GM TIS 2 WEB Subscription Guide Section B1 Page 1 of 6 Orig. Date: 12/12/99 Rev. Date: 6/11/10 Rev. Level: 001 Doc. # B1 NOTE : This guide shows the steps required to purchase the on-line GM TIS2Web Application. The process shown is subject to change at any time. • Go to: www.acdelcotds.com/acdelco/action/subscribehome • Click on “Subscribe Now”. • Click on “click here ”.

Welcome message from author
This document is posted to help you gain knowledge. Please leave a comment to let me know what you think about it! Share it to your friends and learn new things together.
Transcript

GM TIS 2 WEB Subscription Guide
Section B1 Page 1 of 6 Orig. Date: 12/12/99 Rev. Date: 6/11/10 Rev. Level: 001 Doc. # B1
NOTE: This guide shows the steps required to purchase the on-line GM TIS2Web Application. The process shown is subject to change at any time.
• Go to: www.acdelcotds.com/acdelco/action/subscribehome • Click on “Subscribe Now”.
• Click on “click here”.

GM TIS 2 WEB Subscription Guide
Section B1 Page 2 of 6 Orig. Date: 12/12/99 Rev. Date: 6/11/10 Rev. Level: 001 Doc. # B1
• Note: “Login Name” and “Password” is case-sensitive. Please make note of your information.
• Fill in information as required and click on “Submit”.

GM TIS 2 WEB Subscription Guide
Section B1 Page 3 of 6 Orig. Date: 12/12/99 Rev. Date: 6/11/10 Rev. Level: 001 Doc. # B1
• An email will be sent to the email address specified. Click “here” to go back to the
Login Page to log in and log in as requested.
• Scroll to bottom of Terms and Conditions of Use, if agreeable, select “Accept”
and then “Continue”.

GM TIS 2 WEB Subscription Guide
Section B1 Page 4 of 6 Orig. Date: 12/12/99 Rev. Date: 6/11/10 Rev. Level: 001 Doc. # B1
• Click on “Service Information”.
• Click on the “Subscribe Now” shown. The one shown is for the reprogramming
data for J2534 devices.
GM TIS 2 WEB Subscription Guide
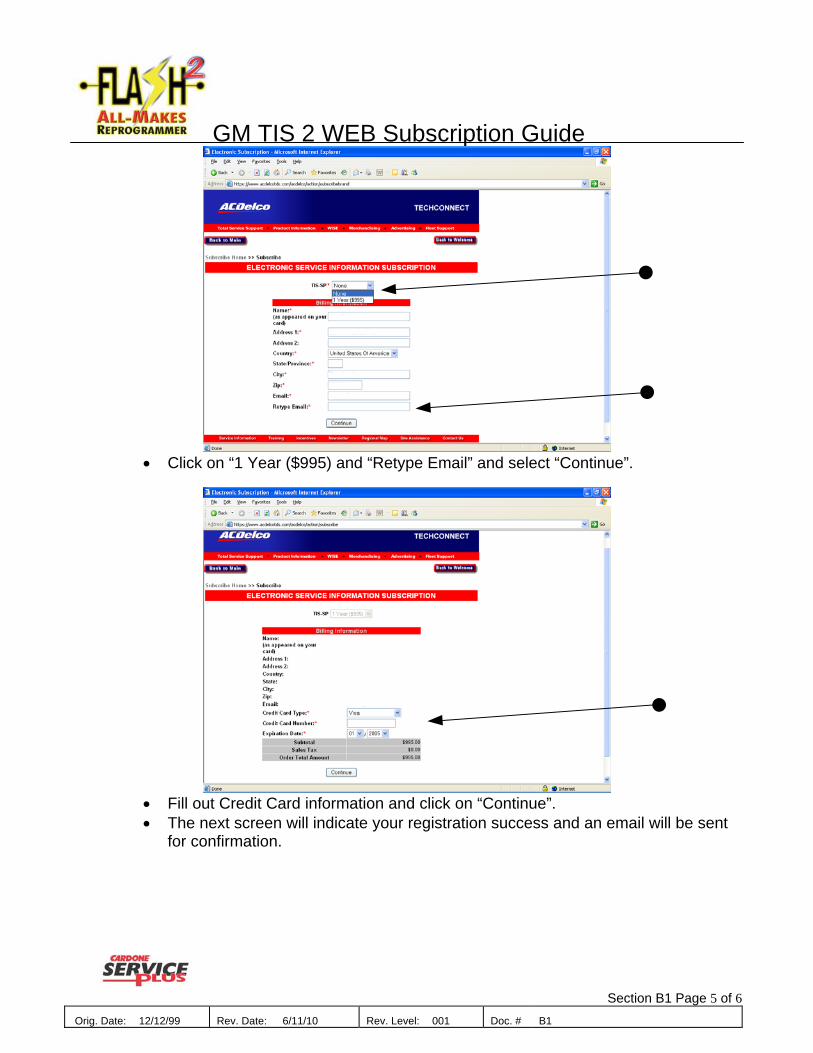
Section B1 Page 5 of 6 Orig. Date: 12/12/99 Rev. Date: 6/11/10 Rev. Level: 001 Doc. # B1
• Click on “1 Year ($995) and “Retype Email” and select “Continue”.
• Fill out Credit Card information and click on “Continue”. • The next screen will indicate your registration success and an email will be sent
for confirmation.

GM TIS 2 WEB Subscription Guide
Section B1 Page 6 of 6 Orig. Date: 12/12/99 Rev. Date: 6/11/10 Rev. Level: 001 Doc. # B1
BLANK PAGE
GM TIS2Web Initial Set-up Guide
Section B2 Page 1 of 2 Orig. Date: 12/12/99 Rev. Date: 12/12/99 Rev. Level: 000 Doc. # B2
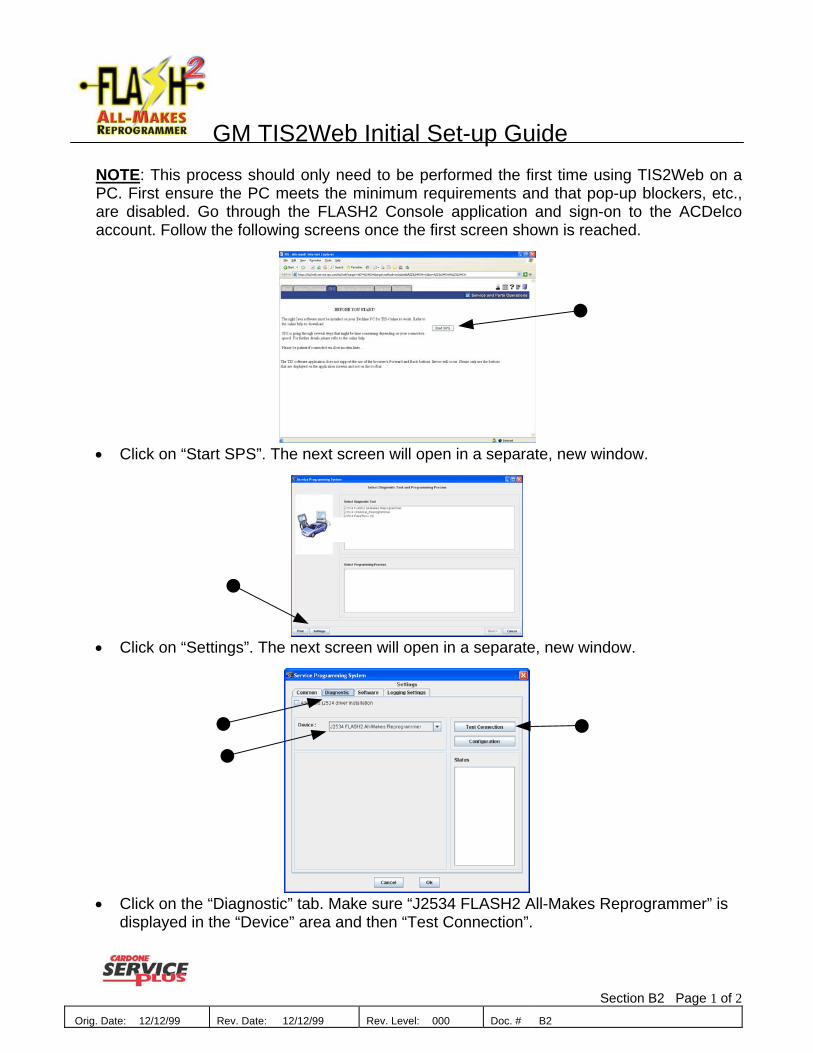
NOTE: This process should only need to be performed the first time using TIS2Web on a PC. First ensure the PC meets the minimum requirements and that pop-up blockers, etc., are disabled. Go through the FLASH2 Console application and sign-on to the ACDelco account. Follow the following screens once the first screen shown is reached.
• Click on “Start SPS”. The next screen will open in a separate, new window.
• Click on “Settings”. The next screen will open in a separate, new window.
• Click on the “Diagnostic” tab. Make sure “J2534 FLASH2 All-Makes Reprogrammer” is
displayed in the “Device” area and then “Test Connection”.
GM TIS2Web Initial Set-up Guide
Section B2 Page 2 of 2 Orig. Date: 12/12/99 Rev. Date: 12/12/99 Rev. Level: 000 Doc. # B2
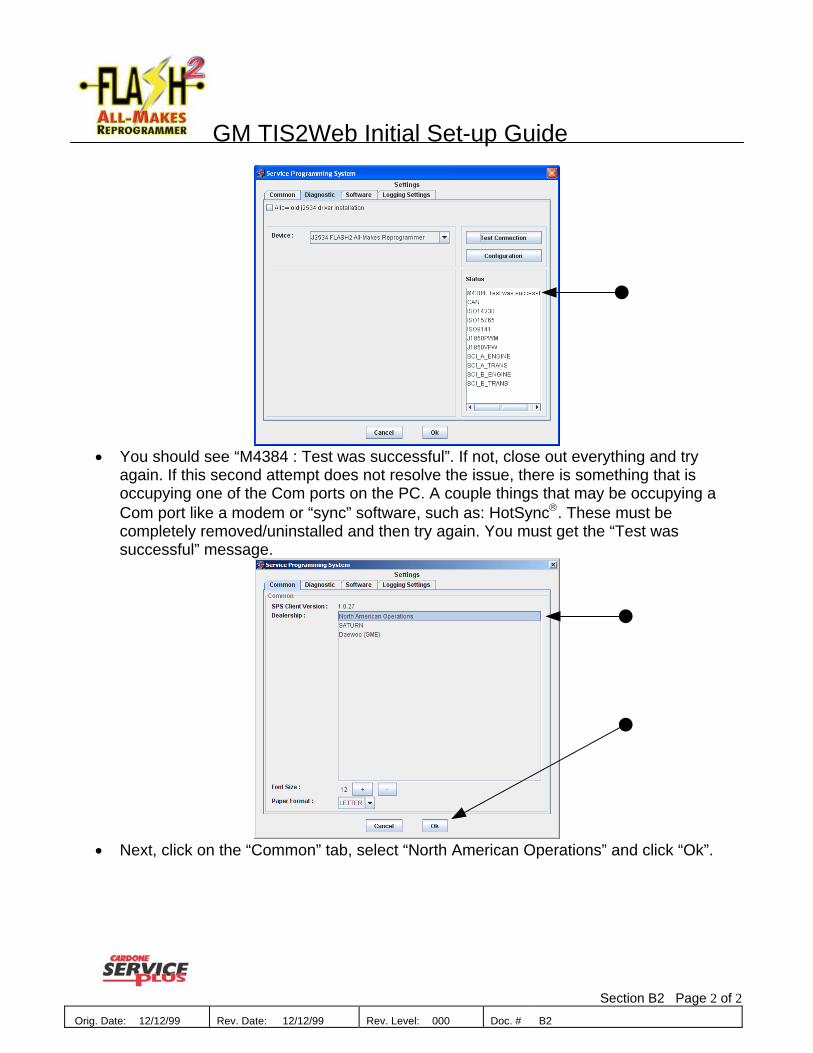
• You should see “M4384 : Test was successful”. If not, close out everything and try
again. If this second attempt does not resolve the issue, there is something that is occupying one of the Com ports on the PC. A couple things that may be occupying a Com port like a modem or “sync” software, such as: HotSync®. These must be completely removed/uninstalled and then try again. You must get the “Test was successful” message.
• Next, click on the “Common” tab, select “North American Operations” and click “Ok”.

GM TIS2Web On/Off-Car Reprogramming Guide
Section B3 Page 1 of 12 Orig. Date: 12/12/99 Rev. Date: 07/26/10 Rev. Level: 002 Doc. # B3
NOTE: This guide is and shows the common steps in reprogramming. Application-specific variations may not be represented. Simply follow the applicable screen prompts and proceed as indicated. This process is subject to change w/o notice.
• Click on the GM icon.
• Click on “FLASH2 Reprogramming”.
• Click either “On-Car” or “Off-Car” as applicable.

GM TIS2Web On/Off-Car Reprogramming Guide
Section B3 Page 2 of 12 Orig. Date: 12/12/99 Rev. Date: 07/26/10 Rev. Level: 002 Doc. # B3
• Read “Warning” information and click on “Next”.
• On-Car only: It is strongly recommended that a “Battery Test” be conducted. Read
the notes and click on “Battery Test”.
• On-Car only: Ensure Battery Test is within acceptable parameters. Click “Next”.

GM TIS2Web On/Off-Car Reprogramming Guide
Section B3 Page 3 of 12 Orig. Date: 12/12/99 Rev. Date: 07/26/10 Rev. Level: 002 Doc. # B3
• Please read the “Important!” instructions and click “Next”.
• On-Car: make sure the vehicle’s Ignition Switch is in the “On” position and click “OK”. • Off-Car: make sure the FLASH2 tool’s Ignition Switch is in the “On” position and click “Ok”.
• Make the appropriate selection and click “Next”.
• Click “Use WebLink” and click “Next”. Please wait as your Internet Browser opens.

GM TIS2Web On/Off-Car Reprogramming Guide
Section B3 Page 4 of 12 Orig. Date: 12/12/99 Rev. Date: 07/26/10 Rev. Level: 002 Doc. # B3
• Type in “User Name” and “Password” and click “Log In”.
• Scroll down to bottom and click on “Accept”, if you agree, and “Continue”.
• Click on “Service Information”.

GM TIS2Web On/Off-Car Reprogramming Guide
Section B3 Page 5 of 12 Orig. Date: 12/12/99 Rev. Date: 07/26/10 Rev. Level: 002 Doc. # B3
• Click “TIS2Web – Service Programming”.
• Click on “Service Programming System (SPS) “icon.
• Click on “Start SPS”. (Note: any delay corresponds to Internet provider connection
speed and user volume.) The next screen will open a separate, new window.

GM TIS2Web On/Off-Car Reprogramming Guide
Section B3 Page 6 of 12 Orig. Date: 12/12/99 Rev. Date: 07/26/10 Rev. Level: 002 Doc. # B3
• Always Click on SKIP
• Click on “J2534 FLASH2 All-Makes Reprogrammer” and “Replace and Program ECU”
and click “Next”. (Note: “Replace ECU” option will only allow reprogramming if a new calibration is available. “Replace and Reprogram ECU” will allow programming over the same, current calibration.)

GM TIS2Web On/Off-Car Reprogramming Guide
Section B3 Page 7 of 12 Orig. Date: 12/12/99 Rev. Date: 07/26/10 Rev. Level: 002 Doc. # B3
• Click “Next”.
• Using the dropdown arrows, select “Salesmake, Model Year, Vehicle Type, Car Line,
etc.”, until all required selections are complete. Click “Next.
• Input the correct VIN for the vehicle the ECU is being used on and click “Next”.

GM TIS2Web On/Off-Car Reprogramming Guide
Section B3 Page 8 of 12 Orig. Date: 12/12/99 Rev. Date: 07/26/10 Rev. Level: 002 Doc. # B3
• Select “PCM/VCM” and “Normal” and click “Next”. (If other modules are being
programmed, the remaining few screens may be different. Simply read and follow on-screen instructions as requested and respond accordingly.)
• Note any “Controller Specific Instructions”, if any. • On-Car: Follow on-screen directions as applicable and click “Next”. • Off-Car: Click “Next”.
• Refer to Current Calibration and Index shown. Make appropriate Calibration selections
where required.

GM TIS2Web On/Off-Car Reprogramming Guide
Section B3 Page 9 of 12 Orig. Date: 12/12/99 Rev. Date: 07/26/10 Rev. Level: 002 Doc. # B3
• Summary of calibration selections made. Click “Next”…
• Reprogramming screen….
• Programming Complete. Note any “Controller Specific Instructions”, if any. • Click “Cancel” to close the program.
NOTE: If NEW is selected be certain to allow at least 30 with “ignition” off. Failure to allow 30 seconds before disconnecting the Console may result in a lost or corrupt VIN to be stored in ECM memory.

GM TIS2Web On/Off-Car Reprogramming Guide
Section B3 Page 10 of 12 Orig. Date: 12/12/99 Rev. Date: 07/26/10 Rev. Level: 002 Doc. # B3
• Close GM TIS 2 WEB application by clicking on the “open door”.
• Click “Logout”.

GM TIS2Web On/Off-Car Reprogramming Guide
Section B3 Page 11 of 12 Orig. Date: 12/12/99 Rev. Date: 07/26/10 Rev. Level: 002 Doc. # B3
• Close “Internet Explorer” by clicking on the red “x” as shown.
• Read and click “Next”.
NOTE: Failure to allow 30 seconds before disconnecting the Console may result in a lost or corrupt VIN to be stored in ECM memory.
• Read and click “Ok”.
• On-Car: make sure the vehicle’s Ignition Switch is in the “Off” position and click “OK”. • Off-Car: make sure the FLASH2 tool’s Ignition Switch is in the “Off” position and click “Ok”.
GM TIS2Web On/Off-Car Reprogramming Guide
Section B3 Page 12 of 12 Orig. Date: 12/12/99 Rev. Date: 07/26/10 Rev. Level: 002 Doc. # B3
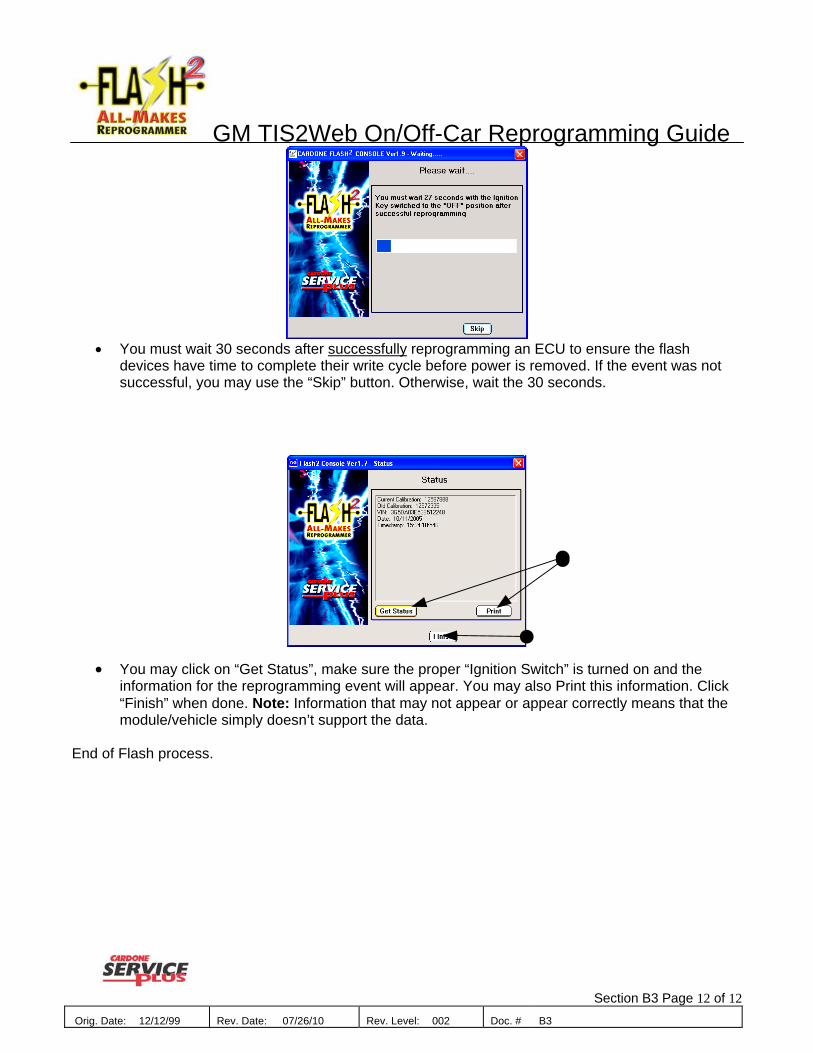
• You must wait 30 seconds after successfully reprogramming an ECU to ensure the flash
devices have time to complete their write cycle before power is removed. If the event was not successful, you may use the “Skip” button. Otherwise, wait the 30 seconds.
• You may click on “Get Status”, make sure the proper “Ignition Switch” is turned on and the information for the reprogramming event will appear. You may also Print this information. Click “Finish” when done. Note: Information that may not appear or appear correctly means that the module/vehicle simply doesn’t support the data.
End of Flash process.
Related Documents


![Untitled-6 [] · tis 1227-2539 (1996) tis 1390-2539 (1996) tis 1227-2539 (1996) tis 1390-2539 (1996) tis 1227-2539 (1996)](https://static.cupdf.com/doc/110x72/5e1a6a0f6b8d9f48bd19bcad/untitled-6-tis-1227-2539-1996-tis-1390-2539-1996-tis-1227-2539-1996-tis.jpg)