Video Capturing and Editing 1. Getting started with Windows Movie Maker Windows Movie Maker is a feature of Windows Vista that enables you to create home movies and slide shows on your computer, complete with professional-looking titles, transitions, effects, music, and even narration. And when you’re ready, you can use Windows Movie Maker to publish your movie and share it with your friends and family. If you’re new to digital video editing or just new to Windows Movie Maker, keep reading for an introduction to the different tools you'll use in Windows Movie Maker and for links to help you learn more. 2. Understanding the Windows Movie Maker tools Windows Movie Maker is divided into three main areas: the panes, the storyboard/timeline, and the preview monitor. Fig. 1: A view of Windows Movie Maker The main areas of Windows Movie Maker About the panes Windows Movie Maker provides several different panes that you can work in, depending on which tasks you want to complete. The Tasks pane lists the common tasks that you may need to perform when making a movie, including importing files, editing, and publishing your movie. The Collections pane displays your collection folders, which contain clips. The collection folders appear in the Collections pane on the left, and the clips in the

Welcome message from author
This document is posted to help you gain knowledge. Please leave a comment to let me know what you think about it! Share it to your friends and learn new things together.
Transcript

Video Capturing and Editing
1 Getting started with Windows Movie Maker
Windows Movie Maker is a feature of Windows Vista that enables you to create home
movies and slide shows on your computer complete with professional-looking titles
transitions effects music and even narration And when yoursquore ready you can use
Windows Movie Maker to publish your movie and share it with your friends and family
If yoursquore new to digital video editing or just new to Windows Movie Maker keep reading
for an introduction to the different tools youll use in Windows Movie Maker and for links
to help you learn more
2 Understanding the Windows Movie Maker tools
Windows Movie Maker is divided into three main areas the panes the
storyboardtimeline and the preview monitor
Fig 1 A view of Windows Movie Maker
The main areas of Windows Movie Maker
About the panes
Windows Movie Maker provides several different panes that you can work in
depending on which tasks you want to complete
The Tasks pane lists the common tasks that you may need to perform when making
a movie including importing files editing and publishing your movie
The Collections pane displays your collection folders which contain clips The
collection folders appear in the Collections pane on the left and the clips in the
Video Capturing and Editing
Training Programme under CAFT ldquoOnline Content Creation and Management in an eLearning Environmentrdquo
370
selected collection folder are displayed in the Contents pane on the right The
following picture shows the Collections pane
Fig 2 Collection Pane
The Contents pane shows clips effects or transitions youre working with while you
create your movie depending on the view youre working with You can change the view
to show thumbnails or details
You can drag clips transitions or effects from the Contents pane or a collection from the
Collections pane to the storyboardtimeline for your current project You can also drag
clips to the preview monitor to play them If you make changes to a clip those changes are
only reflected in the current project they do not affect the source file
3 About the storyboard and timeline
The area where you create and edit your project is displayed in two views the storyboard
and the timeline You can switch between these two views when making a movie
Storyboard The storyboard is the default view in Windows Movie Maker You can use
the storyboard to look at the sequence or ordering of the clips in your project and easily
rearrange them if necessary This view also lets you see any video effects or video
transitions that have been added Audio clips that you have added to a project are not
displayed on the storyboard but you can see them in the timeline view The following
picture shows the storyboard view in Windows Movie Maker
Fig 3 Storyboard View
Video Capturing and Editing
Training Programme under CAFT ldquoOnline Content Creation and Management in an eLearning Environmentrdquo
371
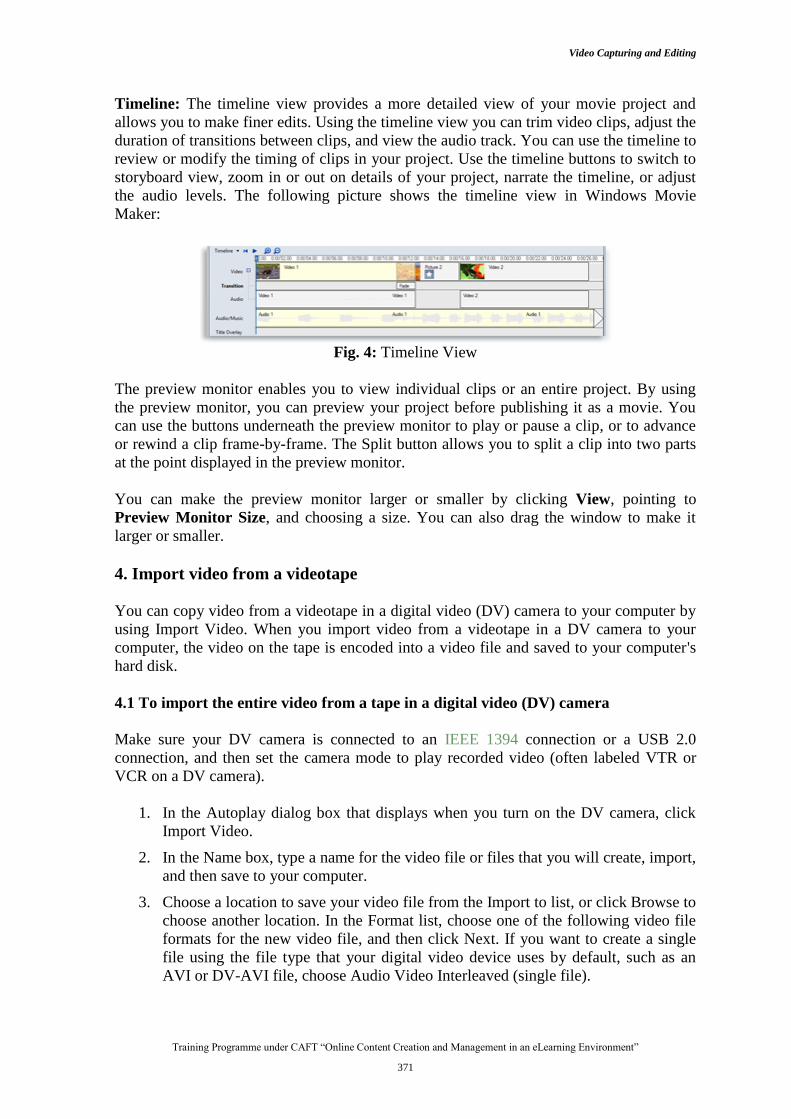
Timeline The timeline view provides a more detailed view of your movie project and
allows you to make finer edits Using the timeline view you can trim video clips adjust the
duration of transitions between clips and view the audio track You can use the timeline to
review or modify the timing of clips in your project Use the timeline buttons to switch to
storyboard view zoom in or out on details of your project narrate the timeline or adjust
the audio levels The following picture shows the timeline view in Windows Movie
Maker
Fig 4 Timeline View
The preview monitor enables you to view individual clips or an entire project By using
the preview monitor you can preview your project before publishing it as a movie You
can use the buttons underneath the preview monitor to play or pause a clip or to advance
or rewind a clip frame-by-frame The Split button allows you to split a clip into two parts
at the point displayed in the preview monitor
You can make the preview monitor larger or smaller by clicking View pointing to
Preview Monitor Size and choosing a size You can also drag the window to make it
larger or smaller
4 Import video from a videotape
You can copy video from a videotape in a digital video (DV) camera to your computer by
using Import Video When you import video from a videotape in a DV camera to your
computer the video on the tape is encoded into a video file and saved to your computers
hard disk
41 To import the entire video from a tape in a digital video (DV) camera
Make sure your DV camera is connected to an IEEE 1394 connection or a USB 20
connection and then set the camera mode to play recorded video (often labeled VTR or
VCR on a DV camera)
1 In the Autoplay dialog box that displays when you turn on the DV camera click
Import Video
2 In the Name box type a name for the video file or files that you will create import
and then save to your computer
3 Choose a location to save your video file from the Import to list or click Browse to
choose another location In the Format list choose one of the following video file
formats for the new video file and then click Next If you want to create a single
file using the file type that your digital video device uses by default such as an
AVI or DV-AVI file choose Audio Video Interleaved (single file)
Video Capturing and Editing
Training Programme under CAFT ldquoOnline Content Creation and Management in an eLearning Environmentrdquo
372
4 If you want to create a single Windows Media Video (WMV) file containing all of
the information on the video tape choose Windows Media Video File (single file)
If you want to create a WMV file for every scene on the videotape choose
Windows Media Video (one file per scene)
5 Click Import the entire videotape to my computer and then click Next
6 If you want to stop importing video before the end of the videotape click Stop
and then click Yes Click Finish
7 The imported video is saved as one or more video files on your computer and
appears in Windows Photo Gallery
5 To import the entire video from a tape in a digital video (DV) camera and
then burn it to a DVD
1 Make sure your DV camera is connected properly using an IEEE 1394 connection
or a USB 20 connection and then set the camera mode to play recorded video
(often labeled VTR or VCR on a DV camera)
2 In the Autoplay dialog box that displays when you turn on the DV camera click
Import Video
3 In the Name box type a name for the video file or files that you will create import
and then save to your computer
4 Choose a location to save your video file from the Import to list or click Browse to
choose another location
5 In the Format list choose one of the following video file formats for the new video
file and then click Next
6 If you want to create a single file using the file type that your digital video device
uses by default such as an AVI or DV-AVI file choose Audio Video Interleaved
(single file)
7 If you want to create a single Windows Media Video (WMV) file containing all of
the information on the video tape choose Windows Media Video File (single file)
8 If you want to create a WMV file for every scene on the videotape choose
Windows Media Video (one file per scene)
9 Click only import parts of the videotape to my computer and then click Next On
the Cue the videotape and then start importing video page do one or more of the
following
10 By using either the DV camera controls in Import Video or the controls on your
video camera locate the start of the clip or clips on the tape that you want to
import to your computer
11 If you want to specify the amount of time to import video from the videotape
select the Stop importing after check box and then enter a time limit for importing
video
12 Click Start Video Import The videotape plays automatically and importing begins
Video Capturing and Editing
Training Programme under CAFT ldquoOnline Content Creation and Management in an eLearning Environmentrdquo
373
13 Do one of the following When the tape reaches the point at which you want to
stop importing click Stop Video Import If you have selected the Stop importing
after check box wait for the specified amount of time for video to be imported
14 Repeat steps 13 for each part of the videotape you want to import
15 When you are done importing video click Finish The imported video is saved as
one or more video files on your computer and appears in Windows Photo Gallery
Note
You can also open Import Video using Windows Movie Maker With the DV camera
connected to your computer and turned on in playback mode in Windows Movie Maker
on the File menu click Import from Digital Video Camera
You can also open Import Video using Windows Photo Gallery With the DV camera
connected to your computer and turned on in playback mode in Windows Photo Gallery
click File click Import from Camera or Scanner click your DV camera in the list of
devices and then click Import
Video cannot be imported from an analog video camera or VCR when using Import Video
or Windows Movie Maker To import video from an analog video camera or VCR you
need to have an analog video capture device installed on your computer and then use
software that enables you to import video from an analog capture device
For more information check the documentation that came with your analog capture device
or go to the manufacturers website
Some DV cameras also allow you to connect to an analog device such as a VCR The DV
camera will convert the video from the analog source into digital video For more
information check the documentation that came with your DV camera or go to the
manufacturers website site For more information about using a DV camera to import
video from an analog video device see Import analog video to your computer by using a
DV camera at httpswindowshelpmicrosoftcomWindowsen-USHelp3ae62d5e-29e2-
41eb-b326-9e42ac46b7021033mspx
6 Import video files pictures and audio into Windows Movie Maker
You can import files with the following file name extensions into Windows Movie Maker
to use in your project
Video files asf avi dvr-ms m1v mp2 mp2v mpe mpeg mpg mpv2 wm
andwmv
Audio files aif aifc aiff asf au mp2 mp3 mpa snd wav and wma
Picture files bmp dib emf gif jfif jpe jpeg jpg png tif tiff and wmf
You can also import files into Windows Movie Maker that have a different extension from
the ones listed above but not all file types will work when you try to use them to make a
movie
Video Capturing and Editing
Training Programme under CAFT ldquoOnline Content Creation and Management in an eLearning Environmentrdquo
374
Microsoft Recorded TV Show files (with a dvr-ms file name extension) that are not
protected using digital rights management can be imported into Windows Movie Maker if
your computer is running Windows Vista Home Premium or Windows Vista Ultimate
61 To import files into Windows Movie Maker
Click File and then click Import Media Items
Navigate to the location that contains the digital media files you want to import
and then click Import
You can import several video clips at once For consecutive clips click the first video clip
in the list press and hold down the SHIFT key and then click the last clip in the list For
video clips that are not consecutive press and hold down the CTRL key and then click
each clip that you want to import into Windows Movie Maker
You can also import video files and pictures by dragging the files from Windows Photo
Gallery into Windows Movie Maker
7 Work with clips in Windows Movie Maker
After yoursquove imported files into Windows Movie Maker youre ready to start the main
part of moviemakingmdashediting Using Windows Movie Maker you can edit clips in a
variety of different ways You can split a long clip into two shorter clips combine two
clips into a single clip trim the beginning or ending of a clip and even create new clips
71 Split and combine clips
You can manually split video and audio clips into smaller clips to make your clips easier
to work with For example if you have a video clip that has two different scenes you
might want to split the video clip at the point where the one scene ends and the other
begins and then insert a transition between the two clips
Fig 5 A video clip thatrsquos been split into two clips
Conversely you might have a file that was divided into smaller clips that you want to
combine However you can only combine contiguous clips Contiguous means that the
start time of the second clip immediately follows the end time of the first clip For
example if you have a video or audio file that was divided into clips when it was imported
into Windows Movie Maker and the clips are named Clip 1 Clip 2 and Clip 3 in that
Video Capturing and Editing
Training Programme under CAFT ldquoOnline Content Creation and Management in an eLearning Environmentrdquo
375
order you could combine Clip 1 and Clip 2 or Clip 2 and Clip 3 but you cannot combine
Clip 1 and Clip 3
You can combine contiguous video clips on the storyboard or in the Contents pane (before
adding the clip or clips to the storyboardtimeline)
72 To split a clip
1 In the Contents pane or on the storyboardtimeline click the video or audio clip
that you want to split
2 Under the preview monitor click the Play button
3 When the clip reaches a point near the place you want to split the clip click Pause
4 Under the preview monitor use the playback controls to find the point where you
want to split the clip
5 Under the preview monitor click the Split button (You can drag the playback
indicator on the seek bar to the exact spot where you want to split the clip)
73 To combine clips
1 In the Contents pane or on the storyboard hold down the CTRL key and then click
the contiguous clips you want to combine
2 Click Clip and then click Combine
3 The name and property information of the first clip in the group is used for the new
clip and the time is adjusted accordingly (You can combine more than two clips at
a time as long as they are consecutive To select multiple clips click the first clip
press and hold down the SHIFT key and then click the last clip)
74 Trim (hide) parts of a video clip
When you trim a clip you make a new start andor end trim point The start trim point
determines when the clip will begin to play and the end trim point determines when the
clip will stop playing in your project and final movie When you trim a clip the trimmed
part of the clip is not actually removed from the source file its just hidden so the trimmed
part doesnt appear in your project or published movie
Video Capturing and Editing
Training Programme under CAFT ldquoOnline Content Creation and Management in an eLearning Environmentrdquo
376
Fig6 A trimmed video clip with the trimmed part highlighted
75 To trim a video clip
1 If you are in the storyboard view click View and then click Timeline
2 On the timeline click the clip that you want to trim
3 Use the playback controls under the preview monitor to find the point where you
want to trim the clip
4 Do the following
When the playback indicator is at the point where you want the selected video or
audio clip to start playing back click Clip and then click Trim Beginning
When the playback indicator is at the point where you want the selected video or
audio clip to stop playing back click Clip and then click Trim End
You can also drag the trim handles on a clip to set the start and end trim points
Trim handles appear as small black triangles at the beginning and end of a clip
after you click the clip on the timeline When you hold your pointer over a trim
handle the pointer changes to a red double-headed arrow Drag a trim handle to
set the new start or end point of the clip
Video Capturing and Editing
Training Programme under CAFT ldquoOnline Content Creation and Management in an eLearning Environmentrdquo
377
Fig7 Trimming a clip with the trim handle
You might need to click the Zoom Timeline In button one or more times to see clips more
clearly on the timeline The Zoom Timeline In button appears on the timeline toolbar as a
magnifying glass with a plus sign (+) in it
76 To undo a trimmed clip
1 If you are in storyboard view click View and then click Timeline
2 Click the trimmed clip on the timeline click Clip and then click Clear Trim
Points
77 Create clips
You might want to create several smaller more manageable clips from a single existing
video clip to make it easier to work with your project Windows Movie Maker creates
clips in different ways depending on the clips source If the source clip is from a digital
video (DV) camera Windows Movie Maker creates clips that are based on the time
stamps that the DV camera inserts when the source video is originally recorded as well as
significant frame changes in the video
1 In the Contents pane select the video clip for which you want to create clips
2 Click Tools and then click Create Clips
3 Clips can be created automatically for Windows Media Video (WMV) files and
Audio-Video Interleaved (AVI) video files that use the DV codec For other video
file formats clips cannot always be created automatically using clip creation so
the video file appears as one large video clip in Windows Movie Maker For these
large video clips split the clip manually to separate the large video clip into
smaller clips
8 Add transitions and effects to pictures and video in Windows Movie Maker
You can improve your moviemaking by adding your own special touches to make your
movies look distinctive and professional By adding transitions and effects you can make
sure that your movie flows nicely from one scene to the next and give it the look you want
Video Capturing and Editing
Training Programme under CAFT ldquoOnline Content Creation and Management in an eLearning Environmentrdquo
378
81 Transitions
A transition controls how your movie plays from one video clip or picture to the next You
can add a transition between two pictures video clips or titles in any combination on the
storyboardtimeline You might choose to use a popular and great-looking transition like a
Fade Or you might choose to use more brash transitions such as Bars Shatter or Zig
Zag (to name just a few)
Fig 8 A project on the storyboard with transition
Any transitions that you add appear on the Transition track of the timeline To see this
track you must expand the Video track
Fig 9 A project on the timeline with a transition
82 To add a transition
On the storyboardtimeline click the second of the two video clips titles or pictures that
you want to add a transition between
1 Click Tools and then click Transitions
2 In the Contents pane click the transition that you want to add You can click Play
under the monitor to see a preview of what the transition looks like
3 Click Clip and then click Add to Timeline or Add to Storyboard
4 You can also add a transition by dragging it to the timeline and dropping it
between two clips on the Video track Or if you are in the storyboard view you
can drag the transition to the transition cell between two video clips or pictures
Video Capturing and Editing
Training Programme under CAFT ldquoOnline Content Creation and Management in an eLearning Environmentrdquo
379
5 If you upgraded your computer from Windows XP to Windows Vista any
additional transitions and effects that you had previously downloaded and installed
will not be available in the current version of Windows Movie Maker
83 To change the transition duration
The amount of overlap between two clips determines the transition duration At times you
might want to make the transition shorter or longer
1 To view the Transition track of the timeline expand the Video track
2 On the Transition track of the timeline do one of the following
3 To reduce the transition duration drag the beginning of the transition towards the
end of the timeline
4 To increase the transition duration drag the beginning of the transition towards the
beginning of the timeline
84 To change the default transition duration
1 Click Tools click Options and then click the Advanced tab
2 Type the time (in seconds) that you want transitions to play back by default after
the transitions are added to the storyboardtimeline
85 To remove a transition
1 Do one of the following
On the storyboard click the transition cell that contains the transition that
you want to remove
On the timeline click the transition on the Transition track that you want to
remove
Click Edit and then click Remove
86 Effects
Effects enable you to add special effects to your movie For example you might have an
imported video that you want to look and feel like a classic old-time movie If so you
could add one of the Film Age effects to a video clip picture or title to make the video for
that clip look like an old-time movie
Video Capturing and Editing
Training Programme under CAFT ldquoOnline Content Creation and Management in an eLearning Environmentrdquo
380
Fig 10 A project on the storyboard with an effect
Fig 11 A project on the timeline with an effect
87 To add an effect
On the storyboardtimeline select the video clip picture or title to which you want to add
the effect
1 Click Tools and then click Effects
2 In the Contents pane click the effect you want to add You can click Play under the
preview monitor to see a preview of what the effect looks like
3 Click Clip and then click Add to Timeline or Add to Storyboard
4 You can also add an effect by dragging the effect from the Contents pane and
dropping it on a picture or video clip on the Video track of the timeline to the
effect cell of a video clip or to a picture on the storyboard
5 The thumbnail view in the Contents pane displays examples of the different
effects
88 To change an effect
1 On the Video track of the timeline or on the storyboard click the video clip
picture or title that has the applied effect you want to change
2 Click Clip point to Video and then click Effects
3 Do one of the following
Video Capturing and Editing
Training Programme under CAFT ldquoOnline Content Creation and Management in an eLearning Environmentrdquo
381
4 To remove an effect in the Displayed effects area click the effect and then click
Remove Repeat as necessary
5 To add an effect in the Available effects area click the effect you want to add and
then click Add Repeat as necessary
6 If you add multiple effects you can change the order in which they are displayed
by using the Move Up or Move Down buttons
7 To quickly add an effect you can drag an effect to a video clip picture or title on
the storyboardtimeline
8 If you add the same effect more than once to a clip the effect is applied as many
times as you added it For example if you add the Speed Up Double effect two
times to the same video clip the clip would play four times as fast as the original
clip
9 You can also remove an effect by selecting the effect cell in the storyboard that
contains the effect you want to remove and then pressing the DELETE key
9 Add movie titles and credits in Windows Movie Maker
With Windows Movie Maker you can add a title your name the date credits and other
text to your movie For example you might want to add a title to introduce a person or
scene that appears in your movie
You can add title text to various places in your movie at the beginning or end before or
after a clip or overlaying a clip The title plays for the specified amount of time either on
the screen by itself or overlaying the video as it plays and then the title disappears and the
video clip or picture continues
The following picture shows a project with a title that appears before a video clip
Fig 12 Beginning title on the timeline
The following picture shows a project with a title that overlays a video clip as the clip
plays
Video Capturing and Editing
Training Programme under CAFT ldquoOnline Content Creation and Management in an eLearning Environmentrdquo
382
Fig 13 Overlay title on the timeline
The following picture shows a project with credits that appear at the end of the project
Fig 14 Credits on the timeline
91 To add a title or credit
1 If you know where you want the title or credit to appear in your movie click that
location on the storyboardtimeline
2 Click Tools and then click Titles and Credits
3 Click the link that corresponds to where you want to add the title or credit
4 In the Enter text for title box type the text that you want to appear as the title or
credit
5 After you type the text the monitor displays the default animation and format for
the title or credit you want to add
6 To change the title animation click Change the title animation and select a title
animation from the list
7 To change the font and color for your title click Change the text font and color
and then choose the font font color formatting background color transparency
font size and position of the title to your liking
8 Click Add Title
Video Capturing and Editing
Training Programme under CAFT ldquoOnline Content Creation and Management in an eLearning Environmentrdquo
383
92 To edit an existing title
1 On the storyboardtimeline click the title you want to edit
2 Click Edit and then click Edit Title
3 Make the changes you want to make and then click Add Title
93 To change the title duration
1 To make sure that you are in timeline view click the View menu and then click
Timeline
2 Select the title whose duration you want to change
3 Do one of the following
To extend the playback duration of the title drag the end trim handle
toward the end of the timeline
To reduce the playback duration of the title drag the end trim handle
toward the beginning of the timeline
94 To remove a title
On the storyboardtimeline click the title that you want to remove from your movie
1 Click Edit and then click Remove
2 Trim handles appear as black triangles at the beginning and end of a clip The
pointer changes to a red double-headed arrow when you hold it over a trim handle
10 Publish a movie in Windows Movie Maker
When you finish working on a project you can publish the project as a movie A movie is
a Windows Media file with a wmv file name extension or an Audio-Video Interleaved
(AVI) file with an avi file name extension When you publish a movie in Windows Movie
Maker you can share it with others in a number of waysmdashthrough your computer on a
recordable CD on a recordable DVD as an attachment in an e-mail message or on
videotape in a DV camera
101 To publish a movie to your computer
1 Click File click Publish Movie
2 Click This computer and then click Next
3 In the File name box type a name for your movie
4 In the Publish to box choose where you want to save your movie once its
published and then click Next
5 Choose the settings you want to use to publish your movie and then click Publish
6 If you want to watch your movie after it has been published select the Play movie
when I click Finish check box
Video Capturing and Editing
Training Programme under CAFT ldquoOnline Content Creation and Management in an eLearning Environmentrdquo
384
7 Click Finish
102 To publish and burn a movie to a DVD
To publish and burn a movie to a DVD you must have Windows DVD Maker which is
included in Windows Vista Ultimate and Windows Vista Home Premium You also need a
DVD burner
1 Insert a blank recordable or rewritable DVD into your DVD burner
2 Open a project in Windows Movie Maker
3 Click File and then click Publish Movie
4 Click DVD and then click Next Windows DVD Maker opens
5 Complete the steps to create a DVD using Windows DVD Maker
103 To publish and burn a movie to a recordable CD
1 Insert a blank recordable CD or a rewriteable CD into your CD burner
2 Click File and then click Publish Movie
3 Click Recordable CD and then click Next
4 In the File name box type a name for your movie
5 In the CD Name box type a name for the CD and then click Next
6 Choose the settings you want to use to publish your movie and then click Publish
7 To publish and burn the movie to another recordable CD select the Publish this
movie to another recordable CD check box and then click Next Replace the
recordable CD with another recordable CD and then repeat steps 4 through 6
104 To send a movie as an e-mail attachment in an e-mail message
1 Click File and then click Publish Movie
2 Click E-mail and then click Next
3 After the movie is published do any of the following
To play the movie in your default player before sending it click Play the
movie
To save a local copy of the movie on your computer in addition to sending
it as an e-mail attachment click Save a copy of my movie on my computer
enter a movie file name in the File name box and then click Save
4 To attach the movie to an e-mail message click Attach Movie
5 In your default e-mail program enter the e-mail address of the person you are
sending the movie to add any additional text to the body and then send the
message
Video Capturing and Editing
Training Programme under CAFT ldquoOnline Content Creation and Management in an eLearning Environmentrdquo
385
105 To record a movie to a videotape in a digital video camera
1 Switch your digital video (DV) camera on and verify that it is in playback mode
(often labeled VCR on the camera)
2 Click File and then click Publish Movie
3 Click Digital video camera and then click Next
4 If you have more than one digital video device powered on and detected by
Windows Movie Maker on the Choose a digital video camera page choose the
digital video device that contains the videotape to which you want to record your
movie and then click Next
5 When you see the Cue your tape page using the transport controls on your camera
rewind or fast-forward the tape to the point where you want your movie to be
recorded and then click Next
6 You should verify that you are not overwriting a portion of the tape that contains
recorded video you want to keep
7 To begin recording your movie back to tape click Yes
8 Wait for your movie to be published and then recorded to the videotape The time
it takes to create and record the movie to tape depends on the length of the movie
and the system resources on your computer You can preview the movie in the
LCD display of your DV camera as your movie is recorded to tape
9 Click Finish
11 To change where movies are temporarily saved
Windows Movie Maker uses a temporary file storage location in the following ways
1 When you publish a movie the audio or movie file is held in the temporary file
location until the file is published
2 When you record an audio narration a temporary file is stored in the temporary file
storage location and then removed after the audio file is saved
3 When you publish a movie that you want to attach to an e-mail message a copy of
the movie file is stored in the temporary file location until the movie is sent
successfully
4 When you send a movie to a tape in a digital video (DV) camera the temporary
movie file that is created is stored in this location until the movie is recorded to the
tape
You can change the default file storage location in Windows Movie Maker For example
you might want to do this if you have a storage location that has more available disk space
If your hard disk has two partitions you may want to choose the drive that has more
storage space
1 Click Tools and then click Options
Video Capturing and Editing
Training Programme under CAFT ldquoOnline Content Creation and Management in an eLearning Environmentrdquo
386
2 Click the General tab and then in the Temporary storage box choose the default
location where you want your temporary audio and movie files to be saved
temporarily
111 To avoid including the title author copyright rating and comments
information in the published movie file
You can choose not to include information such as the title author copyright rating and
comments in your published movie files If you not to include this information your name
and other metadata information is not displayed when you or someone else plays back
your movie in a media player For more information about entering information about your
project and final published movie see Add a title author name and description for a
movie
To choose not to include metadata in your finished movie do the following
1 Click Tools and then click Options
2 Click the General tab and then select or clear the Do not include the title author
copyright rating and comments information in the published movie file check
box depending on whether you want personally identifiable information to be
removed with the published movie file

Video Capturing and Editing
Training Programme under CAFT ldquoOnline Content Creation and Management in an eLearning Environmentrdquo
370
selected collection folder are displayed in the Contents pane on the right The
following picture shows the Collections pane
Fig 2 Collection Pane
The Contents pane shows clips effects or transitions youre working with while you
create your movie depending on the view youre working with You can change the view
to show thumbnails or details
You can drag clips transitions or effects from the Contents pane or a collection from the
Collections pane to the storyboardtimeline for your current project You can also drag
clips to the preview monitor to play them If you make changes to a clip those changes are
only reflected in the current project they do not affect the source file
3 About the storyboard and timeline
The area where you create and edit your project is displayed in two views the storyboard
and the timeline You can switch between these two views when making a movie
Storyboard The storyboard is the default view in Windows Movie Maker You can use
the storyboard to look at the sequence or ordering of the clips in your project and easily
rearrange them if necessary This view also lets you see any video effects or video
transitions that have been added Audio clips that you have added to a project are not
displayed on the storyboard but you can see them in the timeline view The following
picture shows the storyboard view in Windows Movie Maker
Fig 3 Storyboard View
Video Capturing and Editing
Training Programme under CAFT ldquoOnline Content Creation and Management in an eLearning Environmentrdquo
371
Timeline The timeline view provides a more detailed view of your movie project and
allows you to make finer edits Using the timeline view you can trim video clips adjust the
duration of transitions between clips and view the audio track You can use the timeline to
review or modify the timing of clips in your project Use the timeline buttons to switch to
storyboard view zoom in or out on details of your project narrate the timeline or adjust
the audio levels The following picture shows the timeline view in Windows Movie
Maker
Fig 4 Timeline View
The preview monitor enables you to view individual clips or an entire project By using
the preview monitor you can preview your project before publishing it as a movie You
can use the buttons underneath the preview monitor to play or pause a clip or to advance
or rewind a clip frame-by-frame The Split button allows you to split a clip into two parts
at the point displayed in the preview monitor
You can make the preview monitor larger or smaller by clicking View pointing to
Preview Monitor Size and choosing a size You can also drag the window to make it
larger or smaller
4 Import video from a videotape
You can copy video from a videotape in a digital video (DV) camera to your computer by
using Import Video When you import video from a videotape in a DV camera to your
computer the video on the tape is encoded into a video file and saved to your computers
hard disk
41 To import the entire video from a tape in a digital video (DV) camera
Make sure your DV camera is connected to an IEEE 1394 connection or a USB 20
connection and then set the camera mode to play recorded video (often labeled VTR or
VCR on a DV camera)
1 In the Autoplay dialog box that displays when you turn on the DV camera click
Import Video
2 In the Name box type a name for the video file or files that you will create import
and then save to your computer
3 Choose a location to save your video file from the Import to list or click Browse to
choose another location In the Format list choose one of the following video file
formats for the new video file and then click Next If you want to create a single
file using the file type that your digital video device uses by default such as an
AVI or DV-AVI file choose Audio Video Interleaved (single file)
Video Capturing and Editing
Training Programme under CAFT ldquoOnline Content Creation and Management in an eLearning Environmentrdquo
372
4 If you want to create a single Windows Media Video (WMV) file containing all of
the information on the video tape choose Windows Media Video File (single file)
If you want to create a WMV file for every scene on the videotape choose
Windows Media Video (one file per scene)
5 Click Import the entire videotape to my computer and then click Next
6 If you want to stop importing video before the end of the videotape click Stop
and then click Yes Click Finish
7 The imported video is saved as one or more video files on your computer and
appears in Windows Photo Gallery
5 To import the entire video from a tape in a digital video (DV) camera and
then burn it to a DVD
1 Make sure your DV camera is connected properly using an IEEE 1394 connection
or a USB 20 connection and then set the camera mode to play recorded video
(often labeled VTR or VCR on a DV camera)
2 In the Autoplay dialog box that displays when you turn on the DV camera click
Import Video
3 In the Name box type a name for the video file or files that you will create import
and then save to your computer
4 Choose a location to save your video file from the Import to list or click Browse to
choose another location
5 In the Format list choose one of the following video file formats for the new video
file and then click Next
6 If you want to create a single file using the file type that your digital video device
uses by default such as an AVI or DV-AVI file choose Audio Video Interleaved
(single file)
7 If you want to create a single Windows Media Video (WMV) file containing all of
the information on the video tape choose Windows Media Video File (single file)
8 If you want to create a WMV file for every scene on the videotape choose
Windows Media Video (one file per scene)
9 Click only import parts of the videotape to my computer and then click Next On
the Cue the videotape and then start importing video page do one or more of the
following
10 By using either the DV camera controls in Import Video or the controls on your
video camera locate the start of the clip or clips on the tape that you want to
import to your computer
11 If you want to specify the amount of time to import video from the videotape
select the Stop importing after check box and then enter a time limit for importing
video
12 Click Start Video Import The videotape plays automatically and importing begins
Video Capturing and Editing
Training Programme under CAFT ldquoOnline Content Creation and Management in an eLearning Environmentrdquo
373
13 Do one of the following When the tape reaches the point at which you want to
stop importing click Stop Video Import If you have selected the Stop importing
after check box wait for the specified amount of time for video to be imported
14 Repeat steps 13 for each part of the videotape you want to import
15 When you are done importing video click Finish The imported video is saved as
one or more video files on your computer and appears in Windows Photo Gallery
Note
You can also open Import Video using Windows Movie Maker With the DV camera
connected to your computer and turned on in playback mode in Windows Movie Maker
on the File menu click Import from Digital Video Camera
You can also open Import Video using Windows Photo Gallery With the DV camera
connected to your computer and turned on in playback mode in Windows Photo Gallery
click File click Import from Camera or Scanner click your DV camera in the list of
devices and then click Import
Video cannot be imported from an analog video camera or VCR when using Import Video
or Windows Movie Maker To import video from an analog video camera or VCR you
need to have an analog video capture device installed on your computer and then use
software that enables you to import video from an analog capture device
For more information check the documentation that came with your analog capture device
or go to the manufacturers website
Some DV cameras also allow you to connect to an analog device such as a VCR The DV
camera will convert the video from the analog source into digital video For more
information check the documentation that came with your DV camera or go to the
manufacturers website site For more information about using a DV camera to import
video from an analog video device see Import analog video to your computer by using a
DV camera at httpswindowshelpmicrosoftcomWindowsen-USHelp3ae62d5e-29e2-
41eb-b326-9e42ac46b7021033mspx
6 Import video files pictures and audio into Windows Movie Maker
You can import files with the following file name extensions into Windows Movie Maker
to use in your project
Video files asf avi dvr-ms m1v mp2 mp2v mpe mpeg mpg mpv2 wm
andwmv
Audio files aif aifc aiff asf au mp2 mp3 mpa snd wav and wma
Picture files bmp dib emf gif jfif jpe jpeg jpg png tif tiff and wmf
You can also import files into Windows Movie Maker that have a different extension from
the ones listed above but not all file types will work when you try to use them to make a
movie
Video Capturing and Editing
Training Programme under CAFT ldquoOnline Content Creation and Management in an eLearning Environmentrdquo
374
Microsoft Recorded TV Show files (with a dvr-ms file name extension) that are not
protected using digital rights management can be imported into Windows Movie Maker if
your computer is running Windows Vista Home Premium or Windows Vista Ultimate
61 To import files into Windows Movie Maker
Click File and then click Import Media Items
Navigate to the location that contains the digital media files you want to import
and then click Import
You can import several video clips at once For consecutive clips click the first video clip
in the list press and hold down the SHIFT key and then click the last clip in the list For
video clips that are not consecutive press and hold down the CTRL key and then click
each clip that you want to import into Windows Movie Maker
You can also import video files and pictures by dragging the files from Windows Photo
Gallery into Windows Movie Maker
7 Work with clips in Windows Movie Maker
After yoursquove imported files into Windows Movie Maker youre ready to start the main
part of moviemakingmdashediting Using Windows Movie Maker you can edit clips in a
variety of different ways You can split a long clip into two shorter clips combine two
clips into a single clip trim the beginning or ending of a clip and even create new clips
71 Split and combine clips
You can manually split video and audio clips into smaller clips to make your clips easier
to work with For example if you have a video clip that has two different scenes you
might want to split the video clip at the point where the one scene ends and the other
begins and then insert a transition between the two clips
Fig 5 A video clip thatrsquos been split into two clips
Conversely you might have a file that was divided into smaller clips that you want to
combine However you can only combine contiguous clips Contiguous means that the
start time of the second clip immediately follows the end time of the first clip For
example if you have a video or audio file that was divided into clips when it was imported
into Windows Movie Maker and the clips are named Clip 1 Clip 2 and Clip 3 in that
Video Capturing and Editing
Training Programme under CAFT ldquoOnline Content Creation and Management in an eLearning Environmentrdquo
375
order you could combine Clip 1 and Clip 2 or Clip 2 and Clip 3 but you cannot combine
Clip 1 and Clip 3
You can combine contiguous video clips on the storyboard or in the Contents pane (before
adding the clip or clips to the storyboardtimeline)
72 To split a clip
1 In the Contents pane or on the storyboardtimeline click the video or audio clip
that you want to split
2 Under the preview monitor click the Play button
3 When the clip reaches a point near the place you want to split the clip click Pause
4 Under the preview monitor use the playback controls to find the point where you
want to split the clip
5 Under the preview monitor click the Split button (You can drag the playback
indicator on the seek bar to the exact spot where you want to split the clip)
73 To combine clips
1 In the Contents pane or on the storyboard hold down the CTRL key and then click
the contiguous clips you want to combine
2 Click Clip and then click Combine
3 The name and property information of the first clip in the group is used for the new
clip and the time is adjusted accordingly (You can combine more than two clips at
a time as long as they are consecutive To select multiple clips click the first clip
press and hold down the SHIFT key and then click the last clip)
74 Trim (hide) parts of a video clip
When you trim a clip you make a new start andor end trim point The start trim point
determines when the clip will begin to play and the end trim point determines when the
clip will stop playing in your project and final movie When you trim a clip the trimmed
part of the clip is not actually removed from the source file its just hidden so the trimmed
part doesnt appear in your project or published movie
Video Capturing and Editing
Training Programme under CAFT ldquoOnline Content Creation and Management in an eLearning Environmentrdquo
376
Fig6 A trimmed video clip with the trimmed part highlighted
75 To trim a video clip
1 If you are in the storyboard view click View and then click Timeline
2 On the timeline click the clip that you want to trim
3 Use the playback controls under the preview monitor to find the point where you
want to trim the clip
4 Do the following
When the playback indicator is at the point where you want the selected video or
audio clip to start playing back click Clip and then click Trim Beginning
When the playback indicator is at the point where you want the selected video or
audio clip to stop playing back click Clip and then click Trim End
You can also drag the trim handles on a clip to set the start and end trim points
Trim handles appear as small black triangles at the beginning and end of a clip
after you click the clip on the timeline When you hold your pointer over a trim
handle the pointer changes to a red double-headed arrow Drag a trim handle to
set the new start or end point of the clip
Video Capturing and Editing
Training Programme under CAFT ldquoOnline Content Creation and Management in an eLearning Environmentrdquo
377
Fig7 Trimming a clip with the trim handle
You might need to click the Zoom Timeline In button one or more times to see clips more
clearly on the timeline The Zoom Timeline In button appears on the timeline toolbar as a
magnifying glass with a plus sign (+) in it
76 To undo a trimmed clip
1 If you are in storyboard view click View and then click Timeline
2 Click the trimmed clip on the timeline click Clip and then click Clear Trim
Points
77 Create clips
You might want to create several smaller more manageable clips from a single existing
video clip to make it easier to work with your project Windows Movie Maker creates
clips in different ways depending on the clips source If the source clip is from a digital
video (DV) camera Windows Movie Maker creates clips that are based on the time
stamps that the DV camera inserts when the source video is originally recorded as well as
significant frame changes in the video
1 In the Contents pane select the video clip for which you want to create clips
2 Click Tools and then click Create Clips
3 Clips can be created automatically for Windows Media Video (WMV) files and
Audio-Video Interleaved (AVI) video files that use the DV codec For other video
file formats clips cannot always be created automatically using clip creation so
the video file appears as one large video clip in Windows Movie Maker For these
large video clips split the clip manually to separate the large video clip into
smaller clips
8 Add transitions and effects to pictures and video in Windows Movie Maker
You can improve your moviemaking by adding your own special touches to make your
movies look distinctive and professional By adding transitions and effects you can make
sure that your movie flows nicely from one scene to the next and give it the look you want
Video Capturing and Editing
Training Programme under CAFT ldquoOnline Content Creation and Management in an eLearning Environmentrdquo
378
81 Transitions
A transition controls how your movie plays from one video clip or picture to the next You
can add a transition between two pictures video clips or titles in any combination on the
storyboardtimeline You might choose to use a popular and great-looking transition like a
Fade Or you might choose to use more brash transitions such as Bars Shatter or Zig
Zag (to name just a few)
Fig 8 A project on the storyboard with transition
Any transitions that you add appear on the Transition track of the timeline To see this
track you must expand the Video track
Fig 9 A project on the timeline with a transition
82 To add a transition
On the storyboardtimeline click the second of the two video clips titles or pictures that
you want to add a transition between
1 Click Tools and then click Transitions
2 In the Contents pane click the transition that you want to add You can click Play
under the monitor to see a preview of what the transition looks like
3 Click Clip and then click Add to Timeline or Add to Storyboard
4 You can also add a transition by dragging it to the timeline and dropping it
between two clips on the Video track Or if you are in the storyboard view you
can drag the transition to the transition cell between two video clips or pictures
Video Capturing and Editing
Training Programme under CAFT ldquoOnline Content Creation and Management in an eLearning Environmentrdquo
379
5 If you upgraded your computer from Windows XP to Windows Vista any
additional transitions and effects that you had previously downloaded and installed
will not be available in the current version of Windows Movie Maker
83 To change the transition duration
The amount of overlap between two clips determines the transition duration At times you
might want to make the transition shorter or longer
1 To view the Transition track of the timeline expand the Video track
2 On the Transition track of the timeline do one of the following
3 To reduce the transition duration drag the beginning of the transition towards the
end of the timeline
4 To increase the transition duration drag the beginning of the transition towards the
beginning of the timeline
84 To change the default transition duration
1 Click Tools click Options and then click the Advanced tab
2 Type the time (in seconds) that you want transitions to play back by default after
the transitions are added to the storyboardtimeline
85 To remove a transition
1 Do one of the following
On the storyboard click the transition cell that contains the transition that
you want to remove
On the timeline click the transition on the Transition track that you want to
remove
Click Edit and then click Remove
86 Effects
Effects enable you to add special effects to your movie For example you might have an
imported video that you want to look and feel like a classic old-time movie If so you
could add one of the Film Age effects to a video clip picture or title to make the video for
that clip look like an old-time movie
Video Capturing and Editing
Training Programme under CAFT ldquoOnline Content Creation and Management in an eLearning Environmentrdquo
380
Fig 10 A project on the storyboard with an effect
Fig 11 A project on the timeline with an effect
87 To add an effect
On the storyboardtimeline select the video clip picture or title to which you want to add
the effect
1 Click Tools and then click Effects
2 In the Contents pane click the effect you want to add You can click Play under the
preview monitor to see a preview of what the effect looks like
3 Click Clip and then click Add to Timeline or Add to Storyboard
4 You can also add an effect by dragging the effect from the Contents pane and
dropping it on a picture or video clip on the Video track of the timeline to the
effect cell of a video clip or to a picture on the storyboard
5 The thumbnail view in the Contents pane displays examples of the different
effects
88 To change an effect
1 On the Video track of the timeline or on the storyboard click the video clip
picture or title that has the applied effect you want to change
2 Click Clip point to Video and then click Effects
3 Do one of the following
Video Capturing and Editing
Training Programme under CAFT ldquoOnline Content Creation and Management in an eLearning Environmentrdquo
381
4 To remove an effect in the Displayed effects area click the effect and then click
Remove Repeat as necessary
5 To add an effect in the Available effects area click the effect you want to add and
then click Add Repeat as necessary
6 If you add multiple effects you can change the order in which they are displayed
by using the Move Up or Move Down buttons
7 To quickly add an effect you can drag an effect to a video clip picture or title on
the storyboardtimeline
8 If you add the same effect more than once to a clip the effect is applied as many
times as you added it For example if you add the Speed Up Double effect two
times to the same video clip the clip would play four times as fast as the original
clip
9 You can also remove an effect by selecting the effect cell in the storyboard that
contains the effect you want to remove and then pressing the DELETE key
9 Add movie titles and credits in Windows Movie Maker
With Windows Movie Maker you can add a title your name the date credits and other
text to your movie For example you might want to add a title to introduce a person or
scene that appears in your movie
You can add title text to various places in your movie at the beginning or end before or
after a clip or overlaying a clip The title plays for the specified amount of time either on
the screen by itself or overlaying the video as it plays and then the title disappears and the
video clip or picture continues
The following picture shows a project with a title that appears before a video clip
Fig 12 Beginning title on the timeline
The following picture shows a project with a title that overlays a video clip as the clip
plays
Video Capturing and Editing
Training Programme under CAFT ldquoOnline Content Creation and Management in an eLearning Environmentrdquo
382
Fig 13 Overlay title on the timeline
The following picture shows a project with credits that appear at the end of the project
Fig 14 Credits on the timeline
91 To add a title or credit
1 If you know where you want the title or credit to appear in your movie click that
location on the storyboardtimeline
2 Click Tools and then click Titles and Credits
3 Click the link that corresponds to where you want to add the title or credit
4 In the Enter text for title box type the text that you want to appear as the title or
credit
5 After you type the text the monitor displays the default animation and format for
the title or credit you want to add
6 To change the title animation click Change the title animation and select a title
animation from the list
7 To change the font and color for your title click Change the text font and color
and then choose the font font color formatting background color transparency
font size and position of the title to your liking
8 Click Add Title
Video Capturing and Editing
Training Programme under CAFT ldquoOnline Content Creation and Management in an eLearning Environmentrdquo
383
92 To edit an existing title
1 On the storyboardtimeline click the title you want to edit
2 Click Edit and then click Edit Title
3 Make the changes you want to make and then click Add Title
93 To change the title duration
1 To make sure that you are in timeline view click the View menu and then click
Timeline
2 Select the title whose duration you want to change
3 Do one of the following
To extend the playback duration of the title drag the end trim handle
toward the end of the timeline
To reduce the playback duration of the title drag the end trim handle
toward the beginning of the timeline
94 To remove a title
On the storyboardtimeline click the title that you want to remove from your movie
1 Click Edit and then click Remove
2 Trim handles appear as black triangles at the beginning and end of a clip The
pointer changes to a red double-headed arrow when you hold it over a trim handle
10 Publish a movie in Windows Movie Maker
When you finish working on a project you can publish the project as a movie A movie is
a Windows Media file with a wmv file name extension or an Audio-Video Interleaved
(AVI) file with an avi file name extension When you publish a movie in Windows Movie
Maker you can share it with others in a number of waysmdashthrough your computer on a
recordable CD on a recordable DVD as an attachment in an e-mail message or on
videotape in a DV camera
101 To publish a movie to your computer
1 Click File click Publish Movie
2 Click This computer and then click Next
3 In the File name box type a name for your movie
4 In the Publish to box choose where you want to save your movie once its
published and then click Next
5 Choose the settings you want to use to publish your movie and then click Publish
6 If you want to watch your movie after it has been published select the Play movie
when I click Finish check box
Video Capturing and Editing
Training Programme under CAFT ldquoOnline Content Creation and Management in an eLearning Environmentrdquo
384
7 Click Finish
102 To publish and burn a movie to a DVD
To publish and burn a movie to a DVD you must have Windows DVD Maker which is
included in Windows Vista Ultimate and Windows Vista Home Premium You also need a
DVD burner
1 Insert a blank recordable or rewritable DVD into your DVD burner
2 Open a project in Windows Movie Maker
3 Click File and then click Publish Movie
4 Click DVD and then click Next Windows DVD Maker opens
5 Complete the steps to create a DVD using Windows DVD Maker
103 To publish and burn a movie to a recordable CD
1 Insert a blank recordable CD or a rewriteable CD into your CD burner
2 Click File and then click Publish Movie
3 Click Recordable CD and then click Next
4 In the File name box type a name for your movie
5 In the CD Name box type a name for the CD and then click Next
6 Choose the settings you want to use to publish your movie and then click Publish
7 To publish and burn the movie to another recordable CD select the Publish this
movie to another recordable CD check box and then click Next Replace the
recordable CD with another recordable CD and then repeat steps 4 through 6
104 To send a movie as an e-mail attachment in an e-mail message
1 Click File and then click Publish Movie
2 Click E-mail and then click Next
3 After the movie is published do any of the following
To play the movie in your default player before sending it click Play the
movie
To save a local copy of the movie on your computer in addition to sending
it as an e-mail attachment click Save a copy of my movie on my computer
enter a movie file name in the File name box and then click Save
4 To attach the movie to an e-mail message click Attach Movie
5 In your default e-mail program enter the e-mail address of the person you are
sending the movie to add any additional text to the body and then send the
message
Video Capturing and Editing
Training Programme under CAFT ldquoOnline Content Creation and Management in an eLearning Environmentrdquo
385
105 To record a movie to a videotape in a digital video camera
1 Switch your digital video (DV) camera on and verify that it is in playback mode
(often labeled VCR on the camera)
2 Click File and then click Publish Movie
3 Click Digital video camera and then click Next
4 If you have more than one digital video device powered on and detected by
Windows Movie Maker on the Choose a digital video camera page choose the
digital video device that contains the videotape to which you want to record your
movie and then click Next
5 When you see the Cue your tape page using the transport controls on your camera
rewind or fast-forward the tape to the point where you want your movie to be
recorded and then click Next
6 You should verify that you are not overwriting a portion of the tape that contains
recorded video you want to keep
7 To begin recording your movie back to tape click Yes
8 Wait for your movie to be published and then recorded to the videotape The time
it takes to create and record the movie to tape depends on the length of the movie
and the system resources on your computer You can preview the movie in the
LCD display of your DV camera as your movie is recorded to tape
9 Click Finish
11 To change where movies are temporarily saved
Windows Movie Maker uses a temporary file storage location in the following ways
1 When you publish a movie the audio or movie file is held in the temporary file
location until the file is published
2 When you record an audio narration a temporary file is stored in the temporary file
storage location and then removed after the audio file is saved
3 When you publish a movie that you want to attach to an e-mail message a copy of
the movie file is stored in the temporary file location until the movie is sent
successfully
4 When you send a movie to a tape in a digital video (DV) camera the temporary
movie file that is created is stored in this location until the movie is recorded to the
tape
You can change the default file storage location in Windows Movie Maker For example
you might want to do this if you have a storage location that has more available disk space
If your hard disk has two partitions you may want to choose the drive that has more
storage space
1 Click Tools and then click Options
Video Capturing and Editing
Training Programme under CAFT ldquoOnline Content Creation and Management in an eLearning Environmentrdquo
386
2 Click the General tab and then in the Temporary storage box choose the default
location where you want your temporary audio and movie files to be saved
temporarily
111 To avoid including the title author copyright rating and comments
information in the published movie file
You can choose not to include information such as the title author copyright rating and
comments in your published movie files If you not to include this information your name
and other metadata information is not displayed when you or someone else plays back
your movie in a media player For more information about entering information about your
project and final published movie see Add a title author name and description for a
movie
To choose not to include metadata in your finished movie do the following
1 Click Tools and then click Options
2 Click the General tab and then select or clear the Do not include the title author
copyright rating and comments information in the published movie file check
box depending on whether you want personally identifiable information to be
removed with the published movie file
Video Capturing and Editing
Training Programme under CAFT ldquoOnline Content Creation and Management in an eLearning Environmentrdquo
371
Timeline The timeline view provides a more detailed view of your movie project and
allows you to make finer edits Using the timeline view you can trim video clips adjust the
duration of transitions between clips and view the audio track You can use the timeline to
review or modify the timing of clips in your project Use the timeline buttons to switch to
storyboard view zoom in or out on details of your project narrate the timeline or adjust
the audio levels The following picture shows the timeline view in Windows Movie
Maker
Fig 4 Timeline View
The preview monitor enables you to view individual clips or an entire project By using
the preview monitor you can preview your project before publishing it as a movie You
can use the buttons underneath the preview monitor to play or pause a clip or to advance
or rewind a clip frame-by-frame The Split button allows you to split a clip into two parts
at the point displayed in the preview monitor
You can make the preview monitor larger or smaller by clicking View pointing to
Preview Monitor Size and choosing a size You can also drag the window to make it
larger or smaller
4 Import video from a videotape
You can copy video from a videotape in a digital video (DV) camera to your computer by
using Import Video When you import video from a videotape in a DV camera to your
computer the video on the tape is encoded into a video file and saved to your computers
hard disk
41 To import the entire video from a tape in a digital video (DV) camera
Make sure your DV camera is connected to an IEEE 1394 connection or a USB 20
connection and then set the camera mode to play recorded video (often labeled VTR or
VCR on a DV camera)
1 In the Autoplay dialog box that displays when you turn on the DV camera click
Import Video
2 In the Name box type a name for the video file or files that you will create import
and then save to your computer
3 Choose a location to save your video file from the Import to list or click Browse to
choose another location In the Format list choose one of the following video file
formats for the new video file and then click Next If you want to create a single
file using the file type that your digital video device uses by default such as an
AVI or DV-AVI file choose Audio Video Interleaved (single file)
Video Capturing and Editing
Training Programme under CAFT ldquoOnline Content Creation and Management in an eLearning Environmentrdquo
372
4 If you want to create a single Windows Media Video (WMV) file containing all of
the information on the video tape choose Windows Media Video File (single file)
If you want to create a WMV file for every scene on the videotape choose
Windows Media Video (one file per scene)
5 Click Import the entire videotape to my computer and then click Next
6 If you want to stop importing video before the end of the videotape click Stop
and then click Yes Click Finish
7 The imported video is saved as one or more video files on your computer and
appears in Windows Photo Gallery
5 To import the entire video from a tape in a digital video (DV) camera and
then burn it to a DVD
1 Make sure your DV camera is connected properly using an IEEE 1394 connection
or a USB 20 connection and then set the camera mode to play recorded video
(often labeled VTR or VCR on a DV camera)
2 In the Autoplay dialog box that displays when you turn on the DV camera click
Import Video
3 In the Name box type a name for the video file or files that you will create import
and then save to your computer
4 Choose a location to save your video file from the Import to list or click Browse to
choose another location
5 In the Format list choose one of the following video file formats for the new video
file and then click Next
6 If you want to create a single file using the file type that your digital video device
uses by default such as an AVI or DV-AVI file choose Audio Video Interleaved
(single file)
7 If you want to create a single Windows Media Video (WMV) file containing all of
the information on the video tape choose Windows Media Video File (single file)
8 If you want to create a WMV file for every scene on the videotape choose
Windows Media Video (one file per scene)
9 Click only import parts of the videotape to my computer and then click Next On
the Cue the videotape and then start importing video page do one or more of the
following
10 By using either the DV camera controls in Import Video or the controls on your
video camera locate the start of the clip or clips on the tape that you want to
import to your computer
11 If you want to specify the amount of time to import video from the videotape
select the Stop importing after check box and then enter a time limit for importing
video
12 Click Start Video Import The videotape plays automatically and importing begins
Video Capturing and Editing
Training Programme under CAFT ldquoOnline Content Creation and Management in an eLearning Environmentrdquo
373
13 Do one of the following When the tape reaches the point at which you want to
stop importing click Stop Video Import If you have selected the Stop importing
after check box wait for the specified amount of time for video to be imported
14 Repeat steps 13 for each part of the videotape you want to import
15 When you are done importing video click Finish The imported video is saved as
one or more video files on your computer and appears in Windows Photo Gallery
Note
You can also open Import Video using Windows Movie Maker With the DV camera
connected to your computer and turned on in playback mode in Windows Movie Maker
on the File menu click Import from Digital Video Camera
You can also open Import Video using Windows Photo Gallery With the DV camera
connected to your computer and turned on in playback mode in Windows Photo Gallery
click File click Import from Camera or Scanner click your DV camera in the list of
devices and then click Import
Video cannot be imported from an analog video camera or VCR when using Import Video
or Windows Movie Maker To import video from an analog video camera or VCR you
need to have an analog video capture device installed on your computer and then use
software that enables you to import video from an analog capture device
For more information check the documentation that came with your analog capture device
or go to the manufacturers website
Some DV cameras also allow you to connect to an analog device such as a VCR The DV
camera will convert the video from the analog source into digital video For more
information check the documentation that came with your DV camera or go to the
manufacturers website site For more information about using a DV camera to import
video from an analog video device see Import analog video to your computer by using a
DV camera at httpswindowshelpmicrosoftcomWindowsen-USHelp3ae62d5e-29e2-
41eb-b326-9e42ac46b7021033mspx
6 Import video files pictures and audio into Windows Movie Maker
You can import files with the following file name extensions into Windows Movie Maker
to use in your project
Video files asf avi dvr-ms m1v mp2 mp2v mpe mpeg mpg mpv2 wm
andwmv
Audio files aif aifc aiff asf au mp2 mp3 mpa snd wav and wma
Picture files bmp dib emf gif jfif jpe jpeg jpg png tif tiff and wmf
You can also import files into Windows Movie Maker that have a different extension from
the ones listed above but not all file types will work when you try to use them to make a
movie
Video Capturing and Editing
Training Programme under CAFT ldquoOnline Content Creation and Management in an eLearning Environmentrdquo
374
Microsoft Recorded TV Show files (with a dvr-ms file name extension) that are not
protected using digital rights management can be imported into Windows Movie Maker if
your computer is running Windows Vista Home Premium or Windows Vista Ultimate
61 To import files into Windows Movie Maker
Click File and then click Import Media Items
Navigate to the location that contains the digital media files you want to import
and then click Import
You can import several video clips at once For consecutive clips click the first video clip
in the list press and hold down the SHIFT key and then click the last clip in the list For
video clips that are not consecutive press and hold down the CTRL key and then click
each clip that you want to import into Windows Movie Maker
You can also import video files and pictures by dragging the files from Windows Photo
Gallery into Windows Movie Maker
7 Work with clips in Windows Movie Maker
After yoursquove imported files into Windows Movie Maker youre ready to start the main
part of moviemakingmdashediting Using Windows Movie Maker you can edit clips in a
variety of different ways You can split a long clip into two shorter clips combine two
clips into a single clip trim the beginning or ending of a clip and even create new clips
71 Split and combine clips
You can manually split video and audio clips into smaller clips to make your clips easier
to work with For example if you have a video clip that has two different scenes you
might want to split the video clip at the point where the one scene ends and the other
begins and then insert a transition between the two clips
Fig 5 A video clip thatrsquos been split into two clips
Conversely you might have a file that was divided into smaller clips that you want to
combine However you can only combine contiguous clips Contiguous means that the
start time of the second clip immediately follows the end time of the first clip For
example if you have a video or audio file that was divided into clips when it was imported
into Windows Movie Maker and the clips are named Clip 1 Clip 2 and Clip 3 in that
Video Capturing and Editing
Training Programme under CAFT ldquoOnline Content Creation and Management in an eLearning Environmentrdquo
375
order you could combine Clip 1 and Clip 2 or Clip 2 and Clip 3 but you cannot combine
Clip 1 and Clip 3
You can combine contiguous video clips on the storyboard or in the Contents pane (before
adding the clip or clips to the storyboardtimeline)
72 To split a clip
1 In the Contents pane or on the storyboardtimeline click the video or audio clip
that you want to split
2 Under the preview monitor click the Play button
3 When the clip reaches a point near the place you want to split the clip click Pause
4 Under the preview monitor use the playback controls to find the point where you
want to split the clip
5 Under the preview monitor click the Split button (You can drag the playback
indicator on the seek bar to the exact spot where you want to split the clip)
73 To combine clips
1 In the Contents pane or on the storyboard hold down the CTRL key and then click
the contiguous clips you want to combine
2 Click Clip and then click Combine
3 The name and property information of the first clip in the group is used for the new
clip and the time is adjusted accordingly (You can combine more than two clips at
a time as long as they are consecutive To select multiple clips click the first clip
press and hold down the SHIFT key and then click the last clip)
74 Trim (hide) parts of a video clip
When you trim a clip you make a new start andor end trim point The start trim point
determines when the clip will begin to play and the end trim point determines when the
clip will stop playing in your project and final movie When you trim a clip the trimmed
part of the clip is not actually removed from the source file its just hidden so the trimmed
part doesnt appear in your project or published movie
Video Capturing and Editing
Training Programme under CAFT ldquoOnline Content Creation and Management in an eLearning Environmentrdquo
376
Fig6 A trimmed video clip with the trimmed part highlighted
75 To trim a video clip
1 If you are in the storyboard view click View and then click Timeline
2 On the timeline click the clip that you want to trim
3 Use the playback controls under the preview monitor to find the point where you
want to trim the clip
4 Do the following
When the playback indicator is at the point where you want the selected video or
audio clip to start playing back click Clip and then click Trim Beginning
When the playback indicator is at the point where you want the selected video or
audio clip to stop playing back click Clip and then click Trim End
You can also drag the trim handles on a clip to set the start and end trim points
Trim handles appear as small black triangles at the beginning and end of a clip
after you click the clip on the timeline When you hold your pointer over a trim
handle the pointer changes to a red double-headed arrow Drag a trim handle to
set the new start or end point of the clip
Video Capturing and Editing
Training Programme under CAFT ldquoOnline Content Creation and Management in an eLearning Environmentrdquo
377
Fig7 Trimming a clip with the trim handle
You might need to click the Zoom Timeline In button one or more times to see clips more
clearly on the timeline The Zoom Timeline In button appears on the timeline toolbar as a
magnifying glass with a plus sign (+) in it
76 To undo a trimmed clip
1 If you are in storyboard view click View and then click Timeline
2 Click the trimmed clip on the timeline click Clip and then click Clear Trim
Points
77 Create clips
You might want to create several smaller more manageable clips from a single existing
video clip to make it easier to work with your project Windows Movie Maker creates
clips in different ways depending on the clips source If the source clip is from a digital
video (DV) camera Windows Movie Maker creates clips that are based on the time
stamps that the DV camera inserts when the source video is originally recorded as well as
significant frame changes in the video
1 In the Contents pane select the video clip for which you want to create clips
2 Click Tools and then click Create Clips
3 Clips can be created automatically for Windows Media Video (WMV) files and
Audio-Video Interleaved (AVI) video files that use the DV codec For other video
file formats clips cannot always be created automatically using clip creation so
the video file appears as one large video clip in Windows Movie Maker For these
large video clips split the clip manually to separate the large video clip into
smaller clips
8 Add transitions and effects to pictures and video in Windows Movie Maker
You can improve your moviemaking by adding your own special touches to make your
movies look distinctive and professional By adding transitions and effects you can make
sure that your movie flows nicely from one scene to the next and give it the look you want
Video Capturing and Editing
Training Programme under CAFT ldquoOnline Content Creation and Management in an eLearning Environmentrdquo
378
81 Transitions
A transition controls how your movie plays from one video clip or picture to the next You
can add a transition between two pictures video clips or titles in any combination on the
storyboardtimeline You might choose to use a popular and great-looking transition like a
Fade Or you might choose to use more brash transitions such as Bars Shatter or Zig
Zag (to name just a few)
Fig 8 A project on the storyboard with transition
Any transitions that you add appear on the Transition track of the timeline To see this
track you must expand the Video track
Fig 9 A project on the timeline with a transition
82 To add a transition
On the storyboardtimeline click the second of the two video clips titles or pictures that
you want to add a transition between
1 Click Tools and then click Transitions
2 In the Contents pane click the transition that you want to add You can click Play
under the monitor to see a preview of what the transition looks like
3 Click Clip and then click Add to Timeline or Add to Storyboard
4 You can also add a transition by dragging it to the timeline and dropping it
between two clips on the Video track Or if you are in the storyboard view you
can drag the transition to the transition cell between two video clips or pictures
Video Capturing and Editing
Training Programme under CAFT ldquoOnline Content Creation and Management in an eLearning Environmentrdquo
379
5 If you upgraded your computer from Windows XP to Windows Vista any
additional transitions and effects that you had previously downloaded and installed
will not be available in the current version of Windows Movie Maker
83 To change the transition duration
The amount of overlap between two clips determines the transition duration At times you
might want to make the transition shorter or longer
1 To view the Transition track of the timeline expand the Video track
2 On the Transition track of the timeline do one of the following
3 To reduce the transition duration drag the beginning of the transition towards the
end of the timeline
4 To increase the transition duration drag the beginning of the transition towards the
beginning of the timeline
84 To change the default transition duration
1 Click Tools click Options and then click the Advanced tab
2 Type the time (in seconds) that you want transitions to play back by default after
the transitions are added to the storyboardtimeline
85 To remove a transition
1 Do one of the following
On the storyboard click the transition cell that contains the transition that
you want to remove
On the timeline click the transition on the Transition track that you want to
remove
Click Edit and then click Remove
86 Effects
Effects enable you to add special effects to your movie For example you might have an
imported video that you want to look and feel like a classic old-time movie If so you
could add one of the Film Age effects to a video clip picture or title to make the video for
that clip look like an old-time movie
Video Capturing and Editing
Training Programme under CAFT ldquoOnline Content Creation and Management in an eLearning Environmentrdquo
380
Fig 10 A project on the storyboard with an effect
Fig 11 A project on the timeline with an effect
87 To add an effect
On the storyboardtimeline select the video clip picture or title to which you want to add
the effect
1 Click Tools and then click Effects
2 In the Contents pane click the effect you want to add You can click Play under the
preview monitor to see a preview of what the effect looks like
3 Click Clip and then click Add to Timeline or Add to Storyboard
4 You can also add an effect by dragging the effect from the Contents pane and
dropping it on a picture or video clip on the Video track of the timeline to the
effect cell of a video clip or to a picture on the storyboard
5 The thumbnail view in the Contents pane displays examples of the different
effects
88 To change an effect
1 On the Video track of the timeline or on the storyboard click the video clip
picture or title that has the applied effect you want to change
2 Click Clip point to Video and then click Effects
3 Do one of the following
Video Capturing and Editing
Training Programme under CAFT ldquoOnline Content Creation and Management in an eLearning Environmentrdquo
381
4 To remove an effect in the Displayed effects area click the effect and then click
Remove Repeat as necessary
5 To add an effect in the Available effects area click the effect you want to add and
then click Add Repeat as necessary
6 If you add multiple effects you can change the order in which they are displayed
by using the Move Up or Move Down buttons
7 To quickly add an effect you can drag an effect to a video clip picture or title on
the storyboardtimeline
8 If you add the same effect more than once to a clip the effect is applied as many
times as you added it For example if you add the Speed Up Double effect two
times to the same video clip the clip would play four times as fast as the original
clip
9 You can also remove an effect by selecting the effect cell in the storyboard that
contains the effect you want to remove and then pressing the DELETE key
9 Add movie titles and credits in Windows Movie Maker
With Windows Movie Maker you can add a title your name the date credits and other
text to your movie For example you might want to add a title to introduce a person or
scene that appears in your movie
You can add title text to various places in your movie at the beginning or end before or
after a clip or overlaying a clip The title plays for the specified amount of time either on
the screen by itself or overlaying the video as it plays and then the title disappears and the
video clip or picture continues
The following picture shows a project with a title that appears before a video clip
Fig 12 Beginning title on the timeline
The following picture shows a project with a title that overlays a video clip as the clip
plays
Video Capturing and Editing
Training Programme under CAFT ldquoOnline Content Creation and Management in an eLearning Environmentrdquo
382
Fig 13 Overlay title on the timeline
The following picture shows a project with credits that appear at the end of the project
Fig 14 Credits on the timeline
91 To add a title or credit
1 If you know where you want the title or credit to appear in your movie click that
location on the storyboardtimeline
2 Click Tools and then click Titles and Credits
3 Click the link that corresponds to where you want to add the title or credit
4 In the Enter text for title box type the text that you want to appear as the title or
credit
5 After you type the text the monitor displays the default animation and format for
the title or credit you want to add
6 To change the title animation click Change the title animation and select a title
animation from the list
7 To change the font and color for your title click Change the text font and color
and then choose the font font color formatting background color transparency
font size and position of the title to your liking
8 Click Add Title
Video Capturing and Editing
Training Programme under CAFT ldquoOnline Content Creation and Management in an eLearning Environmentrdquo
383
92 To edit an existing title
1 On the storyboardtimeline click the title you want to edit
2 Click Edit and then click Edit Title
3 Make the changes you want to make and then click Add Title
93 To change the title duration
1 To make sure that you are in timeline view click the View menu and then click
Timeline
2 Select the title whose duration you want to change
3 Do one of the following
To extend the playback duration of the title drag the end trim handle
toward the end of the timeline
To reduce the playback duration of the title drag the end trim handle
toward the beginning of the timeline
94 To remove a title
On the storyboardtimeline click the title that you want to remove from your movie
1 Click Edit and then click Remove
2 Trim handles appear as black triangles at the beginning and end of a clip The
pointer changes to a red double-headed arrow when you hold it over a trim handle
10 Publish a movie in Windows Movie Maker
When you finish working on a project you can publish the project as a movie A movie is
a Windows Media file with a wmv file name extension or an Audio-Video Interleaved
(AVI) file with an avi file name extension When you publish a movie in Windows Movie
Maker you can share it with others in a number of waysmdashthrough your computer on a
recordable CD on a recordable DVD as an attachment in an e-mail message or on
videotape in a DV camera
101 To publish a movie to your computer
1 Click File click Publish Movie
2 Click This computer and then click Next
3 In the File name box type a name for your movie
4 In the Publish to box choose where you want to save your movie once its
published and then click Next
5 Choose the settings you want to use to publish your movie and then click Publish
6 If you want to watch your movie after it has been published select the Play movie
when I click Finish check box
Video Capturing and Editing
Training Programme under CAFT ldquoOnline Content Creation and Management in an eLearning Environmentrdquo
384
7 Click Finish
102 To publish and burn a movie to a DVD
To publish and burn a movie to a DVD you must have Windows DVD Maker which is
included in Windows Vista Ultimate and Windows Vista Home Premium You also need a
DVD burner
1 Insert a blank recordable or rewritable DVD into your DVD burner
2 Open a project in Windows Movie Maker
3 Click File and then click Publish Movie
4 Click DVD and then click Next Windows DVD Maker opens
5 Complete the steps to create a DVD using Windows DVD Maker
103 To publish and burn a movie to a recordable CD
1 Insert a blank recordable CD or a rewriteable CD into your CD burner
2 Click File and then click Publish Movie
3 Click Recordable CD and then click Next
4 In the File name box type a name for your movie
5 In the CD Name box type a name for the CD and then click Next
6 Choose the settings you want to use to publish your movie and then click Publish
7 To publish and burn the movie to another recordable CD select the Publish this
movie to another recordable CD check box and then click Next Replace the
recordable CD with another recordable CD and then repeat steps 4 through 6
104 To send a movie as an e-mail attachment in an e-mail message
1 Click File and then click Publish Movie
2 Click E-mail and then click Next
3 After the movie is published do any of the following
To play the movie in your default player before sending it click Play the
movie
To save a local copy of the movie on your computer in addition to sending
it as an e-mail attachment click Save a copy of my movie on my computer
enter a movie file name in the File name box and then click Save
4 To attach the movie to an e-mail message click Attach Movie
5 In your default e-mail program enter the e-mail address of the person you are
sending the movie to add any additional text to the body and then send the
message
Video Capturing and Editing
Training Programme under CAFT ldquoOnline Content Creation and Management in an eLearning Environmentrdquo
385
105 To record a movie to a videotape in a digital video camera
1 Switch your digital video (DV) camera on and verify that it is in playback mode
(often labeled VCR on the camera)
2 Click File and then click Publish Movie
3 Click Digital video camera and then click Next
4 If you have more than one digital video device powered on and detected by
Windows Movie Maker on the Choose a digital video camera page choose the
digital video device that contains the videotape to which you want to record your
movie and then click Next
5 When you see the Cue your tape page using the transport controls on your camera
rewind or fast-forward the tape to the point where you want your movie to be
recorded and then click Next
6 You should verify that you are not overwriting a portion of the tape that contains
recorded video you want to keep
7 To begin recording your movie back to tape click Yes
8 Wait for your movie to be published and then recorded to the videotape The time
it takes to create and record the movie to tape depends on the length of the movie
and the system resources on your computer You can preview the movie in the
LCD display of your DV camera as your movie is recorded to tape
9 Click Finish
11 To change where movies are temporarily saved
Windows Movie Maker uses a temporary file storage location in the following ways
1 When you publish a movie the audio or movie file is held in the temporary file
location until the file is published
2 When you record an audio narration a temporary file is stored in the temporary file
storage location and then removed after the audio file is saved
3 When you publish a movie that you want to attach to an e-mail message a copy of
the movie file is stored in the temporary file location until the movie is sent
successfully
4 When you send a movie to a tape in a digital video (DV) camera the temporary
movie file that is created is stored in this location until the movie is recorded to the
tape
You can change the default file storage location in Windows Movie Maker For example
you might want to do this if you have a storage location that has more available disk space
If your hard disk has two partitions you may want to choose the drive that has more
storage space
1 Click Tools and then click Options
Video Capturing and Editing
Training Programme under CAFT ldquoOnline Content Creation and Management in an eLearning Environmentrdquo
386
2 Click the General tab and then in the Temporary storage box choose the default
location where you want your temporary audio and movie files to be saved
temporarily
111 To avoid including the title author copyright rating and comments
information in the published movie file
You can choose not to include information such as the title author copyright rating and
comments in your published movie files If you not to include this information your name
and other metadata information is not displayed when you or someone else plays back
your movie in a media player For more information about entering information about your
project and final published movie see Add a title author name and description for a
movie
To choose not to include metadata in your finished movie do the following
1 Click Tools and then click Options
2 Click the General tab and then select or clear the Do not include the title author
copyright rating and comments information in the published movie file check
box depending on whether you want personally identifiable information to be
removed with the published movie file

Video Capturing and Editing
Training Programme under CAFT ldquoOnline Content Creation and Management in an eLearning Environmentrdquo
386
2 Click the General tab and then in the Temporary storage box choose the default
location where you want your temporary audio and movie files to be saved
temporarily
111 To avoid including the title author copyright rating and comments
information in the published movie file
You can choose not to include information such as the title author copyright rating and
comments in your published movie files If you not to include this information your name
and other metadata information is not displayed when you or someone else plays back
your movie in a media player For more information about entering information about your
project and final published movie see Add a title author name and description for a
movie
To choose not to include metadata in your finished movie do the following
1 Click Tools and then click Options
2 Click the General tab and then select or clear the Do not include the title author
copyright rating and comments information in the published movie file check
box depending on whether you want personally identifiable information to be
removed with the published movie file
Related Documents