Getting Started with Abaqus: Keywords Edition

Welcome message from author
This document is posted to help you gain knowledge. Please leave a comment to let me know what you think about it! Share it to your friends and learn new things together.
Transcript

Getting Started with Abaqus: Keywords Edition
Abaqus ID:
Printed on:


Getting Started with Abaqus
Keywords Edition
Abaqus ID:
Printed on:

Legal NoticesCAUTION: This documentation is intended for qualified users who will exercise sound engineering judgment and expertise in the use of the Abaqus
Software. The Abaqus Software is inherently complex, and the examples and procedures in this documentation are not intended to be exhaustive or to apply
to any particular situation. Users are cautioned to satisfy themselves as to the accuracy and results of their analyses.
Dassault Systèmes and its subsidiaries, including Dassault Systèmes Simulia Corp., shall not be responsible for the accuracy or usefulness of any analysis
performed using the Abaqus Software or the procedures, examples, or explanations in this documentation. Dassault Systèmes and its subsidiaries shall not
be responsible for the consequences of any errors or omissions that may appear in this documentation.
The Abaqus Software is available only under license from Dassault Systèmes or its subsidiary and may be used or reproduced only in accordance with the
terms of such license. This documentation is subject to the terms and conditions of either the software license agreement signed by the parties, or, absent
such an agreement, the then current software license agreement to which the documentation relates.
This documentation and the software described in this documentation are subject to change without prior notice.
No part of this documentation may be reproduced or distributed in any form without prior written permission of Dassault Systèmes or its subsidiary.
The Abaqus Software is a product of Dassault Systèmes Simulia Corp., Providence, RI, USA.
© Dassault Systèmes, 2010
Abaqus, the 3DS logo, SIMULIA, CATIA, and Unified FEA are trademarks or registered trademarks of Dassault Systèmes or its subsidiaries in the United
States and/or other countries.
Other company, product, and service names may be trademarks or service marks of their respective owners. For additional information
concerning trademarks, copyrights, and licenses, see the Legal Notices in the Abaqus 6.10 Release Notes and the notices at:
http://www.simulia.com/products/products_legal.html.
Abaqus ID:
Printed on:

Locations
SIMULIA Worldwide Headquarters Rising Sun Mills, 166 Valley Street, Providence, RI 02909–2499, Tel: +1 401 276 4400,
Fax: +1 401 276 4408, [email protected] http://www.simulia.com
SIMULIA European Headquarters Gaetano Martinolaan 95, P. O. Box 1637, 6201 BP Maastricht, The Netherlands, Tel: +31 43 356 6906,
Fax: +31 43 356 6908, [email protected]
Technical Support Centers
United States Fremont, CA, Tel: +1 510 794 5891, [email protected]
West Lafayette, IN, Tel: +1 765 497 1373, [email protected]
Northville, MI, Tel: +1 248 349 4669, [email protected]
Woodbury, MN, Tel: +1 612 424 9044, [email protected]
Beachwood, OH, Tel: +1 216 378 1070, [email protected]
West Chester, OH, Tel: +1 513 275 1430, [email protected]
Warwick, RI, Tel: +1 401 739 3637, [email protected]
Lewisville, TX, Tel: +1 972 221 6500, [email protected]
Australia Richmond VIC, Tel: +61 3 9421 2900, [email protected]
Austria Vienna, Tel: +43 1 22 707 200, [email protected]
Benelux Huizen, The Netherlands, Tel: +31 35 52 58 424, [email protected]
Canada Toronto, ON, Tel: +1 416 402 2219, [email protected]
China Beijing, P. R. China, Tel: +8610 6536 2288, [email protected]
Shanghai, P. R. China, Tel: +8621 3856 8000, [email protected]
Czech & Slovak Republics Synerma s. r. o., Psáry, Prague-West, Tel: +420 603 145 769, [email protected]
Finland Vantaa, Tel: +358 46 712 2247, [email protected]
France Velizy Villacoublay Cedex, Tel: +33 1 61 62 72 72, [email protected]
Germany Aachen, Tel: +49 241 474 01 0, [email protected]
Munich, Tel: +49 89 543 48 77 0, [email protected]
Greece 3 Dimensional Data Systems, Crete, Tel: +30 2821040012, [email protected]
India Chennai, Tamil Nadu, Tel: +91 44 43443000, [email protected]
Israel ADCOM, Givataim, Tel: +972 3 7325311, [email protected]
Italy Lainate MI, Tel: +39 02 39211211, [email protected]
Japan Tokyo, Tel: +81 3 5442 6300, [email protected]
Osaka, Tel: +81 6 4803 5020, [email protected]
Yokohama-shi, Kanagawa, Tel: +81 45 470 9381, [email protected]
Korea Mapo-Gu, Seoul, Tel: +82 2 785 6707/8, [email protected]
Latin America Puerto Madero, Buenos Aires, Tel: +54 11 4312 8700, [email protected]
Malaysia WorleyParsons Advanced Analysis, Kuala Lumpur, Tel: +603 2039 9000, [email protected]
New Zealand Matrix Applied Computing Ltd., Auckland, Tel: +64 9 623 1223, [email protected]
Poland BudSoft Sp. z o.o., Poznań, Tel: +48 61 8508 466, [email protected]
Russia, Belarus & Ukraine TESIS Ltd., Moscow, Tel: +7 495 612 44 22, [email protected]
Scandinavia Västerås, Sweden, Tel: +46 21 150870, [email protected]
Singapore WorleyParsons Advanced Analysis, Singapore, Tel: +65 6735 8444, [email protected]
South Africa Finite Element Analysis Services (Pty) Ltd., Parklands, Tel: +27 21 556 6462, [email protected]
Spain & Portugal Principia Ingenieros Consultores, S.A., Madrid, Tel: +34 91 209 1482, [email protected]
Taiwan Simutech Solution Corporation, Taipei, R.O.C., Tel: +886 2 2507 9550, [email protected]
Thailand WorleyParsons Advanced Analysis, Singapore, Tel: +65 6735 8444, [email protected]
Turkey A-Ztech Ltd., Istanbul, Tel: +90 216 361 8850, [email protected]
United Kingdom Warrington, Tel: +44 1 925 830900, [email protected]
Sevenoaks, Tel: +44 1 732 834930, [email protected]
Complete contact information is available at http://www.simulia.com/locations/locations.html.
Abaqus ID:
Printed on:


CONTENTS
Contents
1. Introduction
The Abaqus products 1.1
Getting started with Abaqus 1.2
Abaqus documentation 1.3
Getting help 1.4
Support 1.5
A quick review of the finite element method 1.6
Getting Started 1.7
2. Abaqus Basics
Components of an Abaqus analysis model 2.1
Format of the input file 2.2
Example: creating a model of an overhead hoist 2.3
Comparison of implicit and explicit procedures 2.4
Summary 2.5
3. Finite Elements and Rigid Bodies
Finite elements 3.1
Rigid bodies 3.2
Summary 3.3
4. Using Continuum Elements
Element formulation and integration 4.1
Selecting continuum elements 4.2
Example: connecting lug 4.3
Mesh convergence 4.4
Related Abaqus examples 4.5
Suggested reading 4.6
Summary 4.7
5. Using Shell Elements
Element geometry 5.1
Shell formulation – thick or thin 5.2
Shell material directions 5.3
Selecting shell elements 5.4
Example: skew plate 5.5
v
Abaqus ID:gsk-toc
Printed on: Fri March 19 -- 15:34:09 2010

CONTENTS
Related Abaqus examples 5.6
Suggested reading 5.7
Summary 5.8
6. Using Beam Elements
Beam cross-section geometry 6.1
Formulation and integration 6.2
Selecting beam elements 6.3
Example: cargo crane 6.4
Related Abaqus examples 6.5
Suggested reading 6.6
Summary 6.7
7. Linear Dynamics
Introduction 7.1
Damping 7.2
Element selection 7.3
Mesh design for dynamics 7.4
Example: cargo crane under dynamic loading 7.5
Effect of the number of modes 7.6
Effect of damping 7.7
Comparison with direct time integration 7.8
Other dynamic procedures 7.9
Related Abaqus examples 7.10
Suggested reading 7.11
Summary 7.12
8. Nonlinearity
Sources of nonlinearity 8.1
The solution of nonlinear problems 8.2
Including nonlinearity in an Abaqus analysis 8.3
Example: nonlinear skew plate 8.4
Related Abaqus examples 8.5
Suggested reading 8.6
Summary 8.7
9. Nonlinear Explicit Dynamics
Types of problems suited for Abaqus/Explicit 9.1
Explicit dynamic finite element methods 9.2
Automatic time incrementation and stability 9.3
Example: stress wave propagation in a bar 9.4
vi
Abaqus ID:gsk-toc
Printed on: Fri March 19 -- 15:34:09 2010

CONTENTS
Damping of dynamic oscillations 9.5
Energy balance 9.6
Summary 9.7
10. Materials
Defining materials in Abaqus 10.1
Plasticity in ductile metals 10.2
Selecting elements for elastic-plastic problems 10.3
Example: connecting lug with plasticity 10.4
Example: blast loading on a stiffened plate 10.5
Hyperelasticity 10.6
Example: axisymmetric mount 10.7
Mesh design for large distortions 10.8
Techniques for reducing volumetric locking 10.9
Related Abaqus examples 10.10
Suggested reading 10.11
Summary 10.12
11. Multiple Step Analysis
General analysis procedures 11.1
Linear perturbation analysis 11.2
Example: vibration of a piping system 11.3
Restart analysis 11.4
Example: restarting the pipe vibration analysis 11.5
Related Abaqus examples 11.6
Summary 11.7
12. Contact
Overview of contact capabilities in Abaqus 12.1
Interaction between surfaces 12.2
Defining contact in Abaqus/Standard 12.3
Modeling issues for rigid surfaces in Abaqus/Standard 12.4
Abaqus/Standard 2-D example: forming a channel 12.5
General contact in Abaqus/Standard 12.6
Abaqus/Standard 3-D example: shearing of a lap joint 12.7
Defining contact in Abaqus/Explicit 12.8
Modeling considerations in Abaqus/Explicit 12.9
Abaqus/Explicit example: circuit board drop test 12.10
Compatibility between Abaqus/Standard and Abaqus/Explicit 12.11
Related Abaqus examples 12.12
vii
Abaqus ID:gsk-toc
Printed on: Fri March 19 -- 15:34:09 2010
CONTENTS
Suggested reading 12.13
Summary 12.14
13. Quasi-Static Analysis with Abaqus/Explicit
Analogy for explicit dynamics 13.1
Loading rates 13.2
Mass scaling 13.3
Energy balance 13.4
Example: forming a channel in Abaqus/Explicit 13.5
Summary 13.6
A. Example Files
Overhead hoist frame A.1
Connecting lug A.2
Skew plate A.3
Cargo crane A.4
Cargo crane – dynamic loading A.5
Nonlinear skew plate A.6
Stress wave propagation in a bar A.7
Connecting lug with plasticity A.8
Blast loading on a stiffened plate A.9
Axisymmetric mount A.10
Test fit of hyperelastic material data A.11
Vibration of a piping system A.12
Forming a channel with Abaqus/Standard A.13
Shearing of a lap joint A.14
Circuit board drop test A.15
Forming a channel with Abaqus/Explicit A.16
viii
Abaqus ID:gsk-toc
Printed on: Fri March 19 -- 15:34:09 2010

THE Abaqus PRODUCTS
1. Introduction
Abaqus is a suite of powerful engineering simulation programs, based on the finite element method, that
can solve problems ranging from relatively simple linear analyses to the most challenging nonlinear
simulations. Abaqus contains an extensive library of elements that can model virtually any geometry.
It has an equally extensive list of material models that can simulate the behavior of most typical
engineering materials including metals, rubber, polymers, composites, reinforced concrete, crushable
and resilient foams, and geotechnical materials such as soils and rock. Designed as a general-purpose
simulation tool, Abaqus can be used to study more than just structural (stress/displacement) problems.
It can simulate problems in such diverse areas as heat transfer, mass diffusion, thermal management of
electrical components (coupled thermal-electrical analyses), acoustics, soil mechanics (coupled pore
fluid-stress analyses), piezoelectric analysis, and fluid dynamics.
Abaqus offers a wide range of capabilities for simulation of linear and nonlinear applications.
Problems with multiple components are modeled by associating the geometry defining each component
with the appropriate material models and specifying component interactions. In a nonlinear analysis
Abaqus automatically chooses appropriate load increments and convergence tolerances and continually
adjusts them during the analysis to ensure that an accurate solution is obtained efficiently.
1.1 The Abaqus products
Abaqus consists of three main analysis products—Abaqus/Standard, Abaqus/Explicit, and Abaqus/CFD.
There are also four special-purpose add-on analysis products for Abaqus/Standard—Abaqus/Aqua,
Abaqus/Design, Abaqus/AMS, and Abaqus/Foundation. Abaqus/CAE is the complete Abaqus
environment that includes capabilities for creating Abaqus models, interactively submitting and
monitoring Abaqus jobs, and evaluating results. Abaqus/Viewer is a subset of Abaqus/CAE that
includes just the postprocessing functionality. In addition, the Abaqus Interface for Moldflow and
the Abaqus Interface for MSC.ADAMS are interfaces to Moldflow and ADAMS/Flex, respectively.
Abaqus also provides translators that convert geometry from third-party CAD systems to models
for Abaqus/CAE, convert entities from third-party preprocessors to input for Abaqus analyses, and
that convert output from Abaqus analyses to entities for third-party postprocessors. The relationship
between these products is shown in Figure 1–1.
Abaqus/Standard
Abaqus/Standard is a general-purpose analysis product that can solve a wide range of linear and
nonlinear problems involving the static, dynamic, thermal, and electrical response of components.
This product is discussed in detail in this guide. Abaqus/Standard solves a system of equations
implicitly at each solution “increment.” In contrast, Abaqus/Explicit marches a solution forward
through time in small time increments without solving a coupled system of equations at each
increment (or even forming a global stiffness matrix).
1–1
Abaqus ID:
Printed on:

THE Abaqus PRODUCTS
Moldflow
Abaqus/StandardAbaqus/ExplicitAbaqus/CFD
(Abaqus/Viewer)
Abaqus Interfacefor MSC. ADAMS
Abaqus Interfacefor Moldflow
Abaqus/CAEAssociative interfacesCAD
Systems
Abaqus/AquaAbaqus/AMSAbaqus/Design
Figure 1–1 Abaqus products.
Abaqus/Explicit
Abaqus/Explicit is a special-purpose analysis product that uses an explicit dynamic finite element
formulation. It is suitable for modeling brief, transient dynamic events, such as impact and blast
problems, and is also very efficient for highly nonlinear problems involving changing contact
conditions, such as forming simulations. Abaqus/Explicit is discussed in detail in this guide.
Abaqus/CFD
Abaqus/CFD is a computational fluid dynamics analysis product. It can solve a broad class of
incompressible flow problems including laminar and turbulent flow, thermal convective flow, and
deforming mesh problems. Abaqus/CFD is not discussed in this guide.
Abaqus/CAE
Abaqus/CAE (Complete Abaqus Environment) is an interactive, graphical environment for
Abaqus. It allows models to be created quickly and easily by producing or importing the geometry
of the structure to be analyzed and decomposing the geometry into meshable regions. Physical and
material properties can be assigned to the geometry, together with loads and boundary conditions.
Abaqus/CAE contains very powerful options to mesh the geometry and to verify the resulting
analysis model. Once the model is complete, Abaqus/CAE can submit, monitor, and control the
analysis jobs. The Visualization module can then be used to interpret the results.
1–2
Abaqus ID:
Printed on:

THE Abaqus PRODUCTS
Abaqus/Viewer, which is a subset of Abaqus/CAE that contains only the postprocessing
capabilities of the Visualization module, is discussed in this guide. The other Abaqus/CAE
modules are not discussed in this guide.
Abaqus/Aqua
Abaqus/Aqua is a set of optional capabilities that can be added to Abaqus/Standard. It is intended
for the simulation of offshore structures, such as oil platforms. Some of the optional capabilities
include the effects of wave and wind loading and buoyancy. Abaqus/Aqua is not discussed in this
guide.
Abaqus/Design
Abaqus/Design is a set of optional capabilities that can be added to Abaqus/Standard to perform
design sensitivity calculations. Abaqus/Design is not discussed in this guide.
Abaqus/AMS
Abaqus/AMS is an optional capability that can be added to Abaqus/Standard. It uses the automatic
multi-level substructuring (AMS) eigensolver during a natural frequency extraction. Abaqus/AMS
is not discussed in this guide.
Abaqus/Foundation
Abaqus/Foundation offers more efficient access to the linear static and dynamic analysis
functionality in Abaqus/Standard. Abaqus/Foundation is not discussed in this guide.
Abaqus Interface for Moldflow
The Abaqus Interface for Moldflow translates finite element model information from a Moldflow
analysis to write a partial Abaqus input file. The Abaqus Interface for Moldflow is not discussed in
this guide.
Abaqus Interface for MSC.ADAMS
The Abaqus Interface for MSC.ADAMS allows Abaqus finite element models to be included as
flexible components within the MSC.ADAMS family of products. The interface is based on the
component mode synthesis formulation of ADAMS/Flex. The Abaqus Interface for MSC.ADAMS
is not discussed in this guide.
Geometry translators
Abaqus provides the following translators for converting geometry from third-party CAD systems
to parts and assemblies for Abaqus/CAE:
• The CATIA V5 Associative Interface creates a link between CATIA V5 and Abaqus/CAE
that allows you to transfer model data and propagate design changes from CATIA V5 to
Abaqus/CAE.
1–3
Abaqus ID:
Printed on:

GETTING STARTED WITH Abaqus
• The SolidWorks Associative Interface creates a link between SolidWorks and Abaqus/CAE
that allows you to transfer model data and propagate design changes from SolidWorks to
Abaqus/CAE.
• The Pro/ENGINEER Associative Interface creates a link between Pro/ENGINEER and
Abaqus/CAE that allows you to transfer model data and propagate design changes between
Pro/ENGINEER and Abaqus/CAE.
• The Geometry Translator for CATIA V4 allows you to import the geometry of CATIA V4-
format parts and assemblies directly into Abaqus/CAE.
• The Geometry Translator for I-DEAS converts parts and assemblies in I-DEAS to geometry
files that can be imported by Abaqus/CAE.
• The Geometry Translator for Parasolid allows you to import the geometry of Parasolid-format
parts and assemblies directly into Abaqus/CAE.
In addition, the NX Associative Interface creates a link between NX and Abaqus/CAE that allows
you to transfer model data and propagate design changes between NX and Abaqus/CAE. The NX
Associative Interface be purchased and downloaded from the Elysium web site.
The geometry translators are not discussed in this guide.
Translator utilities
Abaqus provides the following translators for converting entities from third-party preprocessors to
input for Abaqus analyses or for converting output from Abaqus analyses to entities for third-party
postprocessors:
• abaqus fromansys translates an ANSYS input file to an Abaqus input file.
• abaqus fromnastran translates a Nastran bulk data file to an Abaqus input file.
• abaqus frompamcrash translates a PAM-CRASH input file into an Abaqus input file.
• abaqus fromradioss translates a RADIOSS input file into an Abaqus input file.
• abaqus tonastran translates an Abaqus input file to Nastran bulk data file format.
• abaqus toOutput2 translates anAbaqus output database file to the Nastran Output2 file format.
• abaqus tozaero enables the exchange of aeroelastic data between Abaqus and ZAERO.
The translator utilities are not discussed in this guide.
1.2 Getting started with Abaqus
This guide is an introductory text designed to give new users guidance in analyzing solid, shell, beam,
and truss models with Abaqus/Standard and Abaqus/Explicit, and viewing the results in Abaqus/Viewer
or another postprocessor. You do not need any previous knowledge of Abaqus to benefit from this
guide, although some previous exposure to the finite element method is recommended. If you are
already familiar with the Abaqus solver products (Abaqus/Standard or Abaqus/Explicit) but would like
1–4
Abaqus ID:
Printed on:

GETTING STARTED WITH Abaqus
an introduction to the Abaqus/CAE interface, refer to the Getting Started with Abaqus: Interactive
Edition manual.
This document covers only stress/displacement simulations, concentrating on both linear and
nonlinear static analyses as well as dynamic analyses. Other types of simulations, such as heat transfer
and mass diffusion, are not covered.
1.2.1 How to use this guide
Each of the chapters in this guide introduces one or more topics relevant to using Abaqus/Standard
and Abaqus/Explicit. Throughout the manual the term Abaqus is used to refer collectively to both
Abaqus/Standard and Abaqus/Explicit; the individual product names are used when information applies
to only one product. Most chapters contain a short discussion of the topic or topics being considered and
one or two tutorial examples. You should work through the examples carefully since they contain a great
deal of practical advice on using Abaqus.
The capabilities of Abaqus/Standard and Abaqus/Explicit are introduced gradually in these
examples. You may create input files using a text editor; however, using an interactive pre-processor
facilitates model creation for these examples. Full versions of the input files that you create in each
example are in Appendix A, “Example Files.” If you have access to Abaqus/CAE, you can use the
companion manual, Getting Started with Abaqus: Interactive Edition, to perform all preprocessing and
analysis steps using detailed Abaqus/CAE tutorials.
This chapter is a short introduction to Abaqus and this guide. Chapter 2, “Abaqus Basics,” which is
centered around a simple example, covers the basics of using Abaqus. By the end of Chapter 2, “Abaqus
Basics,” you will know the fundamentals of how to prepare a model for an Abaqus simulation, check the
data, run the analysis job, and view the results.
Chapter 3, “Finite Elements and Rigid Bodies,” presents an overview of the main element families
available in Abaqus. The use of continuum (solid) elements, shell elements, and beam elements is
discussed in Chapter 4, “Using Continuum Elements”; Chapter 5, “Using Shell Elements”; andChapter 6,
“Using Beam Elements”; respectively.
Linear dynamic analyses are discussed in Chapter 7, “Linear Dynamics.” Chapter 8, “Nonlinearity,”
introduces the concept of nonlinearity in general, and geometric nonlinearity in particular, and contains
the first nonlinear Abaqus simulation. Nonlinear dynamic analyses are discussed in Chapter 9,
“Nonlinear Explicit Dynamics,” and material nonlinearity is introduced in Chapter 10, “Materials.”
Chapter 11, “Multiple Step Analysis,” introduces the concept of multistep simulations, and Chapter 12,
“Contact,” discusses the many issues that arise in contact analyses. Using Abaqus/Explicit to solve
quasi-static problems is presented in Chapter 13, “Quasi-Static Analysis with Abaqus/Explicit.”
The illustrative example is a sheet metal forming simulation, which requires importing between
Abaqus/Explicit and Abaqus/Standard to perform the forming and springback analyses efficiently.
1–5
Abaqus ID:
Printed on:

GETTING STARTED WITH Abaqus
1.2.2 Conventions used in this guideThis manual adheres to the following conventions:
Typographical conventions
Different text styles are used in the tutorial examples to indicate specific actions or identify items.
• Input in COURIER FONT should be typed into Abaqus/Viewer or your computer exactly as
shown. For example,
abaqus viewer
would be typed on your computer to run Abaqus/Viewer.
• Menu selections, tabs within dialog boxes, and labels of items on the screen in Abaqus/Viewer
are indicated in bold:
View→Graphics OptionsContour Plot Options
View orientation triad
By default, Abaqus/Viewer uses the alphabetical option, x�y�z, for labeling the view orientation
triad. In general, this manual adopts the numerical option, 1-2-3, to permit direct correspondence
with degree of freedom and output labeling.
1.2.3 Basic mouse actionsFigure 1–2 shows the mouse button orientation for a left-handed and a right-handed 3-button mouse.
right-handedmouse
left-handedmouse
12
3
1
23
Figure 1–2 Mouse buttons.
The following terms describe actions you perform using the mouse:
1–6
Abaqus ID:
Printed on:

Abaqus DOCUMENTATION
Click
Press and quickly release the mouse button. Unless otherwise specified, the instruction “click”
means that you should click mouse button 1.
Drag
Press and hold down mouse button 1 while moving the mouse.
Point
Move the mouse until the cursor is over the desired item.
Select
Point to an item and then click mouse button 1.
[Shift]+Click
Press and hold the [Shift] key, click mouse button 1, and then release the [Shift] key.
[Ctrl]+Click
Press and hold the [Ctrl] key, click mouse button 1, and then release the [Ctrl] key.
Abaqus/Viewer is designed for use with a 3-button mouse. Accordingly, this manual refers to mouse
buttons 1, 2, and 3 as shown in Figure 1–2. However, you can use Abaqus/Viewer with a 2-button mouse
as follows:
• The two mouse buttons are equivalent to mouse buttons 1 and 3 on a 3-button mouse.
• Pressing both mouse buttons simultaneously is equivalent to pressing mouse button 2 on a 3-button
mouse.
Tip: You are instructed to click mouse button 2 in procedures throughout this manual. Make
sure that you configure mouse button 2 (or the wheel button) to act as a middle button click.
1.3 Abaqus documentation
The documentation for Abaqus is extensive and complete. The following documentation and
publications are available from SIMULIA through the Abaqus online HTML documentation and in
PDF format. For more information on accessing the online HTML manuals, refer to the discussion of
execution procedures in the Abaqus Analysis User’s Manual. For more information on printing the
manuals, refer to “Printing from a PDF book,” Section 5.3 of Using Abaqus Online Documentation.
Abaqus Analysis User’s Manual
This manual contains a complete description of the elements, material models, procedures, input
specifications, etc. It is the basic manual for Abaqus/Standard, Abaqus/Explicit, and Abaqus/CFD;
and it provides both input file usage and Abaqus/CAE usage information. This guide regularly
refers to the Abaqus Analysis User’s Manual, so you should have it available as you work through
the examples.
1–7
Abaqus ID:
Printed on:

Abaqus DOCUMENTATION
Abaqus/CAE User’s Manual
This manual includes detailed descriptions of how to use Abaqus/CAE for model generation,
analysis, and results evaluation and visualization. Abaqus/Viewer users should refer to the
information on the Visualization module in this manual.
Using Abaqus Online Documentation
This manual contains instructions for navigating, viewing, and searching the Abaqus HTML and
PDF documentation. In addition, this manual explains how to use the PDF documentation to
produce a high quality printed copy and how to use the icon in all PDF books except the
Abaqus Scripting Reference Manual and the Abaqus GUI Toolkit Reference Manual to print a
selected section of a book.
Other Abaqus documentation:
Abaqus Example Problems Manual
This manual contains detailed examples designed to illustrate the approaches and decisions needed
to perform meaningful linear and nonlinear analysis. Many of the examples are worked with several
different element types, mesh densities, and other variations. Typical cases are large motion of an
elastic-plastic pipe hitting a rigid wall; inelastic buckling collapse of a thin-walled elbow; explosive
loading of an elastic, viscoplastic thin ring; consolidation under a footing; buckling of a composite
shell with a hole; and deep drawing of a metal sheet. It is generally useful to look for relevant
examples in this manual and to review them when embarking on a new class of problem.
When you want to use a feature that you have not used before, you should look up one or more
examples that use that feature. Then, use the example to familiarize yourself with the correct usage
of the capability. To find an example that uses a certain feature, search the online documentation or
use the abaqus findkeyword utility (see “Querying the keyword/problem database,” Section 3.2.11
of the Abaqus Analysis User’s Manual, for more information).
All the input files associated with the examples are provided as part of the Abaqus installation.
The abaqus fetch utility is used to extract sample Abaqus input files from the compressed archive
files provided with the release (see “Fetching sample input files,” Section 3.2.12 of the Abaqus
Analysis User’s Manual, for more information). You can fetch any of the example files so that you
can run the simulations yourself and review the results. You can also access the input files through
the hyperlinks in the Abaqus Example Problems Manual.
Abaqus Benchmarks Manual
This manual contains benchmark problems and analyses used to evaluate the performance of
Abaqus; the tests are multiple element tests of simple geometries or simplified versions of real
problems. The NAFEMS benchmark problems are included in this manual.
1–8
Abaqus ID:
Printed on:

Abaqus DOCUMENTATION
Abaqus Verification Manual
This manual contains basic test cases, providing verification of each individual program feature
(procedures, output options, MPCs, etc.) against exact calculations and other published results. It
may be useful to run these problems when learning to use a new capability. In addition, the supplied
input data files provide good starting points to check the behavior of elements, materials, etc.
Abaqus Theory Manual
This manual contains detailed, precise discussions of all theoretical aspects of Abaqus. It is written
to be understood by users with an engineering background.
Abaqus Keywords Reference Manual
This manual contains a complete description of all the input options that are available in
Abaqus/Standard and Abaqus/Explicit.
Abaqus User Subroutines Reference Manual
This manual contains a complete description of all the user subroutines available for use in Abaqus
analyses. It also discusses the utility routines that can be used when writing user subroutines.
Abaqus Glossary
This manual defines technical terms as they apply to the Abaqus Unified FEA Product Suite.
Abaqus Release Notes
This manual contains brief descriptions of the new features available in the latest release of the
Abaqus product line.
Abaqus Installation and Licensing Guide
This manual describes how to install Abaqus and how to configure the installation for particular
circumstances. Some of this information, of most relevance to users, is also provided in the
Abaqus Analysis User’s Manual.
In addition to the documentation listed above, the following manuals are available for Abaqus
interfaces and custom programming techniques not discussed in this guide:
• Abaqus Interface for Moldflow User’s Manual
• Abaqus Interface for MSC.ADAMS User’s Manual
• Abaqus Scripting User’s Manual
• Abaqus Scripting Reference Manual
• Abaqus GUI Toolkit User’s Manual
• Abaqus GUI Toolkit Reference Manual
SIMULIA also provides documentation for all of the geometry translators described in “The Abaqus
products,” Section 1.1.
1–9
Abaqus ID:
Printed on:

GETTING HELP
Additional publications available from SIMULIA:
Quality Assurance Plan
This document describes the QA procedures followed by SIMULIA. It is a controlled document,
provided to customers who subscribe to either the Nuclear QA Program or the Quality Monitoring
Service.
Lecture Notes
These notes are available on many topics to which Abaqus is applied. They are used in the technical
seminars that are presented to help users improve their understanding and usage of Abaqus. While
not intended as stand-alone tutorial material, they are sufficiently comprehensive that they can
usually be used in that mode. The list of available lecture notes is included in the Documentation
Price List or can be found on the Products page at www.simulia.com.
Abaqus online resources
SIMULIA has a home page on the World Wide Web (www.simulia.com), containing a variety of
useful information about the Abaqus suite of programs, including:
• Frequently asked questions
• Abaqus systems information and machine requirements
• Benchmark timing documents
• Error status reports
• Abaqus documentation price list
• Training seminar schedule
• Newsletters
1.4 Getting help
You may want to read additional information about Abaqus/Viewer features at various points during the
tutorials. The context-sensitive help system allows you to locate relevant information quickly and easily.
Context-sensitive help is available for every item in the main window and in all dialog boxes.
1–10
Abaqus ID:
Printed on:

GETTING HELP
Note:
• On Windows platforms, the help system uses your default web browser to display the online
documentation.
• On UNIX and Linux platforms, the help system searches the system path for Firefox. If the help
system cannot find Firefox, an error is displayed.
The browser_type and browser_path variables can be set in the environment file to modify
this behavior. For more information, see “System customization parameters,” Section 4.1.4 of the
Abaqus Installation and Licensing Guide.
To obtain context-sensitive help:
1. From the main menu bar, select Help→On Context.
Tip: You can also click the help tool to access context-sensitive help.
The cursor changes to a question mark.
2. Click any part of the main window except its frame.
A help window appears in your browser window. The help window displays information about the
item you selected.
3. Scroll to the bottom of the help window.
At the bottom of the window, a list of blue, underlined items appears. These items are links to the
Abaqus/CAE User’s Manual, which includes all Abaqus/Viewer help topics.
4. Click any one of the items.
A book window appears in your default web browser. The window is arranged into four frames as
follows:
• The Abaqus/CAE User’s Manual appears in a text frame on the right side of the window. The
manual is turned to the item that you selected.
• An expandable table of contents is available on the lower left side of the window for easy
navigation throughout the book.
• The table of contents control tools in the upper left frame allow you to vary the level of detail
displayed in the table of contents frame or to change the size of the frame. Click to expand
several levels in the table of contents of an online book. Click to collapse all expanded
sections in the table of contents. Click and , respectively, to widen or narrow the table
of contents frame.
• The navigation frame at the top of the book window allows you to select another book from
the entire Abaqus documentation collection. The navigation frame also allows you to search
the entire manual.
1–11
Abaqus ID:
Printed on:

SUPPORT
5. Click any item in the table of contents.
The text frame changes to reflect the item you selected.
6. Click the icon to the left of a topic heading to expand it.
The headings of the subtopics appear under the topic heading, and the sign changes to , indicating
that the section is expanded. If appears beside a subsection, there are no further levels within that
section to expand. To collapse an expanded section of the table of contents, click next to the
topic heading.
7. In the search panel in the navigation frame, type any word that appears in the text frame on the right
and click Search.
When the search is complete, the table of contents frame displays the number of hits next to each
topic heading and all hits become highlighted in the text frame. Click Next Match or PreviousMatch in the navigation frame to move through the document from one hit to the next.
You can enter a single word or a phrase in the search panel, and you can use the [*] character as
a wildcard. For detailed instructions on using the search capabilities of the online documentation,
see Using Abaqus Online Documentation.
8. Close the web browser windows.
1.5 Support
SIMULIA offers both technical (engineering) support and systems support for Abaqus. Technical and
systems support are provided through the nearest local support office. We regard technical support as an
important part of the service we offer and encourage you to contact us with any questions or concerns
that you have about your Abaqus analyses. You can contact our offices by telephone, fax, electronic mail,
or regular mail. Information on how to contact each office is listed in the front of each Abaqus manual.
Support is also available on the World Wide Web for your convenience. The SIMULIA Online Support
System is accessible through the My Support page at www.simulia.com. When contacting your local
support office, please specify whether you would like technical support (you have encountered problems
performing an Abaqus analysis) or systems support (Abaqus will not install correctly, licensing does not
work correctly, or other hardware-related issues have arisen).
We welcome any suggestions for improvements to the support program or documentation. We
will ensure that any enhancement requests you make are considered for future releases. If you wish
to file a complaint about the service or products provided by SIMULIA, refer to the Support page at
www.simulia.com.
1–12
Abaqus ID:
Printed on:

SUPPORT
1.5.1 Technical support
SIMULIA technical support engineers can assist in clarifying Abaqus features and checking errors by
giving both general information on using Abaqus and information on its application to specific analyses.
If you have concerns about an analysis, we suggest that you contact us at an early stage, since it is usually
easier to solve problems at the beginning of a project rather than trying to correct an analysis at the end.
Please have the following information ready before calling the technical support hotline, and include
it in any written contacts:
• The release of Abaqus that are you using.
– The release numbers for Abaqus/Standard, Abaqus/Explicit, and Abaqus/CFD are given at the
top of the data (.dat) file.
– The release numbers for the Abaqus Interface for Moldflow and the Abaqus Interface for
MSC.ADAMS are output to the screen.
• The type of computer on which you are running Abaqus.
• The symptoms of any problems, including the exact error messages, if any.
• Workarounds or tests that you have already tried.
For support about a specific problem, any available Abaqus output files may be helpful in answering
questions that the support engineer may ask you.
The support engineer will try to diagnose your problem from the model description and a description
of the difficulties you are having. Frequently, the support engineer will need model sketches, which can
be e-mailed, faxed, or sent in the mail. Plots of the final results or the results near the point that the
analysis terminated may also be needed to understand what may have caused the problem.
If the support engineer cannot diagnose your problem from this information, you may be asked
to send the input data. The data can be sent by means of e-mail, ftp, CD, or DVD. It may also be
attached to a support incident in the SIMULIA Online Support System. Please check the Support pageat www.simulia.com for the media formats that are currently accepted.
All support incidents are tracked in the SIMULIA Online Support System. This tracking enables
you (as well as the support engineer) to monitor the progress of a particular problem and to check that
we are resolving support issues efficiently. To use the SIMULIA Online Support System, you need to
register with the system. Visit the My Support page at www.simulia.com for instructions on how to
register. If you are contacting us to discuss an existing support problem and you know the incident
number, please mention it so that we can consult the database to see what the latest action has been and,
thus, avoid duplication of effort. In addition, please give the receptionist the support engineer’s name or
include it at the top of any e-mail correspondence.
1–13
Abaqus ID:
Printed on:

A QUICK REVIEW OF THE FINITE ELEMENT METHOD
1.5.2 Systems supportAbaqus systems support engineers can help you resolve issues related to the installation and running of
Abaqus, including licensing difficulties, that are not covered by technical support.
You should install Abaqus by carefully following the instructions in the Abaqus Installation and
Licensing Guide. If you encounter problems with the installation or licensing, first review the instructions
in the Abaqus Installation and Licensing Guide to ensure that they have been followed correctly. If this
method does not resolve the problems, consult the SIMULIA Answers database in the SIMULIA Online
Support System for information about known installation problems. If this method does not address your
situation, please contact your local support office. Send whatever information is available to define the
problem: error messages from an aborted analysis or a detailed explanation of the problems encountered.
Whenever possible, please send the output from the abaqus info=support command.
1.5.3 Support for academic institutionsUnder the terms of the Academic License Agreement, we do not provide support to users at academic
institutions unless the institution has also purchased technical support. Please contact us for more
information.
1.6 A quick review of the finite element method
This section reviews the basics of the finite element method. The first step of any finite element simulation
is to discretize the actual geometry of the structure using a collection of finite elements. Each finite
element represents a discrete portion of the physical structure. The finite elements are joined by shared
nodes. The collection of nodes and finite elements is called themesh. The number of elements per unit of
length, area, or in a mesh is referred to as the mesh density. In a stress analysis the displacements of the
nodes are the fundamental variables that Abaqus calculates. Once the nodal displacements are known,
the stresses and strains in each finite element can be determined easily.
1.6.1 Obtaining nodal displacements using implicit methodsA simple example of a truss, constrained at one end and loaded at the other end as shown in Figure 1–3,
is used to introduce some terms and conventions used in this document. The objective of the analysis is
to find the displacement of the free end of the truss, the stress in the truss, and the reaction force at the
constrained end of the truss.
In this case the rod shown in Figure 1–3 will be modeled with two truss elements. In Abaqus truss
elements can carry axial loads only. The discretized model is shown in Figure 1–4 together with the node
and element labels.
1–14
Abaqus ID:
Printed on:

A QUICK REVIEW OF THE FINITE ELEMENT METHOD
Figure 1–3 Truss problem.
Node a
Node b
Node c
Element 1
Element 2
Figure 1–4 Discretized model of the truss problem.
Free-body diagrams for each node in the model are shown in Figure 1–5. In general each node will
carry an external load applied to the model, P, and internal loads, I, caused by stresses in the elements
attached to that node. For a model to be in static equilibrium, the net force acting on each node must be
zero; i.e., the internal and external loads at each nodemust balance each other. For node a this equilibrium
equation can be obtained as follows.
Pa
Node b
Node a
Node c
PcPb
I 1
Ib1 Ib
2
Ic2
a
Figure 1–5 Free-body diagram for each node.
Assuming that the change in length of the rod is small, the strain in element 1 is given by
1–15
Abaqus ID:
Printed on:

A QUICK REVIEW OF THE FINITE ELEMENT METHOD
where and are the displacements at nodes a and b, respectively, and L is the original length of the
element.
Assuming that the material is elastic, the stress in the rod is given by the strain multiplied by the
Young’s modulus, E:
The axial force acting on the end node is equivalent to the stress in the rod multiplied by its cross-
sectional area, A. Thus, a relationship between internal force, material properties, and displacements is
obtained:
Equilibrium at node a can, therefore, be written as
Equilibrium at node b must take into account the internal forces acting from both elements joined
at that node. The internal force from element 1 is now acting in the opposite direction and so becomes
negative. The resulting equation is
For node c the equilibrium equation is
For implicit methods, the equilibrium equations need to be solved simultaneously to obtain the
displacements of all the nodes. This requirement is best achieved by matrix techniques; therefore, write
the internal and external force contributions as matrices. If the properties and dimensions of the two
elements are the same, the equilibrium equations can be simplified as follows:
In general, it may be that the element stiffnesses, the terms, are different from element to
element; therefore, write the element stiffnesses as and for the two elements in the model. We are
interested in obtaining the solution to the equilibrium equation in which the externally applied forces, P,
are in equilibrium with the internally generated forces, I. When discussing this equation with reference
to convergence and nonlinearity, we write it as
1–16
Abaqus ID:
Printed on:

A QUICK REVIEW OF THE FINITE ELEMENT METHOD
For the complete two-element, three-node structure we, therefore, modify the signs and rewrite the
equilibrium equation as
In an implicit method, such as that used in Abaqus/Standard, this system of equations can then be solved
to obtain values for the three unknown variables: , , and ( is specified in the problem as 0.0).
Once the displacements are known, we can go back and use them to calculate the stresses in the truss
elements. Implicit finite element methods require that a system of equations is solved at the end of each
solution increment.
In contrast to implicit methods, an explicit method, such as that used in Abaqus/Explicit, does not
require the solving of a simultaneous system of equations or the calculation of a global stiffness matrix.
Instead, the solution is advanced kinematically from one increment to the next. The extension of the
finite element method to explicit dynamics is covered in the following section.
1.6.2 Stress wave propagation illustratedThis section attempts to provide some conceptual understanding of how forces propagate through amodel
when using the explicit dynamics method. In this illustrative example we consider the propagation of a
stress wave along a rod modeled with three elements, as shown in Figure 1–6. We will study the state of
the rod as we increment through time.
P1 2 3 41 2 3
l ll
Figure 1–6 Initial configuration of a rod with a concentrated load, , at the free end.
In the first time increment node 1 has an acceleration, , as a result of the concentrated force, ,
applied to it. The acceleration causes node 1 to have a velocity, , which, in turn, causes a strain rate,
, in element 1. The increment of strain, , in element 1 is obtained by integrating the strain rate
through the time of increment 1. The total strain, , is the sum of the initial strain, , and the increment
in strain. In this case the initial strain is zero. Once the element strain has been calculated, the element
1–17
Abaqus ID:
Printed on:

A QUICK REVIEW OF THE FINITE ELEMENT METHOD
stress, , is obtained by applying the material constitutive model. For a linear elastic material the
stress is simply the elastic modulus times the total strain. This process is shown in Figure 1–7. Nodes 2
and 3 do not move in the first increment since no force is applied to them.
–
P1 2 3 41 2 3
u1PM1------- u1⇒ u1 td∫ el1⇒
u1l
----- el1⇒ el1 t
⇒ el1
d∫
el1+ el1⇒ E el1
= = = =
= =o
Figure 1–7 Configuration at the end of increment 1 of a rod
with a concentrated load, , at the free end.
In the second increment the stresses in element 1 apply internal, element forces to the nodes
associated with element 1, as shown in Figure 1–8. These element stresses are then used to calculate
dynamic equilibrium at nodes 1 and 2.
P1 2 3 41 2 3
Iel1 = el1A
u1P I el1–M1
------------------- u1⇒ u1old u1 t
u2
d∫+
Iel1M2---------- u2⇒ u2 td∫
= =
= =
el1u2 u1–
l---------------- el1⇒ el1 t
el1⇒
d∫el1
el1⇒
+
E el1
= =
=
=
el1old
Figure 1–8 Configuration of the rod at the beginning of increment 2.
The process continues so that at the start of the third increment there are stresses in both elements
1 and 2, and there are forces at nodes 1, 2, and 3, as shown in Figure 1–9. The process continues until
the analysis reaches the desired total time.
1–18
Abaqus ID:
Printed on:

A QUICK REVIEW OF THE FINITE ELEMENT METHOD
P1 2 3 41 2 3
Iel1 I
el2
Figure 1–9 Configuration of the rod at the beginning of increment 3.
1–19
Abaqus ID:
Printed on:


Abaqus BASICS
2. Abaqus Basics
A complete Abaqus analysis usually consists of three distinct stages: preprocessing, simulation, and
postprocessing. These three stages are linked together by files as shown below:
Output files:job.odb, job.dat,job.res, job.fil
Preprocessing
Input file:job.inp
Simulation
Postprocessing
or
Abaqus/CAE or other software
Abaqus/Standard
Abaqus/CAE or other software
Abaqus/Explicit
Preprocessing (Abaqus/CAE)
In this stage you must define the model of the physical problem and create an Abaqus input file.
The model is usually created graphically using Abaqus/CAE or another preprocessor, although the
Abaqus input file for a simple analysis can be created directly using a text editor.
Simulation (Abaqus/Standard or Abaqus/Explicit)
The simulation, which normally is run as a background process, is the stage in which
Abaqus/Standard or Abaqus/Explicit solves the numerical problem defined in the model. Examples
of output from a stress analysis include displacements and stresses that are stored in binary files
ready for postprocessing. Depending on the complexity of the problem being analyzed and the
power of the computer being used, it may take anywhere from seconds to days to complete an
analysis run.
2–1
Abaqus ID:
Printed on:

COMPONENTS OF AN Abaqus ANALYSIS MODEL
Postprocessing (Abaqus/Viewer)
You can evaluate the results once the simulation has been completed and the displacements, stresses,
or other fundamental variables have been calculated. The evaluation is generally done interactively
using Abaqus/Viewer or another postprocessor. Abaqus/Viewer, which reads the neutral binary
output database file, has a variety of options for displaying the results, including color contour plots,
animations, deformed shape plots, and X–Y plots.
2.1 Components of an Abaqus analysis model
An Abaqus model is composed of several different components that together describe the physical
problem to be analyzed and the results to be obtained. At a minimum the analysis model consists of
the following information: discretized geometry, element section properties, material data, loads and
boundary conditions, analysis type, and output requests.
Discretized geometry
Finite elements and nodes define the basic geometry of the physical structure being modeled in
Abaqus. Each element in the model represents a discrete portion of the physical structure, which
is, in turn, represented by many interconnected elements. Elements are connected to one another
by shared nodes. The coordinates of the nodes and the connectivity of the elements—that is, which
nodes belong to which elements—comprise the model geometry. The collection of all the elements
and nodes in a model is called the mesh. Generally, the mesh will be only an approximation of the
actual geometry of the structure.
The element type, shape, and location, as well as the overall number of elements used in the
mesh, affect the results obtained from a simulation. The greater the mesh density (i.e., the greater
the number of elements in the mesh), the more accurate the results. As the mesh density increases,
the analysis results converge to a unique solution, and the computer time required for the analysis
increases. The solution obtained from the numerical model is generally an approximation to the
solution of the physical problem being simulated. The extent of the approximations made in the
model’s geometry, material behavior, boundary conditions, and loading determines how well the
numerical simulation matches the physical problem.
Element section properties
Abaqus has a wide range of elements, many of which have geometry not defined completely by
the coordinates of their nodes. For example, the layers of a composite shell or the dimensions of
an I-beam section are not defined by the nodes of the element. Such additional geometric data
are defined as physical properties of the element and are necessary to define the model geometry
completely (see Chapter 3, “Finite Elements and Rigid Bodies”).
2–2
Abaqus ID:
Printed on:

COMPONENTS OF AN Abaqus ANALYSIS MODEL
Material data
Material properties for all elements must be specified. While high-quality material data are often
difficult to obtain, particularly for the more complex material models, the validity of the Abaqus
results is limited by the accuracy and extent of the material data.
Loads and boundary conditions
Loads distort the physical structure and, thus, create stress in it. The most common forms of loading
include:
• point loads;
• pressure loads on surfaces;
• distributed tractions on surfaces;
• distributed edge loads and moments on shell edges;
• body forces, such as the force of gravity; and
• thermal loads.
Boundary conditions are used to constrain portions of the model to remain fixed (zero
displacements) or to move by a prescribed amount (nonzero displacements).
In a static analysis enough boundary conditions must be used to prevent the model frommoving
as a rigid body in any direction; otherwise, unrestrained rigid bodymotion causes the stiffness matrix
to be singular. A solver problem will occur during the solution stage and may cause the simulation
to stop prematurely. Abaqus/Standard will issue a warning message if it detects a solver problem
during a simulation. It is important that you learn to interpret such error messages. If you see a
“numerical singularity” or “zero pivot” warning message during a static stress analysis, you should
check whether all or part of your model lacks constraints against rigid body translations or rotations.
Rigid body motions can consist of both translations and rotations of the components. The potential
rigid body motions depend on the dimensionality of the model.
Dimensionality Possible Rigid Body Motion
Three-dimensional Translation in the 1-, 2-, and 3-directions.
Rotation about the 1-, 2-, and 3-axes.
Axisymmetric Translation in the 2-direction.
Rotation about the 3-axis (axisymmetric rigid bodies only).
Plane stress Translation in the 1- and 2-directions.
Plane strain Rotation about the 3-axis.
By default, the 1-, 2-, and 3-directions are aligned with the axes of a global Cartesian coordinate
system (discussed later).
2–3
Abaqus ID:
Printed on:

FORMAT OF THE INPUT FILE
In a dynamic analysis inertia forces prevent the model from undergoing infinite motion
instantaneously as long as all separate parts in the model have some mass; therefore, solver
problem warnings in a dynamic analysis usually indicate some other modeling problem, such as
excessive plasticity.
Analysis type
Abaqus can carry out many different types of simulations, but this guide only covers the two most
common: static and dynamic stress analyses.
In a static analysis the long-term response of the structure to the applied loads is obtained.
In other cases the dynamic response of a structure to the loads may be of interest: for example,
the effect of a sudden load on a component, such as occurs during an impact, or the response of a
building in an earthquake.
Output requests
An Abaqus simulation can generate a large amount of output. To avoid using excessive disk space,
you can limit the output to that required for interpreting the results.
2.2 Format of the input file
The input file is the means of communication between the preprocessor, usually Abaqus/CAE, and
the analysis product, Abaqus/Standard or Abaqus/Explicit. It contains a complete description of the
numerical model. The input file is a text file that has an intuitive, keyword-based format, so it is easy
to modify using a text editor if necessary; if a preprocessor such as Abaqus/CAE is used, modifications
should be made using it. Indeed, small analyses can be specified easily by typing the input file directly.
The example of an overhead hoist, shown in Figure 2–1, is used to illustrate the basic format of
the Abaqus input file. The hoist is a simple, pin-jointed beam and truss model that is constrained at the
left-hand end and mounted on rollers at the right-hand end. The members can rotate freely at the joints.
The frame is prevented from moving out of plane. A simulation is performed to determine the structure’s
deflection and the peak stress in its members when a 10 kN load is applied as shown in Figure 2–1.
Since this problem is very simple, the Abaqus input file is compact and easily understood. The
complete Abaqus input file for this example, which is shown in Figure 2–2 and also in “Overhead hoist
frame,” Section A.1, is split into two distinct parts. The first section contains model data and includes
all the information required to define the structure being analyzed. The second section contains history
data that define what happens to the model: the sequence of loading or events for which the response of
the structure is required. This history is divided into a sequence of steps, each defining a separate part of
the simulation. For example, the first step may define a static loading while the second step may define
a dynamic loading, etc.
The input file is composed of a number of option blocks that contain data describing a part of the
model. Each option block begins with a keyword line, which is usually followed by one or more data
lines. These lines cannot exceed 256 characters.
2–4
Abaqus ID:
Printed on:

FORMAT OF THE INPUT FILE
1 m
1 m
1 m 1 m
1 m
10,000 N
All members arecircular steel rods,5 mm in diameter.
Material propertiesGeneral properties:
Elastic properties:ρ 7800 kg/m
3=
E 200 109
Pa×=
ν 0.3=
Figure 2–1 Schematic of an overhead hoist.
2.2.1 Keyword linesKeywords (or options) always begin with a star or asterisk (*). For example, *NODE is the keyword
for specifying the nodal coordinates, and *ELEMENT is the keyword for specifying the element
connectivity. Keywords are often followed by parameters, some of which may be required. The
parameter TYPE is required with the *ELEMENT option because the element type must always be
given when defining elements. For example, the following statement indicates that we are defining the
connectivity of T2D2 elements (two-dimensional truss elements with two nodes):
*ELEMENT, TYPE=T2D2
Many parameters are optional and are defined only in certain circumstances. For example, the following
statement indicates that all the nodes defined in this option block will be put into a set called PART1.
*NODE, NSET=PART1
It is not essential to put nodes into sets, although it is convenient in many instances.
2–5
Abaqus ID:
Printed on:

FORMAT OF THE INPUT FILE
Model data
History data
Keyword line
Data linesOptionblock
Comment
*HEADINGTwo-dimensional overhead hoist frameSI Units1-axis horizontal, 2-axis vertical*PREPRINT, ECHO=YES, MODEL=YES, HISTORY=YES**** Model definition***NODE101, 0., 0., 0.102, 1., 0., 0.103, 2., 0., 0.104, 0.5, 0.866, 0.105, 1.5, 0.866, 0.*ELEMENT, TYPE=T2D2, ELSET=FRAME11, 101,10212, 102,10313, 101,10414, 102,10415, 102,10516, 103,10517, 104,105*SOLID SECTION, ELSET=FRAME, MATERIAL=STEEL1.963E-5,*MATERIAL, NAME=STEEL*ELASTIC200.E9, 0.3**** History data***STEP, PERTURBATION10kN central load*STATIC*BOUNDARY101, ENCASTRE103, 2*CLOAD102, 2, -10.E3*NODE PRINTU,RF,*EL PRINTS,*END STEP
Figure 2–2 Input for overhead hoist model.
2–6
Abaqus ID:
Printed on:

FORMAT OF THE INPUT FILE
Keywords and parameters are case independent and must use enough characters to make them
unique. Parameters are separated by commas. If a parameter has a value, an equal sign (=) is used
to associate the value with the parameter.
Occasionally, so many parameters are required that they will not fit on a single 256-character line.
In this case a comma is placed at the end of the line to indicate that the next line is a continuation line.
For example, the following keyword and parameters are a valid keyword line:
*ELEMENT, TYPE = T2D2,ELSET = FRAME
Details of the keywords are documented in the Abaqus Keywords Reference Manual.
2.2.2 Data lines
Keyword lines are usually followed by data lines, which provide data that are more easily specified
as lists than as parameters on the keyword line. Examples of such data include nodal coordinates;
element connectivities; or tables of material properties, such as stress-strain curves. The data required
for particular option blocks are specified in the Abaqus Keywords Reference Manual. For example, the
option block defining the nodes for the overhead hoist model is:
*NODE101, 0., 0., 0.102, 1., 0., 0.103, 2., 0., 0.104, 0.5, 0.866, 0.105, 1.5, 0.866, 0.
The first piece of data in each data line is an integer that defines the node number. The second, third,
and fourth entries are floating-point numbers that specify the , , coordinates of the node.
The data can consist of a mixture of integer, floating point, or alphanumeric values. Floating point
values can be entered in a variety of ways; for example, Abaqus interprets all of the following as the
number four:
4.0 4. 4
4.0E+0 .4E+1 40.E−1
Data items are separated by commas, as in Figure 2–2, which allows fairly arbitrary spacing of the
input values on the data line. If there is only one item on a data line, it must be followed by a comma.
2–7
Abaqus ID:
Printed on:

EXAMPLE: CREATING A MODEL OF AN OVERHEAD HOIST
2.3 Example: creating a model of an overhead hoist
The simulation of the pin-jointed, overhead hoist in Figure 2–1 is used to illustrate the creation of an
Abaqus input file using an editor. As you read through this section, you should type the data into a file
using one of the editors available on your computer. The Abaqus input file must have an .inp file
extension. For convenience, name the input file frame.inp. The file identifier, which can be chosen
to identify the analysis, is called the jobname. In this case use the jobname “frame” to associate it easily
with the input file called frame.inp.All of the other examples in this guide assume that you will be using a preprocessor, such as
Abaqus/CAE, to generate the mesh if you are going to create the model from scratch. Input files for
all the examples are available. See Appendix A, “Example Files,” for instructions on how to retrieve
these input files. However, since the purpose of this example is to help you understand the structure and
format of the Abaqus input file, you should type this input file in directly, rather than use a preprocessor
or copy the input file that is provided. If you wish to create the entire model using Abaqus/CAE, refer
to “Example: creating a model of an overhead hoist,” Section 2.3 of Getting Started with Abaqus:
Interactive Edition.
2.3.1 Units
Before starting to define this or anymodel, you need to decide which system of units you will use. Abaqus
has no built-in system of units. Do not include unit names or labels when entering data in Abaqus. All
input data must be specified in consistent units. Some common systems of consistent units are shown in
Table 2–1.
Table 2–1 Consistent units.
Quantity SI SI (mm) US Unit (ft) US Unit (inch)
Length m mm ft in
Force N N lbf lbf
Mass kg tonne (103 kg) slug lbf s2 /in
Time s s s s
Stress Pa (N/m2) MPa (N/mm2 ) lbf/ft2 psi (lbf/in2 )
Energy J mJ (10−3 J) ft lbf in lbf
Density kg/m3 tonne/mm3 slug/ft3 lbf s2 /in4
2–8
Abaqus ID:
Printed on:

EXAMPLE: CREATING A MODEL OF AN OVERHEAD HOIST
The SI system of units is used throughout this guide. Users working in the systems labeled “US
Unit” should be careful with the units of density; often the densities given in handbooks of material
properties are multiplied by the acceleration due to gravity.
2.3.2 Coordinate systems
You also need to decide which coordinate system to use. The global coordinate system in Abaqus
is a right-handed, rectangular (Cartesian) system. For this example define the global 1-axis to be the
horizontal axis of the hoist and the global 2-axis to be the vertical axis (Figure 2–3). The global 3-axis
is normal to the plane of the framework. The origin ( =0, =0, =0) is the bottom left-hand corner
of the frame.
1
2
Origin(x1 = 0, x2 = 0)
Figure 2–3 Coordinate system and origin for model.
For two-dimensional problems, such as this one, Abaqus requires that the model lie in a plane
parallel to the global 1–2 plane.
2.3.3 Mesh
You must select the element types and design the mesh. Creating a proper mesh for a given problem
requires experience. For this example you will use a single truss element to model each member of the
frame, as shown in Figure 2–4.
2–9
Abaqus ID:
Printed on:

EXAMPLE: CREATING A MODEL OF AN OVERHEAD HOIST
Nodes
Trusselements
Figure 2–4 Finite element mesh.
A truss element, which can carry only tensile and compressive axial loads, is ideal for modeling
pin-jointed frameworks, such as the overhead hoist. Truss elements are described in “Truss elements,”
Section 3.1.5, and also in the Abaqus Analysis User’s Manual, which describes every element available
in Abaqus. The index of element types (Section EI.1, “Abaqus/Standard Element Index,” of the Abaqus
Analysis User’s Manual) makes locating a particular element easy. Whenever you are using an element
for the first time, you should read the description, which includes the element connectivity and any
element section properties needed to define the element’s geometry.
The connectivity for the truss elements used in the overhead hoist model is shown in Figure 2–5.
2
1
Figure 2–5 Connectivity for the 2-node truss element (T2D2).
Node and element numbers are merely identification labels. They are usually generated
automatically by Abaqus/CAE or another preprocessor. The only requirement for node and element
numbers is that they must be positive integers. Gaps in the numbering are allowed, and the order in
which nodes and elements are defined does not matter. Any nodes that are defined but not associated
with an element are removed automatically and are not included in the simulation.
In this case we use the node and element numbers shown in Figure 2–6.
2–10
Abaqus ID:
Printed on:

EXAMPLE: CREATING A MODEL OF AN OVERHEAD HOIST
104 105
101 102 103
13 14
1211
15 16
17
Figure 2–6 Node and element numbers for the hoist model.
2.3.4 Model dataThe first part of the input file must contain all of the model data. These data define the structure being
analyzed. In the overhead hoist example the model data consist of the following:
• Geometry:
– Nodal coordinates.
– Element connectivity.
– Element section properties.
• Material properties.
Heading
The first option in any Abaqus input file must be *HEADING. The data lines that follow the
*HEADING option are lines of text describing the problem being simulated. You should provide
an accurate description to allow the input file to be identified at a later date. Moreover, it is often
helpful to specify the system of units, directions of the global coordinate system, etc. For example,
the *HEADING option block for the hoist problem contains the following:
*HEADINGTwo-dimensional overhead hoist frameSI units (kg, m, s, N)1-axis horizontal, 2-axis vertical
Data file printing options
By default, Abaqus will not print an echo of the input file or the model and history definition data to
the printed output (.dat) file. However, it is recommended that you check your model and history
2–11
Abaqus ID:
Printed on:

EXAMPLE: CREATING A MODEL OF AN OVERHEAD HOIST
definition in a datacheck run before performing the analysis. The datacheck run is discussed later
in this chapter.
To request a printout of the input file and of the model and history definition data, add the
following statement to the input file:
*PREPRINT, ECHO=YES, MODEL=YES, HISTORY=YES
Nodal coordinates
The coordinates of each node can be defined once you select the mesh design and node numbering
scheme. For this problem use the numbering shown in Figure 2–6. The coordinates of nodes are
defined using the *NODE option. Each data line of this option block has the form
<node number>,< -coordinate>,< -coordinate>,< -coordinate>
The nodes for the hoist model are defined as follows:
*NODE101, 0., 0., 0.102, 1., 0., 0.103, 2., 0., 0.104, 0.5, 0.866, 0.105, 1.5, 0.866, 0.
Element connectivity
The members of the overhead hoist are modeled with truss elements. The format of each data line
for a truss element is
<element number>, <node 1>, <node 2>
where node 1 and node 2 are at the ends of the element (see Figure 2–5). For example, element 16
connects nodes 103 and 105 (see Figure 2–6), so the data line defining this element is
16, 103, 105
The TYPE parameter on the *ELEMENT option must be used to specify the kind of element being
defined. In this case you will use T2D2 truss elements.
One of the most useful features in Abaqus is the availability of node and element sets that are
referred to by name. By using the ELSET parameter on the *ELEMENT option, all of the elements
defined in the option block are added to an element set called FRAME. A set name can have as many
as 80 characters and must start with a letter. Since element section properties are assigned through
element set names, all elements in the model must belong to at least one element set.
The complete *ELEMENT option block for the overhead hoist model (see Figure 2–6) is shown
below:
*ELEMENT, TYPE=T2D2, ELSET=FRAME11, 101, 102
2–12
Abaqus ID:
Printed on:

EXAMPLE: CREATING A MODEL OF AN OVERHEAD HOIST
12, 102, 10313, 101, 10414, 102, 10415, 102, 10516, 103, 10517, 104, 105
Element section properties
Each element must refer to an element section property. The appropriate element section option for
each element and the additional geometric data (if any) needed for each element are described in
the Abaqus Analysis User’s Manual.
For the T2D2 element you must use the *SOLID SECTION option and give one data line with
the cross-sectional area of the element. If you leave the data line blank, the cross-sectional area is
assumed to be 1.0.
In this case all the members are circular bars that are 5 mm in diameter. Their cross-sectional
area is 1.963 × 10⁻⁵ m2 .
The MATERIAL parameter, which is required for most element section options, refers to the
name of a material property definition that is to be used with the elements. The name can have up
to 80 characters and must begin with a letter.
In this example all of the elements have the same section properties and are made of the same
material. Typically, there will be several different element section properties in an analysis; for
example, different components in a model may be made of different materials. The elements are
associated with material properties through element sets. For the overhead hoist model the elements
are added to an element set called FRAME. Element set FRAME is then used as the value of the
ELSET parameter on the element section option. Add the following option block to your input file:
*SOLID SECTION, ELSET=FRAME, MATERIAL=STEEL** diameter = 5mm --> area = 1.963E-5 sq. m.1.963E-5,
Any line in the input file that beginswith ∗∗ is treated as a comment.
Cross-sectional area of truss elements.
Materials
One of the features that makes Abaqus a truly general-purpose finite element program is that almost
any material model can be used with any element. Once the mesh has been created, material models
can be associated, as appropriate, with the elements in the mesh.
Abaqus has a large number of material models, many of which include nonlinear behavior.
In this overhead hoist example we use the simplest form of material behavior: linear elasticity.
In Chapter 10, “Materials,” two of the most common forms of nonlinear material behavior are
considered: metal plasticity and rubber elasticity. A discussion of all the material models available
in Abaqus can be found in the Abaqus Analysis User’s Manual.
2–13
Abaqus ID:
Printed on:

EXAMPLE: CREATING A MODEL OF AN OVERHEAD HOIST
Linear elasticity is appropriate for many materials at small strains, particularly for metals up
to their yield point. It is characterized by a linear relationship between stress and strain (Hooke’s
law), as shown in Figure 2–7.
Stress
Strain
Young’s modulus, E
Figure 2–7 Linear elastic material.
The material behavior is characterized by two constants: Young’s modulus, E, and Poisson’s
ratio, .
A material definition in the Abaqus input file starts with a *MATERIAL option. The parameter
NAME is used to associate a material with an element section property. For example,
*SOLID SECTION, ELSET=FRAME, MATERIAL=STEEL1.963E-5*MATERIAL, NAME=STEEL
Material suboptions directly follow their associated *MATERIAL option. Several suboptions
may be required to complete the material definition. All material suboptions are associated with the
material that is listed on the most recent *MATERIAL option until another *MATERIAL option or
a non-material option block is given.
Without considering thermal expansion effects (which would be defined with the
*EXPANSION material suboption), one material suboption, *ELASTIC, is required to define a
linear elastic material. The form of this option block is
*ELASTIC<E>,< >
Therefore, the complete, isotropic, linear elastic material definition for the hoist members, which
are made of steel, should be entered into your input file as
*MATERIAL, NAME=STEEL*ELASTIC200.E9, 0.3
2–14
Abaqus ID:
Printed on:

EXAMPLE: CREATING A MODEL OF AN OVERHEAD HOIST
The model definition portion of this problem is now complete since all the components
describing the structure have been specified.
2.3.5 History data
The history data define the sequence of events for the simulation. This loading history is divided into
a series of steps, each defining a different portion of the structure’s loading. Each step contains the
following information:
• the type of simulation (static, dynamic, etc.);
• the loads and constraints; and
• the output required.
In this example we are interested in the static response of the overhead hoist to a 10 kN load applied
at the midspan, with the left-hand end fully constrained and a roller constraint on the right-hand end (see
Figure 2–1). This is a single event, so only a single step is needed for the simulation.
The *STEP option is used to mark the start of a step. Like the *HEADING option, this option may
be followed by data lines containing a title for the step. In your hoist model use the following *STEP
option block:
*STEP, PERTURBATION10kN central load
The PERTURBATION parameter indicates that this is a linear analysis. If this parameter is omitted,
the analysis may be linear or nonlinear. The use of the PERTURBATION parameter is discussed further
in Chapter 11, “Multiple Step Analysis.”
Analysis procedure
The analysis procedure (the type of simulation) must be defined immediately following the *STEP
option block. In this case we want the long-term static response of the structure. The option for a
static simulation is *STATIC. For linear analysis this option has no parameters or data lines, so add
the following line to your input file:
*STATIC
The remaining input data in the step define the boundary conditions (constraints), loads, and
output required and can be given in any order that is convenient.
Boundary conditions
Boundary conditions are applied to those parts of the model where the displacements are known.
Such parts may be constrained to remain fixed (have zero displacement) during the simulation or
may have specified, nonzero displacements. In either situation the constraints are applied directly
to the nodes of the model.
2–15
Abaqus ID:
Printed on:

EXAMPLE: CREATING A MODEL OF AN OVERHEAD HOIST
In some cases a node may be constrained completely and, thus, cannot move in any direction
(for example, node 101 in our case). In other cases a node is constrained in some directions but is
free to move in others. For example, node 103 is fixed in the vertical direction but is free to move
in the horizontal direction. The directions in which a node is able to move are called degrees of
freedom (dof). In the case of our two-dimensional hoist, each node can move in the global 1- and
2-directions; therefore, there are two degrees of freedom at each node. If the hoist could move out of
plane, the problemwould be three-dimensional, and each node would have three degrees of freedom.
Nodes attached to beam and shell elements have additional degrees of freedom representing the
components of rotation and, thus, may have up to six degrees of freedom.
The labeling convention used for the degrees of freedom in Abaqus is as follows:
dof 5
dof 4
dof 6
dof 1
dof 3
dof 2
2
3 1
1 Translation in the 1-direction (U1).
2 Translation in the 2-direction (U2).
3 Translation in the 3-direction (U3).
4 Rotation about the 1-direction (UR1).
5 Rotation about the 2-direction (UR2).
6 Rotation about the 3-direction (UR3).
The degrees of freedom active at a node depend on the type of elements attached to that node.
Chapter 3, “Finite Elements and Rigid Bodies,” describes the active degrees of freedom for some
of the elements available in Abaqus. The two-dimensional truss element, T2D2, has two degrees of
freedom active at each node—translation in the 1- and 2-directions (dof 1 and dof 2, respectively).
Constraints on nodes are defined by using the *BOUNDARY option and specifying the
constrained degrees of freedom. Each data line is of the form:
<node number>, <first dof>, <last dof>, <magnitude of displacement>
The first degree of freedom and last degree of freedom are used to give a range of degrees
of freedom that will be constrained. For example, the following statement constrains degrees of
freedom 1, 2, and 3 at node 101 to have zero displacement (the node cannot move in either the
global 1-, 2-, or 3-direction):
101, 1, 3, 0.0
If the magnitude of the displacement is not specified on the data line, it is assumed to be zero.
If the node is constrained in one direction only, the third field should be blank or equal to the second
2–16
Abaqus ID:
Printed on:

EXAMPLE: CREATING A MODEL OF AN OVERHEAD HOIST
field. For example, to constrain node 103 in the 2-direction (degree of freedom 2) only, any of the
following data line formats can be used:
103, 2,2, 0.0
or
103, 2,2
or
103, 2
Boundary conditions on a node are cumulative. Thus, the following input constrains node 101
in both directions 1 and 2:
101, 1101, 2
Rather than specifying each constrained degree of freedom, some of the more common
constraints can be given directly using the following named constraints:
Degree of freedom Description
ENCASTRE Constraint on all displacements and rotations at a node.
PINNED Constraint on all translational degrees of freedom.
XSYMM Symmetry constraint about a plane of constant .
YSYMM Symmetry constraint about a plane of constant .
ZSYMM Symmetry constraint about a plane of constant .
XASYMM Antisymmetry constraint about a plane of constant .
YASYMM Antisymmetry constraint about a plane of constant .
ZASYMM Antisymmetry constraint about a plane of constant .
Thus, another way to constrain all the active degrees of freedom at node 101 in the hoist model is
101, ENCASTRE
The complete *BOUNDARY option block for our hoist problem is:
*BOUNDARY101, ENCASTRE103, 2
In this example all of the constraints are in the global 1- or 2-directions. In many cases
constraints are required in directions that are not aligned with the global directions. The
2–17
Abaqus ID:
Printed on:

EXAMPLE: CREATING A MODEL OF AN OVERHEAD HOIST
*TRANSFORM option can be used in such cases to define a local coordinate system for boundary
condition application. The skew plate example in Chapter 5, “Using Shell Elements,” demonstrates
how to use this option in such cases.
Loading
Loading is anything that causes the displacement or deformation of the structure, including:
• concentrated loads,
• pressure loads,
• distributed traction loads,
• distributed edge loads and moment on shells,
• nonzero boundary conditions,
• body loads, and
• temperature (with thermal expansion of the material defined).
In reality there is no such thing as a concentrated, or point, load; the load will always be applied
over some finite area. However, if the area being loaded is similar to or smaller than the elements in
that area, it is an appropriate idealization to treat the load as a concentrated load applied to a node.
Concentrated loads are specified using the *CLOAD option. The data lines for this option have
the form:
<node number>, <dof>, <load magnitude>
In this simulation a load of −10 kN is applied in the 2-direction to node 102. The option block is:
*CLOAD102, 2, -10.E3
Output requests
Finite element analyses can create very large amounts of output. Abaqus allows you to control and
manage this output so that only data required to interpret the results of your simulation are produced.
Four types of output are available:
• Results stored in a neutral binary file used by Abaqus/Viewer for postprocessing. This file is
called the Abaqus output database file and has the extension .odb.
• Printed tables of results, written to the Abaqus data (.dat) file.
• Restart data, used to continue the analysis, written to the Abaqus restart (.res) file.
• Results stored in binary files for subsequent postprocessing with third-party software, written
to the Abaqus results (.fil) file.
You will use the first two of these in the overhead hoist simulation.
By default, an output database file, which includes a preselected set of the most commonly
used output variables for a given type of analysis, is created. A list of preselected variables for
default output database output is given in the Abaqus Analysis User’s Manual. You do not need
2–18
Abaqus ID:
Printed on:

EXAMPLE: CREATING A MODEL OF AN OVERHEAD HOIST
to add any output requests to accept these defaults. For this example the default output database
output includes the deformed configuration and the applied nodal loads.
Selected results also can be written in tabular form to the Abaqus data file. By default, no
printout is written to the Abaqus data file. The *NODE PRINT option controls the printing of nodal
results (for example, displacements and reaction forces), while the *EL PRINT option controls the
printing of element results. A comprehensive list of the output variables available is given in the
Abaqus Analysis User’s Manual.
The data lines for either of these options list the output to appear in the columns of the table.
Each data line creates a separate table of data that can have a maximum of nine columns.
For this analysis we are interested in the displacements of the nodes (output variable U), the
reaction forces at the constrained nodes (output variable RF), and the stress in the members (output
variable S). Use the following in your input file:
*NODE PRINTU,RF,*EL PRINTS,
to request that Abaqus generate three tables of output data in the data file.
Since you have now finished the definition of all the data required for the step, use the *END
STEP option to mark the end of the step:
*END STEP
The input file is now complete. Compare the input file you have generated to the complete
input file given in Figure 2–2. Save the data as frame.inp, and exit the editor.
2.3.6 Checking the modelHaving generated the input file for this simulation, you are ready to run the analysis. Unfortunately, it is
possible to have errors in the input file because of typing errors or incorrect or missing data. You should
perform a datacheck analysis first before running the simulation. To run a datacheck analysis, make
sure that you are in the directory where the input file frame.inp is located, and type the following
command:
abaqus job=frame datacheck interactive
If this command results in an error message, the Abaqus installation on your computer has been
customized. You should contact your systems administrator to find out the appropriate command to run
Abaqus. The job=frame parameter specifies that the jobname for this analysis is frame. All the
files associated with this analysis will have this jobname as their identifier, which allows them to be
recognized easily.
2–19
Abaqus ID:
Printed on:

EXAMPLE: CREATING A MODEL OF AN OVERHEAD HOIST
The analysis will run interactively, and messages similar to those shown below will appear on your
screen:
Abaqus JOB frameAbaqus 6.10-1Begin Analysis Input File Processor2/23/2010 9:26:43 AMRun pre.exeAbaqus License Manager checked out the following licenses:Abaqus/Foundation checked out 3 tokens.2/23/2010 9:26:45 AMEnd Analysis Input File ProcessorBegin Abaqus/Standard DatacheckBegin Abaqus/Standard Analysis2/23/2010 9:26:45 AMRun standard.exeAbaqus License Manager checked out the following licenses:Abaqus/Foundation checked out 3 tokens.2/23/2010 9:26:45 AMEnd Abaqus/Standard AnalysisAbaqus JOB frame COMPLETED
When the datacheck analysis is complete, you will find that a number of additional files have been
created by Abaqus. If any errors are encountered during the datacheck analysis, messages will be written
to the data file, frame.dat. This data file is a text file that can be viewed in an editor or printed. Try
viewing the data file in a text editor. The file can contain lines up to 256 characters long, so the editor
should be able to accommodate that many characters.
Header page
The data file starts with a header page that contains information about the release of Abaqus used to
run the analysis. The header page also contains the phone number, address, and contact information
of your local office or representative who can offer technical support and advice.
Input file echo
After the header page, the data file includes an echo of the input file. The input data echo is generated
by adding the option *PREPRINT, ECHO=YES to the input file. By default, the parameter ECHO
is set to NO.
A B A Q U S I N P U T E C H O
5 10 15 20 25 30 35 40 45 50 55 60 65 70 75 80--------------------------------------------------------------------------------*HEADINGTwo-dimensional overhead hoist frameSI units (kg, m, s, N)1-axis horizontal, 2-axis vertical
LINE 5 *PREPRINT, ECHO=YES, MODEL=YES, HISTORY=YES**
2–20
Abaqus ID:
Printed on:

EXAMPLE: CREATING A MODEL OF AN OVERHEAD HOIST
** Model definition***NODE, NSET=NALL
LINE 10 101, 0., 0., 0.102, 1., 0., 0.103, 2., 0., 0.104, 0.5, 0.866, 0.105, 1.5, 0.866, 0.
LINE 15 *ELEMENT, TYPE=T2D2, ELSET=FRAME11, 101, 10212, 102, 10313, 101, 10414, 102, 104
LINE 20 15, 102, 10516, 103, 10517, 104, 105*SOLID SECTION, ELSET=FRAME, MATERIAL=STEEL** diameter = 5mm --> area = 1.963E-5 m^2
LINE 25 1.963E-5,*MATERIAL, NAME=STEEL*ELASTIC200.E9, 0.3**
LINE 30 ** History data***STEP, PERTURBATION10kN central load*STATIC
LINE 35 *BOUNDARY101, ENCASTRE103, 2*CLOAD102, 2, -10.E3
LINE 40 *NODE PRINTU,RF,*EL PRINTS,
LINE 45 *END STEP--------------------------------------------------------------------------------
5 10 15 20 25 30 35 40 45 50 55 60 65 70 75 80--------------------------------------------------------------------------------
Options processed by Abaqus
Following the input data echo is a list of the options processed by Abaqus. This is the first point at
which error and warning messages appear. All error messages are prefixed with ***ERROR, while
warnings begin with ***WARNING. Since these messages always begin the same way, searching
the data file for warning and error messages is straightforward. When the error is a syntax problem
(i.e., when Abaqus cannot understand the input), the error message is followed by the line from the
input file that is causing the error.
OPTIONS BEING PROCESSED***************************
*HEADINGTwo-dimensional overhead hoist frame
*NODE, NSET=NALL*ELEMENT, TYPE=T2D2, ELSET=FRAME*MATERIAL, NAME=STEEL*ELASTIC*SOLID SECTION, ELSET=FRAME, MATERIAL=STEEL*BOUNDARY*SOLID SECTION, ELSET=FRAME, MATERIAL=STEEL*STEP, PERTURBATION*STEP, PERTURBATION*STEP, PERTURBATION
2–21
Abaqus ID:
Printed on:

EXAMPLE: CREATING A MODEL OF AN OVERHEAD HOIST
10kN central load*STATIC*BOUNDARY*EL PRINT*EL FILE*END STEP*STEP, PERTURBATION*STATIC*BOUNDARY*CLOAD*NODE PRINT*NODE FILE*END STEP
Model data
The rest of the data file is a series of tables containing all of the model data and the history data that
should be checked for any obvious errors or omissions. These tables are generated by including
the option *PREPRINT, MODEL=YES, HISTORY=YES in the input file. However, these tables
may take up a large amount of disk space for large models. By default, the parameters MODEL and
HISTORY are set to NO.
The model data section begins with the element definitions, which summarize all the model
data. The model data also include the material description. It is always a good idea to check that
Abaqus has interpreted the material properties you gave in the input file correctly. Mistakes in the
material properties can sometimes cause subtle errors that are difficult to detect from the results. It
is easier to check the data here.
E L E M E N T D E F I N I T I O N S
NUMBER TYPE PROPERTY NODES FORMING ELEMENTREFERENCE
11 T2D2 1 101 10212 T2D2 1 102 10313 T2D2 1 101 10414 T2D2 1 102 10415 T2D2 1 102 10516 T2D2 1 103 10517 T2D2 1 104 105
S O L I D S E C T I O N (S)
PROPERTY NUMBER 1
MATERIAL NAME STEELATTRIBUTES 1.96300E-05 0.0000 0.0000
HOURGLASS CONTROL STIFFNESS 3.84615E+08
(USED WITH LOWER ORDER REDUCED INTEGRATED SOLID ELEMENTS LIKE CPS4R,CPE4RH,C3D8R)
M A T E R I A L D E S C R I P T I O N
MATERIAL NAME: STEEL
ELASTIC YOUNG'S POISSON'SMODULUS RATIO
2.00000E+11 0.30000
2–22
Abaqus ID:
Printed on:
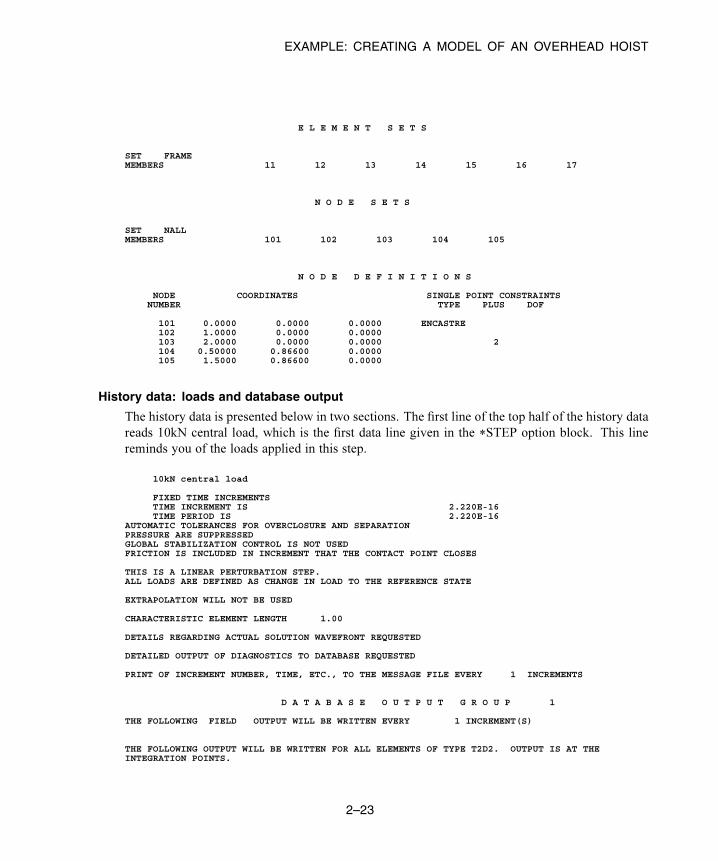
EXAMPLE: CREATING A MODEL OF AN OVERHEAD HOIST
E L E M E N T S E T S
SET FRAMEMEMBERS 11 12 13 14 15 16 17
N O D E S E T S
SET NALLMEMBERS 101 102 103 104 105
N O D E D E F I N I T I O N S
NODE COORDINATES SINGLE POINT CONSTRAINTSNUMBER TYPE PLUS DOF
101 0.0000 0.0000 0.0000 ENCASTRE102 1.0000 0.0000 0.0000103 2.0000 0.0000 0.0000 2104 0.50000 0.86600 0.0000105 1.5000 0.86600 0.0000
History data: loads and database output
The history data is presented below in two sections. The first line of the top half of the history data
reads 10kN central load, which is the first data line given in the *STEP option block. This line
reminds you of the loads applied in this step.
10kN central load
FIXED TIME INCREMENTSTIME INCREMENT IS 2.220E-16TIME PERIOD IS 2.220E-16
AUTOMATIC TOLERANCES FOR OVERCLOSURE AND SEPARATIONPRESSURE ARE SUPPRESSEDGLOBAL STABILIZATION CONTROL IS NOT USEDFRICTION IS INCLUDED IN INCREMENT THAT THE CONTACT POINT CLOSES
THIS IS A LINEAR PERTURBATION STEP.ALL LOADS ARE DEFINED AS CHANGE IN LOAD TO THE REFERENCE STATE
EXTRAPOLATION WILL NOT BE USED
CHARACTERISTIC ELEMENT LENGTH 1.00
DETAILS REGARDING ACTUAL SOLUTION WAVEFRONT REQUESTED
DETAILED OUTPUT OF DIAGNOSTICS TO DATABASE REQUESTED
PRINT OF INCREMENT NUMBER, TIME, ETC., TO THE MESSAGE FILE EVERY 1 INCREMENTS
D A T A B A S E O U T P U T G R O U P 1
THE FOLLOWING FIELD OUTPUT WILL BE WRITTEN EVERY 1 INCREMENT(S)
THE FOLLOWING OUTPUT WILL BE WRITTEN FOR ALL ELEMENTS OF TYPE T2D2. OUTPUT IS AT THEINTEGRATION POINTS.
2–23
Abaqus ID:
Printed on:

EXAMPLE: CREATING A MODEL OF AN OVERHEAD HOIST
S E
THE FOLLOWING OUTPUT WILL BE WRITTEN FOR ALL NODES
U RF CF
END OF DATABASE OUTPUT GROUP 1
D A T A B A S E O U T P U T G R O U P 2
THE FOLLOWING HISTORY OUTPUT WILL BE WRITTEN EVERY 1 INCREMENT(S)
THE FOLLOWING ENERGY OUTPUT QUANTITIES WILL BE WRITTEN FOR THE WHOLE MODEL
ALLKE ALLSE ALLWK ALLPD ALLCD ALLVD ALLKL ALLAE ALLQB
ALLEE ALLIE ETOTAL ALLFD ALLJD ALLSD ALLDMD
END OF DATABASE OUTPUT GROUP 2
History data: summary
The second half of the history data is displayed below. This section summarizes the element and
nodal output requests, boundary conditions, and concentrated loads.
E L E M E N T P R I N T
THE FOLLOWING TABLE IS PRINTED AT EVERY 1 INCREMENT FOR ALL ELEMENTS OF TYPE T2D2. OUTPUT IS ATTHE INTEGRATION POINTS.
SUMMARIES WILL BE PRINTED WHERE APPLICABLE
TABLE 1 S11
E L E M E N T F I L E O U T P U T
THE FOLLOWING TABLE IS OUTPUT AT EVERY 1 INCREMENT FOR ALL ELEMENTS OF TYPE T2D2. OUTPUT IS ATTHE INTEGRATION POINTS.
S
N O D E P R I N T
THE FOLLOWING TABLE IS PRINTED FOR ALL NODES AT EVERY 1 INCREMENT
SUMMARIES WILL BE PRINTED
TABLE 1 U1 U2
THE FOLLOWING TABLE IS PRINTED FOR ALL NODES AT EVERY 1 INCREMENT
SUMMARIES WILL BE PRINTED
TABLE 2 RF1 RF2
N O D E F I L E O U T P U T
THE FOLLOWING TABLE IS OUTPUT FOR ALL NODES AT EVERY 1 INCREMENT
2–24
Abaqus ID:
Printed on:

EXAMPLE: CREATING A MODEL OF AN OVERHEAD HOIST
U RF
B O U N D A R Y C O N D I T I O N S
NODE DOF AMP. MAGNITUDE NODE DOF AMP. MAGNITUDEREF. REF.
103 2 (RAMP) 0.0000
- (RAMP) OR (STEP) - INDICATE USE OF DEFAULT AMPLITUDES ASSOCIATED WITH THE STEP
B O U N D A R Y C O N D I T I O N S
NODE TYPE NODE TYPE NODE TYPE NODE TYPE NODE TYPE
101 ENCASTRE
C O N C E N T R A T E D L O A D S
NODE DOF AMP. AMPLITUDE NODE DOF AMP. AMPLITUDE NODE DOF AMP. AMPLITUDEREF. REF. REF.
102 2 -10000.
Remaining items in the data file
If there are any error messages, the number of such messages produced during the datacheck
analysis is listed at the end of the data file. If there are only warning messages, the number of
these messages is listed at the bottom of the data file after any of the requested output.
If error messages are generated during the datacheck analysis, it will not be possible to perform
the analysis until the causes of the error messages are corrected. The causes of warning messages
should always be investigated. Sometimes, warning messages are indications of mistakes in the
input data; other times they are harmless and can be ignored safely.
The final section of the data file, not shown in this guide, includes a summary of the size of the
numerical model and an estimate of the file sizes required for the simulation. When analyzing large
models, use this output to ensure that you have enough disk space available to perform the analysis.
2.3.7 Running the analysisMake any necessary corrections to your input file. When the datacheck analysis completes with no error
messages, run the analysis itself by using the command
abaqus job=frame continue interactive
Messages like those below will appear on the screen:
Abaqus JOB frameAbaqus 6.10-1
2–25
Abaqus ID:
Printed on:

EXAMPLE: CREATING A MODEL OF AN OVERHEAD HOIST
Begin Abaqus/Standard Analysis2/23/2010 9:30:19 AMRun standard.exeAbaqus License Manager checked out the following licenses:Abaqus/Foundation checked out 3 tokens.2/23/2010 9:30:20 AMEnd Abaqus/Standard AnalysisAbaqus JOB frame COMPLETED
You should always perform a datacheck analysis before running a simulation to ensure that the
input data are correct and to check that there is enough disk space and memory available to complete
the analysis. However, it is possible to combine the datacheck and analysis phases of the simulation by
using the command
abaqus job=frame interactive
If a simulation is expected to take a substantial amount of time, it is convenient to run it in the
background by omitting the interactive parameter:
abaqus job=frame
(The above commands apply for the standard Abaqus installation on a workstation. However,
Abaqus jobs may be run in batch queues on some computers. If you have any questions, ask your
systems administrator how to run Abaqus on your system.)
2.3.8 ResultsAfter the analysis is completed, the data file, frame.dat, will contain the tables of results requested
with the *NODE PRINT and *EL PRINT options. The tables of results follow the output from the
datacheck analysis. The results from the overhead hoist simulation follow.
Element output
Two-dimensional overhead hoist frame STEP 1 INCREMENT 110kN central load TIME COMPLETED IN THIS STEP 0.00
S T E P 1 S T A T I C A N A L Y S I S
10kN central load
FIXED TIME INCREMENTSTIME INCREMENT IS 2.220E-16TIME PERIOD IS 2.220E-16
LINEAR EQUATION SOLVER TYPE DIRECT SPARSE
THIS IS A LINEAR PERTURBATION STEP.ALL LOADS ARE DEFINED AS CHANGE IN LOAD TO THE REFERENCE STATE
2–26
Abaqus ID:
Printed on:

EXAMPLE: CREATING A MODEL OF AN OVERHEAD HOIST
M E M O R Y E S T I M A T E
PROCESS FLOATING PT MINIMUM MEMORY MEMORY TOOPERATIONS REQUIRED MINIMIZE I/O
PER ITERATION (MBYTES) (MBYTES)
1 2.65E+002 13 20NOTE:
(1) THE ESTIMATE PRINTED IS THE MAXIMUM ESTIMATE FROM THE CURRENT STEP TO THE LAST STEPOF THE ANALYSIS, WITH THE UNSYMMETRIC MATRIX AND SOLVER TAKEN INTO ACCOUNT IFAPPLICABLE. SINCE THE ESTIMATE IS BASED ON THE ACTIVE DEGREES OF FREEDOM IN THEFIRST ITERATION OF THE CURRENT STEP, FOR PROBLEMS WITH SUBSTANTIAL CHANGES IN ACTIVEDEGREES OF FREEDOM BETWEEN STEPS (OR EVEN WITHIN THE SAME STEP), THE MEMORY ESTIMATEMIGHT BE NOTICEABLY DIFFERENT THAN THE ACTUAL USAGE. A FEW EXAMPLES ARE: PROBLEMSWITH SIGNIFICANT CONTACT CHANGES, PROBLEMS WITH MODEL CHANGE, PROBLEMS WITH BOTHSTATIC STEP AND STEADY STATE DYNAMIC PROCEDURES, WHERE THE ACOUSTIC ELEMENTS WILLONLY BE ACTIVATED IN THE STEADY STATE DYNAMIC STEPS.
(2) THE ESTIMATE FOR THE FLOATING POINT OPERATIONS ON EACH PROCESS IS BASEDON THE INITIAL LOAD SCHEDULING AND THIS MIGHT NOT REFLECT THE ACTUAL FLOATINGPOINT OPERATIONS COMPLETED ON EACH PROCESS. DUE TO THE DYNAMIC LOAD BALANCING SCHEME,THE ACTUAL LOAD BALANCE IS EXPECTED TO BE BETTER THAN THE ESTIMATE PRINTED HERE.
(3) DEPENDING ON THE SETTING OF THE memory PARAMETER, THE DISK USAGE BY SCRATCH DATA CANVARY FROM CLOSE TO ZERO TO THE ESTIMATED MEMORY TO MINIMIZE I/O.
(4) USING RESTART, WRITE CAN GENERATE A LARGE AMOUNT OF DATA.
INCREMENT 1 SUMMARY
TIME INCREMENT COMPLETED 2.220E-16, FRACTION OF STEP COMPLETED 1.00STEP TIME COMPLETED 2.220E-16, TOTAL TIME COMPLETED 0.00
E L E M E N T O U T P U T
THE FOLLOWING TABLE IS PRINTED FOR ALL ELEMENTS WITH TYPE T2D2 AT THE INTEGRATION POINTS
ELEMENT PT FOOT- S11NOTE
11 1 1.4706E+0812 1 1.4706E+0813 1 -2.9412E+0814 1 2.9412E+0815 1 2.9412E+0816 1 -2.9412E+0817 1 -2.9412E+08
MAXIMUM 2.9412E+08ELEMENT 14
MINIMUM -2.9412E+08ELEMENT 17
Node output
N O D E O U T P U T
THE FOLLOWING TABLE IS PRINTED FOR ALL NODES
NODE FOOT- U1 U2NOTE
102 7.3531E-04 -4.6698E-03103 1.4706E-03 0.000104 1.4706E-03 -2.5472E-03105 0.000 -2.5472E-03
2–27
Abaqus ID:
Printed on:

EXAMPLE: CREATING A MODEL OF AN OVERHEAD HOIST
MAXIMUM 1.4706E-03 0.000AT NODE 104 101
MINIMUM 0.000 -4.6698E-03AT NODE 101 102
THE FOLLOWING TABLE IS PRINTED FOR ALL NODES
NODE FOOT- RF1 RF2NOTE
101 -9.0949E-13 5000.103 0.000 5000.
MAXIMUM 0.000 5000.AT NODE 102 103
MINIMUM -9.0949E-13 0.000AT NODE 101 102
Are the nodal displacements and peak stresses in the individual members reasonable for this hoist
and these applied loads?
It is always a good idea to check that the results of the simulation satisfy basic physical principles. In
this case check that the external forces applied to the hoist sum to zero in both the vertical and horizontal
directions.
What nodes have vertical forces applied to them? What nodes have horizontal forces? Do the results
from your simulation match those shown here?
Abaqus also creates several other files during a simulation. One such file—the output database file,
frame.odb—can be used to visualize the results graphically using Abaqus/Viewer.
2.3.9 PostprocessingGraphical postprocessing is important because of the great volume of data created during a simulation.
For any realistic model it is impractical for you to try to interpret results in the tabular form of the data
file. Abaqus/Viewer allows you to view the results graphically using a variety of methods, including
deformed shape plots, contour plots, vector plots, animations, and X–Y plots. All of these methods are
discussed in this guide. For more information on any of the postprocessing features discussed in this
guide, consult the sections on the Visualization module in the Abaqus/CAE User’s Manual. For this
example you will use Abaqus/Viewer to do some basic model checks and to display the deformed shape
of the frame.
Start Abaqus/Viewer by typing the following command at the operating system prompt:
abaqus viewer
The Abaqus/Viewer window appears.
To begin this exercise, open the output database file that Abaqus/Standard generated during the
analysis of the problem.
2–28
Abaqus ID:
Printed on:

EXAMPLE: CREATING A MODEL OF AN OVERHEAD HOIST
To open the output database file:
1. From the main menu bar, select File→Open; or use the tool in the File toolbar.
The Open Database dialog box appears.
2. From the list of available output database files, select frame.odb.
3. Click OK.
Tip: You can also open the output database frame.odb by typing the following
command at the operating system prompt:
abaqus viewer odb=frame
Abaqus/Viewer opens the output database created by the job and displays the undeformed model
shape, as shown in Figure 2–8.
1
2
3
Figure 2–8 Undeformed model shape.
You can choose to display the title block and state block at the bottom of the viewport; these blocks
are not shown in Figure 2–8. The title block at the bottom of the viewport indicates the following:
• The description of the model (from the job description).
• The name of the output database (from the name of the analysis job).
• The product name (Abaqus/Standard or Abaqus/Explicit) and release used to generate the output
database.
• The date the output database was last modified.
The state block at the bottom of the viewport indicates the following:
• Which step is being displayed.
• The increment within the step.
• The step time.
2–29
Abaqus ID:
Printed on:

EXAMPLE: CREATING A MODEL OF AN OVERHEAD HOIST
The view orientation triad indicates the orientation of the model in the global coordinate system. The 3D
compass located in the upper-right corner of the viewport allows you to manipulate the view directly.
You can suppress the display of and customize the title block, state block, view orientation triad,
and 3D compass by selecting Viewport→Viewport Annotation Options from the main menu bar (for
example, many of the figures in this manual do not include the title block or the compass).
The Results Tree
You will use the Results Tree to query the components of the model. The Results Tree allows easy
access to the history output contained in an output database file for the purpose of creating X–Y
plots and also to groups of elements, nodes, and surfaces based on set names, material and section
assignment, etc. for the purposes of verifying the model and also controlling the viewport display.
To query the model:
1. All output database files that are open in a given postprocessing session are listed underneath
the Output Databases container. Expand this container and then expand the container for
the output database named frame.odb.
2. Expand the Materials container, and click the material named STEEL.
All elements are highlighted in the viewport because only one material assignment was used
in this analysis.
The Results Tree will be used more extensively in later examples to illustrate the X–Y plotting
capability and manipulating the display using display groups.
Customizing an undeformed shape plot
You will now use the plot options to enable the display of node and element numbering. Plot
options that are common to all plot types (undeformed, deformed, contour, symbol, and material
orientation) are set in a single dialog box. The contour, symbol, and material orientation plot types
have additional options, each specific to the given plot type.
To display node numbers:
1. From the main menu bar, select Options→Common; or use the tool in the toolbox.
The Common Plot Options dialog box appears.
2. Click the Labels tab.
3. Toggle on Show node labels.
4. Click Apply.
Abaqus/Viewer applies the change and keeps the dialog box open.
2–30
Abaqus ID:
Printed on:

EXAMPLE: CREATING A MODEL OF AN OVERHEAD HOIST
The customized undeformed plot is shown in Figure 2–9 (your node numbers may be different
depending on the order in which you sketched the frame members).
101 102 103
104 105
1
2
3
Figure 2–9 Node number plot.
To display element numbers:
1. In the Labels tabbed page of the Common Plot Options dialog box, toggle on Showelement labels.
2. Click OK.
Abaqus/Viewer applies the change and closes the dialog box.
The resulting plot is shown in Figure 2–10 (your element numbers may be different depending
on the order in which you sketched the frame members).
101 102 103
104 105
11 12
13 14 15 16
17
1
2
3
Figure 2–10 Node and element number plot.
2–31
Abaqus ID:
Printed on:

EXAMPLE: CREATING A MODEL OF AN OVERHEAD HOIST
Remove the node and element labels before proceeding. To disable the display of node and
element numbers, repeat the above procedure and, under Labels, toggle off Show node labelsand Show element labels.
Displaying and customizing a deformed shape plot
You will now display the deformed model shape and use the plot options to change the deformation
scale factor. You will also superimpose the undeformed model shape on the deformed model shape.
From the main menu bar, select Plot→Deformed Shape; or use the tool in the toolbox.
Abaqus/Viewer displays the deformed model shape, as shown in Figure 2–11.
1
2
3
Figure 2–11 Deformed model shape.
For small-displacement analyses (the default formulation in Abaqus/Standard) the
displacements are scaled automatically to ensure that they are clearly visible. The scale factor is
displayed in the state block. In this case the displacements have been scaled by a factor of 42.83.
To change the deformation scale factor:
1. From the main menu bar, select Options→Common; or use the tool in the toolbox.
2. From the Common Plot Options dialog box, click the Basic tab if it is not already selected.
3. From the Deformation Scale Factor area, toggle on Uniform and enter 10.0 in the Valuefield.
4. Click Apply to redisplay the deformed shape.
The state block displays the new scale factor.
5. To return to automatic scaling of the displacements, repeat the above procedure and, in the
Deformation Scale Factor field, toggle on Auto-compute.
6. Click OK to close the Common Plot Options dialog box.
2–32
Abaqus ID:
Printed on:

EXAMPLE: CREATING A MODEL OF AN OVERHEAD HOIST
To superimpose the undeformed model shape on the deformed model shape:
1. Click the Allow Multiple Plot States tool in the toolbox to allow multiple plot states
in the viewport; then click the tool or select Plot→Undeformed Shape to add the
undeformed shape plot to the existing deformed plot in the viewport.
By default, Abaqus/Viewer plots the deformed model shape in green and the (superimposed)
undeformed model shape in a translucent white.
2. The plot options for the superimposed image are controlled separately from those of the
primary image. From the main menu bar, select Options→Superimpose; or use the
tool in the toolbox to change the edge style of the superimposed (i.e., undeformed) image.
3. From the Superimpose Plot Options dialog box, click the Color & Style tab.
4. In the Color & Style tabbed page, select the dashed edge style.
5. Click OK to close the Superimpose Plot Options dialog box and to apply the change.
The plot is shown in Figure 2–12. The undeformed model shape appears with a dashed edge style.
Checking the model with Abaqus/Viewer
You can use Abaqus/Viewer to check that the model is correct before running the simulation. You
have already learned how to draw plots of the model and to display the node and element numbers.
These are useful tools for checking that Abaqus is using the correct mesh.
The boundary conditions applied to the overhead hoist model can also be displayed and
checked.
To display boundary conditions on the undeformed model:
1. Click the tool in the toolbox to disable multiple plot states in the viewport.
2. Display the undeformed model shape, if it is not displayed already.
3. From the main menu bar, select View→ODB Display Options.
4. In the ODB Display Options dialog box, click the Entity Display tab.
5. Toggle on Show boundary conditions.
6. Click OK.
Abaqus/Viewer displays symbols to indicate the applied boundary conditions, as shown in
Figure 2–13.
Tabular data reports
In addition to the graphical capabilities described above, Abaqus/Viewer allows you to write data
to a text file in a tabular format. This is a convenient alternative to writing printed data to the data
( .dat) file, especially for complicated models. Output generated this way has many uses; for
2–33
Abaqus ID:
Printed on:

EXAMPLE: CREATING A MODEL OF AN OVERHEAD HOIST
Figure 2–12 Undeformed and deformed model shapes.
1
2
3
Figure 2–13 Applied boundary conditions on the overhead hoist.
example, it can be used in written reports. In this problem you will generate a report containing the
element stresses, nodal displacements, and reaction forces.
To generate field data reports:
1. From the main menu bar, select Report→Field Output.
2. In theVariable tabbed page of theReport Field Output dialog box, accept the default positionlabeled Integration Point. Click the triangle next to S: Stress components to expand the
list of available variables. From this list, toggle on S11.
2–34
Abaqus ID:
Printed on:

EXAMPLE: CREATING A MODEL OF AN OVERHEAD HOIST
3. In the Setup tabbed page, name the report Frame.rpt. In the Data region at the bottom of
the page, toggle off Column totals.
4. Click Apply.
The element stresses are written to the report file.
5. In the Variable tabbed page of the Report Field Output dialog box, change the position to
Unique Nodal. Toggle off S: Stress components, and select U1 and U2 from the list of
available U: Spatial displacement variables.
6. Click Apply.
The nodal displacements are appended to the report file.
7. In the Variable tabbed page of the Report Field Output dialog box, toggle off U: Spatialdisplacement, and select RF1 and RF2 from the list of available RF: Reaction forcevariables.
8. In the Data region at the bottom of the Setup tabbed page, toggle on Column totals.
9. Click OK.
The reaction forces are appended to the report file, and the Report Field Output dialog box
closes.
Open the file Frame.rpt in a text editor. The contents of this file are shown below. Your
node and element numbering may be different. Very small values may also be calculated differently,
depending on your system.
Stress output:Field Output Report
Source 1---------
ODB: frame.odbStep: Step-1Frame: Increment 1: Step Time = 2.2200E-16
Loc 1 : Integration point values from source 1
Output sorted by column "Element Label".
Field Output reported at integration points for part: PART-1-1
Element Int S.S11Label Pt @Loc 1
-------------------------------------------------11 1 147.062E+0612 1 147.062E+0613 1 -294.118E+0614 1 294.118E+0615 1 294.118E+0616 1 -294.118E+0617 1 -294.125E+06
Minimum -294.125E+06At Element 17
Int Pt 1
2–35
Abaqus ID:
Printed on:

EXAMPLE: CREATING A MODEL OF AN OVERHEAD HOIST
Maximum 294.118E+06At Element 15
Int Pt 1
Displacement output:Field Output Report
Source 1---------
ODB: frame.odbStep: Step-1Frame: Increment 1: Step Time = 2.2200E-16
Loc 1 : Nodal values from source 1
Output sorted by column "Node Label".
Field Output reported at nodes for part: PART-1-1
Node U.U1 U.U2Label @Loc 1 @Loc 1
-------------------------------------------------101 0. -5.E-33102 735.312E-06 -4.66977E-03103 1.47062E-03 -5.E-33104 1.47062E-03 -2.54716E-03105 433.681E-21 -2.54716E-03
Minimum 0. -4.66977E-03
At Node 101 102Maximum 1.47062E-03 -5.E-33
At Node 104 103
Reaction force output:
Field Output Report
Source 1---------
ODB: frame.odbStep: Step-1Frame: Increment 1: Step Time = 2.2200E-16
Loc 1 : Nodal values from source 1
Output sorted by column "Node Label".
Field Output reported at nodes for part: PART-1-1
Node RF.RF1 RF.RF2Label @Loc 1 @Loc 1
-------------------------------------------------101 -909.495E-15 5.E+03102 0. 0.103 0. 5.E+03104 0. 0.105 0. 0.
Minimum -909.495E-15 0.At Node 101 105
2–36
Abaqus ID:
Printed on:

EXAMPLE: CREATING A MODEL OF AN OVERHEAD HOIST
Maximum 0. 5.E+03At Node 105 103
Total -909.495E-15 10.E+03
The information obtained in these tables is the same as that examined earlier when reviewing
the printed results in the data (.dat) file. The advantage of using Abaqus/Viewer to generate
the tabular data is that you may create it as a postprocessing operation, whereas writing it to the
data (.dat) file requires you to include the appropriate option in the input file (a preprocessing
operation). Thus, Abaqus/Viewer offers greater flexibility to generate tabular output.
2.3.10 Rerunning the analysis using Abaqus/ExplicitWe will rerun the same analysis in Abaqus/Explicit for comparison. This time we are interested in the
dynamic response of the hoist to the same load applied suddenly at the midspan. Before continuing, save
a copy of frame.inp as frame_xpl.inp. Make all subsequent changes to the frame_xpl.inpinput file. You will need to replace the static step with an explicit dynamic step, modify the output
requests and the material definition, and change the element library before you can resubmit the job.
Modifying the material definition
Since Abaqus/Explicit performs a dynamic analysis, a complete material definition requires that
you specify the material density. For this problem assume the density is equal to 7800 kg/m3 .
You can modify the material definition by adding the *DENSITY option to the material option
block. The form of this option is as follows:
*DENSITY< >,
Thus, the complete material definition for the hoist members is:
*MATERIAL, NAME=STEEL*ELASTIC200.E9, 0.3*DENSITY7800.,
Replacing the analysis step
The step definition must change to reflect a dynamic, explicit analysis. Locate the existing *STEP
option block, which appears as follows:
*STEP, PERTURBATION10kN central load
Replace this option block with the following one:
2–37
Abaqus ID:
Printed on:

EXAMPLE: CREATING A MODEL OF AN OVERHEAD HOIST
*STEP10kN central load, suddenly applied
The analysis procedure (the type of simulation) must be defined immediately following
the *STEP option block. In Abaqus/Explicit the three analysis options are *DYNAMIC,
EXPLICIT; *DYNAMIC TEMPERATURE-DISPLACEMENT, EXPLICIT; and *ANNEAL.
The *DYNAMIC TEMPERATURE-DISPLACEMENT procedure simulates the fully coupled
thermal-mechanical response of a body, while the *ANNEAL procedure simulates the relaxation of
stresses and plastic strains that occurs as metals are heated to a high temperature. In this simulation
we want to determine the dynamic response of the structure over a period of 0.01 s. Thus, we will
use *DYNAMIC, EXPLICIT. Replace the *STATIC option block with the following:
*DYNAMIC, EXPLICIT, 0.01
Modifying the output requests
Because this is a dynamic analysis in which the transient response of the frame is of interest, it is
helpful to have the displacements of the center point written as history output. Displacement history
output can be requested only for a node set. Thus, you will create a node set that contains the node at
the center of the bottom of the truss. Then you will add displacements to the history output requests.
Create a set named CENTER using the *NSET option, as follows:
*NSET, NSET=CENTER102,
Place this option block in the model data portion of your input file (e.g., after the node definitions).
Replace the existing output requests with the following:
*OUTPUT, FIELD, VARIABLE=PRESELECT*OUTPUT, HISTORY, VARIABLE=PRESELECT, FREQUENCY=1*NODE OUTPUT, NSET=CENTERU,
Submitting the new input file for analysis
Perform an interactive datacheck analysis of the input data in the frame_xpl input file:
abaqus job=frame_xpl datacheck interactive
Make any necessary corrections to your input file. When the datacheck analysis completes with no
error messages, run the analysis itself by using the command
abaqus job=frame_xpl continue interactive
2–38
Abaqus ID:
Printed on:

EXAMPLE: CREATING A MODEL OF AN OVERHEAD HOIST
2.3.11 Postprocessing the dynamic analysis resultsFor the static linear perturbation analysis done in Abaqus/Standard you examined the deformed shape
as well as stress, displacement, and reaction force output. For the Abaqus/Explicit analysis you can
similarly examine the deformed shape and generate field data reports. Because this is a dynamic analysis,
you should also examine the transient response resulting from the loading. You will do this by animating
the time history of the deformed model shape and plotting the displacement history of the bottom center
node in the truss.
Start by opening the frame_xpl output database using the instructions in “Postprocessing,”
Section 2.3.9, then plot the deformed shape of the model. For large-displacement analyses (the default
formulation in Abaqus/Explicit) the displaced shape scale factor has a default value of 1. Change the
Deformation Scale Factor to 20 so that you can more easily see the deformation of the truss.
To create a time-history animation of the deformed model shape:
1. From the main menu bar, select Animate→Time History; or use the tool in the toolbox.
The time history animation begins in a continuous loop at its fastest speed. Abaqus/Viewer displays
the movie player controls in the right side of the context bar (immediately above the viewport).
2. From the main menu bar, select Options→Animation; or use the animation options tool in
the toolbox (located directly underneath the tool).
The Animation Options dialog box appears.
3. Change the Mode to Play Once, and slow the animation down by moving the Frame Rate slider.
4. You can use the animation controls to start, pause, and step through the animation. From left to
right of Figure 2–14, these controls perform the following functions: play/pause, first, previous,next, and last.
The truss responds dynamically to the load. You can confirm this by plotting the vertical
displacement history of the node set CENTER.You can create X–Y curves from either history or field data stored in the output database (.odb) file.
X–Y curves can also be read from an external file or they can be typed into Abaqus/Viewer interactively.
Once curves have been created, their data can be further manipulated and plotted to the screen in graphical
form. In this example you will create and plot the curve using history data.
To create an X–Y plot of the vertical displacement for a node:
1. In the Results Tree, expand the History Output container underneath the output database named
frame_xpl.odb.
2–39
Abaqus ID:
Printed on:

COMPARISON OF IMPLICIT AND EXPLICIT PROCEDURES
Firstimage
Nextimage
LaunchFrame
Selector
Play/Pause
Previousimage
Lastimage
Figure 2–14 Postprocessing animation controls.
2. From the list of available history output, double-click Spatial displacement: U2 atNode 102 in NSET CENTER.
Abaqus/Viewer plots the vertical displacement at the center node along the bottom of the truss, as
shown in Figure 2–15.
Note: The chart legend has been suppressed and the axis labels modified in this figure. Many X–Y
plot options are directly accessible by double-clicking the appropriate regions of the viewport. To
enable direct object actions, however, you must first click in the prompt area to cancel the
current procedure (if necessary). To suppress the legend, double-click it in the viewport to open the
Chart Legend Options dialog box. In the Contents tabbed page of this dialog box, toggle off
Show legend. To modify the axis labels, double-click either axis to open the Axis Options dialog
box, and edit the axis titles as indicated in Figure 2–15.
Exiting Abaqus/Viewer
Save your model database file; then select File→Exit from the main menu bar to exit
Abaqus/Viewer.
2.4 Comparison of implicit and explicit procedures
Abaqus/Standard and Abaqus/Explicit are capable of solving a wide variety of problems. The
characteristics of implicit and explicit procedures determine which method is appropriate for a given
problem. For those problems that can be solved with either method, the efficiency with which the
problem can be solved can determine which product to use. Understanding the characteristics of implicit
and explicit procedures will help you answer this question. Table 2–2 lists the key differences between
the analysis products, which are discussed in detail in the relevant chapters in this guide.
2–40
Abaqus ID:
Printed on:

COMPARISON OF IMPLICIT AND EXPLICIT PROCEDURES
Time0.000 0.002 0.004 0.006 0.008 0.010
Dis
plac
emen
t (m
m)
−8.0
−6.0
−4.0
−2.0
0.0[x1.E−3]
Figure 2–15 Vertical displacement at the midspan of the truss.
Table 2–2 Key differences between Abaqus/Standard and Abaqus/Explicit.
Quantity Abaqus/Standard Abaqus/Explicit
Element library Offers an extensive element library. Offers an extensive library of
elements well suited for explicit
analyses. The elements available
are a subset of those available in
Abaqus/Standard.
Analysis procedures General and linear perturbation
procedures are available.
General procedures are available.
Material models Offers a wide range of material models. Similar to those available in
Abaqus/Standard; a notable
difference is that failure material
models are allowed.
Contact formulation Has a robust capability for solving
contact problems.
Has a robust contact functionality
that readily solves even the most
complex contact simulations.
2–41
Abaqus ID:
Printed on:

COMPARISON OF IMPLICIT AND EXPLICIT PROCEDURES
Quantity Abaqus/Standard Abaqus/Explicit
Solution technique Uses a stiffness-based solution technique
that is unconditionally stable.
Uses an explicit integration solution
technique that is conditionally
stable.
Disk space and
memory
Due to the large numbers of iterations
possible in an increment, disk space and
memory usage can be large.
Disk space and memory usage is
typically much smaller than that for
Abaqus/Standard.
2.4.1 Choosing between implicit and explicit analysis
For many analyses it is clear whether Abaqus/Standard or Abaqus/Explicit should be used. For example,
as demonstrated in Chapter 8, “Nonlinearity,” Abaqus/Standard is more efficient for solving smooth
nonlinear problems; on the other hand, Abaqus/Explicit is the clear choice for a wave propagation
analysis. There are, however, certain static or quasi-static problems that can be simulated well with
either program. Typically, these are problems that usually would be solved with Abaqus/Standard but
may have difficulty converging because of contact or material complexities, resulting in a large number
of iterations. Such analyses are expensive in Abaqus/Standard because each iteration requires a large
set of linear equations to be solved.
Whereas Abaqus/Standard must iterate to determine the solution to a nonlinear problem,
Abaqus/Explicit determines the solution without iterating by explicitly advancing the kinematic state
from the previous increment. Even though a given analysis may require a large number of time
increments using the explicit method, the analysis can be more efficient in Abaqus/Explicit if the same
analysis in Abaqus/Standard requires many iterations.
Another advantage of Abaqus/Explicit is that it requires much less disk space and memory than
Abaqus/Standard for the same simulation. For problems in which the computational cost of the two
programs may be comparable, the substantial disk space and memory savings of Abaqus/Explicit make
it attractive.
2.4.2 Cost of mesh refinement in implicit and explicit analyses
Using the explicit method, the computational cost is proportional to the number of elements and roughly
inversely proportional to the smallest element dimension. Mesh refinement, therefore, increases the
computational cost by increasing the number of elements and reducing the smallest element dimension.
As an example, consider a three-dimensional model with uniform, square elements. If the mesh is refined
by a factor of two in all three directions, the computational cost increases by a factor of 2 × 2 × 2 as a
result of the increase in the number of elements and by a factor of 2 as a result of the decrease in the
smallest element dimension. The total computational cost of the analysis increases by a factor of 24 ,
2–42
Abaqus ID:
Printed on:

SUMMARY
or 16, by refining the mesh. Disk space and memory requirements are proportional to the number of
elements with no dependence on element dimensions; thus, these requirements increase by a factor of 8.
Whereas predicting the cost increase with mesh refinement for the explicit method is rather
straightforward, cost is more difficult to predict when using the implicit method. The difficulty arises
from the problem-dependent relationship between element connectivity and solution cost, a relationship
that does not exist in the explicit method. Using the implicit method, experience shows that for many
problems the computational cost is roughly proportional to the square of the number of degrees of
freedom. Consider the same example of a three-dimensional model with uniform, square elements.
Refining the mesh by a factor of two in all three directions increases the number of degrees of freedom
by approximately 23 , causing the computational cost to increase by a factor of roughly (23 )2 , or 64.
The disk space and memory requirements increase in the same manner, although the actual increase is
difficult to predict.
The explicit method shows great cost savings over the implicit method as the model size increases,
as long as the mesh is relatively uniform. Figure 2–16 illustrates the comparison of cost versus model
size using the explicit and implicit methods. For this problem the number of degrees of freedom scales
with the number of elements.
Cost
Number of degrees of freedom
explicit
implicit
Figure 2–16 Cost versus model size in using the explicit and implicit methods.
2.5 Summary
• The Abaqus input file contains a complete description of the analysis model. It is the means of
communication between the preprocessor (Abaqus/CAE, for example) and the analysis product
(Abaqus/Standard or Abaqus/Explicit).
• The input file contains two sections: the model data defining the structure being analyzed and the
history data defining what happens to the structure.
• Each section of the input file comprises a number of option blocks, each consisting of a keyword
line, which may be followed by data lines.
2–43
Abaqus ID:
Printed on:

SUMMARY
• You can perform a datacheck analysis once you have created the input file. Error and warning
messages are printed to the data file. After a successful datacheck analysis, estimates of the
computer resources required for the simulation are printed to the data file.
• Use Abaqus/Viewer to verify the model geometry and boundary conditions graphically, using the
output database file generated during the datacheck phase.
• It is often easiest to check for mistakes in material properties in the data (.dat) file; geometry,
loads, and boundary conditions are more easily checked with a graphical postprocessor such as
Abaqus/Viewer.
• Always check that the results satisfy basic engineering principles, such as equilibrium.
• Abaqus/Viewer allows you to visualize analysis results graphically in a variety of ways and also
allows you to write tabular data reports.
• The choice between using implicit or explicit methods depends largely on the nature of the problem.
2–44
Abaqus ID:
Printed on:

FINITE ELEMENTS
3. Finite Elements and Rigid Bodies
Finite elements and rigid bodies are the fundamental components of an Abaqus model. Finite elements
are deformable, whereas rigid bodies move through space without changing shape. While users of finite
element analysis programs tend to have some understanding of what finite elements are, the general
concept of rigid bodies within a finite element program may be somewhat new.
For computational efficiency Abaqus has a general rigid body capability. Any body or part of a
body can be defined as a rigid body; most element types can be used in a rigid body definition (the
exceptions are listed in “Rigid body definition,” Section 2.4.1 of the Abaqus Analysis User’s Manual).
The advantage of rigid bodies over deformable bodies is that the motion of a rigid body is described
completely by no more than six degrees of freedom at a reference node. In contrast, deformable elements
havemany degrees of freedom and require expensive element calculations to determine the deformations.
When such deformations are negligible or not of interest, modeling a component as a rigid body produces
significant computational savings without affecting the overall results.
3.1 Finite elements
A wide range of elements is available in Abaqus. This extensive element library provides you with a
powerful set of tools for solving many different problems. The elements available in Abaqus/Explicit
are a subset of those available in Abaqus/Standard. This section introduces you to the five aspects of an
element that influence how it behaves.
3.1.1 Characterizing elements
Each element is characterized by the following:
• Family
• Degrees of freedom (directly related to the element family)
• Number of nodes
• Formulation
• Integration
Each element in Abaqus has a unique name, such as T2D2, S4R, or C3D8I. The element name, as you
saw in the overhead hoist example in Chapter 2, “Abaqus Basics,” is used as the value of the TYPE
parameter on the *ELEMENT option in the input file. The element name identifies each of the five
aspects of an element. The naming convention is explained in this chapter.
3–1
Abaqus ID:
Printed on:

FINITE ELEMENTS
Family
Figure 3–1 shows the element families most commonly used in a stress analysis. One of the major
distinctions between different element families is the geometry type that each family assumes.
Continuum(solid) elements
Shellelements
Beam elements
Truss elements
Membraneelements
Infiniteelements
Rigidelements
Springs and dashpots
Figure 3–1 Commonly used element families.
The element families that you will use in this guide—continuum, shell, beam, truss, and rigid
elements—are discussed in detail in other chapters. The other element families are not covered
in this guide; if you are interested in using them in your models, read about them in Part VI,
“Elements,” of the Abaqus Analysis User’s Manual.
The first letter or letters of an element’s name indicate to which family the element belongs.
For example, the S in S4R indicates this is a shell element, while the C in C3D8I indicates this is a
continuum element.
Degrees of freedom
The degrees of freedom (dof) are the fundamental variables calculated during the analysis. For
a stress/displacement simulation the degrees of freedom are the translations at each node. Some
element families, such as the beam and shell families, have rotational degrees of freedom as well.
For a heat transfer simulation the degrees of freedom are the temperatures at each node; a heat
transfer analysis, therefore, requires the use of different elements than a stress analysis, since the
degrees of freedom are not the same.
The following numbering convention is used for the degrees of freedom in Abaqus:
1 Translation in direction 1
2 Translation in direction 2
3 Translation in direction 3
3–2
Abaqus ID:
Printed on:

FINITE ELEMENTS
4 Rotation about the 1-axis
5 Rotation about the 2-axis
6 Rotation about the 3-axis
7 Warping in open-section beam elements
8 Acoustic pressure, pore pressure, or hydrostatic fluid pressure
9 Electric potential
11 Temperature (or normalized concentration in mass diffusion analysis) for
continuum elements or temperature at the first point through the thickness
of beams and shells
12+ Temperature at other points through the thickness of beams and shells
Directions 1, 2, and 3 correspond to the global 1-, 2-, and 3-directions, respectively, unless a local
coordinate system has been defined at the nodes.
Axisymmetric elements are the exception, with the displacement and rotation degrees of
freedom referred to as follows:
1 Translation in the r-direction
2 Translation in the z-direction
6 Rotation in the r–z plane
Directions r (radial) and z (axial) correspond to the global 1- and 2-directions, respectively, unless
a local coordinate system has been defined at the nodes. See Chapter 5, “Using Shell Elements,”
for a discussion of defining a local coordinate system at the nodes.
In this guide our attention is restricted to structural applications. Therefore, only elements
with translational and rotational degrees of freedom are discussed. For information on other types
of elements (for example, heat transfer elements), consult the Abaqus Analysis User’s Manual.
By default, Abaqus/CAE uses the alphabetical option, x�y�z, for labeling the view orientation
triad. In general, this manual adopts the numerical option, 1-2-3, to permit direct correspondence
with degree of freedom and output labeling. For more information on labeling of axes, see
“Customizing the view triad,” Section 5.4 of the Abaqus/CAE User’s Manual.
Number of nodes—order of interpolation
Displacements, rotations, temperatures, and the other degrees of freedom mentioned in the previous
section are calculated only at the nodes of the element. At any other point in the element, the
displacements are obtained by interpolating from the nodal displacements. Usually the interpolation
order is determined by the number of nodes used in the element.
3–3
Abaqus ID:
Printed on:

FINITE ELEMENTS
• Elements that have nodes only at their corners, such as the 8-node brick shown in Figure 3–2(a),
use linear interpolation in each direction and are often called linear elements or first-order
elements.
• Elements with midside nodes, such as the 20-node brick shown in Figure 3–2(b), use quadratic
interpolation and are often called quadratic elements or second-order elements.
• Modified triangular or tetrahedral elements with midside nodes, such as the 10-node
tetrahedron shown in Figure 3–2(c), use a modified second-order interpolation and are often
called modified elements or modified second-order elements.
(a) Linear element(8-node brick, C3D8)
(b) Quadratic element(20-node brick, C3D20)
(c) Modified second-order element(10-node tetrahedron, C3D10M)
Figure 3–2 Linear brick, quadratic brick, and modified tetrahedral elements.
Abaqus/Standard offers a wide selection of both linear and quadratic elements. Abaqus/Explicit
offers only linear elements, with the exception of the quadratic beam and modified tetrahedron and
triangle elements.
Typically, the number of nodes in an element is clearly identified in its name. The 8-node
brick element, as you have seen, is called C3D8; and the 8-node general shell element is called
S8R. The beam element family uses a slightly different convention: the order of interpolation is
identified in the name. Thus, a first-order, three-dimensional beam element is called B31, whereas
a second-order, three-dimensional beam element is called B32. A similar convention is used for
axisymmetric shell and membrane elements.
Formulation
An element’s formulation refers to the mathematical theory used to define the element’s behavior.
In the absence of adaptive meshing all of the stress/displacement elements in Abaqus are based
on the Lagrangian or material description of behavior: the material associated with an element
remains associated with the element throughout the analysis, and material cannot flow across
element boundaries. In the alternative Eulerian or spatial description, elements are fixed in space
as the material flows through them. Eulerian methods are used commonly in fluid mechanics
simulations. Abaqus/Standard uses Eulerian elements to model convective heat transfer. Adaptive
meshing combines the features of pure Lagrangian and Eulerian analyses and allows the motion
of the element to be independent of the material. Eulerian elements and adaptive meshing are not
discussed in this guide.
3–4
Abaqus ID:
Printed on:

FINITE ELEMENTS
To accommodate different types of behavior, some element families in Abaqus include
elements with several different formulations. For example, the shell element family has three
classes: one suitable for general-purpose shell analysis, another for thin shells, and yet another
for thick shells. (These shell element formulations are explained in Chapter 5, “Using Shell
Elements.”)
Some Abaqus/Standard element families have a standard formulation as well as some
alternative formulations. Elements with alternative formulations are identified by an additional
character at the end of the element name. For example, the continuum, beam, and truss element
families include members with a hybrid formulation in which the pressure (continuum elements)
or axial force (beam and truss elements) is treated as an additional unknown; these elements are
identified by the letter “H” at the end of the name (C3D8H or B31H).
Some element formulations allow coupled field problems to be solved. For example, elements
whose names begin with the letter C and end with the letter T (such as C3D8T) possess both
mechanical and thermal degrees of freedom and are intended for coupled thermal-mechanical
simulations.
Several of the most commonly used element formulations are discussed later in this guide.
Integration
Abaqus uses numerical techniques to integrate various quantities over the volume of each element.
Using Gaussian quadrature for most elements, Abaqus evaluates the material response at each
integration point in each element. Some elements in Abaqus can use full or reduced integration,
a choice that can have a significant effect on the accuracy of the element for a given problem, as
discussed in detail in “Element formulation and integration,” Section 4.1.
Abaqus uses the letter “R” at the end of the element name to distinguish reduced-integration
elements (unless they are also hybrid elements, in which case the element name ends with the letters
“RH”). For example, CAX4 is the 4-node, fully integrated, linear, axisymmetric solid element; and
CAX4R is the reduced-integration version of the same element.
Abaqus/Standard offers both full and reduced-integration elements; Abaqus/Explicit offers
only reduced-integration elements with the exception of the modified tetrahedron and triangle
elements and the fully integrated first-order shell and brick elements.
3.1.2 Continuum elementsAmong the different element families, continuum or solid elements can be used to model the widest
variety of components. Conceptually, continuum elements simply model small blocks of material in a
component. Since they may be connected to other elements on any of their faces, continuum elements,
like bricks in a building or tiles in a mosaic, can be used to build models of nearly any shape, subjected
to nearly any loading. Abaqus has both stress/displacement and coupled temperature-displacement
continuum elements; this guide will discuss only stress/displacement elements.
Continuum stress/displacement elements in Abaqus have names that begin with the letter “C.” The
next two letters indicate the dimensionality and usually, but not always, the active degrees of freedom
3–5
Abaqus ID:
Printed on:

FINITE ELEMENTS
in the element. The letters “3D” indicate a three-dimensional element; “AX,” an axisymmetric element;
“PE,” a plane strain element; and “PS,” a plane stress element.
The use of continuum elements is discussed further in Chapter 4, “Using Continuum Elements.”
Three-dimensional continuum element library
Three-dimensional continuum elements can be hexahedra (bricks), wedges, or tetrahedra. The full
inventory of three-dimensional continuum elements and the nodal connectivity for each type can be
found in “Three-dimensional solid element library,” Section 25.1.4 of the Abaqus Analysis User’s
Manual.
Whenever possible, hexahedral elements or second-order modified tetrahedral elements should
be used in Abaqus. First-order tetrahedra (C3D4) have a simple, constant-strain formulation, and
very fine meshes are required for an accurate solution.
Two-dimensional continuum element library
Abaqus has several classes of two-dimensional continuum elements that differ from each other
in their out-of-plane behavior. Two-dimensional elements can be quadrilateral or triangular.
Figure 3–3 shows the three classes that are used most commonly.
Axisymmetricelement CAX4
3 (θ)
2 (z)
1 (r)
3
2
Plane strainelement CPE4
Plane stresselement CPS4
3 1
21
Figure 3–3 Plane strain, plane stress, and axisymmetric elements without twist.
3–6
Abaqus ID:
Printed on:

FINITE ELEMENTS
Plane strain elements assume that the out-of-plane strain, , is zero; they can be used to
model thick structures.
Plane stress elements assume that the out-of-plane stress, , is zero; they are suitable for
modeling thin structures.
Axisymmetric elements without twist, the “CAX” class of elements, model a 360° ring; they
are suitable for analyzing structures with axisymmetric geometry subjected to axisymmetric loading.
Abaqus/Standard also provides generalized plane strain elements, axisymmetric elements with
twist, and axisymmetric elements with asymmetric deformation.
• Generalized plane strain elements include the additional generalization that the out-of-plane
strain may vary linearly with position in the plane of the model. This formulation is particularly
suited for the thermal-stress analysis of thick sections.
• Axisymmetric elements with twist model an initially axisymmetric geometry that can twist
about the axis of symmetry. These elements are useful for modeling the torsion of cylindrical
structures, such as axisymmetric rubber bushings.
• Axisymmetric elements with asymmetric deformation model an initially axisymmetric
geometry that can deform asymmetrically (typically as a result of bending). They are useful
for simulating problems such as an axisymmetric rubber mount that is subjected to shear loads.
The latter three classes of two-dimensional continuum elements are not discussed in this guide.
Two-dimensional solid elements must be defined in the 1–2 plane so that the node order is
counterclockwise around the element perimeter, as shown in Figure 3–4.
Quadrilateral element Triangular element
1 2
34
1 2
3
2
1
Figure 3–4 Correct nodal connectivity for two-dimensional elements.
When using a preprocessor to generate the mesh, ensure that the element normals all point in the
same direction as the positive, global 3-axis. Failure to provide the correct element connectivity
will cause Abaqus to issue an error message stating that elements have negative area.
Degrees of freedom
All of the stress/displacement continuum elements have translational degrees of freedom at each
node. Correspondingly, degrees of freedom 1, 2, and 3 are active in three-dimensional elements,
while only degrees of freedom 1 and 2 are active in plane strain elements, plane stress elements,
and axisymmetric elements without twist. To find the active degrees of freedom in the other classes
3–7
Abaqus ID:
Printed on:

FINITE ELEMENTS
of two-dimensional solid elements, see “Two-dimensional solid element library,” Section 25.1.3 of
the Abaqus Analysis User’s Manual.
Element properties
The *SOLID SECTION option defines the material and any additional geometric data associated
with a set of continuum elements. For three-dimensional and axisymmetric elements no additional
geometric information is required: the nodal coordinates completely define the element geometry.
For plane stress and plane strain elements the thickness of the elements must be specified on the
data line. For example, if the elements are 0.2 m thick, the element property definition would be
the following:
*SOLID SECTION, ELSET=<element set name>, MATERIAL=<material name>0.2,
Formulation and integration
Alternative formulations available for the continuum family of elements in Abaqus/Standard include
an incompatible mode formulation (the last or second-to-last letter in the element name is I) and a
hybrid element formulation (the last letter in the element name is H), both of which are discussed
in detail later in this guide.
In Abaqus/Standard you can choose between full and reduced integration for quadrilateral
and hexahedral (brick) elements. In Abaqus/Explicit you can choose between full and reduced
integration for hexahedral (brick) elements; however, only reduced integration is available
for quadrilateral first-order elements. Both the formulation and type of integration can have a
significant effect on the accuracy of solid elements, as discussed in “Element formulation and
integration,” Section 4.1.
Element output variables
By default, element output variables such as stress and strain refer to the global Cartesian coordinate
system. Thus, the -component of stress at the integration point shown in Figure 3–5(a) acts in
the global 1-direction. Even if the element rotates during a large-displacement simulation, as shown
in Figure 3–5(b), the default is still to use the global Cartesian system as the basis for defining the
element variables. However, Abaqus allows you to define a local coordinate system for element
variables (see “Example: skew plate,” Section 5.5). This local coordinate system rotates with the
motion of the element in large-displacement simulations. A local coordinate system can be very
useful if the object being modeled has some natural material orientation, such as the fiber directions
in a composite material.
3.1.3 Shell elements
Shell elements are used tomodel structures inwhich one dimension (the thickness) is significantly smaller
than the other dimensions and the stresses in the thickness direction are negligible.
3–8
Abaqus ID:
Printed on:

FINITE ELEMENTS
2
1
2
1
2
1
(a) (b)
Figure 3–5 Default material directions for continuum elements.
Shell element names in Abaqus begin with the letter “S.” Axisymmetric shells all begin with the
letters “SAX.” Abaqus/Standard also provides axisymmetric shells with asymmetric deformations, which
begin with the letters “SAXA.” The first number in a shell element name indicates the number of nodes
in the element, except for the case of axisymmetric shells, for which the first number indicates the order
of interpolation.
Two types of shell elements are available in Abaqus: conventional shell elements and continuum
shell elements. Conventional shell elements discretize a reference surface by defining the element’s
planar dimensions, its surface normal, and its initial curvature. Continuum shell elements, on the other
hand, resemble three-dimensional solid elements in that they discretize an entire three-dimensional body
yet are formulated so that their kinematic and constitutive behavior is similar to conventional shell
elements. In this manual only conventional shell elements are discussed. Henceforth, we will refer to
them simply as “shell elements.” Formore information on continuum shell elements, see “Shell elements:
overview,” Section 26.6.1 of the Abaqus Analysis User’s Manual.
The use of shell elements is discussed in detail in Chapter 5, “Using Shell Elements.”
Shell element library
In Abaqus/Standard general three-dimensional shell elements are available with three different
formulations: general-purpose, thin-only, and thick-only. The general-purpose shells and the
axisymmetric shells with asymmetric deformation account for finite membrane strains and
arbitrarily large rotations. The three-dimensional “thick” and “thin” element types provide for
arbitrarily large rotations but only small strains. The general-purpose shells allow the shell
thickness to change with the element deformation. All of the other shell elements assume
small strains and no change in shell thickness, even though the element’s nodes may undergo
finite rotations. Triangular and quadrilateral elements with linear and quadratic interpolation
are available. Both linear and quadratic axisymmetric shell elements are available. All of the
quadrilateral shell elements (except for S4) and the triangular shell element S3/S3R use reduced
integration. The S4 element and the other triangular shell elements use full integration. Table 3–1
summarizes the shell elements available in Abaqus/Standard.
All the shell elements in Abaqus/Explicit are general-purpose. Finite membrane strain and
small membrane strain formulations are available. Triangular and quadrilateral elements are
3–9
Abaqus ID:
Printed on:

FINITE ELEMENTS
Table 3–1 Three classes of shell elements in Abaqus/Standard.
General-Purpose Shells Thin-Only Shells Thick-Only Shells
S4, S4R, S3/S3R, SAX1, SAX2,
SAX2T, SC6R, SC8R
STRI3, STRI65, S4R5,
S8R5, S9R5, SAXA
S8R, S8RT
available with linear interpolation. A linear axisymmetric shell element is also available. Table 3–2
summarizes the shell elements available in Abaqus/Explicit.
Table 3–2 Two classes of shell elements in Abaqus/Explicit.
Finite-Strain Shells Small-Strain Shells
S4, S4R, S3/S3R, SAX1 S4RS, S4RSW, S3RS
For most explicit analyses the large-strain shell elements are appropriate. If, however, the
analysis involves small membrane strains and arbitrarily large rotations, the small-strain shell
elements are more computationally efficient. The S4RS and S3RS elements do not consider
warping, while the S4RSW element does.
The shell formulations available in Abaqus are discussed in detail in Chapter 5, “Using Shell
Elements.”
Degrees of freedom
The three-dimensional elements in Abaqus/Standard whose names end in the number “5” (e.g.,
S4R5, STRI65) have 5 degrees of freedom at each node: three translations and two in-plane rotations
(i.e., no rotations about the shell normal). However, all six degrees of freedom are activated at a
node if required; for example, if rotational boundary conditions are applied or if the node is on a
fold line of the shell.
The remaining three-dimensional shell elements have six degrees of freedom at each node
(three translations and three rotations).
The axisymmetric shells have three degrees of freedom associated with each node:
1 Translation in the r-direction.
2 Translation in the z-direction.
6 Rotation in the r–z plane.
Element properties
Use either the *SHELL GENERAL SECTION or the *SHELL SECTION option to define the
thickness and material properties for a set of shell elements. These two options have similar formats:
3–10
Abaqus ID:
Printed on:

FINITE ELEMENTS
*SHELL SECTION, ELSET=<element set name>, MATERIAL=<material name><thickness>,<number of section points>
or
*SHELL GENERAL SECTION, ELSET=<element set name>,MATERIAL=<material name><thickness>
If you specify the *SHELL SECTION option, Abaqus uses numerical integration to calculate
the behavior at selected points through the thickness of the shell. These points are called section
points, as shown in Figure 3–6. The MATERIAL parameter refers to a material property definition,
which may be linear or nonlinear. You can specify any odd number of section points through the
shell thickness.
Figure 3–6 Section points through the thickness of a shell element.
The *SHELL GENERAL SECTION option allows you to define the cross-section behavior in
a number of general ways to model linear or nonlinear behavior. Since Abaqus models the shell’s
cross-section behavior directly in terms of section engineering quantities (area, moments of inertia,
etc.) with this option, there is no need for Abaqus to integrate any quantities over the element
cross-section. Therefore, *SHELL GENERAL SECTION is less expensive computationally than
*SHELL SECTION. The response is calculated in terms of force andmoment resultants; the stresses
and strains are calculated only when they are requested for output.
Reference surface offsets
The reference surface of the shell is defined by the shell element’s nodes and normal definitions.
When modeling with shell elements, the reference surface is typically coincident with the shell’s
midsurface. However, many situations arise in which it is more convenient to define the reference
surface as offset from the shell’s midsurface. For example, surfaces created in CAD packages
usually represent either the top or bottom surface of the shell body. In this case it may be easier to
define the reference surface to be coincident with the CAD surface and, therefore, offset from the
shell’s midsurface.
3–11
Abaqus ID:
Printed on:

FINITE ELEMENTS
Shell offsets can also be used to define a more precise surface geometry for contact problems
where shell thickness is important. By default, shell offset and thickness are accounted for in contact
constraints in Abaqus/Explicit. The effect of offset and thickness in contact can be suppressed, if
required.
Shell offsets can also be useful when modeling a shell with continuously varying thickness. In
this case defining the nodes at the shell midplane can be difficult. If one surface is smooth while
the other is rough, as in some aircraft structures, it is easiest to use shell offsets to define the nodes
at the smooth surface.
Offsets can be introduced by using the OFFSET parameter on the *SHELL SECTION and
*SHELL GENERAL SECTION options. The offset value is defined as a fraction of the shell
thickness measured from the shell’s midsurface to the shell’s reference surface.
The degrees of freedom for the shell are associated with the reference surface. All kinematic
quantities, including the element’s area, are calculated there. Large offset values for curved shells
may lead to a surface integration error, affecting the stiffness, mass, and rotary inertia for the shell
section. For stability purposes Abaqus/Explicit also automatically augments the rotary inertia used
for shell elements on the order of the offset squared, which may result in errors in the dynamics
for large offsets. When large offsets from the shell’s midsurface are necessary, use multi-point
constraints or rigid body constraints instead.
Element output variables
The element output variables for shells are defined in terms of local material directions that lie on
the surface of each shell element. In all large-displacement simulations these axes rotate with the
element’s deformation. You can also define a local material coordinate system that rotates with the
element’s deformation in a large-displacement analysis.
3.1.4 Beam elements
Beam elements are used to model components in which one dimension (the length) is significantly greater
than the other two dimensions and only the stress in the direction along the axis of the beam is significant.
Beam element names in Abaqus begin with the letter “B.” The next character indicates the
dimensionality of the element: “2” for two-dimensional beams and “3” for three-dimensional beams.
The third character indicates the interpolation used: “1” for linear interpolation, “2” for quadratic
interpolation, and “3” for cubic interpolation.
The use of beam elements is discussed in Chapter 6, “Using Beam Elements.”
Beam element library
Linear, quadratic, and cubic beams are available in two and three dimensions. Cubic beams are not
available in Abaqus/Explicit.
3–12
Abaqus ID:
Printed on:

FINITE ELEMENTS
Degrees of freedom
Three-dimensional beams have six degrees of freedom at each node: three translational degrees
of freedom (1–3) and three rotational degrees of freedom (4–6). “Open-section”-type beams (such
as B31OS) are available in Abaqus/Standard and have an additional degree of freedom (7) that
represents the warping of the beam cross-section.
Two-dimensional beams have three degrees of freedom at each node: two translational degrees
of freedom (1 and 2) and one rotational degree of freedom (6) about the normal to the plane of the
model.
Element properties
Use either the *BEAM SECTION or the *BEAM GENERAL SECTION option to define the
geometry of the beam cross-section; the nodal coordinates define only the length.
If you specify the *BEAM SECTION option, the beam cross-section is defined geometrically,
and the MATERIAL parameter refers to a material property definition. Abaqus calculates the cross-
section behavior of the beam by numerical integration over the cross-section, allowing both linear
and nonlinear material behavior.
The *BEAM GENERAL SECTION option allows you to define the cross-section behavior in
a number of general ways to model linear or nonlinear behavior. Since Abaqus models the beam’s
cross-section behavior directly in terms of section engineering quantities (area, moments of inertia,
etc.) with this option, there is no need for Abaqus to integrate any quantities over the element
cross-section. Therefore, *BEAM GENERAL SECTION is less expensive computationally than
*BEAM SECTION. The response is calculated in terms of the force and moment resultants; the
stresses and strains are calculated only when they are requested for output.
Formulation and integration
The linear beams (B21 and B31) and the quadratic beams (B22 and B32) are shear deformable
and account for finite axial strains; therefore, they are suitable for modeling both slender and stout
beams. The cubic beam elements in Abaqus/Standard (B23 and B33) do not account for shear
flexibility and assume small axial strain, although large displacements and rotations of the beams
are valid. They are, therefore, suitable for modeling slender beams.
Abaqus/Standard provides variants of linear and quadratic beam elements that are suitable for
modeling thin-walled, open-section beams (B31OS and B32OS). These elements correctly model
the effects of torsion and warping in open cross-sections, such as I-beams or U-section channels.
Open-section beams are not covered in this guide.
Abaqus/Standard also has hybrid beam elements that are used for modeling very slender
members, such as flexible risers on offshore oil installations, or for modeling very stiff links.
Hybrid beams are not covered in this guide.
Element output variables
The stress components in three-dimensional, shear-deformable beam elements are the axial stress
( ) and the shear stress due to torsion ( ). The shear stress acts about the section wall in
3–13
Abaqus ID:
Printed on:

FINITE ELEMENTS
a thin-walled section. Corresponding strain measures are also available. The shear-deformable
beams also provide estimates of transverse shear forces on the section. The slender (cubic) beams
in Abaqus/Standard have only the axial variables as output. Open-section beams in space also have
only the axial variables as output, since the torsional shear stresses are negligible in this case.
All two-dimensional beams use only axial stress and strain.
The axial force, bending moments, and curvatures about the local beam axes can also be
requested for output. For details of what components are available with which elements, see “Beam
modeling: overview,” Section 26.3.1 of the Abaqus Analysis User’s Manual. Details of how the
local beam axes are defined are given in Chapter 6, “Using Beam Elements.”
3.1.5 Truss elements
Truss elements are rods that can carry only tensile or compressive loads. They have no resistance to
bending; therefore, they are useful formodeling pin-jointed frames. Moreover, truss elements can be used
as an approximation for cables or strings (for example, in a tennis racket). Trusses are also sometimes
used to represent reinforcement within other elements. The overhead hoist model in Chapter 2, “Abaqus
Basics,” uses truss elements.
All truss element names begin with the letter “T.” The next two characters indicate the
dimensionality of the element—“2D” for two-dimensional trusses and “3D” for three-dimensional
trusses. The final character represents the number of nodes in the element.
Truss element library
Linear and quadratic trusses are available in two and three dimensions. Quadratic trusses are not
available in Abaqus/Explicit.
Degrees of freedom
Truss elements have only translational degrees of freedom at each node. Three-dimensional truss
elements have degrees of freedom 1, 2, and 3, while two-dimensional truss elements have degrees
of freedom 1 and 2.
Element properties
The *SOLID SECTION option is used to specify the name of the material property definition
associated with the given set of truss elements. The cross-sectional area is given on the data line:
*SOLID SECTION, ELSET=<element set name>, MATERIAL=<material><cross-sectional area>
Formulation and integration
In addition to the standard formulation, a hybrid truss element formulation is available in
Abaqus/Standard. It is useful for modeling very stiff links whose stiffness is much greater than
that of the overall structure.
3–14
Abaqus ID:
Printed on:

RIGID BODIES
Element output variables
Axial stress and strain are available as output for truss elements.
3.2 Rigid bodies
In Abaqus a rigid body is a collection of nodes and elements whose motion is governed by the motion
of a single node, known as the rigid body reference node, as shown in Figure 3–7.
Rigid body slavenodes
Rigid bodyreference node
Figure 3–7 Elements forming a rigid body.
The shape of the rigid body is defined either as an analytical surface obtained by revolving or extruding a
two-dimensional geometric profile or as a discrete rigid body obtained by meshing the body with nodes
and elements. The shape of the rigid body does not change during a simulation but can undergo large rigid
body motions. The mass and inertia of a discrete rigid body can be calculated based on the contributions
from its elements, or they can be assigned specifically.
The motion of a rigid body can be prescribed by applying boundary conditions at the rigid body
reference node. Loads on a rigid body are generated from concentrated loads applied to nodes and
distributed loads applied to elements that are part of the rigid body or from loads applied to the rigid
body reference node. Rigid bodies interact with the rest of the model through nodal connections to
deformable elements and through contact with deformable elements.
The use of rigid bodies is illustrated in Chapter 12, “Contact.”
3–15
Abaqus ID:
Printed on:

RIGID BODIES
3.2.1 Determining when to use a rigid bodyRigid bodies can be used to model very stiff components that are either fixed or undergoing large rigid
body motions. They can also be used to model constraints between deformable components, and they
provide a convenient method of specifying certain contact interactions. When Abaqus is used for
quasi-static forming analyses, rigid bodies are ideally suited for modeling tooling (such as punch, die,
drawbead, blank holder, roller, etc.) and may also be effective as a method of constraint.
It may be useful to make parts of a model rigid for verification purposes. For example, in complex
models elements far away from the particular region of interest could be included as part of a rigid
body, resulting in faster run times at the model development stage. When you are satisfied with the
model, you can remove the rigid body definitions and incorporate an accurate deformable finite element
representation throughout.
The principal advantage to representing portions of a model with rigid bodies rather than deformable
finite elements is computational efficiency. Element-level calculations are not performed for elements
that are part of a rigid body. Although some computational effort is required to update the motion of the
nodes of the rigid body and to assemble concentrated and distributed loads, the motion of the rigid body
is determined completely by a maximum of six degrees of freedom at the rigid body reference node.
In Abaqus/Explicit rigid bodies are particularly effective for modeling relatively stiff parts of
a structure for which tracking waves and stress distributions is not important. Element stable time
increment estimates in the stiff region can result in a very small global time increment. Since rigid
bodies and elements that are part of a rigid body do not affect the global time increment, using a rigid
body instead of a deformable finite element representation in a stiff region can result in a much larger
global time increment, without significantly affecting the overall accuracy of the solution.
Rigid bodies defined with analytical rigid surfaces in Abaqus are slightly cheaper in terms of
computational cost than discrete rigid bodies. In Abaqus/Explicit, for example, contact with analytical
rigid surfaces tends to be less noisy than contact with discrete rigid bodies because analytical rigid
surfaces can be smooth, whereas discrete rigid bodies are inherently faceted. However, the shapes that
can be defined with analytical rigid surfaces are limited.
3.2.2 Components of a rigid bodyTo create a discrete rigid body, use the *RIGID BODY option as the property reference for the elements
forming the rigid body. Use the REF NODE parameter to assign a rigid body reference node to the rigid
body. A rigid body reference node has both translational and rotational degrees of freedom and must
be defined for every rigid body. The position of the rigid body reference node is not important unless
rotations are applied to the body or reaction moments about a certain axis through the body are desired.
In either of these situations the node should be placed such that it lies on the desired axis through the
body.
*RIGID BODY, REF NODE=<node>, ELSET=<element set name>,PIN NSET=<node set name>, TIE NSET=<node set name>
3–16
Abaqus ID:
Printed on:

RIGID BODIES
In addition to the rigid body reference node, discrete rigid bodies consist of a collection of nodes
that are generated by assigning elements and nodes to the rigid body. These nodes, known as the rigid
body slave nodes (see Figure 3–7), provide a connection to other elements. Nodes that are part of a rigid
body are one of two types:
• Pin nodes, which have only translational degrees of freedom.
• Tie nodes, which have both translational and rotational degrees of freedom.
The rigid body node type is determined by the type of elements on the rigid body to which the node
is attached. The node type also can be specified or modified when assigning nodes directly to a rigid
body. For pin nodes only the translational degrees of freedom are part of the rigid body, and the motion
of these degrees of freedom is constrained by the motion of the rigid body reference node. For tie nodes
both the translational and rotational degrees of freedom are part of the rigid body and are constrained by
the motion of the rigid body reference node.
The nodes defining the rigid body cannot have any boundary conditions, multi-point constraints, or
constraint equations applied to them. Boundary conditions, multi-point constraints, constraint equations,
and loads can be applied, however, to the rigid body reference node.
3.2.3 Rigid elementsThe rigid body capability in Abaqus allows most elements—not just rigid elements—to be part of a rigid
body. For example, shell elements or rigid elements can be used to model the same effect if the *RIGID
BODY option refers to the element set that contains the elements forming the rigid body. The rules
governing rigid bodies, such as how loads and boundary conditions are applied, pertain to all element
types that form the rigid body, including rigid elements.
The names of all rigid elements begin with the letter “R.” The next characters indicate the
dimensionality of the element. For example, “2D” indicates that the element is planar; and “AX,” that
the element is axisymmetric. The final character represents the number of nodes in the element.
Rigid element library
The three-dimensional quadrilateral (R3D4) and triangular (R3D3) rigid elements are used to model
the two-dimensional surfaces of a three-dimensional rigid body. Another element—a two-node,
rigid beam element (RB3D2)—is provided in Abaqus/Standard mainly to model components of
offshore structures to which fluid drag and buoyancy loads must be applied.
Two-node, rigid elements are available for plane strain, plane stress, and axisymmetric models.
A planar, two-node rigid beam element is also available in Abaqus/Standard and is used mainly to
model offshore structures in two dimensions.
Degrees of freedom
Only the rigid body reference node has independent degrees of freedom. For three-dimensional
elements the reference node has three translational and three rotational degrees of freedom; for
3–17
Abaqus ID:
Printed on:

SUMMARY
planar and axisymmetric elements the reference node has degrees of freedom 1, 2, and 6 (rotation
about the 3-axis).
The nodes attached to rigid elements have only slave degrees of freedom. The motion of
these nodes is determined entirely by the motion of the rigid body reference node. For planar
and three-dimensional rigid elements the only slave degrees of freedom are translations. The rigid
beam elements in Abaqus/Standard have the same slave degrees of freedom as the corresponding
deformable beam elements: 1–6 for the three-dimensional rigid beam and 1, 2, and 6 for the planar
rigid beam.
Physical properties
All rigid elements must reference a *RIGID BODY option. For the planar and beam elements the
cross-sectional area can be defined on the data line. For the axisymmetric and three-dimensional
elements the thickness can be defined on the data line; these data are required only if you apply body
forces to the rigid elements. The default thickness is zero. Alternatively, the NODAL THICKNESS
parameter defines an average facet thickness based on the thickness at the nodes. These data are
required when applying body forces or when the thickness is needed for the contact definition.
Formulation and integration
Since the rigid elements are not deformable, they do not use numerical integration points, and there
are no optional formulations.
Element output variables
There are no element output variables. The only output from rigid elements is the motion of the
nodes. In addition, reaction forces and reaction moments are available at the rigid body reference
node.
3.3 Summary
• Abaqus has an extensive library of elements that can be used for a wide range of structural
applications. Your choice of element type has important consequences regarding the accuracy and
efficiency of your simulation. The elements available in Abaqus/Explicit are a subset of those
available in Abaqus/Standard.
• The degrees of freedom active at a node depend on the element types attached to the node.
• The element name completely identifies the element’s family, formulation, number of nodes, and
type of integration.
• All elements must refer to a section property definition. The section property provides any
additional data required to define the geometry of the element and also identifies the associated
material property definition.
3–18
Abaqus ID:
Printed on:

SUMMARY
• For continuum elements Abaqus defines the element output variables, such as stress and strain, with
respect to the global Cartesian coordinate system. You can change to a local coordinate system by
using the *ORIENTATION option.
• For three-dimensional shell elements Abaqus defines the element output variables with respect to a
coordinate system based on the surface of the shell. You can change the coordinate system by using
the *ORIENTATION option.
• For computational efficiency any part of a model can be defined as a rigid body, which has degrees
of freedom only at its reference node.
• As a method of constraint in an Abaqus/Explicit analysis, rigid bodies are computationally more
efficient than multi-point constraints.
3–19
Abaqus ID:
Printed on:

ELEMENT FORMULATION AND INTEGRATION
4. Using Continuum Elements
The continuum (solid) family of stress/displacement elements is the most comprehensive of the
element libraries in Abaqus. There are some differences in the solid element libraries available in
Abaqus/Standard and Abaqus/Explicit.
Abaqus/Standard solid element library
The Abaqus/Standard solid element library includes first-order (linear) interpolation elements
and second-order (quadratic) interpolation elements in two or three dimensions using either
full or reduced integration. Triangles and quadrilaterals are available in two dimensions; and
tetrahedra, triangular wedges, and hexahedra (“bricks”) are provided in three dimensions. Modified
second-order triangular and tetrahedral elements are also provided.
In addition, hybrid and incompatible mode elements are available in Abaqus/Standard.
Abaqus/Explicit solid element library
The Abaqus/Explicit solid element library includes reduced-integration first-order (linear)
interpolation elements in two or three dimensions. Modified second-order interpolation triangles
and tetrahedra are also available. Full integration or regular second-order elements are not available
in Abaqus/Explicit, with the exception of the fully integrated first-order hexahedral element (an
incompatible mode version of this element is also available).
For detailed information on the options available for continuum elements, please see “Solid (continuum)
elements,” Section 25.1.1 of the Abaqus Analysis User’s Manual.
When the permutations of all these various element options are made, the total number of solid
elements available to you is large—over 20 just for three-dimensional models. The accuracy of your
simulation will depend strongly on the type of element you use in your model. The thought of choosing
which of these elements is best for your model may seem daunting, especially at first. However, you will
come to view this selection as a 20+ piece tool set that provides you with the ability to choose just the
right tool, or element, for a particular job.
This chapter discusses the effect that different element formulations and levels of integration have
on the accuracy of a particular analysis. Some general guidelines for selecting continuum elements are
also given. These provide the foundation upon which you can build your knowledge as you gain more
experience using Abaqus. The example at the end of this section will allow you to put this knowledge to
use as you build and analyze a connecting lug.
4.1 Element formulation and integration
The influence that the order of the element (linear or quadratic), the element formulation, and the level of
integration have on the accuracy of a structural simulation will be demonstrated by considering a static
analysis of the cantilever beam shown in Figure 4–1.
4–1
Abaqus ID:
Printed on:

ELEMENT FORMULATION AND INTEGRATION
P
Figure 4–1 Cantilever beam under a point load P at its free end.
This is a classic test used to assess the behavior of a given finite element. Since the beam is relatively
slender, we would normally model it with beam elements. However, it is used here to help assess the
effectiveness of various solid elements.
The beam is 150 mm long, 2.5 mm wide, and 5 mm deep; built-in at one end; and carrying a tip
load of 5 N at the free end. The material has a Young’s modulus, E, of 70 GPa and a Poisson’s ratio of
0.0. Using beam theory, the static deflection of the tip of the beam for a load P is given as
where , l is the length, b is the width, and d is the depth of the beam.
For 5 N the tip deflection is 3.09 mm.
4.1.1 Full integration
The expression “full integration” refers to the number of Gauss points required to integrate the
polynomial terms in an element’s stiffness matrix exactly when the element has a regular shape. For
hexahedral and quadrilateral elements a “regular shape” means that the edges are straight and meet at
right angles and that any edge nodes are at the midpoint of the edge. Fully integrated, linear elements
use two integration points in each direction. Thus, the three-dimensional element C3D8 uses a 2 × 2
× 2 array of integration points in the element. Fully integrated, quadratic elements (available only in
Abaqus/Standard) use three integration points in each direction. The locations of the integration points
in fully integrated, two-dimensional, quadrilateral elements are shown in Figure 4–2.
4–2
Abaqus ID:
Printed on:

ELEMENT FORMULATION AND INTEGRATION
Quadratic element(e.g., CPS8)
Linear element(e.g., CPS4)
1 2 3
4 5 6
7 8 9
1 2
3 4
1 2
4 3
1 5 2
4
6
7
8
3
Figure 4–2 Integration points in fully integrated, two-dimensional, quadrilateral elements.
Several different finite element meshes were used in Abaqus/Standard simulations of the cantilever
beam problem, as shown in Figure 4–3. The simulations use either linear or quadratic, fully integrated
elements and illustrate the effects of both the order of the element (first versus second) and the mesh
density on the accuracy of the results.
1 × 6
2 × 12
4 × 12
8 × 24
Figure 4–3 Meshes used for the cantilever beam simulations.
The ratios of the tip displacements for the various simulations to the beam-theory value of 3.09 mm
are shown in Table 4–1.
The linear elements CPS4 and C3D8 underpredict the deflection so badly that the results are
unusable. The results are least accurate with coarse meshes, but even a fine mesh (8 × 24) still predicts
a tip displacement that is only 56% of the theoretical value. Notice that for the linear, fully integrated
elements it makes no difference how many elements there are through the thickness of the beam. The
underprediction of tip deflection is caused by shear locking, which is a problem with all fully integrated,
first-order, solid elements.
4–3
Abaqus ID:
Printed on:

ELEMENT FORMULATION AND INTEGRATION
Table 4–1 Normalized tip displacements with fully-integrated elements.
Mesh Size (Depth × Length)Element
1 × 6 2 × 12 4 × 12 8 × 24
CPS4 0.074 0.242 0.242 0.561
CPS8 0.994 1.000 1.000 1.000
C3D8 0.077 0.248 0.243 0.563
C3D20 0.994 1.000 1.000 1.000
As we have seen, shear locking causes the elements to be too stiff in bending. It is explained as
follows. Consider a small piece of material in a structure subject to pure bending. The material will
distort as shown in Figure 4–4.
1
2
M M
Figure 4–4 Deformation of material subjected to bending moment M.
Lines initially parallel to the horizontal axis take on constant curvature, and lines through the thickness
remain straight. The angle between the horizontal and vertical lines remains at 90°.
The edges of a linear element are unable to curve; therefore, if the small piece of material is modeled
using a single element, its deformed shape is like that shown in Figure 4–5.
1
2
M M1
2
Figure 4–5 Deformation of a fully integrated, linear element subjected to bending moment M.
For visualization, dotted lines that pass through the integration points are plotted. It is apparent that
the upper line has increased in length, indicating that the direct stress in the 1-direction, , is tensile.
Similarly, the length of the lower dotted line has decreased, indicating that is compressive. The
length of the vertical dotted lines has not changed (assuming that displacements are small); therefore,
at all integration points is zero. All this is consistent with the expected state of stress of a small piece
of material subjected to pure bending. However, at each integration point the angle between the vertical
and horizontal lines, which was initially 90°, has changed. This indicates that the shear stress, , at
4–4
Abaqus ID:
Printed on:

ELEMENT FORMULATION AND INTEGRATION
these points is nonzero. This is incorrect: the shear stress in a piece of material under pure bending is
zero.
This spurious shear stress arises because the edges of the element are unable to curve. Its presence
means that strain energy is creating shearing deformation rather than the intended bending deformation,
so the overall deflections are less: the element is too stiff.
Shear locking only affects the performance of fully integrated, linear elements subjected to
bending loads. These elements function perfectly well under direct or shear loads. Shear locking is not
a problem for quadratic elements since their edges are able to curve (see Figure 4–6). The predicted
tip displacements for the quadratic elements shown in Table 4–1 are close to the theoretical value.
However, quadratic elements will also exhibit some locking if they are distorted or if the bending stress
has a gradient, both of which can occur in practical problems.
1
2
M M
Figure 4–6 Deformation of a fully integrated, quadratic element subjected to bending moment M.
Fully integrated, linear elements should be used only when you are fairly certain that the loads will
produce minimal bending in your model. Use a different element type if you have doubts about the type
of deformation the loading will create. Fully integrated, quadratic elements can also lock under complex
states of stress; thus, you should check the results carefully if they are used exclusively in your model.
However, they are very useful for modeling areas where there are local stress concentrations.
Volumetric locking is another form of overconstraint that occurs in fully integrated elements when
the material behavior is (almost) incompressible. It causes overly stiff behavior for deformations that
should cause no volume changes. It is discussed further in Chapter 10, “Materials.”
4.1.2 Reduced integrationOnly quadrilateral and hexahedral elements can use a reduced-integration scheme; all wedge, tetrahedral,
and triangular solid elements use full integration, although they can be used in the same mesh with
reduced-integration hexahedral or quadrilateral elements.
Reduced-integration elements use one fewer integration point in each direction than the fully
integrated elements. Reduced-integration, linear elements have just a single integration point located
at the element’s centroid. (Actually, these first-order elements in Abaqus use the more accurate
“uniform strain” formulation, where average values of the strain components are computed for the
element. This distinction is not important for this discussion.) The locations of the integration points
for reduced-integration, quadrilateral elements are shown in Figure 4–7.
4–5
Abaqus ID:
Printed on:

ELEMENT FORMULATION AND INTEGRATION
1 2
3 4
1
4
8
2
34
Linear element(e.g., CPS4R)
Quadratic element(e.g., CPS8R)
1
3
2
1
5
7
6
Figure 4–7 Integration points in two-dimensional elements with reduced integration.
Abaqus simulations of the cantilever beam problem were performed using the reduced-integration
versions of the same four elements utilized previously and using the four finite element meshes shown
in Figure 4–3. The results from these simulations are presented in Table 4–2.
Table 4–2 Normalized tip displacements with reduced-integration elements.
Mesh Size (Depth × Length)Element
1 × 6 2 × 12 4 × 12 8 × 24
CPS4R 20.3* 1.308 1.051 1.012
CPS8R 1.000 1.000 1.000 1.000
C3D8R 70.1* 1.323 1.063 1.015
C3D20R 0.999** 1.000 1.000 1.000
* no stiffness to resist the applied load, ** two elements through width
Linear reduced-integration elements tend to be too flexible because they suffer from their own
numerical problem called hourglassing. Again, consider a single reduced-integration element modeling
a small piece of material subjected to pure bending (see Figure 4–8).
1
2
M M
Figure 4–8 Deformation of a linear element with reduced integration subjected to bending moment M.
Neither of the dotted visualization lines has changed in length, and the angle between them is also
unchanged, which means that all components of stress at the element’s single integration point are zero.
4–6
Abaqus ID:
Printed on:

ELEMENT FORMULATION AND INTEGRATION
This bending mode of deformation is thus a zero-energy mode because no strain energy is generated by
this element distortion. The element is unable to resist this type of deformation since it has no stiffness
in this mode. In coarse meshes this zero-energy mode can propagate through the mesh, producing
meaningless results.
In Abaqus a small amount of artificial “hourglass stiffness” is introduced in first-order reduced-
integration elements to limit the propagation of hourglass modes. This stiffness is more effective at
limiting the hourglassmodeswhenmore elements are used in themodel, whichmeans that linear reduced-
integration elements can give acceptable results as long as a reasonably fine mesh is used. The errors
seen with the finer meshes of linear reduced-integration elements (see Table 4–2) are within an acceptable
range for many applications. The results suggest that at least four elements should be used through the
thickness when modeling any structures carrying bending loads with this type of element. When a single
linear reduced-integration element is used through the thickness of the beam, all the integration points
lie on the neutral axis and the model is unable to resist bending loads. (These cases are marked with a *
in Table 4–2.)
Linear reduced-integration elements are very tolerant of distortion; therefore, use a fine mesh of
these elements in any simulation where the distortion levels may be very high.
The quadratic reduced-integration elements available in Abaqus/Standard also have hourglass
modes. However, the modes are almost impossible to propagate in a normal mesh and are rarely a
problem if the mesh is sufficiently fine. The 1 × 6 mesh of C3D20R elements fails to converge because
of hourglassing unless two elements are used through the width, but the more refined meshes do not
fail even when only one element is used through the width. Quadratic reduced-integration elements
are not susceptible to locking, even when subjected to complicated states of stress. Therefore, these
elements are generally the best choice for most general stress/displacement simulations, except in
large-displacement simulations involving very large strains and in some types of contact analyses.
4.1.3 Incompatible mode elementsThe incompatible mode elements, available primarily inAbaqus/Standard, are an attempt to overcome the
problems of shear locking in fully integrated, first-order elements. Since shear locking is caused by the
inability of the element’s displacement field to model the kinematics associated with bending, additional
degrees of freedom, which enhance the element’s deformation gradients, are introduced into the first-
order element. These enhancements to the deformation gradients allow a first-order element to have a
linear variation of the deformation gradient across the element’s domain as shown in Figure 4–9(a). The
standard element formulation results in a constant deformation gradient across the element as shown in
Figure 4–9(b), resulting in the nonzero shear stress associated with shear locking. These enhancements to
the deformation gradients are entirely internal to an element and are not associated with nodes positioned
along the element edges. Unlike incompatible mode formulations that enhance the displacement field
directly, the formulation used in Abaqus does not result in overlapping material or a hole along the
boundary between two elements, as shown in Figure 4–10. Furthermore, the formulation used in Abaqus
is extended easily to nonlinear, finite-strain simulations, somethingwhich is not as easywith the enhanced
displacement field elements.
4–7
Abaqus ID:
Printed on:

ELEMENT FORMULATION AND INTEGRATION
(a) (b)
y y
∂u∂y
∂u∂y
Figure 4–9 Variation of deformation gradient in (a) an incompatible mode (enhanced deformation
gradient) element and (b) a first-order element using a standard formulation.
holeinitialgeometry
deformedgeometry
Figure 4–10 Potential kinematic incompatibility between incompatible mode elements that
use enhanced displacement fields rather than enhanced deformation gradients. Abaqus uses
the latter formulation for its incompatible mode elements.
Incompatible mode elements can produce results in bending problems that are comparable to
quadratic elements but at significantly lower computational cost. However, they are sensitive to element
distortions. Figure 4–11 shows the cantilever beam modeled with deliberately distorted incompatible
mode elements: in one case with “parallel” distortion and in the other with “trapezoidal” distortion.
15°15° 15°
30°
45°
Parallel distortion
45°
Trapezoidal distortion
30°
Figure 4–11 Distorted meshes of incompatible mode elements.
4–8
Abaqus ID:
Printed on:

ELEMENT FORMULATION AND INTEGRATION
Figure 4–12 shows the tip displacements for the cantilever beam models. The tip displacements are
normalized with respect to the analytical solution and plotted against the level of element distortion.
Parallel distortion Trapezoidal distortion
CPS4I
CPS4
CPS8R
CPS4I
CPS4
CPS8R
Figure 4–12 Effect of parallel and trapezoidal distortion of incompatible mode elements.
Three types of plane stress elements in Abaqus/Standard are compared: the fully integrated, linear
element; the reduced-integration, quadratic element; and the linear, incompatible mode element. The
fully integrated, linear elements produce poor results in all cases, as expected. On the other hand, the
reduced-integration, quadratic elements give very good results that do not deteriorate until the elements
are badly distorted.
When the incompatible mode elements are rectangular, even a mesh with just one element through
the thickness of the cantilever gives results that are very close to the theoretical value. However, even
quite small levels of trapezoidal distortion make the elements much too stiff. Parallel distortion also
reduces the accuracy of the element but to a lesser extent.
Incompatible mode elements are useful because they can provide high accuracy at a low cost if they
are used appropriately. However, care must be taken to ensure that the element distortions are small,
which may be difficult when meshing complex geometries; therefore, you should again consider using
the reduced-integration, quadratic elements in models with such geometries because they show much
less sensitivity to mesh distortion. In a severely distorted mesh, however, simply changing the element
type will generally not produce accurate results. The mesh distortion should be minimized as much as
possible to improve the accuracy of the results.
4–9
Abaqus ID:
Printed on:

SELECTING CONTINUUM ELEMENTS
4.1.4 Hybrid elementsA hybrid element formulation is available for just about every type of continuum element in
Abaqus/Standard, including all reduced-integration and incompatible mode elements. Hybrid elements
are not available in Abaqus/Explicit. Elements using this formulation have the letter “H” in their names.
Hybrid elements are used when the material behavior is incompressible (Poisson’s ratio = 0.5)
or very close to incompressible (Poisson’s ratio > 0.475). Rubber is an example of a material with
incompressible material behavior. An incompressible material response cannot be modeled with regular
elements (except in the case of plane stress) because the pressure stress in the element is indeterminate.
Consider an element under uniform hydrostatic pressure (Figure 4–13).
Uniformpressure
Figure 4–13 Element under hydrostatic pressure.
If the material is incompressible, its volume cannot change under this loading. Therefore, the
pressure stress cannot be computed from the displacements of the nodes; and, thus, a pure displacement
formulation is inadequate for any element with incompressible material behavior.
Hybrid elements include an additional degree of freedom that determines the pressure stress in the
element directly. The nodal displacements are used only to calculate the deviatoric (shear) strains and
stresses.
A more detailed description of the analysis of rubber materials is given in Chapter 10, “Materials.”
4.2 Selecting continuum elements
The correct choice of element for a particular simulation is vital if accurate results are to be obtained at a
reasonable cost. You will undoubtedly develop your own guidelines for selecting elements for your own
particular applications as you become more experienced in using Abaqus. However, as you begin to use
Abaqus, the guidelines given here may be helpful.
The following recommendations apply to both Abaqus/Standard and Abaqus/Explicit:
4–10
Abaqus ID:
Printed on:

EXAMPLE: CONNECTING LUG
• Minimize the mesh distortion as much as possible. Coarse meshes with distorted linear elements
can give very poor results.
• Use a fine mesh of linear, reduced-integration elements (CAX4R, CPE4R, CPS4R, C3D8R, etc.)
for simulations involving very large mesh distortions (large-strain analysis).
• In three dimensions use hexahedral (brick-shaped) elements wherever possible. They give the
best results for the minimum cost. Complex geometries can be difficult to mesh completely with
hexahedrons; therefore, wedge and tetrahedral elements may be necessary. The linear versions of
these elements, C3D4 and C3D6, are poor elements (fine meshes are needed to obtain accurate
results); as a result, these elements should generally be used only when necessary to complete a
mesh, and, even then, they should be far from any areas where accurate results are needed.
• Some preprocessors contain free-meshing algorithms that mesh arbitrary geometries with
tetrahedral elements. The quadratic tetrahedral elements in Abaqus/Standard (C3D10 or C3D10I)
should give reasonable results for small-displacement problems without contact. An alternative to
these elements is the modified quadratic tetrahedral element available in both analysis products
(C3D10M), which is robust for large-deformation problems and contact problems using the
default “hard” contact relationship and exhibits minimal shear and volumetric locking. With either
element, however, the analysis will take longer to run than an equivalent mesh of hexahedral
elements. You should not use a mesh containing only linear tetrahedral elements (C3D4): the
results will be inaccurate unless you use an extremely large number of elements.
Abaqus/Standard users should also consider the following recommendations:
• Use quadratic, reduced-integration elements (CAX8R, CPE8R, CPS8R, C3D20R, etc.) for general
analysis work, unless you need to model very large strains or have a simulation with complex,
changing contact conditions.
• Use quadratic, fully integrated elements (CAX8, CPE8, CPS8, C3D20, etc.) locally where stress
concentrations may exist. They provide the best resolution of the stress gradients at the lowest cost.
• For contact problems use a fine mesh of linear, reduced-integration elements or incompatible mode
elements (CAX4I, CPE4I, CPS4I, C3D8I, etc.). See Chapter 12, “Contact.”
4.3 Example: connecting lug
In this example you will use three-dimensional, continuum elements to model the connecting lug shown
in Figure 4–14.
The lug is welded firmly to a massive structure at one end. The other end contains a hole. When
it is in service, a bolt will be placed through the hole of the lug. You have been asked to determine the
static deflection of the lug when a 30 kN load is applied to the bolt in the negative 2-direction. Because
the goal of this analysis is to examine the static response of the lug, you should use Abaqus/Standard as
your analysis product. You decide to simplify this problem by making the following assumptions:
4–11
Abaqus ID:
Printed on:

EXAMPLE: CONNECTING LUG
50 MPa pressureload
0.125 m 0.02
0.05 m
2 (y)
1 (x)
3 (z)
0.015 m
0.025 m
Figure 4–14 Sketch of the connecting lug.
• Rather than include the complex bolt-lug interaction in the model, you will use a distributed pressure
over the bottom half of the hole to load the connecting lug (see Figure 4–14).
• You will neglect the variation of pressure magnitude around the circumference of the hole and use
a uniform pressure.
• The magnitude of the applied uniform pressure will be 50 MPa: 30 kN/ (2 × 0.015 m × 0.02 m).
After examining the static response of the lug, you will modify the model and use Abaqus/Explicit
to study the transient dynamic effects resulting from sudden loading of the lug.
4.3.1 Coordinate system
In your model define the global 1-axis to lie along the length of the lug, the global 2-axis to be vertical,
and the global 3-axis to lie in the thickness direction. Place the origin of the global coordinate system
( ) at the center of the hole on the face (see Figure 4–14).
4–12
Abaqus ID:
Printed on:

EXAMPLE: CONNECTING LUG
4.3.2 Mesh designYou need to consider the type of element that will be used before you start building the mesh for a
particular problem. A suitable mesh design that uses quadratic elements may very well be unsuitable if
you change to linear, reduced-integration elements. For this example use 20-node hexahedral elements
with reduced integration (C3D20R). With the element type selected, you can design the mesh for the
connecting lug. The most important decision regarding the mesh design for this application is how many
elements to use around the circumference of the lug’s hole. A possible mesh for the connecting lug is
shown in Figure 4–15; you should build your model to be similar to it.
Figure 4–15 Suggested mesh of C3D20R elements for the connecting lug model.
Another thing to consider when designing a mesh is what type of results you want from the
simulation. The mesh in Figure 4–15 is rather coarse and, therefore, unlikely to yield accurate stresses.
Four quadratic elements per 90° is the minimum number that should be considered for a problem like
this one; using twice that many is recommended to obtain reasonably accurate stress results. However,
this mesh should be adequate to predict the overall level of deformation in the lug under the applied
loads, which is what you were asked to determine. The influence of increasing the mesh density used
in this simulation is discussed in “Mesh convergence,” Section 4.4.
You need to decide what system of units to use in your model. The SI system of meters, seconds,
and kilograms is recommended, but use another system if you prefer.
4.3.3 Preprocessing—creating the modelThe model for the overhead hoist in Chapter 2, “Abaqus Basics,” was simple enough that the Abaqus
input file could be created by typing the input directly into a text editor. This approach clearly is
impractical for most real problems; instead, this example and all subsequent examples in the book point
4–13
Abaqus ID:
Printed on:

EXAMPLE: CONNECTING LUG
you to the completed input file for the example, and the steps in the examples illustrate the syntax of
model and history data in the Abaqus input file. The complete input file for this example, lug.inp, isavailable in “Connecting lug,” Section A.2.
This example uses the mesh, the node and element sets shown in Figure 4–16, and the pressure load
and boundary conditions shown in Figure 4–14.
Node set: LHEND
Node set:HOLEBOT
Element set:PRESS
Element set: BUILTIN
Figure 4–16 Useful node and element sets for the connecting lug simulation.
Subsequent steps will add the additional data needed for the model to describe the format of an Abaqus
input file. If you would prefer to adjust the mesh and you do not have a preprocessor, use the Abaqus
mesh generation options in “Connecting lug,” Section A.2. If you wish to create the entire model
using Abaqus/CAE, refer to “Example: connecting lug,” Section 4.3 of Getting Started with Abaqus:
Interactive Edition.
In the description of this simulation that follows, the node and element numbers used are from
the model found in “Connecting lug,” Section A.2. These node and element numbers are shown in
Figure 4–17 and Figure 4–18. If you use a preprocessor, the node and element numbering in your model
will almost certainly differ from that shown here. As youmakemodifications to your input file, remember
to use the node and element numbers in your model and not those given here.
4–14
Abaqus ID:
Printed on:

EXAMPLE: CONNECTING LUG
Additional planes of nodes in the z-direction are incremented by 5000.
1 3 57
911
13
15
17
19
21
2325
272931333537
3941
43
45
47
49
51
53
5557
5961 63
201205
209
213
217
221
225
229233237
241
245
249
253
257
261
401 403405
407
409
411
413
415
417
419
421
423
425
427429
431433435437439441
443
445
447
449
451
453
455
457 459 461 463
601605
609
613
617
621
625
629633637641
645
649
653
657 661
801 803805
807
809
811
813
815
817
819
821
823
825
827829
831833835837839841
843
845
847
849
851
853
855
857 859 861 863
1041
1045
1049
1053
1057
1241
1243
1245
1247
1249
1251
1253
1255
1257
1441
1445
1449
1453
1457
1641
1643
1645
1647
1649
1651
1653
1655
1657
1841
1845
1849
1853
1857
2041
2043
2045
2047
2049
2051
2053
2055
2057
2241
2245
2249
2253
2257
2441
2443
2445
2447
2449
2451
2453
2455
2457
2641
2645
2649
2653
2657
2841
2843
2845
2847
2849
2851
2853
2855
2857
3041
3045
3049
3053
3057
3241
3243
3245
3247
3249
3251
3253
3255
3257
Figure 4–17 Node numbers in the plane .
Additional planes of elements in the z-direction are incremented by 1000.
1
2
3
4
5
6
7
8910
11
12
13
14
1516
101
102
103
104
105
106
107
108109110
111
112
113
114
115 116
201202203204205206
211212213214215216
221222223224225226
231232233234235236
Figure 4–18 Element numbers in the plane .
4.3.4 Reviewing the input file—the model dataThe model data—including the node and element definitions, set definitions, and section and material
properties—are discussed in the following sections.
4–15
Abaqus ID:
Printed on:

EXAMPLE: CONNECTING LUG
Model description
An Abaqus input file always starts with the *HEADING option. Often the description given in
this option by the preprocessor is not very informative, although it might give the date and time
when the file was generated. You should provide a suitable title on the data lines of this option
so that someone looking at this file can tell what is being modeled and what units you used. The
*HEADING option block used in lug.inp appears below:
*HEADINGLinear Elastic Steel Connecting LugS.I. Units (N, kg, m, s)
Nodal coordinates and element connectivity
In input files created by a preprocessor, the model’s nodal coordinates usually are in one large
*NODE option block, with the coordinates specified for each node individually.
The element definitions generated by the preprocessor usually are contained in several
*ELEMENT option blocks. Typically, each block contains elements that have the same element
section and material properties. In the connecting lug model only one element type is used, and
all the elements have the same properties. Therefore, there will probably be a single *ELEMENT
option block in your input file. It will look similar to
*ELEMENT, TYPE=C3D20R, ELSET=LUG1, 1, 401, 405, 5, 10001, 10401, 10405, 10005,
201, 403, 205, 3, 10201, 10403, 10205, 10003,5001, 5401, 5405, 5005
2, 5, 405, 409, 9, 10005, 10405, 10409, 10009,205, 407, 209, 7, 10205, 10407, 10209, 10007,
5005, 5405, 5409, 5009.......
Here three data lines are used to define the connectivity of one C3D20R element completely
(a minimum of two is required). If a data line in an *ELEMENT option block ends with a comma,
it indicates that the next data line contains more nodes defining the current element. The parameter
ELSET=LUG indicates that all the elements defined in the following data lines will be stored in
an element set called LUG. If your model does not have a descriptive element set name in the
*ELEMENT option, change it to LUG.
Node and element sets
The node and element sets are important components of an Abaqus input file because they allow
you to assign loads, boundary conditions, and material properties efficiently. They also offer great
flexibility in defining the output that your simulation will produce and make it much easier to
understand the input file.
4–16
Abaqus ID:
Printed on:

EXAMPLE: CONNECTING LUG
Some preprocessors, such as Abaqus/CAE, will allow you to select and name groups of entities,
such as nodes and elements, as you build the model; when the Abaqus input file is created, node
and element sets are generated from these groups.
You define sets using the *NSET and *ELSET options in the input file. The name of a set is
specified with either the NSET or ELSET parameter. The data lines list the nodes or elements that
are included in the set. Each data line can contain up to 16 numbers, and there can be as many data
lines as required. For example, the node set LHEND (see Figure 4–16) can be defined as
*NSET, NSET=LHEND3241, 3243, 3245, 3247, 3249, 3251, 3253, 3255, 3257,8241, 8245, 8249, 8253, 8257, 13241, 13243, 13245, 13247,
13249, 13251, 13253, 13255, 13257, 18241, 18245, 18249, 18253,18257, 23241, 23243, 23245, 23247, 23249, 23251, 23253, 23255,23257
If you are adding a node or element set to the input file with an editor and the identification
numbers follow a regular pattern, the GENERATE parameter allows a range of nodes to be included
by specifying the beginning node number, ending node number, and the increment in node numbers.
For example, the node set LHEND could be defined as follows:
*NSET, NSET=LHEND, GENERATE3241, 3257, 28241, 8257, 4
13241, 13257, 218241, 18257, 423241, 23257, 2
Sets can also be created by referring to other sets. If the preprocessor that you used did not
create the element set BUILTIN or the node set HOLEBOT that are shown in Figure 4–16, add them
to your input file using an editor; they will be essential in limiting the output during the simulation.
You should also create the element set PRESS shown in Figure 4–16. Remember to use the node
and element numbers in your model and not those shown in the figure.
Section properties
Look up the C3D20R element in Chapter 25, “Continuum Elements,” of the Abaqus Analysis User’s
Manual to determine the correct element section option and the required data that must be specified
for this element. You will discover that the C3D20R element uses the *SOLID SECTION option to
define the element’s section properties. Because this is a three-dimensional element, Abaqus needs
no additional geometric data for the element section.
Element set LUG contains all the elements, so that element set is suitable for this example. The
following element section option statement is used for this example:
*SOLID SECTION, ELSET=LUG, MATERIAL=STEEL
4–17
Abaqus ID:
Printed on:

EXAMPLE: CONNECTING LUG
If you did not define an element set with the name LUG, use the name of whatever element set
contains all the elements in your model as the value of the ELSET parameter. The material property
definition in the model will have the name STEEL.
Materials
The connecting lug is made of a mild steel and, thus, has isotropic, linear elastic material behavior
under the loads being applied. Assume that E = 200 GPa and that = 0.3. These are given on the
data line of the *ELASTIC option (remember the overhead hoist example in Chapter 2, “Abaqus
Basics”). The following material property definition specifies these properties in the input file:
*MATERIAL, NAME=STEEL*ELASTIC200.E9, 0.3
The value for the NAME parameter on the *MATERIAL option must match the value of the
MATERIAL parameter on the *SOLID SECTION option.
4.3.5 Reviewing the input file—the history dataThe history data portion of the input file starts at the first *STEP option. Many preprocessors create a
linear static step in the input file by default. This example will use a general static step. The following
options define the step:
*STEP<possibly a title describing this step>*STATIC
If these options are not in your input file, add them at the end of the existing data. It is easier for
someone else to understand your model if you use the data lines following the *STEP option to add a
suitable title describing the event being simulated in the step.
Boundary conditions
In the model of the connecting lug, all the nodes need to be constrained in all three directions at the
left-hand end where it is attached to its parent structure (see Figure 4–19).
In this example, each constrained degree of freedom is specified individually in the
*BOUNDARY option block, as shown below:
*BOUNDARY3241, 1,13241, 2,23241, 3,3......
If a large number of nodes are constrained, these data can occupy a great deal of space in the
computer’s memory. Where a number of nodes all have the same boundary conditions, it is more
4–18
Abaqus ID:
Printed on:

EXAMPLE: CONNECTING LUG
Figure 4–19 Boundary conditions on the connecting lug.
efficient to apply the constraints directly to a node set containing all the nodes. Thus, in the lug
model we prefer to create the node set LHEND to specify the constraints:
*BOUNDARYLHEND, ENCASTRE
If you think that you defined the boundary conditions incorrectly, you can display them in
Abaqus/Viewer and compare them with the boundary conditions shown in Figure 4–19. The
postprocessing instructions given at the end of “Postprocessing,” Section 2.3.9, discuss how to do
this.
Loading
The lug carries a pressure of 50 MPa distributed around the bottom-half of the hole. Pressure loads
can be defined conveniently using the preprocessor by selecting the element faces to which the load
is applied. In the connecting lug input file, these loads will appear as a *DLOAD option block. For
example, the *DLOAD option block for the connecting lug may look like
*DLOAD1, P6, 5.E+072, P6, 5.E+073, P6, 5.E+074, P6, 5.E+07
13, P6, 5.E+07...
1015, P6, 5.E+071016, P6, 5.E+07
4–19
Abaqus ID:
Printed on:

EXAMPLE: CONNECTING LUG
The format of each data line is
<element or element set name>, <load ID>, <load magnitude>
In this case the “load ID” consists of the letter “P” followed by the number of the element face to
which pressure is applied. The face numbers depend on the connectivity of the element and are
defined for each element type in the Abaqus Analysis User’s Manual. For the three-dimensional
hexahedral elements used in this example, the face numbers are shown in Figure 4–20.
Face 1
1
4
2
3
5
8
6
7
Face 5
Face 2
Face 4
Face 6
Face 3
Face 1 1-2-3-4 faceFace 2 5-8-7-6 faceFace 3 1-5-6-2 faceFace 4 2-6-7-3 faceFace 5 3-7-8-4 faceFace 6 4-8-5-1 face
Figure 4–20 Face numbers on hexahedral elements.
In the model, as defined in “Connecting lug,” Section A.2, the pressure is applied to face 6 of the
elements around the bottom of the hole, so the load ID is “P6.”
For meshes generated with a preprocessor, the face numbers and, hence, the load IDs will
depend on how the mesh is generated. Some preprocessors, such as Abaqus/CAE, can determine
the correct load ID automatically; this makes it very easy to specify pressure loads on complicated
meshes. However, this method tends to produce long lists of data lines in the input file. In models
where the same load ID and load magnitude are used for each element, you can use an element
set—which is more efficient—to apply the pressure loads. For example, in this model the *DLOAD
option block may appear as
*DLOADPRESS, P6, 5.E+07
where we have made use of the element set PRESS whose members are shown in Figure 4–16.
Output requests
By default, many preprocessors create an Abaqus input file that has a large number of output
request options. These requests are in addition to the output database file request that is generated
automatically by Abaqus. If, when you edit your input file, you find that these additional output
options were created, delete them because they will generally generate too much unnecessary
output.
4–20
Abaqus ID:
Printed on:

EXAMPLE: CONNECTING LUG
You were asked to determine the deflection of the connecting lug when the load is applied. A
simple method for obtaining this result is to print out all the displacements in the model. However, it
is likely that the location on the lug with the largest deflection is probably going to be on the bottom
of the hole, where the load is applied. Furthermore, only the displacement in the 2-direction (U2)
is going to be of interest. You should have created a node set, HOLEBOT, containing those nodes.
Use that set to limit the requested displacements to just those five nodes at the bottom of the hole
and to limit the output to just the vertical displacements.
*NODE PRINT, NSET=HOLEBOTU2,
It is good practice to check that the reaction forces at the constraints balance the applied loads.
All the reaction forces at a node can be printed by specifying the variable RF. We again use the node
set LHEND to limit the output to those nodes that are constrained.
*NODE PRINT, NSET=LHEND, TOTAL=YES, SUMMARY=NORF,
You can define several *NODE PRINT and *EL PRINT options. The parameter
TOTALS=YES causes the sum of the reaction forces at all the nodes in the node set to be printed.
The SUMMARY=NO parameter prevents the minimum and maximum values in the table from
being printed.
The following commands print the stress tensor (variable S) and the Mises stress (variable
MISES) for the elements at the constrained end (element set BUILTIN):
*EL PRINT, ELSET=BUILTINS, MISES
You will use the NFORC output variable to create and display free body cuts in
“Postprocessing—visualizing the results,” Section 4.3.8. The following options write the nodal
forces due to the element stresses to the output database while also writing the default output:
*OUTPUT, FIELD, VARIABLE=PRESELECT*ELEMENT OUTPUTNFORC,*OUTPUT, HISTORY, VARIABLE=PRESELECT
The end of a step is indicated with the option
*END STEP
This input option must be the last option in your model.
4–21
Abaqus ID:
Printed on:

EXAMPLE: CONNECTING LUG
4.3.6 Running the analysisIf you modified any input data, store the input in a file called lug.inp (an example file is listed in
“Connecting lug,” Section A.2). Then, run the simulation using the command:
abaqus job=lug interactive
When the job has completed, check the data file, lug.dat, for any errors or warnings. If there
are any errors, correct the input file and run the simulation again. If you have problems correcting any
errors, try comparing your input file to the one given in “Connecting lug,” Section A.2. Check that you
have the correct parameters for each input option.
4.3.7 ResultsWhen the job has completed successfully, look at the three tables of output that you requested. They will
be found at the end of the data file. A portion of the table of element stresses is shown in Figure 4–21.
The maximum Mises stress at the built-in end is approximately 306 MPa.
.
.
.
Integration point at which results are given.
THE FOLLOWING TABLE IS PRINTED AT THE INTEGRATION POINTS FOR ELEMENT TYPE C3D20R AND ELEMENT SET BUILTIN
ELEMENT PT FOOT- S11 S22 S33 S12 S13 S23 MISES NOTE
206 1 2.8192E+08 -8.1398E+06 -1.3867E+07 -6.9975E+06 -1.1688E+07 1.1556E+06 2.9392E+08 206 2 3.4766E+08 8.7629E+07 8.1158E+07 -4.9896E+07 4.2710E+07 3.1290E+06 2.8690E+08 206 3 1.8341E+08 1.3272E+06 -8.9091E+06 -3.3674E+07 -6.3447E+06 1.7790E+06 1.9661E+08 206 4 1.9471E+08 3.8981E+07 3.8422E+07 -2.4493E+07 2.7244E+07 3.1046E+06 1.6851E+08 206 5 3.0367E+08 -1.1909E+06 -2.7817E+06 -8.2581E+06 -4.0589E+06 -1.8407E+05 3.0608E+08 206 6 3.2968E+08 7.9725E+07 7.4055E+07 -5.6416E+07 9.2002E+06 -7.8331E+04 2.7153E+08 206 7 1.9944E+08 7.8575E+06 -1.0716E+06 -3.4469E+07 -2.3479E+06 5.4628E+05 2.0512E+08 206 8 1.8060E+08 3.3280E+07 3.2765E+07 -3.0944E+07 5.6498E+06 -7.4119E+04 1.5731E+08
1236 1 -1.9946E+08 -7.8863E+06 1.0719E+06 -3.4403E+07 -2.3479E+06 -5.4545E+05 2.0510E+08 1236 2 -1.8062E+08 -3.3293E+07 -3.2771E+07 -3.0908E+07 5.6503E+06 7.4267E+04 1.5730E+08 1236 3 -3.0367E+08 1.1878E+06 2.7818E+06 -8.2327E+06 -4.0583E+06 1.8502E+05 3.0607E+08 1236 4 -3.2963E+08 -7.9705E+07 -7.4039E+07 -5.6389E+07 9.1989E+06 7.8203E+04 2.7148E+08 1236 5 -1.8343E+08 -1.3529E+06 8.9107E+06 -3.3606E+07 -6.3449E+06 -1.7770E+06 1.9658E+08 1236 6 -1.9474E+08 -3.8996E+07 -3.8431E+07 -2.4460E+07 2.7246E+07 -3.1025E+06 1.6851E+08 1236 7 -2.8193E+08 8.1369E+06 1.3864E+07 -6.9711E+06 -1.1686E+07 -1.1543E+06 2.9393E+08 1236 8 -3.4761E+08 -8.7610E+07 -8.1144E+07 -4.9872E+07 4.2703E+07 -3.1275E+06 2.8686E+08
MAXIMUM 3.4766E+08 8.7629E+07 8.1158E+07 -6.9711E+06 4.2710E+07 3.1290E+06 3.0608E+08 ELEMENT 206 206 206 236 206 206 206
MINIMUM -3.4761E+08 -8.7610E+07 -8.1144E+07 -5.6416E+07 -4.2710E+07 -3.1290E+06 3.5722E+07 ELEMENT 236 236 236 206 1206 1206 226
Figure 4–21 Table of element stresses in the data file.
The tables showing the displacements of the nodes along the bottom of the hole and the reaction
forces at the constrained nodes are shown in Figure 4–22 and Figure 4–23, respectively.
4–22
Abaqus ID:
Printed on:

EXAMPLE: CONNECTING LUG
THE FOLLOWING TABLE IS PRINTED FOR NODES BELONGING TO NODE SET HOLEBOT
NODE FOOT- U2 NOTE
1 -3.1342E-04 5001 -3.1348E-04 10001 -3.1349E-04 15001 -3.1348E-04 20001 -3.1342E-04
MAXIMUM -3.1342E-04 AT NODE 20001
MINIMUM -3.1349E-04 AT NODE 10001
Figure 4–22 Table of nodal displacements in the data file.
The bottom of the hole in the lug has displaced about 0.3 mm. The total reaction force in the 2-direction
at the constrained nodes is equal and opposite to the applied load in that direction of −30 kN.
4.3.8 Postprocessing—visualizing the resultsOnce you have looked at the results in the data file, start Abaqus/Viewer by typing the following
command at the operating system prompt:
abaqus viewer odb=lug
Plotting the deformed shape
From the main menu bar, select Plot→Deformed Shape; or use the tool in the toolbox.
Figure 4–24 displays the deformed model shape at the end of the analysis. What is the displacement
magnification level?
Changing the view
The default view is isometric. You can change the view using the options in the View menu or the
view tools in the View Manipulation toolbar. You can also specify a view by entering values for
rotation angles, viewpoint, zoom factor, or fraction of viewport to pan. Direct view manipulation
is also available using the 3D compass.
To manipulate the view using the 3D compass:
• Click and drag one of the straight axes of the 3D compass to pan along an axis.
• Click and drag any of the quarter-circular faces on the 3D compass to pan along a plane.
• Click and drag one of the three arcs along the perimeter of the 3D compass to rotate the
model about the axis that is perpendicular to the plane containing the arc.
• Click and drag the free rotation handle (the point at the top of the 3D compass) to rotate
the model freely about its pivot point.
4–23
Abaqus ID:
Printed on:

EXAMPLE: CONNECTING LUG
The totals of the reaction forcesmake it easy to check that the sumof the forces acting on the model(applied loads plus the reactionforces) is equal to zero.
THE FOLLOWING TABLE IS PRINTED FOR NODES BELONGING TO NODE SET LHEND
NODE FOOT- RF1 RF2 RF3 NOTE
3241 872.9 765.2 -936.5 3243 -1.0792E+04 -139.6 -2692. 3245 2544. 29.24 -636.7 3247 -3471. 248.1 -879.4 3249 -0.1244 -366.6 9.4686E-02 3251 3473. 247.2 879.7 3253 -2543. 29.40 636.9 3255 1.0792E+04 -140.0 2692. 3257 -873.2 765.1 936.4 8241 -1.2520E+04 3365. -150.5 8245 -1.1681E+04 1683. -221.0 8249 0.7131 761.5 -1.5664E-02 8253 1.1682E+04 1681. 220.9 8257 1.2518E+04 3364. 150.4 13241 2632. 1467. -1.2818E-11 13243 -1.8432E+04 256.3 5.4115E-10 13245 6063. 273.5 -1.1869E-10 13247 -5943. 946.3 1.0687E-10 13249 -0.4196 -470.0 -1.4521E-10 13251 5944. 944.6 -1.1846E-10 13253 -6063. 273.8 -1.7849E-10 13255 1.8431E+04 255.3 -4.3929E-10 13257 -2632. 1467. -8.8306E-11 18241 -1.2520E+04 3365. 150.5 18245 -1.1681E+04 1683. 221.0 18249 0.7131 761.5 1.5664E-02 18253 1.1682E+04 1681. -220.9 18257 1.2518E+04 3364. -150.4 23241 872.9 765.2 936.5 23243 -1.0792E+04 -139.6 2692. 23245 2544. 29.24 636.7 23247 -3471. 248.1 879.4 23249 -0.1244 -366.6 -9.4686E-02 23251 3473. 247.2 -879.7 23253 -2543. 29.40 -636.9 23255 1.0792E+04 -140.0 -2692. 23257 -873.2 765.1 -936.4
TOTAL 1.7806E-09 3.0000E+04 1.6445E-09
Figure 4–23 Table of reaction forces in the data file.
• Click the label for any of the axes on the 3D compass to select a predefined view (the
selected axis is perpendicular to the plane of the viewport).
• Double-click anywhere on the 3D compass to specify a view.
Most of the views in this manual are specified directly. This is to allow you to confirm the state of
your model by checking against the images in the manual. You are encouraged, however, to practice
using the above methods to manipulate your views as you deem fit.
To specify the view:
1. From the main menu bar, select View→Specify (or double-click the 3D compass).
The Specify View dialog box appears.
4–24
Abaqus ID:
Printed on:

EXAMPLE: CONNECTING LUG
Step: Step−1Increment 1: Step Time = 2.2200E−16
Deformed Var: U Deformation Scale Factor: +2.968e+01
1
2
3
Figure 4–24 Deformed model shape of connecting lug (shaded).
2. From the list of available methods, select Viewpoint.
In the Viewpoint method, you enter three values representing the X-, Y-, and Z-position of an
observer. You can also specify an up vector. Abaqus positions your model so that this vector
points upward.
3. Enter the X-, Y-, and Z-coordinates of the viewpoint vector as 1, 1, 3 and the coordinates
of the up vector as 0, 1, 0.
4. Click OK.Abaqus/Viewer displays your model in the specified view, as shown in Figure 4–25.
Step: Step−1Increment 1: Step Time = 2.2200E−16
Deformed Var: U Deformation Scale Factor: +2.968e+01
1
2
3
Figure 4–25 Deformedmodel shape viewed from specified viewpoint.
4–25
Abaqus ID:
Printed on:

EXAMPLE: CONNECTING LUG
Visible edges
Several options are available for choosing which edges will be visible in the model display. The
previous plots show all exterior edges of the model; Figure 4–26 displays only feature edges.
Step: Step−1Increment 1: Step Time = 2.2200E−16
Deformed Var: U Deformation Scale Factor: +2.968e+01
1
2
3
Figure 4–26 Deformed shape with only feature edges visible.
To display only feature edges:
1. From the main menu bar, select Options→Common.
The Common Plot Options dialog box appears.
2. Click the Basic tab if it is not already selected.
3. From the Visible Edges options, choose Feature edges.
4. Click Apply.
The deformed plot in the current viewport changes to display only feature edges, as shown in
Figure 4–26.
Render style
A shaded plot is a filled plot in which a lightsource appears to be directed at the model. This is
the default render style and can be very useful when viewing complex three-dimensional models.
Three other render styles provide additional display options: wireframe, hidden line, and filled.
You can select a render style from the Common Plot Options dialog box or from the tools on the
4–26
Abaqus ID:
Printed on:

EXAMPLE: CONNECTING LUG
Render Style toolbar: wireframe , hidden line , filled , and shaded . To display
the wireframe plot shown in Figure 4–27, select Exterior edges in the Common Plot Options
dialog box, click OK to close the dialog box, and select wireframe plotting by clicking the tool.
All subsequent plots will be displayed in the wireframe render style until you select another render
style.
Step: Step−1Increment 1: Step Time = 2.2200E−16
Deformed Var: U Deformation Scale Factor: +2.968e+01
1
2
3
Figure 4–27 Wireframe plot.
A wireframe model showing internal edges can be visually confusing for complex
three-dimensional models. You can use the other render style tools to select the hidden line and
filled render styles, shown in Figure 4–28 and Figure 4–29, respectively. These render styles are
more useful when viewing complex three-dimensional models.
1
2
3Step: Step-1Increment 1: Step Time = 2.2200E-16
Deformed Var: U Deformation Scale Factor: +2.968e+01
Figure 4–28 Hidden line plot.
4–27
Abaqus ID:
Printed on:

EXAMPLE: CONNECTING LUG
Step: Step−1Increment 1: Step Time = 2.2200E−16
Deformed Var: U Deformation Scale Factor: +2.968e+01
1
2
3
Figure 4–29 Filled element plot.
Contour plots
Contour plots display the variation of a variable across the surface of a model. You can create filled
or shaded contour plots of field output results from the output database.
To generate a contour plot of the Mises stress:
1. From the main menu bar, select Plot→Contours→On Deformed Shape.
The filled contour plot shown in Figure 4–30 appears.
The Mises stress, S Mises, indicated in the legend title is the default variable chosen by
Abaqus for this analysis. You can select a different variable to plot.
2. From the main menu bar, select Result→Field Output.
The Field Output dialog box appears; by default, the Primary Variable tab is selected.
3. From the list of available output variables, select a new variable to plot.
4. Click OK.
The contour plot in the current viewport changes to reflect your selection.
Tip: You can also use the Field Output toolbar, located above the viewport, to change
the displayed field output variable. For more information, see “Using the field output
toolbar,” Section 40.4.2 of the Abaqus/CAE User’s Manual.
Abaqus/Viewer offers many options to customize contour plots. To see the available options,
click the Contour Options tool in the toolbox. By default, Abaqus/Viewer automatically
4–28
Abaqus ID:
Printed on:

EXAMPLE: CONNECTING LUG
(Avg: 75%)S, Mises
+8.879e+06+3.857e+07+6.827e+07+9.796e+07+1.277e+08+1.573e+08+1.870e+08+2.167e+08+2.464e+08+2.761e+08+3.058e+08+3.355e+08+3.652e+08
Step: Step−1Increment 1: Step Time = 2.2200E−16Primary Var: S, MisesDeformed Var: U Deformation Scale Factor: +2.968e+01
Figure 4–30 Filled contour plot of Mises stress.
computes the minimum and maximum values shown in your contour plots and evenly divides the
range between these values into 12 intervals. You can control the minimum and maximum values
Abaqus/Viewer displays (for example, to examine variations within a fixed set of bounds), as well
as the number of intervals.
To generate a customized contour plot:
1. In the Basic tabbed page of the Contour Plot Options dialog box, drag the ContourIntervals slider to change the number of intervals to nine.
2. In the Limits tabbed page of the Contour Plot Options dialog box, choose Specify beside
Max; then enter a maximum value of 400E+6.
3. Choose Specify beside Min; then enter a minimum value of 60E+6.
4. Click OK.
Abaqus/Viewer displays your model with the specified contour option settings, as shown in
Figure 4–31 (this figure shows Mises stress; your plot will show whichever output variable
you have chosen). These settings remain in effect for all subsequent contour plots until you
change them or reset them to their default values.
4–29
Abaqus ID:
Printed on:

EXAMPLE: CONNECTING LUG
(Avg: 75%)S, Mises
+6.000e+07+9.778e+07+1.356e+08+1.733e+08+2.111e+08+2.489e+08+2.867e+08+3.244e+08+3.622e+08+4.000e+08
+8.879e+06
Step: Step−1Increment 1: Step Time = 2.2200E−16Primary Var: S, MisesDeformed Var: U Deformation Scale Factor: +2.968e+01
Figure 4–31 Customized plot of Mises stress.
Displaying contour results on interior surfaces
You can cut your model such that interior surfaces are made visible. For example, you may want to
examine the stress distribution in the interior of a part. View cuts can be created for such purposes.
Here, a simple planar cut is made through the lug to view the Mises stress distribution through the
thickness of the part.
To create a view cut:
1. From the main menu bar, select Tools→View Cut→Create.
2. In the dialog box that appears, accept the default name and shape. Enter 0,0,0 as the Originof the plane (i.e., a point through which the plane will pass), 1,0,1 as the Normal axis to
the plane, and 0,1,0 as Axis 2 of the plane.
3. Click OK to close the dialog box and to make the view cut.
The view appears as shown in Figure 4–32. From the main menu bar, select Tools→ViewCut→Manager to open the View Cut Manager. By default, the regions on and below the cut
4–30
Abaqus ID:
Printed on:

EXAMPLE: CONNECTING LUG
(Avg: 75%)S, Mises
+6.000e+07+9.778e+07+1.356e+08+1.733e+08+2.111e+08+2.489e+08+2.867e+08+3.244e+08+3.622e+08+4.000e+08
+8.879e+06
Step: Step−1Increment 1: Step Time = 2.2200E−16Primary Var: S, MisesDeformed Var: U Deformation Scale Factor: +2.968e+01
Figure 4–32 Mises stress through the lug thickness.
are displayed (as indicated by the check marks beneath the on cut and below cutsymbols). To translate or rotate the cut, choose Translate or Rotate from the list of available
motions and enter a value or drag the slider at the bottom of the View Cut Manager.
4. To view the full model again, toggle off Cut-4 in the View Cut Manager.
For more information on view cuts, see Chapter 77, “Cutting through a model,” of the
Abaqus/CAE User’s Manual.
Maximum and minimum values
The maximum and minimum values of a variable in a model can be determined easily.
To display the minimum and maximum values of a contour variable:
1. From the main menu bar, select Viewport→Viewport Annotation Options; then click the
Legend tab in the dialog box that appears.
The Legend options become available.
2. Toggle on Show min/max values.
3. Click OK.
The contour legend changes to report the minimum and maximum contour values.
4–31
Abaqus ID:
Printed on:

EXAMPLE: CONNECTING LUG
One of the goals of this example is to determine the deflection of the lug in the negative
2-direction. You can contour the displacement component of the lug in the 2-direction to determine
its peak displacement in the vertical direction as follows. In the Contour Plot Options dialog box,
click Defaults to reset the minimum and maximum contour values and the number of intervals to
their default values before proceeding.
To contour the displacement of the connecting lug in the 2-direction:
1. From the list of variable types on the left side of the Field Output toolbar, select Primary if
it is not already selected.
Tip: You can click on the left side of the Field Output toolbar to make your
selections from the Field Output dialog box instead of the toolbar. If you use
the dialog box, you must click Apply or OK for Abaqus/Viewer to display your
selections in the viewport.
2. From the list of available output variables in the center of the toolbar, select output variable U.
3. From the list of available components and invariants on the right side of the Field Outputtoolbar, select U2.
What is the maximum displacement value in the negative 2-direction?
Displaying a subset of the model
By default, Abaqus/Viewer displays your entire model; however, you can choose to display a subset
of your model called a display group. This subset can contain any combination of part instances,
geometry (cells, faces, or edges), elements, nodes, and surfaces from the current model or output
database. For the connecting lug model you will create a display group consisting of the elements
at the bottom of the hole. Since a pressure load was applied to this region, an internal set is created
by Abaqus that can be used for visualization purposes.
To display a subset of the model:
1. In the Results Tree, double-click Display Groups.
The Create Display Group dialog box opens.
2. From the Item list, select Elements. From the Method list, select Internal sets.
Once you have selected these items, the list on the right-hand side of the Create DisplayGroup dialog box shows the available selections.
3. Using this list, identify the set that contains the elements at the bottom of the hole. Toggle on
Highlight items in viewport below the list so that the outlines of the elements in the selected
set are highlighted in red.
4–32
Abaqus ID:
Printed on:

EXAMPLE: CONNECTING LUG
4. When the highlighted set corresponds to the group of elements at the bottom of the hole, click
Replace to replace the current model display with this element set.
Abaqus/Viewer displays the specified subset of your model.
5. Click Dismiss to close the Create Display Group dialog box.
When creating an Abaqus model, youmay want to determine the face labels for a solid element.
For example, you may want to verify that the correct load ID was used when applying pressure loads
or when defining surfaces for contact. In such situations you can use the Visualization module to
display the mesh after you have run a datacheck analysis that creates an output database file.
To display the face identification labels and element numbers on the undeformedmodel shape:
1. From the main menu bar, select Options→Common.
The Common Plot Options dialog box appears.
2. Set the render style to filled; all visible element edges will be displayed for convenience.
a. Toggle on Filled under Render Style.
b. Toggle on All edges under Visible Edges.
3. Click the Labels tab, and toggle on Show element labels and Show face labels.
4. Click Apply to apply the plot options.
5. From the main menu bar, select Plot→Undeformed Shape; or use the tool in the
toolbox.
Abaqus/Viewer displays the element and face identification labels in the current display group.
6. Click Defaults in the Common Plot Options dialog box to restore the default plot settings
and then click OK to close the dialog box.
Displaying a free body cut
You can define a free body cut to view the resultant forces andmoments transmitted across a selected
surface of a model. Force vectors are displayed with a single arrowhead and moment vectors with
a double arrowhead.
To create a free body cut:
1. To display the entire model in the viewport, select Tools→Display Group→Plot→All fromthe main menu bar.
2. From the main menu bar, select Tools→Free Body Cut→Manager.
3. Click Create in the Free Body Cut Manager.
4–33
Abaqus ID:
Printed on:

EXAMPLE: CONNECTING LUG
4. From the dialog box that appears, select 3D element faces as the Selection method and
click Continue.
5. In the Free Body Cross-Section dialog box, select Surfaces as the Item and Pick fromviewport as the Method.
6. In the prompt area, set the selection method to by angle and accept the default angle.
7. Select the surface, highlighted in Figure 4–33, to define the free body cut cross-section.
a. From the Selection toolbar, toggle off the Select the Entity Closest to the Screen
tool and ensure that the Select From All Entities tool is selected.
b. As you move the cursor in the viewport, Abaqus/CAE highlights all of the potential
selections and adds ellipsis marks (...) next to the cursor arrow to indicate an ambiguous
selection. Position the cursor so that one of the faces of the desired surface is highlighted,
and click to display the first surface selection.
Figure 4–33 Selected faces for the free body cross-section.
c. Use the Next and Previous buttons to cycle through the possible selections until the
appropriate vertical surface is highlighted, and click OK.
8. Click Done in the prompt area to indicate your selection is complete. Click OK in the FreeBody Cross-Section dialog box.
9. In the Edit Free Body Cut dialog box, accept the default settings for the Summation Pointand the Component Resolution. Click OK to close the dialog box.
10. Click Options in the Free Body Cut Manager.
4–34
Abaqus ID:
Printed on:

EXAMPLE: CONNECTING LUG
11. From the Free Body Plot Options dialog box, select the Force tab in the Color & Styletabbed page. Click the resultant color sample to change the color of the resultant force
arrow.
12. Once you have selected a new color for the resultant force arrow, click OK in the Free BodyPlot Options dialog box and click Dismiss in the Free Body Cut Manager.
The free body cut is displayed in the viewport, as shown in Figure 4–34.
Figure 4–34 Free body cut displayed on the connecting lug.
Generating tabular data reports for subsets of the model
Tabular output data were generated earlier for this model using printed output requests. However,
for complicated models it is convenient to write these data for selected regions of the model using
Abaqus/Viewer. This is achieved using display groups in conjunction with the report generation
feature. For the connecting lug problem we will generate the following tabular data reports:
• Stresses in the elements at the built-in end of the lug (to determine the maximum stress in the
lug)
• Reaction forces at the built-in end of the lug (to check that the reaction forces at the constraints
balance the applied loads)
• Vertical displacements at the bottom of the hole (to determine the deflection of the lug when
the load is applied)
Each of these reports will be generated using display groups whose contents are selected in the
viewport. Thus, begin by creating and saving display groups for each region of interest.
4–35
Abaqus ID:
Printed on:

EXAMPLE: CONNECTING LUG
To create and save a display group containing the elements at the built-in end:
1. In the Results Tree, double-click Display Groups.
2. Choose Elements from the Item list and Pick from viewport as the selection method.
3. Restore the option to select entities closest to the screen.
4. In the prompt area, set the selection method to by angle; and click the built-in face of the lug.Click Done when all the elements at the built-in face of the lug are highlighted in the viewport.
In the Create Display Group dialog box, click Replace followed by Save As. Savethe display group as built-in elements.
To create and save a display group containing the nodes at the built-in end:
1. In the Create Display Group dialog box, choose Nodes from the Item list and Pick fromviewport as the selection method.
2. In the prompt area, set the selection method to by angle; and click the built-in face of the lug.Click Done when all the nodes on the built-in face of the lug are highlighted in the viewport.
In the Create Display Group dialog box, click Replace followed by Save As. Savethe display group as built-in nodes.
To create and save a display group containing the nodes at the bottom of the hole:
1. In the Create Display Group dialog box, select All from the item list, and click Replace
to reset the active display group to include the entire model.
2. In the Create Display Group dialog box, choose Nodes from the Item list and Pick fromviewport as the selection method.
3. In the prompt area, set the selection method to individually; and select the nodes at the bottomof the hole in the lug, as indicated in Figure 4–35. ClickDone when all the nodes on the bottom
of the hole are highlighted in the viewport. In the Create Display Group dialog box, click
Replace followed by Save As. Save the display group as nodes at hole bottom.
Now generate the reports.
To generate field data reports:
1. In the Results Tree, click mouse button 3 on built-in elements underneath the DisplayGroups container. In the menu that appears, select Plot to make it the current display group.
2. From the main menu bar, select Report→Field Output.
4–36
Abaqus ID:
Printed on:

EXAMPLE: CONNECTING LUG
Figure 4–35 Nodes in display group nodes at hole bottom.
3. In theVariable tabbed page of theReport Field Output dialog box, accept the default positionlabeled Integration Point. Click the triangle next to S: Stress components to expand the
list of available variables. From this list, selectMises and the six individual stress components:
S11, S22, S33, S12, S13, and S23.
4. In the Setup tabbed page, name the report Lug.rpt. In the Data region at the bottom of the
page, toggle off Column totals.
5. Click Apply.
6. In the Results Tree, click mouse button 3 on built-in nodes underneath the Display Groupscontainer. In the menu that appears, select Plot to make it the current display group. (To see
the nodes, toggle on Show node symbols in the Common Plot Options dialog box.)
7. In the Variable tabbed page of the Report Field Output dialog box, change the position to
Unique Nodal. Toggle off S: Stress components, and select RF1, RF2, and RF3 from the
list of available RF: Reaction force variables.
8. In the Data region at the bottom of the Setup tabbed page, toggle on Column totals.
9. Click Apply.
4–37
Abaqus ID:
Printed on:

EXAMPLE: CONNECTING LUG
10. In the Results Tree, click mouse button 3 on nodes at hole bottom underneath the DisplayGroups container. In the menu that appears, select Plot to make it the current display group.
11. In the Variable tabbed page of the Report Field Output dialog box, toggle off RF: Reactionforce, and select U2 from the list of available U: Spatial displacement variables.
12. In the Data region at the bottom of the Setup tabbed page, toggle off Column totals.
13. Click OK.
Open the file Lug.rpt in a text editor. A portion of the table of element stresses is shown
below. The element data are given at the element integration points. The integration point associated
with a given element is noted under the column labeled Int Pt. The bottom of the table contains
information on the maximum and minimum stress values in this group of elements. The results
indicate that the maximum Mises stress at the built-in end is approximately 330 MPa. Your results
may differ slightly if your mesh is not identical to the one used here.
Field Output Report
Source 1---------
ODB: lug.odbStep: Step-1Frame: Increment 1: Step Time = 2.2200E-16
Loc 1 : Integration point values from source 1
Output sorted by column "Element Label".
Field Output reported at nodes for part: PART-1-1
Element Int S.Mises S.S11 S.S22 S.S33 S.S12Label Pt @Loc 1 @Loc 1 @Loc 1 @Loc 1 @Loc 1------------------------------------------------------------------------------
S.S13 S.S23@Loc 1 @Loc 1
--------------------------206 1 293.921E+06 281.921E+06 -8.1398E+06 -13.8667E+06 -6.99752E+06
-11.6881E+06 1.15564E+06206 2 286.9E+06 347.661E+06 87.6292E+06 81.1577E+06 -49.8957E+0642.7097E+06 3.12903E+06206 3 196.605E+06 183.407E+06 1.32717E+06 -8.90914E+06 -33.674E+06
-6.34469E+06 1.77895E+06206 4 168.508E+06 194.713E+06 38.9812E+06 38.4224E+06 -24.4931E+0627.2442E+06 3.10456E+06206 5 306.077E+06 303.672E+06 -1.19087E+06 -2.78165E+06 -8.2581E+06
-4.05888E+06 -184.07E+03206 6 271.531E+06 329.68E+06 79.7248E+06 74.0551E+06 -56.4163E+069.20019E+06 -78.3313E+03206 7 205.123E+06 199.438E+06 7.85751E+06 -1.07157E+06 -34.4693E+06
-2.34785E+06 546.279E+03206 8 157.315E+06 180.601E+06 33.2797E+06 32.7648E+06 -30.9435E+065.64979E+06 -74.1186E+03
.
.1236 1 205.096E+06 -199.458E+06 -7.88628E+06 1.07185E+06 -34.4032E+06-2.3479E+06 -545.449E+031236 2 157.301E+06 -180.618E+06 -33.2934E+06 -32.7715E+06 -30.9083E+065.65027E+06 74.2669E+031236 3 306.071E+06 -303.67E+06 1.18777E+06 2.78175E+06 -8.2327E+06
-4.05827E+06 185.017E+031236 4 271.48E+06 -329.625E+06 -79.7048E+06 -74.0391E+06 -56.3889E+069.19885E+06 78.2027E+03
4–38
Abaqus ID:
Printed on:

EXAMPLE: CONNECTING LUG
1236 5 196.584E+06 -183.433E+06 -1.35291E+06 8.91071E+06 -33.6059E+06-6.34491E+06 -1.77698E+061236 6 168.507E+06 -194.738E+06 -38.996E+06 -38.4311E+06 -24.4598E+0627.2461E+06 -3.10252E+061236 7 293.927E+06 -281.931E+06 8.13693E+06 13.8641E+06 -6.97109E+06
-11.6862E+06 -1.15429E+061236 8 286.857E+06 -347.614E+06 -87.6102E+06 -81.1438E+06 -49.8721E+0642.7034E+06 -3.12746E+06
Minimum 35.7223E+06 -347.614E+06 -87.6102E+06 -81.1438E+06 -56.4163E+06-42.7097E+06 -3.12903E+06
At Element 226 236 236 1236 12061206 1206Int Pt 2 4 4 8 2
6 6Maximum 306.077E+06 347.661E+06 87.6292E+06 81.1577E+06 -6.97109E+0642.7097E+06 3.12903E+06
At Element 206 1206 1206 206 1236206 206Int Pt 5 6 6 2 7
2 2
How does the maximum value of Mises stress compare to the value reported in the contour plot
generated earlier? Do the two maximum values correspond to the same point in the model? The
Mises stresses shown in the contour plot have been extrapolated to the nodes, whereas the stresses
written to the report file for this problem correspond to the element integration points. Therefore,
the location of the maximum Mises stress in the report file is not exactly the same as the location of
the maximum Mises stress in the contour plot. This difference can be resolved by requesting that
stress output at the nodes (extrapolated from the element integration points and averaged over all
elements containing a given node) be written to the report file. If the difference is large enough to
be of concern, this is an indication that the mesh may be too coarse.
The table listing the reaction forces at the constrained nodes is shown below. The Total entry
at the bottom of the table contains the net reaction force components for this group of nodes. The
results confirm that the total reaction force in the 2-direction at the constrained nodes is equal and
opposite to the applied load of −30 kN in that direction.
Field Output Report
Source 1---------
ODB: lug.odbStep: Step-1Frame: Increment 1: Step Time = 2.2200E-16
Loc 1 : Nodal values from source 1
Output sorted by column "Node Label".
Field Output reported at nodes for part: PART-1-1
Node RF.RF1 RF.RF2 RF.RF3Label @Loc 1 @Loc 1 @Loc 1
-----------------------------------------------------------------3241 872.912 765.17 -936.5413243 -10.7924E+03 -139.598 -2.69241E+033245 2.5436E+03 29.2367 -636.6683247 -3.47143E+03 248.065 -879.4013249 -124.431E-03 -366.58 94.6864E-03
.
4–39
Abaqus ID:
Printed on:

EXAMPLE: CONNECTING LUG
.23249 -124.431E-03 -366.58 -94.6864E-0323251 3.47251E+03 247.215 -879.69923253 -2.54332E+03 29.3956 -636.90623255 10.7918E+03 -139.991 -2.69226E+0323257 -873.161 765.137 -936.363
Minimum -18.4323E+03 -470.038 -2.69241E+03At Node 13243 13249 3243
Maximum 18.431E+03 3.3654E+03 2.69241E+03At Node 13255 8241 23243
Total 600.502E-06 30.0000E+03 -454.747E-12
The table showing the displacements of the nodes along the bottom of the hole (listed below)
indicates that the bottom of the hole in the lug has displaced about 0.3 mm.
Field Output Report
Source 1---------
ODB: lug.odbStep: Step-1Frame: Increment 1: Step Time = 2.2200E-16
Loc 1 : Nodal values from source 1
Output sorted by column "Node Label".
Field Output reported at nodes for part: PART-1-1
Node U.U2Label @Loc 1
---------------------------------1 -313.425E-06
10001 -313.494E-0620001 -313.425E-06
Minimum -313.494E-06
At Node 10001Maximum -313.425E-06
At Node 20001
4.3.9 Rerunning the analysis using Abaqus/Explicit
Youwill now evaluate the dynamic response of the lugwhen the same load is applied suddenly. Of special
interest is the transient response of the lug. You will have to modify the model for the Abaqus/Explicit
analysis. Before proceeding, copy the existing input file to a input file named lug_xpl.inp. Make all
subsequent changes to the lug_xpl.inp input file. Before running the explicit analysis, you will need
to change the element type, add a density to the material model, and change the step type. In addition,
you should make modifications to the field output requests.
4–40
Abaqus ID:
Printed on:

EXAMPLE: CONNECTING LUG
Change element type
Second-order hexahedral elements are not available in the Abaqus/Explicit element library. Thus,
you will need to change the element type specified on the *ELEMENT option from C3D20R to
C3D8R. This change also requires that you edit the element nodal connectivity so that only eight
nodes are specified for each element. For example, the following *ELEMENT option block was
used to define one of the elements in lug.inp:
*ELEMENT, TYPE=C3D20R1, 1, 401, 405, 5, 10001, 10401, 10405, 10005,
201, 403, 205, 3, 10201, 10403, 10205, 10003,5001, 5401, 5405, 5005
In lug_xpl.inp this option block has two changes: the element type has been changed to C3D8R
and the nodal connectivity consists of the first eight nodes in the original list, which define the corner
nodes of the element.
*ELEMENT, TYPE=C3D8R1, 1, 401, 405, 5, 10001, 10401, 10405, 10005
Because the C3D8R element employs reduced integration, use the enhanced strain algorithm
to control hourglassing. You can specify enhanced hourglassing with the *SECTION CONTROLS
option:
*SOLID SECTION, ELSET=LUG, MATERIAL=STEEL, CONTROLS=EC-1*SECTION CONTROLS, NAME=EC-1, HOURGLASS=ENHANCED
Edit the material definition
Since Abaqus/Explicit performs a dynamic analysis, a complete material definition requires that
you specify the material density. For this problem assume the density is equal to 7800 kg/m3 .
You can modify the material definition by adding the *DENSITY option to the material option
block. The complete material definition for the connecting lug is:
*MATERIAL, NAME=STEEL*ELASTIC200.E9, 0.3*DENSITY7800.,
Replace the static step with a dynamic, explicit step
Revise the step definition to examine the dynamic response of the lug over a period of 0.005 s. This
change requires that you change the *STEP option block, which appeared as follows for the static
analysis:
4–41
Abaqus ID:
Printed on:

EXAMPLE: CONNECTING LUG
*STEPApply uniform pressure to the hole
*STATIC
Replace this option block with the following one:
*STEPDynamic lug loading*DYNAMIC, EXPLICIT, 0.005
Request field output at evenly spaced intervals and default history output
Write field output at 125 equally spaced intervals and also write the default history output. You can
specify output at evenly spaced intervals by appending the NUMBER INTERVAL parameter to the
*OUTPUT option block. Replace the existing output requests with the following:
*OUTPUT, FIELD, NUMBER INTERVAL=125*NODE OUTPUTRF, U*ELEMENT OUTPUT, DIRECTIONS=YESS,*OUTPUT, HISTORY, VARIABLE=PRESELECT
Save the changes to the input file called lug_xpl.inp. Then run the simulation using the
command:
abaqus job=lug_xpl
4.3.10 Postprocessing the dynamic analysis results
In the static analysis performed with Abaqus/Standard you examined the deformed shape of the lug as
well as stress and displacement output. For the Abaqus/Explicit analysis you can similarly examine
the deformed shape, stresses, and displacements in the lug. Because transient dynamic effects may
result from a sudden loading, you should also examine the time histories for internal and kinetic energy,
displacement, and Mises stress.
Open the output database (.odb) file created by this job.
Plotting the deformed shape
From the main menu bar, select Plot→Deformed Shape; or use the tool in the toolbox.
Figure 4–36 displays the deformed model shape at the end of the analysis.
4–42
Abaqus ID:
Printed on:

EXAMPLE: CONNECTING LUG
Step: Step−1, Dynamic lug loadingIncrement 6762: Step Time = 5.0000E−03
Deformed Var: U Deformation Scale Factor: +1.000e+00
Figure 4–36 Deformed model shape for the explicit analysis (shaded).
As discussed earlier, Abaqus/Explicit assumes large deformation theory by default; thus, the
deformation scale factor is automatically set to 1. If the displacements are too small to be seen,
scaling can be applied to aid the study of the response.
To see the vibrations in the lug more clearly, change the deformation scale factor to 50. In
addition, animate the time history of the deformed shape of the lug and decrease the frame rate of
the time history animation.
The time history animation of the deformed shape of the lug shows that the suddenly applied
load induces vibrations in the lug. Additional insights about the behavior of the lug under this type
of loading can be gained by plotting the kinetic energy, internal energy, displacement, and stress in
the lug as a function of time. Some of the questions to consider are:
1. Is energy conserved?
2. Was large-displacement theory necessary for this analysis?
3. Are the peak stresses reasonable? Will the material yield?
X–Y plotting
X–Y plots can display the variation of a variable as a function of time. You can create X–Y plots
from field and history output.
4–43
Abaqus ID:
Printed on:

EXAMPLE: CONNECTING LUG
To create X–Y plots of the internal and kinetic energy as a function of time:
1. In the Results Tree, expand the History Output container underneath the output database
named lug_xpl.odb.
2. The list of all the variables in the history portion of the output database appears; these are the
only history output variables you can plot.
From the list of available output variables, double-click ALLIE to plot the internal energy for
the whole model.
Abaqus reads the data for the curve from the output database file and plots the graph shown in
Figure 4–37.
Figure 4–37 Internal energy for the whole model.
3. Repeat this procedure to plot ALLKE, the kinetic energy for the whole model (shown in
Figure 4–38).
Both the internal energy and the kinetic energy show oscillations that reflect the vibrations of
the lug. Throughout the simulation, kinetic energy is transformed into internal (strain) energy
and vice-versa. Since the material is linear elastic, total energy is conserved. This can be seen
by plotting ETOTAL, the total energy of the system, together with ALLIE and ALLKE. Thevalue of ETOTAL is approximately zero throughout the course of the analysis. Energy balances
in dynamic analysis are discussed further in Chapter 9, “Nonlinear Explicit Dynamics.”
4–44
Abaqus ID:
Printed on:

EXAMPLE: CONNECTING LUG
Figure 4–38 Kinetic energy for the whole model.
We will examine the nodal displacements at the bottom of the lug hole to evaluate the significance
of geometrically nonlinear effects in this simulation.
To generate a plot of displacement versus time:
1. Plot the deformed shape of the lug. In the Results Tree, double-click XY Data.
2. In the Create XY Data dialog box that appears, toggle on ODB field output and click
Continue.
3. In the XY Data from ODB Field Output dialog box that appears, select Unique Nodal asthe type of position from which the X–Y data should be read.
4. Click the arrow next to U: Spatial displacement and toggle on U2 as the displacement
variable for the X–Y data.
5. Select the Elements/Nodes tab. Choose Pick from viewport as the selection method for
identifying the node for which you want X–Y data.
6. Click Edit Selection. In the viewport, select one of the nodes on the bottom of the hole as
shown in Figure 4–39 (if necessary, change the render style to facilitate your selection). Click
Done in the prompt area.
4–45
Abaqus ID:
Printed on:

EXAMPLE: CONNECTING LUG
Figure 4–39 Selected node at the bottom of the hole.
7. Click Plot in the XY Data from ODB Field Output dialog box to plot the nodal displacement
as a function of time.
The history of the oscillation, as shown in Figure 4–40, indicates that the displacements are
small (relative to the structure’s dimensions).
Thus, this problem could have been solved adequately using small-deformation theory. This
would have reduced the computational cost of the simulation without significantly affecting
the results. Nonlinear geometric effects are discussed further in Chapter 8, “Nonlinearity.”
We are also interested in the stress history of the connecting lug. The area of the lug near the built-in
end is of particular interest because the peak stresses expected to occur there may cause yielding in
the material.
To generate a plot of Mises stress versus time:
1. Plot the deformed shape of the lug again.
2. Select the Variables tab in the XY Data from ODB Field Output dialog box. Deselect U2as the variable for the X–Y data plot.
4–46
Abaqus ID:
Printed on:
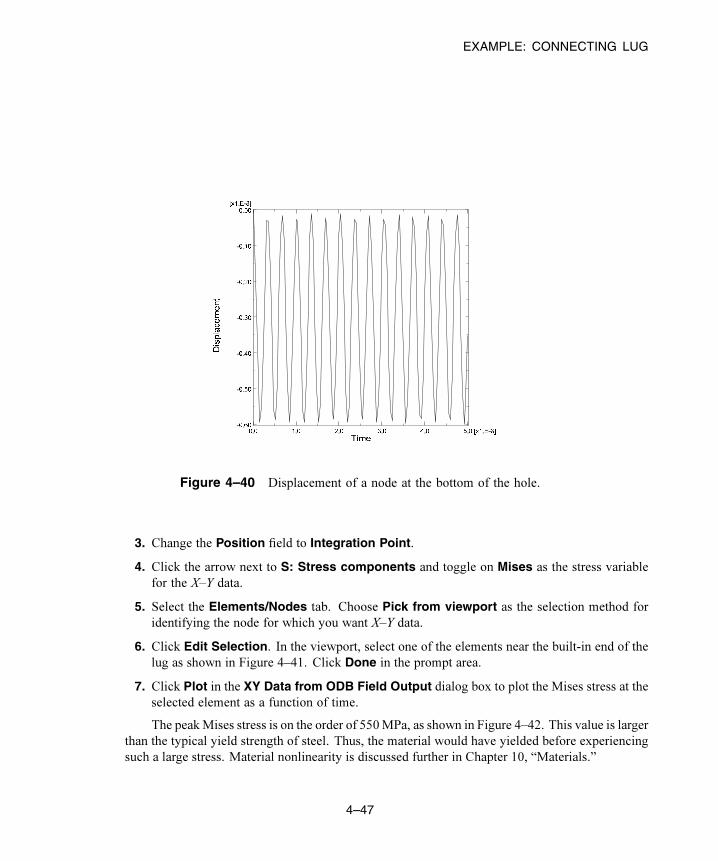
EXAMPLE: CONNECTING LUG
Figure 4–40 Displacement of a node at the bottom of the hole.
3. Change the Position field to Integration Point.
4. Click the arrow next to S: Stress components and toggle on Mises as the stress variable
for the X–Y data.
5. Select the Elements/Nodes tab. Choose Pick from viewport as the selection method for
identifying the node for which you want X–Y data.
6. Click Edit Selection. In the viewport, select one of the elements near the built-in end of the
lug as shown in Figure 4–41. Click Done in the prompt area.
7. Click Plot in the XY Data from ODB Field Output dialog box to plot the Mises stress at the
selected element as a function of time.
The peakMises stress is on the order of 550MPa, as shown in Figure 4–42. This value is larger
than the typical yield strength of steel. Thus, the material would have yielded before experiencing
such a large stress. Material nonlinearity is discussed further in Chapter 10, “Materials.”
4–47
Abaqus ID:
Printed on:

EXAMPLE: CONNECTING LUG
Figure 4–41 Selected element near the built-in end of the lug (hidden).
Figure 4–42 Mises stress near the built-in end of the lug.
4–48
Abaqus ID:
Printed on:

MESH CONVERGENCE
4.4 Mesh convergence
It is important that you use a sufficiently refined mesh to ensure that the results from your Abaqus
simulation are adequate. Coarse meshes can yield inaccurate results in analyses using implicit or explicit
methods. The numerical solution provided by your model will tend toward a unique value as you increase
the mesh density. The computer resources required to run your simulation also increase as the mesh is
refined. The mesh is said to be converged when further mesh refinement produces a negligible change
in the solution.
As you gain experience, you will learn to judge what level of refinement produces a suitable mesh
to give acceptable results for most simulations. However, it is always good practice to perform a mesh
convergence study, where you simulate the same problem with a finer mesh and compare the results. You
can have confidence that your model is producing a mathematically accurate solution if the two meshes
give essentially the same result.
Mesh convergence is an important consideration in both Abaqus/Standard and Abaqus/Explicit.
The connecting lug will be used as an example of a mesh refinement study by further analyzing the
connecting lug in Abaqus/Standard using four different mesh densities (Figure 4–43). The number of
elements used in each mesh is indicated in the figure.
Fine mesh (448 elements) Very fine mesh (1792 elements)
Normal mesh (112 elements)Coarse mesh (14 elements)
Figure 4–43 Different meshes for the connecting lug problem.
4–49
Abaqus ID:
Printed on:

MESH CONVERGENCE
We consider the influence of the mesh density on three particular results from this model:
• The displacement of the bottom of the hole.
• The peak Mises stress at the stress concentration on the bottom surface of the hole.
• The peak Mises stress where the lug is attached to the parent structure.
The locations where the results are compared are shown in Figure 4–44.
Step: Step 1 Increment 1: Step Time = 2.2200E-16Primary Var: S, MisesDeformed Var: U Deformation Scale Factor: +2.968e+01
1
2
3
+8.872e+06+6.000e+07+8.667e+07
(Ave. Crit.: 75%)S, Mises
+3.771e+08
+8.667e+07+1.133e+08+1.400e+08+1.667e+08+1.933e+08+2.200e+08+2.467e+08+2.733e+08+3.000e+08
Step: Step 1 Increment 1: Step Time = 2.2200E-16Primary Var: S, MisesDeformed Var: U Deformation Scale Factor: +2.968e+01
Step: Step 1 Increment 1: Step Time = 2.2200E-16
Deformed Var: U Deformation Scale Factor: +2.968e+01
Displacement ofbottom of hole
von Mises stress onbottom surface of hole
von Mises stress atattachment
Figure 4–44 Locations where results are compared in the mesh refinement study.
The results for each of the four mesh densities are compared in Table 4–3, along with the CPU time
required to run each simulation.
Table 4–3 Results of mesh refinement study.
Mesh Displacement ofbottom of hole
Stress atbottom of hole
Stress atattachment
RelativeCPU time
Coarse 3.07E−4 256.E6 312.E6 0.83
Normal 3.13E−4 311.E6 365.E6 1.0
Fine 3.14E−4 332.E6 426.E6 3.2
Very fine 3.15E−4 345.E6 496.E6 13.3
4–50
Abaqus ID:
Printed on:

MESH CONVERGENCE
The coarse mesh predicts less accurate displacements at the bottom of hole, but the normal, fine,
and very fine meshes all predict similar results. The normal mesh is, therefore, converged as far as the
displacements are concerned. The convergence of the results is plotted in Figure 4–45.
80 100 120
1.0
1.2
1.4
1.6
Relative Mesh Density
Nor
mal
ized
Res
ult
20 40 600
Figure 4–45 Convergence of results in mesh refinement study.
All the results are normalized with respect to the values predicted by the coarse mesh. The peak
stress on the bottom of the hole converges much more slowly than the displacements because stress and
strain are calculated from the displacement gradients; thus, a much finer mesh is required to predict
accurate displacement gradients than is needed to calculate accurate displacements.
Mesh refinement significantly changes the stress calculated at the attachment of the connecting lug;
it continues to increase with continued mesh refinement. A stress singularity exists at the corner of the
lug where it attaches to the parent structure. Theoretically the stress is infinite at this location; therefore,
increasing the mesh density will not produce a converged stress value at this location. This singularity
occurs because of the idealizations used in the finite element model. The connection between the lug
and the parent structure has been modeled as a sharp corner, and the parent structure has been modeled
as rigid. These idealizations lead to the stress singularity. In reality there probably will be a small fillet
between the lug and the parent structure, and the parent structure will be deformable, not rigid. If the
exact stress in this location is required, the fillet between the components must be modeled accurately
(see Figure 4–46) and the stiffness of the parent structure must also be considered.
4–51
Abaqus ID:
Printed on:

MESH CONVERGENCE
Sharp cornergives a stresssingularity.
Fillet.
Finite element modelidealization.
Actual geometry ofcomponent.
Figure 4–46 Idealizing a fillet as a sharp corner.
It is common to omit small details like fillet radii from a finite element model to simplify the analysis
and to keep the model size reasonable. However, the introduction of any sharp corner into a model will
lead to a stress singularity at that location. This normally has a negligible effect on the overall response
of the model, but the predicted stresses close to the singularity will be inaccurate.
For complex, three-dimensional simulations the available computer resources often dictate a
practical limit on the mesh density that you can use. In this case you must use the results from the
analysis carefully. Coarse meshes are often adequate to predict trends and to compare how different
concepts behave relative to each other. However, you should use the actual magnitudes of displacement
and stress calculated with a coarse mesh with caution.
It is rarely necessary to use a uniformly fine mesh throughout the structure being analyzed. You
should use a fine mesh mainly in the areas of high stress gradients and use a coarser mesh in areas of
low stress gradients or where the magnitude of the stresses is not of interest. For example, Figure 4–47
shows a mesh that is designed to give an accurate prediction of the stress concentration at the bottom of
the hole.
Figure 4–47 Mesh refined around the hole.
4–52
Abaqus ID:
Printed on:

RELATED Abaqus EXAMPLES
A fine mesh is used only in the region of high stress gradients, and a coarse mesh is used elsewhere.
The results from an Abaqus/Standard simulation with this locally refined mesh are shown in Table 4–4.
This table shows that the results are comparable to those from the very fine mesh, but the simulation with
the locally refined mesh required considerably less CPU time than the analysis with the very fine mesh.
Table 4–4 Comparison of very fine and locally refined meshes.
Mesh Displacement ofbottom of hole
Stress atbottom of hole
RelativeCPU time
Very fine 3.15E−4 345.E6 22.5
Locally refined 3.14E−4 346.E6 3.44
You can often predict the locations of the highly stressed regions of amodel—and, hence, the regions
where a fine mesh is required—using your knowledge of similar components or with hand calculations.
This information can also be gained by using a coarse mesh initially to identify the regions of high stress
and then refining the mesh in these regions. The latter procedure is carried out easily using preprocessors
like Abaqus/CAE where the complete numerical model (i.e., material properties, boundary conditions,
loads, etc.) can be defined based on the geometry of the structure. It is simple to mesh the geometry
coarsely for the initial simulation and then to refine the mesh in the appropriate regions, as indicated by
the results from the coarse simulation.
Abaqus provides an advanced feature, called submodeling, that allows you to obtain more detailed
(and accurate) results in a region of interest in the structure. The solution from a coarse mesh of the entire
structure is used to “drive” a detailed local analysis that uses a fine mesh in this region of interest. (This
topic is beyond the scope of this guide. See “Submodeling: overview,” Section 10.2.1 of the Abaqus
Analysis User’s Manual, for further details.)
4.5 Related Abaqus examples
If you are interested in learning more about using continuum elements in Abaqus, you should examine
the following problems:
• “Geometrically nonlinear analysis of a cantilever beam,” Section 2.1.2 of the Abaqus Benchmarks
Manual
• “Spherical cavity in an infinite medium,” Section 2.2.4 of the Abaqus Benchmarks Manual
• “Performance of continuum and shell elements for linear analysis of bending problems,”
Section 2.3.5 of the Abaqus Benchmarks Manual
4–53
Abaqus ID:
Printed on:
SUGGESTED READING
4.6 Suggested reading
The volume of literature that has been written on the finite element method and the applications of finite
element analysis is enormous. In most of the remaining chapters of this guide, a list of suggested books
and articles is provided so that you can explore the topics in more depth if you wish. While the advanced
references will not be of interest to most users, they provide detailed theoretical information for the
interested user.
General texts on the finite element method
• NAFEMS Ltd., A Finite Element Primer, 1986.
• Becker, E. B., G. F. Carey, and J. T. Oden, Finite Elements: An Introduction, Prentice-Hall,
1981.
• Carey, G. F., and J. T. Oden, Finite Elements: A Second Course, Prentice-Hall, 1983.
• Cook, R. D., D. S. Malkus, and M. E. Plesha, Concepts and Applications of Finite Element
Analysis, John Wiley & Sons, 1989.
• Hughes, T. J. R., The Finite Element Method, Prentice-Hall, Inc., 1987.
• Zienkiewicz, O. C., and R. L. Taylor, The Finite Element Method: Volumes I, II, and III,
Butterworth-Heinemann, 2000.
Performance of linear solid elements
• Prathap, G., “The Poor Bending Response of the Four-Node Plane Stress Quadrilaterals,”
International Journal for Numerical Methods in Engineering, vol. 21, 825–835, 1985.
Hourglass control in solid elements
• Belytschko, T., W. K. Liu, and J. M. Kennedy, “Hourglass Control in Linear and Nonlinear
Problems,” Computer Methods in Applied Mechanics and Engineering, vol. 43, 251–276,
1984.
• Flanagan, D. P., and T. Belytschko, “A Uniform Strain Hexahedron and Quadrilateral with
Hourglass Control,” International Journal for Numerical Methods in Engineering, vol. 17,
679–706, 1981.
• Puso, M. A., “A Highly Efficient Enhanced Assumed Strain Physically Stabilized Hexahedral
Element,” International Journal for Numerical Methods in Engineering, vol. 49, 1029–1064,
2000.
Incompatible mode elements
• Simo, J. C. and M. S. Rifai, “A Class of Assumed Strain Methods and the Method of
Incompatible Modes,” International Journal for Numerical Methods in Engineering, vol. 29,
1595–1638, 1990.
4–54
Abaqus ID:
Printed on:

SUMMARY
4.7 Summary
• The formulation and order of integration used in a continuum element can have a significant effect
on the accuracy and cost of the analysis.
• First-order (linear) elements using full integration are prone to shear locking and normally should
not be used.
• First-order, reduced-integration elements are prone to hourglassing; sufficient mesh refinement
minimizes this problem.
• When using first-order, reduced-integration elements in a simulation where bending deformation
will occur, use at least four elements through the thickness.
• Hourglassing is rarely a problem in the second-order, reduced-integration elements in
Abaqus/Standard. You should consider using these elements for most general applications when
there is no contact.
• The accuracy of the incompatible mode elements available in Abaqus/Standard is strongly
influenced by the amount of element distortion.
• The numerical accuracy of the results depends on the mesh that has been used. Ideally a mesh
refinement study should be carried out to ensure that the mesh provides a unique solution to the
problem. However, remember that using a converged mesh does not ensure that the results from the
finite element simulation will match the actual behavior of the physical problem: that also depends
on other approximations and idealizations in the model.
• In general, refine the mesh mainly in regions where you want accurate results; a finer mesh is
required to predict accurate stresses than is needed to calculate accurate displacements.
• Advanced features such as submodeling are available in Abaqus to help you to obtain useful results
for complex simulations.
4–55
Abaqus ID:
Printed on:


ELEMENT GEOMETRY
5. Using Shell Elements
Use shell elements to model structures in which one dimension (the thickness) is significantly smaller
than the other dimensions and in which the stresses in the thickness direction are negligible. A structure,
such as a pressure vessel, whose thickness is less than 1/10 of a typical global structural dimension
generally can be modeled with shell elements. The following are examples of typical global dimensions:
• the distance between supports,
• the distance between stiffeners or large changes in section thickness,
• the radius of curvature, and
• the wavelength of the highest vibration mode of interest.
Abaqus shell elements assume that plane sections perpendicular to the plane of the shell remain
plane. Do not be confused into thinking that the thickness must be less than 1/10 of the element
dimensions. A highly refined mesh may contain shell elements whose thickness is greater than their
in-plane dimensions, although this is not generally recommended—continuum elements may be more
suitable in such a case.
5.1 Element geometry
Two types of shell elements are available in Abaqus: conventional shell elements and continuum
shell elements. Conventional shell elements discretize a reference surface by defining the element’s
planar dimensions, its surface normal, and its initial curvature. The nodes of a conventional shell
element, however, do not define the shell thickness; the thickness is defined through section properties.
Continuum shell elements, on the other hand, resemble three-dimensional solid elements in that they
discretize an entire three-dimensional body yet are formulated so that their kinematic and constitutive
behavior is similar to conventional shell elements. Continuum shell elements are more accurate in
contact modeling than conventional shell elements, since they employ two-sided contact taking into
account changes in thickness. For thin shell applications, however, conventional shell elements provide
superior performance.
In this manual only conventional shell elements are discussed. Henceforth, we will refer to them
simply as “shell elements.” For more information on continuum shell elements, see “Shell elements:
overview,” Section 26.6.1 of the Abaqus Analysis User’s Manual.
5.1.1 Shell thickness and section points
The shell thickness is required to describe the shell cross-section and must be specified. In addition to
specifying the shell thickness, you can choose to have the stiffness of the cross-section calculated during
5–1
Abaqus ID:
Printed on:

ELEMENT GEOMETRY
the analysis or once at the beginning of the analysis. You define the shell thickness using either the
*SHELL SECTION or *SHELL GENERAL SECTION option.
If you use the *SHELL SECTION option, Abaqus uses numerical integration to calculate the
stresses and strains independently at each section point (integration point) through the thickness of
the shell, thus allowing nonlinear material behavior. For example, an elastic-plastic shell may yield at
the outer section points while remaining elastic at the inner section points. The location of the single
integration point in an S4R (4-node, reduced integration) element and the configuration of the section
points through the shell thickness are shown in Figure 5–1.
Section points throughthe thickness of theshell at the location ofthe integration point
Integration point inan S4R element Section through shell
1
3
5
Top surface of shell
Figure 5–1 Configuration of section points in a numerically integrated shell.
You can specify any odd number of section points through the shell thickness with the *SHELL
SECTION option. By default, Abaqus uses five section points through the thickness of a homogeneous
shell, which is sufficient for most nonlinear design problems. However, you should use more section
points in some complicated simulations, especially when you anticipate reversed plastic bending (nine
is normally sufficient in this case). For linear problems three section points provide exact integration
through the thickness. However, the *SHELL GENERAL SECTION option is more efficient for linear
elastic shells.
If you use the *SHELL GENERAL SECTION option, the material behavior must be linear elastic,
as the stiffness of the cross-section is calculated only once at the beginning of the simulation. In this case,
all calculations are done in terms of the resultant forces and moments across the entire cross-section. If
you request stress or strain output, Abaqus provides default output for the bottom surface, the midplane,
and the top surface.
5–2
Abaqus ID:
Printed on:

ELEMENT GEOMETRY
5.1.2 Shell normals and shell surfacesThe connectivity of the shell element defines the direction of the positive normal, as shown in Figure 5–2.
1
2
3
4n
1
2
3
n
n
2
1Axisymmetric shells
Three-dimensional shells
face SPOS
face SNEG
Figure 5–2 Positive normals for shells.
For axisymmetric shell elements the positive normal direction is defined by a 90° counterclockwise
rotation from the direction going from node 1 to node 2. For three-dimensional shell elements the positive
normal is given by the right-hand rule going around the nodes in the order in which they appear in the
element definition.
The “top” surface of a shell is the surface in the positive normal direction and is called the SPOS face
for contact definition. The “bottom” surface is in the negative direction along the normal and is called
the SNEG face for contact definition. Normals should be consistent among adjoining shell elements.
The positive normal direction defines the convention for element-based pressure load application
and output of quantities that vary through the shell thickness. A positive element-based pressure
load applied to a shell element produces a load that acts in the direction of the positive normal. (The
element-based pressure load convention for shell elements is opposite to that for continuum elements;
the surface-based pressure load conventions for shell and continuum elements are identical. For more
on the difference between element-based and surface-based distributed loads, see “Distributed loads,”
Section 30.4.3 of the Abaqus Analysis User’s Manual.)
5–3
Abaqus ID:
Printed on:

ELEMENT GEOMETRY
5.1.3 Initial shell curvatureShells in Abaqus (with the exception of element types S3/S3R, S3RS, S4R, S4RS, S4RSW, and STRI3)
are formulated as true curved shell elements; true curved shell elements require special attention to
accurate calculation of the initial surface curvature. Abaqus automatically calculates the surface normals
at the nodes of every shell element to estimate the initial curvature of the shell. The surface normal at
each node is determined using a fairly elaborate algorithm, which is discussed in detail in “Defining the
initial geometry of conventional shell elements,” Section 26.6.3 of the Abaqus Analysis User’s Manual.
With a coarse mesh as shown in Figure 5–3, Abaqus may determine several independent surface
normals at the same node for adjoining elements. Physically, multiple normals at a single node mean
that there is a fold line between the elements sharing the node. While it is possible that you intend to
model such a structure, it is more likely that you intend to model a smoothly curved shell; Abaqus will
try to smooth the shell by creating an averaged normal at a node.
Coarse meshThe angle between successive elementnormals is greater than 20°, so separatenormals are retained at each node foradjacent elements, and the behavior is thatof a folded sheet.
Refined meshThere is a single normal at eachnode for adjacent elements, and thebehavior is that of a curved shell.
Physicalstructure
Structure modeledby Abaqus
Figure 5–3 Effect of mesh refinement on the nodal surface normals.
The basic smoothing algorithm used is as follows: if the normals at a node for each shell element
attached to the node are within 20° of each other, the normals will be averaged. The averaged normal
will be used at that node for all elements attached to the node. If Abaqus cannot smooth the shell, a
warning message is issued in the data (.dat) file.You may override the default algorithm. To introduce fold lines into a curved shell or to model a
curved shell with a coarse mesh, use the *NODE and *NORMAL options to define the normals manually.
With the *NODE option you specify the surface normal at a node as the 4th, 5th, and 6th values on the
data line, following the nodal coordinates. A normal you define with *NODE is the normal used for
5–4
Abaqus ID:
Printed on:

SHELL FORMULATION – THICK OR THIN
all elements sharing that node, unless *NORMAL is also used. Use the *NORMAL option to specify a
normal at a node for selected elements only. Normals defined with *NORMAL override normals defined
with *NODE. See “Defining the initial geometry of conventional shell elements,” Section 26.6.3 of the
Abaqus Analysis User’s Manual, for further details.
5.1.4 Reference surface offsetsThe reference surface of the shell is defined by the shell element’s nodes and normal definitions. When
modeling with shell elements, the reference surface is typically coincident with the shell’s midsurface.
However, many situations arise in which it is more convenient to define the reference surface as offset
from the shell’s midsurface. For example, surfaces created in CAD packages usually represent either the
top or bottom surface of the shell body. In this case it may be easier to define the reference surface to be
coincident with the CAD surface and, therefore, offset from the shell’s midsurface.
Shell offsets can also be used to define a more precise surface geometry for contact problems where
shell thickness is important. Another situation where the offset from the midsurface may be important is
when a shell with continuously varying thickness is modeled. In this case defining the nodes at the shell
midplane can be difficult. If one surface is smooth while the other is rough, as in some aircraft structures,
it is easiest to use shell offsets to define the nodes at the smooth surface.
Offsets can be introduced by specifying an offset value, which is defined as the distance (measured
as a fraction of the shell’s thickness) from the shell’s midsurface to the reference surface containing the
element’s nodes. Positive values of the offset are in the positive normal direction. When the offset is set
equal to 0.5 or SPOS, the top surface of the shell is the reference surface. When the offset is set equal to
–0.5 or SNEG, the bottom surface is the reference surface. The default offset is 0, which indicates that
the middle surface of the shell is the reference surface. These three reference surface offset settings are
shown in Figure 5–4 for a mesh where the nodal positions are held fixed.
The degrees of freedom for the shell are associated with the reference surface. All kinematic
quantities, including the element’s area, are calculated there. Large offset values for curved shells may
lead to a surface integration error, affecting the stiffness, mass, and rotary inertia for the shell section. For
stability purposes Abaqus/Explicit also automatically augments the rotary inertia used for shell elements
on the order of the offset squared, which may result in errors in the dynamics for large offsets. When large
offsets from the shell’s midsurface are necessary, use multi-point constraints or rigid body constraints
instead.
5.2 Shell formulation – thick or thin
Shell problems generally fall into one of two categories: thin shell problems and thick shell problems.
Thick shell problems assume that the effects of transverse shear deformation are important to the solution.
Thin shell problems, on the other hand, assume that transverse shear deformation is small enough to
be neglected. Figure 5–5(a) illustrates the transverse shear behavior of thin shells: material lines that
5–5
Abaqus ID:
Printed on:

SHELL FORMULATION – THICK OR THIN
a) OFFSET= 0
Reference surface and midsurface are coincident
b) OFFSET= −0.5 (SNEG)
Reference surface isthe bottom surface
c) OFFSET= +0.5 (SPOS)
Reference surface isthe top surface
SNEG
SPOS SPOS SPOS
SNEG SNEG
Mid surface
n
n
n
Figure 5–4 Schematic of shell offsets for offset values
of 0, –0.5 and +0.5.
are initially normal to the shell surface remain straight and normal throughout the deformation. Hence,
transverse shear strains are assumed to vanish ( ). Figure 5–5(b) illustrates the transverse shear
behavior of thick shells: material lines that are initially normal to the shell surface do not necessarily
remain normal to the surface throughout the deformation, thus adding transverse shear flexibility ( ).
(a) (b)
x x
Deformation of cross-section Deformation of cross-section
w wTransversesection
Transversesection
Neutral axis Neutral
axis
dwdx
dwdx
dwdx
− γ = β
γ
Figure 5–5 Behavior of transverse shell sections in (a) thin shells and (b) thick shells.
5–6
Abaqus ID:
Printed on:

SHELL MATERIAL DIRECTIONS
Abaqus offers multiple classes of shell elements, distinguished by the element’s applicability to thin
and thick shell problems. General-purpose shell elements are valid for use with both thick and thin shell
problems. In certain cases, for specific applications, enhanced performance can be obtained by using the
special-purpose shell elements available in Abaqus/Standard.
The special-purpose shell elements fall into two categories: thin-only shell elements and thick-only
shell elements. All special-purpose shell elements provide for arbitrarily large rotations but only small
strains. The thin-only shell elements enforce the Kirchhoff constraint; that is, plane sections normal to
the midsection of the shell remain normal to the midsurface. The Kirchhoff constraint is enforced either
analytically in the element formulation (STRI3) or numerically through the use of a penalty constraint.
The thick-only shell elements are second-order quadrilaterals that may produce more accurate results
than the general-purpose shell elements in small-strain applications where the loading is such that the
solution is smoothly varying over the span of the shell.
To decide if a given application is a thin or thick shell problem, we can offer a few guidelines. For
thick shells transverse shear flexibility is important, while for thin shells it is negligible. The significance
of transverse shear in a shell can be estimated by its thickness-to-span ratio. A shell made of a single
isotropic material with a ratio greater than 1/15 is considered “thick”; if the ratio is less than 1/15, the
shell is considered “thin.” These estimates are approximate; you should always check the transverse
shear effects in your model to verify the assumed shell behavior. Since transverse shear flexibility can
be significant in laminated composite shell structures, this ratio should be much smaller for “thin” shell
theory to apply. Composite shells with very compliant interior layers (so-called “sandwich” composites)
have very low transverse shear stiffness and should almost always be modeled with “thick” shells; if
the assumption of plane sections remaining plane is violated, continuum elements should be used. See
“Shell section behavior,” Section 26.6.4 of the Abaqus Analysis User’s Manual, for details on checking
the validity of using shell theory.
Transverse shear force and strain are available for general-purpose and thick-only shell elements.
For three-dimensional elements, estimates of transverse shear stress are provided. The calculation of
these stresses neglects coupling between bending and twisting deformation and assumes small spatial
gradients of material properties and bending moments.
5.3 Shell material directions
Shell elements, unlike continuum elements, use material directions local to each element. Anisotropic
material data, such as that for fiber-reinforced composites, and element output variables, such as stress
and strain, are defined in terms of these local material directions. In large-displacement analyses the local
material axes on a shell surface rotate with the average motion of the material at each integration point.
5–7
Abaqus ID:
Printed on:

SHELL MATERIAL DIRECTIONS
5.3.1 Default local material directionsThe local material 1- and 2-directions lie in the plane of the shell. The default local 1-direction is the
projection of the global 1-axis onto the shell surface. If the global 1-axis is normal to the shell surface,
the local 1-direction is the projection of the global 3-axis onto the shell surface. The local 2-direction
is perpendicular to the local 1-direction in the surface of the shell, so that the local 1-direction, local
2-direction, and the positive normal to the surface form a right-handed set (see Figure 5–6).
32
12
1
n
Global Cartesian coordinate system
Figure 5–6 Default local shell material directions.
The default set of local material directions can sometimes cause problems; a case in point is the
cylinder shown in Figure 5–7.
2
3 1
Figure 5–7 Default local material 1-direction in a cylinder.
For most of the elements in the figure the local 1-direction is circumferential. However, there is a line of
elements that are normal to the global 1-axis. For these elements the local 1-direction is the projection of
the global 3-axis onto the shell, making the local 1-direction axial instead of circumferential. A contour
plot of the direct stress in the local 1-direction, , looks very strange, since for most elements is
the circumferential stress, whereas for some elements it is the axial stress. In such cases it is necessary
to define more appropriate local directions for the model, as discussed in the next section.
5–8
Abaqus ID:
Printed on:

SHELL MATERIAL DIRECTIONS
5.3.2 Creating alternative material directionsThe *ORIENTATION option allows you to control the local material directions directly. With it you
can replace the global Cartesian coordinate system with a local rectangular, cylindrical, or spherical
coordinate system. You define the orientation of the local ( , , ) coordinate system by specifying
the location of two points, a and b, as shown in Figure 5–8. For example, a local rectangular system is
defined with the following option:
*ORIENTATION, SYSTEM=RECTANGULAR, NAME=LOCALR< >, < >, < >, < >, < >, < >
1 (global)
23
b
a
Rectangular
(circumferential)a
b
Cylindrical
(meridional)
a
b
(radial)
1 (global)2
3
(radial)
(circumferential)
Spherical
z′
y ′
x ′
y ′
x ′z ′
x ′
z′
Figure 5–8 Definition of local coordinate systems.
The parameter NAME specifies a label for this orientation, and the coordinates of point
a ( , , ) and point b ( , , ) are given in the global Cartesian system. The local coordinate
system is then referred to by the ORIENTATION parameter on the *SHELL SECTION or *SHELL
GENERAL SECTION option.
Youmust still specify another piece of information. Abaqus must also be told which of the local axes
corresponds to which material direction. On the second data line following *ORIENTATION, specify
the local axis (1, 2, or 3) that is closest to being normal to the shell’s surface. Abaqus follows a cyclic
5–9
Abaqus ID:
Printed on:

SHELL MATERIAL DIRECTIONS
permutation (1, 2, 3) of the axes and projects the axis following your selection onto the shell region to
form the material 1-direction. For example, if you choose the -axis, Abaqus projects the -axis onto
the shell to form the material 1-direction. The material 2-direction is defined by the cross product of the
shell normal and the material 1-direction. Normally, the final material 2-direction and the projection of
the other local axis, in this case the -axis, will not coincide for curved shells.
If these local axes do not create the desired material directions, you can specify a rotation about
the selected axis. The other two local axes are rotated by this amount before they are projected onto the
shell’s surface to give the final material directions. The following option block would create the local
system shown in Figure 5–9:
*ORIENTATION, SYSTEM=RECTANGULAR, NAME=LOCALR< >, < >, < >, < >, < >, < >1,
Again, it is the rotated - and -axes that Abaqus projects onto the surface of the shell elements. For the
projections to be interpreted easily, the selected axis should be as close as possible to the shell normal.
Rotation is specified about the -axis.
Rotated -axis
Rotated -axis
z′
z′
y′
y′
x′
x′
αα
Figure 5–9 Rotation of the local coordinate system for shell elements.
If the centerline of the cylinder shown in Figure 5–7 coincides with the global 3-axis, the following
option block could be used to define consistent material directions:
*ORIENTATION, SYSTEM=CYLINDRICAL, NAME=CYLIND10., 0., 0., 0., 0., 1.1, 0.
Points a and b lie along the centerline of the cylinder. Since the orientation of the cylinder matches
the orientation of our newly defined cylindrical coordinate system, the -axis is radial, the -axis is
circumferential, and the -axis is axial. The -axis corresponds approximately to the shell normal
direction, and a zero rotation is specified; therefore, the projection of the -axis onto the shell’s surface is
the material 1-direction. Thus, the material 1-direction is always circumferential, and the corresponding
material 2-direction is always axial.
5–10
Abaqus ID:
Printed on:

EXAMPLE: SKEW PLATE
5.4 Selecting shell elements
• The linear, finite-membrane-strain, fully integrated, quadrilateral shell element (S4) can be used
when greater solution accuracy is desired, for problems prone to membrane- or bending-mode
hourglassing, or for problems where in-plane bending is expected.
• The linear, finite-membrane-strain, reduced-integration, quadrilateral shell element (S4R) is robust
and is suitable for a wide range of applications.
• The linear, finite-membrane-strain, triangular shell elements (S3/S3R) can be used as
general-purpose elements. A refined mesh may be needed to capture bending deformations
or high strain gradients because of the constant strain approximation in the elements.
• To account for the influence of shear flexibility in laminated composite shell models, use the shell
elements suitable for modeling thick shells (S4, S4R, S3/S3R, S8R); check that the assumption of
plane sections remaining plane is satisfied.
• Quadratic shell elements, either quadrilateral or triangular, are very effective for general, small-
strain, thin-shell applications. These elements are not susceptible to shear or membrane locking.
• If you must use second-order elements in contact simulations, do not use the quadratic, triangular
shell element (STRI65). Use the 9-node, quadrilateral shell element (S9R5) instead.
• For very large models that will experience only geometrically linear behavior, the linear, thin-shell
element (S4R5) will generally be more cost-effective than the general-purpose shell elements.
• The small membrane strain elements are effective for explicit dynamics problems involving small
membrane strains and arbitrarily large rotations.
5.5 Example: skew plate
You have been asked to model the plate shown in Figure 5–10. It is skewed 30° to the global 1-axis, is
built-in at one end, and is constrained to move on rails parallel to the plate axis at the other end. You
are to determine the midspan deflection when the plate carries a uniform pressure. You are also to assess
whether a linear analysis is valid for this problem. You will perform an analysis using Abaqus/Standard.
5.5.1 Coordinate system
The orientation of the structure in the global coordinate system and the suggested origin of the system
are shown in Figure 5–10. The plate lies in the global 1–2 plane. Will it be easy to interpret the results
of the simulation if you use the default material directions for the shell elements in this model?
5–11
Abaqus ID:
Printed on:

EXAMPLE: SKEW PLATE
20.0 kPaEnd
built-in
1
32
OriginThickness=0.8 cm
3
1
1
2
30°40 cm
100 cm
0.8 cm
Plan
Elevation
zerorotation
Figure 5–10 Sketch of the skew plate.
5.5.2 Mesh design
Figure 5–11 shows the suggested mesh for this simulation.
You must answer the following questions before selecting an element type: Is the plate thin or
thick? Are the strains small or large? The plate is quite thin, with a thickness-to-minimum span ratio of
0.02. (The thickness is 0.8 cm and the minimum span is 40 cm.) While we cannot readily predict the
magnitude of the strains in the structure, we think that the strains will be small. Based on this information,
you choose quadratic shell elements (S8R5), because they give accurate results for thin shells in small-
strain simulations. For further details on shell element selection, consult “Choosing a shell element,”
Section 26.6.2 of the Abaqus Analysis User’s Manual.
5–12
Abaqus ID:
Printed on:

EXAMPLE: SKEW PLATE
1
2
3
Figure 5–11 Suggested mesh design for the skewed plate simulation.
5.5.3 Preprocessing—creating the modelThe input file for the skew plate example is skew.inp, which is available in “Skew plate,” Section A.3.
This example uses the mesh shown in Figure 5–11 by creating the node sets shown in Figure 5–12, and
stores all of the the elements in an element set calledPLATE. The following steps in this example describe
how the material and history information is defined in this input file. This exercise will give you a better
understanding of how the various option blocks combine to define an Abaqus model. If you wish to create
the entire model using Abaqus/CAE, refer to “Example: skew plate,” Section 5.5 of Getting Started with
Abaqus: Interactive Edition.
Before you start to build the model, decide on a system of units. The dimensions are given in cm,
but the loading and material properties are given in MPa and GPa. Since these are not consistent units,
you must choose a consistent system to use in your model and convert the necessary input data.
5.5.4 Reviewing the input file—the model dataAt this point we assume that you have created the basic mesh using your preprocessor. In this section
you will review and make corrections to your input file, as well as include additional information, such
as material data.
Model description
The following would be a suitable description in the *HEADING option for this simulation:
5–13
Abaqus ID:
Printed on:

EXAMPLE: SKEW PLATE
Node set:ENDB
Node set:ENDA
Node set:MIDSPAN
Figure 5–12 Node sets needed for the skew plate simulation.
*HEADINGLinear Elastic Skew Plate. 20 kPa Load.S.I. Units (meters, newtons, sec, kilograms)
It clearly explains what you are modeling and what units you are using.
Element connectivity
Check to make sure that you are using the correct element type (S8R5). It is possible that you
specified the wrong element type in the preprocessor or that the translator made a mistake when
generating the input file. The *ELEMENT option block in your model should begin with the
following:
*ELEMENT, TYPE=S8R5, ELSET=PLATE
In some examples, the name given for the ELSET parameter is not a descriptive name like PLATE.If necessary, you may want to change these values, because meaningful names for node and element
sets make input files easy to understand.
Node sets
The three node sets shown in Figure 5–12 will be useful in completing the model of the plate. These
node sets are described in the input file using *NSET option blocks.
5–14
Abaqus ID:
Printed on:

EXAMPLE: SKEW PLATE
Defining alternative material directions
If you use the default material directions, the direct stress in the material 1-direction, , will
contain contributions from both the axial stress, produced by the bending of the plate, and the stress
transverse to the axis of the plate. It will be easier to interpret the results if the material directions
are aligned with the axis of the plate and the transverse direction. Therefore, a local rectangular
coordinate system is needed in which the local -direction lies along the axis of the plate (i.e., at
30° to the global 1-axis) and the local -direction is also in the plane of the plate.
As you learned in “Shell material directions,” Section 5.3, the *ORIENTATION option defines
such a local coordinate system. Choose point a (see Figure 5–8) to have coordinates (10.0E−2,
5.77E−2, 0.)—so that = tan 30°—and point b to have coordinates (−5.77E−2, 10.E−2, 0.).
You must also specify which axis is not projected onto the shell surface (the -direction in this
model) as well as an additional rotation (zero using this method). The following *ORIENTATION
option block creates the proper local coordinate system, named SKEW:
*ORIENTATION, NAME=SKEW, SYSTEM=RECTANGULAR10.0E-2,5.77E-2,0.0, -5.77E-2,10.0E-2,0.03, 0.0
Alternatively, you can define exactly the same local coordinate system by choosing point a and
point b to lie on the global coordinate 1- and 2-axes and specifying an additional rotation of 30°:
*ORIENTATION, NAME=SKEW, SYSTEM=RECTANGULAR1., 0., 0., 0., 1., 0.3, 30.
Section properties
Since the structure is made of a single material with constant thickness, the section properties are the
same for all elements. Therefore, you can use the element set PLATE (which includes all elements)
to assign the physical and material properties to the elements. Since you assume that the plate is
linear elastic, the *SHELL GENERAL SECTION option is more efficient than using the *SHELL
SECTION option. The following element property option block defines the section properties for
this example:
*SHELL GENERAL SECTION, ELSET=PLATE, MATERIAL=MAT1,ORIENTATION=SKEW0.8E-2,
The ORIENTATION parameter tells Abaqus to use the local coordinate system named SKEWto define the material directions for the shells in element set PLATE. All element variables will be
defined in the SKEW coordinate system.
5–15
Abaqus ID:
Printed on:
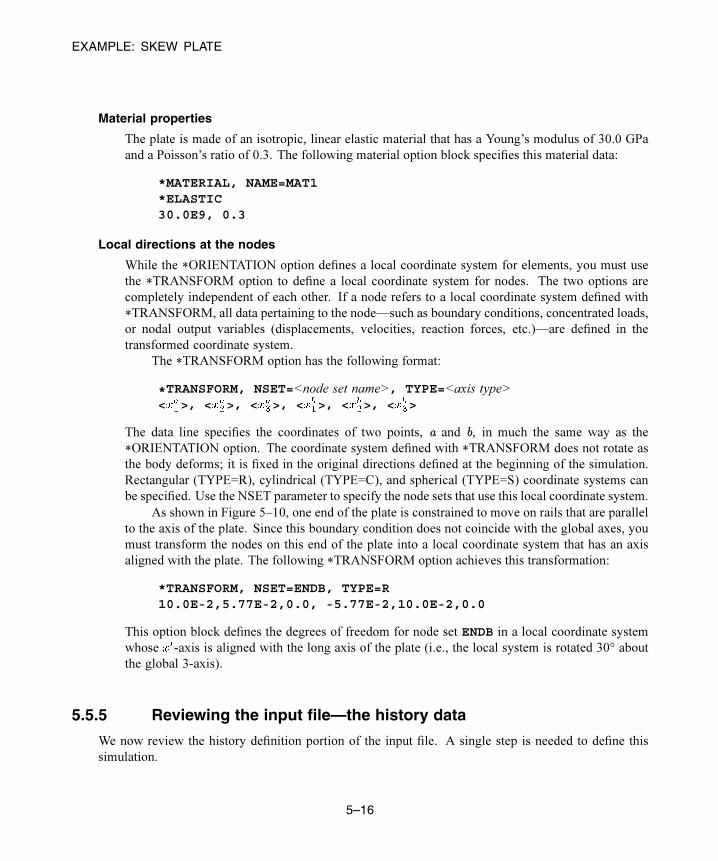
EXAMPLE: SKEW PLATE
Material properties
The plate is made of an isotropic, linear elastic material that has a Young’s modulus of 30.0 GPa
and a Poisson’s ratio of 0.3. The following material option block specifies this material data:
*MATERIAL, NAME=MAT1*ELASTIC30.0E9, 0.3
Local directions at the nodes
While the *ORIENTATION option defines a local coordinate system for elements, you must use
the *TRANSFORM option to define a local coordinate system for nodes. The two options are
completely independent of each other. If a node refers to a local coordinate system defined with
*TRANSFORM, all data pertaining to the node—such as boundary conditions, concentrated loads,
or nodal output variables (displacements, velocities, reaction forces, etc.)—are defined in the
transformed coordinate system.
The *TRANSFORM option has the following format:
*TRANSFORM, NSET=<node set name>, TYPE=<axis type>< >, < >, < >, < >, < >, < >
The data line specifies the coordinates of two points, a and b, in much the same way as the
*ORIENTATION option. The coordinate system defined with *TRANSFORM does not rotate as
the body deforms; it is fixed in the original directions defined at the beginning of the simulation.
Rectangular (TYPE=R), cylindrical (TYPE=C), and spherical (TYPE=S) coordinate systems can
be specified. Use the NSET parameter to specify the node sets that use this local coordinate system.
As shown in Figure 5–10, one end of the plate is constrained to move on rails that are parallel
to the axis of the plate. Since this boundary condition does not coincide with the global axes, you
must transform the nodes on this end of the plate into a local coordinate system that has an axis
aligned with the plate. The following *TRANSFORM option achieves this transformation:
*TRANSFORM, NSET=ENDB, TYPE=R10.0E-2,5.77E-2,0.0, -5.77E-2,10.0E-2,0.0
This option block defines the degrees of freedom for node set ENDB in a local coordinate system
whose -axis is aligned with the long axis of the plate (i.e., the local system is rotated 30° about
the global 3-axis).
5.5.5 Reviewing the input file—the history data
We now review the history definition portion of the input file. A single step is needed to define this
simulation.
5–16
Abaqus ID:
Printed on:

EXAMPLE: SKEW PLATE
Step definition
The *STEP definition specifies a linear, static simulation:
*STEP, PERTURBATIONUniform pressure (20.0 kPa) load*STATIC
The line following *STEP, PERTURBATION contains a clear description of the loading
applied in this step.
Boundary conditions
The nodes at the left-hand end of the plate (node set ENDA) need to be constrained completely by
the following boundary condition:
*BOUNDARYENDA, ENCASTRE
The nodes at the right-hand end of the plate need to be constrained to model their “rail”
boundary condition. Since you have transformed the nodes at this end using *TRANSFORM,
you must apply the boundary conditions in the local coordinate system. To allow these nodes to
move in the local 1-direction (along the axis of the plate) only, all other degrees of freedom must
be constrained as follows:
ENDB, 2,6
Had you not defined node sets ENDA and ENDB, you would have had to create a data line for each
node.
Loading
A distributed pressure load of 20.0 kPa is applied to the plate in this simulation. As shown in
Figure 5–10, the pressure acts in the negative global 3-direction. Pressure loads are applied to the
faces of elements with the *DLOAD option (*DLOAD is described in Chapter 4, “Using Continuum
Elements,” for the lug model example). Shell elements have only one face; therefore, the load
identifier for pressure is just “P.” A positive pressure on a shell acts in the direction of the positive
element normal. The shell elements in the input file from “Skew plate,” Section A.3, have normals
that align with the positive global 3-axis. Thus, the following input defines the correct pressure
loading in that model:
*DLOADPLATE, P, -20000.0
Since element set PLATE contains all elements in the model, this option block applies a pressure
load to all elements in the model.
5–17
Abaqus ID:
Printed on:

EXAMPLE: SKEW PLATE
Output requests
If the preprocessor has generated default output request options, you should delete them. To create
an output database ( .odb) file for use with Abaqus/Viewer and printed tables of the element
stresses, nodal reaction forces and moments, and displacements at the midspan of the plate, the
following output requests are included in the input file:
*OUTPUT, FIELD, OP=NEW*NODE OUTPUTU, RF*ELEMENT OUTPUTS, E*OUTPUT, HISTORY, OP=NEW*NODE OUTPUT, NSET=MIDSPANU,*EL PRINTS,E,*NODE PRINT, SUMMARY=NO, TOTALS=YES, GLOBAL=YESRF,*NODE PRINT, NSET=MIDSPANU,
Specifying the *OUTPUT option overrides the default output selections noted in the previous
chapters. The option is used with the FIELD and HISTORY parameters to request field and history
output to the output database file. In general, field output is used to generate contour plots, symbol
plots, and deformed shape plots; history output is used for X–Y plotting. In conjunction with the
*OUTPUT option, the *NODE OUTPUT option is used to request output of nodal variables and
the *ELEMENT OUTPUT option is used for output of element variables.
5.5.6 Running the analysisAfter storing your input in a file called skew.inp, run the analysis interactively. If you do not remember
how to run the analysis, see “Running the analysis,” Section 4.3.6. If your analysis does not complete,
check the data file, skew.dat, for error messages. Modify your input file to remove the errors; if
you still have trouble running your model, compare your input file to the one given in “Skew plate,”
Section A.3.
5.5.7 ResultsAfter running the simulation successfully, look at the table of stresses in the data file, skew.dat. Anexcerpt from the table is shown below.
5–18
Abaqus ID:
Printed on:

EXAMPLE: SKEW PLATE
THE FOLLOWING TABLE IS PRINTED FOR ALL ELEMENTS WITH TYPE S8R5 AT THE INTEGRATION POINTS
ELEMENT PT SEC FOOT- S11 S22 S12PT NOTE
1 1 1 OR -4.2759E+07 -9.3051E+06 6.7584E+061 1 3 OR 4.2759E+07 9.3051E+06 -6.7584E+061 2 1 OR -7.4724E+07 -2.7832E+06 1.0599E+071 2 3 OR 7.4724E+07 2.7832E+06 -1.0599E+071 3 1 OR -7.3273E+07 -2.8832E+07 2.1403E+071 3 3 OR 7.3273E+07 2.8832E+07 -2.1403E+071 4 1 OR -8.2885E+07 -1.8951E+07 1.4786E+071 4 3 OR 8.2885E+07 1.8951E+07 -1.4786E+07::
114 1 1 OR -8.2885E+07 -1.8951E+07 1.4786E+07114 1 3 OR 8.2885E+07 1.8951E+07 -1.4786E+07114 2 1 OR -7.3273E+07 -2.8832E+07 2.1403E+07114 2 3 OR 7.3273E+07 2.8832E+07 -2.1403E+07114 3 1 OR -7.4724E+07 -2.7832E+06 1.0599E+07114 3 3 OR 7.4724E+07 2.7832E+06 -1.0599E+07114 4 1 OR -4.2759E+07 -9.3051E+06 6.7584E+06114 4 3 OR 4.2759E+07 9.3051E+06 -6.7584E+06
MAXIMUM 2.3826E+08 1.0326E+08 7.0025E+07ELEMENT 4 4 4
MINIMUM -2.3826E+08 -1.0326E+08 -7.0025E+07ELEMENT 4 4 4
OR: *ORIENTATION USED FOR THIS ELEMENT
The second column (SEC PT—section point) identifies the location in the element where the stress was
calculated. Section point 1 lies on the SNEG surface of the shell, and section point 3 lies on the SPOS
surface. The letters OR appear in the FOOTNOTE column, indicating that an *ORIENTATION option
has been used for the element: the stresses refer to a local coordinate system.
Check that the small-strain assumption was valid for this simulation. The axial strain corresponding
to the peak stress is 0.008. Because the strain is typically considered small if it is less than 4 or
5%, a strain of 0.8% is well within the appropriate range to be modeled with S8R5 elements.
Look at the reaction forces and moments in the following table:
THE FOLLOWING TABLE IS PRINTED FOR ALL NODES
NODE FOOT- RF1 RF2 RF3 RM1 RM2 RM3NOTE
1 0.000 0.000 -109.9 1.775 -0.3283 0.0002 0.000 0.000 6.448 7.597 -36.46 0.0003 0.000 0.000 239.9 6.568 -35.46 0.0004 0.000 0.000 455.4 6.806 -88.26 0.0005 0.000 0.000 260.5 6.948 -51.13 0.0006 0.000 0.000 750.8 8.305 -126.5 0.0007 0.000 0.000 73.90 8.749 -62.23 0.0008 0.000 0.000 2286. 31.06 -205.8 0.0009 0.000 0.000 37.19 -1.610 -76.45 0.000
1201 0.000 0.000 37.19 1.610 76.45 0.0001202 0.000 0.000 2286. -31.06 205.8 0.0001203 0.000 0.000 73.90 -8.749 62.23 0.0001204 0.000 0.000 750.8 -8.305 126.5 0.0001205 0.000 0.000 260.5 -6.948 51.13 0.0001206 0.000 0.000 455.4 -6.806 88.26 0.0001207 0.000 0.000 239.9 -6.568 35.46 0.0001208 0.000 0.000 6.448 -7.597 36.46 0.0001209 0.000 0.000 -109.9 -1.775 0.3283 0.000
TOTAL 0.000 0.000 8000. 3.7096E-11 -1.8769E-09 0.000
5–19
Abaqus ID:
Printed on:

EXAMPLE: SKEW PLATE
The reaction forces were written in the global coordinate system because of howwe requested the reaction
force output (GLOBAL=YES on the *NODE PRINT option). Otherwise, the reactions for the nodes
would have been written in the local coordinate system. Check that the sum of the reaction forces
and reaction moments with the corresponding applied loads is zero. The nonzero reaction force in the
3-direction equilibrates the vertical force of the pressure load (20 kPa × 1.0 m × 0.4 m). In addition to the
reaction forces, the pressure load causes self-equilibrating reaction moments at the constrained rotational
degrees of freedom.
The table of displacements (which is not shown here) shows that the mid-span deflection across the
plate is 5.3 cm, which is approximately 5% of the plate’s length. By running this as a linear analysis,
we assume the displacements to be small. It is questionable whether these displacements are truly
small relative to the dimensions of the structure; nonlinear effects may be important, requiring further
investigation. In this case we need to perform a geometrically nonlinear analysis, which is discussed in
Chapter 8, “Nonlinearity.”
5.5.8 Postprocessing
This section discusses postprocessing with Abaqus/Viewer. Both contour and symbol plots are useful
for visualizing shell analysis results. Since contour plotting was discussed in detail in Chapter 4, “Using
Continuum Elements,” we use symbol plots here.
Start Abaqus/Viewer by typing the following command at the operating system prompt:
abaqus viewer odb=skew
By default, Abaqus/Viewer plots the undeformed shape of the model.
Element normals
Use the undeformed shape plot to check the model definition. Check that the element normals for
the skew-plate model were defined correctly and point in the positive 3-direction.
To display the element normals:
1. From the main menu bar, select Options→Common; or use the tool in the toolbox.
The Common Plot Options dialog box appears.
2. Click the Normals tab.
3. Toggle on Show normals, and accept the default setting of On elements.
4. Click OK to apply the settings and to close the dialog box.
The default view is isometric. You can change the view using the options in the view menu or
the view tools (such as ) from the View Manipulation toolbar.
5–20
Abaqus ID:
Printed on:

EXAMPLE: SKEW PLATE
To change the view:
1. From the main menu bar, select View→Specify.
The Specify View dialog box appears.
2. From the list of available methods, select Viewpoint.
3. Enter the -, - and -coordinates of the viewpoint vector as −0.2, −1, 0.8 and the
coordinates of the up vector as 0, 0, 1.
4. Click OK.
Abaqus/Viewer displays your model in the specified view, as shown in Figure 5–13.
123
Figure 5–13 Shell element normals in the skew plate model.
Symbol plots
Symbol plots display the specified variable as a vector originating from the node or element
integration points. You can produce symbol plots of most tensor- and vector-valued variables. The
exceptions are mainly nonmechanical output variables and element results stored at nodes, such
as nodal forces. The relative size of the arrows indicates the relative magnitude of the results,
and the vectors are oriented along the global direction of the results. You can plot results for the
resultant of variables such as displacement (U), reaction force (RF), etc.; or you can plot individual
components of these variables.
Before proceeding, suppress the visibility of the element normals.
To generate a symbol plot of the displacement:
1. From the list of variable types on the left side of the Field Output toolbar, select Symbol.
2. From the list of output variables in the center of the toolbar, select U.
5–21
Abaqus ID:
Printed on:

EXAMPLE: SKEW PLATE
3. From the list of vector quantities and selected components, select U3.
Abaqus/Viewer displays a symbol plot of the displacement vector resultant on the deformed
model shape.
4. The default shaded render style obscures the arrows. An unobstructed view of the arrows can
be obtained by changing the render style to Wireframe using the Common Plot Optionsdialog box. If the element normals are still visible, you should turn them off at this time.
5. The symbol plot can also be based on the undeformed model shape. From the main menu bar,
select Plot→Symbols→On Undeformed Shape.
A symbol plot on the undeformed model shape appears, as shown in Figure 5–14.
123
Figure 5–14 Symbol plot of displacement.
You can plot principal values of tensor variables such as stress using symbol plots. A
symbol plot of the principal values of stress yields three vectors at every integration point,
each corresponding to a principal value oriented along the corresponding principal direction.
Compressive values are indicated by arrows pointing toward the integration point, and tensile
values are indicated by arrows pointing away from the integration point. You can also plot
individual principal values.
To generate a symbol plot of the principal stresses:
1. From the list of variable types on the left side of the Field Output toolbar, select Symbol.
2. From the list of output variables in the center of the toolbar, select S.
5–22
Abaqus ID:
Printed on:

EXAMPLE: SKEW PLATE
3. From the list of tensor quantities and components, select All principal components as the
tensor quantity.
Abaqus/Viewer displays a symbol plot of principal stresses.
4. From the main menu bar, select Options→Symbol; or use the Symbol Options tool in
the toolbox to change the arrow length.
The Symbol Plot Options dialog box appears.
5. In the Color & Style page, click the Tensor tab.
6. Drag the Size slider to select 2 as the arrow length.
7. Click OK to apply the settings and to close the dialog box.
The symbol plot shown in Figure 5–15 appears.
1
23
Figure 5–15 Symbol plot of principal stresses on the bottom surface of the plate.
8. The principal stresses are displayed at section point 1 by default. To plot stresses at nondefault
section points, select Result→Section Points from the main menu bar to open the SectionPoints dialog box.
9. Select the desired nondefault section point for plotting.
10. In a complex model, the element edges can obscure the symbol plots. To suppress the display
of the element edges, choose Feature edges in the Basic tabbed page of the Common PlotOptions dialog box.
5–23
Abaqus ID:
Printed on:

EXAMPLE: SKEW PLATE
Figure 5–16 shows a symbol plot of the principal stresses at the default section point with only
feature edges visible.
1
23
Figure 5–16 Symbol plot of principal stresses using feature edges.
Material directions
Abaqus/Viewer also allows you visualize the element material directions. This feature is
particularly useful if you would like to verify that the material directions were assigned correctly
in the simulation.
To plot the material directions:
1. From the main menu bar, select Plot→Material Orientations→On Undeformed Shape; or
use the tool in the toolbox.
The material orientation directions are plotted on the undeformed shape. By default, the triads
that represent the material orientation directions are plotted without arrowheads.
2. From the main menu bar, select Options→Material Orientation; or use the Material
Orientation Options tool in the toolbox to display the triads with arrowheads.
The Material Orientation Plot Options dialog box appears.
3. Set the Arrowhead option to use filled arrowheads in the triad.
4. Click OK to apply the settings and to close the dialog box.
5–24
Abaqus ID:
Printed on:

EXAMPLE: SKEW PLATE
5. Use the predefined views available in the Views toolbar to display the plate as shown in
Figure 5–17. In this figure, perspective is turned off. To turn off perspective, click the
tool in the View Options toolbar.
Tip: If the Views toolbar is not visible, select View→Toolbars→Views from the
main menu bar.
By default, the material 1-direction is colored blue, the material 2-direction is colored yellow,
and, if it is present, the material 3-direction is colored red.
1
2
3
Figure 5–17 Plot of material orientation directions in the plate.
Evaluating results based on tabular data
As noted previously, a convenient alternative to writing printed data to the data ( .dat) file is togenerate a tabular report using Abaqus/Viewer. With the aid of display groups, create a tabular data
report of the whole model element stresses (components S11, S22, and S12), the reaction forces
and moments at the supported nodes (sets ENDA and ENDB), and the displacements of the midspan
nodes (set MIDSPAN). The stress data are shown below.
Field Output Report
Source 1---------
ODB: skew.odbStep: Step-1Frame: Increment 1: Step Time = 2.2200E-16
5–25
Abaqus ID:
Printed on:

EXAMPLE: SKEW PLATE
Loc 1 : Integration point values at shell general ... : SNEG, (fraction = -1.0)Loc 2 : Integration point values at shell general ... : SPOS, (fraction = 1.0)
Output sorted by column "Element Label".
Field Output reported at integration points for part: PLATE-1
Element Int S.S11 S.S11 S.S22 S.S22 S.S12 S.S12Label Pt @Loc 1 @Loc 2 @Loc 1 @Loc 2 @Loc 1 @Loc 2
-----------------------------------------------------------------------------------------------------1 1 -42.7593E+06 42.7593E+06 -9.30515E+06 9.30515E+06 6.75836E+06 -6.75836E+061 2 -74.7242E+06 74.7242E+06 -2.78322E+06 2.78322E+06 10.5987E+06 -10.5987E+061 3 -73.2731E+06 73.2731E+06 -28.832E+06 28.832E+06 21.4032E+06 -21.4032E+061 4 -82.8849E+06 82.8849E+06 -18.9513E+06 18.9513E+06 14.7861E+06 -14.7861E+06
.
.114 1 -82.8849E+06 82.8849E+06 -18.9513E+06 18.9513E+06 14.7861E+06 -14.7861E+06114 2 -73.2731E+06 73.2731E+06 -28.832E+06 28.832E+06 21.4032E+06 -21.4032E+06114 3 -74.7242E+06 74.7242E+06 -2.78322E+06 2.78322E+06 10.5987E+06 -10.5987E+06114 4 -42.7593E+06 42.7593E+06 -9.30515E+06 9.30515E+06 6.75836E+06 -6.75836E+06
Minimum -238.256E+06 -90.2214E+06 -103.26E+06 -10.5215E+06 -18.8595E+06 -70.0247E+06At Element 4 54 4 63 81 111
Int Pt 3 3 1 1 2 2
Maximum 90.2214E+06 238.256E+06 10.5215E+06 103.26E+06 70.0247E+06 18.8595E+06At Element 54 4 63 4 111 81
Int Pt 3 3 1 1 2 2
The reaction forces and moments are listed in the following table:
Field Output Report
Source 1---------
ODB: skew.odbStep: Step-1Frame: Increment 1: Step Time = 2.2200E-16
Loc 1 : Nodal values from source 1
Output sorted by column "Node Label".
Field Output reported at nodes for part: PART-1-1
Node RF.RF1 RF.RF2 RF.RF3 RM.RM1 RM.RM2 RM.RM3Label @Loc 1 @Loc 1 @Loc 1 @Loc 1 @Loc 1 @Loc 1
-------------------------------------------------------------------------------------1 0. 0. -109.912 1.77484 -328.266E-03 0.2 0. 0. 6.44824 7.59742 -36.4615 0.3 0. 0. 239.923 6.5683 -35.4597 0.4 0. 0. 455.379 6.80581 -88.2614 0.5 0. 0. 260.543 6.94783 -51.1276 0.6 0. 0. 750.833 8.30465 -126.458 0.7 0. 0. 73.904 8.74902 -62.2273 0.8 0. 0. 2.28569E+03 31.0634 -205.759 0.9 0. 0. 37.1932 -1.6098 -76.4492 0.
1201 0. 0. 37.1932 1.6098 76.4492 0.1202 0. 0. 2.28569E+03 -31.0634 205.759 0.1203 0. 0. 73.904 -8.74902 62.2273 0.1204 0. 0. 750.833 -8.30465 126.458 0.1205 0. 0. 260.543 -6.94783 51.1276 0.1206 0. 0. 455.379 -6.80581 88.2614 0.1207 0. 0. 239.923 -6.5683 35.4597 0.1208 0. 0. 6.44824 -7.59742 36.4615 0.1209 0. 0. -109.912 -1.77484 328.266E-03 0.
Minimum 0. 0. -109.912 -31.0634 -205.759 0.At Node 1209 1209 1 1202 8 1209
5–26
Abaqus ID:
Printed on:

SUGGESTED READING
Maximum 0. 0. 2.28569E+03 31.0634 205.759 0.At Node 1209 1209 8 8 1202 1209
Total 0. 0. 8.00000E+03 0. 0. 0.
5.6 Related Abaqus examples
• “Pressurized fuel tank with variable shell thickness,” Section 2.1.6 of the Abaqus Example Problems
Manual
• “Analysis of an anisotropic layered plate,” Section 1.1.2 of the Abaqus Benchmarks Manual
• “Buckling of a simply supported square plate,” Section 1.2.4 of the Abaqus Benchmarks Manual
• “The barrel vault roof problem,” Section 2.3.1 of the Abaqus Benchmarks Manual
5.7 Suggested reading
The following references provide a more in-depth treatment of the theoretical and computational aspects
of shell theory.
Basic shell theory
• Timoshenko, S., Strength of Materials: Part II, Krieger Publishing Co., 1958.
• Timoshenko, S. and S. W. Krieger, Theory of Plates and Shells, McGraw-Hill, Inc., 1959.
• Ugural, A. C., Stresses in Plates and Shells, McGraw-Hill, Inc., 1981.
Basic computational shell theory
• Cook, R. D., D. S. Malkus, and M. E. Plesha, Concepts and Applications of Finite Element
Analysis, John Wiley & Sons, 1989.
• Hughes, T. J. R., The Finite Element Method, Prentice-Hall, Inc., 1987.
Advanced shell theory
• Budiansky, B., and J. L. Sanders, “On the ‘Best’ First-Order Linear Shell Theory,” Progress in
Applied Mechanics, The Prager Anniversary Volume, 129–140, 1963.
Advanced computational shell theory
• Ashwell, D. G., and R. H. Gallagher, Finite Elements for Thin Shells and Curved Members,
John Wiley & Sons, 1976.
• Hughes, T. J. R., T. E. Tezduyar, “Finite Elements Based upon Mindlin Plate Theory with
Particular Reference to the Four-Node Bilinear Isoparametric Element,” Journal of Applied
Mechanics, 587–596, 1981.
5–27
Abaqus ID:
Printed on:

SUMMARY
• Simo, J. C., D. D. Fox, and M. S. Rifai, “On a Stress Resultant Geometrically Exact Shell
Model. Part III: Computational Aspects of the Nonlinear Theory,” Computer Methods in
Applied Mechanics and Engineering, vol. 79, 21–70, 1990.
5.8 Summary
• The cross-section behavior of shell elements can be determined using numerical integration
through the shell thickness (*SHELL SECTION) or using a cross-section stiffness calculated at
the beginning of the analysis (*SHELL GENERAL SECTION).
• *SHELL GENERAL SECTION is efficient, but it can be used only with linear materials. *SHELL
SECTION can be used with both linear and nonlinear materials.
• Numerical integration is performed at a number of section points through the shell thickness. These
section points are the locations at which element variables can be output. The default outermost
section points lie on the surfaces of the shell.
• The direction of a shell element’s normal determines the positive and negative surfaces of the
element. To define contact and interpret element output correctly, you must know which surface is
which. The shell normal also defines the direction of positive pressure loads applied to the element
and can be plotted in Abaqus/Viewer.
• Shell elements use material directions local to each element. In large-displacement analyses the
local material axes rotate with the element. *ORIENTATION can be used to define non-default
local coordinate systems. The element variables, such as stress and strain, are output in the local
directions.
• *TRANSFORM defines local coordinate systems for nodes. Concentrated loads and boundary
conditions are applied in the local coordinate system. All printed nodal output, such as
displacements, also refer to the local system by default.
• Symbol plots can help you visualize the results from a simulation. They are especially useful for
visualizing the motion and load paths of a structure.
5–28
Abaqus ID:
Printed on:

BEAM CROSS-SECTION GEOMETRY
6. Using Beam Elements
Use beam elements to model structures in which one dimension (the length) is significantly greater than
the other two dimensions and in which the longitudinal stress is most important. Beam theory is based
on the assumption that the deformation of the structure can be determined entirely from variables that
are functions of position along the structure’s length. For beam theory to produce acceptable results,
the cross-section dimensions should be less than 1/10 of the structure’s typical axial dimension. The
following are examples of typical axial dimensions:
• the distance between supports,
• the distance between gross changes in cross-section, and
• the wavelength of the highest vibration mode of interest.
Abaqus beam elements assume that plane sections perpendicular to the axis of the beam remain
plane during deformation.
Do not be confused into thinking that the cross-section dimensions should be less than 1/10 of a
typical element length. A highly refined mesh may contain beam elements whose length is less than
their cross-section dimensions, although this is not generally recommended—continuum elements may
be more suitable in such a case.
6.1 Beam cross-section geometry
You can use the *BEAM SECTION option or the *BEAM GENERAL SECTION option to define the
beam section. With either option you can define the beam cross-section geometrically by specifying the
shape and dimensions of the section. The *BEAM GENERAL SECTION option can also be used to
define the beam section through section engineering properties, such as area and moments of inertia.
Alternatively, the beam section can be based on a mesh of special two-dimensional elements for which
geometric quantities are calculated numerically.
Abaqus offers a variety of common cross-section shapes, as shown in Figure 6–1, should you decide
to define the beam profile geometrically. You can also define almost any thin-walled cross-section using
the arbitrary cross-section definition. For a detailed discussion of the beam cross-sections available in
Abaqus, see “Beam cross-section library,” Section 26.3.9 of the Abaqus Analysis User’s Manual.
The basic format of the *BEAM SECTION option is
*BEAM SECTION, ELSET=<element set name>, SECTION=<section type>,MATERIAL=<material name><cross-section dimensions>
< >,< >,< >
6–1
Abaqus ID:
Printed on:

BEAM CROSS-SECTION GEOMETRY
Box Circular
Hexagonal I-beam L-section
Pipe Rectangular Trapezoid
Arbitrary
Figure 6–1 Beam cross-sections.
Set the SECTION parameter to one of the cross-sections shown in Figure 6–1. Provide the required
cross-section dimensions, which are different for each type of cross-section, as specified in “Beam cross-
section library,” Section 26.3.9 of the Abaqus Analysis User’s Manual. The vector on the second data
line defines the approximate normal, , which is explained later in this section.
The basic format of the *BEAM GENERAL SECTION option is
*BEAM GENERAL SECTION, ELSET=<element set name>, SECTION=<section type>
<cross-section dimensions> or <section engineering properties>
< >,< >,< >
<Young's modulus (E)>,<torsional shear modulus (G)>
To define the section’s properties geometrically, set the SECTION parameter to one of the
cross-sections shown in Figure 6–1. In this case you provide the required cross-section dimensions the
same way as you would with *BEAM SECTION. The vector on the second data line again defines the
approximate normal, . On the third line you enter the elastic material constants, because *BEAM
GENERAL SECTION does not refer to any material option block. If you define the section’s properties
geometrically with this option, the material behavior must be linear elastic.
The alternative is to set the SECTION parameter to GENERAL or NONLINEAR GENERAL,
in which case you provide the section engineering properties (area, moments of inertia, and torsional
constants) instead of the cross-section dimensions. These parameters allow you to combine the beam’s
geometry and material behavior to define its response to loads. This response may be linear or nonlinear.
See “Using a general beam section to define the section behavior,” Section 26.3.7 of the Abaqus Analysis
User’s Manual, for further details.
6–2
Abaqus ID:
Printed on:

BEAM CROSS-SECTION GEOMETRY
Meshed beam cross-sections allow a description of the beam cross-section that includes multiple
materials and complex geometry. This type of beam profile is discussed further in “Meshed beam cross-
sections,” Section 10.5.1 of the Abaqus Analysis User’s Manual.
6.1.1 Section points
When you specify *BEAM SECTION, Abaqus calculates the beam element’s response at an array of
section points throughout the beam cross-section. The number of section points, as well as the section
point locations, are shown in “Beam cross-section library,” Section 26.3.9 of the Abaqus Analysis User’s
Manual. Element output variables, such as stress and strain, are available at any of the section points;
however, by default output is provided at only a select number of section points, as listed in “Beam
cross-section library,” Section 26.3.9 of the Abaqus Analysis User’s Manual. All the section points for
a rectangular cross-section (SECTION=RECT) are shown in Figure 6–2.
Array of sectionpoints at eachintegration point
Integrationpoints
1
21
25
53Nodes
23
Figure 6–2 Integration and default section points in a B32 rectangular beam element.
For this cross-section output is provided at points 1, 5, 21, and 25 by default. The beam element
shown in Figure 6–2 uses a total of 50 section points, 25 at each of the two integration points, to calculate
its stiffness.
When you specify *BEAM GENERAL SECTION, Abaqus does not calculate the beam’s response
at the section points. Instead, it uses the section engineering properties to determine the section response.
Therefore, Abaqus uses section points only as locations for output, and you need to specify the section
points at which you desire output. Use the *SECTION POINTS option, which must follow the *BEAM
GENERAL SECTION option, to specify the location of the section points:
*SECTION POINTS< >,< >
6–3
Abaqus ID:
Printed on:

BEAM CROSS-SECTION GEOMETRY
The - and -coordinates are given in the local 1–2 coordinate system of the beam cross-section.
For example, if we require stresses at the corners of an element with the rectangular beam cross-section
shown in Figure 6–3, we would use the following option block:
*SECTION POINTS-0.01, -0.0050.01, -0.0050.01, 0.005
-0.01, 0.005
0.01
0.02
1
2
Figure 6–3 Section points at the corners of a rectangular beam.
The points you specify are assigned identifying numbers based on the order they are given; i.e., the first
point is section point 1, the second is section point 2, etc.
6.1.2 Cross-section orientationYou must define the orientation of a beam’s cross-section in global Cartesian space. The local tangent
along the beam element, , is defined as the vector along the element axis pointing from the first node
of the element to the next node. The beam cross-section is perpendicular to this local tangent. The local
(1–2) beam section axes are represented by the vectors and . The three vectors , , and form
a local, right-handed, coordinate system (see Figure 6–4).
The -direction is always (0.0, 0.0, −1.0) for two-dimensional beam elements.
For three-dimensional beam elements there are several ways to define the orientation of the local
beam section axes. The simplest is to specify an extra node on the data line defining the element in the
*ELEMENT option. The vector, , from the first node in the beam element to this additional node
(see Figure 6–4), is used initially as an approximate -direction. Abaqus then defines the beam’s
-direction as . Having determined , Abaqus defines the actual -direction as . This
procedure ensures that the local tangent and local beam section axes form an orthogonal system.
6–4
Abaqus ID:
Printed on:
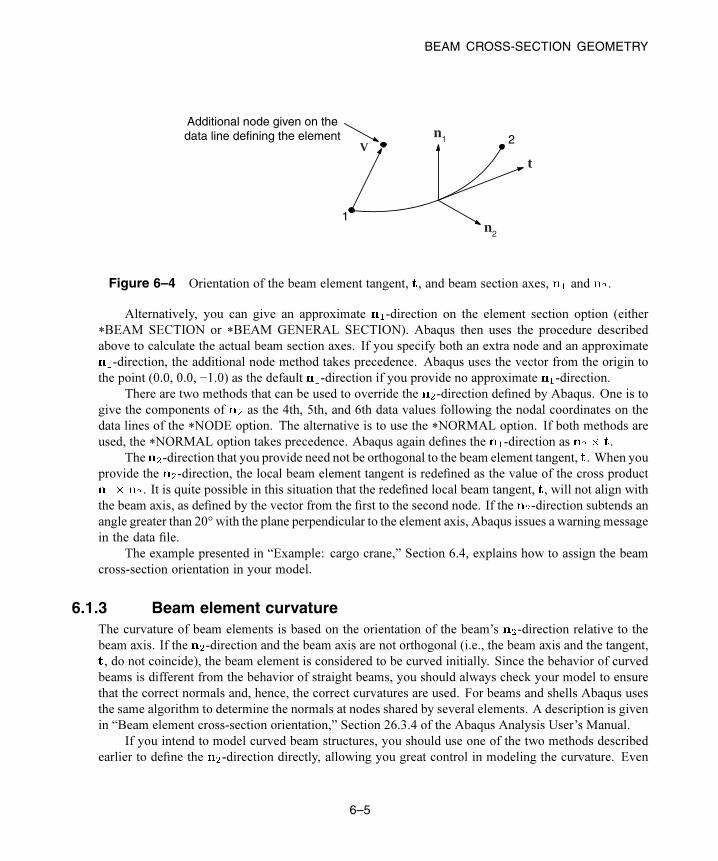
BEAM CROSS-SECTION GEOMETRY
1
2
Additional node given on thedata line defining the element n1
n2
tV
Figure 6–4 Orientation of the beam element tangent, , and beam section axes, and .
Alternatively, you can give an approximate -direction on the element section option (either
*BEAM SECTION or *BEAM GENERAL SECTION). Abaqus then uses the procedure described
above to calculate the actual beam section axes. If you specify both an extra node and an approximate
-direction, the additional node method takes precedence. Abaqus uses the vector from the origin to
the point (0.0, 0.0, −1.0) as the default -direction if you provide no approximate -direction.
There are two methods that can be used to override the -direction defined by Abaqus. One is to
give the components of as the 4th, 5th, and 6th data values following the nodal coordinates on the
data lines of the *NODE option. The alternative is to use the *NORMAL option. If both methods are
used, the *NORMAL option takes precedence. Abaqus again defines the -direction as .
The -direction that you provide need not be orthogonal to the beam element tangent, . When you
provide the -direction, the local beam element tangent is redefined as the value of the cross product
. It is quite possible in this situation that the redefined local beam tangent, , will not align with
the beam axis, as defined by the vector from the first to the second node. If the -direction subtends an
angle greater than 20° with the plane perpendicular to the element axis, Abaqus issues a warning message
in the data file.
The example presented in “Example: cargo crane,” Section 6.4, explains how to assign the beam
cross-section orientation in your model.
6.1.3 Beam element curvatureThe curvature of beam elements is based on the orientation of the beam’s -direction relative to the
beam axis. If the -direction and the beam axis are not orthogonal (i.e., the beam axis and the tangent,
, do not coincide), the beam element is considered to be curved initially. Since the behavior of curved
beams is different from the behavior of straight beams, you should always check your model to ensure
that the correct normals and, hence, the correct curvatures are used. For beams and shells Abaqus uses
the same algorithm to determine the normals at nodes shared by several elements. A description is given
in “Beam element cross-section orientation,” Section 26.3.4 of the Abaqus Analysis User’s Manual.
If you intend to model curved beam structures, you should use one of the two methods described
earlier to define the -direction directly, allowing you great control in modeling the curvature. Even
6–5
Abaqus ID:
Printed on:

BEAM CROSS-SECTION GEOMETRY
if you intend to model a structure made up of straight beams, curvature may be introduced as normals
are averaged at shared nodes. You can rectify this problem by defining the beam normals directly as
explained previously.
6.1.4 Nodal offsets in beam sectionsWhen beam elements are used as stiffeners for shell models, it is convenient to have the beam and shell
elements share the same nodes. By default, shell element nodes are located at the midplane of the shell,
and beam element nodes are located somewhere in the cross-section of the beam. Hence, if the shell
and beam elements share the same nodes, the shell and the beam stiffener will overlap unless the beam
cross-section is offset from the location of the node (see Figure 6–5).
Same node used for shell and beam elements
Shell section
(a) (b)
Figure 6–5 Using beams as stiffeners for shell models: (a) without
offset of beam sections; (b) with offset of beam sections.
With beam section types I, TRAPEZOID, and ARBITRARY it is possible to specify that the section
geometry is located at some distance from the origin of the section’s local coordinate system, which
is located at the element’s nodes. Since it is easy to offset beams with such cross-sections from their
nodes, they can be used readily as stiffeners as shown in Figure 6–5(b). (If flange or web buckling of the
stiffeners is important, shells should be used to model the stiffeners.)
The I-beam shown in Figure 6–6 is attached to a shell 1.2 units thick. The following input is used
to orient the beam section as it is shown in the figure:
*BEAM SECTION, SECTION=I, ELSET=<element set name>, MATERIAL=<material>−0.6, 2.4, 3.0, 2.0, 0.2, 0.2, 0.2< >, < >,< >
The first item on the first data line defines the offset of the beam node from the bottom of the I-
section. The offset is one half of the shell thickness or 0.6. The remaining data items are the beam depth,
the width of the bottom and top flanges, the thickness of the bottom and top flanges, and the thickness
of the web.
You can give the location of the centroid and shear center if you specify the *BEAM
GENERAL SECTION option with the parameter SECTION=GENERAL. The *SHEAR CENTER and
6–6
Abaqus ID:
Printed on:

FORMULATION AND INTEGRATION
22.0
2.4
0.2
0.2 0.2
3.0
1
Shell section thickness 1.2
Figure 6–6 I-beam used as stiffener for a shell element.
*CENTROID options allow these locations to be offset from the node, enabling you to model stiffeners
readily. For example, the input for the I-beam attached to the shell as shown in Figure 6–6 is:
*BEAM GENERAL SECTION, SECTION=GENERAL, ELSET=<element set name>
1.4, 1.312, 0., 0.585, 0.0192
< >, < >, < >
<Young’s modulus>,<torsional shear modulus>*CENTROID0., 1.642857*SHEAR CENTER0., 1.202857
Area, , , , torsional rigidityI11 I12 I22n1
1n1
2n1
3
It is also possible to define the beam nodes and shell nodes separately and connect the beam and shell
using a rigid beam constraint between the two nodes. See “Linear constraint equations,” Section 31.2.1
of the Abaqus Analysis User’s Manual, for further details.
6.2 Formulation and integration
All beam elements in Abaqus are “beam-column” elements—meaning they allow axial, bending, and
torsional deformation. The Timoshenko beam elements also consider the effects of transverse shear
deformation.
6–7
Abaqus ID:
Printed on:

FORMULATION AND INTEGRATION
6.2.1 Shear deformationThe linear elements (B21 and B31) and the quadratic elements (B22 and B32) are shear deformable,
Timoshenko beams; thus, they are suitable for modeling both stout members, in which shear deformation
is important, and slender beams, in which shear deformation is not important. The cross-sections of these
elements behave in the same manner as the cross-sections of the thick shell elements, as illustrated in
Figure 6–7(b) and discussed in “Shell formulation – thick or thin,” Section 5.2.
(a) (b)
x x
Deformation of cross-section Deformation of cross-section
w wTransversesection
Transversesection
Neutral axis Neutral
axis
dwdx
dwdx
dwdx
− γ = β
γ
Figure 6–7 Behavior of transverse beam sections in (a) slender beams and (b) thick beams.
Abaqus assumes the transverse shear stiffness of these beam elements to be linear elastic and
constant. In addition, these beams are formulated so that their cross-sectional area can change as a
function of the axial deformation, an effect that is considered only in geometrically nonlinear simulations
(see Chapter 8, “Nonlinearity”) in which the POISSON parameter on the beam section property option
has a nonzero value. These elements can provide useful results as long as the cross-section dimensions
are less than 1/10 of the typical axial dimensions of the structure, which is generally considered to be
the limit of the applicability of beam theory; if the beam cross-section does not remain plane under
bending deformation, beam theory is not adequate to model the deformation.
The cubic elements available in Abaqus/Standard—the so-called Euler-Bernoulli beam elements
(B23 and B33)—do not model shear flexibility. The cross-sections of these elements remain
perpendicular to the beam axis (see Figure 6–7(a)). Therefore, the cubic beam elements are most
effective for modeling structures with relatively slender members. Since cubic elements model a cubic
variation of displacement along their lengths, a structural member often can be modeled with a single
cubic element for a static analysis and with a small number of elements for a dynamic analysis. These
elements assume that shear deformations are negligible. Generally, if the cross-section dimensions are
less than 1/15 of the typical axial dimensions of the structure, this assumption is valid.
6–8
Abaqus ID:
Printed on:

FORMULATION AND INTEGRATION
6.2.2 Torsional response—warpingStructural members are often subjected to torsional moments, which occur in almost any
three-dimensional frame structure. Loads that cause bending in one member may cause twisting in
another, as shown in Figure 6–8.
Torsion andbending
Bending
Figure 6–8 Torsion induced in a frame structure.
The response of a beam to torsion depends on the shape of its cross-section. Generally, torsion in a beam
produces warping or nonuniform out-of-plane displacements in the cross-section. Abaqus considers the
effects of torsion and warping only in the three-dimensional elements. The warping calculation assumes
that the warping displacements are small. The following cross-sections behave differently under torsion:
solid cross-sections; closed, thin-walled cross-sections; and open, thin-walled cross-sections.
Solid cross-sections
A solid, non-circular cross-section does not remain plane under torsion; instead, the section warps.
Abaqus uses St. Venant warping theory to calculate a single component of shear strain caused by
the warping at each section point in the cross-section. The warping in such solid cross-sections is
considered unconstrained and creates negligible axial stresses. (Warping constraints would affect
the solution only in the immediate vicinity of the constrained end.) The torsional stiffness of a beam
with a solid cross-section depends on the shear modulus, G, of the material and the torsion constant,
J, of the beam section. The torsion constant depends on the shape and the warping characteristics
of the beam cross-section. Torsional loads that produce large amounts of inelastic deformation in
the cross-section cannot be modeled accurately with this approach.
Closed, thin-walled cross-sections
Beams that have closed, thin-walled, non-circular cross-sections (BOX or HEX) have significant
torsional stiffness and, thus, behave in a manner similar to solid sections. Abaqus assumes that
warping in these sections is also unconstrained. The thin-walled nature of the cross-section allows
Abaqus to consider the shear strains to be constant through the wall thickness. The thin-walled
assumption is generally valid provided that the wall thickness is 1/10 a typical beam cross-section
dimension. Examples of typical cross-section dimensions for thin-walled cross-sections include:
6–9
Abaqus ID:
Printed on:

FORMULATION AND INTEGRATION
• The diameter of a pipe section.
• The length of an edge of a box section.
• The typical edge length of an arbitrary section.
Open, thin-walled cross-sections
Open, thin-walled cross-sections are very flexible in torsion when warping is unconstrained, and
the primary source of torsional stiffness in such structures is the constraint of the axial warping
strains. Constraining the warping of open, thin-walled beams introduces axial stresses that can
affect the beam’s response to other loading types. Abaqus/Standard has shear deformable beam
elements, B31OS and B32OS, which include the warping effects in open, thin-walled sections.
These elements must be usedwhenmodeling structures with open, thin-walled cross-sections—such
as a channel (defined as an ARBITRARY section) or an I-section—that are subjected to significant
torsional loading.
The variation of the warping-induced axial deformation over the beam’s cross-section is defined by
the section’s warping function. The magnitude of this function is treated as an extra degree of freedom,
7, in the open-section beam elements. Constraining this degree of freedom prevents warping at the nodes
at which the constraints are applied.
So that the warping amplitude can be different in each branch, the junction between open-section
beams in a frame structure generally should be modeled with separate nodes for each branch (see
Figure 6–9).
Use separate nodes for the membersconnected at this location. Constraindof’s 1–6 to be equal at theconnection but keep the warpingdegree of freedom (7) independent,and constrain it separately, ifnecessary.
Figure 6–9 Connecting open-section beams.
However, if the connection is designed to prevent warping, all branches should share a common
node, and the warping degree of freedom should be constrained using the *BOUNDARY option.
A shear force that does not act through the beam’s shear center produces torsion. The twisting
moment is equal to the shear force multiplied by its eccentricity with respect to the shear center. Often,
the centroid and the shear center do not coincide in open, thin-walled beam sections (see Figure 6–10).
If the nodes are not located at the shear center of the cross-section, the section may twist under loading.
6–10
Abaqus ID:
Printed on:

EXAMPLE: CARGO CRANE
sc
cs
sc
c
s
s c
c,s
Figure 6–10 Approximate locations of shear centers, s, and
centroids, c, for a number of beam cross-sections.
6.3 Selecting beam elements
• First-order, shear-deformable beam elements (B21, B31) should be used in any simulation that
includes contact.
• If the transverse shear deformation is important, use Timoshenko (quadratic) beam elements (B22,
B32).
• If the structure is either very rigid or very flexible, the hybrid beam elements (B21H, B32H, etc.)
available in Abaqus/Standard should be used in geometrically nonlinear simulations.
• The Euler-Bernoulli (cubic) beams (B23, B33) available in Abaqus/Standard are very accurate for
simulations that include distributed loading, such as dynamic vibration analyses.
• Structures with open, thin-walled cross-sections should be modeled with the elements that use open-
section warping theory (B31OS, B32OS) available in Abaqus/Standard.
6.4 Example: cargo crane
A light-service, cargo crane is shown in Figure 6–11. You have been asked to determine the static
deflections of the crane when it carries a load of 10 kN. You should also identify the critical members
and joints in the structure: i.e., those with the highest stresses and loads. Because this is a static analysis
you will analyze the cargo crane using Abaqus/Standard.
6–11
Abaqus ID:
Printed on:

EXAMPLE: CARGO CRANE
z x
y
A
B
C
D
E
Figure 6–11 Sketch of a light-service cargo crane.
The crane consists of two truss structures joined together by cross bracing. The two main members
in each truss structure are steel box beams (box cross-sections). Each truss structure is stiffened by
internal bracing, which is welded to the main members. The cross bracing connecting the two truss
structures is bolted to the truss structures. These connections can transmit little, if any, moment and,
therefore, are treated as pinned joints. Both the internal bracing and cross bracing use steel box beams
with smaller cross-sections than the main members of the truss structures. The two truss structures are
connected at their ends (at point E) in such a way that allows independent movement in the 3-direction
and all of the rotations, while constraining the displacements in the 1- and 2-directions to be the same.
The crane is welded firmly to a massive structure at points A, B, C, and D. The dimensions of the crane
are shown in Figure 6–12. In the following figures, truss A is the structure consisting of members AE,
BE, and their internal bracing; and truss B consists of members CE, DE, and their internal bracing.
The ratio of the typical cross-section dimension to global axial length in the main members of the
crane is much less than 1/15. The ratio is approximately 1/15 in the shortest member used for internal
bracing. Therefore, it is valid to use beam elements to model the crane.
6.4.1 Coordinate systemYou should use the default global rectangular Cartesian coordinate system shown in Figure 6–11 and
Figure 6–12. Locate the origin of the coordinate system midway between points A and D. If you build
your model with a different origin or orientation of the coordinate system, ensure that the input data in
your model reflect your coordinate system and not the one shown here.
6–12
Abaqus ID:
Printed on:

EXAMPLE: CARGO CRANE
0.2
Plan
1
3
8.0
2.0
0.5
Elevation
1
21.0
2.0 2.0 2.0
1.3330.667
Figure 6–12 Dimensions (in m) of the cargo crane.
6.4.2 Mesh designThe cargo crane will be modeled with three-dimensional, slender, cubic beam elements (B33). The cubic
interpolation in these elements allows us to use a single element for each member and still obtain accurate
results under the applied bending load. The mesh that you use in the simulation is shown in Figure 6–13.
The welded joints in the crane provide complete continuity of the translations and rotations from one
element to the next. You, therefore, need only a single node at each welded joint in the model. The bolted
joints, which connect the cross bracing to the truss structures, and the connection at the tip of the truss
structures are different. Since these joints do not provide complete continuity for all nodal degrees of
freedom, separate nodes are needed for each element at the connection. Appropriate constraints between
these separate nodes must then be given by using the *MPC, *BOUNDARY, or *EQUATION options.
The *MPC and *EQUATION options are discussed in more detail later.
The node numbers for the various members of the cargo crane model are shown in Figure 6–14.
6–13
Abaqus ID:
Printed on:

EXAMPLE: CARGO CRANE
Figure 6–13 Mesh for cargo crane.
Truss B
Cross bracing
Truss A100
101
102
103
104
105
106
107
200
201
202
203
204
205
206
207
301
302
303
305
306
401
402
403
405
406
Figure 6–14 Node numbers in crane model.
6–14
Abaqus ID:
Printed on:

EXAMPLE: CARGO CRANE
These are the node numbers from the input file given in “Cargo crane,” Section A.4. Separate nodes have
been defined on the cross-bracing elements and the truss structures that they connect. Separate nodes are
also needed at the end of each truss structure, point E in Figure 6–11. The node numbers in your model
may be different from those shown here.
The element numbers for the various members of the cargo crane model are shown in Figure 6–15.
Truss B
Cross bracing
Truss A
300
301
302
303 304
305
306
307
100101
102
103104
105
106
110
111112
113114
200
201
202
203
204
205
206
210
211
212
213
214
Figure 6–15 Element numbers in crane model.
These are the element numbers from the input file given in “Cargo crane,” Section A.4. The element
numbers in your model may be different from those shown here.
6–15
Abaqus ID:
Printed on:

EXAMPLE: CARGO CRANE
6.4.3 Preprocessing—creating the modelThe full input file for this example is crane.inp, and it is available in “Cargo crane,” Section A.4.
The Abaqus input options used to create the nodes and elements shown on the preceding pages can be
found in “Cargo crane,” Section A.4. If you wish to create the entire model using Abaqus/CAE, refer to
“Example: cargo crane,” Section 6.4 of Getting Started with Abaqus: Interactive Edition.
6.4.4 Reviewing the input file—the model dataThis section describes how the model data are described in the input file for this example. These data
include the descriptions for the input file heading, its nodes and elements, beam sections and orientations,
constraints, and boundary conditions.
Heading
The heading used in this example provides a short description of the model and the units used:
*HEADING3-D model of light-service cargo craneS.I. Units (m, kg, N, sec)
Nodal coordinates and element connectivity
Define the nodal coordinates in a *NODE option block. If you decide to do this with an editor,
you may want to use the mesh generation commands found in “Cargo crane,” Section A.4. In this
example, a node set called ATTACH is created; this node set contains the nodes at points A, B, C,
and D, the points at which the crane is attached to the parent structure.
*NSET, NSET=ATTACH100, 107, 200, 207
Create elements in your model that correspond to the elements shown in Figure 6–15, but
remember that your numbering may be different. (Having the same numbering will make defining
some modeling features easier, however.) There are several element sets that you will need in this
simulation. As the elements are defined, they are grouped into following element sets:
OUTA 100, 101, 102, 103, 104, 105, 106BRACEA 110, 111, 112, 113, 114OUTB 200, 201, 202, 203, 204, 205, 206BRACEB 210, 211, 212, 213, 214CROSSEL 300, 301, 302, 303, 304, 305, 306, 307
where these element numbers refer to those elements shown in Figure 6–15. The element sets OUTAand OUTB contain the main outer members for the two truss structures. Element sets BRACEA and
6–16
Abaqus ID:
Printed on:

EXAMPLE: CARGO CRANE
BRACEB contain the elements modeling the internal bracing within each truss structure. Element
set CROSSEL contains the cross bracing that connects the two truss structures.
Beam element properties
Since the material behavior in this simulation is assumed to be linear elastic, use the *BEAM
GENERAL SECTION option to define the section properties. All of the beams in this structure
have a box-shaped cross-section.
A box-section is specified using the parameter SECTION=BOX. The first data line contains
the section dimensions, which are the dimensions a, b, , , , and shown in Figure 6–16 for
a box section. The dimensions shown in Figure 6–16 are for the main members of the two trusses
in the crane.
a = 0.1
b = 0.05
t3 = 0.005 t1 = 0.005
t2 = 0.005
t4 = 0.005
2
1
Local beam section axes
Figure 6–16 Cross-section geometry and dimensions (in m) of the main members.
The beam section axes for the main members should be oriented such that the beam 1-axis
is orthogonal to the plane of the truss structures shown in the elevation view (Figure 6–12) and
the beam 2-axis is orthogonal to the elements in that plane. Specify this orientation by giving the
approximate direction of the beam 1-axis (the -vector) on the second data line of the *BEAM
GENERAL SECTION option. To get the correct normal, , in this case, you need to provide a
very accurate . It is somewhat easier to provide an approximate direction, which would be the
negative 3-direction. However, given the logic that Abaqus uses to determine given and ,
the normal is rotated slightly from its proper orientation if we use this approximate . You can
specify the same -direction for all elements in each of the two truss structures. The third data
line contains the elastic and shear moduli, assuming a mild strength steel with = 200.0 GPa, =
0.25, and = 80.0 GPa. These modeling data are included in the input file in the following option
blocks:
*BEAM GENERAL SECTION, SECTION=BOX, ELSET=OUTA0.10,0.05,0.005,0.005,0.005,0.005-0.1118, 0.0, -0.9936200.E9,80.E9
6–17
Abaqus ID:
Printed on:

EXAMPLE: CARGO CRANE
*BEAM GENERAL SECTION, SECTION=BOX, ELSET=OUTB0.10,0.05,0.005,0.005,0.005,0.005-0.1118, 0.0, 0.9936200.E9,80.E9
The dimensions of the beam sections for the bracing members are shown in Figure 6–17. Both
the cross bracing and the bracing within each truss structure have the same beam section geometry,
but they do not share the same orientation of the beam section axes. Therefore, separate *BEAM
GENERAL SECTION options must be used. The bracing is made from the same steel as the main
members.
a = 0.03
b = 0.03
t3 = 0.003t1 = 0.003
t2 = 0.003
t4 = 0.003
2
1Local beam section axes
Figure 6–17 Cross-section geometry and dimensions (in m) of the bracing members.
The approximate -vector for the internal truss bracing is the same as for the main members
of the respective truss structures. The following input defines the element properties of this bracing:
*BEAM GENERAL SECTION, SECTION=BOX, ELSET=BRACEA0.03,0.03,0.003,0.003,0.003,0.003-0.1118, 0.0, -0.9936200.E9,80.E9*BEAM GENERAL SECTION, SECTION=BOX, ELSET=BRACEB0.03,0.03,0.003,0.003,0.003,0.003-0.1118, 0.0, 0.9936200.E9,80.E9
We make some assumptions so that the orientation of the cross bracing is somewhat easier to
specify. All of the beam normals ( -vectors) should lie approximately in the plane of the plan
view of the cargo crane (see Figure 6–12). This plane is skewed slightly from the global 1–3 plane.
Again, a simple method for defining such an orientation is to provide an approximate -vector that
is orthogonal to this plane on the element property options. The vector should be nearly parallel to
the global 2-direction. Since the angle between the normals from one element to the next is always
greater than 20°, the normals are not averaged at the nodes.
6–18
Abaqus ID:
Printed on:

EXAMPLE: CARGO CRANE
Depending on the exact orientation of the members in the cross bracing, it is possible that
we would have to define the normals individually for each of the cross-bracing elements. Such an
exercise would be very similar to what you have already done by defining the normals for the two
truss structures. Since the square cross-bracing members are subjected to primarily axial loading,
their deformation is not sensitive to cross-section orientation. Therefore, we accept the default
normals that Abaqus calculates to be correct. The approximate -vector for the cross bracing is
aligned with the y-axis. The following option block specifies the cross-bracing:
*BEAM GENERAL SECTION, SECTION=BOX, ELSET=CROSSEL0.03,0.03,0.003,0.003,0.003,0.0030.0,1.0,0.0200.E9,80.E9
Beam section orientation
In this model you will have a modeling error if you provide data that only define the orientation
of the approximate -vector. The averaging of beam normals at the nodes (see “Beam element
curvature,” Section 6.1.3) causes Abaqus to use incorrect geometry for the cargo crane model. To
see this, you can use Abaqus/Viewer to display the beam section axes and beam tangent vectors (see
“Postprocessing,” Section 6.4.7). However, the normals in the crane model appear to be correct in
Abaqus/Viewer; yet, they are, in fact, slightly incorrect. You can also find such modeling mistakes
by examining the averaged nodal normals that are printed in the data (.dat) file. Some of the
normals in the incorrect model of the cargo crane are shown in the following output:
100 0.00000E+00 0.00000E+00 1.0000 -0.18202 0.98308 2.04813E-02 ENCASTRE101 2.0000 0.37500 0.77500 -0.18202 0.98308 2.04813E-02102 4.0000 0.75000 0.55000 -0.25486 0.96655 2.86770E-02103 6.0000 1.1250 0.32500 -0.18202 0.98308 2.04813E-02
N O D E D E F I N I T I O N S
NODE COORDINATES NORMAL SINGLE POINT CONSTRAINTS NUMBER TYPE PLUS DOF
The problem is the normal vector for node 102, which does not match those at the other
nodes defining the lower, main member in truss A (see Figure 6–14). Four elements (101, 102,
112, and 113) contain node 102. When the averaging of beam normals at nodes produces multiple
independent normals, the additional normals at the node are also printed in the data file (see “Beam
element curvature,” Section 6.1.3, for details). The correct geometry for the crane model requires
three independent beam normals at node 102: one each for the bracing elements 112 and 113 and a
single normal for elements 101 and 102. The normal shown above for node 102 is not the normal
needed for elements 101 and 102. If it were, it would match the normals shown for nodes 100, 101,
or 103. Nor is it the correct normal for either of the other two elements, whose normals are printed
in the data file, as shown below.
6–19
Abaqus ID:
Printed on:

EXAMPLE: CARGO CRANE
N O R M A L D E F I N I T I O N S
ELEMENT NODE NORMAL ELEMENT NODE NORMAL
100 101 -0.1820 0.9831 2.0481E-02 101 101 -0.1820 0.9831 2.0481E-02101 102 -0.1820 0.9831 2.0481E-02 102 102 -0.1820 0.9831 2.0481E-02102 103 -0.1820 0.9831 2.0481E-02 103 103 -0.1820 0.9831 2.0481E-02103 104 -0.1820 0.9831 2.0504E-02 104 105 6.1600E-02 -0.9981 -6.9312E-03
In this table element 113 shows no normal for either of its nodes, node 102 and node 105. Thus,
the normal shown for node 102 above in the NODE DEFINITIONS table was the average of the
normals from elements 101, 102, and 113. Using the Abaqus logic for averaging normals, we could
have predicted that the normals at the nodes of element 113 would be averaged with the normals for
the adjacent elements. For this problem the important part of the averaging logic is that normals that
subtend an angle less than 20° with the reference normal are averaged with the reference normal
to define a new reference normal. In the case of the normals at node 102, the original reference
normal is the normal for elements 101 and 102. Since the normal for element 113 at node 102
subtends an angle less than 20° with the original reference normal, it is averaged with the normals
for elements 101 and 102 at node 102 to define the new reference normal at that node. On the other
hand, since the normal for element 112 subtends an angle of approximately 30° with the original
reference normal, it has an independent normal at node 102, as shown in the data file.
This incorrect average normal means that elements 101, 102, and 113 have a section geometry
that twists about the beam axis from one end of the element to the other, which is not the intended
geometry. You must use the *NORMAL option to define the normals at node 102 for element 113
explicitly. Explicitly specifying the normal directions prevents Abaqus from applying its averaging
algorithm. You must also use *NORMAL for the corresponding elements on the opposite side of
the crane: element 213, node 202 of truss B.
There is also a problem with the normals at nodes 104 and 204 at the tip of each truss
structure, again because the angle between elements 103 and 104 is less than 20°. Since we are
modeling straight beam elements, the normals are constant at both nodes in each element. Thus,
the *NORMAL option block that you should put in your input file has six data lines. If you used
the numbering scheme shown in Figure 6–14 and Figure 6–15, the following option block should
be added to your input file:
*NORMAL, TYPE=ELEMENT113, 102, -0.3962, 0.9171, 0.0446113, 105, -0.3962, 0.9171, 0.0446213, 202, -0.3962, 0.9171, -0.0446213, 205, -0.3962, 0.9171, -0.0446103, 104, -0.1820, 0.9829, 0.0205203, 204, -0.1820, 0.9829, -0.0205
Element
Node
Normal at node
6–20
Abaqus ID:
Printed on:

EXAMPLE: CARGO CRANE
Multi-point constraints
The cross bracing, unlike the internal truss bracing, is bolted to the truss members. You can assume
that these bolted connections are unable to transmit rotations or torsion. The duplicate nodes that
were defined at these locations are needed to define this constraint. In Abaqus such constraints
between nodes can be defined using multi-point constraints (MPCs) or constraint equations.
Multi-point constraints allow constraints to be imposed between different degrees of freedom
of the model. A large library of MPCs is available in Abaqus. (See “Linear constraint equations,”
Section 31.2.1 of the Abaqus Analysis User’s Manual, for a complete list and a description of each
one.) The format of the *MPC option is
*MPC<type of MPC>,<node 1 or node set 1>,<node 2 or node set 2>, ......
You can define multiple constraints of the same type with just a single data line by using node
sets. The MPC type needed to model the bolted connection is PIN. The pinned joint created by this
MPC constrains the displacements at two nodes to be equal, but the rotations, if they exist at the
nodes, remain independent.
There are many bolted joints in the crane model. The following is the complete *MPC option
block for the model from “Cargo crane,” Section A.4:
*MPCPIN,101,301PIN,102,302PIN,103,303PIN,105,305PIN,106,306PIN,201,401PIN,202,402PIN,203,403PIN,205,405PIN,206,406
Add a similar option block to your model, changing the node numbers to correspond to those
in your model. If all of the nodes on the two truss structures had been grouped into a node set
called TRUSNODE and all of the nodes on the cross bracing had been grouped into a node set called
CROSNODE, the option block could have been shortened to the following:
*NSET, NSET=TRUSNODE, UNSORTED101,102,103,105,106,201,202,203,205,206*NSET, NSET=CROSNODE, UNSORTED301,302,303,305,306,401,402,403,405,406*MPCPIN, TRUSNODE, CROSNODE
6–21
Abaqus ID:
Printed on:

EXAMPLE: CARGO CRANE
If a node set is provided as the first item after the MPC type, the second item can be either
another node set or a single node. When the data line of an *MPC option contains a node set and
then a single node, as shown below, Abaqus creates an MPC constraint between each node in the set
and the individual node specified. For example, the following option block would create a pinned
joint between node 301 and each node in node set TRUSNODE.
*MPCPIN, TRUSNODE, 301
Constraint equations
Constraints between nodal degrees of freedom can also be specified with linear equations by using
the *EQUATION option. The form of each equation is
where is the coefficient associated with degree of freedom . Each linear constraint equation
requires at least two data lines. The number of terms, n, involved in the equation is given on the
first data line beneath the *EQUATION option. On the subsequent data lines the format is
< >,< >,< >,< >,< >,< >, ,< >,< >,< >
Exactly four terms must be given on each data line except the final one, which can have fewer terms.
In the crane model the tips of the two trusses are connected together such that degrees of
freedom 1 and 2 (the translations in the 1- and 2-directions) of each tip node are equal, while the
other degrees of freedom (3–6) at the nodes are independent. We need two linear constraints, one
equating degree of freedom 1 at node 104 to degree of freedom 1 at node 204:
and the other equating degree of freedom 2 at node 104 to degree of freedom 2 at node 204:
You may have to change the node numbers if you created this model using a preprocessor.
The following option block defines the appropriate constraints at point E in the crane model (see
Figure 6–11):
*EQUATION2104,1,1.0, 204,1,-1.02104,2,1.0, 204,2,-1.0
6–22
Abaqus ID:
Printed on:

EXAMPLE: CARGO CRANE
The degrees of freedom at the first node defined in an *MPC or *EQUATION are eliminated
from the stiffness matrix. Therefore, these nodes should not appear in other MPCs or constraint
equations. Nor should boundary conditions be applied to the eliminated degrees of freedom.
Boundary conditions
The crane is attached firmly to the parent structure. The following *BOUNDARY option block
constrains all of the nodes at the attachment points, which should have been grouped into node set
ATTACH:
*BOUNDARYATTACH, ENCASTRE
6.4.5 Reviewing the input file—the history data
The following options specify a static, linear perturbation simulation:
*STEP, PERTURBATIONStatic tip load on crane*STATIC
Loading
A concentrated load of 10 kN is applied in the negative y-direction to node 104. Since there is a
constraint equation connecting the y-displacement of nodes 104 and 204, the load is carried equally
by both nodes. The following *CLOAD option block provides an equal load on both nodes:
*CLOAD104,2,-1.0E4
Output requests
Write the displacements (U) and reaction forces and moments (RF) at the nodes, and the
section forces and moments (SF) in the elements to the output database for postprocessing with
Abaqus/Viewer, as shown in the following option blocks:
*OUTPUT, FIELD*NODE OUTPUTU, RF*ELEMENT OUTPUTSF,*END STEP
6–23
Abaqus ID:
Printed on:

EXAMPLE: CARGO CRANE
6.4.6 Running the analysisStore the input in a file called crane.inp. Run the analysis using the command
abaqus job=crane
6.4.7 PostprocessingStart Abaqus/Viewer by typing the following command at the operating system prompt:
abaqus viewer odb=crane
Abaqus/Viewer plots the undeformed shape of the crane model.
Plotting the deformed model shape
To begin this exercise, plot the deformed model shape with the undeformed model shape
superimposed on it. Specify a nondefault view using (0, 0, 1) as the X-, Y-, and Z-coordinates of
the viewpoint vector and (0, 1, 0) as the X-, Y-, and Z-coordinates of the up vector.
Tip: You can also display the model using this view by clicking from the Viewstoolbar.
The undeformed shape of the crane superimposed upon the deformed shape is shown in
Figure 6–18.
123
Figure 6–18 Deformed shape of cargo crane.
Using display groups to plot element and node sets
You can use display groups to plot existing node and element sets; you can also create display
groups by selecting nodes or elements directly from the viewport. You will create a display group
containing only the elements associated with the main members in truss structure A.
6–24
Abaqus ID:
Printed on:

EXAMPLE: CARGO CRANE
To create and plot a display group:
1. In the Results Tree, expand the Sections container underneath the output database file named
crane.odb.
2. To facilitate your selection, change the view back to the default isometric view using the
tool in the Views toolbar.
Tip: If the Views toolbar is not visible, select View→Toolbars→Views from the
main menu bar.
3. In succession, click the items in the container until the elements associated with the main
members in truss A are highlighted in the viewport. Click mouse button 3 on this item and
select Replace from the menu that appears.
Abaqus/Viewer now displays only this group of elements.
4. To save this group, double-click Display Groups in the Results Tree; or use the tool in
the Display Group toolbar.
The Create Display Group dialog box appears.
5. In the Create Display Group dialog box, click Save As and enter MainA as the name for
your display group.
6. Click Dismiss to close the Create Display Group dialog box.
This display group now appears underneath the Display Groups container in the Results Tree.
Beam cross-section orientation
You will now plot the section axes and beam tangents on the undeformed model shape.
To plot the beam section axes:
1. From themainmenu bar, selectPlot→Undeformed Shape; or use the tool in the toolbox
to display only the undeformed model shape.
2. From the main menu bar, select Options→Common; then, click the Normals tab in the
dialog box that appears.
3. Toggle on Show normals, and accept the default setting of On elements.
4. In the Style area at the bottom of the Normals page, specify the Length to be Long.
5. Click OK.
The section axes and beam tangents are displayed on the undeformed shape.
The resulting plot is shown in Figure 6–19. The text annotations in Figure 6–19 that identify the
section axes and beam tangent will not appear in your image. The vector showing the local beam
1-axis, , is blue; the vector showing the beam 2-axis, , is red; and the vector showing the beam
tangent, , is white.
6–25
Abaqus ID:
Printed on:

EXAMPLE: CARGO CRANE
1
2
3
Beam 2-axis
Beam tangent
Beam 1-axis
Figure 6–19 Plot of beam section axes and tangents for elements in display group MainA.
Rendering beam profiles
You will now display an idealized representation of the beam profile.
To render beam profiles:
1. From the main menu bar, select View→ODB Display Options.
The ODB Display Options dialog box appears.
2. In the General tabbed page, toggle on Render beam profiles and accept the default scale
factor of 1.
3. Click OK.
Abaqus/Viewer displays beam profiles with the appropriate dimensions and in the correct
orientations. Figure 6–20 shows the beam profiles on the whole model. Your changes are
saved for the duration of the session.
Creating a hard copy
You can save the image of the beam normals to a file for hardcopy output.
To create a PostScript file of the beam normals image:
1. From the main menu bar, select File→Print.
The Print dialog box appears.
2. From the Settings area in the Print dialog box, select Black&White as the Rendition type;
and toggle on File as the Destination.
6–26
Abaqus ID:
Printed on:

EXAMPLE: CARGO CRANE
Figure 6–20 Cargo crane with beam profiles displayed.
3. Select PS as the Format, and enter beamsectaxes.ps as the File name.
4. Click PS Options.
The PostScript Options dialog box appears.
5. From the PostScript Options dialog box, select 600 dpi as the Resolution; and toggle off
Print date.
6. Click OK to apply your selections and to close the dialog box.
7. In the Print dialog box, click OK.
Abaqus/Viewer creates a PostScript file of the beam normals image and saves it in yourworking
directory as beamsectaxes.ps. You can print this file using your system’s command for
printing PostScript files.
Displacement summary
Write a summary of the displacements of all nodes in display group MainA to a file named
crane.rpt. The peak displacement at the tip of the crane in the 2-direction is 0.0188 m.
Section forces and moments
Abaqus can provide output for structural elements in terms of forces and moments acting on the
cross-section at a given point. These section forces and moments are defined in the local beam
coordinate system. Toggle off the rendering of beam profiles, then contour the section moment
about the beam 1-axis in the elements in display group MainA. For clarity, reset the view so that
the elements are displayed in the 1–2 plane.
6–27
Abaqus ID:
Printed on:

RELATED Abaqus EXAMPLES
To create a “bending moment”-type contour plot:
1. From the list of variable types on the left side of the Field Output toolbar, select Primary.
2. From the list of output variables in the center of the toolbar, select SM.
Abaqus/Viewer automatically selectsSM1, the first component name in the list on the right side
of the Field Output toolbar, and displays a contour plot of the bending moment about the beam
1-axis on the deformed model shape. The deformation scale factor is chosen automatically
since geometric nonlinearity was not considered in the analysis.
3. Open the Common Plot Options dialog box, and select a Uniform deformation scale factor
of 1.0.
Color contour plots of this type typically are not very useful for one-dimensional elements such
as beams. A more useful plot is a “bending moment”-type plot, which you can produce using
the contour options.
4. From the main menu bar, select Options→Contour; or use the Contour Options tool
in the toolbox.
The Contour Plot Options dialog box appears; by default, the Basic tab is selected.
5. In the Contour Type field, toggle on Show tick marks for line elements.
6. Click OK.
The plot shown in Figure 6–21 appears. The magnitude of the variable at each node is
now indicated by the position at which the contour curve intersects a “tick mark” drawn
perpendicular to the element. This “bending moment”-type plot can be used for any
variable (not just bending moments) for any one-dimensional element, including trusses and
axisymmetric shells as well as beams.
6.5 Related Abaqus examples
• “Detroit Edison pipe whip experiment,” Section 2.1.2 of the Abaqus Example Problems Manual
• “Buckling analysis of beams,” Section 1.2.1 of the Abaqus Benchmarks Manual
• “Crash simulation of a motor vehicle,” Section 1.3.14 of the Abaqus Benchmarks Manual
• “Geometrically nonlinear analysis of a cantilever beam,” Section 2.1.2 of the Abaqus Benchmarks
Manual
6–28
Abaqus ID:
Printed on:

SUMMARY
1
2
3
–182 N.m. 265 N.m.
Figure 6–21 Bending moment diagram (moment about beam 1-axis)
for elements in display group MainA. The locations with the highest
stress (created by the bending of the elements) are indicated.
6.6 Suggested reading
Basic beam theory
• Timoshenko, S., Strength of Materials: Part II, Krieger Publishing Co., 1958.
• Oden, J. T. and E. A. Ripperger, Mechanics of Elastic Structures, McGraw-Hill, 1981.
Basic computational beam theory
• Cook, R. D., D. S. Malkus, and M. E. Plesha, Concepts and Applications of Finite Element
Analysis, John Wiley & Sons, 1989.
• Hughes, T. J. R., The Finite Element Method, Prentice-Hall Inc., 1987.
6.7 Summary
• The behavior of beam elements can be determined by numerical integration of the section (either
*BEAM SECTION or *BEAM GENERAL SECTION) or can be given directly in terms of area,
moments of inertia, and torsional constant (*BEAM GENERAL SECTION).
• When *BEAM GENERAL SECTION is used with numerical integration, the calculations are done
once at the start of the simulation, and elastic behavior is assumed.
6–29
Abaqus ID:
Printed on:

SUMMARY
• Abaqus includes a number of standard cross-section shapes. Other shapes, provided they are “thin-
walled,” can be modeled using SECTION=ARBITRARY.
• The orientation of the cross-section must be defined either by specifying a third node or by defining a
vector as part of the element property definition. The orientations can be plotted in Abaqus/Viewer.
• The beam cross-section can be offset from the nodes that define the beam. This procedure is useful
in modeling stiffeners on shells.
• The linear and quadratic beams include the effects of shear deformation. The cubic beams
in Abaqus/Standard do not account for shear flexibility. The open-section beam elements in
Abaqus/Standard correctly model the effects of torsion and warping (including warping constraints)
in thin-walled, open sections.
• Multi-point constraints, constraint equations, and connectors can be used to connect degrees of
freedom at nodes to model pinned connections, rigid links, etc.
• “Bending moment”-type plots allow the results of one-dimensional elements, such as beams, to be
visualized easily.
• Display options allow you to render beam profiles for enhanced graphical representations of
undeformed and deformed plots.
• Hard copies of Abaqus/Viewer plots can be obtained in PostScript (PS), Encapsulated PostScript
(EPS), Tag Image File Format (TIFF), Portable Network Graphics (PNG), and Scalable Vector
Graphics (SVG) formats.
6–30
Abaqus ID:
Printed on:

INTRODUCTION
7. Linear Dynamics
A static analysis is sufficient if you are interested in the long-term response of a structure to applied loads.
However, if the duration of the applied load is short (such as in an earthquake) or if the loading is dynamic
in nature (such as that from rotating machinery), you must perform a dynamic analysis. This chapter
discusses linear dynamic analysis in Abaqus/Standard; see Chapter 9, “Nonlinear Explicit Dynamics,”
for a discussion of nonlinear dynamic analysis in Abaqus/Explicit.
7.1 Introduction
A dynamic simulation is one in which inertia forces are included in the dynamic equation of equilibrium:
where
M is the mass of the structure,
is the acceleration of the structure,
I are the internal forces in the structure, and
P are the applied external forces.
The expression in the equation shown above is nothing more than Newton’s second law of motion (
).
The inclusion of the inertial forces ( ) in the equation of equilibrium is the major difference
between static and dynamic analyses. Another difference between the two types of simulations is in the
definition of the internal forces, I. In a static analysis the internal forces arise only from the deformation
of the structure; in a dynamic analysis the internal forces contain contributions created by both the motion
(i.e., damping) and the deformation of the structure.
7.1.1 Natural frequencies and mode shapes
The simplest dynamic problem is that of a mass oscillating on a spring, as shown in Figure 7–1.
The internal force in the spring is given by so that its dynamic equation of motion is
7–1
Abaqus ID:
Printed on:

INTRODUCTION
Force, p
Displacement, uStiffness, k
Mass, m
Figure 7–1 Mass-spring system.
This mass-spring system has a natural frequency (in radians/time) given by
If the mass is moved and then released, it will oscillate at this frequency. If the force is applied at
this frequency, the amplitude of the displacement will increase dramatically—a phenomenon known as
resonance.
Real structures have a large number of natural frequencies. It is important to design structures in
such a way that the frequencies at which they may be loaded are not close to the natural frequencies. The
natural frequencies can be determined by considering the dynamic response of the unloaded structure
( in the dynamic equilibrium equation). The equation of motion is then
For an undamped system , so
Solutions to this equation have the form
Substituting this into the equation of motion yields the eigenvalue problem
where .
This system has n eigenvalues, where n is the number of degrees of freedom in the finite element
model. Let be the jth eigenvalue. Its square root, , is the natural frequency of the jth mode of the
structure, and is the corresponding jth eigenvector. The eigenvector is also known as the mode shape
because it is the deformed shape of the structure as it vibrates in the jth mode.
7–2
Abaqus ID:
Printed on:

INTRODUCTION
In Abaqus the *FREQUENCY procedure is used to extract the modes and frequencies of the
structure. This procedure is easy to use in that you need only specify the number of modes required or
the maximum frequency of interest.
7.1.2 Modal superpositionThe natural frequencies and mode shapes of a structure can be used to characterize its dynamic response
to loads in the linear regime. The deformation of the structure can be calculated from a combination of
the mode shapes of the structure using themodal superposition technique. Each mode shape is multiplied
by a scale factor. The vector of displacements in the model, u, is defined as
where is the modal displacement and is the generalized coordinate of mode i. This technique is valid
only for simulations with small displacements, linear elastic materials, and no contact conditions—in
other words, linear problems.
In structural dynamic problems the response of a structure usually is dominated by a relatively
small number of modes, making modal superposition a particularly efficient method for calculating the
response of such systems. Consider a model containing 10,000 degrees of freedom. Direct integration
of the dynamic equations of motion would require the solution of 10,000 simultaneous equations at
each point in time. If the structural response is characterized by 100 modes, only 100 equations need
to be solved every time increment. Moreover, the modal equations are uncoupled, whereas the original
equations of motion are coupled. There is an initial cost in calculating the modes and frequencies, but
the savings obtained in the calculation of the response greatly outweigh the cost.
If nonlinearities are present in the simulation, the natural frequencies may change significantly
during the analysis, and modal superposition cannot be employed. In this case direct integration of
the dynamic equation of equilibrium is required, which is much more expensive than modal analysis.
A problem should have the following characteristics for it to be suitable for linear transient dynamic
analysis:
• The system should be linear: linear material behavior, no contact conditions, and no nonlinear
geometric effects.
• The response should be dominated by relatively few frequencies. As the frequency content of the
response increases, such as is the case in shock and impact problems, the modal superposition
technique becomes less effective.
• The dominant loading frequencies should be in the range of the extracted frequencies to ensure that
the loads can be described accurately.
• The initial accelerations generated by any suddenly applied loads should be described accurately
by the eigenmodes.
• The system should not be heavily damped.
7–3
Abaqus ID:
Printed on:

DAMPING
7.2 Damping
If an undamped structure is allowed to vibrate freely, the magnitude of the oscillation is constant. In
reality, however, energy is dissipated by the structure’s motion, and the magnitude of the oscillation
decreases until the oscillation stops. This energy dissipation is known as damping. Damping is usually
assumed to be viscous or proportional to velocity. The dynamic equilibrium equation can be rewritten
to include damping as
where
C is the damping matrix for the structure and
is the velocity of the structure.
The dissipation of energy is caused by a number of effects, including friction at the joints of the
structure and localized material hysteresis. Damping is a convenient way of including the important
absorption of energy without modeling the effects in detail.
In Abaqus/Standard the eigenmodes are calculated for the undamped system, yet most engineering
problems involve some kind of damping, however small. The relationship between the damped natural
frequency and the undamped natural frequency for each mode is
where
is the damped eigenvalue,
is the damping ratio, which is the fraction of critical damping,
c is the damping of that mode shape, and
is the critical damping.
The eigenfrequencies of the damped system are very close to the corresponding quantities for the
undamped system for small values of ( < 0.1). As increases, the undamped eigenfrequencies become
less accurate; and as approaches 1, the use of undamped eigenfrequencies becomes invalid.
If a structure is critically damped ( ), after any disturbance it will return to its initial static
configuration as quickly as possible without overshooting (Figure 7–2).
7–4
Abaqus ID:
Printed on:

DAMPING
Criticallydamped
Underdamped
Overdamped
Static Equilibrium
Figure 7–2 Damped motion patterns for various values of .
7.2.1 Definition of damping in Abaqus/StandardIn Abaqus/Standard a number of different types of damping can be defined for a transient modal analysis:
direct modal damping, Rayleigh damping, and composite modal damping.
Damping is defined for modal dynamic procedures by using the *MODALDAMPING option. This
option is part of the step definition and allows different amounts of damping to be defined for each mode.
Direct, Rayleigh, and composite damping can all be defined this way.
Direct modal damping
The fraction of critical damping, , associated with each mode can be defined using direct modal
damping. Typically, values in the range of 1% to 10% of critical damping are used. Direct modal
damping allows you to define precisely the damping of each mode of the system.
The MODAL=DIRECT parameter on the *MODAL DAMPING option indicates that direct
modal damping is being specified. For example, to define 4% of critical modal damping for the first
10 modes and 5% for modes 11–20, include the following in the step definition:
*MODAL DAMPING, MODAL=DIRECT1, 10, 0.0411, 20, 0.05
7–5
Abaqus ID:
Printed on:

DAMPING
Rayleigh damping
In Rayleigh damping the assumption is made that the damping matrix is a linear combination of the
mass and stiffness matrices,
where and are user-defined constants. Although the assumption that the damping is proportional
to the mass and stiffness matrices has no rigorous physical basis, in practice the damping distribution
rarely is known in sufficient detail to warrant any other more complicated model. In general, this
model ceases to be reliable for heavily damped systems; that is, above approximately 10% of critical
damping. As with the other forms of damping, you can define precisely the Rayleigh damping of
each mode of the system.
For a given mode i, the damping ratio, , and the Rayleigh damping values, and , are
related through
The RAYLEIGH parameter on the *MODAL DAMPING option indicates that Rayleigh
damping is to be used. For example, to define = 0.2525 and = 2.9 × 10⁻³ for modes 1–10 and
= 0.2727 and = 3.03 × 10⁻³ for modes 11–20, the following lines would be included in the
step definition:
*MODAL DAMPING, RAYLEIGH1, 10, 0.2525, 2.9E-311, 20, 0.2727, 3.03E-3
Composite damping
In composite damping a fraction of critical damping is defined for each material, and a composite
damping value is found for the whole structure. This option is useful when many different materials
are present in the structure. Composite damping is not discussed further in this guide.
7.2.2 Choosing damping valuesIn most linear dynamic problems the proper specification of damping is important to obtain accurate
results. However, damping is approximate in the sense that it models the energy absorbing characteristics
of the structure without attempting to model the physical mechanisms that cause them. Therefore, it
is difficult to determine the damping data required for a simulation. Occasionally, you may have data
available from dynamic tests, but often you will have to work with data gleaned from references or
experience. In such cases you should be very cautious in interpreting the results, and you should use
parametric studies to assess the sensitivity of the simulation to damping values.
7–6
Abaqus ID:
Printed on:

MESH DESIGN FOR DYNAMICS
7.3 Element selection
Virtually all of the elements in Abaqus can be used in dynamic analyses. In general the rules for selecting
the elements are the same as those for static simulations. However, for simulations of impact and blast
loading, first-order elements should be used. They have a lumped mass formulation, which is better
able to model the effect of stress waves than the consistent mass formulation used in the second-order
elements.
7.4 Mesh design for dynamics
When you are designing meshes for dynamic simulations, you need to consider the mode shapes that will
be excited in the response and use a mesh that is able to represent those mode shapes adequately. This
means that a mesh that is adequate for a static simulation may be unsuitable for calculating the dynamic
response to loading that excites high frequency modes.
Consider, for example, the plate shown in Figure 7–3. The mesh of first-order shell elements is
adequate for a static analysis of the plate under a uniform load and is also suitable for the prediction
of the first mode shape. However, the mesh is clearly too coarse to be able to model the sixth mode
accurately.
(a) Mode 1: 31.1 Hz (b) Mode 6: 140 Hz
Figure 7–3 Vibration frequencies and corresponding mode
shapes of the plate based on the coarse mesh.
Figure 7–4 shows the same plate modeled with a refined mesh of first-order elements. The displaced
shape for the sixth mode now looks much better, and the frequency predicted for this mode is more
accurate. If the dynamic loading on the plate is such that there is significant excitation of this mode, the
refined mesh must be used; the results from the coarse mesh will not be accurate.
7–7
Abaqus ID:
Printed on:
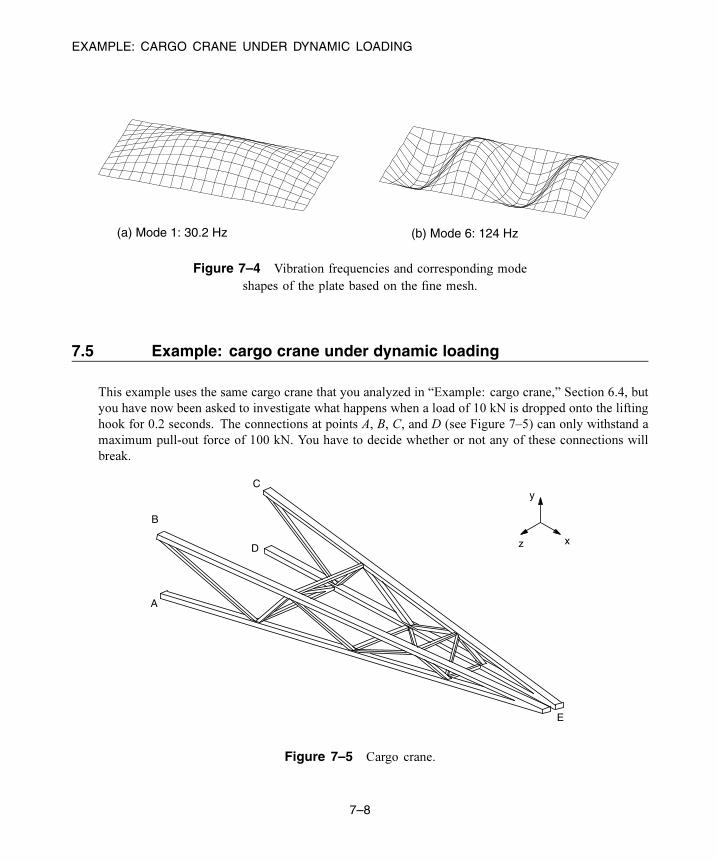
EXAMPLE: CARGO CRANE UNDER DYNAMIC LOADING
(a) Mode 1: 30.2 Hz (b) Mode 6: 124 Hz
Figure 7–4 Vibration frequencies and corresponding mode
shapes of the plate based on the fine mesh.
7.5 Example: cargo crane under dynamic loading
This example uses the same cargo crane that you analyzed in “Example: cargo crane,” Section 6.4, but
you have now been asked to investigate what happens when a load of 10 kN is dropped onto the lifting
hook for 0.2 seconds. The connections at points A, B, C, and D (see Figure 7–5) can only withstand a
maximum pull-out force of 100 kN. You have to decide whether or not any of these connections will
break.
z x
y
A
B
C
D
E
Figure 7–5 Cargo crane.
7–8
Abaqus ID:
Printed on:

EXAMPLE: CARGO CRANE UNDER DYNAMIC LOADING
The short duration of the loading means that inertia effects are likely to be important, making
dynamic analysis essential. You are not given any information regarding the damping of the structure.
Since there are bolted connections between the trusses and the cross bracing, the energy absorption
caused by frictional effects is likely to be significant. Based on experience, you therefore choose 5% of
critical damping in each mode.
The magnitude of the applied load versus time is shown in Figure 7–6.
Figure 7–6 Load-time characteristic.
The steps that follow assumes that you have access to the full input file for this example. This
input file, dynamics.inp, is provided in “Cargo crane – dynamic loading,” Section A.5, in the online
HTML version of this manual. Instructions on how to fetch and run the script are given in Appendix A,
“Example Files.”
If you prefer to create this example interactively using Abaqus/CAE, refer to “Example: cargo crane
under dynamic loading,” Section 7.5 of Getting Started with Abaqus: Interactive Edition.
7.5.1 Modifications to the input file—the model dataThe model data are the same as for the static analysis with the modifications described below. These
modifications are most easily made using an editor, although youmay change the model in a preprocessor
if you prefer.
7–9
Abaqus ID:
Printed on:

EXAMPLE: CARGO CRANE UNDER DYNAMIC LOADING
Material
In dynamic simulations the density of every material must be specified so that the mass matrix
can be formed. The steel in the crane has a density of 7800 kg/m3 . The beam element properties
were defined using the *BEAM GENERAL SECTION option, so there are no material property
definitions in this input file. The density must be specified using the DENSITY parameter on the
*BEAM GENERAL SECTION option. For example,
*BEAM GENERAL SECTION, SECTION=BOX, ELSET=OUTA, DENSITY=7800.0.10,0.05,0.005,0.005,0.005,0.005-0.1118, 0.0, -0.9936200.E9,80.E9
The DENSITY parameter has been added to all the element property options.
If material data are defined using the *MATERIAL option, the density is included by using the
*DENSITY option and giving the mass density on the data line. For example,
*MATERIAL, NAME=STEEL
*ELASTIC<Young's modulus>,<Poisson's ratio>
*DENSITY<density>,
Initial conditions
In this example the structure has no initial velocities or accelerations, which is the default. However,
if you wanted to define initial velocities, you could do so using the following option:
*INITIAL CONDITIONS, TYPE=VELOCITY
The nodes (or node sets), the direction, and the magnitude of the velocity are specified on the data
line, as follows:
<node or node set>,<dof>, <velocity>
For example:
*INITIAL CONDITIONS, TYPE=VELOCITYNALL, 1, 10.0
would set the velocity in the 1-direction of all the nodes in node set NALL to 10 m/s.
Time variation of load
The magnitude of the load applied to the tip of the crane is time dependent as illustrated in
Figure 7–6. The time dependence of a load is defined using the *AMPLITUDE option. The
*AMPLITUDE option must appear as part of the model data, even though the *CLOAD option
referring to it is part of the history data.
7–10
Abaqus ID:
Printed on:

EXAMPLE: CARGO CRANE UNDER DYNAMIC LOADING
Four pairs of time andmagnitude data are given on each data line for the *AMPLITUDE option,
and a name is assigned to the amplitude curve using the NAME parameter. For your simulation the
option block defining the amplitude curve should look similar to the following:
*AMPLITUDE, NAME=BOUNCE, VALUE=RELATIVE, SMOOTH=0.250.0, 0.0, 0.01, 1.0, 0.2, 1.0, 0.21, 0.0
The name of the curve, BOUNCE, will be used to refer the loading option (*CLOAD) to this
amplitude curve. The actual load applied will be the product of the magnitude on the loading option
and the amplitude on the BOUNCE curve. The parameter VALUE=RELATIVE is used to indicate
this approach. You can choose to define the absolute magnitude of the loading on the *AMPLITUDE
option by using VALUE=ABSOLUTE.
7.5.2 Modifications to the input file—the history dataThe history definition is substantially different from that in the static analysis. Therefore, delete the entire
static step, and add a new history section as discussed below.
Two steps are required for this analysis. The first step calculates the natural frequencies and mode
shapes of the structure. The second step then uses these data to calculate the transient dynamic response
of the hoist. If you want to model any nonlinearities in this simulation, you must use the *DYNAMIC
procedure. In this analysis we will assume that everything is linear.
Step 1 – Modes and frequencies
The *FREQUENCY procedure is used to calculate natural frequencies and mode shapes. Abaqus
offers the Lanczos and the subspace iteration eigenvalue extraction methods. The Lanczos method
is the default method; it is generally faster when a large number of eigenmodes is required for a
system with many degrees of freedom. The subspace iteration method may be faster when only a
few (less than 20) eigenmodes are needed.
We use the default Lanczos eigensolver in this analysis. The number of modes required is
specified on the data line of the *FREQUENCY option. Alternatively, it is possible to specify
the minimum and maximum frequencies of interest, so that the step will complete once Abaqus
has found all of the eigenvalues inside the specified range. A shift point may also be specified so
that eigenvalues nearest the shift point will be extracted. By default, no minimum or maximum
frequency or shift is used. If the structure is not constrained against rigid body modes, the shift
value should be set to a small negative value to remove numerical problems associated with rigid
body motion.
The form of the *FREQUENCY option block is
*FREQUENCY<number of eigenvalues>,< min. frequency>,< max. frequency>,<shift point>
The step and procedure option blocks for this simulation are
*STEP, PERTURBATIONFrequency extraction of the first 30 modes
7–11
Abaqus ID:
Printed on:

EXAMPLE: CARGO CRANE UNDER DYNAMIC LOADING
*FREQUENCY30,
In structural dynamic analysis the response is usually associated with the lower modes.
However, enough modes should be extracted to provide a good representation of the dynamic
response of the structure. One way of checking that a sufficient number of eigenvalues has been
extracted is to look at the total effective mass in each degree of freedom, which indicates how much
of the mass is active in each direction of the extracted modes. The effective masses are tabulated
in the data file under the eigenvalue output. Ideally, the sum of the modal effective masses for each
mode in each direction should be at least 90% of the total mass. This is discussed further in “Effect
of the number of modes,” Section 7.6.
Boundary conditions
The boundary conditions are the same as in the static analysis.
Output
By default, Abaqus writes the mode shapes to the output database (.odb) file so that they can be
plotted using Abaqus/Viewer. The nodal displacements for each mode shape are normalized so that
the maximum displacement is unity. Therefore, these results, and the corresponding stresses and
strains, are not physically meaningful: they should be used only for relative comparisons.
The step terminates with
*END STEP
Step 2 – Transient dynamics
The *MODAL DYNAMIC procedure is used for transient modal dynamic analysis. The fixed time
increment and the total step time are given on the data line for this option. The total time of the
simulation is 0.5 seconds with a constant increment of 0.005 seconds. The format of this data line
is basically the same as that for *STATIC. However, in this case we must be careful to ensure that
we give real values of time; in dynamic analysis time is a real, physical quantity.
The form of the *STEP and *MODAL DYNAMIC option blocks for this simulation should be
*STEP, PERTURBATIONCrane Response to Dropped Load*MODAL DYNAMIC0.005, 0.5
Damping
5% of critical damping should be used in all 30 modes extracted in the first step. This input is
specified in the following *MODAL DAMPING option block:
*MODAL DAMPING, MODAL=DIRECT1, 30, 0.05
7–12
Abaqus ID:
Printed on:

EXAMPLE: CARGO CRANE UNDER DYNAMIC LOADING
Selecting the eigenmodes
The eigenmodes used in a mode-based dynamic procedure must be selected with the *SELECT
EIGENMODES option if *MODAL DAMPING is used. For this example, the form of this option
is:
*SELECT EIGENMODES, GENERATE1, 30, 1
Loading
Apply the concentrated force to the tip of the crane at node 104 in the negative global 2-direction.
The *EQUATION constraint between nodes 104 and 204 in degree of freedom 2 means that the load
will be carried equally by both nodes and, thus, by both halves of the crane. The concentrated force
is defined using the *CLOAD option. This example uses the parameter AMPLITUDE=BOUNCE
to indicate that the amplitude curve named BOUNCE (previously defined as part of the model data)
should be used to define the time varying magnitude of the load during the step:
*CLOAD, AMPLITUDE=BOUNCE104, 2, -1.0E4
The actual magnitude of the load applied at any point in time is obtained by multiplying the
magnitude given on the *CLOAD option (−10,000 N) and the value of the BOUNCE amplitude curve
at that time.
Boundary conditions
The same boundary conditions that were applied in Step 1 are still in effect for this step. Since the
boundary conditions cannot be changed between a *FREQUENCY step and any subsequent modal
dynamic steps, no boundary conditions should be specified.
Output
Dynamic analyses usually require many more increments than static analyses to complete. As a
consequence, the volume of output from dynamic analyses can be very large, and you should control
the output requests to keep the output files to a reasonable size.
You can estimate the size of the restart file using the approximate sizes given near the bottom
of the data file during a datacheck analysis.
In this example request output of the deformed shape to the output database file at the end of
every fifth increment. There will be 100 increments in the step (0.5/0.005); therefore, there will be
20 frames of output.
*OUTPUT, FIELD, FREQUENCY=5, VARIABLE=PRESELECT
The displacements of the independent tip node, which is assigned to a node set named TIP,and the reaction forces at the fixed nodes, which are grouped into a node set named ATTACH, arewritten as history data to the output database file every increment so that a higher resolution of these
7–13
Abaqus ID:
Printed on:

EXAMPLE: CARGO CRANE UNDER DYNAMIC LOADING
data will be available. In dynamic analyses we are also concerned about the energy distribution in
the model and what form the energy takes. Kinetic energy is present in the model as a result of
the motion of the mass; strain energy is present as a result of the displacement of the structure;
energy is also dissipated through damping. We can output the kinetic energy (ALLKE), strain
energy (ALLSE), energy dissipated through damping (ALLVD), external work on the entire model
(ALLWK), and the total energy balance in the model (ETOTAL). The history portion of the output
request is written as follows:
*NSET, NSET=TIP104,*OUTPUT, HISTORY, FREQUENCY=1*NODE OUTPUT, NSET=TIPU,*NODE OUTPUT, NSET=ATTACHRF,*ENERGY OUTPUTALLKE, ALLSE, ALLVD, ALLWK, ETOTAL
The step terminates with the following:
*END STEP
7.5.3 Running the analysisThe input file is called dynamics.inp (an example is listed in “Cargo crane – dynamic loading,”
Section A.5). Use the following command to run the analysis in the background:
abaqus job=dynamics
7.5.4 ResultsExamine the status (.sta) file and printed output data (.dat) file to evaluate the analysis results.
Status file
Looking at the contents of the status file, dynamics.sta, we can see that the time increment
associated with the single increment in Step 1 is very small. A *FREQUENCY step uses no time,
because time is not relevant in a frequency extraction step. The contents of the status file are shown
below.
SUMMARY OF JOB INFORMATION:STEP INC ATT SEVERE EQUIL TOTAL TOTAL STEP INC OF DOF IF
DISCON ITERS ITERS TIME/ TIME/LPF TIME/LPF MONITOR RIKSITERS FREQ
1 1 1 0 1 0 0.00 1.00e-36 1.000e-362 1 1 0 1 0 0.00 0.00500 0.0050002 2 1 0 1 0 0.00 0.0100 0.0050002 3 1 0 1 0 0.00 0.0150 0.005000
7–14
Abaqus ID:
Printed on:

EXAMPLE: CARGO CRANE UNDER DYNAMIC LOADING
2 4 1 0 1 0 0.00 0.0200 0.0050002 5 1 0 1 0 0.00 0.0250 0.0050002 6 1 0 1 0 0.00 0.0300 0.005000
....2 94 1 0 1 0 0.00 0.470 0.0050002 95 1 0 1 0 0.00 0.475 0.0050002 96 1 0 1 0 0.00 0.480 0.0050002 97 1 0 1 0 0.00 0.485 0.0050002 98 1 0 1 0 0.00 0.490 0.0050002 99 1 0 1 0 0.00 0.495 0.0050002 100 1 0 1 0 0.00 0.500 0.005000
The output in the status file for Step 2 shows that the time increment size is constant throughout
the step and that each increment requires only one iteration. Since modal dynamic analysis involves
the linear superposition of the mode shapes, no iterating is required. For the same reason, the
message file contains no information about equilibrium or residuals.
Data file
The primary results for Step 1 are the extracted eigenvalues, participation factors, and effective
mass, as shown below.
E I G E N V A L U E O U T P U T
MODE NO EIGENVALUE FREQUENCY GENERALIZED MASS COMPOSITE MODAL DAMPING(RAD/TIME) (CYCLES/TIME)
1 1773.4 42.112 6.7023 151.93 0.00002 7016.7 83.766 13.332 30.208 0.00003 7647.5 87.450 13.918 90.345 0.00004 22987. 151.61 24.130 252.17 0.00005 24700. 157.16 25.013 273.36 0.00006 34712. 186.31 29.652 487.27 0.00007 42845. 206.99 32.944 1139.8 0.0000
....25 2.25686E+05 475.06 75.609 202.13 0.000026 2.42412E+05 492.35 78.361 126.41 0.000027 2.84018E+05 532.93 84.819 1256.1 0.000028 2.92348E+05 540.69 86.054 336.30 0.000029 3.13943E+05 560.31 89.175 272.68 0.000030 3.64727E+05 603.93 96.118 65.301 0.0000
The highest frequency extracted is 96 Hz. The period associated with this frequency is
0.0104 seconds, which is comparable to the fixed time increment of 0.005 seconds. There is no
point in extracting modes whose period is substantially smaller than the time increment used.
Conversely, the time increment must be capable of resolving the highest frequencies of interest.
The column for generalized mass lists the mass of a single degree of freedom system associated
with that mode.
The table of participation factors indicates the predominant degrees of freedom in which the
modes act, as shown below.
P A R T I C I P A T I O N F A C T O R S
MODE NO X-COMPONENT Y-COMPONENT Z-COMPONENT X-ROTATION Y-ROTATION Z-ROTATION
1 -6.06605E-04 -6.17856E-03 1.4284 1.4275 -6.0252 -3.35708E-022 0.18479 -0.25764 8.04234E-04 2.11013E-03 -6.16037E-03 -1.77993 -0.17449 1.5525 4.88076E-03 -5.59860E-03 3.24463E-02 9.36604 -1.10413E-04 -9.12881E-03 8.21144E-02 0.25983 1.2206 -2.81765E-025 -3.92505E-03 2.12130E-03 -2.99967E-02 -0.60854 1.7727 -1.73639E-02
7–15
Abaqus ID:
Printed on:

EXAMPLE: CARGO CRANE UNDER DYNAMIC LOADING
6 3.71232E-02 -0.35739 6.34593E-03 -1.45655E-02 1.01858E-02 -0.984027 -2.47377E-03 -1.52592E-03 6.01315E-02 7.73021E-02 -0.28992 5.88122E-04
....25 -8.01019E-02 -0.20492 -3.86555E-02 2.80613E-02 -2.62786E-02 -0.1385026 -2.47964E-02 -0.36496 4.43575E-02 1.74964E-03 -1.17507E-02 -0.1868827 1.69491E-02 2.49520E-02 2.25017E-02 1.13973E-03 -4.29309E-02 1.92756E-0228 4.67076E-02 2.75436E-02 -0.11808 -7.71408E-03 0.24076 -2.33327E-0229 9.83072E-03 -3.65293E-03 4.59284E-03 -8.23023E-04 -1.55409E-02 -7.70945E-0330 4.79501E-02 1.81505E-02 0.13180 4.41195E-02 -0.35213 -4.21114E-02
Mode 1 acts predominately in the 3–direction.
The table of effective mass indicates the amount of mass active in each degree of freedom for
any one mode, as shown below. The total mass of the model is given earlier in the data file and is
414.34 kg.
E F F E C T I V E M A S S
MODE NO X-COMPONENT Y-COMPONENT Z-COMPONENT X-ROTATION Y-ROTATION Z-ROTATION
1 5.59049E-05 5.79980E-03 309.98 309.61 5515.4 0.171222 1.0315 2.0051 1.95382E-05 1.34505E-04 1.14639E-03 95.6943 2.7507 217.75 2.15219E-03 2.83181E-03 9.51119E-02 7925.34 3.07407E-06 2.10137E-02 1.7002 17.024 375.70 0.200195 4.21169E-03 1.23019E-03 0.24599 101.24 859.10 8.24252E-026 0.67153 62.239 1.96231E-02 0.10338 5.05556E-02 471.837 6.97946E-03 2.65561E-03 4.1239 6.8153 95.864 3.94492E-04
....25 1.2969 8.4876 0.30203 0.15916 0.13958 3.877026 7.77241E-02 16.837 0.24872 3.86971E-04 1.74546E-02 4.414727 0.36084 0.78205 0.63600 1.63166E-03 2.3151 0.4667028 0.73367 0.25513 4.6887 2.00122E-02 19.494 0.1830929 2.63525E-02 3.63860E-03 5.75195E-03 1.84704E-04 6.58572E-02 1.62069E-0230 0.15014 2.15127E-02 1.1344 0.12711 8.0972 0.11580
TOTAL 22.179 378.25 373.65 557.99 8348.1 8695.0
To ensure that enough modes have been used, the total effective mass in each direction should
be a large proportion of the mass of the model (say 90%). However, some of the mass of the model
is associated with nodes that are constrained. This constrained mass is approximately one-quarter of
the mass of all the elements attached to the constrained nodes, which, in this case, is approximately
28 kg. Therefore, the mass of the model that is able to move is 385 kg. The effective mass in
the x-, y-, and z-directions is 6%, 98%, and 97%, respectively, of the mass that can move. The
total effective mass in the 2- and 3-directions is well above the 90% recommended earlier; the total
effective mass in the 1-direction is much lower. However, since the loading is applied in the 2-
direction, the response in the 1-direction is not significant.
The data file does not contain any results for the modal dynamics step, because all of the data
file output requests were turned off.
7.5.5 Postprocessing
When you are in the directory containing the output database file dynamics.odb, type the followingcommand at the operating system prompt:
abaqus viewer odb=dynamics
7–16
Abaqus ID:
Printed on:

EXAMPLE: CARGO CRANE UNDER DYNAMIC LOADING
Plotting mode shapes
You can visualize the deformation mode associated with a given natural frequency by plotting the
mode shape associated with that frequency.
To select a mode and plot the corresponding mode shape:
1. In the context bar, click the frame selector tool .
The Frame Selector dialog box appears. Drag the bottom corner of the dialog box to enlarge
it so that both step names are clearly visible.
2. Drag the frame slider to select frame 1 in Step-1. This is the first eigenmode.
3. From the main menu bar, select Plot→Deformed Shape; or use the tool in the toolbox.
Abaqus/Viewer displays the deformed model shape associated with the first vibration mode,
as shown in Figure 7–7.
Step: Step−1, Frequency extraction of the first 30 modesMode 1: Value = 1773.4 Freq = 6.7023 (cycles/time)
Deformed Var: U Deformation Scale Factor: +8.000e−011
2
3
Figure 7–7 Mode 1.
4. Select the third mode (frame 3 in Step-1) from the Frame Selector dialog box. Afterward,
close the dialog box.
Abaqus/Viewer displays the third mode shape shown in Figure 7–8.
7–17
Abaqus ID:
Printed on:

EXAMPLE: CARGO CRANE UNDER DYNAMIC LOADING
Step: Step−1, Frequency extraction of the first 30 modesMode 3: Value = 7647.5 Freq = 13.918 (cycles/time)
Deformed Var: U Deformation Scale Factor: +8.000e−011
2
3
Figure 7–8 Mode 3.
Note: A complete list of the available frames is given in the Step/Frame dialog box
(Result→Step/Frame). This dialog box offers an alternative means to switching between
frames.
Animation of results
You will animate the analysis results. First create a scale factor animation of the third eigenmode.
Then create a time-history animation of the transient results.
To create a scale factor animation of an eigenmode:
1. From the main menu bar, select Animate→Scale Factor; or use the tool in the toolbox.
Abaqus/Viewer displays the third mode shape and steps through different deformation scale
factors ranging from 0 to 1.
Abaqus/Viewer also displays the movie player controls on the right side of the context bar.
2. In the context bar, click to pause the animation.
7–18
Abaqus ID:
Printed on:

EXAMPLE: CARGO CRANE UNDER DYNAMIC LOADING
To create a time-history animation of the transient results:
1. From the main menu bar, select Result→Active Steps/Frames to select which frames will
be active in the history animation.
Abaqus/Viewer displays the Active Steps/Frames dialog box.
2. Toggle the step names so that only the second step (Step-2) is selected.
3. Click OK to accept the selection and to close the dialog box.
4. From the main menu bar, select Animate→Time History; or use the tool from the
toolbox.
Abaqus/Viewer steps through each available frame of the second step. The state block indicates
the current step and increment throughout the animation. After the last increment of this step
is reached, the animation process repeats itself.
5. You can customize the deformed shape plot while the animation is running.
a. Display the Common Plot Options dialog box.
b. Choose Uniform from the Deformation Scale Factor field.
c. Enter 15.0 as the deformation scale factor value.
d. Click Apply to apply your change.
Abaqus/Viewer now steps through the frames in the second step with a deformation scale
factor of 15.0.
e. Choose Auto-compute from the Deformation Scale Factor field.
f. Click OK to apply your change and to close the Common Plot Options dialog box.
Abaqus/Viewer now steps through the frames in the second step with a default
deformation scale factor of 0.8.
Determining the peak pull-out force
To find the peak pull-out force at the attachment points, create an X–Y plot of the reaction force in
the 1-direction (variable RF1) at the attached nodes. This involves plotting multiple curves at the
same time.
To plot multiple curves:
1. In the Results Tree, click mouse button 3 on History Output for the output database named
dynamics.odb. From the menu that appears, select Filter.
2. In the filter field, enter*RF1* to restrict the history output to just the reaction force components
in the 1-direction.
3. From the list of available history output, select the four curves (using [Ctrl]+Click) that have the
following form:
Reaction Force: RF1 PI: TRUSS-1 Node xxx in NSET ATTACH
7–19
Abaqus ID:
Printed on:

EXAMPLE: CARGO CRANE UNDER DYNAMIC LOADING
4. Click mouse button 3, and select Plot from the menu that appears.
Abaqus/Viewer displays the selected curves.
5. Click in the prompt area to cancel the current procedure.
To position the grid:
1. Double-click the plot to open the Chart Options dialog box.
2. In this dialog box, switch to the Grid Area tabbed page.
3. In the Size region of this page, select the Square option.
4. Use the slider to set the size to 75.
5. In the Position region of this page, select the Auto-align option.
6. From the available alignment options, select the last one (position the grid in the lower right
corner of the viewport).
7. Click Dismiss.
To position the legend:
1. Double-click the legend to open the Chart Legend Options dialog box.
2. In this dialog box, switch to the Area tabbed page.
3. In the Position region of this page, toggle on Inset.
4. To display the minimum and maximum values in the legend, switch to the Contents tabbed
page of the dialog box. In the Numbers region of this page, toggle on Show min/max.
5. Click Dismiss.
6. Drag the legend in the viewport to reposition it.
The resulting plot (which has been customized) is shown in Figure 7–9. The curves for the
two nodes at the top of each truss (points B and C) are almost a reflection of those for the nodes on
the bottom of each truss (points A and D).
Note: To modify the curve styles, click in the Visualization toolbox to open the CurveOptions dialog box.
At the attachment points at the top of each truss structure, the peak tensile force is around 80 kN,
which is below the 100 kN capacity of the connection. Keep in mind that a negative reaction force
in the 1-direction means that the member is being pulled away from the wall. The lower attachments
are in compression (positive reaction force) while the load is applied but oscillate between tension
and compression after the load has been removed. The peak tensile force is about 40 kN, well below
the allowable value. To find this value, probe the X–Y plot.
7–20
Abaqus ID:
Printed on:

EXAMPLE: CARGO CRANE UNDER DYNAMIC LOADING
Time0.00 0.10 0.20 0.30 0.40 0.50
For
ce
−0.05
0.00
0.05
[x1.E6]
RF1 Point ARF1 Point BRF1 Point CRF1 Point D
XMIN 0.000E+00XMAX 5.000E−01YMIN −8.076E+04YMAX 7.915E+04
Peak tensile point
Probe this point
Figure 7–9 History of the reaction forces at the attached nodes.
To query the X–Y plot:
1. From the main menu bar, select Tools→Query.
The Query dialog box appears.
2. Click Probe values in the Visualization Module Queries field.
The Probe Values dialog box appears.
3. Select the point indicated in Figure 7–9.
The Y-coordinate of this point is –46.64 kN, which corresponds to the value of the reaction
force in the 1-direction.
7–21
Abaqus ID:
Printed on:

EFFECT OF DAMPING
7.6 Effect of the number of modes
For this simulation 30 modes were used to represent the dynamic behavior of the structure. The total
modal effective mass for all of these modes was well over 90% of the mass of the structure that can move
in the y- and z-directions, indicating that the dynamic representation is adequate.
Figure 7–10 shows the displacement in the direction of degree of freedom 2 at node 104 versus time
and illustrates the effect of using fewer modes on the quality of the results. If you look at the table of
effective mass, you will see that the first significant mode in the 2-direction is mode 3, which accounts
for the lack of response when only two modes are used. The displacement of this node in the direction of
degree of freedom 2 for the analyses using five modes and 30modes is similar after 0.2 seconds; however,
the early response differs, suggesting that there are significant modes in the range of 5–30 relating to the
early response. When five modes are used, the total modal effective mass in the 2-direction is only 57%
of the moveable mass.
2 modes5 modes30 modes
Figure 7–10 Effect of different numbers of modes on the results.
7.7 Effect of damping
In this simulation we used 5% of critical damping in all modes. This value was chosen from experience,
based on the fact that the bolted connections between the trusses and the cross bracing might absorb
7–22
Abaqus ID:
Printed on:

COMPARISON WITH DIRECT TIME INTEGRATION
significant energy as a result of local frictional effects. In cases such as this, where accurate data are not
available, it is important to investigate the effect of the choices that you make.
Figure 7–11 compares the history of the reaction force at one of the top connections (point C) when
1%, 5%, and 10% of critical damping are used. As expected, the oscillations at lower damping levels do
not diminish as quickly as those at higher damping levels, and the peak force is higher in the models with
lower damping. With damping ratios even as low as 1%, the peak pull-out force is 85 kN, which is still
less than the strength of the connection (100 kN). Therefore, the cargo crane should retain its integrity
under this drop load.
1% damping5% damping10% damping
Figure 7–11 Effect of damping ratio on the pull-out force.
7.8 Comparison with direct time integration
Since this is a transient dynamic analysis, it is natural to consider how the results compare with those
obtained using direct integration of the equations of motion. Direct integration can be performed with
either implicit (Abaqus/Standard) or explicit (Abaqus/Explicit) methods. Here we extend the analysis to
use the explicit dynamics procedure.
A direct comparison with the results presented earlier is not possible since the B33 element type
and direct modal damping are not available in Abaqus/Explicit. Thus, in the Abaqus/Explicit analysis
the element type is changed to B31 and Rayleigh damping is used in place of direct modal damping.
7–23
Abaqus ID:
Printed on:

COMPARISON WITH DIRECT TIME INTEGRATION
Save a copy of dynamics.inp as dynamics_xpl.inp. All subsequent changes should be
made to dynamics_xpl.inp.
To modify the model:
1. Change the element type to B31 for all elements in the model. You can perform this change by
modifying the TYPE parameter on the *ELEMENT option:
*ELEMENT, TYPE=B31
2. Add mass proportional damping to the bracing section properties. To do this, add the following
*DAMPING option to the end of the material data option block for the bracing section:
*DAMPING, ALPHA=15.
This statement specifies a value of 15 for alpha damping and 0 for the remaining damping quantities.
These values produce a reasonable trade-off in the values of critical damping at low and high
frequencies of the structure. For the three lowest natural frequencies, the effective value of
is greater than 0.05, but as was shown in Figure 7–10, the first two modes do not contribute
significantly to the response. For the remaining modes, the value of is less than 0.05. The
variation of as a function of natural frequency is shown in Figure 7–12.
ξ = 0.05
ξ = 2ωα
Figure 7–12 Effect of damping on the results.
3. Repeat the previous step for the main member section properties.
7–24
Abaqus ID:
Printed on:

COMPARISON WITH DIRECT TIME INTEGRATION
4. Delete both analysis steps.
5. Create an single explicit dynamics step, and specify a time period of 0.5 s. In addition, edit the
step to use linear geometry by setting NLGEOM=NO on the *STEP option (this will result in a
linear analysis). For your simulation the option block defining the explicit dynamics step should
look similar to the following:
*STEP, NLGEOM=NODirect integration transient dynamic analysis*DYNAMIC, EXPLICIT, 0.5*BULK VISCOSITY0.06, 1.2
6. Redefine the tip load.
The *CLOAD option block for this simulation is:
*CLOAD, AMPLITUDE=BOUNCE104, 2, -1.0E4
7. Redefine node set TIP to include only node 104.
Create a default field output request and two history output requests. In the first, request
displacement history for the set TIP; in the second, request reaction force history for the set
ATTACH.
For your simulation, the option block defining the output requests should look similar to the
following:
*NSET, NSET=TIP104,*OUTPUT, FIELD, VARIABLE=PRESELECT*OUTPUT, HISTORY, VARIABLE=PRESELECT*NODE OUTPUT, NSET=TIPU,*NODE OUTPUT, NSET=ATTACHRF,
Terminate the step with
*END STEP
8. Save the input file as dynamics_xpl.inp and submit for analysis:
abaqus job=dynamics_xpl.inp
7–25
Abaqus ID:
Printed on:
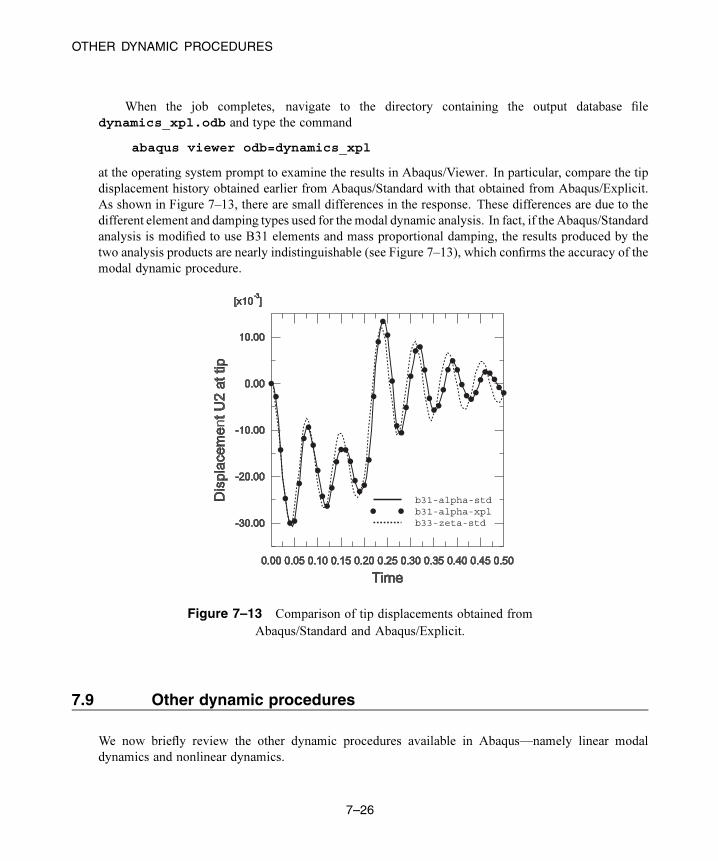
OTHER DYNAMIC PROCEDURES
When the job completes, navigate to the directory containing the output database file
dynamics_xpl.odb and type the command
abaqus viewer odb=dynamics_xpl
at the operating system prompt to examine the results in Abaqus/Viewer. In particular, compare the tip
displacement history obtained earlier from Abaqus/Standard with that obtained from Abaqus/Explicit.
As shown in Figure 7–13, there are small differences in the response. These differences are due to the
different element and damping types used for the modal dynamic analysis. In fact, if the Abaqus/Standard
analysis is modified to use B31 elements and mass proportional damping, the results produced by the
two analysis products are nearly indistinguishable (see Figure 7–13), which confirms the accuracy of the
modal dynamic procedure.
b31-alpha-stdb31-alpha-xplb33-zeta-std
Figure 7–13 Comparison of tip displacements obtained from
Abaqus/Standard and Abaqus/Explicit.
7.9 Other dynamic procedures
We now briefly review the other dynamic procedures available in Abaqus—namely linear modal
dynamics and nonlinear dynamics.
7–26
Abaqus ID:
Printed on:

OTHER DYNAMIC PROCEDURES
7.9.1 Linear modal dynamics
There are several other linear, dynamic procedures in Abaqus/Standard that employ the modal
superposition technique. Unlike *MODAL DYNAMIC, which calculates the response in the time
domain, these procedures provide results in the frequency domain, which can give additional insight
into the behavior of the structure.
A complete description of these procedures is given in “Dynamic stress/displacement analysis,”
Section 6.3 of the Abaqus Analysis User’s Manual.
Steady-state dynamics
The *STEADY STATE DYNAMICS option calculates the amplitude and phase of the structure’s
response caused by harmonic excitation over a user-specified range of frequencies. Typical
examples include the following:
• The response of car engine mounts over a range of engine operating speeds.
• Rotating machinery in buildings.
• Components on aircraft engines.
Response spectrum
The *RESPONSE SPECTRUM option provides an estimate of the peak response (displacement,
stress, etc.) when a structure is subjected to dynamic motion of its fixed points. The motion of
the fixed points is known as “base motion”; an example is a seismic event causing ground motion.
Typically the method is used when an estimate of the peak response is required for design purposes.
Random response
The *RANDOM RESPONSE option predicts the response of a system subjected to random
continuous excitation. The excitation is expressed in a statistical sense using a power spectral
density function. Examples of random response analysis include the following:
• The response of an airplane to turbulence.
• The response of a structure to noise, such as that emitted by a jet engine.
7.9.2 Nonlinear dynamics
As mentioned earlier, the *MODAL DYNAMIC procedure is suitable only for linear problems. When
nonlinear dynamic response is of interest, the equations of motion must be integrated directly. The
direct-integration of the equations of motion is performed in Abaqus/Standard using an implicit dynamics
procedure (*DYNAMIC). When this procedure is used, the mass, damping, and stiffness matrices are
assembled and the equation of dynamic equilibrium is solved at each point in time. Since these operations
are computationally intensive, direct-integration dynamics is more expensive than the modal methods.
7–27
Abaqus ID:
Printed on:

SUMMARY
Since the nonlinear dynamic procedure in Abaqus/Standard uses implicit time integration, it is
suitable for nonlinear structural dynamics problems, for example, in which a sudden event initiates the
dynamic response, such as an impact, or when the structural response involves large amounts of energy
being dissipated by plasticity or viscous damping. In such studies the high frequency response, which is
important initially, is damped out rapidly by the dissipative mechanisms in the model.
An alternative for nonlinear dynamic analyses is the explicit dynamics procedure available in
Abaqus/Explicit. As discussed in Chapter 2, “Abaqus Basics,” the explicit algorithm propagates
the solution as a stress wave through the model, one element at a time. Thus, it is most suitable for
applications in which stress wave effects are important and in which the event time being simulated is
short (typically less than one second).
Another advantage associated with the explicit algorithm is that it can model discontinuous
nonlinearities such as contact and failure more easily than Abaqus/Standard. Large, highly
discontinuous problems are often more easily modeled with Abaqus/Explicit, even if the response
is quasi-static. Explicit dynamic analyses are discussed further in Chapter 9, “Nonlinear Explicit
Dynamics.”
7.10 Related Abaqus examples
• “Linear analysis of the Indian Point reactor feedwater line,” Section 2.2.2 of the Abaqus Example
Problems Manual
• “Explosively loaded cylindrical panel,” Section 1.3.3 of the Abaqus Benchmarks Manual
• “Eigenvalue analysis of a cantilever plate,” Section 1.4.6 of the Abaqus Benchmarks Manual
7.11 Suggested reading
• Clough, R. W. and J. Penzien, Dynamics of Structures, McGraw-Hill, 1975.
• NAFEMS Ltd., A Finite Element Dynamics Primer, 1993.
• Spence, P. W. and C. J. Kenchington, The Role of Damping in Finite Element Analysis, Report
R0021, NAFEMS Ltd., 1993.
7.12 Summary
• Dynamic analyses include the effect of the structure’s inertia.
• The *FREQUENCY procedure extracts the natural frequencies and mode shapes of the structure.
• The mode shapes can then be used to determine the dynamic response of linear systems by modal
superposition. This technique is efficient, but it cannot be used for nonlinear problems.
7–28
Abaqus ID:
Printed on:

SUMMARY
• Linear dynamic procedures are available in Abaqus/Standard to calculate the transient response to
transient loading, the steady-state response to harmonic loading, the peak response to base motion,
and the response to random loading.
• You should extract enough modes to obtain an accurate representation of the dynamic behavior of
the structure. The total modal effective mass in the direction in which motion will occur should be
at least 90% of the mass that can move to produce accurate results.
• You can define direct modal damping, Rayleigh damping, and composite modal damping in
Abaqus/Standard. However, since the natural frequencies and mode shapes are based on the
undamped structure, the structure being analyzed should be only lightly damped.
• Modal techniques are not suitable for nonlinear dynamic simulations. Direct time integration
(*DYNAMIC) methods must be used in these situations.
• The *AMPLITUDE option allows any time variation of loads or prescribed boundary conditions to
be defined.
• Mode shapes and transient results can be animated in Abaqus/Viewer. This provides a useful way
of understanding the response of dynamic and nonlinear static analyses.
7–29
Abaqus ID:
Printed on:


NONLINEARITY
8. Nonlinearity
This chapter discusses nonlinear structural analysis in Abaqus. The differences between linear and
nonlinear analyses are summarized below.
Linear analysis
All the analyses discussed so far have been linear: there is a linear relationship between the applied
loads and the response of the system. For example, if a linear spring extends statically by 1 m under
a load of 10 N, it will extend by 2 m when a load of 20 N is applied. This means that in a linear
Abaqus/Standard analysis the flexibility of the structure need only be calculated once (by assembling
the stiffness matrix and inverting it). The linear response of the structure to other load cases can
be found by multiplying the new vector of loads by the inverted stiffness matrix. Furthermore, the
structure’s response to various load cases can be scaled by constants and/or superimposed on one
another to determine its response to a completely new load case, provided that the new load case is
the sum (or multiple) of previous ones. This principle of superposition of load cases assumes that
the same boundary conditions are used for all the load cases.
Abaqus/Standard uses the principle of superposition of load cases in linear dynamics
simulations, which are discussed in Chapter 7, “Linear Dynamics.”
Nonlinear analysis
A nonlinear structural problem is one in which the structure’s stiffness changes as it deforms.
All physical structures are nonlinear. Linear analysis is a convenient approximation that is often
adequate for design purposes. It is obviously inadequate for many structural simulations including
manufacturing processes, such as forging or stamping; crash analyses; and analyses of rubber
components, such as tires or engine mounts. A simple example is a spring with a nonlinear
stiffening response (see Figure 8–1).
Linear spring.Stiffness is constant.
Nonlinear spring.Stiffness is not constant.
Force
Displacement
Force
Displacement
Figure 8–1 Linear and nonlinear spring characteristics.
8–1
Abaqus ID:
Printed on:

SOURCES OF NONLINEARITY
Since the stiffness is now dependent on the displacement, the initial flexibility can no longer
be multiplied by the applied load to calculate the spring’s displacement for any load. In a nonlinear
implicit analysis the stiffness matrix of the structure has to be assembled and inverted many times
during the course of the analysis, making it much more expensive to solve than a linear implicit
analysis. In an explicit analysis the increased cost of a nonlinear analysis is due to reductions in
the stable time increment. The stable time increment is discussed further in Chapter 9, “Nonlinear
Explicit Dynamics.”
Since the response of a nonlinear system is not a linear function of the magnitude of the applied
load, it is not possible to create solutions for different load cases by superposition. Each load case
must be defined and solved as a separate analysis.
8.1 Sources of nonlinearity
There are three sources of nonlinearity in structural mechanics simulations:
• Material nonlinearity.
• Boundary nonlinearity.
• Geometric nonlinearity.
8.1.1 Material nonlinearity
This type of nonlinearity is probably the one that you are most familiar with and is covered in more depth
in Chapter 10, “Materials.” Most metals have a fairly linear stress/strain relationship at low strain values;
but at higher strains the material yields, at which point the response becomes nonlinear and irreversible
(see Figure 8–2).
Rubber materials can be approximated by a nonlinear, reversible (elastic) response (see Figure 8–3).
Material nonlinearity may be related to factors other than strain. Strain-rate-dependent material data
and material failure are both forms of material nonlinearity. Material properties can also be a function
of temperature and other predefined fields.
8.1.2 Boundary nonlinearity
Boundary nonlinearity occurs if the boundary conditions change during the analysis. Consider the
cantilever beam, shown in Figure 8–4, that deflects under an applied load until it hits a “stop.”
8–2
Abaqus ID:
Printed on:

SOURCES OF NONLINEARITY
Strain
Stress
Initial yield stress
Ultimate tensile stress
MaterialFailure
Young’s modulus, ESlope is
Figure 8–2 Stress-strain curve for an elastic-plastic material under uniaxial tension.
Strain
Stress
Figure 8–3 Stress-strain curve for a rubber-type material.
Figure 8–4 Cantilever beam hitting a stop.
8–3
Abaqus ID:
Printed on:

SOURCES OF NONLINEARITY
The vertical deflection of the tip is linearly related to the load (if the deflection is small) until it
contacts the stop. There is then a sudden change in the boundary condition at the tip of the beam,
preventing any further vertical deflection, and so the response of the beam is no longer linear. Boundary
nonlinearities are extremely discontinuous: when contact occurs during a simulation, there is a large and
instantaneous change in the response of the structure.
Another example of boundary nonlinearity is blowing a sheet of material into a mold. The sheet
expands relatively easily under the applied pressure until it begins to contact the mold. From then on the
pressure must be increased to continue forming the sheet because of the change in boundary conditions.
Boundary nonlinearity is covered in Chapter 12, “Contact.”
8.1.3 Geometric nonlinearityThe third source of nonlinearity is related to changes in the geometry of the structure during the analysis.
Geometric nonlinearity occurs whenever the magnitude of the displacements affects the response of the
structure. This may be caused by:
• Large deflections or rotations.
• “Snap through.”
• Initial stresses or load stiffening.
For example, consider a cantilever beam loaded vertically at the tip (see Figure 8–5).
Figure 8–5 Large deflection of a cantilever beam.
If the tip deflection is small, the analysis can be considered as being approximately linear. However,
if the tip deflections are large, the shape of the structure and, hence, its stiffness changes. In addition,
if the load does not remain perpendicular to the beam, the action of the load on the structure changes
significantly. As the cantilever beam deflects, the load can be resolved into a component perpendicular
to the beam and a component acting along the length of the beam. Both of these effects contribute to the
nonlinear response of the cantilever beam (i.e., the changing of the beam’s stiffness as the load it carries
increases).
One would expect large deflections and rotations to have a significant effect on the way that
structures carry loads. However, displacements do not necessarily have to be large relative to the
8–4
Abaqus ID:
Printed on:

THE SOLUTION OF NONLINEAR PROBLEMS
dimensions of the structure for geometric nonlinearity to be important. Consider the “snap through”
under applied pressure of a large panel with a shallow curve, as shown in Figure 8–6.
Undeformed shape
“Snapped through”shape
Initialstiffness
As the panel “snapsthrough,” the stiffness
becomes negative.
Positive stiffness isregained once the panel
snaps through
Load
Deflection
Applied pressure
Figure 8–6 Snap-through of a large shallow panel.
In this example there is a dramatic change in the stiffness of the panel as it deforms. As the panel
“snaps through,” the stiffness becomes negative. Thus, although the magnitude of the displacements,
relative to the panel’s dimensions, is quite small, there is significant geometric nonlinearity in the
simulation, which must be taken into consideration.
An important difference between the analysis products should be noted here: by default,
Abaqus/Standard assumes small deformations, while Abaqus/Explicit assumes large deformations.
8.2 The solution of nonlinear problems
The nonlinear load-displacement curve for a structure is shown in Figure 8–7. The objective of the
analysis is to determine this response. Consider the external forces, P, and the internal (nodal) forces,
I, acting on a body (see Figure 8–8(a) and Figure 8–8(b), respectively). The internal loads acting on a
node are caused by the stresses in the elements that contain that node.
For the body to be in static equilibrium, the net force acting at every node must be zero. Therefore,
the basic statement of static equilibrium is that the internal forces, I, and the external forces, P, must
balance each other:
8–5
Abaqus ID:
Printed on:

THE SOLUTION OF NONLINEAR PROBLEMS
Load
Displacement
P
u
Figure 8–7 Nonlinear load-displacement curve.
Ia
Id
Ic
Ib
Pp
(a) External loads in a simulation. (b) Internal forces acting at a node.
Figure 8–8 Internal and external loads on a body.
Abaqus/Standard uses the Newton-Raphson method to obtain solutions for nonlinear problems. In
a nonlinear analysis the solution usually cannot be calculated by solving a single system of equations, as
would be done in a linear problem. Instead, the solution is found by applying the specified loads gradually
and incrementally working toward the final solution. Therefore, Abaqus/Standard breaks the simulation
into a number of load increments and finds the approximate equilibrium configuration at the end of each
load increment. It often takes Abaqus/Standard several iterations to determine an acceptable solution to
a given load increment. The sum of all of the incremental responses is the approximate solution for the
nonlinear analysis. Thus, Abaqus/Standard combines incremental and iterative procedures for solving
nonlinear problems.
8–6
Abaqus ID:
Printed on:

THE SOLUTION OF NONLINEAR PROBLEMS
Abaqus/Explicit determines a solution to the dynamic equilibrium equation without
iterating by explicitly advancing the kinematic state from the previous increment. Solving a problem
explicitly does not require the formation of tangent stiffness matrices. The explicit central-difference
operator satisfies the dynamic equilibrium equations at the beginning of the increment, t; the accelerations
calculated at time t are used to advance the velocity solution to time and the displacement
solution to time . For linear and nonlinear problems alike, explicit methods require a small time
increment size that depends solely on the highest natural frequency of the model and is independent of
the type and duration of loading. Simulations typically require a large number of increments; however,
due to the fact that a global set of equations is not solved in each increment, the cost per increment of an
explicit method is much smaller than that of an implicit method. The small increments characteristic of
an explicit dynamic method make Abaqus/Explicit well suited for nonlinear analysis.
8.2.1 Steps, increments, and iterationsThis section introduces some new vocabulary for describing the various parts of an analysis. It is
important that you clearly understand the difference between an analysis step, a load increment, and
an iteration.
• The load history for a simulation consists of one or more steps. You define the steps, which generally
consist of an analysis procedure option, loading options, and output request options. Different loads,
boundary conditions, analysis procedure options, and output requests can be used in each step. For
example:
– Step 1: Hold a plate between rigid jaws.
– Step 2: Add loads to deform the plate.
– Step 3: Find the natural frequencies of the deformed plate.
• An increment is part of a step. In nonlinear analyses the total load applied in a step is broken into
smaller increments so that the nonlinear solution path can be followed.
In Abaqus/Standard you suggest the size of the first increment, and Abaqus/Standard
automatically chooses the size of the subsequent increments. In Abaqus/Explicit the default time
incrementation is fully automatic and does not require user intervention. Because the explicit
method is conditionally stable, there is a stability limit for the time increment. The stable time
increment is discussed in Chapter 9, “Nonlinear Explicit Dynamics.”
At the end of each increment the structure is in (approximate) equilibrium and results are
available for writing to the output database, restart, data, or results files. The increments at which
you select results to be written to the output database file are called frames.
The issues associated with time incrementation in Abaqus/Standard and Abaqus/Explicit
analyses are quite different, since time increments are generally much smaller in Abaqus/Explicit.
• An iteration is an attempt at finding an equilibrium solution in an increment when solving with an
implicit method. If the model is not in equilibrium at the end of the iteration, Abaqus/Standard
tries another iteration. With every iteration the solution Abaqus/Standard obtains should be closer
8–7
Abaqus ID:
Printed on:

THE SOLUTION OF NONLINEAR PROBLEMS
to equilibrium; sometimes Abaqus/Standard may need many iterations to obtain an equilibrium
solution. When an equilibrium solution has been obtained, the increment is complete. Results can
be requested only at the end of an increment.
Abaqus/Explicit does not need to iterate to obtain the solution in an increment.
8.2.2 Equilibrium iterations and convergence in Abaqus/StandardThe nonlinear response of a structure to a small load increment, , is shown in Figure 8–9.
Abaqus/Standard uses the structure’s initial stiffness, , which is based on its configuration at , and
to calculate a displacement correction, , for the structure. Using , the structure’s configuration
is updated to .
K0
IaRa
ua
a
Ka
ΔP
u0
P
Load
Displacement
ca
Figure 8–9 First iteration in an increment.
Convergence
Abaqus/Standard forms a new stiffness, , for the structure, based on its updated configuration,
. Abaqus/Standard also calculates , in this updated configuration. The difference between the
total applied load, P, and can now be calculated as:
where is the force residual for the iteration.
If is zero at every degree of freedom in the model, point a in Figure 8–9 would lie on the
load-deflection curve, and the structure would be in equilibrium. In a nonlinear problem it is almost
impossible to have equal zero, so Abaqus/Standard compares it to a tolerance value. If is less
than this force residual tolerance, Abaqus/Standard accepts the structure’s updated configuration
as the equilibrium solution. By default, this tolerance value is set to 0.5% of an average force
8–8
Abaqus ID:
Printed on:

THE SOLUTION OF NONLINEAR PROBLEMS
in the structure, averaged over time. Abaqus/Standard automatically calculates this spatially and
time-averaged force throughout the simulation.
If is less than the current tolerance value, P and are in equilibrium, and is
a valid equilibrium configuration for the structure under the applied load. However, before
Abaqus/Standard accepts the solution, it also checks that the displacement correction, , is small
relative to the total incremental displacement, . If is greater than 1% of the
incremental displacement, Abaqus/Standard performs another iteration. Both convergence checks
must be satisfied before a solution is said to have converged for that load increment. The exception
to this rule is the case of a linear increment, which is defined as any increment in which the largest
force residual is less than 10−8 times the time-averaged force. Any case that passes such a stringent
comparison of the largest force residual with the time-averaged force is considered linear and
does not require further iteration. The solution is accepted without any check on the size of the
displacement correction.
If the solution from an iteration is not converged, Abaqus/Standard performs another iteration
to try to bring the internal and external forces into balance. This second iteration uses the
stiffness, , calculated at the end of the previous iteration together with to determine another
displacement correction, , that brings the system closer to equilibrium (point b in Figure 8–10).
K0
Ia
ua
a
a b
Ia
P
Ib
K0
Ka
ua ub
Rb
u0
P
ΔP
Load
Displacement
cb
Figure 8–10 Second iteration.
Abaqus/Standard calculates a new force residual, , using the internal forces from the
structure’s new configuration, . Again, the largest force residual at any degree of freedom,
8–9
Abaqus ID:
Printed on:

THE SOLUTION OF NONLINEAR PROBLEMS
, is compared against the force residual tolerance, and the displacement correction for the
second iteration, , is compared to the increment of displacement, . If necessary,
Abaqus/Standard performs further iterations.
For each iteration in a nonlinear analysis Abaqus/Standard forms the model’s stiffness matrix
and solves a system of equations. This means that each iteration is equivalent, in computational cost,
to conducting a complete linear analysis. It should now be clear that the computational expense of
a nonlinear analysis in Abaqus/Standard can be many times greater than for a linear one.
It is possible with Abaqus/Standard to save results at each converged increment. Thus, the
amount of output data available from a nonlinear simulation is many times that available from a
linear analysis of the same geometry. Consider both of these factors and the types of nonlinear
simulations that you want to perform when planning your computer resources.
8.2.3 Automatic incrementation control in Abaqus/StandardAbaqus/Standard automatically adjusts the size of the load increments so that it solves nonlinear problems
easily and efficiently. You only need to suggest the size of the first increment in each step of your
simulation. Thereafter, Abaqus/Standard automatically adjusts the size of the increments. If you do not
provide a suggested initial increment size, Abaqus/Standard will try to apply all of the loads defined in
the step in the first increment. In highly nonlinear problems Abaqus/Standard will have to reduce the
increment size repeatedly, resulting in wasted CPU time. Generally it is to your advantage to provide a
reasonable initial increment size (see “Modifications to the input file—the history data,” Section 8.4.1,
for an example); only in very mildly nonlinear problems can all of the loads in a step be applied in a
single increment.
The number of iterations needed to find a converged solution for a load increment will vary
depending on the degree of nonlinearity in the system. By default, if the solution has not converged
within 16 iterations or if the solution appears to diverge, Abaqus/Standard abandons the increment
and starts again with the increment size set to 25% of its previous value. An attempt is then made at
finding a converged solution with this smaller load increment. If the increment still fails to converge,
Abaqus/Standard reduces the increment size again. By default, Abaqus/Standard allows a maximum of
five cutbacks of increment size in an increment before stopping the analysis.
In Abaqus/Standard you can also add the INC parameter to specify the maximum number of
increments allowed during the step. Abaqus/Standard terminates the analysis with an error message
if it needs more increments than this limit to complete the step. The default number of increments
for a step is 100; if significant nonlinearity is present in the simulation, the analysis may require
many more increments. The INC parameter specifies an upper limit on the number of increments
that Abaqus/Standard can use, rather than the number of increments it must use. For example, a step
involving nonlinear geometry with a maximum of 150 increments would be specified as:
*STEP, NLGEOM=YES, INC=150
In a nonlinear analysis a step takes place over a finite period of “time,” although this “time” has
no physical meaning unless inertial effects or rate-dependent behavior are present. In Abaqus/Standard
8–10
Abaqus ID:
Printed on:

THE SOLUTION OF NONLINEAR PROBLEMS
you specify the initial time increment, , and the total step time, on the data line of the
procedure option used in the step. For example,
*STATIC0.1, 1.0
Initial time increment ( )T initialΔ
Total step time ( )T total
defines a static analysis that occurs over 1.0 units of time and has an initial increment of 0.1. The ratio of
the initial time increment to the step time specifies the proportion of load applied in the first increment.
The initial load increment is given by
The choice of initial time increment can be critical in certain nonlinear simulations in Abaqus/Standard,
but for most analyses an initial increment size that is 5% to 10% of the total step time is usually sufficient.
In static simulations the total step time is usually set to 1.0 for convenience, unless, for example, rate-
dependent material effects or dashpots are included in the model. With a total step time of 1.0 the
proportion of load applied is always equal to the current step time; i.e., 50% of the total load is applied
when the step time is 0.5.
Although you must specify the initial increment size in Abaqus/Standard, Abaqus/Standard
automatically controls the size of the subsequent increments. This automatic control of the increment
size is suitable for the majority of nonlinear simulations performed with Abaqus/Standard, although
further controls on the increment size are available. Abaqus/Standard will terminate an analysis if
excessive cutbacks caused by convergence problems reduce the increment size below the minimum
value. The default minimum allowable time increment, , is 10−5 times the total step time. By
default, Abaqus/Standard has no upper limit on the increment size, , other than the total step
time. Depending on your Abaqus/Standard simulation, you may want to specify different minimum
and/or maximum allowable increment sizes. For example, if you know that your simulation may have
trouble obtaining a solution if too large a load increment is applied, perhaps because the model may
undergo plastic deformation, you may want to decrease .
If the increment converges in fewer than five iterations, this indicates that the solution is being
found fairly easily. Therefore, Abaqus/Standard automatically increases the increment size by 50% if
two consecutive increments require fewer than five iterations to obtain a converged solution.
Details of the automatic load incrementation scheme are given in the message file, as shown in more
detail in “Results,” Section 8.4.3.
8–11
Abaqus ID:
Printed on:

INCLUDING NONLINEARITY IN AN Abaqus ANALYSIS
8.3 Including nonlinearity in an Abaqus analysis
We now discuss how to account for nonlinearity in an Abaqus analysis. The main focus is on geometric
nonlinearity.
8.3.1 Geometric nonlinearity
Incorporating the effects of geometric nonlinearity in an analysis requires only minor changes to an
Abaqus/Standard model. You need to make sure the step definition considers geometrically nonlinear
effects by setting the NLGEOM parameter equal to YES on the *STEP option. This is the default setting
in Abaqus/Explicit. You also need to set time incrementation parameters as discussed in “Automatic
incrementation control in Abaqus/Standard,” Section 8.2.3.
The following input describes a static analysis in which the load is applied over 5 units of time and
the initial time increment is 1 unit of time; the minimum and maximum time increments are set to 0.0001
and 1.5, respectively:
*STATIC1.0, 5.0, 0.0001, 1.5
TΔ minTΔ initial
TΔ max
Abaqus will apply 20% (1.0/5.0) of the total load in the first increment, and it will terminate the analysis
if it has problems converging and requires an increment smaller than 0.0001. If the time increment grows
because the solution is converging easily, the maximum time increment Abaqus can use is 1.5.
Local directions
In a geometrically nonlinear analysis the local material directions may rotate with the deformation
in each element. For shell, beam, and truss elements the local material directions always rotate with
the deformation. For solid elements the local material directions rotate with the deformation only
if the elements refer to an *ORIENTATION option; otherwise, the default local material directions
remain constant throughout the analysis.
Local directions defined at nodes by using the *TRANSFORM option remain fixed throughout
the analysis; they do not rotate with the deformation. See “Transformed coordinate systems,”
Section 2.1.5 of the Abaqus Analysis User’s Manual, for further details.
8–12
Abaqus ID:
Printed on:

EXAMPLE: NONLINEAR SKEW PLATE
Effect on subsequent steps
Once you include geometric nonlinearity in a step, it is considered in all subsequent steps. If
nonlinear geometric effects are not requested in a subsequent step, Abaqus will issue a warning
stating that they are being included in the step anyway.
Other geometrically nonlinear effects
The large deformations in a model are not the only important effects that are considered when
geometric nonlinearity is activated. Abaqus/Standard also includes terms in the element stiffness
calculations that are caused by the applied loads, the so-called load stiffness. These terms improve
convergence behavior. In addition, the membrane loads in shells and the axial loads in cables
and beams contribute much of the stiffness of these structures in response to transverse loads.
By including geometric nonlinearity, the membrane stiffness in response to transverse loads is
considered as well.
8.3.2 Material nonlinearity
The addition of material nonlinearity to an Abaqus model is discussed in Chapter 10, “Materials.”
8.3.3 Boundary nonlinearity
The introduction of boundary nonlinearity is discussed in Chapter 12, “Contact.”
8.4 Example: nonlinear skew plate
This example is a continuation of the linear skew plate simulation described in Chapter 5, “Using Shell
Elements,” and shown in Figure 8–11. You will now reanalyze the plate in Abaqus/Standard to include
the effects of geometric nonlinearity. The results from this analysis will allow you to determine the
importance of geometrically nonlinear effects and, therefore, the validity of the linear analysis.
You only need to modify the history data to convert this model from a linear simulation to a nonlinear
simulation.
If you wish, you can follow the guidelines at the end of this example to extend the simulation to
perform a dynamic analysis using Abaqus/Explicit.
The steps that follow assumes that you have access to the full input file for this example. This input
file, skew_nl.inp, is available in “Nonlinear skew plate,” Section A.6, in the online HTML version of
this manual. Instructions on how to fetch and run the script are given in Appendix A, “Example Files.”
If you wish to create the entire model using Abaqus/CAE, please refer to “Example: nonlinear skew
plate,” Section 8.4 of Getting Started with Abaqus: Interactive Edition.
8–13
Abaqus ID:
Printed on:

EXAMPLE: NONLINEAR SKEW PLATE
20 kPa
Endbuilt-in
1
32
zerorotation
Figure 8–11 Skew plate.
8.4.1 Modifications to the input file—the history dataThis example does not change any model data in the original skew plate example; only history data
changes are included.
Applying NLGEOM to the step
Set the NLGEOM parameter equal to YES on the *STEP option, and remove the PERTURBATION
parameter. This indicates that the analysis now includes nonlinear geometric effects. The default
maximum number of increments is 100; Abaqus may use fewer increments than this upper limit,
but it will stop the analysis if it needs more.
The modified *STEP option looks like:
*STEP, NLGEOM=YES
You may also wish to modify the description of the step to reflect that this is now a nonlinear
analysis.
Defining the step time
This analysis requires a data line to the *STATIC option that specifies the size of the initial time
increment, , for the analysis and the total step time for the simulation. A total step time of
1.0 is used, and is specified such that Abaqus applies 10% of the load in the first increment.
The completed *STATIC option block will, therefore, be
*STATIC0.1, 1.0
8–14
Abaqus ID:
Printed on:

EXAMPLE: NONLINEAR SKEW PLATE
Output control
In a linear analysis Abaqus solves the equilibrium equations once and calculates the results for this
one solution. A nonlinear analysis can produce much more output because results can be requested
at the end of each converged increment. If you do not select the output requests carefully, the output
files become very large, potentially filling the disk space on your computer.
As noted earlier, output is available in four different files:
• the output database (.odb) file, which contains data in a neutral binary format necessary to
postprocess the results with Abaqus/Viewer;
• the data (.dat) file, which contains printed tables of selected results;
• the restart (.res) file, which is used to continue the analysis; and
• the results (.fil) file, which is used with third-party postprocessors.
Only the options for the output database (.odb) and printed output (.dat) files are discussedhere. If selected carefully, data can be saved frequently during the simulation without using
excessive disk space.
Remove the existing output requests from your input file; and add the following output options,
which ensure that only selected output is saved during the nonlinear analysis.
To reduce the size of the output database file, the FREQUENCY parameter is used on the
*OUTPUT, FIELD option; in this simulation field output is written every second increment. Thus,
the FREQUENCY parameter is set to 2 on the *OUTPUT option:
*OUTPUT, FIELD, FREQUENCY=2, VARIABLE=PRESELECT
The parameter VARIABLE=PRESELECT indicates that a preselected set of the most commonly
used field variables for a given type of analysis will be written to the output database (.odb)file. If you are simply interested in the final results, set the FREQUENCY parameter equal to a
large number. Results are always stored at the end of each step, regardless of the value of the
FREQUENCY parameter; therefore, using a large value causes only the final results to be saved.
Request that the displacements of the nodes at the midspan be saved to the output database file.
These results will be used later to demonstrate the X–Y plotting capability in Abaqus/Viewer. Use
the default FREQUENCY value (FREQUENCY=1) for this history output request for the output
database file. Here the *NODE OUTPUT option must appear immediately after the history output
request. Remember to use the NSET or ELSET parameters when limiting the output being requested
to a subset of the model; otherwise, the default subset, which is the entire model, will be used.
Finally, request that reaction forces (RF) be printed for all the nodes in the model and that the
displacements (U) be printed for the nodes at the midspan (node set MIDSPAN). You will need two
*NODE PRINT options because you are requesting results for two different subsets of the model.
Again, use the FREQUENCY parameter to reduce the amount of output; print the data every second
increment.
The new list of output request option blocks looks like:
8–15
Abaqus ID:
Printed on:

EXAMPLE: NONLINEAR SKEW PLATE
*OUTPUT, FIELD, FREQUENCY=2, VARIABLE=PRESELECT*OUTPUT, HISTORY, FREQUENCY=1*NODE OUTPUT, NSET=MIDSPANU,*NODE PRINT, NSET=MIDSPAN, FREQUENCY=2U,*NODE PRINT, SUMMARY=NO, TOTALS=YES, FREQUENCY=2RF,
Finally, the step definition is completed using the *END STEP option.
*END STEP
8.4.2 Running the analysisStore the modified input in a file called skew_nl.inp (an example input file is listed in “Nonlinear
skew plate,” Section A.6). Run the analysis using the following command:
abaqus job=skew_nl interactive
8.4.3 ResultsDuring a nonlinear analysis, two additional output files become very important. They are the status file
(skew_nl.sta) and the message file (skew_nl.msg). As the analysis progresses, Abaqus will writedata to both of these files. You can view the data even as Abaqus continues your analysis. You will need
to learn how to use the data in these files to assess Abaqus’s progress on your simulations. There may
be situations where you decide, based on information in these files, to terminate your analysis early. A
more likely scenario is that you may need to use these files to learn what caused Abaqus to terminate
your analysis prematurely; i.e., what caused the convergence problems.
Status file
The status file is particularly useful for monitoring the progress of a nonlinear simulation while the
job is running. The output below shows the status file for this nonlinear skewed plate example.
SUMMARY OF JOB INFORMATION:STEP INC ATT SEVERE EQUIL TOTAL TOTAL STEP INC OF DOF IF
DISCON ITERS ITERS TIME/ TIME/LPF TIME/LPF MONITOR RIKSITERS FREQ
1 1 1 0 4 4 0.100 0.100 0.10001 2 1 0 2 2 0.200 0.200 0.10001 3 1 0 2 2 0.350 0.350 0.15001 4 1 0 2 2 0.575 0.575 0.22501 5 1 0 3 3 0.913 0.913 0.33751 6 1 0 2 2 1.00 1.00 0.08750
The status file contains a separate line for every converged increment in the simulation. The first
column shows the step number—in this case there is only one step. The second column gives the
8–16
Abaqus ID:
Printed on:

EXAMPLE: NONLINEAR SKEW PLATE
increment number. The sixth column shows the number of iterations Abaqus needed to obtain a
converged solution in each increment; for example, Abaqus needed 4 iterations in increment 1. The
eighth column shows the total step time completed, and the ninth column shows the increment size
( ).
This example shows how Abaqus automatically controls the increment size and, therefore, the
proportion of load applied in each increment. In this analysis Abaqus applied 10% of the total load
in the first increment: you specified to be 0.1 and the step time to be 1.0. Abaqus needed
four iterations to converge to a solution in the first increment. Abaqus only needed two iterations
in the second increment, so it automatically increased the size of the next increment by 50% to
= 0.15. Abaqus also increased in both the fourth and fifth increments. It adjusted the final
increment size to be just enough to complete the analysis; in this case the final increment size was
0.0875.
Message file
The message file contains more detailed information about the progress of the analysis than the
status file. Abaqus lists all of the tolerances and parameters to control the analysis at the start of
each step in the message file, as shown below. This is done for each step because these controls
can be modified from step to step. The default values of these controls are appropriate for most
analyses, so normally it is not necessary for you to modify them. The modification of control
tolerances and parameters is beyond the scope of this guide (it is discussed in “Commonly used
control parameters,” Section 7.2.2 of the Abaqus Analysis User’s Manual).
S T E P 1 S T A T I C A N A L Y S I S
Uniform pressure (20.0 kPa) load
AUTOMATIC TIME CONTROL WITH -A SUGGESTED INITIAL TIME INCREMENT OF 0.100AND A TOTAL TIME PERIOD OF 1.00THE MINIMUM TIME INCREMENT ALLOWED IS 1.000E-05THE MAXIMUM TIME INCREMENT ALLOWED IS 1.00
LINEAR EQUATION SOLVER TYPE DIRECT SPARSE
CONVERGENCE TOLERANCE PARAMETERS FOR FORCECRITERION FOR RESIDUAL FORCE FOR A NONLINEAR PROBLEM 5.000E-03CRITERION FOR DISP. CORRECTION IN A NONLINEAR PROBLEM 1.000E-02INITIAL VALUE OF TIME AVERAGE FORCE 1.000E-02AVERAGE FORCE IS TIME AVERAGE FORCEALTERNATE CRIT. FOR RESIDUAL FORCE FOR A NONLINEAR PROBLEM 2.000E-02CRITERION FOR ZERO FORCE RELATIVE TO TIME AVRG. FORCE 1.000E-05CRITERION FOR RESIDUAL FORCE WHEN THERE IS ZERO FLUX 1.000E-05CRITERION FOR DISP. CORRECTION WHEN THERE IS ZERO FLUX 1.000E-03CRITERION FOR RESIDUAL FORCE FOR A LINEAR INCREMENT 1.000E-08FIELD CONVERSION RATIO 1.00CRITERION FOR ZERO FORCE REL. TO TIME AVRG. MAX. FORCE 1.000E-05CRITERION FOR ZERO DISP. RELATIVE TO CHARACTERISTIC LENGTH 1.000E-08
CONVERGENCE TOLERANCE PARAMETERS FOR MOMENTCRITERION FOR RESIDUAL MOMENT FOR A NONLINEAR PROBLEM 5.000E-03CRITERION FOR ROTATION CORRECTION IN A NONLINEAR PROBLEM 1.000E-02INITIAL VALUE OF TIME AVERAGE MOMENT 1.000E-02AVERAGE MOMENT IS TIME AVERAGE MOMENTALTERNATE CRIT. FOR RESIDUAL MOMENT FOR A NONLINEAR PROBLEM 2.000E-02CRITERION FOR ZERO MOMENT RELATIVE TO TIME AVRG. MOMENT 1.000E-05
8–17
Abaqus ID:
Printed on:

EXAMPLE: NONLINEAR SKEW PLATE
CRITERION FOR RESIDUAL MOMENT WHEN THERE IS ZERO FLUX 1.000E-05CRITERION FOR ROTATION CORRECTION WHEN THERE IS ZERO FLUX 1.000E-03CRITERION FOR RESIDUAL MOMENT FOR A LINEAR INCREMENT 1.000E-08FIELD CONVERSION RATIO 1.00CRITERION FOR ZERO MOMENT REL. TO TIME AVRG. MAX. MOMENT 1.000E-05
VOLUMETRIC STRAIN COMPATIBILITY TOLERANCE FOR HYBRID SOLIDS 1.000E-05AXIAL STRAIN COMPATIBILITY TOLERANCE FOR HYBRID BEAMS 1.000E-05TRANS. SHEAR STRAIN COMPATIBILITY TOLERANCE FOR HYBRID BEAMS 1.000E-05SOFT CONTACT CONSTRAINT COMPATIBILITY TOLERANCE FOR P>P0 5.000E-03SOFT CONTACT CONSTRAINT COMPATIBILITY TOLERANCE FOR P=0.0 0.100DISPLACEMENT COMPATIBILITY TOLERANCE FOR DCOUP ELEMENTS 1.000E-05ROTATION COMPATIBILITY TOLERANCE FOR DCOUP ELEMENTS 1.000E-05
EQUILIBRIUM WILL BE CHECKED FOR SEVERE DISCONTINUITY ITERATIONS
TIME INCREMENTATION CONTROL PARAMETERS:FIRST EQUILIBRIUM ITERATION FOR CONSECUTIVE DIVERGENCE CHECK 4EQUILIBRIUM ITERATION AT WHICH LOG. CONVERGENCE RATE CHECK BEGINS 8EQUILIBRIUM ITERATION AFTER WHICH ALTERNATE RESIDUAL IS USED 9MAXIMUM EQUILIBRIUM ITERATIONS ALLOWED 16EQUILIBRIUM ITERATION COUNT FOR CUT-BACK IN NEXT INCREMENT 10MAXIMUM EQUILIB. ITERS IN TWO INCREMENTS FOR TIME INCREMENT INCREASE 4MAXIMUM ITERATIONS FOR SEVERE DISCONTINUITIES 50MAXIMUM CUT-BACKS ALLOWED IN AN INCREMENT 5MAXIMUM DISCON. ITERS IN TWO INCREMENTS FOR TIME INCREMENT INCREASE 50MAXIMUM CONTACT AUGMENTATIONS FOR *SURFACE BEHAVIOR,AUGMENTED LAGRANGE 6CUT-BACK FACTOR AFTER DIVERGENCE 0.2500CUT-BACK FACTOR FOR TOO SLOW CONVERGENCE 0.5000CUT-BACK FACTOR AFTER TOO MANY EQUILIBRIUM ITERATIONS 0.7500CUT-BACK FACTOR AFTER TOO MANY SEVERE DISCONTINUITY ITERATIONS 0.2500CUT-BACK FACTOR AFTER PROBLEMS IN ELEMENT ASSEMBLY 0.2500INCREASE FACTOR AFTER TWO INCREMENTS THAT CONVERGE QUICKLY 1.500MAX. TIME INCREMENT INCREASE FACTOR ALLOWED 1.500MAX. TIME INCREMENT INCREASE FACTOR ALLOWED (DYNAMICS) 1.250MAX. TIME INCREMENT INCREASE FACTOR ALLOWED (DIFFUSION) 2.000MINIMUM TIME INCREMENT RATIO FOR EXTRAPOLATION TO OCCUR 0.1000MAX. RATIO OF TIME INCREMENT TO STABILITY LIMIT 1.000FRACTION OF STABILITY LIMIT FOR NEW TIME INCREMENT 0.9500TIME INCREMENT INCREASE FACTOR BEFORE A TIME POINT 1.000AUTOMATIC TOLERANCES FOR OVERCLOSURE AND SEPARATIONPRESSURE ARE SUPPRESSEDGLOBAL STABILIZATION CONTROL IS NOT USEDFRICTION IS INCLUDED IN INCREMENT THAT THE CONTACT POINT CLOSES
PRINT OF INCREMENT NUMBER, TIME, ETC., EVERY 1 INCREMENTS
Abaqus lists a summary of each iteration in the message file after the lists of tolerances and
controls. It prints the values of the largest residual force, ; largest increment of displacement,
; the largest correction to displacement, ; and the time averaged force, . It also prints the
nodes and degrees of freedom (DOF) at which , , and occur. A similar summary is
printed for rotational degrees of freedom.
INCREMENT 1 STARTS. ATTEMPT NUMBER 1, TIME INCREMENT 0.100
CONVERGENCE CHECKS FOR EQUILIBRIUM ITERATION 1
AVERAGE FORCE 12.2 TIME AVG. FORCE 12.2LARGEST RESIDUAL FORCE -749. AT NODE 1051 DOF 1LARGEST INCREMENT OF DISP. -5.576E-03 AT NODE 559 DOF 3LARGEST CORRECTION TO DISP. -5.576E-03 AT NODE 559 DOF 3
FORCE EQUILIBRIUM NOT ACHIEVED WITHIN TOLERANCE.
AVERAGE MOMENT 1.12 TIME AVG. MOMENT 1.12LARGEST RESIDUAL MOMENT -3.273E-03 AT NODE 1104 DOF 5
8–18
Abaqus ID:
Printed on:

EXAMPLE: NONLINEAR SKEW PLATE
LARGEST INCREMENT OF ROTATION 1.598E-02 AT NODE 159 DOF 5LARGEST CORRECTION TO ROTATION 1.598E-02 AT NODE 159 DOF 5
ROTATION CORRECTION TOO LARGE COMPARED TO ROTATION INCREMENT
In this example the initial time increment is 0.1, as specified in the input file. The average
force for the increment is 12.2 N, and has the same value since this is the first increment. The
largest residual force in the model, , is −749 N, which is clearly greater than 0.005 × .
occurred at node 1051 in degree of freedom 1. Abaqus must also check for equilibrium of the
moments in the model since this model includes shell elements. The moment/rotation field also
failed to satisfy the equilibrium check.
Although failure to satisfy the equilibrium check is enough to cause Abaqus to try another
iteration, you should also examine the displacement correction. In the first iteration of the first
increment of the first step the largest increment of displacement, , and the largest correction
to displacement, , are both −5.576 × 10⁻³ m; and the largest increment of rotation and correction
to rotation are both 1.598 × 10⁻² radians. Since the incremental values and the corrections are always
equal in the first iteration of the first increment of the first step, the check that the largest corrections
to nodal variables are less than 1% of the largest incremental values will always fail. However, if
Abaqus judges the solution to be linear (a judgement based on the magnitude of the residuals,
< 10−8 ), it will ignore this criterion.
Since Abaqus did not find an equilibrium solution in the first iteration, it tries a second iteration,
as shown below.
CONVERGENCE CHECKS FOR EQUILIBRIUM ITERATION 2
AVERAGE FORCE 1.00 TIME AVG. FORCE 1.00LARGEST RESIDUAL FORCE -0.173 AT NODE 1051 DOF 1LARGEST INCREMENT OF DISP. -5.582E-03 AT NODE 651 DOF 3LARGEST CORRECTION TO DISP. -7.050E-05 AT NODE 1201 DOF 1
FORCE EQUILIBRIUM NOT ACHIEVED WITHIN TOLERANCE.
AVERAGE MOMENT 1.12 TIME AVG. MOMENT 1.12LARGEST RESIDUAL MOMENT -8.698E-04 AT NODE 208 DOF 5LARGEST INCREMENT OF ROTATION -1.597E-02 AT NODE 1051 DOF 5LARGEST CORRECTION TO ROTATION 1.305E-04 AT NODE 409 DOF 4
THE MOMENT EQUILIBRIUM EQUATIONS HAVE CONVERGED
In the second iteration has fallen to −0.173 N at node 1051 in degree of freedom 1.
However, equilibrium is not satisfied in this iteration because 0.005 , where = 1.00 N,
is still less than . The displacement correction criterion also failed again because
= −7.050 × 10⁻⁵ , which occurred at node 1201 in degree of freedom 1, is more than 1% of
= −5.582 × 10⁻³ , the maximum displacement increment.
Both the moment residual check and the largest correction to rotation check were satisfied in
this second iteration; however, Abaqus must perform two more iterations because the solutions did
not pass the force residual check (or the largest correction to displacement criterion). The message
file summaries for the additional iterations necessary to obtain a solution in the first increment are
shown below.
8–19
Abaqus ID:
Printed on:

EXAMPLE: NONLINEAR SKEW PLATE
CONVERGENCE CHECKS FOR EQUILIBRIUM ITERATION 3
AVERAGE FORCE 0.997 TIME AVG. FORCE 0.997LARGEST RESIDUAL FORCE -5.838E-03 AT NODE 459 DOF 2LARGEST INCREMENT OF DISP. -5.582E-03 AT NODE 651 DOF 3LARGEST CORRECTION TO DISP. 9.150E-06 AT NODE 559 DOF 3
FORCE EQUILIBRIUM NOT ACHIEVED WITHIN TOLERANCE.
AVERAGE MOMENT 1.12 TIME AVG. MOMENT 1.12LARGEST RESIDUAL MOMENT -1.338E-06 AT NODE 908 DOF 5LARGEST INCREMENT OF ROTATION -1.597E-02 AT NODE 1051 DOF 5LARGEST CORRECTION TO ROTATION 3.233E-05 AT NODE 809 DOF 5
THE MOMENT EQUILIBRIUM EQUATIONS HAVE CONVERGED
CONVERGENCE CHECKS FOR EQUILIBRIUM ITERATION 4
AVERAGE FORCE 0.997 TIME AVG. FORCE 0.997LARGEST RESIDUAL FORCE -1.581E-07 AT NODE 1002 DOF 1LARGEST INCREMENT OF DISP. -5.582E-03 AT NODE 651 DOF 3LARGEST CORRECTION TO DISP. 1.945E-09 AT NODE 559 DOF 3
THE FORCE EQUILIBRIUM EQUATIONS HAVE CONVERGED
AVERAGE MOMENT 1.12 TIME AVG. MOMENT 1.12LARGEST RESIDUAL MOMENT 3.691E-10 AT NODE 259 DOF 5LARGEST INCREMENT OF ROTATION -1.597E-02 AT NODE 1051 DOF 5LARGEST CORRECTION TO ROTATION 6.461E-09 AT NODE 809 DOF 5
THE MOMENT EQUILIBRIUM EQUATIONS HAVE CONVERGED
ITERATION SUMMARY FOR THE INCREMENT: 4 TOTAL ITERATIONS, OF WHICH0 ARE SEVERE DISCONTINUITY ITERATIONS AND 4 ARE EQUILIBRIUM ITERATIONS.
TIME INCREMENT COMPLETED 0.100 , FRACTION OF STEP COMPLETED 0.100STEP TIME COMPLETED 0.100 , TOTAL TIME COMPLETED 0.100
After four iterations = 0.997 N and = −1.581 × 10⁻⁷ N at node 1002 in degree
of freedom 1. These values satisfy < 0.005 × , so the force residual check is satisfied.
Comparing to the largest increment of displacement shows that the displacement correction
is below the required tolerance. The solution for the forces and displacements has, therefore,
converged. The checks for both the moment residual and the rotation correction continue to be
satisfied, as they have been since the second iteration. With a solution that satisfies equilibrium
for all variables (displacement and rotation in this case), the first load increment is complete. The
increment summary shows the number of iterations that were required for this increment, the size
of the increment, and the fraction of the step that has been completed.
The second increment requires two iterations to converge, as shown below.
INCREMENT 2 STARTS. ATTEMPT NUMBER 1, TIME INCREMENT 0.100
CONVERGENCE CHECKS FOR EQUILIBRIUM ITERATION 1
AVERAGE FORCE 10.2 TIME AVG. FORCE 6.33LARGEST RESIDUAL FORCE -4.11 AT NODE 459 DOF 2LARGEST INCREMENT OF DISP. -5.585E-03 AT NODE 651 DOF 3LARGEST CORRECTION TO DISP. 1.846E-04 AT NODE 509 DOF 3
FORCE EQUILIBRIUM NOT ACHIEVED WITHIN TOLERANCE.
AVERAGE MOMENT 2.27 TIME AVG. MOMENT 1.70LARGEST RESIDUAL MOMENT -1.226E-02 AT NODE 208 DOF 4LARGEST INCREMENT OF ROTATION -1.586E-02 AT NODE 1051 DOF 4
8–20
Abaqus ID:
Printed on:

EXAMPLE: NONLINEAR SKEW PLATE
LARGEST CORRECTION TO ROTATION -7.332E-04 AT NODE 409 DOF 5MOMENT EQUILIBRIUM NOT ACHIEVED WITHIN TOLERANCE.
CONVERGENCE CHECKS FOR EQUILIBRIUM ITERATION 2
AVERAGE FORCE 10.2 TIME AVG. FORCE 6.33LARGEST RESIDUAL FORCE -5.316E-04 AT NODE 359 DOF 2LARGEST INCREMENT OF DISP. -5.587E-03 AT NODE 651 DOF 3LARGEST CORRECTION TO DISP. -2.954E-06 AT NODE 459 DOF 3
THE FORCE EQUILIBRIUM EQUATIONS HAVE CONVERGED
AVERAGE MOMENT 2.67 TIME AVG. MOMENT 1.90LARGEST RESIDUAL MOMENT 4.569E-07 AT NODE 208 DOF 4LARGEST INCREMENT OF ROTATION -1.586E-02 AT NODE 1051 DOF 4LARGEST CORRECTION TO ROTATION 1.028E-05 AT NODE 209 DOF 4
THE MOMENT EQUILIBRIUM EQUATIONS HAVE CONVERGEDTIME INCREMENT MAY NOW INCREASE TO 0.150
ITERATION SUMMARY FOR THE INCREMENT: 2 TOTAL ITERATIONS, OF WHICH0 ARE SEVERE DISCONTINUITY ITERATIONS AND 2 ARE EQUILIBRIUM ITERATIONS.
TIME INCREMENT COMPLETED 0.100 , FRACTION OF STEP COMPLETED 0.200STEP TIME COMPLETED 0.200 , TOTAL TIME COMPLETED 0.200
Abaqus continues this process of applying an increment of load then iterating to find a solution
until it completes the whole analysis (or reaches the increment specified as the value of the INC
parameter). In this analysis it required four more increments. Abaqus gives a summary at the end
of the message file of how the analysis progressed and how many error and warning messages it
issued. The summary for this analysis is shown below. An important item to check is how many
iterations Abaqus uses. In this analysis it performed 15 iterations over the six increments: the
model’s system of equations was solved 15 times (i.e., 15 matrix decompositions), illustrating the
increased computational expense of nonlinear analyses compared with linear simulations.
THE ANALYSIS HAS BEEN COMPLETED
ANALYSIS SUMMARY:TOTAL OF 6 INCREMENTS
0 CUTBACKS IN AUTOMATIC INCREMENTATION15 ITERATIONS INCLUDING CONTACT ITERATIONS IF PRESENT15 PASSES THROUGH THE EQUATION SOLVER OF WHICH15 INVOLVE MATRIX DECOMPOSITION, INCLUDING0 DECOMPOSITION(S) OF THE MASS MATRIX1 REORDERING OF EQUATIONS TO MINIMIZE WAVEFRONT0 ADDITIONAL RESIDUAL EVALUATIONS FOR LINE SEARCHES0 ADDITIONAL OPERATOR EVALUATIONS FOR LINE SEARCHES1 WARNING MESSAGES DURING USER INPUT PROCESSING0 WARNING MESSAGES DURING ANALYSIS0 ANALYSIS WARNINGS ARE NUMERICAL PROBLEM MESSAGES0 ANALYSIS WARNINGS ARE NEGATIVE EIGENVALUE MESSAGES0 ERROR MESSAGES
JOB TIME SUMMARYUSER TIME (SEC) = 0.50000SYSTEM TIME (SEC) = 0.0000TOTAL CPU TIME (SEC) = 0.50000WALLCLOCK TIME (SEC) = 2
8–21
Abaqus ID:
Printed on:

EXAMPLE: NONLINEAR SKEW PLATE
You should always check this summary at the end of every Abaqus simulation. It tells you
if the analysis job ran to completion (i.e., whether it terminated without a FORTRAN error), and
it gives the number of error and warning messages Abaqus issued during the simulation. Always
investigate any errors or warnings. All warnings and errors generated during the analysis are found
in the message (.msg) file. Warnings issued “during user input processing” are found in the data
(.dat) file.
Data file
The tables of displacements and reaction forces that you requested are in the data (.dat) file. Themidspan deflections at the end of the step can be found near the end of the file.
THE FOLLOWING TABLE IS PRINTED FOR NODES BELONGING TO NODE SET MIDSPAN
NODE FOOT- U1 U2 U3 UR1 UR2 UR3NOTE
601 -1.2795E-04 -4.4921E-05 -1.0831E-02602 -1.2457E-04 -4.5147E-05 -1.0749E-02603 -1.2218E-04 -4.5645E-05 -1.0679E-02604 -1.2070E-04 -4.5966E-05 -1.0625E-02605 -1.1891E-04 -4.6602E-05 -1.0581E-02606 -1.1749E-04 -4.6822E-05 -1.0553E-02607 -1.1489E-04 -4.7487E-05 -1.0537E-02608 -1.1213E-04 -4.7541E-05 -1.0541E-02609 -1.0685E-04 -4.8026E-05 -1.0561E-02
MAXIMUM -1.0685E-04 -4.4921E-05 -1.0537E-02 0.000 0.000 0.000AT NODE 609 601 607 0 0 0
MINIMUM -1.2795E-04 -4.8026E-05 -1.0831E-02 0.000 0.000 0.000AT NODE 601 609 601 0 0 0
Compare these with the displacements from the linear analysis in Chapter 5, “Using Shell
Elements.” The maximum displacement at the midspan in this simulation is about 9% less than
that predicted from the linear analysis. Including the nonlinear geometric effects in the simulation
reduces the vertical deflection (U3) of the midspan of the plate.
Another difference between the two analyses is that in the nonlinear simulation there are
nonzero deflections in the 1- and 2-directions. What effects make the in-plane displacements, U1
and U2, nonzero in the nonlinear analysis? Why is the vertical deflection of the plate less in the
nonlinear analysis?
The plate deforms into a curved shape: a geometry change that is taken into account in the
nonlinear simulation. As a consequence, membrane effects cause some of the load to be carried by
membrane action rather than by bending alone. This makes the plate stiffer. In addition, the pressure
loading, which is always normal to the plate’s surface, starts to have a component in the 1- and
2-directions as the plate deforms. The nonlinear analysis includes the effects of this stiffening and
the changing direction of the pressure. Neither of these effects is included in the linear simulation.
The differences between the linear and nonlinear simulations are sufficiently large to indicate
that a linear simulation is not adequate for this plate under this particular loading condition.
For five degree of freedom shells, such as the S8R5 element used in this analysis, Abaqus does
not output total rotations at the nodes.
8–22
Abaqus ID:
Printed on:

EXAMPLE: NONLINEAR SKEW PLATE
8.4.4 PostprocessingWhen you are in the directory containing the output database file skew_nl.odb, type the following
command at the operating system prompt:
abaqus viewer odb=skew_nl
Showing the available frames
To begin this exercise, determine the available output frames (the increment intervals at which
results were written to the output database).
To show the available frames:1. From the main menu bar, select Result→Step/Frame.
The Step/Frame dialog box appears.
During the analysis Abaqus/Standard wrote field output results to the output database file every
second increment, as was requested. Abaqus/Viewer displays the list of the available frames,
as shown in Figure 8–12.
Figure 8–12 Available frames.
The list tabulates the steps and increments for which field variables are stored. This analysis
consisted of a single step with six increments. The results for increment 0 (the initial state
of the step) are saved by default, and you saved data for increments 2, 4, and 6. By default,
8–23
Abaqus ID:
Printed on:

EXAMPLE: NONLINEAR SKEW PLATE
Abaqus/Viewer always uses the data for the last available increment saved in the output
database file.
2. Click OK to dismiss the Step/Frame dialog box.
Displaying the deformed and undeformed model shapes
Use the Allow Multiple Plot States tool to display the deformed model shape with the
undeformed model shape superimposed. Set the render style for both images to wireframe, and
toggle off the translucency of the superimposed plot from the Superimpose Plot Optionsdialog box. Rotate the view to obtain a plot similar to that shown in Figure 8–13. By default, the
deformed shape is plotted for the last increment. (For clarity, the edges of the undeformed shape
are plotted using a dashed style.)
12
3
Figure 8–13 Deformed and undeformed model shapes of the skew plate.
Using results from other frames
You can evaluate the results from other increments saved to the output database file by selecting the
appropriate frame.
To select a new frame:
1. From the main menu bar, select Result→Step/Frame.
The Step/Frame dialog box appears.
2. Select Increment 4 from the Frame menu.
3. Click OK to apply your changes and to close the Step/Frame dialog box.
Any plots now requested will use results from increment 4. Repeat this procedure, substituting
the increment number of interest, to move through the output database file.
8–24
Abaqus ID:
Printed on:

EXAMPLE: NONLINEAR SKEW PLATE
Note: Alternatively, you may use the Frame Selector dialog box to select a results frame.
X–Y plotting
You saved the displacements of the midspan nodes (node set MIDSPAN) in the history portion of
the output database file skew_nl.odb for each increment of the simulation. You can use these
results to create X–Y plots. In particular, you will plot the vertical displacement history of the nodes
located at the edges of the plate midspan.
To create X–Y plots of the midspan displacements:
1. First, display only the nodes in the node set namedPART-1–1.MIDSPAN: in the Results Tree,expand the Node Sets container underneath the output database file named skew_nl.odb.Click mouse button 3 on the set named PART-1-1.MIDSPAN, and select Replace from the
menu that appears.
2. Use the Common Plot Options dialog box to show the node labels (i.e., numbers) to
determine which nodes are located at the edges of the plate midspan.
3. In the Results Tree, expand the History Output container for the output database named
skew_nl.odb.
4. Locate the output labeled as follows: Spatial displacement: U3 at Node xxxin NSET MIDSPAN. Each of these curves represents the vertical motion of one of the
midspan nodes.
Tip: Filter the container according to *U3* to facilitate your selection.
5. Select (using [Ctrl]+Click) the vertical motion of the two midspan edge nodes. Use the node
labels to determine which curves you need to select.
6. Click mouse button 3, and select Plot from the menu that appears.
Abaqus reads the data for both curves from the output database file and plots a graph similar
to the one shown in Figure 8–14. (For clarity, the second curve has been changed to a dashed
line, and the default grid and legend positions have been changed.)
The nonlinear nature of this simulation is clearly seen in these curves: as the analysis
progresses, the plate stiffens. In this simulation the increase in the plate stiffness with the
deformation is due to membrane effects. Therefore, the resulting peak displacement is less
than that predicted by the linear analysis, which did not include this effect.
You can create X–Y curves from either history or field data stored in the output database (.odb)file. X–Y curves can also be read from an external file or they can be typed into the Visualization
module interactively. Once curves have been created, their data can be further manipulated and
plotted to the screen in graphical form.
The X–Y plotting capability of Abaqus/Viewer is discussed further in Chapter 10, “Materials.”
8–25
Abaqus ID:
Printed on:

EXAMPLE: NONLINEAR SKEW PLATE
U3 N: 1 NSET MIDSPANU3 N: 2 NSET MIDSPAN
Figure 8–14 Midspan displacement history at the edges of the skew plate.
Tabular data
Create a tabular data report of the midspan displacements. Use the node set PART-1–1.MIDSPANto create the appropriate display group and the frame selector to choose the final frame. The contents
of the report are shown below.
Source 1---------
ODB: skew_nl.odbStep: Step-1Frame: Increment 6: Step Time = 1.000
Loc 1 : Nodal values from source 1
Output sorted by column "Node Label".
Field Output reported at nodes for part: PART-1-1
Node U.U1 U.U2 U.U3Label @Loc 1 @Loc 1 @Loc 1
-----------------------------------------------------------------601 -2.68589E-03 -746.369E-06 -49.4577E-03602 -2.62498E-03 -749.228E-06 -48.9958E-03603 -2.57304E-03 -758.277E-06 -48.5853E-03604 -2.53788E-03 -761.475E-06 -48.1742E-03605 -2.48991E-03 -774.13E-06 -47.6904E-03606 -2.45666E-03 -777.171E-06 -47.1307E-03607 -2.40294E-03 -792.3E-06 -46.52E-03608 -2.36145E-03 -793.014E-06 -45.9489E-03609 -2.27792E-03 -805.258E-06 -45.4701E-03
8–26
Abaqus ID:
Printed on:

SUGGESTED READING
Minimum -2.68589E-03 -805.258E-06 -49.4577E-03
At Node 601 609 601Maximum -2.27792E-03 -746.369E-06 -45.4701E-03
At Node 609 601 609
8.4.5 Running the analysis in Abaqus/ExplicitAs an optional exercise, you can modify the model and run a dynamic analysis of the skew plate in
Abaqus/Explicit. To do so, you must add a density of 7800 kg/m3 to the material definition for steel
and change the element type to S4R (with appropriate modifications to the element connectivity list).
In addition, you should edit the history output requests to write the translations and rotations for the
set MIDSPAN to the output database file. This information will be helpful in evaluating the dynamic
response of the plate. After making the appropriate model changes, you can create and run a new job to
examine the transient dynamic effects in the plate under a suddenly applied load.
8.5 Related Abaqus examples
• “Elastic-plastic collapse of a thin-walled elbow under in-plane bending and internal pressure,”
Section 1.1.2 of the Abaqus Example Problems Manual
• “Laminated composite shells: buckling of a cylindrical panel with a circular hole,” Section 1.2.2 of
the Abaqus Example Problems Manual
• “Unstable static problem: reinforced plate under compressive loads,” Section 1.2.5 of the Abaqus
Example Problems Manual
• “Large rotation of a one degree of freedom system,” Section 1.3.5 of the Abaqus Benchmarks
Manual
• “Vibration of a cable under tension,” Section 1.4.3 of the Abaqus Benchmarks Manual
8.6 Suggested reading
The following references provide additional information on nonlinear finite element methods. They
allow the interested user to explore the topic in more depth.
General texts on nonlinear finite element analysis
• Belytschko, T., W. K. Liu, and B. Moran, Nonlinear Finite Elements for Continua and
Structures, Wiley & Sons, 2000.
• Bonet, J., and R. D. Wood, Nonlinear Continuum Mechanics for Finite Element Analysis,
Cambridge, 1997.
8–27
Abaqus ID:
Printed on:

SUMMARY
• Cook, R. D., D. S. Malkus, and M. E. Plesha, Concepts and Applications of Finite Element
Analysis, Wiley & Sons, 1989.
• Crisfield, M. A., Non-linear Finite Element Analysis of Solids and Structures, Volume I:
Essentials, Wiley & Sons, 1991.
• Crisfield, M. A., Non-linear Finite Element Analysis of Solids and Structures, Volume II:
Advanced Topics, Wiley & Sons, 1997.
• E. Hinton (editor), NAFEMS Introduction to Nonlinear Finite Element Analysis, NAFEMS
Ltd., 1992.
• Oden, J. T., Finite Elements of Nonlinear Continua, McGraw-Hill, 1972.
8.7 Summary
• There are three sources of nonlinearity in structural problems: material, geometric, and boundary
(contact). Any combination of these may be present in an Abaqus analysis.
• Geometric nonlinearity occurs whenever the magnitude of the displacements affects the response
of the structure. It includes the effects of large displacements and rotations, snap through, and load
stiffening.
• In Abaqus/Standard nonlinear problems are solved iteratively using the Newton-Raphson method.
A nonlinear problem will require many times the computer resources required by a linear problem.
• Abaqus/Explicit does not need to iterate to obtain a solution; however, the computational cost may
be affected by reductions in the stable time increment due to large changes in geometry.
• A nonlinear analysis step is split into a number of increments.
– Abaqus/Standard iterates to find the approximate static equilibrium obtained at the end of each
new load increment. Abaqus/Standard controls the load incrementation by using convergence
controls throughout the simulation.
– Abaqus/Explicit determines a solution by advancing the kinematic state from one increment to
the next, using a smaller time increment than what is commonly used in implicit analyses. The
size of the increment is limited by the stable time increment. By default, time incrementation
is completely automated in Abaqus/Explicit.
• The status file allows the progress of an analysis to be monitored while it is running. The message
file contains the details of the load incrementation and iterations.
• Results can be saved at the end of each increment so that the evolution of the structure’s response
can be visualized in Abaqus/Viewer. Results can also be plotted in the form of X–Y graphs.
8–28
Abaqus ID:
Printed on:

TYPES OF PROBLEMS SUITED FOR Abaqus/Explicit
9. Nonlinear Explicit Dynamics
In previous chapters you explored the basics of explicit dynamics procedures; in this chapter you will
examine this topic in greater detail. The explicit dynamics procedure can be an effective tool for solving
a wide variety of nonlinear solid and structural mechanics problems. It is often complementary to an
implicit solver such as Abaqus/Standard. From a user standpoint, the distinguishing characteristics of
the explicit and implicit methods are:
• Explicit methods require a small time increment size that depends solely on the highest natural
frequencies of the model and is independent of the type and duration of loading. Simulations
generally take on the order of 10,000 to 1,000,000 increments, but the computational cost per
increment is relatively small.
• Implicit methods do not place an inherent limitation on the time increment size; increment size is
generally determined from accuracy and convergence considerations. Implicit simulations typically
take orders of magnitude fewer increments than explicit simulations. However, since a global set
of equations must be solved in each increment, the cost per increment of an implicit method is far
greater than that of an explicit method.
Knowing these characteristics of the two procedures can help you decide which methodology is
appropriate for your problems.
9.1 Types of problems suited for Abaqus/Explicit
Before discussing how the explicit dynamics procedure works, it is helpful to understand what classes
of problems are well-suited to Abaqus/Explicit. Throughout this manual we have incorporated pertinent
examples of the following classes of problems commonly performed in Abaqus/Explicit:
High-speed dynamic events
The explicit dynamics method was originally developed to analyze high-speed dynamic events
that can be extremely costly to analyze using implicit programs, such as Abaqus/Standard. As
an example of such a simulation, the effect of a short-duration blast load on a steel plate is analyzed
in Chapter 10, “Materials.” Since the load is applied rapidly and is very severe, the response of
the structure changes rapidly. Accurate tracking of stress waves through the plate is important for
capturing the dynamic response. Since stress waves are associated with the highest frequencies of
the system, obtaining an accurate solution requires many small time increments.
Complex contact problems
Contact conditions are formulated more easily using an explicit dynamics method than using an
implicit method. The result is that Abaqus/Explicit can readily analyze problems involving complex
contact interaction between many independent bodies. Abaqus/Explicit is particularly well-suited
for analyzing the transient dynamic response of structures that are subject to impact loads and
9–1
Abaqus ID:
Printed on:

EXPLICIT DYNAMIC FINITE ELEMENT METHODS
subsequently undergo complex contact interaction within the structure. An example of such a
problem is the circuit board drop test presented in Chapter 12, “Contact.” In this example a circuit
board sitting in foam packaging is dropped on the floor from a height of 1 m. The problem involves
impact between the packaging and the floor, as well as rapidly changing contact conditions between
the circuit board and the packaging.
Complex postbuckling problems
Unstable postbuckling problems are solved readily in Abaqus/Explicit. In such problems the
stiffness of the structure changes drastically as the loads are applied. Postbuckling response often
includes the effects of contact interactions.
Highly nonlinear quasi-static problems
For a variety of reasons Abaqus/Explicit is often very efficient in solving certain classes of
problems that are essentially static. Quasi-static process simulation problems involving complex
contact such as forging, rolling, and sheet-forming generally fall within these classes. Sheet
forming problems usually include very large membrane deformations, wrinkling, and complex
frictional contact conditions. Bulk forming problems are characterized by large distortions, flash
formation, and contact interaction with the dies. An example of a quasi-static forming simulation
is presented in Chapter 13, “Quasi-Static Analysis with Abaqus/Explicit.”
Materials with degradation and failure
Material degradation and failure often lead to severe convergence difficulties in implicit analysis
programs, but Abaqus/Explicit models such materials well. An example of material degradation
is the concrete cracking model, in which tensile cracking causes the material stiffness to become
negative. An example of material failure is the ductile failure model for metals, in which material
stiffness can degrade until it reduces to zero. At this time the failed elements are removed from the
model entirely.
Each of these types of analyses can include temperature and heat transfer effects.
9.2 Explicit dynamic finite element methods
This section contains an algorithmic description of the Abaqus/Explicit solver as well as a comparison
between implicit and explicit time integration and a discussion of the advantages of the explicit dynamics
method.
9.2.1 Explicit time integrationAbaqus/Explicit uses a central difference rule to integrate the equations of motion explicitly through
time, using the kinematic conditions at one increment to calculate the kinematic conditions at the next
9–2
Abaqus ID:
Printed on:

EXPLICIT DYNAMIC FINITE ELEMENT METHODS
increment. At the beginning of the increment the program solves for dynamic equilibrium, which states
that the nodal massmatrix, , times the nodal accelerations, , equals the net nodal forces (the difference
between the external applied forces, , and internal element forces, ):
The accelerations at the beginning of the current increment (time ) are calculated as
Since the explicit procedure always uses a diagonal, or lumped, mass matrix, solving for the
accelerations is trivial; there are no simultaneous equations to solve. The acceleration of any node is
determined completely by its mass and the net force acting on it, making the nodal calculations very
inexpensive.
The accelerations are integrated through time using the central difference rule, which calculates
the change in velocity assuming that the acceleration is constant. This change in velocity is added to
the velocity from the middle of the previous increment to determine the velocities at the middle of the
current increment:
The velocities are integrated through time and added to the displacements at the beginning of the
increment to determine the displacements at the end of the increment:
Thus, satisfying dynamic equilibrium at the beginning of the increment provides the accelerations.
Knowing the accelerations, the velocities and displacements are advanced “explicitly” through time.
The term “explicit” refers to the fact that the state at the end of the increment is based solely on the
displacements, velocities, and accelerations at the beginning of the increment. This method integrates
constant accelerations exactly. For the method to produce accurate results, the time increments must be
quite small so that the accelerations are nearly constant during an increment. Since the time increments
must be small, analyses typically require many thousands of increments. Fortunately, each increment is
inexpensive because there are no simultaneous equations to solve. Most of the computational expense
lies in the element calculations to determine the internal forces of the elements acting on the nodes. The
element calculations include determining element strains and applying material constitutive relationships
(the element stiffness) to determine element stresses and, consequently, internal forces.
Here is a summary of the explicit dynamics algorithm:
1. Nodal calculations.
a. Dynamic equilibrium.
9–3
Abaqus ID:
Printed on:

EXPLICIT DYNAMIC FINITE ELEMENT METHODS
b. Integrate explicitly through time.
2. Element calculations.
a. Compute element strain increments, , from the strain rate, .
b. Compute stresses, , from constitutive equations.
c. Assemble nodal internal forces, .
3. Set to and return to Step 1.
9.2.2 Comparison of implicit and explicit time integration proceduresFor both the implicit and the explicit time integration procedures, equilibrium is defined in terms of the
external applied forces, , the internal element forces, , and the nodal accelerations:
where is the mass matrix. Both procedures solve for nodal accelerations and use the same element
calculations to determine the internal element forces. The biggest difference between the two procedures
lies in the manner in which the nodal accelerations are computed. In the implicit procedure a set of linear
equations is solved by a direct solution method. The computational cost of solving this set of equations
is high when compared to the relatively low cost of the nodal calculations with the explicit method.
Abaqus/Standard uses automatic incrementation based on the full Newton iterative solution method.
Newton’s method seeks to satisfy dynamic equilibrium at the end of the increment at time and
to compute displacements at the same time. The time increment, , is relatively large compared to
that used in the explicit method because the implicit scheme is unconditionally stable. For a nonlinear
problem each increment typically requires several iterations to obtain a solution within the prescribed
tolerances. Each Newton iteration solves for a correction, , to the incremental displacements, .
Each iteration requires the solution of a set of simultaneous equations,
9–4
Abaqus ID:
Printed on:

EXPLICIT DYNAMIC FINITE ELEMENT METHODS
which is an expensive procedure for large models. The effective stiffness matrix, , is a linear
combination of the tangent stiffness matrix and the mass matrix for the iteration. The iterations continue
until several quantities—force residual, displacement correction, etc.—are within the prescribed
tolerances. For a smooth nonlinear response Newton’s method has a quadratic rate of convergence, as
illustrated below:
Iteration Relative Error
1 1
2 10−2
3 10−4
. .
. .
. .
However, if the model contains highly discontinuous processes, such as contact and frictional
sliding, quadratic convergence may be lost and a large number of iterations may be required. Cutbacks
in the time increment size may become necessary to satisfy equilibrium. In extreme cases the resulting
time increment size in the implicit analysis may be on the same order as a typical stable time increment
for an explicit analysis, while still carrying the high solution cost of implicit iteration. In some cases
convergence may not be possible using the implicit method.
Each iteration in an implicit analysis requires solving a large system of linear equations, a procedure
that requires considerable computation, disk space, and memory. For large problems these equation
solver requirements are dominant over the requirements of the element and material calculations, which
are similar for an analysis in Abaqus/Explicit. As the problem size increases, the equation solver
requirements grow rapidly so that, in practice, the maximum size of an implicit analysis that can be
solved on a given machine often is dictated by the amount of disk space and memory available on the
machine rather than by the required computation time.
9.2.3 Advantages of the explicit time integration methodThe explicit method is especially well-suited to solving high-speed dynamic events that require many
small increments to obtain a high-resolution solution. If the duration of the event is short, the solution
can be obtained efficiently.
Contact conditions and other extremely discontinuous events are readily formulated in the explicit
method and can be enforced on a node-by-node basis without iteration. The nodal accelerations can be
adjusted to balance the external and internal forces during contact.
The most striking feature of the explicit method is the absence of a global tangent stiffness matrix,
which is required with implicit methods. Since the state of the model is advanced explicitly, iterations
and tolerances are not required.
9–5
Abaqus ID:
Printed on:

AUTOMATIC TIME INCREMENTATION AND STABILITY
9.3 Automatic time incrementation and stability
The stability limit dictates the maximum time increment used by the Abaqus/Explicit solver. It is a critical
factor in the performance of Abaqus/Explicit. The following sections describe the stability limit and
discuss how Abaqus/Explicit determines this value. Issues surrounding the model design parameters that
affect the stability limit are also addressed. These model parameters include the model mass, material,
and mesh.
9.3.1 Conditional stability of the explicit methodWith the explicit method the state of the model is advanced through an increment of time, , based
on the state of the model at the start of the increment at time . The amount of time that the state can
be advanced and still remain an accurate representation of the problem is typically quite short. If the
time increment is larger than this maximum amount of time, the increment is said to have exceeded the
stability limit. A possible effect of exceeding the stability limit is a numerical instability, which may
lead to an unbounded solution. It generally is not possible to determine the stability limit exactly, so
conservative estimates are used instead. The stability limit has a great effect on reliability and accuracy,
so it must be determined consistently and conservatively. For computational efficiency Abaqus/Explicit
chooses the time increments to be as close as possible to the stability limit without exceeding it.
9.3.2 Definition of the stability limitThe stability limit is defined in terms of the highest frequency in the system ( ). Without damping
the stability limit is defined by the expression
and with damping it is defined by the expression
where is the fraction of critical damping in the mode with the highest frequency. (Recall that critical
damping defines the limit between oscillatory and non-oscillatory motion in the context of free-damped
vibration. Abaqus/Explicit always introduces a small amount of damping in the form of bulk viscosity to
control high-frequency oscillations.) Perhaps contrary to engineering intuition, damping always reduces
the stability limit.
The actual highest frequency in the system is based on a complex set of interacting factors, and it
is not computationally feasible to calculate its exact value. Alternately, we use a simple estimate that is
9–6
Abaqus ID:
Printed on:

AUTOMATIC TIME INCREMENTATION AND STABILITY
efficient and conservative. Instead of looking at the global model, we estimate the highest frequency of
each individual element in the model, which is always associated with the dilatational mode. It can be
shown that the highest element frequency determined on an element-by-element basis is always higher
than the highest frequency in the assembled finite element model.
Based on the element-by-element estimate, the stability limit can be redefined using the element
length, , and the wave speed of the material, :
For most element types—a distorted quadrilateral element, for example—the above equation is only an
estimate of the actual element-by-element stability limit because it is not clear how the element length
should be determined. As an approximation the shortest element distance can be used, but the resulting
estimate is not always conservative. The shorter the element length, the smaller the stability limit. The
wave speed is a property of the material. For a linear elastic material with a Poisson’s ratio of zero
where is Young’s modulus and is the mass density. The stiffer the material, the higher the wave
speed, resulting in a smaller stability limit. The higher the density, the lower the wave speed, resulting
in a larger stability limit.
Our simplified stability limit definition provides some intuitive understanding. The stability limit is
the transit time of a dilatational wave across the distance defined by the characteristic element length. If
we know the size of the smallest element dimension and the wave speed of the material, we can estimate
the stability limit. For example, if the smallest element dimension is 5 mm and the dilatational wave
speed is 5000 m/s, the stable time increment is on the order of 1 × 10⁻⁶ s.
9.3.3 Fully automatic time incrementation versus fixed timeincrementation in Abaqus/Explicit
Abaqus/Explicit uses equations such as those discussed in the previous section to adjust the time
increment size throughout the analysis so that the stability limit, based on the current stage of the
model, is never exceeded. Time incrementation is automatic and requires no user intervention, not even
a suggested initial time increment. The stability limit is a mathematical concept resulting from the
numerical model. Since the finite element program has all of the relevant details, it can determine an
efficient and conservative stability limit. However, Abaqus/Explicit does allow the user to override the
automatic time incrementation, if desired.
The time increment used in an explicit analysis must be smaller than the stability limit of the
central-difference operator. Failure to use a small enough time increment will result in an unstable
solution. When the solution becomes unstable, the time history response of solution variables such
9–7
Abaqus ID:
Printed on:

AUTOMATIC TIME INCREMENTATION AND STABILITY
as displacements will usually oscillate with increasing amplitudes. The total energy balance will also
change significantly. If the model contains only one material type, the initial time increment is directly
proportional to the size of the smallest element in the mesh. If the mesh contains uniform size elements
but contains multiple material descriptions, the element with the highest wave speed will determine the
initial time increment.
In nonlinear problems—those with large deformations and/or nonlinear material response—the
highest frequency of the model will continually change, which consequently changes the stability limit.
Abaqus/Explicit has two strategies for time incrementation control: fully automatic time incrementation
(where the code accounts for changes in the stability limit) and fixed time incrementation.
Two types of estimates are used to determine the stability limit: element by element and global. An
analysis always starts by using the element-by-element estimation method and may switch to the global
estimation method under certain circumstances.
The element-by-element estimate is conservative; it will give a smaller stable time increment
than the true stability limit that is based upon the maximum frequency of the entire model. In general,
constraints such as boundary conditions and kinematic contact have the effect of compressing the
eigenvalue spectrum, and the element-by-element estimates do not take this into account.
The adaptive, global estimation algorithm determines the maximum frequency of the entire model
using the current dilatational wave speed. This algorithm continuously updates the estimate for the
maximum frequency. The global estimator will usually allow time increments that exceed the element-
by-element values.
A fixed time incrementation scheme is also available in Abaqus/Explicit. The fixed time increment
size is determined either by the initial element-by-element stability estimate for the step or by a time
increment specified directly by the user. Fixed time incrementation may be useful when a more accurate
representation of the higher mode response of a problem is required. In this case, a time increment
size smaller than the element-by-element estimates may be used. When fixed time incrementation is
used, Abaqus/Explicit will not check that the computed response is stable during the step. The user
should ensure that a valid response has been obtained by carefully checking the energy history and other
response variables.
9.3.4 Mass scaling to control time incrementation
Since the mass density influences the stability limit, under some circumstances scaling the mass density
can potentially increase the efficiency of an analysis. For example, because of the complex discretization
of many models, there are often regions containing very small or poorly shaped elements that control the
stability limit. These controlling elements are often few in number and may exist in localized areas. By
increasing the mass of only these controlling elements, the stability limit can be increased significantly,
while the effect on the overall dynamic behavior of the model may be negligible.
The automatic mass scaling features in Abaqus/Explicit can keep offending elements from hindering
the stability limit. There are two fundamental approaches used in mass scaling: defining a scaling factor
directly or defining a desired element-by-element stable time increment for the elements whose mass is
to be scaled. These two approaches, described in detail in “Mass scaling,” Section 11.7.1 of the Abaqus
9–8
Abaqus ID:
Printed on:

EXAMPLE: STRESS WAVE PROPAGATION IN A BAR
Analysis User’s Manual, permit additional user control over the stability limit. However, use caution
when employing mass scaling since significantly changing the mass of the model may change the physics
of the problem.
9.3.5 Effect of material on stability limitThe material model affects the stability limit through its effect on the dilatational wave speed. In a linear
material the wave speed is constant; therefore, the only changes in the stability limit during the analysis
result from changes in the smallest element dimension during the analysis. In a nonlinear material, such
as a metal with plasticity, the wave speed changes as the material yields and the stiffness of the material
changes. Abaqus/Explicit monitors the effective wave speeds in the model throughout the analysis, and
the current material state in each element is used for stability estimates. After yielding, the stiffness
decreases, reducing the wave speed and, consequently, increasing the stability limit.
9.3.6 Effect of mesh on stability limitSince the stability limit is roughly proportional to the shortest element dimension, it is advantageous
to keep the element size as large as possible. Unfortunately, for accurate analyses a fine mesh is often
necessary. To obtain the highest possible stability limit while using the required level of mesh refinement,
the best approach is to have a mesh that is as uniform as possible. Since the stability limit is based on the
smallest element dimension in the model, even a single small or poorly shaped element can reduce the
stability limit drastically. For diagnostic purposes Abaqus/Explicit provides a list in the status (.sta)file of the 10 elements in the mesh with the lowest stability limit. If the model contains some elements
whose stability limits are much lower than those of the rest of the mesh, remeshing the model more
uniformly may be worthwhile.
9.3.7 Numerical instabilityAbaqus/Explicit remains stable for most elements under most circumstances. It is possible, however,
to define spring and dashpot elements such that they become unstable during the course of an analysis.
Therefore, it is useful to be able to recognize a numerical instability if it occurs in your analysis. If it
does occur, the result typically will be unbounded, nonphysical, and often characterized by oscillatory
solutions.
9.4 Example: stress wave propagation in a bar
This example demonstrates some of the fundamental ideas in explicit dynamics described earlier in
Chapter 2, “Abaqus Basics.” It also illustrates stability limits and the effect of mesh refinement and
material properties on the solution time.
The bar has the dimensions shown in Figure 9–1.
9–9
Abaqus ID:
Printed on:

EXAMPLE: STRESS WAVE PROPAGATION IN A BAR
p = 1.0 × 10⁵ Pa
E = 207 × 109 Pa
= 7800 kg/m3
1 m
0.2 m0.2 m
side viewfront view
ν
Figure 9–1 Schematic for wave propagation in a bar.
To make the problem a one-dimensional strain problem, all four lateral faces are on rollers; thus, the
three-dimensional model simulates a one-dimensional problem. The material is steel with the properties
shown in Figure 9–1. The free end of the bar is subjected to a blast load with a magnitude of 1.0 × 10⁵ Pa
and a duration of 3.88 × 10⁻⁵ s. The normalized load versus time is shown in Figure 9–2.
Figure 9–2 Blast amplitude versus time.
Using the material properties (neglecting Poisson’s ratio), we can calculate the wave speed of the
material using the equations introduced in the previous section.
9–10
Abaqus ID:
Printed on:

EXAMPLE: STRESS WAVE PROPAGATION IN A BAR
At this speed the wave passes to the fixed end of the bar in 1.94 × 10⁻⁴ s. Since we are interested in
the stress propagation along the length of the bar through time, we need an adequately refined mesh to
capture the stress wave accurately. We will assume that the blast load will take place over the span of 10
elements. To determine the length of these 10 elements, multiply the blast duration by the wave speed:
The length of 10 elements is 0.2 m. Since the total length of the bar is 1.0 m, we would have 50 elements
along the length. To keep the mesh uniform, we will also have 10 elements in each of the transverse
directions, making the mesh 50 × 10 × 10. This mesh is shown in Figure 9–3.
1
2
3
Y
XZ
Figure 9–3 50 × 10 × 10 mesh.
Create this mesh in your preprocessor. Use the coordinate system shown in Figure 9–3.
9.4.1 Node and element setsThis example defines node and element sets to apply the loads and boundary conditions and to visualize
output. The node sets are defined on their respective faces, as shown in Figure 9–4.
9–11
Abaqus ID:
Printed on:

EXAMPLE: STRESS WAVE PROPAGATION IN A BAR
NBOT
NFRONT
NBACK
NTOP
NFIX
Figure 9–4 Node sets.
The element sets are defined as shown in Figure 9–5.
ELOAD
entire model inelement set BAR
Figure 9–5 Element sets for modeling.
In addition, this example defined an element set containing three elements in the center of the bar.
You can define this element set manually by selecting these elements such that their faces nearest to the
free end are at distances 0.25 m, 0.5 m, and 0.75 m from the free end, as shown in Figure 9–6. These
elements will be used for postprocessing.
9–12
Abaqus ID:
Printed on:

EXAMPLE: STRESS WAVE PROPAGATION IN A BAR
EOUT
Figure 9–6 Element sets for postprocessing.
9.4.2 Reviewing the input file—the model dataIn this section you will review your input file and include additional information.
Model description
The following would be a suitable description in the *HEADING option for this simulation:
*HEADINGStress wave propagation in a bar -- 50x10x10 elementsSI units (kg, m, s, N)
Element connectivity
If you create input files using a preprocessor, check to make sure that you are using the correct
element type (C3D8R). It is possible that the preprocessor specified the element type incorrectly.
The *ELEMENT option block in this model begins with the following:
*ELEMENT, TYPE=C3D8R, ELSET=BAR
If you created this input file using a preprocessor, the name given for the ELSET parameter in
your model may not be BAR. If necessary, change the name to BAR.
Section properties
The section properties are the same for all elements. In the following option statement, the element
set BAR is used to assign the material properties to the elements.
*SOLID SECTION, ELSET=BAR, MATERIAL=STEEL
9–13
Abaqus ID:
Printed on:

EXAMPLE: STRESS WAVE PROPAGATION IN A BAR
Material properties
The bar is made of steel, which we assume to be linear elastic with a Young’s modulus of 207 ×
109 Pa, a Poisson’s ratio of 0.3, and a density of 7800 kg/m3 . The following material option block
specifies these values:
*MATERIAL, NAME=STEEL*ELASTIC207.0E9, 0.3*DENSITY7800.0,
Fixed boundary conditions
In this model, we fix all the translations at the built-in, right-hand end of the bar, then constrain
the front, back, top, and bottom faces of the bar so that these faces are on rollers and the strain is
uniaxial. Using the node sets defined previously, the following boundary conditions are used in this
model:
*BOUNDARYNFIX, 1, 3NFRONT, 1, 1NBACK, 1, 1NTOP, 2, 2NBOT, 2, 2
Amplitude definition
The blast load is applied at its maximum value instantaneously and is held constant for 3.88 × 10⁻⁵ s.
Then the load is suddenly removed and held constant at zero. The *AMPLITUDE option is used
to define the time variation of loads and boundary conditions. On the data lines following the
*AMPLITUDE option, pairs of data are given in the form:
<time>, <amplitude>, <time>, <amplitude>, etc.
Up to four data pairs can be entered on each data line. Abaqus considers the amplitude to be held
constant following the last amplitude value given. The following *AMPLITUDE option block
defines the amplitude for the blast load:
*AMPLITUDE, NAME=BLAST0., 1., 3.88E-5, 1., 3.89E-5, 0, 3.90E-5, 0.
9.4.3 Reviewing the input file—the history dataWe will now review the history data associated with this problem, including the step definition, loading,
bulk viscosity, and output requests.
9–14
Abaqus ID:
Printed on:

EXAMPLE: STRESS WAVE PROPAGATION IN A BAR
Step definition
The step definition indicates that this is an explicit dynamics analysis with a duration of 2.0 × 10⁻⁴ s.
You can also include a descriptive title for the step.
*STEPBlast loading*DYNAMIC, EXPLICIT, 2.0E-4
Loading
Apply the pressure load with a value of 1.0 × 10⁵ Pa to the free face of the bar, which you previously
defined to be in an element set called ELOAD. The pressure load at any given time is the magnitude
specified under the *DLOAD option times the value interpolated from the amplitude curve. To
apply the load correctly, you need to determine the face identifier label of the free element faces. For
the model defined in “Stress wave propagation in a bar,” Section A.7, the free face is face number 3,
which corresponds to the pressure identifier P3. The face identifier depends on the order in which
the nodes are defined on the *ELEMENT option, as shown in Figure 9–7. Use the amplitude named
BLAST when applying the pressure load.
*DLOAD, AMPLITUDE=BLASTELOAD, <P1, P2, P3, P4, P5, or P6>, 1.0E5
If you define the pressure load in your preprocessor, the correct face identifier should be
determined automatically.
7
3
4
1
8
26
5
face 3
Figure 9–7 Face label identifier for a C3D8R element.
Bulk viscosity
To keep the stress wave as sharp as possible, the quadratic bulk viscosity (discussed in “Bulk
viscosity,” Section 9.5.1) is set to zero.
*BULK VISCOSITY0.06, 0.0
9–15
Abaqus ID:
Printed on:

EXAMPLE: STRESS WAVE PROPAGATION IN A BAR
Output requests
By default, many preprocessors create an Abaqus input file that has a large number of output request
options. If you created your input file using a preprocessor and you find that these default output
options were created, delete them all because they will generally generate too much output.
You want to have an output database file created during the analysis so that you can use
Abaqus/Viewer to postprocess the results. Four output database frames (intervals at which data are
written to the output database) are adequate to show the stress wave propagating through the mesh.
This example sets the parameter VARIABLE=PRESELECT on the *OUTPUT, FIELD option to
write the default field data for a *DYNAMIC, EXPLICIT procedure to the output database file. In
addition, stress (S) history output in element set EOUT is requested for every increment.
*OUTPUT, FIELD, VARIABLE=PRESELECT, NUMBER INTERVAL=4*OUTPUT, HISTORY, FREQUENCY=1*ELEMENT OUTPUT, ELSET=EOUTS,*END STEP
9.4.4 Running the analysisAfter storing your input in a file called wave_50x10x10.inp, run the analysis using the following
command:
abaqus job=wave_50x10x10
If your analysis does not complete, check the data file, wave_50x10x10.dat, and status file,
wave_50x10x10.sta, for error messages. Modify your input file to remove the errors. If you still
have trouble running your analysis, compare your input file to the one given in “Stress wave propagation
in a bar,” Section A.7.
Status file
The status file, wave_50x10x10.sta, contains information about moments of inertia, followed
by information concerning the initial stability limit. The 10 elements with the lowest stable time
limits are listed in rank order.
Most critical elements:Element number Rank Time increment Increment ratio
----------------------------------------------------------1 1 1.819458E-06 1.000000E+00
19 2 1.819458E-06 1.000000E+00201 3 1.819458E-06 1.000000E+00219 4 1.819458E-06 1.000000E+00301 5 1.819458E-06 1.000000E+00319 6 1.819458E-06 1.000000E+00501 7 1.819458E-06 1.000000E+00519 8 1.819458E-06 1.000000E+00601 9 1.819458E-06 1.000000E+00619 10 1.819458E-06 1.000000E+00
9–16
Abaqus ID:
Printed on:

EXAMPLE: STRESS WAVE PROPAGATION IN A BAR
The status file continues with information about the progress of the solution.
STEP 1 ORIGIN 0.0000
Total memory used for step 1 is approximately 6.9 megabytes.Global time estimation algorithm will be used.Scaling factor: 1.0000Variable mass scaling factor at zero increment: 1.0000
STEP TOTAL CPU STABLE CRITICAL KINETIC TOTALINCREMENT TIME TIME TIME INCREMENT ELEMENT ENERGY ENERGY
0 0.000E+00 0.000E+00 00:00:00 1.819E-06 1 0.000E+00 0.000E+00Results number 0 at increment zero.ODB Field Frame Number 0 of 4 requested intervals at increment zero.ODB Field Frame Number 0 of 2 requested intervals at increment zero.
6 1.092E-05 1.092E-05 00:00:00 1.819E-06 1 4.432E-05 -1.134E-0612 2.183E-05 2.183E-05 00:00:00 1.819E-06 201 9.043E-05 -1.437E-0617 3.318E-05 3.318E-05 00:00:00 2.896E-06 1 1.376E-04 -1.201E-0621 4.474E-05 4.474E-05 00:00:00 2.882E-06 1 1.547E-04 1.875E-0623 5.050E-05 5.050E-05 00:00:00 2.877E-06 1 1.533E-04 2.685E-06
ODB Field Frame Number 1 of 4 requested intervals at 5.049687E-0527 6.199E-05 6.199E-05 00:00:00 2.870E-06 1 1.517E-04 9.508E-07
.
.
.
9.4.5 PostprocessingStart Abaqus/Viewer by typing the following command at the operating system prompt:
abaqus viewer odb=wave_50x10x10
Plotting the stress along a path
We are interested in looking at how the stress distribution along the length of the bar changes with
time. To do so, we will look at the stress distribution at three different times throughout the course
of the analysis.
Create a curve of the variation of the stress in the 3-direction (S33) along the axis of the bar
for each of the first three frames of the output database file. To create these plots, you first need to
define a straight path along the axis of the bar.
To create a point list path along the center of the bar:
1. In the Results Tree, double-click Paths.
The Create Path dialog box appears.
2. Name the path Center. Select Point list as the path type, and click Continue.
The Edit Point List Path dialog box appears.
3. In the Point Coordinates table, enter the coordinates of the centers of both ends of the bar.
The input specifies a path from the first point to the second point, as defined in the global
coordinate system of the model.
Note: If you generated the geometry and mesh using the procedure described earlier, the table
entries are 0, 0, 1 and 0, 0, 0. If you used an alternate procedure to generate the bar
9–17
Abaqus ID:
Printed on:

EXAMPLE: STRESS WAVE PROPAGATION IN A BAR
geometry, you can use the tool in the Query toolbar to determine the coordinates of the
centers at each end of the bar.
4. When you have finished, click OK to close the Edit Point List Path dialog box.
To save X–Y plots of stress along the path at three different times:
1. In the Results Tree, double-click XYData.
The Create XY Data dialog box appears.
2. Choose Path as the X–Y data source, and click Continue.
The XY Data from Path dialog box appears with the path that you created visible in the list
of available paths. If the undeformed model shape is currently displayed, the path you select
is highlighted in the plot.
3. Toggle on Include intersections under Point Locations.
4. Accept True distance as the selection in the X Values region of the dialog box.
5. Click Field Output in the Y Values region of the dialog box to open the Field Output dialogbox.
6. Select the S33 stress component, and click OK.
The field output variable in the XY Data from Path dialog box changes to indicate that stress
data in the 3-direction (S33) will be created.
Note: Abaqus/Viewer may warn you that the field output variable will not affect the current
image. Leave the plot state As is, and click OK to continue.
7. Click Step/Frame in the Y Values region of the XY Data from Path dialog box.
8. In the Step/Frame dialog box that appears, choose frame 1, which is the second of the five
recorded frames. (The first frame listed, frame 0, is the base state of the model at the beginning
of the step.) Click OK.
The Y Values region of the XY Data from Path dialog box changes to indicate that data from
Step 1, frame 1 will be created.
9. To save the X–Y data, click Save As.
The Save XY Data As dialog box appears.
10. Name the X–Y data S33_T1, and click OK.
S33_T1 appears in the XYData container of the Results Tree.
11. Repeat Steps 7 through 9 to create X–Y data for frames 2 and 3. Name the data sets S33_T2and S33_T3, respectively.
12. To close the XY Data from Path dialog box, click Cancel.
9–18
Abaqus ID:
Printed on:

EXAMPLE: STRESS WAVE PROPAGATION IN A BAR
To plot the stress curves:
1. In the XYData container, drag the cursor to select all three X–Y data sets.
2. Click mouse button 3, and select Plot from the menu that appears.
Abaqus/Viewer plots the stress in the 3-direction along the center of the bar for frames 1, 2,
and 3, corresponding to approximate simulation times of 5 × 10⁻⁵ s, 1 × 10⁻⁴ s, and 1.5 × 10⁻⁴ s,
respectively.
3. Click in the prompt area to cancel the current procedure.
To customize the X–Y plot:
1. Double-click the Y-axis.
The Axis Options dialog box appears. The Y Axis is selected.
2. In the Tick Mode region of the Scale tabbed page, select By increment and specify that the
Y-axis major tick marks occur at 20E3 Pa increments.
You can also customize the axis titles.
3. Switch to the Title tabbed page.
4. Enter Stress - S33 (Pa) as the Y-axis title.
5. To edit the X-axis, select the axis label in the X Axis field of the dialog box. In the Title tabbed
page of the dialog box, enter Distance along bar (m) as the X-axis title.
6. Click Dismiss to close the Axis Options dialog box.
To customize the appearance of the curves in the X–Y plot:
1. In the Visualization toolbox, click to open the Curve Options dialog box.
2. In the Curves field, select S33_T2.
3. Choose the dotted line style for the S33_T2 curve.
The S33_T2 curve becomes dotted.
4. Repeat Steps 2 and 3 to make the S33_T3 curve dashed.
5. Dismiss the Curve Options dialog box.
The customized plot appears in Figure 9–8. (For clarity, the default grid and legend positions
have been changed.)
We can see that the length of the bar affected by the stress wave is approximately 0.2 m in each
of the three curves. This distance should correspond to the distance that the blast wave travels during
its time of application, which can be checked by a simple calculation. If the length of the wave front is
0.2 m and the wave speed is 5.15 × 10³ m/s, the time it takes for the wave to travel 0.2 m is 3.88 × 10⁻⁵ s.
9–19
Abaqus ID:
Printed on:

EXAMPLE: STRESS WAVE PROPAGATION IN A BAR
S33_T1S33_T2S33_T3
Figure 9–8 Stress (S33) along the bar at three different time instances.
As expected, this is the duration of the blast load that we applied. The stress wave is not exactly square
as it passes along the bar. In particular, there is “ringing” or oscillation of the stress behind the sudden
changes in stress. Linear bulk viscosity, discussed later in this chapter, damps the ringing so that it does
not affect the results adversely.
Creating a history plot
Another way to study the results is to view the time history of stress at three different points within
the bar.
To plot the stress history:
1. In the Results Tree, click mouse button 3 on History Output and deselect Group Childrenfrom the menu that appears.
2. Select the data for the three elements. Use [Ctrl]+Click to select multiple X–Y data sets.
3. Click mouse button 3, and select Plot from the menu that appears.
Abaqus/Viewer displays an X–Y plot of the longitudinal stress in each element versus time.
4. Click in the prompt area to cancel the current procedure.
As before, you can customize the appearance of the plot.
9–20
Abaqus ID:
Printed on:

EXAMPLE: STRESS WAVE PROPAGATION IN A BAR
To customize the X–Y plot:
1. Double-click the X-axis.
The Axis Options dialog box appears.
2. Switch to the Title tabbed page.
3. Specify Total time (s) as the X-axis title.
4. Click Dismiss to close the dialog box.
To customize the appearance of the curves in the X–Y plot:
1. In the Visualization toolbox, click to open the Curve Options dialog box.
2. In the Curves field, select the temporary X–Y data label that corresponds to the element closest
to the free end of the bar. (Of the elements in this set, this one is affected first by the stress
wave.)
3. Enter S33-0.25 as the curve legend text.
4. In the Curves field, select the temporary X–Y data label that corresponds to the element in the
middle of the bar. (This is the element affected next by the stress wave.)
5. Specify S33-0.5 as the curve legend text, and change the curve style to dotted.
6. In the Curves field, select the temporary X–Y data label that corresponds to the element closest
to the fixed end of the bar. (This is the element affected last by the stress wave.)
7. Specify S33-0.75 as the curve legend text, and change the curve style to dashed.
8. Click Dismiss to close the dialog box.
The customized plot appears in Figure 9–9. (For clarity, the default grid and legend positions
have been changed.)
In the history plot we can see that stress at a given point increases as the stress wave travels through
the point. Once the stress wave has passed completely through the point, the stress at the point oscillates
about zero.
9.4.6 How the mesh affects the stable time increment and CPU timeIn “Automatic time incrementation and stability,” Section 9.3, we discussed howmesh refinement affects
the stability limit and the CPU time. Here wewill illustrate this effect with the wave propagation problem.
We began with a reasonably refined mesh of square elements with 50 elements along the length and
10 elements in each of the two transverse directions. For illustrative purposes, we will now use a coarse
mesh of 25 × 5 × 5 elements and observe how refining the mesh in the various directions changes the
CPU time. The four meshes are shown in Figure 9–10.
9–21
Abaqus ID:
Printed on:

EXAMPLE: STRESS WAVE PROPAGATION IN A BAR
S33-0.25S33-0.5S33-0.75
Figure 9–9 Time history of stress (S33) at three points along
the length of the bar (0.25 m, 0.5 m, and 0.75 m).
25 × 5 × 5 50 × 5 × 5
50 × 10 × 5 50 × 10 × 10
Figure 9–10 Meshes from least to most refined.
Table 9–1 shows how the CPU time (normalized with respect to the coarse mesh model result)
changes with mesh refinement for this problem. The first half of the table provides the expected results,
based on the simplified stability equations presented in this guide; the second half of the table provides
the results obtained by running the analyses in Abaqus/Explicit on a desktop workstation.
9–22
Abaqus ID:
Printed on:

EXAMPLE: STRESS WAVE PROPAGATION IN A BAR
Table 9–1 Mesh refinement and solution time.
Simplified Theory ActualMesh
(s)Number ofElements
CPU Time(s)
Max(s)
Number ofElements
NormalizedCPU Time
25 × 5 × 5 A B C 6.06e-6 625 1
50 × 5 × 5 A/2 2B 4C 3.14e-6 1250 4
50 × 10 × 5 A/2 4B 8C 3.12e-6 2500 8.33
50 × 10 × 10 A/2 8B 16C 3.11e-6 5000 16.67
For the theoretical results we choose the coarsest mesh, 25 × 5 × 5, as the base state, and we
define the stable time increment, the number of elements, and the CPU time as variables A, B, and C,
respectively. As the mesh is refined, two things happen: the smallest element dimension decreases, and
the number of elements in the mesh increases. Each of these effects increases the CPU time. In the first
level of refinement, the 50 × 5 × 5 mesh, the smallest element dimension is cut in half and the number
of elements is doubled, increasing the CPU time by a factor of four over the previous mesh. However,
further doubling the mesh to 50 × 10 × 5 does not change the smallest element dimension; it only doubles
the number of elements. Therefore, the CPU time increases by only a factor of two over the 50 × 5 × 5
mesh. Further refining the mesh so that the elements are uniform and square in the 50 × 10 × 10 mesh
again doubles the number of elements and the CPU time.
This simplified calculation predicts quite well the trends of how mesh refinement affects the stable
time increment and CPU time. However, there are reasons why we did not compare the predicted and
actual stable time increment values. First, recall that we made the approximation that the stable time
increment is
We then assumed that the characteristic element length, , is the smallest element dimension, whereas
Abaqus/Explicit actually determines the characteristic element length based on the overall size and shape
of the element. Another complication is that Abaqus/Explicit employs a global stability estimator, which
allows a larger stable time increment to be used. These factors make it difficult to predict the stable
time increment accurately before running the analysis. However, since the trends follow nicely from the
simplified theory, it is straightforward to predict how the stable time increment will change with mesh
refinement.
9.4.7 How the material affects the stable time increment and CPU timeThe same wave propagation analysis performed on different materials would take different amounts of
CPU time, depending on the wave speed of the material. For example, if we were to change the material
from steel to aluminum, the wave speed would change from 5.15 × 10³ m/s to
9–23
Abaqus ID:
Printed on:

DAMPING OF DYNAMIC OSCILLATIONS
The change from aluminum to steel has minimal effect on the stable time increment, because the stiffness
and the density differ by nearly the same amount. In the case of lead the difference is more substantial,
as the wave speed decreases to
which is approximately one-fifth the wave speed of steel. The stable time increment for the lead bar
would be five times the stable time increment of our steel bar.
9.5 Damping of dynamic oscillations
There are two reasons for adding damping to a model: to limit numerical oscillations or to add physical
damping to the system. Abaqus/Explicit provides several methods of introducing damping into the
analysis.
9.5.1 Bulk viscosityBulk viscosity introduces damping associated with volumetric straining. Its purpose is to improve
the modeling of high-speed dynamic events. Abaqus/Explicit contains linear and quadratic forms of
bulk viscosity. You can set bulk viscosity to nondefault values from step to step by using the *BULK
VISCOSITY option, although it is rarely necessary to do so. The bulk viscosity pressure is not included
in the material point stresses because it is intended as a numerical effect only. As such, it is not
considered part of the material’s constitutive response.
Linear bulk viscosity
By default, linear bulk viscosity is always included to damp “ringing” in the highest element
frequency. It generates a bulk viscosity pressure that is linear in the volumetric strain rate,
according to the following equation:
where is a damping coefficient, whose default value is 0.06, is the current material density,
is the current dilatational wave speed, is the element characteristic length, and is the
volumetric strain rate.
9–24
Abaqus ID:
Printed on:

DAMPING OF DYNAMIC OSCILLATIONS
Quadratic bulk viscosity
Quadratic bulk viscosity is included only in continuum elements (except for the plane stress element,
CPS4R) and is applied only if the volumetric strain rate is compressive. The bulk viscosity pressure
is quadratic in the strain rate, according to the following equation:
where is the damping coefficient, whose default value is 1.2.
The quadratic bulk viscosity smears a shock front across several elements and is introduced
to prevent elements from collapsing under extremely high velocity gradients. Consider a simple
one-element problem in which the nodes on one side of the element are fixed and the nodes on the
other side have an initial velocity in the direction of the fixed nodes, as shown in Figure 9–11.
V0
V0
Figure 9–11 Element with fixed nodes and prescribed velocities.
The stable time increment size is precisely the transit time of a dilatational wave across the element.
Therefore, if the initial nodal velocity is equal to the dilatational wave speed of the material, the
element collapses to zero volume in one time increment. The quadratic bulk viscosity pressure
introduces a resisting pressure that prevents the element from collapsing.
Fraction of critical damping due to bulk viscosity
The bulk viscosity pressures are based on only the dilatational modes of each element. The fraction
of critical damping in the highest element mode is given by the following equation:
where is the fraction of critical damping. The linear term alone represents 6% of critical damping,
whereas the quadratic term is usually much smaller.
9–25
Abaqus ID:
Printed on:

DAMPING OF DYNAMIC OSCILLATIONS
9.5.2 Viscous pressureViscous pressure loads are commonly used in structural problems and quasi-static problems to damp out
the low-frequency dynamic effects, thus allowing static equilibrium to be reached in a minimal number
of increments. These loads are applied as distributed loads (*DLOAD) defined by the following formula:
where is the pressure applied to the body; is the viscosity, given on the data line as the magnitude of
the load; is the velocity vector of the point on the surface where the viscous pressure is being applied;
and is the unit outward normal vector to the surface at the same point. For typical structural problems
it is not desirable to absorb all of the energy. Typically, is set equal to a small percentage—perhaps 1
or 2 percent—of the quantity as an effective way of minimizing ongoing dynamic effects.
9.5.3 Material dampingThe material model itself may provide damping in the form of plastic dissipation or viscoelasticity. For
many applications such damping may be adequate. Another option is to use Rayleigh damping defined
using the *DAMPING option, which is part of the *MATERIAL option block. There are two damping
factors associated with Rayleigh damping: for mass proportional damping and for stiffness
proportional damping.
Mass proportional damping
The factor defines a damping contribution proportional to the mass matrix for an element. The
damping forces that are introduced are caused by the absolute velocities of nodes in the model. The
resulting effect can be likened to the model moving through a viscous fluid so that any motion of
any point in the model triggers damping forces. Reasonable mass proportional damping does not
reduce the stability limit significantly.
Stiffness proportional damping
The factor defines damping proportional to the elastic material stiffness. A “damping stress,”
, proportional to the total strain rate is introduced, using the following formula:
where is the strain rate. For hyperelastic and hyperfoam materials is defined as the initial
elastic stiffness. For all other materials is the material’s current elastic stiffness. This damping
stress is added to the stress caused by the constitutive response at the integration point when the
dynamic equilibrium equations are formed, but it is not included in the stress output. Damping
can be introduced for any nonlinear analysis and provides standard Rayleigh damping for linear
analyses. For a linear analysis stiffness proportional damping is exactly the same as defining a
9–26
Abaqus ID:
Printed on:

ENERGY BALANCE
damping matrix equal to times the stiffness matrix. Stiffness proportional damping must be
used with caution because it may significantly reduce the stability limit. To avoid a dramatic drop
in the stable time increment, the stiffness proportional damping factor, , should be less than or
of the same order of magnitude as the initial stable time increment without damping.
9.5.4 Discrete dashpotsYet another option is to define individual dashpot elements. Each dashpot element provides a damping
force proportional to the relative velocity of its two nodes. The advantage of this approach is that it
enables you to apply damping only at points where you decide it is necessary. Dashpots always should
be used in parallel with other elements, such as springs or trusses, so that they do not cause a significant
reduction in the stability limit.
9.6 Energy balance
Energy output is often an important part of an Abaqus/Explicit analysis. Comparisons between various
energy components can be used to help evaluate whether an analysis is yielding an appropriate response.
9.6.1 Statement of energy balanceAn energy balance for the entire model can be written as
where is the internal energy, is the viscous energy dissipated, is the frictional energy
dissipated, is the kinetic energy, is the internal heat energy, is the work done by
the externally applied loads, and , , and are the work done by contact penalties, by
constraint penalties, and by propelling added mass, respectively. is the external heat energy
through external fluxes. The sum of these energy components is , which should be constant. In
the numerical model is only approximately constant, generally with an error of less than 1%.
Internal energyThe internal energy is the sum of the recoverable elastic strain energy, ; the energy dissipated
through inelastic processes such as plasticity, ; the energy dissipated through viscoelasticity or
creep, ; the artificial strain energy, ; the energy dissipated through damage, ; the
energy dissipated through distortion control, ; and the fluid cavity energy, :
The artificial strain energy includes energy stored in hourglass resistances and transverse shear in
shell and beam elements. Large values of artificial strain energy indicate that mesh refinement or
other changes to the mesh are necessary.
9–27
Abaqus ID:
Printed on:

ENERGY BALANCE
Viscous energy
The viscous energy is the energy dissipated by damping mechanisms, including bulk viscosity
damping and material damping. A fundamental variable in the global energy balance, viscous
energy is not part of the energy dissipated through viscoelasticity or inelastic processes.
External work of applied forces
The external work is integrated forward continuously, defined entirely by nodal forces (moments)
and displacements (rotations). Prescribed boundary conditions also contribute to the external work.
9.6.2 Output of the energy balanceEach of the energy quantities can be requested as output and can be plotted as time histories summed over
the entire model, particular element sets, individual elements, or as energy density within each element.
The variable names associated with the energy quantities summed over the entire model or element sets
are as listed in Table 9–2.
Table 9–2 Whole model energy output variables.
Variable Name Energy Quantity
ALLIE Internal energy, :ALLIE = ALLSE + ALLPD + ALLCD + ALLAE +
ALLDMD + ALLDC + ALLFC.
ALLKE Kinetic energy, .
ALLVD Viscous dissipated energy, .
ALLFD Frictional dissipated energy, .
ALLCD Energy dissipated by viscoelasticity, .
ALLWK Work of the external forces, .
ALLPW Work done by contact penalties, .
ALLCW Work done by constraint penalties, .
ALLMW Work done by propelling added mass (due to mass scaling), .
ALLSE Elastic strain energy, .
ALLPD Inelastic dissipated energy, .
ALLAE Artificial strain energy, .
ALLIHE Internal heat energy, .
ALLHF External heat energy through external fluxes, .
ALLDMD Energy dissipated by damage, .
9–28
Abaqus ID:
Printed on:

SUMMARY
Variable Name Energy Quantity
ALLDC Energy dissipated by distortion control, .
ALLFC Fluid cavity energy (negative of work done by fluid cavities), .
ETOTAL Energy balance:
.
In addition, Abaqus/Explicit can produce element-level energy output and energy density output, as listed
in Table 9–3.
Table 9–3 Whole element energy output variables.
Variable Name Whole Element Energy Quantity
ELSE Elastic strain energy.
ELPD Plastic dissipated energy.
ELCD Creep dissipated energy.
ELVD Viscous dissipated energy.
ELASE Artificial energy = drill energy + hourglass energy.
EKEDEN Kinetic energy density in the element.
ESEDEN Elastic strain energy density in the element.
EPDDEN Plastic energy density dissipated in the element.
EASEDEN Artificial strain energy density in the element.
ECDDEN Creep strain energy density dissipated in the element.
EVDDEN Viscous energy density dissipated in the element.
ELDMD Energy dissipated in the element by damage.
9.7 Summary
• Abaqus/Explicit uses a central difference rule to integrate the kinematics explicitly through time.
• The explicit method requires many small time increments. Since there are no simultaneous
equations to solve, each increment is inexpensive.
• The explicit method has great cost savings over the implicit method as the model size increases.
• The stability limit is the maximum time increment that can be used to advance the kinematic state
and still remain accurate.
9–29
Abaqus ID:
Printed on:

SUMMARY
• Abaqus/Explicit automatically controls the time increment size throughout the analysis to maintain
stability.
• As the material stiffness increases, the stability limit decreases; as the material density increases,
the stability limit increases.
• For a mesh with a single material, the stability limit is roughly proportional to the smallest element
dimension.
• Generally, mass proportional damping is used in Abaqus/Explicit to damp low-frequency
oscillations, and stiffness proportional damping is used to damp high-frequency oscillations.
• In some situations an Abaqus/Explicit analysis may become unstable. The example problems in
this chapter describe how to recognize and rectify instabilities.
9–30
Abaqus ID:
Printed on:

DEFINING MATERIALS IN Abaqus
10. Materials
The material library in Abaqus allows most engineering materials to be modeled, including metals,
plastics, rubbers, foams, composites, granular soils, rocks, and plain and reinforced concrete. This guide
discusses only three of the most commonly used material models: linear elasticity, metal plasticity, and
rubber elasticity. All of the material models are discussed in detail in Part V, “Materials,” of the Abaqus
Analysis User’s Manual.
10.1 Defining materials in Abaqus
You can use any number of different materials in your simulation. Each material definition starts with
a *MATERIAL option. The NAME parameter identifies the name associated with the material being
defined. This name is used to assign the material definition to specific elements in the model.
The material definition is one of the few situations in which the position of option blocks in the
Abaqus input file is important. All of the option blocks defining specific aspects of a material’s behavior,
such as its elastic modulus or density, must follow the *MATERIAL option directly. Furthermore,
the material option blocks defining the behavior of a particular material cannot be interrupted by other
nonmaterial options. Abaqus issues an error message if it cannot associate a material behavior option
block, such as *ELASTIC, with a prior *MATERIAL option.
For example, consider a material description, such as an elastic-plastic metal subjected to
gravitational loads, that requires several material behavior option blocks to supply Abaqus with the
necessary data. In addition to the elastic and plastic property option blocks, Abaqus needs the material’s
density to calculate the gravitational loads. Thus, the complete material description would be
*MATERIAL, NAME=STEEL*ELASTIC2.1E11, 0.3
Elastic properties
*PLASTIC2.0E8, 0.03.0E8, 0.2*DENSITY7800.0,
Plastic properties
Density
A non-material option block between the *PLASTIC and *DENSITY options, as shown in the following
input, would cause Abaqus to terminate the analysis with an error message.
10–1
Abaqus ID:
Printed on:

PLASTICITY IN DUCTILE METALS
ARY
*MATERIAL, NAME=STEEL*ELASTIC2.1E11, 0.3*PLASTIC2.0E8, 0.03.0E8, 0.2*BOUND101, 1, 3,*DENSITY7800.0,
Because of this option blockAbaqus does not knowwhich ∗MATERIAL optionthis option block belongs to.
10.2 Plasticity in ductile metals
Many metals have approximately linear elastic behavior at low strain magnitudes (see Figure 10–1), and
the stiffness of the material, known as the Young’s or elastic modulus, is constant.
Strain
Stress
Young’s modulus, E
Figure 10–1 Stress-strain behavior for a linear elastic material, such as steel, at small strains.
At higher stress (and strain) magnitudes, metals begin to have nonlinear, inelastic behavior (see
Figure 10–2), which is referred to as plasticity.
10.2.1 Characteristics of plasticity in ductile metalsThe plastic behavior of a material is described by its yield point and its post-yield hardening. The shift
from elastic to plastic behavior occurs at a certain point, known as the elastic limit or yield point, on a
material’s stress-strain curve (see Figure 10–2). The stress at the yield point is called the yield stress. In
most metals the initial yield stress is 0.05 to 0.1% of the material’s elastic modulus.
10–2
Abaqus ID:
Printed on:

PLASTICITY IN DUCTILE METALS
Nominal strain
Nom
inal
str
ess
Young’s modulus, E
Yield pointHardening
Ultimate strength
Necking
Failure
Unloading curveParallel to Young's modulus
1
Figure 10–2 Nominal stress-strain behavior of an elastic-plastic material in a tensile test.
The deformation of the metal prior to reaching the yield point creates only elastic strains, which
are fully recovered if the applied load is removed. However, once the stress in the metal exceeds the
yield stress, permanent (plastic) deformation begins to occur. The strains associated with this permanent
deformation are called plastic strains. Both elastic and plastic strains accumulate as the metal deforms
in the post-yield region.
The stiffness of a metal typically decreases dramatically once the material yields (see Figure 10–2).
A ductile metal that has yielded will recover its initial elastic stiffness when the applied load is removed
(see Figure 10–2). Often the plastic deformation of the material increases its yield stress for subsequent
loadings: this behavior is called work hardening.
Another important feature of metal plasticity is that the inelastic deformation is associated with
nearly incompressible material behavior. Modeling this effect places some severe restrictions on the
type of elements that can be used in elastic-plastic simulations.
A metal deforming plastically under a tensile load may experience highly localized extension and
thinning, called necking, as the material fails (see Figure 10–2). The engineering stress (force per unit
undeformed area) in the metal is known as the nominal stress, with the conjugate nominal strain (length
change per unit undeformed length). The nominal stress in the metal as it is necking is much lower than
the material’s ultimate strength. This material behavior is caused by the geometry of the test specimen,
the nature of the test itself, and the stress and strain measures used. For example, testing the samematerial
in compression produces a stress-strain plot that does not have a necking region because the specimen
is not going to thin as it deforms under compressive loads. A mathematical model describing the plastic
behavior of metals should be able to account for differences in the compressive and tensile behavior
independent of the structure’s geometry or the nature of the applied loads. This goal can be accomplished
10–3
Abaqus ID:
Printed on:

PLASTICITY IN DUCTILE METALS
if the familiar definitions of nominal stress, , and nominal strain, , where the subscript 0
indicates a value from the undeformed state of the material, are replaced by new measures of stress and
strain that account for the change in area during the finite deformations.
10.2.2 Stress and strain measures for finite deformationsStrains in compression and tension are the same only if considered in the limit as ; i.e.,
and
where l is the current length, is the original length, and is the true strain or logarithmic strain.
The stress measure that is the conjugate to the true strain is called the true stress and is defined as
where F is the force in the material and A is the current area. A ductile metal subjected to finite
deformations will have the same stress-strain behavior in tension and compression if true stress is
plotted against true strain.
10.2.3 Defining plasticity in AbaqusWhen defining plasticity data in Abaqus, you must use true stress and true strain. Abaqus requires these
values to interpret the data correctly.
Quite often material test data are supplied using values of nominal stress and strain. In such
situations you must use the expressions presented below to convert the plastic material data from
nominal stress-strain values to true stress-strain values.
The relationship between true strain and nominal strain is established by expressing the nominal
strain as
Adding unity to both sides of this expression and taking the natural log of both sides provides the
relationship between the true strain and the nominal strain:
10–4
Abaqus ID:
Printed on:

PLASTICITY IN DUCTILE METALS
The relationship between true stress and nominal stress is formed by considering the incompressible
nature of the plastic deformation and assuming the elasticity is also incompressible, so
The current area is related to the original area by
Substituting this definition of A into the definition of true stress gives
where
can also be written as
Making this final substitution provides the relationship between true stress and nominal stress and strain:
Note that these relationships are valid only prior to necking.
The *PLASTIC option in Abaqus defines the post-yield behavior for most metals. Abaqus
approximates the smooth stress-strain behavior of the material with a series of straight lines joining
the given data points. Any number of points can be used to approximate the actual material behavior;
therefore, it is possible to use a very close approximation of the actual material behavior. The data on
the *PLASTIC option define the true yield stress of the material as a function of true plastic strain.
The first piece of data given defines the initial yield stress of the material and, therefore, should have a
plastic strain value of zero.
The strains provided in material test data used to define the plastic behavior are not likely to be
the plastic strains in the material. Instead, they will probably be the total strains in the material. You
must decompose these total strain values into the elastic and plastic strain components. The plastic strain
is obtained by subtracting the elastic strain, defined as the value of true stress divided by the Young’s
modulus, from the value of total strain (see Figure 10–3).
10–5
Abaqus ID:
Printed on:

PLASTICITY IN DUCTILE METALS
εpl
εt
εel
True
str
ess
True strain
Figure 10–3 Decomposition of the total strain into elastic and plastic components.
This relationship is written
where
is true plastic strain,
is true total strain,
is true elastic strain,
is true stress, and
E is Young’s modulus.
Example of converting material test data to Abaqus input
The nominal stress-strain curve in Figure 10–4 will be used as an example of how to convert the
test data defining a material’s plastic behavior into the appropriate input format for Abaqus. The six
points shown on the nominal stress-strain curve will be used as the data for the *PLASTIC option.
10–6
Abaqus ID:
Printed on:

PLASTICITY IN DUCTILE METALS
E = 210. GPa
Nominal Strain
Nom
inal
Str
ess
(MP
a)
200.
0.1 0.2
400.
Figure 10–4 Elastic-plastic material behavior.
The first step is to use the equations relating the true stress to the nominal stress and strain and
the true strain to the nominal strain (shown earlier) to convert the nominal stress and nominal strain
to true stress and true strain. Once these values are known, the equation relating the plastic strain
to the total and elastic strains (shown earlier) can be used to determine the plastic strains associated
with each yield stress value. The converted data are shown in Table 10–1.
Table 10–1 Stress and strain conversions.
NominalStress (Pa)
NominalStrain
True Stress(Pa)
True Strain PlasticStrain
200E6 0.00095 200.2E6 0.00095 0.0
240E6 0.025 246E6 0.0247 0.0235
280E6 0.050 294E6 0.0488 0.0474
340E6 0.100 374E6 0.0953 0.0935
380E6 0.150 437E6 0.1398 0.1377
400E6 0.200 480E6 0.1823 0.1800
While there are few differences between the nominal and true values at small strains, there are very
significant differences at larger strain values; therefore, it is extremely important to provide the
proper stress-strain data to Abaqus if the strains in the simulation will be large.
10–7
Abaqus ID:
Printed on:

PLASTICITY IN DUCTILE METALS
Data regularization in Abaqus/Explicit
When performing an analysis, Abaqus/Explicit may not use the material data exactly as defined
by the user; for efficiency, all material data that are defined in tabular form are automatically
regularized. Material data can be functions of temperature, external fields, and internal state
variables, such as plastic strain. For each material point calculation, the state of the material must
be determined by interpolation, and, for efficiency, Abaqus/Explicit fits the user-defined curves
with curves composed of equally spaced points. These regularized material curves are the material
data used during the analysis. It is important to understand the differences that might exist between
the regularized material curves used in the analysis and the curves that you specified.
To illustrate the implications of using regularized material data, consider the following two
cases. Figure 10–5 shows a case in which the user has defined data that are not regular.
300
200
100
.0 .2 .4 .6 .8 1.0
σy
user-defined data pointsregular data points
∗
εpl
∗∗∗
∗
Figure 10–5 Example of user data that can be regularized exactly.
In this example Abaqus/Explicit generates the six regular data points shown, and the user’s data are
reproduced exactly. Figure 10–6 shows a case where the user has defined data that are difficult to
regularize exactly. In this example it is assumed that Abaqus/Explicit has regularized the data by
dividing the range into 10 intervals that do not reproduce the user’s data points exactly.
10–8
Abaqus ID:
Printed on:

PLASTICITY IN DUCTILE METALS
300
200
100
.0 .2 .4 .6 .8 1.0
σy∗
∗
∗
∗
εpl
user-defined data points
regular data pointsmaximum difference 26%
∗
Figure 10–6 Example of user data that are difficult to regularize.
Abaqus/Explicit attempts to use enough intervals such that the maximum error between the
regularized data and the user-defined data is less than 3%; however, you can change this error
tolerance. If more than 200 intervals are required to obtain an acceptable regularized curve, the
analysis stops during the data checking with an error message. In general, the regularization is
more difficult if the smallest interval defined by the user is small compared to the range of the
independent variable. In Figure 10–6 the data point for a strain of 1.0 makes the range of strain
values large compared to the small intervals defined at low strain levels. Removing this last data
point enables the data to be regularized much more easily.
Interpolation between data points
Abaqus interpolates linearly between the data points provided (or, in Abaqus/Explicit, regularized
data) to obtain the material’s response and assumes that the response is constant outside the range
defined by the input data, as shown in Figure 10–7. Thus, the stress in this material will never exceed
480 MPa; when the stress in the material reaches 480 MPa, the material will deform continuously
until the stress is reduced below this value.
10–9
Abaqus ID:
Printed on:

SELECTING ELEMENTS FOR ELASTIC-PLASTIC PROBLEMS
Figure 10–7 Material curve used by Abaqus.
10.3 Selecting elements for elastic-plastic problems
The incompressible nature of plastic deformation in metals places limitations on the types of elements
that can be used for an elastic-plastic simulation. The limitations arise because modeling incompressible
material behavior adds kinematic constraints to an element; in this case the limitations constrain the
volume at the element’s integration points to remain constant. In certain classes of elements the addition
of these incompressibility constraints makes the element overconstrained. When these elements cannot
resolve all of these constraints, they suffer from volumetric locking, which causes their response to be
too stiff. Volumetric locking is indicated by a rapid variation of hydrostatic pressure stress from element
to element or integration point to integration point.
The fully integrated, second-order, solid elements available in Abaqus/Standard are very susceptible
to volumetric locking when modeling incompressible material behavior and, therefore, should not be
used in elastic-plastic simulations. The fully integrated, first-order, solid elements in Abaqus/Standard
do not suffer from volumetric locking because Abaqus actually uses a constant volume strain in these
elements. Thus, they can be used safely in plasticity problems.
Reduced-integration solid elements have fewer integration points at which the incompressibility
constraints must be satisfied. Therefore, they are not overconstrained and can be used for most elastic-
plastic simulations. The second-order reduced-integration elements in Abaqus/Standard should be used
with caution if the strains exceed 20–40% because at this magnitude they can suffer from volumetric
locking. This effect can be reduced with mesh refinement.
10–10
Abaqus ID:
Printed on:

EXAMPLE: CONNECTING LUG WITH PLASTICITY
If you have to use fully integrated, second-order elements in Abaqus/Standard, use the hybrid
versions, which are designed to model incompressible behavior; however, the additional degrees of
freedom in these elements will make the analysis more computationally expensive.
A family of modified second-order triangular and tetrahedral elements is available that provides
improved performance over the first-order triangular and tetrahedral elements and that avoids some of
the problems that exist for conventional second-order triangular and tetrahedral elements. In particular,
these elements exhibit minimal shear and volumetric locking. These elements are available in addition
to fully integrated and hybrid elements in Abaqus/Standard; they are the only second-order continuum
(solid) elements available in Abaqus/Explicit.
10.4 Example: connecting lug with plasticity
You have been asked to investigate what happens if the steel connecting lug from Chapter 4, “Using
Continuum Elements,” is subjected to an extreme load (60 kN) caused by an accident. The results
from the linear analysis indicate that the lug will yield. You need to determine the extent of the plastic
deformation in the lug and the magnitude of the plastic strains so that you can assess whether or not the lug
will fail. You do not need to consider inertial effects in this analysis; thus, you will use Abaqus/Standard
to examine the static response of the lug.
The only inelastic material data available for the steel are its yield stress (380 MPa) and its strain at
failure (0.15). You decide to assume that the steel is perfectly plastic: the material does not harden, and
the stress can never exceed 380 MPa (see Figure 10–8).
380.E6
True strain
True
stre
ss
εel
E=200.E9
Figure 10–8 Stress-strain behavior for the steel.
In reality some hardeningwill probably occur, but this assumption is conservative; if the material hardens,
the plastic strains will be less than those predicted by the simulation.
The steps that follow assume that you have access to the full input file for this example. This input
file, lug_plas.inp, is provided in “Connecting lug with plasticity,” Section A.8, in the online HTML
10–11
Abaqus ID:
Printed on:

EXAMPLE: CONNECTING LUG WITH PLASTICITY
version of this manual. Instructions on how to fetch and run the script are given in Appendix A, “Example
Files.”
If you wish to create the entire model using Abaqus/CAE, please refer to “Example: connecting lug
with plasticity,” Section 10.4 of Getting Started with Abaqus: Interactive Edition.
10.4.1 Modifications to the input file—the model dataIn this example, the material definition specifies the post-yield behavior of the material using the
*PLASTIC option. The Young’s modulus for the material is 200 GPa, and the initial yield stress at zero
plastic strain is 380 MPa. Since you are modeling the steel as perfectly plastic, no other yield stresses
are given on the *PLASTIC option.
The complete material definition is:
*MATERIAL, NAME=STEEL*ELASTIC200.E9, 0.3*PLASTIC380.E6,0.0
All other option blocks in the model definition portion of the input file remain unchanged.
10.4.2 Modifications to the input file—the history dataThis analysis requires a general, nonlinear simulation because of the nonlinear material behavior in the
model. Therefore, the PERTURBATION parameter must be removed from the *STEP option. The total
step time in the *STATIC procedure option block has been set to 1.0, and the initial increment size is
20% of the total step time. This simulation is a static analysis of the lug under the extreme loads; you do
not know in advance how many increments this simulation may require. The default maximum of 100
increments, however, is reasonably large and should be sufficient for this analysis. Also, we assume that
the effects of geometric nonlinearity will not be important in this simulation, so the NLGEOM parameter
is omitted from the *STEP option. This portion of the input file appears as follows.
*STEP*STATIC0.2, 1.0
Loading
The load applied in this simulation is twice what was applied in the linear elastic simulation of the
lug (60 kN vs. 30 kN). Therefore, this model doubles the magnitude of the pressures applied to the
lug. The modified *DLOAD option block looks like:
*DLOADPRESS, P6, 1.E+08
10–12
Abaqus ID:
Printed on:

EXAMPLE: CONNECTING LUG WITH PLASTICITY
Output requests
You will use Abaqus/Viewer to review all of the results from this simulation, so all printed output
requests have been deleted. The resulting output request option in your input file appears below:
*OUTPUT, FIELD, FREQUENCY=1, VARIABLE=PRESELECT
You will need to save some history data in the output database file to use with the X–Y plotting
capability in Abaqus/Viewer. The displacements for node set HOLEBOT, which should already
exist, are stored using the following option:
*OUTPUT, HISTORY, FREQUENCY=1*NODE OUTPUT, NSET=HOLEBOTU,
You also want detailed results for one of the elements along the built-in end of the lug (see
Figure 10–9).
1
2
3
element 206
Figure 10–9 Element 206.
This is element 206 in the mesh generated by the commands found in “Connecting lug with
plasticity,” Section A.8; the element in this location may have a different number in your model.
This element is chosen because it is the element for which the stresses are most likely to be largest
in magnitude. In the input file for this example, an element set has been created that contains the
element, and saves the stresses (S), stress invariants (SINV), plastic strains (PE), and strains (E)
for that element set in the output database file. The necessary option blocks are shown below:
*ELEMENT OUTPUT, ELSET=EL206S, SINV, PE, E*ELSET, ELSET=EL206206,
10–13
Abaqus ID:
Printed on:

EXAMPLE: CONNECTING LUG WITH PLASTICITY
Note: The *ELSET option used to define the element set appears after the output requests so as to
not break up the block of suboptions associated with the *OUTPUT option.
10.4.3 Running the analysis
Save these changes to your model, and run the analysis with the following command:
abaqus job=lug_plas
Status file
Monitor the simulation while it is running by looking at the status file, lug_plas.sta. When
Abaqus has finished the simulation, your status file will contain information similar to the following:
SUMMARY OF JOB INFORMATION:STEP INC ATT SEVERE EQUIL TOTAL TOTAL STEP INC OF DOF IF
DISCON ITERS ITERS TIME/ TIME/LPF TIME/LPF MONITOR RIKSITERS FREQ
1 1 1 0 1 1 0.200 0.200 0.20001 2 1 0 1 1 0.400 0.400 0.20001 3 1 0 3 3 0.700 0.700 0.30001 4 1U 0 4 4 0.700 0.700 0.30001 4 2 0 2 2 0.775 0.775 0.075001 5 1 0 4 4 0.887 0.887 0.11251 6 1U 0 4 4 0.887 0.887 0.11251 6 2 0 3 3 0.916 0.916 0.028131 7 1U 0 5 5 0.916 0.916 0.042191 7 2 0 2 2 0.926 0.926 0.010551 8 1 0 4 4 0.942 0.942 0.015821 9 1U 0 3 3 0.942 0.942 0.023731 9 2 0 5 5 0.948 0.948 0.0059331 10 1U 0 4 4 0.948 0.948 0.0059331 10 2 0 4 4 0.949 0.949 0.0014831 11 1 0 4 4 0.951 0.951 0.0014831 12 1U 0 3 3 0.951 0.951 0.0022251 12 2 0 3 3 0.951 0.951 0.00055621 13 1 0 4 4 0.952 0.952 0.00083431 14 1U 0 2 2 0.952 0.952 0.0012511 14 2 0 4 4 0.953 0.953 0.00031291 15 1U 0 2 2 0.953 0.953 0.00046931 15 2 0 3 3 0.953 0.953 0.00011731 16 1U 0 3 3 0.953 0.953 0.00017601 16 2 0 3 3 0.953 0.953 4.399e-0051 17 1 0 3 3 0.953 0.953 6.599e-0051 18 1U 0 2 2 0.953 0.953 9.899e-0051 18 2 0 2 2 0.953 0.953 2.475e-0051 19 1 0 3 3 0.953 0.953 3.712e-0051 20 1U 0 1 1 0.953 0.953 5.568e-0051 20 2 0 3 3 0.953 0.953 1.392e-0051 21 1 0 3 3 0.953 0.953 2.088e-0051 22 1U 0 1 1 0.953 0.953 3.132e-0051 22 2 0 2 2 0.953 0.953 1.000e-0051 23 1 0 3 3 0.953 0.953 1.500e-0051 24 1U 0 1 1 0.953 0.953 2.250e-005
THE ANALYSIS HAS NOT BEEN COMPLETED
Abaqus was able to apply only 95% of the prescribed load to the model and still obtain a converged
solution. The status file shows that Abaqus reduced the size of the time increment, which is shown
in the last (right-hand) column, many times during the simulation and stopped the analysis in the
10–14
Abaqus ID:
Printed on:

EXAMPLE: CONNECTING LUG WITH PLASTICITY
24th increment. You will have to look at the information in the message file to understand why
Abaqus terminated the simulation early.
Message file
The message file, lug_plas.msg, contains detailed information about the simulation’s progress
(see “Results,” Section 8.4.3, for more information about the format of the message file).
Look at the information for the first increment in the analysis (it is also shown below); you
will discover that the model’s initial behavior is linear. The model’s behavior was also linear in the
second increment.
Responseis linear
Displacementcorrection isignored sincethe residual force isessentially zero
INCREMENT 1 STARTS. ATTEMPT NUMBER 1, TIME INCREMENT 0.200
CONVERGENCE CHECKS FOR EQUILIBRIUM ITERATION 1
AVERAGE FORCE 128. TIME AVG. FORCE 128.LARGEST RESIDUAL FORCE -6.864E-10 AT NODE 10605 DOF 2LARGEST INCREMENT OF DISP. -1.685E-04 AT NODE 815 DOF 2LARGEST CORRECTION TO DISP. -1.685E-04 AT NODE 815 DOF 2 THE FORCE EQUILIBRIUM RESPONSE WAS LINEAR IN THIS INCREMENT
ITERATION SUMMARY FOR THE INCREMENT: 1 TOTAL ITERATIONS, OF WHICH 0 ARE SEVERE DISCONTINUITY ITERATIONS AND 1 ARE EQUILIBRIUM ITERATIONS.
Abaqus requires several iterations to obtain a converged solution in the third increment, which
indicates that nonlinear behavior occurred in the model during this increment. The only nonlinearity
in the model is the plastic material behavior, so the steel must have started to yield somewhere in
the lug at this applied load magnitude. The summaries of the iterations for the third increment are
shown below.
INCREMENT 3 STARTS. ATTEMPT NUMBER 1, TIME INCREMENT 0.300
CONVERGENCE CHECKS FOR EQUILIBRIUM ITERATION 1
AVERAGE FORCE 794. TIME AVG. FORCE 459.LARGEST RESIDUAL FORCE 831. AT NODE 13057 DOF 1LARGEST INCREMENT OF DISP. -2.573E-04 AT NODE 20815 DOF 2LARGEST CORRECTION TO DISP. -4.658E-06 AT NODE 10817 DOF 2
FORCE EQUILIBRIUM NOT ACHIEVED WITHIN TOLERANCE.
CONVERGENCE CHECKS FOR EQUILIBRIUM ITERATION 2
AVERAGE FORCE 797. TIME AVG. FORCE 460.LARGEST RESIDUAL FORCE -23.5 AT NODE 12843 DOF 1LARGEST INCREMENT OF DISP. -2.690E-04 AT NODE 20815 DOF 2LARGEST CORRECTION TO DISP. -1.171E-05 AT NODE 5817 DOF 2
FORCE EQUILIBRIUM NOT ACHIEVED WITHIN TOLERANCE.
CONVERGENCE CHECKS FOR EQUILIBRIUM ITERATION 3
AVERAGE FORCE 801. TIME AVG. FORCE 461.LARGEST RESIDUAL FORCE 1.755E-02 AT NODE 12855 DOF 1LARGEST INCREMENT OF DISP. -2.691E-04 AT NODE 815 DOF 2
10–15
Abaqus ID:
Printed on:

EXAMPLE: CONNECTING LUG WITH PLASTICITY
LARGEST CORRECTION TO DISP. -1.054E-07 AT NODE 817 DOF 2THE FORCE EQUILIBRIUM EQUATIONS HAVE CONVERGED
ITERATION SUMMARY FOR THE INCREMENT: 3 TOTAL ITERATIONS, OF WHICH0 ARE SEVERE DISCONTINUITY ITERATIONS AND 3 ARE EQUILIBRIUM ITERATIONS.
TIME INCREMENT COMPLETED 0.300 , FRACTION OF STEP COMPLETED 0.700STEP TIME COMPLETED 0.700 , TOTAL TIME COMPLETED 0.700
Abaqus attempts to find a solution in the fourth increment using an increment size of 0.3, which
means it is applying 30% of the total load, or 18MPa, during this increment. After several iterations,
Abaqus issues warning messages that the strain increments it calculated exceed the strain at initial
yield by 50 times. After a few more iterations Abaqus determines that the solution in this increment
is not going to converge; instead, it is diverging. Therefore, Abaqus abandons this attempt at finding
a solution, reduces the increment size to 25% of the value used in the first attempt, and tries a second
attempt at finding a solution. This reduction in increment size is called a cut-back. With the smaller
increment size, Abaqus finds a converged solution in just a few iterations. Some of the iteration
summaries from the first attempt of the fourth increment are shown below.
There isexcessiveplastic strainfor this loadincrement
INCREMENT 4 STARTS. ATTEMPT NUMBER 1, TIME INCREMENT 0.300
CONVERGENCE CHECKS FOR EQUILIBRIUM ITERATION 1
AVERAGE FORCE 1.196E+03 TIME AVG. FORCE 645. LARGEST RESIDUAL FORCE -4.908E+03 AT NODE 12849 DOF 2 LARGEST INCREMENT OF DISP. -5.806E-04 AT NODE 10817 DOF 2 LARGEST CORRECTION TO DISP. -3.116E-04 AT NODE 10817 DOF 2 FORCE EQUILIBRIUM NOT ACHIEVED WITHIN TOLERANCE.
CONVERGENCE CHECKS FOR EQUILIBRIUM ITERATION 2
AVERAGE FORCE 1.286E+03 TIME AVG. FORCE 668. LARGEST RESIDUAL FORCE 1.168E+04 AT NODE 13045 DOF 1 LARGEST INCREMENT OF DISP. -1.484E-03 AT NODE 10817 DOF 2 LARGEST CORRECTION TO DISP. -9.038E-04 AT NODE 10817 DOF 2 FORCE EQUILIBRIUM NOT ACHIEVED WITHIN TOLERANCE.
CONVERGENCE CHECKS FOR EQUILIBRIUM ITERATION 3
AVERAGE FORCE 1.482E+03 TIME AVG. FORCE 717. LARGEST RESIDUAL FORCE 1.721E+04 AT NODE 13049 DOF 2 LARGEST INCREMENT OF DISP. -6.796E-03 AT NODE 10817 DOF 2 LARGEST CORRECTION TO DISP. -5.311E-03 AT NODE 817 DOF 2 FORCE EQUILIBRIUM NOT ACHIEVED WITHIN TOLERANCE.
***WARNING: THE STRAIN INCREMENT HAS EXCEEDED FIFTY TIMES THE STRAIN TO CAUSE FIRST YIELD AT 120 POINTS
CONVERGENCE CHECKS FOR EQUILIBRIUM ITERATION 4
AVERAGE FORCE 2.356E+03 TIME AVG. FORCE 935. LARGEST RESIDUAL FORCE -4.587E+04 AT NODE 12447 DOF 1 LARGEST INCREMENT OF DISP. -7.530E-02 AT NODE 10817 DOF 2 LARGEST CORRECTION TO DISP. -6.850E-02 AT NODE 5817 DOF 2 FORCE EQUILIBRIUM NOT ACHIEVED WITHIN TOLERANCE.
***NOTE: THE SOLUTION APPEARS TO BE DIVERGING. CONVERGENCE IS JUDGED UNLIKELY.
Because convergence is judged to be unlikely, Abaqus cuts back the time increment.
10–16
Abaqus ID:
Printed on:

EXAMPLE: CONNECTING LUG WITH PLASTICITY
Now that you have reviewed the early increments of the simulation, move to the end of the
message file and review the last increment Abaqus attempted. You will see that Abaqus is using a
very small increment size, on the order of 1.0 × 10⁻⁵ , in this final increment because of the many
cut-backs. The iteration summaries for the last increment are shown below. Abaqus makes two
attempts to find a solution in this final increment, but it must cut back the time increment in each
attempt because the strain increments are so large that it does not even try to perform the plasticity
calculations. This check on the magnitude of the total strain increment is another example of
the many automatic solution controls Abaqus uses to ensure that the solution obtained for your
simulation is both accurate and efficient. The automatic solution controls are suitable for almost all
simulations. Therefore, you do not have to worry about providing parameters to control the solution
algorithm: you only have to be concerned with the input data for your model.
The strains are so large that Abaqus does not even try to find asolution.
Abaqusterminates the analysisbecause thecut-backwould reducethe incrementsize below the
limit.
INCREMENT 24 STARTS. ATTEMPT NUMBER 1, TIME INCREMENT 2.250E-05
***WARNING: THE STRAIN INCREMENT HAS EXCEEDED FIFTY TIMES THE STRAIN TO CAUSE FIRST YIELD AT 152 POINTS
***WARNING: THE STRAIN INCREMENT IS SO LARGE THAT THE PROGRAM WILL NOT ATTEMPT THE PLASTICITY CALCULATION AT 16 POINTS
***NOTE: MATERIAL CALCULATIONS FAILED TO CONVERGE OR WERE NOT ATTEMPTED AT ONE OR MORE POINTS. CONVERGENCE IS JUDGED UNLIKELY.
INCREMENT 24 STARTS. ATTEMPT NUMBER 2, TIME INCREMENT 1.000E-05
***WARNING: THE STRAIN INCREMENT HAS EXCEEDED FIFTY TIMES THE STRAIN TO CAUSE FIRST YIELD AT 120 POINTS
***WARNING: THE STRAIN INCREMENT HAS EXCEEDED FIFTY TIMES THE STRAIN TO CAUSE FIRST YIELD AT 132 POINTS
CONVERGENCE CHECKS FOR EQUILIBRIUM ITERATION 1
AVERAGE FORCE 1.751E+03 TIME AVG. FORCE 1.352E+03 LARGEST RESIDUAL FORCE -44.9 AT NODE 11841 DOF 2 LARGEST INCREMENT OF DISP. -0.153 AT NODE 15817 DOF 2 LARGEST CORRECTION TO DISP. -4.662E-02 AT NODE 10817 DOF 2 FORCE EQUILIBRIUM NOT ACHIEVED WITHIN TOLERANCE.
***WARNING: THE STRAIN INCREMENT HAS EXCEEDED FIFTY TIMES THE STRAIN TO CAUSE FIRST YIELD AT 136 POINTS
***WARNING: THE STRAIN INCREMENT IS SO LARGE THAT THE PROGRAM WILL NOT ATTEMPT THE PLASTICITY CALCULATION AT 4 POINTS
***NOTE: MATERIAL CALCULATIONS FAILED TO CONVERGE OR WERE NOT ATTEMPTED AT ONE OR MORE POINTS. CONVERGENCE IS JUDGED UNLIKELY.
***ERROR: TIME INCREMENT REQUIRED IS LESS THAN THE MINIMUM SPECIFIED
10–17
Abaqus ID:
Printed on:

EXAMPLE: CONNECTING LUG WITH PLASTICITY
If you look at the summary at the end of the message file, you will find that Abaqus issued
many warning messages during the analysis. Reviewing the message file will show that most of
these warnings were the result of numerical problems with the plasticity calculations. You know
that Abaqus terminated the analysis early because these numerical problems forced it to cut back
the time increment until it was below the minimum allowable time increment.
In the third column of the status file you will see the number of attempts Abaqus made to
solve an increment. In the sixth column the number of iterations needed for the last attempt at an
increment is printed. Now, you should look at the results in Abaqus/Viewer to understand what
caused this excessive plasticity.
10.4.4 Postprocessing the resultsLook at the results in Abaqus/Viewer to understand what caused the excessive plasticity. Run
Abaqus/Viewer by entering the following command at the operating system prompt:
abaqus viewer odb=lug_plas
Plotting the deformed model shape
Create a plot of the model’s deformed shape, and check that this shape is realistic.
The default view is isometric. You can set the view shown in Figure 10–10 by using the options
in the View menu or the tools in the View Manipulation toolbar; in this figure perspective is also
turned off.
Step: Step−1Increment 23: Step Time = 0.9529
Deformed Var: U Deformation Scale Factor: +2.000e−02
Figure 10–10 Deformed model shape using results for the simulation without hardening.
10–18
Abaqus ID:
Printed on:

EXAMPLE: CONNECTING LUG WITH PLASTICITY
The displacements and, particularly, the rotations of the lug shown in the plot are large but do
not seem large enough to have caused all of the numerical problems seen in the simulation. Look
closely at the information in the plot’s title for an explanation. The deformation scale factor used in
this plot is 0.02; i.e., the displacements are scaled to 2% of their actual values. (Your deformation
scale factor may be different.)
Abaqus/Viewer always scales the displacements in a geometrically linear simulation such that
the deformed shape of the model fits into the viewport. (This is in contrast to a geometrically
nonlinear simulation, where Abaqus/Viewer does not scale the displacements and, instead, adjusts
the view by zooming in or out to fit the deformed shape in the plot.) To plot the actual displacements,
set the deformation scale factor to 1.0. This will produce a plot of the model in which the lug has
deformed until it is almost parallel to the vertical (global Y) axis.
The applied load of 60 kN exceeds the limit load of the lug, and the lug collapses when the
material yields at all the integration points through its thickness. The lug then has no stiffness to
resist further deformation because of the perfectly plastic post-yield behavior of the steel. This is
consistent with the pattern observed earlier concerning the locations of the large strain increments
and maximum displacement corrections.
10.4.5 Adding hardening to the material model
The connecting lug simulation with perfectly plastic material behavior predicts that the lug will suffer
catastrophic failure caused by the collapse of the structure. We have already mentioned that the steel
would probably exhibit some hardening after it has yielded. You suspect that including hardening
behavior would allow the lug to withstand this 60 kN load because of the additional stiffness it would
provide. Therefore, you decide to add some hardening to the steel’s material property definition.
Assume that the yield stress increases to 580 MPa at a plastic strain of 0.35, which represents typical
hardening for this class of steel. The stress-strain curve for the modified material model is shown in
Figure 10–11.
Modify your *PLASTIC option block as follows so that it includes the hardening data:
*PLASTIC380.E6, 0.00580.E6, 0.35
10.4.6 Running the analysis with plastic hardening
Save the model with plastic hardening to a new input file named lug_plas_hard.inp, and run the
analysis using the command
abaqus job=lug_plas_hard
10–19
Abaqus ID:
Printed on:

EXAMPLE: CONNECTING LUG WITH PLASTICITY
380.E6
True strain
True
str
ess
0.3529
E=200.E9
580.E6
Figure 10–11 Modified stress-strain behavior of the steel.
Status file
The summary of the analysis in the status file, which is shown below, shows that Abaqus found
a converged solution when the full 60 kN load was applied. The hardening data added enough
stiffness to the lug to prevent it from collapsing under the 60 kN load.
SUMMARY OF JOB INFORMATION:STEP INC ATT SEVERE EQUIL TOTAL TOTAL STEP INC OF DOF IF
DISCON ITERS ITERS TIME/ TIME/LPF TIME/LPF MONITOR RIKSITERS FREQ
1 1 1 0 1 1 0.200 0.200 0.20001 2 1 0 1 1 0.400 0.400 0.20001 3 1 0 3 3 0.700 0.700 0.30001 4 1 0 7 7 1.00 1.00 0.3000
In this simulation there is very little information of interest in the message file. There are no
warnings issued during the analysis, so you can proceed directly to postprocessing the results with
Abaqus/Viewer.
10.4.7 Postprocessing the resultsStart Abaqus/Viewer, and use the following command to review the results of the second analysis:
abaqus viewer odb=lug_plas_hard
Deformed model shape and peak displacements
Plot the deformed model shape with these new results, and change the deformation scale factor
to 2 to obtain a plot similar to Figure 10–12. The displayed deformations are double the actual
deformations.
Contour plot of Mises stress
Contour the Mises stress in the model. Create a filled contour plot using ten contour intervals on the
actual deformed shape of the lug (i.e., set the deformation scale factor to 1.0) with the plot title and
10–20
Abaqus ID:
Printed on:

EXAMPLE: CONNECTING LUG WITH PLASTICITY
Step: Step−1Increment 4: Step Time = 1.000
Deformed Var: U Deformation Scale Factor: +2.000e+00
Figure 10–12 Deformed model shape for the simulation with plastic hardening.
state blocks suppressed. Use the view manipulation tools to position and size the model to obtain a
plot similar to that shown in Figure 10–13.
Do the values listed in the contour legend surprise you? The maximum stress is greater than
580 MPa, which should not be possible since the material was assumed to be perfectly plastic at
this stress magnitude. This misleading result occurs because of the algorithm that Abaqus/Viewer
uses to create contour plots for element variables, such as stress. The contouring algorithm requires
data at the nodes; however, Abaqus/Standard calculates element variables at the integration
points. Abaqus/Viewer calculates nodal values of element variables by extrapolating the data from
the integration points to the nodes. The extrapolation order depends on the element type; for
second-order, reduced-integration elements Abaqus/Viewer uses linear extrapolation to calculate
the nodal values of element variables. To display a contour plot of Mises stress, Abaqus/Viewer
extrapolates the stress components from the integration points to the nodal locations within each
element and calculates the Mises stress. If the differences in Mises stress values fall within the
specified averaging threshold, nodal averaged Mises stresses are calculated from each surrounding
element’s invariant stress value. Invariant values exceeding the elastic limit can be produced by
the extrapolation process.
Try plotting contours of each component of the stress tensor (variables S11, S22, S33, S12,
S23, and S13). You will see that there are significant variations in these stresses across the elements
at the built-in end. This causes the extrapolated nodal stresses to be higher than the values at the
integration points. The Mises stress calculated from these values will, therefore, also be higher.
Note: Element type C3D10I does not suffer from this extrapolation problem. The integration points
of this element type are located at the nodes, resulting in improved surface stress visualization.
10–21
Abaqus ID:
Printed on:

EXAMPLE: CONNECTING LUG WITH PLASTICITY
(Avg: 75%)S, Mises
+2.267e+07+9.019e+07+1.577e+08+2.252e+08+2.928e+08+3.603e+08+4.278e+08+4.953e+08+5.628e+08+6.304e+08+6.979e+08
Figure 10–13 Contour of Mises stress.
The Mises stress at an integration point can never exceed the current yield stress of the
element’s material; however, the extrapolated nodal values reported in a contour plot may do so.
In addition, the individual stress components may have magnitudes that exceed the value of the
current yield stress; only the Mises stress is required to have a magnitude less than or equal to the
value of the current yield stress.
You can use the query tools in the Visualization module to check the Mises stress at the
integration points.
To query the Mises stress:
1. From the main menu bar, select Tools→Query; or use the tool in the Query toolbar.
The Query dialog box appears.
2. In the Visualization Module Queries field, select Probe values.
The Probe Values dialog box appears.
3. Select the Mises stress output by clicking in the column to the left of S, Mises.
A check mark appears in the S, Mises row.
10–22
Abaqus ID:
Printed on:

EXAMPLE: CONNECTING LUG WITH PLASTICITY
4. Make sure that Elements and the output position Integration Pt are selected.
5. Use the cursor to select elements near the constrained end of the lug.
Abaqus/Viewer reports the element ID and type by default and the value of the Mises stress at
each integration point starting with the first integration point. The Mises stress values at the
integration points are all lower than the values reported in the contour legend and also below
the yield stress of 580 MPa. You can click mouse button 1 to store probed values.
6. Click Cancel when you have finished probing the results.
The fact that the extrapolated values are so different from the integration point values indicates
that there is a rapid variation of stress across the elements and that the mesh is too coarse for accurate
stress calculations. This extrapolation error will be less significant if the mesh is refined but will
always be present to some extent. Therefore, always use nodal values of element variables with
caution.
Contour plot of equivalent plastic strain
The equivalent plastic strain in a material (PEEQ) is a scalar variable that is used to represent the
material’s inelastic deformation. If this variable is greater than zero, the material has yielded. Those
parts of the lug that have yielded can be identified in a contour plot of PEEQ by selecting Primaryfrom the list of variable types on the left side of the Field Output toolbar and selecting PEEQ from
the list of output variables. Any areas in the model plotted in a dark color in Abaqus/Viewer still
have elastic material behavior (see Figure 10–14).
It is clear from the plot that there is gross yielding in the lug where it is attached to its parent
structure. The maximum plastic strain reported in the contour legend is about 10%. However,
this value may contain errors from the extrapolation process. Use the query tool to check the
integration point values of PEEQ in the elements with the largest plastic strains. You will find that
the largest equivalent plastic strains in the model are about 0.067 at the integration points. This
does not necessarily indicate a large extrapolation error since there are strain gradients present in
the vicinity of the peak plastic deformation.
Creating a variable-variable (stress-strain) plot
The X–Y plotting capability in Abaqus/Viewer was introduced earlier in this manual. In this section
you will learn how to create X–Y plots showing the variation of one variable as a function of another.
You will use the stress and strain data saved to the output database (.odb) file to create a stress-
strain plot for one of the integration points in an element adjacent to the constrained end of the lug.
In the model used in this discussion, the stress-strain data were saved for element 206. You
may have specified a different element number in your model; if you did, use that element number
in place of 206 in the input examples that follow. Also, use data from an integration point that is
closest to the top surface of the lug but not adjacent to the constrained nodes. Thus, you will need
to identify the element’s label as well as its nodal connectivity to determine which integration point
to use.
10–23
Abaqus ID:
Printed on:

EXAMPLE: CONNECTING LUG WITH PLASTICITY
(Avg: 75%)PEEQ
+0.000e+00+6.326e−03+1.265e−02+1.898e−02+2.530e−02+3.163e−02+3.796e−02+4.428e−02+5.061e−02+5.693e−02+6.326e−02+6.959e−02+7.591e−02
Figure 10–14 Contour of equivalent plastic strain (PEEQ).
To determine the integration point number:
1. In the Display Group toolbar, select the Create Display Group tool; in the CreateDisplay Group dialog box, select Elements as the item and Element sets as the method.
From the list of available element sets, select EL206 and toggle on Highlight items inviewport to confirm its selection. Click Replace.
2. Plot the undeformed shape of this element with the node labels made visible. Click the auto-fit
tool to obtain a plot similar to Figure 10–15.
3. Use the Query tool to obtain the nodal connectivity for this corner element (toggle on Nodesin the Probe Values dialog box). You will have to expand the Nodes column at the bottom
of the dialog box to see the complete list; you are interested in only the first four nodes.
4. Compare the nodal connectivity list with the undeformed model shape plot to determine which
is the 1–2–3–4 face on your C3D20R element, as defined in “Three-dimensional solid element
library,” Section 25.1.4 of the Abaqus Analysis User’s Manual. For example, in Figure 10–15
10–24
Abaqus ID:
Printed on:
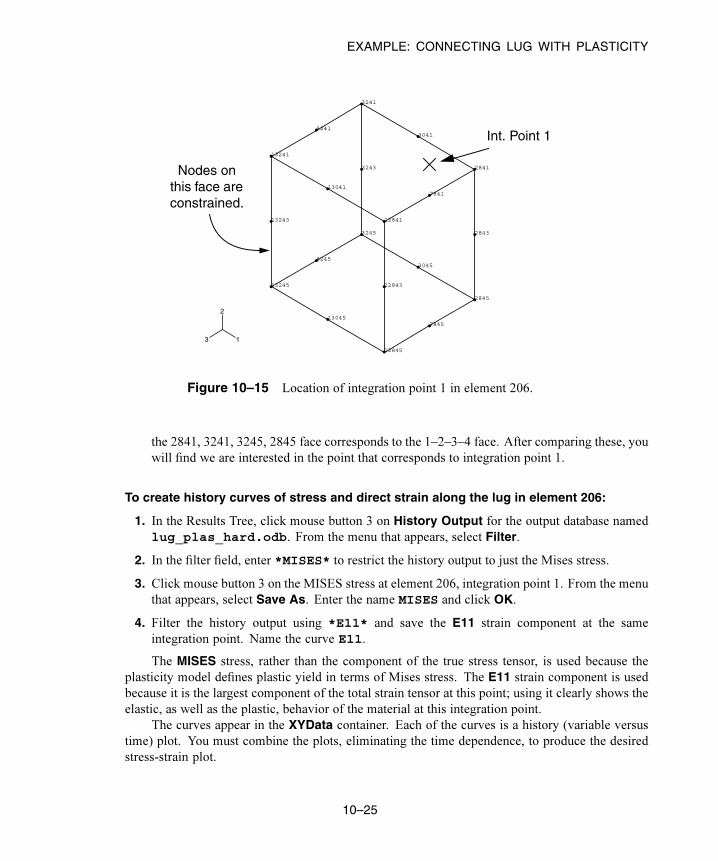
EXAMPLE: CONNECTING LUG WITH PLASTICITY
2841
2843
2845
3041
3045
3241
3243
3245
7841
7845
8241
8245
12841
12843
12845
13041
13045
13241
13243
13245
1
2
3
Nodes onthis face areconstrained.
Int. Point 1
Figure 10–15 Location of integration point 1 in element 206.
the 2841, 3241, 3245, 2845 face corresponds to the 1–2–3–4 face. After comparing these, you
will find we are interested in the point that corresponds to integration point 1.
To create history curves of stress and direct strain along the lug in element 206:
1. In the Results Tree, click mouse button 3 on History Output for the output database named
lug_plas_hard.odb. From the menu that appears, select Filter.
2. In the filter field, enter *MISES* to restrict the history output to just the Mises stress.
3. Click mouse button 3 on the MISES stress at element 206, integration point 1. From the menu
that appears, select Save As. Enter the name MISES and click OK.
4. Filter the history output using *E11* and save the E11 strain component at the same
integration point. Name the curve E11.
The MISES stress, rather than the component of the true stress tensor, is used because the
plasticity model defines plastic yield in terms of Mises stress. The E11 strain component is used
because it is the largest component of the total strain tensor at this point; using it clearly shows the
elastic, as well as the plastic, behavior of the material at this integration point.
The curves appear in the XYData container. Each of the curves is a history (variable versus
time) plot. You must combine the plots, eliminating the time dependence, to produce the desired
stress-strain plot.
10–25
Abaqus ID:
Printed on:

EXAMPLE: CONNECTING LUG WITH PLASTICITY
To combine history curves to produce a stress-strain plot:
1. In the Results Tree, double-click XYData.
The Create XY Data dialog box appears.
2. Select Operate on XY data, and click Continue.
The Operate on XY Data dialog box appears. Expand the Name field to see the full name of
each curve.
3. From the Operators listed, select combine(X,X).
combine( ) appears in the text field at the top of the dialog box.
4. In the XY Data field, select the stress and strain curves.
5. Click Add to Expression. The expression combine("E11", "MISES") appears in the
text field. In this expression "E11"will determine the X-values and "MISES"will determine
the Y-values in the combined plot.
6. Save the combined data object by clicking Save As at the bottom of the dialog box.
The Save XY Data As dialog box appears. In the Name text field, type SVE11; and click
OK to close the dialog box.
7. To view the combined stress-strain plot, click Plot Expression at the bottom of the dialog
box.
8. Click Cancel to close the dialog box.
9. Click in the prompt area to cancel the current procedure.
This X–Y plot would be clearer if the limits on the X- and Y-axes were changed.
To customize the stress-strain curve:
1. Double-click either axis to open the Axis Options dialog box.
2. Set the maximum value of the X-axis (E11 strain) to 0.09, the maximum value of the Y-axis
(MISES stress) to 500 MPa, and the minimum value to 0.0 MPa.
3. Switch to the Title tabbed page, and customize the X- and Y-axis labels as shown in
Figure 10–16.
4. Click Dismiss to close the Axis Options dialog box.
5. It will also be helpful to display a symbol at each data point of the curve. Open the CurveOptions dialog box.
6. From the Curves field, select the stress-strain curve (SVE11).
The SVE11 data object is highlighted.
10–26
Abaqus ID:
Printed on:

EXAMPLE: CONNECTING LUG WITH PLASTICITY
Figure 10–16 Mises stress vs. direct strain (E11) along the lug in the corner element.
7. Toggle on Show symbol. Accept the defaults, and click Dismiss at the bottom of the dialog
box.
The stress-strain plot appears with a symbol at each data point of the curve.
You should now have a plot similar to the one shown in Figure 10–16. The stress-strain curve
shows that the material behavior was linear elastic for this integration point during the first two
increments of the simulation. In this plot it appears that the material remains linear during the third
increment of the analysis; however, it does yield during this increment. This illusion is created by
the extent of strain shown in the plot. If you limit the maximum strain displayed to 0.01 and set
the minimum value to 0.0, the nonlinear material behavior in the third increment can be seen more
clearly (see Figure 10–17).
This stress-strain curve contains another apparent error. It appears that the material yields at
250 MPa, which is well below the initial yield stress. However, this error is caused by the fact that
Abaqus/Viewer connects the data points on the curve with straight lines. If you limit the increment
size, the additional points on the graph will provide a better display of the material response and
show yield occurring at exactly 380 MPa.
The results from this second simulation indicate that the lug will withstand this 60 kN load if
the steel hardens after it yields. Taken together, the results of the two simulations demonstrate that
it is very important to determine the actual post-yield hardening behavior of the steel. If the steel
has very little hardening, the lug may collapse under the 60 kN load. Whereas if it has moderate
hardening, the lug will probably withstand the load although there will be extensive plastic yielding
10–27
Abaqus ID:
Printed on:

EXAMPLE: BLAST LOADING ON A STIFFENED PLATE
Figure 10–17 Mises stress vs. direct strain (E11) along the
lug in the corner element. Maximum strain 0.01.
in the lug (see Figure 10–14). However, even with plastic hardening, the factor of safety for this
loading will probably be very small.
10.5 Example: blast loading on a stiffened plate
The previous example illustrated some of the convergence difficulties that may be encountered when
solving problems involving a nonlinear material response using implicit methods. We will now focus
on solving a problem involving plasticity using explicit dynamics. As will become evident shortly,
convergence difficulties are not an issue in this case since iteration is not required for explicit methods.
In this example you will assess the response of a stiffened square plate subjected to a blast loading
in Abaqus/Explicit. The plate is firmly clamped on all four sides and has three equally spaced stiffeners
welded to it. The plate is constructed of 25 mm thick steel and is 2 m square. The stiffeners are made
from 12.5 mm thick plate and have a depth of 100 mm. Figure 10–18 shows the plate geometry and
material properties in more detail. Since the plate thickness is significantly smaller than any other global
dimensions, shell elements can be used to model the plate.
The purpose of this example is to determine the response of the plate and to see how it changes as
the sophistication of the material model increases. Initially, we analyze the behavior with the standard
elastic-plastic material model. Subsequently, we study the effects of including material damping and
rate-dependent material properties.
10–28
Abaqus ID:
Printed on:

EXAMPLE: BLAST LOADING ON A STIFFENED PLATE
True Stress (Pa) True Plastic Strain
300 × 106 0.000
350 × 106 0.025
375 × 106 0.100
394 × 106 0.200
400 × 106 0.350
Material propertiesGeneral properties:
Elastic properties:
Plastic properties:
ρ 7800 kg/m3
=
E 210 109
Pa×=ν 0.3=
Plate thickness = 25 mm
Stiffener thickness = 12.5 mm
2.0 m
2.0 m
0.1 m
0.5 m (stiffeners are evenly spaced)
2
1
3
1
Figure 10–18 Problem description for blast load on a stiffened plate.
10–29
Abaqus ID:
Printed on:
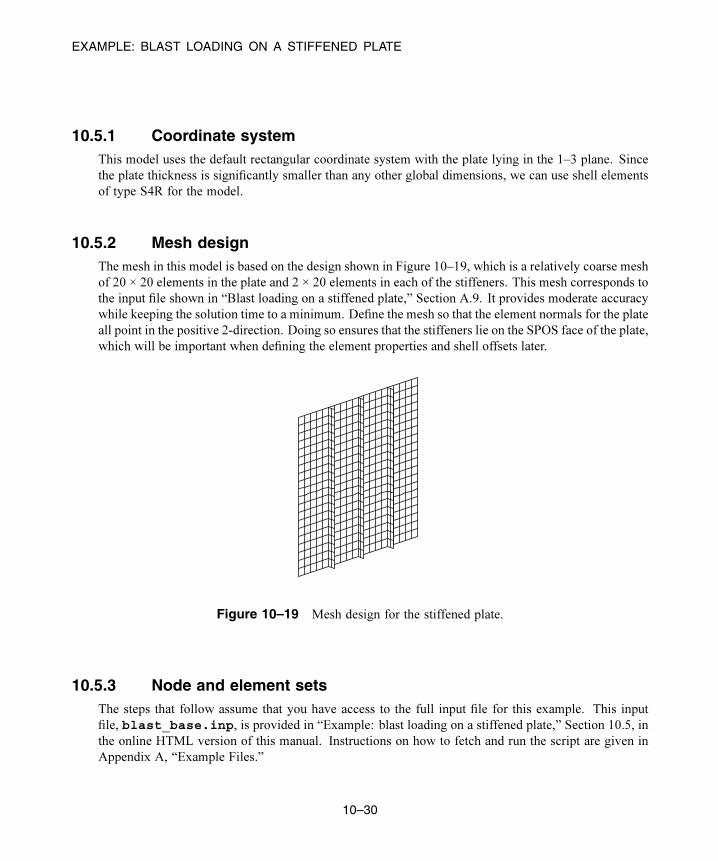
EXAMPLE: BLAST LOADING ON A STIFFENED PLATE
10.5.1 Coordinate systemThis model uses the default rectangular coordinate system with the plate lying in the 1–3 plane. Since
the plate thickness is significantly smaller than any other global dimensions, we can use shell elements
of type S4R for the model.
10.5.2 Mesh designThe mesh in this model is based on the design shown in Figure 10–19, which is a relatively coarse mesh
of 20 × 20 elements in the plate and 2 × 20 elements in each of the stiffeners. This mesh corresponds to
the input file shown in “Blast loading on a stiffened plate,” Section A.9. It provides moderate accuracy
while keeping the solution time to a minimum. Define the mesh so that the element normals for the plate
all point in the positive 2-direction. Doing so ensures that the stiffeners lie on the SPOS face of the plate,
which will be important when defining the element properties and shell offsets later.
Figure 10–19 Mesh design for the stiffened plate.
10.5.3 Node and element setsThe steps that follow assume that you have access to the full input file for this example. This input
file, blast_base.inp, is provided in “Example: blast loading on a stiffened plate,” Section 10.5, in
the online HTML version of this manual. Instructions on how to fetch and run the script are given in
Appendix A, “Example Files.”
10–30
Abaqus ID:
Printed on:

EXAMPLE: BLAST LOADING ON A STIFFENED PLATE
If you wish to create the entire model using Abaqus/CAE, please refer to “Example: blast loading
on a stiffened plate,” Section 10.5 of Getting Started with Abaqus: Interactive Edition.
Figure 10–20 shows all the sets necessary to apply the element properties, loads, and boundary
conditions.
node set EDGE
node set EDGE
element set STIFFMAX(center elements onthe central stiffener)
node set NOUT(center node of plate)
element set STIFF
Figure 10–20 Node and element sets.
This model includes all the nodes on the perimeter of the plate in a node set called EDGE. These nodeswill have a completely fixed boundary condition. For output purposes, a node set called NOUT has been
created containing the node at the center of the plate. Plate elements are included in an element set called
PLATE, and the stiffener elements in an element set called STIFF. In addition, the four center elements
on the central stiffener are included in an element set called STIFFMAX; this element set is for output
purposes. These center elements will be subject to the maximum bending stress in the stiffeners.
10.5.4 Reviewing the input file—the model dataWe now review the model data for this problem, including the model description, node and element
definitions, element properties and shell offsets, material properties, boundary conditions, and amplitude
definition for the blast load.
Model description
The *HEADING option is used to include a title and model description in the input file. The heading
is useful for future reference purposes and may contain information on model revisions and the
evolution of complex models. It can be several lines long, but only the first line will be printed as
a title on the output pages. Below is the *HEADING definition used for this analysis.
10–31
Abaqus ID:
Printed on:

EXAMPLE: BLAST LOADING ON A STIFFENED PLATE
*HEADINGBlast load on a flat plate with stiffenersS4R elements (20x20 mesh)Normal stiffeners (20x2)SI units (kg, m, s, N)
Nodal coordinates and element connectivity
The mesh is shown in Figure 10–19 and the sets are shown in Figure 10–20.
Element properties and shell offset
Each element set in the model has the section properties shown below. To insure that each set of
elements refers to a material definition, the appropriate MATERIAL parameter has been included
on each *SHELL SECTION option:
*SHELL SECTION, MATERIAL=STEEL, ELSET=PLATE, OFFSET=SPOS0.025,*SHELL SECTION, MATERIAL=STEEL, ELSET=STIFF0.0125,
The material named STEEL will be defined in the next section. Setting OFFSET to SPOS
offsets the midsurface of the plate one half of the shell thickness away from the nodes. The effect
is to make the PLATE nodes lie on the SPOS shell face instead of on the shell midsurface. The
purpose of the shell offset in this case is to allow the stiffeners to butt up against the plate without
overlapping any material with the plate. Figure 10–21 shows the cross-section of the joint between
the stiffener and panel using the OFFSET parameter.
base plate
stiffener
plate midsurface
plate nodes lie on shell SPOS or SNEG face
stiffener nodes lieon shell midsurface
Figure 10–21 Stiffener joint in which the plate’s midsurface is offset from its nodes.
10–32
Abaqus ID:
Printed on:
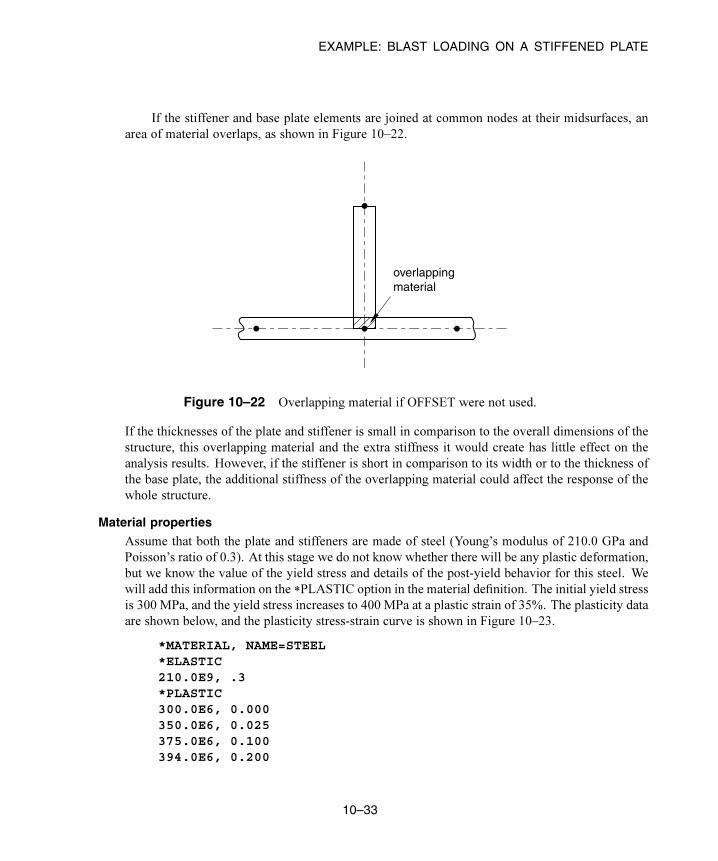
EXAMPLE: BLAST LOADING ON A STIFFENED PLATE
If the stiffener and base plate elements are joined at common nodes at their midsurfaces, an
area of material overlaps, as shown in Figure 10–22.
overlappingmaterial
Figure 10–22 Overlapping material if OFFSET were not used.
If the thicknesses of the plate and stiffener is small in comparison to the overall dimensions of the
structure, this overlapping material and the extra stiffness it would create has little effect on the
analysis results. However, if the stiffener is short in comparison to its width or to the thickness of
the base plate, the additional stiffness of the overlapping material could affect the response of the
whole structure.
Material properties
Assume that both the plate and stiffeners are made of steel (Young’s modulus of 210.0 GPa and
Poisson’s ratio of 0.3). At this stage we do not know whether there will be any plastic deformation,
but we know the value of the yield stress and details of the post-yield behavior for this steel. We
will add this information on the *PLASTIC option in the material definition. The initial yield stress
is 300 MPa, and the yield stress increases to 400 MPa at a plastic strain of 35%. The plasticity data
are shown below, and the plasticity stress-strain curve is shown in Figure 10–23.
*MATERIAL, NAME=STEEL*ELASTIC210.0E9, .3*PLASTIC300.0E6, 0.000350.0E6, 0.025375.0E6, 0.100394.0E6, 0.200
10–33
Abaqus ID:
Printed on:

EXAMPLE: BLAST LOADING ON A STIFFENED PLATE
400.0E6, 0.350*DENSITY7800.0,
Figure 10–23 Yield stress versus plastic strain.
During the analysis Abaqus calculates values of yield stress from the current values of plastic
strain. As discussed earlier, the process of lookup and interpolation is most efficient when the
data are regular—when the stress-strain data are at equally spaced values of plastic strain. To
avoid having the user input regular data, Abaqus/Explicit automatically regularizes the data. In
this case the data are regularized by Abaqus/Explicit by expanding to 15 equally spaced points with
increments of 0.025.
To illustrate the error message that is produced when Abaqus/Explicit cannot regularize the
material data, try setting the regularization tolerance, RTOL, to 0.001 and include one additional
data pair, as shown below:
*MATERIAL, NAME=STEEL, RTOL=0.001*ELASTIC210.0E9, .3*PLASTIC300.0E6, 0.0349.0E6, 0.001350.0E6, 0.025375.0E6, 0.10394.0E6, 0.20400.0E6, 0.35
additional data pair
10–34
Abaqus ID:
Printed on:

EXAMPLE: BLAST LOADING ON A STIFFENED PLATE
The combination of the low tolerance value (RTOL=0.001) and the small interval in the user-defined
data leads to difficulty in regularizing this material definition. The following error message is
produced in the status (.sta) file:
***ERROR: Failed to regularize material data. Please checkyour input data to see if they meet both criteria asexplained in the "MATERIAL DEFINITION" section of the
Abaqus Analysis User's Manual. In general, regularization ismore difficult if the smallest interval defined by the useris small compared to the range of the independent variable.
Before continuing, set the regularization tolerance back to the default value (0.03) and remove the
additional pair of data points.
Boundary conditions
The edges of the plate are fully constrained using the node set EDGE defined previously.
*BOUNDARYEDGE, ENCASTRE
Alternatively, you could specify the degrees of freedom by number.
*BOUNDARYEDGE, 1, 6
Amplitude definition for blast load
Since the plate will be subjected to a load that varies with time, you must define an appropriate
amplitude curve to describe the variation. The amplitude curve shown in Figure 10–24 can be
defined as follows:
*AMPLITUDE, NAME=BLAST0.0, 0.0, 1.0E-3, 7.0E5, 10E-3, 7.0E5, 20E-3, 0.050E-3, 0.0
The pressure increases rapidly from zero at the start of the analysis to its maximum of 7.0 × 10⁵ Pa
in 1 ms, at which point it remains constant for 9 ms before dropping back to zero in another 10 ms.
It then remains at zero for the remainder of the analysis.
10.5.5 Reviewing the input file—the history dataThe history data begin with the *STEP option, which is followed immediately by a title for the step.
After the title, this step is defined as a *DYNAMIC, EXPLICIT procedure with a time period of 50 ms.
*STEPApply blast loading
10–35
Abaqus ID:
Printed on:

EXAMPLE: BLAST LOADING ON A STIFFENED PLATE
Figure 10–24 Pressure load as a function of time.
** Explicit analysis with a time duration of 50 ms*DYNAMIC, EXPLICIT, 50E-03
Applying the blast load
The *DLOAD option is used to apply the blast load to the plate. It is important to ensure that the
pressure load is being applied in the correct direction. Positive pressure is defined as acting in the
direction of the positive shell normal. For shell elements the positive normal direction is obtained
using the right-hand rule about the nodes of the element, as shown in Figure 10–25. Since the
magnitude of the load has been defined in the BLAST amplitude definition, we need to apply only a
unit pressure under *DLOAD. This pressure is applied so that it pushes against the top of the plate
(where the stiffeners are on the bottom of the plate). Such a pressure load will place the outer fibers
of the stiffeners in tension. The full option is shown below:
*DLOAD, AMPLITUDE=BLASTPLATE, P, 1.0
10–36
Abaqus ID:
Printed on:

EXAMPLE: BLAST LOADING ON A STIFFENED PLATE
1 2
4 3
positive shell normal
positive pressure load
Figure 10–25 Definition of positive pressure load.
Output requests
To check on the progress of the solution, use the *MONITOR option to monitor the deflection
at the center node of the plate during the analysis. In this example we monitor the out-of-plane
displacement at the center node by adding the following command to the input file:
*MONITOR, NODE=<center node number>, DOF=2
For the input file shown in “Blast loading on a stiffened plate,” Section A.9, the node number at the
center of the plate is 411.Set the number of intervals during the step at which field data are written to the output database
file (ODB) to 25. This ensures that the selected data outputs are written every 2 ms since the total
time for the step is 50 ms. In general, you should try to limit the number of frames written during the
analysis to keep the size of the output database file reasonable. In this analysis saving information
every 2 ms should provide sufficient detail to study the response of the structure visually. This
model requests field output for the stresses, plastic strains, and nodal displacements.
*OUTPUT, FIELD, NUMBER INTERVAL=25*ELEMENT OUTPUTS,PE*NODE OUTPUTU
A more detailed set of output can be saved for selected parts of the model by using the
*OUTPUT, HISTORY option. Set the TIME INTERVAL parameter to 1.0E−4 seconds to write the
required data at 500 points during the analysis. Write von Mises stress (MISES), equivalent plastic
strain (PEEQ), and volumetric strain rate (ERV) for the elements in element set STIFFMAX. Sincethe nodes that will undergo the maximum displacements are at the center of the plate, use node
set NOUT to output displacement and velocity history data for the center of the plate. In addition,
save the following energy variables: kinetic energy (ALLKE), recoverable strain energy (ALLSE),
work done (ALLWK), energy lost in plastic dissipation (ALLPD), total internal energy (ALLIE),
10–37
Abaqus ID:
Printed on:

EXAMPLE: BLAST LOADING ON A STIFFENED PLATE
energy lost in viscous dissipation (ALLVD), artificial energy (ALLAE), and the energy balance
(ETOTAL).
*OUTPUT, HISTORY, TIME INTERVAL=1.0E-4*ELEMENT OUTPUT, ELSET=STIFFMAXPEEQ, MISES*NODE OUTPUT, NSET=NOUTU, V*ENERGY OUTPUTALLKE, ALLSE, ALLWK, ALLPD, ALLIE, ALLVD, ALLAE, ETOTAL*END STEP
Save your input in a file called blast_base.inp since these results will serve as a base state
from which to compare subsequent analyses. Run the analysis using the following command:
abaqus job=blast_base
10.5.6 OutputWe now examine the output information contained in the status (.sta) file.
Status file
Information concerning model information, such as total mass and center of mass, and the initial
stable time increment can be found at the top of the status file. The 10 most critical elements (i.e.,
those resulting in the smallest time increments) in rank order are also shown here. If your model
contains a few elements that are much smaller than the rest of the elements in the model, the small
elements will be the most critical elements and will control the stable time increment. The stable
time increment information in the status file can indicate elements that are adversely affecting the
stable time increment, allowing you to change the mesh to improve the situation, if necessary. It
is ideal to have a mesh of roughly uniformly sized elements. In this example the mesh is uniform;
thus, the 10 most critical elements share the same minimum time increment. The beginning of the
status file is shown below.
-------------------------------------------------------------------------------MODEL INFORMATION (IN GLOBAL X-Y COORDINATES)
-------------------------------------------------------------------------------
Total mass in model = 838.50Center of mass of model = ( 1.000000E+00, 3.488372E-03, 1.000000E+00)
Moments of Inertia :About Center of Mass About Origin
I(XX) 2.849002E+02 1.123410E+03I(YY) 5.519482E+02 2.228948E+03I(ZZ) 2.712609E+02 1.109771E+03I(XY) -8.881784E-16 -2.925000E+00I(YZ) -8.881784E-16 -2.925000E+00I(ZX) -2.273737E-13 -8.385000E+02
-------------------------------------------------------------------------------STABLE TIME INCREMENT INFORMATION
10–38
Abaqus ID:
Printed on:

EXAMPLE: BLAST LOADING ON A STIFFENED PLATE
-------------------------------------------------------------------------------
The stable time increment estimate for each element is based onlinearization about the initial state.
Initial time increment = 8.18646E-06
Statistics for all elements:Mean = 1.30938E-05Standard deviation = 2.69043E-06
Most critical elements :Element number Rank Time increment Increment ratio
----------------------------------------------------------1022 1 8.186462E-06 1.000000E+001024 2 8.186462E-06 1.000000E+001027 3 8.186462E-06 1.000000E+001029 4 8.186462E-06 1.000000E+001033 5 8.186462E-06 1.000000E+001038 6 8.186462E-06 1.000000E+002022 7 8.186462E-06 1.000000E+002024 8 8.186462E-06 1.000000E+002027 9 8.186462E-06 1.000000E+002029 10 8.186462E-06 1.000000E+00
During the analysis the status file can be viewed to monitor the progress of the analysis. Shown
below is the beginning of the solution progress portion of the status file. Note that many more
increments have been carried out than you would expect from an Abaqus/Standard analysis and
that the output database file is being written at intervals of 2 ms.
-------------------------------------------------------------------------------SOLUTION PROGRESS
-------------------------------------------------------------------------------
STEP 1 ORIGIN 0.0000
Total memory used for step 1 is approximately 1.7 megabytes.Global time estimation algorithm will be used.Scaling factor: 1.0000Variable mass scaling factor at zero increment: 1.0000
STEP TOTAL CPU STABLE CRITICAL KINETICINCREMENT TIME TIME TIME INCREMENT ELEMENT ENERGY MONITOR
0 0.000E+00 0.000E+00 00:00:00 8.186E-06 1024 0.000E+00 0.000E+00ODB Field Frame Number 0 of 25 requested intervals at increment zero.ODB Field Frame Number 0 of 5 requested intervals at increment zero.
244 2.005E-03 2.005E-03 00:00:00 8.182E-06 2035 4.499E+03 4.224E-03ODB Field Frame Number 1 of 25 requested intervals at 2.005236E-03
488 4.001E-03 4.001E-03 00:00:01 8.181E-06 2018 1.105E+04 2.506E-02ODB Field Frame Number 2 of 25 requested intervals at 4.001393E-03
733 6.005E-03 6.005E-03 00:00:01 8.138E-06 2030 5.879E+03 4.555E-02ODB Field Frame Number 3 of 25 requested intervals at 6.004539E-03
978 8.003E-03 8.003E-03 00:00:02 8.133E-06 2030 1.727E+02 4.976E-02ODB Field Frame Number 4 of 25 requested intervals at 8.002752E-03
1224 1.000E-02 1.000E-02 00:00:02 8.139E-06 2030 2.299E+03 4.461E-02ODB Field Frame Number 5 of 25 requested intervals at 1.000000E-02
Output for the node referenced on the *MONITOR option is also included in this file.
10–39
Abaqus ID:
Printed on:

EXAMPLE: BLAST LOADING ON A STIFFENED PLATE
10.5.7 Postprocessing
Run Abaqus/Viewer by entering the following command at the operating system prompt:
abaqus viewer odb=blast_base
Changing the view
The default view is isometric, which does not provide a particularly clear view of the plate. To
improve the viewpoint, rotate the view using the options in the View menu or the tools in the ViewManipulation toolbar. Specify the view and select the viewpoint method for rotating the view.
Enter the X-, Y-, and Z-coordinates of the viewpoint vector as 1,0.5,1 and the coordinates of the
up vector as 0,1,0.
Verifying shell section assignment
You can also visualize the shell thickness while postprocessing the results. From the main menu bar,
selectView→ODB Display Options. In theODB Display Options dialog box, toggle onRendershell thickness and click Apply. If the model looks correct, as shown in Figure 10–26, toggle
off this option and click OK before proceeding with the rest of the postprocessing instructions.
Otherwise, correct the section assignment and rerun the job.
Animation of results
As noted in earlier examples, animating your results will provide a general understanding of the
dynamic response of the plate under the blast loading. First, plot the deformed model shape. Then,
create a time-history animation of the deformed shape. Use the Animation Options dialog box to
change the mode to Play once.You will see from the animation that as the blast loading is applied, the plate begins to deflect.
Over the duration of the load the plate begins to vibrate and continues to vibrate after the blast load
has dropped to zero. The maximum displacement occurs at approximately 8 ms, and a displaced
plot of that state is shown in Figure 10–27. The animation images can be saved to a file for playback
at a later time.
To save the animation:
1. From the main menu bar, select Animate→Save As.
The Save Image Animation dialog box appears.
2. In the Settings field, enter the file name blast_base.
The format of the animation can be specified as AVI, QuickTime, VRML, or Compressed
VRML.
3. Choose the QuickTime format, and click OK.
10–40
Abaqus ID:
Printed on:

EXAMPLE: BLAST LOADING ON A STIFFENED PLATE
1
2
3
Figure 10–26 Plate with shell thickness displayed.
Figure 10–27 Displaced shape at 8 ms.
The animation is saved as blast_base.mov in your current directory. Once saved,
your animation can be played external to Abaqus/Viewer using industry-standard animation
software.
History output
Since it is not easy to see the deformation of the plate from the deformed plot, it is desirable to view
the deflection response of the central node in the form of a graph. The displacement of the node in
the center of the plate is of particular interest since the largest deflection occurs at this node.
Display the displacement history of the central node, as shown in Figure 10–28 (with
displacements in millimeters).
10–41
Abaqus ID:
Printed on:
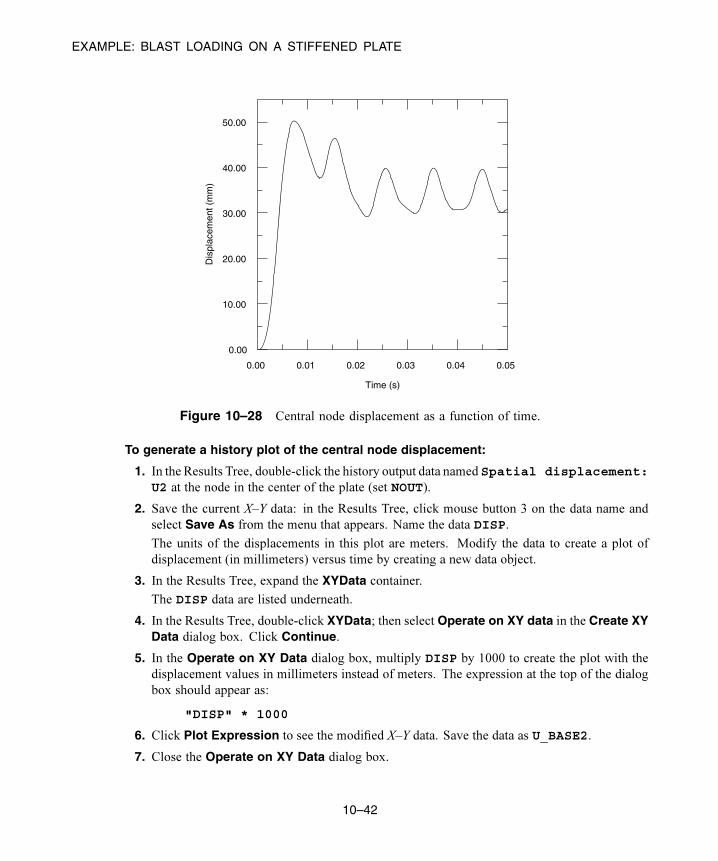
EXAMPLE: BLAST LOADING ON A STIFFENED PLATE
0.00 0.01 0.02 0.03 0.04 0.05
0.00
10.00
20.00
30.00
40.00
50.00
Time (s)
Dis
plac
emen
t (m
m)
Figure 10–28 Central node displacement as a function of time.
To generate a history plot of the central node displacement:
1. In the Results Tree, double-click the history output data named Spatial displacement:U2 at the node in the center of the plate (set NOUT).
2. Save the current X–Y data: in the Results Tree, click mouse button 3 on the data name and
select Save As from the menu that appears. Name the data DISP.
The units of the displacements in this plot are meters. Modify the data to create a plot of
displacement (in millimeters) versus time by creating a new data object.
3. In the Results Tree, expand the XYData container.
The DISP data are listed underneath.
4. In the Results Tree, double-click XYData; then select Operate on XY data in the Create XYData dialog box. Click Continue.
5. In the Operate on XY Data dialog box, multiply DISP by 1000 to create the plot with the
displacement values in millimeters instead of meters. The expression at the top of the dialog
box should appear as:
"DISP" * 1000
6. Click Plot Expression to see the modified X–Y data. Save the data as U_BASE2.
7. Close the Operate on XY Data dialog box.
10–42
Abaqus ID:
Printed on:

EXAMPLE: BLAST LOADING ON A STIFFENED PLATE
8. Click the Axis Options tool in the toolbox. In the Axis Options dialog box, change the
Y-axis title to Displacement (mm). Click OK to close the dialog box. The resulting plot
is shown in Figure 10–28.
The plot shows that the displacement reaches a maximum of 50.2 mm at 7.7 ms and then
oscillates after the blast load is removed.
The other quantities saved as history output in the output database are the total energies of the model.
The energy histories can help identify possible shortcomings in the model as well as highlight
significant physical effects. Display the histories of five different energy output variables—ALLAE,
ALLIE, ALLKE, ALLPD, and ALLSE.
To generate history plots of the model energies:
1. Save the history results for the ALLAE, ALLIE, ALLKE, ALLPD, and ALLSE output
variables as X–Y data. A default name is given to each curve; rename each according to its
output variable name: ALLAE, ALLKE, etc.
2. In the Results Tree, expand the XYData container.
The ALLAE, ALLIE, ALLKE, ALLPD, and ALLSE X–Y data objects are listed underneath.
3. Select ALLAE, ALLIE, ALLKE, ALLPD, and ALLSE using [Ctrl]+Click; click mouse button 3,
and select Plot from the menu that appears to plot the energy curves.
4. To more clearly distinguish between the different curves in the plot, open the Curve Optionsdialog box and change their line styles.
• For the curve ALLSE, select a dashed line style.
• For the curve ALLPD, select a dotted line style.
• For the curve ALLAE, select a chain dashed line style.
• For the curve ALLIE, select the second thinnest line type.
5. To change the position of the legend, open the Chart Legend Options dialog box and switch
to the Area tabbed page.
6. In the Position region of this page, toggle on Inset and click Dismiss. Drag the legend in
the viewport so that it fits within the grid, as shown in Figure 10–29.
We can see that once the load has been removed and the plate vibrates freely, the kinetic energy
increases as the strain energy decreases. When the plate is at its maximum deflection and, therefore,
has its maximum strain energy, it is almost entirely at rest, causing the kinetic energy to be at a
minimum.
Note that the plastic strain energy rises to a plateau and then rises again. From the plot of
kinetic energy we can see that the second rise in plastic strain energy occurs when the plate has
rebounded from its maximum displacement and is moving back in the opposite direction. We are,
therefore, seeing plastic deformation on the rebound after the blast pulse.
10–43
Abaqus ID:
Printed on:

EXAMPLE: BLAST LOADING ON A STIFFENED PLATE
0.00 0.01 0.02 0.03 0.04 0.05
[x10 ]3
0.00
10.00
20.00
30.00
40.00
50.00
Time (s)
ALLAEALLIEALLKEALLPDALLSE
Ene
rgy
(J)
Figure 10–29 Energy quantities as a function of time.
Even though there is no indication that hourglassing is a problem in this analysis, study the
artificial strain energy to make sure. As discussed in Chapter 4, “Using Continuum Elements,”
artificial strain energy or “hourglass stiffness” is the energy used to control hourglass deformation,
and the output variable ALLAE is the accumulated artificial strain energy. This discussion on
hourglass control applies equally to shell elements. Since energy is dissipated as plastic deformation
as the plate deforms, the total internal energy is much greater than the elastic strain energy alone.
Therefore, it is most meaningful in this analysis to compare the artificial strain energy to an energy
quantity that includes the dissipated energy as well as the elastic strain energy. Such a variable is the
total internal energy, ALLIE, which is a summation of all internal energy quantities. The artificial
strain energy is approximately 2% of the total internal energy, indicating that hourglassing is not a
problem.
One thing we can notice from the deformed shape is that the central stiffener is subject to
almost pure in-plane bending. Using only two first-order, reduced-integration elements through the
depth of the stiffener is not sufficient to model in-plane bending behavior. While the solution from
this coarse mesh appears to be adequate since there is little hourglassing, for completeness we will
study how the solution changes when we refine the mesh of the stiffener. Use caution when you
refine the mesh, since mesh refinement will increase the solution time by increasing the number of
elements and decreasing the element size.
An input file for a model with a refined stiffener mesh is included in “Blast loading on a
stiffened plate,” Section A.9 (blast_refined.inp); four elements through the depth are used
to model the stiffener instead of two. This increase in the number of elements increases the solution
time by approximately 20%. In addition, the stable time increment decreases by approximately a
10–44
Abaqus ID:
Printed on:

EXAMPLE: BLAST LOADING ON A STIFFENED PLATE
factor of two as a result of the reduction of the smallest element dimension in the stiffeners. Since
the total increase in solution time is a combination of the two effects, the solution time of the refined
mesh increases by approximately a factor of 1.2 × 2, or 2.4, over that of the original mesh.
Figure 10–30 shows the histories of artificial energy for both the original mesh and the mesh
with the refined stiffeners. The artificial energy is slightly lower in the refined mesh. As a result,
we would not expect the results to change significantly from the original to the refined mesh.
0.00 0.01 0.02 0.03 0.04 0.05
[x10 ]3
0.00
0.20
0.40
0.60
0.80
1.00
Time (s)
OriginalRefinedA
rtifi
cial
Ene
rgy
(J)
Figure 10–30 Artificial energy in the original and refined meshes.
Figure 10–31 shows that the displacement of the plate’s central node is almost identical in both cases,
indicating that the original mesh is capturing the overall response adequately. One advantage of the
refined mesh, however, is that it better captures the variation of stress and plastic strain through the
stiffeners.
Contour plots
In this section you will use the contour plotting capability of Abaqus/Viewer to display the von
Mises stress and equivalent plastic strain distributions in the plate. Use the model with the refined
stiffener mesh to create the plots; from the main menu bar, select File→Open and choose the file
blast_refined.odb.
To generate contour plots of the von Mises stress and equivalent plastic strain:
1. From the list of variable types on the left side of the Field Output toolbar, select Primary.
10–45
Abaqus ID:
Printed on:

EXAMPLE: BLAST LOADING ON A STIFFENED PLATE
0.00 0.01 0.02 0.03 0.04 0.05
0.00
10.00
20.00
30.00
40.00
50.00
Time (s)
Dis
plac
emen
t (m
m)
OriginalRefined
Figure 10–31 Central node displacement history for
the original and refined meshes.
2. From the list of output variables in the center of the toolbar, select S. The stress invariants andcomponents are available in the next list to the right. Select the Mises stress invariant.
3. From the main menu bar, select Result→Section Points.
4. In the Section Points dialog box that appears, select Top and bottom as the active locations
and click OK.
5. Select Plot→Contours→On deformed shape, or use the tool from the toolbox.
Abaqus plots the contours of the von Mises stress on both the top and bottom faces of each
shell element. To see this more clearly, rotate the model in the viewport.
The view that you set earlier for the animation exercise should be changed so that the stress
distribution is clearer.
6. Change the view back to the default isometric view using the tool in the Views toolbar.
Tip: If the Views toolbar is not visible, select View→Toolbars→Views from the
main menu bar.
Figure 10–32 shows a contour plot of the von Mises stress at the end of the analysis.
10–46
Abaqus ID:
Printed on:

EXAMPLE: BLAST LOADING ON A STIFFENED PLATE
(Avg: 75%)SPOS, (fraction = 1.0)SNEG, (fraction = −1.0)S, Mises
+1.058e+07+3.632e+07+6.206e+07+8.780e+07+1.135e+08+1.393e+08+1.650e+08+1.908e+08+2.165e+08+2.422e+08+2.680e+08+2.937e+08+3.195e+08
X
Y
Z
Figure 10–32 Contour plot of von Mises stress at 50 ms.
7. Similarly, contour the equivalent plastic strain. Select Primary from the list of variable types
on the left side of the Field Output toolbar and select PEEQ from the list of output variables
next to it.
Figure 10–33 shows a contour plot of the equivalent plastic strain at the end of the analysis.
10.5.8 Reviewing the analysisThe objective of this analysis is to study the deformation of the plate and the stress in various parts of
the structure when it is subjected to a blast load. To judge the accuracy of the analysis, you will need to
consider the assumptions and approximations made and identify some of the limitations of the model.
Damping
Undamped structures continue to vibrate with constant amplitude. Over the 50ms of this simulation,
the frequency of the oscillation can be seen to be approximately 100 Hz. A constant amplitude
vibration is not the response that would be expected in practice since the vibrations in this type
of structure would tend to die out over time and effectively disappear after 5–10 oscillations. The
energy loss typically occurs by a variety of mechanisms including frictional effects at the supports
and damping by the air.
Consequently, we need to consider the presence of damping in the analysis to model this energy
loss. The energy dissipated by viscous effects, ALLVD, is nonzero in the analysis, indicating that
10–47
Abaqus ID:
Printed on:
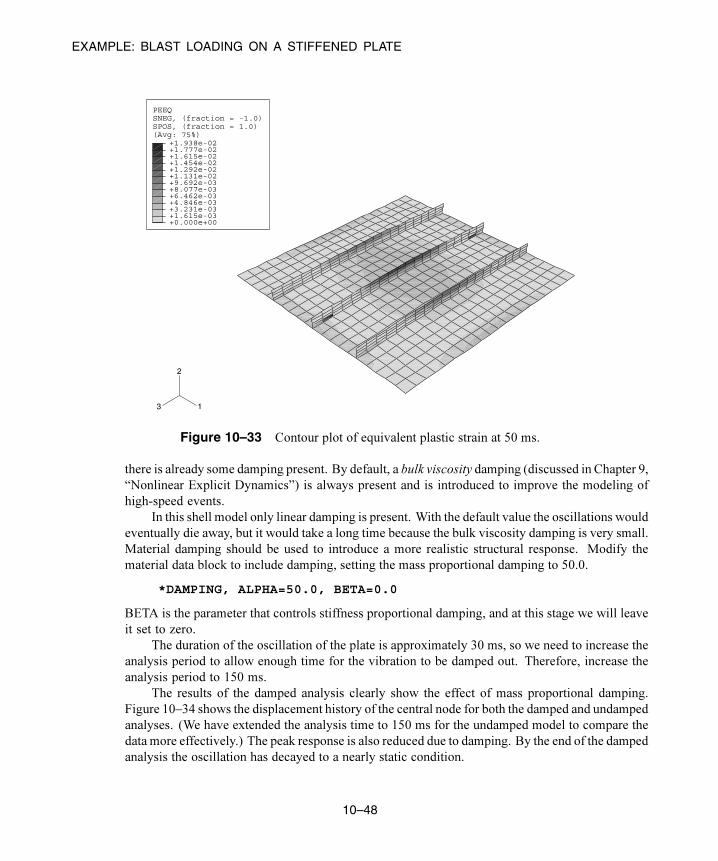
EXAMPLE: BLAST LOADING ON A STIFFENED PLATE
(Avg: 75%)SPOS, (fraction = 1.0)SNEG, (fraction = -1.0)PEEQ
+0.000e+00+1.615e-03+3.231e-03+4.846e-03+6.462e-03+8.077e-03+9.692e-03+1.131e-02+1.292e-02+1.454e-02+1.615e-02+1.777e-02+1.938e-02
1
2
3
Figure 10–33 Contour plot of equivalent plastic strain at 50 ms.
there is already some damping present. By default, a bulk viscosity damping (discussed in Chapter 9,
“Nonlinear Explicit Dynamics”) is always present and is introduced to improve the modeling of
high-speed events.
In this shell model only linear damping is present. With the default value the oscillations would
eventually die away, but it would take a long time because the bulk viscosity damping is very small.
Material damping should be used to introduce a more realistic structural response. Modify the
material data block to include damping, setting the mass proportional damping to 50.0.
*DAMPING, ALPHA=50.0, BETA=0.0
BETA is the parameter that controls stiffness proportional damping, and at this stage we will leave
it set to zero.
The duration of the oscillation of the plate is approximately 30 ms, so we need to increase the
analysis period to allow enough time for the vibration to be damped out. Therefore, increase the
analysis period to 150 ms.
The results of the damped analysis clearly show the effect of mass proportional damping.
Figure 10–34 shows the displacement history of the central node for both the damped and undamped
analyses. (We have extended the analysis time to 150 ms for the undamped model to compare the
data more effectively.) The peak response is also reduced due to damping. By the end of the damped
analysis the oscillation has decayed to a nearly static condition.
10–48
Abaqus ID:
Printed on:

EXAMPLE: BLAST LOADING ON A STIFFENED PLATE
0.00 0.05 0.10 0.15
0.00
10.00
20.00
30.00
40.00
50.00
Time (s)
Dis
plac
emen
t (m
m)
DampedUndamped
Figure 10–34 Damped and undamped displacement histories.
Rate dependence
Somematerials, such as mild steel, show an increase in the yield stress with increasing strain rate. In
this example the loading rate is high, so strain-rate dependence is likely to be important. The *RATE
DEPENDENT option is used with the *PLASTIC option to introduce strain-rate dependence.
Add the following to the *MATERIAL option block under the *PLASTIC option:
*RATE DEPENDENT40.0, 5.0
With this definition of rate-dependent behavior, the ratio of the dynamic yield stress to the
static yield stress ( ) is given for an equivalent plastic strain rate ( ), according to the equation
, where and are material constants (40.0 and 5.0 in this case).
When the *RATE DEPENDENT option is included, the yield stress effectively increases as
the strain rate increases. Therefore, because the elastic modulus is higher than the plastic modulus,
we expect a stiffer response in the analysis with rate dependence. Both the displacement history
of the central portion of the plate shown in Figure 10–35 and the history of plastic strain shown in
Figure 10–36 confirm that the response is indeed stiffer when rate dependence is included.
10–49
Abaqus ID:
Printed on:

EXAMPLE: BLAST LOADING ON A STIFFENED PLATE
0.00 0.01 0.02 0.03 0.04 0.05
0.00
10.00
20.00
30.00
40.00
50.00
Time (s)
Dis
plac
emen
t (m
m)
No Rate DepRate Dep
Figure 10–35 Displacement of the central node with and without rate dependence.
0.00 0.01 0.02 0.03 0.04 0.05
[x10 ]3
0.00
5.00
10.00
15.00
20.00
25.00
30.00
35.00
40.00
Time (s)
No Rate DepRate Dep
Pla
stic
Ene
rgy
(J)
Figure 10–36 Plastic strain energy with and without rate dependence.
10–50
Abaqus ID:
Printed on:

HYPERELASTICITY
10.6 Hyperelasticity
We now turn our attention to another class of material nonlinearity, namely, the nonlinear elastic response
exhibited by rubber materials.
10.6.1 IntroductionThe stress-strain behavior of typical rubber materials, shown in Figure 10–37, is elastic but highly
nonlinear. This type of material behavior is called hyperelasticity. The deformation of hyperelastic
materials, such as rubber, remains elastic up to large strain values (often well over 100%).
Abaqus makes the following assumptions when modeling a hyperelastic material:
• The material behavior is elastic.
• The material behavior is isotropic.
• The simulation will include nonlinear geometric effects (NLGEOM=YES will be used).
In addition, Abaqus/Standard assumes the hyperelastic material is incompressible by default.
Abaqus/Explicit assumes the material is nearly incompressible (Poisson’s ratio is 0.475 by default).
Elastomeric foams are another class of highly nonlinear, elastic materials. They differ from rubber
materials in that they have very compressible behavior when subjected to compressive loads. They are
modeled with a separate material model in Abaqus and are not discussed in detail in this guide.
10.6.2 CompressibilityMost solid rubber materials have very little compressibility compared to their shear flexibility. This
behavior is not a problem with plane stress, shell, or membrane elements. However, it can be a problem
when using other elements, such as plane strain, axisymmetric, and three-dimensional solid elements.
For example, in applications where the material is not highly confined, it would be quite satisfactory to
assume that the material is fully incompressible: the volume of the material cannot change except for
thermal expansion. In cases where the material is highly confined (such as an O-ring used as a seal), the
compressibility must be modeled correctly to obtain accurate results.
Abaqus/Standard has a special family of “hybrid” elements that must be used to model the fully
incompressible behavior seen in hyperelastic materials. These “hybrid” elements are identified by the
letter ‘H’ in their name; for example, the hybrid form of the 8-node brick, C3D8, is called C3D8H.
Except for plane stress and uniaxial cases, it is not possible to assume that the material is fully
incompressible in Abaqus/Explicit because the program has nomechanism for imposing such a constraint
at each material calculation point. An incompressible material also has an infinite wave speed, resulting
in a time increment of zero. Therefore, we must provide some compressibility. The difficulty is that, in
many cases, the actual material behavior provides too little compressibility for the algorithms to work
efficiently. Thus, except for plane stress and uniaxial cases, the user must provide enough compressibility
for the code to work, knowing that this makes the bulk behavior of the model softer than that of the actual
10–51
Abaqus ID:
Printed on:

HYPERELASTICITY
Strain
Str
ess
Figure 10–37 Typical stress-strain curve for rubber.
material. Some judgment is, therefore, required to decide whether or not the solution is sufficiently
accurate, or whether the problem can be modeled at all with Abaqus/Explicit because of this numerical
limitation. We can assess the relative compressibility of a material by the ratio of its initial bulk modulus,
, to its initial shear modulus, . Poisson’s ratio, , also provides a measure of compressibility since
it is defined as
Table 10–2 provides some representative values.
Table 10–2 Relationship between compressibility and Poisson’s ratio.
Poisson’s ratio
10 0.452
20 0.475
50 0.490
100 0.495
1,000 0.4995
10,000 0.49995
If no value is given for the material compressibility, by default Abaqus/Explicit assumes
, corresponding to Poisson’s ratio of 0.475. Since typical unfilled elastomers have ratios in the
range of 1,000 to 10,000 ( to ) and filled elastomers have ratios in the
range of 50 to 200 ( to ), this default provides much more compressibility than is
10–52
Abaqus ID:
Printed on:

HYPERELASTICITY
available in most elastomers. However, if the elastomer is relatively unconfined, this softer modeling of
the material’s bulk behavior usually provides quite accurate results. Unfortunately, in cases where the
material is highly confined—such as when it is in contact with stiff, metal parts and has a very small
amount of free surface, especially when the loading is highly compressive—it may not be feasible to
obtain accurate results with Abaqus/Explicit.
If you are defining the compressibility rather than accepting the default value in Abaqus/Explicit,
an upper limit of 100 is suggested for the ratio of . Larger ratios introduce high frequency noise
into the dynamic solution and require the use of excessively small time increments.
10.6.3 Strain energy potentialAbaqus uses a strain energy potential (U), rather than a Young’s modulus and Poisson’s ratio, to relate
stresses to strains in hyperelastic materials. Several different strain energy potentials are available: a
polynomial model, the Ogdenmodel, the Arruda-Boyce model, theMarlowmodel, and the van derWaals
model. Simpler forms of the polynomial model are also available, including the Mooney-Rivlin, neo-
Hookean, reduced polynomial, and Yeoh models.
The polynomial form of the strain energy potential is one that is commonly used. Its form is
where U is the strain energy potential; is the elastic volume ratio; and are measures of the
distortion in the material; and N, , and are material parameters, which may be functions of
temperature. The parameters describe the shear behavior of the material, and the parameters
introduce compressibility. If the material is fully incompressible (a condition not allowed in
Abaqus/Explicit), all the values of are set to zero and the second part of the equation shown above
can be ignored. If the number of terms, N, is one, the initial shear modulus, , and bulk modulus, ,
are given by
and
If the material is also incompressible, the equation for the strain energy density is
This expression is commonly referred to as the Mooney-Rivlin material model. If is also zero, the
material is called neo-Hookean.
The other hyperelastic models are similar in concept and are described in “Hyperelasticity,”
Section 19.5 of the Abaqus Analysis User’s Manual.
10–53
Abaqus ID:
Printed on:

HYPERELASTICITY
You must provide Abaqus with the relevant material parameters to use a hyperelastic material.
For the polynomial form these are and . It is possible that you will be supplied with these
parameters when modeling hyperelastic materials; however, more likely you will be given test data for
the materials that you must model. Fortunately, Abaqus can accept test data directly and calculate the
material parameters for you (using a least squares fit).
10.6.4 Defining hyperelastic behavior using test dataA convenient way of defining a hyperelastic material is to supply Abaqus with experimental test data.
Abaqus then calculates the constants using a least squares method. Abaqus can fit data for the following
experimental tests:
• Uniaxial tension and compression
• Equibiaxial tension and compression
• Planar tension and compression (pure shear)
• Volumetric tension and compression
The deformation modes seen in these tests and the Abaqus input options used to define the data for
each are shown in Figure 10–38. Unlike plasticity data, the test data for hyperelastic materials must be
given to Abaqus as nominal stress and nominal strain values.
Volumetric compression data only need to be given if the material’s compressibility is important.
Normally in Abaqus/Standard it is not important, and the default fully incompressible behavior is used.
As noted earlier, Abaqus/Explicit assumes a small amount of compressibility if no volumetric test data
are given.
Obtaining the best material model from your data
The quality of the results from a simulation using hyperelastic materials strongly depends on the
material test data that you provide Abaqus. Typical tests are shown in Figure 10–38. There are
several things that you can do to help Abaqus calculate the best possible material parameters.
Wherever possible, try to obtain experimental test data from more than one deformation
state—this allows Abaqus to form a more accurate and stable material model. However, some
of the tests shown in Figure 10–38 produce equivalent deformation modes for incompressible
materials. The following are equivalent tests for incompressible materials:
• Uniaxial tension ↔ Equibiaxial compression
• Uniaxial compression ↔ Equibiaxial tension
• Planar tension ↔ Planar compression
You do not need to include data from a particular test if you already have data from another test that
models a particular deformation mode.
In addition, the following may improve your hyperelastic material model:
10–54
Abaqus ID:
Printed on:

HYPERELASTICITY
13
2
TENSION COMPRESSION
UNIAXIAL TEST
BIAXIAL TEST
13
2
PLANAR TEST
13
2
VOLUMETRIC TEST
13
2
Figure 10–38 Deformation modes and Abaqus input options for the various experimental
tests for defining hyperelastic material behavior.
• Obtain test data for the deformation modes that are likely to occur in your simulation. For
example, if your component is loaded in compression, make sure that your test data include
compressive, rather than tensile, loading.
• Both tension and compression data are allowed, with compressive stresses and strains entered
as negative values. If possible, use compression or tension data depending on the application,
10–55
Abaqus ID:
Printed on:

EXAMPLE: AXISYMMETRIC MOUNT
since the fit of a single material model to both tensile and compressive data will normally be
less accurate than for each individual test.
• Try to include test data from the planar test. This test measures shear behavior, which can be
very important.
• Provide more data at the strain magnitudes that you expect the material will be subjected to
during the simulation. For example, if the material will only have small tensile strains, say
under 50%, do not provide much, if any, test data at high strain values (over 100%).
• Perform one-element simulations of the experimental tests and compare the results Abaqus
calculates to the experimental data. If the computational results are poor for a particular
deformation mode that is important to you, try to obtain more experimental data for that
deformation mode. These one-element simulations are very easy to perform in Abaqus/CAE.
Please consult the Abaqus/CAE User’s Manual for details.
Stability of the material model
It is common for the material model determined from the test data to be unstable at certain strain
magnitudes. Abaqus performs a stability check to determine the strain magnitudes where unstable
behavior will occur and prints a warning message in the data (.dat) file. You should check this
information carefully since your simulation may not converge if any part of the model experiences
strains beyond the stability limits. The stability checks are done for specific deformations, so it
is possible for the material to be unstable at the strain levels indicated if the deformation is more
complex. Likewise, it is possible for the material to become unstable at lower strain levels if the
deformation is more complex. In Abaqus/Standard your simulation may not converge if a part of
the model exceeds the stability limits.
See “Hyperelastic behavior of rubberlike materials,” Section 19.5.1 of the Abaqus Analysis
User’s Manual, for suggestions on improving the accuracy and stability of the test data fit.
10.7 Example: axisymmetric mount
You have been asked to find the axial stiffness of the rubber mount shown in Figure 10–39 and to identify
any areas of high maximum principal stress that might limit the fatigue life of the mount. The mount
is bonded at both ends to steel plates. It will experience axial loads up to 5.5 kN distributed uniformly
across the plates. The cross-section geometry and dimensions are given in Figure 10–39.
You can use axisymmetric elements for this simulation since both the geometry of the structure and
the loading are axisymmetric. Therefore, you only need to model a plane through the component: each
element represents a complete 360° ring. You will examine the static response of the mount; therefore,
you will use Abaqus/Standard for your analysis.
10–56
Abaqus ID:
Printed on:

EXAMPLE: AXISYMMETRIC MOUNT
z
r
Plane to be modeled
centerline
1050
50
60
origin
r=47.16
All dimensions in mm.
100
Figure 10–39 Axisymmetric mount.
10.7.1 SymmetryYou do not need to model the whole section of this axisymmetric component because the problem is
symmetric about a horizontal line through the center of the mount. By modeling only half of the section,
you can use half as many elements and, hence, approximately half the number of degrees of freedom.
This significantly reduces the run time and storage requirements for the analysis or, alternatively, allows
you to use a more refined mesh.
Many problems contain some degree of symmetry. For example, mirror symmetry, cyclic symmetry,
axisymmetry, or repetitive symmetry (shown in Figure 10–40) are common. More than one type of
symmetry may be present in the structure or component that you want to model.
When modeling just a portion of a symmetric component, you have to add boundary conditions to
make the model behave as if the whole component were being modeled. You may also have to adjust the
applied loads to reflect the portion of the structure actually being modeled. Consider the portal frame in
Figure 10–41.
The frame is symmetric about the vertical line shown in the figure. To maintain symmetry in the
model, any nodes on the symmetry line must be constrained from translating in the 1-direction and from
rotating about the 2- or 3-axes (degrees of freedom 5 and 6). Therefore, the symmetry constraints are
*BOUNDARY<node>,1<node>,5,6
In the frame problem the load is applied along the model’s symmetry plane; therefore, only half of
the total value should be applied to the portion you are modeling.
10–57
Abaqus ID:
Printed on:

EXAMPLE: AXISYMMETRIC MOUNT
Mirror symmetry Axisymmetry
Cyclic symmetry
Repetitive symmetry
Figure 10–40 Various forms of symmetry.
Base built in
ENCASTREboundarycondition
Point load, P, appliedon center line
Appliedload=P/2
XSYMMboundarycondition
1
2
3
Figure 10–41 Symmetric portal frame.
In axisymmetric analyses using axisymmetric elements, such as this rubber mount example, we
need model only the cross-section of the component. The element formulation automatically includes
the effects of axial symmetry.
10–58
Abaqus ID:
Printed on:

EXAMPLE: AXISYMMETRIC MOUNT
10.7.2 Coordinate systemThe model in this example uses the default r–z (1–2) axisymmetric coordinate system in this simulation.
Its origin is placed at the level of the bottom of the plate, as shown in Figure 10–39.
10.7.3 Mesh designThe mesh in this example uses a 30 × 15 mesh of first-order, axisymmetric, hybrid solid elements
(CAX4H) for the rubber mount. Only the bottom half of the mount is specified in the model, as shown
in Figure 10–42.
1
2
3
Line of symmetry
Steel plate
Rubber
Figure 10–42 Mesh for the rubber mount.
Hybrid elements are required in this example because the material is fully incompressible. The elements
are not expected to be subjected to bending, so shear locking in these fully integrated elements should
not be a concern. Model the steel plates with a single layer of incompatible mode elements (CAX4I)
because it is possible that the plates may bend as the rubber underneath them deforms.
The node and element numbers from the input file given in “Axisymmetric mount,” Section A.10,
are shown in Figure 10–43 and Figure 10–44. These will be used in the discussion of this example. If
you build the model yourself, it will probably have different node and element numbers.
10.7.4 Preprocessing—creating the modelThe steps that follow assume that you have access to the full input file for this example. This input
file, mount.inp, is provided in “Blast loading on a stiffened plate,” Section A.9, in the online HTML
10–59
Abaqus ID:
Printed on:

EXAMPLE: AXISYMMETRIC MOUNT
1 2 3 4 5 6 7 8 9 10 11 12 13 14 15 16 17 18
101 102 103 104 105 106 107 108 109 110 111 112 113 114 115 116 117 118
201 202 203 204 205 206 207 208 209 210 211 212 213 214 215 216 217 218 219
301 302 303 304 305 306 307 308 309 310 311 312 313 314 315 316 317 318 319
401 402 403 404 405 406 407 408 409 410 411 412 413 414 415 416 417 418 419
501 502 503 504 505 506 507 508 509 510 511 512 513 514 515 516 517 518 519 520
601 602 603 604 605 606 607 608 609 610 611 612 613 614 615 616 617 618 619 620
701 702 703 704 705 706 707 708 709 710 711 712 713 714 715 716 717 718 719 720
801 802 803 804 805 806 807 808 809 810 811 812 813 814 815 816 817 818 819 820 821
901 902 903 904 905 906 907 908 909 910 911 912 913 914 915 916 917 918 919 920 921
1
2
3
Node numbers increase by 100
Nodenumbers
increase by 1
Figure 10–43 Node numbers.
1 2 3 4 5 6 7 8 9 10 11 12 13 14 15 16 17 18
101 102 103 104 105 106 107 108 109 110 111 112 113 114 115 116 117 118
201 202 203 204 205 206 207 208 209 210 211 212 213 214 215 216 217 218
301 302 303 304 305 306 307 308 309 310 311 312 313 314 315 316 317 318 319
401 402 403 404 405 406 407 408 409 410 411 412 413 414 415 416 417 418 419
501 502 503 504 505 506 507 508 509 510 511 512 513 514 515 516 517 518 519
601 602 603 604 605 606 607 608 609 610 611 612 613 614 615 616 617 618 619 620
701 702 703 704 705 706 707 708 709 710 711 712 713 714 715 716 717 718 719 720
801 802 803 804 805 806 807 808 809 810 811 812 813 814 815 816 817 818 819 820
901 902 903 904 905 906 907 908 909 910 911 912 913 914 915 916 917 918 919 920
1
2
3
Element numbers increase by 100
Elementnumbers
increase by 1
Figure 10–44 Element numbers.
version of this manual. Instructions on how to fetch and run the script are given in Appendix A, “Example
Files.”
If you use Abaqus/CAE or another preprocessor to create the mesh for this model, try to create a
node set MIDDLE containing all the nodes on the symmetry plane, and apply a pressure load of 0.50 MPa
to the bottom of the plate (Figure 10–45). Check that this pressure results in a total applied load of 5.5 kN
(5.5 kN = 0.50 MPa × ). If you can’t create the mesh, the Abaqus input options used to create
the model can be found in “Axisymmetric mount,” Section A.10.
10–60
Abaqus ID:
Printed on:

EXAMPLE: AXISYMMETRIC MOUNT
Node set: MIDDLE
Pressure:0.5 MPa
1
2
3
Figure 10–45 Node set MIDDLE and pressure loading.
If you wish to create the entire model using Abaqus/CAE, refer to “Example: axisymmetric mount,”
Section 10.7 of Getting Started with Abaqus: Interactive Edition.
10.7.5 Reviewing the input file—the model dataWe review the model data, including the geometry definition (nodes and elements) and the material
properties.
Model description
The input file should contain a suitable description of the analysis.
*HEADINGAxisymmetric mount analysis under axial loadingS.I. Units (m, kg, N, sec)
Nodal coordinates and element connectivity
There will be at least two *ELEMENT option blocks in the input file since two different types of
elements are used in the simulation. It is a good idea to check that the element types are correct and
that the element sets containing the elements have descriptive names. The *ELEMENT options in
your input file should look like
*ELEMENT, TYPE=CAX4I, ELSET=PLATE*ELEMENT, TYPE=CAX4H, ELSET=RUBBER
10–61
Abaqus ID:
Printed on:

EXAMPLE: AXISYMMETRIC MOUNT
Node sets
Check that the node set MIDDLE has been created. If it has not, add it using an editor.
Property definition
Two element property definitions are required: one for the elements modeling the rubber and one
for those modeling the plates. The following element property definitions should be in your model:
*SOLID SECTION, MATERIAL=RUBBER, ELSET=RUBBER*SOLID SECTION, MATERIAL=STEEL, ELSET=PLATE
Material properties: hyperelastic model for the rubber
You have been given some experimental test data, shown in Figure 10–46, for the rubber material
used in the mount. Three different sets of test data—a uniaxial test, a biaxial test, and a planar (shear)
test—are available. You decide to have Abaqus calculate the appropriate hyperelastic material
constants from the test data. You are not sure how large the strains will be in the rubber mount,
but you suspect that they will be under 2.0.
UNIAXIAL
BIAXIAL
PLANAR
Nom
inal
Str
ess
(Pa)
Nominal Strain
Figure 10–46 Material test data for the rubber material.
10–62
Abaqus ID:
Printed on:

EXAMPLE: AXISYMMETRIC MOUNT
The test data for the biaxial and planar tests go well beyond this magnitude, so you decide to
perform a one-element simulation of the experimental tests to confirm that the coefficients that
Abaqus calculates from the test data are adequate.
Use a first-order, polynomial strain energy function to model the rubber material. Indicate
these choices by using the N=1 and POLYNOMIAL parameters on the *HYPERELASTIC option.
Use the TEST DATA INPUT parameter to indicate that Abaqus should find the material constants
from the test data you will provide. The test data are given on options that immediately follow the
*HYPERELASTIC option. The data should be entered as nominal stress and the corresponding
nominal strain, with negative values indicating compression. You may be able to enter the data
directly using your preprocessor (for instance, if you are using Abaqus/CAE); otherwise, you will
have to add it to your input file with an editor. The material definition for the rubber will look like
*MATERIAL, NAME=RUBBER*HYPERELASTIC, N=1, POLYNOMIAL, TEST DATA INPUT*UNIAXIAL TEST DATA0.054E6, 0.03800.152E6, 0.13380.254E6, 0.22100.362E6, 0.34500.459E6, 0.46000.583E6, 0.62420.656E6, 0.85100.730E6, 1.4268
*BIAXIAL TEST DATA0.089E6, 0.02000.255E6, 0.14000.503E6, 0.42000.958E6, 1.49001.703E6, 2.75002.413E6, 3.4500
*PLANAR TEST DATA0.055E6, 0.06900.324E6, 0.28280.758E6, 1.38621.269E6, 3.03451.779E6, 4.0621
The input file for the single-element simulation of the three experimental tests is shown in
“Test fit of hyperelastic material data,” Section A.11. The computational and experimental results
for the various types of tests are compared in Figure 10–47, Figure 10–48, and Figure 10–49. The
Abaqus and experimental results for the biaxial tension test match very well. The computational and
experimental results for the uniaxial tension and planar tests match well at strains less than 100%.
10–63
Abaqus ID:
Printed on:

EXAMPLE: AXISYMMETRIC MOUNT
BIAX_COMP
BIAXIAL
Nom
inal
Str
ess
(Pa)
Nominal Strain
Figure 10–47 Comparison of experimental data (BIAXIAL)
and Abaqus results (BIAX_COMP): biaxial tension.
UNI_COMP
UNIAXIAL
Nom
inal
Str
ess
(Pa)
Nominal Strain
Figure 10–48 Comparison of experimental data (UNIAXIAL)
and Abaqus results (UNI_COMP): uniaxial tension.
The hyperelastic material model created from these material test data is probably not suitable for
10–64
Abaqus ID:
Printed on:

EXAMPLE: AXISYMMETRIC MOUNT
PLANAR_COMP
PLANAR
Nom
inal
Str
ess
(Pa)
Nominal Strain
Figure 10–49 Comparison of experimental data (PLANAR) and
Abaqus results (PLANAR_COMP): planar shear.
use in general simulations where the strains may be larger than 100%. However, the model will be
adequate for this simulation if the principal strains remain within the strain magnitudes where the
data and the hyperelastic model fit well. If you find that the results are beyond these magnitudes or
if you are asked to perform a different simulation, you will have to insist on getting better material
data. Otherwise, you will not be able to have much confidence in your results.
Material properties: elastic properties for the steelThe steel is modeled with linear elastic properties only ( = 200 GPa, = 0.3) because the loads
should not be large enough to cause inelastic deformations. Thus, the material option blocks for the
steel are
*MATERIAL, NAME=STEEL*ELASTIC2.0E11, 0.3
10.7.6 Reviewing the input—the history dataWe now discuss the history data associated with this problem, including the time incrementation
parameters, boundary conditions, loading, and output requests.
10–65
Abaqus ID:
Printed on:

EXAMPLE: AXISYMMETRIC MOUNT
Including nonlinear geometry and specifying the initial increment size
When hyperelastic materials are used in a model, Abaqus assumes that it may undergo large
deformations. But large deformations and other nonlinear geometric effects are included only if
the NLGEOM parameter is set to YES on the *STEP option. Therefore, you must include it in this
simulation or Abaqus will terminate the analysis with an input error. The *STEP option should
look like
*STEP, NLGEOM=YES
The simulation will be a static analysis with a total step time of 1.0. Specify the initial time
increment to be 1/100th of the total step time. The procedure option block should look like
*STATIC.01, 1.0
Boundary conditions
Specify symmetry boundary conditions on the nodes lying on the symmetry plane. In this model
the symmetry conditions prevent the nodes from moving in degree of freedom 2 (axially), as shown
in Figure 10–50.
1
2
3
Figure 10–50 Boundary conditions on the rubber mount.
Symmetry conditions that constrain motion in the global 2-direction can be applied using the
YSYMM type boundary condition, or you can simply constrain the 2-direction. In this case the
*BOUNDARY option block has the following format:
*BOUNDARYMIDDLE, 2, 2, 0.0
10–66
Abaqus ID:
Printed on:

EXAMPLE: AXISYMMETRIC MOUNT
No boundary constraints are needed in the radial direction (global 1-direction) because the
axisymmetric nature of the model does not allow the structure to move as a rigid body in the radial
direction. Abaqus will allow nodes to move in the radial direction, even those initially on the axis
of symmetry (i.e., those with a radial coordinate of 0.0), if no boundary conditions are applied to
their radial displacements (degree of freedom 1). Since you want to let the mount deform radially in
this analysis, do not apply any boundary conditions; again, Abaqus will prevent rigid body motions
automatically.
Loading
The mount must carry a maximum axial load of 5.5 kN, spread uniformly over the steel plates. A
distributed load is, therefore, applied to the bottom of the steel plate. The magnitude of the pressure
is given by
If you generated the pressure loading using a preprocessor, a *DLOAD option block with many
data lines may be present in the input file.
*DLOAD1, P1, 0.50E62, P1, 0.50E6
...29, P1, 0.50E630, P1, 0.50E6
For the element and node numbering discussed here, the pressure is applied to face 1 of all the
elements in element set PLATE. This allows us to use a much more compact format for the data
lines of the *DLOAD option block.
*DLOADPLATE, P1, 0.50E6
Output requests
Write the preselected variables and nominal strains as field output to the output database file. In
addition, write the displacement of one of the nodes on the bottom of the steel plate to the output
database file so that the stiffness of the mount can be calculated. You will need to create a node set
containing the node. The output option blocks in your model should be similar to the following:
*NSET, NSET=OUT1,*OUTPUT, FIELD, VARIABLE=PRESELECT*ELEMENT OUTPUTNE,*OUTPUT, HISTORY
10–67
Abaqus ID:
Printed on:

EXAMPLE: AXISYMMETRIC MOUNT
*NODE OUTPUT, NSET=OUTU,
Ensure that the end of the step definition is clearly marked with an *END STEP option.
10.7.7 Running the analysisStore your input options in a file called mount.inp. The input options for the model discussed in the
above sections can be found in “Axisymmetric mount,” Section A.10. Since the nonlinear nature of the
simulation means that it may take some time to complete, use the following command to run the analysis
in the background:
abaqus job=mount
When the job has completed, check the data file, mount.dat, for errors. If there are any, correctthe input file and rerun the analysis. If necessary, compare your input with that shown in “Axisymmetric
mount,” Section A.10.
10.7.8 ResultsWe briefly review the results associated with the polynomial fit of the test data.
The hyperelastic material parameters
In this simulation you specified that the material is incompressible ( =0). The incompressibility
is assumed since no volumetric test data were provided. To simulate compressible behavior, you
must provide volumetric test data in addition to the other test data. You also specified that Abaqus
should use a first-order, polynomial strain energy function. This form of the hyperelasticity model
is known as the Mooney-Rivlin material model.
The hyperelastic material coefficients— , , and —that Abaqus calculates from the
material test data are given in the data file, mount.dat, provided that you used the *PREPRINT,
MODEL=YES option in the model data section of the input file. The material test data are also
written in the file so that you can ensure that Abaqus used the correct data, as shown below.
M A T E R I A L D E S C R I P T I O N
MATERIAL NAME: RUBBER
HYPERELASTIC MATERIAL PROPERTIES
UNIAXIAL TEST DATA
NOMINAL STRAIN NOMINAL STRESS(TEST) NOMINAL STRESS(ABAQUS)3.8000E-02 5.4000E+04 3.9605E+040.1338 1.5200E+05 1.2803E+050.2210 2.5400E+05 1.9764E+05
10–68
Abaqus ID:
Printed on:

EXAMPLE: AXISYMMETRIC MOUNT
0.3450 3.6200E+05 2.8404E+050.4600 4.5900E+05 3.5477E+050.6242 5.8300E+05 4.4505E+050.8510 6.5600E+05 5.5627E+051.427 7.3000E+05 8.0275E+05
HYPERELASTIC MATERIAL PROPERTIES
BIAXIAL TEST DATA
NOMINAL STRAIN NOMINAL STRESS(TEST) NOMINAL STRESS(ABAQUS)2.0000E-02 8.9000E+04 4.1264E+040.1400 2.5500E+05 2.2551E+050.4200 5.0300E+05 4.6078E+051.490 9.5800E+05 1.0063E+062.750 1.7030E+06 1.7767E+063.450 2.4130E+06 2.3301E+06
HYPERELASTIC MATERIAL PROPERTIES
PLANAR TEST DATA
NOMINAL STRAIN NOMINAL STRESS(TEST) NOMINAL STRESS(ABAQUS)6.9000E-02 5.5000E+04 9.0339E+040.2828 3.2400E+05 2.9189E+051.386 7.5800E+05 8.3431E+053.034 1.2690E+06 1.4500E+064.062 1.7790E+06 1.8235E+06
HYPERELASTICITY - MOONEY-RIVLIN STRAIN ENERGY
D1 C10 C01
0.00000000 176050.524 4332.63031
If there were any problems with the stability of the hyperelastic material model, warning
messages would be given before the material parameters. The material model is stable at all
strains with these material test data and this strain energy function. However, if you specified that
a second-order (N=2), polynomial strain energy function be used, you would see the following
warnings in the data file:
*HYPERELASTIC, N=2, POLYNOMIAL, TEST DATA INPUT***WARNING: UNSTABLE HYPERELASTIC MATERIAL
FOR UNIAXIAL TENSION WITH A NOMINAL STRAIN LARGER THAN 6.9700FOR UNIAXIAL COMPRESSION WITH A NOMINAL STRAIN LESS THAN -0.9795FOR BIAXIAL TENSION WITH A NOMINAL STRAIN LARGER THAN 5.9800FOR BIAXIAL COMPRESSION WITH A NOMINAL STRAIN LESS THAN -0.6458FOR PLANE TENSION WITH A NOMINAL STRAIN LARGER THAN 7.0400FOR PLANE COMPRESSION WITH A NOMINAL STRAIN LESS THAN -0.8756
POLYNOMIAL STRAIN ENERGY FUNCTION WITH N = 2D1 C10 C01D2 C20 C11 C02
0.0000E+00 0.1934E+06 -148.20.0000E+00 -805.7 180.0 -3.967
10–69
Abaqus ID:
Printed on:

EXAMPLE: AXISYMMETRIC MOUNT
If you only had the uniaxial test data available for this problem, you would find that the
Mooney-Rivlin material model Abaqus creates would have unstable material behavior above
certain strain magnitudes.
10.7.9 PostprocessingUse Abaqus/Viewer to look at the analysis results by issuing the following command at the operating
system prompt:
abaqus viewer odb=mount
Calculating the stiffness of the mount
Determine the stiffness of the mount by creating an X–Y plot of the displacement of the steel plate
as a function of the applied load. You will first create a plot of the vertical displacement of the node
on the steel plate for which you wrote data to the output database file. Data were written for the
node in set OUT in this model.
To create a history curve of vertical displacement and swap the X- and Y-axes:
1. In the Results Tree, expand the History Output container underneath the output database
named mount.odb.
2. Locate and select the vertical displacement U2 at the node in set OUT.
3. Click mouse button 3, and select Save As from the menu that appears to save the X–Y data.
The Save XY Data As dialog box appears.
4. Type the name DISP, and click OK.
5. In the Results Tree, double-click XYData.
The Create XY Data dialog box appears.
6. Select Operate on XY data, and click Continue.The Operate on XY Data dialog box appears.
7. From the Operators listed, click swap(X).
swap( ) appears in the text field at the top of the dialog box.
8. In the XY Data field, double-click DISP.
The expression swap( "DISP" ) appears in the text field at the top of the dialog box.
9. Save the swapped data object by clicking Save As at the bottom of the dialog box.
The Save XY Data As dialog box appears.
10. In the Name text field, type SWAPPED; and click OK to close the dialog box.
11. To view the swapped plot of time-displacement, click Plot Expression at the bottom of the
Operate on XY Data dialog box.
10–70
Abaqus ID:
Printed on:

EXAMPLE: AXISYMMETRIC MOUNT
You now have a curve of time-displacement. What you need is a curve showing
force-displacement. This is easy to create because in this simulation the force applied to the
mount is directly proportional to the total time in the analysis. All you have to do to plot a
force-displacement curve is multiply the curve SWAPPED by the magnitude of the load (5.5 kN).
To multiply a curve by a constant value:
1. In the Operate on XY Data dialog box, click Clear Expression.
2. In the XY Data field, double-click SWAPPED.
The expression "SWAPPED" appears in the text field at the top of the dialog box. Your cursor
should be at the end of the text field.
3. Multiply the data object in the text field by the magnitude of the applied load by entering
*5500.
4. Save the multiplied data object by clicking Save As at the bottom of the dialog box.
The Save XY Data As dialog box appears.
5. In the Name text field, type FORCEDEF; and click OK to close the dialog box.
6. To view the force-displacement plot, click Plot Expression at the bottom of the Operate onXY Data dialog box.
You have now created a curve with the force-deflection characteristic of the mount (the axis
labels do not reflect this since you did not change the actual variable plotted). To get the stiffness,
you need to differentiate the curve FORCEDEF. You can do this by using the differentiate( )operator in the Operate on XY Data dialog box.
To obtain the stiffness:
1. In the Operate on XY Data dialog box, clear the current expression.
2. From the Operators listed, click differentiate(X).
differentiate( ) appears in the text field at the top of the dialog box.
3. In the XY Data field, double-click FORCEDEF.
The expression differentiate( "FORCEDEF" ) appears in the text field.
4. Save the differentiated data object by clicking Save As at the bottom of the dialog box.
The Save XY Data As dialog box appears.
5. In the Name text field, type STIFF; and click OK to close the dialog box.
6. To plot the stiffness-displacement curve, click Plot Expression at the bottom of the Operateon XY Data dialog box.
7. Click Cancel to close the dialog box.
8. Open the Axis Options dialog box and switch to the Title tabbed page.
10–71
Abaqus ID:
Printed on:

EXAMPLE: AXISYMMETRIC MOUNT
9. Customize the axis titles so they appear as shown in Figure 10–51.
STIFF
Displacement (m)
Sti
ffn
ess
(N/m
)
Figure 10–51 Stiffness characteristic of the mount.
10. Click Dismiss to close the Axis Options dialog box.
The stiffness of the mount increases by almost 100% as the mount deforms. This is a result of the
nonlinear nature of the rubber and the change in shape of the mount as it deforms. Alternatively, you
could have created the stiffness-displacement curve directly by combining all the operators above
into one expression.
To define the stiffness curve directly:
1. In the Results Tree, double-click XYData.
The Create XY Data dialog box appears.
2. Select Operate on XY data, and click Continue.
The Operate on XY Data dialog box appears.
3. Clear the current expression; and from the Operators listed, click differentiate(X).
differentiate( ) appears in the text field at the top of the dialog box.
4. From the Operators listed, click swap(X).
differentiate( swap( ) ) appears in the text field.
5. In the XY Data field, double-click DISP.
The expression differentiate( swap( "DISP" ) ) appears in the text field.
10–72
Abaqus ID:
Printed on:

EXAMPLE: AXISYMMETRIC MOUNT
6. Place the cursor in the text field directly after the swap( "DISP" ) data object, and type
*5500 to multiply the swapped data by the constant total force value.
differentiate( swap( "DISP" )*5500 ) appears in the text field.
7. Save the differentiated data object by clicking Save As at the bottom of the dialog box.
The Save XY Data As dialog box appears.
8. In the Name text field, type STIFFNESS; and click OK to close the dialog box.
9. Click Cancel to close the Operate on XY Data dialog box.
10. Customize the X- and Y-axis labels as they appear in Figure 10–51 if you have not already
done so.
11. In the Results Tree, click mouse button 3 on STIFFNESS underneath the XYData container
and select Plot from the menu that appears to view the plot in Figure 10–51 that shows the
variation of the mount’s axial stiffness as the mount deforms.
Model shape plots
You will now plot the undeformed and deformed model shapes of the mount. The latter plot will
allow you to evaluate the quality of the deformed mesh and to assess the need for mesh refinement.
To plot the undeformed and deformed model shapes:
1. From the main menu bar, select Plot→Undeformed Shape; or use the tool in the
Visualization module toolbox to plot the undeformed model shape (see Figure 10–52).
1
2
3
Figure 10–52 Undeformed model shape of the rubber mount.
2. Select Plot→Deformed Shape, or use the tool to plot the deformed model shape of the
mount (see Figure 10–53).
10–73
Abaqus ID:
Printed on:

EXAMPLE: AXISYMMETRIC MOUNT
1
2
3
Figure 10–53 Deformed model shape of the rubber under an applied load of 5500 N.
If the figure obscures the plot title, you can move the plot by clicking the tool and holding
down mouse button 1 to pan the deformed shape to the desired location. Alternatively, you can turn
the plot title off (Viewport→Viewport Annotation Options).The plate has been pushed up, causing the rubber to bulge at the sides. Zoom in on the bottom
left corner of the mesh using the tool from the View Manipulation toolbar. Click mouse
button 1, and hold it down to define the first corner of the new view; move the mouse to create
a box enclosing the viewing area that you want (Figure 10–54); and release the mouse button.
Alternatively, you can zoom and pan the plot by selecting View→Specify from the main menu bar.
You should have a plot similar to the one shown in Figure 10–54.
Badly distortedmesh
1
2
3
Figure 10–54 Distortion at the left-hand corner of the rubber mount model.
Some elements in this corner of the model are becoming badly distorted because the mesh
design in this area was inadequate for the type of deformation that occurs there. Although the shape
of the elements is fine at the start of the analysis, they become badly distorted as the rubber bulges
10–74
Abaqus ID:
Printed on:
EXAMPLE: AXISYMMETRIC MOUNT
outward, especially the element in the corner. If the loading were increased further, the element
distortion may become so excessive that the analysis may abort. “Mesh design for large distortions,”
Section 10.8, discusses how to improve the mesh design for this problem.
The keystoning pattern exhibited by the distorted elements in the bottom right-hand corner
of the model indicates that they are locking. A contour plot of the hydrostatic pressure stress in
these elements (without averaging across elements sharing common nodes) shows rapid variation
in the pressure stress between adjacent elements. This indicates that these elements are suffering
from volumetric locking, which was discussed earlier in “Selecting elements for elastic-plastic
problems,” Section 10.3, in the context of plastic incompressibility. Volumetric locking arises
in this problem from overconstraint. The steel is very stiff compared to the rubber. Thus, along
the bond line the rubber elements cannot deform laterally. Since these elements must also
satisfy incompressibility requirements, they are highly constrained and locking occurs. Analysis
techniques that address volumetric locking are discussed in “Techniques for reducing volumetric
locking,” Section 10.9.
Contouring the maximum principal stress
Plot the maximum in-plane principal stress in the model. Follow the procedure given below to
create a filled contour plot on the actual deformed shape of the mount with the plot title suppressed.
To contour the maximum principal stress:
1. By default, Abaqus/Viewer displays S, Mises as the primary field output variable. In the FieldOutput toolbar, select Max. Principal as the invariant.
Abaqus/Viewer automatically changes the current plot state to display a contour plot of the
maximum in-plane principal stresses on the deformed model shape.
2. Open the Contour Plot Options dialog box.
3. Drag the uniform contour intervals slider to 8.
4. Click OK to view the contour plot and to close the dialog box.
Create a display group showing only the elements in the rubber mount.
5. In the Results Tree, expand the Materials container underneath the output database file named
Mount.odb.
6. Click mouse button 3 on RUBBER, and select Replace from the menu that appears to replace
the current display with the selected elements.
7. The viewport display changes and displays only the rubber mount elements, as shown in
Figure 10–55.
10–75
Abaqus ID:
Printed on:

EXAMPLE: AXISYMMETRIC MOUNT
(Avg: 75%)S, Max. Principal
−4.882e+05−4.101e+05−3.321e+05−2.540e+05−1.759e+05−9.789e+04−1.984e+04+5.822e+04+1.363e+05
1
2
3
Maximum principal stress around 88.2 kPa
Largest principal stress (100 kPa) is in the distorted element
Figure 10–55 Contours of maximum principal stress in the rubber mount.
The maximum principal stress in the model, reported in the contour legend, is 136 kPa.
Although the mesh in this model is fairly refined and, thus, the extrapolation error should be
minimal, you may want to use the query tool to determine the more accurate integration point
values of the maximum principal stress.
When you look at the integration point values, you will discover that the peak value of
maximum principal stress occurs in one of the distorted elements in the bottom right-hand part
of the model. This value is likely to be unreliable because of the levels of element distortion and
volumetric locking. If this value is ignored, there is an area near the plane of symmetry where the
maximum principal stress is around 88.2 kPa.
The easiest way to check the range of the principal strains in the model is to display the
maximum and minimum values in the contour legend.
10–76
Abaqus ID:
Printed on:

MESH DESIGN FOR LARGE DISTORTIONS
To check the principal nominal strain magnitude:
1. From the main menu bar, select Viewport→Viewport Annotation Options.
The Viewport Annotation Options dialog box appears.
2. Click the Legend tab, and toggle on Show min/max values.
3. Click OK.
The maximum and minimum values appear at the bottom of the contour legend in the viewport.
4. In the Field Output toolbar, select Primary as the variable type if it is not already selected.
Abaqus/Viewer automatically changes the current plot state to display a contour plot of the
maximum in-plane principal stresses on the deformed model shape.
5. From the list of output variables, select NE.
6. From the list of invariants in the Field Output toolbar, select Max. Principal if it is not
already selected.
The contour plot changes to display values for maximum principal nominal strain. Note the
value of the maximum principal nominal strain from the contour legend.
7. From the list of invariants, select Min. Principal.
The contour plot changes to display values for minimum principal nominal strain. Note the
value of the minimum principal nominal strain from the contour legend.
The maximum and minimum principal nominal strain values indicate that the maximum
tensile nominal strain in the model is about 100% and the maximum compressive nominal strain
is about 56%. Because the nominal strains in the model remained within the range where the
Abaqus hyperelasticity model has a good fit to the material data, you can be fairly confident that
the response predicted by the mount is reasonable from a material modeling viewpoint.
10.8 Mesh design for large distortions
We know that the element distortions in the corners of the rubber mount are undesirable. The results
in these areas are unreliable; and if the load were increased, the analysis might fail. These problems
can be corrected by using a better mesh design. The mesh shown in Figure 10–56 is an example of
an alternate mesh design that might be used to reduce element distortion in the bottom left corner of
the rubber model. The issues surrounding the mesh distortion in the opposite corner are addressed in
“Techniques for reducing volumetric locking,” Section 10.9. The elements in the bottom left-hand corner
region are now much more distorted in the initial, undeformed configuration. However, as the analysis
progresses and the elements deform, their shape actually improves. The deformed shape plot, shown in
Figure 10–57, illustrates that the amount of element distortion in this region is reduced; however, the
level of mesh distortion in the bottom right-hand corner of the rubber model is still significant.
10–77
Abaqus ID:
Printed on:

MESH DESIGN FOR LARGE DISTORTIONS
1
2
3
Figure 10–56 Modified mesh to minimize element distortions in the
bottom left corner of the rubber model during the simulation.
1
2
3
Figure 10–57 Deformed shape of the modified mesh.
The contours of maximum principal stress (Figure 10–58) show that the very localized stress in that
corner has been reduced only slightly.
Mesh design for large-distortion problems is more difficult than it is for small-displacement
problems. A mesh must be produced where the shape of the elements is reasonable throughout the
analysis, not just at the start. You must estimate how the model will deform using experience, hand
calculations, or the results from a coarse finite element model.
10–78
Abaqus ID:
Printed on:

TECHNIQUES FOR REDUCING VOLUMETRIC LOCKING
1
2
3
-4.917e+05
(Ave. Crit.: 75%)S, Max. Principal
-4.917e+05-4.225e+05-3.533e+05-2.841e+05-2.149e+05-1.457e+05-7.652e+04-7.325e+03+6.187e+04+1.311e+05
Figure 10–58 Contours of maximum principal stress in the modified mesh.
10.9 Techniques for reducing volumetric locking
A small amount of compressibility is introduced into the rubber material model in order to alleviate
volumetric locking. Provided the amount of compressibility is small, the results obtained with a nearly
incompressible material will be very similar to those obtained with an incompressible material.
Compressibility is introduced by setting the material constant to a nonzero value. The value is
chosen so that the initial Poisson’s ratio, , is close to 0.5. The equations given in “Hyperelastic behavior
of rubberlike materials,” Section 19.5.1 of the Abaqus Analysis User’s Manual, can be used to relate
and in terms of and (the initial shear and bulk moduli, respectively) for the polynomial form of
the strain energy potential. For example, the hyperelastic material coefficients obtained earlier from the
test data (see “The hyperelastic material parameters” in “Example: axisymmetric mount,” Section 10.7)
were given as 176051 and 4332.63; thus, setting 5.E−7 yields 0.46.
A model incorporating compressibility with additional mesh refinement (to reduce mesh distortion)
is shown in Figure 10–59 (this mesh can be generated easily by changing the edge seeds in Abaqus/CAE
or another preprocessor). The deformed shape associated with this model is shown in Figure 10–60.
10–79
Abaqus ID:
Printed on:

RELATED Abaqus EXAMPLES
1
2
3
Figure 10–59 Modified mesh with refinement at both corners.
1
2
3
Figure 10–60 Deformed shape of the modified mesh.
It is clear from this figure that the mesh distortion has been reduced significantly in the critical regions of
the rubber model. Examining contour plots of the pressure (without averaging across elements) reveals
a smooth variation in pressure stress between elements. Thus, volumetric locking has been eliminated.
10.10 Related Abaqus examples
• “Pressurized rubber disc,” Section 1.1.7 of the Abaqus Benchmarks Manual
• “Necking of a round tensile bar,” Section 1.1.9 of the Abaqus Benchmarks Manual
• “Fitting of rubber test data,” Section 3.1.4 of the Abaqus Benchmarks Manual
• “Uniformly loaded, elastic-plastic plate,” Section 3.2.1 of the Abaqus Benchmarks Manual
10–80
Abaqus ID:
Printed on:

SUMMARY
10.11 Suggested reading
The following provides the interested user with additional references on material modeling.
General texts on materials
• Ashby, M. F., and D. R. H. Jones, Engineering Materials, Pergamon Press, 1980.
• Callister, W. D., Materials Science & Engineering—An Introduction, John Wiley, 1994.
• Pascoe, K. J., An Introduction to the Properties of Engineering Materials, Van Nostrand, 1978.
Plasticity
• SIMULIA, Metal Inelasticity in Abaqus.
• Lubliner, J., Plasticity Theory, Macmillan Publishing Co., 1990.
• Calladine, C. R., Engineering Plasticity, Pergamon Press, 1969.
Rubber elasticity
• SIMULIA, Modeling Rubber and Viscoelasticity with Abaqus.
• Gent, A., Engineering with Rubber (How to Design Rubber Components), Hanser Publishers,
1992.
10.12 Summary
• Abaqus contains an extensive library to model the behavior of various engineering materials. It
includes models for metal plasticity and rubber elasticity.
• The stress-strain data for the metal plasticity model must be defined in terms of true stress and true
plastic strain.
• The metal plasticity model in Abaqus assumes incompressible plastic behavior.
• For efficiency Abaqus/Explicit regularizes user-defined material curves by fitting them with curves
composed of equally spaced points.
• The hyperelastic material model in Abaqus/Standard allows true incompressibility. The hyperelastic
material model in Abaqus/Explicit does not: the default Poisson’s ratio for hyperelastic materials
in Abaqus/Explicit is 0.475. Some analyses may require increasing Poisson’s ratio to model
incompressibility more accurately.
• Polynomial, Ogden, Arruda-Boyce, Marlow, van derWaals, Mooney-Rivlin, neo-Hookean, reduced
polynomial, and Yeoh strain energy functions are available for rubber elasticity (hyperelasticity).
All models allow the material coefficients to be determined directly from experimental test data.
The test data must be specified as nominal stress and nominal strain values.
10–81
Abaqus ID:
Printed on:

SUMMARY
• Stability warnings may indicate that a hyperelastic material model is unsuitable for the strain ranges
you wish to analyze.
• The presence of symmetry can be used to reduce the size of a simulation since only part of the
component needs to be modeled. The effect of the rest of the component is represented by applying
appropriate boundary conditions.
• Mesh design for large-distortion problems is more difficult than for small-displacement problems.
The elements in the mesh must not become too distorted at any stage of the analysis.
• Volumetric locking can be alleviated by permitting a small amount of compressibility. Care must
be taken to ensure that the amount of compressibility introduced into the problem does not grossly
affect the overall results.
• The X–Y plotting capabilities in Abaqus/Viewer allow data in curves to be manipulated to create
new curves. Two curves or a curve and a constant can be added, subtracted, multiplied, or divided.
Curves can also be differentiated, integrated, and combined.
10–82
Abaqus ID:
Printed on:

GENERAL ANALYSIS PROCEDURES
11. Multiple Step Analysis
The general goal of an Abaqus simulation is to predict the response of a structure to applied loads. Recall
that in a general sense the term load in Abaqus refers to anything that induces a change in the response
of a structure from its initial state; for example, nonzero boundary conditions or applied displacements,
point forces, pressures, fields, etc. In some cases loads are relatively simple, such as a single set of
point loads on a structure. In other problems the loads applied to a structure can be very complex. For
example, different loads may be applied to different portions of the model in a particular sequence over
some period of time, or the magnitude of the loads may vary as a function of time. The term load history
is used to refer to such complex loading of a model.
In Abaqus the user divides the complete load history of the simulation into a number of steps. Each
step is a period of “time,” specified by the user, for which Abaqus calculates the response of the model
to a particular set of loads and boundary conditions. The user must specify the type of response, known
as the analysis procedure, during each step and may change analysis procedures from step to step. For
example, static dead loads, perhaps gravitational loads, could be applied to a structure in one step; and
the dynamic response of the loaded structure to earthquake accelerations could be calculated in the next
step. Both implicit and explicit analyses can contain multiple steps; however, implicit and explicit steps
cannot be combined in the same analysis job. To combine a series of implicit and explicit steps, the
results transfer (or import) capability can be used. This feature is discussed in “Transferring results
between Abaqus/Explicit and Abaqus/Standard,” Section 9.2.2 of the Abaqus Analysis User’s Manual,
and is not discussed further here.
Abaqus divides all of its analysis procedures into two main groups: linear perturbation and general.
General analysis steps can be included in an Abaqus/Standard or an Abaqus/Explicit analysis; linear
perturbation steps are available only in Abaqus/Standard. Loading conditions and “time” are defined
differently for the two cases. Furthermore, the results from each type of procedure should be interpreted
differently.
The response of the model during a general analysis procedure, known as a general step, may be
either nonlinear or linear. In a step that uses a perturbation procedure, which is called a perturbation
step, the response can only be linear. Abaqus/Standard treats such steps as a linear perturbation about the
preloaded, predeformed state (known as the base state) created by any previous general steps; therefore,
its capability for doing linear simulations is rather more general than that of a purely linear analysis
program.
11.1 General analysis procedures
The starting point for each general step is the deformed state at the end of the last general step. Therefore,
the state of the model evolves in a sequence of general steps as it responds to the loads defined in each
11–1
Abaqus ID:
Printed on:

GENERAL ANALYSIS PROCEDURES
step. Any initial conditions (specified using the *INITIAL CONDITIONS option) define the starting
point for the first general step in the simulation.
All general analysis procedures share the same concepts for applying loads and defining “time.”
11.1.1 Time in general analysis stepsAbaqus has two measures of time in a simulation. The total time increases throughout all general steps
and is the accumulation of the total step time from each general step. Each step also has its own time
scale (known as the step time), which begins at zero for each step. Time varying loads and boundary
conditions can be specified in terms of either time scale. The time scales for an analysis whose history
is divided into three steps, each 100 seconds long, are shown in Figure 11–1.
Totaltime
Steptime
Step 1 Step 2 Step 3
0s
0s 300s
100s0s100s100s 0s
200s100s
Figure 11–1 Step and total time for a simulation.
11.1.2 Specifying loads in general stepsIn general steps the loads must be specified as total values, not incremental values. For example, if a
concentrated load has a value of 1000 N in the first step and it is increased to 3000 N in the second general
step, the magnitude given on the *CLOAD option in the two steps should be 1000 N and 3000 N, not
1000 N and 2000 N.
Modifying loads from step to step
Applying a load in Abaqus requires more than just providing its magnitude and direction. You
must also specify how these new loads interact with the existing loads and boundary conditions of
the same type that were defined in previous general steps. All the loading and boundary condition
options—such as *BOUNDARY, *CLOAD, and *DLOAD—use the OP parameter to indicate how
the loads they define interact with the existing loads of that type. The parameter can be set to
OP=MOD or OP=NEW. Abaqus assumes OP=MOD if no value is provided for the OP parameter.
11–2
Abaqus ID:
Printed on:

GENERAL ANALYSIS PROCEDURES
Using OP=MOD causes the loads defined in the current general step to modify the same types
of loads already applied to the model in previous general steps. Any load that is not specifically
modified in the current step continues to follow its associated amplitude definition, provided the
amplitude curve is defined in terms of total time; otherwise, the load is maintained at the magnitude
it had at the end of the last general step. For example, consider a cantilever beam modeled with two
B22 elements (see Figure 11–2) with concentrated loads of 1000 N applied to nodes 3 and 5 in the
first general step.
1 2 3 4 5
*CLOAD3, 2, 1000.5, 2, 1000.
1000N 1000N
Figure 11–2 Loads applied to a beam in the first general step (Step 1).
In the next general step (Step 2) loads of 2000 N are specified on nodes 4 and 5 using the
OP=MOD parameter. Thus, these loads modify those applied in Step 1. The loading applied to the
model at the end of Step 2 is shown in Figure 11–3.
* CLOAD, OP=MOD4, 2, 2000.5, 2, 2000.
1 2 3 4 5
1000N
2000N 2000N
Figure 11–3 Loads applied in Step 2 with OP=MOD.
Using OP=NEW causes Abaqus to remove all existing loads of that type and only apply the
loads specified in this current step to the model. If OP=NEW is specified on the *CLOAD option
in Step 2, the loading on our example beam is shown in Figure 11–4.
11–3
Abaqus ID:
Printed on:

LINEAR PERTURBATION ANALYSIS
1 2 3 4 5
*CLOAD, OP=NEW4, 2, 2000.5, 2, 2000.
2000N 2000N
Figure 11–4 Loads applied in Step 2 with OP=NEW.
Be very careful when you use the OP=NEW parameter on the *BOUNDARY option to remove
a boundary constraint from your model. All boundary constraints are removed from the model, not
just the one youwant removed; therefore, youmust respecify all the boundary conditions that should
remain active in the model. Remember that the boundary conditions that you specify must provide
enough constraints to prevent rigid body motions in all components of your model. Failure to do so
will cause Abaqus to issue numerical singularity warnings and leads to excessive displacements.
11.2 Linear perturbation analysis
Linear perturbation analysis steps are available only in Abaqus/Standard.
The starting point for a linear perturbation step is called the base state of the model. If the first
step in a simulation is a linear perturbation step, the base state is the state of the model specified using
the *INITIAL CONDITIONS option. Otherwise, the base state is the state of the simulation at the
end of the last general step prior to the linear perturbation step. Although the response of the structure
during the perturbation step is by definition linear, the model may have a nonlinear response in previous
general steps. For models with a nonlinear response in the prior general steps, Abaqus/Standard uses the
current elastic modulus as the linear stiffness for perturbation procedures. This modulus is the initial
elastic modulus for elastic-plastic materials and the tangent modulus for hyperelastic materials (see
Figure 11–5); the moduli used for other material models are described in “General and linear perturbation
procedures,” Section 6.1.2 of the Abaqus Analysis User’s Manual.
11–4
Abaqus ID:
Printed on:

LINEAR PERTURBATION ANALYSIS
Base stateF
orce
Displacement
tangentmodulus
Figure 11–5 For hyperelastic materials the tangent modulus is used as the stiffness in linear
perturbation steps that occur after general, nonlinear steps.
The loads in the perturbation step should be sufficiently small that the model’s response would
not deviate much from that predicted with the tangent modulus. If the simulation includes contact, the
contact state between two surfaces does not change during a perturbation step: points that were closed
in the base state remain closed, and points that were open remain open.
11.2.1 Time in linear perturbation stepsIf another general step follows a perturbation step, it uses the state of the model at the end of the last
general step as its starting point, not the state of the model at the end of the perturbation step. Thus,
the response from a linear perturbation step has no permanent effect on the simulation. Therefore,
Abaqus/Standard does not include the step time of linear perturbation steps in the total time for the
analysis. In fact, what Abaqus/Standard actually does is to define the step time of a perturbation step to
be very small (10−36 ) so that it has no effect when it is added to the total accumulated time. The exception
to this rule is the *MODAL DYNAMIC procedure.
11.2.2 Specifying loads in linear perturbation stepsLoads and prescribed boundary conditions given in linear perturbation steps are always local to that step.
The load magnitudes (including the magnitudes of prescribed boundary conditions) given in a linear
perturbation step are always the perturbation (increment) of the load, not the total magnitude. Likewise,
the value of any solution variable is output as the perturbation value only—the value of the variable in
the base state is not included.
11–5
Abaqus ID:
Printed on:

LINEAR PERTURBATION ANALYSIS
As an example of a simple load history that includes a mixture of general and perturbation steps,
consider the bow and arrow shown in Figure 11–6.
1.27 m(50.0 in)
Bow
A A
String
F
0.0254 m (1.0 in)
Bow String
SECTION A
0.0025 m(0.1 in)
Step 1 = Pretension Step 2 = Pull Back Step 4 = Dynamic Release
_ A
Figure 11–6 Simple bow and arrow.
Step 1 might be to string the bow—to pretension the bowstring. Step 2 would then follow this by pulling
back the string with an arrow, thus storing more strain energy in the system. Step 3 might then be a linear
perturbation analysis step: an eigenvalue frequency analysis to investigate the natural frequencies of the
loaded system. Such a step might also have been included between Steps 1 and 2, to find the natural
frequencies of the bow and string just after the string is pretensioned but before it is pulled back to shoot.
Step 4 is then a nonlinear dynamic analysis, in which the bowstring is released, so that the strain energy
that was stored in the system by pulling back the bowstring in Step 2 imparts kinetic energy to the arrow
and causes it to leave the bow. This step thus continues to develop the nonlinear response of the system,
but now with dynamic effects included.
In this case it is obvious that each nonlinear general analysis step must use the state at the end of
the previous nonlinear general analysis step as its initial condition. For example, the dynamic part of
the history has no loading—the dynamic response is caused by the release of some of the strain energy
stored in the static steps. This effect introduces a natural order dependency in the input file: nonlinear
11–6
Abaqus ID:
Printed on:

LINEAR PERTURBATION ANALYSIS
general analysis steps follow one another in the input, in the order in which the events they define occur,
with linear perturbation analysis steps inserted at the appropriate times in this sequence to investigate the
linear behavior of the system at those times.
A more complex load history is illustrated in Figure 11–7, which shows a schematic representation
of the steps in the manufacture and use of a stainless steel sink. The sink is formed from sheet steel
using a punch, a die, and a blank holder. This forming simulation will consist of a number of general
steps. Typically, the first step may involve the application of blank holder pressure, and the punching
operation will be simulated in the second step. The third step will involve the removal of the tooling,
allowing the sink to spring back into its final shape. Each of these steps is a general step since together
they model a sequential load history, where the starting condition for each step is the ending condition
from the previous step. These steps obviously include many nonlinear effects (plasticity, contact, large
deformations). At the end of the third step, the sink will contain residual stresses and inelastic strains
caused by the forming process. Its thickness will also vary as a direct result of the manufacturing process.
The sink is then installed: boundary conditions would be applied around the edge of the sink where
it is attached to the worktop. The response of the sink to a number of different loading conditions may
be of interest and has to be simulated. For example, a simulation may need to be performed to ensure
that the sink does not break if someone stands on it. Step 4 would, therefore, be a linear perturbation
step analyzing the static response of the sink to a local pressure load. Remember that the results from
Step 4 will be perturbations from the state of the sink after the forming process; do not be surprised if
the displacement of the center of the sink in this step is only 2 mm, but you know that the sink deformed
much more than that since the start of the forming simulation. This 2 mm deflection is just the additional
deformation from the sink’s final configuration after the forming process (i.e., the end of Step 3) caused
by the weight of the person. The total deflection, measured from the undeformed sheet’s configuration,
is the sum of this 2 mm and the deflection at the end of Step 3.
The sink may also be fitted with a waste disposal unit, so its steady-state dynamic response to a
harmonic load at certain frequencies must be simulated. Step 5 would, therefore, be a second linear
perturbation step using the *STEADY STATE DYNAMICS, DIRECT procedure with a load applied at
the point of attachment of the disposal unit. The base state for this step is the state at the end of the
previous general step—that is, at the end of the forming process (Step 3). The response in the previous
perturbation step (Step 4) is ignored. The two perturbation steps are, therefore, separate, independent
simulations of the sink’s response to loads applied to the base state of the model.
If another general step is included in the analysis, the condition of the structure at the start of the
step is that at the end of the previous general step (Step 3). Step 6 could, therefore, be a general step with
loads modeling the sink being filled with water. The response in this step may be linear or nonlinear.
Following this general step, Step 7 could be a simulation repeating the analysis performed in Step 4.
However, in this case the base state (the state of the structure at the end of the previous general step) is
the state of the model at the end of Step 6. Therefore, the response will be that of a full sink, rather than
an empty one. Performing another steady-state dynamics simulation would produce inaccurate results
because the mass of the water, which would change the response considerably, would not be considered
in the analysis.
11–7
Abaqus ID:
Printed on:

LINEAR PERTURBATION ANALYSIS
Die
Blankholder
Punch
Step 1 - Apply blankholder pressure
Step 2 - Form sink
Step 3 - Remove tooling
Step 4 - Stand on sink Step 5 - Run wastedisposal unit
F
t
Step 6 - Fill sink
Step 7 - Stand on sink
Figure 11–7 Steps in the manufacture and use of a sink.
11–8
Abaqus ID:
Printed on:

EXAMPLE: VIBRATION OF A PIPING SYSTEM
The following procedures in Abaqus/Standard are always linear perturbation steps:
• *BUCKLE,
• *FREQUENCY,
• *MODAL DYNAMIC,
• *RANDOM RESPONSE,
• *RESPONSE SPECTRUM, and
• *STEADY STATE DYNAMICS.
The *STATIC procedure can be either a general or linear perturbation procedure. Include the
PERTURBATION parameter on the *STEP option to make a static step a linear perturbation procedure.
11.3 Example: vibration of a piping system
In this example you will study the vibrational frequencies of a 5 m long section of a piping system. The
pipe is made of steel and has an outer diameter of 18 cm and a 2 cm wall thickness (see Figure 11–8).
5 mOD0.18 m
Wall thickness 0.02m
Global 1-axis
Origin
Figure 11–8 Portion of piping system being analyzed.
It is clamped firmly at one end and can move only axially at the other end. This 5 m portion of the
piping system may be subjected to harmonic loading at frequencies up to 50 Hz. The lowest vibrational
mode of the unloaded structure is 40.1 Hz, but this value does not consider how the loading applied to
the piping structure may affect its response. To ensure that the section does not resonate, you have been
asked to determine the magnitude of the in-service load that is required so that its lowest vibrational
mode is higher than 50 Hz. You are told that the section of pipe will be subjected to axial tension when
in service. Start by considering a load magnitude of 4 MN.
The lowest vibrational mode of the pipe will be a sine wave deformation in any direction transverse
to the pipe axis because of the symmetry of the structure’s cross-section. You use three-dimensional
beam elements to model the pipe section.
The analysis requires a natural frequency extraction. Thus, you will use Abaqus/Standard as your
analysis product.
11–9
Abaqus ID:
Printed on:

EXAMPLE: VIBRATION OF A PIPING SYSTEM
11.3.1 Coordinate systemThe default, global coordinate system is used. Place the origin at the left end of the pipe section, and
make the axis of the pipe and the global 1-axis coincident, as shown in Figure 11–8.
11.3.2 Mesh designModel the pipe section with a uniformly spaced mesh of 30 second-order, pipe elements (PIPE32). The
node and element numbers of the model used in this discussion are shown in Figure 11–9.
Node 1 Node 61
Element 1Element 30
Figure 11–9 Node and element numbers (both increase by 1 from left to right).
11.3.3 Preprocessing—creating the modelYou can create the mesh for this example using your preprocessor, or if you prefer, you can use the
Abaqus mesh generation options shown in “Vibration of a piping system,” Section A.12. If you wish
to create the entire model using Abaqus/CAE please refer to “Example: vibration of a piping system,”
Section 11.3 of Getting Started with Abaqus: Interactive Edition.
11.3.4 Reviewing the input file—the model dataThe steps that follow assumes that you have access to the full input file for this example. This input file,
pipe-2.inp, is provided in “Vibration of a piping system,” Section A.12, in the online HTML version
of this manual. Instructions on how to fetch and run the script are given in Appendix A, “Example Files.”
The model definition—including the model description, node and element definitions, section
properties, and material properties—is discussed next.
Model description
The *HEADING option should include a suitable title in the data lines. In the sample input file, this
option looks like the following:
11–10
Abaqus ID:
Printed on:

EXAMPLE: VIBRATION OF A PIPING SYSTEM
*HEADINGAnalysis of a 5 meter long pipe under tensile loadPipe has OD of 180 mm and ID of 140 mmS.I. Units
Nodal coordinates and element connectivity
Check that the correct element type (PIPE32) has been used and that the element set names are
suitably descriptive.
*ELEMENT, TYPE=PIPE32, ELSET=PIPE
Create node sets containing the nodes at either end of the pipe section. The following option
blocks create the node sets for the model shown in Figure 11–9:
*NSET, NSET=LEFT1*NSET, NSET=RIGHT61
Beam properties
The *BEAM SECTION, SECTION=PIPE option will be used with the PIPE32 elements. The
outer radius (90 mm) and the wall thickness (20 mm) are needed to define this beam section type
geometrically. It is easier to define the orientation of the beam section geometry for this model
than it was for the cargo crane model in the earlier chapters because the pipe section is symmetric.
Define the approximate -direction as the vector (0., 0., –1.0). In this model the actual -vector
will coincide with this approximate vector.
*BEAM SECTION, ELSET=PIPE, MATERIAL=STEEL, SECTION=PIPE0.09, 0.020.0, 0.0, -1.0
Material data
The option blocks defining the material behavior of the steel pipe in your model are included in the
following lines:
*MATERIAL, NAME=STEEL*ELASTIC200.E9, 0.3
You must define the density of the steel material (7800 kg/m3 ) because eigenmodes and
eigenfrequencies are being extracted in this simulation and a mass matrix is needed for this
procedure. Therefore, the following option block must follow the *ELASTIC option block:
*DENSITY7800.,
11–11
Abaqus ID:
Printed on:

EXAMPLE: VIBRATION OF A PIPING SYSTEM
11.3.5 Reviewing the input file—the history dataIn this simulation you need to investigate the eigenmodes and eigenfrequencies of the steel pipe section
when a 4 MN tensile load is applied. Therefore, the load history data will be split into two steps:
Step 1. General step: Apply a 4 MN tensile force.
Step 2. Linear perturbation step: Calculate modes and frequencies.
The actual magnitude of time in these steps will have no effect on the results; unless the model
includes damping or rate-dependent material properties, “time” has no physical meaning in a static
analysis procedure. Therefore, use a step time of 1.0 in the general analysis steps.
Step 1 – Apply a 4 MN tensile force
The options necessary to define the first analysis step—including the procedure definition, boundary
conditions, loading, and output requests—are reviewed.
Step and analysis procedure definition
The first step is a general static step that includes the effect of geometric nonlinearity. Specify an
initial increment size that is 1/10 the total step time, causing Abaqus to apply 10% of the load in
the first increment. The following option blocks define the analysis procedure, and they include a
meaningful description of the step to make reviewing the load history much easier:
*STEP, NLGEOM=YESApply axial tensile load of 4.0 MN*STATIC0.1, 1.0
Boundary conditions
The pipe section is clamped at its left end (node 1 in the model shown in Figure 11–9). It is also
clamped at the other end; however, the axial force must be applied at this end, so only degrees of
freedom 2 to 6 are constrained.
*BOUNDARYLEFT, 1, 6RIGHT, 2, 6
Tensile loading
Apply a 4 MN tensile force to the right end of the pipe section such that it deforms in the positive
axial (global 1) direction. Forces are applied, by default, in the global coordinate system. Therefore,
the *CLOAD option block looks like
*CLOADRIGHT, 1, 4.0E6
11–12
Abaqus ID:
Printed on:

EXAMPLE: VIBRATION OF A PIPING SYSTEM
In this case the load is applied directly to the node set defined earlier. Use the node set name from
your model or the node number in the *CLOAD option in your input file.
Output requests
Write data to the restart file every 10 increments. In addition, write the preselected field data every
10 increments as well as the stress components and stress invariants for element 25 as history data
to the output database file. The following option blocks define these output requests:
*ELSET, ELSET=ELEMENT2525*RESTART, WRITE, FREQUENCY=10*OUTPUT, FIELD, FREQUENCY=10, VARIABLE=PRESELECT*OUTPUT, HISTORY*ELEMENT OUTPUT, ELSET=ELEMENT25S, SINV
End the step with the *END STEP option.
Step 2 – Extract modes and frequencies
The second step extracts the natural frequencies of the extended pipe. The required options are
discussed below.
Step and analysis procedure definition
In the second step you need to calculate the eigenmodes and eigenfrequencies of the pipe in
its loaded state. The eigenfrequency extraction procedure (*FREQUENCY option) used in this
step is a linear perturbation procedure. Although only the first (lowest) eigenmode is of interest,
extract the first eight eigenmodes for the model. Specify this number on the data line of the
*FREQUENCY option block. The option blocks to define the analysis procedure should look
similar to the following:
*STEP, PERTURBATIONExtract modes and frequencies*FREQUENCY8,
Loads
You require the natural frequencies of the extended pipe section. This does not involve the
application of any perturbation loads, and the fixed boundary conditions are carried over from the
previous general step. Therefore, you do not need to specify any loads or boundary conditions in
this step.
11–13
Abaqus ID:
Printed on:

EXAMPLE: VIBRATION OF A PIPING SYSTEM
Output requests
Any output requests required in a linear perturbation step must be redefined since the requests from
the previous general step do not carry over. You want data to be written to the restart and output
database files. The following option blocks define these requests:
*RESTART, WRITE*OUTPUT, FIELD, VARIABLE=PRESELECT
Again, mark the termination of the step definition with the *END STEP option.
11.3.6 Running the analysis
Store the input option blocks in a file called pipe.inp. Run the analysis in the background using the
command
abaqus job=pipe
11.3.7 Status file
Check the status file as the job is running. When the analysis completes, the contents of the status file
will look similar to
SUMMARY OF JOB INFORMATION:STEP INC ATT SEVERE EQUIL TOTAL TOTAL STEP INC OF DOF IF
DISCON ITERS ITERS TIME/ TIME/LPF TIME/LPF MONITOR RIKSITERS FREQ
1 1 1 0 1 1 0.100 0.100 0.10001 2 1 0 1 1 0.200 0.200 0.10001 3 1 0 1 1 0.350 0.350 0.15001 4 1 0 1 1 0.575 0.575 0.22501 5 1 0 1 1 0.913 0.913 0.33751 6 1 0 1 1 1.00 1.00 0.087502 1 1 0 4 0 1.00 1.00e-36 1.000e-36
Both steps are shown, and the time associated with the linear perturbation step (Step 2) is very small:
the *FREQUENCY procedure, or any linear perturbation procedure, does not contribute to the general
loading history of the model.
11.3.8 Postprocessing
Run Abaqus/Viewer using the command
abaqus viewer odb=pipe
11–14
Abaqus ID:
Printed on:

EXAMPLE: VIBRATION OF A PIPING SYSTEM
Deformed shapes from the linear perturbation steps
When Abaqus/Viewer starts, it automatically uses the last available frame on the output database
file. The results from the second step of this simulation are the natural mode shapes of the pipe and
the corresponding natural frequencies. Plot the first mode shape.
To plot the first mode shape:
1. From the main menu bar, select Result→Step/Frame.
The Step/Frame dialog box appears.
2. Select step Step-2 and frame Mode 1.
3. Click OK.
4. From the main menu bar, select Plot→Deformed Shape.
5. Click the tool in the toolbox to allow multiple plot states in the viewport; then click the
tool or selectPlot→Undeformed Shape to add the undeformed shape plot to the existing
deformed plot in the viewport.
6. Include node symbols on both plots (the superimpose options control the appearance of the
undeformed shape when multiple plot states are displayed). Change the color of the node
symbols to green and the symbol shape to a solid circle.
7. Click the auto-fit tool so that the entire plot is rescaled to fit in the viewport.
The default view is isometric. Try rotating the model to find a better view of the first
eigenmode, similar to that shown in Figure 11–10.
Natural frequency (modes 1 and 2) = 47.1 HzThe base state (undeformedconfiguration) is the deformedshape from Step 1.
Figure 11–10 First and second eigenmode shapes of the pipe section under the tensile
load (the modes lie in planes orthogonal to each other).
Since this is a linear perturbation step, the undeformed shape is the shape of the structure in the
base state. This makes it easy to see the motion relative to the base state. Use the Frame Selectorto plot the other mode shapes. You will discover that this model has many repeated eigenmodes.
This is a result of the symmetric nature of the pipe’s cross-section, which yields two eigenmodes
11–15
Abaqus ID:
Printed on:

RESTART ANALYSIS
for each natural frequency, corresponding to the 1–2 and 1–3 planes. The second eigenmode shape
is shown in Figure 11–10. Some of the higher vibrational mode shapes are shown in Figure 11–11.
Natural frequency(modes 3 and 4) = 118.4 Hz
Natural frequency(modes 5 and 6) = 218.5 Hz
Figure 11–11 Shapes of eigenmodes 3 through 6; corresponding
mode shapes lie in planes orthogonal to each other.
The natural frequency associated with each eigenmode is reported in the plot title. The lowest
natural frequency of the pipe section when the 4 MN tensile load is applied is 47.1 Hz. The tensile
loading has increased the stiffness of the pipe and, thus, increased the vibrational frequencies of the
pipe section. This lowest natural frequency is within the frequency range of the harmonic loads;
therefore, resonance of the pipe may be a problem when it is used with this loading.
You, therefore, need to continue the simulation and apply additional tensile load to the pipe
section until you find the magnitude that raises the natural frequency of the pipe section to an
acceptable level. Rather than repeating the analysis and increasing the applied axial load, you can
use the restart capability in Abaqus to continue the load history of a prior simulation in a new
analysis.
11.4 Restart analysis
Multistep simulations need not be defined in a single job. Indeed, it is usually desirable to run a complex
simulation in stages. This allows you to examine the results and confirm that the analysis is performing
as expected before continuing with the next stage. The Abaqus restart analysis capability allows a
simulation to be restarted and the model’s response to additional load history to be calculated.
The restart analysis capability is discussed in detail in “Restarting an analysis,” Section 9.1.1 of the
Abaqus Analysis User’s Manual.
11–16
Abaqus ID:
Printed on:

RESTART ANALYSIS
11.4.1 The restart and state files
The Abaqus/Standard restart (.res) file and the Abaqus/Explicit state (.abq) file contain the
information necessary to continue a previous analysis. In Abaqus/Explicit the package (.pac) fileand the selected results (.sel) file are also used for restarting an analysis and must be saved upon
completion of the first job. In addition, both products require the output database (.odb) file. Restartfiles can become very large for large models; when restart data are requested, they are written for every
increment or interval by default. Thus, it is important to control the frequency at which restart data are
written. Sometimes it is useful to allow data to be overwritten on the restart file during a step. This
means that at the end of the analysis there is only one set of restart data for each step, corresponding to
the state of the model at the end of each step. However, if the analysis is interrupted for some reason,
such as a computer malfunction, the analysis can be continued from the point where restart data were
last written.
11.4.2 Writing a restart file
The *RESTART option controls the writing of the restart file. While the option can appear anywhere in
the input file, it normally appears as part of a step definition. As with other output request options, the
values defined in a *RESTART option apply during the current step and any subsequent general steps,
until the option is modified in a later step. The option
*RESTART, WRITE, FREQUENCY=<n>
writes data to the restart file every nth increment. Restart data are also written at the end of each step,
regardless of whether the last increment is divisible by n. If the FREQUENCY parameter is omitted,
data are written every increment.
Restart files can become very large for large models, so it is often useful to include the OVERLAY
parameter to control the size of the restart file. This parameter allows data to be overwritten on the restart
file during a step.
11.4.3 Reading a restart file
When restarting a simulation from the end of a previous analysis, use the READ parameter on the
*RESTART option. You can also use the STEP and INC parameters to specify the particular point in the
simulation’s load history from which to restart the analysis. When performing a restart simulation, the
*RESTART option should appear immediately after the *HEADING option. No model data need appear
in this restart input file since the model data for the analysis will be read from the restart file. Only node
set definitions, element set definitions, amplitude definitions, and additional history data can be modified
in the restart input file.
11–17
Abaqus ID:
Printed on:

RESTART ANALYSIS
Continuing an interrupted run
The new analysis continues directly from the specified step and increment of the previous analysis.
If the given step and increment do not correspond to the end of the previous analysis, Abaqus will
simulate all of the remaining previously defined load history data before trying to simulate any new
load history data provided in the input file. Therefore, if an analysis was interrupted by a computer
malfunction, the following input file would complete the analysis as originally defined:
*HEADINGRestart of interrupted run
*RESTART, READ, STEP=<step>, INC=<increment>
Continuing with additional steps
If the previous analysis completed successfully and, having viewed the results, you want to add
additional steps to the load history, the specified step and increment should be the last step and last
increment of the previous analysis. Alternatively, they can be omitted and by default Abaqus will
read the last available data in the restart file. The *RESTART option is followed by any new step
definitions.
*HEADINGAdd new step data
*RESTART, READ, STEP=<last step>, INC=<last increment>
*STEP... new step definition...
*END STEP
Changing an analysis
Sometimes, having viewed the results of the previous analysis, you may want to restart the analysis
from an intermediate point and change the remaining load history data in some manner—for
example, to add more output requests, to change the loading, or to adjust the analysis controls.
Often this is necessary when a step has exceeded its maximum number of increments. If the
analysis is restarted as described above, Abaqus thinks that the analysis is partway through a step,
tries to complete the step, and promptly exceeds the maximum number of increments again.
In such situations the END STEP parameter should be included on the *RESTART option
to indicate that the current step should be terminated at the step and increment specified on the
*RESTART option and all previously defined history data should be ignored. The simulation may
then continue with the new steps defined after the *RESTART option. For example, if a step allowed
only a maximum of 20 increments, which was less than the number of increments necessary to
complete the step, the following restart input file would allow Abaqus to restart the simulation and
finish the applied load:
*HEADINGContinue an analysis that exceeded the maximum number ofincrements
11–18
Abaqus ID:
Printed on:

EXAMPLE: RESTARTING THE PIPE VIBRATION ANALYSIS
*RESTART, READ, STEP=<step>, INC=20, END STEP
*STEP, INC=100... repeat step definition...
*END STEP
In this situation the entire step definition, including applied loads and boundary conditions, should
be identical to that specified in the original run with the following exceptions:
• The number of increments should be increased.
• The total time of the new step should be the total time of the original step less the time
completed in the step in the first run. For example, if the time of the step as originally
specified was 100 seconds and the analysis ran out of increments at a step time of 20 seconds,
the duration of the step in the restart analysis should be 80 seconds.
• Any amplitude definitions specified in terms of step time need to be respecified to reflect the
new time scale of the step. Amplitude definitions specified in terms of total time do not need
to be changed, provided the modifications given above are used.
The magnitudes of any loads or prescribed boundary conditions remain unchanged since they
are always total values in general analysis steps.
11.5 Example: restarting the pipe vibration analysis
To demonstrate how to restart an analysis, take the pipe section example in “Example: vibration of a
piping system,” Section 11.3, and restart the simulation, adding two additional steps of load history. The
first simulation predicted that the piping section would be vulnerable to resonance when extended axially;
you must now determine how much additional axial load will increase the pipe’s lowest vibrational
frequency to an acceptable level.
Step 3 will be a general step that increases the axial load on the pipe to 8 MN, and Step 4 will
calculate the eigenmodes and eigenfrequencies again.
Create a new input file, called pipe-2.inp, and add the option blocks discussed below. If you
wish to create the entire model using Abaqus/CAE, refer to “Example: restarting the pipe vibration
analysis,” Section 11.5 of Getting Started with Abaqus: Interactive Edition.
11.5.1 Reviewing the input file—the model dataThe only model data required are the *HEADING option and a *RESTART option to read the restart
data from the end of the previous analysis. Abaqus reads all other model data, such as node and element
definitions, directly from the restart file. Add the following option blocks to your new input file:
*HEADINGIncrease tensile load on the piping system
11–19
Abaqus ID:
Printed on:

EXAMPLE: RESTARTING THE PIPE VIBRATION ANALYSIS
and determine lowest frequency.*RESTART, READ
Neither the INCREMENT nor the STEP parameter is included on the *RESTART, READ option since
by default Abaqus will read the data for the last increment written to the restart file. Since you are
continuing the simulation from the end of the previous analysis, no parameters are needed.
11.5.2 Reviewing the input file—the history data
The history data consist of two steps. Apply a tensile load (8 MN) to the pipe section in Step 3. The
following option block must be placed in Step 3:
*CLOADRIGHT, 1, 8.0E6
Set the initial time increment in Step 3 to 1/10 the total step time, which should be 1.0. Step 4 is an
exact copy of Step 2 from the previous analysis. All of the load history option blocks necessary to define
this restart analysis are shown below.
*STEP, NLGEOM=YESApply 8 MN axial tensile load*STATIC0.1, 1.*CLOADRIGHT, 1, 8.0E6*RESTART, WRITE, FREQUENCY=10*OUTPUT, FIELD, FREQUENCY=10, VARIABLE=PRESELECT*OUTPUT, HISTORY*ELEMENT OUTPUT, ELSET=ELEMENT25S, SINV*END STEP*STEP, PERTURBATIONExtract modes and frequencies*FREQUENCY8,*RESTART, WRITE*OUTPUT, FIELD, VARIABLE=PRESELECT*END STEP
The complete input file for this restart analysis is listed in “Vibration of a piping system,” Section A.12.
11–20
Abaqus ID:
Printed on:

EXAMPLE: RESTARTING THE PIPE VIBRATION ANALYSIS
11.5.3 Running the analysis
When running a simulation that will need to read data from a restart file, you must specify the root name
of the restart file, without the .res extension, with the oldjob parameter on the Abaqus command
line. Thus, use the following command to run this restart analysis:
abaqus job=pipe-2 oldjob=pipe
11.5.4 Status file
Again, check the status file as the job is running. When the analysis completes, the contents of the status
file will look like
SUMMARY OF JOB INFORMATION:STEP INC ATT SEVERE EQUIL TOTAL TOTAL STEP INC OF DOF IF
DISCON ITERS ITERS TIME/ TIME/LPF TIME/LPF MONITOR RIKSITERS FREQ
3 1 1 0 1 1 1.10 0.100 0.10003 2 1 0 1 1 1.20 0.200 0.10003 3 1 0 1 1 1.35 0.350 0.15003 4 1 0 1 1 1.58 0.575 0.22503 5 1 0 1 1 1.91 0.913 0.33753 6 1 0 1 1 2.00 1.00 0.087504 1 1 0 6 0 2.00 1.00e-36 1.000e-36
This analysis starts at Step 3 since Steps 1 and 2 were completed in the previous analysis. There
are now two output database (.odb) files associated with this simulation. Data for Steps 1 and 2 are
in the file pipe.odb; data for Steps 3 and 4 are in the file pipe-2.odb. When plotting results in
Abaqus/Viewer, you need to remember which results are stored in each file, and you need to ensure that
Abaqus/Viewer is using the correct output database file.
11.5.5 Postprocessing the restart analysis results
Start Abaqus/Viewer and specify that the output database file from the restart analysis should be used by
giving the following command:
abaqus viewer odb=pipe-2
Plotting the eigenmodes of the pipe
Plot the same six eigenmode shapes of the pipe section for this simulation as were plotted in the
previous analysis. The eigenmode shapes can be plotted using the procedures described for the
original analysis. These eigenmodes and their natural frequencies are shown in Figure 11–12; again,
the corresponding mode shapes lie in planes orthogonal to each other.
11–21
Abaqus ID:
Printed on:

EXAMPLE: RESTARTING THE PIPE VIBRATION ANALYSIS
Natural frequency(modes 1 and 2) = 53.1 Hz
Natural frequency(modes 3 and 4) = 127.5 Hz
Natural frequency(modes 5 and 6) = 228.9 Hz
Figure 11–12 Shapes and frequencies of eigenmodes 1 through 6 with 8 MN tensile load.
Under 8MN of axial load, the lowest mode is now at 53.1 Hz, which is greater than the required
minimum of 50 Hz. If you want to find the exact load at which the lowest mode is just above 50 Hz,
you can repeat this restart analysis and change the value of the applied load.
Plotting X–Y graphs from field data for selected steps
Use the field data stored in the output database files, pipe.odb and pipe-2.odb, to plot the
history of the axial stress in the pipe for the whole simulation.
To generate a history plot of the axial stress in the pipe for the restart analysis:
1. In the Results Tree, double-click XYData.
The Create XY Data dialog box appears.
2. Select ODB field output from this dialog box, and click Continue to proceed.
The XY Data from ODB Field Output dialog box appears.
3. In theVariables tabbed page of this dialog box, accept the default selection of IntegrationPoint for the variable position and select S11 from the list of available stress components.
11–22
Abaqus ID:
Printed on:

EXAMPLE: RESTARTING THE PIPE VIBRATION ANALYSIS
4. At the bottom of the dialog box, toggle Select for the section point and click Settings to
choose a section point.
5. In the Field Report Section Point Settings dialog box that appears, select the category
beam and choose any of the available section points for the pipe cross-section. Click OK to
exit this dialog box.
6. In the Elements/Nodes tabbed page of the XY Data from ODB Field Output dialog box,
select Element labels as the selection Method. There are 30 elements in the model, and they
are numbered consecutively from 1 to 30. Enter any element number (for example, 25) in theElement labels text field that appears on the right side of the dialog box.
7. Click Active Steps/Frames, and select Step-3 as the only step from which to extract data.
8. At the bottom of theXY Data from ODB Field Output dialog box, clickPlot to see the historyof axial stress in the element.
The plot traces the axial stress history at each integration point of the element in the restart
analysis. Since the restart is a continuation of an earlier job, it is often useful to view the results
from the entire (original and restarted) analysis.
To generate a history plot of the axial stress in the pipe for the entire analysis:
1. Save the current plot by clicking Save at the bottom of the XY Data from ODB Field Outputdialog box. Two curves are saved (one for each integration point), and default names are given
to the curves.
2. Rename either curve RESTART, and delete the other curve.
3. From the main menu bar, select File→Open; or use the tool in the File toolbar to open
the file pipe.odb.
4. Following the procedure outlined above, save the plot of the axial stress history for the same
element and integration/section point used above. Name this plot ORIGINAL.
5. In the Results Tree, expand the XYData container.
The ORIGINAL and RESTART curves are listed underneath.
6. Select both plots with [Ctrl]+Click. Click mouse button 3, and select Plot from the menu that
appears to create a plot of axial stress history in the pipe for the entire simulation.
7. To change the style of the line, open the Curve Options dialog box.
8. For the RESTART curve, select a dotted line style.
9. Click Dismiss to close the dialog box.
10. To change the axis titles, open the Axis Options dialog box.
In this dialog box, switch to the Title tabbed page.
11. Change the X-axis title to TOTAL TIME, and change the Y-axis title to STRESS S11.
11–23
Abaqus ID:
Printed on:

RELATED Abaqus EXAMPLES
12. Click Dismiss to close the dialog box.
The plot created by these commands is shown in Figure 11–13. The axial stress history of
the same element during Step 3 can be plotted by itself by selecting only the RESTART curve (see
Figure 11–14).
Total Time0.0 0.5 1.0 1.5 2.0
Str
ess
S11
0.00
0.10
0.20
0.30
0.40
0.50
0.60
0.70
0.80[x1.E9]
ORIGINALRESTART
Figure 11–13 History of axial stress in the pipe.
11.6 Related Abaqus examples
• “Deep drawing of a cylindrical cup,” Section 1.3.4 of the Abaqus Example Problems Manual
11–24
Abaqus ID:
Printed on:

SUMMARY
Total Time1.0 1.2 1.4 1.6 1.8 2.0
Str
ess
S11
0.40
0.45
0.50
0.55
0.60
0.65
0.70
0.75
0.80[x1.E9]
RESTART
Figure 11–14 History of axial stress in the pipe during Step 3.
• “Linear analysis of the Indian Point reactor feedwater line,” Section 2.2.2 of the Abaqus Example
Problems Manual
• “Vibration of a cable under tension,” Section 1.4.3 of the Abaqus Benchmarks Manual
• “Random response to jet noise excitation,” Section 1.4.10 of the Abaqus Benchmarks Manual
11.7 Summary
• An Abaqus simulation can include any number of steps.
• Implicit and explicit steps are not allowed in the same analysis job.
11–25
Abaqus ID:
Printed on:

SUMMARY
• An analysis step is a period of “time” during which the response of the model to a specified set of
loads and boundary conditions is calculated. The character of this response is determined by the
particular analysis procedure used during the step.
• The response of a structure in a general analysis step may be either linear or nonlinear.
• The starting condition for each general step is the ending condition of the previous general step.
Thus, the model’s response evolves during a sequence of general steps in a simulation.
• Linear perturbation steps (available only in Abaqus/Standard) calculate the linear response of the
structure to a perturbation load. The response is reported relative to the base state defined by the
condition of the model at the end of the last general step.
• In general steps the OP parameter on any loading options—such as *BOUNDARY, *CLOAD, and
*DLOAD—controls how the values specified with these options interact with those values defined
in previous steps.
• Analyses can be restarted as long as a restart file is saved. Restart files can be used to continue an
interrupted analysis or to add additional load history to the simulation.
11–26
Abaqus ID:
Printed on:

INTERACTION BETWEEN SURFACES
12. Contact
Many engineering problems involve contact between two or more components. In these problems a force
normal to the contacting surfaces acts on the two bodies when they touch each other. If there is friction
between the surfaces, shear forces may be created that resist the tangential motion (sliding) of the bodies.
The general aim of contact simulations is to identify the areas on the surfaces that are in contact and to
calculate the contact pressures generated.
In a finite element analysis contact conditions are a special class of discontinuous constraint,
allowing forces to be transmitted from one part of the model to another. The constraint is discontinuous
because it is applied only when the two surfaces are in contact. When the two surfaces separate, no
constraint is applied. The analysis has to be able to detect when two surfaces are in contact and apply
the contact constraints accordingly. Similarly, the analysis must be able to detect when two surfaces
separate and remove the contact constraints.
12.1 Overview of contact capabilities in Abaqus
Contact simulations in Abaqus/Standard can either be surface based or contact element based. Contact
simulations in Abaqus/Explicit are surface based only. In this manual, surface-based contact is discussed.
Surface-based contact can utilize either the general (“automatic”) contact algorithm or the contact
pair algorithm. The general contact algorithm allows for a highly automated contact definition, where
contact is based on an automatically generated all-inclusive surface definition. Conversely, the contact
pair algorithm requires you to explicitly pair surfaces that may potentially come into contact. Both
algorithms require specification of contact properties between surfaces (for example, friction).
The discussion of contact in this manual addresses the contact pair approach and general contact in
Abaqus/Standard and general contact in Abaqus/Explicit.
12.2 Interaction between surfaces
The interaction between contacting surfaces consists of two components: one normal to the surfaces and
one tangential to the surfaces. The tangential component consists of the relative motion (sliding) of the
surfaces and, possibly, frictional shear stresses. Each contact interaction can refer to a contact property
that specifies a model for the interaction between the contacting surfaces. There are several contact
interaction models available in Abaqus; the default model is frictionless contact with no bonding.
12–1
Abaqus ID:
Printed on:

INTERACTION BETWEEN SURFACES
12.2.1 Behavior normal to the surfacesThe distance separating two surfaces is called the clearance. The contact constraint is applied in
Abaqus when the clearance between two surfaces becomes zero. There is no limit in the contact
formulation on the magnitude of contact pressure that can be transmitted between the surfaces. The
surfaces separate when the contact pressure between them becomes zero or negative, and the constraint
is removed. This behavior, referred to as “hard” contact, is the default contact behavior in Abaqus and
is summarized in the contact pressure-clearance relationship shown in Figure 12–1.
Contact clearance
Con
tact
pre
ssur
e
00
Figure 12–1 Contact pressure-clearance relationship for “hard” contact.
By default, “hard” contact is directly enforced when using contact pairs in Abaqus/Standard. The
dramatic change in contact pressure that occurs when a contact condition changes from “open” (a
positive clearance) to “closed” (clearance equal to zero) sometimes makes it difficult to complete
contact simulations in Abaqus/Standard; the same is not true for Abaqus/Explicit since iteration is not
required for explicit methods. Alternative enforcement methods (e.g., penalty) are available for contact
pairs, as discussed in “Contact constraint enforcement methods in Abaqus/Standard,” Section 34.1.2 of
the Abaqus Analysis User’s Manual. Penalty enforcement of the contact constraints is the only option
available for general contact. Other sources of information include “Common difficulties associated
with contact modeling in Abaqus/Standard,” Section 35.1.2 of the Abaqus Analysis User’s Manual;
“Common difficulties associated with contact modeling using contact pairs in Abaqus/Explicit,”
Section 35.2.2 of the Abaqus Analysis User’s Manual; the “Modeling Contact with Abaqus/Standard”
lecture notes; and the “Advanced Topics: Abaqus/Explicit” lecture notes.
12.2.2 Sliding of the surfacesIn addition to determining whether contact has occurred at a particular point, an Abaqus analysis also
must calculate the relative sliding of the two surfaces. This can be a very complex calculation; therefore,
12–2
Abaqus ID:
Printed on:

INTERACTION BETWEEN SURFACES
Abaqus makes a distinction between analyses where the magnitude of sliding is small and those where
the magnitude of sliding may be finite. It is much less expensive computationally to model problems
where the sliding between the surfaces is small. What constitutes “small sliding” is often difficult to
define, but a general guideline to follow is that problems can use the “small-sliding” approximation if a
point contacting a surface does not slide more than a small fraction of a typical element dimension.
Small sliding is not available for general contact.
12.2.3 Friction models
When surfaces are in contact, they usually transmit shear as well as normal forces across their interface.
Thus, the analysis may need to take frictional forces, which resist the relative sliding of the surfaces,
into account. Coulomb friction is a common friction model used to describe the interaction of contacting
surfaces. The model characterizes the frictional behavior between the surfaces using a coefficient of
friction, .
The default friction coefficient is zero. The tangential motion is zero until the surface traction
reaches a critical shear stress value, which depends on the normal contact pressure, according to the
following equation:
where is the coefficient of friction and is the contact pressure between the two surfaces. This equation
gives the limiting frictional shear stress for the contacting surfaces. The contacting surfaces will not slip
(slide relative to each other) until the shear stress across their interface equals the limiting frictional shear
stress, . For most surfaces is normally less than unity. Coulomb friction can be defined with or
. The solid line in Figure 12–2 summarizes the behavior of the Coulomb friction model: there is zero
relative motion (slip) of the surfaces when they are sticking (the shear stresses are below ). Optionally,
a friction stress limit can be specified if both contacting surfaces are element-based surfaces.
In Abaqus/Standard the discontinuity between the two states—sticking or slipping—can result in
convergence problems during the simulation. You should include friction in your Abaqus/Standard
simulations only when it has a significant influence on the response of the model. If your contact
simulation with friction encounters convergence problems, one of the first modifications you should
try in diagnosing the difficulty is to rerun the analysis without friction. In general, friction presents no
additional computational difficulties for Abaqus/Explicit.
Simulating ideal friction behavior can be very difficult; therefore, by default in most cases,
Abaqus uses a penalty friction formulation with an allowable “elastic slip,” shown by the dotted line in
Figure 12–2. The “elastic slip” is the small amount of relative motion between the surfaces that occurs
when the surfaces should be sticking. Abaqus automatically chooses the penalty stiffness (the slope of
the dotted line) so that this allowable “elastic slip” is a very small fraction of the characteristic element
length. The penalty friction formulation works well for most problems, including most metal forming
applications.
12–3
Abaqus ID:
Printed on:

INTERACTION BETWEEN SURFACES
slippingτ (shear stress)
τ
γ (slip)
sticking
crit
Figure 12–2 Frictional behavior.
In those problems where the ideal stick-slip frictional behavior must be included, the “Lagrange”
friction formulation can be used in Abaqus/Standard and the kinematic friction formulation can be used
in Abaqus/Explicit. The “Lagrange” friction formulation is more expensive in terms of the computer
resources used because Abaqus/Standard uses additional variables for each surface node with frictional
contact. In addition, the solution converges more slowly so that additional iterations are usually required.
This friction formulation is not discussed in this guide.
Often the friction coefficient at the initiation of slipping from a sticking condition is different from
the friction coefficient during established sliding. The former is typically referred to as the static friction
coefficient, and the latter is referred to as the kinetic friction coefficient. In Abaqus an exponential decay
law is available to model the transition between static and kinetic friction (see Figure 12–3). This friction
formulation is not discussed in this guide.
In Abaqus/Standard the inclusion of friction in a model adds unsymmetric terms to the system of
equations being solved. If is less than about 0.2, the magnitude and influence of these terms are quite
small and the regular, symmetric solver works well (unless the contact surface has high curvature).
For higher coefficients of friction, the unsymmetric solver is invoked automatically because it will
improve the convergence rate. The unsymmetric solver requires twice as much computer memory and
scratch disk space as the symmetric solver. The unsymmetric solver can also be selected by including
the UNSYMM=YES parameter on the *STEP option. Large values of generally do not cause any
difficulties in Abaqus/Explicit.
12–4
Abaqus ID:
Printed on:

INTERACTION BETWEEN SURFACES
μk
μs
μ
γeq
μ = μk + (μs − μk) e−dcγeq
Figure 12–3 Exponential decay friction model.
12.2.4 Other contact interaction optionsThe other contact interaction models available in Abaqus depend on the analysis product and the
algorithm used and may include adhesive contact behavior, softened contact behavior, fasteners (for
example, spot welds), and viscous contact damping. These options are not discussed in this guide.
Details about them can be found in the Abaqus Analysis User’s Manual.
12.2.5 Surface-based constraintsTie constraints are used to tie together two surfaces for the duration of a simulation. Each node on the
slave surface is constrained to have the same motion as the point on the master surface to which it is
closest. For a structural analysis this means the translational (and, optionally, the rotational) degrees of
freedom are constrained.
Abaqus uses the undeformed configuration of the model to determine which slave nodes are tied to
the master surface. By default, all slave nodes that lie within a given distance of the master surface are
tied. The default distance is based on the typical element size of the master surface. This default can
be overridden in one of two ways: by specifying the distance within which slave nodes must lie from
the master surface to be constrained or by specifying the name of a set containing the nodes that will be
constrained.
12–5
Abaqus ID:
Printed on:

DEFINING CONTACT IN Abaqus/Standard
Slave nodes can also be adjusted so that they lie exactly on the master surface. If slave nodes have
to be adjusted by distances that are a large fraction of the length of the side of the element (to which the
slave node is attached), the element can become severely distorted; avoid large adjustments if possible.
Tie constraints are particularly useful for rapid mesh refinement between dissimilar meshes.
12.3 Defining contact in Abaqus/Standard
The first step in defining contact pairs in Abaqus/Standard is to create the surfaces using the *SURFACE
option. The next step is to specify the surfaces that interact with one another using the *CONTACT
PAIR option. Each contact interaction refers to a surface interaction definition, which is created with the
*SURFACE INTERACTION option. A contact pressure-clearance relationship and friction properties
can be assigned to a surface interaction definition.
The definition of surfaces is optional for general contact because an all-inclusive element-based
surface is automatically created when the *CONTACT option is used. Specific surface pairings may be
used, however, to include regions not included in the default surface (*CONTACT INCLUSIONS), to
preclude interaction between different regions of a model (*CONTACT EXCLUSIONS), or to override
global contact property assignments. For example, if you want to apply a certain friction coefficient to
all but a few surfaces in your model, you can assign a global friction coefficient and and override this
property for a given pair of user-defined surfaces using the *CONTACT PROPERTY ASSIGNMENT
option.
12.3.1 Defining surfaces
Surfaces are created with the *SURFACE option by identifying all of the element faces that form the
surface. This is done in much the same way as defining distributed pressure loads.
Surfaces on continuum elements
A two-dimensional, first-order continuum element, such as CPE4, has four faces consisting of the
segments defined by nodes 1–2, 2–3, 3–4, and 4–1, respectively, as shown in Figure 12–4. The face
identifiers consist of the letter “S” followed by the face number. For example, use the following
option block to include face 2 of the element shown in Figure 12–4 in a surface called FLANGE1:
*SURFACE, NAME=FLANGE15, S2
12–6
Abaqus ID:
Printed on:

DEFINING CONTACT IN Abaqus/Standard
1 2
34
Face 2
Face 1
Face 4
Face 3
Element 5
Figure 12–4 Face numbers on a two-dimensional, first-order (4-node) element.
As is the case for many options in Abaqus, both element numbers and element sets can be
used; the use of element sets can make the definition of large surfaces much easier. It is valid to
specify both element sets and individual elements in the same *SURFACE option block, as shown
in Figure 12–5 and the example below. The surface TOPSURF consists of the element faces shown
in Figure 12–5 and is created as follows:
*ELSET, ELSET=TOP, GENERATE5, 8*SURFACE, NAME=TOPSURFTOP, S35, S48, S2
7
3
8
42
6
1
5S4
S3 S3 S3 S3
S2
Figure 12–5 Face numbers and elements that form the surface TOPSURF.
Abaqus can determine the free faces of two- and three-dimensional continuum elements
automatically and use them to create a surface. To use this capability, simply include all the
elements whose free faces make up the surface on the data lines of the *SURFACE option. Either
12–7
Abaqus ID:
Printed on:

DEFINING CONTACT IN Abaqus/Standard
element sets or individual element numbers can be used. If elements in the interior of the body
are included, Abaqus will ignore them. For example, the surface shown in Figure 12–5 could also
be defined using
*SURFACE, NAME=TOPSURFTOP,
Surfaces on shell, membrane, and rigid elements
For shell, membrane, and rigid elements you must specify which side of the element forms the
contact surface. The side in the direction of the positive element normal is called SPOS, while the
side in the direction of the negative element normal is called SNEG, as shown in Figure 12–6. As
discussed in Chapter 5, “Using Shell Elements,” the connectivity of an element defines the positive
element normal. The positive element normals can be viewed in Abaqus/Viewer.
n
2
1
Side SPOS
Side SNEG
Figure 12–6 Surfaces on a two-dimensional shell or rigid element.
The following option block defines surface SURF1 as the surface composed of all the SPOS
faces of the elements in element set SHELLS:
*SURFACE, NAME=SURF1SHELLS, SPOS
Restrictions on the types of surfaces that can be created in Abaqus are discussed in “Surface
definition,” Section 2.3 of the Abaqus Analysis User’s Manual; please read them before beginning
a contact simulation.
Rigid surfaces
Rigid surfaces are the surfaces of rigid bodies. They can be defined as an analytical shape, or they
can be based on the underlying surfaces of elements associated with the rigid body.
Analytical rigid surfaces are created by defining a series of connected lines, arcs, and
parabolas. The parameter ANALYTICAL SURFACE on the *RIGID BODY option binds an
analytical rigid surface (defined with the TYPE parameter on the *SURFACE option) with a rigid
body. The *RIGID BODY option must be defined in the model definition. The TYPE parameter on
the *SURFACE option defines the dimensionality of the surface, and it has three possible values:
12–8
Abaqus ID:
Printed on:

DEFINING CONTACT IN Abaqus/Standard
• Use TYPE=SEGMENTS to define a two-dimensional analytical rigid surface.
• Use TYPE=CYLINDRICAL to define a three-dimensional analytical rigid surface that is
extruded infinitely in the out-of-plane direction.
• Use TYPE=REVOLUTION to define a three-dimensional analytical rigid surface of
revolution.
The following is an example input for the two-dimensional analytical rigid surface named
SRIGID shown in Figure 12–7:
*SURFACE, TYPE=SEGMENTS, NAME=SRIGIDSTART, 5.0, 0.0LINE, 10.0, 0.0CIRCL, 15.0, 5.0, 10.0, 5.0
where the rigid body is defined by
*RIGID BODY, ANALYTICAL SURFACE=SRIGID, REF NODE=10000
Generatordirection
TYPE=CYLINDERTYPE=REVOLUTION
Surface that isgenerated
Segment thatyou define
Figure 12–7 Analytical rigid surfaces.
Discretized rigid surfaces are based on the underlying elements that make up a rigid body; thus,
they can be more geometrically complex than analytical rigid surfaces. Discretized rigid surfaces
are defined using the *SURFACE option in exactly the same manner as surfaces on deformable
bodies.
12.3.2 Contact interactionsWith the contact pair approach, you define possible contact between two surfaces in an Abaqus/Standard
simulation by giving the surface names on the *CONTACT PAIR option. When you define a contact
pair, you must decide whether the magnitude of the relative sliding will be small or finite. The default is
the more general finite-sliding formulation. The small-sliding formulation is appropriate if the relative
12–9
Abaqus ID:
Printed on:

DEFINING CONTACT IN Abaqus/Standard
motion of the two surfaces is less than a small proportion of the characteristic length of an element
face. The small-sliding formulation is selected by including the SMALL SLIDING parameter on the
*CONTACT PAIR option. Using the small-sliding formulation will result in a more efficient analysis.
Each contact pair must refer to a surface interaction definition, in much the same way that each
element must refer to an element property definition. Use the INTERACTION parameter on the
*CONTACT PAIR option to refer to a *SURFACE INTERACTION option where the different surface
interaction models, such as *FRICTION, can be defined.
The following example:
*CONTACT PAIR, INTERACTION=FRIC, SMALL SLIDINGFLANGE1, FLANGE2*SURFACE INTERACTION, NAME=FRIC*FRICTION0.1,
specifies that surfaces FLANGE1 and FLANGE2 might interact with each other and that the amount of
relative sliding that occurs will be considered to be small. The interaction between the surfaces includes
friction, with a friction coefficient of 0.1.
With the general contact approach, you do not need to explicitly define and pair individual surfaces.
By using the *CONTACT option and its related sub-options, Abaqus/Standard automatically defines an
“all-inclusive” element-based surface and enforces contact between the members of that surface. The
contact definition as a result is considerably simplified. The following example:
*CONTACT*CONTACT INCLUSIONS, ALL EXTERIOR*CONTACT PROPERTY ASSIGNMENT, , FRIC,
*SURFACE INTERACTION, NAME=FRIC*FRICTION0.1
specifies that all exterior faces in a given model might interact with each other. The interaction between
all surfaces includes friction, with a friction coefficient of 0.1.
12.3.3 Slave and master surfaces
By default, contact pairs in Abaqus/Standard use a pure master-slave contact algorithm: nodes on one
surface (the slave) cannot penetrate the segments that make up the other surface (the master), as shown in
Figure 12–8. The algorithm places no restrictions on the master surface; it can penetrate the slave surface
between slave nodes, as shown in Figure 12–8. The order of the two surfaces given on the *CONTACT
PAIR option determines which surface is the master surface and which is the slave surface; the first
surface is the slave surface, and the second is the master surface.
12–10
Abaqus ID:
Printed on:

DEFINING CONTACT IN Abaqus/Standard
Master surface (segments)
Slave surface (nodes)
Penetration ofmaster surface
Figure 12–8 The master surface can penetrate the slave surface.
Due to the strict master-slave formulation, youmust be careful to select the slave andmaster surfaces
correctly in order to achieve the best possible contact simulation. Some simple rules to follow are:
• the slave surface should be the more finely meshed surface; and
• if the mesh densities are similar, the slave surface should be the surface with the softer underlying
material.
The general contact algorithm in Abaqus/Standard enforces contact in an average sense between
interacting surfaces; Abaqus/Standard automatically assigns master and slave roles.
12.3.4 Small and finite slidingWhen using the small-sliding formulation, Abaqus/Standard establishes the relationship between the
slave nodes and the master surface at the beginning of the simulation. Abaqus/Standard determines
which segment on the master surface will interact with each node on the slave surface. It maintains these
relationships throughout the analysis, never changing which master surface segments interact with which
slave nodes. If geometric nonlinearity is included in the model by setting the NLGEOM parameter equal
to YES on the *STEP option, the small-sliding algorithm accounts for any rotation and deformation of the
master surface and updates the load path through which the contact forces are transmitted. If geometric
nonlinearity is not included in the model, any rotation or deformation of the master surface is ignored
and the load path remains fixed.
The finite-sliding contact formulation requires that Abaqus/Standard constantly determine which
part of the master surface is in contact with each slave node. This is a very complex calculation, especially
if both the contacting bodies are deformable. The structures in such simulations can be either two- or
three-dimensional. Abaqus/Standard can also model the finite-sliding self-contact of a deformable body.
Such a situation occurs when a structure folds over onto itself.
The finite-sliding formulation for contact between a deformable body and a rigid surface is not as
complex as the finite-sliding formulation for two deformable bodies. Finite-sliding simulations where
the master surface is rigid can be performed for both two- and three-dimensional models.
The contact pair algorithm can consider either small or finite sliding effects; general contact only
considers finite sliding effects.
12–11
Abaqus ID:
Printed on:

DEFINING CONTACT IN Abaqus/Standard
12.3.5 Element selectionSelection of elements for contact depends heavily on the contact enforcement used. For example, for
“hard” contact with direct enforcement (the default pressure-overclosure relationship and enforcement
method for contact pairs), it is generally better to use first-order elements for those parts of a model that
will form a slave surface. Second-order elements can sometimes cause problems with “hard” contact
when direct enforcement is used because of the way these elements calculate consistent nodal loads
for a constant pressure. The consistent nodal loads for a constant pressure, P, on a second-order, two-
dimensional element with area A are shown in Figure 12–9.
Pressure, P
FA
FB
FA
FB
= 2PA
3
FA
= PA
6
Figure 12–9 Equivalent nodal loads for a constant pressure
on a two-dimensional, second-order element.
The direct enforcement hard contact algorithm bases important decisions on the forces acting on the
slave nodes. It is difficult for the algorithm to tell if the force distribution shown in Figure 12–9 represents
a constant contact pressure or an actual variation across the element. The equivalent nodal forces for
a three-dimensional, second-order brick element are even more confusing because they do not even
have the same sign for a constant pressure, making it very difficult for the algorithm to work correctly,
especially for nonuniform contact. Therefore, to avoid such problems, Abaqus/Standard automatically
adds a midface node to any face of a second-order, three-dimensional brick or wedge element that defines
a slave surface. The equivalent nodal forces for a second-order element face with a midface node have
the same sign for a constant pressure, although they still differ considerably in magnitude.
The equivalent nodal forces for applied pressures on first-order elements always have a consistent
sign and magnitude; therefore, there is no ambiguity about the contact state that a given distribution of
nodal forces represents.
If you are using hard contact with direct enforcement and your geometry is complicated and
requires the use of an automatic mesh generator, the modified second-order tetrahedral elements
(C3D10M) in Abaqus/Standard should be used. These elements are designed to be used in complex
contact simulations; regular second-order tetrahedral elements (C3D10) have zero contact force at
12–12
Abaqus ID:
Printed on:

DEFINING CONTACT IN Abaqus/Standard
their corner nodes, leading to poor predictions of the contact pressures. The modified second-order
tetrahedral elements can calculate the contact pressures accurately.
Regular second-order elements can generally be used without difficulty when modeling “hard”
contact with the penalty or augmented Lagrange enforcement methods.
12.3.6 Contact algorithmUnderstanding the algorithm Abaqus/Standard uses to solve contact problems will help you understand
the diagnostic output in the message file and carry out contact simulations successfully.
The contact algorithm in Abaqus/Standard, which is shown in Figure 12–10, is built around the
Newton-Raphson technique discussed in Chapter 8, “Nonlinearity.”
Figure 12–10 Contact algorithm in Abaqus/Standard.
Abaqus/Standard examines the state of all contact interactions at the start of each increment to establish
whether slave nodes are open or closed. If a node is closed, Abaqus/Standard determines whether it is
sliding or sticking. Abaqus/Standard applies a constraint for each closed node and removes constraints
from any node where the contact state changes from closed to open. Abaqus/Standard then carries out
an iteration and updates the configuration of the model using the calculated corrections.
In the updated configuration Abaqus/Standard checks for changes in the contact conditions at the
slave nodes. Any node where the clearance after the iteration becomes negative or zero has changed
status from open to closed. Any node where the contact pressure becomes negative has changed status
from closed to open. If any contact changes are detected in the current iteration, Abaqus/Standard labels
it a severe discontinuity iteration.
12–13
Abaqus ID:
Printed on:

MODELING ISSUES FOR RIGID SURFACES IN Abaqus/Standard
Abaqus/Standard continues to iterate until the severe discontinuities are sufficiently small (or no
severe discontinuities occur) and the equilibrium (flux) tolerances are satisfied. Alternatively, you
can choose a different approach in which Abaqus/Standard will continue to iterate until no severe
discontinuities occur before checking for equilibrium.
The summary for each completed increment in the message and status files shows how many
iterations were severe discontinuity iterations and how many were equilibrium iterations (an equilibrium
iteration is one in which no severe discontinuities occur). The total number of iterations for an
increment is the sum of these two. For some increments, you may find that all iterations are labeled
severe discontinuity iterations (this occurs when small contact changes are detected in each iteration
and equilibrium is ultimately satisfied).
Abaqus/Standard applies sophisticated criteria involving changes in penetration, changes in the
residual force, and the number of severe discontinuities from one iteration to the next to determine
whether iteration should be continued or terminated. Hence, it is in principle not necessary to limit
the number of severe discontinuity iterations. This makes it possible to run contact problems that require
large numbers of contact changes without having to change the control parameters. The default limit for
the maximum number of severe discontinuity iterations is 50, which in practice should always be more
than the actual number of iterations in an increment.
12.4 Modeling issues for rigid surfaces in Abaqus/Standard
There are a number of issues that you should consider when modeling contact problems in
Abaqus/Standard that involve rigid surfaces. These issues are discussed in detail in “Common
difficulties associated with contact modeling in Abaqus/Standard,” Section 35.1.2 of the Abaqus
Analysis User’s Manual; but some of the more important issues are described here.
• The rigid surface is always the master surface in a contact interaction.
• The rigid surface should be large enough to ensure that slave nodes do not slide off and “fall behind”
the surface. If this happens, the solution usually will fail to converge. Extending the rigid surface
or including corners along the perimeter (see Figure 12–11) will prevent slave nodes from falling
behind the master surface.
A node “falling behind” a rigid surfacecan cause convergence problems
Extending the rigid surface prevents anode from “falling behind” the surface
Figure 12–11 Extending rigid surfaces to prevent convergence problems.
12–14
Abaqus ID:
Printed on:

Abaqus/Standard 2-D EXAMPLE: FORMING A CHANNEL
• The deformable mesh must be refined enough to interact with any feature on the rigid surface. There
is no point in having a 10 mm wide feature on the rigid surface if the deformable elements that will
contact it are 20 mm across: the rigid feature will just penetrate into the deformable surface as
shown in Figure 12–12.
Ensure that the mesh density on the slave surface is appropriate tomodel the interaction with the smallest features on the rigid surface
Figure 12–12 Modeling small features on the rigid surface.
With a sufficiently refined mesh on the deformable surface, Abaqus/Standard will prevent the rigid
surface from penetrating the slave surface.
• The contact algorithm in Abaqus/Standard requires the master surface of a contact pair to be smooth.
Rigid surfaces are always the master surface and so should always be smoothed. Abaqus/Standard
does not smooth discrete rigid surfaces. The level of refinement controls the smoothness of a discrete
rigid surface. Analytical rigid surfaces can be smoothed using the FILLET RADIUS parameter on
the *SURFACE option to define a fillet radius that is used to smooth any sharp corners in the rigid
surface definition (see Figure 12–13.)
• The rigid surface normal must always point toward the deformable surface with which it will
interact. If it does not, Abaqus/Standard will detect severe overclosures at all of the nodes on the
deformable surface; the simulation will probably terminate due to convergence difficulties.
The normals for an analytical rigid surface are defined as the directions obtained by the 90°
counterclockwise rotation of the vectors from the beginning to the end of each line and circular
segment forming the surface (see Figure 12–14).
The normals for a rigid surface created from rigid elements are defined by the faces specified
on the *SURFACE option creating the surface.
12.5 Abaqus/Standard 2-D example: forming a channel
This simulation of the forming of a channel in a long metal sheet illustrates the use of rigid surfaces
and some of the more complex techniques often required for a successful contact analysis in
Abaqus/Standard.
The problem consists of a strip of deformable material, called the blank, and the tools—the punch,
die, and blank holder—that contact the blank. The tools are modeled as (analytical) rigid surfaces because
12–15
Abaqus ID:
Printed on:

Abaqus/Standard 2-D EXAMPLE: FORMING A CHANNEL
r
Sharp corners in a rigid surfacecan cause convergence problems
Define a fillet radiusto smooth sharp cornersin the analytical rigid surface
Figure 12–13 Smoothing an analytical rigid surface.
Start of linesegments
Rigid surface normals
End of linesegments
Figure 12–14 Normals for an analytical rigid surface.
they are much stiffer than the blank. Figure 12–15 shows the basic arrangement of the components. The
blank is 1 mm thick and is squeezed between the blank holder and the die. The blank holder force is
440 kN. This force, in conjunction with the friction between the blank and blank holder and the blank
and die, controls how the blank material is drawn into the die during the forming process. You have been
asked to determine the forces acting on the punch during the forming process. You also must assess how
well the channel is formed with these particular settings for the blank holder force and the coefficient of
friction between the tools and blank.
A two-dimensional, plane strain model will be used. The assumption that there is no strain in the
out-of-plane direction of the model is valid if the structure is long in this direction. Only half of the
channel needs to be modeled because the forming process is symmetric about a plane along the center
of the channel.
The model will use contact pairs rather than general contact, since general contact is not available
for analytical rigid surfaces in Abaqus/Standard.
The dimensions of the various components are shown in Figure 12–16.
12.5.1 Coordinate systemTwo-dimensional, plane strain models are defined, by default, in the global 1–2 plane as shown in
Figure 12–16. For the forming simulation, place the origin of this plane at the bottom left-hand corner
12–16
Abaqus ID:
Printed on:

Abaqus/Standard 2-D EXAMPLE: FORMING A CHANNEL
PunchBlankholder
Die
Blank
Final punchposition
symmetryBlank holder forcePunch force
Figure 12–15 Forming analysis.
0.1
0.051
0.01
0.001
0.06
0.005
0.011
0.005
0.06
gap = 0.0
gap = 0.0
0.06
0.0050.0
0.001
symmetryplane
2(y)
1(x)
Figure 12–16 Dimensions, in m, of the components in the forming simulation.
of the blank (Figure 12–16). The 1-direction will be normal to the symmetry plane, which is located
at .
12–17
Abaqus ID:
Printed on:

Abaqus/Standard 2-D EXAMPLE: FORMING A CHANNEL
12.5.2 Mesh designThe mesh for this simulation can be divided into the deformable blank and the rigid tools.
Blank
Once again, the element type should be selected before the mesh is designed. The mesh used for
the blank should consist of four rows of 100 CPE4R elements (see Figure 12–17). Four rows of
elements are used so that better resolution of the deformation through the thickness of the blank will
be obtained.
RP RP
RP
Figure 12–17 Mesh.
The node and element numbers for the mesh shown in Figure 12–18 are from the model of
this problem given in “Forming a channel with Abaqus/Standard,” Section A.13. These node and
element numbers are used in the discussion that follows.
12–18
Abaqus ID:
Printed on:
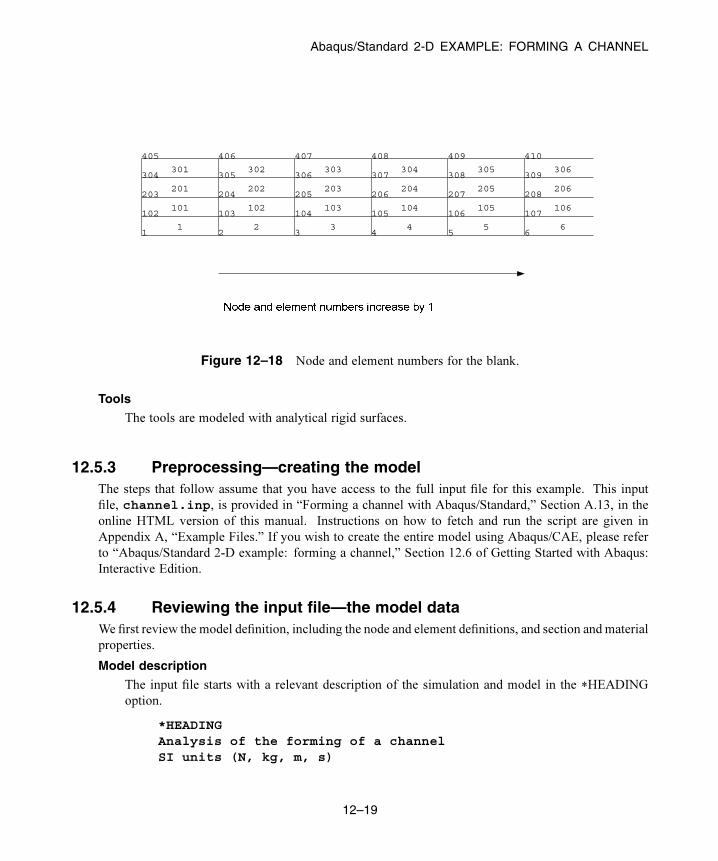
Abaqus/Standard 2-D EXAMPLE: FORMING A CHANNEL
410409408407406405
309308307306305304
208207206205204203
107106105104103102
654321
306305304303302301
206205204203202201
106105104103102101
654321
Figure 12–18 Node and element numbers for the blank.
Tools
The tools are modeled with analytical rigid surfaces.
12.5.3 Preprocessing—creating the modelThe steps that follow assume that you have access to the full input file for this example. This input
file, channel.inp, is provided in “Forming a channel with Abaqus/Standard,” Section A.13, in the
online HTML version of this manual. Instructions on how to fetch and run the script are given in
Appendix A, “Example Files.” If you wish to create the entire model using Abaqus/CAE, please refer
to “Abaqus/Standard 2-D example: forming a channel,” Section 12.6 of Getting Started with Abaqus:
Interactive Edition.
12.5.4 Reviewing the input file—the model dataWe first review the model definition, including the node and element definitions, and section and material
properties.
Model description
The input file starts with a relevant description of the simulation and model in the *HEADING
option.
*HEADINGAnalysis of the forming of a channelSI units (N, kg, m, s)
12–19
Abaqus ID:
Printed on:

Abaqus/Standard 2-D EXAMPLE: FORMING A CHANNEL
Nodal coordinates and element connectivity
Check that the preprocessor used the correct element type for the blank. Provide a meaningful
element set name, such as BLANK, for the elements. The *ELEMENT option in this model follows:
*ELEMENT, TYPE=CPE4R, ELSET=BLANK
The model definition also specifies the creation of node sets so that parts of the model can
be constrained and moved easily. These nodes are located on the centerline of the blank and have
symmetric constraints into a node set called CENTER.
*NSET, NSET=CENTER1,102,203,304,405
The node along the middle of the sheet at the left-hand side of the model, underneath the punch,
is included in node set MIDLEFT.
*NSET, NSET=MIDLEFT203,
Again, the node numbers in these option blocks are for the model in Figure 12–18; your node
numbers may be different.
Two element sets, BLANK_B and BLANK_T, will be defined that contain the lower and upper
rows of elements in the blank. These will be used to define the contact surfaces on the blank.
*ELSET, ELSET=BLANK_B, GENERATE1,100,1*ELSET, ELSET=BLANK_T, GENERATE301,400,1
Section and material properties for the blank
The blank is made from a high-strength steel (elastic modulus of 210.0 GPa, = 0.3). Its inelastic
stress-strain behavior is shown in Figure 12–19. The material undergoes considerable work
hardening as it deforms plastically. It is likely that plastic strains will be large in this analysis;
therefore, hardening data are provided up to 50% plastic strain.
12–20
Abaqus ID:
Printed on:

Abaqus/Standard 2-D EXAMPLE: FORMING A CHANNEL
0.2 0.50.40.30.1
Plastic strain
Str
ess
(MP
a) 400.
300.
500.
600.
100.
200.
Figure 12–19 Yield stress vs. plastic strain.
The blank is going to undergo significant rotation as it deforms. Reporting the values of stress
and strain in a coordinate system that rotates with the blank’s motion will make it much easier to
interpret the results. Therefore, an *ORIENTATION option should be used to create a coordinate
system that is aligned initially with the global coordinate system but moves with the elements as
they deform. The following input options are needed to define the blank’s element and material
properties:
*ORIENTATION, NAME=LOCAL1.,0.,0., 0.,1.,0.1, 0*SOLID SECTION, MATERIAL=STEEL, ORIENTATION=LOCAL,ELSET=BLANK, CONTROL=EC-1*SECTION CONTROLS, NAME=EC-1, HOURGLASS=ENHANCED*MATERIAL, NAME=STEEL*ELASTIC2.1E11,0.3*PLASTIC400.E6, 0.0E-2420.E6, 2.0E-2500.E6,20.0E-2600.E6,50.0E-2
12–21
Abaqus ID:
Printed on:

Abaqus/Standard 2-D EXAMPLE: FORMING A CHANNEL
12.5.5 Contact definitionsThe contact definitions for each part of the model are discussed here.
Rigid surfaces
The blank holder, the punch, and the die are modeled with analytical rigid surfaces. A rigid body
reference node will be assigned to each of these surfaces when they are created. If you did not
create these rigid body reference nodes during preprocessing, add the following option block to
your model:
*NODE, NSET=REFPUNCH7000, 0.000, 0.06*NODE, NSET=REFHOLD8000, 0.1,0.06*NODE, NSET=REFDIE9000,0.1,-0.06*NSET, NSET=NOUTREFDIE, REFHOLD, REFPUNCH
Each node is placed in a node set to make the input file easy to read. While someone unfamiliar
with the specific mesh used in the simulation may not know why boundary conditions are applied
to node 7000, they might be able to guess why boundary conditions were applied to the REFPUNCHnode. All reference nodes are also assigned to a set named NOUT to facilitate the history output
requests that will follow.
To ensure that an analytical rigid surface’s normals point toward the deformable surfaces
that the rigid surface will contact, the segments composing the rigid surface must be defined in
a particular order. For example, to create the correct normals for the surface PUNCH, define the
surface from the top right corner to the bottom left corner of the punch. The following input to
the model creates the surface PUNCH:
*SURFACE, TYPE=SEGMENTS, NAME=PUNCH, FILLET RADIUS=0.001START,0.050, 0.060LINE, 0.050, 0.006CIRCL,0.045, 0.001, 0.045,0.006LINE,-0.010, 0.001*RIGID BODY, ANALYTICAL SURFACE=PUNCH, REF NODE=7000
The parameter TYPE=SEGMENTS specifies that a two-dimensional rigid surface is being defined.
The NAME parameter specifies the name of the surface, PUNCH. The data lines define the
geometry of the surface. The first data line always has the word “START” followed by the 1-
12–22
Abaqus ID:
Printed on:

Abaqus/Standard 2-D EXAMPLE: FORMING A CHANNEL
and 2-coordinates of the starting point for the surface. The subsequent lines define line, circular,
and parabolic segments. For this surface the second data line defines a straight line from the start
position (0.05, 0.060) to (0.050, 0.006). The third data line defines a circular arc from the end
of the straight line (0.05, 0.006) to (0.045, 0.001) with the center of the circle located at (0.045,
0.006). The last data line defines a straight line from the end of the arc to (−0.010, 0.001).
This definition should produce a smooth rigid surface but, to be safe, the FILLET RADIUS
parameter specifies that a 1 mm fillet radius should be used to smooth any discontinuities in the
surface definition. It is always good practice to add the FILLETRADIUS parameter to the definition
of any analytical rigid surface.
The *RIGID BODY option is used to bind the analytical surface to a rigid body with its rigid
body reference node specified by the REF NODE parameter and the surface referred to by its name,
using the ANALYTICAL SURFACE parameter.
The rigid surfaces for the blank holder and the die are defined in a similar way. The following
option blocks define the surfaces on these tools:
*SURFACE, TYPE=SEGMENTS, NAME=HOLDER, FILLET RADIUS=0.001START,0.110, 0.001LINE, 0.056,0.001CIRCL,0.051,0.006, 0.056,0.006LINE, 0.051,0.060*RIGID BODY, ANALYTICAL SURFACE=HOLDER, REF NODE=8000***SURFACE, TYPE=SEGMENTS, NAME=DIE, FILLET RADIUS=0.001START,0.051,-0.060LINE, 0.051,-0.005CIRCL,0.056,0.,0.056,-0.005LINE, 0.11, 0.*RIGID BODY, ANALYTICAL SURFACE=DIE, REF NODE=9000
All of the rigid surfaces in this simulation extend beyond the deformable blank to ensure that
there is no possibility that slave nodes will slide behind any of them. The initial configuration of
these surfaces and the locations of their reference nodes are shown in Figure 12–20.
Deformable surfaces
Using the two element sets defined on the blank, create a contact surface on the top of the blank,
called BLANK_T, and one on the bottom, called BLANK_B. If you use the automatic free surface
generation capability, the option blocks will look like
*SURFACE, NAME=BLANK_BBLANK_B,*SURFACE, NAME=BLANK_TBLANK_T,
12–23
Abaqus ID:
Printed on:

Abaqus/Standard 2-D EXAMPLE: FORMING A CHANNEL
8000 (REFHOLD) Holder reference node
7000 (REFPUNCH) Punch reference node
9000 (REFDIE) Die reference node
Figure 12–20 Rigid body reference nodes.
Contact pairs
Contact must be defined between the top of the blank and the punch, the top of the blank and the
blank holder, and the bottom of the blank and the die. The rigid surface must be the master surface
in each of these contact pairs. Each contact pair must refer to a *SURFACE INTERACTION option
that defines a surface interaction model governing how the surfaces of the contact pair interact with
each other. Multiple contact pairs can refer to the same *SURFACE INTERACTION option.
In this example we assume that the friction coefficient is zero between the blank and the punch.
The friction coefficient between the blank and the other two tools is assumed to be 0.1. Therefore,
two *SURFACE INTERACTION options must be used in the model: one with friction and one
without. Frictionless contact is the default in Abaqus, so no *FRICTION option is needed in the
surface interaction definition for the contact pair.
The option blocks to define the contact pairs and surface interactions in your model will look
like
*CONTACT PAIR, INTERACTION=FRIC, TYPE=SURFACE TO SURFACEBLANK_B, DIEBLANK_T, HOLDER
12–24
Abaqus ID:
Printed on:

Abaqus/Standard 2-D EXAMPLE: FORMING A CHANNEL
*CONTACT PAIR, INTERACTION=NOFRIC, TYPE=SURFACE TO SURFACEBLANK_T, PUNCH*SURFACE INTERACTION, NAME=FRIC*FRICTION0.1,*SURFACE INTERACTION, NAME=NOFRIC
For each contact pair the surface-to-surface contact discretization technique has been used, which
controls the location where contact constraints will be generated and enforced.
12.5.6 Reviewing the input file—the history data
There are two major sources of difficulty in Abaqus/Standard contact analyses: rigid body motion of the
components before contact conditions constrain them, and sudden changes in contact conditions, which
lead to severe discontinuity iterations as Abaqus/Standard tries to establish the exact condition of all
contact surfaces. Therefore, wherever possible, take precautions to avoid these situations.
Removing rigid body motion is not particularly difficult. Simply ensure that there are enough
constraints to prevent all rigid body motions of all the components in the model. This approach may
mean using boundary conditions initially to get the components into contact, instead of applying loads
directly. Using this approach may require more steps than originally anticipated, but the solution of the
problem should proceed more smoothly.
Alternatively, contact controls may be used to stabilize rigid body motion automatically. With this
approach Abaqus/Standard applies viscous damping to the slave nodes of the contact pair. Care must be
taken, however, to ensure that the viscous damping does not significantly alter the physics of the problem,
as will be the case if the dissipated stabilization energy and contact damping stresses are sufficiently
small.
The simulation will consist of two steps. Since the simulation involves material, geometric, and
boundary nonlinearities, general steps must be used. In addition, the forming process is quasi-static;
thus, we can ignore inertia effects throughout the simulation. Rather than use additional steps to establish
firm contact, contact stabilization as described above will be used.
Step 1
In this step contact will be established between the blank holder and the blank while the punch and
die are held fixed. Given the quasi-static nature of the problem and the fact that nonlinear response
will be considered, a static, general step is required. The effects of geometric nonlinearity must be
considered in this simulation, so set the NLGEOM parameter equal to YES on the *STEP option.
Set the initial time increment to 0.05 and the total time period to 1.0.Constrain the blank holder in degrees of freedom 1 and 6, where degree of freedom 6 is the
rotation in the plane of the model; constrain the punch and die completely. All of the boundary
conditions for the rigid surfaces are applied to their respective rigid body reference nodes. Apply
12–25
Abaqus ID:
Printed on:

Abaqus/Standard 2-D EXAMPLE: FORMING A CHANNEL
symmetric boundary constraints on the nodes of the blank lying on the symmetry plane (node set
CENTER).Recall that in this simulation the required blank holder force is 440 kN. Thus, apply a
concentrated force to set REFHOLD and specify a magnitude of −440.E3 for degree of freedom 2.
Finally, specify that the preselected field output be written every 20 increments for this step.
In addition, request that the vertical reaction force and displacement (RF2 and U2) at the punch
reference node (node set REFPUNCH) be written every increment as history data. Use the *PRINT,
CONTACT=YES option to write contact diagnostics to the message file.
The complete step definition in your model appears below:
*STEP, NLGEOM=YESApply holder force*STATIC0.05, 1.0*BOUNDARYCENTER , XSYMMREFDIE , 1, 6REFPUNCH, 1, 6REFHOLD , 1, 1REFHOLD , 6, 6*CLOADREFHOLD, 2, -4.4E5*OUTPUT, FIELD, FREQ=20, VAR=PRESELECT*OUTPUT, HISTORY, FREQ=1, VAR=PRESELECT*NODE OUTPUT, NSET=REFPUNCHRF2, U2*PRINT, CONTACT=YES*END STEP
Step 2
Move the punch down to complete the forming operation.
Between the frictional sliding, the changing contact conditions, and the inelastic material
behavior, there is significant nonlinearity in this step; therefore, set the maximum number of
increments to a large value (for example, set INC=1000 on the *STEP option). Set the initial time
increment to be 0.05 and the total step time to be 1.0.
To alleviate convergence difficulties that may arise due to the changing contact states (in
particular for contact between the punch and the blank), define contact controls to invoke automatic
contact stabilization for the contact pair involving the punch and the blank. Reduce the default
damping factor by a factor of 1,000 to minimize the effects of stabilization on the solution.
Your output requests from the previous step will be propagated to this step. The complete input
for Step 2 appears below:
12–26
Abaqus ID:
Printed on:

Abaqus/Standard 2-D EXAMPLE: FORMING A CHANNEL
*STEP, NLGEOM=YES, INC=1000Apply punch stroke*STATIC.05, 1.0*CONTACT CONTROLS, MASTER=PUNCH, SLAVE=BLANK_T, STABILIZE=0.001*BOUNDARYREFPUNCH, 2, 2, -0.030*END STEP
12.5.7 Running the analysisSave the input in the file channel.inp (see “Forming a channel with Abaqus/Standard,”
Section A.13).
abaqus job=channel
Check the status and message files while the job is running to see how it is progressing.
Status fileThis analysis should take approximately 180 increments to complete. The top of the status file is
shown below.
SUMMARY OF JOB INFORMATION:STEP INC ATT SEVERE EQUIL TOTAL TOTAL STEP INC OF DOF IF
DISCON ITERS ITERS TIME/ TIME/LPF TIME/LPF MONITOR RIKSITERS FREQ
1 1 1 4 0 4 0.0500 0.0500 0.050001 2 1 2 0 2 0.100 0.100 0.050001 3 1 2 0 2 0.175 0.175 0.075001 4 1 2 0 2 0.288 0.288 0.11251 5 1 3 0 3 0.456 0.456 0.16881 6 1 2 0 2 0.709 0.709 0.25311 7 1 2 0 2 1.00 1.00 0.29062 1 1U 2 1 3 1.00 0.000 0.050002 1 2U 4 0 4 1.00 0.000 0.012502 1 3 29 0 29 1.00 0.00313 0.0031252 2 1 5 0 5 1.01 0.00547 0.0023442 3 1 6 0 6 1.01 0.00781 0.0023442 4 1 9 0 9 1.01 0.0113 0.003516
Abaqus has a difficult time determining the contact state in the first increment of Step 2. It needs
three attempts before it finds the proper configuration of the PUNCH and BLANK_T surfaces and
achieves equilibrium. After this difficult start, Abaqus quickly increases the increment size to a
more reasonable value. The end of the status file is shown below.
2 167 2 0 4 4 1.95 0.952 0.0022392 168 1 1 3 4 1.96 0.956 0.0033582 169 1 2 2 4 1.96 0.961 0.0050372 170 1 1 3 4 1.97 0.968 0.0075562 171 1 3 3 6 1.98 0.980 0.011332 172 1U 4 0 4 1.98 0.980 0.017002 172 2 1 3 4 1.98 0.984 0.0042502 173 1 3 2 5 1.99 0.990 0.006375
12–27
Abaqus ID:
Printed on:

Abaqus/Standard 2-D EXAMPLE: FORMING A CHANNEL
2 174 1U 4 0 4 1.99 0.990 0.0095632 174 2 3 2 5 1.99 0.993 0.0023912 175 1 1 2 3 2.00 0.996 0.0035862 176 1 4 1 5 2.00 1.00 0.003721
THE ANALYSIS HAS COMPLETED SUCCESSFULLY
This simulation contains many severe discontinuity iterations. The message file will be quite
large because of the number of iterations in the analysis. Although it might be tempting to limit
the information written to this file, generally this should not be done because this information is the
main source of diagnostic data that Abaqus provides during the simulation.
12.5.8 Troubleshooting Abaqus/Standard contact analyses
Contact analyses are generally more difficult to complete than just about any other type of simulation in
Abaqus/Standard. Therefore, it is important to understand all of the options available to help you with
contact analyses.
If a contact analysis runs into difficulty, the first thing to check is whether the contact surfaces are
defined correctly. The easiest way to do this is to run a datacheck analysis and plot the surface normals
in Abaqus/Viewer. You can plot all of the normals, for both surfaces and structural elements, on either
the deformed or the undeformed plots. Use the Normals options in the Common Plot Options dialog
box to do this, and confirm that the surface normals are in the correct directions.
Abaqus/Standard may still have some problems with contact simulations, even when the contact
surfaces are all defined correctly. One reason for these problems may be the default convergence
tolerances and limits on the number of iterations: they are quite rigorous. In contact analyses it
is sometimes better to allow Abaqus/Standard to iterate a few more times rather than abandon
the increment and try again. This is why Abaqus/Standard makes the distinction between severe
discontinuity iterations and equilibrium iterations during the simulation.
The *PRINT, CONTACT=YES option is essential for almost every contact analysis. The
information this option provides in the message file can be vital for spotting mistakes or problems. For
example, chattering can be spotted because the same slave node will be seen to be involved in all of the
severe discontinuity iterations. If you see this, you will have to modify the mesh in the region around
that node or add constraints to the model. Contact data in the message file can also identify regions
where only a single slave node is interacting with a surface. This is a very unstable situation and can
cause convergence problems. Again, you should modify the model to increase the number of elements
in such regions.
12.5.9 Postprocessing
In Abaqus/Viewer, examine the deformation of the blank.
12–28
Abaqus ID:
Printed on:

Abaqus/Standard 2-D EXAMPLE: FORMING A CHANNEL
Deformed model shape and contour plots
The basic result of this simulation is the deformation of the blank and the plastic strain caused by the
forming process. We can plot the deformed model shape and the plastic strain, as described below.
To plot the deformed model shape:
1. Plot the deformed model shape. You can remove the die and the punch from the display and
visualize just the blank.
2. In the Results Tree, expand the Element sets container underneath the output database file
named channel.odb.
3. From the list of available element sets, select PART-1–1.BLANK. Click mouse button 3,
and select Replace from the menu that appears to replace the current display group with the
selected elements. Click , if necessary, to fit the model in the viewport.
The resulting plot is shown in Figure 12–21.
1
2
3
Figure 12–21 Deformed shape of blank at the end of Step 2.
To plot the contours of equivalent plastic strain:
1. From the main menu bar, select Plot→Contours→On Deformed Shape; or click the
tool from the toolbox to display contours of Mises stress.
2. Open the Contour Plot Options dialog box.
3. Drag the Contour Intervals slider to change the number of contour intervals to 7.
4. Click OK to apply these settings.
12–29
Abaqus ID:
Printed on:

Abaqus/Standard 2-D EXAMPLE: FORMING A CHANNEL
5. Select Primary from the list of variable types on the left side of the Field Output toolbar, andselect PEEQ from the list of output variables.
PEEQ is an integrated measure of plastic strain. A nonintegrated measure of plastic strain is
PEMAG. PEEQ and PEMAG are equal for proportional loading.
6. Use the tool to zoom into any region of interest in the blank, as shown in Figure 12–22.
(Avg: 75%)PEEQ
+0.000e+00+3.053e−02+6.107e−02+9.160e−02+1.221e−01+1.527e−01+1.832e−01+2.137e−01
Figure 12–22 Contours of the scalar plastic strain variable PEEQ in one corner of the blank.
The maximum plastic strain is approximately 21%. Compare this with the failure strain of the
material to determine if the material will tear during the forming process.
History plots of the reaction forces on the blank and punch
The solid line in Figure 12–23 shows the variation of the reaction force RF2 at the punch’s rigid
body reference node.
To create a history plot of the reaction force:
1. In the Results Tree, expand the History Output container. Double-click Reactionforce: RF1 PI: PART—1–1 Node xxx in NSET NOUT.
A history plot of the reaction force in the 1-direction appears.
2. Select and plot Reaction force: RF2 PI: PART—1–1 Node xxx in NSETNOUT.
3. Open the Axis Options dialog box to label the axes.
4. Switch to the Title tabbed page.
5. Specify Reaction Force - RF2 as the Y-axis label, and Total Time as the X-axis
label.
12–30
Abaqus ID:
Printed on:

Abaqus/Standard 2-D EXAMPLE: FORMING A CHANNEL
Time0.0 0.5 1.0 1.5 2.0
For
ce
−0.15
−0.10
−0.05
0.00[x1.E6]
Figure 12–23 Force on punch.
6. Click Dismiss to close the dialog box.
The punch force, shown in Figure 12–23, rapidly increases to about 160 kN during Step 2,
which runs from a total time of 1.0 to 2.0.
History plot of the stabilization and internal energies
It is important to verify that the presence of contact stabilization does not significantly alter the
physics of the problem. One way to assess this requirement is to compare the energy dissipation due
to stabilization (ALLSD) against the internal energy of the structure (ALLIE). Ideally the amount
of stabilization energy should be a small fraction of the internal energy. Figure 12–24 shows the
variation of the stabilization and internal energies. It is clear that the dissipated stabilization energy
is indeed small.
12–31
Abaqus ID:
Printed on:

Abaqus/Standard 2-D EXAMPLE: FORMING A CHANNEL
Time0.0 0.5 1.0 1.5 2.0
Ene
rgy
0.0
0.5
1.0
1.5
[x1.E3]
ALLIE Whole ModelALLSD Whole Model
Figure 12–24 Stabilization and internal energies.
Plotting contours on surfaces
Abaqus/Viewer includes a number of features designed specifically for postprocessing contact
analyses. The Display Group feature can be used to collect surfaces into display groups, similar
to element and node sets.
To display contact surface normal vectors:
1. Plot the undeformed model shape.
2. In the Results Tree, expand the Surface Sets container. Select the surfaces named BLANK-T and PART—1–1.PUNCH. Click mouse button 3, and select Replace from the menu that
appears.
3. Using the Common Plot Options dialog box, turn on the display of the normal vectors (Onsurfaces) and set the length of the vector arrows to Short.
12–32
Abaqus ID:
Printed on:

Abaqus/Standard 2-D EXAMPLE: FORMING A CHANNEL
4. Use the tool, if necessary, to zoom into any region of interest, as shown in Figure 12–25.
Figure 12–25 Surface normals.
To contour the contact pressure:
1. Plot the contours of plastic strain again.
2. From the list of variable types on the left side of the Field Output toolbar, select Primary, ifit is not already selected.
3. From the list of output variables in the center of the toolbar, select CPRESS.
4. Remove the PART—1–1.PUNCH surface from your display group.
To visualize contours of surface-based variables better in two-dimensional models, you can
extrude the plane strain elements to construct the equivalent three-dimensional view. You can
sweep axisymmetric elements in a similar fashion.
5. From the main menu bar, select View→ODB Display Options.
The ODB Display Options dialog box appears.
6. Select the Sweep/Extrude tab to access the Sweep/Extrude options.
7. In the Extrude region of the dialog box, toggle on Extrude elements; and set the Depth to
0.05 to extrude the model for the purpose of displaying contours.
8. Click OK to apply these settings.
Rotate the model using the tool to display the model from a suitable view, such as the one
shown in Figure 12–26.
12–33
Abaqus ID:
Printed on:

GENERAL CONTACT IN Abaqus/Standard
CPRESS
+0.000e+00+2.981e+07+5.962e+07+8.943e+07+1.192e+08+1.491e+08+1.789e+08+2.087e+08
Figure 12–26 Contact pressure.
12.6 General contact in Abaqus/Standard
In the channel forming example in “Abaqus/Standard 2-D example: forming a channel,” Section 12.5,
contact interaction is defined using the contact pairs algorithm, which requires you to explicitly define
the surfaces that may potentially come into contact. As an alternative, you can specify contact in an
Abaqus/Standard analysis by using the general contact algorithm. The contact interaction domain,
contact properties, and surface attributes are specified independently for general contact, offering a
more flexible way to add detail incrementally to a model. The simple interface for specifying general
contact allows for a highly automated contact definition; however, it is also possible to define contact
with the general contact interface to mimic traditional contact pairs. Conversely, specifying self-contact
of a surface spanning multiple bodies with the contact pair user interface (if the surface-to-surface
formulation is used) mimics the highly automated approach often used for general contact.
12–34
Abaqus ID:
Printed on:

Abaqus/Standard 3-D EXAMPLE: SHEARING OF A LAP JOINT
In Abaqus/Standard, traditional pairwise specifications of contact interactions will often result
in more efficient or robust analyses as compared to an all-inclusive self-contact approach to defining
contact. Therefore, there is often a trade-off between ease of defining contact and analysis performance.
Abaqus/CAE provides a contact detection tool that greatly simplifies the process of creating traditional
contact pairs for Abaqus/Standard (see “Understanding contact and constraint detection,” Section 15.6
of the Abaqus/CAE User’s Manual).
12.7 Abaqus/Standard 3-D example: shearing of a lap joint
This simulation of the shearing of a lap joint illustrates the use of general contact in Abaqus/Standard.
The model consists of two overlapping aluminum plates that are connected with a titanium rivet.
The left end of the bottom plate is fixed, and the force is applied to the right end of the top plate to shear
the joint. Figure 12–27 shows the basic arrangement of the components. Because of symmetry, only half
of the joint is modeled to reduce computational cost. Frictional contact is assumed.
Rivet
Top plate
Bottom plate
Figure 12–27 Lap joint analysis.
12.7.1 Mesh design
Select the element type before designing the mesh. The mesh used for the plates should consist of C3D8I
elements; the rivet should be meshed with C3D8R and C3D6 elements (a representative mesh is shown
in Figure 12–28).
12–35
Abaqus ID:
Printed on:

Abaqus/Standard 3-D EXAMPLE: SHEARING OF A LAP JOINT
X
YZ
Figure 12–28 Mesh.
12.7.2 Preprocessing—creating the modelThe steps that follow assume that you have access to the full input file for this example. This input file,
lap_joint.inp, is provided in “Shearing of a lap joint,” Section A.14, in the online HTML version
of this manual. Instructions on how to fetch and run the script are given in Appendix A, “Example
Files.” If you wish to create the entire model using Abaqus/CAE, please refer to “Abaqus/Standard 3-D
example: shearing of a lap joint,” Section 12.8 of Getting Started with Abaqus: Interactive Edition.
12.7.3 Reviewing the input file—the model dataWe first review the model definition, including the node and element definitions, and section and material
properties.
Model description
The input file starts with a relevant description of the simulation and model in the *HEADING
option.
*HEADINGShearing of a lap jointSI units (N, kg, mm, s)
12–36
Abaqus ID:
Printed on:

Abaqus/Standard 3-D EXAMPLE: SHEARING OF A LAP JOINT
Nodal coordinates and element connectivity
Check that the preprocessor used the correct element type for the plates and rivet. Provide
meaningful element set names, such as PLATE and RIVET, for the elements. The *ELEMENT
options in this model follow:
*ELEMENT, TYPE=C3D8I, ELSET=PLATE...*ELEMENT, TYPE=C3D8R, ELSET=RIVET...*ELEMENT, TYPE=C3D6, ELSET=RIVET...
The model definition also specifies the creation of node sets so that parts of the model can be
constrained and moved easily. These sets are located at the following locations: at the bottom-left
corner of the bottom plate (set CORNER), the left face of the bottom plate (set FIX), the right faceof the top plate (set PULL), and the symmetry plane (set SYMM).
*NSET, NSET=CORNER...*NSET, NSET=FIX...*NSET, NSET=PULL...*NSET, NSET=SYMM...
The first of these sets will be used to prevent rigid body motion in the 3-direction; the next two will
be used to fix the end of one plate and pull the end of the other, respectively; the last one will be
used to impose symmetry conditions.
Section and material properties for the blank
The plates are made from aluminum (elastic modulus of 71.7 × 10³ MPa, = 0.33). Its inelastic
stress-strain behavior is tabulated in Table 12–1.
Table 12–1 Yield stress–plastic strain data (aluminum).
Yield stress (MPa) Plastic strain
350.00 0.0
368.71 1.0E−3
12–37
Abaqus ID:
Printed on:

Abaqus/Standard 3-D EXAMPLE: SHEARING OF A LAP JOINT
Yield stress (MPa) Plastic strain
376.50 2.0E−3
391.98 5.0E−3
403.15 8.0E−3
412.36 1.1E−2
422.87 1.5E−2
444.17 2.5E−2
461.50 3.5E−2
507.90 7.0E−2
581.50 0.15
649.17 0.25
704.22 0.35
728.78 0.40
751.85 0.45
773.68 0.50
794.44 0.55
814.28 0.60
The rivet is made from titanium (elastic modulus of 112 × 103 MPa, = 0.34). Its inelastic
stress-strain behavior is tabulated in Table 12–2.
Table 12–2 Yield stress–plastic strain data (titanium).
Yield stress (MPa) Plastic strain
907.00 0.0
934.86 1.0E−3
944.28 2.0E−3
961.77 5.0E−3
973.73 8.0E−3
983.28 1.1E−2
993.89 1.5E−2
12–38
Abaqus ID:
Printed on:

Abaqus/Standard 3-D EXAMPLE: SHEARING OF A LAP JOINT
Yield stress (MPa) Plastic strain
1014.7 2.5E−2
1023.3 3.0E−2
1051.1 5.0E−2
1099.8 0.10
1129.0 0.14
1164.9 0.20
1190.2 0.25
1212.8 0.30
The following input options are needed to define the material properties:
*SOLID SECTION, MATERIAL=ALUMINUM, ELSET=PLATES*MATERIAL, NAME=ALUMINUM*ELASTIC71700., 0.33
*PLASTIC350.00, 0.368.71, 0.001376.50, 0.002391.98, 0.005403.15, 0.008412.36, 0.011422.87, 0.015444.17, 0.025461.50, 0.035507.90, 0.070581.50, 0.150649.17, 0.250704.22, 0.350728.78, 0.400751.85, 0.450773.68, 0.500794.44, 0.550814.28, 0.600
*SOLID SECTION, MATERIAL=TITANIUM, ELSET=RIVET*MATERIAL, NAME=TITANIUM*ELASTIC
12–39
Abaqus ID:
Printed on:

Abaqus/Standard 3-D EXAMPLE: SHEARING OF A LAP JOINT
112000., 0.34*PLASTIC907.00, 0.934.86, 0.001944.28, 0.002961.77, 0.005973.73, 0.008983.28, 0.011993.89, 0.0151014.7, 0.0251023.3, 0.0301051.1, 0.0501099.8, 0.1001129.0, 0.1401164.9, 0.2001190.2, 0.2501212.8, 0.300
12.7.4 Contact definitionsThe contact definitions for the model are discussed here.
Defining contact
Contact will be used to enforce the interactions between the plates and the rivet. The friction
coefficient between all parts is assumed to be 0.05.
This problem could use either contact pairs or the general contact algorithm. We will use
general contact in this problem to demonstrate the simplicity of the contact definition.
The contact property is defined using the *SURFACE INTERACTION option; a friction
coefficient of 0.05 is specified.
*SURFACE INTERACTION, NAME=FRIC*FRICTION0.05,
Use the *CONTACT option to define a general contact interaction. Use the ALL EXTERIOR
parameter on the *CONTACT INCLUSIONS option to specify self-contact for the unnamed,
all-inclusive surface defined automatically by Abaqus/Standard. The *CONTACT PROPERTY
ASSIGNMENT option is used to assign the contact property named FRIC to the general contact
interaction.
*CONTACT*CONTACT INCLUSIONS, ALL EXTERIOR
12–40
Abaqus ID:
Printed on:

Abaqus/Standard 3-D EXAMPLE: SHEARING OF A LAP JOINT
*CONTACT PROPERTY ASSIGNMENT, , FRIC
12.7.5 Reviewing the input file—the history dataStep definition and boundary conditions
Create a single static, general step and include the effects of geometric nonlinearity. Set the initial
time increment to 0.05 and the total time to 1.0. Accept the default output requests.One end of the assembly is fixed while the other is pulled along the length of the plates (1-
direction). In addition, a single node is fixed in the vertical (3-) direction to prevent rigid body
motion and the nodes on the symmetry plane are fixed in the direction normal to the plane (2-
direction). The boundary conditions are summarized in Table 12–3.
Table 12–3 Summary of boundary conditions.
Geometry Set BCs
fix U1 = 0.0
pull U1 = 2.5
symm U2 = 0.0
corner U3 = 0.0
The complete step definition required for the model appears below:
*STEP, NLGEOM=YES*STATIC0.05, 1.
*BOUNDARYFIX, 1, 1PULL, 1, 1, 2.5SYMM, 2, 2CORNER, 3, 3
*OUTPUT, FIELD, VARIABLE=PRESELECT*OUTPUT, HISTORY, VARIABLE=PRESELECT*END STEP
12.7.6 Running the analysisSave the input in the file lap_joint.inp (see “Shearing of a lap joint,” Section A.14). Run the
simulation using the following command:
12–41
Abaqus ID:
Printed on:

Abaqus/Standard 3-D EXAMPLE: SHEARING OF A LAP JOINT
abaqus job=lap_joint
Check the status and message files while the job is running to see how it is progressing.
Status file
This analysis should take approximately 13 increments to complete. The contents of the status file
are shown below:
SUMMARY OF JOB INFORMATION:STEP INC ATT SEVERE EQUIL TOTAL TOTAL STEP INC OF DOF IF
DISCON ITERS ITERS TIME/ TIME/LPF TIME/LPF MONITOR RIKSITERS FREQ
1 1 1 11 2 13 0.0500 0.0500 0.050001 2 1 3 2 5 0.100 0.100 0.050001 3 1 4 2 6 0.175 0.175 0.075001 4 1 3 2 5 0.288 0.288 0.11251 5 1 4 5 9 0.456 0.456 0.16881 6 1U 6 0 6 0.456 0.456 0.16881 6 2 3 3 6 0.498 0.498 0.042191 7 1 2 6 8 0.541 0.541 0.042191 8 1 1 4 5 0.583 0.583 0.042191 9 1 0 4 4 0.625 0.625 0.042191 10 1 1 2 3 0.688 0.688 0.063281 11 1 1 3 4 0.783 0.783 0.094921 12 1 2 2 4 0.926 0.926 0.14241 13 1 1 2 3 1.00 1.00 0.07441
12.7.7 PostprocessingIn Abaqus/Viewer, examine the deformation of the assembly.
Deformed model shape and contour plots
The basic results of this simulation are the deformation of the joint and the stresses caused by the
shearing process. Plot the deformed model shape and the Mises stress, as shown in Figure 12–29
and Figure 12–30, respectively.
Contact pressures
You will now plot the contact pressures in the lap joint.
Since it is difficult to see contact pressures when the entire model is displayed, use the DisplayGroups toolbar to display only the top plate in the viewport.
Create a path plot to examine the variation of the contact pressure around the bolt hole of the
top plate.
To create a path plot:
1. In the Results Tree, double-click Paths. In the Create Path dialog box, select Edge list asthe type and click Continue.
2. In the Edit Edge List Path dialog box, select the instance corresponding to the top plate and
click Add After.
12–42
Abaqus ID:
Printed on:

Abaqus/Standard 3-D EXAMPLE: SHEARING OF A LAP JOINT
XY
Z
Figure 12–29 Deformed model shape.
(Avg: 75%)S, Mises
+8.057e+00+8.459e+01+1.611e+02+2.377e+02+3.142e+02+3.907e+02+4.672e+02+5.438e+02+6.203e+02+6.968e+02+7.734e+02+8.499e+02+9.264e+02
XY
Z
Figure 12–30 Mises stress.
3. In the prompt area, select by shortest distance as the selection method.
4. In the viewport, select the edge at the left end of the bolt hole as the starting edge of the path and
the node at the right end of the bolt hole as the end node of the path, as shown in Figure 12–31.
12–43
Abaqus ID:
Printed on:

DEFINING CONTACT IN Abaqus/Explicit
End: 81
2345
67
Start: 9
XYZ
Figure 12–31 Path definition.
5. Click Done in the prompt area to indicate that you have finished making selections for the
path. Click OK to save the path definition and to close the Edit Edge List Path dialog box.
6. In the Results Tree, double-click XYData. Select Path in the Create XY Data dialog box, and
click Continue.
7. In the Y Values frame of the XY Data from Path dialog box, click Step/Frame. In the
Step/Frame dialog box, select the last frame of the step. Click OK to close the Step/Framedialog box.
8. Make sure that the field output variable is set to CPRESS, and click Plot to view the path plot.
Click Save As to save the plot.
The path plot appears as shown in Figure 12–32.
12.8 Defining contact in Abaqus/Explicit
Abaqus/Explicit provides two algorithms for modeling contact interactions. The general (“automatic”)
contact algorithm allows very simple definitions of contact with very few restrictions on the types of
surfaces involved (see “Defining general contact interactions in Abaqus/Explicit,” Section 32.4.1 of
the Abaqus Analysis User’s Manual). The contact pair algorithm has more restrictions on the types
of surfaces involved and often requires more careful definition of contact; however, it allows for some
interaction behaviors that currently are not available with the general contact algorithm (see “Defining
contact pairs in Abaqus/Explicit,” Section 32.5.1 of the Abaqus Analysis User’s Manual). General
12–44
Abaqus ID:
Printed on:

DEFINING CONTACT IN Abaqus/Explicit
True distance along path0.0 2.0 4.0 6.0 8.0 10.0
Str
ess
0.0
0.4
0.8
1.2
[x1.E3]
Figure 12–32 CPRESS distribution around the bolt hole in top plate.
contact interactions typically are defined by specifying self-contact for a default, element-based surface
defined automatically by Abaqus/Explicit that includes all bodies in the model. To refine the contact
domain, you can include or exclude specific surface pairs. Contact pair interactions are defined by
specifying each of the individual surface pairs that can interact with each other.
12.8.1 Abaqus/Explicit contact formulationThe contact formulation in Abaqus/Explicit includes the constraint enforcement method, the contact
surface weighting, and the sliding formulation.
Constraint enforcement method
For general contact (*CONTACT) Abaqus/Explicit enforces contact constraints using a penalty
contact method, which searches for node-into-face and edge-into-edge penetrations in the current
configuration. The penalty stiffness that relates the contact force to the penetration distance is
chosen automatically by Abaqus/Explicit so that the effect on the time increment is minimal yet
the penetration is not significant.
The contact pair algorithm (*CONTACT PAIR) uses a kinematic contact formulation by
default that achieves precise compliance with the contact conditions using a predictor/corrector
12–45
Abaqus ID:
Printed on:

DEFINING CONTACT IN Abaqus/Explicit
method. The increment at first proceeds under the assumption that contact does not occur. If at
the end of the increment there is an overclosure, the acceleration is modified to obtain a corrected
configuration in which the contact constraints are enforced. The predictor/corrector method used
for kinematic contact is discussed in more detail in “Contact constraint enforcement methods in
Abaqus/Explicit,” Section 34.2.3 of the Abaqus Analysis User’s Manual; some limitations of this
method are discussed in “Common difficulties associated with contact modeling using contact
pairs in Abaqus/Explicit,” Section 35.2.2 of the Abaqus Analysis User’s Manual.
The normal contact constraint for contact pairs can optionally be enforced with the penalty
contact method, which can model some types of contact that the kinematic method cannot. For
example, the penalty method allows modeling of contact between two rigid surfaces (except when
both surfaces are analytical rigid surfaces). When the penalty contact formulation is used, equal and
opposite contact forces with magnitudes equal to the penalty stiffness times the penetration distance
are applied to the master and slave nodes at the penetration points. The penalty stiffness is chosen
automatically by Abaqus/Explicit and is similar to that used by the general contact algorithm. A
penalty scale factor can also be specified. To select the penalty method for a contact pair analysis,
set the MECHANICAL CONSTRAINT parameter to PENALTY on the *CONTACT PAIR option.
Contact surface weighting
In the pure master-slave approach one of the surfaces is the master surface and the other is the
slave surface. As the two bodies come into contact, the penetrations are detected and the contact
constraints are applied according to the constraint enforcement method (kinematic or penalty).
Pure master-slave weighting (regardless of the constraint enforcement method) will resist only
penetrations of slave nodes into master facets. Penetrations of master nodes into the slave surface
can go undetected, as shown in Figure 12–33, unless the mesh on the slave surface is adequately
refined.
slavesurface
mastersurface
Figure 12–33 Penetration of master nodes into slave surface with pure master-slave contact.
Balanced master-slave contact simply applies the pure master-slave approach twice, reversing
the surfaces on the second pass. One set of contact constraints is obtained with surface 1 as the
slave, and another set of constraints is obtained with surface 2 as the slave. The acceleration
corrections or forces are obtained by taking a weighted average of the two calculations. For
12–46
Abaqus ID:
Printed on:

DEFINING CONTACT IN Abaqus/Explicit
kinematic balanced master-slave contact a second correction is made to resolve any remaining
penetrations, as described in “Contact formulations for contact pairs in Abaqus/Explicit,”
Section 34.2.2 of the Abaqus Analysis User’s Manual. The balanced master-slave contact
constraint when kinematic compliance is used is illustrated in Figure 12–34.
Figure 12–34 Balanced master-slave contact constraint with kinematic compliance.
The balanced approach minimizes the penetration of the contacting bodies and, thus, provides more
accurate results in most cases.
The general contact algorithm uses balanced master-slave weighting whenever possible; pure
master-slave weighting is used for general contact interactions involving node-based surfaces,
which can act only as pure slave surfaces. For the contact pair algorithm Abaqus/Explicit will
decide which type of weighting to use for a given contact pair based on the nature of the two
surfaces involved and the constraint enforcement method used.
The general contact algorithm uses balanced master-slave weighting whenever possible; pure
master-slave weighting is used for general contact interactions involving node-based surfaces,
which can act only as pure slave surfaces. Use the *CONTACT FORMULATION, TYPE=PURE
MASTER-SLAVE to specify pure master-slave weighting for other general contact interactions.
For the contact pair algorithm Abaqus/Explicit will decide which type of weighting to use for a
given contact pair based on the nature of the two surfaces involved and the constraint enforcement
method used. The weight of the average can be specified by the user for balanced master-slave
contact with the contact pair algorithm using the WEIGHT parameter on the *CONTACT PAIR
option. For most element types the default weight is 0.5 so that the same weight is used for each of
the acceleration corrections. SettingWEIGHT to 1.0 specifies a pure master-slave relationship with
the first surface as the master surface. Conversely, a weight of zero means that the second surface
is the master surface.
Sliding formulation
When defining a contact pair, you must decide whether the magnitude of the relative sliding will
be small or finite. The default (and only option for general contact interactions) is the more general
finite-sliding formulation. Small sliding is appropriate if the relative motion of the two surfaces
is less than a small proportion of the characteristic length of an element face. The small-sliding
12–47
Abaqus ID:
Printed on:

MODELING CONSIDERATIONS IN Abaqus/Explicit
formulation is selected by including the SMALL SLIDING parameter on the *CONTACT PAIR
option. Using the small-sliding formulation when applicable results in a more efficient analysis.
12.9 Modeling considerations in Abaqus/Explicit
We now discuss the following modeling considerations: correct definition of surfaces, overconstraints,
mesh refinement, and initial overclosures.
12.9.1 Correct surface definitionsCertain rules must be followed when defining surfaces for use with each of the contact algorithms. The
general contact algorithm has fewer restrictions on the types of surfaces that can be involved in contact;
however, two-dimensional and node-based surfaces can be used only with the contact pair algorithm.
Continuous surfaces
Surfaces used with the general contact algorithm can span multiple unattached bodies. More than
two surface facets can share a common edge. In contrast, all surfaces used with the contact pair
algorithm must be continuous and simply connected. The continuity requirement has the following
implications for what constitutes a valid or invalid surface definition for the contact pair algorithm:
• In two dimensions the surface must be either a simple, nonintersecting curve with two terminal
ends or a closed loop. Figure 12–35 shows examples of valid and invalid two-dimensional
surfaces.
Valid ClosedSimply Connected2-D Surface
Valid OpenSimply Connected2-D Surface
Invalid 2-D Surface
Figure 12–35 Valid and invalid two-dimensional surfaces for the contact pair algorithm.
12–48
Abaqus ID:
Printed on:

MODELING CONSIDERATIONS IN Abaqus/Explicit
• In three dimensions an edge of an element face belonging to a valid surface may be either on
the perimeter of the surface or shared by one other face. Two element faces forming a contact
surface cannot be joined just at a shared node; they must be joined across a common element
edge. An element edge cannot be shared by more than two surface facets. Figure 12–36
illustrates valid and invalid three-dimensional surfaces.
valid simply connected surface
invalid surface invalid surface
Figure 12–36 Valid and invalid three-dimensional surfaces for the contact pair algorithm.
• In addition, it is possible to define three-dimensional, double-sided surfaces. In this case both
sides of a shell, membrane, or rigid element are included in the same surface definition, as
shown in Figure 12–37.
valid double-sided surface
both sidesbelong to thesame surface
Figure 12–37 Valid double-sided surface.
12–49
Abaqus ID:
Printed on:

MODELING CONSIDERATIONS IN Abaqus/Explicit
Extending surfaces
Abaqus/Explicit does not extend surfaces automatically beyond the perimeter of the surface
defined by the user. If a node from one surface is in contact with another surface and it slides along
the surface until it reaches an edge, it may “fall off the edge.” Such behavior can be particularly
troublesome because the node may later reenter from the back side of the surface, thereby violating
the kinematic constraint and causing large jumps in acceleration at that node. Consequently, it is
good modeling practice to extend surfaces somewhat beyond the regions that will actually contact.
In general, we recommend covering each contacting body entirely with surfaces; the additional
computational expense is minimal.
Figure 12–38 shows two simple box-like bodies constructed of brick elements.
Perimeter of contact surface
Perimeter of contact surface
Only top of box defined as surface
Side of box included in surface definition
Figure 12–38 Surface perimeters.
12–50
Abaqus ID:
Printed on:

MODELING CONSIDERATIONS IN Abaqus/Explicit
The upper box has a contact surface defined only on the top face of the box. While it is a
permissible surface definition in Abaqus/Explicit, the lack of extensions beyond the “raw edge”
could be problematic. In the lower box the surface wraps some distance around the side walls,
thereby extending beyond the flat, upper surface. If contact is to occur only at the top face of the
box, this extended surface definition minimizes contact problems by keeping any contacting nodes
from going behind the contact surface.
Mesh seams
Two nodes with the same coordinate (double nodes) can generate a seam or crack in a valid surface
that appears to be continuous, as shown in Figure 12–39. A node sliding along the surface can fall
through this crack and slide behind the contact surface. A large, nonphysical acceleration correction
may be caused once penetration is detected. Mesh seams can be detected in Abaqus/Viewer by
drawing the free edges of the model. Any seams that are not part of the desired perimeter can be
double-noded regions.
Both nodes have the samecoordinates. They are separatedto show the crack in the surface.
Figure 12–39 Example of a double-noded mesh.
Complete surface definition
Figure 12–40 illustrates a two-dimensional model of a simple connection between two parts.
12–51
Abaqus ID:
Printed on:

MODELING CONSIDERATIONS IN Abaqus/Explicit
* CONTACT PAIRSURFACE 1, SURFACE 3SURFACE 2, SURFACE 3
surface 1 surface 2
Analysis will stop after the firstincrement with message thatelements are badly distorted
surface 3
these nodes on surface 3 are behind surfaces 1 and 2
Figure 12–40 Example of an incorrect surface definition.
The contact definition shown in the figure is not adequate for modeling this connection because the
surfaces do not represent a complete description of the geometry of the bodies. At the beginning of
the analysis some of the nodes on surface 3 find that they are “behind” surfaces 1 and 2. Figure 12–41
shows an adequate surface definition for this connection. The surfaces are continuous and describe
the entire geometry of the contacting bodies.
12–52
Abaqus ID:
Printed on:

MODELING CONSIDERATIONS IN Abaqus/Explicit
surface 4
* CONTACT PAIRSURFACE 4, SURFACE 5
surface 5
Figure 12–41 Correct surface definition.
Consistent surface normals
Single-sided surfaces on shell, membrane, or rigid elements must be defined so that the normal
directions do not “flip” as the surface is traversed. Figure 12–42 shows a mesh of SAX1 elements
whose normals are not continuous from one element to the next. The face identifier SPOS
indicates that the surface is on the face with the positive outward normal, and the face identifier
SNEG indicates the reverse. If a surface was defined using the SPOS face for all the elements,
Abaqus/Explicit would issue a warning message stating that the surface is not valid. A valid
surface could be defined with this mesh if the surface definition shown in the figure, which uses
both SPOS and SNEG face identifiers to accommodate the inconsistent element normals, is used.
It is not necessary for the normals of all the underlying shell, membrane, or rigid elements to
have a consistent positive orientation for a double-sided surface; if possible, Abaqus/Explicit will
define the surface such that its facets have consistent normals, even if the underlying elements do not
have consistent normals. The facet normals will be the same as the element normals if the element
normals are all consistent; otherwise, an arbitrary positive orientation is chosen for the surface.
If it is not possible to make the facet normals consistent (for example, if the surface contains a
T-intersection of shells), the surface can be used with the general contact algorithm but not with the
contact pair algorithm.
Highly warped surfaces
No special treatment of warped surfaces is required for the general contact algorithm. However,
when a surface used with the contact pair algorithm contains highly warped facets, a more expensive
tracking approach must be used than the approach required when the surface does not contain highly
12–53
Abaqus ID:
Printed on:

MODELING CONSIDERATIONS IN Abaqus/Explicit
101102
103104 105 106 107
. . ELEMENT, TYPE = SAX1, ELSET = SHELL1, 101, 1022, 102, 1033, 104, 1034, 105, 1045, 105, 1066, 106, 107 . . . SURFACE DEFINITION, NAME = WALL1, SPOS2, SPOS3, SNEG4, SNEG5, SPOS6, SPOS
*
*
orientation of the surface is in this direction
n1
n2
n3n4
n5 n6
Figure 12–42 Inconsistent surface normals.
warped facets. To keep the solution as efficient as possible, Abaqus monitors the warpage of the
surfaces and issues a warning if surfaces become too warped; if the normal directions of adjacent
facets differ by more than 20°, Abaqus issues a warning message. Once a surface is deemed to be
highly warped, Abaqus switches from the more efficient contact search approach to a more accurate
search approach to account for the difficulties posed by the highly warped surface.
For the sake of efficiency Abaqus does not check for highly warped surfaces every increment.
Rigid surfaces are checked for high warpage only at the start of the step, since rigid surfaces do
not change shape during the analysis. Deformable surfaces are checked for high warpage every
20 increments by default. Some analyses may have surfaces whose warpage increases in severity
quite suddenly, making the default 20 increment frequency check inadequate. The user can change
the frequency of the warping checks by setting the WARP CHECK PERIOD parameter on the
*CONTACT CONTROLS option to the desired number of increments. Some analyses in which
the surface warping is less than 20° may also require the more accurate contact search approach
12–54
Abaqus ID:
Printed on:

MODELING CONSIDERATIONS IN Abaqus/Explicit
associated with highly warped surfaces. Use the WARP CUT OFF parameter on the *CONTACT
CONTROLS option to redefine the angle that defines high warpage.
Rigid element discretization
Complex rigid surface geometries can be modeled using rigid elements. Rigid elements in
Abaqus/Explicit are not smoothed; they remain faceted exactly as defined by the user. The
advantage of unsmoothed surfaces is that the surface defined by the user is exactly the same as
the surface used by Abaqus; the disadvantage is that faceted surfaces require much higher mesh
refinement to define smooth bodies accurately. In general, using a large number of rigid elements
to define a rigid surface does not increase the CPU costs significantly. However, a large number of
rigid elements does increase the memory overhead significantly.
The user must ensure that the discretization of any curved geometry on rigid bodies is adequate.
If the rigid body discretization is too coarse, contacting nodes on the deformable body may “snag,”
leading to erroneous results, as illustrated in Figure 12–43.
blank motion
"snagging"
sheet metalblankrigid tool
Figure 12–43 Potential effect of coarse rigid body discretization.
A node that is snagged on a sharp corner may be trapped from further sliding along the rigid surface
for some time. Once enough energy is released to slide beyond the sharp corner, the node will
snap dynamically before contacting the adjacent facet. Such motions cause noisy solutions. The
more refined the rigid surface, the smoother the motion of the contacting slave nodes. The general
contact algorithm includes some numerical rounding of features that prevents snagging of nodes
from becoming a concern for discrete rigid surfaces. In addition, penalty enforcement of the contact
constraints reduces the tendency for snagging to occur. Analytical rigid surfaces should normally be
used with the contact pair algorithm for rigid bodies whose shape is an extruded profile or a surface
of revolution.
12.9.2 Overconstraining the modelJust as multiple conflicting boundary conditions should not be defined at a given node, multi-point
constraints and contact conditions enforced with the kinematic method generally should not be defined
at the same node because they may generate conflicting kinematic constraints. Unless the constraints
12–55
Abaqus ID:
Printed on:

MODELING CONSIDERATIONS IN Abaqus/Explicit
are entirely orthogonal to one another, the model will be overconstrained; the resulting solution will be
quite noisy, as Abaqus/Explicit tries to satisfy the conflicting constraints. Penalty contact constraints
and multi-point constraints acting on the same nodes will not generate conflicts because the penalty
constraints are not enforced as strictly as the multi-point constraints.
12.9.3 Mesh refinementFor contact as well as all other types of analyses, the solution improves as the mesh is refined. For
contact analyses using a pure master-slave approach, it is especially important that the slave surface
is refined adequately so that the master surface facets do not overly penetrate the slave surface. The
balanced master-slave approach does not require high mesh refinement on the slave surface to have
adequate contact compliance. Mesh refinement is generally most important with pure master-slave
contact between deformable and rigid bodies; in this case the deformable body is always the pure slave
surface and, thus, must be refined enough to interact with any feature on the rigid body. Figure 12–44
shows an example of the penetration that can occur if the discretization of the slave surface is poor
compared to the dimensions of the features on the master surface. If the deformable surface were more
refined, the penetrations of the rigid surface would be much less severe.
deformableslave surface
rigid mastersurface
Figure 12–44 Example of inadequate slave surface discretization.
Tie constraints
Using the *TIE option prevents surfaces initially in contact from penetrating, separating, or sliding
relative to one another. Tie constraints are, therefore, an easy means of mesh refinement. Since any
gaps that exist between the two contact surfaces, however small, will result in nodes that are not
tied to the opposite contact boundary, you must use the ADJUST=YES parameter to ensure that the
two surfaces are exactly in contact at the start of the analysis.
The tie constraint formulation constrains translational and, optionally, rotational degrees of
freedom. When using tied contact with structural elements, you must ensure that any unconstrained
rotations will not cause problems.
12–56
Abaqus ID:
Printed on:

Abaqus/Explicit EXAMPLE: CIRCUIT BOARD DROP TEST
12.9.4 Initial contact overclosure
Abaqus/Explicit will automatically adjust the undeformed coordinates of nodes on contact surfaces to
remove any initial overclosures. When using the balanced master-slave approach, both surfaces are
adjusted; when using the pure master-slave approach, only the slave surface is adjusted. Displacements
associated with adjusting the surface to remove overclosures do not cause any initial strain or stress for
contact defined in the first step of the analysis. When conflicting constraints exist, initial overclosures
may not be completely resolved by repositioning nodes. In this case severe mesh distortions can result
near the beginning of an analysis when the contact pair algorithm is used. The general contact algorithm
stores any unresolved initial penetrations as offsets to avoid large initial accelerations.
In subsequent steps any nodal adjustments to remove initial overclosures cause strains that
often cause severe mesh distortions because the entire nodal adjustments occur in a single, very brief
increment. This is especially true when the kinematic constraint method is used. For example, if the
node is overclosed by 1.0 × 10⁻³ m and the increment time is 1.0 × 10⁻⁷ s, the acceleration applied to
the node to correct the overclosure is 2.0 × 10¹¹ m/s2 . Such a large acceleration applied to a single node
typically will cause warnings about deformation speed exceeding the wave speed of the material and
warnings about severe mesh distortions a few increments later, once the large acceleration has deformed
the associated elements significantly. Even a very slight initial overclosure can induce extremely large
accelerations for kinematic contact. In general, it is important that in Step 2 and beyond any new contact
surfaces that you define are not overclosed.
Figure 12–45 shows a common case of initial overclosure of two contact surfaces. All of the nodes
on the contact surfaces lie exactly on the same arc of a circle; but since the mesh of the inner surface
is finer than that of the outer surface and since the element edges are linear, some nodes on the finer,
inner surface initially penetrate the outer surface. Assuming that the pure master-slave approach is
used, Figure 12–46 shows the initial, strain-free displacements applied to the slave-surface nodes by
Abaqus/Explicit. In the absence of external loads this geometry is stress free. If the default, balanced
master-slave approach is used, a different initial set of displacements is obtained, and the resulting mesh
is not entirely stress free.
12.10 Abaqus/Explicit example: circuit board drop test
In this example youwill investigate the behavior of a circuit board in protective crushable foam packaging
dropped at an angle onto a rigid surface. Your goal is to assess whether the foam packaging is adequate
to prevent circuit board damage when the board is dropped from a height of 1 meter. You will use the
general contact capability in Abaqus/Explicit to model the interactions between the different components.
Figure 12–47 shows the dimensions of the circuit board and foam packaging in millimeters and the
material properties.
12–57
Abaqus ID:
Printed on:

Abaqus/Explicit EXAMPLE: CIRCUIT BOARD DROP TEST
Figure 12–45 Original overclosure of two contact surfaces.
Figure 12–46 Corrected contact surfaces.
12.10.1 Coordinate system
While the circuit board will be dropped at an angle, it is easiest to use the *SYSTEM option to define
the mesh aligned with a local rectangular coordinate system, as shown in Figure 12–47. The *SYSTEM
option transforms nodal coordinates from the local coordinate system to the global coordinate system.
This option allows you to define the circuit board in the x–z plane of the local coordinate system, which
is rotated by the desired angle relative to the global coordinate system.
The *SYSTEM option defines a new coordinate system by specifying three points: a local origin,
a point on the local x-axis, and a point in the local x–y plane. Before defining the nodes for the circuit
board, use the following option to tilt the mesh so that it lands on its corner:
12–58
Abaqus ID:
Printed on:

Abaqus/Explicit EXAMPLE: CIRCUIT BOARD DROP TEST
100
150
2
12
220
24
z
x
circuit board
foampackaging
local coordinatesystem
110
Material properties
Circuit board material (plastic):
Foam packaging material is crushable foam:
(Foam plasticity data are given in the text.)
E 45 109× Pa=
ν 0.3=
ρ 500 kg/m3
=
E 3 106× Pa=
ν 0.0=ρ 100 kg/m
3=
y
Figure 12–47 Dimensions in millimeters and material properties.
*SYSTEM0., 0., 0., .5, .707, .25-.5, .707, -.5
All subsequent nodal definitions will be in this local coordinate system. To reset the coordinate system
to the default, use another *SYSTEM option with no data lines.
12–59
Abaqus ID:
Printed on:

Abaqus/Explicit EXAMPLE: CIRCUIT BOARD DROP TEST
12.10.2 Mesh design
The overall mesh for this problem is shown in Figure 12–48.
shell normaldirection
Figure 12–48 Mesh of the circuit board and foam packaging.
Define the circuit board so that the shell normals are in the direction indicated. Defining the bottom corner
of the foam packaging as the origin of your model will ensure the correct positioning of the circuit board
and packaging. Since the ground onto which the board will be dropped is effectively rigid, use a single
R3D4 element for this part of the model. The packaging is a three-dimensional solid structure that should
be modeled using C3D8R elements. The circuit board itself can be considered as a thin, flat plate with
various chips attached to it. Therefore, model the circuit board with S4R elements, and model the chips
with MASS elements.
Since you will be using shell elements for the circuit board, Abaqus/Explicit will, by default, use
the original shell element thickness when checking for contact. The circuit board and its slot in the foam
packaging are both the same thickness (2 mm) so that there is a snug fit between the two bodies. In this
example the circuit board is a mesh of 10 × 10 S4R elements, and the foam packaging is a mesh of 6 ×
7 × 15 elements, as shown in Figure 12–49.
12–60
Abaqus ID:
Printed on:

Abaqus/Explicit EXAMPLE: CIRCUIT BOARD DROP TEST
15 elements
Figure 12–49 Packaging mesh detail.
The MASS elements are positioned as shown in Figure 12–50. The mesh for the packaging is too coarse
near the impacting corner to provide highly accurate results. However, the mesh is adequate for a low-
cost preliminary study.
(10,135)
(80,30)
(70,90)
Element set PARTScontains elements onthe circuit board connected to the chips.
Element set BOTPART contains only the bottom-most of these elements.
Element set CHIPScontains all masselements, each with amass of 0.005 kg.
Node set CHIPS containscorresponding nodes.
Figure 12–50 Position of mass elements on circuit board. Numbers in parentheses are (x, y) coordinates
in millimeters based on a local origin at the bottom left-hand corner of the circuit board.
12–61
Abaqus ID:
Printed on:

Abaqus/Explicit EXAMPLE: CIRCUIT BOARD DROP TEST
12.10.3 Node and element setsThe steps that follow assume that you have access to the full input file for this example. This input file,
circuit.inp, is provided in “Circuit board drop test,” Section A.15, in the online HTML version of
this manual. Instructions on how to fetch and run the script are given in Appendix A, “Example Files.”
Figure 12–50 and Figure 12–51 show all of the sets necessary to apply the element properties, loads,
initial conditions, and boundary conditions, as well as to request output for postprocessing.
Element set FLOORcontains the rigid element for the floor.
Node set REF contains the reference node for the rigid floor.
Element set PACKcontains all foam packaging elements.
Node set PACK containsall foam packaging nodes.
Element set BOARDcontains all circuit board elements.
Node set BOARD containsall circuit board nodes.
Figure 12–51 Necessary node and element sets.
Include the circuit board elements in an element set called BOARD, and include the corresponding circuitboard nodes in a node set called BOARD. Similarly, for the foam packaging include the elements in an
12–62
Abaqus ID:
Printed on:

Abaqus/Explicit EXAMPLE: CIRCUIT BOARD DROP TEST
element set called PACK, and include the nodes in a node set called PACK. The element sets will be
used to refer to material properties, and the node sets will be used to apply initial conditions. Create an
element set called FLOOR containing the floor’s rigid element and a node set called REF containing the
reference node for the rigid surface modeling the floor. Include the mass elements modeling the chips in
an element set called CHIPS.
12.10.4 Simulating free fallTwo methods could be used to simulate the circuit board being dropped from a height of 1 meter.
You could model the circuit board and foam at a height of 1 meter above the rigid surface and allow
Abaqus/Explicit to calculate the motion under the influence of gravity; however, this method is clearly
impractical because of the large number of increments required to complete the “free-fall” part of the
simulation. The most efficient method is to model the circuit board and packaging in an initial position
very close to the surface with an initial velocity to simulate the 1 meter drop (4.43 m/s).
12.10.5 Reviewing the input file—the model dataWe now review the model data required for this simulation, including the model description, the node
and element definitions, element and material properties, boundary and initial conditions, and surface
definitions. You can review these data by fetching and opening the input file circuit.inp.
Model description
The *HEADING option in this example provides a suitable heading for your model. SI units are
used in this example.
*HEADINGCircuit board drop test1.0 meter dropSI units (kg, m, s, N)
Nodal coordinates and element connectivity
Use your preprocessor to generate the mesh in the local coordinate system. Precede the nodal
definitions with the *SYSTEM option to transform the nodes into the tilted coordinate system, as
described previously. In circuit.inp, the nodal definitions for the foam packaging and circuit
board look like
*SYSTEM0., 0., 0., .5, .707, .25-.5, .707, -.5*NODE1, 0.005, -0.010, 0.01211, 0.005, -0.010, 0.162
12–63
Abaqus ID:
Printed on:

Abaqus/Explicit EXAMPLE: CIRCUIT BOARD DROP TEST
.
.** Reset coordinate system***SYSTEM
When you have finished defining the nodes in the rotated, local coordinate system, use the
*SYSTEM option again without any data lines so that additional node numbers will be given in the
global coordinate system. Define the nodes for the rigid surface so that it is large enough to keep
the deformable bodies from falling off any of its edges. Use a 0.1 mm vertical clearance from the
bottom corner of the foam packaging to ensure that there is no initial overclosure of the contact
surfaces.
Element properties
Give each element set appropriate section properties. Include the appropriate MATERIAL
parameter on each section option so that each set of elements is linked to a material definition. We
have named the foam packaging material FOAM, and we will define it in the next section.
*SOLID SECTION, ELSET=PACK, MATERIAL=FOAM, CONTROLS=HGLASS*SECTION CONTROLS, NAME=HGLASS, HOURGLASS=ENHANCED
For the circuit board it is most meaningful to output stress results in the longitudinal and
lateral directions, aligned with the edges of the board. Therefore, we need to specify local material
directions for the circuit board mesh. We can use the same local coordinate system that we
previously defined using the *SYSTEM option. The desired material directions can be achieved
using the *ORIENTATION option with the DEFINITION=COORDINATES parameter. On the
first data line specify the x-, y-, and z-coordinates of two points, a and b, respectively, to define
the local coordinate system. On the second data line specify an additional rotation of 90° about
the local 2- (or y-) axis. The name of the ORIENTATION is then referred to on the *SHELL
SECTION option.
*SHELL SECTION, ELSET=BOARD, MATERIAL=PCB, ORIENTATION=OR10.002,*ORIENTATION, NAME=OR1, SYSTEM=RECTANGULAR,DEFINITION=COORDINATES0.5, 0.707, 0.25, -0.5, 0.707, -0.52, 90.0
The mass of each of the chips on the circuit board is defined to be 0.005 kg using the *MASS
option.
*MASS, ELSET=CHIPS0.005,
12–64
Abaqus ID:
Printed on:

Abaqus/Explicit EXAMPLE: CIRCUIT BOARD DROP TEST
Define the rigid body by referring to the element set FLOOR and the rigid body reference node
on the *RIGID BODY option. The actual node number of the reference node must be specified, not
the node set name.
*RIGID BODY, ELSET=FLOOR, REF NODE=<reference node number>
Material properties
We You now need to define the material properties for the circuit board and the foam packaging.
For the circuit board use a PCB elastic material with a Young’s modulus of 45 GPa, a Poisson’s
ratio of 0.3, and a density of 500 kg/m3 .
*MATERIAL, NAME=PCB*ELASTIC45.E9, 0.3*DENSITY500.,
The foam packaging material is modeled using the crushable foam plasticity model. Use the
*ELASTIC option to define the Young’s modulus as 3 MPa and the Poisson’s ratio as 0.0. The
material density is 100 kg/m3 .
*MATERIAL, NAME=FOAM*ELASTIC3.E6, 0.0
*DENSITY100.,
The yield surface of a crushable foam in the p–q (pressure stress–Mises equivalent stress) plane
is illustrated in Figure 12–52. The *CRUSHABLE FOAM, HARDENING=VOLUMETRIC option
uses two data items to define the initial yield behavior.
*CRUSHABLE FOAM, HARDENING=VOLUMETRIC1.1, 0.1
The first data item is the the ratio of initial yield stress in uniaxial compression to initial yield stress
in hydrostatic compression, ; we have chosen it to be 1.1. The second data item is the ratio
of yield stress in hydrostatic tension to initial yield stress in hydrostatic compression, . This
data item is given as a positive value; in this problem we have chosen it to be 0.1.
Include hardening effects with the *CRUSHABLE FOAM HARDENING option. The first
data item on each line is the yield stress in uniaxial compression, given as a positive value; the
second data item on each line is the absolute value of the corresponding plastic strain. The crushable
foam hardening model follows the curve shown in Figure 12–53.
12–65
Abaqus ID:
Printed on:

Abaqus/Explicit EXAMPLE: CIRCUIT BOARD DROP TEST
3
1
-p t
ppcp
c
Uniaxial compression
0pc
q
softenedsurface
originalsurface
hardened surface
0cσ
3
0cσ
Figure 12–52 Crushable foam model: yield surface in the p–q plane.
initial volumetricplastic strain, ε pl
0
0.6
0.4
0.2
0.00 2 4 6 8 10
Volumetric Plastic Strain
Siz
e of
the
Yie
ld S
urfa
ce (
Pa)
initial size of theyield surface (p p )c t0
[×10 ]6
_
Figure 12–53 Foam hardening material data.
12–66
Abaqus ID:
Printed on:

Abaqus/Explicit EXAMPLE: CIRCUIT BOARD DROP TEST
*CRUSHABLE FOAM HARDENING0.22000E6, 0.00.24651E6, 0.10.27294E6, 0.20.29902E6, 0.30.32455E6, 0.40.34935E6, 0.50.37326E6, 0.60.39617E6, 0.70.41801E6, 0.80.43872E6, 0.90.45827E6, 1.00.49384E6, 1.20.52484E6, 1.40.55153E6, 1.60.57431E6, 1.80.59359E6, 2.00.62936E6, 2.50.65199E6, 3.00.68334E6, 5.00.68833E6, 10.0
Boundary conditions
The rigid surface representing the floor is fully constrained by applying a fixed boundary condition
to the reference node, which was previously defined as node set REF.
*BOUNDARYREF, ENCASTRE
Initial conditions
The circuit board and foam packaging is given an initial velocity of −4.43 m/s in the global
3-direction, corresponding to the velocity at the end of a 1 meter free fall.
*INITIAL CONDITIONS, TYPE=VELOCITYBOARD, 3, -4.43PACK, 3, -4.43
Defining contact
Either contact algorithm could be used for this problem. However, the definition of contact using
the contact pair algorithm would be more cumbersome since, unlike general contact, the surfaces
involved in contact pairs cannot span more than one body. We use the general contact algorithm in
this example to demonstrate the simplicity of the contact definition for more complex geometries.
12–67
Abaqus ID:
Printed on:

Abaqus/Explicit EXAMPLE: CIRCUIT BOARD DROP TEST
First, a named contact property is defined using the *SURFACE INTERACTION option, a
friction coefficient of 0.3 is defined.
*SURFACE INTERACTION, NAME=FRIC*FRICTION0.3,
Use the *CONTACT option to define a general contact interaction. Use the ALL EXTERIOR
parameter on the *CONTACT INCLUSIONS option to specify self-contact for the unnamed,
all-inclusive surface defined automatically by Abaqus/Explicit. The *CONTACT PROPERTY
ASSIGNMENT option is used to assign the contact property named FRIC to the general contact
interaction.
*CONTACT*CONTACT INCLUSIONS, ALL EXTERIOR*CONTACT PROPERTY ASSIGNMENT, , FRIC
12.10.6 Reviewing the input file—the history dataThe *DYNAMIC, EXPLICIT option is used to select a dynamic stress/displacement analysis using
explicit integration. The time period of the step is defined as 20 ms.
*STEP*DYNAMIC, EXPLICIT, 0.02
Output requests
The preselected field data are written to the output database file by including the following line in
the input file:
*OUTPUT, FIELD, VARIABLE=PRESELECT
Values of vertical nodal displacement (U3), velocity (V3), and acceleration (A3) will be written for
each of the attached chips as history data to the output database file. An output interval of 0.07 ms
has been selected.
*OUTPUT, HISTORY, TIME INTERVAL=0.07E-3*NODE OUTPUT, NSET=CHIPSU3, V3, A3
Energy values will be written summed over the entire model. Specifically, write values for
kinetic energy (ALLKE), internal energy (ALLIE), elastic strain energy (ALLSE), artificial energy
(ALLAE), and the energy dissipated by plastic deformation (ALLPD).
12–68
Abaqus ID:
Printed on:

Abaqus/Explicit EXAMPLE: CIRCUIT BOARD DROP TEST
*ENERGY OUTPUTALLIE, ALLKE, ALLPD, ALLAE, ALLSE
The end of the step is indicated with the *END STEP option.
12.10.7 Running the analysisRun the analysis using the following command:
abaqus job=circuit analysis
This analysis is somewhat more complicated than the previous analyses in this guide, and it may take 45
minutes or more to run to completion, depending on the power of your computer.
Status file
Information concerning the initial stable time increment can be found at the top of the status file.
The 10 most critical elements (i.e., those resulting in the smallest time increments) are also shown
in rank order.
-------------------------------------------------------------------------------MODEL INFORMATION (IN GLOBAL X-Y COORDINATES)
-------------------------------------------------------------------------------
Total mass in model = 3.49594E-02Center of mass of model = (-1.076765E-02, 4.948691E-02, 8.492255E-02)
Moments of Inertia :About Center of Mass About Origin
I(XX) 6.655668E-05 4.042925E-04I(YY) 9.949297E-05 3.556680E-04I(ZZ) 6.893156E-05 1.585989E-04I(XY) -1.344118E-05 5.187227E-06I(YZ) -5.240504E-06 -1.521594E-04I(ZX) 3.958677E-05 7.155426E-05
-------------------------------------------------------------------------------STABLE TIME INCREMENT INFORMATION
-------------------------------------------------------------------------------
The stable time increment estimate for each element is based onlinearization about the initial state.
Initial time increment = 8.80392E-07
Statistics for all elements:Mean = 1.04795E-05Standard deviation = 3.99235E-06
Most critical elements :Element number Rank Time increment Increment ratio
----------------------------------------------------------98 1 8.803920E-07 1.000000E+0083 2 8.803923E-07 9.999997E-0180 3 8.803923E-07 9.999996E-0179 4 8.803925E-07 9.999995E-0171 5 8.803925E-07 9.999994E-0130 6 8.803926E-07 9.999993E-0136 7 8.803926E-07 9.999993E-0169 8 8.803926E-07 9.999993E-0177 9 8.803926E-07 9.999993E-0186 10 8.803926E-07 9.999993E-01
12–69
Abaqus ID:
Printed on:

Abaqus/Explicit EXAMPLE: CIRCUIT BOARD DROP TEST
:::
-------------------------------------------------------------------------------SOLUTION PROGRESS
-------------------------------------------------------------------------------
STEP 1 ORIGIN 0.0000
Total memory used for step 1 is approximately 3.7 megabytes.Global time estimation algorithm will be used.Scaling factor: 1.0000Variable mass scaling factor at zero increment: 1.0000
STEP TOTAL CPU STABLE CRITICAL KINETICINCREMENT TIME TIME TIME INCREMENT ELEMENT ENERGY
0 0.000E+00 0.000E+00 00:00:00 8.394E-07 98 3.430E-01Results number 0 at increment zero.ODB Field Frame Number 0 of 5 requested intervals at increment zero.
1188 1.000E-03 1.000E-03 00:00:03 8.394E-07 91 3.123E-01:::
12.10.8 PostprocessingStart Abaqus/Viewer by typing the following:
abaqus viewer odb=circuit
at the operating system prompt.
Checking material directions
The material directions obtained from this orientation definition can be checked with
Abaqus/Viewer.
To plot the material orientation:
1. First, change the view to a more convenient setting. If it is not visible, display the Viewstoolbar by selecting View→Toolbars→Views from the main menu bar. In the Views toolbar,
select the X–Z setting.
2. From the main menu bar, select Plot→Material Orientations→On Deformed Shape.
The orientations of the material directions for the circuit board at the end of the simulation are
shown. The material directions are drawn in different colors. The material 1-direction is blue,
the material 2-direction is yellow, and the 3-direction, if it is present, is red.
3. To view the initial material orientation, select Result→Step/Frame. In the Step/Framedialog box that appears, select Increment 0. Click Apply.
Abaqus displays the initial material directions.
4. To restore the display to the results at the end of the analysis, select the last increment available
in the Step/Frame dialog box; and click OK.
12–70
Abaqus ID:
Printed on:

Abaqus/Explicit EXAMPLE: CIRCUIT BOARD DROP TEST
Animation of results
You will create a time-history animation of the deformation to help you visualize the motion and
deformation of the circuit board and foam packaging during impact.
To create a time-history animation:
1. Plot the deformed model shape at the end of the analysis.
2. From the main menu bar, select Animate→Time History.
The animation of the deformed model shape begins.
3. From the main menu bar, select View→Parallel to turn off perspective.
4. In the context bar, click to pause the animation after a full cycle has been completed.
5. In the context bar, click and then select a node on the foam packaging near one of the
corners that impacts the floor. When you restart the animation the camera will move with the
selected node. If you zoom in on the node, it will remain in view throughout the animation.
Note: To reset the camera to follow the global coordinate system, click in the context
bar.
While you view the deformation history of the drop test, take note of when the foam is in contact
with the floor. You should observe that the initial impact occurs over the first 4 ms of the analysis.
A second impact occurs from about 8 ms to 15 ms. The deformed state of the foam and board at
approximately 4 ms after impact is shown in Figure 12–54.
Plotting model energy histories
Plot graphs of various energy variables versus time. Energy output can help you evaluate whether
an Abaqus/Explicit simulation is predicting an appropriate response.
To plot energy histories:
1. In the Results Tree, click mouse button 3 on History Output for the output database named
circuit.odb. From the menu that appears, select Filter.
2. In the filter field, enter *ALL* to restrict the history output to just the energy output variables.
3. Select the ALLAE output variable, and save the data as Artificial Energy.
4. Select the ALLIE output variable, and save the data as Internal Energy.
5. Select the ALLKE output variable, and save the data as Kinetic Energy.
6. Select the ALLPD output variable, and save the data as Plastic Dissipation.
7. Select the ALLSE output variable, and save the data as Strain Energy.
12–71
Abaqus ID:
Printed on:

Abaqus/Explicit EXAMPLE: CIRCUIT BOARD DROP TEST
Figure 12–54 Deformed mesh at 4 ms.
8. In the Results Tree, expand the XYData container.
9. Select all five curves. Click mouse button 3, and select Plot from the menu that appears to
view the X–Y plot.
Next, you will customize the appearance of the plot; begin by changing the line styles of the
curves.
10. Open the Curve Options dialog box.
11. In this dialog box, apply different line styles and thicknesses to each of the curves displayed
in the viewport.
Next, reposition the legend so that it appears inside the plot.
12. Double-click the legend to open the Chart Legend Options dialog box.
13. In this dialog box, switch to the Area tabbed page, and toggle on Inset.
14. In the viewport, drag the legend over the plot.
Now change the format of the X-axis labels.
15. In the viewport, double-click the X-axis to access the X Axis options in the Axis Optionsdialog box.
16. In this dialog box, switch to the Axes tabbed page, and select the Engineering label format
for the X-axis.
The energy histories appear as shown in Figure 12–55.
12–72
Abaqus ID:
Printed on:

Abaqus/Explicit EXAMPLE: CIRCUIT BOARD DROP TEST
Time (s)
Ene
rgy
(J)
Figure 12–55 Energy results versus time.
First, consider the kinetic energy history. At the beginning of the simulation the components
are in free fall, and the kinetic energy is large. The initial impact deforms the foam packaging, thus
reducing the kinetic energy. The components then bounce and rotate about the impacted corner
until the opposite side of the foam packaging impacts the floor at about 8 ms, further reducing the
kinetic energy.
The deformation of the foam packaging during impact causes a transfer of kinetic energy to
internal energy in the foam packaging and the circuit board. From Figure 12–55 we can see that the
internal energy increases as the kinetic energy decreases. In fact, the internal energy is composed
of elastic energy and plastically dissipated energy, both of which are also plotted in Figure 12–55.
Elastic energy rises to a peak and then falls as the elastic deformation recovers, but the plastically
dissipated energy continues to rise as the foam is deformed permanently.
Another important energy output variable is the artificial energy, which is a substantial fraction
(approximately 15%) of the internal energy in this analysis. By now you should know that the
quality of the solution would improve if the artificial energy could be decreased to a smaller fraction
of the total internal energy.
What causes high artificial strain energy in this problem?
Contact at a single node—such as the corner impact in this example—can cause hourglassing,
especially in a coarse mesh. Two common strategies for reducing the artificial strain energy are
to refine the mesh or to round the impacting corner. For the current exercise, however, we shall
continue with the original mesh, realizing that improving the mesh would lead to an improved
solution.
12–73
Abaqus ID:
Printed on:

Abaqus/Explicit EXAMPLE: CIRCUIT BOARD DROP TEST
Evaluating acceleration histories at the chips
The next result we wish to examine is the acceleration of the chips attached to the circuit board.
Excessive accelerations during impact may damage the chips. Therefore, in order to assess the
desirability of the foam packaging, we need to plot the acceleration histories of the three chips.
Since we expect the accelerations to be greatest in the 3-direction, we will plot the variable A3.
To plot acceleration histories:
1. In the Results Tree, filter the History Output container according to *A3*, select the
acceleration A3 of the nodes 60, 357, and 403 in the set CHIPS; and plot the three X–Y data
objects.
The X–Y plot appears in the viewport. As before, customize the plot appearance to obtain a
plot similar to Figure 12–56.
Time (s)
Ver
tical
Acc
eler
atio
n (m
/s2 )
Figure 12–56 Acceleration of the three chips in the Z-direction.
Next, we will evaluate the plausibility of the acceleration data recorded at the bottom chip. To
do this, we will integrate the acceleration data to calculate the chip velocity and displacement and
compare the results to the velocity and displacement data recorded directly by Abaqus/Explicit.
To integrate the bottom chip acceleration history:
1. In the Results Tree, filter the History Output container according to *Node 403*, selectthe acceleration A3 of node 403; and save the data as A3.
12–74
Abaqus ID:
Printed on:

Abaqus/Explicit EXAMPLE: CIRCUIT BOARD DROP TEST
2. In the Results Tree, double-click XYData; then select Operate on XY data in the Create XYData dialog box. Click Continue.
3. In the Operate on XY Data dialog box, integrate acceleration A3 to calculate velocity and
subtract the initial velocity magnitude of 4.43 m/s. The expression at the top of the dialog box
should appear as:
integrate ( "A3" ) - 4.43
4. Click Plot Expression to plot the calculated velocity curve.
5. In the Results Tree, filter the History Output container according to *V3*. Click mouse
button 3 on the velocity V3 history output for node 403; and select Add to Plot from the
menu that appears.
The X–Y plot appears in the viewport. As before, customize the plot appearance to obtain a
plot similar to Figure 12–57. The velocity curve you produced by integrating the acceleration
data may be different from the one pictured here. The reason for this will be discussed later.
Time (s)
Ver
tical
Vel
ocity
(m
/s)
Figure 12–57 Velocity the bottom chip in the Z-direction.
6. In the Operate on XY Data dialog box, integrate acceleration A3 a second time to calculate
chip displacement. The expression at the top of the dialog box should appear as:
integrate ( integrate ( "A3" ) - 4.43 )
7. Click Plot Expression to plot the calculated displacement curve.
12–75
Abaqus ID:
Printed on:

Abaqus/Explicit EXAMPLE: CIRCUIT BOARD DROP TEST
Notice that the Y-value type is length. In order to plot the calculated displacement with the
same Y-axis as the displacement output recorded during the analysis, we must save the X–Y
data and change the Y-value type to displacement.
8. Click Save As to save the calculated displacement curve as U3-from-A3.
9. In the XYData container of the Results Tree, click mouse button 3 on U3-from-A3; andselect Edit from the menu that appears.
10. In the Edit XY Data dialog box, choose Displacement as the Y-value type.
11. In the Results Tree, double-click U3–from-A3 to recreate the calculated displacement plot
with the displacement Y-value type.
12. In the Results Tree, filter the History Output container according to *U3*. Click mouse
button 3 on the displacement U3 history output for node 403; and select Add to Plot fromthe menu that appears.
The X–Y plot appears in the viewport. As before, customize the plot appearance to obtain a
plot similar to Figure 12–58. Again, the curve you produced by integrating the acceleration
data may be different from the one pictured here. The reason for this will be discussed later.
Time (s)
Ver
tical
Dis
plac
emen
t (m
)
Figure 12–58 Displacement of the bottom chip in the Z-direction.
Why are the velocity and displacement curves calculated by integrating the acceleration data
different from the velocity and displacement recorded during the analysis?
In this example the acceleration data has been corrupted by a phenomenon called aliasing.
Aliasing is a form of data corruption that occurs when a signal (such as the results of an Abaqus
analysis) is sampled at a series of discrete points in time, but not enough data points are saved in
12–76
Abaqus ID:
Printed on:

Abaqus/Explicit EXAMPLE: CIRCUIT BOARD DROP TEST
order to correctly describe the signal. The aliasing phenomenon can be addressed using digital signal
processing (DSP) methods, a fundamental principle of which is the Nyquist Sampling Theorem
(also known as the Shannon Sampling Theorem). The Sampling Theorem requires that a signal be
sampled at a rate that is greater than twice the signal’s highest frequency. Therefore, the maximum
frequency content that can be described by a given sampling rate is half that rate (the Nyquist
frequency). Sampling (storing) a signal with large-amplitude oscillations at frequencies greater
than the Nyquist frequency of the sample rate may produce significantly distorted results due to
aliasing. In this example the chip acceleration was sampled every 0.07 ms, which is a sampling
rate of 14.3 kHz (the sample rate is the inverse of the sample size). The recorded data was aliased
because the chip acceleration response has frequency content above 7.2 kHz (half the sample rate).
Aliasing of a sine wave
To better understand how aliasing distorts data, consider a 1 kHz sine wave sampled using various
sampling rates, as shown in Figure 12–59.
Figure 12–59 1 kHz sine wave sampled at 1.1 kHz and 3 kHz.
According to the Sampling Theorem, this signal must be sampled at a rate greater than 2 kHz to
avoid alias distortions. We will evaluate what happens when the sample rate is greater than or less
than this value.
Consider the data recorded with a sample rate of 1.1 kHz; this rate is less than the required
2 kHz rate. The resulting curve exhibits alias distortions because it is an extremely misleading
representation of the original 1 kHz sine wave.
Now consider the data recordedwith a sample rate of 3 kHz; this rate is greater than the required
2 kHz rate. The frequency content of the original signal is captured without aliasing. However, this
12–77
Abaqus ID:
Printed on:

Abaqus/Explicit EXAMPLE: CIRCUIT BOARD DROP TEST
sample rate is not high enough to guarantee that the peak values of the sampled signal are captured
very accurately. To guarantee 95% accuracy of the recorded local peak values, the sampling rate
must exceed the signal frequency by a factor of ten or more.
Avoiding aliasing
In the previous two examples of aliasing (the aliased chip acceleration and the aliased sine wave),
it would not have been obvious from the aliased data alone that aliasing had occurred. In addition,
there is no way to uniquely reconstruct the original signal from the aliased data alone. Therefore,
care should be taken to avoid aliasing your analysis results, particularly in situations when aliasing
is most likely to occur.
Susceptibility to aliasing depends on a number of factors, including output rate, output
variable, and model characteristics. Recall that signals with large-amplitude oscillations at
frequencies greater than half the sampling rate (the Nyquist frequency) may be significantly
distorted due to aliasing. The two output variables that are most likely to have large-amplitude
high-frequency content are accelerations and reaction forces. Therefore, these variables are the
most susceptible to aliasing. Displacements, on the other hand, are lower in frequency content
by nature, so they are much less susceptible to aliasing. Other result variables, such as stress and
strain, fall somewhere in between these two extremes. Any model characteristic that reduces the
high-frequency response of the solution will decrease the analysis’s susceptibility to aliasing. For
example, an elastically dominated impact problem would be even more susceptible to aliasing than
this circuit board drop test which includes energy absorbing packaging.
The safest way to ensure that aliasing is not a problem in your results is to request output
at every increment. When you do this, the output rate is determined by the stable time increment,
which is based on the highest possible frequency response of the model. However, requesting output
at every increment is often not practical because it would result in very large output files. In addition,
output at every increment is usually much more data than you need; there is no need to capture high-
frequency solution noise when what you are really interested in is the lower-frequency structural
response. An alternative method for avoiding aliasing is to request output at a lower rate and use
the Abaqus/Explicit real-time filtering capabilities to remove high-frequency content from the result
before writing data to the output database file. This technique uses less disk space than requesting
output every increment; however, it is up to you to ensure that your output rate and filter choices
are appropriate (to avoid aliasing or other distortions related to digital signal processing).
Abaqus/Explicit offers filtering capabilities for both field and history data. Filtering of history
data only is discussed here.
12.10.9 Rerunning the analysis with output filteringIn this section you will add real-time filters to the history output requests for the circuit board drop
test analysis. While Abaqus/Explicit does allow you to create user-defined output filters (Butterworth,
Chebyshev Type I, and Chebyshev Type II) based on criteria that you specify, in this example we will use
the built-in anti-aliasing filter. The built-in anti-aliasing filter is designed to give you the best un-aliased
representation of the results recorded at the output rate you specify on the output request. To do this,
12–78
Abaqus ID:
Printed on:

Abaqus/Explicit EXAMPLE: CIRCUIT BOARD DROP TEST
Abaqus/Explicit internally applies a low-pass, second-order, Butterworth filter with a cutoff frequency set
to one-third of the sampling rate. For more information on filtering history output, see Answer 3493 in the
SIMULIA Online Support System, which is accessible from the My Support page at www.simulia.com.
For more information on defining your own real-time filters, see “Filtering output and operating on output
in Abaqus/Explicit” in “Output to the output database,” Section 4.1.3 of the Abaqus Analysis User’s
Manual.
Modifying the history output requests
When Abaqus writes nodal history output to the output database, it gives each data object a name
that indicates the recorded output variable, the filter used (if any), the node number, and the node
set. For this exercise you will be creating multiple output requests for the bottom-most chip (node
403) that differ only by the output sample rate, which is not a component of the history output
name. In order to easily distinguish between the similar output requests, create two new sets for
node 403. Name one of the new sets BotChip-all and the other BotChip-largeInc.
*NSET, NSET=BotChip-all403*NSET, NSET=BotChip-largeInc403
Next, add a new history output request for the vertical displacement, velocity, and acceleration
of the chips. In addition, request element logarithmic strain components (LE11, LE22 and LE12),
and logarithmic principal strain (LEP) at the top face (section point 5) of element set BOTPART of
the circuit board to which the bottom-most chip is attached. For these output requests record the
data at every 0.07 ms and apply the built-in anti-aliasing filter.
*OUTPUT, HISTORY, TIME INTERVAL=0.07E-3, FILTER=ANTIALIASING*NODE OUTPUT, NSET=CHIPSU3, V3, A3
*ELEMENT OUTPUT, ELSET=BOTPART5,LE11, LE22, LE12, LEP
Request history output at every increment for the vertical displacement, velocity, and
acceleration of the bottom-most chip. Use node set BotChip-all for this output request.
*OUTPUT, HISTORY, FREQUENCY=1*NODE OUTPUT, NSET=BotChip-allU3, V3, A3
Add one more output request for the vertical displacement, velocity, and acceleration of the
bottom-most chip. This time request the output every 0.7 ms and apply the built-in anti-aliasing
filter. Use node set BotChip-largeInc.
12–79
Abaqus ID:
Printed on:

Abaqus/Explicit EXAMPLE: CIRCUIT BOARD DROP TEST
*OUTPUT, HISTORY, TIME INTERVAL=0.7E-3, FILTER=ANTIALIASING*NODE OUTPUT, NSET=BotChip-largeIncU3, V3, A3
When you are finished, there will be four history output requests for the bottom chip (the
original one and the three added here).
Evaluating the filtered acceleration of the bottom chip
When the analysis completes, test the plausibility of the acceleration history output for the bottom
chip recorded every 0.07 ms using the built-in, anti-aliasing filter. Do this by saving and then
integrating the filtered acceleration data (A3_ANTIALIASING for node 403 in set CHIPS) andcomparing the results to recorded velocity and displacement data, just as you did earlier for the
unfiltered version of these results. This time you should find that the velocity and displacement
curves calculated by integrating the filtered acceleration are very similar to the velocity and
displacement values written to the output database during the analysis. You may also have noticed
that the velocity and displacement results are the same regardless of whether or not the built-in
anti-aliasing filter is used. This is because the highest frequency content of the nodal velocity and
displacement curves is much less than half the sampling rate. Consequently, no aliasing occurred
when the data was recorded without filtering, and when the built-in anti-aliasing filter was applied
it had no effect because there was no high frequency response to remove.
Next, compare the acceleration A3 history output recorded every increment with the two
acceleration A3 history curves recorded every 0.07 ms. Plot the data recorded at every increment
first so that it does not obscure the other results.
To plot the acceleration histories
1. In the Results Tree, filter the History Output container according to *A3*Node 403* and
double-click the acceleration A3 history output for the node set BotChip-all.
2. Select the two acceleration A3 history output objects for Node 403 in the set CHIPS (one
filtered with the built-in anti-aliasing filter and the other with no filtering) using [Ctrl]+Click;
click mouse button 3 and select Add to Plot from the menu that appears.
The X–Y plot appears in the viewport. Zoom in to view only the first third of the results and
customize the plot appearance to obtain a plot similar to Figure 12–60.
First consider the acceleration history recorded every increment. This curve contains a lot
of data, including high-frequency solution noise which becomes so large in magnitude that it
obscures the structurally-significant lower-frequency components of the acceleration. When output
is requested every increment, the output time increment is the same as the stable time increment,
which (in order to ensure stability) is based on a conservative estimate of the highest possible
frequency response of the model. Frequencies of structural significance are typically two to four
orders of magnitude less than the highest frequency of the model. In this example the stable time
increment ranges between 8.4 × 10⁻⁴ ms to 8.8 × 10⁻⁴ ms (see the status file, circuit.sta),which corresponds to a sample rate of about 1 MHz; this sample rate has been rounded down for
12–80
Abaqus ID:
Printed on:

Abaqus/Explicit EXAMPLE: CIRCUIT BOARD DROP TEST
Time (s)
Ver
tical
Acc
eler
atio
n (m
/s2 )
Figure 12–60 Comparison of acceleration output with and without filtering.
this discussion, even though it means that the value is not conservative. Recalling the Sampling
Theorem, the highest frequency that can be described by a given sample rate is half that rate;
therefore, the highest frequency of this model is about 500 kHz and typical structural frequencies
could be as high as 5 kHz (2 orders of magnitude less than the highest model frequency). While
the output recorded every increment contains a lot of undesirable solution noise in the 5 to 500
kHz range, it is guaranteed to be good (not aliased) data, which can be filtered later with a
postprocessing operation if necessary.
Next consider the data recorded every 0.07 ms without any filtering. Recall that this is the
curve we know to be corrupted by aliasing. The curve jumps from point to point by directly
including whatever the raw acceleration value happens to be after each 0.07 ms interval. The
variable nature of the high-frequency noise makes this aliased result very sensitive to otherwise
imperceptible variations in the solution (due to differences between computer platforms, for
example), hence the results you recorded every 0.07 increments may be significantly different from
those shown in Figure 12–60. Similarly, the velocity and displacement curves we produced by
integrating the aliased acceleration (Figure 12–57 and Figure 12–58) data are extremely sensitive
to small differences in the solution noise.
When the built-in anti-aliasing filter is applied to the output requested every 0.07 ms,
frequency content that is too high to be captured by the 14.3 kHz sample rate is filtered out before
the result is written to the output database. To do this, Abaqus internally defines a low-pass,
second-order, Butterworth filter. Low-pass filters attenuate the frequency content of a signal that
12–81
Abaqus ID:
Printed on:

Abaqus/Explicit EXAMPLE: CIRCUIT BOARD DROP TEST
is above a specified cutoff frequency. An ideal low-pass filter would completely eliminate all
frequencies above the cutoff frequency while having no effect on the frequency content below
the cutoff frequency. In reality there is a transition band of frequencies surrounding the cutoff
frequency that are partially attenuated. To compensate for this, the built-in anti-aliasing filter has a
cutoff frequency that is one-third of the sample rate, a value lower than the Nyquist frequency of
one-half the sample rate. In most cases (including this example), this cutoff frequency is adequate
to ensure that all frequency content above the Nyquist frequency has been removed before the data
are written to the output database.
Abaqus/Explicit does not check to ensure that the specified output time interval provides an
appropriate cutoff frequency for the internal anti-aliasing filter; for example, Abaqus does not check
that only the noise of the signal is eliminated. When the acceleration data are recorded every
0.07 ms, the internal anti-aliasing filter is applied with cutoff frequency of 4.8 kHz. Notice that this
cutoff frequency is nearly the same value we previously determined to be the maximum physically
meaningful frequency for the model (two orders of magnitude less than the maximum frequency the
stable time increment can capture). The 0.07 ms output interval was intentionally chosen for this
example to avoid filtering frequency content that could be physically meaningful. Next, we will
study the results when the anti-aliasing filter is applied with a sample interval that is too large.
To plot the filtered acceleration histories
1. In the Results Tree, filter the History Output container according to *A3*Node 403* and
double-click the acceleration A3 history output for the node set BotChip-all.
2. Select the two filtered acceleration A3_ANTIALIASING history output objects for Node403; click mouse button 3 and select Add to Plot from the menu that appears.
The X–Y plot appears in the viewport. Zoom out and customize the plot appearance to obtain
a plot similar to Figure 12–61.
Figure 12–61 clearly illustrates some of the problems that can arise when the built-in
anti-aliasing filter is used with too large an output time increment. First, notice that many of
the oscillations in the acceleration output are filtered out when the acceleration is recorded with
large time increments. In this dynamic impact problem it is likely that a significant portion
of the removed frequency content is physically meaningful. Previously, we estimated that the
frequency of the structural response may be as large as 5 kHz; however, when the sample interval
is 0.7 ms, filtering is performed with a low cutoff frequency of 0.47 kHz (sample interval of 0.7 ms
corresponds to a sample frequency of 1.4 kHz, one third of which is the 0.47 kHz cutoff frequency).
Even though the results recorded every 0.7 ms may not capture all physically meaningful frequency
content, it does capture the low-frequency content of the acceleration data without distortions due
to aliasing. Keep in mind that filtering decreases the peak value estimations, which is desirable
if only solution noise is filtered, but can be misleading when physically meaningful solution
variations have been removed.
Another issue to note is that there is a time delay in the acceleration results recorded every
0.7 ms. This time delay (or phase shift) affects all real-time filters. The filter must have some input
12–82
Abaqus ID:
Printed on:

Abaqus/Explicit EXAMPLE: CIRCUIT BOARD DROP TEST
Time (s)
Ver
tical
Acc
eler
atio
n (m
/s2 )
Figure 12–61 Filtered acceleration with different output sampling rates.
in order to produce output; consequently the filtered result will include some time delay. While
some time delay is introduced for all real-time filtering, the time delay becomes more pronounced
as the filter cutoff frequency decreases; the filter must have input over a longer span of time in
order to remove lower frequency content. Increasing the filter order (an option if you have created
a user-defined filter, rather than using the second-order built-in anti-aliasing filter) also results in
an increase in the output time delay. For more information, see “Filtering output and operating on
output in Abaqus/Explicit” in “Output to the output database,” Section 4.1.3 of the Abaqus Analysis
User’s Manual.
Use the real-time filtering functionality with caution. In this example we would not have been
able to identify the problems with the heavily filtered data if we did not have appropriate data for
comparison. In general it is best to use a minimal amount of filtering in Abaqus/Explicit, so that the
output database contains a rich, un-aliased, representation for the solution recorded at a reasonable
number of time points (rather than at every increment). If additional filtering is necessary, it can be
done as a postprocessing operation in Abaqus/Viewer.
Filtering acceleration history in Abaqus/Viewer
In this section we will use Abaqus/Viewer to filter the acceleration history data written to the output
database. Filtering as a postprocessing operation in Abaqus/Viewer has several advantages over
the real-time filtering available in Abaqus/Explicit. In the Abaqus/Viewer you can quickly filter
X–Y data and plot the results. You can easily compare the filtered results to the unfiltered results
to verify that the filter produced the desired effect. Using this technique you can quickly iterate
12–83
Abaqus ID:
Printed on:

Abaqus/Explicit EXAMPLE: CIRCUIT BOARD DROP TEST
to find appropriate filter parameters. In addition, the Abaqus/Viewer filters do not suffer from the
time delay that is unavoidable when filtering is applied during the analysis. Keep in mind, however,
that postprocessing filters cannot compensate for poor analysis history output; if the data has been
aliased or if physically meaningful frequencies have been removed, no postprocessing operation
can recover the lost content.
To demonstrate the differences between filtering in Abaqus/Viewer and filtering in
Abaqus/Explicit, we will filter the acceleration of the bottom chip in Abaqus/Viewer and compare
the results to the filtered data Abaqus/Explicit wrote to the output database.
To filter acceleration history:
1. In the Results Tree, filter the History Output container according to *A3*Node 403*,select the acceleration A3 history output for the node set BotChip-all, and save the data
as A3-all.
2. In the Results Tree, double-click XYData; then select Operate on XY data in the Create XYData dialog box. Click Continue.
3. In the Operate on XY Data dialog box, filter A3-all with filter options that are equivalent
to those applied by the Abaqus/Explicit built-in anti-aliasing filter when the output increment
is 0.7 ms. Recall that the built-in anti-aliasing filter is a second-order Butterworth filter with a
cutoff frequency that is one-third of the output sample rate, hence the expression at the top of
the dialog box should appear as:
butterworthFilter ( xyData="A3-all",cutoffFrequency=1/(3*0.0007) )
4. Click Plot Expression to plot the filtered acceleration curve.
5. In the Results Tree, click mouse button 3 on the filtered acceleration A3_ANTIALIASINGhistory output for node set BotChip-largeInc; and select Add to Plot from the menu
that appears. If you wish, also add the filtered acceleration history for node 403 in the set
CHIPS.
The X–Y plot appears in the viewport. As before, customize the plot appearance to obtain a
plot similar to Figure 12–62.
In Figure 12–62 it is clear that the postprocessing filter in Abaqus/Viewer does not suffer
from the time delay that occurs when filtering is performed while the analysis is running. This
is because the Abaqus/Viewer filters are bidirectional, which means that the filtering is applied first
in a forward pass (which introduces some time delay) and then in a backward pass (which removes
the time delay). As a consequence of the bidirectional filtering in Abaqus/Viewer, the filtering is
essentially applied twice, which results in additional attenuation of the filtered signal compared to
the attenuation achieved with a single-pass filter. This is why the local peaks in the acceleration
curve filtered in Abaqus/Viewer are a bit lower than those in the curve filtered by Abaqus/Explicit.
12–84
Abaqus ID:
Printed on:

Abaqus/Explicit EXAMPLE: CIRCUIT BOARD DROP TEST
Time (s)
Ver
tical
Acc
eler
atio
n (m
/s2 )
Figure 12–62 Comparison of acceleration filtered in
Abaqus/Explicit and Abaqus/Viewer.
To develop a better understanding of the Abaqus/Viewer filtering capabilities, return to the
Operate on XY Data dialog box and filter the acceleration data with other filter options. For
example, try different cutoff frequencies.
Can you confirm that the cutoff frequency of 4.8 kHz associated with the built-in anti-aliasing
filter with a time increment size of 0.07 was appropriate? Does increasing the cutoff frequency to
6 kHz, 7 kHz, or even 10 kHz produce significantly different results?
You should find that a moderate increase in the cutoff frequency does not have a significant
effect on the results, implying that we probably have not missed physically meaningful frequency
content when we filtered with a cutoff frequency of 4.8 kHz.
Compare the results of filtering the acceleration data with Butterworth and Chebyshev Type I
filters. The Chebyshev filter requires a ripple factor parameter (rippleFactor), which indicates how
much oscillation you will allow in exchange for an improved filter response; see “Filtering output
and operating on output in Abaqus/Explicit” in “Output to the output database,” Section 4.1.3 of
the Abaqus Analysis User’s Manual for more information. For the Chebyshev Type I filter a ripple
factor of 0.071 will result in a very flat pass band with a ripple that is only 0.5%.
You may not notice much difference between the filters when the cutoff frequency is 5 kHz, but
what about when the cutoff frequency is 2 kHz? What happens when you increase the order of the
Chebyshev Type I filter?
Compare your results to those shown in Figure 12–63.
12–85
Abaqus ID:
Printed on:

Abaqus/Explicit EXAMPLE: CIRCUIT BOARD DROP TEST
Time (s)
Ver
tical
Acc
eler
atio
n (m
/s2 )
Figure 12–63 Comparison of acceleration filtered with
Butterworth and Chebyshev Type I filters.
Note: The Abaqus/Viewer postprocessing filters are second-order by default. To define a
higher order filter you can use the filterOrder parameter with the butterworthFilter and the
chebyshev1Filter operators. For example, use the following expression in the Operate onXY Data dialog box to filter A3-all with a sixth-order Chebyshev Type I filter using a cutoff
frequency of 2 kHz and a ripple factor of 0.017.
chebyshev1Filter ( xyData="A3-all" , cutoffFrequency=2000,rippleFactor= 0.017, filterOrder=6)
The second-order Chebyshev Type I filter with a ripple factor of 0.071 is a relatively weak filter,
so some of the frequency content above the 2 kHz cutoff frequency is not filtered out. When the
filter order is increased, the filter response is improved so that the results are more like the equivalent
Butterworth filter. For more information on the X–Y data filters available in Abaqus/Viewer see
“Operating on saved X–Y data objects,” Section 45.4 of the Abaqus/CAE User’s Manual.
Filtering strain history in Abaqus/Viewer
Strain in the circuit board near the location of the chips is another result that may assist us in
determining the desirability of the foam packaging. If the strain under the chips exceeds a limiting
value, the solder securing the chips to the board will fail. We wish to identify the peak strain in
12–86
Abaqus ID:
Printed on:

Abaqus/Explicit EXAMPLE: CIRCUIT BOARD DROP TEST
any direction. Therefore, the maximum and minimum principal logarithmic strains are of interest.
Principal strains are one of a number of Abaqus results that are derived from nonlinear operators;
in this case a nonlinear function is used to calculate principal strains from the individual strain
components. Some other common results that are derived from nonlinear operators are principal
stresses, Mises stress, and equivalent plastic strains. Care must be taken when filtering results that
are derived from nonlinear operators, because nonlinear operators (unlike linear ones) can modify
the frequency of the original result. Filtering such a result may have undesirable consequences; for
example, if you remove a portion of the frequency content that was introduced by the application of
the nonlinear operator, the filtered result will be a distorted representation of the derived quantity.
In general, you should either avoid filtering quantities derived from nonlinear operators or filter the
underlying quantities before calculating the derived quantity using the nonlinear operator.
The strain history output for this analysis was recorded every 0.07 ms using the built-in anti-
aliasing filter. To verify that the anti-aliasing filter did not distort the principal strain results, we
will calculate the principal logarithmic strains using the filtered strain components and compare the
result to the filtered principal logarithmic strains.
To calculate the principal logarithmic strains:
1. In the Results Tree, filter the History Output according to *LE*, select the logarithmic strain
component LE11 on the SPOS surface of the element in set BOTPART, and save the data as
LE11.
2. Similarly, save the LE12 and LE22 strain components for the same element as LE12 and
LE22, respectively.
3. In the Results Tree, double-click XYData; then select Operate on XY data in the Create XYData dialog box. Click Continue.
4. In the Operate on XY Data dialog box, use the saved logarithmic strain components to
calculate the maximum principal logarithmic strain. The expression at the top of the dialog
box should appear as:
(("LE11"+"LE22")/2) + sqrt( power(("LE11"-"LE22")/2,2)+ power("LE12"/2,2) )
5. Click Save As to save calculated maximum principal logarithmic strain as LEP-Max.
6. Edit the expression in the Operate on XY Data dialog box to calculate the minimum principal
logarithmic strain. The modified expression should appear as:
(("LE11"+"LE22")/2) - sqrt( power(("LE11"-"LE22")/2,2)+ power("LE12"/2,2) )
7. Click Save As to save calculated minimum principal logarithmic strain as LEP-Min.
In order to plot the calculated principal logarithmic strains with the same Y-axis as the strains
recorded during the analysis, change the Y-value type to strain.
12–87
Abaqus ID:
Printed on:

Abaqus/Explicit EXAMPLE: CIRCUIT BOARD DROP TEST
8. In the XYData container of the Results Tree, click mouse button 3 on LEP-Max; and select
Edit from the menu that appears.
9. In the Edit XY Data dialog box, choose Strain as the Y-value type.
10. Similarly, edit LEP-Min and select Strain as the Y-value type.
11. Using the Results Tree, plot LEP-Man and LEP-Min along with the principal strains recorded
during the analysis (LEP1 and LEP2) for the element in set BOTPART.
12. As before, customize the plot appearance to obtain a plot similar to Figure 12–64.
Time (s)
Str
ain
Figure 12–64 Principal logarithmic strain values versus time.
In Figure 12–64 we see that the filtered principal logarithmic strain curves recorded during
the analysis are indistinguishable from the principal logarithmic strain curves calculated from the
filtered strain components. Therefore the anti-aliasing filter (cutoff frequency 4.8 kHz) did not
remove any of the frequency content introduced by the nonlinear operation to calculate principal
strains form the original strain data. Next, filter the strain data with a lower cutoff frequency of
500 Hz.
To filter principal logarithmic strains with a cutoff frequency of 500 Hz:
1. In the Results Tree, double-click XYData; then select Operate on XY data in the Create XYData dialog box. Click Continue.
12–88
Abaqus ID:
Printed on:

Abaqus/Explicit EXAMPLE: CIRCUIT BOARD DROP TEST
2. In the Operate on XY Data dialog box, filter the maximum principal logarithmic strain LEP-Max using a second-order Butterworth filter with a cutoff frequency of 500 Hz. The expression
at the top of the dialog box should appear as:
butterworthFilter(xyData="LEP-Max", cutoffFrequency=500)
3. Click Save As to save the calculated maximum principal logarithmic strain as LEP-Max-FilterAfterCalc-bw500.
4. Similarly, filter the logarithmic strain components LE11, LE12, and LE22 using the same
second-order Butterworth filter with a cutoff frequency of 500 Hz. Save the resulting curves
as LE11–bw500, LE12–bw500, and LE22–bw500, respectively.
5. Now calculate the maximum principal logarithmic strain using the filtered logarithmic strain
components. The expression at the top of the Operate on XY Data dialog box should appear
as:
(("LE11-bw500"+"LE22-bw500")/2) + sqrt(power(("LE11-bw500"-"LE22-bw500")/2,2) +power("LE12-bw500"/2,2) )
6. Click Save As to save the calculated maximum principal logarithmic strain as LEP-Max-CalcAfterFilter-bw500.
7. In the XYData container of the Results Tree, click mouse button 3 on LEP-Max-CalcAfterFilter-bw500; and select Edit from the menu that appears.
8. In the Edit XY Data dialog box, choose Strain as the Y-value type.
9. Plot LEP-Max-CalcAfterFilter-bw500 and LEP-Max-FilterAfterCalc-bw500 as shown in Figure 12–65.
In Figure 12–65 you can see that there is a significant difference between filtering the strain
data before and after the principal strain calculation. The curve that was filtered after the principal
strain calculation is distorted because some of the frequency content introduced by applying the
nonlinear principal-stress operator is higher than the 500 Hz filter cutoff frequency. In general,
you should avoid directly filtering quantities that have been derived from nonlinear operators;
whenever possible filter the underlying components and then apply the nonlinear operator to the
filtered components to calculate the desired derived quantity.
Strategy for recording and filtering Abaqus/Explicit history output
Recording output for every increment in Abaqus/Explicit generally produces much more data than
you need. The real-time filtering capability allows you to request history output less frequently
without distorting the results due to aliasing. However, you should ensure that your output rate and
filtering choices have not removed physically meaningful frequency content nor distorted the results
(for example, by introducing a large time delay or by removing frequency content introduced by
nonlinear operators). Keep in mind that no amount of postprocessing filtering can recover frequency
content filtered out during the analysis, nor can postprocessing filtering recover an original signal
12–89
Abaqus ID:
Printed on:

COMPATIBILITY BETWEEN Abaqus/Standard AND Abaqus/Explicit
Time (s)
Str
ain
Figure 12–65 Principal logarithmic strain calculated before
and after filtering (cutoff frequency 500 Hz).
from aliased data. In addition, it may not be obvious when results have been over-filtered or aliased
if additional data are not available for comparison. A good strategy is to choose a relatively high
output rate and use the Abaqus/Explicit filters to prevent aliasing of the history output, so that valid
and rich results are written to the output database. You may even wish to request output at every
increment for a couple of critical locations. After the analysis completes, use the postprocessing
tools in Abaqus/Viewer to quickly and iteratively apply additional filtering as desired.
12.11 Compatibility between Abaqus/Standard and Abaqus/Explicit
There are fundamental differences in the mechanical contact algorithms in Abaqus/Standard and
Abaqus/Explicit. These differences are reflected in how contact conditions are defined. The main
differences are the following:
• Abaqus/Standard typically uses a pure master-slave relationship for the contact constraints (see
“Defining contact pairs in Abaqus/Standard,” Section 32.3.1 of the Abaqus Analysis User’s
Manual); the nodes of the slave surface are constrained not to penetrate into the master surface.
The nodes of the master surface can, in principle, penetrate into the slave surface. Abaqus/Explicit
includes this formulation but typically uses a balanced master-slave weighting by default (see
“Contact formulation for general contact in Abaqus/Explicit,” Section 34.2.1 of the Abaqus
12–90
Abaqus ID:
Printed on:

SUGGESTED READING
Analysis User’s Manual, and “Contact formulations for contact pairs in Abaqus/Explicit,”
Section 34.2.2 of the Abaqus Analysis User’s Manual).
• The contact formulations in Abaqus/Standard and Abaqus/Explicit differ in many respects. For
example, Abaqus/Standard provides a surface-to-surface formulation, while Abaqus/Explicit
provides an edge-to-edge formulation.
• The constraint enforcement methods in Abaqus/Standard and Abaqus/Explicit differ in some
respects. For example, both Abaqus/Standard and Abaqus/Explicit provide penalty constraint
methods, but the default penalty stiffnesses differ.
• Abaqus/Standard and Abaqus/Explicit both provide a small-sliding contact formulation (see
“Contact formulations in Abaqus/Standard,” Section 34.1.1 of the Abaqus Analysis User’s Manual,
and “Contact formulations for contact pairs in Abaqus/Explicit,” Section 34.2.2 of the Abaqus
Analysis User’s Manual). However, the small-sliding contact formulation in Abaqus/Standard
transfers the load to the master nodes according to the current position of the slave node.
Abaqus/Explicit always transfers the load through the anchor point.
As a result of these differences, contact definitions specified in an Abaqus/Standard analysis cannot
be imported into an Abaqus/Explicit analysis and vice versa (see “Transferring results between
Abaqus/Explicit and Abaqus/Standard,” Section 9.2.2 of the Abaqus Analysis User’s Manual).
12.12 Related Abaqus examples
• “Indentation of a crushable foam plate,” Section 3.2.10 of the Abaqus Benchmarks Manual
• “Pressure penetration analysis of an air duct kiss seal,” Section 1.1.16 of the Abaqus Example
Problems Manual
• “Deep drawing of a cylindrical cup,” Section 1.3.4 of the Abaqus Example Problems Manual
12.13 Suggested reading
The following references provide additional information on contact analysis with finite element methods.
They allow the interested user to explore the topic in more depth.
General texts on contact analysis
• Belytschko, T., W. K. Liu, and B. Moran, Nonlinear Finite Elements for Continua and
Structures, Wiley & Sons, 2000.
• Crisfield, M. A., Non-linear Finite Element Analysis of Solids and Structures, Volume II:
Advanced Topics, Wiley & Sons, 1997.
• Johnson, K. L., Contact Mechanics, Cambridge, 1985.
• Oden, J. T., and G. F. Carey, Finite Elements: Special Problems in Solid Mechanics, Prentice-
Hall, 1984.
12–91
Abaqus ID:
Printed on:

SUMMARY
General text on digital signal proccesing
• Stearns, S. D., and R. A. David, Signal Processing Algorithms in MATLAB, Prentice Hall P T
R, 1996.
12.14 Summary
• Contact analyses require a careful, logical approach. Divide the analysis into several steps
if necessary, and apply the loading slowly making sure that the contact conditions are well
established.
• In general, it is best to use a separate step for each part of the analysis in Abaqus/Standard even if
it is just to change boundary conditions to loads. You will almost certainly end up with more steps
than anticipated, but the model should converge much more easily. Contact analyses are much more
difficult to complete if you try to apply all the loads in one step.
• In Abaqus/Standard achieve stable contact conditions between all components before applying the
working loads to the structure. If necessary, apply temporary boundary conditions, which may be
removed at a later stage. The final results should be unaffected, provided that the constraints produce
no permanent deformation.
• Do not apply boundary conditions to nodes on contact surfaces that constrain the node in the
direction of contact in Abaqus/Standard. If there is friction, do not constrain these nodes in any
degree of freedom: zero pivot messages may result.
• Always try to use first-order elements for contact simulations in Abaqus/Standard.
• Abaqus/Explicit provides two distinct algorithms for modeling contact: general contact (defined
with the *CONTACT option) and contact pairs (defined with the *CONTACT PAIR option).
• General contact interactions allow you to define contact between many or all regions of a model;
contact pair interactions describe contact between two surfaces or between a single surface and
itself.
• General contact can be defined in the model or history part of the input file; contact pairs are defined
in the history part of the input file.
• Surfaces used with the Abaqus/Explicit general contact algorithm can span multiple unattached
bodies. More than two surface facets can share a common edge. In contrast, all surfaces used with
the contact pair algorithm must be continuous and simply connected.
• Surfaces are defined using the *SURFACE option. Individual nodes can be included in a contact
pair by using the TYPE=NODE parameter on the *SURFACE option. Analytical rigid surfaces
are assigned to a rigid body by using the ANALYTICAL SURFACE parameter on the *RIGID
BODY option. The parameters TYPE=SEGMENTS, CYLINDRICAL, or REVOLUTION on the
*SURFACE option specify the type of analytical rigid surface.
• In Abaqus/Explicit single-sided surfaces on shell, membrane, or rigid elements must be defined so
that the normal directions do not “flip” as the surface is traversed.
12–92
Abaqus ID:
Printed on:

SUMMARY
• Abaqus/Explicit does not smooth rigid surfaces; they are faceted like the underlying elements.
Coarse meshing of discrete rigid surfaces can produce noisy solutions with the contact pair
algorithm. The general contact algorithm does include some numerical rounding of features.
• Tie constraints are a useful means of mesh refinement in Abaqus.
• Abaqus/Explicit adjusts the nodal coordinates without strain to remove any initial overclosures prior
to the first step. If the adjustments are large with respect to the element dimensions, elements can
become severely distorted.
• In subsequent steps any nodal adjustments to remove initial overclosures in Abaqus/Explicit induce
strains that can potentially cause severe mesh distortions.
• When you are interested in results that are likely to contain high frequency oscillations, such as
accelerations in an impact problem, request Abaqus/Explicit history output with a relatively high
output rate and (if the output rate is less than every increment) apply an anti-aliasing filter; then, use
a postprocessing filter if stronger filtering is desired.
• The Abaqus Analysis User’s Manual contains more detailed discussions of contact modeling in
Abaqus. “Contact interaction analysis: overview,” Section 32.1.1 of the Abaqus Analysis User’s
Manual, is a good place to begin further reading on the subject.
12–93
Abaqus ID:
Printed on:


ANALOGY FOR EXPLICIT DYNAMICS
13. Quasi-Static Analysis with Abaqus/Explicit
The explicit solution method is a true dynamic procedure originally developed to model high-speed
impact events in which inertia plays a dominant role in the solution. Out-of-balance forces are propagated
as stress waves between neighboring elements while solving for a state of dynamic equilibrium. Since
the minimum stable time increment is usually quite small, most problems require a large number of
increments.
The explicit solution method has proven valuable in solving quasi-static problems as
well—Abaqus/Explicit solves certain types of static problems more readily than Abaqus/Standard does.
One advantage of the explicit procedure over the implicit procedure is the greater ease with which it
resolves complicated contact problems. In addition, as models become very large, the explicit procedure
requires fewer system resources than the implicit procedure. Refer to “Comparison of implicit and
explicit procedures,” Section 2.4, for a detailed comparison of the implicit and explicit procedures.
Applying the explicit dynamic procedure to quasi-static problems requires some special
considerations. Since a static solution is, by definition, a long-time solution, it is often computationally
impractical to analyze the simulation in its natural time scale, which would require an excessive number
of small time increments. To obtain an economical solution, the event must be accelerated in some way.
The problem is that as the event is accelerated, the state of static equilibrium evolves into a state of
dynamic equilibrium in which inertial forces become more dominant. The goal is to model the process
in the shortest time period in which inertial forces remain insignificant.
Quasi-static analyses can also be conducted in Abaqus/Standard. Quasi-static stress analysis in
Abaqus/Standard is used to analyze linear or nonlinear problems with time-dependent material response
(creep, swelling, viscoelasticity, and two-layer viscoplasticity) when inertia effects can be neglected. For
more information on quasi-static analysis in Abaqus/Standard, see “Quasi-static analysis,” Section 6.2.5
of the Abaqus Analysis User’s Manual.
13.1 Analogy for explicit dynamics
To provide youwith a more intuitive understanding of the differences between a slow, quasi-static loading
case and a rapid loading case, we use the analogy illustrated in Figure 13–1. The figure shows two cases
of an elevator full of passengers. In the slow case the door opens and you walk in. To make room, the
occupants adjacent to the door slowly push their neighbors, who push their neighbors, and so on. This
disturbance passes through the elevator until the people next to the walls indicate that they cannot move.
A series of waves pass through the elevator until everyone has reached a new equilibrium position. If
you increase your speed slightly, you will shove your neighbors more forcefully than before, but in the
end everyone will end up in the same position as in the slow case.
In the fast case the door opens and you run into the elevator at high speed, permitting the occupants
no time to rearrange themselves to accommodate you. You will injure the two people directly in front of
the door, while the other occupants will be unaffected.
13–1
Abaqus ID:
Printed on:

LOADING RATES
Figure 13–1 Analogy for slow and fast loading cases.
The same thinking is true for quasi-static analyses. The speed of the analysis often can be increased
substantially without severely degrading the quality of the quasi-static solution; the end result of the slow
case and a somewhat accelerated case are nearly the same. However, if the analysis speed is increased to
a point at which inertial effects dominate, the solution tends to localize, and the results are quite different
from the quasi-static solution.
13.2 Loading rates
The actual time taken for a physical process is called its natural time. Generally, it is safe to assume that
performing an analysis in the natural time for a quasi-static process will produce accurate static results.
After all, if the real-life event actually occurs in a natural time scale in which velocities are zero at the
conclusion, a dynamic analysis should be able to capture the fact that the analysis has, in fact, achieved
a steady state. You can increase the loading rate so that the same physical event occurs in less time
as long as the solution remains nearly the same as the true static solution and dynamic effects remain
insignificant.
13.2.1 Smooth amplitude curvesFor accuracy and efficiency quasi-static analyses require the application of loading that is as smooth as
possible. Sudden, jerky movements cause stress waves, which can induce noisy or inaccurate solutions.
Applying the load in the smoothest possible manner requires that the acceleration changes only a small
amount from one increment to the next. If the acceleration is smooth, it follows that the changes in
velocity and displacement are also smooth.
Abaqus has a simple, built-in type of amplitude called SMOOTH STEP that automatically creates
a smooth loading amplitude. When you define time-amplitude data pairs using *AMPLITUDE,
DEFINITION=SMOOTH STEP, Abaqus/Explicit automatically connects each of your data pairs
with curves whose first and second derivatives are smooth and whose slopes are zero at each of your
data points. Since both of these derivatives are smooth, you can apply a displacement loading with
SMOOTH STEP using only the initial and final data points, and the intervening motion will be smooth.
13–2
Abaqus ID:
Printed on:

LOADING RATES
Using this type of loading amplitude allows you to perform a quasi-static analysis without generating
waves due to discontinuity in the rate of applied loading. For example, for the following amplitude
definition Abaqus/Explicit creates the amplitude curve shown in Figure 13–2:
*AMPLITUDE, DEFINITION=SMOOTH STEP0.0, 0.0, 1.0E-5, 1.0
0
1.0
1.0E-5 2.0E-5
ampl
itude
time
Figure 13–2 Amplitude definition using *AMPLITUDE, DEFINITION=SMOOTH STEP.
13.2.2 Structural problemsIn a static analysis the lowest mode of the structure usually dominates the response. Knowing the
frequency and, correspondingly, the period of the lowest mode, you can estimate the time required
to obtain the proper static response. To illustrate the problem of determining the proper loading
rate, consider the deformation of a side intrusion beam in a car door by a rigid cylinder, as shown in
Figure 13–3. The actual test is quasi-static.
The response of the beam varies greatly with the loading rate. At an extremely high impact velocity
of 400 m/s, the deformation in the beam is highly localized, as shown in Figure 13–4. To obtain a better
quasi-static solution, consider the lowest mode.
The frequency of the lowest mode is approximately 250 Hz, which corresponds to a period of
4 milliseconds. The natural frequencies can easily be calculated using the *FREQUENCY procedure in
Abaqus/Standard. To deform the beam by the desired 0.2 m in 4 milliseconds, the velocity of the cylinder
is 50 m/s. While 50 m/s still seems like a high, impact velocity, the inertial forces become secondary to
the overall stiffness of the structure, and the deformed shape—shown in Figure 13–5—indicates a much
better quasi-static response.
13–3
Abaqus ID:
Printed on:

LOADING RATES
1
2
3Rigid Cylinder
Fixed BC
Fixed BC
Circular BeamLength = 1 m
Young's Modulus = 200 GPaPoisson's Ratio = 0.3Yield Stress = 250 MPaHardening Modulus = 20 MPaDensity = 7800 Kg/m**3Shell Thickness = 3 mm
Figure 13–3 Rigid cylinder impacting beam.
1
2
3 1
2
3
Figure 13–4 Impact velocity of 400 m/s.
1
2
3 1
2
3
Figure 13–5 Impact velocity of 50 m/s.
13–4
Abaqus ID:
Printed on:

LOADING RATES
While the overall structural response appears to be what we expect as a quasi-static solution, it is usually
desirable to increase the loading time to 10 times the period of the lowest mode to be certain that the
solution is truly quasi-static. To improve the results even further, the velocity of the rigid cylinder could
be ramped up gradually—for example, using a SMOOTH STEP amplitude definition—thereby easing
the initial impact.
13.2.3 Metal forming problemsArtificially increasing the speed of forming events is necessary to obtain an economical solution, but
how large a speedup can we impose and still obtain an acceptable static solution? If the deformation
of the sheet metal blank corresponds to the deformed shape of the lowest mode, the time period of the
lowest structural mode can be used as a guideline for forming speed. However, in forming processes the
rigid dies and punches can constrain the blank in such a way that its deformation may not relate to the
structural modes. In such cases a general recommendation is to limit punch speeds to less than 1% of the
sheet metal wave speed. For typical processes the punch speed is on the order of 1 m/s, while the wave
speed of steel is approximately 5000 m/s. This recommendation, therefore, suggests a factor of 50 as an
upper bound on the speedup of the punch velocity.
The suggested approach to determining an acceptable punch velocity involves running a series of
analyses at various punch speeds in the range of 3 to 50 m/s. Perform the analyses in the order of fastest
to slowest since the solution time is inversely proportional to the punch velocity. Examine the results of
the analyses, and get a feel for how the deformed shapes, stresses, and strains vary with punch speed.
Some indications of excessive punch speeds are unrealistic, localized stretching and thinning as well as
the suppression of wrinkling. If you begin with a punch speed of, for example, 50 m/s, and decrease
it from there, at some point the solutions will become similar from one punch speed to the next—an
indication that the solutions are converging on a quasi-static solution. As inertial effects become less
significant, differences in simulation results also become less significant.
As the loading rate is increased artificially, it becomes more and more important to apply the loads
in a gradual and smooth manner. For example, the simplest way to load the punch is to impose a
constant velocity throughout the forming step. Such a loading causes a sudden impact load onto the
sheet metal blank at the start of the analysis, which propagates stress waves through the blank and may
produce undesired results. The effect of any impact load on the results becomes more pronounced as the
loading rate is increased. Ramping up the punch velocity from zero using a smooth step amplitude curve
minimizes these adverse effects.
Springback
Springback is often an important part of a forming analysis because the springback analysis
determines the shape of the final, unloaded part. While Abaqus/Explicit is well-suited for forming
simulations, springback poses some special difficulties. The main problem with performing
springback simulations within Abaqus/Explicit is the amount of time required to obtain a
steady-state solution. Typically, the loads must be removed very carefully, and damping must
13–5
Abaqus ID:
Printed on:

MASS SCALING
be introduced to make the solution time reasonable. Fortunately, the close relationship between
Abaqus/Explicit and Abaqus/Standard allows a much more efficient approach.
Since springback involves no contact and usually includes only mild nonlinearities,
Abaqus/Standard can solve springback problems much faster than Abaqus/Explicit can. Therefore,
the preferred approach to springback analyses is to import the completed forming model from
Abaqus/Explicit into Abaqus/Standard. You must create an Abaqus/Standard input file that will
import the forming results and perform the springback analysis. Using the *IMPORT option within
the Abaqus/Standard input file, you specify the element sets that you wish to import. Usually, the
entire deformable mesh is imported. The nodes, elements, and section properties are imported
automatically, but you must redefine the materials and boundary conditions. Once the springback
analysis is complete, you can import the model back into Abaqus/Explicit to continue with another
forming stage.
13.3 Mass scaling
Mass scaling enables an analysis to be performed economically without artificially increasing the loading
rate. Mass scaling is the only option for reducing the solution time in simulations involving a rate-
dependent material or rate-dependent damping, such as dashpots. In such simulations increasing the
loading rate is not an option because material strain rates increase by the same factor as the loading
rate. When the properties of the model change with the strain rate, artificially increasing the loading rate
artificially changes the process.
The following equations show how the stable time increment is related to the material density.
As discussed in “Definition of the stability limit,” Section 9.3.2, the stability limit for the model is the
minimum stable time increment of all elements. It can be expressed as
where is the characteristic element length and is the dilatational wave speed of the material. The
dilatational wave speed for a linear elastic material with Poisson’s ratio equal to zero is given by
where is the material density.
According to the above equations, artificially increasing the material density, , by a factor of
decreases the wave speed by a factor of and increases the stable time increment by a factor of .
Remember that when the global stability limit is increased, fewer increments are required to perform
the same analysis, which is the goal of mass scaling. Scaling the mass, however, has exactly the same
influence on inertial effects as artificially increasing the loading rate. Therefore, excessive mass scaling,
just like excessive loading rates, can lead to erroneous solutions. The suggested approach to determining
13–6
Abaqus ID:
Printed on:

ENERGY BALANCE
an acceptable mass scaling factor, then, is similar to the approach to determining an acceptable loading
rate scaling factor. The only difference to the approach is that the speedup associated with mass scaling
is the square root of the mass scaling factor, whereas the speedup associated with loading rate scaling
is proportional to the loading rate scaling factor. For example, a mass scaling factor of 100 corresponds
exactly to a loading rate scaling factor of 10.
There are several ways to implement mass scaling in your model using the *FIXED MASS
SCALING or *VARIABLE MASS SCALING option in the history definition of the input file. Since
the option is part of the history definition, it can be changed from step to step, allowing great flexibility.
Refer to “Mass scaling,” Section 11.7.1 of the Abaqus Analysis User’s Manual, for details.
13.4 Energy balance
Themost general means of evaluatingwhether or not a simulation is producing an appropriate quasi-static
response involves studying the various model energies. The following is the energy balance equation in
Abaqus/Explicit:
where is the internal energy, is the viscous energy dissipated, is the frictional energy
dissipated, is the kinetic energy, is the internal heat energy, is the work done by
the externally applied loads, and , , and are the work done by contact penalties, by
constraint penalties, and by propelling added mass, respectively. is the external heat energy
through external fluxes. The sum of these energy components is , which should be constant. In
the numerical model is only approximately constant, generally with an error of less than 1%.
To illustrate energy balance with a simple example, consider the uniaxial tensile test shown in
Figure 13–6. The energy history for the quasi-static test would appear as shown in Figure 13–7. If a
simulation is quasi-static, the work applied by the external forces is nearly equal to the internal energy
of the system. The viscously dissipated energy is generally small unless viscoelastic materials, discrete
dashpots, or material damping are used. We have already established that the inertial forces are negligible
in a quasi-static analysis because the velocity of the material in the model is very small. The corollary
to both of these conditions is that the kinetic energy is also small. As a general rule the kinetic energy of
the deforming material should not exceed a small fraction (typically 5% to 10%) of its internal energy
throughout most of the process.
When comparing the energies, remember that Abaqus/Explicit reports a global energy balance,
which includes the kinetic energy of any rigid bodies with mass. Since only the deformable bodies are
of interest when evaluating the results, the kinetic energy of the rigid bodies should be subtracted from
when evaluating the energy balance.
For example, if you are simulating a transport problem with rolling rigid dies, the kinetic energy
of the rigid bodies may be a significant portion of the total kinetic energy of the model. In such cases
you must subtract the kinetic energy associated with rigid body motions before a meaningful comparison
with internal energy can be made.
13–7
Abaqus ID:
Printed on:

EXAMPLE: FORMING A CHANNEL IN Abaqus/Explicit
F
F
Figure 13–6 Uniaxial tensile test.
ener
gy
EW
EI
ETOT, EKE FD, EV
time
, E
Figure 13–7 Energy history for quasi-static tensile test.
13.5 Example: forming a channel in Abaqus/Explicit
In this example you will solve the channel forming problem from Chapter 12, “Contact,” using
Abaqus/Explicit. You will then compare the results from the Abaqus/Standard and Abaqus/Explicit
analyses.
You will make modifications to the model created for the Abaqus/Standard analysis so that you are
able to run it in Abaqus/Explicit. These modifications include adding density to the material model and
changing the steps. Before running the Abaqus/Explicit analysis, you will use the frequency extraction
procedure in Abaqus/Standard to determine the time period required to obtain a proper quasi-static
response.
13–8
Abaqus ID:
Printed on:

EXAMPLE: FORMING A CHANNEL IN Abaqus/Explicit
13.5.1 Preprocessing—rerunning the model with Abaqus/ExplicitBefore starting, save a copy ofchannel.inp aschannel_freq.inp. Make all subsequent changes
to the channel_freq.inp file. channel_freq.inp is also available in the “Forming a channel
with Abaqus/Explicit,” Section A.16. In this section you will modify the input file in order to perform a
frequency extraction of the blank using Abaqus/Standard.
Determining an appropriate step time
“Loading rates,” Section 13.2, discusses the procedures for determining the appropriate step time
for a quasi-static process. We can determine an approximate lower bound on step time duration if
we know the lowest natural frequency, the fundamental frequency, of the blank. One way to obtain
such information is to run a frequency analysis in Abaqus/Standard. In this forming analysis the
punch deforms the blank into a shape similar to the lowest mode. Therefore, it is important that the
time for the first forming stage is greater than or equal to the time period for the lowest mode if you
wish to model structural, as opposed to localized, deformation.
To perform a natural frequency extraction:
1. Modify the *MATERIAL option block to include the *DENSITY suboption:
*DENSITY7800.,
2. Delete all data associated with the die, holder, and punch (*SURFACE, *RIGID BODY,
*CONTACT PAIR, etc.). These rigid parts are not necessary for the frequency analysis.
3. Delete all steps except for the first one. Change the procedure type to *FREQUENCY, and
change its step description to Frequency modes. Request five eigenvalues using the
default Lanczos eigensolver.
4. Delete all boundary conditions except the boundary condition applied to the set CENTER. Thisleaves the blank constrained with a symmetry boundary condition applied to the left end.
The revised history data appears below.
*STEP, PERTURBATIONFrequency modes*FREQUENCY5,*BOUNDARYCENTER, XSYMM*END STEP
13–9
Abaqus ID:
Printed on:

EXAMPLE: FORMING A CHANNEL IN Abaqus/Explicit
Note: Since the frequency extraction step is a linear perturbation procedure, nonlinear
material properties will be ignored. In this analysis the left end of the blank is constrained
in the x-direction and cannot rotate about the normal; however, it is not constrained in the
y-direction. Therefore, the first mode extracted will be a rigid body mode. The frequency of
the second mode will determine the appropriate time period for the quasi-static analysis in
Abaqus/Explicit.
5. Save the channel_freq.inp input file, submit the job for analysis, and monitor the
solution progress.
6. When the analysis is complete, enter Abaqus/Viewer and open the output database file created
by this analysis. From the main menu bar, select Plot→Deformed Shape; or use the
tool in the toolbox.
The deformed model shape for the first vibration mode is plotted (it is a rigid body mode).
Advance the plot to the second mode of the blank. Superimpose the undeformed model shape on
the deformed model shape.
The frequency analysis shows that the blank has a fundamental frequency of 140 Hz,
corresponding to a period of 0.00714 s. Figure 13–8 shows the displaced shape of the second
mode. We now know that the shortest step time for the forming analysis is 0.00714 s.
1
2
3
Figure 13–8 Second mode of the blank from the Abaqus/Standard frequency analysis.
Creating the Abaqus/Explicit forming analysis
The goal of the forming process is to quasi-statically form a channel with a punch displacement
of 0.03 m. In selecting loading rates for quasi-static analyses, it is recommended that you begin
with faster loading rates and decrease the loading rates as necessary to converge on a quasi-static
solution more quickly. However, if you wish to increase the likelihood of a quasi-static result
in your first analysis attempt, you should consider step times that are a factor of 10 to 50 times
slower than that corresponding to the fundamental frequency. In this analysis you will start with
a time period of 0.007 s for the forming analysis step, which is based on the frequency analysis
13–10
Abaqus ID:
Printed on:

EXAMPLE: FORMING A CHANNEL IN Abaqus/Explicit
performed in Abaqus/Standard, which shows that the blank has a fundamental frequency of 140 Hz,
corresponding to a time period of 0.00714 s. This time period corresponds to a constant punch
velocity of 4.3 m/s. You will examine the kinetic and internal energy results carefully to check that
the solution does not include significant dynamic effects.
Before starting, save a copy of channel.inp as channel_xpl.inp. Make all
subsequent changes to the channel_xpl.inp file. channel_xpl.inp is also available in
“Forming a channel with Abaqus/Explicit,” Section A.16. In this section you will modify the input
file in order to perform the forming analysis of the blank using Abaqus/Explicit. This analysis also
requires a density setting for the material model Steel, so repeat the density specification step in
“Example: forming a channel in Abaqus/Explicit,” Section 13.5.
A concentrated force will be applied to the blank holder. To compute the dynamic response of
the holder, a point mass must be assigned to its rigid body reference point. The actual mass of the
holder is not important; what is important is that the mass should be of the same order of magnitude
as the mass of the blank (0.78 kg) to minimize noise in the contact calculations. Choose a point
mass value of 0.1 kg. To assign the mass, append the following statements to the option block for
the rigid blank holder.
*ELEMENT, TYPE=MASS, ELSET=HOLDER_MASS8000, 8000*MASS, ELSET=HOLDER_MASS0.1,
For the first attempt of this metal forming analysis, you will use tabular amplitude curves with
the default smoothing parameter for both the application of the holder force and the punch stroke.
Create a tabular amplitude curve for application of the holder force named Ramp1 using the data
in Table 13–1. Define a second tabular amplitude curve for the punch stroke named Ramp2 using
the data in Table 13–2.
The ramp amplitude data are defined in *AMPLITUDE statements, as shown below.
*AMPLITUDE, NAME=RAMP10., 0., 0.0001, 1.*AMPLITUDE, NAME=RAMP20., 0., 0.007, 1.
As with the Abaqus/Standard analysis, you will need two steps for the Abaqus/Explicit
analysis. In the first step the holder force is applied; in the second step the punch stroke is applied.
This can be easily done by modifying the existing steps. For each step, replace the step procedure
with the explicit dynamics procedure. For the first step, specify a time period of 0.0001 s.
This time period is appropriate for the application of the holder force because it is long enough
to avoid dynamic effects but short enough to prevent a significant impact on the run time for the
job. Move the contact pair definitions from the model data to the first step definition (but delete
the TYPE=SURFACE to SURFACE parameter for each contact pair as it is relevant only for
Abaqus/Standard). In the step, retain the boundary conditions and concentrated force definitions.
13–11
Abaqus ID:
Printed on:

EXAMPLE: FORMING A CHANNEL IN Abaqus/Explicit
Table 13–1 Ramp amplitude data for Ramp1.
Time (sec) Amplitude
0.0 0.0
0.0001 1.0
The amplitude curve associated with the concentrated force should be set to RAMP1. Modify the
history output request for the punch reference node to request output at 200 evenly spaced intervals
using the built-in anti-aliasing filter.
After these changes the first step definition will appear in the input file as follows:
**** Step 1***STEPApply holder force*DYNAMIC, EXPLICIT, 0.0001*CONTACT PAIR, INTERACTION=FRICBLANK_B, DIEBLANK_T, HOLDER*CONTACT PAIR, INTERACTION=NOFRICBLANK_T, PUNCH*BOUNDARYCENTER , XSYMMREFDIE , 1, 6REFPUNCH, 1, 6REFHOLD , 1, 1REFHOLD , 6, 6*CLOAD, AMPLITUDE=RAMP1REFHOLD, 2, -4.4E5*OUTPUT, FIELD, VARIABLE=PRESELECT*OUTPUT, HISTORY, VARIABLE=PRESELECT, FILTER=ANTIALIASING*NODE OUTPUT, NSET=REFPUNCHRF2, U2
*END STEP
For the second explicit dynamics step set the time period to 0.007 s. Delete the *CONTACT
CONTROLS option (it is relevant only for Abaqus/Standard), and modify the boundary condition
to use the amplitude curve RAMP2. The second step appears as follows:
13–12
Abaqus ID:
Printed on:

EXAMPLE: FORMING A CHANNEL IN Abaqus/Explicit
Table 13–2 Ramp amplitude data for Ramp2.
Time (sec) Amplitude
0.0 0.0
0.007 1.0
**** Step 2***STEPApply punch stroke*DYNAMIC, EXPLICIT, 0.007*BOUNDARY, AMPLITUDE=RAMP2REFPUNCH,2,2,-0.030*END STEP
To help determine how closely the analysis approximates the quasi-static assumption, the
various energy histories will be useful. Especially useful is comparing the kinetic energy to the
internal strain energy. The energy history is written to the output database file as part of the
preselected history output.
Running the job
Save the input file and submit the job for analysis. Monitor the solution progress; correct any
modeling errors that are detected, and investigate the cause of any warning messages.
Strategy for evaluating the results
Before looking at the results that are ultimately of interest, such as stresses and deformed shapes, we
need to determine whether or not the solution is quasi-static. One good approach is to compare the
kinetic energy history to the internal energy history. In a metal forming analysis most of the internal
energy is due to plastic deformation. In this model the blank is the primary source of kinetic energy
(the motion of the holder is negligible, and the punch and die have no mass associated with them).
To determine whether an acceptable quasi-static solution has been obtained, the kinetic energy of the
blank should be no greater than a few percent of its internal energy. For greater accuracy, especially
when springback stresses are of interest, the kinetic energy should be lower. This approach is very
useful because it applies to all types of metal forming processes and does not require any intuitive
understanding of the stresses in the model; many forming processes may be too complex to permit
an intuitive feel for the results.
While a good primary indication of the caliber of a quasi-static analysis, the ratio of kinetic
energy to internal energy alone is not adequate to confirm the quality. You should also evaluate the
13–13
Abaqus ID:
Printed on:

EXAMPLE: FORMING A CHANNEL IN Abaqus/Explicit
two energies independently to determine whether they are reasonable. This part of the evaluation
takes on increased importance when accurate springback stress results are needed because an
accurate springback stress solution is highly dependent on accurate plasticity results. Even if the
kinetic energy is fairly small, if it contains large oscillations, the model could be experiencing
significant plasticity. Generally, we expect smooth loading to produce smooth results; if the
loading is smooth but the energy results are oscillatory, the results may be inadequate. Since
an energy ratio is incapable of showing such behavior, you should also study the kinetic energy
history itself to see whether it is smooth or noisy.
If the kinetic energy does not indicate quasi-static behavior, it can be useful to look at velocity
histories at some nodes to get an understanding of the model’s behavior in various regions. Such
velocity histories can indicate which regions of the model are oscillating and causing the high kinetic
energies.
Evaluating the results
Enter Abaqus/Viewer, and open the output database created by this job (channel_xpl.odb).Plot the whole model kinetic (ALLKE) and internal (ALLIE) energies.
History plots of the kinetic and internal energies for the whole model appear as shown in
Figure 13–9 and Figure 13–10, respectively.
The kinetic energy history shown in Figure 13–9 oscillates significantly. In addition, the kinetic
energy history has no clear relation to the forming of the blank, which indicates the inadequacy of
this analysis. In this analysis the punch velocity remains constant, while the kinetic energy—which
is primarily due to the motion of the blank—is far from constant.
Comparing Figure 13–9 and Figure 13–10 shows that the kinetic energy is a small fraction
(less than 1%) of the internal energy through all but the very beginning of the analysis. The criterion
that kinetic energy must be small relative to internal energy has been satisfied, even for this severe
loading case.
Although the kinetic energy of the model is a small fraction of the internal energy, it is still
quite noisy. Therefore, we should change the simulation in some way to obtain a smoother response.
13.5.2 Forming analysis—attempt 2
Even if the punch actually moves at a nearly constant velocity, the results of the first simulation attempt
indicate it is desirable to use a different amplitude curve that allows the blank to accelerate more smoothly.
When considering what type of loading amplitude to use, remember that smoothness is important in all
aspects of a quasi-static analysis. The preferred approach is to move the punch as smoothly as possible
the desired distance in the desired amount of time.
Wewill now analyze the forming stage using a smoothly applied punch force and a smoothly applied
punch displacement; we will compare the results to those obtained earlier. Refer to “Smooth amplitude
curves,” Section 13.2.1, for an explanation of the smooth step amplitude curve.
Revise the existing amplitude curve definitions RAMP1 and RAMP2 so that they define smooth
step amplitude curves. You can make this change by appending DEFINITION=SMOOTH STEP to
each *AMPLITUDE option. The amplitude curves will now be smooth in both their first and second
13–14
Abaqus ID:
Printed on:

EXAMPLE: FORMING A CHANNEL IN Abaqus/Explicit
Figure 13–9 Kinetic energy history for forming analysis, attempt 1.
Figure 13–10 Internal energy history for forming analysis, attempt 1.
derivatives. Therefore, using a smooth step amplitude curve for the displacement control also assures us
that the velocity and acceleration are smooth.
13–15
Abaqus ID:
Printed on:

EXAMPLE: FORMING A CHANNEL IN Abaqus/Explicit
Save the channel_xpl.inp input file and submit it for analysis. Monitor the solution progress;
correct any modeling errors that are detected, and investigate the cause of any warning messages.
Evaluating the results for attempt 2
The kinetic energy history is shown in Figure 13–11.
Figure 13–11 Kinetic energy history for forming analysis, attempt 2.
The response of the kinetic energy is clearly related to the forming of the blank: the value of kinetic
energy peaks in the middle of the second step, corresponding to the time when the punch velocity
is the greatest. Thus, the kinetic energy is appropriate and reasonable.
The internal energy for attempt 2, shown in Figure 13–12, shows a smooth increase from zero
up to the final value. Again, the ratio of kinetic energy to internal energy is quite small and appears
to be acceptable. Figure 13–13 compares the internal energy in the two forming attempts.
13–16
Abaqus ID:
Printed on:

EXAMPLE: FORMING A CHANNEL IN Abaqus/Explicit
Figure 13–12 Internal energy history for forming analysis, attempt 2.
13.5.3 Discussion of the two forming attemptsOur initial criteria for evaluating the acceptability of the results was that the kinetic energy should be
small compared to the internal energy. What we found was that even for the most severe case, attempt 1,
this condition seems to have been met adequately. The addition of a smooth step amplitude curve helped
reduce the oscillations in the kinetic energy, yielding a satisfactory quasi-static response.
The additional requirements—that the histories of kinetic energy and internal energy must be
appropriate and reasonable—are very useful and necessary, but they also increase the subjectivity of
evaluating the results. Enforcing these requirements in general for more complex forming processes
may be difficult because these requirements demand some intuition regarding the behavior of the
forming process.
Results of the forming analysis
Now that we are satisfied that the quasi-static solution for the forming analysis is adequate, we can
study some of the other results of interest. Figure 13–14 shows a comparison of the Mises stress in
the blank obtained with Abaqus/Standard and Abaqus/Explicit.
The plot shows that the peak stresses in the Abaqus/Standard and Abaqus/Explicit analyses are
within 1% of each other and that the overall stress contours of the blank are very similar. To further
examine the validity of the quasi-static analysis results, you should compare the equivalent plastic
strain results and final deformed shapes from the two analyses.
13–17
Abaqus ID:
Printed on:

EXAMPLE: FORMING A CHANNEL IN Abaqus/Explicit
IE Attempt 1IE Attempt 2
Figure 13–13 Comparison of internal energies for the two attempts of the forming analysis.
(Avg: 75%)S, Mises
+3.669e+06+4.289e+07+8.211e+07+1.213e+08+1.606e+08+1.998e+08+2.390e+08+2.782e+08+3.174e+08+3.567e+08+3.959e+08+4.351e+08+4.743e+08
(Avg: 75%)S, Mises
+2.419e+06+4.203e+07+8.164e+07+1.213e+08+1.609e+08+2.005e+08+2.401e+08+2.797e+08+3.193e+08+3.589e+08+3.985e+08+4.381e+08+4.778e+08
Figure 13–14 Contour plot of Mises stress in Abaqus/Standard
(left) and Abaqus/Explicit (right) channel forming analyses.
13–18
Abaqus ID:
Printed on:

EXAMPLE: FORMING A CHANNEL IN Abaqus/Explicit
Figure 13–15 shows contour plots of the equivalent plastic strain in the blank, and Figure 13–16
shows an overlay plot of the final deformed shape predicted by the two analyses. The equivalent
plastic strain results for the Abaqus/Standard and Abaqus/Explicit analyses are within 5% of each
other. In addition, the final deformed shape comparison shows that the explicit quasi-static analysis
results are in excellent agreement with the results from the Abaqus/Standard static analysis.
You should also compare the steady punch force predicted by the Abaqus/Standard and
Abaqus/Explicit analyses.
To compare the punch force-displacement histories:
1. Save the punch displacement (U2) and reaction force (RF2) history data from the
Abaqus/Standard analysis as U2–std and RF2–std, respectively. The number of the punch
reference node is 7000.
2. Similarly, save punch displacement (U2) and reaction force (RF2) history data from the
Abaqus/Explicit analysis as U2–xpl and RF2–xpl, respectively.
Next, you will operate on saved X–Y data to create the force-displacement curves. In the force-
displacement plot we would like the downward motion of the punch to be represented as a
positive value; therefore, when you create the force-displacement curves include a negative
sign before the displacement history data so that motion in the negative 2-direction will be
positive.
3. In the Results Tree, double-click XYData; then select Operate on XY data in the Create XYData dialog box. Click Continue.
4. In the Operate on XY Data dialog box, combine the force and displacement history data from
the Abaqus/Standard analysis to create a force-displacement curve. The expression at the top
of the dialog box should appear as:
combine ( -"U2-std", "RF2-std" )
5. Click Save As to save the calculated displacement curve as forceDisp-std.
6. In the Operate on XY Data dialog box, combine the force and displacement history data from
the Abaqus/Explicit analysis to create a force-displacement curve. The expression at the top
of the dialog box should appear as:
combine ( -"U2-xpl", "RF2-xpl" )
7. Click Save As to save the calculated displacement curve as forceDisp-xpl.
8. Plot forceDisp-std and forceDisp-xpl in the viewport.
There is significantly more noise in the Abaqus/Explicit results compared to the
Abaqus/Standard results because Abaqus/Explicit simulates a quasi-static response while
Abaqus/Standard solves for true static equilibrium. Some of the noise in the Abaqus/Explicit
history data was removed during the analysis by the built-in anti-aliasing filter specified on
the output request. Now, you will use an Abaqus/Viewer X–Y data filter to remove more of
13–19
Abaqus ID:
Printed on:

EXAMPLE: FORMING A CHANNEL IN Abaqus/Explicit
(Avg: 75%)PEEQ
+0.000e+00+1.925e−02+3.851e−02+5.776e−02+7.701e−02+9.627e−02+1.155e−01+1.348e−01+1.540e−01+1.733e−01+1.925e−01+2.118e−01+2.310e−01
(Avg: 75%)PEEQ
+0.000e+00+2.089e−02+4.178e−02+6.268e−02+8.357e−02+1.045e−01+1.254e−01+1.462e−01+1.671e−01+1.880e−01+2.089e−01+2.298e−01+2.507e−01
Figure 13–15 Contour plot of PEEQ in Abaqus/Standard (left)
and Abaqus/Explicit (right) channel forming analyses.
Figure 13–16 Final deformed shape in Abaqus/Standard
and Abaqus/Explicit forming analyses.
the solution noise from the Abaqus/Explicit force-displacement curve. The Abaqus/Viewer
13–20
Abaqus ID:
Printed on:

EXAMPLE: FORMING A CHANNEL IN Abaqus/Explicit
X–Y data filters should only be applied to X–Y data whose X-value is time. This avoids
confusion regarding the meaning of the filter cutoff frequency and prevents problems with the
data regularization that is performed internally before the filter is applied. Consequently, you
will not filter forceDisp-xpl directly, but rather you will filter U2-xpl and RF2-xplindividually before combining them to create a new force-displacement curve. It is best to
apply the same filter operations (both during the analysis and during postprocessing) to any
two X–Y data objects that will be combined. This will ensure that any distortions due to
filtering (such as time delays) are uniformly applied to the combined data.
9. In the Operate on XY Data dialog box, filter the force history data using a Butterworth filter
with a cutoff frequency of 1100 Hz. The expression at the top of the dialog box should appear
as:
butterworthFilter(xyData="RF2-xpl",cutoffFrequency=1100)
Note: Choosing an appropriate filter cutoff frequency takes engineering judgment and a good
understanding of the physical system being modeled. Often an iterative approach (beginning
with a relatively high cutoff frequency and then gradually reducing it) can be used to find a
cutoff frequency that removes solution noise withminimal distortion of the underlying physical
solution. Knowledge of the system’s natural frequencies can also assist in the determination of
appropriate filter cutoff frequencies. For this example, we performed a frequency extraction
analysis to determine the fundamental frequency of the undeformed blank (140 Hz); however,
the blank at the end of the forming step will have a fundamental frequency that is considerably
higher. If you perform a natural frequency extraction analysis on the final model configuration,
you will find that the fundamental frequency at the end of the forming step is approximately
1000 Hz. Hence, a cutoff frequency that is slightly larger than this value is a good choice for
this model.
10. Click Save As to save the calculated displacement curve as RF2-xpl-bw1100.
11. Similarly, filter the displacement history data using a Butterworth filter with a cutoff frequency
of 1100 Hz. The expression at the top of the Operate on XY Data dialog box should appear
as:
butterworthFilter(xyData="U2-xpl",cutoffFrequency=1100)
12. Click Save As to save the calculated displacement curve as U2-xpl-bw1100.
13. Combine the filtered Abaqus/Explicit force and displacement histories. The expression at the
top of the Operate on XY Data dialog box should appear as:
combine ( -"U2-xpl-bw1100", "RF2-xpl-bw1100" )
14. Click Save As to save the calculated displacement curve as forceDisp-xpl-bw1100.
15. Add forceDisp-xpl-bw1100 to the plot of forceDisp-std and forceDisp-xpl.Customize the plot appearance to obtain a plot similar to Figure 13–17.
13–21
Abaqus ID:
Printed on:

EXAMPLE: FORMING A CHANNEL IN Abaqus/Explicit
Punch displacement0.000 0.005 0.010 0.015 0.020 0.025 0.030
Pun
ch fo
rce
−0.20
−0.15
−0.10
−0.05
0.00[x1.E6]
forceDisp−stdforceDisp−xplforceDisp−xpl−bw1100
Figure 13–17 Steady punch force comparison for Abaqus/Standard and Abaqus/Explicit.
As seen in Figure 13–17, the steady punch force predicted by Abaqus/Explicit is approximately
12% higher than that predicted by Abaqus/Standard. The differences between the Abaqus/Standard
and Abaqus/Explicit results are primarily due to two factors. First, Abaqus/Explicit regularizes the
material data. Second, friction effects are handled slightly differently in the two analysis products;
Abaqus/Standard uses penalty friction, whereas Abaqus/Explicit uses kinematic friction.
From these comparisons it is clear that both Abaqus/Standard and Abaqus/Explicit are capable of
handling difficult contact analyses such as this one. However, there are some advantages to running
this type of analysis in Abaqus/Explicit: Abaqus/Explicit is able to handle complex contact conditions
more readily and with fewer manipulations of steps and boundary conditions than Abaqus/Standard.
In particular, the Abaqus/Standard analysis requires five steps and additional boundary conditions to
ensure the proper contact conditions and prevent rigid body motions. In Abaqus/Explicit the same
analysis is completed using only two steps and no extra boundary conditions. However, when choosing
Abaqus/Explicit for quasi-static analysis, you should be aware that you may need to iterate on an
appropriate loading rate. In determining the loading rate, it is recommended that you begin with faster
loading rates and decrease the loading rate as necessary. This will help optimize the run time for the
analysis.
13–22
Abaqus ID:
Printed on:

EXAMPLE: FORMING A CHANNEL IN Abaqus/Explicit
13.5.4 Methods of speeding up the analysis
Now that we have obtained an acceptable solution to the forming analysis, we can try to obtain similar
acceptable results using less computer time. Most forming analyses require too much computer time to
be run in their physical time scale because the actual time period of forming events is large by explicit
dynamics standards; running in an acceptable amount of computer time often requires making changes
to the analysis to reduce the computer cost. There are two ways to reduce the cost of the analysis:
1. Artificially increase the punch velocity so that the same forming process occurs in a shorter step
time. This method is called load rate scaling.
2. Artificially increase the mass density of the elements so that the stability limit increases, allowing
the analysis to take fewer increments. This method is called mass scaling.
Unless the model has rate-dependent materials or damping, these two methods effectively do the same
thing.
Determining acceptable mass scaling
“Loading rates,” Section 13.2, and “Metal forming problems,” Section 13.2.3, discuss how to
determine acceptable scaling of the loading rate or mass to accelerate the time scale of a quasi-static
analysis. The goal is to model the process in the shortest time period in which inertial forces
remain insignificant. There are bounds on how much the solution time can be increased while still
obtaining a meaningful quasi-static solution.
As discussed in “Loading rates,” Section 13.2, we can use the same methods to determine an
appropriate mass scaling factor as we would use to determine an appropriate load rate scaling factor.
The difference between the two methods is that a load rate scaling factor of has the same effect
as a mass scaling factor of . Originally, we assumed that a step time on the order of the period
of the fundamental frequency of the blank would be adequate to produce quasi-static results. By
studying the model energies and other results, we were satisfied that these results were acceptable.
This technique produced a punch velocity of approximately 4.3 m/s. Now we will accelerate the
solution time using mass scaling and compare the results against our unscaled solution to determine
whether the scaled results are acceptable. We assume that scaling can only diminish, not improve,
the quality of the results. The objective is to use scaling to decrease the computer time and still
produce acceptable results.
Our goal is to determine what scaling values still produce acceptable results and at what point
the scaled results become unacceptable. To see the effects of both acceptable and unacceptable
scaling factors, we investigate a range of scaling factors on the stable time increment size from
to 5; specifically, we choose , , and 5. These speedup factors translate into mass scaling
factors of 5, 10, and 25, respectively.
To apply mass scaling of 5, add the following option to the history definition,
*FIXED MASS SCALING, ELSET=BLANK, FACTOR=5
13–23
Abaqus ID:
Printed on:

EXAMPLE: FORMING A CHANNEL IN Abaqus/Explicit
and save the modified input in a file named channel_xpl_5.inp and submit it for analysis;
also create input files named channel_xpl_10.inp and channel_xpl_25.inp with mass
scaling factors of 10 and 25, respectively, and submit them for analysis.
First, wewill look at the effect ofmass scaling on the equivalent plastic strains and the displaced
shape. We will then see whether the energy histories provide a general indication of the analysis
quality.
Evaluating the results with mass scaling
One of the results of interest in this analysis is the equivalent plastic strain, PEEQ. Since we have
already seen the contour plot of PEEQ at the completion of the unscaled analysis in Figure 13–15,
we can compare the results from each of the scaled analyses with the unscaled analysis results.
Figure 13–18 shows PEEQ for a speedup of (mass scaling of 5), Figure 13–19 shows PEEQ for
a speedup of (mass scaling of 10), and Figure 13–20 shows PEEQ for a speedup of 5 (mass
scaling of 25). Figure 13–21 compares the internal and kinetic energy histories for each case of mass
scaling. The mass scaling case using a factor of 5 yields results that are not significantly affected by
the increased loading rate. The case with a mass scaling factor of 10 shows a high kinetic-to-internal
energy ratio, yet the results seem reasonable when compared to those obtained with slower loading
rates. Thus, this is likely close to the limit on how much this analysis can be sped up. The final case,
with a mass scaling factor of 25, shows evidence of strong dynamic effects: the kinetic-to-internal
energy ratio is quite high, and a comparison of the final deformed shapes among the three cases
demonstrates that the deformed shape is significantly affected in the last case.
(Ave. Crit.: 75%)PEEQ
+0.000e+00+2.857e-02+5.714e-02+8.571e-02+1.143e-01+1.429e-01+1.714e-01+2.000e-01+2.263e-01
Figure 13–18 Equivalent plastic strain PEEQ for speedup of (mass scaling of 5).
13–24
Abaqus ID:
Printed on:

EXAMPLE: FORMING A CHANNEL IN Abaqus/Explicit
(Ave. Crit.: 75%)PEEQ
+0.000e+00+2.857e-02+5.714e-02+8.571e-02+1.143e-01+1.429e-01+1.714e-01+2.000e-01+2.349e-01
Figure 13–19 Equivalent plastic strain PEEQ for speedup of (mass scaling of 10).
Discussion of speedup methods
As the mass scaling increases, the solution time decreases. The quality of the results also decreases
because dynamic effects become more prominent, but there is usually some level of scaling that
improves the solution time without sacrificing the quality of the results. Clearly, a speedup of 5 is
too great to produce quasi-static results for this analysis.
A smaller speedup, such as , does not alter the results significantly. These results would
be adequate for most applications, including springback analyses. With a scaling factor of 10 the
quality of the results begins to diminish, while the general magnitudes and trends of the results
remain intact. Correspondingly, the ratio of kinetic energy to internal energy increases noticeably.
The results for this case would be adequate for many applications but not for accurate springback
analysis.
13.5.5 Springback analysis in Abaqus/StandardWhile it is possible to perform springback analyses within Abaqus/Explicit, Abaqus/Standard is much
more efficient at solving springback analyses. Since springback analyses are simply static simulations
without external loading or contact, Abaqus/Standard can obtain a springback solution in just a few
increments. Conversely, Abaqus/Explicit must obtain a dynamic solution over a time period that is long
enough for the solution to reach a steady state. For efficiency Abaqus has the capability to transfer results
13–25
Abaqus ID:
Printed on:

EXAMPLE: FORMING A CHANNEL IN Abaqus/Explicit
(Ave. Crit.: 75%)PEEQ
+0.000e+00+2.857e-02+5.714e-02+8.571e-02+1.143e-01+1.429e-01+1.714e-01+2.000e-01+2.109e-01
Figure 13–20 Equivalent plastic strain PEEQ for speedup of 5 (mass scaling of 25).
back and forth between Abaqus/Explicit and Abaqus/Standard, allowing us to perform forming analyses
in Abaqus/Explicit and springback analyses in Abaqus/Standard.
The steps that follow assumes that you have access to the full input file for this example. This
input file, channel_springback.inp, is provided in “Forming a channel with Abaqus/Explicit,”
Section A.16, in the online HTML version of this manual. Instructions on how to fetch and run the script
are given in Appendix A, “Example Files.”
The first option following *HEADING is the *IMPORT option, which reads the element definitions
and the state from the corresponding Abaqus/Explicit analysis. This import input file begins with the
following:
*HEADINGAnalysis of the forming of a channel -- springbackAbaqus/Standard springback following channel_xpl_5.inpSI units (kg, m, s, N)
*IMPORT, STEP=2, STATE=YES, UPDATE=NOBLANK,*IMPORT NSETCENTER, MIDLEFT
Setting the STATE parameter equal to YES causes the state of the model—stresses, strains, etc.—to
be imported. Setting the UPDATE parameter equal to NO causes the strains and displacements to be
13–26
Abaqus ID:
Printed on:

EXAMPLE: FORMING A CHANNEL IN Abaqus/Explicit
imported as well instead of being reset to zero. The data line following the *IMPORT option supplies
the name of the element set containing the elements that are to be imported. The *IMPORT NSET option
identifies node set names to be imported.
Next, create a general static step. Set the initial time increment to 0.1, and include the effects of
geometric nonlinearity (note that the Abaqus/Explicit analysis considered them; this is the default setting
in Abaqus/Explicit). Springback analyses can suffer from instabilities that adversely affect convergence.
Thus, include automatic stabilization to prevent this problem. Use the default value for the dissipated
energy fraction.
You must redefine the boundary conditions, which are not imported. Impose the same
XSYMM-type displacement boundary conditions that were imposed in the Abaqus/Explicit model on
the set Center.
To remove rigid body motion, it is necessary to fix a single point in the blank, such as set MidLeft,in the 2-direction (in this way you impose no unnecessary constraints). Rather than apply a displacement
boundary condition to this point, apply a zero-velocity boundary condition to fix this point at its final
position at the end of the forming stage. This will allow the model to retain continuity in the blank
location through any additional forming stages that may follow.
The complete history definition is as follows:
*STEP, NLGEOM=YES*STATIC, STABILIZE, ALLSDTOL=00.1, 1.*BOUNDARYCENTER, XSYMM*BOUNDARY, TYPE=VELOCITYMIDLEFT, 2, 2*END STEP
Save your input in a file named channel_springback.inp, and run the analysis using the
following command:
abaqus job=channel_springback oldjob=channel_xpl_5
Results of the springback analysis
Figure 13–22 overlays (View→Overlay Plot) the deformed shape of the blank after the forming
and springback stages (the forming stage corresponds to the last frame of the Abaqus/Explicit output
database file, while the springback stage corresponds to the final frame of the Abaqus/Standard
output database file). The springback result is necessarily dependent on the accuracy of the forming
stage preceding it. In fact, springback results are highly sensitive to errors in the forming stage,
more sensitive than the results of the forming stage itself.
13–27
Abaqus ID:
Printed on:

EXAMPLE: FORMING A CHANNEL IN Abaqus/Explicit
IE10IE25IE5KE10KE25KE5
Figure 13–21 Kinetic and internal energy histories for mass scaling factors of 5, 10, and 25,
corresponding to speedup factors of , , and 5, respectively.
springback
formed shape
Figure 13–22 Deformed model shapes following forming and springback.
You should also plot the blank’s internal energy ALLIE and compare it with the static
stabilization energy ALLSD that is dissipated. The stabilization energy should be a small fraction
of the internal energy to have confidence in the results. Figure 13–23 shows a plot of these two
13–28
Abaqus ID:
Printed on:

SUMMARY
energies; the static stabilization energy is indeed small and, thus, has not significantly affected the
results.
ALLIE Whole ModelALLSD Whole Model
Figure 13–23 Internal and static stabilization energy histories.
13.6 Summary
• If a quasi-static analysis is performed in its natural time scale, the solution should be nearly the
same as a truly static solution.
• It is often necessary to use load rate scaling or mass scaling to obtain a quasi-static solution using
less CPU time.
13–29
Abaqus ID:
Printed on:

SUMMARY
• The loading rate often can be increased somewhat, as long as the solution does not localize. If the
loading rate is increased too much, inertial forces adversely affect the solution.
• Mass scaling is an alternative to increasing the loading rate. When using rate-dependent materials,
mass scaling is preferable because increasing the loading rate artificially changes the material
properties.
• In a static analysis the lowest modes of the structure dominate the response. Knowing the lowest
natural frequency and, correspondingly, the period of the lowest mode, you can estimate the time
required to obtain the proper static response.
• It may be necessary to run a series of analyses at varying loading rates to determine an acceptable
loading rate.
• The kinetic energy of the deforming material should not exceed a small fraction (typically 5% to
10%) of the internal energy throughout most of the simulation.
• Using the *AMPLITUDE option with the DEFINITION=SMOOTH STEP parameter is the most
efficient way to prescribe displacements in a quasi-static analysis.
• Import the model from Abaqus/Explicit to Abaqus/Standard to perform an efficient springback
analysis.
13–30
Abaqus ID:
Printed on:

Appendix A: EXAMPLE FILES
Appendix A: Example Files
This appendix contains a list of complete input files for the examples contained in this guide. You can get a
copy of any of these input files with the command
abaqus fetch job=file_name
where file_name does not include the extension .inp.
A.1 Overhead hoist frame
• frame.inp
• frame_xpl.inp
A.2 Connecting lug• lug.inp
• lug_xpl.inp
A.3 Skew plate
• skew.inp
A.4 Cargo crane• crane.inp
A.5 Cargo crane – dynamic loading
• dynamics.inp
• dynamics_xpl.inp
A.6 Nonlinear skew plate
• skew_nl.inp
• skew_nl_xpl.inp
A.7 Stress wave propagation in a bar• wave_50x10x10.inp
• wave_25x5x5.inp
A–1
Abaqus ID:
Printed on:

Appendix A: EXAMPLE FILES
• wave_50x5x5.inp
• wave_50x10x5.inp
A.8 Connecting lug with plasticity
• lug_plas.inp
• lug_plas_hard.inp
A.9 Blast loading on a stiffened plate
• blast_base.inp
• blast_damp.inp
• blast_long.inp
• blast_refined.inp
• blast_rate.inp
A.10 Axisymmetric mount
• mount.inp
A.11 Test fit of hyperelastic material data
• single_elem2.inp
A.12 Vibration of a piping system
• pipe.inp
• pipe-2.inp
A.13 Forming a channel with Abaqus/Standard
• channel.inp
A.14 Shearing of a lap joint
• lap_joint.inp
A.15 Circuit board drop test
• circuit.inp
A–2
Abaqus ID:
Printed on:

Appendix A: EXAMPLE FILES
A.16 Forming a channel with Abaqus/Explicit
• channel_freq.inp
• channel_xpl.inp
• channel_xpl_5.inp
• channel_xpl_10.inp
• channel_xpl_25.inp
• channel_springback.inp
A–3
Abaqus ID:
Printed on:

Related Documents