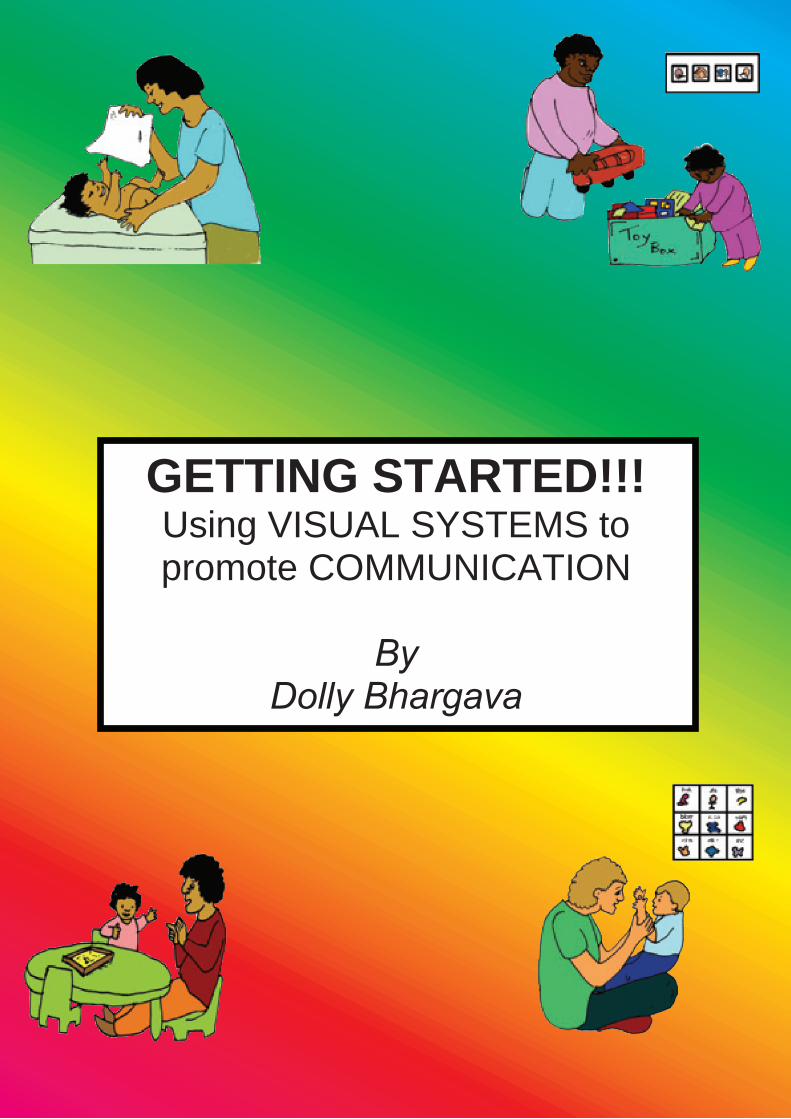
GETTING STARTED!!! Using VISUAL SYSTEMS to promote COMMUNICATION By Dolly Bhargava

Welcome message from author
This document is posted to help you gain knowledge. Please leave a comment to let me know what you think about it! Share it to your friends and learn new things together.
Transcript
1
GETTING STARTED!!! Using VISUAL SYSTEMS to promote COMMUNICATION
ByDolly Bhargava
2
ACKNOWLEDGEMENTS
‘GETTING STARTED!!! Using Visual Systems to Promote
Communication’ was produced with funding received by School for
Parents from the Non Government Centre Support for Non School
Organisations of Western Australia.
This booklet and DVD was developed by Dolly Bhargava, Disability
Specialist Speech Pathologist. She works with children and adults with
intellectual and/or multiple disabilities in a variety of settings. Dolly has
also completed a Masters in Special Education (Sensory Disability) and is
currently doing her Masters in Philosophy (Speech Pathology). She
provides consultancy and training services on a range of communication,
behaviour management, literacy and vocational related issues nationally
and internationally. She developed this booklet and DVD in collaboration
with the teaching staff at School for Parents, parents of children attending
the Early Intervention Program at Carson Street School and Peter Wright
from All Round Vision.
The images used in this resource reflect the ethnic diversity and disabilities
in Western Australia. The images are from and copyright of the following
picture software programs:
- Softpics with Fantasticpics (www.innovativeprogramming.net.au)
- Boardmaker Version 6 (www.mayer-johnson.com)
- Picture This….Pro Series (www.mayer-johnson.com)
School for Parents Carson Street School East Victoria Park WA 6101 Telephone: (08) 9361 7500 Email: [email protected] www.carsonst.wa.edu.au
3
TABLE OF CONTENTS
1. Introduction Page 4
2. What is communication? Page 5
3. What are the different types of visual supports? Page 7
4. What are visual systems? Page 8
5. Why use visual systems? Page 11
6. When should you use visual systems? Page 14
7. Who should use the visual systems described in Topic 11? Page 15
8. What are some of the considerations for choosing Page 16
appropriate visual supports and visual systems?
9. What do you need to make visual systems? Page 20
10. How do you make the visual systems? Page 21
11. Visual System Descriptions
a) First/Then Page 25
b) Daily Schedule Page 26
c) Mini Schedule Page 28
d) PECS Page 30
e) Choice Making Page 32
f) Labelling the environment Page 34
g) Calendar Page 35
h) Activity Checklist Page 36
i) Let’s Chat Page 37
12. Tips for encouraging speech development Page 41
13. Tips for encouraging language development Page 42
14. Appendix – Useful books Page 46
15. Appendix – Useful internet sites Page 47
4
Topic 1 - Introduction Welcome to ‘GETTING STARTED!!! Using Visual Systems to Promote
Communication’. This practical resource booklet has been written for parents
and discusses a range of visual systems that can be used at home to develop your
child’s communication skills. Along with the booklet is a DVD which demonstrates
the use of the strategies discussed in the booklet with children with communication
difficulties.
Communication is a process that is happening throughout the day. Having a
communication difficulty can restrict/limit the child’s ability to participate in everyday
activities. When a child can’t get their message across, they usually become
frustrated. Whatever a child’s age, it is important to address this frustration. Visual
systems can provide the child with an effective method for communicating needs,
wants, information, feelings and ideas.
Parents should note that the use of visual systems is not giving up on your child's
verbal skills. Visual systems do not stop your child from learning to speak or
producing speech. Visual systems can form the foundation of communication skills
that may allow verbal communication at a later point but most importantly can be a
great help during this transitional time.
As parents you spend most time with your child doing real life activities, so you are in
the ideal position to develop your child’s communication skills. The booklet and DVD
describe a range of strategies that you can use to turn your child’s everyday routines
and activities into opportunities for communication and learning. Please adapt or
modify the suggestions to suit your individual circumstances. Most importantly, by
injecting fun into the learning process you can make the communication practise an
enjoyable one. Once your child realises that using visual systems is fun, they will
automatically, not only learn to communicate effectively, but they will seek to learn
more.
Dolly Bhargava Disability Specialist Speech Pathologist
5
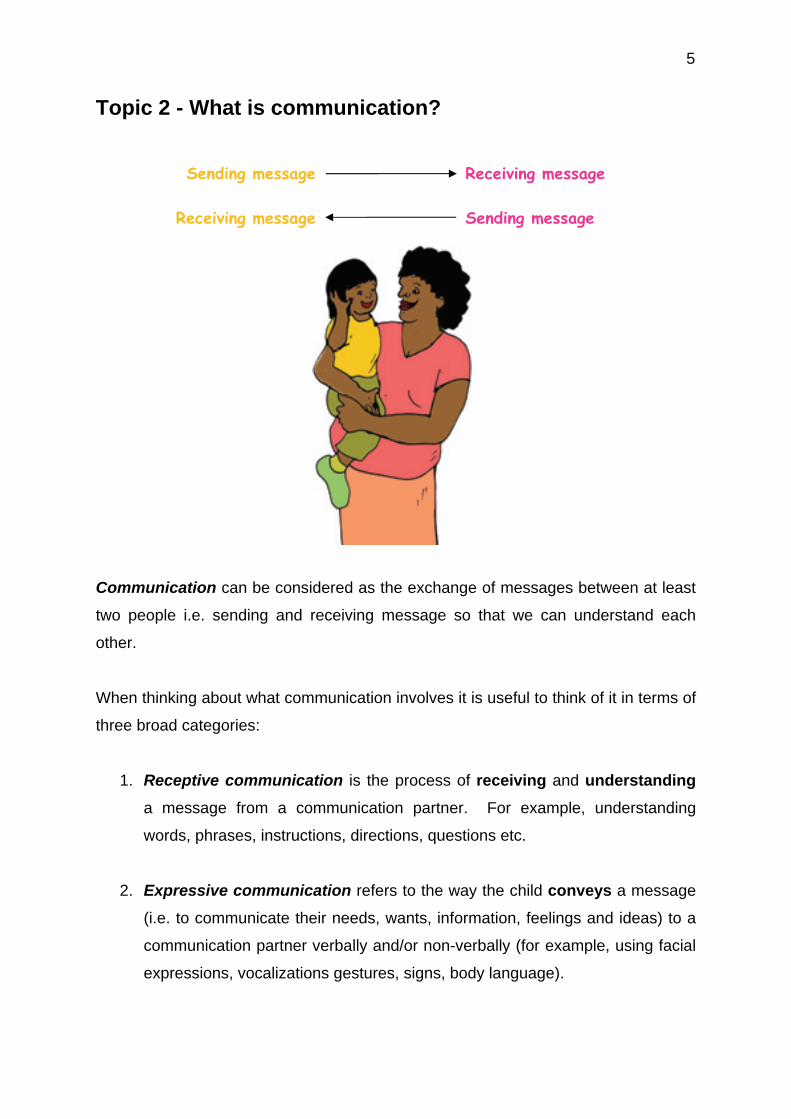
Topic 2 - What is communication?
Communication can be considered as the exchange of messages between at least
two people i.e. sending and receiving message so that we can understand each
other.
When thinking about what communication involves it is useful to think of it in terms of
three broad categories:
1. Receptive communication is the process of receiving and understanding
a message from a communication partner. For example, understanding
words, phrases, instructions, directions, questions etc.
2. Expressive communication refers to the way the child conveys a message
(i.e. to communicate their needs, wants, information, feelings and ideas) to a
communication partner verbally and/or non-verbally (for example, using facial
expressions, vocalizations gestures, signs, body language).
Sending message
Receiving message
Receiving message Sending message

6
3. Social communication refers to when, how and for what purpose the child
uses communication. For example, making eye contact, sharing with others,
having a conversation etc.
Developing communication skills is complex for a large number of children with
disabilities. When children cannot understand messages from their environment
and/or get their message across using speech alone, visual systems that
incorporate visual supports can enhance and support the child’s communication
skills.

7
Topic 3 - What are the different types of visual supports?
4. Written word refers to the ability to read and understand the words.
My morning routine 1. Go to the toilet 2. Wash hands 3. Brush teeth 4. Wash face 5. Comb hair 6. Eat breakfast
1..Objects refer to the use of everyday objects from an activity for communication. Objects can represent an activity, location, and person. For example, to inform the child its time to eat show them their plate or its time to go swimming show them their swimming costume or its time to go to grandma’s show them grandma’s scarf that looks like the scarf grandma always wears. Object symbols are a step up from using everyday objects as the child needs to associate the object symbol with an activity/location/person. An object symbol is made by using an object that is associated with the activity and Velcroing it onto a cardboard or laminated sheet. For example, a mouse to represent a computer activity or a packet of crackers and cheese to represent morning tea.
3. Computer line drawings refer to the use of coloured or black and white line drawings (hand drawn or commercially produced). Examples of commercially available programs include Clipart, Boardmaker, Softpics with Fantasticpics, COMPIC etc. These pictures can be easy to recognise (iconic/least abstract) to difficult to understand (abstract). As you can see below a computer line drawing of an apple or an aeroplane is easier to recognise compared to a feeling (for example, angry) or an action (for example, washing face). If you use abstract drawings you will need to teach their meaning (i.e. help your child make the association between the concept in real life and the drawing.
Coloured + Iconic Black & white +Iconic Coloured + Abstract Black& white +Abstract
2. Photos refer to the use of photographs for communication. This includes non-digital and digital photos, Polaroid photos, pictures cut out from magazines, catalogues etc. Photos can represent people, activities, places, objects (food, drinks, toys, grooming/personal hygiene, clothes).
apple
Washing face
Bed
Mum
Least abstract/ Iconic /Easy to understand
/recognise
START HERE
and depending your child’s response
gradually progress to
HERE if appropriate
Most abstract/ Most difficult to
understand/recognise
Vegemite sandwich
angry aeroplane
Morning tea
Com
puter

8
Topic 4 - What are visual systems? Visual systems incorporate a range of visual supports to help the child’s
communication skills. There are a whole range of visual systems that can be used to
facilitate the development of receptive, expressive and social communication: Below
is a list of visual systems:
Schedules Mini Schedules Calendars
Category Books
Social Stories
Circles Concepts
Activity Checklists Social Scripts Comic Strip Conversations
Chat System Wh System? (Who? What? Where? When? Why? System)
Cause – Effect Links
Shopping Lists
Problem Solution Charts
Behavioural Rules
Cue Cards
PECS (Picture Exchange Communication System)
Choice System ALS (Aided Language Stimulation Boards)
ILS (Interactive Language Stimulation Boards)
PODD (Pragmatic Organisation Dynamic Display)
NOTE: In this booklet (topic 11) we will only be discussing the visual systems that
were used as part of this project which was a collaborative team effort between a
Disability Specialist Speech Pathologist, Carson Street School and parents of
children attending the Early Intervention Program at Carson Street.

9
It is important to embed visual supports into visual systems. As the saying goes “A
picture can say a thousand words…” in other words a visual support (for example, an
object, photo, computer line drawing) on its own can communicate a variety of
meanings. For example, if you saw a photo of a ‘park’ it could mean ‘I want to go to
the park’ ‘I went to the park’, ‘I am going to a park’. However, if the photo of the park
was embedded in a visual system it would help convey the specific message. For
example, to convey the message ‘I want to go to the park’ the photo of the park can
be embedded in a ‘Choices’ system whose purpose is to present all the activity
options (Figure 1). To convey the message ‘I went to the park’ the photo can be
embedded in a ‘Chat Book’ whose purpose is to help the child talk about what they
have done (Figure 2). To convey the message ‘I am going to the park’ the photo can
be embedded in a ‘Schedule’ system whose purpose is to help the child understand
the sequence of events in their day (Figure 3).
Figure 1 – Choices System ‘I want to go to the park’
Figure 3 – Schedule ‘I am going to the park’
Figure 2 – Chat Book ‘I went to the park’
My Chat Page
When? Today Who? I went with mum Where? We went to the park What? We saw lots of pretty
yellow flowers at the park
My Outings Choices
park
beach
Afternoon park
icecream
home
10
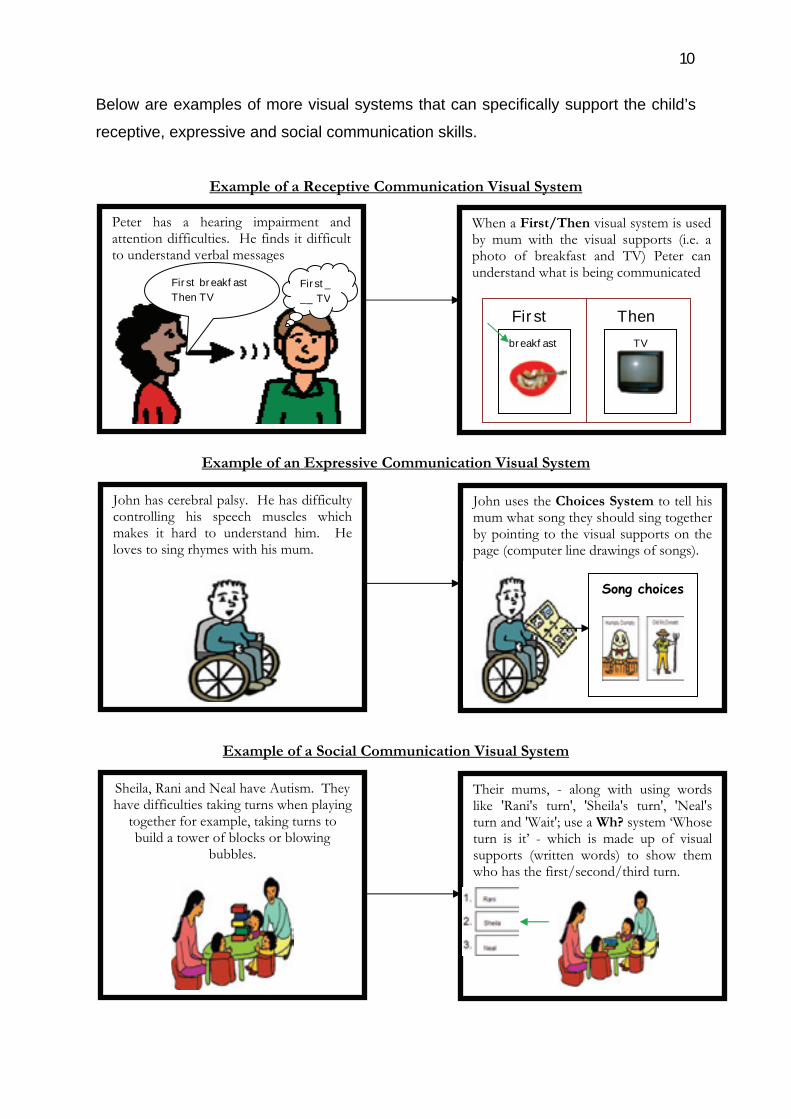
Below are examples of more visual systems that can specifically support the child’s
receptive, expressive and social communication skills.
Example of a Receptive Communication Visual System
Example of an Expressive Communication Visual System
Example of a Social Communication Visual System
Peter has a hearing impairment and attention difficulties. He finds it difficult to understand verbal messages
When a First/Then visual system is used by mum with the visual supports (i.e. a photo of breakfast and TV) Peter can understand what is being communicated
First Then
breakfast
TV
John has cerebral palsy. He has difficulty controlling his speech muscles which makes it hard to understand him. He loves to sing rhymes with his mum.
John uses the Choices System to tell his mum what song they should sing together by pointing to the visual supports on the page (computer line drawings of songs).
Song choices
Sheila, Rani and Neal have Autism. They have difficulties taking turns when playing
together for example, taking turns to build a tower of blocks or blowing
bubbles.
Their mums, - along with using words like 'Rani's turn', 'Sheila's turn', 'Neal's turn and 'Wait'; use a Wh? system ‘Whose turn is it’ - which is made up of visual supports (written words) to show them who has the first/second/third turn.
First_ __ TV
First breakfast Then TV
11
Topic 5 - Why use visual systems? Visual systems can be particularly helpful for children with the following difficulties:
a) Communication difficulties - In order for communication to take place, the
child needs to understand what is being communicated to them and be able to
convey their messages. It can be very frustrating for children who have
difficulties with understanding and/or expressing themselves. This frustration
can often lead to the child resorting to using inappropriate behaviours to get
their message across. Visual systems can make communication more
accessible.
b) Slow information processing - Slow information processing means that the
way the brain is processing communication is affected. As a consequence
the child requires more time to "take in" the information process (interpret)
information respond to the information. The child may require multiple
opportunities to practice and remember the information. Without the
additional time the information may come and go too quickly without the child
understanding or responding appropriately.
Visual systems are permanent and non-transitory whereas language is
fleeting. In other words when we present information verbally, the words are
available for a brief moment and if the child did not hear the verbal information
then they have missed out. Whereas when the information is presented
visually it is static and it can be there for as long as the child needs.
c) Attention difficulties - Effective communication requires the ability to rapidly
establish attention on what is being said, maintain attention and shift attention
to the next topic. However, many children with attention difficulties
experience difficulty establishing, maintaining and shifting attention at the
speed necessary to participate effectively in communication interactions. As a
consequence the verbal information may disappear before the child has had a
chance to pay attention enough to take in what is being said. They may miss
a lot of information and only receive fragments of the verbal information.
12
Visual systems can address these issues by staying there as long as the
child needs to see the information, take it in and respond to it.
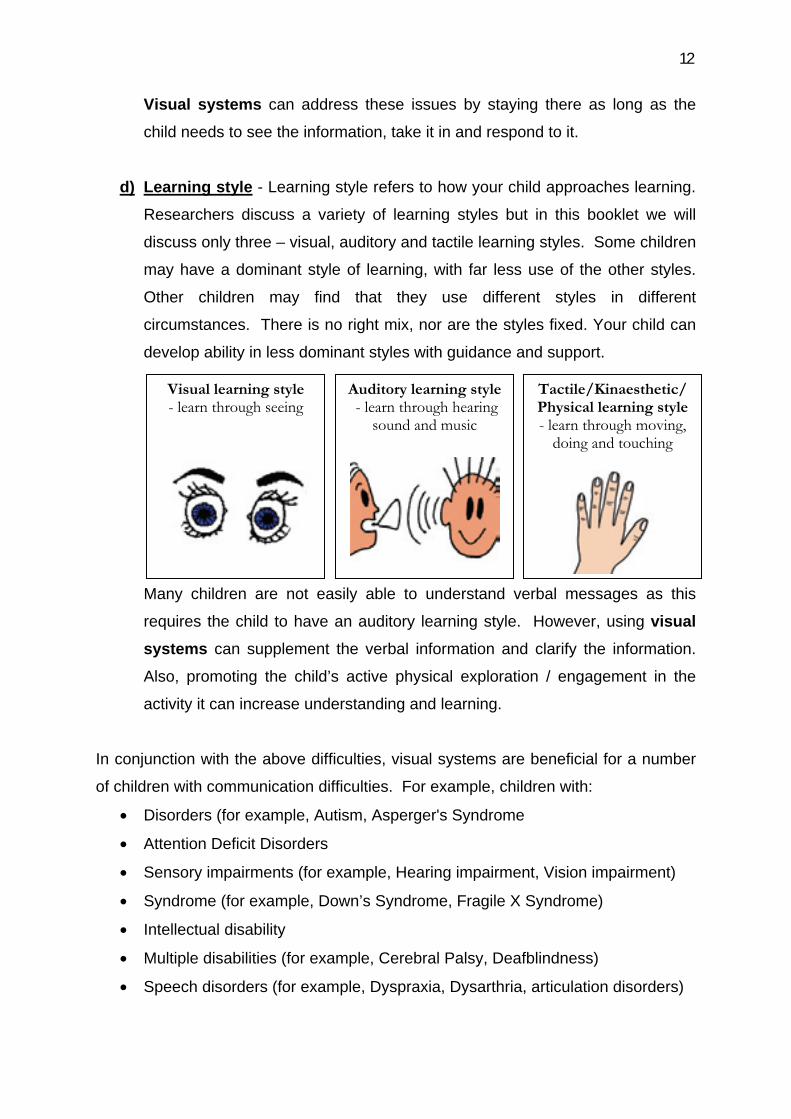
d) Learning style - Learning style refers to how your child approaches learning.
Researchers discuss a variety of learning styles but in this booklet we will
discuss only three – visual, auditory and tactile learning styles. Some children
may have a dominant style of learning, with far less use of the other styles.
Other children may find that they use different styles in different
circumstances. There is no right mix, nor are the styles fixed. Your child can
develop ability in less dominant styles with guidance and support.
Many children are not easily able to understand verbal messages as this
requires the child to have an auditory learning style. However, using visual systems can supplement the verbal information and clarify the information.
Also, promoting the child’s active physical exploration / engagement in the
activity it can increase understanding and learning.
In conjunction with the above difficulties, visual systems are beneficial for a number
of children with communication difficulties. For example, children with:
• Disorders (for example, Autism, Asperger's Syndrome
• Attention Deficit Disorders
• Sensory impairments (for example, Hearing impairment, Vision impairment)
• Syndrome (for example, Down’s Syndrome, Fragile X Syndrome)
• Intellectual disability
• Multiple disabilities (for example, Cerebral Palsy, Deafblindness)
• Speech disorders (for example, Dyspraxia, Dysarthria, articulation disorders)
Visual learning style - learn through seeing
Auditory learning style - learn through hearing
sound and music
Tactile/Kinaesthetic/ Physical learning style - learn through moving,
doing and touching
13
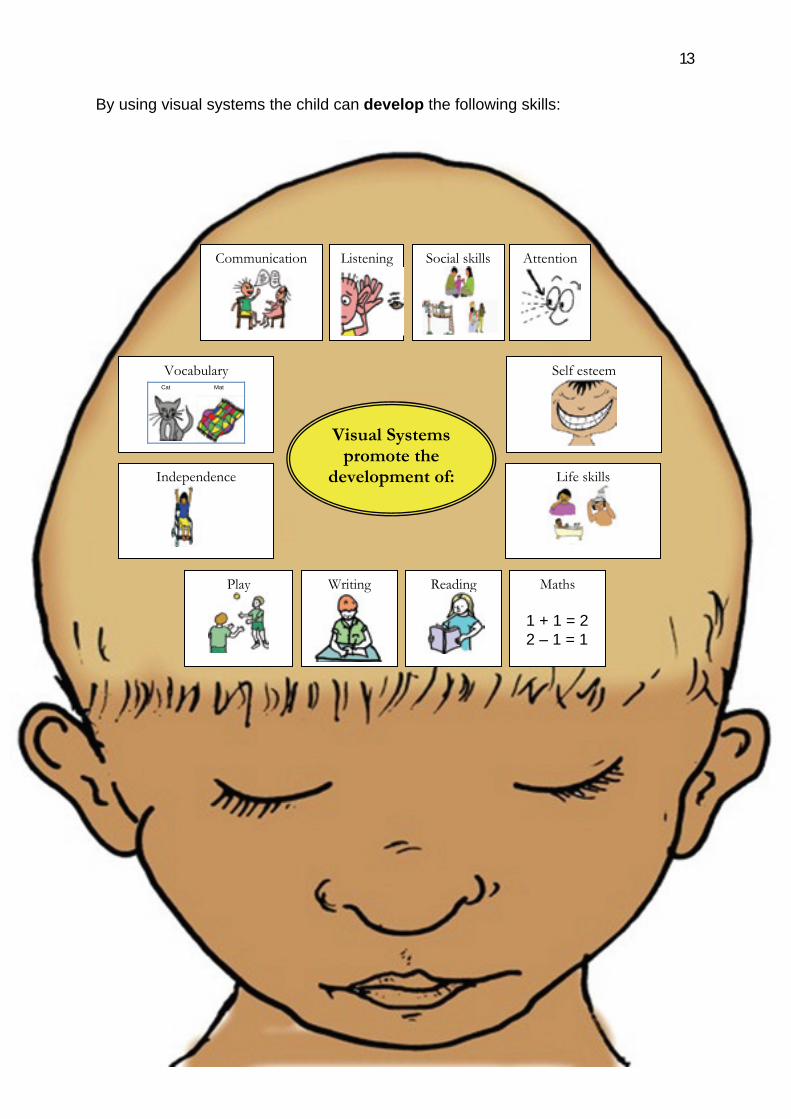
By using visual systems the child can develop the following skills:
• • • • • • • • • • •
• • • • • • • • • • • • • • • • • • • • •
Visual Systems promote the
development of:
Social skills Communication
Attention
Writing Reading
Maths
1 + 1 = 22 – 1 = 1
Play
Vocabulary
Cat Mat
Self esteem
Independence
Life skills
Listening

14
Topic 6 - When should you use visual systems? Visual systems should be used throughout the day as communication is an integral part of life, so it is best learned and practiced as part of everyday routine. You can
create activity specific visual systems that can facilitate the development of your
child’s receptive, expressive and social communication skills.
Int
Sleeping
Eating Toileting
Getting dressed Playing
Bathing
Cleaning up
Visiting people
Shopping Fun outings
Integrate visual systems into the child’s life

15
Topic 7 - Who should use the visual systems described in
Topic 11? The visual systems discussed in Topic 11 are for children with medium to low communication support needs. The table below lists the sort of information that
can be understood and expressed by children with low, medium and high
communication support needs. Please refer to it to help you identify the
communication support needs of your child and if the visual systems described in
Topic 11 are suitable for your child.
Low Communication Support Needs
Medium Communication Support Needs
High Communication Support Needs
Child is developing an understanding of:
• time – past, present and future
• simple/complex directions, language concepts
• speech, signs • photos, computer line
drawings (for example, Boardmaker, Softpics), written word
• Visual systems (for example, schedule, checklists)
Child is developing an understanding of:
• things happening right now
• their name, and your voice pitch and pattern
• speech when accompanied by other cues (for example, gestures, sound and objects)
• how their behaviours and actions affect people and the environment (i.e. intentionality)
• understand objects and show an interest in photos
Child is beginning to develop an understanding of:
• Speech cues (for example, sit, eat, drink) • Object cues (for example, when shown a
cup child opens mouth) • Sound cues (for example, when microwave
bell rings child gets excited) • Taste cues (for example, when offered
food child licks lips) • Smell cues (for example, upon smelling the
hand cream child puts hand out) • Location cues (for example, when told
computer child looks/moves towards computer)
Child can communicate: • wants, needs and feelings • with speech, photos, signs,
computer line drawings, and written words
• Visual systems (for example, choice systems, chat books)
Child can communicate: • choices by pointing,
looking or pushing away; request for ‘more’
• nonverbally (for example, facial expressions, body movement, with limited gestures, signs)
• with objects and 1 -2 photos
Child is beginning to communicate: • in response to what’s happening on the
inside (for example, pain, hunger) or in the environment (for example, startles in response to a loud noise)
• by non verbal means • by using consistent signals that can be
interpreted by a communication partner • does not respond to photos, line
drawings, written words
If after reading the table you are unsure that the visual systems discussed in Topic
11 are suitable for your child please contact your local speech pathologist (speech
therapist). The speech pathologist can perform specific assessments in order to find
out which areas of communication appear to be difficult for your child. Based on the
assessment the speech pathologist can provide information and strategies to help
your child (for example, visual systems, strategies for facilitating speech
development).
REC
EPTI
VE
EXPR
ESSI
VE
16
Topic 8 - What are some of the considerations for choosing appropriate visual supports and visual systems? Each visual system should be individualized to meet the needs of the child. In order
to create systems that will be effective tools for each child, consideration must be
given to a variety of factors related to the visual support such as:
1. Choice of Visual Support – Deciding on the way a message should be
represented – i.e. objects, photos, computer line drawings or written word will
depend on what the child understands. The ability to understand different
levels of abstraction will vary from child to child. Begin by using visual support
that your child understands. For example, if you child responds best to
photos then photos should be used. Remember to always use speech when
using visual support.
If you are unsure, researchers suggest that it is best to start with objects and
then gradually move to photographs before moving to computer line drawings.
The aim is to start simple and then gradually work towards the more abstract.
For example, consider how a child might learn to request a drink: Starting
with a photo to make a request for a real object can be too abstract. Initially,
the child might need a real cup to request juice. You can teach that a photo of
a cup and a real cup represent the same thing by first using the real cup with
the photo, and then transitioning to just using the photo. Some children may
always prefer the real object. The goal is simply to provide whatever makes
the connection for a child. If you see confusion or frustration in the child's
attempts to communicate, decrease the level of abstraction. If you are unsure
how to begin to use visual systems with your child at home, contact a speech
pathologist.
It is important to combine the visual support with a written word. Labelling the
visual support will promote an interest in letters and words, and some children
may even become early readers. By labelling the visual support it also
ensures that everyone using the visual support with the child will use the
same language when interacting with them.
17
Use a minimum font size of 18 point and in a standard non cursive font (for
example, Comic Sans MS, Arial, Century Gothic).
2. Number of visual supports – You will need to consider the number of
objects /photos /computer line drawings your child can use at a time.
Researchers suggest that you should gradually build the number of visual
supports you have on your child’s visual system. You may begin with one or
two and as your child’s understanding develops you can keep adding more.
3. Size of visual support - Depending on your child’s visual skills the way you
present the visual support may need to be modified. It is important to make
sure your child can see the visual support so you may need to change the
size of the visual support for optimum viewing. If the child needs the visuals
to be distinctive, highlighting and darkening the outline of the picture may
help. In some types of visual impairments by presenting the visual support on
a contrasting background is beneficial. For example, a dark object /photo
/computer line drawing on a white background or a light
object/photo/computer line drawing on a dark background.
4. Time - Most importantly be sure to give your child enough time to focus on the
visual support.
5. Presentation of visual support – Depending on your child’s visual scanning
abilities (horizontal scanning – looking from left to right; vertical scanning –
looking from top to bottom) present the visual support from left to right. This is
to encourage horizontal scanning which is what we use when reading.
6. Location of the visual system – The visual system should be easily
accessible for the child. It should be stored in the location where the child will
be engaging in the activity. For example, a food and drink choices page could
be kept in the kitchen. You could put it on the fridge or a wall or a dining table
so that it’s in view.
18
7. Portability of the visual system –This is an important consideration which
will determine how big/small; heavy/light or fixed/portable the system will be.
If the child has difficulty with mobility then you will have to determine ways
that the child can access their visual systems as independently as possible.
8. Tips on taking photos
• Have a good camera preferably a digital camera.
• Make sure that there is enough light so that the photograph comes
out clear. Use the flash as necessary.
• When taking photographs to use for communication, it is helpful to
make the photograph as simple as possible include only one object
in the picture or make the background blank.
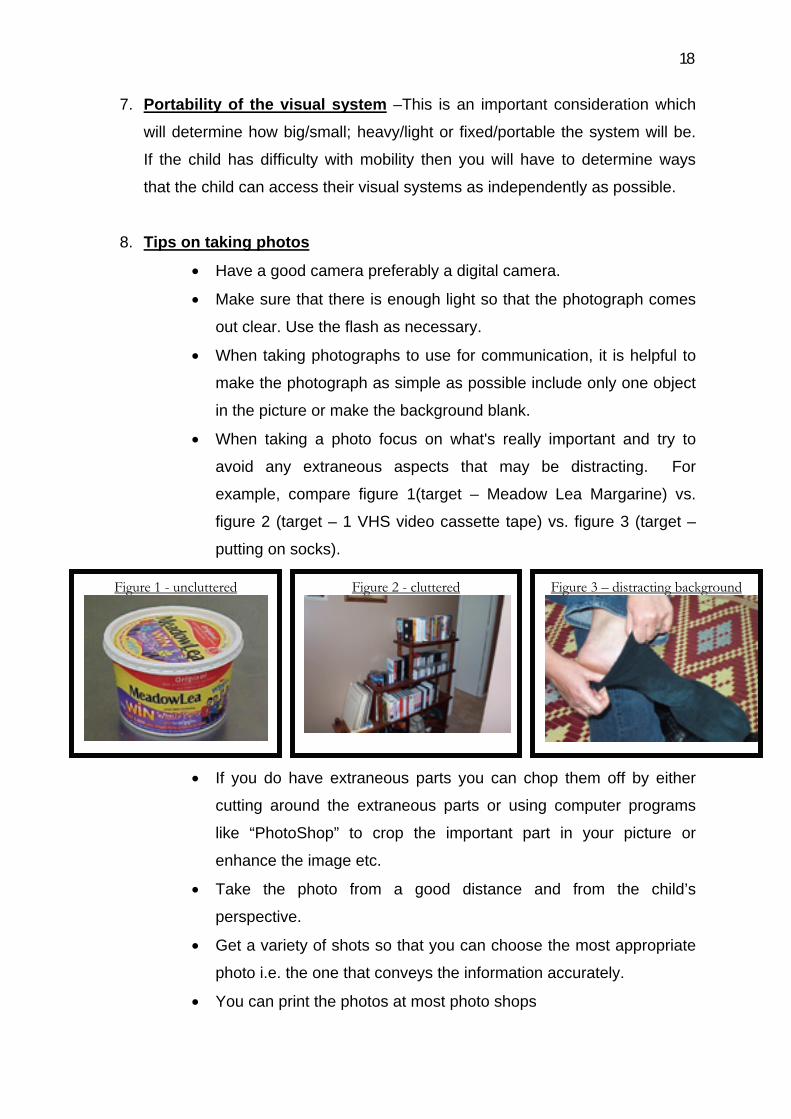
• When taking a photo focus on what's really important and try to
avoid any extraneous aspects that may be distracting. For
example, compare figure 1(target – Meadow Lea Margarine) vs.
figure 2 (target – 1 VHS video cassette tape) vs. figure 3 (target –
putting on socks).
• If you do have extraneous parts you can chop them off by either
cutting around the extraneous parts or using computer programs
like “PhotoShop” to crop the important part in your picture or
enhance the image etc.
• Take the photo from a good distance and from the child’s
perspective.
• Get a variety of shots so that you can choose the most appropriate
photo i.e. the one that conveys the information accurately.
• You can print the photos at most photo shops
Figure 1 - uncluttered
Figure 2 - cluttered Figure 3 – distracting background
19
9. Additional cues - In conjunction with the visual systems use speech and the
following cues to add meaning to the message such as:
- Routines i.e. use them in the same way each and consistently.
- Environmental arrangement /Location cue for example, dining table
set up with utensils time to eat; library story time; bathroom
bath.
- Body language (i.e. facial expressions, proximity, body stance,
movement of body, reaching, touching, pointing, eye contact, eye
gaze, and gestures).
- Key signs (for example, Makaton is a key word signing system that
provides a means to communicate and encourages language
development).
- Other natural cues (i.e. taste, touch, smell).
20
Topic 9 - What do you need to make visual systems? You will need the following:
• Velcro (rough/smooth or hook/loop)
• A4/A3 Laminator
• A4/A3 Laminating pouches
• Scissors
• White/Coloured paper
• Digital camera for photos
• Colour printer
• Magazine and catalog pictures
• Labels from food products, toy boxes, etc.
• Computer line drawing picture software programs if appropriate. There are
several picture software programs, below we have listed the programs that
were used as part of this project:
Boardmaker Softpics With Fantastic Pics Picture This Boardmaker is a communication and
learning tool containing over 4,500
Picture Communication Symbols
(PCS). It is designed to enhance the
language and learning process for
students of all levels.
Phone: (07) 3808 6833
Fax: (07) 3808 6108
Web: www.spectronicsinoz.com
Email: [email protected]
Softpics with Fantastic Pics is a flexible
and easy to use image library and software
package for creating Visual Systems. It
contains over 3500 images. It is designed
by Australians for Australians
Phone: (02) 9876 3568
Fax: (02) 9876 3568
Web: www.innovativeprogramming.net.au
Email: [email protected]
Picture This…Pro is an easy to use
program and contains 5000 quality
photographs.
Phone: (07) 3808 6833
Fax: (07) 3808 6108
Web: www.spectronicsinoz.com
Email: [email protected]
21
Topic 10 – How do you make the visual systems? 1. Gather the materials - Scissors, glue, A4/A3 paper, laminating pouches,
Velcro and visual support representing the activities (objects, photographs,
computer line drawings).
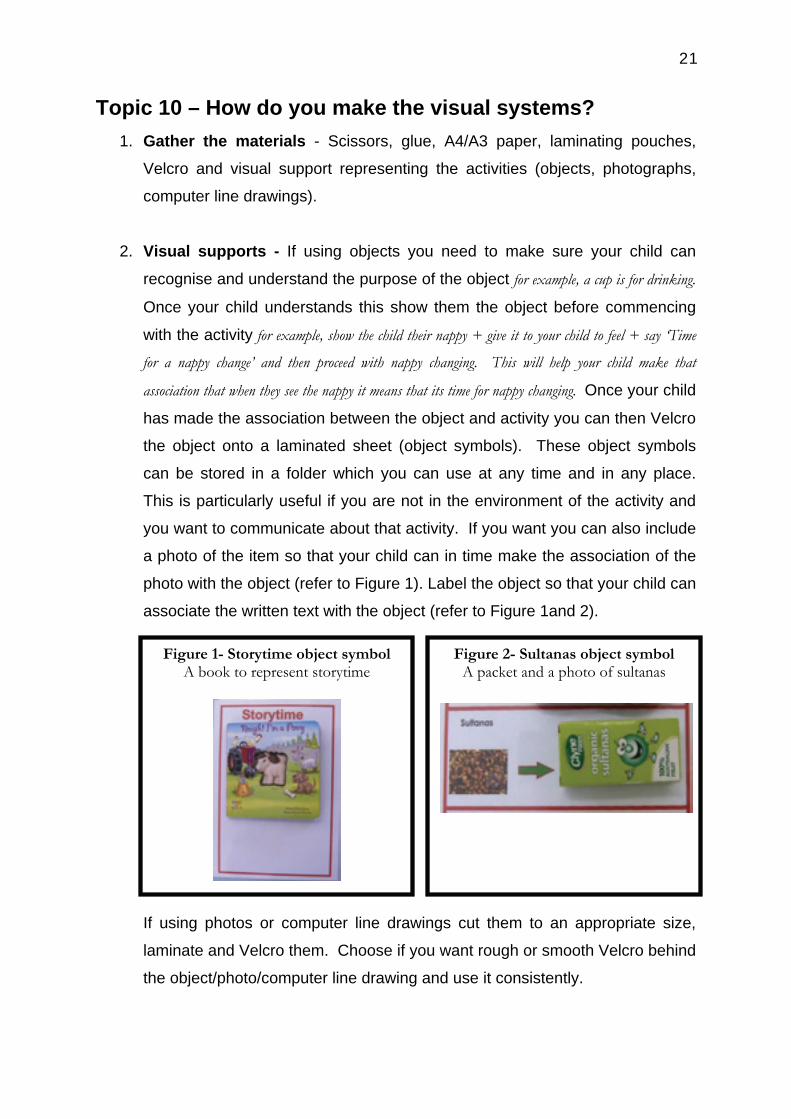
2. Visual supports - If using objects you need to make sure your child can
recognise and understand the purpose of the object for example, a cup is for drinking.
Once your child understands this show them the object before commencing
with the activity for example, show the child their nappy + give it to your child to feel + say ‘Time
for a nappy change’ and then proceed with nappy changing. This will help your child make that
association that when they see the nappy it means that its time for nappy changing. Once your child
has made the association between the object and activity you can then Velcro
the object onto a laminated sheet (object symbols). These object symbols
can be stored in a folder which you can use at any time and in any place.
This is particularly useful if you are not in the environment of the activity and
you want to communicate about that activity. If you want you can also include
a photo of the item so that your child can in time make the association of the
photo with the object (refer to Figure 1). Label the object so that your child can
associate the written text with the object (refer to Figure 1and 2).
If using photos or computer line drawings cut them to an appropriate size,
laminate and Velcro them. Choose if you want rough or smooth Velcro behind
the object/photo/computer line drawing and use it consistently.
Figure 2- Sultanas object symbol A packet and a photo of sultanas
Figure 1- Storytime object symbol A book to represent storytime
22
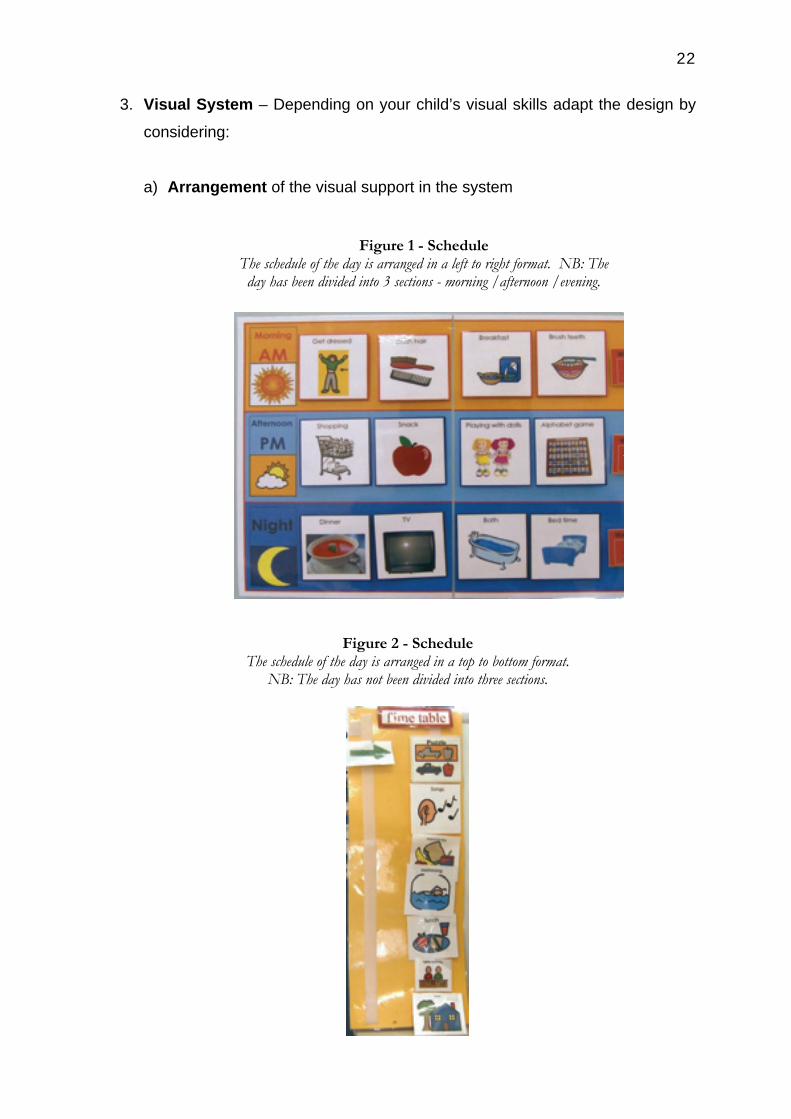
3. Visual System – Depending on your child’s visual skills adapt the design by
considering:
a) Arrangement of the visual support in the system
Figure 1 - Schedule The schedule of the day is arranged in a left to right format. NB: The day has been divided into 3 sections - morning /afternoon /evening.
Figure 2 - Schedule The schedule of the day is arranged in a top to bottom format.
NB: The day has not been divided into three sections.
23
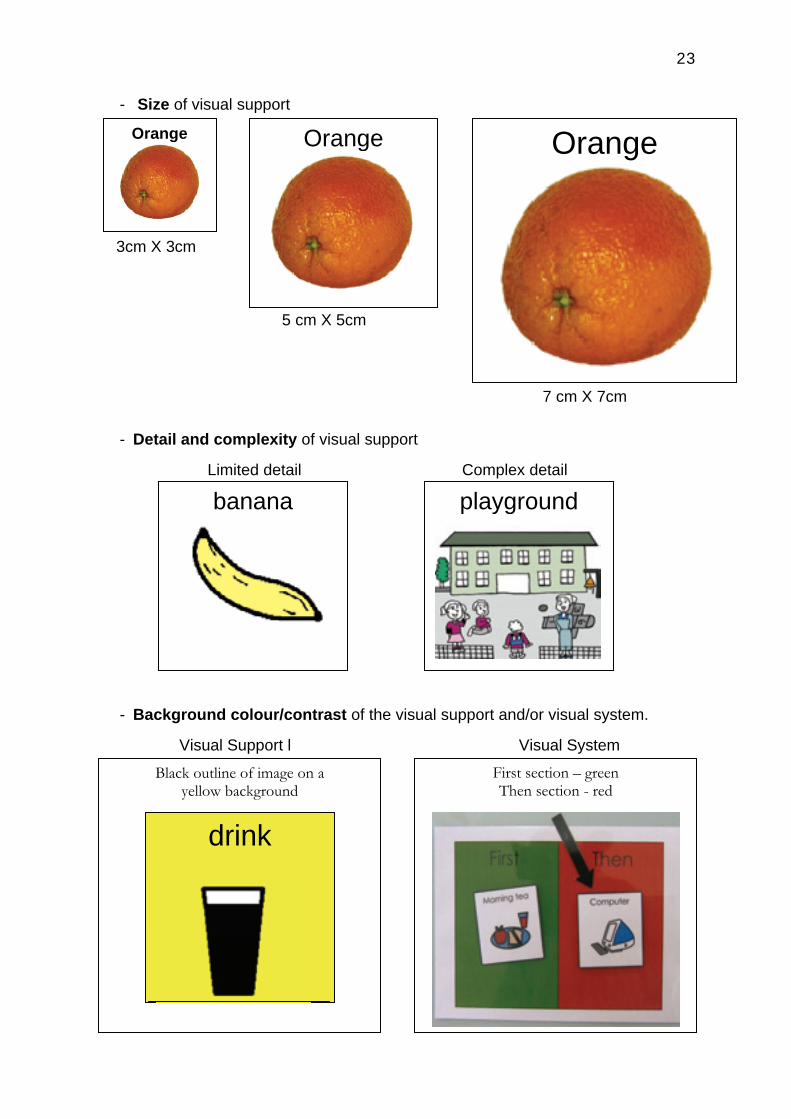
- Size of visual support
3cm X 3cm 5 cm X 5cm 7 cm X 7cm
- Detail and complexity of visual support Limited detail Complex detail
- Background colour/contrast of the visual support and/or visual system. Visual Support l Visual System
Orange
Orange
Orange
playground
banana
First section – green Then section - red
Black outline of image on a yellow background
drink
24
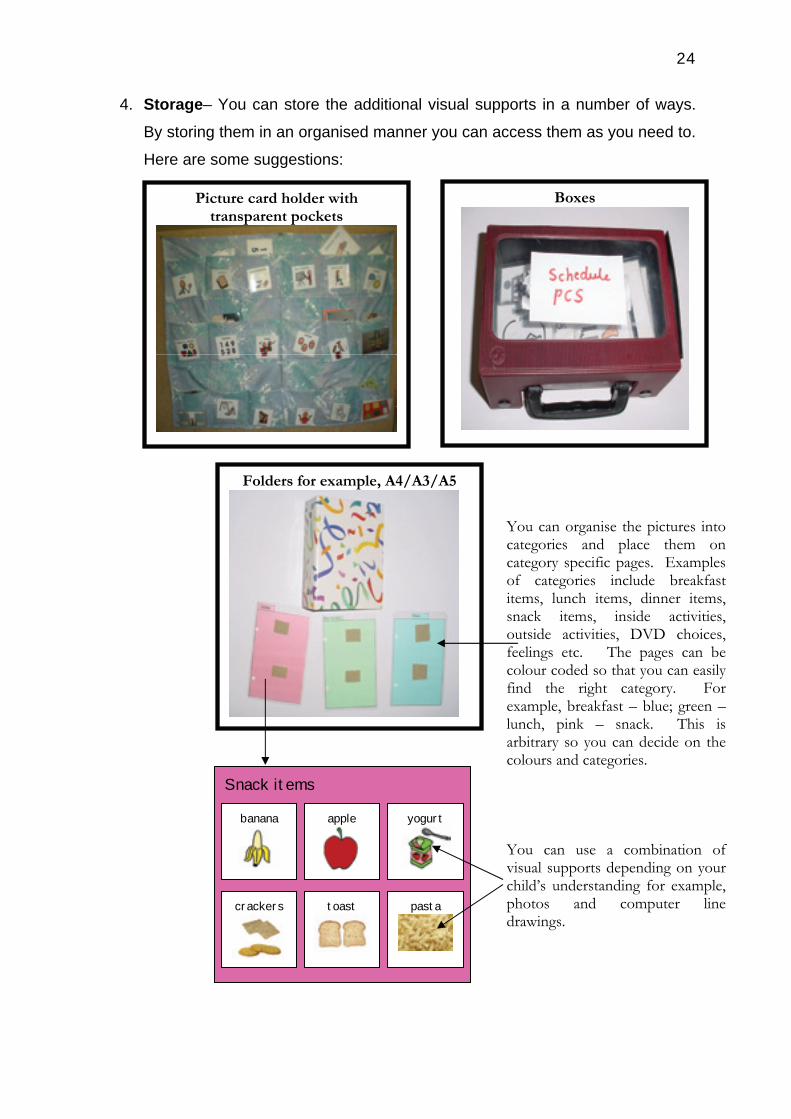
4. Storage– You can store the additional visual supports in a number of ways.
By storing them in an organised manner you can access them as you need to.
Here are some suggestions:
Picture card holder with transparent pockets
Folders for example, A4/A3/A5
Boxes
You can organise the pictures into categories and place them on category specific pages. Examples of categories include breakfast items, lunch items, dinner items, snack items, inside activities, outside activities, DVD choices, feelings etc. The pages can be colour coded so that you can easily find the right category. For example, breakfast – blue; green – lunch, pink – snack. This is arbitrary so you can decide on the colours and categories. You can use a combination of visual supports depending on your child’s understanding for example, photos and computer line drawings.
Snack items
banana
apple yogurt
crackers toast
pasta
25
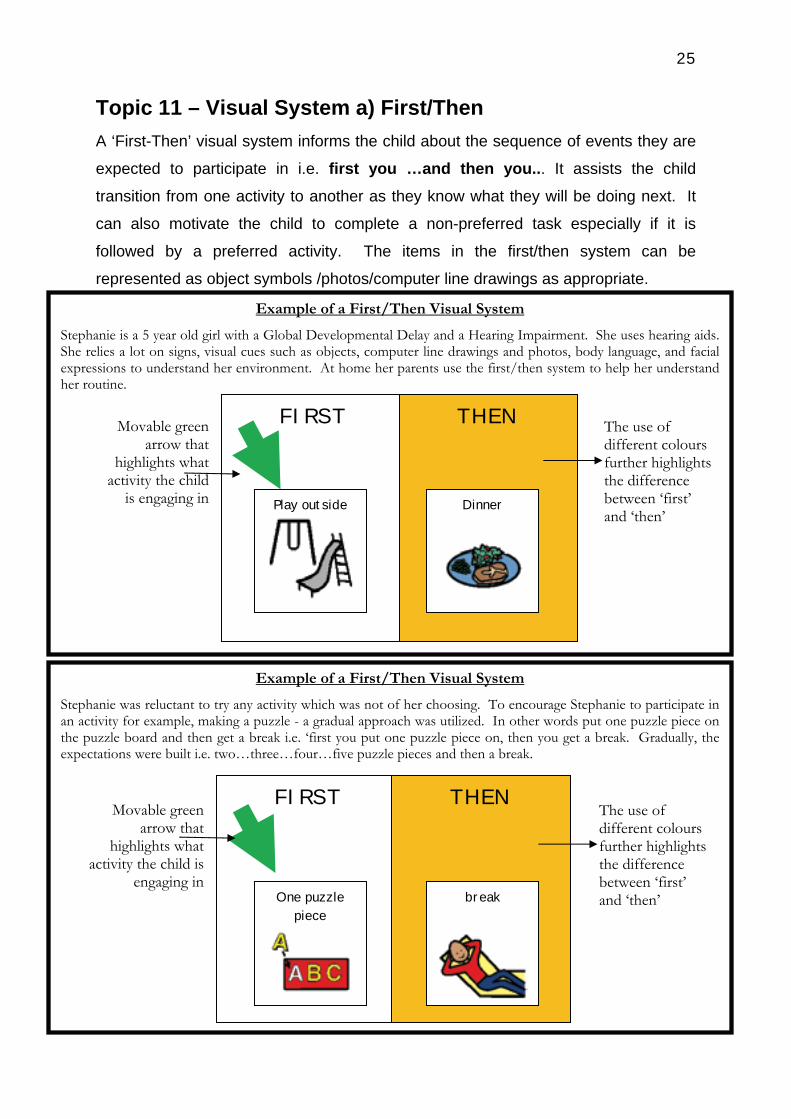
Example of a First/Then Visual SystemStephanie was reluctant to try any activity which was not of her choosing. To encourage Stephanie to participate in an activity for example, making a puzzle - a gradual approach was utilized. In other words put one puzzle piece on the puzzle board and then get a break i.e. ‘first you put one puzzle piece on, then you get a break. Gradually, the expectations were built i.e. two…three…four…five puzzle pieces and then a break.
Example of a First/Then Visual SystemStephanie is a 5 year old girl with a Global Developmental Delay and a Hearing Impairment. She uses hearing aids. She relies a lot on signs, visual cues such as objects, computer line drawings and photos, body language, and facial expressions to understand her environment. At home her parents use the first/then system to help her understand her routine.
Topic 11 – Visual System a) First/Then A ‘First-Then’ visual system informs the child about the sequence of events they are
expected to participate in i.e. first you …and then you... It assists the child
transition from one activity to another as they know what they will be doing next. It
can also motivate the child to complete a non-preferred task especially if it is
followed by a preferred activity. The items in the first/then system can be
represented as object symbols /photos/computer line drawings as appropriate.
FIRST THEN THEN
One puzzle piece
break
Movable green
arrow that highlights what
activity the child is engaging in
The use of different colours further highlights the difference between ‘first’ and ‘then’
FIRST THEN THEN Movable green
arrow that highlights what
activity the child is engaging in
The use of different colours further highlights the difference between ‘first’ and ‘then’
Play outside Dinner
26
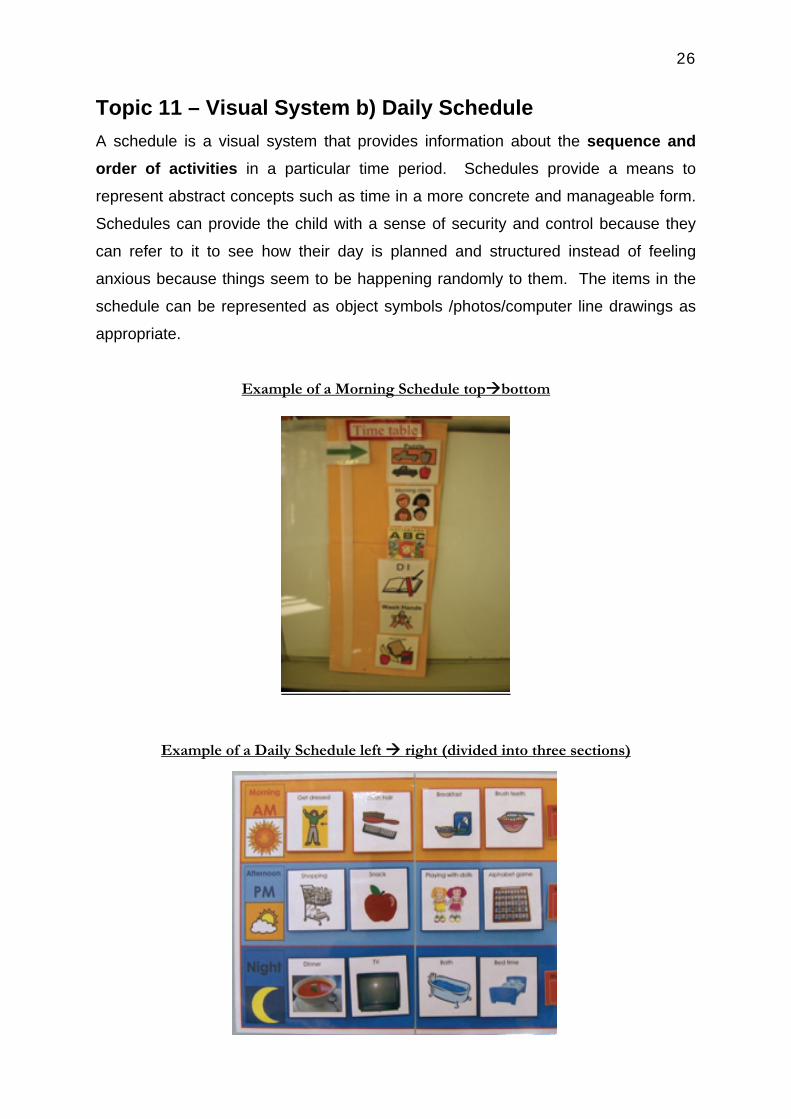
Topic 11 – Visual System b) Daily Schedule A schedule is a visual system that provides information about the sequence and order of activities in a particular time period. Schedules provide a means to
represent abstract concepts such as time in a more concrete and manageable form.
Schedules can provide the child with a sense of security and control because they
can refer to it to see how their day is planned and structured instead of feeling
anxious because things seem to be happening randomly to them. The items in the
schedule can be represented as object symbols /photos/computer line drawings as
appropriate.
Example of a Morning Schedule top bottom
Example of a Daily Schedule left right (divided into three sections)

27
The daily schedule shows the big picture for the day and is generally not specific.
The schedule may say, “playtime” but that may be anything for example playing with
puzzles, trains, blocks, playing outside etc. Consider how many activities you will
display on the schedule at the one time (for example, morning activities vs. the entire
day’s activities). When an activity has finished the child can remove the picture
symbol and put it in a finished envelope/box. Alternatively, the child can turn the
picture around to indicate the activity has finished.
Example of only the morning section being displayed
Example of a Finished Envelope Example of child turning the picture
Black and white chequered boxes are drawn onto an envelope

28
Example of a washing hands mini schedule
Example of a getting ready in the morning mini schedule
Topic 11 – Visual System c) Mini Schedule
A mini schedule is visual system that represents a task analysis of an activity from
the main schedule. Task analysis refers to breaking down an activity into simple,
clear and manageable steps. Sometimes there are lots of steps within an activity
which are not shown on the daily schedule. This can prove confusing to the child.
For example, get ready is very general, but ‘put your lunchbox in the fridge’, ‘put your
communication book on the teacher’s desk’, ‘put your drink bottle on you desk’ and
‘hang up your bag’ defines the precise steps within the “getting ready” instruction.
The items in the mini schedule can be represented as object symbols
/photos/computer line drawings.

29
Example of a getting organised in the morning mini schedule Grace uses a mini schedule to get organised in the morning before class starts i.e. 1.put communication book in box 2. put lunch box and bottle in fridge 3. hang bag on hook.
Example of making a sandwich mini schedule
30
Topic 11 – Visual System d) PECS (Picture Exchange Communication System) PECS stands for The Picture Exchange Communication System. The PECS training
program was developed at the Delaware Autistic Program by Bondy and Frost. It
has been designed to help children and adults with autism and other developmental
disabilities to learn how to initiate communication. By using a structured and
systemized teaching approach to teach the child communication, PECS helps the
child learn the:
o Function of communication (i.e. exchange of a message between two people
related to needs and wants),
o Purpose of visual supports (for example, communicate their needs and wants
by using visual supports) and
o Importance of approaching the communication partner with a visual support to
initiate communication.
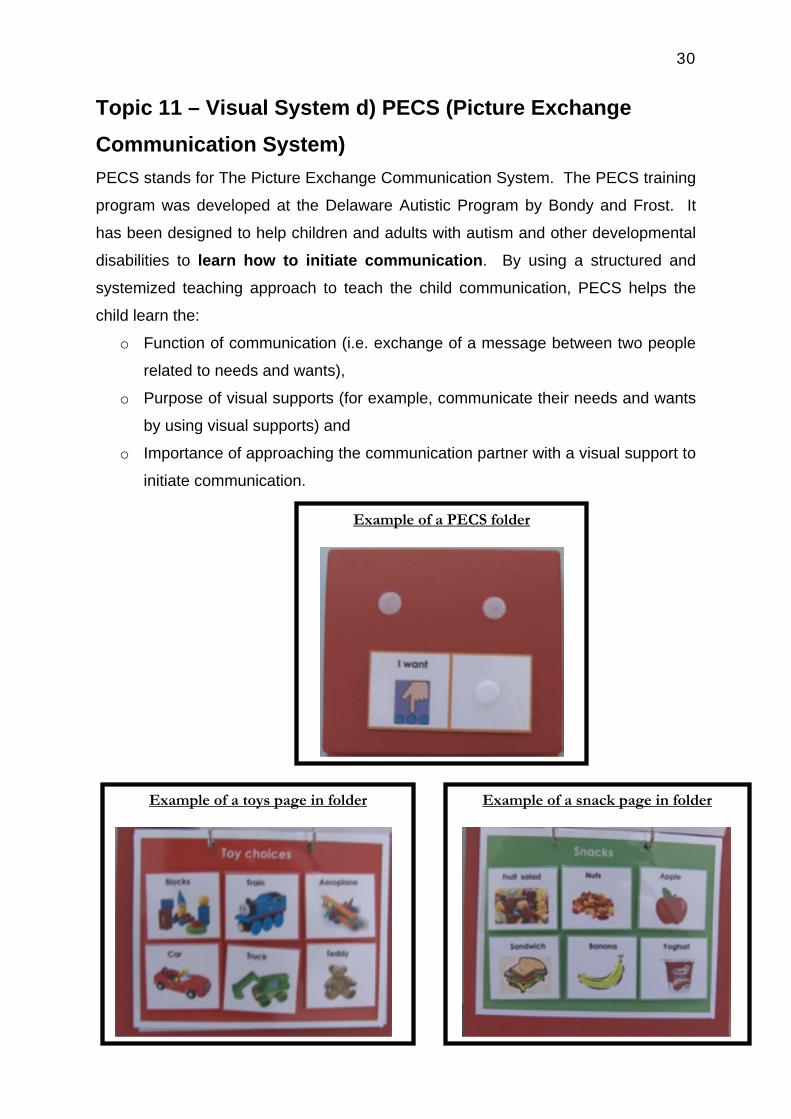
Example of a PECS folder
Example of a snack page in folder
Example of a toys page in folder
31
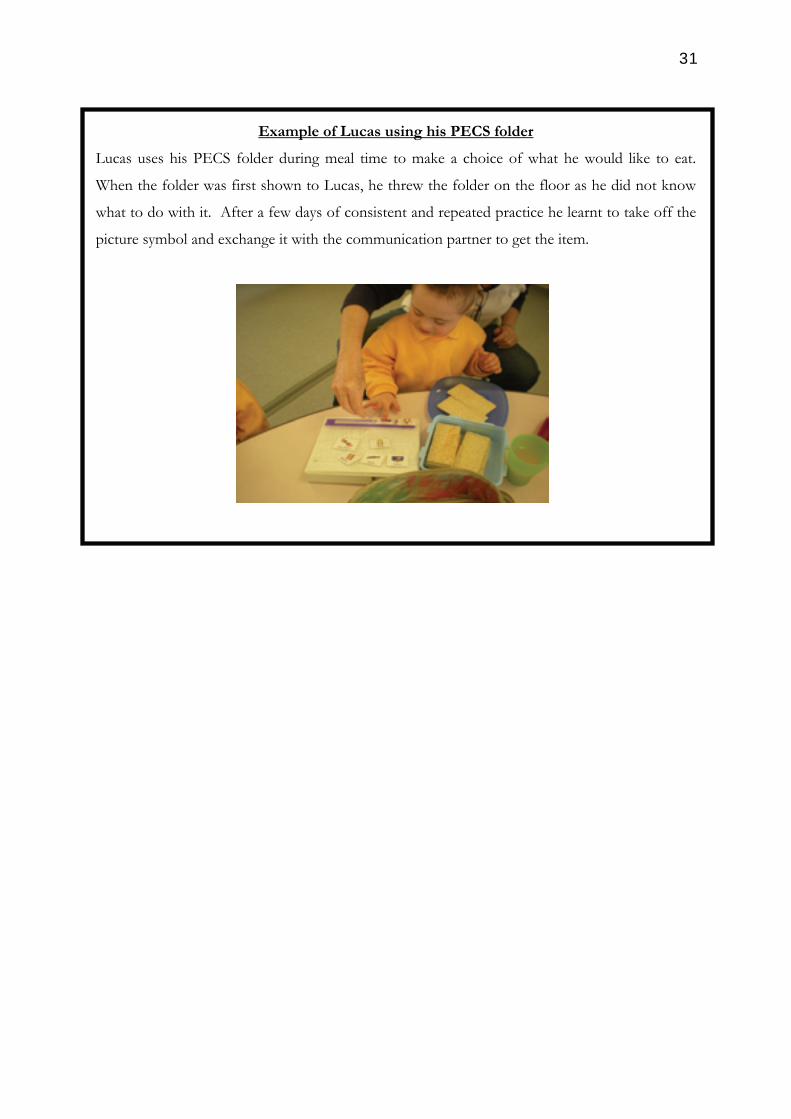
Example of Lucas using his PECS folder
Lucas uses his PECS folder during meal time to make a choice of what he would like to eat.
When the folder was first shown to Lucas, he threw the folder on the floor as he did not know
what to do with it. After a few days of consistent and repeated practice he learnt to take off the
picture symbol and exchange it with the communication partner to get the item.
32
Topic 11 – Visual System e) Choice Making A choice making visual system is a menu of choices that provides the child with the
opportunity to select one object/activity… from a set of options. This promotes the
child’s control over their environment, increases their independence motivation to
participation, facilitates personal satisfaction and encourages self esteem. Learning
how to make a choice is a skill that is learnt by having multiple opportunities to
practice making choices. For example, when Peter was offered a choice between
Brussel sprouts and carrots he chose Brussel sprouts. His father offered him the
Brussel sprouts and Peter had a taste. He then spat them out in disgust. This was a
learning opportunity for him where he got to evaluate the choice in terms of its
consequence and decide for himself whether the item was acceptable or not
acceptable. Therefore, it is crucial to provide the child with several opportunities to
practice choice making between varieties of items throughout the day. The choice
items can be represented as object symbols/photos/computer line drawings as
appropriate.
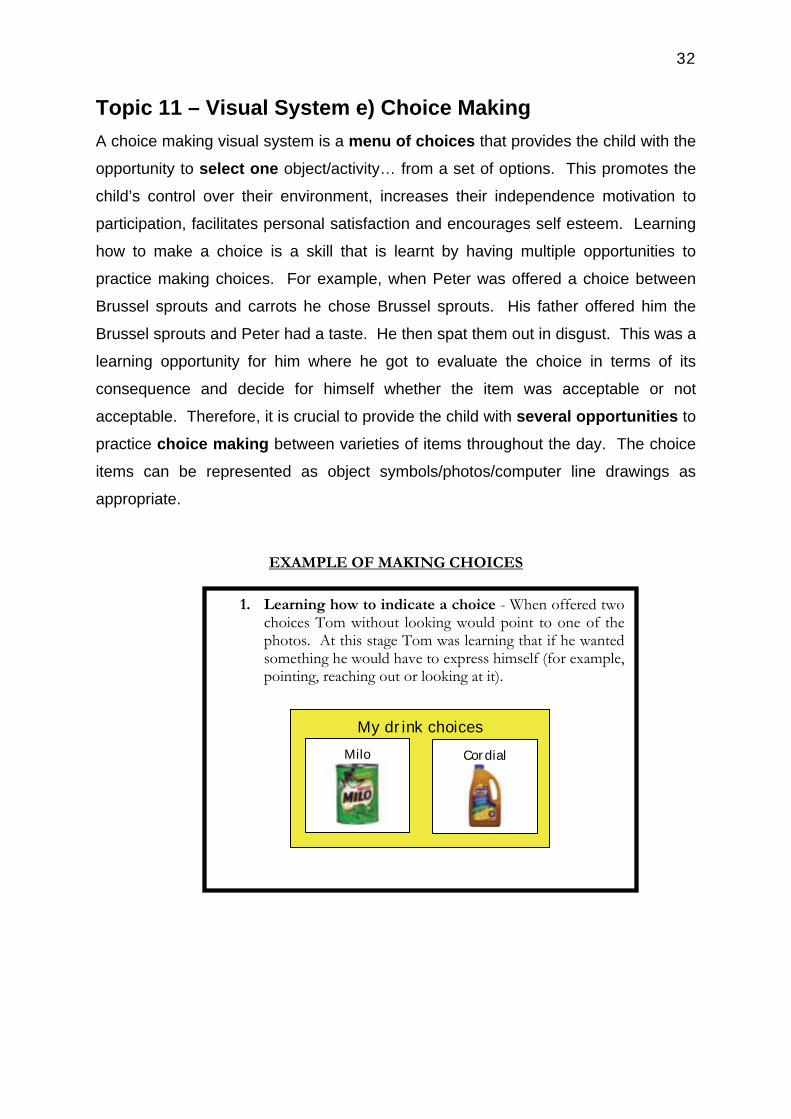
EXAMPLE OF MAKING CHOICES
1. Learning how to indicate a choice - When offered two choices Tom without looking would point to one of the photos. At this stage Tom was learning that if he wanted something he would have to express himself (for example, pointing, reaching out or looking at it).
My drink choicesMilo Cordial
33
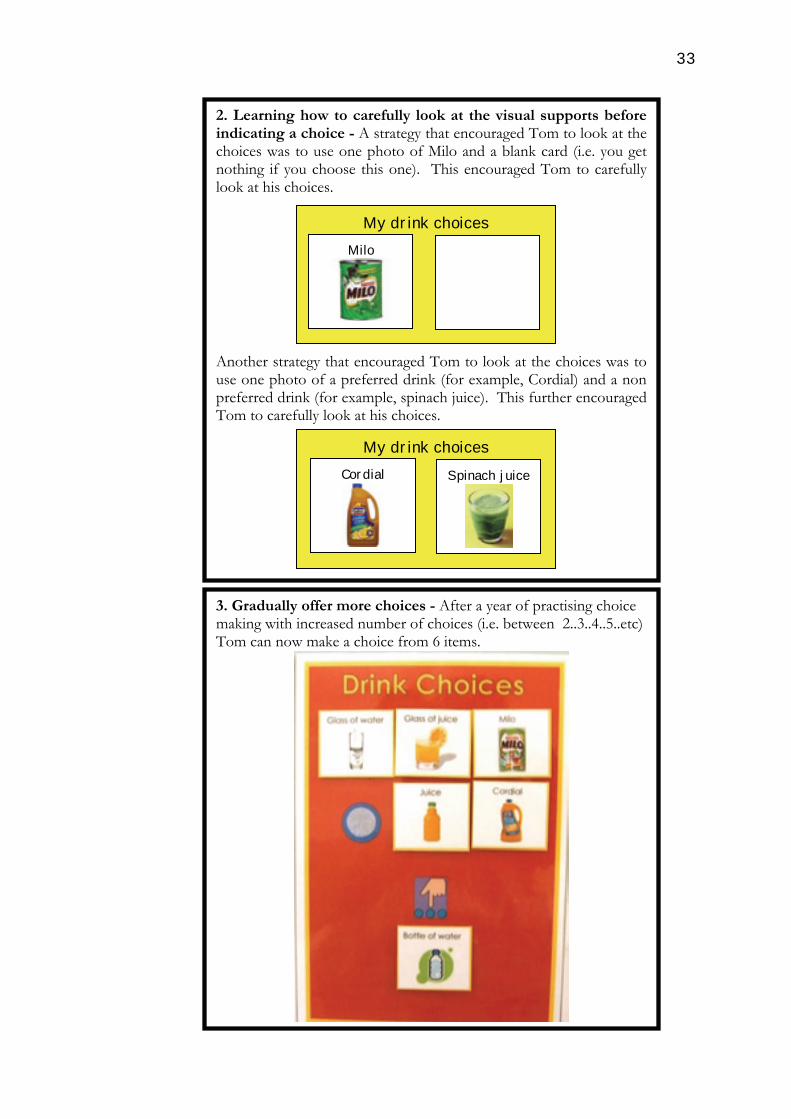
2. Learning how to carefully look at the visual supports before indicating a choice - A strategy that encouraged Tom to look at the choices was to use one photo of Milo and a blank card (i.e. you get nothing if you choose this one). This encouraged Tom to carefully look at his choices.
Another strategy that encouraged Tom to look at the choices was to use one photo of a preferred drink (for example, Cordial) and a non preferred drink (for example, spinach juice). This further encouraged Tom to carefully look at his choices.
3. Gradually offer more choices - After a year of practising choice making with increased number of choices (i.e. between 2..3..4..5..etc) Tom can now make a choice from 6 items.
My drink choicesMilo
My drink choicesCordial Spinach juice
34
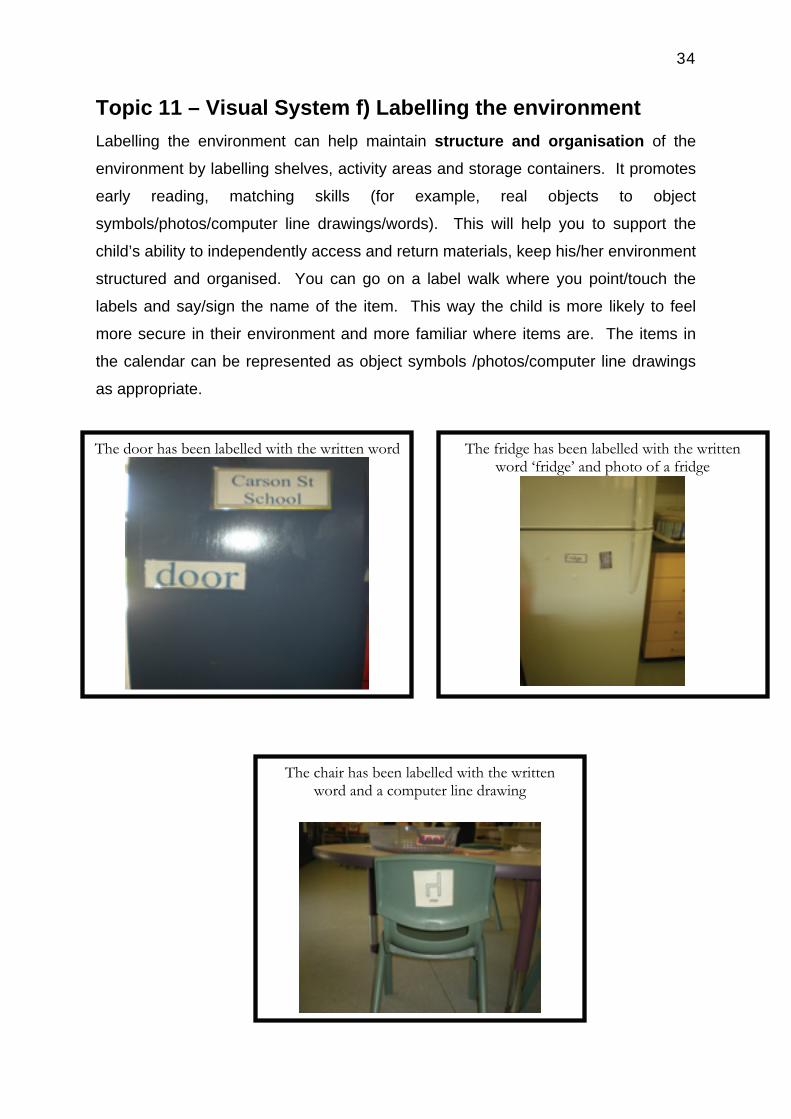
Topic 11 – Visual System f) Labelling the environment Labelling the environment can help maintain structure and organisation of the
environment by labelling shelves, activity areas and storage containers. It promotes
early reading, matching skills (for example, real objects to object
symbols/photos/computer line drawings/words). This will help you to support the
child’s ability to independently access and return materials, keep his/her environment
structured and organised. You can go on a label walk where you point/touch the
labels and say/sign the name of the item. This way the child is more likely to feel
more secure in their environment and more familiar where items are. The items in
the calendar can be represented as object symbols /photos/computer line drawings
as appropriate.
The fridge has been labelled with the written word ‘fridge’ and photo of a fridge
The chair has been labelled with the written word and a computer line drawing
The door has been labelled with the written word
35
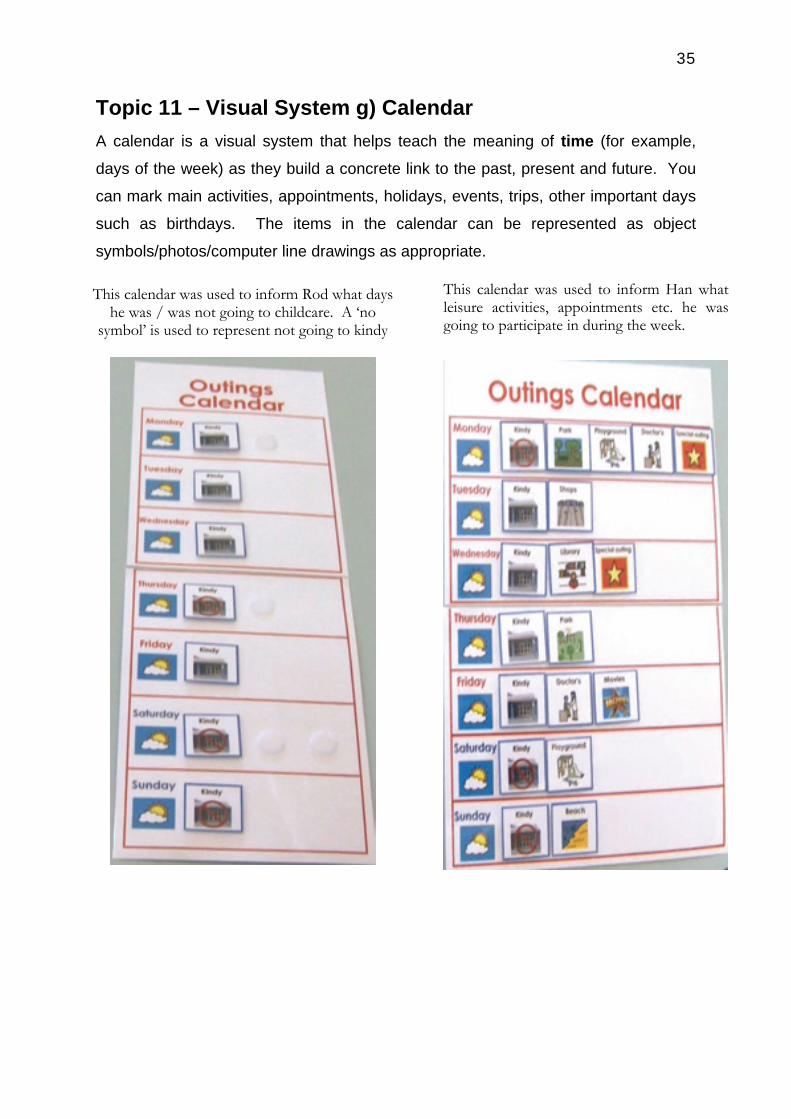
Topic 11 – Visual System g) Calendar A calendar is a visual system that helps teach the meaning of time (for example,
days of the week) as they build a concrete link to the past, present and future. You
can mark main activities, appointments, holidays, events, trips, other important days
such as birthdays. The items in the calendar can be represented as object
symbols/photos/computer line drawings as appropriate.
This calendar was used to inform Rod what days he was / was not going to childcare. A ‘no
symbol’ is used to represent not going to kindy
This calendar was used to inform Han what leisure activities, appointments etc. he was going to participate in during the week.
36
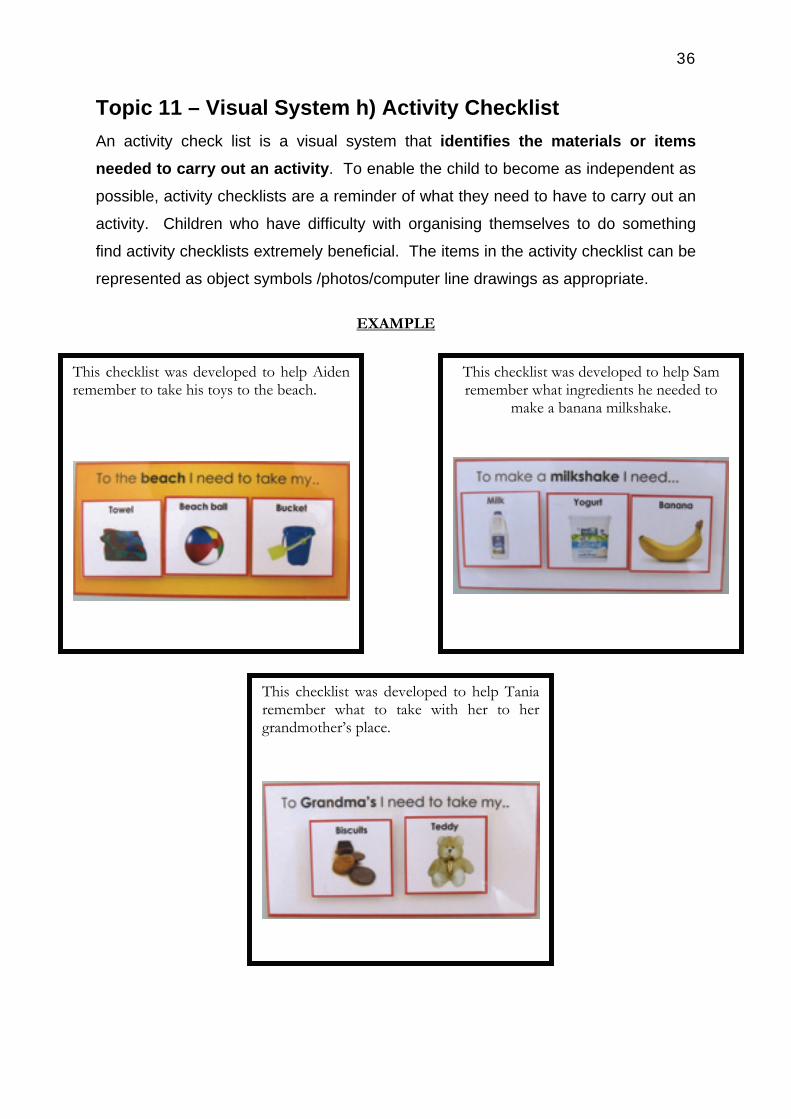
Topic 11 – Visual System h) Activity Checklist An activity check list is a visual system that identifies the materials or items needed to carry out an activity. To enable the child to become as independent as
possible, activity checklists are a reminder of what they need to have to carry out an
activity. Children who have difficulty with organising themselves to do something
find activity checklists extremely beneficial. The items in the activity checklist can be
represented as object symbols /photos/computer line drawings as appropriate.
EXAMPLE
This checklist was developed to help Aiden remember to take his toys to the beach.
This checklist was developed to help Sam remember what ingredients he needed to
make a banana milkshake.
This checklist was developed to help Tania remember what to take with her to her grandmother’s place.
37
Topic 11 – Visual System ‘Let’s Chat’ System The ‘Let’s Chat’ system offers the communication partner specific strategies to
facilitate the development of the child’s communication and literacy skills. The ‘Let’s
Chat’ book is a tool that can be used by both the child and the communication
partner to have an interactive chat about topics that are meaningful and interesting
to the child.
The ‘Let’s Chat’ book is produced using a child centred approach where there is a
direct connection between the content and the child’s life. It contains a written
account about the child’s experiences, interests, background etc accompanied by
visual information. By basing the information on topics that are important,
meaningful and motivating to the child it is a great way of tapping into the child’s
interest and contributing to the development of a positive attitude towards literacy
and communication.
The “Let’s Chat” process requires interactive and active participation by both the
communication partner and the child. The entire process promotes the development
of the child’s social and communication skills in a meaningful and functional way -
before, during and after the experience. By chatting with the child about the
experience before it occurs will help prepare them in terms of what to expect.
During the activity by interacting with the child and others the communication
partner can model a variety of social and communication skills. After the activity has
occurred creating the pages in the “Let’s Chat" book together will enable the child to
revisit their experience with the communication partner, which has several benefits
for the child’s communication and social development.
Firstly, it acknowledges the child’s experiences and background knowledge.
Secondly, it can be used as a reference where the child has a good chance of
knowing what the communication partner is referring to. Thirdly, by reviewing such
information it develops their observational skills, which helps their understanding of
the experience and clarifies it. Fourthly, it provides them with a means of expressing
themselves and conversing about their past, present, future needs and aspirations.

38
Finally, it provides the communication partner with the opportunity to demonstrate to
the child how they can share information about their experiences with others by
using their method of communication for example, speech, sign, gesture along with
the visual and written information to get their message across.
By using the “Let’s Chat” process on a frequent basis it provides the child with
meaningful practice which helps improve and develop their confidence in their
communication and social skills. For example, they will learn how to begin a topic of
conversation that is meaningful and interesting to them, maintain and end the
conversation appropriately. This empowers them to have more control of the
conversation, have more opportunities to participate actively in a conversation with a
greater number of people and have successful interactions.
. QUESTIONS THAT ARE USED TO CREATE THE ‘LET’S CHAT’ PAGE
- Who did you go with? (Identify the participants involved in the activity) - What did you do? (The sequence of events)
- How did you get there? (Means of getting to the activity)
- When did you go? (Time of activity)
- Where did you go? (Location of the activity)
- Why did you go? (If there was a specific reason)
- Comments ( Additional information not included in the above questions)
The items in the “Let’s Chat” page can be presented with object symbols
/photos/computer line drawings as appropriate
Please refer to:
Bloom, Y. & Bhargava, D. (2003) Let’s Read Together. Part 2 Creating personalized material to promote literacy in children and adults using AAC Strategies. Beecroft: Innovative Communication Programming
for more information on the ‘The Chat System’ to develop your child’s
communication and literacy skills.
39
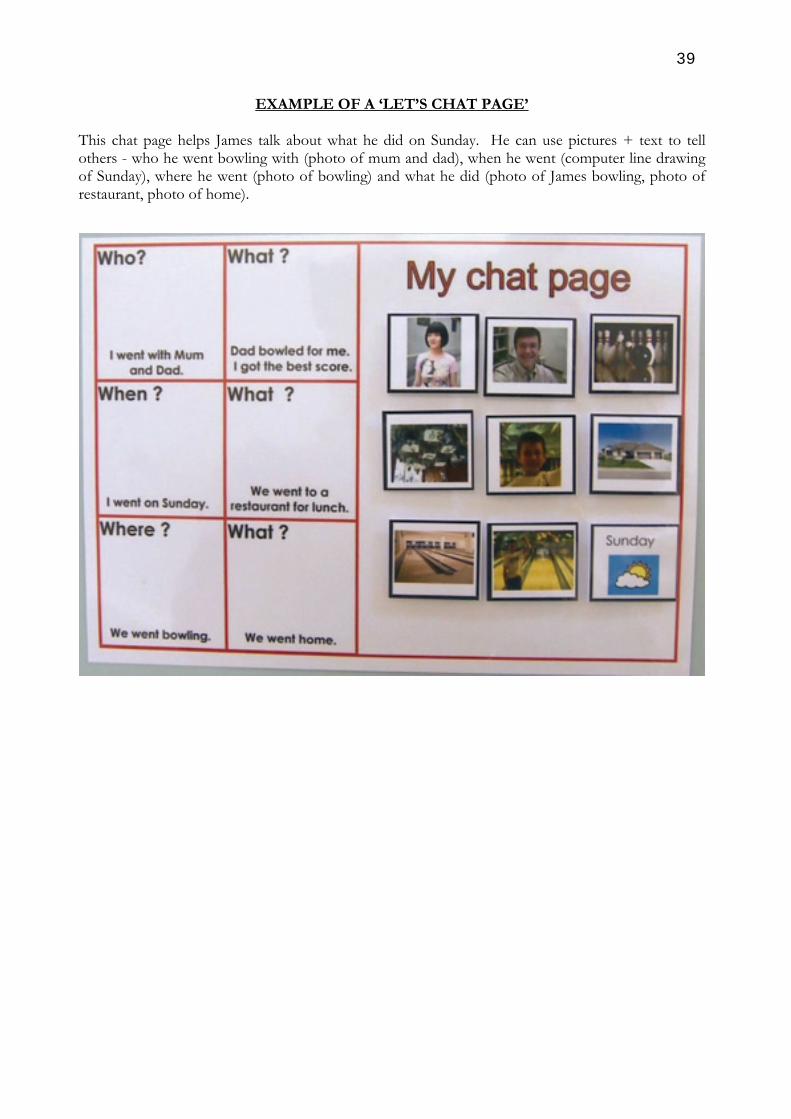
EXAMPLE OF A ‘LET’S CHAT PAGE’
This chat page helps James talk about what he did on Sunday. He can use pictures + text to tell others - who he went bowling with (photo of mum and dad), when he went (computer line drawing of Sunday), where he went (photo of bowling) and what he did (photo of James bowling, photo of restaurant, photo of home).
40
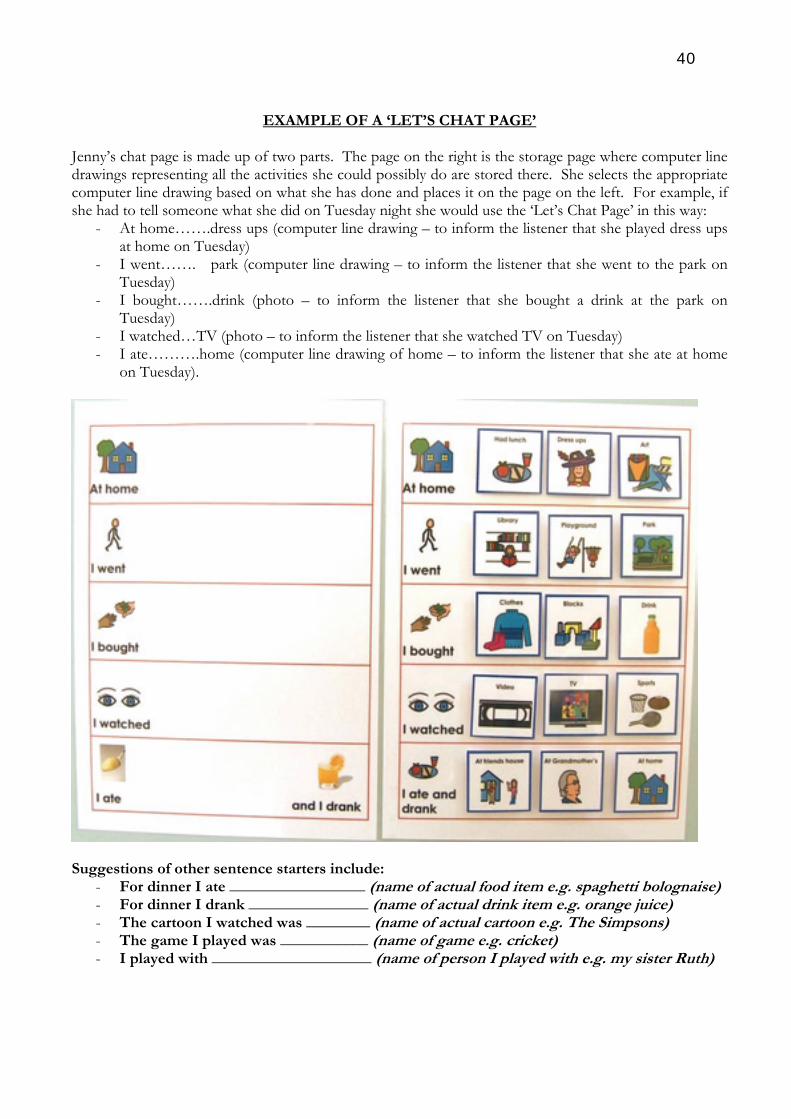
EXAMPLE OF A ‘LET’S CHAT PAGE’ Jenny’s chat page is made up of two parts. The page on the right is the storage page where computer line drawings representing all the activities she could possibly do are stored there. She selects the appropriate computer line drawing based on what she has done and places it on the page on the left. For example, if she had to tell someone what she did on Tuesday night she would use the ‘Let’s Chat Page’ in this way:
- At home…….dress ups (computer line drawing – to inform the listener that she played dress ups at home on Tuesday)
- I went……. park (computer line drawing – to inform the listener that she went to the park on Tuesday)
- I bought…….drink (photo – to inform the listener that she bought a drink at the park on Tuesday)
- I watched…TV (photo – to inform the listener that she watched TV on Tuesday) - I ate……….home (computer line drawing of home – to inform the listener that she ate at home
on Tuesday).
Suggestions of other sentence starters include:
- For dinner I ate _________________ (name of actual food item e.g. spaghetti bolognaise) - For dinner I drank _______________ (name of actual drink item e.g. orange juice) - The cartoon I watched was ________ (name of actual cartoon e.g. The Simpsons) - The game I played was ___________ (name of game e.g. cricket) - I played with ____________________ (name of person I played with e.g. my sister Ruth)
41
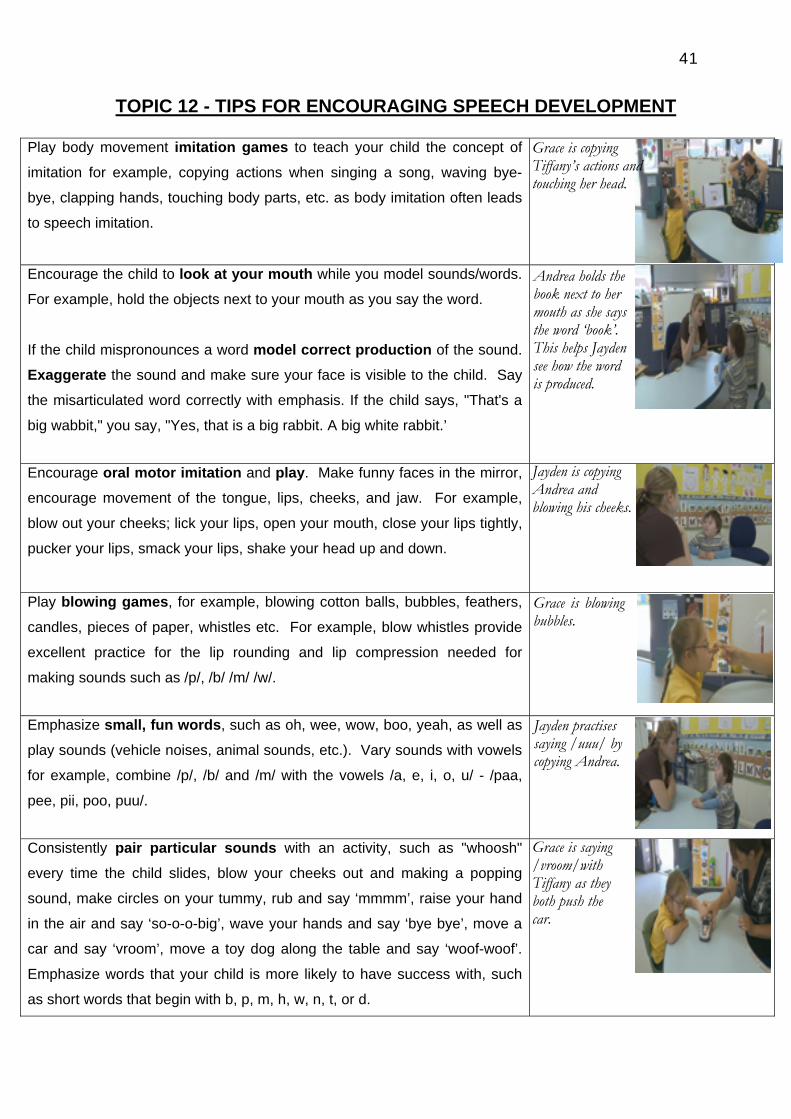
TOPIC 12 - TIPS FOR ENCOURAGING SPEECH DEVELOPMENT
Play body movement imitation games to teach your child the concept of
imitation for example, copying actions when singing a song, waving bye-
bye, clapping hands, touching body parts, etc. as body imitation often leads
to speech imitation.
Encourage the child to look at your mouth while you model sounds/words.
For example, hold the objects next to your mouth as you say the word.
If the child mispronounces a word model correct production of the sound.
Exaggerate the sound and make sure your face is visible to the child. Say
the misarticulated word correctly with emphasis. If the child says, "That's a
big wabbit," you say, "Yes, that is a big rabbit. A big white rabbit.’
Encourage oral motor imitation and play. Make funny faces in the mirror,
encourage movement of the tongue, lips, cheeks, and jaw. For example,
blow out your cheeks; lick your lips, open your mouth, close your lips tightly,
pucker your lips, smack your lips, shake your head up and down.
Play blowing games, for example, blowing cotton balls, bubbles, feathers,
candles, pieces of paper, whistles etc. For example, blow whistles provide
excellent practice for the lip rounding and lip compression needed for
making sounds such as /p/, /b/ /m/ /w/.
Emphasize small, fun words, such as oh, wee, wow, boo, yeah, as well as
play sounds (vehicle noises, animal sounds, etc.). Vary sounds with vowels
for example, combine /p/, /b/ and /m/ with the vowels /a, e, i, o, u/ - /paa,
pee, pii, poo, puu/.
Consistently pair particular sounds with an activity, such as "whoosh"
every time the child slides, blow your cheeks out and making a popping
sound, make circles on your tummy, rub and say ‘mmmm’, raise your hand
in the air and say ‘so-o-o-big’, wave your hands and say ‘bye bye’, move a
car and say ‘vroom’, move a toy dog along the table and say ‘woof-woof’.
Emphasize words that your child is more likely to have success with, such
as short words that begin with b, p, m, h, w, n, t, or d.
Grace is copying Tiffany’s actions and touching her head.
Andrea holds the book next to her mouth as she says the word ‘book’. This helps Jayden see how the word is produced.
Jayden is copying Andrea and blowing his cheeks.
Grace is blowing bubbles.
Jayden practises saying /uuu/ by copying Andrea.
Grace is saying /vroom/with Tiffany as they both push the car.
42
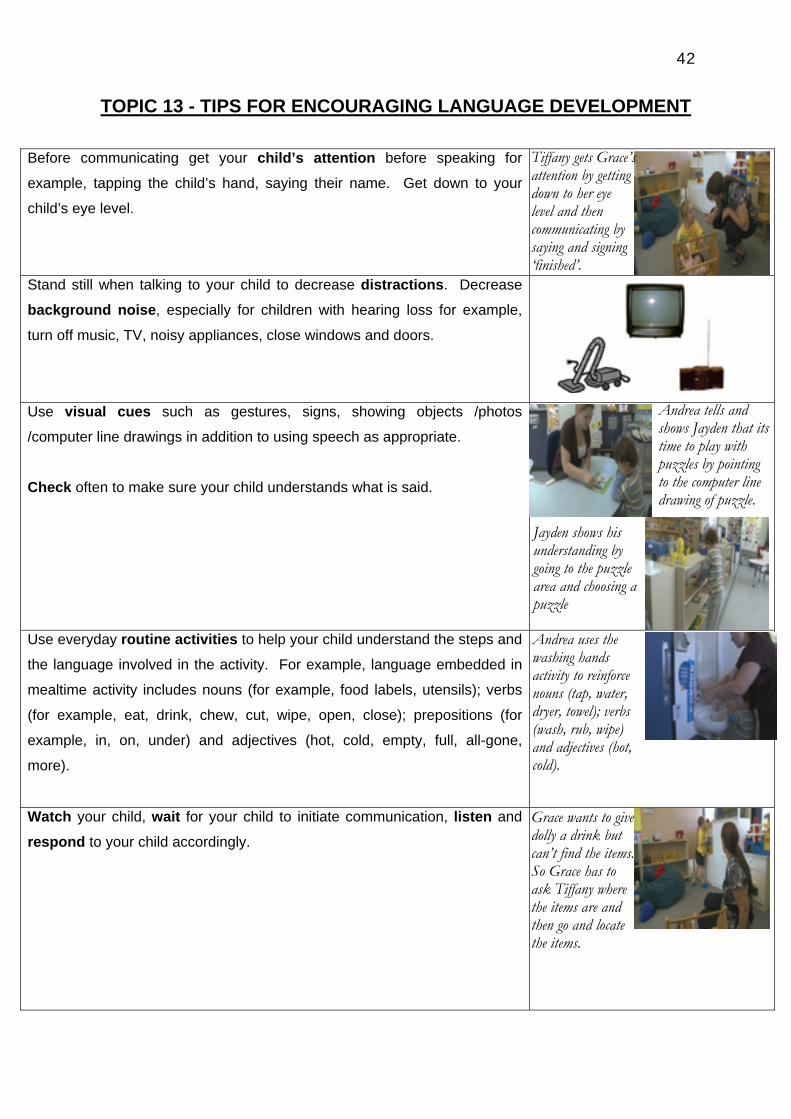
TOPIC 13 - TIPS FOR ENCOURAGING LANGUAGE DEVELOPMENT
Before communicating get your child’s attention before speaking for
example, tapping the child’s hand, saying their name. Get down to your
child’s eye level.
Stand still when talking to your child to decrease distractions. Decrease
background noise, especially for children with hearing loss for example,
turn off music, TV, noisy appliances, close windows and doors.
Use visual cues such as gestures, signs, showing objects /photos
/computer line drawings in addition to using speech as appropriate.
Check often to make sure your child understands what is said.
Use everyday routine activities to help your child understand the steps and
the language involved in the activity. For example, language embedded in
mealtime activity includes nouns (for example, food labels, utensils); verbs
(for example, eat, drink, chew, cut, wipe, open, close); prepositions (for
example, in, on, under) and adjectives (hot, cold, empty, full, all-gone,
more).
Watch your child, wait for your child to initiate communication, listen and respond to your child accordingly.
Tiffany gets Grace’s attention by getting down to her eye level and then communicating by saying and signing ‘finished’.
Andrea tells and shows Jayden that its time to play with puzzles by pointing to the computer line drawing of puzzle.
Andrea uses the washing hands activity to reinforce nouns (tap, water, dryer, towel); verbs (wash, rub, wipe) and adjectives (hot, cold).
Grace wants to give dolly a drink but can’t find the items. So Grace has to ask Tiffany where the items are and then go and locate the items.
Jayden shows his understanding by going to the puzzle area and choosing a puzzle

43
Self-talk involves talking aloud to yourself about whatever activity you are
engaged in when your child is around. Keep your sentences short and
simple. For example, as you make lunch, say something like, “I am making
lunch. I need bread. Here's bread. I need peanut butter. Spread it on."
...and so forth, you talk about what you are doing while your child is
watching.
Even before the child starts asking, “Wha dat?” you can use descriptive language to provide the answers. Description provides words, labels, and
descriptions of objects and actions in the. For example, in describing what
your child is playing with, touching, or seeing, you might say, “That is a fast
car. It is red. Uh-oh, one of the doors is broken. See, this one is broken.”
Using expansion language means adding more information to the words
that your child uses to talk about objects or actions. What you are basically
doing by adding more words is revising and completing your child’s speech,
but you are doing it without directly correcting what your child has said. This
method requires careful listening on your part. For example, your child
might say, “Car.” Considering the where, when, and circumstance you
might reply, “Yes, that is John’s car.”
Expansion-plus can be used once your child is using his or her own short,
simple sentences, you can add descriptors, prepositions, pronouns, and
verbs to make the sentences more complete. For example your child might
say, “John, go bye-bye.” You might respond, “Yes, John is going home”.
You are not correcting your child’s sentence so much as adding more
information to it. As another example, if your child says, “Car go” you might
respond, “We are driving the car to the grocery store”.
Develop your child’s ability to follow instructions gradually by using speech
and visual supports. Start with one instruction at a time. When they start to
get this right most of the time, build your instruction to include 2 parts (for
example, “Wash your hands, then get changed”).
Andrea and Jayden are having a tea party. Andrea engages in self talk as she drinks her cup of tea by saying “I’m drinking a cup of tea. Its got milk and sugar. Yum Yum!
Tiffany is describing Grace’s actions during doll play, by saying, “You’re giving dolly a cuddle”.’
Andrea is expanding on Jayden’s verbalisation “book” by saying “You’re giving dolly a book”+ signing ‘give book’.
Andrea asks Jayden to turn the page in the book by using speech + signing ‘turn the page’ + tapping on the page.
Tiffany is expanding on Grace’s verbalisations of “dolly bottle” by saying “Dolly’s thirsty!!! You’re giving dolly a bottle of milk. She is hungry” + signing ‘thirsty, you, milk
d h ’
44
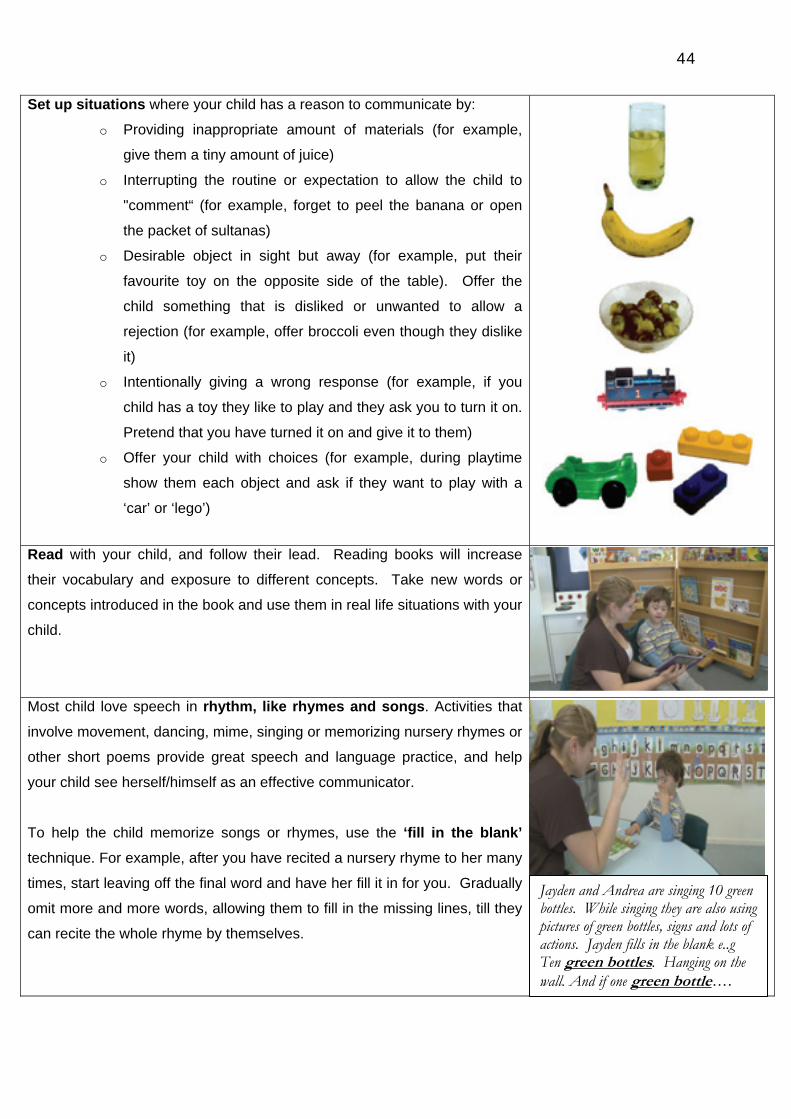
Set up situations where your child has a reason to communicate by:
o Providing inappropriate amount of materials (for example,
give them a tiny amount of juice)
o Interrupting the routine or expectation to allow the child to
"comment“ (for example, forget to peel the banana or open
the packet of sultanas)
o Desirable object in sight but away (for example, put their
favourite toy on the opposite side of the table). Offer the
child something that is disliked or unwanted to allow a
rejection (for example, offer broccoli even though they dislike
it)
o Intentionally giving a wrong response (for example, if you
child has a toy they like to play and they ask you to turn it on.
Pretend that you have turned it on and give it to them)
o Offer your child with choices (for example, during playtime
show them each object and ask if they want to play with a
‘car’ or ‘lego’)
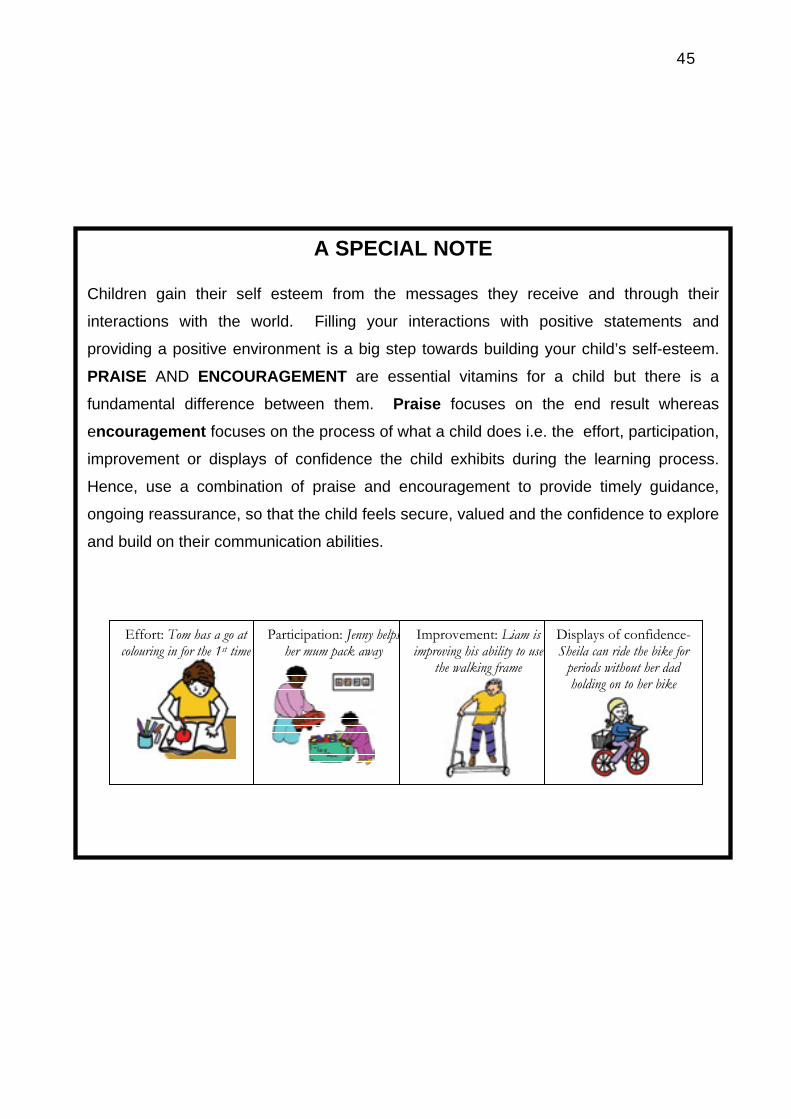
Read with your child, and follow their lead. Reading books will increase
their vocabulary and exposure to different concepts. Take new words or
concepts introduced in the book and use them in real life situations with your
child.
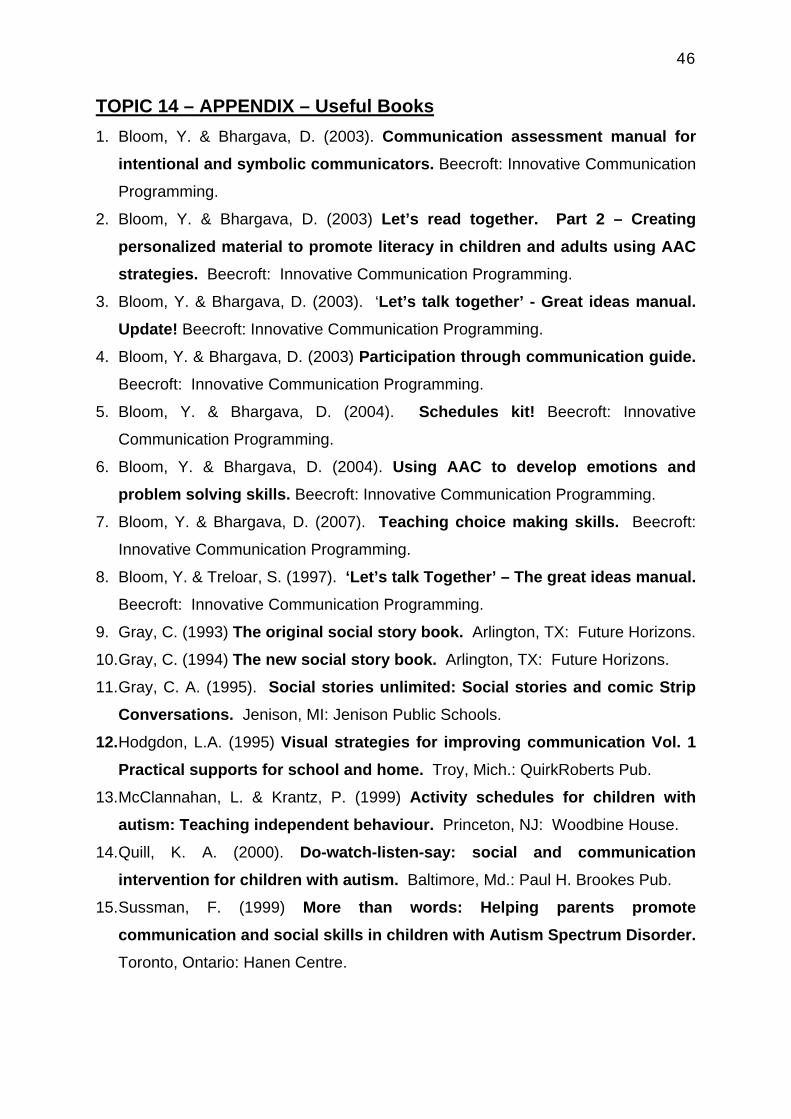
Most child love speech in rhythm, like rhymes and songs. Activities that
involve movement, dancing, mime, singing or memorizing nursery rhymes or
other short poems provide great speech and language practice, and help
your child see herself/himself as an effective communicator.
To help the child memorize songs or rhymes, use the ‘fill in the blank’ technique. For example, after you have recited a nursery rhyme to her many
times, start leaving off the final word and have her fill it in for you. Gradually
omit more and more words, allowing them to fill in the missing lines, till they
can recite the whole rhyme by themselves.
Jayden and Andrea are singing 10 green bottles. While singing they are also using pictures of green bottles, signs and lots of actions. Jayden fills in the blank e..g Ten green bottles. Hanging on the wall. And if one green bottle….
45
o
A SPECIAL NOTE
Children gain their self esteem from the messages they receive and through their
interactions with the world. Filling your interactions with positive statements and
providing a positive environment is a big step towards building your child’s self-esteem.
PRAISE AND ENCOURAGEMENT are essential vitamins for a child but there is a
fundamental difference between them. Praise focuses on the end result whereas
encouragement focuses on the process of what a child does i.e. the effort, participation,
improvement or displays of confidence the child exhibits during the learning process.
Hence, use a combination of praise and encouragement to provide timely guidance,
ongoing reassurance, so that the child feels secure, valued and the confidence to explore
and build on their communication abilities.
Effort: Tom has a go at colouring in for the 1st time
Participation: Jenny helps her mum pack away
Improvement: Liam is improving his ability to use
the walking frame
Displays of confidence- Sheila can ride the bike for
periods without her dad holding on to her bike
46
TOPIC 14 – APPENDIX – Useful Books
1. Bloom, Y. & Bhargava, D. (2003). Communication assessment manual for intentional and symbolic communicators. Beecroft: Innovative Communication
Programming. 2. Bloom, Y. & Bhargava, D. (2003) Let’s read together. Part 2 – Creating
personalized material to promote literacy in children and adults using AAC strategies. Beecroft: Innovative Communication Programming.
3. Bloom, Y. & Bhargava, D. (2003). ‘Let’s talk together’ - Great ideas manual. Update! Beecroft: Innovative Communication Programming.
4. Bloom, Y. & Bhargava, D. (2003) Participation through communication guide. Beecroft: Innovative Communication Programming.
5. Bloom, Y. & Bhargava, D. (2004). Schedules kit! Beecroft: Innovative
Communication Programming.
6. Bloom, Y. & Bhargava, D. (2004). Using AAC to develop emotions and problem solving skills. Beecroft: Innovative Communication Programming.
7. Bloom, Y. & Bhargava, D. (2007). Teaching choice making skills. Beecroft:
Innovative Communication Programming.
8. Bloom, Y. & Treloar, S. (1997). ‘Let’s talk Together’ – The great ideas manual. Beecroft: Innovative Communication Programming.
9. Gray, C. (1993) The original social story book. Arlington, TX: Future Horizons. 10. Gray, C. (1994) The new social story book. Arlington, TX: Future Horizons.
11. Gray, C. A. (1995). Social stories unlimited: Social stories and comic Strip Conversations. Jenison, MI: Jenison Public Schools.
12. Hodgdon, L.A. (1995) Visual strategies for improving communication Vol. 1 Practical supports for school and home. Troy, Mich.: QuirkRoberts Pub.
13. McClannahan, L. & Krantz, P. (1999) Activity schedules for children with autism: Teaching independent behaviour. Princeton, NJ: Woodbine House.
14. Quill, K. A. (2000). Do-watch-listen-say: social and communication intervention for children with autism. Baltimore, Md.: Paul H. Brookes Pub.
15. Sussman, F. (1999) More than words: Helping parents promote communication and social skills in children with Autism Spectrum Disorder. Toronto, Ontario: Hanen Centre.
47
TOPIC 14 – APPENDIX – Useful internet sites
www.dotolearn.com – This site has picture communication cards, songs, games,
learning activities for children with a range of disabilities.
www.usevisualstrategies.com – This site has information for using visual supports
solve behaviour problems and improve communication in children with a range of
disabilities.
www.mayerjohnson.com – This site has information about Boardmaker and other
resources to assist children with communication difficulties.
www.images.google.com – This site has thousands of pictures you can access for
free.
www.teacch.com – This site has lots of information on Autism and related issues.
www.pecs.com – This site explains the Picture Exchange Communication System by
Bondy and Frost.
www.playsteps.com – This site illustrates and sells visually structured play task.
www.tonyattwood.com and www.aspie.com – These sites have great information
about Autism and Asperger Syndrome.
www.innovativeprogramming.net.au – This site has information about Softpics with
Fantasticpics and other useful resources.

This project was produced with funding receivedby School for Parents from the Non GovernmentCentre Support For Non School Organisations of
Western Australia
For more information contact:School for Parents
c/o Carson Street SchoolEast Victoria Park WA 6101Telephone: (08) 9361 7500Email: [email protected]
Related Documents


![Skaffold - storage.googleapis.com · [getting-started getting-started] Hello world! [getting-started getting-started] Hello world! [getting-started getting-started] Hello world! 5.](https://static.cupdf.com/doc/110x72/5ec939f2a76a033f091c5ac7/skaffold-getting-started-getting-started-hello-world-getting-started-getting-started.jpg)