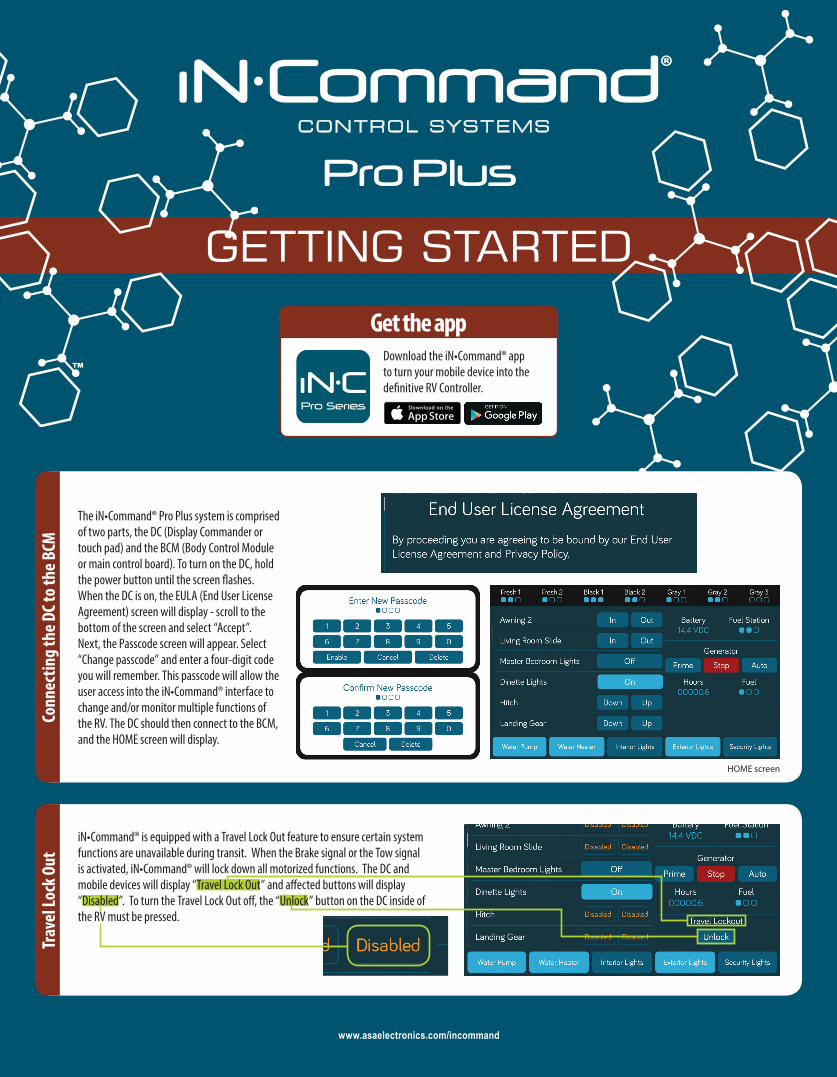
GETTING STARTED Travel Lock Out Connecting the DC to the BCM ™ iN•Command® is equipped with a Travel Lock Out feature to ensure certain system functions are unavailable during transit. When the Brake signal or the Tow signal is activated, iN•Command® will lock down all motorized functions. The DC and mobile devices will display “Travel Lock Out” and affected buttons will display “Disabled”. To turn the Travel Lock Out off, the “Unlock” button on the DC inside of the RV must be pressed. www.asaelectronics.com/incommand The iN•Command® Pro Plus system is comprised of two parts, the DC (Display Commander or touch pad) and the BCM (Body Control Module or main control board). To turn on the DC, hold the power button until the screen flashes. When the DC is on, the EULA (End User License Agreement) screen will display - scroll to the bottom of the screen and select “Accept”. Next, the Passcode screen will appear. Select “Change passcode” and enter a four-digit code you will remember. This passcode will allow the user access into the iN•Command® interface to change and/or monitor multiple functions of the RV. The DC should then connect to the BCM, and the HOME screen will display. HOME screen Get the app Download the iN•Command® app to turn your mobile device into the definitive RV Controller.

Welcome message from author
This document is posted to help you gain knowledge. Please leave a comment to let me know what you think about it! Share it to your friends and learn new things together.
Transcript
GETTING STARTED
Trav
el Lo
ck O
utCo
nnec
ting
the D
C to t
he B
CM
™
™
iN•Command® is equipped with a Travel Lock Out feature to ensure certain system functions are unavailable during transit. When the Brake signal or the Tow signal is activated, iN•Command® will lock down all motorized functions. The DC and mobile devices will display “Travel Lock Out” and affected buttons will display “Disabled”. To turn the Travel Lock Out off, the “Unlock” button on the DC inside of the RV must be pressed.
www.asaelectronics.com/incommand
The iN•Command® Pro Plus system is comprised of two parts, the DC (Display Commander or touch pad) and the BCM (Body Control Module or main control board). To turn on the DC, hold the power button until the screen flashes. When the DC is on, the EULA (End User License Agreement) screen will display - scroll to the bottom of the screen and select “Accept”. Next, the Passcode screen will appear. Select “Change passcode” and enter a four-digit code you will remember. This passcode will allow the user access into the iN•Command® interface to change and/or monitor multiple functions of the RV. The DC should then connect to the BCM, and the HOME screen will display.
HOME screen
Get the appDownload the iN•Command® app to turn your mobile device into the definitive RV Controller.
Prog
ram
min
g Flo
orpl
an on
Dev
icePa
iring
an A
ndro
id or
iSO
Devi
ce
©Copyright 2016 ASA Electronics, LLC QRGINCOMMAND1116MA-1612001B-1R
For owner’s manual and software updates please visit http://www.asaelectronics.com/incommand. For update instructions, please refer to Software Update section starting on page 22 in the owner’s manual.
For further assistance, please call 877-845-8750.
NOTE: Some features may not be available depending on installed factory options.
Patent # (D776,068) Patent # (D762,644)
MODEL NUMBER: JRVCS2
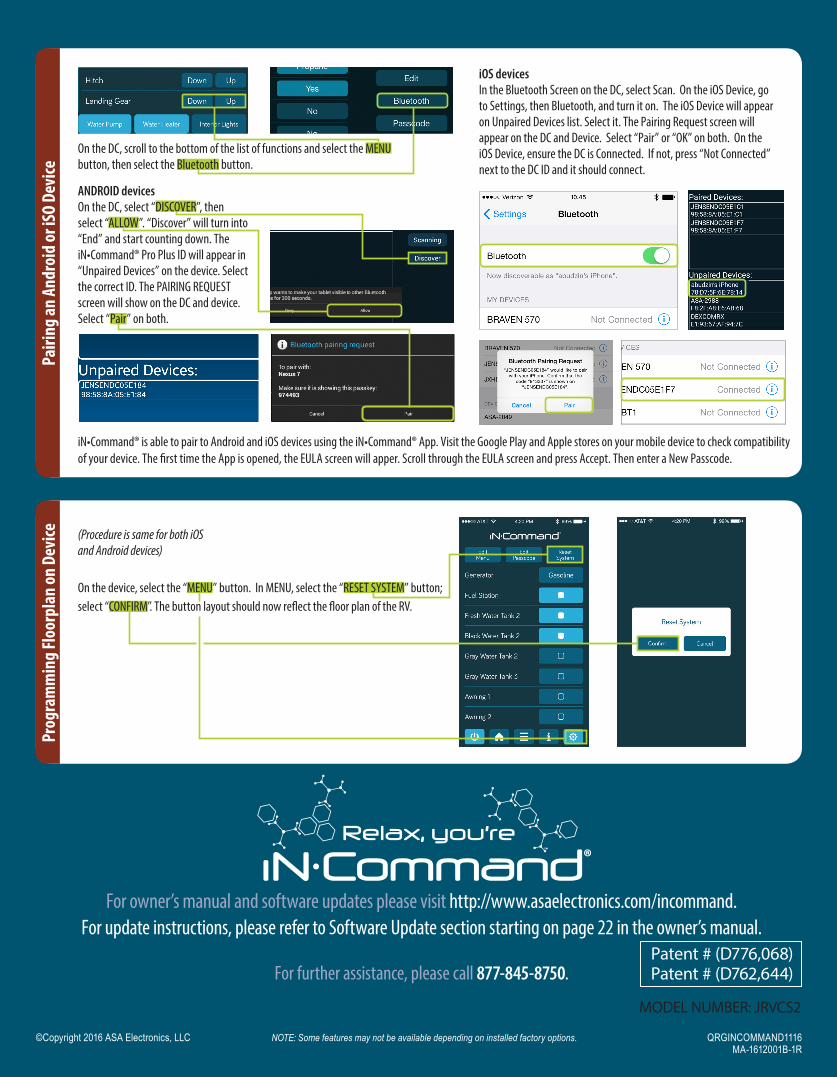
(Procedure is same for both iOS and Android devices)
On the device, select the “MENU” button. In MENU, select the “RESET SYSTEM” button; select “CONFIRM”. The button layout should now reflect the floor plan of the RV.
On the DC, scroll to the bottom of the list of functions and select the MENU button, then select the Bluetooth button.
ANDROID devicesOn the DC, select “DISCOVER”, then select “ALLOW”. “Discover” will turn into “End” and start counting down. The iN•Command® Pro Plus ID will appear in “Unpaired Devices” on the device. Select the correct ID. The PAIRING REQUEST screen will show on the DC and device. Select “Pair” on both.
iOS devicesIn the Bluetooth Screen on the DC, select Scan. On the iOS Device, go to Settings, then Bluetooth, and turn it on. The iOS Device will appear on Unpaired Devices list. Select it. The Pairing Request screen will appear on the DC and Device. Select “Pair” or “OK” on both. On the iOS Device, ensure the DC is Connected. If not, press “Not Connected” next to the DC ID and it should connect.
iN•Command® is able to pair to Android and iOS devices using the iN•Command® App. Visit the Google Play and Apple stores on your mobile device to check compatibility of your device. The first time the App is opened, the EULA screen will apper. Scroll through the EULA screen and press Accept. Then enter a New Passcode.
Related Documents