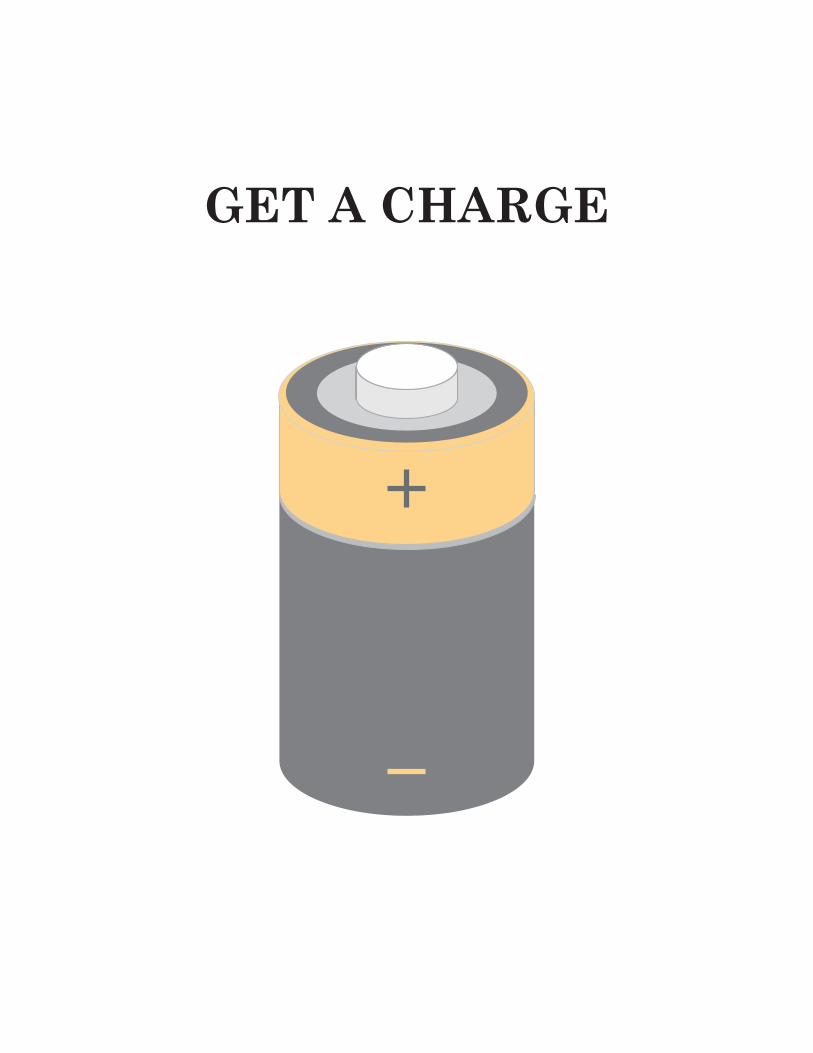
GET A CHARGE

Welcome message from author
This document is posted to help you gain knowledge. Please leave a comment to let me know what you think about it! Share it to your friends and learn new things together.
Transcript
GET A CHARGE

2
Get a CharGe
Adapted from Schaumburg Illinois School District 54 Science Curriculum“Batteries and Bulbs”
Teacher’s Guide
Developed by:Tracy Brubeck, Rebecca Keim, Kathy Thompson
Piloted by:Chris Bersett, Clyde Bunte, Albert Coleman,
Shirley Crossman, James Pidgeon, Linda Pflasterer
Edited by: Michael Schneider
M.A.S.H.Math And Science Hands-On
A science Literacy Project
Funded By:Illinois State Board of Education
Sponsored By:Regional offices of Education
Southern Illinois University Edwardsville
ESC Project Team: SIUE Project Team:Director: Michael SchneiderCoordinator: Kathy DerangoConsultants: Barbara Goldenherseh Dr. Andrea Williams Joan Barrett
Director: Dr. David WinnettCoordinator: Ann ScatesSpecialist: Dr. Virginia BryanConsultants: Dr. William P. Ahlbrand Dr. Lela DeToye Dr. Thomas Jewett Dr. Robert Williams
In Cooperation with Regional SuperintendentsThe Honorable Harry Briggs, Jr.The Honorable Faye HughesThe Honorable Russell MasinelliThe Honorable Martha O’MalleyThe Honorable Larry Wolfe
Madison CountyMonroe/Randolph CountiesMacoupin CountySt. Clair CountyClinton/Washington Counties
3
Get a CharGe
Table of ContentsM.A.S.H. at a Glance ......................................................................................................5Major Purpose .................................................................................................................8Teacher Background Information: .................................................................................9Illinois Learning Standards Adopted July 1997 .........................................................10
Activity Sheet A .......................................................................................................11Activity Sheet B .......................................................................................................12
SAFETY POSTER: ........................................................................................................14Cooperative Learning: Classroom Management Techniques .....................................15Get A Charge – Test ......................................................................................................18
Get A Charge Test – Answer Key ...........................................................................21ACTIVITY #1: Static Electricity ..................................................................................22
Static Electricity ......................................................................................................24Static Electricity (record results) ............................................................................25
ACTIVITY #2: Static Electricity – Charges .................................................................26Science Extension I ..................................................................................................27Science Extension II ................................................................................................28Activity Sheet 2-A Static Electricity – Charges .....................................................29Activity Sheet 2-B Static Electricity – Charges .....................................................30Activity Sheet 2-C 3 cm x 15 cm strips ...................................................................31
ACTIVITY #3: Make It Light .......................................................................................32Student Activity Sheets 3A and 3B: Make It Light – Answer Key .......................33Student Activity Sheet 3-A – Make It Light Prediction Sheet ..............................34Student Activity Sheet 3-B – Make It Light Prediction Sheet ..............................35
ACTIVITY #4: Making Circuits ...................................................................................36Student Activity Sheet 4A, 4B, and 4C Answer Key 4A ......................................36Student Activity Sheet 4-A – Series Circuit ..........................................................37Student Activity Sheet 4-B – Parallel Circuits ......................................................38Student Activity Sheet 4-C – Making Circuits ......................................................39
ACTIVITY #5: Battery Burnout ...................................................................................40

4
Get a CharGe
Student Activity Sheet 5-A – Battery Burnout ......................................................42Student Activity Sheet 5-B – Battery Burnout ......................................................43
ACTIVITY #6: Conduction ...........................................................................................45Student Activity Sheet 6-A Conduction & 6-B Conduction Chart Answer Key ...47Teacher Activity Sheet: Conduction Web ...............................................................48Student Activity Sheet 6-B – Conduction ..............................................................49Student Activity Sheet 6-B – Conduction Chart ....................................................50
ACTIVITY #7: Switches ................................................................................................51Student Activity Sheet 7-A Switches – Answer Key .............................................52Student Activity Sheet 7-A – Switches ...................................................................53
ACTIVITY #8: A Secret Language ...............................................................................54Student Activity Sheet 8B – Secret Language Answer Key .................................54Student Activity Sheet 8-A – Secret Language .....................................................55Student Activity Sheet 8-B – Secret Language .....................................................56ACTIVITY #9: An Electromagnet ...........................................................................57Student Activity Sheet 9-A – An Electromagnet Answer Key ..............................58Student Activity Sheet 9-A – An Electromagnet ...................................................59Student Activity Sheet 9-B – An Electromagnet ...................................................60Student Activity Sheet 9-C – An Electromagnet ...................................................61ACTIVITY #10: Magnetism and Coils ....................................................................62Student Activity Sheet 10-A – Magnetism and Coils ............................................64Student Activity Sheet 10-B – Magnetism and Coils ............................................65

5
Get a CharGe
M.A.S.H. At A GlAnce
Introduction
This section is written to provide you with a quick overview of the major curriculum elements around which the M.A.S.H. Kits are designed. The acronym M.A.S.H. represents Math And Science Hands-on. M.A.S.H. Kits were developed through a cooperative effort among local school districts, Educational Service Center Region 16, and Southern Illinois University at Edwardsville and originated from a regional Title II Science Cooperative. Funding by the Illinois State Board of Education through a Science Literacy Grant provided development, piloting, and revision of these kits, designed to meet the needs of teachers wanting to teach activity-based science in southwestern Illinois. Specifically, these needs were identified as: availability and cost of materials, lack of time needed to teach science inquiry, and teachers’ limited background in science. The thrust of development focused on these needs. The key elements of the M.A.S.H. Kit program are: scope and sequence of fundamental science concepts, alignment with state goals, emphasis on science process skills, cooperative learning, integration of language arts, opportunity to apply mathematics skills in real problem solving situations, teacher ownership, and alternatives in assessment. Special recognition should be given to the exemplary science kit program from Schaumburg Illinois School District 54, for their initial assistance and ideas.
Scope & Sequence
Each kit is developed around a fundamental theme in science that can be matched to concepts covered in most textbooks. Students explore these central themes as they complete approximately ten developmentally appropriate, process-based activities. The primary sequence introduces a theme from life, physical, or earth science. The intermediate kits further develop these same themes. Middle school kits continue to reinforce these same basic themes while utilizing a higher level of technology.
State Goals
The M.A.S.H. Kits were developed by Illinois educators primarily to assist classroom teachers in meeting the educational needs of their students. As a result, each investigation’s instructional objectives focus upon the Illinois State Goals for Learning. These goals include the basic concepts and fundamental skills in science, mathematics, social studies, language arts, fine arts, health, and physical education. Each investigation has been carefully selected to prepare students to meet or exceed Illinois goals. At the beginning of each of the activities the specific goals and objectives addressed by that activity has been identified and referenced.

6
Get a CharGe
Science Process Skills
The activities in the kits address the science process skills necessary for students to utilize when learning science: observe, measure, classify, infer, predict, communicate, formulate hypothesis, experiment, and interpret data.
Cooperative Learning
The instructional approach utilized in this curriculum is one of having students work in cooperative groups. It is recommended that the size of your cooperative groups not exceed four students. Many educational benefits occur when students work together in groups to investigate and solve problems. Cooperative learning more closely resembles the way individuals work together to solve problems in the real world. Another important reason for the use of cooperative groups is to make the acquisition, costs, and management of materials reasonable for the classroom teacher.
Language Arts
Students read about, talk about, and write about the exciting science activities they are doing. This additional use of language along with the science investigation, reinforces the students’ understanding of the scientific principles being explored. Not only do many of the kits include their own science-related books, but an additional list of resources is located in the introduction of each kit guide.
Mathematics
Many of the science investigations result in an opportunity for the students to apply mathematics skills in a variety of ways. Students are encouraged to quantify their observations with metric measurements; record and report those same observations with charts, tables, and graphs. Often times students will need to apply mathematical operations to solve problems or answer questions.
Alternatives in Assessment
The Unit Test provided in this guide can be used to determine students’ understanding of the major concepts dealt with in the kit. Unit Tests use a variety of different questions such as multiple choice, fill in the blank, short answer, etc. The Unit Test may be given in a pre-post type format to determine: 1) the increase of students’ understanding as a result of this unit and 2) clarify students’ prior skills and knowledge to determine the direction instruction should take. Kits also include a performance based assessment that gives teachers the opportunity to observe what students actually can do with the science concepts and skills they have learned.

7
Get a CharGe
Teacher Ownership
The success of this program has been strongly dependent upon teacher ownership, especially at the very beginning of the projects’ early stages of developing, piloting, and editing of the core activities. Continued teacher ownership has resulted in the creation of extension activities which provide additional instructional opportunities in all curricular areas. These extensions continue to be developed by classroom teachers using the M.A.S.H. kits. Materials for these extensions may or may not be included in the kit. If you have a great extension idea for a kit activity, please send it to us at Southern Illinois University Edwardsville, Box 2224, Edwardsville, IL, 62026 or call 618-650-3065.

8
Get a CharGe
MAjor PurPoSe
What do rubbing a balloon across your head, shuffling across the floor, and drying clothes without a fabric softener all have in common? Friction and static electricity! With Get A Charge, your students will creatively explore such ideas as static electricity while also experimenting with the basic principles behind such concepts. Through activities found in Get A Charge, students are able to play the role of electrician, engineer, and scientist all in one. By constructing a closed circuit, making a light bulb glow, and creating a switch, students are given the opportunity to explore electricity first-hand. With the Get A Charge kit, students will increase their ability to think scientifically, strengthen their concept knowledge, and enhance their attitude towards the study of science.
objectiveS
After completing Get a Charge, a student will be able to:
Generally:
• based on past observations, develop hypotheses and then test for accuracy• measure objects using the metric system• follow directions of a scientific diagram to successfully construct objects• complete charts to compare information in an efficient and scientific
manner• graph information to allow for quick and easy comparisons
Specifically:
• demonstrate that unlike charges attract and like charges repel• construct a closed circuit by making a bulb light• compare the brightness of bulbs by constructing a series and a parallel
circuit• distinguish between conductors and insulators• create a simple switch by using basic materials• construct a model of an electromagnet
9
Get a CharGe
teAcHer bAckGround inforMAtion:1. Cooperative Learning Groups – All work in this unit is meant to be done
in groups of two to four students. The importance of helping each other and sharing must be stressed. It is helpful if both individual and group goals are set by the teacher and students.
2. Inquiry-Discovery Method – Very little of this material should be TOLD to the students. They should learn by completing the activities in the unit. This provides students with valuable experiences and skills along with learning the content contained in this unit.
3. Play Time – Time should be allowed for students to appreciate Get A Charge materials in a non -structured, informal environment before and during the unit.
4. Battery Storage – Please place the batteries in their proper boxes when finished with the activities. Do not place the batteries in a bag.
5. Unit Introduction – To find out student’s prior knowledge about electricity let the children brain storm. First, place the word electricity on chart paper or butcher paper. List all the words the students give you. Remember when brainstorming all words are accepted. Then, form a semantic mapping by putting the words under different categories. Words that have nothing to do with electricity will naturally be discarded. Finally, have the students write their own definition of electricity.
6. ScientificJournal – Students may want to keep a daily journal of their experiments. This journal can also include usage of the unit vocabulary words and any questions they may have.
7. Creative Writing – A creative writing sheet, in the shape of an light bulb, has been provide with this unit. It may be used with any language arts activity.

10
Get a CharGe
Activity #1Science 11.A.2a, 2b, 2d 12.D.2b 13.A.2b 13.B.2cActivity #2Science 11.A.2a, 2b, 2e 13.A.2a, 2b, 2cActivity #3Science 11.A.2a, 2b 11.B.2a, 2b, 2c, 2d, 2e, 2f 13.A.2a, 2b, 2c 13.B.2dActivity #4Science 11.A.2a, 2b 11.B.2c, 2d, 2e, 2f 13.A.2a, 2bActivity #5Math 10.B.2b, 2dScience 11.A.2a, 2b, 2c, 2d, 2e 13.A.2a, 2b, 2cActivity #6Science 11.A.2a, 2b, 2c, 2d, 2e 11.B.2c, 2d 13.A.2a, 2b 13.B.2a, 2bActivity #7Science 11.A.2a, 2b, 2d 13.A.2a 13.B.2bActivity #8Science 11.A.2a, 2b, 2d 11.B.2c, 2d, 2e 13.A.2a, 2c 13.B.2a, 2c
illinoiS leArninG StAndArdS AdoPted july 1997
Activity #9Science 11.A.2a, 2b 11.B.2a, 2b, 2c, 2d, 2e, 2f 13.A.2a, 2bActivity #10Math 10.B.2a, 2b, 2dScience 11.A.2a, 2b, 2c, 2d 11.B.2c, 2d 13.A.2a, 2b 13.B.2b

11
Get a CharGe
Name _______________________________________
Activity SHeet A
What I Know What I Want to Know What I Learned
I am confused about:

12
Get a CharGe
Name _______________________________________
Activity SHeet bAttitude Survey
Science – Get a Charge
Directions: Please read each of the following statements carefully. Put a check mark by each statement that you agree with.
1. I would rather study science than any other subject.
2. Science is of great value.
3. I really enjoy science.
4. Science is boring.
5. I love to study science.
6. Science is a waste of time.
7. Science will benefit only the smart kids.
8. I have no desire for science.
9. Science is profitable to everyone who takes it.
10. Science is practical.
11. I like science experiments.
12. Science experiments are dumb.
13. . Science teaches me to think.
14. Science is of benefit to me.
15. I hate science.
You may write any additional comments about science that you feel are important.

13
Get a CharGe

14
Get a CharGe
These safety rules may be discussed and posted during science activities or the teacher may have the class generate a list of safety procedures to follow.
SAfety PoSter:1. Always wear proper eye and clothing protection.
2. Work only with materials that have been approved and provided by your teacher. Never take chemicals or equipment from the supply shelf yourself.
3. Never perform an experiment your teacher has not reviewed and given you permission to perform. Listen carefully to the teacher’s instructions and ask for help if you are unsure of what to do.
4. Do not use any equipment that is not working properly or is unsafe for any reason. Report faulty or damaged equipment to your teacher.
5. Tie back long hair. Confine all loose clothing.
6. Always be careful when handling chemicals. Immediately wash chemicals off your skin with water. Get help from your teacher immediately if there are any spills.
7. Never put any equipment in or near your mouth or eyes. Never eat or drink while in the science area.
8. Do not taste anything during an experiment unless the teacher tells you that it is safe.
9. Clean up work area and return all materials to their proper place.
10. Always be careful when handling sharp items such as scissors, mirrors, compasses, pins, tacks, and paper clips.
11. Speak quietly in groups so that directions can be heard.
12. Immediately inform your teacher of any accidents.

15
Get a CharGe
cooPerAtive leArninG: clASSrooM MAnAGeMent tecHniqueS
1. In order for your students to complete the activities successfully, it is essential that they know, and follow, the ten rules for group work:
* Move into groups quietly, without bothering others* Use quiet voices* Stay with your group* Everyone does a job* Everyone shares the work* No one is bossy* Everyone shares materials* Everyone shares ideas* Take turns talking* Care about others’ feelings
2. Initially avoid competition between groups. This can be accomplished by carefully selecting groups in a variety of manners — randomly (i.e. by birthdays), by students’ abilities, or by allowing the students to choose groups for themselves. It is important to note that if the final technique is used to form groups, the students must be made aware that if their group does not perform adequately or productively, alternative selection methods will be employed (i.e. teacher selection).
3. Clearly define the task to be done.4. Be sure there is a “product” connected with the group activity.5. In setting time limits, allow too little time rather than too much time for the
group to finish.6. Each person in the team should play an active role. Regular rotation of roles
should occur to give each student the opportunity to play a different role. Roles students can have are:Principal Investigator:
This person keeps the group members on task, makes sure the activity is understood by all and is completed. Any questions will be immediately clarified with the teacher.
Materials Manager:
This person obtains all supplies the group needs. If the group is large enough, a second Materials Manager can be assigned to be responsible for returning materials to the supply area and having the group clean up its work area..
Recorder/Evaluator:
This person writes down responses that team members have formulated. This person notes how well group members perform their responsibilities, contributing to the overall performance and outcome of the group.
Reporter: This person writes down the group’s conclusions and reports to the class. The reporter may also need to record the group’s data on a class graph or chart. If the group is large enough, two Reporters can be assigned — one to record conclusions and chart data, the other to present their findings to the class.

16
Get a CharGe
7. Follow the Five C’s of Group work to have a safe, and FUN, science activity:
CAUTION: Laboratory group work requires caution in every part. Safety instructions should be followed and a safety checklist should be implemented before each activity.
COOPERATE: To insure successful group work, each member must cooperate with the other members of the group.
CONTRIBUTE: Each member must make an effort to contribute something to the group.
CONTROL: Group work requires control over our body movements, voices, and actions. To avoid chaos in the classroom, control must be practiced by each member of the group.
CLEAN-UP: Each group member must do his or her part to clean up after the activity. Students must make sure the work area is clean and all materials are put away.
8. The culmination of a group activity should be a time of sharing and evaluating how well group members worked together as well as examining the groups’ end results or products.
9. Bulletin Boards
Magnets Electricity T-846, Trend Enterprises, Inc., St. Paul, MN 55164
10. Learning Strategies – You are encouraged to use the following strategy(s) to introduce any lesson in this unit.
KWL strategy suggest that you identify “what you know about the topic” (K), “what you want to know about the topic” (W), and after the lesson, “what you learned” (L). There is also a section on the KWL sheet for what the student is still confused about. Students fill out the first two boxes before the lesson and the last two after the lesson.
Mapping is a technique for visually organizing material. Place a concept word in the middle of the board or butcher paper and let the children give you category words and phrases that fit with your word. See Teacher Activity Sheet 6B for an example.
11. Attitude Survey – The attitude survey is optional.
12. Safety – Electricity can be very dangerous. The lessons in this unit are very safe. Be sure to stress general safety when dealing with electricity.
17
Get a CharGe
RESOURCE LIST:
The ESC Center Region 16 has the following materials:
Computer Software
Basic Electricity, Micro Med, 87-800, SC 2-7, Apple.
Videos
Current Electricity, Mr. Wizard, 372.3 Books
Dimensions of Thinking, Marzano, Bob, 372.8 Dime.
Electricity and Magnetism, Pomeroy, J., 523.018 Pome.
TOPS Learning System, Marson, Ron 537 Mars.
All About Cooperative Learning, Brown, M., 371.3 Brow.
18
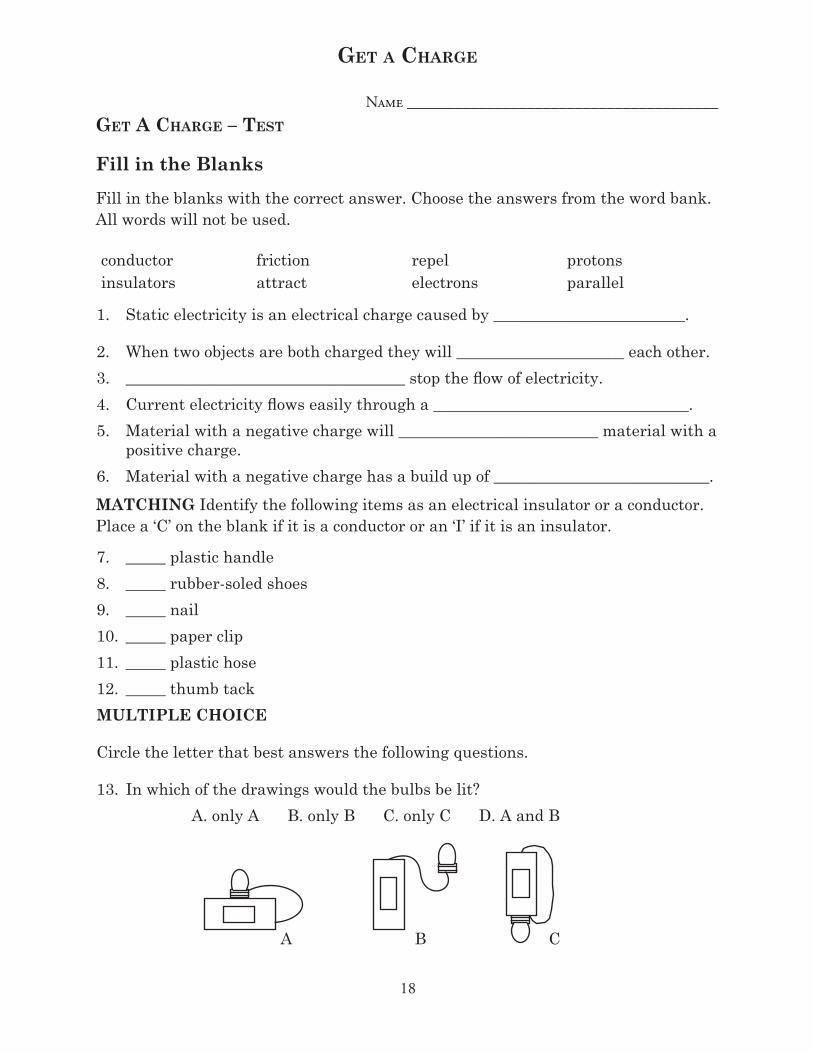
Get a CharGe
1. Static electricity is an electrical charge caused by ________________________.
2. When two objects are both charged they will _____________________ each other.3. ___________________________________ stop the flow of electricity.4. Current electricity flows easily through a ________________________________.5. Material with a negative charge will _________________________ material with a
positive charge.6. Material with a negative charge has a build up of ___________________________.MATCHING Identify the following items as an electrical insulator or a conductor. Place a ‘C’ on the blank if it is a conductor or an ‘I’ if it is an insulator.
7. _____ plastic handle8. _____ rubber-soled shoes9. _____ nail10. _____ paper clip11. _____ plastic hose12. _____ thumb tackMULTIPLE CHOICE
Circle the letter that best answers the following questions.
13. In which of the drawings would the bulbs be lit? A. only A B. only B C. only C D. A and B
Name _______________________________________
Fill in the BlanksFill in the blanks with the correct answer. Choose the answers from the word bank. All words will not be used.
conductor friction repel protonsinsulators attract electrons parallel
A B C
Get A cHArGe – teSt

19
Get a CharGe
14. In which of the drawings are the bulbs in a series circuit? A. only A B. only B C. only C D. A and B
15. In which of the drawings are the bulbs in a parallel circuit? A. only A B. only B C. only C D. B and C
16. Which of the symbols represents a bulb? A. B. C. D.
17. Which of the symbols represent a battery? A. B. C. D.
18. In which of the drawings are there two batteries?
A. only A B. only B C. only C D. A and B
A B C
A B C
A B C

20
Get a CharGe
19. In which of the drawings will the electromagnet pick up the most nails?
A. B . C . D.
20. In which of the drawings would the bulb be lit?
A. only A B. only B C. only C D. A and B
SHORT ANSWER: Answer the following questions in complete sentences.
21. How would the strength of an electromagnet containing twenty turns of wire compare with the same kind of electromagnet with ten turns of wire?
22. Explain the difference between an open and closed switch.
A
A
B
B
C
C
D

21
Get a CharGe
Get A cHArGe teSt - AnSwer key
1. Friction2. Repel3. Insulators4. Conductor5. Attract6. Electrons7. I8. I9. C10. C11. I12. C13. C14. D15. D16. B17. A18. B19. D20. A21. The electromagnet with 20 turns will be stronger than the one with 10 turns.22. In a closed switch the metal touches and electricity flows. In an open switch the
electricity cannot flow.

22
Get a CharGe
Activity #1: StAtic electricity
TIME: 30 Minutes
OBJECTIVE: Develop a hypothesis that friction causes static electricity.
TEACHER BACKGROUND INFORMATION: Normally, the atoms within a material are neutral, having an equal number of electron (-) and protons (+). However, friction between certain materials causes electrons to move from one material to the other. When electrons are added to a material, the material has a negative charge. When electrons are taken from a material, the material has a positive charge. Electrical charges caused by friction are called static electricity. Materials with like charges repel each other. Materials with unlike charges attract each other. A dry day will produce better results than one that is humid.
MATERIALS: Balloon Sheet of paper Plastic wrap Wool cloth Student activity sheet lA Student activity sheet 1
PROCEDURE:
1. Distribute balloons and wool cloth.
2. Blow up balloon and tie neck tightly.
3. Have students hold the balloon to the wall to see what happens. The balloon should fall to the floor.
4. Take the wool cloth and rub the balloon.
5. Hold the balloon to the wall. It will stick. The wall is neutral, but when the balloon is held next to the wall it attracts the positive charges. See picture.
6. Take a piece of paper. Hold it against the wall. Let go of the paper. Observe what happens. The paper should drop. Now hold it against the wall and rub it vigorously with your hand. What happens? It should adhere to the wall. Lift a corner. What happens? The paper should drop.
7 . Try rubbing the paper with other materials (plastic wrap, wool, pencil). Which material gives you the greatest charge?

23
Get a CharGe
8. Repeat with plastic wrap against the wall. Rub with wool cloth. Try other materials. What happens?
9. Draw the hypothesis: Friction (the rubbing) causes static electricity.
FORMATIVE EVALUATION: Discuss with your students their observations.
Have them formulate a hypothesis.

24
Get a CharGe
MATERIALS: Balloon, plastic wrap, sheet of paper, wool cloth
PROCEDURE:
1. Blow up the balloon and tie the neck tightly.
2. Hold the balloon next to the wall. Let go of the balloon. Record your observation.
3. Take a piece of wool cloth and rub the balloon. Hold the balloon to the wall. Let go. Record your results.
4. Take a piece of paper. Hold it against the wall. Let go of the paper. Record your observation.
5. Hold the paper against the wall and rub it vigorously with your hand. Let go of the paper. Record your results. What happens when you lift one corner? Record your results.
6. Take a piece of plastic wrap. Hold it against the wall. Let go of the plastic wrap. Record your observation.
7. Take a piece of plastic wrap. Hold it against the wall. Rub the wrap with your hand. Record the results.
8. Try other materials to charge the paper and plastic wrap. Examples: rub the paper with another piece of paper, rub it with a wool cloth, etc. Record your results.
9. Answer the following questions:
Why does the balloon stick to the wall?
What made the electrons transfer from one object to the other in this activity?
Formulate a hypothesis about what causes static electricity.
Name _______________________________________StAtic electricity
25
Get a CharGe
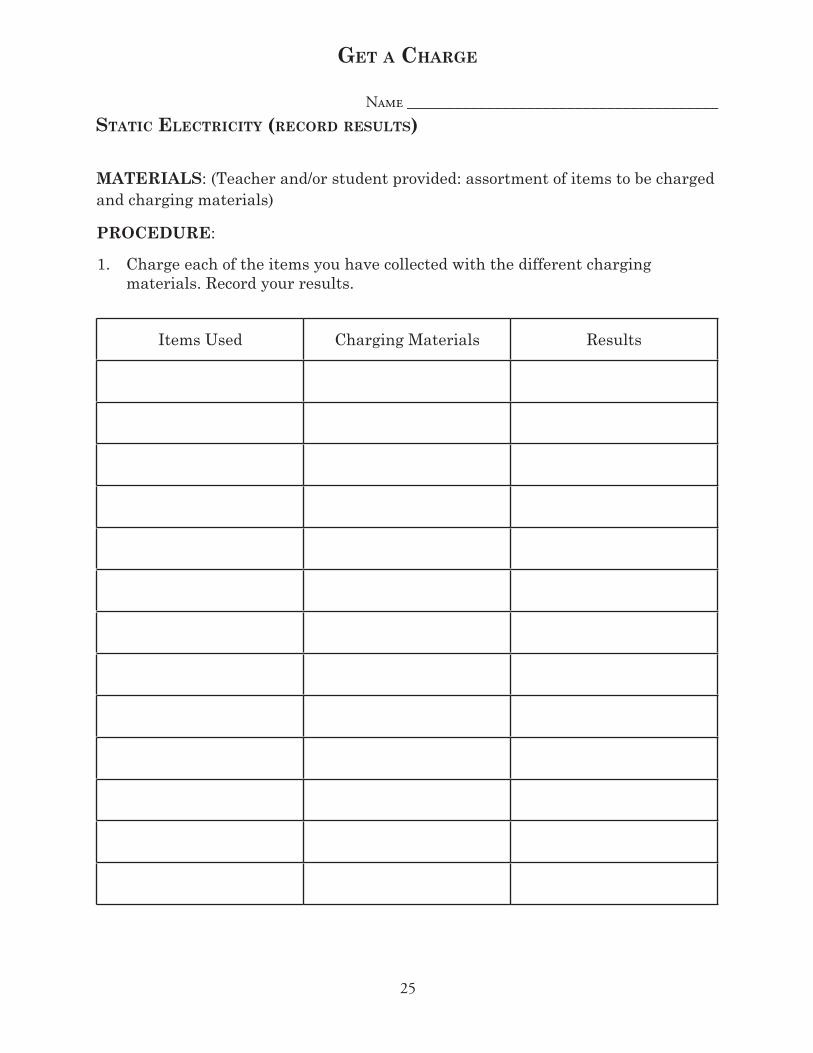
Name _______________________________________StAtic electricity (record reSultS)
MATERIALS: (Teacher and/or student provided: assortment of items to be charged and charging materials)
PROCEDURE:
1. Charge each of the items you have collected with the different charging materials. Record your results.
Items Used Charging Materials Results
26
Get a CharGe
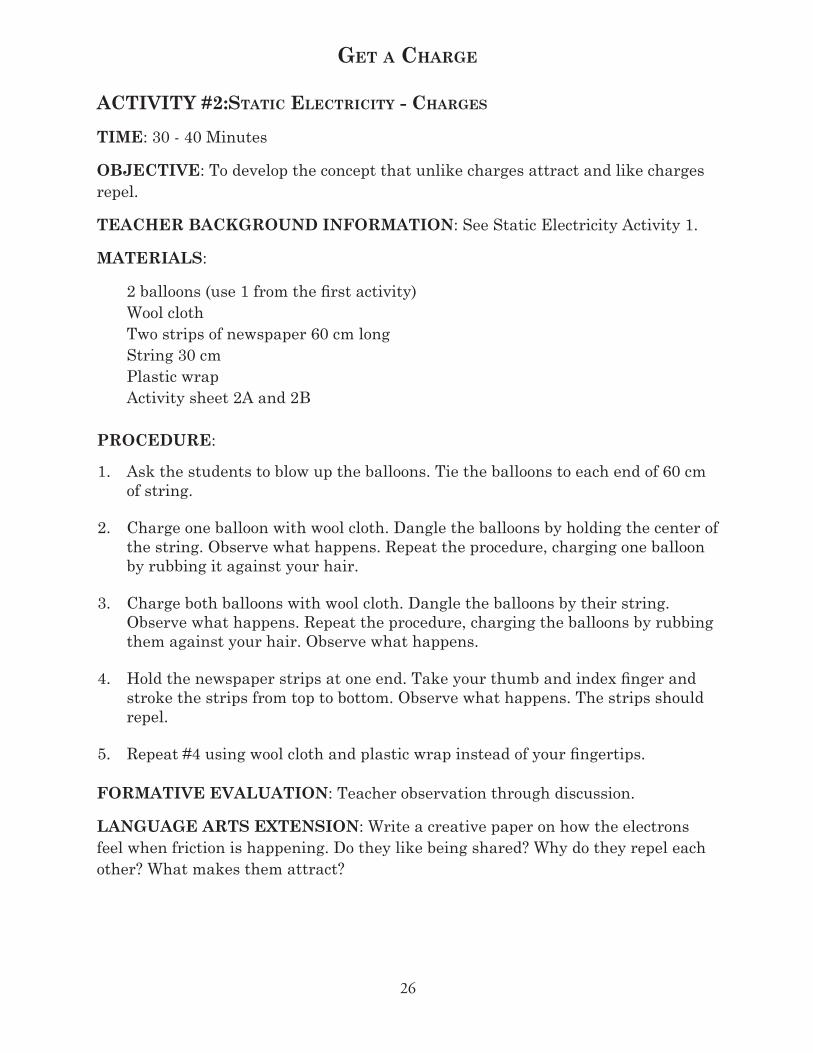
Activity #2:StAtic electricity - cHArGeS
TIME: 30 - 40 Minutes
OBJECTIVE: To develop the concept that unlike charges attract and like charges repel.
TEACHER BACKGROUND INFORMATION: See Static Electricity Activity 1.
MATERIALS:
2 balloons (use 1 from the first activity) Wool cloth Two strips of newspaper 60 cm long String 30 cm Plastic wrap Activity sheet 2A and 2B
PROCEDURE:
1. Ask the students to blow up the balloons. Tie the balloons to each end of 60 cm of string.
2. Charge one balloon with wool cloth. Dangle the balloons by holding the center of the string. Observe what happens. Repeat the procedure, charging one balloon by rubbing it against your hair.
3. Charge both balloons with wool cloth. Dangle the balloons by their string. Observe what happens. Repeat the procedure, charging the balloons by rubbing them against your hair. Observe what happens.
4. Hold the newspaper strips at one end. Take your thumb and index finger and stroke the strips from top to bottom. Observe what happens. The strips should repel.
5. Repeat #4 using wool cloth and plastic wrap instead of your fingertips.
FORMATIVE EVALUATION: Teacher observation through discussion.
LANGUAGE ARTS EXTENSION: Write a creative paper on how the electrons feel when friction is happening. Do they like being shared? Why do they repel each other? What makes them attract?

27
Get a CharGe
Science extenSion iMATERIALS: Strip of paper 15 cm by 3 cm, wool cloth, (Teacher and/or student provided: pan of water, comb, scissors)
TEACHER BACKGROUND INFORMATION: Humidity plays a big role in the success of this activity. Try to do this on a dry day with low humidity.
PROCEDURE:
1. Cut two slits in the paper. Then slide the slits into each other. See picture.
2. Put the fish in a pan of water.
3. Charge the comb with the wool cloth.
4. Move the comb near the fish. Do not touch the fish or pan with the comb. Observe what happens.
5. Answer the following questions:
What happens after you charge the comb and hold it near the fish?
Why is it important that the comb not touch anything?

28
Get a CharGe
Science extenSion iiMATERIALS: Wool, (Teacher and/or student provided: plastic comb, small piece of paper)
PROCEDURE:
1. Make tiny pieces of confetti from your piece of paper. Try to pick up the confetti with your comb. Observe what happens.
2. Rub or charge the comb with wool cloth.
3. Move the comb near the confetti. Observe what happens.

29
Get a CharGe
Name _______________________________________Activity SHeet 2-A StAtic electricity – cHArGeS
MATERIALS: Two strips of newspaper 60 cm long, string 30 cm, wool cloth, two balloons, plastic wrap
PROCEDURE:
1. Blow up balloons. Tie string around the neck of the balloons.
2. Charge one balloon by rubbing it with the wool cloth. Hold the balloons by the string. Record the results on the chart.
3. Charge both balloons with the wool cloth. Hold the balloons by their string. Record your results.
4. Take two strips of newspaper. Hold the strips together at one end. Take your thumb and index fingers and stroke the strips from top to bottom. Record your results.
5. Repeat number 4 using a wool cloth and plastic wrap instead of your fingers. Record your results.
6. Answer the following questions:
Why were the balloons attracted to each other when only one balloon was charged?
Why did the balloons repel when both were charged?
Formulate a hypothesis about like and unlike charges.

30
Get a CharGe
Name _______________________________________Activity SHeet 2-b StAtic electricity – cHArGeS
MATERIALS: Strip of paper 15 cm by 3 cm, wool cloth, (Teacher and/or student provided: pan of water, comb, scissors)
PROCEDURE:
1. Cut two slits in the paper. Then slide the slits into each other. See picture.
2. Put the fish in a pan of water.
3. Charge the comb with the wool cloth.
4. Move the comb near the fish. Do not touch the fish or pan with the comb. Observe what happens.
5. Answer the following questions:
What happens after you charge the comb and hold it near the fish?
Why is it important that the comb not touch anything?

31
Get a CharGe
Activity SHeet 2-c 3cM x 15cM StriPS

32
Get a CharGe
Activity #3: MAke it liGHt
TIME: 45 Minutes
OBJECTIVE: Students will construct and draw a closed circuit.
TEACHER BACKGROUND INFORMATION: The teacher should refrain from predicting outcomes. A closed circuit occurs when all the metal parts of the circuit are connected and the current can flow to the light bulb and make it glow. An open circuit occurs when there is a break in the circuit and the light will not glow.
MATERIALS: Batteries Bulbs Wires Student prediction 3A
Student activity 3B
PROCEDURE:
1. Pass out one bulb, one 15-20 cm piece of wire, and one battery to each child.
2. Ask the students to see if they can make their bulbs light. Allow them to experiment to see how many different ways they can make the bulb light up.
3. Now, let the students attempt to light the bulb with reference to the prediction sheet.
4. Have students draw at least four different ways to light the bulb. Refer to activity sheet 3B.
FORMATIVE EVALUATION: Classroom discussion and activity sheet 3B.
LANGUAGE ARTS EXTENSION: Have students write a paragraph explaining how to form a closed circuit.

33
Get a CharGe
Student Activity SHeetS 3A And 3b: MAke it liGHt – AnSwer key
3A:
1. yes2. yes3. yes4. no5. no6. no7. yes8. no9. yes10. no11. no12. noNote: Answers can vary according to whether batteries have a plastic coating or not.
3B:
Answers will vary when students draw pictures of ways they made the bulbs light.

34
Get a CharGe
Name _______________________________________Student Activity SHeet 3-A MAke it liGHt Prediction SHeet
Try to duplicate the drawings below. Write “YES” next to the drawing if the bulb will light. Write “NO” next to the drawing if the bulb will not light
12
3
4
7
10 11
12
98
5
6

35
Get a CharGe
Name _______________________________________Student Activity SHeet 3-b MAke it liGHt Prediction SHeet
Draw a picture of four different ways you made the bulb light.
Extra: Draw pictures of ways you tried in which the bulb did not light.

36
Get a CharGe
Activity #4: MAkinG circuitS
TIME: 45 Minutes
OBJECTIVE: The learner will demonstrate a series and parallel circuit.
TEACHER BACKGROUND INFORMATION: In a series circuit there is only one path for electricity to follow. If that path is broken, electricity will not flow. In a parallel circuit there is more than one path for electricity to follow.
MATERIALS:
Bulbs (2) Battery Battery holders Bulb bases (2) Wires (4) Student activity sheet 4A
PROCEDURE:
1. Pass out materials and activity sheet 4A.
2. Students should make a series circuit and complete activity sheet.
3. Pass out activity sheet 4B. Students should make a parallel circuit and complete the sheet.
Student Activity SHeet 4A, 4b, And 4c AnSwer key
FORMATIVE EVALUATION: Teacher observation and activity sheets 4A and 4B.
4A Question AnswerDescribe the brightness of the bulb. Answers will varyHow has the brightness changed? Bulbs burn at a dimmer brightnessDescribe what happened to the remaining bulb. The remaining bulb goes out
4B Describe the brightness of the bulb. Answers will varyHow did the brightness of the second bulb change? Brightness stays the sameWhat happened to the other bulb? It remains lit
4C Refer to teacher background information

37
Get a CharGe
Name _______________________________________Student Activity SHeet 4-A SerieS circuit
Illustration 4A
Using a flashlight bulb, bulb base, two wires, a battery bolder, and two battery clips assemble the circuit illustrated above. Describe the brightness of the bulb.
“ D ”
Illustration 4B
Add a second bulb and base as illustrated above. How has the brightness changed?
In a series circuit, each bulb is dependent on all of the other bulbs for a complete circuit.
In a series circuit, the voltage of the battery is divided between the bulbs. Now, unscrew one of the bulbs. Describe what happened to the remaining bulb when you removed one bulb.
“ D ”

38
Get a CharGe
Name _______________________________________Student Activity SHeet 4-b PArAllel circuitS
Illustration 4C
Illustration 4D
Using a flashlight bulb, bulb base, two wires, a battery holder, and two battery clips. Assemble the circuit illustrated above. Describe the brightness of the bulb.
Now, add a second bulb and base as illustrated above. How did adding the second bulb to the circuit change the brightness of the second bulb?
In a parallel circuit, each bulb receives the full voltage produced by the battery.
While you have both bulbs lite, remove one bulb from the socket. What happens to the other bulb?
In a parallel circuit, each bulb operates separately from the others.

39
Get a CharGe
Name _______________________________________Student Activity SHeet 4-c MAkinG circuitS
Draw a picture of a series circuit.
Draw a picture of two different parallel circuits. Explain the difference between a series and a parallel circuit.

40
Get a CharGe
Activity #5: bAttery burnout
TIME: 20-30 minutes first day, 5 minutes daily thereafter, 20 minutes for final graphing exercise.
OBJECTIVE: Students will compare the price of batteries versus their longevity.
TEACHER BACKGROUND INFORMATION: There are many brands and types of batteries on the market. This activity must be closely monitored to be done scientifically. Each battery must be turned on and off at exactly the same time. Two students should be in charge of each battery. You decide the best time to turn them on and off. The number of test stations set up will be determined by the number of different batteries brought in. An alternative to this would be to test the same type of batteries to see if they all last the same length of time.
TEACHER/STUDENT PROVIDED MATERIALS:
Three different brands of new ‘D’ cell batteries Light bulbs Wire of all the same length Bulb holders Activity sheet 5A Activity sheet 5B
PROCEDURE:
1. Predict which brand will last the longest.
2. Pass out activity sheet 5B. Fill in the names of the batteries and their cost.
3. Assemble a simple series circuit. Daily, record the number of hours and minutes the bulb is lit.
4. Transfer your recorded information to your graph.
5. After the experiment is over decide which battery is the best value for your money.
FORMATIVE EVALUATION: Activity sheet 5B and classroom discussion.
LANGUAGE ARTS EXTENSION: Have each group write a persuasive paragraph about their brand of battery.

41
Get a CharGe
MATH EXTENSION: Graph the results of the number of hours each battery worked.
SCIENCE EXTENSION: Discuss your results and how the design of your experiment may have affected these results.

42
Get a CharGe
Name _______________________________________Student Activity SHeet 5-A bAttery burnout
MATERIALS: Light bulbs Wire, all the same length Bulb holders Activity sheet 5B Teacher and/or student provided: three different brands of new ‘D’ cell batteries
PROCEDURE:
1. Predict which brand will last the longest.
2. Fill in the names of the batteries and their cost in the correct locations on Activity Sheet 5B.
3. Assemble a simple series circuit. Daily, record the number of hours and minutes the bulb is lit.
4. Transfer your recorded information to a graph.
5. After the experiment is over decide which battery is the best value for your money.

43
Get a CharGe
Name _______________________________________Student Activity SHeet 5-b bAttery burnout
Battery Brand Price Date Time On Time Off # Hours/Minutes1.
GRAND TOTAL2.
GRAND TOTAL3.
GRAND TOTAL

44
Get a CharGe

45
Get a CharGe
Activity #6: conduction
TIME: 45 Minutes
OBJECTIVE: Students will distinguish between conductors and insulators by testing a variety of materials.
TEACHER BACKGROUND INFORMATION: When electrons flow through a conductor an electric current is produced. All materials resist the flow of electrons. Good conductors, such as metals, provide little resistance. Poor conductors, such as plastic and rubber provide high resistance.
Use webbing to introduce the lesson. Use teacher activity sheet as a guide.
MATERIALS: Battery holder/two electrical clips ‘D’ cell battery, Flashlight bulb Bulb socket Three pieces of wire - 20cm each Student activity sheet 6A Student activity sheet 6B
TESTING MATERIALS: Cotton balls, nails, rubber bands, brass fasteners, paper clips, sponge, thumbtacks, clothespins, aluminum foil. Teacher and/or students can provide additional testing materials.

46
Get a CharGe
PROCEDURE:
1. Write the word conduction on the board. Have students brainstorm and put their words and phrases on the board in the form of a web. See teacher activity sheet 6-A.
2. Give students activity sheet 6B (second sheet) and let them predict which items will be conductors and which ones will be insulators. Have them record their predictions in front of the item by placing a ‘C’ for conductor and an ‘I’ for insulator.
3. Distribute materials and connect the wire, flashlight bulb, and dry cell as shown on activity sheet 6A.
4. Place the stripped end of each wire onto the testing materials. Do not touch the two ends of the wire together.
What happened to the light?
If it lights up, is it an insulator or a conductor?
5. Record the results on the chart on activity sheet 6B.
6. Write a conclusion that compares your results with your predictions. Also draw a conclusion about materials that are conductors and insulators.
FORMATIVE EVALUATION: Through class discussion develop a large classroom chart that shows which items were conductors and which ones were insulators. Leave openings for future testing of materials.
LANGUAGE ARTS EXTENSION: Have students write a comparison that concludes the differences between conductors and insulators.
MATH EXTENSION: Have each group graph the number of items that they found to be conductors or insulators of electricity. You may use the items in this activity, however have your students try out as many items from around the room as possible. Have each group compare their findings and then find the classroom average for both the number of conductors and insulators.

47
Get a CharGe
Student Activity SHeet 6-A conduction & 6-b conduction cHArt AnSwer key
6A:
7. Answers may vary. Metals conduct electricity, others do not.
6B:
Cotton Ball — NoNail — YesRubber Band — No Brad Fastener — Yes Paper Clip — Yes Sponge — No Thumbtack — YesClothespin — No (Yes, if it includes metal)Aluminum Foil — Yes Plastic Chip — No

48
Get a CharGe
teAcHer Activity SHeet: conduction web
Write the concept word, conduction, in the middle of the web. Write category words in the other circles. Let the students come up with their own categories from the words that they listed during the brainstorming. Place all of their words under the appropriate category. Below is just a sample.

49
Get a CharGe
Name _______________________________________Student Activity SHeet 6-b conduction
MATERIALS: One ‘D’ cell battery, bulb base, flashlight bulb, three pieces of wire, battery holder, two electrical, clips
TESTING MATERIALS: Cotton ball, nail, rubber band, brass fastener, paper clip, sponge, thumbtack, clothespin, and aluminum foil. Teacher and/or students can provide additional testing materials.
PROCEDURE:
1. Write the names of the testing materials on the chart.
2. Predict which items will be conductors and which ones will be insulators. Record your predictions in front of the items by placing an ‘I’ for insulator and a ‘C’ for conductor.
3. Assemble the conduction tester like the picture below.
4. Place the testing materials between the two wires, touch both wires to the testing materials. Do not let the two wires touch.
5. Record your results on the chart.
6. Were all of your predictions correct?
7. What conclusions can you make about objects that do or do not conduct electricity?

50
Get a CharGe
Name _______________________________________Student Activity SHeet 6-b conduction cHArt
Objects Tested Conducts ElectricityYes No
Cotton Ball
Nail
Rubber Band
Bread Fastener
Paper Clip
Sponge
Thumbtack
Clothespin
Aluminum Foil
Other Materials:

51
Get a CharGe
Activity #7: SwitcHeS
TIME: 35 Minutes
OBJECTIVE: The learner will construct a switch and understand the difference between a closed and open circuit.
TEACHER BACKGROUND INFORMATION: In this lesson the students will construct a switch. Look at the picture for guidance.
MATERIALS: Lamp assembly (bulb holder, battery holder, and connecting wires) Two thumbtacks Two insulated wires (stripped at the ends) Clothespin Activity sheet 7A
PROCEDURE:
We recommend that the teacher to do steps 1-3 ahead of time. This task can be difficult for some students and they may cause the clothespin to split. They may also stick themselves with the thumbtacks. Once the thumbtacks are in the clothespins, there is no need to remove them.
1. Take one wire and wrap the stripped end around the pin of a thumbtack. Push the pin lightly into the mouth of the clothespin. (Illustration 7A)
2. Take the other wire and wrap the stripped end around the pin of the other thumbtack. Push the pin lightly into the other side of the mouth of the clothespin.
3. Now, squeeze the mouth of the clothespin together to drive the thumbtacks deeper into the wood. Be careful not to drive them so deep that they protrude through the other sides.
4. Take the other ends of the wires and connect them to make a circuit as shown in Illustration 7A.
5. Open the clothespin. See what happens. Close the clothespin. Observe what happens.
FORMATIVE EVALUATION: Teacher observation during the activity and activity sheet.

52
Get a CharGe
Student Activity SHeet 7-A SwitcHeS AnSwer key
6. The conductors must touch for the electricity to flow. Insulation will keep the electricity from flowing. No, because the rock stops the flow.

53
Get a CharGe
Name _______________________________________Student Activity SHeet 7-A SwitcHeS
MATERIALS: Lamp assembly (bulb holder, battery holder, and wire), two thumbtacks, two insulated wires (stripped at the ends), and clothespin
PROCEDURE:
1. Take one wire and wrap the stripped end around the pin of a thumbtack. Push the pin lightly into the mouth of the clothespin. (Illustration 7A)
2. Take the other wire and wrap the stripped end around the pin of the other thumbtack. Push the pin lightly into the other side of the mouth of the clothespin.
3. Now, squeeze the mouth of the clothespin together to drive the thumbtacks deeper into the wood. Be careful not to drive them so deeply that they protrude through the other sides.
4. Take the other ends of the wire and connect them to complete the circuit in Illustration 7A.
5. Open the clothespin. Observe what happens. Close the clothespin. Observe what happens. NOTE: When you have finished the exercise, leave the thumbtacks in the clothespins.
Illustration 7A
6. Answer the following questions:
Why is a closed circuit needed to make the bulb light?
Why do you think part of the wire must be stripped of insulation to make the switch work?
Suppose you put a rock in the clothespin’s mouth making sure it touches the thumbtacks. Will the bulb light? Why or why not.

54
Get a CharGe
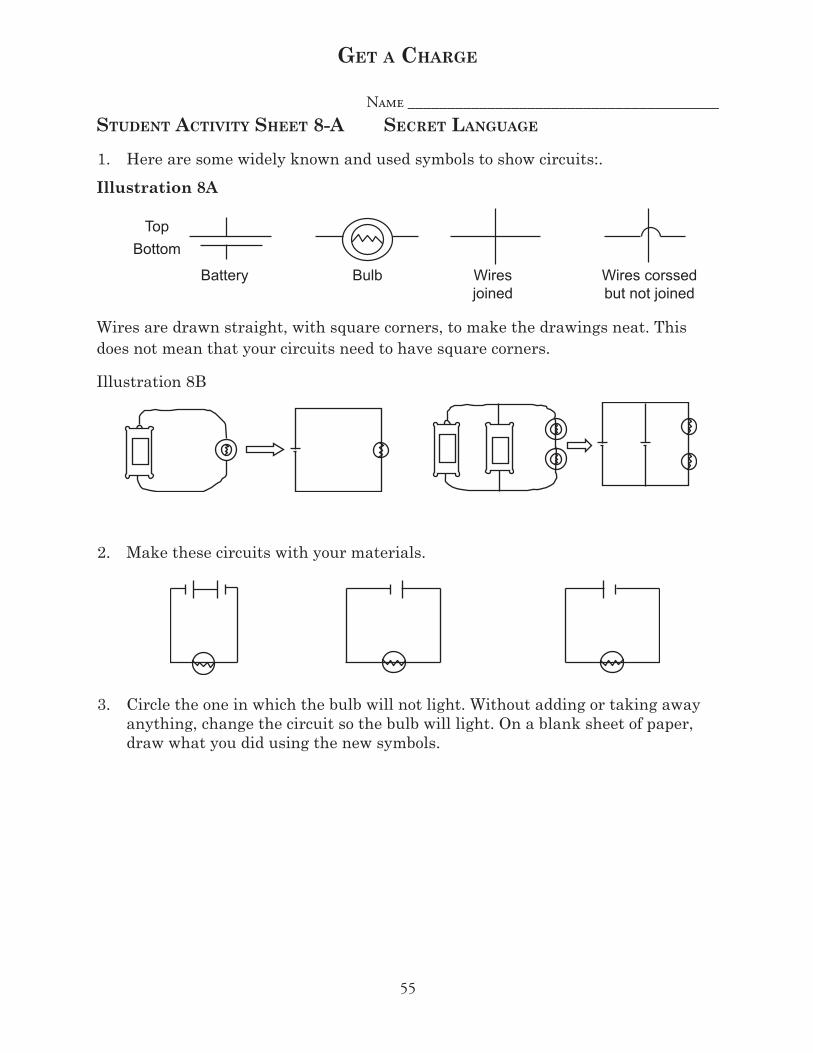
Activity #8: A Secret lAnGuAGe
TIME: 45 – 60 Minutes
OBJECTIVE: To construct circuits that match diagrams with commonly used electrical symbols.
MATERIALS:Each pair should have: 1 bulb 2 batteries 2, 20 cm wires 2, 5 cm wires 1 bulb holder Activity sheet 8A Activity sheet 8B
PROCEDURE:
1. Point out the need to have a universal language in making diagrams so everyone can understand what we are trying to say.
2. Pass out activity sheet 8A.
3. Discuss each symbol with the class on activity sheet 8A
4. Pass out materials.
5. Have the pairs construct models of the circuits represented in the diagrams and complete activity sheets.
6. Pass out activity sheet 8B. Have students complete.
FORMATIVE EVALUATION: Activity sheet 8B
Student Activity SHeet 8b Secret lAnGuAGe AnSwer key
1. H2. D3. G4. A
5. C6. E7. F8. B
55
Get a CharGe
Student Activity SHeet 8-A Secret lAnGuAGe
1. Here are some widely known and used symbols to show circuits:.Illustration 8A
Wires are drawn straight, with square corners, to make the drawings neat. This does not mean that your circuits need to have square corners.
Illustration 8B
2. Make these circuits with your materials.
3. Circle the one in which the bulb will not light. Without adding or taking away anything, change the circuit so the bulb will light. On a blank sheet of paper, draw what you did using the new symbols.
TopBottom
Battery Bulb Wiresjoined
Wires corssedbut not joined
Name _______________________________________

56
Get a CharGe
Student Activity SHeet 8-b Secret lAnGuAGe
Name _______________________________________
Match the circuits at the top of the secret language diagrams on the bottom. Put the letter of the correct answer in the blank.
12
3 4
8
765
DCBA
E F G H

57
Get a CharGe
Activity #9: An electroMAGnet
TIME: 45 – 60 Minutes
OBJECTIVE: Students will construct a model of an electromagnet. Students will explore the general properties of the electromagnet.
TEACHER BACKGROUND INFORMATION: An electromagnet is a magnet that is made with current electricity. When the current stops, the magnet stops working.
The teacher should let the students construct the electromagnet with as little help as possible. Ask the students how they will know if their electromagnet is working. After the electromagnet is assembled ask questions such as:
What objects can the electromagnet pick up?
Where is the best place on the magnet to pick up the clips? Do both ends work?
Do they work individually or at the same time? Is the nail hot?
After the electromagnet has successfully been assembled, save it for activity 10, Magnetism and Coils.
MATERIALS:
Battery holder
‘D’ cell battery
1 wire 100 cm long
1 large nail 8-10 cm long
Paper clips
Student activity sheet 9A
Student activity sheet 9B
Student activity sheet 9C

58
Get a CharGe
PROCEDURE:
1. Show the materials that will be needed to make an electromagnet. You may want to draw the electrical symbols on the board. See activity sheet 8A.
2. Have the students predict how an electromagnet should be assembled by drawing a picture of it in the first box of activity sheet 9B.
3. Distribute all of the materials to cooperative learning groups of 2-4. Stress how they will know if the electromagnet is working.
4. Allow several minutes for the groups of students to construct the electromagnet. Offer help only to those who exhibit frustration. If a group is totally lost encourage them with questions such as:
Where does the source of power come from? Are the wires hooked up?
If all else fails refer them to the picture of the electromagnet on activity sheet 9C. Do not do it for them.
5. Draw a picture of the assembled electromagnet in the second box of activity sheet 9B.
6. Ask the questions given under teacher information.
7. Have each student summarize the differences between what they imagined and what they actually did.
LANGUAGE ARTS EXTENSION: Students can write directions on how to make an electromagnet by using the signal words, first, then, next, now, and finally.
SCIENCE EXTENSIONS:
Compare strengths of magnets with different thicknesses of centers. Add more nails.
Compare strengths of electromagnets with different thicknesses of wire. Compare strengths of electromagnets with different types of materials for the
center.
Student Activity SHeet 9A — An electroMAGnet AnSwer key
6. All the metal objects. The tip of the nail. Yes. All the same time. Yes.

59
Get a CharGe
Student Activity SHeet 9-A An electroMAGnet
Name _______________________________________
MATERIALS: Battery holder, ‘D’ cell battery, 1 wire 100 cm long, 1 large nail 8-10 cm long, paper clips
PROCEDURE:
1. Predict how an electromagnet should be assembled by drawing a picture of it in the first box on activity sheet 9B.
2. Using the proper materials, construct the electromagnet.
3. Test your electromagnet to see if you made it correctly.
4. Draw a picture of the assembled electromagnet in the second box of activity sheet 9B.
5. Summarize the difference between what you imagined and what you actually did.
6. Answer the following questions:
What objects can the electromagnet pick up?
Where is the best place on the magnet to pick up the clips?
Do both ends work?
Do the ends work individually or at the same time?
Is the nail hot?

60
Get a CharGe
Student Activity SHeet 9-b An electroMAGnet
Name _______________________________________
What I imagined:
What I actually did:
Differences:

61
Get a CharGe
Student Activity SHeet 9-c An electroMAGnet
Name _______________________________________
Make an electromagnet like the one pictured below:
Illustration 9A
'D'

62
Get a CharGe
Activity #10: MAGnetiSM And coilS
TIME: 45 Minutes
OBJECTIVE: Students will compare the strength of an electromagnet with the numbers of coils around the nail.
TEACHER BACKGROUND INFORMATION: The strength of an electromagnet in this experiment depends on the number of coils wrapped around the nail. All coils must touch each other. The paper clips should be picked up end to end, so that the test can be done the same way each time.
When doing the additional activities change only one variable at a time, such as:
1. More sources of power.
2. Distances between coils.
3. Thickness of nails.
MATERIALS: Battery holders ‘D’ cell batteries 1 wire 100 cm long 1 large nail 8-10 cm long Several paper clips Student activity sheets 10A, 10B, and 10C
PROCEDURE:
1. Hand out activity sheet 10A, 10B, and 10C. Have students record their prediction of what will happen to the strength of the magnet when they increase the number of coils.
2. Distribute all of the materials to cooperative learning groups of 2-4 students.
3. Identify the variables of the experiment as a one 10 cm nail and the number of coils.
4. Confirm the prediction through an experiment by having students start with 5 coils. The students should test the strength by measuring the number of paper clips the nail will pick up. Have them record their information on Activity Sheet 10B.
63
Get a CharGe
5. They can now add 5 more coils of wire to the nail and test their prediction. Again, have the students record the number of coils and the number of clips that the electromagnet will pick up.
6. Based on their first experiment, ask them to make a hypothesis: The more times you wrap the wire around the nail, the stronger the magnet becomes.
7. They can now continue to test their hypothesis by adding more coils in increments of five. Have them continue to record their information. Increments of five are used to make certain there will be a variation in the number of paper clips the nail will pick up. The strength of the battery will also be a factor.
8. They can transfer this recorded information using the graph paper provided. At this level, students should be able to plot the X and Y axes, label the independent (manipulated) and dependent (responding) variables, and name the graph.
FORMATIVE EVALUATION: Class discussion of student Activity Sheet 10A.
MATH EXTENSION: Using the graph, have students make ratios such as 10 coils/ 4 clips, and see if there is a pattern to the ratios. Can they estimate where the next point might be on the graph?
SCIENCE EXTENSIONS:
Add a battery in a series circuit. Add a battery in a parallel circuit.
Change the size of the center by adding more nails.
Test if there is a difference in the strength of the electromagnet if the number of coils are the same, but the distance in between each coil is different.

64
Get a CharGe
Student Activity SHeet 10-A MAGnetiSM And coilS
Name _______________________________________
MATERIALS: Battery holder, one ‘D’ cell battery, 1 wire 100 cm long, 1 large nail 8-10 cm long, and several paper clips
PROCEDURE:
1. On Activity Sheet 10B, predict what will happen to the strength of the magnet if the number of coils is increased.
2. Identify the variables of the experiment and write them after your prediction.
3. Confirm your prediction through an experiment. Start with 5 coils. Test the strength by measuring the number of paper clips the nail will pick up. Record your information on Activity Sheet 10B.
4. Add 5 more coils of wire to the nail and test your prediction. Again, record the number of coils and the number of clips that the electromagnet will pick up. Was your prediction correct?
5. Based on your first experiment, make a hypothesis.
6. Continue to test your hypothesis by adding more coils in increments of five. Continue recording your information. Was your hypothesis correct?
7. Transfer this recorded information using the graph paper provided. Plot the X and Y axes, label the independent (manipulated) and dependent (responding) variables, and name your graph.
8. Can you think of a science project you might develop from this experiment?

65
Get a CharGe
Student Activity SHeet 10-b MAGnetiSM And coilS
Name _______________________________________
Prediction: _________________________________________________________________
Coils Clips Coils Clips
Hypothesis: _________________________________________________________________static electricity the positive or negative electric charges in objects.
Related Documents


