OPERA PMS Reference Manual Opera Hotel Edition Version 4.0 ©2006 MICROS ® Systems Inc. All Rig hts Reserved. P roprietary and C onfidential. 1

Welcome message from author
This document is posted to help you gain knowledge. Please leave a comment to let me know what you think about it! Share it to your friends and learn new things together.
Transcript

7/31/2019 GEN V40 PMS Reference Manual FINAL Eng Ch
http://slidepdf.com/reader/full/gen-v40-pms-reference-manual-final-eng-ch 1/474
OPERA PMS Reference Manual Opera Hotel Edition Version 4.0
©2006 MICROS® Systems Inc. All Rights Reserved. P roprietary and C onfidential.
1

7/31/2019 GEN V40 PMS Reference Manual FINAL Eng Ch
http://slidepdf.com/reader/full/gen-v40-pms-reference-manual-final-eng-ch 2/474

7/31/2019 GEN V40 PMS Reference Manual FINAL Eng Ch
http://slidepdf.com/reader/full/gen-v40-pms-reference-manual-final-eng-ch 3/474
Table of Contents
CHAPTER 1 - I NTRODUCTI ON 12
Welcom e to t he OPERA Proper t y Management System 13 How this manual is organized 13
Add i t i ona l Resources 14 Online Help 14Hyperlinks 14 eLearning 14Training Activity Workbook 14
Naviga t iona l A ids 15 Operational Suggestions 15
Key Concepts 15Extremely Important 15
Recogn iz ing So f tw are Term s and Operat ions 16 Press a Key - Click the Mouse - Select a Button 16Screens 16 Fields 16Numbered Steps 17
CHAPTER 2 - PROFI LES 18
Pro f il e I n t r oduc t i on 19
Profile Types 19Profile Search 20
Creating a New Individual Profile 21Creating a New Company, Travel Agent, or Source Profile 22Profile Statistics and Information 24
Pro f i l e Opt ions 26 Attachment 26
Changes 27Credit Cards 28 Delete 29Future 29
History 30Merge 32Negotiated Rates 33 Notes 35Preferences 37
Privacy 40Relationship 41
CHAPTER 3 - RESERVATI ONS 4 3
©2006 MICROS® Systems Inc. All Rights Reserved. P roprietary and C onfidential.
3

7/31/2019 GEN V40 PMS Reference Manual FINAL Eng Ch
http://slidepdf.com/reader/full/gen-v40-pms-reference-manual-final-eng-ch 4/474
New Reserva t ions 45 New Reservation with Rate Query 45Search and Edit Reservation 57
Multiple Rate Reservation 58Fixed Rate Reservation 61 Name Change on a Reservation 62Reservation with Multiple Profiles 64 Reservation with Negotiated Rate 65Individual Group Reservation 69
Cancel a Reservation 70Reinstate a Reservation 70Waitlist a Reservation 72
Reserva t ion Opt ions 75 Accompany-ing Guest 75
Add-On Reservation (Copy) 76
Agent/ Company 77 Alerts 78Billing 79 Caller Info 79Cancel 79Changes 80 Confirmation 81Credit Cards 82
Delete 82Deposit/CXL 82
Facility Scheduler 84Fixed Charges 85
History 86Housekeeping 86Locators 87 Messages 88Package Option 89
Party 89Privileges 91
Pro-Forma Folio 92Queue 93Rate Info 93Register Card 93Room Move 94
Routing 95
Shares 100 Traces 104Track It 105
Waitlist 105Wake Up Calls 105
Add i t i ona l Reserva t ion Fea tu res 106 Room Plan 106Floor Plan 107
Batch Confirmations 108
©2006 MICROS® Systems Inc. All Rights Reserved. P roprietary and C onfidential.
4

7/31/2019 GEN V40 PMS Reference Manual FINAL Eng Ch
http://slidepdf.com/reader/full/gen-v40-pms-reference-manual-final-eng-ch 5/474
Calendar 110
CHAPTER 4 – FRONT DESK 1 12
Arr i va ls and Check I n 113 Searching for Arrivals 113Checking In a Guest 116
Checking In a Walk-In Guest 118
Queue Reserva t ions 121 Placing an Arrival into Queue 121Managing the Queue 123
I n House Guests 124 Searching for In-House Guests 124
Editing In-House Guest Records 124 Canceling a Check-In 126
Add i t i ona l Fron t Desk Fea tu res 128 Accounts – Posting Masters 128Room Assignment – Individual 129
Room Assignment – Auto 131Room Assignment – Unassign 133 Messages 134Traces – Viewing and Resolving 139Wake Up Calls 140
CHAPTER 5 - CASHI ERI NG 1 43
Cashier ing Basics 14 5 Understand Debits and Credits 145Cashier Login 145
Navigating Folios 146Posting a Charge 147
Transfer Charges to/from Another Room 148Transfer Charges to/from Another Folio Window 150Posting Payments 151
Preview, Print, and File a Folio 152Split a Charge 155 Adjusting a Charge 156
Adjust an Interface or Night Audit Posting 157 Correct / Edit a Charge 158Guest Refunds and Paid Outs 159
Bi l li ng Opt ions 160 Credit Cards 160Fixed Charges 161 Package Options 161Phone Details 162
Posting History 163
©2006 MICROS® Systems Inc. All Rights Reserved. P roprietary and C onfidential.
5
7/31/2019 GEN V40 PMS Reference Manual FINAL Eng Ch
http://slidepdf.com/reader/full/gen-v40-pms-reference-manual-final-eng-ch 6/474
Post Rate Code 164Privileges 164Routing 165
Additional Options 165
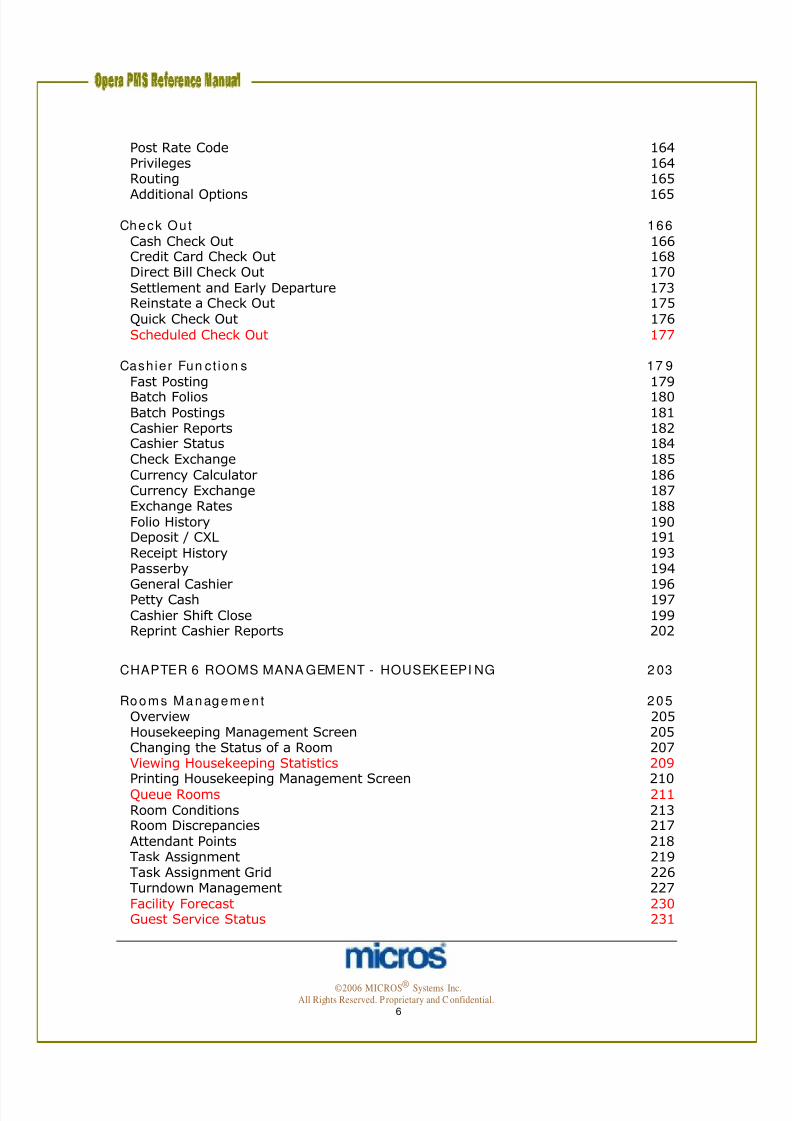
Check Out 166 Cash Check Out 166Credit Card Check Out 168 Direct Bill Check Out 170Settlement and Early Departure 173 Reinstate a Check Out 175Quick Check Out 176Scheduled Check Out 177
Cashier Fun ct ion s 17 9 Fast Posting 179
Batch Folios 180Batch Postings 181
Cashier Reports 182Cashier Status 184
Check Exchange 185Currency Calculator 186Currency Exchange 187
Exchange Rates 188Folio History 190 Deposit / CXL 191Receipt History 193
Passerby 194
General Cashier 196 Petty Cash 197Cashier Shift Close 199Reprint Cashier Reports 202
CHAPTER 6 ROOMS MANA GEMENT - HOUSEKEEPI NG 2 03
Rooms Managemen t 205 Overview 205Housekeeping Management Screen 205 Changing the Status of a Room 207Viewing Housekeeping Statistics 209 Printing Housekeeping Management Screen 210Queue Rooms 211Room Conditions 213 Room Discrepancies 217Attendant Points 218
Task Assignment 219Task Assignment Grid 226
Turndown Management 227Facility Forecast 230 Guest Service Status 231
©2006 MICROS® Systems Inc. All Rights Reserved. P roprietary and C onfidential.
6

7/31/2019 GEN V40 PMS Reference Manual FINAL Eng Ch
http://slidepdf.com/reader/full/gen-v40-pms-reference-manual-final-eng-ch 7/474
Add i t i ona l Rooms Management Opt ions 232 Out of Order / Out of Service 232Room History 235
Overbooking 236Occupancy Graph 237 Maintenance 238
CHAPTER 7 – ACCOUNTS RECEI VABLE 2 4 0
AR Ove rv i ew 241 AR Pre- Requisites 241 Transfer F/O Data 242
Accoun t Ma in tenance 244 New AR Account 244
View AR Accounts 246View and Modify AR Invoice Details 247 Create a New AR Invoice 248Adjust an AR Invoice 249
Apply an Unallocated Payment 250Applying Payments to Oldest Invoices or Selectively 251
Apply Payment and Close an Invoice 253Unapply Payment – Write Off 254Reverse Payment 255
Compress Invoices 255
Accoun t ing Opt ion s 258 Account Setup 258
Aging 259 Close Invoice 259Fixed Charges 259
Future Resv. 259AR Notes 260Post History 261
Pay History 261Profile 262
Reminders - Individual 262Statements - Individual 263 Traces 264Transfer 266 Year View 267
Add i t i ona l AR Fea tu res 268 Research 268
AR Credit Cards 270Batch Processing Statements 271 Batch Reminders 273Statement and Reminder History 275
AR Batch Posting 275AR Detailed Aging Report 277
©2006 MICROS® Systems Inc. All Rights Reserved. P roprietary and C onfidential.
7

7/31/2019 GEN V40 PMS Reference Manual FINAL Eng Ch
http://slidepdf.com/reader/full/gen-v40-pms-reference-manual-final-eng-ch 8/474
AR Daily Checklist 278
CHAPTER 8 - MI SCELLANEOUS 2 80
Quick Keys 281 Show Quick Keys 281F1 – Opera Help 282
Shift F1 – Occupancy Graph 284Control F1 – Keyboard Shortcuts 285 Shift F2 – Control Panel 286Control F2 – Detailed Availability 287 F3 – Available Room Search 289Shift F3 – House Status 290Control F3 – Room Plan 292 Shift F4 – Inquiry 293
Control F4 – Dashboard 294 F5 – Rate Query 296Shift F5 - Floor Plan 298
Shift F6 – Quick Book 299F7 – New Reservation 299 Shift F7 – Telephone Book 299Control F7 – Telephone Operator 301F8 – Log Out 302 Shift F8 – Interfaces Submenu 302Control F8 – Maximum Availability 303
Shift F9 – Function Diary 303
Add i t i ona l Miscel laneous Fea tu res 304
Reports 304Reports Scheduler 306
Interfaces 309Change Password 310Track It – Dashboard 310
Track It – Valet 313Log Book 315 Registration Cards 316
Advanced Misce l laneous Featu res 31 7 Data Extraction 317Print Tasks 322
User Activity Log 323Memberships 325File Export 326 File Download 329
CHAPTER 9 – END OF DAY 3 30 Overview 331Pre-Audit Work 332
Running the Audit 335Post-Audit Work 337
©2006 MICROS® Systems Inc. All Rights Reserved. P roprietary and C onfidential.
8

7/31/2019 GEN V40 PMS Reference Manual FINAL Eng Ch
http://slidepdf.com/reader/full/gen-v40-pms-reference-manual-final-eng-ch 9/474
Reprint Night Audit Reports 338
CHAPTER 10 – BUSI NESS BLOCKS - GROUPS 3 39
Gro up Basics 34 1 Business Block vs. Quick Business Block 341Group Status Codes 341
Group Block Search 344Inquiry 345 New Block Header 348Quick Business Block 354 Block Grid 357Range Rooms to Grid 359Wash Rooms from Grid 361 Room Type Priorities in Grid 362
Group Block Reservations 363
Group Opt ions 365 Rooming List 366
Rooming List with Shares 367Rooming List Quick Split 370
Rooming List Import 371Room Assign 371Room Status 372
Check In Group 373New Posting Master 374 Delete 374Cut Keys 374
Print Registration Cards 375
Block Opt ions 376 Add PM 376Changes 376Copy 377
Cutoff 378Deposit / CXL 378
Notes 379Item Inventory 379 Shift Date 380Statistics 381 Custom Tour Series 382Refresh Rates 383Wash Schedule 384
Add i t i ona l Group Featu res 385 Block Charge Routing 385 Cancel a Group 386Family Blocks 387
CHAPTER 11 – COMMI SSI ON HANDLI NG 38 8
©2006 MICROS® Systems Inc. All Rights Reserved. P roprietary and C onfidential.
9
7/31/2019 GEN V40 PMS Reference Manual FINAL Eng Ch
http://slidepdf.com/reader/full/gen-v40-pms-reference-manual-final-eng-ch 10/474
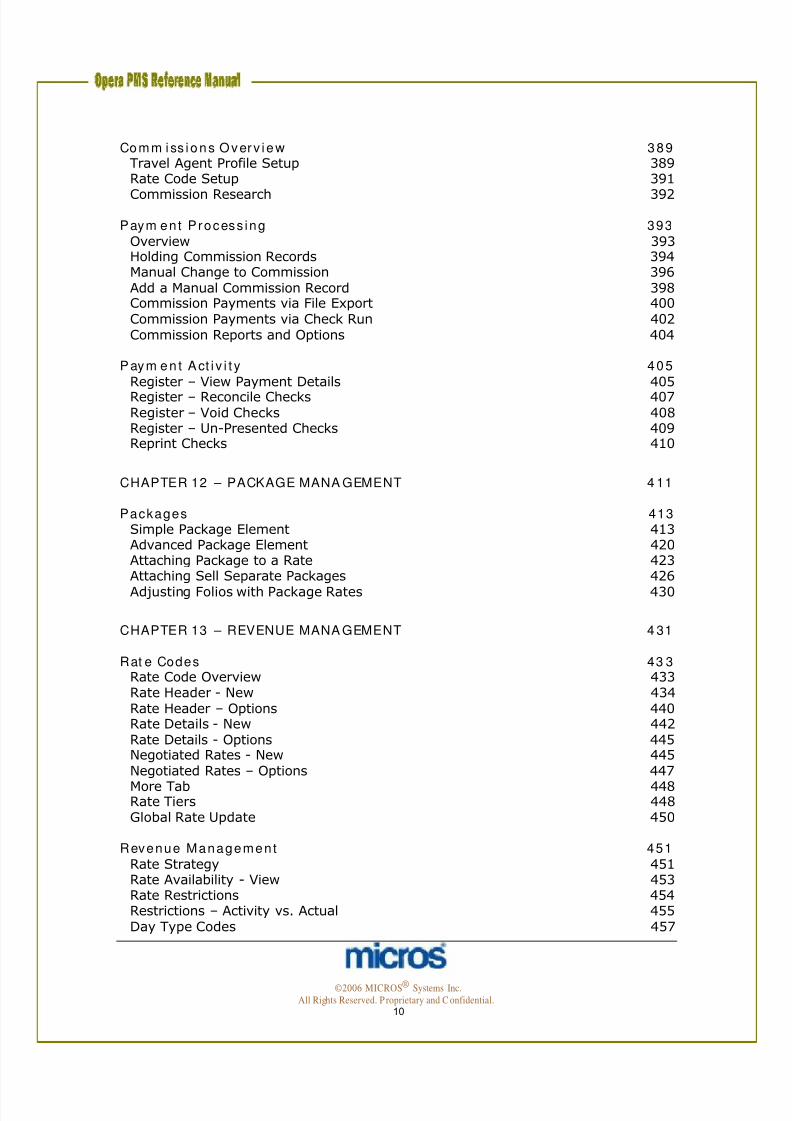
Comm iss i ons Overv i ew 389 Travel Agent Profile Setup 389Rate Code Setup 391
Commission Research 392
Paym ent Process ing 393 Overview 393Holding Commission Records 394 Manual Change to Commission 396Add a Manual Commission Record 398 Commission Payments via File Export 400Commission Payments via Check Run 402Commission Reports and Options 404
Paym en t Act i v i t y 405 Register – View Payment Details 405
Register – Reconcile Checks 407Register – Void Checks 408
Register – Un-Presented Checks 409Reprint Checks 410
CHAPTER 12 – PACKAGE MANA GEMENT 4 11
Packages 413 Simple Package Element 413
Advanced Package Element 420Attaching Package to a Rate 423
Attaching Sell Separate Packages 426
Adjusting Folios with Package Rates 430
CHAPTER 13 – REVENUE MANA GEMENT 4 31
Rat e Codes 43 3 Rate Code Overview 433Rate Header - New 434Rate Header – Options 440 Rate Details - New 442Rate Details - Options 445 Negotiated Rates - New 445Negotiated Rates – Options 447
More Tab 448Rate Tiers 448 Global Rate Update 450
Revenue Management 451 Rate Strategy 451
Rate Availability - View 453Rate Restrictions 454
Restrictions – Activity vs. Actual 455Day Type Codes 457
©2006 MICROS® Systems Inc. All Rights Reserved. P roprietary and C onfidential.
10
7/31/2019 GEN V40 PMS Reference Manual FINAL Eng Ch
http://slidepdf.com/reader/full/gen-v40-pms-reference-manual-final-eng-ch 11/474
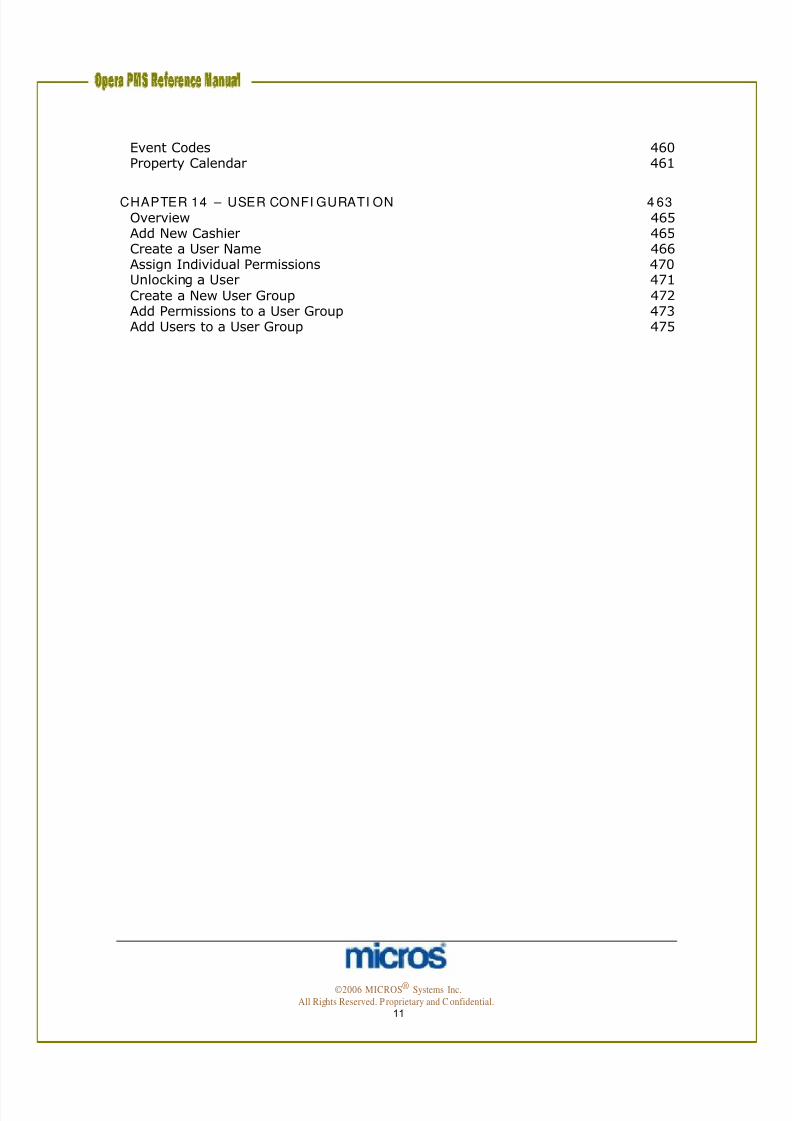
Event Codes 460Property Calendar 461
CHAPTER 14 – USER CONFI GURATI ON 4 63 Overview 465Add New Cashier 465 Create a User Name 466Assign Individual Permissions 470 Unlocking a User 471Create a New User Group 472
Add Permissions to a User Group 473Add Users to a User Group 475
©2006 MICROS® Systems Inc. All Rights Reserved. P roprietary and C onfidential.
11

7/31/2019 GEN V40 PMS Reference Manual FINAL Eng Ch
http://slidepdf.com/reader/full/gen-v40-pms-reference-manual-final-eng-ch 12/474
Chapter 1 - Introduction
©2006 MICROS® Systems Inc. All Rights Reserved. P roprietary and C onfidential.
12

7/31/2019 GEN V40 PMS Reference Manual FINAL Eng Ch
http://slidepdf.com/reader/full/gen-v40-pms-reference-manual-final-eng-ch 13/474
Welcome to the OPERA Property Management System This Reference Manual serves as a reference tool that answers your questionsabout the use and operation of the O pera Hotel Edition software system. It is
intended to guide you through how to use most functionality in the PropertyManagement System. How thismanual isorganized
This manual follows the design of the Opera modules in addition to severalsupplemental management chapters.
The manual contains the following chapters:
1. Introduction
2. Reservations
3. Front D esk
4. Cashiering
5. Room s Management-Housekeeping
6. Accounting
7. Miscellaneous
8. End of D ay-Night Audit
9. Groups
10. Commissions
11. Packages
12. User Management
13. Rate-Revenue Management
14. Index
©2006 MICROS® Systems Inc. All Rights Reserved. P roprietary and C onfidential.
13

7/31/2019 GEN V40 PMS Reference Manual FINAL Eng Ch
http://slidepdf.com/reader/full/gen-v40-pms-reference-manual-final-eng-ch 14/474
Additional Resources
While th is Manual will be your on-site reference to ol, there are a variety of additional resources available to you. When you need to check on a process orlook up add itional information there are several additional resources available thatcan answer your questions quickly and easily.
Online Help When you are actually working in the software, the m ost quickly accessibleresource is the OPERA On-Line Help Function.
Pressing the F1 key displays OPERA’s On-Line Help from any screen in thesystem.
Hyperlinks Hyperlinks appear in the electronic version of this Training Guide:Table of Con tents Hyperlink
Clicking an item in the Table of Contents navigates you to that page of thedocument. After reviewing the inform ation, you can click the header of eachchapter to go back to the Table of Con tents.
eLearning Training of new employees or retraining of current employees may be performedvia the O pera eLearning CD s provided during your installation. Should yourequire additional CDs, you may purchase them by sending an email [email protected].
Training
ActivityWorkbook
This workbook, used during the Opera installation is a valuable tool to use whentraining your new employees. After they have completed the Opera E-Learning
CDs they may then take manager-guided training via the Workbook, whichreinforces and builds on the topics learned in eLearning. Th is Workboo k offersactivities to be performed live in the Opera system using your Training schema.
©2006 MICROS® Systems Inc. All Rights Reserved. P roprietary and C onfidential.
14

7/31/2019 GEN V40 PMS Reference Manual FINAL Eng Ch
http://slidepdf.com/reader/full/gen-v40-pms-reference-manual-final-eng-ch 15/474
Navigational Aids
As you use this manual as your guide to successful Opera PMS softwareoperation, you will notice several symbols that we have created to reinforce andcall attention to vital points. Please become familiar with these symbols, as theywill play an impo rtant part in your understanding of the conten t in th is guide.You will find these aids in the left column of this manual:
Operational Suggestions
The compass will direct you to recommendations and “best practices” forsoftware operation . Tho ugh there are many ways to perform most functions inthe system, it is our suggestion that you follow this practice for maximumsystem performance. This symb ol can also a suggestion o r process that isdirectly related to p roviding your guests with the h ighest level of service andsatisfaction possible.
Key Concepts This symbol represents a “key concept” that is especially important to youroverall und erstanding of the software and its function ality. This symbol canalso indicate operational suggestion or key factor that increases the p rofitabilityof your prop erty and will help you to maximize revenue production.
Extremely Important
Info rmation highlighted by this symbol is extremely importan t; you will want to focus o n and review this information carefully.
©2006 MICROS® Systems Inc. All Rights Reserved. P roprietary and C onfidential.
15

7/31/2019 GEN V40 PMS Reference Manual FINAL Eng Ch
http://slidepdf.com/reader/full/gen-v40-pms-reference-manual-final-eng-ch 16/474
Recognizing Software Terms and Operations
As you begin your exploration of the O PERA Property Management System, youwill find that new terms are quickly entering your vocabulary. As you may or maynot know, we present information in software system documentation in specificways to assist you with quickly recognizing and p erforming tasks.
Press a Key - Click the Mouse -Select a Button
As you probably know, there are three primary ways to give commands and makethe software perform in a certain way:
1. Pressing a key on the keyboard2. Placing the cursor in a part icular place on th e screen and clicking the mouse3. Placing the mouse cursor on a button that appears on the screen and then
clicking th e mouse.
In this Guide, if we instruct to press a key, the name of that key will be presentedbo ld type.
Example:
Press the F1 key to access O nline H elp.
Likewise, if you are to place the cursor at a particular point on the screen, or on aparticular but ton that appears on the screen and then click the mouse to performthe operation , the name o f the operation you are performing is also printed inbo ld type.
Examples:
Select OK to save.
Click in the Name field, enter the guest last name and select Search. Screens The system organizes software tasks on screens that appear on the mo nitor.
When instructions refer to a specific screen, the screen name appears in capitalletters and in bo ld text.
Example:
From the RATE QUERY DETAILS screen, select…. Fields A field is an area of a screen where you are asked to enter information (i.e. the
user Name field). In this guide, references to fields also appear in bold text.
Example:
Enter the Block Code you wish to search for and select Search .
©2006 MICROS® Systems Inc. All Rights Reserved. P roprietary and C onfidential.
16

7/31/2019 GEN V40 PMS Reference Manual FINAL Eng Ch
http://slidepdf.com/reader/full/gen-v40-pms-reference-manual-final-eng-ch 17/474
Numbered Steps
In most cases, each software procedure is broken down into a number of specificsteps. In cases where there are multiple steps required for you to perform a task
within the system, they are numbered.
Example:
Follow the steps below to edit a reservation:
1. Locate the reservation using the RESERVATION SEARCH screen.2. O nce you locate the reservation , select Edit.3. Make any modifications you wish and choose OK to save changes.
©2006 MICROS® Systems Inc. All Rights Reserved. P roprietary and C onfidential.
17

7/31/2019 GEN V40 PMS Reference Manual FINAL Eng Ch
http://slidepdf.com/reader/full/gen-v40-pms-reference-manual-final-eng-ch 18/474
Chapter 2 - Profiles
©2006 MICROS® Systems Inc. All Rights Reserved. P roprietary and C onfidential.
18

7/31/2019 GEN V40 PMS Reference Manual FINAL Eng Ch
http://slidepdf.com/reader/full/gen-v40-pms-reference-manual-final-eng-ch 19/474
Profile Introduction
Use of P rofiles not only provides a way of tracking repeats business but allowinginformation such as guest preferences remains on guest’s profile. Pro files allow usto serve our guests each time th ey return to the hotel in a more efficient m anner.
Every reservation m ust have an individual (or guest) profile attached to it. Profilescan be simp le, with a first and last name and address only, or comp lex withpreferences and notes. Profiles also simp lify and speed up the reservation p rocessbecause we already have the guest, company, or travel agent information on file.
Profile Types
O PE RA uses six types of profiles. The screens for each profile type loo k similarbut are different in the fields they con tain. All Profiles store names, addresses, anddemographic data:
Individual profiles contain each guest’s personal information . Every reservationmust have an individual profile. All revenue and con tributions for each individualreservation track through the individual profile. Making a reservation for a firsttime guest at your ho tel automatically creates a guest’s individual profile.
Company profiles track production statistics, are used for direct bill chargerouting, for indicating negotiated rates and many other reasons. AR num bersoften exists on com pany profiles for direct billing purposes. N egotiated rates alsolink to company profiles.
Source profiles track the volume of bookings a caller makes. Source profiles track
referrals from Conventions, Visitors Bureaus and In ternet Booking Engines. Amost com mon use for Source profiles is Price line, Expedia and Secretary’s Clubs.
Contact profiles track meeting planner production and are commonly used if yourho tel uses the OP ERA Sales and Catering system. While contacts may no t behotel guests, it is useful to register their addresses and telephone numbers forsoliciting future group business.
Group profiles link reservations to groups. Th ey also assist in routing charges andtracking production p er group. The Group profile creates when the GroupBusiness Block creates. Most frequently, G roup pro files track con tracted businessand room night p roduction.
Travel Agent profiles are used to pay commissions and for tracking productionstatistics by travel agency. Entering the agency’s IATA numbers on the profilesensure commissions pay directly to the appropriate agency.
©2006 MICROS® Systems Inc. All Rights Reserved. P roprietary and C onfidential.
19

7/31/2019 GEN V40 PMS Reference Manual FINAL Eng Ch
http://slidepdf.com/reader/full/gen-v40-pms-reference-manual-final-eng-ch 20/474
Profile Search
From the main menu, select Reservations and Profiles. The PROFILE
SEARCH screen displays.
1. E nter the last name in the Name field and ch oose the profile type desired from the View By field. Partial entries in the search criteria return a greatnumber of results.
2. Highlight the desired profile and open it by double clicking on the profile orby selecting Edit.
©2006 MICROS® Systems Inc. All Rights Reserved. P roprietary and C onfidential.
20
7/31/2019 GEN V40 PMS Reference Manual FINAL Eng Ch
http://slidepdf.com/reader/full/gen-v40-pms-reference-manual-final-eng-ch 21/474
Creating aNewIndividualProfile
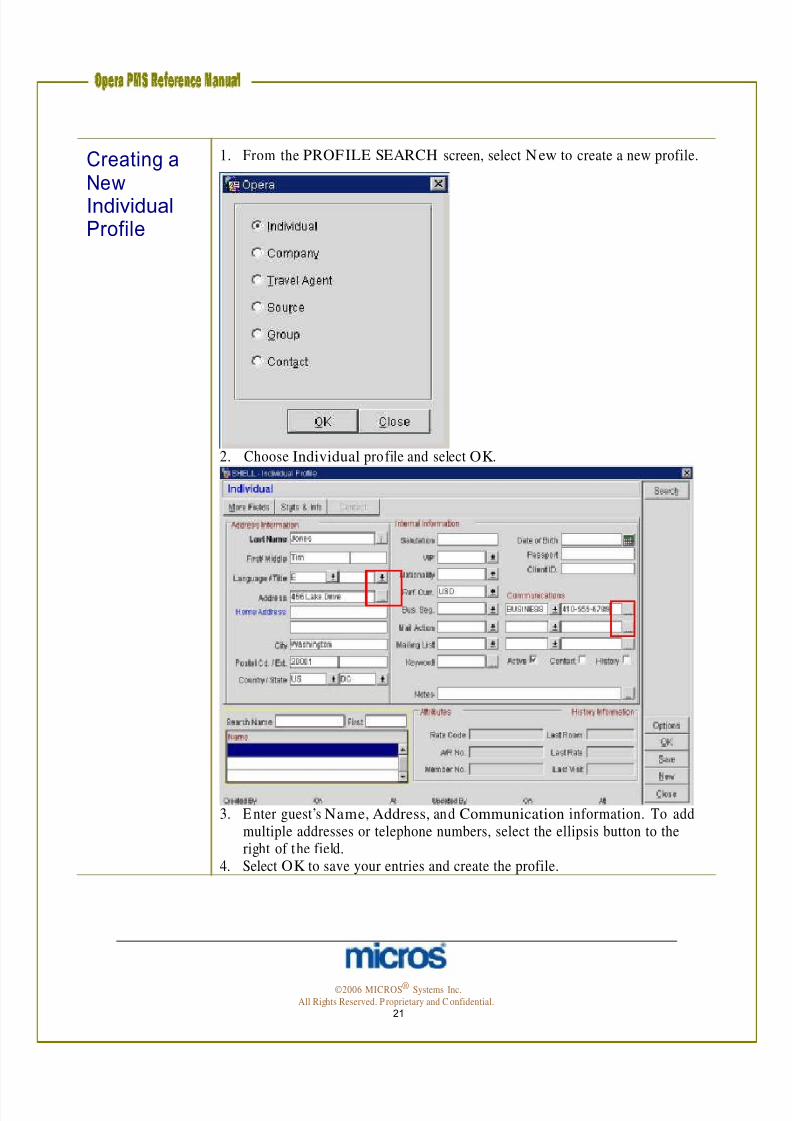
1. From the PROFILE SEARCH screen, select New to create a new profile.
2. Choose Individual profile and select OK.
3. E nter guest’s Name, Address, and Communication information. To add multiple addresses or telephone numbers, select the ellipsis button to theright of the field.
4. Select OK to save your entries and create the profile.
©2006 MICROS® Systems Inc. All Rights Reserved. P roprietary and C onfidential.
21

7/31/2019 GEN V40 PMS Reference Manual FINAL Eng Ch
http://slidepdf.com/reader/full/gen-v40-pms-reference-manual-final-eng-ch 22/474
Creating aNewCompany,Travel Agent,or SourceProfile
When creating an account pro file (i.e. Comp any, Travel Agent, or Source), manyof the same steps used in creating an Individual profiles apply; however, some
fields are different.1. From the PROFILE SEARCH screen, select New to create a new profile.
2. Choose Company, Travel Agent or Source profile and select OK.
©2006 MICROS® Systems Inc. All Rights Reserved. P roprietary and C onfidential.
22
7/31/2019 GEN V40 PMS Reference Manual FINAL Eng Ch
http://slidepdf.com/reader/full/gen-v40-pms-reference-manual-final-eng-ch 23/474
3. Enter Account, Address, and Communications . To add multiple addressesor telephone numbers, choose on th e ellipsis button to th e right of the field.
4. The Type field designates whether th is is Com pany, Travel Agent, or Sourceprofile.5. If this is a Travel Agent profile, enter their IATA number in the field
indicated.6. If this is a Com pany profile, enter their Corp. ID number in the field
indicated.7. Select OK to save the profile.NOTE: If owner fun ctionality is active, the Owner field is a mandatory field onaccount profiles. O wner designates person within the hotel that is respon siblefor the account. This is typically the sales agent.
©2006 MICROS® Systems Inc. All Rights Reserved. P roprietary and C onfidential.
23

7/31/2019 GEN V40 PMS Reference Manual FINAL Eng Ch
http://slidepdf.com/reader/full/gen-v40-pms-reference-manual-final-eng-ch 24/474
ProfileStatisticsandInformation
STATS & INFO screens (a tab at the top of any profile) displays the following:
• Total Guest Stays
• Total G uest Revenue
• Total N o-Show Reservations
• Total Canceled Reservations
Use the steps below to locate profile statistics and information:
1. From the PROFILE SEARCH screen, search fo r and locate your p rofile.2. Select Edit to open the profile.3. Select the Stats & Info tab at the top of the screen.
OPERA displays a summary of all past reservations for the year for this guest or company, as well as a comparison to the previous year’s activity.
NOTE: All Pro file H istory is for your ho tel on ly. The database of profileinformation is specific to your hotel.
4. Check the Restricted field to indicate the account is on a restricted list andenter a Rule in the field. If you select this option, when settling a folio to thisaccount or attaching this profile to a reservation the message you type in heredisplays to the user. Your ho tel policy determ ines how to handle restrictedaccounts.
©2006 MICROS® Systems Inc. All Rights Reserved. P roprietary and C onfidential.
24
7/31/2019 GEN V40 PMS Reference Manual FINAL Eng Ch
http://slidepdf.com/reader/full/gen-v40-pms-reference-manual-final-eng-ch 25/474
5. Use the Language down arrow to choo se the preferred language for thisprofile.
6. You can also create an AR account for the company by clicking on the dropdown arrow next to the A/ R No. field and completing the SETUPACCOUNT screen. (You must have user permission to create ARaccounts.)
NOTE: See the Accounts Receivable chapter of this manual for completeinstructions on creating AR accounts.
7. Select OK to return to the main profile screen.
©2006 MICROS® Systems Inc. All Rights Reserved. P roprietary and C onfidential.
25

7/31/2019 GEN V40 PMS Reference Manual FINAL Eng Ch
http://slidepdf.com/reader/full/gen-v40-pms-reference-manual-final-eng-ch 26/474
Profile Options
To view and utilize advanced pro file functionality, Edit and select Options.
Attachment Attachments allow you to select and create file attachments to the profile formail merges and o ther p ossibilities.
To attach a file:
1. Locate the Pro file using the PROFILE SEARCH screen.2. H ighlight the profile and select Edit.3. Select Options.4. Select Attachment.5. Select New to add an attachment or Open to o pen an existing attachment.
6. Select Merge to merge existing attachments (such as two welcome letters)into one.
7. Select Close to return to the profile.
©2006 MICROS® Systems Inc. All Rights Reserved. P roprietary and C onfidential.
26

7/31/2019 GEN V40 PMS Reference Manual FINAL Eng Ch
http://slidepdf.com/reader/full/gen-v40-pms-reference-manual-final-eng-ch 27/474
Changes Changes track all changes and updates made to the profile.
To view changes on a profile:
1. Locate the Pro file using the PROFILE SEARCH screen.2. H ighlight the profile and select Edit.3. Select Options.4. Select Changes.
NOTE: Updates made to the p rofile list in descending order.
5. Select Close after investigating to return to the profile.
©2006 MICROS® Systems Inc.
All Rights Reserved. P roprietary and C onfidential. 27

7/31/2019 GEN V40 PMS Reference Manual FINAL Eng Ch
http://slidepdf.com/reader/full/gen-v40-pms-reference-manual-final-eng-ch 28/474
Credit Cards The Credit Card option allows you to add, edit, and delete credit cardinform ation associated with a profile, saving effort and eliminating re-keying
errors. O nce information has been entered here, it can be quickly be accessedfrom other areas of OPERA such as reservations, billing, accounts receivable,and elsewhere.
To attach a credit card to a profile:
1. Locate the Pro file using the PROFILE SEARCH screen.2. H ighlight the profile and select Edit.3. Select Options.4. Select Credit Cards.
5. Select New to add credit card information to the profile 6. Select Edit to change existing credit information.7. Delete removes the highlighted credit card information from the profile.
To enter a new credit card on the CREDIT CARD – NE W screen:
1. Click the drop down arrow next to the Card Type field and select theappropriate credit card type (i.e. Visa, American E xpress, MasterCard).
2. E nter the Credit Card N umber.3. E nter the Expiration Date on the card.4. E nter the Name on Card as it appears on the face of the credit card.5. Select OK to save.
©2006 MICROS® Systems Inc. All Rights Reserved. P roprietary and C onfidential.
28

7/31/2019 GEN V40 PMS Reference Manual FINAL Eng Ch
http://slidepdf.com/reader/full/gen-v40-pms-reference-manual-final-eng-ch 29/474
Delete The Delete option deletes the profile entirely from th e database. O PE RA prompts the user to con firm before removing the p rofile from the database.
NOTE: We do no t suggest deleting profiles as statistical and revenueinformation stored abou t that pro file is lost. A better suggestion is to m ake theprofile inactive.
Future The FUTURE RESERVATION screen displays upcoming reservations for aprofile and offers the op tion to add future reservations to any profile.
To view future reservations on a profile:
1. Locate the profile using the PROFI LE SEARCH screen.2. H ighlight the profile and select Edit.3. Select Options.
4. Select Future.
NOTE: Each future reservation for the profile lists in ascending order.
Below are the options available from this screen:
• New allows a user to create a new reservation .
• Edit displays full reservation details fo r the highlighted reservation .
©2006 MICROS® Systems Inc. All Rights Reserved. P roprietary and C onfidential.
29

7/31/2019 GEN V40 PMS Reference Manual FINAL Eng Ch
http://slidepdf.com/reader/full/gen-v40-pms-reference-manual-final-eng-ch 30/474
History The History option provides past and current reservation information (including turn ways) and a record of how the guest has contributed to your
revenue while staying at your prop erties. To view a guest or account’s history:
1. Locate the Pro file using the PROFILE SEARCH screen.2. H ighlight the profile and select Edit.3. Select Options.4. Select History.
5. Select Stay Info. to review reservations history or Revenue for items purchased during the guest’s stay.
NOTE: The Revenue option is only available if the ho tel has defined specificbuckets for areas of revenue d isplayable in this area.
©2006 MICROS® Systems Inc. All Rights Reserved. P roprietary and C onfidential.
30
7/31/2019 GEN V40 PMS Reference Manual FINAL Eng Ch
http://slidepdf.com/reader/full/gen-v40-pms-reference-manual-final-eng-ch 31/474
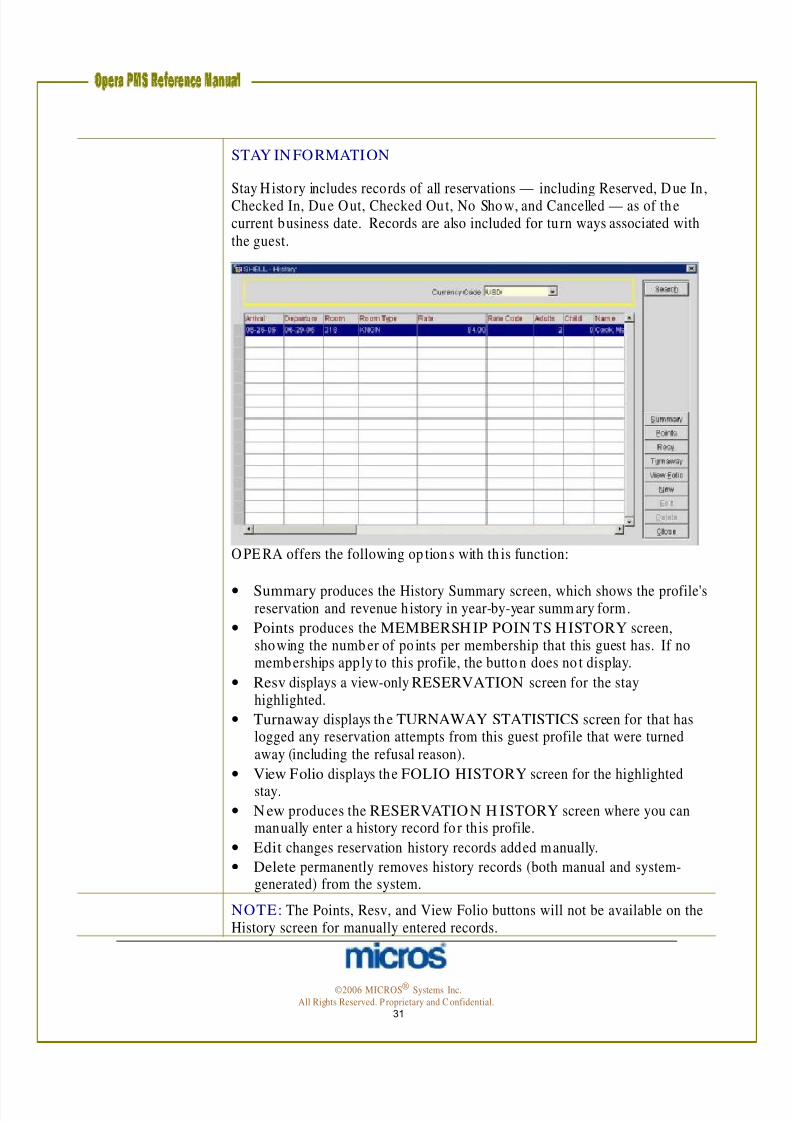
STAY IN FORMATION
Stay History includes records of all reservations — including Reserved, Due In,Checked In, Due Out, Checked Out, No Show, and Cancelled — as of thecurrent business date. Records are also included for turn ways associated withthe guest.
O PE RA offers the following op tions with th is function:
• Summary produces the History Summary screen, which shows the profile'sreservation and revenue h istory in year-by-year summ ary form.
• Points produces the MEMBERSH IP POIN TS H ISTORY screen,showing the numb er of po ints per membership that this guest has. If nomemberships app ly to this profile, the butto n does no t display.
• Resv displays a view-only RESERVATION screen for the stayhighlighted.
• Turnaway displays the TURNAWAY STATISTICS screen for that haslogged any reservation attempts from this guest profile that were turnedaway (including the refusal reason).
• View Folio displays the FOLIO HISTORY screen for the highlightedstay.
• New produces the RESERVATIO N H ISTORY screen where you canmanually enter a history record fo r this profile.
• Edit changes reservation history records added manually.
• Delete permanently removes history records (both manual and system-generated) from the system.
NOTE: The Points, Resv, and View Folio buttons will not be available on theHistory screen for manually entered records.
©2006 MICROS® Systems Inc. All Rights Reserved. P roprietary and C onfidential.
31

7/31/2019 GEN V40 PMS Reference Manual FINAL Eng Ch
http://slidepdf.com/reader/full/gen-v40-pms-reference-manual-final-eng-ch 32/474
Merge The Merge profile option merges duplicate profiles into one single profile.D uplicate profiles com monly exist for one guest with in the system. The Merge
option eliminates duplicate profiles and merges their history together.
To merge two or more guest profiles together:
1. From the PROFILE screen, select Options.
NOTE : The profile that the merge initiates from becom es the master. Thesecond p rofile merges into the m aster.
2. Select Merge.
3. Search for the profile you would like to merge using the PROFILESEARCH screen and select OK.
The PROFILE ME RGE screen opens listing the two profiles, one on the leftand on e on the right (for comparison purposes).
4. Select Merge to merge the profiles together and the system merges all information, historical data, revenue, and history together.
©2006 MICROS® Systems Inc. All Rights Reserved. P roprietary and C onfidential.
32

7/31/2019 GEN V40 PMS Reference Manual FINAL Eng Ch
http://slidepdf.com/reader/full/gen-v40-pms-reference-manual-final-eng-ch 33/474
Negotiated Rates
N egotiated Rates are beneficial when accessing the Rate Q uery for a specificcompany since only the negot iated rates display for that company. In addition,
N egotiated Rates speed up the reservation process.
Follow the steps below to add a Negotiated Rate to a profile:
1. From the PROFILE SEARCH screen, highlight the desired profile andselect Edit.
2. Select Options.3. Select Negotiated Rates.
The NE GOTIATED RATES screen d isplays any existing negotiated ratesassociated with the p rofile.
4. Select New to add a new negotiated rate.
©2006 MICROS® Systems Inc. All Rights Reserved. P roprietary and C onfidential.
33
7/31/2019 GEN V40 PMS Reference Manual FINAL Eng Ch
http://slidepdf.com/reader/full/gen-v40-pms-reference-manual-final-eng-ch 34/474
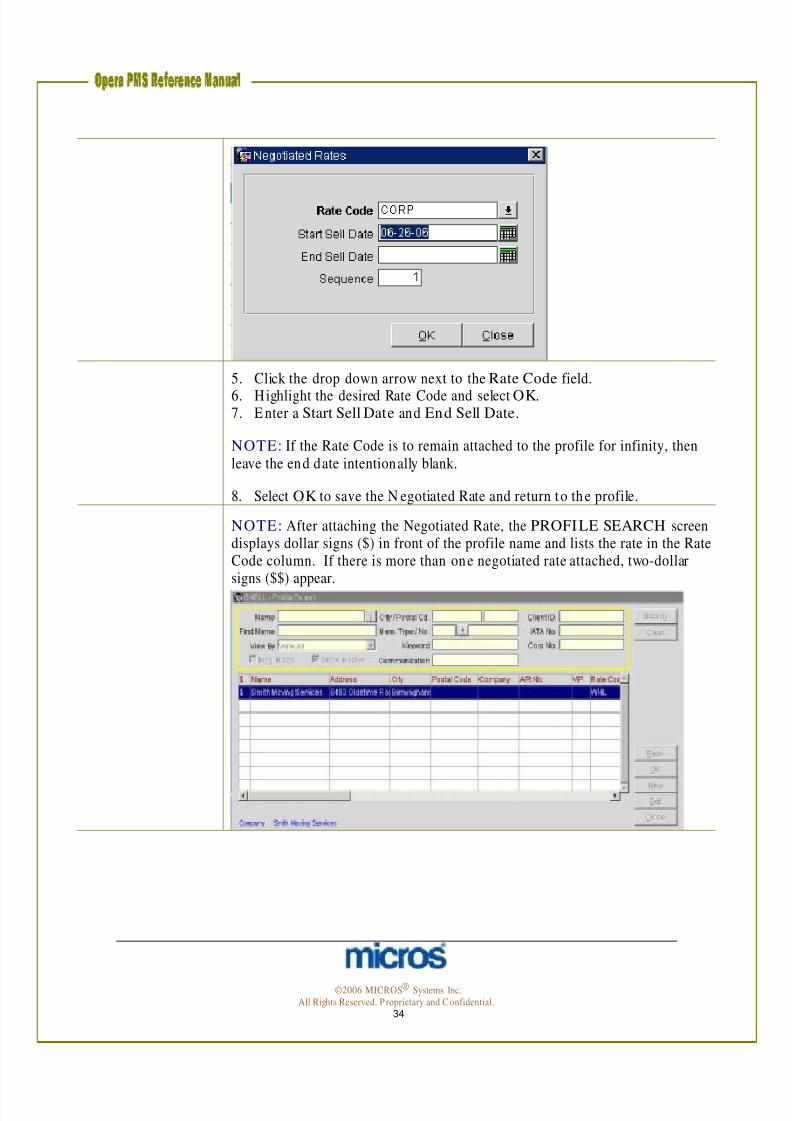
5. Click the drop down arrow next to the Rate Code field.
6. Highlight the desired Rate Code and select OK.7. E nter a Start Sell Date and End Sell Date.
NOTE: If the Rate Code is to remain attached to the profile for infinity, thenleave the end date intentionally blank.
8. Select OK to save the N egotiated Rate and return to the profile.
NOTE: After attaching the Negotiated Rate, the PROFILE SEARCH screendisplays dollar signs ($) in front of the profile name and lists the rate in the RateCode column. If there is more than one negotiated rate attached, two-dollarsigns ($$) appear.
©2006 MICROS® Systems Inc. All Rights Reserved. P roprietary and C onfidential.
34
7/31/2019 GEN V40 PMS Reference Manual FINAL Eng Ch
http://slidepdf.com/reader/full/gen-v40-pms-reference-manual-final-eng-ch 35/474
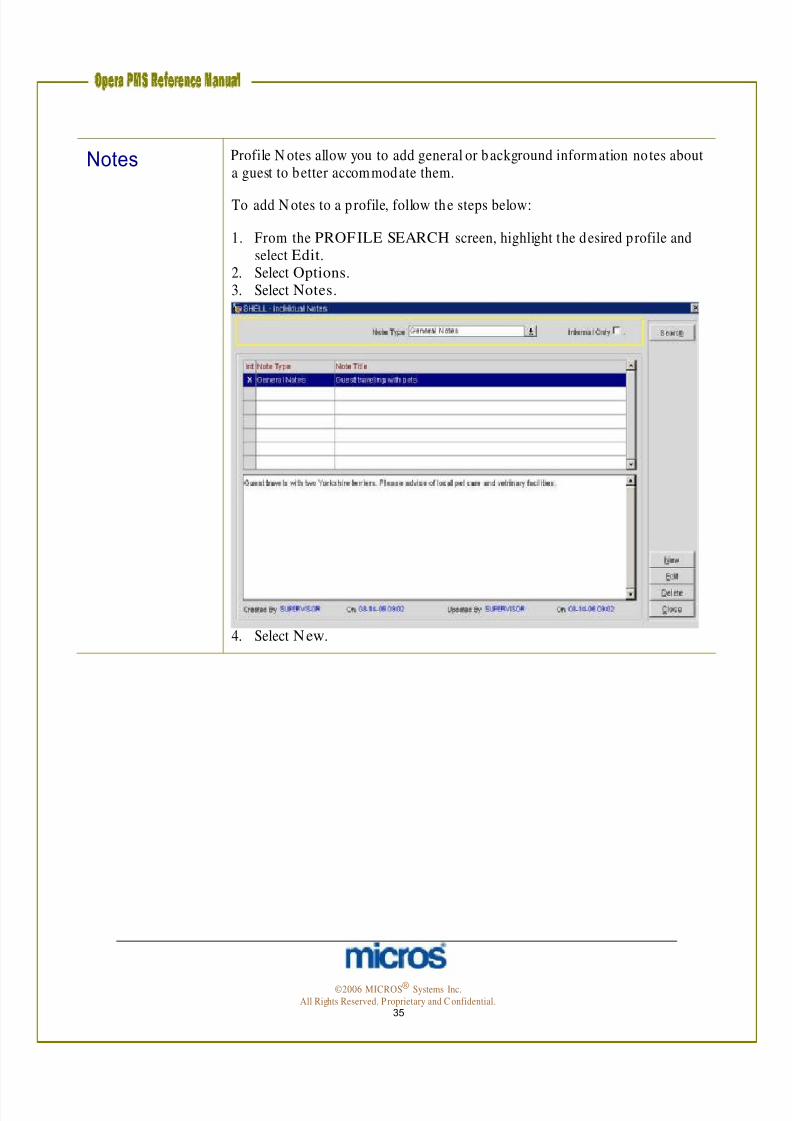
Notes Profile N otes allow you to add general or background information notes about a guest to better accommodate them.
To add N otes to a p rofile, follow the steps below:
1. From the PROFILE SEARCH screen, highlight the desired profile andselect Edit.
2. Select Options.3. Select Notes.
4. Select New.
©2006 MICROS® Systems Inc. All Rights Reserved. P roprietary and C onfidential.
35

7/31/2019 GEN V40 PMS Reference Manual FINAL Eng Ch
http://slidepdf.com/reader/full/gen-v40-pms-reference-manual-final-eng-ch 36/474
5. Click the drop down arrow next to the N ote Type field to select a note type.
NOTE: If you use the Reservation N ote type, this note copies into each n ewreservation for this guest.
6. Highlight the appropriate N ote Type and select OK.7. E nter a brief synopsis of the note in the Title field.8. Click in the white text box and enter the no te.
9. Select OK to save and return to the INDIVIDUAL NOTES screen.
©2006 MICROS® Systems Inc.
All Rights Reserved. P roprietary and C onfidential. 36

7/31/2019 GEN V40 PMS Reference Manual FINAL Eng Ch
http://slidepdf.com/reader/full/gen-v40-pms-reference-manual-final-eng-ch 37/474
Preferences Th e Preferences function enables you to associate likes and dislikes (such asfavorite room type, desired room features and floor location, choice of wine
and newspaper, etc.) with the current profile, enhancing your service to theguests and companies you do business with. Preferences entered in the profileapply to every reservation for this guest in future; thus, only save preferencesthat the guest always requests.
To enter a guest preference on a profile:
1. From the profile, select Options.2. Select Preferences.
3. Select New.
©2006 MICROS® Systems Inc. All Rights Reserved. P roprietary and C onfidential.
37
7/31/2019 GEN V40 PMS Reference Manual FINAL Eng Ch
http://slidepdf.com/reader/full/gen-v40-pms-reference-manual-final-eng-ch 38/474
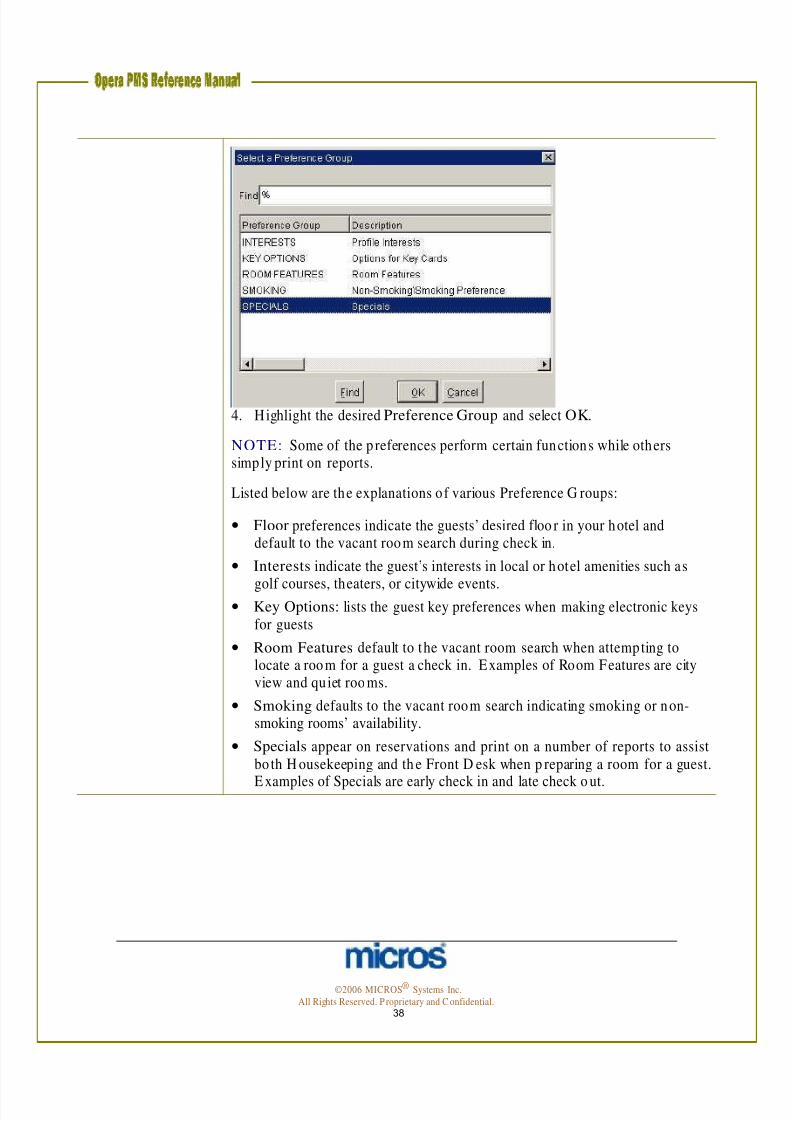
4. Highlight the desired Preference Group and select OK.
NOTE: Some of the p references perform certain functions while otherssimply print on reports.
Listed below are the explanations of various Preference G roups:
• Floor preferences indicate the guests’ desired floo r in your hotel anddefault to the vacant room search during check in.
• Interests indicate the guest’s interests in local or hotel amenities such as
golf courses, theaters, or citywide events.• Key Options: lists the guest key preferences when making electronic keys
for guests
• Room Features default to the vacant room search when attempting tolocate a room for a guest a check in. Examples of Room Features are cityview and quiet roo ms.
• Smoking defaults to the vacant room search indicating smoking or non-smoking rooms’ availability.
• Specials appear on reservations and print on a number of reports to assistbo th H ousekeeping and th e Front D esk when p reparing a room for a guest.
E xamples of Specials are early check in and late check o ut.
©2006 MICROS® Systems Inc. All Rights Reserved. P roprietary and C onfidential.
38

7/31/2019 GEN V40 PMS Reference Manual FINAL Eng Ch
http://slidepdf.com/reader/full/gen-v40-pms-reference-manual-final-eng-ch 39/474
After selecting the Preference Group, a list of values belonging to thatPreference Group appears allowing you to select the desired Preference Code.
5. Highlight the desired Preference.
6. Using the mouse, place an “X” next to the desired preference and selectOK.
©2006 MICROS® Systems Inc. All Rights Reserved. P roprietary and C onfidential.
39

7/31/2019 GEN V40 PMS Reference Manual FINAL Eng Ch
http://slidepdf.com/reader/full/gen-v40-pms-reference-manual-final-eng-ch 40/474
Privacy The Privacy function allows a guest to choose rather they want to receivepromotional information, mailings, etc.
To activate the privacy feature on a guest profile:
1. From the profile, select Options.2. Select Privacy.
The PROFILE PRIVACY screen displays:
3. Choose the options for privacy the guest prefers and enter an Email address if one does not already exist on the profile.
NOTE: Email displays or allows the entry of the primary email address for theguest. An email address appears if on e exists already on the profile as a methodof com munication. Modifying the email address from the PROFILEPRIVACY screen, or vice versa, also updates the email address on the guest’smain profile.
NOTE: The promotional information field is the place where a guest choiceto opt out can be recorded. If you select this field o n the above screen, thenthe Mailing List field on the profile displays “N” as well.
©2006 MICROS® Systems Inc. All Rights Reserved. P roprietary and C onfidential.
40

7/31/2019 GEN V40 PMS Reference Manual FINAL Eng Ch
http://slidepdf.com/reader/full/gen-v40-pms-reference-manual-final-eng-ch 41/474
Relationship Relationships define the associations between and among individuals,companies, travel agents, groups, sources, and oth er entities in O PERA.
Knowing that Jim Lawson is an employee of Alpha Sources, Inc.; that TimMarks is the spouse of VIP Sandra Haley; or that Asset Management Corp. is asubsidiary of Co unty Wide Bank, for example, can aid in decision-making andin providing good custom er service. In addition, when a relationship is set upbetween profiles, one profile can share negotiated rates with another by virtueof their relationship.
To create a new relationship between profiles:
1. Select Options and Relationships.
2. Select New from the PROFILE RELATION SH IP screen.
The following screen appears:
3. Choose the profile type you wish to create a relationsh ip with for the current p rofile and select OK.
4. Search for the Individual, Com pany, Travel Agent, Source, or Group usingthe PROFILE SEARCH screen. If none exists, create a New profile.
5. H ighlight the profile on the PROFILE SEARCH screen and select OK.
©2006 MICROS® Systems Inc. All Rights Reserved. P roprietary and C onfidential.
41

7/31/2019 GEN V40 PMS Reference Manual FINAL Eng Ch
http://slidepdf.com/reader/full/gen-v40-pms-reference-manual-final-eng-ch 42/474
The following window appears:
6. Highlight the appropriate Relationship From/ To and select OK.
NOTE: To add multiple relationships, continue this process for each profileyou wish to relate to this profile.
7. O nce you have completed adding all Relationsh ips, select OK to return tothe main profile.
©2006 MICROS® Systems Inc. All Rights Reserved. P roprietary and C onfidential.
42

7/31/2019 GEN V40 PMS Reference Manual FINAL Eng Ch
http://slidepdf.com/reader/full/gen-v40-pms-reference-manual-final-eng-ch 43/474
Chapter 3 - Reservations
©2006 MICROS® Systems Inc. All Rights Reserved. P roprietary and C onfidential.
43

7/31/2019 GEN V40 PMS Reference Manual FINAL Eng Ch
http://slidepdf.com/reader/full/gen-v40-pms-reference-manual-final-eng-ch 44/474
©2006 MICROS® Systems Inc.
All Rights Reserved. P roprietary and C onfidential. 44

7/31/2019 GEN V40 PMS Reference Manual FINAL Eng Ch
http://slidepdf.com/reader/full/gen-v40-pms-reference-manual-final-eng-ch 45/474
New Reservations
In this chapter, we learn creating, editing, and canceling reservations inO PERA PMS. In addition , there is instruction on the many options forreservations that we may use to better serve our guests.
New Reservation with Rate Query
Begin a reservation with a rate and availability search. Fo llow the steps belowto perform a Rate Q uery.
1. Use the F5 function key to op en the RATE IN FORMATION screen,then select Rate Query or from the m ain m enu, select Reservations thenNew Reservation. Alternately, you may press the F7 function key to b eing anew reservation.
Th e RATE QUERY screen appears.
To search for general rate availability, pre-qualify the guest by at least enter the following criteria:
2. Enter an Arrival date and number of Nights.
3. Then, enter the num ber of Adults and/ or Children.
4. If the guest has stayed at your ho tel before, enter his/ her name in theName field so that you may use their profile to expedite the reservationand also view the guest’s preferences and/ or stay history.
©2006 MICROS® Systems Inc. All Rights Reserved. P roprietary and C onfidential.
45

7/31/2019 GEN V40 PMS Reference Manual FINAL Eng Ch
http://slidepdf.com/reader/full/gen-v40-pms-reference-manual-final-eng-ch 46/474
Th e PROFILE SEARCH screen appears.
5. Either enter the last Name of the existing profile or select New to create a new p rofile.
NOTE: Refer to the Profiles chapter of this manual for specific instructions
on creating p rofiles.
6. Com plete the applicable fields and select OK to return to the RATEQUERY screen.
7. O nce you have comp leted all search criteria, select OK to see the results of your query.
©2006 MICROS® Systems Inc. All Rights Reserved. P roprietary and C onfidential.
46

7/31/2019 GEN V40 PMS Reference Manual FINAL Eng Ch
http://slidepdf.com/reader/full/gen-v40-pms-reference-manual-final-eng-ch 47/474
Th e RATE QUERY screen appears with available rates and room types, in agrid form at, for your hotel on the requested dates.
Along the top o f the screen are the Room Types, while Rate Codes list along the left side. In the center of the grid are actual Rates.
Rates that are GREEN in color indicate availability for that Room T ype and
Rate Code, where those RED in color indicate no availability.
Selecting a cell within the grid displays Rate and Room Type inform ation in thegray box in the bottom right-hand corner of the screen. Th is box also con tainsany rate specific information , such as Rate Features, Rate Restrictions orD eposit/ Cancellation information .
The b uttons along th e right side of the screen offer supplemental informationand add itional options:
©2006 MICROS® Systems Inc. All Rights Reserved. P roprietary and C onfidential.
47
7/31/2019 GEN V40 PMS Reference Manual FINAL Eng Ch
http://slidepdf.com/reader/full/gen-v40-pms-reference-manual-final-eng-ch 48/474
Overbook : Select to see the House and Room Type overbooking numbers
Item Inv: If the highlighted Rate Code has items attached to it (such as a crib
or a portab le fireplace), then this op tion defaults to the availability screen forthose items. If no inventory items exist for the Rate Code selected, then theavailability screens fo r all items in inventory defaults to the reservation requestdate.
Waitlist: Records a waitlist reservation when th e desired rate is not availableand the prospective guest wishes to be notified if the rate becomes available.
Rate Info: Displays the room rates, package rates, and taxes per night in moredetail.
Analyze: Rate Restrictions placed on the rates or room types during the stayrequest (i.e. two-night m inimum, closed to arrival, etc.)
Long Info: Additional information regarding the Rate Code, configurable bythe hotel, with in-depth text explanations of the rate.
Turnaways: Logs the reservation call as a Turn away for stat istical purposes totrack denials and regrets.
Scope: returns you to the Rate Query screen to input new dates orrequirements.
Close: closes the Rate Q uery Details screen 8. After making a Rate and Room selection within the grid, select OK to
move forward with the reservation .
©2006 MICROS® Systems Inc. All Rights Reserved. P roprietary and C onfidential.
48

7/31/2019 GEN V40 PMS Reference Manual FINAL Eng Ch
http://slidepdf.com/reader/full/gen-v40-pms-reference-manual-final-eng-ch 49/474
Th e RESERVATION screen appears.
©2006 MICROS® Systems Inc. All Rights Reserved. P roprietary and C onfidential.
49

7/31/2019 GEN V40 PMS Reference Manual FINAL Eng Ch
http://slidepdf.com/reader/full/gen-v40-pms-reference-manual-final-eng-ch 50/474
Th e RESERVATION screen is divided into the fo llowing sections:
Header: Contains information about the guest and the guest’s company, travelagent, group , and mem bership affiliations. A button links you directly to th eguest’s Profile screen where complete guest demographics are stored.
Details: Accommodation information for the guest’s stay, including arrival anddeparture dates, room and rate information, p ayment m ethod, credit cards, andpackages.
8. Com plete all the necessary fields using proper capitalization andpunctuation. Fields that are required to complete the reservation inOPERA have a bold field descriptor (i.e. Arrival, Departure, RoomType, Rate Code, Res. Type, etc.).
9. Save the reservation by on e of the following methods:
• OK to save the reservation and close the screen
• Save to save the reservation and have it remain on your screen
• Close to exit the screen without saving the reservation (a promptasks you to save)
RESERVATION SCREEN FIELD DESCRIPTIONS:
Arrival Date: Indicates the arrival date of the guest. E ither type the date in
this field or use the calendar to select the date – this field defaults from choicesmade in the RATE QUERY screen.
©2006 MICROS® Systems Inc. All Rights Reserved. P roprietary and C onfidential.
50

7/31/2019 GEN V40 PMS Reference Manual FINAL Eng Ch
http://slidepdf.com/reader/full/gen-v40-pms-reference-manual-final-eng-ch 51/474
Nights: The num ber of nights for the guest reservation – th is field alsodefaults from choices made in the RATE QUERY screen.
Departure Date: The departure date auto-populates based on the arrival dateand number of nights – this field also defaults from choices made in theRATE QUERY screen.
Adults/ Child: N umber of adults and children occupying the room that m aydirectly affect the rates with m ultiple person charges
Number of Rooms: E nter the num ber of rooms for this reservation . Thefield defaults to 1. If, for example, the guest requires 2 rooms, enter 2 in th isfield (for one reservation, two room s, same confirmation num ber). All roo mswill be of the same roo m type. Alternatively, if the guest requires more than
one roo m with separate confirmation n umbers, see the Add On feature in theReservation Options (later in this chapter).
Rm. Type: The room type the guest prefers for the reservation that defaultsfrom the choices made in the RATE QUERY screen. Click the drop downarrow next to th is field to change the preferred room type.
RTC: Room Type Charge allows upgrades of guest into premium roomswithout affecting the rate – if the Rm. Type field changes, th is field sho uldremain the original room type booked and quoted to the guest.
Room: This field is the guest’s room number. This must populate at check inbut m ay also to pre-block a room du ring the reservation process. Click on thedrop-down arrow next to this field to select a room from the AVAILABLEROOM search screen.
Rate Code: The code that defines the rate charged to the guest – this field alsodefaults from choices made in the RATE QUERY screen. To change a rate,click on th e drop down arrow next to th is field to return to the RATE QUERY screen. Th e Rate for the Rate Code chosen displays in the RATE field.
Rate/ Fixed Rate: The rate charged to the guest each night of theaccommo dation. To view multiple rates or rate changes during the stay, select
the ellipsis button next to this field. We cover fixing rates on reservations indetail later in this chapter
Block Code: Populates if the reservation is part of a group or business block.
©2006 MICROS® Systems Inc. All Rights Reserved. P roprietary and C onfidential.
51

7/31/2019 GEN V40 PMS Reference Manual FINAL Eng Ch
http://slidepdf.com/reader/full/gen-v40-pms-reference-manual-final-eng-ch 52/474
ETA: Field to record the guests’ estimated time of arrival for transpo rtation
Market: The market defaults based on the Rate Code selection made in theRATE QUERY screen – market defines the sales sector the guest belongs andthe rate they pay are tracked on reports.
Source: The source tracks how the hotel received this reservation (i.e. GuestDirect, CRS, Internet) – may or may not default based on Rate Code selection
Res. Type: The method by which the guest intends to guarantee thereservation (i.e. Credit Card, 6pm Courtesy Hold) for arrival. The type defaultsto the hotel’s most common guarantee type, but may change by clicking on thedrop down arrow next to this field.
Payment: Records the method of payment to guarantee the reservation (i.e.Visa, American E xpress, Cash). To change the method of paymen t, click thedrop down arrow next to this field. To add more than one form of payment,select the ellipsis button to enter multiple payments. Below is an example of amultiple payment m ethod window:
Within this window, you may also set specific authorization rules for each payment type. To establish different authorization rules, click the drop downarrow in the Auth/ Rule field. If a value is required, also enter the flat amountor percentage in the Amt/ Pct field.
Credit Card N o.: When guaranteeing a reservation with a credit card, enterthe card num ber in this field. D epending on the Payment type cho sen,
O PE RA validates the card numb er. In addition, if a credit card number existson the guest profile, an additional window displays asking if you would like touse the card num ber on file.
Exp. Date: When guaranteeing a reservation with a credit, enter the card’sexpiration date. O PE RA validates expiration dates for future dates only.
©2006 MICROS® Systems Inc. All Rights Reserved. P roprietary and C onfidential.
52
7/31/2019 GEN V40 PMS Reference Manual FINAL Eng Ch
http://slidepdf.com/reader/full/gen-v40-pms-reference-manual-final-eng-ch 53/474
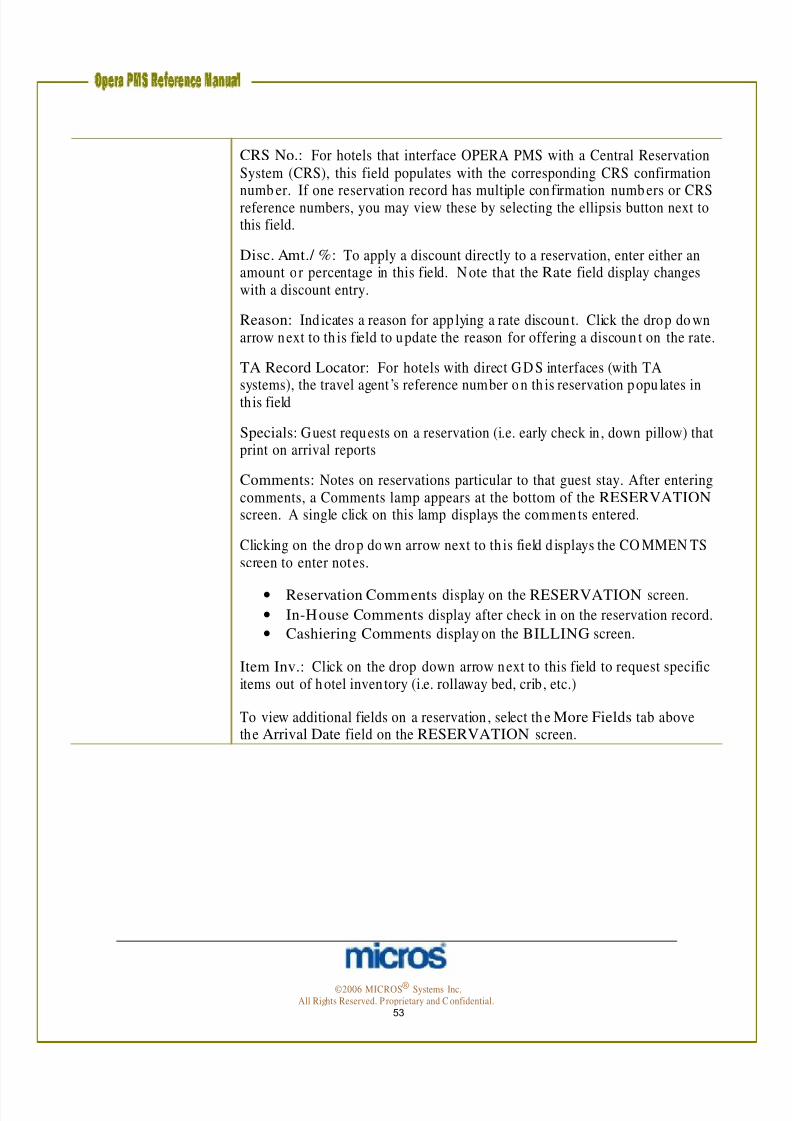
CRS No.: For hotels that interface OPERA PMS with a Central ReservationSystem (CRS), this field populates with the corresponding CRS confirmation
numb er. If one reservation record has multiple con firmation numb ers or CRSreference numbers, you may view these by selecting the ellipsis button next tothis field.
Disc. Amt./ %: To apply a discount directly to a reservation, enter either anamount or percentage in this field. N ote that the Rate field display changeswith a discount entry.
Reason: Ind icates a reason for app lying a rate discoun t. Click the drop do wnarrow next to th is field to update the reason for offering a discoun t on the rate.
TA Record Locator: For hotels with direct GD S interfaces (with TA
systems), the travel agent’s reference number on th is reservation popu lates inthis field
Specials: Guest requests on a reservation (i.e. early check in, down pillow) thatprint on arrival reports
Comments: Notes on reservations particular to that guest stay. After enteringcomments, a Comments lamp appears at the bottom of the RESERVATIONscreen. A single click on this lamp displays the comments entered.
Clicking on the drop down arrow next to th is field d isplays the CO MMEN TSscreen to enter notes.
• Reservation Comments display on the RESERVATION screen.
• In-House Comments display after check in on the reservation record.
• Cashiering Comments display on the BILLING screen.
Item Inv.: Click on the drop down arrow next to this field to request specificitems out of hotel inventory (i.e. rollaway bed, crib, etc.)
To view additional fields on a reservation , select th e More Fields tab abovethe Arrival Date field on the RESERVATION screen.
©2006 MICROS® Systems Inc. All Rights Reserved. P roprietary and C onfidential.
53

7/31/2019 GEN V40 PMS Reference Manual FINAL Eng Ch
http://slidepdf.com/reader/full/gen-v40-pms-reference-manual-final-eng-ch 54/474
MORE FIELDS TAB:
Below is an explanation of the most commonly used fields on ADDITIONAL RESERVATION FIELDS screen:
No Post: Checking th is box on a reservation activates functionality to allcharge interfaces preventing the guest from charging to their room. Typically,Cash is the only form of paymen t that defaults with th e No Post flag. Creditforms of payment authorize for incidentals and allow the guests to post chargesto their rooms. To restrict a guest from consuming charges, select this checkbox.
Print Rate: Checking this box indicates that the Rate field on the reservationpopulates on any collateral printed for th e guest (i.e. Registration Card). Toprevent a rate from printing, deselect this op tion .
Video Check Out: Allows guests with appropriate credit to use Video CheckO ut from the guest room – on ly app lies to hotels with an appropriate In-RoomMovie interface. To disable, deselect this op tion.
C/ O Time: Indicates the anticipated check out time for the guest fortransportation requests.
Tax Type: Iden tifies whether the guest p ays all taxes or is exempt som e or all
taxes. The default value is for th e guest to pay all taxes – to change th isparticular reservation, click the drop down arrow next to this field and choosean alternate tax type.
©2006 MICROS® Systems Inc. All Rights Reserved. P roprietary and C onfidential.
54

7/31/2019 GEN V40 PMS Reference Manual FINAL Eng Ch
http://slidepdf.com/reader/full/gen-v40-pms-reference-manual-final-eng-ch 55/474
TURNAWAY SCREEN:
If you exit from the reservation process without completing the reservation(either f rom the RATE QUERY or RESERVATION screen) a turnaway isrecorded. Below is an example of this screen:
All fields default from the reservation request except the Turnaway Code field. Simply click on the drop down arrow next to th is field to select a reasonthe reservation is turning away. To save, select OK.
©2006 MICROS® Systems Inc.
All Rights Reserved. P roprietary and C onfidential. 55

7/31/2019 GEN V40 PMS Reference Manual FINAL Eng Ch
http://slidepdf.com/reader/full/gen-v40-pms-reference-manual-final-eng-ch 56/474
After saving the reservation, an O PE RA confirmation num ber displays.
10. Select OK to the confirmation number.
Lastly, the CLOSING SCRIPT screen appears for you to recap thereservation details with the guest.
11. Select Close to finish the reservation .
©2006 MICROS® Systems Inc. All Rights Reserved. P roprietary and C onfidential.
56

7/31/2019 GEN V40 PMS Reference Manual FINAL Eng Ch
http://slidepdf.com/reader/full/gen-v40-pms-reference-manual-final-eng-ch 57/474
Search and Edit Reservation
Use the following steps to locate and edit an existing reservation:
1. From the main menu, select Reservations and Update Reservation.Select Advanced for more options to search for reservations.
Th e RESERVATION SEARCH screen display. Fields surrounded by theyellow bo x indicate fields to enter search criteria.
2. Search for a guest reservation using any of the search fields (i.e. Name, CRS No/ TA Rec Loc).
3. O nce you enter all search criteria, select Search.
A list o f all reservations that meet that search criteria display in the grid.
©2006 MICROS® Systems Inc. All Rights Reserved. P roprietary and C onfidential.
57

7/31/2019 GEN V40 PMS Reference Manual FINAL Eng Ch
http://slidepdf.com/reader/full/gen-v40-pms-reference-manual-final-eng-ch 58/474
Multiple Rate Reservation
Rate changes usually occur dur ing lengthy guest stays or for stays that gothrough a weekday and weekend period.
Rate Codes that have rate changes in effect during the stay dates requestedhighlight in yellow on the RATE QUERY screen.
When making a reservation fo r a guest for multiple nights with a rate change ineffect, follow the steps below:
1. Select the desired rate in the grid and select OK to proceed.
©2006 MICROS® Systems Inc. All Rights Reserved. P roprietary and C onfidential.
58

7/31/2019 GEN V40 PMS Reference Manual FINAL Eng Ch
http://slidepdf.com/reader/full/gen-v40-pms-reference-manual-final-eng-ch 59/474
Th e RATE SUMMARY screen appears.
2. Confirm details of the rate changes with the guest and select Close to proceed.
A message displays advising again o f the rate change and that th e MULTIPLERATE screen is available to verify the rates.
3. Select OK to proceed with the reservation .
©2006 MICROS® Systems Inc. All Rights Reserved. P roprietary and C onfidential.
59

7/31/2019 GEN V40 PMS Reference Manual FINAL Eng Ch
http://slidepdf.com/reader/full/gen-v40-pms-reference-manual-final-eng-ch 60/474
NOTE: The RESERVATION screen appears with the Rate field highlighted in yellow. In addition , there is a Daily Details lamp in red at thebottom of the screen. This indicates there are details on the daily rates thatdiffer.
1. To review the details of the rate change, click on the ellipsis button next tothe Rate field or select the Daily Details lamp at the bo ttom o f the screen.
2. Select Daily Details.
3. Select Close to return to the reservation screen and complete as usual.
©2006 MICROS® Systems Inc. All Rights Reserved. P roprietary and C onfidential.
60

7/31/2019 GEN V40 PMS Reference Manual FINAL Eng Ch
http://slidepdf.com/reader/full/gen-v40-pms-reference-manual-final-eng-ch 61/474
Fixed Rate Reservation
Som etimes it is necessary to override a published rate. To do th is, use theFixed Rate option . Whenever possible, use the correct Rate Code to o btain
the desired rate. Fixed Rate app lies the change for the entirety of the gueststay. The best example for using this feature is for a reservation that has a ratechange in effect during the stay where you wish to guarantee the rate on thearrival night throughout the guest stay.
NOTE: To apply a discount to a reservation, use the Disc. Amt. field. Youshould only use Fixed Rate to fix an arrival rate through the guest stay.
Follow the steps below fix a rate on a multi-night reservation to the arrival ratefor all nights of the guest stay:
1. Locate the reservation and select Edit to open the reservation .2. Click on the ellipsis button next to the Rate field to view the rate
information.3. Select Daily Details.
Th e DAILY DETAILS screen appears.
4. Highlight the arrival date and select Edit. 5. Enter the last date of the stay in the Update Through field.6. Modify the Rate amount as necessary.7. Check the Fixed Rate option.8. Select OK to save changes.9. Select OK to close th e Daily D etails screen.10. Select OK to save changes and close the reservation.
©2006 MICROS® Systems Inc. All Rights Reserved. P roprietary and C onfidential.
61

7/31/2019 GEN V40 PMS Reference Manual FINAL Eng Ch
http://slidepdf.com/reader/full/gen-v40-pms-reference-manual-final-eng-ch 62/474
Name Changeon aReservation
To change the name of a guest on a reservation, follow the steps below:
1. Search for the reservation using the RESERVATIO N SEARCH screen.2. Edit the reservation .3. Select the ellipsis but ton next to the Name field at the top o f the
RESERVATION screen.
©2006 MICROS® Systems Inc. All Rights Reserved. P roprietary and C onfidential.
62

7/31/2019 GEN V40 PMS Reference Manual FINAL Eng Ch
http://slidepdf.com/reader/full/gen-v40-pms-reference-manual-final-eng-ch 63/474
The existing profile attached to the reservation displays.
NOTE: Do N OT type over the existing profile information. Typing overthe existing profile perman ently changes information on that guest’s profileand all associated reservation s.
4. Locate the yellow search box in the lower left corner of the PROFILE screen and en ter the new guest’s last name in the search fields.5. Press tab and a list of similar profiles display.6. Choose the desired profile and select OK. 7. If the profile does not exist, select New, complete a new individual profile,
and select OK to save.
©2006 MICROS® Systems Inc.
All Rights Reserved. P roprietary and C onfidential. 63

7/31/2019 GEN V40 PMS Reference Manual FINAL Eng Ch
http://slidepdf.com/reader/full/gen-v40-pms-reference-manual-final-eng-ch 64/474
Notice when you return to the reservation, the new guest’s name is the profileon the reservation.
Reservation with Multiple
Profiles
It is possible to attach multiple profiles and link one of each profile type to a reservation. Travel Agent pro files usually generate com mission s whileCompany profiles have Negotiated Rates and authorize the direct billing of
charges. A Group profile automatically attaches to all group reservations fortracking of group productivity.
The Individual profile type is the on ly profile required no every reservation.However, you may have additional profiles or any combination of additionalprofiles also attached. Additional profile types that can exist on onereservation are Company, Travel Agent, Group and Source.
See the Profiles chapter of this manual for mo re information on these profiletypes.
Follow the steps below to link another profile to a reservation.
1. Search for and Edit the reservation.2. Click on the drop down arrow next to the field of the profile type you wish
to add (i.e. Agent, Company, Source, etc.).3. The PROFILE SEARCH screen displays.4. Search for and select an existing profile or cho ose New to create a new
profile.5. Select OK to attach the profile and return to the RESERVATION screen.
©2006 MICROS® Systems Inc. All Rights Reserved. P roprietary and C onfidential.
64

7/31/2019 GEN V40 PMS Reference Manual FINAL Eng Ch
http://slidepdf.com/reader/full/gen-v40-pms-reference-manual-final-eng-ch 65/474
Reservation with Negotiated Rate
Your hotel may contract and negotiate a rate for a local corporate account. These rates are generally at a confirmed discount off the normal rack orcorpo rate rates and are only available to guests staying on business with thatrecognized corporate account. N egotiated Rates are beneficial whenperforming a Rate Query for a specific company as only the negotiated ratesdisplay for that company. In addition, Nego tiated Rates speed up thereservation process.
Follow the steps below to complete a reservation for a company with aNegotiated Rates:
©2006 MICROS® Systems Inc. All Rights Reserved. P roprietary and C onfidential.
65
7/31/2019 GEN V40 PMS Reference Manual FINAL Eng Ch
http://slidepdf.com/reader/full/gen-v40-pms-reference-manual-final-eng-ch 66/474
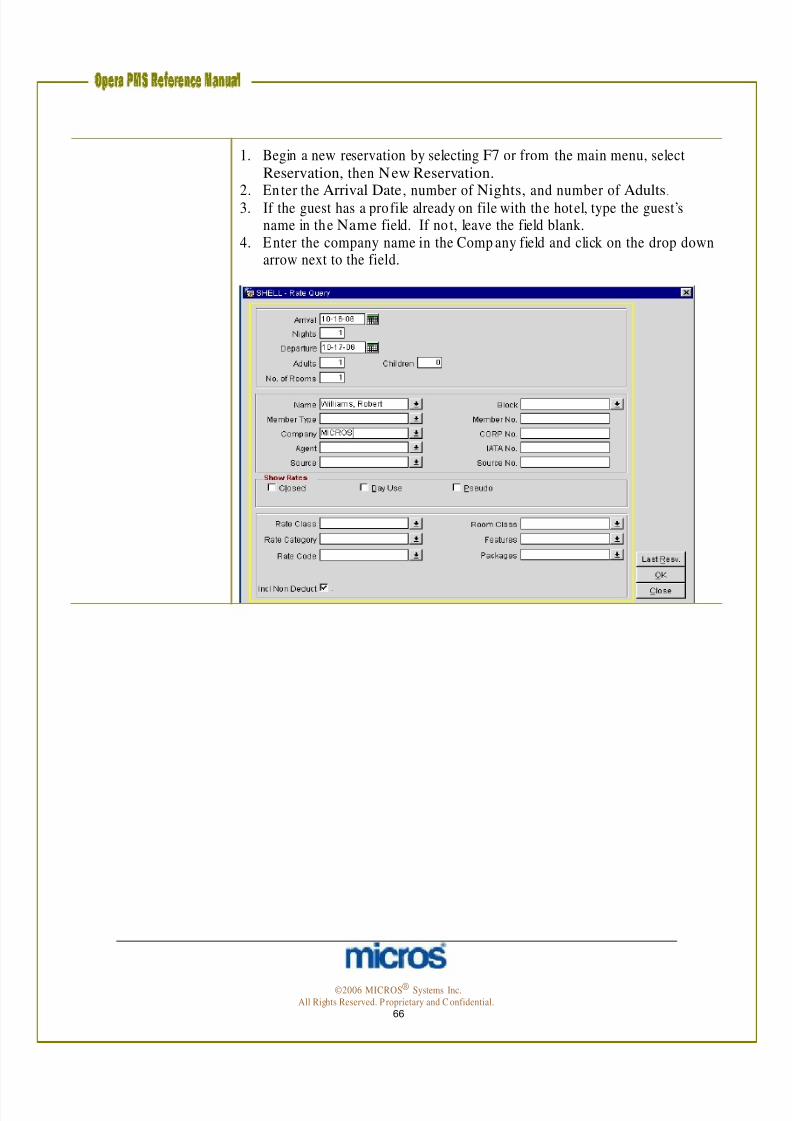
1. Begin a new reservation by selecting F7 or from the main menu, selectReservation, then New Reservation.
2. En ter the Arrival Date, number of Nights, and number of Adults .3. If the guest has a profile already on file with the hotel, type the guest’s
name in the Name field. If no t, leave the field blank.4. Enter the company name in the Comp any field and click on the drop down
arrow next to the field.
©2006 MICROS® Systems Inc. All Rights Reserved. P roprietary and C onfidential.
66

7/31/2019 GEN V40 PMS Reference Manual FINAL Eng Ch
http://slidepdf.com/reader/full/gen-v40-pms-reference-manual-final-eng-ch 67/474
Th e PROFILE SEARCH screen displays.
NOTE: The “$” to the left of the Company name in the results grid. This indicates that there is a Negotiated Rate attached to th at profile. You can alsoview the rate in the Rate Code field once you get to the Reservation screen.
5. Highlight the app ropriate Com pany profile and select OK.
©2006 MICROS® Systems Inc. All Rights Reserved. P roprietary and C onfidential.
67

7/31/2019 GEN V40 PMS Reference Manual FINAL Eng Ch
http://slidepdf.com/reader/full/gen-v40-pms-reference-manual-final-eng-ch 68/474
Th e RATE QUERY DETAILS screen displays with only the N egotiatedRate.
To display all available rates, uncheck the Negotiated box in the lower left- hand corner.
6. Highlight an available Room Type in the grid and select OK.7. Complete the reservation as no rmal.
NOTE: When you make a reservation for a N egotiated Rate, the Com panyprofile also attaches to the reservation.
©2006 MICROS® Systems Inc.
All Rights Reserved. P roprietary and C onfidential. 68

7/31/2019 GEN V40 PMS Reference Manual FINAL Eng Ch
http://slidepdf.com/reader/full/gen-v40-pms-reference-manual-final-eng-ch 69/474
IndividualGroupReservation
G roup reservations deduct from an allocation or b lock of room s assigned tothat particular group , no t from general hotel invento ry. To m ake an individual
group reservation, follow the steps below:1. From the main menu, select Reservations and New Reservation.2. O n the RATE QUERY screen, enter the Arrival Date, number of
Nights , and number of Adults. 3. If the guest has a profile already on file with the hotel, type the guest’s
name in the Name field. If no t, leave the field blank.4. Click the drop down arrow to the right of the Block field in the upper
right corner of the screen.5. A list of all group s in house during the stay dates requested displays.
H ighlight the correct group . The rooms available for that appear at thebottom of the screen.
NOTE: Available rooms by room type appear in the grid GREEN , butdisplay in RED if not.
To view the group’s rate for that room type, select any of the Rate options (i.e. 1 Person Rate) at the bottom o f the screen.
©2006 MICROS® Systems Inc. All Rights Reserved. P roprietary and C onfidential.
69
7/31/2019 GEN V40 PMS Reference Manual FINAL Eng Ch
http://slidepdf.com/reader/full/gen-v40-pms-reference-manual-final-eng-ch 70/474
Cancel a Reservation
6. Highlight the desired room type and choose Select.
The system automatically populates the Block code and the Room Type foryou on the RESERVATION screen.
7. Com plete the reservation and select OK to save the booking.
NOTE: N otice that no Rate Code exists on this reservation. Since groupscontract rates on an individually, group reservations typically do no t have RateCodes.
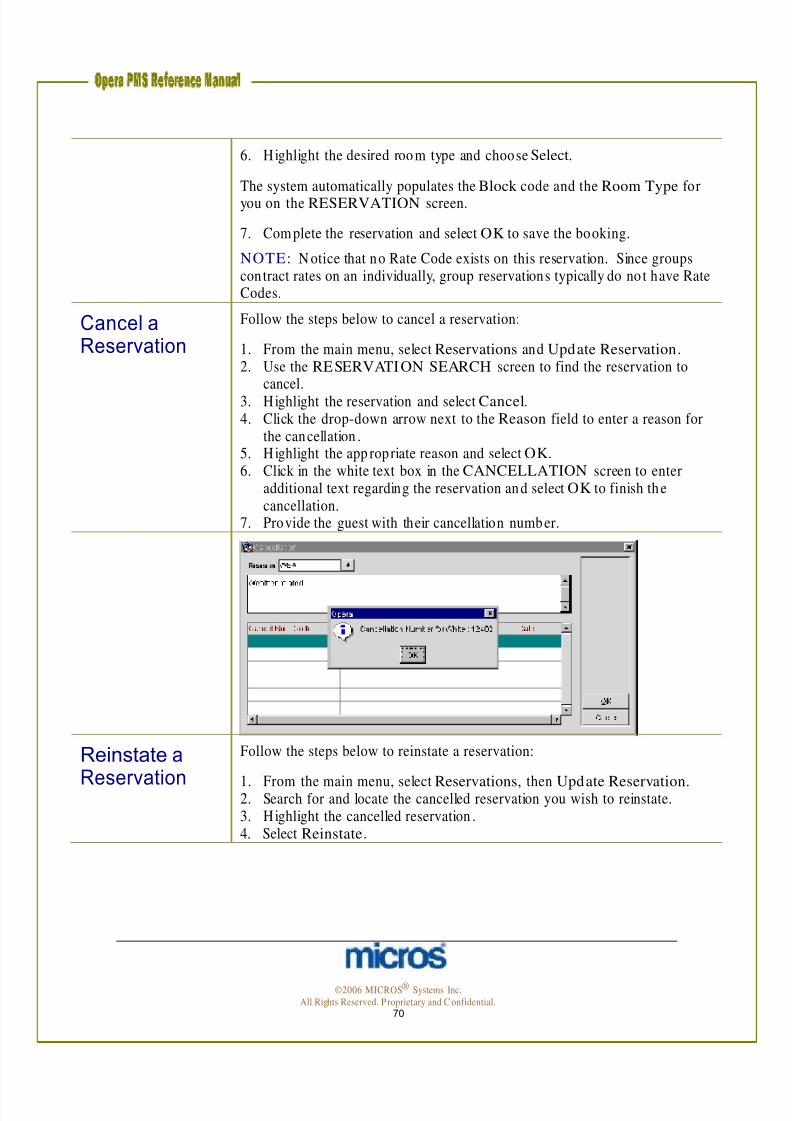
Follow the steps below to cancel a reservation:
1. From the main menu, select Reservations and Update Reservation.2. Use the RESERVATION SEARCH screen to find the reservation to
cancel.3. Highlight the reservation and select Cancel.4. Click the drop-down arrow next to the Reason field to enter a reason for
the cancellation .5. Highlight the app ropriate reason and select OK. 6. Click in the white text box in the CANCELLATION screen to enter
additional text regarding the reservation and select OK to finish thecancellation.
7. Provide the guest with their cancellation number.
Reinstate a
Reservation
Follow the steps below to reinstate a reservation:
1. From the main menu, select Reservations, then Update Reservation. 2. Search for and locate the cancelled reservation you wish to reinstate.3. Highlight the cancelled reservation .4. Select Reinstate.
©2006 MICROS® Systems Inc. All Rights Reserved. P roprietary and C onfidential.
70

7/31/2019 GEN V40 PMS Reference Manual FINAL Eng Ch
http://slidepdf.com/reader/full/gen-v40-pms-reference-manual-final-eng-ch 71/474
5. Answer “Yes” to reinstate the reservation. 6. Make any applicable changes (if any) to the reservation and select OK to
save the reservation .7. Provide the confirmation number to the guest.
NOTE: If your hotel has a two-way interface with a Cen tral Reservation
System, the confirmation number generated will be a new numb er. If yourhotel uses OPE RA PMS independently, the same OPE RA confirmationnumber assigns.
©2006 MICROS® Systems Inc. All Rights Reserved. P roprietary and C onfidential.
71
7/31/2019 GEN V40 PMS Reference Manual FINAL Eng Ch
http://slidepdf.com/reader/full/gen-v40-pms-reference-manual-final-eng-ch 72/474
Waitlist a Reservation
When there is no available inventory for your hotel on a given reservation dateor a guest’s room p reference is not available, the Waitlist function can assign a
Waitlist status to a reservation . To place a reservation on the waitlist while reserving, follow the s teps below:
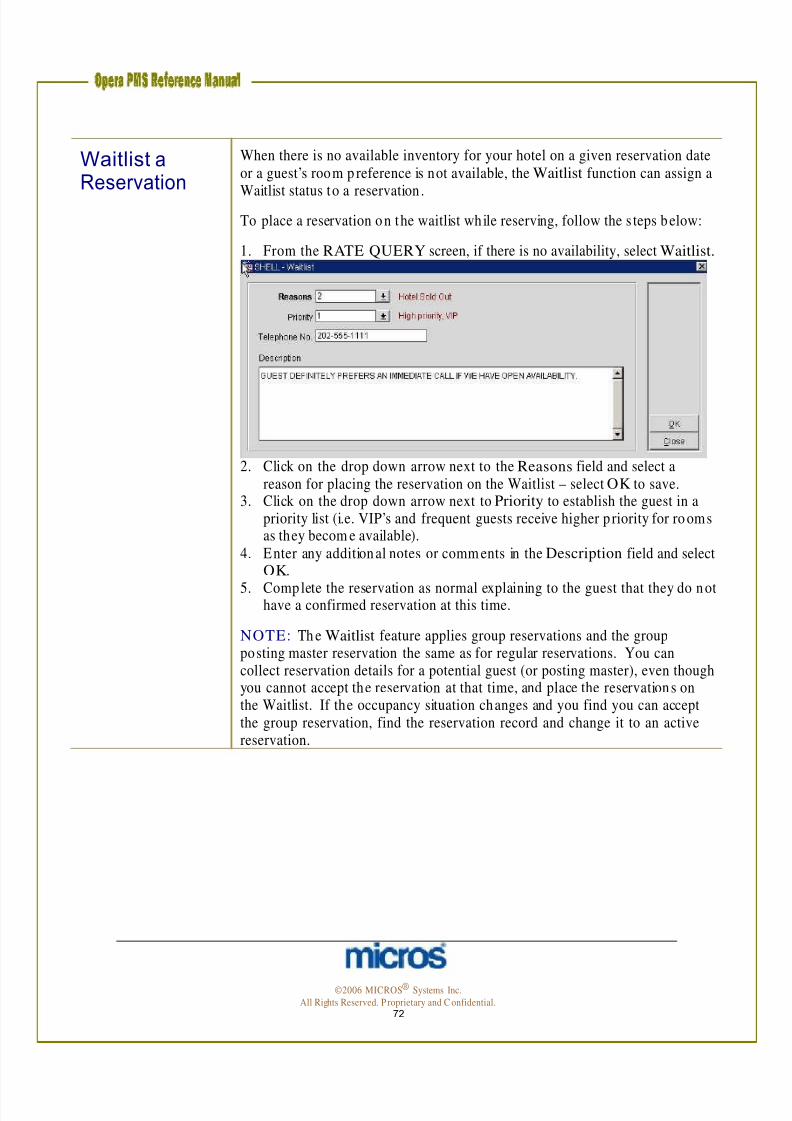
1. From the RATE QUERY screen, if there is no availability, select Waitlist.
2. Click on the drop down arrow next to the Reasons field and select a reason for placing the reservation on the Waitlist – select OK to save.
3. Click on the drop down arrow next to Priority to establish the guest in apriority list (i.e. VIP’s and frequent guests receive higher p riority for ro omsas they becom e available).
4. Enter any additional notes or comm ents in the Description field and selectOK.
5. Complete the reservation as normal explaining to the guest that they do nothave a confirmed reservation at this time.
NOTE: Th e Waitlist feature applies group reservations and the groupposting master reservation the same as for regular reservations. You cancollect reservation details for a potential guest (or posting master), even thoughyou cannot accept the reservation at that time, and place the reservations onthe Waitlist. If the occupancy situation changes and you find you can acceptthe group reservation, find the reservation record and change it to an activereservation.
©2006 MICROS® Systems Inc.
All Rights Reserved. P roprietary and C onfidential. 72
7/31/2019 GEN V40 PMS Reference Manual FINAL Eng Ch
http://slidepdf.com/reader/full/gen-v40-pms-reference-manual-final-eng-ch 73/474
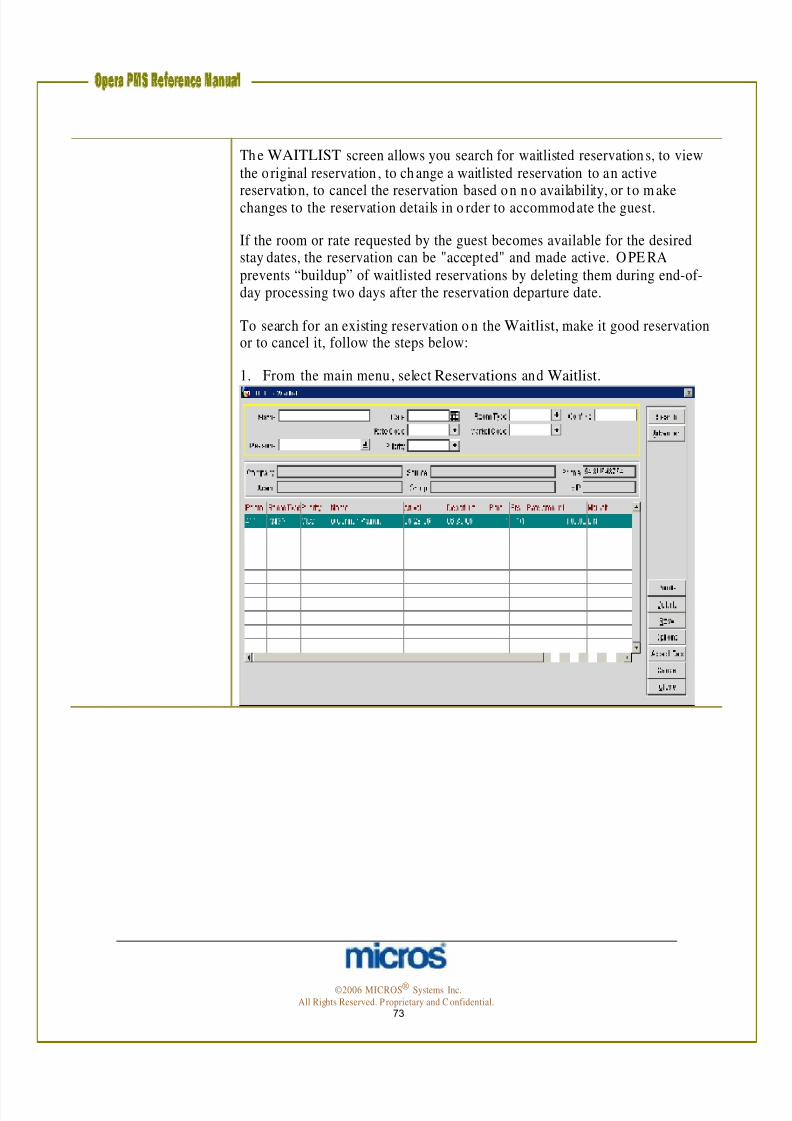
Th e WAITLIST screen allows you search for waitlisted reservation s, to viewthe o riginal reservation , to ch ange a waitlisted reservation to an active
reservation, to cancel the reservation based on no availability, or to m akechanges to the reservation details in o rder to accommodate the guest.
If the room or rate requested by the guest becomes available for the desiredstay dates, the reservation can be "accepted" and made active. O PE RAprevents “buildup” of waitlisted reservations by deleting them during end-of-day processing two days after the reservation departure date.
To search for an existing reservation o n the Waitlist, make it good reservationor to cancel it, follow the steps below:
1. From the main menu, select Reservations and Waitlist.
©2006 MICROS® Systems Inc. All Rights Reserved. P roprietary and C onfidential.
73

7/31/2019 GEN V40 PMS Reference Manual FINAL Eng Ch
http://slidepdf.com/reader/full/gen-v40-pms-reference-manual-final-eng-ch 74/474
2. Enter the guests last Name or Conf. No. and select Search.
NOTE: The Advanced butto n enables the Company, Source, Agent, Groupfields for use as additional search options. Th e Details option displays theoriginal reasons for p lacing reservation s on Waitlist.
3. Highlight and desired waitlist reservation and choose Accept Res. to makethe reservation active.
4. Com plete the reservation as no rmal and select OK to save.
NOTE: When you accept the reservation , a message prom pts you to confirmthat you wish to make the reservation active. To ensure that accepting thereservation does not violate inventory restrictions, OPERA automaticallychecks for the conditions below:
• O verbooking restrictions and limits
• Booking into an already blocked or occupied room (which mightcreate a share)
• D eposit and Cancellation requirements attached to the rate orreservation
• Completeness of reservation details (e.g., a valid rate code is selected)
• Rate Code restrictions
Cancel removes the highlighted waitlisted reservation from the database. Amessage notifies you if cancellation rules exist for the rate or reservation .
©2006 MICROS® Systems Inc. All Rights Reserved. P roprietary and C onfidential.
74
7/31/2019 GEN V40 PMS Reference Manual FINAL Eng Ch
http://slidepdf.com/reader/full/gen-v40-pms-reference-manual-final-eng-ch 75/474
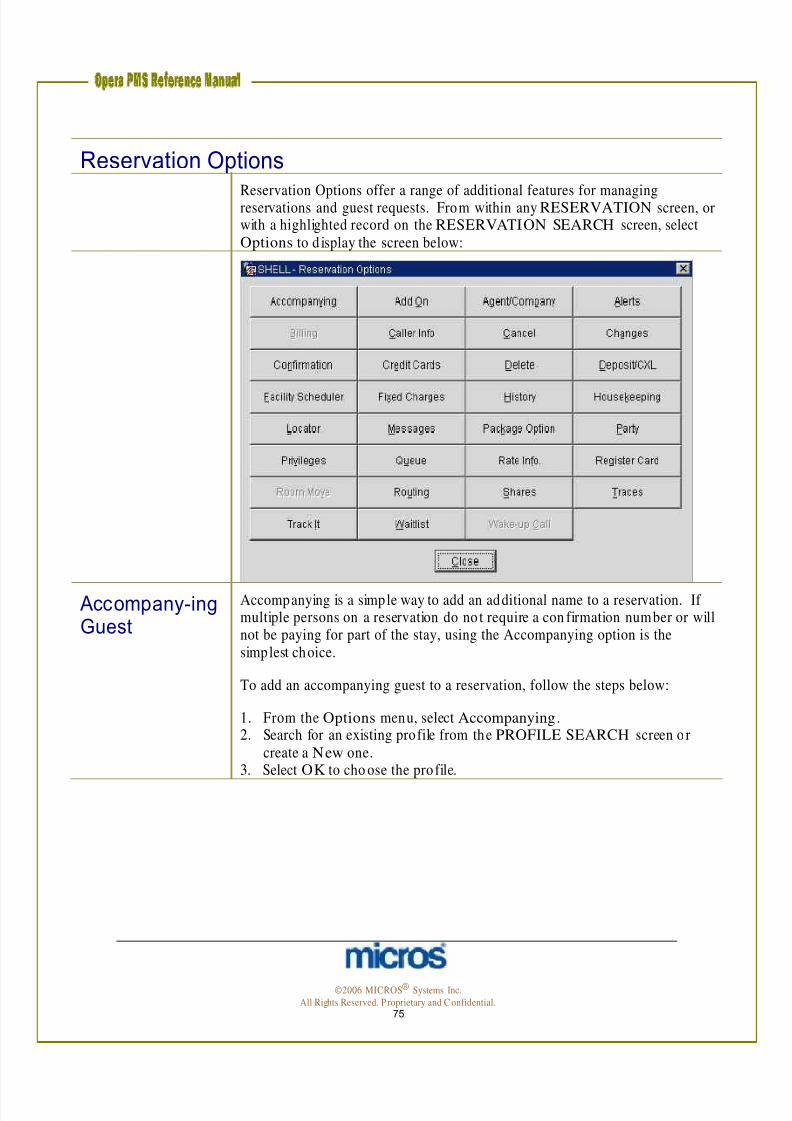
Reservation Options
Reservation Options offer a range of additional features for managingreservations and guest requests. From within any RESERVATION screen, orwith a highlighted record on the RESERVATION SEARCH screen, selectOptions to d isplay the screen below:
Accompany-ing Guest
Accompanying is a simple way to add an additional name to a reservation. If multiple persons on a reservation do no t require a con firmation number or willnot be paying for part of the stay, using the Accompanying option is thesimplest choice.
To add an accompanying guest to a reservation, follow the steps below:
1. From the Options menu, select Accompanying.2. Search for an existing profile from the PROFILE SEARCH screen o r
create a New one.3. Select OK to cho ose the pro file.
©2006 MICROS® Systems Inc.
All Rights Reserved. P roprietary and C onfidential. 75
7/31/2019 GEN V40 PMS Reference Manual FINAL Eng Ch
http://slidepdf.com/reader/full/gen-v40-pms-reference-manual-final-eng-ch 76/474
Add-On Reservation (Copy)
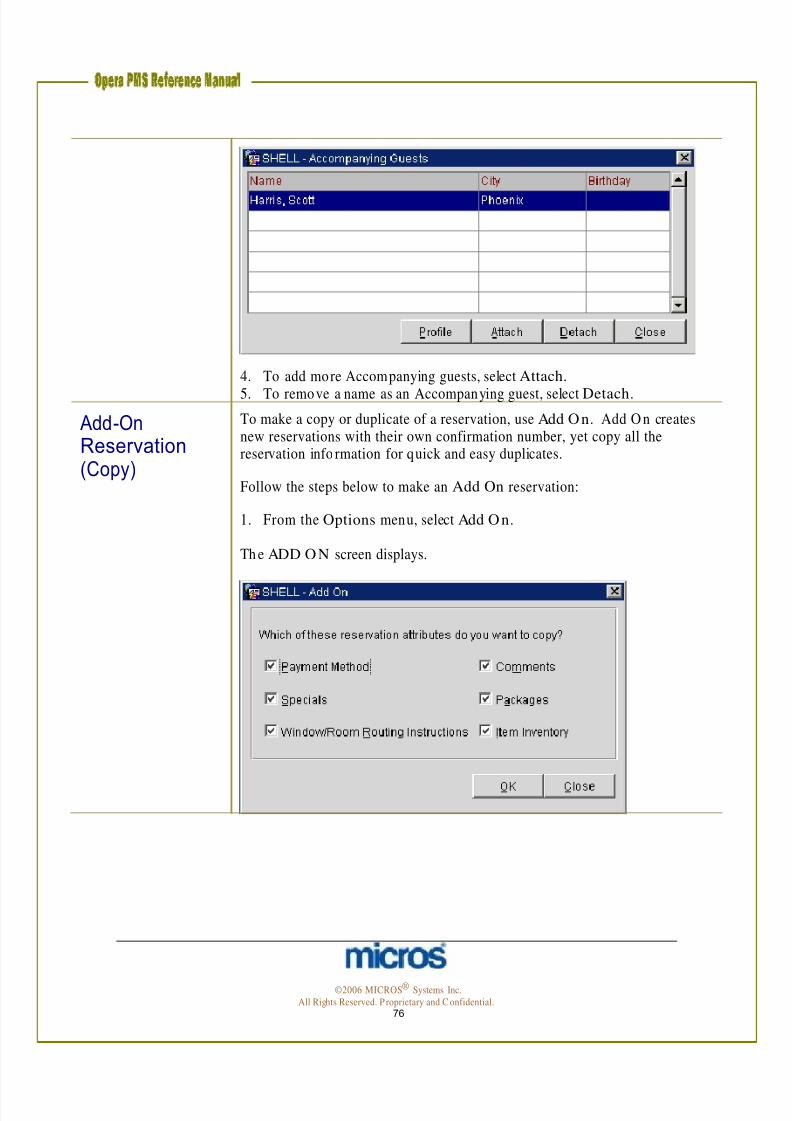
4. To add more Accompanying guests, select Attach.
5. To remove a name as an Accompanying guest, select Detach.
To make a copy or duplicate of a reservation, use Add O n. Add O n createsnew reservations with their own confirmation number, yet copy all thereservation info rmation for quick and easy duplicates.
Follow the steps below to make an Add On reservation:
1. From the Options menu, select Add O n.
Th e ADD O N screen displays.
©2006 MICROS® Systems Inc. All Rights Reserved. P roprietary and C onfidential.
76
7/31/2019 GEN V40 PMS Reference Manual FINAL Eng Ch
http://slidepdf.com/reader/full/gen-v40-pms-reference-manual-final-eng-ch 77/474
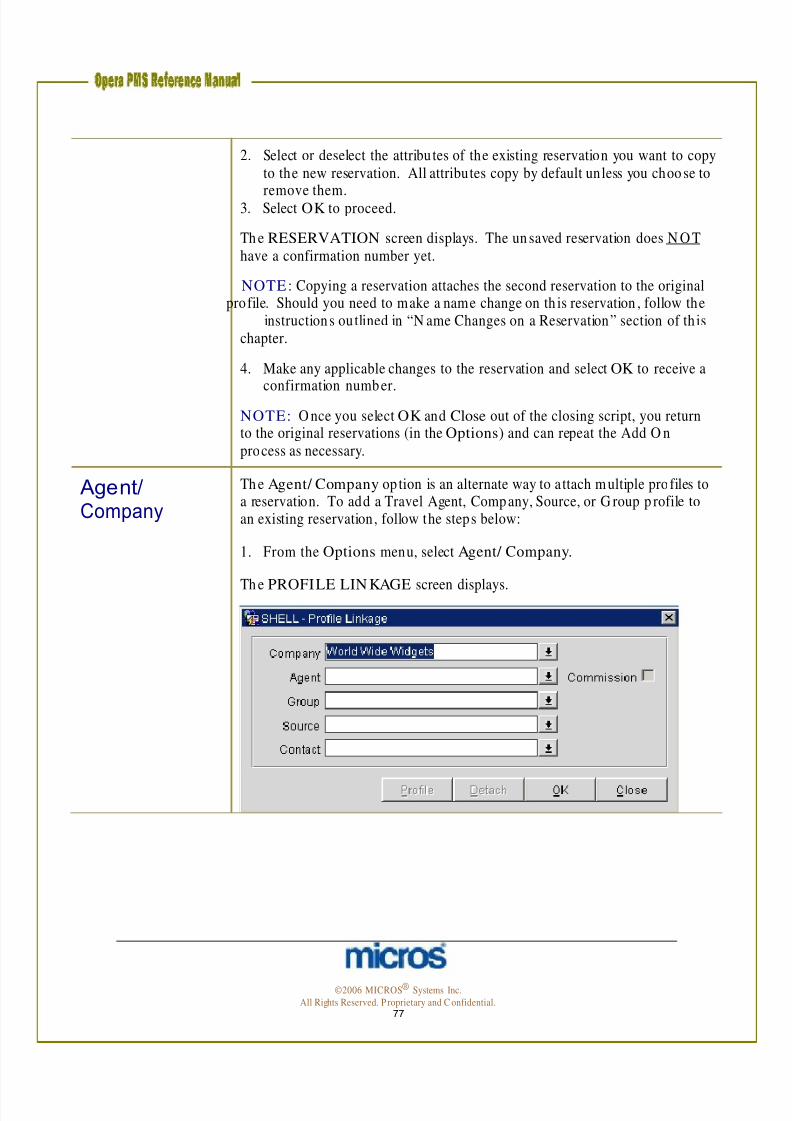
Agent/Company
2. Select or deselect the attributes of the existing reservation you want to copyto the new reservation. All attributes copy by default unless you choo se to
remove them.3. Select OK to proceed.
Th e RESERVATION screen displays. The un saved reservation does N O Thave a confirmation number yet.
NOTE : Copying a reservation attaches the second reservation to the originalprofile. Should you need to make a name change on th is reservation , follow the
instructions outlined in “N ame Changes on a Reservation” section of th ischapter.
4. Make any applicable changes to the reservation and select OK to receive a
confirmation number.NOTE: O nce you select OK and Close out of the closing script, you returnto the original reservations (in the Options) and can repeat the Add O nprocess as necessary.
Th e Agent/ Company op tion is an alternate way to a ttach m ultiple pro files toa reservation. To add a Travel Agent, Company, Source, or G roup p rofile toan existing reservation, follow the steps below:
1. From the Options menu, select Agent/ Company.
Th e PROFILE LIN KAGE screen displays.
©2006 MICROS® Systems Inc.
All Rights Reserved. P roprietary and C onfidential. 77

7/31/2019 GEN V40 PMS Reference Manual FINAL Eng Ch
http://slidepdf.com/reader/full/gen-v40-pms-reference-manual-final-eng-ch 78/474
2. To add a Company profile, click on the drop down arrow next to theCompany field.
3. To add a Travel Agent profile, click on the drop down arrow next to theAgent field.4. To add a Source or G roup p rofile, click on the drop down arrow next to
the Source or Group fields.5. Using the PROFILE SEARCH screen, search for and highlight the
desired profile(s), and select OK.6. O nce you return to the PROFILE LIN KAGE screen, select OK to save
and return to the RESERVATION OPTION S screen.
Alerts Alerts attached to reservations create pop-up windows that alert the user eachtime you access the reservation . Most comm on ly, Alerts signal an actionneeded on a reservation at a particular time in th e life cycle of a reservation.
Alerts display in different locations depending on the action (i.e. check-in,check out, etc.)
Follow the steps below to add an Alert to a reservation:
1. From the Options menu, select Alerts.2. Select New.
Th e ALERT INPUT screen displays.
©2006 MICROS® Systems Inc. All Rights Reserved. P roprietary and C onfidential.
78

7/31/2019 GEN V40 PMS Reference Manual FINAL Eng Ch
http://slidepdf.com/reader/full/gen-v40-pms-reference-manual-final-eng-ch 79/474
3. Click the drop down arrow next to the Code field.4. Highlight the app ropriate pre-defined Alert Code and select OK.
5. Click on the drop down arrow next to the Area field.6. Highlight and select the appro priate area to alert this reservation. Forexample, if the alert is to verify an ID for a qualifying rate at check-in,select “Check In.”
• Check In: Alert displays when you access the reservation in Front Desk > Arrivals
• Check Out: Alert d isplays when you access the reservation atdeparture in Cashiering > Billing
• Reservation: Alert d isplays when you access the reservation inReservations > Update Reservations
7. Enter any additional information n eeded for the Alert in the Description
box and select OK to save.
Billing Th e Billing option allows easy access to the guest folio from the reservation or in-house guests screens. Billing is only active on guests in-house and no t as an active reservation since no folio exists until check in occurs. Selecting th isoption on an in-house guest directs you to their folio as seen in Cashiering >Billing.
If your hotel has the parameter set to allow Pre-Stay Charging, on the day of the guest arrival, the Billing option is available.
Caller Info Th e CALL HISTORY screen displays information about phon e calls received by the Central Reservation Office to set up and make changes to reservations
cross-sold at the central level.
Cancel The Cancel option cancels the reservation . For more information o n cancelingreservations, refer to the “Cancel a Reservation” section of this chapter.
©2006 MICROS® Systems Inc. All Rights Reserved. P roprietary and C onfidential.
79
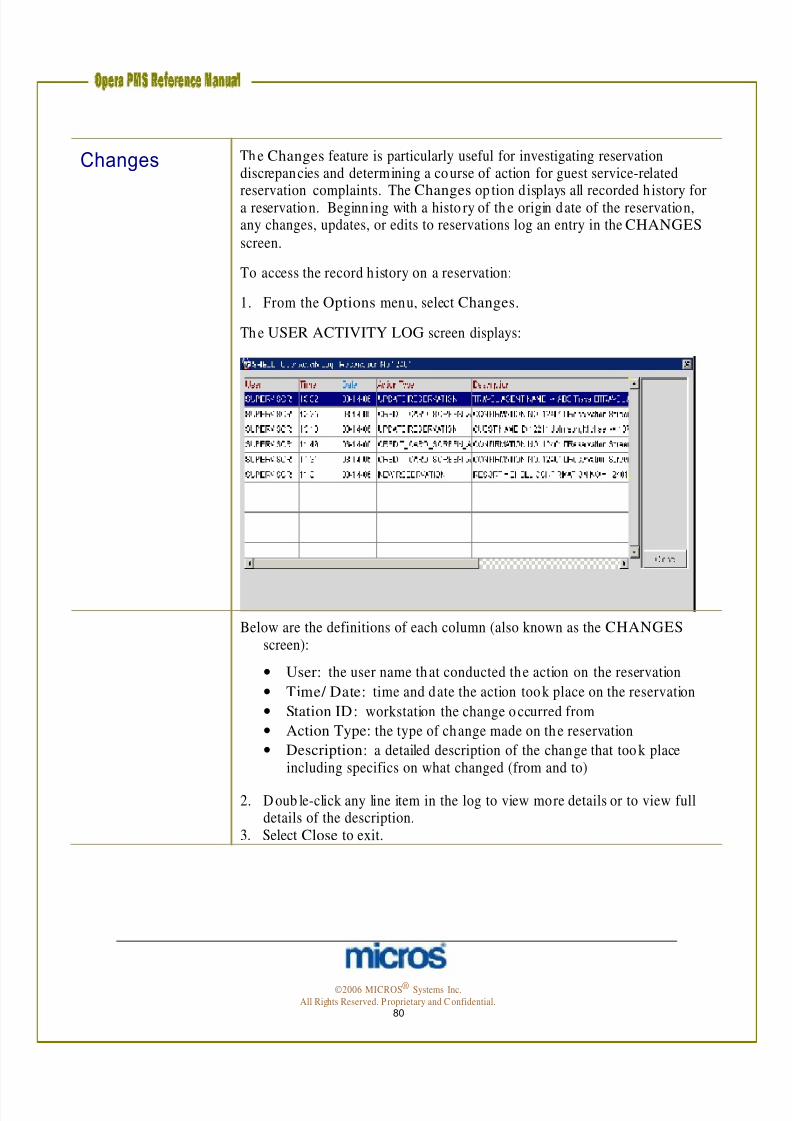
7/31/2019 GEN V40 PMS Reference Manual FINAL Eng Ch
http://slidepdf.com/reader/full/gen-v40-pms-reference-manual-final-eng-ch 80/474
Changes Th e Changes feature is particularly useful for investigating reservationdiscrepancies and determining a course of action for guest service-related
reservation complaints. The Changes op tion displays all recorded h istory fora reservation. Beginning with a histo ry of th e origin date of the reservation,any changes, updates, or edits to reservations log an entry in the CHANGES screen.
To access the record h istory on a reservation:
1. From the Options menu, select Changes.
Th e USER ACTIVITY LOG screen displays:
Below are the definitions of each column (also known as the CHANGES screen):
• User: the user name that conducted the action on the reservation
• Time/ Date: time and date the action took place on the reservation
• Station ID: workstation the change o ccurred from
• Action Type: the type of change made on the reservation
• Description: a detailed description of the change that too k placeincluding specifics on what changed (from and to)
2. D oub le-click any line item in the log to view more details or to view fulldetails of the description.
3. Select Close to exit.
©2006 MICROS® Systems Inc. All Rights Reserved. P roprietary and C onfidential.
80

7/31/2019 GEN V40 PMS Reference Manual FINAL Eng Ch
http://slidepdf.com/reader/full/gen-v40-pms-reference-manual-final-eng-ch 81/474
Confirmation Th e Confirmation op tion sends confirmation letters to the guest for theirreservation upon request. There are three different ways to deliver
confirmations: printing and mailing, emailing, and faxing. Each hotel may alsohave more than one confirmation letter type to select from when accessing thisoption.
NOTE: Email and Fax delivery op tions require special configuration and/ oralternative software.
NOTE: All hotels have at least one general con firmation letter type andrequire the assistance of OPERA PMS Support to create multiple confirmationletter types.
To print a confirmation letter to mail to a guest:
1. From the Options menu, select Confirmation .
Th e CONFIRMATIONS screen displays.
©2006 MICROS® Systems Inc. All Rights Reserved. P roprietary and C onfidential.
81

7/31/2019 GEN V40 PMS Reference Manual FINAL Eng Ch
http://slidepdf.com/reader/full/gen-v40-pms-reference-manual-final-eng-ch 82/474
2. Place an “X” in the Print column on the row for the guest to whom youwould like to mail the confirmation. If mu ltiple profiles or guests exist inthe reservation, be certain to select the Individual profile of the guest towhom you are delivering the confirmation.
3. Click the drop do wn arrow next to the field labeled Conf. Name on theline for th e recipient guest.
4. Highlight the Confirmation Letter Nam e you would prefer to deliver andselect OK.
5. If no address exists on the profile, click the drop down arrow next to theAddress field to add an address.
6. If emailing or faxing a confirmation, ensure either an email address or faxnumber exists in the fields in the Email and Fax columns. If no emailaddresses or fax numbers exist, click the drop down arrow next to eachfield to add on e.
7. Select Send .
NOTE: The Status column displays the status of the con firmation letter. A“Pending” status indicates the confirmation letter has not printed, emailed, orfaxed. A “Successful” status indicates the confirmation letter delivered to theguest.
8. To preview the confirmation letter to your screen, select Preview.9. To save the confirmation letter to file on your comp uter, select File.
NOTE: Confirmation letters previewed or saved to file open and save asAdobe PD F (Portable D ocument Fo rmat) files. In addition , when emailing a
confirmation , the n ew message created through the email program attaches theconfirmation letter to the message as a PD F attachment.
Credit Cards Th e Credit Cards feature applies on ly to guests paying with credit card afterthey have checked into the hotel. This feature allows the user to obtainadditional authorization o n a card as well as to view authorization history foreach payment method. For more inform ation on credit cards andauthorization , refer to the “Fron t D esk” chapter of this manual.
Delete D o n ot use this option as it permanently deletes reservations from th edatabase. Th is option is only available during a manual reservation en try attime of install.
Deposit/CXL Th e Deposit opt ion enters requests on reservations made for rate op tions thatrequire an advance deposit. You may app ly a deposit of any amount to anyreservation at anytime. N ot only does this screen allow you to set the requestto collect the deposit, it also allows you to post the deposit once received.
The second tab o f the DEPOSIT CANCELLATIO N screen allows you tomanage reservations made for rate options with cancellation rules.
©2006 MICROS® Systems Inc. All Rights Reserved. P roprietary and C onfidential.
82

7/31/2019 GEN V40 PMS Reference Manual FINAL Eng Ch
http://slidepdf.com/reader/full/gen-v40-pms-reference-manual-final-eng-ch 83/474
To enter a deposit request on a reservation , follow the steps b elow:
1. From the Options menu, select Deposit/ CXL.2. Select Deposit Tab, and then New.
3. Click the drop down arrow next to the Deposit Rule field to enter a pre- defined deposit rule (i.e. 100% of guest stay, or 1st night’s room and tax).
4. D epending on the deposit rule for the reservation , enter either thePercentage or the Deposit Amount you request for the reservation.
5. En ter the Due Date you require the funds to be collected and applied tothe reservation.
6. Select OK to save
©2006 MICROS® Systems Inc.
All Rights Reserved. P roprietary and C onfidential. 83

7/31/2019 GEN V40 PMS Reference Manual FINAL Eng Ch
http://slidepdf.com/reader/full/gen-v40-pms-reference-manual-final-eng-ch 84/474
To post a received deposit on a reservation:
1. From the DEP OSIT CANCELLATION screen, select Payment.Th e CASHIER LOGIN screen displays.2. Enter your Password and select OK.3. Complete the RESERVATION DEPOSIT PAYMEN T screen (be
certain to change the Reservation Type field to “Deposit Received”) andselect OK.
A message displays asking if you would like to update the reservation with thenew payment method.
Facility Scheduler
4. Answer “Yes” to update the reservation with the depo sit payment type (i.e. Check). Answer “N o” to leave the depo sit payment type as the original on
the reservation.5. To print a receipt for the deposit, select Print Receipt.6. Select Close to exit.
Th e Facility Scheduler feature primarily exists for extended-stay properties toschedule “light-touch” service for long-term guests. Presented in a calendarformat, the Facility Scheduler provides you with a visual reference for thefrequency of the facility tasks (i.e. ho usekeeping service) pertaining to areservation . The dates marked with b lue represent dates on which there can b ea scheduled housekeeping task assigned.
©2006 MICROS® Systems Inc. All Rights Reserved. P roprietary and C onfidential.
84

7/31/2019 GEN V40 PMS Reference Manual FINAL Eng Ch
http://slidepdf.com/reader/full/gen-v40-pms-reference-manual-final-eng-ch 85/474
• Instructions add special directions that appear on the H ousekeepingTask Sheet for this room .
• Customize/ Edit can be used to change the H ousekeeping schedulefor the reservation once the guest has checked in. Fo r moreinformation on establishing a custom Housekeeping schedule, refer tothe “Fron t Desk” chapter of this manual.
• Details display all tasks and their associated codes for the highlighteddate. You can also access details by double-clicking in the m iddle of any date box.
Fixed Charges Fixed charges allow charges to post autom atically in each reservation through the N ight Audit process along with room and tax. E xamples of Fixed Charges that p ost every night are rollaway beds and p arking charges.
To add Fixed Charges to reservations or in-house guests, follow the stepsbelow:
1. From the Options menu, select Fixed Charges.2. Select New.
Th e FIXED CHARGES N EW screen displays.
©2006 MICROS® Systems Inc. All Rights Reserved. P roprietary and C onfidential.
85

7/31/2019 GEN V40 PMS Reference Manual FINAL Eng Ch
http://slidepdf.com/reader/full/gen-v40-pms-reference-manual-final-eng-ch 86/474
3. Choose the frequency to post the fixed charge (i.e. O nce, Daily, Weekly,etc.).
4. If the fixed charge does no t apply to all nights of the guest stay, enter aBegin Date and End Date for the charge. If the fixed charge only appliesonce, enter the Date.
5. Click the drop down arrow next to the Trn. Code field.6. Search for and highlight the app ropriate Transaction Code to post. Select
OK.7. Enter the price for the fixed charge in the Amount field.8. Enter the quantity of the fixed charge in the Quantity field (i.e. If there are
two cars being charged for parking, enter a quantity of “2” and the fixedcharge posts twice for the parking charge).
9. Enter a Supplement to describe the purpose of the fixed charge (i.e. roomcharge manual – extra bed).
10. Select OK to save and exit.
History To view past reservation history on the profile associated with this reservation,select the History op tion. For full instructions on viewing and manipulatinghistory information, refer to the “History” section of the Profiles chapter inthis manual.
Housekeeping Th e Housekeeping option allows guest preferences on turndown service orrequests service times for room service. Additionally, any notes thatHousekeeping might need for this guest apply using this option and display onthe department’s Task Assignment sheets.
To request turndown service for a guest at a particular time with specialinstructions, follow these steps below:1. From the Options menu, select Housekeeping.
Th e HOUSEKEEPING screen displays.
©2006 MICROS® Systems Inc. All Rights Reserved. P roprietary and C onfidential.
86

7/31/2019 GEN V40 PMS Reference Manual FINAL Eng Ch
http://slidepdf.com/reader/full/gen-v40-pms-reference-manual-final-eng-ch 87/474
2. Check the box next to the Turndown field.3. Type any additional instructions for Hou sekeeping in the Room
Instructions field.4. Select OK to save.
NOTE: Turndown entries are not visible on the usual task sheets; however,they are visible when printing task sheets from the turndown menu inHousekeeping.
Locators Locators allow the F ront D esk to determine the location of an in-house guest at any time during their stay. O ne advan tage to th is feature is that if the guest receives a call while not in their room (but in some other location in the hotel),the PBX O perator can see the locator lamp indicated on their room number.The operator may then transfer the call to that facility (i.e. the guest is in the
restaurant and would like all calls sent directly to that outlet so he does notmiss an important phone call).
To attach a Locator to an in-house guest reservation , follow the steps below:
1. From the Options menu, select Locator.2. Select New to display the LOCATORS – NEW screen.
3. En ter the Begin Date and End Date for the location change.
4. En ter the From Time and To Time for th e location change.
NOTE: The From Time and To Time must be greater than the operatingsystem’s time.
5. Enter any additional information about the guest’s location in theLocation Text field.
6. Select OK to save the Locator.
©2006 MICROS® Systems Inc. All Rights Reserved. P roprietary and C onfidential.
87
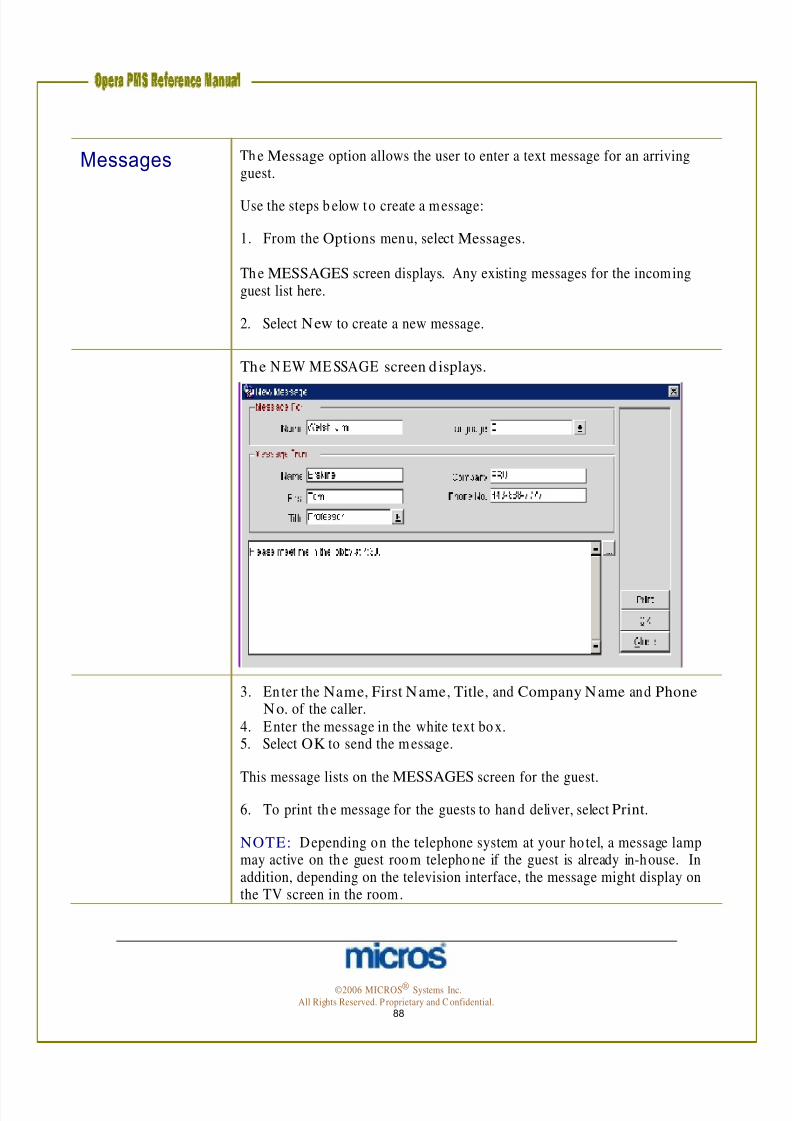
7/31/2019 GEN V40 PMS Reference Manual FINAL Eng Ch
http://slidepdf.com/reader/full/gen-v40-pms-reference-manual-final-eng-ch 88/474
Messages Th e Message option allows the user to enter a text message for an arrivingguest.
Use the steps b elow to create a message:
1. From the Options menu, select Messages.
Th e MESSAGES screen displays. Any existing messages for the incomingguest list here.
2. Select New to create a new message.
The N EW ME SSAGE screen d isplays.
3. En ter the Name, First Name, Title, and Company Name and Phone No. of the caller.
4. Enter the message in the white text box.5. Select OK to send the m essage.
This message lists on the MESSAGES screen for the guest.
6. To print the message for the guests to hand deliver, select Print.
NOTE: Depending on the telephone system at your ho tel, a message lampmay active on th e guest room telepho ne if the guest is already in-house. Inaddition, depending on the television interface, the message might display onthe TV screen in the room.
©2006 MICROS® Systems Inc. All Rights Reserved. P roprietary and C onfidential.
88
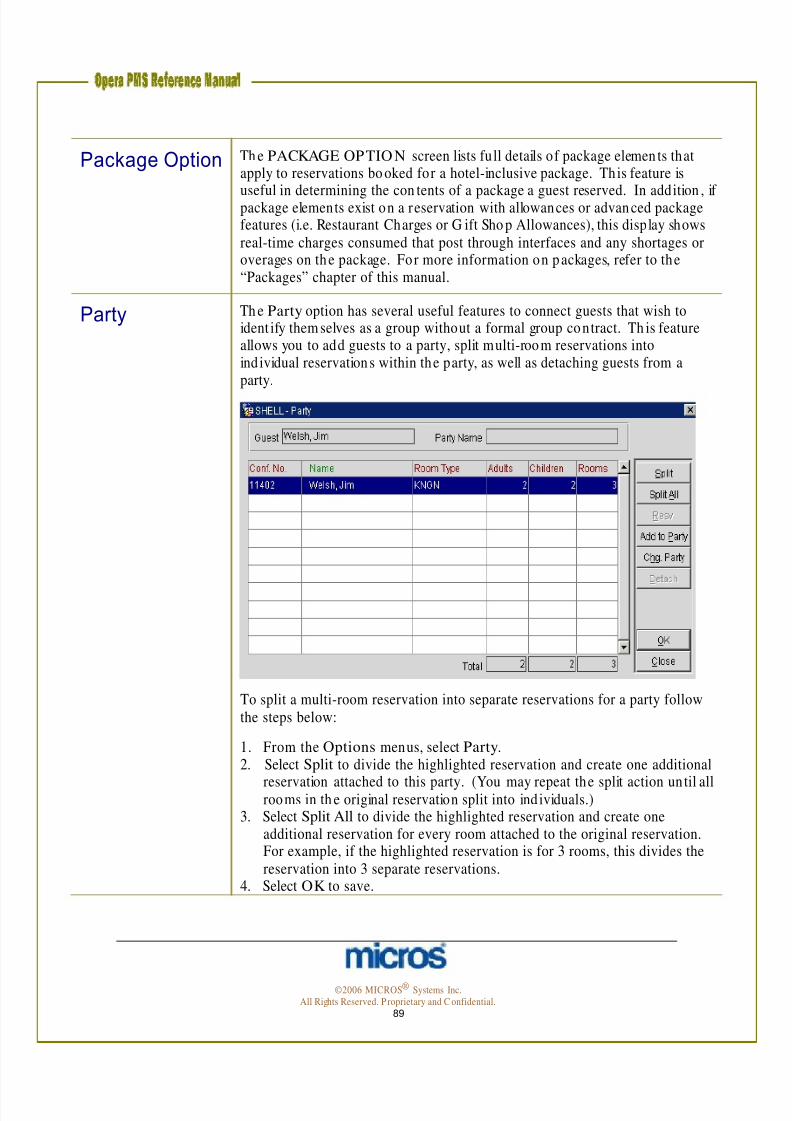
7/31/2019 GEN V40 PMS Reference Manual FINAL Eng Ch
http://slidepdf.com/reader/full/gen-v40-pms-reference-manual-final-eng-ch 89/474
Package Option Th e PACKAGE OPTIO N screen lists full details of package elemen ts thatapply to reservations bo oked for a hotel-inclusive package. This feature is
useful in determining the con tents of a package a guest reserved. In addition , if package elements exist on a reservation with allowances or advanced packagefeatures (i.e. Restaurant Charges or G ift Sho p Allowances), this display showsreal-time charges consumed that post through interfaces and any shortages oroverages on the package. For more information on packages, refer to the“Packages” chapter of this manual.
Party Th e Party option has several useful features to connect guests that wish toident ify them selves as a group without a formal group contract. Th is featureallows you to add guests to a party, split multi-room reservations intoindividual reservations within the party, as well as detaching guests from aparty.
To split a multi-room reservation into separate reservations for a party follow the steps below:
1. From the Options menus, select Party.2. Select Split to divide the highlighted reservation and create one additional
reservation attached to this party. (You may repeat the split action until allrooms in th e original reservation split into individuals.)3. Select Split All to divide the highlighted reservation and create one
additional reservation for every room attached to the original reservation.For example, if the highlighted reservation is for 3 rooms, this divides thereservation into 3 separate reservations.
4. Select OK to save.
©2006 MICROS® Systems Inc. All Rights Reserved. P roprietary and C onfidential.
89

7/31/2019 GEN V40 PMS Reference Manual FINAL Eng Ch
http://slidepdf.com/reader/full/gen-v40-pms-reference-manual-final-eng-ch 90/474
To attach or add a reservation to an existing party, follow the steps below:
1. From the Options menu, select Party.2. Select Add to Party.3. Search for and highlight the existing reservation you would like to add to
this party and select OK.
The reservation now belongs to the party.
To detach a reservation from an existing party, follow the steps bellows:
1. From the Options menu, select Party.2. Highlight the reservation you wish to remove from the party, and select
Detach .3. Answer “Yes” to detach the reservation from th e party and select OK to
save.
The reservation no longer belongs to the existing party.
To change the party a reservation belongs to (from one party to another),follow the steps below:
1. From the Options menu, select Party.2. Highlight the reservation you wish to change parties, and select Chg.
Party.3. Search for and select the primary reservation that you wish to change the
association to and select OK.
4. Answer “Yes” to move the existing reservation to ano ther party.
The reservation now belongs to another party.
©2006 MICROS® Systems Inc. All Rights Reserved. P roprietary and C onfidential.
90

7/31/2019 GEN V40 PMS Reference Manual FINAL Eng Ch
http://slidepdf.com/reader/full/gen-v40-pms-reference-manual-final-eng-ch 91/474
Privileges Use the Privileges feature to place restriction s or allow certain privileges oneach reservation. Checking or un-checking any of the privilege options
changes the guests authority for certain in-house services.
The o ptions to choose from are as follows:
• No Post prevents any postings from being charged or applying to thefolio o ther than room and tax charges.
• Authorize Direct Bill authorizes the reservation for direct billing to anAR account .
• Video Check Out indicates the guest ability to use the video check outmethod. Whether or not video check out is allowed for the guest may
depend on whether the guest has provided a credit card method of payment and whether property policy permits.
• Pre-Stay Charging – autho rizes charges to the account p rior to theguest arrival (i.e. lunch in the restauran t befo re checking into the hotel)
• Post-Stay Charging – authorizes charges to the account after theguest’s departure (i.e. breakfast in the restaurant after departing thehotel)
• Scheduled Check Out – allows the reservation to be slated for ascheduled check out time (only if the property used Scheduled CheckOut feature)
©2006 MICROS® Systems Inc. All Rights Reserved. P roprietary and C onfidential.
91

7/31/2019 GEN V40 PMS Reference Manual FINAL Eng Ch
http://slidepdf.com/reader/full/gen-v40-pms-reference-manual-final-eng-ch 92/474
Pro-Forma Folio Th e Pro-Forma Folio option produces a folio with estimated charges for theentire length o f the guest stay. The actual folio upon dep arture could greatly
differ from the pro form a folio.Th e FOLIO OPTIONS screen allows you to specify customizing optionswhen you are printing or p reviewing a fo lio or fo lios.
Folio Style allows you to select the style in which you wish to print and d isplay the selected folio.
Preview displays the selected folio on screen. O nce the folio displays, you mayprint the folio from the preview screen.
Print prints the selected folio.
File generates a PDF file that you can display to the screen or save locally or tothe network drive.
NOTE: For mo re information on p rinting Pro-Form Folios, refer to the“Front D esk” chapter of th is manual.
©2006 MICROS® Systems Inc. All Rights Reserved. P roprietary and C onfidential.
92
7/31/2019 GEN V40 PMS Reference Manual FINAL Eng Ch
http://slidepdf.com/reader/full/gen-v40-pms-reference-manual-final-eng-ch 93/474
Queue Th e Queue option allows you to place an arriving reservation into a queue forroom availability. When a guest with a reservation arrives, and there are norooms clean or inspected to check them in, this feature prioritizes handlingthose arrivals. Reservations placed on queue can be pre-assigned to a roomnumb er, or may be queued with no room assignment.
To place a reservation on queue, follow the steps below:
1. From the Options menu, select Queue.2. Select OK to save the reservation into the queue.
NOTE: A message displays indicating the reservation is in queue and at whatpriority (i.e. 3 rd on the list).
For mo re information on Q ueue reservations, refer to the “Front D esk”
chapter of th is manual. Rate Info Th e Rate Info option d isplays all room rates and a package summary,
including taxes, for each night of the guest stay. This is particularly usefulwhen guests have rate changes during their stay. In addition , the totals forroom and tax for all nights of the guest stay display in the Grand Total fieldon the RATE SUMMARY screen.
To view details for a particular room night (room charges, taxes, and anypackage elements posting), highlight one n ight o f the guest stay and select theDetails option in RATE SUMMARY screen.
Register Card Th e Register Card feature pre-prints a registration card for the reservation.This option is useful to pre-print the registration card prior to the guest’sarrival. In addition, if the original registration card becomes lost o r missing, itis useful to generate a new registration card.
For more information on printing registration cards, refer to the “Fron t D esk”chapter of th is manual.
©2006 MICROS® Systems Inc. All Rights Reserved. P roprietary and C onfidential.
93
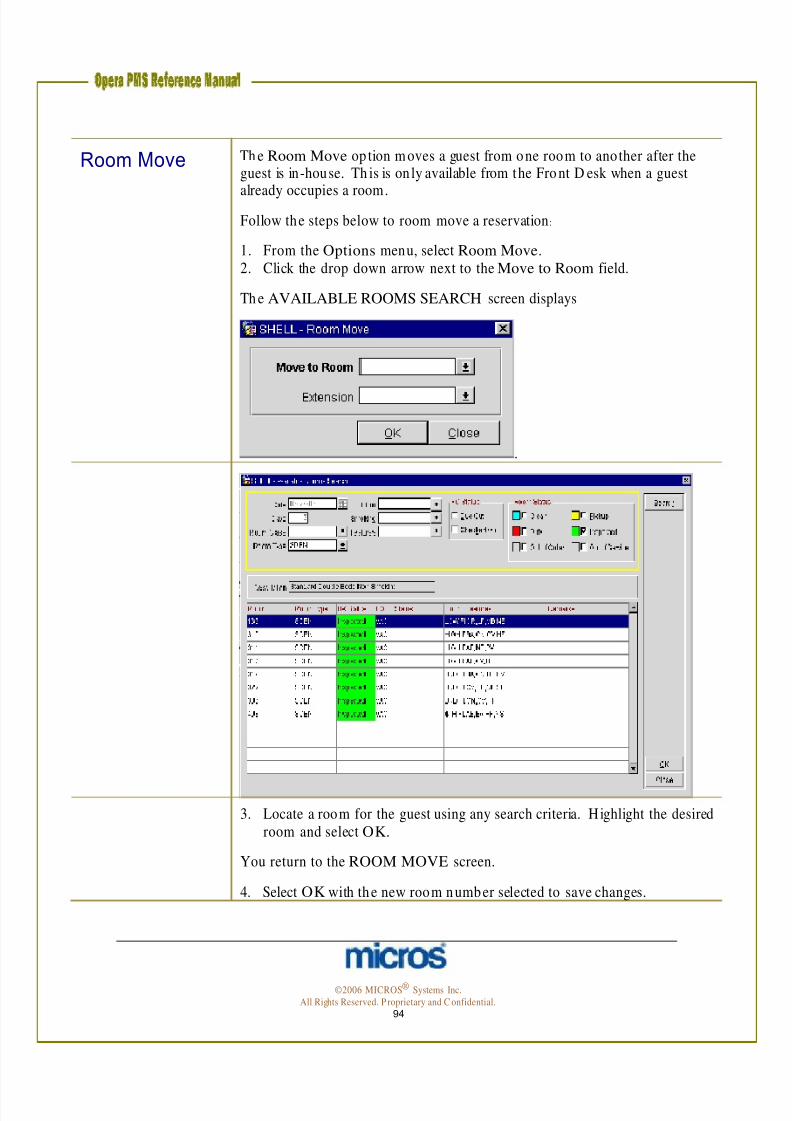
7/31/2019 GEN V40 PMS Reference Manual FINAL Eng Ch
http://slidepdf.com/reader/full/gen-v40-pms-reference-manual-final-eng-ch 94/474
Room Move Th e Room Move op tion m oves a guest from one room to another after theguest is in-house. Th is is only available from the Fro nt D esk when a guest
already occupies a room.Follow the steps below to room move a reservation :
1. From the Options menu, select Room Move.2. Click the drop down arrow next to the Move to Room field.
Th e AVAILABLE ROOMS SEARCH screen displays
.
3. Locate a room for the guest using any search criteria. Highlight the desired room and select OK.
You return to the ROOM MOVE screen.
4. Select OK with the new room number selected to save changes.
©2006 MICROS® Systems Inc. All Rights Reserved. P roprietary and C onfidential.
94

7/31/2019 GEN V40 PMS Reference Manual FINAL Eng Ch
http://slidepdf.com/reader/full/gen-v40-pms-reference-manual-final-eng-ch 95/474
A prompt appears to update the Ho usekeeping status on the first room .
5. Select the approp riate room status.
• Inspected/ Clean: used if the guest has not arrived and the roomhas not been entered
• Pickup: used if the guest only briefly accessed the room o r you are
unsure of the correct status of the room .• Dirty: used if the guest occupied the roo m for any period of time
and requires attention by the H ousekeeping department
Routing Th e Routing option allows automatic charge routing of any type of chargetransactions. Routing applies to reservations at any time (before or afterarrival). Most comm only, Routing applies to ch arges directly billed to acompany’s AR account with the hotel.
There are 2 types of charge routing. Window routing automatically routescharges from one folio to another folio within the same guest’s bill. Roomrouting automatically routes charges to a different guest room and folio.
©2006 MICROS® Systems Inc. All Rights Reserved. P roprietary and C onfidential.
95

7/31/2019 GEN V40 PMS Reference Manual FINAL Eng Ch
http://slidepdf.com/reader/full/gen-v40-pms-reference-manual-final-eng-ch 96/474
WIN DOW ROUTIN G:
To setup charge Routing from one folio to ano ther within the same guest
room , follow th e steps below:
1. From the Options menu, select Routing.2. Select New.
Th e ROUTIN G IN STRUCTION S – NEW screen displays.
©2006 MICROS® Systems Inc. All Rights Reserved. P roprietary and C onfidential.
96
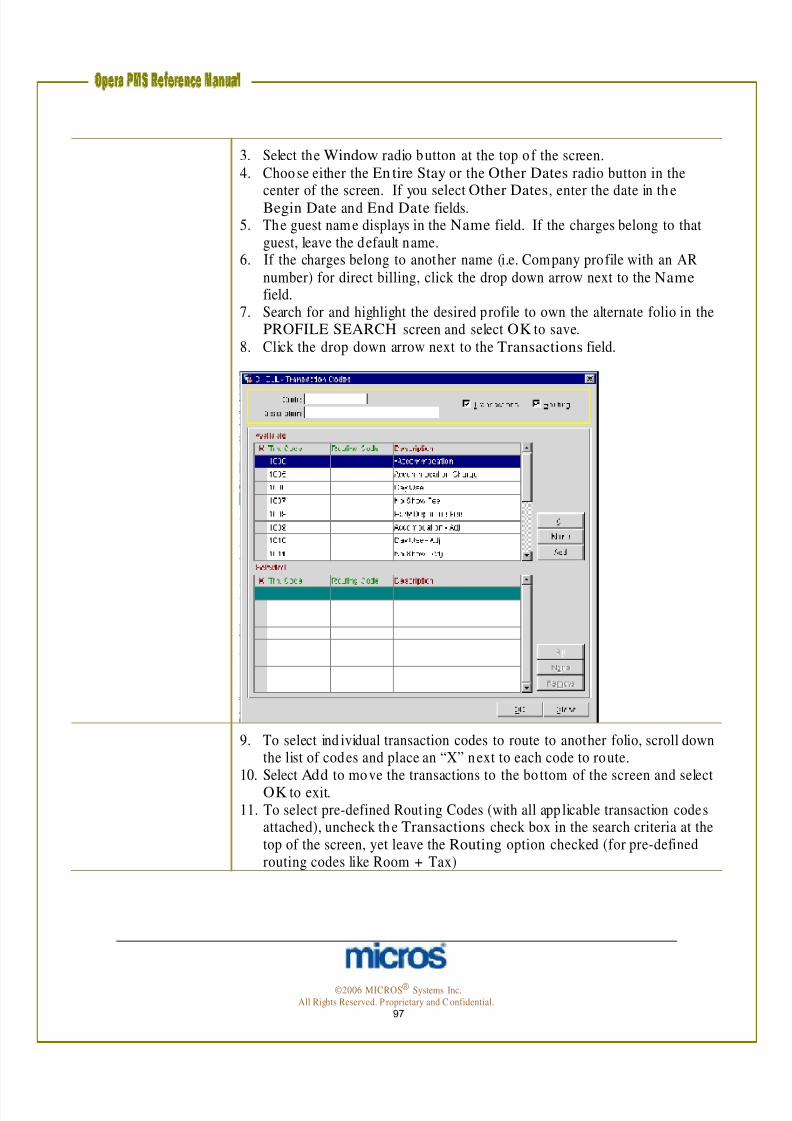
7/31/2019 GEN V40 PMS Reference Manual FINAL Eng Ch
http://slidepdf.com/reader/full/gen-v40-pms-reference-manual-final-eng-ch 97/474
3. Select the Window radio button at the top o f the screen.4. Choo se either the En tire Stay or the Other Dates radio button in the
center of the screen. If you select Other Dates, enter the date in th eBegin Date and End Date fields.5. The guest nam e displays in the Name field. If the charges belong to that
guest, leave the default name.6. If the charges belong to another name (i.e. Company profile with an AR
number) for direct billing, click the drop down arrow next to the Namefield.
7. Search for and highlight the desired profile to own the alternate folio in thePROFILE SEARCH screen and select OK to save.
8. Click the drop down arrow next to the Transactions field.
9. To select ind ividual transaction codes to route to another folio, scroll down the list of codes and place an “X” next to each code to route.
10. Select Add to move the transactions to the bo ttom of the screen and selectOK to exit.
11. To select pre-defined Routing Codes (with all app licable transaction codesattached), uncheck th e Transactions check box in the search criteria at thetop of the screen, yet leave the Routing option checked (for pre-definedrouting codes like Room + Tax)
©2006 MICROS® Systems Inc. All Rights Reserved. P roprietary and C onfidential.
97
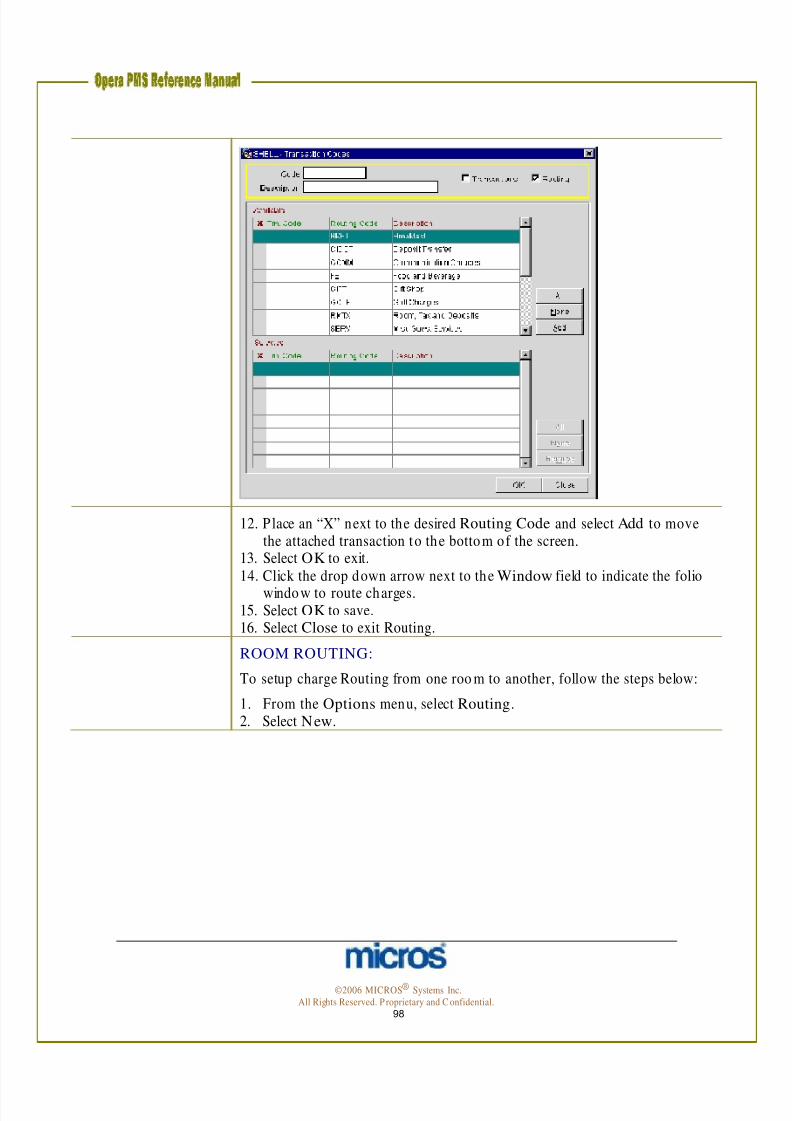
7/31/2019 GEN V40 PMS Reference Manual FINAL Eng Ch
http://slidepdf.com/reader/full/gen-v40-pms-reference-manual-final-eng-ch 98/474
12. P lace an “X” next to the desired Routing Code and select Add to move the attached transaction to the bottom of the screen.
13. Select OK to exit.14. Click the drop down arrow next to the Window field to indicate the folio
window to route charges.15. Select OK to save.16. Select Close to exit Routing.
ROOM ROUTING:
To setup charge Routing from one roo m to another, follow the steps below:
1. From the Options menu, select Routing.2. Select New.
©2006 MICROS® Systems Inc. All Rights Reserved. P roprietary and C onfidential.
98

7/31/2019 GEN V40 PMS Reference Manual FINAL Eng Ch
http://slidepdf.com/reader/full/gen-v40-pms-reference-manual-final-eng-ch 99/474
Th e ROUTIN G IN STRUCTION S – NEW screen displays.
3. Select the Room radio but ton at the top of the screen. 4. Choo se either the En tire Stay or the Other Dates radio button in the
center of the screen. If you select Other Dates, enter the date in th eBegin Date and End Date fields.
5. Click the drop down arrow next to the Route to Room field.6. Search for the room to rou te charges to using the Name or Room fields in
the search criteria.7. Highlight the desired room and select OK.8. Click the drop down arrow next to the Transactions field.9. Select either individual transactions or pre-defined routing codes to route
as learned in the first part of this section.10. Select OK to exit.11. Select OK to save.
12. Select Close to exit Routing.
NOTE: If you setup Routing on fo lios o r guest rooms after charges havealready posted to the master folio, those charges do not automatically move orrefresh to the new instructions. You must manually mark each charge on thefolio and transfer them, as necessary, to the appropriate folios.
©2006 MICROS® Systems Inc. All Rights Reserved. P roprietary and C onfidential.
99
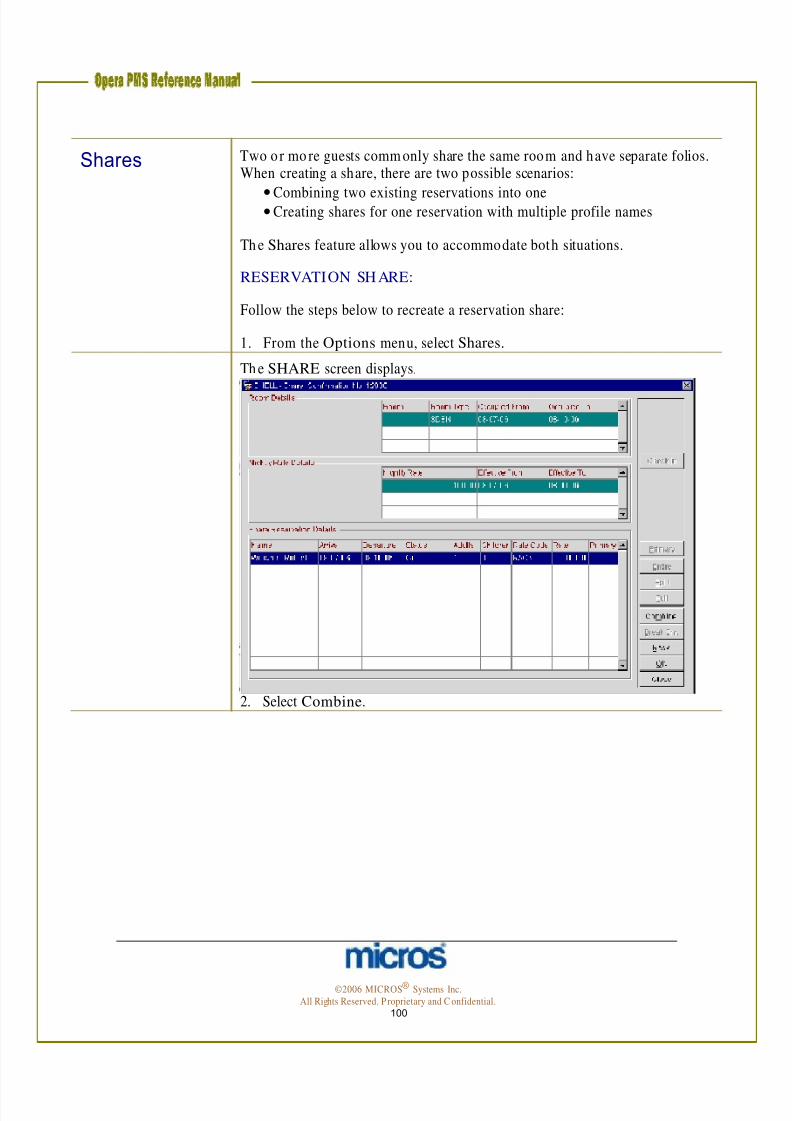
7/31/2019 GEN V40 PMS Reference Manual FINAL Eng Ch
http://slidepdf.com/reader/full/gen-v40-pms-reference-manual-final-eng-ch 100/474
Shares Two o r mo re guests comm only share the same room and have separate folios.When creating a share, there are two possible scenarios:
• Combining two existing reservations into one• Creating shares for one reservation with multiple profile names
Th e Shares feature allows you to accommodate both situations.
RESERVATION SH ARE:
Follow the steps below to recreate a reservation share:
1. From the Options menu, select Shares.
Th e SHARE screen displays.
2. Select Combine.
©2006 MICROS® Systems Inc. All Rights Reserved. P roprietary and C onfidential.
100

7/31/2019 GEN V40 PMS Reference Manual FINAL Eng Ch
http://slidepdf.com/reader/full/gen-v40-pms-reference-manual-final-eng-ch 101/474
3. Select the Reservation radio button at the top of the screen. 4. Click the drop down arrow next to the Name field.5. Search for the existing reservation by N ame or Room and select OK.6. Select OK to save and return to the SH ARE screen.
©2006 MICROS® Systems Inc. All Rights Reserved. P roprietary and C onfidential.
101
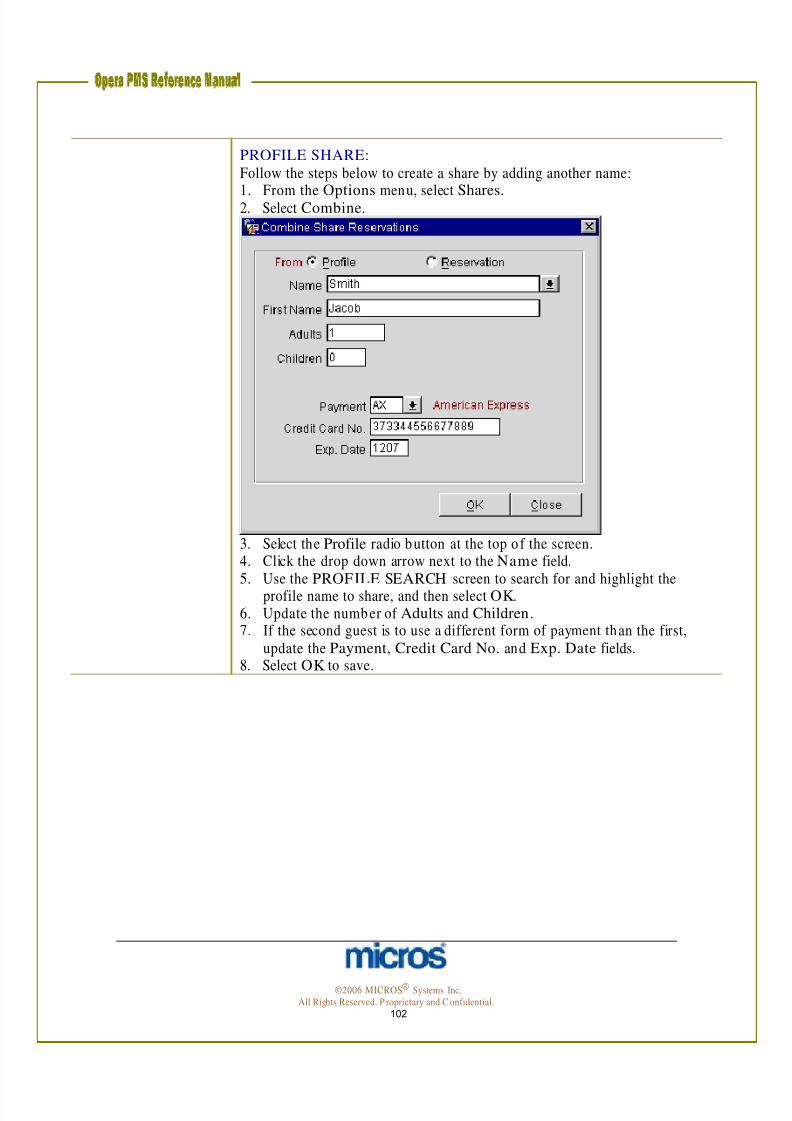
7/31/2019 GEN V40 PMS Reference Manual FINAL Eng Ch
http://slidepdf.com/reader/full/gen-v40-pms-reference-manual-final-eng-ch 102/474
PROFILE SHARE: Follow the steps below to create a share by adding another name:
1. From the Options menu, select Shares. 2. Select Combine.
3. Select the Profile radio button at the top o f the screen. 4. Click the drop down arrow next to the Name field.5. Use the PROFILE SEARCH screen to search for and highlight the
profile name to share, and then select OK.6. Update the number of Adults and Children.7. If the second guest is to use a different form of payment than the first,
update the Payment, Credit Card No. and Exp. Date fields.8. Select OK to save.
©2006 MICROS® Systems Inc. All Rights Reserved. P roprietary and C onfidential.
102

7/31/2019 GEN V40 PMS Reference Manual FINAL Eng Ch
http://slidepdf.com/reader/full/gen-v40-pms-reference-manual-final-eng-ch 103/474
After either performing a Reservation Share or Profile Share, continue by determining how to share the rate. Th ere are three options for assigning ratesto sharing guests:
• Entire – Highlight the reservation to carry the entire rate and select thisoption. Th is assigns a zero rate to every oth er share on th e reservation .
• Split – Divides the rate evenly between the reservations.• Full – Assigns the full rate to both reservations.
NOTE: These options are not available for shared reservations with differentRate Codes.
9. Select OK to save the share and return to the reservation.
BREAK SH ARE :
From the RESERVATION SHARE screen, you can b reak a share intoindividual reservations not occupying the same room.
To split an existing share, follow the steps below:
1. From the Options menu, select Shares. 2. Highlight the primary reservation and select Break Shr.
This function splits the one, shared reservation into two separate reservationsand generates a new confirmation number for the broken share.
©2006 MICROS® Systems Inc. All Rights Reserved. P roprietary and C onfidential.
103

7/31/2019 GEN V40 PMS Reference Manual FINAL Eng Ch
http://slidepdf.com/reader/full/gen-v40-pms-reference-manual-final-eng-ch 104/474
Traces Traces are intern al, interdepartmental messages that serve as reminders forother employees. Traces assist the hotel in taking actions on a special guest
requests.
Follow these steps to enter a trace on a reservation for a fellow employee:
1. From the Options menu, select Traces and New.
Th e TRACES – NEW screen displays.
2. Select the From Date and To Date for the trace to appear on reports.
3. Click the drop down arrow next to the Dept Code field to choose thedepartment(s) to send the trace.
4. Select one of the pre-defined Trace Texts, if applicable, by clicking on theellipsis box on the right side of the screen.
5. Type any additional trace information in the white Trace Text box, if necessary.
6. Select OK to save.
To resolve a Trace sent by ano ther department, fo llow the steps b elow:
1. From the Options menu, select Traces.
Th e TRACES screen displays
2. To resolve a particular trace, highlight the applicable trace and selectResolve.
3. To resolve all traces on a reservation , select the All op tion to mark alltraces and then select Resolve.
©2006 MICROS® Systems Inc. All Rights Reserved. P roprietary and C onfidential.
104

7/31/2019 GEN V40 PMS Reference Manual FINAL Eng Ch
http://slidepdf.com/reader/full/gen-v40-pms-reference-manual-final-eng-ch 105/474
Track It Th e Track It op tion displays the TRACK IT DASH BOARD screen, whichhouses the most-used features of Track It module (a valet/ bell standmanagement m odule). Extensive search criteria help you locate the ticketnumbers for baggage and parcels for arriving guests from the valet or bellstand. In add ition , you can create and edit tickets, associate or un-associatereservations with tickets, and access reservation details and option s.
Below are some of the o ptions within T rack It for your use:
• Search produces a list of Track It tickets that match your searchcriteria
• Advanced provides addition search options
• Phone Book displays the Telephone Book screen for looking uppho ne numbers and Web addresses
• Report prepares and prints a copy of the search results grid entriescurrently displaying o n the screen
• History displays the TRACK IT H ISTORY screen for the ticketcurrently displayed in the Track It Details area; a log o f all activitiesrelated to the ticket, from most recent to earliest
• Save saves your ticket information .
• Cancel removes the highlighted Track It t icket record from Track Itmonitoring. It is un attached from th e reservation (if it was attached toa reservation ) and is no longer accessed via search.
• New creates a new Track It t icket.
• Detach un-attaches the reservation from the Track It ticket currentlydisplayed in the Track It Details area.
• Options displays the Reservation Options screen for the reservationattached to the Track It ticket currently displayed in the Track It Details area
• Attach attaches a reservation to the T rack It ticket currently displayedin the Track It Details area
For mo re inform ation o n the Track It feature, refer to the “Miscellaneous”chapter of th is manual.
Waitlist Th e Waitlist option allows you to place a reservation into a waitlist status in
the event that no rooms are available at the hotel.For more information on waitlist reservations, refer to the “Waitlist aReservation” section of this chapter.
Wake Up Calls Th e Wake Up Calls option allows you to place and manage manual wake uprequests from guests in house.For m ore information on wake up calls for in-house guests, refer to the “WakeUp Calls” section o f the Fron t D esk chapter in this manual.
©2006 MICROS® Systems Inc. All Rights Reserved. P roprietary and C onfidential.
105

7/31/2019 GEN V40 PMS Reference Manual FINAL Eng Ch
http://slidepdf.com/reader/full/gen-v40-pms-reference-manual-final-eng-ch 106/474
Additional Reservation Features
Room Plan Th e Room Plan is useful to organize pre-blocked rooms to maximize hotelavailability. In the Roo m Plan, all in-house and pre-blocked rooms display in acalendar function to view a week at a time. Use th is feature to mo ve pre-blocked reservations to arrive in rooms expected to depart.
To use the Room Plan to pre-block arriving reservations, follow the stepsbelow:
1. From the main menu, select Reservation and Room Plan.
Th e ROOM PLAN screen displays.
©2006 MICROS® Systems Inc. All Rights Reserved. P roprietary and C onfidential.
106

7/31/2019 GEN V40 PMS Reference Manual FINAL Eng Ch
http://slidepdf.com/reader/full/gen-v40-pms-reference-manual-final-eng-ch 107/474
A number of features in the Roo m P lan make making reservation managementeasier.
• New/ Edit: Create a new reservation by highlighting an empty cellwithin the Room Plan and selecting New. Alternate ly, highlight anexisting guest reservation and choose Edit to update the reservation.
• Room Block : accesses the ROOM BLOCKIN G screen for auto -assignment of room allotments. Refer to the “Front D esk” chapter of this manual for mo re inform ation on Room Blocking.
• Options: allows access to Reservation O ptions discussed earlier in thischapter.
• OOO/ OOS: places the room in either Out of O rder or O ut of Servicestatus
• Check in: accesses the QUICK CHECK IN screen for speedy checkin of reservations. The arrival date must be the current date.
• Calendar: accesses the Property Calendar for details on events andhotel activities.
2. To move pre-blocked reservations from one room assignment to another,simply search for the existing reservation , and using your mouse, click anddrag the reservation to the desired room n umber.
Floor Plan Th e Floor Plan feature is a visual display of all room s in the ho tel in relationto each other, floor b y floor. You m ay also view the current H ousekeepingstatus of every room (i.e. Occupied, Vacant, and D ue to Arrive or D ue to
Depart).
To view the Floor Plan, follow the steps below:
1. From the main menu, select Reservations and Floor Plan.2. Highlight the desired floor and select View.
©2006 MICROS® Systems Inc. All Rights Reserved. P roprietary and C onfidential.
107
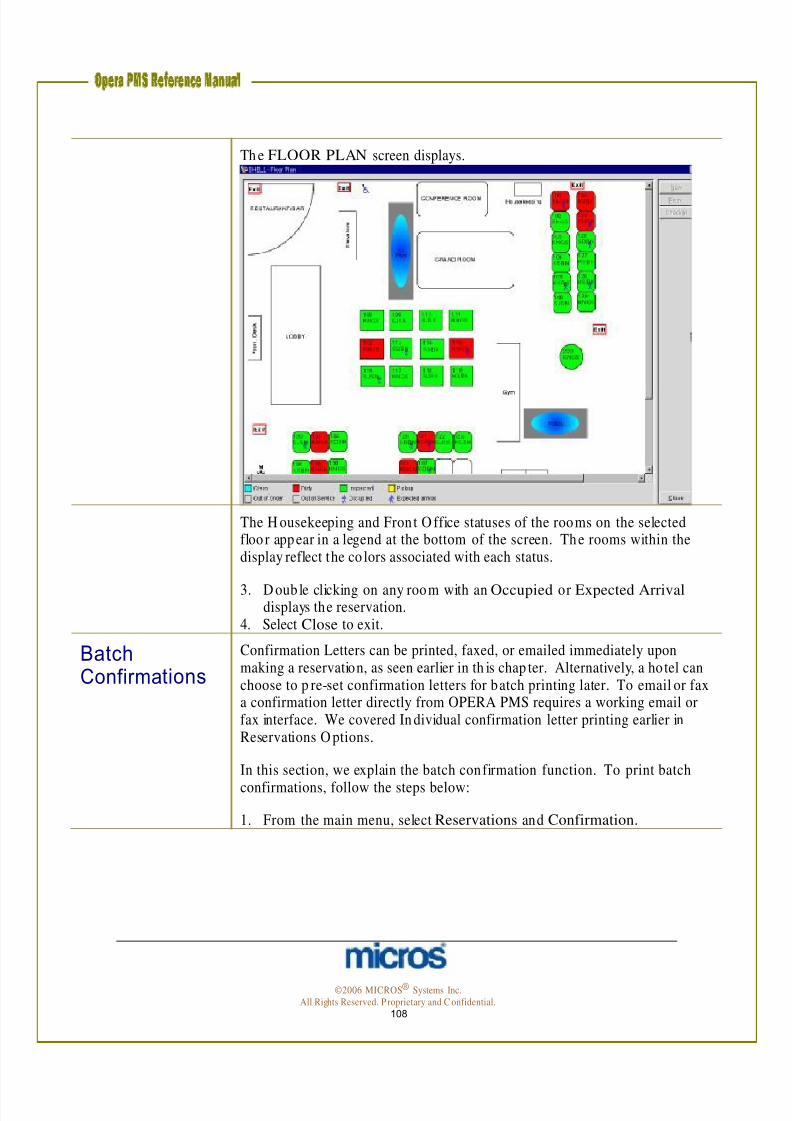
7/31/2019 GEN V40 PMS Reference Manual FINAL Eng Ch
http://slidepdf.com/reader/full/gen-v40-pms-reference-manual-final-eng-ch 108/474
Th e FLOOR PLAN screen displays.
The H ousekeeping and Front O ffice statuses of the rooms on the selected floo r appear in a legend at the bottom of the screen. The rooms within thedisplay reflect the co lors associated with each status.
Batch Confirmations
3. D oub le clicking on any room with an Occupied or Expected Arrival displays the reservation.
4. Select Close to exit.
Confirmation Letters can be printed, faxed, or emailed immediately uponmaking a reservation, as seen earlier in th is chap ter. Alternatively, a hotel canchoose to p re-set confirmation letters for batch printing later. To email or faxa confirmation letter directly from OPERA PMS requires a working email orfax interface. We covered In dividual confirmation letter printing earlier inReservations O ptions.
In this section, we explain the batch confirmation function. To print batch
confirmations, follow the steps below:
1. From the main menu, select Reservations and Confirmation.
©2006 MICROS® Systems Inc. All Rights Reserved. P roprietary and C onfidential.
108

7/31/2019 GEN V40 PMS Reference Manual FINAL Eng Ch
http://slidepdf.com/reader/full/gen-v40-pms-reference-manual-final-eng-ch 109/474
Th e CONFI RMATION LETTERS TO BE SEN T screen displays.
©2006 MICROS® Systems Inc. All Rights Reserved. P roprietary and C onfidential.
109

7/31/2019 GEN V40 PMS Reference Manual FINAL Eng Ch
http://slidepdf.com/reader/full/gen-v40-pms-reference-manual-final-eng-ch 110/474
The default view of this screen displays all reservations no t yet checked in.
2. To see only tho se reservation s with confirmation letters pending, it is
important to check the box in the center of the screen labeled PendingOnly. This displays all confirmation letters marked fo r batch sending.
3. Use any of the below options to batch confirmations:
• Print All: To select all confirmations letters that have been pre-setto print, select this option. O nce marked, select Send and allconfirmation letters print.
• Print None: To unselect all confirmation letters for print, selectthis op tion. All selected printed confirmation letters unmark forprinting.
• Fax All: To select all confirmation letters that have been pre-set to
fax, select this op tion. O nce marked, select Send. Allconfirmation letters fax to their attached fax numbers. A working fax interface is required for this feature.
• Fax None: To unselect all confirmation letters for fax, select thisoption. All selected fax confirmation letters are unmarked.
• Email All: To select all confirmation letters that have been pre-setto email, select this option. O nce marked, select Send. Allconfirmation letters email to th eir attached email addresses. Aworking email interface is required for th is feature.
• Email None: To unselect all confirmation letters for em ail, selectthis option . All selected email confirmation letters are unmarked.
• Attach: To attach a con firmation letter to any reservation orupdate the confirmation letter for a reservation, select Attach. Th eCONFIRMATION LETTER screen for the highlightedreservation displays. See the Reservation s Op tions section for adetailed explanation on using this screen.
4. O nce all confirmation letters to send are marked, select Send to produce ordeliver the letters. Con firmation letters print for postal mailing, faxconfirmation letters send to the guest’s fax number, and email confirmationletters email as Adobe Acrobat attachments on the guest’s email address.
Calendar The Calendar opt ion displays the hotel’s general availability by month . Tomove from month to month, select the month you desire at the top of thecalendar. This screen mo st often d isplays overall ho tel availability for weeks ata time, and furnishes information about events and sells strategies for the hotel.
©2006 MICROS® Systems Inc. All Rights Reserved. P roprietary and C onfidential.
110
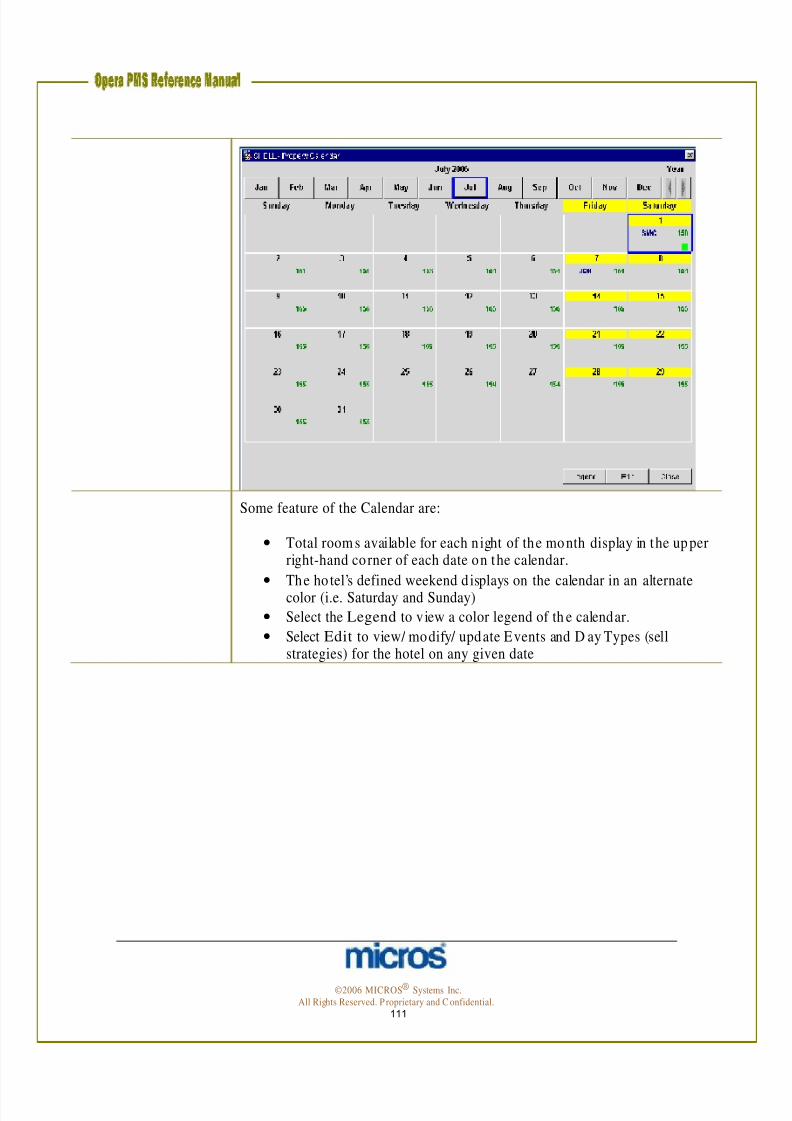
7/31/2019 GEN V40 PMS Reference Manual FINAL Eng Ch
http://slidepdf.com/reader/full/gen-v40-pms-reference-manual-final-eng-ch 111/474
Some feature of the Calendar are:
• Total room s available for each n ight of the month display in the upperright-hand corner of each date on the calendar.
• The ho tel’s defined weekend d isplays on the calendar in an alternatecolor (i.e. Saturday and Sunday)
• Select the Legend to view a color legend of th e calendar.
• Select Edit to view/ modify/ update Events and D ay Types (sellstrategies) for the hotel on any given date
©2006 MICROS® Systems Inc. All Rights Reserved. P roprietary and C onfidential.
111

7/31/2019 GEN V40 PMS Reference Manual FINAL Eng Ch
http://slidepdf.com/reader/full/gen-v40-pms-reference-manual-final-eng-ch 112/474
Chapter 4 – Front Desk
©2006 MICROS® Systems Inc. All Rights Reserved. P roprietary and C onfidential.
112

7/31/2019 GEN V40 PMS Reference Manual FINAL Eng Ch
http://slidepdf.com/reader/full/gen-v40-pms-reference-manual-final-eng-ch 113/474
Arrivals and Check In
Searchingfor Arrivals
The Arrivals function is the gateway to checking in guests with or withoutreservations. You can search for incoming guests via a num ber of custom izablecriteria, check them in, or perform a walk in.
To search for arriving guests, follow the steps below:
1. From the main menu, select Front Desk .2. Select Arrivals.
The ARRIVALS screen displays.
The top po rtion of th e screen provides a variety of fields to narrow your search for the arriving guest. Th e bottom portion of the screen displays reservations andsearch results in the grid.
3. Enter the search information into the appropriate fields. Select Advanced toproduce more search options. Use the Clear feature to remove all searchop tions and begin a new search.
©2006 MICROS® Systems Inc.
All Rights Reserved. P roprietary and C onfidential. 113

7/31/2019 GEN V40 PMS Reference Manual FINAL Eng Ch
http://slidepdf.com/reader/full/gen-v40-pms-reference-manual-final-eng-ch 114/474
NOTE : Com mo ns fields used in searching for arriving guests are the Name, CRS No/ TA Rec Loc, and Conf. No.)
4. Select Search to display results.
©2006 MICROS® Systems Inc. All Rights Reserved. P roprietary and C onfidential.
114
7/31/2019 GEN V40 PMS Reference Manual FINAL Eng Ch
http://slidepdf.com/reader/full/gen-v40-pms-reference-manual-final-eng-ch 115/474
With a reservation h ighlighted, various function bu ttons become available. Beloware the addition features and functions on this screen:
• Lamps in the lower part of the screen alert you when th e reservation haspreferences, deposit or cancellation requirements, shares, profile notes,reservation comments, routing, or other features associated with it.
• Check In offers a quick check-in of the highlighted reservation. Refer tothe “Checking In a Guest” section of th is chapter for mo re instructions.
• Cancel removes the reservation of an expected arrival (the reservation isno longer displayed on the Arrivals dialog box and the reservation statuschanges to Cancelled). You can cancel an expected reservation if the guest has not made a deposit to guarantee the reservation, if the reservation is aduplicate, or if the guest informed the property that they would not arrive.
Canceling a reservation releases the roo m back to availability.
NOTE: If the guest has made a deposit, you cannot cancel the reservation withthis option. You must refund a depo sit through th e Cashiering module.
• Reinstate returns a canceled reservation to reserved status.
• Reg. Card prints a registration card for the highlighted guest. Th e defaultregistration card is automatically selected. If no default card exists, theRegistration Card screen prompts the user to select a registration cardfrom th e Registration Cards repo rts group.
• Profile displays the p rofile screen for the selected reservation.
• Options display the Reservation Options dialog box without displayingthe full reservation .
• Edit displays the Reservation screen fo r the selected reservation.
©2006 MICROS® Systems Inc. All Rights Reserved. P roprietary and C onfidential.
115

7/31/2019 GEN V40 PMS Reference Manual FINAL Eng Ch
http://slidepdf.com/reader/full/gen-v40-pms-reference-manual-final-eng-ch 116/474
Checking Ina Guest
Follow the steps below to check in a guest:
1. From the main menu, select Front Desk and Arrivals.2. Search for and highlight the arriving guest.3. Select Edit if the guests’ accommodation needs to change in any way
(additional nights requested or a change in room type. O therwise, selectCheck In .
The PAYMEN T METH OD screen appears
A Room num ber automatically assigns for the room type reserved. If no room s are available, the Room field is blank.
4. To change the room num ber assigned, or to search for an alternate room , clickthe drop do wn arrow next to the Room field.
5. Search for and highlight an available room (clean or inspected), and select OK to return.
©2006 MICROS® Systems Inc. All Rights Reserved. P roprietary and C onfidential.
116

7/31/2019 GEN V40 PMS Reference Manual FINAL Eng Ch
http://slidepdf.com/reader/full/gen-v40-pms-reference-manual-final-eng-ch 117/474
The Method of Payment defaults from the reservation. Wheth er the presentedmethod of payment is the same or needs to change, swipe the credit card at this
po int for accuracy purp oses. If the card is not available to swipe, manually enterthe card or payment details.
6. Click the drop down arrow next to the Method of Payment field to select theform of payment. Alternately, if there are multiple forms of payment (i.e. acredit card for room and tax and one for incidentals), select the ellipsis buttonnext to this field.
7. Enter the Credit Card No. and Expiration Date.8. Select OK to save.
9. Answer Yes or No to print the registration card. Th is depends on your ho tel’s procedure for registration cards.
A message displays confirmation the successful check in.
10. Select OK to com plete.
©2006 MICROS® Systems Inc. All Rights Reserved. P roprietary and C onfidential.
117

7/31/2019 GEN V40 PMS Reference Manual FINAL Eng Ch
http://slidepdf.com/reader/full/gen-v40-pms-reference-manual-final-eng-ch 118/474
Checking Ina Walk-InGuest
G uests that arrive without reservations are walk-in guests. To perform a Walk-In,follow the steps below:
1. From the main menu, select Front Desk and Arrivals.
2. Select Walk In.
The RATE QUE RY screen displays.
©2006 MICROS® Systems Inc. All Rights Reserved. P roprietary and C onfidential.
118

7/31/2019 GEN V40 PMS Reference Manual FINAL Eng Ch
http://slidepdf.com/reader/full/gen-v40-pms-reference-manual-final-eng-ch 119/474
3. Com plete the Rate Q uery screen and select OK.
The RESERVATION screen displays.
4. Com plete all fields as outlined in the Reservations chapter of this manual.
NOTE : Choose “Walk In” as the Source.
©2006 MICROS® Systems Inc. All Rights Reserved. P roprietary and C onfidential.
119

7/31/2019 GEN V40 PMS Reference Manual FINAL Eng Ch
http://slidepdf.com/reader/full/gen-v40-pms-reference-manual-final-eng-ch 120/474
5. Select OK to save the check in.
NOTE: It is very important that you select OK while performing a walk-in. If you select Save, O PE RA only saves the reservation but does not m ove forwardwith the check in.
A con firmation message displays reading, “Check In [Guest N ame]?”
6. Answer Yes.
The PAYMEN T METH OD screen displays.
7. Confirm the payment information or change it as needed. Remember to swipe the credit card if applicable.
8. Select OK to save.A message displays asking to print a registration card.
9. Answer Yes or No to print a registration card.A m essage displays to confirm the successfully check-in.10. Select OK to com plete.
©2006 MICROS® Systems Inc. All Rights Reserved. P roprietary and C onfidential.
120

7/31/2019 GEN V40 PMS Reference Manual FINAL Eng Ch
http://slidepdf.com/reader/full/gen-v40-pms-reference-manual-final-eng-ch 121/474
Queue Reservations
Placing an Arrival intoQueue
The Queue feature helps your hotel to manage guest arrivals before their room isavailable for assignment. Reservations put on queue go into a priority list forHousekeeping to attend to first. Coordinated Front D esk and Housekeepingoperations help to better service guests and prioritize assigning them clean roomsupon arrival.
A reservation does not necessarily have to have a room number assigned to be inthe queue. You may place a room reservation on queue without pre-assigning aroom num ber. As soon as a room is available for the particular reserved roomtype, you may assign a clean/ inspected roo m and complete the check-in.
To place an arriving reservation into the Queue, follow the steps below:
1. From the main menu, select Front Desk and Arrivals.2. O nce you locate the guest reservation, highlight the record and select
Options.
©2006 MICROS® Systems Inc. All Rights Reserved. P roprietary and C onfidential.
121
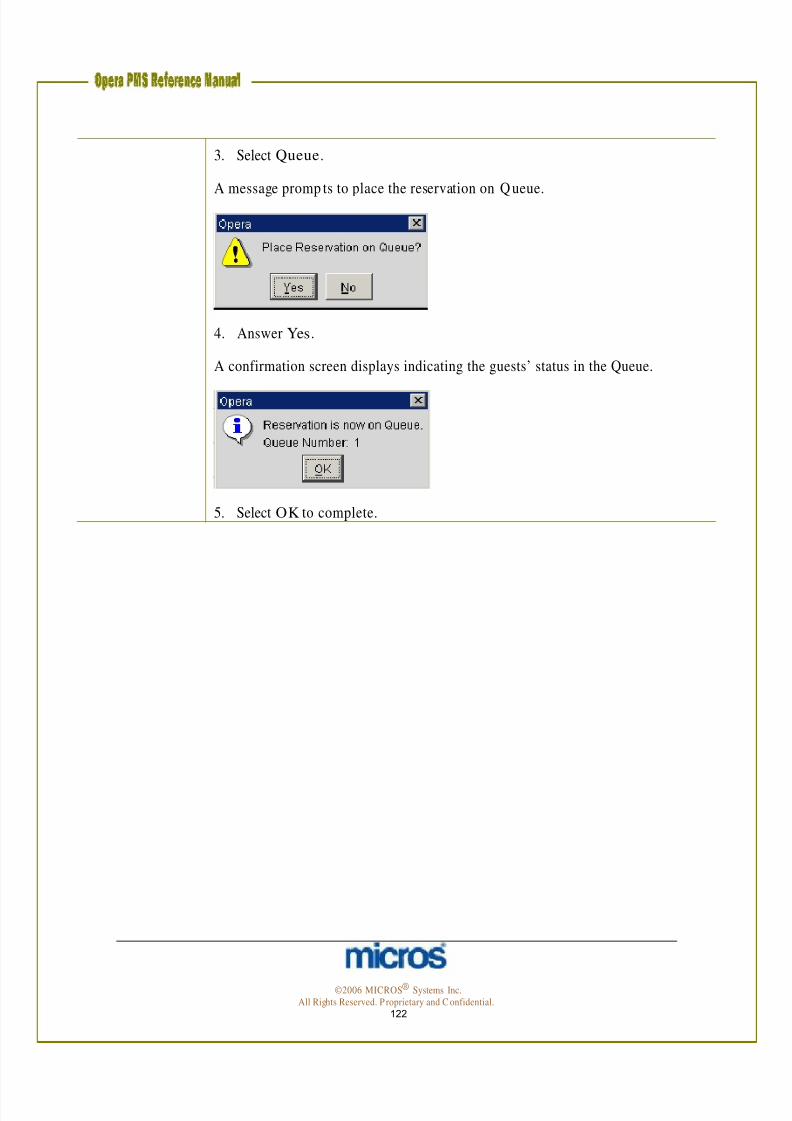
7/31/2019 GEN V40 PMS Reference Manual FINAL Eng Ch
http://slidepdf.com/reader/full/gen-v40-pms-reference-manual-final-eng-ch 122/474
3. Select Queue.
A message promp ts to place the reservation on Q ueue.
4. Answer Yes.
A confirmation screen displays indicating the guests’ status in the Queue.
5. Select OK to complete.
©2006 MICROS® Systems Inc. All Rights Reserved. P roprietary and C onfidential.
122

7/31/2019 GEN V40 PMS Reference Manual FINAL Eng Ch
http://slidepdf.com/reader/full/gen-v40-pms-reference-manual-final-eng-ch 123/474
Managingthe Queue
O nce a reservation is in the queue, the Front D esk can manage the queue byfollowing the step below:
1. From the main menu, select Front Desk and Queue Reservations.
The QUEUE RESERVATIONS screen displays.
Reservation s already placed in queue display on th is screen in priority order. Click on any column header to resort the display. N ote the Q-Time and Room Status columns.
2. If a reservation is ready to check-in and the roo m is available, highlight thereservation and select Check In. Continue the process to check in thereservation as outlined earlier in th is chapter.
3. To alter a reservation s place in the queue, highlight the record and selectPriority to move the reservation to the top of the queue.
Additional features within the QUEUE RESERVATIONS screen are asfollows:
• Resv. display the reservation record for the highlighted reservation .
• Details display the ROOM EDITS screen for the guest's room whenthere is an assigned room number to the guest.
• Statistics displays a detailed view of the current reservation s in queue.
• Report prepares and prints th e Q ueue Reservations report.
©2006 MICROS® Systems Inc. All Rights Reserved. P roprietary and C onfidential.
123

7/31/2019 GEN V40 PMS Reference Manual FINAL Eng Ch
http://slidepdf.com/reader/full/gen-v40-pms-reference-manual-final-eng-ch 124/474
In House Guests
Searchingfor In-HouseGuests
The IN H OUSE GUESTS screen allows you to view and modify reservationinformation and/ or pro files of in-house guests. This feature is identical to theRESERVATION SEARCH screen, except that reservation statuses do not liston this screen (since the guests are in-house).
To search for an in-house guest, follow the steps below:
1. From the main menu, select Front Desk and In-House Guests.2. E nter in the desired search inform ation (i.e. Name, Room No., etc). Select
Advanced for additional search criteria options.
3. Select Search.
Editing In-
House GuestRecords
Search results display in the grid at the bottom of the IH H OUSE GUESTS screen.
It m ay be necessary to modify a guests’ stay information after the guest h aschecked in. Fo r example, when a guest wishes to extend their stay, editing the in-
house record is required.
To modify an in-house guest reservation, follow the steps below:
1. From the main menu, select Front Desk and Arrivals.2. E nter search criteria (i.e. Name, Room No., etc.) and select Search. 3. Highlight the record and either doub le-click it or select Edit.
©2006 MICROS® Systems Inc. All Rights Reserved. P roprietary and C onfidential.
124
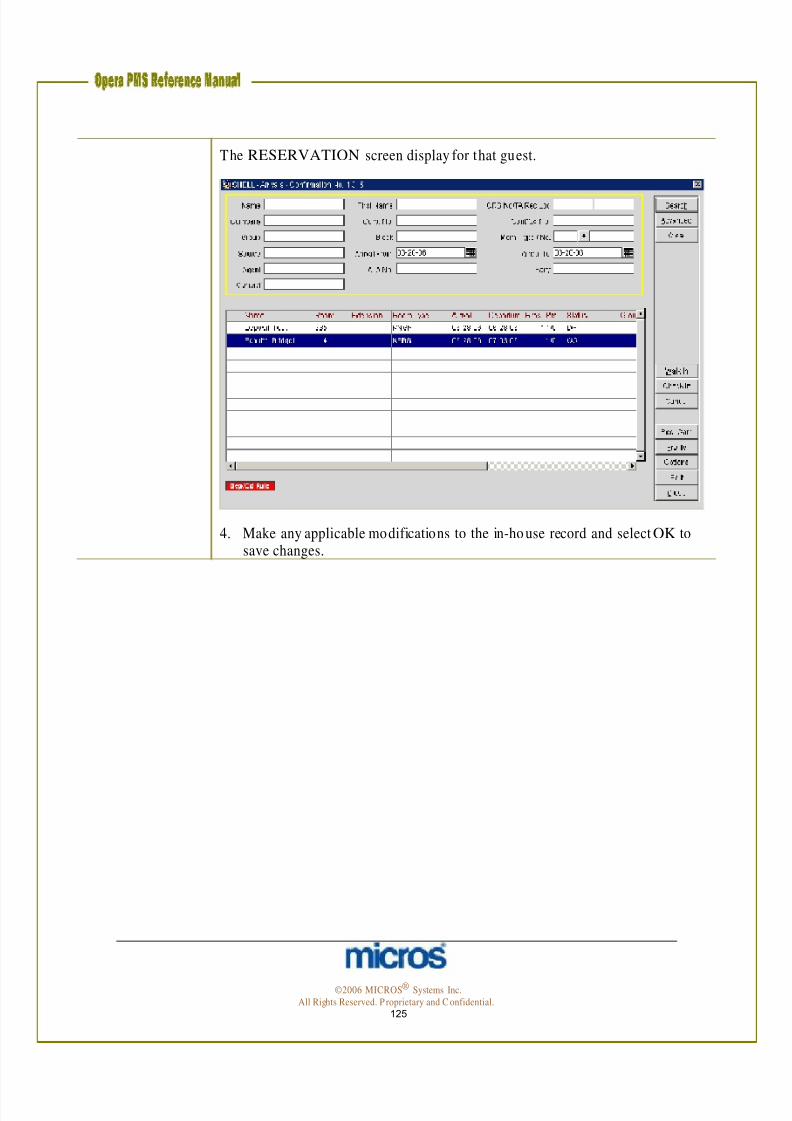
7/31/2019 GEN V40 PMS Reference Manual FINAL Eng Ch
http://slidepdf.com/reader/full/gen-v40-pms-reference-manual-final-eng-ch 125/474
The RESERVATION screen display for that guest.
4. Make any applicable modifications to the in-ho use record and select OK to save changes.
©2006 MICROS® Systems Inc. All Rights Reserved. P roprietary and C onfidential.
125

7/31/2019 GEN V40 PMS Reference Manual FINAL Eng Ch
http://slidepdf.com/reader/full/gen-v40-pms-reference-manual-final-eng-ch 126/474
Canceling a Check-In
From time to time, there may be a need to return a guest’s reservation statusfrom checked in to reserved. For example, if you accidentally checked in an
incorrect reservation, it may be necessary to cancel that check-in.
NOTE: Canceling a check in can o nly happen on the day of arrival while nocharges exist on the guest folio. In addition , canceling a check-in does NO Tcancel the reservation – the record on ly returns to a D ue-In status.
To cancel a checked in reservation, follow the steps below:
1. From the main menu, select Front Desk and Arrivals.2. E nter search criteria (i.e. Name, Room No., etc.) and select Search. 3. Highlight the incorrectly checked in reservation record.
4. Select Cancel C/ I.
©2006 MICROS® Systems Inc. All Rights Reserved. P roprietary and C onfidential.
126

7/31/2019 GEN V40 PMS Reference Manual FINAL Eng Ch
http://slidepdf.com/reader/full/gen-v40-pms-reference-manual-final-eng-ch 127/474
A message displays asking if you indeed would like to cancel this check in.
5. Answer Yes.
A message displays asking if you would like to block th e room.
6. Answer Yes to leave the roo m n umber pre-blocked on the arriving reservation. Answer No to return the reservation to a due-in status, withouthaving a room number pre-assigned.
©2006 MICROS® Systems Inc. All Rights Reserved. P roprietary and C onfidential.
127

7/31/2019 GEN V40 PMS Reference Manual FINAL Eng Ch
http://slidepdf.com/reader/full/gen-v40-pms-reference-manual-final-eng-ch 128/474
Additional Front Desk Features
Accounts –PostingMasters
Posting Masters are reservations and fo lios th at exist on ly for billing purp oses.Ano ther name for a Posting Master (PM) is a House Account. Posting Masterscommonly exist for Banquet charges and internal financial purposes. Th eAccounts feature is a simple way to check in Posting Masters or HouseAccounts.
To use the Accounts function , follow the steps below:
1. From the main menu, select Front Desk and Accounts.
The ACCOUNTS screen displays.
2. E nter the profile Name used to create the po sting master or the last name o f a guest. Select the ellipsis butto n next to th is field to access the PROFILESEARCH screen for locating existing company or guest profiles.
3. E nter the First Name of the guest if the PM is for an individual rather than acompany or group.4. E nter the Date From and Date To for the arrival and departure date of the
PM account.5. E nter the “PM” Room Type for posting master. Click the drop down arrow
to select the PM room type or simply type “PM” in the field.
©2006 MICROS® Systems Inc. All Rights Reserved. P roprietary and C onfidential.
128

7/31/2019 GEN V40 PMS Reference Manual FINAL Eng Ch
http://slidepdf.com/reader/full/gen-v40-pms-reference-manual-final-eng-ch 129/474
NOTE: Your hotel may have several different types of Posting Master roomtypes. If this is the case, select the roo m type that best serves the inten dedpurpose of the reservation . For example, if creating the reservation fo r a BanquetCharge, the hotel may have a room type called PB (Posting Banquets).
6. Click the down arrow next to the Room field to select any available roomnumber from the AVAILABLE ROOMS SEARCH screen. Most PMroo m n umbers are in the 9000 series (i.e. 9001, 9002, etc.).
7. E nter the Rate Code defined by your hotel for PM accoun ts (i.e. HO USE).8. E nter the Market Code defined by your hotel for PM accounts (i.e.
H=House Use).9. E nter the approp riate Source Doe defined b y your hotel for PM accounts
(i.e. HU= House Use).10. Select OK to com plete the account.
If the Date From date for the P osting Master is the current b usiness date, amessage displays asking if you would like to check in the guest.
11. Answer “Yes” to check in the PM account. Room Assignment – Individual
The Room Assignment feature offers a variety of useful functions, allowing youto easily pre-block rooms for your arriving guests and speed up the check inprocess at the desk when working with large group check ins. If there are a largenumber of special room type requests or VIP arrivals, pre-blocking rooms canhelp eliminate last minute rushing to prepare rooms for their arrival.
©2006 MICROS® Systems Inc. All Rights Reserved. P roprietary and C onfidential.
129
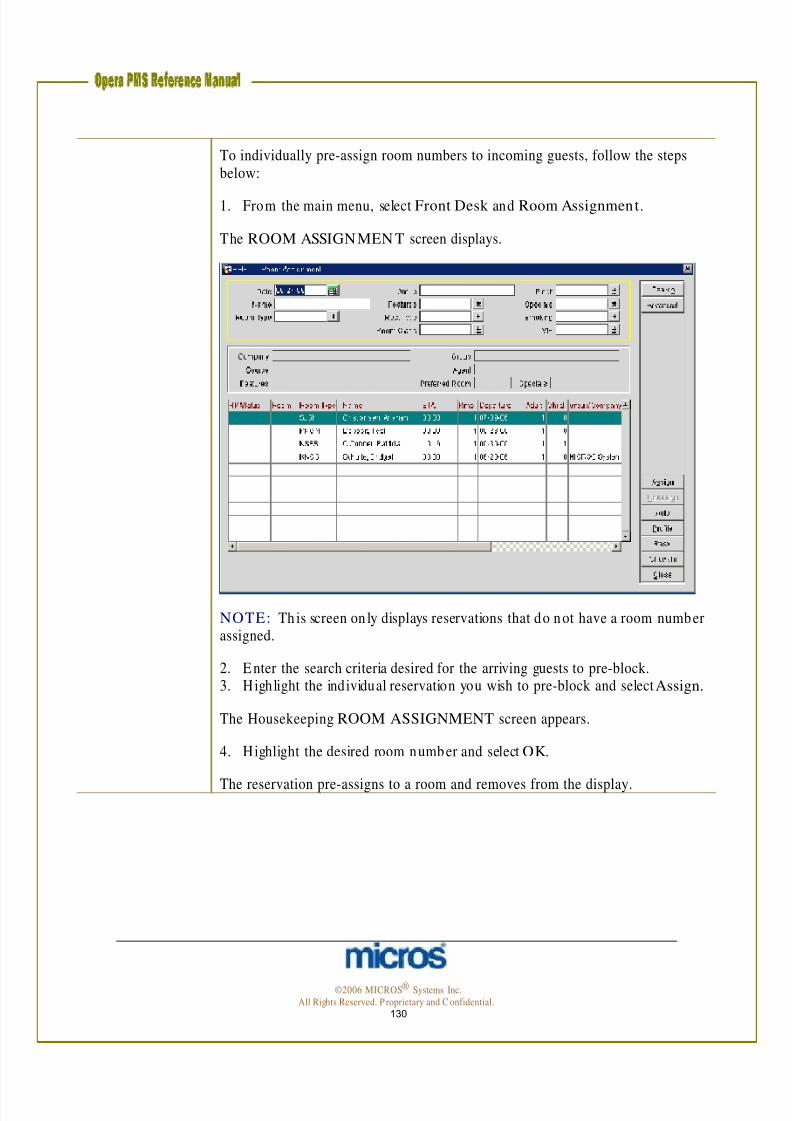
7/31/2019 GEN V40 PMS Reference Manual FINAL Eng Ch
http://slidepdf.com/reader/full/gen-v40-pms-reference-manual-final-eng-ch 130/474
To individually pre-assign room numbers to incoming guests, follow the stepsbelow:
1. From the main menu, select Front Desk and Room Assignment.
The ROOM ASSIGNMEN T screen displays.
NOTE: This screen on ly displays reservations that do not have a room number assigned.
2. E nter the search criteria desired for the arriving guests to pre-block.3. Highlight the individual reservation you wish to pre-block and select Assign.
The Housekeeping ROOM ASSIGNMENT screen appears.
4. Highlight the desired room number and select OK.
The reservation pre-assigns to a room and removes from the display.
©2006 MICROS® Systems Inc. All Rights Reserved. P roprietary and C onfidential.
130

7/31/2019 GEN V40 PMS Reference Manual FINAL Eng Ch
http://slidepdf.com/reader/full/gen-v40-pms-reference-manual-final-eng-ch 131/474
Room Assignment – Auto
There may be a need to have the system automatically assign roo ms to guest. Fo rexample, if it is your hotel’s po licy to pre-assign all incoming VIP room s, or all
members of a group , the Auto feature is the most practical way to assign rooms.
To automatically assign rooms to a range of reservations, follow the steps below:
1. From the main menu, select Front Desk and Room Assignment.2. Using the search criteria in the ROOM ASSIGNMENT screen, search for
the reservation that you want to assign rooms, such as a group or allincoming smoking guests.
3. Select the Auto option.
NOTE: The Auto option automatically assigns rooms for any reservationsdisplayed in the m ain ROOM ASSIGNMENT screen. Searching for thereservations prior to selecting Auto is strongly encouraged.
©2006 MICROS® Systems Inc. All Rights Reserved. P roprietary and C onfidential.
131

7/31/2019 GEN V40 PMS Reference Manual FINAL Eng Ch
http://slidepdf.com/reader/full/gen-v40-pms-reference-manual-final-eng-ch 132/474
The AUTOMATIC ROOM ASSIGNMEN T screen displays.
4. Choose the Assign radio bu tton at the top of the screen. 5. To assign certain room types or specific features (i.e. King N on-Smoking, 3rd
Floor, etc.) make the applicable selections on th is screen (i.e. Room Type,
Smoking, Floor, etc.).6. To vary the Housekeeping statuses in the assignment process, select the
check boxes to the right of the screen for Dirty Rooms, Clean Rooms, andInspected Rooms.
7. To use the preferences indicated on the guests’ pro files and reservations,check the Use Associated Preferences feature.
8. When com pleted entering information, select Start.
As the system automatically assigns a room to each reservation, the in the Statussection o f the screen shows the room numb er assigned to each. After completingthe automatic room assignment, the d isplay counts the room s assigned and
unassigned.
NOTE: If reservations fail to assign during this pro cess, change the selectioncriteria and attempt the automatic assignment again. Typically, reservation s withtoo many preferences or limited availability on clean/ inspected rooms causereservation no t to assign.
©2006 MICROS® Systems Inc. All Rights Reserved. P roprietary and C onfidential.
132

7/31/2019 GEN V40 PMS Reference Manual FINAL Eng Ch
http://slidepdf.com/reader/full/gen-v40-pms-reference-manual-final-eng-ch 133/474
Room Assignment – Unassign
To remove pre-blocked rooms from arriving reservations, follow the steps below:
1. From the main menu, select Front Desk and Room Assignment.2. Select the Advanced search option and p lace a check mark in the Include Assigned Res. box.
3. Search for the reservation(s) to unassign room s and highlight the desired record.
4. Select Unassign .
To remove a range of reservations with pre-blocked rooms, follow the stepsbelow:
1. Search for existing pre-assigned reservations using steps 1-3 above.2. Select Auto to display the AUTOMATIC ROOM ASSIGNMENT screen.3. At the top of the screen, select the Unassign radio button.4. Inp ut any search criteria to narrow the reservation s affected (i.e. Group,
Arrival Date, etc.) and select Start.
All rooms that meet the criteria are no longer pre-blocked.
©2006 MICROS® Systems Inc. All Rights Reserved. P roprietary and C onfidential.
133

7/31/2019 GEN V40 PMS Reference Manual FINAL Eng Ch
http://slidepdf.com/reader/full/gen-v40-pms-reference-manual-final-eng-ch 134/474
Messages The Messages function enables you to send messages to individual guests,group s of guests, and selected guests such as a Party or Block. The database
retains an un limited number of messages for every guest, with functionality tomark them as “Received” or “Not Received”, as well as the ability to p rintmessages on a standard message form . The database retains messages in thesystem until you delete it or un til the E nd of D ay sequence (N ight Audit)following the recipient guest's check out.
All features explained in the “Reservation s” chapter of this manual also apply inthe Messages function o f the Fron t Desk. Typically, when leaving a message foran individual, the Reservations Options is the most practical place to manage themessage for the guest. When m anaging messages for multiple guests, thefunction within the Front Desk menu allows extended capabilities.
©2006 MICROS® Systems Inc. All Rights Reserved. P roprietary and C onfidential.
134

7/31/2019 GEN V40 PMS Reference Manual FINAL Eng Ch
http://slidepdf.com/reader/full/gen-v40-pms-reference-manual-final-eng-ch 135/474
CREATE A NEW MESSAGE
To enter a new message for a guest using the Front D esk > Messages feature,follow the steps below:
1. From the main menu, select Front Desk and Messages.
The main MESSAGES screen displays.
2. Select New.
The SELE CT GUESTS screen displays.
3. Input the Name or Room of the party to receive the message(s) and select Search .
4. Place an “X” next to the guest and select OK.
©2006 MICROS® Systems Inc. All Rights Reserved. P roprietary and C onfidential.
135

7/31/2019 GEN V40 PMS Reference Manual FINAL Eng Ch
http://slidepdf.com/reader/full/gen-v40-pms-reference-manual-final-eng-ch 136/474
The NEW MESSAGE screen displays.
5. E nter the caller’s information and message as learned in the “Reservations” chapter of this manual.6. Select OK to deliver the m essage.
©2006 MICROS® Systems Inc. All Rights Reserved. P roprietary and C onfidential.
136

7/31/2019 GEN V40 PMS Reference Manual FINAL Eng Ch
http://slidepdf.com/reader/full/gen-v40-pms-reference-manual-final-eng-ch 137/474
EDI T AN EXISTIN G MESSAGE:
To edit an existing message from within the SELECT GUESTS screen in theFron t D esk > Messages feature, follow the steps below:
1. Search for and highlight the guest with a message to edit. Select OK.
The main MESSAGES screen displays.
2. Highlight the message to alter and select Edit.
The EDIT MESSAGE screen appears.
3. Make any necessary changes to the caller information o r message text.
4. Select OK to save changes.
If you sent this message to mo re than one guest, a message prompts you to savethe change for the current guest only or for all guests who received this message.
5. Select This Guest or All Guests, as appropriate.
©2006 MICROS® Systems Inc. All Rights Reserved. P roprietary and C onfidential.
137

7/31/2019 GEN V40 PMS Reference Manual FINAL Eng Ch
http://slidepdf.com/reader/full/gen-v40-pms-reference-manual-final-eng-ch 138/474
DELIVER MESSAGES:
When you relay a message to a guest, either verbally or via a printed message, themessage delivers to the guest and marks as received. This prevents accidentallydelivering the same message to guests more than once.
To deliver a message to a guest and mark the message received, follow the stepsbelow:
1. Select Front Desk and Messages.
2. Search for the party to receive the message(s). 3. Highlight the message and select Receive to indicate that you h ave given the
message to the guest. To m arked multiple messages, place an “X” next toeach message (or choose All to mark all messages) and then select Receive.
©2006 MICROS® Systems Inc. All Rights Reserved. P roprietary and C onfidential.
138

7/31/2019 GEN V40 PMS Reference Manual FINAL Eng Ch
http://slidepdf.com/reader/full/gen-v40-pms-reference-manual-final-eng-ch 139/474
Traces –Viewing andResolving
VIEWIN G DEPARTMEN T TRACES:
Traces are internal interdepartmental messages that serve as reminders for otheremployees. Traces assist the ho tel in taking actions on guests’ special requests.For more information on entering t races directly on a reservation , refer to the“Reservations” chapter of this manual.
Follow the steps below to view existing traces for your department:
1. From the main menu, select Front Desk and Traces.
The TRACES screen appears.
2. Click the drop down arrow next to the Department field in the search criteria and choose your department (i.e. Front Desk, Reservations,Housekeeping, etc.)
3. Select OK to return to the TRACES screen.4. E nsure the check box next to Unresolved is active to o nly few traces that
require action.
5. Select Search.Traces for your department display in the results grid.6. To view details or modify on an individual trace, select Edit.
The TRACES – EDIT screen displays.
7. Make any applicable modifications and select OK to save changes.
©2006 MICROS® Systems Inc. All Rights Reserved. P roprietary and C onfidential.
139
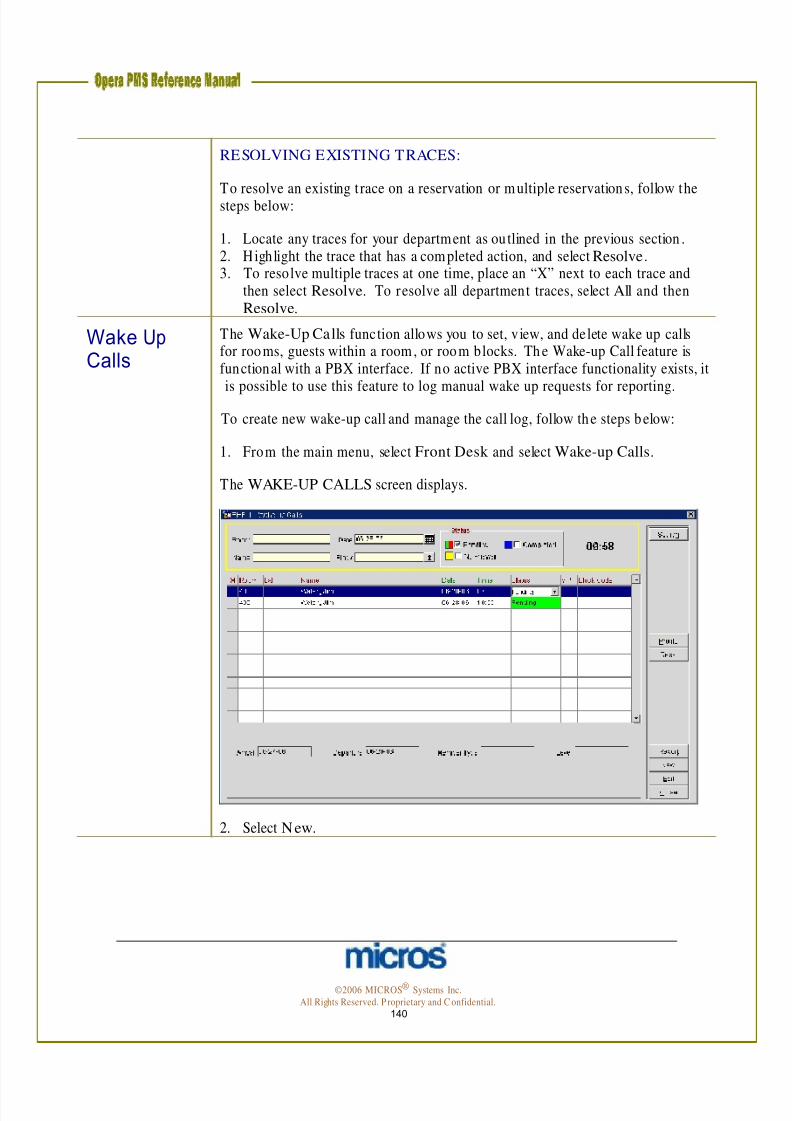
7/31/2019 GEN V40 PMS Reference Manual FINAL Eng Ch
http://slidepdf.com/reader/full/gen-v40-pms-reference-manual-final-eng-ch 140/474
RESOLVING EXISTING TRACES:
To resolve an existing trace on a reservation or m ultiple reservations, follow thesteps below:
Wake Up Calls
1. Locate any traces for your department as outlined in the previous section . 2. Highlight the trace that has a com pleted action, and select Resolve.3. To resolve multiple traces at one time, place an “X” next to each trace and
then select Resolve. To resolve all department traces, select All and thenResolve.
The Wake-Up Calls function allows you to set, view, and delete wake up callsfor rooms, guests within a room , or room blocks. Th e Wake-up Call feature isfunctional with a PBX interface. If no active PBX interface functionality exists, it
is possible to use this feature to log manual wake up requests for reporting.
To create new wake-up call and manage the call log, follow the steps below:
1. From the main menu, select Front Desk and select Wake-up Calls.
The WAKE-UP CALLS screen displays.
2. Select New.
©2006 MICROS® Systems Inc. All Rights Reserved. P roprietary and C onfidential.
140

7/31/2019 GEN V40 PMS Reference Manual FINAL Eng Ch
http://slidepdf.com/reader/full/gen-v40-pms-reference-manual-final-eng-ch 141/474
The WAKE-UP CALLS - N EW screen appears.
3. E nter the Room num ber or click the do wn arrow to display the IN H OUSE GUEST SEARCH screen.
4. E nter in the Time of the wake-up call, and the Date From, No Days, To if the dates requested are more than on e night.
5. To select to set wake up calls for an entire group, click the drop down arrownext to the Block field and select the appropriate group.
6. E nter any Notes regarding the call request.7. Select OK to save.
©2006 MICROS® Systems Inc. All Rights Reserved. P roprietary and C onfidential.
141

7/31/2019 GEN V40 PMS Reference Manual FINAL Eng Ch
http://slidepdf.com/reader/full/gen-v40-pms-reference-manual-final-eng-ch 142/474
The new wake-up call displays in the grid.
NOTE: You may set up individual wake-up calls for guests sharing th e same roo m, whether or not they have individual ph one extensions. If you select aroo m with shares, sharing guests list individually on the IN HOUSE GUEST
SEARCH screen. You m ay select the sharers individually to set up separatewake-up calls.
From within the WAKE-UP CALLS screen, there are several additionalfunctions.
• If you manually deliver a wake-up call, you may change the status of thewake-up call directly in the grid from “Pending” to “Completed” or “NoAnswer”. This feature marks the actual time the PBX Operator deliveredthe wake-up call.
• To p rint a Report of all wake-up call requests, select Report.
©2006 MICROS® Systems Inc. All Rights Reserved. P roprietary and C onfidential.
142

7/31/2019 GEN V40 PMS Reference Manual FINAL Eng Ch
http://slidepdf.com/reader/full/gen-v40-pms-reference-manual-final-eng-ch 143/474
Chapter 5 - Cashiering
©2006 MICROS® Systems Inc. All Rights Reserved. P roprietary and C onfidential.
143

7/31/2019 GEN V40 PMS Reference Manual FINAL Eng Ch
http://slidepdf.com/reader/full/gen-v40-pms-reference-manual-final-eng-ch 144/474
©2006 MICROS® Systems Inc.
All Rights Reserved. P roprietary and C onfidential. 144

7/31/2019 GEN V40 PMS Reference Manual FINAL Eng Ch
http://slidepdf.com/reader/full/gen-v40-pms-reference-manual-final-eng-ch 145/474
Cashiering Basics
UnderstandDebits andCredits
Cashier Login
O PE RA finan cials work solely in terms of debits and credits to guest folios. Youeither post a charge and “add” to the guest folio balance or post a payment o radjustment and “subtract” from the guest folio b alance. Debits and Credits arekey aspects of transactions you post as a Cashier.
Debit - a transaction posting that “adds” to the guest’s folio balance where theguest consum es a charge and owes the hotel for the service. For example, when aguest charges an item such as dinner in the restaurant, that charge posts to theguest’s account (Folio) as a debit using a Transaction Code (e.g. RestaurantDinner).
Credit - a transaction posting that “subtracts” from the guest folio balance where
the guest pays for a charge or service applied to their folio. Another way to creditthe guest’s account is posting an adjustment to a guest’s folio. In m ost cases,credits are payments posted when a guest checks out. For example, when a guestmakes a payment, or there is an adjustment o r correction to the folio, the paymentor adjustment posts to the guest’s account (Folio) as a credit using a TransactionCode (i.e. Cash).
Every user with the ability to access Cashiering has a unique User Name, Cashier ID, and Password.
For financial accountability and security, OPERA requires you to login each time
you make a financial transaction. The CASHIER LOGIN screen displays eachtime you access a function in the Cashiering menu, prom pting you to enter youruser Password. Passwords for cashier logins are the same as your user passwordwhen you log into the system.
Each user also has a unique Cashier ID attached to their user name that tracks allfinancial transactions posted by the user. Having these security features requireseach user to b e accountable for all postings and payments performed on a givenbusiness date and helps p revent fraudulent financial activity in the system.
©2006 MICROS® Systems Inc. All Rights Reserved. P roprietary and C onfidential.
145
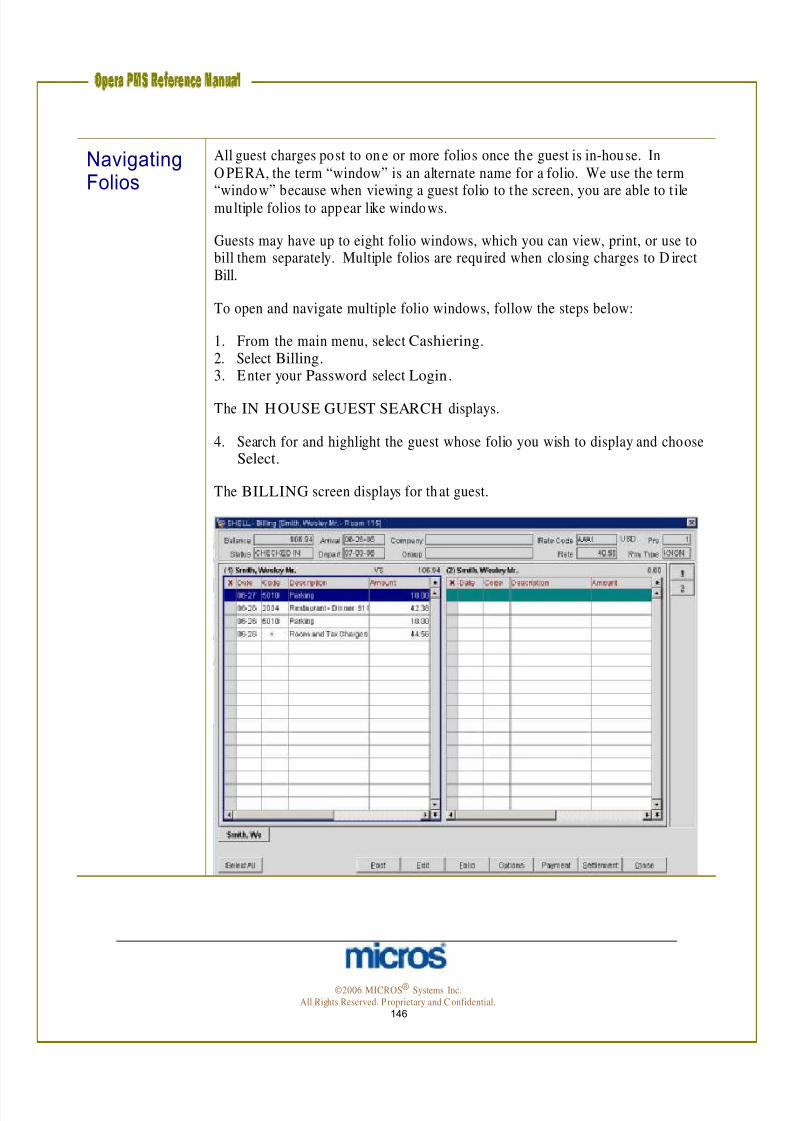
7/31/2019 GEN V40 PMS Reference Manual FINAL Eng Ch
http://slidepdf.com/reader/full/gen-v40-pms-reference-manual-final-eng-ch 146/474
Navigating Folios
All guest charges post to on e or more folios once the guest is in-house. InO PERA, the term “window” is an alternate name for a folio. We use the term
“window” because when viewing a guest folio to the screen, you are able to t ilemultiple folios to appear like windows.
Guests may have up to eight folio windows, which you can view, print, or use tobill them separately. Multiple folios are required when closing charges to D irectBill.
To open and navigate multiple folio windows, follow the steps below:
1. From the main menu, select Cashiering.2. Select Billing.3. Enter your Password select Login .
The IN H OUSE GUEST SEARCH displays.
4. Search for and highlight the guest whose folio you wish to display and chooseSelect.
The BILLING screen displays for th at guest.
©2006 MICROS® Systems Inc. All Rights Reserved. P roprietary and C onfidential.
146

7/31/2019 GEN V40 PMS Reference Manual FINAL Eng Ch
http://slidepdf.com/reader/full/gen-v40-pms-reference-manual-final-eng-ch 147/474
G uest reservation information lists along the top o f the folio window for yourreference.
5. Right click with the mouse to open a menu of options.6. Select New Window near the bottom of the list.Another folio window appears to the right o f Folio 1.7. Repeat this process up to a maximum of eight (8) folio windows.
Posting a
Charge
Employees can move postings from one folio window to another by dragging and dropp ing the transaction with the mouse. To perform this, click on the charge tomove with the mouse, hold and d rag the charge to the 2nd window, and releasethe mouse to drop the charge.
From time to time, it is necessary to po st charges manually to a guest folio.
Charges posted directly by a user require accessing the folio. Charges postedautomatically through the Night Audit do not require a user’s intervention.
To manually post a charge to a guest folio, follow the steps below:
1. From the main menu, select Cashiering and Billing.2. Enter your Password in the CASHIER LOGIN screen and select Login.
The IN H OUSE GUEST SEARCH screen displays.
3. Search for and highlight the desired guest room.4. Choose Select to op en the folio.
5. Select Post at the bottom of the BILLING screen.
©2006 MICROS® Systems Inc. All Rights Reserved. P roprietary and C onfidential.
147

7/31/2019 GEN V40 PMS Reference Manual FINAL Eng Ch
http://slidepdf.com/reader/full/gen-v40-pms-reference-manual-final-eng-ch 148/474
6. Click the drop down arrow next to the Code field.
NOTE: It is also possible to enter the code directly into the field without
accessing the list of values by entering the first few letters of the transaction code(example: “park” for “Parking”) or the numeric transaction code.
The transaction description populates in th e Description field.
7. Enter dollar Amount of the posting.8. Enter the Qty (Quantity) to post multiple transactions at the same price. (i.e.
If a guest receives 30 photocopies at .25 cents each, enter a quantity of 30 at aprice of .25)
9. Select the folio Win (Window) to p ost the transaction . The default windo wfor all postings is the first folio window.
10. Select from a list of Arr. Code (Arrangement Codes) if the charge descriptionshould group by charge type (i.e. Restaurant Charges).
NOTE: N ot all transaction codes have an Arrangement Code. Th is is only fortransactions of the same nature to display on the folio with a generic name.
11. Enter the Check No. (Check N umber) when m anually posting Foo d andBeverage transactions (in the event that the POS interface is down). If there isnot interface with the F&B outlets and the PMS and the F&B charge is amanual one, you may leave this blank as well.
12. Use the Supplement and Reference fields to enter an explanation of th echarge. These fields may print on the guest folio, so be certain to limit
explanations to text approp riate for the guest to view.13. Select Post to post the charge.14. Con tinue this process to post charges until complete. O nce all charges po st,
select Close.
The posted charges now display on the folio. Transfer Chargesto/from
Another Room
Follow the steps below to transfer a charge from one room to ano ther:
1. From the main menu, select Cashiering and Billing.2. Search for, highlight the desired guest room, and cho ose Select.
©2006 MICROS® Systems Inc. All Rights Reserved. P roprietary and C onfidential.
148

7/31/2019 GEN V40 PMS Reference Manual FINAL Eng Ch
http://slidepdf.com/reader/full/gen-v40-pms-reference-manual-final-eng-ch 149/474
1. H ighlight the charge(s) to transfer and right-click the mouse. 2. To transfer multiple transactions, place an “X” next to each charge or
highlight th e charges and select the Space bar.3. Select Transfer Transaction.
The TRANSFER TYPE screen displays.
©2006 MICROS® Systems Inc. All Rights Reserved. P roprietary and C onfidential.
149

7/31/2019 GEN V40 PMS Reference Manual FINAL Eng Ch
http://slidepdf.com/reader/full/gen-v40-pms-reference-manual-final-eng-ch 150/474
1. Select to Transfer TO another Room and Marked Postings.
The IN H OUSE SEARCH screen displays.Select the Room(s) to transfer the charge(s) to or from by entering the roomnumber directly in the Room field, by entering the guest’s last name directly in theRoom field or by clicking the d rop down arrow n ext to the Room field to selectthe room number(s).
2. Verify the transfer information and select Transfer. The confirmation screenbelow displays:
Alternate options for transferring charges are as follows:
Transfer
Chargesto/from Another FolioWindow
• Grouped Postings transfers all charges attached to the selected transaction codes (i.e. F&B charges, charges with generates).
• Entire Folio selects all charges on the fo lio to transfer
• Marked Postings transfers the postings marked on the folio with an “X”.
• Partial Posting performs a split to the charge selected to post, and then
transfers the charge.• Check Number transfers all charges with a specific check n umber (i.e.
F&B charges)
• Transfer TO another Room transfers charges to another guest room
• Transfer FROM another Room transfers charges from another guestroom to th is folio
• Transfer FROM List of Rooms transfers charges from a list of otherguest rooms to this folio
Follow the steps below to transfer a charge to another folio window:
1. From the main menu, select Cashiering and Billing.2. Search for, highlight the desired guest room, and cho ose Select.3. H ighlight the charge(s) to transfer and right click the mouse. To transfer
multiple transactions, place an “X” next to each charge.
©2006 MICROS® Systems Inc. All Rights Reserved. P roprietary and C onfidential.
150

7/31/2019 GEN V40 PMS Reference Manual FINAL Eng Ch
http://slidepdf.com/reader/full/gen-v40-pms-reference-manual-final-eng-ch 151/474
4. Select Transfer to Window and choose the Window number.
The folio window displays with the charges transferred.
Posting Payments
NOTE: You may also transfer charges from one folio window to ano ther by dragging and dropping the charge across windows.
Payments apply a credit or payment to an in-house guest room. O PERAautomatically defaults to the payment method assigned to the particular window (if multiple payment types exist) or defaults to the one on the reservation as well asthe total amount due on the folio.
Follow the steps below to m ake a Payment:
1. Access and display a guest folio in the BILLING screen.2. Select Payment.
©2006 MICROS® Systems Inc. All Rights Reserved. P roprietary and C onfidential.
151

7/31/2019 GEN V40 PMS Reference Manual FINAL Eng Ch
http://slidepdf.com/reader/full/gen-v40-pms-reference-manual-final-eng-ch 152/474
3. If the payment type differs from that of the reservation , click the drop down arrow next to the Payment Code field.
4. H ighlight the desired payment type and select OK. 5. Enter the payment amount in the Amount field. Th is field defaults to the
folio balance.6. If the guest pays by credit card, type the card number and expiration date in
the Credit Card No./ Exp. Date fields7. Enter a Reference note for the payment and select Post.
Preview,Print, andFile a Folio
NOTE: The payment now displays on the guest folio, and the folio balance reduces by the payment amoun t.
Folio displays the guest folio in printed fo rmat on the screen. From here, youmay either p rint the folio; review on the screen d isplay, or save a copy to file onyour computer for accuracy of the bill.
To preview a folio to the screen, follow the steps below:
1. Access and display a guest folio in the BILLING screen.2. Select Folio to view the folio.
©2006 MICROS® Systems Inc. All Rights Reserved. P roprietary and C onfidential.
152

7/31/2019 GEN V40 PMS Reference Manual FINAL Eng Ch
http://slidepdf.com/reader/full/gen-v40-pms-reference-manual-final-eng-ch 153/474
The FOLIO OPTIONS screen displays.
©2006 MICROS® Systems Inc. All Rights Reserved. P roprietary and C onfidential.
153
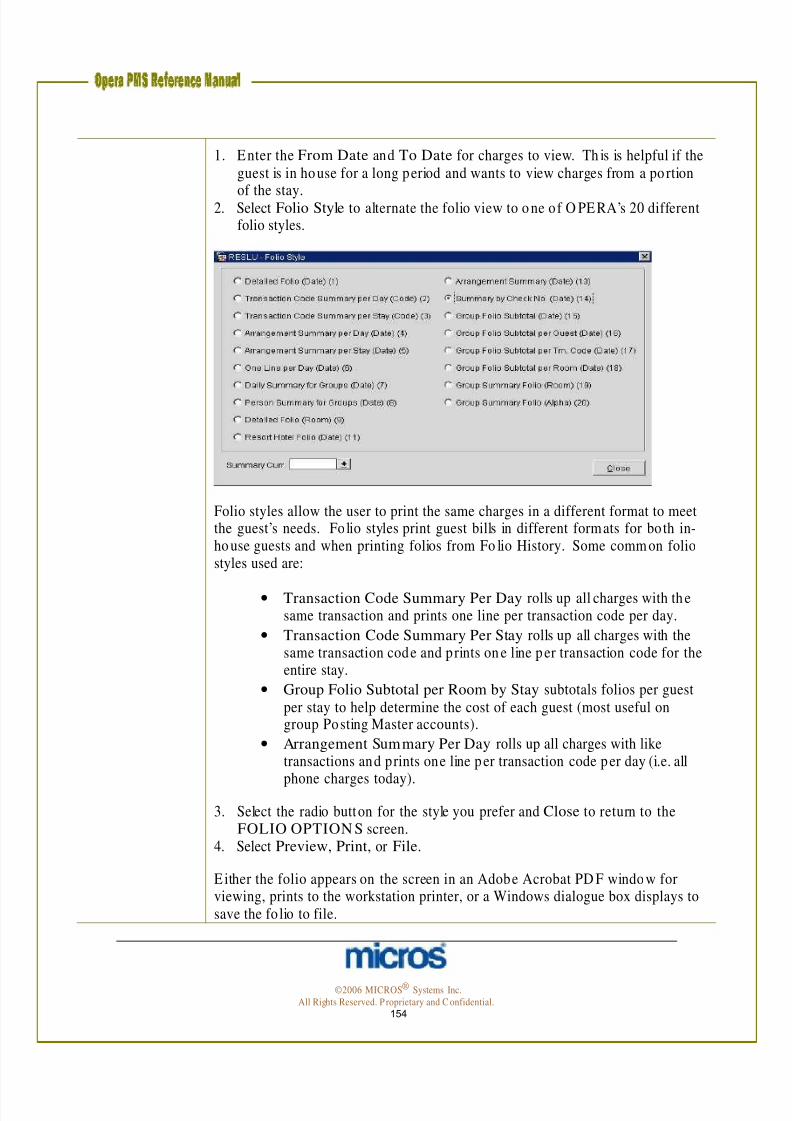
7/31/2019 GEN V40 PMS Reference Manual FINAL Eng Ch
http://slidepdf.com/reader/full/gen-v40-pms-reference-manual-final-eng-ch 154/474
1. Enter the From Date and To Date for charges to view. Th is is helpful if theguest is in house for a long period and wants to view charges from a po rtion
of the stay.2. Select Folio Style to alternate the folio view to o ne of O PERA’s 20 differentfolio styles.
Folio styles allow the user to print the same charges in a different format to meet the guest’s needs. Folio styles print guest bills in different formats for both in-ho use guests and when printing folios from Fo lio History. Some comm on foliostyles used are:
• Transaction Code Summary Per Day rolls up all charges with thesame transaction and prints one line per transaction code per day.
• Transaction Code Summary Per Stay rolls up all charges with thesame transaction code and prints on e line per transaction code for theentire stay.
• Group Folio Subtotal per Room by Stay subtotals folios per guestper stay to help determine the cost of each guest (most useful ongroup Posting Master accounts).
• Arrangement Summary Per Day rolls up all charges with liketransactions and prints one line per transaction code per day (i.e. all
phone charges today).
3. Select the radio button for the style you prefer and Close to return to theFOLIO OPTION S screen.
4. Select Preview, Print, or File.
E ither the folio appears on the screen in an Adobe Acrobat PD F window forviewing, prints to the workstation printer, or a Windows dialogue box displays tosave the fo lio to file.
©2006 MICROS® Systems Inc. All Rights Reserved. P roprietary and C onfidential.
154

7/31/2019 GEN V40 PMS Reference Manual FINAL Eng Ch
http://slidepdf.com/reader/full/gen-v40-pms-reference-manual-final-eng-ch 155/474
Split a Charge
The need to Split a charge on a guest folio happens for a nu mber of reasons.Most commonly, two guests staying in the same room prefer to split their room
charges and offer different forms of payment. You may also use the Splitfunction to split a transaction if an adjustment needs to b e made to ensure itappears correctly on the guest’s b ill.
Follow the steps below to Split a charge:
1. Access and display the guest folio in the BILLING screen.2. H ighlight th e desired charge, right-click and select Split.
The SPLIT AMOUNT/ PERCEN TAGE screen displays.
3. Select the radio button to split the charge by an Amount or Percentage. 4. Enter the Amount to split or Percentage to split (either an amount o r
percentage).
5. Select OK to save.
The charge splits into two separate postings on th e folio. From this point, one orbo th charges can transfer to another folio or another room .
NOTE: You can view the history for the original charge and the split transactionin Posting History.
©2006 MICROS® Systems Inc. All Rights Reserved. P roprietary and C onfidential.
155
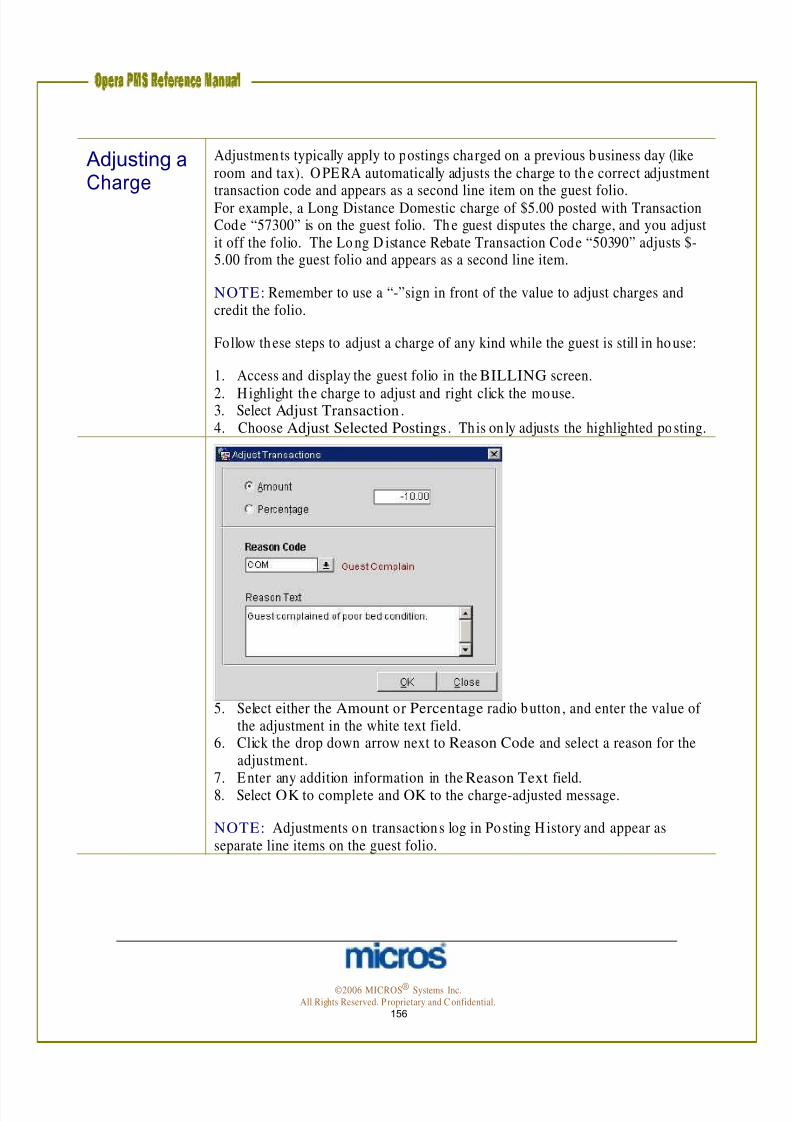
7/31/2019 GEN V40 PMS Reference Manual FINAL Eng Ch
http://slidepdf.com/reader/full/gen-v40-pms-reference-manual-final-eng-ch 156/474
Adjusting a Charge
Adjustments typically apply to postings charged on a previous business day (likeroom and tax). O PERA automatically adjusts the charge to the correct adjustment
transaction code and appears as a second line item on the guest folio.For example, a Long Distance Domestic charge of $5.00 posted with TransactionCode “57300” is on the guest folio. Th e guest disputes the charge, and you adjustit off the folio. The Lo ng D istance Rebate Transaction Code “50390” adjusts $-5.00 from the guest folio and appears as a second line item.
NOTE: Remember to use a “-”sign in front of the value to adjust charges andcredit the folio.
Follow these steps to adjust a charge of any kind while the guest is still in ho use:
1. Access and display the guest folio in the BILLING screen.
2. H ighlight the charge to adjust and right click the mouse.3. Select Adjust Transaction .4. Choose Adjust Selected Postings. This on ly adjusts the highlighted posting.
5. Select either the Amount or Percentage radio button , and enter the value of the adjustment in the white text field.
6. Click the drop down arrow next to Reason Code and select a reason for theadjustment.
7. Enter any addition information in the Reason Text field.8. Select OK to complete and OK to the charge-adjusted message.
NOTE: Adjustments on transactions log in Posting H istory and appear asseparate line items on the guest folio.
©2006 MICROS® Systems Inc. All Rights Reserved. P roprietary and C onfidential.
156

7/31/2019 GEN V40 PMS Reference Manual FINAL Eng Ch
http://slidepdf.com/reader/full/gen-v40-pms-reference-manual-final-eng-ch 157/474
Adjust anInterface or Night AuditPosting
For interface postings and room and tax rebates automatically posted during thenight audit, you must manually post and adjustment.
Follow the steps below to adjust an interface or automatic posting:1. From the guest folio, select Post.
The POSTING screen displays.
2. Manually enter the “Rebate” transaction Code for the transaction to adjust. 3. Enter a “-” before the value being adjusted in the Amount or Qty (Quantity)
field.4. Choose the Win (Window) the adjustment applies to and enter a reason for
the negative posting in th e Supplement field.5. Select Post.
NOTE : Room and tax rebates—or any transactions that have “generates” topost along with the charge (i.e. taxes generate along with room charges duringnight audit) autom atically adjust the generate(s). In o ther words, if you adjust$10.00 off a room charge and the tax percentage is 5%, 5% of $10.00 also adjustsas generates (i.e. 50 cents).
NOTE: Since interface and automatic charges must adjust manually, thesetransactions appear as separate line items on the folio.
©2006 MICROS® Systems Inc. All Rights Reserved. P roprietary and C onfidential.
157

7/31/2019 GEN V40 PMS Reference Manual FINAL Eng Ch
http://slidepdf.com/reader/full/gen-v40-pms-reference-manual-final-eng-ch 158/474
Correct /Edit aCharge
In O PE RA, you may correct a transaction posted incorrectly or by mistake. Acorrection only applies if the posting occurred in the same business day and
po sted manually to th e folio. For examp le, if you mistakenly posted a $20 parkingcharge to a guest folio that should have been $10, you may correct the posting byediting the charge.
To correct or edit a charge, follow the steps below:
1. Access and display the guest folio in the BILLING screen.2. H ighlight the charge to correct and either double-click the charge or select
Edit.
The EDI T TRANSACTION DET AILS screen displays.
3. Correct the value of the posting in the Price field and select OK to save
changes.
NOTE: Since the correction is on the same business date, and by the same user,there is no additional line item on the folio. The corrected charge displays on th eguest folio, as it should. However, transaction details log in Post ing H istory.
©2006 MICROS® Systems Inc. All Rights Reserved. P roprietary and C onfidential.
158

7/31/2019 GEN V40 PMS Reference Manual FINAL Eng Ch
http://slidepdf.com/reader/full/gen-v40-pms-reference-manual-final-eng-ch 159/474
GuestRefundsand PaidOuts
When a departing guest has a credit balance on their folio, it is necessary to refundthe remaining balance to the guest. Wheth er your hotel considers these guest
refunds or paid outs, handle the debit posting to the fo lio in the same manner.
NOTE: Please do not use the Petty Cash or General Cashier functionality toperform guest refunds or paid ou ts. The postings must happen directly to theguest folio to reconcile the folio balance to zero.
From a guest folio with a credit balance, follow the steps below to issue a paid outor guest refund:
1. Access and display the guest folio in the BILLING screen.2. Select Post and enter the Code for a “Paid Out” or “Guest Refund.”3. Enter the Amount to refund and select Post.
4. Answer “Yes” to print a receipt and have the guest to sign. 5. Select Close to return to the guest folio.6. N otice the zero folio balance.
NOTE: It is not necessary to enter a “-“ sign in the amount field, as Paid Outand Guest Refund payment transaction codes are configured as debits to the folio.
©2006 MICROS® Systems Inc. All Rights Reserved. P roprietary and C onfidential.
159

7/31/2019 GEN V40 PMS Reference Manual FINAL Eng Ch
http://slidepdf.com/reader/full/gen-v40-pms-reference-manual-final-eng-ch 160/474
Billing Options
Within the folio window, there are several additional options to assist withmanaging the guest folio. Selecting Options from any guest folio displays thefollowing screen:
Credit Cards Th e Credit Cards option allows the same features on credit cards as In-House G uests found in the Fron t Desk chapter of this manual.
Follow the steps below to access Credit Cards for authorizations:
1. Access and display a guest folio in the BILLING screen .
2. Select Options from3. Select Credit Cards.
To obtain additional authorization for the credit card on file, select Authorization.
To view a history of all autho rization requests for the credit card on file, selectAuthorization H istory.
©2006 MICROS® Systems Inc. All Rights Reserved. P roprietary and C onfidential.
160
7/31/2019 GEN V40 PMS Reference Manual FINAL Eng Ch
http://slidepdf.com/reader/full/gen-v40-pms-reference-manual-final-eng-ch 161/474
Fixed Charges
Many times, a guest has a charge that occurs every night during the stay. It ispossible for the system to post those charges during the night audit along withroom and tax. O PE RA calls these Fixed Charges.
Follow the steps below to set up a Fixed Charge:
1. Access and display a guest folio in the BILLING screen.2. Select Options.3. Select Fixed Charges.4. Comp lete the FIXED CH ARGES screen and select OK.
NOTE: For more details on applying Fixed Charges to reservations, refer to the“Fixed Charges” section of the Reservations Chapter in this manual.
Package Options Many hotels offer packages for guests that may include b reakfast or dinner with
the room rate. Typically, a dollar amoun t is set aside for a meal. Sometimes aguest consumes more than the package allows. In this case, it is helpful to seehow much of a package has been consumed if a guest is questioning charges ontheir folio.
Follow the steps below to see the package elements for a room:
1. Access and display a guest folio in the BILLING screen.2. Select Options.3. Select Package Options.
This screen displays the amount allocated fo r a package element as well as theamount of that element consumed by the guest. This is helpful in explaining whythe guest might have an overage charge on the folio.
NOTE: If an overage amount exists, it displays on the guest folio, and thereference field notes the overage.
NOTE : For more details on Package Op tions, refer to the “Package Op tions”section of the Reservations Chapter in this manual.
©2006 MICROS® Systems Inc. All Rights Reserved. P roprietary and C onfidential.
161

7/31/2019 GEN V40 PMS Reference Manual FINAL Eng Ch
http://slidepdf.com/reader/full/gen-v40-pms-reference-manual-final-eng-ch 162/474
Phone Details
Phone Details allows the user to see detailed information regarding a phonecharge posted to a guest folio. In the event of a guest dispute or question about a
ph one call, this option is particularly useful.
NOTE : Phone Details are not visible until the telephone interface is active. Asphone calls post to the guest folio through the interface program, details log inthis window.
Follow the steps below to see Phone D etails for a guest:
1. Access and display the guest folio in the BILLING screen.2. Select Options.3. Select Phone Details.
The PH ONE DETAILS screen displays.
This screen displays the Date and Time of the call, the Duration, the Number Dialed , and the Amount of the call.
NOTE: The Print Phone Details op tion enables and disables phone num berdetails from printing on the guest fo lio.
©2006 MICROS® Systems Inc. All Rights Reserved. P roprietary and C onfidential.
162

7/31/2019 GEN V40 PMS Reference Manual FINAL Eng Ch
http://slidepdf.com/reader/full/gen-v40-pms-reference-manual-final-eng-ch 163/474
Posting History
Posting H istory tracks posting details and information on charges posted toguest folios. Charges autom atically appear in Posting History when th e charge
applies to the folio. Whenever you correct, split, or adjust a charge, a recordappears in p osting h istory as well.
Follow the steps below to view transaction Posting History:
1. Access and display a guest folio in the BILLING screen.2. Select Options.3. Select Posting History.
The POSTIN G HISTORY screen displays.
• Action is the type of posting or transaction logged (i.e. transfer charge, split charge, manual posting, etc.)
• Revenue Date is the business date affected by the transaction
• Posting Date is the actual system date when the transaction posted
• User/ Name is the user ID and last name of the user that posted thetransaction
• Reason/ Description populates when an adjustment or negativetransaction is logged in history
NOTE: If you highlight an adjusted or corrected transaction, the Original andChanges of that transaction display in the lower portion of this screen.
©2006 MICROS® Systems Inc. All Rights Reserved. P roprietary and C onfidential.
163

7/31/2019 GEN V40 PMS Reference Manual FINAL Eng Ch
http://slidepdf.com/reader/full/gen-v40-pms-reference-manual-final-eng-ch 164/474
Post Rate Code
Post Rate Code autom atically generates a posting of room and tax charges for anyuser selected Rate Code. The Rate Code that exists on the reservation defaults,
ho wever, the posting screen allows the user to change the Rate Code posted. Usethis feature to post room and tax on a folio for a rate plan different from thereserved one.
To post a manual room and tax charge, follow the steps below:
1. Access and display a guest folio in the BILLING screen.2. Select Options.3. Select Post Rate Code.
4. Click the drop down arrow next to the Rate Code field if the rate to post is different that the reserved rate.
5. Search for and highlight the appropriate Rate Code, and select OK.6. Select the Win. (Window) to apply the charge to and select Post.7. Select Close to return to the folio and no tice the manual room and tax posting
on the folio.
NOTE : Post Rate Code does not affect the normal room and tax postingsgenerated by the audit process, nor does it trigger automatic postings such asFixed Charges. Also, be careful when using this feature since the posted ratemight differ from the reservation and alter Market Statistics for this business date.
Privileges Privileges are several options that allow specific charging instructions o n folios
such as No Post, Pre-Post Stay Charging, Scheduled Check Out, and AuthorizeD irect Bill. For more inform ation on folio privileges, refer to the “Reservations”chapter of th is manual.
©2006 MICROS® Systems Inc. All Rights Reserved. P roprietary and C onfidential.
164

7/31/2019 GEN V40 PMS Reference Manual FINAL Eng Ch
http://slidepdf.com/reader/full/gen-v40-pms-reference-manual-final-eng-ch 165/474
Routing Charge Routing is extremely useful when setting up direct billing for a guest. Youcan route charges to another room, a Posting Master account, or to separatecharges on the guest’s own bill for a second form of payment.
Follow the steps below to access the charge Routing op tion:
1. Access and display a guest folio in the BILLING screen.2. Select Options.3. Select Routing.
NOTE: For more information on folio and window routing, refer to the“Reservations” chapter in this manual.
Additional
Options Additional options not covered in detail in this chapter are:
• Agent/ Company – refer to the “Reservations” chapter of this manual formore details. This feature is useful in Billing in the event you need to adda Company profile to the reservation for direct bill purposes.
• Folio History – refer to the “Folio H istory” section of this chapter foradditional details. Th is feature is useful in Billing in the even t that youneed to access a folio for a guest from a previous stay.
• Profile – refer to the “Profiles” chapter of this manual for details onviewing profiles. This feature is useful in Billing in the event that youquickly need to change the name on a folio.
• Reservations – refer to the “ Reservations” chapter of th is manual fordetails on viewing reservation s. Th is feature is useful in Billing in the
event you need to quickly make an accommodation change (i.e. extend the number of nights).
• Deposit/ CXL – refer to the “Reservations” chapter of th is manual fordetails on posting deposits, handling deposit requests, and handlingcancellation requirements.
• Room Move – refer to the “Front D esk” chapter of this manual fordetails on m oving guest room s. Th is feature is useful in Billing in theevent a guest requests to move to anoth er room.
• Changes – refer to the “Reservations” chapter of this manual for detailson the changes/ user activity log.
©2006 MICROS® Systems Inc. All Rights Reserved. P roprietary and C onfidential.
165

7/31/2019 GEN V40 PMS Reference Manual FINAL Eng Ch
http://slidepdf.com/reader/full/gen-v40-pms-reference-manual-final-eng-ch 166/474
Check Out
Cash Check Out
Many guests depart the hotel and wish to settle their folios using Cash as the formof payment. Even if the original payment metho d is not cash, it is po ssible tocheck a guest out with Cash.
Follow the steps below to check out a guest paying cash:
1. Access and display the folio for the Due-O ut guest in the BILLING screen.2. Select Check Out.
The CHECK OUT OPTION S screen displays.
3. Select to Check Out the guest and close the folio.
NOTE : O nly select to Check Out With Open Folio for guests not settling theiraccount with a form of payment. This option only displays if your hotel haselected to allow O pen Folios.
4. Select OK.
The PAYMENT screen displays and defaults the Payment field from thepayment type on the reservation. The Amount field defaults to the balance of thefolio.
©2006 MICROS® Systems Inc. All Rights Reserved. P roprietary and C onfidential.
166

7/31/2019 GEN V40 PMS Reference Manual FINAL Eng Ch
http://slidepdf.com/reader/full/gen-v40-pms-reference-manual-final-eng-ch 167/474
5. Click on the drop down arrow next to the Payment Code field if the form of payment is anything other than “Cash.”
6. H ighlight and select “Cash” from the list of values and select OK.
7. Verify the Amount is correct or enter the amount of Cash given. 8. Select Post to post the Cash payment and settle the folio.
9. Answer “Yes” to prin t a payment receipt and a copy of the folio, or “N o” toprint only a copy of the folio.
Once the first window checks out of the system, a message appears asking tocontinue with the next window until all windows check out with a zero balance (if multiple folio windows exist).
Once you settle all windows, the reservation status changes to “Checked Out."This status appears in the upper left corner of the BILLING screen.
NOTE: If your hotel uses the Scheduled Checkout feature, a prompt displaysasking if you would like to schedule the check out for a later time. Fo r more
information , refer to the “Scheduled Checkout” section of th is chapter.
©2006 MICROS® Systems Inc. All Rights Reserved. P roprietary and C onfidential.
167

7/31/2019 GEN V40 PMS Reference Manual FINAL Eng Ch
http://slidepdf.com/reader/full/gen-v40-pms-reference-manual-final-eng-ch 168/474
Credit Card Check Out
Many guests depart the hotel and wish to settle their folios using either the creditcard on file or an alternate card as the form o f payment. E ven if the original
payment method is Cash, it is possible to check a guest out using a credit card.
Follow the steps below to check out a guest paying by credit card:
1. Access and display the Due-Out guest folio in the BILLING screen.2. Select Check Out.
The CHECK OUT OPTION S screen displays.
3. Select to Check Out the guest and close the folio.
NOTE : O nly select to Check Out With Open Folio for guests not settling theiraccount with a form of payment. This option only displays if your hotel haselected to allow O pen Folios.
The PAYMENT screen displays and defaults the Payment field from theauthorized payment type on th e reservation. The Amo unt field defaults to thebalance of the folio.
©2006 MICROS® Systems Inc. All Rights Reserved. P roprietary and C onfidential.
168

7/31/2019 GEN V40 PMS Reference Manual FINAL Eng Ch
http://slidepdf.com/reader/full/gen-v40-pms-reference-manual-final-eng-ch 169/474
4. Verify that the credit card displayed is the correct card to charge. If not , you may either swipe a new card or click the drop down arrow next to thePayment Code field to en ter a new Credit Card No. and Exp. Date.
5. Select Post to post the card payment and settle the fo lio.6. Answer Yes to print a payment receipt and a copy of the fo lio, or No to p rint
only a copy of the folio.
NOTE: If the guest uses the same credit card, the system only obtains additionalauthorization if the current authorization amoun t does not cover the to tal foliobalance. In th is case, only the difference in the authorized amount and foliobalance authorizes. If the guest gives a new card num ber for settlement o f thefolio, authorization occurs for the entire folio balance.
Once the first window checks out of the system, a message appears asking tocontinue with the next window until all windows check out with a zero balance (if multiple folio windows exist).
Once you settle all windows, the reservation status changes to “Checked Out."
This status appears in the upper left corner of the BILLING screen.
NOTE: If your hotel uses the Scheduled Checkout feature, a prompt displaysasking if you would like to schedule the check out for a later time. Fo r moreinformation , refer to the “Scheduled Checkout” section of th is chapter.
©2006 MICROS® Systems Inc. All Rights Reserved. P roprietary and C onfidential.
169
7/31/2019 GEN V40 PMS Reference Manual FINAL Eng Ch
http://slidepdf.com/reader/full/gen-v40-pms-reference-manual-final-eng-ch 170/474
Direct Bill Check Out
When checking out a guest with Direct Bill as the form of payment, it is importantto follow proper procedures. D irect Bill charges are not settled by the guest, bu t
rather post to an Accounts Receivable account for payment by a third party. As aresult, use special care to ensure D irect Bills are setup accurately.
The following are required for Direct Bill check outs to Company AR accounts:
• An active Company profile exists on the reservation.
• An active AR N umber exists on the Company profile.
• Charges route to separate folio windows.
• The separate folio window must be “owned” b y the Company profile.
For direct billing situations where the company is no t paying for all guest charges,
the first folio window “owned” by the guest must h ave an alternate form of payment (i.e. credit card).
NOTE : For details on attaching Company Profiles to direct bill reservations, orfor details on setting up Routing for direct bills, refer to the “Reservations”chapter of th is manual.
©2006 MICROS® Systems Inc. All Rights Reserved. P roprietary and C onfidential.
170
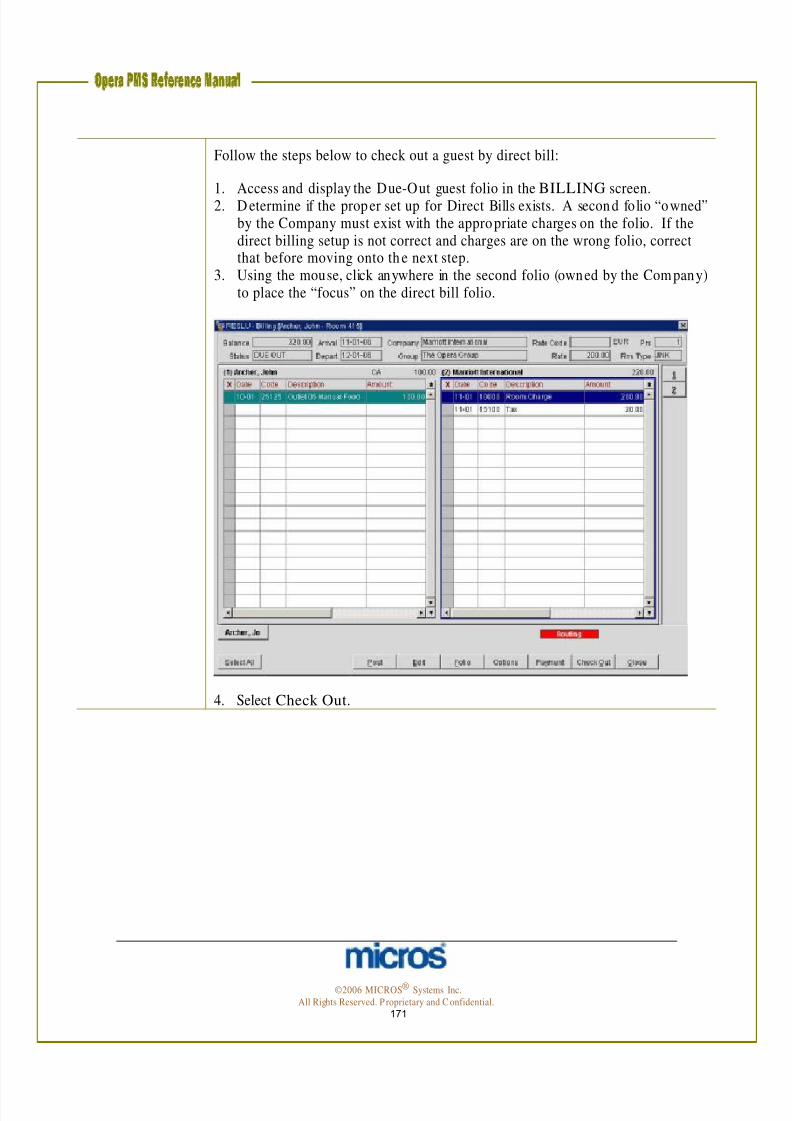
7/31/2019 GEN V40 PMS Reference Manual FINAL Eng Ch
http://slidepdf.com/reader/full/gen-v40-pms-reference-manual-final-eng-ch 171/474
Follow the steps below to check out a guest by direct bill:
1. Access and display the Due-Out guest folio in the BILLING screen.2. D etermine if the proper set up for Direct Bills exists. A second folio “owned”by the Company must exist with the appropriate charges on the folio. If thedirect billing setup is not correct and charges are on the wrong folio, correctthat before moving onto th e next step.
3. Using the mouse, click anywhere in the second folio (owned by the Com pany)to place the “focus” on the direct bill folio.
4. Select Check Out.
©2006 MICROS® Systems Inc. All Rights Reserved. P roprietary and C onfidential.
171
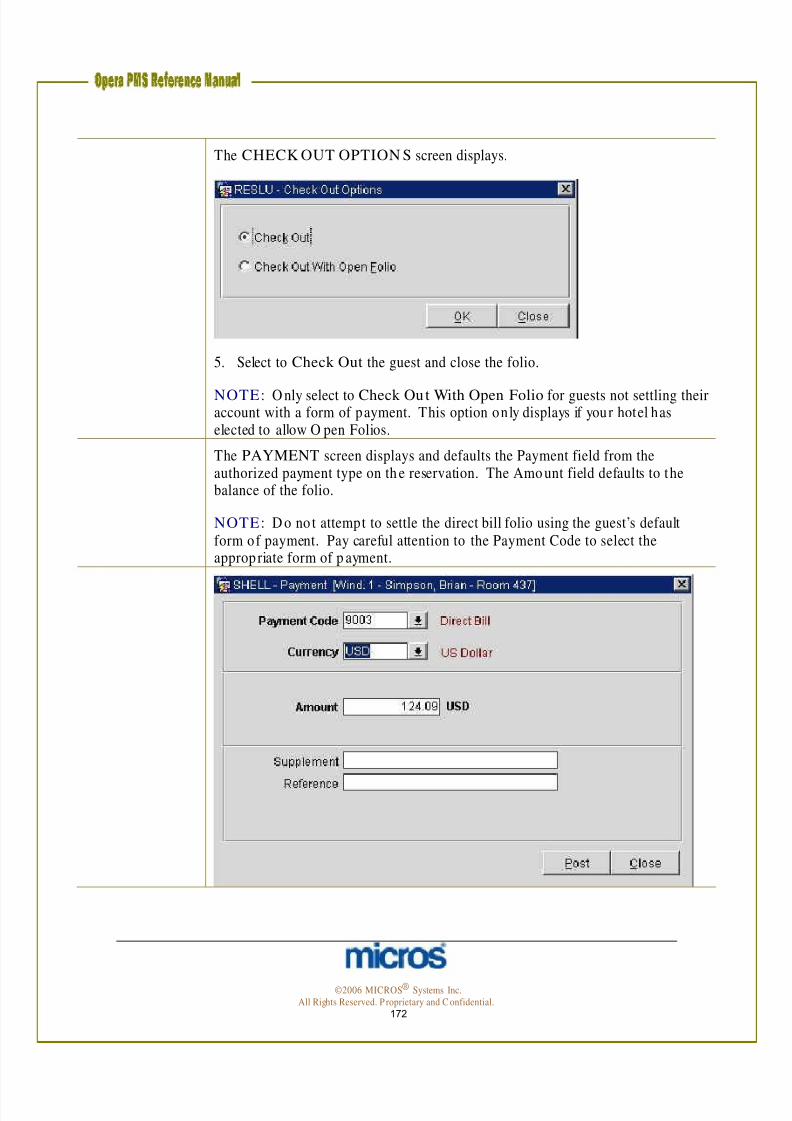
7/31/2019 GEN V40 PMS Reference Manual FINAL Eng Ch
http://slidepdf.com/reader/full/gen-v40-pms-reference-manual-final-eng-ch 172/474
The CHECK OUT OPTION S screen displays.
5. Select to Check Out the guest and close the folio.
NOTE : O nly select to Check Out With Open Folio for guests not settling theiraccount with a form of payment. This option only displays if your hotel haselected to allow O pen Folios.
The PAYMENT screen displays and defaults the Payment field from theauthorized payment type on th e reservation. The Amo unt field defaults to thebalance of the folio.
NOTE : D o no t attempt to settle the direct bill folio using the guest’s defaultform of payment. Pay careful attention to the Payment Code to select theappropriate form of p ayment.
©2006 MICROS® Systems Inc. All Rights Reserved. P roprietary and C onfidential.
172

7/31/2019 GEN V40 PMS Reference Manual FINAL Eng Ch
http://slidepdf.com/reader/full/gen-v40-pms-reference-manual-final-eng-ch 173/474
6. Click the drop down arrow next to the Payment Code field to change theform of payment to “City Ledger” or “Direct Bill” and select OK.
7. Verify the Amount is correct.8. Select Post to post the direct bill payment and settle the folio.9. Answer “Yes” to prin t a payment receipt and a copy of the folio, or “N o” to
print only a copy of the folio.
NOTE: If the folio window “owned” by the guest has a balance, a messageappears asking you to settle the balance of Folio 1. Either use the default form of payment on th e reservation or collect a new form of payment from the guest tosettle. Follow the steps outline in the above sections for Cash or Credit CardCheck O ut.
Once you settle all windows, the reservation status changes to “Checked Out."
This status appears in the upper left corner of the BILLING screen.
Settlementand EarlyDeparture
NOTE: If your hotel uses the Scheduled Checkout feature, a prompt displays asking if you would like to schedule the check out for a later time. Fo r moreinformation , refer to the “Scheduled Checkout” section of th is chapter.
Circumstances sometimes prompt a guest to check out before the departure dateor to desire an interim or advanced bill. In one of these circumstances, the guestis not to depart today. Therefore, on the BILLING screen, the Check Out feature is no t active or available and the Settlement function is in its p lace.
Follow the steps below to settle a guest folio:
1. Access and display the guest folio in the BILLING screen.
Since the guest’s departure date is not today, the Check Out option is notavailable.
2. Select Settlement .3. Select one of the following three options to settle the bill:
©2006 MICROS® Systems Inc. All Rights Reserved. P roprietary and C onfidential.
173

7/31/2019 GEN V40 PMS Reference Manual FINAL Eng Ch
http://slidepdf.com/reader/full/gen-v40-pms-reference-manual-final-eng-ch 174/474
• Interim Bill allows a guest to make a payment to the account and settlesthe folio to a zero balance witho ut checking the guest out. Chargescontinue to post to th e folio as norm al. This is helpful for guests thatneed to settle the bill at the end of every week to report expenses.
• Early Departure allows the guest to check out with the current balance.Use this option if the guest departs the room early and wishes to settle thebill in full.
• Advanced Bill posts advance room and tax for the remainder of theguest’s stay, allowing the guest to m ake a payment to settle the accoun t.N o additional charges post to the folio for the remainder of the guest’sstay. The guest does not check out and room and tax do not repost duringN ight Audit. Use this option if a guest wants to sett le the bill the nightbefore they leave.
NOTE: Room and tax predictions posted using Advanced Bill do N O T postroom and tax for future business dates on today’s business date. O nly a predictioncalculates and the app ropriate room and tax totals post on the intended night. 4. Follow the steps outlined in the above Cash Check Out, Credit Card Check
O ut, and D irect Bill Check O ut sections to po st payments and complete thesettlements.
NOTE: Interim Bill and Advanced Bill options used for in-house guests retain aCHECKE D IN status on the reservation . Early D eparture checks the guest outand changes the reservation status to CH ECK ED O UT.
©2006 MICROS® Systems Inc. All Rights Reserved. P roprietary and C onfidential.
174

7/31/2019 GEN V40 PMS Reference Manual FINAL Eng Ch
http://slidepdf.com/reader/full/gen-v40-pms-reference-manual-final-eng-ch 175/474
Reinstate a Check Out
If you need to check a guest back in, the Reinstate option returns the guest to in-house status by checking th em back into the same room they previously occupied.
The reinstate option is only available for guests that departed on that business day.Reinstate also allows for posting late charges (or charges not posted before aguest’s departure like a breakfast charge from the restaurant) to a guest fo lio o ncedeparted.
NOTE: If your hotel allows Post-Stay Charging or check outs with an OpenFolio, the Reinstate feature is not necessary to post a late charge.
Follow the steps below to Reinstate a checked-out guest:
1. Access and display the Checked Out guest folio in the BILLING screen.
2. Select Reinstate.
3. A message displays asking if you would like to reinstate the guest; answer“Yes” to reinstate or “N o” to leave the guest checked out.
4. A message displays asking if you would like to send a signal to the interfacesindicating the roo m as occupied by the guest once again. Answer “Yes” if theguest still occupies the room or “N o” if the guest has indeed departed, but youare posting late charges.
NOTE: The guest now occupies the room with a D UE -OUT status. If thecheck out was a mistake, be certain to verify and correct the departure date of theguest.
5. If this guest did indeed depart, post any late charges as applicable and checkthe guest back out of the system.
©2006 MICROS® Systems Inc. All Rights Reserved. P roprietary and C onfidential.
175

7/31/2019 GEN V40 PMS Reference Manual FINAL Eng Ch
http://slidepdf.com/reader/full/gen-v40-pms-reference-manual-final-eng-ch 176/474
Quick Check Out
The Quick Check Out feature allows you to manage multiple departures at onetime. This is particularly useful when clearing departures at the end of the
morning shift or for a mass group departure. The Quick Check Out feature worksfor individual departures as well as multiple departures at o ne t ime.
Follow the steps below to use the Q uick Check O ut feature:
1. From the main menu, select Cashiering and Quick Check Out.2. Enter your Password in the CASHIER LOGIN screen and select Login.
The IN H OUSE GUEST SEARCH screen displays with today’s Due Outguests only.
Use th e search criteria, if necessary, to minimize results by groups of guests.
3. Select one of the options below:
• C/ O Zero – checks out all remaining guests currently with a zerobalance.
• C/ O All – checks out all guests due to depart today. Any folios with abalance prompt a payment window to settle the folio.
• Check Out – checks out the highlighted guests. Any folios with abalance promp t a payment window to settle the folio. To check outmultiple rooms, but n ot all room s, place and “X” next to each roombefore choosing this op tion .
• Billing – opens the BILLING screen for the highlighted guest room
A folio for all guests with a zero balance that check out prints to the localworkstation print.
©2006 MICROS® Systems Inc. All Rights Reserved. P roprietary and C onfidential.
176

7/31/2019 GEN V40 PMS Reference Manual FINAL Eng Ch
http://slidepdf.com/reader/full/gen-v40-pms-reference-manual-final-eng-ch 177/474
Scheduled Check Out
The Scheduled Check Out feature is an addition to the check out process if yourho tel elects to use this feature. Within the Reservation O ptions and Privileges,
you can authorize or de-authorize scheduled check out for a guest and input atime for th e automatic check out to occur. When settling the guest bill throughBilling, a pro mpt displays asking if you would like scheduling the room for checkout later.
A constant processor runs that periodically checks for any departures that passedtheir scheduled check out time. If a room is schedule and the system date andtime passes, the room is automatically departed .
NOTE: Scheduled Check O ut o nly processes a departure if the en tire roombalance (including all folio windows) is zero.
To view and manage today’s departures scheduled to check out at a specific time,follow the steps below:
1. From the main menu, select Cashiering and Scheduled Check Out.
The SCHE DULED CHE CK OUT GUEST SEARCH screen displays.
©2006 MICROS® Systems Inc. All Rights Reserved. P roprietary and C onfidential.
177

7/31/2019 GEN V40 PMS Reference Manual FINAL Eng Ch
http://slidepdf.com/reader/full/gen-v40-pms-reference-manual-final-eng-ch 178/474
This screen lists all guests with a scheduled check out time in the Time column.
2. Remembering that this feature only works for zero balance folios, workthrough each departure to settle their folio.3. H ighlight the first departure with a folio balance and select Billing.4. Follow instructions learned earlier in this chapter to make a payment and settle
each folio.5. To process a check out on a room originally scheduled for a future time,
highlight the room and select Check Out (this removes the room from th elist).
©2006 MICROS® Systems Inc. All Rights Reserved. P roprietary and C onfidential.
178

7/31/2019 GEN V40 PMS Reference Manual FINAL Eng Ch
http://slidepdf.com/reader/full/gen-v40-pms-reference-manual-final-eng-ch 179/474
Cashier Functions
Cashier Functions provide m any addition al features for handling guest financials.Some features display on the main menu, while others display within the functionsmenu below:
Fast Posting
Fast Posting is a quick and easy to way to charge m ultiple transactions to different room s. For example, posting a list of laundry charges or mini-barcharges can quickly post to folios using this feature. Transaction types do nothave to be the same to use Fast Po sting.
Follow the steps below to p ost charges using Fast Posting:
1. From the main menu, select Cashiering.
2. Select Fast Posting.3. Enter your Password in the CASHIER LOGIN screen and select Login.
The TRANSACTION POSTING screen displays. However, note thedifferences in this posting screen versus the traditional posting screen.
©2006 MICROS® Systems Inc. All Rights Reserved. P roprietary and C onfidential.
179

7/31/2019 GEN V40 PMS Reference Manual FINAL Eng Ch
http://slidepdf.com/reader/full/gen-v40-pms-reference-manual-final-eng-ch 180/474
4. Type in the Room/ Name of the first guest room. You may enter the roomnumber directly or click the drop down arrow next to the field to search forthe room by name.
5. Con tinue all oth er fields as learned in the “Post a Charge” section o f thischapter.
6. Select Post.7. Repeat this process for each transaction you need to post.
NOTE: As you continue posting charges, the Total Postings and Amount fields at the bo ttom of the screen con tinuously update. Th is is particularly usefulif you are fast posting multiple charges and need to verify that they all posted.
8. Select Close when finished.
Batch Folios Batch Folios is a function used during the Night Audit shift to print express
checkout folios. Refer to the “E nd of Day” chapter of this manual for moredetails on Batch Folios.
©2006 MICROS® Systems Inc. All Rights Reserved. P roprietary and C onfidential.
180

7/31/2019 GEN V40 PMS Reference Manual FINAL Eng Ch
http://slidepdf.com/reader/full/gen-v40-pms-reference-manual-final-eng-ch 181/474
Batch Postings
Batch Postings posts the same charge to multiple guest folios and rooms at onetime. A comm on type of Batch Posting is a bagging handling (Porterage) charge
for a large guest group or Parking charges. With Batch Postings, all transactionsmust be the same type and price.
Follow the steps below to complete a Batch Posting:
1. From the main menu, select Cashiering.2. Select Cashier Functions.3. Select Batch Postings 4. Enter your Password and select Login.
The BATCH POSTIN GS screen displays.
©2006 MICROS® Systems Inc. All Rights Reserved. P roprietary and C onfidential.
181

7/31/2019 GEN V40 PMS Reference Manual FINAL Eng Ch
http://slidepdf.com/reader/full/gen-v40-pms-reference-manual-final-eng-ch 182/474
5. Click the drop down arrow next to the Trn. Code field to select thetransaction code to post.
6. Enter the Amount of the posting.7. Click the drop down arrow next to the Rooms field and select all applicableroom s by placing an ‘X’ next to each room number.
8. Choose Select to save and return to the BATCH POSTIN GS screen.9. Enter any desired Post Text or Supplement information.10. To p ost charges to guest room s with a “N o-Post” flag, leave the Override
No-Post Flag check box marked.11. Select OK to save and po st the batch charges.12. Answer “Yes” to view posting details.
The POSTING DETAIL screen displays.
All room s that the batch po sting affected have an “X” in the OK column.
Cashier Reports
13. Select OK to com plete.
Cashier Reports printed at th e end of the day help th e user to balancetransactions and close their shift. The reports can print pr ior to closing yourCashier for easy balancing. O nce the Cashier closes, Cashier Reports reset andyou no longer have details for the Cashier.
Follow the steps below to print Cashier Reports prior to the end of a shift:
1. From the main menu, select Cashiering.2. Select Cashier Shift Functions 3. Select Cashier Shift Reports.4. Enter your Password in the CASHIER LOGIN screen and select Login.
©2006 MICROS® Systems Inc. All Rights Reserved. P roprietary and C onfidential.
182

7/31/2019 GEN V40 PMS Reference Manual FINAL Eng Ch
http://slidepdf.com/reader/full/gen-v40-pms-reference-manual-final-eng-ch 183/474
The CASHIER REPORTS MENU displays. There are six differen t cashierreports, one for each payment type.
• Cash Report displays all Cash transactions (including Paid O uts) expected to b e in the shift drop .
• Check Report displays all Check transactions expected to be in theshift drop.
• Foreign Currency Report displays any foreign Currency E xchangesthe Cashier performed expected to be in the shift drop .
• Credit Cards lists all Credit Card t ransactions posted on today’sbusiness date.
• AR Settlement Report displays any fo lio balances settled to ARAccounts using the Direct Bill payment type.
• Miscellaneous Payment Report displays any other transactions notdefined above.
5. Cho ose the desired report and select OK.
A report for the payment type displays to the screen with each transaction posted
by that Cashier.
6. Select Details to view transaction level details.7. Select Print to send the repo rt to the local workstation printer.
©2006 MICROS® Systems Inc. All Rights Reserved. P roprietary and C onfidential.
183

7/31/2019 GEN V40 PMS Reference Manual FINAL Eng Ch
http://slidepdf.com/reader/full/gen-v40-pms-reference-manual-final-eng-ch 184/474
Cashier Status
Cashier Status assists the Night Auditor in determining which Cashiers haveclosed and balanced versus those that are still op en. This is good information to
view before attempting to com plete the N ight Audit.
Follow the steps below to access Cashier Status:
1. From the main menu, select Cashiering.2. Select Cashier Functions.3. Select Cashier Status.
The CASH IER STATUS screen displays.
This screen displays the status of each Cashier N o., the Cashier Name, as well as the number of Times Open and Last Closed.
4. Select Close to exit.
©2006 MICROS® Systems Inc. All Rights Reserved. P roprietary and C onfidential.
184

7/31/2019 GEN V40 PMS Reference Manual FINAL Eng Ch
http://slidepdf.com/reader/full/gen-v40-pms-reference-manual-final-eng-ch 185/474
Check Exchange
If your ho tel allows guests to cash checks at the Fro nt D esk, Check Exchange tracks those transactions for easy balancing at the end of shift.
Follow the steps below to perform a Check Exchange:
1. From the main menu, select Cashiering. 2. Select Cashier Functions.3. Select Check Exchange.4. Enter your Password in the CASHIER LOGIN screen and select Login.
The CHE CK EXCHANGE screen displays.
5. Select the guest Room number or Name.
NOTE: To perform a Check Exchange, the guest must be in-house.
6. Enter the written amount of the check in the Amount field.7. Enter the check number in the Text field.8. Use the Supplement field to enter any additional information required by the
hotel, such as approval code or license number.9. Select OK to complete the exchange.10. A message displays asking if you would like to p rint a receipt. Answer Yes to
print a receipt o f the exchange for the guest or No no t print a receipt.
NOTE : If the guest needs a receipt for the Check Exchange at any time, receiptsare available in the Receipt H istory area of Cashier Functions. For detailedinstructions on printing receipts, refer to the “Receipt History” section of thisChapter.
©2006 MICROS® Systems Inc. All Rights Reserved. P roprietary and C onfidential.
185
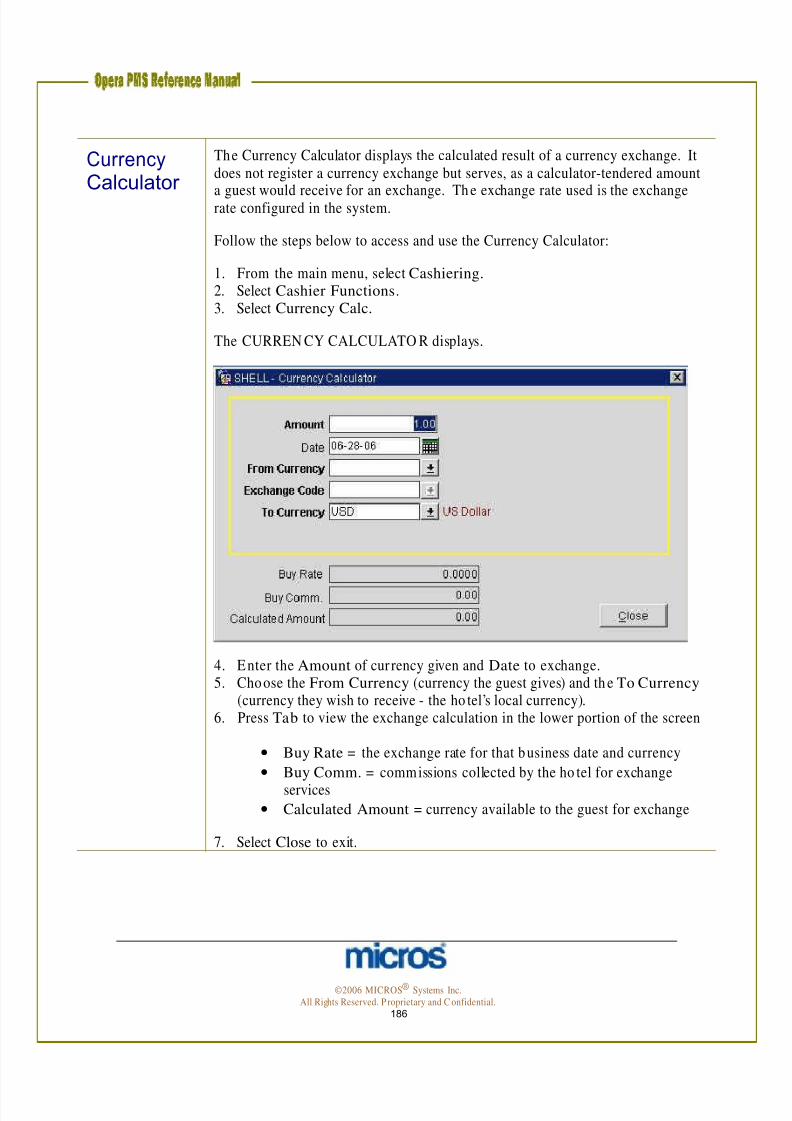
7/31/2019 GEN V40 PMS Reference Manual FINAL Eng Ch
http://slidepdf.com/reader/full/gen-v40-pms-reference-manual-final-eng-ch 186/474
Currency Calculator
The Currency Calculator displays the calculated result of a currency exchange. Itdoes not register a currency exchange but serves, as a calculator-tendered amount
a guest would receive for an exchange. Th e exchange rate used is the exchangerate configured in the system.
Follow the steps below to access and use the Currency Calculator:
1. From the main menu, select Cashiering. 2. Select Cashier Functions.3. Select Currency Calc.
The CURREN CY CALCULATO R displays.
4. Enter the Amount of cur rency given and Date to exchange. 5. Choose the From Currency (currency the guest gives) and th e To Currency
(currency they wish to receive - the ho tel’s local currency).6. Press Tab to view the exchange calculation in the lower portion of the screen
• Buy Rate = the exchange rate for that business date and currency
• Buy Comm. = commissions collected by the ho tel for exchange
services• Calculated Amount = currency available to the guest for exchange
7. Select Close to exit.
©2006 MICROS® Systems Inc. All Rights Reserved. P roprietary and C onfidential.
186

7/31/2019 GEN V40 PMS Reference Manual FINAL Eng Ch
http://slidepdf.com/reader/full/gen-v40-pms-reference-manual-final-eng-ch 187/474
Currency Exchange
For hotels that exchange currency at the Fron t D esk, the Currency Exchange feature registers and tracks any exchanges for quicker and easier cashier balancing.
Follow the steps below to p erform a Currency Exchange:
1. From the main menu, select Cashiering.2. Select Cashier Functions.3. Select Currency Exchange.4. Enter your Password in the CASHIER LOGIN screen and select Login.
The CURRENCY EXCH ANGE RATE S screen displays.
5. Select the guest Room N o. or Name.
6. Select the Currency Code for exchange. Click on the drop down arrow nextto the field to display all currencies the hotel accepts.
7. The Exchange Code shou ld always be “Currency Exchange.”8. Enter the Amount of the currency to exchange. After entering this field, the
currency calculates in th e lower portion of th e screen in local currency(Exchange Rate Details and Local Amount).
9. Type additional information required in the Supplement field10. Select to print additional Copies of Receipt to use one for the shift drop and
give one to th e guest as a receipt.11. Select OK to complete the exchange.
©2006 MICROS® Systems Inc. All Rights Reserved. P roprietary and C onfidential.
187

7/31/2019 GEN V40 PMS Reference Manual FINAL Eng Ch
http://slidepdf.com/reader/full/gen-v40-pms-reference-manual-final-eng-ch 188/474
Exchange Rates
Exchange Rates constantly fluctuate and need maintaining in the system in orderfor guests to receive the fair market value when exchanging currency.
If your hotel allows currency exchanges, follow the steps below to updateExchange Rates on a frequent basis:
1. From the main menu, select Cashiering.2. Select Cashier Functions.3. Select Exchange Rate.
The EXCH ANGE RATES screen displays.
The six types of exchanges are as follows:
• Exchange: the exchange value used to exchange foreign currency cashto local currency cash. Exchange fees may apply and build into theexchange percentage. Rates app ly at the time of exchange.
• Check: the exchange value used to exchange foreign currency checksdrawn on fo reign banks to local currency cash. Exchange fees mayapply and build into the exchange percentage. Rates app ly at the timeof exchange.
• Settlement: the exchange value used to exchange foreign currencypayments to a local currency payment when settling a folio. Typically,exchange values for sett lements build at a lower percentage than a cashexchange. Rates app ly at the time of settlement.
• Posting: the exchange value used to exchange foreign currencypo stings applied to a guest folio. Exchange values for postingstypically build at the same rate as a cash exchange. Rates apply at the time of the po sting, not at the time of the settlement .
©2006 MICROS® Systems Inc. All Rights Reserved. P roprietary and C onfidential.
188
7/31/2019 GEN V40 PMS Reference Manual FINAL Eng Ch
http://slidepdf.com/reader/full/gen-v40-pms-reference-manual-final-eng-ch 189/474
• Commission: the exchange value used to exchange foreign currencycommission payments to travel agents. Exchange values for
commission s typically build at a lower percentage than cash exchanges.Rates apply at the time of the commission payment.
• Membership: the exchange value used to exchange revenue allocatedfor membership points for loyalty programs.
4. D ouble-click an exchange rate to update an existing value.5. Enter the updated Begin Date and Buy Rate. 6. Select OK. 7. To view exchange rates created for future dates, highlight the currency desired
and select Future. 8. To view exchange rates for past dates, highlight th e currency desired and select
Past.
©2006 MICROS® Systems Inc. All Rights Reserved. P roprietary and C onfidential.
189
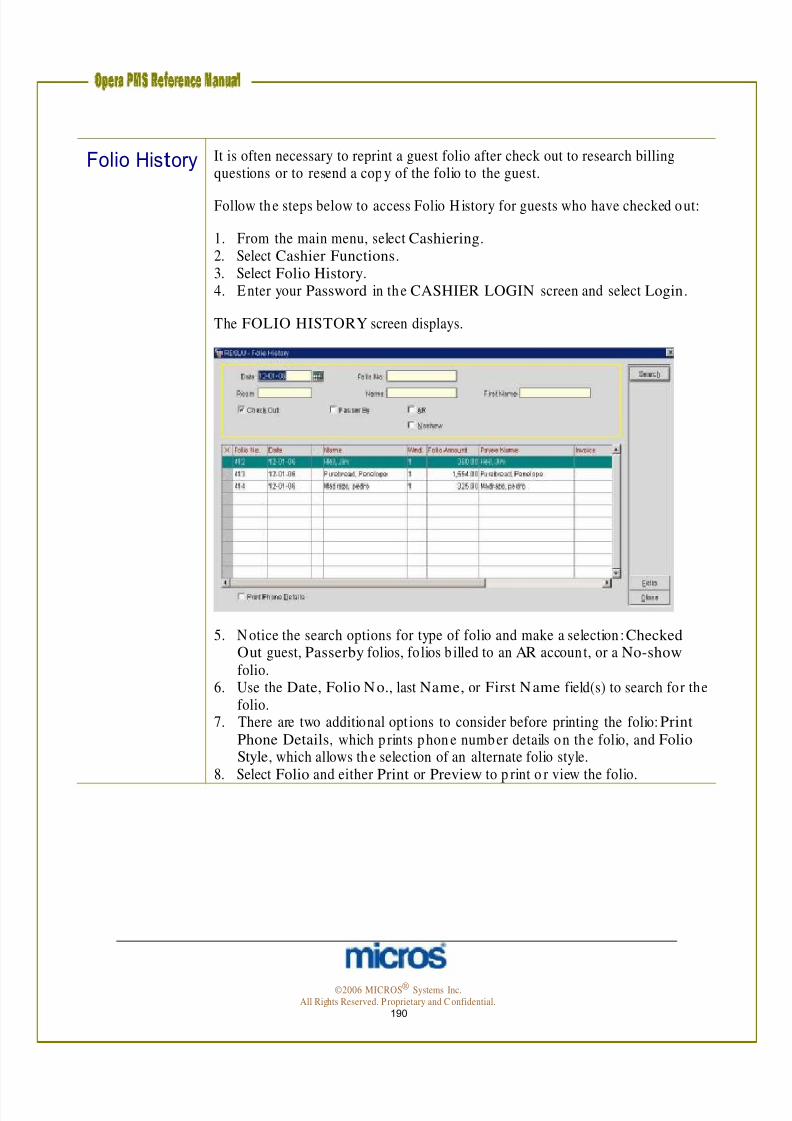
7/31/2019 GEN V40 PMS Reference Manual FINAL Eng Ch
http://slidepdf.com/reader/full/gen-v40-pms-reference-manual-final-eng-ch 190/474
Folio History It is often necessary to reprint a guest folio after check out to research billingquestions or to resend a cop y of the folio to the guest.
Follow the steps below to access Folio H istory for guests who have checked out:
1. From the main menu, select Cashiering.2. Select Cashier Functions.3. Select Folio History.4. Enter your Password in the CASHIER LOGIN screen and select Login.
The FOLIO HISTORY screen displays.
5. N otice the search options for type of folio and make a selection : Checked Out guest, Passerby folios, folios b illed to an AR account, or a No-show folio.
6. Use the Date, Folio No., last Name, or First Name field(s) to search for thefolio.
7. There are two additional opt ions to consider before printing the folio: Print
Phone Details, which p rints phon e number details on the folio, and FolioStyle, which allows th e selection of an alternate folio style.
8. Select Folio and either Print or Preview to p rint o r view the folio.
©2006 MICROS® Systems Inc. All Rights Reserved. P roprietary and C onfidential.
190
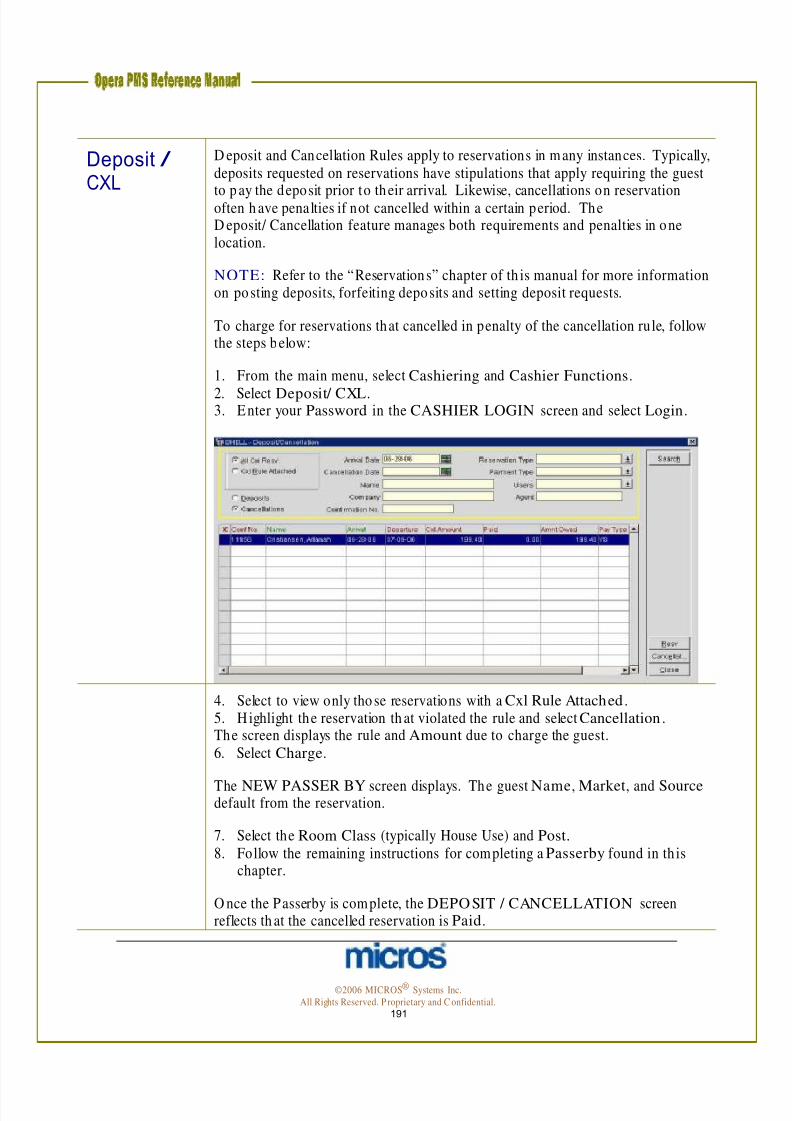
7/31/2019 GEN V40 PMS Reference Manual FINAL Eng Ch
http://slidepdf.com/reader/full/gen-v40-pms-reference-manual-final-eng-ch 191/474
Deposit /CXL
D eposit and Cancellation Rules apply to reservations in m any instances. Typically,deposits requested on reservations have stipulations that apply requiring the guest
to p ay the deposit prior to their arrival. Likewise, cancellations on reservationoften h ave penalties if not cancelled within a certain period. TheD eposit/ Cancellation feature manages both requirements and penalties in onelocation.
NOTE: Refer to the “Reservations” chapter of th is manual for more informationon posting deposits, forfeiting deposits and setting deposit requests.
To charge for reservations that cancelled in penalty of the cancellation rule, followthe steps below:
1. From the main menu, select Cashiering and Cashier Functions.
2. Select Deposit/ CXL.3. Enter your Password in the CASHIER LOGIN screen and select Login.
4. Select to view only tho se reservations with a Cxl Rule Attached. 5. H ighlight the reservation th at violated the rule and select Cancellation .The screen displays the rule and Amount due to charge the guest.6. Select Charge.
The NEW PASSER BY screen displays. The guest Name, Market, and Source default from the reservation.
7. Select the Room Class (typically House Use) and Post. 8. Follow the remaining instructions for completing a Passerby found in th is
chapter.
O nce the Passerby is complete, the DEPO SIT / CANCELLATION screenreflects th at the cancelled reservation is Paid.
©2006 MICROS® Systems Inc. All Rights Reserved. P roprietary and C onfidential.
191
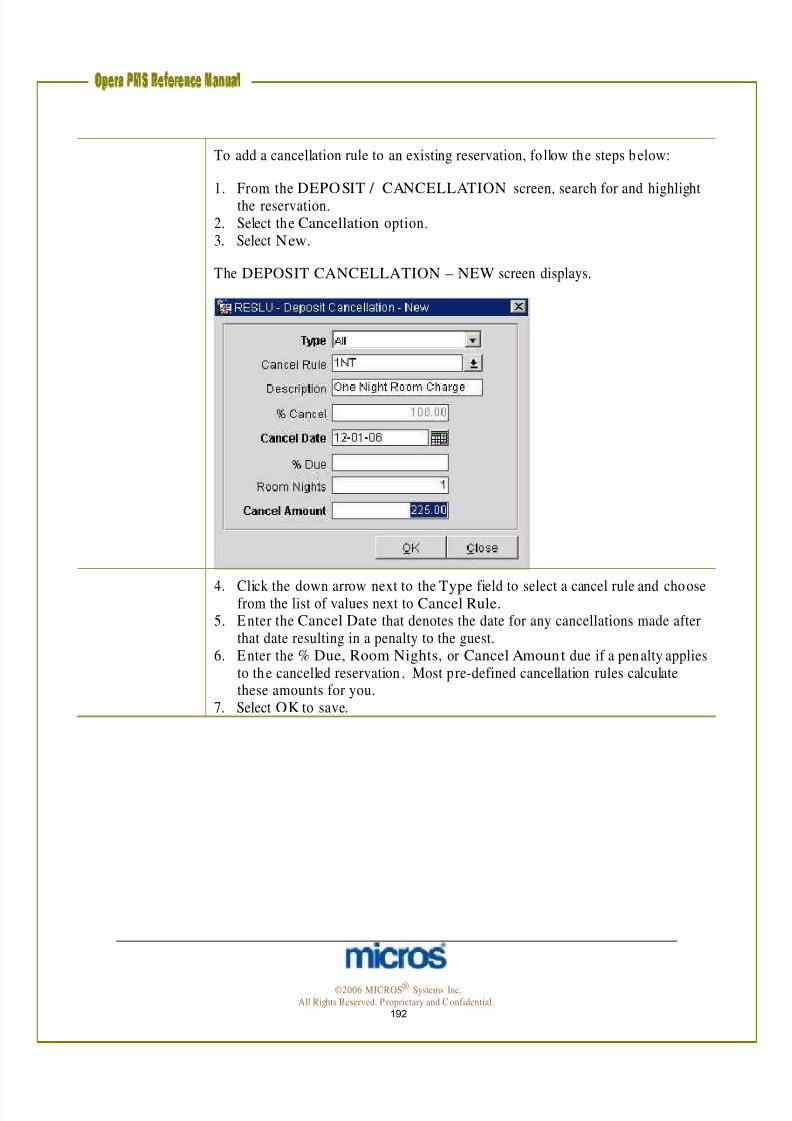
7/31/2019 GEN V40 PMS Reference Manual FINAL Eng Ch
http://slidepdf.com/reader/full/gen-v40-pms-reference-manual-final-eng-ch 192/474
To add a cancellation rule to an existing reservation, follow the steps below:
1. From the DEPOSIT / CANCELLATION screen, search for and highlightthe reservation.2. Select the Cancellation option.3. Select New.
The DEPOSIT CANCELLATION – NEW screen displays.
4. Click the down arrow next to the Type field to select a cancel rule and choose from the list of values next to Cancel Rule.
5. Enter the Cancel Date that denotes the date for any cancellations made afterthat date resulting in a penalty to the guest.
6. Enter the % Due, Room Nights, or Cancel Amount due if a penalty appliesto the cancelled reservation . Most pre-defined cancellation rules calculatethese amounts for you.
7. Select OK to save.
©2006 MICROS® Systems Inc. All Rights Reserved. P roprietary and C onfidential.
192

7/31/2019 GEN V40 PMS Reference Manual FINAL Eng Ch
http://slidepdf.com/reader/full/gen-v40-pms-reference-manual-final-eng-ch 193/474
Receipt History
G uests sometimes need a receipt from a transaction that occurred in the past. InReceipt History, you can locate, preview, and print receipts for past transactions.
Receipt History prints every type of receipt: Payment, Paid Out, Deposit, andExchange receipts.
Follow the steps below to access a receipt from Receipt History:
1. From the main menu, select Cashiering.2. Select Cashier Functions.3. Select Receipt History.
The RECEIPT HISTORY screen displays.
4. Click on the drop down arrow next to the Receipt Type field and select the type of receipt.
5. Enter the guest Name and either the From or To dates and select Search. 6. Select Preview to view the receipt or Print to reprint the receipt.
©2006 MICROS® Systems Inc. All Rights Reserved. P roprietary and C onfidential.
193

7/31/2019 GEN V40 PMS Reference Manual FINAL Eng Ch
http://slidepdf.com/reader/full/gen-v40-pms-reference-manual-final-eng-ch 194/474
Passerby The Passerby function allows the user to post charges without having to check aguest into the hotel. Most often ho tels use Passerby to post G uaranteed N o
Shows. In addition, if a passer by walks into the hotel and con sumes a servicewithout checking into a guest room, this feature allows the charge and payment topost on a folio and generates a receipt in one function. An example of a truePasserby is a walk-in from the street that purchases a postage stamp and pays cashfor the transaction. If the guest would like to charge and p ay later, use theAccounts (Posting Master) feature in the Front D esk menu.
Follow the steps below to p ost a Passerby:
1. From the main menu, select Cashiering. 2. Select Passerby.3. Enter your Password in the CASHIER LOGIN screen and select Login.
The PASSER BY TODAY screen displays
©2006 MICROS® Systems Inc. All Rights Reserved. P roprietary and C onfidential.
194

7/31/2019 GEN V40 PMS Reference Manual FINAL Eng Ch
http://slidepdf.com/reader/full/gen-v40-pms-reference-manual-final-eng-ch 195/474
4. Select Post.
5. Create a pro file in the Name field.
Some hotels create generic pro files called “Passer By” or “Non G uests”. If a hotelhas man y passerby charges, it may be useful to create profiles such as “PasserbyFax” or “Passerby Business Center”; otherwise, enter a name for the guest.
6. The Market and Source defaults to the ho tel-defined values (i.e. HouseAccounts or Unspecified).
7. Select a Room Class. N ormally Passerby revenue posts to the “Pseudo”Room Class, since no true guest room exists.
8. Select Post.
The same TRANSACTION P OSTING screen used for po sting charge in theBILLING screen displays.
9. Enter the Code, Amount, Quantity, and any Supplement/ Reference detailsand select Post.
10. Once you finish entering all postings, select Close.
The same PAYMENTS screen appears when posting payments in the BILLING screen.
11. Enter the Payment Code, Amount, and any other payment d etails and select
Post.
A Passerby folio p rints for the guest as a receipt.
©2006 MICROS® Systems Inc. All Rights Reserved. P roprietary and C onfidential.
195
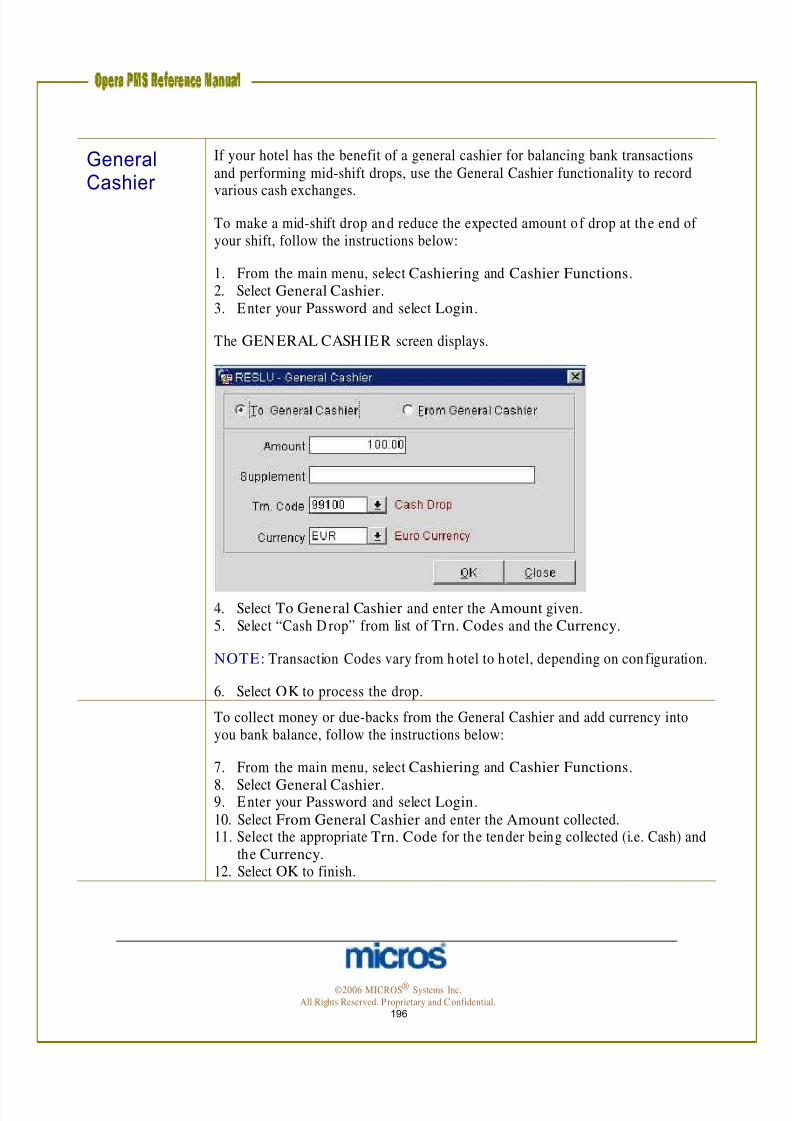
7/31/2019 GEN V40 PMS Reference Manual FINAL Eng Ch
http://slidepdf.com/reader/full/gen-v40-pms-reference-manual-final-eng-ch 196/474
General Cashier
If your hotel has the benefit of a general cashier for balancing bank transactionsand performing mid-shift drops, use the General Cashier functionality to record
various cash exchanges.
To make a mid-shift drop and reduce the expected amount o f drop at the end of your shift, follow the instructions below:
1. From the main menu, select Cashiering and Cashier Functions.2. Select General Cashier.3. Enter your Password and select Login.
The GENERAL CASH IER screen displays.
4. Select To General Cashier and enter the Amount given. 5. Select “Cash D rop” from list of Trn. Codes and the Currency.
NOTE: Transaction Codes vary from h otel to hotel, depending on configuration.
6. Select OK to process the drop.
To collect money or due-backs from the General Cashier and add currency intoyou bank balance, follow the instructions below:
7. From the main menu, select Cashiering and Cashier Functions.
8. Select General Cashier.9. Enter your Password and select Login.10. Select From General Cashier and enter the Amount collected.11. Select the appropriate Trn. Code for the tender being collected (i.e. Cash) and
the Currency.12. Select OK to finish.
©2006 MICROS® Systems Inc. All Rights Reserved. P roprietary and C onfidential.
196

7/31/2019 GEN V40 PMS Reference Manual FINAL Eng Ch
http://slidepdf.com/reader/full/gen-v40-pms-reference-manual-final-eng-ch 197/474
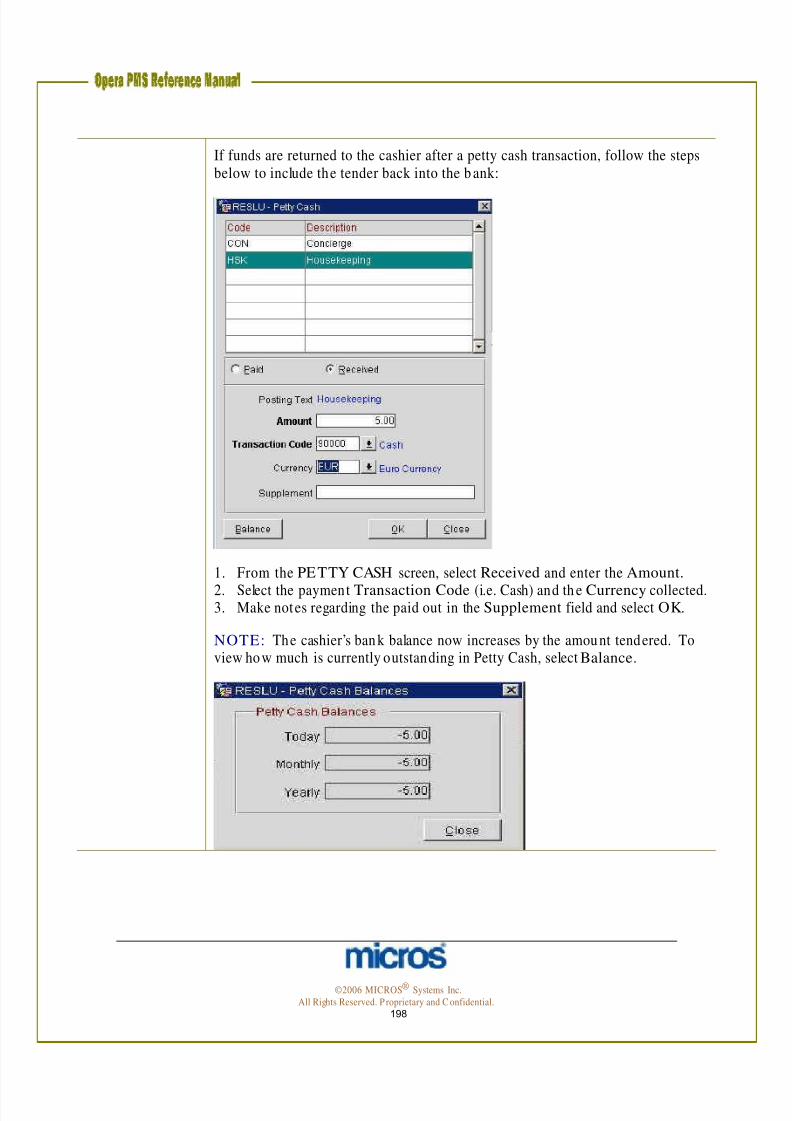
7/31/2019 GEN V40 PMS Reference Manual FINAL Eng Ch
http://slidepdf.com/reader/full/gen-v40-pms-reference-manual-final-eng-ch 198/474
If funds are returned to the cashier after a petty cash transaction, follow the stepsbelow to include the tender back into the b ank:
1. From the PETTY CASH screen, select Received and enter the Amount.
2. Select the payment Transaction Code (i.e. Cash) and th e Currency collected.3. Make notes regarding the paid out in the Supplement field and select OK.
NOTE: The cashier’s bank balance now increases by the amount tendered. Toview how much is currently outstanding in Petty Cash, select Balance.
©2006 MICROS® Systems Inc. All Rights Reserved. P roprietary and C onfidential.
198

7/31/2019 GEN V40 PMS Reference Manual FINAL Eng Ch
http://slidepdf.com/reader/full/gen-v40-pms-reference-manual-final-eng-ch 199/474
Cashier Shift Close
At the end o f every shift, a Cashier must register a drop (including all cash, checkand fo reign currencies received) and close the Cashier for the day. Closing the
Cashier resets the transaction to tals to zero for the n ext shift the Cashier works
At the beginning of your shift, the first time you access a financial area, such as theBILLING screen, the system asks if you would like to o pen your Cashier. Alltransactions and payments you post throughout the shift log in today’s Journalready for balancing at the end of the shift.
Follow the steps below to close your Cashier once you complete your shift:
1. From the main menu, select Cashiering. 2. Select Cashier Shift Functions and Cashier Shift Close 3. Enter your Password and select Login.
The CASHIER CLOSURE SUMMARY screen displays.
©2006 MICROS® Systems Inc. All Rights Reserved. P roprietary and C onfidential.
199

7/31/2019 GEN V40 PMS Reference Manual FINAL Eng Ch
http://slidepdf.com/reader/full/gen-v40-pms-reference-manual-final-eng-ch 200/474
A summary of all transaction s, by type, display on th is screen.
4. To view specific details, highlight a transaction Description and selectDetails.
The JOURNAL displays.
To view transaction level detail, highlight a posting and select Details. The EDIT TRANSACTION DET AILS screen displays.
5. Close out of any detail screens, and select OK from the CASHIERCLOSURE SUMMARY screen to proceed.
©2006 MICROS® Systems Inc. All Rights Reserved. P roprietary and C onfidential.
200

7/31/2019 GEN V40 PMS Reference Manual FINAL Eng Ch
http://slidepdf.com/reader/full/gen-v40-pms-reference-manual-final-eng-ch 201/474
The CASH IER CLOSURE screen displays.
On the left side of the screen, any cash taken and paid outs given display to calculate the Expected Shift Drop . This is the cash total the system expects youto drop.
6. Coun t your drawer and remove any cash above the bank balance.7. Enter the amount of cash you intend to drop in the Actual Cash field.8. If you received or exchanged any checks, enter the amount of checks you
intend to drop in the Actual Checks field.
If the Actual Cash and Actual Checks equal the E xpected Shift D rop, the Shift Drop in Balance message displays.
If the Actual Cash and Actual Checks do no t equal the E xpected Shift Drop , Shift Drop Over or Shift Drop Short message displays. This indicates that you areeither over or sho rt in your drop . To investigate, select Back to return to theCASHIER CLOSURE SUMMARY screen and investigate the Journal.
The Foreign Currency and Foreign Check fields’ display any currencyexchanges or check exchanges on a foreign bank you conducted today. The Shift Drop amounts must equal the foreign currency or checks you include in yourdrop.
9. After verifying all funds, to comp lete the shift closure, select OK.
©2006 MICROS® Systems Inc. All Rights Reserved. P roprietary and C onfidential.
201
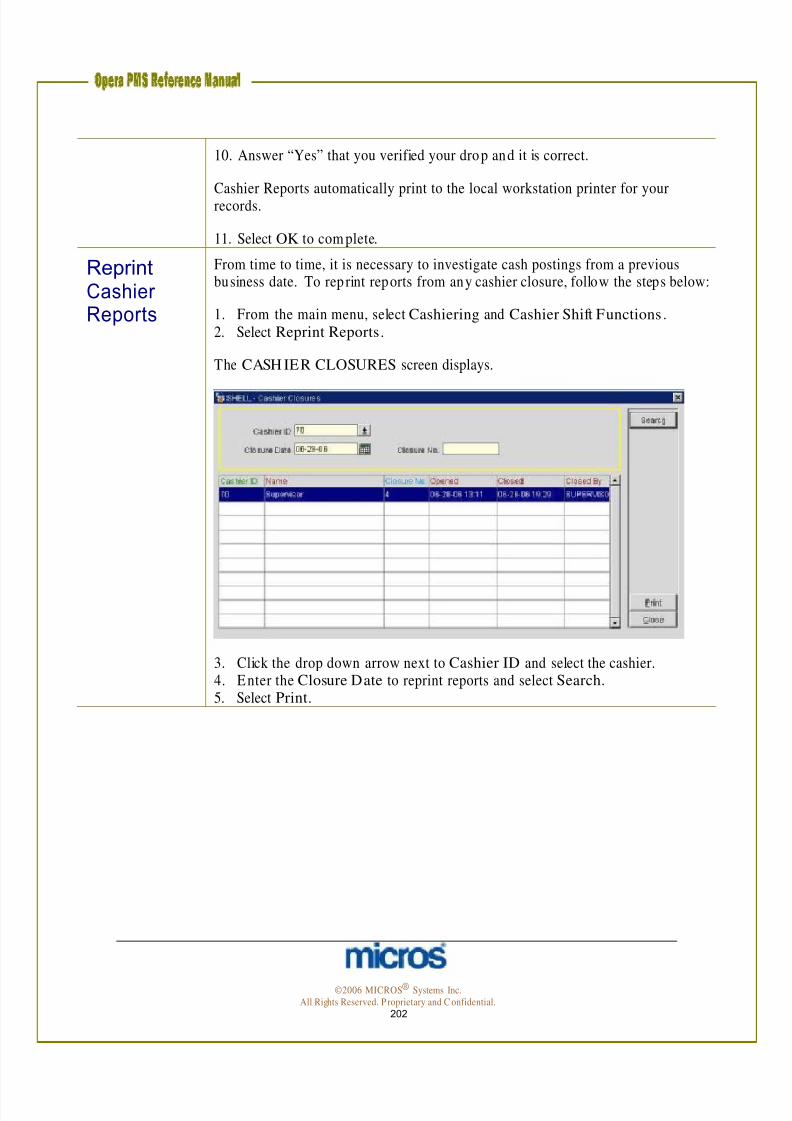
7/31/2019 GEN V40 PMS Reference Manual FINAL Eng Ch
http://slidepdf.com/reader/full/gen-v40-pms-reference-manual-final-eng-ch 202/474
10. Answer “Yes” that you verified your drop and it is correct.
Cashier Reports automatically print to the local workstation printer for yourrecords.
ReprintCashier Reports
11. Select OK to com plete.
From time to time, it is necessary to investigate cash postings from a previousbusiness date. To rep rint reports from any cashier closure, follow the steps below:
1. From the main menu, select Cashiering and Cashier Shift Functions.2. Select Reprint Reports.
The CASH IER CLOSURES screen displays.
3. Click the drop down arrow next to Cashier ID and select the cashier. 4. Enter the Closure Date to reprint reports and select Search. 5. Select Print.
©2006 MICROS® Systems Inc. All Rights Reserved. P roprietary and C onfidential.
202

7/31/2019 GEN V40 PMS Reference Manual FINAL Eng Ch
http://slidepdf.com/reader/full/gen-v40-pms-reference-manual-final-eng-ch 203/474
Chapter 6 Rooms Management -
Housekeeping
©2006 MICROS® Systems Inc. All Rights Reserved. P roprietary and C onfidential.
203

7/31/2019 GEN V40 PMS Reference Manual FINAL Eng Ch
http://slidepdf.com/reader/full/gen-v40-pms-reference-manual-final-eng-ch 204/474
©2006 MICROS® Systems Inc.
All Rights Reserved. P roprietary and C onfidential. 204

7/31/2019 GEN V40 PMS Reference Manual FINAL Eng Ch
http://slidepdf.com/reader/full/gen-v40-pms-reference-manual-final-eng-ch 205/474
Rooms Management
Overview OPERA’s Rooms Management module enables employees to view andcontrol various facets of a room's con dition , status, and availability. Withhousekeeping, room history, occupancy, and maintenance information attheir fingertips, Room s Management and Housekeeping departments worktogether seamlessly; efficiently addressing areas that need attention therebybetter ensuring guests’ satisfaction .
Housekeeping
ManagementScreen
Room Management contains six main options: Housekeeping, Out of O rder/ Service, Room History, Overbooking, O ccupancy Graph, andMaintenance.
The most commonly used section of Rooms Management is
Housekeeping Management, which enables you to control dailyhousekeeping and room status details. Housekeeping Departments candetermine which rooms require service, assigning them to specific attendantsand granting them points upon com pletion. D iscrepancies betweenHousekeeping and the F ront O ffice can easily be tracked and resolved.Various functions enable you to change status codes for individual rooms ormultiple rooms, make an entry for repairs and room assignment, generate taskreports, assess workloads, and crosscheck Front Office Status againstHousekeeping Status.
Follow the steps below to access the HOUSEKEEPING screen:
1. From the main menu, select Rooms Management.2. Select Housekeeping
The HOUSEKEEPING options screen displays with various options tochoose.
3. Select Housekeeping Mgmt.
©2006 MICROS® Systems Inc. All Rights Reserved. P roprietary and C onfidential.
205

7/31/2019 GEN V40 PMS Reference Manual FINAL Eng Ch
http://slidepdf.com/reader/full/gen-v40-pms-reference-manual-final-eng-ch 206/474
The main HOUSEKEEPING screen displays.
The top left of th e screen allows searching by room and Front O ffice status. Initially, all rooms list by default; after selecting Clear All, checking individualboxes controls the rooms that display below. The roo m list at the bottom of the screen displays room s in numeric order. If you would like to change thedisplay order, click on a column header other than Room .
©2006 MICROS® Systems Inc. All Rights Reserved. P roprietary and C onfidential.
206

7/31/2019 GEN V40 PMS Reference Manual FINAL Eng Ch
http://slidepdf.com/reader/full/gen-v40-pms-reference-manual-final-eng-ch 207/474
Changing theStatus of aRoom
In O PE RA the Ho usekeeping Room Statuses are:
• Clean: the room was serviced and is available for a guest to occupy
• Dirty: the roo m is not serviced and is no t available for a guest tooccupy
• Pickup: an alternate status some hotels elect to use if Housekeepingattends to room s that do no t need full service (i.e. a guest onlyoccupies a room for a few minutes and the room o nly needsrefreshing)
• Inspected: an additional status some hotels elect to use as the lastcheck by Housekeeping supervisors before making a room availablefor a guest to occupy
In addition , the following statuses are also available for a roo m. You enterthese statuses in a different area; however, the status do es display in theH OUSEKEEPIN G MANAGEMEN T screen. They are:
• Out of Order: the room is not available to sell under anycircumstances. O ut of O rder rooms deduct from inventory;therefore, they affect occupancy calculations.
• Out of Service: functions the same as O O O , but room s do not deduct from invento ry coun ts. Typically, hotels use the O ut of Service status for same day maintenance jobs or Sales show rooms.
There are two methods to change the status of a room:
• The first option is to click on the drop down arrow next to its roomstatus. To change the statuses of multiple roo ms, place an “X” nextto the desired room s in the first column of the room list, and then click on th e drop down arrow from one of the selected rooms.
©2006 MICROS® Systems Inc. All Rights Reserved. P roprietary and C onfidential.
207

7/31/2019 GEN V40 PMS Reference Manual FINAL Eng Ch
http://slidepdf.com/reader/full/gen-v40-pms-reference-manual-final-eng-ch 208/474
The second op tion is to use Change:
1. Select Change from the main HOUSEKEEPING screenThe QUICK CHANGE ROOM STATUS screen displays.
There are three options for changing the room status from this screen:
• Room List allows you to enter the room s by room numb er; separateeach one by a com ma.
• From Room/ To allows you to enter a series of rooms by roomnumber.
• Section is available to change room s by a specific housekeepingsection.
2. Select the new status from Change Status to 3. Select OK
©2006 MICROS® Systems Inc. All Rights Reserved. P roprietary and C onfidential.
208

7/31/2019 GEN V40 PMS Reference Manual FINAL Eng Ch
http://slidepdf.com/reader/full/gen-v40-pms-reference-manual-final-eng-ch 209/474
ViewingHousekeepingStatistics
The statistics option from the H OUSEKEEPIN G MANAGEMEN T
screen gives an overview of the ho tel with information pertinent to the
Housekeeping department.
To view Housekeeping Statistics:
1. Access the HOUSEKEEPING screen2. Select Statistics
The ROOM STATISTICS screen displays.
The top po rtion of the screen displays the Room Statistic totals. The lower portion displays the Details for the Room Statistics.
3. Select Report to p rint the Room Statistics4. Select Close to return to the main HOUSEKEEPING screen
©2006 MICROS® Systems Inc. All Rights Reserved. P roprietary and C onfidential.
209

7/31/2019 GEN V40 PMS Reference Manual FINAL Eng Ch
http://slidepdf.com/reader/full/gen-v40-pms-reference-manual-final-eng-ch 210/474
PrintingHousekeepingManagementScreen
The housekeeping management screen is printable using the Report option.The Report option applies any search filters from the HOUSEKEEPING
screen.
To Preview, Print or F ile the Report from the HOUSEKEEPING screen:
1. Select Repor t
The REPORT PARAMETE RS screen displays.
2. Select Preview, Print or File
The H OUSEKEEPIN G DETAIL REPORT displays or prints, dependingon your selection.
©2006 MICROS® Systems Inc. All Rights Reserved. P roprietary and C onfidential.
210

7/31/2019 GEN V40 PMS Reference Manual FINAL Eng Ch
http://slidepdf.com/reader/full/gen-v40-pms-reference-manual-final-eng-ch 211/474
Queue Rooms At times, guests arrive before a room for their room type is available forassignment, causing potential guest service issues for Front Desk staff and
guests. Available from the Housekeeping menu, the Op era Queue Roomsfeature helps you manage room assignment fairly and have guests into theirrooms sooner by coordinating Fron t Desk and Housekeeping efforts.
Front Desk staff can assign reservations to the reservation queue if the guest'sroom is not ready for assignment or if there are no available rooms of theroom type attached to th e reservation . Housekeeping staff can use the QueueRooms screen to determine if there are guests waiting to check in to aparticular room or type of room if there are, the queue list provides guidancein determining which rooms to service first.
©2006 MICROS® Systems Inc. All Rights Reserved. P roprietary and C onfidential.
211

7/31/2019 GEN V40 PMS Reference Manual FINAL Eng Ch
http://slidepdf.com/reader/full/gen-v40-pms-reference-manual-final-eng-ch 212/474
Q ueue information appears in the Queue Rooms screen. The Q ueue Roomsreport provides print or file listings of reservations and room queues.
To access the Q ueue Rooms screen:
1. Select Queue Rooms from the HOUSEKEEPING op tions screen
The QUEUE ROOMS screen displays.
The QUEUE ROOMS screen provides the following options:
• Search allows you to en ter search criteria to locate reservationson queue by either Room Type or a specific Room .
• Statistics calculates current statistics so you can view thecompiled information from room status and reservation status ina list form .
• Details displays the room configuration information for thehighlighted room on queue.
• Resv accesses the reservation for the room on queue.
• Report generates a repo rt of the current q ueue rooms.
To update the status of a guest’s room that is waiting on Queue, follow thesteps below:
1. Access the Queue Rooms screen2. Highlight the guest’s name that has the room that you wish to update.3. Select the down arrow next to the Room Status 4. Select the new Room Status
©2006 MICROS® Systems Inc. All Rights Reserved. P roprietary and C onfidential.
212

7/31/2019 GEN V40 PMS Reference Manual FINAL Eng Ch
http://slidepdf.com/reader/full/gen-v40-pms-reference-manual-final-eng-ch 213/474
Room Conditions
The ROOM CONDITION S screen lets you assign room condition codesto roo ms. You may also view reservations for occupied rooms, which may be
useful when assigning a room condition.
Use Room Cond ition Cod es to designate room s that are available for show,require special housekeeping attention, or any other reasons specific to yourho tel. Room s that have a room con dition assigned may or may not beavailable for assignment depending on the configuration of the roomcond ition code assigned to the room.
©2006 MICROS® Systems Inc. All Rights Reserved. P roprietary and C onfidential.
213

7/31/2019 GEN V40 PMS Reference Manual FINAL Eng Ch
http://slidepdf.com/reader/full/gen-v40-pms-reference-manual-final-eng-ch 214/474
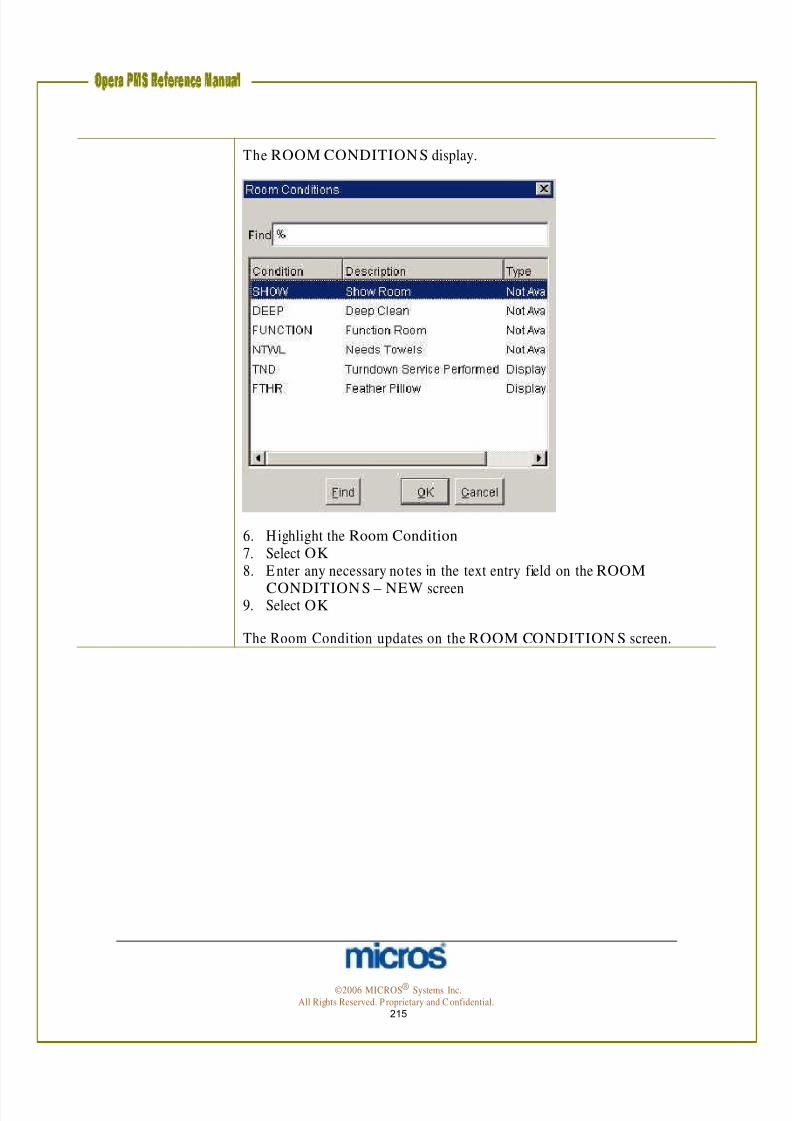
7/31/2019 GEN V40 PMS Reference Manual FINAL Eng Ch
http://slidepdf.com/reader/full/gen-v40-pms-reference-manual-final-eng-ch 215/474
The ROOM CONDITION S display.
6. Highlight the Room Condition 7. Select OK 8. E nter any necessary notes in the text entry field on the ROOM
CONDITION S – NEW screen9. Select OK
The Room Condition updates on the ROOM CONDITION S screen.
©2006 MICROS® Systems Inc. All Rights Reserved. P roprietary and C onfidential.
215

7/31/2019 GEN V40 PMS Reference Manual FINAL Eng Ch
http://slidepdf.com/reader/full/gen-v40-pms-reference-manual-final-eng-ch 216/474
To remove a Room Condition:
1. Select Room Conditions from the HOUSEKEEPING op tions screenThe ROOM CONDITION S screen displays.
2. Using the criteria at the top of the screen, search for the room(s) or room type(s)
3. Highlight the desired record4. Select Delete 5. The system promp ts if you are sure you want to comp lete the action.
Select Yes.
©2006 MICROS® Systems Inc. All Rights Reserved. P roprietary and C onfidential.
216

7/31/2019 GEN V40 PMS Reference Manual FINAL Eng Ch
http://slidepdf.com/reader/full/gen-v40-pms-reference-manual-final-eng-ch 217/474
Room Discrepancies
At times, the information regarding a roo m differs between the Fron t O fficeand Housekeeping. The Rooms Discrepancies screen allows the ho tel to
view and resolve such problems with ease.
There are three discrepant room situations:
• Skip: Fron t Desk Status = O ccupied; Housekeeping Status = Vacant
• Sleep: Front D esk Status = Vacant; Ho usekeeping Status = O ccupied
• Person: Records differ regarding the number of guests occupying aroom . This is important for extra room charges, amount of cleaningnecessary and fire code regulations.
Follow these steps below to view and resolve discrepant rooms:
1. Select Rm. Discrepancies from the HOUSEKEEPING opt ions screen
The ROOM DISCREPANCIES screen displays.
2. To resolve Skip rooms, investigate the discrepancy and have the Front
D esk check the guest out or update the H K status to O CC (occupied).3. To resolve Sleep rooms, investigate the discrepancy and have the FrontD esk reinstate the guest or update the H K status to VAC (vacant).
4. To resolve People discrepancies, investigate and determine the numberof people in th e room, updating the in-house reservation with the actualnumber of guests.
©2006 MICROS® Systems Inc.
All Rights Reserved. P roprietary and C onfidential. 217

7/31/2019 GEN V40 PMS Reference Manual FINAL Eng Ch
http://slidepdf.com/reader/full/gen-v40-pms-reference-manual-final-eng-ch 218/474
Attendant Points
The Attendant P oints menu option gives you the ability to award po ints toeach of your room attendants on a daily basis, which can be a special
incentive if attendants work extra rooms on certain days or for a generalroom attendant’s bonu s plan.
To assign po ints to an attendant:
1. Select Attendant Points from the HOUSEKEEPING op tions screen
The ATTEN DANT POINT S screen displays.
2. Select New
The ATTEN DANT POIN TS – NEW screen displays.
©2006 MICROS® Systems Inc. All Rights Reserved. P roprietary and C onfidential.
218

7/31/2019 GEN V40 PMS Reference Manual FINAL Eng Ch
http://slidepdf.com/reader/full/gen-v40-pms-reference-manual-final-eng-ch 219/474
3. E nter the Date the attendant earned the po ints.4. E nter an Attendant ID or use the drop down arrow to display the list of
attendants. Th is also populates the Name.5. Enter Points you are awarding the attendant.6. Select OK
Task
Assignment
To view previously awarded attendant po ints; use the search box in the upper right of the screen. Use the down arrows to choose the appropriate start, enddates for the accrual period, and display the list of attendants. If you want todisplay or modify the points for a particular room attendant, enter theattendant's code. Leave the field blank to display a list with all the roomattendants who have assigned points for the selected day or date range.
Th e Task Assignm ent feature allows you to generate daily task assignment
sheets for one or more Housekeeping employees. Use this function togenerate task sheets for an individual attendant, a group of attendants, or allavailable attendants on a daily basis. Housekeeping Executives can generatesheets manually, by selecting attendants and individual rooms, orautomatically.
To create a task assignment sheet manually, follow the steps below:
1. Select Task Assignment from the HOUSEKEEPING options screen
The TASK ASSIGN MENT screen displays.
2. Select New, highlight an existing entry and choose Details, or double- click on an existing entry for the setup process.
©2006 MICROS® Systems Inc. All Rights Reserved. P roprietary and C onfidential.
219
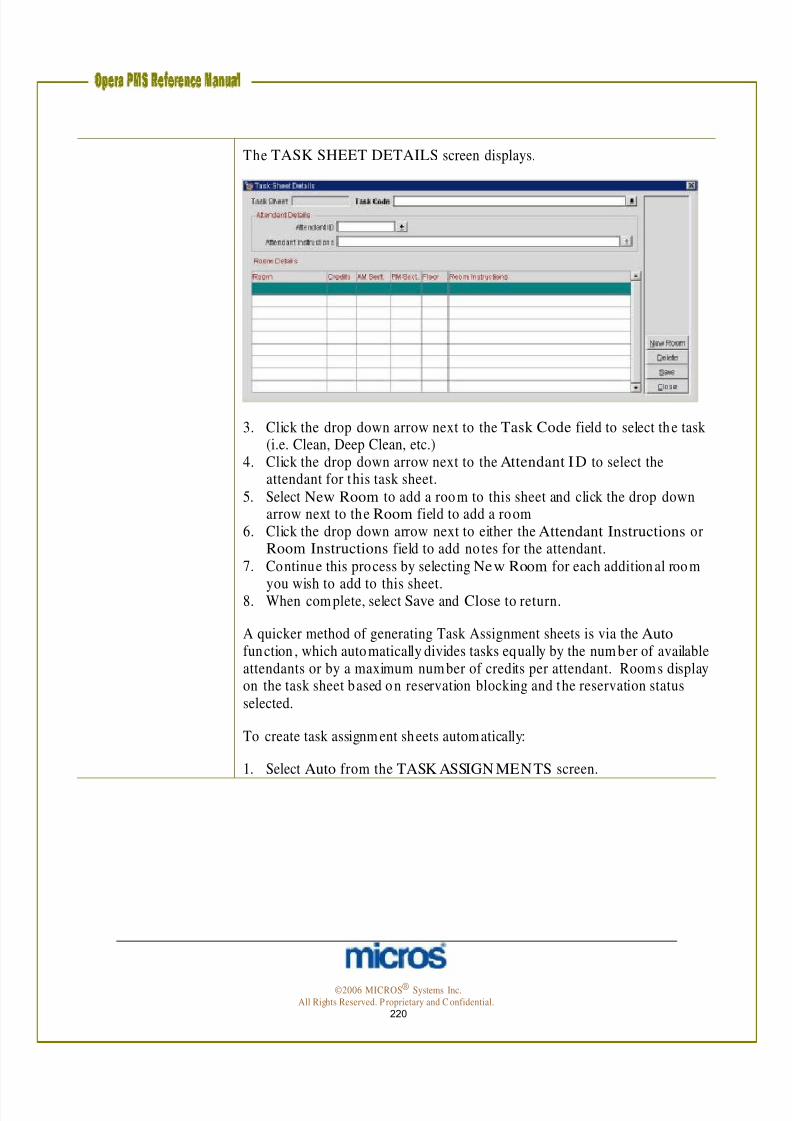
7/31/2019 GEN V40 PMS Reference Manual FINAL Eng Ch
http://slidepdf.com/reader/full/gen-v40-pms-reference-manual-final-eng-ch 220/474
The TASK SHEET DETAILS screen displays.
3. Click the drop down arrow next to the Task Code field to select the task (i.e. Clean, Deep Clean, etc.)
4. Click the drop down arrow next to the Attendant I D to select theattendant for this task sheet.
5. Select New Room to add a room to this sheet and click the drop downarrow next to the Room field to add a room
6. Click the drop down arrow next to either the Attendant Instructions orRoom Instructions field to add no tes for the attendant.
7. Continue this process by selecting New Room for each additional room
you wish to add to this sheet.8. When com plete, select Save and Close to return.
A quicker method of generating Task Assignment sheets is via the Autofunction , which automatically divides tasks equally by the num ber of availableattendants or by a maximum num ber of credits per attendant. Room s displayon the task sheet based on reservation blocking and the reservation statusselected.
To create task assignm ent sheets autom atically:
1. Select Auto from the TASK ASSIGN MENTS screen.
©2006 MICROS® Systems Inc. All Rights Reserved. P roprietary and C onfidential.
220

7/31/2019 GEN V40 PMS Reference Manual FINAL Eng Ch
http://slidepdf.com/reader/full/gen-v40-pms-reference-manual-final-eng-ch 221/474
The AUTOMATIC GENERATION OF TASKS screen displays.
NOTE: You may also access this screen to prepare a task sheet for turndown service by selecting the Report button from the Turndo wn Managementscreen; however, the Room Class and Task Code options will beunavailable.
2. Select the Room Status check boxes for the statuses you wish to includeon the generated task sheets.
3. Select the FO status you wish to include. The task sheet includes onlythe rooms that match the FO status you select (the default is to have both
selected), and no rooms print if neither option is selected.4. Select the down arrow to choose the Task Code(s) you desire for thetask assignment sheet.
The FACILITY TASKS screen displays.
5. Select the task code and choose OK.
©2006 MICROS® Systems Inc. All Rights Reserved. P roprietary and C onfidential.
221

7/31/2019 GEN V40 PMS Reference Manual FINAL Eng Ch
http://slidepdf.com/reader/full/gen-v40-pms-reference-manual-final-eng-ch 222/474
6. E nter in the num ber of attendants into the Total Attendants field.7. To select specific attendants, select the ellipsis button to display the
Attendants screen.
After you have made your choice from the Attendants screen, the numberselected automatically pop ulates this field. When leaving the Max Creditsfield b lank, an equal number of rooms assign to each task sheet/ attendant.
8. E nter the maximum number of credits to assign to any one-attendant/ task sheet in the Max Credit field.
The number of attendants entered in the To tal Attendants field, no t toexceed this number per attendan t, will divide credits evenly. Any left overcredits will flow down to the last task sheet. If a number of attendants are
not entered into the Total Attendants field, Opera creates task sheets, eachhaving the assigned maximum number of credits. When the TotalAttendants field is blank, a number of task sheets create such that each tasksheet assigns the maximum number of credits.
©2006 MICROS® Systems Inc. All Rights Reserved. P roprietary and C onfidential.
222

7/31/2019 GEN V40 PMS Reference Manual FINAL Eng Ch
http://slidepdf.com/reader/full/gen-v40-pms-reference-manual-final-eng-ch 223/474
9. Select the down arrow to choose the Reservation Status to include inthe task assignm ent sheet. Again, the task sheet includes only rooms that
match the status you select.
The RESERVATION STATUS screen displays.
The Advanced button expands the list of task generation op tions to include the following:
• Excl. Check Out Time ... To Rooms matching these criteria isexcluded from assignment.
• Task I nstructions might include general or routine cleaningdirections such as "Vacuum carpet, furniture, and drapes" o r "Changebed linen."
• Attendant Instructions provides space fore specific instructions,e.g.” Frank - call Lester if you need assistance moving the furniture."You can print such information on the task sheet, depending on thetask sheet style selected.
• Room Instructions provides a similar space for instructions relatedto specific rooms, e.g., "Remove room service setup" or "Replacebath mat.” Th is info rmation is also printab le on the task sheet,
depending on the task sheet style selected.• Exclude VIP excludes VIP types from the task assignments when
checked.
• VIP ONLY includes only rooms assigned to VIP guests.
• Task Sheet By allows you to choose how you want the room s listedon the task assignment sheets.
10. Select OK to the Task Assignment screen.11. Select the Report op tion to print the Task Assignm ent sheets.
©2006 MICROS® Systems Inc. All Rights Reserved. P roprietary and C onfidential.
223

7/31/2019 GEN V40 PMS Reference Manual FINAL Eng Ch
http://slidepdf.com/reader/full/gen-v40-pms-reference-manual-final-eng-ch 224/474
The TASK SHEE T REPORT screen displays.
E nter the fo llowing details on the TASK SH EE T RE PORT Screen:
• Task Date From/ To: the current date automatically defaults andtypically would n ot change.
• Task Code: enter the Task Code that the sheets are to print for. Thisenables printing the task sheets for on e task code and n ot ano ther.
• Task Sheet From/ To: optional field used to print specific tasksheets. By default all Task Sheets print.
• Attendant: optional field used to print specific task sheet for anattendant. By default all Attendants print.
• Report Styles: The repo rt can display in several styles. Select thestyle that meets the needs of your hotel.
©2006 MICROS® Systems Inc. All Rights Reserved. P roprietary and C onfidential.
224

7/31/2019 GEN V40 PMS Reference Manual FINAL Eng Ch
http://slidepdf.com/reader/full/gen-v40-pms-reference-manual-final-eng-ch 225/474
Th e following checkboxes are also available:
• Due Outs Only restricts the report from printing any otherreservation status other than Due Out.
• Show guest name indicates the guest name appears on the p rintedsheet.
• Use Priority indicates the report is to use whichever Task Code is thehighest priority when printed on the sheet.
• Include Summary once all the sheets have printed an additionalsummary sheet prints.
• Include House Use any reservations designated as house use areincluded in the task assignment sheets.
• Show Specials will add a co lumn to th e repo rt to display any special
requests the guest has indicated on their reservation.
12. Select Print.
COMPLETE TASK SH EETS:
To manually complete task sheets once they return and are inspected, followthe steps below:
1. From the TASK ASSIG N MEN T screen, select Complete.
The TASK SHEE T N UMBERS screen displays.
2. Place an “X” next to each task sheet to complete or select All. 3. Select OK.
NOTE: You m ay now alternate the view on the TASK ASSIGNMENT screen between Pending and Completed task sheets.
©2006 MICROS® Systems Inc. All Rights Reserved. P roprietary and C onfidential.
225

7/31/2019 GEN V40 PMS Reference Manual FINAL Eng Ch
http://slidepdf.com/reader/full/gen-v40-pms-reference-manual-final-eng-ch 226/474
Task AssignmentGrid
EXPANDED VIEW
Once you have task assignment sheets generated, if you would like to modifythe sheets before printing, select the Expanded feature from the TASKASSIGNMENTS screen.
The TASK ASSIGNMEN T TASK SH EE T GRID displays with a legend at the top of the screen.
From this screen, you may drag and drop room s from on e task sheet toanother using your mouse. In addition, you may move a room from onesheet to another by placing an “X” next to the roo m(s) and selecting Move.
If there are mo re than the defaults of ten task sheets in this expanded view,select Go To and en ter the sheet you wish to view.
©2006 MICROS® Systems Inc. All Rights Reserved. P roprietary and C onfidential.
226

7/31/2019 GEN V40 PMS Reference Manual FINAL Eng Ch
http://slidepdf.com/reader/full/gen-v40-pms-reference-manual-final-eng-ch 227/474
Turndown Management
The TURNDOWN MANAGEMENT screen displays a list of rooms thathave requested turndown service for the current date, while identifying rooms
that have already received turndown service and those that do not require itfor the current date.
To prepare a task sheet for Ho usekeeping:
1. From the main menu, select Rooms Management and Housekeeping.2. Select Turndown Management
The TURNDOWN MANAGEMENT screen displays.
O pera offers the following o ptions for filtering th e Turndown Search screen display:
Turndown Status
• Requested shows reservations pending turndown service. TheTurndown check box is selected on the Room Instructions screen forthat reservation.
• Not Required shows reservations for which turndown service is notto provide.
• Completed shows reservations that have already received turndownservice on the current date.
Reservation Status
• Arrivals shows reservations that are scheduled to arrive today (DueIn).
©2006 MICROS® Systems Inc. All Rights Reserved. P roprietary and C onfidential.
227

7/31/2019 GEN V40 PMS Reference Manual FINAL Eng Ch
http://slidepdf.com/reader/full/gen-v40-pms-reference-manual-final-eng-ch 228/474
• Arrived shows reservations that are in-house (Checked Ins thatarrived today and D ue O uts that are Day Use)
• Stay Over shows reservations that will be in-house tonight (CheckedIns th at arrived prior to today).
3. Make your search criteria selections4. Select Search 5. To display a reservation for review or editing, double click on the grid
entry or h ighlight your cho ice and select Resv.
The Advanced button accesses the following additional search options:
1. From Room/ To Room searches for a range of rooms. Entering only aFrom Room searches for that room and all higher num bered rooms.
2. Room Type allows you to choo se one or more room types.3. Room Class allows you to choose on e or more roo m classes for which
you wish to search.6. To generate the turndown tasksheet, select Report
The TURNDOWN T ASKSH EE T filter screen displays.
7. Enter Total Attendan ts 8. Enter Maximum Credits 9. Choose to Show Guest N ame 10. Select OK 11. Choose to Preview, Print or File the task sheet.
©2006 MICROS® Systems Inc. All Rights Reserved. P roprietary and C onfidential.
228

7/31/2019 GEN V40 PMS Reference Manual FINAL Eng Ch
http://slidepdf.com/reader/full/gen-v40-pms-reference-manual-final-eng-ch 229/474
The TURNDOWN TASKSHEET prints, files or displays on screen.
©2006 MICROS® Systems Inc. All Rights Reserved. P roprietary and C onfidential.
229
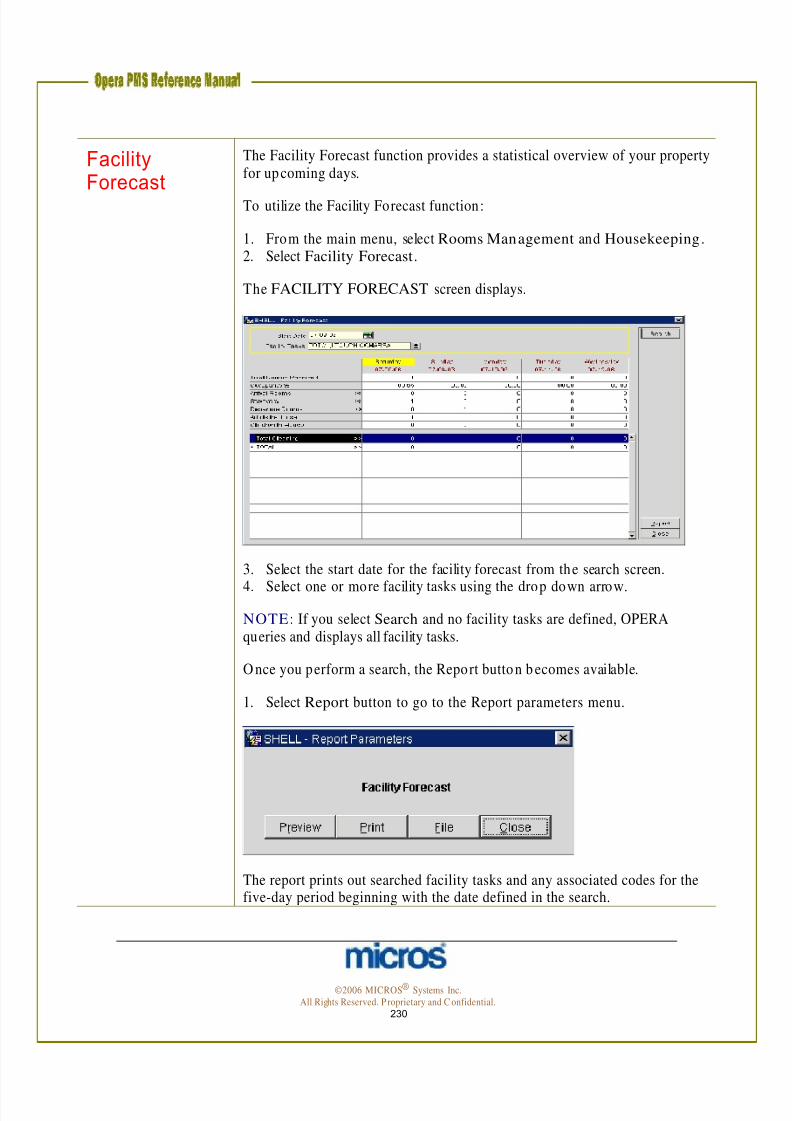
7/31/2019 GEN V40 PMS Reference Manual FINAL Eng Ch
http://slidepdf.com/reader/full/gen-v40-pms-reference-manual-final-eng-ch 230/474
Facility Forecast
The Facility Forecast function provides a statistical overview of your propertyfor upcoming days.
To utilize the Facility Forecast function:
1. From the main menu, select Rooms Management and Housekeeping.2. Select Facility Forecast.
The FACILITY FORECAST screen displays.
3. Select the start date for the facility forecast from the search screen.
4. Select one or more facility tasks using the drop down arrow.
NOTE: If you select Search and no facility tasks are defined, OPERAqueries and displays all facility tasks.
O nce you perform a search, the Report button b ecomes available.
1. Select Report button to go to the Report parameters menu.
The report prints out searched facility tasks and any associated codes for the five-day period beginning with the date defined in the search.
©2006 MICROS® Systems Inc. All Rights Reserved. P roprietary and C onfidential.
230

7/31/2019 GEN V40 PMS Reference Manual FINAL Eng Ch
http://slidepdf.com/reader/full/gen-v40-pms-reference-manual-final-eng-ch 231/474
Guest Service Status
The Guest Service Status screen is to set up and manage “Do N ot D isturb”and “Make Up Room” guest service no tations. The screen displays guest
service statuses fo r all currently occupied rooms. A room can have a D o No tD isturb Status (D N D ), a Make Up Room (MUP) status, or no guest servicestatus.
To use this feature:
1. From the main menu, select Rooms Management and Housekeeping.2. Select Guest Service Status .
The GUEST SERVICE STATUS screen displays.
3. Choose the appropriate search criteria and select the Search button. O pera selects all statuses by default; Service Status and Room default isblank.
• Resv. displays the reservation associated with the highlighted room• Report previews and/ or p rints the hk_details report, automatically
filtered to show only occupied rooms.
©2006 MICROS® Systems Inc. All Rights Reserved. P roprietary and C onfidential.
231

7/31/2019 GEN V40 PMS Reference Manual FINAL Eng Ch
http://slidepdf.com/reader/full/gen-v40-pms-reference-manual-final-eng-ch 232/474
Additional Rooms Management Options
Out of Order /Out of Service
For whatever the reason a room becomes unavailable to guests, be it amechanical failure with the room, or otherwise, OPERA makes it easy to markthe rooms and set them aside, preventing them from being reserved. The Outof O rder (OO O ) and Out of Service (O O S) option makes a room among thelast to be sold or completely unavailable for sale due to m aintenance issues.
O ut of O rder room s deduct from inventory (made unavailable); while O ut of Service rooms remain in inventory (“last resort” availability). Room b locks canbe put O O O / O O S for any given date or period in the future.
NOTE: It is not po ssible to take an occupied or reserved room to a status of O ut of O rder.
To mark a room as Out of Order or Out of Service:
1. From the main menu, select Rooms Management.2. Select Out of Order/ Service.
The OUT OF ORDER/ SERVICE screen displays.
By default, all room s display in roo m number order. The top portion of the screen allows you to select search criteria. Checking the boxes in the Showfield restricts the rooms displayed to OO O , OO S, or both . You can alsosearch by date or room.
3. Select New to place a room on O O O o r OO S status.
©2006 MICROS® Systems Inc. All Rights Reserved. P roprietary and C onfidential.
232

7/31/2019 GEN V40 PMS Reference Manual FINAL Eng Ch
http://slidepdf.com/reader/full/gen-v40-pms-reference-manual-final-eng-ch 233/474
You may enter room into O O O / O O S status by two possible methods.
• Room List-manually type in the room’s numbers separated by acomma, or select the down arrow beside the field then mark all therooms with an “X”.
• From Room and To Room-all room numbers in between the roo msentered in th is field get placed into O O O or O O S status.
4. E nter the From Date and To Date.5. The Status field indicates whether the room goes into Out of Order or
Ou t of Service. 6. Return Status indicates the housekeeping status the roo m returns too
upon coming out of OO S or O O S status.7. Reason indicates the general reason for the room going into O O S or
O O O status.8. Remarks is a free format text area to type in a more specific reason as to
the change o f status.9. Select OK
Some additional options for the OUT OF ORDER/ SERVICE screen are
listed below:
©2006 MICROS® Systems Inc. All Rights Reserved. P roprietary and C onfidential.
233
7/31/2019 GEN V40 PMS Reference Manual FINAL Eng Ch
http://slidepdf.com/reader/full/gen-v40-pms-reference-manual-final-eng-ch 234/474
• Details allows you to view all current information on this room.
• Resv. displays the reservation connected to the room, if any.
• Copy duplicates the status of one entry, applying it to a number of rooms.For example, a carpet cleaner might come to clean the entire third floor atonce. O pera enables you quickly handle large room groups by creating asingle entry, selecting Copy, and entering all roo m numbers that will be outof order at the same time.
• Edit modifies an existing record.
To remove a room from O O O / O O S before the default date passes, follow thesteps below:
1. From the OUT OF ORDER/ SERVICE screen, search fo r and h ighlight
the room you wish to remove.2. Select Delete.3. Answer “Yes” to the message confirming the deletion.
NOTE: If you delete an ou t-of-order roo m for a future date, the status of theroo m will remain as it is currently. If you delete or change an active out-of-order setting (i.e., for today), OPERA will use the Status after Return setting forthe room.
©2006 MICROS® Systems Inc. All Rights Reserved. P roprietary and C onfidential.
234

7/31/2019 GEN V40 PMS Reference Manual FINAL Eng Ch
http://slidepdf.com/reader/full/gen-v40-pms-reference-manual-final-eng-ch 235/474
Room History The Room H istory option allows research on room num bers for manypurposes. You may view reservations that o ccupied room numbers from any
date in the past. With th is feature, you can search for occupying guests for lostand found items.
To display a room’s history, follow the step s below:
1. From the main menu, select Rooms Management.2. Select Room H istory.
The ROOM HISTORY screen displays.
3. In the top po rtion of the screen, enter any search criteria such as the Room Number you wish to view and select Search.
4. You may also select to see room that have Departure Since or even searchfor a past guest by Credit Card N o.
5. To view guest information such as address or pho ne number, highlight theroom record and select Profile.
6. To view the guest’s reservation details, select Resv. 7. To view the revenue generated by the past guest or even to view folio
details, select either Revenue or Folio.
©2006 MICROS® Systems Inc. All Rights Reserved. P roprietary and C onfidential.
235

7/31/2019 GEN V40 PMS Reference Manual FINAL Eng Ch
http://slidepdf.com/reader/full/gen-v40-pms-reference-manual-final-eng-ch 236/474

7/31/2019 GEN V40 PMS Reference Manual FINAL Eng Ch
http://slidepdf.com/reader/full/gen-v40-pms-reference-manual-final-eng-ch 237/474
The NE W NUMBER TO OVERBOOKING screen displays.
3. E nter the From Date/ To for the dates to set overbooking limits. 4. Check the days of week the limits app ly.5. Click the drop down arrow next to the Room Type field to select the room
type for overbooking.
6. Select the Number or Percentage radio button to either set a specificoverbooking number or rooms or a percentage of the total number of rooms by room type.
7. E nter either the Overbook Number or Overbook Level.8. Select OK.
Occupancy
Graph
N otice the limits set in the Overbooking column of the setup screen. To view the d ifference in the n umb er of rooms left to sell and the overbooking limit,select Physical.
The Occupancy Graph is a won derful too l for graph ically viewing occupancyactivity at the ho tel. Housekeeping and Maintenance departments alsocomm only use this feature for scheduling purposes. For more details onviewing and understanding the Occupancy Graph, refer to the“Miscellaneous” chapter of this manual.
©2006 MICROS® Systems Inc. All Rights Reserved. P roprietary and C onfidential.
237

7/31/2019 GEN V40 PMS Reference Manual FINAL Eng Ch
http://slidepdf.com/reader/full/gen-v40-pms-reference-manual-final-eng-ch 238/474
Maintenance The Maintenance feature gives the Engineering and Housekeeping department the ability to note a work order for a room that is in Out of O rder
status. This feature allows you to enter an action fo r the maintenancedepartment to take on a room. From th is, the engineer may print a repo rt of allrequests. O nce all maintenance requests are attended to, the work orders maybe resolved.
NOTE: Placing a maintenance order on a room numb er does notautomatically place the room in O ut of O rder status nor is the room deductedfrom invento ry. In addition , this is not a full-scale quality management system.
To place a work order into maintenance for a room , follow the steps below:
1. From the main menu, select Rooms Management and Maintenance .
The MAINTENANCE screen displays.
2. Select New. The ROOM MAIN TEN ANCE – NEW screen displays.
3. Click the drop down arrow next to the Room field and choose the roo m(s)for the work order.
4. Click the drop down arrow next to the Reason field to select from a list of pre-defined maintenance requests.
5. E nter any additional instructions or text for the work order in the Remarks field and select Save.
©2006 MICROS® Systems Inc. All Rights Reserved. P roprietary and C onfidential.
238

7/31/2019 GEN V40 PMS Reference Manual FINAL Eng Ch
http://slidepdf.com/reader/full/gen-v40-pms-reference-manual-final-eng-ch 239/474
To print a report o f all unresolved work orders, follow the steps below:
1. From the MAINTENANCE screen, select the Unresolve radio button atthe top o f the screen and select Search to display unresolved work ordersin th e display grid.
2. Select Print.
To resolve maintenance requests once completed, follow the steps below:
1. From the MAINTENANCE screen, search for and highlight the roomwith a work order to resolve.
2. Select Resolve. 3. Answer “Yes” to resolve the record.
©2006 MICROS® Systems Inc. All Rights Reserved. P roprietary and C onfidential.
239

7/31/2019 GEN V40 PMS Reference Manual FINAL Eng Ch
http://slidepdf.com/reader/full/gen-v40-pms-reference-manual-final-eng-ch 240/474
Chapter 7 – Accounts Receivable ©2006 MICROS® Systems Inc.
All Rights Reserved. P roprietary and C onfidential. 240

7/31/2019 GEN V40 PMS Reference Manual FINAL Eng Ch
http://slidepdf.com/reader/full/gen-v40-pms-reference-manual-final-eng-ch 241/474
AR Overview
AR Pre-Requisites
There are four pre-requisites for direct bills to properly post to the AR Ledger.
• A valid AR number must exist on the Company, Group or Source profile.This indicates that Accounting validated the company’s credit andapproves them for direct billing.
• The charges that the company agrees to pay for must route to foliowindo w “2” on th e guest folio “owned” by the AR Profile.
• The charges routed to the second folio window must h ave CL (CityLedger) or DB (Direct Bill) as the form of payment and settled to theappropriate transaction code.
• A N ight Audit must complete on the business date the direct bill checkoutoccurs moving the folio balance to an invoice on the AR accoun t.
©2006 MICROS® Systems Inc. All Rights Reserved. P roprietary and C onfidential.
241

7/31/2019 GEN V40 PMS Reference Manual FINAL Eng Ch
http://slidepdf.com/reader/full/gen-v40-pms-reference-manual-final-eng-ch 242/474
Transfer F/O Data
Transfer F/ O D ata is a process that allows the user to view, edit and print allinvoices before transferring them to the AR account . All invoices in the transfer
bin total on the AR Ledger as accruals, but are not actual invoices until theytransfer. This feature enables Accoun ting to check the accuracy of the companiesbilled for the invoices before they show up in the account.
NOTE: This feature is on ly available if the AR application sett ing “AutoTransfer Folios” is NO T active. If this setting is active, the Transfer F/ O D atabin do es not exist and invoices transfer to their appropriate AR accounts in th eAR ledger dur ing the audit following the guests’ checkou t date.
Follow the steps below to transfer outstanding invoices from the T ransfer F/ OD ata bin to the AR Ledger:
1. From the main menu, select AR.2. Select Transfer F/ O Data.
The TRANSFER ACCRUALS TO AR screen displays.
©2006 MICROS® Systems Inc. All Rights Reserved. P roprietary and C onfidential.
242

7/31/2019 GEN V40 PMS Reference Manual FINAL Eng Ch
http://slidepdf.com/reader/full/gen-v40-pms-reference-manual-final-eng-ch 243/474
The Transfer accruals to AR screen displays all folios fro m the previous businessday checked out to the D B transaction code. Check Outs for today do no t display
in the bin un til a N ight Aud it runs.
3. To search for transactions for a specific date, enter the date in the From Date and To Date fields.
4. Verify that each folio invo ice belongs to the correct AR account.5. If an invo ice needs adjusting to belong to another accoun t, highlight the
invoice in question and select Edit.6. When the PROFILE SEARCH screen d isplays, use the search criteria to
locate the appropriate company responsible for that invoice7. H ighlight the desired company and select OK to save.8. To see folio detail on the invoice, highlight the desired invoice and select
Details.
NOTE: You cannot make adjustments from this screen. Adjustments are onlypossible on folios once the invoice exists on the AR account.
9. If necessary, print a copy of the folio by selecting Folio. Print individualfolios for each invoice by placing an “X” next to each invoice before selectingFolio. To print all folios for all invoices, select the All option before selectingFolio.
10. After printing, choose Transfer send all selected invoices to theircorrespon ding account in the AR ledger. Th is options transfer only thoseinvoices marked with an “X”. There is also All, which m arks all invoices to
transfer to the AR ledger for that business date at the same time.
©2006 MICROS® Systems Inc. All Rights Reserved. P roprietary and C onfidential.
243
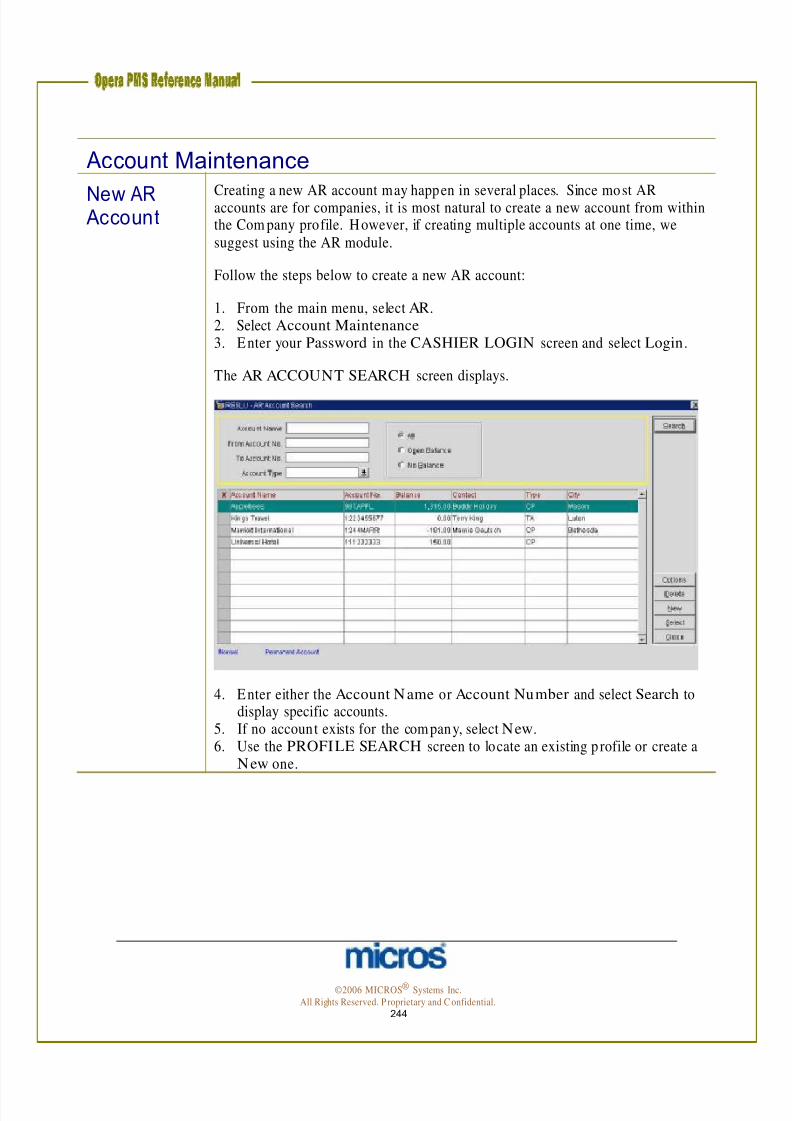
7/31/2019 GEN V40 PMS Reference Manual FINAL Eng Ch
http://slidepdf.com/reader/full/gen-v40-pms-reference-manual-final-eng-ch 244/474
Account Maintenance
New AR Account
Creating a new AR account may happen in several places. Since most ARaccounts are for companies, it is most natural to create a new account from withinthe Com pany profile. However, if creating multiple accounts at one time, wesuggest using the AR module.
Follow the steps below to create a new AR account:
1. From the main menu, select AR.2. Select Account Maintenance 3. Enter your Password in the CASHIER LOGIN screen and select Login.
The AR ACCOUNT SEARCH screen displays.
4. Enter either the Account N ame or Account Number and select Search to display specific accounts.
5. If no account exists for the com pany, select New.6. Use the PROFILE SEARCH screen to locate an existing p rofile or create a
New one.
©2006 MICROS® Systems Inc. All Rights Reserved. P roprietary and C onfidential.
244

7/31/2019 GEN V40 PMS Reference Manual FINAL Eng Ch
http://slidepdf.com/reader/full/gen-v40-pms-reference-manual-final-eng-ch 245/474
The SETUP ACCOUNT screen displays.
7. Click the drop down arrow next to Account Type to select the hotel defined account type (i.e. Corporate Accounts). Account types usually differ fromho tel to ho tel and are setup for varying reminder letter cycles.
8. Enter the Account Number. Account num bers are defined your hotel.Usually, they follow some pattern and the Accounting office sets that patternfor all accoun ts. D epend ing on your hotel’s application settings, this num bermay auto-generate or you may enter the number manually.
9. Enter the Credit Limit to define how much the Accounting departmentapproves for use on th is accoun t. Th is does not limit the account from use,but rather flags the account on reports if there are outstanding balances thatexceed the account’s credit limit. D epending on your ho tel’s applicationsettings, you may have a default credit limit assigned fo r accounts.
10. Select Flagged for the account on ly if the account h as a “Restricted” statusto deactivate the account for direct billing.
11. Enter the Contact and AR address, phone, or fax information. If theaccount contact or com munication information differs from that on theprofile, be certain to change those details here. Changing these details will notchange the information on the existing profile.
12. Leave the Include in Batch Stmt. and Permanent Account check boxesmarked to include th is account when p rinting batch statements of invoices andto prevent the account from deletion during purging.
13. Select OK to save.
©2006 MICROS® Systems Inc. All Rights Reserved. P roprietary and C onfidential.
245
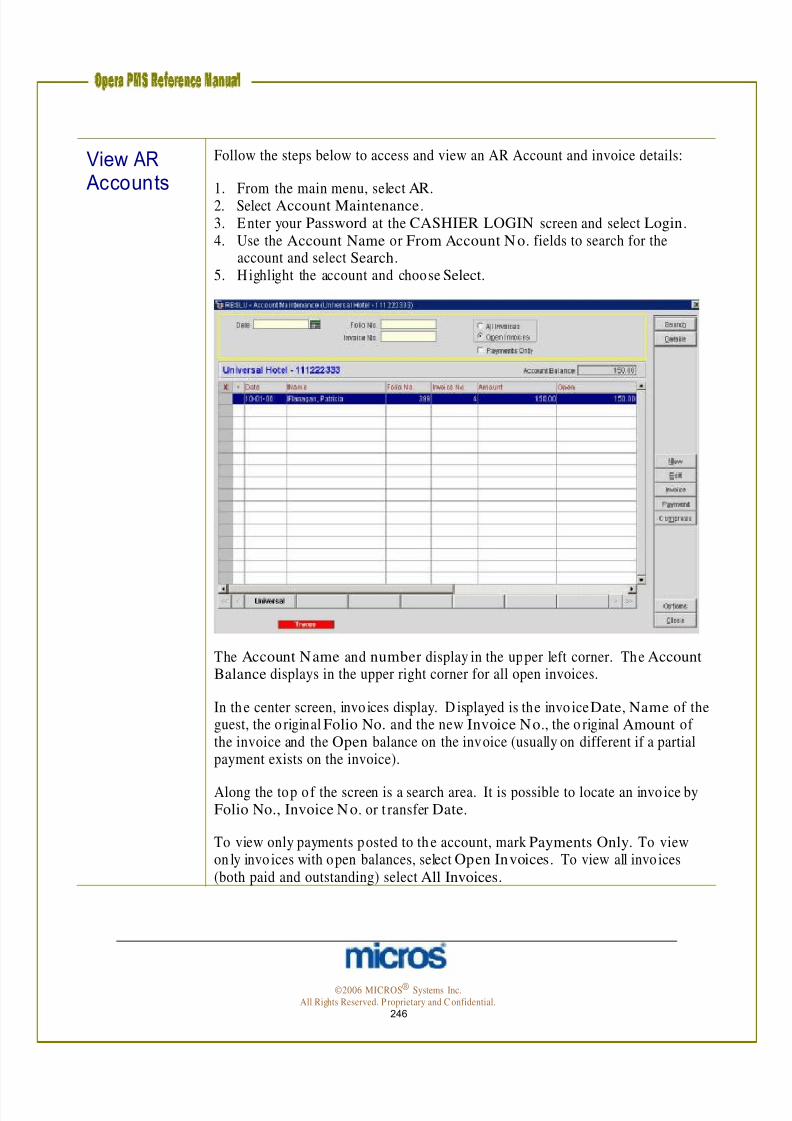
7/31/2019 GEN V40 PMS Reference Manual FINAL Eng Ch
http://slidepdf.com/reader/full/gen-v40-pms-reference-manual-final-eng-ch 246/474
View AR Accounts
Follow the steps below to access and view an AR Account and invoice details:
1. From the main menu, select AR.2. Select Account Maintenance.3. Enter your Password at the CASHIER LOGIN screen and select Login.4. Use the Account Name or From Account N o. fields to search for the
account and select Search.5. H ighlight the account and choose Select.
The Account Name and number display in the upper left corner. The Account Balance displays in the upper right corner for all open invoices.
In the center screen, invo ices display. D isplayed is the invo ice Date, Name of theguest, the o riginal Folio No. and the new Invoice No., the o riginal Amount of the invoice and the Open balance on the invoice (usually on different if a partialpayment exists on the invoice).
Along the top o f the screen is a search area. It is possible to locate an invo ice byFolio No., Invoice No. or t ransfer Date.
To view only payments posted to th e account, mark Payments Only. To viewon ly invo ices with open balances, select Open Invoices. To view all invo ices(both paid and outstanding) select All Invoices.
©2006 MICROS® Systems Inc. All Rights Reserved. P roprietary and C onfidential.
246

7/31/2019 GEN V40 PMS Reference Manual FINAL Eng Ch
http://slidepdf.com/reader/full/gen-v40-pms-reference-manual-final-eng-ch 247/474
Listed below are the features within the ACCOUNT MAIN TENANCE screen:
View and
Modify ARInvoiceDetails
• New - creates a new AR invoice for that accoun t directly in the AR Ledger
• Edit - edits the invoice history for the selected invoice
• Invoice - displays folio details on the selected invo ice
• Payment - applies a payment to the selected invoice
• Compress - combines multiple invo ices selected into one invoice (formore details on compressing invoices, see the “Compress Invoices”section of this chapter.
• Options - displays the AR invoice options menu (i.e. Notes, Traces, PostHistory)
When viewing invoices, the folio details from the original guest stay display on thescreen. This allows you to investigate the details of a particular invoice and makeadjustments o r post new charges to the invoice.
Follow the steps below to view the folio details of an invoice:
1. From the ACCOUN T MAIN TENANCE screen, highlight the invo ice youwish to see de tails and select Invoice.
The INVOICE DETAILS screen displays.
Along the top of the screen is stay information on the invoice including Arrival dates, Departure dates, and guest Name.
Individual charges appear in the center of the screen very much like a folio in theBILLING screen.
©2006 MICROS® Systems Inc. All Rights Reserved. P roprietary and C onfidential.
247

7/31/2019 GEN V40 PMS Reference Manual FINAL Eng Ch
http://slidepdf.com/reader/full/gen-v40-pms-reference-manual-final-eng-ch 248/474
Create a
New ARInvoice
2. To ap ply a charge to the existing invo ice directly in the AR accoun t, selectPost. Th e same po sting screen you see in the Cashiering module appears.
3. To po st an adjustment to an existing charge on an invoice, highlight theexisting charge and select Adjust. See the “Adjusting Charges on an ARInvoice” section of this chapter for m ore details.
4. To print the folio, select Folio.5. To modify transaction details, such as a reference or supp lemen t line, on a
particular charge, highlight that charge and select Edit.6. To view or modify the individual guest profile that belon gs to that invoice,
select Profile.7. To close the AR IN VOICE DETAILS screen and return to th e
ACCOUNT MAINTE NANCE screen, select Close.
In some instances, it is necessary to create an invoice directly in the AR account.
Follow the steps below to create a new invo ice directly in the AR ledger:
1. From the ACCOUN T MAIN TENANCE screen, select New.
The NE W INVOICE screen displays.
2. Enter the Market, Source, Room Class, and any Invoice Supplement or Invoice Reference details desired. Typically, the hotel predefines these fo r a
new invoice in AR configuration.3. Select OK to continue.
The POSTING screen displays.
Enter the charges to post (as explained in the Cashiering chapter) and select Post.
4. A message displays asking if you would like to print a folio fo r the invoice.Answer Yes to print the invoice or No to decline.
©2006 MICROS® Systems Inc. All Rights Reserved. P roprietary and C onfidential.
248

7/31/2019 GEN V40 PMS Reference Manual FINAL Eng Ch
http://slidepdf.com/reader/full/gen-v40-pms-reference-manual-final-eng-ch 249/474
Adjust an AR Invoice
It is possible to adjust charges on an invoice after the invoice reaches the ARaccount. Any adjustments made to an invoice in AR will no t reflect in Folio
History on that folio in the Cashiering module.
Follow the steps below to adjust a charge on an invoice:
1. H ighlight the desired invoice in the ACCOUNT MAINTENANCE screenand select Invoice.
2. Select Adjust.
The AD JUST T RN. CO D ES PO STIN G S screen displays.
3. Enter the Trn. Code to adjust on the invoice. 4. To adjust multiple dates for the same transaction code, enter a Begin Date
and End Date.5. Enter an Amount or Percentage to adjust. Be certain to enter a “-“sign
when reducing a charge on the folio.6. Enter the Reason Code for the adjustment and any additional Reason Text.7. Select OK to save.
©2006 MICROS® Systems Inc. All Rights Reserved. P roprietary and C onfidential.
249

7/31/2019 GEN V40 PMS Reference Manual FINAL Eng Ch
http://slidepdf.com/reader/full/gen-v40-pms-reference-manual-final-eng-ch 250/474
Apply anUnallocatedPayment
Sometimes, you receive a payment on an account that does not directly apply tospecific invo ices. An unallocated payment app lies a credit to the to tal account
balance and not a specific invo ice. Even though an unallocated payment appliesto the total account balance, individual invoices continue to age (even if theaccount balance is zero). Therefore, in every situation possible, apply paymentson accounts directly to invoices.
Follow the steps below to apply an unallocated payment to an AR account:
1. From the ACCOUN T MAIN TENANCE screen, select Payment withoutmarking or highlighting any invoices.
2. Enter the Payment Code and Amount as well as any Supplement or
Reference information (i.e. check numbers).3. Select the Unallocated Payment option.4. Select OK.
NOTE: Applying a credit has reduced the account balance, but the invoices stillage and con tinue to age until paid in full. To close an invo ice and stop it fromaging, a payment m ust apply directly to the invo ice.
©2006 MICROS® Systems Inc. All Rights Reserved. P roprietary and C onfidential.
250

7/31/2019 GEN V40 PMS Reference Manual FINAL Eng Ch
http://slidepdf.com/reader/full/gen-v40-pms-reference-manual-final-eng-ch 251/474
ApplyingPayments toOldestInvoices or Selectively
When you receive a payment on an invoice, correct procedure is to apply thepayment directly to th at invo ice. However, there are instances where invo ices
have aged seriously and you choo se to apply a payment to the oldest invoices. INaddition, there are also times when a check arrives from a company that includespayment for multiple invoices.
Follow the steps below to apply a payment to the oldest invoices:
1. From the ACCOUN T MAIN TENANCE screen, place an “X” next to theinvoice(s) you wish to pay and select Payment.
2. Enter the Payment Code and Amount as well as any Supplement or Reference information (i.e. check numbers).
3. Select the Apply payment to oldest charges option.4. Select OK.
This applies the credit in order of age of the invoice.
©2006 MICROS® Systems Inc. All Rights Reserved. P roprietary and C onfidential.
251

7/31/2019 GEN V40 PMS Reference Manual FINAL Eng Ch
http://slidepdf.com/reader/full/gen-v40-pms-reference-manual-final-eng-ch 252/474
Follow th e steps below to apply a payment selectively to several invoices:
1. From the ACCOUTN MAIN TENANCE screen, place and “X” next to theinvoice(s) you wish to pay and select Payment.2. Enter the Payment Code and Amount as well as any Supplement or
Reference information (i.e. check numbers).3. Select the Apply payment selectively option.
The APPLY CREDIT SELECTIVELY screen displays.
All invoices selected list with the Balance and Post Date of the invoice.
4. H ighlight the invo ice to apply credit and use either the Pay Full option ortype the amount to pay in the Apply field.
NOTE: N ote the Remaining balances at the bo ttom of the screen. This isuseful when applying payments selectively to indicate how much remains on thepayment.
5. App ly the to tal credit available in the payment and select Post.
©2006 MICROS® Systems Inc. All Rights Reserved. P roprietary and C onfidential.
252

7/31/2019 GEN V40 PMS Reference Manual FINAL Eng Ch
http://slidepdf.com/reader/full/gen-v40-pms-reference-manual-final-eng-ch 253/474
ApplyPaymentand Closean Invoice
Ano ther way of making payments o n AR accounts is paying an invoice directly.Use the Payment option when posting collected payments on specific invoices
individually intended to close the invo ice.
Follow the steps below to p ost a payment and close an invoice:
1. Search for the invoice to pay on the ACCOUNT MAINTE NANCE screen.2. H ighlight th e desired invo ice to pay, place an “X” next to the invoice, and
select Payment.
3. Select the Payment Code and enter the Amount. The amount defaults to the invoice balance.
4. Choose to Apply payment to marked charges.5. Enter any Supplement or Reference information needed.6. Select Post.
The invoice is now fully paid and closed.
©2006 MICROS® Systems Inc. All Rights Reserved. P roprietary and C onfidential.
253

7/31/2019 GEN V40 PMS Reference Manual FINAL Eng Ch
http://slidepdf.com/reader/full/gen-v40-pms-reference-manual-final-eng-ch 254/474
UnapplyPayment –Write Off
There are times when we need to reverse a credit or payment (usually when postedin error). For this situation, use the Unapply credit feature. Unapplying a
payment do es no t reverse the payment from the accoun t. Usually, after a creditunapplies from an invoice, we write the balance of the invoice off by making aninvoice adjustment.
Follow the steps below to Unapply a credit or payment:
1. Locate the invoice on the ACCOUNT MAINTENANCE screen.2. H ighlight the invo ice and right-click to choose Unapply.
The payment o riginally applied to that invoice now appears as a separate line item. The invoice returns to an “O pen” status as well.
©2006 MICROS® Systems Inc. All Rights Reserved. P roprietary and C onfidential.
254
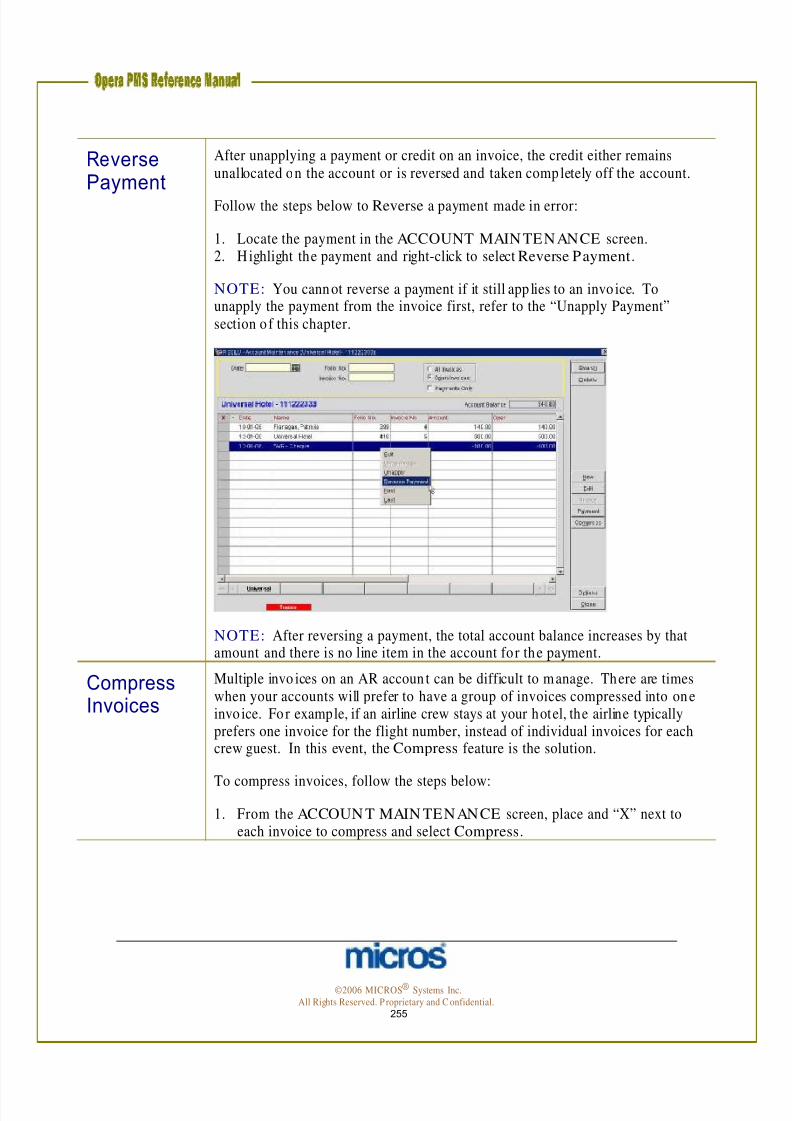
7/31/2019 GEN V40 PMS Reference Manual FINAL Eng Ch
http://slidepdf.com/reader/full/gen-v40-pms-reference-manual-final-eng-ch 255/474
Reverse Payment
After unapplying a payment or credit on an invoice, the credit either remainsunallocated on the account or is reversed and taken completely off the account.
Follow the steps below to Reverse a payment made in error:
1. Locate the payment in the ACCOUNT MAIN TENANCE screen.2. H ighlight the payment and right-click to select Reverse Payment.
NOTE: You cannot reverse a payment if it still app lies to an invo ice. Tounapply the payment from the invoice first, refer to the “Unapply Payment”section o f this chapter.
Compress Invoices
NOTE: After reversing a payment, the total account balance increases by that amount and there is no line item in the account for the payment.
Multiple invo ices on an AR accoun t can be difficult to manage. There are timeswhen your accounts will prefer to have a group of invoices compressed into oneinvo ice. Fo r example, if an airline crew stays at your hotel, the airline typicallyprefers one invoice for the flight number, instead of individual invoices for eachcrew guest. In this event, the Compress feature is the solution.
To compress invoices, follow the steps below:
1. From the ACCOUN T MAIN TENANCE screen, place and “X” next toeach invoice to compress and select Compress.
©2006 MICROS® Systems Inc. All Rights Reserved. P roprietary and C onfidential.
255

7/31/2019 GEN V40 PMS Reference Manual FINAL Eng Ch
http://slidepdf.com/reader/full/gen-v40-pms-reference-manual-final-eng-ch 256/474
The COMPRESS INVOICES screen displays.
2. Enter any Reference or Supplement information regarding the compression and select OK.
The invoices wrap into one invoice and new invoice number assigns.
3. To view details of the compressed invo ices, click the “+ ” sign next to thecompressed invoice.
©2006 MICROS® Systems Inc. All Rights Reserved. P roprietary and C onfidential.
256

7/31/2019 GEN V40 PMS Reference Manual FINAL Eng Ch
http://slidepdf.com/reader/full/gen-v40-pms-reference-manual-final-eng-ch 257/474
In the event that you mistakenly compressed invoices and need to reverse theaction, highlight the compressed invoice and right-click the mouse to choose
Uncompress .
This action returns all com pressed invoices back to individual invoices.
NOTE: You m ay only uncompress invoices on the same b usiness date theyoriginally compressed.
©2006 MICROS® Systems Inc. All Rights Reserved. P roprietary and C onfidential.
257

7/31/2019 GEN V40 PMS Reference Manual FINAL Eng Ch
http://slidepdf.com/reader/full/gen-v40-pms-reference-manual-final-eng-ch 258/474
Accounting Options
To view, update and m aintain account information from the AR accoun t fromboth the AR ACCOUN T SEARCH screen and the ACCOUNTMAINTENANCE screen, use any of the op tions below:
Select Options from the AR ACCOUN T SEARCH screen to display theACCOUNT POSTING OPTIONS screen.
Select Options from the ACCOUNT MAINTENANCE screen to display the ACCOUNT POSTING OPTIONS screen.
Account Setup
The Account Setup feature displays the SETUP ACCOUNT screen view earlier in this chapter. If you need to make modifications to the AR accoun t information,select this option.
©2006 MICROS® Systems Inc. All Rights Reserved. P roprietary and C onfidential.
258

7/31/2019 GEN V40 PMS Reference Manual FINAL Eng Ch
http://slidepdf.com/reader/full/gen-v40-pms-reference-manual-final-eng-ch 259/474
Aging Aging shows a view of outstanding or “open” balances or credits on an account for all aging periods.
Follow the steps below to view the aging o f an account:
1. Select Options from the AR ACCOUNT SEARCH screen.2. Select Aging.
This screen displays the aging Levels (buckets) and any Open balances or Credits in each bucket.
Close Invoice
Fixed Charges
Future Resv.
3. Select Close to exit.
For hotels that allow invoices to remain open until a manual selection to close it,the Close Invoice opt ion closes paid invoices. Th is option is only available onceyou pay the invoice in full. If your hotel does not choose to close invo icesmanually, the process of applying a full payment to the invoice closes the invoice.
The Fixed Charges option exists for setting up a fixed charge to po stautom atically to an AR accoun t. For example, if a company next door to th e hotelrents a parking space from the hotel and you bill them on a monthly basis, setup aFixed Charge on the account to p ost to an invoice nightly with the E nd of D ay
postings.
For more details on created Fixed Charges, refer to the “Reservations” chapter of this manual.
Selecting the Future Resv. option displays any future reservations for the accounthighlighted. Th is is particularly useful if you have approved a company’s credit forDirect Bill at your hotel and wish to access each future reservation and authorizebilling for the guests.
©2006 MICROS® Systems Inc. All Rights Reserved. P roprietary and C onfidential.
259

7/31/2019 GEN V40 PMS Reference Manual FINAL Eng Ch
http://slidepdf.com/reader/full/gen-v40-pms-reference-manual-final-eng-ch 260/474
AR Notes AR Notes log text information o r keep notes about an account. Use it to recordnotes during telephone conversations, to record past history of issues, or just to
log general information regarding the account.
Follow the steps below to add Notes to an account:
1. Select Options from the AR ACCOUNT SEARCH screen.2. Select Notes
Previously entered no tes appear on the screen.
3. Select New to enter a new note.4. Add a Title for the note and enter any note Text.5. Select OK to save.
©2006 MICROS® Systems Inc. All Rights Reserved. P roprietary and C onfidential.
260

7/31/2019 GEN V40 PMS Reference Manual FINAL Eng Ch
http://slidepdf.com/reader/full/gen-v40-pms-reference-manual-final-eng-ch 261/474
Post History Post History displays detailed information regarding postings (both payments andrevenue postings) applied to an AR account.
Follow the steps below to view Post H istory on an account:
1. Select Options from the AR ACCOUNT SEARCH screen.2. Select Post H istory.
All postings to the AR account display.
3. Select Details to access more information about an individual charge including adjustments.
Details list the original posting on the left and any changed or adjustedtransactions on the right.
Pay History Payment History displays detailed information about payments made on an AR
account.
Follow the steps below to v iew Payment H istory on an account:
1. Select Options from the ACCOUNT MAINTENANCE screen.2. Select Pay History.
The PAYMENT HISTORY screen displays any paymen ts made on invoices, theapplied Amount to each invoice, and the Post Date of the payment.
©2006 MICROS® Systems Inc. All Rights Reserved. P roprietary and C onfidential.
261

7/31/2019 GEN V40 PMS Reference Manual FINAL Eng Ch
http://slidepdf.com/reader/full/gen-v40-pms-reference-manual-final-eng-ch 262/474
Profile This feature accesses the profile for the accoun t. Fo r more details on modifying and updating profiles, refer to the “Profiles” chapter of this manual.
Reminders -Individual
Most commonly, AR departments generate Reminder letters for accounts withinvoices past due or seriously delinquent in batches. From t ime to time, you maydesire to print an individual reminder letter.
Follow the steps below to generate a Reminder for an individual account withinvoices that have passed an aging cycle:
1. From the AR ACCOUNT SEARCH screen, select Options.2. Select Reminders.
The REMINDERS screen displays.
NOTE: Reminders on ly display on th is screen if an invoice has passed a Reminder cycle and you need to deliver a letter.
3. Place an “X” next to the letter you would like to send. Select All to mark allletters.
4. Either Preview the letter to your screen, Print the letter to your localworkstation printer, File the letter on your computer, Fax the letter, or Emailthe letter.
NOTE: You must have the appropriate software and setup to Fax or Em ailReminder letters.
©2006 MICROS® Systems Inc. All Rights Reserved. P roprietary and C onfidential.
262

7/31/2019 GEN V40 PMS Reference Manual FINAL Eng Ch
http://slidepdf.com/reader/full/gen-v40-pms-reference-manual-final-eng-ch 263/474
Statements - Individual
The Statement op tion prints a statement o f invoices for one account at a time.There is a review of Batch Statements later in this chapter.
Follow the steps below to p rint a Statement for a s ingle account:
1. Select Options from the ACCOUNT MAINTENANCE screen.2. Select Statement.
The STATEMENTS screen displays.
Place an “X” next to the Account Name to print statements.
3. If printing a customize statement, to print a statement on ly displaying invoicesbalanced forward to the AR ledger before a certain date, enter the date rangein the Balance Forward From/ To fields.
4. To print a statemen t only displaying invoices applied to the account after acertain date; enter the date range in the Last Posted From/ To fields.
NOTE : These fields customize the statement to print only the invoices selected.
5. To p rint a customized line of text on any statement, select the Add Text option.
6. Choose either the Print Fu ll Statement or Print Folios to print applicable
folios for invoices on the statement, and enter th e numb er of Copies to print.7. Select Print to p rint statements, File to file statements local on the PC, or Fax
or Email to fax or email the statements to an account.
©2006 MICROS® Systems Inc. All Rights Reserved. P roprietary and C onfidential.
263
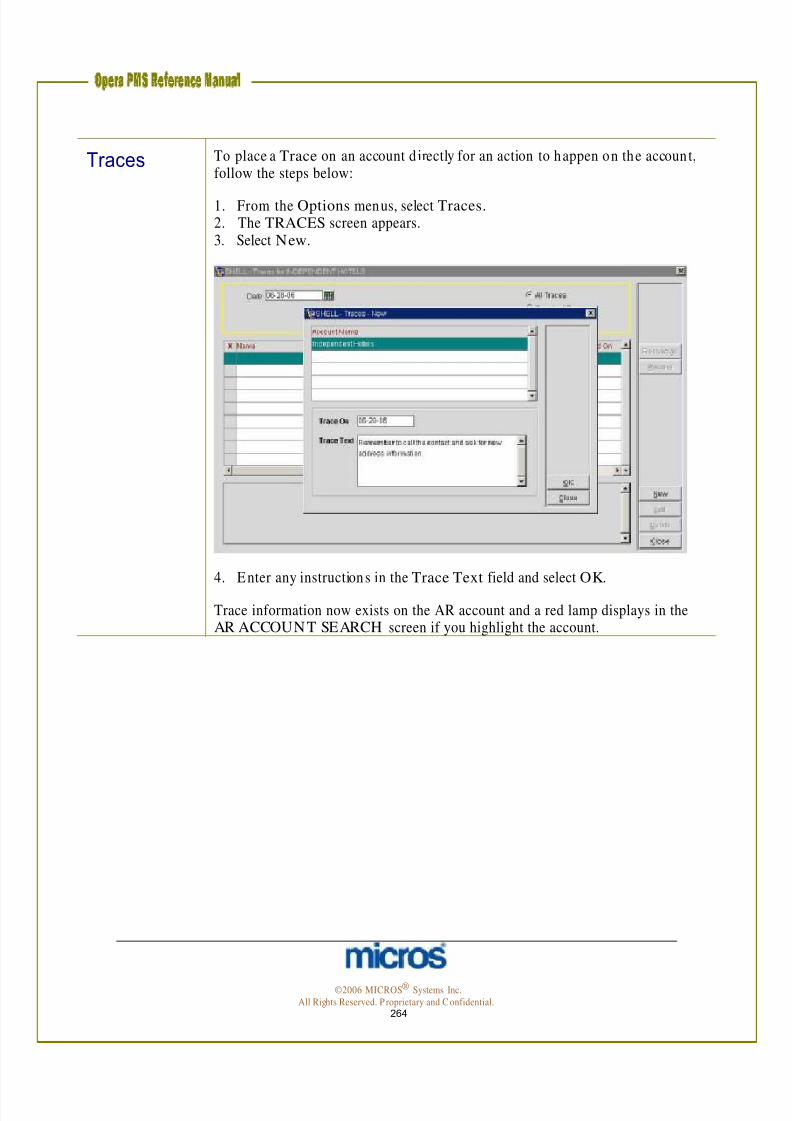
7/31/2019 GEN V40 PMS Reference Manual FINAL Eng Ch
http://slidepdf.com/reader/full/gen-v40-pms-reference-manual-final-eng-ch 264/474
Traces To place a Trace on an account d irectly for an action to happen on the account,follow the steps below:
1. From the Options menus, select Traces. 2. The TRACES screen appears.3. Select New.
4. Enter any instructions in the Trace Text field and select OK.
Trace information now exists on the AR account and a red lamp displays in theAR ACCOUNT SEARCH screen if you highlight the account.
©2006 MICROS® Systems Inc. All Rights Reserved. P roprietary and C onfidential.
264

7/31/2019 GEN V40 PMS Reference Manual FINAL Eng Ch
http://slidepdf.com/reader/full/gen-v40-pms-reference-manual-final-eng-ch 265/474
To view and manage all traces for individual or all accounts, follow the stepsbelow:
1. From the main menu, select AR and Traces.
The TRACES screen displays for all accounts. The radio buttons in the searchcriteria allow you to change views for All Traces, Resolved Traces, orUnresolved Traces.
2. To resolve an individual trace for an account, place and “X” next to the trace and select Resolve.
3. To resolve all traces for all accoun ts, select Resolve All.4. To m odify or view an existing trace, select Edit. 5. Select Close to exit.
©2006 MICROS® Systems Inc. All Rights Reserved. P roprietary and C onfidential.
265

7/31/2019 GEN V40 PMS Reference Manual FINAL Eng Ch
http://slidepdf.com/reader/full/gen-v40-pms-reference-manual-final-eng-ch 266/474
Transfer If a direct bill accidentally posted to the wrong company, you can transfer theinvoice to ano ther account using the Transfer option.
NOTE: If the invoice was paid, the payment m ust be unapplied before theinvoices can transfer.
Follow the steps below to Transfer invoices from one account to another:
1. Place an “X” next to the desired invoice in the ACCOUNTMAINTENANCE screen and select Options.
2. Select Transfer.
The TRANSFER screen displays.
3. Using the search fields, locate the AR accoun t to transfer the invoice to and highlight the account.
The Amount field is the total amount of the invoice to transfer.
4. Enter any additional text in the Supplement field.5. Select OK to continue.
6. A message appears asking if you would like to transfer the invo ice. AnswerYes to complete the transfer or No to cancel the transfer.
NOTE : The original AR account now has both a “+ ” and a “-” invoiceindicating the debit and credit transfer to anoth er account. Th is will no t print onthe statement.
©2006 MICROS® Systems Inc. All Rights Reserved. P roprietary and C onfidential.
266

7/31/2019 GEN V40 PMS Reference Manual FINAL Eng Ch
http://slidepdf.com/reader/full/gen-v40-pms-reference-manual-final-eng-ch 267/474
Year View Year View displays summary totals of all debits and credits on an AR account for an entire year. Th is view provides the best indication of how often accounts have
been tardy with payments
Follow the steps below to access the Year View:
1. Select Options from the ACCOUNT MAINTENANCE screen.2. Select Year View.
The YEAR VIEW screen displays.
This screen displays the history of Debits and Credits on a monthly basis for the past year. This is helpful info rmation when giving credit references or respon ding
to inquiries on a company’s account trends. In addition , this feature helps toevaluate renegotiating a company’s autho rization fo r direct billing at your ho tel.
©2006 MICROS® Systems Inc. All Rights Reserved. P roprietary and C onfidential.
267

7/31/2019 GEN V40 PMS Reference Manual FINAL Eng Ch
http://slidepdf.com/reader/full/gen-v40-pms-reference-manual-final-eng-ch 268/474
Additional AR Features
Research Clients com mon ly request the status of an invoice or ask for more information.Invoices remain in history after closing before the system purges the invoice. Thesystem p urges old records by way of an app lication setting that’s definedspecifically at each and every hotel. Research p rovides a way to view invoiceinformation with ease.
Follow the steps below to access the AR Research option:
1. From the main menu, select AR.2. Select Research.3. Enter your Password in the CASHIER LOGIN screen and select Login.
The TRANSACTIO N SEARCH screen displays a list of all invoices.
All invoices (bo th p aid and unpaid) are available from th is screen.
4. Use the search criteria fields to search for an invoice by Date, Invoice No.,Account Name, or Account N o.
©2006 MICROS® Systems Inc. All Rights Reserved. P roprietary and C onfidential.
268

7/31/2019 GEN V40 PMS Reference Manual FINAL Eng Ch
http://slidepdf.com/reader/full/gen-v40-pms-reference-manual-final-eng-ch 269/474
The following options are also available for use from this screen:
Account – displays the ACCOUN T MAIN TENANCE for the selected accoun tand all invoices that belong to that account
Edit – displays invo ice details such as posting date and o riginal amounts.
History – displays the posting history for the selected invoice
Pay – allows payments to p ost directly to a selected invoice
Transfer – allows the transfer of a selected invoice to another account
View – displays folio details for the selected invoice for adjusting or reprinting of
the folio
©2006 MICROS® Systems Inc. All Rights Reserved. P roprietary and C onfidential.
269

7/31/2019 GEN V40 PMS Reference Manual FINAL Eng Ch
http://slidepdf.com/reader/full/gen-v40-pms-reference-manual-final-eng-ch 270/474
AR Credit Cards
AR Credit Cards allows all credit card transactions on a given business date tocreate an invoice in the AR ledger awaiting payment. Th is feature compresses all
credit transactions by credit card type into one invoice per day and transfers to theAR ledger until the hotel receives confirmation that a payment deposits in thebank for a batch. Th is feature requires the Accounting department o r Night Auditto transfer the credit cards by type to the corresponding AR account.
Follow the steps below to transfer credit cards to the AR ledger:
1. From the main menu, select AR.2. Select Credit Cards.3. Enter your Password in the CASHIER LOGIN screen and select Login.
The CREDIT CARDS screen displays.
4. Select the first Credit Card type from the search box and select Search.
All credit card closures for that card type for the previous business date appear onthe screen.
5. Select Print All to print a detailed list o f all transactions for that credit cardtype before transferring to the AR ledger. O nce cards transfer, eachtransaction compresses into one invoice but detail is not lost.
6. To t ransfer one card at a time, place an “X” next to the record and selectTransfer.
©2006 MICROS® Systems Inc. All Rights Reserved. P roprietary and C onfidential.
270

7/31/2019 GEN V40 PMS Reference Manual FINAL Eng Ch
http://slidepdf.com/reader/full/gen-v40-pms-reference-manual-final-eng-ch 271/474
7. To t ransfer all cards of the select card type, choose All to select all credit cardrecords and then select Tfr. All button.
BatchProcessingStatements
NOTE : To view transferred credit cards, access any card type AR accoun t via Account Maintenance, and choose Select to open the account. Select View todisplays individual transaction details on the compressed invoice. O nce the wire-transfer information arrives from the bank, you should Pay the account invoice asnormal.
Batch Statements prints statements in one-step for all accoun ts with either o peninvoice balances or all accoun ts in general.
Follow the steps below to print Batch Statements:
1. From the main menu, select AR.2. Select Batch Processing and Statements.
3. Use the search criteria at the top of the screen to minimize the list of accounts if necessary. Leave blank for all accounts.
NOTE : For this example, we run Batch Statements for all open balances with anaccount balance of $1.00 or higher.
4. Select Open Balances and enter $1.00 in the Minimum Balance field andselect Search.
5. To print a statemen t for an individual account, place an “X” next to theaccount name and select Print.
6. To enter prom otional text and customize the statement, select Add Text andenter a f ree text line.
7. To print statemen ts for all selected accoun ts, select All and then Print.8. A message displays asking if you wou ld like to generate statements for the
selected accounts. Answer Yes to print or No to cancel the request.
©2006 MICROS® Systems Inc. All Rights Reserved. P roprietary and C onfidential.
271

7/31/2019 GEN V40 PMS Reference Manual FINAL Eng Ch
http://slidepdf.com/reader/full/gen-v40-pms-reference-manual-final-eng-ch 272/474
Additional op tions from within the STATEMENTS screen are as fo llows:
• Print Invoices check box allows you to print individual invoices alongwith the statements.
• Previously Printed allows you to sort and print statements and invoicespreviously printed.
• Not Printed allows you to sort and print statements and invoices notpreviously printed.
• Copies allows you to enter th e numb er of copies of statements to p rint.
• Balance Forward From/ To allows you to sort just those accounts toprint statements with a balance from or to a certain date.
• Last Posted From/ To allows you to sort just those accounts to printstatements that last had posting activity from or to a certain date.
• Sort Mailing by allows you to sort the o rder in which the statements pr intfor select accounts (i.e. by Account N ame or Account N o.).
• Preview, File, Fax and Email allow options for previewing statements toyour screen, filing statements local to your PC, faxing statem ents andemailing statements.
NOTE: To fax or email statements, you must have the applicable software andsetup for faxing and printing.
©2006 MICROS® Systems Inc. All Rights Reserved. P roprietary and C onfidential.
272

7/31/2019 GEN V40 PMS Reference Manual FINAL Eng Ch
http://slidepdf.com/reader/full/gen-v40-pms-reference-manual-final-eng-ch 273/474
Batch Reminders
Reminder Letters send notices based on aging periods for accounts with overdueinvoice balances. You may print reminders individually for an account or in batch
for all accounts that have reminders due.
NOTE: It is important to remember that once you print an AR account’sreminder letter, the system does not allow reprinting from this area. A reminderletter for an account on ly displays again in this screen on ce it passes a newreminder letter cycle.
To reprint p ast Reminder Letters, follow the steps b elow:
1. From the main menu, select AR and Batch Processing.2. Select Reminders.
The PRINT REMINDER LETTERS screen displays.
3. Locate any account(s) using the search criteria and p lace an ‘X” next to each account to select individual accounts. To select all accounts, select All.
4. Select Generate.
If reminders exist for printing, those reminders display in the GENERATEREMINDER LETTERS screen.
©2006 MICROS® Systems Inc. All Rights Reserved. P roprietary and C onfidential.
273

7/31/2019 GEN V40 PMS Reference Manual FINAL Eng Ch
http://slidepdf.com/reader/full/gen-v40-pms-reference-manual-final-eng-ch 274/474
5. Place an “X” next to an individual account to p rint the generated reminders and select Print. To print all generated reminders for all accoun ts, select All.
6. You may also choose to deliver or view reminder letters with the Preview,
File, Fax or Email options.
NOTE: To file or fax reminder letters, you must have the app licable email or faxsoftware setup .
©2006 MICROS® Systems Inc. All Rights Reserved. P roprietary and C onfidential.
274
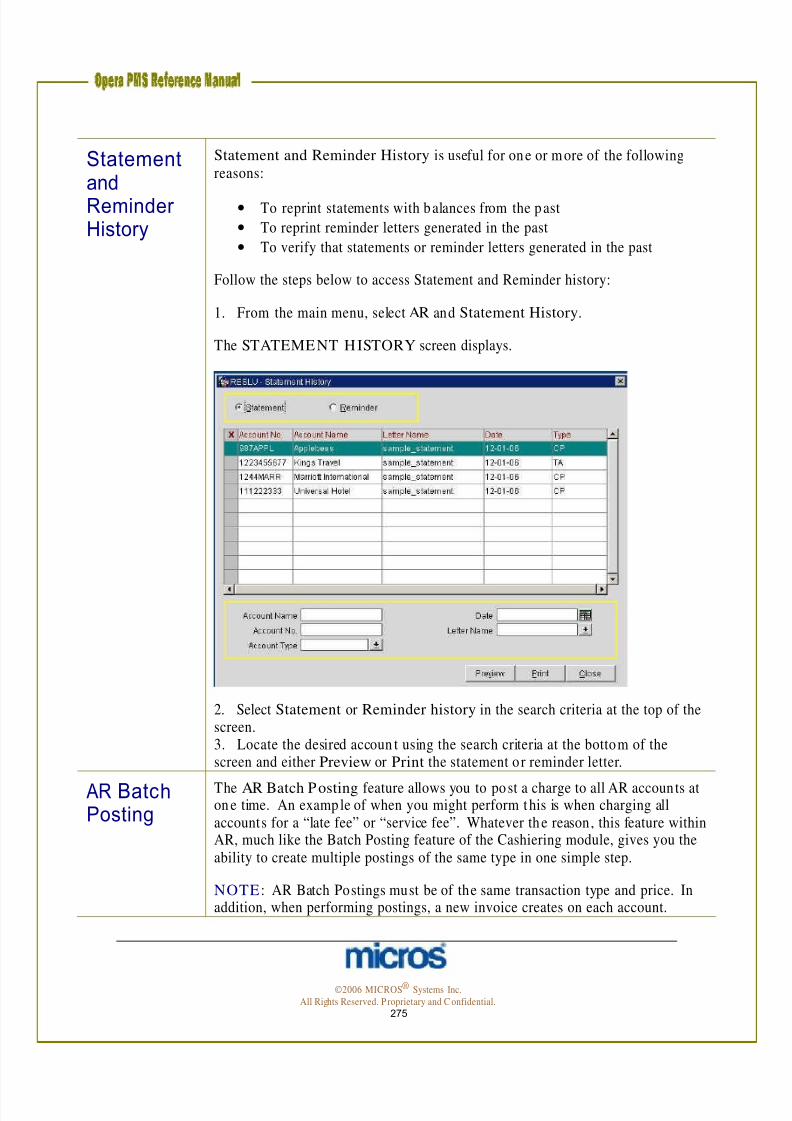
7/31/2019 GEN V40 PMS Reference Manual FINAL Eng Ch
http://slidepdf.com/reader/full/gen-v40-pms-reference-manual-final-eng-ch 275/474
StatementandReminder History
Statement and Reminder History is useful for one or m ore of the followingreasons:
• To reprint statements with balances from the past
• To reprint reminder letters generated in the past
• To verify that statements or reminder letters generated in the past
Follow the steps below to access Statement and Reminder history:
1. From the main menu, select AR and Statement History.
The STATEMENT HISTORY screen displays.
AR Batch Posting
2. Select Statement or Reminder history in the search criteria at the top of the screen.3. Locate the desired accoun t using the search criteria at the bottom of thescreen and either Preview or Print the statement or reminder letter.
The AR Batch Posting feature allows you to post a charge to all AR accounts aton e time. An example of when you might perform this is when charging allaccounts for a “late fee” or “service fee”. Whatever the reason, this feature withinAR, much like the Batch Posting feature of the Cashiering module, gives you theability to create multiple postings of the same type in one simple step.
NOTE : AR Batch Postings must be of the same transaction type and price. Inaddition, when performing postings, a new invoice creates on each account.
©2006 MICROS® Systems Inc. All Rights Reserved. P roprietary and C onfidential.
275

7/31/2019 GEN V40 PMS Reference Manual FINAL Eng Ch
http://slidepdf.com/reader/full/gen-v40-pms-reference-manual-final-eng-ch 276/474
Follow the steps below to perform AR Batch Postings:
1. From the main menu, select AR and Batch Postings.2. Enter your Password in the CASHIER LOGIN screen and select Login.
The AR BATCH POSTINGS screen displays.
3. Click the drop down arrow next to the Trn. Code field and select the transaction code to post.
4. Enter the Amount of the posting.5. To select all accounts of a specific type (i.e. all airline accounts), click the drop
down arrow next to the Account Type field.6. Place and “X” next to the type of account and select OK.7. To select individual accoun ts, click the drop do wn arrow next to the Account
field.8. Search for and place an “X” next to each account to charge.9. Select OK to return to the AR BATCH POSTINGS screen.10. Enter any Supplement or Reference information.
11. Check the Override Credit Limit box if you wish to po st the charges to theaccounts regardless off th eir credit limitation s.
12. Select OK to complete the postings.The Progress Bar indicates success for batch po stings. A message displays after100% p osted successfully.13. Answer “Yes” to view Posting Details or “No” to exit the screen.The POSTING DETAILS screen lists all postings generated to accounts.14. Select OK and Close to exit the screen.
©2006 MICROS® Systems Inc. All Rights Reserved. P roprietary and C onfidential.
276

7/31/2019 GEN V40 PMS Reference Manual FINAL Eng Ch
http://slidepdf.com/reader/full/gen-v40-pms-reference-manual-final-eng-ch 277/474
AR Detailed AgingReport
The AR Detailed Aging report displays all detail of accounts by Account Nameand lists with account balances in their app ropriate aging periods. Totals calculate
for each Account Name, Account Type, as well as for the AR Ledger as a wholeby aging period . Accounts also group by type for easy filtering of specific types of AR accounts (i.e. Gro up vs. Company vs. Airlines Crews).
To print or preview Detailed Aging report, follow the steps below:
1. From the main menu, select Miscellaneous and Reports.2. Select the Report Group of Accounts Receivable.3. H ighlight the AR Detailed Aging report and select OK.
4. Enter the desired Account Type, Business Date, and Sort Order (i.e. by Account Name).5. Select to Preview, Print or File.
©2006 MICROS® Systems Inc. All Rights Reserved. P roprietary and C onfidential.
277

7/31/2019 GEN V40 PMS Reference Manual FINAL Eng Ch
http://slidepdf.com/reader/full/gen-v40-pms-reference-manual-final-eng-ch 278/474

7/31/2019 GEN V40 PMS Reference Manual FINAL Eng Ch
http://slidepdf.com/reader/full/gen-v40-pms-reference-manual-final-eng-ch 279/474
General Cashier
1. O btain or reprint a copy of the Trial Balance report and the Cashier Summaryreport from the night before.2. Using the Cashier Summary report, verify the drops for each Cashier that
posted Cash, Checks, or Foreign Currency.3. Balance the total Cash, Checks, and Foreign Currency on the Cashier
Summary report to the totals on the Trial Balance.
Income Audit
1. The following reports must balance with each other for Op era to be in balancewith itself:
2. Tr ial Balance Report – Guest Ledger D etail Report ; Financial Revenue and
Payments Report3. Tr ial Balance Report – D eposit Cuto ver Repor t; D eposit Ledger D etails4. Tr ial Balance Report – AR Aging Detail Repor t and AR Aging Summary
Report5. Tr ial Balance Report – Package Ledger Detail and the Package Allowance
G uest INHPlease refer to your pro perty specific Accoun ts Receivable checklist. Th is is only asuggested example of daily tasks to perform for proper Account Maintenance.
©2006 MICROS® Systems Inc. All Rights Reserved. P roprietary and C onfidential.
279

7/31/2019 GEN V40 PMS Reference Manual FINAL Eng Ch
http://slidepdf.com/reader/full/gen-v40-pms-reference-manual-final-eng-ch 280/474

7/31/2019 GEN V40 PMS Reference Manual FINAL Eng Ch
http://slidepdf.com/reader/full/gen-v40-pms-reference-manual-final-eng-ch 281/474
Quick Keys
Show Quick Keys
OPERA has several Quick Key options for viewing hotel activity andperforming various tasks in the system. These quick key op tions make it simpleand easy to use the keyboard at any point in the system to access certainfunctions withou t having to navigate through the menus.
To view all options and Show Quick Keys, follow the steps below:
1. From the main menu, select Miscellaneous.2. Select Show Quick Keys.
To access a function within Quick Keys, you may either click the icon on the
menu or press the correspon ding shortcut key on th e keyboard listed for th atfunction.
The top row of the menu lists the designated function key for each column (i.e.F1, F2, F3, etc.). In add ition, the left column of the screen lists the designatedcommand key for each row (i.e. Shift, Control). Using these shortcut keysallow you to quickly access various functions from any screen in OPERA.
©2006 MICROS® Systems Inc. All Rights Reserved. P roprietary and C onfidential.
281

7/31/2019 GEN V40 PMS Reference Manual FINAL Eng Ch
http://slidepdf.com/reader/full/gen-v40-pms-reference-manual-final-eng-ch 282/474
F1 – Opera Help
The OPERA Online H elp screens are an online resource for obtaining quickinformation on a particular screen. Much of the information found in the help
menus m irrors the information found in th is manual.
A popular key feature of OPERA’s help function, pressing F1 from any screenin the system will automatically direct you to help on the current task, such aswhen you need a definition of a field or further description of a topic.
To navigate Opera Help at any time, follow the steps below:
1. Fro m anywhere in the system, press the F1 function key.
2. Select a top ic from the menu on the left (i.e. PMS O perations - Cashiering).
©2006 MICROS® Systems Inc. All Rights Reserved. P roprietary and C onfidential.
282

7/31/2019 GEN V40 PMS Reference Manual FINAL Eng Ch
http://slidepdf.com/reader/full/gen-v40-pms-reference-manual-final-eng-ch 283/474
3. Select a function from the topic list (i.e. Passerby).
Info rmation regarding that topic displays on the right side of the screen. For further inform ation on a particular field, select any hyperlinks underlined inblue to n avigate to the h elp menu for that field.
NOTE: If you press F1 while in any screen in OPERA, the systemautomatically navigates you to the help menu and topic for that field.
©2006 MICROS® Systems Inc. All Rights Reserved. P roprietary and C onfidential.
283

7/31/2019 GEN V40 PMS Reference Manual FINAL Eng Ch
http://slidepdf.com/reader/full/gen-v40-pms-reference-manual-final-eng-ch 284/474
Shift F1 –OccupancyGraph
The Occupancy Graph is a nice feature for a visual display of the ho tel’soccupancy by date or week. This graph sho ws your hotels occupancy in terms
of reservations and blocks, with several options to sort the display.
To view and use the O ccupancy Graph , follow the steps below:
1. From anywhere in the system, select Shift and F1.
The OCCUPANCY GRAPH screen displays.
2. Use the search criteria at the top of the screen to sort by Start Date or Room Type and select Search .
3. To alter the Bar Display, click the drop down arrow next to the field.4. You may also add Grid Lines and Percentages for easier viewing.5. To switch to a week view, select the drop down arrow next to the Number
of field.
6. To move the display forward or backwards by week or days, select thearrows at the botto m of the graph.
7. To print the current display, select Print.
©2006 MICROS® Systems Inc. All Rights Reserved. P roprietary and C onfidential.
284

7/31/2019 GEN V40 PMS Reference Manual FINAL Eng Ch
http://slidepdf.com/reader/full/gen-v40-pms-reference-manual-final-eng-ch 285/474
Control F1 –KeyboardShortcuts
The Control F1 function key displays a list o f available keyboard shortcuts.These shortcuts include quick key options found in this chapter as well as
additional keyboard navigation tips.
To display the KEYS screen, follow the steps below:
1. Fro m anywhere in the system, select Control F1.
2. Select OK to close.
©2006 MICROS® Systems Inc. All Rights Reserved. P roprietary and C onfidential.
285

7/31/2019 GEN V40 PMS Reference Manual FINAL Eng Ch
http://slidepdf.com/reader/full/gen-v40-pms-reference-manual-final-eng-ch 286/474
Shift F2 –Control Panel
The CONTROL PANEL screen displays a weekly view of hotel arrivalactivity, occupancy, and availability. The CONTROL PANEL screen is
invaluable to managers as a scheduling and forecasting tool. In addition to theitems no ted above, this feature displays group activity and overbooking levels.
To view the Control Panel, follow the steps below:
1. From anywhere in the system, select Shift F2.
The CONTROL PANEL screen displays.
2. Use the search criteria at the top o f the screen to m odify the Start Date if necessary and select Search .
Down the left side of the screen, explanations of values within the grid display(i.e. Available Ph ysical Room s, Adults in H ouse, etc.)
The following are also options from this screen:
• The Blocks option displays all Group Blocks for the date selected inthe grid.
• The Details opt ion displays how m any rooms sold by room type andreservation type.
• If your hotel uses the Turnaway feature, the Turnaway option allowsyou to log turnaway details for the selected date.
©2006 MICROS® Systems Inc. All Rights Reserved. P roprietary and C onfidential.
286

7/31/2019 GEN V40 PMS Reference Manual FINAL Eng Ch
http://slidepdf.com/reader/full/gen-v40-pms-reference-manual-final-eng-ch 287/474
Control F2 –Detailed Availability
The DETAILED AVAILABILITY screen displays available rooms infourteen-day increments. In addition, this screen has functionality to toggle
from occupancy to availability by room types.
To display Detailed Availability, follow the steps below:
1. Fro m anywhere in the system, select Control F2.
The DETAILED AVAILABILITY screen displays.
2. E nter the Start Date in the search criteria at the top of the screen and choose to Include N on-Deduct, I nclude Overbooking, or Include
OOO rooms and select Search.
©2006 MICROS® Systems Inc. All Rights Reserved. P roprietary and C onfidential.
287

7/31/2019 GEN V40 PMS Reference Manual FINAL Eng Ch
http://slidepdf.com/reader/full/gen-v40-pms-reference-manual-final-eng-ch 288/474
The following are also options from this screen:
• The Blocks option display a list of Business Blocks in house for thedate selected.
• The Details option display availability information for the date.Selecting the Occupancy option within this screen changes theinformation displayed from availability to sold stat istics.
• The Zoom op tion displays how m any room s sold by room type and reservation type.
• The Occupancy option changes the main grid view from availableroom counts to sold roo m counts and toggles back to Availability.
• If your hotel uses the Turnaway feature, the Turnaway optionallows you to log turnaway details for the selected date.
©2006 MICROS® Systems Inc. All Rights Reserved. P roprietary and C onfidential.
288

7/31/2019 GEN V40 PMS Reference Manual FINAL Eng Ch
http://slidepdf.com/reader/full/gen-v40-pms-reference-manual-final-eng-ch 289/474
F3 – Available Room Search
The AVAILABLE ROOMS SEARCH screen allows you to easily search fora room number that is available, clean or inspected.
To access the Available Rooms Search, follow the steps below:
1. Fro m anywhere in the system, select F3.
The AVAILABLE ROOMS SEARCH screen displays.
The default search criterion for this screen is the available status at your hotel (i.e. Clean o r In spected).
2. Use any of the search criteria to modify the viewable results and selectSearch .
©2006 MICROS® Systems Inc. All Rights Reserved. P roprietary and C onfidential.
289
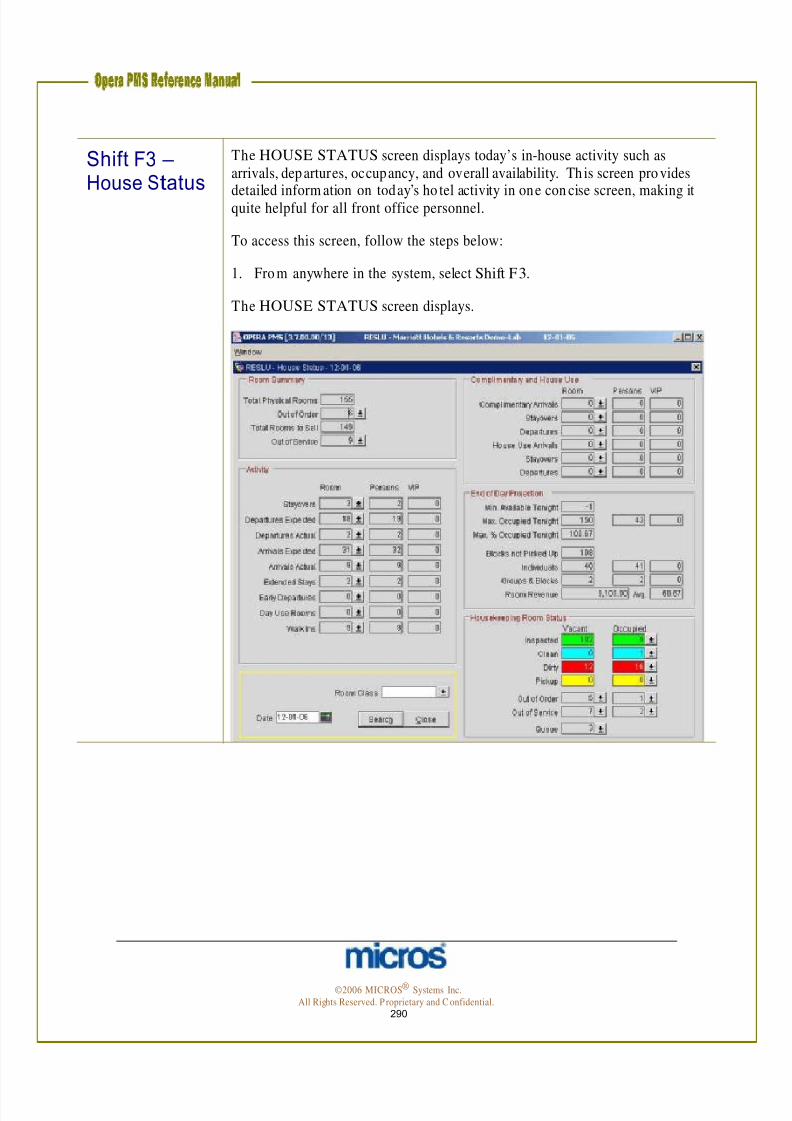
7/31/2019 GEN V40 PMS Reference Manual FINAL Eng Ch
http://slidepdf.com/reader/full/gen-v40-pms-reference-manual-final-eng-ch 290/474
Shift F3 –House Status
The HOUSE STATUS screen displays today’s in-house activity such asarrivals, departures, occupancy, and overall availability. Th is screen pro vides
detailed inform ation on today’s ho tel activity in one con cise screen, making itquite helpful for all front office personnel.
To access this screen, follow the steps below:
1. Fro m anywhere in the system, select Shift F3.
The HOUSE STATUS screen displays.
©2006 MICROS® Systems Inc. All Rights Reserved. P roprietary and C onfidential.
290

7/31/2019 GEN V40 PMS Reference Manual FINAL Eng Ch
http://slidepdf.com/reader/full/gen-v40-pms-reference-manual-final-eng-ch 291/474
Th e default date for th is screen is today’s business date. Th ere are five mainsections to this screen:
• Room Summary – displays the Total Physical Rooms in the hotel,minus any Out of Order rooms, for a Total Rooms to Sell figure.
• Activity – displays the business date’s activity in term s of arrivals anddepartures while differentiating expected versus departures.
• Complimentary and H ouse Use – displays any expectedComplimentary Arrivals as well as House Use Arrivals includingStayovers and Departures for both.
• End of Day Projection – displays occupancy totals and percentagesfor the business date along with any group room s in the Blocks not Picked Up field.
• Housekeeping Room Status – d isplays actual coun ts of room s byhousekeeping status (i.e. Clean, Dirty, Inspected, or Pickup).
2. To view more information abou t a status field, click the drop down arrownext to the field.
3. To alter the business date, modify the Date field in th e search criteria andselect Search.
NOTE: If you m odify the search date to a future date, the HousekeepingRoom Status section removes and the Activity section reduces (see thescreenshot example below).
©2006 MICROS® Systems Inc. All Rights Reserved. P roprietary and C onfidential.
291

7/31/2019 GEN V40 PMS Reference Manual FINAL Eng Ch
http://slidepdf.com/reader/full/gen-v40-pms-reference-manual-final-eng-ch 292/474
Control F3 –Room Plan
The ROOM PLAN screen displays for a visual layout of guests occupying orreserved for each roo m number in the hotel. This feature is most useful for
pre-assigning groups of rooms at a time as well as for room moves.
To display this screen, follow the steps below:
1. Fro m anywhere in the system, select Control F3.
The ROOM PLAN screen displays.
The left side of the screen displays Room numbers and housekeeping Room Status. Within the grid are actual reservations occupying certain room
num bers whether in-hou se or pre-blocked for arrival. Each date along the topspans a ten-day period with the hotels designated weekend highlighted inyellow.
2. To modify the viewable date, select a new Date in the search criteria andselect Search.
3. To increase the number of rooms that display vertically, select Vertical Zoom.
4. To increase the number of dates that display ho rizontally, selectH orizontal Zoom.
5. To move an in-house or pre-assigned room from one room to another,simply highlight the room in the grid and using your mouse, drag and dropthe roo m to another cell in the grid.
NOTE: If this process causes a room change to a different room type, amessage prom pts asking you to verify that room type change or to authorizeany accommodation or rate changes.
Some addition al features from this screen are as follows:
©2006 MICROS® Systems Inc. All Rights Reserved. P roprietary and C onfidential.
292

7/31/2019 GEN V40 PMS Reference Manual FINAL Eng Ch
http://slidepdf.com/reader/full/gen-v40-pms-reference-manual-final-eng-ch 293/474
• New/ Edit: creates a new or edits an existing reservation for the roomand date selected in the grid.
• Advanced: displays advanced search options
• Rm. Block : after selecting a room number and a date, this option takesthe user to the ROOM ASSIGNMENT screen and displays on lyreservations that meet the room type and date requirements. If noroo ms exist, a m essage displays indicating so.
• Walk In: allows the user to create a walk in guest reservation from th isscreen. Refer to th e Front D esk chapter of this manual for details onthis process.
• Options: displays the Reservation Options for the guest selected in themain grid of the screen.
• OOO/ OOS: displays the OUT OF ORDER screen, and is useful for
placing a room out of order or out of service quickly.• Calendar: displays the CALENDAR screen; for m ore information,
refer to the Reservations chapter of this manual. Shift F4 –Inquiry
The INQUIRY screen is a useful tool for the Sales department andReservation departments to request availability for group con tracts. Fo r moredetails on this option, refer to the “Business Blocks – Groups” chapter of thismanual.
©2006 MICROS® Systems Inc. All Rights Reserved. P roprietary and C onfidential.
293

7/31/2019 GEN V40 PMS Reference Manual FINAL Eng Ch
http://slidepdf.com/reader/full/gen-v40-pms-reference-manual-final-eng-ch 294/474
Control F4 –Dashboard
The Dashboard is an all-inclusive screen for the Front Desk staff to performmost functions of their job ro le. Using the D ashboard an agent can create
reservations, check in guests, print reports, make changes to guest information,walk in guests, view and make posting to the guest bill, as well as begin thecheck out p rocess.
To access this screen, follow the steps below:
1. Fro m anywhere in the system, select Control F4.
The DASH BOARD screen displays.
The dashboard contains several display areas: Search, Reservation, Profile, Additional Information, and Cashiering.
SEARCH:
2. To search for reservations or in-house guests, enter the Name orConfirmation number in the search criteria and select Search. Foradditional search o ptions, select Advanced.
3. To display the shortcut key menu from th is chapter, select Show Quick Keys.
4. To access the users defined repo rt menu select Reports.5. To access the main ho usekeeping screen, select Housekeeping.
©2006 MICROS® Systems Inc. All Rights Reserved. P roprietary and C onfidential.
294
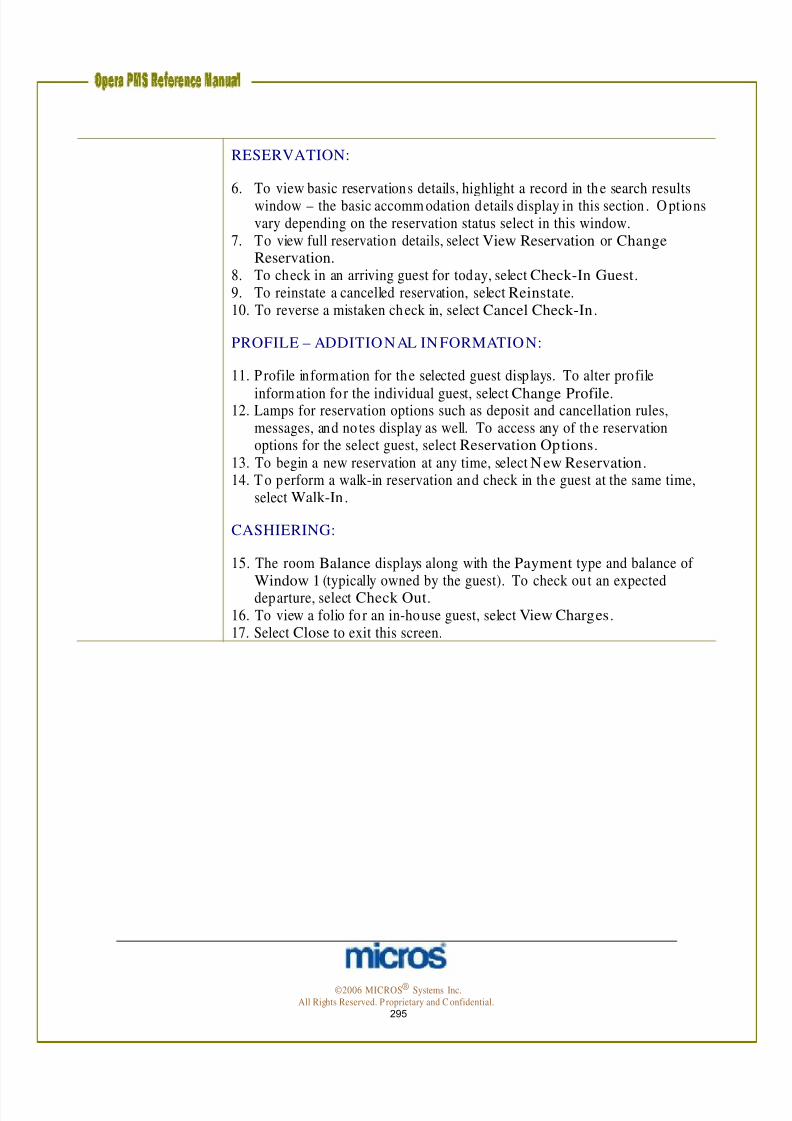
7/31/2019 GEN V40 PMS Reference Manual FINAL Eng Ch
http://slidepdf.com/reader/full/gen-v40-pms-reference-manual-final-eng-ch 295/474
RESERVATION:
6. To view basic reservations details, highlight a record in the search resultswindow – the basic accomm odation details display in this section . O pt ionsvary depending on the reservation status select in this window.
7. To view full reservation details, select View Reservation or Change Reservation.
8. To check in an arriving guest for today, select Check-In Guest.9. To reinstate a cancelled reservation, select Reinstate.10. To reverse a mistaken check in, select Cancel Check-In.
PROFILE – ADDITIONAL IN FORMATION:
11. P rofile information for the selected guest displays. To alter profile
inform ation for the individual guest, select Change Profile.12. Lamps for reservation options such as deposit and cancellation rules,
messages, and no tes display as well. To access any of the reservationoptions for the select guest, select Reservation Options.
13. To begin a new reservation at any time, select New Reservation.14. T o perform a walk-in reservation and check in the guest at the same time,
select Walk-In .
CASHIERING:
15. The room Balance displays along with the Payment type and balance of Window 1 (typically owned by the guest). To check out an expecteddeparture, select Check Out.
16. To view a folio fo r an in-house guest, select View Charges.17. Select Close to exit this screen.
©2006 MICROS® Systems Inc. All Rights Reserved. P roprietary and C onfidential.
295

7/31/2019 GEN V40 PMS Reference Manual FINAL Eng Ch
http://slidepdf.com/reader/full/gen-v40-pms-reference-manual-final-eng-ch 296/474
F5 – Rate Query
To check availability and perform rate queries, selecting th is quick key accessesseveral options.
To access each of th ese rate options for information, fo llow the steps below:
1. From anywhere in the system, select F5.
The RATE INFORMATION screen displays.
2. To perform a query on rate availability, select Rate Query. For more
information on the RATE QUERY screen, refer to the “Reservations”chapter of th is manual.
3. To perform a lookup of rates that fall within a defined price range, selectRate Lookup.
The RATE LOOKUP screen displays.
©2006 MICROS® Systems Inc. All Rights Reserved. P roprietary and C onfidential.
296

7/31/2019 GEN V40 PMS Reference Manual FINAL Eng Ch
http://slidepdf.com/reader/full/gen-v40-pms-reference-manual-final-eng-ch 297/474
4. E nter a Date and Price Range and select Search for a list o f rates.5. To view a list of items available for sell within packages, select Package
Elements. The PACKAGE CODES screen displays.6. To view a graphic display of rate restrictions and house level inventorycon trols, select Rate Availability Grid. The RATE AVAILABILITYscreen displays.
7. If your hotel has listed invento ry for items such as cribs or rollaway beds,select Item Inventory. The ITEM INVENTORY AVAILABILITYscreen displays.
©2006 MICROS® Systems Inc. All Rights Reserved. P roprietary and C onfidential.
297
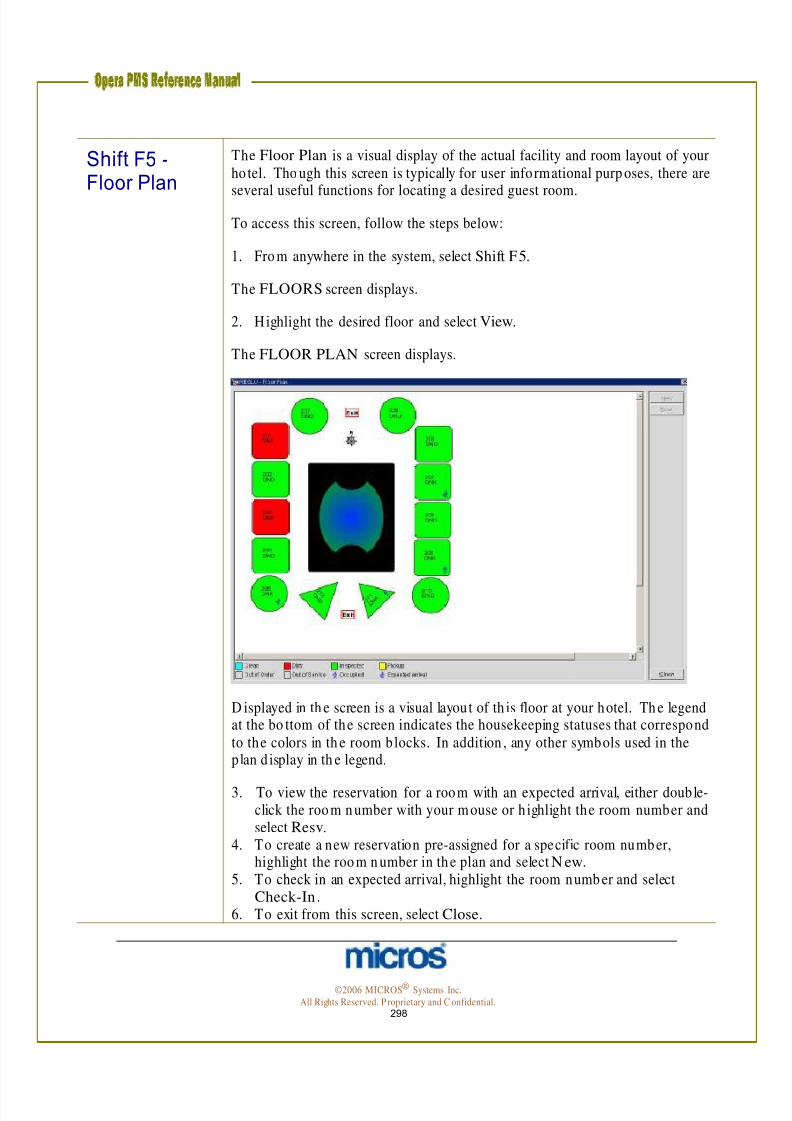
7/31/2019 GEN V40 PMS Reference Manual FINAL Eng Ch
http://slidepdf.com/reader/full/gen-v40-pms-reference-manual-final-eng-ch 298/474
Shift F5 -Floor Plan
The Floor Plan is a visual display of the actual facility and room layout of yourho tel. Tho ugh this screen is typically for user informational purp oses, there are
several useful functions for locating a desired guest room.
To access this screen, follow the steps below:
1. Fro m anywhere in the system, select Shift F5.
The FLOORS screen displays.
2. Highlight the desired floor and select View.
The FLOOR PLAN screen displays.
D isplayed in th e screen is a visual layout of th is floor at your hotel. Th e legend at the bo ttom of the screen indicates the housekeeping statuses that correspondto the colors in th e room blocks. In addition , any other symbols used in theplan d isplay in th e legend.
3. To view the reservation for a room with an expected arrival, either double-click the room number with your m ouse or h ighlight the room number andselect Resv.
4. To create a new reservation pre-assigned for a specific room number,highlight the room n umber in the plan and select N ew.
5. To check in an expected arrival, highlight the room numb er and selectCheck-In .
6. To exit from this screen, select Close.
©2006 MICROS® Systems Inc. All Rights Reserved. P roprietary and C onfidential.
298

7/31/2019 GEN V40 PMS Reference Manual FINAL Eng Ch
http://slidepdf.com/reader/full/gen-v40-pms-reference-manual-final-eng-ch 299/474
Shift F6 –Quick Book
F7 – New Reservation
Shift F7 –TelephoneBook
Th e Quick Book feature accesses the QUICK BUSINESS BLOCK screen.For m ore information on this feature, refer to the “Business Blocks – G roups”
chapter of th is manual.This feature accesses the RATE Q UERY screen to begin bo oking a newreservation . For more information on new reservations, refer to the“Reservations” chapter of this manual.
The Telephone Book is useful for retrieving local telephone numbers (i.e.taxis, restaurants, etc.) for guests. O nce you enter data, this screen can serve asyour automated “Concierge,” allowing you to serve your guests with greaterinformation. You can then o ffer this information to your guests and even printthe information for them.
To view this feature, follow the steps below:
1. From anywhere in the system, select Shift F7.
The TELEPHONE BOOK screen displays.
This screen has three major display areas. Th e left side of the screen con tains Category information to group telephone entries such as restaurants or taxis.The right side of the screen actually houses the telephone entries from withineach category. The lower port ion of the screen displays any Remarks or WebAddress information. Use any of the search criteria at the top o f the screen tolocate information.
©2006 MICROS® Systems Inc. All Rights Reserved. P roprietary and C onfidential.
299

7/31/2019 GEN V40 PMS Reference Manual FINAL Eng Ch
http://slidepdf.com/reader/full/gen-v40-pms-reference-manual-final-eng-ch 300/474
2. To add a new category, highlight the Category section of the screen andselect New. Enter the Category name and Description and select OK.
3. To add a new teleph one entry within a category, first select the Category and then highlight the right side of the screen before selecting New.4. E nter the Name of th e telephone entry, a Telephone number, any
Remarks and a Web Address if applicable. Select OK to save.5. To p rint a report of a specific telepho ne category, select Report.6. To open an internet window and direct to the website for the telephone
entry (i.e. www.hotels.com) highlight the telephone entry and click oncewith your mo use in the Web Address field.
7. To remove a telepho ne entry or category altogether from the database,highlight the en tries and select Delete.
8. Select Close to exit.
©2006 MICROS® Systems Inc. All Rights Reserved. P roprietary and C onfidential.
300

7/31/2019 GEN V40 PMS Reference Manual FINAL Eng Ch
http://slidepdf.com/reader/full/gen-v40-pms-reference-manual-final-eng-ch 301/474
Control F7 –TelephoneOperator
The Telephone Operator function is primarily for the P BX operator to locateguests, search for profiles, and manage guest messages, yet any Front O ffice
user can access this feature.
To view the operator screen, follow the steps below:
From anywhere in the system, select Control F7.
The T. OP ERATOR screen displays.
Use the search criteria (including Advanced search options) to locate a guest.
In the results grid, guest Name, Room number, and reservation Status display. The follow op tions are also available from th is screen:
• The Message option navigates the user to the MESSAGES screen forthe selected guest.
• The Profile op tion navigates the user to the profile of the selectedguest.
• The Trace option navigates the user to th e TRACES screen for theselected guest.
• The Locator op tion navigates the user to the N EW LOCATOR screen for the selected guest.
• The Resv. option navigates the user into the RESERVATION EDIT screen allowing the user to make modifications to the guest reservation.
©2006 MICROS® Systems Inc. All Rights Reserved. P roprietary and C onfidential.
301

7/31/2019 GEN V40 PMS Reference Manual FINAL Eng Ch
http://slidepdf.com/reader/full/gen-v40-pms-reference-manual-final-eng-ch 302/474
F8 – Log Out This feature logs the user out of the system without closing the application.When pressing F8 from anywhere within the system, an OPE RA LOGIN
screen displays.
Another user may enter their login credentials, perform a task and press F8 to log the user out again. When you select F8 to log out and then log back in, thesystem returns you to the same function you were working in before loggingout. This is mostly useful for situations where the user does not havepermission to perform a function and needs to rely on a manager or supervisorto perform the action.
To log back into the system, enter a User name and Password and select
Login.
Shift F8 –InterfacesSubmenu
NOTE: Logging out of the system using this feature only temporarily logs the user out. Without comp leting exiting the system, the main login screen (singlesign-on) still has your user credentials. To completely log out o f the system sono other user can m istakenly open another module, you must select to log off from the main OPERA webpage.
Th is feature accesses the IN TERFACE MEN U screen fo r managing thepro perty’s interfaces, such as movies, PBX, and key card systems. For moreinformation on interfaces, refer to the “In terfaces” section of this chapter.
©2006 MICROS® Systems Inc. All Rights Reserved. P roprietary and C onfidential.
302
7/31/2019 GEN V40 PMS Reference Manual FINAL Eng Ch
http://slidepdf.com/reader/full/gen-v40-pms-reference-manual-final-eng-ch 303/474
Control F8 –Maximum Availability
The Maximum Availability feature displays the hotel’s availability by roomtype for a s ingle date including overbooking or sell limits.
To view availability, follow the steps below:
1. Fro m anywhere in the system, select Control F8.
The MAXIMUM AVAILABILITY screen displays.
2. To modify the date viewed, enter a new date in the Start Date field and select Search.
Shift F9 –FunctionDiary
General H otel Availability, Maximum Availability, and Minimum (Tentative) availability display in the results depending on the numb er of individual and group reservation s sold, deducted, and blocked. In addition, RCTotals (room s committed totals) display at the bo ttom of the window.
The Function Diary is a displayable feature for hotels with convention andmeeting space. If your hotel uses OPERA Sales and Catering or the Fu nctionSpace features within the Prop erty Management System, th is screen d isplaysreservation s for meeting and convention space. Access this feature to viewevents and meetings plan in specific function rooms at your hotel.
For m ore information on this feature, refer to the O PE RA Version 4.0 – Salesand Catering Reference Manual.
©2006 MICROS® Systems Inc. All Rights Reserved. P roprietary and C onfidential.
303

7/31/2019 GEN V40 PMS Reference Manual FINAL Eng Ch
http://slidepdf.com/reader/full/gen-v40-pms-reference-manual-final-eng-ch 304/474
Additional Miscellaneous Features
Reports O PE RA has a vast and robust report capability. The Reports option is thefeature to access and print any report in the system.
To print a report, follow th e steps below:
1. From the main menu, select Miscellaneous and Reports.
The REPORTS screen displays.
2. To search for a specific report by name, enter the report name in the Report field and select Search.
3. All reports categorize into groups based on the information the reportscontains. To view only reports within a specific category, click the drop
down arrow next to the Report Group field to choose the function area(i.e. D eparture, Financial, and H ousekeeping).4. O nce you locate the report, highlight the report and select OK.5. You may also select to Fax/ Email or Print to File explained later in this
section . Additionally, you may alter the number of Copies to print or theCurrent Printer designated for that workstation.
©2006 MICROS® Systems Inc. All Rights Reserved. P roprietary and C onfidential.
304

7/31/2019 GEN V40 PMS Reference Manual FINAL Eng Ch
http://slidepdf.com/reader/full/gen-v40-pms-reference-manual-final-eng-ch 305/474
In most cases, the next screen that displays is a “filter” screen for modifying theview of the generated report. These screens differ based on the report selected.
Filters are specific for each report, and some reports do not contain any filtersand therefore customization of the repo rt cannot occur.
6. Select any applicable filter criteria, parameters, check boxes, and radio
but tons to customize the report to your liking.7. Select an option at the botto m of the filter screen to continue.
Located at the bottom of the filter and parameter screens are the 3 op tions:
• Preview allows the user to view the report o n screen without sendingthe report to any printer. The user can choose to print the report afterselecting the preview op tion. When previewing reports, the report displays as a Portable Document Format (PD F) file in Adobe AcrobatReader.
• Print sends the report directly to the defined workstation printer. The
report does not display on screen for any type of preview.• File op tion allows the user to save the report (in PD F file format) to a
designated file or directory on th e local workstation . This is ideal foremailing reports.
• Close exits the reports filter without generating the report.
For m ore information on the available repo rts, how to filter or customize areport, and general report de tails, refer to the O PERA PMS Version 4.0 – To pReports Guide.
©2006 MICROS® Systems Inc. All Rights Reserved. P roprietary and C onfidential.
305

7/31/2019 GEN V40 PMS Reference Manual FINAL Eng Ch
http://slidepdf.com/reader/full/gen-v40-pms-reference-manual-final-eng-ch 306/474
Reports Scheduler
The Report Scheduler allows the h otel to set standard time for reports togenerate and automatically print or save to a file location.
To schedule and manage reports in the scheduler, follow the steps below:
1. From the main menu, select Miscellaneous and Reports Scheduler.
The SCHEDULES screen displays.
Search criteria at the top of the screen yields actual Scheduled Reports in the center of the screen. The methods and parameters used for the scheduledreports d isplay at the bottom of th e screen (i.e. report comm unicating toprinter, report communicating to email, report sending to file, etc.).
©2006 MICROS® Systems Inc. All Rights Reserved. P roprietary and C onfidential.
306

7/31/2019 GEN V40 PMS Reference Manual FINAL Eng Ch
http://slidepdf.com/reader/full/gen-v40-pms-reference-manual-final-eng-ch 307/474
2. Within the SCHEDULES screen, select New to add a new reportschedule.
The REPORTS screen appears.
3. Highlight the report you wish to scheduled and select OK.
The SCHEDULE screen appears.
©2006 MICROS® Systems Inc. All Rights Reserved. P roprietary and C onfidential.
307

7/31/2019 GEN V40 PMS Reference Manual FINAL Eng Ch
http://slidepdf.com/reader/full/gen-v40-pms-reference-manual-final-eng-ch 308/474
4. E nter the Date and Time the report is to begin printing.5. In the Repeat area select the frequency for the report to print.
6. The Repeat Until area defines the end Date and Time for the report toprint. Choose the opt ion Indefinite if the report is to remain on theschedule.
7. Select OK to finalize the schedule.8. If the report has parameters, select all applicable filters for the report.9. Select how to generate the report (Preview, Print, or File).
Any reports scheduled to print now display in th e list. At the designated dateand time, the reports automatically generate to the listed output.
Some additional options from the SCHEDULES screen are as follows:
• To toggle between reports listed for a scheduled time, and the actualscheduled print outs that took place, select the Reports option. To goback to viewing schedules, select Schedules.
• To delete or edit any existing report schedules, select Delete or Edit.
• To view a report already submitted for printing, highlight the report andselect View.
• To run a schedule report listing now instead of waiting for thescheduled time, select Run Now.
• To refresh the display at any given time and update the latest reportsprinted , select Refresh.
©2006 MICROS® Systems Inc. All Rights Reserved. P roprietary and C onfidential.
308

7/31/2019 GEN V40 PMS Reference Manual FINAL Eng Ch
http://slidepdf.com/reader/full/gen-v40-pms-reference-manual-final-eng-ch 309/474
Interfaces
E very ho tel has different charge interfaces that connect with O PERA. Most hotels, by standard have a teleph one o r PBX interface, a key-card interface(such as VingCard or T ESA), a voice mail interface, and a movie interface (suchas Lodgenet). Full service hotels with Food and Beverage outlets have F&Binterfaces (such as MICROS PO S). The Interface option h as the optionavailable for all users to access each installed interface.
The Interface Sub Menu displays all installed interfaces and their connectionstatus. If an interface is not functioning, access this feature to check for thestatus of the interface.
Alternately, this menu allows som e additional op tions like generating aduplicate key for a guest or deactivating long distance calls and in-room movies.For each of these features to operate, the interface installed must allow thefunctionality control from this menu.
©2006 MICROS® Systems Inc. All Rights Reserved. P roprietary and C onfidential.
309

7/31/2019 GEN V40 PMS Reference Manual FINAL Eng Ch
http://slidepdf.com/reader/full/gen-v40-pms-reference-manual-final-eng-ch 310/474
Change Password
E ach user has the ability to chan ge his or her login password at any time. Mostuser names are set to expire on a regular basis requiring frequent password
changes for security purposes.
To change your login password at any time for your user login or cashier login,follow the steps below:
1. From the main menu, select Miscellaneous and Change Password.
The CHANGE USER PASSWORD screen displays:
2. E nter your Old Password . 3. E nter a New Password. Passwords m ust be at least six characters in
length with one num ber.4. Re-enter the same password to Confirm N ew Password and select OK
Track It –Dashboard
NOTE: The next time you log into O PE RA from the main sign-on screen,
the new password takes effect.The Track It! option allows to t rack the intake and delivery of items includingluggage, parcels, laundry and lost and foun d items. In addition , this featureincludes a possible tracking module for valet parking.
To view and use the main Track It feature, follow the steps below:
1. From the main menu, select Miscellaneous and Track It.
2. Select Dashboard
©2006 MICROS® Systems Inc. All Rights Reserved. P roprietary and C onfidential.
310

7/31/2019 GEN V40 PMS Reference Manual FINAL Eng Ch
http://slidepdf.com/reader/full/gen-v40-pms-reference-manual-final-eng-ch 311/474
The TRACK IT DASH BOARD screen displays.
Th is screen consists of f ive main areas:
• Search – search criteria for locating parcels, valet, baggage or
lost/ found items by Ticket Number. Also includes ability to accessthe hotel’s Phone Book and to print a Track It report. Search resultsdisplay in the grid below.
• Log Book and Events – any items in the Log Book for the user’sdepartment or Sales and Catering Events list in this display area for thebellman’s interest.
• Track It Details – area to input new tickets for a parcel, valet, baggageor lost/ found item.
• Reservation Details – are to select the guest to attach or detach atracked item
©2006 MICROS® Systems Inc. All Rights Reserved. P roprietary and C onfidential.
311

7/31/2019 GEN V40 PMS Reference Manual FINAL Eng Ch
http://slidepdf.com/reader/full/gen-v40-pms-reference-manual-final-eng-ch 312/474
3. To create a new Track It ticket, select New from th e Track It D etailssection.
4. Click the drop down arrow next to Track It Group and choose theapprop riate group. Use “Parcel” to track packages and deliveries; use“Valet” to track parked cars via the valet service – your hotel may also usethis to track laundry/ valet; use “Baggage” to t rack luggage stored forarriving and departing guests; use “Lost” to track lost and found items.
5. E nter a Ticket Number if applicable.6. Click the drop down arrow next to Type to select the type of item from the
Track It Group.7. Click the drop down arrow next to Action to cho ose the activity on the
item (storing, delivering, etc.)8. Click the drop down arrow next to the Location field to select th e location
of a stored item (i.e. behind front desk, bellman closet, etc.)
9. E nter the Quantity of the item(s) (i.e. 2 bags) and a Description if applicable.
10. Choo se a Follow Up Date for a reminder on reports to follow up with theguest.
11. Select Save to store th e item in the T rack It database.
NOTE: You may also view history on a Track It item by searching for theitem and selecting History. In addition , you m ay remove an unwanted Track Ititem without deleting by selecting Cancel. To attach a Track It item to an existing guest reservation or in-house guestrecord, follow the steps below:
1. From the main menu, select Miscellaneous, and then Track It.2. Select Dashboard.3. Search for an existing ticket or create a new one.4. O nce you locate the ticket or complete a new one, highlight the item in the
left hand side of the screen.5. In the lower right hand corner of the screen, select Attach 6. Locate the desired reservation from the RESERVATIONS search screen.7. Highlight the desired record and select OK.
The Track It item now displays the reservation details in connection with the
ticket.To detach a Track It item from an existing guest record, highlight the ticket inthe search results window and select Detach.
©2006 MICROS® Systems Inc. All Rights Reserved. P roprietary and C onfidential.
312

7/31/2019 GEN V40 PMS Reference Manual FINAL Eng Ch
http://slidepdf.com/reader/full/gen-v40-pms-reference-manual-final-eng-ch 313/474
Track It –Valet
The Track I t! Valet Dashboard is useful for valet parking department fortracking vehicles, processing vehicle locations, and other pertinent owner
information.
To view and use the valet feature, follow the steps below:
1. From the main menu, select Miscellaneous and Track It.2. Select Valet.
The VALET screen appears.
3. To add a newly parked car, select New.
The VALET – NEW screen displays.
4. E nter a Ticket Number given to the guest when the car dropped off. 5. Click the drop down arrows next to Type, Action, and Location to
identify each. 6. E nter any addition Reference or Description information and select Save.
©2006 MICROS® Systems Inc. All Rights Reserved. P roprietary and C onfidential.
313

7/31/2019 GEN V40 PMS Reference Manual FINAL Eng Ch
http://slidepdf.com/reader/full/gen-v40-pms-reference-manual-final-eng-ch 314/474
The following options are also available from the VALET screen for managingparking services:
• To print a repo rt of all cars valet parked, select Report.
• To view a display of all incoming house activity, select H ouse Stat.
• To edit an existing valet entry, search for and highlight the record, thenselect Edit.
• To delete an existing valet entry, search fo r and h ighlight the record,then select Delete.
©2006 MICROS® Systems Inc. All Rights Reserved. P roprietary and C onfidential.
314

7/31/2019 GEN V40 PMS Reference Manual FINAL Eng Ch
http://slidepdf.com/reader/full/gen-v40-pms-reference-manual-final-eng-ch 315/474
Log Book The Log Book is a feature to enhance commun ications between shifts. Asguest activity constantly requires shift associates to m ake notes of specific
requests and to log each request to pass on from shift to shift, the Log Bookreplaces the manual need to write such requests. Use the Log Book to givespecific instructions from one shift to the next on guest activity.
To leave a note in the Log Book for the next shift or for another associate,follow the steps below:
1. From the main menu, select Miscellaneous and Log Book .
The LOG BOOK screen displays.
2. To view Log Book entries for your department , select the Log Date and Department at the top o f the screen and select Search .
3. To create a new entry in the Log Book, select N ew.4. Choose the Department to view the log entry and to day’s Date and Time.
NOTE: Any Log Book entries for future dates and times do not display unlessthat log date is either active or you have directly searched for it.
5. E nter any Details for th e log entry and select OK.
The following options are also available from within this screen:
• To print logged details for your department, select Report.
• To edit an existing logged en try, highlight th e entry and select Edit.
• To delete an existing logged entry, highlight the en try and select Delete.
©2006 MICROS® Systems Inc. All Rights Reserved. P roprietary and C onfidential.
315

7/31/2019 GEN V40 PMS Reference Manual FINAL Eng Ch
http://slidepdf.com/reader/full/gen-v40-pms-reference-manual-final-eng-ch 316/474
Registration Cards
The Registration Cards option prints batch registration cards for arrivingguests. If your hotel pre-registers guests, this is a common feature to use on a
daily basis.
To print batch Registration Cards, follow the steps below:
1. From the main menu, select Miscellaneous and Registration Cards.
The PRINT REGISTRATION FORMS screen displays.
2. The hotel’s default Registration Card po pulates the Registration Form field, as does today’s Arrival Date.
3. Select to print batch registration cards for either reservation s forIndividuals or Blocks or both.
4. Check the filter to Print if City is Omitted , if these guests are to b eincluded.
5. To print registration cards for a particular Room Class (i.e. Executive
Level) or Membership Type, click on the drop down arrow next to thefield and select the app ropriate value.
6. Select the Sort Order that you prefer the cards to print (i.e. Alph abetical).7. Choose any other filters as necessary and select Print.
NOTE: Registration cards fo r arriving reservations no t pre-assigned to aroom number print with the Room N o. field blank. You may elect to repr intthe registration card at any time during check in or once the guest is in house.
©2006 MICROS® Systems Inc. All Rights Reserved. P roprietary and C onfidential.
316

7/31/2019 GEN V40 PMS Reference Manual FINAL Eng Ch
http://slidepdf.com/reader/full/gen-v40-pms-reference-manual-final-eng-ch 317/474
Advanced Miscellaneous Features
Data Extraction Data Extraction offers your hotel the flexibility to pull data from the maindatabase and export it to another tool. Most comm only, Sales departmentsuse this utility to extract profile data on guests, companies and groups for usein other system. D ata Extraction o ffers multiple options to extract datadirectly from database tables into other programs.
To perform a D ata Extraction , follow the steps below:
1. From the main menu, select Miscellaneous .2. Select Data Extraction.3. Select Data Extraction Query.
The DATA EXTRACTION QUERY SEARCH screen displays.
4. Select New to create a new query.
©2006 MICROS® Systems Inc. All Rights Reserved. P roprietary and C onfidential.
317

7/31/2019 GEN V40 PMS Reference Manual FINAL Eng Ch
http://slidepdf.com/reader/full/gen-v40-pms-reference-manual-final-eng-ch 318/474
The DATA EXTRACTION QUERY screen displays.
5. E nter a Query Name for the extraction (i.e. Com pany Profiles in US with AR Accounts)
6. Click the drop down arrow next to the Step 1 Select a Data Source fieldto select a data source.
7. Click the drop down arrow next to the Step 2 Select a Field for FilterCondition field to select a filter field. The DATA SOURCE FIELDSscreen lists all available fields in the data source. For example, if the datasource is Profiles, then the filters available are tho se fields on a profilescreen.
8. Click the drop down arrow next to the Step 3 Specify a FilterCondition field to apply a filter condition. For filter conditions withvalues, enter the value(s) in the white text bo x.
NOTE: The AND/ OR and () buttons allow you to write advanced filters.
9. Select Add next to the Step 4 Apply the Filter Condition field to insertthe chosen filter and its condition .
10. Repeat the fields for Step 2 and Step 3 until all applicable filters areadded to the white display window at the bottom of the screen.
11. Select Save to save the query and Process to process the query.
©2006 MICROS® Systems Inc. All Rights Reserved. P roprietary and C onfidential.
318
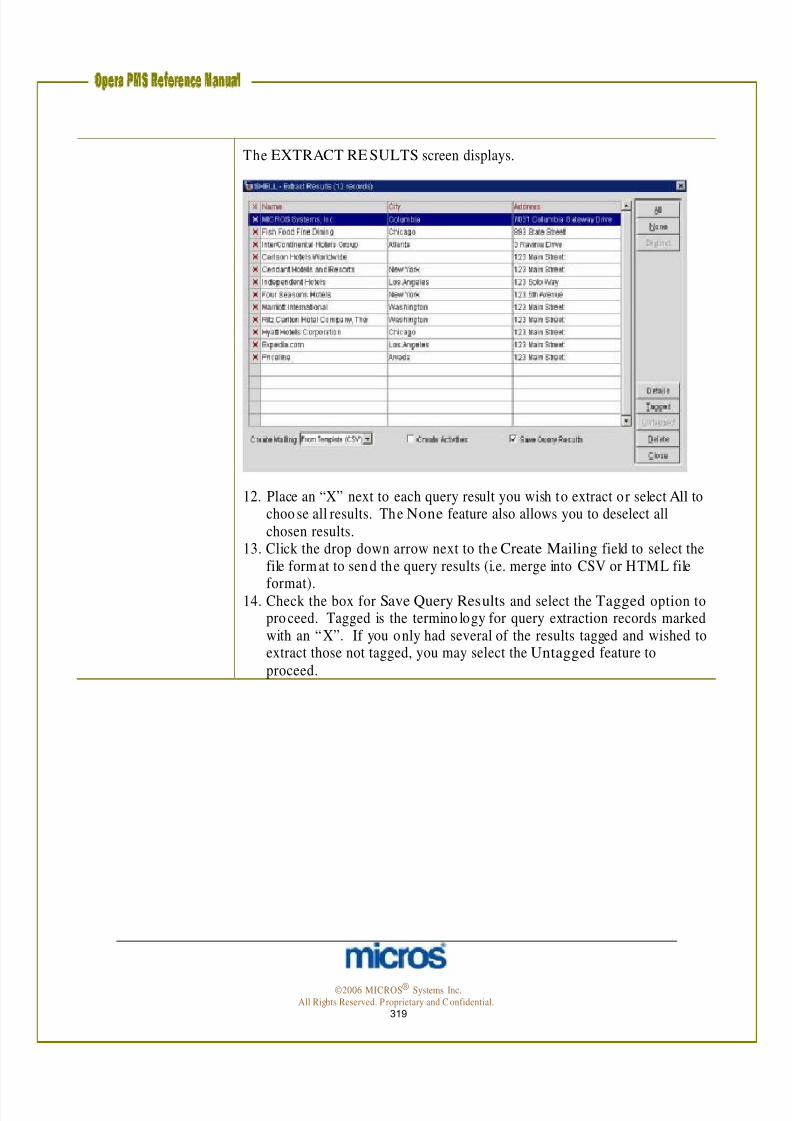
7/31/2019 GEN V40 PMS Reference Manual FINAL Eng Ch
http://slidepdf.com/reader/full/gen-v40-pms-reference-manual-final-eng-ch 319/474
The EXTRACT RE SULTS screen displays.
12. Place an “X” next to each query result you wish to extract or select All to choo se all results. The None feature also allows you to deselect allchosen results.
13. Click the drop down arrow next to the Create Mailing field to select thefile form at to send the query results (i.e. merge into CSV or HTML file
format).14. Check the box for Save Query Results and select the Tagged option topro ceed. Tagged is the termino logy for query extraction records markedwith an “ X”. If you only had several of the results tagged and wished toextract those not tagged, you may select the Untagged feature toproceed.
©2006 MICROS® Systems Inc. All Rights Reserved. P roprietary and C onfidential.
319

7/31/2019 GEN V40 PMS Reference Manual FINAL Eng Ch
http://slidepdf.com/reader/full/gen-v40-pms-reference-manual-final-eng-ch 320/474
The MERGE FIE LD LIST screen displays.
15. Select New to create a field list of columns to pull into your extractions. In other words, the list you are creating allows you to define the actualdata columns that merge into the file (while separating unwanted dataout). If a field list for th is type of extraction already exists, you mayhighlight it and select OK.
©2006 MICROS® Systems Inc. All Rights Reserved. P roprietary and C onfidential.
320

7/31/2019 GEN V40 PMS Reference Manual FINAL Eng Ch
http://slidepdf.com/reader/full/gen-v40-pms-reference-manual-final-eng-ch 321/474
The FIE LD LIST screen displays.
16. Enter the Field List Name to define the type of mailing you intend to send (i.e. AR Company Mailing).
17. Highlight any Available Fields in the data column and select Add tomove them to the Selected Fields column. To undo a selection ,
highlight the selected field and choose Remove.18. Select OK to return to the MERGE FIELD list screen.19. Highlight the saved list (i.e. AR Company Mailing) and select OK.
Th e data extracts into either a Microsoft E xcel file (CSV) or into a web file(HTML) for manipulating and viewing.
©2006 MICROS® Systems Inc. All Rights Reserved. P roprietary and C onfidential.
321

7/31/2019 GEN V40 PMS Reference Manual FINAL Eng Ch
http://slidepdf.com/reader/full/gen-v40-pms-reference-manual-final-eng-ch 322/474
Print Tasks To print directly from an O PE RA workstation, Print Tasks must exist. Print Tasks ident ify the default printer for any system related print jobs. For
example, all registration cards from the workstation can go to the F ront D eskprinter, while directing AR statements to a different printer in the BackOffice.
To setup new print tasks for the workstation you currently are working on,follow the steps below:
1. From the main menu, select Miscellaneous and Print Tasks.
The PRINT TASKS screen displays any current print tasks for yourworkstation. The Physical Device is the p rinter listed fo r each task.
2. To add a new print task, select New.
The PRIN T TASK – NE W screen displays.
©2006 MICROS® Systems Inc. All Rights Reserved. P roprietary and C onfidential.
322

7/31/2019 GEN V40 PMS Reference Manual FINAL Eng Ch
http://slidepdf.com/reader/full/gen-v40-pms-reference-manual-final-eng-ch 323/474
3. Click the drop down arrow next to the Printer field to select the printer.4. Click the drop down arrow next to the Print Task field and choose the
individual print tasks to send to the chosen printer.
NOTE: If all print tasks should go to this printer, select All from the tasklist.
User Activity Log
5. Select OK to save changes. 6. To modify an existing printer for a print task, highlight the task and select
Edit.
The User Activity Log is a valuable resource fo r investigating h istory andresearching a particular user’s activity on any given business date. Use thisscreen to view the date and times actual system transactions took place and
print the results if necessary.
To access the User Activity Log, follow th e steps below:
1. From the main menu, select Miscellaneous and User Activity Log.
The USER ACTIVITY LOG screen displays.
©2006 MICROS® Systems Inc. All Rights Reserved. P roprietary and C onfidential.
323

7/31/2019 GEN V40 PMS Reference Manual FINAL Eng Ch
http://slidepdf.com/reader/full/gen-v40-pms-reference-manual-final-eng-ch 324/474
2. Click on the drop down arrow next to the User field and select thedesired user to research.
3. Choose a radio button to th e right to indicate the module for the activity(i.e. Reservations, H ousekeeping, etc.)4. E nter the Date/ To date range and select one of the radio buttons to the
right to search fo r activity in a p articular module of the system.5. Select the Type of activity within th at mo dule (i.e. New Reservation).6. You may also further refine your search by entering details in the Text
search field.7. Select Search.
Th e user’s activity displays in the results window o f th e USER ACTIVITYLOG screen.
8. To view the Description on a particular activity, dou ble-click the activitywith the mouse to open a description window or highlight the line itemand select Details.
9. To p rint th e results from a user activity search, select Report.
©2006 MICROS® Systems Inc. All Rights Reserved. P roprietary and C onfidential.
324

7/31/2019 GEN V40 PMS Reference Manual FINAL Eng Ch
http://slidepdf.com/reader/full/gen-v40-pms-reference-manual-final-eng-ch 325/474
Memberships The Memberships feature gives you th e flexibility to add m embershipnumbers to existing or past reservations to award guest points. In addition,
you are able to use this feature to apply one membership number as a hostfor several reservations (i.e. one membership number for five rooms allawarded to the same number).
To add a membership record to a reservation for points, follow the stepsbelow:
1. From the main menu, select Miscellaneous and Memberships.
The ATTACH MEMBERSHIP S TO RESERVATIO NS screen displays.
2. Click the drop down arrow next to the Guest field and search for the Checked O ut reservation.
3. Click the drop down arrow next to the Member Type field to selectfrom an existing m embership on the guest profile.
4. Place an “X” next to the memb ership to add and select OK.5. If a mem bership does not exist, select New from within the
MEMBERSHIPS screen to add a new one.
NOTE: For m ore information on adding memberships to a guest profile,refer to the “ Profiles” chapter of this manual.
6. Select Calculate.7. Answer “Yes” to add the membership and calculate points.8. Select OK to the con firmation message.
©2006 MICROS® Systems Inc. All Rights Reserved. P roprietary and C onfidential.
325
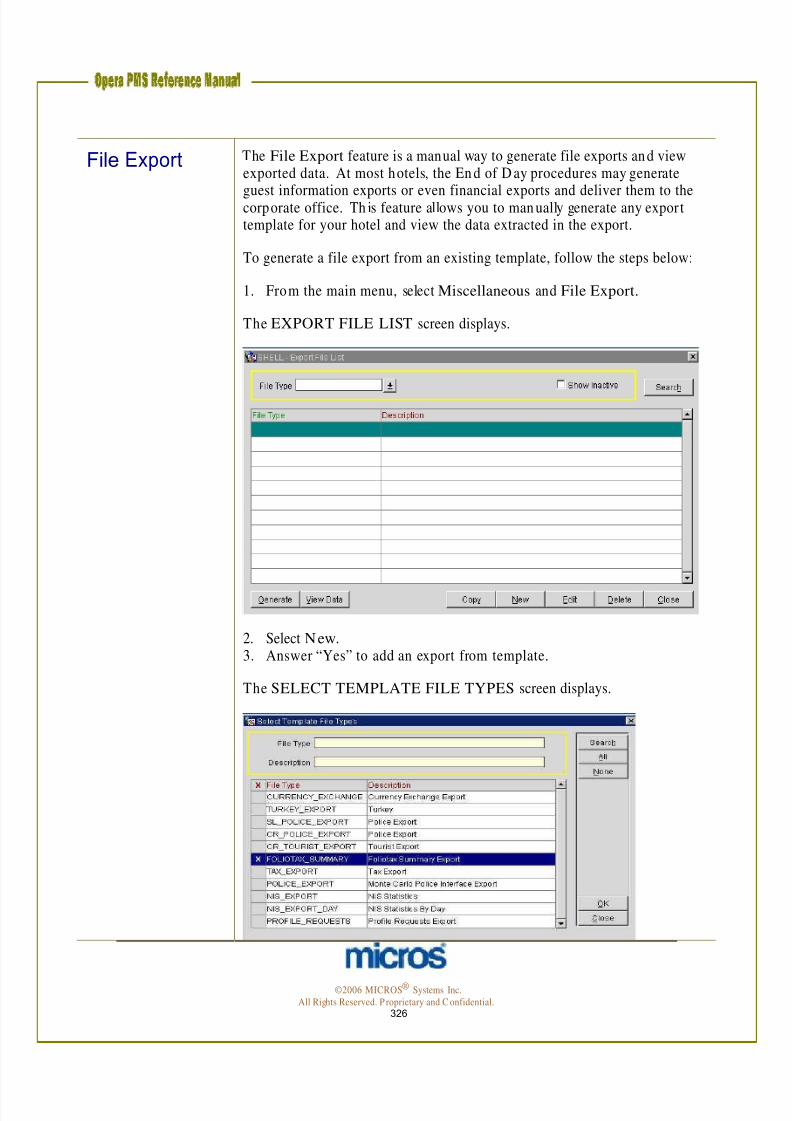
7/31/2019 GEN V40 PMS Reference Manual FINAL Eng Ch
http://slidepdf.com/reader/full/gen-v40-pms-reference-manual-final-eng-ch 326/474
File Export The File Export feature is a manual way to generate file exports and viewexported data. At most hotels, the En d of D ay procedures may generate
guest information exports or even financial exports and deliver them to thecorporate office. Th is feature allows you to man ually generate any exporttemplate for your hotel and view the data extracted in the export.
To generate a file export from an existing template, follow the steps below:
1. From the main menu, select Miscellaneous and File Export.
The EXPORT FILE LIST screen displays.
2. Select New. 3. Answer “Yes” to add an export from template.
The SELECT TEMPLATE FILE TYPES screen displays.
©2006 MICROS® Systems Inc. All Rights Reserved. P roprietary and C onfidential.
326

7/31/2019 GEN V40 PMS Reference Manual FINAL Eng Ch
http://slidepdf.com/reader/full/gen-v40-pms-reference-manual-final-eng-ch 327/474
4. Place an “X” next to the file export template you desire and select OK.
Th e export file chosen lists in the display.5. Select Generate.
The EXPORT FILE TYPES screen displays.
6. Select Generate again. 7. E nter any parameters required for the export and select Start.8. Answer “Yes” to view generated data.
The EXPORT DATA LIST screen displays.
9. To view the raw data collected in the export, select View.
©2006 MICROS® Systems Inc. All Rights Reserved. P roprietary and C onfidential.
327

7/31/2019 GEN V40 PMS Reference Manual FINAL Eng Ch
http://slidepdf.com/reader/full/gen-v40-pms-reference-manual-final-eng-ch 328/474
The EXPORT DATA screen displays.
10. To generate the file and save it local to the server, select Generate File.
The EXPORT screen displays.
11. Enter a File Name and File Extn. (i.e. taxexport.xls) and select OK. 12. To zip the generated file, select Zip File.
©2006 MICROS® Systems Inc. All Rights Reserved. P roprietary and C onfidential.
328

7/31/2019 GEN V40 PMS Reference Manual FINAL Eng Ch
http://slidepdf.com/reader/full/gen-v40-pms-reference-manual-final-eng-ch 329/474
File Download The File Download feature enables you to download saved export files from the server to your local workstation. For example, if a membership export
was saved to your server, and you have reason to view the f ile locally, use th isop tion to accomplish th is.
To download a file locally from a server location , follow the steps below:
1. From the main menu, select Miscellaneous and File Download .
The FILE DOWNLOAD screen displays.
2. E nter the desired file in the File Name field and select Search. 3. Highlight the file and select Download .4. Select Save to download the file and save to your local workstation.
A directory dialogue bo x displays.
5. Choose the directory folder to save the file and select Save.
©2006 MICROS® Systems Inc. All Rights Reserved. P roprietary and C onfidential.
329

7/31/2019 GEN V40 PMS Reference Manual FINAL Eng Ch
http://slidepdf.com/reader/full/gen-v40-pms-reference-manual-final-eng-ch 330/474
Chapter 9 – End of Day
©2006 MICROS® Systems Inc. All Rights Reserved. P roprietary and C onfidential.
330
7/31/2019 GEN V40 PMS Reference Manual FINAL Eng Ch
http://slidepdf.com/reader/full/gen-v40-pms-reference-manual-final-eng-ch 331/474
Overview Hotel properties use the End of D ay sequence to close and balance each businessday's financial activities. Some of the processes the End o f Day sequence
performs includes, reconciling guests' folios, processing credit card transactions,generating fixed charges postings, calculate and print the d aily statistics, provide acumulative balance of accounts receivable, and purge old data. Th e sequencecloses each business day and assures the financial accuracy of the fo llowingbusiness day. Through a vast reporting system, the E nd of Day sequence assistsmanagemen t with interpreting operations, forecasting, and retrieving of statisticalinformation.
The End of D ay sequence follows a prearranged routine designed to update theguest folio, balance and close the property's records for that day, and prepare anddistribute a range of reports.
The business date in OPERA is not automatically changed when the real datechanges. The End of Day sequence is the trigger that moves the system dateforward by one date. Therefore, it is possible to run the End of Day sequenceprior to th e real date change or the next morning.
There are three comp onents to the audit process:
PRE-AUDIT WORK: This portion is completed prior to the runn ing of the Endof D ay. Th is work entails runn ing reports and ensuring the hotel as a whole is inbalance. The procedures outlined in this guide are minimum suggested proceduresand these may change for each individual property.
RUNN ING AUDIT: This portion is actually performing the E nd o f Daysequence. Th e system performs all of the date closure processes and functionsand prints reports.
POST AUDIT WORK: This portion is completed after the En d of D aysequence comp letes. The p rimary function of th is componen t is preparing theho tel for the new day. The procedures outlined in this guide are minimumsuggested procedures and these may change for each individual property.
©2006 MICROS® Systems Inc. All Rights Reserved. P roprietary and C onfidential.
331

7/31/2019 GEN V40 PMS Reference Manual FINAL Eng Ch
http://slidepdf.com/reader/full/gen-v40-pms-reference-manual-final-eng-ch 332/474
Pre-Audit Work
This checklist is only a generic checklist to follow as an example for trainingpurposes. Please refer to your property specific End of Day or N ight Audit
checklist for a complete list o f audit tasks.
1. Review com munication from the previous shift (Log Book).2. Count and verify your bank prior to the previous shift’s departure.3. Print your shift reports: G o to Miscellaneous, then Reports; change the
Report Group to “Shift Reports” and select the shift reports for the auditshift which typically include:
• G uest In-Ho use by Room (sorted alphabetically and by room)
• Arrivals Detailed (sorted alph abetically with no tes/ com ments)
• D epartures (sorted by room )
• Housekeeping Status
• G uest IN H: Cash P ayment Method
• Credit Limit (all payments)
• G uest INH : Reservation Traces
• Arrivals: VIP Report
NOTE: These reports m ay be scheduled to print automatically through theReports Scheduler.
4. Review daily arrivals. Check for duplicate reservations, block special requests,and split reservations with multiple rooms.
5. Review the Credit Limit report for high balances and up date app rovals, if needed through either manual or batch autho rizations.6. Review Trace report and com municate with appropriate departments.7. Review VIP arrivals and com municate with Housekeeping and Room Service
to ensure the rooms are completely ready.8. Throughout the evening, print D O WNTIME or emergency reports as
necessary.
NOTE: These reports m ay be scheduled to print automatically through theReports Scheduler.
9. Post all manual charges.
10. Check for Lost Interfaces postings (room # 9500); the PM account shou ldalways have a zero balance. If there is a balance, determine which guest thecharges belong and transfer or adjust them.
11. Follow through and resolve any Discrepant Room s in Housekeeping.12. Print the Guests In-House Complimentary report and verify if the rooms
listed as comp limentary are correct.
©2006 MICROS® Systems Inc. All Rights Reserved. P roprietary and C onfidential.
332

7/31/2019 GEN V40 PMS Reference Manual FINAL Eng Ch
http://slidepdf.com/reader/full/gen-v40-pms-reference-manual-final-eng-ch 333/474
13. Perform a bucket check. Look for and verify the following on each guest’sregistration card:
• N ame – correct name on the room
• Room # - correct guest in the correct room number
• Rate – correct rate to charge the guest
• Rate Code & Market Code – correct rate/ market code
• D eparture D ate – correct departure date for the guest
• Tax Exempt status – correct tax status
• Routing Instructions – setup if applicable
• Payment Type – check for credit card imprint
• Comp/ Hou se – ensure that these are approved by management
• Signature – required on all registration cards
• Address – required on all profiles and registration cards
14. Perform the E nd of D ay Sequence and th e following list is of suggested En dof D ay Reports:
• Trial Balance (trial_balance)
• Guest Ledger (guest_ledger)
• Package Ledger Detail (effpkgledgerdtl)
• Manager’s Report (manager_report)
• Cashier Audit (finpayments)
• No Show Report (nanoshow)• In H ouse G uest List (gibyroom)
• Financial Payments and Revenue (findeptcodes)
• O pen Balance All (finopb alall)
• Journal by Cashier and Transaction Report (finjrnlbytrans)
• Paid O uts (finpaidout)
• AR Ledger (arledger)
• G uests In H ouse: Complimentary (gi_c_h)
• Group in House by Room (grpinhousebyroom)
• G roup in H ouse Summary (nagrpbussumm)
• A/ R Ledger Aging Detail (aragingdet)• A/ R Ledger Aging Summary (aragingsum)
• Reservation Traces (gitraces)
• Rate Variance (gi_ratevariance)
• Credit Limit Report (gi_auth limit)
• Market Segment To tals (res_forecast2)
• Reservation Statistics (res_statistics2)
• D eposit Transfer at C/ I (nadeptransci)
©2006 MICROS® Systems Inc. All Rights Reserved. P roprietary and C onfidential.
333

7/31/2019 GEN V40 PMS Reference Manual FINAL Eng Ch
http://slidepdf.com/reader/full/gen-v40-pms-reference-manual-final-eng-ch 334/474
15. Verify that all manual wake-up calls are entered into the pho ne system.16. Balance your shift work, close your Cashier, and then at the end of your shift
print your Cashier Report. Coun t your drawer, and drop your deposit.17. Comm unicate with the next shift any unusual activities and guest service itemsto know for the following shift.
©2006 MICROS® Systems Inc. All Rights Reserved. P roprietary and C onfidential.
334

7/31/2019 GEN V40 PMS Reference Manual FINAL Eng Ch
http://slidepdf.com/reader/full/gen-v40-pms-reference-manual-final-eng-ch 335/474
Running the Audit
After all pre-work is accomplished, follow the steps below to being the systematicaudit and roll the business date:
1. Check that all users in the Back O ffice, Front D esk, and PBX have loggedcompletely out of the application and closed their session.
NOTE: Closing open cashiers will no t make a drop for them. Any unsettled orun-dropped balances carry over to the next business date for each cashier.
2. To start the Night Audit, return to the main OP ERA web page and select End of Day. Alternately, from within the app lication , you may select End of Day and Night Audit.
3. Enter your User Name and Password. 4. Select today’s Business Date and choose Login.
O PERA verifies there is enough disk space to proceed and displays the END OFDAY screen.
5. Select Start to b egin. 6. The first step in the routine is to perform a country and state check on all
reservations. This ensures that each record has a suitable address. If itidentifies records with m issing information , the results d isplay in a separatewindow.
7. N ext, the system auto matically processes any arrivals yet to check in as a noshow and their reservation status changes. If your ho tel uses the Rolling N oShow feature, those reservations with reservation types designated to rollautom atically roll the arrival date of the reservation to the next day.
8. N ext, a check for any remaining Departures not Checked Out occurs andremaining departures display. E ither extend th e guest stay or check out theguest. Process all of the departure’s on the screen as the End o f D ay sequencecanno t con tinue with departures remaining. Select OK after clearing alldepartures.
©2006 MICROS® Systems Inc. All Rights Reserved. P roprietary and C onfidential.
335

7/31/2019 GEN V40 PMS Reference Manual FINAL Eng Ch
http://slidepdf.com/reader/full/gen-v40-pms-reference-manual-final-eng-ch 336/474
9. The next procedure ensures the current user’s cashier is closed if it is notclosed then the system promp ts, “Do you want to Close the Cashier?”
Answer “Yes” and close your Cashier.10. Finally, the system automatically closes any cashiers that have no t closedthem selves. Answer “Yes” to close all open cashiers. You can prevent this bychecking the Cashier Status screen in the Cashier Functions prior torunning En d of D ay.
11. Enter any weather and notes information. This is a perfect opportunity toenter notes for the cover page of audit reports that you distribute tomanagement. An example of notes to enter here are if you have suggestionsfor corrections and adjustment for day shifts.
12. N ext, the business date rolls. A message app ears on the screen, sending asignal to all users indicating they are to log out of the system. After 1 minute,the system automatically severs the user’s connection, and the End of Daysequence continues. The system date rolls forward to th e next day.
13. As the actual audit begins, a window appears showing po stings for Room, Tax,Fixed Charges, Packages, and P ackage Profit and Loss followed by thesystematic En d of D ay procedures. To the right o f this window, the statusdisplays as “RUN N ING ” (in Blue).
14. If any of the procedures display as “FAILE D ” (in red), you m ust exit theN ight Audit. For any failures during Room and Tax postings, exit the auditand investigate the room number causing the failure. Most com monly, afailure to post occurs when a Rate Code does no t exist on th e reservation .Resolve the discrepancy and log back into the audit. Be careful to select thelast bu siness date, as a new day now exists because the business date ro lled.
Select Start to begin where you left off.15. After addition al procedures run , users may log back into the system and
continue working on the new business date.16. In the final step, the system automatically prints Night Audit reports to the
printer. While not all reports that list actually print (som e on ly file), you cansee the status of each report as it prints. If pr inting fails for any reason, you
may regenerate and reprint audit repo rts at any time in the application. Referto the “Reprint N ight Audit Reports” section of th is chapter for m ore details.
17. The N ight Audit is now com plete: Select OK.
©2006 MICROS® Systems Inc. All Rights Reserved. P roprietary and C onfidential.
336
7/31/2019 GEN V40 PMS Reference Manual FINAL Eng Ch
http://slidepdf.com/reader/full/gen-v40-pms-reference-manual-final-eng-ch 337/474
Post-Audit Work
Vital to the hotel’s success, night auditors report to department heads eachbusiness day’s financials, arrivals and departures, and statistics needed for hotel
op erational decisions. To b egin the new day, many auditors print reports for eachdepartment and place them in their app ropriate in-bo xes. Auditors may assisttheir hotels by:
• Providing Housekeeping Status reports for in-coming Housekeeping staff or possibly break out the ho tel using the Roo ms Management feature. Formore information on managing task assignment sheets, refer to the“Room s Management – Housekeeping” chapter of t his manual.
• Printing Batch Fo lios for express checkouts or early departure groups. Fo rmore details on printing batch folios, refer to the “Cashiering” chapter o f this manual
• Performing as many tasks as possible on the AM Front Desk Checklist toassist the AM Front Desk staff in preparing for the arrivals and departuresfor the day
• Checking Posting Masters back into the system, if they rotate daily. Tocheck in h ouse and/ or posting master accounts. If your ho tel’s policy is toreset house accounts every day, follow the procedures outline in the“Fron t D esk” chapter of this manual for walking in PM accounts.
• Transfer any financials from OPERA PMS to your local or interfacedaccounting program. Use existing audit reports and financial repo rts forfigures and statistics.
• Reprinting and distributing audit reports to all department heads. For
details on printing or reprinting audit reports, follow the steps in theremaining sections of this chapter.
©2006 MICROS® Systems Inc. All Rights Reserved. P roprietary and C onfidential.
337

7/31/2019 GEN V40 PMS Reference Manual FINAL Eng Ch
http://slidepdf.com/reader/full/gen-v40-pms-reference-manual-final-eng-ch 338/474
ReprintNight AuditReports
Every night the audit process generates a set of reports for the day. These reportscan be:
• Stored locally on the server as a .pd f file for later viewing• Sent to printer as a hard copy
Most reports generate during the audit with both a printed and filed copy. Whenreports file during the audit, they save in a local directory on the application server.
O ccasionally, you may need reprint a copy of an audit repo rt. To reprint an auditreport at any time, follow the steps below:
1. From the main menu, select End of Day and En d of Day Reports.2. Select the business Date for th e desired repo rt and select Search .
The EN D OF DAY REPORTS screen displays.
3. Place an “X” next to the desired Report Name. You may print one or mu ltiple repor ts at a time. To choose to reprint all reports, select All to markeach report for that business day.
4. Select Print to send the report (s) to the printer. As with all oth er repo rts, youalso have the option to Preview the report p rior to printing.
NOTE: The Recreate op tion is useful to regenerate the report. Typically, is notnecessary to recreate a report, but if the report parameters have changed or thedata has changed the option is available to regenerate the repo rt based on th e newinformation.
©2006 MICROS® Systems Inc. All Rights Reserved. P roprietary and C onfidential.
338

7/31/2019 GEN V40 PMS Reference Manual FINAL Eng Ch
http://slidepdf.com/reader/full/gen-v40-pms-reference-manual-final-eng-ch 339/474
Chapter 10 – Business Blocks - Groups ©2006 MICROS® Systems Inc.
All Rights Reserved. P roprietary and C onfidential. 339

7/31/2019 GEN V40 PMS Reference Manual FINAL Eng Ch
http://slidepdf.com/reader/full/gen-v40-pms-reference-manual-final-eng-ch 340/474
©2006 MICROS® Systems Inc.
All Rights Reserved. P roprietary and C onfidential. 340

7/31/2019 GEN V40 PMS Reference Manual FINAL Eng Ch
http://slidepdf.com/reader/full/gen-v40-pms-reference-manual-final-eng-ch 341/474
Group Basics
BusinessBlock vs.QuickBusinessBlock
OPERA offers two versions of group functionality: Quick Business Block andBusiness Block. Both versions share the same core functionality for groups,but Business Block o ffers enhanced functionality typically no t needed forsmaller operations. In addition, the design of the full Business Block mo duleworks in conjunction with Sales and Catering functionality. Q uick BusinessBlock is designed for hotels with simplified group contracts.
Hotels with O PE RA Xpress PMS typically use Q uick Business Blocks, yethotels with the OPERA PMS may also use this feature if theirgroup/ convention business does no t warrant a full block module. Alternately,OPERA Xpress PMS hotels may also use the full Business Block module if their operation calls for the full functionality of a group management system.
For either option, there are detailed explanations of the functionality for eachwithin this chapter.
Group Status Codes
Status Codes indicate the current booking status for a group. The block statusdetermines several things:
• Whether the group rooms allotted deduct from house inventory or not
• Whether or no t users and book or pickup reservations for the block
Below are examples of possible group statuses. These may vary from h otel tohotel depend ing on your operation and sales requirements. E ach status
happens in succession of each other causing a virtual “life-cycle” for the group.Some statuses deduct inventory, while others only show the intent of the group.Likewise, some statuses allow for pickup of reservations. All statuses differfrom h otel to ho tel based on the con figuration at time of installation .
Some examples of possible block statuses are:
©2006 MICROS® Systems Inc. All Rights Reserved. P roprietary and C onfidential.
341

7/31/2019 GEN V40 PMS Reference Manual FINAL Eng Ch
http://slidepdf.com/reader/full/gen-v40-pms-reference-manual-final-eng-ch 342/474
IN QUIRY (INQ)
The inquiry process is a starting status for beginning the group contractpro cess. At this stage, the customer is simply inquiring about possibleavailability. N o rooms deduct from inven tory in this status. You may moveforward with p roposal or tentative status from here, or cancel the inquiryaltogether.
PROPOSAL (PRP)
Th is is the initial step in the group booking process. When a sales inqu iry doesno t immediately change to a firm booking, you can save it as a Proposal.Creating and saving the proposal enable you to have better records of salesleads and allows you to follow-up with them fo r future business. If the group
proposal is accepted, you may upgrade the status to Tentative or cancel at thispoint. N o room s deduct from inventory in this status.
TEN TATIVE (TEN )
Th is status is for a group booking pending the receipt of a signed contract.Allocated rooms do not deduct from inventory. N on-deducted means theallotm ents exists but the roo ms still exist in th e hotel’s general invento ry. Youcannot create reservations for the group while it remains in a tentative statusAt this state you may cancel the group or more forward to make it definite.
DEFIN ITE – (DEF)
The next status is for a group with a signed contract. Allocated group room sdeduct from hotel’s general invento ry in th is status. You are also able to pickuprooms and book reservations for b locks in the D efinite status. You may onlycancel the group from this po int.
CANCELLED – (CXL)
When a block cancels, any room inventory set aside for the group releases andreturns to the ho tel general invento ry. It is vital to notate detailed cancellationreasons as well as group block destination. O PERA stores this information and
makes it available via reports fo r future analysis. Th is status helps you to trackand determ ine cancellation trends or to indicate destination cities/ ho tels wherebusiness is going instead. In addition, groups will no t cancel with activereservations.
©2006 MICROS® Systems Inc. All Rights Reserved. P roprietary and C onfidential.
342
7/31/2019 GEN V40 PMS Reference Manual FINAL Eng Ch
http://slidepdf.com/reader/full/gen-v40-pms-reference-manual-final-eng-ch 343/474
ACTUAL – (ACT)
Th is status refers to in-house or p ast group s and only changes once guestsbegin arriving and check into the hotel. In particular, this status tracks theactual revenue and inventory consumed by the group against the inventoryforecasted for the group .
NOTE: Additional group statuses you may see at your hotel include Lost andRefused. If your hotel uses a Sales and Catering system, these statuses typicallyidentify business lost due to competition or refused due to price andavailability.
©2006 MICROS® Systems Inc. All Rights Reserved. P roprietary and C onfidential.
343
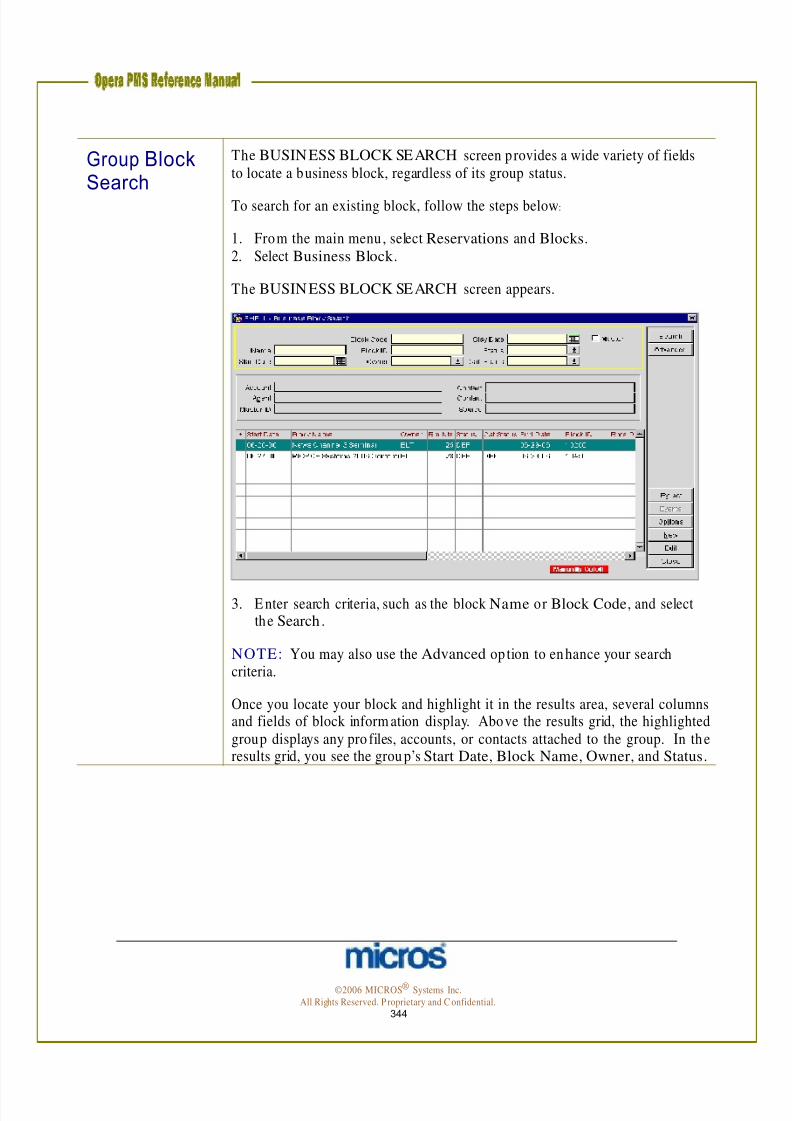
7/31/2019 GEN V40 PMS Reference Manual FINAL Eng Ch
http://slidepdf.com/reader/full/gen-v40-pms-reference-manual-final-eng-ch 344/474
Group Block Search
The BUSINESS BLOCK SEARCH screen provides a wide variety of fieldsto locate a business block, regardless of its group status.
To search for an existing block, follow the steps below :
1. From the main menu, select Reservations and Blocks.2. Select Business Block .
The BUSINESS BLOCK SEARCH screen appears.
3. E nter search criteria, such as the block Name or Block Code, and select the Search .
NOTE: You may also use the Advanced op tion to enhance your searchcriteria.
Once you locate your block and highlight it in the results area, several columnsand fields of block inform ation display. Above the results grid, the highlightedgroup displays any pro files, accounts, or contacts attached to the group. In theresults grid, you see the grou p’s Start Date, Block Name, Owner, and Status.
©2006 MICROS® Systems Inc. All Rights Reserved. P roprietary and C onfidential.
344

7/31/2019 GEN V40 PMS Reference Manual FINAL Eng Ch
http://slidepdf.com/reader/full/gen-v40-pms-reference-manual-final-eng-ch 345/474
Inquiry Th e Inquiry feature allows you to view availability to answer group contractinquiries with initial sales contact calls. You m ay also use this feature to being
the booking process while quickly creating a Business Block utilizing theinformation already entered.
Available options include:
• Review the client’s requested d ates as well as alternate dates
• Assess availability during tho se periods
• Select the desired dates to view the revenue and occupancy impacts
• Close your sale while the client is still on the telephon e
To access the Inquiry feature, follow the steps below:
1. From the main menu, select Reservations and Blocks. 2. Select Inquiry.
NOTE: You may also access this feature by using the Shift F4 quick keys.
The IN QUIRY PROCESS screen displays.
3. Click the ellipsis but ton at the top o f the screen next to any of the profile fields to attach the inquiring company or accounts profile and contactinform ation. Attaching prof iles enables you to track group business by noton ly the group block and company, but also track by contact for thatcompany. In this example, doing this links the company “RobinsonMarketing” and contact “Cheryl Robinson” for tracking p urposes for th isgroup inquiry.
©2006 MICROS® Systems Inc. All Rights Reserved. P roprietary and C onfidential.
345
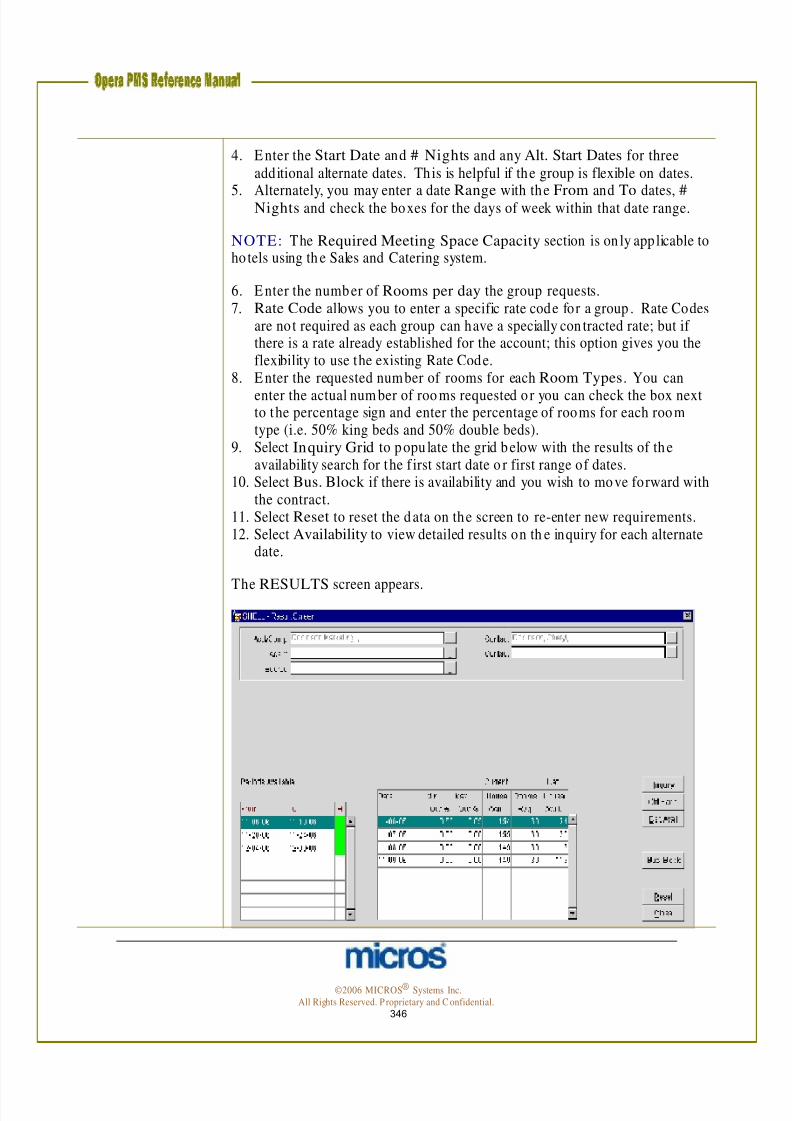
7/31/2019 GEN V40 PMS Reference Manual FINAL Eng Ch
http://slidepdf.com/reader/full/gen-v40-pms-reference-manual-final-eng-ch 346/474
4. E nter the Start Date and # Nights and any Alt. Start Dates for threeadditional alternate dates. This is helpful if the group is flexible on dates.
5. Alternately, you may enter a date Range with the From and To dates, #Nights and check the boxes for the days of week within that date range.
NOTE: The Required Meeting Space Capacity section is on ly applicable toho tels using th e Sales and Catering system.
6. E nter the number of Rooms per day the group requests.7. Rate Code allows you to enter a specific rate code for a group . Rate Codes
are not required as each group can have a specially con tracted rate; but if there is a rate already established for the account; this option gives you theflexibility to use the existing Rate Code.
8. E nter the requested number of rooms for each Room Types. You can
enter the actual num ber of roo ms requested o r you can check the box nextto the percentage sign and enter the percentage of rooms for each roomtype (i.e. 50% king beds and 50% double beds).
9. Select Inquiry Grid to popu late the grid below with the results of theavailability search for the f irst start date o r first range of dates.
10. Select Bus. Block if there is availability and you wish to move forward withthe contract.
11. Select Reset to reset the data on the screen to re-enter new requirements.12. Select Availability to view detailed results on th e inquiry for each alternate
date.
The RESULTS screen appears.
©2006 MICROS® Systems Inc. All Rights Reserved. P roprietary and C onfidential.
346

7/31/2019 GEN V40 PMS Reference Manual FINAL Eng Ch
http://slidepdf.com/reader/full/gen-v40-pms-reference-manual-final-eng-ch 347/474
In the lower-left portion of this screen, the range of dates and alternate datesdisplay. In the lower-right portion o f this screen, the following columns display
availability:
• Min Occ % = hotel occupancy based on 100%
• Max Occ % = ho tel occupancy including overboo king numbers
• House Avail (Current)= hotel availability before the group block
• Rooms Req. = # of rooms requested by group b lock
• H ouse Avail (Net) = Hotel availability if you accept the group b lock
13. Select the Periods Available date range on the left side of the screen andthe details of each day’s availability appear to the right.
14. Select the Ctrl Panel op tion to d isplay the CONTROL PANEL screen
for the highlighted group dates.15. Select the Det. Avail option to display the DETAILED AVAILABILITYscreen for the highlighted group dates. This enables you to ensure that thenumber of rooms by room types requested are available, not merely thetotal num ber of requested rooms. From this screen, you can also selectBlocks to go to the BLOCKS screen.
16. Select Inquiry to go back to the o riginal INQUIRY screen and restart theinquiry process.
17. Select Reset to clear the screen and return to the IN QUIRY PROCESS screen.
18. When the client decides on a date, highlight the date select Bus Block .Th is saves the information and takes the user to the QUI CK BUSIN ESSBLOCK creation screen, allowing you to save the block information whilethe con tact is on the telepho ne. You can then re-open the block as aBusiness Block and p roceed with completing all fields as needed.
©2006 MICROS® Systems Inc. All Rights Reserved. P roprietary and C onfidential.
347

7/31/2019 GEN V40 PMS Reference Manual FINAL Eng Ch
http://slidepdf.com/reader/full/gen-v40-pms-reference-manual-final-eng-ch 348/474
New Block Header
Th e alternative to creating a group via the Inquiry is to create a group directlyfrom the Business Block. The Block Header contains information that applies
to every reservation attached to the group .
To create a new block, follow the steps below:
1. From main menu, select Reservations and Blocks.2. Select Business Block .
The BUSINESS BLOCK SEARCH screen appears.
3. Select New.
The BUSINESS BLOCK screen appears.
This screen d isplays in four different sections; the first section is for storing profiles, the second section for group n ame and dates, the third section forroom’s information, and the last section for revenue statistics.
4. Attach any pertinent Company, Travel Agent, Contact or Source profiles atthe top of the screen. The Group Profile autom atically creates after yousave the block.
©2006 MICROS® Systems Inc. All Rights Reserved. P roprietary and C onfidential.
348

7/31/2019 GEN V40 PMS Reference Manual FINAL Eng Ch
http://slidepdf.com/reader/full/gen-v40-pms-reference-manual-final-eng-ch 349/474
5. E nter the Name of th e group. This should be the call to action for thegroup since the group name is what agents search fo r when b ooking group
reservations.6. E nter the cont racted Start Date, number of Nights and End Date.7. En ter the Shoulder Start and Shoulder End dates if this group is elastic
with sho ulder dates. For more information on elastic blocks, refer to theRoom s tab portion of this chapter.
8. Status is the current phase this block is in regarding reservation pickup.Beginning status for a group may differ at your hotel. Refer to Group K eyConcepts at the beginning o f this module for a detailed explanation of group statuses. Typically, the starting status of the group is either TE N(Tentative), PRO (Prospect), o r IN Q (Inquiry).
9. Select a Market code. Remember to use the app ropriate group marketingcode for tracking purposes.
10. Select the appropriate Source code for the group.11. Enter the Sales or Reservations Manager that owns the block in the Owner
field. Th is is necessary in o rder to track sales productivity by Manager.
©2006 MICROS® Systems Inc. All Rights Reserved. P roprietary and C onfidential.
349
7/31/2019 GEN V40 PMS Reference Manual FINAL Eng Ch
http://slidepdf.com/reader/full/gen-v40-pms-reference-manual-final-eng-ch 350/474
ROOMS TAB:
1. E nter the Block Code. You may reuse block codes, depending onapplication settings chosen by your hotel.2. Select a Res. Type as a form of guarantee for the group. The reservationtype defaults to every reservation made for the group.
3. Typically, Rate Code is not used with groups, as the sales departmentusually contracts a negotiated rate for the group. Rates enter separately forgroups using the Business Block Rate Grid. For example, IBM is holding atraining meeting at your hotel and their negotiated rate is the G-IBM16 RateCode. You would then app ly this Rate Code to the block. All rate detailsfrom the Rate Code copy into the Rate Grid for th is block.
4. Click the drop down arrow next to the Inv. Control field to chooseElastic. Th is feature allows reservations to book even if the group has no
availability (as long as there is general hotel availability). By checking thisop tion , agents may book room s beyond the contracted number of rooms forthe group dates. If you do not wish to sell beyond the original contractedallotment, select Non-Elastic.
5. Packages adds a package comp onent to a group. The price for thepackage element adds to or combines to the rates negotiated for the group.
6. E nter either a Cutoff Date or Cutoff Days for the group. For the cutoff date, any used rooms for all dates of the group return to general inventory.For the cuto ff days, however many days ahead of the group start date, unusedrooms return to general invento ry one day at a time (i.e. rolling cutoff).
7. Follow-up Date is the date to follow-up with the group con tact for a
decision.8. Decision Date is the date that there must b e a signed group contract or adefinite confirmation that the group intends to book.
9. Owner refers to the Sales or Reservations Manager that owns the roompo rtion of the block. This field is necessary in order to track sales productivityby Manager. O wner names (typically their 3-character initials) are created inUser Configuration. Each Manager who can potentially be involved withSales/ Catering shou ld have O wner designation in their User profile.
10. Select Save to complete the block header and move on to the remainingtabs.
©2006 MICROS® Systems Inc. All Rights Reserved. P roprietary and C onfidential.
350
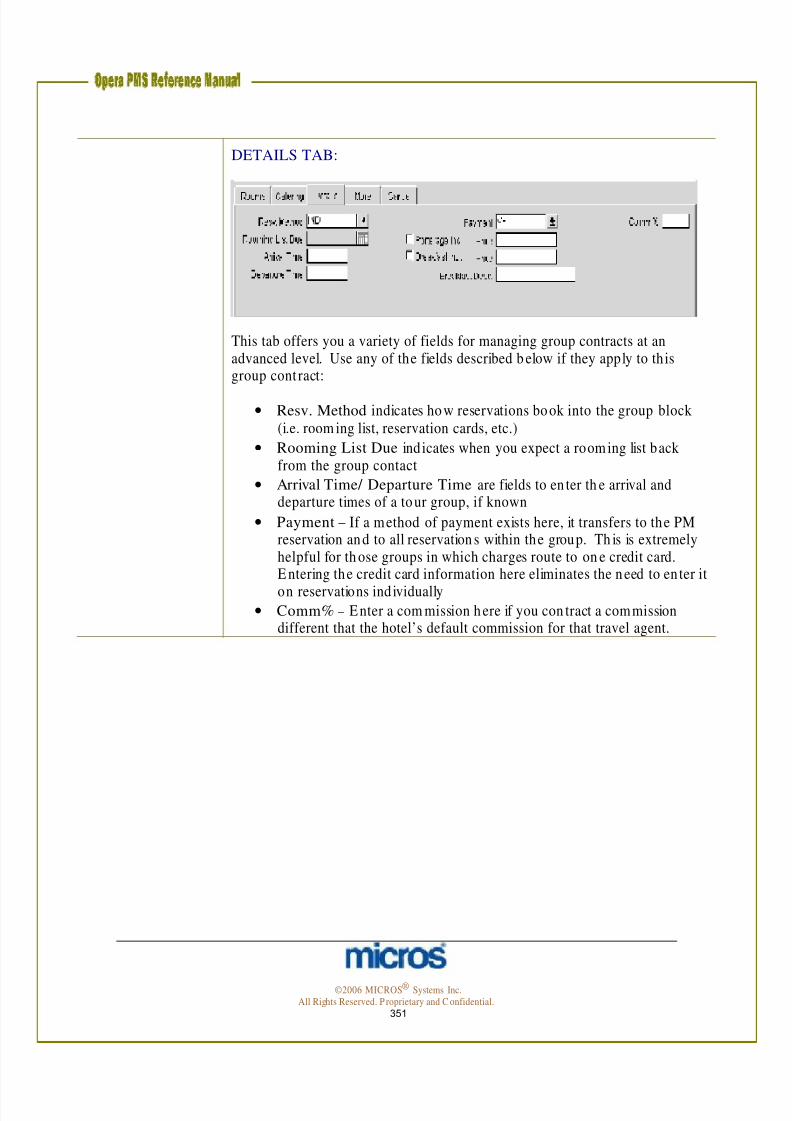
7/31/2019 GEN V40 PMS Reference Manual FINAL Eng Ch
http://slidepdf.com/reader/full/gen-v40-pms-reference-manual-final-eng-ch 351/474
DETAILS TAB:
This tab offers you a variety of fields for managing group contracts at an advanced level. Use any of the fields described b elow if they apply to thisgroup cont ract:
• Resv. Method indicates how reservations book into the group block(i.e. room ing list, reservation cards, etc.)
• Rooming List Due ind icates when you expect a room ing list backfrom the group contact
• Arrival Time/ Departure Time are fields to en ter th e arrival anddeparture times of a tour group, if known
• Payment – If a method of payment exists here, it transfers to the PMreservation and to all reservation s within the group. Th is is extremelyhelpful for th ose groups in which charges route to on e credit card.E ntering the credit card information here eliminates the need to en ter it
on reservations individually• Comm% – Enter a com mission here if you con tract a commission
different that the hotel’s default commission for that travel agent.
©2006 MICROS® Systems Inc. All Rights Reserved. P roprietary and C onfidential.
351

7/31/2019 GEN V40 PMS Reference Manual FINAL Eng Ch
http://slidepdf.com/reader/full/gen-v40-pms-reference-manual-final-eng-ch 352/474
CANCEL TAB:
This tab contains information used for statistical tracking in the event the Business Block cancels.
• Rooms Cancellation No. displays the cancellation number for theroom portion of the block
• Rooms Cancellation Reason displays when a group status changes toCancelled or Lost. Choose the appropriate reason why this BusinessBlock was lost or cancelled.
• Rooms Cancellation Comments is the description for thecancellation reason selected. You can add additional com ments in thisfield as necessary.
• Rooms Cancellation Destination is the destination or venue to whichthis piece of business was lost.
• Catering Cancellation No. displays the cancellation number for thecatering portion o f the b lock
• Catering Reason displays when a catering block status changes toCancelled or Lost. Choose the appropriate reason why this Cateringblock was lost or can celled.
• Catering Comments is the description for the cancellation reasonselected. Additional catering cancellation co mments maybe added.
©2006 MICROS® Systems Inc. All Rights Reserved. P roprietary and C onfidential.
352
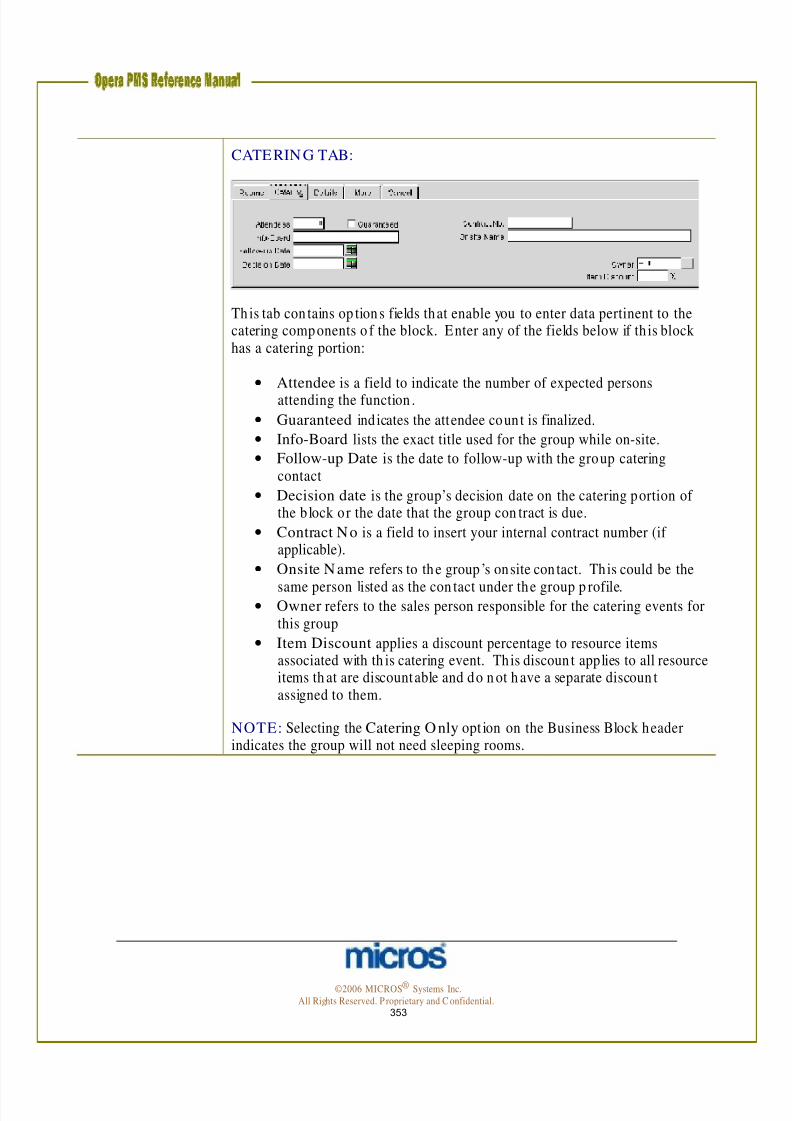
7/31/2019 GEN V40 PMS Reference Manual FINAL Eng Ch
http://slidepdf.com/reader/full/gen-v40-pms-reference-manual-final-eng-ch 353/474
CATERIN G TAB:
Th is tab con tains op tions fields that enable you to enter data pertinent to the catering components o f the block. Enter any of the fields below if th is blockhas a catering portion:
• Attendee is a field to indicate the number of expected personsattending the function .
• Guaranteed ind icates the attendee count is finalized.
• Info-Board lists the exact title used for the group while on-site.
• Follow-up Date is the date to follow-up with the group cateringcontact
• Decision date is the group’s decision date on the catering portion of the b lock or the date that the group con tract is due.
• Contract No is a field to insert your internal contract number (if applicable).
• Onsite N ame refers to the group’s onsite con tact. This could be the
same person listed as the con tact under the group p rofile.• Owner refers to the sales person responsible for the catering events for
this group
• Item Discount applies a discount percentage to resource itemsassociated with th is catering event. This discoun t applies to all resourceitems th at are discountable and do n ot h ave a separate discoun tassigned to them.
NOTE: Selecting the Catering O nly opt ion on the Business Block headerindicates the group will not need sleeping rooms.
©2006 MICROS® Systems Inc. All Rights Reserved. P roprietary and C onfidential.
353

7/31/2019 GEN V40 PMS Reference Manual FINAL Eng Ch
http://slidepdf.com/reader/full/gen-v40-pms-reference-manual-final-eng-ch 354/474
QuickBusinessBlock
Th e alternative to creating a group via the Inquiry is to create a group directlyfrom the Quick Business Block . To create a new block using the quick
feature, follow the steps below:
1. From main menu, select Reservations and Blocks.2. Select Quick Business Block .
The QUICK BUSIN ESS BLOCK SEARCH screen appears.
3. Select New.
The QUICK BUSIN ESS BLOCK screen appears.
This screen d isplays in two d ifferent section s; the first section is for sto ring profiles, the second section for group n ame, dates and rooms inform ation.
4. Attach any pertinent Company, Travel Agent, Contact or Source profiles atthe top of the screen. The Group Profile autom atically creates after yousave the block.
©2006 MICROS® Systems Inc. All Rights Reserved. P roprietary and C onfidential.
354
7/31/2019 GEN V40 PMS Reference Manual FINAL Eng Ch
http://slidepdf.com/reader/full/gen-v40-pms-reference-manual-final-eng-ch 355/474
ROOMS TAB:
5. E nter the Name of the group. This should be the call to action fo r thegroup since the group name is what agents search fo r when b ooking groupreservations.
6. E nter the cont racted Start Date, number of Nights and End Date.7. E nter the Shoulder Start and Shoulder End dates if this group is elastic
with shoulder dates.8. E nter the Block Code for the group. D epending on your ho tels
configuration, this code may auto-populate or have a format to follow (i.e.alphanumeric combination of characters).
9. Status is the current phase this block is in regarding reservation pickup.Beginning status for a group may differ at your hotel. Refer to Group K eyConcepts at the beginning o f this module for a detailed explanation of
group statuses. Typically, the starting status of the group is TEN(Tentative).
10. Select a Res. Type as a form of guarantee for the group. The reservationtype defaults to every reservation made for the group.
11. Select a Market code. Remember to use the appropriate group m arketingcode for tracking purposes.
12. Select the appropriate Source code for the group.13. Enter the Sales or Reservations Manager that owns the block in the Owner
field. Th is is necessary in o rder to track sales productivity by Manager.14. Click the drop down arrow next to the Elastic field to choose Elastic.
Th is feature allows reservations to book even if the group has no
availability (as long as there is general hotel availability). By checking th isop tion , agents may book rooms beyond the contracted number of room sfor the group d ates. If you do no t wish to sell beyond the or iginalcontracted allotment, select Non-Elastic. If you wish to allow the hotel tosell into the group to the definite overbooking limits, select Sell Limit.
15. E nter either a Cutoff Date or Cutoff Days for the group. For the cutoff date, any used rooms for all dates of the group return to general inventory.For the cutoff days, however many days ahead of the group start date,unused rooms return to general inventory one day at a time (i.e. rollingcutoff).
16. Resv. Method indicates how reservations book into the group block (i.e.
roo ming list, reservation cards, etc.)17. Type indicates the type of booking this group contract was sold as (i.e.convention, tour, group, etc.).
18. Check the Suppress Rate box if you the rates for the group should notdisplay for any user or guest.
©2006 MICROS® Systems Inc. All Rights Reserved. P roprietary and C onfidential.
355

7/31/2019 GEN V40 PMS Reference Manual FINAL Eng Ch
http://slidepdf.com/reader/full/gen-v40-pms-reference-manual-final-eng-ch 356/474
19. Typically, Rate Code is not used with groups, as the sales departmen tusually con tracts a negotiated rate for the group. Rates enter separately for
groups using the Business Block Rate Grid. For examp le, IBM is holding atraining meeting at your hotel and their negotiated rate is the G-IBM16Rate Code. You would then apply this Rate Code to the block. All ratedetails from the Rate Code copy into the Rate Grid for th is block.
20. Packages adds a package comp onent to a group. The price for thepackage element adds to o r comb ines to the rates negotiated for the group.
21. Trace Code is a field that you may select a dep artmental trace code toapply to all bookings against this group .
22. Select Save to save the quick block.
The QUICK BUSIN ESS BLOCK screen displays again with a grid in th elower portion of the screen.
Follow instructions in the Roo ms G rid section of this chapter for ranging and
washing rooms in the block allotment. However, from the header screen, youhave many of the same v iew and sort options found in the full grid.
©2006 MICROS® Systems Inc. All Rights Reserved. P roprietary and C onfidential.
356
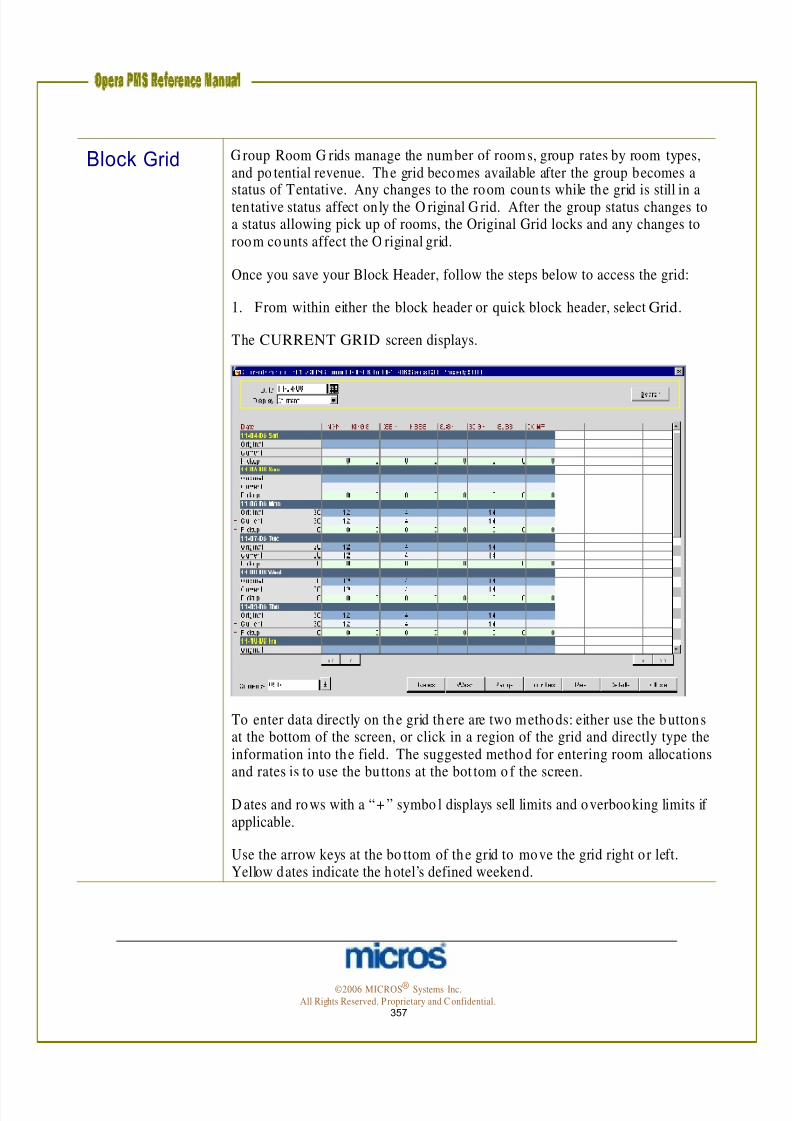
7/31/2019 GEN V40 PMS Reference Manual FINAL Eng Ch
http://slidepdf.com/reader/full/gen-v40-pms-reference-manual-final-eng-ch 357/474
Block Grid G roup Room G rids manage the number of room s, group rates by room types, and po tential revenue. The grid becomes available after the group becomes a
status of Tentative. Any changes to the room coun ts while the grid is still in atentative status affect only the O riginal G rid. After the group status changes toa status allowing pick up of rooms, the Original Grid locks and any changes toroom counts affect the O riginal grid.
Once you save your Block Header, follow the steps below to access the grid:
1. From within either the block header or quick block header, select Grid.
The CURRENT GRID screen displays.
To enter data directly on the grid th ere are two methods: either use the buttons at the bottom of the screen, or click in a region of the grid and directly type theinformation into the field. The suggested method for entering room allocationsand rates is to use the bu ttons at the bot tom o f the screen.
D ates and rows with a “+ ” symbo l displays sell limits and overbooking limits if applicable.
Use the arrow keys at the bo ttom of the grid to move the grid right or left.Yellow dates indicate the hotel’s defined weekend.
©2006 MICROS® Systems Inc. All Rights Reserved. P roprietary and C onfidential.
357

7/31/2019 GEN V40 PMS Reference Manual FINAL Eng Ch
http://slidepdf.com/reader/full/gen-v40-pms-reference-manual-final-eng-ch 358/474
The Display menu in the search criteria at the top of the screen offer a varietyof views:
• Original reflects the allocated room counts for the group block while itis still in a tentative status. These allocated room counts have deductedfrom h otel invento ry.
• Available only after the group turns Definite, Current reflects thecurrent number of rooms reserved for the group.
• Available reflects ho w many room s are still available for individualreservations to be bo oked.
• Rates reflect the rates assigned for each date for each room type in thegrid.
• Contract, an optional entry, reflects the number of rooms the group
agreed to on the contract and appears on repo rts for comparisonpurposes only.
©2006 MICROS® Systems Inc. All Rights Reserved. P roprietary and C onfidential.
358

7/31/2019 GEN V40 PMS Reference Manual FINAL Eng Ch
http://slidepdf.com/reader/full/gen-v40-pms-reference-manual-final-eng-ch 359/474
Range Roomsto Grid
When you are ready to allocate room s into the block G rid, follow the stepsbelow:
1. From the group’s CURRENT GRID screen, select Range.
The BLOCK RANGE SETTING screen displays.
2. E nter a Date Range by choosing a From, Nights and To date. You may
also indicate the days of week to range rooms into the grid.3. Place and “X” next to each Room Type to allocate rooms. Keep in mind
that each room type cho sen here gets the same values applied. Forexample, if you select KN G N , KN G S, TD BN, and T D BS, each room typegets the same number of rooms allocated (i.e. 5 in the above example tototal 20 rooms applied).
4. The Increase/ Decrease Rooms check box has several different functions.If you do not check this box, any values you enter become the actual valuesin the grid. Fo r example, if you do not check this box and enter 10 room s,even if there are already 20 rooms allocated for these room s’ types, 10roo ms becomes the final figure per room type. Checking the box increases
or decreases the values by that amount. For example, checking this boxand entering 5 room s per room type (or -5 rooms per room type). If theblock already has 10 rooms allocated per room type, the final figure perroom type is 15.
NOTE: In the Occupancy 1-4 fields, you may enter the num ber of roo ms toallocate for each room type based on occupancy (i.e. two rooms with oneperson, two rooms with two persons, three rooms with four persons, etc.)
©2006 MICROS® Systems Inc. All Rights Reserved. P roprietary and C onfidential.
359

7/31/2019 GEN V40 PMS Reference Manual FINAL Eng Ch
http://slidepdf.com/reader/full/gen-v40-pms-reference-manual-final-eng-ch 360/474
5. Alternately, you may enter a rate for Rate 1 and enter an Addl. Rate foreach additional person, depending on the terms of your contract. The
additional person rate defaults to the hotel’s extra person designator.
NOTE: Be aware that using the additional rate feature because during theRate Query process, unless the reservations agent correctly inputs the numberof persons, the rate does not calculate with the additional person charges untildisplayed on the reservation screen. Th is may cause an incorrect rate quo te atthe time of Rate Q uery.
6. E nter a Sell Limit if you desire to set a limit to the number of room s tooversell within this group.
NOTE: This feature only applies if the group is marked as an E lastic Block.
Th is control only applies to rooms sold against the block in O PE RA.
7. Cutoff Date/ Cutoff Days allows you to set an ind ividual cutoff date ornum bers of days by room type.
8. Select OK to allocate the rooms to the grid.
©2006 MICROS® Systems Inc. All Rights Reserved. P roprietary and C onfidential.
360

7/31/2019 GEN V40 PMS Reference Manual FINAL Eng Ch
http://slidepdf.com/reader/full/gen-v40-pms-reference-manual-final-eng-ch 361/474
Wash Roomsfrom Grid
To wash rooms from a group, or decrease the existing allocation, follow thesteps b elow:
1. From the CURREN T GRID , select Wash .
The BLOCK WASH FOR screen displays.
2. E nter a Date Range by selecting the From, Nights, and To fields or choosing the check bo xes next to the days of the week. In addition, youmay define separate wash values by choosing the Advance button at thebottom of the window.
3. Select either the By Value or By Percentage radio button and enter aValue or Percentage.
4. Place an “X” next to each room type to wash, or select All for all roomtypes.
5. Select OK to save changes and apply the wash to the grid.
©2006 MICROS® Systems Inc. All Rights Reserved. P roprietary and C onfidential.
361

7/31/2019 GEN V40 PMS Reference Manual FINAL Eng Ch
http://slidepdf.com/reader/full/gen-v40-pms-reference-manual-final-eng-ch 362/474
Room TypePriorities inGrid
The Priorities option allows you to modify the display order for room types inthe grid. Using this feature makes it easier to see the room types app licable for
the group in the first columns of the grid. Th is display order dictates the roo mtype selling order for th is specific block in the reservations query as well.
To change the priority of room types displayed, follow the steps below:
1. From the CURRENT GRID screen, select Priorities.2. Answer Yes to see the minimum available rooms.
The ROOM GRID PRIORITIE S screen displays.
3. Click in the Pr. No. (Priority Num ber) column to the left of the room type that con tains the largest number of group roo ms, and a 1 auto-populates.Then select the room type that h as the second largest number of grouprooms and click in the same column; a 2 auto-populates next to that room.Comp lete this for the balance of room types in descending order.
4. Select OK and the room types reorder themselves on the grid. This displayorder is now visible on the Rate Q uery for th is group.
©2006 MICROS® Systems Inc. All Rights Reserved. P roprietary and C onfidential.
362

7/31/2019 GEN V40 PMS Reference Manual FINAL Eng Ch
http://slidepdf.com/reader/full/gen-v40-pms-reference-manual-final-eng-ch 363/474
Group Block Reservations
G roup block reservations can boo k from within the b lock header. Follow thesteps below to access the Reservations menu within a group block:
1. From the main menu, select Reservations and Blocks. 2. Select Business Block. 3. Search for and highlight the desired block, and choose Edit. 4. Select Resv. This option is only available if the group is in a D efinite status
and available for p ickup.5. As the screen opens, a pop-up message displays advising you “A Post
Master will be created, would you like to continue?” Answer “Yes.”
The RESERVATIO NS LIST screen displays.
©2006 MICROS® Systems Inc. All Rights Reserved. P roprietary and C onfidential.
363

7/31/2019 GEN V40 PMS Reference Manual FINAL Eng Ch
http://slidepdf.com/reader/full/gen-v40-pms-reference-manual-final-eng-ch 364/474
The top portion of the screen displays reservations that exist for the group andpertinent information on each. There will at least be a PM reservation fo r the
group.
The button s to the t pertain to the reservations listed on the top of the screen,with one exception – New. For all oth er functions, you may highlight thedesired reservation and perform one of the actions listed below.
• New allows you to m ake a new reservation for the group. To begina new reservation , select an available room type in the lower port ionof th e screen and select this option.
• Edit allows you to m odify the selected reservation.
• Options allow you to view the Reservations O ptions for thehighlighted reservation.
• Profile displays the p rofile for the selected reservation
• Check-In displays if the guest is due to check-in th at day. Wecover group check in a later point in this chapter.
• Advanced displays an advanced RESERVATION SEARCH screen to locate reservations within this group block.
• Cancel allows you to cancel a highlighted reservation.
• Reinstate appears in place of the Cancel button if you haveselected a reservation that already cancelled. Both o f thesefunctions work as they would for any reservation in O PE RA.
• Close exits the RESERVATION LIST screen.
At the bo ttom of the screen, the group room grid displays. This allows you todisplay any room grid view to ob tain roo m counts or rate inform ation. Tochange the display, click the drop down arrow n ext to the field at the bo ttom of the screen to alternate between Available or Rates views.
©2006 MICROS® Systems Inc. All Rights Reserved. P roprietary and C onfidential.
364

7/31/2019 GEN V40 PMS Reference Manual FINAL Eng Ch
http://slidepdf.com/reader/full/gen-v40-pms-reference-manual-final-eng-ch 365/474
Group Options
From the RESERVATION LIST screen, select Group Opt.
Two important considerations before accessing th e Group Options menu:
• You should always have the group’s PM (Posting Master) highlightedbefore you open the Group Options menu. D oing so ensures that allpertinent information entered on the Posting Master carries over tonew reservations made.
• If you have set up the block to be “G TD O nly,” be sure that there is aform o f payment en tered in the D etails Tab of the block header.
©2006 MICROS® Systems Inc. All Rights Reserved. P roprietary and C onfidential.
365

7/31/2019 GEN V40 PMS Reference Manual FINAL Eng Ch
http://slidepdf.com/reader/full/gen-v40-pms-reference-manual-final-eng-ch 366/474
Rooming List To enter a group rooming list, follow the steps below:
1. From the G roup Op tions menu, select Rooming List.
The GROUP ROO MIN G LIST screen displays.
2. If you want to Search Guest Profile when creating the rooming list, check the box at the bottom of the screen. If you cho ose to activate this feature,the system prompts with a PROFILE SEARCH screen for each newreservation entered in the rooming list.
NOTE : The cursor is not visible but it is sitting over the first space in theName column of the room ing list. The n ame of the group appears in th is fieldbut you can m erely type over it
3. E nter the guests last Name, First name, Arrival, Departure, and roomType by tabbing from one field to the next.
4. If there is no method of payment on the posting master reservation , (i.e.each individual provides their own form of guarantee), be certain to tab tothe Payment field to enter a form of guarantee.
5. After entering all reservation information for the first guest on the list, use
the down arrow on the keyboard to move to the next guest. Continue thisprocess to enter all reservations.
NOTE: When you have entered the name of the last guest, do N OT arrowdown to the next line, this will create an unneeded reservation. If you do th is,you will have to go back and cancel this reservation.
6. Select Save when finished.
©2006 MICROS® Systems Inc. All Rights Reserved. P roprietary and C onfidential.
366

7/31/2019 GEN V40 PMS Reference Manual FINAL Eng Ch
http://slidepdf.com/reader/full/gen-v40-pms-reference-manual-final-eng-ch 367/474
Rooming Listwith Shares
If you are entering a Rooming List where all rooms are shares, follow the stepsabove but do no t Save.
1. E nter all guest names, dates and room types as in the instructions above.2. After doing this, click in the far left column (marked with an X) for the 2nd
name, 4th name and so on . Doing this designates each person marked withan “X” to share a room with the name above. The first name is thePrimary name in the Share.
©2006 MICROS® Systems Inc. All Rights Reserved. P roprietary and C onfidential.
367
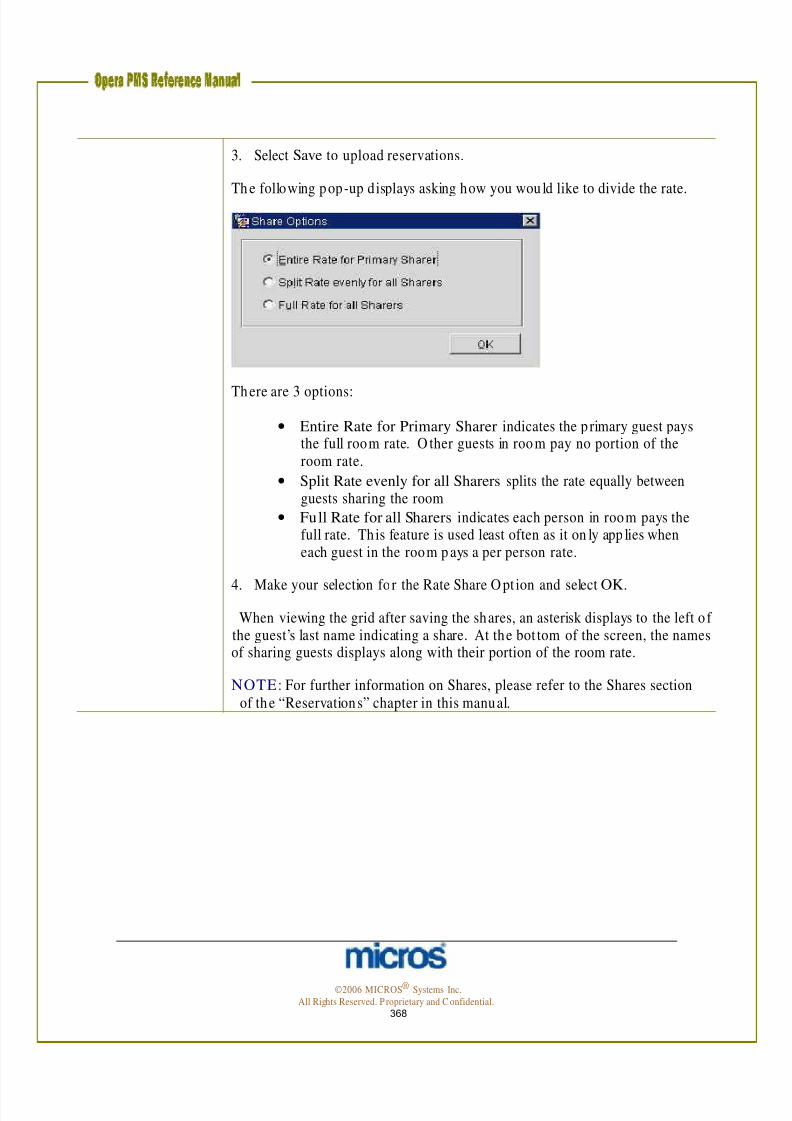
7/31/2019 GEN V40 PMS Reference Manual FINAL Eng Ch
http://slidepdf.com/reader/full/gen-v40-pms-reference-manual-final-eng-ch 368/474
3. Select Save to upload reservations.
Th e following pop-up displays asking how you wou ld like to divide the rate.
There are 3 options:
• Entire Rate for Primary Sharer indicates the p rimary guest paysthe full room rate. O ther guests in room pay no portion of theroom rate.
• Split Rate evenly for all Sharers splits the rate equally betweenguests sharing the room
• Full Rate for all Sharers indicates each person in room pays thefull rate. This feature is used least often as it on ly app lies wheneach guest in the room p ays a per person rate.
4. Make your selection for the Rate Share O pt ion and select OK.
When viewing the grid after saving the shares, an asterisk displays to the left o f the guest’s last name indicating a share. At the bot tom of the screen, the namesof sharing guests displays along with their portion of the room rate.
NOTE: For further information on Shares, please refer to the Shares sectionof the “Reservations” chapter in this manual.
©2006 MICROS® Systems Inc. All Rights Reserved. P roprietary and C onfidential.
368

7/31/2019 GEN V40 PMS Reference Manual FINAL Eng Ch
http://slidepdf.com/reader/full/gen-v40-pms-reference-manual-final-eng-ch 369/474
There are a number of available buttons o n th e ROOMING LIST screen:
• Clear allows you to clear any entries in the rooming list and begin anew list.
• Traces enables you to place traces on a single group reservation or forall group reservations.
• Messages place a message for a single group guest or fo r all guests inthe group.
• Share allows you to select two existing reservations in a ro om ing listand create sharing reservations.
• Profile accesses the individual profile of the highlighted reservation
• Resv accesses the reservation information of the highlighted guest.
• Quick Split is a feature to split remaining rooms in the block into
individual, generic reservations. Refer to the following section forinstructions on this feature.
• Grids allow access to the ROOM GRID screen for an updated view of the room’s grid.
• Block displays the BUSIN ESS BLOCK screen for an updated view of the b lock h eader.
• Print opens and p rints a rooming list report for this group
NOTE: It is also possible to access the Rooming List feature d irectly fromthe b lock header in the Quick Business Block .
©2006 MICROS® Systems Inc. All Rights Reserved. P roprietary and C onfidential.
369
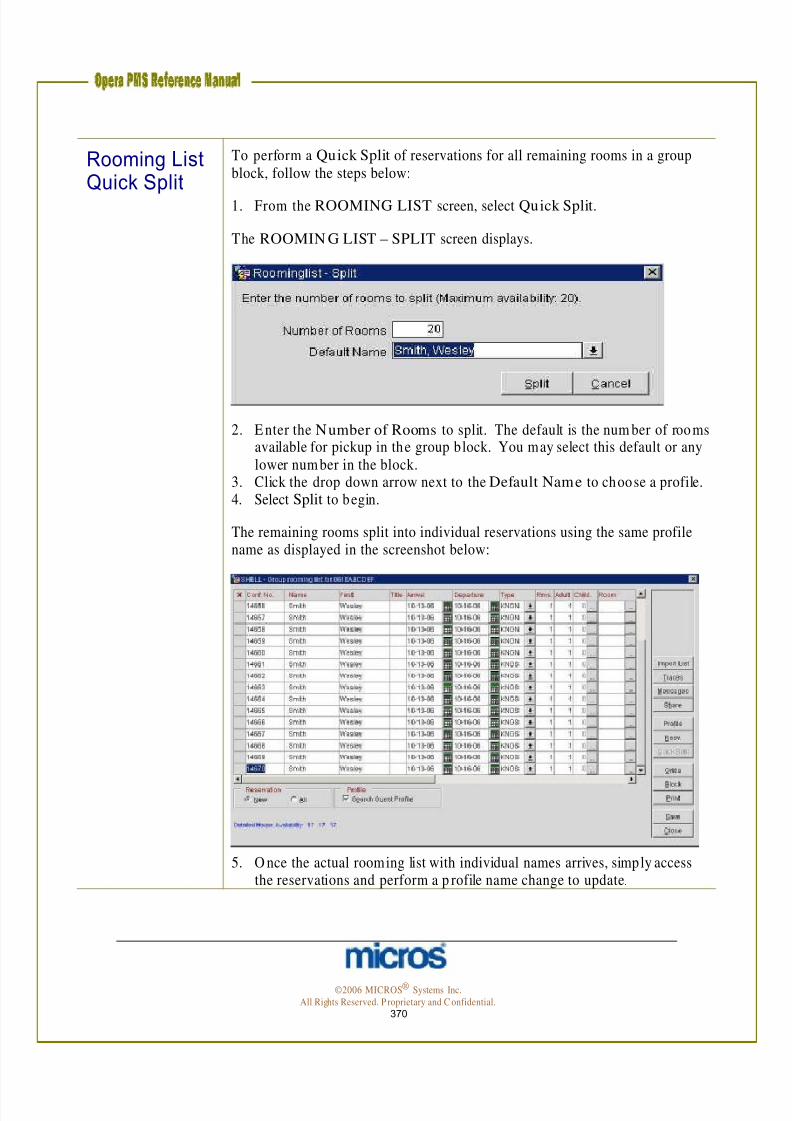
7/31/2019 GEN V40 PMS Reference Manual FINAL Eng Ch
http://slidepdf.com/reader/full/gen-v40-pms-reference-manual-final-eng-ch 370/474
Rooming List Quick Split
To perform a Quick Split of reservations for all remaining rooms in a groupblock, follow the steps below:
1. From the ROOMING LIST screen, select Quick Split.
The ROOMIN G LIST – SPLIT screen displays.
2. E nter the Number of Rooms to split. The default is the num ber of rooms available for pickup in the group block. You may select this default or anylower num ber in the block.
3. Click the drop down arrow next to the Default Name to choose a profile.4. Select Split to begin.
The remaining rooms split into individual reservations using the same profilename as displayed in the screenshot below:
5. O nce the actual rooming list with individual names arrives, simply access the reservations and perform a p rofile name change to update .
©2006 MICROS® Systems Inc. All Rights Reserved. P roprietary and C onfidential.
370

7/31/2019 GEN V40 PMS Reference Manual FINAL Eng Ch
http://slidepdf.com/reader/full/gen-v40-pms-reference-manual-final-eng-ch 371/474
Rooming List Import
If a group contact sends a rooming list to the hotel in a file format, it is possibleto import that list directly into the ROOMING LIST screen and avoid the
entry of each individual reservation. To imp ort a room ing list, the exact XMLfile found on the OPE RA server must be used to input the rooming list. Formo re the location of this file, select F1 for O PE RA Help.
Room Assign The Room Assign makes blocking your group rooms fast and easy! Takeadvantage of this functionality to block your groups in designated areas of thehotel. You can also ensure that you are meeting their specific room needs byusing the Features or Floor fields for filtering. For example, if a group wantsall of their rooms to be quiet rooms away from the elevator, you can enter thedesired features and the system blocks the rooms as such, as long as they areno t previously blocked or occupied. To pre-assign rooms to a block, follow thesteps b elow:
1. From the Group Options menu, select Room Assign.
The AUTOMATIC ROOM BLOCKIN G screen displays.
2. Choose to Assign room s and enter any pertinent Guests or Rooms information.
3. Select Start. The assignment status of each arriving reservation displays inthe Status window.
4. Select Close when finished.
For more information on room assignment, refer to the “Front D esk” chapterof th is manual.
©2006 MICROS® Systems Inc. All Rights Reserved. P roprietary and C onfidential.
371

7/31/2019 GEN V40 PMS Reference Manual FINAL Eng Ch
http://slidepdf.com/reader/full/gen-v40-pms-reference-manual-final-eng-ch 372/474
Room Status Use the Room Status to view the Housekeeping room status of your arrivals for groups due in on the current date, prior to using the group Check In
feature. This is extremely helpful for managing those group s that pre-registeredand pre-assigned for roo ms.
1. From the Group Options menu, select Room Status.
The GROUP ROOM STATUS screen displays.
N ote the H ousekeeping status for all rooms in the Status column. Once all rooms’ display as “Clean” or “Inspected”, you may proceed with a groupcheck-in.
2. Select Close to exit.
©2006 MICROS® Systems Inc. All Rights Reserved. P roprietary and C onfidential.
372

7/31/2019 GEN V40 PMS Reference Manual FINAL Eng Ch
http://slidepdf.com/reader/full/gen-v40-pms-reference-manual-final-eng-ch 373/474
Check In Group
The Check-In Group option allows you to manage your group check-ins andregistration card needs. This easily allows you to p re-register your groups by
filtering through the room statuses noted. Based on your key card interfaces,you may also p rint their keys.
To check in a group, follow the steps below:
1. From the Group Options menu, select Check-In Group.
The CHE CK-IN GROUP screen displays.
2. Select to Check In Clean Rooms Only.
If you would like to cut keys for the group, make a choice in the Cut Keys section as well as the Numb er of Keys section.
3. Select a choice in the Print Registration Cards section and select Check In.
4. Select Close when complete.
NOTE: The status of each check in displays in the Status window at thebo ttom of the screen; if any reservations do n ot have a payment type on thereservation, a window displays prompting you to input a payment type for thecheck in.
©2006 MICROS® Systems Inc. All Rights Reserved. P roprietary and C onfidential.
373

7/31/2019 GEN V40 PMS Reference Manual FINAL Eng Ch
http://slidepdf.com/reader/full/gen-v40-pms-reference-manual-final-eng-ch 374/474
New Posting Master
New Post Master allows you to create an additional posting master for thegroup. Keep in mind that a posting master automatically creates when you
make your first group reservation. Use this feature when you need to create a2nd o r 3rd master for accounting purposes.
Delete Delete is no t typically an option for hotels. This option remains locked bypermission intentionally as we never want to delete blocks, rather you shouldcancel a block if it no longer has a contract at your ho tel. D eleting a blockeliminates the block en tirely from the database as well as deletes the blockhistory from the system. Th is feature only exists for hotels newly installed withOPERA to delete any block mistakenly entered in the system.
Cut Keys Cut Keys gives you the capability of printing keys for your group in advance.Note that this functionality is based on the available functionality of your keycard interface.
To cut keys for a group without checking the group in, follow the steps below:
1. From the Group Options menu, select Cut Keys.
The CUT KEYS screen displays.
2. Choose an option to Cut Keys and the Number of Keys and select OK.
©2006 MICROS® Systems Inc. All Rights Reserved. P roprietary and C onfidential.
374

7/31/2019 GEN V40 PMS Reference Manual FINAL Eng Ch
http://slidepdf.com/reader/full/gen-v40-pms-reference-manual-final-eng-ch 375/474
PrintRegistrationCards
You can selectively Print Registration Cards via the final option in Group
Options. This enables you to print registration cards for guests that are D ue-
In, In-House or Reserved.
To pre-print batch registration cards for a group , follow the steps below:
1. From the Group Options menu, select Print Registration Cards.
The PRIN T RE G. CARDS screen displays.
2. Select a Print Option and choose to Print.
NOTE: Unless you pre-assign roo ms for this group , the room n umber fieldon the registration card prints blank.
©2006 MICROS® Systems Inc. All Rights Reserved. P roprietary and C onfidential.
375

7/31/2019 GEN V40 PMS Reference Manual FINAL Eng Ch
http://slidepdf.com/reader/full/gen-v40-pms-reference-manual-final-eng-ch 376/474
Block Options
The Block Options pertain to the overall management of the block. Access theseop tions on the right side of the BLOCK HEADER screen .
Add PM Add PM creates an additional Posting Master. A confirmation m essage appears. In cases of complex billing to a posting account, it may be necessary to create a second or third posting master for separating the group b illing charges. Theposting master creates but a 9000 number does not automatically assign.
Changes Changes display the h istory of changes to the b lock, listing every change made to the block and by whom . These changes display similarly to reservations or profile changes.
©2006 MICROS® Systems Inc. All Rights Reserved. P roprietary and C onfidential.
376

7/31/2019 GEN V40 PMS Reference Manual FINAL Eng Ch
http://slidepdf.com/reader/full/gen-v40-pms-reference-manual-final-eng-ch 377/474
Copy Copy allows you to m ake a duplicate copy of the b lock, which is very helpful withgroup s that occur in series. You can create the original block, entering all pertinen t
information and then copy it for each of the future dates needed.
To copy a block and all rooms details to another block, follow the steps below:
1. From the Block Options menu, select Copy.
The COPY BOOKIN G screen displays.
2. To copy grid details from the original block select Room Block . 3. To copy any notes with the same group profile, select Include Booking
Notes and Keep same Group Profile.4. Enter the group’s New Start Date and New Block Code.5. Select OK to save.
NOTE: When using the C opy option , only reuse Block Codes for groups infuture business weeks. Your hotel may also have an application setting requiringthat all block codes be unique.
NOTE: Blocks copy with th e hotel’s default starting status of Tentative. Tomake the group block and the rooms allocated in the grid deduct from inventory,you must access the copied block and change the status to D efinite.
©2006 MICROS® Systems Inc. All Rights Reserved. P roprietary and C onfidential.
377

7/31/2019 GEN V40 PMS Reference Manual FINAL Eng Ch
http://slidepdf.com/reader/full/gen-v40-pms-reference-manual-final-eng-ch 378/474
Cutoff Cutoff allows you to cutoff all rooms in the group. This is a “hard” cutoff as itreturns all unsold invento ry to the house. This feature works similarly to theCutoff Date or Cutoff Days feature on the block header, but creates animmediate return despite the actual business date.
NOTE: After you use this option, any room reservations cancelled within theblock return to house inventory, no t back into the block invento ry.
Deposit /CXL
Deposit/ CXL allows the user to enter a deposit of any payment m ethod acceptedby the hotel. G roup deposits generally apply to the po sting master and charges bygroup members route to th e master. Th rough this feature, you are able to apply adeposit rule for all reservations as well as a cancellation rule.
For detailed information on posting deposits, refer to the “Reservations” chapterof th is manual.
©2006 MICROS® Systems Inc. All Rights Reserved. P roprietary and C onfidential.
378

7/31/2019 GEN V40 PMS Reference Manual FINAL Eng Ch
http://slidepdf.com/reader/full/gen-v40-pms-reference-manual-final-eng-ch 379/474
Notes Notes posts notes about the block as a whole and are typically internal notes. Notes to guests or guest follow-up items should apply to reservations directly as
traces, messages, or alerts.
To apply a no te to a b lock, follow the steps below:
1. From the Block Options menu, select Notes.
The BUSINESS BLOCK NOTES screen displays.
2. Select New to post a new note.
The BUSINESS BLOCK NOTES – NEW screen displays.
Item Inventory
3. To keep the note internal and prevent it from printing on any group correspondence, select Internal.
4. Click the drop down arrow next to the N ote Type field to choose a note type.5. Enter a Title for the note and type any instructions in the white text box.
6. Select OK to save.
Use this feature to reserve item inventory for the group, such as rollaway beds,cribs, or equipment. For more information on Item Inventory, refer to the“Reservations” chapter of this manual.
©2006 MICROS® Systems Inc. All Rights Reserved. P roprietary and C onfidential.
379

7/31/2019 GEN V40 PMS Reference Manual FINAL Eng Ch
http://slidepdf.com/reader/full/gen-v40-pms-reference-manual-final-eng-ch 380/474
Shift Date Shift Date allows you to move the date of the group. You merely enter the newgroup start date and everything transfers to that new date.
The only stipulation is that you cannot shift a group if reservations exist for thegroup. If reservations exist, cop y the group for the new dates then change theindividual reservations to move them to the new group.
To shift the start dates for a group with no existing reservations, follow the stepsbelow:
1. From the Block Options menu, select Shift Date.
The SH IFT DATE screen displays.
2. Enter the New Starting Date of th e block and select OK.
©2006 MICROS® Systems Inc. All Rights Reserved. P roprietary and C onfidential.
380

7/31/2019 GEN V40 PMS Reference Manual FINAL Eng Ch
http://slidepdf.com/reader/full/gen-v40-pms-reference-manual-final-eng-ch 381/474
Statistics Statistics displays a screen shown below o ffering a group room count andrevenue summary. Potential refers to the revenue to receive if the group
consumes all of their blocked room s. Actual pertains to their consumed p ickup.
Selecting Block I nfo displays a very informative group resum e report.
Pickup Info displays group pickup statistics.
Daily offers a detailed daily breakdown of block information.
©2006 MICROS® Systems Inc. All Rights Reserved. P roprietary and C onfidential.
381

7/31/2019 GEN V40 PMS Reference Manual FINAL Eng Ch
http://slidepdf.com/reader/full/gen-v40-pms-reference-manual-final-eng-ch 382/474
Custom Tour Series
The Custom Tour Series feature allows you to co py a block for a series of blocksthat span a range of dates. O ften, hotels book tour groups that return on a
month ly basis for examp le. Using this feature allows you to create blocks formany dates in the future using the same block header information on the originalblock.
To create a custom tour series, follow the steps below:
1. From the Block Options menu, select Cust. Tour Series.
The CUSTOM TOUR SERIES screen displays.
2. Enter a Tour Code and Master Block Code.
NOTE: Custom To ur Series essential creates a master and sub -block scenario. If your hotel has the application setting for unique block codes active, you mustenter a unique block code for each tour in the series. If no t, you m ay reenter thesame block code for each tour as long as their dates are unique.
3. Enter the first Block Code followed by the first Arrival Date.4. Enter the first block’s Booking Status and Block Name.5. Press the down arrow on your keyboard to move to the next line.6. Con tinue entering blocks for each block in the tour series.
7. O nce finished, select OK to save the blocks.8. Answer Yes to create the tour series.9. Select OK from the COPY BOOKINGS screen.
NOTE : Booking Status for each b lock must start at “ TE N” (starting status) andeventually change to a “D EF” status.
©2006 MICROS® Systems Inc. All Rights Reserved. P roprietary and C onfidential.
382

7/31/2019 GEN V40 PMS Reference Manual FINAL Eng Ch
http://slidepdf.com/reader/full/gen-v40-pms-reference-manual-final-eng-ch 383/474
Refresh Rates
This feature refreshes all rates on the grid if an alternate selection is made to add aRate Code to the block header. All rates refresh to th e details found on the
selected Rate Code.
NOTE : Any existing reservations made for this group for the original con tractedrates do not update. They retain their quoted rate to prevent confusion with th eguest.
©2006 MICROS® Systems Inc. All Rights Reserved. P roprietary and C onfidential.
383

7/31/2019 GEN V40 PMS Reference Manual FINAL Eng Ch
http://slidepdf.com/reader/full/gen-v40-pms-reference-manual-final-eng-ch 384/474

7/31/2019 GEN V40 PMS Reference Manual FINAL Eng Ch
http://slidepdf.com/reader/full/gen-v40-pms-reference-manual-final-eng-ch 385/474
Additional Group Features
BlockChargeRouting
The most commo n Reservation O ption to use in the context of a group is routinginstructions. Follow the steps discussed in the “Cashiering” chapter of thismanual.
O ne feature of the Business Block m odule is that when you make changes toreservations within a group (such as routing), OPERA allows you to copy thosechanges to all group reservations. Th is is particularly useful when sett ing uprouting instructions or making overall changes to the accommodations of a group.When in the RESERVATION LIST screen, if you edit a group reservation andperform any change, this feature activates when you save and close thereservation . Below is an example of the screen th at displays allowing you to copyyour changes to all guests in the group.
Make the applicable selection (i.e. All G uests in the G roup) and select OK. If you have setup charge routing for one reservation in the group, you can use thisfeature to copy those routing instructions to each reservation in the group .
©2006 MICROS® Systems Inc. All Rights Reserved. P roprietary and C onfidential.
385

7/31/2019 GEN V40 PMS Reference Manual FINAL Eng Ch
http://slidepdf.com/reader/full/gen-v40-pms-reference-manual-final-eng-ch 386/474
Cancel a Group
Canceling a booking is performed in the same manner as changing the status of abo oking. Canceling a group bo oking releases all room s that are blocked back to
the m ain ho tel inventory.
NOTE: You cannot cancel a group block if any reservations exist for the group.
Follow the steps below to cancel a Group booking:
1. From the BLOCK H EADER screen, click the drop down arrow next to theStatus field and select the cancelled statu s (CXL).
2. Select OK to save changes.
The CANCEL BLOCK screen displays.
3. Click the drop down arrow next to the Reason field to select a block cancellation reason code.
4. Enter any additional comm ents in the free text box.5. Click the drop down arrow next to the Destination field if you lost the
business to another ho tel or location . Th is may be another city or perhaps acompeting ho tel.
6. If a Posting Master exists, a prom pt displays asking you to enter the reason forcanceling the Posting Master.
7. Select OK to save.8. If this group is part of master block, select any addition sub-blocks to cancel
or choose None to leave the sub-blocks active. Select Proceed.
©2006 MICROS® Systems Inc. All Rights Reserved. P roprietary and C onfidential.
386

7/31/2019 GEN V40 PMS Reference Manual FINAL Eng Ch
http://slidepdf.com/reader/full/gen-v40-pms-reference-manual-final-eng-ch 387/474
Family Blocks
When the Family Block application parameter is active, OP ERA autom aticallyassumes that the Quick Business Block is Elastic. This means that you may make
reservations without being limited to a room allotm ent. All that is required is tocreate a block header using the Quick Business Block feature and the status of thegroup header must be D efinite. Th is is particularly useful for impromptu groups,such as an airline’s distressed passenger groups, that do not formally contract anallotm ent. In addition, with this feature abb reviated rooming list functionalityhelps to simply the input of reservations.
Once you create a block header using the Quick Business Block feature and turnthe group status to D efinite, a Rooming List button appears near the bottom of the QUICK BUSINESS BLOCK screen.
1. Without having to enter an allotment of rooms, simp ly select Rooming List.
The ROOMING LIST screen displays in an abb reviated format.
2. Enter the list of reservation s as learned earlier in this chapter and select Save.
NOTE: Because there are no rooms allotted for this block, each reservation isbo rrowed from general house availability. A message displays prompting you toborrow rooms from the house.
©2006 MICROS® Systems Inc. All Rights Reserved. P roprietary and C onfidential.
387

7/31/2019 GEN V40 PMS Reference Manual FINAL Eng Ch
http://slidepdf.com/reader/full/gen-v40-pms-reference-manual-final-eng-ch 388/474
Chapter 11 – Commission Handling
©2006 MICROS® Systems Inc. All Rights Reserved. P roprietary and C onfidential.
388

7/31/2019 GEN V40 PMS Reference Manual FINAL Eng Ch
http://slidepdf.com/reader/full/gen-v40-pms-reference-manual-final-eng-ch 389/474
Commissions Overview
The Commissions module is a licensed feature th at is optional at individualho tels. Processing and h andling comm issionable reservations in O PERA mayvary from location to location . All reservations made by a travel agency requirea profile attached to the reservation with a valid agency IATA number andbank account. In addition , the rates reserved for the guest must becommissionable rates.
Once a guest with a commissionable reservation has stayed at the hotel, thereservation record falls into the Commissions module for processing after theaudit on the guest departure date. Depending on your ho tel’s setup, thecommissions may pay directly from OPERA via a check run, may process toanother system via a file export, or may pay centrally. Instruction in this
chapter covers most payment scenarios, but may vary for your hotel.
Travel Agent Profile Setup
Typically, if your hotel pays commission s centrally, m ost steps in th is chapter are not n ecessary. Be certain to con firm with your ho tel’s Systems Expert onthe exact steps for com mission p rocessing.
When creating a Travel Agent profile, a few steps are necessary to ensure thatcommission records create in the Commission handling feature.
1. First, for an agency that you intend to pay commissions via a central systemor third-party interface, a valid agency IATA number is required on theprofile.
2. N ext, select the Stats & Info button.
©2006 MICROS® Systems Inc. All Rights Reserved. P roprietary and C onfidential.
389

7/31/2019 GEN V40 PMS Reference Manual FINAL Eng Ch
http://slidepdf.com/reader/full/gen-v40-pms-reference-manual-final-eng-ch 390/474
The STATISTICS & IN FO screen displays.
3. Click the drop down arrow next to the Bank Account field.
The PROFILE COMMISSION DET AILS screen displays.
4. Click the drop down arrow next to the Bank Account field again and select the account from which to pay commissions to this agency.
NOTE: Your h otel may have several accounts from which to paycommissions. Some com missions may pay centrally while others are paid via alocal hotel bank account.
5. Click the drop down arrow next to the Commission Code field and selectthe type of com mission available for th is agency (i.e. 10%, no n-commissionable, 5%, etc.)
NOTE: This code is the default commission paid for every reservation madefor through this agency on rates that qualify for commissions.
6. Select OK and Save the p rofile.
©2006 MICROS® Systems Inc. All Rights Reserved. P roprietary and C onfidential.
390

7/31/2019 GEN V40 PMS Reference Manual FINAL Eng Ch
http://slidepdf.com/reader/full/gen-v40-pms-reference-manual-final-eng-ch 391/474

7/31/2019 GEN V40 PMS Reference Manual FINAL Eng Ch
http://slidepdf.com/reader/full/gen-v40-pms-reference-manual-final-eng-ch 392/474
Commission Research
If there is a need to research any reservation record that p rocessed through theComm issions module, use the Commission Research feature to locate and
research that record. Follow the steps below to investigate a com missionrecord:
1. From the main menu, select Commissions and Commission Research .
The RESERVATIO N SEARCH screen displays.
2. D epending on the available information , enter the guests’ last Name or the travel Agent nam e in the search criteria and select Search .
3. H ighlight the desired com mission able reservation and select Resv to viewreservation details.
4. Select Comm to view the actual commission percentages or amountsprocessed for this reservation.
The COMMISSION DETAILS screen displays the check number andpayment along with the current status o f the commission check.
5. Select Close to return. 6. Select Profile to view the guest or travel agent pro file associated with the
highlighted commission record.
©2006 MICROS® Systems Inc. All Rights Reserved. P roprietary and C onfidential.
392

7/31/2019 GEN V40 PMS Reference Manual FINAL Eng Ch
http://slidepdf.com/reader/full/gen-v40-pms-reference-manual-final-eng-ch 393/474
Payment Processing
Overview Each new business day, a reservation with commission records from previousguest stays display in the Payment Processing area. There are two ways topay commissions:
• By Account processes and displays all com mission s for a p articular bank account. This feature is particularly useful if your ho tel paysagency com missions local (by their own bank account); in addition, usethis feature to process a batch check run.
• By Agent processes and displays any comm ission s for a particulartravel agency, regardless of the account paying the com mission s. Th isis particularly useful if you receive invoices for your travel agencies andneed to pay all commissions for one particular agent.
NOTE: D epending on your selection , the system calculates all applicable
commissions before displaying the Accounts or Agents to pay.
©2006 MICROS® Systems Inc. All Rights Reserved. P roprietary and C onfidential.
393

7/31/2019 GEN V40 PMS Reference Manual FINAL Eng Ch
http://slidepdf.com/reader/full/gen-v40-pms-reference-manual-final-eng-ch 394/474
HoldingCommissionRecords
Situations arise from t ime to time, where it is necessary to investigatereservation records before paying commissions. In the event that you need to
place a hold on either an individual commission record or for an agency aswhole, follow the steps below:
1. From the main menu, select Commissions and Payment Processing.2. Select By Account or By Agent.3. Search for and highlight either the bank account containing the comm ission
record or the travel agent to pay the commission . 4. Select OK to view commission records.
The COMMISSION PROCESSING SCREEN displays.
5. If you selected By Agent, the processing screen displays all com mission records for that t ravel agency. Place and “X” next to the agency name inthe “H ” column to place all outstanding commission records on hold.Alternately, you may highlight the travel agent and select Hold.
NOTE: The commission records below no w have an “X” in the “H ” columnindicating the records are on ho ld.
6. If you selected By Accoun t, search for and highlight the approp riate travelagent in the top of the screen to display all commission records for thatagency.
©2006 MICROS® Systems Inc. All Rights Reserved. P roprietary and C onfidential.
394

7/31/2019 GEN V40 PMS Reference Manual FINAL Eng Ch
http://slidepdf.com/reader/full/gen-v40-pms-reference-manual-final-eng-ch 395/474
7. In the lower portion of the screen (D etails for…), place an “X” next to each record in the “H” column you wish to hold for general investigationreasons. Alternately, you m ay highlight the record and select Hold.
8. In the lower portion of the screen, place an “X” next to each record in the“A” column you wish to stop th e comm ission while waiting on an ARpayment fo r the reservation. Alternately, you may highlight the record andselect AR.
9. In the lower portion of the screen, place and “X” next to each record in the“P” column you wish to stop the commission for records that deductedcomm issions on a prepayment. In this case, the payment made b y thetravel agency already deducted the commission, so you do not need toprocess another payment.
10. To remo ve a com mission from hold, follow any of the steps above. Then ,remove the “X” from the “H”, “A”, or “P” columns. Alternately, you m ayhighlight the agent o r individual record already on hold and select Release.
NOTE: When you place a commission on hold for any reason, the Funds section at the b ottom of the COMMISSION PROCESSIN G screen displaysa total of amounts on hold.
NOTE: Comm ission records that display highlighted in yellow indicate thereare multiple commissions that apply to one reservation . In addition, the T/ Scolumn identifies whether the commissionable profile is a Travel Agent orSource profile.
©2006 MICROS® Systems Inc. All Rights Reserved. P roprietary and C onfidential.
395

7/31/2019 GEN V40 PMS Reference Manual FINAL Eng Ch
http://slidepdf.com/reader/full/gen-v40-pms-reference-manual-final-eng-ch 396/474
ManualChange toCommission
If the commission amount or percentage calculate on a reservation recordneeds to be altered, followed the steps below to manually change a commission
record:
1. From the main menu, select Commissions and Payment Processing.2. Select By Account and let the system calculate all outstanding
commissions.3. Search for, highlight the desired bank account, and select OK.
O utstanding commissions calculate for th e chosen account.
NOTE: You may also find the record by using the By Agent feature, butsearching by Bank Account displays more commission records at one time.
The COMMISSION PROCESSIN G screen displays.
4. Locate and select the desired travel agent that the com mission record belongs to in the top portion of the screen.
5. H ighlight the comm ission record in the Details section and select Edit.
Full com mission details display for this reservation record.
©2006 MICROS® Systems Inc. All Rights Reserved. P roprietary and C onfidential.
396

7/31/2019 GEN V40 PMS Reference Manual FINAL Eng Ch
http://slidepdf.com/reader/full/gen-v40-pms-reference-manual-final-eng-ch 397/474
6. E ither change the Commission Amount manually or select a new Commission Code.
7. E nter any comments regarding the change to comm ission in the Notes field.
8. Select OK to save changes.
©2006 MICROS® Systems Inc. All Rights Reserved. P roprietary and C onfidential.
397
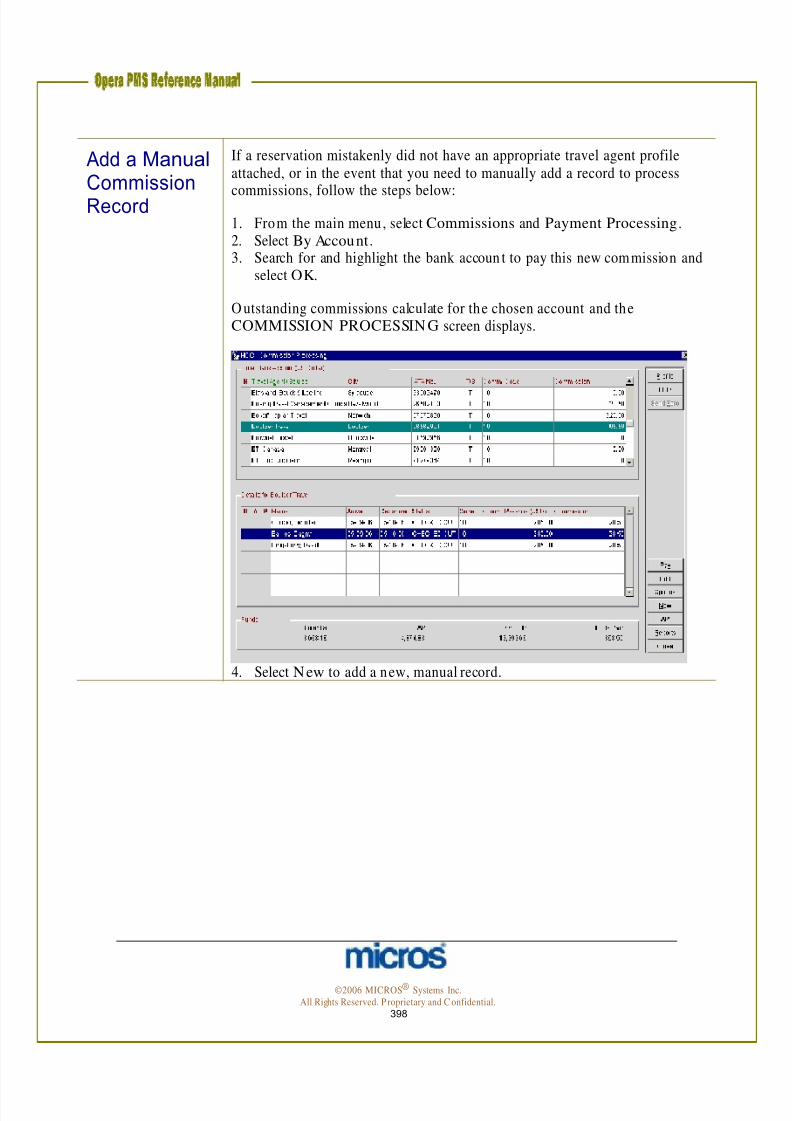
7/31/2019 GEN V40 PMS Reference Manual FINAL Eng Ch
http://slidepdf.com/reader/full/gen-v40-pms-reference-manual-final-eng-ch 398/474
Add a ManualCommissionRecord
If a reservation mistakenly did not have an appropriate travel agent profileattached, or in the event that you need to manually add a record to process
commissions, follow the steps below:
1. From the main menu, select Commissions and Payment Processing.2. Select By Account.3. Search for and highlight the bank accoun t to pay this new commission and
select OK.
O utstanding commissions calculate for the chosen account and theCOMMISSION PROCESSIN G screen displays.
4. Select New to add a new, manual record.
©2006 MICROS® Systems Inc. All Rights Reserved. P roprietary and C onfidential.
398
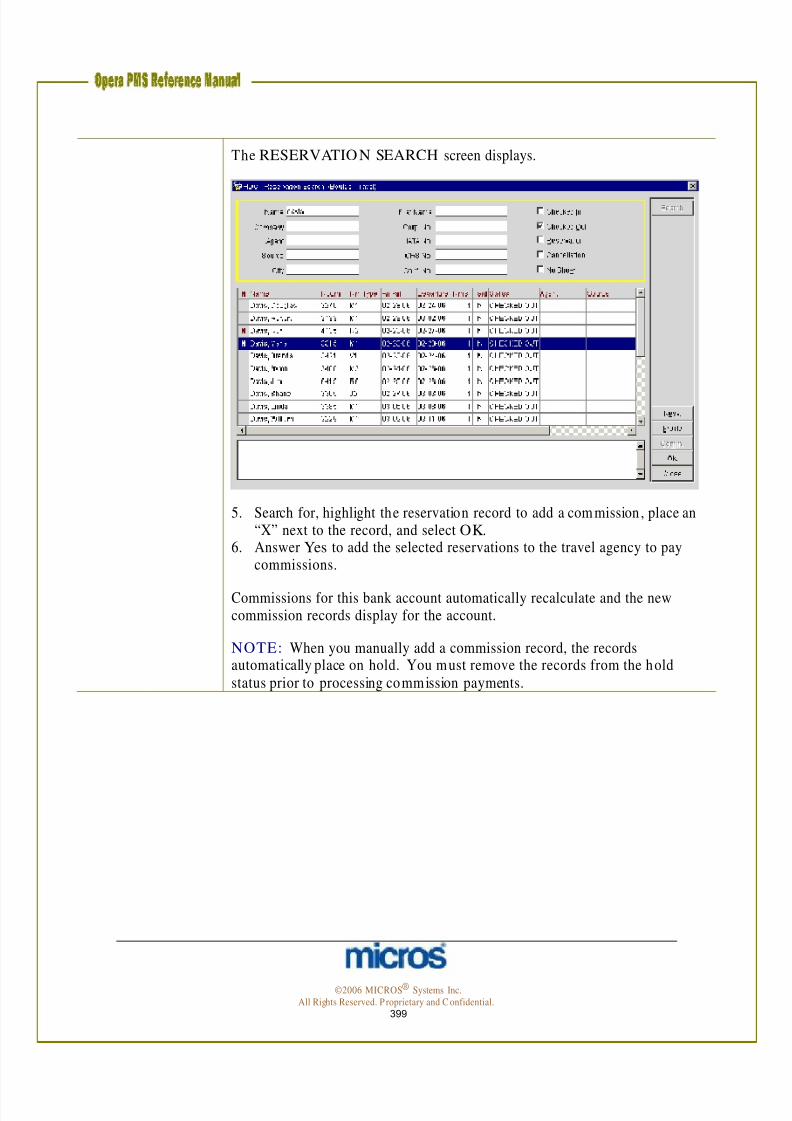
7/31/2019 GEN V40 PMS Reference Manual FINAL Eng Ch
http://slidepdf.com/reader/full/gen-v40-pms-reference-manual-final-eng-ch 399/474
The RESERVATIO N SEARCH screen displays.
5. Search for, highlight the reservation record to add a com mission , place an “X” next to the record, and select OK.
6. Answer Yes to add the selected reservations to the travel agency to paycommissions.
Commissions for this bank account automatically recalculate and the newcommission records display for the account.
NOTE: When you manually add a commission record, the recordsautomatically place on hold. You must remove the records from the holdstatus prior to processing commission payments.
©2006 MICROS® Systems Inc. All Rights Reserved. P roprietary and C onfidential.
399

7/31/2019 GEN V40 PMS Reference Manual FINAL Eng Ch
http://slidepdf.com/reader/full/gen-v40-pms-reference-manual-final-eng-ch 400/474
CommissionPayments viaFile Export
If your hotel processes commissions within OPERA and generates a file exportto deliver to a third party for payment, setup is required on th e Bank Account
to indicate that comm ission s will pay via a file export. O nce th is setup is inplace, follow the steps below to generate the export:
1. From the main menu, select Commissions and Payment Processing.2. Select By Account.3. Search for and highlight the bank accoun t to pay this new commission and
select OK.
O utstanding commissions calculate for the chosen account and theCOMMISSION PROCESSIN G screen displays.
4. Select Pay to p rocess all comm ission records not on hold for payment. 5. Enter the Departure Date Range for commissions to process. If your
hotel does not process commission exports daily, this is useful to includeseveral days’ worth of co mm ission records.
6. Answer Yes to be sure that you want to p ay commissions.7. A message displays indicating that a text file has been created. Answer Yes
to print the transmittal letter.
An export file (in the designed file format) generates and stores in a designatedfile location on the O PE RA application server.
©2006 MICROS® Systems Inc. All Rights Reserved. P roprietary and C onfidential.
400

7/31/2019 GEN V40 PMS Reference Manual FINAL Eng Ch
http://slidepdf.com/reader/full/gen-v40-pms-reference-manual-final-eng-ch 401/474
DOWNLOAD TH E E XPORT FILE FROM TH E SERVER TO YOUR
LOCAL WORKSTATION AND DELIVER TO A THIRD PARTY
Once the file export generates to the server, follow the steps below todownload the file to your location workstation:
8. From the main menu, select Miscellaneous and File Download.
The FILE DOWNLOAD screen displays.
9. Insert the file name of the export in the File Name field and select Search.
NOTE: File names and th eir extensions differ depending on the export typeand processor.
10. H ighlight the export file and select Download.
11. Select the option to Save the file. 12. Choose the directory on your local workstation to save the export and
select Save.
O nce the export f ile exists on your local workstation , you may elect to deliverthe file to a third p arty for p ayment by email or any other delivery method (i.e.file transfer or FTP).
©2006 MICROS® Systems Inc. All Rights Reserved. P roprietary and C onfidential.
401

7/31/2019 GEN V40 PMS Reference Manual FINAL Eng Ch
http://slidepdf.com/reader/full/gen-v40-pms-reference-manual-final-eng-ch 402/474
CommissionPayments viaCheck Run
If your hotel processes commissions within O PE RA and prints checks that youmail directly to travel agencies for payment, setup is required on the Bank
Account to indicate that com missions will pay by check. O nce this setup is inplace, follow the steps below to process a check run:
1. From the main menu, select Commissions and Payment Processing.2. Select By Account.3. Search for and highlight the bank accoun t to pay this new commission and
select OK.
O utstanding commissions calculate for the chosen account and theCOMMISSION PROCESSIN G screen displays.
4. Select Pay to p rocess all comm ission records not on hold for payment. 5. Enter the Departure Date Range for commissions to process. If your
hotel does not process commission exports daily, this is useful to includeseveral days’ worth of co mm ission records.
6. Answer Yes to be sure that you want to p ay commissions.7. Answer Yes to p rint held commissions on the pre-payment report if you
wish to see all commissions, yet answer No if you only wish to see theactual commissions that generate checks.
NOTE: The pre-payment repo rt prints to give you an oppo rtunity to reviewall records that are processing for payment by agency before the actual checksprint. Below is a sample report.
©2006 MICROS® Systems Inc. All Rights Reserved. P roprietary and C onfidential.
402

7/31/2019 GEN V40 PMS Reference Manual FINAL Eng Ch
http://slidepdf.com/reader/full/gen-v40-pms-reference-manual-final-eng-ch 403/474
8. After confirming all the payments to process, enter the First Check N o. to be used and select OK.
NOTE: Before printing checks, be certain that the check printer is loadedeither with pre-printed checks or with the approp riate paper or forms. Afterselecting OK in the step above, checks automatically send to the workstationsdefault O PE RA printer designated for checks.
9. Answer Yes to p rint the Check Summary report for a summ ary display of all checks printed in this process run.
Below is an example of the Payment Details report.
©2006 MICROS® Systems Inc. All Rights Reserved. P roprietary and C onfidential.
403

7/31/2019 GEN V40 PMS Reference Manual FINAL Eng Ch
http://slidepdf.com/reader/full/gen-v40-pms-reference-manual-final-eng-ch 404/474
CommissionReports and
Options
To access all available Comm ission H andling reports directly from this module,select the Reports option from within the COMMISSION PROCESSIN Gscreen. A list of commission repo rts displays. Each report has a range of filters to sort the display or data returned. Some example of repo rts usefulwhen hand ling comm issions are as follows:
• Transferred Commissions report displays all com mission recordswithin a departure range, with details, and a total commission amountfor the dates selected.
• Commission Payable report displays all comm ission s not on ho ld forthe selected agency or source.
From the COMMISSION S PROCESSIN G screen, the Options featureoffers several alternatives for handling commissions prior to processing
payments. The list below identifies each option within th is feature:
• Reservation displays the departed reservation of the highlightedcommission record.
• Folio Detail displays the departed folio of the highlighted commissionrecord including individual transactions.
• Folio History activates the history function to search for past guestfolios.
• Detach removes or detaches the highlighted reservation record fromthe t ravel agent o r source.
©2006 MICROS® Systems Inc. All Rights Reserved. P roprietary and C onfidential.
404

7/31/2019 GEN V40 PMS Reference Manual FINAL Eng Ch
http://slidepdf.com/reader/full/gen-v40-pms-reference-manual-final-eng-ch 405/474
Payment Activity
Register –ViewPaymentDetails
After processing commission payments, those transactions and checks list in aRegister. To v iew payment details on a commission record, follow the stepsbelow:
1. From the main menu, select Commissions and Payment Activity.2. Select Register from the CHE CK BOOK MENU screen.3. H ighlight the Bank Account that the commission check was paid from and
select OK.
The PAYMEN T ACTIVITY screen displays.
4. Use the Payee field to enter the travel agent name or enter the Check No. and select Search .
5. To view only checks that have not cleared the Bank Account, selectOutstanding in the search criteria.
6. To include checks that have cleared the Bank Account, select Reconciled inthe search criteria.
7. To include voided checks or checks no t presented to the Bank Account forpayment, select either Unpresented or Void in the search criteria.
NOTE : The life cycle of a com mission check is that it is first O utstanding,
followed by Reconciled. To “unreconcile” a check, you must return th e check toan O utstanding status. If marking a check as “unpresented”, the check must stillbe O utstanding or Voided. To Void a check, the check may be either Outstandingor Unpresented, but all comm ission details return for ano ther com missionprocessing cycle. If you wish to reconcile an Unpresented check, you m ust firstreturn it to an O utstanding status before you can Reconcile.
The paid check record displays in the grid below.
©2006 MICROS® Systems Inc. All Rights Reserved. P roprietary and C onfidential.
405

7/31/2019 GEN V40 PMS Reference Manual FINAL Eng Ch
http://slidepdf.com/reader/full/gen-v40-pms-reference-manual-final-eng-ch 406/474
8. H ighlight the desired check to view and select Details.
The PAYMEN T ACTIVITY – DETAILS screen displays.
Each reservation record included in this check payment for this agency displays, including those records processed that are currently on AR hold or excluded frompayment because of a p repaid commission .
9. H ighlight a reservation record and select Edit to modify the details of thepayment for that commission record.
NOTE: This option is only available if the check has not reconciled with thebank that needs a correction. In th is scenario, you may void the payment, edit thedetails and process another check to the agency.
10. Highlight a reservation record an d select Options to view the reservation,view folio details or fo lio history.
©2006 MICROS® Systems Inc. All Rights Reserved. P roprietary and C onfidential.
406

7/31/2019 GEN V40 PMS Reference Manual FINAL Eng Ch
http://slidepdf.com/reader/full/gen-v40-pms-reference-manual-final-eng-ch 407/474
Register –ReconcileChecks
Once commission checks are mailed from the hotel and received by the agency,those checks clear the Bank Account and must be reconciled within O PERA to
show a received payment. You may reconcile one or multiple checks at one time.To reconcile an outstanding check in the Register, follow the steps below:
1. From the main menu, select Commissions and Payment Activity.2. Select Register from the CHE CK BOOK MENU screen.3. H ighlight the Bank Account that the commission check paid from and select
OK.
The PAYMEN T ACTIVITY screen displays.
4. Use the Payee field to enter the travel agent name or enter the Check No. and select Search . To view only checks that have not cleared the Bank
Account, select Outstanding in the search criteria.5. Select Reconcile.
The EN TER A RANGE OF CHECK NUMBERS TO RECONCILE screendisplays.
6. Enter the First Check Number and the Last Check Number that have cleared the Bank Account.
7. Enter the Reconciled Date for the date these checks cleared the account andselect OK.
©2006 MICROS® Systems Inc. All Rights Reserved. P roprietary and C onfidential.
407
7/31/2019 GEN V40 PMS Reference Manual FINAL Eng Ch
http://slidepdf.com/reader/full/gen-v40-pms-reference-manual-final-eng-ch 408/474
RETURN A RECON CILED CHECK TO OUT STANDIN G STATUS
In the event that a check was mistakenly reconciled, follow the steps below to
return it to an O utstanding status:
1. From the PAYMENT ACTIVITY screen, select Reconciled in the searchcriteria.
2. H ighlight the reconciled check and select Outstanding.
NOTE: The check is now in an O utstanding status and may either be Voided orUnpresented.
Register –Void Checks
To void a check and return all comm ission details to p rocess in another paymentprocessing cycle, follow the steps b elow:
1. From the PAYMENT ACTIVITY screen, search for and highlight the checkto void. Checks must either be in an O utstanding or Unp resented status tovoid.
2. Select Void.3. A message displays warning you that voiding this check returns all details back
to com mission processing. Answer Yes to com plete the void.
NOTE : There is no systematic way to undo a voided check. O nce a check voids,all com mission details must pro cess again and a new check creates for the details.
©2006 MICROS® Systems Inc. All Rights Reserved. P roprietary and C onfidential.
408

7/31/2019 GEN V40 PMS Reference Manual FINAL Eng Ch
http://slidepdf.com/reader/full/gen-v40-pms-reference-manual-final-eng-ch 409/474
Register –Un-PresentedChecks
If you have a check that is either never delivered to the agency or source, orsimply never reconciles with the Bank Account, follow the steps below to indicate
its status:
1. From the main menu, select Commissions and Payment Activity.2. Select Register from the CHE CK BOOK MENU screen.3. H ighlight the Bank Account that the commission check paid from and select
OK.
The PAYMEN T ACTIVITY screen displays.
4. Use the Payee field to enter the travel agent name or enter the Check No. and select Search . To view only checks that have not cleared the BankAccount, select Outstanding in the search criteria.
5. Select Unpresented.6. Answer Yes to m ark the check as Unpresented, enter the date for the check
and select OK.
RETURN AN UNPRE SEN TED CHECK TO OUTSTANDING STATUS
If an Unpresented check finally reconciles with the Bank Account or delivers tothe agency, follow the steps b elow to remove the Unpresented status.
1. From the PAYMENT ACTIVITY screen, select the Unpresented option inthe search criteria to search for the check.
2. H ighlight the desired check and select Outstanding.
NOTE : The check is now in an Outstand ing status and may either be Reconciledor Voided.
©2006 MICROS® Systems Inc. All Rights Reserved. P roprietary and C onfidential.
409

7/31/2019 GEN V40 PMS Reference Manual FINAL Eng Ch
http://slidepdf.com/reader/full/gen-v40-pms-reference-manual-final-eng-ch 410/474
Reprint Checks
In the event that you need to reprint commission checks (i.e. if the check printer jams or if you incorrectly number the check run), follow th e steps below:
1. From the main menu, select Commissions and Payment Activity.2. Select Reprint Checks.3. H ighlight the Bank Accoun t that the checks were printed from and select OK.
The PAYMEN T ACTIVITY screen displays.
4. Select Reprint.
The EN TER A RANGE OF CH ECK NUMBERS TO PRIN T screendisplays.
5. Enter the First Check Number and the Last Check Number to print and select OK.
NOTE: Be certain to align the checks in the printer prior to performing this stepto avoid misprinted checks.
6. After the check print completes, answer Yes to p rint a Check Summary
report.
©2006 MICROS® Systems Inc. All Rights Reserved. P roprietary and C onfidential.
410

7/31/2019 GEN V40 PMS Reference Manual FINAL Eng Ch
http://slidepdf.com/reader/full/gen-v40-pms-reference-manual-final-eng-ch 411/474
Chapter 12 – Package Management
©2006 MICROS® Systems Inc. All Rights Reserved. P roprietary and C onfidential.
411

7/31/2019 GEN V40 PMS Reference Manual FINAL Eng Ch
http://slidepdf.com/reader/full/gen-v40-pms-reference-manual-final-eng-ch 412/474
©2006 MICROS® Systems Inc.
All Rights Reserved. P roprietary and C onfidential. 412

7/31/2019 GEN V40 PMS Reference Manual FINAL Eng Ch
http://slidepdf.com/reader/full/gen-v40-pms-reference-manual-final-eng-ch 413/474
Packages
SimplePackageElement
Packages consist of two componen ts, the Element and the G roup. PackageElemen ts are the individual items with in a package, for example, a movie. ThePackage Group comb ines multiple elements, such as dinner and a movie. Thedinner is an element and the movie is an element; however, they combine to makea Package Group.
Within the Package Element, there are two different types that you may create - aSimple Package or an Advanced Package. The Simple Package E lement does nothave interface charges, it consumes as scheduled and a preset price posts duringthe N ight Audit.
The Advanced Package Element allows interfaces to post a charge, posts to a
guest room at the time of con sumption and abso rbs by the package rather thanappear on the guest folio, and an allowance applies for the price.
The Package Group combines multiple elemen ts to sell as a single package.
To create a new Simp le Package element:
1. From the System Configuration menu, select Rate Management 2. Highlight Packages 3. Select Codes
The PACKAGE CODES screen displays with all existing Package Codes in alphabetical order. These Package Codes consist of both the Package Elementsand Package Groups.
4. Select New to add a new package code
©2006 MICROS® Systems Inc. All Rights Reserved. P roprietary and C onfidential.
413

7/31/2019 GEN V40 PMS Reference Manual FINAL Eng Ch
http://slidepdf.com/reader/full/gen-v40-pms-reference-manual-final-eng-ch 414/474

7/31/2019 GEN V40 PMS Reference Manual FINAL Eng Ch
http://slidepdf.com/reader/full/gen-v40-pms-reference-manual-final-eng-ch 415/474
• Package Profit is for any amounts that are less than the “price”. Forexample, the hotel gains package profit from guests who do not consume
breakfast allowance amount.• Package Loss is for any amount that is more than the “price” yet less
than “allowance”.
• Currency allows you to set the currency for the package element if you areusing multi-currency at your prop erty.
Attributes
• Included in Rate sets this package price to deduct from the rate amountconfigured in the Rate Details screen on the Rate Code. The packageprice allocates to this package element and the remaining amount in the
rate details allocates to Room Revenue.• Add to Rate Separate Line does no t include the package in th e quote
rate but rather adds it to the guest folio as a separate line item.
• Add to Rate Combine Line does not include the package in th e quotedrate, yet comb ines the p osting into one line item on the folio.
• Sell Separate allows this package elemen t to at tach to any reservation sthat have booked a regular (non-package) rate.
• Post Next Day allows the system to hold the allowance amount until theitem posts on the following day. Typically, this only happens withbreakfast because the allowance is set-aside during the night audit but the guest does not have their breakfast until the next morning.
• Item Inventory allows you to attach an item that applies to the packageelement.
• Posting Rhythm determines if the package element is available each dayor on ly on certain days. O pera provides the ability to set posting rhythm’s10 different ways, to suit every package’s needs.
o Post Every Night – Post th is package charge every night.o Post on Arrival Night – Post this on arrival night only. o Post on Every X Nights Starting N ight Y - Post this package
charge every X nights, beginning the Y night of stay. Example: Start on night 3, Post every 2 nights. Reservation Arrival Mon day
D epart Saturday. Monday, no charge, Tuesday, no charge,Wednesday, package charge, Thursday, no charge, Friday, packagecharge.
©2006 MICROS® Systems Inc. All Rights Reserved. P roprietary and C onfidential.
415

7/31/2019 GEN V40 PMS Reference Manual FINAL Eng Ch
http://slidepdf.com/reader/full/gen-v40-pms-reference-manual-final-eng-ch 416/474
o Post on Certain Nights of the Week – Check mark the days of the week to determine the days to post this package charge.
o
Post on Last Night – Post this package charge on the last nightof the stay on ly.o Post Every Nigh t Except Arrival Night – Post this package
charge on all nights o f the stay except the arrival night.o Post Every Night Except Last – Post this package charge on all
nights of the stay except the last night.o Do not Post on First and Last Night – Post this package charge
on all nights except the first and last nights of stay.o Floating Allowance per Stay – Floats the allowance to be
consumed at anytime during the guest stay.o Custom Posting Schedule – This user-defined schedule lets you
enter a posting rhythm over a 14-day period by assigning the day(number) within a guest stay for posting this package price. Forexample, if you check mark boxes 3, 5, and 7, Opera will post onthe third, fifth and seventh day of the stay and will repeat thisposting schedule after the 14th day through the remainder of thestay.
©2006 MICROS® Systems Inc. All Rights Reserved. P roprietary and C onfidential.
416

7/31/2019 GEN V40 PMS Reference Manual FINAL Eng Ch
http://slidepdf.com/reader/full/gen-v40-pms-reference-manual-final-eng-ch 417/474
• Formula is available for advanced posting calculations.
• Calculation Rule determines how the amount calculates. Fo r example:
o Per Adult/ Child - if the item is priced differently for adults thanchildren.
o Per Person - if the item is priced the same for adults and children.o Flat Amount – if the item price does not m ultiply by the number
of peop le in the room . Flat Amo unt will also calculate PE R SHARED RESERVATION in the room assuming all sharedreservations have the same package rate.
• Valid Between contro ls the start and end times during which theallowance defined in the package element are valid. If you leave the fieldsblank, the allowance is valid all day. Fo r example, if breakfast is servedbetween 07:00 and 10:30, you should allow breakfast postings to theallowance only during this period. If a breakfast posting is made later, theamount posts to the guest's folio. Remember that the time of posting isthe time the waiter charges to the room from the P oint o f Sale system, notnecessarily the time when the guest star ted breakfast.
5. Enter a unique package Code for the package element6. Enter the Short Description 7. Enter the Description 8. In the Transaction Details section, enter or select a transaction Code. This
transaction code appears for allowance credit on the package ledger.
NOTE: Overage is no t required on a Simp le Package, as there will be n opo ssibility of overage postings because there is no allowance. N o Alternates arerequired in a Simple Package, as the package amount applies during the audit, andwe accept no o ther charges or transactions. D o no t check Allowance becausethis package element should break out automatically on the package ledger of theaccounting reports. Th is package will never show any profit or loss because it willalways appear consumed at the exact amount set up in the package details.
©2006 MICROS® Systems Inc. All Rights Reserved. P roprietary and C onfidential.
417
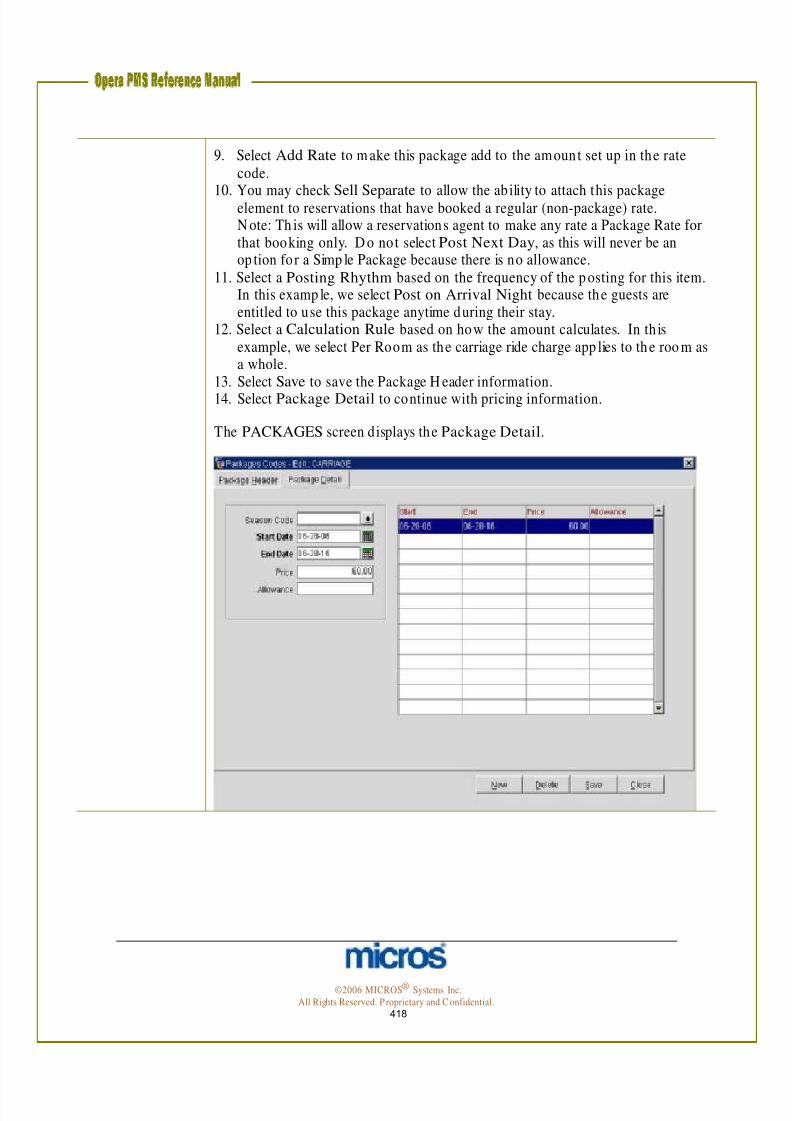
7/31/2019 GEN V40 PMS Reference Manual FINAL Eng Ch
http://slidepdf.com/reader/full/gen-v40-pms-reference-manual-final-eng-ch 418/474
9. Select Add Rate to m ake this package add to the amount set up in the ratecode.
10. You may check Sell Separate to allow the ability to attach this packageelement to reservations that have booked a regular (non-package) rate.N ote: Th is will allow a reservations agent to make any rate a Package Rate forthat booking only. D o not select Post Next Day, as this will never be anop tion for a Simp le Package because there is no allowance.
11. Select a Posting Rhythm based on the frequency of the p osting for this item.In this examp le, we select Post on Arrival Night because the guests areentitled to use this package anytime during their stay.
12. Select a Calculation Rule based on how the amount calculates. In th isexample, we select Per Room as the carriage ride charge app lies to the roo m asa whole.
13. Select Save to save the Package H eader information.14. Select Package Detail to continue with pricing information.
The PACKAGES screen displays the Package Detail.
©2006 MICROS® Systems Inc. All Rights Reserved. P roprietary and C onfidential.
418

7/31/2019 GEN V40 PMS Reference Manual FINAL Eng Ch
http://slidepdf.com/reader/full/gen-v40-pms-reference-manual-final-eng-ch 419/474
The Package Detail tab contains these fields:
1. Season Code allows you to assign a Rate Season Code to this Package.2. Start/ End Date controls when the pricing is available for the package. Youcan set multiple date ranges and pricing amoun ts for the package. Th e dateranges cannot overlap. By default, the package code is valid for a ten-yearperiod starting on the date it is configured. D ates default to th e dates definedfor the season if you assign a Season Code.
3. Price is the actual price of the package element. This amount po sts to thetransaction code defined. (Price cannot be negative when the package has anallowance.)
NOTE: The amounts you enter in the Price and Allowance fields are in thecurrency defined in the package header.
4. Allowance is the amount that the guest can consume against the package.This amoun t is the actual price for the element o r the allowed consumptionprice for the guest. The allowance cannot be less than the price.
15. Enter the Start Date that the price is available.16. Enter the End Date that the price is no longer available.17. Enter the Price for this simple package element.
NOTE : Since th is is a simple package, do not enter an allowance.
18. Select Save to save the package details.
©2006 MICROS® Systems Inc. All Rights Reserved. P roprietary and C onfidential.
419

7/31/2019 GEN V40 PMS Reference Manual FINAL Eng Ch
http://slidepdf.com/reader/full/gen-v40-pms-reference-manual-final-eng-ch 420/474
AdvancedPackageElement
An advanced package is one that sets aside an allowance (credit) to o ffset by thepo sted (debit) charge. Th is item typically posts separately thro ugh an interface
system, but it may also post manually in OPE RA. In either case, the packageconsumes the amoun t posted and does not p ost the charge to the guest folio.Advanced packages may be set up to post the same day, the next day, or anytimebefore the guest checks out.
Use the following steps to create this package:
1. Select Setup 2. Select Configuration 3. Select Rate Management 4. Select Packages 5. Select Codes
The PACKAGES screen displays.
6. Select New to b egin creating a package elemen t.
©2006 MICROS® Systems Inc. All Rights Reserved. P roprietary and C onfidential.
420

7/31/2019 GEN V40 PMS Reference Manual FINAL Eng Ch
http://slidepdf.com/reader/full/gen-v40-pms-reference-manual-final-eng-ch 421/474
The PACKAGE CODES screen displays the Package Header tab.
7. Create a unique package Code for the item 8. Enter a Short Description to display on Package Reports.9. Enter a Description to display on the Rate Info used by reservations agents
to describe packages.10. Enter the Code in Transaction Details that should post. Th is is the
transaction code for the allowance credit on the package ledger.11. Enter the Overage transaction code when applicable.
12. Enter Alternates that the guest may use instead of the previously definedCode.
13. Select Allowance to allow an o verage.14. Select the appropriate Profit and Loss transaction codes for this package.15. Select Included in Rate to make this package price deduct from the rate
amount configured in the Rate D etails screen on the Rate Code.
NOTE: You may also select Add Rate Separate Line or Add Rate Combined Line.
16. Select Post Next Day to allow the system to hold the allowance amount until
the item posts on the following day.17. Select a Posting Rhythm based on the frequency of the p osting for this item.In this examp le, we select Post Every Night because the guests are entitled toa breakfast for every day of their stay.
18. Select a Calculation Rule based on how the amount calculates. In th isexample, we select Per Adult as the b reakfast charge applies to each adult inthe room.
19. Select Save to save the Package H eader information.
©2006 MICROS® Systems Inc. All Rights Reserved. P roprietary and C onfidential.
421

7/31/2019 GEN V40 PMS Reference Manual FINAL Eng Ch
http://slidepdf.com/reader/full/gen-v40-pms-reference-manual-final-eng-ch 422/474
20. Select Package Detail to continue with pricing information.
The PACKAGES screen displays the Package Detail.
19. Enter the Start Date that the price is available. 20. Enter the End Date that the price is no longer available.21. Enter the Price for this advanced package element.22. Enter the Allowance that the guest may consume.
NOTE: You must select Allowance on the Package H eader in order to assignan Allowance on the Package Detail.
23. Select Save to save the package details.
©2006 MICROS® Systems Inc. All Rights Reserved. P roprietary and C onfidential.
422

7/31/2019 GEN V40 PMS Reference Manual FINAL Eng Ch
http://slidepdf.com/reader/full/gen-v40-pms-reference-manual-final-eng-ch 423/474
AttachingPackage toa Rate
In OPERA, you have the ability to attach package elements and groups to specificRate Codes. Th is results in your hotel having Package Rates to sell.
To attach a package element or a group to a Rate Code, follow these steps:
1. From the Configuration menu, select Rate Management 2. Select Rate Classifications 3. Select Rate Codes
The RATE CODE S screen displays.
4. H ighlight the Rate to attach the Package 5. Select Edit
The RATE SETUP - EDIT screen displays.
©2006 MICROS® Systems Inc. All Rights Reserved. P roprietary and C onfidential.
423

7/31/2019 GEN V40 PMS Reference Manual FINAL Eng Ch
http://slidepdf.com/reader/full/gen-v40-pms-reference-manual-final-eng-ch 424/474
6. Click the drop down arrow next to the Package field
The RATE CODE PACKAGE E LEMEN TS screen displays. Packagesattached to this Rate Code display here.
7. To add a package element, select New
The RATE PACKAGES screen displays.
8. Click the drop down arrow next to the Code field
©2006 MICROS® Systems Inc. All Rights Reserved. P roprietary and C onfidential.
424

7/31/2019 GEN V40 PMS Reference Manual FINAL Eng Ch
http://slidepdf.com/reader/full/gen-v40-pms-reference-manual-final-eng-ch 425/474
The PACKAGE ELEMENTS screen displays the Package Elements for yourhotel.
9. Locate the Package Element by scrolling through the list or using Find. 10. Highlight the Package Element to attach to the Rate Code 11. Select OK
NOTE: Review the details for the package element or group . You may makechanges to the package element prior to attaching it to the Rate Code.
12. Select OK on the RATE PACKAGES screen13. Select Close on the RATE CODE PACKAGE ELEMENTS screen
14. Select Save on the Rate Header
©2006 MICROS® Systems Inc. All Rights Reserved. P roprietary and C onfidential.
425

7/31/2019 GEN V40 PMS Reference Manual FINAL Eng Ch
http://slidepdf.com/reader/full/gen-v40-pms-reference-manual-final-eng-ch 426/474
AttachingSellSeparatePackages
To attach a Sell Separate Package to a reservation, fo llow these steps:
1. Click the drop down arrow next to Packages on the RESERVATION screen.
The PACKAGES screen displays.
2. Select New
The PACKAGES – EDIT screen displays.
©2006 MICROS® Systems Inc. All Rights Reserved. P roprietary and C onfidential.
426

7/31/2019 GEN V40 PMS Reference Manual FINAL Eng Ch
http://slidepdf.com/reader/full/gen-v40-pms-reference-manual-final-eng-ch 427/474
3. Click the drop down arrow next to Package to select from the list of existingpackages.
The PACKAGES screen displays the package elements available to sell separate.
4. H ighlight the Package to attach to the reservation 5. Select OK
NOTE: The description that displays on this screen is the Short Description of the package element configuration.
6. Verify and/ or update the Quantity 7. Enter the Begin Date and End Date 8. Select Save 9. Select OK to continue
Continue adding any other packages this guest requires.
10. Once you attach all the packages, select OK to save the reservation.
©2006 MICROS® Systems Inc. All Rights Reserved. P roprietary and C onfidential.
427

7/31/2019 GEN V40 PMS Reference Manual FINAL Eng Ch
http://slidepdf.com/reader/full/gen-v40-pms-reference-manual-final-eng-ch 428/474
The RESERVATION screen now displays the package/ s added.
For a package that is “Add to Rate”, the amount of the package increases the folio total for Room Charge. For a package that is “Included in Rate”, the amount o f the package will reduce the amount of room revenue on a package.
11. Select Options to access additional package information through Rate Info.
The RESERVATION OPTION S screen displays.
12. Select Rate Info
©2006 MICROS® Systems Inc. All Rights Reserved. P roprietary and C onfidential.
428

7/31/2019 GEN V40 PMS Reference Manual FINAL Eng Ch
http://slidepdf.com/reader/full/gen-v40-pms-reference-manual-final-eng-ch 429/474
The RATE SUMMARY screen displays.
13. Highlight th e date that includes package charges. 14. Select Details to see the specific packages for that day.
The RATE DETAILS screen displays.
The top half of the screen shows a listing o f packages for th is date and the amount of each.
15. Click Close to exit.
©2006 MICROS® Systems Inc. All Rights Reserved. P roprietary and C onfidential.
429

7/31/2019 GEN V40 PMS Reference Manual FINAL Eng Ch
http://slidepdf.com/reader/full/gen-v40-pms-reference-manual-final-eng-ch 430/474
AdjustingFolios withPackageRates
The steps below describe how to adjust a guest folio with a package rate.
1. To adjust a package rate, select Post from the BILLING screen.The TRANSACTION POSTING screen displays.
2. Choose the drop down arrow for Code to select from the list of transaction codes.
3. H ighlight the transaction code to adjust4. Select OK
NOTE: A package rate is a combination of different transaction codes bundledtogether. The transaction code approp riate for adjustments depends on a numberof variables. Check with your manager for specific decisions regarding which codeto use.
5. Enter the Amount to adjust6. D etail the reason for the adjustment in the Supplement field7. Select Post
NOTE: Remember to post adjustments as a negative value so that the guest folioreduces by this amoun t.
8. If there are not more charges to post, choo se Close to exit screen.
The adjustment now appears on the guest folio.
9. Select Close to exit screen and prevent any further postings.
©2006 MICROS® Systems Inc. All Rights Reserved. P roprietary and C onfidential.
430

7/31/2019 GEN V40 PMS Reference Manual FINAL Eng Ch
http://slidepdf.com/reader/full/gen-v40-pms-reference-manual-final-eng-ch 431/474
Chapter 13 – Revenue Management
©2006 MICROS® Systems Inc. All Rights Reserved. P roprietary and C onfidential.
431

7/31/2019 GEN V40 PMS Reference Manual FINAL Eng Ch
http://slidepdf.com/reader/full/gen-v40-pms-reference-manual-final-eng-ch 432/474
©2006 MICROS® Systems Inc.
All Rights Reserved. P roprietary and C onfidential. 432

7/31/2019 GEN V40 PMS Reference Manual FINAL Eng Ch
http://slidepdf.com/reader/full/gen-v40-pms-reference-manual-final-eng-ch 433/474
Rate Codes
Rate Code Overview
Rate Codes also know as “Rates”, when p roperly con figured, offer various sellingop tions for your hotel to maximize your revenue. Every reservation requires aRate Code with the exception of reservations made through a Business Block.
Con figuration of a Rate Code consists of four main sections (‘tabs’):
Rate Header is the default screen for a Rate Code with mandatory fields thatappear in bold. The header describes the rate itself and defines how the rate maysell. Sub-sections of the Rate Header screen include Sell Con trols, TransactionD etails, and Componen ts.
Rate Detail is the tab to define the actual rate amounts for each room type.
Several fields in this screen are also mandatory. D etails may vary based on rateseasons or weekend definitions.
Negotiated is the tab to relate or connect Rate Codes with profiles. Rate Codeshave the ability to attach to any type of profile in O PE RA; however, CompanyProfile is more comm on. By making a rate Negotiated, users are able to generate aspecific search fo r a company’s rate in the Rate Q uery.
More is the tab to establish default Routing option s or define Base Rates. Wediscuss both of these options later in th is chapter.
©2006 MICROS® Systems Inc. All Rights Reserved. P roprietary and C onfidential.
433

7/31/2019 GEN V40 PMS Reference Manual FINAL Eng Ch
http://slidepdf.com/reader/full/gen-v40-pms-reference-manual-final-eng-ch 434/474
RateHeader -New
To begin creating a new rate op tion for your hotel, follow the steps below tocreate and define the Rate Header:
1. From the main menu, select Setup and Configuration 2. Select Rate Management and Rate Classification 3. Select Rate Code
The RATE CODE S screen displays.
4. Select New to create a new rate.
The RATE SETUP screen displays.
©2006 MICROS® Systems Inc. All Rights Reserved. P roprietary and C onfidential.
434
7/31/2019 GEN V40 PMS Reference Manual FINAL Eng Ch
http://slidepdf.com/reader/full/gen-v40-pms-reference-manual-final-eng-ch 435/474
RATE H EADER SECTION:
5. Enter a Rate Code to use for selling this rate. Rate Codes should be shor tcodes for the rate (i.e. AAA). This code displays in the Rate Query.6. Enter a brief Description for the rate (i.e. American Autom obile Association
Rate). Th is description also displays in the Rate Query.7. Click the drop down arrow next to the Rate Category field to select the
appropriate category for this rate.
NOTE: The Rate Class autom atically populates with your selection .
8. If you wish for the room charge on the guest folio to d isplay something otherthan the transaction code description, enter a specific Folio Text.
9. Enter a Begin Sell Date for th e first date the rate is available to sell
reservations.10. Enter an End Sell Date for the last date th e rate is available to sell
reservations.
NOTE: The sell dates should be broad and far into the future if this is a rateop tion always available at your hotel (i.e. 01/ 01/ 01 to 12/ 31/ 25).
11. Click the drop down arrow next to the Market field to select the appropriatemarket code for this rate. D efining the market here prevents users fromhaving to decide the market for this rate at reservation time.
12. Click the drop down arrow next to the Source field to select the appropriatesource for reservations booked at this rate. D efining the source here alsoauto-populates in the reservation screen if reserving this rate. O nly define thison the rate if you expect all reservations to come from the same source.
13. Enter a Display Sequence for sequential order the Rate Code displays on theRate Query to sell.
NOTE : Day Types sell sequence overrides the display sequence set here. Wediscuss selling st rategies in a later section of this chapter.
14. Click the drop down arrow next to the Room Types field to select the roomtypes available to sell for this rate.
©2006 MICROS® Systems Inc. All Rights Reserved. P roprietary and C onfidential.
435

7/31/2019 GEN V40 PMS Reference Manual FINAL Eng Ch
http://slidepdf.com/reader/full/gen-v40-pms-reference-manual-final-eng-ch 436/474
The ROOM TYPES screen displays.
15. Place an “X” next to each room type available for this rate and select OK. Alternately, you may select All if all room types apply to this rate.
16. Click the drop down arrow next to the Packages field to select a packageelemen t to attach to this rate. By selecting a package element here, all ratedetails for this rate incorporate the package elemen t. For more informationon packages, refer to the “Packages” chapter of this manual.
17. Enter a Commission % to pay travel agent commissions on reservationsbooked for this rate, and click the drop down arrow next to the Code field toselect a pre-defined commission code.
NOTE : Failure to enter a commission percentage amount indicates this rate is‘non-commissionable’. The Commission % and Code fields on the rate overridethe com missionable amount found on a Travel Agent profile.
©2006 MICROS® Systems Inc. All Rights Reserved. P roprietary and C onfidential.
436

7/31/2019 GEN V40 PMS Reference Manual FINAL Eng Ch
http://slidepdf.com/reader/full/gen-v40-pms-reference-manual-final-eng-ch 437/474
TRANSACTION DET AILS SECTION:
18. Click the drop down arrow next to the Transaction Code field to select thedefault transaction (i.e. 1000) used to post room an d tax for th is rate. Thiscode may differ depending on your hotel’s configuration.
19. If you quote this rate including tax and audit posts charges to the guest foliowitho ut a separate line item for tax, select the Tax Incl. check box.
NOTE: Making a rate tax inclusive reduces the amount o f room revenue o n th ereservation.
20. If this rate option is an inclusive package, click the drop down arrow next tothe Pkg Tran Code field to select the package transaction code (i.e. 7500).This code appears as one line item on the guest folio for this rate, instead of
individual transactions for room, tax, and package elements.21. If this rate is quotable in multiple currencies, click the drop down arrow next
to the Currency Code field to select the currencies that app ly.
NOTE : You may establish multiple currencies for each rate
22. If this rate sells in multiple currencies, click the drop down arrow next to theExchange Type to select the type of exchange applied to this rate.Currencies may have different exchange rates established for d ifferent periods.
©2006 MICROS® Systems Inc. All Rights Reserved. P roprietary and C onfidential.
437
7/31/2019 GEN V40 PMS Reference Manual FINAL Eng Ch
http://slidepdf.com/reader/full/gen-v40-pms-reference-manual-final-eng-ch 438/474
COMPONENTS SECTION:
23. Select the Package check box if this rate sells as a package. The default flagautom atically checks when you attach a package element to the rate.24. Select the Negotiated check box to indicate the rate is negotiated.
NOTE : A negotiated rate will no t appear on the RATE QUERY DETAILSscreen unless it was directly entered into the query via a profile attachment or therate code field.
25. Select the Suppress Rate check box to prevent the rate amount fromdisplaying to reservation agents. The Rate Code displays as “SR” (Supp ressRate) in the Rate Query if the user does not have permission to view ratedetails.
26. Select the Print Rate option to p rint the rate amount on forms such asregistration cards, folios and confirmation letters.
NOTE: The Print Rate field on the More tab of the reservation must also beselected to print rate information on customized forms. If this rate defaults toprint yet the user does not want it to print, removing the flag on the reservationoverrides the default on the rate.
27. Select the Discount check box to permit discounts on reservations for thisrate. If you do not select this option , discounts for this rate are not availableon the reservation .
28. Select the Membership check box to make this rate eligible for FrequentFlyer or Lo yalty Memb ership po ints during the stay.
29. Select the Day Use check bo x to make this rate available for a day use onlyroom.
30. Select the Complimentary check box to indicate the rate is complimentaryfor marketing purposes. Selecting this option identifies reservations bookedfor this rate separately on reports.
31. Select the House Use check box to indicate the rate is for internalmanagemen t use. Reserving Posting Masters (PM) is a prime example for thisop tion. Selecting this option also ident ifies reservation s book for this rateseparately on reports.
32. Select the Day Types check box to indicate this rate for use in establishing
sell strategies. If this rate is setup in a D ay Type configuration , the order thatit displays on the RATE QUERY DETAILS screen may differ from itsdisplay sequence. For more info rmation on D ay Types, refer to the D ayTypes section of this chapter.
33. If your hotel has the Best Available Rates feature active, select th e BAR option to define this rate as a best rate to sell in the Rate Query.
©2006 MICROS® Systems Inc. All Rights Reserved. P roprietary and C onfidential.
438

7/31/2019 GEN V40 PMS Reference Manual FINAL Eng Ch
http://slidepdf.com/reader/full/gen-v40-pms-reference-manual-final-eng-ch 439/474
SELL CONTROLS SECTION :
34. Enter the minimum n umber of nights in the Minimum Stay Through fieldthat a reservation must stay through to book this rate.
NOTE : Leaving the field (or any field in th is section ) blank indicates norestrictions are established.
35. E nter the maximum number of nights in the Maximum Stay Through fieldthat a reservation can stay through to b ook this rate.
36. E nter the minimum number of days in the Minimum Advance Booking field that a reservation must book ahead of arrival to offer this rate.
37. E nter the maximum number of days in the Maximum Advance Booking field that a reservation can book in advance of arrival to offer this rate.
38. En ter a numb er to multiply the rate amoun ts defined in the Rate Details in theMultiplication field.
39. E nter a dollar amount to add to the rate amounts defined in the Rate Detailsin the Addition field.
NOTE : When both Addition and Multiplication fields exist for a rate, thesystem first calculates the Addition value and then uses the Multiplication valueto o btain the end result.
40. Enter the minimum number of persons required on the reservation in theMinimum Occupancy field to o ffer this rate.
41. E nter the maximum number of persons allowed on the reservation in theMaximum Occupancy field to o ffer this rate.
42. Select Save to save the Rate Header.
©2006 MICROS® Systems Inc. All Rights Reserved. P roprietary and C onfidential.
439

7/31/2019 GEN V40 PMS Reference Manual FINAL Eng Ch
http://slidepdf.com/reader/full/gen-v40-pms-reference-manual-final-eng-ch 440/474
RateHeader –Options
After saving a Rate Header, there are several option buttons to add additionalinformation to a rate. Listed below are the various options available:
• The Deposit/ Cxl option opens the DEPOSITRULE/ CANCELLATION SCHE DULES screen. From here, youmay directly apply a rule schedule for either deposit or cancellationrequirements (i.e. 14-day advance deposit required for one night’s roomand tax, with a one-night cancellation p enalty) for this rate.
• Select the Short Info option to enter a b rief description for the rate to display in the lower-right corner of the RATE QUERY DETAILSscreen. Enter program specific inform ation in this screen forreservationists, such as “Identification Required” o r specific packagedetails.
©2006 MICROS® Systems Inc. All Rights Reserved. P roprietary and C onfidential.
440

7/31/2019 GEN V40 PMS Reference Manual FINAL Eng Ch
http://slidepdf.com/reader/full/gen-v40-pms-reference-manual-final-eng-ch 441/474
• Select the Long Info option for a free text box to enter long, descriptiveinformation regarding this rate. Th is information appears if the user
selects to see Long Info from the RATE QUERY DETAILS screen. • Select the Availability op tion to access the RATE AVAILABILITY
screen. Refer to the “Rate Availability” section of this chapter for mo redetails.
• Select the Changes option to review changes that have occurred to thisrate, such as the creation date or when an advance booking requirementswas added to the rate.
• Select the Repeat op tion to copy this Rate Code and create a new ratewitho ut having to retype similar inform ation . When choosing this option ,the COPY RATE CODE screen displays.
Simply enter a New Rate Code in the grid and select OK.
NOTE: The Create Rate Details check bo x defaults as checked to copy existing
rate amounts to the new rate. If you wish to create different rates, uncheck thisoption.
• Delete allows you to delete an existing rate op tion. You are unable todelete rates that already have existing Rate D etails or dependentreservations.
©2006 MICROS® Systems Inc. All Rights Reserved. P roprietary and C onfidential.
441

7/31/2019 GEN V40 PMS Reference Manual FINAL Eng Ch
http://slidepdf.com/reader/full/gen-v40-pms-reference-manual-final-eng-ch 442/474
Rate Details - New
The Rate Detail is where you specify dates and room types for the rate. In mo stho tels, the Senior H otel Management, G eneral Manager, Sales & Marketing
Director work with Regional Offices to define the hotels overall annualbusiness/ marketing plan. O nce rates are established, entering them in the RateD etails has direct impact on po tential room revenue.
To establish Rate Details, follow the steps below:
1. From the Rate Header, select the Rate Details tab at top of screen.
2. Click the drop down arrow next to the Season Code to select a predefined date range or seasons. If no season s exist, you m ay enter the dates directly.
3. Enter a Start Date for this Rate Detail to begin.4. Enter an End Date for th is Rate Detail to end.
NOTE: If you select a Season Code, the Start Date and E nd Date automaticallypopulate.
5. If this rate detail on ly app lies to certain days of the week, (i.e. Fri. and Sat.only) place a check in the boxes to the corresponding days.
©2006 MICROS® Systems Inc. All Rights Reserved. P roprietary and C onfidential.
442

7/31/2019 GEN V40 PMS Reference Manual FINAL Eng Ch
http://slidepdf.com/reader/full/gen-v40-pms-reference-manual-final-eng-ch 443/474
AMOUNTS SECTION:
6. Enter the rate amoun t for 1 Adult, 2 Adults, 3 Adults, 4 Adults, and 5 Adults. If the rates quoted do no t differ by num ber of adults, enter the samerate in each field.
NOTE: Entering a specific rate for each number of adults here ensures that theexact rate by number of adults display in the RATE QUERY DETAILS screen.This also allows a manual definition of when the extra person charge begins.
7. If this rate has an extra person charge to begin with th e hotel’s default extraperson designator, enter a rate amo unt in the Extra Adult field rather that the2 Adults, 3 Adults, etc. fields.
NOTE: Use caution with this feature as the rate does not calculate the numb erof adults until after the Rate Q uery and the user has th e reservation in front o f them.
8. Enter the rate amoun t for 1 Child, 2 Children , 3 Children, and 4 Children on ly if your ho tel charges for children.
NOTE: If there is a charge for ch ildren, th e system assumes this charge is inaddition to th e number of adults in the room and adds the charge to the adultcharge. As a result, do not input the full rate amount, but only the additionalcharges for children.
9. If your hotel charges different rates for children based on their age, enter avalue in all three Child # -# fields (where # is the ho tel defined age ranges).
©2006 MICROS® Systems Inc. All Rights Reserved. P roprietary and C onfidential.
443

7/31/2019 GEN V40 PMS Reference Manual FINAL Eng Ch
http://slidepdf.com/reader/full/gen-v40-pms-reference-manual-final-eng-ch 444/474
ATTRIBUTES SECTION :
10. Click the drop down arrow next to the Market Code field to define themarket for this particular Rate D etail. This field auto populates from th e RateHeader; however, you may app ly a different code for specific period.
NOTE: A Market Code defined on a Rate Detail overrides the Market Code inthe Rate Header.
11. Click the drop down arrow next to the Source Code field to input theintended source of reservations for this particular Rate Detail. Th is field autopo pulates if defined in th e Rate Header; however, you may apply a differentcode for a specific period.
NOTE : A Source Code defined on a Rate Detail overrides a Source Code in theRate Header. In addition , unless all reservations booked for this rate channel fromthe same source of business (i.e. Internet), reservationists typically enter this fieldon the reservation at the time of booking.
12. Click the drop down arrow next to the Room Types field and select the roomtypes available for this rate. Th e only room types that display are the roomtypes defined on the Rate Header.
13. If this rate detail includes a package elemen t, click the drop down arrow nextto the Packages field to select the element.
NOTE: If you attach a package element to a Rate Detail, that element onlyapplies to that rate for the defined period . If you attach a package elemen t to aRate Header, that element applies to all Rate Details for the Rate Code.
14. After entering all details, select Save.15. Select New to repeat this process and enter additional rate details for different
room types or date ranges.
©2006 MICROS® Systems Inc. All Rights Reserved. P roprietary and C onfidential.
444

7/31/2019 GEN V40 PMS Reference Manual FINAL Eng Ch
http://slidepdf.com/reader/full/gen-v40-pms-reference-manual-final-eng-ch 445/474
Rate Details - Options
Some additional features from the Rate D etails tab are as follows:
• Use the Repeat feature to copy rates from one detail to another. Thisfunction copies all rates and room types, but allow you to define alternatedates.
• Use the Split feature to split an existing Rate Detail. To split a rate for aspecific date range and apply a different rate amount, select this option.
The RATE SPLIT screen displays.
• En ter a Start Date and End Date, define rates for the new Rate Detail, and select OK to save.
NOTE: When splitting a Rate Detail, the room types remain the same, but thedates and rates can differ.
Negotiated Rates - New
• Select Changes to view a history of changes for the highlighted Rate Detail.
The Negotiated tab of the Rate Code allows you to view and enter profiles thatoffer this rate as a negotiated rate. Typically, Com pany profiles have negotiatedrates attached. It is possible to create a link or relationship between an accountand a rate through the Profile Opt ions, but you may also m anage that from thistab. The benefit of attaching an account to a rate is that whenever bookingreservations for this account, only the nego tiated rate displays. To view or attachprofiles to this rate as Negotiated, follow the steps below:
©2006 MICROS® Systems Inc. All Rights Reserved. P roprietary and C onfidential.
445

7/31/2019 GEN V40 PMS Reference Manual FINAL Eng Ch
http://slidepdf.com/reader/full/gen-v40-pms-reference-manual-final-eng-ch 446/474
1. From the Rate Header, select the Negotiated tab.
NOTE: If th is rate already has profiles for th is rate negotiated, those profilesdisplays in the grid. If no profiles are negotiated for th is rate, the grid displaysblank.
2. Select New to attach a new profile. The PROFILE SEARCH screendisplays.
3. Locate the profile to negotiate for this rate, highlight the record and selectOK.
The NE GOTIATED RATES screen displays.
4. Select New to establish the details of the negotiated rate.
A second NEGOTIATED RATES screen displays.
5. Click the drop down arrow next to the Rate Code field to select the rate to negotiate. From within this Rate Code, select the rate you are currentlyworking with.
6. D efine the Start Sell Date and End Sell Date and select OK to save.7. Select Close to return to the Negotiate tab.
The profile negotiated for this rate now displays.
©2006 MICROS® Systems Inc. All Rights Reserved. P roprietary and C onfidential.
446
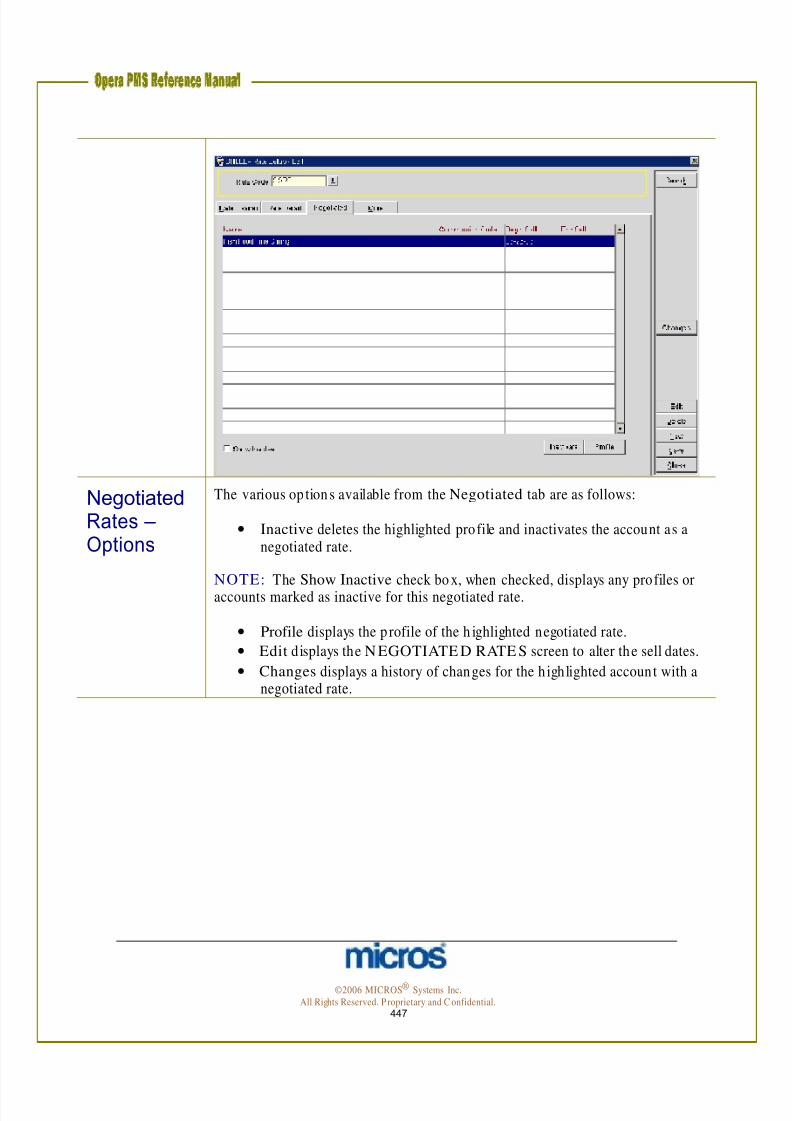
7/31/2019 GEN V40 PMS Reference Manual FINAL Eng Ch
http://slidepdf.com/reader/full/gen-v40-pms-reference-manual-final-eng-ch 447/474
Negotiated Rates –Options
The various op tions available from the Negotiated tab are as follows:
• Inactive deletes the highlighted profile and inactivates the account as anegotiated rate.
NOTE: The Show Inactive check bo x, when checked, displays any profiles oraccounts marked as inactive for this negotiated rate.
• Profile displays the p rofile of the h ighlighted negotiated rate.
• Edit displays the N EGOTIATE D RATE S screen to alter the sell dates.
• Changes displays a history of changes for the h ighlighted account with anegotiated rate.
©2006 MICROS® Systems Inc. All Rights Reserved. P roprietary and C onfidential.
447

7/31/2019 GEN V40 PMS Reference Manual FINAL Eng Ch
http://slidepdf.com/reader/full/gen-v40-pms-reference-manual-final-eng-ch 448/474
More Tab The More tab offers addition al op tions for managing rates. Listed below are theoptions available on this tab:
• To define default Routing for any reservations for this rate (such asInternet Wholesalers that traditionally route all room and tax charges to asecond folio window), click the d rop down arrow next to the Instructionsfield and select either the Transaction Codes or pre-defined RoutingInstructions that apply. If these Routing Instructions only app ly to acertain type of profile, click the drop down arrow next to the Profile Types field and define the profile type for these instructions.
• The Base Rates feature establishes one Rate Code as the “base” rate, andeach additional rate offered at the hotel may be set at a percentage or flatdollar amount o ff that rate. Rate Details for rates using this featureautom atically create based on the o riginal Rate Details for th e “base” rate.
To establish a rate to use the Base Rate as its identifying Rate D etails,follow the steps below:
1. Click the drop down arrow next to the Base Rate field and selectthe Rate Code defined as the hotel’s base (i.e. Rack Rate).
2. Click the drop down arrow next to the Amount field and select toeither base the rate as a “Percentage” or “Flat” dollar amount off.
3. Enter either the dollar amount or percentage in the field to the left.4. Click the drop down arrow next to the Rounding field to
determine how to round the final rate calculations should they notbe an even amount (i.e. 10% off th e base is $175.9877)
NOTE: The UP/ D O WN options round to the nearest dollar with no figuresafter the decimal point. The UP – Keep D ecimal and DO WN – K eep D ecimalround to the nearest dollar and cent. N O N E performs no rounding.
Rate Tiers Hotels with guests that traditionally have extended or lengthy stays often use ratetiers as a means to offer lower room rates for lengthy stays. O PE RA offersfunctionality to handle these rate tiers based on length of stay. In order to usetiered rates when selling reservations, the Rate Tiers functionality must be activewith length of stay periods defined (i.e. 0-6 days, 7-13 days, 14-20 days, + 21 days).
Once you define the length of stay periods, each Rate Code that sells based on
length of stay requires Rate D etails for each tier. Fo llow the steps below to definerates for each tier on a Rate Code:
1. When creating a new Rate Code, from the Rate Header tab, select the new rateas Tiered in the Components section and Save the header.
2. Select the Rate Details tab.
©2006 MICROS® Systems Inc. All Rights Reserved. P roprietary and C onfidential.
448
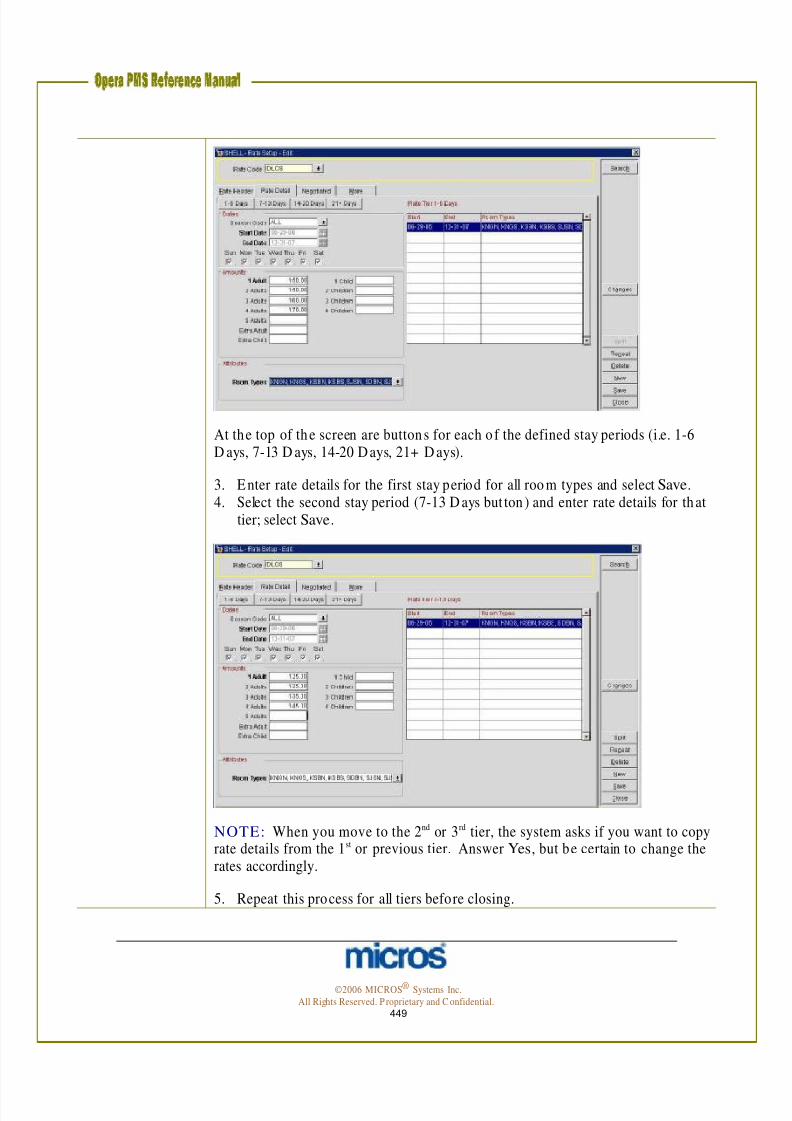
7/31/2019 GEN V40 PMS Reference Manual FINAL Eng Ch
http://slidepdf.com/reader/full/gen-v40-pms-reference-manual-final-eng-ch 449/474
At the top of the screen are buttons for each o f the defined stay periods (i.e. 1-6 D ays, 7-13 D ays, 14-20 Days, 21+ D ays).
3. Enter rate details for the first stay period for all roo m types and select Save.4. Select the second stay period (7-13 D ays but ton ) and enter rate details for that
tier; select Save.
NOTE: When you move to the 2nd or 3rd tier, the system asks if you want to copy rate details from the 1st or previous tier. Answer Yes, but be certain to change the rates accordingly.
5. Repeat this process for all tiers before closing.
©2006 MICROS® Systems Inc. All Rights Reserved. P roprietary and C onfidential.
449
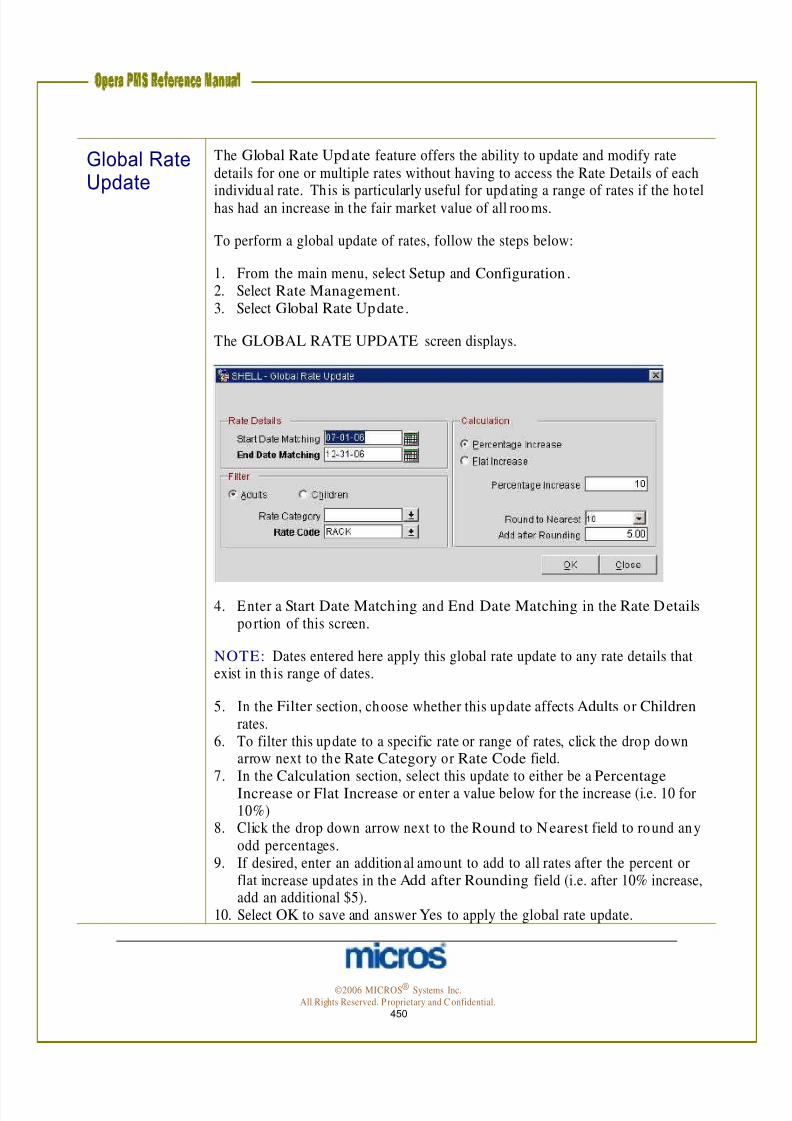
7/31/2019 GEN V40 PMS Reference Manual FINAL Eng Ch
http://slidepdf.com/reader/full/gen-v40-pms-reference-manual-final-eng-ch 450/474
Global Rate Update
The Global Rate Update feature offers the ability to update and modify ratedetails for one or multiple rates without having to access the Rate Details of each
individual rate. This is particularly useful for updating a range of rates if the hotelhas had an increase in the fair market value of all roo ms.
To perform a global update of rates, follow the steps below:
1. From the main menu, select Setup and Configuration .2. Select Rate Management.3. Select Global Rate Update.
The GLOBAL RATE UPDATE screen displays.
4. Enter a Start Date Matching and End Date Matching in the Rate Details po rtion of this screen.
NOTE: Dates entered here apply this global rate update to any rate details thatexist in th is range of dates.
5. In the Filter section, choose whether this update affects Adults or Children rates.
6. To filter this update to a specific rate or range of rates, click the drop downarrow next to the Rate Category or Rate Code field.
7. In the Calculation section, select this update to either be a Percentage Increase or Flat Increase or en ter a value below for the increase (i.e. 10 for10%)
8. Click the drop down arrow next to the Round to Nearest field to round anyodd percentages.
9. If desired, enter an addition al amount to add to all rates after the percent orflat increase updates in the Add after Rounding field (i.e. after 10% increase,add an additional $5).
10. Select OK to save and answer Yes to apply the global rate update.
©2006 MICROS® Systems Inc. All Rights Reserved. P roprietary and C onfidential.
450

7/31/2019 GEN V40 PMS Reference Manual FINAL Eng Ch
http://slidepdf.com/reader/full/gen-v40-pms-reference-manual-final-eng-ch 451/474
Revenue Management
O PE RA offers various tools to m anage and yield the hotel’s rates and availability.The intention of these tools is to maximize hotel revenue and assist with revenuemanagemen t from the PMS. If your hotel has a Revenue Management interfaceactive, these features are disabled to allow that system to act as the yieldmanagement source.
Rate Strategy
The features available for managing revenue and rates are Rate Strategy, Rate Availability, and Rate Restrictions, Day Types and O verboo king.
The Rate Strategy program is a yield management tool to assist with monitoring andmanaging availability of rates. Use the Rate Strategy feature as a tool to create
restrictions or to set sell limits on Rate Categories or Rate Codes. Follow the steps
below to establish a n ew Rate Strategy:
1. From the main menu, select Setup and Configuration .2. Select Rate Management 3. Select Strategy
The RATE STRATEGY screen appears with a list of all existing strategies.
4. Select New.
©2006 MICROS® Systems Inc. All Rights Reserved. P roprietary and C onfidential.
451
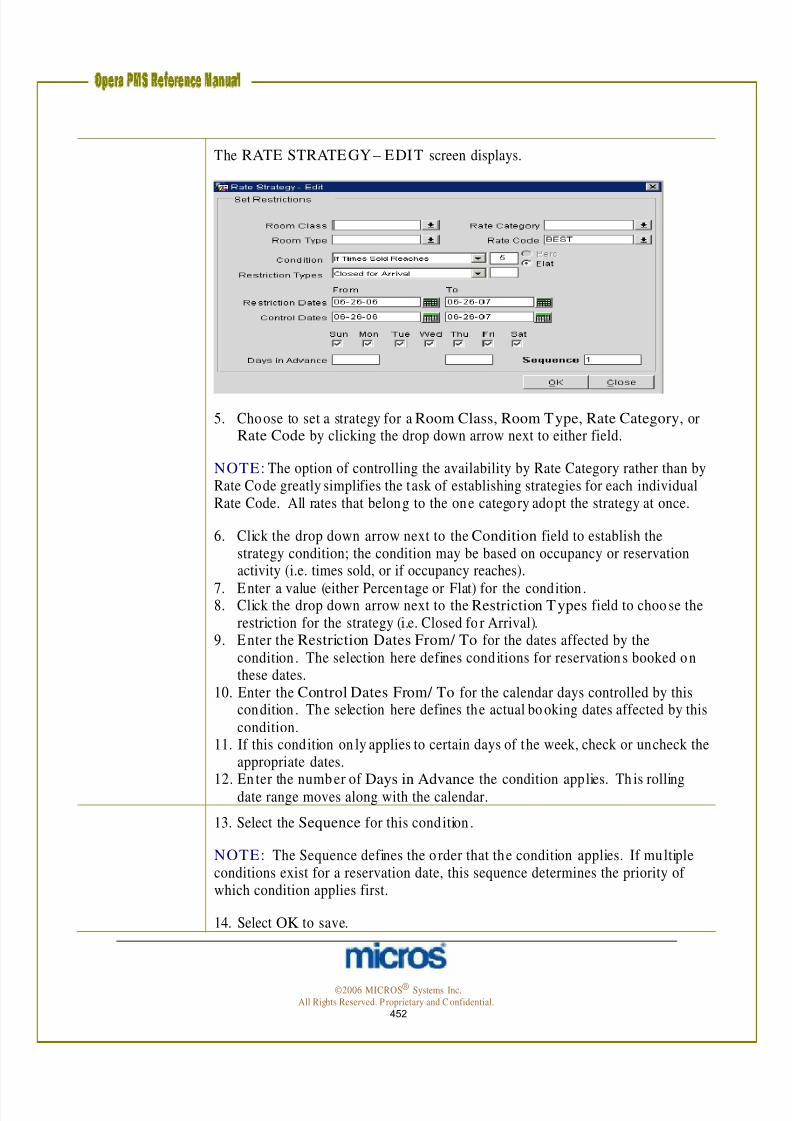
7/31/2019 GEN V40 PMS Reference Manual FINAL Eng Ch
http://slidepdf.com/reader/full/gen-v40-pms-reference-manual-final-eng-ch 452/474
The RATE STRATEGY – EDIT screen displays.
5. Choose to set a strategy for a Room Class, Room Type, Rate Category, or Rate Code by clicking the drop down arrow next to either field.
NOTE : The option of controlling the availability by Rate Category rather than byRate Code greatly simplifies the task of establishing strategies for each individualRate Code. All rates that belong to the one category adopt the strategy at once.
6. Click the drop down arrow next to the Condition field to establish thestrategy condition; the condition may be based on occupancy or reservationactivity (i.e. times sold, or if occupancy reaches).
7. Enter a value (either Percentage or Flat) for the condition .8. Click the drop down arrow next to the Restriction Types field to choo se the
restriction for the strategy (i.e. Closed fo r Arrival).9. Enter the Restriction Dates From/ To for the dates affected by the
condition . The selection here defines conditions for reservations booked onthese dates.
10. Enter the Control Dates From/ To for the calendar days controlled by thiscondition . The selection here defines the actual bo oking dates affected by thiscondition.
11. If this condition on ly applies to certain days of the week, check or uncheck theappropriate dates.
12. En ter the numb er of Days in Advance the condition applies. Th is rollingdate range moves along with the calendar.
13. Select the Sequence for this condition .
NOTE: The Sequence defines the o rder that the condition applies. If multipleconditions exist for a reservation date, this sequence determines the priority of which condition applies first.
14. Select OK to save.
©2006 MICROS® Systems Inc. All Rights Reserved. P roprietary and C onfidential.
452
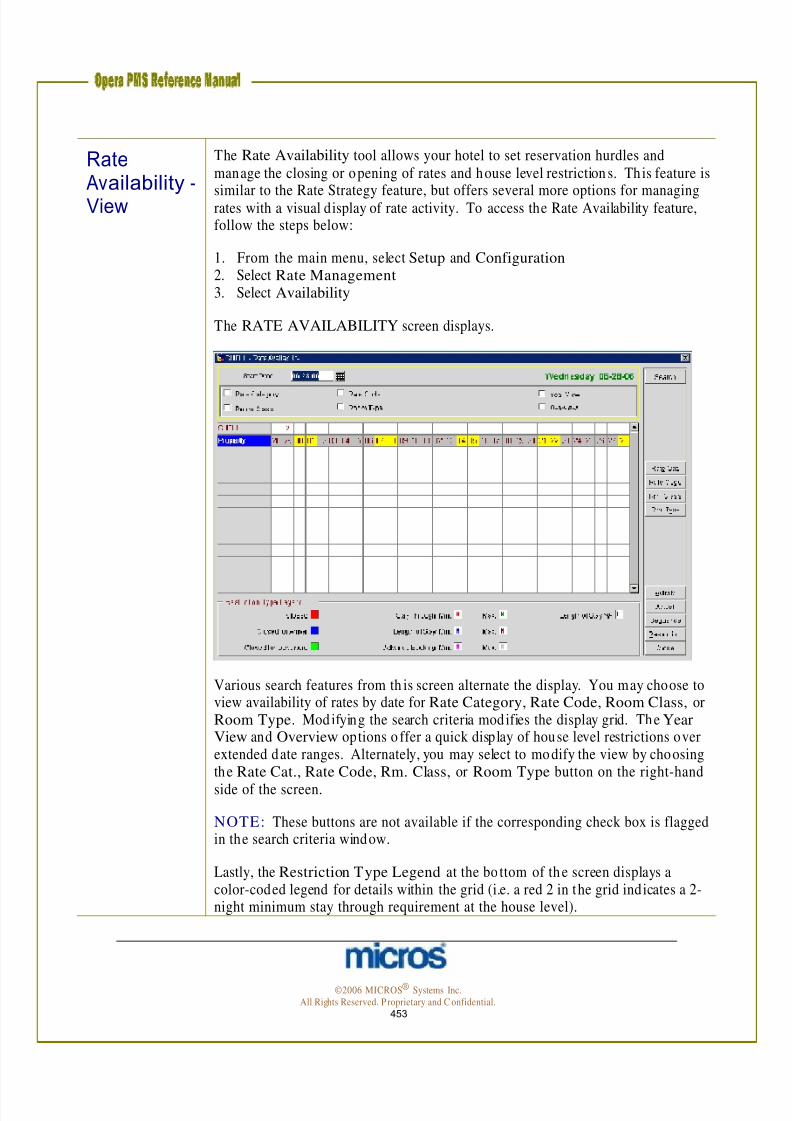
7/31/2019 GEN V40 PMS Reference Manual FINAL Eng Ch
http://slidepdf.com/reader/full/gen-v40-pms-reference-manual-final-eng-ch 453/474
Rate Availability -
View
The Rate Availability tool allows your hotel to set reservation hurdles andmanage the closing or opening of rates and house level restriction s. This feature is
similar to the Rate Strategy feature, but offers several more options for managingrates with a visual display of rate activity. To access the Rate Availability feature,follow the steps below:
1. From the main menu, select Setup and Configuration 2. Select Rate Management 3. Select Availability
The RATE AVAILABILITY screen displays.
Various search features from th is screen alternate the display. You may choose to view availability of rates by date for Rate Category, Rate Code, Room Class, orRoom Type. Mod ifying the search criteria modifies the display grid. The YearView and Overview options o ffer a quick display of house level restrictions overextended date ranges. Alternately, you may select to modify the view by choosingthe Rate Cat., Rate Code, Rm. Class, or Room Type button on the right-hand
side of the screen.
NOTE: These buttons are not available if the corresponding check box is flaggedin the search criteria window.
Lastly, the Restriction Type Legend at the bo ttom of the screen displays acolor-coded legend for details within the grid (i.e. a red 2 in the grid indicates a 2-night minimum stay through requirement at the house level).
©2006 MICROS® Systems Inc. All Rights Reserved. P roprietary and C onfidential.
453

7/31/2019 GEN V40 PMS Reference Manual FINAL Eng Ch
http://slidepdf.com/reader/full/gen-v40-pms-reference-manual-final-eng-ch 454/474
Rate Restrictions
Restrictions allow the hotel to manage availability from the Rate Availabilityfeature. If properly managed and configured, this program works similar to a
simp le yield management system. Mon itoring of availability and enforcingRestrictions result in increased room revenues. Restrictions also allow you to setho use level restrictions from one screen. To use the Restriction s feature to set aho use level restriction, follow the steps below:
1. From the main menu, select Setup and Configuration 2. Select Rate Management and Availability
The RATE AVAILABILITY screen displays.
3. Select Restriction (Restriction…).
The RESTRICTIONS screen displays.
©2006 MICROS® Systems Inc. All Rights Reserved. P roprietary and C onfidential.
454
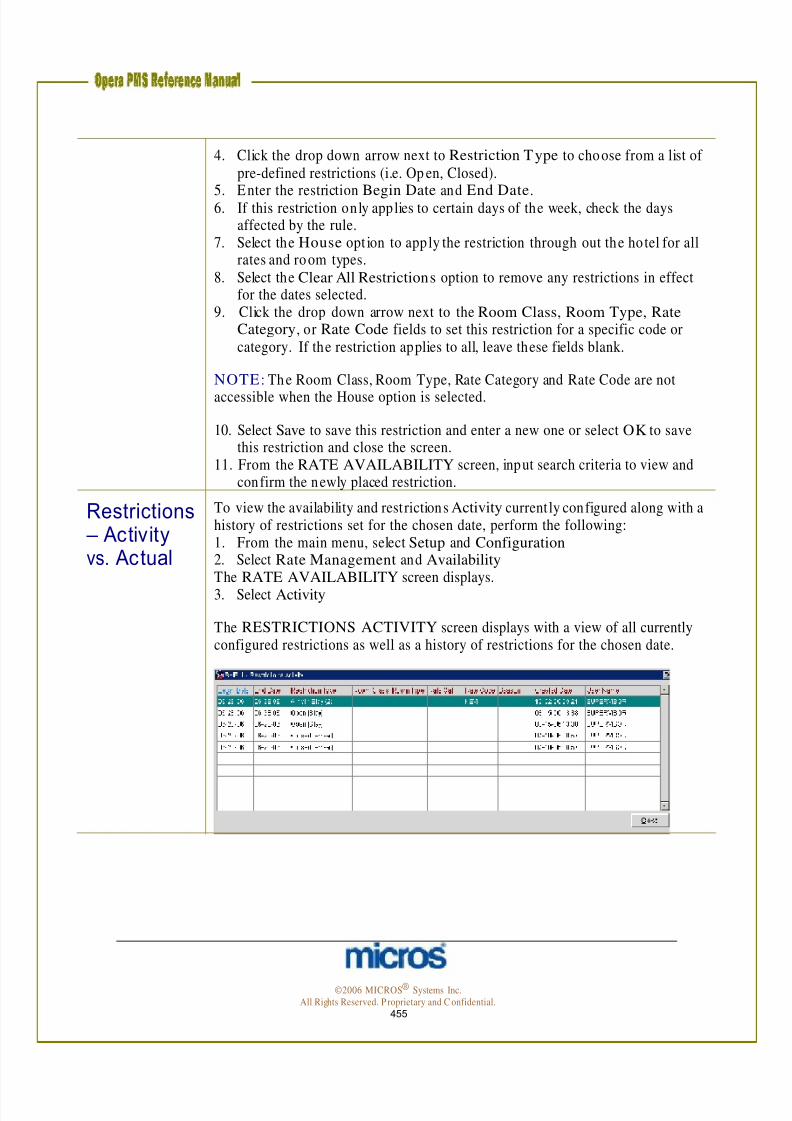
7/31/2019 GEN V40 PMS Reference Manual FINAL Eng Ch
http://slidepdf.com/reader/full/gen-v40-pms-reference-manual-final-eng-ch 455/474
4. Click the drop down arrow next to Restriction Type to choose from a list of pre-defined restrictions (i.e. Op en, Closed).
5. Enter the restriction Begin Date and End Date.6. If this restriction only applies to certain days of the week, check the daysaffected by the rule.
7. Select the House opt ion to apply the restriction through out the hotel for allrates and room types.
8. Select the Clear All Restrictions option to remove any restrictions in effectfor the dates selected.
9. Click the drop down arrow next to the Room Class, Room Type, RateCategory, or Rate Code fields to set this restriction for a specific code orcategory. If the restriction applies to all, leave these fields blank.
NOTE : The Room Class, Room Type, Rate Category and Rate Code are not
accessible when the House option is selected.
Restrictions – Activityvs. Actual
10. Select Save to save this restriction and enter a new one or select OK to save this restriction and close the screen.
11. From the RATE AVAILABILITY screen, input search criteria to view andconfirm the newly placed restriction.
To view the availability and restrictions Activity currently configured along with ahistory of restrictions set for the chosen date, perform the following:1. From the main menu, select Setup and Configuration 2. Select Rate Management and Availability The RATE AVAILABILITY screen displays.
3. Select Activity
The RESTRICTIONS ACTIVITY screen displays with a view of all currentlyconfigured restrictions as well as a history of restrictions for the chosen date.
©2006 MICROS® Systems Inc. All Rights Reserved. P roprietary and C onfidential.
455
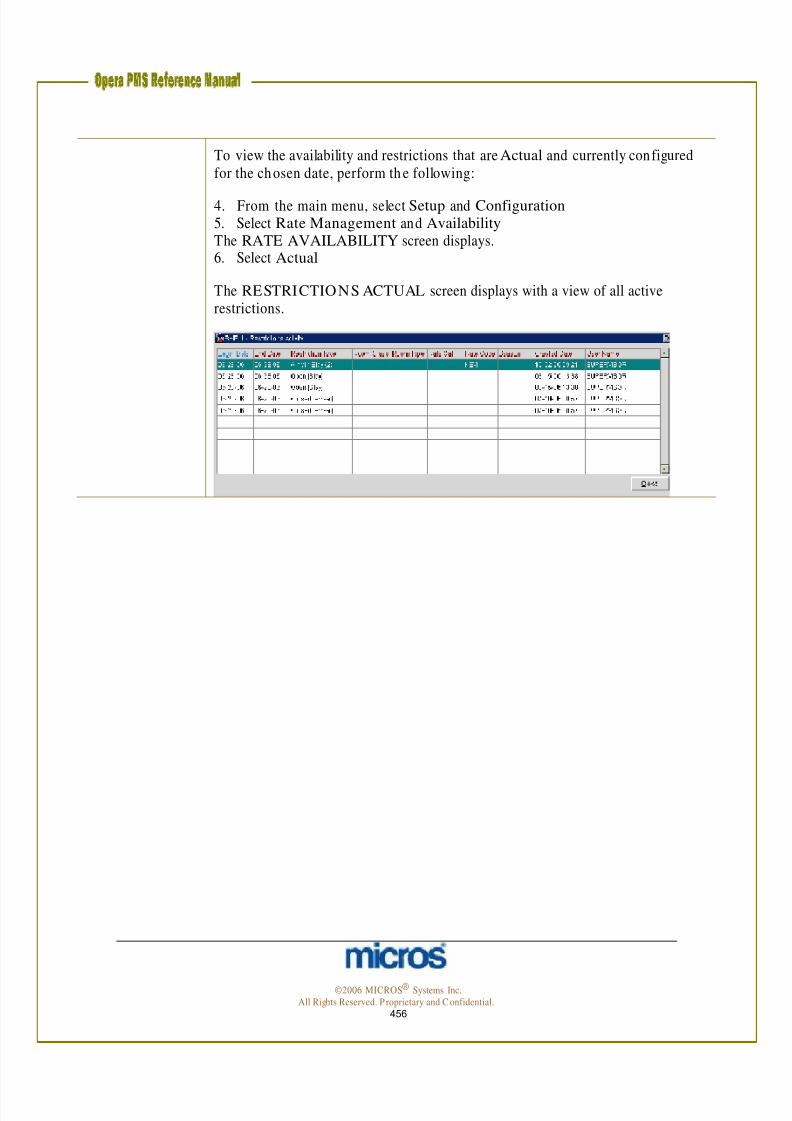
7/31/2019 GEN V40 PMS Reference Manual FINAL Eng Ch
http://slidepdf.com/reader/full/gen-v40-pms-reference-manual-final-eng-ch 456/474
To view the availability and restrictions that are Actual and currently configuredfor the chosen date, perform th e following:
4. From the main menu, select Setup and Configuration 5. Select Rate Management and Availability The RATE AVAILABILITY screen displays.6. Select Actual
The RESTRICTIONS ACTUAL screen displays with a view of all activerestrictions.
©2006 MICROS® Systems Inc. All Rights Reserved. P roprietary and C onfidential.
456

7/31/2019 GEN V40 PMS Reference Manual FINAL Eng Ch
http://slidepdf.com/reader/full/gen-v40-pms-reference-manual-final-eng-ch 457/474
Day Type Codes
Day Type Codes allow rate amo unts to increase or decrease on specific daysdepending on forecasted occupancy. Rate amounts temporarily increase for that
day type by a percentage or additional rate amount. In addition , this feature allowsyou to sequence rates differently than the default sequence for an alternate sellingstrategy. Fo r example, on the weekends, your ho tel may prefer that discoun tedrates display in the Rate Query before corporate rates. To setup D ay Type Codesfor particular seasons or upcoming events, follow the steps below:
1. From the main menu, select Setup and Configuration 2. Select Rate Management and Property Calendar 3. Select Day Type Codes
The DAY TYPE CODES screen displays.
4. Select New to create a new day type.
©2006 MICROS® Systems Inc. All Rights Reserved. P roprietary and C onfidential.
457
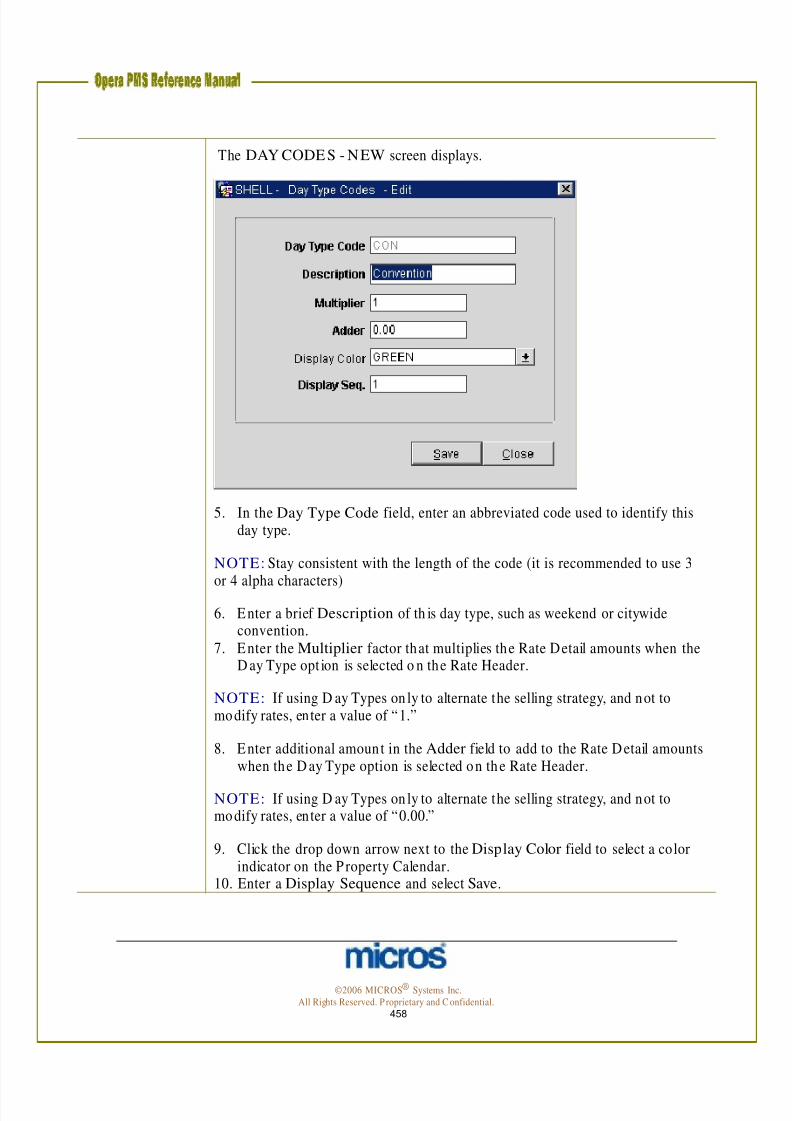
7/31/2019 GEN V40 PMS Reference Manual FINAL Eng Ch
http://slidepdf.com/reader/full/gen-v40-pms-reference-manual-final-eng-ch 458/474
The DAY CODE S - NEW screen displays.
5. In the Day Type Code field, enter an abbreviated code used to identify this day type.
NOTE : Stay consistent with the length of the code (it is recommended to use 3or 4 alpha characters)
6. Enter a brief Description of th is day type, such as weekend or citywideconvention.
7. Enter the Multiplier factor that multiplies the Rate Detail amounts when theD ay Type opt ion is selected o n the Rate Header.
NOTE: If using D ay Types on ly to alternate the selling strategy, and not tomodify rates, enter a value of “1.”
8. Enter additional amount in the Adder field to add to the Rate Detail amountswhen the D ay Type option is selected on the Rate Header.
NOTE: If using D ay Types on ly to alternate the selling strategy, and not tomodify rates, enter a value of “0.00.”
9. Click the drop down arrow next to the Display Color field to select a colorindicator on the P roperty Calendar.
10. Enter a Display Sequence and select Save.
©2006 MICROS® Systems Inc. All Rights Reserved. P roprietary and C onfidential.
458

7/31/2019 GEN V40 PMS Reference Manual FINAL Eng Ch
http://slidepdf.com/reader/full/gen-v40-pms-reference-manual-final-eng-ch 459/474
To establish a new sequence for rates to appear in the Rate Query for a particularDay Type Code, follow the steps below:
1. From the DAY TYPE CODE S screen, highlight the day type and selectSequence.
2. The SEQUENCE screen displays.
3. To reorder the display of rates, click in the Seq. column and type in each sequence for each rate (i.e. enter “1” for the rate to display first in the Rate
Query, followed by “2” for the second rate, etc.)4. Select OK to save.
©2006 MICROS® Systems Inc. All Rights Reserved. P roprietary and C onfidential.
459
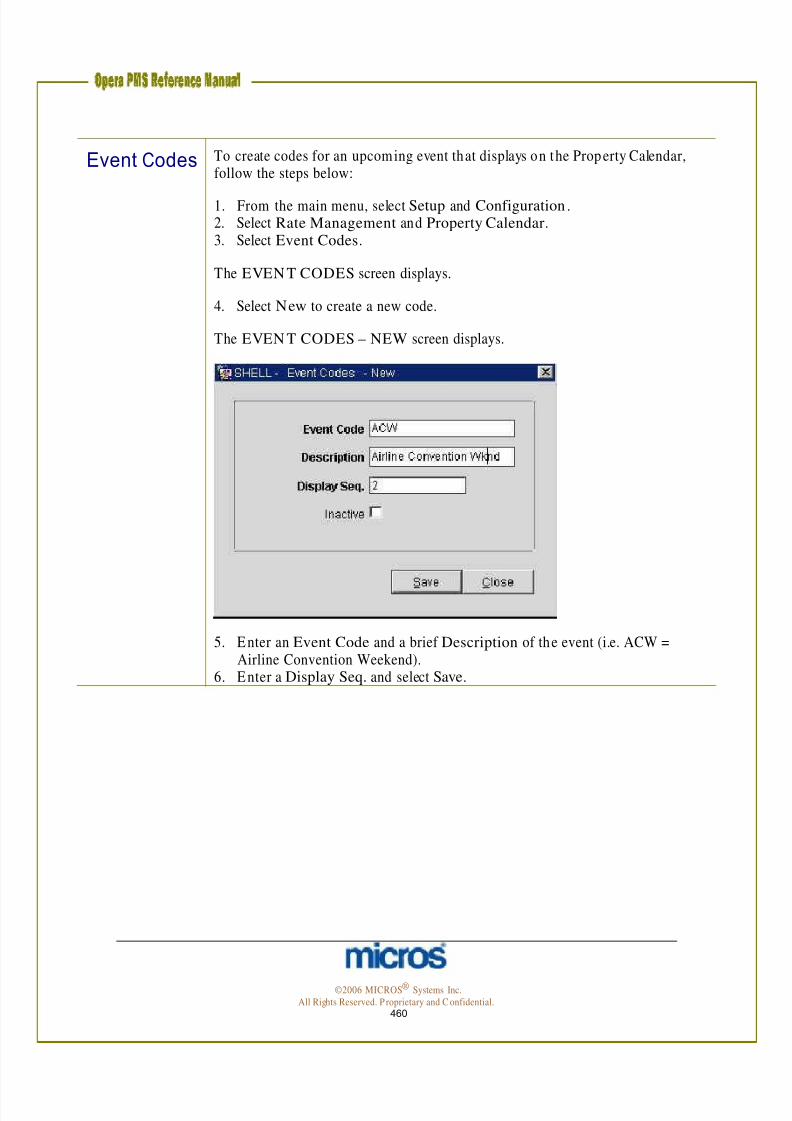
7/31/2019 GEN V40 PMS Reference Manual FINAL Eng Ch
http://slidepdf.com/reader/full/gen-v40-pms-reference-manual-final-eng-ch 460/474
Event Codes To create codes for an upcoming event that displays on the Property Calendar,follow the steps below:
1. From the main menu, select Setup and Configuration .2. Select Rate Management and Property Calendar.3. Select Event Codes.
The EVEN T CODES screen displays.
4. Select New to create a new code.
The EVEN T CODES – NEW screen displays.
5. Enter an Event Code and a brief Description of the event (i.e. ACW = Airline Convention Weekend).
6. Enter a Display Seq. and select Save.
©2006 MICROS® Systems Inc. All Rights Reserved. P roprietary and C onfidential.
460

7/31/2019 GEN V40 PMS Reference Manual FINAL Eng Ch
http://slidepdf.com/reader/full/gen-v40-pms-reference-manual-final-eng-ch 461/474
Property Calendar
To attach and activate E vents or D ay Types to the existing Property Calendar,follow the steps below:
1. From the main menu, select Setup and Configuration .2. Select Rate Management and Property Calendar.3. Select Property Calendar.
The PROPERTY CALENDAR screen displays.
4. Using the calendar button, search for and highlight the date you wish to being setting an event o r day type, and select Edit.
The EDIT PROPERTY/ CALENDAR screen displays and lists any existingD ay Types or Events.
©2006 MICROS® Systems Inc. All Rights Reserved. P roprietary and C onfidential.
461

7/31/2019 GEN V40 PMS Reference Manual FINAL Eng Ch
http://slidepdf.com/reader/full/gen-v40-pms-reference-manual-final-eng-ch 462/474
5. Select New.
The ADD DAY TYPES OR EVEN TS TO PROPERTY CALEN DAR screen displays.
6. Enter the From Date and To Date. 7. Click the drop down arrow next to either the Day Type or Event field to
select the code to add.8. If this Day Type or Event only applies to certain days of the week, check or
uncheck the days and select OK to save.
NOTE: The n ew Event o r D ay Type now displays on the Prop erty Calendar.The entry may be color-coded in the Legend, depending on the con figuration of the Day Type or Event Code.
©2006 MICROS® Systems Inc. All Rights Reserved. P roprietary and C onfidential.
462

7/31/2019 GEN V40 PMS Reference Manual FINAL Eng Ch
http://slidepdf.com/reader/full/gen-v40-pms-reference-manual-final-eng-ch 463/474
Chapter 14 – User Configuration ©2006 MICROS® Systems Inc.
All Rights Reserved. P roprietary and C onfidential. 463

7/31/2019 GEN V40 PMS Reference Manual FINAL Eng Ch
http://slidepdf.com/reader/full/gen-v40-pms-reference-manual-final-eng-ch 464/474
©2006 MICROS® Systems Inc.
All Rights Reserved. P roprietary and C onfidential. 464

7/31/2019 GEN V40 PMS Reference Manual FINAL Eng Ch
http://slidepdf.com/reader/full/gen-v40-pms-reference-manual-final-eng-ch 465/474
User Configuration
Overview The process of creating a new user within O PERA is a 3-step process:
1. Create a Cashier for the user2. Create the User N ame3. Assign the user Permissions
Add New Cashier
This chapter focuses on these steps while explaining the options and permissions for securely managing system functionality throughout the hotelstaff.
The first step in creating a new user is creating a Cashier. This is not arequirement for all employees of the hotel or O PERA users. If a particular
user does not need access to posting areas of the system or the need to check inguests, then a Cashier is not necessary. Some good examples of users that dono need Cashiers are Housekeeping supervisors, PBX operators, and Bellman.These positions typically do not need access to post charges to guests billstherefore would no t need a Cashier ID.
To add Cashiers for each user requiring posting ability, follow the steps below:
1. From the main menu, select Setup and Configuration. 2. Select the Cashiering menu and Cashiers.
The CASH IE R SETUP screen appears.
©2006 MICROS® Systems Inc.
All Rights Reserved. P roprietary and C onfidential. 465

7/31/2019 GEN V40 PMS Reference Manual FINAL Eng Ch
http://slidepdf.com/reader/full/gen-v40-pms-reference-manual-final-eng-ch 466/474
3. To create a new cashier, select New.
The CASH IER - N EW screen appears.
Create a User Name
4. The First field is the Cashier ID. This is a numerical item that the user identifies that cashier. Th e highest number allowed is 9999, and typically,numbers under 100 are reserved for system cashiers and interfaces. Thisnum ber auto generates but can be assigned.
5. E nter the Name of the Cashier.6. The Reserved field determines the property that uses this Cashier. Select
the down arrow beside the field to associate a specific property to thisCashier. This is only necessary in multi-property environments where theCashier might post for multiple locations.
7. Maximum Uses field determines how many times in a business day thecashier may open or close their bank. The standard for most ho tels is three(3).
8. The Float Over/ Short field allows the Cashier to drop over or below thetotal expected drop . Check this boxes if your hotel allows an overage orshortage to float until the next day.
9. Interface Cashier is checked for any system required Cashiers used byinterfaces (i.e., movies, call accounting, point of sale).
10. Exclusive Use checkbox determines if the cashier is devoted to only oneuser. This prevents the Cashier from being available when selecting aCashier from the pool of available ID ’s if the ho tel is using the floatingcashier option .
11. Inactive is checked when an employee no longer works at the ho tel. This
prevents anyone from logging in to the Cashier while maintaining thehistory of what postings the Cashier made.
12. Select Save to complete the Cashier.
Th e second step in creating a login is adding the User. Everyone at theproperty that requires access to O PE RA must have a User name. Th is alsoincludes personnel responsible for profiles and the need to track profileperformance.
To create a new User, follow the steps below:
©2006 MICROS® Systems Inc. All Rights Reserved. P roprietary and C onfidential.
466
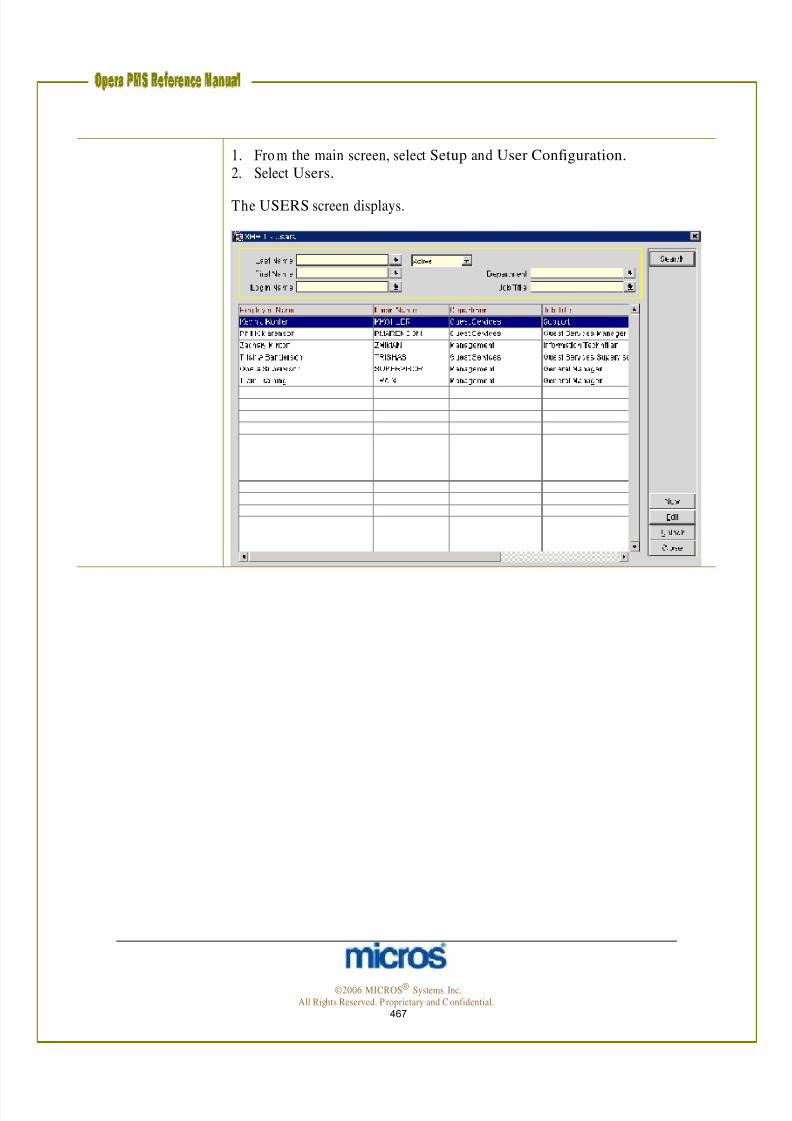
7/31/2019 GEN V40 PMS Reference Manual FINAL Eng Ch
http://slidepdf.com/reader/full/gen-v40-pms-reference-manual-final-eng-ch 467/474
1. Fro m the main screen, select Setup and User Configuration. 2. Select Users.
The USERS screen displays.
©2006 MICROS® Systems Inc. All Rights Reserved. P roprietary and C onfidential.
467

7/31/2019 GEN V40 PMS Reference Manual FINAL Eng Ch
http://slidepdf.com/reader/full/gen-v40-pms-reference-manual-final-eng-ch 468/474
All users in the system display in the main grid of this screen. The search areais useful for finding a particular user when the list of users is quite long. In
addition, you may click the d rop down arrow on the field in the center of search criteria to sort the d isplay by Active, Inactive, and Terminated users.
3. To create a new User, select New.
The NEW USER screen displays.
Th e screen displays with four quadrants of information. Mandatory fields have bold field descriptions.
4. Select a language by choo sing the down arrow beside the Language field.5. Select the appropriate radio dial for whether the user is Male or Female.6. E nter the user’s name in the Last Name, First Name, and Middle fields.7. Select the user’s job title by selecting the down arrow beside the Job Title
field.8. Choose the users department from the list of departments by selecting the
down arrow beside Department. 9. E nter the user’s phone extension in the Extension field.10. Enter a user’s initials to track perform ance and statistics of profiles linked
to the user via the Owner field.11. The Login Screen determines the screen the user sees upon successfully
logging into th e app lication (i.e. Dashboard). If you leave the field blank,the user logs into the main O PE RA screen.
12. Enter any Address and Communications information.
©2006 MICROS® Systems Inc. All Rights Reserved. P roprietary and C onfidential.
468

7/31/2019 GEN V40 PMS Reference Manual FINAL Eng Ch
http://slidepdf.com/reader/full/gen-v40-pms-reference-manual-final-eng-ch 469/474
13. The Login Name field is hotel defined and is the user’s login name. Werecommend having a standard for all names. Suggestions include the first,
middle and last initials or the f irst initial and last name.14. Enter a generic Password for the user. The user is encouraged to changethe password upon first successful login. Passwords may be alpha,num eric, or a comb ination of alpha and numeric. They must be sevencharacters in length and must contain at least one numeric character.
15. Re-enter the chosen password in the Confirm Password field.16. Cashier ID is the field to ente r the Cashier associated to this person . If the
user do no t make postings and does not have a Cashier, leave the fieldblank.
NOTE: If your hotel uses the floating Cashier functionality and the users sharethe same Cashier with other users, leave the field blank. When attem pting to
access the posting area of the system, a prompt displays to choose the Cashier.
17. T o define a specific report group th is users defaults to when accessing theReports mod ule, click the drop down arrow next to the Report Group field.
18. Password Expiration Days field determines how often the user’spassword expires.
NOTE: If the field auto matically populates a number and the field is gray, thenthe p assword expiration is set and m andated in another area of configuration .
19. P lace a check in each box of the Access Contro l area to define theapplications this user may access for the O pera Hotel Edition . Most basicusers require access to PMS only, where a System’s Expert requ ires accessto PMS, Configuration, End of Day, Utilities and the like.
20. Select Save to complete changes and remain on the screen.
©2006 MICROS® Systems Inc. All Rights Reserved. P roprietary and C onfidential.
469
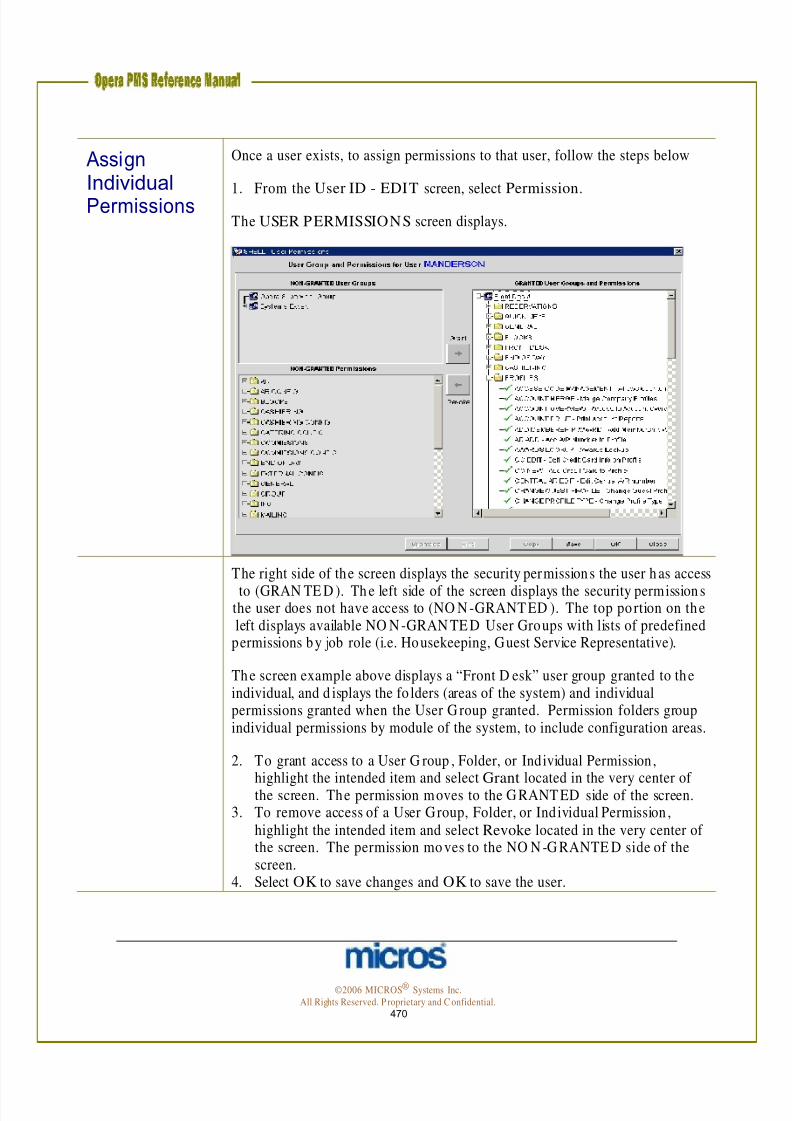
7/31/2019 GEN V40 PMS Reference Manual FINAL Eng Ch
http://slidepdf.com/reader/full/gen-v40-pms-reference-manual-final-eng-ch 470/474
AssignIndividualPermissions
Once a user exists, to assign permissions to that user, follow the steps below
1. From the User ID - EDIT screen, select Permission.The USER PERMISSIONS screen displays.
The right side of the screen displays the security permissions the user h as access
to (GRAN TE D ). Th e left side of the screen displays the security permission sthe user does not have access to (NO N -GRANT ED ). The top po rtion on theleft displays available NO N -GRAN TE D User Groups with lists of predefined
permissions by job role (i.e. Housekeeping, Guest Service Representative).
The screen example above displays a “Front D esk” user group granted to theindividual, and d isplays the fo lders (areas of the system) and individualpermissions granted when the User G roup granted. Permission folders groupindividual permissions by module of the system, to include configuration areas.
2. To grant access to a User G roup , Folder, or Individual Permission ,
highlight the intended item and select Grant located in the very center of the screen. The permission moves to the G RANT ED side of the screen.3. To remove access of a User Group, Folder, or Individual Permission ,
highlight the intended item and select Revoke located in the very center of the screen. The permission mo ves to the NO N -G RANTE D side of thescreen.
4. Select OK to save changes and OK to save the user.
©2006 MICROS® Systems Inc. All Rights Reserved. P roprietary and C onfidential.
470

7/31/2019 GEN V40 PMS Reference Manual FINAL Eng Ch
http://slidepdf.com/reader/full/gen-v40-pms-reference-manual-final-eng-ch 471/474
Unlocking a User
With the latest of security measures, if a user unsuccessfully attempts to log intothe system more than 3 times, OPERA automatically locks the user from
logging back into the system. This situation requires management access tounlock a user.
To unlock a user, follow the steps below:
From the main m enu, select Setup, User Configuration and Users. The USERS search screen appears.
1. Locate the user and highlight the Employee Name. 2. Select Unlock .
The USER PASSWORD screen appears.
3. E nter the word “password” in the Password field as well as in the Confirm Password field.
4. Remove any information in the Disabled On field and select Save.5. Have the user to login to OPE RA again and reset their own password as
learned in the “Miscellaneous” chapter of this manual.
©2006 MICROS® Systems Inc. All Rights Reserved. P roprietary and C onfidential.
471

7/31/2019 GEN V40 PMS Reference Manual FINAL Eng Ch
http://slidepdf.com/reader/full/gen-v40-pms-reference-manual-final-eng-ch 472/474
Create a New User Group
User groups are useful to cluster sets of permissions together so we can quicklyassign permission rights to individuals. To setup or create new user groups for
your hotels job roles, follow the steps below:
1. From the main menu, select Setup and User Configuration. 2. Select User Groups.
The USER GROUPS screen displays.
3. Select New.
The USER GROUP – NEW screen displays.
4. E nter a user Group N ame (usually a short code for the group or department).
5. E nter a Description for the user group .
The Transaction Codes and Report Groups functionality are available atsome p roperties to limit the transaction codes and report groups members of this user group have access to.
6. Enter Transaction Codes that the members of th is user group h ave accessto in Cashiering.
7. Enter Report Groups the m embers of this user group may access.8. Select OK.
©2006 MICROS® Systems Inc. All Rights Reserved. P roprietary and C onfidential.
472

7/31/2019 GEN V40 PMS Reference Manual FINAL Eng Ch
http://slidepdf.com/reader/full/gen-v40-pms-reference-manual-final-eng-ch 473/474
AddPermissionsto a User Group
To add pre-defined permissions to the user group or job role, follow th e stepsbelow:
1. From the USER GROUPS screen, highlight th e Group Name and selectPermissions.
The USER GROUP PERMISSIONS screen appears.
©2006 MICROS® Systems Inc. All Rights Reserved. P roprietary and C onfidential.
473

7/31/2019 GEN V40 PMS Reference Manual FINAL Eng Ch
http://slidepdf.com/reader/full/gen-v40-pms-reference-manual-final-eng-ch 474/474
2. Add permissions to th e User G roup as needed by selecting the individualN O N -GRANTE D Permissions on the left.
3. Highlight the perm ission and select Grant to mo ve the permission to theG RAN TED USER G ROUPS AN D PERMISSION S window.
NOTE: For easy of use and to quickly assign p ermissions, it is possible togrant all of the permissions of ano ther user group to this user group, and thenadd additional individual permissions. For examp le, a Front Desk Supervisorwould have all the capabilities of a Front Desk Agent with additionalresponsibilities. You could grant the Front D esk Supervisor user group theFron t D esk Agent user group permission, and then grant additional supervisorypermissions.
4. Select OK to save changes.
Related Documents