engineering for a better world GEA Refrigeration Technologies GEA Bock Compressor HGZ7 Assembly instructions HGZX7/1620-4 R404A/R507 HGZX7/1620-4 R410A HGZX7/1860-4 R404A/R507 HGZX7/1860-4 R410A HGZX7/2110-4 R404A/R507 HGZX7/2110-4 R410A HGZ7/1620-4 R22 HGZ7/1860-4 R22 HGZ7/2110-4 R22

Welcome message from author
This document is posted to help you gain knowledge. Please leave a comment to let me know what you think about it! Share it to your friends and learn new things together.
Transcript

D
GB
F
E
1
0972
6-11
.201
4-DG
bF
engineering for a better world GEA Refrigeration Technologies
GEA Bock Compressor HGZ7
Assembly instructions
HGZX7/1620-4 R404A/R507 HGZX7/1620-4 R410AHGZX7/1860-4 R404A/R507 HGZX7/1860-4 R410AHGZX7/2110-4 R404A/R507 HGZX7/2110-4 R410A
HGZ7/1620-4 R22 HGZ7/1860-4 R22 HGZ7/2110-4 R22

2
D
GB
F
E
0972
6-11
.201
4-DG
bF
About these instructionsRead these instructions before assembly and before using the compressor. This will avoid misunder-standings and prevent damage. Improper assembly and use of the compressor can result in serious or fatal injury. Observe the safety instructions contained in these instructions.These instructions must be passed onto the end customer along with the unit in which the compres-sor is installed.
GEA Bock GmbH
72636 Frickenhausen
GEA Bock GmbH
Benzstraße 7
72636 Frickenhausen
Germany
Telephone +49 7022 9454 0
Fax +49 7022 9454 137
www.gea.com
Manufacturer
Contact

D
GB
F
E
3
0972
6-11
.201
4-DG
bF
Contents Page
1 Safety 4 1.1 Identificationofsafetyinstructions 1.2 Qualificationsrequiredofpersonnel 1.3 General safety instructions 1.4 Intended use 2 Product description 6 2.1 Short description standard design 2.2 ain and functional parts 2.3 Short description optional design 2.4 Name plate 2.5 Type key 3 Areas of application 9 3.1 Refrigerants 3.2 Oil charge 3.3 Limits of application 3.4 Subcooling temperature 4 Description of functions 12 4.1 Two-stagerefrigerationcircuitwithliquidsubcooler 5 Compressor assembly 14 5.1 Storage and transportation 5.2 Setting up 5.3 Installationoftheliquidsubcoolersystem(standarddesign) 5.4 Installationexample,liquidsubcoolerwithaccessories 5.5 Factory-installedliquidsubcoolersystem(optionaldesign) 5.6 Pipe connections 5.7 Pipes 5.8 Laying suction ans pressure lines 5.9 Operating the shut-off valves 5.10 Operating mode of the lockable service connections 6 Electrical connection 21 6.1 Information for contactor and motor contactor selection 6.2 Circuit diagram for part-winding start 6.3 Standard motor, design for direct or partial winding start 6.4 Electronic trigger unit MP10 6.5 Connecting the trigger unit MP10 6.6 Functional test of the trigger unit MP10 6.7 Oilsumpheater(accessories) 7 Commissioning 28 7.1 Preparations for start-up 7.2 Pressure strengh test 7.3 Leak test 7.4 Evacuation 7.5 Refrigerant charge 7.6 Start-up 7.7 Avoid slugging 8 Maintenance 31 8.1 Preparation 8.2 Work to be carried out 8.3 Spare parts recommendation 8.4 Replacing the valve plates 8.5 Extract from the lubricants table 8.6 Decommissioning 8.7 Accessories 9 Technical data 34 10 Dimensions and connections 35 11 Declaration of conformity and installation 38 12 Service 40

4
D
GB
F
E
0972
6-11
.201
4-DG
bF
1.2 Qualificationsrequiredofpersonnel
DANGER Indicates a dangerous situation which, if not avoided, will cause immediate fatal or serious injury.
WARNING Indicates a dangerous situation which, if not avoided, may cause fatal or serious injury.
CAUTION Indicates a dangerous situation which, if not avoided, may cause fairly severe or minor injury.
ATTENTION Indicates a situation which, if not avoided, may cause property damage.
INFO Important information or tips on simplifying work.
WARNING Inadequatelyqualifiedpersonnelposestheriskofaccidents,the consequencebeingseriousor fatal injury.Workoncompressorsisthereforereservedforpersonnelwhichisqualifiedtoworkonpressurized refrigerant systems:• For example, a refrigeration technician, refrigeration mechatronic
engineer. As well as professions with comparable training, which enables personnel to assemble, install, maintain and repair refrigeration and air-conditioning systems. Personnel must be capable of assessing the work to be carried out and recognising any potential dangers.
1.1 Identificationofsafetyinstructions:
1| Safety

D
GB
F
E
5
0972
6-11
.201
4-DG
bF
1.4 Intended use
1.3 General safety instructions
WARNING Risk of accidents. Refrigerating compressors are pressurised machines and as such call for heightened caution and care in handling.
The maximum permissible overpressure must not be exceeded, even for testing purposes.
Risk of burns! - Depending on the operating conditions, surface temperatures of over 60°C on the discharge side or below 0°C on the suction side can be reached. - Avoid contact with refrigerant necessarily. Contact with refrigerant can cause severe burns and skin damage.
WARNING The compressor may not be used in potentially explosive environments!
These assembly instructions describe the standard version of the compressor named in the title manufactured by GEA Bock. GEA Bock refrigerating compressors are intended for installation in a machine (within theEUaccording to theEUDirectives2006/42/ECMachineryDirective,97/23/ECPressureEquipmentDirective).Commissioning is permissible only if the compressor has been installed in accordance with these as-sembly instructions and the entire system into which it is integrated has been inspected and approved in accordance with legal regulations.
The compressors are intended for use in refrigeration systems in compliance with the limits of application.
Onlytherefrigerantspecifiedintheseinstructionsmaybeused.
Any other use of the compressor is prohibited!
1| Safety

6
D
GB
F
E
0972
6-11
.201
4-DG
bF
2| Product description
Semi-hermetic, two-stage, six cylinder reciprocating compressor with suction-gascooled drive motor.
StagesdividedintoLP/HPattheratioof2:1 Two-stageoperationwithliquidsubcooler Expansion valve for subcooling adjusted for refrigerant and application range
2.1 Short description standard version
Intermediate pressure chamber
Terminal box
Dimension and connection values can be found in Chapter 10
Oil pump
Suction shut-off valve
Name plate
NoticeCEcertificationforpiping(onlyfor
HGZ7/2110-4)
Oil sight glasses
Oil drain plug Charge plug
Valve plate
Discharge shut-off valve
Intermediatepressure line
Fig. 1
Fig. 2
Oil sump heater

D
GB
F
E
7
0972
6-11
.201
4-DG
bF
GEA Bock GmbH72636 Frickenhausen, Germany
2| Product description
Liquidsubcooler,expansionvalve,solenoidvalve,filterdrierandtwosightglassesmounteddirectly to the compressor, piped and insulated.
2.3 Short description optional version
Dimension and connection values can be found in Chapter 10
2 sight glasses
1. Standard version: Compressor with intermediate-pressure line mounted and insulated. Fig.3:Liquidsubcooler,expansionvalve,solenoidvalve,filterdrierandtwosightglassesenclosed separately, for individual, external mounting.
2. Optional version:Liquidsubcooler,expansionvalve,solenoidvalve,filterdrierandtwosightglasses mounted directly to the compressor, piped and insulated.
2.2 Main and functional parts
Fig. 3
Expansionvalve
Liquidsubcooler
Filter drierSolenoid valve
Fig. 4

8
D
GB
F
E
0972
6-11
.201
4-DG
bF
50 Hz}
60 Hz}
Observe the limits of application diagrams!
1 Type designation2 Machine number3 Type code4 Maximum operating current5 Startingcurrent(rotorblocked) Δ: Partwinding1 YYY:Partwindings1and2 Y: Partwinding1 YY: Partwindings1and26 ND(LP):max. admissible operating pressure (g)Low pressure side HD(HP):max. admissible operating pressure(g)High pressure side
7 Voltage,circuit,frequency8 Nominal rotation speed9 Displacement VND = low pressure stage VHD = high pressure stage10 Voltage,circuit,frequency11 Nominal rotation speed12 Displacement VND = low pressure stage VHD = high pressure stage13 Oiltypefilledatthefactory14 Terminal box protection type
Electrical accessories can change the IP protection class!
until A018from A040
}}
2| Product description
/HGZ 7 2110-4X
Fig. 5
2.4 Name plate (example)
2.5 Type key (example)
1)HGZ=Hermeticgascooled(suctiongascooled),two-stage2)X=Esteroilfilling(HFCrefrigerant R404A/R507,R410A)3)PossiblealternativerefrigerantsR404A/R507,R410A,R22
R404A
Refrigerants 3)
Number of poles
Swept volume
Size
Oil charge ²)
Series ¹)
12
456
1413
8
12
7
11
910
GEA Bock GmbH72636 Frickenhausen, Germany
Y/YY
Y/YY3
.
.
.
.

D
GB
F
E
9
0972
6-11
.201
4-DG
bF
3| Areas of application
Thecompressorsarefilledatthefactorywiththefollowingoiltype:-fürR404A/R507,R410A FUCHSRenisoTritonSE55 -fürR22 FUCHSRenisoSP46Compressorswithesteroilcharge(FUCHSRenisoTritonSE55)aremarkedwithanX in the typedesignation(e.g.HGZX7/2110-4R404A).
3.1 Refrigerants• HFKW: R404A/R507,R410A• (H)FCKW: R22
3.2 Oil charge
INFO For refilling, we recommend the above oil types. Alternatives: see lubricants table, Chapter 8.5.
ATTENTION Compressor operation is possible within the operating limits shown in the diagrams. Please note the significance of the shaded areas. Thresholds should not be selected as design or continuous operation points.
- Permissible ambient temperature (-20°C) - (+60°C) - Max. permissible discharge end temperature 140 °C-Max.permissibleswitchingfrequency12x/h. - A minimum running time of 3 min. steady-state condition
(continuous operation) must be achieved.
For operation with supplementary cooling: - Use only oils with high thermal stability. - Avoid continuous operation near the threshold.
When operating in the vacuum range, there is a danger of air entering on the suction side. This can cause chemical reactions, a pressure rise in the condenser and an elevated compressed-gas temperature. Prevent the ingress of air at all costs!
3.3 Limits of application
ATTENTION The correct oil level is shown in figure 6. Damage to the compressor is possible if overfilled or underfilled!
max.
min.
2,3 Ltr. oil level
Fig. 6
~~

10
D
GB
F
E
0972
6-11
.201
4-DG
bF
Max. permissible operating pressure (LP/MP/HP)1): 19/19/28 bar
Design for other areas onrequest
Fig. 7
Fig. 8
Fig. 9
3 | Areas of application
R404A/R507
R410A
R22
1)LP = low pressure MP = intermediate pressure HP = high pressure
tO Evaporation temperature(°C)
tC Condensing temperature(°C)
∆tOhsuctiongassuperheat(K)
Unlimitedapplicationrange

D
GB
F
E
11
0972
6-11
.201
4-DG
bF
3 | Areas of application
Thedesignoftheexpansionvalveonthecompressorcanbedefinedwiththehelpofthediagrambyapproximately calculating the subcooling temperature arising in the relevant operating conditions(t0/tc).Diagramsfordeterminingthesubcoolingtemperatureattheoutputoftheliquidsubcooler.
3.4 Subcooling temperature
tU = Subcooling temperature at the subcooleroutlet(FUA)
tO = Evaporating temperature
Fig. 10
Fig. 11
Fig. 12

12
D
GB
F
E
0972
6-11
.201
4-DG
bF
Therefrigerantsuctionedoutoftheevaporator(21)iscompressedbythe4cylindersoftheLPstage(2)tointermediatepressureMP.Afterthat,thesuperheatedrefrigerantflowsthroughtheintermediatepressurechamber(3),whereitiscooledbytheliquidsubcoolersystemtoreducethedischargeendtemperature.The refrigerant then flows through the intermediate pressure line (4) to the electricmotor of the compressor for to cool the motor. After this, the refrigerant is suctioned in by the two HP cylinders(5)andcompressedtothefinalpressure.
Liquidsubcoolersystem
Theliquidsubcoolersystemconsistsofthecomponents-liquidsubcooler(plateheatexchanger)(6)-expansionvalve(7)-sightglasses(8,9)-solenoidvalve(10)-filterdrier(11)
Aftertherefrigerantreciever(16),theliquidlinewillbesplittedintotwolines:
Line A leads through the liquid subcooler (6) and the subcooled refrigerant flows to the evaporator (21).ThroughLine B refrigerant isexpanding through theexpansionvalve (7) into theliquidsubcooler(6)inordertosubcooltherefrigerantoflineAandthroughtheintermediatepressureline(MP)tocoolthesuperheatedrefrigerant,whichiscompressedfromlowpressuretointermediatepressurechamber(3).
4| Description of functions

D
GB
F
E
13
0972
6-11
.201
4-DG
bF
4| Description of functions
Explanations
1 Compressor2 Cylinder LP-stage3 Intermediate pressure chamber MP4 Intermediate pressure line MP5 Cylinder HP-stage6 Liquidsubcooler7 Reinjection valve8 Sight glass9 Sight glass10 Solenoid valve11 Filter drier12 Damper, pressure line13 Oil separator14 Non-return valve15 Condenser
16 Refrigerant receiver17 Filter drier18 Solenoid valve19 Sight glass20 Expansionvalve(evaporator)21 Evaporator22 Liquidseparator23 Damper, suction line24 Filter suction line
LP = Low pressureMP = Intermediate pressureHP = High pressureFUE=Liquidsubcooler,inletFUA=Liquidsubcooler,outlet
Scope of supply
Line A
Line B
4.1 Two-stagerefrigerationcyclewithliquidsubcooler
Fig. 13

14
D
GB
F
E
0972
6-11
.201
4-DG
bF
5| Compressor assembly
Setuponanevensurfaceorframewithsufficientload-bearing capacity.
Compressor in principle rigidly install.
Provideadequateclearanceformaintenancework. Ensureadequatecompressorventilation.
Do not use in a corrosive, dusty, damp atmosphere or a combustible environment.
Fig. 16
Fig. 17
Fig. 18
F
E
D
C
B
A
1234
F
E
D
C
4 3 2 1
A
BTol.-Ang. DIN ISO 2768-mK
Ra Rz
Maß Passung Freigabe
Alternativbezug:Baumustergeprüft
Teil inaktiv
Lieferantenzeichnung
--
K.-Auftrag:PL:
Zeichnung ungültig
Entwicklungsstand
Teil keine Serie
120400
±0.5
über 0.5bis 6
Benzstraße 7 - 72636 Frickenhausen - Germany - www.bock.de
-
-Unbemaßte Radien:
-
Diese Zeichnung ist unser Eigentum!Sie darf ohne unsere Genehmigung weder nach-gebildet, vervielfältigt, oder Dritten Personen zu-gänglich gemacht werden. Der Nachbau nachdieser Zeichnung, oder an Hand der nach dieserZeichnung hergestellten Gegenstände durch denAbnehmer oder Dritte ist nicht gestattet.Wir behalten uns alle Rechte, gemäß DIN ISO 16016an dieser Zeichnung vor.
Bearb.DatumÄnderungs-Nr.
Werkstoff:
Ausgangsteil, bzw. Rohteil:-
-
Gepr.
NameDatum19.04.
WerkstückkantenDIN ISO 13715
Ersatz für:
Ersetzt durch:
Erstellt2010
Geprüft
-
Kurz
Zone
1/x
Oberflächenbehandlung / Härte:-
Blatt:Änderungsbeschreibung
400Benennung:
±0.8
1000 30 6
-
±0.3
12030
±0.2
Zeichn.-Nr. Teile-Nr.
Oberflächenangaben ISO 1302
x.xxxx-xxxxx.x
Zust.Gußtoleranzen:
Gewicht: (kg)
±0.1
Maßstab:
1:1
Wasserwaagefür Indesign
Der Lieferant muß sicherstellen, dass die Ware ineinwandfreiem Zustand angeliefert wird (Korrosions-schutz, Verpackung für sicheren Transport).
Rz 25Rz 160
s
25
zyxwut
0,05 Rz 1,60,30,71,62 Rz 166,3 Rz 63 Rz 6,3Rz 12,5
F:\u
ser\k
urz\
3D S
ache
n\3D
Tei
le\Z
eich
nung
en\W
asse
rwaa
ge
INFO Newcompressorsarefactory-filledwithinertgas(3barnitrogen).Leave this service charge in the compressor for as long as possible and prevent the ingress of air. Check the compressor for transport damage before starting any work.
?5.1 Storage and transportation
Usetransporteyelet. Do not lift manually! Useliftinggear!
Storageat(-30°C)-(+70°C),maximumpermissiblerelativehumidity10% -95 %, no condensation.
Do not store in a corrosive, dusty, vaporous atmosphere or in a com-bustible environment.
Fig. 15
Fig. 14
5.2 Setting up
ATTENTION Fittings (e.g. pipe holders, additional units, mounting parts etc.) on the compressor are not permissible!

D
GB
F
E
15
0972
6-11
.201
4-DG
bF
5.3 Installationoftheliquidsubcoolersystem (standard version)
Separatelyenclosedcomponents: Liquidsubcooler Reinjection valve Solenoid valve Filter drier 2 sight glasses Screw-in sleeve, solder adapter and seals
Please check for completeness of parts before beginning installation.
Assembly:
Pipe connections:For connections, see dimension diagram Chapter 10. System design, piping and necessary support points for the individual components must be
carefully planned and carried out. Properlyinsulateliquidsubcooleragainstcondensationandheatingandtherelatedlossof
performance. For rigidity reasons, the use of stainless steel pipes with a wall of 1 mm is preferred. The pipes
must be free of tension during and after soldering to prevent possible breaks lateron.
1
2
3
4
5
6
1
2
34
5
6
5| Compressor assembly
Fig. 19
INFO Observe manufacturer‘s instructions!
INFO The points listed here represent general guidelines and information on how to pipe and connect the subcooler unit. To perform this work technical knowledge and skill as well as proof of a hard-soldering testcertificateinaccordancewithDINEN13133isrequired.
INFO Useonlysuitablehardsolderandflux.Solderunderaninertgasatmosphere when copper components are to be soldered! The accompanying expansion valve is designed and adjusted for the compressor and the listed refrigerant (sensor charge, nozzle). Only use expansion valves approved and supplied by GEA Bock!
INFO The intermediate pressure line and intermediate pressure chamber are fully insulated at the factory. To mount the expansion valve, cut the insulation as shown in the marked area in Fig. 20, page 16. Correct sensor placement is marked by an unpainted area on the pipe.
ATTENTION To avoid vibration cracks in the subcooler system, the individual components must be mounted directly to the compressor or installed as a decoupled unit!

16
D
GB
F
E
0972
6-11
.201
4-DG
bF
5| Compressor assembly
Intermediate pressure chamber
Fig. 20
X
W
Intermediate pressure line(Shownwithoutinsulation)
R Y
R Connection of pressure compensation line for expansion valve 7/16"UNF
W Refrigerant injection connection M22 x 1,5
X Schrader connection for intermedie-pressure gauge 7/16"UNF
Y Positionoftemperaturesensor/unpainted
D
GB
F
E
17
0972
6-11
.201
4-DG
bF
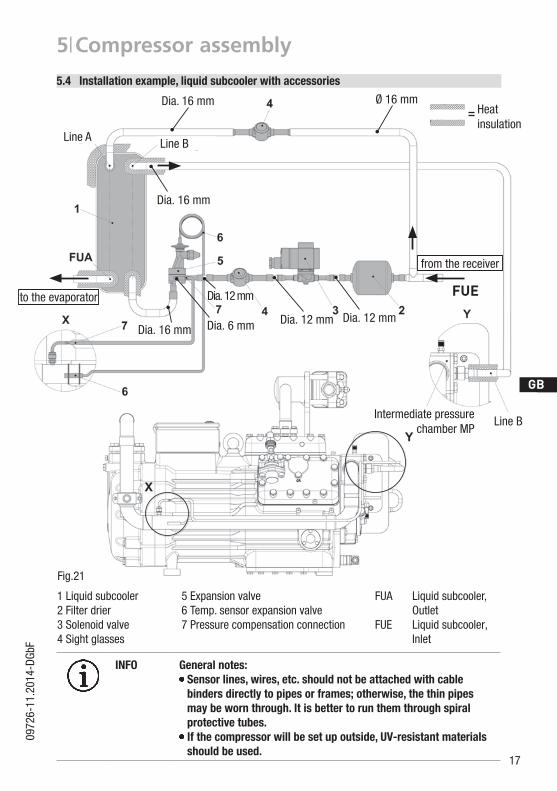
1 Liquidsubcooler 5 Expansion valve FUA Liquidsubcooler, 2 Filter drier 6 Temp. sensor expansion valve Outlet 3 Solenoid valve 7 Pressure compensation connection FUE Liquidsubcooler, 4 Sight glasses Inlet
Ø 16 mm Ø 16 mm
Dia. 16 mm
Dia. 16 mm Dia. 6 mm
Dia. 12 mm
Dia. 12 mm Dia. 12 mm
from the receiver
FUE
Heat insulation
Fig.21
to the evaporator
5| Compressor assembly
5.4 Installationexample,liquidsubcoolerwithaccessories
INFO General notes: Sensor lines, wires, etc. should not be attached with cable binders directly to pipes or frames; otherwise, the thin pipes may be worn through. It is better to run them through spiral protective tubes. If the compressor will be set up outside, UV-resistant materials should be used.
Line B
Line A Line B
Dia. 16 mm
Intermediate pressure chamber MP

18
D
GB
F
E
0972
6-11
.201
4-DG
bF
5.6 Pipe connections
The pipe connections have graduated inside diameters so that pipes with standart millimetre and inch dimensions can be used. The connection diameters of the shut-off valves are rated for maximum compressor output. Theactualrequiredpipecrosssectionmustbematched to the output. The same applies for non-return valves.
Fig.23:graduatedinternal diameter
5| Compressor assembly
ATTENTION Damage possible.Superheating can damage the valve. Remove the pipe supports therefore from the valve for soldering. Only solder using inert gas to inhibit oxidation products (scale)
INFO A soldering suppot for tube diameter 54 mm is mounted to the suction shut-off valve of the compressor. A soldering support for tube diameter 2 1/8'' accompanies the compressor.
Liquidsubcooler,expansionvalve,solenoidvalveandtwosightglassesaremounteddirectlyatthecompressor, piped and insulated.
FUE
FUA
FUE:LiquidsubcoolerinletFUA:Liquidsubcooleroutlet
5.5 Factory-installedliquidsubcoolersystem(optionaldesign)
Fig. 22
GEA Bock GmbH72636 Frickenhausen, Germany

D
GB
F
E
19
0972
6-11
.201
4-DG
bF
5| Compressor assembly
5.8 Laying suction and pressure lines
5.7 Pipes
Pipes and system components must be clean and dry inside and free of scale, swarf and layers of rust and phosphate. Only use air-tight parts.
Lay pipes correctly. Suitable vibration compensators must be provided to prevent pipes being cracked and broken by severe vibrations.
Ensure a proper oil return. Keep pressure losses to an absolute minimum.
Fig. 24
A rule of thumb:Alwayslaythefirstpipesectionstartingfromtheshut-offvalvedownwardsand parallel to the drive shaft.
ATTENTION Improperly installed pipes can cause cracks and tears, the result being a loss of refrigerant.
INFO Proper layout of the suction and discharge lines directly after the compressor is integral to the system’s smooth running and vibration behaviour.
Rigid fixed pointAs short as
possible

20
D
GB
F
E
0972
6-11
.201
4-DG
bF
5| Compressor assembly
5.9 Operating the shut-off valves Before opening or closing the shut-off valve, release the valve spindle seal by approx. ¼ of a turn
counter-clockwise. After activating the shut-off valve, re-tighten the adjustable valve spindle seal clockwise.
Fig. 25 Fig. 26
Valve spindle seal
release
tighten
Pipe connection
Pipe connection
5.10 Operating mode of the lockable service connections
Fig. 27Opening the shut-off valve:Spindle:turntotheleft(counter-clockwise)asfarasitwillgo.—>Shut-offvalvecompletelyopened/serviceconnectionclosed.The connection which cannot be shut off is intended for safety devices.
Fig. 28Opening the service connectionSpindle:Turn½-1turntotherightclockwise.—>Serviceconnectionopened/shut-offvalveopened.The connection which cannot be shut off is intended for safety devices.
Service connection closed
ConnectionblockedSpindle
Connection cannot be shut off
Connection cannot be shut off
Service connection opened
SpindleConnectionopen
Compressor
Compressor

D
GB
F
E
21
0972
6-11
.201
4-DG
bF
6| Electrical connection
6.1 Information for contactor and motor contactor selection
INFO Connect the compressor motor in accordance with the circuit diagram (seeinsideofterminalbox).Usesuitablecableentrypointofthecorrectprotectiontype(see nameplate)forroutingcablesintotheterminalbox.Insertthestrain reliefs and prevent chafe marks on the cables.Comparethevoltageandfrequencyvalueswiththedataforthe
mains power supply. Only connect the motor if these values are the same.
DANGER Risk of electric shock! High voltage! Only carry out work when the electrical system is disconnected from the power supply!
6 Electrical connection
Allprotectiondevicesandswitchingormonitoringunitsmustbefittedinaccordancewiththelocalsafetyregulationsandestablishedspecifications(e.g.VDE)aswellaswiththemanufacturer’sinfor-mation. Motorprotection switchesare required! Motor contactors, feed lines, fuses and motor protectionswitchesmustberatedonthebasisofthemaximumworkingcurrent(seename plate). For motor protection use a current-dependent and time-delayed overload protection device for moni-toring all three phases. Set the overload protection device so that it must be actuated within 2 hours, if there is 1.2 times the max. working current.

22
D
GB
F
E
0972
6-11
.201
4-DG
bF
�nderung
0
Datum Name
Datum
Bearb.
Gepr.
Norm
1
20.Feb.2009
Kelich
16.Nov.2010
Urspr.
2
Ers. f.
3
Ers. d.
4
PW MP10
5 6 7
BOCK COMPRESSORS
8
=
+
9
Bl.
2 Bl.
2
1
X SS
Q1
L1 L2 L3 N PE
Anschluákasten Verdichter
I=60%
F1.1
K11
2
1
3
4
2
5
6
3
1U1
1V1
1W1
PE
M/YYY
M1
R1
2U1
2V1
2W1
I=40%
F1.2
K21
2
4
3
4
5
5
6
6
X1L1L1 N N 434311 12 14L S M
X2 1 2 3 4 5 6
7
F1.1
F1.2
8
R2
4A
F2
S1
R2
9
R2
10
MP10
11
F5
K1
12
T2
13
N
P™l
14
L
15
M
K1
16
S
K1
K1T
K2
P>
F3
17
K1T
18 19
K2T
P
F4
20
K3T
21 22
P<
B1
K2T13
14
Y1
23
K3T
24
K1
25
E1
26
L1.1L2.1L3.1L1.2
NPE
6.2 Circuit diagram for part-winding start
Fig. 29
Q1 Main switchF1.1 Motor protection switch part winding 1F1.2 Motor protection switch part winding 2F2 Fuse control current circuitF3 High pressure safety monitorF4 Safetychain(high/lowpressuremonitoring)F5 Oil differential pressure monitorS1 Control voltage switchB1 Release switch(thermostat)K1 Mains contactor part winding 1K2 Mains contactor part winding 2
Compressor terminal box

D
GB
F
E
23
0972
6-11
.201
4-DG
bF
�nderung
0
Datum Name
Datum
Bearb.
Gepr.
Norm
1
20.Feb.2009
Kelich
16.Nov.2010
Urspr.
2
Ers. f.
3
Ers. d.
4
PW MP10
5 6 7
BOCK COMPRESSORS
8
=
+
9
Bl.
2 Bl.
2
1
X SS
Q1
L1 L2 L3 N PE
Anschluákasten Verdichter
I=60%
F1.1
K11
2
1
3
4
2
5
6
3
1U1
1V1
1W1
PE
M/YYY
M1
R1
2U1
2V1
2W1
I=40%
F1.2
K21
2
4
3
4
5
5
6
6
X1L1L1 N N 434311 12 14L S M
X2 1 2 3 4 5 6
7
F1.1
F1.2
8
R2
4A
F2
S1
R2
9
R2
10
MP10
11
F5
K1
12
T2
13
N
P™l
14
L
15
M
K1
16
S
K1
K1T
K2
P>
F3
17
K1T
18 19
K2T
P
F4
20
K3T
21 22
P<
B1
K2T13
14
Y1
23
K3T
24
K1
25
E1
26
L1.1L2.1L3.1L1.2
NPE
K1T Delayrelaymax.1s(slowrelease),partwinding 2K2T Delayrelaymax.20s(slowrelease), OpensolenoidY1(subcooler)K3T Delayrelaymax.20s(slowrelease), compresssorswitch-off(suctionsubcooler)Y1 Solenoid valve intermediate coolerM1 Compressor motorR1 Coldconductor(PTCsensor)R2 Thermalprotectionthermostat(PTCsensor)R3 Oiltemperature(NTCsensor)

24
D
GB
F
E
0972
6-11
.201
4-DG
bF
400 V
Direktstart YY Teilwicklungsstart Y/YY
1V1 1W11U1
2W12V12U1
L3L2L1 L3L2L1
L3L2L1
1V1 1W11U1
2W12V12U1
Direct start Part winding start
6| Electrical connection
6.3 Standard motor, design for direct or partial winding start
Themotoriswiredfordirectstart(YYYresp.YY)atthefactory.ForpartwindingstartΔ/YYYresp. Y/YYthebridgesmustberemovedandthemotorfeedlineconnectedaccordingtothecircuitdiagram:
INFO A mechanical unloaded start with bypass solenoid valve is notrequired.
Designation on the name plate Sticker on the terminal box
until A018 from A040 until A018 from A040
∆/YYY Y/YYY/YY
Compressors with this marking are suitable for direct or partial winding start. The motor winding is subdividedintotwoparts:Until type code A018: Part winding 1 = 60% and part winding 2 = 40%. This winding division reduces the start-up current needed for a part winding start to approx. 65% of that for a direct start.From type code A040: Part winding 1 = 50% and part winding 2 = 50%. This winding division reduces the start-up current needed for a part winding start to approx. 50% of that for a direct start.
ATTENTION Failure to do this results in opposed rotary fields and results indamage to the motor. After the motor starts up via partial winding 1, partial winding 2 must be switched on after a maximum delay of one second . Failure to comply can adversely affect the service life of the motor.
INFO When testing coils with resistance tester, please note that partial winding 1 and partial winding 2 are wired internally in HGZ7.

D
GB
F
E
25
0972
6-11
.201
4-DG
bF
6| Electrical connection
Terminal boxFig. 30
6.5 Connection of the trigger unit MP10
Temperaturemonitoringconnections:Motorwinding: Terminals1-2Thermalprotectionthermostat: Terminals3-4
Restartprevention: Terminals5-6
ATTENTION Terminals 1 - 6 on the trigger unit MP 10 and terminals PTC 1 and PTC 2 on the compressor terminal board must not come into contact with mains voltage. This would destroy the trigger unit and PTC sensors.The supply voltage at L1-N (+/- for DC 24 V version) must be identical to the voltage at terminals 11, 12, 14 and 43.
INFO Theunithasarestartpreventiondevice.Afteryouhaverectifiedthefault, interrupt the mains voltage. This unlocks the restart preventiondevice and the LEDs H1 and H2 go out.
INFO Connect the trigger unit MP10 in accordance with the circuit diagram. Protect the trigger unit with a delayed-action fuse (F) of max. 4 A. In order to guarantee the protection function, install the triggerunitasthefirstelementinthecontrolpowercircuit.
6.4 Electronic trigger unit MP10
The compressormotor is fittedwith cold conductor temperature sensors (PTC) connected to theelectronic trigger unit MP 10 in the terminal box. Readiness to operate is signalled by the H3 LED (green)afterthepowersupplyisapplied.Inthecaseofexcesstemperatureinthemotorwinding,theunit switches off the compressor and the H1 LED lights red.
The hot gas side of the compressor can also be protected against overtemperature using a thermal protectionthermostat(accessory).TheH2LED(red)isprovidedfortheprotectionfunction.
The unit trips when an overload or inadmissible operating conditions occur. Find and remedy the cause.

26
D
GB
F
E
0972
6-11
.201
4-DG
bF
6| Electrical connection
ThecompressorandthetriggerunitMP10areoperationalwhentheH3LED(green)lights.
6.6 Function test of the trigger unit MP10
Pos ProcedureLED H1 LED H2 LED H3
red red green1 • Interrupt power supply (L1 or S1) OFF OFF OFF
• Releasethemotortemperaturesensorconnection(1or2)• Releasethehotgastemperaturesensor(ifinstalled)(3or4)
2 • Restore the power supply (L1 or S1) ON• Functioncheckofmotortemperaturesensor:operational ON• Functioncheckofhotgastemperaturesensor:operational ON
3 • Interrupt power supply again (L1 or S1) OFF OFF OFF• Reconnectterminals1or2and/or3or4
4 • Restore the power supply (L1 or S1): OFF OFF ON• MP10 is operational again
Before start-up, troubleshooting or making changes to the control power circuit, check the functionality ofthetriggerunit:

D
GB
F
E
27
0972
6-11
.201
4-DG
bF
6| Electrical connection
Fig. 31
Anschlussschema für ÖlsumpfheizungConnection diagramm for oil sump heater Plan de raccordement pour résistance de carter d‘huile
0998
3- 10
.01-D
GBF
DGBF
6.7 Oil sump heater (accessories)
When the compressor is at a standstill, refrigerant diffuses into the lubricating oil of the compressors housing, depending on pressure and ambient temperature. This reduces the lubricating capacity of the oil. When the compressor starts up, the refrigerant contained in the oil evaporates out throught the reductioninpressure.Theconsequencescanbefoamingandmigrationoftheoil,causingoilshocksunder certain circumstances.
Operation: The oil sump heater operates when the compressor is at a standstill. When the compres-sor starts up, the oil sump heater switches off again automatically.
Connection:Theoilsumpheatermustbeconnectedviaanauxiliarycontact(orparallelwiredauxili-arycontact)ofthecompressorcontactortoaseperateelectriccircuit.El.data:230V-1-50/60Hz,140W.
ATTENTION The oil sump heater must not be connected to the electrical circuit of the safety control chain.

28
D
GB
F
E
0972
6-11
.201
4-DG
bF
7| Commissioning
7.1 Preparations for start-up
7.4 Evacuation
First evacuate the system and then include the compressor in the evacuation process. Relieve the compressor pressure. Open the suction and pressure line shut-off valves. Evacuate the suction and discharge pressure sides using the vacuum pump. At the end of the evacuation process, the vacuum should be < 1.5 mbar when the pump is switched off. Repeatthisprocessasoftenasisrequired.
In addition to the suction or high pressure side, the intermediate pressure area of the compressor mustalsobeevacuated(useconnectionX,seepage16,fig.20).Thesolenoidvalveofthesubcoolingsystem(page17,fig.21,item3)mustbeopened.
The compressor has undergone trials in the factory and all functions have been tested. There are therefore no special running-in instructions.
Check the compressor for transport damage!
7.2 Pressure strength test
The compressor has been factory-tested for pressure resistance. The following must be observed if theentireplantissubjectedtoanadditionalpressurestrengthtest:
Test the refrigeration circuit according to EN 378-2 or a corresponding safety standard.
7.3 Leak test
Carry out the leak test of the refrigerating system in accordance with EN 378-2 or a corresponding safety standard without including the compressor.
INFO In order to protect the compressor against inadmissible operating conditions, high pressure and low pressure pressostats are manda-tory on the installation side.
DANGER Risk of bursting! The compressor must only be pressurised using nitrogen (N2). Never pressurise with oxygen or other gases!The maximum permissible overpressure of the compressor must not be exceeded at any time during the testing process (see name plate data)! Do not mix any refrigerant with the nitrogen as this could cause the ignition limit to shift into the critical range.
DANGER Risk of bursting! Do not mix any refrigerant with the nitrogen (N2) as this could cau-se the ignition limit to shift into the critical range.
ATTENTION Do not start the compressor if it is under vacuum. Do not apply any voltage - even for test purposes (must only be operated with refrigerant).Undervacuum,thespark-overandcreepagecurrentdistancesofthe terminal board connection bolts shorten; this can result in winding and terminal board damage.

D
GB
F
E
29
0972
6-11
.201
4-DG
bF
7| Commissioning
Make sure that the suction and pressure line shut-off valves are open.
Withthecompressorswitchedoff,addtheliquidrefrigerantdirectlytothecondenserorreceiver,breaking the vacuum.
Payattentiontoadequaterefrigerantfillbeforestartingupthecompressor. Duringoperation,refrigerantmustbefreeofbubblesinsightglasses1and2oftheliquidsubcooler.
If the refrigerant needs topping up after starting the compressor, it can be topped up in vapour formonthesuctionside,or,takingsuitableprecautions,alsoinliquidformattheinlettotheevaporator.
7.5 Refrigerant charge
CAUTION Wear personal protective clothing such as goggles and protective gloves!
ATTENTION Avoidoverfillingthesystemwithrefrigerant! To avoid shifts in concentration, zeotropic refrigerant blends must alwaysonlybefilledintotherefrigeratingplantinliquidform.
Donotpourliquidcoolantthroughthesuctionlinevalveon the compressor. It is not permissible to mix additives with the oil and
refrigerant.
7.6 Start-up
WARNING Ensure that both shut-off valves are open before starting the compressor!
ATTENTION Iflargerquantitiesofoilhavetobetoppedup,thereisariskofoil hammer effects. If this is the case check the oil return!
Checkthatthesafetyandprotectiondevices(pressureswitch,motorprotection,electricalcontactprotectionmeasures,etc.)areallfunctioningproperly.
Switch on the compressor and allow to run for a minimum of 10 min. Check the oil level by:Theoilmustbevisibleinthesightglass.

30
D
GB
F
E
0972
6-11
.201
4-DG
bF
7| Commissioning
ATTENTION ToavoidliquidshocksontheHPstage,theexpansionvalvemayonly be opened approx. 15-20 seconds after the compressor is switched on (full load operation).
At compressor shut-down: Close the solenoid valve approx. 15 - 20 seconds before the com-pressor is switched off.
7.7 Avoiding slugging
To prevent slugging: The complete refrigeration system must be properly designed. All components must be compatibly rated with each other with regard to output (particularlytheevaporatorandexpansionvalves).
Suction gas superheat at the compressor input should be min. 7 - 10 K.(checkthesetting oftheexpansionvalve).
Thesystemmustreachastateofequilibrium. When selecting the evaporator expansion valve, pay attention to correction factors for liquid
subcooling. Avoid transfer of refrigerant into the compressor when the system is at a standstill.
Theuseofaliquidseparatorisrecommended.
ATTENTION Slugging can damage the compressor and cause refrigerant to leak.

D
GB
F
E
31
0972
6-11
.201
4-DG
bF
8| Maintenance
Only use genuine GEA Bock spare parts!
8.3 Recommended spare parts
HGZ7 / ... 1620-4 1860-4 2110-4
Designation Item No. Item No. Item No.
Set of gaskets kit 80197
Valve plate kitlow pressure side LP
80193
Valve plate kithigh pressure side HP
80194
Piston-connecting rod kit
08995 08996 80112
Piston kit 80042 80048 80106
Connecting rod kit 80306
Oil pump kit 80116
Oil sump heater kit 08426
8.1 Preparation
WARNING Before starting any work on the compressor: Switch off the compressor and secure it to prevent a restart. Relieve compressor of system pressure.Preventairfrominfiltratingthesystem!
After maintenance has been performed: Connect safety switch. Evacuate compressor. Release switch lock.
8.2 Work to be carried out
In order to guarantee optimum operational reliability and service life of the compressor, we recommend carryingoutservicingandinspectionworkatregularintervals: Oil change:
- not mandatory for factory-produced series systems. - forfieldinstallationsorwhenoperatingneartheapplicationlimit:forthefirsttimeafter100
to 200 operating hours, then approx. every 3 years or 10,000 - 12,000 operating hours. Dispose of used oil according to the regulations; observe national regulations.
Annual checks: Oil level, leak tightness, running noises, pressures, temperatures, function of auxiliary devices such as oil sump heater, pressure switch.

32
D
GB
F
E
0972
6-11
.201
4-DG
bF
Ventilplatte LP-Stufe
Ventilplatte HP-Stufe
8| Maintenance
Safety valveSafety bolt
Installation of the valve plates:
Valve plate LP stage Valve plate HP stage
Safety valveSafety bolt
8.4 Replacing the valve plates
The compressors are divided into an LP and an HP compressor stage. Different valve plate designs arerequiredbecauseofthedifferentductsintheindividualcompressorstages.
Fig. 32
WARNING Thevalveplateshavebeenfittedwithsafetyboltstopreventanyconfusion. The safety bolts engage in the corresponding bores on the cylinder heads, the safety bolts must not be removed!

D
GB
F
E
33
0972
6-11
.201
4-DG
bF
8| Maintenance
8.6 Decommissioning
Closetheshut-offvalvesonthecompressor.Draintherefrigerant(itmustnotbedischargedintotheenvironment)anddisposeofitaccordingtotheregulations.Whenthecompressorisdepressurised,undo the fastening screws of the shut-off valves. Remove the compressor using an appropriate hoist. Dispose of the oil inside in accordance with the applicable national regulations.
8.5 Extract from the lubricants table
Theoiltypefilledasstandardinthefactoryismarkedonthename plate. This oil type should be used as a preference. Alternatives are stated in the extract from our lubricants table below.
Available accessories can be found on the Internet at www.gea.com.
8.7 Accessories
Refrigerants GEA Bock standard oil types Recommended alternatives
HFKW(e.g.R134a,R404A,R407C)
Fuchs Reniso Triton SE 55
Fuchs Reniso Triton SEZ 32Esso/MobilEALArctic46Sunoco Suniso SL 46Texaco Capella HFC 55
HFCKW(e.g.R22) Fuchs Reniso SP 46
Fuchs Reniso SP 32BP Energol LPT 46 Sunoco Suniso 3,5 GSTexaco Capella WF 46

34
D
GB
F
E
0972
6-11
.201
4-DG
bF
9| Technical data until A018
1
2 3 4
* PW
= P
art W
indi
ng, m
otor
s fo
r par
t win
ding
sta
rting
1
= 1
. par
t win
ding
, 2 =
2. p
art w
indi
ng¹) F
or s
olde
r con
nect
ions
²) in
sta
ndar
d de
sign
LP =
Low
pre
ssur
e st
age
HP
= H
igh
pres
sure
sta
geOi
l sum
p he
ater:2
30V-1-50
/60Hz
140
W
Toleran
ce(±
10%
)relativetoth
emea
nvalueofth
evolta
gera
nge.
Tak
eaccoun
tofthe
max.ope
ratin
gcu
rren
t/m
ax.p
owercon
sumption
for d
esig
n of
fuse
s, s
uppl
y lin
es a
nd s
afet
y de
vice
s.
Allspecificatio
nsarebased
ontheaverag
eofth
evolta
gera
nge
38
0-42
0 V ∆/
YYY -3-50
HzPW
,440
-480
V∆/YYY
-3-60Hz
PW
>
Win
ding
ratio
s:60%
/40
%
HGZ7
/162
0-4
6
93,7/46
,9112,5/5
6,2
5027
,018
5/2
7829
4
35(1
3 /8)
54(2
1 /8)
4,5
HGZ7
/186
0-4
107,6/5
3,8
129,1/6
4,6
5530
,018
5/2
7829
1
HGZ7
/2110-4
122,4/6
1,2
146,9/7
3,5
6536
,019
1/2
8628
9
Typ
eNo
. of
cylin
-de
rs
50 H
z(1
450
rpm
)
LP
H
P
60 H
z(1
740
rpm
)
LP
H
P Vo
l-ta
ge
Max
.op
erat
ing
curr
ent
Max
.po
wer
cons
ump -
tion
Star
ting
curr
ent
(rotor
locked
)
Wei
ght ²
)Di
scha
rge
line
DV
Suct
ion
line
SV
Oil
char
ge
m3 /h
m3 /h
AkW
Akg
mm(inc
h)mm(inc
h)Lt
r.
*PW
1+
2*P
W1/
PW 1
+2
Conn
ectio
ns ¹)
Elec
tric
al d
ata
Disp
lace
men
t 3
1 4 4 4
2 2

D
GB
F
E
35
0972
6-11
.201
4-DG
bF
9| Technical data from A040
1
2 3 4
* PW
= P
art W
indi
ng, m
otor
s fo
r par
t win
ding
sta
rting
1
= 1
. par
t win
ding
, 2 =
2. p
art w
indi
ng¹) F
or s
olde
r con
nect
ions
²) in
sta
ndar
d de
sign
LP =
Low
pre
ssur
e st
age
HP
= H
igh
pres
sure
sta
geOi
l sum
p he
ater:2
30V-1-50
/60Hz
140
W
Toleran
ce(±
10%
)relativetoth
emea
nvalueofth
evolta
gera
nge.
Tak
eaccoun
tofthe
max.ope
ratin
gcu
rren
t/m
ax.p
owercon
sumption
for d
esig
n of
fuse
s, s
uppl
y lin
es a
nd s
afet
y de
vice
s.
Allspecificatio
nsarebased
ontheaverag
eofth
evolta
gera
nge
38
0-42
0 VY/YY
-3-50Hz
PW,4
40-480
VY/YY-3-60
HzPW
>
Win
ding
ratio
s:50%
/50
%
HGZ7
/162
0-4
6
93,7/46
,9112,5/5
6,2
5027
,017
5/2
6929
4
35(1
3 /8)
54(2
1 /8)
4,5
HGZ7
/186
0-4
107,6/5
3,8
129,1/6
4,6
5530
,017
5/2
6929
1
HGZ7
/2110-4
122,4/6
1,2
146,9/7
3,5
6536
,023
2/3
5728
9
Typ
eNo
. of
cylin
-de
rs
50 H
z(1
450
rpm
)
LP
H
P
60 H
z(1
740
rpm
)
LP
H
P Vo
l-ta
ge
Max
.op
erat
ing
curr
ent
Max
.po
wer
cons
ump -
tion
Star
ting
curr
ent
(rotor
locked
)
Wei
ght ²
)Di
scha
rge
line
DV
Suct
ion
line
SV
Oil
char
ge
m3 /h
m3 /h
AkW
Akg
mm(inc
h)mm(inc
h)Lt
r.
*PW
1+
2*P
W1/
PW 1
+2
Conn
ectio
ns ¹)
Elec
tric
al d
ata
Disp
lace
men
t 3
1 4 4 4
2 2

36
D
GB
F
E
0972
6-11
.201
4-DG
bF
10| Dimensions and connections
Fig. 33Dimensions in mm
ViewX:Connection possibility for oil level regulator
Three-hold connector for oil level regulator ProductsESK,AC+R,CARLY(3xM6,10deep)
10.1 Compressor in standard design
Intermediate pressure mixed line mounted and insulated. (Liquidsubcoolerwithaccessoriesasanextraitem)
Centre of gravity

D
GB
F
E
37
0972
6-11
.201
4-DG
bF
10| Dimensions and connections
Fig. 34Dimensions in mm
ViewX:Connection possibility for oil level regulator
Three-hold connector for oil level regulatorProductsESK,AC+R,CARLY(3xM6,10deep)
10.2 Compressor in optional design
(Liquidsubcoolerwithaccessoriesattacheddirectlytothecompressor)

38
D
GB
F
E
0972
6-11
.201
4-DG
bF
10| Dimensions and connections
SVDV
Suction lineDischarge line see technical data, Chapter 9
FUE LiquidsubcoolerIN Ø 16 mm - 5/8"
FUA LiquidsubcoolerOUT Ø 16 mm - 5/8"
A Connection suction side, not lockable 1/8“ NPTF
A1 Connection suction side, lockable 7/16“UNF
A2 Connection intermediate pressure, not lockable 1/8“ NPTF
A3 Connection intermediate pressure, not lockable 1/4“ NPTF
B Connection discharge side, not lockable 1/8“ NPTF
B1 Connection discharge side, lockable 7/16“UNF
C Connectoin oil pressure safety switch OIL 7/16“UNF
D Connection oil pressure safety switch LP 7/16“UNF
D1 Connection oil return from oil separator 1/4“ NPTF
E Connection oil pressure gauge 7/16“UNF
F Oil drain M22 x 1,5
FS Sight glassliquidline Ø 12 mm
H Oil charge plug M22 x 1,5
J Oilsumpheater(accessories) M22 x 1,5
K Sight glass 3 hole M6
L Connection thermal protection thermostat 1/8“ NPTF
L1 Thermal protection thermostat 1/8“ NPTF
N Filter drier Ø 12 mm
O Connection oil level regulator see view X
ÖV Connection oil service valve 1/4“ NPTF
ÖV1 Oil service valve 7/16“UNF
P Connection oil differential pressure sensor M20 x 1,5
Q Connection oil temperature sensor 1/8“ NPTF
R Connection of pressure compensation line for expansion valve 7/16“UNF
R1 Pressure compensation line for expansion valve Ø 6 mm
T Solenoid valve Ø 12 mm
U Expansion valve - refrigerant-dependent Ø 12 mm
V Oil pressure switch MP 54 -
W Connection refrigerant injection M22 x 1,5
X Connection for Schrader valve for intermediate pressure manometer 7/16“UNF

D
GB
F
E
39
0972
6-11
.201
4-DG
bF
11| Declaration of conformity and installation
DECLARATION OF CONFORMITY CE 01
forusingthecompressorswithintheEuropeanUnion(inaccordancewithLowVoltageDirective2006/95/EC)
We hereby declare that the following refrigerating compressorsProductdesignation: HGZ7complywiththeLowVoltageDirective2006/95/EC.
Appliedharmonisedstandard:EN60034-1:2010EN60204-1:2006
DECLARATION OF INSTALLATION
forusingthecompressorswithintheEuropeanUnion(inaccordancewithMachineryDirective2006/42/EC)
Themanufacturer: GEABockGmbH,Benzstraße7 72636Frickenhausen,Tel.:07022/9454-0
hereby declares that the refrigerating compressor HGZ7complieswiththebasicrequirementsofAppendixII1BoftheMachineryDirective2006/42/EC. Appliedharmonisedstandard:
EN12693:2008andthecorrespondingstandardsreferenced
A partly completed machine may only be put into operation when it has been established that the machine, into which the partly completed machine is to be installed, conforms to the regulationsoftheMachineryDirective(2006/42/EC).
Themanufacturerundertakestotransmitelectronicallythespecialdocumentationrequiredbyindividualstatesforpartlycompletedmachineryonrequest.
Thespecialtechnicaldocumentationrequiredforpartlycompletedmachineryhasbeencreatedin accordance with Appendix VII Part B.
Personresponsiblefordocumentationis:WolfgangSandkötter,Benzstraße7,72636Frickenhausen.
Frickenhausen,01.11.2011 ppa.WolfgangSandkötter,ChiefDevelopmentOfficer

40
D
GB
F
E
0972
6-11
.201
4-DG
bF
PED - CLASSIFICATION (asperEUPressureEquipmentDirective97/23/EC)
DECLARATION OF CONFORMITYforuseofthecompressorswithintheEuropeanUnion (asperEUPressureEquipmentDirective97/23/EC)
We hereby declare that piping of the refrigerant compressors
HGZX7/2110-4R404A,HGZX7/2110-4R410AundHGZ7/2110-4R22
agreeswiththePressureEquipmentDirective97/23/EGdated29May1997.
Valid for Category I pipingEvaluation procedure module A
The other parts of the piping fall under article 3§3 of the Guideline and correspond to good engineering practice
Frickenhausen,01.11.2011 ppa.WolfgangSandkötter,ChiefDevelopmentOfficer
11| Declaration of conformity

D
GB
F
E
41
0972
6-11
.201
4-DG
bF
12| Service
Dear customer,
GEA Bock compressors are top-quality, reliable and service-friendly quality products. Ifyouhaveanyquestionsaboutinstallation,operationandaccessories,pleasecontactourtechnicalserviceorspecialistwholesalerand/orourrepresentative.TheGEABockserviceteamcanbecontact-ed by phone with a toll-free hotline 00 800 / 800 000 88 or via e-mail: [email protected].
Yours faithfully
GEA Bock GmbH
Benzstraße 7
72636 Frickenhausen
Germany

42
D
GB
F
E
0972
6-11
.201
4-DG
bF09
726-
11.2
014-
DG
bF ©
GEA
Gro
up A
G. A
ll rig
hts
rese
rved
.
We live our values.Excellence • Passion • Integrity • Responsibility • GEA-versity
GEA Group is a global engineering company with multi-billion euro sales and operations in more than 50 countries. Founded in 1881, the company is one of the largest providers of innovative equipment and process technology. GEA Group is listed in the STOXX® Europe 600 index.
GEA Refrigeration TechnologiesGEA Bock GmbH
Benzstraße 7, 72636 Frickenhausen, GermanyTelephone: +49 7022 9454-0, Fax: +49 7022 [email protected], www.gea.com
Related Documents