Robert Bosch Power Tools GmbH 70538 Stuttgart GERMANY www.bosch-pt.com 1 609 92A 5N7 (2020.03) PS / 55 en Original instructions zh 正本使用说明书 zh 原始使用說明書 ko 사용 설명서 원본 th หนังสือคู่มือการใช้งานฉบับ ต้นแบบ id Petunjuk-Petunjuk untuk Penggunaan Orisinal vi Bản gốc hướng dẫn sử dụng 1 609 92A 5N7 GBH 2-28 Professional D | DV | DFV

Welcome message from author
This document is posted to help you gain knowledge. Please leave a comment to let me know what you think about it! Share it to your friends and learn new things together.
Transcript

Robert Bosch Power Tools GmbH70538 StuttgartGERMANY
www.bosch-pt.com
1 609 92A 5N7 (2020.03) PS / 55
en Original instructionszh 正本使用说明书zh 原始使用說明書
ko 사용 설명서 원본th หนงสอคมอการใชงานฉบบตนแบบ
id Petunjuk-Petunjuk untukPenggunaan Orisinal
vi Bản gốc hướng dẫn sử dụng
1 609 92A 5N7
GBH 2-28 ProfessionalD | DV | DFV

2 |
English . . . . . . . . . . . . . . . . . . . . . . . . . . . . . . . . . . . . . . . . . . . . . . . . . . . Page 6
中文 . . . . . . . . . . . . . . . . . . . . . . . . . . . . . . . . . . . . . . . . . . . . . . . . . . . . . . . 页 14
繁體中文 . . . . . . . . . . . . . . . . . . . . . . . . . . . . . . . . . . . . . . . . . . . . . . . . . . 頁 20
한국어 . . . . . . . . . . . . . . . . . . . . . . . . . . . . . . . . . . . . . . . . . . . . . . .페이지 26
ไทย . . . . . . . . . . . . . . . . . . . . . . . . . . . . . . . . . . . . . . . . . . . . . . . . . . . . . . หนา 33
Bahasa Indonesia. . . . . . . . . . . . . . . . . . . . . . . . . . . . . . . . . . . . . Halaman 41
Tiếng Việt . . . . . . . . . . . . . . . . . . . . . . . . . . . . . . . . . . . . . . . . . . . . . . . Trang 47
1 609 92A 5N7 | (3/16/2020) Bosch Power Tools

| 3
(4)
(6)(5)
(1)
(2)
(3)
(12)
(14)
(13)
(13)
(9)
(15)
GBH 2-28 DFV
(7)
(8)
(10)(11)
Bosch Power Tools 1 609 92A 5N7 | (3/16/2020)

4 |
X
A
C
B
D
E F
(3)
(14)
(2)
(6)
(5)
(13)
(12)
(17)
(2)
(16)
GBH 2-28 DFV GBH 2-28 DFV
(13)
(2x/3x)
1 609 92A 5N7 | (3/16/2020) Bosch Power Tools

| 5
G
I
H
J
K
(13)
(12)
(20)
GBH 2-28 DFV GBH 2-28 DFV
(18)(19)
(18)(19)
(26)
(5)
(22)(21) (24)(23) (25)
Bosch Power Tools 1 609 92A 5N7 | (3/16/2020)

6 | English
EnglishSafety instructionsGeneral Power Tool Safety Warnings
WARNING Read all safety warnings and all in-structions. Failure to follow the
warnings and instructions may result in electric shock, fireand/or serious injury.Save all warnings and instructions for future reference.The term "power tool" in the warnings refers to your mains-operated (corded) power tool or battery-operated (cord-less) power tool.
Work area safetyu Keep work area clean and well lit. Cluttered or dark
areas invite accidents.u Do not operate power tools in explosive atmospheres,
such as in the presence of flammable liquids, gases ordust. Power tools create sparks which may ignite the dustor fumes.
u Keep children and bystanders away while operating apower tool. Distractions can cause you to lose control.
Electrical safetyu Power tool plugs must match the outlet. Never modify
the plug in any way. Do not use any adapter plugs withearthed (grounded) power tools. Unmodified plugs andmatching outlets will reduce risk of electric shock.
u Avoid body contact with earthed or grounded sur-faces, such as pipes, radiators, ranges and refrigerat-ors. There is an increased risk of electric shock if yourbody is earthed or grounded.
u Do not expose power tools to rain or wet conditions. Water entering a power tool will increase the risk of elec-tric shock.
u Do not abuse the cord. Never use the cord for carry-ing, pulling or unplugging the power tool. Keep cordaway from heat, oil, sharp edges or moving parts. Damaged or entangled cords increase the risk of electricshock.
u When operating a power tool outdoors, use an exten-sion cord suitable for outdoor use. Use of a cord suit-able for outdoor use reduces the risk of electric shock..
u If operating a power tool in a damp location is un-avoidable, use a residual current device (RCD) protec-ted supply. Use of an RCD reduces the risk of electricshock.
Personal safetyu Stay alert, watch what you are doing and use common
sense when operating a power tool. Do not use apower tool while you are tired or under the influenceof drugs, alcohol or medication. A moment of inatten-tion while operating power tools may result in serious per-sonal injury.
u Use personal protective equipment. Always wear eyeprotection. Protective equipment such as dust mask,non-skid safety shoes, hard hat, or hearing protectionused for appropriate conditions will reduce personal in-juries.
u Prevent unintentional starting. Ensure the switch is inthe off-position before connecting to power sourceand/or battery pack, picking up or carrying the tool. Carrying power tools with your finger on the switch or en-ergising power tools that have the switch on invites acci-dents.
u Remove any adjusting key or wrench before turningthe power tool on. A wrench or a key left attached to arotating part of the power tool may result in personal in-jury.
u Do not overreach. Keep proper footing and balance atall times. This enables better control of the power tool inunexpected situations.
u Dress properly. Do not wear loose clothing or jew-ellery. Keep your hair, clothing and gloves away frommoving parts. Loose clothes, jewellery or long hair canbe caught in moving parts.
u If devices are provided for the connection of dust ex-traction and collection facilities, ensure these are con-nected and properly used. Use of dust collection can re-duce dust-related hazards.
Power tool use and careu Do not force the power tool. Use the correct power
tool for your application. The correct power tool will dothe job better and safer at the rate for which it was de-signed.
u Do not use the power tool if the switch does not turn iton and off. Any power tool that cannot be controlledwith the switch is dangerous and must be repaired.
u Disconnect the plug from the power source and/or thebattery pack from the power tool before making anyadjustments, changing accessories, or storing powertools. Such preventive safety measures reduce the riskof starting the power tool accidentally.
u Store idle power tools out of the reach of children anddo not allow persons unfamiliar with the power tool orthese instructions to operate the power tool. Powertools are dangerous in the hands of untrained users.
u Maintain power tools. Check for misalignment or bind-ing of moving parts, breakage of parts and any othercondition that may affect the power tool’s operation.If damaged, have the power tool repaired before use. Many accidents are caused by poorly maintained powertools.
u Keep cutting tools sharp and clean. Properly main-tained cutting tools with sharp cutting edges are lesslikely to bind and are easier to control.
u Use the power tool, accessories and tool bits etc. inaccordance with these instructions, taking into ac-count the working conditions and the work to be per-
1 609 92A 5N7 | (16.03.2020) Bosch Power Tools

English | 7
formed. Use of the power tool for operations differentfrom those intended could result in a hazardous situation.
Serviceu Have your power tool serviced by a qualified repair
person using only identical replacement parts. Thiswill ensure that the safety of the power tool is maintained.
Hammer and Drill Safety WarningsSafety instructions for all operationsu Wear ear protectors. Exposure to noise can cause hear-
ing loss.u Use the auxiliary handle(s). Loss of control can cause
personal injury.u Brace the tool properly before use. This tool produces a
high output torque and without properly bracing the toolduring operation, loss of control may occur resulting inpersonal injury.
u Hold the power tool by insulated gripping surfaces,when performing an operation where the cutting ac-cessory or fasteners may contact hidden wiring or itsown cord. Cutting accessory or fasteners contacting a"live" wire may make exposed metal parts of the powertool "live" and could give the operator an electric shock.
Safety instructions when using long drill bitsu Never operate at higher speed than the maximum
speed rating of the drill bit. At higher speeds, the bit islikely to bend if allowed to rotate freely without contact-ing the workpiece, resulting in personal injury.
u Always start drilling at low speed and with the bit tipin contact with the workpiece. At higher speeds, the bitis likely to bend if allowed to rotate freely without contact-ing the workpiece, resulting in personal injury.
u Apply pressure only in direct line with the bit and donot apply excessive pressure.Bits can bend causingbreakage or loss of control, resulting in personal injury.
Additional safety informationu Use auxiliary handle(s), if supplied with the tool. Loss
of control can cause personal injury.u Hold the power tool firmly with both hands and make
sure you have a stable footing. The power tool can bemore securely guided with both hands.
u Switch the power tool off immediately if the applica-tion tool becomes blocked. Be prepared for hightorque reactions which cause kickback. The applica-tion tool becomes blocked when it becomes jammed inthe workpiece or when the power tool becomes over-loaded.
u Secure the workpiece. A workpiece clamped withclamping devices or in a vice is held more secure than byhand.
u Use suitable detectors to determine if utility lines arehidden in the work area or call the local utility com-pany for assistance. Contact with electric lines can leadto fire and electric shock. Damaging a gas line can lead to
explosion. Penetrating a water line causes property dam-age or may cause an electric shock.
u Always wait until the power tool has come to a com-plete stop before placing it down. The application toolcan jam and cause you to lose control of the power tool.
Products sold in GB only:Your product is fitted with an BS 1363/A approved electricplug with internal fuse (ASTA approved to BS 1362).If the plug is not suitable for your socket outlets, it should becut off and an appropriate plug fitted in its place by an au-thorised customer service agent. The replacement plugshould have the same fuse rating as the original plug.The severed plug must be disposed of to avoid a possibleshock hazard and should never be inserted into a mainssocket elsewhere.
Product Description andSpecifications
Read all the safety and general instructions.Failure to observe the safety and general in-structions may result in electric shock, fireand/or serious injury.
Please observe the illustrations at the beginning of this oper-ating manual.
Intended UseThe power tool is intended for hammer drilling in concrete,brick and stone, as well as for light chiselling work. It is alsosuitable for drilling without impact in wood, metal, ceramicand plastic. Power tools with electronic control and right/leftrotation are also suitable for screwdriving.
Product FeaturesThe numbering of the product features refers to the diagramof the power tool on the graphics page.(1) Keyless quick-change chuck (GBH 2-28 DFV)(2) SDS plus quick-change chuck (GBH 2-28 DFV)(3) SDS plus tool holder(4) Dust protection cap(5) Locking sleeve(6) Locking ring for quick-change chuck
(GBH 2-28 DFV)(7) Rotational direction switch(8) Lock-on button for on/off switch(9) On/off switch(10) Release button for impact/mode selector switch(11) Impact/mode selector switch(12) Button for depth stop adjustment(13) Auxiliary handle (insulated gripping surface)(14) Depth stop(15) Handle (insulated gripping surface)(16) Identification grooves
Bosch Power Tools 1 609 92A 5N7 | (16.03.2020)

8 | English
(17) Drill chuck holder (GBH 2-28 DFV)(18) Front sleeve of the keyless quick-change chuck
(GBH 2-28 DFV)(19) Retaining ring of the keyless quick-change chuck
(GBH 2-28 DFV)(20) Saugfix suction openingA)
(21) Saugfix clamping screwA)
(22) Saugfix depth stopA)
(23) Saugfix telescopic tubeA)
(24) Saugfix wing boltA)
(25) Saugfix guide tubeA)
(26) Universal holder with SDS plus shankA)
A) Accessories shown or described are not included with theproduct as standard. You can find the complete selection ofaccessories in our accessories range.
Technical Data
Rotary hammer GBH 2-28 D GBH 2-28 DVArticle number 3 611 B67 0C.
3 611 B67 0L.3 611 B67 0K.3 611 B67 08.
3 611 B67 1F. 3 611 B67 10.
Quick-change chuck − − − −Rated power input W 850 820 850 820Impact rate min-1 0-5100 0-5100 0-5100 0-5100Impact energy perstroke according toEPTA-Procedure05:2016
J 3.2 3.2 3.2 3.2
Rated speed min-1 0–1300 0–1300 0–1300 0–1300Tool holder SDS plus SDS plus SDS plus SDS plusSpindle collar dia-meter
mm 50 50 50 50
Max. drilling diameter– Concrete mm 28 28 28 28– Masonry (with hol-
low core bit)mm 68 68 68 68
– Steel mm 13 13 13 13– Wood mm 30 30 30 30Weight according toEPTA-Procedure01:2014
kg 2.9 2.9 2.9 2.9
Protection class / II / II / II / II
Rotary hammer GBH 2-28 DFVArticle number 3 611 B67 2C.
3 611 B67 2L.3 611 B67 2K.3 611 B67 28.
Quick-change chuck ● ●Rated power input W 850 820Impact rate min-1 0-5100 0-5100Impact energy per stroke ac-cording to EPTA-Procedure05:2016
J 3.2 3.2
Rated speed min-1 0–1300 0–1300Tool holder SDS plus SDS plusSpindle collar diameter mm 50 50Max. drilling diameter– Concrete mm 28 28
1 609 92A 5N7 | (16.03.2020) Bosch Power Tools

English | 9
Rotary hammer GBH 2-28 DFV– Masonry (with hollow core
bit)mm 68 68
– Steel mm 13 13– Wood mm 30 30Weight according to EPTA-Procedure 01:2014
kg 3.1 3.1
Protection class / II / II
The specifications apply to a rated voltage [U] of 230 V. These specifications may vary at different voltages and in country-specific models.
Assemblyu Pull the plug out of the socket before carrying out any
work on the power tool.
Auxiliary handleu Do not operate your power tool without the auxiliary
handle (13).
Swivelling the auxiliary handle (see figure A)You can swivel the auxiliary handle (13) to any angle for asafe work posture that minimises fatigue.– Turn the lower gripping end of the auxiliary handle (13)
anticlockwise and swivel the auxiliary handle (13) intothe required position. Then turn the lower gripping end ofthe auxiliary handle (13) clockwise to retighten it.Make sure that the retaining strap of the auxiliary handleslots into the corresponding groove of the housing.
Setting the drilling depth (see figure B)You can use the depth stop (14) to set the required drillingdepth X.– Press the button for depth stop adjustment (12) and in-
sert the depth stop into the auxiliary handle (13). The fluting on the depth stop (14) must face downwards.
– Insert the SDS-plus application tool into the SDS-plus toolholder (3) to the stop. Otherwise, the movability of theSDS-plus drilling tool can lead to incorrect adjustment ofthe drilling depth.
– Pull the depth stop far enough out that the distancebetween the drill bit tip and the edge of the depth stopcorresponds to the required drilling depth X.
Selecting Drill Chucks and ToolsFor hammer drilling and chiselling, you will need SDS plustools, which insert into the SDS plus drill chuck.For drilling without impact in wood, metal, ceramic andplastic as well as for screwdriving, tools without SDS plusare used (e.g. cylindrical shank drill bits). A keyless chuck isrequired for such drilling tools.
Removing/inserting the quick-change chuck(GBH 2-28 DFV)
Removing the Quick-Change Chuck (see figure C)– Pull back on the quick-change chuck locking ring (6), hold
it in this position and pull the SDS plus quick-changechuck (2) or the keyless quick-change chuck (1) out fromthe front.
– Once the quick-change chuck is removed, protect it fromdirt.
Inserting the quick-change chuck (see figure D)u Use only model-specific original equipment and pay
attention to the number of identification grooves(16). Only quick-change chucks with two or threeidentification grooves are permitted. If an unsuitablequick-change chuck is used, the application tool can fallout during operation.
– Before insertion, clean the quick-change chuck and lightlygrease the shank.
– Wrap your whole hand around the SDS-plus quick-changechuck (2) or the keyless quick-change chuck (1). Use aturning motion to push the quick-change chuck into thedrill chuck holder (17) until you hear it click into place.
– The quick-change chuck is automatically locked. Checkthat it is locked by pulling on the quick-change chuck.
Changing the ToolThe dust protection cap (4) largely prevents the penetrationof drilling dust into the tool holder during operation. Wheninserting the tool, make sure that the dust protection cap (4)does not become damaged.u Replace a damaged dust protection cap immediately.
It is recommended that you have use an after-salesservice for this.
Changing the tool (SDS plus)Inserting the SDS plus application tool (see figure E)The SDS-plus drill chuck enables you to change the applica-tion tool easily and conveniently without needing to use ad-ditional tools.As a requirement of the system, the SDS-plus applicationtool can move freely. This causes a certain radial run-out atno-load, which has no effect on the accuracy of the drill hole,as the drill bit centres itself upon drilling.
Bosch Power Tools 1 609 92A 5N7 | (16.03.2020)

10 | English
– GBH 2-28 DFV: Insert the SDS plus quick-changechuck (2).
– Clean and lightly grease the shank of the application tool.– Insert the application tool into the tool holder while turn-
ing it until it locks automatically.– Check that it is locked by pulling on the tool.
Removing SDS-plus application tools (see figure F)– Push the locking sleeve (5) back and remove the applica-
tion tool.
Changing the tool (without SDS plus)(GBH 2-28 DFV)
Inserting the application tool (see figure G)Note: Application tools that do not have SDS plus must notbe used for hammer drilling or chiselling. Tools without SDSplus and their drill chucks are damaged by hammer drillingor chiselling.– Insert the keyless quick-change chuck (1).– Hold the retaining ring (19) of the keyless quick-change
chuck firmly in place. Open the tool holder by turning thefront sleeve (18) until the tool can be inserted. Hold theretaining ring (19) in place and firmly tighten the frontsleeve (18) by turning it in the direction of the arrow untilyou hear it click into place.
– Check that it is seated securely by pulling on the tool.Note: If the tool holder was unscrewed all the way, a scrap-ing sound may be heard while retightening the tool holderand it may not fully tighten.In this case, turn the front sleeve (18) in the opposite direc-tion to the arrow by one full turn. This will allow the toolholder to be fully tightened.– Turn the impact/mode selector switch (11) to the
"drilling" position.
Removing the application tool (see figure H)– Hold the retaining ring (19) of the keyless quick-change
chuck firmly in place. Open the tool holder by turning thefront sleeve (18) in the direction of the arrow until thetool can be removed.
Dust extraction with the dust extractionattachment (accessory)Dust/Chip ExtractionThe dust from materials such as lead paint, some types ofwood, minerals and metal can be harmful to human health.Touching or breathing in this dust can trigger allergic reac-tions and/or cause respiratory illnesses in the user or inpeople in the near vicinity. Certain dusts, such as oak or beech dust, are classified ascarcinogenic, especially in conjunction with wood treatmentadditives (chromate, wood preservative). Materials contain-ing asbestos may only be machined by specialists.– Use a dust extraction system that is suitable for the ma-
terial wherever possible.– Provide good ventilation at the workplace.
– It is advisable to wear a P2 filter class breathing mask.The regulations on the material being machined that apply inthe country of use must be observed.u Avoid dust accumulation at the workplace. Dust can
easily ignite.
Fitting the dust extraction attachment (see figure I)For dust extraction, the dust extraction attachment (access-ory) is required. When drilling, the dust extraction attach-ment retracts so that the attachment head is always close tothe surface at the drill hole.– Press the button for depth stop adjustment (12) and re-
move the depth stop (14). Press the button (12) againand insert the dust extraction attachment into the auxili-ary handle (13) from the front.
– Connect an extraction hose (diameter 19 mm, accessory)to the suction opening (20) of the dust extraction attach-ment.
The dust extractor must be suitable for the material beingworked.When extracting dust that is dry, especially detrimental tohealth or carcinogenic, use a special dust extractor.
Setting the drilling depth on the dust extractionattachment (see figure J)You can also set the required drilling depth X when the dustextraction attachment is fitted.– Push the SDS-plus application tool into the SDS-plus tool
holder (3) as far as it will go. Otherwise, the movability ofthe SDS-plus drilling tool can lead to incorrect adjustmentof the drilling depth.
– Loosen the wing bolt (24) on the dust extraction attach-ment.
– Without switching it on, press the power tool firmlyagainst the surface you wish to drill. The SDS-plus applic-ation tool must be touching the surface.
– Position the guide tube (25) of the dust extraction attach-ment in its holder such that the head of the dust extrac-tion attachment rests on the surface to be drilled. Do notslide the guide tube (25) further than necessary over thetelescopic tube (23), so that as much as possible of thescale remains visible on the telescopic tube (23).
– Retighten the wing bolt (24). Loosen the clamping screw(21) on the depth stop of the dust extraction attachment.
– Slide the depth stop (22) onto the telescopic tube (23)so that the distance X shown in the illustration matchesyour required drilling depth.
– Tighten the clamping screw (21) in this position.
Operationu Products that are only sold in AUS and NZ: Use a resid-
ual current device (RCD) with a nominal residual currentof 30 mA or less.
1 609 92A 5N7 | (16.03.2020) Bosch Power Tools

English | 11
Start-upu Pay attention to the mains voltage. The voltage of the
power source must match the voltage specified on therating plate of the power tool. Power tools markedwith 230 V can also be operated with 220 V.
Setting the Operating ModeThe operating mode of the power tool is selected using theimpact/mode selector switch (11).– To change the operating mode, press the release but-
ton (10) and turn the impact/mode selector switch (11)until it clicks into the required position.
Note: Only change the operating mode when the power toolis switched off. Otherwise, the power tool may become dam-aged.
Position for hammer drilling into concreteor stone
Position for drilling without impact in wood,metal, ceramic and plastic and for screw-driving
Vario-Lock position for adjusting the chiselpositionThe impact/mode selector switch (11) willnot engage in this position.
Position for chiselling
Setting the Rotational DirectionThe rotational direction switch (7) is used to change the ro-tational direction of the power tool. However, this is not pos-sible while the on/off switch (9) is being pressed.u Only operate the rotational direction switch (7) when
the power tool is not in use.Always set the rotational direction to clockwise rotation forhammer drilling, drilling and chiselling.– Rotate clockwise: Turn the rotational direction
switch (7) on both sides until it stops in the position.– Rotate anticlockwise: Turn the rotational direction
switch (7) on both sides until it stops in the position.
Switching On/Off– To switch on the power tool, press the on/off switch (9).– To lock the on/off switch (9), press and hold it while also
pushing the lock-on button (8).– To switch off the power tool, release the on/off switch
(9). If the on/off switch (9) is locked, press the switchfirst and then release it.
Adjusting the Speed/Impact Rate– Adjust the speed/impact rate of the power tool when it is
on by pressing in the on/off switch (9) to varying extents.Applying light pressure to the on/off switch (9) results in alow rotational speed/impact rate. Applying increasing pres-sure to the switch increases the speed/impact rate.
Practical Adviceu Only apply the power tool to the screw/nut when the
tool is switched off. Rotating tool inserts can slip off.
Changing the chiselling position (Vario-Lock)You can lock the chisel in 40 different positions, so you canselect the optimum working position for each task.– Insert the chisel into the tool holder.– Turn the impact/mode selector switch (11) to the "Vario-
Lock" position.– Turn the application tool to the required chisel position.– Turn the impact/mode selector switch (11) to the "chis-
elling" position. With this, the tool holder is locked.– Set the rotational direction for chiselling to clockwise.
Chiselling with lock functionTo chisel for extended periods without pressing the on/offswitch (9), lock the on/off switch in "chiselling" operatingmode.– To lock the power tool, press the on/off switch (9) down
fully whilst simultaneously pressing the lock-onswitch (8).
– To switch the lock off, press the lock-on button (8) again.Note: If you switch to a different operating mode while theon/off switch is locked, the power tool will switch off.
Vibration dampingThe integrated vibration damping function re-duces the generated vibration.
u Do not continue to use the power tool if the dampingelement is damaged.
Inserting screwdriver bits (see figure K)u Only apply the power tool to the screw/nut when the
tool is switched off. Rotating tool inserts can slip off.A universal holder (26) with SDS-plus shank (accessory) isrequired to work with screwdriver bits.– Clean and lightly grease the insertion end of the shank.– Insert the universal holder into the tool holder while turn-
ing it until it locks automatically.– Check that it is locked by pulling the universal holder.– Insert a screwdriver bit in the universal holder. Only use
screwdriver bits that fit the screw head.– To remove the universal holder, slide the locking sleeve
(5) backwards and remove the universal holder (26)from the tool holder.
Bosch Power Tools 1 609 92A 5N7 | (16.03.2020)

12 | English
Maintenance and ServiceMaintenance and Cleaningu Pull the plug out of the socket before carrying out any
work on the power tool.u To ensure safe and efficient operation, always keep
the power tool and the ventilation slots clean.In order to avoid safety hazards, if the power supply cordneeds to be replaced, this must be done by Bosch or by anafter-sales service centre that is authorised to repair Boschpower tools.u Replace a damaged dust protection cap immediately.
It is recommended that you have use an after-salesservice for this.
– Clean the tool holder (3) after each use.
After-Sales Service and Application ServiceOur after-sales service responds to your questions concern-ing maintenance and repair of your product as well as spareparts. You can find explosion drawings and information onspare parts at: www.bosch-pt.comThe Bosch product use advice team will be happy to help youwith any questions about our products and their accessor-ies.In all correspondence and spare parts orders, please alwaysinclude the 10‑digit article number given on the nameplateof the product.
CambodiaRobert Bosch (Cambodia) Co., Ltd Unit 8BC, GT Tower, 08th Floor, Street 169, Czechoslovakia Blvd, Sangkat Veal Vong Khan 7 Makara, Phnom Penh VAT TIN: 100 169 511 Tel.: +855 23 900 685 Tel.: +855 23 900 660 www.bosch.com.kh
People’s Republic of China China MainlandBosch Power Tool (China) Co. Ltd.Bosch Service Center567, Bin Kang Road Bin Kang District Hangzhou, Zhejiang ProvinceChina 310052 Tel.: (0571) 8887 5566 / 5588Fax: (0571) 8887 6688 x 5566# / 5588# E-Mail: [email protected]
HK and Macau Special Administrative RegionsRobert Bosch Co. Ltd.21st Floor, 625 King’s RoadNorth Point, Hong Kong Customer Service Hotline: +852 2101 0235Fax: +852 2590 9762E-Mail: [email protected]
IndiaBosch Service Center69, Habibullah Road, (Next to PSBB School), T. Nagar Chennai–600077 Phone: (044) 64561816Bosch Service Center18, Community CenterPhase 1, Mayapuri New Delhi–110064 Phone: (011) 43166190
IndonesiaPT Robert BoschPalma Tower 10th FloorJalan RA Kartini II-S Kaveling 6Pondok Pinang, Kebayoran LamaJakarta Selatan 12310 Tel.: (21) 3005-5800 www.bosch-pt.co.id
MalaysiaRobert Bosch Sdn. Bhd.(220975-V) PT/SMYNo. 8A, Jalan 13/646200 Petaling JayaSelangorTel.: (03) 79663194Toll-Free: 1800 880188Fax: (03) 79583838E-Mail: [email protected]
PakistanRobert Bosch Middle East FZE – Pakistan Liaison Office 2nd Floor Plaza # 10, CCA Block, DHA Phase 5 Lahore, 54810 Phone: +92(303)4444311 Email: [email protected]
PhilippinesRobert Bosch, Inc. 28th Floor Fort Legend Towers, 3rd Avenue corner 31st Street,Fort Bonifacio, Global City, 1634 Taguig City Tel.: (632) 8703871 Fax: (632) 8703870 www.bosch-pt.com.ph
SingaporePowerwell Service Centre Ptd LtdBosch Authorised Service Centre (Power Tools)4012 Ang Mo Kio Ave 10, #01-02 TECHplaceSingapore 569628Tel.: 6452 1770 Fax: 6452 1760 E-Mail: [email protected]
ThailandRobert Bosch Ltd.FYI Center Tower 1, 5th Floor,
1 609 92A 5N7 | (16.03.2020) Bosch Power Tools

English | 13
2525 Rama IV Road, Klongtoei,Bangkok 10110Tel.: 02 0128888Fax: 02 0645802 www.bosch.co.thBosch Service – Training CentreLa Salle Tower Ground Floor Unit No.210/11 La Salle Moo 16Srinakharin RoadBangkaew, Bang PleeSamutprakarn 10540Tel.: 02 7587555Fax: 02 7587525
VietnamBranch of Bosch Vietnam Co., Ltd in HCMC 14th floor, Deutsches Haus, 33 Le DuanBen Nghe Ward, District 1, Ho Chi Minh City Tel.: (028) 6258 3690 Fax: (028) 6258 3692 - 6258 3694 Hotline: (028) 6250 8555 Email: [email protected]
BahrainEA Juffali and Brothers for Technical Equipment Company.Kingdom of Bahrain, Al Aker - Block 0624 - Road 2403 -Building 0055DPhone: +97317704537Fax: +973177045257Email: [email protected]
EgyptRBEG-LLC22 Kamal Eldin HusseinSheraton Heliopolis11799 CairoE-mail: [email protected]
IranRobert Bosch Iran 3rd Floor, No 3, Maadiran BuildingAftab St., Khodami St., Vanak Sq.Tehran 1994834571 Phone: +9821- 86092057
IraqSahba Technology GroupAl Muthana airport roadBaghdadPhone Bagdad: +964 (0) 7 901 930366Phone Dubai: +971 (0) 4 422 1898Email: [email protected]
JordanRoots Arabia – JordanAl-Hurriyah Street, Al-MuqabaleinAmman 11623, JordanP.O. Box: 110068Tel. : +962 6 4398990E-mail: [email protected]
KuwaitShuwaikh Industrial Area, Block 1, Plot 16, Street 3rd P.O. Box 164 – Safat 13002 Phone: +965 - 2496 88 88Fax: +965 - 2481 08 79E-mail: [email protected]
LebanonTehini Hana & Co. S.A.R.L. P.O. Box 90-449 Jdeideh 1202 2040Dora-BeirutPhone: +9611255211 Email: [email protected]
LibyaEl Naser for Workshop ToolsSwanee Road, Alfalah AreaTripoliPhone: +218 21 4811184
OmanMalatan Trading & Contracting LLCP.O. Box 131, Ruwi, MuscatPostal Code: 112, Sultanate of Oman Phone: +968 2479 4035/4089/4901Mob: +968-91315465Fax: +968 2479 4058E-Mail: [email protected]
QatarInternational Construction Solutions W L LP. O. Box 51, DohaPhone: +974 40065458Fax: +974 4453 8585Email: [email protected]
Saudi ArabiaJuffali Technical Equipment Co. (JTECO) P.O.Box: 1049 – Jeddah 21431 – KSA Jeddah: 00966 (0) 12 692 0770 – Ext 433Riyadh: 00966 (0) 11 409 3976 – Ext-30/34/39 Dammam: 00966 (0) 13 833 9565E-mail: [email protected]
SyriaDallal Establishment for Power ToolsDamascus. Baramkeh street - Ibn Amer street, Phone: +963112241006 or 009631122414009Mobile: 00963991141005Email: [email protected]
United Arab EmiratesCentral Motors & Equipment,P.O. Box 26255, Dubai Dubai: 00971 (0) 4 3090920/3090930Abu Dhabi: 00971 (0) 2 4017745Sharjah: 00971 (0) 6 5932777Al Ain: 00971 (0) 3 7157419E- Mail: [email protected]
YemenAbu Alrejal Trading CorporationP.O. Box : 17024 , Zubeiry St.
Bosch Power Tools 1 609 92A 5N7 | (16.03.2020)

14 | 中文
Sana'a, YemenTel: +967-1-20 20 10Fax: +967-1-47 19 17E-mail: [email protected]/[email protected]
EthiopiaForever plc Kebele 2,754, BP 4806, Addis Ababa Phone: +251 111 560 600 Email: [email protected]
GhanaRobert Bosch Ghana Limited21 Kofi Annan Road Airport Residential Area Accra Tel. +233 (0)3027 94616
KenyaRobert Bosch East Africa Ltd Mpaka Road P.O. Box 856 00606 Nairobi
NigeriaRobert Bosch Nigeria Ltd. 52–54 Isaac John Street P.O. Box GRA Ikeja – Lagos
TanzaniaDiesel & Autoelectric Service Ltd. 117 Nyerere Rd., P.O. Box 70839 Vingunguti 12109, Dar Es Salaam Phone: +255 222 861 793/794
Australia, New Zealand and Pacific IslandsRobert Bosch Australia Pty. Ltd.Power Tools Locked Bag 66 Clayton South VIC 3169Customer Contact CenterInside Australia:Phone: (01300) 307044Fax: (01300) 307045Inside New Zealand:Phone: (0800) 543353Fax: (0800) 428570Outside AU and NZ: Phone: +61 3 95415555 www.bosch-pt.com.auwww.bosch-pt.co.nz
Republic of South AfricaCustomer serviceHotline: (011) 6519600Gauteng – BSC Service Centre35 Roper Street, New Centre Johannesburg Tel.: (011) 4939375 Fax: (011) 4930126 E-Mail: [email protected] – BSC Service CentreUnit E, Almar Centre 143 Crompton Street
Pinetown Tel.: (031) 7012120 Fax: (031) 7012446 E-Mail: [email protected] Cape – BSC Service CentreDemocracy Way, Prosperity Park Milnerton Tel.: (021) 5512577 Fax: (021) 5513223 E-Mail: [email protected] HeadquartersMidrand, Gauteng Tel.: (011) 6519600 Fax: (011) 6519880 E-Mail: [email protected]
Armenia, Azerbaijan, GeorgiaRobert Bosch Ltd.David Agmashenebeli ave. 610102 Tbilisi, GeorgiaTel. +995322510073www.bosch.com
Kyrgyzstan, Mongolia, Tajikistan, Turkmenistan,UzbekistanTOO “Robert Bosch” Power Tools, After Sales ServiceMuratbaev Ave., 180050012, Almaty, Kazakhstan Service Email: [email protected] Official Website: www.bosch.com, www.bosch-pt.com
DisposalThe power tool, accessories and packaging should be re-cycled in an environmentally friendly manner.
Do not dispose of power tools along withhousehold waste.
中文安全规章电动工具通用安全警告警告! 阅读所有警告和所有说明! 不遵
照以下警告和说明会导致电击、着火和/或严重伤害。保存所有警告和说明书以备查阅。在所有下列的警告中术语"电动工具"指市电驱动(有线)电动工具或电池驱动(无线)电动工具。工作场地的安全u 保持工作场地清洁和明亮。混乱和黑暗的场地会
引发事故。
1 609 92A 5N7 | (16.03.2020) Bosch Power Tools

中文 | 15
u 不要在易爆环境,如有易燃液体、气体或粉尘的环境下操作电动工具。电动工具产生的火花会点燃粉尘或气体。
u 让儿童和旁观者离开后操作电动工具。注意力不集中会使操作者失去对工具的控制。
电气安全u 电动工具插头必须与插座相配。绝不能以任何方
式改装插头。需接地的电动工具不能使用任何转换插头。未经改装的插头和相配的插座将减少电击危险。
u 避免人体接触接地表面,如管道、散热片和冰箱。如果你身体接地会增加电击危险。
u 不得将电动工具暴露在雨中或潮湿环境中。水进入电动工具将增加电击危险。
u 不得滥用电线。绝不能用电线搬运、拉动电动工具或拔出其插头。使电线远离热源、油、锐边或运动部件。受损或缠绕的软线会增加电击危险。
u 当在户外使用电动工具时,使用适合户外使用的外接软线。适合户外使用的软线将减少电击危险。
u 如果在潮湿环境下操作电动工具是不可避免的,应使用剩余电流动作保护器(RCD)。使用RCD可减小电击危险。
人身安全u 保持警觉,当操作电动工具时关注所从事的操作
并保持清醒。当你感到疲倦,或在有药物、酒精或治疗反应时,不要操作电动工具。在操作电动工具时瞬间的疏忽会导致严重人身伤害。
u 使用个人防护装置。始终佩戴护目镜。安全装置,诸如适当条件下使用防尘面具、防滑安全鞋、安全帽、听力防护等装置能减少人身伤害。
u 防止意外起动。确保开关在连接电源和/或电池盒、拿起或搬运工具时处于关断位置。手指放在已接通电源的开关上或开关处于接通时插入插头可能会导致危险。
u 在电动工具接通之前,拿掉所有调节钥匙或扳手。遗留在电动工具旋转零件上的扳手或钥匙会导致人身伤害。
u 手不要伸展得太长。时刻注意立足点和身体平衡。这样在意外情况下能很好地控制电动工具。
u 着装适当。不要穿宽松衣服或佩戴饰品。让衣服、手套和头发远离运动部件。宽松衣服、佩饰或长发可能会卷入运动部件中。
u 如果提供了与排屑、集尘设备连接用的装置,要确保他们连接完好且使用得当。使用这些装置可减少尘屑引起的危险。
电动工具使用和注意事项u 不要滥用电动工具,根据用途使用适当的电动工
具。选用适当设计的电动工具会使你工作更有效、更安全。
u 如果开关不能接通或关断工具电源,则不能使用该电动工具。如果开关不能接通或关断工具电源,则不能使用该电动工具。
u 在进行任何调节、更换附件或贮存电动工具之前,必须从电源上拔掉插头和/或使电池盒与工具
脱开。这种防护性措施将减少工具意外起动的危险。
u 将闲置不用的电动工具贮存在儿童所及范围之外,并且不要让不熟悉电动工具或对这些说明不了解的人操作电动工具。电动工具在未经培训的用户手中是危险的。
u 保养电动工具。检查运动件是否调整到位或卡住,检查零件破损情况和影响电动工具运行的其他状况。如有损坏,电动工具应在使用前修理好。许多事故由维护不良的电动工具引发。
u 保持切削刀具锋利和清洁。保养良好的有锋利切削刃的刀具不易卡住而且容易控制。
u 按照使用说明书,考虑作业条件和进行的作业来使用电动工具、附件和工具的刀头等。将电动工具用于那些与其用途不符的操作可能会导致危险。
维修u 将你的电动工具送交专业维修人员,使用同样的
备件进行修理。这样将确保所维修的电动工具的安全性。
锤类工具的安全警告适用于全部操作的安全说明u 戴好耳罩。暴露在噪声中会引起听力损伤。u 使用辅助手柄。失控会造成人身伤害。u 工具使用前应得到适当支撑。由于工具输出转矩
大,运行时没有适当支撑会失控导致人身伤害。u 当在钻削附件可能触及暗线或其自身导线的场合
进行操作时,要通过绝缘握持面握持工具。钻削附件碰到带电导线会使工具外露的金属零件带电从而使操作者受到电击。
当使用长钻头时的安全说明u 操作时切勿超出钻头的最大额定转速。在较高转
速下,如果让钻头在不接触工件的情况下随意旋转,很可能导致其弯折,从而引发人身伤害。
u 务必以低转速开始钻孔,并让钻头尖端与工件接触。在较高转速下,如果让钻头在不接触工件的情况下随意旋转,很可能导致其弯折,从而引发人身伤害。
u 施压时务必与钻头成一直线,且不得施加过大压力。若钻头弯折会导致其损坏或失控,从而引发人身伤害。
其它安全规章u 使用随工具提供的辅助手柄。操作失手会引起人
身伤害。u 工作时要使用双手握紧电动工具并确保站稳。使
用双手才能够稳定地操作电动工具。u 当工具刀头被夹住时,请立即关闭电动工具。以
防反作用力矩导致反弹。当电动工具过载或向待加工工件倾斜时,工具刀头就会卡住。
u 固定好工件。使用固定装置或老虎钳固定工件,会比用手持握工件更牢固。
u 使用合适的侦测装置侦察隐藏的电线,或者向当地的相关单位寻求支援。 接触电线可能引起火灾並让操作者触电。损坏了瓦斯管会引起爆炸。凿
Bosch Power Tools 1 609 92A 5N7 | (16.03.2020)

16 | 中文
穿水管不仅会造成严重的财物损失,也可能导致触电。
u 等待电动工具完全静止后才能够放下机器。 机器上的工具可能在工作中被夹住,而令您无法控制电动工具。
产品和性能说明请阅读所有安全规章和指示。不遵照以下警告和说明可能导致电击、着火和/或严重伤害。请注意本使用说明书开头部分的图示。
按照规定使用本电动工具可以在混凝土、砖墙、和石材上进行震动钻,而且也具备了简单的凿削功能。另外也适合在木材、金属、陶材和塑料上进行无冲击钻孔。有电子调节装置和正反转功能的电动工具也能够拧转螺丝。
插图上的机件机件的编号和电动工具详解图上的编号一致。(1) 快速可换式钻夹头(GBH 2-28 DFV)(2) SDS-plus可换式钻夹头
(GBH 2-28 DFV)(3) SDS‑plus工具夹头(4) 防尘盖(5) 锁定套筒
(6) 可换式钻夹头锁环(GBH 2-28 DFV)(7) 正逆转开关(8) 电源开关的锁定按钮(9) 电源开关(10) 冲击/转动停止开关的解锁按键(11) 冲击/转动停止开关(12) 深度尺调节键(13) 辅助手柄(绝缘握柄)(14) 深度尺(15) 手柄(绝缘握柄)(16) 辨识槽线(17) 钻夹头刀柄(GBH 2-28 DFV)(18) 快速可换式钻夹头的前套筒
(GBH 2-28 DFV)(19) 快速可换式钻夹头的止动环
(GBH 2-28 DFV)(20) Saugfix集尘口A)
(21) Saugfix夹紧螺栓A)
(22) Saugfix深度尺A)
(23) Saugfix伸缩管A)
(24) Saugfix翼形螺栓A)
(25) Saugfix导管A)
(26) 带SDS‑plus接头柄的通用杆A)
A) 图表或说明上提到的附件,并不包含在基本的供货范围中。本公司的附件清单中有完整的附件供应项目。
技术参数
锤钻 GBH 2-28 D GBH 2-28 DV物品代码 3 611 B67 0C.
3 611 B67 0L.3 611 B67 0K.3 611 B67 08.
3 611 B67 1F. 3 611 B67 10.
可换式钻夹头 − − − −额定输入功率 瓦 850 820 850 820冲击次数 次/分钟 0-5100 0-5100 0-5100 0-5100单一冲击强度符合EPTA-Procedure05:2016的规定
J 3.2 3.2 3.2 3.2
额定转速 转/分钟 0–1300 0–1300 0–1300 0–1300工具夹头 SDS-plus SDS-plus SDS-plus SDS-plus主轴颈直径 毫米 50 50 50 50最大钻孔直径– 混凝土 毫米 28 28 28 28– 砖墙(使用空心
钻头)毫米 68 68 68 68
– 钢 毫米 13 13 13 13– 木材 毫米 30 30 30 30重量符合EPTA-Procedure01:2014
公斤 2.9 2.9 2.9 2.9
保护等级 / II / II / II / II
1 609 92A 5N7 | (16.03.2020) Bosch Power Tools

中文 | 17
锤钻 GBH 2-28 DFV物品代码 3 611 B67 2C.
3 611 B67 2L.3 611 B67 2K.3 611 B67 28.
可换式钻夹头 ● ●额定输入功率 瓦 850 820冲击次数 次/分钟 0-5100 0-5100单一冲击强度符合EPTA-Procedure 05:2016的规定
J 3.2 3.2
额定转速 转/分钟 0–1300 0–1300工具夹头 SDS-plus SDS-plus主轴颈直径 毫米 50 50最大钻孔直径– 混凝土 毫米 28 28– 砖墙(使用空心钻头) 毫米 68 68– 钢 毫米 13 13– 木材 毫米 30 30重量符合EPTA-Procedure 01:2014
公斤 3.1 3.1
保护等级 / II / II
本说明书提供的参数是以230 V为依据,于低电压地区,此数据有可能不同。
安装u 在电动工具上进行所有操作之前都必须从插座上
拔出电源插头。
辅助手柄u 操作电动工具时务必使用辅助手柄 (13)。
摆动辅助手柄(见图片A)可以任意翻转辅助手柄(13),由此可在工作中采用安全且不易疲劳的姿势。– 逆时针旋转辅助手柄(13)的下半部,并将辅助手
柄(13)转到需要的位置。然后顺时针重新拧紧辅助手柄(13)的下半部。注意,辅助手柄的固定套圈必须位于机壳上的固定套圈专属凹槽中。
调整钻孔深度(参见插图B)利用限深器(14)可以确定所需的钻深X。– 按压限深器调节键(12),并将限深器装入辅助手
柄(13)。限深器(14)的槽纹必须朝下。
– 将SDS-plus工具刀头推入SDS-plus工具夹头(3),直至极限位置。如果未安装好SDS-plus工具,会影响设定深度的准确性。
– 尽可能地拉出限深器,使钻尖与限深器尖端之间的距离等于所需的钻孔深度X。
选择钻夹头和刀具在进行锤钻和凿削时,需要已插有SDS-plus钻夹头的SDS-plus刀具。在木材、金属、陶材和塑料上以及拧转螺丝进行无冲击式钻孔时,可使用不带SDS-plus的刀具(例如圆柱柄钻头)。上述工具必须配合快速夹头一起使用。
拆卸/安装可换式钻夹头(GBH 2-28 DFV)取出可换式钻夹头(参见插图C)– 向后拉出可换式钻夹头锁环(6),将其保持在这个
位置,然后向前拉下SDS-plus可换式钻夹头(2)或快速可换式钻夹头(1)。
– 保护被拆下的可换式钻夹头,不要弄脏。插入可换式钻夹头(参见插图D)u 请只使用型号专用的原厂装备,同时注意识别槽
的数量(16)。只允许使用带两个或三个识别槽的可换式钻夹头。如果使用与该电动工具不匹配的可换式钻夹头,则工具刀头在运行过程中可能掉落。
– 先清洁夹头然后再安装,必须在接头柄的末端涂抹少许油脂。
– 用整只手握住SDS-plus可换式钻夹头(2)和快速可换式钻夹头(1)。将可换式钻夹头拧入钻夹头刀柄(17),直至听到清晰的卡止声。
– 此时可换式钻夹头已经自动锁定。抽拉可换式钻夹头检查其是否已经锁定。
Bosch Power Tools 1 609 92A 5N7 | (16.03.2020)

18 | 中文
更换刀具防尘盖(4)可以防止工作时钻屑进入工具夹头中。插入刀具时请注意不要损坏防尘盖(4)。u 损坏的防尘盖必须立即更换。推荐由本公司的售
后服务部门进行操作。
更换刀具(SDS-plus)安装SDS-plus工具刀头(参见插图E)使用SDS-plus钻夹头可以简单方便地更换工具刀头,无需使用辅助工具。SDS-plus系统的工具刀头是活动的。因此在空转时会产生径向跳动偏差。该偏差对钻孔的精度没影响,因为钻孔时钻头自定心。– GBH 2-28 DFV:安装SDS-plus可换式钻夹头
(2)。– 清洁工具刀头的末端并涂抹少许油脂。– 把工具刀头拧入工具夹头中,必须拧转至工具自
动锁定为止。– 抽拉工具以确定它是否正确锁紧了。拆卸SDS-plus工具刀头(见图片F)– 向后推动锁定套筒(5),取下工具刀头。
更换刀具(无SDS-plus)(GBH 2-28 DFV)插入工具刀头(参见插图G)提示:切勿使用不带SDS-plus的工具来锤钻或凿削!没有SDS‑plus的工具和夹头会在进行锤钻和凿削时受损。– 安装快速可换式钻夹头(1)。– 固定快速可换式钻夹头的止动环(19)。通过转动
前套筒(18)打开工具夹头,直至可以插入刀具。固定止动环(19),然后沿箭头方向用力转动前套筒(18),直至听到清晰的咔咔声。
– 以抽拉的方式检查刀具是否装牢。提示:如果工具夹头被打开到极限位置,那么在拧紧工具夹头时,就能听见咔咔声,且工具夹头不能关闭。在这种情况下逆箭头方向转动前套筒(18)一次。然后,工具夹头才能关闭。– 将冲击转动停止开关(11)旋转至“钻孔”位置。取出工具刀头(参见插图H)– 固定快速可换式钻夹头的止动环(19)。通过沿箭
头方向转动前套筒(18)打开工具夹头,直至能够取出刀具。
带Saugfix(附件)的集尘装置吸锯尘/吸锯屑含铅的颜料以及某些木材、矿物和金属的加工废尘有害健康。机器操作者或者工地附近的人如果接触、吸入这些废尘,可能会有过敏反应或者感染呼吸道疾病。某些尘埃(例如加工橡木或山毛榉的废尘)可能致癌,特别是和处理 木材的添加剂(例如木材的防腐
剂等)结合之后。只有经过专业训练的人才能够加工含石棉的物料。– 尽可能使用适合物料的吸尘装置。– 工作场所要保持空气流通。– 最好佩戴P2滤网等级的口罩。请留心并遵守贵国和加工物料有关的法规。u 避免让工作场所堆积过多的尘垢。尘埃容易被点
燃。安装集尘装置(见图片I)集尘装备需要一个Saugfix(附件)钻孔时Saufix会回弹,这样可以确保Saufix头能够紧贴着表面。– 按压限深器调节键(12)并拆下限深器(14)。重新
按压按钮(12),并将Saugfix从前面装入辅助手柄(13)。
– 将吸尘管(直径19 mm,附件)连接到Saugfix的排气口(20)上。
根据工件的物料选择合适的集尘装置。抽吸可能危害健康、可能导致癌症或干燥的废尘时,务必使用特殊的集尘装置。在Saufix上调整钻孔深度(见图片J)也可以在已安装的Saufix上设定所需的钻孔深度X。– 将SDS-plus工具刀头推入SDS-plus工具夹头
(3),直至极限位置。如果未安装好SDS-plus工具,会影响设定深度的准确性。
– 松开Saufix上的翼形螺栓(24)。– 把尚未开动的电动工具紧紧地顶在待钻孔的位置
上。SDS-plus工具刀头必须安装在平面上。– 将Saufix导管(25)推入它的支架中,以便让
Saugfix头可以保持在待钻孔的平面。推入导管(25)时,尽量不要将它超出伸缩管(23)太多,以此保证伸缩管(23)上的绝大部分刻度能够清晰可见。
– 重新拧紧翼形螺栓(24)。松开Saufix限深器上的夹紧螺栓(21)。
– 将限深器(22)尽量套到伸缩管(23)上,直至符合图中所示您的所需钻孔深度距离X。
– 在这个位置上拧紧夹紧螺栓(21)。
操作操作机器u 注意电源电压!电源的电压必须和电动工具铭牌
上标示的电压一致。标记为230伏电动工具用220伏的电压可以驱动。
设置运行模式通过冲击 / 转动停止开关(11)选择电动工具的运行模式。– 按压用于转换运行模式的解锁按钮(10),然后转
动冲击 / 转动停止开关(11)到所需位置,直至听到卡止声。
提示:仅可在电动工具关闭的情况下更改运行模式!否则可能会损坏电动工具。
1 609 92A 5N7 | (16.03.2020) Bosch Power Tools

中文 | 19
混凝土或石材锤钻位置
木材、金属、陶材和塑料无冲击钻孔以及拧螺丝时的位置
调节凿削的Vario-Lock位置在这个位置上不卡止冲击 / 转动停止开关(11)。
凿头位置
调整旋转方向通过正逆转开关(7)可以更改电动工具的旋转方向。按下起停开关(9)后无法更改。u 只能在电动工具静止时操纵正逆转开关(7)。进行锤钻、正常钻和凿削时,都必须把旋转方向设定为正转。– 正转:转动两面正逆转开关(7)直至极限位置
。– 逆转:转动两面正逆转开关(7)直至极限位置
。接通/关闭– 如要接通电动工具,按压电源开关(9)。– 如要锁定电源开关(9),请按住该开关并另外按压
锁定按钮(8)。– 如要关闭电动工具,松开电源开关(9)。电源开关
(9)锁住时,先按压,然后再松开。调整转速 / 冲击次数– 可无级调节已接通电动工具的转速/冲击次数,视
按压电源开关(9)的力道程度决定。以较小的力按压电源开关(9)时,转速/冲击次数较低。增强施加在起停开关上的压力,可以提高机器的转速 / 冲击次数。
工作提示u 先关闭电动工具,然后再放置在螺母/螺栓上。旋
转的工具刀头可能会滑开。改变凿头位置(Vario‑Lock)您可以将凿头锁定在40的位置。如此可确保最佳的工作姿势。– 把凿头装入工具夹头中。– 将冲击 / 转动停止开关(11)旋转至“Vario-
Lock”位置。– 把凿头旋转到需要的工作位置上。– 将冲击 / 转动停止开关(11)旋转至“凿削”位
置。这样就能锁定工具夹头。
– 进行凿削时必须把旋转方向设定为正转。带锁定功能的凿头为了较长时间凿切而不必始终按着电源开关(9),将电源开关锁定在运行模式“凿切”中。– 锁定时将电源开关(9)按压至极限位置,同时按压
锁定键(8)。– 关闭时再次按压锁定键(8)。提示:如果在电源开关已锁定期间切换到另一种运行模式,则电动工具会自动关闭。减震装置
内置减震装置可减轻出现的振动。
u 如果减震装备损坏了,勿继续使用电动工具。
安装螺丝批嘴(见图片K)u 先关闭电动工具,然后再放置在螺母/螺栓上。旋
转的工具刀头可能会滑开。使用螺丝批嘴时,您需要一个带SDS-plus接头柄(附件)的通用连杆(26)。– 清洁接头柄的末端并在接头柄末端涂抹少许油
脂。– 把通用连杆拧入工具夹头中,并让连杆自动锁
定。– 抽拉连杆,检查连杆是否已经正确锁牢。– 把螺丝批嘴插入通用连杆中。必须使用与螺丝头
大小相符的螺丝批嘴。– 拆卸通用连杆时,向后推锁定套筒(5),然后从工
具夹头中拆下通用连杆(26)。
维修和服务保养和清洁u 在电动工具上进行所有操作之前都必须从插座上
拔出电源插头。u 电动工具和通气孔必须随时保持清洁,以确保工
作效率和工作安全。如果必须更换连接线,务必把这项工作交给Bosch或者经授权的Bosch电动工具顾客服务执行,以避免危害机器的安全性能。u 必须立即更换损坏的防尘盖。最好委托本公司的
顾客服务处换装。– 每次使用后请清洁工具夹头(3)。
客户服务和应用咨询本公司顾客服务处负责回答有关本公司产品的修理、维护和备件的问题。备件的展开图纸和信息也可查看:www.bosch-pt.com博世应用咨询团队乐于就我们的产品及其附件问题提供帮助。询问和订购备件时,务必提供机器铭牌上标示的10位数物品代码。香港和澳门特别行政区罗伯特博世有限公司 香港北角英皇道625号, 21楼 客户服务热线:+852 2101 0235
Bosch Power Tools 1 609 92A 5N7 | (16.03.2020)

20 | 繁體中文
传真:+852 2590 9762 电子邮件: [email protected]中国大陆博世电动工具(中国)有限公司 中国 浙江省 杭州市滨江区 滨康路567号 102/1F 服务中心 邮政编码:310052 电话:(0571)8887 5566 / 5588 传真:(0571)8887 6688 x 5566# / 5588# 电邮:[email protected]
制造商地址:Robert Bosch Power Tools GmbH罗伯特· 博世电动工具有限公司 70538 Stuttgart / GERMANY 70538 斯图加特 / 德国
处理废弃物必须以符合环保要求的方式回收再利用电动工具、附件和包装材料。
请勿将电动工具扔到生活垃圾中!
产品中有害物质的名称及含量
部件名称 有害物质铅
(Pb)汞
(Hg)镉
(Cd)六价铬(Cr+6)
多溴联苯(PBB)
多溴二苯醚(PBDE)
外壳的金属部分
O O O O O O
外壳的非金属部分
O O O O O O
机械传动机构 X O O O O O电机组件 X O O O O O控制组件 X O O O O O附件 O O O O O O配件 O O O O O O连接件 X O O O O O电源线* ① O O O O O O电池系统* ② X O O O O O本表格依据SJ/T11364 的规定编制。O: 表示该有害物质在该部件所有均质材料中的含量均在GB/T 26572 规定的限量要求以下。X: 表示该有害物质至少在该部件的某一均质材料中的含量超出GB/T 26572 规定的限量要求。且目前业界没有成熟的替代方案,符合欧盟RoHS 指令环保要求。① 适用于采用电源线连接供电的产品。② 适用于采用充电电池供电的产品。产品环保使用期限内的使用条件参见产品说明书。
繁體中文安全注意事項電動工具通用安全警告警告 閱讀所有警告和所有說明。不
遵照以下警告和說明會導致電擊、著火和/或嚴重傷害。保存所有警告和說明書以備查閱。
在所有警告中,「電動工具」此一名詞泛指:以市電驅動的(有線)電動工具或是以電池驅動的(無線)電動工具。工作場地的安全u 保持工作場地清潔和明亮。雜亂和黑暗的場地會
引發事故。u 不要在易爆環境,如有易燃液體、氣體或粉塵的
環境下操作電動工具。電動工具產生的火花會點燃粉塵或氣體。
u 讓兒童和旁觀者離開後操作電動工具。注意力不集中會使您失去對工具的控制。
1 609 92A 5N7 | (16.03.2020) Bosch Power Tools

繁體中文 | 21
電氣安全u 電動工具插頭必須與插座相配。 絕不能以任何方
式改裝插頭。 需接地的電動工具不能使用任何轉換插頭。未經改裝的插頭和相配的插座將減少電擊危險。
u 避免人體接觸接地表面,如管道、散熱片和冰箱。如果您身體接地會增加電擊危險。
u 不得將電動工具暴露在雨中或潮濕環境中。水進入電動工具將增加電擊危險。
u 不得濫用電線。 絕不能用電線搬運、拉動電動工具或拔出其插頭。 將電線遠離熱源、油、銳利邊緣或移動零件。受損或纏繞的軟線會增加電擊危險。
u 當在戶外使用電動工具時,使用適合戶外使用的延長線。適合戶外使用的軟線,將減少電擊危險。
u 如果在潮濕環境下操作電動工具是不可避免的,應使用剩餘電流動作保護器(RCD)。使用RCD可降低電擊危險。
人身安全u 保持警覺,當操作電動工具時關注所從事的操作
並保持清醒。 當您感到疲倦,或在有藥物、酒精或治療反應時,不要操作電動工具。在操作電動工具時瞬間的疏忽會導致嚴重人身傷害。
u 使用個人防護裝置。 務必佩戴護目鏡。安全裝置,諸如適當條件下使用防塵面具、防滑安全鞋、安全帽、聽力防護等裝置能減少人身傷害。
u 防止意外起動。 確保開關在連接電源和/或電池組、拿起或搬運工具時處於關閉位置。手指放在已接通電源的開關上或開關處於接通時插入插頭可能會導致危險。
u 在電動工具接通之前,拿掉所有調節鑰匙或扳手。遺留在電動工具旋轉零件上的扳手或鑰匙會導致人身傷害。
u 手不要伸展得太長。 時刻注意立足點和身體平衡。這樣在意外情況下能很好地控制電動工具。
u 著裝適當。 不要穿著寬鬆衣服或佩戴飾品。 衣服、手套和頭髮請遠離移動零件。寬鬆衣服、佩飾或長髮可能會捲入移動零件中。
u 如果有排屑、集塵設備連接用的裝置,請確保其連接完好且使用得當。使用這些裝置可減少塵屑引起的危險。
電動工具使用和注意事項u 請勿濫用電動工具, 根據用途使用適當的電動工
具。選用適當設計的電動工具會使您工作更有效、更安全。
u 如果開關不能開啟或關閉工具電源,則不能使用該電動工具。不能用開關來控制的電動工具是危險的且必須進行修理。
u 在進行任何調整、更換附件或貯存電動工具之前,必須從電源上拔掉插頭和/或將電池組拆下。這種防護性措施將減少工具意外起動的危險。
u 將閒置不用的電動工具貯存在兒童所及範圍之外,不得讓不熟悉電動工具或對這些說明不瞭解
的人操作電動工具。由未經訓練的人員使用電動工具相當危險。
u 保養電動工具。 檢查移動零件是否調整到位或卡住,檢查零件破損情況和影響電動工具運轉的其他狀況。 如有損壞,電動工具應在使用前修理完成。許多事故由維護不良的電動工具引發。
u 保持切削刀具鋒利和清潔。保養良好的有鋒利切削刃的刀具不易卡住而且容易控制。
u 按照使用說明書,考慮作業條件和進行的作業來使用電動工具、配件和工具的尖端等。將電動工具用於那些與其用途不符的操作可能會導致危險。
檢修u 將您的電動工具送交專業維修人員,必須使用同
樣的備件進行更換。這樣將確保所維修的電動工具的安全性。
鎚鑽安全警告所有作業的安全說明u 請戴上耳罩。暴露在噪音下會造成聽力喪失。u 使用輔助握把。失去控制可能會造成人員受傷。u 使用前請確實支撐固定。此工具會產生高輸出扭
力,操作時若未支撐固定可能會失控並導致人員受傷。
u 進行作業時,負責進行切割的配件或固定釘可能會碰觸到隱藏的配線或電動工具的電線,請從絕緣握把處拿持電動工具。負責進行切割的配件或固定釘若是觸及「導電」電線,可能導致電動工具外露的金屬部件「導電」,進而使操作人員遭受電擊。
使用長鑽頭的安全說明u 切勿以超過鑽頭額定最高轉速的速度操作。若鑽
頭未接觸工件且以超過最高轉速的速度無負載轉動,可能會讓鑽頭彎曲並導致人員受傷。
u 請務必以低速啟動並將鑽尖確實抵住工件。若鑽頭未接觸工件且以超過最高轉速的速度無負載轉動,可能會讓鑽頭彎曲並導致人員受傷。
u 請沿著鑽頭方向施加適當的壓力,切勿過度施壓。鑽頭可能會彎曲並造成斷裂、失控並導致人員受傷。
其他安全注意事項u 請使用工具的輔助把手(若有配備)。失去控制
可能會造成人員受傷。u 作業期間請用雙手牢牢握緊電動工具並保持穩
固。使用雙手才能夠更穩定地操作電動工具。u 如果嵌件工具被夾住了,請立刻關閉電動工具的
電源。請準備好承受反作用力所造成的反彈。電動工具過載時或當它在進行加工的工件內部歪斜時,都會造成嵌件工具被夾住不動。
u 固定好工件。使用固定裝置或老虎鉗固定工件,會比用手持握工件更牢固。
u 使用合適的偵測裝置偵察隱藏的電線,或者向當地的相關單位尋求支援。接觸電線可能引起火災並讓操作者觸電。若損壞瓦斯管會引起爆炸。鑿
Bosch Power Tools 1 609 92A 5N7 | (16.03.2020)

22 | 繁體中文
穿水管不僅會造成嚴重的財物損失,也可能導致觸電。
u 必須等待電動工具完全靜止後才能將它放下。嵌件工具可能卡住而使電動工具失控。
產品和功率描述請詳讀所有安全注意事項和指示。如未遵守安全注意事項與指示,可能導致火災、人員遭受電擊及/或重傷。請留意操作說明書中最前面的圖示。
依規定使用機器本電動工具適合在混凝土、磚塊及石材進行鎚擊鑽孔,亦適用於簡易型鑿削作業。此外,它同樣也可以用無震動之方式在木材、金屬、陶瓷或塑膠等材質上進行鑽孔加工。具備電子調速和正逆轉功能的電動工具亦可用於拆裝螺栓。
插圖上的機件機件的編號和電動工具詳解圖上的編號一致。(1) 快換夾頭(GBH 2-28 DFV)(2) SDS-plus(四坑系統)夾頭
(GBH 2-28 DFV)(3) SDS‑plus(四坑系統)工具夾座(4) 防塵蓋(5) 鎖定套筒
(6) 夾頭鎖止環(GBH 2-28 DFV)(7) 正逆轉開關(8) 起停開關鎖止按鈕(9) 起停開關(10) 鎚擊/旋轉停止開關的解鎖按鈕(11) 鎚擊/旋轉停止開關(12) 限深擋塊調整按鈕(13) 輔助手柄(絕緣握柄)(14) 限深擋塊(15) 把手(絕緣握柄)(16) 識別槽(17) 夾頭轉接頭(GBH 2-28 DFV)(18) 快換夾頭的前端套筒(GBH 2-28 DFV)(19) 快換夾頭的固定環(GBH 2-28 DFV)(20) Saugfix 裝置的抽吸口A)
(21) Saugfix 裝置的止付螺栓A)
(22) Saugfix 裝置的限深擋塊A)
(23) Saugfix 裝置的伸縮管A)
(24) Saugfix 裝置的蝶翼螺栓A)
(25) Saugfix 裝置的導管A)
(26) 具有 SDS-plus 接頭柄的萬用接桿A)
A) 圖表或說明上提到的配件,並不包含在基本的供貨範圍中。本公司的配件清單中有完整的配件供應項目。
技術性數據
鎚鑽 GBH 2-28 D GBH 2-28 DV產品機號 3 611 B67 0C.
3 611 B67 0L.3 611 B67 0K.3 611 B67 08.
3 611 B67 1F. 3 611 B67 10.
夾頭 − − − −額定輸入功率 W 850 820 850 820衝撃次數 min-1 0-5100 0-5100 0-5100 0-5100單次鎚擊強度符合EPTA-Procedure05:2016
J 3.2 3.2 3.2 3.2
額定轉速 次/分 0–1300 0–1300 0–1300 0–1300工具夾座 SDS-plus SDS-plus SDS-plus SDS-plus軸頸直徑 mm 50 50 50 50最大鑽孔直徑– 混凝土 mm 28 28 28 28– 砌牆(使用空心
鑽頭)mm 68 68 68 68
– 鋼材 mm 13 13 13 13– 木材 mm 30 30 30 30重量符合 EPTA-Procedure01:2014
kg 2.9 2.9 2.9 2.9
絕緣等級 / II / II / II / II
1 609 92A 5N7 | (16.03.2020) Bosch Power Tools

繁體中文 | 23
鎚鑽 GBH 2-28 DFV產品機號 3 611 B67 2C.
3 611 B67 2L.3 611 B67 2K.3 611 B67 28.
夾頭 ● ●額定輸入功率 W 850 820衝撃次數 min-1 0-5100 0-5100單次鎚擊強度符合 EPTA-Procedure 05:2016
J 3.2 3.2
額定轉速 次/分 0–1300 0–1300工具夾座 SDS-plus SDS-plus軸頸直徑 mm 50 50最大鑽孔直徑– 混凝土 mm 28 28– 砌牆(使用空心鑽頭) mm 68 68– 鋼材 mm 13 13– 木材 mm 30 30重量符合 EPTA-Procedure 01:2014
kg 3,1 3,1
絕緣等級 / II / II
本說明書提供的數值是以 230 伏特為依據,於使用不同電壓的地區,此數據有可能不同。
安裝u 維修電動工具或換裝零、配件之前,務必從插座
上拔出插頭。
輔助手柄u 操作電動工具時務必使用輔助手柄 (13)。
翻轉輔助手柄(請參考圖 A)輔助手柄 (13) 可隨意翻轉,以便採取一個穩固而不容易感到疲勞的工作姿勢。– 逆時針旋轉輔助手柄 (13) 的下方握把處,以便將
輔助手柄 (13) 轉至所需位置。然後再順時針旋轉輔助手柄 (13) 的下方握把處,將它重新鎖緊。注意,輔助手柄的固定套圈必須位於機殼上的固定套圈專屬凹槽中。
調整鑽孔深度(請參考圖B)您可利用限深擋塊(14)設定所需鑽孔深度 X。– 請按壓限深擋塊調整按鈕(12)然後將限深擋塊安
裝到輔助手柄(13)上。限深擋塊(14)上的刻紋必須朝下。
– 將 SDS-plus 嵌件工具往 SDS-plus 工具夾座(3)推入到底。SDS-plus 工具若未確實裝好,會影響深度設定的準確性。
– 將限深擋塊拉出至,鑽頭尖端與限深擋塊尖端之間的距離等於所需的鑽孔深度 X。
選用夾頭和工具進行鎚擊鑽孔和鑿削時,必須使用能夠安裝在SDS‑plus 夾頭上的 SDS‑plus 工具。
若要以無震動之方式在木材、金屬、陶瓷及塑膠等材質上進行鑽孔,或是想要拆裝螺栓,請使用非SDS‑plus 系統的工具(例如具有圓柱柄的鑽頭)。上述工具必須配合快速夾頭一起使用。
拆卸/安裝夾頭(GBH 2-28 DFV)卸下更換式夾頭(請參考圖 C)– 將更換式夾頭鎖止環 (6) 往後拉並讓它固定在這
個位置上,然後將 SDS-plus 更換式夾頭 (2) 或快換夾頭 (1) 往前拔下。
– 更換式夾頭取下後需妥善保護,以免受污。裝上更換式夾頭(請參考圖 D)u 僅可使用機型專用的原廠配件,並同時留意識別
槽的數量(16)。更換式夾頭僅可配有兩個或三個識別槽。 若此電動工具未使用合適的更換式夾頭‵,則嵌件工具可能會在功能運轉期間掉落出來。
– 夾頭需先進行清潔然後才可安裝,必須在接頭柄的插入端塗上少許油脂。
– 用整個手掌環握住 SDS-plus 夾頭 (2) 或快換夾頭 (1)。將夾頭一邊旋轉一邊推至夾頭轉接頭(17) 上,直到清楚聽見卡上的聲音。
– 此時夾頭已經自動鎖定。但是仍需拉動夾頭,以檢查是否已確實鎖止。
更換工具防塵蓋 (4) 可阻止鑽孔時所產生的大部份粉塵侵入工具夾座。安裝工具時要小心,請勿損壞防塵蓋(4)。
Bosch Power Tools 1 609 92A 5N7 | (16.03.2020)

24 | 繁體中文
u 防塵蓋若有受損,應立即更換。最好委託本公司的顧客服務處換裝。
更換工具(SDS-plus)裝上 SDS-plus 嵌件工具(請參考圖 E)夾頭採 SDS‑plus(四坑系統)設計,能夠簡便地更換嵌件工具,無需借助其它輔助工具。SDS‑plus 嵌件工具是活動的,因此在無負載狀態下此類工具會偏心旋轉。開始鑽孔時此工具便會自動置中,因此上述現象並不會影響鑽孔準確度。– GBH 2-28 DFV:直接將 SDS-plus 夾頭 (2) 裝
入即可。– 清潔嵌件工具的插入端並且塗上少許潤滑油脂。– 把嵌件工具轉進工具夾座中,必須轉至嵌件工具
自動鎖定為止。– 拉動工具以確認它是否已正確鎖止。取出 SDS-plus 嵌件工具(請參考圖 F)– 將鎖定套筒 (5) 往後推,然後便可取出嵌件工
具。
更換工具(非 SDS‑plus 系統)(GBH 2-28 DFV)安裝嵌件工具(請參考圖 G)提示:請勿使用非 SDS-plus 系統的工具進行鎚擊鑽孔或鑿削!非 SDS‑plus 系統的工具和夾頭會在進行鎚擊鑽孔和鑿削時受損。– 請裝上快換夾頭 (1)。– 必須握好快換夾頭的固定環 (19),讓它留在原位
不動。旋轉前端套筒 (18),以便工具夾座打開至能夠裝入工具的程度。請將固定環 (19) 握住不動,然後沿箭頭方向用力轉緊前端套筒 (18),此時必須清楚聽見輾軋聲。
– 透過拉動,確認工具是否已裝牢。提示:如果工具夾座先前已完全開啟至極限位置,那麼旋轉工具夾座使之閉合時,即使聽見輾軋聲也不代表工具夾座已鎖上。這時候請您再沿著箭頭的相反方向轉一下前端套筒(18)。然後工具夾座便能確實閉合。– 請將鎚擊/旋轉停止開關 (11) 轉至「鑽孔」位
置。取出嵌件工具(請參考圖 H)– 必須握好快換夾頭的固定環 (19),讓它留在原位
不動。沿著箭頭方向旋轉前端套筒 (18),以便將工具夾座打開至能夠取下工具的程度。
搭配 Saugfix 的吸塵裝置(配件)吸除廢塵/料屑含鉛顏料、部分木材種類、礦石和金屬的加工廢塵有害健康。機器操作者或施工現場附近的人員如果接觸、吸入這些廢塵,可能會引發過敏反應或感染呼吸道疾病。某些塵埃(例如加工橡木或山毛櫸的廢塵)可能致癌,特別是與處理木材的添加劑(例如木材的防腐
劑等)結合之後。唯有受過專業訓練的人才能夠進行含石棉物料的加工。– 儘可能使用適合物料的吸塵裝置。– 工作場所要保持空氣流通。– 建議佩戴 P2 過濾等級的口罩。請留意並遵守貴國的物料加工相關法規。u 避免讓工作場所堆積過多的塵垢。塵埃容易被點
燃。安裝吸塵設備(請參考圖 I)吸塵設備須使用 Saugfix 裝置(配件)。鑽孔時,Saugfix 裝置頂部會往後回彈,這樣的設計可以確保Saugfix 裝置始終緊貼著工件表面。– 請按壓限深擋塊調整按鈕 (12) 然後取出限深擋塊
(14)。請再次按壓按鈕 (12) 並將 Saugfix 裝置從前面裝入輔助手柄 (13) 中。
– 將吸塵管(直徑 19 mm,配件)連接至 Saugfix裝置的抽吸口 (20) 上。
根據工件材質選擇合適的吸塵器。吸集可能危害健康、可能致癌或乾燥的廢塵時,務必使用特殊吸塵器。在 Saugfix 裝置上調整鑽孔深度(請參考圖 J)即使 Saugfix 裝置已裝上,您仍可確認所需的鑽孔深度 X。– 將 SDS-plus 嵌件工具往 SDS-plus 工具夾頭 (3)
推入到底。如果未裝好工具,會影響深度設定的準確性。
– 鬆開 Saugfix 裝置上的蝶翼螺栓 (24)。– 把尚未啟動的電動工具緊緊地頂在工件的待鑽孔
位置上。SDS‑plus 嵌件工具也必須緊貼著工件表面。
– 挪動 Saugfix 裝置導管 (25) 在托架中的位置,使 Saugfix 裝置頂部能完全貼合在待鑽孔的表面上。導管 (25) 推至伸縮管 (23) 之上後,請勿繼續推至超過必要距離,您應要能夠看見伸縮管(23) 上的大部份刻度。
– 重新鎖緊蝶翼螺栓 (24)。鬆開 Saugfix 裝置限深擋塊上的止付螺栓 (21)。
– 如圖所示,將限深擋塊 (22) 推至伸縮管 (23)上,使距離 X 等於所需的鑽孔深度。
– 將止付螺栓 (21) 鎖緊在這個位置上。
操作操作機器u 請注意電源電壓!電源的電壓必須和電動工具銘
牌上標示的電壓一致。標示為 230 V 的電動工具亦可接上 220 V 電源。
設定操作模式您可利用鎚擊/旋轉停止開關 (11) 選擇電動工具的操作模式。– 若要切換操作模式,請按壓解鎖按鈕 (10) 並將鎚
擊/旋轉停止開關 (11) 轉至所需位置,此時應要聽見卡上的聲音。
1 609 92A 5N7 | (16.03.2020) Bosch Power Tools

繁體中文 | 25
提示:請務必在電動工具關閉電源時才變更操作模式!否則可能造成電動工具損壞。
鎚擊鑽孔位置,適用於混凝土或石材
鑽孔位置,可在木材、金屬、陶瓷及塑膠等材質上以無震動之方式進行鑽孔或是拆裝螺栓
Vario-Lock 位置,用以調整鑿頭位置,鎚擊/旋轉停止開關 (11) 無法卡止在這個位置上。
鑿削位置
設定旋轉方向透過正逆轉開關 (7) 即可變更電動工具的旋轉方向。但按下起停開關 (9) 時,將無法這樣做。u 電動工具靜止時,才能操作正逆轉開關 (7)。進行鎚擊鑽孔、一般鑽孔及鑿削時,都必須設為正轉。– 正轉:將兩邊的正逆轉開關 (7) 都轉到最底位
置,對準位置 。– 逆轉:將兩邊的正逆轉開關 (7) 都轉到最底位
置,對準位置 。啟動/關閉– 若要啟動電動工具:按下起停開關 (9)。– 若要固定起停開關 (9) 的位置,請將它按住不放
並同時按壓鎖止按鈕 (8)。– 若要關閉電動工具,放開起停開關 (9) 即可。起
停開關 (9) 的位置若是已被鎖定,請按一下該開關然後放開。
調整轉速/鎚擊次數– 您可為已啟動的電動工具無段調控轉速/衝擊次
數,轉速是由按壓電源開關 (9) 的深度決定。輕按起停開關 (9) 時,轉速/衝擊次數較低。逐漸在開關上加壓,轉速/衝擊次數也會跟著提高。
作業注意事項u 電動工具應先停止運轉,然後才放到螺母/螺栓
上。轉動中的嵌件工具可能會滑開。改變鑿頭位置(Vario‑Lock)鑿頭可固定在 40 個不同的位置上。藉此,您可採取最佳的工作姿勢。– 把鑿頭插進工具夾座中。– 請將鎚擊/旋轉停止開關 (11) 轉至「Vario-
Lock」位置。– 把鑿頭旋轉到所需的工作位置上。
– 請將鎚擊/旋轉停止開關(11)轉至「鑿削」位置。工具夾座隨之鎖定。
– 進行鑿削時必須設為正轉。挖鑿時使用鎖定功能長時間挖鑿時,可將起停開關的位置鎖定在「挖鑿」操作模式上,於是您就不必一直按著起停開關(9)。– 若要鎖定起停開關 (9) 的位置,請將它完全按壓
到底,然後同時按壓鎖止按鈕 (8)。– 再按一次鎖止按鈕 (8) 即可關閉此項功能。提示:如果您在起停開關處於鎖定狀態下時切換至其他操作模式,電動工具將因此關機。減震裝置
內建減震裝置,可減緩震動。
u 如果減震裝備損壞了,勿繼續使用電動工具。
裝上螺絲起子工具頭(請參考圖K)u 電動工具應先停止運轉,然後才放到螺母/螺栓
上。轉動中的嵌件工具可能會滑開。若要使用螺絲起子工具頭,須備妥一個具有 SDS-plus 接頭柄的萬用接桿(26)(配件)。– 清潔接頭柄的末端並且塗上少許潤滑油脂。– 把萬用接桿轉進工具夾座中,必須轉至萬用接桿
自動鎖定為止。– 拉動萬用接桿,以確認萬用接桿是否已確實鎖
止。– 把螺絲起子工具頭插入萬用接桿中。必須使用與
螺絲頭大小相符的螺絲起子工具頭。– 若要取下萬用接桿,請將鎖定套筒(5)往後推,然
後將萬用接桿(26)從工具夾座中取出即可。
維修和服務保養與清潔u 維修電動工具或換裝零、配件之前,務必從插座
上拔出插頭。u 電動工具和通風口都必須保持清潔,這樣才能夠
提高工作品質和安全性。如果必須更換連接線,請務必交由 Bosch 或者經授權的 Bosch 電動工具顧客服務執行,以避免危害機器的安全性能。u 防塵蓋若有受損,應立即更換。最好委託本公司
的顧客服務處換裝。– 每次使用後,請清潔工具夾座 (3)。
顧客服務處和顧客咨詢中心本公司顧客服務處負責回答有關本公司產品的維修、維護和備用零件的問題。以下的網頁中有分解圖和備用零件相關資料:www.bosch-pt.com如果對本公司產品及其配件有任何疑問,博世應用諮詢小組很樂意為您提供協助。當您需要諮詢或訂購備用零件時,請務必提供本產品型號銘牌上 10 位數的產品機號。
Bosch Power Tools 1 609 92A 5N7 | (16.03.2020)

26 | 한국어
中國香港和澳門特別行政區羅伯特.博世有限公司香港北角英皇道625號21樓客戶服務熱線:+852 2101 0235 傳真:+852 2590 9762 電子郵件: [email protected]台灣台灣羅伯特博世股份有限公司 建國北路一段90 號6 樓 台北市10491電話: (02) 7734 2588傳真: (02) 2516 1176www.bosch-pt.com.tw
制造商地址:Robert Bosch Power Tools GmbH 羅伯特· 博世電動工具有限公司 70538 Stuttgart / GERMANY 70538 斯圖加特/ 德國
廢棄物處理必須以符合環保的方式,回收再利用損壞的機器、配件和廢棄的包裝材料。
不可以把電動工具丟入一般的家庭垃圾中。
設備名稱 : 鎚鑽, 型號 : GBH 2-28 D/GBH 2-28 DFV限用物質及其符號
單元 鉛(Pb)
汞(Hg)
鎘(Cd)
六價鉻(Cr+6)
多溴聯苯(PBB)
多溴二苯醚(PBDE)
開關 − O O O O O電容器 O O O O O O馬達 O O O O O O電源線 O O O O O O外殼( 塑料) O O O O O O備考 1. "超出 0.1 wt %" 及 "超出 0.01 wt %" 係指限用物質之百分比含量超出百分比含量基準值。備考 2. "O" 係指該項限用物質之百分比含量未超出百分比含量基準值。備考 3. " − " 係指該項限用物質為排除項目。
한국어안전 수칙전동공구용 일반 안전수칙경고 모든 안전수칙과 지시 사항을
상세히 읽고 지켜야 합니다. 다음의 안전수칙과 지시 사항을 준수하지 않으면 화재위험이 있으며 감전 혹은 중상을 입을 수 있습니다.앞으로 참고할 수 있도록 이 안전수칙과 사용 설명서를 잘 보관하십시오.다음에서 사용되는 "전동공구"라는 개념은 전원에연결하여 사용하는 (전선이 있는) 전동 기기나 배터리를 사용하는 (전선이 없는) 전동 기기를 의미합니다.작업장 안전u 작업장을 항상 깨끗이 하고 조명을 밝게 하십시
오. 작업장 환경이 어수선하거나 어두우면 사고를 초래할 수 있습니다.
u 가연성 유체, 가스 또는 분진이 있어 폭발 위험이있는 환경에서 전동공구를 사용하지 마십시오.
전동공구는 분진이나 증기에 점화하는 스파크를일으킬 수 있습니다.
u 전동공구를 사용할 때 구경꾼이나 어린이 혹은다른 사람이 작업장에 접근하지 못하게 하십시오. 다른 사람이 주의를 산만하게 하면 기기에 대한 통제력을 잃기 쉽습니다.
전기에 관한 안전u 전동공구의 전원 플러그가 전원 콘센트에 잘 맞
아야 합니다. 플러그를 절대 변경시켜서는 안 됩니다. (접지된) 전동공구를 사용할 때 어댑터 플러그를 사용하지 마십시오. 변형되지 않은 플러그와 잘 맞는 콘센트를 사용하면 감전의 위험을줄일 수 있습니다.
u 파이프 관, 라디에이터, 레인지, 냉장고와 같은 접지 표면에 몸이 닿지 않도록 하십시오. 몸에 닿을경우 감전될 위험이 높습니다.
u 전동공구를 비에 맞지 않게 하고 습기 있는 곳에두지 마십시오. 전동공구에 물이 들어가면 감전될 위험이 높습니다.
u 전원 코드를 잘못 사용하는 일이 없도록 하십시오. 전원 코드를 잡고 전동공구를 운반해서는 안되며, 콘센트에서 전원 플러그를 뽑을 때 전원 코드를 잡아 당겨서는 절대로 안 됩니다. 전원 코드가 열과 오일에 접촉하는 것을 피하고, 날카로운
1 609 92A 5N7 | (16.03.2020) Bosch Power Tools

한국어 | 27
모서리나 기기의 가동 부위에 닿지 않도록 주의하십시오. 손상되거나 엉킨 전원 코드는 감전을유발할 수 있습니다.
u 실외에서 전동공구로 작업할 때는 실외용으로 적당한 연장 전원 코드만을 사용하십시오. 실외용연장 전원 코드를 사용하면 감전의 위험을 줄일수 있습니다.
u 전동공구를 습기 찬 곳에서 사용해야 할 경우에는 누전 차단기를 사용하십시오. 누전 차단기를사용하면 감전 위험을 줄일 수 있습니다.
사용자 안전u 신중하게 작업하며, 전동공구를 사용할 때 경솔
하게 행동하지 마십시오. 피로한 상태이거나 약물 복용 및 음주한 후에는 전동공구를 사용하지마십시오 . 전동공구를 사용할 때 잠시라도 주의가 산만해지면 중상을 입을 수 있습니다.
u 작업자 안전을 위한 장치를 사용하십시오. 항상보안경을 착용하십시오. 전동공구의 종류와 사용에 따라 먼지 보호 마스크, 미끄러지지 않는 안전한 신발, 안전모 또는 귀마개 등의 안전한 복장을하면 상해의 위험을 줄일 수 있습니다.
u 실수로 기기가 작동되지 않도록 주의하십시오. 전동공구를 전원에 연결하거나 배터리를 끼우기전에, 혹은 기기를 들거나 운반하기 전에, 전원 스위치가 꺼져 있는지 다시 확인하십시오. 전동공구를 운반할 때 전원 스위치에 손가락을 대거나전원 스위치가 켜진 상태에서 전원을 연결하면사고 위험이 높습니다.
u 전동공구를 사용하기 전에 조절하는 툴이나 키등을 빼 놓으십시오. 회전하는 부위에 있는 툴이나 키로 인해 상처를 입을 수 있습니다.
u 자신을 과신하지 마십시오. 불안정한 자세를 피하고 항상 평형을 이룬 상태로 작업하십시오 . 안정된 자세와 평형한 상태로 작업해야만이 의외의상황에서도 전동공구를 안전하게 사용할 수 있습니다.
u 알맞은 작업복을 입으십시오. 헐렁한 복장을 하거나 장신구를 착용하지 마십시오. 머리나 옷 또는 장갑이 가동하는 기기 부위에 가까이 닿지 않도록 주의하십시오. 헐렁한 복장, 장신구 혹은 긴머리는 가동 부위에 말려 사고를 초래할 수 있습니다.
u 분진 추출장치나 수거장치의 조립이 가능한 경우, 이 장치가 연결되어 있는지, 제대로 작동이 되는지 확인하십시오. 이러한 분진 추출장치를 사용하면 분진으로 인한 사고 위험을 줄일 수 있습니다.
전동공구의 올바른 사용과 취급u 기기를 과부하 상태에서 사용하지 마십시오. 작
업할 때 이에 적당한 전동공구를 사용하십시오.알맞은 전동공구를 사용하면 지정된 성능 한도내에서 더 효율적으로 안전하게 작업할 수 있습니다.
u 전원 스위치가 고장 난 전동공구를 사용하지 마십시오. 전원 스위치가 작동되지 않는 전동공구는 위험하므로, 반드시 수리를 해야 합니다.
u 기기에 세팅을 하거나 액세서리 부품을 교환하거나 혹은 기기를 보관할 때, 항상 전원 콘센트에서플러그를 미리 빼어 놓으십시오. 이러한 조치는실수로 전동공구가 작동하게 되는 것을 예방합니다.
u 사용하지 않는 전동공구는 어린이 손이 닿지 않는 곳에 보관하고, 전동공구 사용에 익숙지 않거나 이 사용 설명서를 읽지 않은 사람은 기기를 사용해서는 안됩니다. 경험이 없는 사람이 전동공구를 사용하면 위험합니다.
u 전동공구를 조심스럽게 관리하십시오. 가동 부위가 하자 없이 정상적인 기능을 하는지, 걸리는부위가 있는지, 혹은 전동공구의 기능에 중요한부품이 손상되지 않았는지 확인하십시오. 손상된 기기의 부품은 전동공구를 다시 사용하기 전에 반드시 수리를 맡기십시오. 제대로 관리하지않은 전동공구의 경우 많은 사고를 유발합니다.
u 절단 공구를 날카롭고 깨끗하게 관리하십시오.날카로운 절단면이 있고 잘 관리된 절단공구는걸리는 경우가 드물고 조절하기도 쉽습니다.
u 전동공구, 액세서리, 장착하는 공구 등을 사용할때, 이 지시 사항과 특별히 기종 별로 나와있는 사용 방법을 준수하십시오. 이때 작업 조건과 실시하려는 작업 내용을 고려하십시오. 원래 사용 분야가 아닌 다른 작업에 전동공구를 사용할 경우위험한 상황을 초래할 수 있습니다.
서비스u 전동공구 수리는 반드시 전문 인력에게 맡기고 ,
수리 정비 시 보쉬 순정 부품만을 사용하십시오.그렇게 함으로써 기기의 안전성을 오래 유지할수 있습니다.
해머에 대한 안전 경고사항모든 작업에 대한 안전 수칙u 방음 보호구를 착용하십시오. 소음에 노출되면
청력을 상실할 수 있습니다.u 보조 손잡이를 사용하십시오. 통제력을 상실하면
부상을 입을 수 있습니다.u 사용하기 전에 공구를 잘 받쳐주십시오. 본 공구
는 출력 토크가 높기 때문에 작동 중 제대로 받쳐주지 않을 경우 통제력을 잃고 부상을 입을 수 있습니다.
u 절단용 액세서리 또는 파스너가 숨겨진 배선에접촉할 가능성이 있는 작업을 수행할 경우, 전동공구의 절연된 손잡이 면만 잡으십시오. 절단용액세서리 또는 파스너가 "전류가 흐르는" 전선에접촉되면, 전동공구의 노출된 금속 부품에 "전류가 흐르는" 상태로 만들어 작업자가 감전될 수 있습니다.
긴 드릴 비트를 사용할 경우 안전 수칙u 절대 드릴 비트의 최대 정격 속도를 초과한 고속
에서 작업하지 마십시오. 고속으로 작업할 경우,비트가 구부러져 가공물에 닿지 않은 상태에서도회전하면서 부상을 입을 수 있습니다.
u 드릴링 시에는 항상 낮은 속도에서 작업을 시작하여 비트의 끝이 가공물에 닿도록 하십시오. 고
Bosch Power Tools 1 609 92A 5N7 | (16.03.2020)

28 | 한국어
속으로 작업할 경우, 비트가 구부러져 가공물에닿지 않은 상태에서도 회전하면서 부상을 입을수 있습니다.
u 비트가 작동하는 부분에만 압력을 가하고 과도한압력을 주지 마십시오.비트가 구부러져 파손되거나 통제력을 잃어 부상을 입을 수 있습니다.
추가 안전 경고사항u 공구에 보조 손잡이가 함께 공급된 경우, 보조 손
잡이를 사용하십시오. 통제력을 상실하면 부상을입을 수 있습니다.
u 전동 공구를 양손으로 꽉 잡고 안전한 자세로 작업하십시오. 전동공구를 양손으로 잡고 움직이면더 안전합니다.
u 툴 홀더에 끼워진 비트가 물리면 즉시 전동공구스위치를 끄십시오. 반동을 유발할 수 있는 강한반동력이 생길 수 있습니다. 전동공구가 과부하된 상태이거나 또는 작업하려는 소재에 걸렸을경우 비트가 물립니다.
u 작업물을 잘 고정하십시오. 고정장치나 기계 바이스에 끼워서 작업하면 손으로 잡는 것보다 더안전합니다.
u 보이지 않는 부위에 에너지 배선 및 배관 여부를확인하려면 적당한 탐지기를 사용하거나 담당 전력 공급회사에 문의하십시오. 전선에 접하게 되면 화재나 전기 충격을 야기할 수 있습니다. 가스관을 손상시키면 폭발 위험이 있습니다. 수도관을 파손하게 되면 재산 피해를 유발하거나 전기충격을 야기할 수 있습니다.
u 전동공구를 내려놓기 전에 기기가 완전히 멈추었는지 확인하십시오. 삽입공구가 걸리거나 전동공구에 대한 통제가 어려워질 수 있습니다.
제품 및 성능 설명모든 안전 수칙과 지침을 숙지하십시오.다음의 안전 수칙과 지침을 준수하지 않으면 화재 위험이 있으며 감전 혹은 중상을 입을 수 있습니다.
사용 설명서 앞 부분에 제시된 그림을 확인하십시오.
규정에 따른 사용본 전동공구는 콘크리트, 벽돌 및 석재에 임팩트 드릴 작업을 하고 간단한 치즐 작업을 하는 데 사용해
야 합니다. 또한 목재, 금속, 세라믹 및 플라스틱에서의 타격 없는 드릴 작업에도 적합합니다. 전자 제어장치와 좌우 회전 기능이 있는 전동공구는 또한스크류 작업을 하는 데에도 사용이 가능합니다.
제품의 주요 명칭제품의 주요 명칭에 표기되어 있는 번호는 기기 그림이 나와있는 면을 참고하십시오.(1) 순간 교환 키레스 척(GBH 2-28 DFV)(2) SDS-plus 키레스 척(GBH 2-28 DFV)(3) SDS‑plus 툴 홀더(4) 먼지 보호 캡(5) 잠금 슬리브(6) 키레스 척 잠금 링(GBH 2-28 DFV)(7) 회전방향 선택 스위치(8) 전원 스위치 잠금 버튼(9) 전원 스위치(10) 모드 선택 스위치 해제 버튼(11) 모드 선택 스위치(12) 깊이 조절자 조절용 버튼(13) 보조 손잡이(절연된 손잡이 부위)(14) 깊이 조절자(15) 손잡이(절연된 손잡이 부위)(16) 식별 홈(17) 드릴 척 서포트(GBH 2-28 DFV)(18) 키레스 척 앞쪽 슬리브(GBH 2-28 DFV)(19) 순간 교환 키레스 척 고정 링
(GBH 2-28 DFV)(20) 분진 추출장치의 흡입 부위 A)
(21) 분진 추출장치의 고정 나사 A)
(22) 분진 추출장치의 깊이 조절자 A)
(23) 분진 추출장치의 텔레스코프 튜브 A)
(24) 분진 추출장치의 날개 나사 A)
(25) 분진 추출장치의 가이드 튜브 A)
(26) SDS‑plus 어댑터 축이 있는 유니버설 홀더A)
A) 도면이나 설명서에 나와있는 액세서리는 표준 공급부품에 속하지 않습니다. 전체 액세서리는 저희 액세서리프로그램을 참고하십시오.
제품 사양
해머 드릴 GBH 2-28 D GBH 2-28 DV제품 번호 3 611 B67 0C.
3 611 B67 0L.3 611 B67 0K.3 611 B67 08.
3 611 B67 1F. 3 611 B67 10.
키레스 척 − − − −소비 전력 W 850 820 850 820타격률 min–1 0-5100 0-5100 0-5100 0-5100EPTA-Procedure05:2016에 따른 스
J 3.2 3.2 3.2 3.2
1 609 92A 5N7 | (16.03.2020) Bosch Power Tools

한국어 | 29
해머 드릴 GBH 2-28 D GBH 2-28 DV트로크당 타격 에너지정격 속도 min–1 0–1300 0–1300 0–1300 0–1300툴 홀더 SDS‑plus SDS‑plus SDS‑plus SDS‑plus스핀들 넥 직경 mm 50 50 50 50최대 드릴 직경– 콘크리트 mm 28 28 28 28– 벽돌(코어 비트
사용 시)mm 68 68 68 68
– 철재 mm 13 13 13 13– 목재 mm 30 30 30 30EPTA-Procedure01:2014에 따른 중량
kg 2.9 2.9 2.9 2.9
보호 등급 / II / II / II / II
해머 드릴 GBH 2-28 DFV제품 번호 3 611 B67 2C.
3 611 B67 2L.3 611 B67 2K.3 611 B67 28.
키레스 척 ● ●소비 전력 W 850 820타격률 min–1 0-5100 0-5100EPTA-Procedure05:2016에 따른 스트로크당 타격 에너지
J 3.2 3.2
정격 속도 min–1 0–1300 0–1300툴 홀더 SDS‑plus SDS‑plus스핀들 넥 직경 mm 50 50최대 드릴 직경– 콘크리트 mm 28 28– 벽돌(코어 비트 사용
시)mm 68 68
– 철재 mm 13 13– 목재 mm 30 30EPTA-Procedure01:2014에 따른 중량
kg 3,1 3,1
보호 등급 / II / II
자료는 정격 전압 [U] 230 V를 기준으로 한 것입니다. 전압이 다른 경우 및 국가별 사양에 따라 변동이 있을수 있습니다.
조립u 전동공구를 보수 정비하기 전에 반드시 콘센트에
서 전원 플러그를 빼십시오.
보조 손잡이u 반드시 보조 손잡이 (13) 를 장착하여 전동공구
를 사용하십시오.
보조 손잡이 조절하기(그림 A 참조)보조 손잡이 (13) 를 알맞게 젖혀서 안전하고 편안한 작업 자세를 취하십시오.– 보조 손잡이 (13) 의 아래쪽을 시계 반대 방향으
로 돌려 보조 손잡이 (13) 의 방향을 원하는 위치로 전환하십시오. 보조 손잡이 (13) 의 아래쪽을시계 방향으로 다시 돌려 끼우십시오.
Bosch Power Tools 1 609 92A 5N7 | (16.03.2020)

30 | 한국어
이때 보조 손잡이의 고정 밴드가 하우징에 있는홈에 제대로 끼여 있는지 확인해야 합니다.
드릴 깊이 조절하기(그림 B 참조)원하는 천공 깊이 X는 깊이 조절자 (14) 로 조절할수 있습니다.– 깊이 조절자 조절용 버튼 (12) 을 눌러 깊이 조절
자를 보조 손잡이 (13) 에 끼우십시오. 깊이 조절자 (14) 에 있는 우툴두툴한 표면이 항상 아래쪽으로 향해 있어야 합니다.
– SDS-plus 비트를 SDS-plus 툴 홀더 (3) 안으로끝까지 밀어 넣습니다. SDS‑plus 비트가 움직이게 되면 천공 깊이를 정확하게 세팅할 수 없게 됩니다.
– 드릴 비트의 끝과 깊이 조절자의 끝 부위의 간격이 원하는 천공 깊이 X가 될 때까지 깊이 조절자를 잡아 당깁니다.
드릴 척과 비트 선택하기해머 드릴 작업이나 치즐 작업을 하려면 기기의SDS‑plus 드릴 척에 삽입되는 SDS‑plus 비트를 사용해야 합니다.목재, 금속, 세라믹 그리고 플라스틱에 타격없이 드릴 작업을 하거나 스크류 작업을 하려면 SDS-plus가 아닌 비트를 사용해야 합니다(예: 실린더 섕크타입 드릴 비트). 이러한 비트를 사용하려면 순간교환 키레스 척이 필요합니다.
키레스 척 탈착하기/장착하기(GBH 2-28 DFV)키레스 척 탈착하기(그림 C 참조)– 키레스 척 잠금 링 (6) 을 뒤로 당기고, 이 위치를
유지한 상태에서 SDS‑plus 키레스 척 (2) 또는교환 가능한 키레스 척 (1) 을 앞으로 당겨 빼냅니다.
– 키레스 척을 탈착한 후 더러워지지 않도록 하십시오.
키레스 척 장착하기(그림 D 참조)u 반드시 기기 모델 고유의 순정품만 사용하고 이
때 식별 홈 (16) 의 개수를 확인해 보십시오. 식별 홈이 두 개 또는 세 개가 있는 키레스 척만 사용해야 합니다. 본 전동공구에 적합하지 않은 키레스 척을 사용한 경우, 비트가 작동 중에 빠질 수있습니다.
– 키레스 척을 끼우기 전에 깨끗이 닦고 끼워지는부분에 약간 그리스를 바릅니다.
– SDS-plus 키레스 척 (2) 또는 순간 교환 키레스척 (1) 을 양손으로 붙잡으십시오. 확실하게 잠기는 소리가 들릴 때까지 키레스 척을 돌리면서 드릴 척 서포트 (17) 쪽으로 미십시오.
– 키레스 척은 자동으로 잠깁니다. 키레스 척을 당겨보아 제대로 잠겼는지 확인해 보십시오.
툴 교환먼지 보호 캡 (4) 은 작업하는 동안 먼지가 툴 홀더안으로 들어가는 것을 방지해 줍니다. 비트 장착 시,
먼지 보호 캡 (4) 이 손상되지 않도록 주의하십시오.u 손상된 먼지 보호 캡은 즉시 교환하십시오. 고객
서비스 센터에서 교환하는 것을 권장합니다.
툴 교환(SDS-plus)SDS‑plus 비트 장착하기(그림 E 참조)SDS‑plus 드릴 척을 사용하면 별도의 공구를 사용하지 않고도 간단하고 쉽게 비트를 교환할 수 있습니다.SDS‑plus 비트는 시스템상 충분히 움직이게 되어있습니다. 그래서 공전 상태에서 편심 현상이 생기지만 드릴작업 시에는 다시 저절로 중심을 잡습니다. 이는 작업의 정확성에 어떠한 영향도 미치지 않습니다.– GBH 2-28 DFV: SDS-plus 키레스 척 (2) 을 끼
우십시오.– 끼우려는 비트의 끝 부분을 깨끗이 닦고 그리스
를 바릅니다.– 비트가 자동으로 잠길 때까지 툴 홀더 안으로 돌
려 끼우십시오.– 비트를 잡아당겨 보면서 제대로 끼워졌는지 확인
해 보십시오.SDS‑plus 비트 탈착하기(그림 F 참조)– 잠금 슬리브 (5) 를 뒤쪽으로 민 후, 비트를 분리
합니다.
(SDS-plus가 아닌) 툴 교환(GBH 2-28 DFV)비트 장착하기(그림 G 참조)지침: 해머 드릴 작업이나 치즐 작업을 할 때SDS‑plus가 아닌 비트를 사용하지 마십시오!SDS‑plus가 아닌 비트와 그 드릴 척이 해머 드릴 작업과 치즐 작업으로 인해 손상됩니다.– 순간 교환 키레스 척 (1) 을 삽입하십시오.– 교환 가능한 키레스 척의 고정 링 (19) 을 꽉 잡
으십시오. 공구가 장착될 때까지 앞쪽 슬리브(18) 를 돌려 공구 어댑터를 푸십시오. 고정 링(19) 을 꽉 붙잡고 잠기는 소리가 확실하게 들릴때까지 앞쪽 슬리브 (18) 를 세게 화살표 방향으로 돌리십시오.
– 비트를 당겨보면서 제대로 끼워졌는지 확인해 보십시오.
지침: 툴 홀더가 스톱 위치까지 열렸으면, 툴 홀더를돌려 잠글 때 끼워지는 소리가 들리며 툴 홀더는 잠기지 않을 수 있습니다.이 경우 앞쪽 슬리브 (18) 를 화살표 방향으로 돌리십시오. 그 이후 툴 홀더를 잠글 수 있습니다.– 모드 선택 스위치 (11) 를 “드릴 작업” 위치로
돌리십시오.비트 분리하기(그림 H 참조)– 교환 가능한 키레스 척의 고정 링 (19) 을 꽉 잡
으십시오. 공구가 분리 때까지 앞쪽 슬리브 (18)를 화살표 방향으로 돌려 공구 어댑터를 푸십시오.
1 609 92A 5N7 | (16.03.2020) Bosch Power Tools

한국어 | 31
분진 추출장치(액세서리)를 사용한 분진 처리분진 및 톱밥 추출장치납 성분을 포함한 페인트나 몇몇 나무 종류, 또는 광물 성분 그리고 철과 같은 재료의 분진은 건강을 해칠 수 있습니다. 이 분진을 만지거나 호흡할 경우,사용자나 주변 사람들이 알레르기 반응이나 호흡기장애를 일으킬 수 있습니다. 떡갈나무나 너도밤나무와 같은 특정한 분진은 암을유발시키며, 특히 목재 처리용으로 사용되는 부가원료 (크로마트, 목재 보호제)와 혼합되면 암을 유발시키게 됩니다. 석면 성분을 포함한 재료는 전문가만 작업할 수 있습니다.– 가능하면 작업물 소재에 적당한 분진 추출장치를
사용하십시오.– 작업장의 통풍이 잘 되도록 하십시오.– 필터등급 P2가 장착된 호흡 마스크를 사용하십
시오.작업용 재료에 관해 국가가 지정한 규정을 고려하십시오.u 작업장에 분진이 쌓이지 않도록 하십시오. 분진
이 쉽게 발화할 수 있습니다.분진 추출장치 조립하기(그림 I 참조)분진 추출을 위해 분진 추출장치(액세서리)가 필요합니다. 드릴 작업 시 분진 추출장치는 수축되어 분진 추출장치 헤드가 항상 모재에 바짝 붙어 있게 합니다.– 깊이 조절자 조절용 버튼 (12) 을 눌러 깊이 조절
자 (14) 를 빼내십시오. 버튼 (12) 을 다시 눌러분진 추출장치를 앞쪽부터 보조 손잡이 (13) 에끼우십시오.
– 흡입 호스(직경 19 mm, 액세서리)를 분진 추출장치의 흡입 부위 (20) 에 연결하십시오.
진공 청소기는 작업하는 소재에 적당한 것이어야 합니다.특히 건강에 유해한 발암성 혹은 건조한 분진을 처리해야 할 경우에는 특수한 청소기를 사용해야 합니다.분진 추출장치의 드릴 깊이 조절하기(그림 J 참조)분진 추출장치가 장착된 상태에서도 원하는 드릴 깊이 X 를 정할 수 있습니다.– SDS-plus 비트를 SDS-plus 툴 홀더 (3) 안으로
끝까지 밀어 넣습니다. SDS‑plus 비트가 움직이게 되면 천공 깊이를 정확하게 세팅할 수 없게 됩니다.
– 분진 추출장치에서 날개 나사 (24) 를 푸십시오.– 전동공구의 스위치를 켜지 않은 상태로 드릴작업
을 하려는 부위에 바싹 댑니다. 이때 SDS‑plus비트가 표면에 닿아야 합니다.
– 분진 추출장치의 가이드 튜브 (25) 를 분진 추출장치 헤드가 드릴 작업해야 할 표면에 놓이도록고정부에서 미십시오. 가이드 튜브 (25) 를 필요한 만큼만 텔레스코프 튜브 (23) 위쪽으로 밀어텔레스코프 튜브 (23) 에 있는 눈금이 최대한 많이 보이도록 하십시오.
– 날개 나사 (24) 를 다시 체결하십시오. 분진 추출장치의 깊이 조절자에서 고정 나사 (21) 를 푸십시오.
– 깊이 조절자 (22) 를 텔레스코프 튜브 (23) 에서밀어 그림에 표시된 간격 X 가 원하는 드릴 깊이와 일치되게 하십시오.
– 이 위치에서 고정 나사 (21) 를 조이십시오.
작동기계 시동u 전원의 전압에 유의하십시오! 공급되는 전원의
전압은 전동공구의 명판에 표기된 전압과 동일해야 합니다. 230 V 로 표시된 전동공구는 220 V에서도 작동이 가능합니다.
작동 모드 설정하기모드 선택 스위치 (11) 를 이용하여 전동공구의 작동 모드를 선택하십시오.– 작동 모드를 변경하려면 해제 버튼 (10) 을 누른
상태에서 모드 선택 스위치 (11) 가 맞물려 잠기는 소리가 날 때까지 원하는 위치로 돌립니다.
지침: 작동 모드는 전동공구가 꺼진 상태에서만 변경하십시오! 그렇게 하지 않으면 전동공구가 손상될 수 있습니다.
콘크리트 또는 석재에서의 해머 드릴작업 위치
목재, 금속, 세라믹, 플라스틱에서 타격이 없는 단순 드릴 작업 및 스크류작업 위치
치즐 위치 조절을 위한 Vario-Lock 위치모드 선택 스위치 (11) 는 이 위치에서 잠기지 않습니다.
치즐 작업 위치
회전방향 설정하기회전방향 선택 스위치 (7) 를 이용해 전동공구의 회전방향을 변경할 수 있습니다. 전원 스위치 (9) 가눌린 상태에서는 변경할 수 없습니다.u 전동공구가 정지된 상태에서만 회전방향 선택 스
위치 (7) 를 작동하십시오.해머 드릴작업, 드릴작업 혹은 치즐작업을 하려면회전방향이 반드시 우회전에 있어야 합니다.– 우회전: 회전방향 선택 스위치 (7) 를 양쪽에 있
는 스토퍼까지 위치로 미십시오.– 좌회전: 회전방향 선택 스위치 (7) 를 양쪽에 있
는 스토퍼까지 위치로 미십시오.
Bosch Power Tools 1 609 92A 5N7 | (16.03.2020)

32 | 한국어
전원 스위치 작동– 전동공구의 전원을 켜려면 전원 스위치를 (9) 누
르십시오.– 전원 스위치 (9) 를 누른 상태로 고정하려면 잠금
버튼 (8) 을 위로 누릅니다.– 전동공구의 전원을 끄려면 전원 스위치 (9) 에서
손을 떼십시오. 전원 스위치 (9) 가 잠긴 상태에서는 먼저 전원 스위치를 눌렀다가 손을 떼십시오.
속도/타격률 조절하기– 전원이 켜진 전동공구의 속도/타격률은 전원 스
위치 (9) 를 움직이는 정도에 따라 자유롭게 조절하십시오.
전원 스위치 (9) 쪽으로 약간만 밀면 낮은 속도/타격률이 설정됩니다. 좀 더 세게 누르면 속도/타격률이 증가합니다.
사용 방법u 전동공구의 스위치가 꺼진 상태에서만 볼트/너트
에 대십시오. 회전하는 드릴 비트가 미끄러질 수있습니다.
치즐 위치 바꾸기(Vario‑Lock)40 위치에서 치즐을 고정시킬 수 있습니다. 이를 통해 각각 적의 작업 위치를 선점할 수 있습니다.– 치즐을 툴 홀더에 끼웁니다.– 모드 선택 스위치 (11) 를 “Vario-Lock” 위치
로 돌리십시오.– 원하는 치즐 위치로 비트를 돌리십시오.– 타격/회전 모드 스위치 (11) 을 “치즐 작업” 위
치로 돌리십시오. 그러면 툴 홀더가 고정됩니다.– 치즐작업을 하려면 회전방향을 오른쪽으로 맞추
십시오.잠금 기능을 이용한 치즐 작업전원 스위치 (9) 를 계속 누르지 않고 더 오랜 시간치즐 작업을 하려면, 전원 스위치를 “치즐 작업”작동 모드에서 전원 스위치를 잠긴 상태로 고정하십시오.– 전원 스위치 (9) 를 고정하려면 전원 스위치를 끝
까지 누른 상태에서 잠금 버튼 (8) 을 누르십시오.
– 전원을 끄려면 잠금 버튼 (8) 을 다시 누르십시오.
지침: 전원 스위치가 잠겨 있는 동안 작동 모드를 전환하면, 전동공구가 꺼집니다.진동 감소장치
진동 감소장치가 내장되어 있어 진동 발생이 줄어듭니다.
u 진동 감소장치가 손상된 경우 전동공구를 계속사용하지 마십시오.
스크류 드라이버 비트 장착하기(그림 K 참조)u 전동공구의 스위치가 꺼진 상태에서만 볼트/너트
에 대십시오. 회전하는 드릴 비트가 미끄러질 수있습니다.
스크류 드라이버 비트를 사용하려면 SDS-plus 어댑터 축이 있는 유니버설 홀더 (26) (액세서리)가필요합니다.– 어댑터 축의 끼워지는 부분을 깨끗이 닦고 약간
그리스를 바릅니다.– 유니버설 홀더가 저절로 잠길 때까지 툴 홀더 안
으로 돌리면서 끼웁니다.– 유니버설 홀더를 당겨보아 제대로 잠겼는지 확인
하십시오.– 스크류 드라이버 비트 한 개를 유니버설 홀더에
끼웁니다. 스크류 헤드에 맞는 스크류 드라이버비트만을 사용하십시오.
– 유니버설 홀더를 분리하려면 잠금 슬리브 (5) 를뒤쪽으로 밀고 유니버설 홀더 (26) 를 툴 홀더에서 분리하십시오.
보수 정비 및 서비스보수 정비 및 유지u 전동공구를 보수 정비하기 전에 반드시 콘센트에
서 전원 플러그를 빼십시오.u 안전하고 올바른 작동을 위하여 전동공구와 전동
공구의 통풍구를 항상 깨끗이 하십시오.연결 코드를 교환해야 할 경우 안전을 기하기 위해Bosch 또는 Bosch 지정 전동공구 서비스 센터에맡겨야 합니다.u 손상된 먼지 보호 캡은 즉시 교환하십시오. 고객
서비스 센터에서 교환하는 것을 권장합니다.– 툴 홀더 (3) 를 사용한 후에는 항상 깨끗이 닦아
주십시오.
AS 센터 및 사용 문의AS 센터에서는 귀하 제품의 수리 및 보수정비, 그리고 부품에 관한 문의를 받고 있습니다. 대체 부품에관한 분해 조립도 및 정보는 인터넷에서도 찾아 볼수 있습니다 - www.bosch-pt.com보쉬 사용 문의 팀에서는 보쉬의 제품 및 해당 액세서리에 관한 질문에 기꺼이 답변 드릴 것입니다.문의나 대체 부품 주문 시에는 반드시 제품 네임 플레이트에 있는 10자리의 부품번호를 알려 주십시오.콜센터 080-955-0909
처리기기와 액세서리 및 포장 등은 환경 친화적인 방법으로 재생할 수 있도록 분류하십시오.
전동공구를 가정용 쓰레기로 처리하지마십시오!
1 609 92A 5N7 | (16.03.2020) Bosch Power Tools

ไทย | 33
ไทย
คำเตอนเพอความปลอดภย
คำเตอนเพอความปลอดภยทวไปในการใชเครองมอไฟฟา
คำเตอน อานคำเตอนเพอความปลอดภยและคำสงทงหมด การไมปฏบตตามคำ
เตอนและคำสงอาจเปนสาเหตใหถกไฟฟาดด เกดไฟไหมและ/หรอไดรบบาดเจบอยางรายแรงเกบรกษาคำเตอนและคำสงทงหมดสำหรบเปดอานในภายหลงคำวา "เครองมอไฟฟา" ในคำเตอนหมายถง เครองมอไฟฟาของทานททำงานดวยพลงงานไฟฟาจากแหลงจายไฟหลก (มสายไฟฟา) และเครองมอไฟฟาททำงานดวยพลงงานไฟฟาจากแบตเตอร (ไรสาย)
ความปลอดภยในสถานททำงานu รกษาสถานททำงานใหสะอาดและมไฟสองสวางด
สถานททมดหรอรกรงรงนำมาซงอบตเหตu อยาใชเครองมอไฟฟาทำงานในสภาพบรรยากาศทจด
ตดไฟได เชน ในททมของเหลวไวไฟ กาซ หรอฝนเมอใชเครองมอไฟฟาจะเกดประกายไฟซงอาจจดฝนหรอไอใหลกเปนไฟได
u ขณะใชเครองมอไฟฟาทำงาน ตองกนเดกและผยนดใหออกหางการหนเหความสนใจอาจทำใหทานขาดการควบคมเครองได
ความปลอดภยเกยวกบไฟฟาu ปลกของเครองมอไฟฟาตองเหมาะพอดกบเตาเสยบ
อยาดดแปลงปลกไมวาในลกษณะใดๆ อยางเดดขาด อยาใชปลกพวงตอใดๆ กบเครองมอไฟฟาทมสายดนปลกทไมดดแปลงและเตาเสยบทเขากนชวยลดความเสยงจากการถกไฟฟาดด
u หลกเลยงอยาใหรางกายสมผสกบพนผวทตอสายดนหรอลงกราวดไว เชน ทอ เครองทำความรอน เตา และตเยน จะเสยงอนตรายจากการถกไฟฟาดดมากขนหากกระแสไฟฟาวงผานรางกายของทานลงดน
u อยาใหเครองมอไฟฟาถกฝนหรออยในสภาพเปยกชนหากนำเขาในเครองมอไฟฟา จะเพมความเสยงจากการถกไฟฟาดด
u อยาใชสายไฟฟาในทางทผด อยาใชสายไฟฟาเพอยกดง หรอถอดปลกเครองมอไฟฟา กนสายไฟฟาออกหางจากความรอน นำมน ขอบแหลมคม หรอชนสวนทเคลอนท สายไฟฟาทชำรดหรอพนกนยงเพมความเสยงจากการถกไฟฟาดด
u เมอใชเครองมอไฟฟาทำงานกลางแจง ใหใชสายไฟตอทเหมาะสำหรบการใชงานกลางแจง การใชสายไฟตอทเหมาะสมสำหรบงานกลางแจงชวยลดอนตรายจากการถกไฟฟาดด
u หากไมสามารถหลกเลยงการใชเครองมอไฟฟาทำงานในสถานทเปยกชนได ใหใชสวทชตดวงจรเมอเกดการรวไหลของไฟฟาจากสายดน(RCD) การใชสวทชตดวงจรเมอเกดการรวไหลของไฟฟาจากสายดนชวยลดความเสยงตอการถกไฟฟาดด
ความปลอดภยของบคคลu ทานตองอยในสภาพเตรยมพรอม ระมดระวงในสงท
ทานกำลงทำอย และมสตขณะใชเครองมอไฟฟาทำงาน อยาใชเครองมอไฟฟาขณะททานกำลงเหนอยหรออยภายใตการครอบงำของฤทธของยาเสพตดแอลกอฮอล และยา เมอใชเครองมอไฟฟาทำงานในชวนาทททานขาดความเอาใจใสอาจทำใหบคคลบาดเจบอยางรนแรงได
u ใชอปกรณปกปองรางกาย สวมแวนตาปองกนเสมออปกรณปกปอง เชน หนากากกนฝน รองเทากนลนหมวกแขง หรอประกบหกนเสยงดงทเลอกใชตามความเหมาะสมกบสภาพการทำงานสามารถลดอนตรายตอบคคลได
u ปองกนการตดเครองโดยไมตงใจ ตรวจสอบใหแนใจวาสวทชอยในตำแหนงปดกอนเชอมตอเขากบแหลงจายไฟ และ/หรอแบตเตอรแพค ยกหรอถอเครองมอการถอเครองโดยใชนวหวทสวทช หรอเสยบพลงไฟฟาขณะสวทชเปดอย อาจนำไปสอบตเหตทรายแรงได
u นำเครองมอปรบแตงหรอประแจปากตายออกกอนเปดสวทชเครองมอไฟฟา เครองมอหรอประแจปากตายทวางอยกบสวนของเครองทกำลงหมนจะทำใหบคคลบาดเจบได
u อยาเออมไกลเกนไป ตงทายนทมนคงและวางนำหนกใหสมดลตลอดเวลาในลกษณะนทานสามารถควบคมเครองมอไฟฟาในสถานการณทไมคาดคดไดดกวา
u แตงกายอยางเหมาะสม อยาใสเสอผาหลวมหรอสวมเครองประดบ เอาผม เสอผา และถงมอ ออกหางจากชนสวนทกำลงหมน เสอผาหลวม เครองประดบ และผมยาวอาจเขาไปตดในสวนของเครองทกำลงหมนได
Bosch Power Tools 1 609 92A 5N7 | (16.03.2020)

34 | ไทย
u หากเครองมอไฟฟามขอเชอมตอกบเครองดดฝนหรอเครองเกบผง ใหตรวจสอบใหแนใจวาไดเชอมตอและใชงานอยางถกตอง การใชอปกรณดดฝนชวยลดอนตรายทเกดจากฝนได
การใชและการดแลรกษาเครองมอไฟฟาu อยางฝนกำลงเครองมอไฟฟา ใชเครองมอไฟฟาทถก
ตองตรงตามลกษณะงานของทาน เครองมอไฟฟาทถกตองจะทำงานไดดกวาและปลอดภยกวาในระดบสมรรถภาพทออกแบบไว
u อยาใชเครองมอไฟฟาถาสวทชไมสามารถเปดปดไดเครองมอไฟฟาทไมสามารถควบคมการเปดปดดวยสวทชได เปนเครองมอไฟฟาทไมปลอดภยและตองสงซอมแซม
u กอนปรบแตงเครอง เปลยนอปกรณประกอบ หรอเกบเครองมอไฟฟาเขาท ตองถอดปลกไฟออกจากแหลงจายไฟ และ/หรอถอดแบตเตอรแพคออกจากเครองมอไฟฟา มาตรการปองกนเพอความปลอดภยนชวยลดความเสยงจากการตดเครองโดยไมไดตงใจ
u เมอเลกใชงานเครองมอไฟฟา ใหเกบเครองไวในททเดกหยบไมถง และไมอนญาตใหบคคลทไมคนเคยกบเครองหรอบคคลทไมไดอานคำแนะนำเหลานใชเครองเครองมอไฟฟาเปนของอนตรายหากตกอยในมอของผใชทไมไดรบการฝกฝน
u บำรงรกษาเครองมอไฟฟา ตรวจสอบชนสวนทเคลอนทวาวางไมตรงแนวหรอตดขดหรอไม ตรวจหาการแตกหกของชนสวนและสภาพอนใดทอาจมผลตอการทำงานของเครองมอไฟฟา หากชำรดตองสงเครองมอไฟฟาไปซอมแซมกอนใชงาน อบตเหตหลายอยางเกดขนเนองจากดแลรกษาเครองไมดพอ
u รกษาเครองมอตดใหคมและสะอาดหากบำรงรกษาเครองมอทมขอบตดแหลมคมอยางถกตองจะสามารถตดไดลนไมตดขดและควบคมไดงายกวา
u ใชเครองมอไฟฟา อปกรณประกอบ เครองมอ และอปกรณอนๆ ตรงตามคำแนะนำเหลาน โดยคำนงถงเงอนไขการทำงานและงานทจะทำ การใชเครองมอไฟฟาทำงานทตางไปจากวตถประสงคการใชงานของเครอง อาจนำไปสสถานการณทเปนอนตรายได
การบรการu สงเครองมอไฟฟาของทานเขารบบรการจากชาง
ซอมทมคณสมบตเหมาะสม โดยใชอะไหลทเหมอนกนเทานน ในลกษณะนทานจะแนใจไดวาเครองมอไฟฟาอยในสภาพทปลอดภย
คำเตอนเพอความปลอดภยสำหรบสวานกระแทก
คำเตอนเพอความปลอดภยสำหรบการทำงานทงหมดu สวมประกบหปองกนสยงดง การรบฟงเสยงดงอาจทำให
สญเสยการไดยนu ใชดามจบเพม การสญเสยการควบคมอาจทำใหบคคลได
รบบาดเจบu ยดเครองมออยางถกตองกอนใชงาน เครองมอนใหแรง
บดสง และหากไมยดเครองมออยางถกตองระหวางการทำงาน อาจสญเสยการควบคมซงจะสงผลใหบคคลไดรบบาดเจบ
u เมอทำงานในบรเวณทอปกรณตดหรอสกรอาจสมผสสายไฟฟาทซอนอยหรอสายไฟฟาของตวเครองเองตองจบเครองมอไฟฟาตรงพนผวจบทหมฉนวน หากอปกรณตดหรอสกรสมผสสายท “มกระแสไฟฟา” ไหลผานจะทำใหชนสวนโลหะทไมมการปองกนของเครองมอไฟฟาเกด “มกระแสไฟฟา” ดวย และสงผลใหผใชงานเครองถกไฟฟาดดได
คำเตอนเพอความปลอดภยเมอใชดอกสวานยาวu อยาทำงานดวยความเรวทสงกวาอตราความเรวสงสด
ของดอกสวาน ทความเรวทสงกวา ดอกสวานอาจโคงงอเมอปลอยใหหมนอยางอสระโดยไมสมผสชนงาน และสงผลใหไดรบบาดเจบทางรางกาย
u เรมตนเจาะดวยความเรวตำและใหปลายดอกสวานสมผสชนงานเสมอ ทความเรวทสงกวา ดอกสวานอาจโคงงอเมอปลอยใหหมนอยางอสระโดยไมสมผสชนงานและสงผลใหไดรบบาดเจบทางรางกาย
u ใชแรงกดใหตรงกบแนวดอกสวานเทานนและอยาใชแรงกดมากเกนไปดอกสวานอาจโคงงอทำใหแตกหกหรอสญเสยการควบคม และสงผลใหไดรบบาดเจบทางรางกาย
คำแนะนำเพอความปลอดภยเพมเตมu ใชดามจบเพมหากจดสงมาพรอมกบเครองการสญเสย
การควบคมอาจทำใหบคคลไดรบบาดเจบu จบเครองมอไฟฟาใหแนนดวยมอทงสองขางและตงทา
ยนใหมนคงขณะทำงาน ทานจะสามารถนำทางเครองมอไฟฟาไดปลอดภยกวาเมอจบเครองดวยมอทงสองขาง
u ปดสวทชเครองมอไฟฟาทนทหากเครองมอตดขด ใหเตรยมพรอมสำหรบปฏกรยาแรงบดสงซงเปนเหตใหเกดการตกลบ เครองมอจะตดขดเมอเครองมอไฟฟาถกใชงานเกนกำลงหรอเครองมอถกบบอดอยในชนงาน
u ยดชนงานใหแนน การยดชนงานดวยเครองหนบหรอแทนจบจะมนคงกวาการยดดวยมอ
u ใชเครองตรวจจบทเหมาะสมเพอตรวจหาสายไฟฟาหรอทอสาธารณปโภคทอาจซอนอยในบรเวณทำงาน
1 609 92A 5N7 | (16.03.2020) Bosch Power Tools

ไทย | 35
หรอตดตอบรษทสาธารณปโภคในพนทเพอขอความชวยเหลอ การสมผสกบสายไฟฟาอาจทำใหเกดไฟไหมหรอถกไฟฟาดด การทำใหทอแกซเสยหายอาจทำใหเกดระเบด การเจาะเขาในทอนำทำใหทรพยสนเสยหาย หรออาจเปนเหตใหถกไฟฟาดดได
u รอใหเครองมอไฟฟาหยดสนทกอนวางเครองลงบนพนเครองมอทใสอยอาจตดขดและทำใหสญเสยการควบคมเครองมอไฟฟา
รายละเอยดผลตภณฑและขอมลจำเพาะ
อานคำเตอนเพอความปลอดภยและคำแนะนำทงหมด การไมปฏบตตามคำเตอนและคำสงอาจเปนสาเหตใหถกไฟฟาดด เกดไฟไหมและ/หรอไดรบบาดเจบอยางรายแรง
กรณาดภาพประกอบในสวนหนาของคมอการใชงาน
ประโยชนการใชงานของเครองเครองนใชสำหรบเจาะตอกในคอนกรต อฐ และหนและยงใชสำหรบงานสกดเบาๆ เครองนยงเหมาะสำหรบเจาะโดยไมกระแทกในไม โลหะ เซรามก และพลาสตกอกดวยเครองมอไฟฟาทมระบบควบคมอเลกทรอนกสและการหมนซาย/ขวาสามารถใชขนสกรไดดวย
สวนประกอบทแสดงภาพลำดบเลขของสวนประกอบผลตภณฑอางถงสวนประกอบของเครองทแสดงในหนาภาพประกอบ
(1) หวจบดอกชนดเปลยนเรว (GBH 2-28 DFV)(2) หวจบดอก SDS-plus (GBH 2-28 DFV)(3) ดามจบเครองมอ SDS-plus
(4) ฝาครอบกนฝน(5) ปลอกสำหรบลอค(6) แหวนลอคสำหรบหวจบดอก (GBH 2-28 DFV)(7) สวทชเปลยนทศทางการหมน(8) ปมลอคสวทชเปด-ปด(9) สวทชเปด-ปด(10) ปมปลดลอคสวทชหยดกระแทก/หยดหมน(11) สวทชหยดกระแทก/หยดหมน(12) ปมสำหรบปรบกานวดความลก(13) ดามจบเพม (พนผวจบหมฉนวน)(14) กานวดความลก(15) ดามจบ (พนผวจบหมฉนวน)(16) รองเอกลกษณ(17) ขอรบหวจบดอก (GBH 2-28 DFV)(18) ปลอกหนาของหวจบดอกชนดเปลยนเรว
(GBH 2-28 DFV)(19) แหวนกนของหวจบชนดเปลยนเรว
(GBH 2-28 DFV)(20) ชองดดออกของ Saugfix A)
(21) นอตหนบสำหรบ Saugfix A)
(22) กานวดความลกของ Saugfix A)
(23) ทอซอนสวมกนของ Saugfix A)
(24) นอตปกของ Saugfix A)
(25) นอตปกของ Saugfix A)
(26) ดามจบดอกทวไปทมกาน SDS-plusA)
A) อปกรณประกอบทแสดงภาพหรออธบายไมรวมอยในการจดสงมาตรฐานกรณาดอปกรณประกอบทงหมดในรายการแสดงอปกรณประกอบของเรา
ขอมลทางเทคนค
สวานโรตาร GBH 2-28 D GBH 2-28 DV
หมายเลขสนคา 3 611 B67 0C.3 611 B67 0L.
3 611 B67 0K.3 611 B67 08.
3 611 B67 1F. 3 611 B67 10.
หวจบดอก − − − −
กำลงไฟฟาพกดดานเขา
วตต 850 820 850 820
อตรากระแทก min-1 0-5100 0-5100 0-5100 0-5100
พลงงานกระแทกตอครงตามระเบยบการ
จล 3.2 3.2 3.2 3.2
Bosch Power Tools 1 609 92A 5N7 | (16.03.2020)

36 | ไทย
สวานโรตาร GBH 2-28 D GBH 2-28 DV
EPTA-Procedure05:2016
อตราความเรวพกด นาท–1 0–1300 0–1300 0–1300 0–1300
ดามจบเครองมอ SDS-plus SDS-plus SDS-plus SDS-plus
เสนผาศนยกลางปลอกแกน
มม. 50 50 50 50
เสนผาศนยกลางการเจาะ สงสด
– คอนกรต มม. 28 28 28 28
– งานกออฐ (ดวยดอกเจาะควาน)
มม. 68 68 68 68
– เหลกกลา มม. 13 13 13 13
– ไม มม. 30 30 30 30
นำหนกตามระเบยบการ EPTA-Procedure01:2014
กก. 2.9 2.9 2.9 2.9
ระดบความปลอดภย / II / II / II / II
สวานโรตาร GBH 2-28 DFV
หมายเลขสนคา 3 611 B67 2C.3 611 B67 2L.
3 611 B67 2K.3 611 B67 28.
หวจบดอก ● ●
กำลงไฟฟาพกดดานเขา วตต 850 820
อตรากระแทก min-1 0-5100 0-5100
พลงงานกระแทกตอครงตามระเบยบการ EPTA-Procedure 05:2016
จล 3.2 3.2
อตราความเรวพกด นาท–1 0–1300 0–1300
ดามจบเครองมอ SDS-plus SDS-plus
เสนผาศนยกลางปลอกแกน มม. 50 50
เสนผาศนยกลางการเจาะ สงสด
– คอนกรต มม. 28 28
– งานกออฐ (ดวยดอกเจาะควาน)
มม. 68 68
– เหลกกลา มม. 13 13
– ไม มม. 30 30
1 609 92A 5N7 | (16.03.2020) Bosch Power Tools

ไทย | 37
สวานโรตาร GBH 2-28 DFV
นำหนกตามระเบยบการEPTA-Procedure01:2014
กก. 3,1 3,1
ระดบความปลอดภย / II / II
คาทใหนใชไดกบแรงดนไฟฟานอมนอล [U] 230 โวลท คาเหลานอาจเปลยนแปลงไปสำหรบแรงดนไฟฟาทแตกตางกนและโมเดลทผลตสำหรบเฉพาะประเทศ
การตดตงu ดงปลกไฟออกจากเตาเสยบกอนปรบแตงเครอง
ดามจบเพมu ใชเครองมอไฟฟารวมกบดามจบเพม (13) เสมอ
การหมนดามจบเพม (ดภาพประกอบ A)ทานสามารถจบดามจบเพม (13) หนไปยงตำแหนงใดกไดเพอใหไดทาทำงานทมนคงและเหนอยนอย– หมนกานจบดานลางของดามจบเพม (13) ทวนเขม
นาฬกา และหนดามจบเพม (13) ไปยงตำแหนงทตองการจากนนจงหมนกานจบดานลางของดามจบเพม (13) ในทศตามเขมนาฬกากลบเขาทใหแนนตรวจสอบใหแนใจวาสายรดปรบความตงของดามจบเพมอยในรองทตวเครอง
การปรบความลกการเจาะ (ดภาพประกอบ B)ทานสามารถใชกานวดความลก (14) เพอตงความลกการเจาะ X ทตองการ– กดปมสำหรบปรบกานวดความลก (12) และใสกานวด
ความลกเขาในดามจบเพม (13) ตองหนพนผวทเปนรองบนกานวดความลก (14) ลงดานลาง
– ดนเครองมอ SDS-plus เขาในดามจบเครองมอ SDS-plus (3) จนสด หากเครองมอ SDS-plus เคลอนไหวอาจทำใหปรบความลกการเจาะไดไมถกตอง
– ดงกานวดความลกออกมาจนระยะหางระหวางปลายดอกสวานและปลายกานวดความลกเทากบความลกการเจาะทตองการ X
การเลอกหวจบดอกและเครองมอสำหรบการเจาะตอกและการสกดตองใชเครองมอ SDS-plus ทใสในหวจบดอก SDS-plusสำหรบการเจาะโดยไมกระแทกในไม โลหะ เซรามก และพลาสตก รวมทงการขนสกร ตองใชเครองมอทไมม SDS-
plus (ต. ย. เชน ดอกสวานทมกานทรงกระบอก)ตองใชหวจบดอกไรเฟองในสำหรบเครองมอเจาะประเภทน
การถอด/การใสหวจบดอกชนดเปลยนเรว(GBH 2-28 DFV)
การถอดหวจบดอกแบบเปลยนเรว (ดภาพประกอบ C)– ดงแหวนลอคสำหรบหวจบดอกแบบเปลยนเรว (6) ไปดาน
หลง จบแหวนลอคใหอยในตำแหนงน และดงหวจบดอกแบบเปลยนเรว SDS-plus (2) หรอหวจบดอกแบบเปลยนเรวหนบเรว (1) ออกทางดานหนา
– เมอถอดออกแลว ตองปองกนหวจบดอกไมใหเปอนสกปรก
การใสหวจบดอกแบบเปลยนเรว (ดภาพประกอบ D)u ใชเฉพาะอปกรณทเปนของแทเทานน และตรวจสอบ
จำนวนรองเอกลกษณ (16) อนญาตใหเปลยนเฉพาะหวจบดอกทมสองหรอสามรองเอกลกษณเทานน หากไมสามารถเปลยนหวจบดอกทเหมาะสมไดสำหรบเครองมอไฟฟาน เครองมอกทใชอาจลมเหลวในระหวางการดำเนนการ
– ทำความสะอาดหวจบดอกกอนใส และเคลอบจาระบบางๆทปลายกาน
– จบหวจบดอก SDS-plus (2) หรอหวจบดอกชนดเปลยนเรว (1) เตมๆ มอ ดนหวจบดอกหมนใสบนขอรบหวจบดอก (17) จนไดยนเสยงขบเขาลอคอยางชดเจน
– หวจบดอกจะลอคโดยอตโนมต ดงหวจบดอกเพอตรวจสอบการลอค
การเปลยนเครองมอฝาครอบกนฝน (4) สวนใหญจะปองกนไมใหฝนทเกดจากการเจาะลอดเขาไปในดามจบเครองมอในระหวางการใชงาน เมอใสเครองมอตองระวงอยาใหฝาครอบกนฝน (4) เสยหายu ตองเปลยนฝาครอบกนฝนทชำรดโดยทนท
เราขอแนะนำวา ควรสงใหศนยบรการหลงการขายเปลยนให
Bosch Power Tools 1 609 92A 5N7 | (16.03.2020)

38 | ไทย
การเปลยนเครองมอ (SDS-plus)
การใสเครองมอ SDS-plus (ดภาพประกอบ E)หวจบดอก SDS-plus ทำใหเปลยนเครองมอเจาะไดงายและสะดวกโดยไมตองใชเครองมออนๆ ชวยตามเงอนไขของระบบ เครองมอ SDS-plus สามารถเคลอนไหวไดอยางอสระ ดงนนเมอเดนตวเปลา เครองมอจะวงสายจากแนวรศม ซงจะไมมผลตอความเทยงตรงของรเจาะ ดอกสวานจะตงตวใหอยตรงกลางเองระหวางการเจาะ– GBH 2-28 DFV: ใสหวจบดอก SDS-plus (2)– ทำความสะอาดและทาจาระบบางๆ ทปลายกานเครองมอ– จบเครองมอหมนใสในดามจบเครองมอจนเขา
ลอคโดยอตโนมต– ดงเครองมอเพอตรวจสอบการลอค
การถอดเครองมอ SDS-plus (ดภาพประกอบ F)– ดนปลอกสำหรบลอค (5) ไปดานหลงและถอดเครองมอ
ออก
การเปลยนเครองมอ (ไมม SDS-plus)(GBH 2-28 DFV)
การใสเครองมอ (ดภาพประกอบ G)หมายเหต: อยาใชเครองมอทไมม SDS-plus สำหรบเจาะตอกหรอสกด! เครองมอทไมม SDS-plus และหวจบดอกของเครองมออาจชำรดจากการเจาะตอกหรอสกด– ใสหวจบดอกชนดเปลยนเรว (1)– จบแหวนยด (19) ของหวจบดอกแบบเปลยนเรวหนบเรว
ใหแนน เปดดามจบเครองมอโดยหมนปลอกหนา (18) จนสามารถใสเครองมอเขาไปได จบแหวนยด (19) ใหแนนและหมนปลอกหนา (18) ไปในทศทางลกศรจนไดยนเสยงขบเขาลอคอยางชดเจน
– ดงเครองมอเพอตรวจสอบการเขาในตำแหนงอยางแนนหนา
หมายเหต: หากดามจบเครองมอถกเปดออกจนสด อาจไดยนเสยงขบเขาลอคขณะหมนดามจบเครองมอใหปด และดามจบเครองมอไมปดลงในกรณนใหหมนปลอกหนา (18) ไปในทศตรงขามกบทศทางลกศรหนงครง จากนนดามจบเครองมอจะสามารถปดได– หมนสวทชหยดกระแทก/หยดหมน (11) ไปทตำแหนง
"การเจาะ"
การถอดเครองมอ (ดภาพประกอบ H)– จบแหวนยด (19) ของหวจบดอกแบบเปลยนเรวหนบเรว
ใหแนน เปดดามจบเครองมอโดยหมนปลอกหนา (18) ไปตามทศทางลกศรจนสามารถถอดเครองมอออกมาได
การดดฝนดวย Saugfix (อปกรณประกอบ)
การดดฝน/ขเลอยฝนทไดจากวสด เชน เคลอบผวทมสารตะกว ไมบางประเภทแรธาต และโลหะ อาจเปนอนตรายตอสขภาพ การสมผสหรอการหายใจเอาฝนเขาไปอาจทำใหเกดปฏกรยาแพฝน และ/หรอนำมาซงโรคตดเชอระบบหายใจแกผใชเครองหรอผทยนอยใกลเคยง ฝนบางประเภท เชน ฝนไมโอก หรอไมบช นบเปนสารททำใหเกดมะเรง โดยเฉพาะอยางยงเมอผสมกบสารเตมแตงเพอบำบดไม (โครเมต ผลตภณฑรกษาเนอไม)สำหรบวสดทมแอสเบสทอสตองใหผเชยวชาญทำงานเทานน– ใชระบบดดฝนออกทเหมาะสมกบประเภทวสด มากเทา
ทจะทำได– จดสถานททำงานใหมการระบายอากาศทด– ขอแนะนำใหสวมหนากากปองกนการตดเชอทมระดบ-ไส
กรอง P2ปฏบตตามกฎขอบงคบสำคญอนๆ ทเกยวกบวสดชนงานทบงคบใชในประเทศของทานu ปองกนการสะสมของฝนในสถานททำงาน
ฝนสามารถลกไหมอยางงายดาย
การตดตง Saugfix (ดภาพประกอบ I)สำหรบการดดฝนออก ตองใช Saugfix (อปกรณประกอบ)ขณะเจาะร Saugfix จะรนกลบเพอใหสวนหวของ Saugfixอยชดกบพนผวรเจาะเสมอ– กดปมปรบกานวดความลก (12) และถอดกานวดความลก
(14) ออกกดปม (12) อกครงและใส Saugfix เขาในดามจบเพม (13) จากดานหนา
– ตอทอดดฝน (เสนผาศนยกลาง 19 มม. อปกรณประกอบ)เขากบชองดดออก (20) ของ Saugfix
เครองดดฝนตองมลกษณะการใชงานทเหมาะกบประเภทวสดชนงานในกรณดดฝนแหงทเปนอนตรายตอสขภาพอยางยงหรออาจกอใหเกดมะเรงได ใหใชเครองดดฝนพเศษ
การปรบความลกการเจาะบน Saugfix (ดภาพประกอบJ)ทานสามารถปรบความลกการเจาะทตองการ X ไดแมมSaugfix ตดตงอย– ดนเครองมอ SDS-plus เขาในดามจบเครองมอ SDS-
plus (3) จนสดการเคลอนทของเครองมอ SDS-plusอาจทำใหปรบความลกการเจาะไดไมถกตอง
– คลายนอตปก (24) บน Saugfix
1 609 92A 5N7 | (16.03.2020) Bosch Power Tools

ไทย | 39
– จบเครองมอไฟฟาเขาหาจดทจะเจาะอยางมนคงโดยไมตองเปดสวทช เครองมอ SDS-plus ตองวางบนพนผวทจะเจาะ
– เลอนทอนำ (25) ของ Saugfix ในทยดเพอใหหวของSaugfix วางอยบนพนผวทจะเจาะ อยาเลอนทอนำ (25)ครอบเหนอทอซอนสวมกน (23) มากเกนจำเปน ทงนเพอจะไดสามารถมองเหนมาตราสวน (23) บนทอซอนสวมกนไดมากทสด
– ขนนอตปก (24) กลบเขาใหแนน คลายนอตหนบ (21)บนกานวดความลกของ Saugfix
– เลอนกานวดความลก (22) บนทอซอนสวมกน (23) ในลกษณะใหระยะทาง X ดงแสดงในภาพประกอบเทากบความลกการเจาะทตองการ
– ขนนอตหนบ (21) ในตำแหนงนเขาใหแนน
การปฏบตงาน
การเรมตนปฏบตงานu ใหสงเกตแรงดนไฟฟา! แรง
ดนไฟฟาจากแหลงจายไฟฟาตองมคาตรงกบคาแรงดนไฟฟาทระบไวบนแผนปายพกดเครอง เครองมอไฟฟาทมเครองหมาย 230 โวลท สามารถใชงานกบ220 โวลท ไดดวย
การตงโหมดทำงานทานสามารถเลอกโหมดทำงานของเครองมอไฟฟาดวยสวทชหยดกระแทก/หยดหมน (11)– เมอตองการเปลยนโหมดทำงาน ใหกดปมปลดลอค (10)
และหมนสวทชหยดกระแทก/หยดหมน (11) ไปยงตำแหนงทตองการจนไดยนเสยงเขาลอค
หมายเหต: เปลยนโหมดทำงานเฉพาะเมอเครองมอไฟฟาปดสวทชอยเทานน! มฉะนนเครองมอไฟฟาอาจชำรดได
ตำแหนงสำหรบการเจาะตอกในคอนกรตหรอหน
ตำแหนงสำหรบการเจาะ โดยไมกระแทกในไม โลหะ เซรามก และพลาสตก รวมทงการขนการขนสกร
ตำแหนงVario-Lock สำหรบปรบตำแหนงสกด สวทชหยดกระแทก/หยดหมน (11) จะไมลอคในตำแหนงน
ตำแหนงสำหรบการสกด
การกลบทศทางการหมนทานสามารถใชสวทชเปลยนทศทางการหมน (7) เพอเปลยนทศทางการหมนของเครองมอไฟฟา อยางไรกตาม หากสวทชเปด-ปด (9) ถกกดอย จะไมสามารถเปลยนทศทางการหมนu หมนสวทชเปลยนทศทางการหมน (7) เมอเครองหยด
นงอยกบทเทานนตงทศทางการหมนสำหรบการเจาะตอก การเจาะ และการสกด ไวทการหมนทางขวาเสมอ– การหมนทางขวา: หมนสวทชเปลยนทศทางการหมน (7)
ทงสองขางจนสดไปทตำแหนง – การหมนทางซาย: หมนสวทชเปลยนทศทางการหมน (7)
ทงสองขางจนสดไปทตำแหนง
การเปด-ปดเครอง– เปดสวทชเครองมอไฟฟาโดยกดสวทชเปด-ปด (9)– ลอคสวทชเปด-ปดโดยกดสวทชเปด-ปด (9) คางไวและดน
ปมลอค (8) เพม– ปดสวทชเครองมอไฟฟาโดยปลอยนวจากสวทชเปด-ปด
(9) หากสวทชเปด-ปด (9) ถกลอค ใหกดสวทชเปด-ปดกอน แลวจงปลอยนว
การตงอตราความเรว/อตรากระแทก– สามารถปรบอตราความเรว/อตรากระแทกของเครองมอ
ไฟฟาทเปดสวทชทำงานไดอยางตอเนอง ทงนขนอยกบแรงทกดลงบนสวทชเปด-ปด (9)
กดสวทชเปด-ปด (9) เบาจะไดอตราความเรว/อตรากระแทกตำ กดสวทชแรงยงขนจะไดอตราความเรว/อตรากระแทกเพมขน
ขอแนะนำในการทำงานu จบเครองมอไฟฟาเขาบนหวสกร/นอตเมอเครองปดอย
เทานน เครองมอทหมนอยอาจลนไถล
การเปลยนตำแหนงสกด (Vario-Lock)ทานสามารถลอคดอกสกดได 40 ตำแหนง ในลกษณะนทานสามารถตงทาทำงานไดเหมาะสมทสดสำหรบแตละรปแบบการทำงาน– ใสดอกสกดเขาในดามจบเครองมอ– หมนสวทชหยดกระแทก/หยดหมน (11) ไปทตำแหนง
"Vario-Lock"– หมนเครองมอไปยงตำแหนงการสกดทตองการ
Bosch Power Tools 1 609 92A 5N7 | (16.03.2020)

40 | ไทย
– หมนสวทชหยดกระแทก/หยดหมน (11) ไปทตำแหนง"การสกด" ดวยวธนดามจบเครองมอจะถกลอคไว
– ตงทศทางการหมนสำหรบการสกดไวทการหมนทางขวา
การสกดดวยฟงกชนลอคเมอตองการสกดเปนเวลานานโดยไมตองกดสวทชเปด-ปด(9) อยางตอเนองใหลอคสวทชเปด-ปดในโหมดทำงาน "การสกด"– เมอตองการลอคใหกดสวทชเปด-ปด (9) ไปจนสดและใน
ขณะเดยวกนใหกดปมลอค (8)– เมอตองการปดสวทชใหกดปมลอค (8) อกครงหมายเหต: หากทานสบสวทชไปทโหมดทำงานอนในขณะทสวทชเปด-ปดลอคอย เครองมอไฟฟาจะปดสวทช
ตวหนวงการสนสะเทอนตวหนวงการสนสะเทอนเบดเสรจชวยลดการสนสะเทอนทเกดขน
u หากองคประกอบตวหนวงการสนสะเทอนชำรดอยาใชเครองมอไฟฟาทำงานตอไป
การใสดอกไขควง (ดภาพประกอบ K)u จบเครองมอไฟฟาเขาบนหวสกร/นอตเมอเครองปดอย
เทานน เครองมอทหมนอยอาจลนไถลเมอใชดอกไขควงทำงานตองใชดามจบดอกทวไป (26) ทมกานตดตง SDS-plus (อปกรณประกอบ) รวมดวย– ทำความสะอาดปลายกานตดตง และเคลอบจาระบบางๆ– จบดามจบดอกทวไปหมนใสในดามจบเครองมอจนเขาลอค
โดยอตโนมต– ดงดามจบดอกทวไปเพอตรวจสอบการลอค– ใสดอกไขควงเขาในดามจบดอกทวไป ใชดอกไขควงทม
ขนาดพอดกบหวสกรเทานน– เมอตองการถอดดามจบดอกทวไปออกใหดงปลอกสำหรบ
ลอค (5) ไปดานหลง และถอดดามจบดอกทวไป (26)ออกจากดามจบเครองมอ
การบำรงรกษาและการบรการ
การบำรงรกษาและการทำความสะอาดu ดงปลกไฟออกจากเตาเสยบกอนปรบแตงเครองu เพอใหทำงานไดอยางถกตองและปลอดภย
ตองรกษาเครองและชองระบายอากาศใหสะอาดอยเสมอ
หากจำเปนตองเปลยนสายไฟฟา ตองสงเครองให Boschหรอศนยบรการหลงการขายทไดรบมอบหมายสำหรบเครองมอไฟฟา Bosch เปลยนให ทงนเพอหลกเลยงอนตราย
u ตองเปลยนฝาครอบกนฝนทชำรดโดยทนทเราขอแนะนำวาควรสงใหศนยบรการหลงการขายเปลยนให
– ทำความสะอาดดามจบเครองมอ (3) ทกครงหลงใชงาน
การบรการหลงการขายและการใหคำปรกษาการใชงานศนยบรการหลงการขายของเรายนดตอบคำถามของทานทเกยวกบการบำรงรกษาและการซอมแซมผลตภณฑรวมทงเรองอะไหล ภาพเขยนแบบการประกอบและขอมลเกยวกบอะไหล กรณาดใน: www.bosch-pt.comทมงานทปรกษาของ บอช ยนดใหขอมลเกยวกบผลตภณฑของเราและอปกรณประกอบตางๆเมอตองการสอบถามและสงซออะไหล กรณาแจงหมายเลขสนคา 10 หลกบนแผนปายรนของผลตภณฑทกครง
ไทยไทย บรษท โรเบรต บอช จำกด เอฟวายไอ เซนเตอร อาคาร 1 ชน 5 เลขท 2525 ถนนพระราม 4 แขวงคลองเตย เขตคลองเตย กรงเทพฯ 10110 โทร: +66 2012 8888 แฟกซ: +66 2064 5800 www.bosch.co.thศนยบรการซอมและฝกอบรม บอชอาคาร ลาซาลทาวเวอร ชน G หองเลขท 2 บานเลขท 10/11 หม 16 ถนนศรนครนทร ตำบลบางแกว อำเภอบางพล จงหวดสมทรปราการ 10540 ประเทศไทย โทรศพท 02 7587555 โทรสาร 02 7587525
การกำจดขยะเครองมอไฟฟา อปกรณประกอบ และหบหอ ตองนำไปแยกประเภทวสดเพอการรไซเคลทเปนมตรตอสงแวดลอม
อยาทงเครองมอไฟฟาลงในขยะครวเรอน!
1 609 92A 5N7 | (16.03.2020) Bosch Power Tools

Bahasa Indonesia | 41
Bahasa IndonesiaPetunjuk KeselamatanPetunjuk Keselamatan Umum Perkakas Listrik
PERINGATAN Bacalah semua petunjukkeselamatan dan semua petunjuk
penggunaan. Kesalahan dalam menjalankan petunjukkeselamatan dan petunjuk penggunaan dapatmengakibatkan sengatan listrik, kebakaran, dan/atau cederaserius.Simpanlah semua petunjuk keselamatan dan petunjukpenggunaan untuk acuan di masa mendatang.Istilah "perkakas listrik" dalam petunjuk keselamatanmengacu pada perkakas listrik yang dioperasikan denganlistrik (menggunakan kabel) atau perkakas listrik yangdioperasikan dengan baterai (tanpa kabel).
Keamanan tempat kerjau Jaga kebersihan dan pencahayaan area kerja. Area
yang berantakan atau gelap dapat memicu kecelakaan.u Jangan mengoperasikan perkakas listrik di
lingkungan yang dapat memicu ledakan, sepertiadanya cairan, gas, atau debu yang mudah terbakar.Perkakas listrik dapat memancarkan bunga api yangkemudian mengakibatkan debu atau uap terbakar.
u Jauhkan dari jangkauan anak-anak dan pengamat saatmengoperasikan perkakas listrik. Gangguan dapatmenyebabkan hilangnya kendali.
Keamanan listriku Steker perkakas listrik harus sesuai dengan
stopkontak. Jangan pernah memodifikasi steker. Jangan menggunakan steker adaptor bersama denganperkakas listrik yang terhubung dengan sistemgrounding. Steker yang tidak dimodifikasi danstopkontak yang cocok akan mengurangi risiko sengatanlistrik.
u Hindari kontak badan dengan permukaan yangterhubung dengan sistem grounding, seperti pipa,radiator, kompor, dan lemari es. Terdapat peningkatanrisiko terjadinya sengatan listrik jika badan Andaterhubung dengan sistem grounding.
u Perkakas listrik tidak boleh terpapar hujan ataubasah. Air yang masuk ke dalam perkakas listrikmenambah risiko terjadinya sengatan listrik.
u Jangan menyalahgunakan kabel. Jangan gunakankabel untuk membawa, menarik, atau melepas stekerperkakas listrik. Jauhkan kabel dari panas, minyak,tepi yang tajam, atau komponen yang bergerak. Kabellistrik yang rusak atau tersangkut menambah risikoterjadinya sengatan listrik.
u Saat mengoperasikan perkakas listrik di luar ruangan,gunakan kabel ekstensi yang sesuai untukpenggunaan di luar ruangan. Penggunaan kabel yang
cocok untuk pemakaian di luar ruangan mengurangi risikoterjadinya sengatan listrik.
u Jika perkakas listrik memang harus dioperasikan ditempat yang lembap, gunakan pemutus arus listrikresidu (RCD). Penggunaan RCD akan mengurangi risikoterjadinya sengatan listrik.
Keselamatan personelu Tetap waspada, perhatikan aktivitas yang sedang
dikerjakan, dan gunakan akal sehat saatmengoperasikan perkakas listrik. Jangan gunakanperkakas listrik saat mengalami kelelahan atau dibawah pengaruh narkoba, alkohol, atau obat-obatan.Jika perkakas listrik dioperasikan dengan dayakonsentrasi yang rendah, hal tersebut dapatmenyebabkan cedera serius.
u Gunakan peralatan pelindung diri. Selalu kenakanpelindung mata. Dengan memakai pakaian dan saranapelindung, misalnya masker anti debu, sepatu tertutupyang tidak licin, helm pelindung, atau pemalut telingasesuai dengan pekerjaan yang dilakukan, hal tersebutdapat mengurangi risiko cedera.
u Hindari start yang tidak disengaja. Pastikan switchberada di posisi off sebelum perkakas listrikdihubungkan ke sumber daya listrik dan/atau baterai,diangkat, atau dibawa. Membawa perkakas listrikdengan jari menempel pada tombol atau perkakas listrikdalam keadaan hidup dapat memicu kecelakaan.
u Singkirkan kunci penyetel atau kunci pas sebelummenghidupkan perkakas listrik. Perkakas atau kuncipas yang masih menempel pada komponen perkakaslistrik yang berputar dapat menyebabkan cedera.
u Jangan melampaui batas. Berdirilah secara mantapdan selalu jaga keseimbangan. Hal ini akanmemberikan kontrol yang lebih baik terhadap perkakaslistrik pada situasi yang tak terduga.
u Kenakan pakaian dengan wajar. Jangan mengenakanperhiasan atau pakaian yang longgar. Jauhkanrambut, pakaian, dan sarung tangan dari bagian-bagian perkakas yang bergerak. Pakaian yang longgar,rambut panjang atau perhiasan dapat tersangkut dalambagian perkakas yang bergerak.
u Jika disediakan perangkat untuk sambunganpengisapan debu dan alat pengumpulan, pastikanperangkat tersebut terhubung dan digunakan denganbenar. Penggunaan alat pengumpulan dapat mengurangibahaya yang disebabkan oleh debu.
Penggunaan dan pemeliharaan perkakas listriku Jangan memaksakan perkakas listrik. Gunakan
perkakas listrik yang sesuai untuk pekerjaan yangdilakukan. Perkakas listrik yang sesuai akan bekerjadengan lebih baik dan aman sesuai tujuan penggunaan.
u Jangan gunakan perkakas listrik dengan switch yangtidak dapat dioperasikan. Perkakas listrik yangswitchnya tidak berfungsi dapat menimbulkan bahayadan harus diperbaiki.
Bosch Power Tools 1 609 92A 5N7 | (16.03.2020)

42 | Bahasa Indonesia
u Tariklah steker dari stopkontak dan/atau keluarkanbaterai sebelum melakukan penyetelan padaperkakas listrik, penggantian aksesori atau sebelummenyimpan perkakas listrik. Tindakan keselamatankerja ini mengurangi risiko perkakas listrik beroperasisecara tiba-tiba.
u Jauhkan dan simpan perkakas listrik dari jangkauananak-anak dan jangan biarkan orang-orang yang tidakmengetahui cara menggunakan perkakas listrik,mengoperasikan perkakas listrik. Perkakas listrikdapat membahayakan jika digunakan oleh orang-orangyang tidak terlatih.
u Rawatlah perkakas listrik. Periksa komponen yangbergerak apabila tidak lurus atau terikat, kerusakankomponen, dan kondisi lain yang dapat mengganggupengoperasian perkakas listrik. Apabila rusak,perbaiki perkakas listrik sebelum digunakan. Banyakkecelakaan terjadi karena perkakas listrik tidak dirawatdengan seksama.
u Jaga ketajaman dan kebersihan alat. Alat pemotongdengan pisau pemotong yang tajam dan dirawat denganbaik tidak akan mudah tersangkut dan lebih mudahdikendalikan.
u Gunakan perkakas listrik, aksesori, dan komponenperkakas dll sesuai dengan petunjuk ini, denganmempertimbangkan kondisi kerja dan pekerjaan yangakan dilakukan. Penggunaan perkakas listrik untuktujuan berbeda dari fungsinya dapat menyebabkan situasiyang berbahaya.
Servisu Minta teknisi berkualifikasi untuk menyervis
perkakas listrik dengan hanya menggunakan sukucadang yang identik. Dengan demikian, hal ini akanmemastikan keamanan perkakas listrik.
Peringatan Keselamatan HammerPetunjuk keselamatan untuk semua pengoperasianu Kenakan sumbat telinga. Suara bising alat dapat
menyebabkan berkurangnya pendengaran.u Gunakan gagang tambahan. Kehilangan kendali dapat
menyebabkan cedera pribadi.u Kencangkan alat dengan benar sebelum digunakan.
Alat ini menghasilkan torsi output yang tinggi dan dapatterjadi kehilangan kendali yang mengakibatkan cederajika alat tidak dikencangkan dengan benar selamapengoperasian.
u Pegang perkakas listrik pada permukaan gagangberisolator saat mengoperasikannya, aksesoripemotong atau pengunci dapat bersentuhan dengankabel yang tidak terlihat atau kabelnya sendiri. Aksesori pemotong atau pengunci yang bersentuhandengan kabel yang dialiri listrik dapat menyebabkanbagian logam perkakas listrik yang terbuka dialiri listriksehingga pengguna dapat tersengat listrik.
Petunjuk keselamatan saat menggunakan mata borpanjangu Jangan pernah mengoperasikan alat dengan
kecepatan yang lebih tinggi dari nilai kecepatanmaksimal mata bor. Pada kecepatan yang tinggi, matabor akan membengkok jika berputar secara bebas tanpamenyentuh benda kerja dan dapat menyebabkan cederaterhadap pengguna.
u Selalu hidupkan alat bor pada kecepatan rendahdengan ujung mata bor menyentuh benda kerja. Padakecepatan yang tinggi, mata bor akan membengkok jikaberputar secara bebas tanpa menyentuh benda kerja dandapat menyebabkan cedera terhadap pengguna.
u Tekan hanya pada garis langsung dengan mata bordan jangan tekan secara berlebihan.Mata bor dapatmembengkok dan menyebabkan kerusakan atau hilangkendali sehingga menyebabkan cedera terhadappengguna.
Petunjuk Keselamatan tambahanu Gunakan handle tambahan, jika tersedia. Kehilangan
kendali dapat menyebabkan cedera.u Pegang erat perkakas listrik dengan kedua tangan
selama mengoperasikannya dan pastikan Anda berdiridi posisi aman. Gunakan perkakas listrik dengan keduatangan secara hati-hati.
u Segera matikan perkakas listrik jika alat tambahanterkunci. Bersiaplah dengan reaksi tinggi yangmenyebabkan sentakan. Alat tambahan akan terkuncijika perkakas listrik mengalami kelebihan beban atauperkakas bergerak miring pada benda kerja.
u Gunakan alat kerja dengan aman. Benda yang ditahandalam alat pemegang atau bais lebih aman daripadabenda yang dipegang dengan tangan.
u Gunakanlah alat detektor logam yang cocok untukmencari kabel dan pipa yang tidak terlihat atauhubungi perusahaan pengadaan setempat. Sentuhandengan kabel-kabel listrik dapat mengakibatkan api dankontak listrik. Pipa gas yang dirusak dapat mengakibatkanledakan. Pipa air yang dirusak mengakibatkan kerusakanbarang-barang atau dapat mengakibatkan kontak listrik.
u Sebelum meletakkan perkakas listrik, tunggulahhingga perkakas berhenti berputar. Alat kerja dapattersangkut dan menyebabkan perkakas listrik tidak dapatdikendalikan.
Spesifikasi produk dan performaBacalah semua petunjuk keselamatan danpetunjuk penggunaan. Kesalahan dalammenjalankan petunjuk keselamatan danpetunjuk penggunaan dapat mengakibatkankontak listrik, kebakaran, dan/atau luka-luka
yang berat.Perhatikan ilustrasi yang terdapat pada sisi sampul panduanpengoperasian.
1 609 92A 5N7 | (16.03.2020) Bosch Power Tools

Bahasa Indonesia | 43
Tujuan penggunaanPerkakas listrik ini cocok untuk pengeboran benda keraspada beton, batu bata dan batu-batuan serta untukpekerjaan memahat yang ringan. Perkakas listrik juga cocokuntuk mengebor tanpa getaran pada kayu, logam, keramikdan bahan sintetis. Perkakas listrik dengan penyetelanelektronik dan arah putaran ke kanan/kiri juga cocok untukmenyekrup.
Ilustrasi komponenNomor-nomor dari bagian-bagian perkakas pada gambarsesuai dengan gambar perkakas listrik pada halamanbergambar.(1) Chuck bor penggantian cepat (GBH 2-28 DFV)(2) Chuck bor penggantian SDS plus (GBH 2-28 DFV)(3) Dudukan alat kerja SDS plus(4) Kap pelindung debu(5) Selongsong pengunci(6) Ring pengunci chuck bor penggantian
(GBH 2-28 DFV)(7) Switch arah putaran(8) Tombol pengunci untuk tombol on/off(9) Tombol on / off(10) Tombol pelepas kunci switch getaran/penghenti
putaran
(11) Switch getaran/penghenti putaran(12) Tombol untuk pengaturan pembatas kedalaman(13) Gagang tambahan (permukaan genggam
berisolator)(14) Pembatas kedalaman(15) Gagang (permukaan genggam berisolator)(16) Alur-alur pengenal(17) Dudukan chuck bor (GBH 2-28 DFV)(18) Selongsong depan chuck bor penggantian cepat
(GBH 2-28 DFV)(19) Ring penahan chuck bor penggantian cepat
(GBH 2-28 DFV)(20) Lubang pengisapan Saugfix A)
(21) Baut penjepit Saugfix A)
(22) Pembatas kedalaman Saugfix A)
(23) Pipa teleskopik Saugfix A)
(24) Baut kupu-kupu Saugfix A)
(25) Pipa pemandu Saugfix A)
(26) Holder universal dengan batang pemasang SDSplusA)
A) Aksesori yang ada pada gambar atau yang dijelaskan tidaktermasuk dalam lingkup pengiriman standar. Semuaaksesori yang ada dapat Anda lihat dalam program aksesorikami.
Data teknis
Bor hammer GBH 2-28 D GBH 2-28 DVNomor seri 3 611 B67 0C.
3 611 B67 0L.3 611 B67 0K.3 611 B67 08.
3 611 B67 1F. 3 611 B67 10.
Chuck borpenggantian
− − − −
Input daya nominal W 850 820 850 820Tingkat getaran min–1 0-5100 0-5100 0-5100 0-5100Daya tiap getaransesuai dengan EPTA-Procedure 05:2016
J 3,2 3,2 3,2 3,2
Kecepatan nominal min–1 0–1300 0–1300 0–1300 0–1300Dudukan alat kerja SDS plus SDS plus SDS plus SDS plusDiameter leher spindel mm 50 50 50 50Diameter pengeboran maks.– Beton mm 28 28 28 28– Tembok (dengan
mata bor pipa)mm 68 68 68 68
– Baja mm 13 13 13 13– Kayu mm 30 30 30 30Berat sesuai denganEPTA-Procedure01:2014
kg 2,9 2,9 2,9 2,9
Tingkat perlindungan / II / II / II / II
Bosch Power Tools 1 609 92A 5N7 | (16.03.2020)

44 | Bahasa Indonesia
Bor hammer GBH 2-28 DFVNomor seri 3 611 B67 2C.
3 611 B67 2L.3 611 B67 2K.3 611 B67 28.
Chuck bor penggantian ● ●Input daya nominal W 850 820Tingkat getaran min–1 0-5100 0-5100Daya tiap getaran sesuaidengan EPTA-Procedure05:2016
J 3,2 3,2
Kecepatan nominal min–1 0–1300 0–1300Dudukan alat kerja SDS plus SDS plusDiameter leher spindel mm 50 50Diameter pengeboran maks.– Beton mm 28 28– Tembok (dengan mata bor
pipa)mm 68 68
– Baja mm 13 13– Kayu mm 30 30Berat sesuai dengan EPTA-Procedure 01:2014
kg 3,1 3,1
Tingkat perlindungan / II / II
Data-data berlaku untuk tegangan nominal [U] 230 V. Pada tegangan yang berbeda dan pada model khusus tiap negara data-data ini dapat bervariasi.
Pemasanganu Sebelum mulai dengan pekerjaan pada perkakas
listrik, tariklah steker dari stopkontak.
Gagang tambahanu Hanya gunakan perkakas listrik dengan gagang
tambahan (13).
Memutar gagang tambahan (lihat gambar A)Gagang tambahan (13) dapat digerakkan ke arah mana pununtuk memungkinkan posisi kerja yang aman dan tidakmelelahkan.– Putar bagian bawah gagang tambahan (13) berlawanan
arah jarum jam dan gerakkan gagang tambahan (13) keposisi yang diinginkan. Setelah itu, putar dan kencangkankembali bagian bawah gagang tambahan (13) searahjarum jam.Pastikan tali pengencang gagang tambahan berada dalamalur yang tersedia di housing.
Mengatur kedalaman pengeboran (lihat gambarB)Dengan pembatas kedalaman (14), kedalaman lubang Xyang diinginkan dapat ditetapkan.– Tekan tombol untuk mengatur pembatas kedalaman (12)
dan pasang pembatas kedalaman ke gagang tambahan(13).
Permukaan yang menonjol pada pembatas kedalaman(14) harus menghadap ke bawah.
– Dorong alat sisipan SDS plus ke dalam dudukan alat kerjaSDS plus (3) hingga maksimal. Alat kerja SDS plus yanggoyah dapat menyebabkan kesalahan dalam penyetelankedalaman bor.
– Tarik pembatas kedalaman hingga jarak antara ujungmata bor dan ujung pembatas kedalaman sesuai dengankedalaman pengeboran X yang diinginkan.
Memilih chuck bor dan alat kerjaUntuk mengebor benda keras dan memahat, diperlukan alatkerja SDS plus yang dipasang ke dalam chuck bor SDS plus.Alat kerja tanpa SDS plus (misalnya bor dengan batangberbentuk silinder) digunakan untuk pengeboran tanpagetaran pada kayu, logam, keramik dan bahan sintetis sertauntuk penyekrupan. Untuk alat kerja tersebut diperlukanchuck bor pengencangan cepat.
Melepaskan/memasang chuck bor penggantian(GBH 2-28 DFV)
Melepaskan chuck bor penggantian (lihat gambar C)– Tarik ring pengunci chuck bor penggantian (6) ke
belakang, tahan ring pengunci pada posisi ini dan tarikchuck bor penggantian SDS plus (2) atau chuck borpenggantian pengencangan cepat (1) ke depan hinggaterlepas.
1 609 92A 5N7 | (16.03.2020) Bosch Power Tools
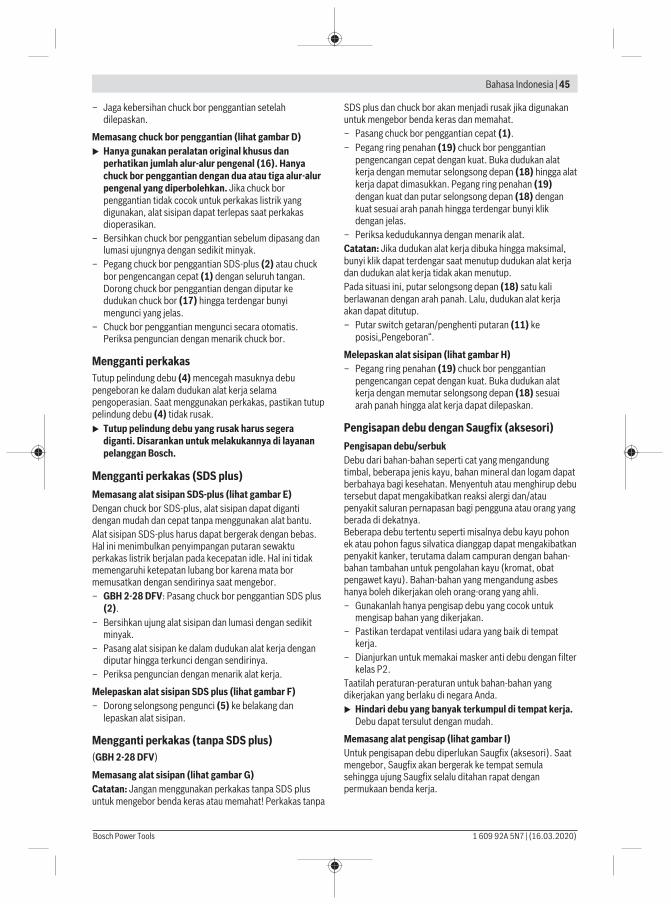
Bahasa Indonesia | 45
– Jaga kebersihan chuck bor penggantian setelahdilepaskan.
Memasang chuck bor penggantian (lihat gambar D)u Hanya gunakan peralatan original khusus dan
perhatikan jumlah alur-alur pengenal (16). Hanyachuck bor penggantian dengan dua atau tiga alur-alurpengenal yang diperbolehkan. Jika chuck borpenggantian tidak cocok untuk perkakas listrik yangdigunakan, alat sisipan dapat terlepas saat perkakasdioperasikan.
– Bersihkan chuck bor penggantian sebelum dipasang danlumasi ujungnya dengan sedikit minyak.
– Pegang chuck bor penggantian SDS-plus (2) atau chuckbor pengencangan cepat (1) dengan seluruh tangan.Dorong chuck bor penggantian dengan diputar kedudukan chuck bor (17) hingga terdengar bunyimengunci yang jelas.
– Chuck bor penggantian mengunci secara otomatis.Periksa penguncian dengan menarik chuck bor.
Mengganti perkakasTutup pelindung debu (4) mencegah masuknya debupengeboran ke dalam dudukan alat kerja selamapengoperasian. Saat menggunakan perkakas, pastikan tutuppelindung debu (4) tidak rusak.u Tutup pelindung debu yang rusak harus segera
diganti. Disarankan untuk melakukannya di layananpelanggan Bosch.
Mengganti perkakas (SDS plus)Memasang alat sisipan SDS-plus (lihat gambar E)Dengan chuck bor SDS‑plus, alat sisipan dapat digantidengan mudah dan cepat tanpa menggunakan alat bantu.Alat sisipan SDS‑plus harus dapat bergerak dengan bebas.Hal ini menimbulkan penyimpangan putaran sewaktuperkakas listrik berjalan pada kecepatan idle. Hal ini tidakmemengaruhi ketepatan lubang bor karena mata bormemusatkan dengan sendirinya saat mengebor.– GBH 2-28 DFV: Pasang chuck bor penggantian SDS plus
(2).– Bersihkan ujung alat sisipan dan lumasi dengan sedikit
minyak.– Pasang alat sisipan ke dalam dudukan alat kerja dengan
diputar hingga terkunci dengan sendirinya.– Periksa penguncian dengan menarik alat kerja.
Melepaskan alat sisipan SDS plus (lihat gambar F)– Dorong selongsong pengunci (5) ke belakang dan
lepaskan alat sisipan.
Mengganti perkakas (tanpa SDS plus)(GBH 2-28 DFV)
Memasang alat sisipan (lihat gambar G)Catatan: Jangan menggunakan perkakas tanpa SDS plusuntuk mengebor benda keras atau memahat! Perkakas tanpa
SDS plus dan chuck bor akan menjadi rusak jika digunakanuntuk mengebor benda keras dan memahat.– Pasang chuck bor penggantian cepat (1).– Pegang ring penahan (19) chuck bor penggantian
pengencangan cepat dengan kuat. Buka dudukan alatkerja dengan memutar selongsong depan (18) hingga alatkerja dapat dimasukkan. Pegang ring penahan (19)dengan kuat dan putar selongsong depan (18) dengankuat sesuai arah panah hingga terdengar bunyi klikdengan jelas.
– Periksa kedudukannya dengan menarik alat.Catatan: Jika dudukan alat kerja dibuka hingga maksimal,bunyi klik dapat terdengar saat menutup dudukan alat kerjadan dudukan alat kerja tidak akan menutup.Pada situasi ini, putar selongsong depan (18) satu kaliberlawanan dengan arah panah. Lalu, dudukan alat kerjaakan dapat ditutup.– Putar switch getaran/penghenti putaran (11) ke
posisi„Pengeboran“.
Melepaskan alat sisipan (lihat gambar H)– Pegang ring penahan (19) chuck bor penggantian
pengencangan cepat dengan kuat. Buka dudukan alatkerja dengan memutar selongsong depan (18) sesuaiarah panah hingga alat kerja dapat dilepaskan.
Pengisapan debu dengan Saugfix (aksesori)Pengisapan debu/serbukDebu dari bahan-bahan seperti cat yang mengandungtimbal, beberapa jenis kayu, bahan mineral dan logam dapatberbahaya bagi kesehatan. Menyentuh atau menghirup debutersebut dapat mengakibatkan reaksi alergi dan/ataupenyakit saluran pernapasan bagi pengguna atau orang yangberada di dekatnya. Beberapa debu tertentu seperti misalnya debu kayu pohonek atau pohon fagus silvatica dianggap dapat mengakibatkanpenyakit kanker, terutama dalam campuran dengan bahan-bahan tambahan untuk pengolahan kayu (kromat, obatpengawet kayu). Bahan-bahan yang mengandung asbeshanya boleh dikerjakan oleh orang-orang yang ahli.– Gunakanlah hanya pengisap debu yang cocok untuk
mengisap bahan yang dikerjakan.– Pastikan terdapat ventilasi udara yang baik di tempat
kerja.– Dianjurkan untuk memakai masker anti debu dengan filter
kelas P2.Taatilah peraturan-peraturan untuk bahan-bahan yangdikerjakan yang berlaku di negara Anda.u Hindari debu yang banyak terkumpul di tempat kerja.
Debu dapat tersulut dengan mudah.
Memasang alat pengisap (lihat gambar I)Untuk pengisapan debu diperlukan Saugfix (aksesori). Saatmengebor, Saugfix akan bergerak ke tempat semulasehingga ujung Saugfix selalu ditahan rapat denganpermukaan benda kerja.
Bosch Power Tools 1 609 92A 5N7 | (16.03.2020)

46 | Bahasa Indonesia
– Tekan tombol untuk mengatur pembatas kedalaman (12)dan lepaskan pembatas kedalaman (14). Tekan kembalitombol (12) dan pasang Saugfix dari depan ke dalamgagang tambahan (13).
– Sambungkan slang pengisap (diameter 19 mm, aksesori)ke lubang pengisap (20) .
Mesin pengisap debu harus sesuai dengan bahan yangdikerjakan.Gunakan mesin pengisap khusus saat mengisap debu yangsangat berbahaya bagi kesehatan, pemicu kanker atau debukering.
Mengatur kedalaman pengeboran pada Saugfix (lihatgambar J)Kedalaman pengeboran yang diinginkan X juga dapat diaturpada Saugfix yang terpasang.– Dorong alat sisipan SDS-plus ke dalam dudukan alat kerja
SDS-plus (3) hingga maksimal. Alat kerja SDS‑plus yanggoyah dapat menyebabkan kesalahan dalam penyetelankedalaman bor.
– Kendurkan baut kupu-kupu (24) pada Saugfix.– Pasang perkakas listrik dengan kuat tanpa
menghidupkannya pada permukaan yang akan dibor. Alatkerja SDS‑plus harus mengenai permukaan yang dibor.
– Posisikan pipa pemandu (25) Saugfix pada penahannyasedemikian rupa hingga ujung Saugfix berada padapermukaan yang akan dibor. Jangan terus mendorongpipa pemandu (25) pada pipa teleskopik (23) dari yangdiperlukan agar sebagian besar skala pada pipateleskopik (23) tetap terlihat.
– Kencangkan kembali baut kupu-kupu (24). Kendurkanbaut penjepit (21) pada pembatas kedalaman Saugfix.
– Geser pembatas kedalaman (22) pada pipa teleskopik(23) sedemikian rupa hingga jarak X yang ditunjukkanpada gambar sesuai dengan kedalaman pengeboran yangdiinginkan.
– Kencangkan baut penjepit (21) di posisi ini.
PenggunaanPengoperasian pertama kaliu Perhatikan tegangan listrik! Tegangan jaringan listrik
harus sesuai dengan tegangan listrik yang tercantumpada label tipe perkakas listrik. Perkakas listrikdengan daya sebesar 230 V seperti yang diindikasikanpada label dapat juga dioperasikan pada daya 220 V.
Mengatur mode pengoperasianPilih mode pengoperasian perkakas listrik menggunakanswitch getaran/penghenti putaran (11).– Untuk mengganti mode pengoperasian, tekan tombol rilis
(10) dan putar switch getaran/penghenti putaran (11) keposisi yang diinginkan hingga switch terdengar mengunci.
Catatan: Hanya ubah mode pengoperasian saat perkakaslistrik dimatikan! Jika tidak, perkakas listrik dapat rusak.
Posisi untuk Pengeboran benda keraspada beton atau batu
Posisi untuk Pengeboran tanpa getaranpada kayu, logam, keramik dan bahansintetis serta untuk Penyekrupan
Posisi Vario-Lock untuk penyesuaian posisipahatSwitch getaran/penghenti putaran (11)tidak mengunci pada posisi ini.
Posisi untuk Pemahatan
Menyetel arah putaranArah putaran perkakas listrik dapat diubah menggunakanswitch arah putaran (7). Namun, hal ini tidak dapatdilakukan jika tombol on/off (9) ditekan.u Tekan switch arah putaran (7) hanya saat perkakas
listrik sedang tidak beroperasi.Selalu atur arah putaran ke kanan untuk mengebor bendakeras, mengebor biasa dan memahat.– Putaran ke kanan: Putar switch arah putaran (7) pada
kedua sisi ke posisi hingga maksimal.– Putaran ke kiri: Putar switch arah putaran (7) pada
kedua sisi ke posisi hingga maksimal.
Menyalakan/mematikan– Untuk menyalakan perkakas listrik, tekan tombol on/off
(9).– Untuk mengunci tombol on/off (9), tekan dan tahan
tombol serta tekan tombol pengunci (8).– Untuk mematikan perkakas listrik, lepaskan tombol on/
off (9). Jika tombol on/off (9) terkunci, tekan tombolterlebih dulu kemudian lepaskan.
Mengatur kecepatan putaran/tingkat getaran– Atur kecepatan putaran/tingkat getaran dari perkakas
listrik yang dinyalakan terus menerus bergantung padaseberapa kuat tombol on/off (9) ditekan.
Jika tombol on/off (9) ditekan lebih ringan, kecepatanputaran/tingkat getaran akan menjadi rendah. Jika tombolditekan kuat, kecepatan putaran/tingkat getaran akanbertambah.
Petunjuk pengoperasianu Pasang perkakas listrik pada mur/sekrup hanya saat
dalam keadaan mati. Alat sisipan yang berputar dapattergelincir.
Mengubah posisi pahat (Vario Lock)Pahat dapat dikunci pada 40 posisi. Dengan demikian,posisi kerja yang optimal dapat diperoleh.
1 609 92A 5N7 | (16.03.2020) Bosch Power Tools

Tiếng Việt | 47
– Masukkan pahat ke dalam dudukan alat kerja.– Putar switch getaran/penghenti putaran (11) ke posisi
"Vario-Lock".– Putar alat sisipan ke posisi pahat yang diinginkan.– Putar switch getaran/penghenti putaran (11) ke posisi
"Pemahatan". Dudukan alat kerja kemudian akanterkunci.
– Untuk memahat, atur arah putaran ke kanan.
Pemahatan dengan fungsi penguncianUntuk memahat dalam waktu lama tanpa selalu menekantombol on/off (9), kunci tombol on/off pada modepengoperasian "Pemahatan".– Untuk mengunci, tekan tombol on/off (9) hingga
maksimal dan tekan tombol pengunci (8) secarabersamaan.
– Untuk mematikan perkakas, tekan kembali tombolpengunci (8).
Catatan: Jika mode pengoperasian diubah selama tombolon/off terkunci, perkakas listrik akan mati dengansendirinya.
Peredaman getaranPeredaman getaran yang terintegrasi akanmengurangi getaran yang muncul.
u Hentikan penggunaan perkakas listrik jika elemenperedaman rusak.
Memasang mata obeng (lihat gambar K)u Pasang perkakas listrik pada mur/sekrup hanya saat
dalam keadaan mati. Alat sisipan yang berputar dapattergelincir.
Untuk menggunakan mata obeng diperlukan holder universal(26) dengan batang pemasang SDS plus (aksesori).– Bersihkan ujung batang pemasang dan lumasi dengan
sedikit minyak.– Pasang holder universal dengan cara diputar ke dalam
dudukan alat kerja hingga terkunci dengan sendirinya.– Periksa penguncian dengan menarik holder universal.– Pasang mata obeng ke dalam holder universal. Hanya
gunakan mata obeng yang sesuai dengan kepala sekrup.– Untuk melepaskan holder universal, dorong selongsong
pengunci (5) ke belakang dan lepaskan holder universal(26) dari dudukan alat kerja.
Perawatan dan servisPerawatan dan pembersihanu Sebelum mulai dengan pekerjaan pada perkakas
listrik, tariklah steker dari stopkontak.u Perkakas listrik dan lubang ventilasi harus selalu
dibersihkan agar perkakas dapat digunakan denganbaik dan aman.
Jika kabel listrik harus diganti, pekerjaan ini harus dilakukanoleh Bosch atau Service Center untuk perkakas listrik Boschresmi agar keselamatan kerja selalu terjamin.
u Tutup pelindung debu yang rusak harus segeradiganti. Direkomendasikan untuk melakukannya dilayanan pelanggan Bosch.
– Bersihkan dudukan alat kerja (3) setiap kali selesaidigunakan.
Layanan pelanggan dan konsultasi penggunaanLayanan pelanggan Bosch menjawab semua pertanyaanAnda tentang reparasi dan perawatan serta tentang sukucadang produk ini. Gambaran teknis (exploded view) daninformasi mengenai suku cadang dapat ditemukan di:www.bosch-pt.comTim konsultasi penggunaan Bosch akan membantu Andamenjawab pertanyaan seputar produk kami besertaaksesorinya.Jika Anda hendak menanyakan sesuatu atau memesan sukucadang, selalu sebutkan nomor model yang terdiri dari 10angka dan tercantum pada label tipe produk.
IndonesiaPT Robert Bosch Palma Tower 10th Floor Jalan RA Kartini II-S Kaveling 6 Pondok Pinang, Kebayoran Lama Jakarta Selatan 12310 Tel.: (021) 3005 5800 Fax: (021) 3005 5801 E-Mail: [email protected] www.bosch-pt.co.id
Cara membuangPerkakas listrik, aksesori, dan kemasan sebaiknya didaurulang secara ramah lingkungan.
Jangan membuang perkakas listrik ke dalamsampah rumah tangga!
Tiếng Việt
Hướng dẫn an toànCảnh báo Tổng quát Cách sử dụng Antoàn Dụng cụ điện Cầm tay
CẢNH BÁO Đọc kỹ mọi cảnh báo an toànvà hướng dẫn. Không tuân
thủ mọi cảnh báo và hướng dẫn được liệt kê dướiđây có thể bị điện giựt, gây cháy và / hay bị thươngtật nghiêm trọng.Hãy giữ tất cả tài liệu về cảnh báo và hướngdẫn để tham khảo về sau.Thuật ngữ "dụng cụ điện cầm tay" trong phần cảnhbáo là đề cập đến sự sử dụng dụng cụ điện cầmtay của bạn, loại sử dụng điện nguồn (có dây cắmđiện) hay vận hành bằng pin (không dây cắm điện).
Bosch Power Tools 1 609 92A 5N7 | (16.03.2020)

48 | Tiếng Việt
Khu vực làm việc an toànu Giữ nơi làm việc sạch và đủ ánh sáng. Nơi
làm việc bừa bộn và tối tăm dễ gây ra tai nạn.u Không vận hành dụng cụ điện cầm tay trong
môi trường dễ gây nổ, chẳng hạn như nơi cóchất lỏng dễ cháy, khí đốt hay rác. Dụng cụđiện cầm tay tạo ra các tia lửa nên có thể làmrác bén cháy hay bốc khói.
u Không để trẻ em hay người đến xem đứnggần khi vận hành dụng cụ điện cầm tay. Sựphân tâm có thể gây ra sự mất điều khiển.
An toàn về điệnu Phích cắm của dụng cụ điện cầm tay phải
thích hợp với ổ cắm. Không bao giờ được cảibiến lại phích cắm dưới mọi hình thức. Không được sử dụng phích tiếp hợp nối tiếpđất (dây mát). Phích cắm nguyên bản và ổ cắmđúng loại sẽ làm giảm nguy cơ bị điện giật.
u Tránh không để thân thể tiếp xúc với đất haycác vật có bề mặt tiếp đất như đường ống, lòsưởi, hàng rào và tủ lạnh. Có nhiều nguy cơ bịđiện giật hơn nếu cơ thể bạn bị tiếp hay nối đất.
u Không được để dụng cụ điện cầm tay ngoàimưa hay ở tình trạng ẩm ướt. Nước vào máysẽ làm tăng nguy cơ bị điện giật.
u Không được lạm dụng dây dẫn điện. Khôngbao giờ được nắm dây dẫn để xách, kéo hayrút phích cắm dụng cụ điện cầm tay. Khôngđể dây gần nơi có nhiệt độ cao, dầu nhớt, vậtnhọn bén và bộ phận chuyển động. Làmhỏng hay cuộn rối dây dẫn làm tăng nguy cơ bịđiện giật.
u Khi sử dụng dụng cụ điện cầm tay ngoài trời,dùng dây nối thích hợp cho việc sử dụngngoài trời. Sử dụng dây nối thích hợp cho việcsử dụng ngoài trời làm giảm nguy cơ bị điện giật.
u Nếu việc sử dụng dụng cụ điện cầm tay ở nơiẩm ướt là không thể tránh được, dùng thiết bịngắt mạch tự động (RCD) bảo vệ nguồn. Sửdụng thiết bị ngắt mạch tự động RCD làm giảmnguy cơ bị điện giật.
An toàn cá nhânu Hãy tỉnh táo, biết rõ mình đang làm gì và hãy
sử dụng ý thức khi vận hành dụng cụ điệncầm tay. Không sử dụng dụng cụ điện cầmtay khi đang mệt mỏi hay đang bị tác động dochất gây nghiện, rượu hay dược phẩm gây ra.Một thoáng mất tập trung khi đang vận hànhdụng cụ điện cầm tay có thể gây thương tíchnghiêm trọng cho bản thân.
u Sử dụng trang bị bảo hộ cá nhân. Luôn luônđeo kính bảo vệ mắt. Trang bị bảo hộ nhưkhẩu trang, giày chống trượt, nón bảo hộ, haydụng cụ bảo vệ tai khi được sử dụng đúng nơiđúng chỗ sẽ làm giảm nguy cơ thương tật chobản thân.
u Phòng tránh máy khởi động bất ngờ. Bảođảm công tắc máy ở vị trí tắt trước khi cắmvào nguồn điện và/hay lắp pin vào, khi nhấcmáy lên hay khi mang xách máy. Ngáng ngóntay vào công tắc máy để xách hay kích hoạtdụng cụ điện cầm tay khi công tắc ở vị trí mở dễdẫn đến tai nạn.
u Lấy mọi chìa hay khóa điều chỉnh ra trướckhi mở điện dụng cụ điện cầm tay. Khóa haychìa còn gắn dính vào bộ phận quay của dụngcụ điện cầm tay có thể gây thương tích cho bảnthân.
u Không rướn người. Luôn luôn giữ tư thếđứng thích hợp và thăng bằng. Điều này tạocho việc điều khiển dụng cụ điện cầm tay tốt hơntrong mọi tình huống bất ngờ.
u Trang phục thích hợp. Không mặc quần áorộng lùng thùng hay mang trang sức. Giữtóc, quần áo và găng tay xa khỏi các bộ phậnchuyển động. Quần áo rộng lùng thùng, đồtrang sức hay tóc dài có thể bị cuốn vào các bộphận chuyển động.
u Nếu có các thiết bị đi kèm để nối máy hút bụivà các phụ kiện khác, bảo đảm các thiết bịnày được nối và sử dụng tốt. Việc sử dụngcác thiết bị gom hút bụi có thể làm giảm các độchại liên quan đến bụi gây ra.
Sử dụng và bảo dưỡng dụng cụ điện cầm tayu Không được ép máy. Sử dụng dụng cụ điện
cầm tay đúng loại theo đúng ứng dụng củabạn. Dụng cụ điện cầm tay đúng chức năng sẽlàm việc tốt và an toàn hơn theo đúng tiến độ màmáy được thiết kế.
u Không sử dụng dụng cụ điện cầm tay nếunhư công tắc không tắt và mở được. Bất kỳdụng cụ điện cầm tay nào mà không thể điềukhiển được bằng công tắc là nguy hiểm và phảiđược sửa chữa.
u Rút phích cắm ra khỏi nguồn điện và/hay pinra khỏi dụng cụ điện cầm tay trước khi tiếnhành bất kỳ điều chỉnh nào, thay phụ kiện,hay cất dụng cụ điện cầm tay. Các biện phápngăn ngừa như vậy làm giảm nguy cơ dụng cụđiện cầm tay khởi động bất ngờ.
u Cất giữ dụng cụ điện cầm tay không dùng tớinơi trẻ em không lấy được và không chongười chưa từng biết dụng cụ điện cầm tayhay các hướng dẫn này sử dụng dụng cụđiện cầm tay. Dụng cụ điện cầm tay nguy hiểmkhi ở trong tay người chưa được chỉ cách sửdụng.
u Bảo quản dụng cụ điện cầm tay. Kiểm traxem các bộ phận chuyển động có bị sai lệchhay kẹt, các bộ phận bị rạn nứt và các tìnhtrạng khác có thể ảnh hưởng đến sự vậnhành của máy. Nếu bị hư hỏng, phải sửa
1 609 92A 5N7 | (16.03.2020) Bosch Power Tools

Tiếng Việt | 49
chữa máy trước khi sử dụng. Nhiều tai nạnxảy ra do bảo quản dụng cụ điện cầm tay tồi.
u Giữ các dụng cụ cắt bén và sạch. Bảo quảnđúng cách các dụng cụ cắt có cạnh cắt bén làmgiảm khả năng bị kẹt và dễ điều khiển hơn.
u Sử dụng dụng cụ điện cầm tay, phụ kiện, đầucài v. v., đúng theo các chỉ dẫn này, hãy lưu ýđến điều kiện làm việc và công việc phải thựchiện. Sự sử dụng dụng cụ điện cầm tay khácvới mục đích thiết kế có thể tạo nên tình huốngnguy hiểm.
Bảo dưỡngu Đưa dụng cụ điện cầm tay của bạn đến thợ
chuyên môn để bảo dưỡng, chỉ sử dụng phụtùng đúng chủng loại để thay. Điều này sẽđảm bảo sự an toàn của máy được giữ nguyên.
Cảnh báo An toàn Khoan búaHướng dẫn an toàn cho mọi hoạt độngu Đeo bao vê tai. Tiếp xúc với tiếng ồn có thể làm
mất khả năng nghe.u Sử dụng tay nắm phụ. Mất điều khiển có thể
gây ra thương tích cho người.u Chằng dụng cụ đúng cách trước khi sử dụng.
Công cụ này tạo ra mô-men xoắn đầu ra cao vànếu không chằng dụng cụ đúng cách trong lúcvận hành, thì việc mất kiểm soát có thể dẫn đếnthương tích cho người.
u Cầm vào bề mặt cầm nắm cách điện củadụng cụ điện cầm tay khi thực hiện một thaotác tại vị trí phụ kiện cắt hoặc dụng cụ kẹp cóthể tiếp xúc với dây điện ngầm hoặc dâynguồn của chính nó. Phụ kiện cắt hoặc dụngcụ kẹp tiếp xúc với dây "có điện" có thể làm chocác phần kim loại hở của dụng cụ điện cầm tay"có điện" và có thể gây ra điện giật cho ngườivận hành.
Hướng dẫn an toàn khi sử dụng các mũi khoandàiu Không vận hành ở tốc độ cao hơn tốc độ tối
đa cho phép của mũi khoan. Ở tốc độ cao hơn,mũi khoan có thể bị cong nếu cho phép xoay tựdo mà không cho tiếp xúc với phôi gia công, dẫnđến thương tích cho người.
u Luôn khởi động khoan ở tốc độ thấp và vớiđầu mũi khoan tiếp xúc với phôi gia công. Ởtốc độ cao hơn, mũi khoan có thể bị cong nếucho phép xoay tự do mà không cho tiếp xúc vớiphôi gia công, dẫn đến thương tích cho người.
u Chỉ dùng áp lực vào đường trực tiếp bằngmũi khoan và không dùng áp lực dư.Các mũikhoan có thể cong, gây ngắt hoặc mất kiểmsoát, dẫn đến thương tích cho người.
Các cảnh báo phụ thêmu Sử dụng (các) tay cầm phụ, nếu được cung
cấp kèm theo dụng cụ. Mất điều khiển có thểgây ra thương tích cho người.
u Giữ máy thật chắc bằng cả hai tay trong khilàm việc và luôn luôn giữ tư thế đứng chothích hợp và cân bằng. Dùng hai tay để điềukhiển máy thì an toàn hơn.
u Tắt dụng cụ điện ngay nếu phụ tùng bị chặn.Hãy chuẩn bị cho những mô-men phản ứngcao, mà gây ra sự dội ngược. Phụ tùng bịchặn, nếu dụng cụ điện bị quá tải hoặc bị kẹttrong phôi gia công cần gia công.
u Kẹp chặt vật gia công. Vật gia công được kẹpbằng một thiết bị kẹp hay bằng êtô thì vững chắchơn giữ bằng tay.
u Dùng thiết bị dò tìm thích hợp để xác địnhnếu có các công trình công cộng lắp đặtngầm trong khu vực làm việc hay liên hệ vớiCty công trình công cộng địa phương để nhờhỗ trợ. Đụng chạm đường dẫn điện có thể gâyra hỏa hoạn và điện giật. Làm hư hại đường dẫnkhí ga có thể gây nổ. Làm thủng đường dẫnnước gây hư hỏng tài sản hay có khả năng gâyra điện giật.
u Luôn luôn đợi cho máy hoàn toàn ngừng hẳntrước khi đặt xuống. Dụng cụ lắp vào máy cóthể bị kẹp chặt dẫn đến việc dụng cụ điện cầmtay bị mất điều khiển.
Mô Tả Sản Phẩm và Đặc TínhKỹ Thuật
Đọc kỹ mọi cảnh báo an toàn và mọihướng dẫn. Không tuân thủ mọi cảnhbáo và hướng dẫn được liệt kê dưới đâycó thể bị điện giật, gây cháy và / hay bịthương tật nghiêm trọng.
Xin lưu ý các hình minh hoạt trong phần trước củahươ ng dân vận hành.
Sử dụng đúng cáchMáy được thiết kế để khoan có động tác búa vàobê-tông, gạch và công trình nề, cũng như dành chocông việc đục không nhiều. Cũng tương tự phù hợpđể khoan mà không cần va đập vào gỗ, kim loại, sứvà chất dẻo. Máy có bộ phận điều khiển điện tử vàquay được chiều phải/trái cũng thích hợp cho việcbắt vít.
Các bộ phận được minh họaSự đánh số các biểu trưng của sản phẩm là đểtham khảo hình minh họa của máy trên trang hìnhảnh.(1) Mâm cặp thay nhanh không chìa
(GBH 2-28 DFV)
Bosch Power Tools 1 609 92A 5N7 | (16.03.2020)

50 | Tiếng Việt
(2) Mâm cặp thay nhanh SDS-plus(GBH 2-28 DFV)
(3) Phần lắp dụng cụ SDS‑plus(4) Chụp ngăn bụi(5) Vòng khóa(6) Vòng khóa mâm cặp thay nhanh
(GBH 2-28 DFV)(7) Gạc vặn chuyển đổi chiều quay(8) Nút khoá giữ chế độ tự‑chạy của công tắc
bật / tắt(9) Công tắc bật/tắt(10) Nút nhả khóa để sử dụng gạc chọn
phương thức hoạt động(11) Gạc Chọn Chế Độ Hoạt Động(12) Nút điều chỉnh cho cỡ định độ sâu(13) Tay nắm phụ (có bề mặt nắm cách điện)(14) Cỡ định độ sâu(15) Tay nắm (bề mặt nắm cách điện)
(16) Rãnh Khía Nhận Dạng(17) Thiết bị tiếp hợp đầu cặp mũi khoan
(GBH 2-28 DFV)(18) Khớp vòng ngoài của mâm cặp thay nhanh
không chìa (GBH 2-28 DFV)(19) Vòng giữ của mâm cặp thay nhanh không
chìa (GBH 2-28 DFV)(20) Lỗ hút phụ kiện gá lắp hút bụi A)
(21) Vít kẹp phụ kiện gá lắp hút bụi A)
(22) Cỡ định độ sâu phụ kiện gá lắp hút bụi A)
(23) Ống lồng phụ kiện gá lắp hút bụi A)
(24) Vít tai hồng phụ kiện gá lắp hút bụi A)
(25) Ống dẫn phụ kiện gá lắp hút bụi A)
(26) Phần lắp đầu gài phổ thông với chuôiSDS‑plusA)
A) Phụ tùng được trình bày hay mô tả không phải làmột phần của tiêu chuẩn hàng hóa được giao kèmtheo sản phẩm. Bạn có thể tham khảo tổng thểcác loại phụ tùng, phụ kiện trong chương trìnhphụ tùng của chúng tôi.
Thông số kỹ thuật
Khoan Búa GBH 2-28 D GBH 2-28 DVMã số máy 3 611 B67 0C.
3 611 B67 0L.3 611 B67 0K.3 611 B67 08.
3 611 B67 1F. 3 611 B67 10.
Mâm cặp thaynhanh
− − − −
Công suất vàodanh định
W 850 820 850 820
Tần suất đập min-1 0-5100 0-5100 0-5100 0-5100Năng lượng va đậpcủa từng hànhtrình dựa theoEPTA-Procedure05:2016
J 3,2 3,2 3,2 3,2
Tốc độ danh định min-1 0–1300 0–1300 0–1300 0–1300Phần lắp dụng cụ SDS-plus SDS-plus SDS-plus SDS-plusĐường kính cổ trục mm 50 50 50 50đường kính mũi khoan tối đa– Bê‑tông mm 28 28 28 28– Công trình nề
(với mũi khoanlõi)
mm 68 68 68 68
– Thép mm 13 13 13 13– Gỗ mm 30 30 30 30Trọng lượng theoQui trình EPTA-Procedure 01:2014
kg 2,9 2,9 2,9 2,9
Cấp độ bảo vệ / II / II / II / II
1 609 92A 5N7 | (16.03.2020) Bosch Power Tools

Tiếng Việt | 51
Khoan Búa GBH 2-28 DFVMã số máy 3 611 B67 2C.
3 611 B67 2L.3 611 B67 2K.3 611 B67 28.
Mâm cặp thay nhanh ● ●Công suất vào danh định W 850 820Tần suất đập min-1 0-5100 0-5100Năng lượng va đập củatừng hành trình dựa theoEPTA-Procedure 05:2016
J 3,2 3,2
Tốc độ danh định min-1 0–1300 0–1300Phần lắp dụng cụ SDS-plus SDS-plusĐường kính cổ trục mm 50 50đường kính mũi khoan tối đa– Bê‑tông mm 28 28– Công trình nề (với mũi
khoan lõi)mm 68 68
– Thép mm 13 13– Gỗ mm 30 30Trọng lượng theo Quitrình EPTA-Procedure01:2014
kg 3,1 3,1
Cấp độ bảo vệ / II / II
Các giá trị đã cho có hiệu lực cho điện thế danh định [U] 230 V. Đối với điện thế thấp hơn và các loại máydành riêng cho một số quốc gia, các giá trị này có thể thay đổi.
Sự lắp vàou Trước khi tiến hành bất cứ việc gì trên máy,
kéo phích cắm điện nguồn ra.
Tay nắm phụu Chỉ vận hành máy của bạn khi đã gắn tay
nắm phụ (13).
Xoay tay nắm phụ (xem hình A)Bạn có thể xoay tay nắm phụ (13) tùy ý, để có tưthế làm việc an toàn và ít mỏi.– Xoay phần tay cầm dưới của tay nắm phụ (13)
ngược chiều kim đồng hồ và xoay tay nắm phụ(13) vào vị trí mong muốn. Sau đó xoay mẩu taycầm dưới của tay cầm phụ (13) theo chiều kimđồng hồ để siết chặt.Hãy lưu ý rằng nẹp định vị của tay nắm phụđược đặt trong rãnh nằm trên vỏ máy đúng nhưchủ định.
Điều chỉnh độ sâu lỗ khoan (xem Hình B)Nhờ chốt chặn độ sâu (14), bạn có thể xác địnhđược độ sâu lỗ khoan X mong muốn.– Bấm nút điều chỉnh cỡ định độ sâu (12) và điều
chỉnh cỡ định độ sâu trên tay nắm phụ (13). Rãnh trên cỡ định độ sâu (14) phải hướng lêntrên.
– Hãy đẩy dụng cụ gài SDS-plus vào khe cắmdụng cụ cho tới cữ chặn (3). Nếu không, sựchuyển dịch của dụng cụ khoan SDS‑plus có thểdẫn đến sự điều chỉnh sai độ sâu khoan.
– Kéo chốt chặn độ sâu ra xa sao cho khoảngcách giữa mũi khoan và đầu chốt chặn độ sâuphù hợp với độ sâu lỗ khoan mong muốn X.
Chọn Lựa Mâm Cặp Khoan và Dụng CụĐể đục hay khoan búa, cần phải sử dụng loại dụngcụ SDS‑plus để lắp vào mâm cặp khoan SDS‑plus.Để khoan không đập trên gỗ, kim loại, sứ và nhựacũng như để bắt vít, cần dùng các dụng cụ khôngSDS-plus (ví dụ khoan có trục hình trụ). Cần sửdụng mâm cặp không dùng chìa cho các dụng cụkhoan nói trên.
Tháo/Lắp Mâm Cặp Thay Nhanh(GBH 2-28 DFV)
Tháo đầu cặp mũi khoan vành răng (xem HìnhC)– Kéo vòng khóa mâm cặp thay nhanh (6) ra phía
sau, giữ chặt tại vị trí và tháo mâm cặp thaynhanh SDS-plus (2) hoặc mâm cặp thay nhanhkhông chìa (1) hướng về phía trướx.
– Sau khi tháo ra, hãy bảo vệ cho mâm cặp thayra không bị bẩn.
Bosch Power Tools 1 609 92A 5N7 | (16.03.2020)

52 | Tiếng Việt
Lắp mâm cặp thay nhanh (xem hình D)u Chỉ sử dụng trang thiết bị gốc và tuân thủ số
lượng rãnh Khía nhận Dạng (16). Chỉ chophép dùng mâm cặp thay nhanh với hai rãnhkhía nhận dạng. Nếu sử dụng mâm cặp thaynhanh không phù hợp với dụng cụ điện này,dụng cụ gài có thể bị rơi khi vận hành.
– Trước khi lắp vào, lau sạch mâm cặp thay nhanhvà bôi một lớp mỏng dầu bôi trơn lên cán chuôi.
– Cầm mâm cặp thay nhanh SDS-plus (2) hoặcmâm cặp thay nhanh không chìa (1) bằng cảbàn tay. Hãy đẩy mâm cặp thay nhanh lên thiếtbị tiếp hợp đầu cặp mũi khoan (17), cho đến khibạn nghe thấy tiếng khớp vào.
– Mâm cặp thay nhanh tự động khóa lại. Kiểm trahiệu quả khóa bằng cách kéo thử mâm cặp thaynhanh.
Thay Dụng CụChụp bảo vệ ngăn bụi (4) giúp ngăn cản phần lớnsự xâm nhập của bụi khoan vào dụng cụ trong thờigian hoạt động. Khi lắp dụng cụ vào, hãy lưu ý rằngchụp bảo vệ ngăn bụi (4) không bị làm hư hỏng.u Thay chụp ngăn bụi bị hỏng ngay lập tức.
Chúng tôi khuyến nghị việc thay thế này domột đại lý phục vụ hậu mãi thực hiện.
Thay đổi dụng cụ (SDS-plus)Thay dụng cụ gài SDS-plus (xem hình E)Mâm cặp khoan SDS‑plus cho phép thay đổi dụngcụ khoan được đơn giản và tiện lợi mà không cầntới các dụng cụ phụ trợ khác.Theo như yêu cầu của hệ thống, dụng cụ khoanSDS‑plus có thể chuyển động tự do. Điều này tạora sự đảo tỏa tròn khi chạy không tải ở một mứcnào đó. Việc này không làm ảnh hưởng đến độchính xác của lỗ khoan, vì mũi khoan định tâm củachính nó trong khi khoan.– GBH 2-28 DFV: Lắp mâm cặp thay nhanh SDS-
plus (2) vào.– Làm sạch và thoa một lớp mỏng dầu bôi trơn lên
chuôi của dụng cụ.– Lắp dụng cụ vào bằng cách xoay vặn dụng cụ
vào ổ lắp dụng cụ cho đến khi tự ăn vào khớp.– Kiểm tra xem đã cài chắc chưa bằng cách kéo
thử dụng cụ ra.
Tháo dụng cụ gài SDS-plus (xem Hình F)– Đẩy vòng khóa (5) về phía sau và tháo phụ tùng.
Thay đổi dụng cụ (không SDS-plus)(GBH 2-28 DFV)
Thay phụ tùng (xem hình G)Hướng dẫn: Không sử dụng các dụng cụ khôngSDS-plus để khoan búa hoặc đục! Khoan hay đục
có động tác búa làm hỏng dụng cụ không phải loạiSDS-plus và mâm cặp của chúng.– Lắp mâm cặp thay nhanh không chìa (1).– Hãy giữ chặt vòng giữ (19) của mâm cặp thay
nhanh không chìa. Hãy mở phần lắp dụng cụbằng cách xoay bạc lót trước (18) cho đến khidụng cụ có thể được lắp. Giữ chặt vòng giữ (19)và xoay bạc lót phía trước (18) bằng lực mạnhtheo hướng mũi tên, cho đến khi nghe thấy tiếngkhớp.
– Kiểm tra xem đã vào chắc chưa bằng cách kéothử dụng cụ ra.
Hướng dẫn: Nếu bộ gá dụng cụ đã được mở racho đến khi dừng lại, thì khi xoay bộ gá dụng cụ cóthể nghe thấy tiếng kêu rắc và bộ gá dụng cụkhông tự đóng lại.Trong trường hợp này, hãy xoay (18) một lần ốngbọc ngoài phía trước ngược hướng mũi tên. Sau đó,bộ gá dụng cụ có thể được đóng lại.– Vặn công tắc dừng xoay/dừng đập (11) vào vị trí
„Khoan“.
Thay (xem Hình H)– Hãy giữ chặt vòng giữ (19) của mâm cặp thay
nhanh không chìa. Hãy mở phần lắp dụng cụbằng cách xoay bạc lót trước (18) theo hướngmũi tên cho đến khi dụng cụ có thể được tháo.
Hệ thống hút bụi có phụ kiện gá lắp hútbụi (Phụ kiện)Hút Dăm/BụiMạt bụi từ các vật liệu được sơn phủ ngoài có chứachì trên một số loại gỗ, khoáng vật và kim loại cóthể gây nguy hại đến sức khoẻ con người. Đụngchạm hay hít thở các bụi này có thể làm người sửdụng hay đứng gần bị dị ứng và/hoặc gây nhiễmtrùng hệ hô hấp. Một số mạt bụi cụ thể, ví dụ như bụi gỗ sồi hayđấu, được xem là chất gây ung thư, đặc biệt là cóliên quan đến các chất phụ gia dùng xử lý gỗ (chấtcromat, chất bảo quản gỗ). Có thể chỉ nên để thợchuyên môn gia công các loại vật liệu có chứaamiăng.– Cách xa ở mức có thể được, sử dụng hệ thống
hút thích hợp cho loại vật liệu.– Tạo không khí thông thoáng nơi làm việc.– Khuyến nghị nên mang mặt nạ phòng độc có bộ
lọc cấp P2.Tuân thủ các qui định của quốc gia bạn liên quanđến loại vật liệu gia công.u Tránh không để rác tích tụ tại nơi làm việc.
Rác có thể dễ dàng bắt lửa.
Lắp thiết bị hút (xem hình I)Để hút bụi, cần phải có phụ kiện gá lắp hút bụi(phụ kiện). Khi khoan, phụ kiện gá lắp hút bụi thulại vì thế đầu của phần gá lắp luôn luôn kề sát vớibề mặt lỗ khoan.
1 609 92A 5N7 | (16.03.2020) Bosch Power Tools

Tiếng Việt | 53
– Bấm nút điều chỉnh cỡ định độ sâu (12) và tháocỡ định độ sâu (14). Bấm lại nút (12) và lắp phụkiện gá lắp hút bụi từ phía trước vào tay nắm phụ(13).
– Hãy nối ống hút (Đường kính 19 mm, phụ kiện)với lỗ hút (20) của phụ kiện gá lắp hút bụi.
Máy hút bụi phải thích hợp dành cho loại vật liệuđang gia công.Khi hút bụi khô loại đặc biệt gây nguy hại đến sứckhỏe hoặc gây ra ung thư, hãy sử dụng máy hút bụiloại chuyên dụng.
Điều chỉnh độ sâu lỗ khoan ở phụ kiện gá lắphút bụi (xem hình J)Bạn có thể cố định độ sâu lỗ khoan mong muốn Xkhi lắp phụ kiện gá lắp hút bụi.– Hãy đẩy dụng cụ gài SDS-plus vào khe cắm
dụng cụ cho tới cữ chặn (3). Nếu không, sựchuyển dịch của dụng cụ khoan SDS‑plus có thểdẫn đến sự điều chỉnh sai độ sâu khoan.
– Hãy nhả vít tai hồng (24) ở phụ kiện gá lắp hútbụi.
– Không mở máy dụng cụ điện lên, ấn mạnhxuống ngay vị trí khoan. Dụng cụ khoanSDS‑plus phải áp mặt lên trên bề mặt.
– Hãy di chuyển ống dẫn (25) của phụ kiện gá lắphút bụi vào giá đỡ sao cho đầu phụ kiện giá lắphút bụi nằm trên bề mặt cần khoan. Không đẩyống dẫn (25) qua ống lồng (23) như mức cầnthiết, để một phần lớn hết mức có thể của thướcnằm trên ống lồng (23).
– Siết chặt lại vít tai hồng (24). Hãy nhả vít kẹp(21) ở cỡ định độ sâu của phụ kiện gá lắp hútbụi.
– Hãy di chuyển cỡ định độ sâu (22) trên ống lồng(23), sao cho khoảng cách đã hiển thị trong hìnhảnh X tương ứng với độ sâu lỗ khoan mongmuốn.
– Hãy siết chặt vít kẹp (21) tại vị trí này.
Vận HànhBắt Đầu Vận Hànhu Hãy cẩn thận với nguồn điện! Điện thế nguồn
phải đúng với điện thế đã ghi rõ trên nhãnmáy. Dụng cụ điện được ghi 230 V cũng cóthể được vận hành ở 220 V.
Điều chỉnh chế độ vận hànhBằng công tắc dừng xoay/dừng đập (11) hãy chọnchế độ vận hành của dụng cụ điện.– Hãy nhấn nút mở khóa (10) để thay đổi chế độ
vận hành và xoay công tắc dừng xoay/dừng đập(11) vào vị trí mong muốn, đến khi vào khớp.
Hướng dẫn: Chỉ thay đổi chế độ vận hành khidụng cụ điện tắt! Nếu không, máy có thể bị làmhỏng.
Vị trí khoan búa rên vê‑tông hoặc đá
Vị trí Khoan thường không đập trêngỗ, kim loại, gốm và nhựa cũng nhưđể bắt vít
Vị trí khóa nhiều chỗ để điều chỉnhvị trí đụcTại vị trí này công tắc dừng xoay/dừng đập (11) không khớp.
Vị trí đục
Đảo Chiều QuayVới gạc vặn chuyển đổi chiều quay (7) bạn có thểthay đổi hướng xoay của dụng cụ điện. Tuy nhiên,việc này không thực hiện được khi công tắc Tắt/Mởđược nhấn (9).u Chỉ kích hoạt gạc vặn chuyển đổi chiều
quay (7) khi dụng cụ điện đã ngừng chạy.Luôn luôn chỉnh đặt chiều quay để khoan búa,khoan thường và đục về chiều quay phải.– Xoay theo chiều kim đồng hồ: Xoay gạc vặn
chuyển đổi chiều quay (7) ở hai bên vào vị trí cho đến cữ chặn.
– Xoay ngược chiều kim đồng hồ: Xoay gạc vặnchuyển đổi chiều quay (7) ở hai bên vào vị trí cho đến cữ chặn.
Bật/tắt– Để bật dụng cụ điện cầm tay, bạn hãy nhấn
công tắc bật/tắt (9).– Để khóa công tắc bật/tắt (9), hãy bấm giữ công
tắc và ấn thêm nút khóa giữ (8).– Để tắt dụng cụ điện cầm tay hãy nhả công tắc
bật/tắt (9). Khi công tắc bật/tắt bị khóa (9) hãynhấn nó và sau đó nhả ra.
Chỉnh đặt Tốc độ/Tần suất Đập– Hãy liên tục điều chỉnh tốc độ/tần suất đập của
dụng cụ điện đang bật tùy theo mức độ bấmcông tắc Tắt/Mở mạnh hay nhẹ (9).
Bấm nhẹ công tắc Tắt/Mở (9) sẽ cho tốc độ/tầnsuất đập thấp. Lực áp mạnh hơn lên công tắc làmtăng tốc độ và tần suất đập.
Hướng Dẫn Sử Dụngu Chỉ đặt dụng cụ điện đã tắt lên đai ốc/vít.
Dụng cụ đang quay có thể bị tuột ra.
Bosch Power Tools 1 609 92A 5N7 | (16.03.2020)

54 | Tiếng Việt
Thay Đổi Vị Trí Đục (Khóa nhiều vị trí)Bạn có thể khóa mũi đục vào 40 các vị trí. Nhờ nhưvậy, ta có thể tạo tư thế thao tác tốt nhất cho từngứng dụng.– Lắp mũi đục vào trong ổ lắp dụng cụ.– Vặn công tắc dừng xoay/dừng đập (11) vào vị trí
„Khóa nhiều vị trí“.– Xoay phần lắp dụng cụ về vị trí đục theo yêu
cầu.– Vặn công tắc dừng xoay/dừng đập (11) vào vị trí
„Đục“. Giá đỡ dụng cụ được khóa.– Để đục, chỉnh đặt chiều quay về chiều quay
phải.
Đục với chức năng khóa giữĐể đục lâu hơn mà không cần liên tục nhấn côngtắc bật/tắt (9), hãy khóa giữ công tắc bật/tắt trongchế độ vận hành „Đục“.– Để khóa hãy nhấn công tắc bật/tắt (9) cho đến
cữ chặn và đồng thời nhấn nút khóa giữ (8).– Để tắt, bạn hãy nhấn lại nút khóa giữ (8).Lưu ý: Hãy chuyển sang chế độ vận hành khác,trong khi công tắc bật/tắt được khóa, dụng cụ điệnđược tắt.
Bộ phận giảm chấnBộ phận giảm chấn tích hợp sẽ giảmcác rung động xuất hiện.
u Không được tiếp tục sử dụng dụng cụ điệnkhi bộ phận giảm chấn đã bị hỏng.
Lắp đầu chìa vặn vít (xem Hình K)u Chỉ đặt dụng cụ điện đã tắt lên đai ốc/vít.
Dụng cụ đang quay có thể bị tuột ra.Để sử dụng đầu chìa vặn vít bạn cần có phần lắpđầu gài phổ thông (26) với chuôi tiếp hợp SDS‑plus(Phụ kiện).– Làm sạch cán chuôi của chuôi tiếp hợp và bôi
một lớp mỏng dầu bôi trơn lên.– Lắp phần lắp đầu gài phổ thông bằng động tác
xoay vào trong phần lắp dụng cụ cho đến khiđược tự động khóa lại.
– Kiểm tra hiệu quả khóa bằng cách kéo thử phầnlắp đầu gài phổ thông ra.
– Lắp đầu gài vặn vít vào trong phần lắp đầu gàiphổ thông. Chỉ sử dụng đầu gài vặn vít vừa vớiđầu vít.
– Để tháo phần lắp đầu gài phổ thông hãy đẩyvòng Khóa (5) ra phía sau và tháo phần lắp đầugài phổ thông (26) ra khỏi phần lắp dụng cụ.
Bảo Dưỡng và Bảo QuảnBảo Dưỡng Và Làm Sạchu Trước khi tiến hành bất cứ việc gì trên máy,
kéo phích cắm điện nguồn ra.
u Để được an toàn và máy hoạt động đúngchức năng, luôn luôn giữ máy và các khethông gió được sạch.
Nếu như cần phải thay dây dẫn điện thì công việcnày phải do hãng Bosch, hay một đại lý đượcBosch ủy nhiệm thực hiện để tránh gặp sự nguyhiểm do mất an toàn.u Thay chụp ngăn bụi bị hỏng ngay lập tức.
Chúng tôi khuyến nghị việc thay thế này domột đại lý phục vụ hậu mãi thực hiện.
– Hãy làm sạch phần lắp dụng cụ (3) sau khi dùng.
Dịch vụ hỗ trợ khách hàng và tư vấn sửdụngBộ phận phục vụ hàng sau khi bán của chúng tôitrả lời các câu hỏi liên quan đến việc bảo dưỡng vàsửa chữa các sản phẩm cũng như phụ tùng thaythế của bạn. Sơ đồ mô tả và thông tin về phụ tùngthay thế cũng có thể tra cứu theo dưới đây:www.bosch-pt.comĐội ngũ tư vấn sử dụng của Bosch sẽ giúp bạn giảiđáp các thắc mắc về sản phẩm và phụ kiện.Trong tất cả các phản hồi và đơn đặt phụ tùng, xinvui lòng luôn luôn nhập số hàng hóa 10 chữ sốtheo nhãn của hàng hóa.
Việt NamCN CÔNG TY TNHH BOSCH VIÊT NAM TAITP.HCM Tâng 14, Ngôi Nhà Đức, 33 Lê Duẩn Phươ ng Bến Nghé, Quân 1, Thanh Phô Hô Chi Minh Tel.: (028) 6258 3690 Fax: (028) 6258 3692 - 6258 3694Hotline: (028) 6250 8555 Email: tuvankhachhang-pt@vn.bosch.comwww.bosch-pt.com.vnwww.baohanhbosch-pt.com.vn
CampuchiaCông ty TNHH Robert Bosch (Campuchia)Đơn nguyên 8BC, GT Tower, Tầng 08, Đường 169, Tiệp Khắc Blvd, Sangkat Veal Vong, Khan 7 Makara, Phnom Penh VAT TIN: 100 169 511 Tel.: +855 23 900 685 Tel.: +855 23 900 660 www.bosch.com.kh
Sự thải bỏMáy, linh kiện và bao bì phải được phân loại để táichế theo hướng thân thiện với môi trường.
Không được thải bỏ dụng cụ điện vàochung với rác sinh hoạt!
1 609 92A 5N7 | (16.03.2020) Bosch Power Tools

| 55
2 607 000 207
1 617 000 132SDS-plus
1 608 571 062Ø 1,5 - 13 mm
1 613 001 010
2 602 025 141
1 607 950 045
1 607 000 173
2 608 550 057SDS-plus
2 608 596 157Ø 8 mm
!
2 608 438 692
2 605 438 098
2 608 572 213SDS-plusØ 50 mm
2 608 438 037
Bosch Power Tools 1 609 92A 5N7 | (3/16/2020)
Related Documents


![GBH 2-24 DS GBH 2-24 DSE GBH 2-24 DSR - mathysbleienbach.ch Gebrauchsanleitung.… · ¯ Spindelhals [mm] 43 (Euro-Norm) 43 (Euro-Norm) 43 (Euro-Norm) Anzahl Mei§elstellungen 36](https://static.cupdf.com/doc/110x72/5ec153be71173655b9387361/gbh-2-24-ds-gbh-2-24-dse-gbh-2-24-dsr-gebrauchsanleitung-spindelhals-mm.jpg)