Gas and Electric User manual Dryer Imagine the possibilities TI ionk iou for 13,Jrd J_sln'_ thl_ _ar N-%III,£jpr,Jd uc.t p]da_ rei_Jbt_r ,_DUI proLitl __ dt Or ,_lD[ItdLJ ^/_,/\6 ¢ F ¢ \ , _.Jamsunu.comzrejb_er 1 -Z_IIZII_I-S A IV] S LI I _G / 72t_,- ?,_'64;

Welcome message from author
This document is posted to help you gain knowledge. Please leave a comment to let me know what you think about it! Share it to your friends and learn new things together.
Transcript

Gas and ElectricUser manual
Dryer
Imagine the possibilities
TI ionk iou for 13,Jrd J_sln'_ thl_ _ar N-%II I,£jpr,Jd uc.t
p]da_ rei_Jbt_r ,_DUI proLitl __ dt Or ,_lD[ItdLJ
^/_,/\6 ¢ F ¢\ ,_.Jamsunu.comzrejb_er1 -Z_IIZII_I-S A IV] S LI I _G / 72t_,- ?,_'64;
@ Contents
Safety instructions
What you need to know about safety instructions ..................................................... 4
Important safety symbols and precautions .............................................................. 4
Important safety instructions ......................................................................... 6
Installing your dryer
Unpacking your dryer ................................................................................ 8
What's included ...................................................................................... 8
Accessories ............................................................................................. 8
Important to installer ................................................................................. 9
Basic requirements ................................................................................... 9
Grounding ........................................................................................... 9
Gas models ............................................................................................. 9
Electric models .......................................................................................... 9
Location considerations ............................................................................. 10
Alcove or closet installations ......................................................................... 10
Ducting requirements ............................................................................... 12
Exhausting ............................................................................................ 13
Dryer exhaust tips ..................................................................................... 14
Gas requirements .................................................................................... 15
Commonwealth of massachusetts installation instructions ............................................ 15
Electrical requirements .............................................................................. 16
Electrical connections ................................................................................. 16
Connecting the inlet hose ........................................................................... 18
Replacement parts and accessories .................................................................. 19
Installation .......................................................................................... 19
Door reversal ........................................................................................ 20
Final installation checklist ............................................................................ 21
Operating instructions, tips ,,
Overview of the control panel ........................................................................ 22
Load the dryer properly ............................................................................... 26
Getting started ........................................................................................ 26
Rack dry (DV42H5400 _ Only) .......................................................................... 28
Child Lock............................................................................................. 29
Drum Light ........................................................................................... 29
English _2
Sound Off ............................................................................................. 29
My Cycle .............................................................................................. 30
Smart Care ............................................................................................ 30
Care and cleaning i_]:::_"
Control panel ......................................................................................... 31
Tumbler ............................................................................................... 31
Stainless steel tumbler ................................................................................ 31
Dryer exterior ......................................................................................... 31
Dryer exhaust system ................................................................................. 31
Clean the lint filter .................................................................................... 31
Special laundry tips
Special laundry tips .................................................................................. 32
t? ?Troubleshooting ......_,
Check these points if your dryer ...................................................................... 33
Information codes ................................................................................... 34
Appendix
Fabric care chart ..................................................................................... 35
Protecting the environment .......................................................................... 36
Declaration of conformity ............................................................................ 36
Specifications ....................................................................................... 36
English _3
I Safety instructionsCongratulations on your new Samsung Dryer. This manual contains important information on the installation, use,
and care of your appliance. Please take the time to read this manual to take full advantage of your dryer's manybenefits and features.
What you need to know about safety instructionsPlease read this manual thoroughly to ensure that you know how to operate the extensive features and functions
of your new appliance safely and emciently. Retain the manual in a safe place near the appliance for future
reference. Use this appliance only for its intended purpose as described in this instruction manual. The Warnings
and Important Safety Instructions in this manual do not cover all possible conditions and situations that may
occur. It is your responsibility to use common sense, caution, and care when installing, maintaining, or operating
your dryer.
Always contact your manufacturer about problems or conditions you do not understand.
Important safety sgmbols and precautions
WARNING: Hazards or unsafe practices that may result in severe physical injury, death and/or
_ roperty damage.Follow the information in this manual to minimize the risk of fire or explosion or to prevent property
damage, personal injury, or death.
A CAUTION: Hazards or unsafe practices that may result in physical injury and/or property damage.
NOTE
These warning signs are here to prevent injury to you and others,
Please follow them explicitly.
After reading this section, keep it in a safe place for future reference.
SAVETHESE INSTRUCTIONS
English-4
WARNING =RiSK OF FiRE= • Clothes dryer installation must be performed by a qualified installer.
, • Install the clothes dryer according to the manufacturer's instructions and local codes.
• Do not install a clothes dryer with flexible plastic venting materials. If flexible metal (foil type) duct is
installed, it must be of a specific type identified by the appliance manufacturer as suitable for use with
clothes dryers. Flexible venting materials are known to collapse, be easily crushed, and trap lint.These
conditions will obstruct clothes dryer airflow and increase the risk of fire.
, . To reduce the risk of severe injury or death, BIIow all installation instructions.
TO REDUCE THE RISK OF FIRE OR EXPLOSION:Do not dry items that have beer] previously cleaned, washed, soaked, or spotted with gasoline, dry cleaning
solvents, or other flammable or explosive substances.They emit vapors that could ignite or explode. Any
material that has been in contact with a cleaning solvent or flammable liquids or solids should not be placed
in the dryer until all traces of these flammable liquids or solids and their fumes have been removed.
There are many highly flammable items used in homes, such as acetone, denatured alcohol, gasoline,
kerosene, some liquid household cleaners, some spot removers, turpentine, waxes, and wax removers.
Do not dry items containing foam rubber (may be labeled latex Barn) or similarly textured rubber-like
materials on a heat setting. Heated foam rubber materials can, under certain circumstances, produce fire by
spontaneous combustion.
,A WHATTO DOIF YOUSMELL GAS:I_)onot try to light any appliance.
Do not turn on the appliance.
Do not touch any electrical switch.
Do not use any phone in your building.
Clear the room, building or area of all occupants.
Immediately call your gas supplier from a neighbor's phone. Follow the gas supplier's instructions.
If you cannot reach your gas supplier, call the fire department.
Installation and service must be performed by a qualified installer, service agency, or the gas supplier.
SAVETHESE INSTRUCTIONS
English _5
Important safety instructions
,d_ WARNINGTo reduce the risk of fire, electric shock, or injury to persons when using your appliance, follow basic
precautions, including the following:
1. Read all instructions before using this appliance.
2. Do not use the dryer to dry clothes which have traces of any flammable substance, such asvegetable oil,
cooking oil, machine oil, flammable chemicals, thinner, etc., or anything containing wax or chemicals, such as
mops and cleaning cloths. Flammable substances may cause the fabric to catch fire by itself.
3. Do not store or use gasoline or other flammable vapors and liquids near this or any other appliance.
4. Do not allow children or pets to play on, in, or in front of the appliance. Close supervision is necessary when
the appliance is used near children and pets.
5. Before the appliance is removed from service or discarded, remove the door to the drying compartment to
prevent children or animals from becoming trapped inside.
6. Do not reach into the appliance when the drum is moving.
7. Do not install or store this appliance where it will be exposed to the weather.
8. Do not temper with the internal controls.
9. Do not repair or replace any part of the appliance or attempt any servicing unless specifically recommended
in the user-maintenance instructions or published in the user-repair instructions that you understand and
have the skills to carry out.
10. Do not use fabric softeners or products to eliminate static unless recommended by the manufacturer of the
fabric softener or product.
11. Clean the lint screen before or after each load.
12. Do not use heat to dry articles containing foam rubber or similarly textured rubber-like materials.
13. Keep the area around the exhaust opening and surrounding areas free from lint, dust, and dirt.
14. The interior of the dryer and exhaust duct should be cleaned periodically by qualified service personnel.
15. Do not place items exposed to cooking oils in your dryer. Items contaminated with cooking oils maycontribute to a chemical reaction that could cause a load to catch fire.
16. This appliance must be grounded. See"Electrical requirements'and "Grounding'in the"lnstalling your dryer"section.
17. This appliance must be properly grounded. Never plug the power cord into a receptacle that is not grounded
adequately and in accordance with local and national codes. Refer to installation instructions for grounding
this appliance.
18. Ensure pockets are free from small irregularly shaped hard objects and foreign material, i.e. coins, knives, pins,
etc.These objects could damage your dryer.
19. Gas leaks may occur in your system, resulting in a dangerous situation.
20. Gas leaks may not be detected by smell alone.
21. Gas suppliers recommend you purchase and install a Ubapproved gas detector.
SAVETHESE INSTRUCTIONS
English _6
_, WARNING
Gas Appliances;WARNING:This product contains chemicals known to the State of California to cause cancer and reproductive
toxicity.
Gas appliances can cause Iowqevel exposure to Proposition 65 listed substances, including but not limited to,
benzene, carbon monoxide, formaldehyde and soot, substances resulting from the incomplete combustion of
natural gas or LPfuels.
iB, CAUTION
1. Do not sit on top of the dryer.
2. Because of continuing product improvements, Samsung reserves the right to change specifications without
notice. For complete details, see the Installation Instructions packed with your product before selecting
cabinetry, making cutouts, or beginning installation.
3. Do not wash clothing with large buckles, buttons, or other heavy metal or solid things.
4. Install and use in accordance with the manufacturer's instructions.
5. All washed and unwashed fabrics that contain vegetable oil or cooking oil can be dangerous. Washing these
items in hot water with extra detergent will reduce, but not eliminate, the hazard. Always use the Cool Down
cycle for these items to reduce their temperature. Never remove these items from the dryer hot or interrupt
the drying cycle until the items have run through the Cool Down cycle. Never pile or stack these items when
they are hot.
6. Take care that children's fingers are not caught in the door when closing it. This may result in injury.
SAVETHESEINSTRUCTIONSEnglish _7
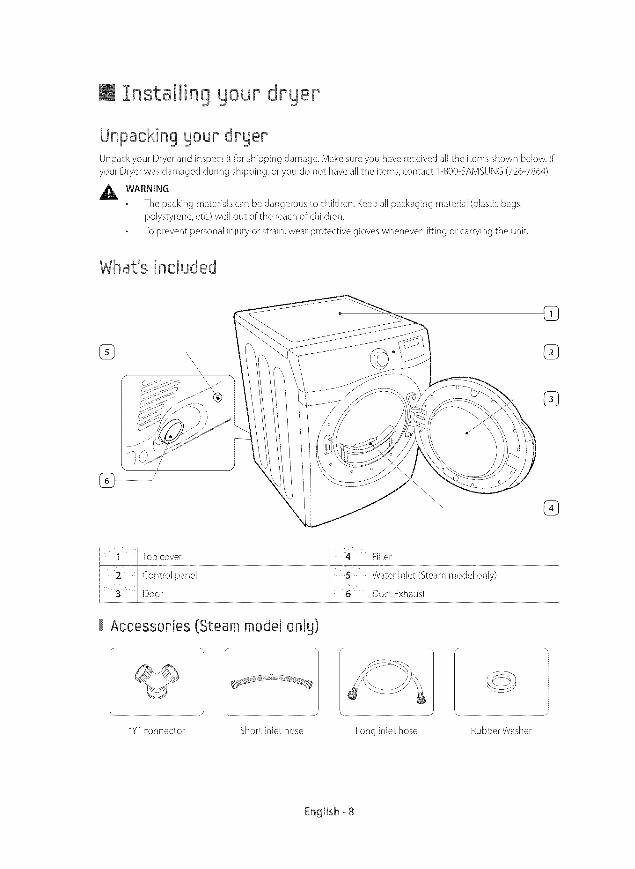
I Znstalling your dpyer
Unpackingyour dnyepUnpack your Dryer and inspect it for shipping damage. Make sure you have received all the items shown below, if
your Dryer was damaged during shipping, or you do not have all the items, contact 1-800-SAMSUNG (726-7864).
,_ WARNINGThe packing materials can be dangerous to children. Keep all packaging material (plastic bags,
polystyrene, etc.) well out of the reach of children.
To prevent personal in]ury or strain, wear protective gloves whenever lifting or carrying the unit.
What's included
8} @
Accessories (Steam model onlg)
"y'Lconnector Short inlet hose
English-8
Important to installer
Please read the following instructions carefully before installing the dryer.These instructions should be kept forfuture reference.
,_. WARNING: Remove the door from all discarded appliances to avoid the danger of a child being trappedand suffocating.
Basic requirementsMake sure you have everything necessary for the proper installation
A GROUNDED ELECTRICALOUTLET is required.
A POWER CORD electric dryer (except for Canada).
GAS LINES (ifa gas dryer) must meet national and local codes.
The EXHAUST SYSTEM must be made of rigid metal or flexible stiff-walled metal exhaust ducting.
GroundingThis dryer must be grounded. In the event of a malfunction or breakdown, grounding the product will reduce the
risk of electrical shock by providing a path of least resistance for the electrical current.
Gas models
Your dryer has a cord with an equipment-grounding conductor and a grounding plug.
The plug must be plugged into an appropriate outlet that is properly installed and grounded in accordancewith all local codes and ordinances.
Do not modify the plug provided with your dryer if it doesn't fit the outlet, have a proper outlet installed by
a qualified electrician.
Never connect the ground wire to the plastic plumbing lines, gas lines, or hot water pipes.
Electricmodels
Your dryer has an optional cord with an equipment-grounding conductor and a grounding plug, which is sold
separately.
The plug must be plugged into an appropriate outlet that is properly installed and grounded in accordancewith all local codes and ordinances.
Do not modify the plug provided with your dryer if it doesn't fit the outlet, have a proper outlet installed by
a qualified electrician.
If a power cord is not used and the electric dryer is to be permanently wired, the dryer must be connected to
a permanently grounded metal wiring system, or an equipment grounding conductor must be run with the
circuit conductors and connected to the equipment grounding terminal or lead on the dryer.
Enq[ish-9
Location considerations
The dryer should be located where there is enough space at the front for loading the dryer, and enough space
behind for the exhaust system.This dryer is factory-ready for the rear exhaust option.To exhaust out the bottom,
right or the left, use the accessory exhaust kit. Instructions are included with the kit. Make sure the room in which
the dryer is located has enough fresh air.The dryer must be located where there are no air-flow obstructions.
For gas dryers, adequate clearance must be maintained as noted on the data plate to ensure adequate air for
combustion and the proper dryer operation.
The dryer must not be installed or stored in an area where it will be exposed to water and/or weather.The dryer
area must be kept clear of combustible materials, gasoline, and other flammable vapors and liquids. A dryer
produces combustible lint.The area around the dryer should be kept lint-free.
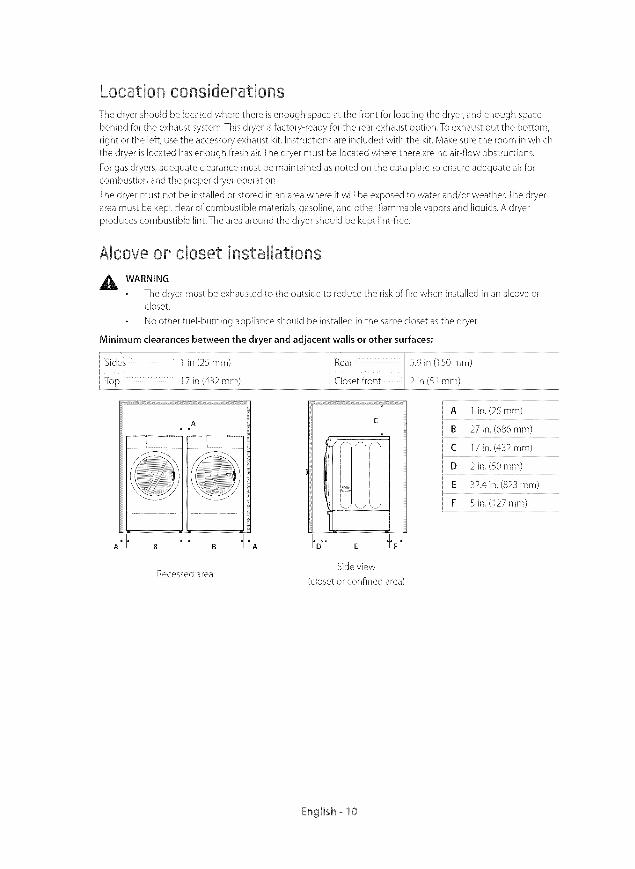
Alcove or closet installations
WARNINGThe dryer must be exhausted to the outside to reduce the risk of fire when installed in an alcove orcloset.
No other fuePburning appliance should be installed in the same closet as the dryer.
Minimum clearances between the dryer and adjacent walls or other surfaces:
js_a--es n!_mm! i%ar _ n!!_Omm! iTop !_!n!_ ra!! i aoie;iront1_!n!.s?ra!! j
L
q )}(( )}
o il. o Vi' E _
A in. (25 mm)
R 27 in. (686 ram)
C 17 in. (432 mm)
D 2 in. (50 mm)
F 32.4 in. (823 ram)
F 5 in.(127 mm)
RecessedareaSideview
(closetor confined area)
English _ 10
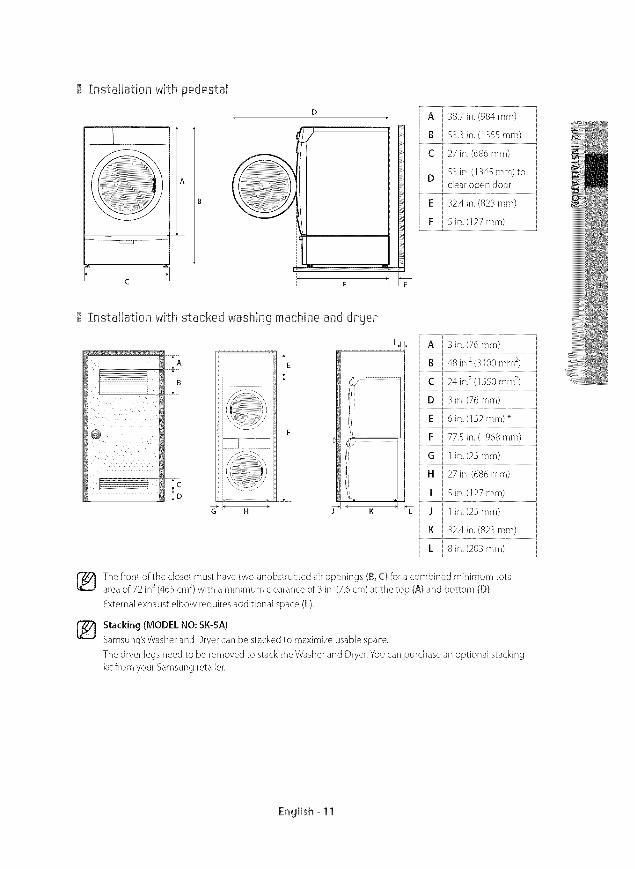
Installation with pedesta!
_1
A
C
D
i' '1E
A 38.7in.(984mm)
B .53.3 in. (1S55 mm)
C 27 in. (686 ram)
53 in. (1345 mm) toD
clear open doortJ E 32.4in.(823 ram)
F 5 in.(127 mm)
Znsta[lation wRh stacked washing machine and dpgep
_:__::rrrrrrr
i_ A 3 in.(76 mm)
B 48 in.2(3100 m m2)
C 24 in.2(15.50 mm 2)÷
D 3 in. (76 ram)
E 6 in.(152 mm) _
F 773 in. (1968 mm)
G 1 in. (25 ram)
H 27 in. (686 ram)
[
I 5 in.@27 mm)
J , 1 in.(25 mm)
K 32.4 in. (823 ram)
L , 8in.(203 mm)
4
The front of the closet must have two unobstructed air openings (B, C) for a combined minimum total2 2area of 72 in (465 cm ) with a minimum clearance of 3 in. (7.6 cm) at the top (A) and bottom (D).
External exhaust elbow requires additional space (L).
Stacking (MODEL NO: SK-SA)Samsung's Washer and Dryer can be stacked to maximize usable space.
The dryer legs need to be removed to stack the Washer and Dryer. You can purchase an optional stacking
kit from your Samsung retailer.
English _ 11
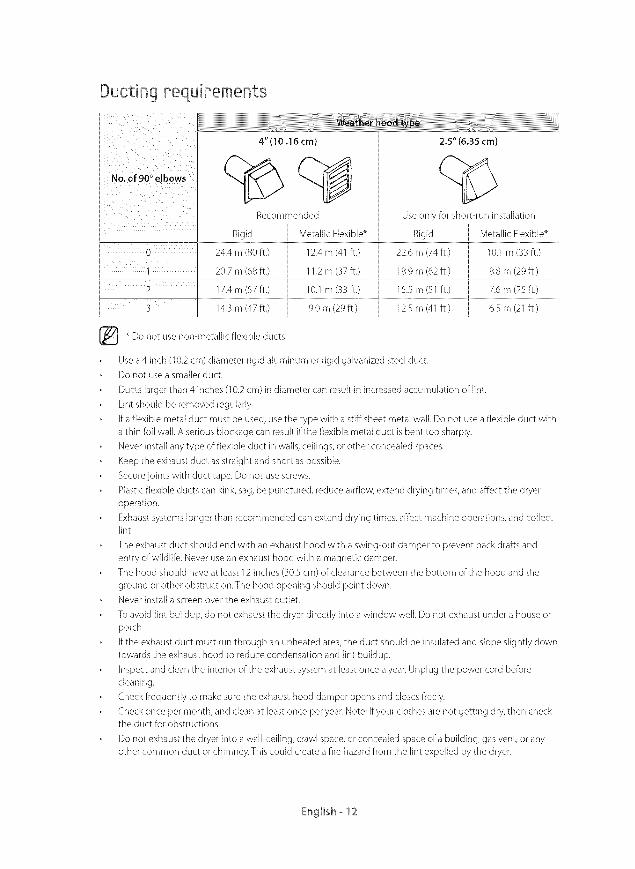
Ducdng pequbements
Recommended Use only for short-run installationii Rigid Metallic Flexible _ Rigid Metallic Flexible _
i 0 24.4 m (80 ft.) 12.4 m (41 ft.) 22.6 m (74 ft.) 10.1 m (33 ft.)i
i t 20.7 m (68 ft.) 11.2 m (37 ft.) 18.9 m (62 ft.) 8.8 m (29 ft.)i
i 2 17.4 m (57 ft.) 10.1 m (33 ft.) 15.5 m (51 ft.) 7.6 m (25 ft.)
3 14.3 m (47 ft.) ' 9.0 m (29 ft.) ' 12.5 m (41 ft.) 6..5 m (2 ] ft.)
_ non-metallic flexible ducts.Do not use
Use a 4 inch (10.2 cm) diameter rigid aluminum or rigid galvanized steel duct.
Do not use a smaller duct.
Ducts larger than 4 inches (10.2 cm) in diameter can result in increased accumulation of lint.
Lint should be removed regularly.
If a flexible metal duct must be used, use the type with a stiff sheet metal wall. Do not use a flexible duct with
a thin foil wall. A serious blockage can result if the flexible metal duct is bent too sharply.
Never install any type of flexible duct in walls, ceilings, or other concealed spaces.
Keep the exhaust duct as straight and short as possible.
Secure joints with duct tape. Do not use screws.
Plastic flexible ducts can kink, sag, be punctured, reduce airflow, extend drying times, and affect the dryer
operation.
Exhaust systems longer than recommended can extend drying times, affect machine operations, and collectlint.
The exhaust duct should end with an exhaust hood with a swing-out damper to prevent back drafts and
entry of wildlife. Never use an exhaust hood with a magnetic damper.
The hood should have at least 12 inches (30.5 cm) of clearance between the bottom of the hood and the
ground or other obstruction.The hood opening should point down.
Never install a screen over the exhaust outlet.
To avoid lint buildup, do not exhaust the dryer directly into a window well. Do not exhaust under a house or
porch.
If the exhaust duct must run through an unheated area, the duct should be insulated and slope slightly down
towards the exhaust hood to reduce condensation and lint buildup.
Inspect and clean the interior of the exhaust system at least once a year. Unplug the power cord before
cleaning.
Check frequently to make sure the exhaust hood damper opens and closes freely.
Check once per month, and clean at least once per year. Note: If your clothes are not getting dry, then checkthe duct for obstructions.
Do not exhaust the dryer into a wall, ceiling, crawl space, or concealed space of a building, gas vent, or any
other common duct or chimney.This could create a fire hazard from the lint expelled by the dryer.
English - 12
If the new dryer is installed into an existing exhaust system you must make sure:
The exhaust system meets all local, state, and national codes.
That a flexible plastic duct is not used.
To inspect and clean all lint buildup from inside the existing duct.
The duct is not dented or crushed.
The exhaust hood damper opens and closes freely.
The static pressure in any exhaust system must not exceed 0.83 inches of water column, or be less than 0.
This can be measured with the dryer running with a manometer at the point where the exhaust duct
connects to the dryer. A no-heat setting should be used.The dryer tumbler should be empty and the lint filter
clean.
Exhausting
The dryer shall not be exhausted into a chimney, a wall, a ceiling, an attic, a crawl space, or a concealed space of a
building.
Exhausting the dryer to the outside will prevent large amounts of lint and moisture from being blown into the
room.
• All dryers must be exhausted to the outside.Do not assemble the duct with screws or other fastening means that extend into the duct and catchlint.
The exhaust duct should be 4 inches (102 mm) in diameter.
The total length of flexible metal duct shall not exceed 2.4 m (7.8 ft.).
In the United States:
Use only those foiPtype flexible ducts, if any, specifically identified for use with the appliance by the manufacturer
and that comply with the OutEine for Clothes DryerTransition Ducts, Subject 21S8A.
In Canada:
Use only those foiPtype flexible ducts, if any, specifically identified for use with the appliance by the manufacturer.
Outside the U.S and Canada:
Refer to the local codes.
WARNINGThe dryer must be exhausted to the outside to reduce the risk of fire when installed in an alcove orcloset.
NEVERUSEA PLASTIC OR NON-METAL FLEXIBLE DUCT.
If your existing ductwork is plastic, non-metal, or combustible, replace it with metal.
Use only a metal exhaust duct that is non-flammable to ensure containment of the exhaust air, heat,
and lint.
English - 13
Dryer exhaust tips
WARNING: A plastic or non-metal flexible duct presents a potential fire hazard.
Make sure your dryer is installed properly so it exhausts air easily.
Use a 4"diameter rigid metal duct.Tape all joints, including at the dryer.
Never use lint-trapping screws.
Keep ducts asstraight as possible.
Clean all old ducts before installing your new dryer.
Be sure the vent flap opens and closes freely.
inspect and clean the exhaust system annually.
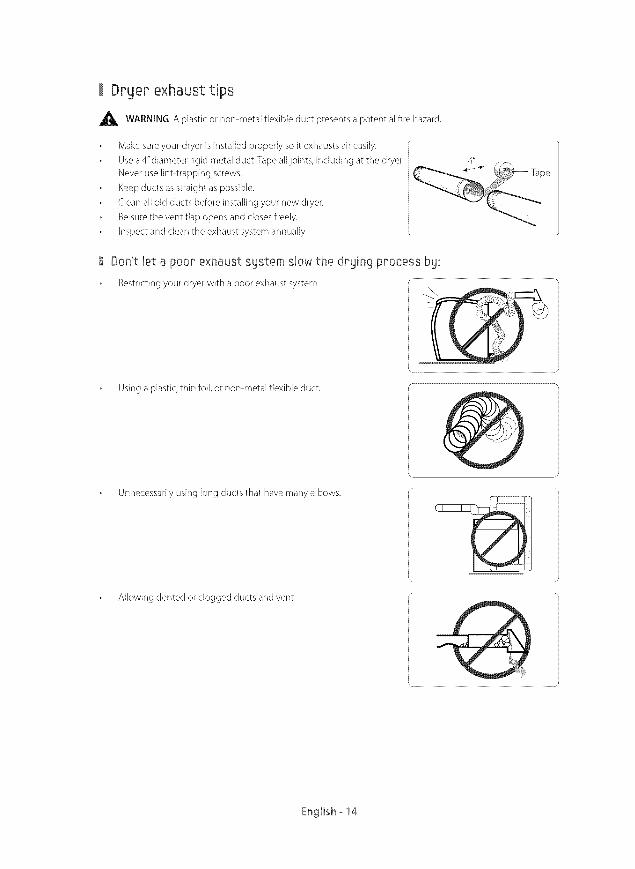
Don't let a poor exhaust sustain slow the drying process bg:
Restricting your dryer with a poor exhaust system. "-...................................................................................................................................................
Using a plastic, thin foil, or non-metal flexible duct.
Unnecessarily using long ducts that have many elbows.
Allowing dented or clogged ducts and vent.
\
English _14
Gas pequipements
THE INSTALLATION MUST CONFORM WITH LOCAL CODES, OR IN THE ABSENCE OF LOCAL CODES, WITH
THE NATIONAL FUEL GAS CODE ANSIIZ223.1, LATEST REVISION (FOR THE UNITED STATES), OR WITH THE
CANICGA-B149 INSTALLATION CODES (FOR CANADA).
Use only natural or LP(liquid propane) gases.
This dryer designed for use with natural gas. If you plan to use your dryer with LP gas (liquid propane), the
conversion must be done by a qualified service technician in order to achieve safe and proper performance.
A 1/2 inch (1.27 cm) gas supply line is recommended and must be reduced to connect to the 3/8 inch (l cm)
gas line on your dryer:The National Fuel Gas Code requires that an accessible, approved manual gas shut-off
valve be installed within 6 inches of your dryer.
Gas dryers installed in residential garages must be raised 18 inches (46 cm) above the floor.
Additionally, a 1/8 inch (0.3 cm) N.RT. (National PipeThread) plugged tapping, accessible for test gauge
connection, must be installed immediately upstream of your dryer's gas supply connection.
Your dryer must be disconnected from the gas supply pipe system during any pressure testing of the system.
DO NOT reuse old flexible metal gas lines. Flexible gas lines must be design certified by the American Gas
Association (CGA in Canada).
• Any pipe joint compound used must be resistant to the action of any liquefied petroleum gas.As a courtesy, most local gas utilities will inspect a gas appliance installation.
GAS IGNITION -Your dryer uses an automatic ignition system to ignite the burner. There is no constant
burning pilot.
Commonwealth of massachusetts installation instructions
Your dryer must be installed by a licensed plumber or gas fitter. A'T" handle manual gas valve must be installed in
the gas supply line to your dryer. If a flexible gas connector is used to install your dryer, the connector may not be
longer than 3 feet (36 inches).
WARNINGGas leaks may occur in your system, creating a dangerous situation.
Gas leaks may not be detected by smell alone.
Gas suppliers recommend that you purchase and install a UL-approved gas detector.
Install and use it in accordance with the manufacturer's instructions.
English - 15
Electpical pequipementsThe wiring diagram is located on the plate below the control panel.
,_ WARNINGThe improper connection of the equipment grounding conductor canresult in a risk of electricshock.Check with a qualified electrician or serviceman ifyou are in doubt asto whether your dryer isproperly grounded. Do not modify the plug provided with your dryer - if it doesn't fit the outlet, havea proper outlet installed by a qualified electrician.
To prevent unnecessaryrisk of fire, electrical shock,or personalinjury, all wiring and grounding mustbe done in accordancewith local codes,or in the absenceof localcodes,with the National ElectricalCode, ANSI/NFPANo.70-LatestRevision(for the U.S.)or the CanadianElectricalCode CSAC22.1-LatestRevisionsand localcodes and ordinances. It isyour responsibilityto provide adequate electricalservicesfor your dryer.
All gasinstallations must be done in accordancewith the national FuelCode ANSVZ2231- LatestRevision(forthe U.S.)orCAN/CGA- B149InstallationCodes- LatestRevision(for Canada)and localcodesand ordinances.
ElectPical connections
Beforeoperating or testing, follow all grounding instructions in the"Grounding"section on page 13.
An individual branch (or separate)circuit serving only your dryer is recommended. DO NOTUSEAN EXTENSIONCORD.
6as models = U.S.and Canada
A 120volt, 60 HzA( approved electrical service,with a 1S-amperefuseor circuit breakeris required.
Electpic models - U.S.0n!yMost U.S.dryers requirea 120/240volt, 60 HzACapproved electrical service.Some require 120/208volt, 60 Hzapproved electricalservice.Theelectric servicerequirements can be found on the data label located behind thedoor. A 30-amperefuse or circuit breakeron both sidesof the line is required.
If a power cord isused,the cord should be plugged into a 30-ampere receptacle.
The power cord is NOTprovided with U.S.electric model dryers.
_k WARNING - RISKOFELECTRICSHOCKWhen local codes allow,the dectrical supply of the dryer may be connected by means of a new powersupplycord kit, marked for usewith a dryer, that isU.L listed and rated at a minimum of120/240volts,30-amperewith three No. 10 copper wire conductors terminated with closedloop terminals, open-endspade lugs with turned up ends,or with tinned leads.
Do not reusea power supply cord from an old dryer.The power cord electric supplywiring must beretained at the dryer cabinet with a suitable Ublisted strain relief.
Grounding through the neutral conductor is prohibited for (1)new branch-circuit installations,(2)mobile homes, (3)recreationalvehicles,and (4)areaswhere local codes prohibit grounding throughthe neutral conductor. (Usea 4-prong plug for 4 wire receptacles,NEMAtype 14-gOR.)
EJectpicmodels = Canada0n!yA 120/240volt, 60 Hz ACapproved electrical servicefused through a 30-ampere fuseor circuit breakeronboth sidesof the line is required.
All Canadian models areshipped with the power cord attached.The power cord should be plugged into a30-ampere receptacle.
In Canada,you may not convert a dryer to 208 volts.
English _ 16

3-WZREsystem connections
1, Loosen or remove the center terminal block screw.
2. Connect the neutral wire (white or center wire) of the power cord to the center, silver-colored terminal screw
of the terminal block.Tighten the screw.
3. Connect the other wires to the outer terminal block screws. Tighten the screws.
4. Tighten the strain reEiefscrews.
5. Insert the tab of the terminaE block cover into your dryer's rear paneEslot.
6. Secure the cover with a holddown screw.
If converting from a4-wire electrical system to a g-wire, the ground strap must be reconnected to theterminal block support to ground the dryer frame to the neutral conductor.
4-WZREsgstem connections
1,
2.
3.
4,
S.
6.
7.
Remove the center terminal block screw.
Connect the ground wire (green or unwrapped) of the power cord to the external ground conductor screw.
Connect the neutral wire (white or center wire) of the power cord and the appliance ground wire (green with
yellow stripes) under the central screw of the terminal block.
Connect the other wires to the outer terminal block screws. Tighten the screws.
Tighten the strain relief screws.
Insert the tab of the terminal block cover into your dryer's rear panel slot.
Secure the cover with a holddown screw.
J fi_ Externa ground connector i A ,--- _j_ .............
i B Greenorbarecopperwireofthepowercord l t_ ,h%i,Y %_' B IJ_ 314 in. (1.9 cm) UL-listed strain relief j i --E
j_i Grounding wire(green/yellow) J ii _ I
J_ Neutral wire (white or center wire)i
8. With a level, check your dryer and make the necessary adjustments to the leveling legs.
9. At this time, make sure all gas connections (on gas models), exhaust and electrical connections are complete.
Plug in your dryer, and check its operation by using the checklist below.
10. (GAS MODELS ONLY)
The burner may not ignite initially due to air in the gas line. AHowing your dryer to operate on a heat setting
will purge the line. If the gas does not ignite within 5 minutes, turn your dryer off and wait 5 minutes. Be sure
the gas supply to your dryer has been turned on. In order to confirm the gas ignition, check the exhaust forheat.
English - 17
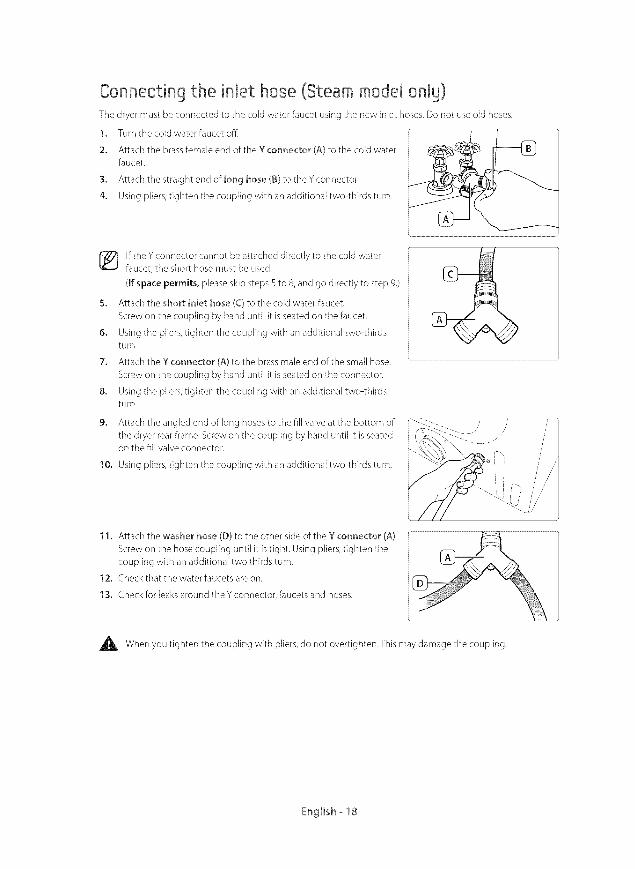
Connecting the inlet hose (Steam model only)The dryer must be connected to the cold water faucet using the new inlet hoses. Do not use old hoses.
1. Turn the cold water faucet off.
2, Attach the brass female end of the Y connector CA)to the cold water
faucet.
3. Attach the straight end of long hose (B) to the Y connector.
4, Using pliers, tighten the coupling with an additional two4hirds turn.
If the Y connector cannot be attached directly to the cold waterfaucet, the short hose must be used.
(If space permits, please skip steps 5 to 8, and go directly to step 9.)
5,
6.
7.
8.
9.
Attach the short inlet hose (C} to the cold water faucet.
Screw on the coupling by hand until it is seated on the faucet. ___
Using the pliers, tighten the coupling with an additional two-thirds
turf].
Attach the Y connector CA)to the brass male end of the small hose. "
Screw on the coupling by hand until it is seated on the connector.
Using the pliers, tighten the coupling with an additional two4hirdsturf].
Attach the angled end of long hoses to the fill valve at the bottom of
the dryer rear frame. Screw on the coupling by hand until it is seatedon the fill valve connector.
10. Using pliers, tighten the coupling with an additional two-thirds turn.
11. Attach the washer hose (D) to the other side of the Y connector CA).
Screw on the hose coupling until it is tight. Using pliers, tighten the
coupling with an additional two thirds turn.
12. Check that the water faucets are on.
13. Check for leaks around the Y connector, faucets and hoses.
When you tighten the coupling with pliers, do not overtighten.This may damage the coupling.
English _18
Replacement parts and accessoriesIf your dryer requires replacement parts or accessories, contact the dealer where you purchased your dryer or the
SAMSUNG customer care center at 1-800-SAMSUNG (726-7864).
Installation
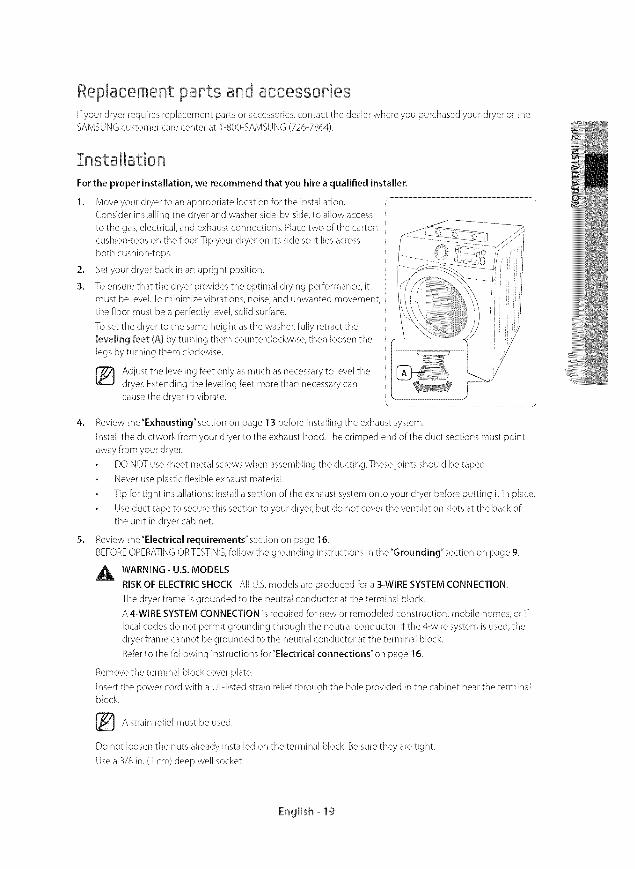
For the proper installation, we recommend that you hire a qualified installer.
1. Move your dryer to an appropriate location for the installation.
Consider installing the dryer and washer side-by-side, to allow access
to the gas, electrical, and exhaust connections. Place two of the carton
cushion-tops on the floor.Tip your dryer on its side so it lies across
both cushion-tops.
2, Set your dryer back in an upright position.
3, To ensure that the dryer provides the optimal drying performance, it
must be level. To minimize vibrations, noise, and unwanted movement,
the floor must be a perfectly level, solid surface.
To set the dryer to the same height asthe washer, fully retract the
leveling feet CA)by turning them counterclockwise, then loosen the
legs by turning them clockwise.
Adjust the leveling feet only as much as necessary to level thedryer. Extending the leveling feet more than necessary can
cause the dryer to vibrate.
Review the"Exhausting'section on page 13 before installing the exhaust system.
Install the ductwork from your dryer to the exhaust hood.The crimped end of the duct sections must point
away from your dryer.
DQ NOT use sheet metal screws when assembling the ducting.Thesejoints should be taped.
Never use plastic flexible exhaust material.
Tip for tight installations: install a section of the exhaust system onto your dryer before putting it in place.
Use duct tape to secure this section to your dryer, but do not cover the ventilation slots at the back of
the unit in dryer cabinet.
Review the"Electrical requirements" section on page 16.
BEFOREOPERATINGOR TESTING, follow the grounding instructions in the"Grounding"section on page 9.
_IL WARNING- U.S. MODELSRISK OF ELECTRIC SHOCK - All U.S.models are produced for a S-WIRE SYSTEM CONNECTION.
The dryer frame is grounded to the neutral conductor at the terminal block.
A 4-WIRE SYSTEM CONNECTION is required for new or remodeled construction, mobile homes, or if
local codes do not permit grounding through the neutral conductor, if the 4-wire system is used, the
dryer frame cannot be grounded to the neutral conductor at the terminal block.
Refer to the following instructions lot"Electrical connections" on page 16.
Remove the terminal block cover plate.
Insert the power cord with a Ublisted strain relief through the hole provided in the cabinet near the terminalblock.
A strain mustrelief be used.
Do not loosen the nuts already installed on the terminal block. Be sure they are tight.
Use a 3/8 in. (1 cm) deep well socket.
English- 19
Review the"Gas requirements" section on page 1S.
Remove the pipe thread protective cap. Apply a pipejoint compound or about 1V2wraps of Teflon tape overall threaded connections.
The pipe joint compound must be resistant to the actions of any liquefied petroleum gas.
Connect the gas supply to your dryer. An additional fitting is required to connect the 3/4" (1.9 cm) female
thread end of a flexible connector to the 3/8" (1 cm) male threaded end on the dryer.
Securely tighten the gas line fitting over the threads.
Turn on the gas supply.
Check all gas connections for leaks using a soap solution.
If bubbles appear, tighten the connections and recheck. DO NOT use an open flame to check for gas leaks.
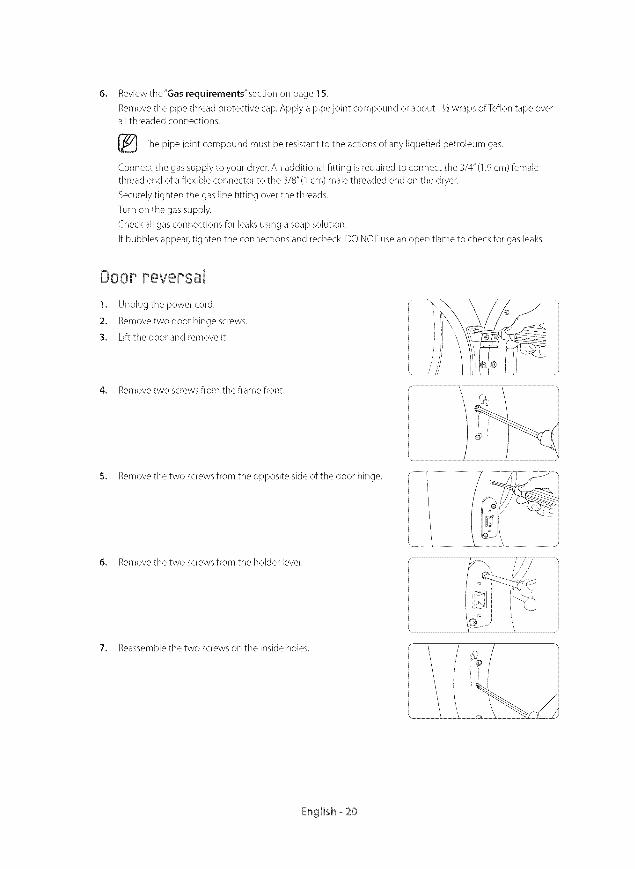
Doop peversaJ
1. Unplug the power cord.
2. Remove two door hinge screws.
3. Lift the door and remove it.
4. Remove two screws from the frame front.
5. Remove the two screws from the opposite side of the door hinge.
6. Remove the two screws from the holder lever.
7. Reassemble the two screws on the inside holes.
English _20
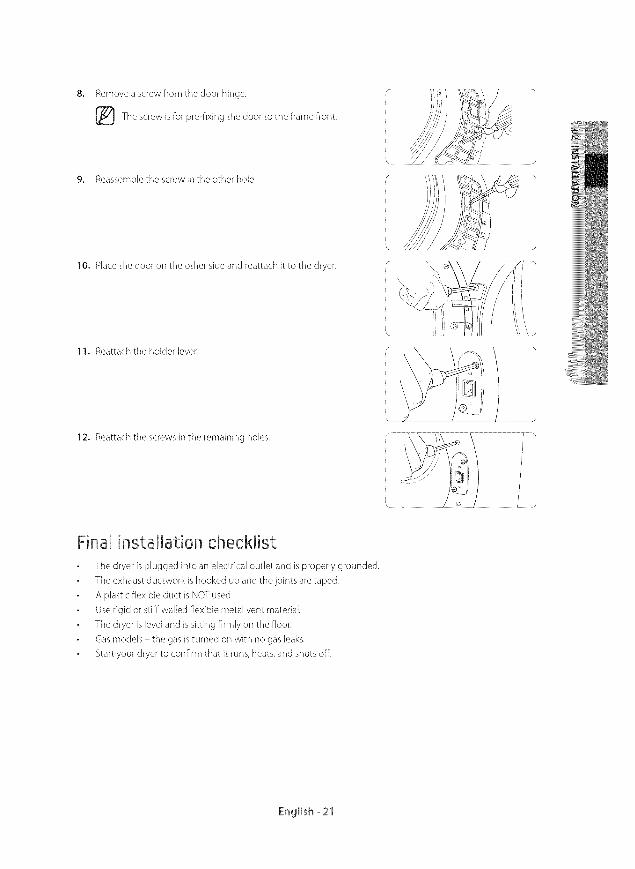
8, Remove a screw from the door hinge.
The screw is for pre-flxing the door to the frame front.
9, Reassemble the screw in the other hole.
10. Place the door on the other side and reattach it to the dryer.
11. Reattach the holder lever.
12. Reattach the screws in the remaining holes.
Final installation checklist
The dryer is plugged into an electrical outlet and is properly grounded.
The exhaust ductwork is hooked up and the joints are taped.
A plastic flexible duct is NOT used.
Use rigid or stiff-walled flexible metal vent material.
The dryer is level and is sitting firmly on the floor.
Gas models the gas is turned on with no gas leaks.
Start your dryer to confirm that it runs, heats, and shuts off.
English- 21
@ OpeRating instructions, tipsTo reduce the risk of fire, electric shock, or injury to persons,read the IMPORTANT SAFETYINSTRU(-TIQNSbefore operating this appliance.
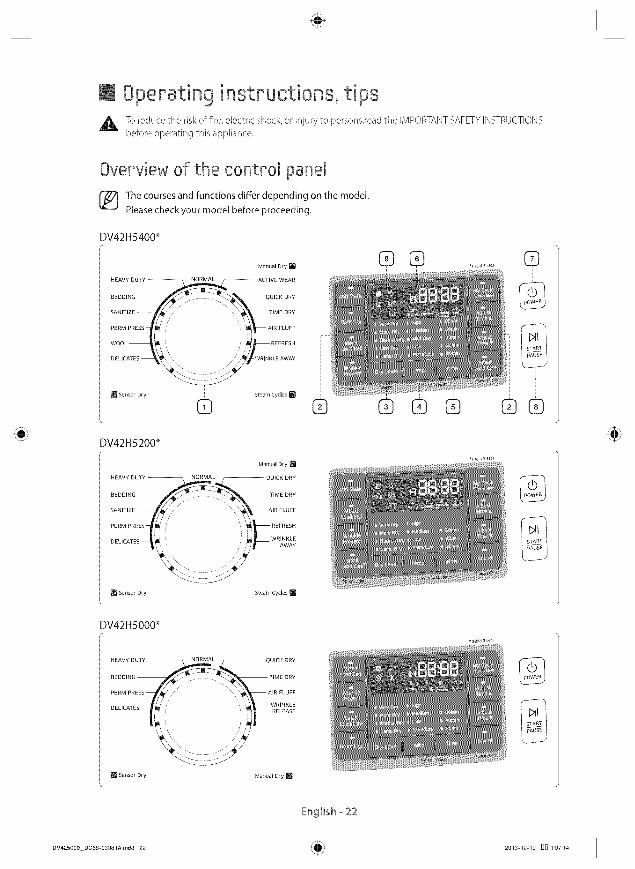
Overview of the control panel
The courses and functions differ depending on the model.Please check your model before proceeding,
DV42H5400*
......... [] @ e ........... @I
HEAVY DUTY NORMAL ACTIVE WEAR
BEDDING QUICK DRY pO_WER....... .......RERM AIR FLUFF _I N_ I
WOOL ' _ REFRESH
DELICATES ' , JWRINWRINKLE AWAY
'TES_k__ ,//\'_ "\ /" /
1
[] ......... y @ ...... ycles• @ @ e @ @
DV42H5000*
'EAVVODTV NOgT_E QU,CKDRYBEDDING TIME DRY
PERM PRESS /// "' AIR FLUFF
DELICATE
[] Sensor Dry Manual Dry []
\ /
English - 22
DV425000 DCBB-O3381Aindd 22 2013-12-19 _ 1:07:14
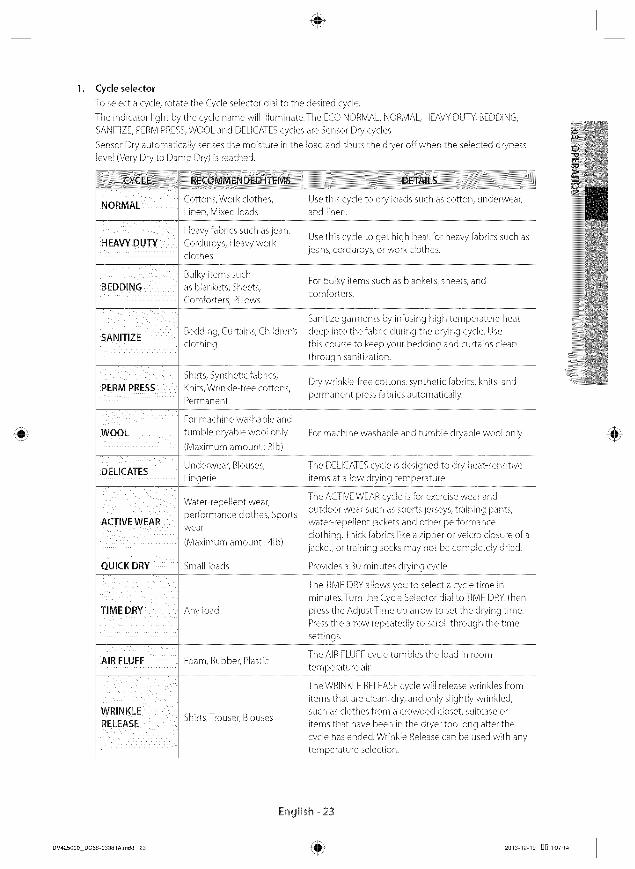
Cycle selector
To select a cycle, rotate the Cycle selector dial to the desired cycle.
The indicator light by the cycle name will illuminate.The ECO NORMAL, NORMAL, HEAVY DUTY, BEDDING,
SANITIZE, PERM PRESS,WOOL and DELICATEScycles are Sensor Dry cycles.
Sensor Dry automatically senses the moisture in the load and shuts the dryer offwhen the selected dryness
level (Very Dry to Damp Dry) is reached.
i Cottons, Work clothes, Use this cycle to dry loads such as cotton, underwear,NORMAL
' Linen, Mixed loads arid linen.
J ... Heavy fabrics such as jean, Use this cycle to get high heat for heavy fabrics such asl NEAV¥DUTY Corduroys,Heavyworki_ _ clothes i jeans,corduroys,orworkclothes.
Bulky items suchi For bulky items such as blankets, sheets, and
i BEDDING as blankets, Sheets, comforters.j Comforters, Pillows jl
Sanitize garments by infusing high temperature heat
i SANITIZE Bedding, Curtains, Children's deep into the fabric during the drying cycle. Use
, clothing this course to keep your bedding and curtains clean, through sanitization.
Shirts, Synt hetic fabrics, '
PERM PRESS Knits, Wrinkle-free cottons, , Dry wrinkle-free cottons, synthetic fabrics, knits, and
i Permanent ' permanent press fabrics automatically.ij For rnachine washable and '
J WOOL tumble dryable wool only For machine washable and tumble dryable wool only.J
i Maximum amount : 3lb) ,
i Underwear, Blouses, The DELICATEScycle is designed to dry heat-sensitiveDELICATES
, Lingerie items at a low drying temperature.K T . ,
The ACTIVEWEAR cycle is for exercise wear andWater-repellent wear,)erformance clothes, Sports outdoor wear such as sports jerseys, training pants,
j ACT!VEWEAR water-repdlentjackets and other performance
i wear clothing. Thick fabrics like a zipper or velcro closure of a(Maximurn amount : 41b) acket, or training socks rnay not be cornpletely dried.
i QUICKDRY Small loads Provides a 30 minutes drying cycle.
i TheTIME DRY allows you to select a cycle time in
J minutes.Turn the Cycle Selector dial toTIME DRY,theni] TIME DRY Any load press the Adjust Time up arrow to set the drying time.
Press the arrow repeatedly to scroll through the time
] settings.l
i The AIR FLUFFcycle tumbles the load in roomi AIRELUFF Foam, Rubber, Plastici temperature air.
TheWRINKLERELEASEcyclew,llreleasewr,nklesfromitems that are dean, dry, arid only slightly wrinkled,
WRINKLE ... suchasclothesfromacrowdedclosetsuitcaseorJ RELEASE bhlrts Trouser Blouses ........ ' _ ,' ' _terns that have been _nthe dryer too long atter the
cycle has ended. Wrinkle Release can be used with any
, temperature selection.
English- 23
DV425000 DO68-O3381Aindd 23 2013-12-19 D_ 1:07:14
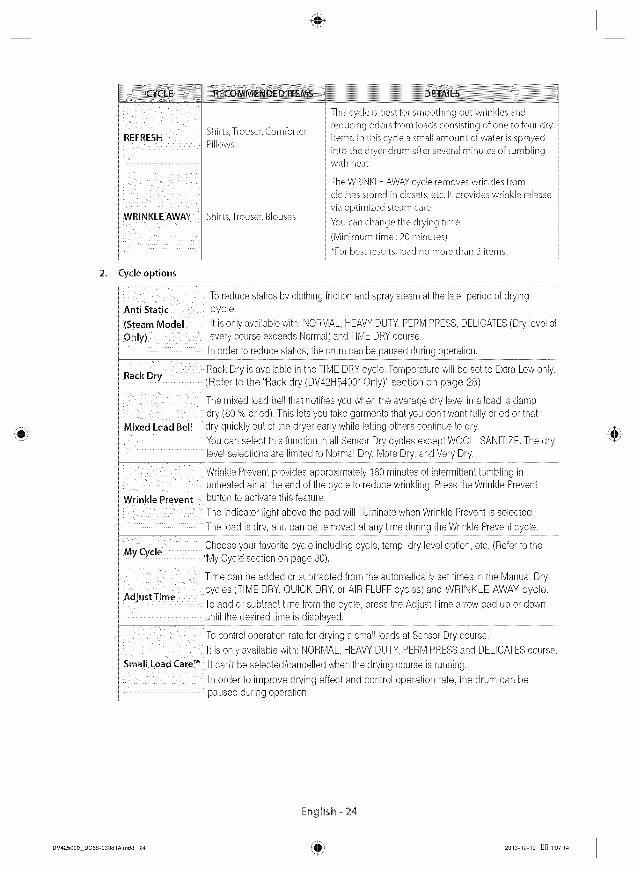
i This cycle isbest for smoothing out wrinkles andreducing odorsfrom loadsconsisting of one to four dry
i Shirts,Trouser,Comforter,JREFRESH items. In this cycle a smallamount of water issprayedj Pillows ' into the dryer drum after severalminutes of tumblingJ
j with heat.
TheWRINKLEAWAYcycle removeswrinkles from '
clothes stored in closets,etc. It provideswrinkle releasevia optimized steamcare.
JWR NKLEAWAY Shirts,Trouser,Blouses
Youcan change the drying time.(Minimum time : 20 minutes)
i . _Forbest results,load no more than 3 items.
Cycle options
,i Toreducestatics by clothing friction and spraysteamat the laterperiod of dryingi Anti Static cycle.
i (Steam Mode! It isonly availablewith: NORMAL,HEAVYDUTY,PERMPRESS,DELICATES(Dry levelofji only) everycourse exceedsNormal) and TIMEDRYcourse.: In order to reducestatics, the drum can be paused during operation.
Rack Dry Rack Dry isavailable inthe TIME DRYcycle. Temperaturewill be set to ExtraLow only.'Refer to the "Rackdry (DV42H5400*Only)" section on page 28).
q
i Themixed load bell that notifies youwhen the average dry level in a load is dampdry (80 % dried). This lets you take garments that you don't want fully dried or that
] Mixed Load Bell Jry quickly out of the dryer early while letting others continue to dry.ii Youcan select this function in all SensorDry cycles except WOOL,SANITIZE.The dry
j level selections are limitedto Normal Dry, More Dry, and VeryDry. ,
i Wrinkle Preventprovides approximately 180 minutes of intermittenttumbling inunheated air at the end of the cycle to reduce wrinkling. Press the Wrinkle Prevent
J
i Wrinkle Prevent button to activate this feature.i The indicator light above the pad will illuminatewhen Wrinkle Preventis selected.l
j The load is dry, and can be removed at any time during the WrinklePreventcycle.J
iMy cycle 3hoose your favorite cycle including cycle, temp, dry level option, etc. (Referto theMy Cyclg section on page 30),
rime can be added or subtracted from the automatically set times in the Manual Dry3ycles (TIME DRY,QUICK DRY,or AIR FLUFFcycles) and WRINKLE AWAY cycle.iAdju't'nmero add or subtract time from the cycle, press the Adjust Time arrow pad up or down
i Jntilthe desired time is displayed.
To control operation rate for drying a small loads at Sensor Dry course.It is only available with: NORMAL,HEAVYDUTY,PERMPRESSand DELIOATEScourse.
] Small Load care'_' It can't be selected/cancelled when the drying course is running.
i In order to improve drying effect and control operation rate, the drum can bei _aused during operation.
English- 24
DV425000 DO68-O3381Aindd 24 2013-12-19 D_ 1:07:14
8,
9.
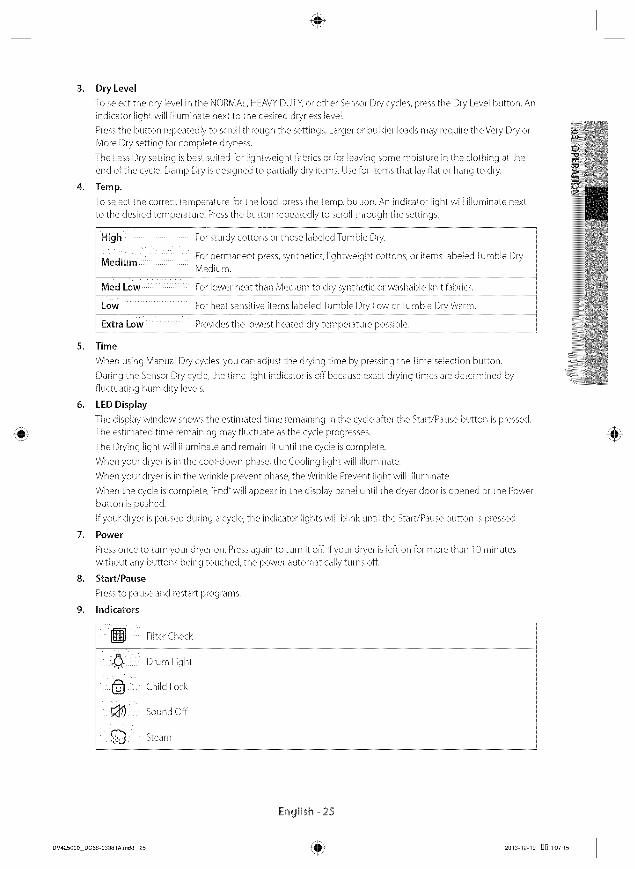
Dry Level
To select the dry level in the NORMAL, HEAVYDUTY, or other Sensor Dry cycles, press the Dry Level button. An
indicator light will illuminate next to the desired dryness level.
Press the button repeatedly to scroll through the settings. Larger or bulkier loads may require theVery Dry or
More Dry setting for complete dryness.
The Less Dry setting is best suited for lightweight fabrics or for leaving some moisture in the clothing at the
end of the cycle. Damp Dry is designed to partially dry items. Use for items that lay fiat or hang to dry.
Temp.
To select the correct temperature for the load, press theTemp, button. An indicator light will illuminate next
to the desired temperature. Pressthe button repeatedly to scroll through the settings.
High For sturdy cottons or those labeled Tumble Dry.
]
j Medium For permanent press, synthetics, lightweight cottons, or items labeled Tumble Dry
Medium.i
i Med Low For lower heat than Medium to dry synthetic or washable knit fabrics.
Low For heat sensitive items labeled Tumble Dry Low orTumble Dry Warm.
E×tra Provides the lowest heated dry temperature possible.
Time
When using Manual Dry cycles, you can adjust the drying time by pressing theTime selection button.
During the Sensor Dry cycle, the time light indicator is off because exact drying times are determined by
fluctuating humidity levels.
LED Display
The display window shows the estimated time remaining in the cycle after the Start/Pause button is pressed.
The estimated time remaining may fluctuate as the cycle progresses.
The Drying light will illuminate and remain lit until the cycle is complete.
When your dryer is in the cooPdown phase, the Cooling light will illuminate.
When your dryer is in the wrinkle prevent phase, the Wrinkle Prevent light will illuminate.
When the cycle is complete,"End'will appear in the display panel until the dryer door is opened or the Power
button is pushed.
If your dryer is paused during a cycle, the indicator lights will blink until the Start/Pause button is pressed.
Power
Press once to turn your dryer on. Press again to turn it off. if your dryer is left on for more than 10 minutes
without any buttons being touched, the power automatically turns off.
Start/Pause
Press to pause and restart programs.
Indicators
'Filter Checki
._. Drum Light
@ Child Lock
j _ Sound OffL
Steam
English- 25
DV425000 DO68-O3381Aindd 25 2013-12-19 []0 1:07:15
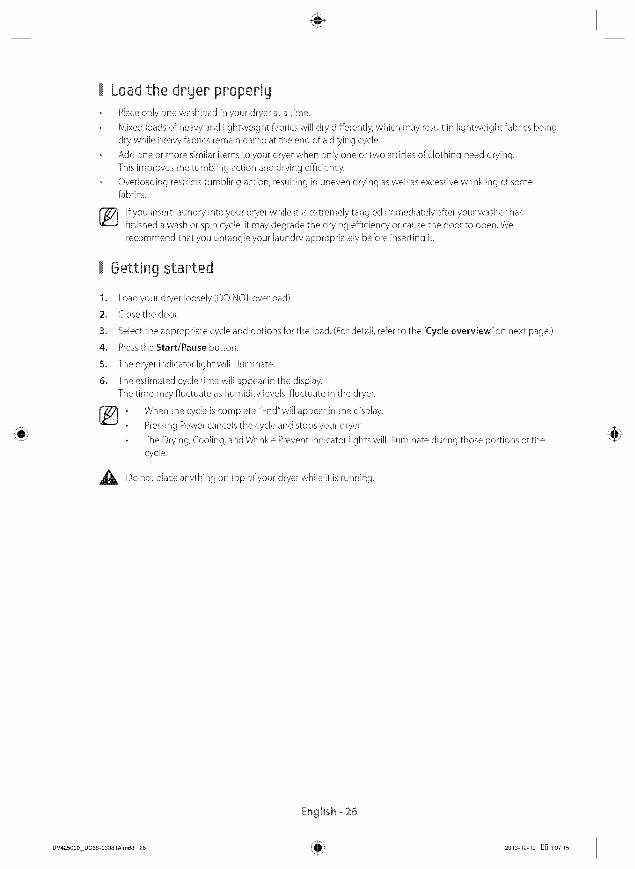
Load the drLjer properlLJ
Place only one washload in your dryer at a time.
Mixed loads of heavy and lightweight fabrics will dry differently, which may result in lightweight fabrics being
dry while heavy fabrics remain damp at the end of a drying cycle.
Add one or more similar items to your dryer when only one or two articles of clothing need drying.
This improves the tumbling action and drying efficiency.
Overloading restricts tumbling action, resulting in uneven drying aswell as excessive wrinkling of somefabrics.
If you insert laundry into your dryer while it is extremely tangled immediately after your washer hasfinished a wash or spin cycle, it may degrade the drying efficiency or cause the door to open. We
recommend that you untangle your laundry appropriately before inserting it.
Getting started
1. Load your dryer loosely (DO NOT overload).
2. CIosethe door.
3. Select the appropriate cycle and options for the load. (For detail, refer to the "Cycle overview" on next page.)
4, Press the Start/Pause button.
5. The dryer indicator light will illuminate.
6. The estimated cycle time will appear in the display.
The time may fluctuate as humidity levels fluctuate in the dryer.
• When the cycle is complete,"End" will appear in the display.Pressing Power cancels the cycle and stops your dryer.
The Drying, Cooling, and Wrinkle Prevent indicator lights will illuminate during those portions of the
cycle.
,_ Do not place anything on top of your dryer while it is running.
English- 26
DV425000 DO68-O3381Aindd 26 2013-12-19 D_ 1:07:15
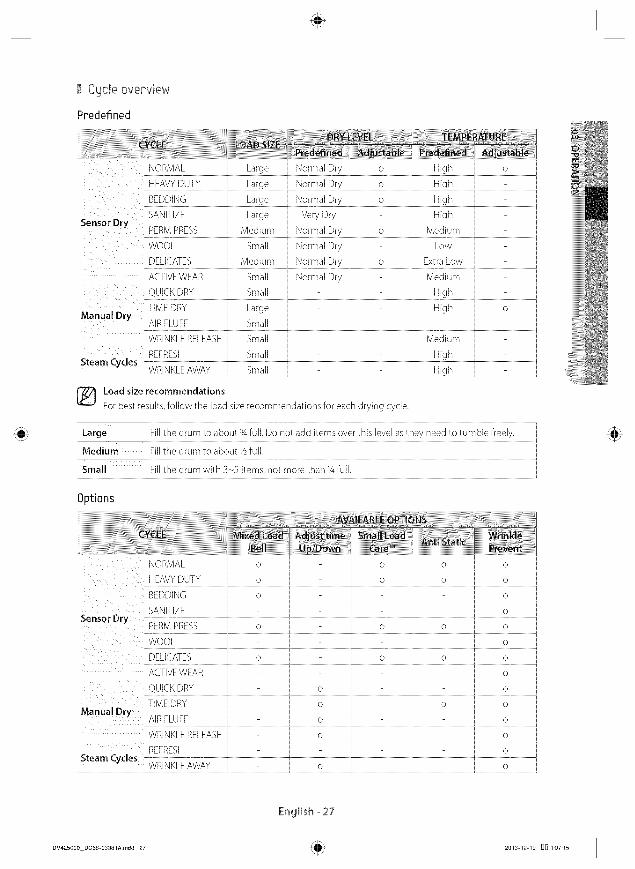
Cycle overview
Predefined
NORMAL _ Large _ Normal Dry , o _ High , o ,i HEAVYDUTY Large Normal Dry o High
i SANITIZE Large VeryDry HighMSensorOr__ERM_RESSj Mediumi Norma_Dryj o i Medium - j
ACTIVEWEAR . Small _ Normal Dry _ _ Medium _
QU,_KDRY, Small, _ , High,TIMEDRY Large High o
iMan_a_Dry _i_£U_F Sm;ii ' _ ' : _ _ 'i , ÷ ÷ ÷ ÷il WRINKLERELEASE Small Medium
'l<;t_,amCv4e,_ REFRESH . Small _ _ _ High _ - .WRINKLEAWAY , Small , High
Load size recommendationsForbest results,follow the load sizerecommendations for eachdrying cycle.
Options
l NORMAL o o o oi , _ ÷ +
HEAVYDUTY , o , + o _ o , o ,
_EDD_N__ o .... oSANITIZE - - - o
WOOL o ,i DELICATES o o o o
j ACTIVEWEAR oQUICKDRY o o
TIMEDRY o o oi Manua! Dry
J _ WRINKLERELEASE o L i o ,REFRESH 0
WRINKLEAWAY , , o o
English _ 27
DV425000 DO68-O3381Aindd 27 2013-12-19 []_ 1:07:15
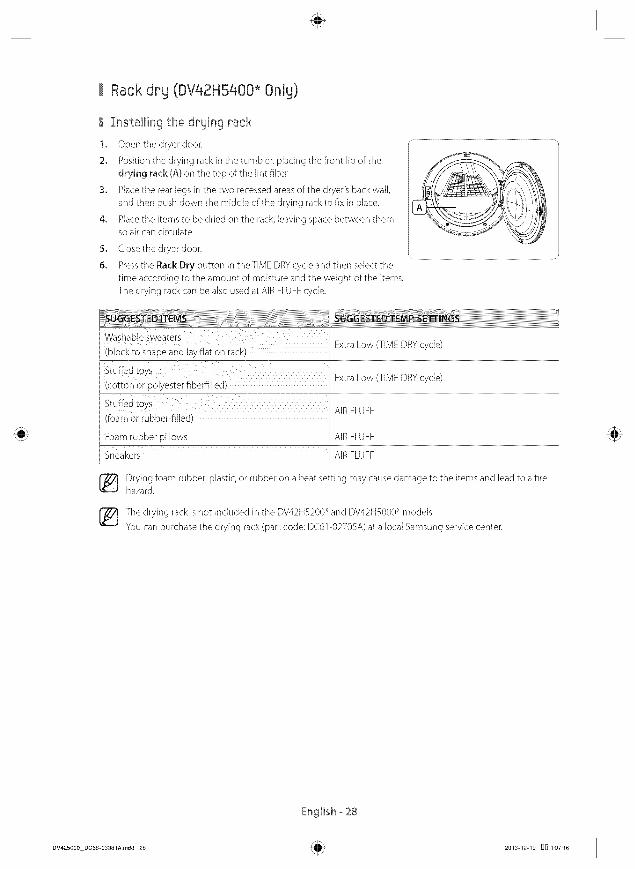
Rack dry (DVq2HSqO0* Only)
Installingthednyingpack
1. Open the dryer door.
2. Position the drying rack in the tumbler, placing the front lip of the
drying rack (A) on the top of the lint filter.
3. Place the rear legs in the two recessed areas of the dryer's back wall,
and then push down the middle of the drying rack to fix in place.
4. Place the items to be dried on the rack, leaving space between themso air can circulate.
5. Close the dryer door.
6. Press the Rack Dry button in the TIME DRY cycle and then select the
time according to the amount of moisture and the weight of the items.
The drying rack can be also used at AIR FLUFFcycle.
vasnalole swea_ers
[IOCK_O snaDe ana at flat on rack
Stuffed tovs
lcotton or Do ,,ester fiberfilled
Stuffed tow
Toam or rubber-filled
Foam ruDDer gillow_
Sneakers AIR FLUFF
Extra Low (TIME DRY cycle)
Extra Low (TIME DRY cycle)
AIR FLUFF
AIR FLUFF
Drying foam rubber, plastic, orrubber on a heat setting may cause damage to the items and lead to a firehazard.
The drying rack is not included in the DV42HS200* and DV42H5000* models.You can purchase the drying rack (part code: DC61-O2705A) at a local Samsung service center.
English _28
DV425000 DO68-O3381Aindd 28 2013-12-19 O0 1:07:16
Child Lock
Prevents children from pBying with your dryer.
Setting/ReleasingTo turn Child Lock on or off, press both the Temp. and Time buttons simultaneously for 3 seconds.
Chin Lock Details
1, You can turn Child Lock on while your dryer is running.
2, Once you set the Child Lock function, no button, except for the Power button, wiJJrespond until you turn offthe Child Lock function.
S, The"ChiJd Lock@"indicatorwiJl beJit.
• if the dryer is powered on again, the Child Lock function stays on.To turn off Child Lock, follow the instructions above.
When other buttons, except for the Power button, do not respond, check the Child Lock indicator, if ChildLock is on, follow the instructions above to turn Child Lock off.
Drum Light
Lights the dryer drum while the dryer is running.
Tupning Onand OffTo turn on or turn off the Drum Light, press and hold the Wrinkle Prevent (DV42HS400*) / Small Load Care TM
(DV42HS200*) button for 3 seconds; press the Drum Light (DV42HS000 *) button.
You can turn the Drum Light on and off whib your dryer is running and when it is stopped.If you do not turn the Drum Light off S minutes after turning it on, the Drum Light is automatically turnedoff.
Sound Off
Use this function to mute the button and operating sounds.
Setting and ReleasingTo turn the Sound Off function on or off, press and hold the Dry Level button for 3 seconds (DV42HS400*); press
the Sound button (DV42HS200 _, DV42HSO00*).
Sound Off Details:
1, You can set Sound Off while your dryer is running.
2, Once you have activated Sound Off, the button and operating sounds are muted until you deactivate it.
S. The"Sound Off_"indicator will be lit.
If you do not turn the Sound Off function off before you turn your dryer off, it will still be on when you turnyour dryer on again. To turn Sound Off off, follow the instructions above.
English- 29
DV425000 DO68-O3381Aindd 29 2013-12-09 D_5:48:18
My Cycle
Load
Press the My Cycle button for less than 3 seconds to activate My Cycle mode where all course settings and
selected options are loaded.
The My Cycle indicator turns on when the mode is active.
If you have not configured any My Cycle settings, the default course settings are loaded.
# Save
You can add and save preferred options to My Cycle.
1, Turn the course dial to select a course.
2, Set necessary options for the selected course. For details on each course and options, see page 27.
3, Press and hold the My Cycle button for more than 3 seconds to save the course options.The My Cycle
indicator blinks while the options are being saved.
The Wrinkle Prevent option is not available for the My Cycle function.
Smart Care
This function enables you to check the status of the dryer using a smartphone.
1. Press and hold the Small Load Care TM (DV42HS400 _) or Sound (DV42H5200 _, DV42HS000 _) button for 3
seconds when an error occurs or if you haven't pressed any buttons on the dryer after you turned the power
on.
2. When the Smart Care function is activated, the LED on the window display rotates for 2 or 3 seconds and then
the error code will appear in the display panel.
3, Run the Smart Care app on your smart phone.
The Smart Care function has been optimized for: GaEaxy& iPhone series (cannot be supported forsome models).
4. If the smart phone's camera is focused on the display panel of the dryer, the panel and error message is
automaticalEy recognized and the error type and countermeasures are displayed on the smart phone.
5. If the smartphone fails to recognize the error code more than twice, please enter the error code displayed on
the display panel of the dryer manually into the Smart Care app.
Downloadingthe Smart Care appDownload the Samsung Laundry App into your mobile phone from the Android market or Apple App store.
(Search word : Samsung Smart Washer/Dryer)
# Precautions when using Smart CareIf light from a light bulb, fluorescent bulb, or Br-np is reflected on the display panel of the washing machine,
the smartphone may not be able to recognize the panel or error message easily.
If you hold the smartphone at too large an angle relative to the front of the display panel, it may not be able
to recognize the error code. For best results, hold the smartphone so that the front of the panel and the
smartphone are parallel or nearly parallel.
EngIBh- 30
DV425000 DO68-O3381Aindd 30 2013-12-19 DO 1:07:16
I Cape and cleaning
Control panel
Clean with a soft, damp cloth. Do not use abrasive substances.
Do not spray cleaners directly on the panel.
The control panel finish may be damaged by some laundry pre-treatment soil and stain remover products.
Apply such products away from your dryer and wipe up any spills or overspray immediately.
Tumbler
Remove any stains caused by crayon, ink, or fabric dye (from new items such as towels orleans) with an all-
purpose cleaner.
Tumble old towels or rags to remove any remaining stain or cleaning substance.
Once these steps are followed, stains may still be visible, but should not transfer to subsequent loads.
Stainless steel tumbler
To clean the stainless steel tumbler, use a damp cloth with a mild, non-abrasive cleaner suitable for stainless steelsurfaces.
Remove the cleaner residue and dry with a clean cloth.
DrLjer exterior
Clean with a soft, damp cloth. Do not use abrasive substances.
Protect the surface from sharp objects.
Do not place any heavy or sharp objects or a detergent box on the dryer. Keep them on the purchased pedestal or
in a separate storage box. This may scratch or damage the top cover of the dryer.
Since the entire dryer has a high-gloss finish, the surface can be scratched or darnaged.
Avoid scratching or damaging the surface when using the dryer.
DrLjer exhaust sLjstem
Should be inspected and cleaned yearly to maintain optimum performance.
The outside exhaust hood should be cleaned more frequently to ensure proper operation.
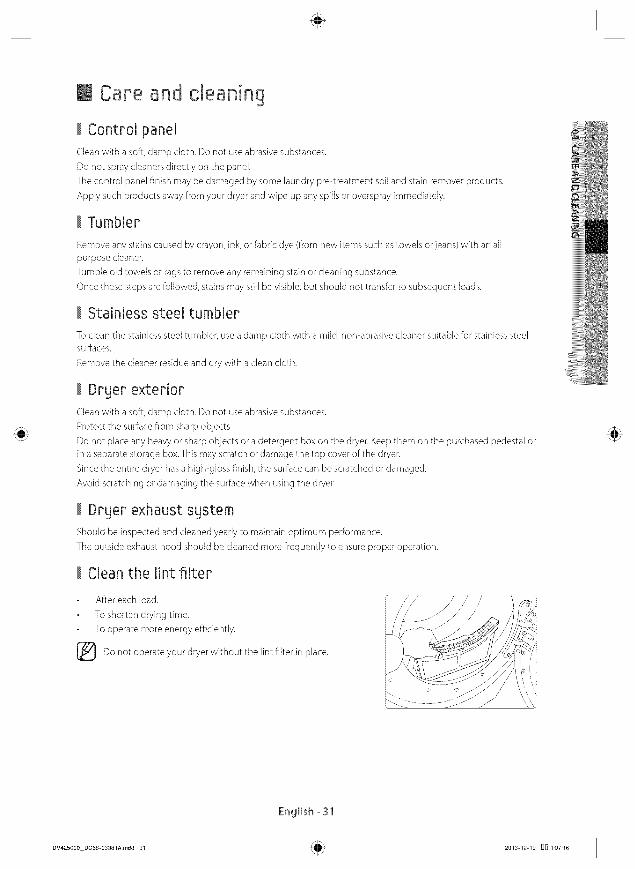
Clean the lint filter
After each load.
To shorten drying time.
To operate more energy efficiently.
Do not operate your dryer without the lint filter in place.
English- 31
DV425000 DC68-O3381Aindd 31 2013-12-19 D_ 1:07:16
I Special laundry tips
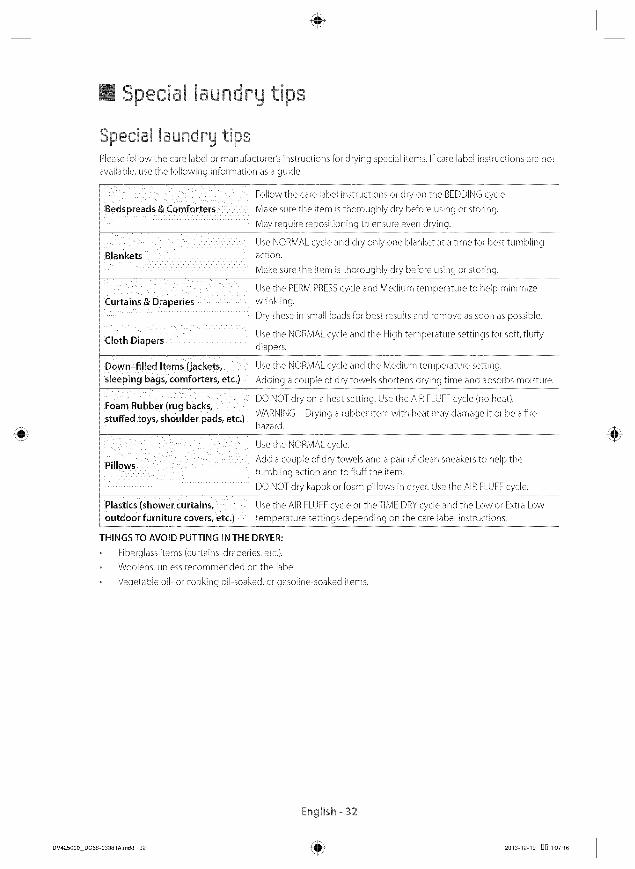
Spedal laundry tipsPlease follow the care label or manufacturer's instructions for drying special items. If care label instructions are not
available, use the following information as a guide.
Follow the care EabeEinstructions or dry on the BEDDING cycle.
Bedspreads & Comforters Make sure the item is thoroughly dry before using or storing.
May require repositioning to ensure even drying.
Use NORMAL cycle and dry only one blanket at a time for best tumblingBlankets action.
Make sure the item is thoroughly dry before using or storing.
Use the PERM PRESScycle and Medium temperature to help minimize
Curtains & Draperies wrinkling.
Dry these in small loads for best results and remove as soon as possible.
Use the NORMAL cycle and the High temperature settings for soft, fluffyCloth Diapers diapers.
Down-filled Items (jackets, Use the NORMAL cycle and the Medium temperature setting.
sleeping bags, comforters, etc.) Adding a couple of dry towels shortens drying time and absorbs moisture.
DO NOT dry on a heat setting. Use the AiR FLUFF cycle (no heat).Foam Rubber (rug backs,
stuffed toys, shoulder pads, etc.) WARNING Drying a rubber item with heat may damage it or be a firehazard.
Use the NORMAL cycle.
Pillows Add a couple of dry towels and a pair of clean sneakers to help thetumbling action and to fluff the item.
DO NOT dry kapok or foam pillows in dryer. Use the AIR FLUFF cycle.
Plastics (shower curtains, Use the AIR FLUFFcycle or the TIME DRY cycle and the Low or Extra Low
• outdoor furniture covers, etc.) temperature settings depending on the care label instructions.
THINGS TO AVOID PUTTING IN THE DRYER:
Fiberglass items (curtains, draperies, etc.).
Woolens, unless recommended on the label.
Vegetable oil- or cooking oiPsoaked, or gasoline-soaked items.
English - S2
DV425000 DO68-O3381Aindd 32 2013-12-19 D_ 1:07:16

I Troubleshooting
Check these points if your dryer°°°
Make sure the door is latched shut.
Be sure the power cord is plugged into a live dectricaJ outlet.Doesn't run.
Check the home's circuit breaker and fuses.
Press the Start/Pause button again if the door is opened during the cycle.
Check the home's circuit breaker and fuses.
Select a heat setting other than Air Fluff.
Doesn't heat. On a gas dryer, check that the gas supply is on.
Clean the lint filter and exhaust duct.
- Dryer may have moved into the cooPdown phase of the cycle.
Check all of the above, plus._
Be sure the exhaust hood outside the home can open and close fredy.
Check exhaust system for lint buildup. Ducting should be inspected and
cleaned annually.
Use a 4" rigid metal exhaust duct.
Do not overload. 1 wash load - 1 dryer load.Doesn't d ry.
- Sort heavy items from lightweight items.
Large, bulky items like blankets or comforters may require repositioning to
ensure even drying.
Check that the dryer is draining properly to extract adequate water from theload.
Check the load for objects such as coins, loose buttons, nails, etc. Remove
Is noisy.
Dries unevenly.
Hasa nodor,
Shuts off before load
is dry
promptly.
it is normal to hear the dryer gas valve or heating element cycle on and off
during the drying cycle.
- Be sure the dryer is leveled properly as outlined in the installation instruction.
- it is normal for the dryer to hum due to the high velocity of air moving
through the dryer drum and exhaust system.
Seams, pockets, and other similarly heavy areas may not be completely dry
when the rest of the load has reached the selected dryness level.This is
normal. Select the Very Dry setting if desired.
If one heavy item is dried with a lightweight load, such as one towel with
sheets, it is possible that the heavy item will not be completely dry when the
rest of the load has reached the selected dryness level. Sort heavy items from
lightweight items for best drying results.
Household odors from painting, varnishing, strong cleaners, etc. may enter the
dryer with the surrounding room air.This is normal as the dryer draws the air
from the room, heats it, pulis it through the tumbler, and exhausts it outside.
When these odors linger in the air, ventilate the room completely before using
the dryer.
Dryer load is too small. Add more items or a few towels and restart the cycle.
Dryer load is too large. Remove some items and restart the dryer.
English _ 33
DV425000 DO68-O3381Aindd 33 2013-12-19 D_ 1:07:16
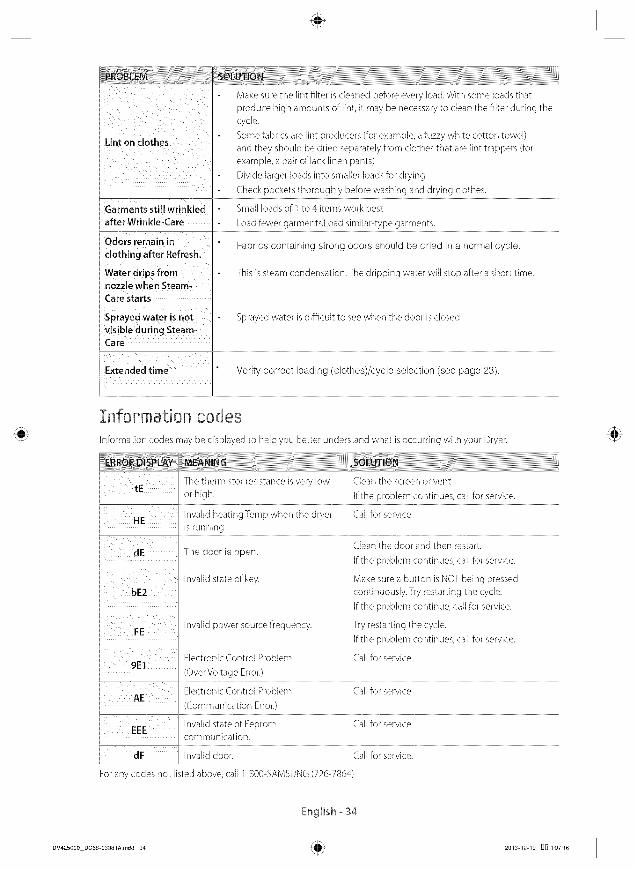
VPROBLEM
Make sure the lint filter is cleaned before every load. With some loads that
produce high amounts of lint, it may be necessary to clean the filter during the
cycle.
Some fabrics are lint producers (for example, a fuzzy white cotton towel)Lint on clothes
and they should be dried separately from clothes that are lint trappers (for
example, a pair of Eacklinen pants)
Divide larger loads into smalEer loads for drying.
Check pockets thoroughly before washing and drying clothes.
Garments still wrinkled Small loads of I to 4 items work best.
afterWrinkle-Care Load fewer garments.Load similar-type garments.
Odors remain in Fabrics containing strong odors should be dried in a normal cycle.clothing after Refresh.
Water drips from This is steam condensation.The dripping water will stop after a short time.nozzle when Steam-
Care starts
Sprayed water is not Sprayed water is difficult to see when the door is closed.
visible during Steam-
Care
Extended time Verify correct loading (clothes)/cycle selection (see page 23).
Znfopmation codes
Information codes may be displayed to help you better understand what is occurring with your Dryer.
l The thermistor resistance is very lowJ tEj or high.
invalid heating Temp when the dryer Call for service.j liEi is running.M ! i i
J Clean the door and then restart.The door is open.
If the problem continues, call for service.
-----Invalid state of key. ' lViake sure a button is NOT being pressed '
continuously. Try restarting the cycle.
i If the problem continue, call for service._ ,
i Invalid power source frequency. Try restarting the cycle.
If the problem continues, call for service.l Ii Electronic Control Problem Call for service.
i1 91:1 (OverVoltage Error.)
Electronic Control Problem Call for service.
j _ Communication Error.)
i Invalid state of Eeprom Call for service.
communication.
Invalid door. Call for service.
For any codes not listed above, call 1-800-SAMSUNG (726-7864)
English _34
DV425000 DO68-O3381Aindd 34 2013-12-19 D_ 1:07:16
I Appendix
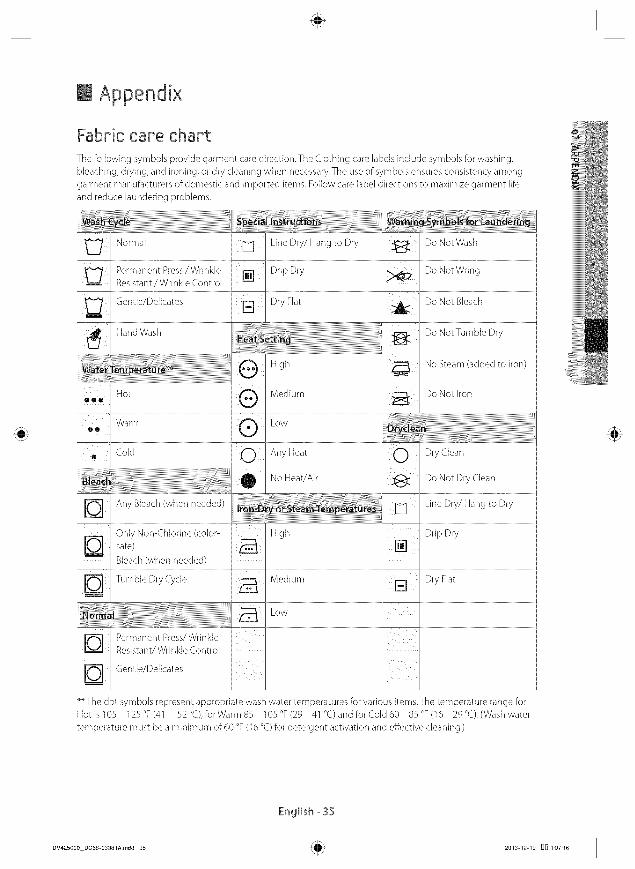
Fabric care chart
The following symbols provide garment care direction. The Clothing care labels include symbols for washing,
bleaching, drying, and ironing, or dry cleaning when necessary.The use of symbols ensures consistency among
garment manufacturers of domestic and imported items. Follow care label directions to maximize garment life
and reduce laundering problems.
Norma_ iS_ L'neDry/HangtoDry l_ DoNotWash:_ PermanentPress/Wr,nk_ei_ Dr,pDry i_ OoNotWr,ngU
Do NotTumble Dry i
No Steam (added to iron)
Do Not Iron
W;rn Lowi o _old AnyHeat Dry,Clean
y ( UneDry/HangtoDry
Only Non-Chlorine (coloP j High i DripDrysafe_ i_ i []
i _ Bleach (when needed) l j
M ,um irai
Permanent Press/WrinkleResistant/Wrinkle Control
Gentle/F;dicates
** The dot symbols represent appropriate wash water temperatures for various items. The temperature range for
HotislOS 1ZS°F(41 52°C),BrWarm85 105°F(29 41°C) and for Cold 60 85°F(16 29°C). (Wash water
temperature must be a minimum of 60 °F (16 °C) for detergent activation and effective cleaning.)
English- 35
DV425000 DC68-O3381Aindd 35 2013-12-19 _ 1:07:16
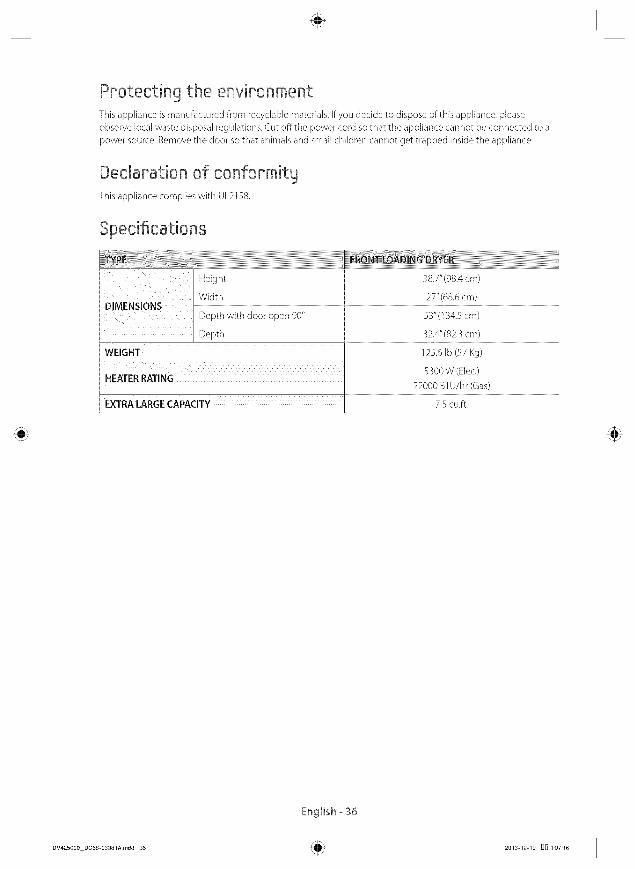
Protecting the environmentThis appliance is manufactured from recyclable materials. If you decide to dispose of this appliance, please
observe local waste disposal regulations. Cut offthe power cord so that the appliance cannot be connected to a
power source. Remove the door so that animals and small children cannot get trapped inside the appliance.
Declaration of conformityThis appliance complies with UL2158.
WEIGHT 125.6 Ib (57 Kg)
i 5300W (Elec.)i HEATER RATING
i _ 22000 BTU/hr (Gas) ,
7.5 cu.ft.
English- 36
DV425000 DO68-O3381Aindd 36 2013-12-19 D_ 1:07:16
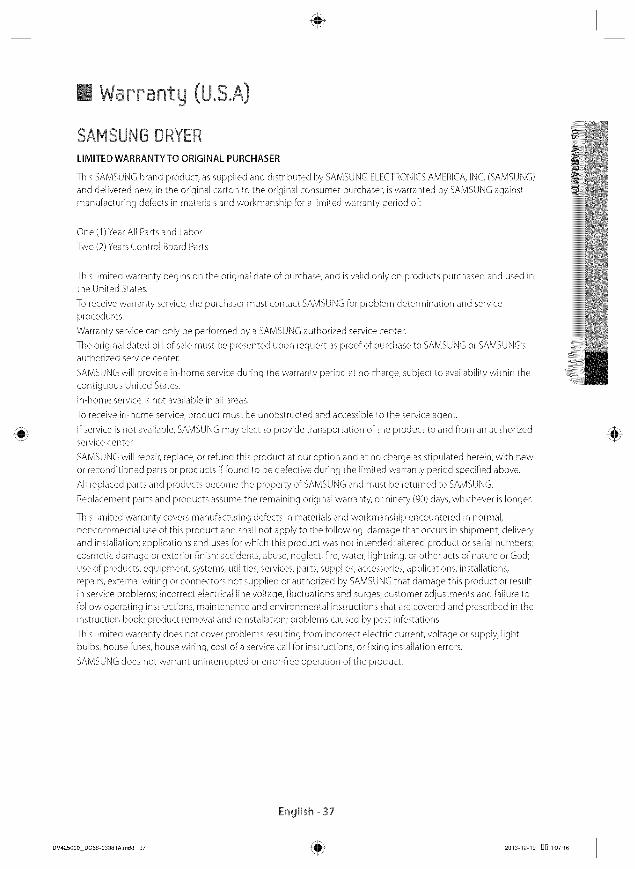
I Warranty (U°S°A)
SAMSUN6 DRYER
LIMITEDWARRANTYTOORIGINAL PURCHASER
This SAMSUNGbrand product, assupplied and distributed by SAMSUNGELECTRONICSAMERICA,INC.(SAMSUNG)and delivered new, in the original carton to the original consumer purchaser,iswarranted by SAMSUNGagainstmanufacturing defects in materialsand workmanship for a limited warranty period of:
One (1) Year All Parts and Labor
Two (2) Years Control Board Parts
This limited warranty begins on the original date of purchase, and is valid only on products purchased and used inthe United States.
To receive warranty service, the purchaser must contact SAMSUNG for problem determination and service
procedures.
Warranty service can only be performed by a SAMSUNG authorized service center.
The original dated bill of sale must be presented upon request as proof of purchase to SAMSUNG or SAMSUNG'sauthorized service center.
SAMSUNG will provide in-home service during the warranty period at no charge, subject to availability within the
contiguous United States.
In-home service is not available in all areas.
To receive in-home service, product must be unobstructed and accessible to the service agent.
If service is not available, SAMSUNG may elect to provide transportation of the product to and from an authorized
service center.
SAMSUNG will repair, replace, or refund this product at our option and at no charge as stipulated herein, with new
or reconditioned parts or products if found to be defective during the limited warranty period specified above.
All replaced parts and products become the property of SAMSUNG and must be returned to SAMSUNG.
Replacement parts and products assume the remaining original warranty, or ninety (90) days, whichever is longer.
This limited warranty covers manufacturing defects in materials and workmanship encountered in normal,
noncommercial use of this product and shall not apply to the following: damage that occurs in shipment; delivery
and installation; applications and uses for which this product was not intended; altered product or serial numbers;
cosmetic damage or exterior finish; accidents, abuse, neglect, fire, water, lightning, or other acts of nature or God;
use of products, equipment, systems, utilities, services, parts, supplies, accessories, applications, installations,
repairs, external wiring or connectors not supplied or authorized by SAMSUNG that damage this product or result
in service problems; incorrect electrical line voltage, fluctuations and surges; customer adjustments and failure to
follow operating instructions, maintenance and environmental instructions that are covered and prescribed in the
instruction book; product removal and reinstalBtion; problems caused by pest infestations.
This limited warranty does not cover problems resulting from incorrect electric current, voltage or supply, light
bulbs, house fuses, house wiring, cost of a service call for instructions, or fixing installation errors.
SAMSUNG does not warrant uninterrupted or error-free operation of the product.
iiiiiiiiiiiiiiiiiiii
English- S7
DV425000 DO68-O3381Aindd 37 2013-12-19 D_ 1:07:16
Except as set forth herein, there are no warranties on this product either express or implied, and samsung
disclaims all warranties including, but not limited to, any implied warranties of merchantability, infringement or
fitness for a particular purpose.
No warranty or guarantee given by any person, firm, or corporation with respect to this product shall be binding
or] samsung.
Samsung shall not be liable for loss of revenue or profits, failure to realize savings or thter benefits, or any other
special, incidental or consequential damages caused by the use, misuse, or inability to use this product, regardless
of the legal theory on which the claim is based, and even if samsung has been advised of the possibility of such
damages.
Nor shall recovery of any kind against samsung be greater in amount than the purchase price of the product sold
by samsung and causing the alleged damage.
Without limiting the foregoing, purchaser assumes all risk and liability for loss, damage, or injury to purchaser
and purchaser's property and to others and their property arising out of the use, misuse, or inability to use this
product. This limited warranty shall not extend to anyone other than the original purchaser of this product, is
nontransferable and states your exclusive remedy.
Some states do not allow limitations on how long an implied warranty lasts, or the exclusion or limitation of
incidental or consequential damages, so the above limitations or exclusions may not apply to you.This warranty
gives you specific rights, and you may also have other rights, which vary from state to state.
To obtain warranty service, please contact SAMSU NG at:
Samsung Electronics America, Inc.
85 Challenger Road Ridgefleld Park, NJ 07660
1-800-SAMSUNG(726-7864)
www.samsung.com
English _38
DV425000 DO68-O3381Aindd 38 2013-12-19 DO 1:07:16
I Warranty (CANADA}
SAMSUN6 DRYER
LIMITEDWARRANTYTOORIGINAL PURCHASER
This SAMSUNGbrand product, assupplied and distributed by SAMSUNGELECTRONICSCANADA,INC.(SAMSUNG)and delivered new, in the original carton to the original consumer purchaser,iswarranted by SAMSUNGagainstmanufacturing defects in materialsand workmanship for a limited warranty period of:
One (1) year part and labor
This limited warranty begins on the original date of purchase, and is valid only on products purchased and used inthe Canada.
To receive warranty service, the purchaser must contact SAMSUNG for problem determination and service
procedures.
Warranty service can only be performed by a SAMSUNG authorized service center.
The original dated bill of sale must be presented upon request as proof of purchase to SAMSUNG or SAMSUNG'sauthorized service center.
SAMSUNG will provide in-home service during the warranty period at no charge, subject to availability within theCanada.
In-home service is not available in aHareas.
To receive in-home service, product must be unobstructed and accessible to the service agent.
if service is not available, SAMSUNG may elect to provide transportation of the product to and from an authorized
service center.
SAMSUNG will repair, replace, or refund this product at our option and at no charge as stipulated herein, with new
or reconditioned parts or products if found to be defective during the limited warranty period specified above.
All replaced parts and products become the property of SAMSUNG and must be returned to SAMSUNG.
Replacement parts and products assume the remaining original warranty, or ninety (90) days, whichever is longer.
This limited warranty covers manufacturing defects in materials and workmanship encountered in normal,
noncommercial use of this product and shall not apply to the following: damage that occurs in shipment; delivery
and installation; applications and uses for which this product was not intended; altered product or serial numbers;
cosmetic damage or exterior finish; accidents, abuse, neglect, fire, water, lightning, or other acts of nature or God;
use of products, equipment, systems, utilities, services, parts, supplies, accessories, applications, installations,
repairs, external wiring or connectors not supplied or authorized by SAMSUNG that damage this product or result
in service problems; incorrect electrical line voltage, fluctuations and surges; customer adjustments and failure to
follow operating instructions, maintenance and environmental instructions that are covered and prescribed in the
instruction book; product removal and reinstalBtion; problems caused by pest infestations.
This limited warranty does not cover problems resulting from incorrect electric current, voltage or supply, light
bulbs, house fuses, house wiring, cost of a service call for instructions, or fixing installation errors.
SAMSUNG does not warrant uninterrupted or error-free operation of the product.
iiiiiiiiiiiiiiiiiiii
English- 39
DV425000 DO68-O3381Aindd 39 2013-12-19 DO 1:07:16
EXCEPTASSETFORTHHEREIN,THEREARENOWARRANTIESONTHISPRODUCTEITHEREXPRESSORIMPLIED,AND SAMSUNGDISCLAIMSALLWARRANTIESINCLUDING,BUTNOTLIMITEDTO,ANYIMPLIEDWARRANTIESOFMERCHANTABILITY,INFRINGEMENTORFITNESSFORA PARTICULARPURPOSE.
NOWARRANTYORGUARANTEEGIVENBYANYPERSON,FIRM,ORCORPORATIONWITHRESPECTTOTHISPRODUCTSHALLBEBINDINGON SAMSUNG.
SAMSUNGSHALLNOTBELIABLEFORLOSSOF REVENUEORPROFITS,FAILURETO REALIZESAVINGSOROTHERBENEFITS,ORANYOTHERSPECIAL,INCIDENTALORCONSEQUENTIALDAMAGESCAUSEDBYTHEUSE,MISUSE,ORINABILITYTOUSETHISPRODUCT,REGARDLESSOFTHELEGALTHEORYON WHICHTHECLAIMISBASED,AND EVENIFSAMSUNGHASBEENADVISEDOFTHEPOSSIBILITYOFSUCHDAMAGES.
NORSHALLRECOVERYOFANYKINDAGAINSTSAMSUNGBEGREATERiNAMOUNTTHANTHEPURCHASEPRICEOFTHE PRODUCTSOLDBYSAMSUNGAND CAUSINGTHEALLEGEDDAMAGE.
WITHOUTLIMffINGTHEFOREGOING,PURCHASERASSUMESALLRISKAND LiABILiTYFORLOSS,DAMAGE,ORINJURYTOPURCHASERAND PURCHASER'SPROPERTYANDTOOTHERSANDTHEIRPROPERTYARISINGOUTOFTHE USE,MISUSE,OR]NABIUTYTOUSETHISPRODUCT.
THISLIMITEDWARRANTYSHALLNOTEXTENDTOANYONEOTHERTHANTHEORIGINALPURCHASEROFTHiSPRODUCT,ISNONTRANSFERABLEAND STATESYOUREXCLUSIVEREMEDY.
Someprovinces do not allow limitations on how long an implied warranty lasts,or the exclusionor limitation ofincidental or consequential damages,sothe above limitations or exclusionsmaynot apply to you.Thiswarrantygivesyou specific rights,and you may alsohaveother rights,which varyfrom provinceto province.
To obtain warranty service, please contact SAMSUNGat:
Samsung Electronics Canada Inc,,
Customer Service 55 Standish Court Mississauga, Ontario LSR4B2 Canada
1-800-SAMSUNG (726-7864)
www,samsung.com/ca (English)
www.samsung.com/ca fr (French)
English _40
DV425000 DC68-O3381Aindd 40 2013-12-19 DO 1:07:17
I Memo
DV425000 DC68-O3381Aindd 41 2013-12-19 D_ 1:07:17
I Memo
DV425000 DC68-O3381Aindd 42 2013-12-19 D_ 1:07:17
I Memo
DV425000 DC68-O3381Aindd 43 2013-12-19 D_ 1:07:17
Scan this with your smarthphone
Scan the QR code* or visit
www.samsung.com/spsn
to view our hetpfu[How-to Videos and Live Shows
*Requires reader to be instalbd on your smartphone
QUESTIONSOR COMMENTS?
DC68-O3381A_REV 01
DV425000 DO68-O3381Aindd 44 2013-12-19 D_ 1:07:17

rdlLqlW
Secadoraa gasy el6ctricaManualdel usuario
4D÷
Imagine las posibilidades
WWW,S a I1]s LII] g COi]/ire g Ister
] -'Cb _,_ 'I'_U[,IGI-Cr -;'r",4,
I Dd425000 D068 02381A MESlndd 1 2012 _2 _9 _ 1 0T26
I Contenido
Instrucciones de seguridad
Lo que necesita saber sobre las instrucciones de seguridad ............................................ 4
Sffnbolos y precauciones de seguridad importantes ............................................................. 4
Instrucciones de seguridad importantes ............................................................... 6
Instalad6n de la secadora
Desempaque de la secadora .......................................................................... 8
Partes de la secadora ................................................................................. 8
Accesorios (solo modelos de vapor) ............................................................................ 8
Importante para el instalador ......................................................................... 9
Requisitos b_sicos .................................................................................... 9
Conexi6n a tierra ..................................................................................... 9
Moddos a gas................................................................................................. 9
Moddos el_ctricos ............................................................................................ 9
Consideraciones acerca de la ubicaci6n .............................................................. 10
Instalaciones del electrodom6stico en un gabinete o en un hueco .................................... 10
Requisitos para el tendido de conductos ............................................................. 12
Drenaje ...................................................................................................... 13
Sugerencias acerca del drenaje de la secadora ................................................................. 14
Requisitos en cuanto al gas .......................................................................... 15
Instrucciones de instaBci6n de B Mancomunidad de Massachusetts ........................................... 15
Requisitos electricos ................................................................................. 16
Conexiones el_ctricas......................................................................................... 16
Conexi6n de la manguera de entrada (solo modelos de vapor) ........................................ 18
Reemplazo de las piezas y los accesorios ............................................................. 19
Instalaci6n .......................................................................................... 19
Inversi6n de la puerta ................................................................................ 20
Lista de verificaci6n final de la instalaci6n ............................................................ 21
Manual de instrucciones, sugerencias ii_)}/
Descripci6n general del panel de control ............................................................. 22
Cargue la secadora de manera adecuada ...................................................................... 26
C6mo comenzar ............................................................................................. 26
Rackdry (Secadoen estante) (solo DV42H54009 .............................................................. 29
Seguro para niflos ............................................................................................ 30
Luzde la tina ................................................................................................. 30
Espa_om_ 2
DV425000 DC68-O3381A MESindd 2 2013-12-19 D_ 1:07:26
Sinsonido................................................................................................... 30
MyCyde(Mi cido) ........................................................................................... 31SmartCare................................................................................................... 31
Cuidado y limpieza
Panelde control .............................................................................................. 32
Tambor ...................................................................................................... 32
Tambor de acero inoxidabEe................................................................................... 32
Exterior de la secadora........................................................................................ 32
Sistema de drenaje de la secadora............................................................................. 32
Limpie el flltro para pelusas................................................................................... 32
:?Sugerendas para prendas especiales
Sugerencias para prendas especiales ................................................................. 33
Soluci6n de problemas
Controle estos puntos si su secadora .................................................................. 34
C6digos de informaci6n ............................................................................. 36
Ap_ndice y
Tabla de indicaciones sobre la tela ................................................................... 37
Protecci6n del medio ambiente ...................................................................... 38
Declaraci6n de conformidad ......................................................................... 38
Especificaciones ..................................................................................... 38
Espafiom_ 3
DV425000 DC68-O3381A MESindd 3 2013-12-19 D_ 1:07:26
I Instrucciones de seguridadFelicitaciones por la compra de la nueva secadora Samsung. Este manual contiene informaci6n importante acerca de la
insta[aci6r el uso y el cuidado de] ebctrodomd_stico. Lea detenidamente estas instrucciones a fin de aprovechar a[ m4ximo
los mOltiples beneflcios y funciones de la secadora.
Lo que necesita saber sobre las instrucciones desegupNadLeaeste manual detenidamente para @render a ud]izar con seguridad y eficacia todas ]ascaracterisdcas y funciones de
su nuevo e]ectrodomd_stico.Conserve e[ manual en ]ugar seguro cerca de[ aparato para consu]tas futuras. Uti[ice este
e]ectrodom6sdco sob para e] prop6sko para e[ que rue desdnado como sedescribe en este manual. Lasadvertencias y ]as
instrucciones de seguridad importantes de este manual no cubren todas [asposib]es condiciones y skuaciones que pueden
ocurrir. Essu responsabi[idad actuar con senSdo corn@l, precauci6n y cuidado cuando insta[e, rea[ice e[ mantenimiento o
ponga en funcionamiento ]asecadora.
Comuniquese siempre con e] fabricante sisurgen prob[emas o situaciones que usted no comprende.
S[mbolos g precauciones de seguridad importantes
ADVERTENCIA: peligros o pr4cdcas inseguras que podrian causar lesiones fisicas graves o la muerte o
_L dafios materiales.Siga la irlformaci6rl conterfida erl este manual para mirfimizar e[ riesgo de incendio o exp[osi6rl o para evitar
da_ios materiales, [esionesfisicas o ]a muerte.+
A pe[igros o pr4cticas inseguras que podrian causar lesiones fisicas o da_os materiales.PRECAUCION:
NOTA
Estas seSales de advertencia est&n aqui para evitar que usted u otras personas sufran daSos.
Siga las instrucciones completamente.
Despu_s de leer esta secci6n, gu_rdela en un lugar seguro para consultas futuras,
CONSERVEESTASINSTRUCCIONESEspaSom _ 4
DV425000 DC68-O3381A MESindd 4 2013-12-19 DO 1:07:27
INCENDIO= • La instalaci6n de la secadora de ropa debe estar a cargo de un instalador califlcado.
= • Instale la secadora de ropa segOn las instrucciones del fabricante y los c6digos locales.
• No instale una secadora de ropa con materiales para ventilaci6n de pl_stico flexible. Sise instala un conducto
de metal flexible (tipo I_mina met_lica), debe serde un tipo especifico identiflcado por el fabricante del
electrodomd_stico como adecuado para utilizar con secadoras de ropa. Los materia[es para ventilaci6n flexib[es suelen
hundirse, aplastarse f_cilmente y atrapar pelusa. Estascondiciones obstruir_in el flujo de aire de la secadora de ropa y
aumentar_n el riesgo de incendio.
= . Parareducir el riesgo de lesiones graves o muerte, siga todas las instrucciones de instalaci6n.
PARADISMINUIR EL RIES60 DEINCENDIO 0 EXPLOSION:No seque prendas que hayan sido previamente Iimpiadas, lavadas,remojadas o salpicadas con gasolina, solventes de
limpieza en seco u otras sustancias inflamables o explosivas. Emiten vapores que pueden prenderse fuego o explotar. No
debe colocarse en la secadora ningOn material que haya estado en contacto con un solvente de Iimpieza o liquidos o
s6lidos inflamables hasta que se haya eliminado todo vestigio de tales liquidos o s61idosinflamables y susvapores.
Existen muchos articulos altamente inflamables en los hogares, tales como acetona, alcohol desnaturalizado, gasolina,
kerosene,algunos limpiadores liquidos de uso dom_stico, algunos quitamanchas, aguarr_is,cerasy removedores de cera.
No seque articulos que contengan goma espuma (puede estar catalogada como espuma de [_tex)o materia[es
semejantes a [agoma y con textura similar en ]a opci6n de secado con calor. Los materiales de goma espuma que
reciben calor pueden, en ciertas circunstancias, provocar incendios por combusti6n espont_inea.
A_ QUEHACERSl PERCIBEOLORA 6AS:No intente encender rfingOn electrodom4stico.
No encienda este electrodom4stico.
No toque ningOn interruptor el6ctrico.
No utilice ningOn teJdono de su ediflcio.
Haga que todos los ocupantes se retiren del cuarto, ediflcio o &rea.
Comuniquese inmediatamente con el proveedor de gas desde el teJ4fono de un vecino. Siga [as instrucciones de[
proveedor de gas.
Sino puede comunicarse con el proveedor de gas, Ilame a[ departamento de bomberos.
La instalaci6n y el servicio td_cnicodeber&n estar a cargo de un instalador califlcado, una agencia de reparaciones o el
proveedor de gas.
CONSERVEESTASINSTRUCCIONESEspa_om _ 5
DV425000 DC68-O3381A MESindd 5 2013-12-19 _ 1:07:27
Znsteucdones de seguridad importantes
,d_ ADVERTENCIAPara reducir el riesgo de incendio, choque el6ctrico o lesiones fisicas cuando usa este electrodom6stico,
siga las instrucciones de seguridad b_sicas que figuran a continuaci6n:
1, Lea todas las instrucciones antes de usar este electrodom6stico.
2, No utilice la secadora para secar ropa que tenga restos de sustancias inflamab]es, como aceites vegetales, de cocd6n
o de m_quina, productos quimicos inflamabbs, disolventes, etc.,o que contengan cera o productos quimicos, como
trapeadores y patios de Iimpieza. Lassustancias inflamabbs pueden ocasionar que la teB se prenda fuego.
3, No a]macene ni utilice gaso]ina u otros vapores o ]fquidos inflamab]es cerca de este o cua]quier otto aparato el6ctrico.
4, No permita que los nitios o Bs mascotas jueguen sobre el electrodomd_stico,dentro de 6] o ffente a 61.Serequiere de
supervisi6n cuando el electrodomd_sticoes uti]izado cerca de nitios y mascotas.
5, Antes de retirar o descartar la secadora, retire la puerta del compartimiento de secado para evitar que los nitios y las
mascotas queden atrapados dentro de la secadora.
6, No introduzca la mano en el ebctrodomd_stico cuando la tina est6 en movimiento.
7. No insta]e o guarde este electrodom6stico don@ quede expuesto a los factores clim_ticos.
8. No modiflque Ioscontroles internos.
9, No repare, reempBce ni intente rea]izar el mantenimiento de cua]quier pieza del e]ectrodom6stico salvo que est6
recomendado especfflcamente en ]as instmcciones de mantenimiento del usuario o en las instrucciones de reparaci6n
para el usuatio pub]icadas y que, a sujuicio, usted tenga la habilidad para Hevarlasa cabo.
1O, No use suavizante para ropa o productos para evitar la est_itica salvo que el fabricante del suavizante para ropa o del
producto Io recomiende.
11, Limpie el flltro para pelusasantes o despu_s de cada carga.
12, No aplique calor para secar prendas que contengan goma espuma o materiales semejantes a la goma con texturasimilar.
13, Mantenga el _rea alrededor de la salida del drenaje y las _reascircundantes libresde pelusa,polvo y suciedad.
14. Elpersonal t6cnico califlcado debe efectuar una limpieza peri6dica del interior de la secadora y del conducto de drenaje.
15. No coloque elementos expuestos a aceites de cocina en ]a secadora.Los elementos contaminados con aceites de cocina
pueden contribuir a que se produzca una reacci6n quimica que ocasione queen la carga de ropa se prenda fllego.
16. Este electrodom_stico debe conectarse a tierra. Consulte'1_equisitos el_ctdcos"y"Conexi6n a tbrra"en la secci@l
"lnstalaci6n de la secadora".
17. Este electrodom6stico debe conectarse a tierra correctamente. Nunca enchufe el cable de alimentaci6n a un recept_iculo
que no est6 conectado atierra correctamente ni guarde conformidad con los c6digos locales y nacionales. Consulte las
instrucciones de instalaci6n para conectar este electrodom6stico a tierra.
18, AsegOresede que los bolsillos no contengan objetos pequetios, s6lidos y de forma irregular, material extratio, etc., por
ejemplo: monedas, cuchillos, alflleres,etc. Talesobjetos podrian datiar la secadora.
19. Sepueden producir p_rdidas de gas en su sistema que generen una situaci6n peligrosa.
20. Lasp&didas de gas pueden no serdetectadas Onicamente pot el olor.
21, Los proveedores de gas recomiendan que compre e instale un detector de gas aprobado pot UL
CONSERVEESTASINSTRUCCIONESEspa_om _ 6
DV425000 DC68-O3381A MESindd 6 2013-12-19 E_ 1:07:27
_ADVERTENCIA
Aparatos a gasADVERTENCIA: estos productos contienen sustancias qdmicas conocidas en el estado de California como causantes de
c_ncer y daflos reproductivos.
Los aparatos a gas pueden provocar una Iigera exposicidn a alguna de las sustancias de la Iista de la disposicidn 65, induidos,
entre otros, benceno, mondxido de carbono, formaldehido y hollffl causada por la posible combustidn incompleta de gas
natural o combustibles PL
,/_PRECAUCION
1. No sesiente encima de la secadora.
2. Debido a las constantes mejoras a los productos, Samsung se reservael derecho de modificar lasespeciflcaciones sin
previo aviso. Paraconocer detalles completos, consulte las instmcciones de instalacidn induidas con su producto antes
de seleccionar los gabinetes, hater aberturas o comenzar la instaBcidn.
3. No lave ropa que contenga hebilBs grandes, botones u otros objetos de metal pesado o sdlido.
4. Instab y utilice de acuerdo con las instrucciones del fabricante.
5. Todas las prendas Iimpias y sucias que contengan aceite vegetal o aceite de cocina pueden resultar peligrosas. Lavar
dichas prendas en agua caliente con una dosis adicional de detergente reducira el peligro, aunque no Io eliminara.
Sbmpre use el ciclo Cool Down (Enfriamiento) para estas prendas con el fin de reducir la temperatura. Nunca retire estas
prendas cuando la secadora se encuentre calbnte ni interrumpa el ciclo de secado hasta que las prendas hayan pasado
per el ciclo Cool Down (Enfriamiento). Nunca amontone o apile estas prendas cuando est@ calientes.
6. AI cerrar la puerta tenga cuidado de no atrapar los dedos de los niflos. Puede provocar lesiones personales.
CONSERVEESTASINSTRUCCIONESEspa_om _ 7
DV6000HA DCdS-03380A Mes.indd 7 2013-12-03 CC 10:42:32
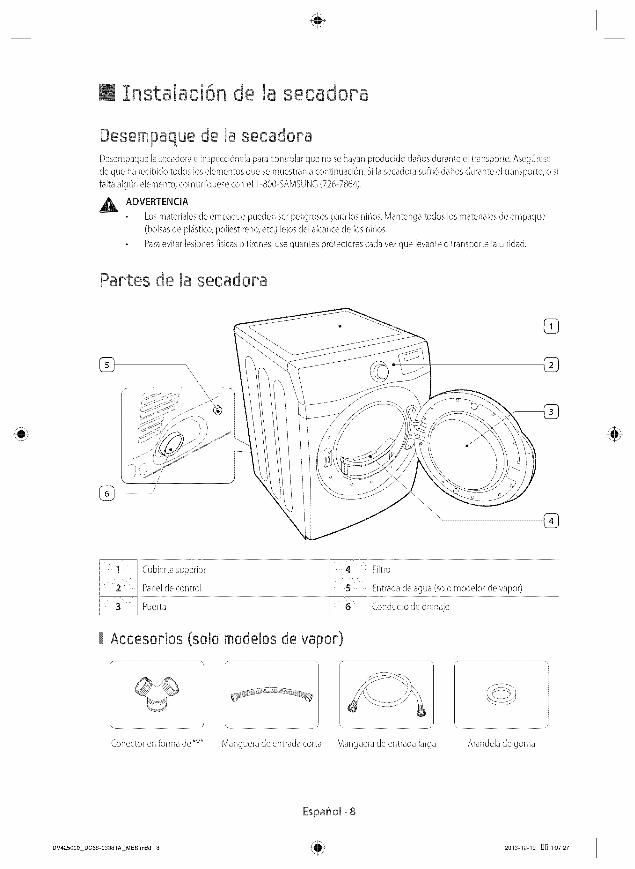
I InstaJaci6n de Jasecadepa
Desempaque de JasecadoraDesempaque [a secadorae inspecci6neb para contro[ar que no sehayan producido da_ios durante el transporte. AsegOrese
de que ha recibido todos los ebmentos qua se muestran a continuaci6n. Si la secadora sufri6 daF_osdurante el transporte, o si
faEtaaEgOnebmento, comurfiquese con eF1-800-SAMSUNG(726 7864).
,_ ADVERTENCIA
Los materiales de empaque pueden set pdigrosos para los rfiF_os.Mantenga todos los rnateriales de empaque
(bolsasde pl_stico, poliestireno, etc.) bjos del alcance de los niF_os.
Paraevitar lesiones fisicas o tirones, use guantes protectores cada vez que levante o transporte la unidad.
Partes de la secadora
Accesorios (solo modelos de vapor)
Conector en forma de"Y" Manguera de entrada corta
Espa_om_ 8
DV425000 DC68-O3381A MESindd 8 2013-12-19 O0 1:07:27
Zmportante para el instaladorLea ]as siguientes instrucciones con detenimiento antes de instalar la secadora. Estasinstrucciones se(:leben conservar paraconsultas futuras.
ADVERTENCIA: Retire la puerta de todos los electrodom_sticos desechados para evitar el peligro de que un niiioquede atrapado y seasflxie.
Requisitos bSsicosAsegOresede tenet todo Io necesario para reaEizaruna instaEaci6nadecuada
Serequiere un TOMACORRIENTECONCONEXIONA TIERRA.
Un CABLEDEALIMENTACIONpara secadorasel_ctricas (excepto (.anad&).
Los(.ONDUCTOSDEGAS (sisetrata de una secadora a gas) deben cumplir con los c6digos locales y nacionales.
ElSISTEMADEDRENAJEdebe set un conducto de drenaje de metal rigido o flexible con un recubrimiento de metalresistente.
Conexi6n a tierraEstasecadora debe conectarse atierra. Encaso de que el electrodom4stico funcione real o sedescomponga, la conexi6n a
tierra del producto reducir_ el riesgo de descarga el_ctrica al ofrecer una vfa de menos resistencia a la corriente el_ctrica.
Modelos a gas
Susecadora tiene un cable con un conductor de conexi6n a tierra del equipo y un enchufe de conexi6n a tierra.
Elenchufe debe conectarse a un tomacorriente adecuado que est6 correctamente instalado y conectado a tierra en
conformidad con todos los c6digos y ordenanzas locales.
No modiflque el enchufe provisto con la secadora;si no entra en el tomacorriente, solicite a un electricista califlcado queinstale el tomacorriente adecuado.
Nunca conecte el cable atierra a las tuberias de pl_istico,alas tuberias de gas o alas caflerias de agua caliente.
Modelosel#ctricos
La secadora requiem un cable opcional con un conductor de conexi6n a tierra dd equipo y un enchufe de conexi6n atierra
que sevende pot separado.
Elenchufe debe conectarse a un tomacorriente adecuado que est6 correctamente instalado y conectado a tierra en
conformidad con todos los c6digos y ordenanzas locales.
No modiflque el enchufe provisto con la secadora;si no entra en el tomacorriente, solicite a un electricista califlcado queinstale el tomacorriente adecuado.
Sino se utiliza un cable de alimentaci6n y ]a secadora el6ctrica debe estar permanentemente conectada, se ]a debe
conectar a un sistema de cableado de metal con conexi6n atierra permanente, o se debe conectar un conductor con
conexi6n atierra del equipo a losconductores del circuito y a la terminal con conexi6n a tierra del equipo o al cable dela secadora.
Espa_om- 9
DV425000 DC68-O3381A MESindd 9 2013-12-19 DO 1:07:27
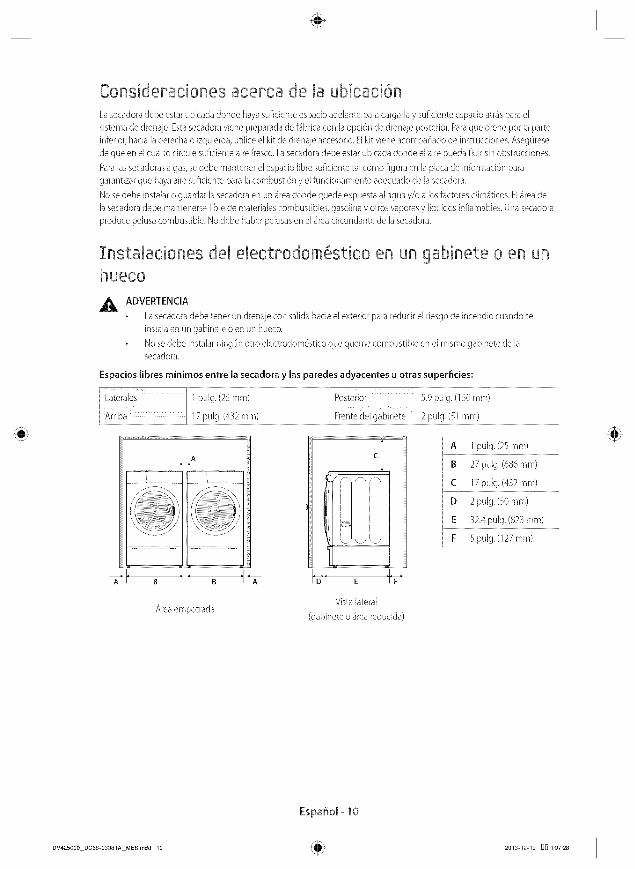
Consideradones acerca de Jaubicaci6n
La se.cadoradebe. estar ubicada donde haya suficie.nte,espacio ade.Bnte para cargarB y suflcie.nte espacio arras para el
siste.made dre.naje..Esta se.cadoravie.he,preparada de f_brica con la opci6n de drenaje, poste.rior.Paraque.drene, pot Eaparte.
inferior, hacia B de.rechao izquie.rda,utilice, el kit de drenaje acce.sorio.El kit vie.he,acompaflado de instruccione.s.Ase.gOrese.
de que.e.ne.]cuarto circu]e,suficie.nte aire fresco. La se.cadorade.be,e.starubicada donde,e.]aire. )ue.dafluir sin obstruccione.s.
ParaBs se.cadorasa gas,se.de.be,mantene.r e.]e.spacioEit)re.suficie.nte,taEcomo flgura e.nEapBca de informaci6n para
garantizar que. haya aire suflcie.nte para ]a combusti6n y d funcionamie.nto ade.cuado de ]a se.cadora.
No se.de.be,instaBr o guardar ]a se.cadorae.nun 4re.adonde,que.de,e.xpue.staal agua y/o a los factore.sdim_ticos. E]_re.ade
la se.cadorade.be,mante.ne.rse.]ibre.de materiale.scombustib]e.s gasolina y otros vapores y ]iquidos inflamable.s. Una se.cadora
produce, pe.lusacombustible.. No de.be,habe.rpdusas e.neel_rea circundante, de la se.cadora.
Instalaciones del electrodom6stico en un gabinete o en unhueco
ADVERTENCIALase.cadorade.be,tene.run dre.najeconsalidahaciaedexteriorparare.ducird rie.sgode ince.ndiocuandose.instalae.nungabine.te,o e.nun hue_co.
Nose.de.be,instalarningOnotto e.le.ctrodom6sticoque.que.me,combustiblee.nedmismogabine.te,de lase.cadora.
Espados Jibres minimos entre Jasecadora y las paredes adyacentes u otras superfldes:
L
o il. o
c
/ /-\ / \, /'\
j/c'_sJ ::
11Vi' e
A 1 pulg.(25mm)
B 27 pulg. (686 mm)
C 17 pulg.(432 ram)
D 2pulg.(S0mm)
E 32.4 pulg. (823 ram)
F , 5pulg.(127mm)
A,rea e.mpotradaVista lateral
(gabirlete. o _re.areducida)
Espa_om-lO
DV425000 DC68-O3381A MESindd 10 2013-12-19 E_ 1:07:28
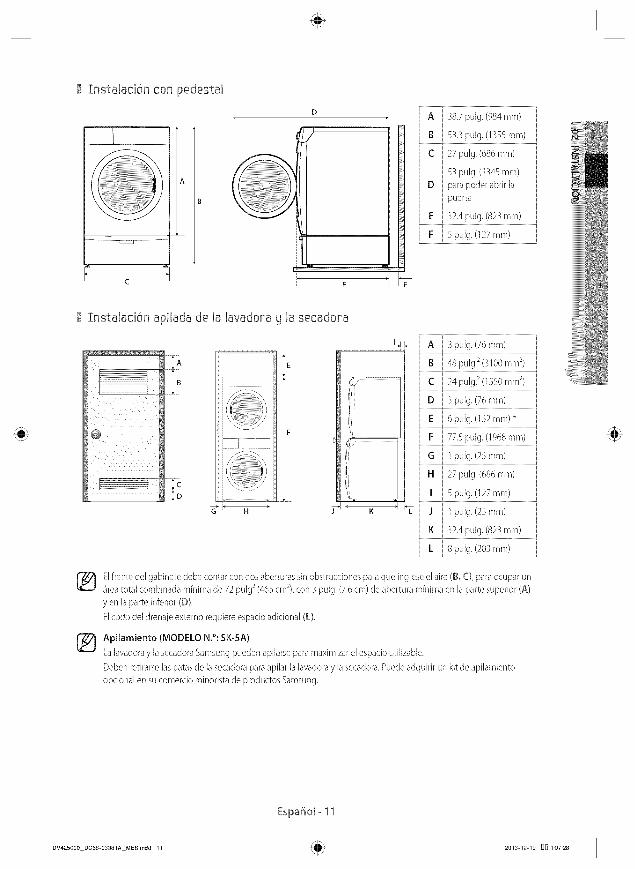
Znstahci6n con pedestal
_1
A
C
D
i' '1E
A 38.7 pulg.(984mm)
B 53.3 pulg. (1355 ram)
C 27 pulg. (686 mm)
53 pulg. (1345 mm)
D para poder abrir [a
puerta
E 32.4 pulg. (823 ram)
F 5 pulg.(127 ram)
Znstalaci6n apilada de la lavadopa g la secadopa
i_ A 3 puig.(76mm)
B 48 pulg. 2(3100 mm 2)
C 24 pulg. 2(1550 mm 2)
D 3 pulg.(76mm)
E 6 puig.(152 ram) _
F 77.5 pulg. (1968 ram)
G I pulg. (25 ram)
H 27 pulg. (686 ram)J
[ I 5 pulg.(127 ram)
J , I pulg.(25 ram)
K 32.4 pulg. (823 ram)
L , 8 pulg.(203 ram)
El frente del gabinete debe contar con dos aberturas sin obstrucciones para que ingrese el aire (B, C), para ocupar un2 2grea total combinada minima de 72 pulg (465 cm ), con 3 pulg. (7.6cm) de abertura minima en la parte superior (A)
y en la parte inferior (D).
Elcodo dd drenaje externo requiere espacio adiciona[ (L).
Apilamiento (MODELO N.°: SK-SA)Lalavadora y la secadora Samsung pueden apilarse para maximizar el espacio utilizable.
Deben retirarse las patas de la secadora para @liar la Bvadora y la secadora.Puede adquirir un kit de apilamiento
optional en sucomercio minorista de productos Samsung.
Espa_om- 11
DV425000 DC68-O3381A MESindd 11 2013-12-19 D_ 1:07:28
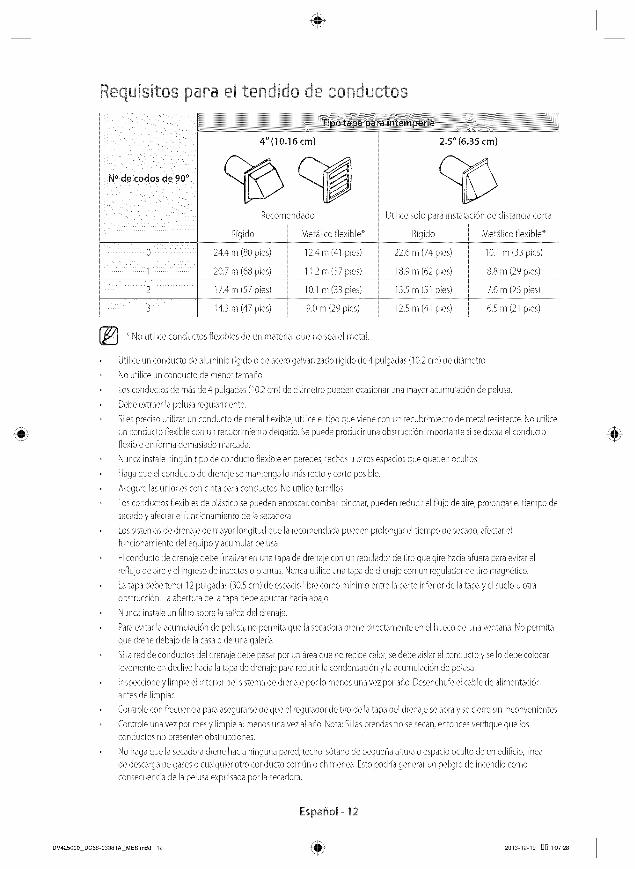
Requ[sitos para el tend[do de conductos
Recomendado Utilice solo para insta[aci6n de distancia corta[ ....j Rfgido Met_ilico flexible* Rfgido Met_ilico flexibb _
[ 0 24.4 m (80 pies) 12.4 m (41 pies) 22.6 m (74 pies) 10.1 m (33 pies)
l 20.7 m (68 pies) 11.2 m (37 pies) 18.9 m (62 pies) 8.8 m (29 pies)
[ 2 17.4 m (57 pies) 10.1 m (33 pies) 15.5 m (51 pies) 7.6 m (25 pies)i
_ utilice conductos flexib[es de material e[ metal.No un que no sea
Utilice un conducto de aluminio rfgido o de acero galvanizado rigido de 4 pulgadas (10.2cm) de di_imetro.
No utilice un conducto de menor tamaflo.
Losconductos de m4sde 4 pulgadas (10.2cm) de di_Smetropueden ocasionaruna mayor acumuBd6n de pelusa.
Debeextraer la pelusa reguBrmente.
Siespredso utilizar un conducto de metal flexible, utilice el tipo que viene con un recubrimiento de metal resistente.No utilice
un conducto flexible con un recubrimiento delgado. Sepuede produdr una obstrucd6n importante sisedobla el conductoflexible en forma demasiado marcada.
Nunca instaleningQntipo de conducto flexible en pare@s,techos u otros espaciosque queden ocultos.
Hagaque el conducto de drenaje se mantenga Io m4s rectoy corto posibb.
Asegure lasuniones con cinta para conductos. No utilice tornillos.
Losconductos flexibles de pl_Ssticose pueden enroscar,combat, pinchar,pueden reducir el flujo de aire, prolongarel tiempo de
secadoy afectarel fundonambnto de B secadora.
Lossistemasde drenaje de mayor Bngitud que B recomendada pueden prolongar el tiempo de secado,afectarel
funcionamiento del equipo y acumuBr pelusa.
Elconducto de drenaje debe flnalizar en una tapa de drenaje con un reguladorde tiro que gire hada afuera paraevitar el
reflujo de aire y el ingreso de insectos o pBntas. Nuncautilice una tapa de drenaje con un regulador de tiro magn@co.
Latapa debe tener 12pulgadas (30.5cm) de espado Iibre como minimo entre la parte inferior de latapa y el suelo uotra
obstrucd6n. Laabertura de latapa debe apuntar hada abajo.
Nunca instaleun flltro sobre B salida del drenaje.
Paraevitar la acumulad6n de pelusa,no permita que la secadoradrene directamente en el hueco de una ventana.No permita
que drene debajo de lacasao de una galeria.
Si la redde conductos del drenaje debe pasar pot un 4teaque no recibecalor, sedebe aislarel conducto y seIo debe colocar
bvemente en @clive hada B tapa de drenaje pararedudr la condensad6n y la acumulad6n de pelusa.
Inspeccione y Iimpie el interior del sistemade drenaje por Io menos una vez por aflo. Desenchufeel cable de alimentad6n
antesde Iimpiar.
Controb con frecuenciapara asegurarsede que el reguBdor de tiro de latapa del drenaje seabra y secierre sininconvenientes.
Controb una vezpor mesy Iimpie al menos una vezal aflo.Nora: SiBs prendasno sesecan,entonces veriflque que los
conductos no presenten obstrucciones.
No hagaque la secadoradrenehacia ninguna pared,techo, s6tano de pequeF/aaltura o espacio oculto de un ediflcio, linea
de descargade gaseso cualquierotto conducto comOno chimenea. Esto podria generar un peligro de incendio como
consecuenciade la pelusaexpulsadapot la secadora.
Espa_o[_12
DV425000 DC68-O3381A MESindd 12 2013-12-19 D[] 1:07:28
Si la nueva secadora se instala dentro de un sistema de drenaje existente, debe asegurarse de que:
Elsistema de drenaje cumpla con todos los c6digos locales,estatales y nacionales.
No se utilice un conducto flexible de pl4stico.
Secontrole y Iimpie toda la pdusa acumulada del interior del conducto existente.
Elconducto no est6 enroscado o aplastado.
El regulador de tiro de la tapa de drenaje seabra y secierre sin inconvenientes.
La presi6n est3tica de cualquier sistema de drenaje no debe superar las 0.83 pulgadas de la columna de agua ni serinferior aO.
Esto se puede medir cuando ]a secadora est,1en funcionamiento con un man6metro en el punto donde el conducto de
drenaje se conecta a la secadora.Se debe utilizar la opci6n sin calor. La tina de la secadora debe estarvacia y el flltro para
pdusas limpio.
Drenaje
La secadora no debe drenarse hacia una chimenea, pared, techo, altillo, s6tano de pequefla altura o espacio oculto de un
ediflcio.
Si la secadora tiene un drenaje con salida hacia el exterior seevitar4 que ingrese una gran cantidad de pelusa y humedad a lahabitaci6n.
• Todas las secadorasdeben tenet un drenaje con salida hacia el exterior.No file el conducto con tornillos u otros medios de sujeci6n que seextiendan dentro del conducto y atrapen
pelusa.
Elconducto de drenaje debe tener 4 pulgadas (102 mm) de diAmetro.
La Iongitud total del conducto flexible met_ilico no debe superar los 2.4m (7.8 pies).
En los Estados Unidos:
Utilice solo losconductos flexibles tipo 14minamet4lica, si los hubiera, identiflcados espedflcamente para su utilizaci6n con el
electrodom6stico por el fabricante y que cumpBn con el Esquema para conductos de transici6n de secadora de ropa,Tema
2158A.
En CanadS:
Utilice solo aquellos conductos flexibles tipo I_mina met_ilica,si los hubiera, especiflcamente identiflcados pot el fabricante
para su uso con el electrodom6stico.
Fuepa de los EEUU_g Canada:
Remitasea los c6digos locales.
_k ADVERTENCIA
Lasecadora debe tener un drenaje con salida hacia el exterior para reducir el riesgo de incendio cuando se
instala en un gabinete o en un hueco.
NUNCAUTILICEUN CONDUCT(}FLEXIBLEDEPL/_STICO0 DEUN MATERIALQUE NO SEAELMETAL.
Sisu red de conductos actual esde pl_istico,de un material que no sea el metal o es inflamable, reempl_cela por
una que seade metal.
Utilice Onicamente un conducto de drenaje de metal que no sea inflamable para asegurar la contenci6n del aire
expulsado, el calory la pelusa.
iiiiiiiiiiiiiiiiiiii
EspaSom- IS
DV425000 DC68-O3381A MESindd 13 2013-12-19 DO 1:07:28
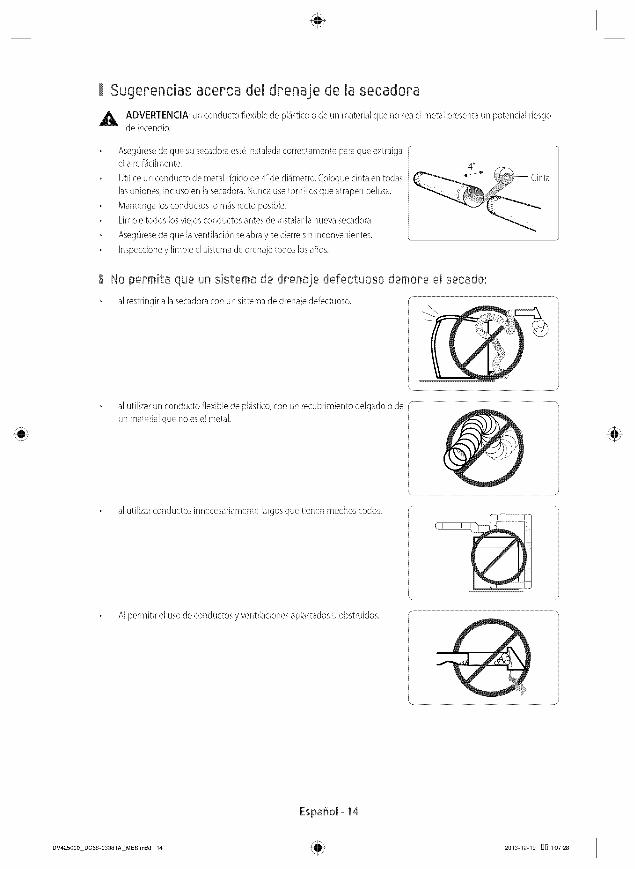
Sugerencias acerca del drenaje de la secadora
_IL DVERTENCIA: un conducto flexible de pl_stico o de un material que no seael metal presenta un potential riesgode incendio.
AsegOresede que su secadora est,_instalada correctamente para que extraigael aire f_icilmente.
UtiJice un conducto de metal rigido de 4"de di_imetro.Coloque cinta en todas
las uniones, incluso en la secadora. Nunca use tornillos que atrapen pelusa.
Mantenga los conductos Io m4s recto posible.
Limpie todos los viejos conductos antes de insta]ar la nueva secadora.
AsegOresede que la venti]aci6n seabra y se cierre sin inconvenientes.
Inspeccione y Iimpie el sistema de drenaje todos los aflos.
No permita que un sistema de dpenaje defectuoso demote e! secado:
al restringir a la secadora con un sistema de drenaje defectuoso, r
al utilizar un conducto flexible de pl4stico, con un recubrimiento de@ado o de
un material que no esel metal.
al utilizar conductos innecesariamente largosque tienen muchos codos.
AI permitir el uso de conductos y ventilaciones aplastados u obstruidos.
Espa_om-14
DV425000 DC68-O3381A MESindd 14 2013-12-19 E_ 1:07:28
Requisitos en cuanto aJgas
LA INSTALACION DEBE REALIZARSE EN CONFORMIDAD CON LOS CODIGOS LOCALES, O EN AUSENCIA DE
ELLOS, CON EL CODIGO NACIONAL PARA GAS Y COMBUSTIBLES ANSI/Z223.1, LA REVISION MAS RECENTE
(PARA LOS ESTADOS UMDOS), O CON LOS CODIGOS DE INSTALACION CAN/CGA-B149 (PARA CANADA).
Utilice @ficamente gas natural o gas LP(gas Iicuado de propano).
Estasecadora est4diseF/adapara utilizar con gas natural. Si tiene pensado utilizar su secadora con gas LP(gas Iicuado de
propano), deber4 efectuarse la conversi6n para Iograr un funcionamiento adecuado y seguro, tarea que deberB estar a
cargo de un t#cnico calificado.
Serecomienda usar un conducto de suministro de gas de 1/2 pulg. (1.27 cm) y debe reducirse para la conexi6n con el
conducto de gas de 3/8 pulg. (1 cm) de su secadora.ElC6digo National para Gas y Combustibles exige que se instale
una v41vulamanual de cierre del gas,aprobada y de f4cil acceso, dentro de las 6 pulgadas de distancia de la secadora.
Las secadoras a gas instaladas en garajes residendales deben estar elevadas a 18 pulgadas (46 crn)
del piso.
Adem_s, inmediatamente contra ]a corriente de ]a conexi6n del suministro de gas de B secadora,se debe instaBr una
conexi6n roscada macho N.RT.(roscanational para tubos) de 1/8 pulg. (0.3 cm), accesible para la conexi6n del medidor
de prueba.
Susecadora debe estar desconectada del sistema de suministro de gas durante laspruebas de presi6n del sistema.
NO vuelva a utilizar el vie}o conducto de gas en metal flexible. EldiseF_odel conducto de gas flexible debe estar
certificado pot la Asociaci6n Americana del Gas (CGAen Canada).
• Todo compuesto de uni6n de tuberias utilizado debe ser resistente a la acci6n del gas Iicuado de petr61eo.A modo de cortesia, la mayoria de las empresas locales de gas inspeccionar_n la instaBci6n del artefacto
agas.
ENCENDIDO DEL GAS Lasecadora utiliza un sistema de encendido autom_tico para encender el quemador. No
existe un piloto que permanezca constantemente encendido.
lnstrucciones de instalaci6n de la Mancomunidad de Nassachusetts
La instalaci6n de la secadora deber_ estar a cargo de un plomero o un gasista matriculado. Sedeber_ instaBr una v_lvula de
gas manual con una manila en forma de "T" en el conducto de suministro de gas de la secadora. Siseutiliza un conector de
gasflexible para instalar la secadora, el conector debe tener una Iongitud m_xima de 3 pies (36 pulgadas).
_, ADVERTENCIASepueden producir p6rdidas de gas en su sistema que ocasionen una situaci6n peligrosa.
Lasp6rdidas de gas pueden no serdetectadas (ilnicamente por el olor.
Los proveedores de gas recomiendan que compre e instale un detector de gas aprobado por UL
Inst_lelo y utilicelo de acuerdo con las instrucciones del fabricante.
Espa_om- 15
DV425000 DC68-O3381A MESindd 15 2013-12-19 _] 1:07:28
Requisitos el ctricosEldiagrama del cableado se encuentra en la placadebajo del panel de control.
ADVERTENCIA
Laconexi6n inadecuada del conductor de conexi6n a tierra del equipo puede dar como resultado un riesgo
de descarga eld_ctrica.Consulte a un electricista o t@nico califlcado sile surgen dudas acerca de si la conexi6n
a tierra de susecadora escorrecta. No modiflque el enchufe provisto con ]a secadora; si no entra en el
tomacorriente, solicite a un ebctricista califlcado que instab el tomacorriente adecuado.
Paraevitar el riesgo innecesario de incendio, descarga el6ctrica o ]esionesfisicas, todo el cableado y ]a conexi6n
a tierra deben realizarseen conformidad con los c6digos locales,o en ausencia de olios, con el C6digo El6ctrico
Nacional, ANSI/NFPANro.70, su Oltima revisi6n (para los EE.UU.)o el C6digo EId_ctricoCanadiense CSAC22.1,
sus@imas revisiones y los c6digos y ordenanzas locales.Essu responsabilidad proveer los servicios el6ctricos
adecuados para su secadora.
Todas las instalaciones de gas deber4n realizarse en conformidad con el C6digo National para Combustibles
ANSI/Z2231,su/]ltima revisi6n (para los EE.UU.)o con losC6digos de Instalaci6n CAN/CGA B149,su/illtima
revisi6n (para Canad4) y los c6digos y ordenanzas locales.
Conexiones el_ctricas
Antes de poner el electrodomd_sticoen funcionamiento o realizar pruebas, siga las instrucciones de conexi6n atierra de la
secci6n"Conexi6n a tierra'en la p4gina 13.
Serecomiendaqua sedestine un circuito derivado individual (oseparado)solo parala secadora.NOUTILI(:EUNCABLEPROLONGADOR.
Mode!os a gas = EEUU.g CanadaBerequiere un servicio dd_ctricoaprobado de CA de 120 voltios, 60 Hz, con un fusible o interruptor de 15 A.
Modeles e!@ctricos= Solo EEUU.
La mayor parte de las secadoras estadounidenses requieren un servicio el6ctrico aprobado de CA de 120/240 voltios, 60
Hz. Algunas requieren un servicio eldctrico aprobado de 120/208 voltios, 60 Hz. Los requisitos del servicio d6ctrico pueden
encontrarse en la etiqueta con informaci6n ubicada detr_is de la puerta. Berequiere un fusible o interruptor de 30 A aamboslados del conducto.
Sise utiliza un cable de alimentaci6n, el cable debe enchufarse a un tomacorriente de 30 A.
NO se provee el cable de alimentaci6n con los modelos d4ctricos de secadoras estadounidenses.
,_ ADVERTENCIA- RIESGODE DESCARGA ELI_CTRICASi Io permiten los c6digos locales,el suministrod6ctrico de lasecadorapuede conectarse por medio de un nuevo kit de
cablesde alimentaci6n d6ctrica, rotuBdo para qua seIo utilice con una secadora,esdeck qua cuente con certificaci6n U.L
y categorizadoen un minimo de 120/240 vokios, 30 A con tres conductores de cobre N.° 10que flnalicen en terminales de
bude cerrado, pernosde palade @o abierto con extremos rebatidos o con conductores de estaf_o.
No vudva a utilizarun cablede alimentaci6n d6ctrica de una secadoravieja. Elcablede alimentaci6n d6ctrica debe
conservarseen el gabinete de la secadoracon un dispositivo de alivio de tensi6n con certiflcaci6n ULadecuado.
Laconexi6n atierra atrav6sdd conductor neutro est4 prohibida para (1) instalacionesnuevascon circuito derivado,
(2)casasrodantes, (3)vehiculos de recreoy (4)_reasen lasqua losc6digos localesprohiban la conexi6n atierra a
trav6s de un conductor neutro. (Useun enchufe de 4 pinespara d tomacorriente de 4 ranuras,tipo NEMA14 30ft.)
Mode!os e!@ctricos= Sob Canada
Berequiere un servicio dd_ctrico aprobado de CAde 120/240 vdtios, 60 Hz,equipado con un fusible o interruptor de 30A a ambos Bdos dd conducto.
Todos los modelos canadienses seenvian con el cable de alimentaci6n adjunto. Elcable de alimentaci6n debeconectarse a un tomacorriente de 30 A.
En no est4 permitido convertir una a 208Canad4 secadora voltios.
Espa_om-16
DV425000 DC68-O3381A MESindd 16 2013-12-19 D_ 1:07:29
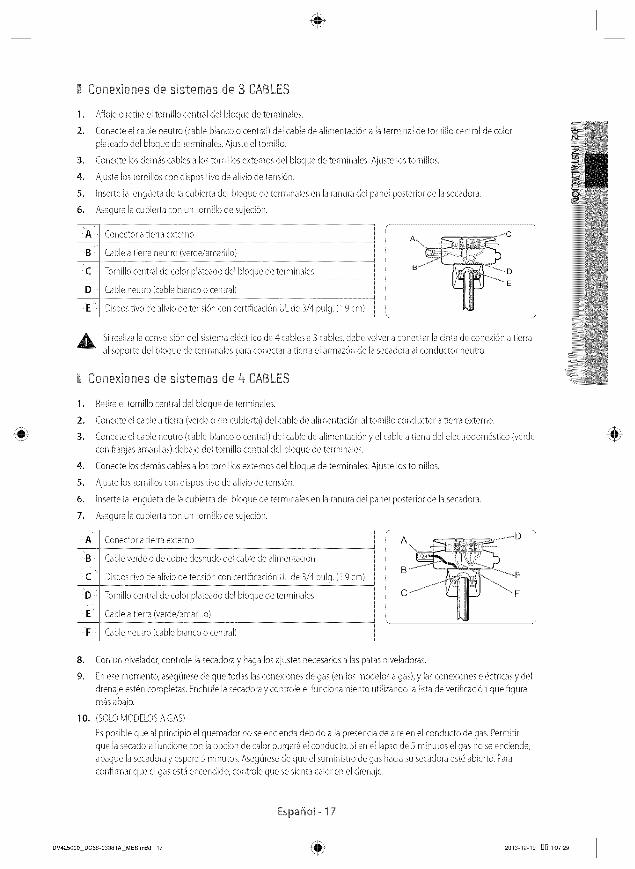
Conexiones de sistemas de 3 CABLES
1. Afloje o retire el tornillo central del bloque de terminales.
2. Conecte el cable neutro (cable blanco o central) del cable de alimentaci6n a la terminal de tornillo central de color
plateado del bloque de terminales. Ajuste el tornillo.
S. Conecte los demos cablesa lostomillos externos del bloque de terminales. Ajuste los tornillos.
4. Ajuste los tornillos con dispositivo de alivio de tensi6n.
S. Inserte la lengtieta de la cubierta del bloque de terminales en la ranura del panel posterior de la secadora.
6. Asegure la cubierta con un tornillo de sujeci6n.
Si realiza la conversi6n del sistema eld_ctricode 4 cables a3 cables, debe volver a conectar la cinta de conexi6n a tierraa] soporte de] bloque de terminales para conectar a tierra el armaz6n de la secadora al conductor neutro.
Conexiones de sistemas de 4 CABLES
1. Retire el tornillo central del bloque de terminales.
2. Conecte el cable a tierra (verde o sin cubierta) de] cable de alimentad6n al torni]lo conductor a tierra extemo.
S. Conecte el cable neutro (cable blanco o central) del cable de alimentaci6n y el cable atierra del electrodom4stico (verde
con franjas amarillas) debajo del tomillo central del bloque de terminales.
4. Conecte los demos cablesa lostomillos externos del bloque de terminales. Ajuste los tornillos.
S. Ajuste los tornillos con dispositivo de alivio de tensi6n.
6. Inserte la lengtieta de la cubierta del bloque de terminales en la ranura del panel posterior de la secadora.
7. Asegure la cubierta con un tornillo de sujeci6n.
iT Conectoratierraextemo j _ ^ _ _.,yD
J B Cableverde o de cobre desnudo del cablede alimentaci6n j _u%i,u" -_
i C Dispositivodealiviodetensi6nconcer_iflcacidnULde3/4pulg,(l.9cm) i ii B"
jE_I To[r_!!!ocer_!!a!de co!o! p!a!eado de! b!oque de !e[m!na!esCablea tierra (verde/amarillo) J C .......
i F Cable neutro (cable blanco o central)
8. Con un nivelador, controle la secadora y haga los ajustes necesarios alas paras nivdadoras.
9. Enese momento, asegOresede que todas las conexiones de gas (en los moddos agas),y lasconexiones el4ctricas y del
drenaje estd_ncompletas. Enchufe la secadora y controle el funcionamiento utilizando la lista de veriflcaci6n que figura
m4s ahalo.
10. (SOLOMODELOSA GAS)
Esposible que al principio el quemador no seencienda debido a la presencia de aire en el conducto de gas.Permitir
que la secadora funcione con laopci6n de calor purgar4 el conducto. Si en el lapsode 5 minutos el gas no seenciende,
@ague la secadora y espere 5 minutos. AsegOresede que el suministro de gas hacia su secadora estd_abierto. Para
confirmar que el gas est4encendido, controle que se sienta calor en el drenaje.
Espa_om- 17
DV425000 DC68-O3381A MESindd 17 2013-12-19 DO 1:07:29
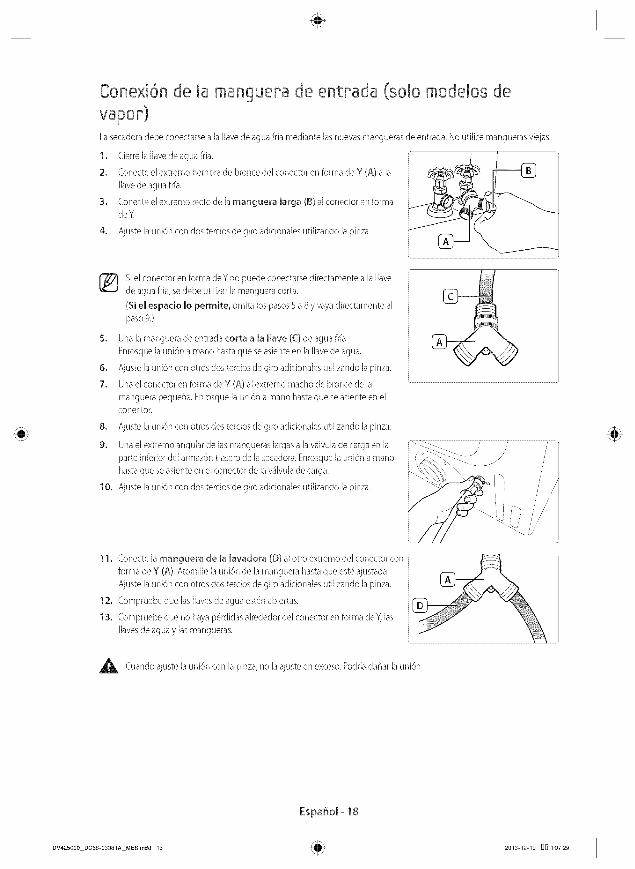
Conexi6n de la manguera de entrada (solo modelos devapor}La secadoradebe conectarse a la [lave de agua fria mediante las nuevas mangueras de entrada. No uti[ice mangueras viejas.
1. Cierre la Ilavede agua fiB.
2. Conecte el extremo hembra de bronce del conector en forma de Y (A) a la
leavede agua fria.
S. Conecte el extremo recto de [a manguera [arga (g) al conector en formadeY.
4. Ajuste la uni6n con dos tercios de giro adicionales utilizando la pinza.
Siel conector en forma deY no puede conectarse directamente a [a Havede agua fria, sedebe utilizar la manguera corta.
($i el espado Io permite, omita los pasos 5 a 8 y vaya directamente al
paso %
5. Una la manguera de entrada corta a la Have (C) de agua fria.
Enrosque la uni6n a mano basra que seasiente en la ]lave de agua.
6. Ajuste ]a uni6n con otros dos tercios de giro adicionales utilizando la pinza.
7. Una el conector en forma de Y (A} al extremo macho de bronce de ]a
manguera pequefla. Enrosque [a uni6n a mano hasta que se asiente en el
conector.
8. Ajuste la uni6n con otros dos tercios de giro adiciona[es utilizando la pinza.
9. Una el extremo angular de las mangueras largasa la v_lvula de carga en la
parte inferior del armaz6n trasero de la secadora. Enrosque ]a uni6n a mano
hasta que se asiente en el conector de la vAlvulade carga.
10. Ajuste la uni6n con dos tercios de giro adicionales utilizando la pinza.
J //
11. Conecte la manguera de la lavadora (D) al otro extremo del conector con
forma de Y (A). Atornille la uni6n de la manguera hasta que est6 ajustada.
Ajuste la uni6n con otros dos tercios de giro adiciona[es utilizando la pinza.
12. Compruebe que las Navesde agua est6n abiertas.
1S. Compruebe que no haya pd_rdidasalrededor del conector en forma deY, las
Ilavesde agua y las mangueras.
_, Cuando ajuste la uni6n con la pinza, no la ajuste en exceso.Podria daflar la uni6n.
Espa_om-18
DV425000 DC68-O3381A MESindd 18 2013-12-19 D_ 1:07:29
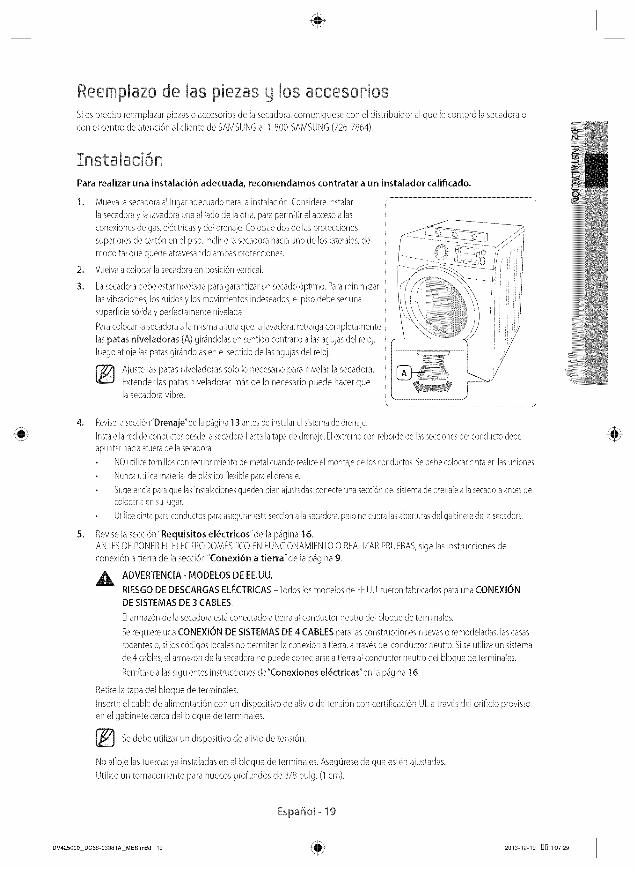
Reemplazode Jaspiezasy bs accesopiosSies preciso reempBzar piezas o accesorios de B secadora,comuniquese con el distribuidor al que Jecompr6 la secadora ocon el centro de atenci6n al cliente de SAMSUNGal] 800 SAMSUNG(726 7864).
InstaJaci6n
Para realizar una instalad6n adecuada, recomendamos contratar a un instalador calificado,
2.
3.
Mueva B secadoraal lugaradecuado para la instalad6n. Considere instalar
la secadoray la lavadora una al ladode laotra, para permitir el accesoalas
conexionesde gas,el6ctricasy dd drenaje. Coloquedos de las protecciones
superioresde cart6n en el piso.Incline B secadorahaciauno de los laterales,de
modo tal que quede atravesandoambas protecciones.
Vuelvaa colocar la secadoraen posici6n vertical.
Lasecadoradebe estarniveladapara garantizar un secado6ptimo. Paraminimizar
lasvibraciones, losruidos y los movimientos indeseados,el piso debe ser una
superfkie s@day perfectamente nivelada.
Paracdocar B secadoraa la misma altura que la lavadora,retraiga compbtamente
Bs patas nbdadoras (A) gir4ndolas en sentido contrario a Bs agujasdel reloj,
luego afloje las parasgir4ndoBs en el senBdode Bs agujasdd rdoj.
Ajuste las paras niveladoras solo 1onecesario para nivelar [a secadora.Extender [as paras nivdadoras m_s de Io necesario puede hater quela secadora vibre.
Revisela secci6n'Drenaje'de lap_gina 13 antesdeinstalarel sistemade drenaje.
Instalelaredde conductosdes@ lasecadorahastalatapa de drena]e.Elextremo conrebordede lasseccionesdel conductodebe
apuntarhaciaafuerade lasecadora.
NO utilicetornillos con recubrimientode metalcuandorealkeel monta)ede losconductos.Sedebecolocarcinta enlasuniones.
Nuncautilicematerialde pl_sticoflexiblepara eldrenaje.
Sugerenciaparaque lasinstalacionesqueden bienajustadas:conecte una secci6ndel sistemade drenaiea la secadoraantesde
colocarlaen sulugar.
Utilicecintaparaconductosparaasegurarestasecci6na lasecadora,perono cubra lasaberturasdel gabinetede la secadora.
Revise]a secci6n "Bequisitos el@ctricos'de [a p_gina 16.
ANTESDEPONERELELECTRODOMESTICOENFUNCIONAMIENTO0 REALIZARPRUEBAS,siga lasinstrucciones de
conexi6n atierra de [a secci6n "Conexi6n a tierra'de la p_gina 9.
ADVEBTENCIA - MODELOS DE EE.UU,RIESGO DE DESCABGAS ELI_CTBICAS Todos losmodelos de EE.UU.fueron fabricados para una CONEXION
DE SISTEMAS DE 3 CABLES
Elarmaz6n de la secadoraest_conectado atierra al conductor neutro dd bloque de terminabs.
Serequiem una CONEXION DE SISTEMAS DE 4 CABLES para lasconstrucciones nuevaso remodeladas,Bs casas
rodanteso, si los c6digos localesno permiten la conexi6n atierra,a trav6sdel conductor neutro. Sise utilizaun sistema
de 4cables,el armaz6nde B secadorano puede conectarsea tierra al conductor neutro del bloque de terminales.
Rem[tasealas siguientes instrucciones de'Conexiones el6ctricas"en la p_gina 16.
Retire [atapa del bloque de terminales.
Inserte el cable de alimentaciGn con un dispositivo de alivio de tensi6n con certificaci6n UL a tray, s del orificio provisto
en el gabinete cerca del bloque de terminales.
debe utilizar de alivio deSe dispositivoun tensiGn.
No afloje las tuercas ya instaBdas en el bioque de terminales. Aseg@esede que est6rl ajustadas.
Utilice un tomacorriente para huecos profundos de 3/8 puJg.(] cm).
EspaSom- 19
DV425000 DC68-O3381A MESindd 19 2013-12-19 E_ 1:07:29
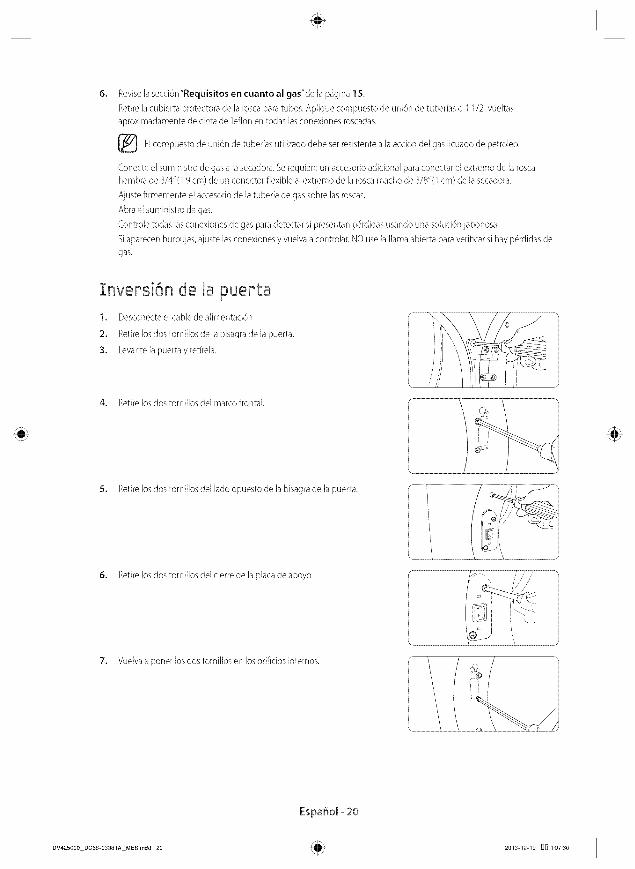
Revise la secci6n'Requisitos en cuanto al gas"de la pBgina 15
Retire la cubierta protectora de la rosca para tubes. Aplique compuesto de uni6n de tuberias o 1 1/2 vueltas
aproximadamente de cinta de Teflon en todas lasconexiones roscadas.
Elcompuesto de uni6n de tubeffas utilizado debe ser resistente a laacci6n del gas Iicuado de petr61eo.
Conecte el suministro de gas a lasecadora. Serequiere un accesorio adiciona] )ara conectar el extremo de la rosca
hembra de 3/4" (1.9cm) de un conector flexible al extremo de la roscamacho de 3/8"(1 cm) de la secadora.
Ajuste firmemente el accesorio de la tubeffa de gas sobre las roscas.
Abra el suministro de gas.
Controle todas lasconexiones de gas para detectar si presentan p4rdidas usando una soluci6n jabonosa.
Siaparecen burbujas, ajuste las conexiones y vuelva acontrolar. NO use la llama abierta para veriflcar si hay pd_rdidasde
gas.
Invepsi6n de la puepta1, Desconecte el cable de alimentaci6n.
2, Retire los dos tornillos de la bisagra de la puerta.
3, Levante la puertayretirela.
4. Retire los dos torniJlosdel marco frontal.
5, Retire los dos tornillos del [ado opuesto de la bisagra de B puerta.
6. Retire los dos torniJlosdel cierre de la plata de apoyo.
7. Vudva a poner losdos tomiJlos en losoriflcios intemos.
Espa_om- 20
DV425000 DC68-O3381A MESindd 20 2013-12-19 DO 1:07:30
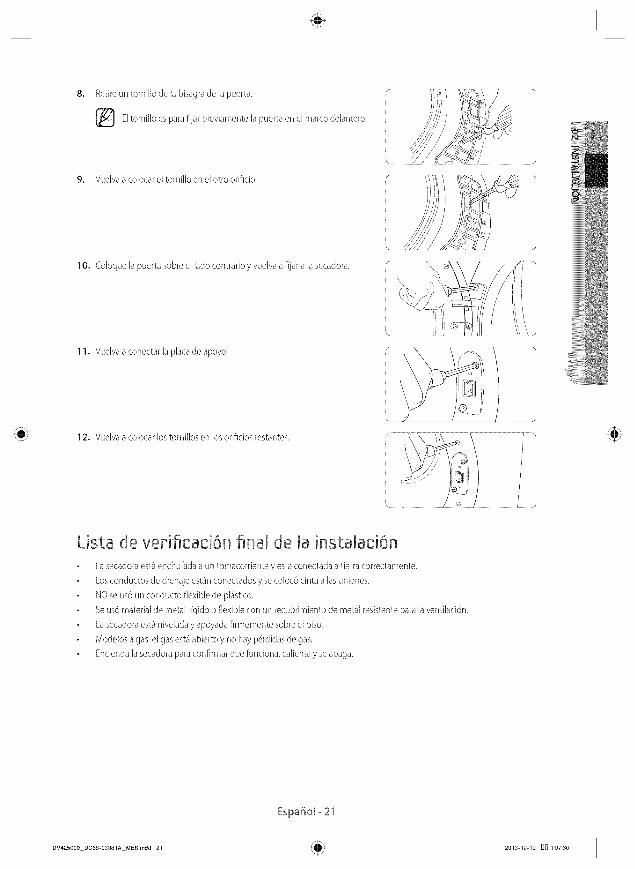
8. Retire un tomiHo de la bisagra de la puerta.
El torni]lo es para fljar previamente B puerta en el marco deBntero.
9. Vuelvaa colocar el torrfiNo en el otro oriflcio.
10. Coloque la puerta sobre el lado contrario y vuelva afljar a la secadora.
11. Vuelvaa conectar la plata de apoyo.
12. Vueba a colocarlostomillosen losoriflcios restantes.
Lista de vemficad6n final de la instalaci6n
La secadora est_enchufada a un tomacorriente y est.1conectada atierra correctamente.
Losconductos de drenaje est_inconectados y secoloc6 cinta a Bs uniones.
NO se us6 un conducto flexible de pl_stico.
Seus6 material de metal rfgido o flexible con un recubrimiento de metal resistente para la ventilaci6n.
La secadora est_ nivelada y apoyada flrmemente sobre el piso.
Modelos a gas:el gas est_abierto y no hay pd_rdidasde gas.
Encienda la secadora para conflrmar que funciona, calienta y seapaga.
Espa_om-21
DV425000 DC68-OSS81A MESindd 21 2013-12-19 D_ 1:07:30
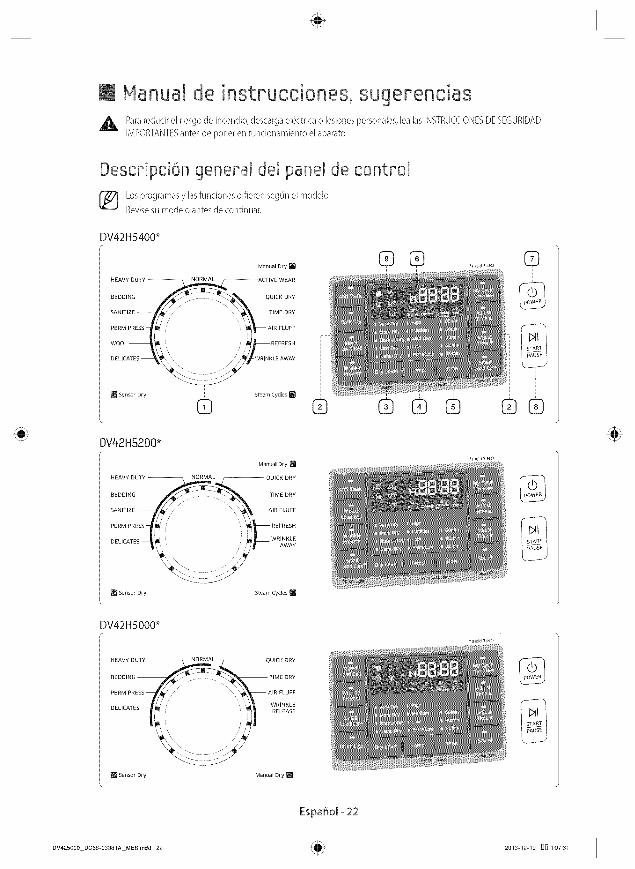
@ Nanua[ de instpucciones, sugepenciasPararedudr el rbsgo de incendio, descarga eFGctrkao lesiones personabs, [ea [asHgTRUCCE©NBSD8986URIDADIMPORTANTESantes de poner en funcionamiento el aparato.
DescpipciGn general del panel de contpoJ
Losprogramas y [as fundones difleren seg@ne[ modelo.Revisesumodelo antes de continuar.
DV42H5000*
,_AVVODTV NOgT_E QO_CKDRYBEDDING TIME DRY
DELICATERERMPRESS_%/ // "' AIR FLUFF
.... w_L_%_
[] Sensor Dry Manual Dry []
\ /
EspaSom_ 22
DV425000 DCBS-O3381A MESindd 22 2013-12-19 _ 1:07:31
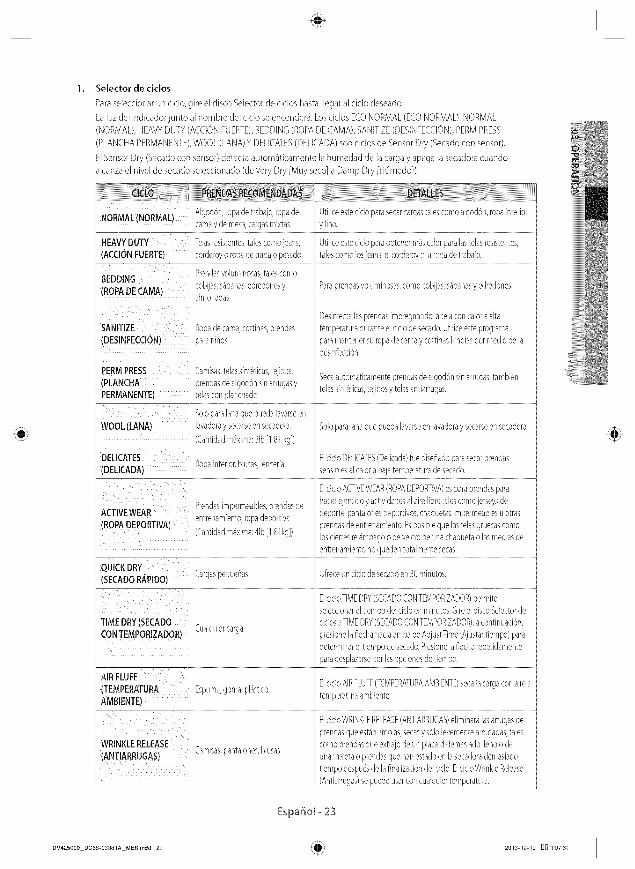
Selector de ciclos
Parasdeccionarun ciclo,gireel discoSelectordecities basra[legaralciclo deseado.
Laluzdd indicadorjuntoalnombrede[ado seencender_i.Losados E(.ONORMAL(E(.ONORMAL),NORMAL(NORMAL),HEAVYDUTY(ACCIONFUERTE),BEDDING(ROPADECAMA),SANITIZE(DESINFECCION),PERMPRESS
(PLANCHAPERMANENTE),WOOL(LANA)YDELICATES(DELICADA)sonciclosde SensorDry(Secadoconsensor).
ElSensorDry (Secadoconsensor)@tectaautom_iticamentelahumedadde lacargayapagalasecadoracuandoalcanzael nivd desecadosdeccionado(deVeryDry[Muyseco]a DampDry [H_medo]).
iiiiiiiiiiiiiiiiiiiiiiiiiiiiiii_';!__iiiii!iiiiiiiiiiiiiiiiiiiii!!ii!ii!ii!iiiiiiiiiiiii
Algod6n,ropadetrabajo,ropade Utiliceestecido parasecarcargastalescomoalgod6n,ropainterior '
, NORMAL(NORMAL) camay demesa,cargasmixtas y lino,+ ,
HEAVYDUTY Tdasresistentes,talescomojeans, Utiliceestecido paraobtenerm4scaJorparalastelasresistentes,
(ACClONFUERTE) corderoyo ropadetrabajopesado talescomoIosieans,elcorderoyo laropadetraba]o.
Prendasvoluminosas,talescomo
BEDDING cobijas,s&banas,edredonesy Paraprendasvoluminosas,comocobijas,s&banasy edredones,, ROPADECAMA) almohadas
i Desinfectahs prendasimpregnandolatda concaloraalta
SANITIZE Ropadecama,cortinas,prendas temperaturaduranteeldclo de secado.Utiliceesteprograma
(DESINFECC!6N) saranif/os )aramantenersuropadecamay cortinaslimpiaspormediodeladesinfecci6n.
PERMPRESS Gmisas,telassint@ticas,tejidos, Secaautom4ticamenteprendasdealgod6nsinarrugas,tambi_n
(PLANCHA prendasdealgod6nsinarrugasy telassint6ticas,tejidosy telasantiarrugas.PERMANENTE) telasconplanchado
Soloparalanaquepuedalavarseen
WOOL(LANA) lavadoray secarseensecadora. Soloparalanaque puedalavarseenlavadoray secarseensecadora.
' (Gntidad m4xima:3ib[1,81kg])
DELICATES Ropainterior;blusas,lenceria Eldclo DELICATES(Delicada)ruedisefiadoparasecarprendas(DELICADA) sensiblesalcaJorabaiatemperaturadesecado.
l Elddo ACTIVEWEAR(ROPADEPORTIVA)esparaprendaspara
Prendasimpermeables,prendasde haterejerdcioy actividadesal airelibretalescomojerseysde
[ ACTIVEWEAR entrenamiento,ropadeportiva @porte,pantalonesdeportivos,chaquetasimpermeablesuotrasj (ROPA DEPORTIVA) xendasde entrenamiento.Esposiblequelastelasgruesascomo
[ (Gntidad m_ixima:41b[1,81kg]) losderresrel4mpagoodevelcrodeunachaquetao lasmediasde
entrenamientono quedentotalmentesecas,
QUJCK RY--(SECADORAPIDO)Grgas pequeiias Ofreceuncido desecadoen30 minutos,
' ElckloTIMEDRY(SECADOCONTEMPORIZADOR)pemlite 'l seleccionard tiempodd cicloenminutos,GireeldiscoSdectorde
FTIMEDRY(SECAD@ cidosaTIMEDRY(SE_ADQCONTEMPORIZADOR),acontinuaci6n,CONTEMPORIZADOB Cualquiercarga )resionelaflechahadaarribadeAdjustTime(Ajustartiempo)para
determinarel tiempodesecado,Presionelaflecharepetidamente
paradesplazarseporlasopcionesdetiempo,
J AIRFLUFF
j (TEMPERATURA Espuma,goma,pl4stico Elado AIRFLUFF(TEMPERATURAAMBIENTE)secalacargaconairea '
[ AMBIENTE) temperaturaambiente,i ' '
ElcicloWRINKLERELEASE(ANTIARRUGAS)eliminarJlasarrugasde
prendasque est4nlimpias,secasy s61olevementearrugadas,tales
WRINKLERELEASE comoprendasqueextrajodeun placarddemasiadoIlenoo de(ANTIARRUGAS) Gmisas,pantalones,blusas una maletaoprendasque hanestadoenlasecadorademasiado
t empodes sde,a na,i a :i nde, ,doWr n eRe,ease, (Antiarrugas)sepuedeusarconcualquiertemperatura,
Espa_om- 2S
DV425000 DC68-O3381A MESindd 23 2013-12-19 _ 1:07:31
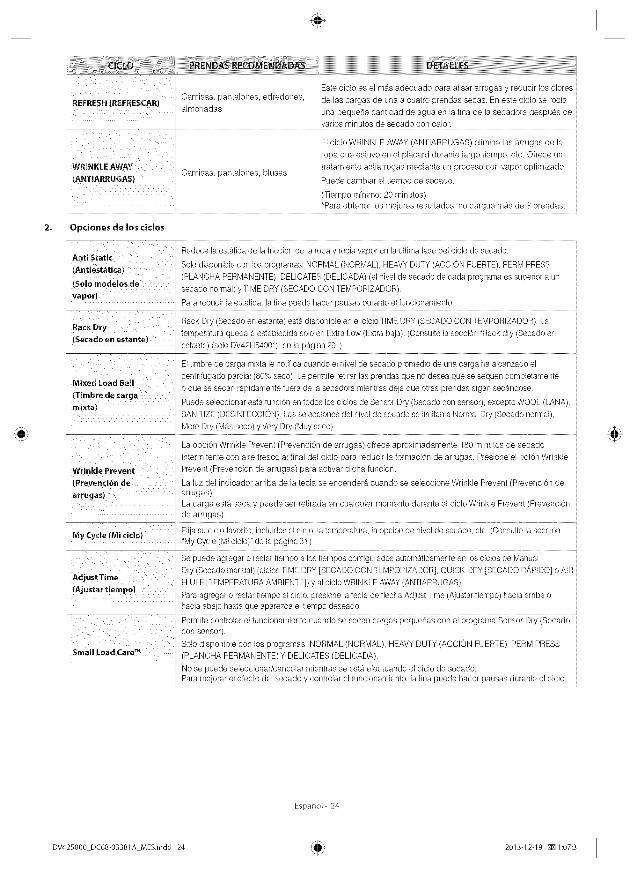
iEste ciclo es el m_s adecuado para alisar arrugas y reducir los olores ii
i REFRESH(REFBESCAR} Camisas, pantalones, edredones, ide las cargas de una a cuatro prendas secas. Eneste ciclo se roda ialmohadas iuna pequeFiacantidad de agua en la tina de la secadora despues de i
varios rninutos de secado con calor.
i Elciclo WRINKLE AWAY(ANTIARRUGAS)elirnina las arrugas de lai ropa que estuvo en el placard durante largo tiempo, etc. Ofrece un
WRINKLE AWAY tratarniento antiarrugas mediante un proceso con vapor optimizado.
i (ANTIARRUGAS) Camisas, pantalones, blusas Puede cambiar el tiempo de secado.
(Tiempo minimo: 20 minutos)!*Para obtener los rnejores resultados, no cargue m_s de 3 prendas. •
2. Opciones de los cities
Reduce laestatica de la friccion de la ropa y rocia vapor en la ultima fase del ciclo de secado.Anti Static(Antiest6tica) Solo disponible con los programas:NORMAL(NORMAL),HEAVYDUTY(ACCIONFUERTE),PERMPRESS
(PLANCHAPERMANENTE),DELICATES(DELICADA)(el nivel de secado de cada programa es superior a un(Solo modeles de secado normal) y TIMEDRY(SECADOCONTEMPORIZADOR).vaporl
Parareducir la estatica, latina puede hacer pausas duranteel funcionamiento.
RackDry (Secado en estante)esta disponible en el ciclo TIMEDRY(SECADOCONTEMPORIZADOR).LaBack Dry
temperatura quedara establecida solo en Extra Low (Extra baja). (Consulte la secci0n "Rack dry (Secado en(Secado en estante)
estante) (solo DV42H5400")"en la pagina 29 .)
El timbre de carga mixta le notifica cuando el nivel de secado promedio de una carga ha alcanzado el
centrifugado parcial (80% seco). Le permite retirar las prendas que no desea que se sequen completamenteMixed Load Bell
o que se secan rapidamente fuera de la secadora mientras deja que otras prendas sigan secandose.(Timbre de cargamixta} Puedeseleccionaresta funcion en todos los ciclos de Sensor Dry(Secado con sensor), excepto WOOL(LANA),
SANITIZE(DESINFECCION).Las selecciones del nivelde secado se limitana NormalDry (Secado normal),
MoreDry (Mas seco) y Very Dry (Muyseco).
La opciOn Wrinkle Prevent (Prevenci0n de arrugas) ofrece aproxirnadamente 180 minutos de secado
intermitente con aire fresco al final del ciclo para reducir la formaci0n de arrugas. Presione el boronWrinkle
Wrinkle Prevent Prevent(PrevenciOnde arrugas) para activar dicha funcion.
{Prevenci6n de La luz del indicador arriba de la tecla seencender4_cuando se seleccione Wrinkle Prevent (Prevencion de
arrugas) arrugas).La carga esta seca y puede set retirada en cualquier momento durante el ciclo Wrinkle Prevent (Prevencionde arrugas).
My Cycle(Mi ciclo) Elijasuciclo favorito, incluidos el ciclo, latemperatura, laopcion de nivel de secado, etc. (Consultela seccion"My Cycle (Mi ciclo)" de la pagina 31.)
Se puede agregar o restar tiempo a los tiempos configurados automaticamenteen los ciclos de Manual
Dry(Secado manual)(ciclos TIMEDRY[SECADOCONTEMPORIZADOR],QUICK DRY[SECADORAPIDO]o AIR iAdjust Time FLUFF[TEMPERATURAAMBIENTE])y al ciclo WRINKLEAWAY(ANTIARRUGAS).
(Ajustar tiempo} Paraagregar o restar tiempo al ciclo, presione la tecla de fiecha Adjust Time(Ajustartiempo) hacia arribao
haciaabajo hasta que aparezca el tiempo deseado.
Permitecontrolar el funcionamiento cuando se secan cargas pequerias con el programa Sensor Dry (Secadocon sensor).
Solo disponible con los programas: NORMAL (NORMAL),HEAVYDUTY(ACCION FUERTE),PERMPRESS
Small Load CareTM (PIANCHA PERMANENTE)Y DEMCATES(DEMCADA).
No se puede seleccionar/cancelar mientras se esta efectuando el ciclo de secado.Paramejorar el efecto del secado y controlar el funcionamiento, la tina puede hacer pausas durante el ciclo.
Espahol- 24
DV425000 DC68-03381A MES.indd 24 2013-12-19 E_ 1:07:31

8,
9,
Dry Level (Nivel de secado)
Paraseleccionarelnivelde secadoenlosdelosNORMAL(NORMAL),HEAVYDUTY(AECIONFUERTE),uotrosciclosdeSensorDry(Secado
consensor),presioneel bot6n DryLevel(Nivd desecado).SeencenderJuna luzen elindicadorjuntoal niveldesecadodeseado.
Presioneelbot6n repetidamenteparedesplazarsepot lasopciones.Lascargasm_sgrandeso m_svoluminosasposiblementerequieran
laopci6nVeryDry(Muyseco)o MoreDry(M_sseco)parequael secadoseacompleto.
Laopci6nLessDry(Menosseco)es lam_sadecuadaparatelaslivianas,oparaqua quedealgodehumedaden lasprendasalfinal del
cido,Laopci6nDamp Dry(HOmedo)rueconcebidaparasecarlasprendasparcialmente.UtFcelaparalasprendasqua @bansecarseen
posici6nhorizontalo colgarse,
Temp, (Temperatura)
Pareseleccionar latemperature correcta pare una carga, presione el bot6n Tamp (Temperatura). Seencender_ la hlz del
indicador junto a la temperature deseada. Presione el bot6n repetidamente para despBzarse pot lasopdones.
i High Paralosalgodonesresistentesoaquellosconelr6tuloTumbleDry(Secaren secadora).(Alta)r
i Paraprendasdeplanchapermanente,telassint6tkas,algodoneslivianosuotrasprendaston elr6tuloMedium (Media)
, TumbleDryMedium(Secarensecadoraatemperaturamedia).I .......
Mad Low (Media baja) Parasecartelassint6ticaso dete)idolavablea unatemperatureinferiora lamediana.i
jLow (Baja) Paraprendassensiblesal calorconelr6tuloTurubleDryLow(Seearenseeadoraatemperaturabaja)oTumbleDryWarm(Secarensecadoraatemperaturac41ida).
Extra Low (Extra baja)Ofrece lamanortemperaturade secadocon¢alorposible.
Time (Tiempo)
CuandousaloscidosManualDry(Secadomanual),puedeajustareltiempo de secadopresionandoel bot6n deselecci6nTime(Tiempo).
Duranteelcido SensorDry(Secadoconsensor),el indicadorluminicodel tiempo seencuentraapagadoporqueel tiempo de secado
exactosedeterminasegOnlosnivdesde humedadfluctuantes.
Pantalla LED
Lapantalla digital muestra el 8empo restantedel ddo calculadodespu6s de presionar el bot6n Start/Pause(Inicio/Pausa).El
tiempo restanteealeulado puede fluetuara medida qua avanceel cido,
Seencender_ la luz de Drying (Secando)y se mantendr_Sencendida basraqua secomplete el ddo.
Cuando la secadoraest6en lafasede enfriamiento, seencender_ la luz de Cooling (Enffiando),
Cuando la seeadoraest6en lafasede prevenci6n de arrugas,seencender_ la luz de Wrinkle Prevent(Prevend6n de arrugas).
Cuando el ddo hayaflnalizado, aparecer_SB palabra "End" (Fin)en el panel de la pantalB basra qua seabra la puerta de la
secadorao sepresione el bot6n Power (Encendido),
Sisusecadorasedetiene durante un cido, laslutes dd indkador parpadear_n hastaqua se presione el bot6n Start/Pause
(Inido/Pausa),
Power (Encendido)
Presi6nelo una vez pare encender la secadora.Vuelva a presionarlo pare apagarla. Si la secadora perrnanece encendida
durante rn_s de 10 rninutos sin qua setoque ninguno de los botones, seapagar4 autom4ticamente.
Start/Pause (lnicio/Pausa)
Presi6nelo pare detener y reiniciar los progremes.
Indicadores
,Control del filtroi
._. Luz de la tina
Seguro pare niflos
_-- Sinsonidoi
Vapor
Espa_om_ 25
DV425000 DC68-O3381A MESindd 25 2013-12-19 _ 1:07:31
Cargue la secadora de manera adecuada
Coloque solo una carga de ropa en la secadora pot vez.
Lascargas mixtas de teBs pesadas y Iivianassesecan en forma diferente, Io que puede ocasionar que las telas livianas
est6n secas mientras que lastelas pesadasqueden hOmedas al final del ciclo de secado.
Agregue una o mAsprendas similares a la secadora cuando necesite secar solo una o dos prendas.
Esto mejora el funcionamiento de la secadora y laeflcacia del secado.
Sobrecargar la secadora Iimita su funcionamiento y ocasiona un secado no uniforme asi como la formaciOn
excesiva de arrugas en algunas telas.
Sicoloca la ropa en la secadora cuando est_ muy enredada inmediatamente despu_s del ciclo de Bvado ocentrifugado, puede reducirse la eficacia del secado o causar que seabra la puerta. Recomendamos desenredar la
ropa antes de colocarla en la secadora.
C6mo comenzar
1. Cargue la secadora dejando algo de espacio Iibre (NO la sobrecargue).
2. Cierrela puerta.
:3. Seleccione el cido y Bs opciones apropiadas para el tipo de carga. (Paraobtener m_sdetalles, consulte"Descripd6n
del ciclo"en la p_iginasiguiente.)
4, Presione el bot6n Start/Pause (Inicio/Pausa).
5. Seencender_ la luz del indicador de la secadora.
6. El tiempo del ciclo calculado aparecer&en la pantalla.
El tiempo puede fluctuar debido a que los niveles de humedad fluctOan en la secadora.
Cuando haya finalizado el ciclo, la palabra "End" (Fin) aparecer4 en la pantalla.
Sipresiona Power (Encendido), se cancelar4 el ciclo y la secadora sedetendrA.
Los indicadores de Drying (Secando),Cooling (Enfriando) y Wrinkle Prevent (Prevenci6n de arrugas) seencender&n durante tales rases del ciclo.
,_ No coloque ningOn objeto en la parte superior de la secadora cuando est_ en funcionamiento
Espa_om- 26
DV425000 DC68-O3381A MESindd 26 2013-12-19 D_ 1:07:31
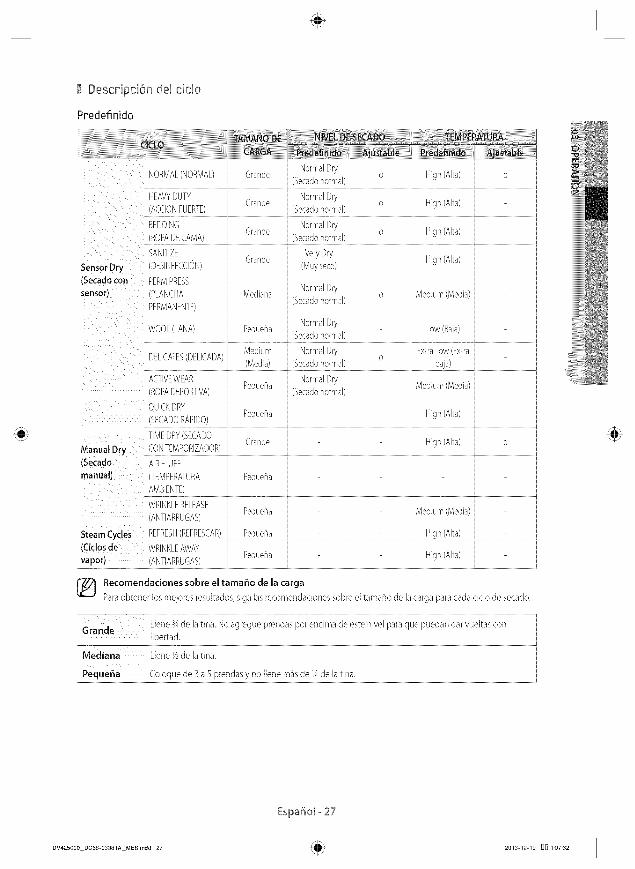
Descripci6n de! cido
Predefinido
i NormalDryi NORMAL(NORMAL) Grande o High (Alta) oj , ÷ (Secadonormal) ....
HEAVYDUTY Grande NormalDry(ACE]ONFUERTE) o High (Alta)
j (ROPADECAMA) = (Secadonormal) tj SANITIZE VeryDry
(DESINFECCION) , , (Muyseco)] sensor Dry @ande High (A]ta)
j (Secado con PERMPRESSNormalDry
Jsensor) (PLANCHA Mediana (Secadonormal) o Medium(Media)PERMANENTE)
J NormalDry
j WOOL(LANA) Pequefla (Secadonormal) Low (Baja)
i Pequefla NormalDry Medium(Media)_ (ROPADEPORTIVA) _ _ (Secadonormal) ....
QUICKDRY Pequefla High (A]ta)j (SECADOR#PIDO)l f i
j TIMEDRY(SECADO Grande High (A]ta) oj Manual Dry
l (Secaaoi manual) (TEMPERATURA Pequefla
AMBENTE)
WRINKLERELEASE .... JPequeF_a
j (ANTIARRUGAS) .... i
SteamCyc!eS REFRESH(REFRESCAR) Pequefla High(Aka) j
J (Ciclos de WRINKLEAWAY i i _ _ : [ '
j vapor) (ANTIARRUGAS) , Pequena i High (AIta) i
Recomendaciones sobre el tama6o de JacargaParaobtener bs mejores resukados, siga lasrecomendadones sobre el tamaflo de B carga para cada ddo de secado.
j._ _ Llene _,*de latir, a. No agregue prer,das por encirna de este nivel para que puedan dar vudtas con j
j L1ranae_ libertad. J
Mediana !!e_!e Y, de !a!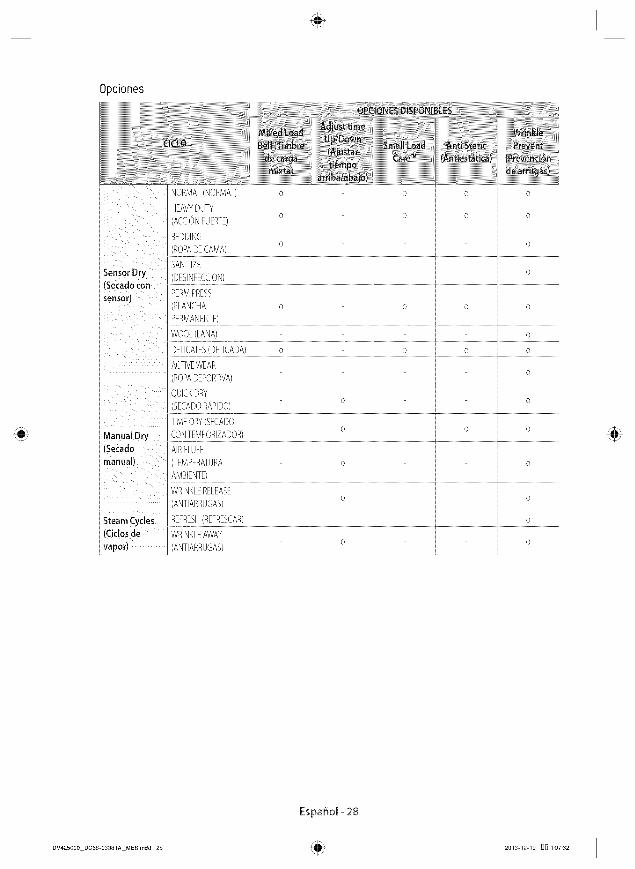
Opciones
NORMAL(NORMAL) o o o o
i i i '(ACCIONFUERTE) j o j j o o o
0 0
, (ROPADECAMA)
j Sensor (DESINFECCION) oj (Secado con
PERMPRE%
i PLANCHA o o o o
PERMANENTE) , $
J 0
j ROPADEPORTIVA)
i SECADOR,@IDO) , o oL z J
j TIMEDRY(SECADO0 - 0 0
j Manual r...ury CONTEMPORIZADOR) _ + i i
i (Secado AIRFLUFF
j manual) TEMPERATURA o o
AMBIENTE)
j ....WRINKLERELEASE0 0
j (ANTIARRUGAS) ......J
j Steam Cyc es REFRESH(REFRESCAR) J - s o J, = ,
j (tic osde WRINKLEAWAY
-jvapor) (ANTIARRUGAS) o o
Espa_om_ 28
DV425000 DC68-O3381A MESindd 28 2013-12-19 D_ 1:07:32
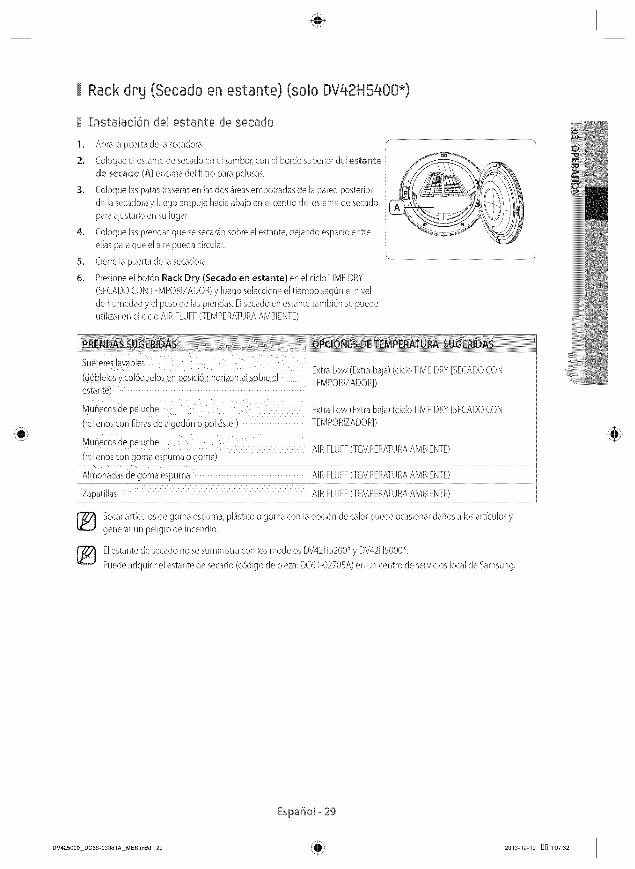
Rack dry (Secado en estante) (solo DV42H5400*)
Znstahci6n de! estante de secado
1. Abra la puerta de la secadora.
2. Co]oque el estante de secado en el tambor, con el horde superior del estante
de secado CA/encima del filtro para pelusas.
3. Coloque las paras traserasen las dos _reas empotradas de la pared posterior
de ]a secadora y ]uego empuje hacia abajo en el centro del estante de secado
para ajustarlo en su lugar.
4. Coloque lasprendas que se secar_nsobre el estante, dejando espacio entre
elias para que e[ aire pueda circular.
5. Cierre la puerta de la secadora.
6. Presione el bot6n Rack Dry (Secado en estante) en el cicloTlME DRY
(SECADOCONTEMPOR]ZADOR)y ]uegosdeccione el tiempo segOn e] nivd
de humedad y e[ peso de ]asprendas. E]secado en estante tambi4n se puedeuti[izar en e] cicb AIR FLUFF(TEMPERATURAAMBIENTE).
Su6teres lavabes
]oDelos y ( )loauelos en DosicIon horizonta soDre el
es_an_e
Muflecos de oelucne
ellenos con fibras de algodon o poliester)
Muflecos de De ]one
(reuenoscot _oma espuma o goma
Almohadas de goma es)urea
Extra Low (Extra baja) (cido TIMEDRY[SECADOCON
TEMPORIZADOR])
Extra Low (Extra baja) (cido TIMEDRY[SECADOCON
TEMPORIZADOR])
AIR FLUFF(TEMPERATURAAMBIENTE)
AIR FLUFF(TEMPERATURAAMBIENTE)
Zapamlas AIR FLUFF(TEMPERATURAAMBIENTE)
Secararticulos de goma espuma, pl_stico o goma con la opci6n de calor puede ocasionar dafios a los articulos ygenerar un pdigro de incendio.
Elestante de secado no sesuministra con los modelos DV42H5200_y DV42HSO00_.Puedeadquirir el estante de secado (c6digo de pieza: DC61-O2705A)en un centro de servidos local de Samsung.
Espa_om_ 29
DV425000 DC68-O3381A MESindd 29 2013-12-19 D_ 1:07:32
Seguro para nifios
Evitaque Eosniflos jueguen con ]a secadora.
Configuraci6n/Liberaci6nParaactivar o desactivar el Seguro para niflos presione simult_neamente Eosbotones Temp. (Temperatura) y Time
(Tiempo) durante 3 segundos.
Deta!les de! Seguro papa nifios
1. Puede acdvar e] Seguro para niflos mientras su secadora est,1en funcionamiento.
2. Una vezque configure lafunci6n Seguro para niflos, no responder_ ning8n bot6n, excepto el bot6n Power (Encendido),
basra que desacdve dicha funci6n.
3, Seencender_ el indicador de"Seguro para niflos I_'(
• Sisevuelve aencender el ebctrodomd_stico, B funci6n Seguro para niflos continuar4 encendida.Para desactivar el Seguro para nitios, siga las instrucciones de arriba.
Cuando otros botones, salvo el botdn Power (Encendido), no respondan, verifique el indicador de Seguro paraniflos. Si el Seguro para niflos est_ acdvado, siga las instmcciones precedentes para desactivarlo.
Luz de la tina
I[umina ]a tina de [a secadora mientras serea[iza el secado.
Encendido g apagadoParaencender o apagar el hldicador Drum Light (Luz de la tina), mantenga presionados los botones Wrinkle Prevent
(Prevenci6n de arrugas) (DV42H5400_)/SmaII Load Care TM (DV42H5200_)durante 3 segundos; presione el bot6n
Drum Light (Luz de la tina) (DV42HSO00*).
Puedeencender y apagar ]a luz de la tina cuando la secadora est4funcionando y cuando se detiene.Sino apaga B luz de latina S minutos despud_sde que seencienda, B luz de B tina seapaga autom_ticamente.
Sin sonido
Useesta funci6n para silenciar los sonidos del bot6n y de] fllncionamiento.
Configuraci6n g liberaci6nParaactivar o desactivar ]a funci6n Sound Off (Sin sonido), mantenga presionado el bot6n Dry Level (Nivel de secado)
durante 3 segundos (DV42HS4009; presione el bot6n Sound (Sonido) (DV42HS200_, DV42HSO009.
Deta!les de Sound Off (Sin sonido):
1, Puede configurar Sound Off (Sin sonido) mientras su secadora est_ en funcionamiento.
2, Despu6s de acdvar la@nd6n Sound Off (Sin Sonido), sesilencian los sonidos del bot6n y del funcionamiento basra quela desacdve.
3. Seencender4 el indicador de "Sin Sonidol_f)".
Sino desacdva Sound Off (SinSonido) antes de apagar la secadora, B fund6n seguir_ activada cuando endendanuevamente la secadora. Paradesactivar Sound Off (Sin Sonido), siga Bs instrucciones detalladas acontinuaci6n.
Espa_om_ 30
DV425000 DC68-O3381A MESindd 30 2013-12-09 _]_ 11:37:01
My Cycle(Miciclo)
CargarPresione el bot6n My Cycle (Mi ciclo) durante menos de 3 segundos para activar el modo My Cycle (Mi ddo) que
dene cargadas todas las conflguradones de los pogramas y las opdones sdecdonadas.
Cuando el modo est_acdvo se enciende el indicador My Cycle (Mi cido).
Sino ha configurado My Cycle (Mi ciclo), secarga B configurad6n predeterminada del programa.
6uardar
Puede agregar y guardar lasopciones preferidas en My Cycle (Mi cido).
1. Gireel selector para selecdonar un programa.
2. Configure ]asopciones necesarias para el programa seleccionado. Paraobtener ctetaHessobre cada programa y Bs
opciones, consulte ]a p_gina 27.
S. Mantenga presionacto el bot6n My Cycle (Mi ciclo) durante m_sde 3 segundos para guardar laopciones del
programa. El indicador My Cycle (Mi ciclo) parpadea mientras seguardan Bs opciones.
_} Laopci6n Wrinkb Prevent (Prevenci6n de arrugas) no est_ ctisponible en la funci6n My Cycle (Mi cic]o).
Smart Care
Estafunci6n permite comprobar el estado de la secadora con un tel6fono inteligente.
1. Mantenga presionado el bot6n Small Load Care TM (DV42H5400_) o Sound (Sonido) (DV42H5200_, DV42H5000_)
durante 3 segundos cuando se muestre un error o si no presion6 ningOn bot6n de la secadora despu6s de encenderB.
2. Cuando la funci6n Smart Care est_acdvada, la LEDde la pantalla gira durante 2 o 3 segundos y el c6digo de error
aparece en la pantalla.
3, Ejecute B aplicad6n Smart Care en su tel6fono inteligente.
Lafunci6n Smart Care se haoptimizado para: seriesGalaxy e iPhone (no escompatible con algunos modelos)
4, Sienfoca la c_mara del tel6fono inteligente al panel de la parltalla de la secadora, el panel y el mensaje de error se
reconocen autom_ticamente y el tipo de error y la soluci6n semuestran en el tel6fono inteligente.
5, Siel tel6fono inteligente no reconoce el c6digo de error m_sde dos veces, ingrese en forma manual el c6digo de error
indicado en el panel de la pantalla de la secadora en la aplicaci6n Smart Care.
Descapga de la aplicaci6n SmaptCapeDescargue la Samsung Laundry App en sutel6fono celuBr des@ Android Market o Apple App store. (BuscarpaBbra:
Lavadora/secadora inteligente Samsung)
Ppecauciones de uso de Smapt Cape
Si ]a ]uz de un fluorescente o una ]_mpara se refleja en el panel de ]a pantalla de la Bvadora, es posible que el tel6fono
inteligente no reconozca f_cilmente el panel o el mensaje de error.
Sisostiene el tel6fono inteligente en un _ngu]o demasiado abierto respecto a] frontal de] panel de ]a pantalB, es posible
que no se reconozca el c6digo de error. Paraobtener los mejores resultados, sostenga el tel&ono inteligente en una
posici6n paralela o casi parabB respecto al frontal del panel.
EspaSom-Sl
DV425000 DC68-O3381A MESindd 31 2013-12-19 D_] 1:07:32
I Cuidade y Jimpieza
Panel de contpol
Limpie con un patio suave y hOmedo. No utilice sustanciasabrasivas.
No rocfe el panel directamente con [impiadoresen aerosol.
Elacabado del panel de control puede datiarse a causa de algunos productos removedores de suciedad y manchas de
tratamiento previo al lavado.
Aplique dichos productos lejos de la secadora y Iimpie el Ifquido derramado o rociado inmediatamente.
Tambor
Elimine todas ]asmanchas ocasionadas por cray6n, tinta o tintura de la tela (proveniente de articulos nuevos, tales como
toallas o jeans) con un Iimpiador comOn.
Posteriormente, seque toa[las o trapos para eliminar restosde manchas o soluci6n de Iimpieza.
Una vez que se hayan seguido estos pasos,es posible que [asmanchas aOnsean visib[es, pero no se transferir_n alas cargas
subsiguientes.
Tambor de acero inoxidable
Para[impiarel tambor de acero inoxidab[e, use un patio humedecido con un Iimpiador suave, no abrasivo, adecuado para
superficies de acero inoxidab[e.
Elimine los residuos del Iimpiador y seque con un patio Iimpio.
Exterior de la secadora
Limple con un pano suave y humedo. No utilice sustanciasabrasivas.
Proteja la superflcie de objetos afilados.
No cobque objetos pesados rli afi[ados rli tampoco el paquete de detergente sobre la secadora. Mant#nga[os apartados
sobre el pedestal o en una caja de almacenaje, que puede adquirir pop separado. Lacubierta superior de la secadora sepodria
rayar o datiar.
La secadoratiene un acabado brillante y la superflcie sepuede rayaro datiar f_icilmente.
Evite rayaro datiar la superficie cuando use la secadora.
Sistema de drenaje de la secadora
Paramantener un 6primo desempetio, se Io debe inspeccionar y limpiar todos los atios.
Latapa de drenaje exterior debe Iimpiarse con m_isfrecuencia para garantizar un funcionamiento adecuado.
Limpie el filtpo papa pelusas
Despu4s de cada carga.
Parareducir el tiempo de secado.
Papahacer uso de la energia con mayor eflcacia.
No haga funcionar la secadora sin el filtro para pelusas colocado.
Espa_om- 32
DV425000 DC68-O3381A MESindd 32 2013-12-19 D_ 1:07:32

I Sugerendas papa ppendas especiaJes
Sugependas papa ppendas especialesSiga las instrucciorles de] fabrkante o de la etiqueta de indkadones para secar prendas especiales. Sino sedispone de
edquetas con indicaciones, use la siguiente informaci6n como guia.
Siga lasinstrucciones de la etiqueta con indicadones o seque en el cidoBEDDING(ROPADECAMA).
Cubrecamas y edredones Aseg@esede que la prenda estd compbtamente seca antes de usarlao
guardarla.
Ta]vez deba volver a co]ocarla para garantizar un secado uniforme.
Utilice el cido NORMAL(NORMAL)y seque de a una sola cobija pop vez para
Iograr un mejor funciorlamiento de la secadora.Cobijas
Aseg@esede que B prenda estd compbtamente seca antes de usarlao
guardarla.
Utilke el cido PERMPRESS(PLANCHAPERMANENTE)y la temperatura Medium
(Media) papareducir laformaci6n de arrugas.Cortinas y pa_os de tela
Seque estos articubs en tandas pequeflas para obtener mejores resultados y
refirdos Io antes posible.
Utilice el cido NORMAL(NORMAL)y la temperatura High (Alta) papapariahsPa_ales de telasuaves y muBdos.
Utilice el ddo NORMAL(NORMAL)y la opci6n de temperatura Medium (Media).
Agregar toalBs secasacorta el tiempo de secado y absorbe la humedad,
Prendas con relleno de plumas
(chaquetas, bolsas de dormir,
edredones, etc.)
NO seque con el ciclo de secado con calor. Useel ddo AIR FLUFF(TEMPERATURAGoma espuma (reverso de AMBiENTE)(sin calor).alfombras, mu_ecos de peluche,
ADVERTEN(.IA Secar un articulo de 9oma con calor puede daF/arlo u ocasionarhombreras, etc.)
un riesgo de incendio.
Use d cido NORMAL(NORMAL).
Agregue un par de toallas secas y un par de zapatillas limpias para mejorar el
Almohadas fundonamiento de lasecadora y secar el articulo.
NO seque almohadas de capoc o de goma espuma en la secadora. Utilice d cido
AIR FLUFF(TEMPERATURAAMBIENTE).
Pl_sticos (cortinas de ba Fio, Utilice d cido AiRFLUFF(TEMPERATURAAMBIENTE)o el cidoTIME DRY(SE(.ADO
cubiertas de muebles papa CONTEMPORIZADOR)y la opci6n de temperatura Low (Baja)o Extra Low
exteriores, etc.) (Extrabaja) de acuerdo con ]asinstrucdones de la etiqueta.
ARTICULOS QUE SE DEBE EVITAR PONER EN LA SECADORA:
Articulos de fibra de vidrio (cortinas, paf/os de tda, etc.).
Lanas,salvo que se recomiende en la etiqueta.
Articulos embebidos en aceite vegetal, aceite de cocina o 9asolina.
Espa_om_ S3
DV425000 DC68-O3381A MESindd 33 2013-12-19 D_ 1:07:32
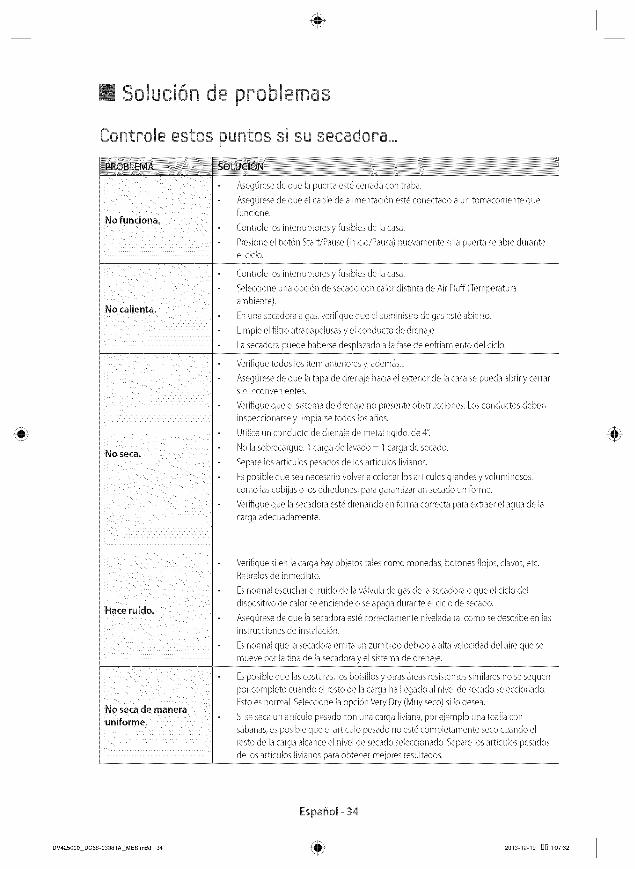
I SoJuci6n de ppobJemas
ContpoJe estos puntos si su secadopaooo
No funciona.
• Presione el bot6n Start/Pause (Inicio/Pausa) nuevamente si la puerta so abre duranteel ciclo.
(.ontrole los interruptores y fusibles do la casa.
Seleccione una opd6n do secadocon calor distinta de Air Fluff (Temperatura
ambiente).No calienta,
Enuna secadora agas,verifique que el suministro de gas est#abierto.
Limpie el filtro atrapapelusas y el conducto de drenaje.
La secadora puede haberse desplazado a lafase do enfriamiento del tide.
Verifique redes los ftem anteriores y, adem_is...
AsegOresede que la tapa do drenaje hacia el exterior do B casa so pueda abrir y cerrarsin inconvenbntes.
Verifique que el sistema de drerlaje no presente obstrucciones. Losconductos deben
inspecdonarse y limpiarse todos los aflos.
Utilke un conducto de drenaje de metal rigido, do 4".
No la sobrecargue. 1carga do lavado - 1carga do secado.No seca.Separe los artffulos pesados de los articulos ]ivianos.
Es posibb que sea necesario volver aco]ocar los artffulos grandes y voluminosos,
come lascobijas o los edredones, para garantizar un secado uniforme.
Verifique que la secadora est6 drenando on forma correcta para extraer el agua do la
carga adecuadamente.
Verifique si on la carga hay objetos tales come monedas, botones flojos, davos, etc.Retirelos de inmediato.
Es normal escuchar el ruido do la wibula do gas do la secadora o que el dale del
Hace ruido, dispositivo do taler soenciende o so apaga durante el tide do secado.Aseg@esede que B secadora est_ correctamente rlivNada tal come sodescribe en lasinstrucciones do instaBci6n.
Es normal que la secadora emita un zumbido debido a aita vdoddad del aire que so
mueve per la tina do la secadora y el sistema do drenaje.
Es posible que ]as costuras, los bolsillos y otras _reas resistentes similares no sesequen
per complete cuando el resto de [a carga ha ]bgado a[ nivel do secado seleccionado.
No seca de manera Esto es normal. Seleccione la opci6n Very Dry (Muy seco) si Io desea.
uniforme. Siso secaun articulo pesado con una carga Iiviana, per ejemplo una toalla cons_banas,esposibb que el artffulo pesado no est_ completamente seco cuando el
resto do ]a carga alcance el hiVe] de secado se[eccionado. Separe los articulos pesados
• de los articulos ]ivianos para obtener mejores resultados.
Espa_om-S4
DV425000 DC68-O3381A MESindd 34 2013-12-19 DO 1:07:32
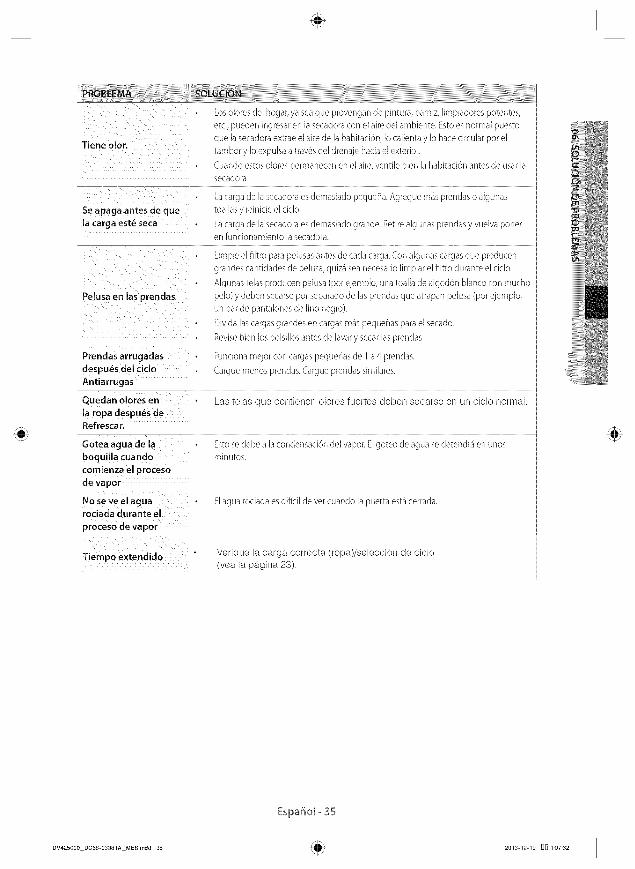
Tiene o[or.
Se apaga antes de que
[a carga est_ seca
Pelusa en las prendas
Prendas arrugadas
despu_s del cido
Antiarrugas
Quedan olores en
la ropa despu_s deRefrescar,
Gotea agua de [a
boquilla cuando
comienza el proceso
de va por
No se ve el aguarodada durante el
proceso de vapor
Tiempo extendido
Los olores del hogar, ya sea que provengan de pintura, barniz, limpiadores potentes,
etc., pueden ingresar en la secadora con el aire del ambiente. Esto es normal puesto
que lasecadora extrae el aire de la habitaci6n, Io calienta y Io hace circular por el
tambor y Io expulsa atray, s del drenaje hacia el exterior.
- Cuando estos olores permanecen en el aire,ventile bien la habitaci6n antes de usar lasecadora.
La carga de la secadora es demasiado pequeff_a.Agregue m&s prendas o algunas
toallas y reinicie el ciclo.
La carga de la secadora es demasiado grande. Retire algunas prendas y vuelva poneren funcionamiento ]a secadora.
Limpie el filtro para pelusas antes de cada carga. Con algunas cargas que producen
grandes cantidades de pelusa, quiz4 sea necesario Iimpiar el flltro durante el ciclo.
Algunas telas producen pelusa (pot ejemplo, una toalla de algod6n blanco con mucho
pe]o) y deben secarsepot separado de las prendas que atrapan pelusa (por ejemplo,
un par de pantalones de lino negro).
Divida ]as cargas grandes en cargas m_s pequeff_aspara el secado.
Revisebien los bolsillos antes de lavar y secar lasprendas.
Funciona mejor con cargas pequeff/asde ] a4 prendas.
Cargue menos prendas. Cargue prendas similares.
Las telas que contienen olores fuertes deben secarse en un ciclo normal.
Esto sedebe a la condensaci6n del vapor. Elgoteo de agua se detendr_i en unos
minutos.
Elagua rociada esdifidl de ver cuando la puerta est4 cerrada.
Verique la carga correcta (ropa)/selecciOn de ciclo
(yea la pd_gina 23).
Espa_om-35
DV425000 DC68-O3381A MESindd 35 2013-12-19 D_ 1:07:32
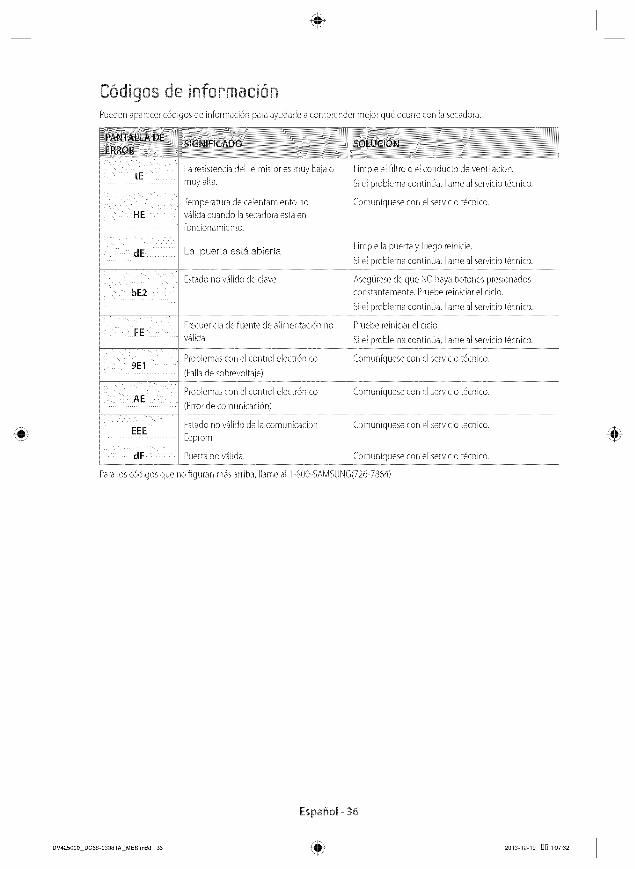
C6d[gos de [nfoemac[6nPueden aparecer c6di, asde informad6n para ayudar[e acomprender mejor qu6 ocurre con [a secadora.
Laresistenda @1termistor es muy bajao Limpie e[ fi]tro o e[ conducto de venti]ad6n.
muy alta. Sie[ problema contint_a, ]lame a[ servicio t#cnico.
--- Temperatura de ca[entamiento no Comurfiquese con el servicio t6cnico.
ii funcionamiento.
La puerta es_4 ablerta Limpie la puerta )/luego reinicie.
J Sie[ problema contini]a, Ilame a[ servicio t#crlico.......... j .... ,
Estado no v_lido de clave AsegOresede que NO haya botones presionados
constantemente. Pruebe reiniciar el cido.
i Siel problema continOa, Ilame al servicio t#cnico.
Frecuenda de flierce de a[imentaci@l no Pruebe reiniciar el dcb.
v41ida Siel problema contin/Sa,Ilame al servicio t#cnico.
j ] 9E1 Problemas con el control eJec_r6nico ComuniqueseconelseMcio_dcn£o.
j (Fallade sobrevoltaje)........... .i
Problemas con el control electr6nico Comuniquese con el servicio t_cnico.i_ AEi (Errorde comunicaci6n), ................, Estado no v_lido de lacomunicaci6n (.omuniquese con el servicio t_cnico.EEE
Eepromi ....... ........ i
j dF Puerta no v41ida. (.omuniquese con el servicio t4cnico................ i
Paralos c6digos que no figuran m_sarriba, Ilame al 1-800-SAMSUNC_(7267864)
DV425000 DC68-O3381AMESindd 36
EspaSom- S5
2013-t2-19 _] 1:07:32 I
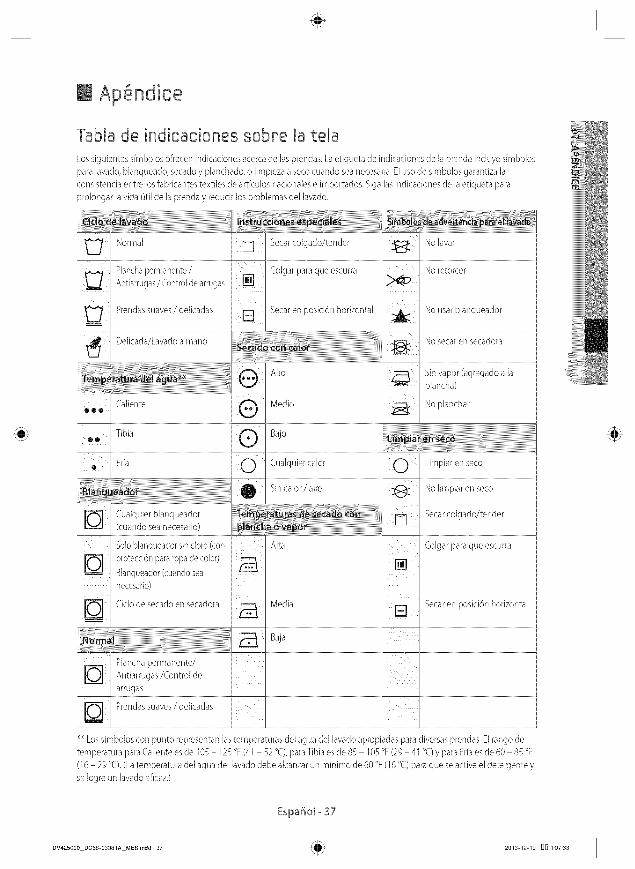
@ Ap_ndice
Tab[a de [nd[cac[ones sobPe [a tela
Lossiguientes sfmbolos ofrecen indicaciones acerca de Bs prendas. La etiqueta de indicaciones de la prenda incluye simbolos
)ara lavado,blanqueado, secado y pBnchado, o Iimpieza a secocuando sea necesaria.El uso de simbolos garantiza la
consistencia entre los fabricantes textiles de arficu[os naciona[es e importados. Siga las indicaciones de [a etiqueta para
prolongar [avida iJtil de [a prenda y reducir los probJemasdel Bvado.
Normal Secarcolgado/tender No Bvar
' .olgarpara ueesc,rraim Noretorcer'U Manchapermanente,MAnSarrugas/Con_roldearrugas [ []
Prendassuaves/ddicadas ' r_ Secaren posici6n horizontal _ Nousarblanqueadori
[ ._ Delicada/Lavadoa mano _ No secar en secadora i
..........T m e_a_ura de _gua.................................................................................................................i _Alto@ _ Sin vapor (agregado alaplancha) [[
i Ca[ientei,,. _Zo _ Nop_ancharli
Bajo[ ®e
j. F;ia _ (.ua[quierca[or 0 Limpiaren seco
! 0
_ Cualquier blanqueadorUuandoseanecesar_o>Solo bBnqueador sindoro (con j
rot cci,n ararosadeco,or>Blanqueador (cuandosea
l
l necesario) j i
I
No [impiar en seco [
Secarcolgado/tender [
Colgar para que escurra
(.ic]odesecadoensecadora i__ Media _ Secarenposici6nhodzontal '
Plancha permanente/
Antiarrugas/Control de
i
Prendassuaves/ ddicadas
_ Los simbolos con punto representan lastemperaturas de[ agua del lavado apropiadas para diversas prendas. El tango de
temperatura para Caliente esde 105 125 °F (41 52 °C),para Tibia esde 85 105 °F (29 41 °C)y para Friaes de 60 85 °F
(16 29 °C).(Latemperatura del agua del Bvado debe alcanzar un minimo de 60 °F (16 °C)para que seactive el detergente y
seIogre un lavado eflcaz.)
Espa_om- S7
DV425000 DC68-O3381A MESindd 37 2013-12-19 _ 1:07:33
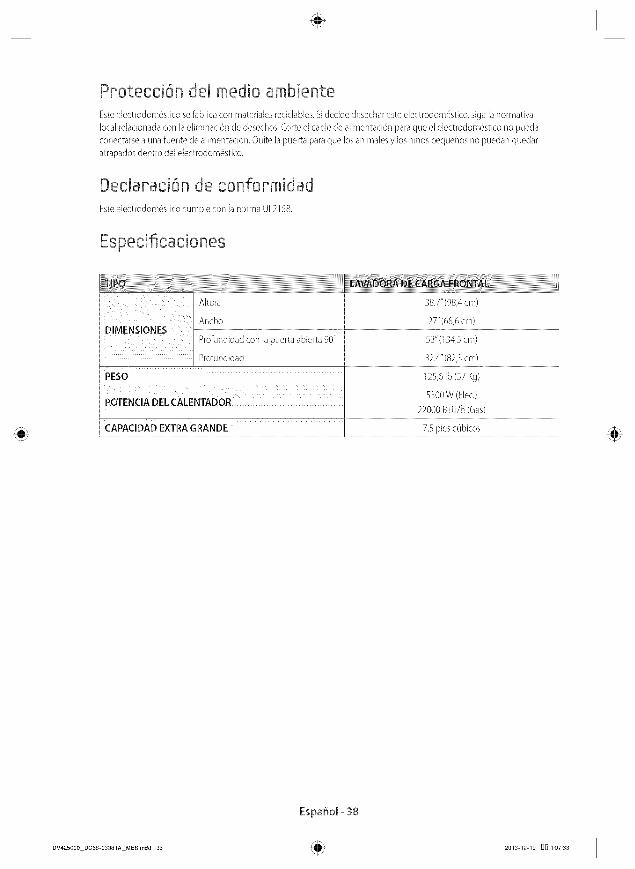
Ppotecci6n del medio ambiente
Esteelectrodom6stico sefabrica con materiales reciclables. Sidecide desechar este electrodomd_stico,siga [a normativa
local relacionada con laeliminaci6n de desechos.Corte el cable de alimentaci6n para que el electrodom6stico no pueda
conectarse a una fuente de alimentaci6n. Quite ]a puerta para que losanima[es y los niflos pequeflos no puedan quedar
atrapados dentro del electrodomd_stico.
Declaraci6n de conformidadEsteelectrodom6stico cumple con [anorma UL2158.
DIMENSIONES
PESO
POTENCIA DEL CALENTADOR
CAPACIDAD EXTRA GRANDE
Altura
Ancho 27" (68,6 cm)
Profundidad co _ r)uerta abierta 90° 53"(134,5 cm)
Profundidad 32.4"(82,3 cm) ,
125,6 Ib (57 Kg)
5300W (Elec.)
22000 BTU/h (Gas)
7,5 pies c0bicos
Espa_om- S8
DV425000 DC68-O3381A MESindd 38 2013-12-19 D_ 1:07:33
I 6arant[a (Estados Unidos)
SECADORA SAMSUN6
GARANTIA LIMITADA PARA EL COMPRADOR ORIGINAL
Elpresente producto de la marca SAMSUNG,tal como Io provee y distribuye SAMSUNGELE(.TRONICSAMERICA,IN(..
(SAMSUNG)y Io entrega nuevo, en suempaque de cart6n original al comprador o consumidor original, est.1garantizado por
SAMSUNGcontra defectos de fabricaci6n de los materiales y la mano de obra durante el periodo limitado de la garantB de:
un (1)afio para todas Bs piezasy la mano de obra
dos (2) aFiospara Bs piezas dd panel de control
La presente garanfia limitada comienza en la fecha original de compra yes v_lida Onicamente para productos comprados yusadosen los EstadosUnidos.
Pararecibir el servicio t6cnico de la garanfia, el comprador debe comunicarse con SAMSUNGcon el fin de que se determine
el problema y los procedimientos del servicio.
Elservicio t@nico de ]a garanfia solo puede set prestado por un centro de servicio td_cnicoautorizado de SAMSUNG.
Sedebe presentar la factura de compra original como prueba de compra a SAMSUNGo al servicio t6cnico autorizado deSAMSUNQ
SAMSUNGprestar_ servicio tdcnico a domicilio durante el perfodo de lagarantia sin costo, sujeto a la disponibilidad dentro de
los Estados Unidos contiguos.
Elservicio t@nico a domicilio no est4 disponible en todas las_reas.
Pararecibir el servicio t4cnico a domicilio, el producto no debe presentar obstrucciones y debe set accesible para el agente
del servicio t_cnico.
Siel servicio td_cnicono est_ disponible, SAMSUNGpuede optar por transportar el producto hasta y des@ el servicio td_cnicoautorizado.
SAMSUNGreparar& reemplazar4 el producto uofmcer4 un reembolso a su criterio y sin cargo adicional, tal como seestablece
en la presente garantia, con piezaso productos nuevos o reacondicionados sise comprueba que esdefectuoso durante el
periodo Iimitado de la garantia especificado anteriormente.
Todas las piezasy los productos reemplazados pasan a ser propiedad de SAMSUNGy @ben set devueltos a SAMSUNG.
Laspiezasy los productos reempBzados asumen la garantia original que testa, o noventa (90) dias, el periodo que sea el m4s
prolongado.
La presente garantia limitada cubm defectos de fabricaci6n de los materiales y la mano de obra encontrados durante el
uso normal y domd_sticode este producto y no ser_v4lida para Io siguiente: da_ios que ocurran durante el envio; entrega e
instalaci6n; aplicaciones y usos para los cuales el presente producto no rue destinado; nOmerosde serie o producto alterados;
da_iocosmd_ticoo acabado exterior; accidentes, abuso, descuido, incendio, inundaci6n, caida de rayos,u otros casos fortuitos
o de fuerza mayor; uso de productos, equipo, sistemas, utilidades, servicios, piezas,suministros, accesorios,aplicaciones,
instaBciones, reparaciones, cableado externo o conectores no provistos ni autorizados pot SAMSUNGque darien este
producto o que acarreen problemas en el servicio; voltaje de la linea eld_ctricaincorrecto, fluctuaciones y sobretensi6n; ajustes
del diente e incumplimiento de Io establecido en el manual de instrucciones, instrucciones de mantenimiento y ambientales
que est_n cubiertas y recomendadas en el manual de instrucciones; traslado y reinstalaci6n del producto; problemas
causados por plagas.
La presente garantia limitada no cubm problemas derivados de la corriente, el voltaje o el suministro el4ctrico incorrectos, ]as
bombillas de luz, los fusibles de la casa,el cableado de la casa,el costo del servicio td_cnicopara recibir instrucciones o cormgirerrores en ]a instalaci6n.
SAMSUNGno garantiza el funcionamiento ininterrumpido o sin errores del producto.
EspaSom- 39
DV425000 DC68-O3381A MESindd 39 2013-12-19 DO 1:07:33
Excepto Io establecido en e[ presente, no existen garantias sobre este producto, ya sean expresaso t4citas, y Samsung
descorloce todas [asgarantias que induyen, aurlque no en carBcter taxativo, cua[quier garantfa t&cita de que el producto
seencuentra en condiciones aptas para la venta, de defraudaci6n de derechos o de que el producto seadecua a los _nes
especi_cos para los cua[es se adquiere.
Ning_Jnaval o garantfa otorgados por persona,compaF_iao corporaci6n alguna con respecto al presente producto revestirB
catheter virlcularlte para Samsung.
Samsung no serBresponsable por pd_rdidade ingresos o lucro cesante, imposibilidad de generar ahorros u obtener otros
bene_cios, o cualquier daF_oderivado de circunstancias especiales, daF_oimprevisto o derivado causado por el uso,uso
hlcorrecto, o incapacidad para usar el preserlte producto, hldependientemerlte de la teoria legal en que sefunde el reclamo y
aun cuarldo se le haya notificado a Samsung de la posibilidad de tales da¢ios.
NingOn resarcimiento de ninguna Fndolecontra Samsung superarB el pmcio de compra del producto vendido pot Samsung y
causante del presunto da¢io.
Sin limitar Io precedente, el comprador asume todo el riesgo y la responsabilidad por pd_rdida,da¢io o lesi6n al comprador y
a los bienes del comprador y a terceros y a susbienes derivados del uso, uso incorrecto o incapacidad para usarel presente
producto. La presente gararltia Iimitada no seextender_ a rlinguna persona distinta del comprador original del pmsente
producto, es irltransfefible y establece su exclusiva reparaci6n.
Algurlos estados rio permiterl Iimitaciorles en cuarlto al plazo de una gararltia implFcita,o la exclusi6rl o limitaci6n de da¢ios
imprevistos o derivados, pot Io tanto las limitaciones o exclusiones antedichas pueden no aplicarse en su caso.Estagarantia le
otorga derechos especi_cos, y adem_s puede tener otros derechos que vaffan segt_lne[ Estado en el que seencuentre.
Para recibir un servicio t@cnico de garantJa, comuniquese con SAMSUNG a:
Samsung Electronics America, Inc.
85 Challenger Road Ridgefield Park, NJ 07660
1-800-SAMSUNG(726-7864)
www.samsung.com
EspaSol- 40
DV425000 DC68-O3381A MESindd 40 2013-12-19 D_] 1:07:33

I 6aranda (CANABA}
SECADORA SAMSUN6
GARANTJA LIMITADA PARA EL COMPRADOR ORIGINAL
Elpresente producto de la marca SAMSUNG,tal como Io provee y distribuye SAMSUNGELE(.TRONICSCANADA, IN(..
(SAMSUNG)y Io entrega nuevo, en suempaque de cart6n original al comprador o consumidor original, est.1garantizado por
SAMSUNGcontra defectos de fabricaci6n de los materiales y la mano de obra durante el periodo limitado de la garantB de:
un (1)clio para las piezasy la mano de obra
La presente garanfia limitada comienza en la fecha original de compra yes v_ilida Onicamente para productos comprados yusadosen Canad&
Pararecibir el servicio t6cnico de la garanfia, el comprador debe comunicarse con SAMSUNGcon el fin de que se determine
el problema y los procedimientos del servicio.
Elservicio t@nico de ]a garanfia solo puede set prestado por un centro de servicio td_cnicoautorizado de SAMSUNG.
Sedebe presentar la factura de compra original como prueba de compra a SAMSUNGo al servicio t6cnico autorizado deSAMSUNQ
SAMSUNGprestar4 servkio td_cnicoa domicilio durante el perfodo de lagarantia sin costo, sujeto a la disponibilidad dentrode Canad4.
Elservicio t@nico a domicilio no est_ disponible en todas lasAreas.
Pararecibir el servicio t@nico a domicilio, el producto no debe presentar obstrucciones y debe set accesible para el agentedel servicio t_cnico.
Siel servicio td_cnicono est_ disponible, SAMSUNGpuede optar pot transportar el producto hasta y desde el servicio td_cnicoautorizado.
SAMSUNGreparar& reemplazar4 el producto uofrecerA un reembolso a su criterio y sin cargo adicional, tal como seestablece
en la presente garantia, con piezaso productos nuevos o reacondicionados sise comprueba que esdefectuoso durante el
periodo Iimitado de la garantia especificado anteriormente.
Todas las piezasy los productos reemplazados pasan a ser propiedad de SAMSUNGy deben set devueltos a SAMSUNG.
Laspiezasy los productos reempBzados asumen la garantia original que testa, o noventa (90) dias, el periodo que sea el m4s
prolongado.
La presente garantia limitada cubre defectos de fabricaci6n de los materiales y la mano de obra encontrados durante el
uso normal y domd_sticode este producto y no ser_vAlida para Io siguiente: dafios que ocurran durante el envio; entrega e
instalaci6n; aplicaciones y usos para los cuales el presente producto no rue destinado; nOmerosde serie o producto alterados;
dafio cosmd_ticoo acabado exterior; accidentes, abuso, descuido, incendio, inundaci6n, caida de rayos,u otros casos fortuitos
o de fuerza mayor; uso de productos, equipo, sistemas, utilidades, servicios, piezas,suministros, accesorios,aplicaciones,
instaBciones, reparaciones, cableado externo o conectores no provistos ni autorizados pot SAMSUNGque daF/eneste
producto o que acarreen problemas en el servicio; voltaje de la linea eld_ctricaincorrecto, fluctuaciones y sobretensi6n; ajustes
del diente e incumplimiento de Io establecido en el manual de instrucciones, instrucciones de mantenimiento y ambientales
que est_incubiertas y recomendadas en el manual de instrucciones; traslado y reinstalaci6n del producto; problemas
causados por plagas.
La presente garantia limitada no cubre problemas derivados de la corriente, el voltaje o el suministro el4ctrico incorrectos, las
bombillas de luz, los fusibbs de la casa,el cableado de la casa,el costo del servicio td_cnicopara recibir instrucciones o corregirerrores en la instalaci6n.
SAMSUNGno garantiza el funcionamiento ininterrumpido o sin errores del producto.
EspaSom-41
DV425000 DC68-O3381A MESindd 41 2013-12-19 D_ 1:07:33
SALVOLQESTABLECIDOENLAPP,ESENTEGAP,ANT[A,NOEXBTENGAP,ANTfASSOBREELPP,ESENTEPP,ODUCTO,YASEANEXPP,ESAS0 TACITAS,YSAMSUNGDESCONOCETODASLASC_AP,ANTfASQUEINCLUYEN,AUNQUENOENCAP,ACTEP,TAXATIVO,(.UALQUIEP,GAP,ANTfATACITADEQUEELPP,ODUCTOSEENCUENTP,AENCONDK.IONESAPTASPAP,ALAVENTA,DEDEFP,AUDACIONDEDEP,ECHOS0 DEQUEELPP,ODUCTOSEADECUAA LOSFINESESPECrFICOSPAP,ALOSCUALESSEADQUIEP,E.NINGONAVAL0 d,AP,ANTrAOTOP,QADOSPOPPEP,SONA,COMPAklfA0 {.OP,POP,A(.IONALC_UNA(.ONP,ESPECTOALPP,ESENTEPP,ODU{.TOP,EVESTIP,A(AP,ACTEP,VINCULANTEPAP,ASAMSUNC_.
SAMSUNGNOSEP,AP,ESPONSABLEPOP,PEP,DIDADEINGP,ESOS0 LU{.P,OCESANTE,IMPOSIBILIDADDEGENEP,AP,AHOP,P,OSUOBTENEP,OTP,OSBENEFICIOS,0 CUALQUIEP,DANODEP,IVADODECIP,CUNSTAN{ZSESPECIALES,DAklOIMPP,EVISTO0 DEP,IVADOCAUSADOPOPELUSO,USOINCOP,P,ECTO,0 INCAPACIDADPAP,AUSAP,ELPP,ESENTEPP,ODUCTO,INDEPEND]ENTEMENTEDELATEOP,iALEGALENQUESEFUNDEELP,ECLAMOYAUNCUANDOSELEHAYANOTIFK.ADOASAMSUNGDELAPOSIBILIDADDETALESDANOS.
NINGONP,ESAP,CIMIENTODENINGUNA/NDOLECONTP,ASAMSUNC_SUPEP,AP,AELMONTODECOMPP,ADELPP,ODU{.TOVENDIDOPOPSAMSUNC_YCAUSANTEDELPP,ESUNTODAi_O.
SiNLIMITAP,LOPP,ECEDENTE,ELCOMPP,ADOP,ASUMETODOELP,IESQOYLAP,ESPONSABILIDADPOPPEP,DIDA,DAklO0 LESIONALCOMPP,ADOP,Y ALOSB]ENESDELCOMPP,ADOP,Y ATEP,CEP,OSYA SUSBIENESDEP,]VADOSDELUSO,USOINCOP,P,E(.TO0 INCAPACIDADPAP,AUSAP,ELPP,ESENTEPP,ODUCTO.LAPP,ESENTEGAP,ANT/ALIMffADANOSEEXTENDEP,/_,A NINC_UNAPEP,SONADBTINTADELCOMPP,ADOP,OP,IGINALDELPP,ESENTEPP,ODUCTO,ES]NTP,ANSFEP,]BLEYESTABLECESUEXCLUSIVAP,EPAP,AC]ON.
Algunasprovindasno permitenIimitacionesen cuantoalplazode unagarantiaimplicita,o laexclusi6no limitaci6nde da_iosimprevistoso derivados,por1oque lasIimitacioneso exdusionesantedichaspuedenno aplicarseen sucaso.Estagarantialeotorgaderechosespecificos,y adem_ispuedetenerotrosderechosque varianseg/_lnlaprovinciaenlaque seencuentre.
Para recibir un servicio t_cnico de garantJa, comunJquese con SAMSUNGa:
Samsung Electronics Canada Inc.,
Customer Service SSStandish Court Mississauga, Ontario LSR4B2 Canada
1-800-SAMSUNG(726-7864)
www.samsung.com/ca (ingles)
www.samsung.com/ca fr (franc_s)
Espa_o[ _ 42
DV425000 DC68-O3381A MESindd 42 2013-12-19 D_] 1:07:33

I Notas
DV425000 DC68-O3381A MESindd 43 2013-12-19 D_] 1:07:33
Scan this with your smarthphone
Scan the QR code* or visit
www.samsung.com/spsn
to view our hetpfu[How-to Videos and Live Shows
*Requires reader to be instalbd on your smartphone
&TIENE PREGUNTAS0 COMENTARIOS?
DC68-03381A_REV 01
DV425000 DC68-O3381A MESindd 44 2013-12-19 D_ 1:07:33
Related Documents