Garden Shed Project Plan The Georgia-Pacific Garden Shed is designed to be built by the moderately experienced carpenter. It features a platform construction on 4x4 posts sunk in concrete-lined holes similar to standard residential deck construction so it can be set on any firm soil whether sloped or flat without site preparation. The sturdy shed will be an attractive addition to your home for many years. There is approximately 40 square feet of floor space inside the shed and ample headroom for storage of bicycles, a lawnmower, garden tools or play equipment. The room is large enough for a six foot potting bench or workbench; a rear window provides natural light. The design includes a hutch on the side big enough for several refuse or recycling bins. Adding insulation, electricity, or running water would expand the use of this room for many purposes. Plytanium and Lumber Posts: 5 — 4 x 4 pressure tre ate d or cedar posts @ 12 ft. Floor and rim joists: 8 —2 x 8 @ 8 Flooring: 3 — 23 / 32 thick Plytanium ™ Sturd-I-Floor ® or Plytanium ™ Sanded Project Panels 4 x 8 Stud walls, sole plates, double cap plates: 8 —2 x 4 @ 14 sidewall studs 18—2 x 4 @ 10 front and rear wall studs 13—2 x 4 @ 16 plates, headers, jacks, etc. Door rails and stiles: 3 —2 x 4 @ 8 Rafters: 6 —2 x 6 @ 14 Ridge Beam: 1—2 x 8 @ 8 Roof Deck: 5 — 15 / 32 @ 4 x 8 Plytanium ™ Sheathing Interior wall sheathing: 11 — 11 / 32 @ 4 x 8 Plytanium ™ Ply-Bead ® Panels Perforated hardboard @ 4 x 8 Ceiling: 4 — 11 / 32 @ 4 x 8 Plytanium Ply-Bead Panels Concrete and Gravel 12—80 lb. bags of concrete mix=2 bags per hole Gravel: enough to cover ground under shed. (optional) Hardware Door hinges: 3 pairs —strap style, black Door latches: 2 —with hasp and lock, black Joist hangers: 16—to fit 2 x 8 joists 14—to fit 2 x 4 joists Nails: 25 lbs.—16 penny hot dipped galvanized (HDG) sinkers 10 lbs. —1 1 / 4 HDG roofing nails 10 lbs. —8 penny HDG finish nails for trim 10 lbs. —8 penny HDG spiral siding nails 5 lbs. —joist hanger nails HDG Trim GP PrimeTrim ® engineered wood trim in the following dimensions: Overdoor , cornerboard s and sub-fascia: 8 —1 x 6 @ 1 6 Door and window casing and trim, hutch corner boards, baseboards: 7—1 x 4 @ 16 Skirt on shed: 2 — 5 / 4 x 10 @ 16 Fascia on shed and band: 6 — 5 / 4 x 8 @ 1 6 Fascia on recycling hutch: 1— 5 / 4 x 6 @ 16 Skirts and band on hutch: 2 — 5 / 4 x 4 @ 1 6 Siding ¹⁹⁄₃₂ x 4 x 8 Plytanium ™ Siding with 4 on center grooves Front and rear facades: 4 —4 x 8 Panels Side facades and door: 7—4 x 8 Panels Moulding and Flashing Cove moulding under fascia edge: 96 linear feet — 3 / 4 or 1 cove profile Optional trim on window in door: 1 —casing @ 8 Drip edge on the top of fascia @ eave and rake: 5 —drip edge @ 10 2 x 2 flashing @ overd oor and windo w; 10 linear feet 3 x 3 flash ing @ hut ch roo f and she d sidewa ll: 10 linear feet Z flashing: 36 linear feet —aluminum flashing Ramp To p Choice pressure-treated lumber joists: 1—2 x 6 pre ssur e-tre ated @ 12 (length will vary to accommodate each site) Decking: 3 — 5 / 4 x 6 pressure-treated @ 12 Optional footholds: number varies with length of ramp, spaced every 12 1 x 2 @ 14 long each Windows Rear window: prefabricated 24 x 24 wood octagonal venting window with clear glass Optional: insect screen Optional window on door: plexiglas or glass custom cut to fit Roof Felt: 1 roll GP-15 lb. residential roofing felt Shingles: 4 bundles GP Summit ® Series Ridge cap: 1 bundle —GP hip and ridge shingles to match desired Summit ® shingle color Roll ridge vent: 8 linear feet Optional Furnishings Shelves: 2 —1 x 10 pine shelves @ 16 Cabinets: 2 —prefabricated 6 running feet, 36 high Countertop: 25 deep — 3 / 4 G-P MDF, cut to fit approx. 6 Trellis Framing: 4 —2 x 2 @ 12 Vinyl coated electrical wire hooks and screw eyes for mounting Paint and Caulk Approximately 2 gallons of exterior acrylic latex primer and wall paint, non-hardening caulk MATERIALS LIST

Welcome message from author
This document is posted to help you gain knowledge. Please leave a comment to let me know what you think about it! Share it to your friends and learn new things together.
Transcript
8/14/2019 Garden Shed Project Plan
http://slidepdf.com/reader/full/garden-shed-project-plan 1/4
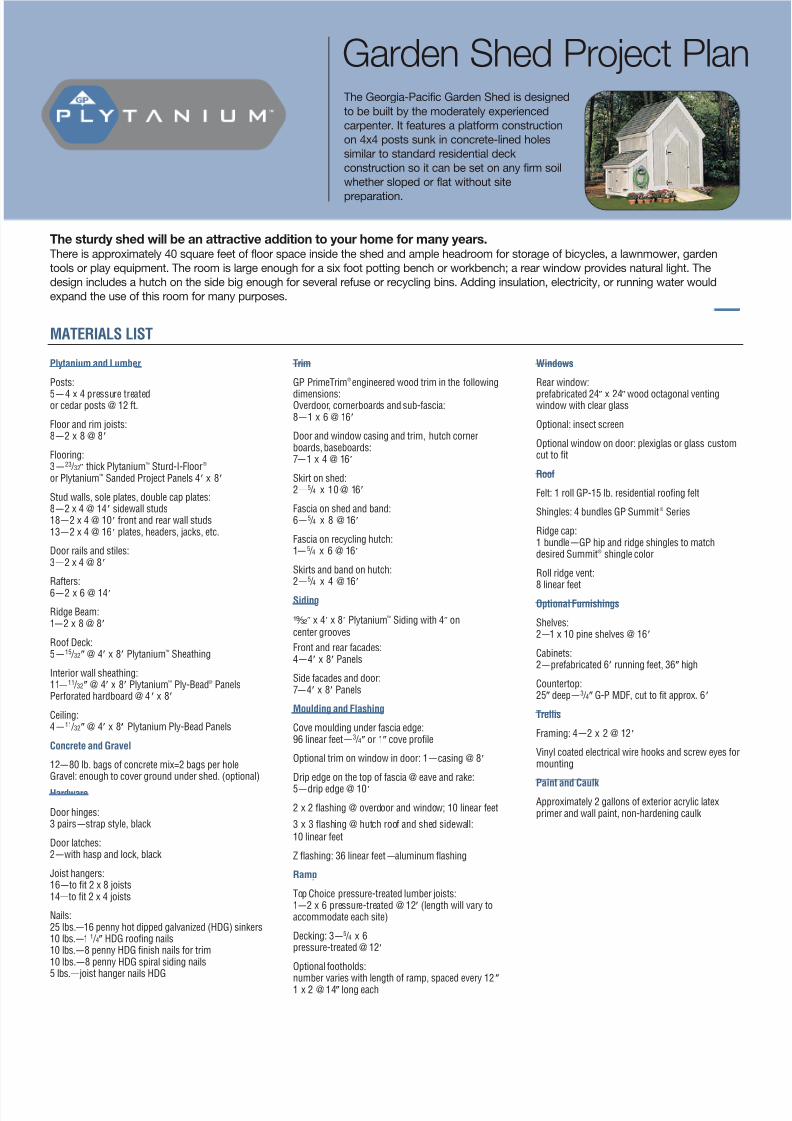
Garden Shed Project PlanThe Georgia-Pacific Garden Shed is designed
to be built by the moderately experienced
carpenter. It features a platform construction
on 4x4 posts sunk in concrete-lined holes
similar to standard residential deck
construction so it can be set on any firm soil
whether sloped or flat without site
preparation.
The sturdy shed will be an attractive addition to your home for many years.There is approximately 40 square feet of floor space inside the shed and ample headroom for storage of bicycles, a lawnmower, garden
tools or play equipment. The room is large enough for a six foot potting bench or workbench; a rear window provides natural light. The
design includes a hutch on the side big enough for several refuse or recycling bins. Adding insulation, electricity, or running water would
expand the use of this room for many purposes.
Plytanium and Lumber
Posts:
5—4 x 4 pressure treatedor cedar posts @ 12 ft.
Floor and rim joists:8—2 x 8 @ 8
Flooring:3—23 / 32 thick Plytanium™ Sturd-I-Floor®
or Plytanium™ Sanded Project Panels 4 x 8
Stud walls, sole plates, double cap plates:8—2 x 4 @ 14 sidewall studs18—2 x 4 @ 10 front and rear wall studs13—2 x 4 @ 16 plates, headers, jacks, etc.
Door rails and stiles:3—2 x 4 @ 8
Rafters:
6—2 x 6 @ 14
Ridge Beam:1—2 x 8 @ 8
Roof Deck:5—15 / 32 @ 4 x 8 Plytanium™ Sheathing
Interior wall sheathing:11—11 / 32 @ 4 x 8 Plytanium™ Ply-Bead® PanelsPerforated hardboard @ 4 x 8
Ceiling:4—11 / 32 @ 4 x 8 Plytanium Ply-Bead Panels
Concrete and Gravel
12—80 lb. bags of concrete mix=2 bags per holeGravel: enough to cover ground under shed. (optional)
Hardware
Door hinges:3 pairs—strap style, black
Door latches:2—with hasp and lock, black
Joist hangers:16—to fit 2 x 8 joists14—to fit 2 x 4 joists
Nails:25 lbs.—16 penny hot dipped galvanized (HDG) sinkers10 lbs.—1 1 / 4 HDG roofing nails10 lbs.—8 penny HDG finish nails for trim10 lbs.—8 penny HDG spiral siding nails5 lbs.—joist hanger nails HDG
Trim
GP PrimeTrim®engineered wood trim in the following
dimensions:Overdoor, cornerboards and sub-fascia:8—1 x 6 @ 16
Door and window casing and trim, hutch cornerboards, baseboards:7—1 x 4 @ 16
Skirt on shed:2—5 / 4 x 10 @ 16
Fascia on shed and band:6—5 / 4 x 8 @ 16
Fascia on recycling hutch:1— 5 / 4 x 6 @ 16
Skirts and band on hutch:2—5 / 4 x 4 @ 16
Siding
¹⁹⁄₃₂ x 4 x 8 Plytanium™ Siding with 4 oncenter grooves
Front and rear facades:4—4 x 8 Panels
Side facades and door:7—4 x 8 Panels
Moulding and Flashing
Cove moulding under fascia edge:96 linear feet—3 / 4 or 1 cove profile
Optional trim on window in door: 1—casing @ 8
Drip edge on the top of fascia @ eave and rake:
5—drip edge @ 10
2 x 2 flashing @ overdoor and window; 10 linear feet
3 x 3 flashing @ hutch roof and shed sidewall:10 linear feet
Z flashing: 36 linear feet—aluminum flashing
Ramp
Top Choice pressure-treated lumber joists:1—2 x 6 pressure-treated @ 12 (length will vary toaccommodate each site)
Decking: 3—5 / 4 x 6pressure-treated @ 12
Optional footholds:
number varies with length of ramp, spaced every 12
1 x 2 @ 14 long each
Windows
Rear window:
prefabricated 24 x 24 wood octagonal ventingwindow with clear glass
Optional: insect screen
Optional window on door: plexiglas or glass customcut to fit
Roof
Felt: 1 roll GP-15 lb. residential roofing felt
Shingles: 4 bundles GP Summit® Series
Ridge cap:1 bundle—GP hip and ridge shingles to matchdesired Summit® shingle color
Roll ridge vent:
8 linear feetOptional Furnishings
Shelves:2—1 x 10 pine shelves @ 16
Cabinets:2—prefabricated 6 running feet, 36 high
Countertop:25 deep—3 / 4 G-P MDF, cut to fit approx. 6
Trellis
Framing: 4—2 x 2 @ 12
Vinyl coated electrical wire hooks and screw eyes formounting
Paint and CaulkApproximately 2 gallons of exterior acrylic latexprimer and wall paint, non-hardening caulk
MATERIALS LIST
8/14/2019 Garden Shed Project Plan
http://slidepdf.com/reader/full/garden-shed-project-plan 2/4
Garden Shed Project Plan
1. SITING THE SHEDChoose a convenient location, (not necessarily on flat ground). Whenfinished, the bottoms of the floor joists should be at least 6 inchesabove the ground, high enough that water puddling on the groundcannot reach them. The ramp should be long enough to slope down
at a 45 degree angle or less.2. FOOTING AND POSTS
Lay out the holes to make certain they are square. Dig the holes forthe footings; the depth should be below your local frost line. Makethe holes larger than the posts to allow for adjustment (approx. 12
wide). Set four full-length 4 x 4 corner posts in the holes, temporarilybracing them in both directions so they stay plumb. DO NOT pourthe concrete. The posts for the hutch should be set after the shed isframed.
3. FRAMINGHang the rim joists on the posts with joist hangers so the outsidefaces are flush. Hang the floor joists from the side rim joists usingjoist hangers at 16 on center or less. Deck the floor with 23 /32
plywood.
Frame the stud walls horizontally on flat ground using standardconstruction techniques including a sole plate, a single top plate, andstuds at 16 on center. Frame the door and window openings leavingthe sole plate under the door. Add a nailing surface if you will beadding interior sheathing. Nail the walls in place between the 4 x 4posts using 16 d sinkers.
Check the posts to be sure they are plumb and level, and then filleach posthole with 2 bags of concrete, leaving the top surface slopedto drain water away from the posts. When the concrete has setthoroughly, cut the four posts off flush with the side wall plate. Add asecond top plate on top of the side walls extending over the post
tops. Add a second top plate on top of the front and rear wallslapping the opposite way over the peaks.
4. RIDGE AND RAFTERSToenail the ridge beam in place between the front and rear walls. Cutthe rafter birdsmouths so the level (seat) cuts are 31 /2 long wherethey sit on the top plate. The plumb cuts are perpendicular to the seatcuts. Let the rafter tails run wild (long) to be trimmed later. Lay outthe rafter spacing on the ridge using five rafters evenly spaced oneach side.
5. SIDINGWrap the entire structure with tar paper or building wrap. Nail bandto rim joists, and skirt above band to stud walls. Before cutting thesiding, lay out the cutting lines on the plywood following the enclosed
patterns so that the grooves do not fall on a cornerboard and so thecenter of the facade is centered between two grooves. Slip theflashing for the shed roof and overdoor trim under the siding beforenailing it to the studs, and Z-flashing under the bottom of the sidingand over the skirts.
6. ROOFTo calculate the rafter tail length mock-up the fascias on the frontfacade following the dotted lines in the detail drawing provided. Cutthe rafter tails so that the fascias will neatly wrap around the buildingcorners. The grooves in the siding meet the sub-fascia allowing theroof to vent. Sheath the roof with 15 /32 Plytanium Sheathing. Applythe roof felt and shingles following manufacturer’s instructions. Coverthe ridge with ridge vent.
7. DOOR AND WINDOWCut the door out of siding and apply 2 x 4’s flat for stiffening and adda diagonal brace from top hinge down to the lower corner on theswinging side. Optional: Add a small window made of plexiglass,window glass or insect screen trimmed with small-dimensioned
window stop and use small strips of lattice for decorative muntins.Hang the door in the cased opening using decorative strap hingesmounted on pads so they lay flat with the door trim. Leave the soleplate under the door as a door stop. Install window in rear wall.
8. TRIMApply the sub-fascia & fascia on top of the siding. Apply covemoulding to trim the bottom and top edges. Add a drip edge at the topof the fascias under the roof deck. Next cut the cornerboards to fitbetween the skirts and fascias. Add the cornerboards to the front andrear facades, then butt the side cornerboards to them so the caulkjoint does not show from the main facades. Add the door and windowcasing and the overdoor and overwindow trim. Add the drip edge tothe side and top edges of the overdoor and overwindow trim.
9. RAMPMake the ramp from 2 x 6 pressure treated joists with 5/4 x 6 deckingnailed on top. Make it long enough that it slopes down at less than a45 degree angle. Optional: If your ramp is long or steep applyfootholds at 12 intervals or at whatever distance is comfortable foryour stride and the angle you have chosen; be sure you can get yourlawnmower or other equipment easily around the footholds. If you areusing the shed for bicycles or a wheelbarrow, two sets of footholdswith a space in between for the wheel would be convenient.
10. INTERIORFinish the interior to suit your planned use of the shed. Insulationand Plytanium Ply-Bead Panels will make it cozy and finished. GPperforated hardboard will make it functional for tool storage. Shelves
and cabinets will be useful for a potting shed if there is wateravailable nearby. A serious gardener may want a large sink. Aworkbench and power source will make a functional workshop.
11. TRELLISLay out the 2 x 2 lattice work as shown in the elevation drawing.Where two boards overlap mark the overlaps on both boards with apencil line. Cut and chisel out half the depth of the wood between thepencil lines to make half-lap joints and reassemble the layout withthe boards lapped together. Use vinyl-coated electrical wire to formsupport for your plants by weaving it between the boards. When youare satisfied with the pattern, screw joints together. Hang the trellisfrom screw eyes with hooks to make it easy to demount for fallcleanup and to repaint the wall behind it without uprooting your
plantings.
12. PAINTCaulk joints carefully except where the siding meets the soffit. Paintor opaque stain the shed to suit your style preference.
13. RECYCLING HUTCHThe hutch is built using the same construction techniques andsequence as the shed except that a ledger board attaches it to theshed much as a deck is attached to a house. Cut the remaining 8 4 4 posts in half to make the two corner posts. Add flashing where theroof meets the shed siding.

8/14/2019 Garden Shed Project Plan
http://slidepdf.com/reader/full/garden-shed-project-plan 3/4
8/14/2019 Garden Shed Project Plan
http://slidepdf.com/reader/full/garden-shed-project-plan 4/4
Georgia-Pacific Corporation55 Park Place – Atlanta, GA 303031-800 BUILD GPwww.gpplytanium.com
PLYTANIUM is a trademark and PLY-BEAD and PRIMETRIM are registered trademarks of Georgia-Pacific Corporation. STURD-I-FLOOR is a registered trademark of APA — The Engineered Wood Association.© 2003 Georgia-Pacific Corporation. All rights reserved. Printed in USA.
7/03 Lit. Item #011645
Georgia-Pacific Corporation makes no warranties expressed or implied regarding theseplans and specifically disclaims the warranties of merchantability and fitness for a particpurpose. Check with an architect or a building expert to make sure that these plans areappropriate to your situation and meet local building codes.
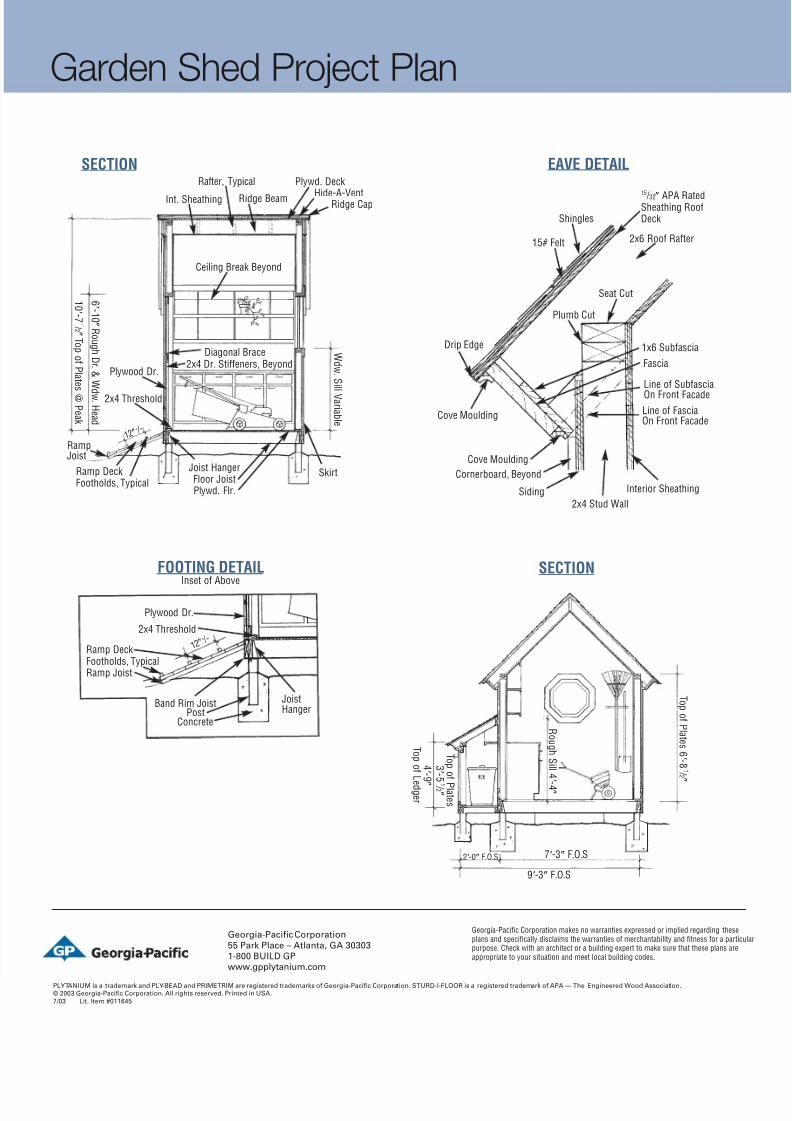
Garden Shed Project Plan
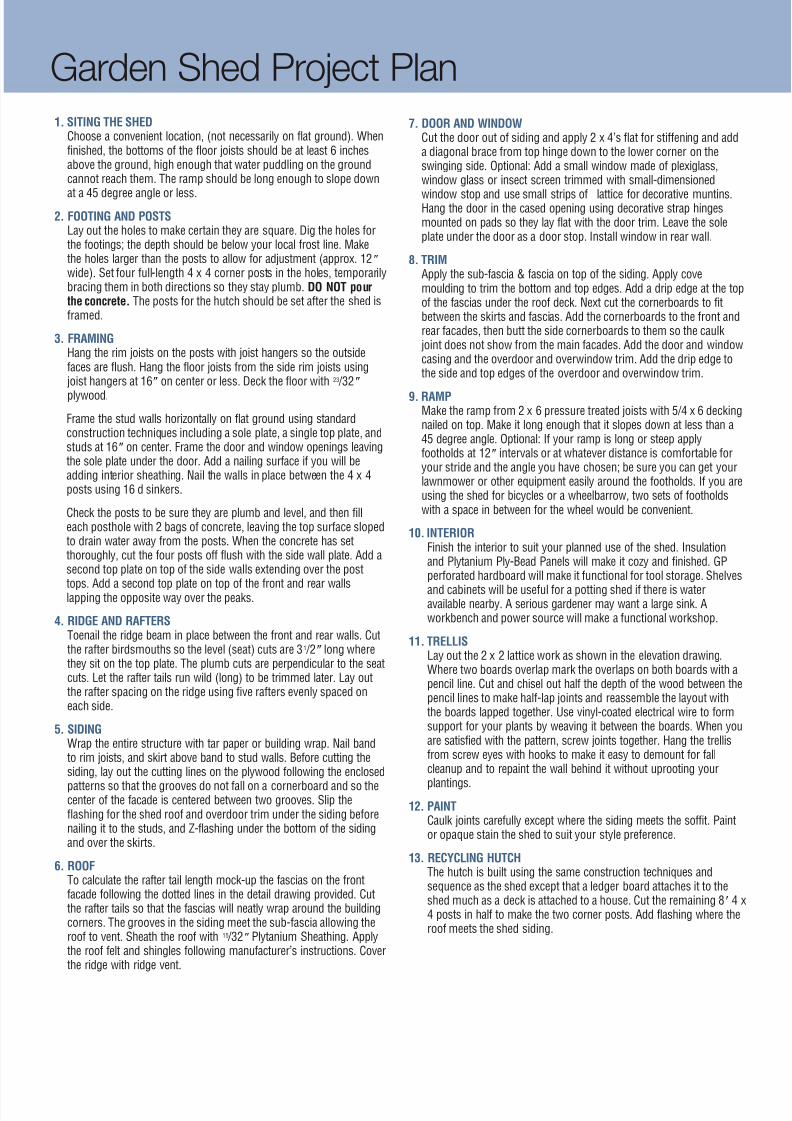
SECTION
1 0 - 7 1 / 2
T o p o f P l a t e
s @ P e a k
6 - 1 0
R o u g h D r . & W
d w.H e a d
Int. Sheathing
Rafter, Typical
Ridge Beam
Plywd. Deck
Hide-A-VentRidge Cap
Ceiling Break Beyond
Plywood Dr.
Skirt
2x4 Threshold
1 2 + / -
Joist HangerFloor JoistPlywd. Flr.
Ramp DeckFootholds, Typical
Diagonal Brace2x4 Dr. Stiffeners, Beyond
RampJoist
FOOTING DETAILInset of Above
Plywood Dr.
Band Rim Joist
ConcretePost
JoistHanger
2x4 Threshold
Ramp DeckFootholds, TypicalRamp Joist
W d w. S i l l V a r i a b l e
1 2 + / -
EAVE DETAIL
Shingles
15# Felt
15
/ 32 APA RatedSheathing RoofDeck
2x6 Roof Rafter
Plumb Cut
Seat Cut
1x6 Subfascia
Fascia
Line of Subfascia
On Front Facade
Line of FasciaOn Front Facade
Interior Sheathing
2x4 Stud WallSiding
Cornerboard, Beyond
Cove Moulding
Cove Moulding
Drip Edge
SECTION
T o p o f P l a t e s 6 - 8 1 / 2
2-0 F.O.S 7-3 F.O.S
9-3 F.O.S
R o u g h S i l l 4
- 4
T o p o f P l a t e s
3 - 5 1 / 2
4 - 9
T o p o f L
e d g e r
Related Documents