Game Hunting in Victoria A manual for responsible and sustainable hunting 2nd Edition

Welcome message from author
This document is posted to help you gain knowledge. Please leave a comment to let me know what you think about it! Share it to your friends and learn new things together.
Transcript

Game Hunting in Victoria
A manual for responsible and sustainable hunting
2nd Edition

Published by Game Management Authority and Kalkomey Enterprises, LLC, November 2018.
Copyright © 2018 by The State of Victoria and Kalkomey Enterprises, LLC. All rights reserved. No part of this publication may be reproduced in any form or by any process without permission in writing from Kalkomey Enterprises, LLC and The State of Victoria, in accordance with the provisions of the Copyright Act 1968. Effort has been made to make this publication as complete and accurate as possible. All references contained in this publication have been compiled from sources believed to be reliable and to represent the best current opinion on the subject. Kalkomey Enterprises, LLC and the State of Victoria are not responsible or liable for any claims, liabilities, damages, or other adverse effects or consequences to any person or property caused or alleged to be caused directly or indirectly from the application or use of the information contained in this publication. TH0213-P1218
Authorised by Game Management Authority, 121 Exhibition Street, Melbourne 3000.JUDO is a registered trademark of Zwickey Archery, Inc.Pyrodex is a registered trademark of Hodgdon Powder Co., Inc. ISBN 978-1-76090-004-5 (pdf/online/MS word)
For more information about the Game Management Authority, go to www.gma.vic.gov.au

THE TEN BASIC RULES OF FIREARM SAFETY
1. Treat every firearm as loaded. Check every firearm yourself; do not take the word of another person that a firearm is unloaded. Pass or accept only open and unloaded firearms. Never accept or pass a firearm to another per-son unless the breech is open and all ammunition has been removed.
2. Always point firearms in a safe direction. Loaded or unloaded, always point the muzzle in a safe direction. A safe direction will depend on where you are and what you are doing.
3. Load your firearm only when ready to fire. Avoid carrying loaded fire-arms around. Only load your firearm when you intend to use it and only in an area where it can be safely and legally discharged.
4. Identify your target beyond all doubt. Make sure of your target before firing. It is not good enough just to think that what you see is your target. Your target must be positively identified before firing; if in doubt, DO NOT SHOOT.
5. Check your firing zone. The firing zone is not only the area between you and your target but also the area beyond the target that is still within the extreme range of your firearm. If using a shotgun, the firing zone could be very wide due to the spread of the shot, particularly at longer ranges.
6. Store ammunition and firearms safely. When not in use, lock away firearms and ammunition separately, out of the reach of children. Not only is this good sense, but in Victoria, there is also a legal obligation that fire-arms and ammunition are locked separately in secure safes at the primary place of residence.
7. Avoid alcohol or drugs when handling firearms. Alcohol and many day-to-day drugs and medicines dull and slow your mental and physical reactions. When using firearms, never use alcohol or drugs. Wait until your firearm is appropriately secured before you have a drink, and insist that others do the same.
8. Never have loaded firearms in the car, home, or camp. Before enter-ing a car, home, or camp, completely unload your firearm. Ensure that the action is open and that there is no ammunition in either the breech or the magazine.
9. Avoid firing at hard surfaces or water. Consider the area in which you are shooting. Could a ricochet occur? A ricochet will almost certainly result from shooting at water or smooth flat surfaces and rocks. Exercise extreme caution when despatching downed birds on water.
10. Don’t climb fences or obstacles with loaded firearms. Before attempt-ing to negotiate a fence or obstacle, unload your firearm. Do not rely on the safety mechanism. The safety mechanism, at best, only supplements the safe handling of firearms.
www.firearmsafety.org.au

Page 2 Table of Contents
Introduction to Game Hunting in VictoriaBrief History . . . . . . . . . . . . . . . . . . . . . . . . . . . .3Importance of Hunting . . . . . . . . . . . . . . . . . . . .4Why Hunter Education? . . . . . . . . . . . . . . . . . . .5
Be a Responsible and Ethical HunterWhy Do We Have Hunting Laws? . . . . . . . . . . . .6Responsible Hunting and Ethics . . . . . . . . . . . . .8Caring for the Environment . . . . . . . . . . . . . . . .11
Introduction to FirearmsWhat Is a Firearm? . . . . . . . . . . . . . . . . . . . . . . .13What Is Ammunition? . . . . . . . . . . . . . . . . . . . .15How a Firearm Works . . . . . . . . . . . . . . . . . . . .18Common Features of Firearms . . . . . . . . . . . . . .19Differences Between Rifles and Shotguns . . . . . .22Match Firearms and Ammunition Correctly . . .26Know Your Firearm’s Range . . . . . . . . . . . . . . . .27Cleaning Your Firearm . . . . . . . . . . . . . . . . . . . .28What Is a Muzzle-Loader? . . . . . . . . . . . . . . . . .29Basic Muzzle-Loader Safety and Skills . . . . . . . .30
Basic Shooting SkillsGood Marksmanship and Accuracy . . . . . . . . . .33Rifle Firing . . . . . . . . . . . . . . . . . . . . . . . . . . . . .34Shotgun Shooting . . . . . . . . . . . . . . . . . . . . . . .38
Bowhunting Equipment and TechniquesKnow Your Bow and Arrow . . . . . . . . . . . . . . . .43Know Your Crossbow . . . . . . . . . . . . . . . . . . . . .45Bowhunting Safety and Skills . . . . . . . . . . . . . . .49
Basic Hunting SkillsPlanning and Preparation . . . . . . . . . . . . . . . . . .52Hunting Strategies . . . . . . . . . . . . . . . . . . . . . . .53Shot Placement Fundamentals . . . . . . . . . . . . . .64Develop a Retrieval Strategy . . . . . . . . . . . . . . . .69Approaching Downed Game . . . . . . . . . . . . . . .70Field Care of Game . . . . . . . . . . . . . . . . . . . . . .71Transporting Game . . . . . . . . . . . . . . . . . . . . . .74Utilising Harvested Game . . . . . . . . . . . . . . . . .74
Be a Safe HunterWhy Firearm Safety Is Important . . . . . . . . . . . .77Safely Carrying Firearms in the Field . . . . . . . . .79Safely Loading and Unloading Firearms . . . . . . .83Safely Transporting Firearms . . . . . . . . . . . . . . .84Safe Firing Zone . . . . . . . . . . . . . . . . . . . . . . . . .85Other Safety Considerations . . . . . . . . . . . . . . .86Hunting From Elevated Stands . . . . . . . . . . . . .86Hunting With Boats . . . . . . . . . . . . . . . . . . . . .89Hunting in Waters Affected by Blue-Green Algae . . . . . . . . . . . . . . . . . . . .91What Duck Hunters Need to Know About Avian Botulism . . . . . . . . . . . . . . . . .92Hunting With Spotlights . . . . . . . . . . . . . . . . . .93
Preparation and Survival SkillsImportance of Planning and Preparation . . . . . .94Topographic Maps and Compasses . . . . . . . . . .96Survival Skills . . . . . . . . . . . . . . . . . . . . . . . . . . .98Coping With Extreme Weather . . . . . . . . . . . .101Basic First Aid . . . . . . . . . . . . . . . . . . . . . . . . .103
Hunting Laws in VictoriaImportance of Hunting Laws . . . . . . . . . . . . . .106Game Licences . . . . . . . . . . . . . . . . . . . . . . . . .107Firearm Laws . . . . . . . . . . . . . . . . . . . . . . . . . .111Crossbow Laws . . . . . . . . . . . . . . . . . . . . . . . . .112Authorised Officers . . . . . . . . . . . . . . . . . . . . .113Hunting Times, Equipment, and Methods . . .113Hunting Areas . . . . . . . . . . . . . . . . . . . . . . . . .115Seasons and Bag Limits . . . . . . . . . . . . . . . . . .123Deer Hunting Laws . . . . . . . . . . . . . . . . . . . . .125Duck Hunting Laws . . . . . . . . . . . . . . . . . . . . .132Hunting Duck With Gundogs . . . . . . . . . . . . .134Public Safety on Wetlands . . . . . . . . . . . . . . . .134Stubble Quail Hunting Laws . . . . . . . . . . . . . .136Introduced Game Birds . . . . . . . . . . . . . . . . . .137
Recognising Game and Non-Game SpeciesDeer . . . . . . . . . . . . . . . . . . . . . . . . . . . . . . . . .138Game Birds . . . . . . . . . . . . . . . . . . . . . . . . . . .150Introduced Game Birds . . . . . . . . . . . . . . . . . .159Distinguishing Between Stubble Quail and Non-Game Quail . . . . . . . . . . . . . . . .169

Chapter One / Page 3 Introduction to Game Hunting in Victoria
Brief History ■ Hunting has a rich cultural heritage in Victoria. Aboriginal communi-
ties across Australia have hunted wildlife for at least 35,000 years. They depended on the management and sustainable use of wildlife for food, clothing, shelter, and cultural and spiritual needs.
■ Globally, recreational game hunting is a form of sustainable use that, as a cultural tradition, has been undertaken for many centuries. The current conservation approach and reserve system around the world originated from the need for and recognition that sustainable hunting requires healthy habitats and wildlife populations. Victoria also has a long tradition of game hunting which has been regulated and actively managed since the 1860s.
■ Describe the role of various government agencies in game hunting. ■ Explain the benefits of hunting and game management. ■ Give reasons why hunter education is important. ■ Describe the behaviour of a responsible hunter.
You should be able to...
• The Game Management Authority (GMA) was established on 1 July 2014. It is an independent statutory authority responsible for the regulation of game hunting in Victoria. It also has an important role in providing advice to ministers on game management.
• The GMA’s objectives are to promote sustainability and responsibility in game hunting through enforcement, licensing, education, training, research, and ensuring resource sustainability.
• Responsibility for game management and hunting is shared across a number of government organisations and agencies. The GMA works closely with these agencies, the hunting community, industry, and other interested stakeholders to ensure that game hunting remains safe, sustainable, humane, and equitable.
• The GMA logo is a stylised symbol of Victoria’s game species: duck, quail, and deer (antler).
Game Management Authority

Chapter One / Page 4
Importance of HuntingHunting and game management activities generate a diverse range of benefits to Victoria.
EconomicEach year in Victoria, hunting generates hundreds of millions of dollars of direct and indirect economic activity. It is a vital part of many rural and regional economies. Hunting also supports thousands of jobs and businesses directly related to the manufacture and sale of hunting and outdoor products and services.
ConservationHunting encourages people to connect with the natural environment and to conserve habitats. Victorian hunters have a long and proud history of contributing to conservation. Victoria’s initial State Game Reserve network was established as a result of hunters who recognised the degradation and loss of wetland habitat and lobbied for its conservation. Hunting provides an incentive to conserve healthy populations of game and to protect their habitats. This contributes to broader biodiversity outcomes.Hunters also contribute to Victoria’s biosecurity efforts. They help control pest animals and provide important assistance and samples to scientists who monitor diseases like avian influenza. Research into game populations also contributes to our understanding of natural systems and can assist in better management of the environment.
SocialPeople participate in hunting for a variety of reasons. Often, the focus is not solely on the act of taking game but rather on the companionship with others who enjoy the same interests. It also helps to bridge the gap between urban and rural communities, and strengthens our social fabric.
HealthHunting is a physical activity that promotes a healthy lifestyle by contributing to not only physical but also mental well-being. International studies consistently show that the benefits from participating in outdoor activi-ties include increased happiness, reduced stress levels, and improved mental health.
Hunters tend to share these interests:
• Participating in recreational target shooting
• Training and hunting with dogs
• Enjoying the experiences of camping and the outdoors
• Learning about the ecology and behaviour of game and other wildlife
• Cooking and eating game
Shared Interests
Department of Jobs, Precincts and Regions (DJPR)
• Responsible for state-wide game, animal welfare, and pest animal policy
• Responsible for wetland closure notifications
Department of Environment, Land, Water and Planning (DELWP)
• Responsible for state-wide land, water, and wildlife management policy
• Responsible for prescribing what types of activities are permitted on different public land classifications
• Manages public land that is not managed by Parks Victoria. This includes managing wildlife and the activities that occur on the land DELWP manages
Parks Victoria
• Manages the parks and reserves estate and the activities that occur on it, like hunting. State Game Reserves and some National Parks are examples of this estate, some of which permit certain types of game hunting during season
• Responsible for signs and other asset maintenance on its estate
Victoria Police
• Responsible for licensing and regulating, possession, use, and trade in firearms and controlled weapons
• Important role in ensuring public safety, particularly when anti–duck hunting protesters are involved or illegal use of firearms
The Roles of Other Government Agencies in Game Hunting

Chapter One / Page 5
Why Hunter Education? ■ Hunter education programs have always taught hunters the practice of
firearm and hunting safety. Today, hunter education programs are about more than safety. They have been expanded to produce responsible, knowledgeable, and involved hunters—hunters who understand the importance of complying with hunting laws and behaving ethically. These programs give beginners a good foundation and provide a refresher for experienced hunters.
■ Ultimately, the mission of hunter education programs is to develop responsible hunters who respect:• The animals• The environment• Other hunters• The hunt• Non-hunters• The law
■ Through comprehensive education, the broader community is given confidence that hunting is being conducted safely, sustainably, equitably, and humanely.
Responsibility, Safety Skills, Knowledge, and InvolvementHunter education strives to instill responsibility, improve skills and knowledge, and encourage the involvement of beginner and veteran hunters. Responsible, ethical behaviour and personal involvement are essential to the future of hunting.
■ Responsibility A knowledgeable and skilful student of hunting will never be a true hunter unless he or she also behaves responsibly. As a responsible hunter, you should always respect the animals, the environment, other hunters, the hunt, non-hunters, and the law.
■ Safety Skills Hunting-related safety skills are gained through knowing the Firearms Safety Code, hands-on training, and practice. It is most valuable to learn these skills from an experienced hunter or hunting organisations.
■ Knowledge Knowledge is learning and understanding the basics of safe firearm handling, hunting methods, bush-craft, and basic game ecology. Before using a firearm, you must know how the firearm operates and how to handle it safely.
■ Involvement Part of the process of becoming a true responsible hunter is becoming involved in efforts to keep hunting a respected recreation. That includes teaching others, working with landowners, and cooperating with game officers. It also includes joining hunting clubs and conservation organisa-tions, which will help preserve habitat and promote wildlife management.

■ Give reasons why we have hunting laws. ■ State how the ‘father of wildlife management’
defined ethical behaviour. ■ Describe how responsible and ethical hunters show
respect for natural resources. ■ Describe how responsible and ethical hunters show
respect for other hunters. ■ Describe how responsible and ethical hunters show
respect for landowners. ■ Describe how responsible and ethical hunters show
respect for non-hunters.
■ Explain why the RESPECT: Hunt Responsibly program is important.
■ List and describe the standards of the RESPECT: Hunt Responsibly program.
■ Describe how we can minimise our impact on the environment.
■ Identify when there are campfire restrictions and what to do during those times.
Chapter Two / Page 6 Be a Responsible and Ethical Hunter
Why Do We Have Hunting Laws? ■ In the past, there are many examples where animals were hunted almost
to extinction. The American bison is a 19th-century example of how hunting pressure reduced an animal population to a fraction of its original size. Closer to home, market hunting combined with recreational hunting and habitat loss contributed to the extinction of the Magpie Goose in Victoria. The same pressures can be applied to any game animal that is not adequately protected by hunting laws.
■ Game species are the common property of all members of society. Therefore, hunting is regulated in the best interest of the wider community and to ensure that the conservation status of game species is not put at risk.
■ The public demands a responsible management approach to ensure that hunting is conducted responsibly, safely, and sustainably, and that animal welfare concerns are addressed.
Game Conservation ■ Game management laws are in place to conserve wildlife for the
enjoyment of future generations, to ensure continued healthy functioning of natural systems, and to minimise the impact on non-game species. These laws allow game to flourish by doing the following:• Establishing hunting seasons that limit harvesting and avoid breeding,
nesting, and other periods of vulnerability, such as food shortages.• Limiting hunting methods and equipment to prevent overharvesting
and protect animal welfare.• Setting bag limits on the number of animals that can be taken to ensure
harvests remain sustainable.• Protecting habitats.
■ An example of a Victorian law that helps game conservation is the closed season for duck hunting, which ensures that there is no harvesting or disruption during the breeding and moulting periods.
■ Laws are also in place to manage any negative impacts of introduced game species, such as deer.
You should be able to...

Chapter Two / Page 7
Safety and Equal Share of Game Resources ■ In addition to ensuring the sustainability of game animals and their
habitats, hunting laws:• Establish safety guidelines for hunting that protect both hunters and
non-hunters.• Offer equal opportunity for all hunters to harvest game.
■ Victorian game hunting laws prevent unsafe activities such as illegal spotlighting for deer or hunting during hours with insufficient light to identify game. Other laws ensure that law-abiding hunters are not obstructed by those who oppose hunting.
Fair Chase ■ Hunting laws also define the rules of fair chase. The concept began in the
Middle Ages when hunters increased the challenge of recreational hunting by setting rules that limited how they hunted game. Some of these concepts have been made into Victorian law to prevent things such as:• Hunting ducks from a motorboat that is underway in open water• Hunting game fleeing from fire or smoke• Using aircraft or vehicles to hunt game• Using baits to lure game
■ Other fair chase rules may not be hunting laws, but hunters are encour-aged to respect what the general public and other hunters may consider fair chase. Many hunting organisations in Victoria have codes of conduct based on the fair chase principles.
Animal WelfareMany hunting laws regulate activity and equipment to ensure that the animal being hunted is treated as humanely as possible. Here are some examples.
■ Bird hunting seasons are timed to avoid breeding and moulting periods, allow young to become strong in flight, and avoid periods of food shortages during winter.
■ Specifications for the types of firearms and bows, as well as calibres, bore sizes, draw weights, and broadheads, all help ensure that the equipment being used is capable of delivering a lethal strike to the animal being hunted.
■ In the event of a non-lethal strike, a hunter must by law despatch the animal immediately upon recovery.
■ Additionally, there are laws about the use of dogs in hunting. • Some laws specify which breeds of dogs and the numbers of dogs
that can be used to hunt game animals. These laws ensure that only breeds that have been specifically bred for hunting purposes are used to hunt game.
• Specific laws and penalties also require hunters to ensure their dogs do not attack, bite, or maim game or any other wildlife.
Under the Prevention of Cruelty to Animals Act 1986, the Code of Practice for the Welfare of Animals in Hunting was specifically developed to:
■ Set guidelines for hunter behaviour in order to ensure that game, non-game animals, and dogs used in hunting are treated humanely.
■ Guide behaviour that promotes the welfare of other animals where hunting occurs.
Remember… Hunting laws ensure that sustainable game populations remain for others to enjoy and that ecosystems remain healthy.
Remember… Responsible hunters do not take unfair advantage of game animals even if it’s legal.
fair chase Balancing the skill and equipment of the hunter with the ability of the animal to escape

Chapter Two / Page 8
Responsible Hunting and EthicsAs Aldo Leopold, the ‘father of wildlife management’, once said, ‘Ethical behaviour is doing the right thing when no one else is watching—even when doing the wrong thing is legal’.
■ While hunting laws preserve wildlife, ethics preserve the hunter’s oppor-tunity to hunt. Because ethics generally govern behaviour that affects public opinion of hunters, ethical behaviour ensures that hunters are welcome and that hunting areas stay open. This social ‘permission’ or community support for hunting is referred to as its social licence to continue to operate.
■ Ethics generally cover behaviour that has to do with issues of fairness, respect, and responsibility not covered by laws. For instance, it’s not illegal to openly transport dead deer uncovered in the back of a utility. Most hunters agree that this behaviour is irresponsible and unethical because it can offend and distress non-hunters. If hunters fail to act ethically and be considerate of others, laws may have to be introduced to govern behaviour standards. No one wants to see more laws, so use common sense and act respectfully and responsibly.
■ There are also ethical issues between the hunter and nature. For example, an animal appears beyond a hunter’s effective shooting skills distance or the capable range of his or her equipment. Should the hunter take the shot anyway and hope to get lucky? Ethical hunters would say no because of the high risk of wounding the animal and failing to recover it.
The Hunter’s Ethical CodeThe ethical code that hunters use today has been developed over time. The code applies to many areas related to hunting:
■ Natural Resources• Leave the land better than you found it.• Adhere to fair chase principles.• Know your capabilities and limitations as a marksman, and stay within
your effective shooting skills distance.• Strive for a quick, clean kill.• Do not aim at another animal until you have recovered any
downed animals.• Ensure that meat and usable parts are not wasted.• Treat both game and non-game animals ethically and humanely.• Abide by game laws and regulations.• Cooperate with game officers and police.• Report illegal hunting.
■ Interactions With Other Hunters• Follow safe firearm handling practices, and insist your companions do
the same. • Refrain from interfering with another’s hunt.• Avoid consuming alcohol and/or drugs, which can impair you to the
point of endangering others.• Share your knowledge and skills with others.
ethics Moral principles or values that distinguish between right and wrong; they are unwritten rules that society expects to be followed
Remember… Hunting is a privilege and can be taken away if hunters fail to act responsibly.

Chapter Two / Page 9
How to Ask Landowners for Permission
• Make contact well ahead of the hunting season.
• Wear street clothes—no hunting gear or firearms.
• Don’t bring companions—a ‘crowd’ could be intimidating.
• Present a hunting portfolio and a list of references.
• Be polite, even if permission is denied. Your courtesy may affect the outcome of future requests.
■ Interactions With Landowners• Ask landowners for permission to hunt.• Follow their restrictions on when, where, and what you may hunt.• Treat livestock and crops as if they were your own.• Offer to share a part of your harvest with the owner.• Leave all gates the way you found them.• If you notice something wrong or out of place, notify the landowner
immediately.• Never enter private, licenced, or leased land unless you have obtained
permission first. ■ Interactions With Non-Hunters
• Transport animals discreetly—don’t display them.• Keep firearms out of sight.• Refrain from taking and posting onto social media graphic photographs
of your harvest. Do not take photographs of the animal covered in blood or of the animal’s tongue hanging out. Also, do not take ones of you straddling or sitting on the animal.
• Maintain a presentable appearance while on the street—no bloody or dirty clothing.
Responsible HuntingResponsible hunting is founded on the principle of respect. In order for hunting to coexist with other public and private land uses, hunters need to remember that the future of hunting depends on how they behave.
■ The Victorian Government, in conjunction with the hunting industry and hunting organisations, support and promote the RESPECT: Hunt Responsibly program. • This program highlights that responsible hunters should always respect
the laws, the animals, the environment, other hunters, the hunt, and non-hunters.
• These responsible hunting standards provide the cornerstone on which this manual was developed. These same standards should be in the forefront of every hunter’s mind. For more information on the standards, visit www.gma.vic.gov.au.
■ While a Game Licence is required by law to hunt for game, there is one important licence which is important to all hunters—a social licence to hunt. The social licence is the informal approval the community gives hunters to hunt. It is not something you buy, but it is something you earn and maintain from the community. • Following the RESPECT: Hunt Responsibly principles can help hunters
maintain this social licence. • Remember that the public may judge all hunters by the irresponsible
actions of a few. Therefore, every hunter should be an ambassador for the recreation. Hunters must show respect and hunt responsibly.
RESPECT: Hunt Responsibly
Not all hunting activity and behaviour can be entirely managed through laws. That’s where the RESPECT: Hunt Responsibly program fits in. This program reminds hunters that respect is the foundation for responsible, safe, and sustainable hunting.
• While it is essential to know the hunting laws, hunters following the RESPECT standards will ensure that they also know their equipment and how to use it well before they go hunting. To ensure proficiency and accuracy, hunters should:
- Sight-in their rifles or pattern their shotguns before entering the field.
- Practise at the range on paper or clay targets.
• Responsible hunters should know their skill limits and only take a shot if they can retrieve the animal and if a humane result is possible. These practices reduce the likelihood of a non-lethal shot.
Landowner Complaints About Hunters
• They don’t get permission to hunt.
• They don’t tell the landowners when they arrive at or leave the property.
• They make too much noise.
• They leave litter behind.
• They carry loaded firearms in vehicles.
• They damage tracks.
• They don’t leave gates as they were found (open or shut).
• They shoot too close to neighbours or livestock.
• They leave fires unattended.
• They violate game laws.
• They drink alcohol to excess.

Chapter Two / Page 10
We’re lucky in Victoria to have such great hunting.
Maybe you went hunting as a kid or you now go hunting with your kids. Maybe you’re new to hunting or you’re an old hand happy to share some know-how.
Whoever you are, one of the key traits of being a good hunter is respect.
The hunting community has formed a partnership to promote a set of standards to ensure respectful and responsible hunting.
This will help to raise the awareness and maintain the highest standards of behaviour of all involved in hunting.
Through the below standards we can enjoy our hunting even more, improve the perception of hunting and be proud of hunting.
Proudly supported by:
Hunting’s future depends on you
Hunting’s future depends on you. Show respect and hunt responsibly.
Respect for animals
Respect the environment
Respect other hunters
Respect non-hunters
Respect the hunt
Respect the laws
For more information on the standards visit www.gma.vic.gov.au
Australian
Deer Association
RAYTRADE PTY LTD

Chapter Two / Page 11
Caring for the EnvironmentVictoria has many areas across the state that are available for game hunting. Victoria’s parks, forests, and wetlands are special places, but to remain so, they need your help. You need to tread lightly to minimise your impact on the natural environment. This will help maintain a quality habitat for quality hunting. Help protect these important areas by following some basic rules.
■ Keep all vehicles, including four-wheel drives, motorbikes, and bicycles, on tracks.
■ Dispose of animal carcasses and waste properly.• Bury all duck feathers and offal away from water sources. After
plucking or breasting your ducks (i.e. leaving the duck breast with a fully feathered wing attached), feathers, offal, and carcass remains should be buried in a site clear of vegetation and at least 50 metres away from water sources. Better still, store them in a rubbish bag and take them home for disposal.
• Pick up all spent cartridge cases and shotgun shells, and dispose of them correctly. Shotgun shells are generally made of plastic and brass. If they are left on the wetland, they will remain there because they do not break down. Therefore, the shells will have a negative impact on the wetland and its wildlife.
• Dispose of deer carcasses thoughtfully. Ensure that all the remains are disposed of away from camping areas and at least 50 metres from a water source. Bury the remains if possible; or at a minimum, cover the carcass with soil, rocks, and branches.
• Take all rubbish home.
Reducing Environmental Impact While CampingHere are some rules you should follow when camping to reduce the impact on the environment.
■ Camp on an existing campsite rather than creating a new one. Camp at least 20 metres from any creek, lake, or wetland.
■ Drive only on formed tracks and roads. Park immediately adjacent to tracks where it is safe to do so.
■ Be careful when camping under trees. Trees can lose their limbs at any time, but particularly during high winds.
■ Do not dig trenches around tents. ■ Take your rubbish home. If you come across other people’s rubbish, do
the bush a favour and take it out with you. ■ Use only dead fallen wood for firewood. Standing trees, even dead ones,
provide a home for wildlife and are a part of the scenery. Do not cut down or damage standing trees or vegetation. Wherever possible, bring your own firewood.
■ Ensure dogs, if permitted at your campsite, are adequately restrained to protect wildlife and other campers. Remember to clean up after your dogs.
■ Protect water quality. Wash up at least 50 metres from any creek, lake, or wetland. Avoid using soap, and use gritty sand and a scourer instead.
■ Leave campsites tidy.
Remember… Many roads and tracks are closed each year due to seasonal conditions. Check for road closures before you go, and look for signs closing roads and tracks. Don’t drive off the beaten track.

Chapter Two / Page 12
Campfire Restrictions ■ General Advice About Fire Restrictions
• Restrictions apply to having campfires in Victoria. These restrictions are important to reduce the chance of a bushfire that could result in loss of life and property. They are actively enforced.
■ Code Red Days • State forests and some parks will be closed on Code Red days, so no
campfires can be lit on Code Red days. • You should monitor all available media to be aware of Code Red
days, Total Fire Ban days, and prohibited periods, and take appro-priate action.
■ Total Fire Ban Days • Campfires are prohibited on Total Fire Ban days. Solid and liquid fuel
barbecues and ovens are also banned on Total Fire Ban days. Only gas or electric appliances that have been designed and commercially manu-factured exclusively for cooking may be used for meal preparation on a Total Fire Ban day, provided: - The ground and airspace within 3 metres of the appliance is clear of flammable material.
- A minimum of 10 litres of water is on hand. - The appliance is in a stable position when in use.
• It is your responsibility to know if a Total Fire Ban day is declared. ■ All Other Times
• On public land, campfires are permitted in the open air as long as you observe the following conditions: - The fire is lit in a properly constructed fireplace or in a trench at least 30 centimetres deep.
- If a fireplace is provided, it must be used. - The fire should not occupy an area exceeding 1 square metre. - The ground and airspace within a distance of 3 metres from the outer perimeter and uppermost point of the fire should be clear of flammable material.
- The fire cannot be left unattended at any time. It must be extin-guished prior to your absence. This includes if you are leaving to go hunting.
3m 3m
3m3m
1m1m
Remember… Campfires must be attended to at all times. If you leave your campsite for any period of time, make sure the fire is extinguished.
Remember… Monitor all available media for announce-ments in relation to Code Red days, Total Fire Ban days, and other prohibited periods.

Chapter Three / Page 13 Introduction to Firearms
What Is a Firearm?A firearm is a mechanical device that uses pressure from a burning powder to force a projectile through and out of a metal tube. To fully appreciate the importance of firearm safety, you first must understand how firearms work. This includes knowing the parts of the firearm, the types of ammunition, how ammunition is fired, and the ranges of the various firearms and ammu-nition used for hunting.
Basic Parts of a FirearmAlthough firearms have changed a great deal since they were first invented, the terms used for their parts have changed very little. All modern firearms have three basic groups of parts.
■ Action: The action is the heart of the firearm—the moving parts that load, fire, and eject the shotshells or cartridges. Several types of actions are used in modern firearms. Muzzle-loaders have locks instead of actions.
■ Stock: The stock serves as the handle of the firearm. It can be composed of one or two pieces and is usually made of wood or a synthetic material.
■ Barrel: The barrel is the metal tube that the projectile travels through (bullets travel through the barrels of rifles; shots travel through the barrels of shotguns).
■ Define ‘firearm’. ■ Identify the basic parts of a rifle and shotgun. ■ Identify the basic components of rifle and shotgun
ammunition. ■ Understand how ammunition is fired from
a firearm. ■ Identify the types of firearm actions. ■ Recognise proper loading and unloading of firearms
with the different types of actions. ■ Identify the location(s) of the safety mechanism on
firearms, and understand how it is used. ■ Name the types of sights found on firearms. ■ Identify how a rifle is different from a shotgun. ■ Identify and explain a rifle’s calibre and a
shotgun’s gauge. ■ Name the common shotgun chokes, and explain
how they differ.
■ Recognise the difference between lead shot and steel shot.
■ Match ammunitions with firearms correctly. ■ Understand the danger of mixing different gauges of
shotshells. ■ Understand why it is important to know your
firearm’s range. ■ Identify cleaning procedures for a firearm. ■ Identify the basic parts of a muzzle-loader. ■ Understand why you should use only black powder
or a synthetic substitute in muzzle-loaders. ■ State safety practices when using muzzle-loaders. ■ Describe safe loading and unloading of a
muzzle-loader. ■ Describe safe firing of a muzzle-loader.
You should be able to...
The first step to becoming a responsible hunter is knowing your equipment and how to use it safely and effectively.
cartridge Ammunition used in modern rifles; a case containing primer, gunpowder, and a bullet
shotshell Ammunition used in modern shotguns; a case containing primer, gunpowder, wad, and a slug or shot

Chapter Three / Page 14
Parts of a Bolt-Action RifleRifles and shotguns have many similar parts. Shown here are the parts of a commonly used rifle—the bolt-action rifle.
bolt: Movable metal block that seals a cartridge into the chamber on some actions
muzzle: The end of the barrel through which the projectile (bullet or shot) exits
barrel: Metal tube through which the projectile travels
bolt handle: Handle used to open a bolt action
butt: The part of the stock that you hold against your shoulder when shooting
magazine: Container on a repeating firearm that holds ammunition before it’s loaded into the chamber; usually tubes or boxes attached to the receiver
trigger: Small lever that is squeezed to start the firing process
trigger guard: Piece that surrounds the trigger to protect it from being squeezed or bumped accidentally
chamber: Base of the barrel used to hold the cartridge or shotshell ready for shooting
safety: Mechanical device that blocks the trigger or hammer to help prevent accidental firing
stock: Handle of firearm
sight: Device used for aiming by aligning a front and rear sight
forestock: Front portion of the stock extending under the barrel in front of the receiver; usually held by the non-trigger hand to help support the firearm
bore: Inside of the firearm barrel through which the projectile travels when fired
breech: Rear end of the barrel
firing pin: A pin that strikes the primer of the cartridge, causing ignition
receiver: Metal housing for the working parts of the action
Other Firearm Parts
The air-rifle is often used by beginning hunters to learn shooting and safety skills. Modern air-rifles have designs, parts, and sights similar to sporting firearms.
Air-rifles can be just as dangerous as larger firearms. Remember that juniors must be 12 years old to be able to obtain a Firearm Licence and must be supervised at all times by a fully licensed adult when using a firearm of any kind.
There are three types of air-rifles.
• Pneumatic air-rifles use a pump system that forces air into an enclosed chamber. The air is retained in the chamber by a valve that allows air to enter but not escape. When the trigger is released, the compressed air drives the pellet or BB out of the barrel.
• CO2-powered or gas-powered air-rifles use compressed CO2 contained in a cylinder. The cylinder attaches to a chamber inside the air rifle. When the trigger is squeezed, a valve releases a quantity of CO2 that propels the pellet or BB out of the barrel.
• Spring-piston air-rifles use a spring that is compressed by a lever. When you squeeze the trigger, the spring is released and thrusts a plunger forward. The plunger pushes a compressed column of air through the barrel, driving out the pellet or BB.
The Air-Rifle
Remember… Air-rifles cannot be used to hunt game animals in Victoria.

Chapter Three / Page 15
• Centrefire ammunition is used for rifles and shotguns. In this type of ammunition, the primer is located in the centre of the casing base. Most centrefire ammunition is reloadable.
• Rimfire ammunition has the primer contained in the rim of the ammunition casing. Rimfire ammunition is limited to low-pressure loads. Rimfire cartridges are not reloadable.
Centrefire and Rimfire Ammunition
Rifle Ammunition
RIMFIRE
CENTREFIRE
bullet
cartridge case
gunpowder
primer
rim containing primer
Parts of an Over-and-Under ShotgunShotguns are another long-barrelled firearm used by hunters. Below are the parts of a commonly used shotgun—the over-and-under shotgun.
What Is Ammunition?Modern ammunition varies depending on the type of firearm. Rifles use a cartridge containing a single projectile (bullet). Shotguns use a shotshell containing either a single slug or a large number of small projectiles (shot or pellets). However, the basic components of cartridges and shotshells are similar.
Basic Components of AmmunitionThe basic components of ammunition are the case, primer, powder, and projectile(s). Shotshells have an additional component called a wad (see diagrams on page 16).
■ Case: The container that holds all the other ammunition components together. It’s usually made of brass, steel, copper, paper, or plastic.
■ Primer: An explosive chemical compound that ignites the gunpowder when struck by a firing pin. Primer may be placed either in the rim of the case (rimfire) or in the centre of the base of the case (centrefire).
■ Gunpowder: A chemical mixture that burns rapidly and converts to an expanding gas when ignited. Modern smokeless powder will burn slowly when ignited in the open (outside of the case). Black powder is less stable and can be explosive when impacted or ignited in the open.
■ Projectile: The object(s) expelled from the barrel. A bullet is a projectile, usually containing lead, fired through a rifle barrel. A slug is a solid projectile, usually of lead, fired through a shotgun barrel. Shot is a group of lead, steel, tungsten alloy, or bismuth pellets fired through a shotgun barrel.
■ Wad: A seal and/or shot container made of paper or plastic separating the powder from the slug or shot in a shotshell. The wad prevents gas from escaping through the shot and holds the shot together as it passes through the barrel.
Rifle Cartridges ■ It’s critical to select the correct cartridge for your rifle (see page 26).
Carefully compare the data stamp on the barrel of the firearm against the description on the ammunition box and the stamp on each cartridge.
sight
muzzle(extended chokes
shown)
barrelforestock (or fore-end)
trigger (pulled)
stock
butt trigger guard
lever rib
safety

Chapter Three / Page 16
■ Bullets used in rifle cartridges come in various designs, sizes, and weights. The bullet usually is made of lead and may have a jacket made of copper, brass, or another metal. Bullets used for hunting game may have soft or hollow points designed to expand (mushroom) upon impact. Bullets used for target shooting usually have solid points that make smaller holes. • Some Common Types of Rifle Bullets
- Pointed Soft Point: Conventional bullets with a lead core and metal jacket that leaves exposed a spire point tip of lead. High velocity, accurate bullets with a flat travel path (trajectory); excellent mushrooming
- Rounded Soft Point and Flat Point: Conventional bullets with a lead core and a metal jacket that leaves exposed a rounded or flat tip of lead. Popular for low-velocity calibres; recommended for tubular magazines
- Protected Tip: Conventional or monolithic bullet with a polymer or alloy tip. Highly accurate with excellent expansion
- Full Metal Jacket: Bullet with a metal jacket that covers the bullet completely (sometimes the base is uncovered). Maximum penetration without mushrooming
Shotshells ■ Shotgun shells (shotshells or shotgun cartridges) use a shot or slug as the
projectile(s).• Shot are multiple pellets fired through a shotgun barrel. Shot size is
matched to the game being hunted. This type of projectile is used typically to hunt game birds.
• A slug is a single solid projectile, usually of lead, used for hunting big game with a shotgun.
■ The shotshells must match exactly the gauge and shell length specified by the manufacturer. This information usually is found on the barrel of the shotgun. Shotguns may be chambered for 21/2-inch, 23/4-inch, 3-inch, or 31/2-inch shells. This refers to the length of the shell after it has been fired. Never load a shotshell that exceeds the approved shell length stamped on the barrel of your shotgun. Read more about correctly matching ammuni-tion to your firearm on page 26.
■ You also must choose the correct type and size of shot for the shotshell. In general, as the size of your target decreases, you should decrease the diameter of the shot you use. • As pellet diameter decreases, more shot can be placed in a standard
shotshell. • The smaller the shot ‘number’, the larger the pellet diameter (see table
on next page).• A shotshell marked as Magnum has more shot or more gunpowder than
a regular shell. Magnum and regular shotshells are interchangeable if the correct gauge and shell length are used.
■ Steel shot pellets react differently than lead when shot. Steel weighs about two-thirds as much as lead but is much harder. Steel does not deform like lead shot and is not as unstable in flight. It will generally produce a tighter pattern than lead shot. See pages 24 and 25 for information about chokes and shot strings for lead and steel shot.
Safety Tip In tubular magazines, the bullet tip of one cartridge rests directly on the primer of the cartridge immediately ahead. For this reason, use only rounded or flat tips in tubular magazines.
Shotgun Ammunition
shot
slug
shell case
gunpowder
primer
wad with shot cup
wad
gauge Term used to designate bore diameter of a shotgun; gauge is the number of lead balls with diameters equal to the diameter of the bore that, when combined, weigh about 0.45 kg (1 lb).
Remember… Only non-toxic shot can be used for duck hunting in Victoria.

Chapter Three / Page 17
A General Guide to International Shot SizesPellet/Shot Designation United States English & Norwegian Italian German, French, & Spanish
F 0.220" (5.6 mm)
TT 0.210" (5.3 mm)
T 0.200" (5.1 mm)
BBB 0.190" (4.8 mm)
BB 0.180" (4.6 mm) 0.160" (4.1 mm) 0.180" (4.6 mm)
B 0.170" (4.3 mm)
0 0.160" (4.1 mm)
1 0.160" (4.1 mm) 0.150" (3.8 mm) 0.150" (3.8 mm) 0.160" (4.1 mm)
2 0.150" (3.8 mm) 0.140" (3.6 mm) 0.140" (3.6 mm) 0.150" (3.8 mm)
3 0.140" (3.6 mm) 0.130" (3.3 mm) 0.130" (3.3 mm) 0.140" (3.6 mm)
4 0.130" (3.3 mm) 0.120" (3.0 mm) 0.120" (3.0 mm) 0.130" (3.3 mm)
5 0.120" (3.0 mm) 0.110" (2.8 mm) 0.120" (3.0 mm)
6 0.110" (2.8 mm) 0.102" (2.6 mm) 0.110" (2.8 mm) 0.110" (2.8 mm)
6 1/2 0.100" (2.5 mm)
7 0.100" (2.5 mm) 0.095" (2.4 mm) 0.100" (2.5 mm) 0.100" (2.5 mm)
71/2 0.095" (2.4 mm) 0.090" (2.3 mm) 0.095" (2.4 mm) 0.095" (2.4 mm)
8 0.090" (2.3 mm) 0.085" (2.2 mm) 0.090" (2.3 mm) 0.090" (2.3 mm)
81/2 0.085" (2.2 mm) 0.085" (2.2 mm)
9 0.080" (2.0 mm) 0.080" (2.0 mm) 0.080" (2.0 mm) 0.080" (2.0 mm)
The table provides the diameters for pellets. Pellet diameters are given in imperial (inches or " ) and metric (millimetres or mm) units of measurement. In some cases, pellet diameters have been rounded off to the nearest decimal point to aid in comparison purposes.
Pellet diameters are based, where possible, on standard institute formulae for the sizing of shot or ammunition manufacturers’ literature.
Safety Tip If using a muzzle-loading, Damascus steel, or twist-barrelled shotgun for duck hunting, consult a competent gunsmith on whether it is safe to use non-toxic shot in your firearm.

Chapter Three / Page 18
How a Firearm WorksThe same physical process is used to shoot shotshells from shotguns or cartridges from rifles. Pulling the trigger causes the firing pin to strike and explode the primer in the base of the cartridge or shotshell. The spark from the primer ignites the gunpowder, which burns rapidly and converts to a gas. The gas rapidly expands and drives the projectile(s) through the barrel with great force.
■ How the rifle fires:1. A cartridge is inserted into the chamber.2. The action is closed, and the firing pin is pushed back and held back
under spring tension.3. The trigger is squeezed, releasing the firing pin, which moves
forward with great force. The firing pin strikes the primer, causing it to explode.
4. The spark from the primer ignites the gunpowder. Gas converted from the burning powder rapidly expands in the cartridge.
5. The expanding gas forces the bullet out of the cartridge and down the barrel with great speed.
6. The rifling in the barrel (see page 23) causes the bullet to spin as it travels out of the barrel. The bullet’s speed and escaping gases produce a ‘bang’.
■ How the shotgun fires:1. Opening the action pushes the firing pin back and holds it under
spring tension.2. A shotshell is inserted into the chamber.3. Closing the action aligns the firing pin with the primer of the
shotshell.4. Pulling the trigger releases the firing pin. The firing pin strikes the
primer, producing sparks.5. Heat and sparks from the primer ignite the gunpowder. Gas converted
from the burning powder expands in the shell.6. The expanding gas forces the wad and shot out of the plastic body of
the shell.7. The escaping gases produce a ‘bang’ as the wad and shot leave
the barrel.8. The wad quickly opens upon exiting the barrel and falls away. The
shot cluster spreads in length and diameter. This spread is called the shot string (see page 25).
firing pin
bolt
cartridge
chamber barrel
• The bolt moves forward, compressing the firing pin spring and inserting a cartridge into the chamber.
• The firing pin is held back under spring tension.
• When the trigger is squeezed, the firing pin moves forward, crushing and igniting the primer in the cartridge base.
• The primer ignites the gunpowder, generating gas pressure, which forces the bullet forward and out of the barrel.
The firing sequence for shotguns is very similar to this sequence shown for a bolt-action rifle.
How Ammunition Is Fired

Chapter Three / Page 19
Common Features of FirearmsAll types of firearms have actions and sights, and they may have safety mecha-nisms or magazines. Features unique to rifles or shotguns are discussed in the following sections.
Firearm ActionsFirearms can be classified by their action type. The action of a firearm is made up of parts that load, unload, fire, and eject the shotshell or cartridge. Actions are either single-shot or repeating styles. Single-shot firearms must be reloaded each time the firearm is fired. Repeating firearms have extra cartridges or shotshells ready in a magazine, cylinder, or extra barrel.
■ Bolt Action: A bolt-action firearm operates like opening and closing a door bolt. The bolt solidly locks into the breech, making it accurate and dependable. • To open the action, lift the handle up, and pull it to the rear. • If the firearm is loaded, the cartridge or shotshell will be ejected as
you pull the bolt to the rear. To make sure it's unloaded, open the action, and check both the chamber and the magazine for cartridges or shotshells.
• You can store a bolt-action firearm safely by storing the bolt separately from the firearm.
■ Lever Action: The lever-action firearm has a large metal lever located behind the trigger. This handle usually forms the trigger guard as well. • To open the action, push the lever downward and forward, which
extracts the cartridge case from the chamber and ejects it. If a magazine holds extra cartridges, another is immediately ready to be loaded into the chamber.
• It’s often difficult to tell whether a lever-action firearm is loaded. To unload, push the lever downward and forward repeatedly until no more cartridges are ejected. To make sure it's unloaded, open the action, and check both the chamber and the magazine for cartridges.
• Most models also have an exposed hammer, which can be dangerous. An exposed hammer can catch on clothing and vegetation and inadver-tently strike the pin and discharge the firearm. On some older model firearms, the incorrect lowering of the hammer can lead to accidental discharge.
• Always use extra caution to keep your hands away from the trigger while working the lever action.
■ Pump Action: The pump-action firearm is fast and smooth. It allows the hunter to re-cock the firearm without taking his or her eye off the target. The pump action also is referred to as ‘slide action’ or ‘trombone action’.• To open the action, slide the forestock to the rear, which extracts
the cartridge or shotshell from the chamber and ejects it. Sliding the forestock toward the muzzle closes the action and readies another cartridge or shell for loading. A pump-action firearm will open only after it’s fired or if a release lever is pressed and the forestock is pulled to the rear.
• To make sure it's unloaded, open the action, and check both the chamber and the magazine for cartridges or shotshells.
Bolt Action
Pump Action
Lever Action
Single-shot rifles are usually break- or bolt-actions. Repeating rifles include the bolt-action, lever-action, pump-action, and semi-automatic types. Operating the lever, bolt, or forestock ejects the empty cartridge case, chambers a new round of ammunition, and cocks the gun.
Common Actions on Rifles
Break (Hinge) Action
Semi-Automatic Action

Chapter Three / Page 20
■ Break (or Hinge) Action: The break-action firearm operates on the same principle as a door hinge, and it is simple to load and unload. • To open the action, point the barrel(s) at the ground. A release lever is
pressed, and the stock drops downward. This allows the cartridges or shotshells to eject or to be removed manually if the firearm is loaded.
• Break-action firearms have a separate barrel for each shotshell or cartridge rather than a magazine. Most models have one or two barrels, but some have up to four.
• Some models also have an exposed hammer(s), which can be dangerous. An exposed hammer can catch on clothing and vegetation and inadver-tently strike the pin and discharge the firearm. On some older model firearms, the incorrect lowering of the hammer can lead to accidental discharge.
■ Semi-Automatic (or Autoloading) Action: As each shot is fired manually, the case of the cartridge or shotshell is ejected automatically, and the chamber is reloaded automatically. • To open the action, you must pull back the bolt’s operating handle. Most
semi-automatics, when the bolt is pulled back, will lock in the open position if the magazine is empty. If the firearm does not lock open, it means that a cartridge or shotshell from the magazine has gone into the chamber, making the firearm ready to fire. A few semi-automatics do not lock open and must be held open to check the chamber.
• To unload, first remove the magazine, and lock the action open. Then make sure it’s unloaded—visually check the chamber for an additional cartridge or shell.
• When closing the action for loading, pull back to unlock the bolt or slide and then let go, allowing it to travel forward on its own. Do not guide it forward with your hand because it may not seat properly.
• On a semi-automatic, the trigger must be pulled each time a shot is fired.
Break Action with Single Barrel
Break Action Side-by-Side with
Double Barrel
Break Action Over-Under with
Double Barrel
Pump Action
Semi-Automatic Action
Bolt-Action Repeater
Lever-Action
Common Actions on Shotguns
Shotguns use many of the same actions as rifles—the pump action, semi-automatic action, and bolt action. They also use a break action as either a single barrel or double barrels. The double barrels can be arranged horizontally (side-by-side) or vertically (over-and-under).
Remember… Under the Firearm Act 1996, pump-action shotguns and semi-automatic firearms cannot be used for recreational game hunting in Victoria.

Chapter Three / Page 21
Safety MechanismsA safety mechanism is a mechanical device that blocks the action to prevent the firearm from shooting until the safety is released or pushed to the off position. It is intended to prevent the firearm from being fired acciden-tally. However, a safety mechanism should never be relied on totally to protect against accidental shooting. The safety mechanism is a mechanical device subject to mechanical failure from wear and other factors, and it can fail when least expected. Also, it can be unknowingly bumped from the safe position as your firearm is being handled or as it catches on clothing or tree branches.The safety mechanism is located around the receiver of the firearm and is usually easy to spot. Common types are:
■ Cross-Bolt Safety Mechanism• Common on pump and semi-automatic firearms• A simple, push-button action that blocks the trigger or hammer• Usually located at the trigger guard or ahead of the hammer
■ Pivot Safety Mechanism• Common on bolt-action rifles• A pivoting lever or tab that blocks the trigger or firing pin• Located on the frame (blocks trigger) or on the bolt or slide (blocks
firing pin) ■ Slide or Tang Safety Mechanism
• Common on some rifles and break-action shotguns• A sliding bar or button that blocks the firing action• Located on the tang (a metal strip behind the receiver) of break-action
firearms or on the side of the receiver on some rifles ■ Half-Cock or Hammer Safety Mechanism
• Common on firearms with exposed hammers• Positions the trigger at half-cock, away from the firing pin• Engaged by placing the trigger at half-cock; some firearms automatically
rebound to the half-cock position after the trigger is released• While not a true safety mechanism, it sometimes is described as a
mechanical safety device by firearm manufacturers
MagazinesIn repeating firearms, the magazine is the place that stores the ammunition that has not been fired. When you work the action, a cartridge is picked up from the magazine and placed in the chamber ready to be fired.
■ Magazines are designed with a spring and follower, which push against the cartridges to move them into the action. When checking a magazine to make sure it’s empty, you must be able to either see or feel the follower; if you cannot see or feel the follower, there may be a cartridge jammed in the magazine, which can be dangerous. Tubular magazines require close attention to make sure a cartridge is not jammed in the magazine.
■ Magazines may be detachable or fixed. • Detachable magazines allow you to remove extra ammunition from the
firearm by simply removing the magazine. • Fixed magazines require the ammunition to be removed manually from
the gun itself. These include tubular, hinged-floor-plate, revolving, and blind magazines.
The red outlines indicate where safety mechanisms are typically located on rifles and shotguns.
Typical Locations of Safety Mechanisms
Safety Tip You should never replace safe firearm handling with trusting the safety mechanism on a firearm. It is a mechan-ical device that could fail. Don’t release the safety mechanism until just before you shoot.
Knowing where the safety mechanism is and how it works is not always as simple as it might seem. Sometimes people alter or modify their guns to disable the safety mechanism. This is very dangerous, especially if the gun gets into the hands of an inexperienced shooter. Be sure you know how the safety mechanism works on your own gun or any others you handle. Never alter or modify your firearm yourself. Have an experienced gunsmith look at your gun if the safety mechanism does not work or if anything else is wrong with it.

Chapter Three / Page 22
SightsA sight is a device used to line up the muzzle with the shooter’s eye so that he or she can hit the target. Sights are more critical on a firearm that fires a single projectile (rifle) than on a firearm that shoots a pattern of shot (shotgun). Shotguns usually have a simple pointing bead. Rifles typically have an open, aperture (peep), or telescopic sight. Read more about using sights in Chapter Four.
■ Bead Sight: Simple round bead set into the top of the barrel near the muzzle of a shotgun. Some shotguns have a second, smaller bead about halfway back on the barrel. The shooter uses the shotgun to ‘point’ at and follow a moving object. The bead is used only for a reference as the shotgun is pointed and moved to follow flying or running targets.
■ Open Sight: Combination of a bead or post front sight and a notched rear sight. These sights are simple and inexpensive. Open sights allow quick sighting. To aim, you centre the top of the bead or post within the notch of the rear sight, and line up on the target. Open sights can be fixed or adjustable.
■ Aperture (Peep) Sight: Combination of a bead or post front sight and a round hole set on the rifle’s receiver close to the shooter’s eye. To aim, you centre the target in the rear peep or aperture sight, and then bring the front sight into the centre of the hole. An aperture sight lets you aim more accurately and is adjusted more easily than an open sight.
■ Telescopic Sight (Scope): Small telescope mounted on your firearm. A scope gathers light, brightening the image and magnifying the target, and does away with aligning rear and front sights. The aiming device inside the scope is called the ‘reticle’. To aim, you simply look through the scope, and line up the crosshairs, post, or dot with your target. Telescopic sights provide the most accurate aiming, which makes them popular for rifle hunting.
■ Reflex Sight (including most dot sights): Small device mounted on your firearm. A reflex sight uses electronics or optical fibres to project a glowing dot or other mark on a lens in front of the shooter’s eye. Some reflex sights also magnify like telescopic sights.
Differences Between Rifles and ShotgunsThe main differences between rifles and shotguns are their barrels and the type of ammunition used.
■ The rifle barrel is long and has thick walls with spiralling grooves cut into the bore. The grooved pattern is called rifling.
■ The shotgun barrel is long and made of fairly thin steel that is very smooth on the inside to allow the shot and wad to glide down the barrel without friction. It’s thinner than a rifle barrel because it does not have to withstand as much pressure.
Open
Bead
Aperture
Dot
Telescopic
Types of Firearm Sights
Remember… Never use the scope on your rifle as a pair of binoculars. If you scan the envi-ronment with the rifle scope, you will end up pointing your firearm in an unsafe direction.
Damascus or ‘Damascus twist’ barrels are older shotgun barrels that were typically made before 1900. Iron and steel ribbons were twisted and welded together. Damascus barrels are weaker than modern barrels and are not designed for the high gas pressures created by modern ammunition. Damascus barrels have a distinctive, irregular pattern of short, streak-like marks around the barrel.
The Damascus Barrel

Chapter Three / Page 23
Rifling in the Rifle BoreA bullet fired from a rifle has a spiral spin that keeps it point-first in flight, increasing accuracy and distance. This is achieved by the rifling inside the barrel, from which the rifle got its name. The barrel is thick and has spiral-ling grooves cut or pressed into the bore. The ridges of metal between the grooves are called lands. Together, the grooves and lands make up the ‘rifling’.
A Rifle’s CalibreCalibre is used to describe the size of a rifle bore and the size of cartridges designed for different bores.
■ Calibre usually is measured as the diameter of the bore from land to opposite land and is expressed in hundredths of an inch, thousandths of an inch, or millimetres. For example, a .270-calibre rifle bore measures 270/1000ths of an inch in diameter between the lands and has a larger bore diameter than a .223. However, there is no standard established for designating calibre. In some cases, the calibre is given as the diameter of the bullet, which is the distance between the grooves.
■ Calibre designations sometimes have a second number that has nothing to do with the diameter. For example, the popular .30-30 is a .30-calibre cartridge, but the second number is a holdover from the days when the cartridge took 30 grains of powder. The ‘06’ in .30-06 refers to the year (1906) it became the official ammunition of the U.S. military. Most European cartridges have metric designations and are commonly expressed in millimetres. For example, a 9.3 x 62 is a cartridge with a 9.3-millimetre bore diameter and a 62-millimetre case length.
■ Every rifle is designed for a specific cartridge. The ammunition must match the data stamp on the firearm. For example, there are several .30-calibre firearms that use the same bullet size but are designed for different cartridges (the .30-30, .30-06, .308, and the .300 Savage). If you cannot find the calibre stamped on the firearm, take it to a qualified gunsmith.
Remember… Reloaded shotshells may have wrong information or have been improperly reloaded. It’s important to mark reloaded shotshells clearly. Use only shotshells or cartridges that you have reloaded yourself or that have been reloaded by a person whom you know is competent.
The bore of a rifle is grooved, which puts a spiral spin on the bullet for greater accuracy. The bore of the shotgun barrel is smooth because rifling would spread the shot pattern too soon.
Shotgun Barrel
Rifle Barrel
lands: The ridges of metal between the grooves in a rifled bore
grooves: The spiral cuts in a rifled bore
Rifle and Shotgun Bores
Rifle Calibres
The circles show bore sizes of common calibres. Having the same bore size does not mean different cartridges are interchangeable.
.45, .458
.44, .444
.40, 10 mm
.357, .38, 9 mm
.30, .30-06, .308, .32,7.62 mm, 8 mm
.270, .280, 7 mm
.22, .223, .25,5.56 mm, 6 mm

Chapter Three / Page 24
A Shotgun’s GaugeShotguns are classified by gauge, which is a measure related to the diameter of the smooth shotgun bore and the size of the shotshell designed for that bore.
■ Common shotgun gauges are 12-gauge, 16-gauge, 20-gauge, and 28-gauge. The smaller the gauge number, the larger the shotgun bore. Gauge is determined by the number of lead balls of size equal to the approximate diameter of the bore that it takes to weigh one pound. For example, it would take 12 lead balls with the same diameter as a 12-gauge shotgun bore to weigh one pound. Today, however, gauge can be measured much the same way as calibre, by measuring the inside bore diameter.
■ The .410-bore shotgun is the only exception to the gauge designation for shotguns. It has an actual bore diameter of 410/1000ths of an inch, which is approximately equivalent to a 671/2 gauge.
■ Each gauge of shotgun shoots only shells of the same gauge. For example, 12-gauge guns use only 12-gauge shells.
■ The gauge of a shotgun is usually marked on the rear of the barrel, and the gauge of a shell is marked on the shell as well as on the factory box.
Shotgun ChokeWhen a shotshell is fired from a shotgun, the pellets leave the barrel and begin to spread or scatter. The farther the pellets travel, the greater the spread of the group of pellets (shot) both in length and diameter. This spread is called the shot string. To control the shot string, shotgun barrels have a choke that will affect the shot pattern when the shot string hits the target. Read more about how to pattern a shotgun in Chapter Four.
■ Generally, your distance from the target determines the choke you need. The choke of a shotgun determines shot pattern and shot string. It has no bearing on shot speed (velocity) or distance (range). That is, the choke does not alter the shotgun’s power—it just controls how tight or spread out the pellets will be at a specific distance.
■ The spread effect of the most common chokes is illustrated below, showing how many pellets will hit within a certain area at different ranges. • Cylinder choke is unconstricted, being the same diameter as the bore.
Cylinder choke produces a broad shot pattern. It is most effective at short distances.
• Skeet choke has a very slight constriction. This choke still produces a broad pattern and is a good choice for quail hunting at short ranges.
• Improved Cylinder choke has a slight constriction. The shot pattern produced is less broad but denser than that of a Skeet choke. This is a good choice for duck, quail, rabbits, and other upland game at relatively close ranges.
• Modified choke has moderate constriction. The pellets stay together longer, making the shot pattern denser and more useful at longer ranges.
• Improved Modified choke has a slightly tighter constriction than the Modified choke.
• Full choke has a tight constriction. It produces a dense shot pattern. This is a choke good for shot at 35 metres (38 yards) and longer ranges.
choke The degree of narrowing at the muzzle end of the shotgun barrel
shot pattern The spread of shot pellets after they hit a patterning board
shot string The three-dimensional spread of shot pellets after they leave the barrel
Sizes shown are the minimum inside bore diameter with a tolerance of +0.020'. Data is presented courtesy of SAAMI.
12 Gauge .725'
16 Gauge .665'
20 Gauge .615'
28 Gauge .545'
.410 Bore
.410'
Shotgun Gauge Sizes

Chapter Three / Page 25
Shot Strings
The illustrations of shot strings represent the full load of pellets at a particular instant in time after a shotshell is fired. It shows a comparison of lead vs. steel shot string of similar weight. Because the steel shot does not deform and remains spherical, the steel shot string is shorter and tighter in diameter then the lead shot string. Deformed pellets slow down faster and deviate more than round pellets.
Steel shot is 30% lighter than lead shot of the same size. Also, steel shot is harder than lead, so the individual pellets stay round after firing, generally keeping the pattern tighter.
Some hunters use steel shot one or two sizes larger to make up for the difference in weight from lead shot. Others use the same size steel shot, or even smaller steel shot, to get more shot into their patterns. You should pattern test your shotgun with various loads of steel shot before hunting game birds with it. Refer to Tom Roster’s Non-Toxic Shot Lethality Table (see page 39) to determine the minimum pattern count needed for particular game birds at particular distances.
Effective pattern density is the key. Maximum pellet counts spread evenly across a 76-centimetre (30-inch) circle are best.
Steel Shot
LENGTH OF SHOT STRING
DIA
MET
ER
direction of flight
Lead Shot36 grams (11/4 ounces) No. 4 shot, 169 pellets (Full choke)
DIA
MET
ER
60–70% the diameter of lead
50–60% the length of leadLENGTH OF SHOT STRING
Steel Shot36 grams (11/4 ounces) No. 2 shot, 156 pellets (Full choke)
direction of flight
Circles represent the approximate diameter of a lead shot pattern (in centimetres) as distance (in metres) increases.
Cylinder
Improved Cylinder
Modified
Full
Cylinder Choke
Improved Cylinder Choke
Modified Choke
Full Choke
Bore narrowing is exaggerated for clarity.
Effects of Choke on Shot Pattern at Various Distances

Chapter Three / Page 26
Match Firearms and Ammunition CorrectlyWith so many kinds of firearms and types of ammunition, it’s not always easy to match the proper ammunition to your firearm correctly—but getting it right is critical. If you match the wrong ammunition to your gun, you can cause an explosion, injuring or possibly killing yourself and any bystanders.
■ To match the proper ammunition to your rifle or shotgun correctly:• Read the specific calibre or gauge designations on the side of the
barrel. Match that designation exactly. For example, if it says ‘.270 Winchester’, you cannot use ‘.270 Weatherby’. Shotgun barrels will give the gauge and the length of the chamber (for example, ‘12-gauge for 2¾-inch shells’ or ‘20-gauge Magnum for 3-inch shells’).
• Carefully read the information on the lid of the ammunition box. With shotgun ammunition, always check the gauge and the shell length and ensure both match the data on the barrel. Before using Magnum loads, check with the firearm manufacturer to confirm that they are safe to use in your shotgun.
• Finally, match the information on the barrel to the information on the cartridge or shotshell before you shoot. If in doubt, ask a more experienced shooter or a qualified gunsmith. Some gun shop assistants, although they sell ammunition, may not know about the differences in sizes or the type of firearm you shoot.
■ Safety practices that will help you avoid using the wrong ammunition are:• Purchase only the correct ammunition for your firearm. Buy the
exact calibre or gauge and length of ammunition for which your rifle or shotgun was designed. For example, shotshell must be the correct length for the shotgun. The data stamp on the barrel of the shotgun will identify what length shell can be used. Never use a shell that is longer than this length.
• Carry only the correct ammunition for the firearm you’re using. Never mix ammunition, such as carrying a calibre or gauge your companion uses. A common mistake involves putting a 20-gauge shotshell into a 12-gauge shotgun. The smaller gauge shell will slide through the 12-gauge chamber and partly down the barrel, causing an obstruction. The shooter, especially when excited by the presence of game, then might insert a 12-gauge shotgun shell behind the 20-gauge shell with potentially deadly consequences.
load The amount of gunpowder in the cartridge or shotshell together with the weight of the bullet or shot charge
Hunting Tip Use an adequate calibre and projectile combination to suit hunting condi-tions. Avoid using high-velocity calibres combined with fragile projectiles when hunting in heavy cover and the quarry is expected to be close. At short distances, fragile projectiles driven at high speeds can split up on contact with heavy muscle or bone without penetrating to the vital organs.
The rear of a shotgun barrel should be marked with the gauge and the length of the chamber.
The data stamp of a rifle is usually stamped toward the rear of the barrel.
Safety Tip Hang fires happen when the firing pin has struck the primer and there is a delay before the gun fires. This can occur for several reasons, such as a faulty firing pin or spring, defective primer, or other cartridge-related problems. A misfire is when the primer fails to ignite the powder. Hang fires and misfires can happen with any kind of firearm.
Always treat a misfire or a hang fire as if the firearm is going to discharge at any second, and keep the firearm pointed in a safe direction. Leave the action closed, and retain your shooting position. Most importantly, maintain safe muzzle control at all times. Eject the round when safe to do so. Failure to follow these safe handling practices could result in a tragedy.
WARNING!Smaller shotshells (such as 20-gauge shells), if mistakenly fed into a 12-gauge gun, will slip past the chamber and lodge in the barrel, causing serious personal injury or gun damage if a 12-gauge shell is loaded and fired. Some rifle ammunition also may fit into the wrong gun, creating a dangerous obstruction. The calibre or gauge stamped on the end of the shell must match that stamped on the gun barrel. Some barrels are not stamped. Be sure the right ammunition is used in your gun.
20-gauge shotshell
lodged in a 12-gauge barrel
Chapter Three / Page 27
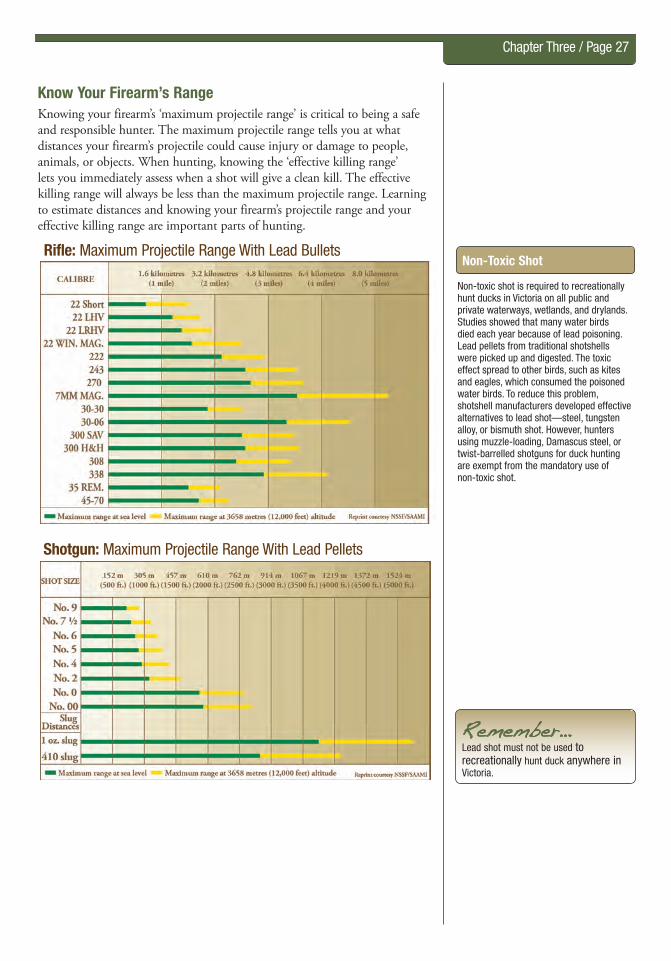
Know Your Firearm’s RangeKnowing your firearm’s ‘maximum projectile range’ is critical to being a safe and responsible hunter. The maximum projectile range tells you at what distances your firearm’s projectile could cause injury or damage to people, animals, or objects. When hunting, knowing the ‘effective killing range’ lets you immediately assess when a shot will give a clean kill. The effective killing range will always be less than the maximum projectile range. Learning to estimate distances and knowing your firearm’s projectile range and your effective killing range are important parts of hunting.
Rifle: Maximum Projectile Range With Lead Bullets
Shotgun: Maximum Projectile Range With Lead Pellets
Remember… Lead shot must not be used to recreationally hunt duck anywhere in Victoria.
Non-toxic shot is required to recreationally hunt ducks in Victoria on all public and private waterways, wetlands, and drylands. Studies showed that many water birds died each year because of lead poisoning. Lead pellets from traditional shotshells were picked up and digested. The toxic effect spread to other birds, such as kites and eagles, which consumed the poisoned water birds. To reduce this problem, shotshell manufacturers developed effective alternatives to lead shot—steel, tungsten alloy, or bismuth shot. However, hunters using muzzle-loading, Damascus steel, or twist-barrelled shotguns for duck hunting are exempt from the mandatory use of non-toxic shot.
Non-Toxic Shot

Chapter Three / Page 28
Cleaning Your Firearm ■ Clean your firearms after every use to keep them in top condition. Every
hunter should own a complete cleaning kit. ■ Work on a cleared table or bench. Always give cleaning your full
attention. Never clean a firearm while doing something else. ■ Follow these basic steps to clean your firearm.
• Point the muzzle in a safe direction, and make sure the gun is unloaded.• Remove all ammunition from the cleaning bench.• For the most thorough cleaning, field strip the firearm as directed in the
firearm owner’s manual. Then clean each part separately.• Follow the instructions in your cleaning kit. If possible, clean the barrel
from the breech (back) end, using a bore guide and a cleaning rod holding a bore brush or patch wetted with solvent. Pass the brush/patch all the way through the barrel. Repeat several times with fresh patches. You may need a larger brush for the chamber. Use a hand brush to clean the crevices where powder residue accumulates. Follow with a dry patch, and finish with a lightly oiled patch for the barrel. Use cloth for other parts.
■ Use a flexible ‘pull-through’ cleaning cable (often referred to as a ‘bore snake’) when cleaning firearms with lever or semi-automatic actions to prevent dirt, grime, or debris from being pushed into the action area. Bore snakes can be used on other types of firearms, and are often favoured by hunters for a quick firearm clean while in the field.
■ Use cleaning solvents in a well-ventilated area and only as directed. ■ If cleaning from the muzzle end, use a muzzle protector so that you don’t
damage the rifling near the muzzle.
• Assorted rod tips—brushes, mop tips, slotted tips, jag tips
• Bore light
• Clean cloths
• Cleaning rods
• Cotton swabs
• Dental mirror
• Gun grease
• Gun oil
• Gunsmith screwdrivers
• Patches appropriate for the calibre or gauge of the firearm
• Pipe cleaners
• Solvent
• Stand to hold the firearm securely in a horizontal position
• Toothbrush
Cleaning Kit
Cleaning a Rifle

Chapter Three / Page 29
What Is a Muzzle-Loader?Muzzle-loader is the term given to early firearms because they are loaded from the muzzle or open end.
■ On these early firearms, locks played the role of modern-day actions. Matchlock and wheel lock muzzle-loaders are rare and valuable, but they also may be unsafe to use. Flintlocks and percussion locks are the muzzle-loaders typically used for shooting competitions and for hunting. They are generally less expensive, lighter, more reliable, and easier to load and maintain than matchlocks and wheel locks.
■ Muzzle-loaders are most commonly rifles. However, there are also smooth-bored muzzle-loaders—shotguns. Shotgun muzzle-loaders can have either a single barrel or double barrels joined side by side. When loading the double-barrelled muzzle-loader, it’s critical to avoid putting the two loads down the same barrel. Double-barrelled guns usually have two locks, one for each barrel. This allows the shooter to fire each barrel separately before the gun is reloaded. Most double-barrelled guns were designed with two triggers.
■ Black powder is the only type of powder that should be used in muzzle-loaders. However, synthetic substitutes, such as Pyrodex, also can be used. Don’t use modern-day smokeless powders in black powder firearms. Smokeless powders can cause serious injury if used in muzzle-loaders.
serpentine
pan
pan coverslow match
Matchlock
spring-powered wheel
pan
pyritecock or doghead
pan cover
Wheel Lock
butt plate
set trigger (on some rifles)
front sight
muzzle
ramrod
triggerstock
patch box
flint
cock
frizzen rear sight
pan key
lock plate
Parts of a Muzzle-Loading Flintlock Rifle
cock cap nipple
Parts of the Percussion Lock

Chapter Three / Page 30
Basic Muzzle-Loader Safety and Skills
Ammunition for Muzzle-LoadersThree types of projectiles—the round ball, the bullet, and shot—are used in muzzle-loaders. Most are melted and cast from pure lead. Round balls are used mainly for target practice but also can be used for hunting. Bullets are preferred for hunting because they are generally more accurate at certain ranges. Shot pellets are designed to spread, just as with today’s shotguns.Black powder is made of potassium nitrate (saltpetre), sulphur, and charcoal. When ignited, it causes a dense cloud of white smoke. It comes in four sizes or granulations.
■ Fg: Coarse grain typically used in cannons, rifles larger than .75 calibre, and 10-gauge shotguns or larger
■ FFg: Medium grain typically used in larger rifles between .50 and .75 calibre, and 20-gauge to 12-gauge shotguns
■ FFFg: Fine grain typically used in smaller rifles and pistols under .50 calibre and smaller shotguns
■ FFFFg: Extra-fine grain typically used as a priming powder in flintlocksPyrodex and Clear Shot are black powder substitutes that can be used in amounts equal to black powder, but loading may vary. Be sure to get instruc-tions from a qualified gunsmith for loading procedures. Substitutes are not recommended for use in flintlocks because they may not ignite from sparks as easily.
striker
ramrod
Pyrodex pellets (optional)
breech cover
mounting for scopecap or
primer (inside)
adjustable sight
stock (often synthetic)
recoil pad
In-Line Muzzle-Loader
bullet (conical, saboted, or belted)
muzzle

Chapter Three / Page 31
Loading a Muzzle-Loader ■ Loading or charging a muzzle-loading firearm presents some special
concerns because it requires the muzzle to be pointed upward. ■ For rifles, position the butt on the ground between your feet. You should
be facing the underside of the barrel. The muzzle should be pointed upward and away from your body. Never work directly over the muzzle.
■ Determine whether the gun is already loaded by checking the barrel with a marked ramrod, which has an ‘unloaded’ or empty marking. If you aren’t sure, consult an experienced muzzle-loader user or gunsmith.
■ Measure out the proper amount and type of powder using the calibrated powder measure. Replace the powder flask’s cap, and swing the flask to the other side of your body. Pour the powder into the barrel from the measure. Tap the barrel to make sure all powder falls to the breech end.
■ Centre a lubricated, pre-cut patch over the muzzle. You can lubricate the patch using a manufactured lubricant or with saliva by placing it in your mouth. Lay the ball on the patch with the sprue or flat side up, if the ball comes with this feature. Then seat the ball, and start it down the barrel using the short starter.
■ Use the longer ramrod to push the ball the rest of the way, making sure it’s seated well on the powder charge. Push the ramrod in short strokes, gripping it just a few inches above the muzzle. If you use longer strokes, you might accidentally snap the rod and injure your hands or arm. Your ramrod should be marked to show when the ball is properly seated over a specific load, such as 70 grains of FFFg powder.
Muzzle-loaders take significantly more knowledge to operate than modern firearms. They also present greater risks. Several rules must be followed to ensure safe operation.
• Keep the muzzle pointed in a safe direction. Do not lean over, stand in front of, or blow down the muzzle.
• Use only black powder or a safe substitute in a muzzle-loading firearm.
• Wait until you’re ready to fire before you prime or cap a muzzle-loader.
• Always wear shooting glasses and ear protection when shooting a muzzle-loader; a long-sleeved shirt is also advisable.
• Never smoke while shooting or loading or when near a powder horn or flask.
• Load a muzzle-loader directly from a calibrated powder measure—do not load from a horn, flask, or other container. A loose spark or glowing ember in the barrel can cause the powder to explode.
• Load only one charge at a time.
• Unload a muzzle-loader before bringing it into your home, camp, or vehicle.
• Stay with your charged muzzle-loader at all times.
Basic Muzzle-Loader Safety
1. Measure powder charge.
2. Pour measured powder down barrel.
3. Place patch and ball on muzzle.
4. Tap ball into barrel with starter.
5. Take out ramrod.
6. Ram ball down barrel.
7. Be sure ball is completely seated.
8. Clear vent hole with pick if necessary.
9. On flintlock muzzle-loader, pour powder into pan and close frizzen.
10. On percussion lock muzzle-loader, place cap on nipple.
Steps for Loading a Muzzle-Loader
6
1 2
3
4
5
7
8 9
10
or

Chapter Three / Page 32
Unloading a Muzzle-Loader ■ There are three ways to unload a muzzle-loader.
• Unload a muzzle-loader by discharging it into a suitable backstop. Do not fire into the air or into the ground at your feet in case the projectile ricochets.
• Use a CO2 discharger to clear the barrel. - Percussion Lock Muzzle-Loader: Slip the discharger over the nipple. - Flintlock Muzzle-Loader: Place the discharger against the touchhole.
• On a modern in-line muzzle-loader, remove the breech plug and simply push the projectile and powder out the rear of the barrel.
■ When a muzzle-loader is unloaded, place your ramrod or loading rod in the barrel before leaning the firearm against a good rest—this will prevent debris from falling down the barrel and blocking the touchhole.
Firing a Muzzle-Loader ■ Percussion Lock
Muzzle-Loader: When you’re ready to fire the muzzle-loader safely, place the percussion cap on the nipple. Be sure that your surroundings and your backstop are safe. Then aim and fire.
■ Flintlock Muzzle-Loader: When priming a flintlock, pull the hammer to a half-cock position, and open the priming pan cover. Check your flint, making sure the setting is tight and properly adjusted. Insert a vent pick or fine wire into the barrel’s touchhole to make sure the opening is clear. With your pan primer, fill the pan about three-fourths full of FFFFg powder. Close the frizzen, and pull the hammer to full cock when you’re ready to fire the shot safely.
■ After firing, place the hammer in the half-cock position, and swab the barrel to remove sparks that might be inside.
Cleaning a Muzzle-Loader ■ Firing a muzzle-loader leaves a corrosive residue inside the
barrel that causes pitting and reduces accuracy. The buildup of residue, called fouling, also will make loading difficult.
■ To avoid fouling, swab the barrel with a moist patch after each shot. The patches or cleaning rags used to wipe the barrel must be the correct size and should be made of cotton or approved synthetic materials. Follow the recommendations of retailers who sell muzzle-loaders or those who regularly use muzzle-loaders.
■ Thoroughly clean a muzzle-loader after each shooting session. Black powder residue can damage the barrel if left overnight.
■ Clean the gun’s lock periodically. Normally it’s held in place by one or two bolts. Once the lock has been removed, scrub both sides with an old toothbrush and hot water. Make sure the entire lock is completely dry, and then lightly oil and replace it.
Sometimes a muzzle-loader will not fire immediately when the trigger is pulled. This is known as ‘hang fire’ and requires great caution because the gun might fire some time after the cap or flint created the initial sparks.
• Keep the gun pointed in a safe direction, preferably downrange.
• Don’t take it anywhere that it could injure someone or damage property if it fires.
• If a muzzle-loader doesn’t fire properly, get help from an experienced shooter to unload it using a ball discharger.
Hang Fire Situations

Chapter Four / Page 33 Basic Shooting Skills
Good Marksmanship and AccuracyA fair amount of knowledge, skill, and experience is required to become a successful hunter. One of the essential skills is good marksmanship, which is accurately and consistently hitting the target where planned. When hunting, accuracy is critical for a clean kill. Good marksmanship is built on three fundamentals.
■ Proper sight adjustment or patterning ■ Proper shooting technique ■ Regular practice
Know Your Effective Shooting Skills DistanceResponsible hunters know their personal accuracy and limit their shots accordingly.
■ A 20-centimetre (8-inch) paper plate is a useful target for establishing deer hunting field accuracy. A 20-centimetre (8-inch) target is about the same size as the vital area of a deer. You need to be able to hit the paper plate consistently at the same distance and from the same shooting position you will be using when hunting. The fact that you can hit a 20-centimetre (8-inch) target at 100 metres from a bench rest does not mean you will be able to do the same from a standing or kneeling position.
■ Before hunting, practise until you are confident you can hit the required target at the distances and from the shooting positions you expect to use in the field. When hunting, limit your shots to your most accurate range.• To determine your effective shooting skills range with a
shotgun, set up a clay target thrower to throw crossing targets (left-to-right if you are right-handed or right-to-left if you are left-handed).
• The targets need to simulate a passing duck, so set the clay thrower to throw the target at approximately 25–45 metres off the ground. The target needs to be travelling at approx-imately 64–72 km/h at the point at which it is to be shot.
■ Define ‘good marksmanship’, and understand why it is important.
■ Identify the fundamentals of good marksmanship. ■ Define ‘sight alignment’ and ‘sight picture’. ■ Understand how to determine your dominant eye. ■ Identify the basic steps to sight-in a rifle. ■ Identify rifle-firing techniques that will help
improve accuracy. ■ Recognise the proper positions for rifle firing. ■ Recognise the common shotgun chokes, and give an
example of when you would use each.
■ Understand which sizes of non-toxic shot are needed to hunt different game birds.
■ Recognise the basic steps for patterning a shotgun. ■ Identify shotgun-shooting techniques that will
improve accuracy. ■ Understand proper shotgun-shooting stance. ■ Understand the difference between swing-through
and maintained or sustained lead when hunting with a shotgun.
You should be able to...
Remember… Before going hunting for game birds, pattern test your shotgun and practise with the choke and load combination you intend to use in the field.

Chapter Four / Page 34
• Starting at 20 metres from the point in the target’s flight path where it will be shot, set up a series of markers at intervals of 10 metres, out to a distance of 40 metres (i.e. at 20, 30, and 40 metres). Then, starting at the 20-metre mark, shoot at eight targets. If you hit six out of the eight (i.e. 75%), move back to the 30-metre mark. Again, if you hit six out of eight, move back to the 40-metre mark.
• Your effective shooting skills distance is the greatest distance that you can consistently hit six out of eight targets. For example, if you consis-tently hit six out of eight targets at 20 metres, but fewer than six at 30 metres, your maximum shooting skills distance is 20 metres. For most shotgun hunters, their effective shooting skills distance is 30 metres.
Rifle Firing
Sight AlignmentSight alignment is the process of lining up rear and front sights. The sight picture is the image you see when the sights are aligned correctly with the target. To ensure that the bullet will travel to the target in your sight, it’s necessary to sight-in your rifle. Before you can do that, you need to determine your dominant or ‘master’ eye.
Dominant or Master Eye ■ Just as you have a dominant hand, you also have a dominant eye. You
need to aim with the dominant—or master—eye for the most accurate shooting. Usually your dominant eye is the same as your dominant hand, but not always.
With an open sight, you line up the target with the blade or bead of the front sight within the notch of the rear sight.
With an aperture sight, you line up the target with the front sight within the rear peephole.
With a telescopic sight with a crosshair reticle, you line up the target with the crosshairs of the sight.
With a telescopic sight with a dot reticle, you line up the target with the dot of the sight. The dot must be centred.
Remember… Good vision is the foundation for good shooting and hunting safety. Have your eyes examined on a regular basis.
Aligning an Open Sight
Misaligned—bullet goes high and left of target
Misaligned—bullet goes right of target
Target
Rear sight
Front sight
Sight correctly aligned on target
Misaligned—bullet goes low of target
Misaligned—bullet goes high of target

Chapter Four / Page 35
■ To determine your dominant eye:1. Form a triangular
opening with your thumbs and forefingers.
2. Stretch your arms out in front of you.
3. Focus on a distant object while looking through the triangular opening and keeping both eyes open.
4. Bring your hands slowly to your face, keeping sight of the object through the opening; the opening will come to your dominant eye naturally.
■ If you’re not sure, close one eye at a time. The weak eye will see the back of your hand; the strong one will be focused on the object in the triangle.
Sighting-In a Rifle
■ Rifle bullets don’t travel in a straight line. They travel in an arc, formed by the pull of gravity. ‘Sighting-in’ is a process of adjusting the sights to hit a target at a specific range. Deer hunters, for example, often sight-in their rifles to hit the bull’s-eye at 100 metres.
■ All rifles should be sighted-in before you hunt using the ammunition you plan to use, especially rifles with aperture or telescopic sights. Guns you sighted-in prior to your last outing could have been knocked out of alignment by a single jolt. That misalignment could mean the difference between a successful hunt and a disappointing experience.
■ Other than ensuring accurate shots, sighting-in a rifle has other advantages.• Forces you to practise• Makes accurate shooting possible• Helps identify problems with your firing technique• Helps determine the farthest range at which you can hit your target• Improves safety by helping you know where your rifle will shoot• Builds confidence in your shooting ability• Allows you to try different ammunition types• Reduces wounding and protects animal welfare
10 metres(bullet hits below
bull’s-eye)
25 metres(bullet hits
above bull’s-eye)
100 metres(bullet hits on
bull’s-eye)
Remember… You must sight-in your rifle with the ammunition you plan to use in the field. Be sure you sight-in, and practise firing your rifle before you go hunting.
Optional Sighting-In Techniques
Use bore or collimator sighting-in initially to line up the rifle on the paper target. However, these techniques alone are not sufficient to sight-in a rifle. You must make final adjustments by firing the rifle with the same ammunition you plan to use in the field.
• Bore sighting-in with bolt-action rifles: Remove the bolt, brace the firearm on sandbags, and look directly through the bore. Correct the rifle’s position until you see the bull’s-eye in the centre of the bore. Adjust the sights to give you a good sight picture.
• Collimator sighting-in for rifles without bolt actions: A collimator slips into the muzzle end of the barrel and allows you to adjust the sights, much like bore sighting-in.
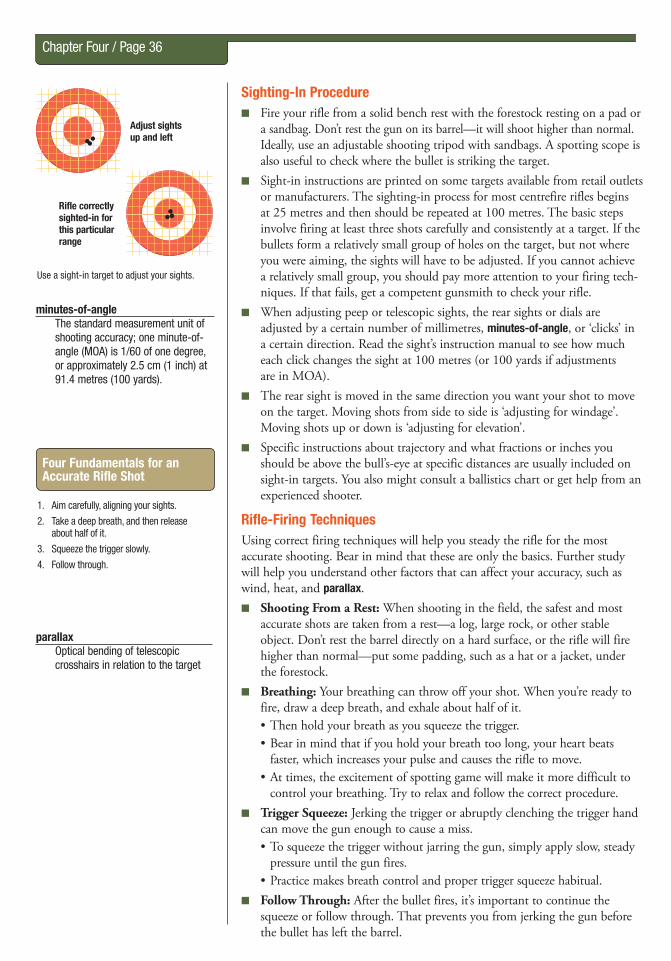
Chapter Four / Page 36
Sighting-In Procedure ■ Fire your rifle from a solid bench rest with the forestock resting on a pad or
a sandbag. Don’t rest the gun on its barrel—it will shoot higher than normal. Ideally, use an adjustable shooting tripod with sandbags. A spotting scope is also useful to check where the bullet is striking the target.
■ Sight-in instructions are printed on some targets available from retail outlets or manufacturers. The sighting-in process for most centrefire rifles begins at 25 metres and then should be repeated at 100 metres. The basic steps involve firing at least three shots carefully and consistently at a target. If the bullets form a relatively small group of holes on the target, but not where you were aiming, the sights will have to be adjusted. If you cannot achieve a relatively small group, you should pay more attention to your firing tech-niques. If that fails, get a competent gunsmith to check your rifle.
■ When adjusting peep or telescopic sights, the rear sights or dials are adjusted by a certain number of millimetres, minutes-of-angle, or ‘clicks’ in a certain direction. Read the sight’s instruction manual to see how much each click changes the sight at 100 metres (or 100 yards if adjustments are in MOA).
■ The rear sight is moved in the same direction you want your shot to move on the target. Moving shots from side to side is ‘adjusting for windage’. Moving shots up or down is ‘adjusting for elevation’.
■ Specific instructions about trajectory and what fractions or inches you should be above the bull’s-eye at specific distances are usually included on sight-in targets. You also might consult a ballistics chart or get help from an experienced shooter.
Rifle-Firing TechniquesUsing correct firing techniques will help you steady the rifle for the most accurate shooting. Bear in mind that these are only the basics. Further study will help you understand other factors that can affect your accuracy, such as wind, heat, and parallax.
■ Shooting From a Rest: When shooting in the field, the safest and most accurate shots are taken from a rest—a log, large rock, or other stable object. Don’t rest the barrel directly on a hard surface, or the rifle will fire higher than normal—put some padding, such as a hat or a jacket, under the forestock.
■ Breathing: Your breathing can throw off your shot. When you’re ready to fire, draw a deep breath, and exhale about half of it.• Then hold your breath as you squeeze the trigger. • Bear in mind that if you hold your breath too long, your heart beats
faster, which increases your pulse and causes the rifle to move.• At times, the excitement of spotting game will make it more difficult to
control your breathing. Try to relax and follow the correct procedure. ■ Trigger Squeeze: Jerking the trigger or abruptly clenching the trigger hand
can move the gun enough to cause a miss. • To squeeze the trigger without jarring the gun, simply apply slow, steady
pressure until the gun fires. • Practice makes breath control and proper trigger squeeze habitual.
■ Follow Through: After the bullet fires, it’s important to continue the squeeze or follow through. That prevents you from jerking the gun before the bullet has left the barrel.
minutes-of-angle The standard measurement unit of shooting accuracy; one minute-of-angle (MOA) is 1/60 of one degree, or approximately 2.5 cm (1 inch) at 91.4 metres (100 yards).
parallax Optical bending of telescopic crosshairs in relation to the target
Adjust sights up and left
Rifle correctly sighted-in for this particular range
Use a sight-in target to adjust your sights.
Four Fundamentals for an Accurate Rifle Shot
1. Aim carefully, aligning your sights.
2. Take a deep breath, and then release about half of it.
3. Squeeze the trigger slowly.
4. Follow through.

Chapter Four / Page 37
Firing PositionsThere are four standard rifle-firing positions: prone, standing, sitting, and kneeling.ProneThe prone position is the steadiest of the four positions. Because it’s the easiest to hold, it’s the best position for mastering the fundamentals of firing—aiming, breath control, trigger squeeze, and follow through.
Safety TipShooting a firearm can cause immediate and permanent hearing loss and can damage your vision.
• When shooting any firearm, wear properly fitting ear protection. For target practice, use an earplug or earmuff (or both) with a high Noise Reduction Rating (NRR). When hunting, use electronic or non-linear devices that allow normal or
even enhanced hearing but block damaging levels of sound.
• Also wear suitable eye protection, such as shooting glasses with high-impact lenses, when shooting to protect your vision.
StandingWith neither arm supported, this is the most difficult position for firing an accurate shot. Rather than trying to hold the barrel steady, which is impossible, try to keep movement of the barrel to as small an area as possible. Smooth, natural motion will produce the best shot.
KneelingWith only one arm braced, the kneeling position is less steady than the prone and sitting positions.
SittingBoth arms are supported by your legs. Next to the prone position, this is the steadiest position.

Chapter Four / Page 38
Shotgun ShootingAs with firing a rifle, good shotgun marksmanship begins with proper prepa-ration, which includes adjusting your gun and ammunition for maximum performance and mastering shotgun techniques. You must use the right choke and ammunition combination to achieve a lethal shot pattern, with sufficient penetration to achieve a humane kill.
Matching Choke and Load to Your Quarry ■ A choke allows you to fine-tune your shotgun for the type of game you’re
hunting. Built-in or attached to the muzzle end of the barrel, the choke is a constriction that controls the shot string, thus affecting shot pattern produced at various distances. See Chapter Three for more details.
■ The tighter the constriction, the greater the distance that the cluster of pellets stays together. The looser the constriction, the faster the shot spreads. Recall from Chapter Three that the most common chokes, ranging from tightest to most open, are:1. Full 2. Improved Modified 3. Modified
4. Improved Cylinder5. Skeet6. Cylinder (unchoked)
■ For example, someone hunting small, fast, close birds would generally use an Improved Cylinder or Modified choke, which creates a broad shot pattern that spreads quickly at close ranges. Conversely, someone hunting a larger, less mobile bird that is usually farther away would select a Full choke, which concentrates the shot in a smaller area. Pellet size also varies based on the size of the game. The chart below suggests choke selections for a variety of game. It is intended only as a guide—choice of choke may vary depending on ammunition, target distance, and hunting conditions. Always pattern your shotgun for the quarry you are hunting and the ammunition you are using.
It is essential that hunters pattern test their chosen choke and shotshell combinations and meet the minimum pattern count required to adequately and effectively harvest the intended game bird. Refer to Tom Roster’s 2012 Non-Toxic Shot Lethality Table for the minimum pattern counts required for Australian game birds (see page 39). By meeting the minimum require-ments set out in the lethality table, you will maximise the likelihood of striking the bird’s vital areas (heart, lungs, brain, and spinal cord). This will ensure a clean and humane kill.
Aim a rifle. Focus your eye on the crosshairs or front sight.
Point a shotgun. Focus your eye on the target.
Remember… Point a shotgun. Pull the trigger.
Aim a rifle. Squeeze the trigger.
QuarryCommonly Used Chokes
(based on typical distance from quarry)
Large-sized duck and goose Improved Cylinder, Modified, Improved Modi-fied, or Full
Medium-sized duck Improved Cylinder or Modified
Small-sized duck Modified
Pheasant Improved Cylinder or Modified
Quail Skeet or Improved Cylinder
Rabbit Improved Cylinder or Modified
Remember… Shots at game birds in flight should be limited to your effective shooting skills distance. This is the distance at which you can hit the target consistently. Shooting beyond this distance leads to an increased number of birds wounded and lost. Also, firing at game too close may destroy the meat.

Chapter Four / Page 39
This table summarises Tom Roster’s analyses to date of the waterfowl and upland game bird lethality databases for 15 published U.S. steel versus lead shooting tests and birds taken for published ballistics reports he authored for ammuni-tion companies and/or the Cooperative North American Shotgunning Education Program (CONSEP) organisation. Pellet sizes listed are for steel shot unless otherwise noted.
Tom Roster’s 2012 Non-Toxic Shot Lethality Table Adapted to Australian Game Birds©
Proven Non-Toxic Shot Loads for Waterfowl & Upland Game Birds1 Load Velocity: 1,275–1,450 FPS
Activity
Typical Shooting Range of Activity (Metres)
Most Effective Steel Shot Size(s) for Activity (USA & Spanish Shot Size Designations)
Minimum Load Weight in Ounces and Grams
Minimum Pellet Hits Needed on Lethal Areas for Clean Kills
Minimum Pattern Count Needed at Any Distance for Clean Kills (# of Pellets in 30" Circle)
Most Effective Choke(s) (Given in Lead Shot Choke Designations)
Indian Peafowl & Cape Barren Goose
35–45 35–45
BB to BBB HEVI–Shot 2
1-1/8 (32 g) 1-1/2 (42 g)
1–2 1–2
60–65 60–65
Modified Improved Cylinder, Modified
Medium Geese at Long Range Magpie Goose
45–60 45–60
BB to BBB HEVI–Shot 2
1-1/4 (36 g) 1-1/2 (42 g)
1–2 1–2
60–65 60–65
Improved Modified Improved Modified or Full
Medium Geese Over Decoys Magpie Goose
35–45 35–45
1 to BB HEVI–Shot 4
1-1/8 (32 g) 1-1/4 (36 g)
1–2 1–2
60–65 60–65
Modified Modified
Mountain Ducks at Long Range
45–60 2 to 1 1-1/8 (32 g) 1–2 75–85 Full
Mountain Ducks Over Decoys
20–40 3 to 2 1-1/8 (32 g) 1–2 75–85 Improved Cylinder (20–32 m), Modified (32–40 m)
Black Ducks at Long Range
40–60 40–60
2 to 1 HEVI–Shot 4
1-1/8 (32 g) 1-1/4 (36 g)
1–2 1–2
85–90 85–90
Full Full
Black Ducks Over Decoys
20–40 6 to 2 (24–28 g) 1–2 85–90 Improved Cylinder (20–32 m), Modified (32–40 m)
Medium Ducks Over Decoys White-eyed, Wood, Grass, & Water Whistle Ducks
20–40 20–40
6 to 3 HEVI–Shot 6
(24–28 g) (28–36 g)
1–2 1–2
115–120 115–120
Improved Cylinder (20–32 m), Modified (32–40 m)
Small Ducks Over Decoys Shoveler, Teal, & Pink-eared Ducks
20–40
20–45
6 to 4
HEVI–Shot 6
(24–28 g)
(28 g)
1–2
1–2
135–145
135–145
Modified (20–32 m), Full (32–40 m)
Chukar Partridge & Feral Pigeon
20–40 6 to 4 3/4 (21 g) 1–2 150–160 Modified
Stubble Quail, Brown, Bobwhite, California, & European
20–30
20–30
7
7 to 6
3/4 (21 g)
3/4 (21 g)
1–2
1–2
225–245
170–190
Skeet, Improved Cylinder Skeet, Improved Cylinder
Ring-necked Pheasants 20–45 20–45
3 to 2 HEVI–Shot 6–4
1 oz (28 g) (32–35 g)
2–3 2–3
90–95 90–95
I.C. (20–30 yds), M. (30–50 yds) I.C. (20–30 yds), M. (30–50 yds)
Turkeys (Head and Neck Shots)
20–35 Steel 4; HEVI 5 1-1/4 (36 g) 3–4 210–230 Full or Extra Full
Swatter Load for Wounded Birds
20–32 7 to 6 1 oz (28 g) 1 200 Modified or Full
Note: The pellets in the steel shot loads tested for this table were traditional, highly spherical ball-shaped pellets of ~7.86 g/cc density and 90–95 DPH hardness. The HEVI-Shot pellets were of 12.0 g/cc density and slightly harder than traditional steel pellets.
To date, steel #BB (4.57 mm) has exhibited the best overall performance for taking medium geese; steel #3 (3.56 mm) gives the best overall performance for ducks.1Values in this table involved testing 2 3/4" (70 mm) and 3" (76 mm) 20-ga.; 2 3/4" (70 mm), 3" (76 mm), and 31/2" (89 mm) 12-ga. steel loads; and 2 3/4" and 3" 12 ga. HEVI-Shot loads.© Copyright 2012 by Tom Roster. Reprint rights granted by written permission only. Write 1190 Lynnewood, Klamath Falls, OR 97601 USA. [email protected]

Chapter Four / Page 40
Patterning Your Shotgun ■ No two shotguns will shoot identical pellet patterns. In some cases, the
pattern will be off-centre. In other instances, there may be gaps in the pattern. In addition to the firing characteristics of the gun, the gun’s choke, the brand of shotshell, the shot size, and the type of shot also affect the pattern. In order to select ammunition that provides the best perfor-mance, it’s necessary to ‘pattern’ your shotgun. Patterning is a practical exercise that involves shooting a specific barrel, choke, and shotshell combination at a target so you can see and record the spread of pellets. In order to cater for different hunting scenarios, you should pattern test different chokes and ammunition combinations from various distances, up to your maximum shooting skills distance. For most hunters, the maximum shooting skills distance is 30 metres. Refer to page 33 for more information on how to determine your maximum shooting skills distance.
■ Patterning can be done with simple, homemade targets—sheets of blank paper about 1.2 x 1.2 metres in size, with a 12-millimetre-thick plywood backing board of the same size. The centre of the paper should be at shoulder height. This easy setup allows users to simply change the paper after every shot. Also, the backing plywood board is penetrable, meaning pellets won’t rebound off the backing surface, re-penetrating the patterning sheet and distorting the results. Because the pellets will penetrate the plywood, ensure that you have a safe background.1. Fire your chosen shotshell combination into the centre of the
patterning sheet. 2. After taking the shot, use a marker to draw a 76-centimetre (30-inch)
circle around the largest concentration of pellet strikes. Count and record the number of pellet strikes inside the 76-centimetre circle, and mark the details of the shotshell (pellet size, charge, and payload weight) and choke so you don’t forget them.
3. Do this a minimum of three times for each shotshell, choke, and distance combination (one shot per sheet of patterning).
4. Total and divide the number of pellet strikes in the 76-centimetre circle by the number of shots taken, which will provide you with an average.
■ The pattern of pellets within a 76-centimetre (30-inch) circle should be of a proper, even density to ensure a clean kill. The pattern should contain a sufficient percentage of the load (total number of pellets).
■ Continue this process, trying different choke and load combinations, until you get an even pattern density with a sufficient percentage of the load within a 76-centimetre (30-inch) circle while shooting from the distance that you expect to be from your quarry and within your effective shooting skills distance.
■ Refer to Tom Roster’s 2012 Non-Toxic Shot Lethality Table Adapted to Australian Game Birds to determine the minimum pattern counts required for a quick kill (see page 39).
■ Refer to the GMA website at www.gma.vic.gov.au for a video demonstrating how to pattern test your shotgun.
Desirable Pattern
Undesirable Pattern
Shot Patterns
Tips to Achieve a Desirable Pattern
• Try a heavier load weight.
• Try a different brand choke, choke profile, or construction.
• Try a different brand of ammunition.
• Try a shotshell with a lower load velocity.
• Pattern at closer range.
Hunting Tip Pattern test your shotgun before going hunting. Picking the best load and choke combination for your shotgun will improve your success rate and result in fewer wounded birds.

Chapter Four / Page 41
Shotgun-Shooting TechniquesUnlike rifle firing, quick reflexes and flexibility are essential for effective shotgun shooting. Proper shotgun techniques will help you develop the rapid, fluid response you need to hit your target.
■ Shooting Stance• A shotgun is almost always shot at a moving target from a standing
position. You must be able to swing freely over a wide arc and maintain control. That requires a relaxed, balanced stance.
• Stand with your feet spread about shoulder-width apart and your knees bent slightly so that you are balanced perfectly. Bring your left foot slightly forward (if you’re a right-handed shooter), and lean your body in the same direction. The position of the feet is important. The toes of your forward foot should point at the spot you expect to shoot the target. Take the time to place your feet properly, even for a quick shot.
• Keeping your knees slightly bent makes it easier to swing with a moving target. The bent leg to the rear supports the movements of your hips, allowing you to swing smoothly.
■ Pointing• Because targets usually appear suddenly and move quickly, there’s
no time to ‘aim’ a shotgun. It’s designed to be pointed, with the eye sighting along the top of the barrel or rib with the focus on the target.
• Your eye must be in line with the barrel, so it’s important to position your head properly on the stock.
• When you bring the gun to your face, the stock should fit snugly against your cheek with your eye on that side above the centreline of the gun. If you can’t assume that position comfortably, you may need to adjust the ‘gun fit’ with the help of a qualified gunsmith.
■ Shouldering the Shotgun• When you bring the shotgun to your shoulder, the stock should come
to your cheek.• A common error is lowering the head and cheek to the stock, instead
of bringing the stock all the way up to the cheek. When done properly, with your head naturally erect, the gun butt always should come to the same spot on your shoulder.
■ Pulling the Trigger• Unlike rifle firing, quick trigger action is important when hunting with
a shotgun. Slap the trigger rather than squeezing it.• Because the trigger is pulled quickly and the body and gun are typically
in motion, breath control isn’t necessary.• Continue the shotgun’s swing as you pull the trigger. Stopping the
swing as you shoot will cause you to shoot behind the moving target.
Snap-ShootingSnap-shooting is a technique to use if you must make a quick shot and the target is straight ahead at close range. You simply raise the shotgun and point to where you think the target will be when the shot arrives.
Use a relaxed, balanced stance with your feet shoulder-width apart and your weight slightly forward on your left foot (if you’re a right-handed shooter), and lean your body in the same direction.
Hunting Tip Keep swinging the shotgun after shooting. Keeping the barrel moving will improve your success rate and reduce wounding.

Chapter Four / Page 42
Leading the TargetThree common methods of leading targets when shotgunning are swing-through, sustained lead, and pull-away.
■ Swing-Through Point your shotgun behind a moving target, and swing with it. Increase the speed of the gun so that the muzzle passes the target, and then fire when you are far enough in front for the shot string to strike the bird when they cross paths. In other words, literally ‘swing through’ the target and fire at a blank space in front of the target. Swing-through is the best technique for the beginning shotgun hunter.
■ Maintained or Sustained Lead This method is a little more challenging because it requires more experi-ence. You estimate the length of the lead necessary to hit the target, and maintain that lead as you swing with the target, fire, and continue the swing.
■ Pull-Away This-method is similar to maintained or sustained lead. The difference is in that as the target is intercepted, the shotgun is pulled forward in a controlled and deliberate effort along the same path of the target. Once the correct lead is determined, the trigger is pulled and the swing continues.
Victorian Shotgunning Education Program (SEP)
SEP provides education material and training to assist game bird hunters in equipment selection, development of key shooting and hunting skills and proven hunting strategies and techniques. This material is designed to increase the proficiency of hunters and subsequently reduce wounding losses. For more information about the Victorian Shotgunning Education Program and to access the SEP handbook, visit the GMA website at www.gma.vic.gov.au.

Chapter Five / Page 43 Bowhunting Equipment and Techniques
Know Your Bow and ArrowWhile modern bows can shoot arrows up to 370 metres (405 yards) at speeds exceeding 320 kilometres per hour (199 miles per hour), the bow is a short-range hunting tool. Any bow can be dangerous at any range and should be handled responsibly. Shots are usually limited to 40 metres (44 yards) or less; at this range, the arrow penetrates and can even pass through an animal. To ensure accuracy and proper penetration, most shots are taken at 14 metres (15 yards).
Common Bow TypesProper bow selection and fit are essential to your accuracy and performance when bowhunting.
■ Longbow• The ‘traditional’ bow, which has straight limbs that form an arc
when strung• Used by those interested in traditional shooting with little additional
equipment
■ Recurve Bow • Much like the longbow, but the limbs curve back away from the belly
of the bow, which can provide more power in a shorter bow than the longbow
• A popular choice because it’s smooth and quiet
gripupper limblower limb
stringnocking point
string silencer string silencer
grip arrow rest
upper limblower limb
sight window
stringnocking point
• To protect the three fingers that draw the bowstring, archers wear three-fingered gloves or finger tabs, or use mechanical releases.
• A mechanical release snaps onto the string and is pulled back with the shooting hand. The archer pulls a trigger to release the string.
• An armguard protects the inner part of the bow arm during release as the string snaps back. The armguard prevents the bowstring from hitting loose clothing and also helps protect the arm if an arrow breaks during release.
Accessories
glove
mechanical release
armguard
finger tab
■ Identify the common bow types and their basic parts.
■ Identify the basic parts of an arrow. ■ List the different types of arrowheads and the
primary use of each. ■ State safety practices for archers. ■ Explain additional safety rules that should be
followed when using a crossbow.
■ Describe the methods used to cock and uncock a crossbow.
■ Describe how to nock an arrow and how to draw and anchor the bow.
■ Demonstrate how to use a bow sight and how to aim a bow instinctively.
You should be able to...

Chapter Five / Page 44
■ Compound Bow • The most popular bow for both hunting and target shooting• A bow with many styles, but they work basically the same way; wheels
and cables attached to the limbs make it easier to hold at full draw (pulled completely back) and able to propel an arrow faster than either a longbow or recurve bow
Stringing a BowThe safe and easy way to string a recurve bow or longbow is to use a bowstringer. The push-pull or step-through method can be hazardous to yourself or your bow.
■ A bowstringer is simply a strong cord with a loop or pocket at each end that fits over the limb tip of recurve bows and some longbows. By standing on the loose middle of the cord after it’s attached to the tips, the limbs can be flexed as the handle is pulled. This allows the bowstring to be slipped safely into place.
■ To replace compound bowstrings, you must use a bow press. A bow press is used to place and hold tension on the limbs, allowing the strings to be changed. Inexperienced bowhunters should have a qualified dealer or individual replace the string on a compound bow.
Parts of an ArrowArrows have four parts.
■ Shaft: The long spine of the arrow. Modern arrow shafts are made of wood, fibreglass, aluminium, or carbon. The arrow, regardless of shaft material, must have the correct stiffness to match the bow. As an arrow is released, the shaft bends before straightening in flight. Incorrect stiffness will cause the arrow to fly erratically and inaccurately.
■ Fletching: The plastic vanes or feathers on an arrow. Fletching creates wind drag and also can cause the arrow to spin similar to a rifle bullet, providing stability and accuracy in flight. Fletching is made up of three or more vanes or feathers. One of the feathers will be a different colour and is called the ‘cock’ feather. The remaining feathers are referred to as the ‘hen’ feathers.
grip
arrow rest
upper limblower limb
cableswheel
bow sight
string
Arrow Parts
Nocking Point
nocking point
arrowhead with target (bullet) point
shaft
fletching(cock)
nock
fletching(hen)
22
17

Chapter Five / Page 45
■ Arrowhead: The point of the arrow. Many different kinds of arrow points are available, each with a different purpose and advantage. The only type of arrowhead allowed for hunting deer in Victoria is the broadhead type, with a minimum of two cutting blades. See Chapter Nine for details.
■ Nock: A slotted plastic tip located on the rear end of the arrow that snaps onto the string and holds the arrow in position. There is a certain point on the bowstring, called the ‘nocking point’, where arrows are nocked. Fine-tuning of this location, by moving it up or down the bowstring, is usually required.
Common Types of Arrowheads ■ Bullet Point: Steel point used for target shooting. ■ Blunt Point: Used for small game hunting and some types of target
shooting; made of steel, hard rubber, or plastic. ■ Field Point: Steel point used for target shooting. ■ JUDO Point: Designed with spring arms attached to catch in grass
and leaves, preventing arrow loss; used for ‘stump’ shooting and small animal hunting.
■ Fish Point: Long, barbed or spring-loaded arrowhead that spears fish and secures them until landed with an attached line.
■ Broadhead: Used primarily for deer hunting. The number of steel blades it contains may vary. The only arrowhead that may be used for deer hunting in Victoria is the broadhead with at least two sharpened cutting blades. • Mechanical (Expandable) Blade Broadhead: Blades are retracted
close to the ferrule before the shot. For deer hunting, the mechanical broadheads must have at least two sharpened cutting blades. Upon impact, the blades expand to expose the cutting edges. These are recom-mended for use only with bows rated 50 pounds or more because most require additional energy to open the blades upon penetration.
Know Your CrossbowA crossbow is a bow with a rifle-like stock that shoots bolts or short arrows. Safe use of a crossbow requires following the safety rules for both firearms and bows.
■ Never travel with a loaded, cocked crossbow. ■ Like conventional bows, the crossbow is limited to
short-range shooting.
Types of Arrowheads
Bullet Point
Blunt Point
Fish Point
JUDO Point
Field Point
Broadhead Points
Broadhead Points with Mechanical (Expandable) Blades
Remember… In Victoria, bows and crossbows can only be used for recreational deer hunting, and certain draw weights and broadheads are required.

Chapter Five / Page 46
Common CrossbowsThe most common types of crossbows are compound and recurve. Crossbows with recurve limbs must have longer limbs and a longer barrel to provide a longer power stroke as compared to a compound crossbow. Many hunters choose the recurve crossbow because of its simplicity.
■ Compound Crossbow
■ Recurve Crossbow
quiver
limb (single or split)
riser
serving
cocking stirrup
barrel
cam/wheel (compound models)
foregrip
arrow retention spring
triggerlatch
stock
sight bridgesight (style varies)
flight groove (arrow track)
cables
string
cocking stirrup barrel
limb
sight bridge
stock
latch
sight (style varies)serving
arrow retention springstring
riser
flight groove
foregrip
trigger
Remember… In Victoria, crossbows must be stored and transported securely. See Chapter Nine for details.
Remember… Only use hunting arrows for hunting and target arrows when target practising.

Chapter Five / Page 47
Crossbow Arrows and NocksA crossbow arrow (bolt) is a shaft tipped with a broadhead for hunting or a field point for practice, with feathers or vanes attached to the other end. It has either an aluminium or carbon shaft—with a flat-capped, ‘moon’, or capture nock at the guidance end—that align with the bowstring when loaded. Never shoot an arrow that is lighter in grain weight, spined lighter, or shorter than the manufacturer’s recommendation. Regardless of your crossbow’s perfor-mance and the type of arrow you shoot, the broadhead arrow point, together with the minimum draw weight, are the most crucial hunting components.
■ Utilise broadheads of appropriate weight to compensate for the shorter and lighter crossbow arrows.
■ Mechanical broadheads with retracted blades that spring open on impact may offer a more consistent arrow flight for the short, light crossbow arrow.
■ See Chapter Nine for legal draw weights and broadhead specifications for deer hunting in Victoria.
Cocking a CrossbowThere are two methods for cocking a crossbow.
■ Manual Cocking: With the manual cocking method, you want to use all four fingers on both hands to avoid risking dry-firing.
Conventional Arrow
Crossbow Arrow
Shaft
Bullet (Target)
Point
Fletching
Nock
Crossbow Arrow Parts
Half Moon Nock
Flat Nock
Capture Nock
Crossbow Nocks

Chapter Five / Page 48
■ Cocking Devices: Because crossbow draw weights can be heavy, you may need to use cocking devices to load the crossbow. Two types of cocking devices are the cocking harness (rope-cocker) and the hand crank. These devices reduce the amount of energy it takes to cock the crossbow.
Uncocking a CrossbowNever use a cocking device to uncock, or unload, the crossbow unless it is specifically recommended to do so by the manufacturer.
■ The recommended method of uncocking a crossbow is to shoot an arrow from the cocked crossbow into a safe backstop.
■ If hunting from an elevated stand or tree stand, remove the arrow from the crossbow, and, leaving the safety in the ‘on’ position, lower the crossbow from your stand. When safely back on ground level, shoot a practice arrow into a safe backstop such as a dirt bank or other suitable target.
Never leave a crossbow cocked over an extended period of time. Check the owner’s manual that came with your crossbow for recommended lengths of time and methods for uncocking.
Cocking Harness
Hand Crank
Remember… Never ‘dry fire’ a crossbow, which is shooting the crossbow without an arrow mounted in the correct shooting position. Dry-firing can damage the crossbow and possibly injure you or a bystander.

Chapter Five / Page 49
Bowhunting Safety and Skills
Bow-Shooting SafetyAn arrow is as deadly as a bullet, so the basic safety rules that govern firearm shooting also apply to archery. Although shooting accidents are rare among bowhunters, they do happen. Archers must obey a few common safety rules, whether on the range or in the field.
■ Release an arrow only when the path to the target and beyond is clear and safe.
■ Make sure there’s a safe backdrop to stop the arrow if you miss—never shoot over the horizon.
■ Don’t shoot an arrow in the general direction of another person. Arrows are easily deflected. A small twig, unseen by you, can cause an arrow to veer dangerously off course.
■ Don’t shoot straight up. A falling arrow carries enough force to penetrate the human skull.
■ Carry arrows in the nocked position only when slowly approaching game—never nock an arrow or draw a bow if someone is in front of you.
■ Use a haul line to raise a bow and quiver into a tree stand to avoid serious injury (see ‘Lifting Hunting Equipment Into a Stand’ in Chapter Seven for more on this subject).
Bow-Shooting PositionStand at a right angle to the target with your feet approximately shoulder-width apart. The stance should feel comfortable and balanced. If you prefer, you may slide your front foot back a little, creating a slightly open stance.
Before practising or hunting, an archer must examine each arrow to make certain there are no cracks or breaks in the shaft and that the nock is in good condition. A cracked or broken nock can be replaced, but a shaft that has cracks or breaks should be discarded.
Never use a cracked arrow. The shaft may shatter on release and be driven into the archer’s wrist or arm. Some common types of damage to look for are:
• Cracks and splinters in wood arrows
• Creases, dents, or cracks in aluminium arrows
• Crushed sidewalls on fibreglass or graphite arrows
Archery Equipment Safety
Always keep broadheads in a covered quiver.
Many archers’ injuries come from broadheads. Broadheads must be kept razor-sharp for hunting, which creates a safety problem if they are handled carelessly. To prevent injury:
• Use a special wrench to screw on broadheads. This device covers the blades while a broadhead is being tightened on an arrow. If a wrench isn’t used, the slightest slip can cause a serious cut. When sharpening broadheads, always stroke the blade away from your hands and body.
• Keep broadheads covered with a quiver while travelling to and from the field. Many arrow injuries occur while loading or unloading equipment in vehicles.
• While dressing bow-killed deer, remember that the broadhead may remain in the animal. Use great caution until all parts of the broadhead have been found.
Broadhead Safety

Chapter Five / Page 50
Nocking an Arrow ■ A nocked arrow should be positioned about 1 centimetre above the
arrow rest on the bow handle. On most bows, a small brass band called a ‘nocking point’ is crimped onto the bowstring to mark the correct position.
■ To nock the arrow:• Grasp the arrow between the thumb and index finger of the right hand
(if you’re a right-handed shooter). • With your left hand, hold the bow parallel to the ground about waist-
high, and string toward the body.• Lay the arrow shaft on the bow’s arrow rest.• Align the slot in the nock with the string, and make sure that the cock
feather points up (some exceptions apply when using shoot-through arrow rests).
• Pull the arrow back until the string snaps into the slot.
Drawing and Anchoring the Bow ■ To draw the bow:
• Grip the bow handle firmly in the left hand, but don’t squeeze.
• With your bow arm straight, raise the bow to a point that your arm is parallel to the ground while simultaneously drawing the string back to your ‘anchor point’ with your shooting hand. The anchor point may be the corner of your mouth, your cheekbone, or your chin.
■ Practice will help you determine your best anchor point—one that’s both comfortable and provides the most accurate shooting. Your fingers should touch the same anchor point each time you draw the bow.
When the arrow is nocked and the bow is raised, the cock feather points to the left if you are right-handed.
If you are right-handed, raise the bow as you pull back the string with the three drawing fingers of your right hand. Simultaneously extend your left arm.
Safety Tip A bow should never be ‘dry fired’. Releasing a string without an arrow nocked transfers energy back to the limbs instead of the arrow. The bow can fly apart, injuring anyone nearby.

Chapter Five / Page 51
Aiming the BowThere are two main methods for aiming bows—bow sights and instinc-tive aiming.
■ Bow sights work best when the distance to the target is known. For instance, when hunting from a tree stand or blind, you can measure the distance to the area where you expect the game to appear. Then it’s a matter of lining up the appropriate sight pin on the target. In hunting situations where it’s hard to know the exact distance to the target, bow sights may not work well. The key to using bow sights is to practise judging distances.
■ Instinctive aiming is more versatile than the bow sight method. You simply look at the intended target with both eyes open and release. You adjust the aim for different distances by instinct developed with practice. Instinctive aiming takes longer to perfect than the bow sight method, but it eliminates much of the guesswork from shooting under some hunting conditions.
Holding and Releasing the Bow ■ Allow your fingers to slip quickly away from the string.
This gives the arrow a straight, stable flight. ■ Keep your bow arm pointed directly at the target after
the release. If the bow is jerked on release, the arrow will fly off target.
■ Follow through by leaving your drawing hand at the anchor point well after the string is released. Ensure you do this even when a mechanical release is used.
With bow sights, you line up the appropriate sight pin on the target.
sight pins
With instinctive aiming, you simply look at the intended target with both eyes open and release.
Remember… Practise on targets that mimic deer and at distances expected in the field. You should never shoot at deer more than 40 metres away.

Chapter Six / Page 52 Basic Hunting Skills
■ Understand the importance of planning and prepa-ration for a safe and successful hunt.
■ Understand why it is important to know how to recognise your quarry.
■ Name basic animal characteristics that can be used for identification.
■ Identify different hunting strategies you can use. ■ Understand what the hunter is responsible for when
he or she has a hunting dog. ■ Understand key hunting strategies for hunting deer,
duck, and quail. ■ Identify the different decoy spread patterns, and
understand when they should be used. ■ Understand why it is important to know where to
place a vital shot for the game you are hunting.
■ Understand how to reduce wounding and increase success in duck hunting.
■ Identify the vital zones for various game when viewed from different angles.
■ Understand the types of shot angles, and tell when they should be used and when they should be avoided.
■ Identify the main factors to consider when devel-oping a retrieval strategy.
■ Understand what to do when approaching downed game.
■ State the first step you should do after you are sure your game is dead.
■ Recognise the basic steps for field dressing game. ■ Recognise the main causes of meat spoilage.
Planning and Preparation ■ A successful hunt begins with careful planning and preparation. The
process usually requires more time than the hunt itself. ■ Here are some steps you should take to prepare for a hunt.
• Educate yourself about the game you’ll be hunting and its environment.• Obtain a Game Licence endorsed for the game you intend to hunt.• Buy appropriate clothing and gear for the environment.• Visit the site (in the off season, if applicable) to familiarise yourself with
the environment.• Ensure the area you intend to hunt is open to hunting. Make sure you
obtain the landowner’s or manager’s consent if you intend to hunt on private property.
• Make sure you are up to date with seasonal arrangements and relevant hunting laws.
• Sight-in rifles, crossbows, and bows; pattern shotguns.• Sharpen your skills at the shooting range.
Know Your Quarry ■ Of all the steps of preparation, educating yourself about the game you’re
hunting is one of the most critical. Understanding your quarry will increase your success and add to the enjoyment of the experience as well.
■ It is important to study your quarry’s behaviour, periods of activity, types of habitat, and preferred food and water requirements. Refer to Chapter Ten for more details.
■ In many cases, knowing your quarry is also necessary to ensure that you’re taking legal game. For example, you may need to determine the sex of game on sight or quickly recognise protected species as they move into firing range.
You should be able to...
It is critical that you educate yourself about your quarry when preparing to hunt. Understanding game species will add to your enjoyment and increase your chances of success as well.
Hunting Tip Make use of animals’ trails when hunting in difficult terrain. Animals usually follow the easiest path. There is less vegeta-tion litter on animal trails; therefore, it is easier to move without making too much noise.

Chapter Six / Page 53
Animal CharacteristicsWhatever you’re hunting, a basic understanding of an animal’s characteristics will help you develop an effective strategy for identifying and tracking it.
■ Animals can be identified by four basic characteristics.• Distinctive Markings: Examples include the bright yellow or orange
legs and yellow iris of the male Blue-winged Shoveler, the black dorsal stripe of the Chital Deer, and the rump patch of the Red Deer.
• Sounds: Examples include the croak of a rutting Fallow buck, the grunt of the Red Deer, and the honk of the Mountain Duck.
• Movement: Examples include the bounce of the Fallow Deer, the different wingbeats of certain ducks, and the running stance of the Hog Deer.
• Group Behaviour: Examples include flock patterns, like the dense flight formation of Pink-eared Ducks, and various herding behaviours of game deer.
■ Further study will help you learn other ways to identify and understand your quarry, including signs the animal leaves, camouflage capability, and behaviour.
Hunting StrategiesHunting techniques are skills honed through education and experience. Ideally, beginners should undertake a hunter education course and seek the guidance of experienced hunters on their initial hunts.
Hunting With Dogs In Victoria:
• Approved gundog breeds can be used to hunt all game except Hog Deer• Approved deer hunting dogs can be used to hunt all deer
except Hog Deer• Approved hound breeds can be used to hunt Sambar Deer only
Refer to Chapter Nine for details on the breeds of dogs permitted for hunting game and the laws on how they can be used.
■ Many hunters use trained dogs to assist them while hunting game. Dogs can be particularly useful to locate downed game.
■ The popular breeds of dogs used to hunt game have skills such as pointing, retrieving, flushing, or trailing. These dogs are bred to instinc-tively hunt, obey commands from the hunter, hunt only certain types of game, and ignore distractions in the field.• Pointers are used primarily to point and retrieve game birds and
locate deer.• Setters are primarily used to search for and point game birds.• Retrievers are used primarily to retrieve waterfowl; they also can be
trained to hunt other game birds.• Spaniels are used mainly as flushers of game birds.• Utility gundog breeds are used to point, flush, and retrieve game birds
and to locate deer.• Hounds are used to flush, trail, and bail Sambar Deer.
■ Hunters are responsible for the behaviour, training, conditioning, and welfare of their hunting dogs. Hunters should always be considerate of other public land users and ensure that their dogs are under control at all times.
• It is the hunter’s responsibility to care for his or her dogs in the field and to be aware of any signs of stress or injury. Dogs used to assist in the hunting of game should be healthy and in good physical condition. They should not be used under conditions where there is an unacceptable risk of injury or heat stress.
• To avoid heat exhaustion, hunt when temperatures are less extreme (e.g. early morning and evening), and be sure to provide your dogs with plenty of water.
• Check your dog during and at the conclusion of the hunt for injuries, ticks, and grass seeds.
• If a dog is injured when in the field, ensure that it receives first aid and professional attention as soon as possible.
Care of Dogs When Hunting

Chapter Six / Page 54
■ Most importantly, hunters are responsible for the actions of their dogs. Under no circumstances should dogs be set onto game or other wildlife. It is an offence for any dog to attack or maim another animal, including pest animals, such as pigs. Any dog that does so must not be used for hunting.
■ Hunters need to ensure their gundogs, deer hunting dogs, or hounds are trained to a level of control so that they do not interfere with other hunters or chase wildlife or livestock.
Deer Hunting Strategies
Still Hunting
■ As the name implies, still hunting is walking stealthily through an animal’s habitat, stopping frequently—sometimes for long periods—to scan and listen for game. Typical places to stop and wait for longer periods include vantage points, overlooking game trails, feeding and resting areas, and overlooking wallows and waterholes.
■ As a general rule, spend at least 10 times longer being still and observing than walking. Keep a low profile; a human silhouette will spook many game species. Use binoculars to identify quarry properly.
■ If you still hunt effectively, game will be unaware of your presence, but so will other hunters. To avoid being mistaken for game by other hunters, wearing a blaze orange clothing item may help.
Stalking
■ The difference between still hunting and stalking is that when stalking, you follow signs leading to a particular type of game or group of animals, or close the distance to game already spotted.
■ You may follow tracks on trails or a morning ‘dew’ trail through leaves and brush. Or you may follow sounds of animals, such as the roar of the Red Deer or the croak of a Fallow buck. Or you may simply need to sneak closer to an animal for a better shot.
■ Stalking requires total focus because you must remember to keep downwind, stay quiet, stay alert, and remain patient. Be aware of other wildlife or stock animals that could give away your presence. These can alert deer to your location if spooked.
■ When deer hunting, the sounds you hear may be another hunter. Use extreme caution in your approach.
Glassing
■ Glassing is sitting for a long time at vantage points and spotting game from afar with binoculars or a spotting scope.
■ After the game is spotted, you stalk it to get within your effective shooting skills distance.
• Use binoculars even in thick cover. It allows you to focus through the layers of vegetation, revealing details not seen by the naked eye.
• Replace the neck strap on the binoculars with a good quality harness. It acts as a stabilising platform during glassing sessions and distributes the weight of the binoculars on the shoulders instead of the neck.
Using Binoculars
Still hunting often involves stopping for long periods to scan and listen for game.
Hunting Tip Learn to move without constantly looking to the ground. Stop often, and scan the environment. Avoid stopping in the open or at the skyline.
Stalking often involves following tracks that lead you to the type of game you are hunting.

Chapter Six / Page 55
Ground Blinds
■ Ground blinds are makeshift or temporary structures located on the ground that conceal the hunter. They can be made out of available vegetation, but many hunters use portable commercial blinds or camou-flage netting.
■ You should situate ground blinds:• Downwind, based on the normal wind pattern during a given time of
day, such as morning • Away from the sun • Where the foreground and background are safest• Overlooking a game trail, wallow, feeding area, or other area that deer
are likely to use regularly
Elevated Stands
■ Elevated stands (tower stands or tree stands) offer a number of advantages to both firearm and bow hunters. Tower stands are above-ground seats or blinds that conceal the hunter above the level of the quarry. Tree stands are stands placed in or against trees. Both types are very popular with Hog Deer hunters.
■ You should check the condition of elevated stands routinely. Also, inspect for insects, birds, and small mammals before entering the stand. Read more in the ‘Hunting From Elevated Stands’ section in Chapter Seven.
Deer Calling
■ Calling is an effective technique for most animals. There are a variety of sounds that can be imitated to draw deer to you. For example, a deer antler ‘rattle’ or a Red Deer ‘roar’ can be imitated by a skilful hunter to attract animals close enough for an effective shot.
■ Some hunters are proficient in imitating various deer calls using only their voice and hands. Others use various artificial callers, including recorders of actual deer sounds.
■ Hunters rattle deer up by imitating the sound of clashing antlers. Both real and artificial antlers can be used.
Flushing
■ Flushing involves using noise, movement, or dogs to cause game to leave cover.
■ Pause frequently when attempting to flush game. When you vary your pace, your quarry may think it has been detected and be more likely to leave cover.
■ Use the wind to your advantage. Scent can cause deer to break cover and move past hunters positioned on likely escape routes.
Deer Hunting With Gundogs or Deer Hunting Dogs
■ Hunting deer in Victoria (except Hog Deer) with the aid of either a gundog or deer hunting dog can increase the opportunities of harvesting and recovering deer.
■ When using gundogs or deer hunting dogs, you must ensure that dogs are always within your control.
■ Dogs that are wide-ranging will often spook deer, reducing your opportu-nity for a shot.
Ground blinds conceal the hunter.
• Snakes can be encountered throughout the year, but the majority of encounters take place during the warmer months.
• Most hunting dogs get bitten around the head and limbs. Dogs bitten by a snake can show some or all of the following signs:
- Sudden weakness that leads to collapse.
- Shaking and twitching.
- Vomiting.
- Dilated pupils that don’t respond to light stimulation.
- Blood in urine.
- Shallow and/or difficult breathing.
- Paralysis.
• What to do if your dog has been bitten:
- Do not try to catch the snake.
- Remain calm and focused.
- Immobilise the dog, if possible.
- Keep the dog as quiet as possible.
- Keep the bite site below the heart.
- Carry the dog to the vehicle.
- Take the dog to the veterinarian immediately.
Snake Bites and Hunting Dogs

Chapter Six / Page 56
■ Deer sometimes focus their attention on the dog, increasing your oppor-tunity for a shot.
■ Hunt downwind of the area in which you suspect the deer is located. This increases the likelihood of the dog picking up the deer’s scent.
■ If you have to track a wounded deer, a trained dog will help to locate the deer in the shortest possible time.
Sambar Deer Hunting With Hounds
■ Using hounds is a very effective way to hunt Sambar Deer, particularly in thick and dense bush environments that are difficult for stalking.
■ You should hound hunt in large gully systems situated at suitable distances from areas where hound hunting is not permitted.
■ Study the topography of the terrain in which you intend to hunt. Familiarise yourself with the location of roads, tracks, and safe areas where a firearm can be discharged.
■ A good understanding of Sambar Deer behaviour in the area you hunt is critical to the success of the hunt. In particular, you need to know the escape routes Sambar Deer will take or areas they are likely to bail.
■ Locate fresh deer sign (e.g. hoof prints, faecal pellets) and use one hound to check for freshness. The hound will vocalise strongly if fresh scent is present. Scent is detected easier in cool and calm weather conditions.
■ Before releasing the hound pack, ensure that the hound team members are positioned at strategic locations around the gully system. Good areas are saddles in between ridge lines, heads of gullies, flat areas at the bottom of steep slopes, and bottoms of gullies, particularly if running water is present.
■ Once all hunters are in position, release the hound pack. ■ Hounds that voice strongly are preferred, as they are better at indicating
location and the direction of travel. You will need to respond quickly if the deer changes direction of travel and relocate accordingly.
■ If the Sambar Deer stops running and is bailed-up, the hound team leader should designate one person to approach and safely despatch the deer.
■ Refer to Chapter Nine for hound hunting regulatory details.
• If you have mobile phone coverage, call your veterinarian before administering first aid on your dog.
• Take along a dog first-aid kit on the hunt. Or add items to your personal first-aid kit that would help your dog in emergencies.
• Some items needed for dog first-aid kits are a muzzle and agents that induce vomiting. If you do not have a muzzle, a bandage can be used to create a makeshift one. If the dog ingests something toxic, inducing vomiting could prevent the toxin from harming the dog. It also gives you the time needed to take your dog to the veterinarian.
Dog First Aid

Chapter Six / Page 57
Duck Hunting Strategies
Scouting
Successful hunters understand and research the environment in which they will be hunting. Scout hunting locations and observe the behaviour of ducks, such as flight patterns and paths, feeding and resting areas, and the time of day the ducks are active.
Positioning
■ Apply what you have learned from scouting trips and position yourself accordingly. If using decoys, set them in feeding and resting areas upwind of flight paths.
■ Ducks must land into the wind, so your blind position and hunting strategy should take this into consideration. Always have your landing area downwind from where you are hunting. If you place your decoys upwind, the chances of the ducks seeing you are greatly increased.
■ Offset your blind (also known as a hide) slightly from the landing area in the decoy spread. This will help you avoid being seen by incoming ducks whilst maintaining an effective shooting skills distance.
■ Make sure you know the depth of the water before setting decoys. ■ Be sure to check the weather forecast before going hunting, as this will
affect game behaviour and where you position yourself.
Using Duck Callers
■ The duck call is an effective tool that can bring waterfowl into your effective shooting skills distance.
■ Select a duck call according to where it will be used. Factors to be consid-ered when assessing a call include its tone, range, and sharpness.
■ Hunters who hunt waterfowl on large open water should use a call that is loud and higher in pitch so the notes will carry. Hunters who hunt ducks on small water bodies (creeks, dams, etc.) should use a call that is softer in volume and pitch.
■ Don’t overdo your calling. If a flock of birds is coming in, there is no need to call.
■ Study waterfowl and determine what calls are associated with different behaviours. Some basic calls include:• Basic quack• Greeting call• Feed call• Lone hen call
Using Decoys
■ Decoys are designed to attract waterfowl to within the hunter’s effective shooting skills distance. When used correctly, decoys greatly improve the success of waterfowl hunters. Hunters should study the specific feeding habits of ducks and set up decoys to mimic this behaviour. Ducks will often fly into decoy spreads if they believe the decoys are feeding. The decoys provide a false sense of security.
Remember… The only native plants that can be used to construct blinds in State Game Reserves are:
• Common reed (Phragmites australis) • Tea tree (Leptospermum spp.) • Cumbungi/bullrush (Typha spp.)
Hunting Tip Practise your duck calling. Test your skills often during the offseason. If you are not proficient, it is better not to attempt calling ducks in. Bad calling keeps ducks away.

Chapter Six / Page 58
■ There are many types of decoys available for a range of hunting situations and conditions. • Some decoys are designed to float on water, while some are designed for
dryland hunting. • Motion decoys are particularly useful for providing movement to your
decoy spread. They stand on stakes and their wings spin, driven by wind or battery, and give the impression of a bird pitching in to land.
■ The number of decoys required changes, depending on your hunting location and the species you are hunting. Hunters should aim to have a reasonable spread of decoys. If you are hunting on large open water lakes, the more decoys you have, the better your result will be. If you are hunting at a small hole in a cumbungi swamp, a dozen decoys may be enough.
Decoy Strategies
The effective use of decoys relates to not only the quantity you have but also the way in which you set them out. There are many decoy patterns that can be used when setting your spread. The appropriate pattern depends on the wind conditions. One common element for any decoy spread is that the pattern should offer a clear area for the ducks to land in. This is called the landing area. It should be about 15 metres in front of where the hunter is concealed (in a blind or hide). The landing area brings the birds to within effective shotgun range.
Floater decoy
Fold-up decoy
Shell decoy
Silhouette decoy
Motion decoy

Chapter Six / Page 59
The V Pattern Decoy Spread
If the wind is at your back, a good decoy spread is the V pattern. This setup uses approximately two dozen floating decoys. Run two groups of decoys angling away from the hide. Each group starts 15 metres out and runs for 30 metres. Put a couple of confidence decoys in front of the blind or hide. Add some silhouettes on the bank so that the ducks focus on the decoys and not you.
The J Pattern Decoy Spread
The J or fishhook pattern is used when you have a crosswind—a wind that is blowing parallel to the shoreline. The pattern generally uses around four dozen decoys and one or two dozen silhouettes. You can use more or fewer, depending on the habitat in which you are hunting and the number of ducks on the water. Place the blind or hide at the base of the hook upwind so that ducks will pass in front of the blind. Look for a natural point or sheltered spot on a river or wetland to set the decoy spread.
confidence decoy A decoy that gives ducks confi-dence in their decision to land in your decoy spread. These normally resemble species of waterbirds or wading birds present in the area
decoy marker A decoy set at a known distance. Usually marks the landing area and the farthest point of your effective shooting skills distance
Hunting Tip Use confidence decoys to make your decoy spreads seem more realistic. Use non-game and wary species confidence decoys, such as swans and herons.

Chapter Six / Page 60
The Dotted i Pattern Decoy Spread
The dotted i pattern is used when you have a really strong wind blowing parallel to you. In these conditions, the ducks will tend to hug the edge of the shore looking for shelter. Set your decoys close to the edge and close together. The ducks will often fly up the decoy spread and pitch into the landing zone. Place the blind or hide directly in front of the landing zone.
Decoys for Specific Species
■ When decoying, use species that occur in that area. If you are hunting inland around dams and rivers, use Wood and Mountain Duck decoys. Similarly, Chestnut Teal decoys should be used around coastal or saline wetlands.
■ Ducks have excellent eyesight, so decoys should be coloured to mimic the colouring of real birds. Try to ensure that your decoys are clean and look realistic. In decoy spreads for dabbling ducks, hunters will often use a variety of different decoy species because it can enhance a spread’s attraction.
Improving Your Decoy Spread
■ Vary the size of your decoy spread so that it is proportional to the size of the water body you are hunting on. A small number of decoys on a large body of water is not very inviting for ducks passing by.
■ Observe how ducks respond to your decoy spread. If the ducks land short, get up and move some of your decoys to steer the ducks into the landing area. If the wind changes, you may need to change your spread size or formation to accommodate a different landing area.
■ Using silhouettes will greatly increase the appeal of your decoys. ■ Remember that your decoys must be visible. Don’t place decoys in
shadows or close to the bank. Place them in water at least 11/2 metres from the bank so that they are easily seen.
• If the wind is blowing into your face, pack up and move. No matter how good your decoy spread is or how well you call, your success will be limited under this condition.
• When hunting deer, always be aware of the wind direction. Check the direction constantly, and be prepared to change plans to ensure you hunt into the wind. You can determine wind direction by using unscented powder puffer, a lighter, or a piece of cotton thread taped to the end of the barrel.
• Use the wind to your advantage when hunting quail. Hunting into the wind will give the quail a smaller chance of hearing you and will make it easier for the dogs to pick up the scent.
Wind Direction
• Always have your blind or hide upwind from your decoys. Remember that ducks need to land into the wind.
• Always leave a space for the ducks to land.
• Make sure your decoys are visible and not covered in shadows.
• Move your decoys according to how the ducks are responding and in response to any wind changes.
• Use other tactics, such as confidence decoys and silhouettes, to mimic realistic conditions.
• Use species that occur in the hunting areas and exhibit similar feeding habits to the target duck.
Key Points for Effectively Using Decoys

Chapter Six / Page 61
Dam Jumping
■ A popular duck hunting technique, mainly employed on farms, is ‘dam jumping’. It requires the hunter to stalk ducks on farm dams and shoot the birds as they flush. To be successful you need to:• Study the flight path and behaviour of the ducks in the area.• Learn where the ducks are located and to where they fly if disturbed.• Use cover to your advantage and approach from the high side
of the dam.• Keep an eye out for the sentinel ducks that are often present and will
alert the other ducks to threats.• Use the wind to your advantage.
■ Hunting in a team covering multiple dams can significantly increase the success of this duck hunting method. Be aware of what is present in your firing zone, including your hunting companions, farm stock, or farm machinery and buildings. Always shoot in a safe direction.
Stubble Quail Hunting Strategies Stubble Quail can be found in a wide variety of habitats, from native grasses to improved pasture, leafy crops to stubble. They prefer open country and will not be found in timbered country. Stubble Quail fly with a loud whirring of wings, often just above the ground, for approximately 50–250 metres or more. They then drop to the ground and sometimes run. It can be difficult to flush them twice.
Using a Gundog
The use of a well-trained gundog to locate, flush, and retrieve quail can be a distinct advantage for the quail hunter. Gundogs scent best when they are working into the wind, so try to maximise this advantage for your dog. Plan things so that you cover the area in a systematic and thorough way, rather than just wandering haphazardly. Generally, quail become inactive and difficult to find during warmer temperatures, and scenting conditions for dogs are more difficult. During these warm periods, it might be better to rest until later in the afternoon or hunt in the early morning when conditions for hunting improve. Cool, cloudy, and breezy days present excellent hunting conditions. On windy days, birds will often turn and swerve to take full advantage of a tail wind.
Walking Up
If you are hunting alone or with friends but without a gundog, work the area systematically. Always be mindful of where your hunting companions are and never shoot in a dangerous direction. Some hunters tie a rope between them and their companions, dragging it along the ground, flushing any birds between them.
Hunting Tip Practise in the closed season on clay targets that simulate the flight of Stubble Quail. Targets should have an outgoing, quartering away (and sometimes crossing) presentation at a height of 90–180 centimetres (3–6 feet) off the ground.

Handy Hints• Plan your hunting season.
• Practise often prior to the hunting season.
• Know the environment where you will be hunting.
• Check the weather forecast.
• Select hunting sites clear of vegetation and obstacles that will impede retrieval of game.
• Pass up shots where the bird will fall into heavy cover.
• Only take shots that are within your maximum shooting skills distance.
• Never take your eye from where a struck bird falls and don’t start shooting at other birds until you have retrieved your game.
• When retrieving game, get yourself, another hunter or your dog there quickly and safely.
• Dispatch struck birds on the water immediately and safely.
• Carry and use ‘swatter’ loads for struck birds. Typical shooting range 20 to 32m. Most effective steel shot size 7 to 5 at 1oz/28g.
• Never shoot into fl ocks, pick a single bird at the rear of the fl ock.
Field Care BasicsBacteria is the cause of spoiled meat.Three factors contribute to bacterial growth.
• Heat: Heat is the number one concern.
Bacteria grows rapidly in a carcass. Meat begins to spoil above 4o celsius, removing innards helps to keep game cool (dispose of innards responsibly).
• Moisture: Moisture also encourages the growth of bacteria.
Because moisture damages meat, don’t use excessive amounts of water to wash the cavity. Allow it to dry.
• Dirt: Dirt can introduce bacteria.
Keep meat clean by covering it with cheesecloth and keeping debris out of the chest cavity. As a rule, it’s best to fi eld dress immediately.
Lead (Forward Allowance) TechniqueUse a well practised Lead Technique and always keep your shooting ranges within your known personal shooting skill distance.
Example of Steel Shot Performance for Mountain Duck. Steel Shot Size 3 to 2Minimum Load 32g/1–1/8oz
Modified (Half) Choke 32 to 40 metres
Improved Cylinder Choke 20 to 32 metres
DecoysThe proper use of decoys can attract some ducks to within effective shooting ranges. Retriever dog
Using a well trained retriever dog assists in locating and collecting downed birds.
Camouflage and HidesUse of applicable tools and equipment increases the effectiveness of a hunter.
Know Your GameUnderstand your quarry, and recognise the correct game species to hunt.
Game Birds
Black DuckWood DuckGrey TealChestnut TealPink-eared DuckMountain DuckHardheadBlue Winged ShovellerStubble Quail
Threatened
Freckled DuckPainted Snipe
Protected
SwanIbisSpoonbillCormorantLong-billed Corella
Recommended Chokes and Loads for Game Ducks Species Distance Choke Minimum Steel Size (m) Load Shot Size
Mountain 20–32 Improved 32g/1–1/8oz #3–2 Duck cylinder
32–40 Modifi ed 32g/1–1/8oz #3–2
Black 20–32 Improved 28g/1oz #6–2 Duck cylinder
32–40 Modifi ed 28g/1oz #4–2
20–32 Improved 28g/1oz #6–3 cylinder
32–40 Modifi ed 28g/1oz #4–3
20–32 Modifi ed 28g/1oz #6–4 32–40 Full 28g/1oz #4
Extracted from the Tom Roster 2012 Non-toxic Shot Lethality Table; (adapted to Victorian Game birds) ©
Note: All shot sizes listed above are United States equivalent.All Choke recommendations are based on Steel (Soft Iron) Shot compatible Choke types.
Wood &Hardhead
Ducks
Blue-wingShoveller,
Teal & Pink-earDucks

Chapter Six / Page 64
Shot Placement FundamentalsEvery hunter wants to bring home the game he or she is seeking; true hunters strive to do it humanely. Humane treatment of hunted game animals is mandated in legislation. To achieve this, it’s essential that you understand the anatomy of the game you’re after, and learn how to place a shot for a clean kill.
Deer Hunting Vital Shots ■ In Victoria, laws dictate minimum firearm calibres, bores, projectile
weights, bow/crossbow draw weights, and arrowheads to ensure humane destruction of deer.
■ The most effective shots are delivered to a deer’s vital organs—heart and lungs. In large game animals, these organs lie in the chest cavity behind the front shoulder. A lung shot is the most effective shot for big game.
■ The area of the vital organs also contains major blood vessels and arteries. A shot in this area causes considerable bleeding. If the animal doesn’t fall immediately, it will leave a blood trail that’s easy to follow.
■ Aside from being a good marksman, the key to a clean kill is patience. Hunters should limit shots to the vital organs only. If you do not have a clear shot to the vital organs, wait until the animal presents the best possible shot.
Remember… It’s difficult to hit a vital area on an animal that is running or moving straight away from you. Rather than risk wounding the animal, wait for a better shot.

Chapter Six / Page 65
Choosing the Proper Shot Angle for DeerThe shot angle is the angle at which the animal is standing in relation to the hunter. Knowing which angles offer the most effective—and least effective—shots is an essential part of being a responsible hunter.
■ Broadside The broadside shot angle is the preferred shot angle for both firearm and bow hunters for larger game animals, such as Sambar, Red, and Fallow Deer. • Firearm: The broadside position offers several excellent shots for a
firearm hunter. The best target is the shoulder and chest area. A bullet of the correct weight that is fired from a firearm adequate for the game will break the shoulder bone and enter the lungs or heart.
• Bow and Crossbow: The broadside angle offers the best shot for large game animals, such as Sambar, Red, and Fallow Deer. For most big game, the aiming spot is straight up from the back side of the front leg, one-third of the way up from the bottom of the chest. An arrow will penetrate the ribs but not the shoulder bone; wait until the near leg is forward, and aim behind the shoulder.
■ Quartering-Away The quartering-away shot angle is when your target is facing away from you but at an angle. The animal is usually looking away from you. • Firearm: For firearm hunters, the quartering-away position offers several
aiming spots on all deer. The area just behind the shoulder is the best aiming spot for direct penetration of the vital organs. Focus on hitting the chest at an angle that will ensure you drive the bullet toward a spot above the opposite front leg.
• Bow and Crossbow: The quartering-away shot angle offers a good opportunity for a clean kill on smaller deer species such as Fallow and Hog Deer. This is not a good shot for bowhunters on larger game such as Red Deer and Sambar Deer because their massive stomachs and intes-tines will block a clean shot to the lungs or heart. An angle that leads to a spot above the opposite front leg is best for quartering-away bow or crossbow shots.

Chapter Six / Page 66
■ Quartering-Toward The quartering-toward shot angle is when the animal is facing toward you but at an angle. Because the animal is typically looking your way, it most likely will spot your movements.• Firearm: The quartering-toward angle presents a clean shot to the vital
organs. A shot can be taken at this angle if the gun is already trained on the animal. For an effective hit, aim at the front of the shoulder of the near front leg. Caution: A light bullet may deflect off the shoulder bones of deer. Be certain to use a firearm and ammunition adequate for the game you hunt and the angle of shot you might select.
• Bow and Crossbow: This angle offers a poor shot opportunity and should not be taken. Heavy shoulder bones shield the majority of vital organs from broadhead-tipped arrow penetration. Also, bowhunters should never fire an arrow at an animal that is looking at them, because the animal could react to the arrow’s movement, resulting in missing the vital organs.
■ Head-On The animal will most likely detect your movements with a head-on shot angle.• Firearm: A head-on shot can be effective if you have an adequate
firearm and your firearm is already positioned for the shot. However, head-on shots rarely result in a clean kill and ruin a lot of meat. Aim at the centre of the chest to hit the vital organs.
• Bow and Crossbow: These angles offer very poor shot selection and should not be taken. Heavy bones in front and muscle mass block penetration to the main vital areas.
■ Rear-End The rear-end shot should not be taken by hunters using firearms, bows, or crossbows.

Chapter Six / Page 67
Duck Hunting Vital ShotsHunting ducks with a shotgun requires a different approach than hunting deer with a rifle, but the principles of correct shot placement remain the same in order to achieve a humane kill. Hunters must deliver a shot string of sufficient pellet density with sufficient pellet energy to penetrate and strike vital areas that result in the bird being quickly despatched. Pellets should strike the front half of the bird to regularly achieve this. Look for the location of pellet strikes after you have plucked your birds for clues on whether you are giving your birds enough lead (forward allowance).Skill deficiencies and hunter behaviours can contribute to a lack of success and waterfowl wounding. The following list identifies key causes of wounding and ways to reduce it and bring more birds to hand with fewer shots. Don’t be influenced by other hunters’ activity, and hunt only within your effective shooting skills distance.
1. Poor shooting skills• Poor shooting skills are the single largest contributor to wounding in
duck hunting.• Practise on clay targets regularly to maintain a high shooting
skill level.2. Poor distance estimation skills
• Some hunters cannot accurately judge distance. As a result, they shoot at birds beyond their effective shooting skills distance, which can lead to wounding.
• Practise estimating and measuring distances in the field. Getting to know the size of the game birds you hunt will make you become more proficient at estimating distances.
3. Using the wrong choke and shotshell combination for the specific game bird and shot distance• Pellets need sufficient energy to penetrate vital organs at specific
distances to effectively take a bird.• Pattern density is also important to ensure a sufficient number of
strikes to the vital organs.• Bigger birds (such as Black Duck) need a less dense pattern count due
to the large size of the vital areas. Conversely, smaller birds require a denser pattern count to ensure that they are taken effectively.
• Refer to Tom Roster’s Non-Toxic Shot Lethality Table (see page 39) for correct load and choke combinations for each game bird species.
4. Failing to properly pattern test choke and shotshell combinations• Hunters should know how different choke and shotshell combina-
tions perform in their shotgun.• To be effective, hunters must measure pellet strike densities at different
distances by pattern testing different choke and shotshell combinations.• Pattern a range of shotshell and load combinations at different
distances within your effective shooting skills distance and measure performance against Tom Roster’s Non-Toxic Shot Lethality Table (see page 39).
5. Shooting beyond one’s personal effective shooting skills distance• The chance of wounding a bird increases as shot distances increase.• Get to know your effective shooting skills distance and hunt within it.
Remember… Know your limits. For the vast majority of duck hunters, their maximum effective shooting skills distance is 30 metres. For those hunters, shooting beyond this distance increases the likelihood of wounding. Help to ensure duck hunting remains sustainable and protect animal welfare by only shooting within this distance.
Remember… Hunters can significantly increase their success rates and substantially lower wounding by doing these three things alone:
• Practise properly and regularly.
• Shoot only at birds within their maximum effective shooting skills distance.
• Use the correct load and choke combination to achieve a lethal pattern.
Hunting Tip Use physical features at known distances or marker decoys placed at known distances to help judge whether the birds are within your effective shooting skills distance.

Chapter Six / Page 68
6. Shooting at the front bird or into the middle of large flocks• Hunters who shoot into the middle of large flocks risk missing and
wounding birds.• Do not shoot at the front (lead) bird. Any misses will likely impact
other birds in the flock.• Hunters should target lone birds or birds at the rear or sides of flocks.
In doing so, any aiming error will not affect nearby birds.7. Taking going-away shots at birds beyond 35 metres
• A ‘going-away’ bird has its vital organs protected by its gizzard and backbone structure.
• Do not shoot at birds at ranges over 35 metres, as there will be insuf-ficient energy in pellets to consistently penetrate the backbone and gizzard and reach vital organs, resulting in a wounded bird.
8. Dropping birds in heavy cover• Birds dropped in heavy cover hide and are often extremely difficult to
locate. • Avoid hunting in areas of heavy cover.
9. Failure to use swatter loads when despatching birds downed in wetlands• A downed bird on the water offers a very small lethal area for
effective despatching.• Always carry swatter loads (steel shot sizes #7.5 to #5 at 1 oz/28
gms), which have the rich, dense pattern needed to effectively despatch a bird on the water. Remember that ricocheting pellets can travel long distances. Ensure that you have a safe background before taking the shot.
10. Poor retrieval strategies• Never take your eyes off a downed bird.• Stop shooting immediately and take the most direct route to where
you last saw it. Use landmarks (e.g. trees, stumps, farm buildings) to mark the location of downed birds.
11. Not using a trained dog when game bird hunting• Put the time and effort into training your dog in the off-season.
A well-trained gundog can greatly increase recovery rates.• An untrained dog, however, can disrupt hunters, cause commotion,
and often force a hunter to take shots outside of his or her effective shooting skills range.
Stubble Quail Hunting Vital ShotsThe same principles for duck hunting apply to quail. Hunters must deliver a shot string of sufficient pellet density with sufficient pellet energy to penetrate and strike vital areas that result in the bird being quickly despatched. Pellets should strike the front half of the bird to regularly achieve this. Follow the above principles to ensure a quick and humane harvest.
GizzardVital Organs
Backbone
Hunting Tip When plucking your birds, check to see where your pellets are striking. If you are striking the bird in the back half, the next time you fire, give the bird more lead or forward allowance.
Hunting Tip • Do not shoot at a flock of ducks. Pick
out a single duck at the rear or side of the flock, and stay with it until it drops.
• Do not shoot at lead birds in a flock. If you miss, you will most likely wound trailing birds.
• Do not shoot at ducks that are flying away from you (going-away birds) at ranges over 35 metres. The vitals in a going-away duck are protected by its gizzard and backbone structure. Pellet penetration to the vitals could be blocked.
• Develop a retrieval strategy when duck hunting. Identify sites and shooting zones where downed game can be readily retrieved. Avoid hunting in heavy cover where downed ducks can be lost.

Chapter Six / Page 69
Develop a Retrieval Strategy ■ Planning the retrieval of your game is an important part of planning your
day’s hunting. A successful hunt requires well-thought-out retrieval strate-gies. All hunters must make every effort to retrieve the game they have shot, ensuring game is recovered quickly and humanely.
■ Any retrieval strategy should cater for two possible scenarios:1. Game that has been struck and killed by a hunter’s shot and recovered.2. Game that has been wounded.
■ Consider the following factors when developing an effective retrieval strategy:• Identify hunting sites or shooting zones where downed game can be
readily retrieved—avoid hunting in areas of heavy cover.• Know the hunting location and the characteristics of its associ-
ated habitat. • If possible, work with another hunter to assist in the retrieval of game.
Deer Retrieval StrategiesIt is a hunter’s ethical responsibility to stop the hunt and search for any wounded animal.
■ Make a practice of carefully observing every movement of a game animal after you shoot it.
■ After taking a shot at a deer, wait for at least half an hour before beginning tracking, unless the downed deer is in sight. Assume the deer was hit. Track for a minimum of 150 metres. If no blood spoor can be found after a thorough search, it is safe to assume that the shot missed the deer.
■ Tracking a deer takes time.• Move slowly and carefully scan the ground and the vegetation up to
shoulder height.• Look for blood spoor, hoof prints, scuff marks, disturbed leaf litter, dry
leaves after rain, upturned damp leaves, and broken twigs.• Look for unusual vegetation disturbance, direction of disturbance,
presence of mud on vegetation, or absence of dew. Insects are often disturbed and spider webs are broken by passing deer.
■ If you lose a trail, search in a circular or grid pattern, and try to pick up the trail again.
■ Use fluorescent tape to mark the blood trail in case darkness or weather forces you to end the search and return the next day. Marking the blood trail also shows where to look for more signs if you lose the trail. Be sure to remove the tape after use.
Game Bird Retrieval Strategies ■ For game birds, don’t assume that downed birds have been killed outright. ■ Once a bird is struck, stop shooting and immediately recover the bird. ■ Use equipment that will aid in the retrieval of downed birds (this could
include such things as a gundog, swatter loads, boats, etc.). ■ If you can’t find the bird, look for tell-tale signs of where the bird went
down, including feathers or disturbed vegetation. ■ Look and listen for any movement.
wounded Struck but not retrieved
Hunting Tip Do not focus all your attention to the ground when tracking a deer. Often spoor can be found on vegetation up to shoulder height.
Hunting Tip • If a quail covey rises in front of you,
don’t shoot aimlessly into the middle of them. Pick out one bird only, preferably a bird on its own.
• If you shoot a quail, make sure you mark exactly where it falls. Make a habit to mark fallen game, and keep your eyes on the spot until you remember where it fell.
• Take the most direct route to the downed bird or where you last saw it fall.

Chapter Six / Page 70
■ If you can’t locate a downed bird, mark where you last saw it with something highly visible (don’t use your gun as you may need it to despatch the bird) and search in half-circle arcs away from where the bird fell at one-metre intervals.
Approaching Downed Game ■ There is a chance that a downed animal could still be alive and needs to
be quickly despatched.• For downed birds, make your way to them quickly but safely. Watch for
movement and have a swatter load at the ready in case you can’t bring the bird to hand easily. Upon recovery, quickly and humanely destroy the animal.
• A downed deer or other large animal should be approached carefully from above and behind the head. Deer can be dangerous in such a situation.
• If the animal appears to be dead, wait a short distance away for a few minutes. Watch for any rise and fall of the chest cavity.
• Notice whether the eyes are closed—the eyes of a dead animal are usually open. You can be certain that the animal is dead if the eye doesn’t blink when touched with a stick.
■ If the animal is still alive, it should be finished with a shot to the base of the ear. If you wish to mount the head, place your shot in the heart–lung area. For bowhunters, the only option is placing an arrow in the heart–lung area.
■ Once the animal is dead, you can begin field dressing, except for Hog Deer. A Hog Deer must be immediately tagged before field dressing (gutting) and caping can begin. Do not break down the carcass or remove any meat. Present the Hog Deer body to the checking station within 24 hours from the time the deer was taken.
Remember… Hog Deer tags must be obtained well in advance of the intended hunt. Visit the GMA website for information on how to order your tags.
Safety Tip Make sure you do not approach a downed deer from the front. If the deer does not require a finishing shot, make sure you unload your firearm straightaway.
Hunting Tip • Dispatch any live birds recovered to
hand immediately. Where possible, stun the duck before breaking its neck. You may want to use a blunt object (like a fishing priest) to apply a heavy blow to the back of the head.
• Confirm the bird is dead by checking for these signs in combination: the eye lids do not close when you touch the eyeball, the body and neck are totally limp and the wings are drooping, no heartbeat or breathing and eyes glazing rapidly.

Chapter Six / Page 71
Field Care of GameThe way you handle game after it’s harvested can have a significant impact on the quality of the meat.
Field Care Basics ■ The growth of bacteria is the cause of spoiled meat. Three factors
contribute to bacteria growth.• Heat: Heat is the number-one concern. Bacteria grow rapidly in a
carcass, especially if it’s allowed to stay warm. Meat begins to spoil above 4.4°C. The higher the temperature—and the longer the meat is exposed—the greater the chance of spoilage. This is particularly true with large game.
• Moisture: Moisture also encourages the growth of bacteria.• Dirt: Dirt can introduce bacteria.
■ Basic field dressing techniques help cool game by removing entrails, which lowers body heat by allowing air into the body cavity. As a rule, it’s best to field dress immediately. • When cooling the body, use available shade. Hang deer, if possible. For
large animals, you should prop the carcass open with a clean stick to allow air to circulate.
• Dispose of entrails thoughtfully. • Keep meat clean by covering it with a game bag. This also protects it
from flies, which lay eggs in exposed flesh. Rubbing meat with black pepper will repel flies. If you have to drag the game to camp, try to keep dirt and debris out of the chest cavity.
• Because moisture damages meat, don’t use excessive amounts of water to wash the cavity. Allow it to dry. Remember that water can also spread any gut content, leading to carcass contamination.
• Skin the animal as soon as possible to allow the carcass to cool.
Field Dressing Game Birds ■ As soon as is practical, the birds should be plucked, de-pinned, and legs
cut off at the feather line. ■ Gutting should be done as soon as practical after the bird is harvested.
Cut around the vent and open the abdomen to each side, empty the lower crop, and sever and remove it from the neck at the head.
■ Carefully draw out the entrails and gizzard, making every effort to remove them intact to prevent gut spillage.
■ Pull out the heart and lungs, and wipe the cavity with paper towels or flush with water and then dry with paper towels.
■ Remove the wing(s) at the second joint (ensure one fully feathered wing is retained for ducks).
■ Place bagged birds on ice in an icebox, refrigerator, or freezer.
Preparing Game Birds for Taxidermy
The quality of your taxidermied game bird trophies is influenced by the steps you take in the field. Ensure you do the following:
■ Avoid placing the bird in a neck hook. ■ Remove as much blood and dirt as possible without damaging
the feathers.
• Here are some additional tips for dressing large game. This method involves removing the skin.
- Because it’s harder to move larger animals, you may need to skin and quarter the animal to pack it out, particularly in a remote area.
- If you’re unable to hang the animal for skinning, begin by making a lengthwise cut and removing one side of the hide. Then, turn the animal onto the skinned hide, and skin the other side.
- To keep dirt off the meat, use the inside of the removed hide as a protective mat as you quarter the animal.
- Put each quarter in a game bag, and attach the bags to a backpack frame for the hike out.
• To help protect meat from the dirt, there is an alternative method of quartering large game, and in particular, Sambar Deer. The back legs are removed with the skin still on. Then the legs can be carried out on your shoulder or backpack, and the skin will protect the meat from dirt and contamination.
Field Dressing Larger Game
Remember… A fully feathered wing must be retained on a duck or the duck breast until you reach your place of residence or immediately prior to cooking. If breasts are removed separately, each breast must have a fully feathered wing attached.
Hunting Tip If you are going to have your game bird mounted, don’t field dress (gut) it. Clean, cool, or freeze the bird and get it to the taxidermist as quickly as possible.

Chapter Six / Page 72
■ Tuck the head under a wing. ■ Put the bird in pantyhose or a stocking, keeping the feathers in a
natural position. ■ Cool the bird immediately by placing it in an icebox or refrigerator. ■ Deliver the bird to the taxidermist within two days. If this is not possible,
you will have to freeze the bird. Ensure the bird is placed in a ziplock bag. Remove all the air before sealing the bag. If stored for long periods before delivery to a taxidermist, it is recommended that you freeze the bird in a block of ice (place in water and then freeze) or, at a minimum, wet the feathers thoroughly before freezing. These techniques reduce or eliminate the risk of freezer burn (drying) the skin and extend storage time.
Carrying Out Deer ■ The following points are important to remember when carrying out deer.
• Present Hog Deer to the checking station with the head and body intact. In the field (prior to presentation at a checking station), you can only field dress (gut) the animal and remove the cape.
• For other deer, split the load in quantities that can be safely carried without risk of injuries. Carrying additional weight increases the risk of injuries in the field.
• If the meat has to be left in the field overnight, hang the parts in a tree out of reach of foxes and wild dogs. Leave a clothing item behind to maintain human scent in the area.
• Recover all of the carcass if possible. Do not waste any meat. Dispose of the offal appropriately.
• Cover any exposed deer hide with a bright-coloured or blaze orange clothing item to prevent other hunters from mistaking you for a deer.
• If carrying out trophies, ensure that they are carried in an upside-down position—with the antler tips pointing toward the ground. Wrap a blaze orange or bright-coloured cloth item around any exposed hide. Wrap fluorescent tape around the antlers.
Caping Game Deer
■ Caping prepares the animal to be professionally preserved by a taxi-dermist. The cape has to be carefully removed before the carcass is processed further.
■ The animal should not be dragged around unnecessarily to prevent damage to the cape. The cape should be kept as clean as possible during the entire removal process. A sharp knife or a scalpel should be used. Be sure to carry out the caping process in a safe manner.
■ The following is the basic field caping method for a shoulder mount.• Make a dorsal cut starting about 5 centimetres behind the antlers.
Continue the cut following the central line along the neck to a point about 30 centimetres past the shoulders. (See dorsal cut in the illustra-tion on the next page.)
Game Bird Kit
bird knife
gloves
scissors(shears)
mechanical plucker
Deer Care Kit
Other typical items include:
• Black pepper to repel insects
• Cheesecloth bags
• Cooler and ice
• Disposable plastic gloves
• Fluorescent orange tape
• Foil
• Gambrel and pulley system
• Hand towels
• Large bag for caped or trophy head
• Plastic bags for cleanup
• Plastic or cotton gloves
• Salt (noniodised) for hide care
small saw
knife and sharpener
game bags
nylon rope (at least 25 metres) and pulley
hatchet
plastic gloves
tag (for Hog Deer)

Chapter Six / Page 73
• From that point, make a cut around the circumference of the body (circular body cut).
• Cut the skin around each of the front legs just above the knees (knee cuts). Join the cuts around the legs to the cut around the body by making an incision at the back of the front legs (under leg cuts).
• Carefully separate the skin with your hand or blade while working toward the head. Remove the head at the head–neck junction carefully. The head with the cape attached can now be delivered to a taxidermist. He or she will remove the skin from the skull and process it further.
■ If it will take more than 24 hours to get the head with the skin attached to a taxidermist, it is safer to skin the head and preserve the cape by salting or freezing. Follow these steps:• Extend the dorsal cut to the back of each coronet in a Y shape. • Working close to the skull, carefully cut the ear bases away from
the skull. • Peel the skin around the coronets. • Proceed to skin the face, paying particular
attention to the eyes and orbital glands.• Split the lips and nose. Turn the ears.• The cape is now ready for salting
or freezing. • Skull cap the head if desired.
■ Skinning the head is relatively difficult for beginners. The steps presented above are only a basic guide. For more details, consult taxidermy literature and look at instructional videos. Seek the help of taxidermists or experienced hunters who can show you how to skin the head.
Location of cuts for shoulder mount.
knee cut
Y cut
under leg cutunder leg cut
circular body cut
dorsal cut
knee cut
Skull cap cut locations.
Hunting Tip During the caping process, ensure that the skin cuts are made from inside out thus avoiding cutting the hair.

Chapter Six / Page 74
Transporting Game ■ Keep dressed game cool and free of insects. If you’ve quartered your deer,
pack the quarters in ice chests—don’t process it beyond quartering until you reach your final destination.
■ Ensure that the load is safely secured and covered so that you do not offend non-hunters.
■ Ensure all game birds are stored on ice or in a refrigerator during transport.
Utilising Harvested Game ■ As a responsible hunter you should always endeavour to make optimal
use of the harvested quarry. Ensure all game birds are recovered. If you are successful in harvesting a deer, you should recover all available meat.
■ Refer to the following information for suggestions on how to utilise your game meat.
When transporting game, be sure to keep it covered to avoid offending others.

Chapter Six / Page 75
Venison Boning Chart—Location of main cuts

Chapter Six / Page 76
Ways to Prepare Venison
The following contains suggestions of how to prepare and serve venison (deer meat).
Game Bird Utilisation
Cut of Meat Meal Type Serving SuggestionWhole bird Slow cooked roast Camp oven, tomatoes, red
wine, herbs and spices.Whole bird (small)
Slow cooked, spatchcock
Small birds slow cooked should be wrapped in bacon. Hot barbecue spatchcock birds. Do not overcook.
Breast Schnitzel, stew, curries, satay, kebabs, sausages, salami, mince, pie
Hot barbecue whole breast, schnitzel and skewered breast. Do not overcook. Use a camp oven for stews and curries and slow cook.
Drumsticks, wings Sausages, salami, mince
Cut all meat from the bone and add to minced breast meat.
Fat Cooking lard Render fat from the abdomen and use for roasting potatoes.
Cut of Meat Meal Type Serving SuggestionNeck Mince, stew, soup • Use a camp oven.
• Add potatoes, mushrooms, carrots, herbs, and spices.Shoulder Mince, roast, stew, soup • Cut all meat from the bone.
• Slow cook with a curry base.Side of Ribs Spare ribs • Marinate overnight in your favourite marinade and chargrill.Foreleg Mince, roast, stew, soup • Mince and make hamburgers.Shank Mince, osso buco • Slice into 3-centimetre pieces.
• Use any traditional osso buco recipe.Backstrap Jerky, roast, steak • Cut meat 2 centimetres thick.
• Barbecue. Do not overcook.Eye Fillet Steak • Cut meat 2 centimetres thick.
• Wrap in smoky bacon.• Barbecue. Do not overcook.
Rump Corned meat, jerky, roast, steak • Make a hole in the middle of the rump.• Stuff with seasoning.• Wrap in bacon and bake.
Round Corned meat, jerky, roast • Make corned venison.• Serve with mashed potatoes and vegetables.
Sirloin Corned meat, jerky, roast • Slice thinly.• Add spicy jerky mix.• Cook in smoker.

Chapter Seven / Page 77 Be a Safe Hunter
Why Firearm Safety Is ImportantWhenever firearms are being handled, an incident can occur if the firearm is not handled responsibly. Preventing hunting incidents depends on knowing and understanding firearms, and handling them skilfully and safely. Responsible hunters practise safe habits until they become second nature.
Firearm Safety in the HomeA high number of fatal firearm incidents can occur while firearms are handled in the home. Because almost all incidents are caused by carelessness and lack of knowledge, it’s the hunter’s duty to help prevent firearm incidents in the home.
■ Most importantly, lock guns away where children can’t reach them, and store ammunition in a separate location. Check to see that a firearm is unloaded before allowing it in any building or living area. Importantly, check with Victoria Police (www.police.vic.gov.au) for legal storage require-ments for firearms and ammunition.
■ Practise these safety rules if handling a firearm in the home.• Always point the muzzle in a safe direction when you pick up a firearm.• Keep your finger off the trigger.• Always check to see that the chamber and the magazine are empty.
■ If a gun is taken from storage to show friends, open the action and show them that the firearm is unloaded, and confirm they understand safe gun handling rules.
■ State practices for handling and storing firearms safely in the home.
■ Identify the primary rules of firearm safety. ■ Name the main causes of hunting incidents. ■ Recognise field carries for a rifle or shotgun. ■ Recognise proper field carries while walking two
or three abreast and while walking two or three in single file.
■ Recognise the safe method for crossing an obstacle if hunting alone or if hunting with a partner.
■ State how to check safely to see that the barrel of a firearm is free of obstructions.
■ State the steps to load and unload a firearm safely. ■ Understand how to transport firearms safely in
vehicles and in boats. ■ Recognise proper spacing between hunters and the
safe firing zone when hunting in a group. ■ Understand why self-control, target identification,
and accuracy are critical for hunting safety.
■ State the functions needed for hunting that are impaired if the hunter consumes alcohol or drugs.
■ Identify advantages and disadvantages of hunting from an elevated stand.
■ Name the accessory you should wear at all times when climbing a tree and when on a tree stand.
■ State how to haul a firearm into an elevated stand safely.
■ Identify a safe position and the firing zone when hunting with a partner in a boat.
■ Name the accessory you should wear at all times when hunting from a boat.
■ Understand what to do to help retain body heat if you are stranded in chilly water.
■ Understand what to do if you suspect that you are hunting in waters affected by blue-green algae.
■ Understand how to use spotlights safely when hunting pest animals.
You should be able to...
• Treat every firearm as loaded.
• Always point firearms in a safe direction.
• Load your firearm only when ready to fire.
• Identify your target beyond all doubt.
• Check your firing zone.
• Store ammunition and firearms safely.
• Avoid alcohol or drugs when handling firearms.
• Never have loaded firearms in the car, home, or camp.
• Avoid firing at hard surfaces or water.
• Don’t climb fences or obstacles with loaded firearms.
The Rules of Firearm Safety
Remember… • The most common hunting incidents
result from hunter judgement mistakes.
• Most firearm incidents occur within 10 metres of the muzzle.

Chapter Seven / Page 78
Hunting Incidents ■ A hunting incident occurs when a hunter directly or indirectly causes
personal injury or death while using a firearm, bow, or crossbow. ■ More broadly defined, a hunting incident is any unplanned, uncontrolled
action that occurs while using a firearm, bow, or crossbow. It can include near misses.
■ Being responsible in order to prevent hunting incidents is your first priority.
Four Main Causes of Hunting Incidents ■ Hunter Judgement Mistakes, such as mistaking another person for game
or not checking the foreground or background before firing ■ Safety Rule Violations, including pointing the muzzle in an unsafe
direction and ignoring proper procedures for crossing a fence, obstacle, or difficult terrain
■ Lack of Control and Practice, which can lead to accidental discharges and stray shots
■ Mechanical Failure, such as an obstructed barrel or using improper ammunition
A successful hunt begins with target practice at the shooting range.
Many of the rules that govern safe firearm handling in the field apply to the shooting range. But a shooting range has some additional requirements.
• Read all range rules that apply to the type of shooting you will do that day.
• If there is a range officer, be sure to follow his or her instructions while shooting.
• When not shooting, unload your firearm, and leave it on the range line or bench until you’re given further instructions.
• Don’t handle your firearm while other shooters are downrange. Step away from the firing line or bench until the range is clear and the range officer instructs you to approach the line or bench.
• If no range officer is present, all shooters must decide on safety commands beforehand so that it’s clear when someone intends to go downrange.
• Before any person goes beyond the firing line or downrange, unload your firearm and step away from the line until the other person returns.
• Under no circumstances should you shoot a firearm when someone is downrange or past the firing line.
• Always wear hearing and eye protection, even if you’re watching others shoot.
• Respond immediately to anyone calling for a ‘cease fire’.
• Fire only at approved targets. Do not fire at rocks, posts, trees, or wildlife.
Using Firearms at the Shooting Range
Be sure of the target and what is in front of it and beyond it. If you cannot see what lies beyond the target, do not take the shot.
Safety Tip When approached by an Authorised Officer or member of the police force, point your muzzle in a safe direction, unload your firearm, and follow the officer’s instructions.

Chapter Seven / Page 79
Safely Carrying Firearms in the FieldThere are several ways to carry a gun safely and still have it ready for quick action. Three rules apply to all carrying methods:
■ Muzzle pointed in a safe direction and under control ■ Firearm loaded only when ready to fire ■ Finger outside the trigger guard
Proper Field Carries ■ Sling Carry
• Easy carry for long treks through open country. Keep a hand on the sling when walking so that it doesn’t slide off your shoulder if you trip. Not recommended for thick brush because the gun could be knocked from your shoulder. There are two variations of sling carry that you can use. - European Carry: Has the muzzle pointing down, on the left shoulder for right-handers and on the right for left-handers. This is a better alternative when carrying firearms with heavy varmint barrels. Firearms are quicker to deploy from a European carry than the tradi-tional sling carry.
- Safari Carry: Positions the firearm at the front. Easily shouldered for a quick shot.
Sling Carry
Trail Carry
European Carry
Safari Carry

Chapter Seven / Page 80
■ Trail Carry Leaves a hand free for balance, but don’t use it when you’re behind someone. Not recommended when walking in snow or brush—debris can get in the barrel.
■ Cradle Carry Comfortable and secure; reduces arm fatigue.
■ Elbow or Side Carry Comfortable, but it has the least muzzle control. It also can snag in brushy terrain. Use it when no one is in front of you.
■ Shoulder Carry Good choice when walking beside or behind others. Don’t use it if someone is behind you.
■ Two-Handed or ‘Ready’ Carry Provides the best control, particularly in thick brush or weeds, or when you need to fire quickly.
Elbow or Side Carry
Cradle Carry
Shoulder Carry
Two-Handed or ‘Ready’ Carry

Chapter Seven / Page 81Selecting the Right Carry When Hunting With OthersCarry selection is based primarily on muzzle control and terrain.
■ If three hunters are walking side by side, the ones at the sides may carry their guns pointing either to the side away from their party or to the front. The one in the centre should keep the gun pointing to the front or up.
■ If three hunters are walking single file, the one in the lead should have the gun pointed ahead but never over the shoulder. The one in the middle must have the gun pointed to the side. The hunter in the rear may point the gun to either side or the rear.
■ When facing another hunter, any carry is safe except the trail carry or forward-facing elbow or side carry.
■ Remember that the same rules for safe carry apply when your hunting companion is a dog.
Checking for ObstructionsOccasionally you may trip or stumble in the field, accidentally dipping the barrel into the ground or snow. Immediately check for an obstruction.
• Point the muzzle in a safe direction.
• Open the action, and make sure the firearm is unloaded.
• Check for debris in the barrel. If the firearm is a break-action, look through the barrel from the breech end, or use a barrel light to inspect the barrel for obstructions.
• Remove any obstructions with a cleaning rod.
• Check the barrel again to make sure no debris remains.
Hunting Tip To ensure that the barrel remains obstruction-free, tape the muzzle with electrical tape. The tape will prevent water, twigs, mud, etc., from entering. When the firearm is discharged, the expanding gasses will blow off the tape and the accuracy will not be affected.
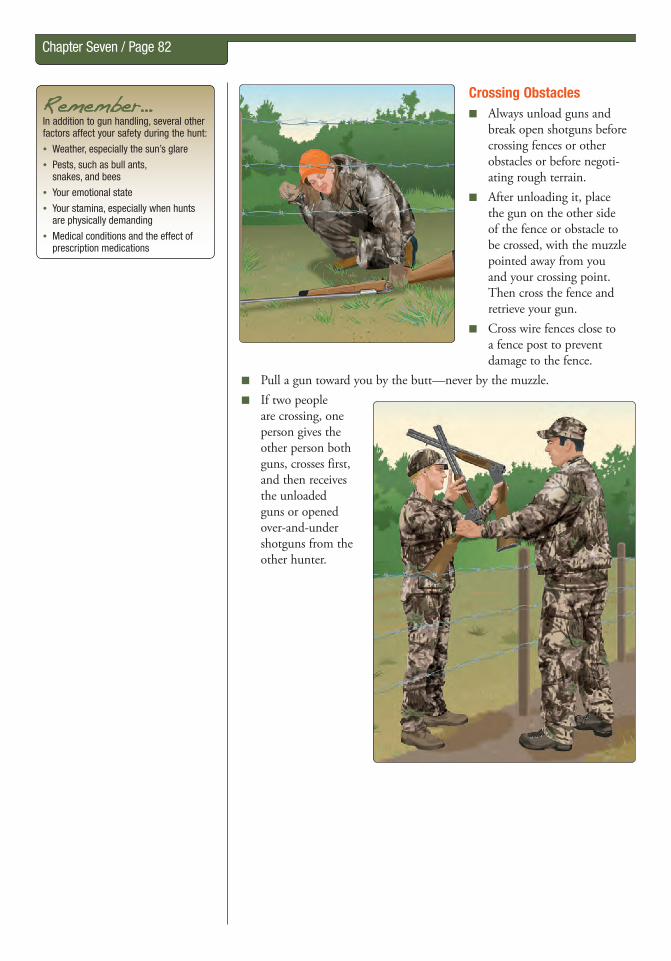
Chapter Seven / Page 82
Crossing Obstacles ■ Always unload guns and
break open shotguns before crossing fences or other obstacles or before negoti-ating rough terrain.
■ After unloading it, place the gun on the other side of the fence or obstacle to be crossed, with the muzzle pointed away from you and your crossing point. Then cross the fence and retrieve your gun.
■ Cross wire fences close to a fence post to prevent damage to the fence.
■ Pull a gun toward you by the butt—never by the muzzle. ■ If two people
are crossing, one person gives the other person both guns, crosses first, and then receives the unloaded guns or opened over-and-under shotguns from the other hunter.
Remember… In addition to gun handling, several other factors affect your safety during the hunt:
• Weather, especially the sun’s glare
• Pests, such as bull ants, snakes, and bees
• Your emotional state
• Your stamina, especially when hunts are physically demanding
• Medical conditions and the effect of prescription medications

Chapter Seven / Page 83
Safely Loading and Unloading FirearmsEven something as simple as loading or unloading a firearm can result in tragedy if it isn’t done properly. Here’s how to do it safely.
■ Loading• Point the muzzle in a safe direction.• Open the action; make sure the barrel is unobstructed.• Put the safety on if the firearm can be loaded with the safety on.• Load the ammunition.• Close the action.• Put the safety on if you were not able to do so before loading.• Keep your finger outside the trigger guard at all times.
■ Unloading• Point the muzzle in a safe direction.• Put the safety on if it is not already on.• Keep your finger outside the trigger guard.• Open the action.• Remove the ammunition by first detaching the magazine. Eject
cartridges or shells if it’s the only way to remove them. (See ‘Firearm Actions’ in Chapter Three for details on specific actions.)
• Make sure the gun is empty by checking both the chamber and the magazine.
Remember… Removal of ammunition from the magazine or removal of the magazine from the firearm does not mean the firearm is unloaded. Remember to remove ammunition from the firearm’s chamber, too.

Chapter Seven / Page 84
Gun sockMaterial: Durable stretch fabric (polyester/acrylic) or soft pile materials
Advantages:
• Lightweight protection from dust, dirt, and moisture
• Offered in camouflage
• Often used as a second case to carry a firearm from a vehicle into a hunting area
Disadvantage:
• Minimal protection from elements or impact
Safely Transporting Firearms ■ There are strict laws that apply to transporting firearms and ammunition
in Victoria. In areas classified as recognised deer habitat, additional regu-lations apply to firearm and ammunition transport requirements.
■ See Chapter Nine for more detailed information on how to transport firearms and ammunition in Victoria.
Typical Gun Cases
Padded, soft-sided caseMaterial: Canvas, nylon, neoprene, polyester, or leather
Advantages:
• Light, easy to handle and store
• Many designs accommodate scoped rifles
• Offered in camouflage
• Waterproof and floating cases available for duck hunters
• Less costly than hard cases
Disadvantage:
• Less protection than hard-sided cases
Lockable, hard-sided caseMaterial: Aluminium or composite
Advantages:
• Lightweight but sturdy
• Meets airline standards
• Can include deep foam padding that holds firearm in place and cushions impact
• Composite models can be moulded to fit firearm
• Available in waterproof models
Disadvantage:
• Bulkier and costlier than soft-sided cases

Chapter Seven / Page 85
Safe Firing ZoneThe area in which a hunter can shoot safely is referred to as a firing zone. Before setting off in a group, hunters should agree on the firing zone each person will cover. A firing zone depends on many factors, including the hunter’s shooting ability, the game being hunted, the hunting environment, and the hunting strategy being used. A hunter’s firing zone changes with every step. This is particularly true of groups hunting birds, rabbits, or other small game.
■ For safety purposes, it’s best to have no more than three hunters in a group. For new hunters, two is a safer number until they become familiar with maintaining a safe firing zone.
■ Hunters should be spaced 25 to 40 metres apart and always in sight of one another. Each hunter has a firing zone, which spans about 45 degrees directly in front of each hunter.
■ A way to visualise 45 degrees is to focus on a distant, fixed object that is straight out in front of you. Stretch your arms straight out from your sides. Make a fist with your thumbs held up. Gradually draw your arms in toward the front until both thumbs are in focus without moving your eyes. This will give you your outer boundaries.
■ If three hunters are walking side by side hunting quail, the hunter in the centre will shoot at birds flushed in the middle that fly straight away. The other hunters will shoot at birds flying toward their end of the line.
■ If a bird turns and flies back across the line of hunters, it’s best if all three hold their swings and do not fire. The same is true of a rabbit scurrying back between the hunters.
■ No hunter, especially when swinging on game, should allow his or her gun to point at a person. Better to pass up a shot than risk injuring someone or damaging property.
■ Everyone hunting in these situations should consider wearing blaze orange whether it’s required by law or not.
Only one hunter should aim at the target. Also, hunters should only shoot if there is an adequate backstop. Don’t shoot at a ‘skylined’ animal.
Remember… Public land is shared with many other users. Always be aware that others may be present in the same area.
Safety Tip A hunter’s firing zone changes with every step. It’s important to remain alert and aware of your companions’ locations at all times.
Safety Tip When hunting in a group, hunters should shoot only at game in front of them if it is safe to do so.
Safety Tip If you are colour-blind, you should be especially cautious when hunting. You may not be able to distinguish the blaze orange clothing of other hunters nor the colour markings that help identify game.
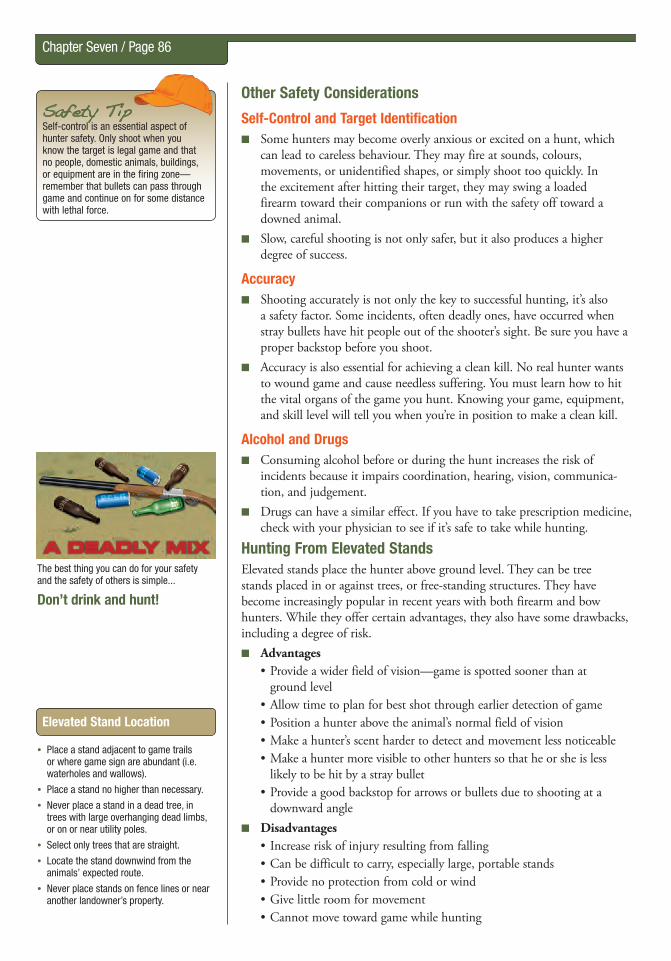
Chapter Seven / Page 86
Other Safety Considerations
Self-Control and Target Identification ■ Some hunters may become overly anxious or excited on a hunt, which
can lead to careless behaviour. They may fire at sounds, colours, movements, or unidentified shapes, or simply shoot too quickly. In the excitement after hitting their target, they may swing a loaded firearm toward their companions or run with the safety off toward a downed animal.
■ Slow, careful shooting is not only safer, but it also produces a higher degree of success.
Accuracy ■ Shooting accurately is not only the key to successful hunting, it’s also
a safety factor. Some incidents, often deadly ones, have occurred when stray bullets have hit people out of the shooter’s sight. Be sure you have a proper backstop before you shoot.
■ Accuracy is also essential for achieving a clean kill. No real hunter wants to wound game and cause needless suffering. You must learn how to hit the vital organs of the game you hunt. Knowing your game, equipment, and skill level will tell you when you’re in position to make a clean kill.
Alcohol and Drugs ■ Consuming alcohol before or during the hunt increases the risk of
incidents because it impairs coordination, hearing, vision, communica-tion, and judgement.
■ Drugs can have a similar effect. If you have to take prescription medicine, check with your physician to see if it’s safe to take while hunting.
Hunting From Elevated StandsElevated stands place the hunter above ground level. They can be tree stands placed in or against trees, or free-standing structures. They have become increasingly popular in recent years with both firearm and bow hunters. While they offer certain advantages, they also have some drawbacks, including a degree of risk.
■ Advantages• Provide a wider field of vision—game is spotted sooner than at
ground level• Allow time to plan for best shot through earlier detection of game• Position a hunter above the animal’s normal field of vision • Make a hunter’s scent harder to detect and movement less noticeable• Make a hunter more visible to other hunters so that he or she is less
likely to be hit by a stray bullet• Provide a good backstop for arrows or bullets due to shooting at a
downward angle ■ Disadvantages
• Increase risk of injury resulting from falling • Can be difficult to carry, especially large, portable stands• Provide no protection from cold or wind• Give little room for movement• Cannot move toward game while hunting
• Place a stand adjacent to game trails or where game sign are abundant (i.e. waterholes and wallows).
• Place a stand no higher than necessary.
• Never place a stand in a dead tree, in trees with large overhanging dead limbs, or on or near utility poles.
• Select only trees that are straight.
• Locate the stand downwind from the animals’ expected route.
• Never place stands on fence lines or near another landowner’s property.
Elevated Stand Location
The best thing you can do for your safety and the safety of others is simple...
Don’t drink and hunt!
Safety Tip Self-control is an essential aspect of hunter safety. Only shoot when you know the target is legal game and that no people, domestic animals, buildings, or equipment are in the firing zone—remember that bullets can pass through game and continue on for some distance with lethal force.

Chapter Seven / Page 87
Types of Elevated Stands ■ Portable Tree Stands
Portable tree stands can be safe and environmentally friendly. Homemade stands should not be used. Commercial stands that are manufactured, certified, and tested to industry standards are best. You should follow the manufacturer’s instructions and also practise installing a tree stand before you go hunting. Portable tree stands come in three basic types.• Hang-On Stands: These simple stands provide about half a square
metre of space. They must be hauled into place and secured to the tree with belts or chains. These stands require separate climbing aids, such as segmented ladders or climbing sticks. When installing a climbing aid, determine your climbing route first. Attach the aid to the tree so that it extends above the stand’s platform, and you can step down onto the centre of the platform.
• Climbing Stands: These self-climbing stands are designed for trees with straight trunks and consist of two sections. A hunter ‘walks’ the stand up a tree by moving the top section with the hands and the bottom section with the feet. While still on the ground, adjust the stand to allow for the tapering of the tree that occurs as you go up. When climbing, go slowly, take small steps, and keep the two sections of the stand connected with a tether. This stand is not suited for trees with shaggy bark or with branches between the ground and the desired elevation.
• Ladder Stands: Ladder stands provide a platform 3 to 6 metres above the ground. The built-in ladder lets you use these stands with a wider range of trees. Due to their size and weight, hunters normally assemble and set up ladder stands before the first day of hunting. Three to five people are needed to erect or take down a ladder stand safely. When setting up the stand, clear the base area of all rocks and debris, making sure the ground is level. Then lean the stand against the tree, and chain or strap it into place. Using all parts, assemble the stand as instructed by the manufacturer.
■ Tripods, Quadpods, or Tower Stands (Freestanding) These stands are similar to a ladder tree stand but are freestanding and do not require a tree. They can be placed anywhere that has a firm base. Some resemble one or two chairs atop stilts. Others are enclosed, box-like platforms.
Fall-Arrest Systems (FASs)You should use a fall-arrest system (FAS) that is manufactured to industry standards. Never use single-strap belts and chest harnesses—they can be deadly. Before hunting, carefully read the manufacturer’s instructions for proper use of your FAS, and follow all safety guidelines.
■ Most tree stand falls occur when a hunter is climbing up or down a tree. Always use a properly fitting FAS that includes a full-body harness at all times when your feet are off the ground. Make sure your FAS includes these components:• Full-body harness—the vest harness is a very effective style of
full-body harness• Lineman’s-style belt and/or climbing belt—used when climbing up
and down the tree• Tree strap—goes around the tree
Types of Elevated Stands
Tripod Stand
Ladder Stand
Climbing Stand
Hang-On Stand
Hanging motionless and suspended in your FAS after a fall can cause the leg straps to constrict blood flow. The pressure can make blood pool in the legs, limiting circulation and depriving organs of oxygen. This is called suspension trauma and can lead quickly to unconsciousness, followed by death.
To avoid suspension trauma while you wait to be rescued:
• Step into your suspension relief strap and stand up to relieve the pressure caused by the leg straps.
• If you do not have a suspension relief strap, move your legs continuously by pushing off from the tree, or raise your knees and pump your legs frequently to keep your blood flowing until help arrives.
Suspension Trauma

Chapter Seven / Page 88
• Tether—attaches the harness to the tree strap• Suspension relief strap—provides a loop to stand in if you fall
■ With an adult present, practise adjusting and using your FAS, including the suspension relief strap, at ground level before hunting from an elevated stand.
■ To protect yourself if you fall, always wear your FAS full-body harness, attaching it to the tree at ground level and keeping it attached throughout your hunt. • Attach one end of the FAS
lineman’s-style belt to one side of the FAS full-body harness, wrap the belt around the tree, and attach the other end of the belt to the other side of the harness.
• Use the FAS lineman’s-style belt with your FAS full-body harness when you are installing or uninstalling the stand or the climbing aids for a hang-on tree stand.
• Also use the belt with your full-body harness when you are climbing into or out of a hang-on stand.
■ When you are in any tree stand, including a ladder stand, use the FAS tree strap and tether to attach your FAS full-body harness to the tree. Attach the tree strap to the tree so that the strap is at, or above, head level when you are standing. After attaching the tether, adjust both the tree strap and tether so that you have no slack in the tether while seated in your stand. If you fall, you do not want to drop below a level that would keep you from returning to the platform.
■ If you should fall while in your stand:• Do not panic. Your FAS will hold.• Signal for help. • Climb back onto the platform as quickly as possible.• Take actions to avoid suspension trauma if you must wait for rescue. If you
do not have a suspension relief strap, keep moving your legs. ■ Discard any FAS that shows signs of wear and tear or has been worn
during a fall. Also adhere to the expiration date sewn into the FAS by the manufacturer.
■ Due to the risks of injuries or death, hunters who choose not to wear and use their FAS properly should stay on the ground to hunt.
Lifting Hunting Equipment Into a Stand ■ Never carry your hunting equipment up or down the tree with you as you
climb. Always use a haul line. ■ Before attaching the haul line to your hunting equipment:
• If using a firearm, unload it and open the action. • If using a bow, put the arrows in a covered quiver secured to the bow.
Elevated Stand Safety
Merely climbing into or out of a tree stand or other elevated platform to hunt puts you at risk. Long hours spent waiting in a stand, as well as poor safety techniques, can lead to accidental falls. To protect yourself, use good judgement and follow these recommendations, always putting safety first.
• Purchase a commercial stand that is manufactured, certified, and tested to industry standards.
• Read the manufacturer’s instructions and watch the video that accompanies the stand. Review this information each season before using the stand.
• Attach your FAS to the tree while at ground level, and keep it attached throughout your hunt—from the time you leave the ground until you get back down.
• Use a tree stand only during daylight hours.
• Practise first with your tree stand and FAS at ground level, using all safety devices that were included with the stand. Then continue to practise, gradually going higher.
• When climbing into or out of a tree stand, always use three points of contact with your hands and feet.
• Keep a firm hold on the climbing system as you enter or leave a platform, and don’t let go until you’re certain you are secure.
• Get enough sleep to ensure that you are well-rested before using a tree stand.
• Carry a signalling device, such as a whistle, radio, or mobile phone, to let others know if you have a problem.
• Take your time, and plan every move you make while installing and using an elevated stand.
• Check your stand carefully prior to each use. Do not leave a stand attached to a tree for more than two weeks.
• Never exceed the weight limit of your stand or FAS. Remember that the weight includes you plus your equipment.
• Do not climb with anything in your hands or on your back. Use a haul line.
• Raise and lower all hunting equipment on the opposite side of the tree from your climbing route.
Full-Body Harness
Vest Harness (Full-Body Harness With Suspension Relief)

Chapter Seven / Page 89
■ Use a haul line of heavy cord attached to your stand to bring up your hunting equipment or to lower it prior to climbing down from your stand.• If using a firearm, attach the haul line to the firearm’s sling so that the
firearm hangs with the muzzle pointed down (tape the end of the muzzle).• If using a bow, attach the haul line so that the arrow fletching points down
when raising your equipment and points up when lowering it. ■ Slip the end of the haul line through your belt—leave it untied so that it can
pull free if you fall. Put on your FAS full-body harness, secure yourself to the tree, and climb to your stand.
■ After you are in the stand and secure, haul up your hunting equipment and untie the haul line.
Hunting With BoatsHunters often use boats in difficult conditions. Special care must be exercised to ensure a safe trip.
Trip Preparation ■ Leave a hunting plan (see page 94) with family or friends with details
on the boating portion of your trip. It should include your planned route and when you expect to return.
■ Be sure the boat is large enough to carry you, your passengers, and all the gear safely.
■ Load gear low in the boat, and distribute the weight evenly. ■ Do not overload your boat, especially with heavy shotgun ammunition. ■ Have each person on board wear a personal flotation device (life jacket). ■ Stow required visual distress signals. ■ Check an up-to-date weather forecast before heading out. ■ Cancel your trip if wind and water conditions aren’t safe.
Transporting Firearms in a Boat ■ The same rules apply as when transporting firearms in a vehicle —unload
and secure firearms before transporting them. The action should be open or the gun broken down, whichever makes the firearm safest.
■ Before boarding the boat, place the unloaded firearm into the bow (front) of the boat with its muzzle pointing forward.
■ When hunting with others, the first person settles in the bow position facing forward after the first gun is placed. Next, place the second unloaded firearm in the stern (rear) of the boat with its muzzle pointing rearward. Then, the second person settles in the stern position facing rearward. Repeat the procedure when disembarking.
Firing Zone in a BoatWhen duck hunting from a boat, the back-to-back position is the safest, with the firing zone confined to a 180-degree area in front of each hunter.
Remember…Don’t press your luck in bad weather. At the first sign of a storm, head for shore.
Remember…In Victoria, all persons must wear personal flotation devices when in a boat that is underway and is shorter than 4.8 metres. Ensure your personal flotation device meets Victorian legal requirements.
Wearable Personal Flotation Devices
TYPE ILife Jacket
TYPE IIBuoyancy Vest
TYPE IIIBuoyancy Garment
TYPE IIIInflatable
Types of Personal Flotation DevicesRead and follow the label restrictions on all PFDs.

Chapter Seven / Page 90
Surviving Water Emergencies ■ Wear an approved personal flotation device (life jacket) while you’re in
the boat. Life jackets will not only keep you afloat, but they’ll also help you keep warm.
■ If you get caught in a storm and your boat swamps or capsizes, stay with the boat. Most small boats will float even when upside down or filled with water. Signal passing boats by waving a bright cloth or raising an oar if one is available.
■ Placing an oar under your back and shoulders and another under your legs can help you float. If decoys are in reach, stuff them inside your jacket.
■ Chest waders in conjunction with a wader belt and hip boots may help you stay afloat. However, it is safer to avoid wearing waders while in a boat.• If in chest waders with a wading belt on, the trapped air may help
you float.• If in hip boots, trap air in the boots by bending your knees. Lie on
your stomach. ■ Equip your boat with a means for re-entry (ladder, sling, etc.) to use if
you should fall into the water.
Cold Water Immersion and Hypothermia ■ Sudden immersion into cold water can cause immediate, involuntary
gasping; hyperventilation; panic; and vertigo —all of which can result in water inhalation and drowning. Immersion in cold water can also cause sudden changes in blood pressure, heart rate, and heart rhythm, which can result in death.
■ Prepare for boating in cold water conditions by always wearing a secured life jacket. Also wear layered clothing for insulation.
■ The best prevention is to take all measures necessary to avoid falling into cold water in the first place. If you do fall into cold water:• Don’t panic. Try to get control of your breathing. Hold onto
something, or stay as still as possible until your breathing is controlled. • When your breathing is under control, perform the most important
functions first before you lose dexterity (10–15 minutes after immersion).
• Put on a PFD immediately if you don’t already have one on. Don’t take your clothes off unless absolutely necessary—they help insulate you.
• Focus on getting out of the water quickly before you lose full use of your hands, arms, and legs. Try to reboard your boat, even if it is swamped or capsized. Get as much of your body out of the water as possible—the rate of heat loss will be slower than if immersed in water.
• If you cannot get out of the water quickly, act to protect against rapid heat loss. In as few as 10 minutes, you may be unable to self-rescue. - Stay as motionless as possible, protecting the high heat loss areas of your body, like the sides of the torso and armpit area. Keep your head and neck out of the water.
- Safety typically looks closer than it actually is, so staying with the boat is usually a better choice than swimming.
Remember…Ensure that you have on board all necessary safety equipment, including buckets, oars, ropes, fire extinguisher, etc.
HuddleRetains body heat and increases survival time
Heat Escape Lessening Posture (HELP)

Chapter Seven / Page 91
- Adopt a position to reduce heat loss. If alone, use the Heat Escape Lessening Posture (HELP) position; if there are others in the water with you, huddle together.
• Be prepared at all times to signal rescuers. ■ Read more about the symptoms of hypothermia in Chapter Eight.
Hunting in Waters Affected by Blue-Green AlgaeDuck hunters need to be aware of the dangers of hunting in waters affected by blue-green algae. Blue-green algae are potentially toxic and can be dangerous to both humans and dogs if ingested.
Recognising Blue-Green AlgaeBlue-green algae blooms can be common at the start of the duck season. High water temperatures, high light intensity, and little rainfall create the perfect environment for the algae to grow. Information signs warning of water affected by blue-green algae may not always be obvious or present. Therefore, hunters should be on the lookout for the signs of water affected by blue-green algae. A blue-green algae bloom or scum may be visible on the water’s surface. Blooms range in colour from dark green to yellowish brown. In addition, algae may be present on the water surface and can look like green paint, thick scum, or ‘pea soup’.
Keeping Yourself Safe ■ Blue-green algae may produce toxins that affect human health. Do not
consume any water or let your pets consume any water that may be affected by blue-green algae.
■ Water affected by blue-green algae can cause health effects in humans that include skin irritation and rashes, gastroenteritis, headache, fevers, muscle weakness, seizures, and respiratory failure.
■ Follow advice on any information signs in affected areas and avoid contact with the water until authorities advise there is no longer a health risk.
■ If you are experiencing symptoms as a result of being exposed to blue-green algae, seek medical attention immediately.
■ Studies have shown that toxins can accumulate in the internal organs (offal) of fish and possibly ducks. As a precaution, discard the internal organs (particularly the liver) of ducks, and rinse the duck with clean water prior to cooking and eating. The offal should not be eaten.
Keeping Your Hunting Dog Safe ■ Dogs are particularly vulnerable to poisoning by blue-green algae, and dog
deaths have been reported after swimming in or drinking affected water. Protect your dog by keeping it from swimming in or ingesting water suspected to be affected by blue-green algae.
■ The offal from ducks that have come into contact with affected waterways should not be fed to dogs.
■ In the event of potential exposure, watch your dog for signs of poisoning, including lethargy, loss of appetite, vomiting, diarrhoea, and seizures. If your dog shows any of these symptoms, contact a veterinarian immediately.
Remember…Blue-green algae may produce toxins that affect human health. Do not consume any water that may be affected by blue-green algae.
Remember…Follow the advice on information signs in affected areas; however, signs may not always be present. Avoid contact with water until authorities advise that there is no longer a health risk.
Remember…Boiling water does not remove the blue-green algae toxin. Use water from sources that are blue-green algae free.

Chapter Seven / Page 92
Precautions You Should TakeIf you suspect water to be contaminated with blue-green algae, make sure you take the following precautions.
■ Avoid wading in the water, unless you are wearing undamaged waders. ■ Do not consume the water or allow your dog to consume the water. ■ Do not eat the offal of any ducks taken from contaminated wetlands,
lakes, and waterways, or feed the offal to your dog. ■ Do not let your dog submerge itself in the water. However, if your dog
does go into contaminated water, wash your dog thoroughly in clean water (wearing gloves) before it starts to groom or lick itself.
■ Avoid using water affected by blue-green algae. Use alternative sources instead.
■ Be aware that boiling algal water does not remove toxins from the water.
What Duck Hunters Need to Know About Avian BotulismAvian botulism is one of the three most important disease problems affecting wild migratory birds. Each year, many birds are paralysed or die after exposure to a toxin produced by the botulinum bacterium. The type-C toxin is most often associated with die-offs of ducks.A few cases have been reported in dogs; however, humans and dogs are generally considered resistant to type-C avian botulism.
How Can Botulism Poisoning Be Recognised?Avian botulism affects the nervous system, causing muscle paralysis. Depending on how far the disease has progressed, various levels of paralysis will be observed. An early sign in ducks is the inability to fly. Once the ability to fly is lost and leg muscles become paralysed, ducks suffering from botulism often propel themselves across the water and mud flats with their wings. Paralysis of the inner eyelid and neck muscles follow. These are the two most easily recognisable signs associated with avian botulism. The inability of the duck to hold its head erect is the reason this disease is called ‘limber-neck’.
Report Suspected CasesIf you see birds that you suspect may have botulism, report immediately to DJPR or DELWP.
Guidelines for Hunters: The Safe and Hygienic Handling of Game Ducks
■ Do not hunt ducks that are displaying signs of avian botulism. ■ Do not handle ducks that are obviously sick or found dead with no
obvious reason. ■ Keep all harvested ducks cool, clean, and dry. ■ Use rubber gloves when cleaning ducks. ■ Avoid hand-to-face contact when dressing ducks and prior to washing
your hands. ■ Do not eat, drink, or smoke while cleaning ducks. ■ Wash your hands with soap and water or alcohol wipes after handling or
dressing ducks.
Remember…Ducks that have lost the ability to fly, lost the use of their legs, and cannot hold their heads erect may have avian botulism. Report any sightings to authorities.
Safety Tip Do not consume undercooked duck. Always cook ducks thoroughly to ensure that the meat temperature reaches 68–74 degrees Celsius.

Chapter Seven / Page 93
■ Clean all tools and surfaces immediately after dressing ducks; use hot soapy water, then disinfect with a 10% chlorine bleach solution.
■ Cook ducks thoroughly (68–74 degrees Celsius) to kill disease and parasites.
■ For duck hunters using mechanical pluckers, consideration should be given to wearing a face mask to protect against pathogens.
Hunting With Spotlights ■ In Victoria, recreational hunting of deer at night with the use of a
spotlight is illegal, dangerous, and unethical. This practice reduces recre-ational hunting opportunities for law-abiding hunters.
■ However, spotlighting at night for pest animals and problem wildlife (including deer where they are causing damage) on private land (with permission of the owner) is an effective method of control.• Hunters should closely follow the Ten Basic Rules of Firearm Safety.
Judging safe direction and firing zones becomes very difficult at night if you do not know the property or surrounding areas very well.
• Hunters should control pest animals and problem wildlife at night under spotlight only on a property they know well. Or they should engage the help of someone who is very familiar with the property and its surrounding areas.
■ If you are spotlighting from a vehicle, the following rules will help ensure everyone’s safety. The shooter should:• Never have more than one firearm in use at one time.• Sit in the front passenger seat with the firearm unloaded (no ammuni-
tion in the chamber). The barrel of the firearm should be pointing out the front passenger window in a safe direction.
• Never shoot from a moving vehicle.• Never shoot from the back seat.• Load the firearm only when ready to shoot. The firearm should be
unloaded immediately if the shot opportunity has passed or the shot has been taken.
• Unload the firearm before exiting the vehicle. After exiting the vehicle, the firearm should be placed on the ground with the barrel pointing in a safe direction.
• Upon returning to the vehicle, wait for all other occupants to enter the vehicle before retrieving the firearm. The shooter should check that the firearm is unloaded and then enter the vehicle.
Remember…In Victoria, recreational hunting of deer at night with the use of a spotlight is illegal.
Remember…Closely follow the Ten Basic Rules of Firearm Safety. You are responsible for your and everyone’s safety.

Chapter Eight / Page 94 Preparation and Survival Skills
Importance of Planning and PreparationHunting is a safe recreation, but it does involve a certain amount of risk. Aside from firearm safety issues, a variety of incidents can occur on a trip outdoors. The rougher the terrain—particularly when it’s unfamiliar terrain—the greater the chance of accidents. Climate extremes also increase the risk. In remote areas, there’s always the possibility of becoming lost. To plan properly, address these four areas when preparing for your hunt.
■ Be Ready: To help you avoid or minimise problems, it’s essential that you plan carefully for the hunt. Responsible hunters anticipate potential problems and make plans to deal with them. Considerations include terrain, location, weather, dangerous wildlife, and the potential for bush fires.
■ Know Your Location: Learn as much as you can about your chosen hunting area before you arrive. Purchase a topographic map, and familia-rise yourself with the terrain. If the location is within a convenient drive, it’s a good idea to visit the area in the off-season.
■ Prepare for Safety: You also need to assess your physical condition and equipment. Refresh your memory of hunting and firearm safety rules, and review the rules with your hunting partners.
■ Tell Others: Prepare a hunting plan that tells where and with whom you are hunting and when you expect to return. Give specific directions on your route to your destination and any alternate destinations. Leave the plan with a family member or friend. Do not deviate from your hunting plan without notification. When hunting with a group, each person should discuss their route plan.
■ List and describe ways to prepare properly for hunting.
■ Prepare a hunting plan. ■ List conditions that affect a hunter’s physical ability
to perform safely and responsibly. ■ Describe how to dress for hunting in cold weather. ■ Understand how to read a topographic map. ■ List the primary requirements for survival. ■ List the basic survival rules. ■ Describe ways to signal for help when lost in
the outdoors. ■ Give the causes and symptoms of hypothermia, and
explain how to prevent and treat hypothermia.
■ Give the causes and symptoms of heat exhaus-tion, and explain how to prevent and treat heat exhaustion.
■ Give examples of why it is important for every hunter to attend first-aid and CPR training courses.
■ Demonstrate how to stop bleeding. ■ Explain what to do if someone breaks a bone. ■ Describe how to recognise first-, second-, and third-
degree burns and how to treat them. ■ Explain what to do immediately if a person suffers a
chest wound. ■ Explain what to do if a person is bitten or stung by
an animal, spider, or snake.
You should be able to...
Hunting Plan
Before you depart, leave a hunting plan with a family member or friend. A hunting plan tells where and with whom you intend to hunt and when you expect to return. It also should contain specific directions on your route to your destination and any alternate destination you may have if bad weather changes your plans. Refer to the GMA website for a hunting plan template.
Hunting Plan
Fill in this form before your departure on a hunt. Leave it with a reliable person. Ask them to call Police
(dial 000) if you do not return as planned. If your plans change or you are delayed, inform the person who
has your hunting plan immediately of the changed arrangements.
1. Hunter contact details
Name: _____________________________________________ Mobile No: ________________________
Address: ______________________________________________________________________________
2. Two way radio Yes No Channel: _______________________
3. Personal Locator Beacon Yes No Registration No: _________________
4. Vehicle Make: _______________________ Model: __________________________________
Color: _______________________ Registration No: __________________________
Parked at: ______________________________________________________________
5. Hunting companions
Name: _____________________________________________ Mobile No: ________________________
Address: ______________________________________________________________________________
Name: _____________________________________________ Mobile No: ________________________
Address: ______________________________________________________________________________
Name: _____________________________________________ Mobile No: ________________________
Address: ______________________________________________________________________________
Name: _____________________________________________ Mobile No: ________________________
Address: ______________________________________________________________________________
6. Trip plan
Depart from: ___________________________________________________________________________
Going to: ______________________________________________________________________________
Route details: __________________________________________________________________________
______________________________________________________________________________________
Camping location/s: _____________________________________________________________________
Alternative route: _______________________________________________________________________
______________________________________________________________________________________
Inform Police (dial 000) if not returned or contact made by:
Date: ___ / ___ / ___ Time: ___________
Depart date: ___ / ___ / ___ Time: ___________ Return date: ___ / ___ / ___ Time: ___________
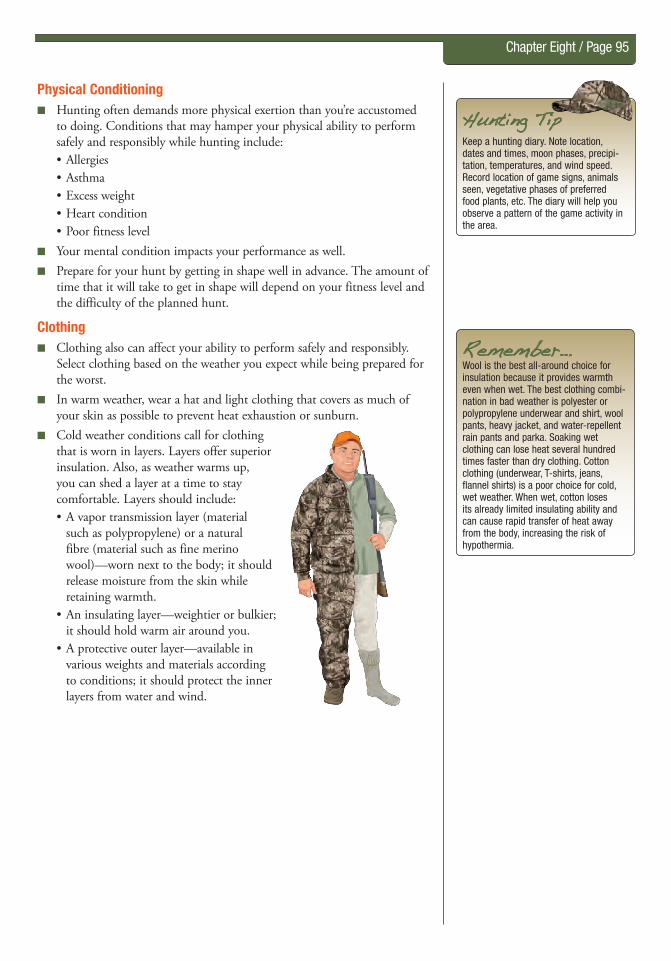
Chapter Eight / Page 95
Physical Conditioning ■ Hunting often demands more physical exertion than you’re accustomed
to doing. Conditions that may hamper your physical ability to perform safely and responsibly while hunting include:• Allergies• Asthma• Excess weight• Heart condition• Poor fitness level
■ Your mental condition impacts your performance as well. ■ Prepare for your hunt by getting in shape well in advance. The amount of
time that it will take to get in shape will depend on your fitness level and the difficulty of the planned hunt.
Clothing ■ Clothing also can affect your ability to perform safely and responsibly.
Select clothing based on the weather you expect while being prepared for the worst.
■ In warm weather, wear a hat and light clothing that covers as much of your skin as possible to prevent heat exhaustion or sunburn.
■ Cold weather conditions call for clothing that is worn in layers. Layers offer superior insulation. Also, as weather warms up, you can shed a layer at a time to stay comfortable. Layers should include:• A vapor transmission layer (material
such as polypropylene) or a natural fibre (material such as fine merino wool)—worn next to the body; it should release moisture from the skin while retaining warmth.
• An insulating layer—weightier or bulkier; it should hold warm air around you.
• A protective outer layer—available in various weights and materials according to conditions; it should protect the inner layers from water and wind.
Remember… Wool is the best all-around choice for insulation because it provides warmth even when wet. The best clothing combi-nation in bad weather is polyester or polypropylene underwear and shirt, wool pants, heavy jacket, and water-repellent rain pants and parka. Soaking wet clothing can lose heat several hundred times faster than dry clothing. Cotton clothing (underwear, T-shirts, jeans, flannel shirts) is a poor choice for cold, wet weather. When wet, cotton loses its already limited insulating ability and can cause rapid transfer of heat away from the body, increasing the risk of hypothermia.
Hunting Tip Keep a hunting diary. Note location, dates and times, moon phases, precipi-tation, temperatures, and wind speed. Record location of game signs, animals seen, vegetative phases of preferred food plants, etc. The diary will help you observe a pattern of the game activity in the area.
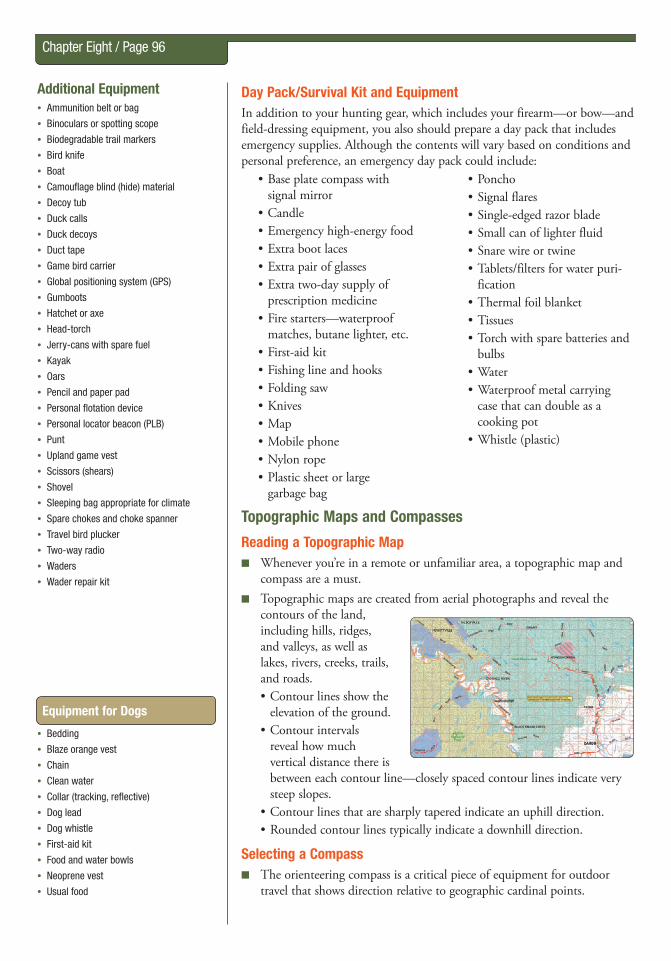
Chapter Eight / Page 96
Day Pack/Survival Kit and EquipmentIn addition to your hunting gear, which includes your firearm—or bow—and field-dressing equipment, you also should prepare a day pack that includes emergency supplies. Although the contents will vary based on conditions and personal preference, an emergency day pack could include:
Topographic Maps and Compasses
Reading a Topographic Map ■ Whenever you’re in a remote or unfamiliar area, a topographic map and
compass are a must. ■ Topographic maps are created from aerial photographs and reveal the
contours of the land, including hills, ridges, and valleys, as well as lakes, rivers, creeks, trails, and roads.• Contour lines show the
elevation of the ground.• Contour intervals
reveal how much vertical distance there is between each contour line—closely spaced contour lines indicate very steep slopes.
• Contour lines that are sharply tapered indicate an uphill direction.• Rounded contour lines typically indicate a downhill direction.
Selecting a Compass ■ The orienteering compass is a critical piece of equipment for outdoor
travel that shows direction relative to geographic cardinal points.
• Base plate compass with signal mirror
• Candle• Emergency high-energy food• Extra boot laces• Extra pair of glasses• Extra two-day supply of
prescription medicine• Fire starters—waterproof
matches, butane lighter, etc.• First-aid kit• Fishing line and hooks• Folding saw• Knives• Map• Mobile phone• Nylon rope• Plastic sheet or large
garbage bag
• Poncho• Signal flares• Single-edged razor blade• Small can of lighter fluid• Snare wire or twine• Tablets/filters for water puri-
fication • Thermal foil blanket• Tissues• Torch with spare batteries and
bulbs• Water• Waterproof metal carrying
case that can double as a cooking pot
• Whistle (plastic)
• Bedding
• Blaze orange vest
• Chain
• Clean water
• Collar (tracking, reflective)
• Dog lead
• Dog whistle
• First-aid kit
• Food and water bowls
• Neoprene vest
• Usual food
Equipment for Dogs
Additional Equipment • Ammunition belt or bag
• Binoculars or spotting scope
• Biodegradable trail markers
• Bird knife
• Boat
• Camouflage blind (hide) material
• Decoy tub
• Duck calls
• Duck decoys
• Duct tape
• Game bird carrier
• Global positioning system (GPS)
• Gumboots
• Hatchet or axe
• Head-torch
• Jerry-cans with spare fuel
• Kayak
• Oars
• Pencil and paper pad
• Personal flotation device
• Personal locator beacon (PLB)
• Punt
• Upland game vest
• Scissors (shears)
• Shovel
• Sleeping bag appropriate for climate
• Spare chokes and choke spanner
• Travel bird plucker
• Two-way radio
• Waders
• Wader repair kit

Chapter Eight / Page 97
■ A good orienteering compass has these features:• Clear base plate that allows you to see the map underneath• Straight sides for aligning two points or for drawing lines• Liquid-filled needle housing that keeps the magnetic needle relatively
steady when taking readings• Two arrows: a direction arrow painted on the base plate (or you may
use the edge of the compass) is used to point the compass from your starting point to your destination; an orienting arrow, located in the needle housing, is used to orient your compass to your map
Global Positioning System (GPS) ■ The Global Positioning System (GPS) is a navigation
system based on a network of satellites. Users with a GPS unit can determine their exact location (latitude and longitude) in any weather condition, all over the world, 24 hours a day.
■ Once the user’s position is determined, a GPS unit can calculate other information—bearing, trip distance, distance to destination, sunrise and sunset times, and more.
■ GPS receivers are accurate to within 15 metres (49 feet) on average. Certain atmospheric factors and other sources of error can affect the accuracy. Accuracy can be improved with a Differential GPS (DGPS) or Wide Area Augmentation System (WAAS).
■ Ensure your GPS is set to the correct datum: Geocentric Datum of Australia GDA94.
Plotting Your Progress ■ As you hike into unfamiliar terrain, you can keep your bearings by taking
frequent compass readings and plotting your progress on a map. • Note key points, such as stream crossings, to help you find your
way back. • Pay particular attention when you reach a high point at the top of a
ridge; use the elevation to locate landmarks visible from there. ■ Learning to set a course and take bearings takes study and practice. The
best way to become proficient with a compass is under the guidance of an experienced individual.
300 m
Remember… If you’re an experienced map reader, you can:
• Read terrain.
• Determine direction.
• Follow rivers, valleys, and ridges.
• Find your location in relationship to your camp.
• Identify areas preferred by game animals.
Remember… Metal objects, such as knives, gun barrels, belt buckles, etc., will affect the magnetic needle in a compass. Ensure metal objects are not in close proximity when you are using the compass.
sighting andsignal mirror
magneticneedle
orientinglines
magnifyinglens
clearbase plate
direction-of-travel arrow
scales
azimuthring
orientingarrow
Hunting Tip Compare the topographic map of the area in which you intend to hunt with recent satellite photos. Often you will pick up inconsistencies before you go out in the field.
Hunting Tip Use your GPS unit to mark critical locations, such as your campsite or vehicle location. Mark locations that are relevant to your hunt, such as location of tree stands, wallows, scrapes, game trails, animal sightings, etc.

Chapter Eight / Page 98
Survival SkillsPlanning and preparation should keep you from having an outdoor misad-venture. If something does go wrong, switch into survival mode. How you respond in the early stages often determines whether your disorien-tation becomes a temporary inconvenience or a traumatic ordeal. If you keep a cool head, you’ll usually get your bearings fairly quickly. Think through recent events to see if you can retrace your path. If you decide you can’t return to your camp or car, commit yourself to spending the night where you are. If you remain in one spot, it’s very likely that you will be found in a few days. You now have four priorities: shelter, fire, signal, and water. (If you think that it will take longer than one day to return to your camp or car, or to get rescued, it is important to look for a source of water.)
Preparing a Shelter ■ Start preparing your camp well before dark. Look for a natural shelter,
such as a rock overhang or a thick stand of evergreens. The site should be dry, well-drained, and protect you from the wind. Ideally, it also should be near water and plenty of firewood.
■ If no natural shelter is available, pick an area with materials nearby to build a lean-to or debris hut.
■ A lean-to is constructed by leaning branches against a horizontal support to form a frame for a roof. Be sure to orient the opening away from the wind. Cover the frame with evergreen branches or tree fern fronds to block wind or precipitation. Leaves and twigs are another option. If you need additional protection, you can add side walls.
■ Build your fire where its heat will radiate into the shelter. Your sleeping area should be located at a safe distance between the shelter wall and the fire.
top when you realise you’ve got a problem. The first thing to do is admit to yourself that you are in trouble.
hink about what you need to do to survive.
bserve the area, and look for water, shelter, fuel, etc.
lan how you are going to use your survival kit and your other available resources. Don’t wait until dark to plan!
S
TOP
Remain calm. Think clearly. Use the tools you have available to you.
Rules of Survival
• Give a responsible person your hunting plan.
• Don’t travel or hunt alone.
• Take enough food and water to last for several days in an emergency.
• Bring a map and compass, and always orient yourself before leaving camp.
• Wear layered clothing, and take extra clothing, preferably wool and polyester, with you.
• Plan your outings so that you can return to camp before dark.
• Never leave camp without taking fire-starting equipment and a foil blanket.
• Don’t panic if you become lost.
Remember… When you find yourself in a survival situation, the most important tool is your brain.

Chapter Eight / Page 99
Starting a Fire ■ If the ground is wet, build the fire on a platform of green logs or rocks.
If the terrain is dry, clear a patch of bare dirt to avoid starting a grass or forest fire.
■ Gather everything you need before starting the fire. Pile fuel ranging from small twigs to fuel logs next to the fire site. Collect more fuel than you think you can use; you may need more than you estimate.
■ Pile fine twigs, grass, or bark shavings loosely as a base. If you can’t find dry kindling, remove bark from trees. Use your knife to shave dry wood from the inside of the bark.
■ Place slightly larger sticks on the starter material until you have a pile about 10 centimetres high.
■ If there’s no breeze, light the kindling in the middle of the base. If there is a breeze, light one end of the kindling so that the flame will be blown toward the rest of the fuel. As the kindling lights and the flames spread to the larger twigs, slowly add more wood to the blaze. Add larger pieces as the fire grows. A large fire will throw more heat and be easier to maintain.
Signalling for Help ■ When you decide to stay put and wait for rescue, prepare help signals as
soon as possible. ■ The international emergency sign for distress is three of any signal: three
shots, three blasts on a whistle, three flashes with a mirror, or three fires evenly spaced. If you’re near an open space, walk an ‘X’ in the snow, grass, or sand. Make it as large as possible so that it can be seen easily from the air. Placing branches, logs, or rocks along the ‘X’ will make it more visible. Do not light signal fires until you hear an aircraft. Adding green gum leaves to the fire will help create smoke.
■ Once you have a shelter, fire, and your signal prepared, you can focus on water and food.
Personal locator beacons (PLBs) provide a distress and alerting system for use in a life-and-death situation. A PLB is a small transmitter that sends out a personalised emergency distress signal to a monitored satellite system. When you buy a PLB, you must register it with the Australian Maritime Safety Authority (AMSA). PLBs are a highly effective and internationally recognised way to summon help.
Personal Locator Beacon
A tepee of larger sticks enclosing the kindling is a good way to start a fire.
Remember… Fires can spread quickly in the Australian bush. Only light a fire if it is essential for your survival and if fire danger ratings permit. Do not further reduce your chances of survival by starting a bush fire.

Chapter Eight / Page 100
Drinking Enough WaterHaving water is critical, particularly during the hot summer months. Ensure you focus your efforts in finding water.
■ Even in cool weather, you need approximately 2 litres of water a day. Under most conditions, humans can only last about three days without water.
■ Pure drinking water is rare, even in the most remote regions. Creeks often are contaminated by Giardia lamblia, a parasite that causes serious intes-tinal sickness in humans.
■ The best way to purify water is by boiling. Chemical purifiers and filter systems can be used. Never make survival problems worse by drinking unsafe water.
Finding Food ■ Humans can go for two weeks or more without food. Although the need
for food is not that urgent, you’ll be more comfortable and clearheaded if you eat. Anywhere there is game, there is food, but probably not what you’re accustomed to eating.
■ Before you head into a remote area, it’s a good idea to learn what’s edible in that particular region. Hopefully, you’ll be able to use your hunting equipment to harvest the bulk of your food.
PlasticSheetSmall
Stone
Container
PiledDirt
DrinkingTube
CondensedWater
Pit – 45 cm deep 1 m wide
Pit – 45 cm deep 1 m wide
Solar stills can provide emergency drinking water. Ground water condenses on a plastic cone set in the ground and drips into a collecting pan.
To make a solar still:
• Dig a pit about 1 metre wide by 45 centimetres deep, preferably in a sunny position and in moist soil.
• Place a shallow container in the centre, surrounded with green vegetation if available.
• Run a tube from the container to the edge of the pit.
• Lay clear plastic over the pit and place a rock or a little soil in the centre to form a cone.
• Water will evaporate and then condensate on the plastic before running down the sides and dripping into the container.
• Draw water through the tube to avoid disturbing the still.
• Make several stills if you have no other source of water.
Solar Still

Chapter Eight / Page 101
Coping With Extreme WeatherSome of the most common and dangerous risks to hunters result from exposure to extreme weather.
HypothermiaHypothermia occurs when your body loses heat faster than it can produce it, causing your core body temperature to fall. Hypothermia is often induced by cold, wet conditions, such as rain, snow, sleet, or immersion in water. However, hypothermia can occur at temperatures as high as 10 degrees Celsius.Moisture from perspiration, humidity, and dew or rain on bushes and trees also can soak your clothing over time, putting you at risk in cold weather. Wet or damp clothes will draw heat out of your body more rapidly than cold air. Wind lowers your body temperature as it evaporates moisture from your body. Resting or sleeping against cold surfaces will also draw heat from your body.
■ Prevention of Hypothermia• Hypothermia can be prevented by dressing properly, by avoiding poten-
tially dangerous weather conditions, and by drying out as quickly as possible when you get wet.
• High-calorie foods, such as chocolate, peanuts, or raisins, provide quick energy that helps your body produce heat.
■ Symptoms of Hypothermia• Uncontrolled shivering—usually the first obvious symptom, but ceases
as hypothermia progresses.• Slow, slurred speech.• Memory loss.• Irrational behaviour, such as removing clothing.• Lack of body movement.• Sleepiness.• Unconsciousness, which could lead to death.
■ Treatment of Hypothermia• Find shelter for the victim.• Remove wet clothing, and replace with dry clothing and other protec-
tive covering. If there is no dry clothing, use a fire to dry one layer at a time.
• Give warm liquids to rehydrate and rewarm, but never give the victim alcohol to drink. Quick-energy foods also produce inner body heat.
• For mild cases, use fire, blankets, or another person’s body heat to warm the victim.
• In more advanced stages, rewarm the victim slowly by placing one or more persons in body contact with the victim. Place canteens of hot water insulated with socks or towels on the groin, armpits, and sides of the neck of the victim.
• A victim at or near unconsciousness must be handled gently and not immersed in a warm bath or exposed to a large fire, which can lead to traumatic shock or death. Immediately contact emergency medical personnel to evacuate the victim to a hospital for treatment.
Hypothermia is often induced by cold, wet conditions, such as rain, snow, sleet, or immersion in water.

Chapter Eight / Page 102
Heat ExhaustionHeat exhaustion is the opposite of hypothermia —the core body tempera-ture increases, usually as a result of hot and humid conditions, plus a lack of water.
■ Prevention of Heat Exhaustion• Drink plenty of water.• Take frequent breaks if you’re hiking to or from your hunting spot,
especially when carrying a large load.• Dress in layers, and shed layers as physical activity increases.
■ Possible Symptoms of Heat Exhaustion• Pale and clammy skin.• Weakness.• Nausea.• Headache.• Muscle cramps.• Heavy sweating.• Weak, rapid pulse.
■ Treatment of Heat Exhaustion• Move to a cooler place and remove unnecessary clothing.• Fan and sponge with cold water to lower body temperature, but don’t
over-chill.• Give cool water to drink.
Heat StrokeHeat stroke should be treated as a medical emergency—it can be fatal.
■ Possible Symptoms of Heat Stroke• High body temperature—may be in excess of 41 degrees Celsius.• Altered behaviour and mental state.• Headaches, nausea, and vomiting.• Rapid, weak pulse and rapid breathing.• Shallow breathing.
■ Treatment of Heat Stroke• Apply wrapped ice or cold packs to groin, armpits, and neck area.• Wrap in a sheet and soak with cool—not cold—water.• Fan, but don’t over-chill.• Call an ambulance.
49 46 43 41 38 35 32 29 27 24 21
42 39 37 35 33 31 28 26 23 21 18 0
44 42 39 36 34 31 29 26 23 21 18 5
47 44 41 38 35 32 29 27 24 21 18 10
51 46 42 39 36 33 30 27 24 22 18 15
54 49 44 41 37 34 31 28 25 22 19 20
59 53 47 43 37 34 31 28 25 22 19 25
64 57 51 45 40 36 32 29 26 23 19 30
62 54 48 42 37 33 29 26 23 19 35
66 58 51 43 37 34 30 26 23 20 40
62 54 46 40 35 31 27 23 20 45
66 57 49 42 36 31 27 24 21 50
61 52 43 37 32 27 24 21 55
65 56 46 38 32 28 24 21 60
59 48 39 33 28 24 21 65
62 51 41 34 29 25 21 70
54 43 35 30 25 21 75
58 45 36 30 26 22 80
47 37 31 26 22 85
50 39 31 26 22 90
41 32 26 22 95
42 33 27 22 100
Air Temperature (ºC)
Relative Humidity (%
)
Heat Index General Effect of Heat Index
Fatigue possible with prolonged exposure and/or physical activity
Sunstroke, heat cramps, or heat exhaustion possible with prolonged exposure and/or physical activity
Sunstroke, heat cramps, or heat exhaustion likely and heat stroke possible with prolonged exposure and/or physical activity
Heat stroke highly likely with continued exposure
The values in the heat index chart show how hot it feels at different air temperatures and humidity levels.

Chapter Eight / Page 103
Basic First AidEvery hunter should take a first-aid course to learn what to do in case of injuries. Below are some common injuries that could occur while hunting.
Bleeding ■ Severe bleeding is a life-threatening medical emergency. The rapid loss
of just one litre of blood can result in shock and loss of consciousness. A victim can bleed to death in a short time.
■ To stop bleeding:• Apply direct pressure on the wound.• Cover with a sterile gauze pad—or the cleanest cloth readily available.
Concerns about infection are secondary when it comes to preventing massive blood loss.
• Press the pad firmly over the wound using the palm of your hand. Don’t lift the pad to check the wound—it will only renew bleeding.
• When a pad becomes soaked, put a fresh one directly over the old pad.• If the wound is on a limb and there’s no fracture, raise the limb above
the level of the heart. Gravity will reduce the blood pressure in the limb. ■ If profuse bleeding continues from major limb trauma and direct pressure
cannot control it, apply a constrictive bandage to the limb as a last resort. ■ Seek medical assistance.
Broken Bones ■ You can assume someone has a broken bone if pain lasts more than a few
minutes, moving the injured area is difficult, or there is swelling in the injured area.
■ If you have to transport the victim, it’s best to immobilise the joint above and below the break to prevent further injury and relieve pain. Don’t try to straighten the limb—splint it the way you found it.
■ For a broken foot, do not remove the shoe. Tie a pillow or thick padding around the foot over the shoe.
■ To splint a broken leg:• Place a blanket or some other type of thick padding between the legs.• Bind the injured leg to the uninjured one with strips of cloth.• Bind the legs together snugly at several places above and below the
painful area.
BurnsGeneral principles for burn first aid:
■ Follow the steps in DRSABCD. ■ Remove the agent causing the burn, and cool the area with cool
running water. ■ Avoid using butter or any type of greasy ointment because they can
interfere with healing and cause an allergic reaction. ■ Cover the burn with a non-adhesive dressing.
DRSABCD Action Plan
The DRSABCD action plan is a first-aid method. It can help you remember what to do when there is an emergency. Remember, in an emergency, call triple zero (000) for an ambulance.
Danger
• Check the area for potential dangers to you, the injured person, and others before performing first aid.
Response
• Check for the person’s responsiveness.
• Ask the person to answer you through verbal or physical responses.
• If there is a response, make the person comfortable, check for any injuries, and monitor him or her.
• If there is no response, move on to the next step.
Send for help
• Call triple zero (000) for an ambulance.
Airway
• Check if the person’s airway is clear.
• If foreign material is present, place the person in recovery position, open the mouth, and clear the airway.
• If no foreign material is present, keep the airway open by tilting the head and lifting the chin.
Breathing
• Look, listen, and feel to make sure the person is breathing. Ensure that the ambulance has been called.
• If the person is breathing normally, place the person in recovery position, and monitor him or her.
• If the person is not breathing, move on to the next step.
CPR
• Start CPR with 30 chest compressions followed by two breaths.
• If you are unable or unwilling to perform breaths, compress only the chest at 100 compressions per minute.
• Continue CPR until the person is alert and breathing normally, medical help has arrived, or you cannot continue CPR.
Defibrillation
• Apply an automatic external defibrillator (AED) if one is available.

Chapter Eight / Page 104
Carbon Monoxide Poisoning ■ Improperly working camp stoves and lanterns, as well as wood and
charcoal fires, can produce lethal carbon monoxide. ■ Symptoms of carbon monoxide poisoning include headache, dizziness,
weakness, and difficulty in breathing. The victim’s skin can turn red, and he or she can lose consciousness.
■ Get victims into fresh air immediately, and keep them lying quietly. Prompt medical care is essential.
Chest Wounds ■ A bullet striking the chest can cause a sucking chest wound—a deep,
open wound of the chest wall that allows air into the chest cavity. ■ All chest injuries are very serious and need immediate medical attention. ■ To respond immediately to a chest wound:
• Use the palm of your hand to cover the wound until a bandage is located.
• Cover the wound with sterile gauze, a clean cloth, plastic, or foil.• Make sure the wound cover forms an airtight seal.• Hold the gauze in place with a bandage or tape.• If the victim has trouble breathing and you suspect a collapsed lung,
remove the bandage to allow air to escape, and replace it quickly.• Transport the victim to the hospital with the injured side down.
Shock ■ Shock can result from any serious injury. Symptoms include pale, cold,
clammy skin; rapid pulse; shallow breathing; and fear in the victim. ■ To treat shock:
• Try to keep the victim calm and comfortable, and get medical help as quickly as possible.
• Keep the victim lying on his or her back. In some cases, shock victims improve by raising their feet (unless fractured or bitten by a snake) above the level of the heart.
• If the victim is having trouble breathing, place in the recovery position.• Maintain normal body temperature, and loosen any restrictive clothing.
Remember… Every hunter should take a first-aid course and a course in cardiopulmonary resuscitation (CPR) to be prepared to handle outdoor emergencies. A prepared hunter also will carry a complete first-aid kit.
Moving an Injured Person
Moving a victim with a back or neck injury should be left to paramedics or other professionals because permanent damage could result from improper handling.
If a victim must be pulled to safety, move him or her lengthwise and head first, supporting the head and neck. Keep the spine in alignment.
Victim placed in the recovery position.

Chapter Eight / Page 105
First-Aid Kit
• 10 centimetres x 10 centimetres combine pads
• 10–15 centimetres heavy crepe bandage
• 110 centimetres x 110 centimetres triangular bandages
• 30 millilitres saline ampoule
• 7.5 centimetres x 7.5 centimetres sterile gauze
• Adhesive strips
• Alcohol swabs
• Antiseptic ampoule
• Antiseptic swabs
• Burns sheet
• Disposable nitrile gloves
• Emergency thermal blanket
• Eye pads (large)
• Forceps
• Hypoallergenic tape
• Notepad and pencil
• Paracetamol
• Resuscitation mask or face shield
• Safety pins
• Scissors
• Tampons
• Tweezers
Stings and Bites ■ Some bites and stings from animals, spiders, and insects can be harmless,
and they can be treated at home. However, some bites and stings can be fatal, depending on the type of animal, spider, and insect.
Less Severe Bites and Stings ■ Apply an ice or cold pack if you are bitten or stung by the following:
• Bees• European wasps• Centipedes• Scorpions• Red-back spiders• Ticks• Ants
■ These can be severe to those who have allergic reactions to them. If the symptoms worsen or if you are in doubt about the severity of the bite or sting, seek medical help as soon as possible.
Severe Bites and Stings ■ Bites from snakes and funnel web spiders can be life-threatening. If a
person is bitten, you should call for an ambulance and apply the pressure immobilisation technique.• Use an elastic bandage (10–15 centimetres wide).• If the bite is on a limb, apply a broad pressure bandage over the bite site.• Apply a firm elastic bandage starting from the extremities (just above the
fingers or toes). Work the bandage towards the body, wrapping over the bite site if possible.
• Ensure the bandage is tight but the blood supply is not stopped.• Use a splint to immobilise the limb.• Check that blood supply is
not stopped after the splint is in place.
• Do not remove the splint and the bandage.
• Keep the person calm and immobile. He or she should be in a reclining position to slow the spread of venom. If the bite is on a limb, keep the wound at or below the level of the heart.
■ There are additional important points to remember if a person is bitten by a snake.• Do not try to catch the snake.• Do not wash the venom off
the skin.• Do not cut the bite site.• Do not try to suck the
venom out.
Remember… Call triple zero (000) for an ambulance.
Remember… Bites from Red-back spiders can be life-threatening to children or pregnant women. If you suspect a Red-back bite, seek medical help immediately.
Victim placed in the recovery position.

Chapter Nine / Page 106 Hunting Laws in Victoria
Importance of Hunting LawsHunting laws are in place to ensure that hunting is conducted safely, sustain-ably, equitably, and humanely. Our hunting laws give the community confi-dence that hunting can continue into the future, thereby maintaining an important cultural tradition; providing opportunities for an active, healthy lifestyle; and supporting an industry worth hundreds of millions of dollars and thousands of jobs.
■ In Victoria, all native wildlife is protected. Some wildlife has been further classified as game for the purpose of recreational hunting.
■ Hunting laws are designed to allow for sustainable use and access to game species in Victoria. The laws can change to reflect seasonal conditions. They may reduce the length of the season and bag limits.
■ There are laws that ensure hunters are able to identify game species and are appropriately licensed. There are also laws that specify the methods used in hunting game and the areas where hunting is permitted.
Game hunting and hunting-related activities are managed under a range of legislation and regulations. The information presented in this chapter is a summary of Victorian hunting laws. It is not exhaustive and is intended to be used as a guide only. For more information, refer to the specific acts and regulations.
■ Understand why hunting laws are important in Victoria.
■ Understand the requirements for obtaining a Game Licence, including for hunting ducks and hunting Sambar Deer with hounds.
■ Understand the firearm laws that hunters must follow.
■ Understand the crossbow laws that hunters must follow.
■ Understand what you must do when approached by an Authorised Officer.
■ Identify the practices that hunters are prohibited from doing while hunting.
■ Identify the areas where you are allowed to hunt game and where you are prohibited from hunting game.
■ Understand the regulations for hunting game with dogs.
■ Understand the species, bag limits, season dates, and methods permitted for hunting game deer, duck, and quail in Victoria.
■ Understand when it is acceptable or unacceptable to possess a spotlight in recognised deer habitat.
■ Understand how you can determine the sunrise and sunset times in different parts of Victoria.
You should be able to...
Remember… All native wildlife and some introduced game species are protected. Game species only may be hunted during the open seasons and by prescribed hunting methods.

Chapter Nine / Page 107
Wildlife Act 1975
The Wildlife Act 1975 establishes regulations to protect and conserve wildlife, prevent wildlife extinction, and promote the sustainable use and access to wildlife. The act also prohibits and regulates people who are involved in activities relating to wildlife.
The following table shows the main acts, regulations, and codes of practice that apply to game hunting in Victoria.
Game Hunting Laws • Wildlife Act 1975• Wildlife (Game) Regulations 2012
Firearm Laws • Firearms Act 1996• Firearms Regulations 2008
Crossbow Laws • Control of Weapons Act 1990• Control of Weapons Regulations 2011
Game Hunting in National Parks
• National Parks Act 1975• National Park (Parks) Regulations 2013
Game Hunting in State Game Reserves
• Wildlife (State Game Reserves) Regulations 2014
Game Hunting on Crown Land
• Conservation, Forest and Lands Act 1987• Crown Land (Reserves) Act 1978• Land Act 1958• Forest (Recreation) Regulations 2010
Animal Welfare • Prevention of Cruelty to Animals Act 1986
• Code of Practice for the Welfare of Animals in Hunting
• Code of Practice for the Welfare of Animals on Private Game Reserves Licensed to Hunt Game Birds
Other Laws • Game Management Authority Act 2014• Wildlife Regulations 2013
Game Licences ■ Anyone hunting game in Victoria, including juniors (12–17 years), must
hold a current Game Licence. The Game Licence must be endorsed for the type(s) of game that you wish to hunt and only permits you to hunt that game in Victoria during the period the licence is valid. Licences can be purchased for a period of one or three years. A range of licence types is available, depending on your requirements.
■ Traditional Owners acting in accordance with a Natural Resource Agreement or other authorisation are exempt from the requirement to hold a Game Licence. However, Traditional Owners who wish to hunt duck or Sambar Deer with the use of hounds must obtain a pass in the relevant test before hunting those species.
■ Traditional Owners acting in accordance with a Natural Resource Agreement or other authorisation must still adhere to the hunting laws when hunting game.
Remember… It is a privilege to hold a licence to hunt game. Any violation of the conditions or the law may result in your licence being suspended or cancelled.
Code of Practice for the Welfare of Animals in Hunting
Under the Prevention of Cruelty to Animals Act 1986, the Code of Practice for the Welfare of Animals in Hunting was specifically developed to ensure humane treatment of animals as it relates to hunting. The code:
• Sets guidelines for hunter behaviour to ensure that game, non-game animals, and dogs used in hunting are treated humanely.
• Guides behaviour that promotes the welfare of other animals where hunting occurs.
All hunters must know and comply with this code.

Chapter Nine / Page 108
Licence TypesThere are a range of Game Licence types that can be purchased to cater for your hunting needs (see table below). In addition to the regular Game Licence, three other licence types are available to assist junior and interna-tional hunters and game bird farmers.
Provisional Game Licences for Juniors
■ A Provisional Game Licence is available for juniors (12–17 years old) only. Unlike a regular Game Licence for juniors, the Provisional Game Licence allows juniors to hunt duck or Sambar Deer with hounds without the need to first pass the Waterfowl Identification Test or Hound Hunting Test. However, a junior hunting under a Provisional Game Licence must be under the direct supervision of an adult who holds a valid Game Licence for the species being hunted and has passed the tests for those species.
■ As with the regular Game Licence for juniors, there is no fee for a Provisional Game Licence. It is valid for the remainder of the calendar year in which the licence is issued. A junior will be issued a Provisional Game Licence to hunt duck or Sambar Deer with hounds only once for each entitlement. It allows a junior hunter to experience hunting under supervision before deciding whether to continue duck hunting or hunting Sambar Deer with hounds.
Game Licences Reference TableGame Licence Type Other Requirements
Stubble Quail • Game Birds (including duck) or• Game Birds (not including duck)
Nil
Pheasants, Partridges, European Quail, and Californian Quail
• Game Birds (including duck) or• Game Birds (not including duck) or• Game Bird Farm Hunting Licence
Nil
Duck • Game Birds (including duck)• Juniors (12–17 years old) may acquire
a once-off, 12-month Provisional Game Licence
• Overseas hunters may hunt under a 14-day Non-Resident of Australia Game Licence
Pass the Waterfowl Identification Test1
Deer (including Sambar, Red, Fallow, Rusa, and Chital)
• Deer (stalking) Nil
Hog Deer • Deer (stalking) Obtain Hog Deer tagsHound Hunting Sambar Deer
• Deer (stalking and hounds)• Juniors (12–17 years old) may acquire
a once-off, 12-month Provisional Game Licence
• Overseas hunters require a 14-day Non-Resident of Australia Game Licence
Pass the Hound Hunting Test1
1Not required for holders of a Provisional or Non-Resident of Australia Game Licence.

Chapter Nine / Page 109
■ At the conclusion of the Provisional Game Licence period, a junior who wishes to continue hunting must obtain a regular Game Licence and pass the relevant tests.
■ A Provisional Game Licence holder is subject to all conditions and laws that apply to regular Game Licence holders.
Game Bird Farm Hunting Licence
■ The Game Bird Farm Hunting Licence is free of charge and is valid for seven days only. This licence makes it easier for game bird farms to cater for corporate events and clients seeking a game-hunting experience in a controlled environment under expert instruction. This licence can be obtained from the GMA website.
■ The holder of a Game Bird Farm Hunting Licence can only hunt non-indigenous game birds (i.e. introduced pheasant, partridge, and quail species) on a game bird farm. Game ducks and Stubble Quail must not be hunted under this licence. Holders of a regular Game Licence for game birds, including duck, can still hunt game duck and Stubble Quail in season and non-indigenous game birds at game bird farms.
International Hunters
■ A Non-Resident of Australia Game Licence is available to facilitate game hunting for international visitors and support the commercial hunting and guiding industries. The Non-Resident of Australia Game Licence removes the need for international hunters to pass the Waterfowl Identification Test or Sambar Deer Hunting with Hounds Test. However, a Non-Resident of Australia Game Licence holder must be under the direct supervision of an adult who holds a valid Game Licence specific to the species being hunted and has passed the required tests.
■ The Non-Resident of Australia Game Licence is only available to people who reside outside Australia and is restricted to a maximum period of 14 days. A Non-Resident of Australia Game Licence attracts the same fee as a full 12-month Game Licence.
■ Overseas visitors intending to use firearms for hunting in Victoria must apply to the Victoria Police for a permit to possess, carry, or use a firearm. For information about Firearms Licences and the possession, use, and ownership of firearms, contact the Licensing Services Branch, Victoria Police, on 1300 651 645.
First-Time Hunters
■ First-time hunters can obtain a Game Licence application form from the GMA website at www.gma.vic.gov.au. Game Licence fees are detailed on the form and website. Pensioner concession cardholders are eligible for a discount of 50% on the price of a licence. Junior (12–17 years old) licences are free of charge.
■ Application instructions are provided on the form and website. On receipt of payment, your application will be processed and a Game Licence sent to you by mail. The turnaround time for Game Licence applications varies and delays may occur during peak periods (e.g. just before a season commences). However, all applications will be processed within 15 working days of payment receipt.

Chapter Nine / Page 110
Free Junior Licences
Juniors (12–17 years old) must obtain a Game Licence in order to hunt game; however, there is no charge for a junior Game Licence.
Hunting on a Receipt
When payment for a Game Licence is made either in person or electronically, you will be issued with a payment reference number (receipt). This proof of payment is regarded as an ‘interim licence’, and you can hunt with this until you receive your licence in the mail. If you sent a cheque or money order by mail and you have confirmed that this has been cashed, you may hunt using your cheque stub or money order stub as proof of payment. This applies to payment receipts for all new, renewed, or amended licences.
Change of AddressBy law, you must advise the GMA of a change of address within 14 days of changing address. This can be done online in the licensing section of the GMA website. An updated licence will be sent to you free of charge. Providing your new address also ensures that you will receive any relevant information that GMA needs to send to you.
Game Licence Amendment, Replacement, and RenewalIf you need to renew your licence, amend your licence type, or have lost or had your licence stolen, please visit the GMA website licensing section for detailed instructions.
Testing Required for Certain Licence Types ■ Anyone wishing to hunt ducks or Sambar Deer with hounds in Victoria
will need to sit and pass the relevant test in order to be issued a Game Licence. The tests ensure that only those hunters able to demonstrate the necessary level of knowledge or skill will be permitted to hunt.
■ Tests are conducted throughout the state during certain times of the year, and people must book a test online through the GMA website. Full details on testing locations, dates, and fees can be found on the GMA website.
■ Provisional and Non-Resident of Australia Game Licence holders must be under the direct supervision of an adult hunter who has passed the relevant test and holds a valid Game Licence to hunt either duck or Sambar Deer with hounds.
Study Material for Tests
The Game Management Authority has developed study material for the Waterfowl Identification Test and the Hound Hunting Test to assist people in preparing for the tests. The material below is the minimum amount of infor-mation any person wishing to sit a test should study in order to pass.
Hound Hunting Test Study Material
A Guide to the Use of Hounds for Hunting Sambar Deer in Victoria is a handbook on the GMA website which details the legal, safety, and ethical requirements when hound hunting. The questions in the Hound Hunting Test are based on the information in this handbook.
Remember… Hunting game without a valid Game Licence is a significant offence. Hunters must remember that a Game Licence should be carried at all times when hunting game and cannot be lent to another person, tampered with, or defaced.
Chapter Nine / Page 111
Waterfowl Identification Test Study Material
■ The Duck WISE (Waterfowl Identification, Safety, Effective, and Efficient Hunting) education video will help all duck hunters accurately identify game and non-game species and will reduce the risk of the wrong birds being taken in the field. The video promotes responsible and lawful hunter behaviour, and provides important information on effective and efficient hunting practices and firearm safety.
■ A copy of the DVD is available free of charge for collection from selected government offices across Victoria. You can also view the video on the GMA website, along with an online practice test.
Firearm LawsFirearm laws are enforced to ensure that firearm owners handle, use, store, and transport their firearms in a safe manner. All applicants for a Victorian Firearm Licence must demonstrate that they can safely handle firearms. They are required to complete the Victorian Firearm Safety Course, pass a test, and obtain a Victorian Firearm Licence issued by Victoria Police. Overseas visitors intending to use firearms for hunting in Victoria must apply to Victoria Police for a permit to possess, carry, or use a firearm. Familiarise yourself with the Firearms Act 1996, and always try to exceed the minimum legal requirements. Under firearm laws, you are required to do the following.
■ Obtain a Firearm Licence. Only licence holders are permitted to use, carry, or possess a firearm.
■ Use only registered firearms. ■ Ensure the firearm and ammunition are carried or used in a manner that
is secure and not dangerous. ■ Take reasonable precautions to ensure that the firearm and ammunition
are not lost or stolen. ■ Ensure that firearms and ammunition are stored in a manner that meets
legal requirements.
Travelling With FirearmsWhen travelling to a hunting location, firearms and ammunition must be transported in a safe and secure manner. Victoria Police guidelines recommend that:
■ Firearms should be transferred in a padded cover or hard case, unloaded and preferably inoperable (i.e. with the bolt removed or trigger lock attached).
■ Firearms and ammunition should be kept out of sight and stored in separate receptacles—a gun case for firearms and a lockable container for ammunition. These receptacles are secured either to the inside of your vehicle or in a lockable component of your vehicle. Apply these storage principles while camping with firearms, too.
■ In camp, firearms must not be left unattended in tents, unlocked vehicles, or laying around. People without a Firearm Licence must not have access to firearms present in camp.
■ Ammunition should be stored separately from the firearms in a part of the vehicle not readily accessible. A glove box cannot be used to store ammu-nition in recognised deer habitat.
HUNT RESPONSIBLYRESPECT
HUNT RESPONSIBLYRESPECT
HUNT RESPONSIBLYRESPECT
HUNT RESPONSIBLYRESPECT
HUNT RESPONSIBLYRESPECT
HUNT RESPONSIBLYRESPECT
HUNT RESPONSIBLYRESPECT
HUNT RESPONSIBLYRESPECT
Duck WISE (Waterfowl Identification, Safety, Effective and Efficient Hunting)
©The State of Victoria, Game Management Authority, 2014
This publication may be of assistance to you but the State of Victoria and its employees do not guarantee that the publication is without flaw of any kind or is wholly appropriate for your particular purposes and therefore disclaims all liability for any error, loss or other consequence which may arise from you relying on any information in this publication.
www.gma.vic.gov.au
Supported by:
This footage has been made available to assist hunters to identify ducks and other waterbirds in flight. This footage also promotes responsible hunting and the maintenance of bird identification and shotgunning skills.
The footage was developed by the Victorian Game Management Authority in conjunction with the Victorian Firearms Safety Foundation and other state game management agencies.
DuckWISE
aterfowl
dentification
afety
ffective
and Efficient Hunting
Remember… When transporting firearms, make sure that they are safe and secure. Never carry loaded firearms in your car or around the campsite.
Remember… For information on firearms licensing, storage, use, and carriage of firearms in Victoria, contact Victoria Police, Licensing and Regulation Division.

Chapter Nine / Page 112
Prohibited Use of FirearmsWhen in possession of a firearm, it is illegal to:
■ Use a firearm in a dangerous manner. ■ Discharge a firearm from a vehicle in a public place ■ Carry and use firearms on private land without permission from the
landowner or manager. ■ Carry, use, and be in possession of firearms while under the influence of
alcohol or drugs (including prescription medicine). ■ Allow any other person in your group who is affected by alcohol or drugs
to carry, use, or possess firearms.
Crossbow LawsCrossbows are prohibited weapons and can only be possessed, carried, or used by a person who:
■ Holds a current Victoria Police Prohibited Weapons Approval ■ Is exempted from needing an approval because they are a member of any
of the following organisations:• Archery Australia• Archery Victoria• Australian Bowhunters Association• Australian Deer Association• Clubs affiliated with Archery Australia• Clubs affiliated with Archery Victoria• Clubs affiliated with the Australian Bowhunters Association• Clubs affiliated with the Australian Deer Association• Field and Game Australia Inc.• Gippsland Deer Stalkers Club• North Eastern Deer Stalkers Association• Shooting Sports Council of Victoria• Sporting Shooters Association of Australia (Victoria) Deerstalkers Club• Sporting Shooters Association of Australia (Victoria) Field Hunters Club• Victorian Deer Association• Victorian Game and Deerstalking Association (VicGame)
Crossbows can only be used to hunt game deer. They cannot be used to hunt game birds. There are minimum legal draw weights and broadhead specifica-tions that apply to deer hunting with a crossbow in Victoria. See page 126 for details.
Storage and Transport of Crossbows ■ Crossbows must be stored safely and securely. This means they must be:
• Fitted with a trigger lock and the keys stored in a separate place.• Stored with a cable lock through the footclaw and connected to
the string.• For a recurve crossbow, stored in the unstrung condition with the prod/
bow assembly demounted from the stock (where possible).• For a compound crossbow, stored with the prod or bow assembly
demounted from the stock. ■ In transit, crossbows should not be accessible to unauthorised people.
They should be concealed from plain sight when being transported.
Equipment Specifications for Hunting
There are minimum specifications that are permitted for game hunting. When using a firearm, bow, or crossbow, the specifications relate to:
• Calibres
• Gauges
• Draw weights
• Arrow weights
• Broadhead configurations
Remember… It is illegal to use a crossbow in a town.

Chapter Nine / Page 113
Authorised OfficersAuthorised Officers are there to help you understand the hunting laws and provide advice and information on hunting. They are also there to enforce the hunting laws, to protect the resources, and to ensure that everyone has equitable access to hunting opportunities and that hunting is conducted in a safe and responsible manner.
■ When hunting, you may be stopped by an Authorised Officer from the Game Management Authority, Parks Victoria, another department, or by a member of Victoria Police. An Authorised Officer may not always wear a uniform, but they will always show you their official identification. If you are approached by an officer in the field, you will be directed to unload any firearms in your possession. You may also be asked to produce your Firearm and/or Game Licence and to provide your correct name and address. Officers may also wish to inspect any game you have harvested or have in your possession.
■ Authorised Officers and members of Victoria Police may stop and search any vehicle or boat to carry out inspections. They may also search outbuildings at your property and your residence with a warrant. They may seize any game, wildlife, or equipment that has been used in the commission of an alleged offence, including firearms, boats, and vehicles.
■ The laws that regulate hunting apply to both public and private land. Victoria Police and Authorised Officers are authorised to enter private land and go onto private waters to conduct their enforcement activities.
■ It is a serious offence to obstruct an Authorised Officer or Victoria Police member in the course of their duty. Obstruction includes to resist, assault, threaten, insult, or abuse an officer, or incite someone else to do so.
Hunting Times, Equipment, and MethodsRestrictions apply to the type of equipment and the methods used in hunting. This allows for sustainable game management, public safety, ethical consider-ations about game, and humane hunting of game.
Hunting Times ■ Legal hunting times are important to ensure hunters can effectively
identify game and for public safety. ■ The recreational hunting of game at night (between half an hour after
sunset to half an hour before sunrise) is not permitted in Victoria (i.e. no night hunting). (Refer to duck hunting laws for permitted hunting times during the opening weekend.)
Prohibited Hunting PracticesThe following hunting practices are not permitted.
■ Hunting and taking game outside of the open season. ■ Hunting protected or threatened wildlife. ■ Using a spotlight, artificial light, infrared device, night vision, or heat-
detecting device to hunt game recreationally. ■ Hunting game fleeing from smoke or fire. ■ Interfering with, hindering, harassing, or obstructing another hunter. ■ Hunting game using bait, a lure, or a decoy—not including game calls or
decoys for duck hunting.
Remember… Authorised Officers are only doing their jobs. If you refuse to obey their directions or prevent them from performing their duties, you are breaking the law.
Remember… You cannot recreationally hunt game at night. Game hunting is only permitted between 30 minutes before sunrise to 30 minutes after sunset.
Hunting Tip When you are approached by an Authorised Officer, unload your firearm and have your licences available for inspection. This will minimise disruption to your hunting.
Hunting Tip Always check the times for sunrise and sunset before hunting.

Chapter Nine / Page 114
■ Hunting game from an aircraft or motor vehicle, or using an aircraft or motor vehicle to assist in the hunting of game.
■ Hunting ducks from a moving boat on open water such as lakes, dams, or swamps. A motor boat operating at five knots or less can be used on open water to retrieve dead or wounded ducks. Note: You are allowed to hunt duck from a boat under power, up to a speed of five knots, in waterways (i.e. rivers, creeks, and streams).
■ Destroying or disturbing any nest, bower display mound, lair, or burrow of any animal.
■ Possessing or using a firearm or bow in a National Park outside the hunting period for that park.
■ Possessing or using a firearm or bow in a State Game Reserve outside the open season. However, you are allowed to possess a firearm or bow in a State Game Reserve 48 hours before the commencement of the open season and 48 hours after the conclusion of the season. Note: The use of firearms or bows outside the season (including the 48-hour periods before and after the open season) is not permitted.
■ Hunting using punt guns, snares, traps, glue, bird-lime, or any other substance that can restrain wildlife. It is an offence to possess any of these items in a State Game Reserve.
Rules for Blinds and Tree StandsBlinds and tree stands are effective ways for hunters to conceal themselves and increase their chances of harvesting game. For example, the use of a blind combined with successful decoy patterns and calling will bring more ducks into your effective shooting skills distance. However, there are certain rules that apply to using blinds and tree stands.
■ Where possible, use commercially bought or homemade portable blinds or bought tree stands.
■ In State Game Reserves, blinds can be a maximum of two metres in height and six metres square in floor area; any sign must not extend past the maximum blind height.
■ In State Game Reserves, the only vegetation you can use to construct blinds is the common reed (Phragmites australis), tea tree (Leptospermum spp.), or cumbungi/bullrush (Typha spp.).
■ In State Game Reserves, you must not remove, displace, deface, or interfere with someone else’s blind or tree stand.
■ In State Game Reserves, you must dismantle a blind or tree stand if directed to do so by an Authorised Officer.
■ You cannot stake a permanent claim to a location just because you have constructed a hide, erected a sign, or have hunted there in the past. Public land is for all land users, including other hunters. Common sense and respect should guide all discussions relating to setting up and using blinds and stands.

Chapter Nine / Page 115
Possession and Use of Game ■ When you harvest game under a Game Licence, it is for your own
personal use and consumption. It is illegal to:• Sell non-taxidermied game• Store game on a commercial premise that is not properly identified and
stored separately• Possess game sourced from the wild on a commercial premise where
food is cooked ■ There are some exemptions, which are detailed in the Wildlife (Game)
Regulations 2012.
Hunting AreasThere are many land classifications in Victoria, and depending on the land classification, hunting may or may not be permitted. You should always check on current hunting restrictions before planning your journey. Remember that game hunting laws apply to public and private land.
Where You Can Hunt
Private Land ■ Hunters are permitted to hunt game on private property where permission
has been granted by the landowner or manager. Game may be hunted only during the open season. All game hunting laws apply to private land.
■ Pest animals may be hunted at any time but only with the permission of the landowner or manager.
Public Land ■ Victoria has vast areas of public land that provide both hunting opportu-
nities and nature conservation. Therefore, when you are planning hunting trips, you should verify that you are entering areas where hunting is permitted.
■ Game hunting can occur throughout state forests and unoccupied Crown land. Other categories of Crown land, such as some Wilderness Parks, Coastal Parks, National Parks, and State Game Reserves, have specific restrictions on where game hunting can or cannot occur.
The following are areas where you are generally allowed to hunt. ■ State forests, Forest Parks (Cobboboonee and Otway), licensed Crown
land, and other unoccupied Crown land• Game species may be hunted only during the open season. Pest animals
may be hunted at any time. ■ State Game Reserves
• Game duck may be hunted on all State Game Reserves but only during the open season. Sixteen State Game Reserves are available for Stubble Quail hunting, six for Hog Deer hunting, and one for Sambar Deer hunting during the respective open seasons. (See the following tables for more information.)
• Foxes, rabbits, and hares may be hunted during the duck open season by holders of a Game Licence endorsed for duck hunting, or autho-rised traditional owners. These pest species may only be hunted in State Game Reserves where duck hunting is permitted and only during daylight hours. The prescribed hunting methods are limited to the use of non-toxic ammunition and a shotgun no greater than 12 gauge.
Remember… It is the responsibility of every hunter to hunt on land where it is permitted. Check with the nearest DELWP or Parks Victoria office for details before entering the field.
Remember… Game laws apply to both private and public land. Authorised Officers enforce the game laws on all land tenures.
Remember… Check the GMA and DELWP websites for maps and descriptions of Victoria's State Game Reserves.
Remember… Make sure you have the landowner’s permission to hunt on private land.

Chapter Nine / Page 116
The 16 State Game Reserves Where Stubble Quail Hunting Is PermittedTitle of Reserve Locality* Title of Reserve Locality*
Blond Bay 20 km south of Bairnsdale Jack Smith Lake 30 km east of YarramBow Lake 40 km east of Edenhope Jones Bay 5 km south of BairnsdaleClydebank Morass 12 km north-east of Sale Lake Coleman 20 km east of SaleDarlot Swamp 10 km north-east of Horsham Lake Connewarre 8 km south-east of GeelongDowd Morass 10 km south-east of Sale Mansfield Swamp 10 km west of StanhopeGaynor Swamp 10 km north of Colbinabbin Macleod Morass Near BairnsdaleHateley’s Lake 10 km west of Natimuk Rowan Swamp 15 km south-west of YarrawongaHeart Morass 5 km east of Sale Wallenjoe Swamp 10 km north of Colbinabbin
The Six State Game Reserves Where Hog Deer Hunting Is PermittedTitle of Reserve Locality* Title of Reserve Locality*
Clydebank Morass 12 km north-east of Sale Heart Morass 5 km east of SaleDowd Morass 10 km south-east of Sale Jack Smith Lake 30 km east of YarramEwings Morass 10 km south-east of Orbost Lake Coleman 20 km east of Sale
The State Game Reserve Where Sambar Deer Hunting Is PermittedEwings Morass 10 km south-east of Orbost from 1 May to 30 November
* For maps of these and other State Game Reserves, refer to the GMA website.
■ Sanctuaries• Game species may not be hunted at any time. • Pest animals may be hunted at any time.
■ National Parks, State Parks, Coastal Parks, Wilderness Parks, and Regional Parks• Generally, hunting of any type is not permitted at any time, but there
are some exceptions (see below). No firearms are allowed in these parks except those that legally can be used for hunting permitted game and pest species. - Alpine National Park and Avon Wilderness Park: All game deer species may be hunted during the open season by stalking only, in parts of the Alpine National Park and in the whole of the Avon Wilderness Park from 15 February to 15 December. The use of dogs to hunt deer is not permitted. Pest animals and other species must not be hunted.
- Baw Baw National Park: All game deer species may be hunted during the open season by stalking, in only the area east of Thomson Valley Road from 15 February to 15 December each year. The use of dogs to hunt deer is not permitted. Pest animals and other species must not be hunted.
- Cape Conran Coastal Park: On Sydenham Inlet in the park, game ducks may be hunted during the open season. Gundogs are allowed for the flushing or retrieval of ducks during the open season. Pest animals and other species must not be hunted.
- Gippsland Lakes Coastal Park: In certain sections, game ducks, Stubble Quail, and Hog Deer may be hunted during the open season. Gundogs are allowed for the flushing or retrieval of game ducks
Remember… Hunting periods in the National Parks may change. Refer to www.parkweb.vic.gov.au for current arrangements.

Chapter Nine / Page 117
and Stubble Quail during the respective seasons. Check with Parks Victoria for details. Pest animals and other species must not be hunted. Hunters must have a permit from Parks Victoria to erect a hide in the Gippsland Lakes Coastal Park.
- Lake Albacutya Park: The hunting of some pest animals (rabbits, foxes, or cats) is allowed as well as the hunting of game duck during the open season. Gundogs are allowed for retrieval of game ducks during the duck open season. Hunting is not permitted in part of the park at the Western Beach visitor facilities, including near the boat ramp.
- Lake Eildon National Park: In certain sections in the south-east of the park, Sambar Deer hunting by stalking is permitted from the first Saturday after Easter until 30 November. The use of dogs to hunt deer is not permitted. Pest animals and other species must not be hunted.
- Mitchell River National Park: Sambar Deer hunting by stalking is permitted east of the Mitchell River and south of Hortons and Calvi Tracks from 15 February to 15 December. The use of dogs to hunt deer is not permitted. Pest animals and other species must not be hunted.
- Tara Range Park: Hunting of all game deer species by stalking, is permitted in the park during the open season, from 15 February to 15 December. The use of dogs to hunt deer is not permitted. Pest animals and other species must not be hunted.
- Nooramunga Marine and Coastal Park: Hunting for Hog Deer and game duck is permitted in certain sections during the open season. Pest animals and other species must not be hunted.
Prohibited Hunting AreasGame hunting is prohibited in the following areas:
■ Melbourne Water catchment areas ■ Sanctuaries ■ Nature Conservation Reserves ■ Flora and Fauna Conservation Reserves ■ Alpine resorts
• Alpine resorts are closed to hunting at all times. However, you are allowed to transport a dog and firearms through a resort, providing that the dogs are in a vehicle and the firearms are unloaded and securely locked away.
■ Murray River• The southern bank of the Murray River, including the original location
of that bank beneath impounded waters, such as Lake Mulwala and Lake Hume, is the state border between Victoria and New South Wales.
• Duck hunting is not permitted on the Murray River; however, south of that border, game ducks may be hunted during the open season on any area open to duck hunting. This includes flood waters that have flowed over the southern bank of the Murray River into Victoria.
• If you are hunting ducks on Lake Mulwala or Lake Hume during the open season, it is your responsibility to be aware of your location on those lakes.
• For more information, contact the Department of Environment, Land, Water and Planning on 136 186.
Remember… Only firearms required for the species permitted to be hunted in National Parks are allowed in these areas. Other firearms must not be carried or used.
Remember… Some areas of public and private land can be temporarily closed to hunting to protect concentrations of rare or threatened species, colonies of breeding waterbirds, or to provide drought refuge. Signs advising closure may not be in place. Always check the GMA website for up-to-date details.

Chapter Nine / Page 118
Public Land Areas Closed to Deer Hunting
■ Some areas of Victoria have been closed to all forms of deer hunting. Other areas have been closed to hound hunting only. When you are hunting, pay attention if you are near the following areas, and ensure that you are hunting only in areas where hunting is permitted.
• AREAS CLOSED TO ALL FORMS OF DEER HUNTING - Warburton and surrounds
-
Note: See sidebar for exceptions.
Note: See sidebar for exceptions.
These Restrictions Do Not Apply to:
• Anyone acting in accordance of an authorisation
• The owners of private land who hunt on their land
• Anyone hunting on private land with the landowner’s consent

Chapter Nine / Page 119
- Rubicon and surrounds
- Areas immediately around Mount Timbertop and Geelong Grammar School’s Timbertop Campus, near the township of Merrijig
Note: See sidebar for exceptions.
Note: See sidebar for exceptions.
These Restrictions Do Not Apply to:
• Anyone acting in accordance of an authorisation
• The owners of private land who hunt on their land
• Anyone hunting on private land with the landowner’s consent

Chapter Nine / Page 120
- Area Around Halls Gap
• AREAS WHERE HOUND HUNTING IS AND IS NOT PERMITTED A large part of eastern Victoria is available for hunting Sambar Deer with the aid of hounds, as long as the land classification allows hunting and the presence of dogs. However, some parts of this area are specifi-cally closed to hound hunting. - Part 1: Areas Available for Hunting Sambar Deer with Hounds The dark area on the map below shows where hound hunting for Sambar Deer is permitted in Victoria. Parts 2, 3, and 4 show areas where hound hunting is not permitted (see pages 119 and 120).

Chapter Nine / Page 121
- Part 2: Marysville and surrounds (detailed plan of Part 1) The white area on the map below shows where hound hunting for Sambar Deer is not permitted.
- Part 3: Jamieson and surrounds (detailed plan of Part 1) The dark area on the map shows where hound hunting for Sambar Deer is not permitted.
Note: See sidebar for exceptions.
These Restrictions Do Not Apply to:
• Anyone acting in accordance of an authorisation
• The owners of private land who hunt on their land
• Anyone hunting on private land with the landowner’s consent

Chapter Nine / Page 122
- Part 4: Buttercup Lane area adjacent to the township of Merrijig (detailed plan of Part 1) The dark area on the map shows where hound hunting for Sambar Deer is not permitted.
Note: See sidebar for exceptions.
These Restrictions Do Not Apply to:
• Anyone acting in accordance of an authorisation
• The owners of private land who hunt on their land
• Anyone hunting on private land with the landowner’s consent

Chapter Nine / Page 123
Dog Breeds Permitted for Hunting Game in Victoria ■ In Victoria, the only breeds of dogs permitted to be used in game hunting
are those classified as Gundogs, Deer Hunting Dogs, and Hounds. The breeds permitted for hunting game in Victoria are shown in the following tables.
■ Gundogs and Deer Hunting Dogs may be used throughout the state, wherever hunting with dogs is permitted.
■ Dogs cannot be used to hunt Hog Deer. ■ Crossbreeds must not be used to hunt any game species in Victoria. ■ Hunters are responsible for the actions of their dogs. ■ Aggressive dogs should not be used for hunting. Under no circumstances
should dogs be set onto game or other wildlife. It is an offence for any dog to attack or maim another animal, including pest animals such as pigs. Any dog that does so must not be used for hunting.
■ Hunters need to ensure their Gundogs, Deer Hunting Dogs, or Hounds do not interfere with other hunters or chase wildlife or livestock.
Seasons and Bag LimitsThere are a number of mechanisms that can be used to regulate harvest levels, including season length, bag limits, number of hunters, and the times and places where hunting can occur. In Victoria, the most commonly applied harvest regulators are season length and bag limits. Under the regulations, the following seasons and bag limits apply.
Gundogs (used for game birds and deer*)Bracco Italiano Hungarian Vizsla
Brittany Spaniel (Epagneul Breton) Hungarian Wirehaired VizslaChesapeake Bay Retriever Irish Red and White SetterClumber Spaniel Irish SetterCocker Spaniel Irish Water SpanielCocker Spaniel (American) Italian SpinoneCurly Coated Retriever Labrador RetrieverEnglish Setter Lagotto RomagnoloEnglish Springer Spaniel Large MunsterlanderField Spaniel Nova Scotia Duck Tolling RetrieverFlat-Coated Retriever PointerGerman Shorthaired Pointer Sussex SpanielGerman Wirehaired Pointer (Deutsch Drahthaar)
Weimaraner (Longhair)
Golden Retriever WeimaranerGordon Setter Welsh Springer Spaniel*excludes Hog Deer
Deer Hunting Dogs (used for deer only*)Border Terrier
DachshundFinnish SpitzFox Terrier (Smooth)Fox Terrier (Wire)German Hunting Terrier (Jagd Terrier)Jack Russell TerrierNorwegian Elkhound
Hounds (used for Sambar Deer only)BeagleBloodhoundHarrier*excludes Hog Deer
Remember… Seasonal changes could reduce the game species allowed to be hunted. Check the GMA website at www.gma.vic.gov.au for current restrictions on species and bag limits.

Chapter Nine / Page 124
Native QuailGame Species Season Bag Limit
Stubble Quail First Saturday in April until 30 June each year
Twenty (20) birds per day
Introduced Game BirdsGame Species Season Bag Limit
Pheasants and Partridges European Quail Californian Quail
All year No limit
DuckGame Species Season Bag Limit
Black Duck Grey TealMountain DuckWood DuckChestnut Teal Blue-winged Shoveler Hardhead Pink-eared Duck
Third Saturday in March until second Monday in June each year
Ten (10) game ducks per day, including no more than two (2) Blue-winged Shoveler
DeerGame Species Season Bag Limit
Hog Deer 1 April–30 April One male and one female
Red Deer All year No limitSambar Deer (stalking only)
All year1 No limit
Sambar Deer (hound hunting)
1 April–30 November2 No limit
Fallow Deer All year No limitChital Deer All year No limitRusa Deer All year No limit1 Note that hunting periods do vary in some National Parks and other locations,
including Ewings Morass State Game Reserve, where Sambar Deer stalking is permitted during specific periods. See the Hunting Areas section for some of these exceptions.
2 Except the period from the Friday before Easter Sunday to the Wednesday after Easter Sunday (inclusive), when Easter falls in April.
Season length and bag limits can sometimes change if populations are low and/or habitat is limited. It is your responsibility to check the GMA website prior to each season to see if modifications to season dates and bag limits have been made.
Remember… It is your responsibility to know the current seasonal arrangements. Refer to www.gma.vic.gov.au for up-to-date informa-tion.

Chapter Nine / Page 125
Deer Hunting LawsTo recreationally hunt deer in Victoria, deer hunters need to be aware of the hunting laws found in Wildlife (Game) Regulations 2012 and the Wildlife Act 1975. There are other general hunting laws contained in other acts on land management, firearms, and animal welfare; a list of these can be found on page 107 and on the GMA website (www.gma.vic.gov.au). Deer hunters must also follow approved hunting methods and equipment; must comply with bag limits, seasons (for Hog Deer), and hunting times (no recreational night hunting); and must have a current Game Licence endorsed for hunting deer: either stalking and/or hunting Sambar Deer with hounds.
Deer Species Open Season Bag LimitHog Deer (tags required) 1 April–30 April One (1) male and
one (1) femaleRed Deer All year No limitSambar Deer (stalking) All year No limitSambar Deer (hound hunting)
1 April–30 November However, when Easter falls within the season, hunting is closed from the Thursday before Easter until the Thursday after Easter
No limit
Fallow Deer All year No limitChital Deer All year No limitRusa Deer All year No limit

Chapter Nine / Page 126
Equipment Requirements for Deer HuntingThe following are the minimum legal requirements for firearm, bow, and crossbow equipment when hunting for deer in Victoria.
Firearm/Bow Sambar, Rusa, and Red Deer
Hog, Fallow, and Chital Deer
Centrefire rifle A minimum calibre of .270" (6.85 mm) with a minimum projectile weight of 130 grains (8.45 grams)
A minimum calibre of .243" (6.17 mm) with a minimum projectile weight of 80 grains (5.18 grams)
Muzzle-loading rifle
A minimum calibre of .45" (11.45 mm) with a minimum projectile weight of 230 grains (14.91 grams)
A minimum calibre of .38" (9.65 mm) with a minimum projectile weight of 200 grains (12.96 grams)
Long, recurve, and compound bows
A minimum draw weight of 50 pounds (22.5 kilograms), using an arrow fitted with a broadhead having a combined minimum weight of 400 grains (26 grams) and at least two sharpened cutting blades
A minimum draw weight of 45 pounds (20 kilograms), using an arrow fitted with a broadhead having a combined minimum weight of 350 grains (22.5 grams) and at least two sharpened cutting blades
Crossbow A minimum draw weight of 150 pounds (68 kilograms), using a bolt fitted with a broadhead having a total minimum weight of 400 grains (26 grams) and at least two sharpened cutting blades
A minimum draw weight of 120 pounds (54.4 kilograms), using a bolt fitted with a broadhead having a total minimum weight of 350 grains (22.5 grams) and at least two sharpened cutting blades
Smooth-bore firearms
A minimum bore of 20 and a maximum bore of 12, using a single solid projectile with a minimum weight of 245 grains (15.88 grams); SG’s (buck shot) must not be used. The firearm must be fitted with a front and rear iron sight (other than a beaded sight or sights), a telescopic sight, or a reflex sight.
Remember… When using a bow or a crossbow, your arrowhead must have at least two sharpened cutting blades.
Remember… A combination firearm (Drilling) with a maximum of three barrels may be used for deer hunting, providing it conforms with the minimum firearms requirements.

Chapter Nine / Page 127
Spotlight RegulationsDeer cannot be recreationally hunted at night or with the use of spotlights.
■ A spotlight is defined as any source of artificial light, infrared device, night vision, or heat-detecting device.
■ A spotlight does not include:• A domestic light used for domestic purposes. This could include such
lights as torches, lanterns, and work lights used around camp.• An emergency light used for emergency purposes, such as handheld
torches or headlamps used to navigate out of the bush or 12-volt lights used when working on your vehicle.
• A light fitted to your vehicle that complies with the Road Safety (Vehicles) Regulations 2009. This covers all spotlights and work lights that are fitted on your vehicle in a legal manner.
Spotlights in Recognised Deer Habitat
■ Hunters travelling in vehicles between 30 minutes after sunset until 30 minutes before sunrise in recognised deer habitat can be in possession of a firearm and spotlight as long as: • The firearm is unloaded and stored in a securely fastened case or
container (e.g. gun bag or gun case) that is stowed in the boot or storage area of a sedan, dual cab, or wagon and is not readily accessible to any occupant of the vehicle.
• For utes or single cabs, the firearm is unloaded and stored in a securely fastened case or container and stowed in a part of the vehicle not readily accessible to any occupant of the vehicle. The best approach here is to fit a lockable steel box to the tray and store the firearm in there.
• Any ammunition is stored separately and is in a part of the vehicle not readily accessible. A glove box cannot be used to store ammunition in recognised deer habitat.
• Any spotlight in or on the vehicle is not in use.
Spotlights and Firearms When on FootHunters on foot in recognised deer habitat between 30 minutes after sunset and 30 minutes before sunrise in recognised deer habitat can use an artificial light (e.g. torch or headlamp) for on-foot navigation purposes as long as:
■ The firearm and magazine is unloaded, meaning all cartridges must be removed from the firearm and any magazine.
■ Ammunition is stored in a closed case or container. This could include a backpack or cartridge case.
■ The artificial light is not fitted to any part of the firearm or a scope or other fitting attached to the firearm.
Exemptions From Spotlight Regulations ■ Landowners/occupiers or their agents who are using a spotlight for the
purpose of controlling pest animals to a distance of 250 metres outside the property boundary.
■ Landowners or their agents controlling deer (not including Hog Deer) that are causing damage on their property, acting in accordance with an Order under the Wildlife Act 1975.
■ Any person who is acting in an accordance with an authorisation issued under the Wildlife Act 1975 that allows them to destroy wildlife.
Remember… Spotlights cannot be used when hunting any game recreationally.
Remember… Don’t store ammunition in the glove box. Ammunition must be stored in a separate lockable box in the boot or rear of your vehicle.
Remember… If two people are working together, one with a spotlight and the other with a firearm in a recognised deer habitat, from 30 minutes after sunset until 30 minutes before sunrise, they are both committing an offence.
Recognised Deer Habitat
Recognised deer habitat is defined as all areas of Crown land in the following Victorian Municipalities.
• Alpine Shire
• Ararat Rural City
• Baw Baw Shire
• Benalla Rural City
• Cardinia Shire
• Colac Otway Shire
• Corangamite Shire
• East Gippsland Shire
• Glenelg Shire
• Horsham Rural City
• Mansfield Shire
• Mitchell Shire
• Murrindindi Shire
• Northern Grampians Shire
• Pyrenees Shire
• South Gippsland Shire
• Southern Grampians Shire
• Strathbogie Shire
• Towong Shire
• Wangaratta Rural City
• Wellington Shire
• Whittlesea City
• Yarra Ranges Shire

Chapter Nine / Page 128
Hunting Deer With Gundogs or Deer Hunting DogsHunters may use a trained dog to help them locate, flush, point, or trail deer. Dogs can be of particular use when locating downed animals that could be lost. Hunters must be able to train their dog(s) to a level that allows the dog to complete its hunting task without chasing other animals and/or attacking the deer being hunted.
■ Dogs can be used only on land classifications that permit people to be in possession of dogs (e.g. dogs cannot be taken into National Parks).
■ Hog Deer cannot be hunted with the aid of dogs. ■ However, all other deer species can be hunted with the aid of gundogs
or approved deer hunting dogs. See ‘Dog Breeds Permitted for Hunting Game in Victoria’ on page 123 for approved breeds.
■ Deer hunters cannot hunt with more than two gundogs or deer hunting dogs, individually or with a team of hunters.
Hunting Sambar Deer With Hounds ■ Deer hunters must have an endorsement on their Game Licence to be
allowed to hunt with hounds. ■ Hound hunting is seasonal, with the season starting on 1 April each year
and ending on 30 November. ■ When Easter falls within the season, hound hunting is closed from the
Thursday before Easter until the Thursday after Easter, inclusive.
Permitted Hound Breeds and Breed Standards
Registered hounds must conform to the Australian National Kennel Council Breed Standards and must not be any taller at the withers than the following (see next page).
Remember… Make sure you use dogs only in areas where they are allowed (e.g. state forest). Dogs are not allowed in National Parks even though you can hunt deer in certain parks.
Remember… Make sure you do not overwork your dogs. Check them for stress or injuries, and provide appropriate treatment when necessary.
Hunting Tip Use GPS tracking collars on your hounds to locate them and to ensure that they do not approach or cross into prohibited areas.

Chapter Nine / Page 129
Beagle
Maximum height at the withers: 40 cm
Harrier
Maximum height at the withers: 53.5 cm
Bloodhound
Maximum height at the withers: 69 cm
The Beagle is a small hound bred primarily for hunting. The dog often works in packs, and it has an even temperament. A Beagle generally has a sturdy and compactly built body.
The Harrier is a medium-sized hunting hound with a short, hard coat. It is active, cheerful, and even-tempered. A Harrier is slightly longer than its height; it has large bones, which gives it stamina and strength on a hunt.
The Bloodhound is a large hound bred for hunting. It has a keen sense of smell and a strong tracking instinct. A Bloodhound is known for its large body with loose skin hanging around its head and neck.

Chapter Nine / Page 130
Laws for Hunting With Hounds
When hunting with hounds, the hunter must comply with the following: ■ Maximum pack size is five hounds; however, up to three addi-
tional pups (hounds under the age of 12 months) may be used for training.
■ Maximum number of hunters in a hound crew is 10 (or 12, providing that two are Provisional Licence–holding juniors or Non-Resident of Australia Game Licence holders).
■ Junior and non-Australian resident hunters can hunt only if they are under the direct supervision of a fully licensed hunter who has passed the Hound Hunting Test.
■ Hound owners are required to include their full name and hound registration number on a permanent tag or label fixed to the collar of the hound. Many hunters like to put additional information on a hound collar to assist in recovery of a hound should it become temporarily lost.
■ Hound owners must ensure that a hound does not attack, bite, or maim wildlife. It is an offence to harm wildlife.
■ The possessor of a hound (any person who has a hound in his or her care) is responsible for ensuring that the hound does not enter any prohibited areas (e.g. National Parks and private property without permission).
■ All hounds must be registered with the Game Management Authority and microchipped.
■ No crossbreed hounds are allowed; hounds must be pure Beagles, Harriers, or Bloodhounds and conform to the standard as set out by the Australian National Kennel Council.
■ It is illegal to block road access for other users (i.e. parking a vehicle across a road). This behaviour damages the reputation of hunters and hunting.
■ It is illegal to use a vehicle once a hound hunt has started, as it is deemed unethical and is not in the spirit of fair chase.
Hog Deer HuntingIn Victoria, Hog Deer hunting is permitted under strict regulations to ensure the species is hunted sustainably.
■ Hog Deer are a highly valued game species, and bag limits are set to allow hunters to take one male and one female Hog Deer per season.
■ The Hog Deer season is open only in the month of April each year (i.e. 1–30 April).
■ Before hunting Hog Deer, hunters must obtain Hog Deer tags from the Game Management Authority. Each hunter is issued two tags: one male and one female. These tags are issued to a hunter and cannot be lent or sold, and can only be used in the season they were obtained.
■ When a Hog Deer is taken, the Hog Deer tag must be immedi-ately attached to the hind leg. See Chapter Six for details on how to attach the tag.
Checking Stations
For Hog Deer checking station locations, visit the Game Management Authority website at www.gma.vic.gov.au.
Remember… When hunting Hog Deer, you must have your tags with you. Apply for your Hog Deer tags early. Don’t leave it until the last minute.

Chapter Nine / Page 131
■ You cannot possess a Hog Deer without the tag being attached. Tags cannot be removed until details have been recorded at a checking station. Checking stations have been established to monitor the take of Hog Deer and provide information on the health of the Hog Deer population.
■ All harvested Hog Deer must be presented to a checking station within 24 hours of being taken. Refer to the GMA website at www.gma.vic.gov.au for locations and hours of operation.
■ At a checking station, hunters will be asked to produce their Game Licence, and details are recorded.
■ The harvested deer will have shoulder height, girth, length, and weight recorded. Stags will have the antlers measured and photographed. The reproductive condition of hinds will be recorded. Samples may also be taken; this includes the removal of the jaw bone for ageing purposes.
■ Completed Hog Deer tag return forms must be sent to the Game Management Authority within 28 days of the last day of the open season.
■ There are balloted Hog Deer hunting opportunities which occur outside the April season (usually February, March, and May) and in areas where hunting is usually prohibited. Currently these areas are Blond Bay State Game Reserve, Boole Poole Peninsula within Gippsland Lakes Coastal Park, and Snake Island within Nooramunga Marine Coastal Park.
■ The ballot is administered by the Blond Bay Hog Deer Advisory Group (BBHDAG). Refer to the GMA website at www.gma.vic.gov.au for details on how to enter the Hog Deer Ballot.
Red, Fallow, Rusa, and Chital Deer HuntingThere are opportunities to hunt other deer in Victoria, including Red, Fallow, Rusa, and Chital Deer. These species can be hunted year round and there is no bag limit. For minimum calibre and bow/crossbow specifications, see the table on page 126.

Chapter Nine / Page 132
Duck Hunting LawsRecreational duck hunting in Victoria is managed sustainably, with the bag limits and season dates set to ensure that hunting does not threaten the conservation status of game duck species. Duck seasons arrangements may change from time to time; and hunters should always check current regula-tions, season dates, and bag limits. Some game species may be protected from hunting at particular times, such as during drought, or bag limits may be changed in response to population numbers and/or environmental conditions.
Game Duck SpeciesGame ducks can be hunted during the open season. Restrictions on the species and bag limits may be imposed when conditions require. There are eight species of native duck declared to be game. They are:
■ Black Duck ■ Grey Teal ■ Chestnut Teal ■ Hardhead ■ Blue-winged Shoveler ■ Pink-eared Duck ■ Mountain Duck ■ Wood Duck
Remember… Freckled Ducks are threatened wildlife and must not be shot.
Hunting Tip Be duck-WISE, and brush up on your identification skills before the season.

Chapter Nine / Page 133
Duck Open Season and Bag Limits ■ Duck season begins on the third Saturday of March and ends 30 minutes
after sunset on the second Monday of June each year. ■ The bag limit is ten (10) game ducks per day, including no more than two
(2) Blue-winged Shoveler. ■ However, season length or bag limits may change from time to time,
so make sure you check the most up-to-date information on the GMA website.
■ On opening Saturday, the 2019 season will open across the state at 9:00 am.
■ On opening Sunday, the permitted time for hunting across the state will start at 8:00 am.
■ Any day after opening weekend, duck hunting is permitted from 30 minutes before sunrise.
■ Hunting ceases 30 minutes after sunset for every day of the season, including the opening weekend.
■ Sunrise and sunset times vary throughout the state; therefore, during the season, legal hunting times also vary. The following information will help you calculate the legal hunting times in your area.• Sunrise and sunset times alter by four minutes for each degree of
longitude across the state. Victoria extends from 141° in the west to 150° in the east. Melbourne is near the 145° line.
• Use the official Melbourne sunrise and sunset times as your starting point to calculate the sunrise and sunset times of your location. If your hunting location is east of 145° (Melbourne), subtract four minutes from the official sunrise and sunset times for each degree of longitude. Anywhere west of the Melbourne line, add four minutes to the official sunrise and sunset times for each degree of longitude.
• Heavy penalties apply for early hunting, which may include losing your Game and Firearm Licences and/or your firearm or other hunting equipment.
• Penalties also apply for early and late hunting during every other day of the duck season.
Equipment Requirements for Duck Hunting ■ Duck hunters are permitted to use shotguns no greater than 12 gauge and
with no more than three barrels. ■ Hunters must use or have in their possession only non-toxic shot when
hunting ducks. This includes duck hunting on all wetlands, waterways, and drylands on public and private land.
■ Hunters are exempt from using non-toxic shot if they are using a muzzle-loading, Damascus steel, or twist-barrelled shotgun.
■ However, duck hunters may have toxic shot (e.g. lead shot) on a State Game Reserve or any other area where they intend to hunt duck, provided it is secured in a vehicle. For toxic shot to be secured in a vehicle, the ammunition must be stored in a closed case or container and stowed in the boot or storage area (not in the glove box) of a sedan, dual cab, or wagon. For a single cab or ute, the ammunition must be stored in a closed case or container and stowed in a part of the vehicle not readily accessible by any occupant of the vehicle.
Example of How to Calculate Hunting Times in the Kerang Lakes Region • Kerang is one degree west of Melbourne.
• Official sunrise at Melbourne is 7:32 a.m.
• Sunrise at Kerang is, therefore, 7:32 a.m. plus four minutes = 7:36 p.m.
• Official sunset at Melbourne is 7:17 p.m.
• Sunset as Kerang is, therefore, 7:17 p.m. plus four minutes = 7:21 p.m.
Using the above calculations, hunting is permitted between 7:06 a.m. (30 minutes before sunrise) and 7:51 p.m. (30 minutes after sunset).
Remember... Hunting arrangements can be varied by the Minister in response to environmental conditions. Always check the GMA website for the latest arrangements.
Remember… Hunting laws for equipment can change from time to time. Refer to the GMA website for up-to-date information.

Chapter Nine / Page 134
■ Hunters may use lead shot while hunting Stubble Quail on the 16 State Game Reserves where Stubble Quail hunting is permitted. See the table on page 116.
■ The following non-toxic shot types are permitted for duck hunting in Victoria. • Bismuth-tin• Iron (steel)• Iron-tungsten• Iron-tungsten-nickel• Tungsten-bronze• Tungsten-iron-copper-nickel
• Tungsten-matrix• Tungsten-polymer• Tungsten-tin-iron• Tungsten-tin-bismuth• Tungsten-tin-iron-nickel• Tungsten-iron-polymer
Refer to Schedule 7 of the Wildlife (Game) Regulations 2012 for further details about the percentage composition by weight for each metal.
Other Duck Hunting Regulations ■ Once a game duck is downed, you must stop shooting and immediately
make all reasonable efforts to recover it. ■ Any injured game ducks must be killed immediately upon recovery. ■ You must not waste hunted game ducks. At least both breasts must be
recovered from harvested game ducks and retained until cooking or you have returned home.
■ As a legal requirement and to ensure ducks can be easily identified, a fully feathered wing must be left on all ducks taken. The feathered wing can be removed only immediately prior to cooking or after hunters have returned home. The practice of breasting ducks is acceptable, providing a fully feathered wing remains attached to the breast after it is removed from the carcass. If the breasts are removed separately, each breast must have a fully feathered wing attached.
■ High-grading your bag is illegal. This practice involves reaching your bag limit then discarding or giving away ducks in order to take more ducks than the set bag limit. Some may do this when they want to take a more preferred species or when they share their bag with someone else. You are only allowed to take the daily bag limit and no more.
Hunting Duck With Gundogs ■ Take time to train your dog. Many clubs can assist with this. ■ Gundogs may only be used in field trials conducted during the
open season by organisations approved by the GMA. ■ Outside the hunting seasons, dogs can be trained using a starter’s
pistol and shotguns with blank ammunition. ■ It is an offence to train dogs outside the hunting season while in
possession of live ammunition. ■ On State Game Reserves, gundogs can only be trained 48 hours before,
during, and 48 hours after a quail or duck season. Firearms cannot be used on a State Game Reserve for dog training.
Hunting Ducks on a State Game Reserve ■ If you are a licensed duck hunter, you may bring a gundog into a State
Game Reserve 48 hours before the first day of the open season and ending 48 hours after the last day of the open season.
Remember… Don’t use lead shot (toxic shot) to hunt ducks. Leave the lead shot at home.
Remember… A fully feathered wing must be left on all ducks taken. If the breasts are removed separately from the duck, a wing must be left attached to each breast.
downed bird A bird that has been brought down to the ground or water as a result of being shot or one that has been shot on the ground

Chapter Nine / Page 135
■ The gundog must be under your immediate control at all times. ■ Other dogs are not permitted in State Game Reserves, unless the dog is an
assistant dog or the dog is confined to a vehicle in transit.There are a number of regulations that apply to using blinds for duck hunting in State Game Reserves. Refer to ‘Rules for Blinds and Tree Stands’ on page 114 for further details.
Hunting Ducks on Creeks, Rivers, and Open Water ■ In waterways (e.g. rivers, creeks, and streams), you are allowed to
hunt ducks from a boat under power up to a speed of 5 knots. See the following illustration for other things you must consider when hunting on waterways.
■ In open water (e.g. lakes, dams, or swamps), you are not permitted to hunt ducks from a boat with the motor running whether in gear or not.
Public Safety on Wetlands Public safety laws are in place to provide a safe environment for duck hunters to undertake their legal recreation while allowing members of the community who disagree with duck hunting to express their views safely. There are a number of offences under the Wildlife Act 1975 that are designed to prevent potentially dangerous interactions between hunters and protesters on wetlands.The following restrictions apply to unauthorised people who enter and remain on specified hunting areas during the open season for ducks. Specified hunting areas are all State Game Reserves and hunting areas listed in Schedule 8 of the Wildlife (Game) Regulations 2012. An unauthorised person is someone who does not have a valid Game Licence endorsed for duck and a Firearm Licence.
■ It is an offence for an unauthorised person to enter or remain in a specified hunting area between the following hours: • From midnight of the first day of duck season until 10 a.m. of that day• From 2 hours before sunset of each day of duck season (including the
first day) until 10 a.m. of the following day
Remember… A 5-knot speed limit applies to hunting from a boat on creeks and rivers. Always wear a life jacket when underway, and have all safety equipment on board.
Remember… If you are found guilty of an offence against public safety laws, you will have a criminal record that could prevent overseas travel or getting a job.
Do nottrespass
Avoid firing on the water.
Beware of ricochet
5 knot speed limit applies to hunting from a boat.
Abide by all safety requirments,including wearing
life jackets when under way
Shoot down the length of the
waterway
Never shoot onto or across private, leased or licensed property without permission
Duck hunting on creeks and riversBeware of your surroundings
including boundaries, roadways, people, property and livestock

Chapter Nine / Page 136
• From 2 hours before sunset of the last day of the duck season until 30 minutes after sunset of that day
(Note: These restrictions only apply to the waterbody and extend out to 25 metres from the water’s edge.)
■ It is an offence for an unauthorised person to approach within 10 metres of a person who is carrying a firearm or actively hunting ducks in specified hunting areas during the duck season.
■ It is an offence for anyone to hinder, harass, interfere with, or obstruct a person engaged in hunting at any location and time.
Banning NoticesAuthorised Officers and the Victoria Police can issue a banning notice to a person whom they suspect on reasonable grounds is committing or has committed any of the above public safety offences. A banning notice prohibits the alleged offender from entering or remaining in a specified hunting area or areas for the period specified in the notice. The length of the banning notice is at the discretion of the Authorised Officer or police member. However, it cannot extend beyond the length of the duck season in which it was issued. It is an offence to contravene a banning notice. The penalty is a maximum of 20 penalty units for a first offence and a maximum of 60 penalty units for a second or subsequent offence.
Exclusion OrdersAn exclusion order is a court order that prohibits a person from entering any or all of the specified hunting areas for a period of up to 12 months. The courts can impose an exclusion order if a person is found guilty of commit-ting a specified offence (i.e. one of the three public safety laws). It is an offence to contravene an exclusion order. The penalty is a maximum of 60 penalty units for a first offence and up to 120 penalty units for a second or subsequent offence.
Lawful ProtestingThese offence provisions do not prevent people from protesting in a safe and lawful manner. At restricted times in specified hunting areas, people may protest as long as they remain at least 25 metres from the water’s edge. They may enter wetlands after restricted times have ceased, but still cannot hinder, harass, interfere with, or obstruct hunters at any time.
Stubble Quail Hunting Laws ■ The Stubble Quail is the most common native quail species in Australia
and is found in Queensland and much of south-eastern and south-western Australia, across a range of habitats. Stubble Quail can be hunted during the open season.
■ Generally, quail hunting occurs on privately owned stubble paddocks and grasslands. However, 16 State Game Reserves are open to Stubble Quail hunting. See page 116 for details of the SGRs where Stubble Quail hunting is permitted.
• Remain calm and polite, and do not engage in arguments—never lose your temper.
• Never touch a protester or use any physical force, and especially never threaten a protester with your firearm.
• Report hunter harassment to law enforcement authorities. To assist in investigations, record the location of the incident; the number of people involved; and details such as the clothing they are wearing, approximate age, complexion, hair length and colour, and any other distinguishing features. If possible, record the vehicle number plate, make, model, colour, and any distinguishing features.
How to Behave if Confronted by Protesters

Chapter Nine / Page 137
Remember… Only approved purebred gundogs may be used to hunt ducks and Stubble Quail.
Stubble Quail Season and Bag Limits ■ Stubble Quail hunting season begins on the first Saturday in April and
ends 30 June, inclusive. ■ The bag limit is a maximum of 20 birds per day.
Equipment Requirements for Stubble Quail Hunting ■ Hunters are permitted to use shotguns no greater than 12 gauge to hunt
Stubble Quail.
■ Lead shot can be used to hunt Stubble Quail.
Other Stubble Quail Hunting Regulations ■ It is important that hunters can readily distinguish between Stubble
Quail and protected species while hunting. (See Chapter Ten for more information.)
■ Once a Stubble Quail is downed, you must stop shooting and immedi-ately make all reasonable efforts to recover it.
■ At least both breasts must be recovered from harvested quail and retained until cooked or the hunter has reached their place of residence.
■ There is no restriction on the number of gundogs that can be used when hunting Stubble Quail.
Introduced Game Birds ■ Introduced game birds are generally only hunted on licensed game bird
farms on private property. ■ Introduced game birds cannot be bred or brought and released for
hunting on public land. These birds can be released on private land, but only if the owners have a Game Bird Farmer Licence. Anyone caught releasing game birds without a licence can face significant penalties and prosecution.
Introduced Game Birds Season and Bag Limits ■ Introduced Californian, European, and Japanese Quail, as well as
pheasants and partridges, may be hunted throughout the year. ■ There are no bag limits for introduced game birds.
Equipment Requirements for Introduced Game Birds Hunting ■ Hunters may only use shotguns that do not exceed 12 gauge. ■ Lead shot may be used.
Other Introduced Game Birds Hunting Regulations ■ There is no restriction on the number of gundogs that can be used when
hunting introduced game birds. ■ When hunting introduced game birds, it is an offence to propel birds and
simulate flight either by mechanical means or by hand. This is consid-ered to be ‘trap’ shooting and is illegal. Substantial fines or imprisonment may apply.
■ Once a game bird is downed you must stop shooting and immediately make all reasonable efforts to recover it.
■ At least both breasts must be recovered from harvested game birds and retained until cooked or the hunter has reached their place of residence.

Chapter Ten / Page 138
In Victoria, all wildlife (including all ducks and quail; all six species of game deer; and all species of introduced pheasant, partridge, and quail) are protected and cannot be hunted, taken, or destroyed, unless by people authorised to do so. Wildlife that has been declared as ‘game’ can only be hunted during declared open seasons, using prescribed methods by holders of a Game Licence. Developing skills for recognising game and non-game animals is a basic requirement for hunters. Knowing the key characteristics of animals will help you distinguish between similar species and between the male and female of the same species. Mistakes in identification can lead to illegal harvest of game or non-game animals. To identify game properly, you must learn to recognise key characteristics of the animal you’re hunting. Understanding where they live, what they eat, and their life cycles will not only help in identifying game and non-game species, but will also make you a better hunter.Identifying animals accurately is a skill that improves with experience. It can be difficult, especially when you must observe quickly or when the differences between animals are subtle. Remember, if you’re NOT SURE, DON’T SHOOT.
Game AnimalsDeer
Chital Deer (Axis axis )
ColourChital Deer are typically brown with white spots, dorsal black stripe, and greyish-white throat patch. Fawns are born with adult colouration.AntlersThe antlers are typically six-tined. They may reach over 76 centimetres (30 inches) in length. The antlers are cast throughout the year with a peak around August to October. The peak velvet period is October to February. Occasionally older stags do not cast their antlers yearly.BreedingChital Deer breed throughout the year with a peak in December to February.BirthingChital Deer give birth throughout the year with a peak in August to October. They typically give birth to one calf, but occasionally can have twins.
Recognising Game and Non-Game Species
Stag (male)
Average Weight: 100 kg
Average Shoulder Height: 90 cm
Hind (female)
Average Weight: 50 kg
Average Shoulder Height: 75 cm
Chapter Ten / Page 139
DietThey are predominantly grazers, feeding on grasses, forbs, leaves, twigs, and young shoots of trees and shrubs. They rarely eat fruits and fungi.DistributionWild, self-sustaining breeding populations are not confirmed in Victoria. HabitatChital Deer can live in a wide range of habitats, from grasslands to dry sclerophyll forest, woodland, and tall shrubland. They are usually present in areas with a mosaic of habitats.Useful Hunting Information
■ They are medium-sized deer and usually found in small to large herds of mixed sex and age groups. It is common to see stags at various stages of antler development with the hinds and calves. Stags in hard antler usually mate with the hinds. However, velvet stags are fertile and will mate if opportunity arises.
■ Chital Deer are usually active during the day, feeding mainly in the early morning and evening. Under hunting pressure, they become nocturnal, feeding at night and bedding in dense shady cover during the day. Chital Deer require easy access to water, particularly during hot periods.
■ Chital Deer are particularly sensitive to scent and movement, departing rapidly when disturbed. Because fawns are usually present in the herds, hinds are continuously scanning for danger. As a result, stalking herds in open country is particularly challenging.
■ Chital Deer are highly vocal, communicating through a variety of barks, chirps, and whistles. During the rut, stags bellow and make occasional grunting sounds.
■ One successful Chital Deer hunting method is slowly stalking into the wind, utilising available cover and keeping movement to a minimum. Another method is still hunting at feeding, watering, and transit areas.

Chapter Ten / Page 140
Fallow Deer (Dama dama )
ColourFallow Deer have significant variation in colour. The most common colour varieties are red, black, white, and menil. Fawns are spotted at birth. Adults can be uniform in colour, or have a spotted appearance.AntlersThe antlers are typically palmated with multiple points. They may reach over 70 centimetres (27 inches) in length. The antlers are cast around September to October. The velvet period is October to February.BreedingThe rutting period is from mid-March to its peak in April.BirthingThey have a defined birthing period from November to January. Fallow does typically give birth to one fawn. Twin births are uncommon.DietFallow Deer are predominantly grazers, feeding on grasses, forbs, twigs, and young shoots of trees and shrubs. They occasionally eat fruits and fungi.DistributionThese deer are widely distributed throughout Victoria. In the west, Fallow Deer range from the South Australian border to the Grampians and Mount Macedon in the east. Large numbers are found in the foothills of the Victorian Alps. Small isolated popu-lations are found in many other locations.HabitatFallow Deer live in a wide range of habitats from open grass-lands to dry sclerophyll forest, open woodland, and forestry plantations. They are usually present in areas with a mosaic of habitats, but occasionally they can be found on open agricultural land. Farm fringe country supports relatively high densities of Fallow Deer.
n Populations present
Doe (female)
Average Weight: 40 kg
Average Shoulder Height: 80 cm
Buck (male)
Average Weight: 90 kg
Average Shoulder Height: 95 cm

Chapter Ten / Page 141
Useful Hunting Information ■ They are a medium-sized deer, usually found in small to large herds. Mature bucks live separately from does and
young for much of the year. During the rut, dominant bucks hold a rutting stand, where they defend groups of does against other bucks.
■ Fallow Deer are usually active during the day, feeding mainly in the early morning and evening. Under hunting pressure, they become nocturnal, feeding at night and bedding in close cover during the day.
■ Fallow Deer have good hearing and sense of smell. They also have very good vision, picking up movement from great distances. When disturbed, they often depart with a characteristic bouncing gait.
■ The presence and activity of bucks can be assessed by monitoring rub trees and scrapes. Fallow bucks roll in urine-soaked scrapes and scent-mark the scrape’s surroundings.
■ Fallow Deer are very vocal. They communicate through barks, bleating, and mewing sounds. During the rut, bucks grunt and make a distinctive croaking sound.
■ A successful Fallow Deer hunting method is slowly stalking into the wind, utilising available cover and keeping movement to a minimum. Another method is still hunting at feeding and transit areas. During the rut, antler rattling and various calls can be used to entice bucks to croak and reveal their locations.

Chapter Ten / Page 142
Hog Deer (Axis porcinus)
ColourAdults are brownish-straw coloured with a cream underside and may have pale cream spots in summer. Occasionally a dorsal dark stripe is present in some adults. Calves are spotted at birth.AntlersThe antlers are typically six-tined. They may reach over 40 centimetres (16 inches) in length. The antlers are cast throughout the year with a peak in September to October. The peak velvet period is October to February.BreedingHog Deer breed throughout the year with a peak in late spring and early summer.BirthingThey give birth throughout the year with a peak in late winter and early spring. They typically have one calf. Twins are uncommon.DietHog Deer are predominantly grazers, feeding on grasses, forbs, leaves, twigs, and young shoots of trees and shrubs. They occasionally eat fruits and fungi.DistributionHog Deer are predominantly found in coastal and lowland Gippsland. The animals are distributed in small isolated populations occurring along the southeastern coast of Victoria, from Cape Liptrap in the west to Orbost in the east.HabitatThey live in coastal shrublands and tea-tree swamps. Freshwater marsh and wet grasslands provide the most favoured and important habitat types available. Farm fringe country often supports high densities.
n Populations present
Stag (male)
Average Weight: 50 kg
Average Shoulder Height: 70 cm
Hind (female)
Average Weight: 32 kg
Average Shoulder Height: 55 cm

Chapter Ten / Page 143
Hog Deer (Axis porcinus)
ColourAdults are brownish-straw coloured with a cream underside and may have pale cream spots in summer. Occasionally a dorsal dark stripe is present in some adults. Calves are spotted at birth.AntlersThe antlers are typically six-tined. They may reach over 40 centimetres (16 inches) in length. The antlers are cast throughout the year with a peak in September to October. The peak velvet period is October to February.BreedingHog Deer breed throughout the year with a peak in late spring and early summer.BirthingThey give birth throughout the year with a peak in late winter and early spring. They typically have one calf. Twins are uncommon.DietHog Deer are predominantly grazers, feeding on grasses, forbs, leaves, twigs, and young shoots of trees and shrubs. They occasionally eat fruits and fungi.DistributionHog Deer are predominantly found in coastal and lowland Gippsland. The animals are distributed in small isolated populations occurring along the southeastern coast of Victoria, from Cape Liptrap in the west to Orbost in the east.HabitatThey live in coastal shrublands and tea-tree swamps. Freshwater marsh and wet grasslands provide the most favoured and important habitat types available. Farm fringe country often supports high densities.
n Populations present
Useful Hunting Information ■ Hog Deer are often found in groups and are mainly active during evenings and throughout the night. They are
highly sensitive to human scent and become entirely nocturnal under hunting pressure. Hog Deer prefer to drink from clean freshwater sources, avoiding brackish and stagnant water. Farm fringe country that has abundant cover for bedding during the day and easy access to improved pasture and crops for feeding at night can support high densities.
■ Hog Deer make a whistling sound or a warning ‘chirp’ when they are alarmed. Hog Deer hold their heads low when they run so that they can duck under obstructions instead of leaping over them.
■ Where Hog Deer are present on farm fringe country, they will dig or push through fences rather than jumping over them. These fence holes are called ‘pop holes’ and are often used by hunters to monitor deer presence and activity.
■ Hunting methods that specifically reduce the scent of a hunter are most effective. The most successful methods are from elevated stands that overlook watering points, game trails, or feeding areas. Preseason scouting and the use of trail cameras can improve hunter success.

Chapter Ten / Page 144
Red Deer (Cervus elaphus )
ColourAdults are reddish-brown in summer and greyish-brown in winter with a distinct creamy or straw-coloured rump patch. Calves are spotted at birth.AntlersThe antlers are typically multi-tined. They may reach over 100 centimetres (40 inches) in length. The antlers are cast around September to October. The velvet period is October to February.BreedingThe rutting period is from mid-March to its peak in April.BirthingRed Deer have a defined birthing period in November to December. They typically have one calf. Twins are uncommon.DietThey are predominantly grazers, feeding on grasses, forbs, leaves, twigs, and young shoots of trees and shrubs. They occasionally eat fruits and fungi.DistributionRed Deer are distributed mainly in and around the Grampians. Small populations are present in the Yarra Valley, Barmah, Mansfield area, and around Bunyip. Small, isolated populations are found in many other locations.HabitatRed Deer live in a wide range of habitats from scrubland to dry sclerophyll forest and subalpine woodlands. Red Deer are well-adapted to open forest, but occasionally can be found in heavy cover. Farm fringe country supports relatively high densities of Red Deer.
n Populations present
Hind (female)
Average Weight: 95 kg
Average Shoulder Height: 90 cm
Stag (male)
Average Weight: 160 kg
Average Shoulder Height: 120 cm

Chapter Ten / Page 145
Red Deer (Cervus elaphus )
ColourAdults are reddish-brown in summer and greyish-brown in winter with a distinct creamy or straw-coloured rump patch. Calves are spotted at birth.AntlersThe antlers are typically multi-tined. They may reach over 100 centimetres (40 inches) in length. The antlers are cast around September to October. The velvet period is October to February.BreedingThe rutting period is from mid-March to its peak in April.BirthingRed Deer have a defined birthing period in November to December. They typically have one calf. Twins are uncommon.DietThey are predominantly grazers, feeding on grasses, forbs, leaves, twigs, and young shoots of trees and shrubs. They occasionally eat fruits and fungi.DistributionRed Deer are distributed mainly in and around the Grampians. Small populations are present in the Yarra Valley, Barmah, Mansfield area, and around Bunyip. Small, isolated populations are found in many other locations.HabitatRed Deer live in a wide range of habitats from scrubland to dry sclerophyll forest and subalpine woodlands. Red Deer are well-adapted to open forest, but occasionally can be found in heavy cover. Farm fringe country supports relatively high densities of Red Deer.
n Populations present
Useful Hunting Information ■ Red Deer are large deer, usually found in small to large herds. Mature stags live separately from hinds and young
for much of the year. During the rut, dominant stags hold a harem of hinds. ■ Red Deer are usually active during the day, feeding mainly in the early morning and evening. Under hunting
pressure, they become nocturnal, feeding at night and bedding in close cover during the day. Red Deer require easy access to water, particularly during hot periods.
■ Red Deer are particularly sensitive to scent and movement, departing rapidly when disturbed. ■ Red Deer, particularly stags, like to wallow, and it is common to see animals coated in mud. The presence and
activity of stags can be assessed by monitoring rub trees, scrapes, and wallows. During the rut, stags are highly vocal. Their grunts and roars can be heard over long distances.
■ The most successful Red Deer hunting methods are stalking with or without dogs (gundogs or deer hunting dogs) or still hunting at feeding and transit areas. To help locate or call in stags during the rut, various calls can be used, particularly calls that imitate the stag’s roar. Stags that do not hold a harem tend to call back and often come in to the call. Stags holding a harem will be reluctant to come to the call but will usually call back, revealing their locations.

Chapter Ten / Page 146
Rusa Deer (Rusa timorensis )
ColourAdults are uniform greyish-brown with cream underparts. Calves are usually born with adult colouration.AntlersThe antlers are typically six-tined. They may reach over 90 centimetres (35 inches) in length. The antlers are cast around January to March. The velvet period is March to July.BreedingRusa Deer have a seasonal rut with a peak from July to September.BirthingMost calves are born from March to May. Rusa Deer typically have one calf. Twins are uncommon.DietRusa Deer are predominantly grazers, feeding on grasses, forbs, leaves, twigs, and young shoots of trees and shrubs. They occasionally eat fruits and fungi.DistributionWild, self-sustaining breeding populations are not confirmed in Victoria.HabitatRusa Deer live in a wide range of habitats from grassland to dry sclerophyll forest, woodland, tall shrubland, and marshes. They are usually present in areas with a mosaic of habitats.
Hind (female)
Average Weight: 90 kg
Average Shoulder Height: 95 cm
Stag (male)
Average Weight: 140 kg
Average Shoulder Height: 110 cm

Chapter Ten / Page 147
Useful Hunting Information ■ Rusa Deer are large deer, usually found in small to large herds. Mature stags live separately from hinds and young
for much of the year. During the rut, dominant stags hold a harem of hinds. ■ Rusa Deer are usually active during the day, feeding mainly in the early morning and evening. Under hunting
pressure, they become nocturnal, feeding at night and bedding in close cover during the day. ■ Rusa Deer, particularly stags, like to wallow, and it is common to see animals coated in mud. The presence and
activity of stags can be assessed by monitoring rub trees, scrapes, and wallows. ■ During the rut, Rusa stags aggressively break and entangle vegetation in their antlers. ■ Rusa Deer are vocal, communicating through barks, short husky sounds, and the shrill roar of stags in rut. ■ One successful Rusa Deer hunting method is slowly stalking into the wind, utilising available cover, and keeping
movement to a minimum. Another method is still hunting at feeding and transit areas.
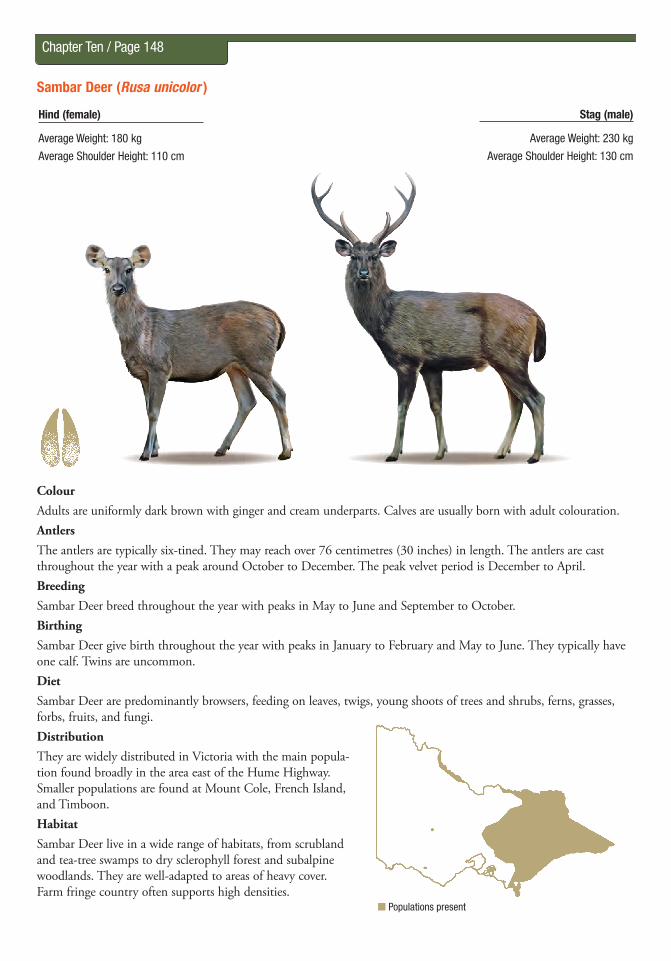
Chapter Ten / Page 148
Sambar Deer (Rusa unicolor )
ColourAdults are uniformly dark brown with ginger and cream underparts. Calves are usually born with adult colouration.AntlersThe antlers are typically six-tined. They may reach over 76 centimetres (30 inches) in length. The antlers are cast throughout the year with a peak around October to December. The peak velvet period is December to April.BreedingSambar Deer breed throughout the year with peaks in May to June and September to October.BirthingSambar Deer give birth throughout the year with peaks in January to February and May to June. They typically have one calf. Twins are uncommon.DietSambar Deer are predominantly browsers, feeding on leaves, twigs, young shoots of trees and shrubs, ferns, grasses, forbs, fruits, and fungi.DistributionThey are widely distributed in Victoria with the main popula-tion found broadly in the area east of the Hume Highway. Smaller populations are found at Mount Cole, French Island, and Timboon.HabitatSambar Deer live in a wide range of habitats, from scrubland and tea-tree swamps to dry sclerophyll forest and subalpine woodlands. They are well-adapted to areas of heavy cover. Farm fringe country often supports high densities.
Hind (female)
Average Weight: 180 kg
Average Shoulder Height: 110 cm
Stag (male)
Average Weight: 230 kg
Average Shoulder Height: 130 cm
n Populations present

Chapter Ten / Page 149
Useful Hunting Information ■ Sambar Deer are usually solitary, but small groups are common. They feed mainly in the evening and throughout
the night. During the day, Sambar Deer bed in secure areas some distance away from where they feed. These bedding areas are usually found three-quarters of the way up the slope or at gully heads, have good cover and escape routes, and are positioned to take advantage of prevailing winds. After cold frosty nights, Sambar Deer often bed in sunny spots on east-facing slopes. On windy days, they prefer sheltered areas that are relatively quiet.
■ Sambar Deer, particularly stags, like to wallow, and it is common to see animals coated in mud. ■ When disturbed, Sambar Deer may remain motionless, unlike other deer that depart rapidly, and occasionally emit
a loud honking sound. It is common for disturbed Sambar Deer to run a short distance and stop to look back, or they may circle downwind to try to identify the disturbance by smell.
■ The presence and activity of stags can be assessed by monitoring rub trees, scrapes, preaching trees, and wallows. ■ The most successful Sambar Deer hunting methods are stalking with or without dogs (gundogs or deer hunting
dogs) or hunting with hounds. Hunting techniques that reduce the scent and noise of a hunter are most effective, particularly when stalking. Quality binoculars should be used often to scan surroundings for concealed Sambar Deer.

Chapter Ten / Page 150
Game Birds
Australian Wood Duck (Chenonetta jubata )
VoiceAustralian Wood Ducks have a drawn-out, nasal mew. The call of the male is higher in pitch and shorter than that of the female. When birds gather to roost, they utter a rapid cluck as a greeting.Colour The head and neck of the adult male is mostly dark brown with a row of elongated black feathers running down the back of the neck. Its body feathers typically have broad black margins. The adult male’s upper wing feathers are darker grey compared to the light grey-brown of the female. The upper breast of the male is grey-mottled black-and-white with the lower breast and flanks grey with fine back barring. The female’s upper and lower breast plumage is white, mottled light brown. The female has a light brown head with white bars through and below the eye. Back, rump, and tail are black.BreedingIn seasons with average rainfall, the breeding period is in the spring. When rainfall is sporadic, breeding occurs after heavy rain. Australian Wood Ducks nest in hollow trees near water but often can be found far from it. Wood Ducks can lay 6–12 eggs. The incubation period is 28 days. Both the female and male care for young when they hatch.DietAustralian Wood Ducks are grazers and feed on young green grass and herbage, including water couch, summer grass, couch, ryegrass, clover, and sedges. They also feed on agricultural crops, such as improved pastures, wheat, lucerne, and rice, where they can cause considerable damage.DistributionAustralian Wood Ducks are generally found across Australia, including Tasmania. HabitatThe Wood Duck is widely distributed and is common throughout Australia. However, it is rare and considered to be a vagrant in tropical Australia. Wood Duck prefer lightly timbered country near water, be it swamps, dams, rivers, or other waterways, where there is access to short grass or herbage where they can graze. Useful Hunting InformationAustralian Wood Ducks are shy and wary birds, often present and hunted successfully on farm dams. They ‘camp’ as a group of 20–50 birds. Following breeding, flocks of up to 2,000 birds are regular. Wood Ducks are very predictable in their movements. They leave for feeding grounds at dusk, come back to roost at camp in early morning, and spend the day roosting quietly. Wood Ducks let out mournful calls as they fly low through trees or along the riverbank, so you can often hear them before you see them.
Male
Average Length: 48 cm
Female
Average Length: 48 cm
n Populations present
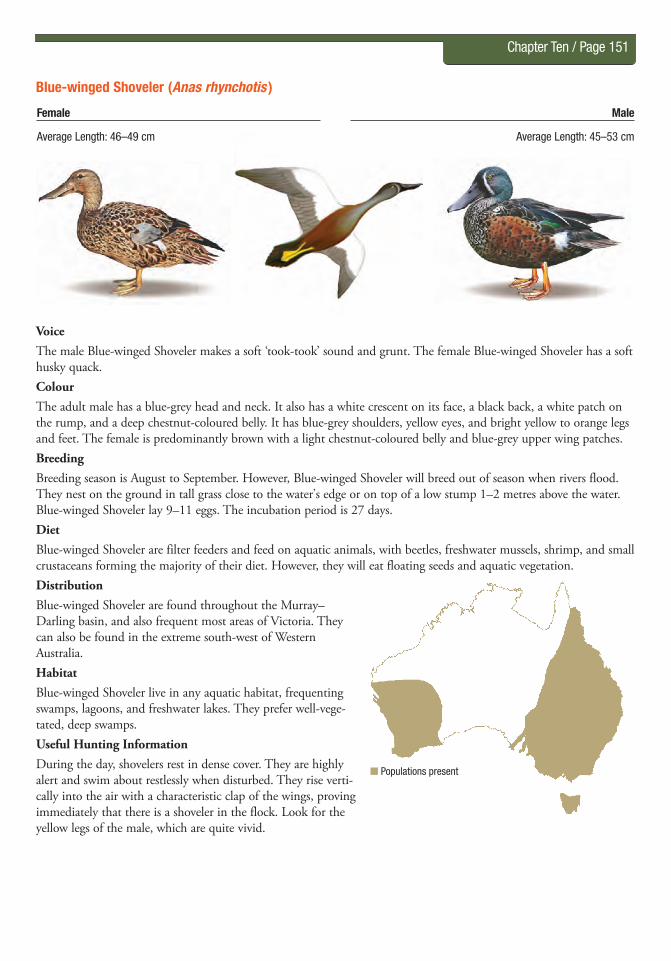
Chapter Ten / Page 151
Blue-winged Shoveler (Anas rhynchotis )
Voice The male Blue-winged Shoveler makes a soft ‘took-took’ sound and grunt. The female Blue-winged Shoveler has a soft husky quack.Colour The adult male has a blue-grey head and neck. It also has a white crescent on its face, a black back, a white patch on the rump, and a deep chestnut-coloured belly. It has blue-grey shoulders, yellow eyes, and bright yellow to orange legs and feet. The female is predominantly brown with a light chestnut-coloured belly and blue-grey upper wing patches. BreedingBreeding season is August to September. However, Blue-winged Shoveler will breed out of season when rivers flood. They nest on the ground in tall grass close to the water’s edge or on top of a low stump 1–2 metres above the water. Blue-winged Shoveler lay 9–11 eggs. The incubation period is 27 days.DietBlue-winged Shoveler are filter feeders and feed on aquatic animals, with beetles, freshwater mussels, shrimp, and small crustaceans forming the majority of their diet. However, they will eat floating seeds and aquatic vegetation.DistributionBlue-winged Shoveler are found throughout the Murray–Darling basin, and also frequent most areas of Victoria. They can also be found in the extreme south-west of Western Australia.HabitatBlue-winged Shoveler live in any aquatic habitat, frequenting swamps, lagoons, and freshwater lakes. They prefer well-vege-tated, deep swamps.Useful Hunting InformationDuring the day, shovelers rest in dense cover. They are highly alert and swim about restlessly when disturbed. They rise verti-cally into the air with a characteristic clap of the wings, proving immediately that there is a shoveler in the flock. Look for the yellow legs of the male, which are quite vivid.
Male
Average Length: 45–53 cm
Female
Average Length: 46–49 cm
n Populations present

Chapter Ten / Page 152
Chestnut Teal (Anas castanea)
VoiceThe female Chestnut Teal has a loud, penetrating, rapid quack of about eight syllables. The male Chestnut Teal utters a muted single peep that is similar to the Grey Teal.Colour The male Chestnut Teal is distinguished by its iridescent green head, white patch on the flank and the lower neck, and breast and abdomen of a rich chestnut. Each feather has an obvious dark-brown blotch. The female Chestnut Teal has plumage similar to the adult female Grey Teal. However, the crown and back of the neck are generally darker. There is an obvious dark patch under the throat, joining the V in the bill that distinguishes the female Chestnut Teal from the Grey Teal.BreedingThe breeding season is July to December. Most clutches are started by October. Chestnut Teal nest in a ground scrape in long grass or in tree hollows close to the water’s edge. They lay 7–15 eggs. The incubation period is 27 days.DietChestnut Teal is a dabbling duck that feeds on aquatic grasses, seeds, and insects. DistributionThese ducks are found in south-eastern Queensland to Victoria, southern South Australia, and south-western Western Australia.HabitatChestnut Teal commonly live in brackish coastal lagoons, saltwater estuaries, and the lower reaches of creeks. They are also found in inland swamps and lakes in years of flood.Useful Hunting InformationWhen not in large mixed flocks with Grey Teal, Chestnut Teal gather in small groups along saline estuaries. If you are targeting these ducks, ensure that you focus on coastal or near-coastal districts. They are generally sedentary but move locally in response to changing water conditions and food supplies.
Male
`Average Length: 41–48 cm
Female
Average Length: 38–46 cm
n Populations present

Chapter Ten / Page 153
Grey Teal (Anas gracilis)
VoiceThe female Grey Teal has a loud, penetrating, ‘laughing’ call that repeats rapidly 15 or more times, with the pitch falling successively. The male Grey Teal has a muted single peep that is similar to the Chestnut Teal.Colour Female and male Grey Teal have similar colouration. The feathers are dark brown with paler edges. The rumps and tails are dark brown. The upper wing patches are glossy black with a blue or green sheen. The upper wing also has a distinctive white triangle patch that is visible in flight. On the water, the Grey Teal is a small duck that floats high. The sides of the head, throat, and chin are pale yellow to almost white. Both sexes have bright red eyes, and their bill and legs are grey.BreedingThese ducks can breed at any time of the year as long as water levels are suitable and food is available. Typically the regular breeding season is spring. They lay 4–14 eggs on bare wood in tree hollows or on the ground covered with downy feathers. The incubation period is 24–26 days.DietGrey Teal is a dabbling duck that feeds on aquatic plants, sedges, seeds, grasses, and insects, such as beetles and larvae. They also feed on shrimp and extremely small crustaceans.DistributionFound throughout Australia, these ducks are highly nomadic and will move in response to local conditions. The greatest numbers of Grey Teal are found in the streams, open marshes, and billabongs of the Murray–Darling Basin.HabitatGrey Teal can be found across a range of habitat types, from irrigation country to open marshland to heavily timbered red gum swamps. Grey Teal frequent creeks, rivers, marshes, and billabongs, both inland and near the coast.Useful Hunting InformationThese ducks will decoy readily when the female call is mimicked. Provide open areas of water in your decoy spread, providing opportunity for birds to pitch in.
Male and Female
Average Length: Male, 40.5–47.5 cm; Female, 37–44 cm
n Populations present

Chapter Ten / Page 154
Hardhead (Aythya australis)
VoiceHardhead Ducks are usually silent. However, the female Hardhead has a soft, harsh croak; and the male has a soft, wheezy whistle. Colour The male Hardhead is distinguished by its white eyes. The adult female has similar plumage to the adult male. However, the white patch below the female breast is not as distinct. In general, these ducks are a medium-sized bird with rich chocolate plumage. The lower breast is white, and the upper wings have a white bar on the trailing edge with brown tips. These features are distinguishable in flight.BreedingBreeding season occurs in wet months, especially when flooding is extensive, and generally in spring. Hardhead nest in a cup of neatly woven reeds, sedges, and sticks. The nests are built in dense reeds, tea tree, lignum, or cumbungi above water about 1 metre deep. The ducks lay 6–18 eggs, usually 12. The incubation period is about 25 days.DietHardhead are diving ducks and mainly eat emergent plants and grasses, such as millet and water couch. They also feed on submerged plants, such as milfoil; aquatic insects, such as beetles and backswimmers; molluscs; shrimp; yabbies; and small fish. DistributionThese ducks are widely distributed throughout Australia; however, the stronghold of the species is in the deeper, permanent freshwater swamps and lagoons of the Murray–Darling Basin and south-east South Australia. They are thought to be more sedentary than Grey Teal but more mobile than Black Ducks. HabitatThese ducks have a strong preference for still areas of deep water with emergent plants, particularly cumbungi and lignum. However, they are equally at home in deep-running turbid waters where flooding inland rivers flow through lignum creeks and channels.Useful Hunting InformationListen for a whirring wingbeat which signals a fast-approaching Hardhead. In flight, the Hardhead has a large white band across the belly, the underwing is translucent white, and the upperwing has a white strip on the trailing edge. Hardhead fly fast, deliberately, and directly. This makes them very difficult to call and decoy. They take off from a running start similar to the Freckled Duck, and confusing the two species is possible. Target deep waters with fresh inflows.
Male
Average Length: 42–54.5 cm
Female
Average Length: 41.5–49 cm
n Populations present

Chapter Ten / Page 155
Mountain Duck (Tadorna tadornoides)
Voice Mountain Ducks make a loud recurring honk. The pitch is much higher in females than in males. Colour The male’s head and upper neck are black-brown, with traces of iridescent green and a white ring around the neck. In addition, the female and immature birds have a white ring around the eye and a white ring around the base of the bill. On both sexes, the upper wing feathers are white and form conspicuous white shoulders visible in flight. The underwing is also white. The duck’s breast is cinnamon brown.BreedingThe breeding season is from June to October, mostly July to August. Mountain Ducks usually nest in a hollow limb of a tall tree about 2–20 metres above ground. Females lay 5–14 eggs. The incubation period is 30–35 days. As with other species of shelduck, the Mountain Duck’s pair bond is long—probably for life.DietMountain Ducks are grazers of green plant material on land and in shallow water. Their diets include grasses, clovers, duckweed, sedges, pondweed, ribbon weed, and algae. Insects and small molluscs are also part of their diets. They can cause serious damage to vegetable, legume, and cereal crops.DistributionMountain Ducks are distributed in south-western and south-eastern Australia, on offshore islands and in small numbers throughout the Wheatbelt. In south-eastern Australia, the main populations are in Tasmania, south-east of South Australia, western Victoria, and the southern tablelands of New South Wales.HabitatThe preferred habitats are large brackish lakes of coastal regions, deep freshwater lakes, and large lagoons and billabongs. Mountain Ducks also frequent open paddocks of agricultural land with improved pasture, cereal, and legume crops. Useful Hunting InformationMountain Ducks are alert and wary, and when disturbed, they quickly leave the area. Flightpaths and movements are regular. Study their behaviours and hunt areas where they frequent. They are often found feeding in farm paddocks. The use of layout blinds, large groups of silhouette decoys, and callers will prove effective.
Male
Average Length: 59–72 cm
Female
Average Length: 55.5–67.5 cm
n Populations present

Chapter Ten / Page 156
Pacific Black Duck (Anas superciliosa )
VoiceThe Pacific Black Duck female has a loud raucous quack repeated four to six times, while the male has a soft, wheezy whistle. Both sexes have a drawn-out quack of one or two syllables.Colour Both sexes are similar in appearance. The top of the Pacific Black Duck’s head is black to dark brown. The back of the neck is dark brown. The body feathers are brown and edged with a cream to light-brown colour. A distinctive dark line goes from the bill to the eyes, with a pale yellow colour above and below the eyes. In flight, the Black Duck is a dark bird with swift wingbeats and a slender neck. The upper wing has no white but does have an iridescent green wing patch. The underwings are white to cream in colour. BreedingBreeding season occurs when water height is at its highest and aquatic plants are fully grown. Pacific Black Ducks generally breed from July to December and will breed following flooding events year-round. They nest in scapes in the ground, reeds, or tree hollows. They lay 7–14 eggs. The incubation period is from 26 to 30 days. DietPacific Black Ducks are typically surface-feeding dabbling ducks. They feed on emergent plants, seeds, grass, herbage, and aquatic plants and animals. They will feed on cultivated grains, such as wheat and rice.DistributionThese ducks are common and widely distributed throughout Australia, but are seldom found in inland deserts. HabitatPacific Black Ducks can be found near fresh, brackish, and sometimes salt water, but they prefer deep freshwater swamps. They also frequent rivers and creeks. Useful Hunting InformationThese ducks are inquisitive and social. They call loudly to pairs or single birds from a distance and pause when birds come looking. Early season birds will decoy readily; however, you should use plenty of decoys. Late season birds will be wary, and usually, fewer decoys will yield more success. Set decoys in sheltered bays when hunting near lakes and swamps. Use decoys on bends or runoffs when hunting near rivers and creeks. Use single periodic quacks from your caller to attract wary birds. Make sure you positively identify the birds you are hunting because in some light conditions, the Freckled Duck can be mistaken for the Black Duck.
Male and Female
Average Length: Male, 50.5–61 cm; Female, 47–58.5 cm
n Populations present

Chapter Ten / Page 157
Pink-eared Duck (Malacorhynchus membranaceus )
VoiceThe Pink-eared Duck makes a musical chirrup or whistling sound when in flight. While on the water, it makes a continuous trill.Colour Both male and female Pink-eared Ducks have similar colouration. The tops of the duck’s head, neck, and back are brown. The side of the head is white with fine light bars and an obvious brown patch surrounding the eyes. Behind the eyes is a small pink patch. The breast and flank plumage is white with brown-striped barring. The rump and upper trailing edges of the wing feathers are white.BreedingPink-eared Ducks breed at any time of the year, provided floodwaters are high enough. They nest in a rounded mound of grey down placed on logs, limbs, or brushes a few centimetres to 10 metres above the water. They usually lay 6 or 7 eggs. The incubation period is 26 to 27 days.DietAbout 94% of the Pink-eared Duck’s diet is small, microscopic food, including insects, water fleas, and small crusta-ceans. The remainder of its diet is freshwater algae and seeds of clovers and grasses.DistributionThese ducks are nomadic and move over the whole continent. They are more common in floodwaters, though they can exist in any freshwater or brackish habitat.HabitatPink-eared Ducks are most commonly found in floodwaters of the Murray–Darling Basin. However, they occupy any inland flooded waterway. They prefer large shallow lakes and marshes. Useful Hunting InformationThese ducks often occur in large numbers with Grey Teal. They fly in dense flocks and decoy readily. Listen for continuous chir-ruping. You often hear Pink-eared Ducks before you see them.
Male and Female
Average Length: Male, 42 cm; Female, 39 cm
n Populations present

Chapter Ten / Page 158
Stubble Quail (Coturnix pectoralis)
VoiceStubble Quail make a three-syllable clear whistle that sounds like ‘cuck-ee-whit’ or ‘clear-too-weep’.Colour The upper parts of both sexes are generally dark brown with pale buff markings. There are also cream stripes in the middle of each feather. The head is generally dark brown-black with a white line down the centre of the head, running down the back of the neck. A white line above the eye extends to the back of the neck. The male’s throat and sides of the face are light to deep chestnut, while the female has a pale cream face. The male has a black patch on the chest with a pale cream breast and belly. The eyes are red-brown.BreedingStubble Quail breed mainly around October to February. However, they can breed following rain events if food is plentiful. DietStubble Quail eat mainly seeds of weeds, native grasses, clovers, saltbush berries, pasture plants, and waste grain from stubble fields. Also they eat some insects, caterpillars, and larvae.DistributionStubble Quail can be found in open country throughout the Southern Wheatbelt, Victoria’s Wimmera–Mallee, and central and south-west down to parts of Gippsland. They also can be found throughout the Riverina and Channel country of the Murray–Darling Basin and in south-east South Australia. The birds are highly nomadic and can appear at times in the Northern Territory and elsewhere beyond their normal ranges.HabitatThese quail live generally in the open country of agricultural land, including cereal stubble, millet stubble, lucerne and clovers, road verges, and native grassland. They avoid forest and open woodland.Tips on Identifying Stubble QuailUnlike other native quail species, Stubble Quail never glide whilst in flight. Instead, they make a loud ‘whirr’ when flushed, fly with fast wingbeats, and drop tail-down into cover. They may fly up to 500 metres before landing. Stubble Quail are generally found in singles or in pairs, sometimes in small groups. They prefer open grassland, cereal crops, stubble, and lucerne; they are often found along the weedy margins of irrigation channels. They are a large, plump bird in comparison to other quail species. Stubble Quail never vocalise when flushed. Pay particular attention to flight characteristics, the habitat you are hunting, and the social organisation of Stubble Quail. Remember, if you are NOT SURE, DON’T SHOOT. See table on page 169.Useful Hunting InformationThe use of a fit pointer, setter, or retrieving dog will greatly enhance your chances of finding birds. Watch your dog. It will signal when it gets the scent. Make the most of your first chance because the birds are difficult to flush a second time. Early, cool, and dewy mornings are best suited for your dog to pick up the scent and will ensure your dog doesn’t overheat.
Male
Average Length: 16–20 cm
Female
Average Length: 17–20 cm
n Populations present

Chapter Ten / Page 159
Introduced Game Birds
California Quail (Callipepla californica )
Voice California Quail have up to 14 different calls. The most frequently used are a contact call, ‘ut ut’, and an assembly call, ‘cu-ca-cow’ or ‘chi-ca-go’.Colour The male California Quail has a bold black face outlined in white, with a brown crown and a pendulous feather plume hanging forward from the forehead. The back of the neck is grey with black scallops and white spots. The back and upper side of the tail is dark grey. The breast is dark grey with underparts and flanks that are fawn or pale grey. Each feather has a centre black line and black border. Wing feathers are dark grey with some edged in fawn. The female California Quail has a small crest on the crown, and the face and throat are grey and streaked with black. The upper breast is grey with very fine fawn wavy lines. BreedingBreeding season is September to January. California Quail can lay 8–12 eggs. The incubation period is 22–23 days.DietCalifornia Quail rely heavily on seeds, especially those from legumes. They will also eat leaves, fresh shoots, berries, and insects.DistributionCalifornia Quail are native to western North America, from Oregon to southern California. In Australia, they are confined to King Island, where they were released in 1930. No wild, self-sustaining populations are known in Victoria. Huntable populations exist only on game bird farms.HabitatCalifornia Quail prefer country covered in clumps of trees and scrub with open space and short grass in between. They move into open pastures and stubble to feed. In their North American natural range, they are found in arid and semi-arid rangelands, and dry farming and irrigation districts.Useful Hunting InformationEven though California Quail prefer semi-open areas, they still need sufficient nearby cover to roost in and escape predators. Coveys leave the roost to begin feeding, often towards water at the first light of day. After roosting during the midday hours in cover, they resume feeding a few hours before dark if they are not disturbed. These habits make early-morning and late-afternoon hours the prime times to locate birds on the move.
Male
Average Length: 24 cm
Female
Average Length: 24 cm

Chapter Ten / Page 160
Chukar Partridge (Alectoris chukar )
Voice The Chukar Partridge is a vocal bird with a variety of calls used for social contact, for aggressive or sexual behaviour, or in alarm. Its common locating call gives the partridge its name. The call starts off as a low-intensity ‘chuck, chuck, chuck’. Then it increases in volume and intensity to a ‘chukar-chukar-chukar’, and finally to a three-syllable ‘chuckara-chuckara-chuckara’.Colour The male and female have similar colouration. The partridge has a strongly patterned head and throat, plain-grey upper parts, strongly barred black and cream flanks, and rufous outer tail feathers. It also has a dark black line across the forehead, eyes, and down the neck that contrasts the white throat from the grey head and breast. The bill, margins of eyelids, legs, and feet are coral pink to deep red or crimson. The female is slightly smaller and lacks the male’s spur on the leg.BreedingOf the introduced game bird species, they are considered to be one of the more easily raised in captivity and have high rates of productivity. They usually breed once a year, depending on environmental conditions, although two broods of young may be raised when nesting conditions are favourable. Chukar Partridge begin nesting in September. Nests are simple scrapes, sometimes lined with grass or feathers in rocky or brushy areas. They can lay 7–21 eggs, determined by environmental conditions. The incubation period is 24 days.DietChukar Partridge feed on a variety of grass and grass seeds, basal shoots, bulbs, stems, leaves, plant buds, and cereals. In agricultural areas, Chukar Partridge feed on the grains of barley, oats, wheat, corn, and fresh shoots of alfalfa and lucerne.DistributionThe Chukar Partridge is native to the mountainous regions of Asia, Western Europe, and the Middle East. Chukar Partridge are a common aviary species in Australia, but have no known wild populations in Victoria. Huntable popu-lations exist only on game bird farms.HabitatChukar Partridge prefer steep, rocky terrains, but they have been recorded in a variety of open woodlands and grasslands.Useful Hunting InformationIn mountainous country, the Chukar Partridge will always run uphill and fly downhill. When possible, they will run to a peak or ridgetop before flushing. Then they fly downhill in an attempt to convert altitude into speed. If you follow them from below, you’ll simply chase them to the top of the mountain only to watch them rocket down the other side. It’s best to intercept them quietly from above or across the slope.
Male and Female
Average Length: 30–38 cm

Chapter Ten / Page 161
European Quail (Coturnix coturnix )
Voice The male European Quail has a distinctive call, which sounds like ‘wet-my-lips’, usually repeated three times in quick succession. The female call is rarely heard, but it is a weak ‘pip-pip’.Colour Female European Quail are characterised by light tan feathers with black speckling on the throat and upper breast. The males have a rusty-brown throat and breast feathers. BreedingEuropean Quail breed once a year; however, they can have up to three clutches in a single season. They can lay 6–12 eggs. The incubation period is 16–18 days.DietThese quail eat mainly vegetative matter and seed. Female European Quail require a high-protein diet for breeding, consisting of weed seeds, cereal grain, and small insects and their larvae, including beetles, ants, and earwigs.DistributionNo wild, self-sustaining populations are known in Victoria. Huntable populations exist only on game farms.HabitatGrasslands are the general habitat of the European Quail. They prefer dense, tall vegetation and avoid forest edges and bush. Cultivated paddocks of wheat, clover, and other small grain crops are used as nesting cover.
Male
Average Length: 18–22 cm
Female
Average Length: 18–22 cm

Chapter Ten / Page 162
Grey Partridge (Perdix perdix )
Voice Grey Partridge make a startled call of ‘kut, kut, kut’. Their general call is a scratchy one-syllable ‘kieerr-ik’ that is repeated.Colour The Grey Partridge is a long, rotund bird. It has a brown back and grey flanks and chest. Its face and throat are chestnut, and are more rich in colour for male partridges. The belly is white and usually marked with a large chestnut-brown horseshoe mark on males and also on many females. It has a brown rump and wings, scalloped with pale edges.BreedingGrey Partridge readily breed in captivity. In the wild, the main breeding period is from April to October (Europe).DietThey are a seed-eating species, but the young in particular take insects as an essential protein supply. They eat seeds, particularly wheat and barley, and fresh shoots.DistributionThey are widespread on farmland across most of Europe into western Asia, and have been introduced into Canada, the United States, South Africa, and New Zealand. There are no wild populations in Victoria. Huntable populations exist only on game bird farms.HabitatGrey Partridge favour areas that have good grass or plant cover. To ensure that food is readily available to the chicks, Grey Partridge often relocate to cropping areas after the eggs hatch.Useful Hunting InformationGrey Partridge are hunted in much the same way you would hunt pheasants, either driven or flushed. They are jumpy and will usually flush as a covey. They often vocalise warning calls while the hunter is still 25 metres away. Single birds hold better than coveys and may provide some excellent close-range shooting. A well-trained gundog is essential.
Male and Female
Average Length: 28–32 cm

Chapter Ten / Page 163
Ring-Necked Pheasant (Phasianus colchicus )
VoiceThe male Ring-Necked Pheasant has a loud territorial crow of ‘ko-koro’. It also makes soft clucks and squawks, and has a ‘kok-kok-kok’ alert call, especially when flushed from cover.Colour The male pheasant has a red face and a vivid metallic green head. Its neck is metallic blue-green with a distinct white ring. Its breast and flanks are copper red, and its belly is black. The pheasant has a brown back, rump, and pair of wings; and it has a purple, red, and brown tail with irregular black bars. The female is mottled brown with chestnut and buff brown. The female’s crown is barred black, and its neck is brown with chestnut borders. The breast and back feathers are mottled with a blackish-brown centre. The undersides are pale creamy-brown with black wavy lines. The tail feathers are marked with black and buff barring.BreedingRing-Necked Pheasants readily breed in captivity. In the wild, they nest on the ground. The pheasants can produce a clutch of roughly 10 eggs. The incubation period is about 26 days. The chicks mature quickly and have a similar appearance to the adult female in just a few weeks.DietAcross their natural range in the wild, the pheasants eat a wide variety of animals and vegetables. For example, they eat fruit; seeds; leaves; small vertebrates, like snakes and lizards; and sometimes small mammals. In captivity, the pheasants eat mixed grains and seeds.DistributionWild colonies exist on Rottnest Island (WA), King Island, and in Tasmania. Wild, self-sustaining populations do not occur in Victoria. Huntable populations exist only on game bird farms.HabitatRing-Necked Pheasants can survive in a broad variety of habitats. However, they prefer agricultural land, inter-spersed hedges, marshes, and woodland borders. They also thrive in native grassland. Useful Hunting InformationYou’ll find most Ring-Necked Pheasants in heavy grass and cover, so a good flushing dog may be useful. Pheasants may hold tight in heavy cover, and often, you’ll walk right past a hiding bird only to have it burst from cover once you’ve walked past. Once you’ve downed a pheasant, a well-trained gundog is invaluable. Wounded pheasants can run fast, and fewer birds are lost by hunters who use gundogs. Reputable game bird farms will have well-trained dogs that can be hunted over.
Male
Average Length: 85 cm
Female
Average Length: 60 cm

Chapter Ten / Page 164
Non-Game AnimalsIn Victoria, all wildlife is protected. Some species are rare or threatened and must not be hunted. The following infor-mation will help you identify protected species that can sometimes be mistaken for game species. It is important to remember that if you are NOT SURE, DON’T SHOOT. Harming protected species could result in substantial fines, imprisonment, or both. In addition, you could lose your Game and Firearm Licences, as well as the equipment used in committing the offence, including firearms, vehicles, or boats.
Blue-billed Duck (Oxyura australis )
VoiceThe Blue-billed Duck rarely makes any sound. The male emits a low-pitched ‘rattle’ in display, and the female makes a low quack. Colour The male Blue-billed Duck’s head and neck are glossy black with a slate-grey bill. The male’s bill turns brilliant blue during the breeding season. Its upper breast and flanks are a rich chestnut colour. The underside is brown-flecked with dark brown. The wings are dark brown. The female Blue-billed Duck is generally black-brown in colour with the breast and belly a lighter brown mottled with black. Unlike the male, the female’s bill does not change colour during breeding.BreedingBreeding season is from September to November. They nest on a floating platform of trampled vegetation, usually bent over reeds. It can lay 5–6 eggs. The incubation period is 26–28 days. DietThe Blue-billed Duck eats equal amounts of plant and animal food, including seeds, buds, and leaves of emergent and submergent aquatic plants; mites; midges; molluscs; and spiders.DistributionBlue-billed Ducks are most numerous in the Murray–Darling Basin but occur throughout most of southern Australia.Habitat These ducks prefer deep, densely vegetated open swamps.Tips on Identifying Blue-billed DuckBlue-billed Duck are heavy-set birds with a compact bill. They rarely fly and will usually dive under water when disturbed. When Blue-billed Duck fly, they run along the water to gain speed before achieving level flight. They fly low and directly with rapid wingbeats. They have short wings with no distinct wing pattern, a moderately long neck, and legs that trail behind them whilst in flight. On the water, they sit low with their spiked tail held high or flat against the water. The blue bill of the male may be visible.
n Populations present
Male
Average Length: 35–44 cm
Female
Average Length: 36.5–44 cm

Chapter Ten / Page 165
Brown Quail (Coturnix ypsilophora )
VoiceThe Brown Quail makes loud whistling crows of ‘ff-weep’ and ‘gop-war’, both of which rise in pitch.Colour Brown Quail can vary in colour. The male is generally dark brown, flecked with black and chestnut. The wing feathers are dark brown, flecked with chestnut on the leading edge. The upper body feathers have a thin white stripe down the centre. The throat is light brown and the underside is brown, flecked with black. The female is similar in appearance to the male, yet paler, with less black, particularly on the underside. The legs and feet of Brown Quail are yellow.BreedingBrown Quail generally breed from October to December in southern Australia and from January to May in more tropical regions of Australia. Brown Quail often extend their breeding season if conditions are suitable. Brown Quail lay 7–11 eggs, but can lay up to 20 eggs.DietThe diet of the Brown Quail consists of grasses, seeds, shoots, and small invertebrates.DistributionBrown Quail are widespread throughout Australia, including Tasmania. Their main range on mainland Australia is across the coastal lowlands.Habitat Their preferred habitat is dense rank grass and herbage, particularly on swamp and creek edges. They can also be found in undulating stubble paddocks and open woodlands.Tips on Identifying Brown QuailBrown Quail are generally larger than Stubble Quail. Brown Quail may be found in groups of up to 30 birds and typically flush together as a group. Brown Quail have quieter wingbeats, as opposed to the ‘whirr’ of the Stubble Quail, and the wingbeats of Brown Quail are not as rapid. Brown Quail often chirp or chatter when flushed, fly only a short distance, and glide toward the end of their flight before dropping head-first into cover. The most evident identifying feature of Brown Quail is their yellow legs, which can be seen when the bird is flushed. See table on page 169.
Male
Average Length: 18 cm
Female
Average Length: 18 cm
n Populations present

Chapter Ten / Page 166
Freckled Duck (Stictonetta naevosa )
VoiceThe Freckled Duck rarely makes a sound. Its contact call is a soft piping, and it has an alarm call of ‘whee-yeiu’.Colour The Freckled Duck is dark grey-brown in colour and covered with fine white freckles. It is uniformly coloured with little contrast and shows no wing pattern. It has a small tuft of feathers on the head with a distinctive narrow, upturned bill. In the breeding season, the base of the male’s bill turns a bright red. In flight, it is an all-dark bird, paler on the belly and underwing. It has a large head and fairly long neck that is carried slightly low in flight, giving a hunched appearance.BreedingThe breeding season is highly dependent on rainfall but generally occurs in spring. The Freckled Duck nests in a well-constructed bowl-shaped nest of fine sticks and lignum. It nests in lignum or other bushes at water level in flood water. The Freckled Duck lays 5–14 eggs. The incubation period is 26–28 days.DietThe Freckled Duck’s main food consists of algae, insects, and crustaceans. It has been known to eat small fish and shells.DistributionThe Freckled Duck is found in inland south-eastern Australia and the south-west of Western Australia. However, vagrants may occur elsewhere, particularly during periods of drought, when significant numbers can concentrate on remaining wetlands.Habitat The Freckled Duck prefers fresh, densely vegetated waters, particu-larly floodwater swamps and creeks vegetated with lignum or canegrass.Tips on Identifying Freckled DuckOn the water, Freckled Duck appear dark grey-brown speckled with off-white markings. The upturned bill (which has a bright red base in breeding males) and the tuft of feathers sticking out at the back of the head are characteristic features that make identification on the water easy.They take off from a running start, similar to the Hardhead; however, they can be identified by their longer neck and upturned bill. Their head is held low whilst in flight, giving them a hunched-back appearance. They do not have any pure white patches on their wings as other game ducks do, though they can be mottled pale white on the belly and under the wing. Freckled Duck generally fly low and circle around and around the wetland before leaving. Under certain light conditions, they can be confused with the Black Duck or Hardhead.
Male and Female
Average Length: Male, 48–53.5 cm; Female, 52–59 cm
n Populations present

Chapter Ten / Page 167
Little Button-Quail (Turnix velox )
Voice The Little Button-Quail makes a repeated moaning ‘oop’.Colour The male generally has a straw-brown back with white streaking, a mottled brown head, light brown-buff flanks, and barring on the chest. Its breast is mainly white. The female Little Button-Quail has a red-buff breast but otherwise has similar colour to the male. They have a large blue-grey bill, pale eyes, and pink legs. BreedingThe Little Button-Quail may breed year round if conditions are favourable. It does not breed if the weather is very cold. The female can lay 3–5 eggs. The incubation period is 13–14 days. The female mates with more than one male in a season.DietThe bird feeds on seed from a wide variety of native grasses. It also eats insects when available.DistributionThe Little Button-Quail is highly nomadic and found across most of inland Australia. It is usually not found near the coast in eastern Australia, but is widespread in South Australia, Western Australia, and most of the Northern Territory. In Victoria, they generally are not found in the Gippsland Region.Habitat The Little Button-Quail favours grasslands and the open woodlands of tropical and temperate regions, particularly arid and semi-arid areas. Tips on Identifying Little Button-QuailLittle Button-Quail are a small bird with uniformly darker wings. In flight, they can be distinguished by their pale flanks, which contrast against their reddish-brown upper body. The Little Button-Quail does not fly long distances and has a short pause between short, rapid wingbeats. See table on page 169.
Male
Average Length: 13–14 cm
Female
Average Length: 14–15 cm
n Populations present

Chapter Ten / Page 168
Plains-wanderer (Pedionomus torquatus )
VoiceThe Plains-wanderer makes a mournful ‘moo’. The male Plains-wanderer utters a soft, repeated ‘chuck’ when calling chicks if danger threatens them.Colour The male Plains-wanderer has general brown-grey plumage. Its cheeks are pale, sandy-buff, spotted, and streaked with dark brown. Its rump is almost black with fine barring. The throat is off-white, and the breast is pale sandy-ochre with faint silver wash scalloping, extending down the belly and flanks. Its bill, legs, and feet are pale yellow. The female Plains-wanderer is larger and more colourful than the male. Its body colour is similar to the male’s, but it has a cinnamon face and a black-and-white chequered collar around the neck.BreedingBreeding season is from June to January but mostly from September to December. The Plains-wanderer usually lays 4 eggs. The incubation period is 23 days. Studies suggest that the female’s role in raising the young is minimal or non-existent, and it is the smaller and more cryptically coloured male that does most of the incubation and chick-rearing. DietThe Plains-wanderer feeds on a variety of seeds and insects.DistributionThe bird can be found throughout south-eastern Australia, where it was formerly common but is now rare. It sometimes can be found in pastures and croplands, but is absent from areas where cover becomes too dense or sparse.Habitat The Plains-wanderer lives in semi-arid, open, flat, grassy inland plains. Stubble Quail hunters can sometimes encounter the species in pasture and weedy stubble paddocks.Tips on Identifying Plains-wandererGenerally, the Plains-wanderer will hide when first disturbed. If approached too close, the Plains-wanderer will prefer to run as opposed to fly. The Plains-wanderer has a laboured, fluttering flight. Often its long yellow legs can be seen trailing behind.
Male
Average Length: 16.5 cm
Female
Average Length: 17.5 cm
n Populations present

Chapter Ten / Page 169
Distinguishing Between Stubble Quail and Non-Game QuailIt is important that hunters can readily distinguish between Stubble Quail and protected quail species while hunting. You should pay particular attention to the size and flight characteristics of the bird, the habitat that you are hunting in, and the social organisation of the birds.Below is a general description that can be used by hunters as a guide to recognising the differences between the Stubble Quail and non-game quail species. Remember, if you are NOT SURE, DON’T SHOOT.
Stubble Quail Non-Game QuailLarge, plump bird (compared to other native quail species).
Generally smaller than Stubble Quail (except Brown Quail, which is slightly larger).
Bold, pale streaks on shoulder, back, and breast. Uniformly darker wings (King, Brown, Little Button).
Prefer open grasslands (improved and natural), cereal crops, stubble, lucerne, and are often found along weedy margins of irrigation channels. Avoid woodlands or areas with many trees.
Found across a range of habitat types, including woodlands; rank, dense grasslands; swampy coastal heaths; bracken; scrublands; grassy forests.
Mostly found singly or in pairs and, occasionally, small groups.
Often found in small groups or coveys (Brown Quail may be found in groups of up to thirty birds).
Never vocalise (call) when flushed. Often chirp or chatter when flushed.Loud whirring of wings when flushed. Fly with fast wingbeats and may travel as far as 500 metres.
Quieter wingbeats, not as rapid. Often fly only a short distance.
Never glide when flying. Curved flight before dropping tail-down into cover.
Glide-in flight (Brown, King); may drop head-first into cover (Brown).

Notes / Page 170
NOTES
Game Hunting in Victoria: A Manual for Responsible and Sustainable Hunting

Notes / Page 171
NOTES
Game Hunting in Victoria: A Manual for Responsible and Sustainable Hunting

Notes / Page 172
NOTES
Game Hunting in Victoria: A Manual for Responsible and Sustainable Hunting


Related Documents