18 July 2018 Installation and Upgrade Guide GAIA R77 VERSIONS Protected

Welcome message from author
This document is posted to help you gain knowledge. Please leave a comment to let me know what you think about it! Share it to your friends and learn new things together.
Transcript
18 July 2018
Installation and Upgrade Guide
GAIA
R77 VERSIONS
Prot
ecte
d
© 2018 Check Point Software Technologies Ltd.
All rights reserved. This product and related documentation are protected by copyright and distributed under licensing restricting their use, copying, distribution, and decompilation. No part of this product or related documentation may be reproduced in any form or by any means without prior written authorization of Check Point. While every precaution has been taken in the preparation of this book, Check Point assumes no responsibility for errors or omissions. This publication and features described herein are subject to change without notice.
RESTRICTED RIGHTS LEGEND:
Use, duplication, or disclosure by the government is subject to restrictions as set forth in subparagraph (c)(1)(ii) of the Rights in Technical Data and Computer Software clause at DFARS 252.227-7013 and FAR 52.227-19.
TRADEMARKS:
Refer to the Copyright page http://www.checkpoint.com/copyright.html for a list of our trademarks.
Refer to the Third Party copyright notices http://www.checkpoint.com/3rd_party_copyright.html for a list of relevant copyrights and third-party licenses.
Important Information
Latest Software
We recommend that you install the most recent software release to stay up-to-date with the latest functional improvements, stability fixes, security enhancements and protection against new and evolving attacks.
Check Point R77 versions
For more about these releases, see:
• R77.30 home page http://supportcontent.checkpoint.com/solutions?id=sk104859
• R77.20 home page http://supportcontent.checkpoint.com/solutions?id=sk101208
• R77.10 home page http://supportcontent.checkpoint.com/solutions?id=sk97617
• R77 home page http://supportcontent.checkpoint.com/solutions?id=sk92965
More Information
Visit the Check Point Support Center http://supportcenter.checkpoint.com.
Latest Version of this Document
Download the latest version of this document http://supportcontent.checkpoint.com/documentation_download?ID=24831.
To learn more, visit the Check Point Support Center http://supportcenter.checkpoint.com.
Feedback
Check Point is engaged in a continuous effort to improve its documentation.
Please help us by sending your comments mailto:[email protected]?subject=Feedback on Gaia R77 Versions Installation and Upgrade Guide.
Searching in Multiple PDFs
To search for text in all the R77 PDF documents, download and extract the complete R77 documentation package http://supportcontent.checkpoint.com/documentation_download?ID=26770. Use Shift-Control-F in Adobe Reader or Foxit reader.
This guide is intended for security administrators responsible for installing R77 on Gaia and for upgrading Gaia to R77 Gaia.
For R77 installation and upgrade instructions on other platforms, see the R77 versions Installation and Upgrade Guide for non-Gaia platforms http://supportcontent.checkpoint.com/documentation_download?ID=30531.
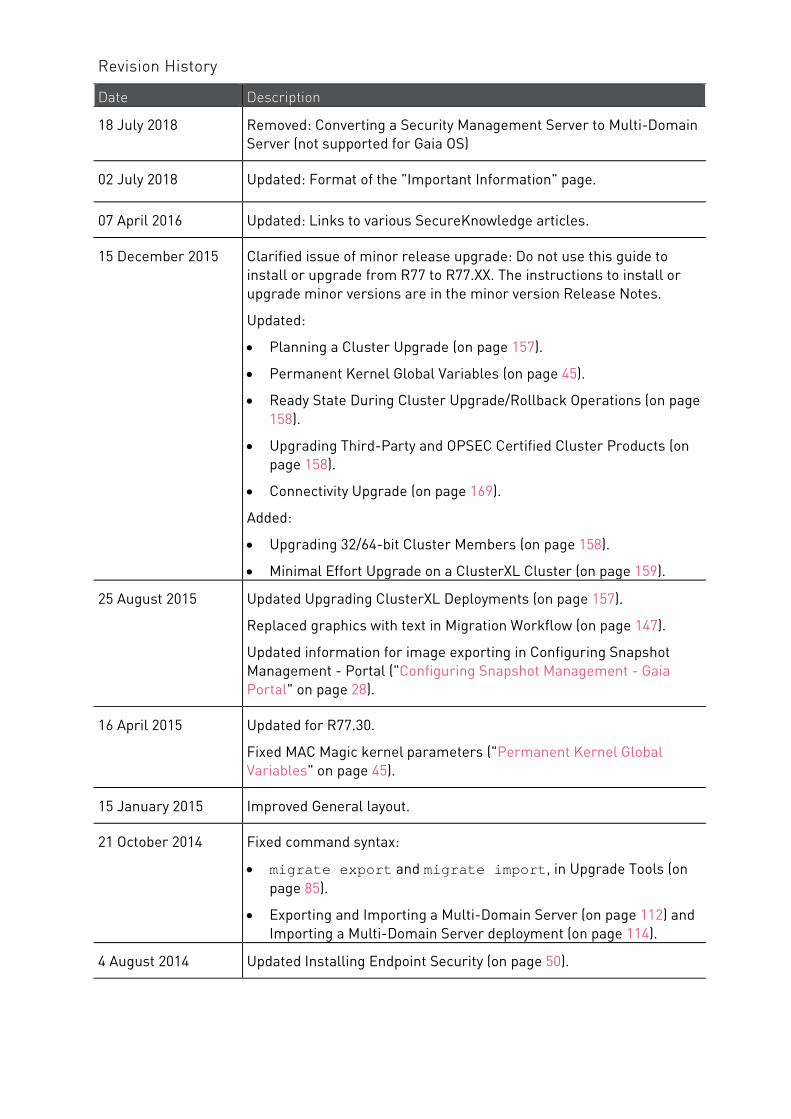
Revision History
Date Description
18 July 2018 Removed: Converting a Security Management Server to Multi-Domain Server (not supported for Gaia OS)
02 July 2018 Updated: Format of the "Important Information" page.
07 April 2016 Updated: Links to various SecureKnowledge articles.
15 December 2015 Clarified issue of minor release upgrade: Do not use this guide to install or upgrade from R77 to R77.XX. The instructions to install or upgrade minor versions are in the minor version Release Notes.
Updated:
• Planning a Cluster Upgrade (on page 157).
• Permanent Kernel Global Variables (on page 45).
• Ready State During Cluster Upgrade/Rollback Operations (on page 158).
• Upgrading Third-Party and OPSEC Certified Cluster Products (on page 158).
• Connectivity Upgrade (on page 169).
Added:
• Upgrading 32/64-bit Cluster Members (on page 158).
• Minimal Effort Upgrade on a ClusterXL Cluster (on page 159).
25 August 2015 Updated Upgrading ClusterXL Deployments (on page 157).
Replaced graphics with text in Migration Workflow (on page 147).
Updated information for image exporting in Configuring Snapshot Management - Portal ("Configuring Snapshot Management - Gaia Portal" on page 28).
16 April 2015 Updated for R77.30.
Fixed MAC Magic kernel parameters ("Permanent Kernel Global Variables" on page 45).
15 January 2015 Improved General layout.
21 October 2014 Fixed command syntax:
• migrate export and migrate import, in Upgrade Tools (on page 85).
• Exporting and Importing a Multi-Domain Server (on page 112) and Importing a Multi-Domain Server deployment (on page 114).
4 August 2014 Updated Installing Endpoint Security (on page 50).
Date Description
25 June 2014 Updated for R77.20.
• Cover changed to be relevant for all R77 versions.
• Added Connectivity Upgrade (on page 169) section.
• Software Updates renamed Upgrades (CPUSE).
• Unattended USB installations on appliances ("USB Installation" on page 15).
• Installing standalone on IP appliances added.
• Added: Running the First Time Configuration Wizard on Smart-1 205/210/2253050/3150 for Security Management Server ("Installing Security Management Server on Appliances" on page 45) and Multi-Domain Server ("Installing Multi-Domain Server on Smart-1 Appliances" on page 75).
28 January 2014 Fixed: To export a Multi-Domain Server, use mds_setup ("Export Tool" on page 104).
14 January 2014 • Added: Link to snapshot limitations ("Installation and Recovery During Product Deployment" on page 23).
• Added: Installation and Recovery During Product Deployment (on page 23).
• Updated: Must not rename an exported image ("Gaia Snapshot Image Management" on page 27).
• Updated: Using migrate export in a Management High Availability environment.
• Added: Installing and upgrading Multi-Domain Security Management using CPUSE and upgrading using the CLI (see "Multi-Domain Server In-Place Upgrade " on page 111) (.
• Added: The migrate -l command includes SmartLog data (see "General Workflow" on page 147).
• Added: SmartReporter and SmartEvent Database Migration for Non-Windows (on page 155).
Date Description
28 November 2013 • Added: Link to sk91060 ("Disk Space" on page 18).
• Fixed:Link to IPSO 6.2 MR4 Release Notes.
• Clarified: All upgrade procedures can be used for Endpoint Security upgrades (on page 93).
• Added: Install database to Updating objects in Domain Management Server databases ("Updating Objects in the Domain Management Server Databases" on page 120).
• Fixed: Zero Downtime Upgrade on a cluster.
• Fixed: The Primary and Secondary Security Management Servers do not have to be on the same subnet.
• Updated: Limitations and added link for latest build number in Upgrading Using Gaia Upgrades (CPUSE) (on page 89).
28 August 2013 First release of this document.
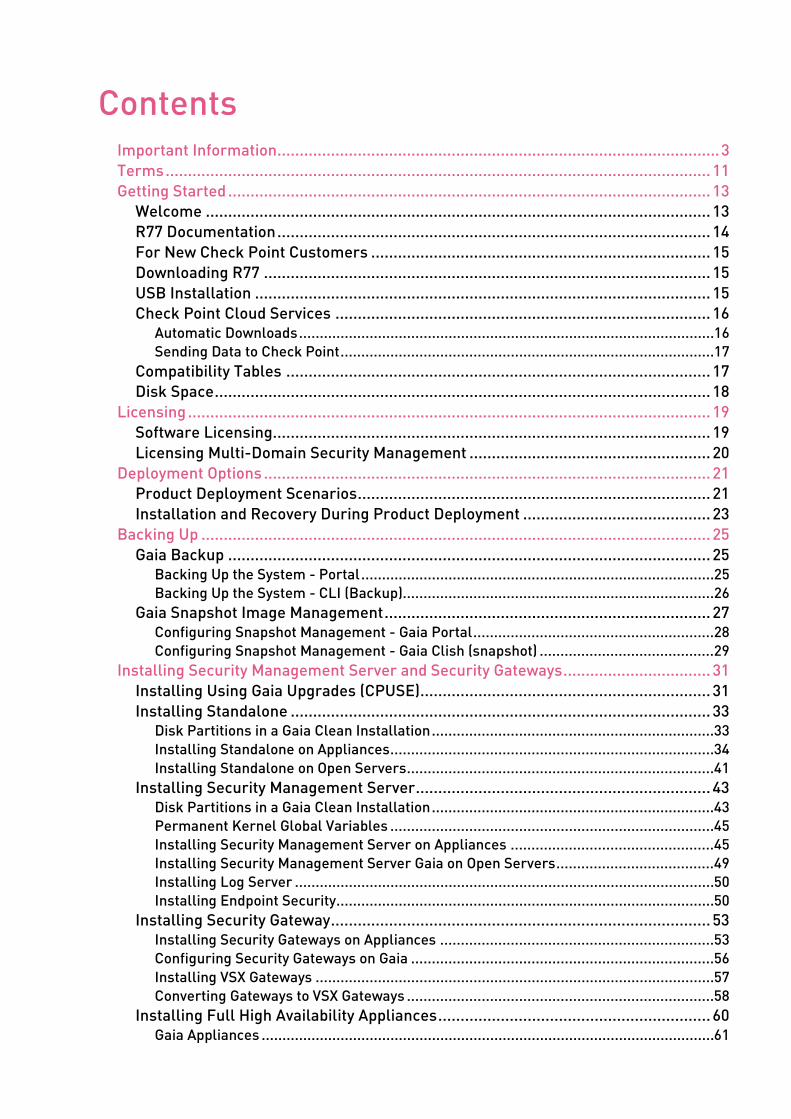
Contents Important Information ................................................................................................... 3 Terms .......................................................................................................................... 11 Getting Started ............................................................................................................ 13
Welcome ................................................................................................................. 13 R77 Documentation ................................................................................................. 14 For New Check Point Customers ............................................................................ 15 Downloading R77 .................................................................................................... 15 USB Installation ...................................................................................................... 15 Check Point Cloud Services .................................................................................... 16
Automatic Downloads .................................................................................................... 16 Sending Data to Check Point .......................................................................................... 17
Compatibility Tables ............................................................................................... 17 Disk Space ............................................................................................................... 18
Licensing ..................................................................................................................... 19 Software Licensing.................................................................................................. 19 Licensing Multi-Domain Security Management ...................................................... 20
Deployment Options .................................................................................................... 21 Product Deployment Scenarios ............................................................................... 21 Installation and Recovery During Product Deployment .......................................... 23
Backing Up .................................................................................................................. 25 Gaia Backup ............................................................................................................ 25
Backing Up the System - Portal ..................................................................................... 25 Backing Up the System - CLI (Backup)........................................................................... 26
Gaia Snapshot Image Management ......................................................................... 27 Configuring Snapshot Management - Gaia Portal .......................................................... 28 Configuring Snapshot Management - Gaia Clish (snapshot) .......................................... 29
Installing Security Management Server and Security Gateways ................................. 31 Installing Using Gaia Upgrades (CPUSE) ................................................................. 31 Installing Standalone .............................................................................................. 33
Disk Partitions in a Gaia Clean Installation .................................................................... 33 Installing Standalone on Appliances .............................................................................. 34 Installing Standalone on Open Servers .......................................................................... 41
Installing Security Management Server .................................................................. 43 Disk Partitions in a Gaia Clean Installation .................................................................... 43 Permanent Kernel Global Variables .............................................................................. 45 Installing Security Management Server on Appliances ................................................. 45 Installing Security Management Server Gaia on Open Servers ...................................... 49 Installing Log Server ..................................................................................................... 50 Installing Endpoint Security........................................................................................... 50
Installing Security Gateway ..................................................................................... 53 Installing Security Gateways on Appliances .................................................................. 53 Configuring Security Gateways on Gaia ......................................................................... 56 Installing VSX Gateways ................................................................................................ 57 Converting Gateways to VSX Gateways .......................................................................... 58
Installing Full High Availability Appliances ............................................................. 60 Gaia Appliances ............................................................................................................. 61
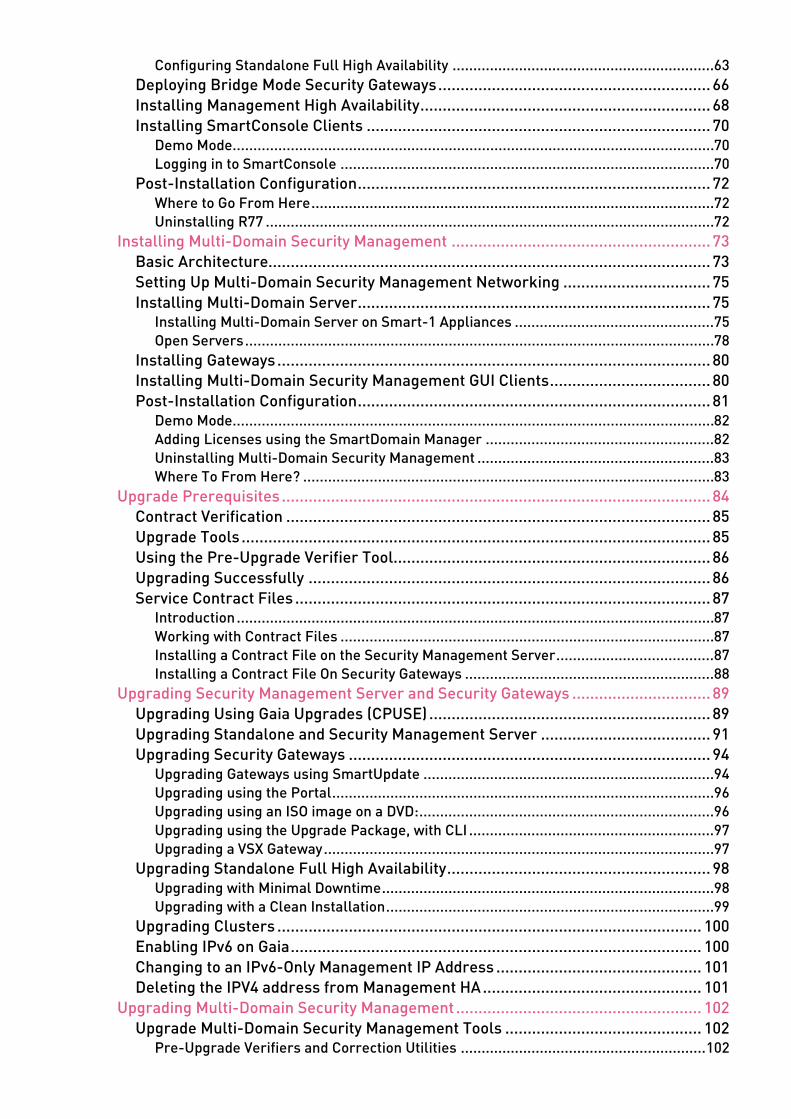
Configuring Standalone Full High Availability ............................................................... 63 Deploying Bridge Mode Security Gateways ............................................................. 66 Installing Management High Availability ................................................................. 68 Installing SmartConsole Clients ............................................................................. 70
Demo Mode .................................................................................................................... 70 Logging in to SmartConsole .......................................................................................... 70
Post-Installation Configuration ............................................................................... 72 Where to Go From Here ................................................................................................. 72 Uninstalling R77 ............................................................................................................ 72
Installing Multi-Domain Security Management .......................................................... 73 Basic Architecture................................................................................................... 73 Setting Up Multi-Domain Security Management Networking ................................. 75 Installing Multi-Domain Server ............................................................................... 75
Installing Multi-Domain Server on Smart-1 Appliances ................................................ 75 Open Servers ................................................................................................................. 78
Installing Gateways ................................................................................................. 80 Installing Multi-Domain Security Management GUI Clients .................................... 80 Post-Installation Configuration ............................................................................... 81
Demo Mode .................................................................................................................... 82 Adding Licenses using the SmartDomain Manager ....................................................... 82 Uninstalling Multi-Domain Security Management ......................................................... 83 Where To From Here? ................................................................................................... 83
Upgrade Prerequisites ................................................................................................ 84 Contract Verification ............................................................................................... 85 Upgrade Tools ......................................................................................................... 85 Using the Pre-Upgrade Verifier Tool....................................................................... 86 Upgrading Successfully .......................................................................................... 86 Service Contract Files ............................................................................................. 87
Introduction ................................................................................................................... 87 Working with Contract Files .......................................................................................... 87 Installing a Contract File on the Security Management Server ...................................... 87 Installing a Contract File On Security Gateways ............................................................ 88
Upgrading Security Management Server and Security Gateways ............................... 89 Upgrading Using Gaia Upgrades (CPUSE) ............................................................... 89 Upgrading Standalone and Security Management Server ...................................... 91 Upgrading Security Gateways ................................................................................. 94
Upgrading Gateways using SmartUpdate ...................................................................... 94 Upgrading using the Portal ............................................................................................ 96 Upgrading using an ISO image on a DVD: ....................................................................... 96 Upgrading using the Upgrade Package, with CLI ........................................................... 97 Upgrading a VSX Gateway .............................................................................................. 97
Upgrading Standalone Full High Availability ........................................................... 98 Upgrading with Minimal Downtime ................................................................................ 98 Upgrading with a Clean Installation ............................................................................... 99
Upgrading Clusters ............................................................................................... 100 Enabling IPv6 on Gaia ............................................................................................ 100 Changing to an IPv6-Only Management IP Address .............................................. 101 Deleting the IPV4 address from Management HA ................................................. 101
Upgrading Multi-Domain Security Management ....................................................... 102 Upgrade Multi-Domain Security Management Tools ............................................ 102
Pre-Upgrade Verifiers and Correction Utilities ........................................................... 102
Container2MultiDomain Tool ....................................................................................... 103 Export Tool .................................................................................................................. 104 migrate export Command ............................................................................................ 104 cma_migrate Command .............................................................................................. 106 cma_migrate and Certificates ..................................................................................... 107 migrate_global_policies Command ............................................................................. 107 Backup and Restore .................................................................................................... 108
Upgrading Multi-Domain Security Management on Smart-1 and Open Servers ... 111 Multi-Domain Server In-Place Upgrade ...................................................................... 111 Exporting and Importing a Multi-Domain Server ......................................................... 112 Replicate and Upgrade ................................................................................................ 114 Gradual Upgrade to Another Computer ....................................................................... 115 Migrating from Security Management Server to Domain Management Server ............ 117
Upgrading a High Availability Deployment ............................................................ 119 Pre-Upgrade Verification and Tools............................................................................. 119 Multi-Domain Server High Availability ......................................................................... 119 Upgrading Multi-Domain Servers and Domain Management Servers .......................... 120 Updating Objects in the Domain Management Server Databases ................................ 120 Managing Domain Management Servers During the Upgrade Process........................ 121
Restarting Domain Management Servers ............................................................. 122 Restoring Your Original Environment ................................................................... 122 Removing Earlier Version Multi-Domain Server Installations .............................. 122 Changing the Multi-Domain Server Interfaces ..................................................... 123 IPS with Multi-Domain Security Management ...................................................... 124 Enabling IPv6 on Gaia ............................................................................................ 125
Enabling IPv6 on Multi-Domain Security Management ................................................ 125 Upgrading with SmartUpdate .................................................................................... 127
Introducing SmartUpdate ...................................................................................... 127 Understanding SmartUpdate ................................................................................ 128 SmartUpdate - Seeing it for the First Time ........................................................... 129 Common Operations ............................................................................................. 130 Upgrading Packages ............................................................................................. 131
Prerequisites for Remote Upgrades ............................................................................ 131 Retrieving Data from Check Point Security Gateways .................................................. 131 Adding New Packages to the Package Repository ....................................................... 131 Verifying the Viability of a Distribution ......................................................................... 132 Transferring Files to Remote Devices ......................................................................... 132 Distributions and Upgrades ......................................................................................... 133 Upgrading UTM-1 Edge Firmware with SmartUpdate .................................................. 134 Canceling and Uninstalling .......................................................................................... 134 Restarting the Check Point Security Gateway .............................................................. 134 Recovering from a Failed Upgrade .............................................................................. 134 Deleting Packages from the Package Repository ........................................................ 135
Managing Licenses ................................................................................................ 136 Licensing Terminology ................................................................................................ 136 License Upgrade .......................................................................................................... 138 The License Attachment Process ................................................................................ 138 Detaching Licenses...................................................................................................... 140 Deleting Licenses from the License & Contract Repository ......................................... 140 Viewing License Properties ......................................................................................... 140 Checking for Expired Licenses .................................................................................... 140 Exporting a License to a File ........................................................................................ 141

Managing Licenses Using SmartUpdate ...................................................................... 141 Web Security License Enforcement ............................................................................. 142
Service Contracts .................................................................................................. 142 Generating CPInfo ................................................................................................. 143
Sending CPinfo to Check Point Automatically .............................................................. 143 The SmartUpdate Command Line ......................................................................... 144
Advanced Upgrade and Database Migration ............................................................. 145 Supported Upgrade Paths, Platforms and Products ............................................. 146 Legacy Hardware Platforms ................................................................................. 146 Requirements for Advanced Upgrade and Migration ............................................ 146 Migration Workflow ............................................................................................... 147
General Workflow ........................................................................................................ 147 Preparing the Source Server for New IP Address ........................................................ 148 Understanding IPv4 and IPv6 Address Issues During Migration .................................. 149 Getting the Migration Tools Package ........................................................................... 152 Using the Pre-Upgrade Verification Tool ..................................................................... 152 Exporting the Management Database .......................................................................... 153 Importing the Management Database .......................................................................... 154 Migrating the Database of a Secondary Security Management Server ......................... 154 Completing Migration to a New IP Address ................................................................. 154 SmartReporter and SmartEvent Database Migration for Non-Windows ...................... 155
Migrate Command Reference ............................................................................... 156 Upgrading ClusterXL Deployments ........................................................................... 157
Planning a Cluster Upgrade .................................................................................. 157 Ready State During Cluster Upgrade/Rollback Operations.......................................... 158 Upgrading 32/64-bit Cluster Members ........................................................................ 158 Upgrading Third-Party and OPSEC Certified Cluster Products .................................... 158
Minimal Effort Upgrade on a ClusterXL Cluster.................................................... 159 Zero Downtime Upgrade on a Cluster ................................................................... 159 ClusterXL Optimal Service Upgrade ..................................................................... 161
Upgrade Workflow from R75.40VS .............................................................................. 161 Upgrading the Cluster from R75.40VS ......................................................................... 163 Upgrade Workflow from R67.10 VSX............................................................................ 165 Upgrading the VSX Cluster from R67.10 ...................................................................... 167 Troubleshooting the Upgrade ...................................................................................... 168 Limitations .................................................................................................................. 168
Connectivity Upgrade ............................................................................................ 169 Upgrading VSX High Availability Cluster ...................................................................... 170 Upgrading ClusterXL High Availability With Connectivity Upgrade .............................. 171 Connectivity Upgrade Commands ................................................................................ 172
Index.......................................................................................................................... 177
Terms Active Domain Server
The only Domain Management Server in a High Availability deployment that can manage a specified Domain.
Active Multi-Domain Server
The one Multi-Domain Server in a High Availability deployment that can work with global objects and global policies.
Administrator
A SmartDashboard or SmartDomain Manager user with permissions to manage Check Point security products and the network environment.
ClusterXL
Cluster of Check Point Security Gateways that work together in a redundant configuration.
These Check Point Security Gateways are installed on Gaia OS, SecurePlatform OS, X-Series XOS, IPSO OS, or Windows OS:
• Up to 8 cluster members are supported in ClusterXL running on Gaia OS and SecurePlatform OS.
• Up to 5 cluster members are supported in 3rd party cluster (IP Series or X-Series appliances running R77.30 and below).
• Up to 5 cluster members are supported in ClusterXL running on Windows OS.
• Up to 2 cluster members are supported in VRRP cluster running on Gaia OS.
Notes:
• In ClusterXL Load Sharing mode, configuring more than 4 members significantly decreases cluster performance due to amount of Delta Sync
• In X-Series chassis, configuring more than 4 members (APMs) significantly decreases cluster performance due to amount of Delta Sync.
• In X-Series DBHA configuration, the above requirement applies to a single chassis (Check Point software is not aware of DBHA).
Database Migration
Process of:
1. Installing the latest Security Management Server or Multi-Domain Server version
from the distribution media on a separate computer from the existing Security Management Server or Multi-Domain Server
2. Exporting the management database from the existing Security Management Server or Multi-Domain Server
3. Importing the management database to the new Security Management Server or Multi-Domain Server
This upgrade method minimizes upgrade risks for an existing deployment.
Distributed Deployment
The Check Point Security Gateway and Security Management Server products are deployed on different computers.
Domain
A network or a collection of networks related to an entity, such as a company, business unit or geographical location.
Domain Log Server
A log server for a specified Domain. It stores and processes logs from Security Gateways that are managed by the corresponding Domain Management Server.
Domain Management Server
A virtual Security Management Server that manages Security Gateways for one Domain, as part of a Multi-Domain Security Management environment.
Global Policy
All Policies defined in the Global Domain that can be assigned to Domains, or to specified groups of Domains.
ICA
Internal Certificate Authority - A component on Check Point Management Server that issues certificates for authentication.
In-Place Upgrade
Upgrading a Security Management Server or Multi-Domain Server to the latest version on the existing computer.

Multi-Domain Log Server
A Check Point computer that runs Check Point software to store and process logs in Multi-Domain Security Management environment. The Multi-Domain Log Server consists of Domain Log Servers that store and process logs from Security Gateways that are managed by the corresponding Domain Management Servers.
Multi-Domain Security Management
A centralized management solution for large-scale, distributed environments with many different Domain networks.
Multi-Domain Server
A Check Point computer that runs Check Point software to host all Domain Management Servers.
Open Server
A physical computer manufactured and distributed by a company, other than Check Point.
Package Repository
A SmartUpdate repository on the Security Management Server that stores uploaded packages. These packages are then used by SmartUpdate to perform upgrades of Check Point Gateways.
Primary Multi-Domain Server
The Multi-Domain Security Management Server in Management High Availability that you install as Primary.
Security Gateway
A Check Point computer that runs Check Point software to inspect traffic and enforce Security Policies for connected network resources.
Security Management Server
A Check Point computer that runs Check Point software to manage the objects and policies in Check Point environment.
Security Policy
A collection of rules that control network traffic and enforce organization guidelines
for data protection and access to resources with packet inspection.
SmartConsole
A Check Point GUI application used to manage security policies, monitor products and events, install updates, provision new devices and appliances, and manage a multi-domain environment and each domain.
SmartDashboard
A Check Point client used to create and manage the security policy.
SmartUpdate
A SmartConsole client used to centrally upgrade and manage Check Point software and licenses.
Standalone Deployment
The Check Point components responsible for managing the Security Policy (the Security Management Server and the Security Gateway) are installed on the same machine.
Standby Domain Server
All Domain Management Servers for a Domain that are not designated as the Active Domain Management Server.
Standby Multi-Domain Server
All Multi-Domain Servers in a Management High Availability deployment that cannot manage global policies and global objects. Standby Multi-Domain Servers are synchronized with the Active Multi-Domain Server.
Gaia Installation and Upgrade Guide R77 Versions | 13
CHAPTE R 1
Getting Started In This Section:
Welcome ........................................................................................................................ 13
R77 Documentation ...................................................................................................... 14
For New Check Point Customers ................................................................................ 15
Downloading R77 .......................................................................................................... 15
USB Installation ............................................................................................................ 15
Check Point Cloud Services ......................................................................................... 16
Compatibility Tables ..................................................................................................... 17
Disk Space ..................................................................................................................... 18
Before you install or upgrade to R77, read the R77 Release Notes http://supportcontent.checkpoint.com/solutions?id=sk104859.
Do not use this guide to install or upgrade from R77 to R77.XX. The instructions to install or upgrade minor versions are in the minor version Release Notes.
Welcome Thank you for choosing Check Point software blades for your security solution. We hope that you will be satisfied with this solution and our support services. Check Point products provide your business with the most up to date and secure solutions available today.
Check Point also delivers worldwide technical services including educational, professional, and support services through a network of Authorized Training Centers, Certified Support Partners, and Check Point technical support personnel to ensure that you get the most out of your security investment.
For additional information on the Internet Security Product Suite and other security solutions, go to: http://www.checkpoint.com or call Check Point at 1(800) 429-4391. For additional technical information, visit the Check Point Support center http://supportcenter.checkpoint.com.
Welcome to the Check Point family. We look forward to meeting all of your current and future network, application, and management security needs.
Getting Started
Gaia Installation and Upgrade Guide R77 Versions | 14
R77 Documentation This guide is intended for security administrators responsible for installing R77 on Gaia and for upgrading Gaia to R77 Gaia.
For R77 installation and upgrade instructions on other platforms, see the R77 versions Installation and Upgrade Guide for non-Gaia platforms http://supportcontent.checkpoint.com/documentation_download?ID=30531.
To install and upgrade other versions, see the Release Notes or the Installation and Upgrade Guide of that version.
To find out about what is new in R77, see the R77 Release Notes. To find the release notes and the documentation, see the R77 home page http://supportcontent.checkpoint.com/solutions?id=sk104859.
Getting Started
Gaia Installation and Upgrade Guide R77 Versions | 15
For New Check Point Customers New Check Point customers can access the Check Point User Center https://usercenter.checkpoint.com to:
• Manage users and accounts
• Activate products
• Get support offers
• Open service requests
• Search the Technical Knowledge Base
Downloading R77 You can download the R77 software images from the R77 home page http://supportcontent.checkpoint.com/solutions?id=sk104859. There are different software images for each operating system.
To use a software image, download it and copy it to the media in one of these ways:
• Create a removable USB device (for installing SecurePlatform or Gaia).
• Burn it to a DVD.
USB Installation You can install a Gaia appliance or open server using an ISO on a removable USB drive. To prepare a USB drive, see: sk65205 http://supportcontent.checkpoint.com/solutions?id=sk65205.
For version R77.20 and higher, the ISOmorphic tool lets an administrator run an unattended installation. In an unattended installation (appliances only):
1. An experienced Check Point system administrator prepares the installation media (USB) with these pre-configured settings for specified network interface:
• IP address
• Network mask
• Default gateway
2. Sends the USB drive to an inexperienced administrator who inserts the drive into the appliance and reboots it.
The tool installs R77.20 (or higher) and configures the appliance with the predefined settings. The LCD indicates a successful installation and interfaces blink in round-robin fashion.
3. The experienced administrator then:
• Connects to the Portal and runs the First Time Configuration Wizard, or
• Opens a command line (SSH) connection to the appliance for further OS level configuration
Note: The ISOmorphic tool does not support unattended installation on open servers.
Getting Started
Gaia Installation and Upgrade Guide R77 Versions | 16
Check Point Cloud Services Check Point products connect to Check Point cloud services to download and upload information.
Automatic Downloads You can enable or disable Automatic Downloads in the Gaia First Time Configuration Wizard, on the Products page. We recommend that you enable Automatic Downloads, so that you can use these features:
• Blade Contracts are annual licenses for Software Blades and product features. If there is no of a valid Blade contract, the applicable blades and related features will work, but with some limitations.
• Data updates and Cloud Services are necessary for the full functionality of these Software Blades and features:
• IPS • Compliance
• Application & URL Filtering • AppWiki
• Threat Prevention (Anti-Bot, Anti-Virus, Anti-Spam) • Threat Wiki
• Threat Emulation • Application Database
• HTTPS Inspection • URL database
• SmartEndpoint
• CPUSE lets you manage upgrades and installations with the Gaia WebUI. You must enable Automatic Downloads to use this feature.
The Automatic Downloads feature is applicable to the Security Management Server, Multi-Domain Server, log servers, and Security Gateways (R77 and higher).
If you disable these features in the First Time Configuration Wizard, you can re-enable it in Global Properties:
1. Open Global Properties > Security Management Access.
2. Select Automatically download Contracts and other important data.
3. Restart SmartDashboard.
4. Install the Policy
For more details and instructions, see sk94508 http://supportcontent.checkpoint.com/solutions?id=sk94508.

Getting Started
Gaia Installation and Upgrade Guide R77 Versions | 17
Sending Data to Check Point In the Gaia First Time Configuration Wizard, on the Summary page, you can enable or disable data uploads to Check Point. This feature is enabled by default. The Upgrades (CPUSE) action statistics require this feature.
In R77 and higher, this setting activates the Check Point User Center Synchronization tool. It updates your User Center account with information from your Security Gateways, mapping your SKUs to your actual deployment.
This setting of a Security Management Server applies to all its Security Gateways (running R77 and higher).
You can always change this setting in SmartDashboard:
1. Click Policy menu > Global Properties > Security Management Access.
2. Select Improve product experience by sending data to Check Point. 3. Click OK.
4. Restart SmartDashboard.
5. Install the Network Security policy.
To learn more, see sk94509 http://supportcontent.checkpoint.com/solutions?id=sk94509.
Note - In some cases, the download process sends a minimal amount of required data about your Check Point installation to the Support Center.
Compatibility Tables If the existing Check Point implementation contains products that are not supported by R77, the installation process terminates. For a list of compatible products by platform, see the R77 Release Notes.
Getting Started
Gaia Installation and Upgrade Guide R77 Versions | 18
Disk Space When you install or upgrade R77, the installation or upgrade wizard makes sure that there is sufficient space on the hard disk to install the Check Point products.
If there is not sufficient space on the hard disk, an error message is shown. The message states:
• The amount of disk space necessary to install the product.
• The directory where the product is installed.
• The amount of free disk space that is available in the directory.
To learn how to remove old Check Point packages and files, see sk91060 http://supportcontent.checkpoint.com/solutions?id=sk91060.
After there is sufficient disk space, install or upgrade the Check Point product.
Gaia Installation and Upgrade Guide R77 Versions | 19
CHAPTE R 2
Licensing In This Section:
Software Licensing ....................................................................................................... 19
Licensing Multi-Domain Security Management ......................................................... 20
Most of the software on the installation media is automatically enabled for a 15-day evaluation period. To get a permanent license, or to extend the evaluation period, visit the Check Point User Center http://usercenter.checkpoint.com.
If you are new to Check Point, we recommend that you visit the Check Point User Center.
For licensing assistance, contact Account Services (mailto:[email protected]). Or call: US +1 972-444-6600, option 5.
Software Licensing If you have not migrated to Software Blade licenses, use the migration options from the Check Point website http://www.checkpoint.com/downloads/product-related/brochure/Software-Blades-Architecture.pdf. Migration to Software Blades is free of charge to purchasers of the Software Subscription service (Enterprise Base Support).
Licenses are required for Security Management Server, Multi-Domain Server, and Security Gateways.
To get a license key from the Check Point User Center:
1. Add the required Check Point products and evaluations to your User Center account: select Accounts & Products > Add Products.
If you cannot add the product you want, contact your Check Point partner or Account Services mailto:[email protected]?subject=Licensing Issues, to make sure the correct certificate keys are assigned to your account.
2. Generate a license key: select Accounts & Products > Products.
3. Select your products and click Activate License.
The selected product evaluations are assigned license keys.
4. Read and accept the End Users License Agreement.
5. Import the product license key with the cpconfig or the First Time Configuration Wizard.
The certificate keys associate the product license with the Security Management Server:
The new license remains valid, even if the IP address of the Security Gateway changes.
Only one IP address is needed for all licenses.
A license can be detached from one Security Gateway and assigned to another.
Licensing
Gaia Installation and Upgrade Guide R77 Versions | 20
Licensing Multi-Domain Security Management • Multi-Domain Security Management licenses are for the IP address of the licensed entity.
• To add a Management domain, you must add a Domain license to Multi-Domain Security Management.
• To add a Management Software Blade to a Multi-Domain Server, you must add the required blade licenses to Multi-Domain Security Management.
• Multi-Domain Security Management licenses can be imported using the Check Point command-line licensing tool or the SmartDomain Manager.
Gaia Installation and Upgrade Guide R77 Versions | 21
CHAPTE R 3
Deployment Options In This Section:
Product Deployment Scenarios ................................................................................... 21
Installation and Recovery During Product Deployment ............................................. 23
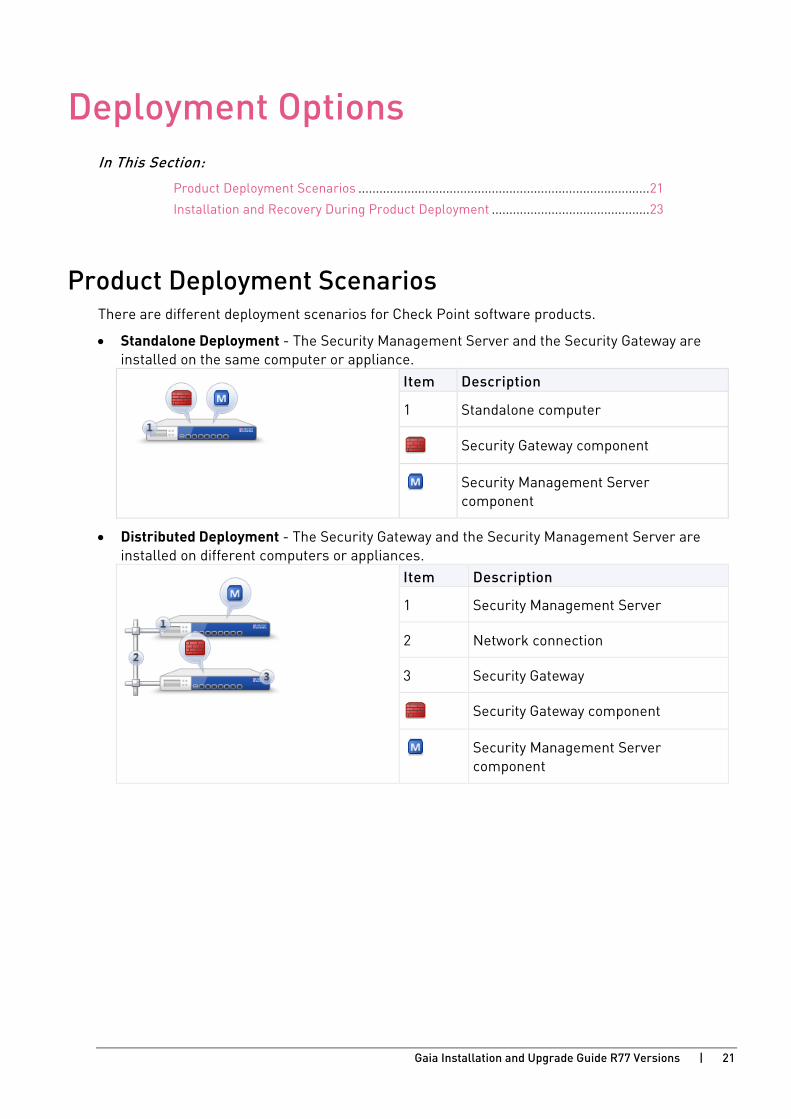
Product Deployment Scenarios There are different deployment scenarios for Check Point software products.
• Standalone Deployment - The Security Management Server and the Security Gateway are installed on the same computer or appliance.
Item Description
1 Standalone computer
Security Gateway component
Security Management Server component
• Distributed Deployment - The Security Gateway and the Security Management Server are installed on different computers or appliances.
Item Description
1 Security Management Server
2 Network connection
3 Security Gateway
Security Gateway component
Security Management Server component
Deployment Options
Gaia Installation and Upgrade Guide R77 Versions | 22
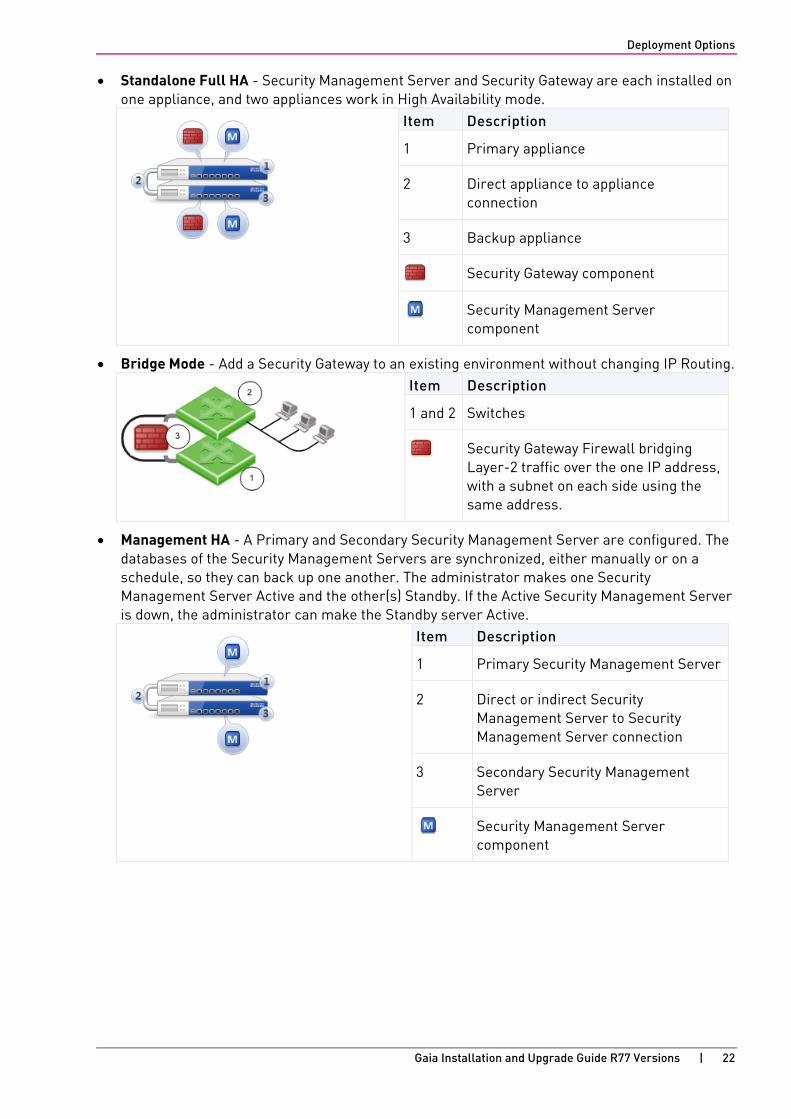
• Standalone Full HA - Security Management Server and Security Gateway are each installed on one appliance, and two appliances work in High Availability mode.
Item Description
1 Primary appliance
2 Direct appliance to appliance connection
3 Backup appliance
Security Gateway component
Security Management Server component
• Bridge Mode - Add a Security Gateway to an existing environment without changing IP Routing.
Item Description
1 and 2 Switches
Security Gateway Firewall bridging Layer-2 traffic over the one IP address, with a subnet on each side using the same address.
• Management HA - A Primary and Secondary Security Management Server are configured. The databases of the Security Management Servers are synchronized, either manually or on a schedule, so they can back up one another. The administrator makes one Security Management Server Active and the other(s) Standby. If the Active Security Management Server is down, the administrator can make the Standby server Active.
Item Description
1 Primary Security Management Server
2 Direct or indirect Security Management Server to Security Management Server connection
3 Secondary Security Management Server
Security Management Server component
Deployment Options
Gaia Installation and Upgrade Guide R77 Versions | 23
Installation and Recovery During Product Deployment This feature is supported in R77.10 and higher.
You can do a clean installation, or restore an earlier installation, with the First Time Configuration Wizard.
Run the First Time Configuration Wizard when connecting to an appliance for the first time, or after installing Gaia on an open server.
Installing a version available locally on your device
If there is more than one image on the appliance or open server, you can install a different image.
To install a factory-default Gaia image that is available locally:
In the First Time Configuration Wizard, select Install a version available locally on your device.
Installing a version from the Check Point Cloud
To install a factory-default Gaia image from the Check Point Cloud:
1. In the First Time Configuration Wizard, select Install a version from Check Point Cloud. Click Next.
2. Define the Connection to Check Point Cloud. Choose an interface to connect to the Internet, and configure connection parameters. Click Next. This shows the versions that you can install from the Check Point Cloud.
3. Choose the version to install. Click Finish.
To install using an ISO on a USB device:
1. Create a Check Point USB installation device using ISOmorphic.
2. Insert the USB device into your appliance and click Finish.
The appliance reboots and the installation starts.
3. Follow the installation from the console.
To follow the installation on an IP Appliance see sk83200 http://supportcontent.checkpoint.com/solutions?id=sk83200 .
Version Recovery from the Check Point Cloud
Use this option to install the version that was installed on an appliance that was returned to Check Point using the RMA (Return Merchandise Authorization) procedure.
This option installs a factory-default image from the Check Point Cloud. If you had Hotfixes installed, you must re-install them.
Use this option if:
• You do not have a working snapshot image.
• The appliance that was returned had R75.40 Gaia or higher, and allowed data uploads to Check Point. See sk94509 http://supportcontent.checkpoint.com/solutions?id=sk94509.
Deployment Options
Gaia Installation and Upgrade Guide R77 Versions | 24
To restore a version from the Check Point Cloud:
1. In the First Time Configuration Wizard, select Automatic version recovery from the Check Point Cloud. Click Next.
2. Define the Connection to Check Point Cloud. Choose an interface to connect to the Internet, and configure connection parameters. Click Next. This shows the name of the last installed version.
3. Choose the version to restore. Click Finish.
If you did a System Configuration Backup on the earlier system and saved the backup to a remote location, you can restore the system with all settings and products.
Version Recovery by Importing a Snapshot Image
Use a snapshot file that was exported earlier, uploaded from your local computer or FTP server, to restore the:
• File system, with customized files.
• System configuration (For example, interfaces, routing, hostname).
• Software Blades.
• Management database (on a Security Management Server or a Multi-Domain Server).
You can import a snapshot that was made on a different release or on this release. You must import it to the same appliance or open server hardware model.
IMPORTANT:
• Before using Snapshot image management, see the known limitations http://supportcontent.checkpoint.com/solutions?id=sk98068.
• After importing the snapshot, you must activate the device license from the Portal or the User Center.
• For more about image management, see Gaia Snapshot Image Management (on page 27).
Gaia Installation and Upgrade Guide R77 Versions | 25
CHAPTE R 4
Backing Up In This Section:
Gaia Backup .................................................................................................................. 25
Gaia Snapshot Image Management ............................................................................. 27
Before you upgrade, back up the Security Management Servers and Security Gateways.
Use the snapshot mechanism if it is available.
Gaia Backup Back up the configuration of the Gaia operating system and of the Security Management Server database. You can restore a previously saved configuration. The configuration is saved to a .tgz file. You can store backups locally, or remotely to a TFTP, SCP or FTP server. You can run the backup manually or on a schedule.
Before you use snapshot image management, see sk91400 http://supportcontent.checkpoint.com/solutions?id=sk91400 and sk98068 http://supportcontent.checkpoint.com/solutions?id=sk98068.
Backing Up the System - Portal
To add a backup:
1. In the tree view, click Maintenance > System Backup
2. Click Add Backup.
The New Backup window opens.
3. Select the location of the backup file:
• This appliance
• TFTP server. Specify the IP address.
• SCP server. Specify the IP address, user name and password.
• FTP server. Specify the IP address, user name and password.
Backing Up
Gaia Installation and Upgrade Guide R77 Versions | 26
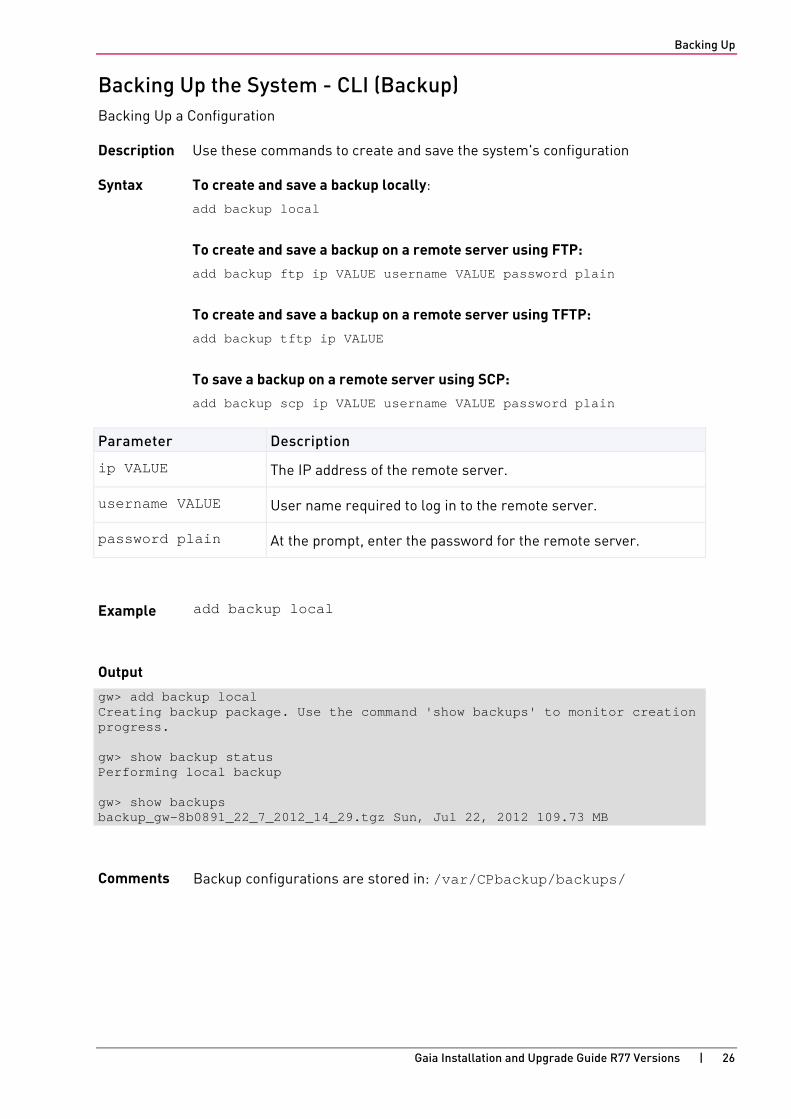
Backing Up the System - CLI (Backup) Backing Up a Configuration
Description Use these commands to create and save the system's configuration
Syntax To create and save a backup locally:
add backup local
To create and save a backup on a remote server using FTP: add backup ftp ip VALUE username VALUE password plain
To create and save a backup on a remote server using TFTP: add backup tftp ip VALUE
To save a backup on a remote server using SCP: add backup scp ip VALUE username VALUE password plain
Parameter Description
ip VALUE The IP address of the remote server.
username VALUE User name required to log in to the remote server.
password plain At the prompt, enter the password for the remote server.
Example add backup local
Output
gw> add backup local Creating backup package. Use the command 'show backups' to monitor creation progress. gw> show backup status Performing local backup gw> show backups backup_gw-8b0891_22_7_2012_14_29.tgz Sun, Jul 22, 2012 109.73 MB
Comments Backup configurations are stored in: /var/CPbackup/backups/
Backing Up
Gaia Installation and Upgrade Guide R77 Versions | 27
Monitoring Backup Status
To monitor the creation of a backup: show backup status
To show the status of the last backup performed: show backups
Gaia Snapshot Image Management A snapshot is a backup of the system settings and products. It includes:
• File system, with customized files
• System configuration (interfaces, routing, hostname, and similar)
• Software Blades
• Management database (on a Security Management Server or a Multi-Domain Server)
A snapshot is very large. A snapshot includes the entire root partition and some of the /var/log partition and other important files. For this reason, snapshots cannot be scheduled the same way that Backups can. Backup and Restore is the preferred method of recovery.
Notes:
• When Gaia creates a snapshot, all system processes and services continue to run. Policy enforcement is not interrupted.
• You can import a snapshot created on a different release or on this release. You must import it to the same appliance or open server hardware model.
• After importing the snapshot, you must activate the device license from the Gaia Portal or the User Center.
Snapshot options:
• Revert to a user created image.
• Revert to a factory default image, which is automatically created on Check Point appliances by the installation or upgrade procedure.
• Delete an image from the local system.
• Export an existing image. This creates a compressed version of the image. You can download the exported image to a different computer and delete the exported image from the Gaia computer. This saves disk space. You must not rename the exported image. If you rename a snapshot image, it is not possible to revert to it.
• Import an exported image.
• View a list of images that are stored locally.
IMPORTANT: Before using Snapshot image management, see the known limitations http://supportcontent.checkpoint.com/solutions?id=sk98068.
Best Practice for creating snapshots:
• Immediately after Gaia installation and first-time configuration.
• Before making a major system change, such as installing a Jumbo Hotfix or route changes. It is not rec ommended to use s naps hots as a way of regularly bac king up your s ystem. System Backup is the preferred met hod. Sc hedule s ystem bac kups on a regular basis, dai ly or w eekly, to pres erve the Gaia OS confi guration and fi rew all databas e.
Backing Up
Gaia Installation and Upgrade Guide R77 Versions | 28
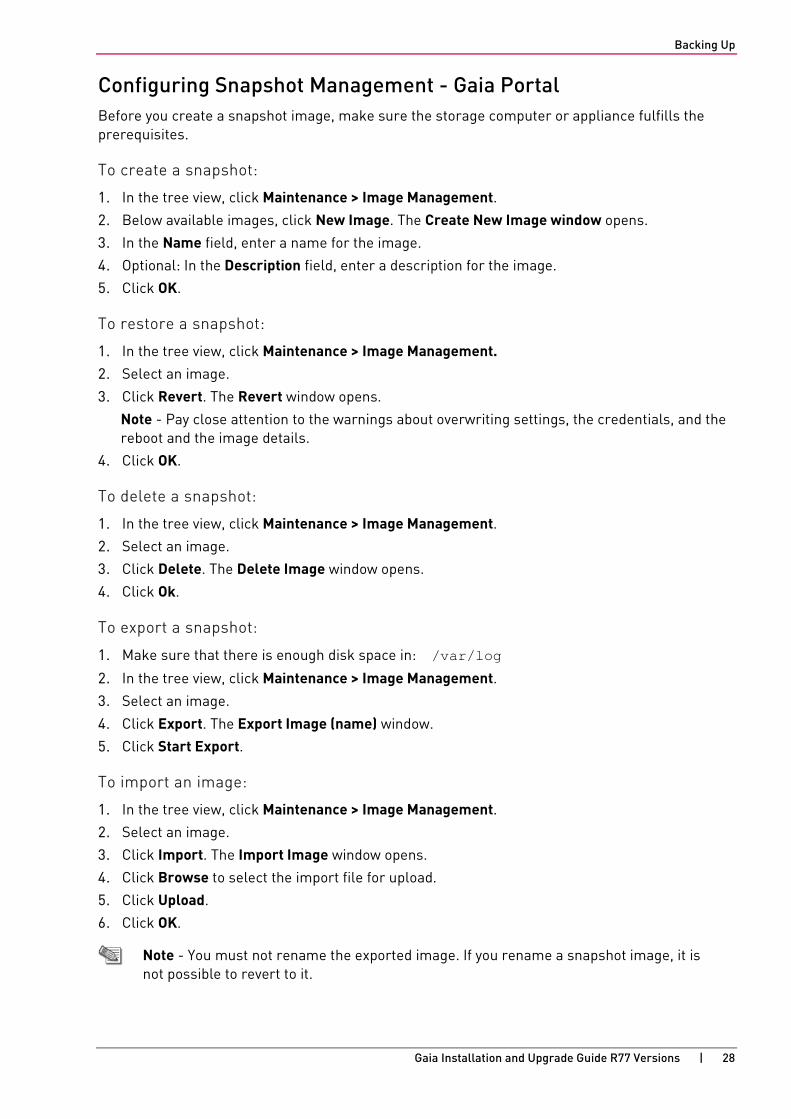
Configuring Snapshot Management - Gaia Portal Before you create a snapshot image, make sure the storage computer or appliance fulfills the prerequisites.
To create a snapshot:
1. In the tree view, click Maintenance > Image Management. 2. Below available images, click New Image. The Create New Image window opens.
3. In the Name field, enter a name for the image.
4. Optional: In the Description field, enter a description for the image.
5. Click OK.
To restore a snapshot:
1. In the tree view, click Maintenance > Image Management. 2. Select an image.
3. Click Revert. The Revert window opens.
Note - Pay close attention to the warnings about overwriting settings, the credentials, and the reboot and the image details.
4. Click OK.
To delete a snapshot:
1. In the tree view, click Maintenance > Image Management. 2. Select an image.
3. Click Delete. The Delete Image window opens.
4. Click Ok.
To export a snapshot:
1. Make sure that there is enough disk space in: /var/log
2. In the tree view, click Maintenance > Image Management. 3. Select an image.
4. Click Export. The Export Image (name) window.
5. Click Start Export.
To import an image:
1. In the tree view, click Maintenance > Image Management. 2. Select an image.
3. Click Import. The Import Image window opens.
4. Click Browse to select the import file for upload.
5. Click Upload.
6. Click OK.
Note - You must not rename the exported image. If you rename a snapshot image, it is not possible to revert to it.
Backing Up
Gaia Installation and Upgrade Guide R77 Versions | 29
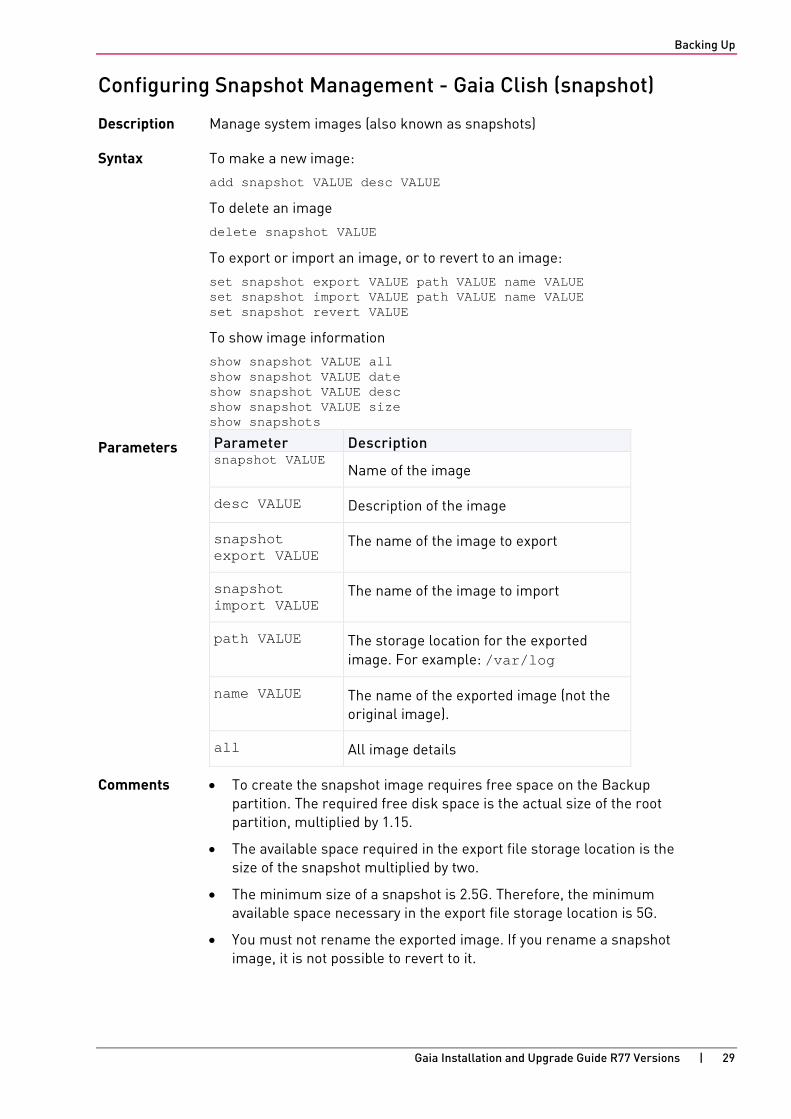
Configuring Snapshot Management - Gaia Clish (snapshot)
Description Manage system images (also known as snapshots)
Syntax To make a new image:
add snapshot VALUE desc VALUE
To delete an image
delete snapshot VALUE
To export or import an image, or to revert to an image:
set snapshot export VALUE path VALUE name VALUE set snapshot import VALUE path VALUE name VALUE set snapshot revert VALUE
To show image information
show snapshot VALUE all show snapshot VALUE date show snapshot VALUE desc show snapshot VALUE size show snapshots
Parameters Parameter Description snapshot VALUE
Name of the image
desc VALUE Description of the image
snapshot export VALUE
The name of the image to export
snapshot import VALUE
The name of the image to import
path VALUE The storage location for the exported image. For example: /var/log
name VALUE The name of the exported image (not the original image).
all All image details
Comments • To create the snapshot image requires free space on the Backup partition. The required free disk space is the actual size of the root partition, multiplied by 1.15.
• The available space required in the export file storage location is the size of the snapshot multiplied by two.
• The minimum size of a snapshot is 2.5G. Therefore, the minimum available space necessary in the export file storage location is 5G.
• You must not rename the exported image. If you rename a snapshot image, it is not possible to revert to it.
Backing Up
Gaia Installation and Upgrade Guide R77 Versions | 30
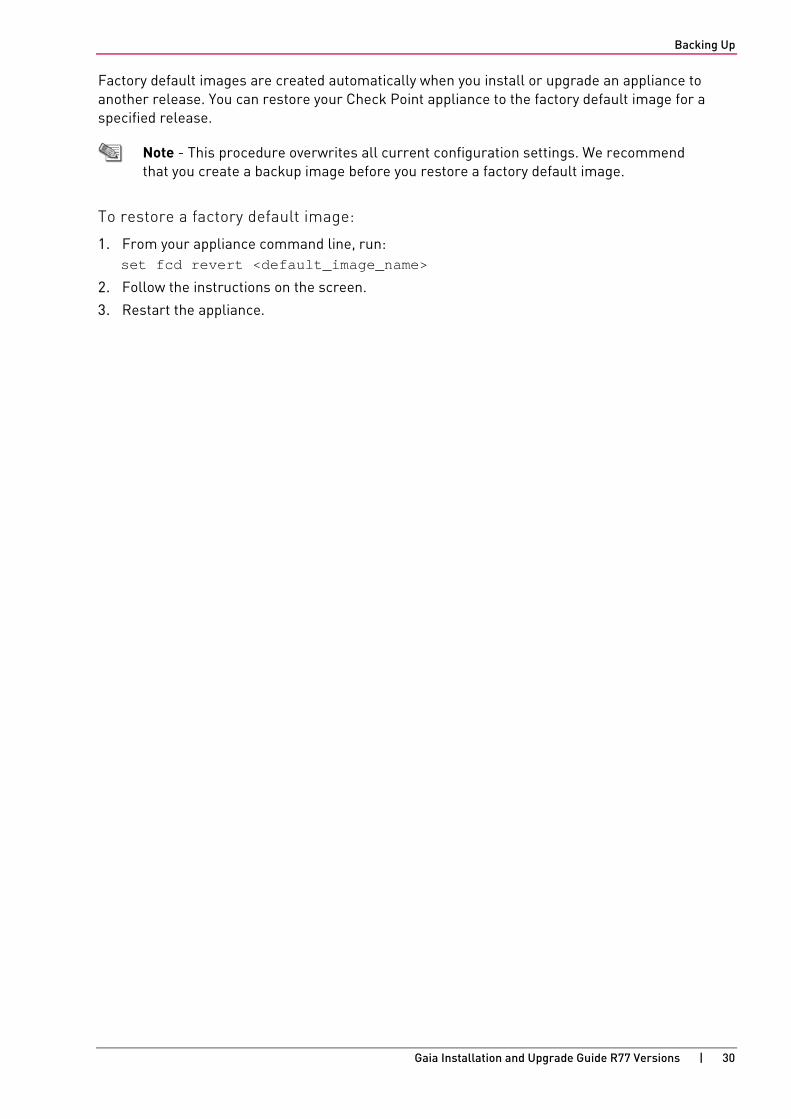
Factory default images are created automatically when you install or upgrade an appliance to another release. You can restore your Check Point appliance to the factory default image for a specified release.
Note - This procedure overwrites all current configuration settings. We recommend that you create a backup image before you restore a factory default image.
To restore a factory default image:
1. From your appliance command line, run: set fcd revert <default_image_name>
2. Follow the instructions on the screen.
3. Restart the appliance.
Gaia Installation and Upgrade Guide R77 Versions | 31
CHAPTE R 5
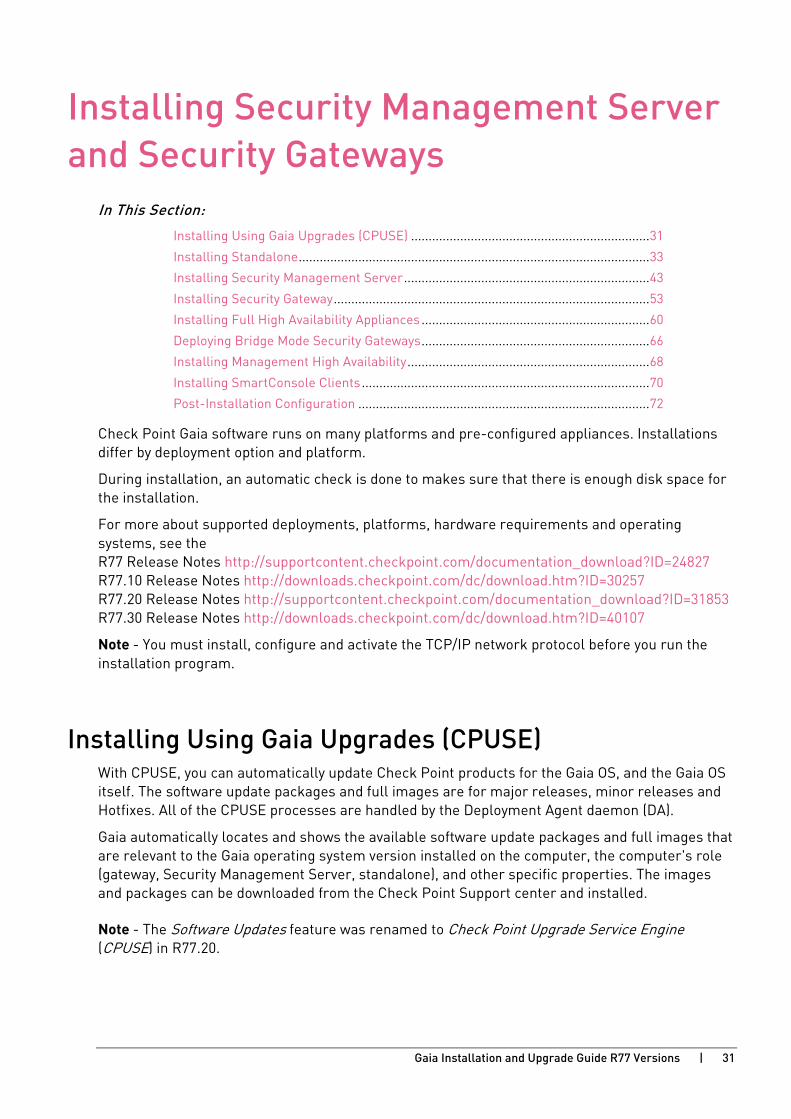
Installing Security Management Server and Security Gateways
In This Section:
Installing Using Gaia Upgrades (CPUSE) .................................................................... 31
Installing Standalone .................................................................................................... 33
Installing Security Management Server ...................................................................... 43
Installing Security Gateway .......................................................................................... 53
Installing Full High Availability Appliances ................................................................. 60
Deploying Bridge Mode Security Gateways ................................................................. 66
Installing Management High Availability ..................................................................... 68
Installing SmartConsole Clients .................................................................................. 70
Post-Installation Configuration ................................................................................... 72
Check Point Gaia software runs on many platforms and pre-configured appliances. Installations differ by deployment option and platform.
During installation, an automatic check is done to makes sure that there is enough disk space for the installation.
For more about supported deployments, platforms, hardware requirements and operating systems, see the R77 Release Notes http://supportcontent.checkpoint.com/documentation_download?ID=24827 R77.10 Release Notes http://downloads.checkpoint.com/dc/download.htm?ID=30257 R77.20 Release Notes http://supportcontent.checkpoint.com/documentation_download?ID=31853 R77.30 Release Notes http://downloads.checkpoint.com/dc/download.htm?ID=40107
Note - You must install, configure and activate the TCP/IP network protocol before you run the installation program.
Installing Using Gaia Upgrades (CPUSE) With CPUSE, you can automatically update Check Point products for the Gaia OS, and the Gaia OS itself. The software update packages and full images are for major releases, minor releases and Hotfixes. All of the CPUSE processes are handled by the Deployment Agent daemon (DA).
Gaia automatically locates and shows the available software update packages and full images that are relevant to the Gaia operating system version installed on the computer, the computer's role (gateway, Security Management Server, standalone), and other specific properties. The images and packages can be downloaded from the Check Point Support center and installed.
Note - The Software Updates feature was renamed to Check Point Upgrade Service Engine (CPUSE) in R77.20.
Installing Security Management Server and Security Gateways
Gaia Installation and Upgrade Guide R77 Versions | 32
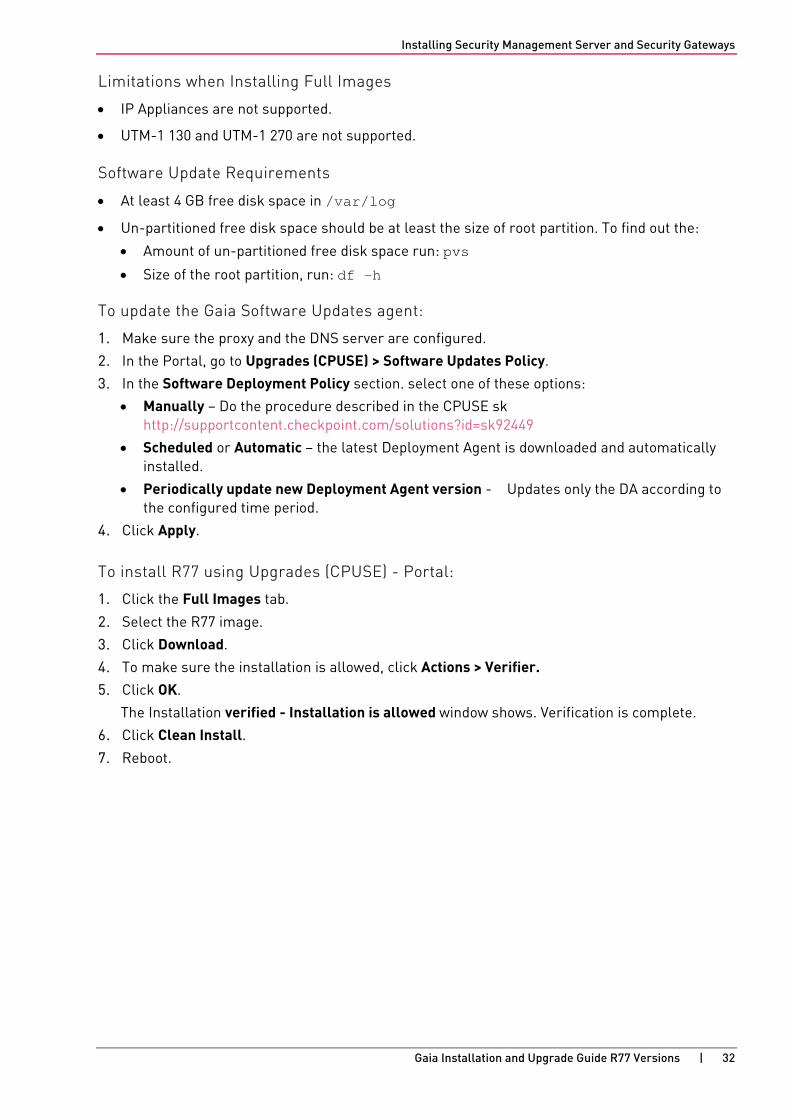
Limitations when Installing Full Images
• IP Appliances are not supported.
• UTM-1 130 and UTM-1 270 are not supported.
Software Update Requirements
• At least 4 GB free disk space in /var/log
• Un-partitioned free disk space should be at least the size of root partition. To find out the:
• Amount of un-partitioned free disk space run: pvs
• Size of the root partition, run: df -h
To update the Gaia Software Updates agent:
1. Make sure the proxy and the DNS server are configured.
2. In the Portal, go to Upgrades (CPUSE) > Software Updates Policy.
3. In the Software Deployment Policy section. select one of these options:
• Manually – Do the procedure described in the CPUSE sk http://supportcontent.checkpoint.com/solutions?id=sk92449
• Scheduled or Automatic – the latest Deployment Agent is downloaded and automatically installed.
• Periodically update new Deployment Agent version - Updates only the DA according to the configured time period.
4. Click Apply.
To install R77 using Upgrades (CPUSE) - Portal:
1. Click the Full Images tab.
2. Select the R77 image.
3. Click Download.
4. To make sure the installation is allowed, click Actions > Verifier. 5. Click OK.
The Installation verified - Installation is allowed window shows. Verification is complete.
6. Click Clean Install.
7. Reboot.
Installing Security Management Server and Security Gateways
Gaia Installation and Upgrade Guide R77 Versions | 33
Installing Standalone In This Section
Disk Partitions in a Gaia Clean Installation ................................................................. 33
Installing Standalone on Appliances ........................................................................... 34
Installing Standalone on Open Servers ....................................................................... 41
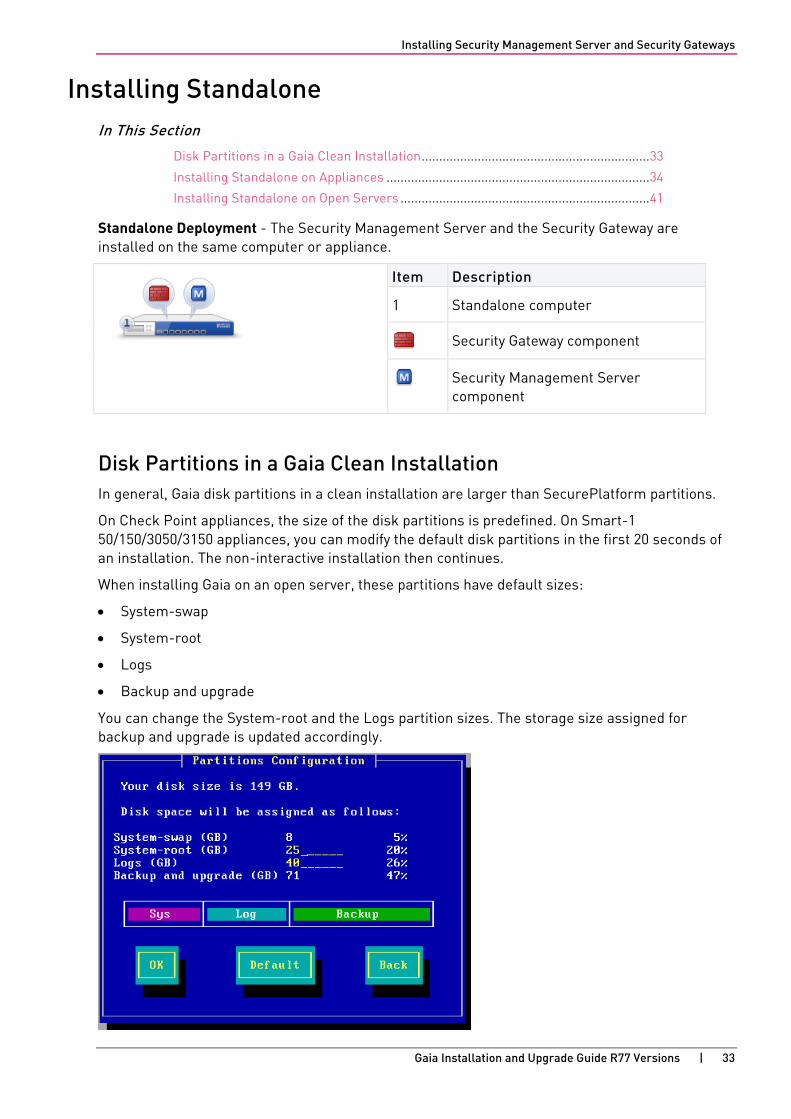
Standalone Deployment - The Security Management Server and the Security Gateway are installed on the same computer or appliance.
Item Description
1 Standalone computer
Security Gateway component
Security Management Server component
Disk Partitions in a Gaia Clean Installation In general, Gaia disk partitions in a clean installation are larger than SecurePlatform partitions.
On Check Point appliances, the size of the disk partitions is predefined. On Smart-1 50/150/3050/3150 appliances, you can modify the default disk partitions in the first 20 seconds of an installation. The non-interactive installation then continues.
When installing Gaia on an open server, these partitions have default sizes:
• System-swap
• System-root
• Logs
• Backup and upgrade
You can change the System-root and the Logs partition sizes. The storage size assigned for backup and upgrade is updated accordingly.
Installing Security Management Server and Security Gateways
Gaia Installation and Upgrade Guide R77 Versions | 34
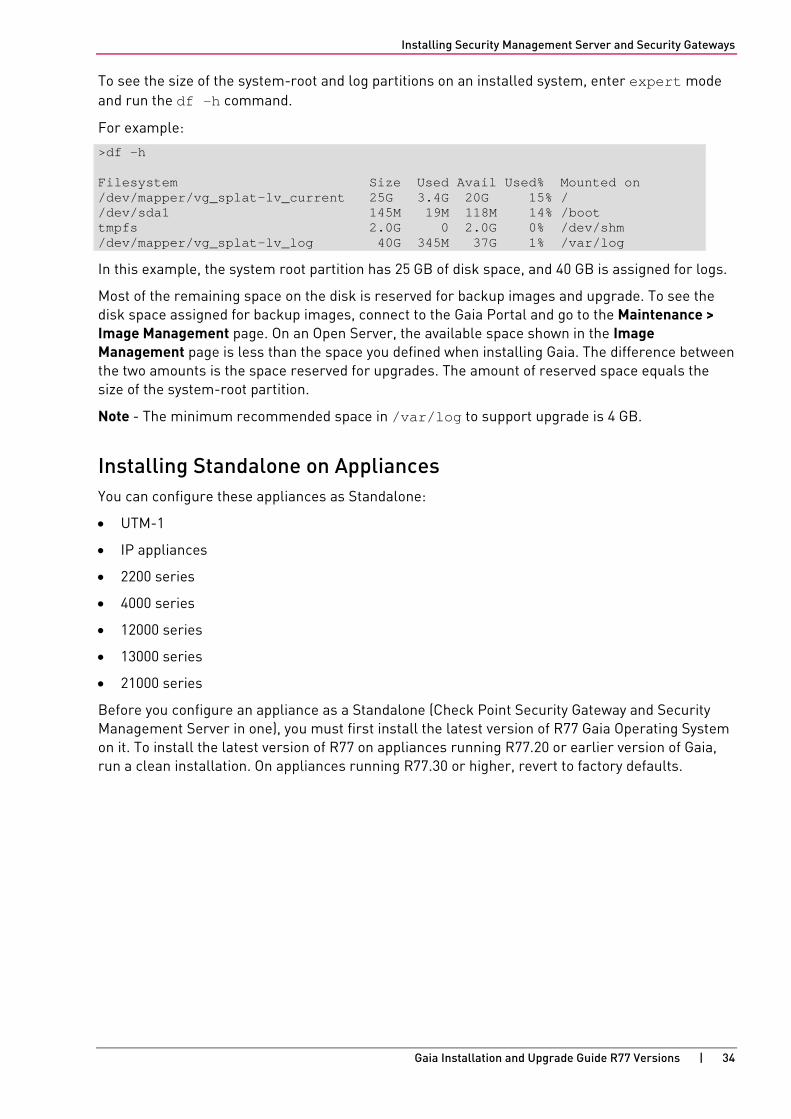
To see the size of the system-root and log partitions on an installed system, enter expert mode and run the df -h command.
For example:
>df -h Filesystem Size Used Avail Used% Mounted on /dev/mapper/vg_splat-lv_current 25G 3.4G 20G 15% / /dev/sda1 145M 19M 118M 14% /boot tmpfs 2.0G 0 2.0G 0% /dev/shm /dev/mapper/vg_splat-lv_log 40G 345M 37G 1% /var/log
In this example, the system root partition has 25 GB of disk space, and 40 GB is assigned for logs.
Most of the remaining space on the disk is reserved for backup images and upgrade. To see the disk space assigned for backup images, connect to the Gaia Portal and go to the Maintenance > Image Management page. On an Open Server, the available space shown in the Image Management page is less than the space you defined when installing Gaia. The difference between the two amounts is the space reserved for upgrades. The amount of reserved space equals the size of the system-root partition.
Note - The minimum recommended space in /var/log to support upgrade is 4 GB.
Installing Standalone on Appliances You can configure these appliances as Standalone:
• UTM-1
• IP appliances
• 2200 series
• 4000 series
• 12000 series
• 13000 series
• 21000 series
Before you configure an appliance as a Standalone (Check Point Security Gateway and Security Management Server in one), you must first install the latest version of R77 Gaia Operating System on it. To install the latest version of R77 on appliances running R77.20 or earlier version of Gaia, run a clean installation. On appliances running R77.30 or higher, revert to factory defaults.
Installing Security Management Server and Security Gateways
Gaia Installation and Upgrade Guide R77 Versions | 35
Running a Clean Installation of Gaia
To install R77 Gaia on IP appliances:
See sk100686 http://supportcontent.checkpoint.com/solutions?id=sk100686.
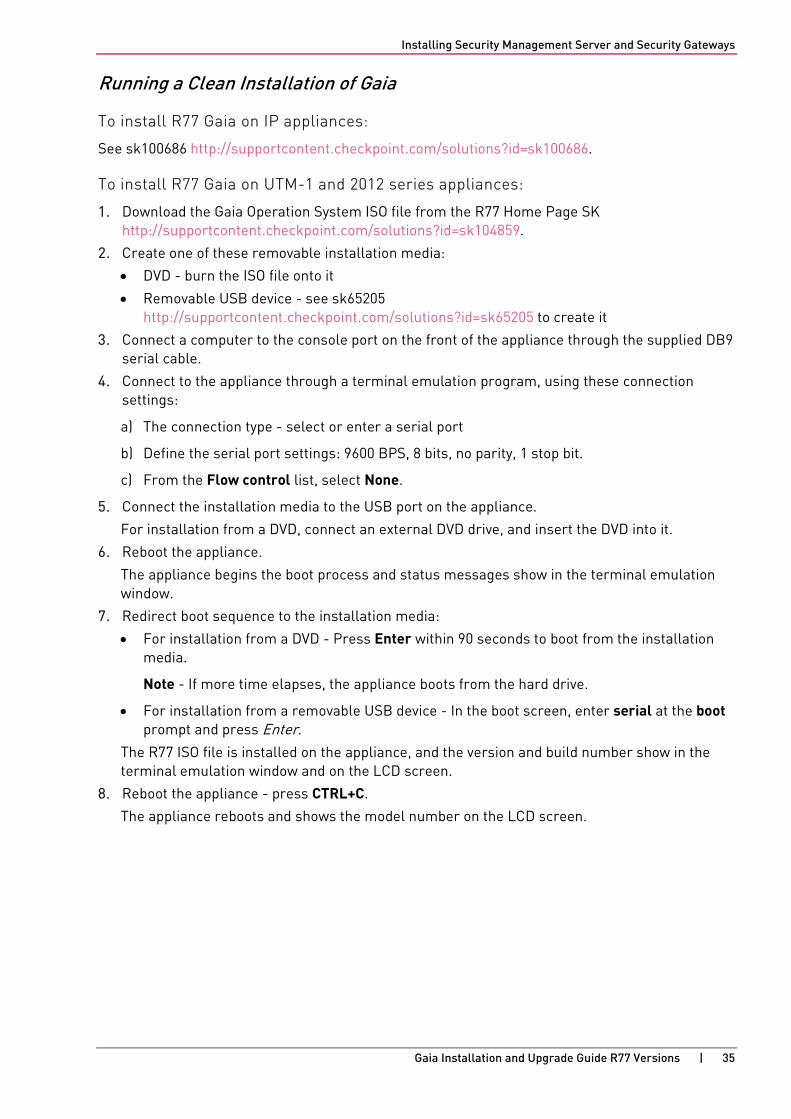
To install R77 Gaia on UTM-1 and 2012 series appliances:
1. Download the Gaia Operation System ISO file from the R77 Home Page SK http://supportcontent.checkpoint.com/solutions?id=sk104859.
2. Create one of these removable installation media:
• DVD - burn the ISO file onto it
• Removable USB device - see sk65205 http://supportcontent.checkpoint.com/solutions?id=sk65205 to create it
3. Connect a computer to the console port on the front of the appliance through the supplied DB9 serial cable.
4. Connect to the appliance through a terminal emulation program, using these connection settings:
a) The connection type - select or enter a serial port
b) Define the serial port settings: 9600 BPS, 8 bits, no parity, 1 stop bit.
c) From the Flow control list, select None.
5. Connect the installation media to the USB port on the appliance.
For installation from a DVD, connect an external DVD drive, and insert the DVD into it.
6. Reboot the appliance.
The appliance begins the boot process and status messages show in the terminal emulation window.
7. Redirect boot sequence to the installation media:
• For installation from a DVD - Press Enter within 90 seconds to boot from the installation media.
Note - If more time elapses, the appliance boots from the hard drive.
• For installation from a removable USB device - In the boot screen, enter serial at the boot prompt and press Enter.
The R77 ISO file is installed on the appliance, and the version and build number show in the terminal emulation window and on the LCD screen.
8. Reboot the appliance - press CTRL+C.
The appliance reboots and shows the model number on the LCD screen.
Installing Security Management Server and Security Gateways
Gaia Installation and Upgrade Guide R77 Versions | 36
Configuring a Standalone Appliance You can configure a Check Point Standalone appliance using the Check Point First Time Configuration Wizard in one of these modes:
• Standard - supported on all appliances running all R77 Gaia versions
• Quick Setup - supported only on 2200, 4000, 12000, 13000 and 21000 series appliances running R77.30 or a later Gaia version
Gaia Quick Setup is suitable for quick deployment of preconfigured settings on Check Point appliances. You can use it in production environments, for Security Checkup analysis, and for demos. Quick Setup configures appliances as Check Point Standalone (Security Management Server and Security Gateway), with selected Software Blades preconfigured, and in monitor or in bridge mode. For more information, see sk102231 http://supportcontent.checkpoint.com/solutions?id=sk102231.
To configure Check Point products on an appliance running Gaia Operating System, the administrator uses the IP address of the management interface on the appliance. The default is 192.168.1.1, but you can change it. If you change the management interface IP address, make sure it is on the same subnet as the management network, so that you can access the appliance from a remote computer over the network. You can change the management IP address before, during, or after running the First Time Configuration Wizard. If you change the management IP address during the First Time Configuration Wizard, the warning shows: Your IP address has been changed. In order to maintain the browser connection, the old IP address will be retained as a secondary IP address.
Note - On a UTM-1 appliance, the internal interface (INT) is used as the management interface.
To change the management IP address before running the First Time Configuration Wizard:
1. Open a console connection to the appliance using the default management IP address.
2. Log in using the default credentials:
• username - admin
• password - admin
3. Run the show interfaces command to get the name of the management interface.
4. In Clish, run this command to set the management interface: set interface mgmt ipv4-address <IPv4 address> subnet-mask <mask>
5. Run this command to configure the static route to the default gateway: set static-route default nexthop gateway address <ip address> on
Now, you can use the configured management IP address to connect through a browser with the Portal and to run the First Time Configuration Wizard.
Installing Security Management Server and Security Gateways
Gaia Installation and Upgrade Guide R77 Versions | 37
To change the management IP address after running the First Time Configuration Wizard:
1. Open a browser connection to the default management IP address.
2. In Portal, go to Network Management > Network interfaces.
3. In the Management Interface area, click Set Management Interface.
4. The Management interface window shows which interface is configured as the management interface.
5. In Interfaces table, select the management interface and click Edit. 6. Change the IP address of the interface.
Note - The connection will drop, because the settings of an interface the browser is currently connecting to are changed.
7. Click OK.
To configure a Standalone appliance using First Time Configuration Wizard in the standard mode:
1. Connect the appliance to the management network through the management interface (MGMT).
2. On a computer that is connected to the management network, open a web browser to the management IP address on the appliance.
The login page opens.
3. Log in with the default credentials:
• username - admin
• password - admin
4. Click Login.
The First Time Configuration Wizard starts and the Welcome screen shows.
5. Click Next. 6. In the Setup section of Deployment Options view, select Continue with Gaia R77 configuration
and click Next. 7. Change the default administrator password and click Next. 8. Configure the Management Connection settings:
• IPv4 address and Subnet mask of the management interface
Note - You can leave the IP address and the subnet mask unchanged. It is either the factory default address or the latest address that the administrator configured.
• IPv4 address of the Default Gateway
• Configure IPv6 (optional) -
Select On from the drop-down menu (by default, it is off)
Enter the IPv6 address and Subnet mask of the management interface
Enter the IPv6 address of the Default Gateway
9. Click Next.
Installing Security Management Server and Security Gateways
Gaia Installation and Upgrade Guide R77 Versions | 38
10. Configure Connection to UserCenter settings (optional) - an additional interface for remote management:
• Interface - select an interface on the appliance
• Configure IPv4 -
Select On from the drop-down menu (by default, it is off)
Enter the IPv4 address and Subnet mask of the interface
• Configure IPv6 -
Select On from the drop-down menu (by default, it is off)
Enter the IPv6 address and Subnet mask of the interface
11. Click Next. 12. Configure the Date and Time Settings in one of these ways:
• Manually
• Configure the NTP server - define the hostname and the IP address (IPv4 or IPv6)
13. Click Next. 14. In the Products window, select Security Gateway and Security Management
If the unit is part of a cluster:
15. Select the cluster type: ClusterXL or VRRP Cluster
• Define the Management as Primary, Secondary, or Log Server/SmartEvent Only
• Enter the Cluster Global ID - only on versions R77.30 and later
16. Click Next. 17. Define login credentials for the Security Management Server administrator account - Name
and New Password
18. Click Next. 19. Define SmartConsole clients that can log in to the Security Management Server:
• For This machine or Network - an IPv4 or an IPv6 address
• Range of IPv4 addresses
20. Click Next. 21. On UTM-1 and 2012 models only -
a) Get a license automatically from the User Center and activate it, or use the trial license.
b) If there is a proxy server between the appliance and the Internet, enter its IP address and port.
c) Click Next.
22. Review the summary, make sure it is correct, and click Finish.
23. On UTM-1 and 2012 models only, click Yes to start the configuration process.
A progress bar tracks the configuration of each task.
24. Click OK to finish the installation.
If the Help Check Point Improve Upgrades (CPUSE) window shows, click Yes or No.
After Gaia R77.30 is installed on the appliance, you can also download the SmartConsole using the Gaia Portal.
Installing Security Management Server and Security Gateways
Gaia Installation and Upgrade Guide R77 Versions | 39
To download the SmartConsole:
1. Open a web browser and connect to: https://<management_ip_address>
2. In the Overview page of the Portal, click Download Now!
When you configure a Standalone appliance in Quick Setup mode, these products settings are configured:
• Security Gateway - in bridge or monitor mode
• Security Management Server with these blades:
• Firewall Software Blade - with Any-Any-Accept default policy and logging of a few common protocols
• IPS Software Blade - set to inspect all traffic and has troubleshooting turned on by default
• Application Control and URL Filtering Software Blades - each with Any-Any-Log policy, set to run in the background, and with fail-open mode turned on
• Anti-Bot Software Blade
• Anti-Virus Software Blade
• Threat Emulation Software Blade - in ThreatCloud mode
• SmartEvent Software Blade - with detect-only policy, set to scan all file types in both directions, and set to run in the background
Note - Anti-Bot, Anti-Virus, and Threat Emulation are not installed on 2200 series appliances
To configure a Standalone appliance using First Time Configuration Wizard in the Quick Setup mode:
1. Connect the appliance to the management network through the management interface (MGMT).
2. On a computer that is connected to the management network, open a web browser to the management IP address on the appliance.
The login page opens.
3. Log in with the default credentials:
• username - admin
• password - admin
4. Click Login.
The First Time Configuration Wizard starts and the Welcome screen shows.
5. Click Next. 6. In the Setup section of Deployment Options view, select Quick Standalone setup of Gaia
<latest_version> and click Next.
Installing Security Management Server and Security Gateways
Gaia Installation and Upgrade Guide R77 Versions | 40
7. In the Quick Setup window, configure settings in these sections:
• Management - New IPv4 address and Subnet mask
Note - You can leave the IP address and the subnet mask unchanged. It is either the factory default address or the latest address that the administrator configured.
• Authentication - New Password (make sure to Confirm Password) for the Gaia OS and the Security Management Server admin account
• Networking -
IPv4 Address (<int>) and Subnet mask (optional) of the additional interface for remote access
Default gateway - make sure it is in the same subnet as the Management IP address (if you use the new interface for management, the address of the default gateway must be in the same subnet as the address of the new interface)
DNS server IP address (optional)
Proxy server (optional) - select Proxy server and enter the Address and the Port number
Topology - select Monitor mode or Bridge mode
To verify connectivity, click Test Connectivity.
8. Click Next. 9. Review the summary, make sure it is correct, and click Finish.
Note - In Quick Setup mode, date and time are automatically synchronized with those on the PC that is used to run the First Time Configuration Wizard.
After the First Time Configuration Wizard runs in Quick Setup mode, the latest R77 version of the Security Checkup is installed and can be used with R77.30 or a later version of SmartConsole.
If you want to convert the standalone appliance into a gateway only, and manage it with an existing Security Management Server, you can download and run this script on the appliance:
# /bin/standlone_to_gw_registry_update.sh $CPDIR/registry/HKLM_registry.data
Notes -
• Quick Setup cannot be used to reconfigure Security Gateways of different versions
• Quick Setup does not automatically activate the Standalone configuration products - the 15 days trial license is used until the products are activated
• After the Quick Setup configuration runs, to activate Threat Emulation Software Blade, you must activate the Standalone on the appliance
Installing Security Management Server and Security Gateways
Gaia Installation and Upgrade Guide R77 Versions | 41
Installing Standalone on Open Servers A standalone deployment can be installed on any computer that meets the minimum requirements (see the Release Notes).
This procedure explains how to install the Gaia operating system on an open server. Then you configure the Standalone Check Point products.
To install Gaia on an open server:
1. Start the computer using the installation media.
2. When the first screen shows, select Install Gaia on the system and press Enter. 3. You must press Enter in 60 seconds, or the computer will try to start from the hard drive. The
timer countdown stops once you press Enter. There is no time limit for the subsequent steps.
4. Press OK to continue with the installation.
5. Select a keyboard language. English US is the default.
6. Make sure the disk space allocation is appropriate for the environment.
7. Enter and confirm the password for the admin account.
8. Select the management interface (default = eth0).
9. Configure the management IP address, net mask and default gateway. You can define the DHCP server on this interface.
10. Select OK to format your hard drive and start the installation.
11. Press reboot to complete the installation.
To configure Check Point products on Gaia, use the First Time Configuration Wizard. Configure the operating system and install the products in one wizard.
To configure standalone products on Gaia:
1. Using your Web browser, go to the Portal:
https://<Gaia management IP address>
2. In the Gaia Portal window, log in using the administrator name and password that you defined during the installation procedure.
3. The Portal shows the First Time Configuration Wizard. Click Next. 4. Select Continue with configuration of Gaia R77.
5. Click Next. 6. Change the default administrator password.
7. Click Next. 8. Set an IPv4 and an IPv6 address for the management interface, or set one IP address (IPv4 or
IPv6).
If you change the management IP address, the new IP address is assigned to the interface. The old IP address is added as an alias and is used to maintain connectivity.
9. Set the host name for the appliance.
Optional:
• Set the domain name, and IPv4 or IPv6 addresses for the DNS servers.
• Set the IP Address and Port for a Proxy Server
10. Click Next.
Installing Security Management Server and Security Gateways
Gaia Installation and Upgrade Guide R77 Versions | 42
11. Set the date and time manually, or enter the hostname, IPv4 address or IPv6 address of the NTP server.
Click Next. 12. Set the username and password for the Security Management Server administrator account
and then click Next. 13. Select Security Gateway and Security Management and then click Next. 14. Define IP addresses from which SmartConsole clients can log in to the Security Management
Server.
• If you select This machine or Network, define an IPv4 or an IPv6 address.
• You can also select a range of IPv4 addresses.
15. Click Next. 16. Get a license automatically from the UserCenter and activate it, or use the trial license.
If there is a proxy server between the appliance and the Internet, enter its IP address and port.
17. Click Next. 18. Review the summary and, if correct, click Finish.
19. To start the configuration process, click Yes.
A progress bar tracks the configuration of each task.
20. Click OK.
21. If the Help Check Point Improve Upgrades (CPUSE) window shows, click Yes or No.
After some minutes, you can use the Portal to configure your standalone environment.
22. If necessary, download SmartConsole from the Gaia Portal.
a) Open a connection from a browser to the Portal: https://<management_ip_address>
b) In the Overview page, click Download Now!
To configure a Gaia Secondary Security Management Server on a Standalone Open Server:
Use the same procedure as for the primary Security Management Server, with these changes:
• In the Products page, define Security Management as Secondary.
• In the Secure Internal Communication (SIC) page, define the Activation Key. Use this key to configure the secondary Security Management Server object in SmartDashboard.
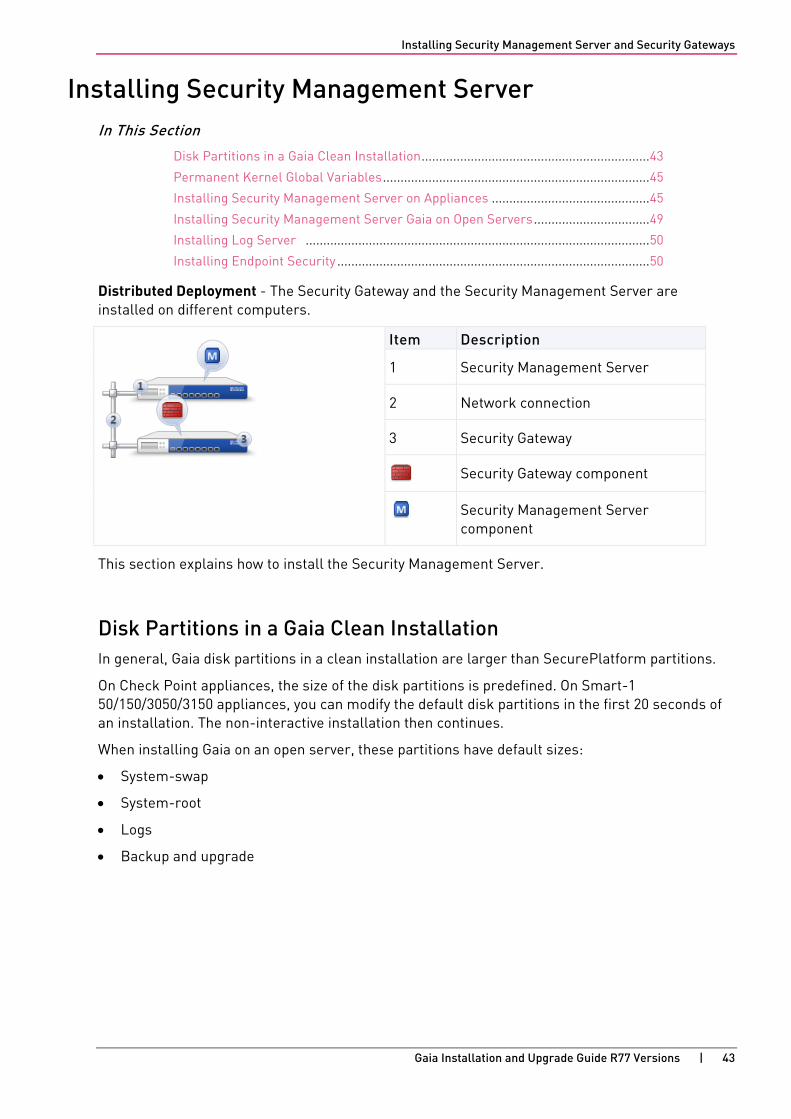
Installing Security Management Server and Security Gateways
Gaia Installation and Upgrade Guide R77 Versions | 43
Installing Security Management Server In This Section
Disk Partitions in a Gaia Clean Installation ................................................................. 43
Permanent Kernel Global Variables ............................................................................ 45
Installing Security Management Server on Appliances ............................................. 45
Installing Security Management Server Gaia on Open Servers ................................. 49
Installing Log Server .................................................................................................. 50
Installing Endpoint Security ......................................................................................... 50
Distributed Deployment - The Security Gateway and the Security Management Server are installed on different computers.
Item Description
1 Security Management Server
2 Network connection
3 Security Gateway
Security Gateway component
Security Management Server component
This section explains how to install the Security Management Server.
Disk Partitions in a Gaia Clean Installation In general, Gaia disk partitions in a clean installation are larger than SecurePlatform partitions.
On Check Point appliances, the size of the disk partitions is predefined. On Smart-1 50/150/3050/3150 appliances, you can modify the default disk partitions in the first 20 seconds of an installation. The non-interactive installation then continues.
When installing Gaia on an open server, these partitions have default sizes:
• System-swap
• System-root
• Logs
• Backup and upgrade
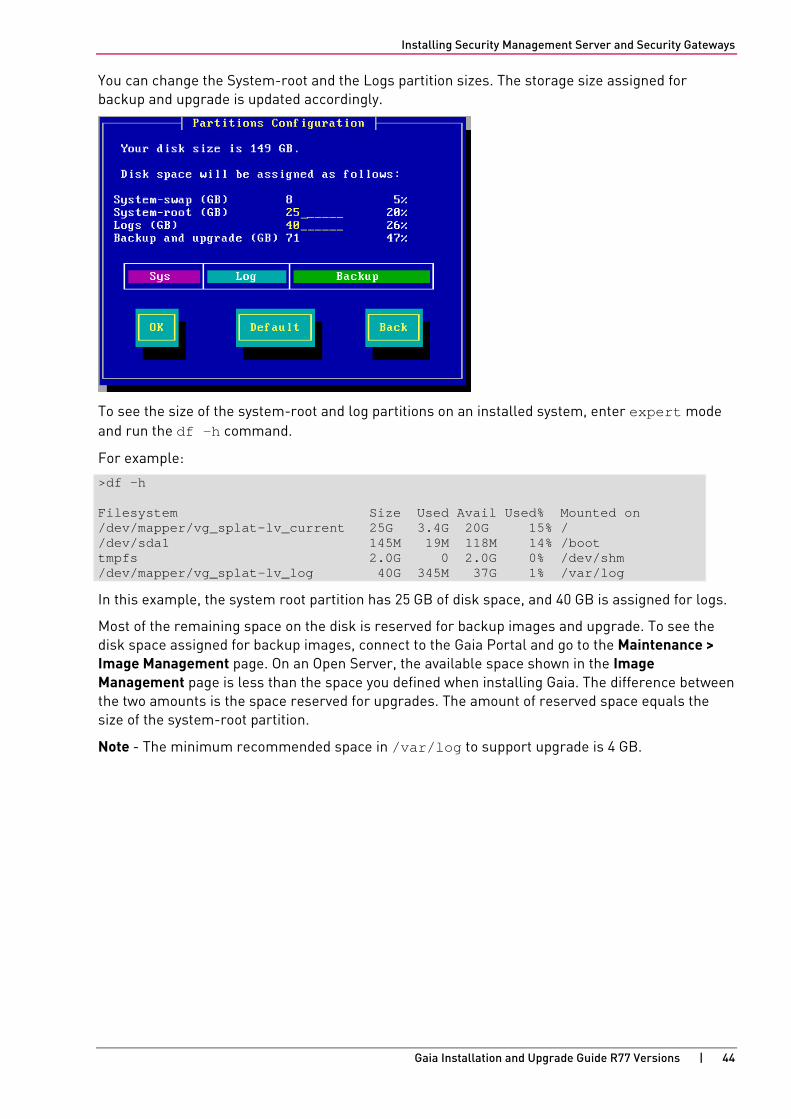
Installing Security Management Server and Security Gateways
Gaia Installation and Upgrade Guide R77 Versions | 44
You can change the System-root and the Logs partition sizes. The storage size assigned for backup and upgrade is updated accordingly.
To see the size of the system-root and log partitions on an installed system, enter expert mode and run the df -h command.
For example:
>df -h Filesystem Size Used Avail Used% Mounted on /dev/mapper/vg_splat-lv_current 25G 3.4G 20G 15% / /dev/sda1 145M 19M 118M 14% /boot tmpfs 2.0G 0 2.0G 0% /dev/shm /dev/mapper/vg_splat-lv_log 40G 345M 37G 1% /var/log
In this example, the system root partition has 25 GB of disk space, and 40 GB is assigned for logs.
Most of the remaining space on the disk is reserved for backup images and upgrade. To see the disk space assigned for backup images, connect to the Gaia Portal and go to the Maintenance > Image Management page. On an Open Server, the available space shown in the Image Management page is less than the space you defined when installing Gaia. The difference between the two amounts is the space reserved for upgrades. The amount of reserved space equals the size of the system-root partition.
Note - The minimum recommended space in /var/log to support upgrade is 4 GB.
Installing Security Management Server and Security Gateways
Gaia Installation and Upgrade Guide R77 Versions | 45
Permanent Kernel Global Variables Make sure that the upgrade does not overwrite custom values with defaults.
For upgrades to R77.30:
1. Note or record the values of kernel variables that you changed after the last upgrade. See sk26202 http://supportcontent.checkpoint.com/solutions?id=sk26202.
2. Note or record the cluster ID before the upgrade.
3. Upgrade each cluster member.
4. See the cluster ID. Run: cphaconf cluster_id get
It must be the same as before the upgrade.
For upgrades to R77.20 and lower:
1. Note or record the values of kernel variables that you changed after the last upgrade. See sk26202 http://supportcontent.checkpoint.com/solutions?id=sk26202.
2. Upgrade each cluster member.
3. Get the values of the variables after the upgrade.
Each must be the same as before the upgrade.
Installing Security Management Server on Appliances You can install a Security Management Server on Smart-1 appliances. For more about supported appliances, see the Release Notes.
1. Make sure that you have the correct ISO file.
2. Install the Gaia or SecurePlatform operating system on Smart-1. See instructions in UTM-1 and 2012 Models.
3. Smart-1 50 only: Smart-1 50 appliances have two images: Security Management Server and Multi-Domain Server. To select the Security Management Server image:
a) While the appliance is restarting, open the terminal emulation program.
b) When prompted, press any key to enter the boot menu.
c) Select Reset to factory defaults - Security Management Server and press Enter.
d) Type yes and press Enter.
The Security Management Server image is selected for the appliance and then the appliance resets.
Install the Security Management Server using the First Time Configuration Wizard.
Note - The management IP address can be changed before or after running the First Time Configuration Wizard. This is useful if you must access the device over the network. Use the console connection to configure the management interface before connecting the Gaia appliance to the network. Once the management interface has this address, you can connect through a browser over the network and run the First Time Configuration Wizard.
Installing Security Management Server and Security Gateways
Gaia Installation and Upgrade Guide R77 Versions | 46
To change the Management address before running the First Time Configuration Wizard:
1. Open a console connection.
2. Log in using the default username and password: admin and admin.
3. Run the show interfaces command to get the name of the management interface.
4. In Clish, set the management interface using:
set interface mgmt ipv4-address <IPv4 address> subnet-mask <mask>
5. Set the static route to the default gateway using:
set static-route default nexthop gateway address <ip address> on
6. Through a browser, connect to the Portal and run the First Time Configuration Wizard.
To change the management IP address after running the First Time Configuration Wizard:
1. Open the Portal.
2. Open the Network Management > Network interfaces window.
3. In the Management Interface area, click Set Management Interface.
4. The Management interface window shows which interface is configured as the management interface.
5. In Interfaces table, select the management interface and click Edit. 6. Change the IP address of the interface.
Note - This changes the settings of an interface the browser is currently connecting to.
7. Click OK.
To start the First Time Configuration Wizard on Gaia:
1. Connect the appliance to your management network through the management interface, which is marked MGMT.
The management interface is preconfigured with the IP address 192.168.1.1. If you later change it through the Check Point Portal, make sure that the new address is on the same subnet as the management network.
2. Open a connection from a browser to the management IP address.
The login page opens.
3. Log in to the system with the default username and password: admin and admin
4. Click Login.
The First Time Configuration Wizard runs.
5. Follow the instructions on the screen.
Note - Settings that you configure in the First Time Configuration Wizard, can be changed later in the Portal, from an Internet browser go to https://<appliance_ip_address>
Installing Security Management Server and Security Gateways
Gaia Installation and Upgrade Guide R77 Versions | 47
To configure Gaia Security Management on Smart-1 appliances:
1. This step applies to R77.10 and higher. For other Gaia releases, configure these options in the Gaia Portal, in the Image Management page and the (Upgrades (CPUSE)) page.
In the Deployment Options page, select Continue with Gaia configuration. Other options ("Installation and Recovery During Product Deployment" on page 23) are:
Clean install • Install a version from the Check Point Cloud.
• Install from a USB device.
Recovery
• Automatic version recovery from the Check Point Cloud.
• Import an existing snapshot.
Click Next. 2. In the Authentication Details page, change the default administrator password.
Click Next. 3. In the Management Connection page, set an IPv4 and an IPv6 address for the management
interface, or set one IP address (IPv4 or IPv6).
You can change the Management IP address. Gaia automatically creates a secondary interface to keep connectivity when the management interface is not available. After you complete the First Time Configuration Wizard, you can remove this interface in the Interface Management > Network Interfaces page.
4. Optional: In the Connection to User Center page, configure an external interface to connect to the Check Point User Center. Use this connection to download a license and activate it. Alternatively, use the trial license. To connect to the User Center, you must also configure DNS and (if applicable) a Proxy Server, in the Device Information page of the Wizard.
5. In the Device Information page, set the Host Name for the appliance.
Optional:
• Set the domain name, and IPv4 or IPv6 addresses for the DNS servers.
• To connect to the User Center, set the IP Address and Port for a Proxy Server. Do this if you want to activate the appliance by downloading a license from the User Center.
Click Next. 6. In the Date and Time Settings page, set the date and time manually, or enter the hostname,
IPv4 address or IPv6 address of the NTP server.
Click Next. 7. This step does not apply to R77.20 and higher or Smart-1 205/210/225/3050/3150:
In the Appliance Type page, select Smart-1 appliance.
Click Next. 8. In the Products page, select Security Management and Primary.
For R77.10 and higher: Automatically download Blade Contracts and other important data. Check Point highly recommends that you select Automatic Downloads (on page 16).
9. In the Security Management Administrator page, define the name and password of an administrator that can connect to the Security Management Server using SmartConsole clients.
Click Next.
Installing Security Management Server and Security Gateways
Gaia Installation and Upgrade Guide R77 Versions | 48
10. In the Security Management GUI Clients page, define IP addresses from which SmartConsole clients can log in to the Security Management Server.
• If you select This machine or Network, define an IPv4 or an IPv6 address.
• You can also select a range of IPv4 addresses.
Click Next. 11. In the Appliance Activation page, get a license automatically from the User Center and
activate it, or use the 15 day trial license.
Click Next. 12. In the Summary page, review your choices
Optional: Improve product experience by Sending Data to Check Point (on page 17).
Click Finish.
13. To start the configuration, click Yes.
A progress bar tracks the configuration of each task.
Click OK.
The Security Management Server is installed on the appliance.
14. If necessary, download SmartConsole from the Gaia Portal.
a) Open a connection from a browser to the Portal: https://<management_ip_address>
b) In the Overview page, click Download Now!
To configure a Gaia secondary Security Management on Smart-1:
Use the same procedure as for the primary Security Management Server, with these changes:
• In the Products page, define Security Management as Secondary.
• In the Secure Internal Communication (SIC) page, define the Activation Key. Use this key to configure the secondary Security Management Server object in SmartDashboard.
To configure a dedicated server for SmartEvent on Smart-1 205/210/225/3050/3150
Use the same procedure as for the Security Management Server, with these changes in the First Time Configuration Wizard:
• In the Products page, select Dedicated Server and SmartEvent.
• In the Secure Internal Communication (SIC) page, define the Activation Key. Use this key to configure the dedicated server for SmartEvent object in SmartDashboard.
Installing Security Management Server and Security Gateways
Gaia Installation and Upgrade Guide R77 Versions | 49
Installing Security Management Server Gaia on Open Servers A Security Management Server can be installed on any computer that meets the minimum requirements listed in the Release Notes.
First install and configure the operating system, then install Check Point products.
This procedure explains how to install a Security Management Server in a distributed deployment after you install the operating system ("Installing Standalone on Open Servers" on page 41).
To configure a Security Management Server on Gaia:
1. Using your Web browser, go the Portal: https://<Gaia management IP address>
2. In the Gaia Portal window, log in using the administrator name and password that you defined during the installation procedure.
3. The Portal shows the First Time Configuration Wizard. Click Next. 4. Select Continue with configuration of Gaia R77.
5. Click Next. 6. Change the default administrator password.
7. Click Next. 8. Set an IPv4 and an IPv6 address for the management interface, or set one IP address (IPv4 or
IPv6).
If you change the management IP address, the new IP address is assigned to the interface. The old IP address is added as an alias and is used to maintain connectivity.
9. Set the host name for the appliance.
Optional:
• Set the domain name, and IPv4 or IPv6 addresses for the DNS servers.
• Set the IP Address and Port for a Proxy Server
10. Click Next. 11. Set the date and time manually, or enter the hostname, IPv4 address or IPv6 address of the
NTP server.
Click Next. 12. Set the user name and password for the Security Management Server administrator account
and then click Next. 13. Select Security Management and then click Next. 14. Define IP addresses from which SmartConsole clients can log in to the Security Management
Server.
• If you select This machine or Network, define an IPv4 or an IPv6 address.
• You can also select a range of IPv4 addresses.
15. Click Next. 16. Get a license automatically from the UserCenter and activate it, or use the trial license.
If there is a proxy server between the appliance and the Internet, enter its IP address and port.
17. Click Next. 18. Review the summary and, if correct, click Finish.
19. To start the configuration process, click Yes.
A progress bar tracks the configuration of each task.
20. Click OK.
Installing Security Management Server and Security Gateways
Gaia Installation and Upgrade Guide R77 Versions | 50
21. If the Help Check Point Improve Upgrades (CPUSE) window shows, click Yes or No.
22. If necessary, download SmartConsole from the Gaia Portal.
a) Open a connection from a browser to the Portal: https://<management_ip_address>
b) In the Overview page, click Download Now!
To configure a Gaia Secondary Security Management Server:
Use the same procedure as for the primary Security Management Server, with these changes:
• In the Products page, define Security Management as Secondary.
• In the Secure Internal Communication (SIC) page, define the Activation Key. Use this key to configure the secondary Security Management Server object in SmartDashboard.
Installing Log Server You can install a log server for a distributed deployment. Install the operating system and start to install the products as for a Security Management Server, but stop at the step where you select components.
To install a Log Server:
Do the steps to install a Security Management Server with these changes:
• When selecting the products to install, select Security Management.
• Define the Security Management as a Log Server.
• In Windows: Do not select SmartEvent.
Installing Endpoint Security In all non-standalone deployments, the Network Security Management Server can also be an Endpoint Security Management Server.
Installing Endpoint Security Servers
Use the installation instructions in this guide to install Security Management Servers. You can enable the Endpoint Security Management Server after the Security Management Server installation is completed. Endpoint Security E80.50 is installed with R77.
For R77 and R77.10 Security Management Servers, see the E80.50 Endpoint Security Administration Guide for more information.
For R77.20 Security Management Servers, see the Endpoint Security on R77.20 Management Administration Guide for more information.
To enable an Endpoint Security Management Server:
1. Use the instructions in this guide to install a Security Management Server.
2. In SmartDashboard, open the Security Management Server object.
3. Enable the Endpoint Policy Management blade in the General Properties page.
4. Select Policy > Install Database.
Installing Security Management Server and Security Gateways
Gaia Installation and Upgrade Guide R77 Versions | 51
Check Point Cloud Services for Endpoint
After the Endpoint Security Management Server is enabled on the Security Management Server, these components communicate with the Check Point cloud services:
• Endpoint Anti-Malware Software Blade – Downloads updates from the Check Point Malware Update Server.
These updates are mandatory for the correct functioning of the Anti-Malware Software Blade. Preventing them causes severe security issues, because the blade does not operate with the latest malware information database.
• Endpoint Anti-Malware Software Blade – Sends suspected malware to the Check Point ThreatCloud Server.
These updates increase the accuracy of malware detection by Check Point Endpoint Security clients and Check Point Security Appliances. To turn them off, modify the Anti-Malware rule in the Organizational Security Policy in SmartEndpoint.
• Endpoint Application Control Software Blade – Downloads information about classified known applications from the Check Point ThreatCloud Server and sends unknown applications for analysis.
These updates are mandatory for the correct functioning of the Endpoint Application Control Software Blade. Without these updates, the blade is unable to classify malicious applications and automatically distinguish between them and non-malicious ones.
To enable an Endpoint Policy Server:
1. Use the instructions in this guide to install a Log Server.
2. Connect from SmartDashboard to the Endpoint Security Management Server and create a new Log Server object:
a) In the Network Objects tree, right-click Check Point and select Security Gateway/Management.
b) Enter a Name and IP address for the Log Server.
c) Click Communication to create SIC with the Security Management Server.
d) In the Management tab, select:
Endpoint Policy Management
Logging & Status
3. Select Policy > Install Database.
When the Endpoint Policy Management blade is enabled, the SecurePlatform/Gaia Portal port changes from 443 to 4434. If you disable the blade, the port changes back to 443.
Installing Security Management Server and Security Gateways
Gaia Installation and Upgrade Guide R77 Versions | 52
Disk Space for Endpoint Security
We recommend that you have at least 10 GB available for Endpoint Security in the Root disk partition.
• In Gaia and SecurePlatform, client packages and release files are stored under the Root partition.
• In Windows, client packages and files are usually stored on the C drive.
The files include:
• 4 GB - Security Management Server installation files.
• 2 GB or more - Client files (each additional version of client packages requires 1GB of disk space).
• 1 GB - Logs.
• 1 GB - High Availability support (more can be required in large environments).
Note - To make future upgrades easier, we recommend that you use a larger disk size than necessary in this deployment.
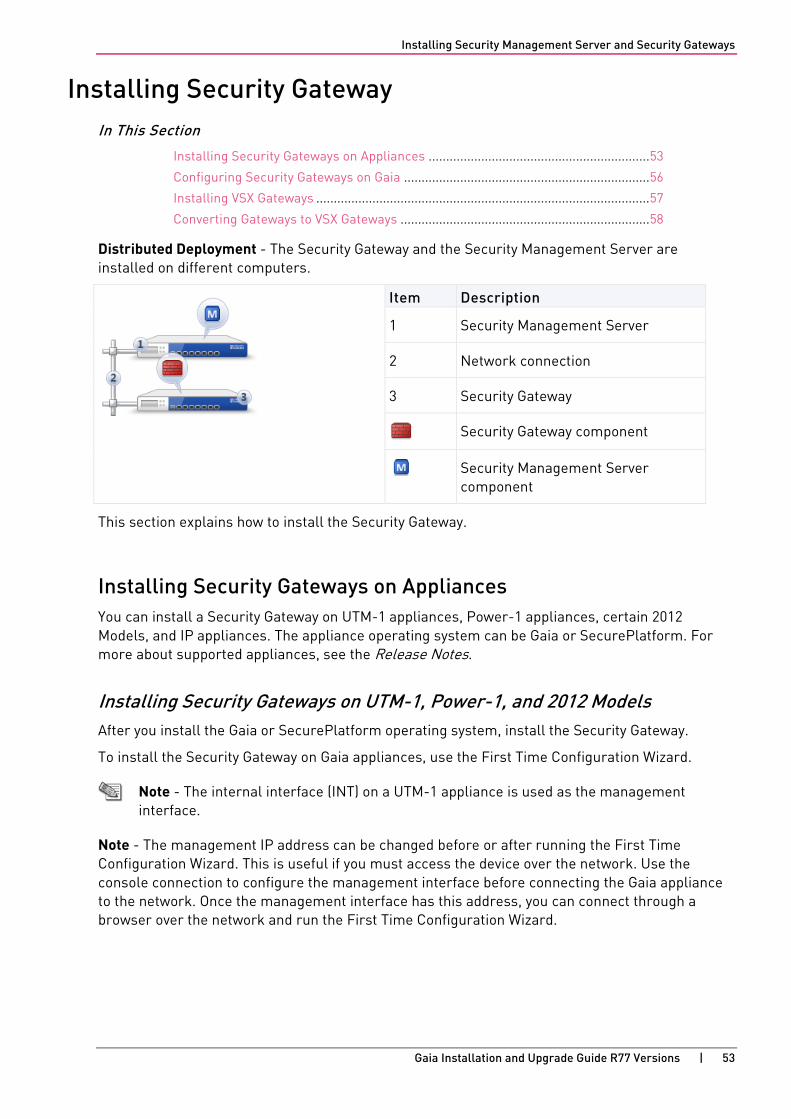
Installing Security Management Server and Security Gateways
Gaia Installation and Upgrade Guide R77 Versions | 53
Installing Security Gateway In This Section
Installing Security Gateways on Appliances ............................................................... 53
Configuring Security Gateways on Gaia ...................................................................... 56
Installing VSX Gateways ............................................................................................... 57
Converting Gateways to VSX Gateways ....................................................................... 58
Distributed Deployment - The Security Gateway and the Security Management Server are installed on different computers.
Item Description
1 Security Management Server
2 Network connection
3 Security Gateway
Security Gateway component
Security Management Server component
This section explains how to install the Security Gateway.
Installing Security Gateways on Appliances You can install a Security Gateway on UTM-1 appliances, Power-1 appliances, certain 2012 Models, and IP appliances. The appliance operating system can be Gaia or SecurePlatform. For more about supported appliances, see the Release Notes.
Installing Security Gateways on UTM-1, Power-1, and 2012 Models After you install the Gaia or SecurePlatform operating system, install the Security Gateway.
To install the Security Gateway on Gaia appliances, use the First Time Configuration Wizard.
Note - The internal interface (INT) on a UTM-1 appliance is used as the management interface.
Note - The management IP address can be changed before or after running the First Time Configuration Wizard. This is useful if you must access the device over the network. Use the console connection to configure the management interface before connecting the Gaia appliance to the network. Once the management interface has this address, you can connect through a browser over the network and run the First Time Configuration Wizard.
Installing Security Management Server and Security Gateways
Gaia Installation and Upgrade Guide R77 Versions | 54
To change the Management address before running the First Time Configuration Wizard:
1. Open a console connection.
2. Log in using the default username and password: admin and admin.
3. Run the show interfaces command to get the name of the management interface.
4. In Clish, set the management interface using:
set interface mgmt ipv4-address <IPv4 address> subnet-mask <mask>
5. Set the static route to the default gateway using:
set static-route default nexthop gateway address <ip address> on
6. Through a browser, connect to the Portal and run the First Time Configuration Wizard.
To change the management IP address after running the First Time Configuration Wizard:
1. Open the Portal.
2. Open the Network Management > Network interfaces window.
3. In the Management Interface area, click Set Management Interface.
4. The Management interface window shows which interface is configured as the management interface.
5. In Interfaces table, select the management interface and click Edit. 6. Change the IP address of the interface.
Note - This changes the settings of an interface the browser is currently connecting to.
7. Click OK.
To start the First Time Configuration Wizard on Gaia:
1. Connect a standard network cable to the appliance management interface and to your management network.
• The management interface is marked MGMT.
• This interface is preconfigured with the IP address 192.168.1.1
Note - Make sure that the management interface on the computer is on the same network subnet as the appliance. For example: IP address 192.168.1.x and Netmask 255.255.255.0 You can change the interface in the Portal, after you complete the First Time Configuration Wizard.
2. Open a connection from a browser to the management IP address.
The login page opens.
3. Log in to the system with the default username and password: admin and admin
4. Click Login.
The First Time Configuration Wizard runs.
5. Follow the instructions on the screen.
Note - Settings that you configure in the First Time Configuration Wizard, can be changed later in the Portal, from an Internet browser go to https://<appliance_ip_address>
Installing Security Management Server and Security Gateways
Gaia Installation and Upgrade Guide R77 Versions | 55
To configure Gaia Security Gateway appliances:
1. In the First Time Configuration Wizard, set the username and password for the administrator account and then click Next.
2. Select Continue with configuration of Gaia R77.
3. Click Next. 4. Change the default administrator password.
5. Click Next. 6. Set an IPv4 and an IPv6 address for the management interface, or set one IP address (IPv4 or
IPv6).
If you change the management IP address, the new IP address is assigned to the interface. The old IP address is added as an alias and is used to maintain connectivity.
7. Set the host name for the appliance.
Optional:
• Set the domain name, and IPv4 or IPv6 addresses for the DNS servers.
• Set the IP Address and Port for a Proxy Server
8. Click Next. 9. Set the date and time manually, or enter the hostname, IPv4 address or IPv6 address of the
NTP server.
Click Next. 10. Select Security Gateway and then click Next. 11. Define the Secure Internal Communication (SIC) Activation Key that is used by the gateway
object in SmartDashboard and then click Next.
The Summary window shows the settings for the appliance.
12. Click Finish.
Gaia R77 is installed on the appliance.
Installing Security Gateways on IP Appliances You can install the Gaia operating system and Check Point Security Gateway on IP appliances.
This is a clean installation. The IPSO and Check Point product configurations are not imported into Gaia.
To install the Operating System:
See: sk100686 http://supportcontent.checkpoint.com/solutions?id=sk100686.
In the First Time Configuration Wizard:
1. In the Welcome window, click Next. 2. Change the default administrator password.
3. Click Next. 4. Set an IPv4 and an IPv6 address for the management interface, or set one IP address (IPv4 or
IPv6).
If you change the management IP address, the new IP address is assigned to the interface. The old IP address is added as an alias and is used to maintain connectivity.
Installing Security Management Server and Security Gateways
Gaia Installation and Upgrade Guide R77 Versions | 56
5. Set the host name for the appliance.
Optional:
• Set the domain name, and IPv4 or IPv6 addresses for the DNS servers.
• Set the IP Address and Port for a Proxy Server
6. Click Next. 7. Configure the Date and Time Settings manually, or enter the hostname, IPv4 address or IPv6
address of the NTP server.
8. Click Next.
9. Select Security Gateway.
10. Answer Yes or No to the DAIP question.
11. Click Next. 12. Enter the SIC Activation Key.
13. Click Next. 14. Get a license automatically from the UserCenter and activate it, or use the trial license.
If there is a proxy server between the appliance and the Internet, enter its IP address and port.
15. Click Next. 16. Review the summary and, if correct, click Finish.
17. To start the configuration process, click Yes.
A progress bar tracks the configuration of each task.
18. Click OK.
Configuring Security Gateways on Gaia This procedure explains how to install a Security Gateway in a distributed deployment after you install the operating system ("Installing Standalone on Open Servers" on page 41).
To configure a Security Gateway on Gaia:
1. Open a Web browser to the Portal:
https://<Gaia management IP address>
2. In the Gaia Portal window, log in with the administrator name and password that you defined during installation.
3. The Portal shows the First Time Configuration Wizard. Click Next. 4. Set the date and time manually, or enter the hostname, IPv4 address or IPv6 address of the
NTP server and then click Next. 5. Set the host name.
6. Optional: Set the domain name, and IPv4 or IPv6 addresses for the DNS servers.
Click Next. 7. Make sure that the IPv4 and IPv6 addresses for the management interface are correct.
8. Select Security Gateway.
Installing Security Management Server and Security Gateways
Gaia Installation and Upgrade Guide R77 Versions | 57
9. Optional: Configure these settings if the Security Gateway is a cluster member:
• Select Unit is part of a cluster
• Select ClusterXL or VRRP
• Enter the Cluster Global ID
• Select Primary or Secondary
Click Next.
10. Define the Secure Internal Communication (SIC) Activation Key that is used by the gateway object in SmartDashboard and then click Next. The Summary window shows the settings for the appliance.
11. Click Finish.
Gaia R77 is installed on the computer.
Installing VSX Gateways A VSX Gateway can be installed on certain Check Point appliances. You can also install it on any computer that meets the minimum requirements (see the Release Notes). Install and configure the Gaia operating system for a Security Gateway. Then install Check Point products and use SmartDashboard to change the Security Gateway to a VSX Gateway. The Security Gateway becomes virtual (VSX) when the VSX object is defined in SmartDashboard. The basic installation procedure for a Security Gateway and a VSX Gateway is the same.
For VSX Gateways on a Crossbeam platform, you must convert the gateway to VSX before you create the VSX object in SmartDashboard. For more about converting to VSX on a Crossbeam platform, see the Crossbeam Administration Guide http://www.bluecoat.com/user/login/customer_portal (password required).
To install a VSX Gateway:
1. Install and configure the R77 ISO file on the VSX Gateway.
The steps are different if the VSX Gateway is on an appliance ("Installing Security Gateways on UTM-1, Power-1, and 2012 Models" on page 53) or an Open Server ("Configuring Security Gateways on Gaia" on page 56).
In the Products window, make sure to only select Security Gateway.
2. For a VSX Gateway on a Crossbeam platform, convert the gateway to VSX.
3. Open SmartDashboard.
4. From the Network Objects tree, right-click Check Point and select VSX > Gateway.
5. Complete the on-screen instructions.
6. Install the necessary licenses on the VSX Gateway.
Installing Security Management Server and Security Gateways
Gaia Installation and Upgrade Guide R77 Versions | 58
Converting Gateways to VSX Gateways Use the VSX Gateway Conversion wizard in SmartDashboard to convert Gaia Security Gateways to VSX Gateways. You can convert one Security Gateway or all the members of a cluster to VSX. The settings of the Security Gateways are applied to the VSX Gateway (VS0). You can also use SmartDashboard to convert a VSX Gateway to a Security Gateway.
We recommend that you go to sk79260 http://supportcontent.checkpoint.com/solutions?id=sk79260, before you use the Conversion wizard. You can only convert Security Gateways or clusters that use the Gaia operating system.
Note - The Security Gateway loses connectivity during the conversion process.
Converting a Security Gateway SmartDashboard converts a Security Gateway or cluster to VSX. You can only complete the Conversion Wizard if the features and settings of the Security Gateway or cluster are compatible with VSX.
When the Conversion Process window is shown, you cannot cancel or close the Conversion Wizard.
To convert a Security Gateway:
1. Open SmartDashboard.
2. In the Network Objects tree, right-click the Security Gateway or cluster and select Convert to VSX.
3. When the Welcome to the VSX Conversion window opens, click Next to continue.
4. In the Compatibility Check window, click Next to continue.
The compatibility check makes sure that the Security Gateway or cluster is compatible with VSX.
5. In the Security Management Server Interface Sharing window, configure how interfaces are created for the new Virtual Systems and then click Convert.
6. After the conversion process completes, click Finish.
The Converting window shows as the management database is updated.
Note - You cannot use SmartDashboard while the Converting window shows.
Checking Compatibility The VSX Gateway Conversion Wizard cannot convert a Security Gateway or cluster that uses Software Blades or other features that VSX does not support. The wizard automatically checks for common compatibility problems with the Security Gateway. We recommend that you go to sk79260 http://supportcontent.checkpoint.com/solutions?id=sk79260, to see a full list of limitations and compatibility problems.
If the Security Gateway is not compatible, the Compatibility Check window tells you the solution for each compatibility problem. Close the wizard, disable the unsupported features, and run the VSX Gateway Conversion Wizard again.

Installing Security Management Server and Security Gateways
Gaia Installation and Upgrade Guide R77 Versions | 59
Completing the Conversion Complete the Security Gateway to VSX Gateway Conversion Wizard. When you complete the wizard, the management database is updated with the new VSX Gateway object.
To complete the Conversion Wizard:
Click Finish. The Converting window is shown as the management database is updated.
Note - You cannot use SmartDashboard while the Converting window is shown.
Converting a VSX Gateway SmartDashboard converts a VSX Gateway or cluster to a Security Gateway. You must remove all the Virtual Systems and other Virtual Devices from the VSX object before you can convert the VSX Gateway.
You cannot convert a VSX Gateway that uses a shared interface configuration to a Security Gateway.
To convert a VSX Gateway to a Security Gateway:
1. Remove all the Virtual Devices from the VSX object.
From the Network Objects tree, right-click each Virtual Device object and select Delete.
2. Right-click the VSX Gateway or cluster and select Convert to Gateway.
A confirmation window opens.
3. Click Yes.
The VSX Gateway is converted to a Security Gateway.
Note - You cannot use SmartDashboard while the Converting window is shown.
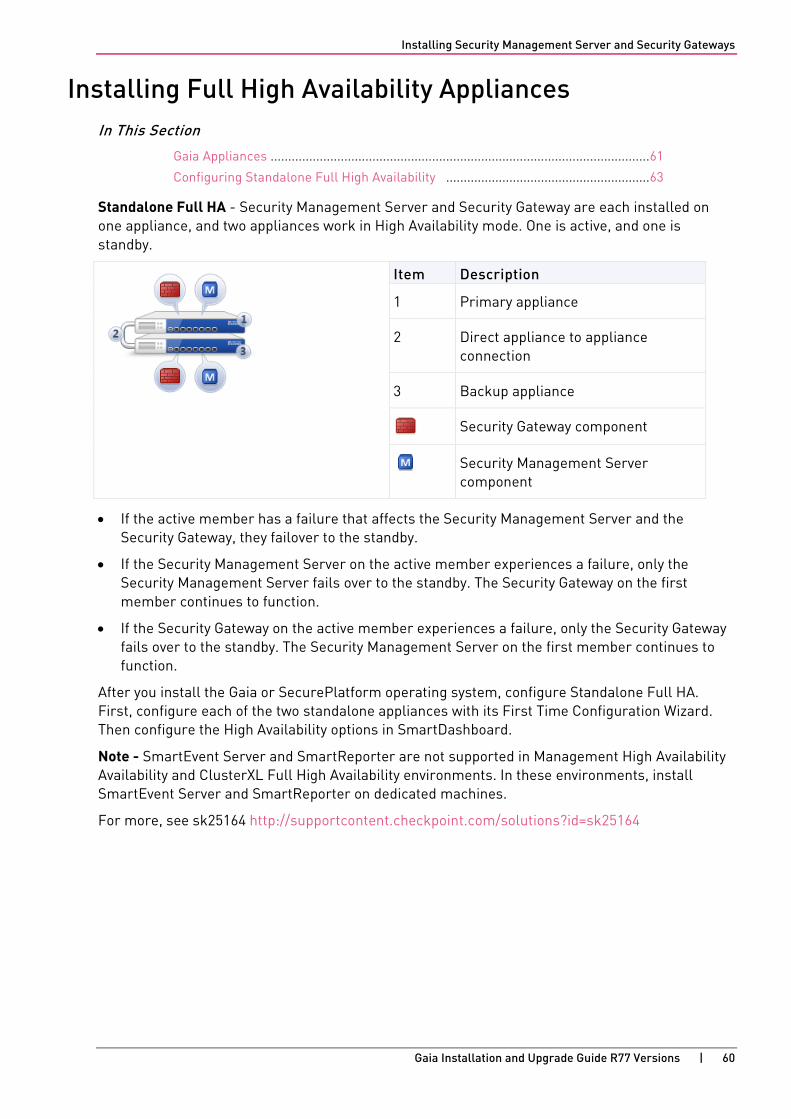
Installing Security Management Server and Security Gateways
Gaia Installation and Upgrade Guide R77 Versions | 60
Installing Full High Availability Appliances In This Section
Gaia Appliances ............................................................................................................ 61
Configuring Standalone Full High Availability .......................................................... 63
Standalone Full HA - Security Management Server and Security Gateway are each installed on one appliance, and two appliances work in High Availability mode. One is active, and one is standby.
Item Description
1 Primary appliance
2 Direct appliance to appliance connection
3 Backup appliance
Security Gateway component
Security Management Server component
• If the active member has a failure that affects the Security Management Server and the Security Gateway, they failover to the standby.
• If the Security Management Server on the active member experiences a failure, only the Security Management Server fails over to the standby. The Security Gateway on the first member continues to function.
• If the Security Gateway on the active member experiences a failure, only the Security Gateway fails over to the standby. The Security Management Server on the first member continues to function.
After you install the Gaia or SecurePlatform operating system, configure Standalone Full HA. First, configure each of the two standalone appliances with its First Time Configuration Wizard. Then configure the High Availability options in SmartDashboard.
Note - SmartEvent Server and SmartReporter are not supported in Management High Availability Availability and ClusterXL Full High Availability environments. In these environments, install SmartEvent Server and SmartReporter on dedicated machines.
For more, see sk25164 http://supportcontent.checkpoint.com/solutions?id=sk25164
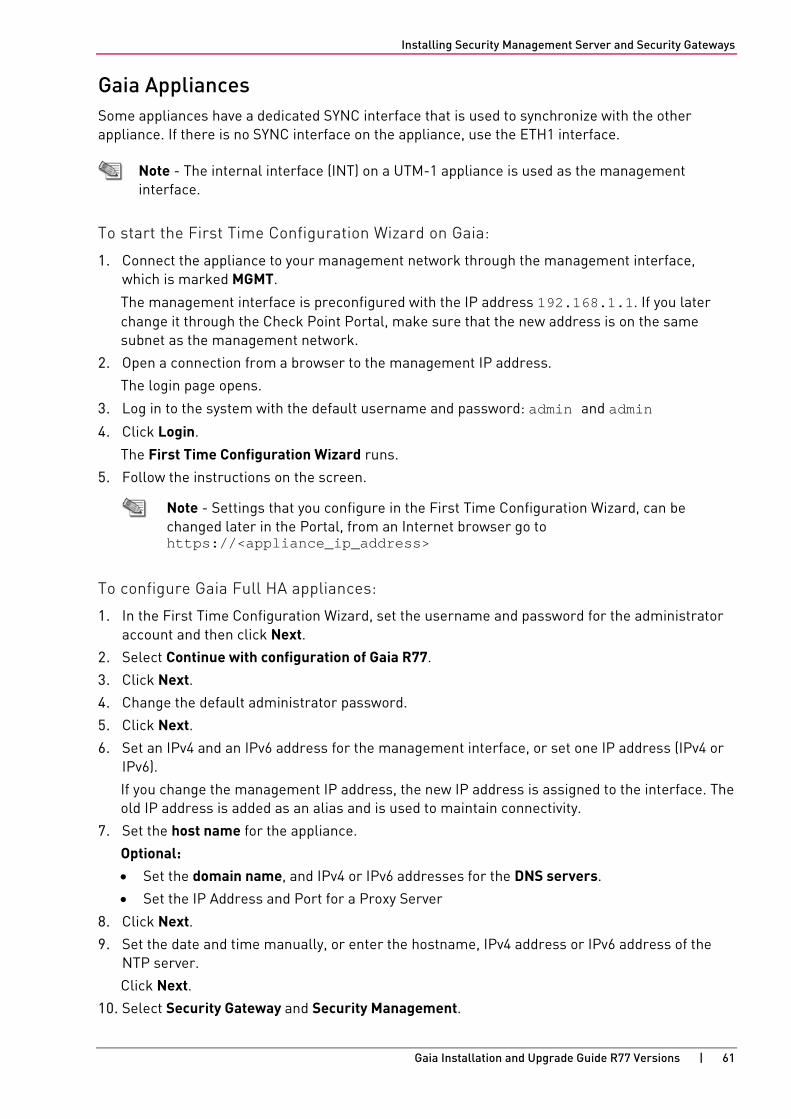
Installing Security Management Server and Security Gateways
Gaia Installation and Upgrade Guide R77 Versions | 61
Gaia Appliances Some appliances have a dedicated SYNC interface that is used to synchronize with the other appliance. If there is no SYNC interface on the appliance, use the ETH1 interface.
Note - The internal interface (INT) on a UTM-1 appliance is used as the management interface.
To start the First Time Configuration Wizard on Gaia:
1. Connect the appliance to your management network through the management interface, which is marked MGMT.
The management interface is preconfigured with the IP address 192.168.1.1. If you later change it through the Check Point Portal, make sure that the new address is on the same subnet as the management network.
2. Open a connection from a browser to the management IP address.
The login page opens.
3. Log in to the system with the default username and password: admin and admin
4. Click Login.
The First Time Configuration Wizard runs.
5. Follow the instructions on the screen.
Note - Settings that you configure in the First Time Configuration Wizard, can be changed later in the Portal, from an Internet browser go to https://<appliance_ip_address>
To configure Gaia Full HA appliances:
1. In the First Time Configuration Wizard, set the username and password for the administrator account and then click Next.
2. Select Continue with configuration of Gaia R77.
3. Click Next. 4. Change the default administrator password.
5. Click Next. 6. Set an IPv4 and an IPv6 address for the management interface, or set one IP address (IPv4 or
IPv6).
If you change the management IP address, the new IP address is assigned to the interface. The old IP address is added as an alias and is used to maintain connectivity.
7. Set the host name for the appliance.
Optional:
• Set the domain name, and IPv4 or IPv6 addresses for the DNS servers.
• Set the IP Address and Port for a Proxy Server
8. Click Next. 9. Set the date and time manually, or enter the hostname, IPv4 address or IPv6 address of the
NTP server.
Click Next. 10. Select Security Gateway and Security Management.
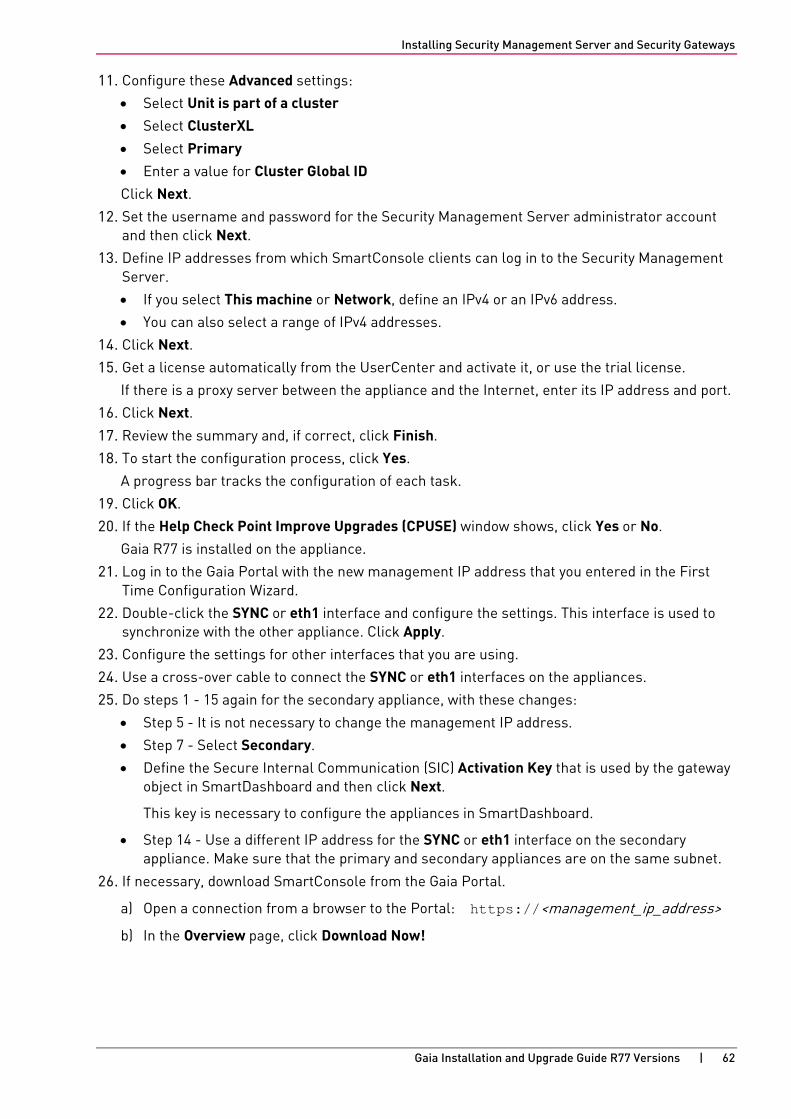
Installing Security Management Server and Security Gateways
Gaia Installation and Upgrade Guide R77 Versions | 62
11. Configure these Advanced settings:
• Select Unit is part of a cluster
• Select ClusterXL
• Select Primary
• Enter a value for Cluster Global ID
Click Next. 12. Set the username and password for the Security Management Server administrator account
and then click Next. 13. Define IP addresses from which SmartConsole clients can log in to the Security Management
Server.
• If you select This machine or Network, define an IPv4 or an IPv6 address.
• You can also select a range of IPv4 addresses.
14. Click Next. 15. Get a license automatically from the UserCenter and activate it, or use the trial license.
If there is a proxy server between the appliance and the Internet, enter its IP address and port.
16. Click Next. 17. Review the summary and, if correct, click Finish.
18. To start the configuration process, click Yes.
A progress bar tracks the configuration of each task.
19. Click OK.
20. If the Help Check Point Improve Upgrades (CPUSE) window shows, click Yes or No.
Gaia R77 is installed on the appliance.
21. Log in to the Gaia Portal with the new management IP address that you entered in the First Time Configuration Wizard.
22. Double-click the SYNC or eth1 interface and configure the settings. This interface is used to synchronize with the other appliance. Click Apply.
23. Configure the settings for other interfaces that you are using.
24. Use a cross-over cable to connect the SYNC or eth1 interfaces on the appliances.
25. Do steps 1 - 15 again for the secondary appliance, with these changes:
• Step 5 - It is not necessary to change the management IP address.
• Step 7 - Select Secondary.
• Define the Secure Internal Communication (SIC) Activation Key that is used by the gateway object in SmartDashboard and then click Next.
This key is necessary to configure the appliances in SmartDashboard.
• Step 14 - Use a different IP address for the SYNC or eth1 interface on the secondary appliance. Make sure that the primary and secondary appliances are on the same subnet.
26. If necessary, download SmartConsole from the Gaia Portal.
a) Open a connection from a browser to the Portal: https://<management_ip_address>
b) In the Overview page, click Download Now!
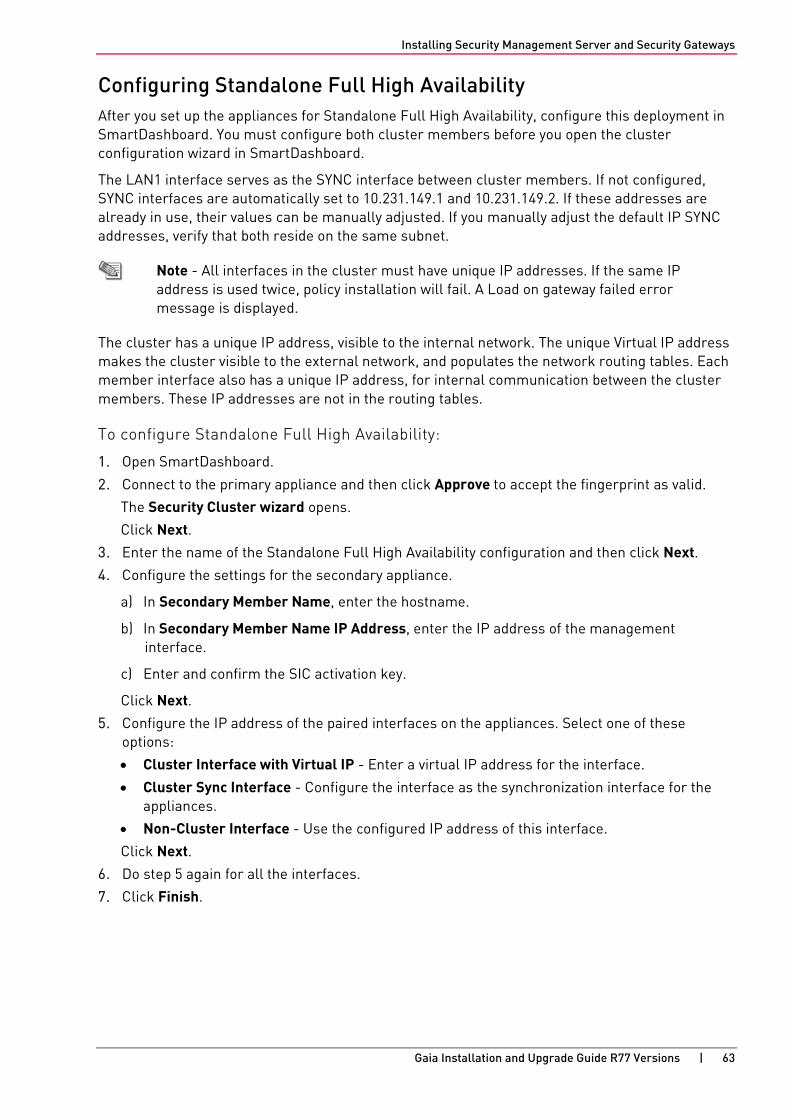
Installing Security Management Server and Security Gateways
Gaia Installation and Upgrade Guide R77 Versions | 63
Configuring Standalone Full High Availability After you set up the appliances for Standalone Full High Availability, configure this deployment in SmartDashboard. You must configure both cluster members before you open the cluster configuration wizard in SmartDashboard.
The LAN1 interface serves as the SYNC interface between cluster members. If not configured, SYNC interfaces are automatically set to 10.231.149.1 and 10.231.149.2. If these addresses are already in use, their values can be manually adjusted. If you manually adjust the default IP SYNC addresses, verify that both reside on the same subnet.
Note - All interfaces in the cluster must have unique IP addresses. If the same IP address is used twice, policy installation will fail. A Load on gateway failed error message is displayed.
The cluster has a unique IP address, visible to the internal network. The unique Virtual IP address makes the cluster visible to the external network, and populates the network routing tables. Each member interface also has a unique IP address, for internal communication between the cluster members. These IP addresses are not in the routing tables.
To configure Standalone Full High Availability:
1. Open SmartDashboard.
2. Connect to the primary appliance and then click Approve to accept the fingerprint as valid.
The Security Cluster wizard opens.
Click Next. 3. Enter the name of the Standalone Full High Availability configuration and then click Next. 4. Configure the settings for the secondary appliance.
a) In Secondary Member Name, enter the hostname.
b) In Secondary Member Name IP Address, enter the IP address of the management interface.
c) Enter and confirm the SIC activation key.
Click Next. 5. Configure the IP address of the paired interfaces on the appliances. Select one of these
options:
• Cluster Interface with Virtual IP - Enter a virtual IP address for the interface.
• Cluster Sync Interface - Configure the interface as the synchronization interface for the appliances.
• Non-Cluster Interface - Use the configured IP address of this interface.
Click Next. 6. Do step 5 again for all the interfaces.
7. Click Finish.
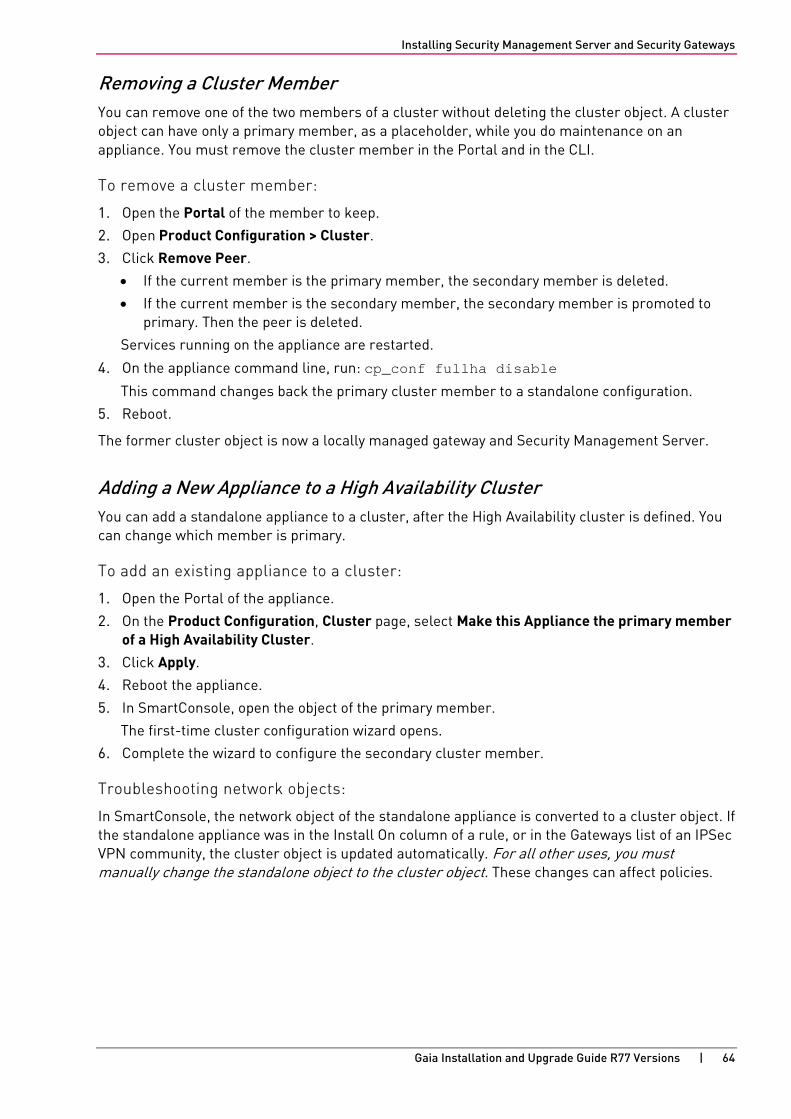
Installing Security Management Server and Security Gateways
Gaia Installation and Upgrade Guide R77 Versions | 64
Removing a Cluster Member You can remove one of the two members of a cluster without deleting the cluster object. A cluster object can have only a primary member, as a placeholder, while you do maintenance on an appliance. You must remove the cluster member in the Portal and in the CLI.
To remove a cluster member:
1. Open the Portal of the member to keep.
2. Open Product Configuration > Cluster.
3. Click Remove Peer.
• If the current member is the primary member, the secondary member is deleted.
• If the current member is the secondary member, the secondary member is promoted to primary. Then the peer is deleted.
Services running on the appliance are restarted.
4. On the appliance command line, run: cp_conf fullha disable
This command changes back the primary cluster member to a standalone configuration.
5. Reboot.
The former cluster object is now a locally managed gateway and Security Management Server.
Adding a New Appliance to a High Availability Cluster You can add a standalone appliance to a cluster, after the High Availability cluster is defined. You can change which member is primary.
To add an existing appliance to a cluster:
1. Open the Portal of the appliance.
2. On the Product Configuration, Cluster page, select Make this Appliance the primary member of a High Availability Cluster.
3. Click Apply.
4. Reboot the appliance.
5. In SmartConsole, open the object of the primary member.
The first-time cluster configuration wizard opens.
6. Complete the wizard to configure the secondary cluster member.
Troubleshooting network objects:
In SmartConsole, the network object of the standalone appliance is converted to a cluster object. If the standalone appliance was in the Install On column of a rule, or in the Gateways list of an IPSec VPN community, the cluster object is updated automatically. For all other uses, you must manually change the standalone object to the cluster object. These changes can affect policies.
Installing Security Management Server and Security Gateways
Gaia Installation and Upgrade Guide R77 Versions | 65
To see objects and rules that use the object to change:
1. Right-click the standalone object and select Where Used.
2. Select a line and click Go To.
3. In the window that opens, replace the standalone object with the cluster object.
If the Where Used line is a:
• Host, Network, Group - Browse through the pages of the properties window that opens, until you find the object to change.
• Policy (for example, dlp_policy) - Open the Gateways page of the Software Blade. Remove the standalone object. Add the cluster object.
4. In Where Used > Active Policies, see the rules that use the standalone object.
5. Select each rule and click Go To.
6. Edit those rules to use the cluster object.
Note - The icon in SmartConsole changes to show new status of the appliance as a primary cluster member. The Name and UID of the object in the database stay the same.
Recommended Logging Options for High Availability In High Availability, log files are not synchronized between the two cluster members. For this reason, we recommend that you configure the logs of the cluster.
To forward cluster logs to an external log server:
1. Open the properties of the cluster object.
2. Open Logs > Additional Logging.
3. Click Forward log files to Log Server, and select the Log Server ("Installing Log Server " on page 50).
4. Select or define a time object for Log forwarding schedule.
Or:
Configure SmartEvent and SmartReporter with standard reports, to use only one of the cluster members as a source for log file correlation and consolidation.
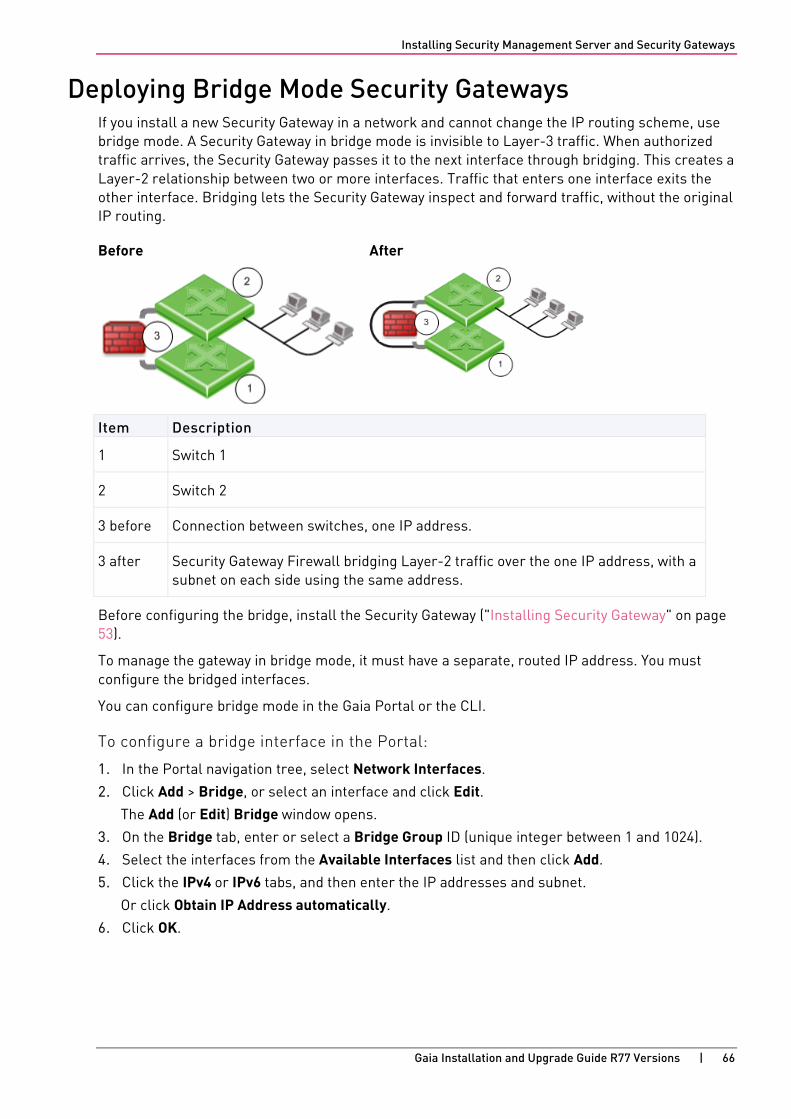
Installing Security Management Server and Security Gateways
Gaia Installation and Upgrade Guide R77 Versions | 66
Deploying Bridge Mode Security Gateways If you install a new Security Gateway in a network and cannot change the IP routing scheme, use bridge mode. A Security Gateway in bridge mode is invisible to Layer-3 traffic. When authorized traffic arrives, the Security Gateway passes it to the next interface through bridging. This creates a Layer-2 relationship between two or more interfaces. Traffic that enters one interface exits the other interface. Bridging lets the Security Gateway inspect and forward traffic, without the original IP routing.
Before
After
Item Description
1 Switch 1
2 Switch 2
3 before Connection between switches, one IP address.
3 after Security Gateway Firewall bridging Layer-2 traffic over the one IP address, with a subnet on each side using the same address.
Before configuring the bridge, install the Security Gateway ("Installing Security Gateway" on page 53).
To manage the gateway in bridge mode, it must have a separate, routed IP address. You must configure the bridged interfaces.
You can configure bridge mode in the Gaia Portal or the CLI.
To configure a bridge interface in the Portal:
1. In the Portal navigation tree, select Network Interfaces.
2. Click Add > Bridge, or select an interface and click Edit. The Add (or Edit) Bridge window opens.
3. On the Bridge tab, enter or select a Bridge Group ID (unique integer between 1 and 1024).
4. Select the interfaces from the Available Interfaces list and then click Add.
5. Click the IPv4 or IPv6 tabs, and then enter the IP addresses and subnet.
Or click Obtain IP Address automatically.
6. Click OK.
Installing Security Management Server and Security Gateways
Gaia Installation and Upgrade Guide R77 Versions | 67
To configure a bridge interface with the CLI:
1. Run: add bridging group <Group Name> interface <physical interface name>
2. Run again for each interface in the bridge.
3. Run: save config
4. Add a bridge interface IP address:
• IPv4: set interface <Group Name> ipv4-address <IP> subnet-mask <Mask>
• IPV6: set interface <Group Name> ipv6-address <IP> mask-length <Prefix>
5. Run: save config
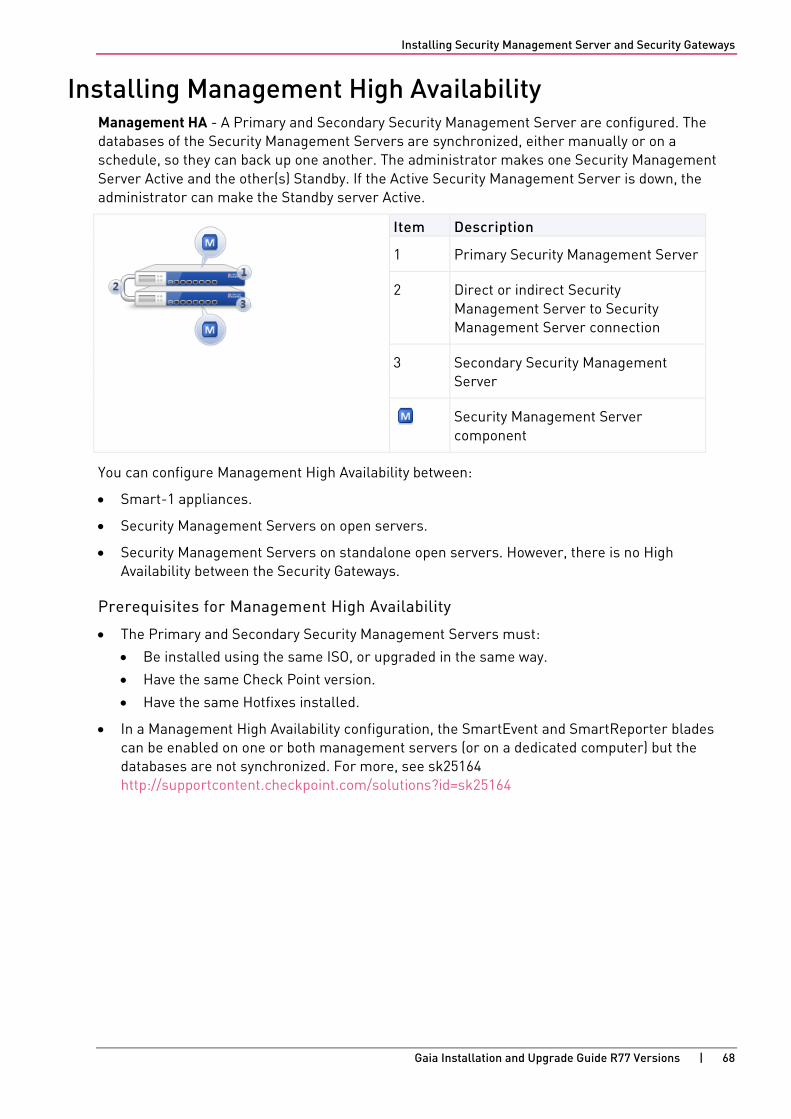
Installing Security Management Server and Security Gateways
Gaia Installation and Upgrade Guide R77 Versions | 68
Installing Management High Availability Management HA - A Primary and Secondary Security Management Server are configured. The databases of the Security Management Servers are synchronized, either manually or on a schedule, so they can back up one another. The administrator makes one Security Management Server Active and the other(s) Standby. If the Active Security Management Server is down, the administrator can make the Standby server Active.
Item Description
1 Primary Security Management Server
2 Direct or indirect Security Management Server to Security Management Server connection
3 Secondary Security Management Server
Security Management Server component
You can configure Management High Availability between:
• Smart-1 appliances.
• Security Management Servers on open servers.
• Security Management Servers on standalone open servers. However, there is no High Availability between the Security Gateways.
Prerequisites for Management High Availability
• The Primary and Secondary Security Management Servers must:
• Be installed using the same ISO, or upgraded in the same way.
• Have the same Check Point version.
• Have the same Hotfixes installed.
• In a Management High Availability configuration, the SmartEvent and SmartReporter blades can be enabled on one or both management servers (or on a dedicated computer) but the databases are not synchronized. For more, see sk25164 http://supportcontent.checkpoint.com/solutions?id=sk25164
Installing Security Management Server and Security Gateways
Gaia Installation and Upgrade Guide R77 Versions | 69
Workflow for Installing and Configuring Management High Availability:
1. Install and configure the primary Security Management Server:
a) Open server only: Install the operating system (Gaia, SecurePlatform or Windows).
b) Configure the primary Security Management Server:
Gaia: Use the First Time Configuration Wizard.
SecurePlatform: Use cpconfig.
Windows: when choosing installation options.
2. Install and configure the secondary Security Management Server:
a) Open server only: Install the operating system (Gaia, SecurePlatform or Windows).
b) Configure the secondary Security Management Server:
Gaia: Use the First Time Configuration Wizard.
SecurePlatform: Use cpconfig.
Windows: when choosing installation options.
For instructions on installing and configuring the primary and secondary Security Management Server see the applicable section:
• Installing Standalone on Open Servers
• Installing Security Management Server on Appliances
• Installing Security Management Server on Open Servers
To learn how to synchronize the databases of the Security Management Servers and make one Active and the other(s) Standby, see the R77 Security Management Administration Guide http://supportcontent.checkpoint.com/documentation_download?ID=24830.
Gaia Installation and Upgrade Guide R77 Versions | 70
CHAPTE R 6
Installing SmartConsole Clients In This Section:
Demo Mode ................................................................................................................... 70
Logging in to SmartConsole ......................................................................................... 70
The SmartDashboard and other SmartConsole applications are the GUI clients to manage the Security Management Server and Security Gateways.
For SmartConsole requirements, see the Release Notes.
To install the SmartConsole clients on Windows platforms:
1. Insert the R77 distribution media or download the SmartConsole application from the Support Center http://supportcontent.checkpoint.com/solutions?id=sk104859.
2. Run the SmartConsole executable.
3. Continue with the instructions on the screen.
Demo Mode You can open the SmartDomain Manager in Demo mode. This mode does not require authentication or a connection to the Multi-Domain Server. Use the Demo mode to experiment with different objects, views, modes and features before you create a production system. The Demo mode includes several pre-configured sample Domains, Domain Management Servers, Security Gateways and policies.
Operations performed in Demo mode are stored in a local database. You can continue a Demo session from the point at which you left off in a previous session.
Logging in to SmartConsole Connect to the Security Management Server from SmartConsole. Security Management Server authenticates the connection when you log in for the first time.
You can create a new certificate for future logins. For more about certificates, see the R77 Security Management Administration Guide http://supportcontent.checkpoint.com/documentation_download?ID=24830.
To log in to SmartConsole clients:
1. Open the SmartConsole from the Start menu.
2. To log in to the Security Management Server:
• To use a password, enter the Security Management Server host name or IP address. Then enter your administrator user name and password.
• To use a certificate, enter the Security Management Server host name or IP address. Then click Certificate and select the certificate.
To experiment with pre-configured sample objects, views, modes and features, select Demo mode.
3. Optional: Enter a description of this session.
4. Optional: Select Read Only. This option lets you connect to the Security Management Server while other administrators are connected. You cannot change settings in this mode.
Installing Security Management Server and Security Gateways
Gaia Installation and Upgrade Guide R77 Versions | 71
5. Click Login.
6. If necessary, confirm the connection using the fingerprint generated during installation.
You see this only the first time that you log in from a client computer.

Installing Security Management Server and Security Gateways
Gaia Installation and Upgrade Guide R77 Versions | 72
Post-Installation Configuration You can use the Check Point configuration tool (cpconfig for Security Management Server or mdsconfig for Multi-Domain Security Management) to configure settings after installation:
• Licenses and Contracts: Add or delete licenses for the Security Management Server and Security Gateways.
• Administrators: Define administrators with Security Management Server access permissions. These administrators must have Read/Write permissions to create the first Security Policy.
• GUI Clients: Define client computers that can connect to the Security Management Server using SmartConsole clients.
Make sure that no firewall blocks port 19009 between the management server and SmartConsole clients.
• Certificate Authority: Starts the Internal Certificate Authority (ICA), which makes connections between the Security Management Server and Gateways. For Windows, you must define the name of the ICA host. You can use the default name or define your own. The ICA name must be in the host name.domain format, for example, ica.checkpoint.com.
• Fingerprint: Save the certificate fingerprint when you log in to SmartConsole clients for the first time.
Where to Go From Here You have learned the basics necessary to get started. Your next step is to get more advanced knowledge of your Check Point software.
Documentation is available on your Check Point DVD and on the R77 home page http://supportcontent.checkpoint.com/solutions?id=sk104859.
For more technical information about Check Point products, go to the Check Point Support Center http://supportcenter.checkpoint.com.
Uninstalling R77 To uninstall the release on Gaia appliances and open servers, use the built-in Backup and Restore (see "Backing Up" on page 25) functionality.
Gaia Installation and Upgrade Guide R77 Versions | 73
CHAPTE R 7
Installing Multi-Domain Security Management
In This Section:
Basic Architecture ........................................................................................................ 73
Setting Up Multi-Domain Security Management Networking ................................... 75
Installing Multi-Domain Server ................................................................................... 75
Installing Gateways ...................................................................................................... 80
Installing Multi-Domain Security Management GUI Clients ...................................... 80
Post-Installation Configuration ................................................................................... 81
Multi-Domain Security Management is a centralized management solution for large-scale, distributed environments with many different network Domains. This best-of-breed solution is ideal for enterprises with many subsidiaries, branches, partners and networks. Multi-Domain Security Management is also an ideal solution for managed service providers (MSPs), cloud computing providers, and data centers.
Centralized management gives administrators the flexibility to manage polices for many diverse entities. Security policies should be applicable to the requirements of different departments, business units, branches and partners, balanced with enterprise-wide requirements.
Basic Architecture Multi-Domain Security Management uses a tiered architecture to manage Domain network deployments.
• The Security Gateway enforces the security policy to protect network resources.
• A Domain is a network or group of networks belonging to a specified entity, such as a company, business unit, department, branch, or organization. For a cloud service provider, you can define one Domain for each customer.
• A Domain Management Server is a virtual Security Management Server that manages security policies and Security Gateways for a specified Domain.
• The Multi-Domain Server is a physical server that is the host for Domain data and system databases.
• SmartConsole is the GUI client that you use to manage Domain security and other Multi-Domain Security Management features.

Installing Multi-Domain Security Management
Gaia Installation and Upgrade Guide R77 Versions | 74
The Multi-Domain Servers and SmartDomain Manager are typically located at central Network Operation Centers (NOCs). Security Gateways are typically located together with protected network resources, often in another city or country.
Item Description
A USA Development Domain
B Headquarters Domain
C UK Development Domain
1 Security Gateway
2 Network Operation Center
3 Multi-Domain Server
4A USA Development Domain Management Server
4B Headquarters Domain Management Server
4C UK Development Domain Management Server
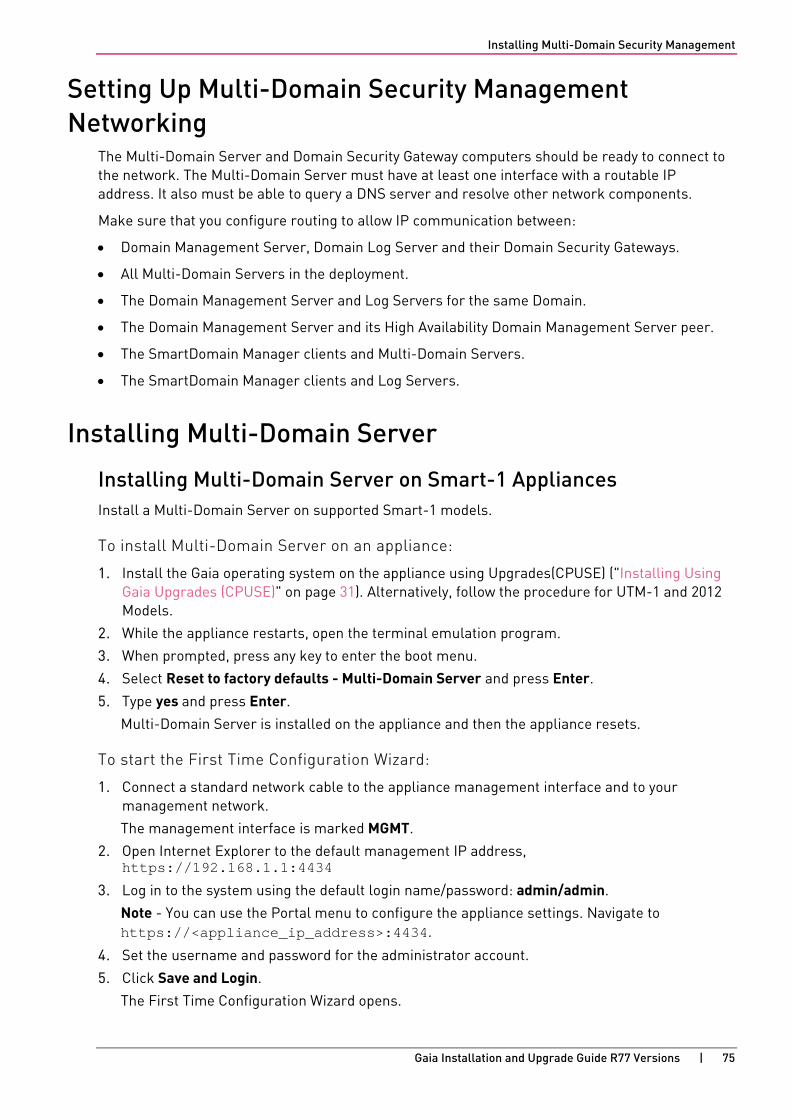
Installing Multi-Domain Security Management
Gaia Installation and Upgrade Guide R77 Versions | 75
Setting Up Multi-Domain Security Management Networking
The Multi-Domain Server and Domain Security Gateway computers should be ready to connect to the network. The Multi-Domain Server must have at least one interface with a routable IP address. It also must be able to query a DNS server and resolve other network components.
Make sure that you configure routing to allow IP communication between:
• Domain Management Server, Domain Log Server and their Domain Security Gateways.
• All Multi-Domain Servers in the deployment.
• The Domain Management Server and Log Servers for the same Domain.
• The Domain Management Server and its High Availability Domain Management Server peer.
• The SmartDomain Manager clients and Multi-Domain Servers.
• The SmartDomain Manager clients and Log Servers.
Installing Multi-Domain Server
Installing Multi-Domain Server on Smart-1 Appliances Install a Multi-Domain Server on supported Smart-1 models.
To install Multi-Domain Server on an appliance:
1. Install the Gaia operating system on the appliance using Upgrades(CPUSE) ("Installing Using Gaia Upgrades (CPUSE)" on page 31). Alternatively, follow the procedure for UTM-1 and 2012 Models.
2. While the appliance restarts, open the terminal emulation program.
3. When prompted, press any key to enter the boot menu.
4. Select Reset to factory defaults - Multi-Domain Server and press Enter.
5. Type yes and press Enter.
Multi-Domain Server is installed on the appliance and then the appliance resets.
To start the First Time Configuration Wizard:
1. Connect a standard network cable to the appliance management interface and to your management network.
The management interface is marked MGMT.
2. Open Internet Explorer to the default management IP address, https://192.168.1.1:4434
3. Log in to the system using the default login name/password: admin/admin.
Note - You can use the Portal menu to configure the appliance settings. Navigate to https://<appliance_ip_address>:4434.
4. Set the username and password for the administrator account.
5. Click Save and Login.
The First Time Configuration Wizard opens.
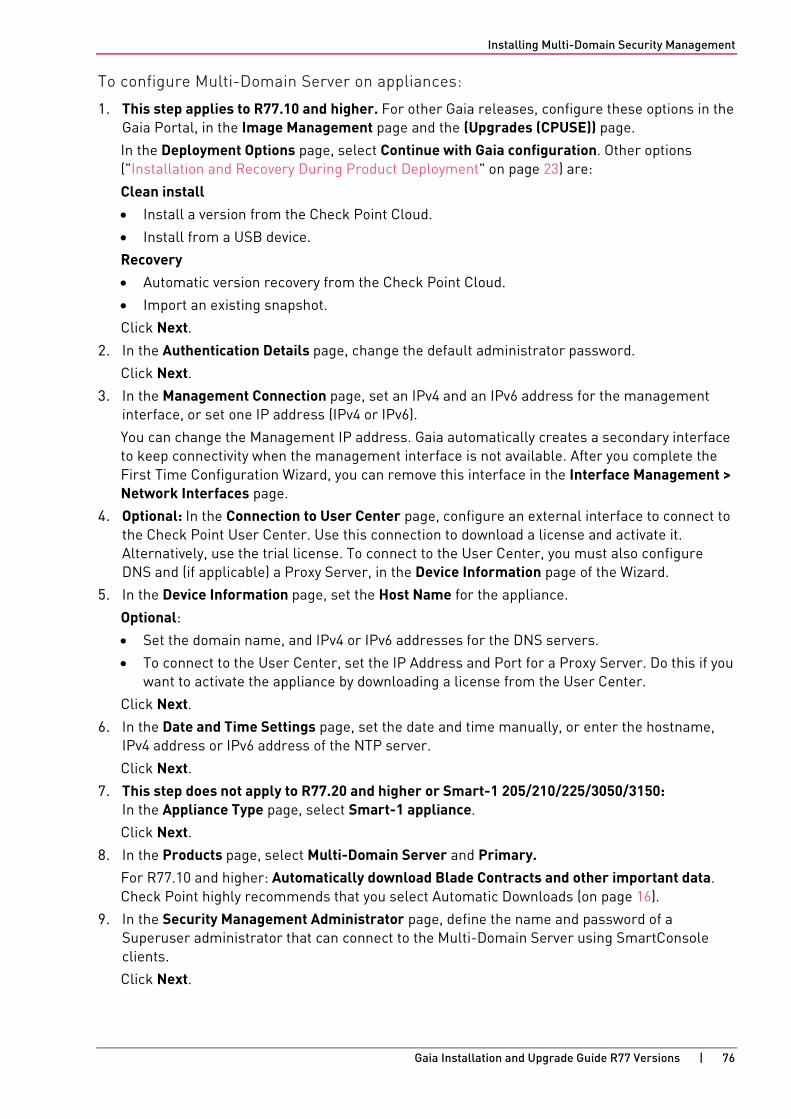
Installing Multi-Domain Security Management
Gaia Installation and Upgrade Guide R77 Versions | 76
To configure Multi-Domain Server on appliances:
1. This step applies to R77.10 and higher. For other Gaia releases, configure these options in the Gaia Portal, in the Image Management page and the (Upgrades (CPUSE)) page.
In the Deployment Options page, select Continue with Gaia configuration. Other options ("Installation and Recovery During Product Deployment" on page 23) are:
Clean install • Install a version from the Check Point Cloud.
• Install from a USB device.
Recovery
• Automatic version recovery from the Check Point Cloud.
• Import an existing snapshot.
Click Next. 2. In the Authentication Details page, change the default administrator password.
Click Next. 3. In the Management Connection page, set an IPv4 and an IPv6 address for the management
interface, or set one IP address (IPv4 or IPv6).
You can change the Management IP address. Gaia automatically creates a secondary interface to keep connectivity when the management interface is not available. After you complete the First Time Configuration Wizard, you can remove this interface in the Interface Management > Network Interfaces page.
4. Optional: In the Connection to User Center page, configure an external interface to connect to the Check Point User Center. Use this connection to download a license and activate it. Alternatively, use the trial license. To connect to the User Center, you must also configure DNS and (if applicable) a Proxy Server, in the Device Information page of the Wizard.
5. In the Device Information page, set the Host Name for the appliance.
Optional:
• Set the domain name, and IPv4 or IPv6 addresses for the DNS servers.
• To connect to the User Center, set the IP Address and Port for a Proxy Server. Do this if you want to activate the appliance by downloading a license from the User Center.
Click Next. 6. In the Date and Time Settings page, set the date and time manually, or enter the hostname,
IPv4 address or IPv6 address of the NTP server.
Click Next. 7. This step does not apply to R77.20 and higher or Smart-1 205/210/225/3050/3150:
In the Appliance Type page, select Smart-1 appliance.
Click Next. 8. In the Products page, select Multi-Domain Server and Primary.
For R77.10 and higher: Automatically download Blade Contracts and other important data. Check Point highly recommends that you select Automatic Downloads (on page 16).
9. In the Security Management Administrator page, define the name and password of a Superuser administrator that can connect to the Multi-Domain Server using SmartConsole clients.
Click Next.

Installing Multi-Domain Security Management
Gaia Installation and Upgrade Guide R77 Versions | 77
10. In the Multi-Domain Server GUI Clients page, define IP addresses from which SmartConsole clients can log in to the Multi-Domain Server.
• If you select This machine or Network, define an IPv4 or an IPv6 address.
• You can also select a range of IPv4 addresses.
Click Next. 11. In the Appliance Activation page, get a license automatically from the User Center and
activate it, or use the 15 day trial license.
Click Next. 12. In the Summary page, review your choices
Optional: Improve product experience by Sending Data to Check Point (on page 17).
Click Finish.
13. To start the configuration, click Yes.
A progress bar tracks the configuration of each task.
14. Click OK.
The Multi-Domain Server is installed on the appliance.
15. If necessary, download SmartConsole from the Gaia Portal.
a) Open a connection from a browser to the Portal: https://<management_ip_address>
a) In the Overview page, click Download Now!
To configure a secondary Multi-Domain Server on appliances:
Use the same procedure as for the primary Multi-Domain Server with these changes:
• Use a different IP address for the management interface on the secondary appliance.
• Select Secondary Multi-Domain Server.
• Define the Secure Internal Communication (SIC) Activation Key that is used by the gateway object in SmartDashboard and then click Next.
This key is necessary to configure the appliances in SmartDashboard.
To configure a Multi-Domain Server log server on appliances:
Do steps 1 - 10 with these changes:
• Step 6 - Select Multi-Domain Log Server.
Define the Secure Internal Communication (SIC) Activation Key that is used by the gateway object in SmartDashboard and then click Next.
This key is necessary to configure the appliances in SmartDashboard.
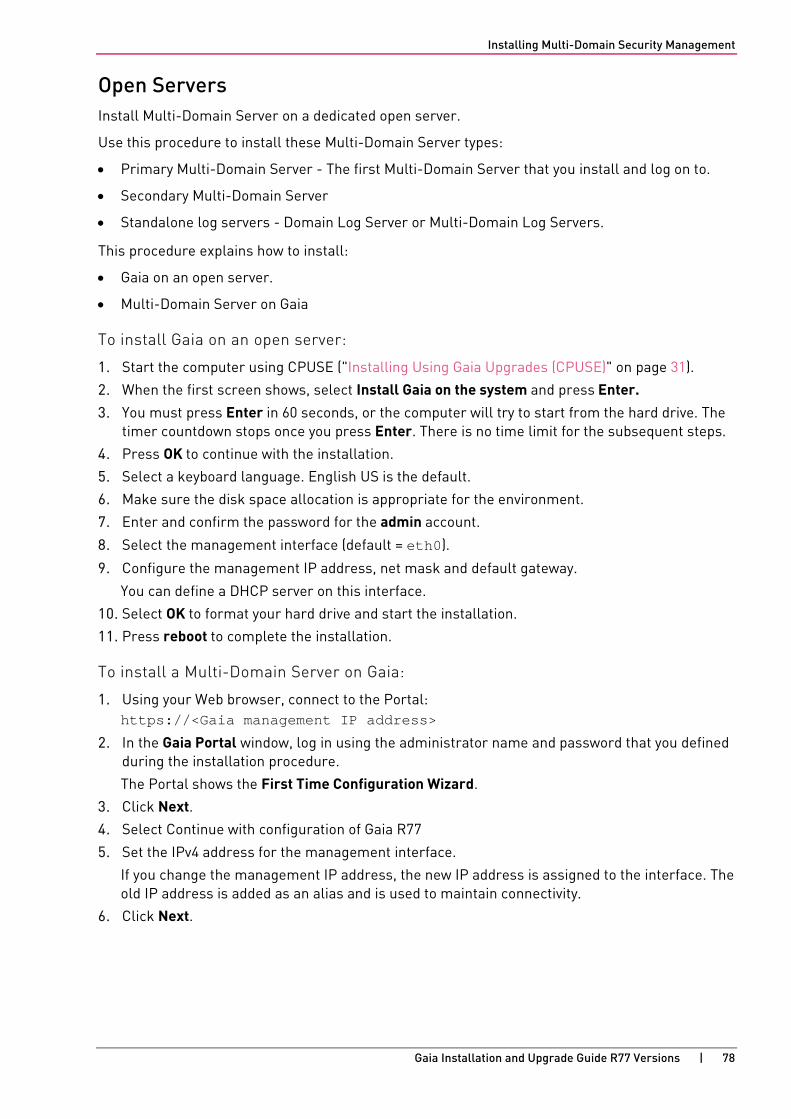
Installing Multi-Domain Security Management
Gaia Installation and Upgrade Guide R77 Versions | 78
Open Servers Install Multi-Domain Server on a dedicated open server.
Use this procedure to install these Multi-Domain Server types:
• Primary Multi-Domain Server - The first Multi-Domain Server that you install and log on to.
• Secondary Multi-Domain Server
• Standalone log servers - Domain Log Server or Multi-Domain Log Servers.
This procedure explains how to install:
• Gaia on an open server.
• Multi-Domain Server on Gaia
To install Gaia on an open server:
1. Start the computer using CPUSE ("Installing Using Gaia Upgrades (CPUSE)" on page 31).
2. When the first screen shows, select Install Gaia on the system and press Enter. 3. You must press Enter in 60 seconds, or the computer will try to start from the hard drive. The
timer countdown stops once you press Enter. There is no time limit for the subsequent steps.
4. Press OK to continue with the installation.
5. Select a keyboard language. English US is the default.
6. Make sure the disk space allocation is appropriate for the environment.
7. Enter and confirm the password for the admin account.
8. Select the management interface (default = eth0).
9. Configure the management IP address, net mask and default gateway.
You can define a DHCP server on this interface.
10. Select OK to format your hard drive and start the installation.
11. Press reboot to complete the installation.
To install a Multi-Domain Server on Gaia:
1. Using your Web browser, connect to the Portal: https://<Gaia management IP address>
2. In the Gaia Portal window, log in using the administrator name and password that you defined during the installation procedure.
The Portal shows the First Time Configuration Wizard.
3. Click Next. 4. Select Continue with configuration of Gaia R77
5. Set the IPv4 address for the management interface.
If you change the management IP address, the new IP address is assigned to the interface. The old IP address is added as an alias and is used to maintain connectivity.
6. Click Next.
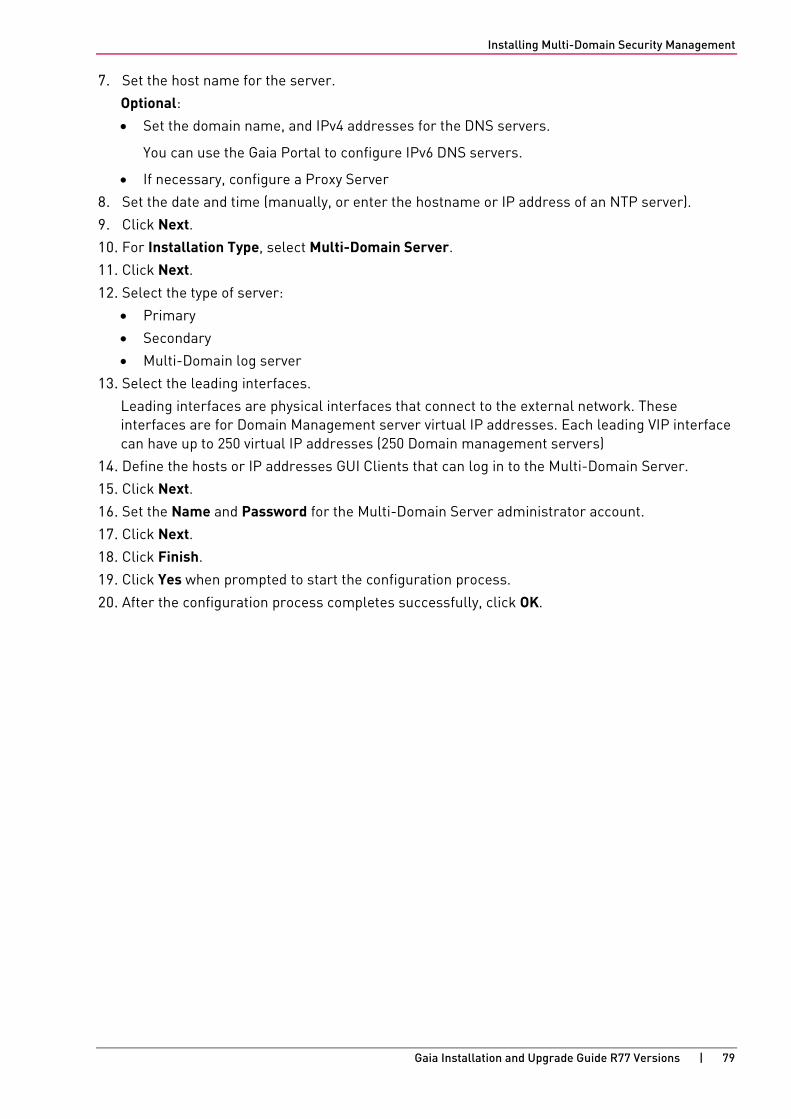
Installing Multi-Domain Security Management
Gaia Installation and Upgrade Guide R77 Versions | 79
7. Set the host name for the server.
Optional:
• Set the domain name, and IPv4 addresses for the DNS servers.
You can use the Gaia Portal to configure IPv6 DNS servers.
• If necessary, configure a Proxy Server
8. Set the date and time (manually, or enter the hostname or IP address of an NTP server).
9. Click Next. 10. For Installation Type, select Multi-Domain Server.
11. Click Next. 12. Select the type of server:
• Primary
• Secondary
• Multi-Domain log server
13. Select the leading interfaces.
Leading interfaces are physical interfaces that connect to the external network. These interfaces are for Domain Management server virtual IP addresses. Each leading VIP interface can have up to 250 virtual IP addresses (250 Domain management servers)
14. Define the hosts or IP addresses GUI Clients that can log in to the Multi-Domain Server.
15. Click Next. 16. Set the Name and Password for the Multi-Domain Server administrator account.
17. Click Next. 18. Click Finish.
19. Click Yes when prompted to start the configuration process.
20. After the configuration process completes successfully, click OK.
Installing Multi-Domain Security Management
Gaia Installation and Upgrade Guide R77 Versions | 80
Installing Gateways Install the Network Operation Center (NOC) and Security Gateways of the domain using the R77 removable media ("Installing Security Gateway" on page 53).
Installing Multi-Domain Security Management GUI Clients
The SmartDomain Manager is automatically installed together with Check Point SmartConsole. If you have not yet installed SmartConsole, do so now.
To install the SmartConsole clients on Windows platforms:
1. Insert the R77 distribution media or download the SmartConsole application from the Support Center http://supportcontent.checkpoint.com/solutions?id=sk104859.
2. If you are using the installation media, go to the Linux\linux\windows folder.
3. Run the SmartConsole executable.
4. Continue with the instructions on the screen.
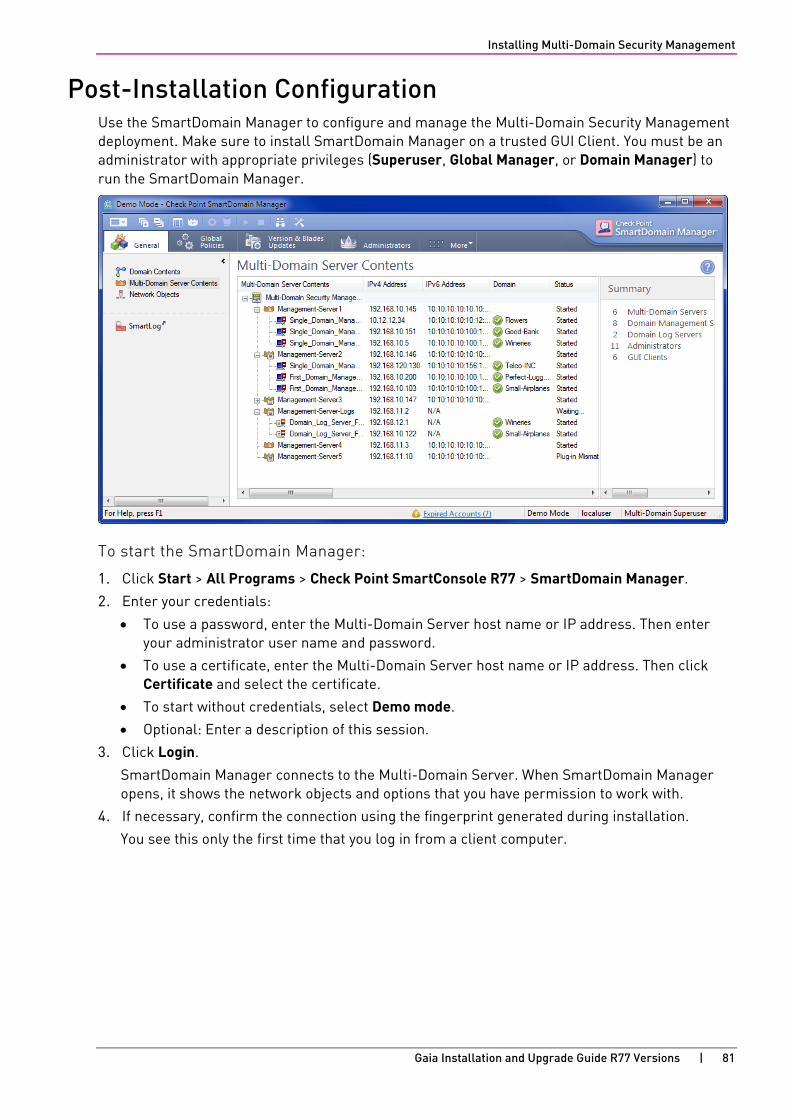
Installing Multi-Domain Security Management
Gaia Installation and Upgrade Guide R77 Versions | 81
Post-Installation Configuration Use the SmartDomain Manager to configure and manage the Multi-Domain Security Management deployment. Make sure to install SmartDomain Manager on a trusted GUI Client. You must be an administrator with appropriate privileges (Superuser, Global Manager, or Domain Manager) to run the SmartDomain Manager.
To start the SmartDomain Manager:
1. Click Start > All Programs > Check Point SmartConsole R77 > SmartDomain Manager.
2. Enter your credentials:
• To use a password, enter the Multi-Domain Server host name or IP address. Then enter your administrator user name and password.
• To use a certificate, enter the Multi-Domain Server host name or IP address. Then click Certificate and select the certificate.
• To start without credentials, select Demo mode.
• Optional: Enter a description of this session.
3. Click Login.
SmartDomain Manager connects to the Multi-Domain Server. When SmartDomain Manager opens, it shows the network objects and options that you have permission to work with.
4. If necessary, confirm the connection using the fingerprint generated during installation.
You see this only the first time that you log in from a client computer.
Installing Multi-Domain Security Management
Gaia Installation and Upgrade Guide R77 Versions | 82
Demo Mode You can open the SmartDomain Manager in Demo mode. This mode does not require authentication or a connection to the Multi-Domain Server. Use the Demo mode to experiment with different objects, views, modes and features before you create a production system. The Demo mode includes several pre-configured sample Domains, Domain Management Servers, Security Gateways and policies.
Operations performed in Demo mode are stored in a local database. You can continue a Demo session from the point at which you left off in a previous session.
Adding Licenses using the SmartDomain Manager You can add a license to a Multi-Domain Server or Multi-Domain Log Server using the SmartDomain Manager.
1. In the SmartDomain Manager, open the General View > Multi-Domain Server Contents page.
2. Double-click a Multi-Domain Server or Multi-Domain Log Server. The Multi-Domain Server Configuration window opens.
3. Open the License tab.
4. Install licenses using Fetch or Add:
Fetch License File
a) Click Fetch From File.
b) In the Open window, browse to and double-click the desired license file.
Add License Information Manually
a) Click Add.
b) In the email message that you received from Check Point, select the entire license string (starting with cplic putlic... and ending with the last SKU/Feature) and copy it to the clipboard.
c) In the Add License window, click Paste License to paste the license details you have saved on the clipboard into the Add License window.
d) Click Calculate to display your Validation Code. Compare this value with the validation code that you received in your email. If validation fails, contact the Check Point licensing center, providing them with both the validation code contained in the email and the one displayed in this window.
Installing Multi-Domain Security Management
Gaia Installation and Upgrade Guide R77 Versions | 83
Uninstalling Multi-Domain Security Management
To uninstall a Multi-Domain Server:
1. Back up the databases.
2. Reformat the hard disk.
To uninstall the SmartDomain Manager and SmartConsole applications, use Add/Remove Programs.
Where To From Here? Check Point documentation provides additional information and is available on the R77 home page on the Check Point Support Center http://supportcontent.checkpoint.com/solutions?id=sk104859. It is also available on the Check Point DVD.
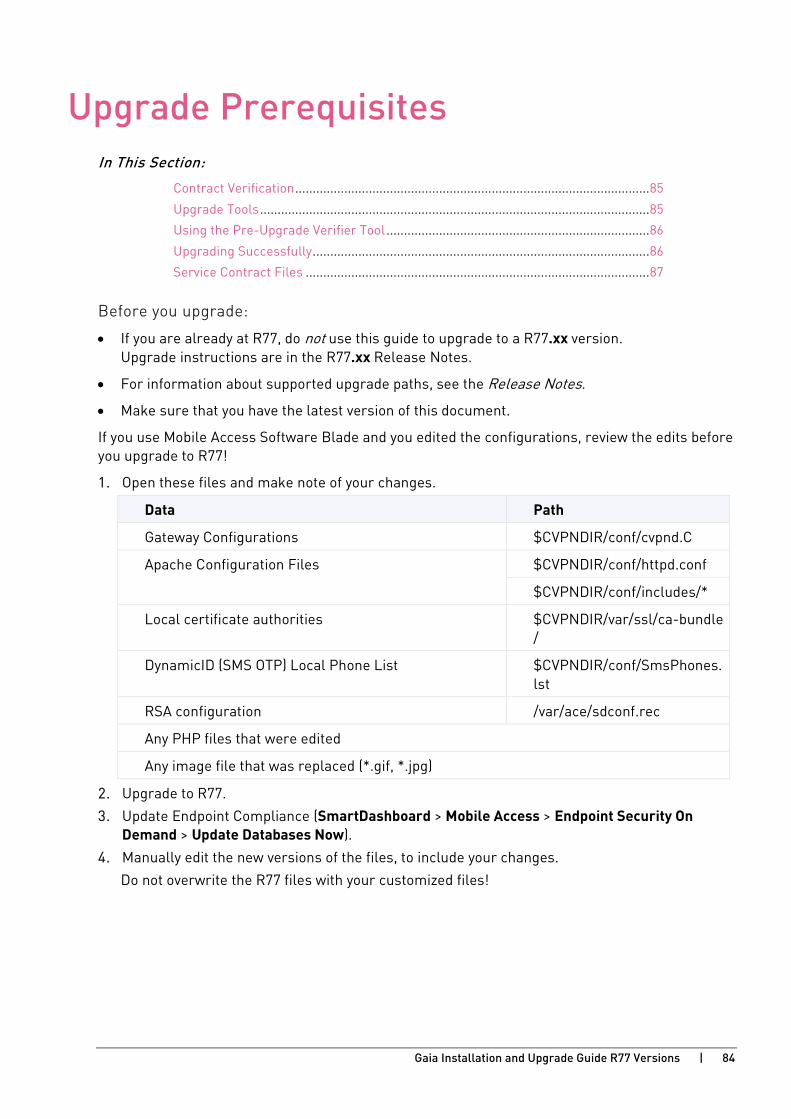
Gaia Installation and Upgrade Guide R77 Versions | 84
CHAPTE R 8
Upgrade Prerequisites In This Section:
Contract Verification ..................................................................................................... 85
Upgrade Tools ............................................................................................................... 85
Using the Pre-Upgrade Verifier Tool ........................................................................... 86
Upgrading Successfully ................................................................................................ 86
Service Contract Files .................................................................................................. 87
Before you upgrade:
• If you are already at R77, do not use this guide to upgrade to a R77.xx version. Upgrade instructions are in the R77.xx Release Notes.
• For information about supported upgrade paths, see the Release Notes.
• Make sure that you have the latest version of this document.
If you use Mobile Access Software Blade and you edited the configurations, review the edits before you upgrade to R77!
1. Open these files and make note of your changes.
Data Path
Gateway Configurations $CVPNDIR/conf/cvpnd.C
Apache Configuration Files $CVPNDIR/conf/httpd.conf
$CVPNDIR/conf/includes/*
Local certificate authorities $CVPNDIR/var/ssl/ca-bundle/
DynamicID (SMS OTP) Local Phone List $CVPNDIR/conf/SmsPhones.lst
RSA configuration /var/ace/sdconf.rec
Any PHP files that were edited
Any image file that was replaced (*.gif, *.jpg)
2. Upgrade to R77.
3. Update Endpoint Compliance (SmartDashboard > Mobile Access > Endpoint Security On Demand > Update Databases Now).
4. Manually edit the new versions of the files, to include your changes.
Do not overwrite the R77 files with your customized files!
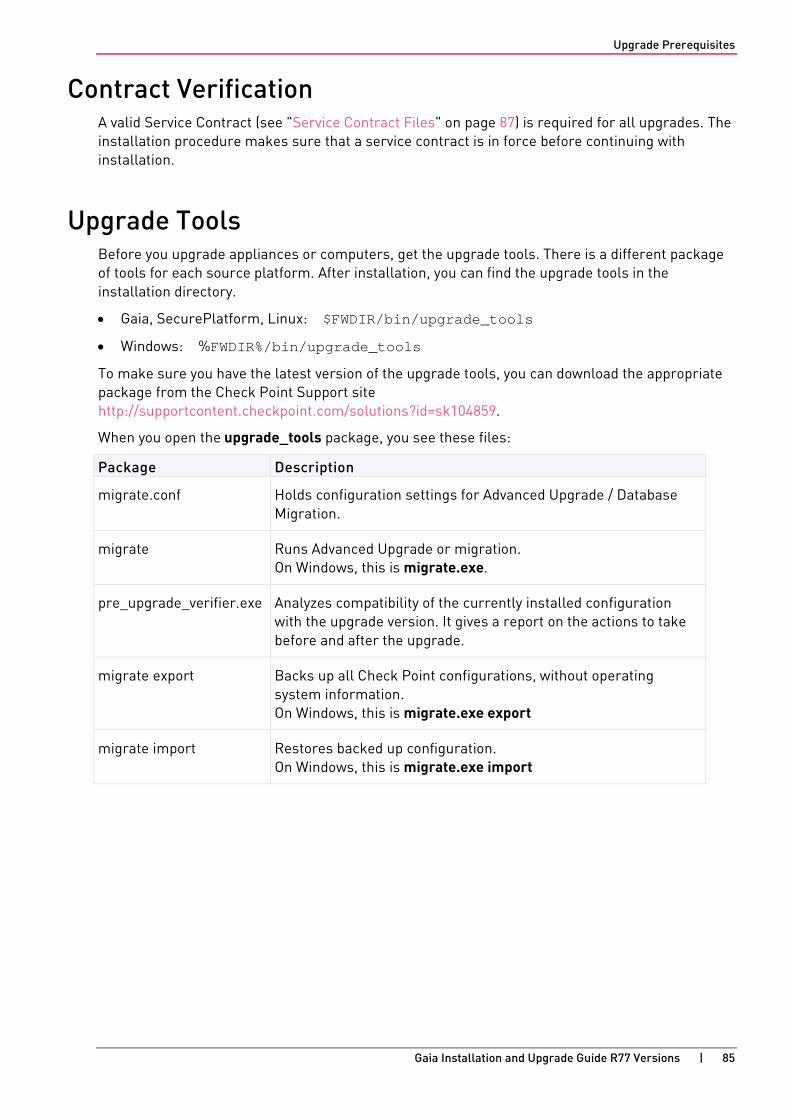
Upgrade Prerequisites
Gaia Installation and Upgrade Guide R77 Versions | 85
Contract Verification A valid Service Contract (see "Service Contract Files" on page 87) is required for all upgrades. The installation procedure makes sure that a service contract is in force before continuing with installation.
Upgrade Tools Before you upgrade appliances or computers, get the upgrade tools. There is a different package of tools for each source platform. After installation, you can find the upgrade tools in the installation directory.
• Gaia, SecurePlatform, Linux: $FWDIR/bin/upgrade_tools
• Windows: %FWDIR%/bin/upgrade_tools
To make sure you have the latest version of the upgrade tools, you can download the appropriate package from the Check Point Support site http://supportcontent.checkpoint.com/solutions?id=sk104859.
When you open the upgrade_tools package, you see these files:
Package Description
migrate.conf Holds configuration settings for Advanced Upgrade / Database Migration.
migrate Runs Advanced Upgrade or migration. On Windows, this is migrate.exe.
pre_upgrade_verifier.exe Analyzes compatibility of the currently installed configuration with the upgrade version. It gives a report on the actions to take before and after the upgrade.
migrate export Backs up all Check Point configurations, without operating system information. On Windows, this is migrate.exe export
migrate import Restores backed up configuration. On Windows, this is migrate.exe import
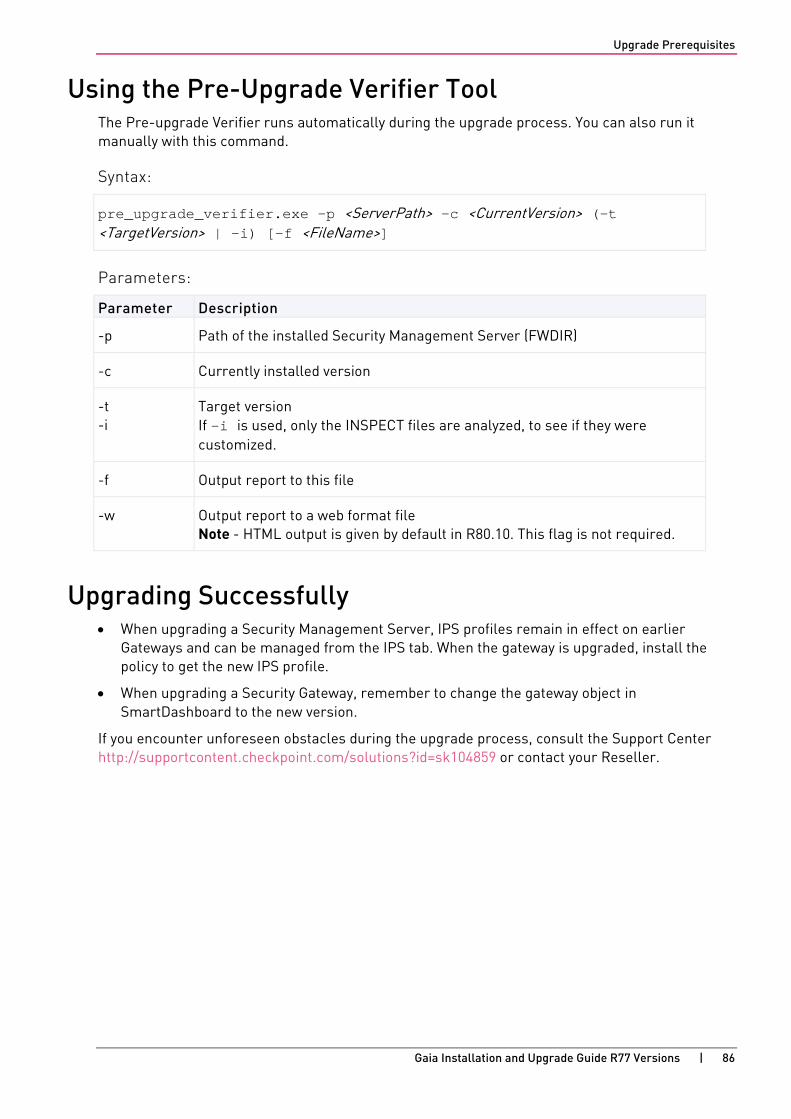
Upgrade Prerequisites
Gaia Installation and Upgrade Guide R77 Versions | 86
Using the Pre-Upgrade Verifier Tool The Pre-upgrade Verifier runs automatically during the upgrade process. You can also run it manually with this command.
Syntax:
pre_upgrade_verifier.exe -p <ServerPath> -c <CurrentVersion> (-t <TargetVersion> | -i) [-f <FileName>]
Parameters:
Parameter Description
-p Path of the installed Security Management Server (FWDIR)
-c Currently installed version
-t -i
Target version If -i is used, only the INSPECT files are analyzed, to see if they were customized.
-f Output report to this file
-w Output report to a web format file Note - HTML output is given by default in R80.10. This flag is not required.
Upgrading Successfully • When upgrading a Security Management Server, IPS profiles remain in effect on earlier
Gateways and can be managed from the IPS tab. When the gateway is upgraded, install the policy to get the new IPS profile.
• When upgrading a Security Gateway, remember to change the gateway object in SmartDashboard to the new version.
If you encounter unforeseen obstacles during the upgrade process, consult the Support Center http://supportcontent.checkpoint.com/solutions?id=sk104859 or contact your Reseller.
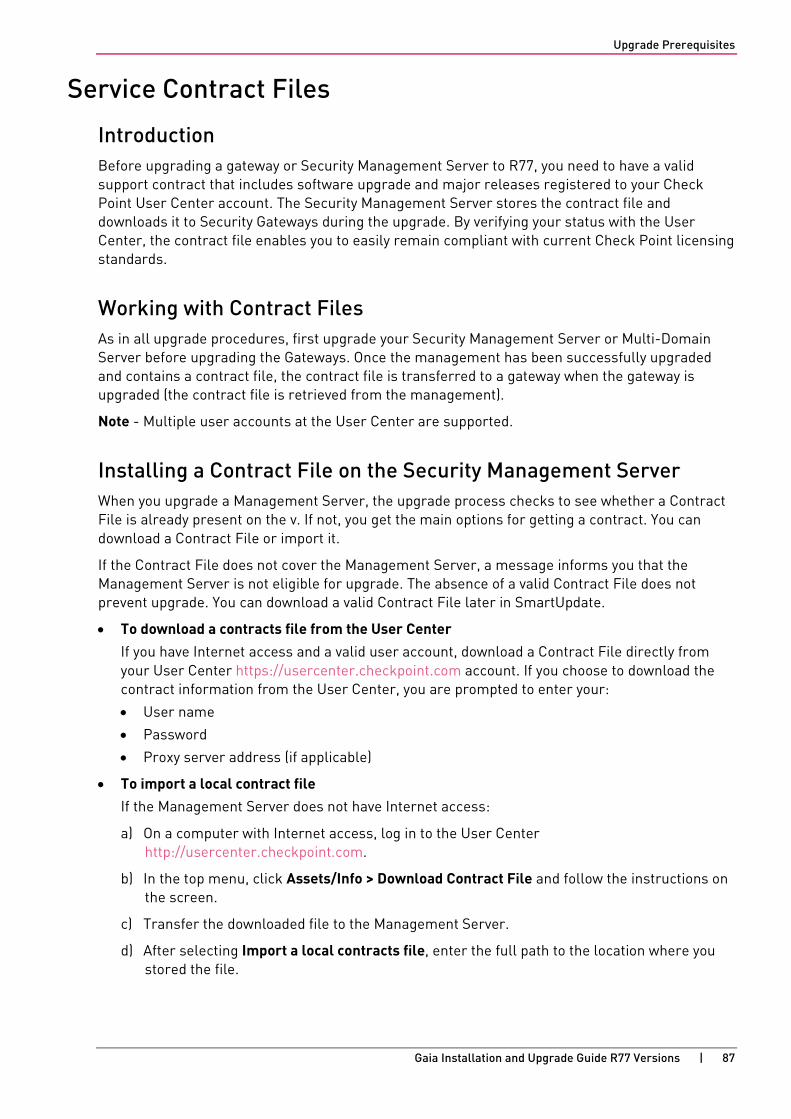
Upgrade Prerequisites
Gaia Installation and Upgrade Guide R77 Versions | 87
Service Contract Files
Introduction Before upgrading a gateway or Security Management Server to R77, you need to have a valid support contract that includes software upgrade and major releases registered to your Check Point User Center account. The Security Management Server stores the contract file and downloads it to Security Gateways during the upgrade. By verifying your status with the User Center, the contract file enables you to easily remain compliant with current Check Point licensing standards.
Working with Contract Files As in all upgrade procedures, first upgrade your Security Management Server or Multi-Domain Server before upgrading the Gateways. Once the management has been successfully upgraded and contains a contract file, the contract file is transferred to a gateway when the gateway is upgraded (the contract file is retrieved from the management).
Note - Multiple user accounts at the User Center are supported.
Installing a Contract File on the Security Management Server When you upgrade a Management Server, the upgrade process checks to see whether a Contract File is already present on the v. If not, you get the main options for getting a contract. You can download a Contract File or import it.
If the Contract File does not cover the Management Server, a message informs you that the Management Server is not eligible for upgrade. The absence of a valid Contract File does not prevent upgrade. You can download a valid Contract File later in SmartUpdate.
• To download a contracts file from the User Center
If you have Internet access and a valid user account, download a Contract File directly from your User Center https://usercenter.checkpoint.com account. If you choose to download the contract information from the User Center, you are prompted to enter your:
• User name
• Password
• Proxy server address (if applicable)
• To import a local contract file
If the Management Server does not have Internet access:
a) On a computer with Internet access, log in to the User Center http://usercenter.checkpoint.com.
b) In the top menu, click Assets/Info > Download Contract File and follow the instructions on the screen.
c) Transfer the downloaded file to the Management Server.
d) After selecting Import a local contracts file, enter the full path to the location where you stored the file.
Upgrade Prerequisites
Gaia Installation and Upgrade Guide R77 Versions | 88
• To continue without contract information
Select this option if you intend to get and install a valid Contract File at a later date. Note that at this point your Security Gateways are not strictly eligible for an upgrade; you may be in violation of your Check Point Licensing Agreement, as shown in the final message of the upgrade process.
Installing a Contract File On Security Gateways After you accept the End User License Agreement (EULA), the upgrade process searches for a valid contract on the gateway. If a valid contract is not located, the upgrade process attempts to retrieve the latest contract file from the Security Management Server. If not found, you can download or import a contract.
If the contract file does not cover the gateway, a message informs you (on Download or Import) that the gateway is not eligible for upgrade. The absence of a valid contract file does not prevent upgrade. When the upgrade is complete, contact your local support provider to obtain a valid contract. Use SmartUpdate to install the contract file.
Use the download or import instructions for installing a contract file on a Security Management Server.
If you continue without a contract, you install a valid contract file later. But the gateway is not eligible for upgrade. You may be in violation of your Check Point Licensing Agreement, as shown in the final message of the upgrade process. Contact your reseller.
Gaia Installation and Upgrade Guide R77 Versions | 89
CHAPTE R 9
Upgrading Security Management Server and Security Gateways
In This Section:
Upgrading Using Gaia Upgrades (CPUSE) .................................................................. 89
Upgrading Standalone and Security Management Server ......................................... 91
Upgrading Security Gateways ...................................................................................... 94
Upgrading Standalone Full High Availability............................................................... 98
Upgrading Clusters .................................................................................................... 100
Enabling IPv6 on Gaia ................................................................................................. 100
Changing to an IPv6-Only Management IP Address ................................................. 101
Deleting the IPV4 address from Management HA .................................................... 101
Upgrading Using Gaia Upgrades (CPUSE) With CPUSE, you can automatically update Check Point products for the Gaia OS, and the Gaia OS itself. The software update packages and full images are for major releases, minor releases and Hotfixes. All of the CPUSE processes are handled by the Deployment Agent daemon (DA).
Gaia automatically locates and shows the available software update packages and full images that are relevant to the Gaia operating system version installed on the computer, the computer's role (gateway, Security Management Server, standalone), and other specific properties. The images and packages can be downloaded from the Check Point Support center and installed.
Note - The Software Updates feature was renamed to Check Point Upgrade Service Engine (CPUSE) in R77.20.
Upgrade Limitations
• Personal files saved outside of the /home directories are erased during the upgrade process. If you created a snapshot immediately before upgrading, you can revert to the snapshot to recover personal files saved outside of the /home directory.
• Open servers that were upgraded from SecurePlatform to Gaia cannot be upgraded.
• Upgrading using Full Images:
• IP Appliances are not supported.
• UTM-1 130 and UTM-1 270 are not supported.
• To upgrade the secondary Security Management Server of a Full High Availability deployment, use the procedure in this guide for upgrading with a clean installation.
• The ssh key is not migrated to the new version.
• The Mobile Access Software Blade custom configuration is not upgraded.
• Virtual Systems Mode is not supported.
• Endpoint Policy Servers cannot be upgraded.
Upgrading Security Management Server and Security Gateways
Gaia Installation and Upgrade Guide R77 Versions | 90
Software Update Requirements
• At least 4 GB free disk space in /var/log
• Un-partitioned free disk space should be at least the size of root partition. To find out the:
• Amount of un-partitioned free disk space run: pvs
• Size of the root partition, run: df -h
To update the Gaia Software Updates agent:
1. Make sure the proxy and the DNS server are configured.
2. In the Portal, go to Upgrades (CPUSE) > Software Updates Policy.
3. In the Software Deployment Policy section. select one of these options:
• Manually – Do the procedure described in the CPUSE sk http://supportcontent.checkpoint.com/solutions?id=sk92449
• Scheduled or Automatic – the latest Deployment Agent is downloaded and automatically installed.
• Periodically update new Deployment Agent version - Updates only the DA according to the configured time period.
4. Click Apply.
To upgrade to R77 using Upgrades (CPUSE) - Portal:
1. Click the Full Images tab.
2. Select the R77 image.
3. Click Download.
4. To make sure the upgrade is allowed, click Actions > Verifier. 5. Click OK.
The Installation verified - Installation is allowed window shows. Verification is complete.
6. Click Upgrade.
7. Reboot.
8. When upgrading a Standalone deployment, Security Management Server, Multi-Domain Server: Go to Upgrades (CPUSE) > Status and Actions and click the Full Images tab to see post upgrade completion process.
Upgrading Security Management Server and Security Gateways
Gaia Installation and Upgrade Guide R77 Versions | 91
Upgrading Standalone and Security Management Server
This section explains how to upgrade Gaia standalone and Security Management Server. A Security Management Server upgraded to R77 can enforce and manage Gateways from earlier versions. Some new features are not available on earlier versions
See the R77 Release Notes for the supported features (in the "Compatibility Tables" section) and deployments.
Upgrade Notes
Upgrading Standalone Appliances
You can upgrade a Standalone deployment on UTM-1 appliances, certain 2012 Models, and IP appliances.
Upgrading Open Servers
Before you upgrade:
• Back up your current configuration (see "Backing Up" on page 25).
• See the Release Notes to make sure that you have enough disk space.
Upgrading the Security Management Server
You do not have to upgrade the Security Management Server and all of the Gateways at the same time. When the Security Management Server is upgraded, you can still manage Gateways from earlier versions (though the Gateways may not support new features).
Important - To upgrade Gaia, there must be at least 4GB free disk space in /var/log.
Use the Pre-Upgrade Verification tool to reduce the risk of incompatibility with your existing environment. The Pre-Upgrade Verification tool generates a detailed report of the actions to take before an upgrade (see "Using the Pre-Upgrade Verifier Tool" on page 86).
There are different upgrade methods for the Security Management Server:
• Upgrade Production Security Management Server
• Migrate and Upgrade to a New Security Management Server ("Advanced Upgrade and Database Migration" on page 145)
Important - After upgrade, you cannot restore a version with a database revision that was made with the old version. You can see old version database saves in Read-Only mode.
Upgrading Security Management Server on Appliances
You can upgrade a Security Management Server on some Smart-1 appliances and open servers.
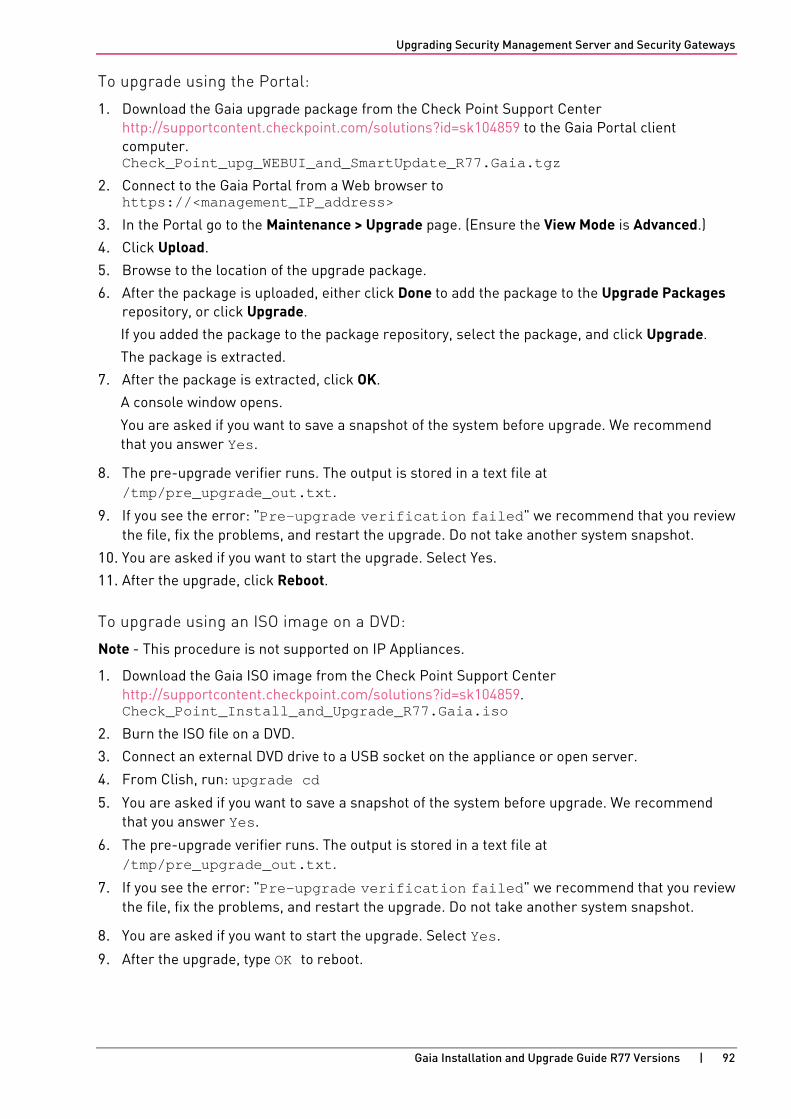
Upgrading Security Management Server and Security Gateways
Gaia Installation and Upgrade Guide R77 Versions | 92
To upgrade using the Portal:
1. Download the Gaia upgrade package from the Check Point Support Center http://supportcontent.checkpoint.com/solutions?id=sk104859 to the Gaia Portal client computer. Check_Point_upg_WEBUI_and_SmartUpdate_R77.Gaia.tgz
2. Connect to the Gaia Portal from a Web browser to https://<management_IP_address>
3. In the Portal go to the Maintenance > Upgrade page. (Ensure the View Mode is Advanced.)
4. Click Upload.
5. Browse to the location of the upgrade package.
6. After the package is uploaded, either click Done to add the package to the Upgrade Packages repository, or click Upgrade.
If you added the package to the package repository, select the package, and click Upgrade.
The package is extracted.
7. After the package is extracted, click OK.
A console window opens.
You are asked if you want to save a snapshot of the system before upgrade. We recommend that you answer Yes.
8. The pre-upgrade verifier runs. The output is stored in a text file at /tmp/pre_upgrade_out.txt.
9. If you see the error: "Pre-upgrade verification failed" we recommend that you review the file, fix the problems, and restart the upgrade. Do not take another system snapshot.
10. You are asked if you want to start the upgrade. Select Yes.
11. After the upgrade, click Reboot.
To upgrade using an ISO image on a DVD:
Note - This procedure is not supported on IP Appliances.
1. Download the Gaia ISO image from the Check Point Support Center http://supportcontent.checkpoint.com/solutions?id=sk104859. Check_Point_Install_and_Upgrade_R77.Gaia.iso
2. Burn the ISO file on a DVD.
3. Connect an external DVD drive to a USB socket on the appliance or open server.
4. From Clish, run: upgrade cd
5. You are asked if you want to save a snapshot of the system before upgrade. We recommend that you answer Yes.
6. The pre-upgrade verifier runs. The output is stored in a text file at /tmp/pre_upgrade_out.txt.
7. If you see the error: "Pre-upgrade verification failed" we recommend that you review the file, fix the problems, and restart the upgrade. Do not take another system snapshot.
8. You are asked if you want to start the upgrade. Select Yes.
9. After the upgrade, type OK to reboot.

Upgrading Security Management Server and Security Gateways
Gaia Installation and Upgrade Guide R77 Versions | 93
To upgrade using the upgrade package, with CLI:
You can upload the TGZ to the Portal, and upgrade Gaia with CLI commands.
1. Download the Gaia upgrade package from the Check Point Support Center http://supportcontent.checkpoint.com/solutions?id=sk104859. Check_Point_upg_Portal_and_SmartUpdate_R77.Gaia.tgz
2. In the Gaia CLI, enter expert mode.
3. Use FTP, SCP or similar to transfer the upgrade package to the Gaia appliance or computer. We recommend that you place the package in /var/log/upload.
4. Exit expert mode.
5. In Clish, register the file as an upgrade package. Run the command: add upgrade <version> package file <full path>
6. Run: upgrade local <version>
For example: upgrade local R77
You are asked if you want to save a snapshot of the system before upgrade. We recommend that you answer Yes.
7. The pre-upgrade verifier runs. The output is stored in a text file at /tmp/pre_upgrade_out.txt.
8. If you see the error: "Pre-upgrade verification failed" we recommend that you review the file, fix the problems, and restart the upgrade. Do not take another system snapshot.
9. You are asked if you want to start the upgrade. Select Yes.
10. After the upgrade, type OK to reboot.
To Upgrade Endpoint Security on the Security Management Server:
To upgrade to R77 with E80.50 from E80.40 or higher, use the upgrade or advanced upgrade and migration procedures for Security Management Servers in this guide.
Upgrading Security Management Server and Security Gateways
Gaia Installation and Upgrade Guide R77 Versions | 94
Upgrading Security Gateways You can upgrade Security Gateways using one of these methods:
• SmartUpdate: Centrally upgrade and manage Check Point software and licenses from a SmartConsole client.
• Local Upgrade: Do a local upgrade on the Security Gateway itself.
Upgrading Security Gateways on Open Servers
Before you upgrade:
It is recommended to back up your configuration (see "Backing Up" on page 25).
Upgrading Gateways using SmartUpdate SmartUpdate is the primary tool used for upgrading Check Point Gateways. The following features and tools are available in SmartUpdate:
• Upgrade All Packages: This feature upgrades all packages installed on a gateway. For IPSO and SecurePlatform, this feature also upgrades your operating system as a part of the upgrade procedure. The SmartUpdate "Upgrade all Packages" option supports HFAs, i.e., it will suggest upgrading the gateway with the latest HFA if a HFA package is available in the Package Repository. "Upgrade All" is the recommended method. In addition, there is an advanced method to install (distribute) packages one by one.
• Add Package to Repository: SmartUpdate provides three "helper" tools for adding packages to the Package Repository:
• From CD/DVD: Adds a package from the Check Point DVD.
• From File: Adds a package that you have stored locally.
• From Download Center: Adds a package from the Check Point Download Center.
• Get Check Point Gateway Data: This tool updates SmartUpdate with the current Check Point or OPSEC third-party packages installed on a specific gateway or for your entire enterprise.
• Check for Updates: This feature, available from the SmartDashboard Tools menu, locates the latest HFA on the Check Point Download Center, and adds it to the Package Repository.
Configuring the Security Management Server for SmartUpdate
To configure the Security Management Server for SmartUpdate:
1. Install the latest version of SmartConsole, including SmartUpdate.
2. Define the remote Check Point Gateways in SmartDashboard (for a new Security Management Server installation).
3. Verify that your Security Management Server contains the correct license to use SmartUpdate.
4. Verify that the Administrator SmartUpdate permissions (as defined in the cpconfig configuration tool) are Read/Write.
5. To enable SmartUpdate connections to the Gateways, make sure that Policy Global Properties > FireWall > Firewall Implied Rules > Accept SmartUpdate Connections (SmartUpdate) is selected. By default, it is selected.

Upgrading Security Management Server and Security Gateways
Gaia Installation and Upgrade Guide R77 Versions | 95
Add Packages to the Package Repository Use SmartUpdate to add packages to and delete packages from the Package Repository:
• directly from the Check Point Download Center website (Packages > Add > From Download Center),
• by adding them from the Check Point DVD (Packages > Add > From CD/DVD),
• by importing a file (Packages > Add > From File).
When adding the package to the Package Repository, the package file is transferred to the Security Management Server. When the Operation Status window opens, you can verify the success of the operation. The Package Repository is then updated to show the new package object.
Gateway Upgrade - SmartUpdate
To update a gateway using SmartUpdate:
1. From SmartUpdate > Packages > Upgrade All Packages select one or more Gateways and click Continue.
The Upgrade All Packages window opens, and in the Upgrade Verification list you can see which Gateways can or cannot be upgraded.
• To see a list of which packages will be installed on the Gateways that can be upgraded, select the gateway and click the Details button.
• For an explanation as to why a gateway cannot be upgraded, select the relevant gateway and click the Details button.
2. From the list provided, select the Gateways that can be upgraded and click Upgrade.
Note - The Allow reboot option (selected by default) is required in order to activate the newly installed packages.
The Operation Status pane opens and shows the progress of the installation. Each operation is represented by a single entry. Double click the entry to open the Operation Details window, which shows the operation history.
The following operations are performed during the installation process:
• The Check Point Remote Installation Daemon connects to the Check Point gateway.
• Verification for sufficient disk space.
• Verification of the package dependencies.
• The package is transferred to the gateway if it is not already there.
• The package is installed on the gateway.
• Enforcement policies are compiled for the new version.
• The gateway is rebooted if the Allow Reboot option was selected and the package requires it.
• The gateway version is updated in SmartDashboard.
• The installed packages are updated in SmartUpdate.
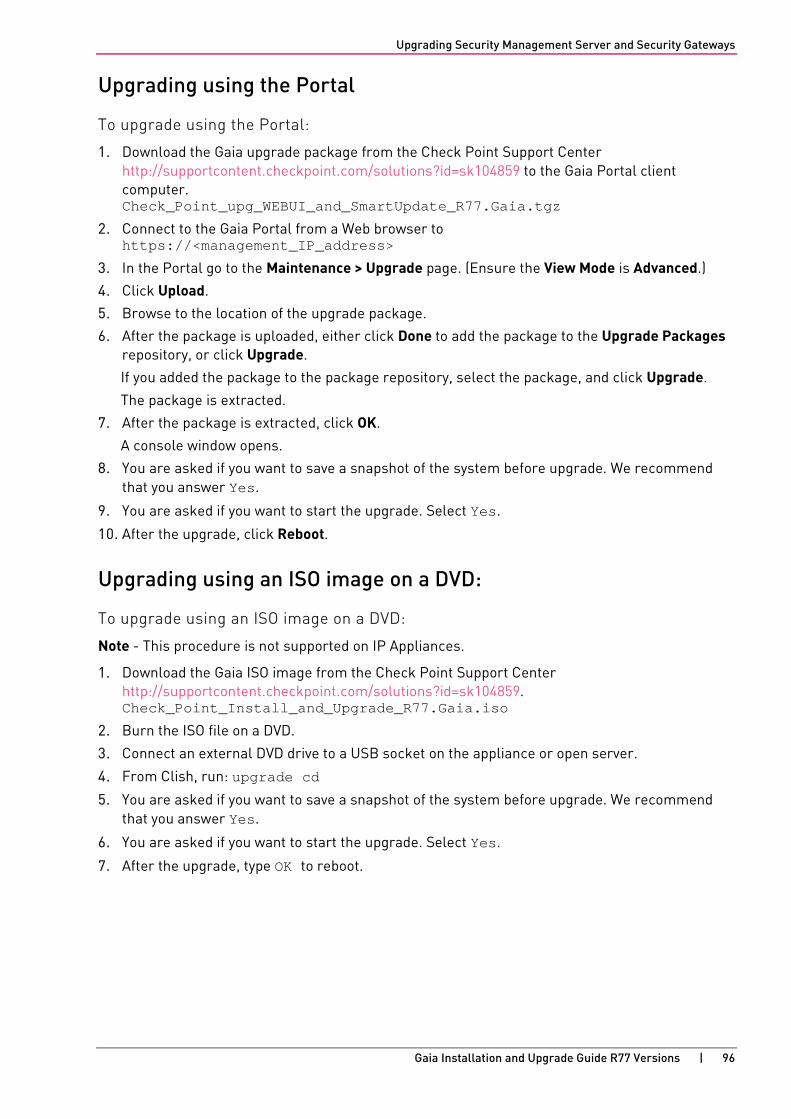
Upgrading Security Management Server and Security Gateways
Gaia Installation and Upgrade Guide R77 Versions | 96
Upgrading using the Portal
To upgrade using the Portal:
1. Download the Gaia upgrade package from the Check Point Support Center http://supportcontent.checkpoint.com/solutions?id=sk104859 to the Gaia Portal client computer. Check_Point_upg_WEBUI_and_SmartUpdate_R77.Gaia.tgz
2. Connect to the Gaia Portal from a Web browser to https://<management_IP_address>
3. In the Portal go to the Maintenance > Upgrade page. (Ensure the View Mode is Advanced.)
4. Click Upload.
5. Browse to the location of the upgrade package.
6. After the package is uploaded, either click Done to add the package to the Upgrade Packages repository, or click Upgrade.
If you added the package to the package repository, select the package, and click Upgrade.
The package is extracted.
7. After the package is extracted, click OK.
A console window opens.
8. You are asked if you want to save a snapshot of the system before upgrade. We recommend that you answer Yes.
9. You are asked if you want to start the upgrade. Select Yes.
10. After the upgrade, click Reboot.
Upgrading using an ISO image on a DVD:
To upgrade using an ISO image on a DVD:
Note - This procedure is not supported on IP Appliances.
1. Download the Gaia ISO image from the Check Point Support Center http://supportcontent.checkpoint.com/solutions?id=sk104859. Check_Point_Install_and_Upgrade_R77.Gaia.iso
2. Burn the ISO file on a DVD.
3. Connect an external DVD drive to a USB socket on the appliance or open server.
4. From Clish, run: upgrade cd
5. You are asked if you want to save a snapshot of the system before upgrade. We recommend that you answer Yes.
6. You are asked if you want to start the upgrade. Select Yes.
7. After the upgrade, type OK to reboot.
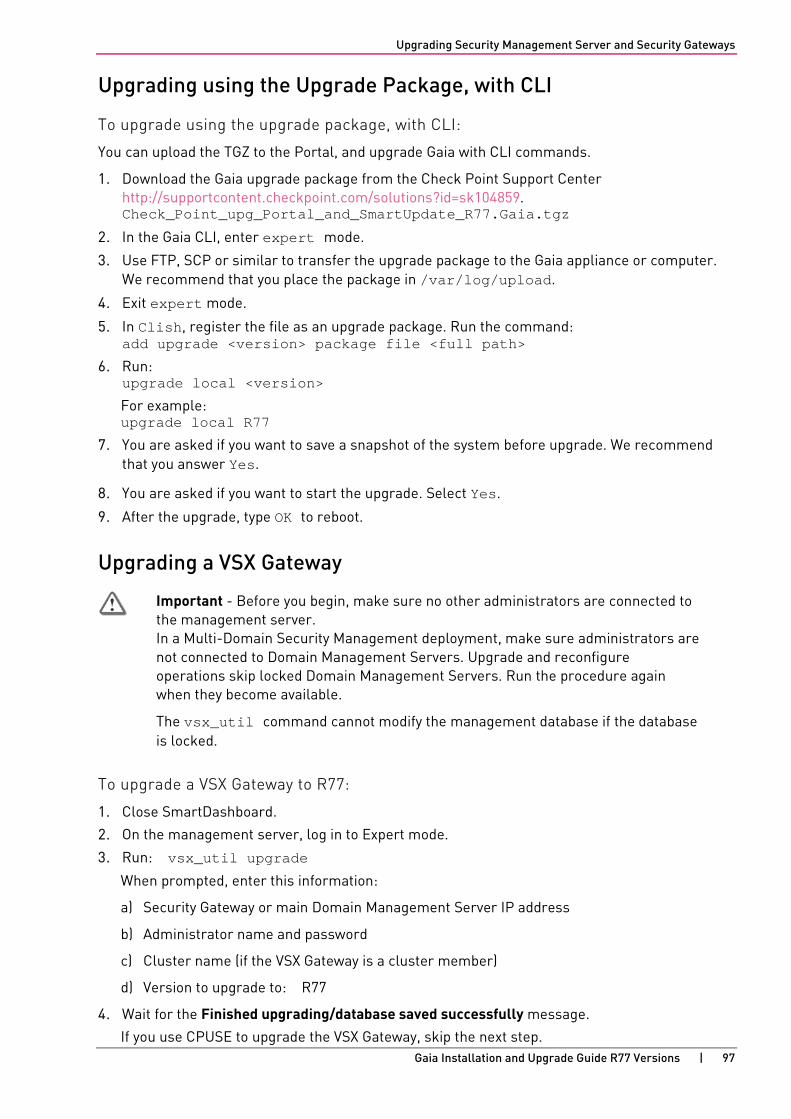
Upgrading Security Management Server and Security Gateways
Gaia Installation and Upgrade Guide R77 Versions | 97
Upgrading using the Upgrade Package, with CLI
To upgrade using the upgrade package, with CLI:
You can upload the TGZ to the Portal, and upgrade Gaia with CLI commands.
1. Download the Gaia upgrade package from the Check Point Support Center http://supportcontent.checkpoint.com/solutions?id=sk104859. Check_Point_upg_Portal_and_SmartUpdate_R77.Gaia.tgz
2. In the Gaia CLI, enter expert mode.
3. Use FTP, SCP or similar to transfer the upgrade package to the Gaia appliance or computer. We recommend that you place the package in /var/log/upload.
4. Exit expert mode.
5. In Clish, register the file as an upgrade package. Run the command: add upgrade <version> package file <full path>
6. Run: upgrade local <version>
For example: upgrade local R77
7. You are asked if you want to save a snapshot of the system before upgrade. We recommend that you answer Yes.
8. You are asked if you want to start the upgrade. Select Yes.
9. After the upgrade, type OK to reboot.
Upgrading a VSX Gateway
Important - Before you begin, make sure no other administrators are connected to the management server. In a Multi-Domain Security Management deployment, make sure administrators are not connected to Domain Management Servers. Upgrade and reconfigure operations skip locked Domain Management Servers. Run the procedure again when they become available.
The vsx_util command cannot modify the management database if the database is locked.
To upgrade a VSX Gateway to R77:
1. Close SmartDashboard.
2. On the management server, log in to Expert mode.
3. Run: vsx_util upgrade
When prompted, enter this information:
a) Security Gateway or main Domain Management Server IP address
b) Administrator name and password
c) Cluster name (if the VSX Gateway is a cluster member)
d) Version to upgrade to: R77
4. Wait for the Finished upgrading/database saved successfully message.
If you use CPUSE to upgrade the VSX Gateway, skip the next step.
Upgrading Security Management Server and Security Gateways
Gaia Installation and Upgrade Guide R77 Versions | 98
5. Run: vsx_util reconfigure
When prompted, enter this information:
a) Management server or main Domain Management Server IP address
b) Administrator name and password
c) SIC activation key for the upgraded member
The security policy is installed and configured on the upgraded VSX Gateway, and this message shows: Reconfigure module operation completed successfully
6. Install the necessary licenses.
7. Reboot.
Upgrading Standalone Full High Availability Full High Availability: The server and the gateway are in a standalone configuration and each has High Availability to a second standalone machine. If there is a failure, the server and the gateway failover to the secondary machine. In the standalone configuration the server and gateway can failover independently of each other. For example, if only the server has an issue, only that server fails over. There is no effect on the gateway in the standalone configuration.
To upgrade Full High Availability for cluster members in standalone configurations, there are different options:
• Upgrade one machine and synchronize the second machine with minimal downtime.
• Upgrade with a clean installation on one machine and synchronize the second machine with system downtime.
Upgrading with Minimal Downtime You can do a Full High Availability upgrade with minimal downtime to the cluster members.
To upgrade Full High Availability with minimal downtime:
1. Make sure the primary cluster member is active and the secondary is standby: check the status of the members.
2. Start failover to the second cluster member.
The secondary cluster member processes all the traffic.
3. Log in with SmartDashboard to the management server of the secondary cluster member.
4. Click Change to Active.
5. Configure the secondary cluster member to be the active management server.
Note - We recommend that you export the database using the Upgrade tools (on page 85).
6. Upgrade the primary cluster member to the appropriate version.
7. Log in with SmartDashboard to the management server of the primary cluster member.
Make sure version of the SmartDashboard is the same as the server.
8. Upgrade the version of the object to the new version.
Upgrading Security Management Server and Security Gateways
Gaia Installation and Upgrade Guide R77 Versions | 99
9. Install the policy on the cluster object.
The primary cluster member processes all the traffic.
Note - Make sure that the For Gateway Clusters install on all the members option is cleared. Selecting this option causes the installation to fail.
10. Upgrade the secondary cluster member to the appropriate version.
11. Synchronize for management High Availability.
Upgrading with a Clean Installation You can do a Full High Availability upgrade with a clean installation on the secondary cluster member and synchronize the primary cluster member. This type of upgrade causes downtime to the cluster members.
To upgrade Full High Availability with a clean installation:
1. Make sure the primary cluster member is active and the secondary is standby: check the status of the members.
2. Start failover to the second cluster member.
The secondary cluster member processes all the traffic.
3. Log in with SmartDashboard to the management server of the secondary cluster member.
4. Click Change to Active.
5. Configure the secondary cluster member to be the active management server.
Note - We recommend that you export the database using the Upgrade tools (on page 85).
6. Upgrade the primary cluster member to the appropriate version.
7. Log in with SmartDashboard to the management server of the primary cluster member.
Make sure version of the SmartDashboard is the same as the server.
8. Upgrade the version of the object to the new version.
9. Install the policy on the cluster object.
The primary cluster member processes all the traffic.
Note - Make sure that the For Gateway Clusters install on all the members option is cleared. Selecting this option causes the installation to fail.
10. Install the secondary member.
11. From SmartDashboard, configure the cluster object.
a) Change the secondary details (if necessary).
b) Establish SIC.
12. Synchronize for management High Availability.
The primary management database synchronizes to the secondary management database.
Upgrading Security Management Server and Security Gateways
Gaia Installation and Upgrade Guide R77 Versions | 100
Upgrading Clusters If the appliance to upgrade was not the primary member of a cluster before, export its database before you upgrade. If it was the primary member before, you do not have to do this.
To upgrade an appliance and add it to a cluster:
1. If the appliance was not the primary member of a cluster, export the Security Management Server database ("Exporting the Management Database" on page 153).
2. Upgrade the appliance.
3. If the appliance was not the primary member of a cluster, Import the database ("Importing the Management Database" on page 154).
4. Using the Portal, on the Cluster page, configure the appliance to be the primary member of a new cluster.
5. Connect a second appliance to the network.
• If the second appliance is based on an earlier version: get the relevant upgrade package from the Download Center, save it to a USB stick, and reinstall the appliance as a secondary cluster member.
• If the second appliance is upgraded: run the first-time wizard and select Secondary Cluster Member.
Enabling IPv6 on Gaia IPv6 is automatically enabled if you configure IPv6 addresses in the First Time Configuration Wizard.
If you did not do this, enable IPv6 in one of the following ways:
To enable IPv6 using Clish: # set ipv6-state on # save config # reboot
To enable IPv6 using the Portal:
1. In the Portal navigation tree, select System Management > system Configuration.
2. For IPv6 Support, select On.
3. When prompted, select Yes to reboot.
Upgrading Security Management Server and Security Gateways
Gaia Installation and Upgrade Guide R77 Versions | 101
Changing to an IPv6-Only Management IP Address To remove the IPv4 management address from a Security Management Server with a dual-IP management addresses (IPv4 and IPv6):
1. Open SmartDashboard using the IPv6 address.
2. Edit the Security Management Server object.
3. In the General Properties page, delete the IPv4 address.
4. Go to the Topology page, Interface Properties window, and delete the IPv4 address.
5. Save.
6. Open the Gaia Portal by connecting to the IPv6 address https://<IPv6 address>.
7. Delete the management IPV4 address from these pages:
• Network Interfaces
• IPv4 Static routes
Deleting the IPV4 address from Management HA You can remove the IPv4 address from one member in a management High Availability environment and keep the IPv6 and IPv4 addresses on the second member.
To remove the IPv4 address from a management HA member:
1. Open the Portal.
2. In the Network Management > Network Interfaces page, delete the IPV4 address.
3. Open SmartDashboard.
4. Reset SIC.
5. Install the database (Policy > Install Database).
6. Reboot.
7. Synchronize the databases of the Security Management Servers.
Gaia Installation and Upgrade Guide R77 Versions | 102
CHAPTE R 10
Upgrading Multi-Domain Security Management
In This Section:
Upgrade Multi-Domain Security Management Tools ............................................... 102
Upgrading Multi-Domain Security Management on Smart-1 and Open Servers ... 111
Upgrading a High Availability Deployment ................................................................ 119
Restarting Domain Management Servers ................................................................. 122
Restoring Your Original Environment........................................................................ 122
Removing Earlier Version Multi-Domain Server Installations ................................. 122
Changing the Multi-Domain Server Interfaces ......................................................... 123
IPS with Multi-Domain Security Management .......................................................... 124
Enabling IPv6 on Gaia ................................................................................................. 125
This section includes procedures for upgrading Multi-Domain Security Management to R77.
Upgrade Multi-Domain Security Management Tools This section describes the different upgrade and migrate utilities, and explains when and how each of them is used.
Pre-Upgrade Verifiers and Correction Utilities Before performing the upgrade the Multi-Domain Security Management upgrade script, UnixInstallScript, runs a list of pre-upgrade utilities. The utilities search for well-known upgrade problems that might be present in your existing installation. The output of the utilities is also saved to a log file. Three types of messages are generated by the pre-upgrade utilities:
• Action items before the upgrade: These include errors and warnings. Errors have to be repaired before the upgrade. Warnings are left for the user to check and conclude whether they should be fixed or not. In some cases, it is suggested that fixing utilities should be run during the pre-upgrade check, but in most cases the fixes are done manually from SmartDashboard. An example of an error to be fixed before the upgrade is when an invalid policy name is found in your existing installation. In this case, you must rename the policy.
• Action items after the upgrade: These include errors and warnings, which are to be handled after the upgrade.
• Information messages: This section includes items to be noted. For example, when a specific object type that is no longer supported is found in your database and is converted during the upgrade process, a message indicates that this change is going to occur.
Upgrading Multi-Domain Security Management
Gaia Installation and Upgrade Guide R77 Versions | 103
Container2MultiDomain Tool In versions prior to Multi-Domain Security Management R75, you had the option of dividing functionality between two physical Multi-Domain Server platforms:
• Multi-Domain Server Containers hosted the Domain Management Server (formerly CMA) databases.
• Multi-Domain Server Managers hosted the system and Global Object databases.
The current version no longer uses this architecture. All Multi-Domain Servers host all management databases.
Versions R75 and later use a different licensing model. All converted Multi-Domain Servers must have the appropriate new licenses.
Check Point developed the Container2MultiDomain utility to help administrators convert their old Multi-Domain Server Containers to the new single platform architecture.
• You can still use your old Multi-Domain Server Containers in a R75 deployment without conversion. Appropriate licenses are required.
• You must attach the appropriate R75 licenses to the upgraded Multi-Domain Server Container before using the Container2MultiDomain utility.
• Container2MultiDomain is applicable only to versions R75 and later.
• You can only use Container2MultiDomain if all of these conditions are true:
• The Multi-Domain Server must have a license that includes the CPSB-GLBP or CPSB-BASE blades.
• The Multi-Domain Server must be a Container.
• The Multi-Domain Server must be running.
• You must restart all Multi-Domain Servers in your deployment after using Container2MultiDomain. You do not need to restart your Domain Management Servers.
Running Container2MultiDomain After upgrading an old Multi-Domain Server Container, this message shows to remind you that you can use Container2MultiDomain to do the conversion.
The installation has indicated that this server is a Container MDS. When converting this server to a Multi-Domain Server, after logging in again to the shell, please add the required Software Blade. Run the Container2MultiDomain utility and follow the instructions.
Converting a Multi-Domain Server is optional.
Upgrading Multi-Domain Security Management
Gaia Installation and Upgrade Guide R77 Versions | 104
To use the utility:
1. Run Container2MultiDomain from the Multi-Domain Server command line.
2. When this message opens, enter yes.
This utility will convert a Container MDS to a Multi-Domain Server. Please make sure the server is up before continuing. Would you like to continue [yes/no] ? yes
This message opens when the process completes.
This server will be converted from a Container MDS to a Multi-Domain Server. Registry has been updated. mdss::sight Updated Successfully Multi-Domain Server database has been updated. Please restart ALL the Multi-Domain Servers in your environment for changes to take effect.
Export Tool The Export current Multi-Domain Server option in mds_setup extracts the database and configuration settings from a Multi-Domain Server and its associated Domain Management Servers. It then stores this data in a single TGZ file. You can import this TGZ file to a newly installed Multi-Domain Server.
Run mds_setup from the DVD, from the linux/p1_install/ directory
In a High Availability deployment, you must export the primary Multi-Domain Server. If the target Multi-Domain Server uses a different leading IP address than the source server, you must change the Multi-Domain Server IP address and the external interface.
You can include the log files in the exported TGZ file. These log files are likely to be very large.
migrate export Command The migrate export command exports the content of one Domain Management Server or Security Management Server database into a TGZ archive file. This archive file serves as the source for the migration tools described below. The migrate utility is included on the Multi-Domain Security Management distribution DVD.
Note - Before you migrate using migrate export, in a Management High Availability environment:
• In Security Management - In SmartDashboard, delete all secondary management objects from the primary Security Management Server.
• In Multi-Domain Security Management - When you migrate Domain Management Servers one at a time, in the SmartDashboard of the primary Domain Management Server, delete the secondary Management Server object.
Upgrading Multi-Domain Security Management
Gaia Installation and Upgrade Guide R77 Versions | 105
To install the migrate utility:
1. Locate the p1_upgrade_tools.tgz archive file in the upgrade_tools subdirectory under the relevant operating system parent directory.
2. Extract the contents of the archive into a folder on the source computer (the computer hosting the Domain Management Server or Security Management Server).
Installation example:
Install from CD: # gtar xvfz /mnt/cdrom/linux/upgrade_tools/linux/p1_upgrade_tools.tgz -C /var/opt/export_tools
Install from DVD: # gtar xvfz /mnt/cdrom/Linux/linux/upgrade_tools/linux/p1_upgrade_tools.tgz -C /var/opt/export_tools
The database to import is the database belonging to the primary Domain Management Server/Security Management Server. Before you import, make sure that the database is synchronized.
If you want to migrate your current High Availability environment to a Domain Management Server High Availability on a different Multi-Domain Server, export the database. Then continue with a High Availability deployment (see the High Availability chapter in the R77 Multi-Domain Security Management Administration Guide http://supportcontent.checkpoint.com/documentation_download?ID=24807).
To export the management database: <fully qualified path to command> migrate export [-l] <output file>
The optional –l flag includes closed log files and SmartLog data from the source Domain Management Server in the output archive.
• The migrate command works on the current Domain Management Server. You must use the mdsenv <Domain Management Server name> command to set environment to the current Domain Management Server (or to the Multi-Domain Server environment for the global policy) before you run the migrate command.
• The output file must be specified with the fully qualified path. Make sure there is sufficient disk space for the output file.
• Run a "log switch" immediately before you export the Domain Management Server to export the log files.
Example: # cd /opt/CPsuite-R77/fw1/bin/upgrade_tools/ # mdsenv dms1 # migrate export -l /var/opt/dms1_exported.tgz
This example assumes that you are upgrading using the distribution CD or DVD.
Upgrading Multi-Domain Security Management
Gaia Installation and Upgrade Guide R77 Versions | 106
cma_migrate Command The cma_migrate command imports an existing Domain Management Server management database into a Multi-Domain Server. If the imported Domain Management Server is from a version earlier than that of the Multi-Domain Server, the upgrade process occurs automatically during the import.
You must run cma_migrate to import Domain Management Servers exported using the migrate export command. Copy the exported management database archive file to target Multi-Domain Server prior to using the cma_migrate command. Bear in mind that the source and target platforms may be different.
Before running cma_migrate, create a new Domain and a new Domain Management Server. Do not start the Domain Management Server.
If you are migrating a Domain Management Server to a new Domain Management Server with a different IP address, it is a different procedure ("Completing Migration to a New IP Address" on page 154).
Syntax: cma_migrate <source management tgz> <target Domain Management Server FWDIR directory>
Example: # cma_migrate /tmp/exported_smc.tgz /opt/CPmds-r71/domains/dms2/CPsuite-R71/fw1
The first argument (<source management tgz>) specifies the path, on the Multi-Domain Server, to the source management data as obtained by the migrate utility. The second argument (<target Domain Management Server FWDIR directory>) is the FWDIR of the newly created Domain Management Server.
Note - You can run mdscmd migratecma to import files to a Domain Management Server, or you can use the SmartDomain Manager.
To run the cma_migrate utility from the SmartDomain Manager:
1. Right-click a Domain Management Server and select Options > Import Domain Management Server.
2. When you enter the path to the exported database file, include the name of the exported database file at the end of the path.

Upgrading Multi-Domain Security Management
Gaia Installation and Upgrade Guide R77 Versions | 107
cma_migrate and Certificates When running cma_migrate, pre-upgrade verification takes place. If no errors are found, then the migration continues. If errors are found, certain modifications must be implemented on the original Security Management Server, after which you must re-export the source.
Certificate Authority Data The cma_migrate process does not change the Certificate Authority or key data. The R77 Domain Management Server has SIC with Security Gateways. If the IP address of the R77 server is not the same as the IP address of the R77.xx server, you must establish trust between the new server and the gateways.
Before you begin, see sk17197 http://supportcontent.checkpoint.com/solutions?id=sk17197 to make sure the environment is prepared.
To initialize a Domain Management Server Internal Certificate Authority:
1. Remove the current Internal Certificate Authority for the specified environment, run:
# mdsstop_customer <DomainServer Name or IP> # mdsenv <DomainServer Name or IP> # fwm sic_reset
2. Create a new Internal Certificate Authority, run:
# mdsconfig -ca <DomainServer Name> <DomainServer IP> # mdsstart_customer <DomainServer Name or IP>
Resolving Issues with IKE Certificates With a VPN tunnel that has an externally managed, third-party gateway and a Check Point Security Gateway, sometimes there is an issue with the IKE certificates after you migrate the management database.
The Security Gateway presents its IKE certificate to its peer. The third-party gateway uses the FQDN of the certificate to retrieve the host name and IP address of the Certificate Authority. If the IKE certificate was issued by a Check Point Internal CA, the FQDN contains the host name of the original management server. The peer gateway will fail to contact the original server and will not accept the certificate.
To fix:
• Update the external DNS server to resolve the host name to the IP address of the relevant Domain Management Server.
• Revoke the IKE certificate for the gateway and create a new one.
migrate_global_policies Command The migrate_global_policies command imports (and upgrades, if necessary) a global policies database from one Multi-Domain Server to another.
Note - migrate_global_policies is blocked if there are global policies assigned to Domains. Do not assign any Global Policy to Domains before you run migrate_global_policies.
Upgrading Multi-Domain Security Management
Gaia Installation and Upgrade Guide R77 Versions | 108
If the global policy database on the target Multi-Domain Server contains polices that are assigned to Domains, the migrate_global_policies command stops. This is to make sure that the Global Policy used by those Domains is not deleted.
Note - When executing the migrate_global_policies utility, the Multi-Domain Server will be stopped. The Domain Management Server can remain up and running.
Syntax: migrate_global_policies <path to exported tgz>
<path to exported tgz>: specifies the fully qualified path to the archive file created by the migrate export command.
Backup and Restore The purpose of the backup/restore utility is to back up a whole Multi-Domain Server, including all the Domain Management Servers that it maintains, and to restore it when necessary. The restoration procedure brings the Multi-Domain Server to the state it was when the backup procedure was executed. The backup saves both user data and binaries.
Note - Backup and restore cannot be used to move the Multi-Domain Server installation between platforms.
Restoration can be performed on the original machine or, if your intention is to upgrade by replicating your Multi-Domain Server for testing purposes, to another machine. When performing a restoration to another machine, if the machine's IP address or interface has changed, refer to Changing the Multi-Domain Server IP Address and External Interface for instructions on how to adjust the restored Multi-Domain Server to the new machine.
During backup, you can view data but cannot make changes. If the Multi-Domain Security Management system consists of several Multi-Domain Servers, the backup procedure takes place manually on all the Multi-Domain Servers concurrently. Likewise, when the restoration procedure takes place, it should be performed on all Multi-Domain Servers concurrently.
mds_backup The mds_backup command backs up the complete Multi-Domain Server, including all the Domain Management Servers, binaries, and user data. If the Multi-Domain Security Management environment has multiple Multi-Domain Servers, backup runs on all of them at the same time.
This command requires Superuser privileges.
mds_backup executes the gtar command on product root directories containing data and binaries, and backs up all files, except those specified in the $MDSDIR/conf/mds_exclude.dat file. The collected data is stored in a single .tgz file, in the current working directory, named with the date-time. For example: 13Sep2002-141437.mdsbk.tgz

Upgrading Multi-Domain Security Management
Gaia Installation and Upgrade Guide R77 Versions | 109
To back up a Multi-Domain Server:
1. Go to a path outside the product directory. This is the working directory.
It is important that you not run mds_backup from a directory that will be backed up, to avoid a circular reference. For example, do not run mds_backup from /opt/CPmds-R77.
2. Run: mds_backup
3. When the process is done, copy the .tgz file, with the mds_restore, gtar and gzip command files, to an external backup location.
Syntax mds_backup [-g -b {-d <target dir name>} -v -h]
Parameter Description
-g Executes without prompting to disconnect GUI clients.
-b Batch mode - executes without asking anything (-g is implied).
-d Specifies a directory store for the backup file. When not specified, the backup file is stored in the current directory. You cannot store the backup file in any location inside the product root directory tree.
-v Verbose mode - lists all files to be backed up, but do not perform the backup operation.
-l Exclude logs from the backup.
-h Help - displays help text.
Comments When using the -g or -b options, make sure that no GUI clients or log servers are connected. If there are client connections, the backup can be corrupted if changes are made during the backup process.
Active log files are not backed up, to avoid read-during-write inconsistencies. It is best practice to run a log switch before backup.
You can back up the Multi-Domain Server without log files. The .tgz will be must smaller. To make sure all logs are excluded:
1. Open: $MDSDIR/conf/mds_exclude.dat
2. Add: log/*
3. Save the file.
mds_restore Use this command to restore a Multi-Domain Server that was backed up with mds_backup. It is best practice to restore to a clean install of the previous version. Use the Installation and Upgrade Guide for major versions, or the Release Notes for minor versions or hotfixes.
If the Multi-Domain Security Management environment has multiple Multi-Domain Servers, restore all Multi-Domain Servers at the same time.
Upgrading Multi-Domain Security Management
Gaia Installation and Upgrade Guide R77 Versions | 110
To restore a Multi-Domain Server:
1. Go to the directory where the backup was created.
2. Log in to expert mode.
3. Run: ./mds_restore <backup_file>
4. If you restore a Multi-Domain Server to a new IP address, configure the new address ("Completing Migration to a New IP Address" on page 154).
Upgrading Multi-Domain Security Management
Gaia Installation and Upgrade Guide R77 Versions | 111
Upgrading Multi-Domain Security Management on Smart-1 and Open Servers
You can upgrade Smart-1 appliances and open servers.
Multi-Domain Server In-Place Upgrade The in-place upgrade process takes place on an existing Multi-Domain Server machine. The Multi-Domain Server, together with all Domain Management Servers, are upgraded in one procedure.
Note - When upgrading Multi-Domain Security Management, all SmartUpdate packages on the Multi-Domain Server (excluding Edge firmware packages) are deleted from the SmartUpdate Repository.
Before doing an in-place upgrade to R77:
1. Run the Pre-upgrade verification only option from UnixInstallScript. In a multi-Multi-Domain Server environment, do this on all Multi-Domain Servers.
2. Make the changes required by the pre-upgrade verification, and if you have High Availability, start synchronizations.
3. Test your changes:
a) Assign the global policy
b) Install policies to Domain Management Servers
c) Verify logging using SmartView Tracker
d) View status using the SmartDomain Manager or SmartView Monitor
4. Run mds_backup to back up your system.
Upgrade Requirements:
Ensure you have at least 6 GB of disk space available to do the upgrade.
• Using the Portal: Check the space available for images in the Maintenance > Image Management page.
• Using the CLI: In expert mode, run the df -h command and check the available space in /var/log.
To Upgrade Using Upgrades (CPUSE)
See Upgrading Using Gaia Upgrades (CPUSE) (on page 89).
To upgrade using an ISO image on a DVD:
1. Download the Gaia ISO image from the Check Point Support Center http://supportcontent.checkpoint.com/solutions?id=sk104859. Check_Point_Install_and_Upgrade_R77.Gaia.iso
2. Burn the ISO file on a DVD.
3. Connect an external DVD drive to a USB socket on the appliance or open server.
4. From Clish, run: upgrade cd
Upgrading Multi-Domain Security Management
Gaia Installation and Upgrade Guide R77 Versions | 112
5. You are asked if you want to save a snapshot of the system before upgrade. We recommend that you answer Yes.
6. You are asked if you want to start the upgrade. Select Yes.
The upgrade takes place.
7. After the upgrade, before rebooting, remove the DVD from the drive.
8. Type OK to reboot.
To upgrade using the upgrade package, with CLI:
You can upload the TGZ to the Portal, and upgrade Gaia with CLI commands.
1. Download the Gaia upgrade package from the Check Point Support Center http://supportcontent.checkpoint.com/solutions?id=sk104859. Check_Point_upg_Portal_and_SmartUpdate_R77.Gaia.tgz
2. In the Gaia CLI, enter expert mode.
3. Use FTP, SCP or similar to transfer the upgrade package to the Gaia appliance or computer. We recommend that you place the package in /var/log/upload.
4. Exit expert mode.
5. In Clish, register the file as an upgrade package. Run the command: add upgrade <version> package file <full path>
6. Run: upgrade local <version>
For example: upgrade local R77
You are asked if you want to save a snapshot of the system before upgrade. We recommend that you answer Yes.
7. The pre-upgrade verifier runs. The output is stored in a text file at /tmp/pre_upgrade_out.txt.
8. If you see the error: "Pre-upgrade verification failed" we recommend that you review the file, fix the problems, and restart the upgrade. Do not take another system snapshot.
9. You are asked if you want to start the upgrade. Select Yes.
Exporting and Importing a Multi-Domain Server You can upgrade to the current version by replicating a deployment from existing (source) Multi-Domain Servers to target Multi-Domain Servers. This process combines a simplified methodology for upgrading a Multi-Domain Security Management deployment with the ability to thoroughly test the deployment prior to implementation.
Use mds_setup with the Export option, to extract database and configuration settings from a Multi-Domain Server, together with its Domain Management Servers, and then stores this data in a single TGZ file. If you are working with a High Availability deployment, you must export the primary Multi-Domain Server.
Run mds_setup from the DVD, from the linux/p1_install/ directory
Use the mds_import.sh command to import the contents of a saved TGZ file to a separate, newly installed Multi-Domain Server.
Upgrading Multi-Domain Security Management
Gaia Installation and Upgrade Guide R77 Versions | 113
These commands export and import the following information:
• Global Multi-Domain Server database
• All Domain Management Servers
• GUI Clients
• Administrators and permissions
• Licenses
• Log files (optional)
Planning the Upgrade Before you start the upgrade, consider these points:
• Make sure that the target Multi-Domain Server meets the minimum hardware and operating system requirements and is configured identically to the source Multi-Domain Server.
• If the target Multi-Domain Server uses a different leading IP address than the source Multi-Domain Server, you must change the Multi-Domain Server IP address and the external interface.
• You must upgrade all Multi-Domain Servers in your deployment, including High Availability and Load Sharing members.
• The target Multi-Domain Server should be on an isolated network segment so the Gateways associated with the source Multi-Domain Server are not affected until the process is complete and fully tested.
Exporting a Multi-Domain Server Deployment After you begin to export from the source Multi-Domain Server, avoid making configuration changes on that Multi-Domain Server. Changes made after export starts are not included in the tgz file. You will need to make such changes manually on the target after you complete the upgrade.
Run mds_setup from the DVD, from the linux/p1_install/ directory
To export a Multi-Domain Server to a TGZ file:
1. Mount the Multi-Domain installation media to a subdirectory.
2. Change the directory to the mounted directory.
3. Browse to the linux/p1_install/ directory.
4. Run: mds_setup
5. Select the Export current Multi-Domain Server option.
6. Follow the instructions on the screen.
7. When prompted, choose whether or not you wish to save the log files to the tgz file.
Note - Exporting log files can significantly increase the tgz file size and the time required to complete the upgrade.
Upgrading Multi-Domain Security Management
Gaia Installation and Upgrade Guide R77 Versions | 114
Importing a Multi-Domain Server deployment
To import a Multi-Domain Server deployment onto a target machine:
1. Perform a clean Multi-Domain Server installation on the target machine, according to the instructions for your specific platform.
2. Copy the appropriate exported tgz file from the source Multi-Domain Server to the new target Multi-Domain Server. The tgz file conforms to the following naming convention: exported_mds_<time & date stamp>.tgz
3. Run the mds_import.sh command on the target Multi-Domain Server. Follow the instructions on the screen.
4. Run mdsstart on the target Multi-Domain Server.
5. Test to confirm that the replication has been successful:
a) Start the Multi-Domain Server.
b) Verify that all Domain Management Servers are running and that you can connect to the Multi-Domain Server using the SmartDomain Manager and Global SmartDashboard.
c) Connect to the Domain Management Servers using SmartDashboard.
Replicate and Upgrade Choose this type of upgrade if you intend to change hardware as part of the upgrade process, or if you want to test the upgrade process first. The existing Multi-Domain Server installation is copied to another machine (referred to as the target machine) by using the mds_backup and mds_restore commands.
To perform the Replicate and Upgrade process:
1. Back up your existing Multi-Domain Server. Run one of these:
• mds_backup
• UnixInstallScript and select the Backup option
2. Install a fresh Multi-Domain Server on the target machine. To restore your existing Multi-Domain Server, first install a fresh Multi-Domain Server on the target machine that is the same version as the existing Multi-Domain Server.
Note - Make sure the target machine is on an isolated network segment, so that Gateways connected to the original Multi-Domain Server are not affected until you switch to the target machine.
3. Restore the Multi-Domain Server on the target machine. Copy the files created by the backup process to the target machine and run: mds_restore.
Important - In Gaia, run this command from expert mode and exit after running the command. You must run this command from the folder that contains the backup file. 1. Go to the folder that contains the backup file. 2. Enter ./mds_restore
4. If your target machine and the source machine have different IP addresses, change the IP Address of the restored Multi-Domain Server to the new IP address. If your target machine and the source machine have different interface names (for example: hme0 and hme1), change the interface of the restored Multi-Domain Server to the new interface name.
Upgrading Multi-Domain Security Management
Gaia Installation and Upgrade Guide R77 Versions | 115
5. Test to confirm that the replication is successful:
a) Start the Multi-Domain Server.
b) Make sure that all Domain Management Servers are running and that you can connect to the Multi-Domain Server with SmartDomain Manager and Global SmartDashboard.
c) Connect to Domain Management Servers using SmartDashboard.
6. Stop the Multi-Domain Server on the target machine and upgrade.
7. Run: Container2MultiDomain.
8. Start the Multi-Domain Server.
Gradual Upgrade to Another Computer In a gradual upgrade, you export Domain Management Servers one at a time from the source Multi-Domain Server to a target Multi-Domain Server of the latest version.
The gradual upgrade does not keep all data.
Data Not Exported To get this data in the new environment:
Multi-Domain Security Management Administrators and management consoles
Redefine and reassign to Domains after the upgrade.
Status of global communities Run: mdsenv; fwm mds rebuild_global_communities_status all
To run a gradual upgrade:
1. Install the Multi-Domain Server on the target machine.
2. On the target Multi-Domain Server, create a Domain and Domain Management Server. Do not start the Domain Management Server.
3. Run: migrate export
The migrate export command exports the Domain Management Server database to a .tgz file on the Multi-Domain Server. It also transfers the licenses for the Domain Management Server.
4. Run: cma_migrate <src tgz> <FWDIR on target>
5. The cma_migrate (see "cma_migrate Command" on page 106) command imports the Domain Management Server database (using the TGZ created by the migrate export command) to the Multi-Domain Server.
6. Start the Domain Management Server.
7. Run: mdsenv; mdsstart
8. Use migrate_global_policies to import the global policies.
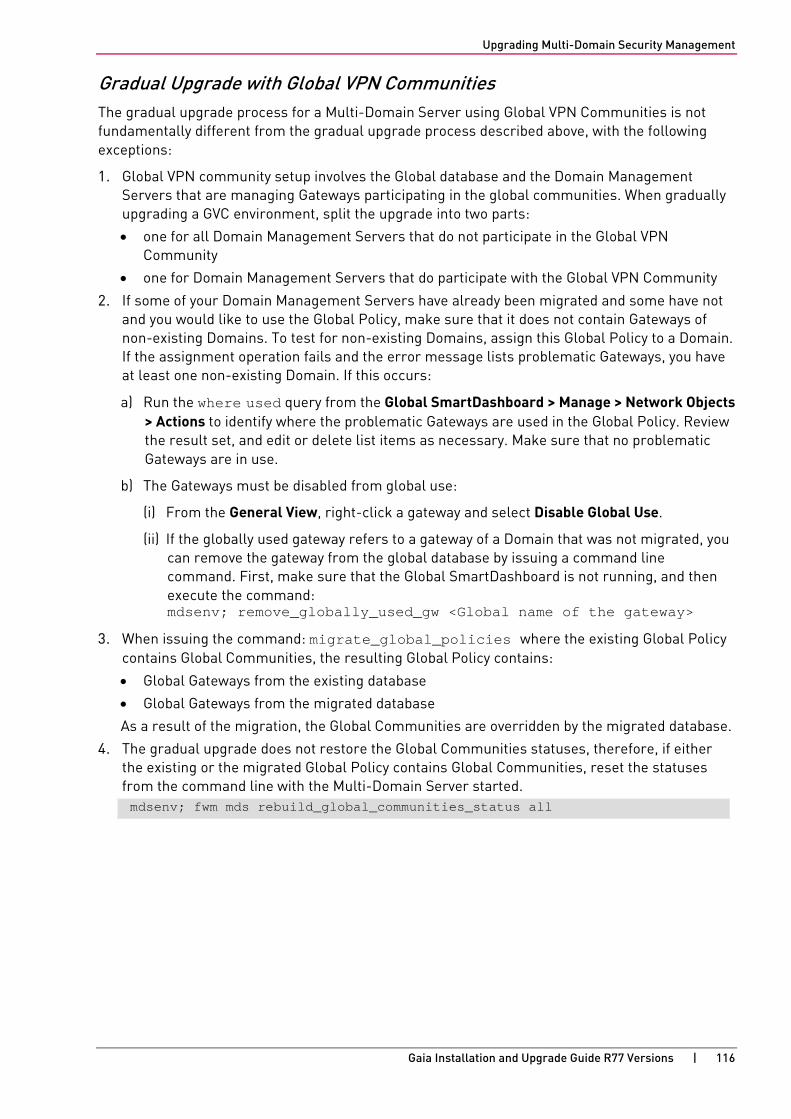
Upgrading Multi-Domain Security Management
Gaia Installation and Upgrade Guide R77 Versions | 116
Gradual Upgrade with Global VPN Communities The gradual upgrade process for a Multi-Domain Server using Global VPN Communities is not fundamentally different from the gradual upgrade process described above, with the following exceptions:
1. Global VPN community setup involves the Global database and the Domain Management Servers that are managing Gateways participating in the global communities. When gradually upgrading a GVC environment, split the upgrade into two parts:
• one for all Domain Management Servers that do not participate in the Global VPN Community
• one for Domain Management Servers that do participate with the Global VPN Community
2. If some of your Domain Management Servers have already been migrated and some have not and you would like to use the Global Policy, make sure that it does not contain Gateways of non-existing Domains. To test for non-existing Domains, assign this Global Policy to a Domain. If the assignment operation fails and the error message lists problematic Gateways, you have at least one non-existing Domain. If this occurs:
a) Run the where used query from the Global SmartDashboard > Manage > Network Objects > Actions to identify where the problematic Gateways are used in the Global Policy. Review the result set, and edit or delete list items as necessary. Make sure that no problematic Gateways are in use.
b) The Gateways must be disabled from global use:
(i) From the General View, right-click a gateway and select Disable Global Use.
(ii) If the globally used gateway refers to a gateway of a Domain that was not migrated, you can remove the gateway from the global database by issuing a command line command. First, make sure that the Global SmartDashboard is not running, and then execute the command: mdsenv; remove_globally_used_gw <Global name of the gateway>
3. When issuing the command: migrate_global_policies where the existing Global Policy contains Global Communities, the resulting Global Policy contains:
• Global Gateways from the existing database
• Global Gateways from the migrated database
As a result of the migration, the Global Communities are overridden by the migrated database.
4. The gradual upgrade does not restore the Global Communities statuses, therefore, if either the existing or the migrated Global Policy contains Global Communities, reset the statuses from the command line with the Multi-Domain Server started. mdsenv; fwm mds rebuild_global_communities_status all
Upgrading Multi-Domain Security Management
Gaia Installation and Upgrade Guide R77 Versions | 117
Migrating from Security Management Server to Domain Management Server This section describes how to migrate the Security Management Server product of a standalone deployment to a Domain Management Server. Then you manage the former-standalone computer as a Security Gateway only from the Domain Management Server.
Note - To later undo the separation of the Security Management Server and Security Gateway on the standalone, back up the standalone computer before you migrate.
Before migrating:
1. Make sure that the target Domain Management Server IP address can communicate with all Gateways.
2. Add an object representing the Domain Management Server (name and IP address) and define it as a Secondary Security Management Server.
3. Install policy on all managed Gateways.
4. Delete all objects or access rules created in steps 1 and 2.
5. If the standalone computer already has Security Gateway installed:
• Clear the Firewall option in the Check Point Products section of the gateway object. You may have to first remove it from the Install On column of your Rule Base (and then add it again).
• If the gateway participates in a VPN community, remove it from the community and erase its certificate. Note these changes, to undo them after the migration.
6. Save and close SmartDashboard. Do not install policy.
To migrate the management database to the Domain Management Server:
1. Go to the fully qualified path of the migrate export command.
2. Run: migrate export [-l] <output file>
3. Create a new Domain Management Server on the Multi-Domain Server, but do not start it.
4. Migrate the exported database into the Domain Management Server. Use the cma_migrate command or the import operation from the SmartDomain Manager, specifying as an argument the database location you specified in step 2.
Note - To run the cma_migrate utility from the SmartDomain Manager, right-click a Domain Management Server and select Options > Import Domain Management Server. In the Import window, when you enter the path to the exported database file, include the name of the exported database file at the end of the path.
You can also run mdscmd migratecma to import files to a Domain Management Server.
5. Restart the Domain Management Server and launch SmartDashboard.
6. In SmartDashboard, under Network Objects, locate:
• An object with the Name and IP address of the Domain Management Server primary management object (migrated). Previous references to the standalone management object now refer to this object.
• An object for each gateway managed previously by Security Management Server.
Upgrading Multi-Domain Security Management
Gaia Installation and Upgrade Guide R77 Versions | 118
7. Edit the Primary Management Object and remove all interfaces (Network Object > Topology > Remove).
8. Create an object for the Security Gateway on the standalone machine (from New > Check Point > Gateway), and:
• Assign a Name and IP address for the gateway.
• Select the appropriate Check Point version.
• Enabled the installed Software Blades.
• If the Security Gateway belonged to a VPN Community, add it back.
• Do not initialize communication.
9. Run Domain Management Server on the primary management object and, in each location, consider changing to the new gateway object.
10. Install the policy on all other Gateways, not the new one. If you see warning messages about this gateway because it is not yet configured, ignore them.
11. Uninstall the standalone deployment.
12. Install a Security Gateway on the previous standalone machine.
13. From the Domain Management Server SmartDashboard, edit the gateway object, define its topology, and establish trust between the Domain Management Server and the Security Gateway.
14. Install the policy on the Security Gateway.
Upgrading Multi-Domain Security Management
Gaia Installation and Upgrade Guide R77 Versions | 119
Upgrading a High Availability Deployment
Multi-Domain Security Management High Availability gives you management redundancy for all Domains. Multi-Domain Security Management High Availability operates at these levels:
• Multi-Domain Server High Availability - By default, Multi-Domain Servers are automatically synchronized with each other. One Multi-Domain Server is always defined as the Active Multi-Domain Server and all other Multi-Domain Servers are Standby Multi-Domain Servers. You can connect to an Active or Standby Multi-Domain Server to work on Domain management tasks.
You can only do Global policy and global object management tasks using the active Multi-Domain Server. In the event that the active Multi-Domain Server is unavailable, you must change one of the standby Multi-Domain Servers to active.
• Domain Management Server High Availability - Multiple Domain Management Servers give Active/Standby redundancy for Domain management. One Domain Management Server for each Domain is Active. The other, fully synchronized Domain Management Servers for that Domain, are standbys. In the event that the Active Domain Management Server becomes unavailable, you must change one of the standby Domain Management Servers to active.
You can also use ClusterXL to give High Availability redundancy to your Domain Security Gateways. You use SmartDashboard to configure and manage Security Gateway High Availability for Domain Management Servers.
Pre-Upgrade Verification and Tools Run the pre-upgrade verification on all Multi-Domain Servers before upgrading any Multi-Domain Servers. Select the Pre-Upgrade Verification Only option from UnixInstallScript. Upgrade the primary Multi-Domain Server only after you have fixed all errors and reviewed all warnings for all Multi-Domain Servers.
Multi-Domain Server High Availability Multi-Domain Servers can only communicate and synchronize with other Multi-Domain Servers running the same version. If your deployment has more than one Multi-Domain Server, make sure they are upgraded to the same version.
To upgrade multiple Multi-Domain Servers:
1. Upgrade the primary Multi-Domain Server.
2. Upgrade the other Multi-Domain Servers.
During the upgrade process, we recommend that you do not use any of the Multi-Domain Servers to make changes to the databases. This can cause inconsistent synchronization between Multi-Domain Servers.
Note - You must upgrade your Multi-Domain Log Servers to the same version as the Multi-Domain Servers.

Upgrading Multi-Domain Security Management
Gaia Installation and Upgrade Guide R77 Versions | 120
Upgrading Multi-Domain Servers and Domain Management Servers
To upgrade a Multi-Domain Server and a Domain Management Server:
1. Run pre-upgrade verification for all Multi-Domain Servers.
2. If a change to the global database is necessary, synchronize the Multi-Domain Servers immediately after making these changes. Update the database on one Multi-Domain Server and start synchronization. The other Multi-Domain Servers will get the database changes automatically.
3. If global database changes affect a global policy assigned to a Domain, assign the global policy again to all affected Domains.
4. If the verification command finds Domain Management Server level errors (for example, Gateways that are no longer supported by the new version):
a) Make the required changes on the Active Domain Management Server.
b) Synchronize the Active Domain Management Server with all Standby Domain Management Servers.
5. If a Domain has Log Servers:
a) In the Domain SmartConsole, manually install the new database: select Policy > Install Database.
b) Select all Log Servers.
c) Make sure that the change to the Domain Log Server is successful.
Note - When synchronizing, make sure that you have only one active Multi-Domain Server and one active Domain Management Server for each Domain.
Change the active Multi-Domain Server and Domain Management Server, and then synchronize the Standby computers.
Updating Objects in the Domain Management Server Databases After upgrading the Multi-Domain Servers and Domain Management Servers, you must update the objects in all Domain Management Server databases. This is necessary because upgrade does not automatically update the object versions attribute in the databases. If you do not manually update the objects, the standby Domain Management Servers and Log Servers will show the outdated versions.
Update the objects with these steps on each Multi-Domain Server.
To update Domain Management Server and Domain Log Server objects:
1. Make sure that all Domain Management Servers are up: mdsstat
If a Domain Management Server is down, resolve the issue, and start the Domain Management Server: mds_startcustomer
2. Go to the top-level CLI: mdsenv
3. Run: $MDSDIR/scripts/mds_fix_cmas_clms_version -c ALL
Optional: Update one Domain Management Server or Domain Log Server at a time with this command: $MDSDIR/scripts/mds_fix_cmas_clms_version -c ALL -n <server_name>
Upgrading Multi-Domain Security Management
Gaia Installation and Upgrade Guide R77 Versions | 121
4. Synchronize all standby Domain Management Servers.
5. Install the database in SmartDashboard for the applicable Domain Management Server.
Managing Domain Management Servers During the Upgrade Process The best practice is to avoid making any changes to Domain Management Server databases during the upgrade process. If your business model cannot support management down-time during the upgrade, you can continue to manage Domain Management Servers during the upgrade process.
This creates a risk of inconsistent Domain Management Server database content between instances on different Multi-Domain Servers. The synchronization process cannot resolve these inconsistencies.
After successfully upgrading one Multi-Domain Server, you can set its Domain Management Servers to Active while you upgrade the others. Synchronization between the Domain Management Servers occurs after all Multi-Domain Servers are upgraded.
If, during the upgrade process, you make changes to the Domain Management Server database using different Multi-Domain Servers, the contents of the two (or more) databases will be different. Because you cannot synchronize these databases, some of these changes will be lost. The Domain Management Server High Availability status appears as Collision.
You must decide which database version to retain and synchronize it to the other Domain Management Servers. You then must re-enter the lost changes to the synchronized database.
Upgrading Multi-Domain Security Management
Gaia Installation and Upgrade Guide R77 Versions | 122
Restarting Domain Management Servers After completing the upgrade process, start Domain Management Servers: mdsstart
Restoring Your Original Environment Before the upgrade:
Pre-upgrade utilities are an integral part of the upgrade process. In some cases, you are required to change your database before the actual upgrade can take place or the Pre-Upgrade Verifier suggests you execute utilities that perform the required changes automatically. Even if you decide to restore your original environment, keep the changes you made as a result of the pre-upgrade verification.
Prepare a backup of your current configuration using the mds_backup utility from the currently installed version. Prepare a backup as the first step of the upgrade process and prepare a second backup right after the Pre-Upgrade Verifier successfully completes with no further suggestions.
To restore your original environment:
1. Remove the new installation:
a) For a SecurePlatform server, manually remove the new software packages. It can be easier to remove all installed Check Point packages and install the original version.
b) For all other servers, log in to expert mode and run the mds_remove utility.
2. Go to the folder that contains the backup file.
3. Run: ./mds_restore
The original environment is restored.
4. Exit expert mode.
Removing Earlier Version Multi-Domain Server Installations
After upgrading your Multi-Domain Server to the latest version, earlier version files are not automatically deleted from the disk. This lets you revert to the old version in the event there are problems with the upgrade. These files can take up a lot of disk space and cause performance degradation.
After you complete testing your upgrade, we recommend that remove these earlier version files. You can use the mds_remove_version tool to automatically remove old installations with no effect on the installed version.
Upgrading Multi-Domain Security Management
Gaia Installation and Upgrade Guide R77 Versions | 123
To remove old installations:
1. Backup your system.
2. Download the tool.
3. Copy the mds_remove_version.sh script to the Multi-Domain Server
4. Run mds_remove_version.sh. There are no parameters or arguments.
5. Confirm when prompted.
6. Make sure that the old files were successfully removed.
Important - This tool removes major releases and all minor releases installed over a major release. For example, if R71.50 is installed on your Multi-Domain Server, and you upgraded to R77, the tool removes R71 and R71.50 files.
Changing the Multi-Domain Server Interfaces If your target machine and the source machine have different IP addresses, follow the steps listed below it to change the restored Multi-Domain Server to the new IP address.
To change the IP address:
1. Stop the Multi-Domain Server by running mdsstop.
2. Change the IP address in $MDSDIR/conf/LeadingIP file to the new IP address.
3. Edit the $MDSDIR/conf/mdsdb/mdss.C file. Find the Multi-Domain Server object that has the source Multi-Domain Server IP address and change its IP address to the new IP address. Do not change the Multi-Domain Server name.
4. Install a new license on the target Multi-Domain Server with the new Multi-Domain Server IP address.
5. For multiple Multi-Domain Server environments, repeat steps 1 to 4 for each Multi-Domain Server that has a changed IP address.
If your target machine and the source machine have different interface names (e.g., hme0 and hme1), follow the steps listed below to adjust the restored Multi-Domain Server to the new interface name.
To change the interface:
1. Change the interface name in file $MDSDIR/conf/external.if to the new interface name.
2. For each Domain Management Server, replace the interface name in $FWDIR/conf/vip_index.conf.
Upgrading Multi-Domain Security Management
Gaia Installation and Upgrade Guide R77 Versions | 124
IPS with Multi-Domain Security Management • When upgrading to R77, the previous Domain IPS configuration is overridden when you first
assign a Global Policy.
We recommend that you save each Domain policy, so that you can restore the settings after the upgrade. To do so, go to the Domain Configuration window > Assign Global Policy tab, and enable Create database version.
• If you manage IPS globally, you must reassign the global policy before installing the policy on Security Gateways.
• Customers upgrading to the current version should note that the IPS subscription has changed.
• All Domains subscribed to IPS are automatically assigned to an "Exclusive" subscription
• "Override" and "Merge" subscriptions are no longer supported.
See the Global Policy Chapter in the R77 Multi-Domain Security Management Administration Guide http://supportcontent.checkpoint.com/documentation_download?ID=24807 for detailed information.
Upgrading Multi-Domain Security Management
Gaia Installation and Upgrade Guide R77 Versions | 125
Enabling IPv6 on Gaia IPv6 is automatically enabled if you configure IPv6 addresses in the First Time Configuration Wizard.
If you did not do this, enable IPv6 in one of the following ways:
To enable IPv6 using Clish: # set ipv6-state on # save config # reboot
To enable IPv6 using the Portal:
1. In the Portal navigation tree, select System Management > system Configuration.
2. For IPv6 Support, select On.
3. When prompted, select Yes to reboot.
Enabling IPv6 on Multi-Domain Security Management If your environment uses IPv6 addresses, you first must enable IPv6 support for the Multi-Domain Server and for any existing Domain Management Servers. It is not necessary to enable IPv6 support for Domain Management Servers that are created after IPv6 is enabled on the Multi-Domain Server, because this occurs automatically.
Before enabling IPv6 support for the Multi-Domain Server:
1. Enable IPv6 in Gaia and assign an IPv6 address to the management interface.
2. Write down the Multi-Domain Server IPv6 address and the names and IPv6 address for all Domain Management Servers. This is necessary because the procedures disconnect the SmartDomain Manager.
To enable IPv6 support for the Multi-Domain Server:
1. From the Multi-Domain Server command line, run > mdsconfig.
2. Select IPv6 Support for Domain Management Server.
3. Press y when asked to change the IPv6 preferences for the Multi-Domain Server.
Press y again to confirm.
4. Enter the management interface name (typically eth0).
5. Enter the Multi-Domain Server IPv6 address.
6. Press y to start Check Point services.
After a few moments, the mdsconfig menu shows.
Upgrading Multi-Domain Security Management
Gaia Installation and Upgrade Guide R77 Versions | 126
To enable IPv6 support for all existing Domain Management Servers:
1. From the mdsconfig menu, select IPv6 Support for Existing Domain Management Servers.
2. Press y when asked to change the IPv6 preferences for Domain Management Servers.
3. Press a to add support to an existing Domain Management Server.
4. Press y to add Support to all Domain Management Servers at once.
5. Press m to manually add IPv6 addresses
Or
Press r to automatically assign IPv6 address from a specified range.
6. Do the instructions on the screen to enter the IPv6 address or a range of IPv6 addresses when prompted.
To manually enable IPv6 support for specified Domain Management Servers.
1. From the mdsconfig menu, select IPv6 Support for Existing Domain Management Servers.
2. At the prompt, press y to change the IPv6 preferences for Domain Management Servers.
3. Press a to add support to an existing Domain Management Server.
4. Press n when asked to enable IPv6 support for all Domain Management Servers at once.
Press y to confirm.
5. At the prompt, enter the Domain Management Server name.
The available Domain Management Servers show above prompt. You can copy and paste the name.
6. Enter the IPv6 address.
Gaia Installation and Upgrade Guide R77 Versions | 127
CHAPTE R 11
Upgrading with SmartUpdate In This Section:
Introducing SmartUpdate ........................................................................................... 127
Understanding SmartUpdate ..................................................................................... 128
SmartUpdate - Seeing it for the First Time ............................................................... 129
Common Operations ................................................................................................... 130
Upgrading Packages................................................................................................... 131
Managing Licenses ..................................................................................................... 136
Service Contracts ....................................................................................................... 142
Generating CPInfo ...................................................................................................... 143
The SmartUpdate Command Line ............................................................................. 144
Introducing SmartUpdate SmartUpdate automatically distributes applications and updates for Check Point and OPSEC Certified products, and manages product licenses. It provides a centralized means to guarantee that Internet security throughout the enterprise network is always up to date. SmartUpdate turns time-consuming tasks that could otherwise be performed only by experts into simple point and click operations.
SmartUpdate extends your organization's ability to provide centralized policy management across enterprise-wide deployments. SmartUpdate can deliver automated software and license updates to hundreds of distributed security Gateways from a single management console. SmartUpdate ensures security deployments are always up-to-date by enforcing the most current security software. This provides greater control and efficiency while dramatically decreasing maintenance costs of managing global security installations.
SmartUpdate enables remote upgrade, installation and license management to be performed securely and easily. A system administrator can monitor and manage remote Gateways from a central location, and decide whether there is a need for software upgrade, new installations and license modification. It is possible to remotely upgrade:
• Check Point Security Gateways
• Hotfixes, Hotfix Accumulators (HFAs) and patches
• Third party OPSEC applications
• UTM-1 Edge
• Check Point IPSO Operating System
• SecurePlatform
All operations that can be performed via SmartUpdate can also be done via the command line interface. See The SmartUpdate Command Line (on page 144) for more information.
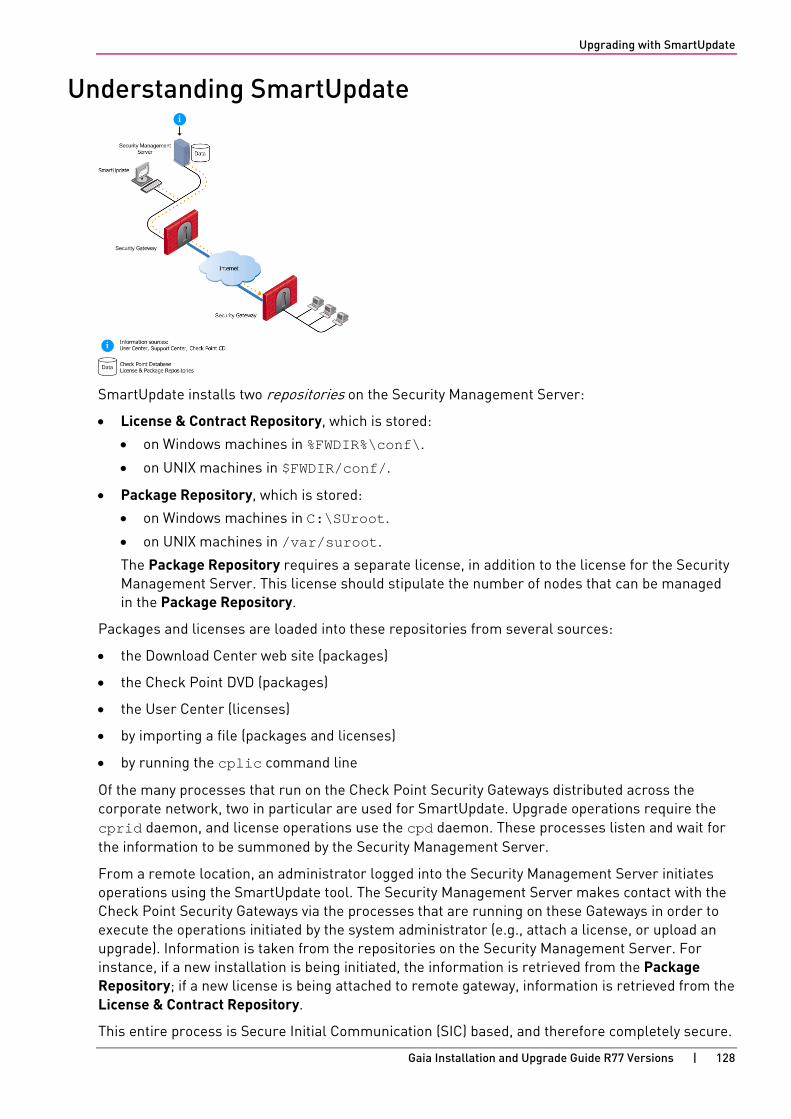
Upgrading with SmartUpdate
Gaia Installation and Upgrade Guide R77 Versions | 128
Understanding SmartUpdate
SmartUpdate installs two repositories on the Security Management Server:
• License & Contract Repository, which is stored:
• on Windows machines in %FWDIR%\conf\.
• on UNIX machines in $FWDIR/conf/.
• Package Repository, which is stored:
• on Windows machines in C:\SUroot.
• on UNIX machines in /var/suroot.
The Package Repository requires a separate license, in addition to the license for the Security Management Server. This license should stipulate the number of nodes that can be managed in the Package Repository.
Packages and licenses are loaded into these repositories from several sources:
• the Download Center web site (packages)
• the Check Point DVD (packages)
• the User Center (licenses)
• by importing a file (packages and licenses)
• by running the cplic command line
Of the many processes that run on the Check Point Security Gateways distributed across the corporate network, two in particular are used for SmartUpdate. Upgrade operations require the cprid daemon, and license operations use the cpd daemon. These processes listen and wait for the information to be summoned by the Security Management Server.
From a remote location, an administrator logged into the Security Management Server initiates operations using the SmartUpdate tool. The Security Management Server makes contact with the Check Point Security Gateways via the processes that are running on these Gateways in order to execute the operations initiated by the system administrator (e.g., attach a license, or upload an upgrade). Information is taken from the repositories on the Security Management Server. For instance, if a new installation is being initiated, the information is retrieved from the Package Repository; if a new license is being attached to remote gateway, information is retrieved from the License & Contract Repository.
This entire process is Secure Initial Communication (SIC) based, and therefore completely secure.
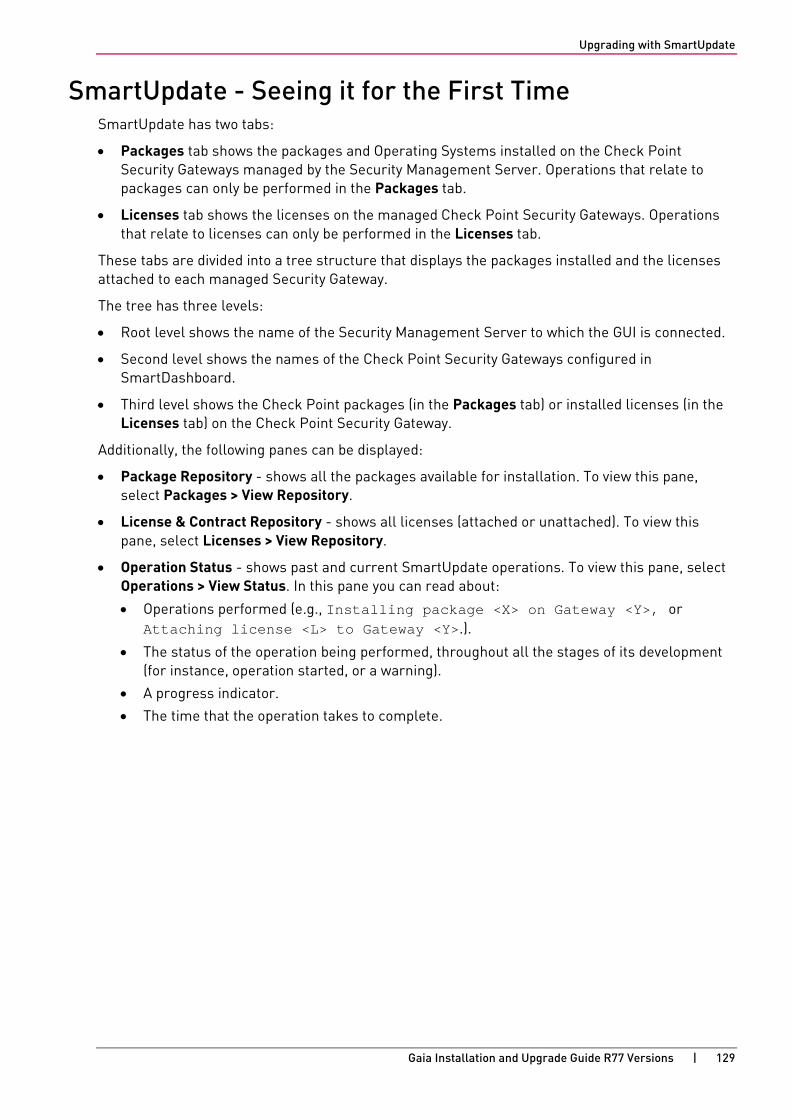
Upgrading with SmartUpdate
Gaia Installation and Upgrade Guide R77 Versions | 129
SmartUpdate - Seeing it for the First Time SmartUpdate has two tabs:
• Packages tab shows the packages and Operating Systems installed on the Check Point Security Gateways managed by the Security Management Server. Operations that relate to packages can only be performed in the Packages tab.
• Licenses tab shows the licenses on the managed Check Point Security Gateways. Operations that relate to licenses can only be performed in the Licenses tab.
These tabs are divided into a tree structure that displays the packages installed and the licenses attached to each managed Security Gateway.
The tree has three levels:
• Root level shows the name of the Security Management Server to which the GUI is connected.
• Second level shows the names of the Check Point Security Gateways configured in SmartDashboard.
• Third level shows the Check Point packages (in the Packages tab) or installed licenses (in the Licenses tab) on the Check Point Security Gateway.
Additionally, the following panes can be displayed:
• Package Repository - shows all the packages available for installation. To view this pane, select Packages > View Repository.
• License & Contract Repository - shows all licenses (attached or unattached). To view this pane, select Licenses > View Repository.
• Operation Status - shows past and current SmartUpdate operations. To view this pane, select Operations > View Status. In this pane you can read about:
• Operations performed (e.g., Installing package <X> on Gateway <Y>, or Attaching license <L> to Gateway <Y>.).
• The status of the operation being performed, throughout all the stages of its development (for instance, operation started, or a warning).
• A progress indicator.
• The time that the operation takes to complete.
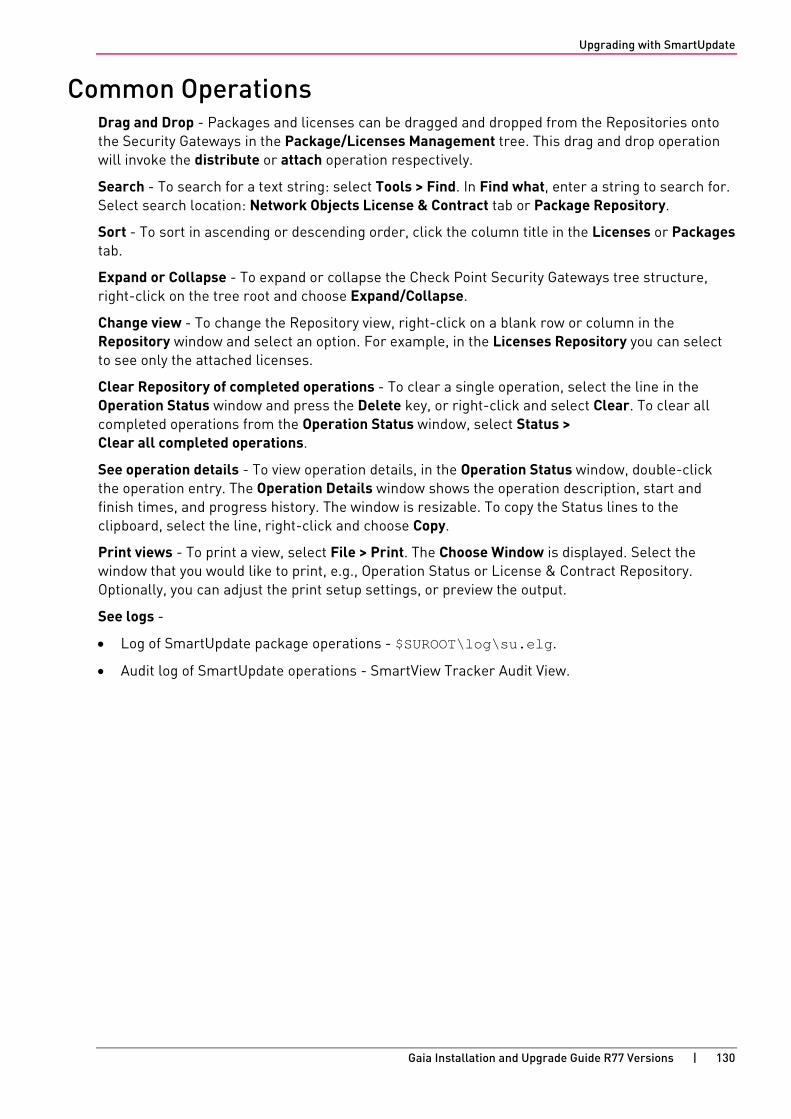
Upgrading with SmartUpdate
Gaia Installation and Upgrade Guide R77 Versions | 130
Common Operations Drag and Drop - Packages and licenses can be dragged and dropped from the Repositories onto the Security Gateways in the Package/Licenses Management tree. This drag and drop operation will invoke the distribute or attach operation respectively.
Search - To search for a text string: select Tools > Find. In Find what, enter a string to search for. Select search location: Network Objects License & Contract tab or Package Repository.
Sort - To sort in ascending or descending order, click the column title in the Licenses or Packages tab.
Expand or Collapse - To expand or collapse the Check Point Security Gateways tree structure, right-click on the tree root and choose Expand/Collapse.
Change view - To change the Repository view, right-click on a blank row or column in the Repository window and select an option. For example, in the Licenses Repository you can select to see only the attached licenses.
Clear Repository of completed operations - To clear a single operation, select the line in the Operation Status window and press the Delete key, or right-click and select Clear. To clear all completed operations from the Operation Status window, select Status > Clear all completed operations.
See operation details - To view operation details, in the Operation Status window, double-click the operation entry. The Operation Details window shows the operation description, start and finish times, and progress history. The window is resizable. To copy the Status lines to the clipboard, select the line, right-click and choose Copy.
Print views - To print a view, select File > Print. The Choose Window is displayed. Select the window that you would like to print, e.g., Operation Status or License & Contract Repository. Optionally, you can adjust the print setup settings, or preview the output.
See logs -
• Log of SmartUpdate package operations - $SUROOT\log\su.elg.
• Audit log of SmartUpdate operations - SmartView Tracker Audit View.
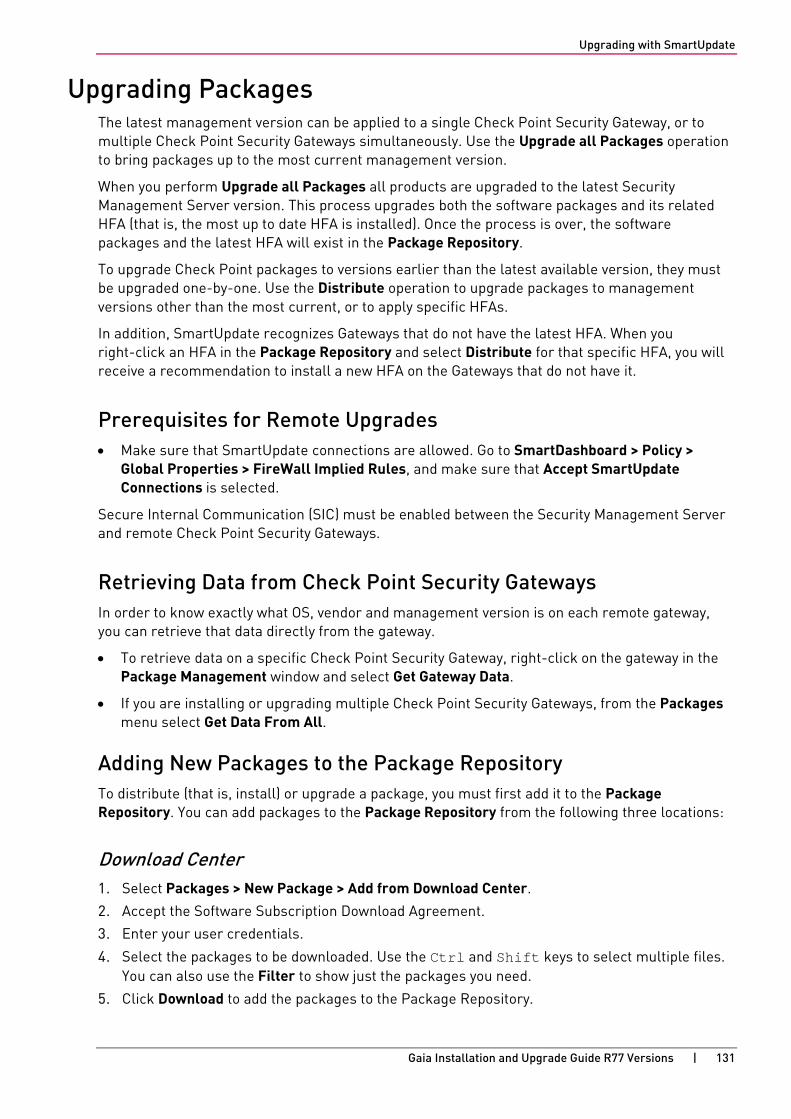
Upgrading with SmartUpdate
Gaia Installation and Upgrade Guide R77 Versions | 131
Upgrading Packages The latest management version can be applied to a single Check Point Security Gateway, or to multiple Check Point Security Gateways simultaneously. Use the Upgrade all Packages operation to bring packages up to the most current management version.
When you perform Upgrade all Packages all products are upgraded to the latest Security Management Server version. This process upgrades both the software packages and its related HFA (that is, the most up to date HFA is installed). Once the process is over, the software packages and the latest HFA will exist in the Package Repository.
To upgrade Check Point packages to versions earlier than the latest available version, they must be upgraded one-by-one. Use the Distribute operation to upgrade packages to management versions other than the most current, or to apply specific HFAs.
In addition, SmartUpdate recognizes Gateways that do not have the latest HFA. When you right-click an HFA in the Package Repository and select Distribute for that specific HFA, you will receive a recommendation to install a new HFA on the Gateways that do not have it.
Prerequisites for Remote Upgrades • Make sure that SmartUpdate connections are allowed. Go to SmartDashboard > Policy >
Global Properties > FireWall Implied Rules, and make sure that Accept SmartUpdate Connections is selected.
Secure Internal Communication (SIC) must be enabled between the Security Management Server and remote Check Point Security Gateways.
Retrieving Data from Check Point Security Gateways In order to know exactly what OS, vendor and management version is on each remote gateway, you can retrieve that data directly from the gateway.
• To retrieve data on a specific Check Point Security Gateway, right-click on the gateway in the Package Management window and select Get Gateway Data.
• If you are installing or upgrading multiple Check Point Security Gateways, from the Packages menu select Get Data From All.
Adding New Packages to the Package Repository To distribute (that is, install) or upgrade a package, you must first add it to the Package Repository. You can add packages to the Package Repository from the following three locations:
Download Center 1. Select Packages > New Package > Add from Download Center.
2. Accept the Software Subscription Download Agreement.
3. Enter your user credentials.
4. Select the packages to be downloaded. Use the Ctrl and Shift keys to select multiple files. You can also use the Filter to show just the packages you need.
5. Click Download to add the packages to the Package Repository.
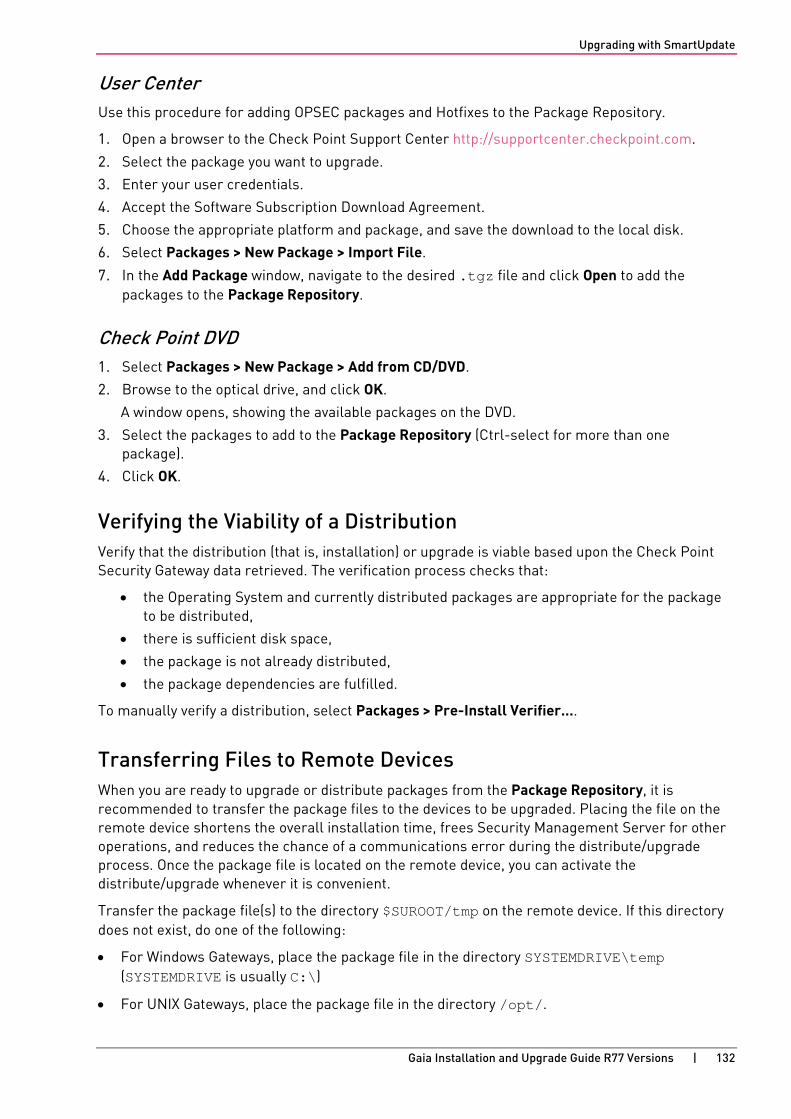
Upgrading with SmartUpdate
Gaia Installation and Upgrade Guide R77 Versions | 132
User Center Use this procedure for adding OPSEC packages and Hotfixes to the Package Repository.
1. Open a browser to the Check Point Support Center http://supportcenter.checkpoint.com.
2. Select the package you want to upgrade.
3. Enter your user credentials.
4. Accept the Software Subscription Download Agreement.
5. Choose the appropriate platform and package, and save the download to the local disk.
6. Select Packages > New Package > Import File.
7. In the Add Package window, navigate to the desired .tgz file and click Open to add the packages to the Package Repository.
Check Point DVD 1. Select Packages > New Package > Add from CD/DVD.
2. Browse to the optical drive, and click OK.
A window opens, showing the available packages on the DVD.
3. Select the packages to add to the Package Repository (Ctrl-select for more than one package).
4. Click OK.
Verifying the Viability of a Distribution Verify that the distribution (that is, installation) or upgrade is viable based upon the Check Point Security Gateway data retrieved. The verification process checks that:
• the Operating System and currently distributed packages are appropriate for the package to be distributed,
• there is sufficient disk space,
• the package is not already distributed,
• the package dependencies are fulfilled.
To manually verify a distribution, select Packages > Pre-Install Verifier….
Transferring Files to Remote Devices When you are ready to upgrade or distribute packages from the Package Repository, it is recommended to transfer the package files to the devices to be upgraded. Placing the file on the remote device shortens the overall installation time, frees Security Management Server for other operations, and reduces the chance of a communications error during the distribute/upgrade process. Once the package file is located on the remote device, you can activate the distribute/upgrade whenever it is convenient.
Transfer the package file(s) to the directory $SUROOT/tmp on the remote device. If this directory does not exist, do one of the following:
• For Windows Gateways, place the package file in the directory SYSTEMDRIVE\temp (SYSTEMDRIVE is usually C:\)
• For UNIX Gateways, place the package file in the directory /opt/.
Upgrading with SmartUpdate
Gaia Installation and Upgrade Guide R77 Versions | 133
Distributions and Upgrades You can upgrade all packages on one remote gateway, or you can distribute specific packages one-by-one for all Gateways.
Upgrading All Packages on a Check Point Remote Gateway
1. Click Packages > Upgrade all Packages.
2. From the Upgrade All Packages window, select the Check Point Security Gateways that you want to upgrade. Use the Ctrl and Shift keys to select multiple devices.
Note - The Reboot if required option (selected by default) is required, to activate the newly distributed package.
3. If one or more of the required packages are missing from the Package Repository, the Download Packages window opens. Download the required package directly to the Package Repository.
4. Click Upgrade.
The installation proceeds only if the upgrade packages for the selected packages are available in the Package Repository.
Updating a Single Package on a Check Point Remote Gateway Use this procedure to select the specific package that you want to apply to a single package. The distribute function allows you to:
• Upgrade the OS on an IP appliance
• Upgrade a package to a management version other than the latest
• Apply Hot Fix Accumulators (HFAs)
To update a single package on a remote gateway:
1. In the Package Management window, click the Check Point Security Gateway to upgrade.
2. Select Packages > distribute.
3. From the distribute Packages window, select the package to distribute.
Use the Ctrl and Shift keys to select multiple packages, and click distribute.
The installation proceeds only if the upgrade packages selected are available in the Package Repository.
Upgrading with SmartUpdate
Gaia Installation and Upgrade Guide R77 Versions | 134
Upgrading UTM-1 Edge Firmware with SmartUpdate The UTM-1 Edge gateway firmware represents the software that is running on the appliance. The UTM-1 Edge gateway's firmware can be viewed and upgraded using SmartUpdate. This is a centralized management tool that is used to upgrade all Gateways in the system by downloading new versions from the download center. When installing new firmware, the firmware is prepared at the Security Management Server, downloaded and subsequently installed when the UTM-1 Edge gateway fetches for updates. Since the UTM-1 Edge gateway fetches at periodic intervals, you will notice the upgraded version on the gateway only after the periodic interval has passed.
If you do not want to wait for the fetch to occur you can download the updates with the Push Packages Now (UTM-1 Edge only) option in the Packages menu. With this option it is possible to create a connection with UTM-1 Edge in order to access new (that is, the latest) software package(s). The distribution is immediate and avoids the need to wait for the fetch to get the package.
Canceling and Uninstalling You can stop a Distributed installation or upgrade while in progress.
To stop a Distributed installation or upgrade:
From the SmartUpdate Menu, select Operation > Stop Operation.
To uninstall a package:
From the SmartUpdate Menu, select Packages > Uninstall.
Note - Uninstallation restores the gateway to the last management version distributed.
Restarting the Check Point Security Gateway After you distribute an upgrade or uninstall, reboot the gateway.
To restart the gateway:
• Select Reboot if required at the final stage of upgrade or uninstall.
• Select Packages > Reboot Gateway.
Recovering from a Failed Upgrade If an upgrade fails on SecurePlatform, SmartUpdate restores the previously distributed version.
SecurePlatform Automatic Revert If an upgrade or distribution operation fails on a SecurePlatform device, the device will reboot itself and automatically revert to the last version distributed.
Upgrading with SmartUpdate
Gaia Installation and Upgrade Guide R77 Versions | 135
Snapshot Image Management on SecurePlatform Gateways Before performing an upgrade, you can use the command line to create a Snapshot image of the SecurePlatform OS, or of the packages distributed. If the upgrade or distribution operation fails, you can use the command line to revert the disk to the saved image.
• To create a Snapshot file on the gateway, type: cprinstall snapshot <object name> <filename>
• To show the available Snapshot files, type: cprinstall show <object name>
• To revert to a given Snapshot file, type: cprinstall revert <object name> <filename>
Note - Snapshot files are stored at /var/CPsnapshot on the gateway.
Deleting Packages from the Package Repository To clear the Package Repository of extraneous or outdated packages, select a package, or Ctrl-select multiple packages and select Packages > Delete Package. This operation cannot be undone.
Upgrading with SmartUpdate
Gaia Installation and Upgrade Guide R77 Versions | 136
Managing Licenses With SmartUpdate, you can manage all licenses for Check Point packages throughout the organization from the Security Management Server. SmartUpdate provides a global view of all available and installed licenses, allowing you to perform such operations as adding new licenses, attaching licenses and upgrading licenses to Check Point Security Gateways, and deleting expired licenses. Check Point licenses come in two forms, Central and Local.
• The Central license is the preferred method of licensing. A Central license ties the package license to the IP address of the Security Management Server. That means that there is one IP address for all licenses; that the license remains valid if you change the IP address of the gateway; and that a license can be taken from one Check Point Security Gateway and given to another with ease. For maximum flexibility, it is recommended to use Central licenses.
• The Local license is an older method of licensing, however it is still supported by SmartUpdate. A Local license ties the package license to the IP address of the specific Check Point Security Gateway, and cannot be transferred to a gateway with a different IP address.
When you add a license to the system using SmartUpdate, it is stored in the License & Contract Repository. Once there, it must be installed to the gateway and registered with the Security Management Server. Installing and registering a license is accomplished through an operation known as attaching a license. Central licenses require an administrator to designate a gateway for attachment, while Local licenses are automatically attached to their respective Check Point Security Gateways.
Licensing Terminology • Add
Licenses received from the User Center should first be added to the License & Contract Repository. Adding a local license to the License & Contract Repository also attaches it to the gateway.
Licenses can be conveniently imported to the License & Contract Repository via a file and they can be added manually by pasting or typing the license details.
• Attach
Licenses are attached to a gateway via SmartUpdate. Attaching a license to a gateway involves installing the license on the remote gateway, and associating the license with the specific gateway in the License & Contract Repository.
• Central License
A Central License is a license attached to the Security Management Server IP address, rather than the gateway IP address. The benefits of a Central License are:
• Only one IP address is needed for all licenses.
• A license can be taken from one gateway and given to another.
• The new license remains valid when changing the gateway IP address. There is no need to create and install a new license.
• Certificate Key
The Certificate Key is a string of 12 alphanumeric characters. The number is unique to each package. For an evaluation license your certificate key can be found inside the mini pack. For a permanent license you should receive your certificate key from your reseller.
Upgrading with SmartUpdate
Gaia Installation and Upgrade Guide R77 Versions | 137
• CPLIC
A command line for managing local licenses and local license operations. For additional information, refer to the R77 Command Line Interface Reference Guide http://supportcontent.checkpoint.com/documentation_download?ID=24833.
• Detach
Detaching a license from a gateway involves uninstalling the license from the remote gateway and making the license in the License & Contract Repository available to any gateway.
• State
Licenses can be in one of the following states:
The license state depends on whether the license is associated with the gateway in the License & Contract Repository, and whether the license is installed on the remote gateway. The license state definitions are as follows:
• Attached indicates that the license is associated with the gateway in the License & Contract Repository, and is installed on the remote gateway.
• Unattached indicates that the license is not associated with the gateway in the License & Contract Repository, and is not installed on any gateway.
• Assigned is a license that is associated with the gateway in the License & Contract Repository, but has not yet been installed on a gateway.
• Upgrade Status is a field in the License & Contract Repository that contains an error message from the User Center when the Upgrade process fails.
• Get Locally installed licenses can be placed in the License & Contract Repository, in order to update the repository with all licenses across the installation. The Get operation is a two-way process that places all locally installed licenses in the License & Contract Repository and removes all locally deleted licenses from the License & Contract Repository.
• License Expiration
Licenses expire on a particular date, or never. After a license has expired, the functionality of the Check Point package may be impaired.
• Local License
A Local License is tied to the IP address of the specific gateway and can only be used with a gateway or a Security Management Server with the same address.
• Multi-License File
Licenses can be conveniently added to a gateway or a Security Management Server via a file, rather than by typing long text strings. Multi-license files contain more than one license, and can be downloaded from the Check Point User Center https://usercenter.checkpoint.com.
Multi-license files are supported by the cplic put, and cplic add command-line commands.
• Features
A character string that identifies the features of a package.
Upgrading with SmartUpdate
Gaia Installation and Upgrade Guide R77 Versions | 138
License Upgrade One of the many SmartUpdate features is to upgrade licenses that reside in the License & Contract Repository. SmartUpdate will take all licenses in the License & Contract Repository, and will attempt to upgrade them with the use of the Upgrade tool.
The License Attachment Process
Introducing the License Attachment Process When a Central license is placed in the License & Contract Repository, SmartUpdate allows you to attach it to Check Point packages. Attaching a license installs it to the remote gateway and registers it with the Security Management Server.
New licenses need to be attached when:
• An existing license expires.
• An existing license is upgraded to a newer license.
• A Local license is replaced with a Central license.
• The IP address of the Security Management Server or Check Point Security Gateway changes.
Attaching a license is a three step process.
1. Get real-time license data from the remote gateway.
2. Add the appropriate license to the License & Contract Repository.
3. Attach the license to the device.
The following explains the process in detail.
Retrieving License Data from Check Point Security Gateways To know exactly what type of license is on each remote gateway, you can retrieve that data directly from the gateway.
• To retrieve license data from a single remote gateway, right-click on the gateway in the License Management window and select Get Check Point Security Gateway Licenses.
• To retrieve license data from multiple Check Point Security Gateways, from the Licenses menu and select Get All Licenses.
Upgrading with SmartUpdate
Gaia Installation and Upgrade Guide R77 Versions | 139
Adding New Licenses to the License & Contract Repository To install a license, you must first add it to the License & Contract Repository. You can add licenses to the License & Contract Repository in the following ways:
Download From the User Center 1. Select Network Objects License & Contract tab > Add License > From User Center
2. Enter your credentials.
3. Perform one of the following:
• Generate a new license (If there are no identical licenses, the license is added to the License & Contract Repository).
• Change the IP address of an existing license, that is, Move IP.
• Change the license from Local to Central.
Importing License Files 1. Select Licenses & Contract > Add License > From File.
2. Browse to the location of the license file, select it, and click Open.
A license file can contain multiple licenses. Unattached Central licenses appear in the License & Contract Repository, and Local licenses are automatically attached to their Check Point Security Gateway. All licenses are assigned a default name in the format SKU@ time date, which you can modify at a later time.
Add License Details Manually
You may add licenses that you have received from the Licensing Center by email. The email contains the license installation instructions.
1. Locate the license:
• If you have received a license by email, copy the license to the clipboard. Copy the string that starts with cplic putlic... and ends with the last SKU/Feature.
• For example: cplic putlic 1.1.1.1 06Dec2002 dw59Ufa2-eLLQ9NB-gPuyHzvQ-WKreSo4Zx CPSUITE-EVAL-3DES-NGX CK-1234567890
• If you have a hard copy printout, continue to step 2.
2. Select the Network Objects License & Contract tab in SmartUpdate.
3. Select Licenses > Add License > Manually. The Add License window appears.
4. Enter the license details:
• If you copied the license to the clipboard, click Paste License. The fields will be populated with the license details.
• Alternatively, enter the license details from a hard-copy printout.
5. Click Calculate, and make sure the result matches the validation code received from the User Center.
6. You may assign a name to the license, if desired. If you leave the Name field empty, the license is assigned a name in the format SKU@ time date.
7. Click OK to complete the operation.
Upgrading with SmartUpdate
Gaia Installation and Upgrade Guide R77 Versions | 140
Attaching Licenses After licenses have been added to the License & Contract Repository, select one or more licenses to attach to a Check Point Security Gateway.
1. Select the license(s).
2. Select Network Objects License & Contract tab > Attach.
3. From the Attach Licenses window, select the desired device.
If the attach operation fails, the Local licenses are deleted from the Repository.
Detaching Licenses Detaching a license involves deleting a single Central license from a remote Check Point Security Gateway and marking it as unattached in the License & Contract Repository. This license is then available to be used by any Check Point Security Gateway.
To detach a license, select Network Objects License & Contract tab > Detach and select the licenses to be detached from the displayed window.
Deleting Licenses from the License & Contract Repository Licenses that are not attached to any Check Point Security Gateway and are no longer needed can be deleted from the License & Contract Repository.
To delete a license:
1. Right-click anywhere in the License & Contract Repository and select View Unattached Licenses.
2. Select the unattached license(s) to be deleted, and click Delete.
Viewing License Properties The overall view of the License & Contract Repository displays general information on each license such as the name of the license and the IP address of the machine to which it is attached. You can view other properties as well, such as expiration date, SKU, license type, certificate key and signature key.
To view license properties, double-click on the license in the Licenses tab.
Checking for Expired Licenses After a license has expired, the functionality of the Check Point package will be impaired; therefore, it is advisable to be aware of the pending expiration dates of all licenses.
To check for expired licenses, select Licenses > Show Expired Licenses.
To check for licenses nearing their dates of expiration:
1. In the License Expiration window, set the Search for licenses expiring within the next x days property.
2. Click Apply to run the search.
To delete expired licenses from the License Expiration window, select the detached license(s) and click Delete.
Upgrading with SmartUpdate
Gaia Installation and Upgrade Guide R77 Versions | 141
Exporting a License to a File Licenses can be exported to a file. The file can later be imported to the License & Contract Repository. This can be useful for administrative or support purposes.
To export a license to a file:
1. In the Licenses Repository, select one or more licenses, right-click, and from the menu select Export to File….
2. In the Choose File to Export License(s) To window, name the file (or select an existing file), and browse to the desired location. Click Save.
All selected licenses are exported. If the file already exists, the new licenses are added to the file.
Managing Licenses Using SmartUpdate To manage licenses using SmartUpdate, select the SmartUpdate view in the SmartDomain Manager Selection Bar. If you loaded SmartUpdate, you can also right-click a Multi-Domain Server object and select Applications > SmartUpdate from the Options menu. Licenses for components and blades are stored in a central repository.
To view repository contents:
1. Select SmartUpdate from the SmartDomain Manager Main menu.
2. Select SmartUpdate > Network Objects License & Contract > View Repository. The repository pane shows in the SmartUpdate view.
To add new licenses to the repository:
1. Select SmartUpdate from the SmartDomain Manager Main menu.
2. Select SmartUpdate > Network Objects License & Contract > Add License.
3. Select a method for adding a license:
• From User Center - Obtain a license file from the User Center.
• From file - Import a license file to the repository.
• Manually - Open the Add License window and enter licenses information manually. You can copy the license string from a file and click Past License to enter the data.
You can now see the license in the repository.
To attach a license to a component:
1. Select SmartUpdate from the SmartDomain Manager Main menu.
2. Select SmartUpdate > Network Objects License & Contract > Attach License.
3. Select a license from the Attach Licenses window. The license shows as attached in the repository.
You can manage other license tasks with SmartUpdate. See the R77 Security Management Administration Guide http://supportcontent.checkpoint.com/documentation_download?ID=24830.
Upgrading with SmartUpdate
Gaia Installation and Upgrade Guide R77 Versions | 142
Web Security License Enforcement A gateway or gateway cluster requires a Web Security license if it enforces one or more of the following protections:
• Malicious Code Protector
• LDAP Injection
• SQL Injection
• Command Injection
• Directory Listing
• Error Concealment
• ASCII Only Request
• Header Rejection
• HTTP Methods
Service Contracts Before upgrading a gateway or Security Management Server, you need to have a valid support contract that includes software upgrade and major releases registered to your Check Point User Center account. The contract file is stored on Security Management Server and downloaded to Check Point Security Gateways during the upgrade process. By verifying your status with the User Center, the contract file enables you to easily remain compliant with current Check Point licensing standards.
For more on service contracts, see the Service Contract Files Web page http://www.checkpoint.com/ngx/upgrade/contract/index.html.
Upgrading with SmartUpdate
Gaia Installation and Upgrade Guide R77 Versions | 143
Generating CPInfo CPInfo is a support tool that gathers into one text file a wide range of data concerning the Check Point packages in your system. When speaking with a Check Point Technical Support Engineer, you may be asked to run CPInfo and transmit the data to the Support Center. Download the tool from the Support Center http://supportcontent.checkpoint.com/solutions?id=sk30567.
To launch CPInfo, select Tools > Generate CPInfo.
1. Choose the directory to which you want to save the output file.
2. Choose between two methods to name the file:
• based on the SR number the technician assigns you, or
• a custom name that you define.
3. Optionally, you may choose to add:
• log files to the CPInfo output.
• the registry to the CPInfo output.
Sending CPinfo to Check Point Automatically SmartUpdate lets you automatically generate and send CPinfo to Check Point Technical support.
To automatically generate and send CPinfo:
1. Open SmartUpdate.
2. Right click a Security Gateway or Security Management Server.
3. Select Upload CPInfo to Check Point. The Upload CPinfo from... window opens.
4. Enter your User Center authentication credentials (email and password) and SR number.
5. Select Download and install latest CPInfo package.
6. Enter an SR Number if you have one.
7. Click Upload More files if you want to send additional files.
Click Add to enter the full path to the remote file on the remote gateway or Security Management Server.
8. Click OK.
The Operation Status window opens.
• CPinfo generates the data, encrypts and transfers the data to the User Center.
• After the secure file upload successfully completes, an email notification is sent to the email address specified in step 3.
Upgrading with SmartUpdate
Gaia Installation and Upgrade Guide R77 Versions | 144
The SmartUpdate Command Line All management operations that are performed via the SmartUpdate GUI can also be executed via the command line. There are three main commands:
• cppkg to work with the Packages Repository.
• cprinstall to perform remote installations of packages.
• cplic for license management.
For details on how to use these commands, see the R77 Command Line Interface Reference Guide http://supportcontent.checkpoint.com/documentation_download?ID=24833.
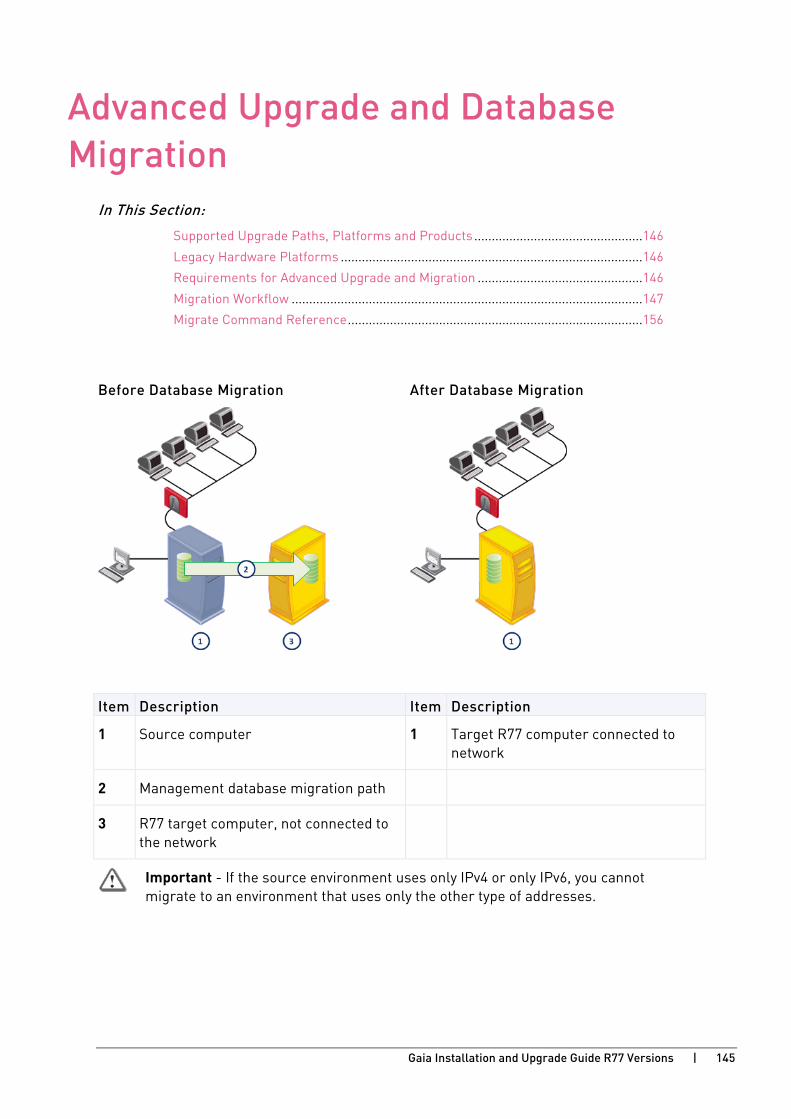
Gaia Installation and Upgrade Guide R77 Versions | 145
CHAPTE R 12
Advanced Upgrade and Database Migration
In This Section:
Supported Upgrade Paths, Platforms and Products ................................................ 146
Legacy Hardware Platforms ...................................................................................... 146
Requirements for Advanced Upgrade and Migration ............................................... 146
Migration Workflow .................................................................................................... 147
Migrate Command Reference .................................................................................... 156 Before Database Migration
After Database Migration
Item Description Item Description
1 Source computer 1 Target R77 computer connected to network
2 Management database migration path
3 R77 target computer, not connected to the network
Important - If the source environment uses only IPv4 or only IPv6, you cannot migrate to an environment that uses only the other type of addresses.
Advanced Upgrade and Database Migration
Gaia Installation and Upgrade Guide R77 Versions | 146
Supported Upgrade Paths, Platforms and Products Make sure that the upgrade version and products are supported on the target operating system and hardware platform. For a list of supported upgrade paths, platforms and products, see the R77 Release Notes http://supportcontent.checkpoint.com/documentation_download?ID=40107.
Solaris: You can migrate a Solaris database to Gaia.
Legacy Hardware Platforms A legacy platform is a hardware platform unsupported for new installations but still supported for database migration.
Solaris is a legacy platform. You can migrate the Solaris database to Windows and SecurePlatform and Gaia. But only from Check Point versions in the supported upgrade path. See the R77 Release Notes.
• For Security Management Server
The database migration procedure for Solaris is the same as for SecurePlatform and Gaia, as described in this chapter.
• For SmartDomain Manager
To export the SmartDomain Manager database from a legacy platform, use the R77 SecurePlatform DVD. Only two menu options are available:
• preupgrade verification
• mds export
Requirements for Advanced Upgrade and Migration Required Disk Space:
• The hard disk on the target machine must be at least 5 times the size of the exported database.
• The size of the /var/log folder on the target must be at least 25% of the size of the /var/ log directory on the source machine.
Required Network Access:
• The source and target servers must be connected to a network.
• The connected network interface must have an IP address.
IPv4 or IPv6:
If the source environment uses only IPv4 or only IPv6, the target must use the same IP address configuration. You cannot migrate to an environment that uses only the other type of addresses.
Target Version and Products:
You can only upgrade or migrate the version of the server or set of products. The target must have the same or higher version and the same set of installed products.
Advanced Upgrade and Database Migration
Gaia Installation and Upgrade Guide R77 Versions | 147
Migration Workflow This section includes a procedural overview for database migration and continues with detailed procedures for each platform. Also included are special procedures for migrating:
• A secondary Security Management Server
• To a server with a different IP address
• SmartReporter
• SmartEvent
Migration Workflow
1. Prepare the source Security Management Server for export.
2. Install the R77 Security Management Server or a standalone deployment on the target server.
3. Export the management database from source Security Management Server.
4. Import the management database to the target Security Management Server.
5. Test the target deployment.
6. Connect the target Security Management Server to the network.
General Workflow
On the source server:
1. Get the migration tools package ("Getting the Migration Tools Package" on page 152).
2. Extract the downloaded package.
Important - Put all extracted files in the same directory, and run the tools from this directory.
3. Make sure the files have executable permissions. For example, In the temporary directory, run chmod 777 *
4. Run fw logswitch to close the SmartView Tracker log files and the SmartLog data. Only closed logs are migrated.
5. Close all Check Point GUI clients that are connected to the Security Management Server.
Alternatively, if this is a computer that is not in production, run cpstop on the source computer.
Important - If you do not close the GUI clients or run cpstop, the exported management database can become corrupted.
6. Make sure the source server and the target server have network access.
• The source and target servers must be connected to a network.
• The connected network interface must have an IP address.
• On SecurePlatform, the ifconfig command output must show that the interface is UP.
• On Windows, the interface must be enabled in the Network Connections window.
7. Run the pre_upgrade_verifier command (see "Using the Pre-Upgrade Verification Tool" on page 152).
8. Correct all errors before continuing.
Advanced Upgrade and Database Migration
Gaia Installation and Upgrade Guide R77 Versions | 148
9. If the target server must have a different IP address than the source server, make the necessary changes on the source server (see "Completing Migration to a New IP Address" on page 154).
10. Export the management database ("Exporting the Management Database" on page 153).
• If SmartReporter is installed on the source server, export the Log Consolidation database.
• If SmartEvent is installed on the source server, export the Events database.
On the target server:
1. Install the R77 Security Management Server or a standalone deployment. Configure as required.
2. Get the most updated migration tools package ("Getting the Migration Tools Package" on page 152) for the target platform (recommended) or use the installed migration tools in $FWDIR/bin/upgrade_tools on Unix platforms or %FWDIR%\bin\upgrade_tools on Windows.
3. Import the management database from the source server to the target ("Importing the Management Database" on page 154).
• If SmartReporter is installed on the source server, import the Log Consolidation database.
• If SmartEvent is installed on the source server, import the SmartEvent Events database.
4. If the target server has a different IP address than the source server, make the necessary changes to the license and target computer ("Completing Migration to a New IP Address" on page 154).
If the target server is a different platform that the source server, edit the database.
5. Test the target installation.
6. Disconnect the source server from the network.
7. Connect the target server to the network.
Preparing the Source Server for New IP Address Licenses are related to the Security Management Server IP address. If you migrate the Security Management Server database to a server with a new IP address, there will be licensing issues. We recommend that you keep the same IP address for the target Security Management Server. If this is not possible, you must prepare the source database before the export and edit the target database after the import ("Completing Migration to a New IP Address" on page 154).
There are additional steps for a Security Management Server that manages VSX Gateways in these configurations:
• From a Security Management Server to a new Domain Management Server or Security Management Server
• From a Domain Management Server to a new Domain Management Server
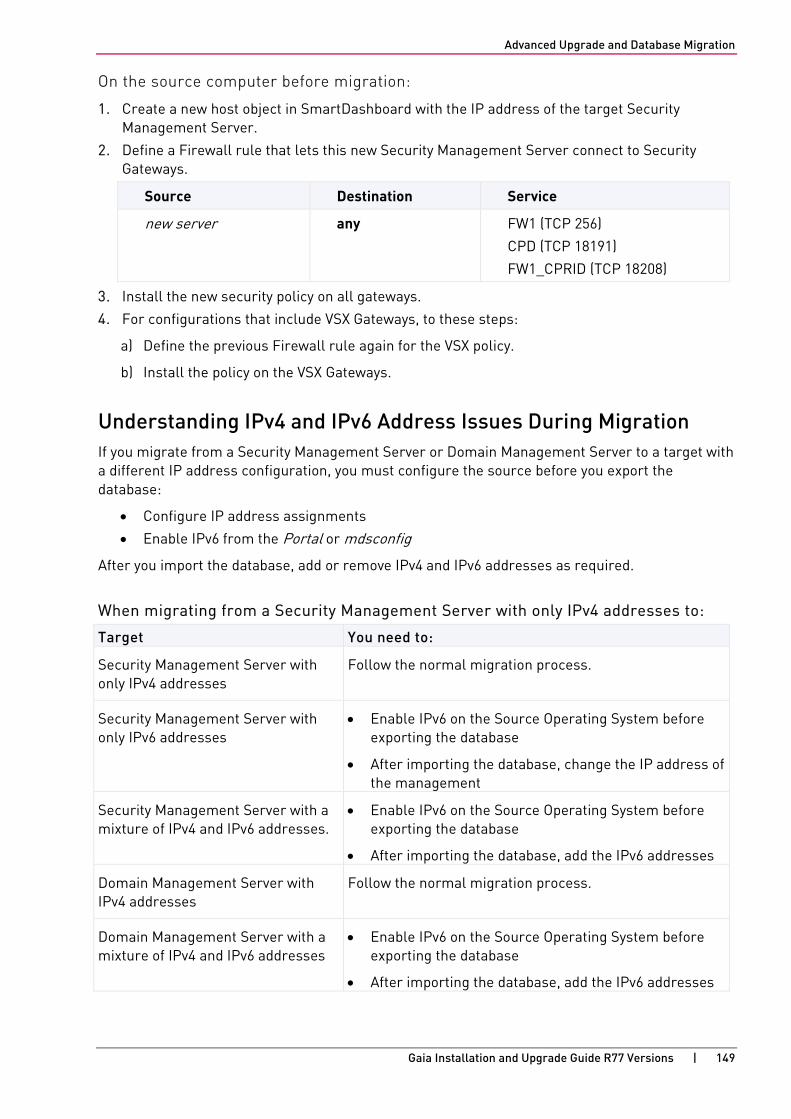
Advanced Upgrade and Database Migration
Gaia Installation and Upgrade Guide R77 Versions | 149
On the source computer before migration:
1. Create a new host object in SmartDashboard with the IP address of the target Security Management Server.
2. Define a Firewall rule that lets this new Security Management Server connect to Security Gateways.
Source Destination Service
new server any FW1 (TCP 256)
CPD (TCP 18191)
FW1_CPRID (TCP 18208)
3. Install the new security policy on all gateways.
4. For configurations that include VSX Gateways, to these steps:
a) Define the previous Firewall rule again for the VSX policy.
b) Install the policy on the VSX Gateways.
Understanding IPv4 and IPv6 Address Issues During Migration If you migrate from a Security Management Server or Domain Management Server to a target with a different IP address configuration, you must configure the source before you export the database:
• Configure IP address assignments
• Enable IPv6 from the Portal or mdsconfig
After you import the database, add or remove IPv4 and IPv6 addresses as required.
When migrating from a Security Management Server with only IPv4 addresses to:
Target You need to:
Security Management Server with only IPv4 addresses
Follow the normal migration process.
Security Management Server with only IPv6 addresses
• Enable IPv6 on the Source Operating System before exporting the database
• After importing the database, change the IP address of the management
Security Management Server with a mixture of IPv4 and IPv6 addresses.
• Enable IPv6 on the Source Operating System before exporting the database
• After importing the database, add the IPv6 addresses
Domain Management Server with IPv4 addresses
Follow the normal migration process.
Domain Management Server with a mixture of IPv4 and IPv6 addresses
• Enable IPv6 on the Source Operating System before exporting the database
• After importing the database, add the IPv6 addresses
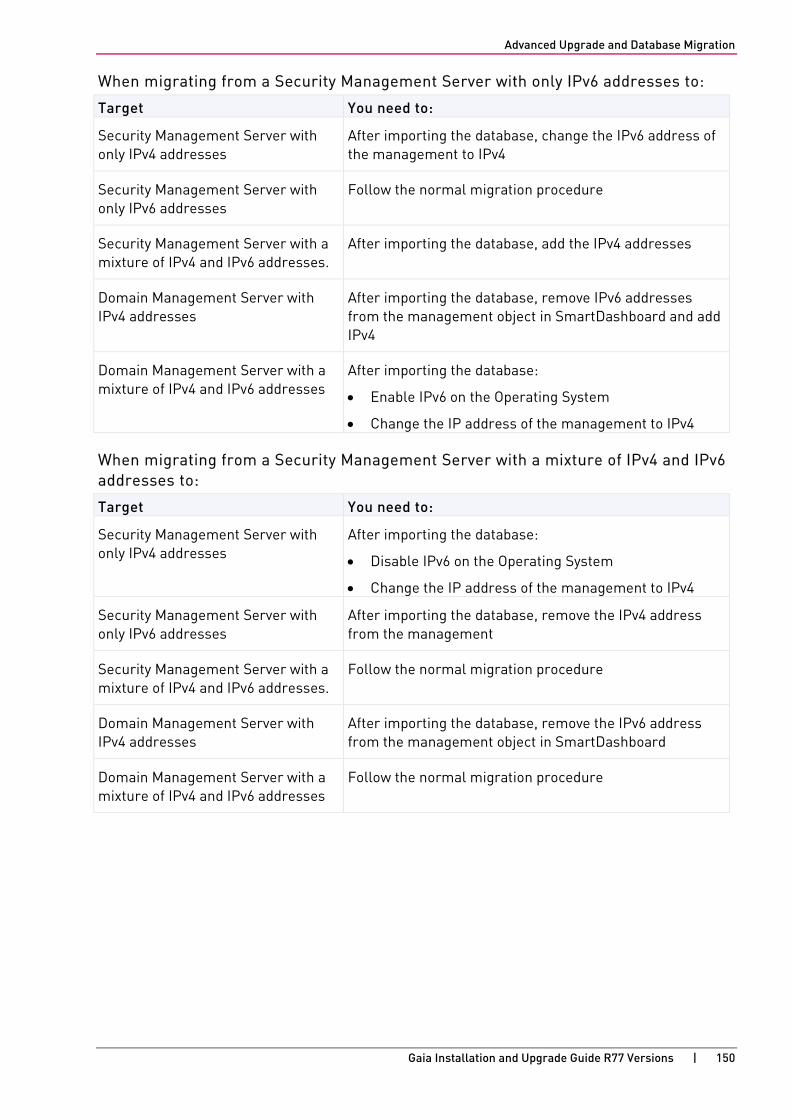
Advanced Upgrade and Database Migration
Gaia Installation and Upgrade Guide R77 Versions | 150
When migrating from a Security Management Server with only IPv6 addresses to:
Target You need to:
Security Management Server with only IPv4 addresses
After importing the database, change the IPv6 address of the management to IPv4
Security Management Server with only IPv6 addresses
Follow the normal migration procedure
Security Management Server with a mixture of IPv4 and IPv6 addresses.
After importing the database, add the IPv4 addresses
Domain Management Server with IPv4 addresses
After importing the database, remove IPv6 addresses from the management object in SmartDashboard and add IPv4
Domain Management Server with a mixture of IPv4 and IPv6 addresses
After importing the database:
• Enable IPv6 on the Operating System
• Change the IP address of the management to IPv4
When migrating from a Security Management Server with a mixture of IPv4 and IPv6 addresses to:
Target You need to:
Security Management Server with only IPv4 addresses
After importing the database:
• Disable IPv6 on the Operating System
• Change the IP address of the management to IPv4
Security Management Server with only IPv6 addresses
After importing the database, remove the IPv4 address from the management
Security Management Server with a mixture of IPv4 and IPv6 addresses.
Follow the normal migration procedure
Domain Management Server with IPv4 addresses
After importing the database, remove the IPv6 address from the management object in SmartDashboard
Domain Management Server with a mixture of IPv4 and IPv6 addresses
Follow the normal migration procedure

Advanced Upgrade and Database Migration
Gaia Installation and Upgrade Guide R77 Versions | 151
When migrating from a Domain Management Server with only IPv4 addresses to:
Target You need to:
Security Management Server with only IPv4 addresses
Follow the normal migration procedure
Security Management Server with only IPv6 addresses
After importing the database:
• Enable IPv6 on the Operating System
• Change the IP address of the management to IPv6
Security Management Server with a mixture of IPv4 and IPv6 addresses.
• Enable IPv6 on the Operating System
• Add IPv6 addresses
Domain Management Server with IPv4 addresses
Follow the normal migration procedure
Domain Management Server with a mixture of IPv4 and IPv6 addresses
After importing the database:
• Enable IPv6 on the Operating System
• Add IPv6 Addresses
When migrating from a Domain Management Server with a mixture of IPv4 and IPv6 addresses to:
Target You need to:
Security Management Server with only IPv4 addresses
• Disable IPv6 on the source Operating System before exporting the database
• After importing the database, change the IP address of the management to IPv4
Security Management Server with only IPv6 addresses
After importing the database, remove the IPv4 address from the management.
Security Management Server with a mixture of IPv4 and IPv6 addresses.
Follow the normal migration procedure
Domain Management Server with IPv4 addresses
• Disable IPv6 on the source Operating System before exporting the database
• Remove the IPv6 address from the target Domain Management Server object in SmartDashboard
Domain Management Server with a mixture of IPv4 and IPv6 addresses
Follow the normal migration procedure
Advanced Upgrade and Database Migration
Gaia Installation and Upgrade Guide R77 Versions | 152
Getting the Migration Tools Package It is important that you use the correct migration tools package. Download the latest version of the migration tools from the Support Center http://supportcontent.checkpoint.com/solutions?id=sk104859. This is the best way to make sure that you get the most recent version.
Alternatively, you can get the migration tools package from the target computer.
To get the migration tools package from the target computer:
1. Install R77 on the target computer.
2. Copy the complete directory from the target computer to the source computer:
• SecurePlatform / Gaia - $FWDIR/bin/upgrade_tools
• Windows - %FWDIR%\bin\upgrade_tools
Use FTP, SCP or similar. The source directory can be anywhere, such as /var/tmp.
The migration tool files are contained in a compressed package. The files in the package are:
• migrate
• migrate_conf
• migrate export
• migrate import
Using the Pre-Upgrade Verification Tool We recommend that you run the pre-upgrade verifier (see "Using the Pre-Upgrade Verifier Tool" on page 86) on the source server before exporting the management database. The pre-upgrade verifier analyzes compatibility of the management database and its current configuration. A detailed report shows the steps to do before and after the upgrade.
The pre-upgrade verifier can only verify a database that is intended for import into a different major version (for example, R77.xx to R77). It cannot be used on a database that is intended for import into the same major version.
Action Items • Errors - Issues that must be resolved before you can continue with the upgrade. If you proceed
without correcting these errors, the upgrade may fail, or you may have problems after upgrade.
• Warnings - Issues that are recommended to resolve before or after the upgrade.
Advanced Upgrade and Database Migration
Gaia Installation and Upgrade Guide R77 Versions | 153
Exporting the Management Database
On Gaia and SecurePlatform - CLI
To create a management database export file on the source computer:
1. Log in to the expert mode.
2. Get the R77 migration tools.
3. Run: <path to migration tools directory>/migrate export <exported database name>.tgz.
4. Do the instructions shown on the screen. This creates the <exported database name>.tgz file.
On Gaia and SecurePlatform - GUI on DVD
To create a management database export file on the source computer:
1. Insert the R77 DVD into source computer drive.
2. At the command prompt, run: patch add cd
3. Select SecurePlatform R77 Upgrade Package.
4. Enter y to confirm the checksum calculation.
5. You are prompted to create a backup image for automatic revert. There is no need to create a backup image now because exporting the management database does not change the system.
Note - Creating a backup image can take up to twenty minutes, during which time Check Point products are stopped.
6. The welcome screen opens. Press n.
7. Press Y to accept the license agreement.
8. From the Security Management Upgrade Option screen, select Export Security Management configuration. Press N to continue.
9. Select a source for the upgrade utilities.
We recommend that you select Download the most updated files from the Check Point website to get the latest files. You can also select Use the upgrade tools contained on the CD. Press N to continue.
10. If the Pre-Upgrade Verification fails, correct the errors and restart this procedure from the step 2. Otherwise, press N to continue.
11. In the Export window, press N to continue. The management database is saved in /var/tmp/cpexport.tgz.
12. Press E to exit the installation program.
Advanced Upgrade and Database Migration
Gaia Installation and Upgrade Guide R77 Versions | 154
Importing the Management Database
To import the management database file to the target computer:
1. Log in to the expert mode.
2. Copy the management database file that you exported from the source computer to a directory of your choice on the target computer. Use FTP, SCP or similar.
3. Run: <path to migration tools directory>/migrate import <path to the file>/<exported database name>.tgz.
4. Do the instructions on the screen to import the management database.
Migrating the Database of a Secondary Security Management Server 1. Export the database file from the primary Security Management Server.
If the Primary Security Management Server is not available, convert the Secondary Security Management Server to a Primary Security Management Server. To get assistance with this step, contact Check Point Support or your vendor.
2. Install a new Primary Security Management Server.
3. Import the management database file to the new Primary Security Management Server.
4. Install new Secondary R77 Security Management Server.
5. Establish SIC with the Secondary Security Management Server.
6. Synchronize the new Secondary Security Management Server with the new Primary Security Management Server.
Completing Migration to a New IP Address Licenses are related to the Security Management Server IP addresses. You must update the license and configure the environment to recognize the new Security Management Server.
1. Update the Security Management Server licenses with the new IP address. If you use central licenses, they must also be updated with the new IP Address.
2. Run cpstop
3. Run cpstart
4. Connect to the new IP address with SmartDashboard.
5. Remove the host object and the rule that you created before migration.
6. Update the primary Security Management Server object to make the IP Address and topology match the new configuration.
7. Reset SIC for all SmartEvent distributed servers.
8. Run evstop and evstart on SmartEvent and SmartReporter distributed servers.
9. On the DNS, map the target Security Management Server host name to the new IP address.
Advanced Upgrade and Database Migration
Gaia Installation and Upgrade Guide R77 Versions | 155
SmartReporter and SmartEvent Database Migration for Non-Windows To migrate the SmartReporter and SmartEvent database from a non-Windows platform to a non-Windows platform, use this procedure. You can also use this procedure to backup and restore the databases.
Tools
• Use the evs_backup utility http://supportcenter.checkpoint.com/file_download?id=23701 to back up the SmartEvent and SmartReporter database and configuration files, and place them in a compressed file. Use the version suitable for the target platform. Download it from the Support Center, or from the $RTDIR/bin directory on the target Unix platform.
• Use the evs_backup_extractor utility http://supportcenter.checkpoint.com/file_download?id=23702 to restore the backup file.
• Use the migration tools to backup and restore the Security Management database and files. Use the version suitable for the target platform. Download it from the Support Center, or from $FWDIR/bin/upgrade_tools/ directory on the target Unix platform.
Backup Procedure
Run the following commands in Expert mode. Use different file name for each of the utilities:
# cd $FWDIR/bin/upgrade_tools/ # ./migrate export <file name 1> # cd $RTDIR/bin # ./evs_backup [-filename <file name 2>] -ExportPreUpgrade
Restore Procedure
Copy the backup files to the target platform and run these commands in Expert mode:
# cd $FWDIR/bin/upgrade_tools/ # ./migrate import <file name 1> # cd $RTDIR/bin # ./evs_backup_extractor [-filename <file name 2>] -ImportPostUpgrade
Advanced Upgrade and Database Migration
Gaia Installation and Upgrade Guide R77 Versions | 156
Migrate Command Reference The migrate command exports a source Security Management Server database to a file, or imports the database file to a target Security Management Server. Use absolute paths in the command, or relative paths from the current directory.
Before you run this command for export, close all SmartConsole clients or run cpstop on the Security Management Server.
Before you run this command for import, run cpstop on the Security Management Server.
Syntax: migrate {export | import} [-l] [-n] <filename> [--exclude-uepm-postgres-db] [--include-uepm-msi-files]
Parameters Description
export import
One of these actions must be used. Make sure services are stopped.
-l Optional. Export or import SmartView Tracker logs and SmartLog data. Only closed logs are exported. Use the fw logswitch command to close the logs before you do the export.
-n Optional. Run silently (non-interactive) using the default options for each setting. Important: If you export a management database in this mode, to a directory with a file with the same name, it is overwritten without prompting. If you import using this option, the command runs cpstop automatically.
--exclude-uepm-postgres-db
Skip over backup/restore of PostgreSQL database of the Endpoint product.
--include-uepm-msi-files Export/import the uepm msi files.
filename Required. Enter the name of the archive file with the server database. The path to the archive must exist.
Gaia Installation and Upgrade Guide R77 Versions | 157
CHAPTE R 13
Upgrading ClusterXL Deployments In This Section:
Planning a Cluster Upgrade ....................................................................................... 157
Minimal Effort Upgrade on a ClusterXL Cluster ....................................................... 159
Zero Downtime Upgrade on a Cluster ....................................................................... 159
ClusterXL Optimal Service Upgrade .......................................................................... 161
Connectivity Upgrade ................................................................................................. 169
Planning a Cluster Upgrade Before you upgrade a ClusterXL, consider the available upgrade options.
Effort and time efficient upgrades with some loss of connectivity
• Simple Upgrade (with downtime) ("Upgrading Security Gateways" on page 94) - Select this option if you have a period of time during which network downtime is allowed. This method is the simplest, because each cluster member is upgraded as an independent Gateway.
• Zero Downtime ("Zero Downtime Upgrade on a Cluster" on page 159) - Select this option if you cannot have any network downtime and need to complete the upgrade quickly, with a minimal number of dropped connections. During this type of upgrade, there is always at least one active member that handles traffic. Connections are not synchronized between cluster members running different Check Point software versions. Note - Connections that were initiated on a cluster member running the old version get dropped when the cluster member is upgraded to a new version. Network connectivity, however, remains available during the upgrade, and connections initiated on an upgraded cluster member are not dropped.
Upgrades that guarantee minimal connectivity loss
• Optimal Service Upgrade (OSU) ("ClusterXL Optimal Service Upgrade" on page 161) - Select this option if security is of utmost concern. During this type of upgrade two cluster members process network traffic. Connections that are initiated during the upgrade stay up through the upgrade. A minimal number of connections that were initiated before the upgrade get dropped after the upgrade.
• Connectivity Upgrade (CU) ("Connectivity Upgrade" on page 169) - Select this option, if you need to upgrade a Security Gateway or a VSX cluster to any version, and guarantee connection failover. Connections that were initiated before the upgrade are synchronized with the upgraded Security Gateways and cluster members so that no connections are dropped.
Note - Before you select the Connectivity Upgrade (CU) option, see sk107042 ClusterXL upgrade methods and paths http://supportcontent.checkpoint.com/solutions?id=sk107042 for limitations.
Upgrading ClusterXL Deployments
Gaia Installation and Upgrade Guide R77 Versions | 158
An administrator can customize the Firewall, VPN, CoreXL, and SecureXL configuration on cluster members by configuring the relevant kernel parameters in special configuration files - $FWDIR/boot/modules/fwkern.conf, $FWDIR/boot/modules/vpnkern.conf, $PPKDIR/boot/modules/simkern.conf, $FWDIR/conf/fwaffinity.conf. For examples, see sk25977 http://supportcontent.checkpoint.com/solutions?id=sk25977. During the upgrade, all customized configuration files are overwritten with the default configuration files.
If you upgrade the cluster through CLI, you can preserve the customized configuration. To do that, you must back up the configuration files before the upgrade and restore them manually immediately after upgrade, before the cluster members are rebooted. See sk42498 http://supportcontent.checkpoint.com/solutions?id=sk42498 for details.
If you upgrade the cluster gateways through Portal, they are rebooted automatically immediately after the upgrade, and the customized configuration is lost.
Note - If configuration customizations are lost during the upgrade, different issues can occur in the upgraded cluster. Cluster members can stop detecting each other, cluster members can move to undesired state, and traffic can be dropped.
Ready State During Cluster Upgrade/Rollback Operations When cluster members of different versions are on the same network, cluster members of the new (upgraded) version remain in state Ready, and cluster members of the previous version remain in state Active Attention. Cluster members in the state Ready do not process traffic for the cluster Virtual IP address and do not synchronize with other cluster members.
To prevent cluster members from being in Ready state:
• Physically disconnect the cluster member
• Shut down all interfaces:
• On Gaia/IPSO, run this Clish command: set interface <Interface_Name> state off
• On SecurePlatform, run this command in Expert mode: ifconfig <Interface_Name> down
• On Windows, disable the interface through Control Panel > Network and Sharing Center
Upgrading 32/64-bit Cluster Members High Availability cluster deployments are supported on 32-bit and 64-bit kernel operating systems. Make sure that all cluster members are running the same 32-bit or the same 64-bit operating system. If the kernel versions are different among the cluster members, those that are running the 64-bit version will stay in the state Ready and will not synchronize with the other cluster members or process any traffic for the cluster Virtual IP address.
Upgrading Third-Party and OPSEC Certified Cluster Products • When upgrading clusters of IP appliances running IPSO operating system (VRRP and IP
Clusters), use the Zero Downtime or the Minimal Effort procedure.
• When upgrading other third-party clustering products, use the Minimal Effort procedure. If the third party vendor has an alternative for the Zero Downtime Upgrade, refer to their documentation for upgrading.
Upgrading ClusterXL Deployments
Gaia Installation and Upgrade Guide R77 Versions | 159
Minimal Effort Upgrade on a ClusterXL Cluster If you can afford to have a period of time during which network downtime is allowed, and choose to perform a Minimal Effort Upgrade, each cluster member is upgraded as an individual gateway. For additional instructions, refer to Upgrading Security Gateways (on page 94).
Zero Downtime Upgrade on a Cluster Zero Downtime Upgrade is supported on all Check Point clusters and third-party clustering products.
During a Zero Downtime Upgrade one member of the cluster remains active, while the other cluster members get upgraded. The active cluster member is upgraded last.
The procedure below describes a three member cluster. However, it can be used for clusters with two or more members.
• In High Availability mode, cluster member M1 is the active member and is upgraded last. M2 and M3 are standby members.
• In Load Sharing mode, all members are active. Randomly choose one of the cluster members to upgrade last. Call it M1.
To upgrade a cluster with the Zero Downtime method:
1. Upgrade the licenses of all cluster members. A convenient time to do this is during the upgrade of the Security Management Server.
To avoid possible problems with switches around the cluster, we recommend changing the CCP protocol to Broadcast mode on all cluster members. Run cphaconf set_ccp broadcast on all cluster members.
Note - cphaconf set_ccp starts working immediately. It does not require a reboot, and it will survive the reboot. If you want to switch the CCP protocol back to Multicast mode on all cluster members after the upgrade, then run cphaconf set_ccp multicast on all cluster members.
2. Attach the upgraded licenses to all cluster members:
a) Connect to the Security Management Server through SmartUpdate. The updated licenses are displayed as Assigned.
b) Use the Attach assigned licenses option to attach the assigned licenses to the cluster members.
3. Upgrade M2.
After the upgrade, reboot M2.
4. Upgrade M3.
After the upgrade, reboot M3
Upgrading ClusterXL Deployments
Gaia Installation and Upgrade Guide R77 Versions | 160
5. In SmartDashboard:
a) In the Gateway Cluster General Properties window, change the Cluster version to R77.
b) In the Install Policy window, clear these options: For Gateway Clusters, install on all the members, Install on each selected Module independently > if it fails do not install at all.
c) Install the security policy on the cluster.
The policy successfully installs on M2 and M3. Policy installation fails on M1 and generates a warning. You can safely ignore the warning.
6. On M1, run: cphaprob stat
Verify that the status of cluster M1 is Active or Active Attention.
Active Attention means that the outbound status of the synchronization interface on M1 s down. This is because M1 stopped communicating with other cluster members.
7. On M1, run: cpstop.
This forces a failover to M2 or M3 (in High Availability mode) or to M2 and M3 (in Load Sharing mode).
Make sure that one member is Active (in High Availability) or that all members are Active (in Load Sharing).
8. On M2 and M3, run: cphaprob stat
9. Upgrade M1.
10. Reboot M1.
11. Optional: To return the cluster control protocol to multicast (instead of broadcast), run cphaconf set_ccp multicast on all cluster members.
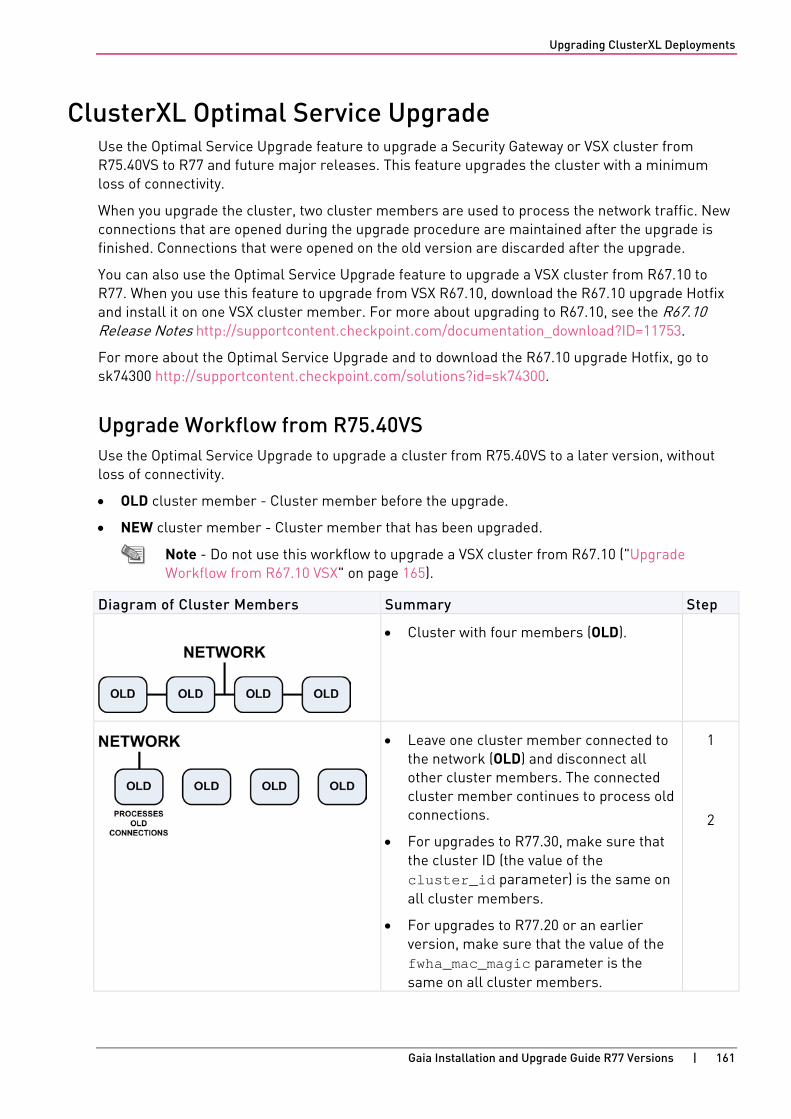
Upgrading ClusterXL Deployments
Gaia Installation and Upgrade Guide R77 Versions | 161
ClusterXL Optimal Service Upgrade Use the Optimal Service Upgrade feature to upgrade a Security Gateway or VSX cluster from R75.40VS to R77 and future major releases. This feature upgrades the cluster with a minimum loss of connectivity.
When you upgrade the cluster, two cluster members are used to process the network traffic. New connections that are opened during the upgrade procedure are maintained after the upgrade is finished. Connections that were opened on the old version are discarded after the upgrade.
You can also use the Optimal Service Upgrade feature to upgrade a VSX cluster from R67.10 to R77. When you use this feature to upgrade from VSX R67.10, download the R67.10 upgrade Hotfix and install it on one VSX cluster member. For more about upgrading to R67.10, see the R67.10 Release Notes http://supportcontent.checkpoint.com/documentation_download?ID=11753.
For more about the Optimal Service Upgrade and to download the R67.10 upgrade Hotfix, go to sk74300 http://supportcontent.checkpoint.com/solutions?id=sk74300.
Upgrade Workflow from R75.40VS Use the Optimal Service Upgrade to upgrade a cluster from R75.40VS to a later version, without loss of connectivity.
• OLD cluster member - Cluster member before the upgrade.
• NEW cluster member - Cluster member that has been upgraded.
Note - Do not use this workflow to upgrade a VSX cluster from R67.10 ("Upgrade Workflow from R67.10 VSX" on page 165).
Diagram of Cluster Members Summary Step
• Cluster with four members (OLD).
• Leave one cluster member connected to the network (OLD) and disconnect all other cluster members. The connected cluster member continues to process old connections.
• For upgrades to R77.30, make sure that the cluster ID (the value of the cluster_id parameter) is the same on all cluster members.
• For upgrades to R77.20 or an earlier version, make sure that the value of the fwha_mac_magic parameter is the same on all cluster members.
1
2
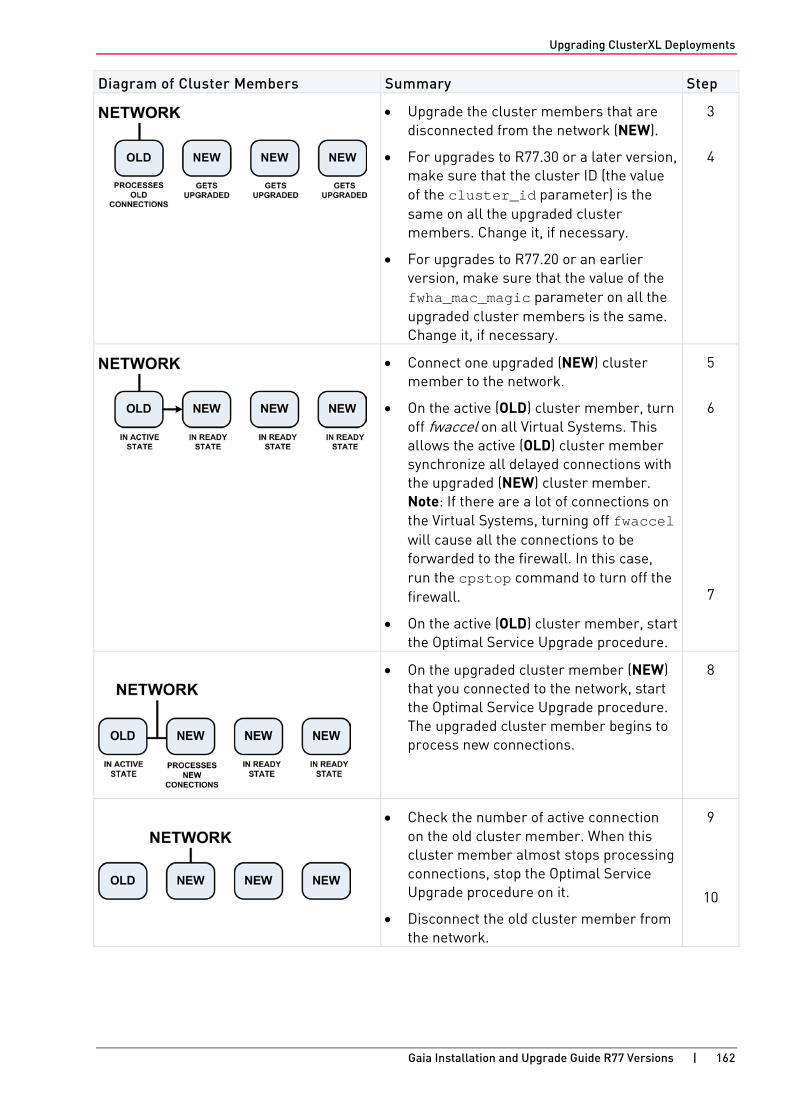
Upgrading ClusterXL Deployments
Gaia Installation and Upgrade Guide R77 Versions | 162
Diagram of Cluster Members Summary Step
• Upgrade the cluster members that are disconnected from the network (NEW).
• For upgrades to R77.30 or a later version, make sure that the cluster ID (the value of the cluster_id parameter) is the same on all the upgraded cluster members. Change it, if necessary.
• For upgrades to R77.20 or an earlier version, make sure that the value of the fwha_mac_magic parameter on all the upgraded cluster members is the same. Change it, if necessary.
3
4
• Connect one upgraded (NEW) cluster member to the network.
• On the active (OLD) cluster member, turn off fwaccel on all Virtual Systems. This allows the active (OLD) cluster member synchronize all delayed connections with the upgraded (NEW) cluster member. Note: If there are a lot of connections on the Virtual Systems, turning off fwaccel will cause all the connections to be forwarded to the firewall. In this case, run the cpstop command to turn off the firewall.
• On the active (OLD) cluster member, start the Optimal Service Upgrade procedure.
5
6
7
• On the upgraded cluster member (NEW) that you connected to the network, start the Optimal Service Upgrade procedure. The upgraded cluster member begins to process new connections.
8
• Check the number of active connection on the old cluster member. When this cluster member almost stops processing connections, stop the Optimal Service Upgrade procedure on it.
• Disconnect the old cluster member from the network.
9
10
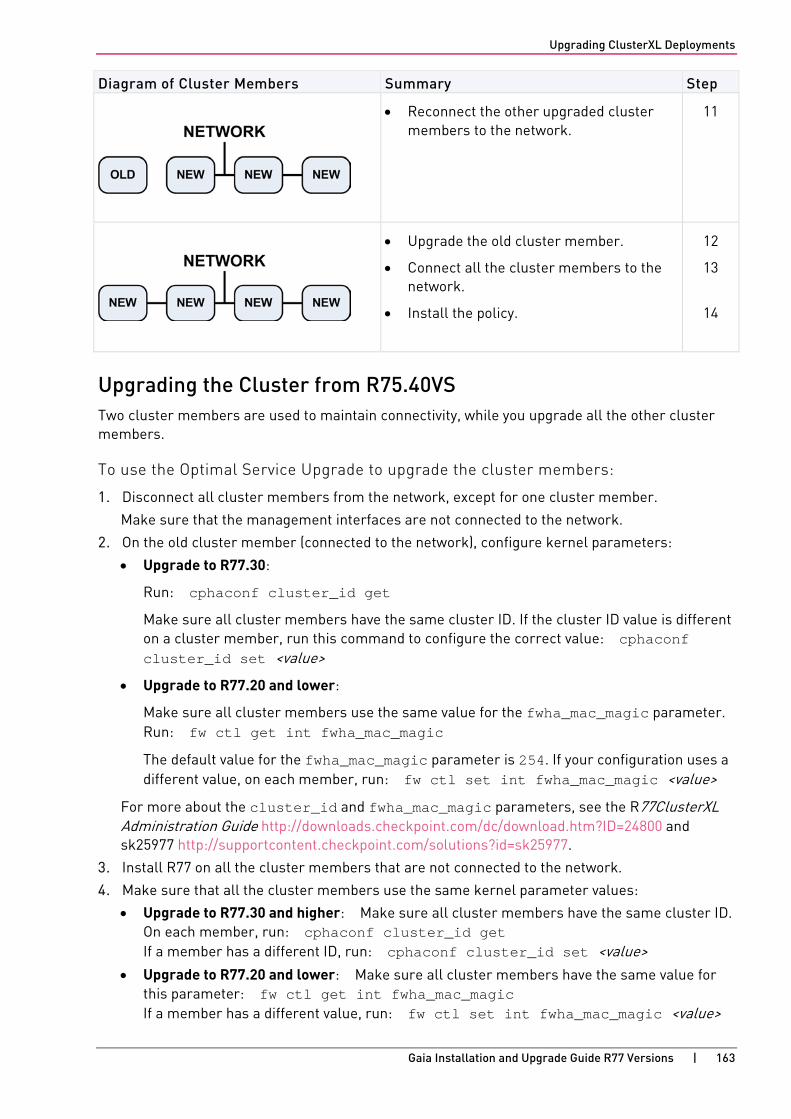
Upgrading ClusterXL Deployments
Gaia Installation and Upgrade Guide R77 Versions | 163
Diagram of Cluster Members Summary Step
• Reconnect the other upgraded cluster members to the network.
11
• Upgrade the old cluster member.
• Connect all the cluster members to the network.
• Install the policy.
12
13
14
Upgrading the Cluster from R75.40VS Two cluster members are used to maintain connectivity, while you upgrade all the other cluster members.
To use the Optimal Service Upgrade to upgrade the cluster members:
1. Disconnect all cluster members from the network, except for one cluster member.
Make sure that the management interfaces are not connected to the network.
2. On the old cluster member (connected to the network), configure kernel parameters:
• Upgrade to R77.30:
Run: cphaconf cluster_id get
Make sure all cluster members have the same cluster ID. If the cluster ID value is different on a cluster member, run this command to configure the correct value: cphaconf cluster_id set <value>
• Upgrade to R77.20 and lower:
Make sure all cluster members use the same value for the fwha_mac_magic parameter. Run: fw ctl get int fwha_mac_magic
The default value for the fwha_mac_magic parameter is 254. If your configuration uses a different value, on each member, run: fw ctl set int fwha_mac_magic <value>
For more about the cluster_id and fwha_mac_magic parameters, see the R77ClusterXL Administration Guide http://downloads.checkpoint.com/dc/download.htm?ID=24800 and sk25977 http://supportcontent.checkpoint.com/solutions?id=sk25977.
3. Install R77 on all the cluster members that are not connected to the network.
4. Make sure that all the cluster members use the same kernel parameter values:
• Upgrade to R77.30 and higher: Make sure all cluster members have the same cluster ID. On each member, run: cphaconf cluster_id get If a member has a different ID, run: cphaconf cluster_id set <value>
• Upgrade to R77.20 and lower: Make sure all cluster members have the same value for this parameter: fw ctl get int fwha_mac_magic If a member has a different value, run: fw ctl set int fwha_mac_magic <value>
Upgrading ClusterXL Deployments
Gaia Installation and Upgrade Guide R77 Versions | 164
5. Prepare the old cluster member for synchronization of old connections with the upgraded cluster member:
a) On the old cluster member, turn off fwaccel - run: fwaccel off -a
b) On the old cluster member, start the Optimal Serve Upgrade - run: cphaosu start
6. Reconnect the SYNC interface of one new cluster member to the network.
7. Move traffic to the new cluster member that is connected to the network. Do these steps:
a) Make sure the new cluster member is in ready state.
b) Connect the other new cluster member interfaces to the network.
c) On the new cluster member, run cphaosu start
d) On the old cluster member, run cphaosu stat
The network traffic statistics are shown.
e) When the old cluster member does not have many connections, run cphaosu finish
8. On the new cluster member, run cphaosu finish
9. Disconnect the old cluster member from the network.
10. Reconnect the other new cluster members to the network one at a time. Do these steps on each cluster member:
a) Run cphastop
b) Connect the new cluster member to the network.
c) Run cphastart
d) In SmartDashboard, change the version of the cluster object to R77 and install the Policy.
11. Upgrade the old cluster member and reconnect it to the network.
12. If the cluster has two members: In SmartDashboard, change the version to R77.
13. Install the Policy.
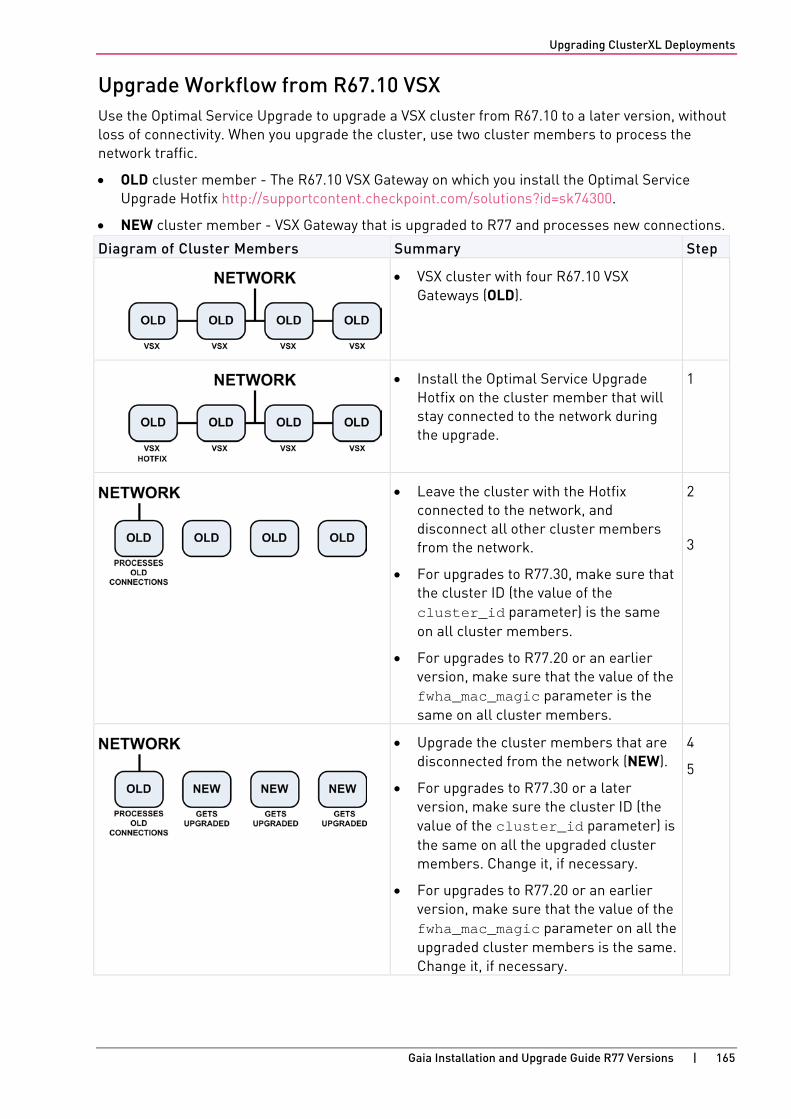
Upgrading ClusterXL Deployments
Gaia Installation and Upgrade Guide R77 Versions | 165
Upgrade Workflow from R67.10 VSX Use the Optimal Service Upgrade to upgrade a VSX cluster from R67.10 to a later version, without loss of connectivity. When you upgrade the cluster, use two cluster members to process the network traffic.
• OLD cluster member - The R67.10 VSX Gateway on which you install the Optimal Service Upgrade Hotfix http://supportcontent.checkpoint.com/solutions?id=sk74300.
• NEW cluster member - VSX Gateway that is upgraded to R77 and processes new connections.
Diagram of Cluster Members Summary Step
• VSX cluster with four R67.10 VSX Gateways (OLD).
• Install the Optimal Service Upgrade Hotfix on the cluster member that will stay connected to the network during the upgrade.
1
• Leave the cluster with the Hotfix connected to the network, and disconnect all other cluster members from the network.
• For upgrades to R77.30, make sure that the cluster ID (the value of the cluster_id parameter) is the same on all cluster members.
• For upgrades to R77.20 or an earlier version, make sure that the value of the fwha_mac_magic parameter is the same on all cluster members.
2
3
• Upgrade the cluster members that are disconnected from the network (NEW).
• For upgrades to R77.30 or a later version, make sure the cluster ID (the value of the cluster_id parameter) is the same on all the upgraded cluster members. Change it, if necessary.
• For upgrades to R77.20 or an earlier version, make sure that the value of the fwha_mac_magic parameter on all the upgraded cluster members is the same. Change it, if necessary.
4
5
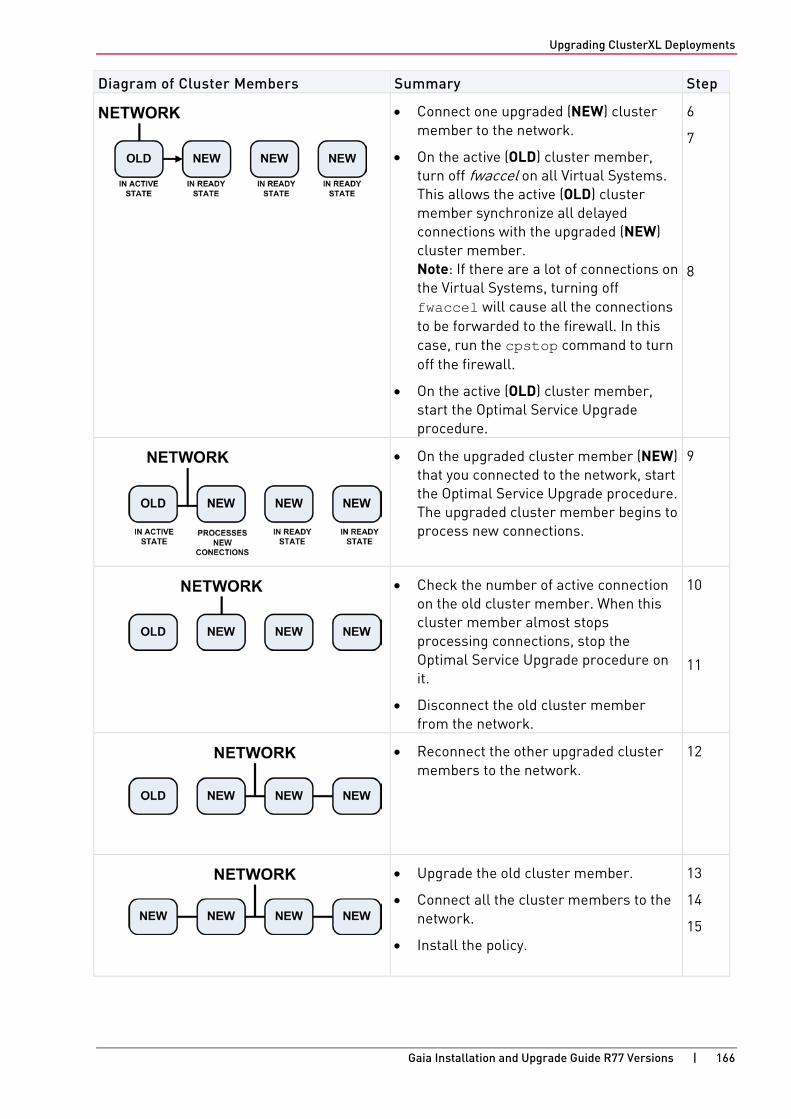
Upgrading ClusterXL Deployments
Gaia Installation and Upgrade Guide R77 Versions | 166
Diagram of Cluster Members Summary Step
• Connect one upgraded (NEW) cluster member to the network.
• On the active (OLD) cluster member, turn off fwaccel on all Virtual Systems. This allows the active (OLD) cluster member synchronize all delayed connections with the upgraded (NEW) cluster member. Note: If there are a lot of connections on the Virtual Systems, turning off fwaccel will cause all the connections to be forwarded to the firewall. In this case, run the cpstop command to turn off the firewall.
• On the active (OLD) cluster member, start the Optimal Service Upgrade procedure.
6
7
8
• On the upgraded cluster member (NEW) that you connected to the network, start the Optimal Service Upgrade procedure. The upgraded cluster member begins to process new connections.
9
• Check the number of active connection on the old cluster member. When this cluster member almost stops processing connections, stop the Optimal Service Upgrade procedure on it.
• Disconnect the old cluster member from the network.
10
11
• Reconnect the other upgraded cluster members to the network.
12
• Upgrade the old cluster member.
• Connect all the cluster members to the network.
• Install the policy.
13
14
15
Upgrading ClusterXL Deployments
Gaia Installation and Upgrade Guide R77 Versions | 167
Upgrading the VSX Cluster from R67.10 Two cluster members are used to maintain connectivity, while you upgrade all the other cluster members.
To use the Optimal Service Upgrade to upgrade the R67.10 VSX cluster members:
1. Install the Optimal Service Upgrade Hotfix on a cluster member. This is the old cluster member with Hotfix. For instructions and download links, refer to sk74300 http://supportcontent.checkpoint.com/solutions?id=sk74300.
2. Disconnect all old cluster members from the network, except for one cluster member.
Make sure that the management interfaces are not connected to the network.
3. On the old cluster member, configure kernel parameters:
• Upgrade to R77.30:
Run: cphaconf cluster_id get
If the cluster ID value is not as expected, run: cphaconf cluster_id set <value>
Make sure all cluster members have the same cluster ID. If a member has a different ID, run this set command to configure the correct value.
• Upgrade to R77.20 and lower:
Make sure all cluster members use the same value for the fwha_mac_magic parameter. Run: fw ctl get int fwha_mac_magic
The default value for the fwha_mac_magic parameter is 254. If your configuration uses a different value, on each member, run: fw ctl set int fwha_mac_magic <value>
For more about the cluster_id and fwha_mac_magic parameters, see the R77 ClusterXL Administration Guide http://downloads.checkpoint.com/dc/download.htm?ID=24800 and sk25977 http://supportcontent.checkpoint.com/solutions?id=sk25977.
4. Install R77 on all the cluster members that are not connected to the network.
5. Prepare the old cluster member for synchronization of old connections with the upgraded cluster member:
a) On the old cluster member, turn off fwaccel - run: fwaccel off -a
b) On the old cluster member, start the Optimal Serve Upgrade - run: cphaosu start
6. Reconnect the SYNC interface of one new cluster member to the network.
7. Move traffic to the new cluster member that is connected to the network. Do these steps:
a) Make sure the new cluster member is in ready state.
b) Connect the other new cluster member interfaces to the network.
c) On the new cluster member, run cphaosu start
d) On the old cluster member, run cphaosu stat
The network traffic statistics are shown.
e) When the old cluster member does not have many connections, run cphaosu finish
8. On the new cluster member, run cphaosu finish
9. Disconnect the old cluster member from the network.

Upgrading ClusterXL Deployments
Gaia Installation and Upgrade Guide R77 Versions | 168
10. Reconnect the other new cluster members to the network one at a time. Do these steps on each cluster member:
a) Run cphastop
b) Connect the new cluster member to the network.
c) Run cphastart
11. Upgrade the old cluster member and reconnect it to the network.
Troubleshooting the Upgrade Use these cphaosu commands if there are problems during the upgrade process.
• If it is necessary to rollback the update, run cphaosu cancel on the new member. The old member processes all the traffic.
• After you run cpshaosu finish on the old member, you can continue to process the old traffic on the old member and the new traffic on the new member. Run cphaosu restart on the old member.
Limitations 1. Upgrade procedure should be implemented when there is minimal network traffic.
2. If there is a member failure during the upgrade, the Optimal Service Upgrade procedure does not provide redundancy.
3. Do not apply configuration changes during the upgrade process.
4. These connections do not survive the upgrade process:
a) Complex connections, for example:
DCE RPC
SUN RPC
Back Web
DHCP
IIOP
FreeTel
WinFrame
NCP
VPN
b) Dynamic routing
c) Bridge mode (L2) configurations
Upgrading ClusterXL Deployments
Gaia Installation and Upgrade Guide R77 Versions | 169
Connectivity Upgrade Before you run Connectivity Upgrade, please see:
• sk107042 ClusterXL upgrade methods and paths http://supportcontent.checkpoint.com/solutions?id=sk107042
• sk101209 R77.20 Known Limitations http://supportcontent.checkpoint.com/solutions?id=sk101209
• sk104860 R77.30 Known Limitations http://supportcontent.checkpoint.com/solutions?id=sk104860
Check Point Connectivity Upgrade synchronizes existing connections to maintain connectivity during a cluster upgrade to R77.20 and later R77 versions from these versions:
• VSX Virtual System Load Sharing R75.40VS
• VSX Virtual System Load Sharing R76
• VSX High Availability R75.40VS
• VSX High Availability R76
• ClusterXL High Availability R75.40VS
• ClusterXL High Availability R76
Upgrades to R77.30 from these versions are also supported:
• R77
• R77.10
• R77.20
During Connectivity Upgrade, some connection flow information is synchronized to maintain connectivity.
Notes -
• Software Blade information does not get synchronized. If a connection needs to be inspected by a Software Blade, and this Software Blade is configured in SmartDashboard to Prefer Connectivity Over Security, then the connection is accepted without the inspection. Otherwise, the connection is dropped.
• All member gateways must have the same number of CoreXL Firewall instances.
• All member gateways must run the same 32-bit or 64-bit kernel edition.
Upgrading ClusterXL Deployments
Gaia Installation and Upgrade Guide R77 Versions | 170
Upgrading VSX High Availability Cluster Before you upgrade:
• Make sure that the cluster has 2 members, where one of them is the Active member and the other member is the Standby
• Get the sync interface IP address and the cluster member ID of the Active cluster member
To check the cluster member's status and to get its IP address and the cluster member ID:
Run the cphaprob stat command on each of the gateways. For more information about the cphaprob stat command, see the R77 Command Line Interface (CLI) Reference Guide http://downloads.checkpoint.com/dc/download.htm?ID=24833.
To upgrade the cluster:
1. Upgrade the Standby cluster member with a clean install. For more information about the clean install, see sk97552 http://supportcontent.checkpoint.com/solutions?id=sk97552.
2. On the upgraded cluster member, run these commands:
a) cphaprob stat
Make sure the status is Ready.
b) cphacu start <Sync IP of Active_GW> <Member ID of Active_GW>
The Connectivity Upgrade runs, and shows this message when it finishes: Connectivity upgrade status: Ready for Failover
3. On the old Active cluster member, run these commands:
a) cphaprob stat
Make sure the local member is in Active or Active Attention state, and the upgraded member is in Down state.
b) fwaccel off -a
Turns off fwaccel on all Virtual Systems so that the delayed connections are synchronized to the upgraded member that is now in Ready state.
c) cpstop
The connections fail over to the upgraded member.
4. On the upgraded cluster member, run: cphaprob stat
Make sure that it is now in Active state.
5. On the new Active cluster member, run: cphacu stat
Make sure that it handles the traffic. See cphacu stat (on page 174).
6. Upgrade the former Active cluster member with a clean install. For more information about the clean install, see sk97552 http://supportcontent.checkpoint.com/solutions?id=sk97552.
Make sure to reboot the gateway after the upgrade.
Upgrading ClusterXL Deployments
Gaia Installation and Upgrade Guide R77 Versions | 171
To make sure all cluster members are up and in VSX High Availability mode:
On each cluster member, run: cphaprob stat
If the state of a cluster member is HA not started, run cphastart on it. For more information about the cphastart and the cphaprob commands, see the R77 Command Line Interface (CLI) Reference Guide http://downloads.checkpoint.com/dc/download.htm?ID=24833.
Upgrading ClusterXL High Availability With Connectivity Upgrade Before you upgrade:
• Make sure that the cluster has 2 members, where one of them is the Active member and the other member is the Standby
• Get the sync interface IP address and the cluster member ID of the Active cluster member
To check the cluster member's state and to get its IP address and the cluster member ID:
Run the cphaprob stat command on the cluster member. For more information about the cphaprob stat command, see the R77 Command Line Interface (CLI) Reference Guide http://downloads.checkpoint.com/dc/download.htm?ID=24833.
To upgrade the cluster:
1. Upgrade the standby cluster member according to the R77 Installation and Upgrade Guide (Gaia) http://downloads.checkpoint.com/dc/download.htm?ID=24831.
Make sure to reboot the gateway after the upgrade.
2. In SmartDashboard, do these:
a) In the Gateway Cluster General Properties window, change the Cluster version to the upgraded one.
b) In the Install Policy window, go to Installation Mode > Install on each selected gateway independently section and clear For Gateway Clusters install on all the members, if it fails do not install at all.
c) Install the security policy on the cluster.
Note - The policy successfully installs on the standby cluster member and fails to install on the Active cluster member. This is expected. Ignore the warning.
3. On the Active cluster member, run: cphaprob stat
Make sure the status is Active or Active Attention, and record the Sync IP and the Member ID of the cluster member.
4. On the upgraded cluster member, run these commands:
a) cphaprob stat
Make sure that the cluster member is in Ready state
b) cphacu start <Sync IP of Active_member> <Member ID of Active_member>
The Connectivity Upgrade runs and shows this message when it finishes: Connectivity upgrade status: Ready for Failover
c) cphacu stat
Make sure that the Active cluster member handles the traffic.
Upgrading ClusterXL Deployments
Gaia Installation and Upgrade Guide R77 Versions | 172
5. On the Active cluster member, run these commands:
a) cphaprob stat
Make sure the local member is in Active or Active Attention state, and the upgraded member is in Down state.
b) fwaccel off -a
Turns off fwaccel on all Virtual Systems so that the delayed connections are synchronized to the upgraded member that is now in Ready state.
c) cpstop
The connections fail over to the upgraded cluster member.
6. On the upgraded cluster member, run: cphaprob stat
Make sure that it is now in the Active state.
7. On the new upgraded cluster member, run: cphacu stat
Make sure it handles the traffic.
8. Upgrade the former Active cluster member.
Make sure to reboot it after the upgrade.
9. Install Policy.
After the cluster upgrade is complete, the Cluster Control Protocol is in the broadcast mode. To return it to the multicast mode, on all cluster members, run: cphaconf set_ccp multicast
Connectivity Upgrade Commands
cphacu start Description Runs Connectivity Upgrade on a cluster member with a specified IP address and a cluster member ID.
Note - To get the IP address and the member ID of a cluster member, run the cphaprob stat command on it. For more information about the cphaprob stat command, see the R77 Command Line Interface (CLI) Reference Guide http://downloads.checkpoint.com/dc/download.htm?ID=24833.
Syntax
cphacu start <IP Address> <Member ID>
Output
cphacu start command outputs this information:
• Performing Full Sync on VSID <VSID number>
• Connectivity Upgrade Status -
• Disabled - Connectivity Upgrade is not running on this cluster member
• Enabled, ready for failover - Connectivity Upgrade completed successfully, and the Active member can now do the failover
• Not enabled since member is Active - Connectivity Upgrade cannot run, because this member is Active
• Full sync for connectivity upgrade is still in progress. Wait until full sync finishes
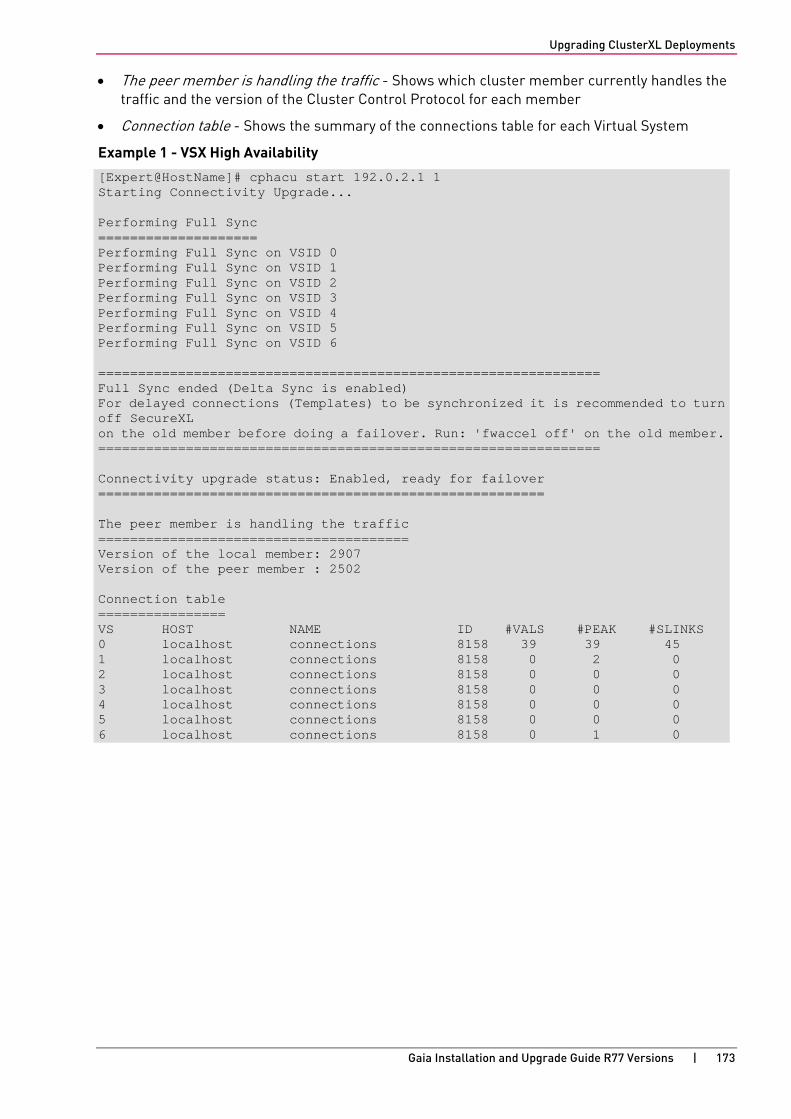
Upgrading ClusterXL Deployments
Gaia Installation and Upgrade Guide R77 Versions | 173
• The peer member is handling the traffic - Shows which cluster member currently handles the traffic and the version of the Cluster Control Protocol for each member
• Connection table - Shows the summary of the connections table for each Virtual System
Example 1 - VSX High Availability
[Expert@HostName]# cphacu start 192.0.2.1 1 Starting Connectivity Upgrade... Performing Full Sync ==================== Performing Full Sync on VSID 0 Performing Full Sync on VSID 1 Performing Full Sync on VSID 2 Performing Full Sync on VSID 3 Performing Full Sync on VSID 4 Performing Full Sync on VSID 5 Performing Full Sync on VSID 6 =============================================================== Full Sync ended (Delta Sync is enabled) For delayed connections (Templates) to be synchronized it is recommended to turn off SecureXL on the old member before doing a failover. Run: 'fwaccel off' on the old member. =============================================================== Connectivity upgrade status: Enabled, ready for failover ======================================================== The peer member is handling the traffic ======================================= Version of the local member: 2907 Version of the peer member : 2502 Connection table ================ VS HOST NAME ID #VALS #PEAK #SLINKS 0 localhost connections 8158 39 39 45 1 localhost connections 8158 0 2 0 2 localhost connections 8158 0 0 0 3 localhost connections 8158 0 0 0 4 localhost connections 8158 0 0 0 5 localhost connections 8158 0 0 0 6 localhost connections 8158 0 1 0
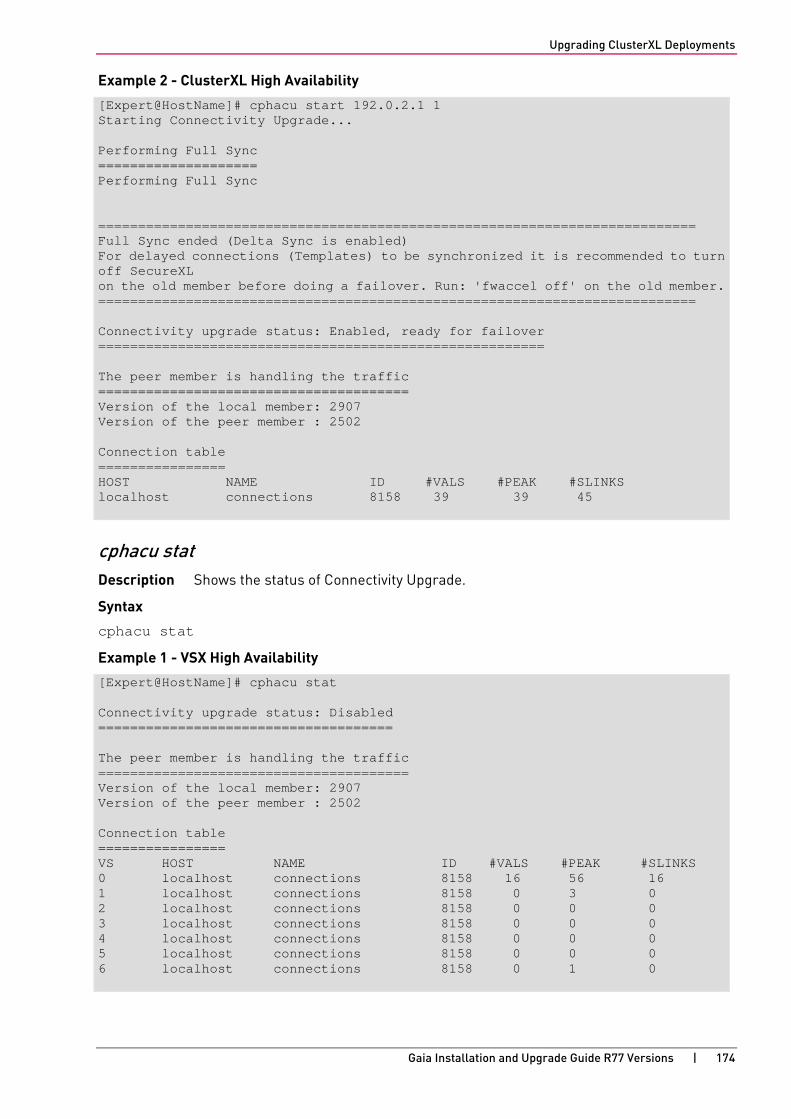
Upgrading ClusterXL Deployments
Gaia Installation and Upgrade Guide R77 Versions | 174
Example 2 - ClusterXL High Availability
[Expert@HostName]# cphacu start 192.0.2.1 1 Starting Connectivity Upgrade... Performing Full Sync ==================== Performing Full Sync =========================================================================== Full Sync ended (Delta Sync is enabled) For delayed connections (Templates) to be synchronized it is recommended to turn off SecureXL on the old member before doing a failover. Run: 'fwaccel off' on the old member. =========================================================================== Connectivity upgrade status: Enabled, ready for failover ======================================================== The peer member is handling the traffic ======================================= Version of the local member: 2907 Version of the peer member : 2502 Connection table ================ HOST NAME ID #VALS #PEAK #SLINKS localhost connections 8158 39 39 45
cphacu stat Description Shows the status of Connectivity Upgrade.
Syntax
cphacu stat
Example 1 - VSX High Availability
[Expert@HostName]# cphacu stat Connectivity upgrade status: Disabled ===================================== The peer member is handling the traffic ======================================= Version of the local member: 2907 Version of the peer member : 2502 Connection table ================ VS HOST NAME ID #VALS #PEAK #SLINKS 0 localhost connections 8158 16 56 16 1 localhost connections 8158 0 3 0 2 localhost connections 8158 0 0 0 3 localhost connections 8158 0 0 0 4 localhost connections 8158 0 0 0 5 localhost connections 8158 0 0 0 6 localhost connections 8158 0 1 0
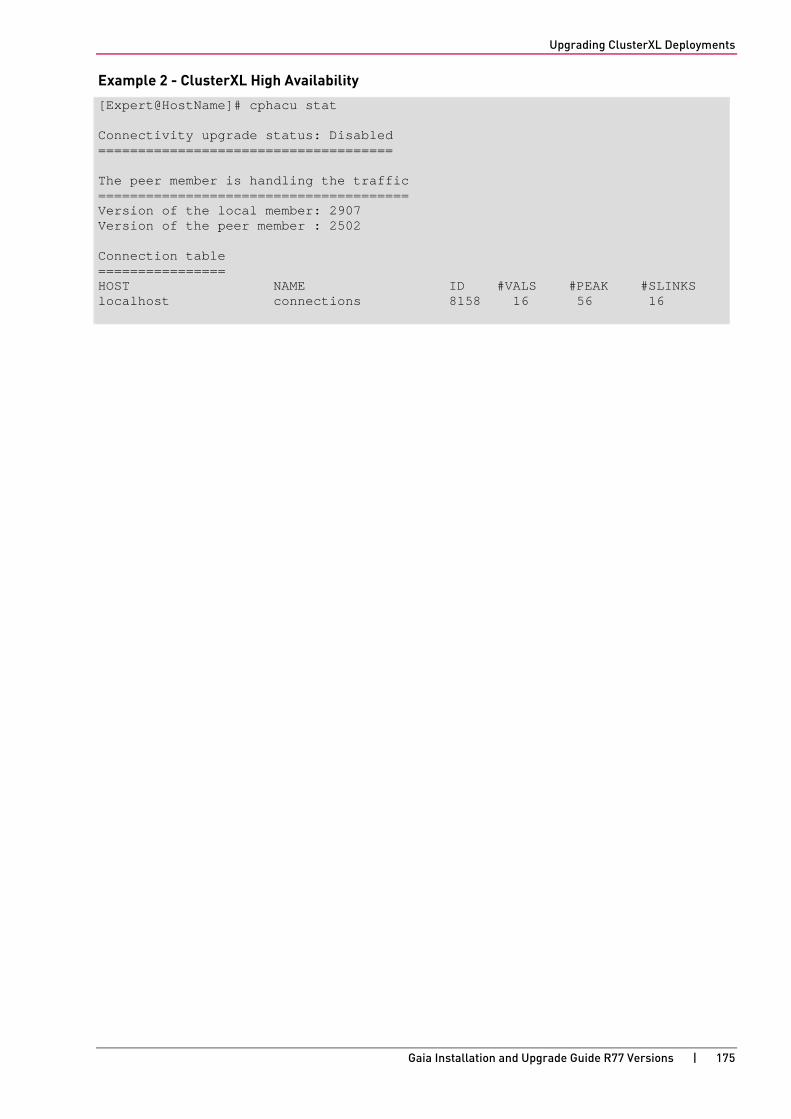
Upgrading ClusterXL Deployments
Gaia Installation and Upgrade Guide R77 Versions | 175
Example 2 - ClusterXL High Availability
[Expert@HostName]# cphacu stat Connectivity upgrade status: Disabled ===================================== The peer member is handling the traffic ======================================= Version of the local member: 2907 Version of the peer member : 2502 Connection table ================ HOST NAME ID #VALS #PEAK #SLINKS localhost connections 8158 16 56 16

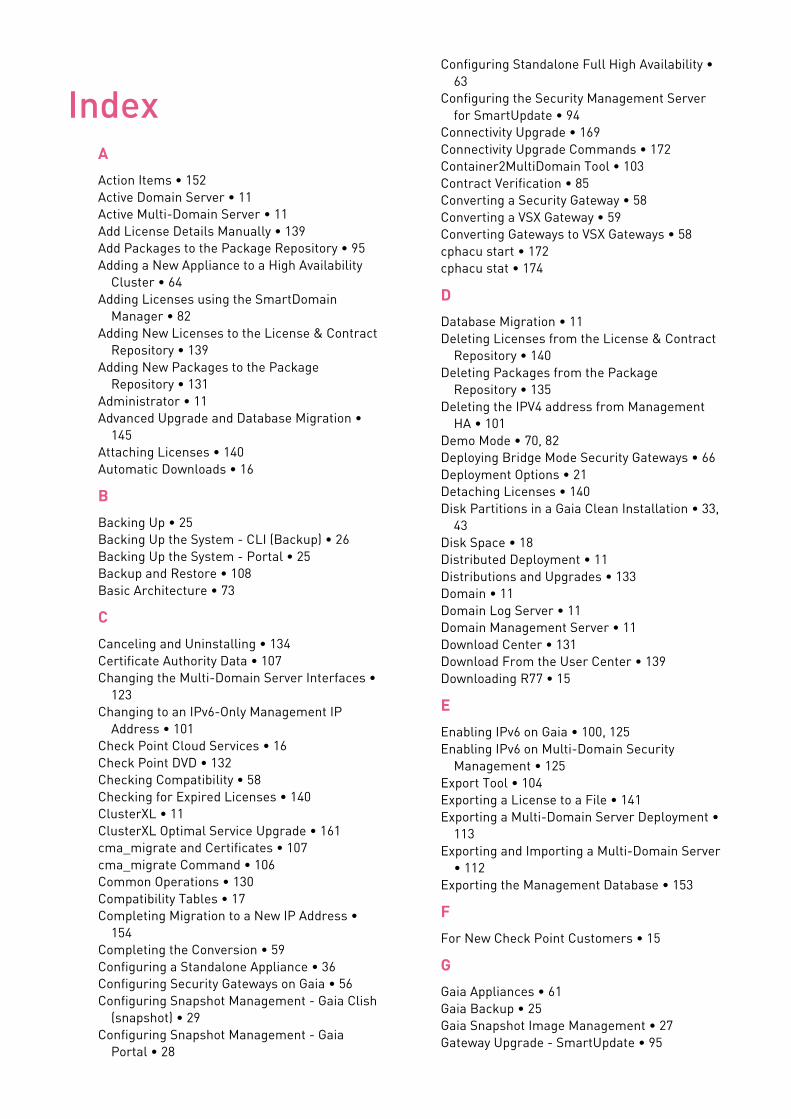
Index A
Action Items • 152 Active Domain Server • 11 Active Multi-Domain Server • 11 Add License Details Manually • 139 Add Packages to the Package Repository • 95 Adding a New Appliance to a High Availability
Cluster • 64 Adding Licenses using the SmartDomain
Manager • 82 Adding New Licenses to the License & Contract
Repository • 139 Adding New Packages to the Package
Repository • 131 Administrator • 11 Advanced Upgrade and Database Migration •
145 Attaching Licenses • 140 Automatic Downloads • 16
B
Backing Up • 25 Backing Up the System - CLI (Backup) • 26 Backing Up the System - Portal • 25 Backup and Restore • 108 Basic Architecture • 73
C
Canceling and Uninstalling • 134 Certificate Authority Data • 107 Changing the Multi-Domain Server Interfaces •
123 Changing to an IPv6-Only Management IP
Address • 101 Check Point Cloud Services • 16 Check Point DVD • 132 Checking Compatibility • 58 Checking for Expired Licenses • 140 ClusterXL • 11 ClusterXL Optimal Service Upgrade • 161 cma_migrate and Certificates • 107 cma_migrate Command • 106 Common Operations • 130 Compatibility Tables • 17 Completing Migration to a New IP Address •
154 Completing the Conversion • 59 Configuring a Standalone Appliance • 36 Configuring Security Gateways on Gaia • 56 Configuring Snapshot Management - Gaia Clish
(snapshot) • 29 Configuring Snapshot Management - Gaia
Portal • 28
Configuring Standalone Full High Availability • 63
Configuring the Security Management Server for SmartUpdate • 94
Connectivity Upgrade • 169 Connectivity Upgrade Commands • 172 Container2MultiDomain Tool • 103 Contract Verification • 85 Converting a Security Gateway • 58 Converting a VSX Gateway • 59 Converting Gateways to VSX Gateways • 58 cphacu start • 172 cphacu stat • 174
D
Database Migration • 11 Deleting Licenses from the License & Contract
Repository • 140 Deleting Packages from the Package
Repository • 135 Deleting the IPV4 address from Management
HA • 101 Demo Mode • 70, 82 Deploying Bridge Mode Security Gateways • 66 Deployment Options • 21 Detaching Licenses • 140 Disk Partitions in a Gaia Clean Installation • 33,
43 Disk Space • 18 Distributed Deployment • 11 Distributions and Upgrades • 133 Domain • 11 Domain Log Server • 11 Domain Management Server • 11 Download Center • 131 Download From the User Center • 139 Downloading R77 • 15
E
Enabling IPv6 on Gaia • 100, 125 Enabling IPv6 on Multi-Domain Security
Management • 125 Export Tool • 104 Exporting a License to a File • 141 Exporting a Multi-Domain Server Deployment •
113 Exporting and Importing a Multi-Domain Server
• 112 Exporting the Management Database • 153
F
For New Check Point Customers • 15
G
Gaia Appliances • 61 Gaia Backup • 25 Gaia Snapshot Image Management • 27 Gateway Upgrade - SmartUpdate • 95
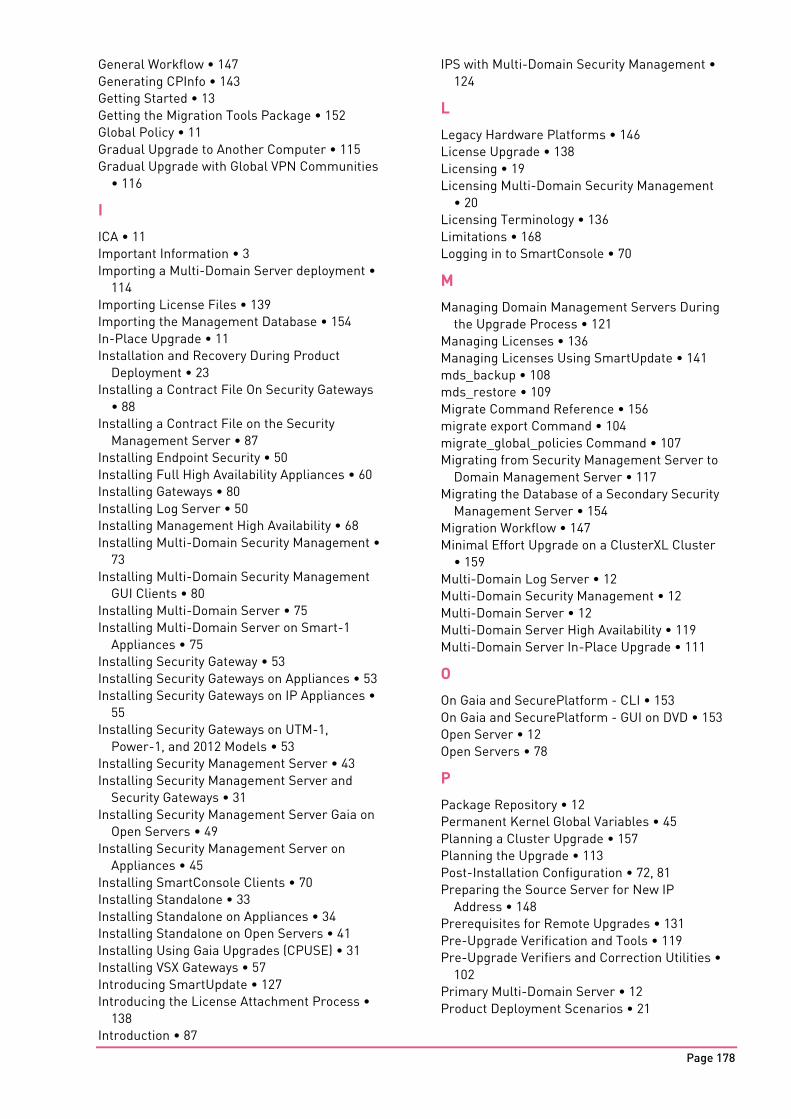
Page 178
General Workflow • 147 Generating CPInfo • 143 Getting Started • 13 Getting the Migration Tools Package • 152 Global Policy • 11 Gradual Upgrade to Another Computer • 115 Gradual Upgrade with Global VPN Communities
• 116
I
ICA • 11 Important Information • 3 Importing a Multi-Domain Server deployment •
114 Importing License Files • 139 Importing the Management Database • 154 In-Place Upgrade • 11 Installation and Recovery During Product
Deployment • 23 Installing a Contract File On Security Gateways
• 88 Installing a Contract File on the Security
Management Server • 87 Installing Endpoint Security • 50 Installing Full High Availability Appliances • 60 Installing Gateways • 80 Installing Log Server • 50 Installing Management High Availability • 68 Installing Multi-Domain Security Management •
73 Installing Multi-Domain Security Management
GUI Clients • 80 Installing Multi-Domain Server • 75 Installing Multi-Domain Server on Smart-1
Appliances • 75 Installing Security Gateway • 53 Installing Security Gateways on Appliances • 53 Installing Security Gateways on IP Appliances •
55 Installing Security Gateways on UTM-1,
Power-1, and 2012 Models • 53 Installing Security Management Server • 43 Installing Security Management Server and
Security Gateways • 31 Installing Security Management Server Gaia on
Open Servers • 49 Installing Security Management Server on
Appliances • 45 Installing SmartConsole Clients • 70 Installing Standalone • 33 Installing Standalone on Appliances • 34 Installing Standalone on Open Servers • 41 Installing Using Gaia Upgrades (CPUSE) • 31 Installing VSX Gateways • 57 Introducing SmartUpdate • 127 Introducing the License Attachment Process •
138 Introduction • 87
IPS with Multi-Domain Security Management • 124
L
Legacy Hardware Platforms • 146 License Upgrade • 138 Licensing • 19 Licensing Multi-Domain Security Management
• 20 Licensing Terminology • 136 Limitations • 168 Logging in to SmartConsole • 70
M
Managing Domain Management Servers During the Upgrade Process • 121
Managing Licenses • 136 Managing Licenses Using SmartUpdate • 141 mds_backup • 108 mds_restore • 109 Migrate Command Reference • 156 migrate export Command • 104 migrate_global_policies Command • 107 Migrating from Security Management Server to
Domain Management Server • 117 Migrating the Database of a Secondary Security
Management Server • 154 Migration Workflow • 147 Minimal Effort Upgrade on a ClusterXL Cluster
• 159 Multi-Domain Log Server • 12 Multi-Domain Security Management • 12 Multi-Domain Server • 12 Multi-Domain Server High Availability • 119 Multi-Domain Server In-Place Upgrade • 111
O
On Gaia and SecurePlatform - CLI • 153 On Gaia and SecurePlatform - GUI on DVD • 153 Open Server • 12 Open Servers • 78
P
Package Repository • 12 Permanent Kernel Global Variables • 45 Planning a Cluster Upgrade • 157 Planning the Upgrade • 113 Post-Installation Configuration • 72, 81 Preparing the Source Server for New IP
Address • 148 Prerequisites for Remote Upgrades • 131 Pre-Upgrade Verification and Tools • 119 Pre-Upgrade Verifiers and Correction Utilities •
102 Primary Multi-Domain Server • 12 Product Deployment Scenarios • 21
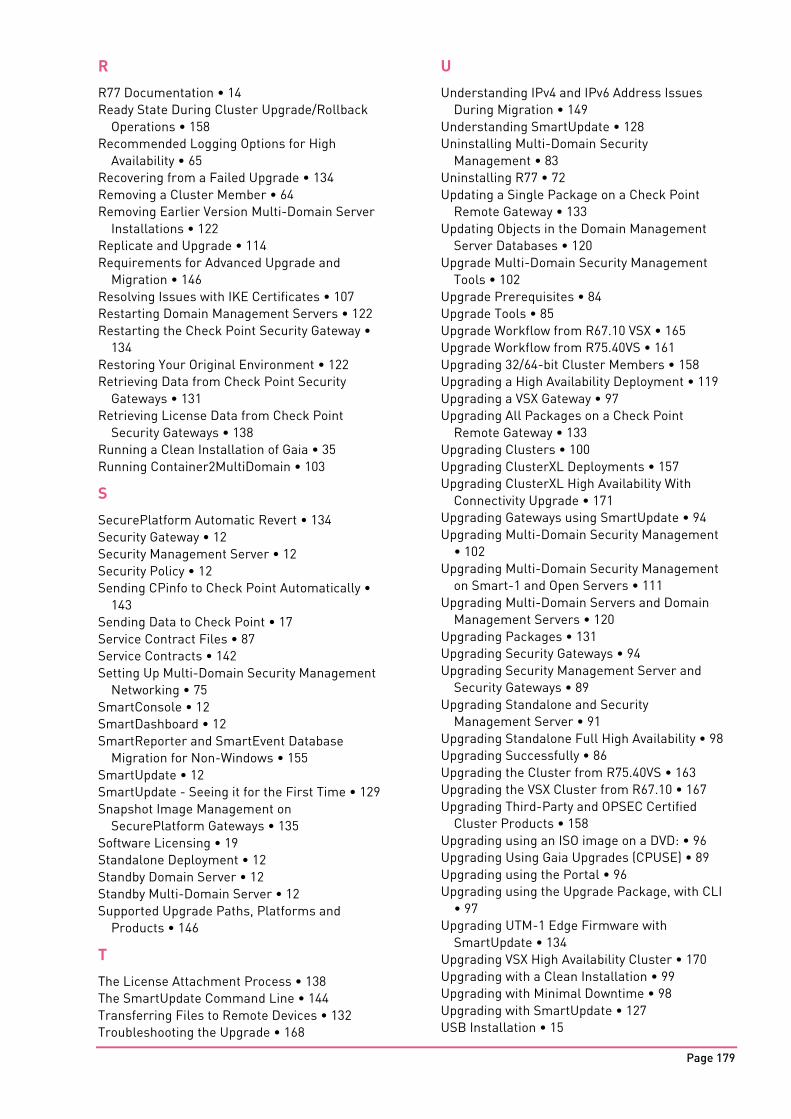
Page 179
R
R77 Documentation • 14 Ready State During Cluster Upgrade/Rollback
Operations • 158 Recommended Logging Options for High
Availability • 65 Recovering from a Failed Upgrade • 134 Removing a Cluster Member • 64 Removing Earlier Version Multi-Domain Server
Installations • 122 Replicate and Upgrade • 114 Requirements for Advanced Upgrade and
Migration • 146 Resolving Issues with IKE Certificates • 107 Restarting Domain Management Servers • 122 Restarting the Check Point Security Gateway •
134 Restoring Your Original Environment • 122 Retrieving Data from Check Point Security
Gateways • 131 Retrieving License Data from Check Point
Security Gateways • 138 Running a Clean Installation of Gaia • 35 Running Container2MultiDomain • 103
S
SecurePlatform Automatic Revert • 134 Security Gateway • 12 Security Management Server • 12 Security Policy • 12 Sending CPinfo to Check Point Automatically •
143 Sending Data to Check Point • 17 Service Contract Files • 87 Service Contracts • 142 Setting Up Multi-Domain Security Management
Networking • 75 SmartConsole • 12 SmartDashboard • 12 SmartReporter and SmartEvent Database
Migration for Non-Windows • 155 SmartUpdate • 12 SmartUpdate - Seeing it for the First Time • 129 Snapshot Image Management on
SecurePlatform Gateways • 135 Software Licensing • 19 Standalone Deployment • 12 Standby Domain Server • 12 Standby Multi-Domain Server • 12 Supported Upgrade Paths, Platforms and
Products • 146
T
The License Attachment Process • 138 The SmartUpdate Command Line • 144 Transferring Files to Remote Devices • 132 Troubleshooting the Upgrade • 168
U
Understanding IPv4 and IPv6 Address Issues During Migration • 149
Understanding SmartUpdate • 128 Uninstalling Multi-Domain Security
Management • 83 Uninstalling R77 • 72 Updating a Single Package on a Check Point
Remote Gateway • 133 Updating Objects in the Domain Management
Server Databases • 120 Upgrade Multi-Domain Security Management
Tools • 102 Upgrade Prerequisites • 84 Upgrade Tools • 85 Upgrade Workflow from R67.10 VSX • 165 Upgrade Workflow from R75.40VS • 161 Upgrading 32/64-bit Cluster Members • 158 Upgrading a High Availability Deployment • 119 Upgrading a VSX Gateway • 97 Upgrading All Packages on a Check Point
Remote Gateway • 133 Upgrading Clusters • 100 Upgrading ClusterXL Deployments • 157 Upgrading ClusterXL High Availability With
Connectivity Upgrade • 171 Upgrading Gateways using SmartUpdate • 94 Upgrading Multi-Domain Security Management
• 102 Upgrading Multi-Domain Security Management
on Smart-1 and Open Servers • 111 Upgrading Multi-Domain Servers and Domain
Management Servers • 120 Upgrading Packages • 131 Upgrading Security Gateways • 94 Upgrading Security Management Server and
Security Gateways • 89 Upgrading Standalone and Security
Management Server • 91 Upgrading Standalone Full High Availability • 98 Upgrading Successfully • 86 Upgrading the Cluster from R75.40VS • 163 Upgrading the VSX Cluster from R67.10 • 167 Upgrading Third-Party and OPSEC Certified
Cluster Products • 158 Upgrading using an ISO image on a DVD: • 96 Upgrading Using Gaia Upgrades (CPUSE) • 89 Upgrading using the Portal • 96 Upgrading using the Upgrade Package, with CLI
• 97 Upgrading UTM-1 Edge Firmware with
SmartUpdate • 134 Upgrading VSX High Availability Cluster • 170 Upgrading with a Clean Installation • 99 Upgrading with Minimal Downtime • 98 Upgrading with SmartUpdate • 127 USB Installation • 15
Page 180
User Center • 132 Using the Pre-Upgrade Verification Tool • 152 Using the Pre-Upgrade Verifier Tool • 86
V
Verifying the Viability of a Distribution • 132 Viewing License Properties • 140
W
Web Security License Enforcement • 142 Welcome • 13 Where To From Here? • 83 Where to Go From Here • 72 Working with Contract Files • 87
Z
Zero Downtime Upgrade on a Cluster • 159
Related Documents