1 E1000 G1000 EDITION For X-Plane 11.30+ Not for real flight! For simulation only!

Welcome message from author
This document is posted to help you gain knowledge. Please leave a comment to let me know what you think about it! Share it to your friends and learn new things together.
Transcript

1
E1000G1000 EDITION
For X-Plane 11.30+
Not for real flight! For simulation only!

2
TABLE OF CONTENT
The Aerobask E1000..............................................................3
Preface................................................................................4
Features..............................................................................5
Special effects.............................................................5
Other.............................................................................5
Aerobask quality 3D model.......................................5
High quality sounds....................................................5
Enhanced Laminar G1000..........................................5
Deep system emulation.............................................5
Installation & Updates.....................................................6
Getting Updates..........................................................6
Minimum Requirements............................................6
Recommended System..............................................6
Installation...................................................................6
By Your Command............................................................7
Hardware Levers.........................................................7
Joystick or Yoke...........................................................7
Rudder Pedals..............................................................7
Airplane Description..............................................................9
Specifications..................................................................10
Overview....................................................................10
Dimensions & Weight...............................................10
Performance..............................................................10
Performance Comparison........................................10
Cockpit Orientation.......................................................11
Remote Control Key Pad.........................................12
Throttle Quadrant....................................................12
Fuel Selector..............................................................12
Pre-Start Switches....................................................13
Pre-Taxi Switches......................................................13
Systems Switches......................................................13
Lights Switches..........................................................13
Anti-Ice Switches.......................................................13
Flaps ContRol.............................................................14
Landing Gear Control...............................................14
Interior Lighting........................................................14
Air Condition & Oxygen...........................................14
Customized G1000.........................................................15
Custom Engine Gauge..............................................15
Touch Screen.............................................................15
Flight Plan Keyboard Entry.....................................15
Options.............................................................................16
“Ground” Tab.............................................................16
“Options” Tab............................................................16
“Sound” Tab...............................................................16
“About” Tab................................................................16
Virtual Tablet...................................................................17
Showing & Hiding the Tablet..................................17
Tablet Features.........................................................17
Tutorial...................................................................................18
Introduction.....................................................................19
From EDOP to EDBM................................................19
Our Flight Plan................................................................20
Departure...................................................................20
En Route.....................................................................20
Approach....................................................................20
X-Plane Setup..................................................................21
Aircraft Preparation.......................................................22
1. Check Fuel..............................................................22
2. Check Payload.......................................................22
3. Remove Static Elements......................................22
4. Request Ground Power.......................................22
5. Close Door.............................................................22
Flight Plan Setup............................................................23
1. Preparations..........................................................23
2. Select your SID......................................................24
3. Enter your Waypoints..........................................25
4. Load your Airways................................................26
5. Select your Approach...........................................27
Radio Setup.....................................................................28
Engine Startup................................................................29
Simplified Engine Start............................................29
Taxi and Run-Up..............................................................30
Taxi..............................................................................30
Before Take-off.........................................................30
Takeoff and Departure..................................................31
Final Check.................................................................31
Take-Off......................................................................31
Climb and DepaRture...............................................31
Climb and Cruise.............................................................32
Approach and Landing...................................................33

3
THE AEROBASK E1000FEATURES, INSTALLATION & CONFIGURATION

4
PREFACE21ST CENTURY PLANE The Aerobask Epic E1000, G1000 Edition is a
completely new model of an aircraft withastonishing performance and iconic design.
Thank you for purchasing theAerobask Epic E1000 – the fastestsingle-engine turboprop and soonto be certified.
With its sleek and elegant airframemade of carbon fiber, the E1000 isable to climb out with 4,000 ft/min– even fully loaded. Its ceiling is jet-like: 34,000 ft. Its range isimpressive: 1,650 nm.
Similarly impressive is the interiordesign: Both the cabin and thecockpit offer wide spaces for pilotsand passengers. The cockpit'slayout is clean and easy to use. Evenon the first sight you will noticethat the interior exudes an aura ofcomfort, sportiness, and safety.
The real E1000 concluded structuraltesting as part of its ongoing
certification process in July 2018and certification is expected soon.
As Aerobask customer you can flythis extraordinary aircraft today inyour X-Plane 11 flight simulator.Our model offers you a faithfulrendition of the aircraft. It allowsyou to feel the aircraft's power, toadmire the beauty of its curves, andto feel right at home in its cabin andcockpit.
If you already flew any previousAerobask version of the E1000, youwill notice that the new version isreally not just an update –everything has been re-createdfrom scratch, be it the super-detailed cockpit, the sleekexterior model, the hi-resolutiontextures, the near-perfectphysically based rendering (PBR),
or the beautifully crafted sounddesign. We also enhanced X-Plane’s default G1000 avionics tobe more user-friendly – you can usemouse and keyboard for easy dataentry. Flying the E1000 is really abreeze.
This is the best E1000 you can findin any simulator, and we dare to sayone of the best single-engineturboprops in the simulator market.
We have put lots of effort in thisaircraft, and we wish you manyhours of fun with it! :-)
February 2019,the Aerobask team

5
FEATURESTHE BEST E1000 EVER Already depicted by Aerobask with an
experimental avionics set a while ago, the EpicE1000 is now back as a completely new version.
AEROBASK QUALITY 3D MODEL
• Completely reworked and re-scaled exterior and interior model
• New 4K PBR textures
• 11 stunning liveries out of the box
• Color-matching interior based on livery
• White (for painters) and Lo-res liveries availalbe through Aerobask website.
• Smooth and VR-friendly manipulators
• Professional Flight model
• New flight model by X-Aerodynamics
• Tested by actual owner Gianfranco Somma
• Matches latest certification prototype performance
HIGH QUALITY SOUNDS
• full FMOD environment by Daniela Rodriguez Careri
• samples from real PT-6 engine
• in-game volume control without pausing the sim
ENHANCED LAMINAR G1000
• Integrates new XP11.30 GFC700 autopilot
• Custom MFD PT-6 engine parameters (on PFD in reversion mode)
• Optional mouse, scrollwheel and dialpad support for easy data input
• Optional keyboard support for dialpad and flight plan input
• Custom detachable popups with fixed ratio and all optional features above
Note: some of the optional featuresmay need VR-mouse at themoment.
DEEP SYSTEM EMULATION
• Realistic engine startup procedure
• Implements new XP11.30 boots-based wings and stabilizer de-icing system
• Implements new XP11.30 oxygen system for emergencies
• Functional breakers, with configurable reliability
• Fully simulated MD302 Standby Attitude Module
SPECIAL EFFECTS
• Rain and windshield icing using librain plugin from Saso Kiselkov
• Dynamic reflections
• custom heat blur effect on both sides
• custom engine twin-contrails
OTHER
• Avitab tablet, with integrated options panel
• Detachable and VR-friendly 2D options panel
• Preferences, fuel and payload saved between flights

6
INSTALLATION & UPDATESREQUIREMENTS & TIPS The Aerobask E1000 is a high quality add on for
X-Plane 11.30+. For the best experience, pleasetake some time to read the following remarks.
MINIMUM REQUIREMENTS
The Aerobask Epic E1000 has beenoptimized for good performance.However, the plane uses highdefinition liveries (4096px), HighDynamic Range (HDR) Lighting,Physical Based Rendering (PBR) andadvanced rain effects.
To fully enjoy these features, yourcomputer should meet thefollowing minimum requirements:
CPU: Intel i5-6600 @3.3 GHz
GPU: Nvidia GTX960
VRAM: 4 GB
RAM: 16 GB
Using such a system, you will beable to achieve stable 25 to 30 FPSin most situations, depending oninstalled scenery and other addonsyou might use.
25 FPS are sufficient for a real-timesimulation. The plane will even loadand run if you have a system weakerthan shown, but you may want toswitch off anti aliasing (AA), setreflections to “low”, reduce texturesize to “high” in your X-Planesettings. We also provide a low-resolution livery which needs lessVRAM.
RECOMMENDED SYSTEM
For a better overall experience, werecommend the following system:
CPU: Intel i7 @4.4 GHz
GPU: Nvidia GTX1080i
VRAM: 11 GB
RAM: 32 GB
INSTALLATION
Purchase the plane and downloadthe zip archive of the plane fromthe x-plane.org store. You shouldfind it in your customer account.
Take note of the serial key youhave received after your purchase.You may also want to copy the keyinto your clipboard, because you’llneed it soon.
Extract the zip archive to your“Aircraft” folder. The resultingfolder structure should, forexample, look like “X-Plane11/Aircraft/Aerobask Epic E1000G1000 Edition”, with all the aircraftfiles in this folder.
Start X-Plane and create a newflight. Your new E1000 will beshown in the “General Aviation”category. Select this plane.
After loading the flight, X-Plane willask you to enter your serial key. Ifyou have copied the key into yourclipboard, simply hit the “paste”button. Otherwise, you can type thekey manually into the text field.Finally, press the “Activate”button.
Using your Internet connection, thekey will now be checked and theaircraft will be activated. You willbe notified of the success on yourscreen.
After activation, reload the planeby first loading the default C172and then switching back to theE1000. (There is also a reloadoption in X-Plane’s developer menu,but this does not initialize the planecorrectly, so please use the stepsoutlined above.)
GETTING UPDATES
This plane can be used togetherwith the SkunkCrafts Updater, toreceive online updates (bug fixes,new features) from within X-Plane,without the need of re-downloading the whole packagefrom the store.
The updater will check if newversions for supported installedaircraft (such as the E1000) areavailable and optionally downloadthese updates for you.
To use the SkunkCrafts updater,download the free updater pluginfrom the following link:
https://forums.x-plane.org/index.php?/forums/topic/144828-updater-download-page-v22-available/
To install the updater, first close X-Plane.
Unzip the conent of thedownloaded zip to “X-Plane11/Resources/plugins”. Be carefulto use this location; never install theupdater to an aircraft or sceneryfolder.
You can configure the updater’sbehavior. This is explained in theupdater’s online documentation,which is available here:
https://forums.x-plane.org/index.php?/forums/topic/166005-skunkcrafts-updater-v2x-documentation/

7
BY YOUR COMMANDNOTES ON HARDWARE
JOYSTICK OR YOKE
The real Epic E1000 uses yokes forpilot and co-pilot. Real-world yokesgive both a comfortable and precisefeeling of being in contral of theplane.
In contrast, as usage statistics show,many X-Plane pilots fly solely withmouse and keyboard. Althoughthat’s perfectly fine, with such asetup the feeling of flight can’t beconveyed realistically by a desktopsimulator. We thereforerecommend to use any flightsimulator with at least a joystick.Cheap, but good joysticks areavailable from various vendors (forexample Thrustmaster).
Even more realistic with the E1000is to use a yoke. You don’t needhigh-precision gear that costshundreds of bucks. Variousmanufactorers offer affordableyokes, for example CH Products,Logitech (formerly Saitek), orHoneycomb.
You can fly the E1000 with keyboard and mouse.Still, flight simulation is so much more enjoyable
with some basic hardware.
HARDWARE LEVERS
The Epic E1000 is a high-performance turbo prop plane witha Pratt & Whitney PT6A-67A engine.This type of engine is usuallycontrolled with a combination ofthree levers: The black levercontrols the engine power. The bluelever controls the propeller. The redlever controls the condition.
In X-Plane, you can either use themouse to move these levers in the3D cockpit, or use your keyboard.Better, of course, is to use hardwarefor the levers. Although somejoysticks are combined with athrottle, there also exist dedicatedcontrols from companies like CHProducts or Logitech. You canassign throttle, prop and conditionto separate levers.
Whichever hardware you use,make sure to calibrate yourjoystick, yoke, pedals and leversin X-Plane.
Thankfully, calibration and setupin X-Plane is a breeze with X-Plane’s included setup assistent.You can start it from the X-Planeinput settings screen.
Please refer to the X-Plane usermanual for details.
Honeycomb Yoke
RUDDER PEDALS
Fixed-wing aircraft are controlled inthree axes: roll, pitch, and yaw. Withyour joystick or yoke (or yourmouse), you control the plane’smovement on the roll and pitchaxes, by moving the ailerons andelevators.
You can climb, sink and turn justwith these axes, but you will soonnotice that turns feel somewhat“strange” – as if your plane waspushed or pulled out of the nicecircle you want to fly. In aviation,this is called un-coordinated.
You want, in contrast, to fly acoordinated turn. Without goinginto aviation theory here, you canimagine a coordinated turn as onewhere pilot and passengers havethe feeling of sitting in acomfortable way, without beingpulled or pushed in unwanteddirections.
To fly a coordinated turn, rudderpedals are used in conjunction withthe ailerons. Rudder pedals arecontrolled with your feet.Affordable rudder pedals for flightsimulation are available fromvarious vendors, such asThrustmaster, CH Products orLogitech.
Thrustmaster Pedals
Logitech Throttle Quadrant

8
X-PLANE CONTROLLER SETTINGS
You should also check thesensitivity of your flight controls:
Set Control Response as needed;different hardware may need adifferent setting here.
Set Stability Augmentation to 0%.Although stability augmentationhelps to get a stable flight, itinvokes false impressions on flightbehavior and may interfere with theautopilot, leading to a wrongautomated flight behavior.
Calibrateselected device
Change view ofpreview photo
Select deviceto configure
Assign function tobutton or axis
Set controlsensitivity
Check your hardware setup before flight. Calibrateeach connected device, assign functions to
buttons & levers, and check sensitivity.

9
AIRPLANE DESCRIPTIONGETTING TO KNOW YOUR PLANE

10
OVERVIEW
Seats 6 Adults
Construction Carbon fiber
Pressurization 6.6 psi
Engine P&W PT6A-67A
Horse Power 1200-HP
Propeller Hartzell Four-Blade
Full Reversing
Avionics Garmin G1000 Nxi
3-Screen Avionics Suite
DIMENSIONS & WEIGHT
Length 35 ft 10 in
Wingspan 43 ft
Height 12 ft 6 in
Wing area 203 sq ft
Cabin length 15 ft
Cabin width 4 ft 7 in
Cabin height 4 ft 11 in
Empty weight 4,600 lbs
MTOW 8,000 lbs
Max payload 1,100 lbs (incl. fuel)
PERFORMANCE
Max cruise 325 KTAS
Eco cruise 265 KTAS
Max ceiling 34,000 ft
Time to climb 15 min. to 34,000 ft
Best climb rate 4,000 ft/minute
Range (max) 1,385 NM
Range (eco) 1,650 NM
Fuel capacity 288 gallons
Source: Pre-certification performance data, according to Epic Aircraft documents.
PERFORMANCE COMPARISON
» Performance like that is the
stuff of dreams.
– Mark Huber, Business Jet TravelerMagazine, March 2018
Takeoff Over 50 ft
Epic E1000 1,600 ft
Daher TBM-900 2,380 ft
Pilatus PC-12 NG 2,450 ft
Max Cruise Speed
Epic E1000 325 KTAS
Daher TBM-900 330 KTAS
Pilatus PC-12 NG 280 KTAS
Max Range
Epic E1000 1,650 nm
Daher TBM-900 1,585 nm
Pilatus PC-12 NG 1,309 nm
Full Fuel Payload
Epic E1000 1,110 lbs
Daher TBM-900 720 lbs
Pilatus PC-12 NG 1,209 lbs
Price
Epic E1000 $2,950,000
Daher TBM-900 $3,700,000
Pilatus PC-12 NG $3,850,000
Source: Flying Magazine, October 2014
SPECIFICATIONSTHE BEST IN ITS CLASS The Epic E1000 has the best overall performance in
its class. Its combination of speed, range, payload,at a great price, make it the premier choice.

11
Annunciators
COCKPIT ORIENTATIONOVERVIEW The cockpit of the E1000 has not just a sleek
design, but also a clear layout – all controls areeasy to find, so you can focus on flying itself.
RightBreaker
Panel
Primary Flight Display(PFD), Pilot side
Multi-functionDisplay (MFD)
Primary Flight Display(PFD), Co-pilot side
Backup Horizonand Speed Tape
Angle of AttackIndicator (AoA)
Annunciators
FuelSelector
ThrottleQuadrant
MainSwitches
LightSwitches
LeftBreaker
Panel
Annunciators
FlapsSelector
LandingGear Lever
AudioPanel
RemoteControlKey Pad
Air Conditionand Oxygen
HeadphoneJacks
(adjust simvolume)

12
PEDESTAL
The pedestal between pilot and co-pilot seatsholds the throttle quadrant, the fuel selector, and
the remote control key pad for easy G1000 use.
THROTTLE QUADRANT
The throttle quadrant consists ofthree levers to control the aircraft'sengine. The levers have distinctcolors:
White: Throttle
Blue: Propeller
Red: Condition
To increase power, push thethrottle lever forward; pull it backto decrease power.
To increase RPM, push thepropeller lever forward; pull it backto decrease RPM.
For idle and flight conditions, pushthe condition lever forward.
To cut off fuel, pull the conditionlever all the way back.
For manual throttle override, clickon the small gray button within thered “MAN OVRD” lever. The leverwill fold out to a usable position.
For using beta (reverse) mode, e.g.to slow down after landing, pull thethrottle lever back to “BETA”.
FUEL SELECTOR
Below the throttle quadrant, thereis the fuel tank selector switch. Ithas three positions:
Red: Off
White: Left tank
White: Right tank
Use this switch to manually selectthe fuel tank. Usually, you shouldactivate automatic tank selectionwith the FUEL AUTO SEL switch onthe switch panel.
REMOTE CONTROL KEY PAD
The Garmin GCU 477 Remote RMSControl Key Pad allows for an easyuse of the Garmin G1000 MultiFunction Display (MFD).
Due to its central position on thepedestal and its clear layout, it ismuch easier to use the MFD than inG1000 installations without theGCU unit.
You can set moving map range here,open the most important MFDpages, enter waypoint IDs in yourflight plan, and much more.
One last remark:
Below the GCU 477 and above thethrottle quadrant, you may noticefour inconspicious buttons.
We recommend to avoid pressingany of these buttons.
Really.
For details on operating the PT6Aengine, please refer to thedocument “Know Your PT6ATurboprop”. This real-worldbrochure provides manyinteresting and important detailson how the engine works and isoperated. It is included as PDF filein the “Real Documents” folder.
13
SWITCHES
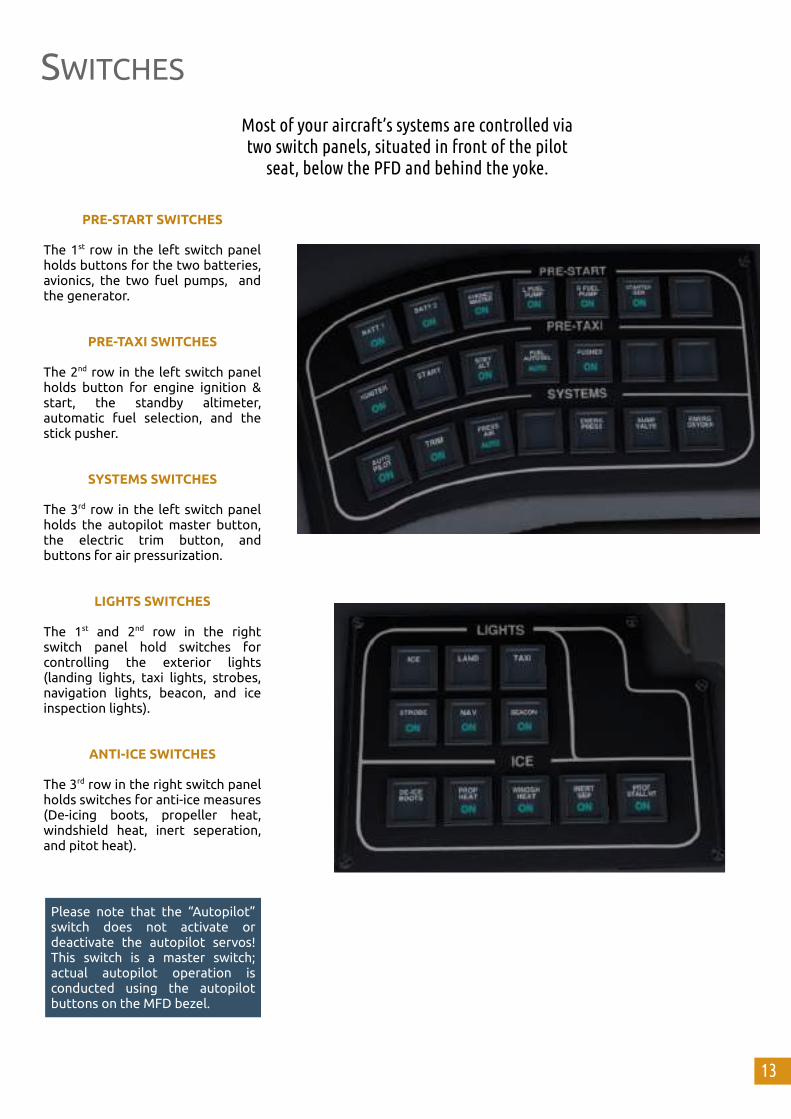
Most of your aircraft’s systems are controlled viatwo switch panels, situated in front of the pilot
seat, below the PFD and behind the yoke.
PRE-START SWITCHES
The 1st row in the left switch panelholds buttons for the two batteries,avionics, the two fuel pumps, andthe generator.
PRE-TAXI SWITCHES
The 2nd row in the left switch panelholds button for engine ignition &start, the standby altimeter,automatic fuel selection, and thestick pusher.
SYSTEMS SWITCHES
The 3rd row in the left switch panelholds the autopilot master button,the electric trim button, andbuttons for air pressurization.
LIGHTS SWITCHES
The 1st and 2nd row in the rightswitch panel hold switches forcontrolling the exterior lights(landing lights, taxi lights, strobes,navigation lights, beacon, and iceinspection lights).
ANTI-ICE SWITCHES
The 3rd row in the right switch panelholds switches for anti-ice measures(De-icing boots, propeller heat,windshield heat, inert seperation,and pitot heat).
Please note that the “Autopilot”switch does not activate ordeactivate the autopilot servos!This switch is a master switch;actual autopilot operation isconducted using the autopilotbuttons on the MFD bezel.

14
OTHER CONTROLS
FLAPS CONTROL
To extend or retract flaps, use theflaps knob, right of the simulationoptions panel and below the radios.
Flaps have 3 positions:
The status of the flaps is shownwith a white LED, showing “NONE”,“T/O” (takeoff), and “LANDING”, infront of the pilot, above the pilot'sPFD and below the gear LEDs.
LANDING GEAR CONTROL
To extend or retract the landinggear, use the gear lever, left ofremote control key pad.
The status of the gear is shown withthree green LEDs showing “LEFT”,“RIGHT”, and “NOSE”, in front of thepilot, above the pilot's PFD.
INTERIOR LIGHTING
To control panel and instrumentlighting, as well as lighting in thefront part of the cabin, use theknobs above the backup horizon, onthe pilot side of the panel.
Lighting in the center and rear partsof the cabin is controlled via theknobs on the cabin ceiling.
AIR CONDITION & OXYGEN
Controls for cabin heating andoxygen are on the co-pilot side.Oxygen works, but heating iscosmetic only (you can hear the aircondition fans, though).
Retracted Take-off Position Landing Position

15
CUSTOMIZED G1000GLASS, EASY TO USE The E1000 has a glass cockpit with a Garmin
G1000. The Aerobask E1000 comes with a customversion of the X-Plane G1000, for better usability.
The X-Plane flight simulatorincludes a good simulation of theGarmin G1000. However, in contrastto real-world installations of theG1000, X-Plane’s G1000 is generic.To better match the G1000 used inthe Epic E1000, we included somecustomizations.
CUSTOM ENGINE GAUGE
The default G1000 has not a correctengine gauge for the E1000. Wetherefore created our own, which isshown in place of the defaultgauge.
TOUCH SCREEN
For easier usage, you canmanipulate many important valuesdirectly by touching the screen (i.e.clicking the values or using themouse scroll wheel to adjust them).For example, for changing a radiofrequency, you can use the mousescroll wheel, which is much easierthan turning the knobs in the 3Dcockpit (of course, this is stillpossible).
FLIGHT PLAN KEYBOARD ENTRY
Entering a flight plan with the FMSknob is a bit tedious. Using theremote control unit in the 3Dcockpit is easier. But the easiestway is our keyboard support – useyour real keyboard to enterwaypoint IDs like airport ICAOcodes and the names of VOR/DMEs,NDBs and FIXes.
1. Click a value, for example ALTITUDE2. Use on-screen keypad to change value3. Click the green input field to confirm
Alternatively, you can also use your mouse’s scroll wheel for adjusting values.
1. Click to move cursor to desired position.2. Type the desired letter on your keyboard or use the mouse wheel.
Everything Is Optional
Although we recommend usingour custom features, you canswitch the customizations off inthe aircraft options (see nextmanual page for details).

16
OPTIONSPREPARE YOUR FLIGHT Use the options menu to easily set payload, order
ground power, remove static elements, andchange important simulation options.
To open the options menu, either:
• Click the big “e” (Epic company icon) on the upper panel center, or
• Move the mouse to the lower left of the screen, to make the Aerobask icon appear, then click it, or
• Open the handrest on the pilot’s left side, take the tablet and use the tablet (recommended for Virtual Reality).
“GROUND” TAB
In the Ground tab, you set weightand balance, add or remove staticelements (e.g. wheel chocks),request ground power and close oropen the door. Please refer to ourtutorial for details.
“OPTIONS” TAB
In the Options tab, you controlcertain simulation behaviors. Youcan set how reliable the circuitbreakers are in your plane and resetbroken breakers. You can switch onor off our custom G1000 features(see previous manual page),reflections on cockpit instrumentsand the windshield. Finally, you cancontrol if our 2D popup can bemoved only inside or also outsidethe screen.
“SOUND” TAB
The Sound tab enables you tocontrol the volume of variousaircraft and simulation sounds.
“ABOUT” TAB
The About tab is a list of all peoplewho were involved in creating andtesting the Aerobask E1000.

17
SHOWING & HIDING THE TABLET
To use the tablet, open thehandrest left of the pilot seat byclicking the handrest. This willreveal the tablet.
Click the tablet. It will be shownfloating near the co-pilot seat. Thetablet is by decision no 2D popup,but a 3D object, therefore it isusable easily in virtual reality, too. Ifyou are a VR user, you surely likethis convenience.
To dismiss the tablet, click thelower right of its bezel. It will bestored in the handrest again.
TABLET FEATURES
The tablet pages are organized in asimilar manner as our optionspopup. You can see all optionspages in the tablet and use it just asthe standard option popup (asdescribed on the previous page).
The other big feature is the AviTabsupport. AviTab is a free 3rd partyplugin similar to an electronic flightbag. Using AviTab, you can:
• view PDF files
• show airport information
• view a moving map
• link your Navigraph accountand see Navigraph charts
You can download AviTab here:
https://forums.x-plane.org/index.php?/files/file/44825-avitab-vr-compatible-tablet-with-pdf-viewer-moving-maps-and-more/
Please refer to AviTab’s owndocumentation on how to set upthe plugin correctly.
VIRTUAL TABLETPERFECT FOR VR For a more immersive experience, you can avoid
using the 2D option panels, but instead use ourAviTab-enabled virtual tablet.

18
TUTORIALHANDS ON PRACTICE

19
INTRODUCTIONTUTORIAL GOALS Although starting and flying the E1000 is quite
easy, we recommend you read this tutorial at leastonce, to learn about the specialities of the plane.
In this tutorial, you’ll perform acomplete flight from A to B withthe Aerobask simulation of the EpicE1000, G1000 edition. Before doingthis tutorial, make sure that you
• know how to set up a flight in X-Plane, and use mouse and keyboard in X-Plane
• have a basic idea about basic flight maneuvers like taxiing, takeoff and landing
• have the X-Plane G1000 documentation handy (it’s included in X-Plane’s “Instructions” folder)
FROM EDOP TO EDBM
Imagine you are an importantpolitician who puts the tax payer’smoney to good use by flying evenshort distances comfortably byplane ;-) You want to fly from onestate’s capital to another one.
We start at Schwerin, which is thebeautiful capital of the Germanfederal state Mecklenburg - WestPomerania, a nice rural country nearthe Baltic Sea. Our destination isMagdeburg, the capital of Saxony-Anhalt, a more industrialized statein the center of Germany.
Our departure airport is EDOP(Schwerin-Parchim), owned by aChinese company which planned tomake a freight hub out of it.However, not much happened since2007, and in December 2018 mostof the airport’s staff was let go. Theairport is still open, though, usedfor training by aviation companies.
From EDOP, we’ll fly to MagdeburgCity airport (EDBM), near thesouthern border of the city area.The airport is primarily used bypropeller and turbo prop planes, fortraining and leasure.
SCENERY RECOMMENDATIONS
Our destination Magdeburg CityAirport (EDBM) is alreadyincluded in X-Plane’s globalairports. It’s a rather plausiblescenery, there’s not much moreto the real airport either.
For Schwerin-Parchim Airport(EDOP), there exists a very goodfreeware scenery, created byRainer Kunst and converted to X-Plane by FlyAgi. This airport, aswell as several other Germanairports by the team, areavailable after registration viaRainer’s own website:
https://simmershome.de/edop-schwerin-xp
In addition, have a look at thegreat VFR objects by GüntherKremp, esp. his packages forSchwerin and Magdeburg:
https://forums.x-plane.org/index.php?/files/file/45327-schwerin-vfr
https://forums.x-plane.org/index.php?/files/file/37741-magdeburg-vfr/
These packages add a lot oflandmarks to the two cities.
Finally, if you have access toOrtho4XP, you may want tocreate some orthoimagery for theroute. An alternative to creatingyour own Ortho4XP tiles are thetiles available from ZonesPhoto,but these are a several years old:
http://zonephoto.x-plane.fr/Cartes.php
In any case, you need the tiles+53+011 (Schwerin) and +53+012(Magdeburg) for photo coverage.
Schwerin-Parchim(EDOP)
Magdeburg City(EDBM)
82 nm
Ch
arts
by
Nav
igra
ph
. No
t fo
r re
al n
avig
atio
n! O
nly
fo
r si
mu
lati
on
use
!

20
OUR FLIGHT PLANDEPARTURE
Our departure airport Schwerin-Parchim (EDOP) has a few StandardInstrument Depatures (SID) whichwe can use after takeoff. As ourdestination is south of EDOP, itmakes sense to use either BKD 5Hor BKD 4J departure, depending ontakeoff direction (06/24).
In this tutorial, I use BKD 5H,because I take off to the east, butboth BKD 5H and BKD 4J will takeus to the BKD (Brunkendorf) VOR,where we will enter airway Z998.
EN ROUTE
From BKD, we’ll fly two small legson the airways Z998 and Q201. Thesingle waypoints are:
(BKD)
Z998 PITENZ998 BIRMOZ998 RATMO
Q201 BRANEQ201 GALKU
The next waypoint after GALKU isalready the initial approach fix (IAF)of the EDBM approach, BUREL.When we reach BUREL, we shouldfly at 4,500 feet.
APPROACH
Magdeburg City airport (EDBM) hasjust a RNAV approach to runway 27.The IAF for the approach is BUREL,which is also part of the Q201airway.
When we reach BM452 at 2,000feet, the approach mode of theautopilot should be able to fly asmooth descent to the runway.

21
Uncheck!
X-PLANE SETUPLaunch X-Plane and start a newflight. As aircraft, select theAerobask Epic E1000, G1000edition, in your favorite livery.
For this tutorial, please do not loadthe aircraft with engines running,as the correct startup sequence ispart of the tutorial.
Set fair weather, i.e. not more thanscattered clouds. For my flights, Ichose a January afternoon, but ofcourse you can set a different timeof year and day.
Set EDOP (Schwerin-Parchim) asstarting position. Please do notstart at the runway, but somewhereat the apron, because we want topractice taxiing to the runway later.
When the plane is loaded and youswitch to outside view, you shouldsee the aircraft cold and dark, withsome static elements attached forprotection.
Select livery
Set fairweather(Cirrus or
Scattered)Set EDOP

22
AIRCRAFT PREPARATIONFor the following steps, pleaseopen the Aerobask options menu.You can do so either by clicking the“Epic” icon on the panel, or theAerobask icon on the lower left ofthe screen, or with the tablet.
Select the “Ground” tab in theoptions menu. Before we let ourpassengers board, close the doorand start the engine, we shouldremove the covers from the engineinlets and the pitot probe, as well asthe wheel chocks.
1. CHECK FUEL
Our trip is short and we won’t needmuch fuel. Still, please set a totalfuel amount of about 100 GAL.
2. CHECK PAYLOAD
As you remember, in our tutorialyou’ll be flying an importantregional politician from one statecapital to another. Your passengerprefers to fly alone, so please onlycheck either the “left pax” or“right pax” option.
Also check the “no bags” option,because our passenger travels withjust some hand luggage.
3. REMOVE STATIC ELEMENTS
Please un-check the “StaticElements” option now.
4. REQUEST GROUND POWER
We want to save battery power, sowe use a Ground Power Unit (GPU)for startup. Please check “GroundPower Unit” to request the GPU. Ina second, you’ll hear the GPU soundand your cockpit comes to life.
5. CLOSE DOOR
Close the door by clicking “CloseDoor”. This takes a few seconds.
Hint: Aircraft Preparation Flow
I find it helpful to always followthe same flow when preparingthe plane. I start at the top, go tothe bottom and then to the right.This way I make sure that I don’tforget a step.
Flow

23
FLIGHT PLAN SETUPYour aircraft should be powered bythe GPU right now; the PFD screenin front of your pilot seat should bealive. If the options menu is stillvisible, please close it for now.
Before we start the engine, wewant to enter our flight plan. Weneed to switch on the avionics forthis, so please press the Avionicsbutton now. Don’t worry aboutpower, as we are using the GPUright now.
In this tutorial, we will make use ofthe customizations we have done tothe G1000 for easier usage in the X-Plane simulator, esp. mouse andkeyboard usage.
1. PREPARATIONS
1. In the 3D cockpit, click the upper part of the Multi Function Display (MFD) to get a popup view of the screen. With the popup, it iseasier to use this screen.
2. On the MFD, press the FPL softkey. The flight plan shows up.
3. The flight plan should be empty at the moment, except your starting location at the beginning. If it is not empty, or your starting airport is not correct, press the MENU button on the MFD, then use the mouse wheel with the lower-right outer FMS knob to select “DELETE FLIGHT PLAN”. Press the ENT button to confirm.
We are now set to start enteringour flight plan.
On the next page, you will learnhow to select a StandardInstrument Departure (SID).

24
preview
ENT
2. SELECT YOUR SID
We want to use the BKD 5Hstandard instrument departure(SID) from EDOP to the BKD VOR.
To select the SID, please performthe following steps on your MFD:
1. Press the FMS knob once to show the cursor.
2. Press the PROC button. A menu with possible procedure actions appears on top of the flight plan.
3. Use the mouse wheel with the lower-right outer FMS knob to highlight “SELECT DEPARTURE”.
4. Press the ENT button to confirm your selection. Another window appears, with all possible departure procedures for the departure airport (EDOP, in our case).
5. With the FMS knob, select the procedure you want to use, which is BKD 5H in our example.
6. Press the ENT button to confirm. A preview of the departure is shown on the map and the departure’s waypoints are listed. Also, the question “LOAD?” is highlighted on the bottom of the window.
7. Press ENT again to confirm loading the procedure into your flight plan. The procedure waypoints are now appended to the plan after your starting airport.
After step 7, your flight plan shouldconsist of five waypoints: EDOP,RW06, PI, D032D and BKD, wherethe last four have all been insertedautomatically as part of theselected departure.
The flight plan cursor should be onthe last line of the flight plan,awaiting your next input.
On the next page, you will learnhow to enter en-route waypointsand afterwards how to selectairways.
PROC
outerFMSknob
innerFMSknob
Select type ofprocedure
Selectdeparture
Confirmwith ENT

25
3. ENTER YOUR WAYPOINTS
At this point, your flight planconsists of your departure airportand the instrument departure BKD5H.
The flight plan cursor should bebelow the last departure waypoint,BKD, awaiting your next input. (Ifthe cursor is not at the end of theplan, use the mouse wheel to turnthe lower-right outer FMS knobuntil it is.)
We will now build the en-route planup. Please perform the followingsteps to enter the first waypoint:
1. Turn the mouse wheel with the lower-right inner FMS knob once to bring up the waypoint window. This window is used for enteringthe identifiers (IDs) of waypoints manually.
2. In the waypoint window, enter the first en-route waypoint of our flight plan, which is PITEN. This is the IDof your waypoint. You have several possibilities to enterwaypoint IDs:
◦ type PITEN with your keyboard, or
◦ type PITEN with the keypad on the pedestalin the 3D cockpit, or
◦ use the inner FMS knob to select a letter and the outer FMS knob to move the cursor to the next position, or
◦ use your mouse wheel to select a letter and the left & right mouse buttons to move the cursor forward and backward.
3. Press the ENT button to confirm your input.
The newly entered waypoint(PITEN) is added to your flight plan.The cursor should be below PITEN,awaiting your next input (if not,move the cursor there).
On the next page, we will use PITENas starting point for selecting ourfirst airway.
Inputwaypoint ID

26
4. LOAD YOUR AIRWAYS
At this point, your flight planconsists of your departure airport,the instrument departure BKD 5H,and the waypoint PITEN. The flightplan cursor is below the lastwaypoint, awaiting your next input.
Although we could continue withentering waypoints one by one, justlike we did with PITEN, this is atedious task and prone to errors.Therefore, airways can be selectedas a whole in the G1000.
Beginning with PITEN, we will nowload an airway to further enhanceour flight plan. Please perform thefollowing steps:
1. Press the MENU button.
2. Use the mouse wheel with the lower-right outer FMS knob to highlight “LOAD AIRWAY”.
3. Press the ENT button to confirm. A new menu will appear, showing airways related to the waypoint above your cursor (i.e. PITEN, in our case).
4. According to our plan, we want to enter the Z998 airway. So with the FMS knob, select Z998. If there are two occurances of Z998,use the first one.
5. Press ENT to confirm. A new menu will appear, in which you have to select the waypoint where we want to exit the airway.
6. In our case, we use RATMO, because from there we’ll head to another airway. So with the FMS knob, select RATMO.
7. Press ENT to confirm. The waypoints of the selected airway Z998 have now been appended to your flight plan, up to the selected exitwaypoint RATMO.
Please enter the single waypointBRANE now, as we did with PITEN.
After that, load the airway Q201,leading from BRANE to the exitwaypoint BUREL, in the same wayas we just did with Z998 andRATMO.
MENU
Selectmenuoption
ENT
Selectairway
preview Selectexit
waypoint

27
5. SELECT YOUR APPROACH
At this point, your flight planconsists of your departure airport,the instrument departure BKD 5H,the waypoint PITEN, the airwayZ998, the waypoint BRANE and theairway Q201, up to the waypointBUREL. The flight plan cursor isbelow the last waypoint.
We are nearly done with our flightplan. We now only have to add ourdestination airport to the plan andselect an approach procedure.Please perform the following steps:
1. Enter the single waypoint EDBM (Magdeburg City airport) at the end of your flight plan. This is done in the same way as shown on page 24.
2. Press the PROC button.
3. With the FMS knob, highlight “SELECT APPROACH”.
4. Press the ENT button to confirm. A new menu appears, showing the available approaches for your destination airport.
5. In our case, at EDBM, there exists only one approach (RNV27 GPS LPV), so you don’t need to use the FMS knob here to select one.
6. Press ENT to confirm. The message “LOAD? Or ACTIVATE?” will be shown on the bottom of the window. With the FMS knob, hightlight “LOAD?”, as we only want to load the approach into our flight plan, but not yet start flyingthe approach.
7. Press ENT to confirm. A new menu appears, in whichyou have to select the transition from en-route flight to the approach.
8. As our flight plan currently ends at BUREL, we choose BUREL, of course. (Use the FMS knob and confirm with ENT. By now you should know how it works.)
This completes our flight plan (seepicture to the right). We will nowset radio frequencies.
Select typeof procedure
Selectapproach
Selecttransition

28
RADIO SETUPBefore we start our engines, weshould dial the correct frequenciesof the departure airport in ourradios.
Both COM and NAV radios arecontrolled in the G1000; there areno separate radio controls in theEpic E1000.
Schwerin-Parchim airport (EDOP)has a tower frequency and anapproach frequency; we only needthe tower frequency which is128.900. There are several wayshow to enter the frequency in theradios. You can do one of thefollowing:
• Move your mouse cursor over the COM areas on the PFD or MFD, then turn the mouse wheel. The mouse cursor will tell you which digit you are currently changing (kHz or MHz). With this method, you can change directly active and standby frequencies of bothCOM1 and COM2.
• Turn the inner and outer COM knob on the MFD bezel. The inner knob kHz, the outer knob MHz. With this method, you can only change standby frequencies, and you need to push the knob to switch between COM1 and COM2.
• Using the FMS knob, open the “nearest airports” page on your MFD, as shown on the right. Then press the “FREQ” softkey. With the FMS knob, highlight the desired frequency and press ENT to change the currently selected standby frequency to the selected one.
Using one of the methodsmentioned above, please set theactive frequency of COM1 to128.900.
Now set the standby frequency ofCOM1 to 119.300, which is the INFOfrequency of our destinationMagdeburg City (EDBM,uncontrolled airport).
Active COM1 Standby COM1 Turn to change standbyActive COM2 Standby COM2 Push to toggle COM1/2

29
ENGINE STARTUPYour aircraft should still bepowered by the GPU. You haveentered the flight plan and areready to start the engine.
For getting you and your importantpassenger in the air quickly, we usea simplified startup procedure inthis tutorial. It won’t do any harm,but please refer to the separatechecklist document for the fullstartup sequence with all necessarysecurity checks.
To locate buttons and leversmentioned in the following steps,please also refer to pages 11 to 15 inthis manual.
SIMPLIFIED ENGINE START
4. Set the Fuel Selector to theLeft tank.
5. Set the Power Lever (black)to idle (fully back, but be sure it is not in beta range).
6. Set the Propeller Lever (blue) to feathered (fully back).
7. Set the Condition Lever (red) to Fuel Cut Off (fully back).
8. Switch on both Batteries.
9. Switch on the Beacon Light.
10. Switch on the Strobes.
11. Switch on the Left Fuel Pump.
12. Press the Starter Button.
13. Once the engine display shows 9% Ng, press the Igniter Button.
14. Once Ng is >15%, move the Condition Lever (red) to Ground Idle.
15. Once Ng is constantly at 54%, switch off the Igniter Button.
16. Verify that the Start Gen Button has been switched on automatically.
17. Open the Options Menu and un-check the “Ground Power Unit” option to remove the GPU.
NG is 9% –press Igniterbutton now
NG is > 15% –move Conditionlever to Ground
Idle now
NG stays at 54% –switch off Igniter
button now
Condition Leveris fully back until
NG is > 15%

30
TAXI AND RUN-UPDespite the cool beverages weserved our passenger afterboarding, he’s getting impatient –so we should really depart now.
TAXI
Perform the following steps:
1. Make sure your parking brake is set before the following steps.
2. Push the Propeller lever (blue) fully forward.
3. Push the Condition lever (red) to flight idle.
4. Move the Throttle lever (black) back to Beta range. (In X-Plane’s settings, you can define a key for “thrust reverse” to easily switch Beta on/off).
5. Release the parking brake.
6. Control speed with the throttle lever – move it forward to slow down.
7. When you’ve come to a stop, set parking brake and move throttle out of beta.
BEFORE TAKE-OFF
At the holding point, perform the“Before Take-off” checklist. If youdon’t have time, at least confirm:
1. Autopilot master switch ON
2. Trim switch ON & trim SET
3. Flaps in TAKE OFF position
4. Stick Pusher ON
5. Press Air switch ON
6. Baro Pressure SET (hint: check X-Plane’s map for the current pressure at EDOP)

31
TAKEOFF AND DEPARTUREFINAL CHECK
Please align with the runway centerline and stop.
Set the Heading bug on your PFD’scompass to runway direction bypushing the HDG knob on MFD orkeypad. Pre-select an altitude of4,000 feet by turning the ALT knob(see page 15 in this manual forother possibilities).
TAKE-OFF
Now perform the following steps:
1. Hold brakes while you push the throttle lever forward.
2. Hold brakes until Ng is > 80%. Continue to push the throttle until 80% torque.
3. Hold runway direction withthe rudder.
4. Rotate at 80 KIAS by gently pulling the yoke.
5. At confirmed positive climb,retract the landing gear.
6. Retract flaps at 120 KIAS.
7. Continue to climb in runwaydirection. Do not go faster than 250 KIAS below FL100.
CLIMB AND DEPARTURE
Now we’ll use the autopilot andswitch on the yaw damper:
1. Press the HDG button to hold current heading.
2. Press the ALT button to hold current altitude.
3. Press the AP button to switch on autopilot servos.
4. Press the NOSE UP button until 2,000 feet climb rate.
5. Press the VS button to activate vertical speed mode.
6. Press the NAV button to let the autopilot follow the flight plan.
7. Press the YD button to switch on the Yaw damper.
2D vs. 3D: Note the Difference
Due to X-Plane limitations, onlythe 3D cockpit’s MFD does havethe Yaw Damper (YD) button.Please also note the slightlydifferent button order on the 2Dpopup. Be careful to notaccidentally press the wrongbutton.
YD
AP
ALT
HDG
NAV
3D Cockpit 2D Popup

32
CLIMB AND CRUISEAfter reaching BKD, the autopilotwill turn southeast for our first en-route waypoint, PITEN.
We assume that ATC allows all ofour altitude requests and pre-select FL150 (15,000 feet) asaltitude.
We choose FL150, because our flightis very short and we won’t be toohigh when descending later. Also,one uses uneven flight levels whengoing east and even flight levelswhen going west.
Activate Vertical Speed mode againwith the VS button; set a speed of3,000 feet / minute.
Continue to climb.
At FL50 (5,000 feet), which istransition altitude, set standardbaro pressure. You can either dialthe value with the BARO knob onthe PFD, use the scroll wheel ofyour mouse while hovering the barovalue with the mouse cursor, or bypressing the “PFD” softkey, thenthe “STD BARO” softkey.
At FL100 (10,000 feet), switch offthe landing light.
Continue to climb.
On FL150, continue to follow theflight plan. When reaching BRANE,our direction changes to southwest,so we should fly at an even altitude,such as FL140. We won’t stay therefor long, though, because we willneed to descent very soon anyway.
Below 5,000 feet, set local baropressure.
Switch COM1 to the standbyfrequency (which is MagdeburgINFO).
Continue descent to 4,000 feetuntil reaching BUREL. This waypointis the first waypoint of ourapproach to EDBM, the initialapproach fix (IAF).
33
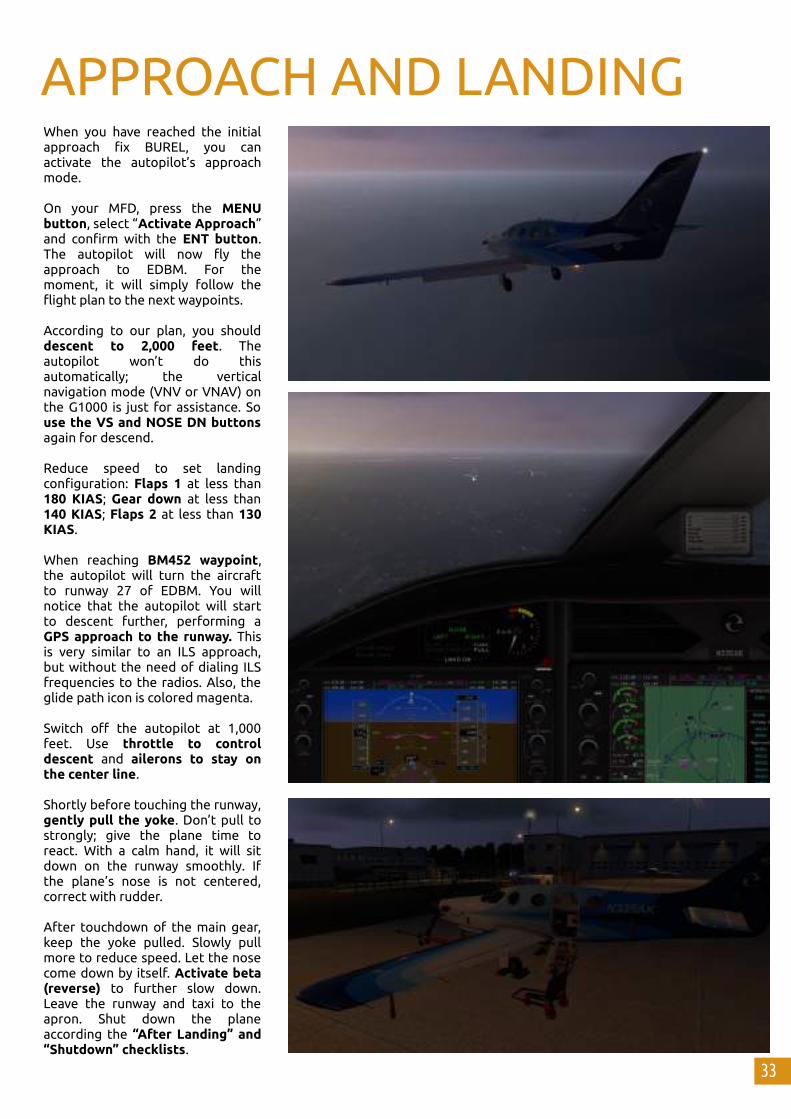
APPROACH AND LANDINGWhen you have reached the initialapproach fix BUREL, you canactivate the autopilot’s approachmode.
On your MFD, press the MENUbutton, select “Activate Approach”and confirm with the ENT button.The autopilot will now fly theapproach to EDBM. For themoment, it will simply follow theflight plan to the next waypoints.
According to our plan, you shoulddescent to 2,000 feet. Theautopilot won’t do thisautomatically; the verticalnavigation mode (VNV or VNAV) onthe G1000 is just for assistance. Souse the VS and NOSE DN buttonsagain for descend.
Reduce speed to set landingconfiguration: Flaps 1 at less than180 KIAS; Gear down at less than140 KIAS; Flaps 2 at less than 130KIAS.
When reaching BM452 waypoint,the autopilot will turn the aircraftto runway 27 of EDBM. You willnotice that the autopilot will startto descent further, performing aGPS approach to the runway. Thisis very similar to an ILS approach,but without the need of dialing ILSfrequencies to the radios. Also, theglide path icon is colored magenta.
Switch off the autopilot at 1,000feet. Use throttle to controldescent and ailerons to stay onthe center line.
Shortly before touching the runway,gently pull the yoke. Don’t pull tostrongly; give the plane time toreact. With a calm hand, it will sitdown on the runway smoothly. Ifthe plane’s nose is not centered,correct with rudder.
After touchdown of the main gear,keep the yoke pulled. Slowly pullmore to reduce speed. Let the nosecome down by itself. Activate beta(reverse) to further slow down.Leave the runway and taxi to theapron. Shut down the planeaccording the “After Landing” and“Shutdown” checklists.

34
CREDITS
3D and texturing: Stéphane Buon
Systems and programming: Lionel Zamouth
Flight model: X-Aerodynamics
FMOD sounds: Daniela Rodríguez Careri
Liveries: Jean-François Edange
Rain effects: Saso Kiselkov
Flight testing: Gianfranco Somma (Epic Aircraft Brasil)
Special thanks to our team of beta testers:
Jean-Pierre, Peter, Stephan, Sven, Hubert, Oskar
User manual written and designed by Mario Donick.
Copyright © 2018-2019 Aerobask.
Related Documents