Fundamentals of Horticulture A Laboratory Manual DKSGACA Manual No. 5/2021 Prepared by Dr. Divya Slathia Dr. Amit Saurabh, Dr. Yogendra Singh & Dr. Shalini Singh Dr. Khem Singh Gill Akal College of Agriculture, Eternal University, Baru Sahib, Sirmour 173101, Himachal Pradesh, India 2021 Horticulture Flowers Training and Pruning Propagation methods Nursery bed preparation Pot mixture Fruits Vegetables

Welcome message from author
This document is posted to help you gain knowledge. Please leave a comment to let me know what you think about it! Share it to your friends and learn new things together.
Transcript

Fundamentals of Horticulture
A Laboratory Manual
DKSGACA Manual No. 5/2021
Prepared by
Dr. Divya Slathia
Dr. Amit Saurabh, Dr. Yogendra Singh & Dr. Shalini Singh
Dr. Khem Singh Gill Akal College of Agriculture,
Eternal University, Baru Sahib,
Sirmour 173101, Himachal Pradesh, India
2021
Horticulture
Flowers Training and
Pruning
Propagation
methods
Nursery bed
preparation
Pot mixture
Fruits
Vegetables
DKSGACA Manual No. 5/2021
Fundamentals of Horticulture
A Laboratory Manual
Prepared By
Dr. Divya Slathia
Dr. Amit Saurabh, Dr. Yogendra Singh & Dr. Shalini Singh
Approved vide item no. 74/19/2021 in the Academic Council Meeting held on 15/06/2021
Dr. Khem Singh Gill Akal College of Agriculture
Eternal University, Baru Sahib
Sirmour 173101, Himachal Pradesh, India
2021

PREFACE
Students would benefit greatly from this practical manual because it contains all of the
necessary information in depth, allowing them to devote more time to practical activities.
Horticultural practical‘s are often of great interest because they enable students to apply
scientific principles and aesthetics of art to a few horticultural operations such as potting a plant.
The students' practical skills would be beneficial to them in their professional careers. The field
activities are detailed in the "Practical Manual on Fundamentals of Horticulture" (HORT-101).
The exercises in this manual are written in accordance with the revised prescribed syllabus.
It is hoped that ―Practical Manual on Fundamental of Horticulture‖ will be very useful to
the under-graduate students as a teaching aid. The information included in this manual is
considered to be of utmost value to the students.
For his guidance, motivation, and moral help in the preparation of this manual, I am
grateful to Professor Dr. S.K. Sharma, Dean, Dr. Khem Singh Gill Akal College of Agriculture,
Eternal University, Baru Sahib, Sirmaur (H.P.).
17-02-2021 Dr. Divya Slathia
Dr. Amit Sourabh,
Dr. Yogendra Singh
Dr. Shalini Singh
CONTENTS
Chapter Particulars Page no.
1. Identification of Garden Tools 1-5
2. Preparation of Seed Bed or Nursery Bed 6-10
3. Preparation of Pot Mixture, Potting and Repotting 11-16
4. Practice of Sexual and Asexual Methods of Propagation 17-23
Including Micropropagation
5. Training and pruning of fruits trees 24-30
6. Layout and planting of orchard 31-35
7. Fertilizer application in different crops 36-42
8. Identification of horticultural crops 43-49
1
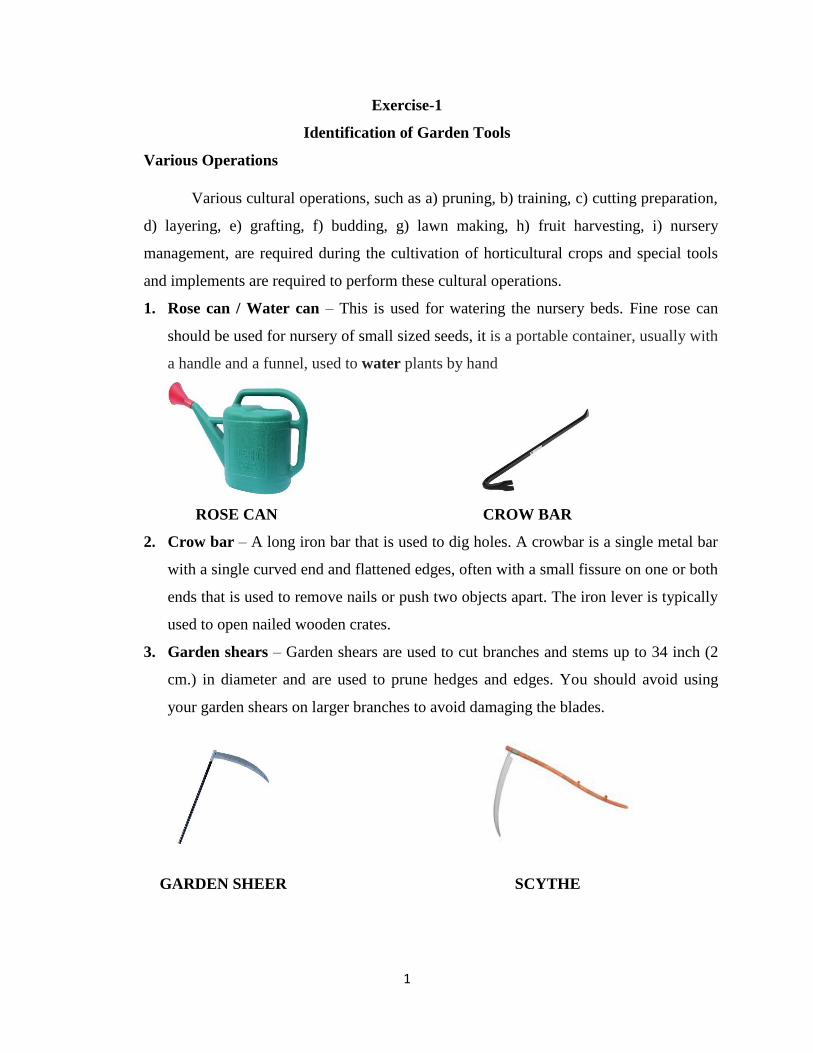
Exercise-1
Identification of Garden Tools
Various Operations
Various cultural operations, such as a) pruning, b) training, c) cutting preparation,
d) layering, e) grafting, f) budding, g) lawn making, h) fruit harvesting, i) nursery
management, are required during the cultivation of horticultural crops and special tools
and implements are required to perform these cultural operations.
1. Rose can / Water can – This is used for watering the nursery beds. Fine rose can
should be used for nursery of small sized seeds, it is a portable container, usually with
a handle and a funnel, used to water plants by hand
ROSE CAN CROW BAR
2. Crow bar – A long iron bar that is used to dig holes. A crowbar is a single metal bar
with a single curved end and flattened edges, often with a small fissure on one or both
ends that is used to remove nails or push two objects apart. The iron lever is typically
used to open nailed wooden crates.
3. Garden shears – Garden shears are used to cut branches and stems up to 34 inch (2
cm.) in diameter and are used to prune hedges and edges. You should avoid using
your garden shears on larger branches to avoid damaging the blades.
GARDEN SHEER SCYTHE

2
4. Scythe – It's a long flat metal with a wooden handle that's 5 cm wide and 45–50 cm long. The
metal is slightly bent at the end and has sharp edges. This is mostly used for manually cutting
grasses.
5. Digging fork – This has 20 cm long prongs attached to a wooden handle. This is used to
uproot trees, root cuttings, harvest tubers, and other related activities without causing damage to
the root system or tubers.
DIGGING FORK SHOVEL
6. Shovel – This is a curved steel plate with a wooden handle that is used to move dirt, manure,
and other materials. A shovel is a method for digging and transferring loose, granular materials
(such as dirt, gravel, grain, or snow) from one place to another.
7. Secateur – This is used to monitor the growth of small shoots in fruit trees, shrubs, and vines.
It is primarily employed in the preparation of cuttings for propagation.
SECATEUR BUDDING AND GRAFTING KNIFE
8. Budding and Grafting knife – This is for budding and grafting purposes. It has two soft
blades, one of which has an ivory edge and is used to raise the bark during the budding process.
3
A straight edge is present on the grafting knife. For opening the bark and inserting the bud, the
budding knife has a curved edge and a blunt end. Patch-budding is performed with a double-
bladed budding knife.
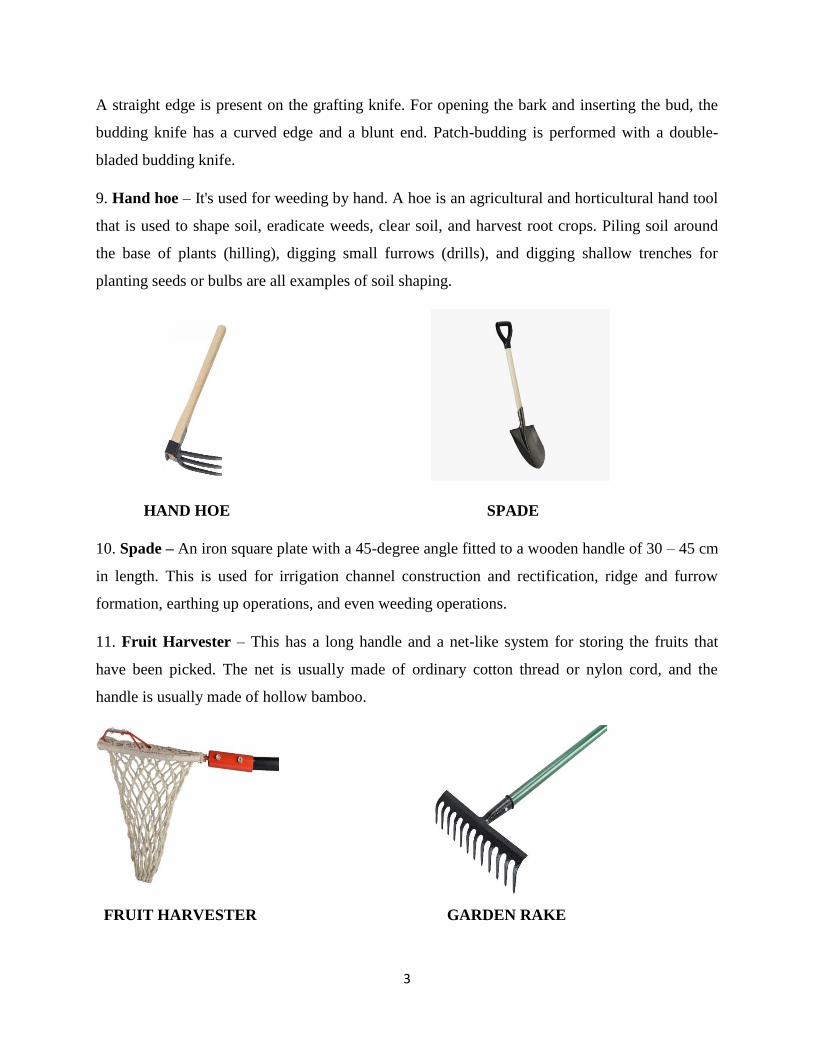
9. Hand hoe – It's used for weeding by hand. A hoe is an agricultural and horticultural hand tool
that is used to shape soil, eradicate weeds, clear soil, and harvest root crops. Piling soil around
the base of plants (hilling), digging small furrows (drills), and digging shallow trenches for
planting seeds or bulbs are all examples of soil shaping.
HAND HOE SPADE
10. Spade – An iron square plate with a 45-degree angle fitted to a wooden handle of 30 – 45 cm
in length. This is used for irrigation channel construction and rectification, ridge and furrow
formation, earthing up operations, and even weeding operations.
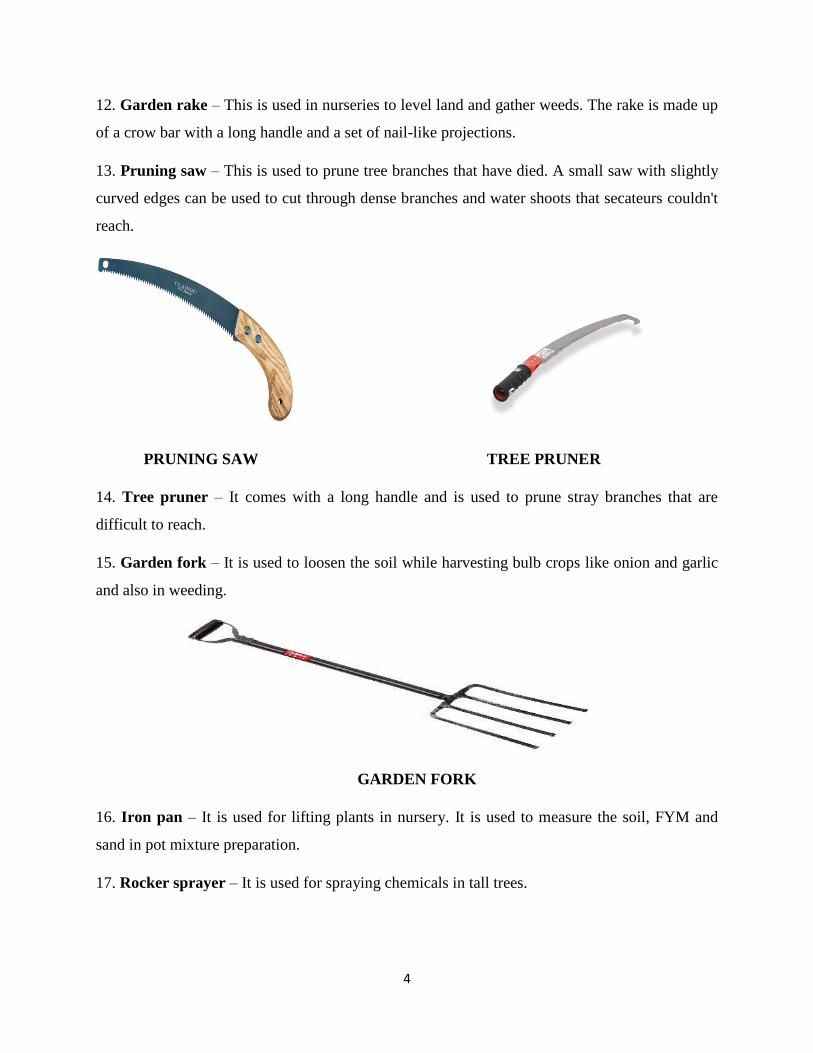
11. Fruit Harvester – This has a long handle and a net-like system for storing the fruits that
have been picked. The net is usually made of ordinary cotton thread or nylon cord, and the
handle is usually made of hollow bamboo.
FRUIT HARVESTER GARDEN RAKE
4
12. Garden rake – This is used in nurseries to level land and gather weeds. The rake is made up
of a crow bar with a long handle and a set of nail-like projections.
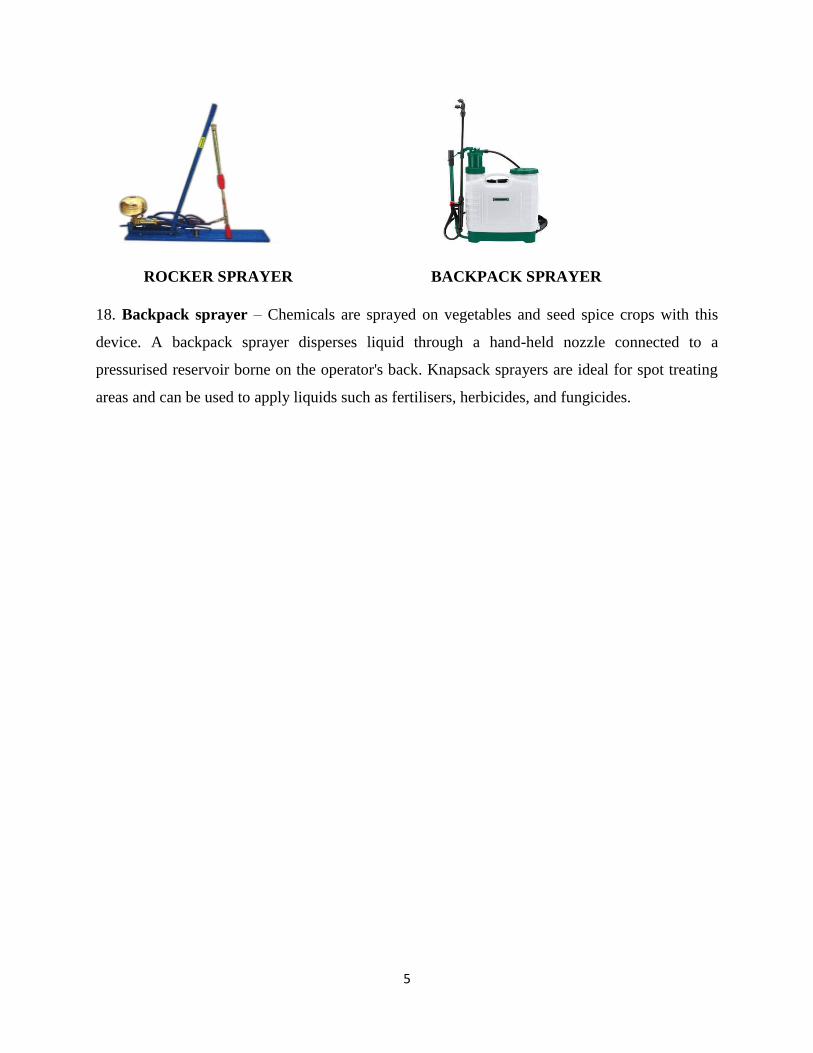
13. Pruning saw – This is used to prune tree branches that have died. A small saw with slightly
curved edges can be used to cut through dense branches and water shoots that secateurs couldn't
reach.
PRUNING SAW TREE PRUNER
14. Tree pruner – It comes with a long handle and is used to prune stray branches that are
difficult to reach.
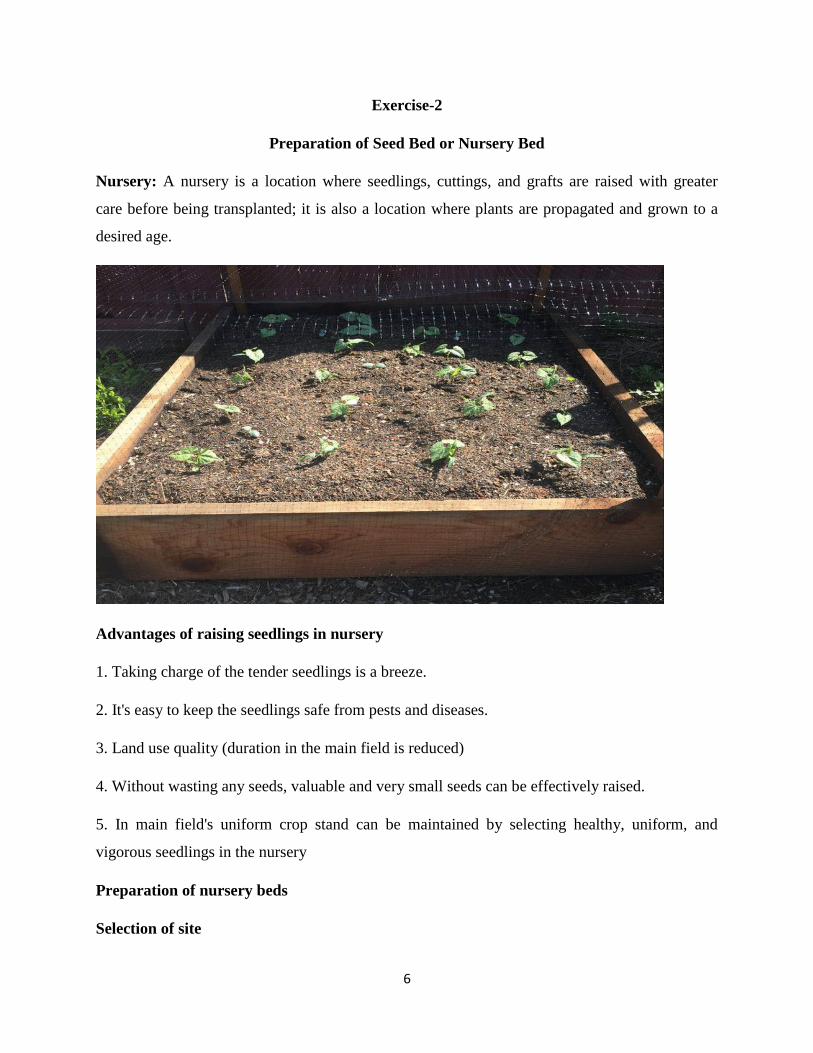
15. Garden fork – It is used to loosen the soil while harvesting bulb crops like onion and garlic
and also in weeding.
GARDEN FORK
16. Iron pan – It is used for lifting plants in nursery. It is used to measure the soil, FYM and
sand in pot mixture preparation.
17. Rocker sprayer – It is used for spraying chemicals in tall trees.
5
ROCKER SPRAYER BACKPACK SPRAYER
18. Backpack sprayer – Chemicals are sprayed on vegetables and seed spice crops with this
device. A backpack sprayer disperses liquid through a hand-held nozzle connected to a
pressurised reservoir borne on the operator's back. Knapsack sprayers are ideal for spot treating
areas and can be used to apply liquids such as fertilisers, herbicides, and fungicides.
6
Exercise-2
Preparation of Seed Bed or Nursery Bed
Nursery: A nursery is a location where seedlings, cuttings, and grafts are raised with greater
care before being transplanted; it is also a location where plants are propagated and grown to a
desired age.
Advantages of raising seedlings in nursery
1. Taking charge of the tender seedlings is a breeze.
2. It's easy to keep the seedlings safe from pests and diseases.
3. Land use quality (duration in the main field is reduced)
4. Without wasting any seeds, valuable and very small seeds can be effectively raised.
5. In main field's uniform crop stand can be maintained by selecting healthy, uniform, and
vigorous seedlings in the nursery
Preparation of nursery beds
Selection of site

7
1. The nursery should be located closer to the water supply.
2. The position should, in general, be partly shaded (i.e., under the trees). If natural shade is not
accessible, artificial shade must be given.
3. It should be well protected from animals.
4. Proper drainage facilities should be provided.
Selection of soil
It's best to use a medium-textured loam (or) sandy loam soil. Organic matter should be abundant
in the soil. The depth of the soil should be between 15 and 25 cm. Types of nursery beds include
the following: (a) Nursery with a flatbed; (b) Nursery with a raised bed (c) Growing a nursery in
a jar, such as polybags or pans.
Preparation of raised bed nursery
Work the soil thoroughly to break up the clods. Weeds, stones and stubbles must all be extracted.
The height of the raised bed should be 10-15 cm, the width should be 1 m, and the length should
be decided by need and convenience. Mix two parts fine red soil, one part sand, and one part
FYM into each bed to enhance aeration and fertility. Until preparing the bed, soak the soil in 4
percent formaldehyde or 0.3 percent copper oxychloride to destroy pathogenic spores.
Advantages of raised bed nursery
- The water flow would be constant and any excess water can be drained.
- In most cases, a high percentage of seeds germinate.
- Weed control and plant safety are simple to implement.
Seed treatment
To control seed borne pathogens, seeds should be handled with Captan or Thiram (2 g) or
Carbendazim @ 1 g/kg of seeds for 24 hours before sowing. Bio-inoculants such as Azospirillum
or Phosphobacteria can be combined with rice Kanji at a ratio of 250 ml/200 g Azospirillum or
Phosphobacteria. Before sowing, seeds are treated with bio-inoculants and dried in the shade.
8
Normally, two packets (400 g) are needed to treat one hectare's worth of seeds. These inoculants
help to boost the seedling's vigour.
Sowing of seeds
A fork or a wooden plank can be used to level the bed's surface. Clear lines with a 10 cm spacing
and a depth of 1-2 cm are drawn around the bed. Seeds are planted in rows and then coated with
sand, fine soil, or powdered FYM. Line sowing seeds makes weeding, drenching, and removing
diseased seedlings much easier. The rate of emergence is determined by the depth of sowing. If
the depth is too shallow, the seeds will sprout and dry out easily. Seedling emergence is greatly
slowed if it is too deep. Sow the seeds 3-4 times the diameter of the seed at a depth of 3-4 times
the diameter of the seed.
Season of sowing
Brinjal - December - January and May - June
Tomato - May-June, November - December and February - March
Chillies - June - July and September - October
Bellary onion - May - June and January - February
Cabbage & Cauliflower - January - February, July - August and September - October (hills)
August - November (plains)
To prevent seeds being washed away, the bed is covered with paddy straw and watered with a
rose can after the seeds have been sown. The seeds should be watered twice a day before they
germinate. Mulches should be removed after germination and watered once a day. The seedlings
should be exposed to full sunlight a week before transplanting and the amount of watering
should be decreased so that the seedlings do not rot.
Types of nursery
1. Temporary nursery: it is made up of elevated nursery beds. It can be transferred from one
location to another as needed.

9
2. Permanent nursery: Side walls with drainage holes are constructed with concrete to a height
of 75 cm. Seeds are sown in soil inside the concrete structure. After removal of each batch of
seedlings the soil is enriched with manures.
Seed rate per hectare
Tomato - 400 - 500 g
Chillies - 1 kg
Brinjal - 375 - 500 g
Cabbage - 375 - 500 g
Cauliflower - 375 - 500 g
Bellary onion - 8 - 12 kg
Pest and disease management
Pests
There are two types of pests which normally attack the nursery plants
1. Sucking pests - Aphids, whiteflies, thrips etc.
2. Biting (or) chewing pests - Beetles, grasshoppers, leaf eating caterpillars etc.
Aside from causing damage to seedlings, sucking pests often serve as vectors for viral disease
transmission, even in the nursery stage. Chilli mosaic diseases are transmitted by aphids.
1. Thrips act as vector for leaf curl virus diseases in chillies and spotted wilt disease in tomato.
Control
i. Using a hand-operated sprayer, apply systemic insecticides such as methyl demeton or
dimethoate @ 1 ml per litre of water.
ii. Sucking pests in the nursery and early stages of the main field can be managed by applying
carbofuran 10 days before pulling seedlings.
10
Diseases
Damping off (Pythium sp., Phytophthora sp., Rhizoctonia sp.) This disease is particularly
harmful to tomato, chilli, brinjal, cabbage, and cauliflower seedlings. Infection is caused by
water logging and inadequate drainage. The disease has two effects on seedlings.
1. Seeds that have been affected decay within the soil, resulting in germination failure.
2. The fungi attack the seedlings in the collar region after germination.
The tissues will soften and become more succulent. The seedlings become trapped and decayed
as the disease progresses.
Control
1. Raising seedlings in raised beds with good drainage facility reduces in infection.
2. The addition of organic matter increases the texture and aeration of the soil.
3. Seeds should not be sown in dense layers in beds.
4. Periodical changing of nursery sites.
5. Before sowing, treat the seeds with Captan, Thiram, or Carbedazim @ 1 g/kg of seeds.
6. Drenching the nursery bed with Bordeaux mixture 1% or copper oxychloride 0.3 percent once
or twice will also help to prevent infection.
Nematode
Carbofuran (or) phorate 100 g/cent should be incorporated in the soil and watered periodically
before sowing the seeds to prevent root knot and lesion nematodes from affecting nursery
seedlings.
Ants: To protect the seeds from ants, apply Lindane 10 percent dust at a rate of 100 g/bed on all
sides of the bed.

11
Exercise-3
Preparation of Pot Mixture, Potting and Repotting
Pot mixture is the medium that provides nutrients to plants that are grown in pots. The
composition of the pot mixture varies from plant to plant.
Quality of pot mixture
1) Physical and chemical properties should be acceptable.
2) It must be able to accommodate enough water and air.
3) It must allow for adequate drainage.
4) It should provide all of the nutrients necessary for plant development.
5) It must be free of weed seeds, soil-borne pathogens, nematodes, and harmful chemicals, as
well as being lightweight.
Ingredients for pot mixture preparation
It differs from one crop to the next. The following are some of the most common ingredients
used in pot mixtures.
- Red earth
- Sand
- FYM
- Leaf mould
- Charcoal
- Brick stone and dried wooden pieces
Crop Pot mixture composition
Ornamental plants
- 3 parts of soil
12
2 parts of organic manure
1 part of sand Indoor house plants
(Begonia, Geraniums etc.) - 2 parts of soil 1 part of organic matter 1 part of sand Indoor foliage
plants (Dracaena, Dieffenbachia, Philodendron) - 1 part soil
1 part organic matter
1 part sand
Orchids - Half broken bricks compost containing equal parts of fine coconut fibre and fresh
sphagnum moss
Anthurium - Leaf mould and cocopeat
Roses Garden loam 4 parts
Cow manure 1 part
Leaf mould 1 part
Wood ash 1 part
Ammonium sulphate 1 handful
A. Potting: The process of transferring seedlings or rooted cuttings from bed to pot is called
potting. The process of separation of plants from pot to the field is called depotting.
The purpose for which plants are potted are:
i) Preparing plants for sale such as rooted cuttings of grapes
ii) Growing plants for decoration like crotons
iii) Growing plants for experimental studies like pot-culture studies
Steps followed in potting of plants.
1. Wet the seed bed before lifting plants. Lift with a ball of earth with as much of the root system
intact as possible. Do not pull out seedlings in the hot sun. Do not allow roots or the soil around
the roots to dry.
13
2. Fill up pots by putting some crocks first, then a layer of sand (5-8 cm) and finally pot mixture
(8-10 cm).
3. Place the plant with the ball of earth in the centre upon the layer of pot mixture (Place on one
side of pots in case of root-stock plants used in inarching).
4. Put pot mixture around the ball of earth, press as you fill up and level off, and leaving one inch
head space at top. Do not press over the ball of earth. It will break and damage the roots.
5. Set the stem of the plant at the same height as it was in the seed bed.
6. Immerse pot with plant in a tub of water gently and keep inside water till air bubbles cease to
come out. Remove and place the pot under shade of trees.
Repotting:
When a plant's root system gets matted around the outside of its earth ball, it needs to be
repotted. Depending on how quickly your houseplants grow, you will need to repot them. Plants
that develop slowly, such as cacti and succulents, do not require regular repotting. Fast-growing
plants, such as geraniums and begonias, should be repotted at least once a year. Repotting is
usually performed during the rainy season, when it is easier for them to develop themselves and
form new roots. In the case of root stocks, the plants should be put in the shade after repotting
and watered regularly (morning and evening) to prevent wilting. The pot should be gently
watered the day before repotting to make it easier to remove the ball of earth intact from the pot.
By placing fingertips over the soil near the plant's base, turning the pot upside down, and tapping
the rim on a table lip, you can achieve this. The entire ball of earth would emerge from the pot in
one piece. The existence of matted roots indicates that repotting is needed. After extracting a
small amount of soil from the ball of earth, place the plant in the centre of a larger pot. The soil
should then be placed in the pot to raise the plant to the proper height, and a fresh soil mixture
should be placed around the roots. Repotting can be achieved with the same soil mixture as
before, firmed with fingertips. A 1cm space underneath the pot rim may be left to allow for
water. The plant should then be well watered and kept out of direct sunlight until it has formed
itself.
14
General
1. Wilting is the first reaction after potting and repotting. To assist plants in reviving, the loss of
transpiration must be monitored. As a result, keep newly potted plants in the shade and water
them regularly.
2. After about ten days in the shade, the plants should be gradually exposed to sunlight by
leaving them out in the sun for a few hours and then taking them back into the shade. Every
week, the length of exposure can be increased until the plants can be held out in the open.
3. Application of fertilisers, removal of old and dry leaves, and protection from pests and
diseases are some of the other tasks involved in maintaining potted plants. The following
methods can be used to make liquid manure.
Kinds of liquid manures
Cow dung or horse manure is placed in a gunny bag and submerged in water. The solution can
then be diluted and added after a week has passed. Oil cakes, such as groundnut cake and
pungam cake, may be broken and soaked in water for one or two days before they have
fermented or decomposed, as indicated by the foul odour.
Media for propagation
1. Soil: The texture and composition of the soil are crucial. The texture is determined by the
proportions of sand, silt, and clay in the mix.
2. Sand: Propagation is done with quartz powder, and cuttings are rooted with plastering grade.
Before using sand, it should be sterilised.
3. Peat: Peat is the partly decomposed remains of aquatic, marsh, bog, or swamp vegetation that
has been preserved under water.
4. Sphagnum moss: It's the dehydrated remnants of Sphagmum plants from acid bogs. It's
sterile, lightweight, and has a large water holding capacity.
5. Vermiculite: When heated, it is a micaceous mineral that expands dramatically. Chemically,
it's a hydrated magnesium-aluminum-iron-silicate. Insoluble in water, light in weight, and neutral
in reaction.

15
6. Perlite: It's a neutral-reacting grey or white volcanic rock mined from lava flows.
7. Pumice: It's a volcanic rock that's either grey or white. It allows for sufficient aeration and
drainage of the media.
8. Leaf mould: In India, it is widely available. Any leaf that is locally accessible can be
decomposed and used.
9. Sawdust: It's a waste product produced during the processing of wood.
10. Coco peat or Coco dust: Cutting and silting coconuts for fibre processing produces a by-
product.
Containers:
1. Seed pan and seed boxes
Seed pans are shallow earthen pots with a top diameter of 35cm and a depth of around 10cm.
They have one big hole in the middle or three holes that are equidistant from each other for
drainage. Wooden seed boxes are 40 cm high, 60 cm long, and 10 cm deep, with 6-8 evenly
spaced holes drilled in the bottom. A crock with the concave side down is put against each of the
holes. Over it and to the side of this crock are several big pieces of crock. To prevent fine soil
from clogging the drainage, two or three handfuls of coarse sand are scattered on the crock bits,
creating a thin layer. The requisite soil mixture is then applied on top of this. Cineraria, Begonia
Gloxinia, and Petunia are all delicate seed forms.
2. Earthern pots
They're made of burnt porous clay and come in a variety of sizes to give plants the right amount
of soil and root space.
They have straight sides and are wider at the top than at the bottom to keep the most compost
where the feeding roots are and to make it easier to remove the soil (ball of earth) intact with
roots while planting or repotting.
In our country, pots of varying sizes viz., tube pots, ¼ size, ½ size, ¾ size and ‗thali‘ are used
commonly.

16
Growing Media for Propagation
Sphagnum peat moss Vermiculite
Leaf mould Saw dust
Coco peat Pumice
17
Exercise-4
Practice of Sexual and Asexual Method of Propagation Including Micropropagation
Reproduction is the process of creating new individuals from pre-existing ones, and the
mode of reproduction refers to how they are produced. The genetic constituents of crop plants
are determined by the mode of propagation, which determines whether the plant is homozygous
or heterozygous.
Sexual method of propagation
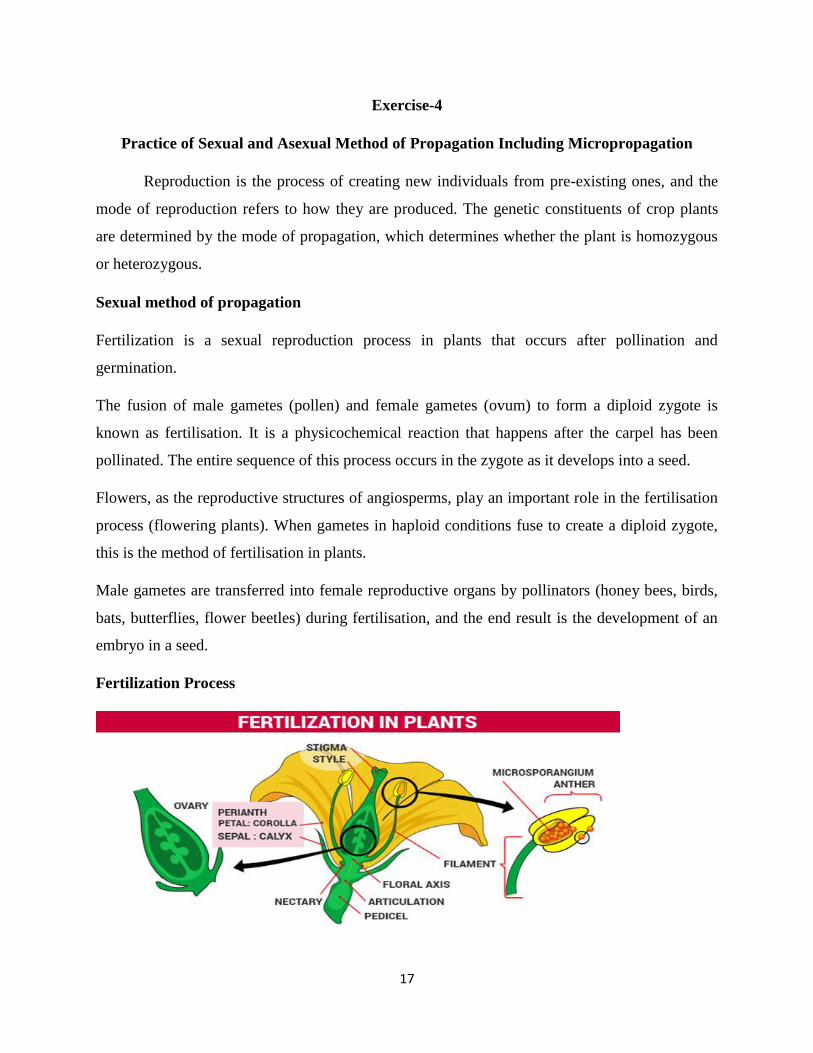
Fertilization is a sexual reproduction process in plants that occurs after pollination and
germination.
The fusion of male gametes (pollen) and female gametes (ovum) to form a diploid zygote is
known as fertilisation. It is a physicochemical reaction that happens after the carpel has been
pollinated. The entire sequence of this process occurs in the zygote as it develops into a seed.
Flowers, as the reproductive structures of angiosperms, play an important role in the fertilisation
process (flowering plants). When gametes in haploid conditions fuse to create a diploid zygote,
this is the method of fertilisation in plants.
Male gametes are transferred into female reproductive organs by pollinators (honey bees, birds,
bats, butterflies, flower beetles) during fertilisation, and the end result is the development of an
embryo in a seed.
Fertilization Process
18
Pollination is the mechanism by which flowering plants are fertilised. Pollen grains from the
anther land on the stigma, resulting in pollination. After the carpel is pollinated, the pollen grain
germinates and develops into the style, which provides a route for the pollen grain to pass down
to the ovary. Via., the micropyle, the pollen tube reaches the ovule and bursts into the embryo
sac. Within the ovule, the male nucleus joins with the nucleus of an egg to form a diploid zygote,
which then swells and grows into a fruit.
Propagation is the method of multiplying or perpetuating a single or a group of plants that have a
particular meaning to humans.
Asexual method of propagation
Many horticultural crops have distinctive vegetative structures that serve as food storage and
propagation. The process of naturally detaching these structures from the mother plant is called
separation. The process of dividing such structures into parts for propagation is known as 'division.'
Bulb:
It's a segment that's underground. It has a fleshy vertical stem axis with a growing point
or flower primordium at the apex that is surrounded by scales. The outside scales are fleshy and
contain food materials, while the inside scales are less fleshy and contain less food. Non-tunicate
bulbs (such as lilium) lack a dry and membranous outer scale, whereas tunicate bulbs (such as
onion) do. Tunicate bulbs are protected by outer scale and non-tunicate bulbs are easily
damaged.
Corm:
The swollen base of a stem axis is encircled by dried, scale-like leaves. A strong stem
structure with distinct nodes and internodes can be seen in the gladiolus corm. Cormels are small
corms that appear between the old and new corms. These corms can be divided into parts, each
with a bud, and used for planting. e.g. Elephant foot yam.
Tuber:
It's a distinct stem system that forms underneath the ground as a result of the swelling of
a stolen's sub-apical portion and the accumulation of reserve materials that occurs. The shape of
a tuber is similar to that of a stem. e.g. Potato, Jerusalem artichoke. These tubers are propagated by
planting whole tubers or cutting them into pieces with one or more buds. Tubercles (e.g., Dioscorea
bulbifera) are tubers produced in the axils of leaves that are used for propagation.
19
Tuberous roots and stem
The adventitious roots of some plants, such as sweet potato and dahlia, thicken and grow
external and internal root structures, but they lack nodes and internodes. Tuberous roots are what
they're called.
Thickened structures in cyclamen have developed from swollen hypocotyl tissue in plants
like begonia. They are vertically arranged and may have stem-like characteristics. Plants with
such roots or stems are propagated by slicing them into segments, each with a part of the crown
bearing a single short bud.
Rhizome
The main axis of the plant grows horizontally at or just below the ground surface in this
stem structure. It is made up of leaf scars on the nodes and internodes. e.g. Ginger, Turmeric,
Ferns etc. In determinate type of rhizomes each clump ends in a flowering stalk and growth
continues only from lateral branches. e.g. Cardamom.
Rhizomes of the indeterminate kind do not form a clump, but instead spread widely over
a large area and grow continuously from the terminal apex and lateral branches. Cutting the
rhizome into pieces and ensuring that each piece has at least one lateral bud or eye allows for
rhizome propagation.
Runner:
It is a stem that grows horizontally along the ground from the axis of a leaf at the crown of a
plant, ultimately forming a new plant at one of the nodes. e.g. Strawberry and mint.
Offset:
It is a type of lateral shoot or branch that grows from the main stem in some plants and is
distinguished by a rosette-like shortened thickened stem. Offsets that produce enough roots can
be removed and used for propagation by cutting them close to the main stem with a sharp knife.
e.g. Pine apple, date palm.
Sucker:
A sucker is a shoot which arises on a plant from below ground usually from an
adventitious buds on a root, e.g. Chrysanthemum.
Division:
It is the most direct way to increase the number of stock plants. During the dormant
season, division must be completed. Each division should have around 3 or 4 buds or stems, and
20
the clump's outer parts should be chosen because they are more vigorous. e.g. Daisy and
Delphinium.
Stolon:
A stolen is an aerial shot that hits roots after colliding with the earth. It may be a prostate
or a horizontally rising stem from the crown. Cyanodon dactylon, for example. A shoot that has
been rooted this way is simply cut from the parent plants and transplanted or potted.
Bulbils:
Some lily varieties, such as Lilium bulbiferum and Lilium tiginum, produce aerial stem
bulblets, also known as bulbils, in the axils of their leaves. Bulbils bloom early in the season and
fall to the ground several weeks after the plant has finished flowering. They are harvested and
planted shortly before they fall naturally. When flower buds have grown, disbudding can be used
to increase bulbil yield. By pinching out the flower buds of certain lily species that do not
naturally form bulbils, they can be induced to do so, e.g. Lilium candidum, L. maculatum.
Crown:
This is a short stem with closely set, short leaves that extends from the central axis above
the fruit. These can be cut and planted to produce a single plant. Pineapple crowns are harvested
from the fruit or at the time of harvest for propagation. Crowns will bear fruit in around 22
months, while slips will bear fruit in 12-18 months. e.g. Pineapple.
In horticultural terminology, the crown refers to the portion of a plant stem that lies on
the ground and produces new shoots. The crown is mainly a point of position near the ground
surface in trees or shrubs with a single trunk, defining the general transition zone between stem
and root. The crown is the part of the plant from which new shoots emerge in herbaceous
perennials. The adventitious roots develop along the base of the new shoots.
Micropropagation
Tissue culture made it possible to grow an entire plant from single cells or tissues, opening up
new avenues for plant improvement. It has become a necessary technique for achieving desirable
genetics, characteristics, and productivity in plants.
Plant tissue culture methods are most widely used in the cultivation of horticulture crops.
Horticulture is a plant agriculture division that focuses on the production of fruits, vegetables,
and ornamental plants. The aim of in-vitro ornamental plant development is to grow disease-free
and genetically identical plants in large numbers.
21
Another advantage of tissue culture is that it does not necessitate a large number of stock plants
for mass production. Only a few explants are used to create the culture of a specific plant, after
which the cultured plants are used in other lines of production. By embryo rescue and somatic
hybridization, this technique also allows for the generation of hybrids of incompatible plants.
In order to grow horticulture plants, not all tissue culture techniques have been effective. Some
methods, such as embryo culture and axillary bud breaking, have a wide variety of uses, while
others are still in the experimental stage of crop production.
ORNAMENTAL CROPS
Tissue culture techniques were used to introduce over 300 ornamentals to the commercial market
(worldwide) in 1990. The technique has developed over 500 million plants, with 90 percent of
them being ornamentals. Orchids, Gerbera, Spathiphyllum (Spathe or peace Lilies), and Boston
fern are only a few of the ornamental plants that use this technique. Some commercial labs can
produce up to 200,000 in vitro plantlets per week.
The three primary goals of producing ornamentals by tissue culture technique are:
1. Production of disease-free plants
2. Rapid production of a large number of genetically identical plants
3. Introduction of new varieties or genotypes
Micropropagation of ornamentals is accomplished by growing axillary (lateral) bud breaking and
adventitious (buds found elsewhere on the plant) bud development.
Axillary bud breaking with shoot tip and single node explants is the best explant/starting material
for in vitro ornamentals. Bulb scales, base plates of corms and bulbs and the inflorescence are all
considered ideal explants in other plants like Lily, Allium, and Irises.
VEGETABLE CROPS
Vegetables are a rich source of vitamins and minerals and they are one of the world's
most important crops. However, tissue culture methods have only been used to grow a
few vegetables on a wide scale. Tissue culture is used to cultivate vegetables for four key
reasons:
1. Production of plantlets of that species in which propagation of plant through seed is a
difficult process
2. Production of genetically identical plants on large-scale
3. Production of virus-free plant materials
22
4. Crop improvement
The three techniques mainly used to produce major vegetable crops of the world include:
1. Somatic embryogenesis
2. Enhanced axillary branching using stem tips and lateral buds
3. Adventitious shoot formation
A somatic embryo develops in two ways: consciously and indirectly (by callus formation).
Cauliflower and potato are two crops that follow the direct route. Plants like carrots, asparagus,
sweet potatoes, pumpkins, and potatoes, on the other hand, grow by forming callus.
Explants from stem tips and lateral buds are used to improve axillary branching. Explants can be
subcultured for several generations with increased shoot formation once they have been formed
in labs using this process. Broccoli, cucumber, asparagus, garlic, cabbage, lettuce, tomato,
potato, and sweet potato are among the vegetable crops that can be grown using this process.
This method is most effective in lowering the genetic abnormalities in the plants.
Asparagus, potato, tomato, broccoli, brussels sprouts, chive, cabbage, carrot, garlic, kale, lettuce,
and pepper have all been successfully grown using the adventitious root forming method. The
only drawback to this method is that it increases genetic diversity.
FRUIT CROPS
To retain genetic characteristics, most fruit crops are propagated using vegetative techniques. In
vitro processing using tissue culture has only been tried on a small number of fruit crops. It was
first used for soft fruit crops such as strawberry and raspberry, as well as tree fruit rootstock such
as peach, apple, cherry, and apricot.
The tissue culture of fruit crops is followed for mainly five purposes that include:
1. Mass propagation of the desired line of the plants
2. Obtain virus-free plants
3. Rapid mass production of plants for breeding purposes
4. Preserve germplasm
5. Produce haploids for the breeding program
Banana, papaya, passion fruit, fig, mulberry, and jackfruit are the most common fruit crops
produced by clonal propagation. Somatic embryogenesis has had limited success in the growth of
plants. Citrus spp., mango, banana, and date palm have all been successfully propagated using
somatic embryogenesis.

23
Other uses for tissue culture include the processing of pathogen-free plants, which are primarily
used in germplasm conservation (preservation). To feed the world's rapidly growing population,
horticulture crops must be propagated in large quantities. Tissue culture is an effective method
for improving crop quality and nutrition. As a consequence, it has a more prominent position,
and usability can be shortly observed to fulfil the requirements of mankind.
24
Exercise-5
Training and Pruning of Fruits Tree
Fruits, vegetables, flowers, medicinal components, spices (oleoresins), aromatic
(essential oils), and other horticultural plants are grown for their products. As a result, these
plants should be handled in such a way that human preferences for growing them in terms of
quality and quantity of produce are completely fulfilled. This necessitates the use of various
inputs to directly manipulate plant growth or the plant environment. Training and pruning are
essential in manipulating plant growth, and our knowledge of plant development and phenology
must be complete. In fruit crops, these practices are critical.
Training:
Definition: Training is a collection of physical techniques for controlling the form, size, and
direction of plant development. In other words, training is the process of orienting a plant in
space using techniques such as binding, fastening, staking, supporting over a trellis or pergola in
a specific way, or pruning some bits.
Objectives:
By having various shapes and ensuring a balanced distribution, you can increase the
appearance and utility of your plant/tree.
Inter-cultivation, plant conservation, and harvesting are among the cultural traditions that have
been made easier.
Planting at a 45-degree angle and horizontally orienting branches increase efficiency. Methods
of Training A plant's method of training is decided by its design, environment, growing intent,
planting method, mechanisation, and other factors, so making an informed decision is important.
Training in herbaceous annuals and biennials: These plants are typically grown without any
effort to alter their growth patterns because, while useful, having a large number in the field is
impractical. However, the following styles of training are affected for some of the ornamental
value and creeping design.
1. Supporting or staking vine-like plants.
2. Vine fruit plants, as well as indeterminate tomatoes, can be trained on a pergola or trellis.
3. In pot plants like aster, marigold, and chrysanthemum, nipping the apices encourages lateral
growth for a bushy or fulsome appearance.
25
4. De-shooting, or the removal of lateral buds, is used in chrysanthemum and Dahlia to create a
single stem for large flowers.
5. In a potted chrysanthemum, staking with bamboo sticks and tying together different shoots.
Training of woody perennials:
Woody perennials are trained to establish a strong foundation for sustainable production of
quality produce and ornamental beauty in various shapes. They are widely spaced and remain on
a place for a long time (topiary). The following methods of training are used in these plants.
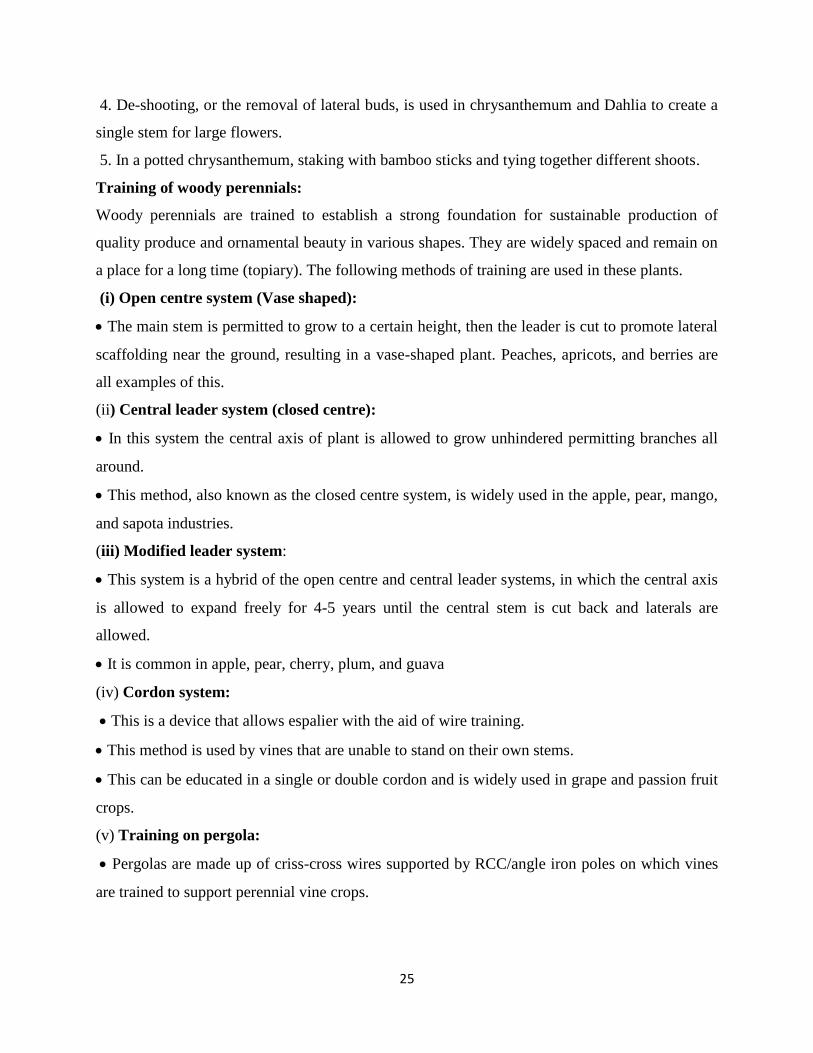
(i) Open centre system (Vase shaped):
The main stem is permitted to grow to a certain height, then the leader is cut to promote lateral
scaffolding near the ground, resulting in a vase-shaped plant. Peaches, apricots, and berries are
all examples of this.
(ii) Central leader system (closed centre):
In this system the central axis of plant is allowed to grow unhindered permitting branches all
around.
This method, also known as the closed centre system, is widely used in the apple, pear, mango,
and sapota industries.
(iii) Modified leader system:
This system is a hybrid of the open centre and central leader systems, in which the central axis
is allowed to expand freely for 4-5 years until the central stem is cut back and laterals are
allowed.
It is common in apple, pear, cherry, plum, and guava
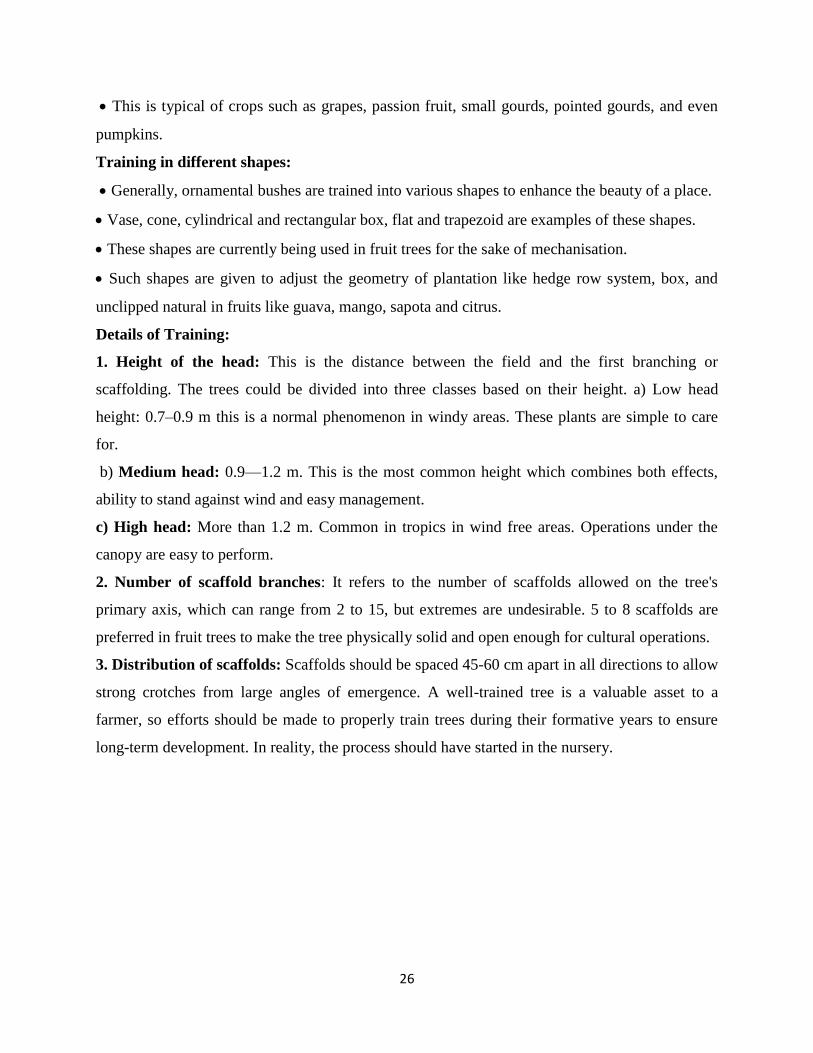
(iv) Cordon system:
This is a device that allows espalier with the aid of wire training.
This method is used by vines that are unable to stand on their own stems.
This can be educated in a single or double cordon and is widely used in grape and passion fruit
crops.
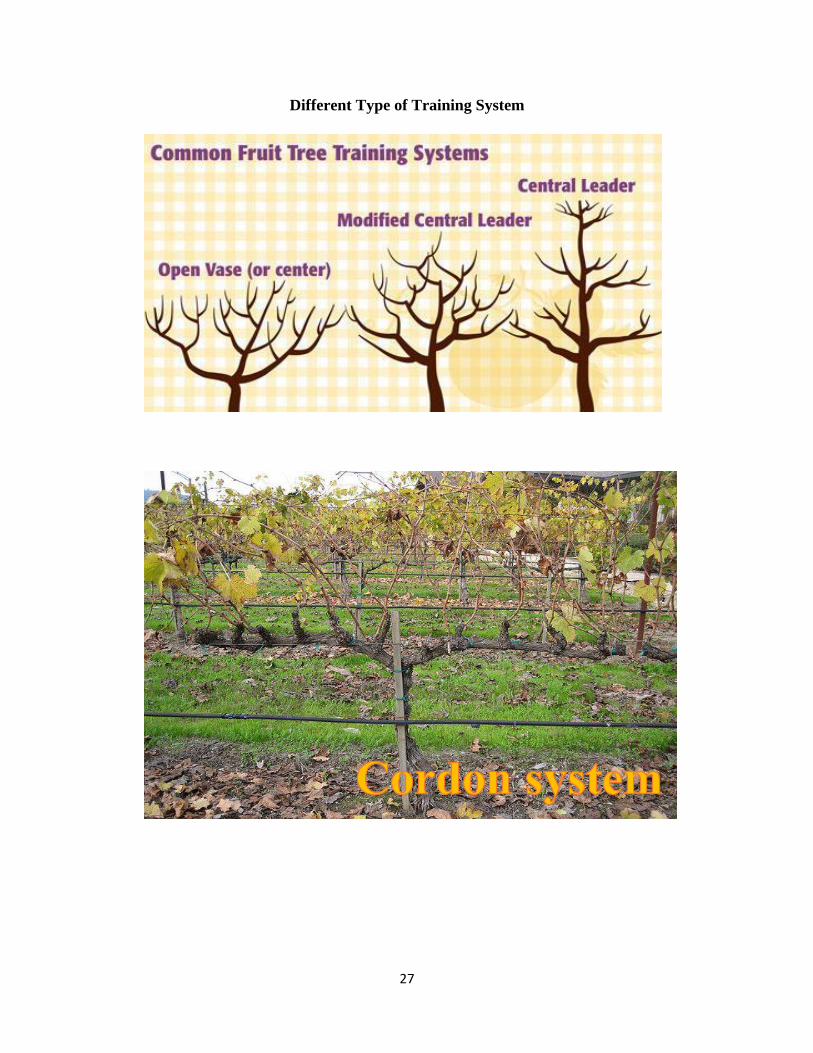
(v) Training on pergola:
Pergolas are made up of criss-cross wires supported by RCC/angle iron poles on which vines
are trained to support perennial vine crops.
26
This is typical of crops such as grapes, passion fruit, small gourds, pointed gourds, and even
pumpkins.
Training in different shapes:
Generally, ornamental bushes are trained into various shapes to enhance the beauty of a place.
Vase, cone, cylindrical and rectangular box, flat and trapezoid are examples of these shapes.
These shapes are currently being used in fruit trees for the sake of mechanisation.
Such shapes are given to adjust the geometry of plantation like hedge row system, box, and
unclipped natural in fruits like guava, mango, sapota and citrus.
Details of Training:
1. Height of the head: This is the distance between the field and the first branching or
scaffolding. The trees could be divided into three classes based on their height. a) Low head
height: 0.7–0.9 m this is a normal phenomenon in windy areas. These plants are simple to care
for.
b) Medium head: 0.9—1.2 m. This is the most common height which combines both effects,
ability to stand against wind and easy management.
c) High head: More than 1.2 m. Common in tropics in wind free areas. Operations under the
canopy are easy to perform.
2. Number of scaffold branches: It refers to the number of scaffolds allowed on the tree's
primary axis, which can range from 2 to 15, but extremes are undesirable. 5 to 8 scaffolds are
preferred in fruit trees to make the tree physically solid and open enough for cultural operations.
3. Distribution of scaffolds: Scaffolds should be spaced 45-60 cm apart in all directions to allow
strong crotches from large angles of emergence. A well-trained tree is a valuable asset to a
farmer, so efforts should be made to properly train trees during their formative years to ensure
long-term development. In reality, the process should have started in the nursery.
27
Different Type of Training System
28
Pruning
Definition: To strike a balance between vegetative growth and development, plant parts such as
bud, shoot, and root are removed. This can also be done to change the tree's fruit load.
Objectives:
1. Maintaining tree growth and vigour, as well as a balance between vegetative vigour and
fruitfulness, in order to encourage the production of an optimal crop of the highest quality.
2. To form the tree so that it makes the most of the space between trees while still allowing
access.
3. To monitor the size and quality of the fruits by distributing the fruiting area properly.
4. To control crop succession and to provide a crop that can be handled easily and inexpensively.
5. To spread the trees for economic orchard management.
6. To remove the dead, diseased and over aged wood.
7. For effective spraying of pesticides to the crop.
29
Types of pruning:
Basically there are three types of pruning with definite purposes.
(i) Frame pruning. (ii) Maintenance pruning. (iii) Renewal pruning.
1. Frame pruning: This pruning is done to give a plant shape and form during its formative
years so that it develops a solid structure and a shape that is easier to deal with. This procedure
begins in the nursery and continues until the fruiting stage is reached. This is done throughout
the year, regardless of the season.
2. Maintenance pruning: This pruning is done to preserve the status quo in terms of production
and to ensure uniform efficiency. It is an annual feature in some plants (deciduous trees like
grapes, apple, pear, peach, etc.) and an uncommon feature in others (evergreen trees like mango,
sapota) confining to removal of water sprouts and unproductive growth and opening of the tree.
3. Renewal pruning: This pruning is done in old trees like mangoes which shows decline. In this
case severe pruning is required.
Factors to be considered in pruning:
Pruning is done as a routine feature in bearing trees in some tree species to strike a balance
between vegetative growth and development so that farmers can get consistent, high-quality
production.
To achieve this one should consider the following factors.
When buds begin to distinguish in relation to blooming.
The age of the tree that produces the most fruit buds of the highest quality and quantity.
Taking these variables into account, we should have a full understanding of the tree/bearing
plant's habit.
Bearing habit refers to a fruit's relative location in relation to a possible bud that will produce a
flower or inflorescence in the shoot. This activity differs from one plant to the next.
30
Principles of pruning:
1. Excessive pruning should be avoided because it stunts the plant's growth and can result in
more water suckers, fascinations (the joining of many parts in a flat plane) and thus reduces the
plant's bearing capacity.
2. Only the wood that isn't appropriate for the tree should be pruned away.
3. Pruning of larger limbs should be avoided as far as possible.
4. Young trees should be pruned with greater care than yielding trees, since extreme pruning of
young trees slows cropping and eliminates much more yield area than is needed.
31
Exercise-6
Layout and Planting of Orchard
The establishment of an orchard is a long-term investment that requires careful consideration. To
ensure optimum yield, the proper position and site, planting method and planting distance,
variety selection, and nursery plant selection must all be carefully considered.
Location and site
Proper selection of site is important, Selection may be made based on the following criteria.
1. The position should be in a well-established fruit-growing area so that you can profit from the
experience of other growers and sell your produce through co-operative organisations with other
fruit growers.
2. There should be a market close to the area.
3. The climate should be suitable to grow the chosen fruit crops.
4. Adequate water supply should be available round the year.
Before a grower selects a site for establishing a new orchard, he must have assessed the
following factors:
1. Suitability of soil, its fertility, the nature of subsoil and soil depth.
2. During the rainy season, the site must have adequate drainage and no water stagnation.
3. Water for irrigation must be of good quality.
4. There must be adequate transportation options, whether by road or rail, within easy reach.
7. There should be certain consumer demand for the fruits that will be grown
8. Workforce availability
Planning of an orchard
For the most productive and cost-effective management, the orchard must be meticulously
planned. When putting together the strategy, keep the following points in mind.
1. Maximum number of trees per unit area with optimum spacing.
2. In order to ensure adequate supervision, stores and office buildings should be built in the
orchard's middle.
3. At a rate of one well per 2 to 4 hectares, wells should be positioned in convenient locations
throughout the region.
4. Each fruit type should be allocated to its own block.
8. For the sake of transportation economy, roads can take up the least amount of space possible.
32
The space between the windbreak and the first row of trees is beneficial to the lane.
9. Short growing trees should be planted in the front, and tall trees should be planted in the back
to allow for easier visibility and to enhance the appearance
10. Evergreen trees should be in the foreground, and deciduous trees should be in the
background.
11. Fruits that attract birds and animals should be planted near the watchman's hut.
12. A good fence is necessary. Compared to other types of fences, live fencing is cost-effective.
Drought-resistant, easy-to-produce from seed, fast-growing plants with thick foliage that can
withstand extreme pruning and thorny plants are perfect for live fencing. Agave, Prosopis
juliflora, Pithecolobium dulce, and Thevetia would make a good live fence if planted in three
rows.
13. Wind breaks, rows of tall trees planted close together around the orchard, are essential to
resist velocity of wind which cause severe ill-effects particularly moisture evaporation from the
soil. Since the wind breaks are very effective in reducing the wind velocity and minimizing the
damage to the fruit trees and to other crops, their presence in regions where strong winds prevail
is of paramount importance. A wind break ordinarily has its maximum effectiveness for a
distance about four times as great as its height but has some effect over twice about that distance.
Trees suitable for windbreak should be erect, tall and quick growing, hardy and drought resistant
and mechanically strong and dense to offer maximum resistance to wind. The trees which are
suitable for growing as wind breaks are Casuarina equisetifolia, Pterospermum acerifolium,
Polyalthia longifolia, Eucalyptus globulus, Grevillea robusta, Azadirachta indica.
Laying out of orchards
any method of layout should aim at providing maximum number of trees per hectare, adequate
space for proper development of the trees and ensuring convenience in orchard cultural practices.
The system of layout can be grouped under two broad categories viz. (a) vertical row planting
pattern and (b) alternate row planting pattern. In the former planting pattern (e.g. square system,
rectangular system), the trees set in a row is exactly perpendicular to those. Trees set in their
adjacent rows. In the later planting pattern (i.e. Hexagonal, Quincunx and Triangular), the trees
in the adjacent rows are not exactly vertical instead the trees in the even rows are midway
between those in the odd rows.
33
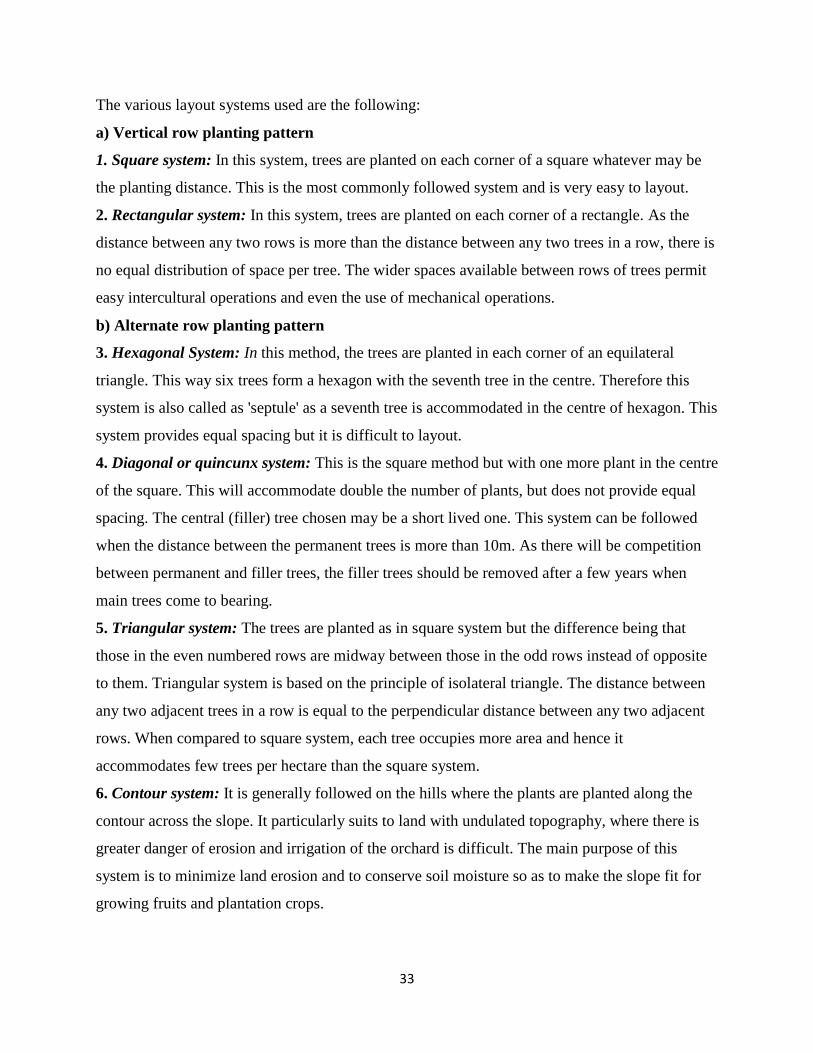
The various layout systems used are the following:
a) Vertical row planting pattern
1. Square system: In this system, trees are planted on each corner of a square whatever may be
the planting distance. This is the most commonly followed system and is very easy to layout.
2. Rectangular system: In this system, trees are planted on each corner of a rectangle. As the
distance between any two rows is more than the distance between any two trees in a row, there is
no equal distribution of space per tree. The wider spaces available between rows of trees permit
easy intercultural operations and even the use of mechanical operations.
b) Alternate row planting pattern
3. Hexagonal System: In this method, the trees are planted in each corner of an equilateral
triangle. This way six trees form a hexagon with the seventh tree in the centre. Therefore this
system is also called as 'septule' as a seventh tree is accommodated in the centre of hexagon. This
system provides equal spacing but it is difficult to layout.
4. Diagonal or quincunx system: This is the square method but with one more plant in the centre
of the square. This will accommodate double the number of plants, but does not provide equal
spacing. The central (filler) tree chosen may be a short lived one. This system can be followed
when the distance between the permanent trees is more than 10m. As there will be competition
between permanent and filler trees, the filler trees should be removed after a few years when
main trees come to bearing.
5. Triangular system: The trees are planted as in square system but the difference being that
those in the even numbered rows are midway between those in the odd rows instead of opposite
to them. Triangular system is based on the principle of isolateral triangle. The distance between
any two adjacent trees in a row is equal to the perpendicular distance between any two adjacent
rows. When compared to square system, each tree occupies more area and hence it
accommodates few trees per hectare than the square system.
6. Contour system: It is generally followed on the hills where the plants are planted along the
contour across the slope. It particularly suits to land with undulated topography, where there is
greater danger of erosion and irrigation of the orchard is difficult. The main purpose of this
system is to minimize land erosion and to conserve soil moisture so as to make the slope fit for
growing fruits and plantation crops.
34
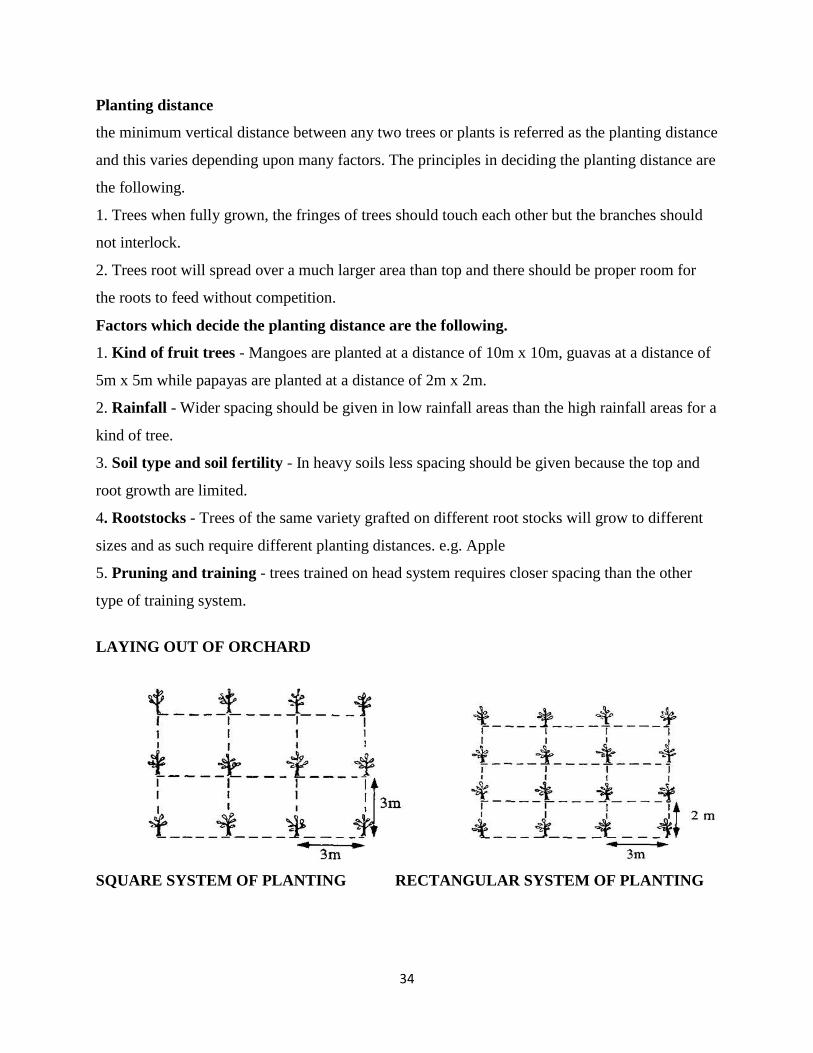
Planting distance
the minimum vertical distance between any two trees or plants is referred as the planting distance
and this varies depending upon many factors. The principles in deciding the planting distance are
the following.
1. Trees when fully grown, the fringes of trees should touch each other but the branches should
not interlock.
2. Trees root will spread over a much larger area than top and there should be proper room for
the roots to feed without competition.
Factors which decide the planting distance are the following.
1. Kind of fruit trees - Mangoes are planted at a distance of 10m x 10m, guavas at a distance of
5m x 5m while papayas are planted at a distance of 2m x 2m.
2. Rainfall - Wider spacing should be given in low rainfall areas than the high rainfall areas for a
kind of tree.
3. Soil type and soil fertility - In heavy soils less spacing should be given because the top and
root growth are limited.
4. Rootstocks - Trees of the same variety grafted on different root stocks will grow to different
sizes and as such require different planting distances. e.g. Apple
5. Pruning and training - trees trained on head system requires closer spacing than the other
type of training system.
LAYING OUT OF ORCHARD
SQUARE SYSTEM OF PLANTING RECTANGULAR SYSTEM OF PLANTING

35
HEXAGONAL SYSTEM OF PLANTING QUINCUNX SYSTEM OF PLANTING
TRIANGULAR SYSTEM OF PLANTING CONTOUR SYSTEM OF PLANTING
6. Irrigation system
the total number of trees per hectare for various important horticultural crops under a) square b)
hexagonal and c) triangular system of planting are given below:
Crop Planting distance (in m)
No. of trees per hectare
Square system Hexagonal
system
Triangular
system
Mango 10 x 10 100 115 89
Sapota 8 x 8 156 118 139
Clove 6 x 6 277 320 248
Acid lime 5 x 5 400 461 357
Coconut 7.5 x 7.5 177 205 159
36
Exercise-7
Fertilizer Application in Different Crops
The Nutrients are chemical elements which are absorbed by the plants in more or less
quantity to transform light energy into chemical energy and to keep up plant metabolism for the
synthesis of organic materials.
Feeding of plants with nutrients is termed as nutrition.
Successful growth and production of the plants in general requires a proper supply of the 16
elements. These elements are regarded as essential to life in higher plants. Allen and Arnon
(1955) laid out following criteria for categorising nutrients essentiality to plants:
1. Complete or partial lack of the element in question must make normal plant growth impossible
2. Deficiency symptoms must be reversed by the addition of the elements in question
3. The element must play specific role in the plant metabolic symptom
They are:
1. Basic elements: Carbon (C), Hydrogen (H) and Oxygen (O) (03)
2. Macro elements: The nutrients that are required in relatively large quantity are termed as
macro elements.
Nitrogen (N), Phosphorus (P) Potash (K), Calcium (Ca) Magnesium (Mg) and Sulphur(S) (06)
3. Micro elements: are those required in relatively less quantity are termed as micro nutrients.
Manganese (Mn), Molybdenum (Mo), Chlorine (Cl), Zinc (Zn), Boron (B), Copper (Cu) and Iron
(Fe) (07)
Besides some nutrients like Aluminium (Al), Cobalt (Co), Sodium (Na), Silica (Si) and
Vanadium (V) are not considered necessary always because either their essential character has
been proved only in some plants or in certain metabolic processes that are not always
necessary.
37
Types of Fertilizers
Inorganic fertilizers
• Chemical substances manufactured from inorganic materials
• Contains higher nutrient than organic manures.
• Nutrient input is lost through leaching, runoff, volatilization, fixation by soil or consumption by
weeds etc.
Organic fertilizers
• These are plant and animal wastes that are used as nutrients after decomposition.
• Improves the soil tilth, aeration, water holding capacity and activity of micro-organism.
Where to Apply The Manures?
• In fully grown trees, the manures and fertilizers should be given over the area, where their
active roots are spread.
• Fertilizer should be given in restricted area i.e., in the surrounding area of about 1 to 1.5 m
away from the trunk of the trees.
Time of Fertilizer Application
• It must be applied when the plants need it.
• Timing depends on the type of fertilizer and climate.
• Fruit trees require more nutrients at the emergence of new flushes and differentiations of floral
buds.
• Utilized more during the course of fruit development.
• Nutrients should be available to them in February–March.
• So, it would be better to apply them in October-November to be available to the trees in
February to March.
38
Importance of Fertilizer Application
Since most of the soils do not provide the requisite nutrient necessary for the growth and
health of plant, they have to be fed with fertilizer to overcome the deficiency
Also, fertilizers are not one time material, which once provide do not have to be
resupplied
In fact every time we harvest plant, they remove some nutrient along with them
Thus regular supply of fertilizer to plant is a must to ensure their regular growth and yield
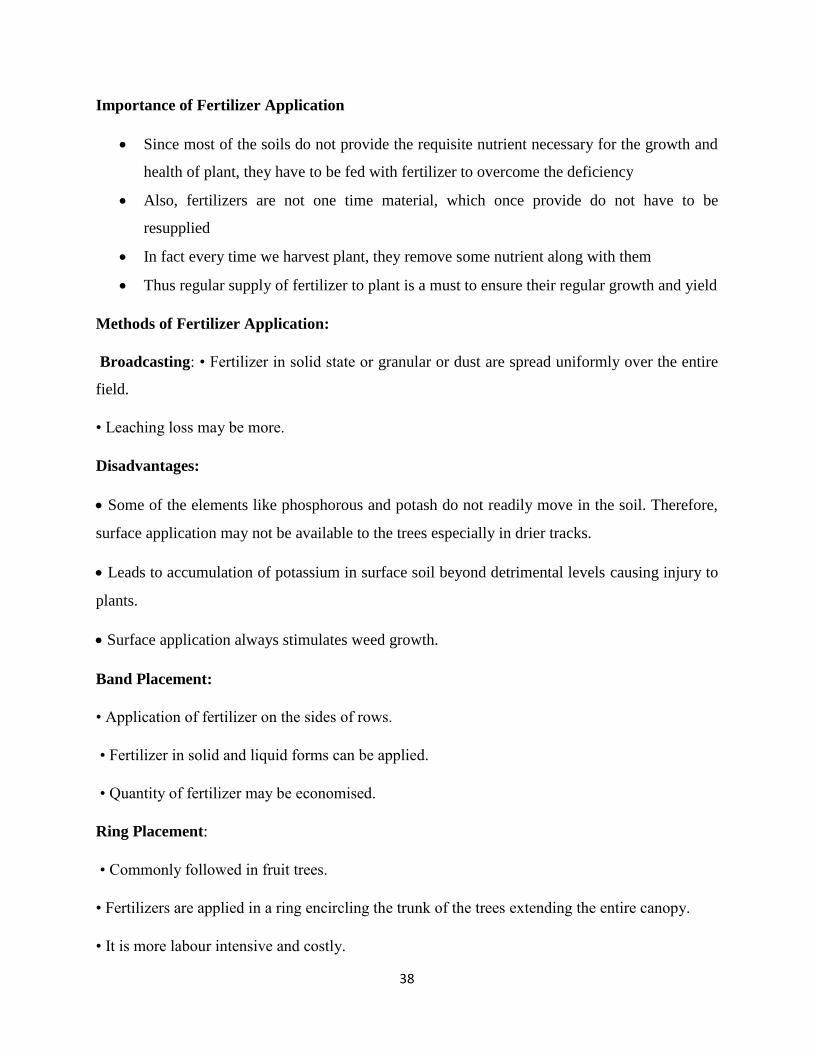
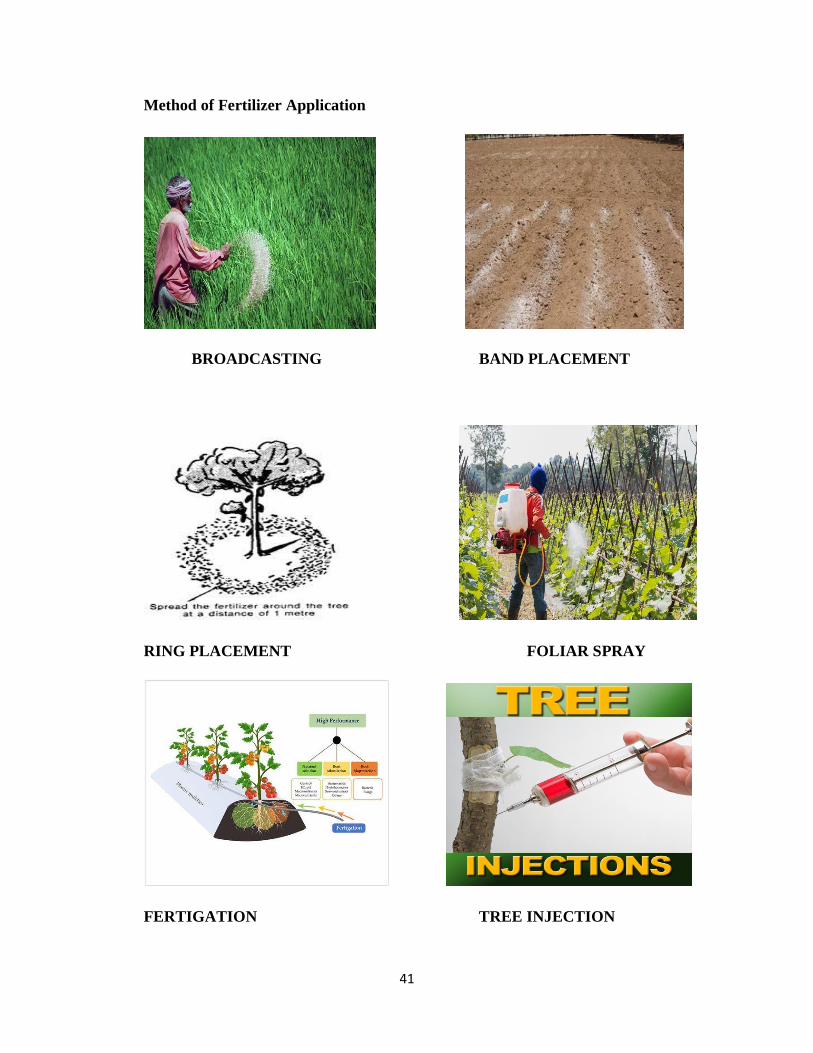
Methods of Fertilizer Application:
Broadcasting: • Fertilizer in solid state or granular or dust are spread uniformly over the entire
field.
• Leaching loss may be more.
Disadvantages:
Some of the elements like phosphorous and potash do not readily move in the soil. Therefore,
surface application may not be available to the trees especially in drier tracks.
Leads to accumulation of potassium in surface soil beyond detrimental levels causing injury to
plants.
Surface application always stimulates weed growth.
Band Placement:
• Application of fertilizer on the sides of rows.
• Fertilizer in solid and liquid forms can be applied.
• Quantity of fertilizer may be economised.
Ring Placement:
• Commonly followed in fruit trees.
• Fertilizers are applied in a ring encircling the trunk of the trees extending the entire canopy.
• It is more labour intensive and costly.
39
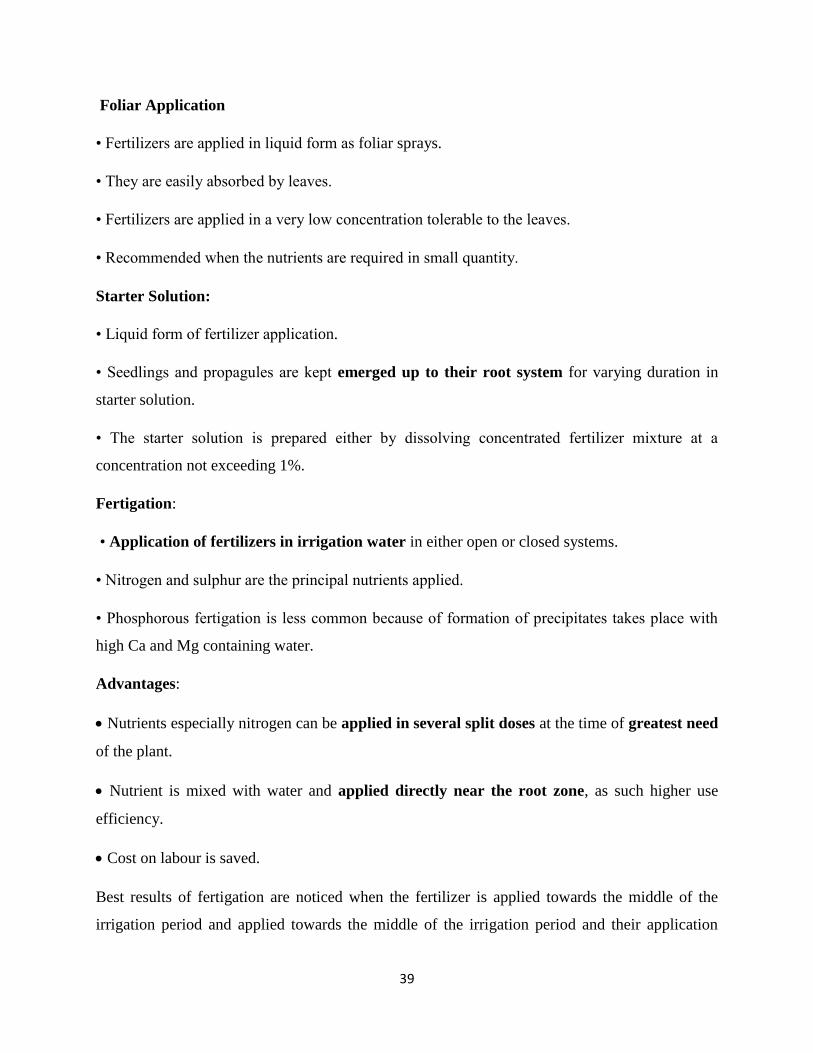
Foliar Application
• Fertilizers are applied in liquid form as foliar sprays.
• They are easily absorbed by leaves.
• Fertilizers are applied in a very low concentration tolerable to the leaves.
• Recommended when the nutrients are required in small quantity.
Starter Solution:
• Liquid form of fertilizer application.
• Seedlings and propagules are kept emerged up to their root system for varying duration in
starter solution.
• The starter solution is prepared either by dissolving concentrated fertilizer mixture at a
concentration not exceeding 1%.
Fertigation:
• Application of fertilizers in irrigation water in either open or closed systems.
• Nitrogen and sulphur are the principal nutrients applied.
• Phosphorous fertigation is less common because of formation of precipitates takes place with
high Ca and Mg containing water.
Advantages:
Nutrients especially nitrogen can be applied in several split doses at the time of greatest need
of the plant.
Nutrient is mixed with water and applied directly near the root zone, as such higher use
efficiency.
Cost on labour is saved.
Best results of fertigation are noticed when the fertilizer is applied towards the middle of the
irrigation period and applied towards the middle of the irrigation period and their application

40
terminated shortly before completion of irrigation. Use of soluble fertilizer improves use
efficiency.
Note: The grower must consider the economics and advantages before deciding for using
fertigation.
Fertigation is used extensively in:
Cut flower production in green houses.
Fruit crops – Grapes, Papaya, Banana and Pomegranate.
Vegetables- Tomato and Capscicum under poly/green houses.
Tree Injection:
• Direct injection of essential nutrients into the tree trunk.
• Trees suffering from iron deficiency are injected with iron salt
Feeding Needles:
• Several types of feeding needles or guns are available with these fertilizers either in dry form
or in water solution placed in holes.
Factors favouring nutrients absorption and transport:
High humidity, proper temperature and incident radiation.
Good CHO supply and vigorous growth.
Chemical and physical properties of nutrient spray solution.
Leaf characters like leaf thickness, hairyness and wax coating on the leaf.
Generally more vigorous plant and young growing leaves have good capacity to absorb
nutrients.
Nitrogen- applied in the form of urea (1%) is readily absorbed.
Sodium and potassium (KCl) - readily absorbed by leaves and they are among the highly
mobile Elements.
41
Method of Fertilizer Application
BROADCASTING BAND PLACEMENT
RING PLACEMENT FOLIAR SPRAY
FERTIGATION TREE INJECTION
42
Note:
Foliar application proves to be most effective where problems of nutrient fixation in soil exits.
So far the most important use of foliar sprays is in application of micronutrients.
Foliar sprays should be applied either with pressure sprayer or with specially designed spray
guns. The trees should be sprayed until the nutrient solution begins to drip from the leaves.
Foliar application of urea has been found effective in many fruit crops like citrus, guava, apple,
etc.
Potassium spray (3-5g/lit) - Papaya, Pineapple, Citrus and Guava.
Precaution:
While applying foliar sprays, care should be taken to ensure correct concentration of spray
solution.
Apply in the morning or evening hours on a clear sky day.
43
Exercise-8
Identification of Horticultural Crops
Nomenclature and identification of horticultural crops
Nomenclature is a method or scheme for naming plants. Binominal is a universal method
in which a plant is assigned a two-word name, one suggesting the genus or group it belongs to
and the other separating it from other plants in the group. The plant is classified and named using
this two-word or binominal appellation.
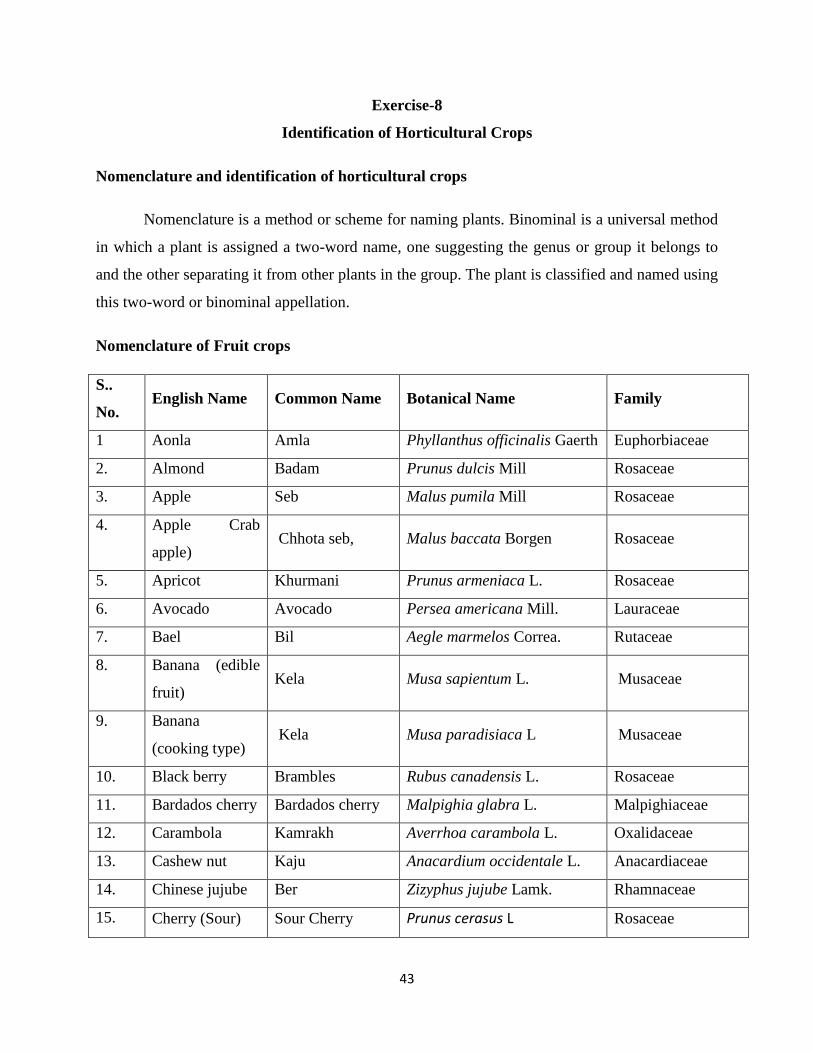
Nomenclature of Fruit crops
S..
No. English Name Common Name Botanical Name Family
1 Aonla Amla Phyllanthus officinalis Gaerth Euphorbiaceae
2. Almond Badam Prunus dulcis Mill Rosaceae
3. Apple Seb Malus pumila Mill Rosaceae
4. Apple Crab
apple) Chhota seb, Malus baccata Borgen Rosaceae
5. Apricot Khurmani Prunus armeniaca L. Rosaceae
6. Avocado Avocado Persea americana Mill. Lauraceae
7. Bael Bil Aegle marmelos Correa. Rutaceae
8. Banana (edible
fruit) Kela Musa sapientum L. Musaceae
9. Banana
(cooking type) Kela Musa paradisiaca L Musaceae
10. Black berry Brambles Rubus canadensis L. Rosaceae
11. Bardados cherry Bardados cherry Malpighia glabra L. Malpighiaceae
12. Carambola Kamrakh Averrhoa carambola L. Oxalidaceae
13. Cashew nut Kaju Anacardium occidentale L. Anacardiaceae
14. Chinese jujube Ber Zizyphus jujube Lamk. Rhamnaceae
15. Cherry (Sour) Sour Cherry Prunus cerasus L Rosaceae
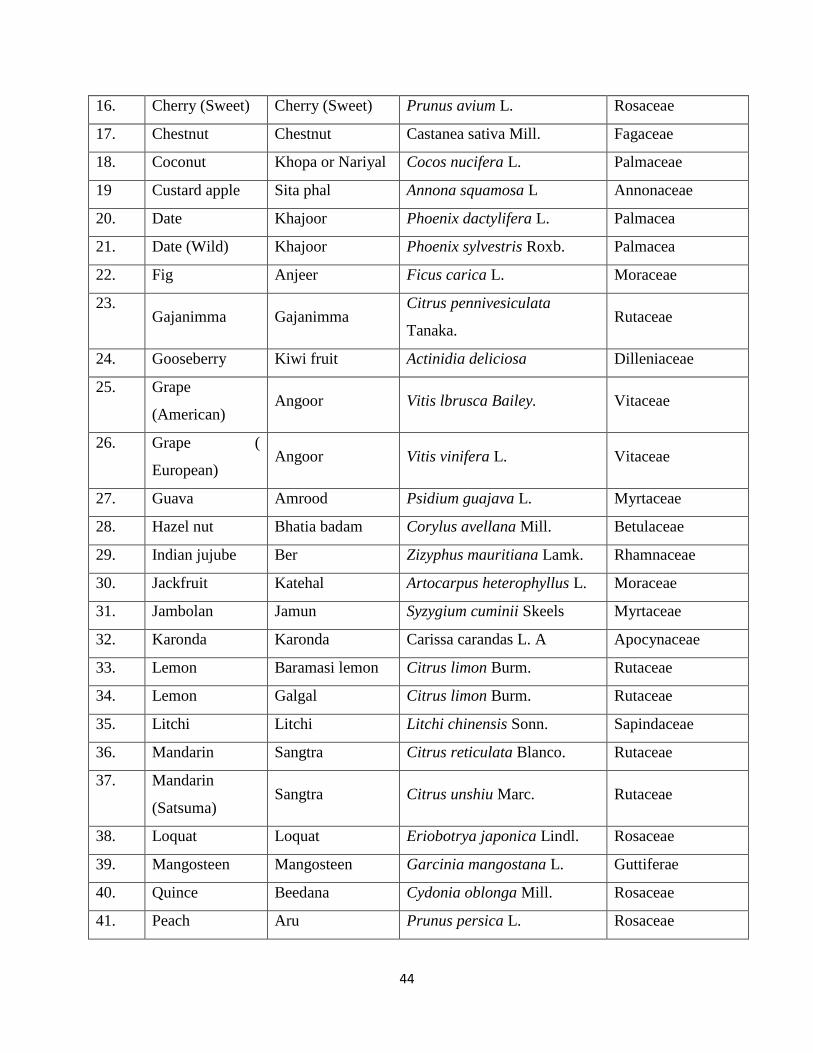
44
16. Cherry (Sweet) Cherry (Sweet) Prunus avium L. Rosaceae
17. Chestnut Chestnut Castanea sativa Mill. Fagaceae
18. Coconut Khopa or Nariyal Cocos nucifera L. Palmaceae
19 Custard apple Sita phal Annona squamosa L Annonaceae
20. Date Khajoor Phoenix dactylifera L. Palmacea
21. Date (Wild) Khajoor Phoenix sylvestris Roxb. Palmacea
22. Fig Anjeer Ficus carica L. Moraceae
23. Gajanimma Gajanimma
Citrus pennivesiculata
Tanaka. Rutaceae
24. Gooseberry Kiwi fruit Actinidia deliciosa Dilleniaceae
25. Grape
(American) Angoor Vitis lbrusca Bailey. Vitaceae
26. Grape (
European) Angoor Vitis vinifera L. Vitaceae
27. Guava Amrood Psidium guajava L. Myrtaceae
28. Hazel nut Bhatia badam Corylus avellana Mill. Betulaceae
29. Indian jujube Ber Zizyphus mauritiana Lamk. Rhamnaceae
30. Jackfruit Katehal Artocarpus heterophyllus L. Moraceae
31. Jambolan Jamun Syzygium cuminii Skeels Myrtaceae
32. Karonda Karonda Carissa carandas L. A Apocynaceae
33. Lemon Baramasi lemon Citrus limon Burm. Rutaceae
34. Lemon Galgal Citrus limon Burm. Rutaceae
35. Litchi Litchi Litchi chinensis Sonn. Sapindaceae
36. Mandarin Sangtra Citrus reticulata Blanco. Rutaceae
37. Mandarin
(Satsuma) Sangtra Citrus unshiu Marc. Rutaceae
38. Loquat Loquat Eriobotrya japonica Lindl. Rosaceae
39. Mangosteen Mangosteen Garcinia mangostana L. Guttiferae
40. Quince Beedana Cydonia oblonga Mill. Rosaceae
41. Peach Aru Prunus persica L. Rosaceae
45
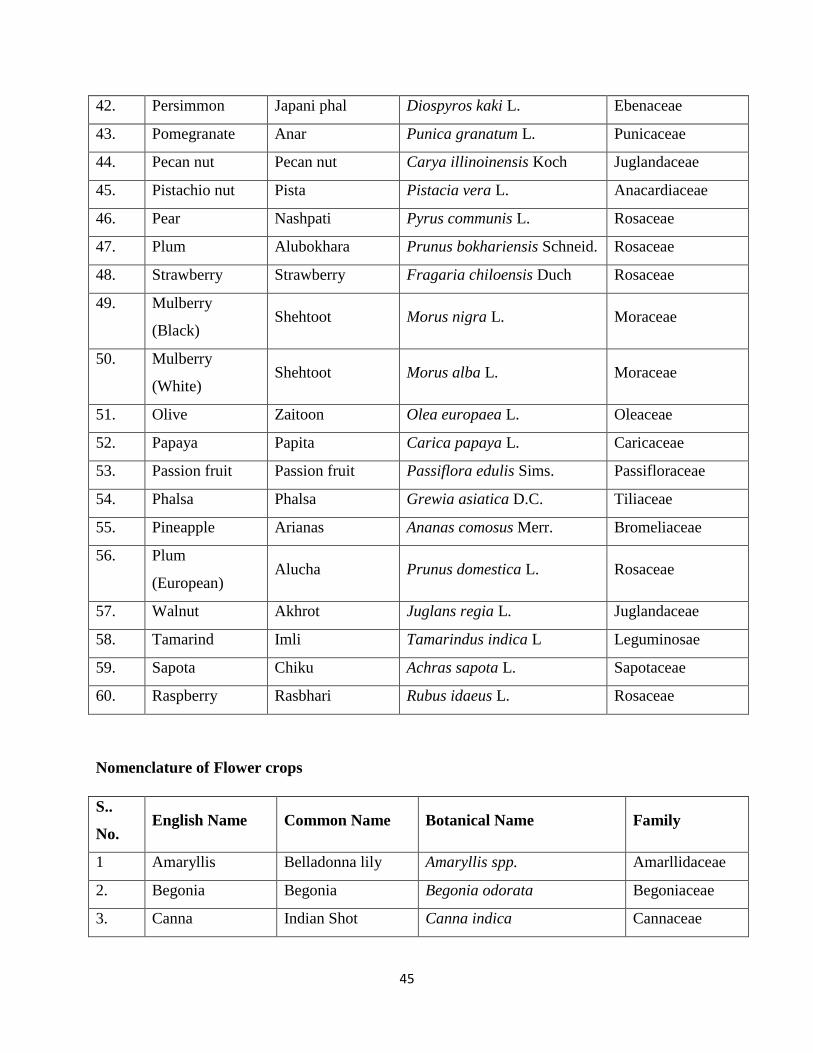
42. Persimmon Japani phal Diospyros kaki L. Ebenaceae
43. Pomegranate Anar Punica granatum L. Punicaceae
44. Pecan nut Pecan nut Carya illinoinensis Koch Juglandaceae
45. Pistachio nut Pista Pistacia vera L. Anacardiaceae
46. Pear Nashpati Pyrus communis L. Rosaceae
47. Plum Alubokhara Prunus bokhariensis Schneid. Rosaceae
48. Strawberry Strawberry Fragaria chiloensis Duch Rosaceae
49. Mulberry
(Black) Shehtoot Morus nigra L. Moraceae
50. Mulberry
(White) Shehtoot Morus alba L. Moraceae
51. Olive Zaitoon Olea europaea L. Oleaceae
52. Papaya Papita Carica papaya L. Caricaceae
53. Passion fruit Passion fruit Passiflora edulis Sims. Passifloraceae
54. Phalsa Phalsa Grewia asiatica D.C. Tiliaceae
55. Pineapple Arianas Ananas comosus Merr. Bromeliaceae
56. Plum
(European) Alucha Prunus domestica L. Rosaceae
57. Walnut Akhrot Juglans regia L. Juglandaceae
58. Tamarind Imli Tamarindus indica L Leguminosae
59. Sapota Chiku Achras sapota L. Sapotaceae
60. Raspberry Rasbhari Rubus idaeus L. Rosaceae
Nomenclature of Flower crops
S..
No. English Name Common Name Botanical Name Family
1 Amaryllis Belladonna lily Amaryllis spp. Amarllidaceae
2. Begonia Begonia Begonia odorata Begoniaceae
3. Canna Indian Shot Canna indica Cannaceae
46
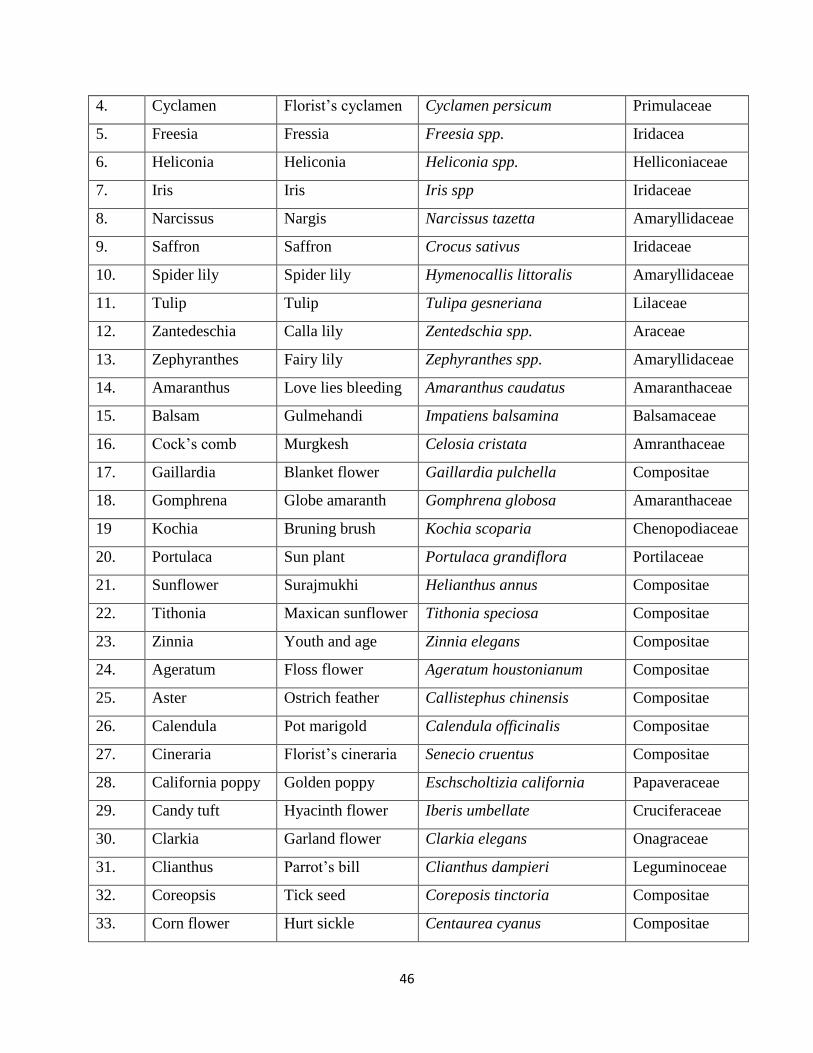
4. Cyclamen Florist‘s cyclamen Cyclamen persicum Primulaceae
5. Freesia Fressia Freesia spp. Iridacea
6. Heliconia Heliconia Heliconia spp. Helliconiaceae
7. Iris Iris Iris spp Iridaceae
8. Narcissus Nargis Narcissus tazetta Amaryllidaceae
9. Saffron Saffron Crocus sativus Iridaceae
10. Spider lily Spider lily Hymenocallis littoralis Amaryllidaceae
11. Tulip Tulip Tulipa gesneriana Lilaceae
12. Zantedeschia Calla lily Zentedschia spp. Araceae
13. Zephyranthes Fairy lily Zephyranthes spp. Amaryllidaceae
14. Amaranthus Love lies bleeding Amaranthus caudatus Amaranthaceae
15. Balsam Gulmehandi Impatiens balsamina Balsamaceae
16. Cock‘s comb Murgkesh Celosia cristata Amranthaceae
17. Gaillardia Blanket flower Gaillardia pulchella Compositae
18. Gomphrena Globe amaranth Gomphrena globosa Amaranthaceae
19 Kochia Bruning brush Kochia scoparia Chenopodiaceae
20. Portulaca Sun plant Portulaca grandiflora Portilaceae
21. Sunflower Surajmukhi Helianthus annus Compositae
22. Tithonia Maxican sunflower Tithonia speciosa Compositae
23. Zinnia Youth and age Zinnia elegans Compositae
24. Ageratum Floss flower Ageratum houstonianum Compositae
25. Aster Ostrich feather Callistephus chinensis Compositae
26. Calendula Pot marigold Calendula officinalis Compositae
27. Cineraria Florist‘s cineraria Senecio cruentus Compositae
28. California poppy Golden poppy Eschscholtizia california Papaveraceae
29. Candy tuft Hyacinth flower Iberis umbellate Cruciferaceae
30. Clarkia Garland flower Clarkia elegans Onagraceae
31. Clianthus Parrot‘s bill Clianthus dampieri Leguminoceae
32. Coreopsis Tick seed Coreposis tinctoria Compositae
33. Corn flower Hurt sickle Centaurea cyanus Compositae
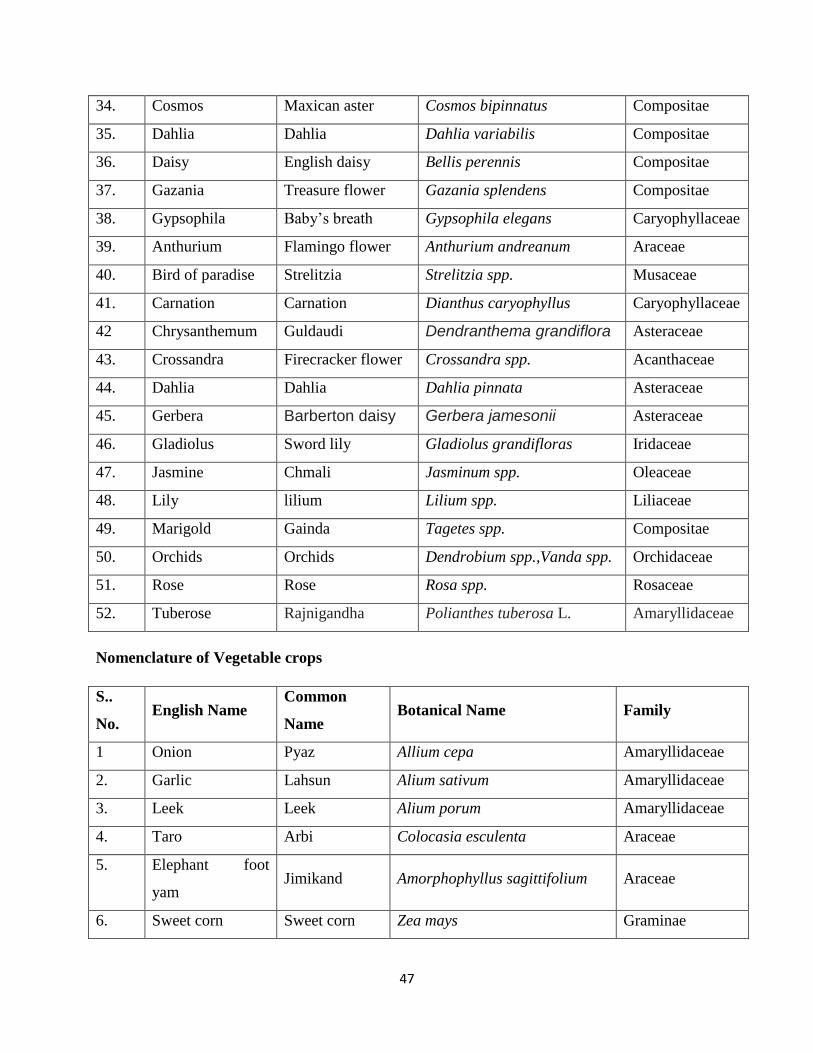
47
34. Cosmos Maxican aster Cosmos bipinnatus Compositae
35. Dahlia Dahlia Dahlia variabilis Compositae
36. Daisy English daisy Bellis perennis Compositae
37. Gazania Treasure flower Gazania splendens Compositae
38. Gypsophila Baby‘s breath Gypsophila elegans Caryophyllaceae
39. Anthurium Flamingo flower Anthurium andreanum Araceae
40. Bird of paradise Strelitzia Strelitzia spp. Musaceae
41. Carnation Carnation Dianthus caryophyllus Caryophyllaceae
42 Chrysanthemum Guldaudi Dendranthema grandiflora Asteraceae
43. Crossandra Firecracker flower Crossandra spp. Acanthaceae
44. Dahlia Dahlia Dahlia pinnata Asteraceae
45. Gerbera Barberton daisy Gerbera jamesonii Asteraceae
46. Gladiolus Sword lily Gladiolus grandifloras Iridaceae
47. Jasmine Chmali Jasminum spp. Oleaceae
48. Lily lilium Lilium spp. Liliaceae
49. Marigold Gainda Tagetes spp. Compositae
50. Orchids Orchids Dendrobium spp.,Vanda spp. Orchidaceae
51. Rose Rose Rosa spp. Rosaceae
52. Tuberose Rajnigandha Polianthes tuberosa L. Amaryllidaceae
Nomenclature of Vegetable crops
S..
No. English Name
Common
Name Botanical Name Family
1 Onion Pyaz Allium cepa Amaryllidaceae
2. Garlic Lahsun Alium sativum Amaryllidaceae
3. Leek Leek Alium porum Amaryllidaceae
4. Taro Arbi Colocasia esculenta Araceae
5. Elephant foot
yam Jimikand Amorphophyllus sagittifolium Araceae
6. Sweet corn Sweet corn Zea mays Graminae
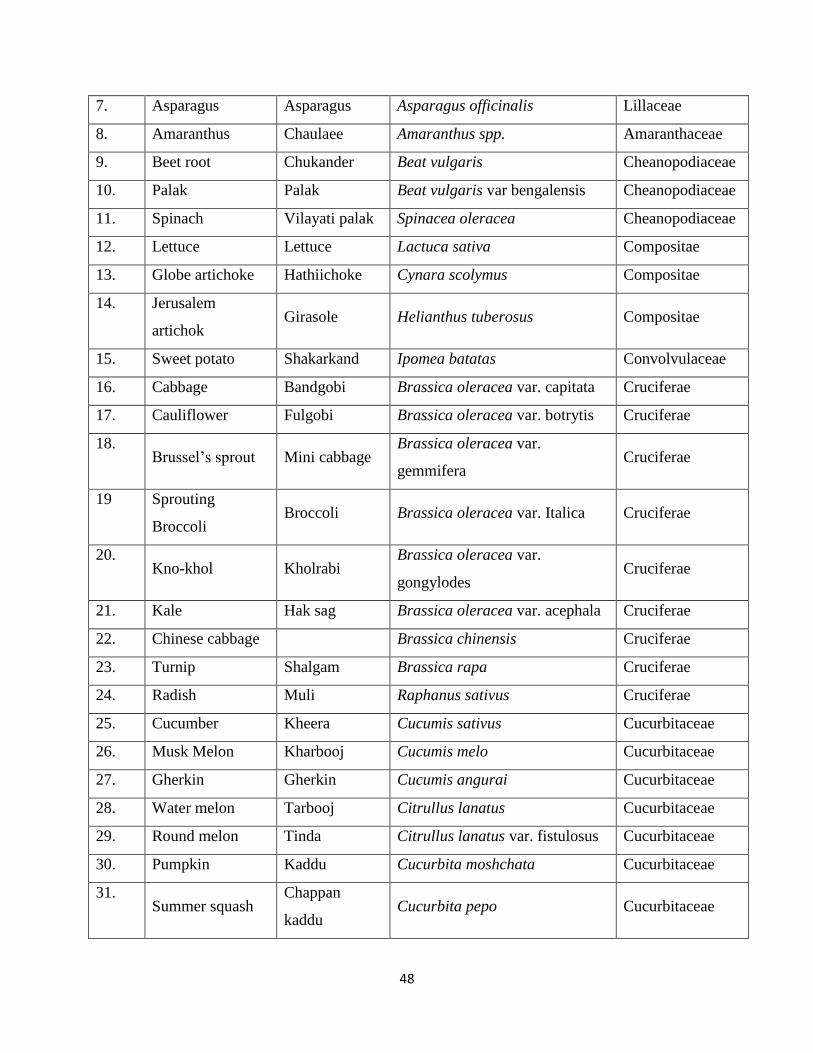
48
7. Asparagus Asparagus Asparagus officinalis Lillaceae
8. Amaranthus Chaulaee Amaranthus spp. Amaranthaceae
9. Beet root Chukander Beat vulgaris Cheanopodiaceae
10. Palak Palak Beat vulgaris var bengalensis Cheanopodiaceae
11. Spinach Vilayati palak Spinacea oleracea Cheanopodiaceae
12. Lettuce Lettuce Lactuca sativa Compositae
13. Globe artichoke Hathiichoke Cynara scolymus Compositae
14. Jerusalem
artichok Girasole Helianthus tuberosus Compositae
15. Sweet potato Shakarkand Ipomea batatas Convolvulaceae
16. Cabbage Bandgobi Brassica oleracea var. capitata Cruciferae
17. Cauliflower Fulgobi Brassica oleracea var. botrytis Cruciferae
18. Brussel‘s sprout Mini cabbage
Brassica oleracea var.
gemmifera Cruciferae
19 Sprouting
Broccoli Broccoli Brassica oleracea var. Italica Cruciferae
20. Kno-khol Kholrabi
Brassica oleracea var.
gongylodes Cruciferae
21. Kale Hak sag Brassica oleracea var. acephala Cruciferae
22. Chinese cabbage Brassica chinensis Cruciferae
23. Turnip Shalgam Brassica rapa Cruciferae
24. Radish Muli Raphanus sativus Cruciferae
25. Cucumber Kheera Cucumis sativus Cucurbitaceae
26. Musk Melon Kharbooj Cucumis melo Cucurbitaceae
27. Gherkin Gherkin Cucumis angurai Cucurbitaceae
28. Water melon Tarbooj Citrullus lanatus Cucurbitaceae
29. Round melon Tinda Citrullus lanatus var. fistulosus Cucurbitaceae
30. Pumpkin Kaddu Cucurbita moshchata Cucurbitaceae
31. Summer squash
Chappan
kaddu Cucurbita pepo Cucurbitaceae
49
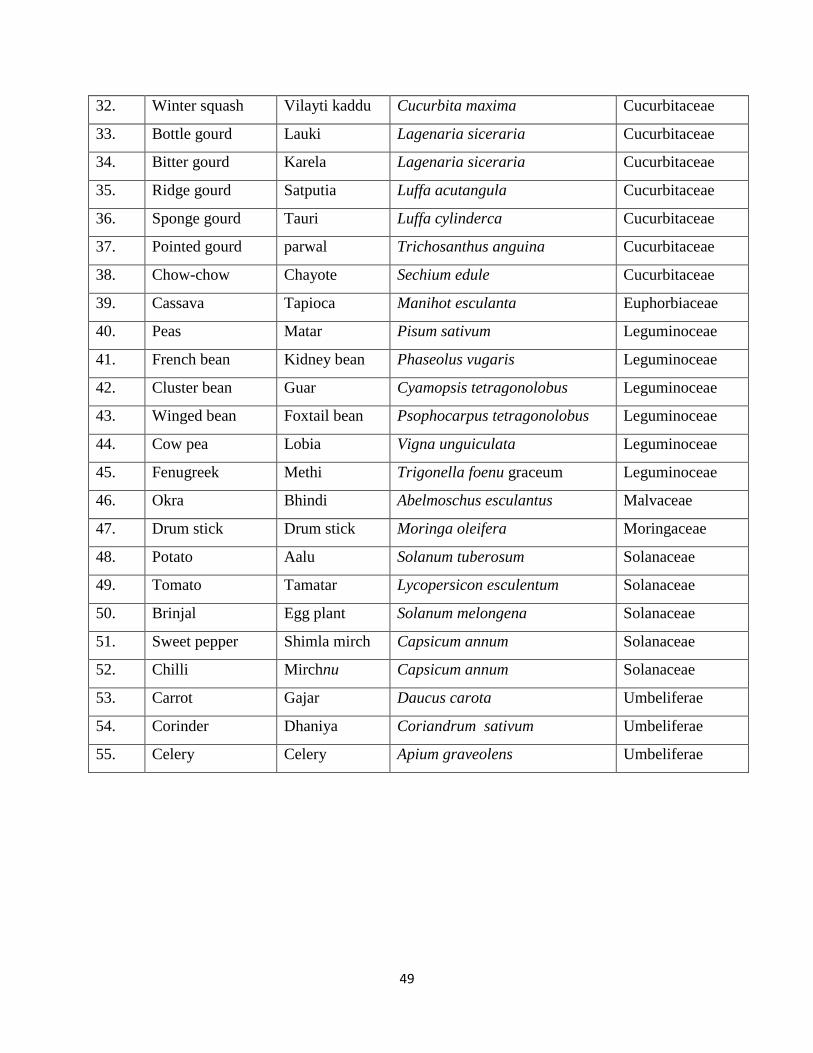
32. Winter squash Vilayti kaddu Cucurbita maxima Cucurbitaceae
33. Bottle gourd Lauki Lagenaria siceraria Cucurbitaceae
34. Bitter gourd Karela Lagenaria siceraria Cucurbitaceae
35. Ridge gourd Satputia Luffa acutangula Cucurbitaceae
36. Sponge gourd Tauri Luffa cylinderca Cucurbitaceae
37. Pointed gourd parwal Trichosanthus anguina Cucurbitaceae
38. Chow-chow Chayote Sechium edule Cucurbitaceae
39. Cassava Tapioca Manihot esculanta Euphorbiaceae
40. Peas Matar Pisum sativum Leguminoceae
41. French bean Kidney bean Phaseolus vugaris Leguminoceae
42. Cluster bean Guar Cyamopsis tetragonolobus Leguminoceae
43. Winged bean Foxtail bean Psophocarpus tetragonolobus Leguminoceae
44. Cow pea Lobia Vigna unguiculata Leguminoceae
45. Fenugreek Methi Trigonella foenu graceum Leguminoceae
46. Okra Bhindi Abelmoschus esculantus Malvaceae
47. Drum stick Drum stick Moringa oleifera Moringaceae
48. Potato Aalu Solanum tuberosum Solanaceae
49. Tomato Tamatar Lycopersicon esculentum Solanaceae
50. Brinjal Egg plant Solanum melongena Solanaceae
51. Sweet pepper Shimla mirch Capsicum annum Solanaceae
52. Chilli Mirchnu Capsicum annum Solanaceae
53. Carrot Gajar Daucus carota Umbeliferae
54. Corinder Dhaniya Coriandrum sativum Umbeliferae
55. Celery Celery Apium graveolens Umbeliferae
Related Documents