The Full Story: A Cheap And Sturdy Work Bench For About $20 In This Article: The Materials Cutting The OSB Cutting The Legs Assembling The Side Frames Assembling The End Rails Assemb ling The Top and She lf Tools and Materials Related Articles: Index of Workshop Articles Building A Shelf Unit Installing Electrical Outlets on a Work Bench Skill Level: 2 (Basic) Time Taken: About 2 Hours By Bruce W. Maki , Editor T he Mater ials: The materials used for this project: Four 8' 2x4's One partial 2x4, about 6' long. Two large pieces of OSB (Oriented Strand Board). I used scraps recovered from job s ites. One piece was 7/16" thick, and one just happened to be 5/8" thick. 3" Deck Screws 1-5/8" Deck Screws Note on OSB Thickness: I have made several work benches like this one. Most have used 7/16" thick OSB for the top and bott om shelves . Heavier OS B won't hurt, of course, but just costs more with questionable benefit. I would never use 1/4" OSB for a work bench. It just is not strong enough, and is not much cheaper than 7/ 16" OSB. Cutting The OSB: Building A Basic Work Bench ht tp://www.h am m erz one.com /archives/workshop/bench/below20xl.ht m l 1 of 8 7/1/2008 3:29 PM

Welcome message from author
This document is posted to help you gain knowledge. Please leave a comment to let me know what you think about it! Share it to your friends and learn new things together.
Transcript

8/6/2019 FULL_Building a Basic Work Bench
http://slidepdf.com/reader/full/fullbuilding-a-basic-work-bench 1/8
The Full Story:
A Cheap And Sturdy Work BenchFor About $20
In This Article:
The Materials
Cutting The OSB
Cutting The Legs
Assembling The Side Frames
Assembling The End Rails
Assembling The Top and Shelf
Tools and Materials
Related Articles:
Index of Workshop Articles
Building A Shelf Unit
Installing Electrical Outlets on a Work
Bench
Skill Level: 2 (Basic) Time Taken: About 2 Hours
By Bruce W. Maki, Editor
The Materials:
The materials used for this project:
Four 8' 2x4'sOne partial 2x4, about 6' long.Two large pieces of OSB (Oriented Strand Board). I usedscraps recovered from job sites. One piece was 7/16" thick,and one just happened to be 5/8" thick.3" Deck Screws1-5/8" Deck Screws
Note on OSB Thickness: I have made several work benches like this one. Most have used7/16" thick OSB for the top and bottom shelves. Heavier OSB won't hurt, of course, but justcosts more with questionable benefit.
I would never use 1/4" OSB for a work bench. It just is not strong enough, and is not muchcheaper than 7/16" OSB.
Cutting The OSB:
ing A Basic Work Bench http://www.hammerzone.com/archives/workshop/bench/below
7/1/2008

8/6/2019 FULL_Building a Basic Work Bench
http://slidepdf.com/reader/full/fullbuilding-a-basic-work-bench 2/8
The first thing I did was to lay some 2x4's across two saw horses andplace the OSB on top.
I often use a 4' level for drawing lines. This method is easier andmore precise than using a chalk line.
The level used here is a product called a "Tri-Level" from Sears, which cost about $15. One
edge is triangular-shaped and has a ruler scale.
I cut the OSB to the desired width. In this case, the smallest of thetwo scraps of OSB was about 26" x 48", so my goal was to maketwo pieces the same size.
If I was using a new, full sheet of OSB, (that is, if I ran out of plywood scraps), I would cut two 24" x 48" pieces from the 4' x 8'panel, leaving enough for another work bench. Many stores sell 4'x 4' panels and 2' x 4' panels.
Cutting The 2x4's:
I used a power miter saw to cut the 2x4's, because it is faster, easier,and safer than using a circular saw. This tool is the best $150 I haveever spent.
For laying out the cuts I used a tape measure, a red pen and a"speed square".
Cutting The Legs:
ing A Basic Work Bench http://www.hammerzone.com/archives/workshop/bench/below
7/1/2008
8/6/2019 FULL_Building a Basic Work Bench
http://slidepdf.com/reader/full/fullbuilding-a-basic-work-bench 3/8
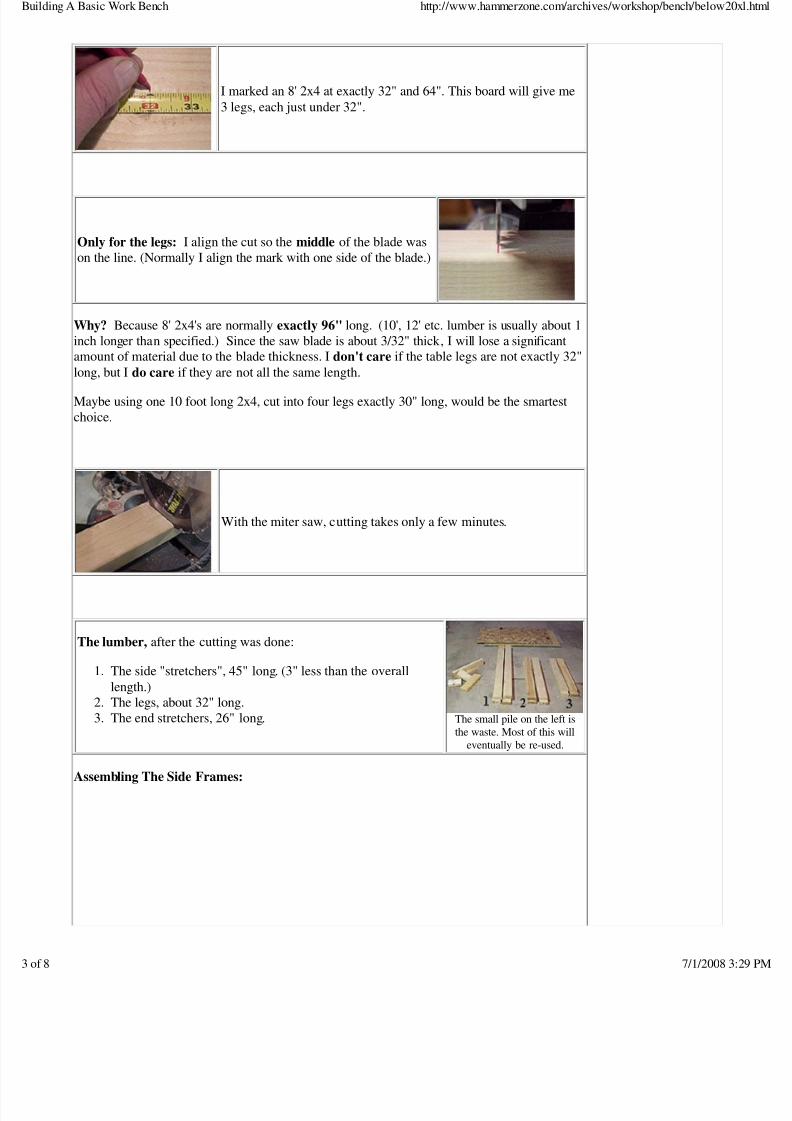
I marked an 8' 2x4 at exactly 32" and 64". This board will give me3 legs, each just under 32".
Only for the legs: I align the cut so the middle of the blade wason the line. (Normally I align the mark with one side of the blade.)
Why? Because 8' 2x4's are normally exactly 96" long. (10', 12' etc. lumber is usually about 1inch longer than specified.) Since the saw blade is about 3/32" thick, I will lose a significantamount of material due to the blade thickness. I don't care if the table legs are not exactly 32"
long, but I do care if they are not all the same length.
Maybe using one 10 foot long 2x4, cut into four legs exactly 30" long, would be the smartestchoice.
With the miter saw, cutting takes only a few minutes.
The lumber, after the cutting was done:
The side "stretchers", 45" long. (3" less than the overalllength.)
1.
The legs, about 32" long.2.The end stretchers, 26" long.3. The small pile on the left is
the waste. Most of this will
eventually be re-used.
Assembling The Side Frames:
ing A Basic Work Bench http://www.hammerzone.com/archives/workshop/bench/below
7/1/2008

8/6/2019 FULL_Building a Basic Work Bench
http://slidepdf.com/reader/full/fullbuilding-a-basic-work-bench 4/8
The overall dimensions of the frame:
I marked the legs 6" above the floor.
The sides are laid on top of the legs,forming a rectangle. The lower sidestretcher is aligned with the red linementioned above.
I arranged the pieces so the cornerswere close to being square.
Then I drilled one hole at each corner.
I drove one 3" deck screw into each corner.
I checked the diagonal measurements.
ing A Basic Work Bench http://www.hammerzone.com/archives/workshop/bench/below
7/1/2008

8/6/2019 FULL_Building a Basic Work Bench
http://slidepdf.com/reader/full/fullbuilding-a-basic-work-bench 5/8
They were within 1/8". Close, but notgood enough for me.
So I tapped the frame lightly, to shift it alittle. I held the lower part down withmy foot.
The squared-up side frame.
Then I drove in three more screws foreach joint.
Due to poor planning, I almost ran out of 3" screws, so I used some 2-1/2" Ardox(spiral) nails.
Assembling The Ends:
After the side frames were completed, I turnedthem over and stood an end stretcher upright,and then fastened it with deck screws. I usedthe Speed Square to maintain a right angle.
The side with two end stretchers attached. Theother side looked exactly the same.
Assembling The Two Halves:
I turned each half upside-down and placedthem together.
I used a Quick-Grip clamp to hold thelumber while driving the deck screws.
ing A Basic Work Bench http://www.hammerzone.com/archives/workshop/bench/below
7/1/2008

8/6/2019 FULL_Building a Basic Work Bench
http://slidepdf.com/reader/full/fullbuilding-a-basic-work-bench 6/8
Then I flipped the unit over andconnected the top components.
The completed frame.
Details: Note how the corners are joined. Thistype of over-lapping 2x4 joint is quite strong.Pre-drilling the holes helps prevent splittingof the wood, which is common when nailed orscrewed near the end.
Installing The Shelves:
I placed the top piece of OSB on theframe and attached it with 1-5/8" deck screws. I spaced the screws about 8"apart.
An aerial view.
The work bench with the top shelf attached.
The bottom shelf required a notch at each corner, to fit around the legs.
The notches are a little bigger than 3" x 5".
ing A Basic Work Bench http://www.hammerzone.com/archives/workshop/bench/below
7/1/2008

8/6/2019 FULL_Building a Basic Work Bench
http://slidepdf.com/reader/full/fullbuilding-a-basic-work-bench 7/8
Note the orientation of the notches: The 5"dimension is along the long side of the panel.
I tilted the OSB panel to get it in place. Fortunatelyit fit properly on the first try. In the past I have hadto cut the notches slightly larger because the shelf would not fit the first time. Cutting them 1/8" to 1/4"bigger seems to be a fair compromise.
The bottom shelf was also attached with 1-5/8" deck screws.
The completed work bench.
This is the 8th work bench I have built using this design. Every one has been a different size,because each was made using materials on hand. Typically the dimensions of the plywood
shelves dictates the work bench size.
One has been narrow, only 18" wideOne has been quite long, 68" x 24", to support a wood lathe that weighs 150 pounds.This bench has extra stretchers between the side rails.Several have been made entirely of recycled lumber.One bench used recycled 2x4's for the top, instead of plywood or OSB.I routinely stand on these workbenches to reach lumber stored overhead. I find thedesign to be the sturdiest I have seen, for the cost and level of simplicity.I believe this structure is adequate for standing on because: 1.) The weight is distributedon the equivalent of four studs, and 2.) 7/16" OSB is acceptable for roof sheathing whenthe trusses are spaced 24" on center. The surface is a little springy, but it will certainlyhold the weight of a typical person.On one of these benches I installed two electrical outlets. View that article.
ing A Basic Work Bench http://www.hammerzone.com/archives/workshop/bench/below
7/1/2008

8/6/2019 FULL_Building a Basic Work Bench
http://slidepdf.com/reader/full/fullbuilding-a-basic-work-bench 8/8
Tools Used:
Circular Saw
Cordless Drill/Driver
Hammer, Tape Measure
4' Level or Chalk Line
Jig Saw (or Hand Saw)
Power Miter Saw (optional)
Materials Used:
Lumber, 2x4x8', (Qty: 5)
OSB, About ½ Sheet
Deck Screws, 3", 1-5/8"
Back To Top Of Page
Before You Hurt Yourself, Read our Disclaimer.
Search Page
Home What's New Project Archives H.I. World
Rants Contact Us
Copyright © 1999, 2005 HammerZone.com
Written December 3, 1999Revised January 4, 2005
ing A Basic Work Bench http://www.hammerzone.com/archives/workshop/bench/below
Related Documents


