1 IBM Rochester Systems Lab Services PowerHA Tools for IBM i Full System FlashCopy Manager Installation and Users Guide June 16, 2020June 27, 2019April 16, 2019January 21, 2019 Version 4.54

Welcome message from author
This document is posted to help you gain knowledge. Please leave a comment to let me know what you think about it! Share it to your friends and learn new things together.
Transcript
1
IBM Rochester Systems Lab Services
PowerHA Tools for IBM i
Full System FlashCopy
Manager
Installation and Users Guide
June 16, 2020June 27, 2019April 16, 2019January 21, 2019
Version 4.54

2
Introduction ................................................................................................................................................ 16
What’s new in 4.2 ................................................................................................................................................................ 17
What’s new in 4.3 ................................................................................................................................................................ 18
What’s new in 4.4 ................................................................................................................................................................ 18
What’s new in 4.5 ................................................................................................................................................................ 19
Planning .............................................................................................................................................................................. 20
Requirements ...................................................................................................................................................................... 20
Controlling LPAR(s) Requirements .................................................................................................................................... 21
Source LPAR Requirements ................................................................................................................................................ 22
Target LPAR Requirements ................................................................................................................................................ 23
Running FSFC jobs in another subsystem .......................................................................................................................... 23
Clustering Security Requirements ....................................................................................................................................... 24
Requirement to coordinate QTIME between managing partitions ..................................................................................... 24
Setting up Full System Flash Copy............................................................................................................ 26
Considerations .................................................................................................................................................................... 26 System name vs. LPAR name ........................................................................................................................................ 26 System serial number and software licensing ................................................................................................................ 26 IP addresses .................................................................................................................................................................... 26 Clustering ....................................................................................................................................................................... 26 Source LPAR Communication Agent (non-PVI) ........................................................................................................... 27 Credentials ..................................................................................................................................................................... 27 LPAR date and time ....................................................................................................................................................... 27 Communications ports.................................................................................................................................................... 28 Remote FlashCopy ......................................................................................................................................................... 28 Object Save Timestamps on Source LPAR are not Updated ......................................................................................... 29
Incremental Backups ................................................................................................................................................. 29 Journal Receiver Management .................................................................................................................................. 29
DS8K SafeGuarded Copies ............................................................................................................................................ 30 Physical-Virtual Isolation (PVI) for Production LPARs ................................................................................................ 30
Memory Flush / Quiesce ........................................................................................................................................... 30 Startup Programs ....................................................................................................................................................... 30 Autostart Entries ........................................................................................................................................................ 31 BRMS Considerations ............................................................................................................................................... 31 Logs and Joblogs ....................................................................................................................................................... 34
Live Partition Mobility (LPM) Support ......................................................................................................................... 35
FSFC Installation ............................................................................................................................................................... 36 Make the LPARs available ............................................................................................................................................. 36 Configure the External Storage Units............................................................................................................................. 36 Implement any SAN zoning required ............................................................................................................................. 36 Install IBM PowerHA Standard Edition for i on the control nodes................................................................................ 36 Set up and start clustering .............................................................................................................................................. 36 For DS8K install DSCLI on the Controlling LPARs ..................................................................................................... 37 Configure the HMCs ...................................................................................................................................................... 37 Install FSFC on Controlling and Source LPARs ............................................................................................................ 37 Setup FSFC on Controlling LPARs ............................................................................................................................... 37
Controlling LPAR startup program changes ............................................................................................................. 38 Setup FSFC on Source LPARs ....................................................................................................................................... 38
Source LPAR startup program changes ..................................................................................................................... 38
3
License information........................................................................................................................................................ 39 Change ownership of FSFC objects ............................................................................................................................... 40 Download Java Secure Channel code (JSch) ................................................................................................................. 40 Create the credentials to be used by the control nodes ................................................................................................... 40 Create a Full System Flash Copy environment .............................................................................................................. 41
Storwize Environments ............................................................................................................................................. 41 DS8K Environments .................................................................................................................................................. 43
Define Host Connections ............................................................................................................................................... 45 Storwize Host Connections ....................................................................................................................................... 46 DS8K Host Connections ............................................................................................................................................ 47
Create Copy Services Environment (CSE) Data ............................................................................................................ 49 Check the configuration details (CHKFSFLASH) ......................................................................................................... 50 Perform the flashcopy (STRFSFLASH) ........................................................................................................................ 50 Monitor the target LPAR ................................................................................................................................................ 50 Create CSE Data to perform a backup ........................................................................................................................... 51 Check the configuration details (CHKFSFLASH) ......................................................................................................... 51 Perform the flashcopy (STRFSFLASH) ........................................................................................................................ 51 Monitor the target LPAR ................................................................................................................................................ 52 Create additional CSE Data’s for other backups and LPARs ......................................................................................... 52
PVI FSFC Installation ........................................................................................................................................................ 53 Make the LPARs available ............................................................................................................................................. 53 Configure the External Storage Units............................................................................................................................. 53 Implement any SAN zoning required ............................................................................................................................. 53 Install IBM PowerHA Standard Edition for i on the control nodes................................................................................ 53 Set up and start clustering .............................................................................................................................................. 53 For DS8K install DSCLI on the Controlling LPARs ..................................................................................................... 54 Configure the CSM ........................................................................................................................................................ 54 Configure the HMCs ...................................................................................................................................................... 54 Restore FSFC on Controlling and Source LPARs.......................................................................................................... 54 Setup FSFC on Source LPARs ....................................................................................................................................... 54
Startup program changes ........................................................................................................................................... 55 WRKSTRPRSC ......................................................................................................................................................... 56
Setup FSFC on Controlling LPARs ............................................................................................................................... 58 Controlling LPAR startup program changes ............................................................................................................. 58
License information........................................................................................................................................................ 58 Change ownership of FSFC objects ............................................................................................................................... 59 Download Java Secure Channel code (JSch) ................................................................................................................. 59 Create the credentials to be used by the control nodes ................................................................................................... 60 Create a Full System Flash Copy environment .............................................................................................................. 60
Storwize Environments ............................................................................................................................................. 60 DS8K Environments .................................................................................................................................................. 62
Define Host Connections ............................................................................................................................................... 65 Storwize Host Connections ....................................................................................................................................... 65 DS8K Host Connections ............................................................................................................................................ 66
Create Copy Services Environment (CSE) Data ............................................................................................................ 67 Check the configuration details (CHKFSFLASH) ......................................................................................................... 67 Perform the flashcopy (STRFSFLASH) ........................................................................................................................ 68 Monitor the target LPAR ................................................................................................................................................ 68 Create CSE Data to perform a backup ........................................................................................................................... 68 Check the configuration details (CHKFSFLASH) ......................................................................................................... 69 Perform the flashcopy (STRFSFLASH) ........................................................................................................................ 69 Monitor the target LPAR ................................................................................................................................................ 69 Create additional CSE Data’s for other backups and LPARs ......................................................................................... 69
Updating or Upgrading Full System Flash Copy ..................................................................................... 70

4
Upgrading from a prior release .......................................................................................................................................... 70 To update the controllers: .......................................................................................................................................... 70 To update a source LPAR: ........................................................................................................................................ 71
Updating to a newer build date........................................................................................................................................... 71 To update a controller or source LPAR: .................................................................................................................... 71
Backups........................................................................................................................................................ 73
Backups with BRMS ............................................................................................................................................................ 73 Overview ........................................................................................................................................................................ 73 Monitoring Control Group Status in Batch Restricted State .......................................................................................... 74 Monitoring Control Group for Abnormal End ............................................................................................................... 74 BRMS Network Feature ................................................................................................................................................. 74 Moving QUSRBRM ....................................................................................................................................................... 74
Partial Changes Only (*CHGONLY) ........................................................................................................................ 75 Incremental Backups ...................................................................................................................................................... 75 Media Device Configuration .......................................................................................................................................... 76 Restricted State TCP/IP .................................................................................................................................................. 77 Locking the QUSRBRM Library ................................................................................................................................... 77 Restricting BRMS by Media Class ................................................................................................................................ 78 Control Group Modifications ......................................................................................................................................... 79 System Policy ................................................................................................................................................................. 79 Duplication and Maintenance ......................................................................................................................................... 79 Recoveries and Reports .................................................................................................................................................. 80 BRMS Backup Logs ...................................................................................................................................................... 81
Recovery Point FlashCopy ......................................................................................................................... 82
Commands ................................................................................................................................................... 83
ADDCSECRDE - Add CSE Credential Entry ..................................................................................................................... 83
CHGBLDFLG – Change Build Flags ................................................................................................................................. 84
CHGBRMSOBJ - Change BRMS Object Attributes ............................................................................................................ 85
CHGCSECRDE - Change CSE Credential Entry ............................................................................................................... 87
CHGCSEDTA – Change CSE Data .................................................................................................................................... 87
CHKFSFLASH - Check Full System Flash ......................................................................................................................... 87
CHKRCYPNT – Check Recovery Point Flash .................................................................................................................... 89
CLNICSMLOG – Clean ICSM Log ..................................................................................................................................... 89
CLRDDD – Clear Device Data Domain ............................................................................................................................. 90
CNLFSFLASH – Cancel Full System FlashCopy ............................................................................................................... 90
CPYCSEDTA – Copy CSE Data ......................................................................................................................................... 90
CRTCSEDTA - Create Copy Services Environment Data .................................................................................................. 91
DLTCSEDTA - Delete CSE Data ...................................................................................................................................... 101
DSPCSEDTA - Display Copy Services Data .................................................................................................................... 101
DSPDDDLCK - Display DDD lock holder ....................................................................................................................... 102
ENDFSFLASH - End Full System Flash ........................................................................................................................... 102
IPLLPAR – IPL Partition .................................................................................................................................................. 103
5
LOGMSG – Log Message ................................................................................................................................................. 105
PRTCSE – Print CSE Information .................................................................................................................................... 106
RLSCSELCK - Release Copy Services Lock ..................................................................................................................... 107
RMVCSECRDE - Remove CSE Credential Entry ............................................................................................................. 107
RSMFSFLASH – Resume Full System FlashCopy ............................................................................................................ 107
RSTDDD – Restore Toolkit Device Data Domains .......................................................................................................... 107
RTVINF - Retrieve ICSM Information .............................................................................................................................. 108
RUNDSCMD - Run DS Scripted Command ...................................................................................................................... 115
RUNLPARCMD - Run command based on LPAR/SRLN .................................................................................................. 117
RUNSVCCMD - Run SVC Command ............................................................................................................................... 117
SAVDDD – Save Toolkit Device Data Domains ............................................................................................................... 118
SETCSELCK - Set Copy Services Lock ............................................................................................................................. 118
SETDDDLCK - Set DDD lock holder ............................................................................................................................... 118
SETUPFSFC - Set up IBM Pwr HA tools – FSFC ............................................................................................................ 118
STRFSFLASH - Start Full System Flash ........................................................................................................................... 120
STRGMTGTFL - Start a GMIR Target Flash ................................................................................................................... 121
SWRCYPNT – Switch Recovery Point Copy ..................................................................................................................... 121
VIEWLOG - View Log File ............................................................................................................................................... 121
WRKCSE - Work with Copy Services Environment .......................................................................................................... 122
WRKCSECRDL - Work with CSE Credential List ............................................................................................................ 123
WRKCSEDTA -Work with IBM i CSE Data ..................................................................................................................... 123
WRKSTRPRSC -Work with Startup Resources ................................................................................................................. 123
ZAPDDDLCK - Zap DDD lock ........................................................................................................................................ 125
E 126
xit Program and Points............................................................................................................................. 127
6
6
Introduction
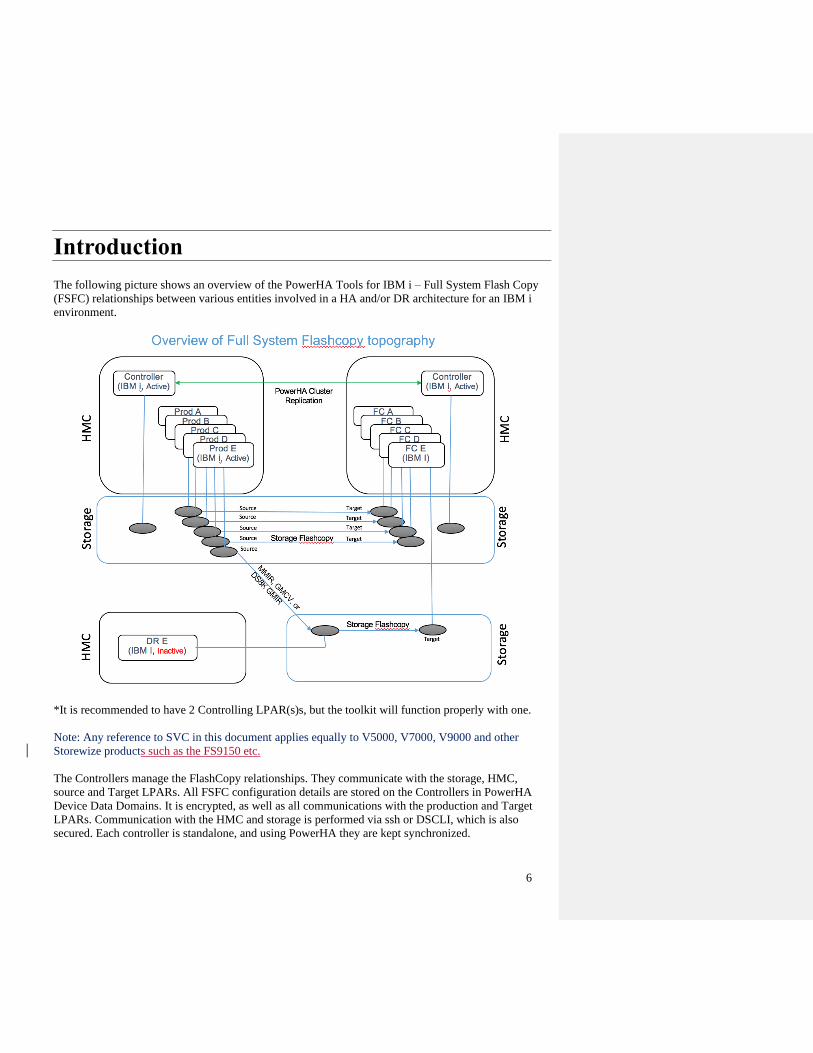
The following picture shows an overview of the PowerHA Tools for IBM i – Full System Flash Copy
(FSFC) relationships between various entities involved in a HA and/or DR architecture for an IBM i
environment.
*It is recommended to have 2 Controlling LPAR(s)s, but the toolkit will function properly with one.
Note: Any reference to SVC in this document applies equally to V5000, V7000, V9000 and other
Storewize products such as the FS9150 etc.
The Controllers manage the FlashCopy relationships. They communicate with the storage, HMC,
source and Target LPARs. All FSFC configuration details are stored on the Controllers in PowerHA
Device Data Domains. It is encrypted, as well as all communications with the production and Target
LPARs. Communication with the HMC and storage is performed via ssh or DSCLI, which is also
secured. Each controller is standalone, and using PowerHA they are kept synchronized.
7
The ‘source’ LPAR is usually the production LPAR, but other LPAR’s (development, QA, etc) can also
be the ‘source’ of a Flash Copy. The toolkit will perform several actions on the Source LPAR to
prepare it for Flash Copy, such as flushing memory, holding database transaction, preparing BRMS,
etc. When the Source LPAR is suspended in preparation for Flash Copy, it cannot communicate with
the storage to trigger a FlashCopy, thus the controller is required to perform this task.
The ‘target’ LPAR is the one attached to the Flash Copy LUNs, and is usually used for backups, but
can also be utilized for data mining, UAT, or any other purpose where a nearly identical copy of the
Source LPAR is required.
Storwize products which include an SVC are supported. DS8K products are also supported. All other
storage products (for example XIV or non-IBM storage) are supported when attached to an SVC as
managed disks.
Flash Copy is a technology contained within one storage unit. Thin-provisioned / Space-efficient, full
and incremental flashcopies are supported by the FSFC Toolkit. Remote Flash Copy is possible when
using replication:
• DS8K and SVC synchronous (Metro Mirror) replication
• DS8K asynchronous (Global Mirror) replication
• SVC snapshot (Global Mirror w/Change Volumes) replication
SVC asynchronous (Global Mirror) replication without Change Volumes does not support remote Flash
Copy.
What’s new in 4.2
Full System Flash Copy was originally introduced at version 6.0 in an older family of the Copy
Services Toolkit, and continued until version 7.70. The older toolkit did not require PowerHA. In 2017
we merged the 7.70 toolkit into our main family of toolkits (PowerHA Tools for IBM i) and switched
to use the versioning sequence of that toolkit. That’s why an upgrade from 7.70 yielded version 4.2.
Some literature refers the “Version 1” and “Version 2” of the toolkit. Version 1 included all releases of
Copy Services Toolkit up to and including 7.70; Version 2 starts with 4.2.
These are the primary enhancement which were added to Version 4.2:
• Multiple Controlling LPAR(s)s for redundancy and resiliency
• All data stored and transferred is encrypted
• FlashCopy can be triggered from controlling or Source LPARs
• Simplified and improved interfaces and new commands for ease of use
• Less time required for deployment
• All communication is via IP addresses (no dependency on name resolution)
• Controller and Source toolkit code levels can be different for staging upgrades
• Improved platform for future features
8
• Integrated into same library (QZRDHASM) and release as IASP and Full System Replication
Toolkits
• Use any DS8K user profile, not just QLPAR
Significantly, 4.2 requires PowerHA Standard Edition to be installed on the Controlling LPAR(s)s.
What’s new in 4.3
Version 4.3 addressed several concerns our customers had:
• Support for more than approximately 11 FSR and FSFC CSE Data’s. We have restructured how
we use the PowerHA Device Data Domains and Cluster Resource Groups to allow the toolkit to
create more CSE Data’s. The upper limit is now in the thousands, far more than anyone would
reasonable need to have. However, since the structure has changed, it is not compatible with 4.2
DDD’s and CRG’s. Upgrading from 4.2 to 4.3 will require recreating all the environments.
• Faster BRMS transfer speeds. Prior to version 4.3 we used a savefile to move BRMS from the
flashcopy target to the source LPARs. The performance bottleneck was writing the records to
the savefile in 528 records. FSFC 4.3 utilizes virtual tape instead, which sends all of its I/O
through the IFS, and we are able to tailor the writes to 32k or 64k at a time, dramatically
increasing the transfer rates. In our lab we have seen 5-6 times faster transfer rates, even
including encrypting the data.
• Backwards compatibility. The toolkit philosophy is that the controller will be able to
communicate with a production LPAR which is at most one release behind. Thus, a 4.3
controller can communication with a 4.2 or 4.3 production LPAR.
• Additional information is gathered during DMPINF to allow for validation of installation using
just the zip file.
• Additional safeguards against the target LPAR starting the production LPAR startup program
and coming online by modifying the startup program to call QZRDENDSBS.
• Recovery Flash Point allows the user to create frequent FlashCopies of the production LPAR
for the purpose of recovery, not backups. This is a good option to create a point in time copy
which can be used to protect against ransomware, corruption, or to provide a quick and easy
way to revert to a pre-batch-processing state.
• Commands SAVDDD and RSTDDD to save and restore Toolkit device data domains.
What’s new in 4.4
Version 4.4 added limited Full System CSM support and Physical-Virtual Isolation (PVI) of the
production LPAR. This support ties into the DS8K SafeGuarded Copies feature. In addition, various
tweaks and renaming of standard FSFC and FSR concepts have changed.
The limit for the number of CSE environments (WRKCSE) was lifted from approximately 60 to over
one thousand
Customers who are not using CSM/SafeGuarded Copies or PVI and don’t need the increased number of
enivronments should stay on version 4.3.
9
In addition, many minor tweaks and defects have been addressed. Please review the FSFC Wiki for the
latest updates.
What’s new in 4.5
Version 4.5 saw the addition of a number of significant new features as well as many minor
enhancements. FSFC and FSR are better integrated.
Note that version 4.5 is not supported on IBM i 7.1 and the toolkit will be built and saved on version
7.3 – we can build for 7.2 if necessary.
The list of features includes:
Major feature enhancements:
• Full system LUN switch
• CSM support for FSFC and FSR operations
DS8K enhancements:
• Cascading flashcopies on DS8K
• Support for DS8K host and volume mapping
• GMIR ESE D-Copy support
Storwize enhancements:
• View and change SVC copy and cleaning rates
FSFC enhancements:
• Wait for incremental copy to finish (USETARGET *COPIED)
• STRFSFLASH from source LPAR to either controller
• Prompt for HMC LPAR and profile names
• Prompt for backup command
• Before FSFC ensure target not running on source LUNs
• CHK commands warn if log files > 20 MB
• WRKCSE opt 16 (LUN mapping) counts LUNs
• Allow QSTRUPPGM *NONE
• Clean up useless and confusing log entries
• CHK/STRFSFLASH checks QLPAR isn’t disabled or expired on the source
• List IP addresses that don’t match when doing remote STRFSFLASH
• CSEDTA SHUTDOWN(*NO) and RESTART(*NO) changes to *YES/*NO
• FSFC support for virtual IP
• Send FSFC Finished to QSYSOPR as program messages
10
• Support for aggregate communication lines
• Turn off DS ping in CHKFSLFLASH/STRFSFLASH
• QSTRUPPGM can be *NONE
• STRFSFLASH is aware of DS8K Hyperswap status
• Ensure target is not running on LUNs to be flashed over, if target is not to be shut down.
• CHKFSFLASH will warn if ctl.log is greater than 20 MB
• Warn or Fail if source LPAR is set to IPL to restricted state
• If ENDFSFLASH is unable to reach the source LPAR then try the IPs listed in WRKSTRPRSC
*CMN
Enhanced integration with BRMS:
• ENDFSFLASH *CLNDYNMED also cleans up functional usage authorities
• CRT/CSEDTA allows for prompting of backup and shut down commands
• Enable FSFC pause/resume for BRMS Xfer method *ALL
• BRMS *SYSBAS custom timestamps
• Monitor BRMS control groups that end abnormally
• Display control group status while in batch restricted state
• Export BRMS backup logs to the controller (or any tagged joblog)
• On BRMS transfer *CHGONLY include BRMS files QA1AZCG (Control group status) and
QA1ADXR (duplication cross reference file)
General enhancements:
• Migration of data from prior releases to 4.5
• Additional options on WRKCSEDTA
• WRKCSEDTA has more validations
• Log when explicit DDD lock commands are called
Planning
Planning for FSFC installation is part of the services engagement associated with purchasing this
product. This includes ensuring that all requirements/restrictions are followed. An overview of the
Requirements and Restrictions is included below.
Requirements
Prior to the start of installation, the services representative must ensure the following requirements have
been met:
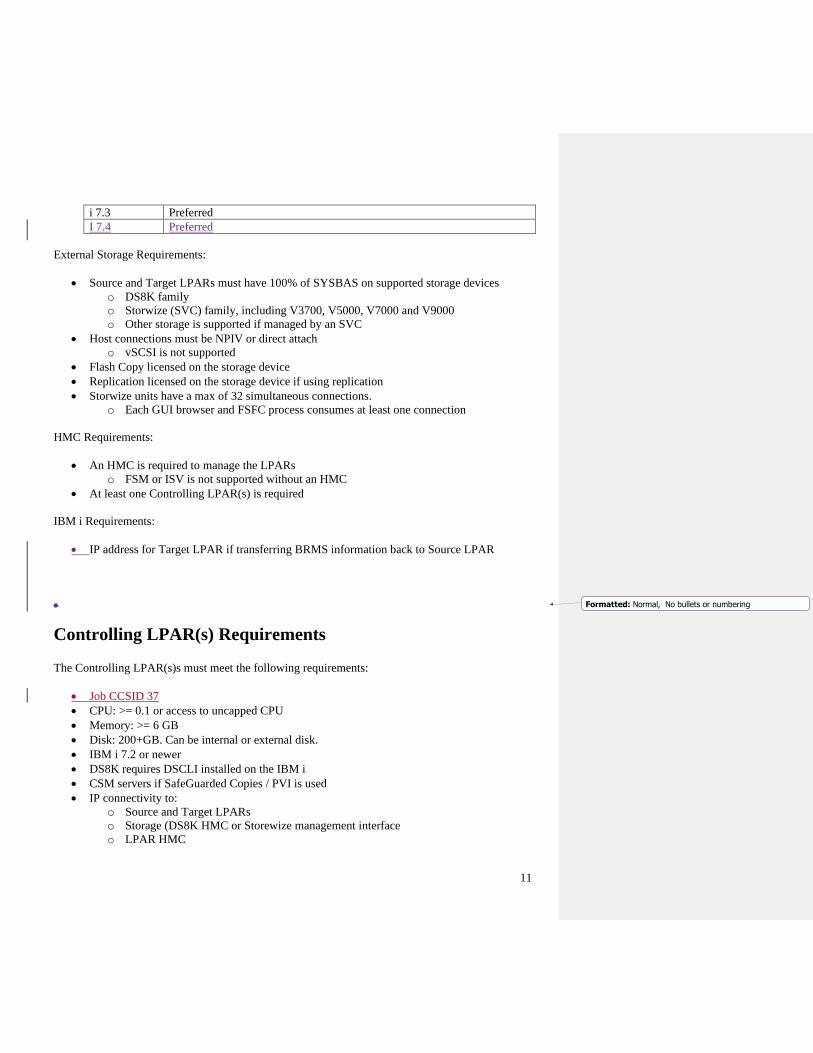
IBM i Release IBM i Copy Services Manager for Power HA on i 4.54
i 7.1 Not supported
i 7.2 Preferred
11
i 7.3 Preferred
I 7.4 Preferred
External Storage Requirements:
• Source and Target LPARs must have 100% of SYSBAS on supported storage devices
o DS8K family
o Storwize (SVC) family, including V3700, V5000, V7000 and V9000
o Other storage is supported if managed by an SVC
• Host connections must be NPIV or direct attach
o vSCSI is not supported
• Flash Copy licensed on the storage device
• Replication licensed on the storage device if using replication
• Storwize units have a max of 32 simultaneous connections.
o Each GUI browser and FSFC process consumes at least one connection
HMC Requirements:
• An HMC is required to manage the LPARs
o FSM or ISV is not supported without an HMC
• At least one Controlling LPAR(s) is required
IBM i Requirements:
• IP address for Target LPAR if transferring BRMS information back to Source LPAR
•
Controlling LPAR(s) Requirements
The Controlling LPAR(s)s must meet the following requirements:
• Job CCSID 37
• CPU: >= 0.1 or access to uncapped CPU
• Memory: >= 6 GB
• Disk: 200+GB. Can be internal or external disk.
• IBM i 7.2 or newer
• DS8K requires DSCLI installed on the IBM i
• CSM servers if SafeGuarded Copies / PVI is used
• IP connectivity to:
o Source and Target LPARs
o Storage (DS8K HMC or Storewize management interface
o LPAR HMC
Formatted: Normal, No bullets or numbering
12
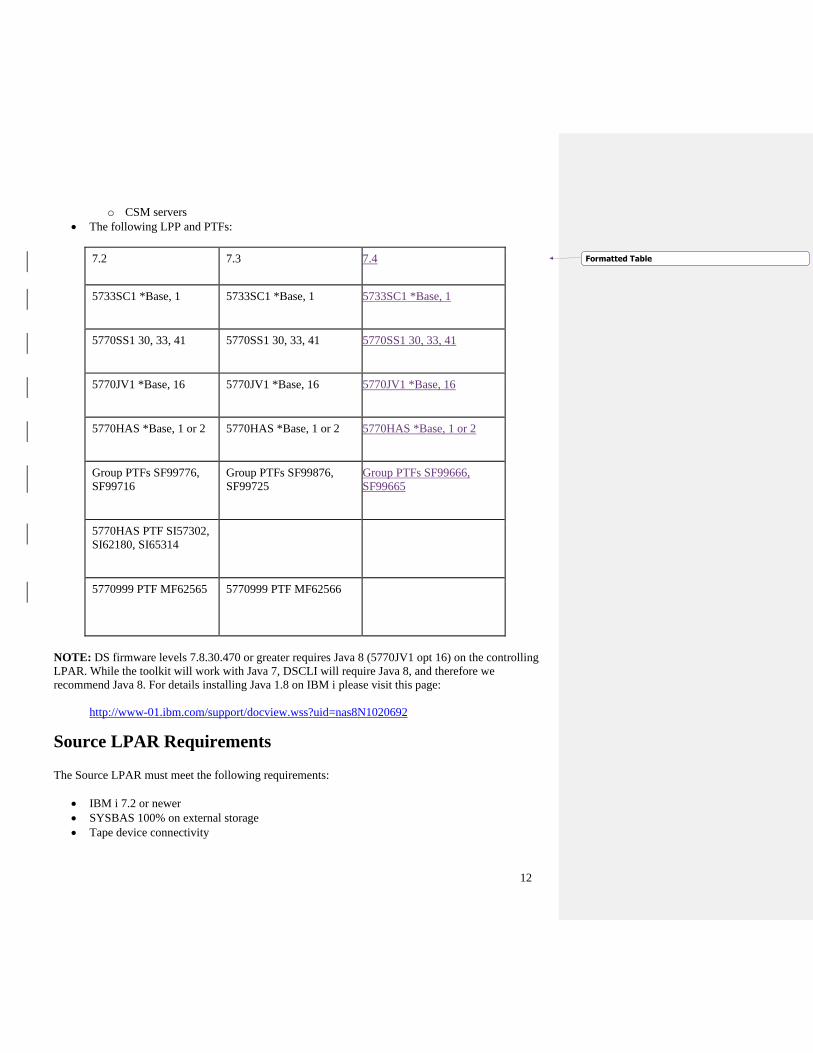
o CSM servers
• The following LPP and PTFs:
7.2 7.3 7.4
5733SC1 *Base, 1 5733SC1 *Base, 1 5733SC1 *Base, 1
5770SS1 30, 33, 41 5770SS1 30, 33, 41 5770SS1 30, 33, 41
5770JV1 *Base, 16 5770JV1 *Base, 16 5770JV1 *Base, 16
5770HAS *Base, 1 or 2 5770HAS *Base, 1 or 2 5770HAS *Base, 1 or 2
Group PTFs SF99776,
SF99716
Group PTFs SF99876,
SF99725
Group PTFs SF99666,
SF99665
5770HAS PTF SI57302,
SI62180, SI65314
5770999 PTF MF62565 5770999 PTF MF62566
NOTE: DS firmware levels 7.8.30.470 or greater requires Java 8 (5770JV1 opt 16) on the controlling
LPAR. While the toolkit will work with Java 7, DSCLI will require Java 8, and therefore we
recommend Java 8. For details installing Java 1.8 on IBM i please visit this page:
http://www-01.ibm.com/support/docview.wss?uid=nas8N1020692
Source LPAR Requirements
The Source LPAR must meet the following requirements:
• IBM i 7.2 or newer
• SYSBAS 100% on external storage
• Tape device connectivity
Formatted Table
13
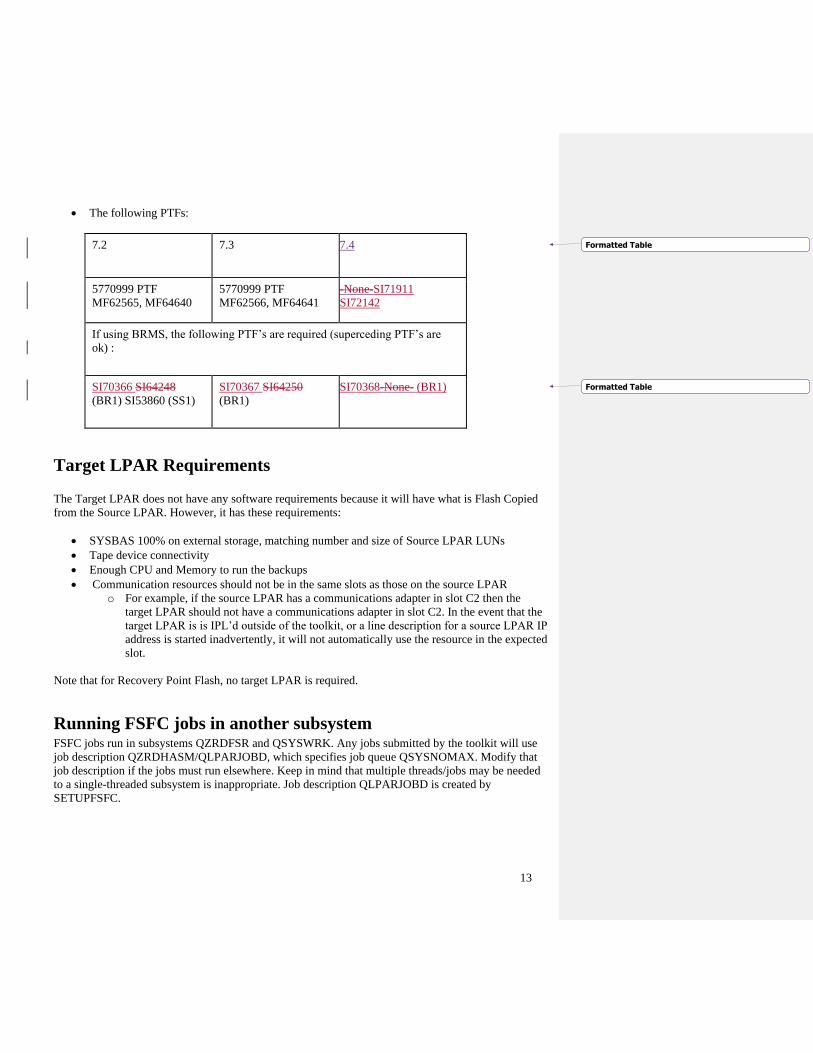
• The following PTFs:
7.2 7.3 7.4
5770999 PTF
MF62565, MF64640
5770999 PTF
MF62566, MF64641
-None-SI71911
SI72142
If using BRMS, the following PTF’s are required (superceding PTF’s are
ok) :
SI70366 SI64248
(BR1) SI53860 (SS1)
SI70367 SI64250
(BR1)
SI70368-None- (BR1)
Target LPAR Requirements
The Target LPAR does not have any software requirements because it will have what is Flash Copied
from the Source LPAR. However, it has these requirements:
• SYSBAS 100% on external storage, matching number and size of Source LPAR LUNs
• Tape device connectivity
• Enough CPU and Memory to run the backups
• Communication resources should not be in the same slots as those on the source LPAR
o For example, if the source LPAR has a communications adapter in slot C2 then the
target LPAR should not have a communications adapter in slot C2. In the event that the
target LPAR is is IPL’d outside of the toolkit, or a line description for a source LPAR IP
address is started inadvertently, it will not automatically use the resource in the expected
slot.
Note that for Recovery Point Flash, no target LPAR is required.
Running FSFC jobs in another subsystem FSFC jobs run in subsystems QZRDFSR and QSYSWRK. Any jobs submitted by the toolkit will use
job description QZRDHASM/QLPARJOBD, which specifies job queue QSYSNOMAX. Modify that
job description if the jobs must run elsewhere. Keep in mind that multiple threads/jobs may be needed
to a single-threaded subsystem is inappropriate. Job description QLPARJOBD is created by
SETUPFSFC.
Formatted Table
Formatted Table
14
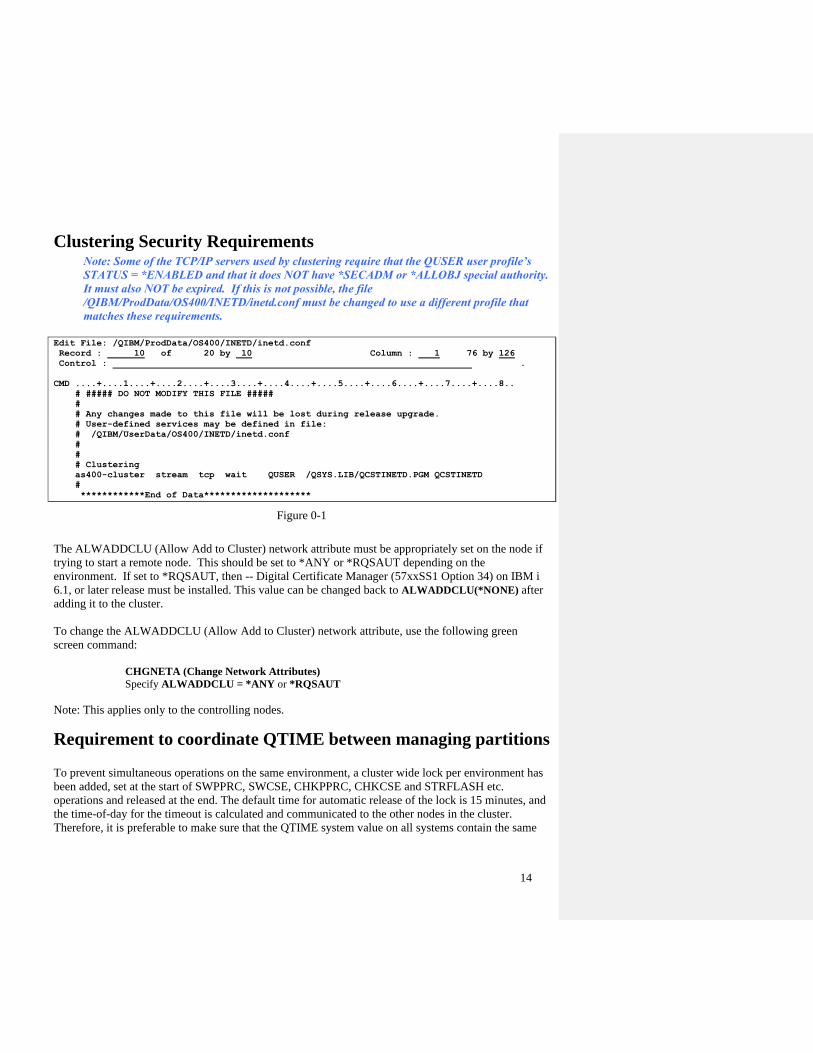
Clustering Security Requirements Note: Some of the TCP/IP servers used by clustering require that the QUSER user profile’s
STATUS = *ENABLED and that it does NOT have *SECADM or *ALLOBJ special authority.
It must also NOT be expired. If this is not possible, the file
/QIBM/ProdData/OS400/INETD/inetd.conf must be changed to use a different profile that
matches these requirements.
Edit File: /QIBM/ProdData/OS400/INETD/inetd.conf
Record : 10 of 20 by 10 Column : 1 76 by 126
Control : .
CMD ....+....1....+....2....+....3....+....4....+....5....+....6....+....7....+....8..
# ##### DO NOT MODIFY THIS FILE #####
#
# Any changes made to this file will be lost during release upgrade.
# User-defined services may be defined in file:
# /QIBM/UserData/OS400/INETD/inetd.conf
#
#
# Clustering
as400-cluster stream tcp wait QUSER /QSYS.LIB/QCSTINETD.PGM QCSTINETD
#
************End of Data********************
Figure 0-1
The ALWADDCLU (Allow Add to Cluster) network attribute must be appropriately set on the node if
trying to start a remote node. This should be set to *ANY or *RQSAUT depending on the
environment. If set to *RQSAUT, then -- Digital Certificate Manager (57xxSS1 Option 34) on IBM i
6.1, or later release must be installed. This value can be changed back to ALWADDCLU(*NONE) after
adding it to the cluster.
To change the ALWADDCLU (Allow Add to Cluster) network attribute, use the following green
screen command:
CHGNETA (Change Network Attributes)
Specify ALWADDCLU = *ANY or *RQSAUT
Note: This applies only to the controlling nodes.
Requirement to coordinate QTIME between managing partitions
To prevent simultaneous operations on the same environment, a cluster wide lock per environment has
been added, set at the start of SWPPRC, SWCSE, CHKPPRC, CHKCSE and STRFLASH etc.
operations and released at the end. The default time for automatic release of the lock is 15 minutes, and
the time-of-day for the timeout is calculated and communicated to the other nodes in the cluster.
Therefore, it is preferable to make sure that the QTIME system value on all systems contain the same

15
time-of-day. You should consider use of the Simple Network Time Protocol (SNTP) TCP server to
automate keeping the time synchronized.
Note: If systems are in different time zones or the system times are significantly different, then this
locking will work only on the local system.
16
Setting up Full System Flash Copy
Considerations At setup time, the source system will be running, and all resources required for that partition will be
known to the system. However some information about FlashCopy target node resources may not be
known until that node is activated for the first time. Some of this information can be inferred from
LPAR number and resources. The IP addresses for both the source and target should be known prior to
starting the setup.
The Controller partitions do not need to be dedicated to this purpose. They can be any other partition
available, i.e., dev, QA, etc. They need to be able to communicate with the source and target partitions
they will manage via TCP with the Full System Flash Copy tools. However, PowerHA Standard
Edition is required, and is licensed according to the number of cores used. It may be more economical
to create a small dedicated Controlling LPAR(s).
System name vs. LPAR name
The system name is stored in *SYSBAS via the CHGNETA command. Thus when the Target LPAR is
active, it sees its system name as that of the Source LPAR. The LPAR name is stored in the hosting
HMC, and is not modified during Flash Copy.
System serial number and software licensing
The serial number is stored in the hardware and if the Target LPAR is on a different system, the serial
number will be different between the source and Target LPARs. Licenses for 3rd party software that
depend upon a specific serial number will need to be adjusted after a switch. The new RTVLPARINF
command can be used to determine the current LPAR for the system. The new RUNLPARCMD
command can also be used in the startup program to make changes. Licenses for FSFC allow multiple
serial numbers and will not require adjustment. You should check with the vendors of other licensed
software to determine how to install serial-number-based licenses for their products.
The FSFC Toolkit requires a valid license for the controlling and Source LPARs. It does not check for
a license on the Target LPAR.
IP addresses
The IP addresses and subnetwork of an LPAR may need to change as part of a switchover. The IP
addresses and line descriptions for the Target LPAR must be configured on the Source LPAR so that
after a Flash Copy, they are available to the Target LPAR. The FSFC Toolkit will control which line
descriptions and IP addresses are activated on the source or Target LPARs. Prior to the Flash Copy, the
line description, TCP and IP interfaces are changed to not start with the controlling subsystem; after the
Flash Copy they are changed back to their original values. When the Target LPAR IPLs, the toolkit will
only start the specified line description and IP interface. Route entries can also be changed.
Clustering
One or two Controlling LPAR(s)s are required in a cluster. The toolkit will function with a single
controlling LPAR (i.e. a single node cluster). The cluster and device domain can have any names.
17
The cluster function allows the CSE data to be mirrored between the control nodes so that either control
node can run functions at any time.
Source LPAR Communication Agent (non-PVI)
The controller(s) must be able to communicate with the Source LPARs. To do so, subsystem
QZRDFSR must be started on the source, controlling and Target LPARs, with pre-start program
QZRDIAEXT2 handling service requests. The subsystem can be started by using command STRSBS
/QZRDHASM/QZRDFSR . Use of the SETUPFSFC will stop and restart the subsystem. QZRDFSR
The Communication Agent listens on a specified port, and default port is 55920. On the Source LPAR,
use the command SETUPFSFC to change the port. This information is stored in file
/QIBM/Qzrdhasm/FSRPort. On the Controlling LPAR(s), the port is configured using CRTCSEDTA,
CHGCSEDTA or WRKCSEDTA opt 2. The port specified must be the same on both the controller and
Source LPAR.
FSFC and FSR use the same communication agent and port information. QZRDIAEXT2 is also used to
receive QUSRBRM after a backup.
Communications between the source and Controller are encrypted.
Credentials
The Controller(s) must be able to communicate with all participants in the Full System Flash Copy
environment:
1. Source Power System HMC
2. Target Power System HMC
3. Source SVC/DS HMC
4. Target SVC/DS HMC
5. Source node
6. Target node
7. CSM servers
Configuring the user profiles and passwords for the SVCs, DS HMCs, CSMs and Power Systems
HMCs in the configuration is required as part of setup.
LPAR date and time
The date and time of an LPAR is stored in the HMC with offsets stored in IBM i *SYSBAS. Since only
*SYSBAS, not the HMC data, is replicated to the target site, the first time an LPAR is IPLed the date
and time may need to be configured. Subsequent IPLs will retain the correct date/time.
Activation Engine / Cloud-init
If the Activation Engine / Cloud-init functionality is installed it will cause the target LPAR to delay
starting QCTL and may start IP addresses too soon. Run this command to disable the cloud-init
functions:
18
CALL PGM(QSYS/QAENGCHG) PARM('WAITTIME=0')
Note that there must be no spaces around the equal sign and the required 7.4 PTFs must be applied.
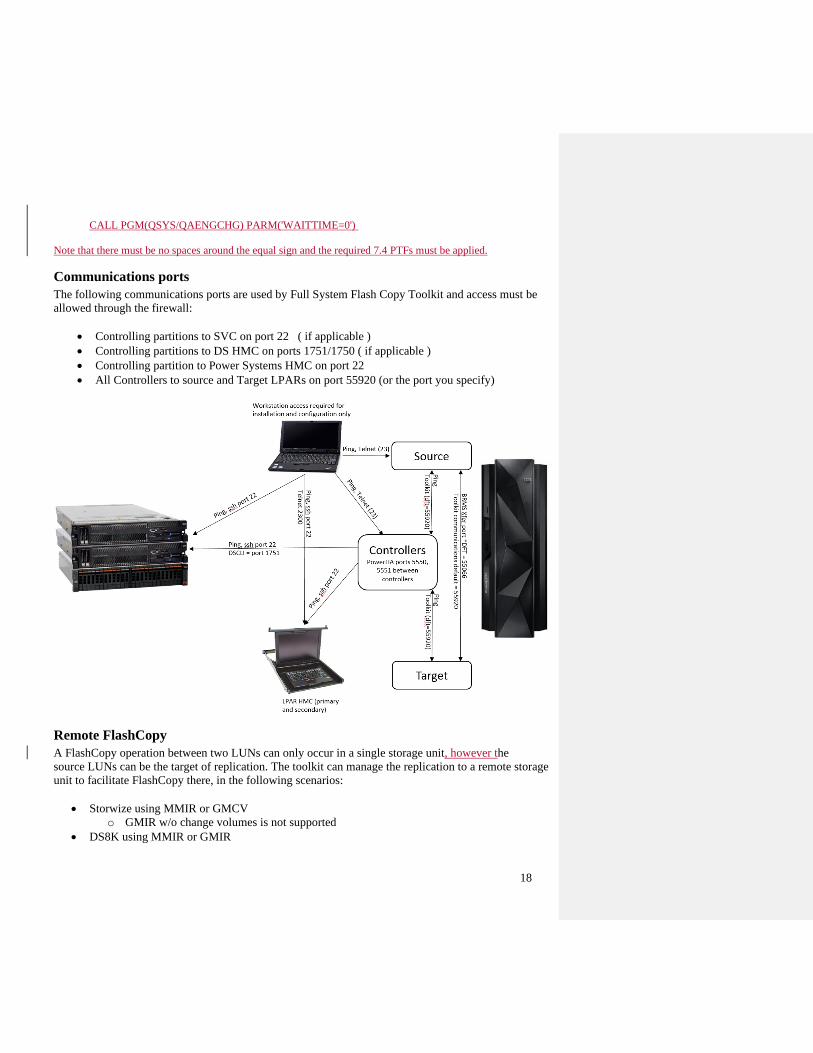
Communications ports
The following communications ports are used by Full System Flash Copy Toolkit and access must be
allowed through the firewall:
• Controlling partitions to SVC on port 22 ( if applicable )
• Controlling partitions to DS HMC on ports 1751/1750 ( if applicable )
• Controlling partition to Power Systems HMC on port 22
• All Controllers to source and Target LPARs on port 55920 (or the port you specify)
Remote FlashCopy
A FlashCopy operation between two LUNs can only occur in a single storage unit, however the
source LUNs can be the target of replication. The toolkit can manage the replication to a remote storage
unit to facilitate FlashCopy there, in the following scenarios:
• Storwize using MMIR or GMCV
o GMIR w/o change volumes is not supported
• DS8K using MMIR or GMIR

19
o The toolkit will create use the D-Copy for FlashCopy purposes
For MMIR operations, there is no need to manage the replication. The toolkit Environments
(WRKCSE) will use the remote storage as if it were the local one, because the MMIR target LUNs will
always be synchronized with the source LUNs. Note that the FlashCopy toolkit will NOT monitor
MMIR replication status; the Full System Replication Manager (a separate feature in the toolkit) can
perform this function.
For DS8K GMIR operations, two Environments must be created, with the same name: a GMIR
environment for managing the replication, and a FLASH environment with D-Copy LUNs enabled for
the Flashcopy operations. The toolkit will create the D-Copy using the GMIR ‘pause with secondary
access’ function.
Storwize GMCV operations only requires one FLASH environment in WRKCSE which will contain
the IP addresses of the local and remote storage units, as well as the Remote Copy Consistency Group
ID’s. The toolkit will monitor the freeze points of the GMCV replication and perform the Flashcopy at
the correct time. The toolkit will tolerate a freeze time as much as two hours delayed, but a much
smaller (< 10 minutes) delay is recommended.
Object Save Timestamps on Source LPAR are not Updated
The backups occur on the FlashCopy target LPAR which means the objects on the target will have their
save timestamps updated. The source LPAR objects will NOT have their timestamps updated. These
timestamps are important for two reasons:
Incremental Backups
Customers with Full System FlashCopy typically do not perform incremental backups. With the ability
to allow for longer backup windows, most of our customers can now perform full backups every night,
allowing for much simpler recovery processes.
However, there are still a handful of customers who choose to perform incremental backups on the
target LPAR. The challenge is that the objects’ save timestamps are not updated and SAVCHGOBJ
will pick up all the changes since the previous full (*CUML) or incremental (*INCR) backup on the
source LPAR. The best way to handle this is to use BRMS. When BRMS on the target LPAR runs, it
will record all the reference timestamps for the objects into file QUSRBRM/QA1ALR and move that to
the source LPAR. The next FlashCopy will copy that file to the target LPAR, and BRMS will use the
information in that file as the changed object reference date.
Journal Receiver Management
Many products use the save timestamp of the journal receiver to manage when it is deleted. Since there
is no API for the toolkit to update the save timestamp of a journal receiver, the customer must evaluate
the best method of addressing their journal receiver management.
The most common method is to save the receivers on the production LPAR after the flashcopy backups
have been completed.
20
Another method is to change the way the receivers are managed, i.e. delete them when they are no
longer needed vs. when they are saved. Note that a receiver exit program can be used to block or delay
the deletion.
DS8K SafeGuarded Copies
Starting in version 4.4, support for DS8K SafeGuarded Copies was added. This is only supported
on DS8Ks via CSM sessions. Interfaces were added to the toolkit to manage the SafeGuarded Copies.
Creating a SafeGuarded Copy does not invoke Full System FlashCopy functions. Restoring and IPLing
from the copies is not a function included in this toolkit.
Physical-Virtual Isolation (PVI) for Production LPARs
In addition to SafeGuarded Copies, PVI for Production LPARs has been implemented in 4.4. Typically
this involves replication from the production LPAR to a DR site, where the FlashCopy is created. There
is no communication path back to the production (source) LPAR, which precludes the FSFC Toolkit
from any memory flushes, changing startup programs or sending BRMS data back.
FSFC using Physical-Virtual Isolation has a different process than normal FSFC. Since there is no
communication paths from the Controlling or Target LPARs to the Source (Production) LPAR, more
data is stored on the Controlling LPAR. Because the Target LPAR must have some knowledge of how
to reach the Controlling LPAR when it IPLs after the Flashcopy, additional data must be stored on the
Source LPAR.
Memory Flush / Quiesce
The lack of communication to the Source LPAR prevents the Controller from notifying the Source
LPAR that a FlashCopy is about to occur. Therefore it is not possible to flush memory or suspend
database transactions on the Source LPAR prior to a FlashCopy. The FlashCopy will appear to the
target LPAR as an immediate crash, with any data or transactions still cached in memory lost. To
mitigate any damage to important files or partial database transactions, all important user data should
be journaled, or the applications should have logical to detect and repair mid-transaction failures.
Startup Programs
The inability to notify the Source LPAR of an impending FlashCopy also means that no preparation to
the Start Up program (system value QSTRUPPGM) and IPL attributes (CHGIPLA) is possible. These
values must be set such that every time the Source or Target LPAR IPLs it must be able detect where it
is running and therefore take appropriate actions. Consequently, no information can be transferred to
the Source LPAR prior to the FlashCopy, requiring the Source LPAR to maintain knowledge of which
IP interfaces to activate when IPLing as a Target LPAR, and which Controlling LPAR to contact to
continue the FlashCopy backup progress.
21
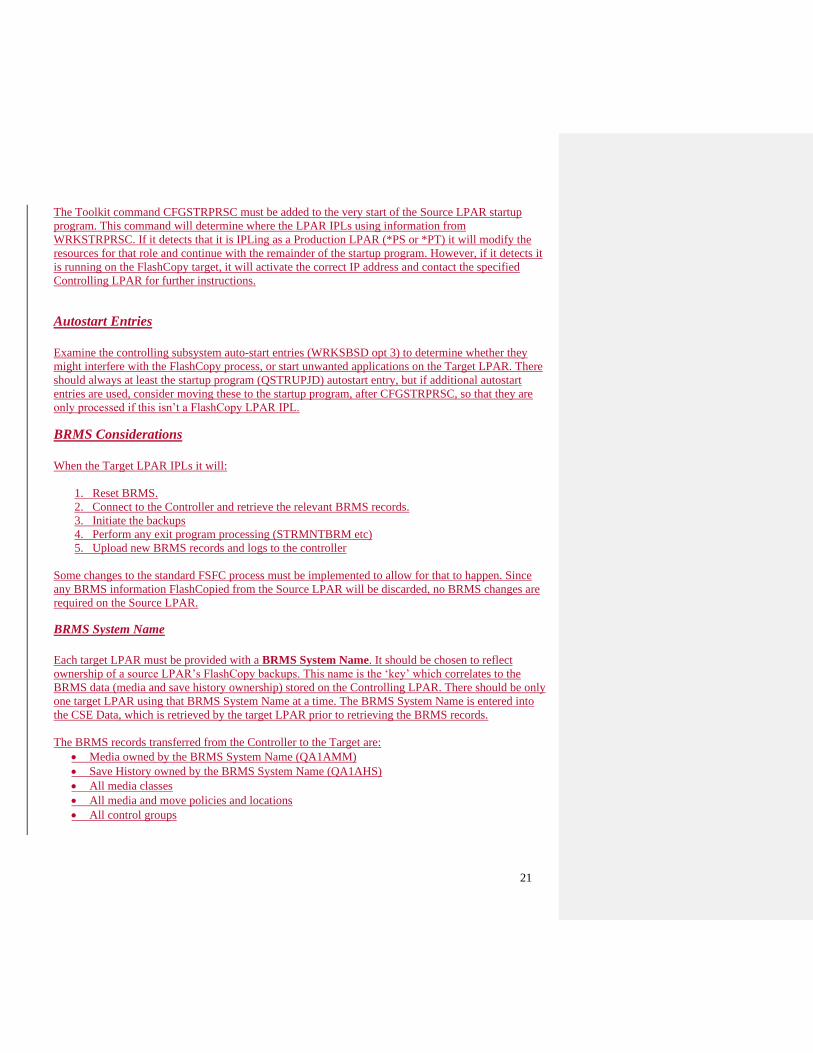
The Toolkit command CFGSTRPRSC must be added to the very start of the Source LPAR startup
program. This command will determine where the LPAR IPLs using information from
WRKSTRPRSC. If it detects that it is IPLing as a Production LPAR (*PS or *PT) it will modify the
resources for that role and continue with the remainder of the startup program. However, if it detects it
is running on the FlashCopy target, it will activate the correct IP address and contact the specified
Controlling LPAR for further instructions.
Autostart Entries
Examine the controlling subsystem auto-start entries (WRKSBSD opt 3) to determine whether they
might interfere with the FlashCopy process, or start unwanted applications on the Target LPAR. There
should always at least the startup program (QSTRUPJD) autostart entry, but if additional autostart
entries are used, consider moving these to the startup program, after CFGSTRPRSC, so that they are
only processed if this isn’t a FlashCopy LPAR IPL.
BRMS Considerations
When the Target LPAR IPLs it will:
1. Reset BRMS.
2. Connect to the Controller and retrieve the relevant BRMS records.
3. Initiate the backups
4. Perform any exit program processing (STRMNTBRM etc)
5. Upload new BRMS records and logs to the controller
Some changes to the standard FSFC process must be implemented to allow for that to happen. Since
any BRMS information FlashCopied from the Source LPAR will be discarded, no BRMS changes are
required on the Source LPAR.
BRMS System Name
Each target LPAR must be provided with a BRMS System Name. It should be chosen to reflect
ownership of a source LPAR’s FlashCopy backups. This name is the ‘key’ which correlates to the
BRMS data (media and save history ownership) stored on the Controlling LPAR. There should be only
one target LPAR using that BRMS System Name at a time. The BRMS System Name is entered into
the CSE Data, which is retrieved by the target LPAR prior to retrieving the BRMS records.
The BRMS records transferred from the Controller to the Target are:
• Media owned by the BRMS System Name (QA1AMM)
• Save History owned by the BRMS System Name (QA1AHS)
• All media classes
• All media and move policies and locations
• All control groups
22
Note that the Target LPAR will not be in a BRMS network group. Neither the Source nor Target
LPARs should be entered into the Controlling LPAR’s BRMS network group.
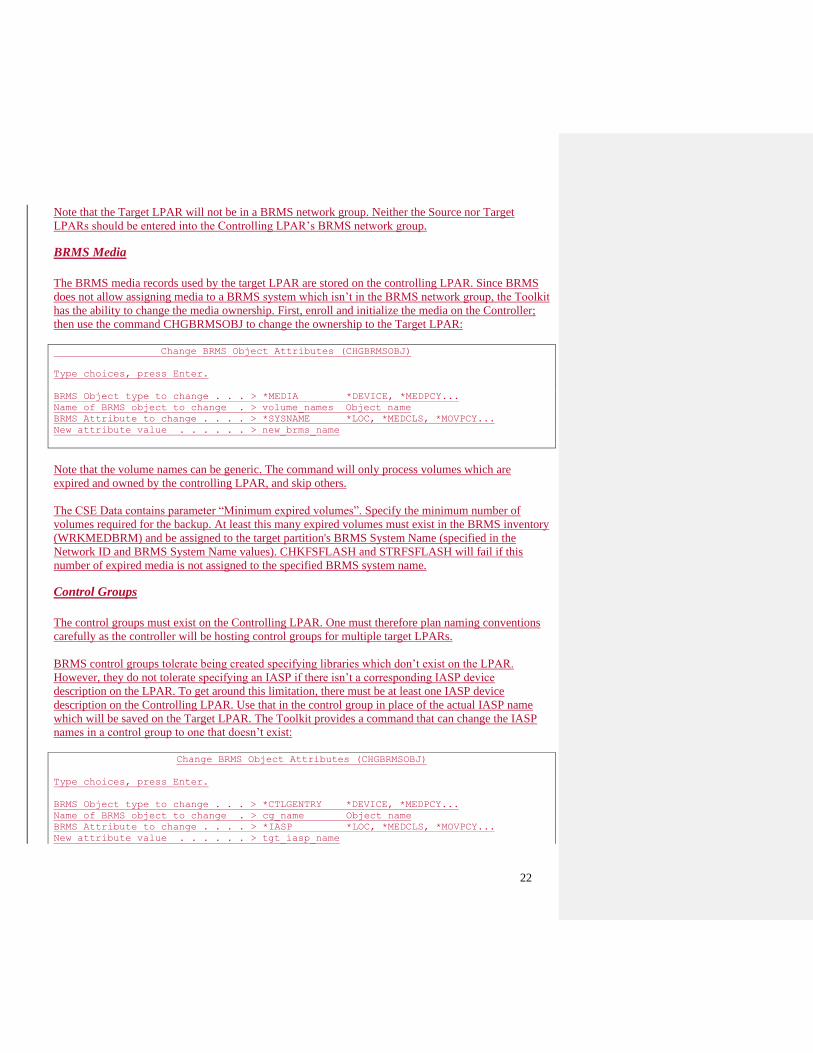
BRMS Media
The BRMS media records used by the target LPAR are stored on the controlling LPAR. Since BRMS
does not allow assigning media to a BRMS system which isn’t in the BRMS network group, the Toolkit
has the ability to change the media ownership. First, enroll and initialize the media on the Controller;
then use the command CHGBRMSOBJ to change the ownership to the Target LPAR:
Change BRMS Object Attributes (CHGBRMSOBJ)
Type choices, press Enter.
BRMS Object type to change . . . > *MEDIA *DEVICE, *MEDPCY...
Name of BRMS object to change . > volume_names Object name
BRMS Attribute to change . . . . > *SYSNAME *LOC, *MEDCLS, *MOVPCY...
New attribute value . . . . . . > new_brms_name
Note that the volume names can be generic. The command will only process volumes which are
expired and owned by the controlling LPAR, and skip others.
The CSE Data contains parameter “Minimum expired volumes”. Specify the minimum number of
volumes required for the backup. At least this many expired volumes must exist in the BRMS inventory
(WRKMEDBRM) and be assigned to the target partition's BRMS System Name (specified in the
Network ID and BRMS System Name values). CHKFSFLASH and STRFSFLASH will fail if this
number of expired media is not assigned to the specified BRMS system name.
Control Groups
The control groups must exist on the Controlling LPAR. One must therefore plan naming conventions
carefully as the controller will be hosting control groups for multiple target LPARs.
BRMS control groups tolerate being created specifying libraries which don’t exist on the LPAR.
However, they do not tolerate specifying an IASP if there isn’t a corresponding IASP device
description on the LPAR. To get around this limitation, there must be at least one IASP device
description on the Controlling LPAR. Use that in the control group in place of the actual IASP name
which will be saved on the Target LPAR. The Toolkit provides a command that can change the IASP
names in a control group to one that doesn’t exist:
Change BRMS Object Attributes (CHGBRMSOBJ)
Type choices, press Enter.
BRMS Object type to change . . . > *CTLGENTRY *DEVICE, *MEDPCY...
Name of BRMS object to change . > cg_name Object name
BRMS Attribute to change . . . . > *IASP *LOC, *MEDCLS, *MOVPCY...
New attribute value . . . . . . > tgt_iasp_name
23
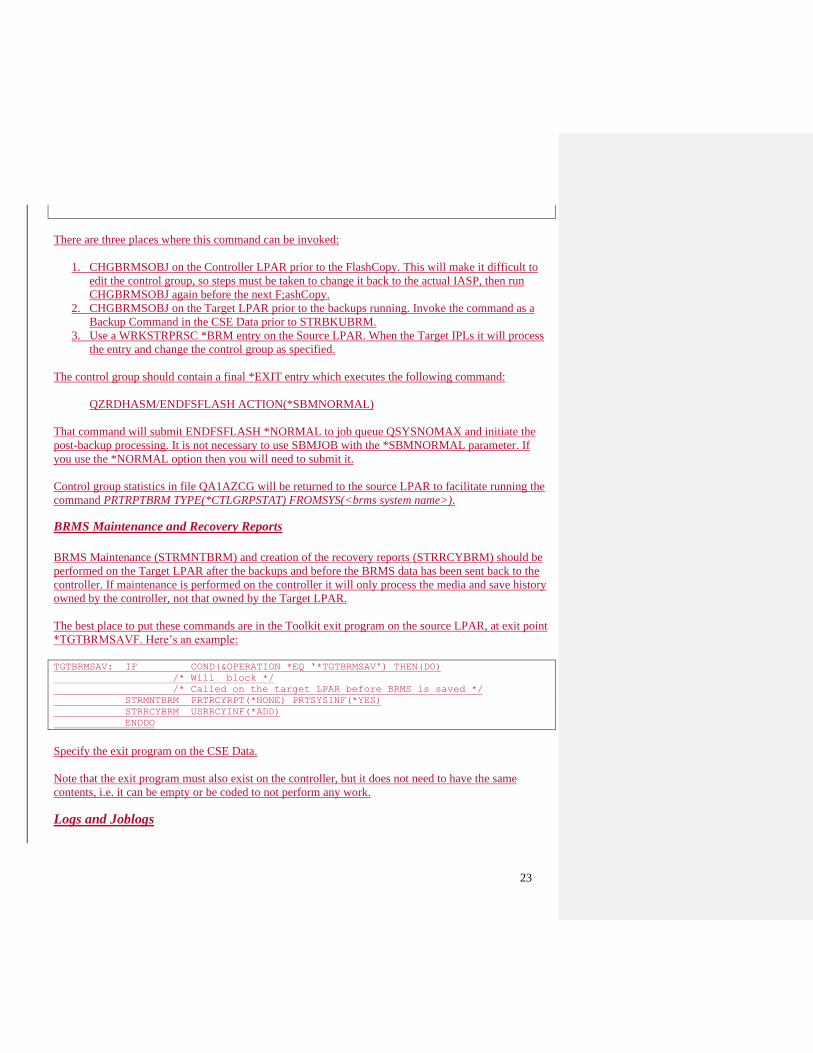
There are three places where this command can be invoked:
1. CHGBRMSOBJ on the Controller LPAR prior to the FlashCopy. This will make it difficult to
edit the control group, so steps must be taken to change it back to the actual IASP, then run
CHGBRMSOBJ again before the next F;ashCopy.
2. CHGBRMSOBJ on the Target LPAR prior to the backups running. Invoke the command as a
Backup Command in the CSE Data prior to STRBKUBRM.
3. Use a WRKSTRPRSC *BRM entry on the Source LPAR. When the Target IPLs it will process
the entry and change the control group as specified.
The control group should contain a final *EXIT entry which executes the following command:
QZRDHASM/ENDFSFLASH ACTION(*SBMNORMAL)
That command will submit ENDFSFLASH *NORMAL to job queue QSYSNOMAX and initiate the
post-backup processing. It is not necessary to use SBMJOB with the *SBMNORMAL parameter. If
you use the *NORMAL option then you will need to submit it.
Control group statistics in file QA1AZCG will be returned to the source LPAR to facilitate running the
command PRTRPTBRM TYPE(*CTLGRPSTAT) FROMSYS(<brms system name>).
BRMS Maintenance and Recovery Reports
BRMS Maintenance (STRMNTBRM) and creation of the recovery reports (STRRCYBRM) should be
performed on the Target LPAR after the backups and before the BRMS data has been sent back to the
controller. If maintenance is performed on the controller it will only process the media and save history
owned by the controller, not that owned by the Target LPAR.
The best place to put these commands are in the Toolkit exit program on the source LPAR, at exit point
*TGTBRMSAVF. Here’s an example:
TGTBRMSAV: IF COND(&OPERATION *EQ '*TGTBRMSAV') THEN(DO)
/* Will block */
/* Called on the target LPAR before BRMS is saved */
STRMNTBRM PRTRCYRPT(*NONE) PRTSYSINF(*YES)
STRRCYBRM USRRCYINF(*ADD)
ENDDO
Specify the exit program on the CSE Data.
Note that the exit program must also exist on the controller, but it does not need to have the same
contents, i.e. it can be empty or be coded to not perform any work.
Logs and Joblogs

24
The toolkit will create a temporary library on the Source and Controlling LPARs to move data between
the LPARs. The name of the library is the BRMS System Name specified in the CSE Data. An output
queue named QZOUTQ is created in the temporary library
TIP: Anything placed into this library at or after exit point *TGTBRMSAV will be included on the
transfer to the controlling LPAR.
TIP: When ENDFSFLASH runs, the Toolkit will retrieve the joblog for any jobs with information
placed on a specific data queue. To place that information on the data queue, issue this command in the
job of which you want the joblog:
QZRDHASM/ENDFSFLASH ACTION(*TAGJOBLOG)
The spoolfiles in QZOUTQ will be converted to streamfiles and placed on the controller at:
/QIBM/Qzrdhasm/fsfc/<CSE Data>/brmsysname_timestamp
T to prevent CLEANLOG from removing these, and also accidental deletion, this directory and all it’s
contents are marked “ready only”.
All the joblogs are converted to CCSID 1252 for viewing on PCs. Viewlog
(/QIBM/Qzrdhasm/qzrdhasm.log), ctl.log and trg.log are all in the usual places. There is no src.log.
BRMS Logs
BRMS backups, maintenance and recovery reports will be executed using this outqueue. The output
from QSYS/DSPLOGBRM OUTPUT(*PRINT) DETAIL(*FULL) will also be placed in this outqueue.
BRMS flight recorders from /tmp/brms are zipped and brought back to the controller as well.
Log File Cleanup
Run the command CLEANLOGS on a regular basis to remove logs and directories older than the
specified number of days. This will not remove the directories and files marked “read only”.
In the CSE Data, parameter “Number days to retain BRMS Logs” controls when the read-only logs and
BRMS reports are changed to not read-only, allowing CLEANLOGS to remove them. This is
performed at the end of the STRFSFLASH process. Note that CLEANLOGS checks the last modified
date of a directory, and changing the *READONLY flag will update that date, therefore the directory
will not be removed by CLEANLOGS until the specified number of days have elapsed since
STRFSLFASH removed the *READONLY flag.
Live Partition Mobility (LPM) Support

25
In order to support Live Partition Mobility the FSFC Toolkit can search for an LPAR. To do so, when
creating or editing the CSE Data, enter ‘*SEARCH’ on the ‘HMC managed system’ parameter (this
must be upper case). CHKFSLASH and STRFSFLASH will search all the managed systems on the
specified HMC IP addresses and use the first LPAR it finds that matches.
26
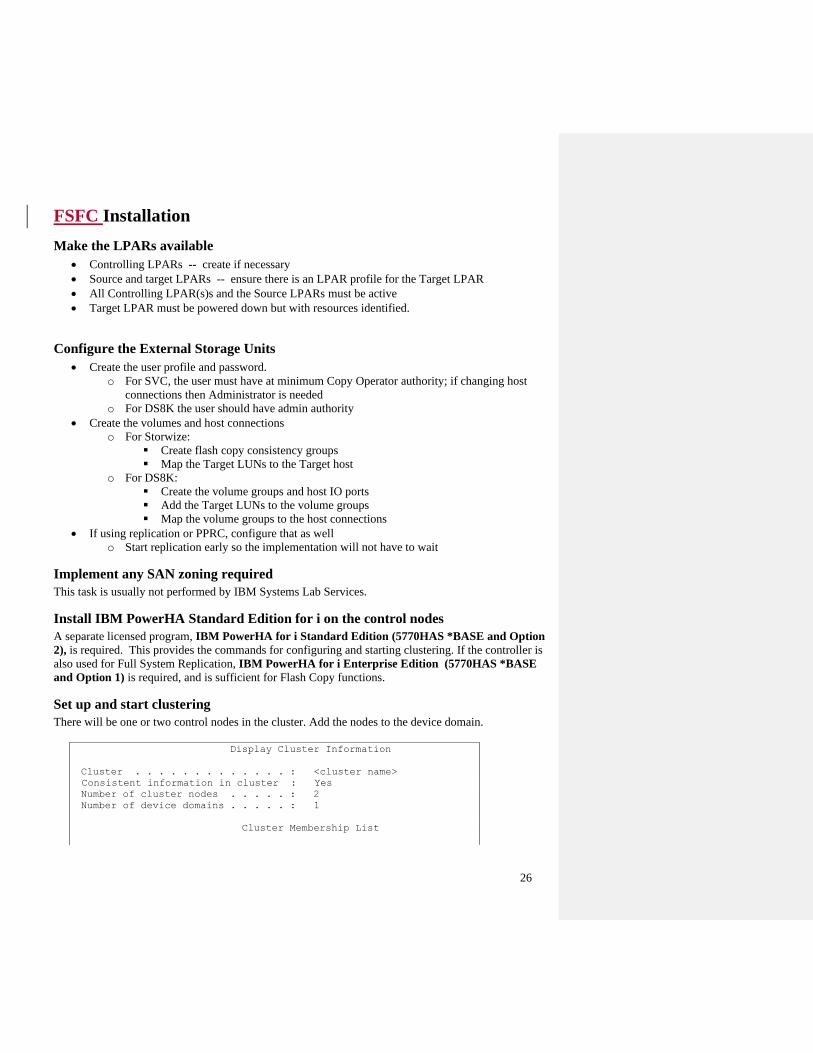
FSFC Installation
Make the LPARs available
• Controlling LPARs -- create if necessary
• Source and target LPARs -- ensure there is an LPAR profile for the Target LPAR
• All Controlling LPAR(s)s and the Source LPARs must be active
• Target LPAR must be powered down but with resources identified.
Configure the External Storage Units
• Create the user profile and password.
o For SVC, the user must have at minimum Copy Operator authority; if changing host
connections then Administrator is needed
o For DS8K the user should have admin authority
• Create the volumes and host connections
o For Storwize:
▪ Create flash copy consistency groups
▪ Map the Target LUNs to the Target host
o For DS8K:
▪ Create the volume groups and host IO ports
▪ Add the Target LUNs to the volume groups
▪ Map the volume groups to the host connections
• If using replication or PPRC, configure that as well
o Start replication early so the implementation will not have to wait
Implement any SAN zoning required
This task is usually not performed by IBM Systems Lab Services.
Install IBM PowerHA Standard Edition for i on the control nodes
A separate licensed program, IBM PowerHA for i Standard Edition (5770HAS *BASE and Option
2), is required. This provides the commands for configuring and starting clustering. If the controller is
also used for Full System Replication, IBM PowerHA for i Enterprise Edition (5770HAS *BASE
and Option 1) is required, and is sufficient for Flash Copy functions.
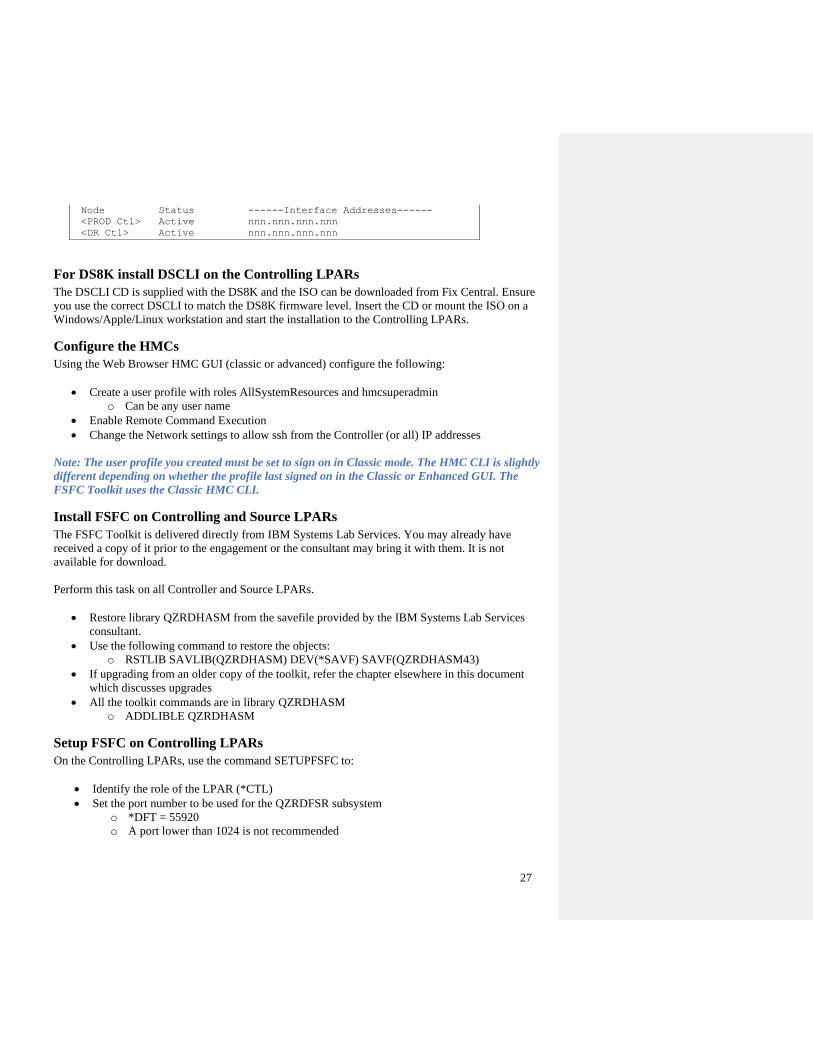
Set up and start clustering
There will be one or two control nodes in the cluster. Add the nodes to the device domain.
Display Cluster Information
Cluster . . . . . . . . . . . . . : <cluster name>
Consistent information in cluster : Yes
Number of cluster nodes . . . . . : 2
Number of device domains . . . . . : 1
Cluster Membership List
27
Node Status ------Interface Addresses------
<PROD Ctl> Active nnn.nnn.nnn.nnn
<DR Ctl> Active nnn.nnn.nnn.nnn
For DS8K install DSCLI on the Controlling LPARs
The DSCLI CD is supplied with the DS8K and the ISO can be downloaded from Fix Central. Ensure
you use the correct DSCLI to match the DS8K firmware level. Insert the CD or mount the ISO on a
Windows/Apple/Linux workstation and start the installation to the Controlling LPARs.
Configure the HMCs
Using the Web Browser HMC GUI (classic or advanced) configure the following:
• Create a user profile with roles AllSystemResources and hmcsuperadmin
o Can be any user name
• Enable Remote Command Execution
• Change the Network settings to allow ssh from the Controller (or all) IP addresses
Note: The user profile you created must be set to sign on in Classic mode. The HMC CLI is slightly
different depending on whether the profile last signed on in the Classic or Enhanced GUI. The
FSFC Toolkit uses the Classic HMC CLI.
Install FSFC on Controlling and Source LPARs
The FSFC Toolkit is delivered directly from IBM Systems Lab Services. You may already have
received a copy of it prior to the engagement or the consultant may bring it with them. It is not
available for download.
Perform this task on all Controller and Source LPARs.
• Restore library QZRDHASM from the savefile provided by the IBM Systems Lab Services
consultant.
• Use the following command to restore the objects:
o RSTLIB SAVLIB(QZRDHASM) DEV(*SAVF) SAVF(QZRDHASM43)
• If upgrading from an older copy of the toolkit, refer the chapter elsewhere in this document
which discusses upgrades
• All the toolkit commands are in library QZRDHASM
o ADDLIBLE QZRDHASM
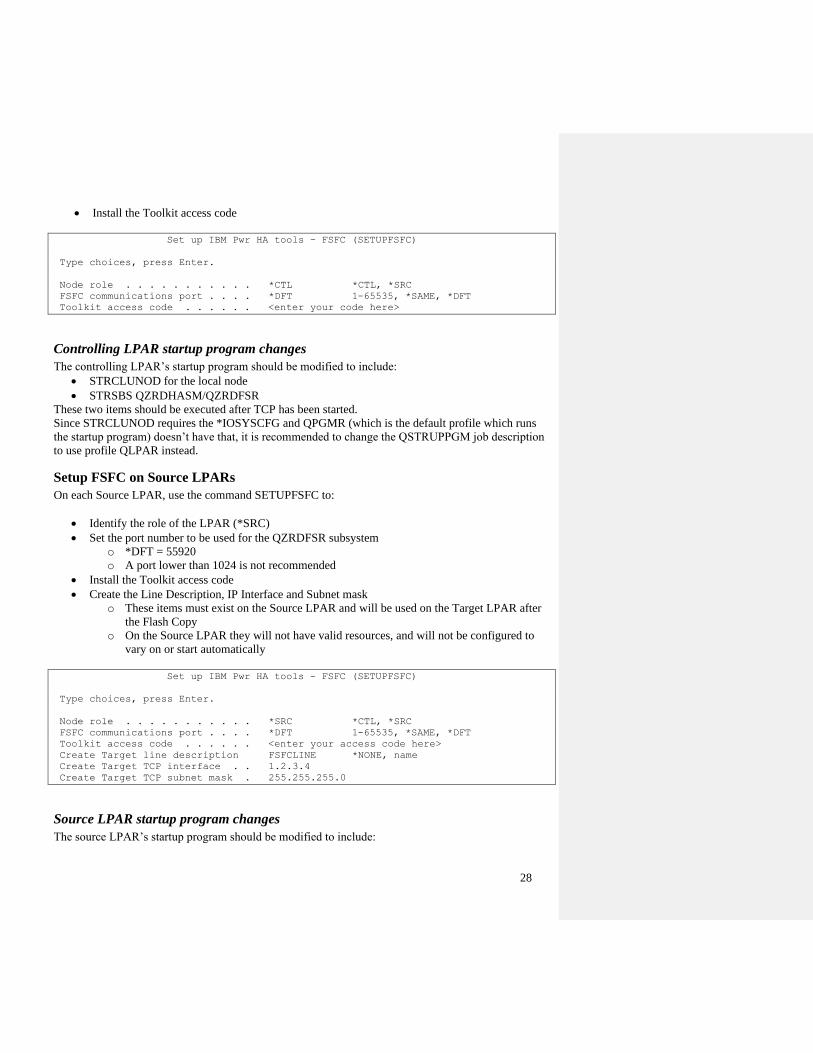
Setup FSFC on Controlling LPARs
On the Controlling LPARs, use the command SETUPFSFC to:
• Identify the role of the LPAR (*CTL)
• Set the port number to be used for the QZRDFSR subsystem
o *DFT = 55920
o A port lower than 1024 is not recommended
28
• Install the Toolkit access code
Set up IBM Pwr HA tools - FSFC (SETUPFSFC)
Type choices, press Enter.
Node role . . . . . . . . . . . *CTL *CTL, *SRC
FSFC communications port . . . . *DFT 1-65535, *SAME, *DFT
Toolkit access code . . . . . . <enter your code here>
Controlling LPAR startup program changes
The controlling LPAR’s startup program should be modified to include:
• STRCLUNOD for the local node
• STRSBS QZRDHASM/QZRDFSR
These two items should be executed after TCP has been started.
Since STRCLUNOD requires the *IOSYSCFG and QPGMR (which is the default profile which runs
the startup program) doesn’t have that, it is recommended to change the QSTRUPPGM job description
to use profile QLPAR instead.
Setup FSFC on Source LPARs
On each Source LPAR, use the command SETUPFSFC to:
• Identify the role of the LPAR (*SRC)
• Set the port number to be used for the QZRDFSR subsystem
o *DFT = 55920
o A port lower than 1024 is not recommended
• Install the Toolkit access code
• Create the Line Description, IP Interface and Subnet mask
o These items must exist on the Source LPAR and will be used on the Target LPAR after
the Flash Copy
o On the Source LPAR they will not have valid resources, and will not be configured to
vary on or start automatically
Set up IBM Pwr HA tools - FSFC (SETUPFSFC)
Type choices, press Enter.
Node role . . . . . . . . . . . *SRC *CTL, *SRC
FSFC communications port . . . . *DFT 1-65535, *SAME, *DFT
Toolkit access code . . . . . . <enter your access code here>
Create Target line description FSFCLINE *NONE, name
Create Target TCP interface . . 1.2.3.4
Create Target TCP subnet mask . 255.255.255.0
Source LPAR startup program changes
The source LPAR’s startup program should be modified to include:
29
• QZRDHASM/RUNLPARCMD SRLN(xxxxxxx) LPAR(xx) CMD(CALL
PGM(QZRDHASM/QZRDENDSBS))
o Specify the target LPAR serial and LPAR numbers
o Review QZRDHASM/QCLSRC QZRDENDSBS for changes
• STRSBS QZRDHASM/QZRDFSR
RUNLPARCMD should be placed at the very beginning of the startup program, before any other
commands are called. The purpose of this is to prevent the customer startup program from being
executed on the target LPAR and impersonating the production LPAR IP addresses and workload.
While the toolkit has other safeguards in place, this entry in the startup program is the “last line of
defense” and guards against human as well as software errors.
License information
Although SETUPFSFC includes the Access Code field, ADDPRDACS and DSPPRDACS commands
can also be used to add and display the license information for FSFC. ADDPRDACS can be used to
enter keys for different serial numbers, and the FSFC Toolkit can determine which LPAR it is running
on and check for the appropriate license.
Prior versions of the Toolkit did not require a license key on the target LPAR, but it does since 4.3.
This is usually not a problem since the license key used for the source LPAR is valid for the target
LPAR is the serial is not different. However, if the target LPAR serial is different from the source
LPAR serial number a license key is required. Use ADDPRDACS on the source LPAR to enter the
license key for use on the target LPAR, and specify the target LPAR serial number.
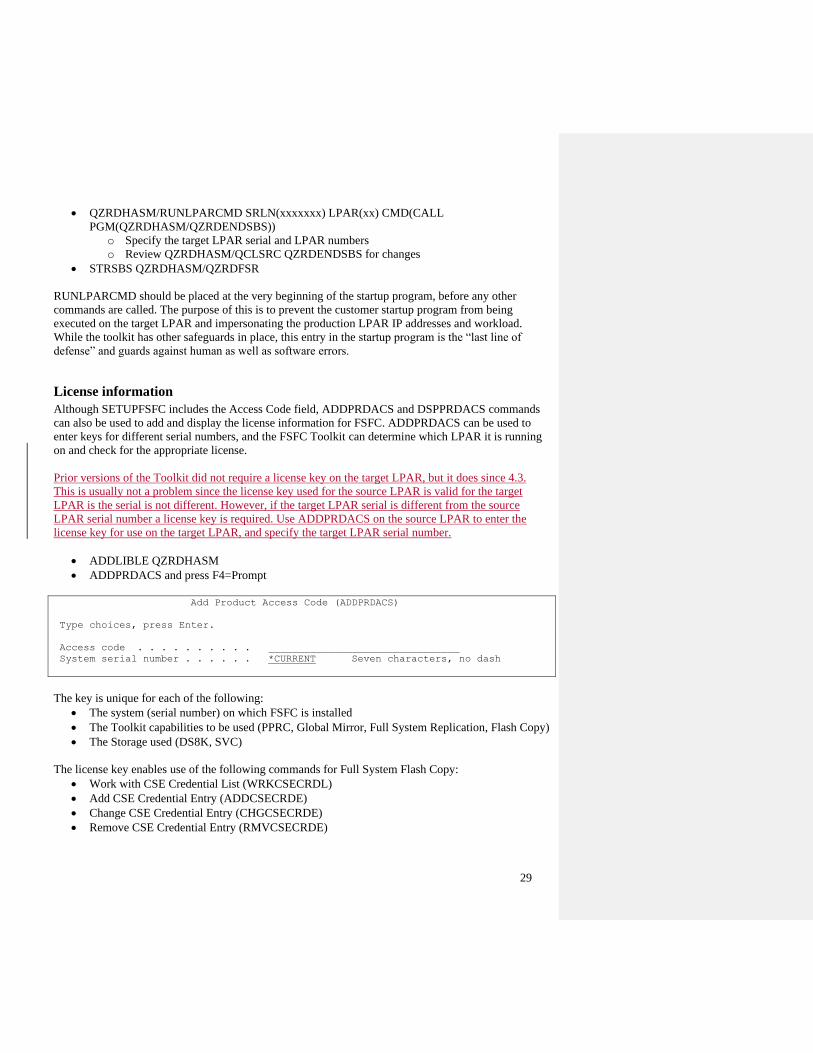
• ADDLIBLE QZRDHASM
• ADDPRDACS and press F4=Prompt
Add Product Access Code (ADDPRDACS)
Type choices, press Enter.
Access code . . . . . . . . . . ________________________________
System serial number . . . . . . *CURRENT Seven characters, no dash
The key is unique for each of the following:
• The system (serial number) on which FSFC is installed
• The Toolkit capabilities to be used (PPRC, Global Mirror, Full System Replication, Flash Copy)
• The Storage used (DS8K, SVC)
The license key enables use of the following commands for Full System Flash Copy:
• Work with CSE Credential List (WRKCSECRDL)
• Add CSE Credential Entry (ADDCSECRDE)
• Change CSE Credential Entry (CHGCSECRDE)
• Remove CSE Credential Entry (RMVCSECRDE)

30
• Work with CSE Environments (WRKCSE)
• Work with CSE Data (WRKCSEDTA)
• Change CSE Data (CHGCSEDTA)
• Create CSE CRG (CRTCSEDTA)
• Display CSE Data (DSPCSEDTA)
• Check FSFC Data (CHKFSFLASH)
• Start FSFC (STRFSFLASH)
• End FSFC (ENDFSFLASH)
• Retrieve LPAR Information (RTVLPARINF)
• Run LPAR Command (RUNLPARCMD)
Change ownership of FSFC objects
All FSFC objects are shipped as owned by QPGMR, and the *PUBLIC has *CHANGE authority to
them. It is recommended to change the authorities to the objects in the QZRDHASM library based
upon the security guidelines of your organization.
Download Java Secure Channel code (JSch)
Download JSch to /QIBM/qzrdhasm/ssh on all three nodes from
http://prdownloads.sourceforge.net/jsch/jsch-0.1.55.jar?download
•
• Because it is open-source, you must download it yourself (i.e., we can't bundle it with our FSFC
code). It is recommended to read the End User License Agreement for JSch.
• Download to your desktop and then use FTP to copy it to your IBM i at /QIBM/qzrdhasm/ssh.
The toolkit access the jar file via the symbolic link /QIBM/qzrdhasm/ssh/jsch.jar. If a different version
is downloaded (for example 0.1.54) then change the symbolic link to use the newer jar version. Unless
otherwise indicated, the toolkit is only tested with 0.1.55.
ftp> bin
200 Representation type is binary IMAGE
ftp> put jsch-0.1.55.jar /QIBM/qzrdhasm/ssh/jsch-
0.1.55.jar
227 Entering Passive Mode (9,5,168,177,167,46).
150-NAMEFMT set to 1
150 Sending file to /QIBM/qzrdhasm/ssh/jsch-0.1.55.jar
226 File transfer completed successfully.
249282 bytes sent in 0.742 secs (336.12 Kbytes/sec)
ftp>
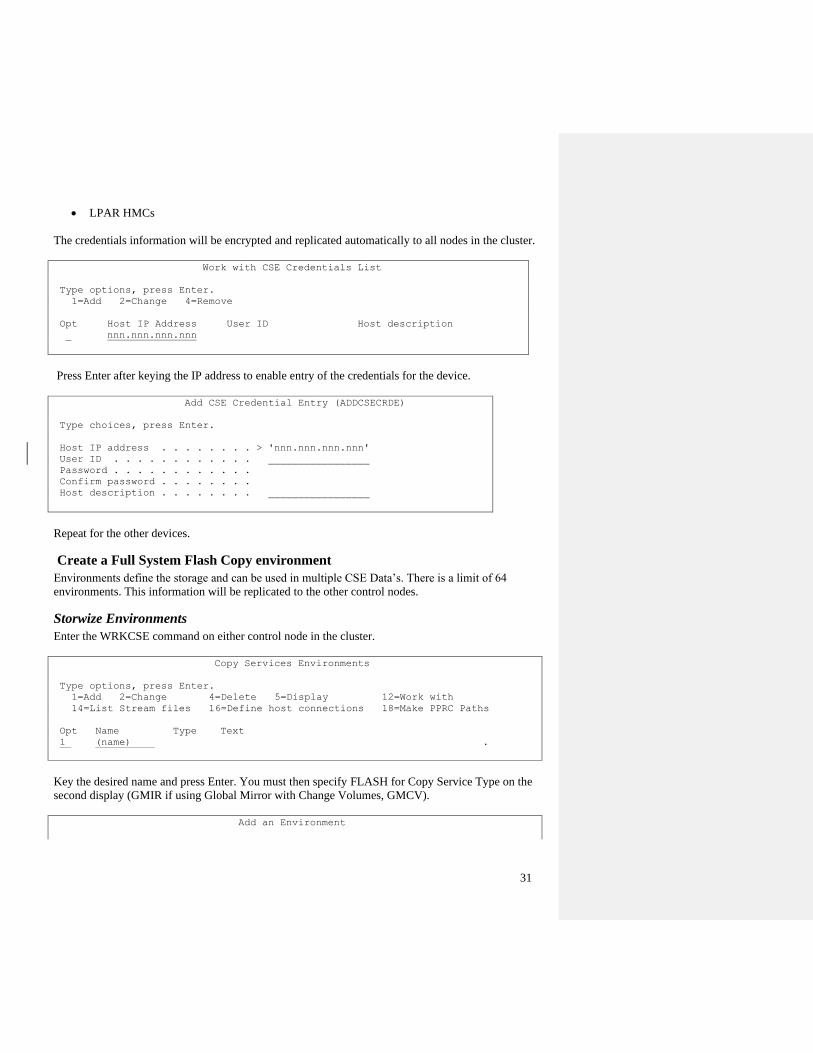
Create the credentials to be used by the control nodes
On either control node, use the Work with CSM Credentials List (WRKCSECRDL) command to enter
the User IDs and passwords for:
• Storwize storage units
• DS8k storage units
Field Code Changed
31
• LPAR HMCs
The credentials information will be encrypted and replicated automatically to all nodes in the cluster.
Work with CSE Credentials List
Type options, press Enter.
1=Add 2=Change 4=Remove
Opt Host IP Address User ID Host description
_ nnn.nnn.nnn.nnn
Press Enter after keying the IP address to enable entry of the credentials for the device.
Add CSE Credential Entry (ADDCSECRDE)
Type choices, press Enter.
Host IP address . . . . . . . . > 'nnn.nnn.nnn.nnn'
User ID . . . . . . . . . . . . _________________
Password . . . . . . . . . . . .
Confirm password . . . . . . . .
Host description . . . . . . . . _________________
Repeat for the other devices.
Create a Full System Flash Copy environment
Environments define the storage and can be used in multiple CSE Data’s. There is a limit of 64
environments. This information will be replicated to the other control nodes.
Storwize Environments
Enter the WRKCSE command on either control node in the cluster.
Copy Services Environments
Type options, press Enter.
1=Add 2=Change 4=Delete 5=Display 12=Work with
14=List Stream files 16=Define host connections 18=Make PPRC Paths
Opt Name Type Text
1 (name) .
Key the desired name and press Enter. You must then specify FLASH for Copy Service Type on the
second display (GMIR if using Global Mirror with Change Volumes, GMCV).
Add an Environment
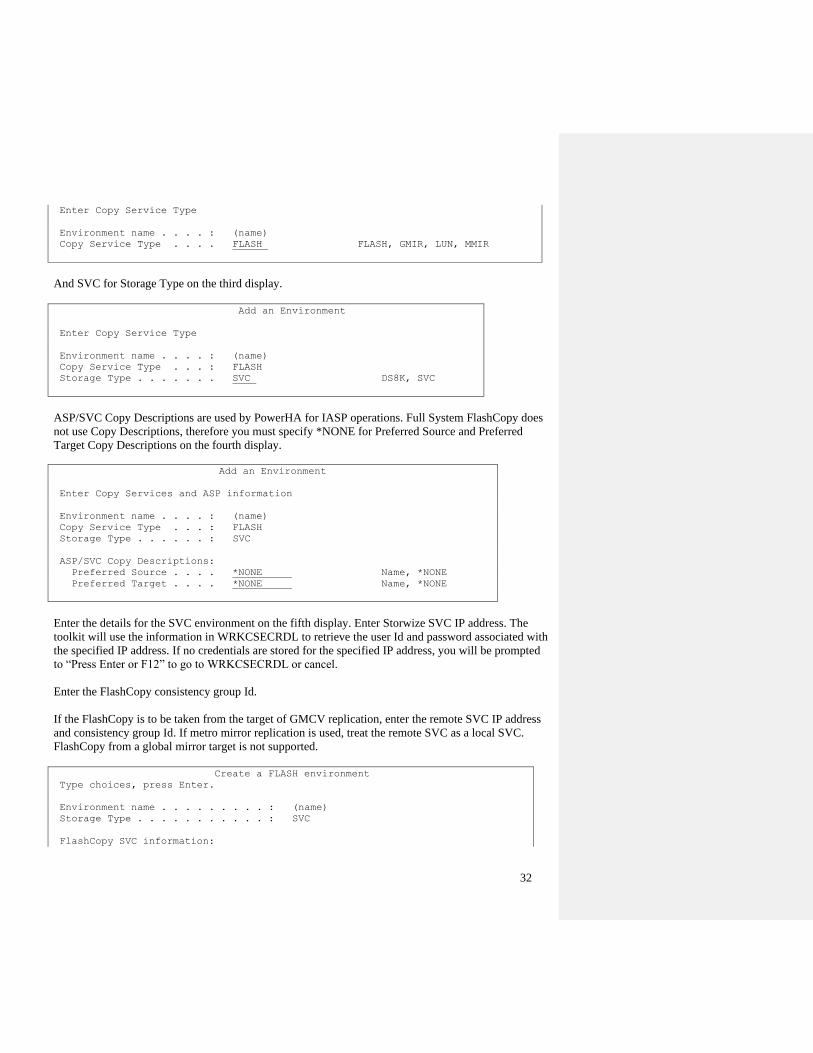
32
Enter Copy Service Type
Environment name . . . . : (name)
Copy Service Type . . . . FLASH FLASH, GMIR, LUN, MMIR
And SVC for Storage Type on the third display.
Add an Environment
Enter Copy Service Type
Environment name . . . . : (name)
Copy Service Type . . . : FLASH
Storage Type . . . . . . . SVC DS8K, SVC
ASP/SVC Copy Descriptions are used by PowerHA for IASP operations. Full System FlashCopy does
not use Copy Descriptions, therefore you must specify *NONE for Preferred Source and Preferred
Target Copy Descriptions on the fourth display.
Add an Environment
Enter Copy Services and ASP information
Environment name . . . . : (name)
Copy Service Type . . . : FLASH
Storage Type . . . . . . : SVC
ASP/SVC Copy Descriptions:
Preferred Source . . . . *NONE Name, *NONE
Preferred Target . . . . *NONE Name, *NONE
Enter the details for the SVC environment on the fifth display. Enter Storwize SVC IP address. The
toolkit will use the information in WRKCSECRDL to retrieve the user Id and password associated with
the specified IP address. If no credentials are stored for the specified IP address, you will be prompted
to “Press Enter or F12” to go to WRKCSECRDL or cancel.
Enter the FlashCopy consistency group Id.
If the FlashCopy is to be taken from the target of GMCV replication, enter the remote SVC IP address
and consistency group Id. If metro mirror replication is used, treat the remote SVC as a local SVC.
FlashCopy from a global mirror target is not supported.
Create a FLASH environment
Type choices, press Enter.
Environment name . . . . . . . . . : (name)
Storage Type . . . . . . . . . . . : SVC
FlashCopy SVC information:
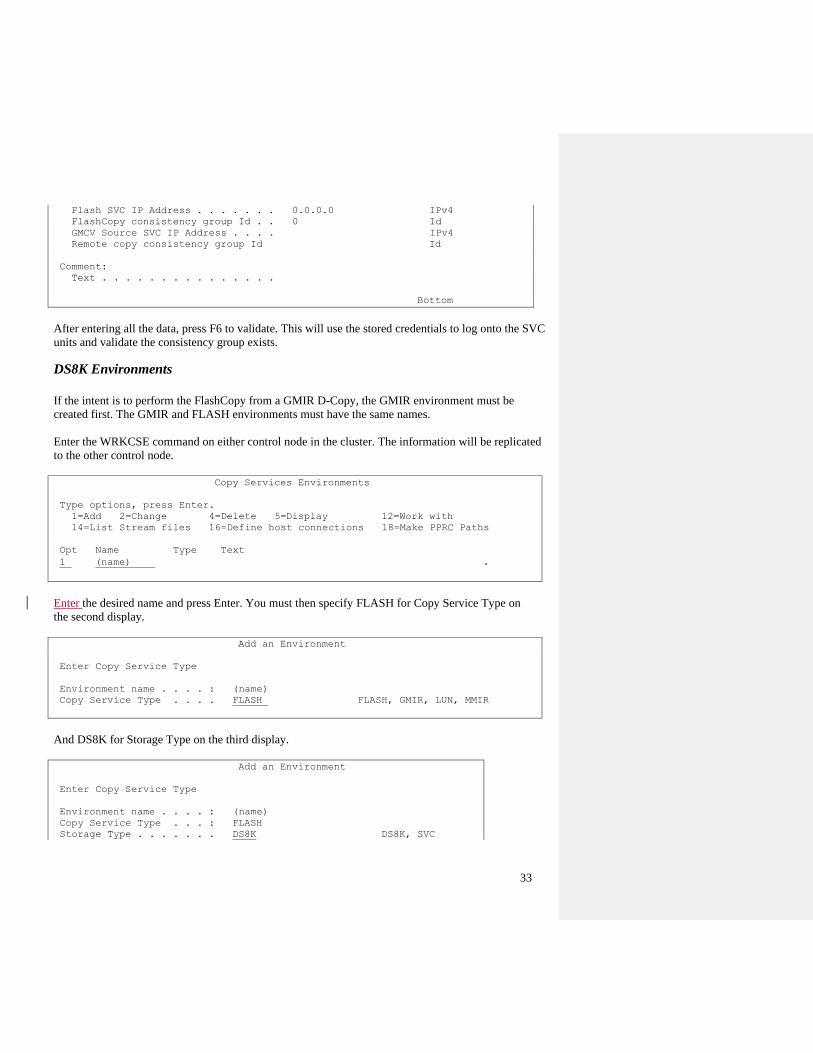
33
Flash SVC IP Address . . . . . . . 0.0.0.0 IPv4
FlashCopy consistency group Id . . 0 Id
GMCV Source SVC IP Address . . . . IPv4
Remote copy consistency group Id Id
Comment:
Text . . . . . . . . . . . . . . .
Bottom
After entering all the data, press F6 to validate. This will use the stored credentials to log onto the SVC
units and validate the consistency group exists.
DS8K Environments
If the intent is to perform the FlashCopy from a GMIR D-Copy, the GMIR environment must be
created first. The GMIR and FLASH environments must have the same names.
Enter the WRKCSE command on either control node in the cluster. The information will be replicated
to the other control node.
Copy Services Environments
Type options, press Enter.
1=Add 2=Change 4=Delete 5=Display 12=Work with
14=List Stream files 16=Define host connections 18=Make PPRC Paths
Opt Name Type Text
1 (name) .
Enter the desired name and press Enter. You must then specify FLASH for Copy Service Type on
the second display.
Add an Environment
Enter Copy Service Type
Environment name . . . . : (name)
Copy Service Type . . . . FLASH FLASH, GMIR, LUN, MMIR
And DS8K for Storage Type on the third display.
Add an Environment
Enter Copy Service Type
Environment name . . . . : (name)
Copy Service Type . . . : FLASH
Storage Type . . . . . . . DS8K DS8K, SVC
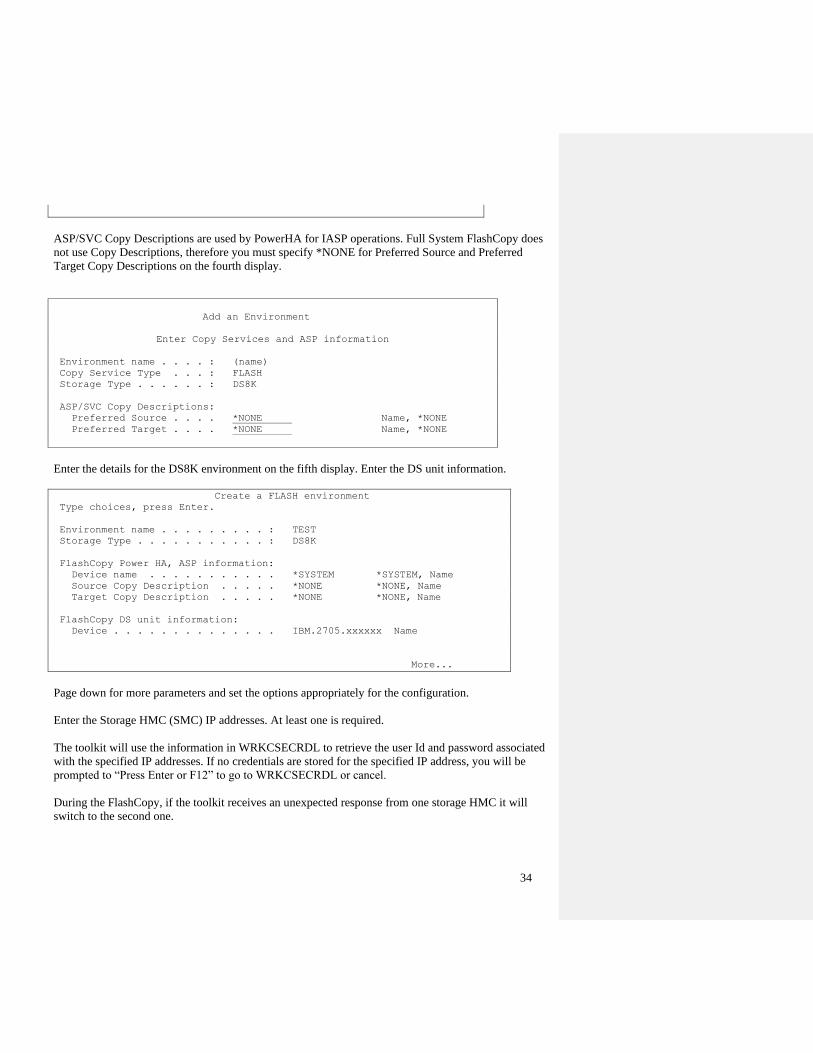
34
ASP/SVC Copy Descriptions are used by PowerHA for IASP operations. Full System FlashCopy does
not use Copy Descriptions, therefore you must specify *NONE for Preferred Source and Preferred
Target Copy Descriptions on the fourth display.
Add an Environment
Enter Copy Services and ASP information
Environment name . . . . : (name)
Copy Service Type . . . : FLASH
Storage Type . . . . . . : DS8K
ASP/SVC Copy Descriptions:
Preferred Source . . . . *NONE Name, *NONE
Preferred Target . . . . *NONE Name, *NONE
Enter the details for the DS8K environment on the fifth display. Enter the DS unit information.
Create a FLASH environment
Type choices, press Enter.
Environment name . . . . . . . . . : TEST
Storage Type . . . . . . . . . . . : DS8K
FlashCopy Power HA, ASP information:
Device name . . . . . . . . . . . *SYSTEM *SYSTEM, Name
Source Copy Description . . . . . *NONE *NONE, Name
Target Copy Description . . . . . *NONE *NONE, Name
FlashCopy DS unit information:
Device . . . . . . . . . . . . . . IBM.2705.xxxxxx Name
More...
Page down for more parameters and set the options appropriately for the configuration.
Enter the Storage HMC (SMC) IP addresses. At least one is required.
The toolkit will use the information in WRKCSECRDL to retrieve the user Id and password associated
with the specified IP addresses. If no credentials are stored for the specified IP address, you will be
prompted to “Press Enter or F12” to go to WRKCSECRDL or cancel.
During the FlashCopy, if the toolkit receives an unexpected response from one storage HMC it will
switch to the second one.
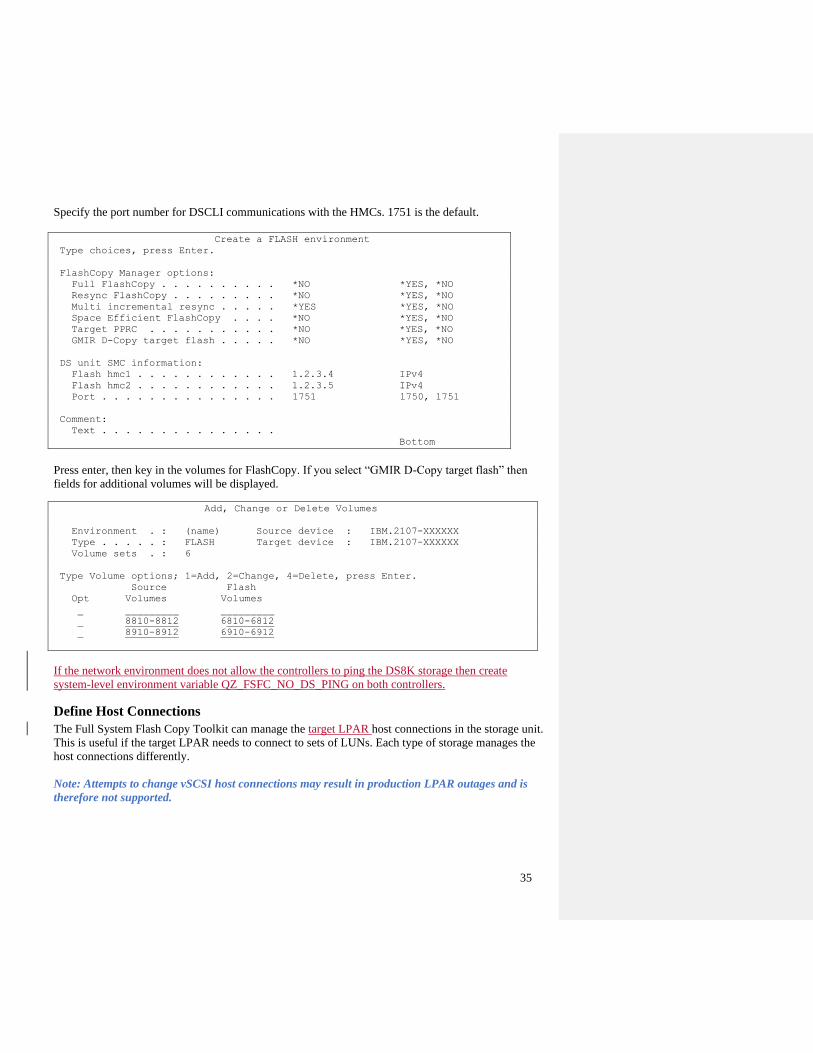
35
Specify the port number for DSCLI communications with the HMCs. 1751 is the default.
Create a FLASH environment
Type choices, press Enter.
FlashCopy Manager options:
Full FlashCopy . . . . . . . . . . *NO *YES, *NO
Resync FlashCopy . . . . . . . . . *NO *YES, *NO
Multi incremental resync . . . . . *YES *YES, *NO
Space Efficient FlashCopy . . . . *NO *YES, *NO
Target PPRC . . . . . . . . . . . *NO *YES, *NO
GMIR D-Copy target flash . . . . . *NO *YES, *NO
DS unit SMC information:
Flash hmc1 . . . . . . . . . . . . 1.2.3.4 IPv4
Flash hmc2 . . . . . . . . . . . . 1.2.3.5 IPv4
Port . . . . . . . . . . . . . . . 1751 1750, 1751
Comment:
Text . . . . . . . . . . . . . . .
Bottom
Press enter, then key in the volumes for FlashCopy. If you select “GMIR D-Copy target flash” then
fields for additional volumes will be displayed.
Add, Change or Delete Volumes
Environment . : (name) Source device : IBM.2107-XXXXXX
Type . . . . . : FLASH Target device : IBM.2107-XXXXXX
Volume sets . : 6
Type Volume options; 1=Add, 2=Change, 4=Delete, press Enter.
Source Flash
Opt Volumes Volumes
_ _________ _________
_ 8810-8812 6810-6812
_ 8910-8912 6910-6912
If the network environment does not allow the controllers to ping the DS8K storage then create
system-level environment variable QZ_FSFC_NO_DS_PING on both controllers.
Define Host Connections
The Full System Flash Copy Toolkit can manage the target LPAR host connections in the storage unit.
This is useful if the target LPAR needs to connect to sets of LUNs. Each type of storage manages the
host connections differently.
Note: Attempts to change vSCSI host connections may result in production LPAR outages and is
therefore not supported.
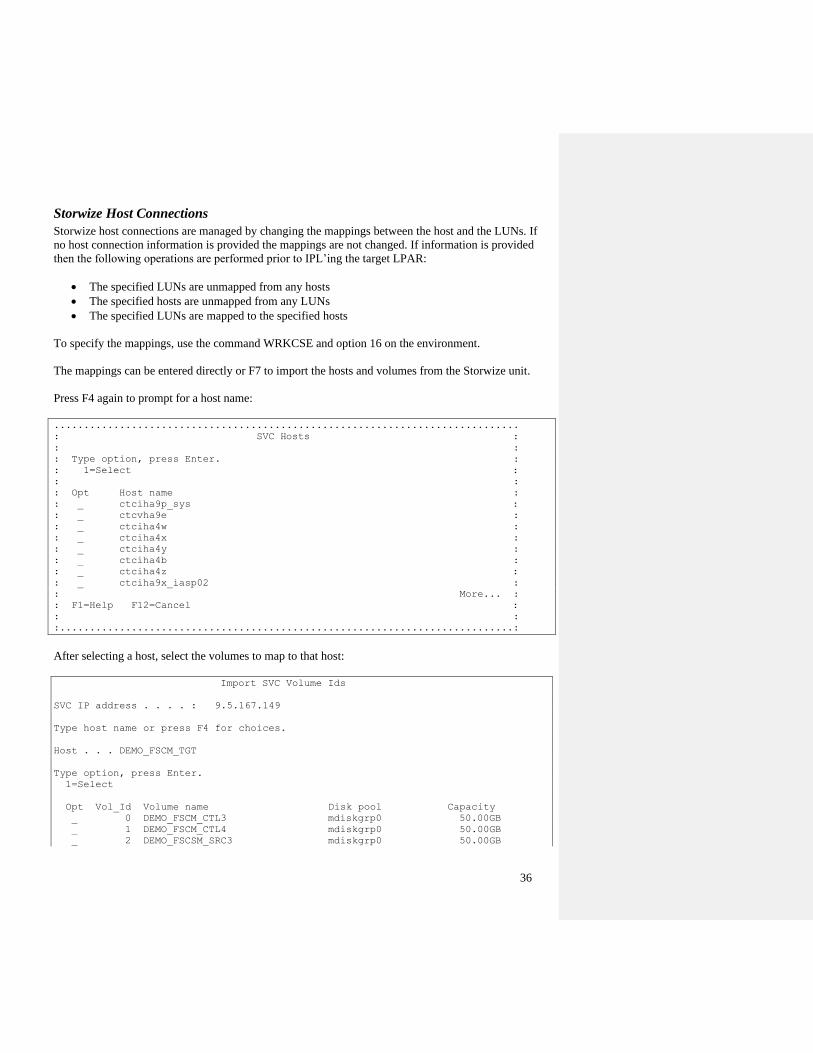
36
Storwize Host Connections
Storwize host connections are managed by changing the mappings between the host and the LUNs. If
no host connection information is provided the mappings are not changed. If information is provided
then the following operations are performed prior to IPL’ing the target LPAR:
• The specified LUNs are unmapped from any hosts
• The specified hosts are unmapped from any LUNs
• The specified LUNs are mapped to the specified hosts
To specify the mappings, use the command WRKCSE and option 16 on the environment.
The mappings can be entered directly or F7 to import the hosts and volumes from the Storwize unit.
Press F4 again to prompt for a host name:
..............................................................................
: SVC Hosts :
: :
: Type option, press Enter. :
: 1=Select :
: :
: Opt Host name :
: ctciha9p_sys :
: ctcvha9e :
: ctciha4w :
: ctciha4x :
: ctciha4y :
: ctciha4b :
: ctciha4z :
: ctciha9x_iasp02 :
: More... :
: F1=Help F12=Cancel :
: :
:............................................................................:
After selecting a host, select the volumes to map to that host:
Import SVC Volume Ids
SVC IP address . . . . : 9.5.167.149
Type host name or press F4 for choices.
Host . . . DEMO_FSCM_TGT
Type option, press Enter.
1=Select
Opt Vol_Id Volume name Disk pool Capacity
0 DEMO_FSCM_CTL3 mdiskgrp0 50.00GB
1 DEMO_FSCM_CTL4 mdiskgrp0 50.00GB
2 DEMO_FSCSM_SRC3 mdiskgrp0 50.00GB
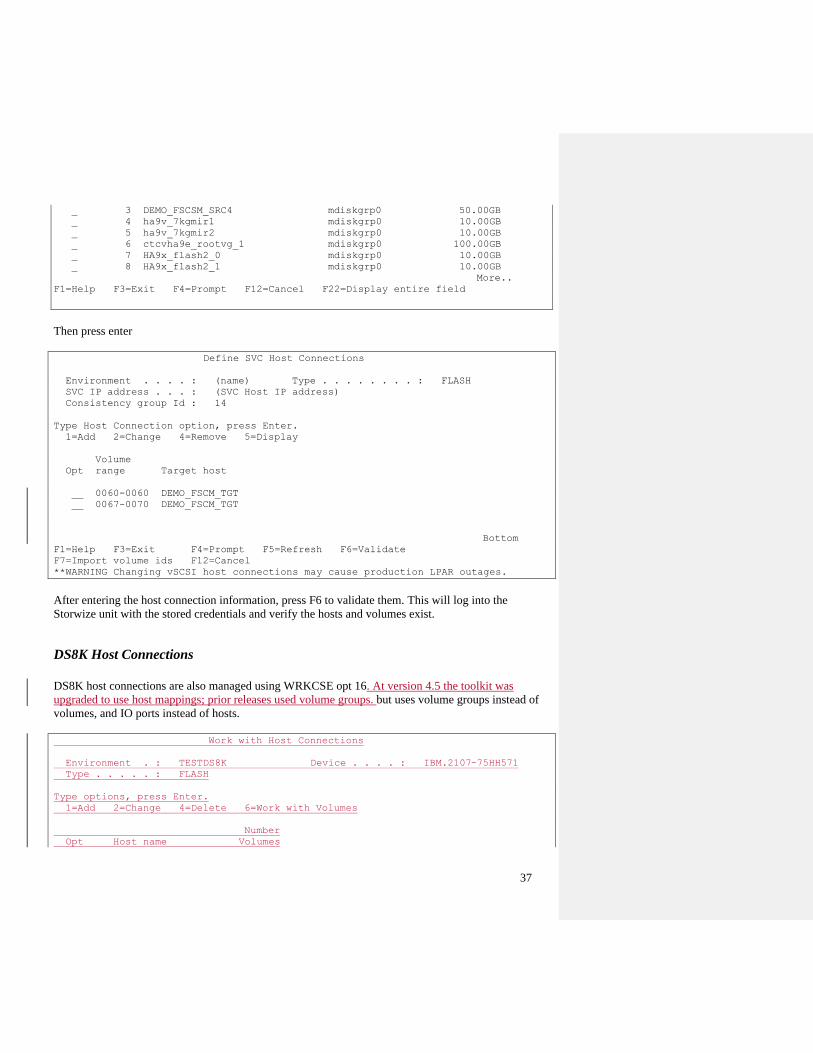
37
3 DEMO_FSCSM_SRC4 mdiskgrp0 50.00GB
4 ha9v_7kgmir1 mdiskgrp0 10.00GB
5 ha9v_7kgmir2 mdiskgrp0 10.00GB
6 ctcvha9e_rootvg_1 mdiskgrp0 100.00GB
7 HA9x_flash2_0 mdiskgrp0 10.00GB
8 HA9x_flash2_1 mdiskgrp0 10.00GB
More..
F1=Help F3=Exit F4=Prompt F12=Cancel F22=Display entire field
Then press enter
Define SVC Host Connections
Environment . . . . : (name) Type . . . . . . . . : FLASH
SVC IP address . . . : (SVC Host IP address)
Consistency group Id : 14
Type Host Connection option, press Enter.
1=Add 2=Change 4=Remove 5=Display
Volume
Opt range Target host
0060-0060 DEMO_FSCM_TGT
0067-0070 DEMO_FSCM_TGT
Bottom
F1=Help F3=Exit F4=Prompt F5=Refresh F6=Validate
F7=Import volume ids F12=Cancel
**WARNING Changing vSCSI host connections may cause production LPAR outages.
After entering the host connection information, press F6 to validate them. This will log into the
Storwize unit with the stored credentials and verify the hosts and volumes exist.
DS8K Host Connections
DS8K host connections are also managed using WRKCSE opt 16. At version 4.5 the toolkit was
upgraded to use host mappings; prior releases used volume groups. but uses volume groups instead of
volumes, and IO ports instead of hosts.
Work with Host Connections
Environment . : TESTDS8K Device . . . . : IBM.2107-75HH571
Type . . . . . : FLASH
Type options, press Enter.
1=Add 2=Change 4=Delete 6=Work with Volumes
Number
Opt Host name Volumes
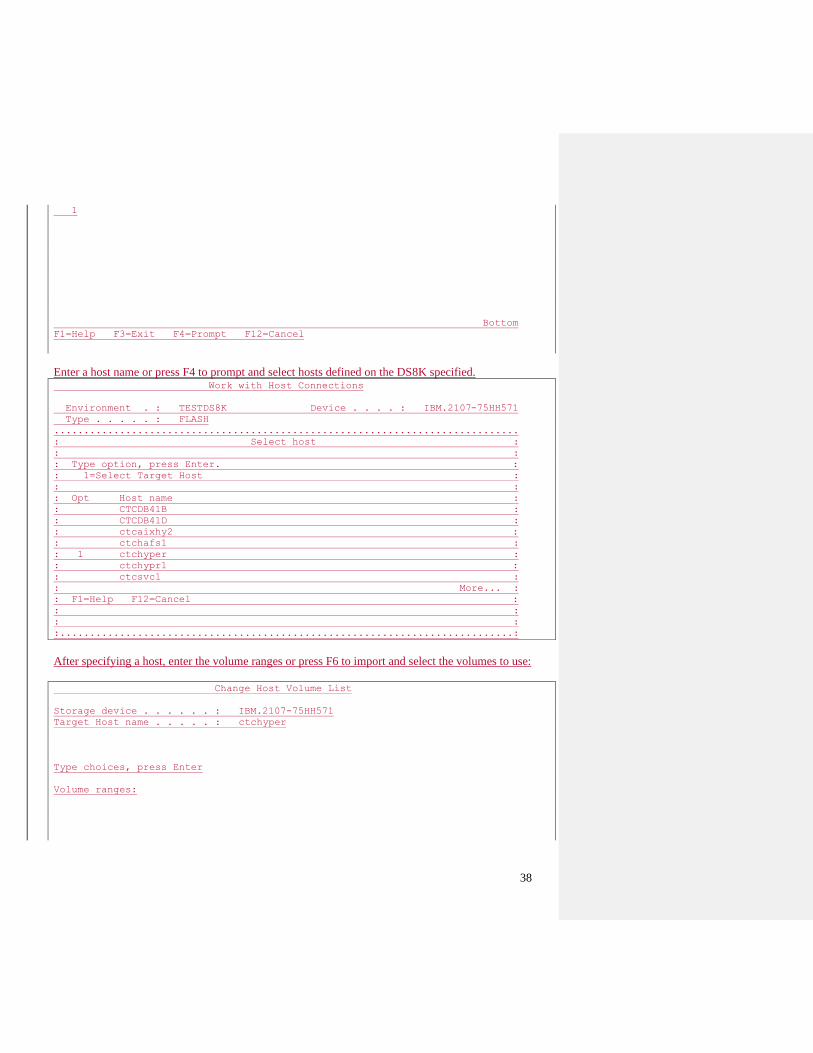
38
1
Bottom
F1=Help F3=Exit F4=Prompt F12=Cancel
Enter a host name or press F4 to prompt and select hosts defined on the DS8K specified. Work with Host Connections
Environment . : TESTDS8K Device . . . . : IBM.2107-75HH571
Type . . . . . : FLASH
..............................................................................
: Select host :
: :
: Type option, press Enter. :
: 1=Select Target Host :
: :
: Opt Host name :
: CTCDB41B :
: CTCDB41D :
: ctcaixhy2 :
: ctchafs1 :
: 1 ctchyper :
: ctchypr1 :
: ctcsvc1 :
: More... :
: F1=Help F12=Cancel :
: :
: :
:............................................................................:
After specifying a host, enter the volume ranges or press F6 to import and select the volumes to use:
Change Host Volume List
Storage device . . . . . . : IBM.2107-75HH571
Target Host name . . . . . : ctchyper
Type choices, press Enter
Volume ranges:
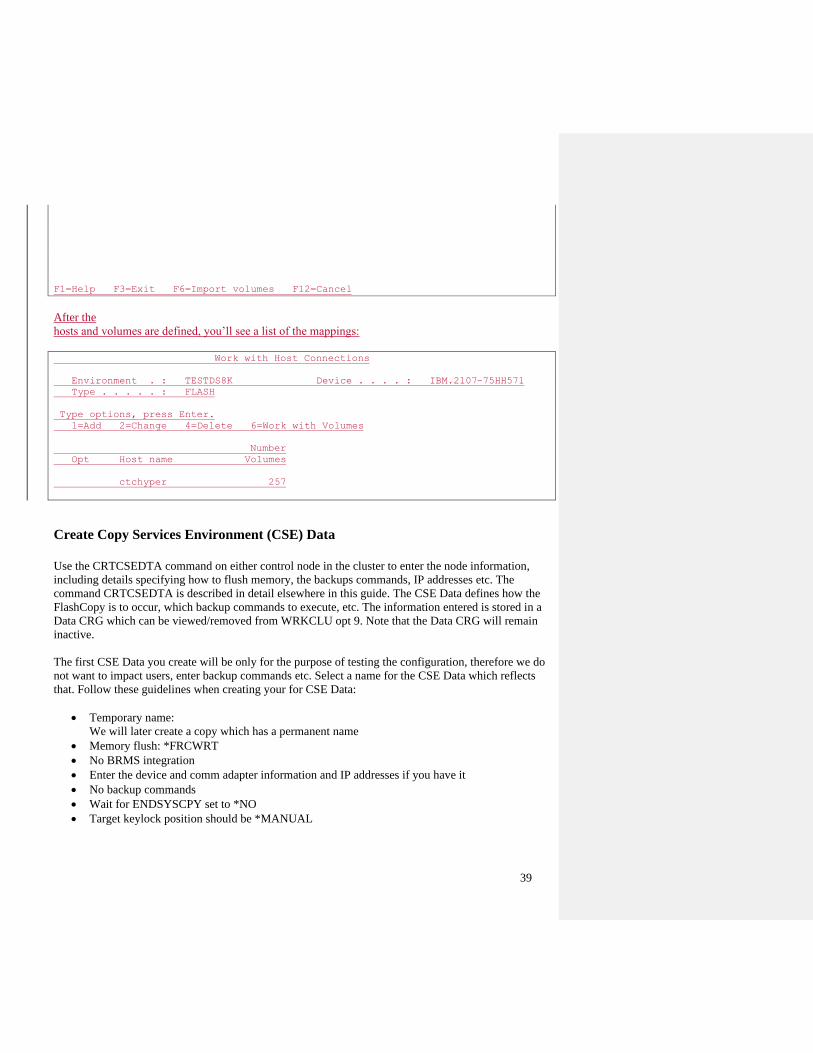
39
F1=Help F3=Exit F6=Import volumes F12=Cancel
After the
hosts and volumes are defined, you’ll see a list of the mappings:
Work with Host Connections
Environment . : TESTDS8K Device . . . . : IBM.2107-75HH571
Type . . . . . : FLASH
Type options, press Enter.
1=Add 2=Change 4=Delete 6=Work with Volumes
Number
Opt Host name Volumes
ctchyper 257
Create Copy Services Environment (CSE) Data
Use the CRTCSEDTA command on either control node in the cluster to enter the node information,
including details specifying how to flush memory, the backups commands, IP addresses etc. The
command CRTCSEDTA is described in detail elsewhere in this guide. The CSE Data defines how the
FlashCopy is to occur, which backup commands to execute, etc. The information entered is stored in a
Data CRG which can be viewed/removed from WRKCLU opt 9. Note that the Data CRG will remain
inactive.
The first CSE Data you create will be only for the purpose of testing the configuration, therefore we do
not want to impact users, enter backup commands etc. Select a name for the CSE Data which reflects
that. Follow these guidelines when creating your for CSE Data:
• Temporary name:
We will later create a copy which has a permanent name
• Memory flush: *FRCWRT
• No BRMS integration
• Enter the device and comm adapter information and IP addresses if you have it
• No backup commands
• Wait for ENDSYSCPY set to *NO
• Target keylock position should be *MANUAL
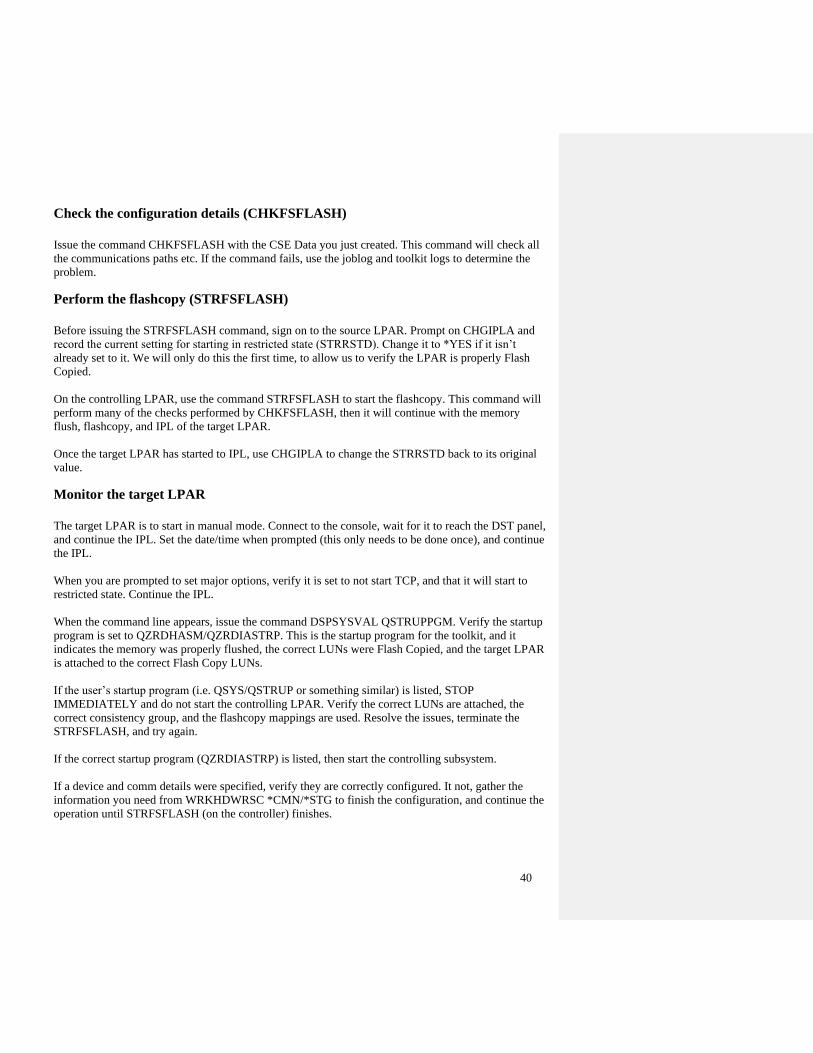
40
Check the configuration details (CHKFSFLASH)
Issue the command CHKFSFLASH with the CSE Data you just created. This command will check all
the communications paths etc. If the command fails, use the joblog and toolkit logs to determine the
problem.
Perform the flashcopy (STRFSFLASH)
Before issuing the STRFSFLASH command, sign on to the source LPAR. Prompt on CHGIPLA and
record the current setting for starting in restricted state (STRRSTD). Change it to *YES if it isn’t
already set to it. We will only do this the first time, to allow us to verify the LPAR is properly Flash
Copied.
On the controlling LPAR, use the command STRFSFLASH to start the flashcopy. This command will
perform many of the checks performed by CHKFSFLASH, then it will continue with the memory
flush, flashcopy, and IPL of the target LPAR.
Once the target LPAR has started to IPL, use CHGIPLA to change the STRRSTD back to its original
value.
Monitor the target LPAR
The target LPAR is to start in manual mode. Connect to the console, wait for it to reach the DST panel,
and continue the IPL. Set the date/time when prompted (this only needs to be done once), and continue
the IPL.
When you are prompted to set major options, verify it is set to not start TCP, and that it will start to
restricted state. Continue the IPL.
When the command line appears, issue the command DSPSYSVAL QSTRUPPGM. Verify the startup
program is set to QZRDHASM/QZRDIASTRP. This is the startup program for the toolkit, and it
indicates the memory was properly flushed, the correct LUNs were Flash Copied, and the target LPAR
is attached to the correct Flash Copy LUNs.
If the user’s startup program (i.e. QSYS/QSTRUP or something similar) is listed, STOP
IMMEDIATELY and do not start the controlling LPAR. Verify the correct LUNs are attached, the
correct consistency group, and the flashcopy mappings are used. Resolve the issues, terminate the
STRFSFLASH, and try again.
If the correct startup program (QZRDIASTRP) is listed, then start the controlling subsystem.
If a device and comm details were specified, verify they are correctly configured. It not, gather the
information you need from WRKHDWRSC *CMN/*STG to finish the configuration, and continue the
operation until STRFSFLASH (on the controller) finishes.
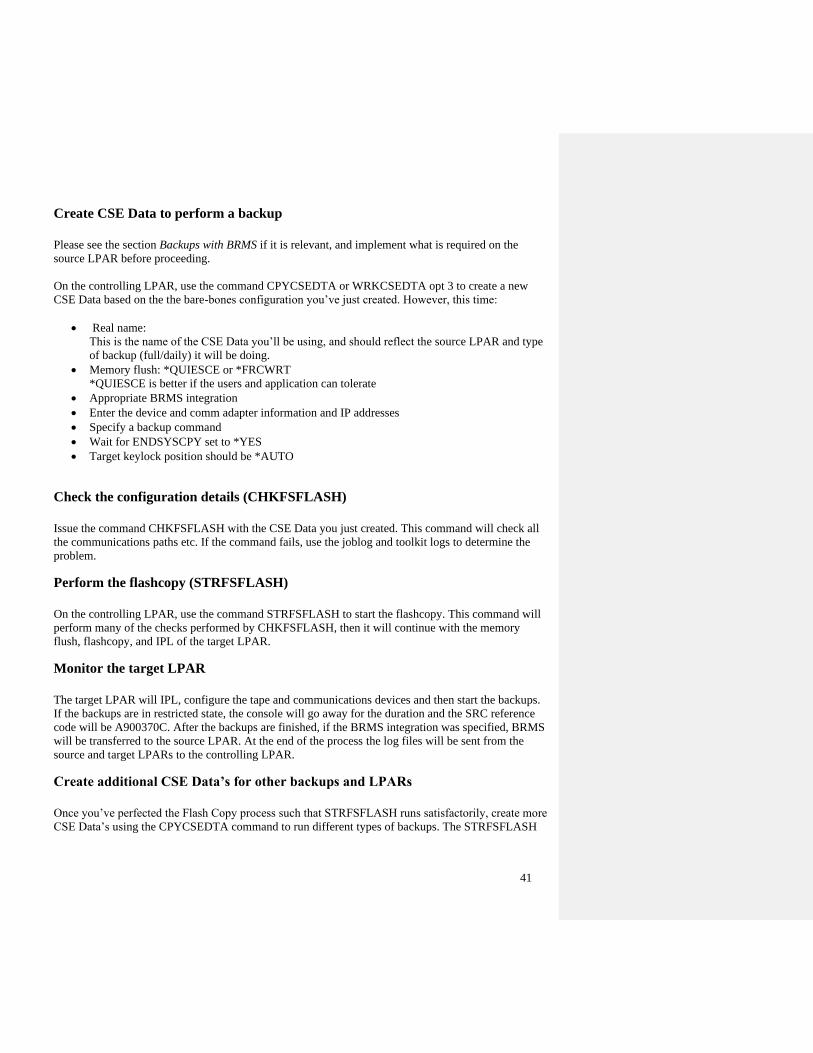
41
Create CSE Data to perform a backup
Please see the section Backups with BRMS if it is relevant, and implement what is required on the
source LPAR before proceeding.
On the controlling LPAR, use the command CPYCSEDTA or WRKCSEDTA opt 3 to create a new
CSE Data based on the the bare-bones configuration you’ve just created. However, this time:
• Real name:
This is the name of the CSE Data you’ll be using, and should reflect the source LPAR and type
of backup (full/daily) it will be doing.
• Memory flush: *QUIESCE or *FRCWRT
*QUIESCE is better if the users and application can tolerate
• Appropriate BRMS integration
• Enter the device and comm adapter information and IP addresses
• Specify a backup command
• Wait for ENDSYSCPY set to *YES
• Target keylock position should be *AUTO
Check the configuration details (CHKFSFLASH)
Issue the command CHKFSFLASH with the CSE Data you just created. This command will check all
the communications paths etc. If the command fails, use the joblog and toolkit logs to determine the
problem.
Perform the flashcopy (STRFSFLASH)
On the controlling LPAR, use the command STRFSFLASH to start the flashcopy. This command will
perform many of the checks performed by CHKFSFLASH, then it will continue with the memory
flush, flashcopy, and IPL of the target LPAR.
Monitor the target LPAR
The target LPAR will IPL, configure the tape and communications devices and then start the backups.
If the backups are in restricted state, the console will go away for the duration and the SRC reference
code will be A900370C. After the backups are finished, if the BRMS integration was specified, BRMS
will be transferred to the source LPAR. At the end of the process the log files will be sent from the
source and target LPARs to the controlling LPAR.
Create additional CSE Data’s for other backups and LPARs
Once you’ve perfected the Flash Copy process such that STRFSFLASH runs satisfactorily, create more
CSE Data’s using the CPYCSEDTA command to run different types of backups. The STRFSFLASH

42
command be placed on the job scheduler, called from another application, or issued from the
production LPAR. Integrating it with a customer’s environment may require additional testing.
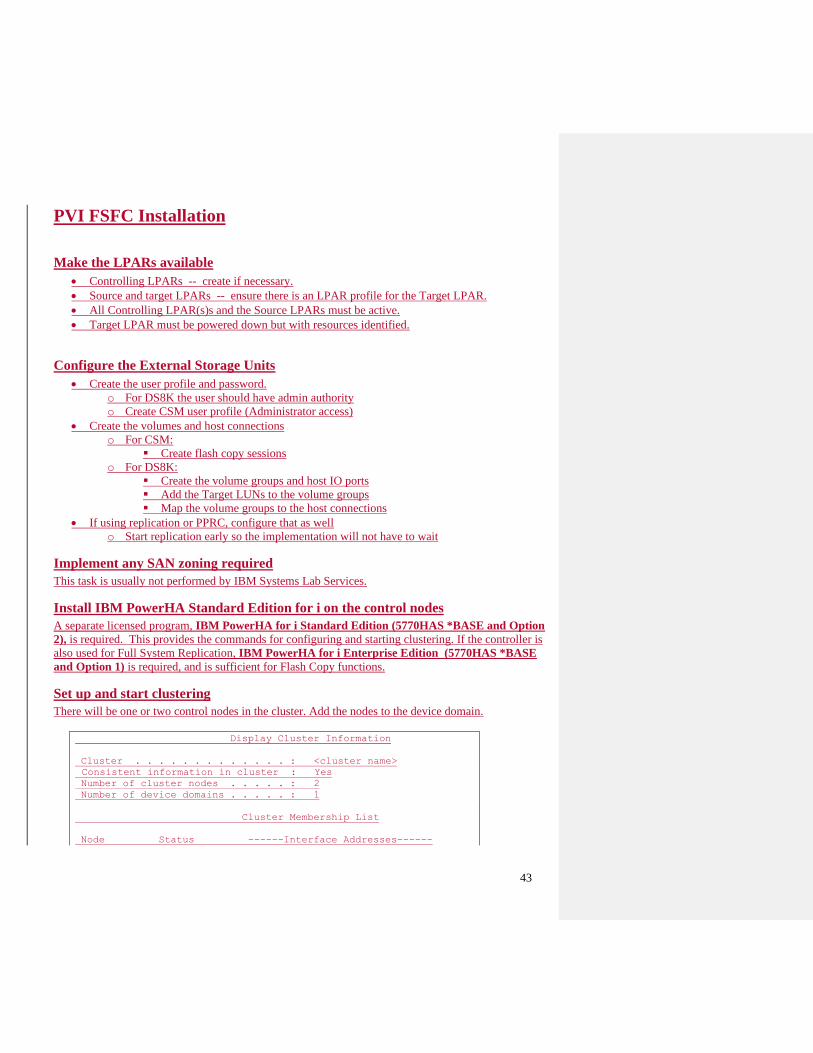
43
PVI FSFC Installation
Make the LPARs available
• Controlling LPARs -- create if necessary.
• Source and target LPARs -- ensure there is an LPAR profile for the Target LPAR.
• All Controlling LPAR(s)s and the Source LPARs must be active.
• Target LPAR must be powered down but with resources identified.
Configure the External Storage Units
• Create the user profile and password.
o For DS8K the user should have admin authority
o Create CSM user profile (Administrator access)
• Create the volumes and host connections
o For CSM:
▪ Create flash copy sessions
o For DS8K:
▪ Create the volume groups and host IO ports
▪ Add the Target LUNs to the volume groups
▪ Map the volume groups to the host connections
• If using replication or PPRC, configure that as well
o Start replication early so the implementation will not have to wait
Implement any SAN zoning required
This task is usually not performed by IBM Systems Lab Services.
Install IBM PowerHA Standard Edition for i on the control nodes
A separate licensed program, IBM PowerHA for i Standard Edition (5770HAS *BASE and Option
2), is required. This provides the commands for configuring and starting clustering. If the controller is
also used for Full System Replication, IBM PowerHA for i Enterprise Edition (5770HAS *BASE
and Option 1) is required, and is sufficient for Flash Copy functions.
Set up and start clustering
There will be one or two control nodes in the cluster. Add the nodes to the device domain.
Display Cluster Information
Cluster . . . . . . . . . . . . . : <cluster name>
Consistent information in cluster : Yes
Number of cluster nodes . . . . . : 2
Number of device domains . . . . . : 1
Cluster Membership List
Node Status ------Interface Addresses------
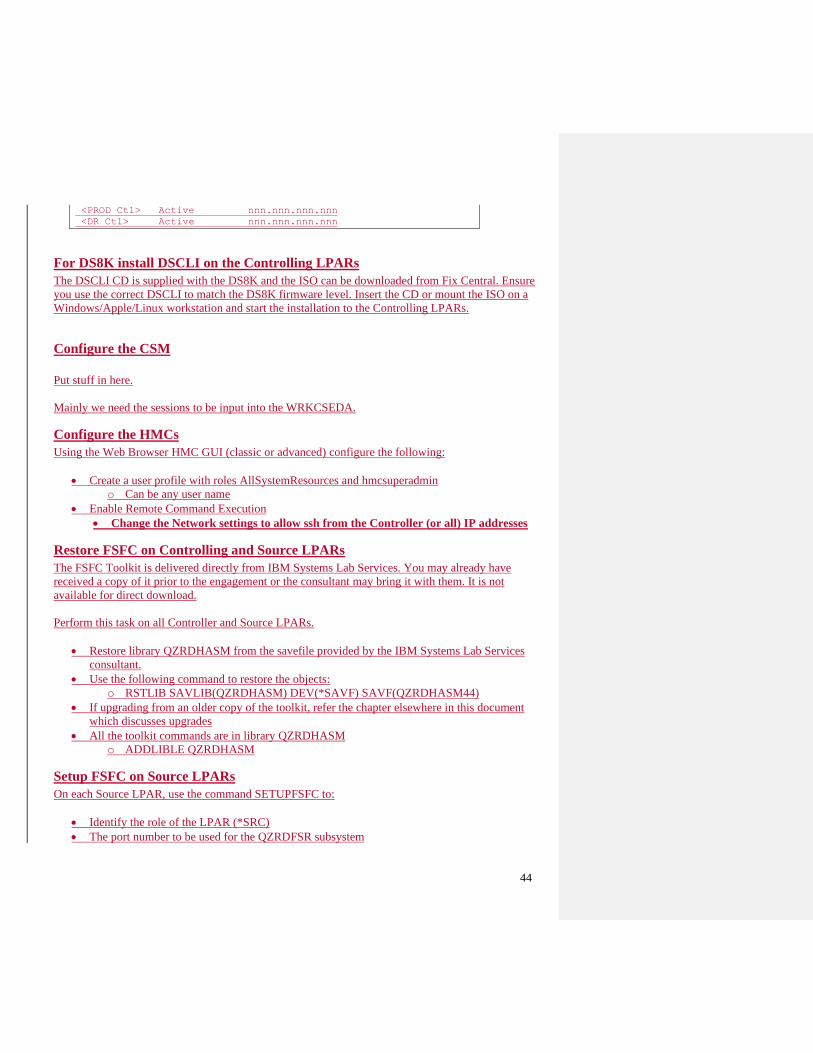
44
<PROD Ctl> Active nnn.nnn.nnn.nnn
<DR Ctl> Active nnn.nnn.nnn.nnn
For DS8K install DSCLI on the Controlling LPARs
The DSCLI CD is supplied with the DS8K and the ISO can be downloaded from Fix Central. Ensure
you use the correct DSCLI to match the DS8K firmware level. Insert the CD or mount the ISO on a
Windows/Apple/Linux workstation and start the installation to the Controlling LPARs.
Configure the CSM
Put stuff in here.
Mainly we need the sessions to be input into the WRKCSEDA.
Configure the HMCs
Using the Web Browser HMC GUI (classic or advanced) configure the following:
• Create a user profile with roles AllSystemResources and hmcsuperadmin
o Can be any user name
• Enable Remote Command Execution
• Change the Network settings to allow ssh from the Controller (or all) IP addresses
Restore FSFC on Controlling and Source LPARs
The FSFC Toolkit is delivered directly from IBM Systems Lab Services. You may already have
received a copy of it prior to the engagement or the consultant may bring it with them. It is not
available for direct download.
Perform this task on all Controller and Source LPARs.
• Restore library QZRDHASM from the savefile provided by the IBM Systems Lab Services
consultant.
• Use the following command to restore the objects:
o RSTLIB SAVLIB(QZRDHASM) DEV(*SAVF) SAVF(QZRDHASM44)
• If upgrading from an older copy of the toolkit, refer the chapter elsewhere in this document
which discusses upgrades
• All the toolkit commands are in library QZRDHASM
o ADDLIBLE QZRDHASM
Setup FSFC on Source LPARs
On each Source LPAR, use the command SETUPFSFC to:
• Identify the role of the LPAR (*SRC)
• The port number to be used for the QZRDFSR subsystem
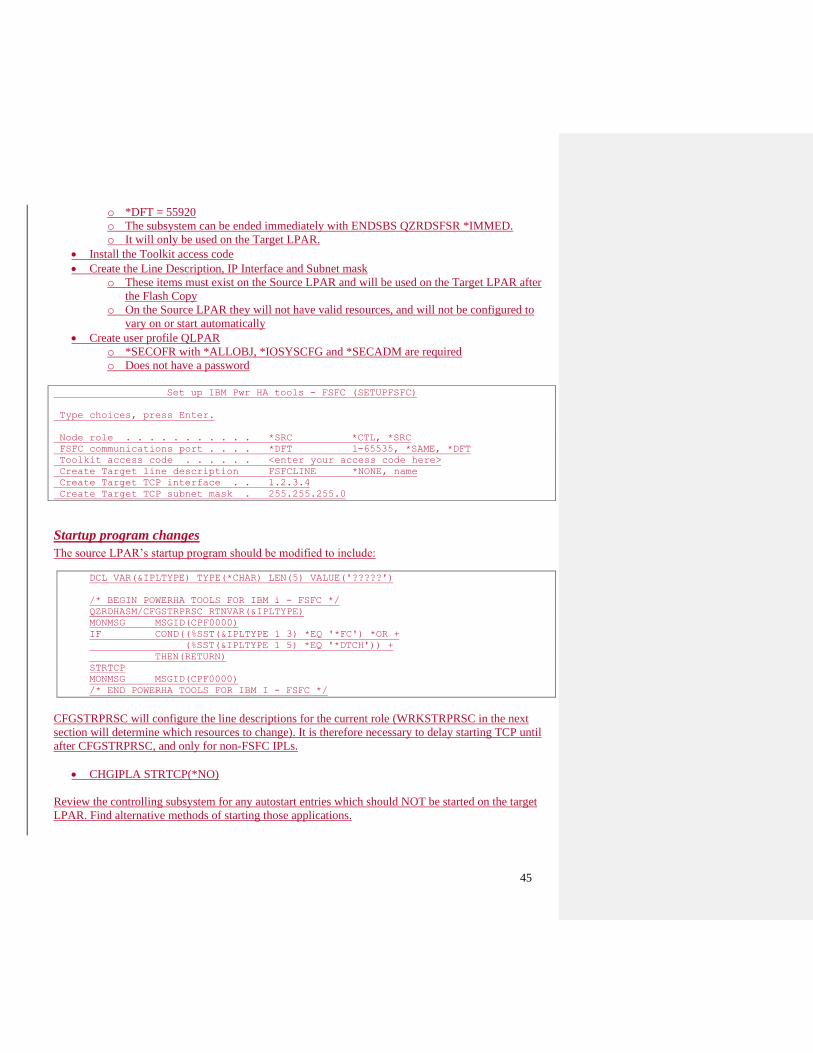
45
o *DFT = 55920
o The subsystem can be ended immediately with ENDSBS QZRDSFSR *IMMED.
o It will only be used on the Target LPAR.
• Install the Toolkit access code
• Create the Line Description, IP Interface and Subnet mask
o These items must exist on the Source LPAR and will be used on the Target LPAR after
the Flash Copy
o On the Source LPAR they will not have valid resources, and will not be configured to
vary on or start automatically
• Create user profile QLPAR
o *SECOFR with *ALLOBJ, *IOSYSCFG and *SECADM are required
o Does not have a password
Set up IBM Pwr HA tools - FSFC (SETUPFSFC)
Type choices, press Enter.
Node role . . . . . . . . . . . *SRC *CTL, *SRC
FSFC communications port . . . . *DFT 1-65535, *SAME, *DFT
Toolkit access code . . . . . . <enter your access code here>
Create Target line description FSFCLINE *NONE, name
Create Target TCP interface . . 1.2.3.4
Create Target TCP subnet mask . 255.255.255.0
Startup program changes
The source LPAR’s startup program should be modified to include:
DCL VAR(&IPLTYPE) TYPE(*CHAR) LEN(5) VALUE('?????')
/* BEGIN POWERHA TOOLS FOR IBM i - FSFC */
QZRDHASM/CFGSTRPRSC RTNVAR(&IPLTYPE)
MONMSG MSGID(CPF0000)
IF COND((%SST(&IPLTYPE 1 3) *EQ '*FC') *OR +
(%SST(&IPLTYPE 1 5) *EQ '*DTCH')) +
THEN(RETURN)
STRTCP
MONMSG MSGID(CPF0000)
/* END POWERHA TOOLS FOR IBM I - FSFC */
CFGSTRPRSC will configure the line descriptions for the current role (WRKSTRPRSC in the next
section will determine which resources to change). It is therefore necessary to delay starting TCP until
after CFGSTRPRSC, and only for non-FSFC IPLs.
• CHGIPLA STRTCP(*NO)
Review the controlling subsystem for any autostart entries which should NOT be started on the target
LPAR. Find alternative methods of starting those applications.
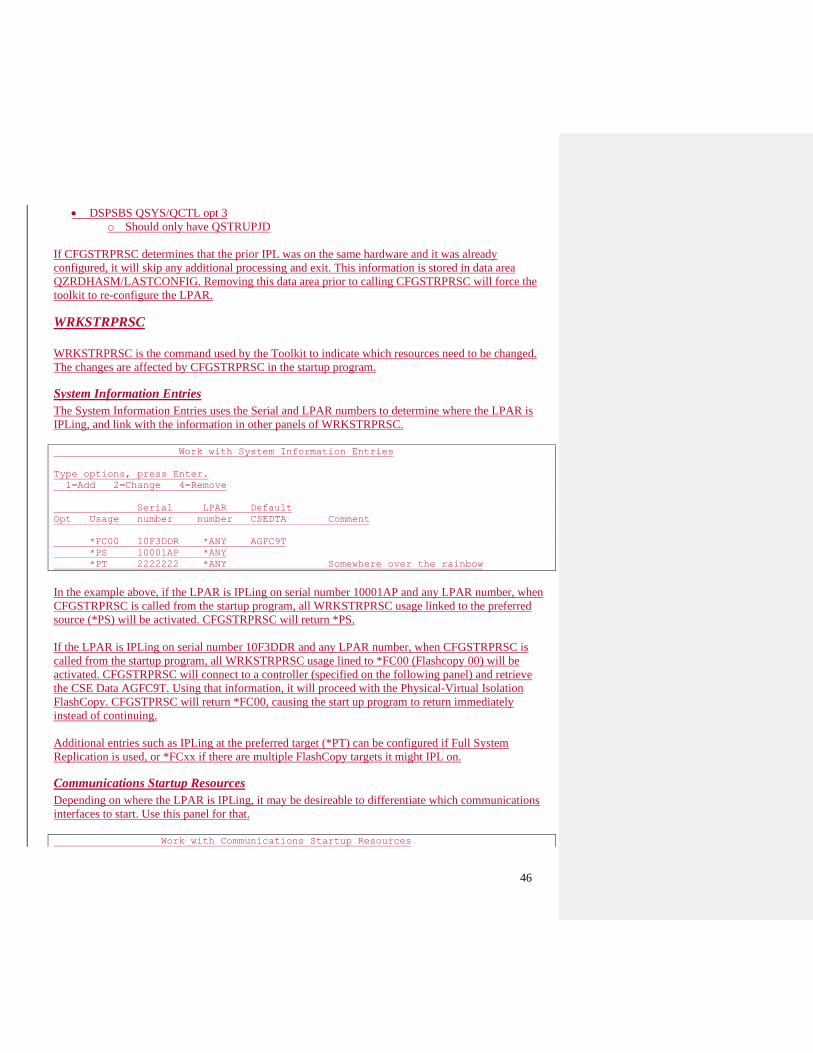
46
• DSPSBS QSYS/QCTL opt 3
o Should only have QSTRUPJD
If CFGSTRPRSC determines that the prior IPL was on the same hardware and it was already
configured, it will skip any additional processing and exit. This information is stored in data area
QZRDHASM/LASTCONFIG. Removing this data area prior to calling CFGSTRPRSC will force the
toolkit to re-configure the LPAR.
WRKSTRPRSC
WRKSTRPRSC is the command used by the Toolkit to indicate which resources need to be changed.
The changes are affected by CFGSTRPRSC in the startup program.
System Information Entries
The System Information Entries uses the Serial and LPAR numbers to determine where the LPAR is
IPLing, and link with the information in other panels of WRKSTRPRSC.
Work with System Information Entries
Type options, press Enter.
1=Add 2=Change 4=Remove
Serial LPAR Default
Opt Usage number number CSEDTA Comment
*FC00 10F3DDR *ANY AGFC9T
*PS 10001AP *ANY
*PT 2222222 *ANY Somewhere over the rainbow
In the example above, if the LPAR is IPLing on serial number 10001AP and any LPAR number, when
CFGSTRPRSC is called from the startup program, all WRKSTRPRSC usage linked to the preferred
source (*PS) will be activated. CFGSTRPRSC will return *PS.
If the LPAR is IPLing on serial number 10F3DDR and any LPAR number, when CFGSTRPRSC is
called from the startup program, all WRKSTRPRSC usage lined to *FC00 (Flashcopy 00) will be
activated. CFGSTRPRSC will connect to a controller (specified on the following panel) and retrieve
the CSE Data AGFC9T. Using that information, it will proceed with the Physical-Virtual Isolation
FlashCopy. CFGSTPRSC will return *FC00, causing the start up program to return immediately
instead of continuing.
Additional entries such as IPLing at the preferred target (*PT) can be configured if Full System
Replication is used, or *FCxx if there are multiple FlashCopy targets it might IPL on.
Communications Startup Resources
Depending on where the LPAR is IPLing, it may be desireable to differentiate which communications
interfaces to start. Use this panel for that.
Work with Communications Startup Resources
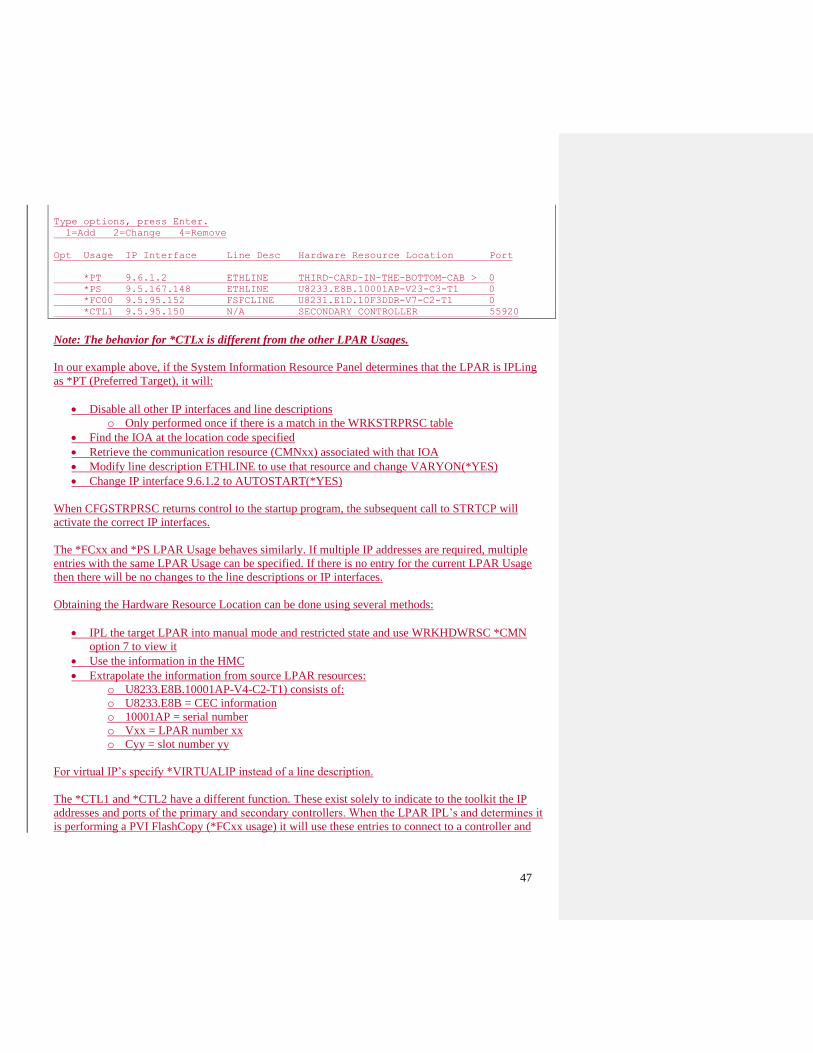
47
Type options, press Enter.
1=Add 2=Change 4=Remove
Opt Usage IP Interface Line Desc Hardware Resource Location Port
*PT 9.6.1.2 ETHLINE THIRD-CARD-IN-THE-BOTTOM-CAB > 0
*PS 9.5.167.148 ETHLINE U8233.E8B.10001AP-V23-C3-T1 0
*FC00 9.5.95.152 FSFCLINE U8231.E1D.10F3DDR-V7-C2-T1 0
*CTL1 9.5.95.150 N/A SECONDARY CONTROLLER 55920
Note: The behavior for *CTLx is different from the other LPAR Usages.
In our example above, if the System Information Resource Panel determines that the LPAR is IPLing
as *PT (Preferred Target), it will:
• Disable all other IP interfaces and line descriptions
o Only performed once if there is a match in the WRKSTRPRSC table
• Find the IOA at the location code specified
• Retrieve the communication resource (CMNxx) associated with that IOA
• Modify line description ETHLINE to use that resource and change VARYON(*YES)
• Change IP interface 9.6.1.2 to AUTOSTART(*YES)
When CFGSTRPRSC returns control to the startup program, the subsequent call to STRTCP will
activate the correct IP interfaces.
The *FCxx and *PS LPAR Usage behaves similarly. If multiple IP addresses are required, multiple
entries with the same LPAR Usage can be specified. If there is no entry for the current LPAR Usage
then there will be no changes to the line descriptions or IP interfaces.
Obtaining the Hardware Resource Location can be done using several methods:
• IPL the target LPAR into manual mode and restricted state and use WRKHDWRSC *CMN
option 7 to view it
• Use the information in the HMC
• Extrapolate the information from source LPAR resources:
o U8233.E8B.10001AP-V4-C2-T1) consists of:
o U8233.E8B = CEC information
o 10001AP = serial number
o Vxx = LPAR number xx
o Cyy = slot number yy
For virtual IP’s specify *VIRTUALIP instead of a line description.
The *CTL1 and *CTL2 have a different function. These exist solely to indicate to the toolkit the IP
addresses and ports of the primary and secondary controllers. When the LPAR IPL’s and determines it
is performing a PVI FlashCopy (*FCxx usage) it will use these entries to connect to a controller and
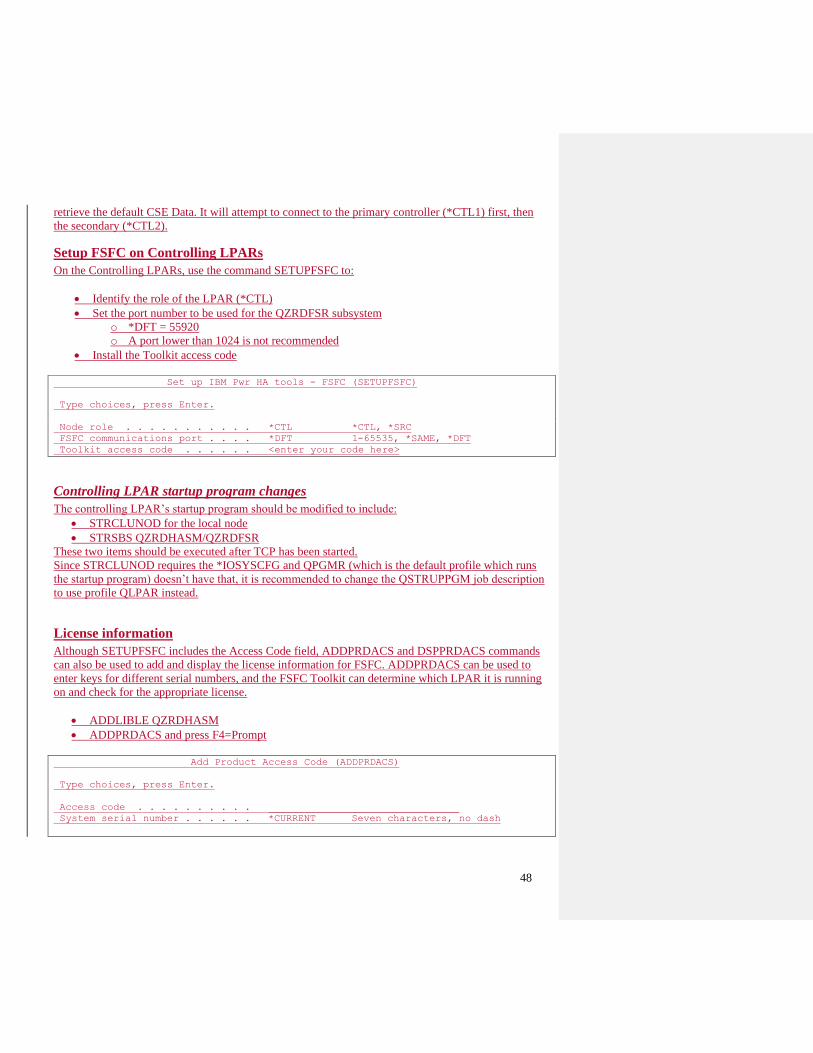
48
retrieve the default CSE Data. It will attempt to connect to the primary controller (*CTL1) first, then
the secondary (*CTL2).
Setup FSFC on Controlling LPARs
On the Controlling LPARs, use the command SETUPFSFC to:
• Identify the role of the LPAR (*CTL)
• Set the port number to be used for the QZRDFSR subsystem
o *DFT = 55920
o A port lower than 1024 is not recommended
• Install the Toolkit access code
Set up IBM Pwr HA tools - FSFC (SETUPFSFC)
Type choices, press Enter.
Node role . . . . . . . . . . . *CTL *CTL, *SRC
FSFC communications port . . . . *DFT 1-65535, *SAME, *DFT
Toolkit access code . . . . . . <enter your code here>
Controlling LPAR startup program changes
The controlling LPAR’s startup program should be modified to include:
• STRCLUNOD for the local node
• STRSBS QZRDHASM/QZRDFSR
These two items should be executed after TCP has been started.
Since STRCLUNOD requires the *IOSYSCFG and QPGMR (which is the default profile which runs
the startup program) doesn’t have that, it is recommended to change the QSTRUPPGM job description
to use profile QLPAR instead.
License information
Although SETUPFSFC includes the Access Code field, ADDPRDACS and DSPPRDACS commands
can also be used to add and display the license information for FSFC. ADDPRDACS can be used to
enter keys for different serial numbers, and the FSFC Toolkit can determine which LPAR it is running
on and check for the appropriate license.
• ADDLIBLE QZRDHASM
• ADDPRDACS and press F4=Prompt
Add Product Access Code (ADDPRDACS)
Type choices, press Enter.
Access code . . . . . . . . . . ________________________________
System serial number . . . . . . *CURRENT Seven characters, no dash
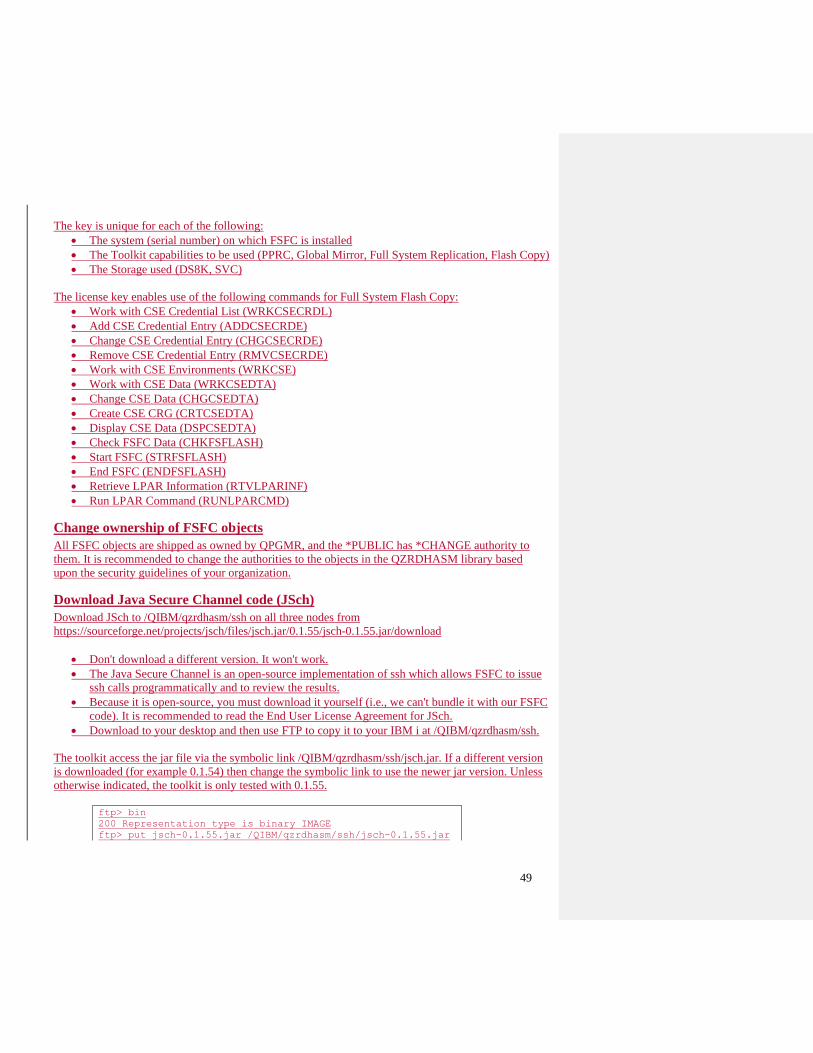
49
The key is unique for each of the following:
• The system (serial number) on which FSFC is installed
• The Toolkit capabilities to be used (PPRC, Global Mirror, Full System Replication, Flash Copy)
• The Storage used (DS8K, SVC)
The license key enables use of the following commands for Full System Flash Copy:
• Work with CSE Credential List (WRKCSECRDL)
• Add CSE Credential Entry (ADDCSECRDE)
• Change CSE Credential Entry (CHGCSECRDE)
• Remove CSE Credential Entry (RMVCSECRDE)
• Work with CSE Environments (WRKCSE)
• Work with CSE Data (WRKCSEDTA)
• Change CSE Data (CHGCSEDTA)
• Create CSE CRG (CRTCSEDTA)
• Display CSE Data (DSPCSEDTA)
• Check FSFC Data (CHKFSFLASH)
• Start FSFC (STRFSFLASH)
• End FSFC (ENDFSFLASH)
• Retrieve LPAR Information (RTVLPARINF)
• Run LPAR Command (RUNLPARCMD)
Change ownership of FSFC objects
All FSFC objects are shipped as owned by QPGMR, and the *PUBLIC has *CHANGE authority to
them. It is recommended to change the authorities to the objects in the QZRDHASM library based
upon the security guidelines of your organization.
Download Java Secure Channel code (JSch)
Download JSch to /QIBM/qzrdhasm/ssh on all three nodes from
https://sourceforge.net/projects/jsch/files/jsch.jar/0.1.55/jsch-0.1.55.jar/download
• Don't download a different version. It won't work.
• The Java Secure Channel is an open-source implementation of ssh which allows FSFC to issue
ssh calls programmatically and to review the results.
• Because it is open-source, you must download it yourself (i.e., we can't bundle it with our FSFC
code). It is recommended to read the End User License Agreement for JSch.
• Download to your desktop and then use FTP to copy it to your IBM i at /QIBM/qzrdhasm/ssh.
The toolkit access the jar file via the symbolic link /QIBM/qzrdhasm/ssh/jsch.jar. If a different version
is downloaded (for example 0.1.54) then change the symbolic link to use the newer jar version. Unless
otherwise indicated, the toolkit is only tested with 0.1.55.
ftp> bin
200 Representation type is binary IMAGE
ftp> put jsch-0.1.55.jar /QIBM/qzrdhasm/ssh/jsch-0.1.55.jar
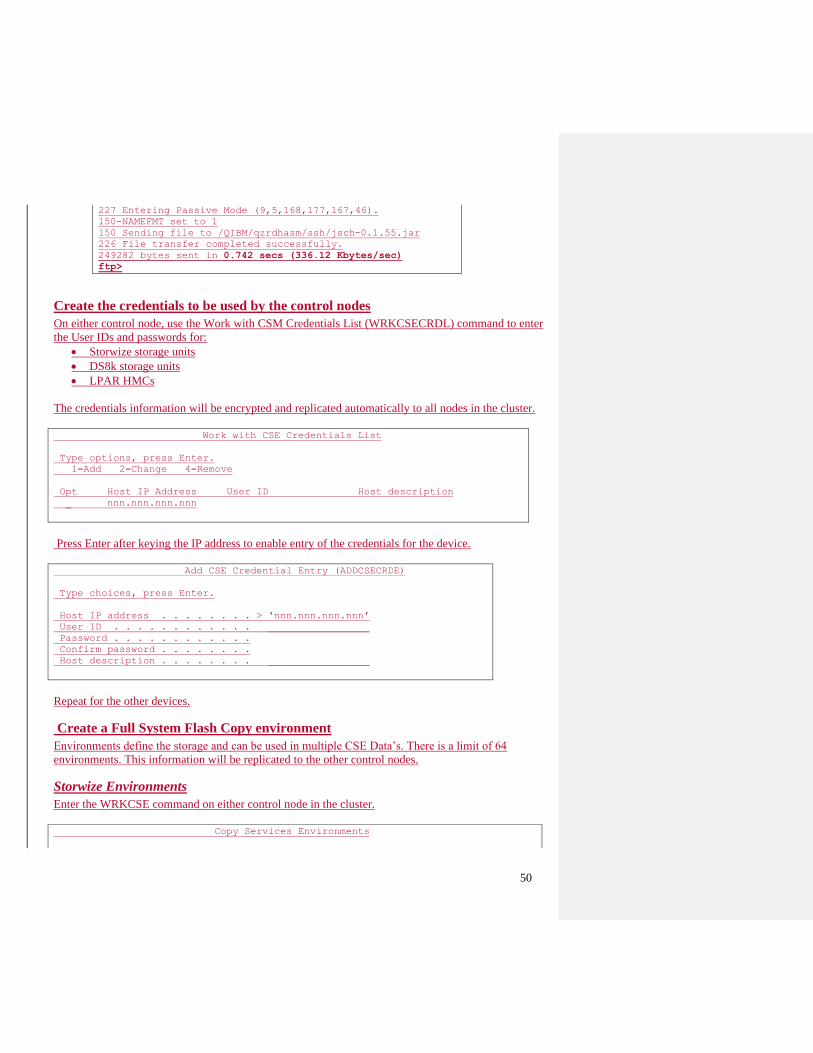
50
227 Entering Passive Mode (9,5,168,177,167,46).
150-NAMEFMT set to 1
150 Sending file to /QIBM/qzrdhasm/ssh/jsch-0.1.55.jar
226 File transfer completed successfully.
249282 bytes sent in 0.742 secs (336.12 Kbytes/sec)
ftp>
Create the credentials to be used by the control nodes
On either control node, use the Work with CSM Credentials List (WRKCSECRDL) command to enter
the User IDs and passwords for:
• Storwize storage units
• DS8k storage units
• LPAR HMCs
The credentials information will be encrypted and replicated automatically to all nodes in the cluster.
Work with CSE Credentials List
Type options, press Enter.
1=Add 2=Change 4=Remove
Opt Host IP Address User ID Host description
_ nnn.nnn.nnn.nnn
Press Enter after keying the IP address to enable entry of the credentials for the device.
Add CSE Credential Entry (ADDCSECRDE)
Type choices, press Enter.
Host IP address . . . . . . . . > 'nnn.nnn.nnn.nnn'
User ID . . . . . . . . . . . . _________________
Password . . . . . . . . . . . .
Confirm password . . . . . . . .
Host description . . . . . . . . _________________
Repeat for the other devices.
Create a Full System Flash Copy environment
Environments define the storage and can be used in multiple CSE Data’s. There is a limit of 64
environments. This information will be replicated to the other control nodes.
Storwize Environments
Enter the WRKCSE command on either control node in the cluster.
Copy Services Environments
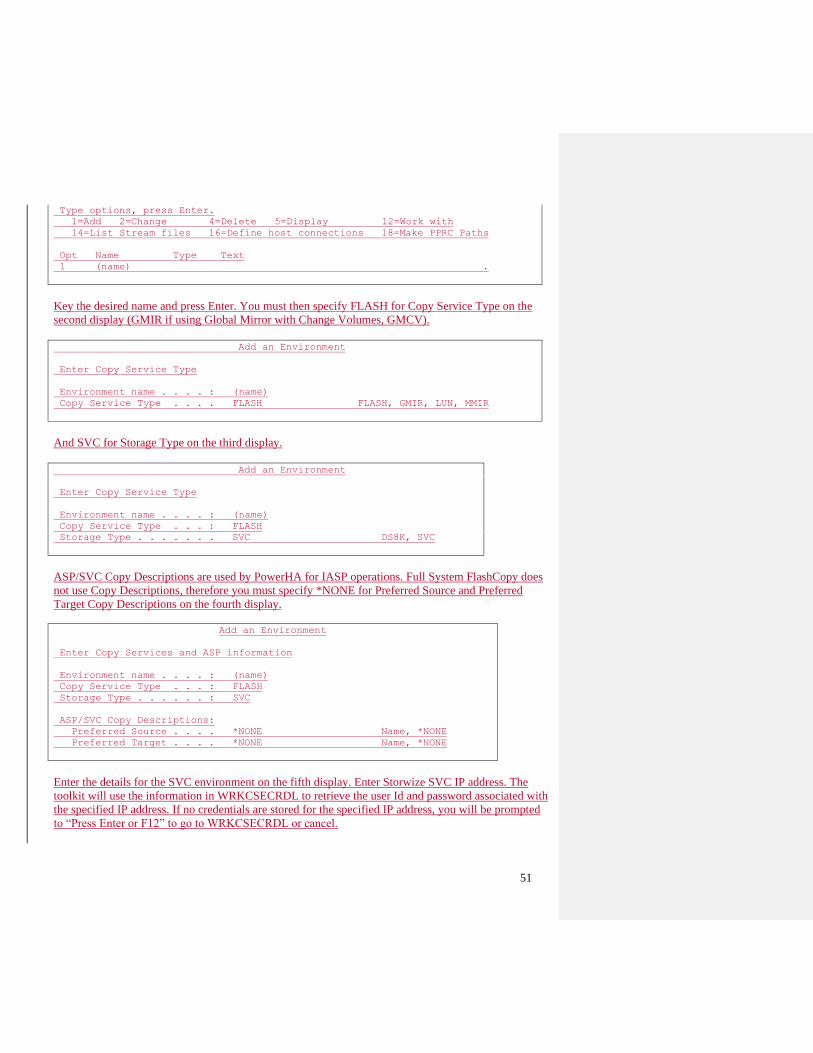
51
Type options, press Enter.
1=Add 2=Change 4=Delete 5=Display 12=Work with
14=List Stream files 16=Define host connections 18=Make PPRC Paths
Opt Name Type Text
1 (name) .
Key the desired name and press Enter. You must then specify FLASH for Copy Service Type on the
second display (GMIR if using Global Mirror with Change Volumes, GMCV).
Add an Environment
Enter Copy Service Type
Environment name . . . . : (name)
Copy Service Type . . . . FLASH FLASH, GMIR, LUN, MMIR
And SVC for Storage Type on the third display.
Add an Environment
Enter Copy Service Type
Environment name . . . . : (name)
Copy Service Type . . . : FLASH
Storage Type . . . . . . . SVC DS8K, SVC
ASP/SVC Copy Descriptions are used by PowerHA for IASP operations. Full System FlashCopy does
not use Copy Descriptions, therefore you must specify *NONE for Preferred Source and Preferred
Target Copy Descriptions on the fourth display.
Add an Environment
Enter Copy Services and ASP information
Environment name . . . . : (name)
Copy Service Type . . . : FLASH
Storage Type . . . . . . : SVC
ASP/SVC Copy Descriptions:
Preferred Source . . . . *NONE Name, *NONE
Preferred Target . . . . *NONE Name, *NONE
Enter the details for the SVC environment on the fifth display. Enter Storwize SVC IP address. The
toolkit will use the information in WRKCSECRDL to retrieve the user Id and password associated with
the specified IP address. If no credentials are stored for the specified IP address, you will be prompted
to “Press Enter or F12” to go to WRKCSECRDL or cancel.

52
Enter the FlashCopy consistency group Id.
If the FlashCopy is to be taken from the target of GMCV replication, enter the local SVC IP address
and consistency group Id (the Toolkit will determine the remote IP and CG ID). If metro mirror
replication is used, treat the remote SVC as a local SVC. FlashCopy from a global mirror target is not
supported.
Create a FLASH environment
Type choices, press Enter.
Environment name . . . . . . . . . : (name)
Storage Type . . . . . . . . . . . : SVC
FlashCopy SVC information:
Flash SVC IP Address . . . . . . . 0.0.0.0 IPv4
FlashCopy consistency group Id . . 0 Id
GMCV Source SVC IP Address . . . . IPv4
Remote copy consistency group Id Id
Comment:
Text . . . . . . . . . . . . . . .
Bottom
After entering all the data, press F6 to validate. This will use the stored credentials to log onto the SVC
units and validate the consistency group exists.
DS8K Environments
If the intent is to perform the FlashCopy from a GMIR D-Copy, the GMIR environment must be
created first. The GMIR and FLASH environments must have the same names.
Enter the WRKCSE command on either control node in the cluster. The information will be replicated
to the other control node.
Copy Services Environments
Type options, press Enter.
1=Add 2=Change 4=Delete 5=Display 12=Work with
14=List Stream files 16=Define host connections 18=Make PPRC Paths
Opt Name Type Text
1 (name) .
Key the desired name and press Enter. You must then specify FLASH for Copy Service Type on the
second display.
Add an Environment
Enter Copy Service Type
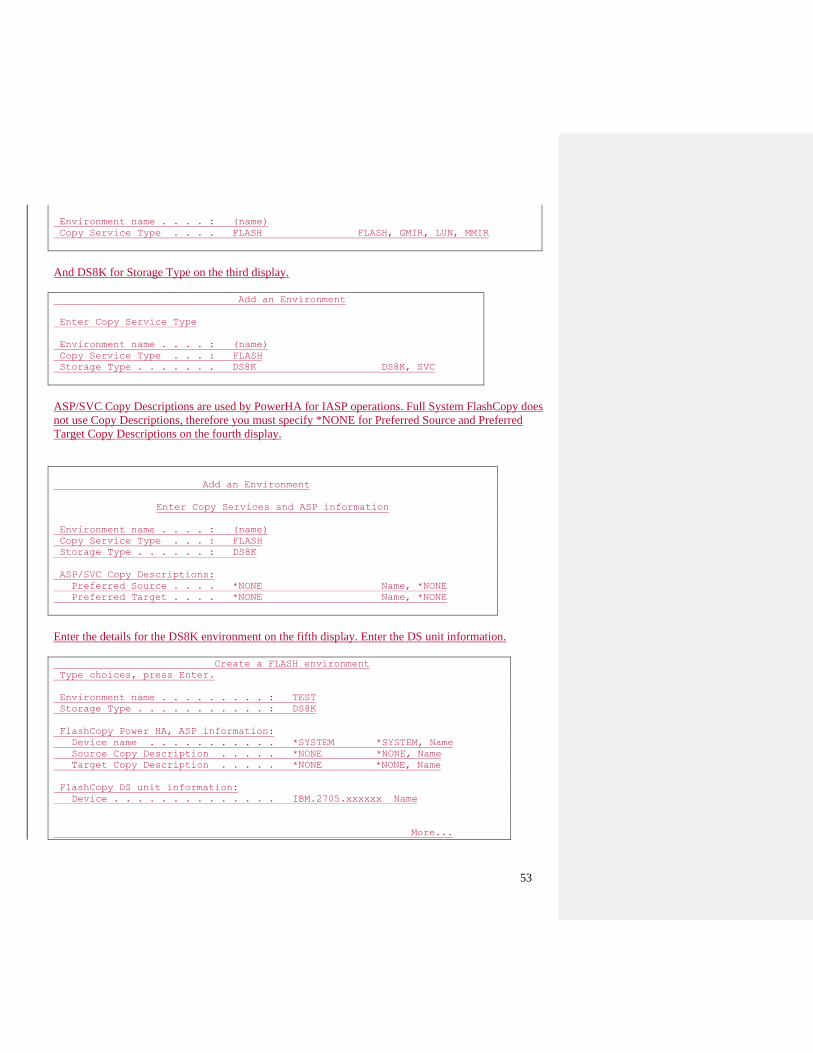
53
Environment name . . . . : (name)
Copy Service Type . . . . FLASH FLASH, GMIR, LUN, MMIR
And DS8K for Storage Type on the third display.
Add an Environment
Enter Copy Service Type
Environment name . . . . : (name)
Copy Service Type . . . : FLASH
Storage Type . . . . . . . DS8K DS8K, SVC
ASP/SVC Copy Descriptions are used by PowerHA for IASP operations. Full System FlashCopy does
not use Copy Descriptions, therefore you must specify *NONE for Preferred Source and Preferred
Target Copy Descriptions on the fourth display.
Add an Environment
Enter Copy Services and ASP information
Environment name . . . . : (name)
Copy Service Type . . . : FLASH
Storage Type . . . . . . : DS8K
ASP/SVC Copy Descriptions:
Preferred Source . . . . *NONE Name, *NONE
Preferred Target . . . . *NONE Name, *NONE
Enter the details for the DS8K environment on the fifth display. Enter the DS unit information.
Create a FLASH environment
Type choices, press Enter.
Environment name . . . . . . . . . : TEST
Storage Type . . . . . . . . . . . : DS8K
FlashCopy Power HA, ASP information:
Device name . . . . . . . . . . . *SYSTEM *SYSTEM, Name
Source Copy Description . . . . . *NONE *NONE, Name
Target Copy Description . . . . . *NONE *NONE, Name
FlashCopy DS unit information:
Device . . . . . . . . . . . . . . IBM.2705.xxxxxx Name
More...
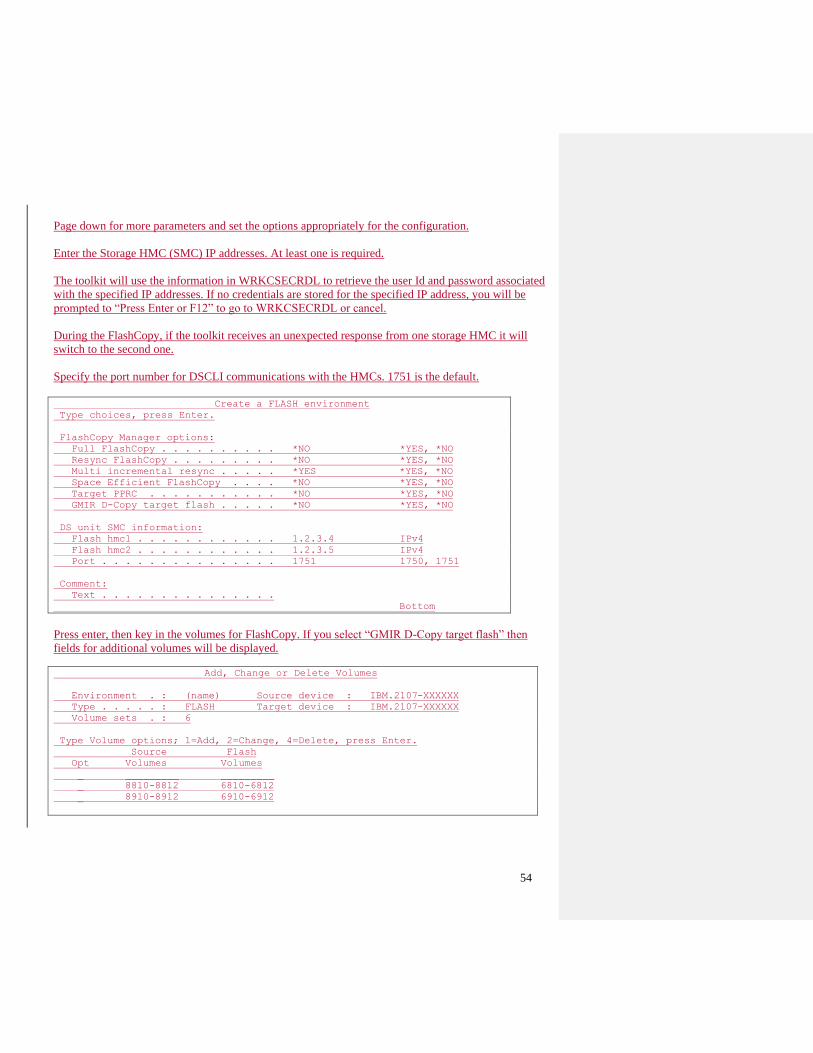
54
Page down for more parameters and set the options appropriately for the configuration.
Enter the Storage HMC (SMC) IP addresses. At least one is required.
The toolkit will use the information in WRKCSECRDL to retrieve the user Id and password associated
with the specified IP addresses. If no credentials are stored for the specified IP address, you will be
prompted to “Press Enter or F12” to go to WRKCSECRDL or cancel.
During the FlashCopy, if the toolkit receives an unexpected response from one storage HMC it will
switch to the second one.
Specify the port number for DSCLI communications with the HMCs. 1751 is the default.
Create a FLASH environment
Type choices, press Enter.
FlashCopy Manager options:
Full FlashCopy . . . . . . . . . . *NO *YES, *NO
Resync FlashCopy . . . . . . . . . *NO *YES, *NO
Multi incremental resync . . . . . *YES *YES, *NO
Space Efficient FlashCopy . . . . *NO *YES, *NO
Target PPRC . . . . . . . . . . . *NO *YES, *NO
GMIR D-Copy target flash . . . . . *NO *YES, *NO
DS unit SMC information:
Flash hmc1 . . . . . . . . . . . . 1.2.3.4 IPv4
Flash hmc2 . . . . . . . . . . . . 1.2.3.5 IPv4
Port . . . . . . . . . . . . . . . 1751 1750, 1751
Comment:
Text . . . . . . . . . . . . . . .
Bottom
Press enter, then key in the volumes for FlashCopy. If you select “GMIR D-Copy target flash” then
fields for additional volumes will be displayed.
Add, Change or Delete Volumes
Environment . : (name) Source device : IBM.2107-XXXXXX
Type . . . . . : FLASH Target device : IBM.2107-XXXXXX
Volume sets . : 6
Type Volume options; 1=Add, 2=Change, 4=Delete, press Enter.
Source Flash
Opt Volumes Volumes
_ _________ _________
_ 8810-8812 6810-6812
_ 8910-8912 6910-6912
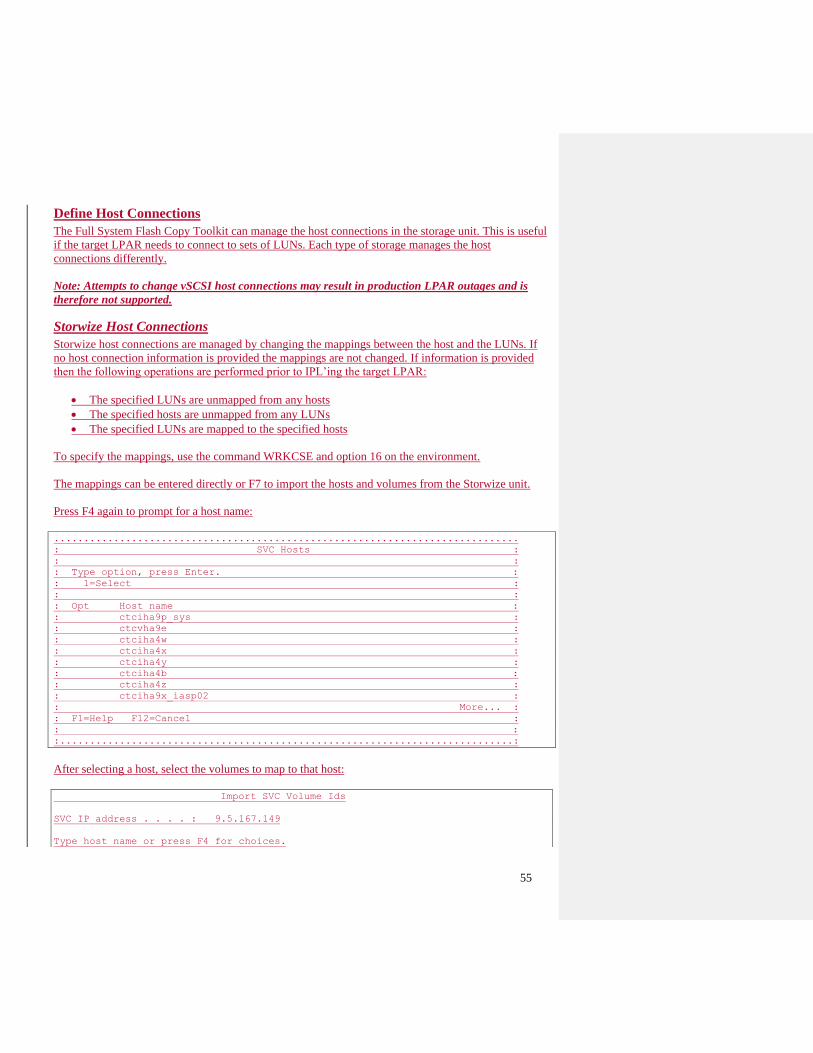
55
Define Host Connections
The Full System Flash Copy Toolkit can manage the host connections in the storage unit. This is useful
if the target LPAR needs to connect to sets of LUNs. Each type of storage manages the host
connections differently.
Note: Attempts to change vSCSI host connections may result in production LPAR outages and is
therefore not supported.
Storwize Host Connections
Storwize host connections are managed by changing the mappings between the host and the LUNs. If
no host connection information is provided the mappings are not changed. If information is provided
then the following operations are performed prior to IPL’ing the target LPAR:
• The specified LUNs are unmapped from any hosts
• The specified hosts are unmapped from any LUNs
• The specified LUNs are mapped to the specified hosts
To specify the mappings, use the command WRKCSE and option 16 on the environment.
The mappings can be entered directly or F7 to import the hosts and volumes from the Storwize unit.
Press F4 again to prompt for a host name:
..............................................................................
: SVC Hosts :
: :
: Type option, press Enter. :
: 1=Select :
: :
: Opt Host name :
: ctciha9p_sys :
: ctcvha9e :
: ctciha4w :
: ctciha4x :
: ctciha4y :
: ctciha4b :
: ctciha4z :
: ctciha9x_iasp02 :
: More... :
: F1=Help F12=Cancel :
: :
:............................................................................:
After selecting a host, select the volumes to map to that host:
Import SVC Volume Ids
SVC IP address . . . . : 9.5.167.149
Type host name or press F4 for choices.
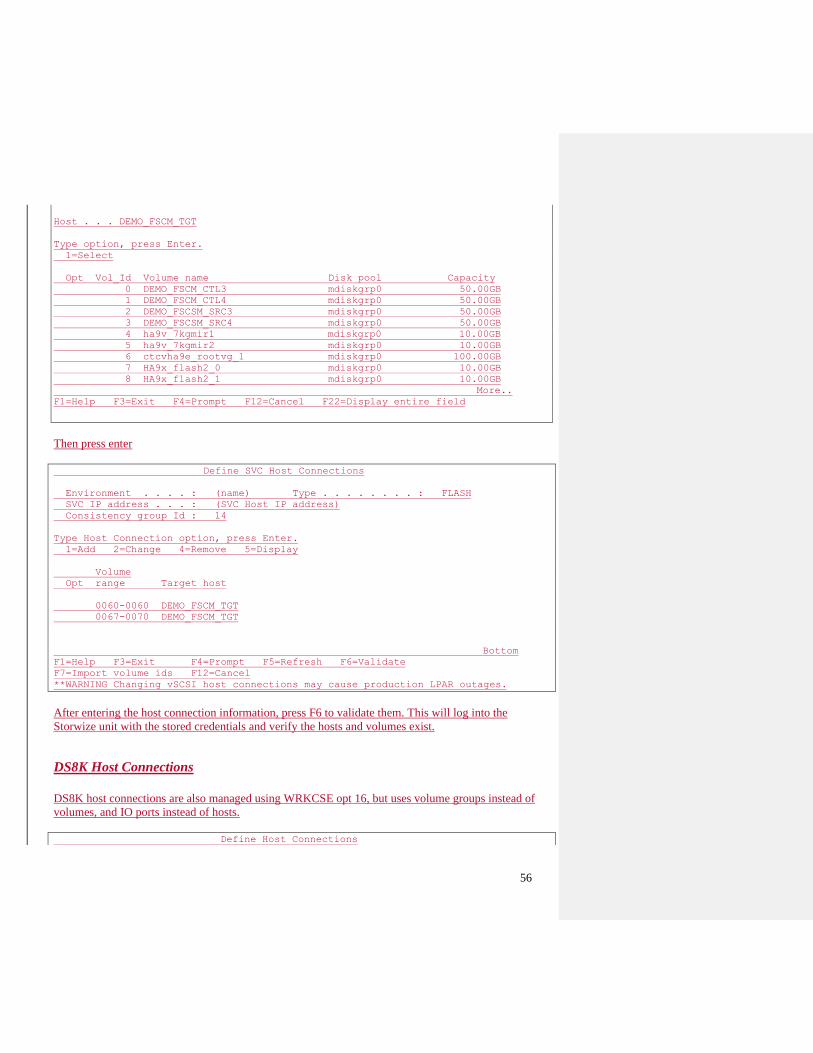
56
Host . . . DEMO_FSCM_TGT
Type option, press Enter.
1=Select
Opt Vol_Id Volume name Disk pool Capacity
0 DEMO_FSCM_CTL3 mdiskgrp0 50.00GB
1 DEMO_FSCM_CTL4 mdiskgrp0 50.00GB
2 DEMO_FSCSM_SRC3 mdiskgrp0 50.00GB
3 DEMO_FSCSM_SRC4 mdiskgrp0 50.00GB
4 ha9v_7kgmir1 mdiskgrp0 10.00GB
5 ha9v_7kgmir2 mdiskgrp0 10.00GB
6 ctcvha9e_rootvg_1 mdiskgrp0 100.00GB
7 HA9x_flash2_0 mdiskgrp0 10.00GB
8 HA9x_flash2_1 mdiskgrp0 10.00GB
More..
F1=Help F3=Exit F4=Prompt F12=Cancel F22=Display entire field
Then press enter
Define SVC Host Connections
Environment . . . . : (name) Type . . . . . . . . : FLASH
SVC IP address . . . : (SVC Host IP address)
Consistency group Id : 14
Type Host Connection option, press Enter.
1=Add 2=Change 4=Remove 5=Display
Volume
Opt range Target host
0060-0060 DEMO_FSCM_TGT
0067-0070 DEMO_FSCM_TGT
Bottom
F1=Help F3=Exit F4=Prompt F5=Refresh F6=Validate
F7=Import volume ids F12=Cancel
**WARNING Changing vSCSI host connections may cause production LPAR outages.
After entering the host connection information, press F6 to validate them. This will log into the
Storwize unit with the stored credentials and verify the hosts and volumes exist.
DS8K Host Connections
DS8K host connections are also managed using WRKCSE opt 16, but uses volume groups instead of
volumes, and IO ports instead of hosts.
Define Host Connections
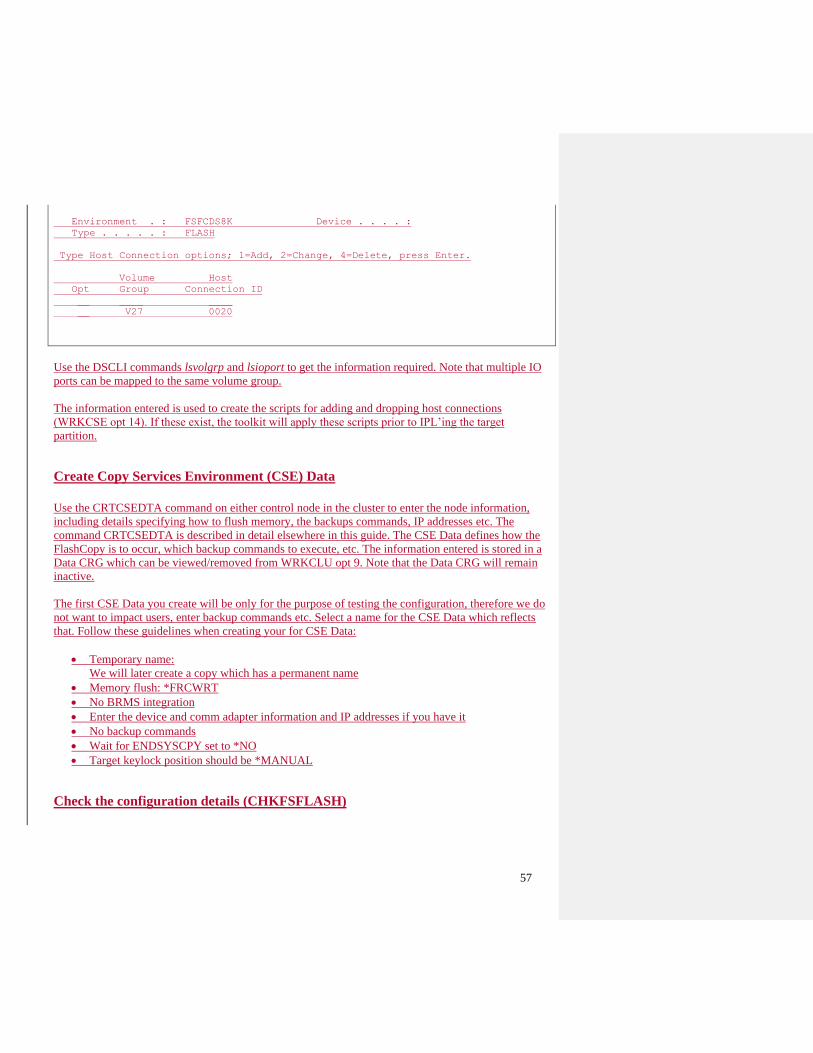
57
Environment . : FSFCDS8K Device . . . . :
Type . . . . . : FLASH
Type Host Connection options; 1=Add, 2=Change, 4=Delete, press Enter.
Volume Host
Opt Group Connection ID
__ ____ ____
__ V27 0020
Use the DSCLI commands lsvolgrp and lsioport to get the information required. Note that multiple IO
ports can be mapped to the same volume group.
The information entered is used to create the scripts for adding and dropping host connections
(WRKCSE opt 14). If these exist, the toolkit will apply these scripts prior to IPL’ing the target
partition.
Create Copy Services Environment (CSE) Data
Use the CRTCSEDTA command on either control node in the cluster to enter the node information,
including details specifying how to flush memory, the backups commands, IP addresses etc. The
command CRTCSEDTA is described in detail elsewhere in this guide. The CSE Data defines how the
FlashCopy is to occur, which backup commands to execute, etc. The information entered is stored in a
Data CRG which can be viewed/removed from WRKCLU opt 9. Note that the Data CRG will remain
inactive.
The first CSE Data you create will be only for the purpose of testing the configuration, therefore we do
not want to impact users, enter backup commands etc. Select a name for the CSE Data which reflects
that. Follow these guidelines when creating your for CSE Data:
• Temporary name:
We will later create a copy which has a permanent name
• Memory flush: *FRCWRT
• No BRMS integration
• Enter the device and comm adapter information and IP addresses if you have it
• No backup commands
• Wait for ENDSYSCPY set to *NO
• Target keylock position should be *MANUAL
Check the configuration details (CHKFSFLASH)
58
Issue the command CHKFSFLASH with the CSE Data you just created. This command will check all
the communications paths etc. If the command fails, use the joblog and toolkit logs to determine the
problem.
Perform the flashcopy (STRFSFLASH)
Before issuing the STRFSFLASH command, sign on to the source LPAR. Prompt on CHGIPLA and
record the current setting for starting in restricted state (STRRSTD). Change it to *YES if it isn’t
already set to it. We will only do this the first time, to allow us to verify the LPAR is properly Flash
Copied.
On the controlling LPAR, use the command STRFSFLASH to start the flashcopy. This command will
perform many of the checks performed by CHKFSFLASH, then it will continue with the memory
flush, flashcopy, and IPL of the target LPAR.
Once the target LPAR has started to IPL, use CHGIPLA to change the STRRSTD back to its original
value.
Monitor the target LPAR
The target LPAR is to start in manual mode. Connect to the console, wait for it to reach the DST panel,
and continue the IPL. Set the date/time when prompted (this only needs to be done once), and continue
the IPL.
When you are prompted to set major options, verify it is set to not start TCP, and that it will start to
restricted state. Continue the IPL.
When the command line appears, issue the command DSPSYSVAL QSTRUPPGM. Verify the startup
program is set to QZRDHASM/QZRDIASTRP. This is the startup program for the toolkit, and it
indicates the memory was properly flushed, the correct LUNs were Flash Copied, and the target LPAR
is attached to the correct Flash Copy LUNs.
If the user’s startup program (i.e. QSYS/QSTRUP or something similar) is listed, STOP
IMMEDIATELY and do not start the controlling LPAR. Verify the correct LUNs are attached, the
correct consistency group, and the flashcopy mappings are used. Resolve the issues, terminate the
STRFSFLASH, and try again.
If the correct startup program (QZRDIASTRP) is listed, then start the controlling subsystem.
If a device and comm details were specified, verify they are correctly configured. It not, gather the
information you need from WRKHDWRSC *CMN/*STG to finish the configuration, and continue the
operation until STRFSFLASH (on the controller) finishes.
Create CSE Data to perform a backup

59
Please see the section Backups with BRMS if it is relevant, and implement what is required on the
source LPAR before proceeding.
On the controlling LPAR, use the command CPYCSEDTA or WRKCSEDTA opt 3 to create a new
CSE Data based on the the bare-bones configuration you’ve just created. However, this time:
• Real name:
This is the name of the CSE Data you’ll be using, and should reflect the source LPAR and type
of backup (full/daily) it will be doing.
• Memory flush: *QUIESCE or *FRCWRT
*QUIESCE is better if the users and application can tolerate
• Appropriate BRMS integration
• Enter the device and comm adapter information and IP addresses
• Specify a backup command
• Wait for ENDSYSCPY set to *YES
• Target keylock position should be *AUTO
Check the configuration details (CHKFSFLASH)
Issue the command CHKFSFLASH with the CSE Data you just created. This command will check all
the communications paths etc. If the command fails, use the joblog and toolkit logs to determine the
problem.
Perform the flashcopy (STRFSFLASH)
On the controlling LPAR, use the command STRFSFLASH to start the flashcopy. This command will
perform many of the checks performed by CHKFSFLASH, then it will continue with the memory
flush, flashcopy, and IPL of the target LPAR.
Monitor the target LPAR
The target LPAR will IPL, configure the tape and communications devices and then start the backups.
If the backups are in restricted state, the console will go away for the duration and the SRC reference
code will be A900370C. After the backups are finished, if the BRMS integration was specified, BRMS
will be transferred to the source LPAR. At the end of the process the log files will be sent from the
source and target LPARs to the controlling LPAR.
Create additional CSE Data’s for other backups and LPARs
Once you’ve perfected the Flash Copy process such that STRFSFLASH runs satisfactorily, create more
CSE Data’s using the CPYCSEDTA command to run different types of backups. The STRFSFLASH
command be placed on the job scheduler, called from another application, or issued from the
production LPAR. Integrating it with a customer’s environment may require additional testing.
60
Updating or Upgrading Full System Flash Copy
All the controllers and source LPARs in a cluster must be at the same version (i.e. 4.4). We strongly
recommend that they also all be at the same build date. The version and build date is stored in data area
QZRDHASM/BUILD.
The 4.4 controllers will support non-cluster source LPARs running at 4.3 or 4.4, which facilitates
upgrading source LPARs in stages.
Versions 7.xx and 4.x can co-exist on the same controllers and source LPARs.
The migration program QZRDIAMIGW can be used to change 4.3 or 4.4 toolkit information to 4.5.
DS8K volume groups are no longer supported on WRKCSE opt 16 panels. These have been changed to
Host names and volume mappings and the configurations on the DS8K will also need to change.
The functionality of the data area ONLYRSTCLS has been replaced by environment variable
QIBM_FSFC_DISABLE_MEDIA_CLASS_CHECK.
Upgrading from a prior release
Updating to a new release can be performed from version 4.3 (build date 3/5/2019 or newer) or 4.4 (any
build date). For older releases please update to 4.3, or contact Toolkit support for assistance.
To update the controllers:
1. Ensure no STRFSFLASH or STRFLASH or SWCSE commands are in process.
2. End the toolkit subsystem:
ENDSBS QZRDFSR *IMMED
3. Issue QZRDHASM/DMPINF ENV(*ALL) EXTDLOGS(*NO) to generate a text file with all
of the WRKCSE / WRKCSEDTA information.
4. Save the DDD information:
- Create a directory for them: MKDIR '/tmp/ddd43backups' (call the directory whatever you
want)
- Save the information: QZRDHASM/SAVDDD PATH('tmp/ddd43backups')
61
5. On each controller, issue the restore command:
RSTLIB SAVLIB(QZRDHASM) DEV(*SAVF) SAVF(QGPL/QZRDHASM45)
MBROPT(*ALL) ALWOBJDIF(*ALL) OMITOBJ((QZRDHASM/*ALL
*DTAQ))
6. Update to the most recent Secure Java jar file.
Download from here: https://sourceforge.net/projects/jsch/files/jsch.jar/0.1.55/jsch-
0.1.55.jar/download
Place it on both controllers in /QIBM/Qzrdhasm/ssh/
7. On one controlling partition, migrate the existing DDD to the new format:
- Issue the command CALL QZRDHASM/QZRDIAMIGW
8. On each controlling partition:
- issue the command SETUPFSFC NODEROLE(*CTL)
To update a source LPAR:
1. End the toolkit subsystem:
ENDSBS QZRDFSR *IMMED
2. On each source partition, issue the restore command:
RSTLIB SAVLIB(QZRDHASM) DEV(*SAVF) SAVF(QGPL/QZRDHASM45)
MBROPT(*ALL) ALWOBJDIF(*ALL) OMITOBJ((QZRDHASM/*ALL
*DTAQ))
3. On each source partition, issue the SETUPFSFC NODEROLE(*SRC) command
After these steps have been performed, it is recommended that CHKFSFLASH be performed
prior to the next planned flashcopy to test the configuration.
Updating to a newer build date
To update a controller or source LPAR:
1. Ensure no STRFSFLASH or STRFLASH or SWCSE commands are in process.
2. End the toolkit subsystem:
ENDSBS QZRDFSR *IMMED
3. Place the savefile on each controller and source LPAR and restore into QZRDHASM
RSTLIB SAVLIB(QZRDHASM) DEV(*SAVF) SAVF(QGPL/QZRDHASM45)
MBROPT(*ALL) ALWOBJDIF(*ALL) OMITOBJ((QZRDHASM/*ALL
*DTAQ))
4. On each controlling partition issue the command SETUPFSFC NODEROLE(*CTL)
5. On each source partition, issue the command SETUPFSFC NODEROLE(*SRC)
After these steps have been performed, it is recommended that CHKFSFLASH be performed
prior to the next planned flashcopy to test the configuration.

62
63
Backups
The Full System Flash Copy Toolkit is designed to automate the process to create a point-in-time clone
of a production LPAR for the purposes of backups. While it has provisions to start backups, it is not a
backup application and it is the responsibility of the customer to manage and monitor their backups.
Backups with BRMS
Overview
Performing a Flash Copy of a partition creates an identical copy of the partition, and that includes
BRMS. If the BRMS processes are not followed, there will be two BRMS systems with identical names
in the BRMS network group, with the result being a loss of integrity when the BRMS data is
synchronized to one or more partitions. In order to manage this correctly, there must only be one
unique active instance of a BRMS partition in a BRMS network group. BRMS has documented
program calls to activate and deactivate partitions to maintain the integrity of the BRMS network
group.
Consider the BRMS network group which consists of partitions SYSA, SYSB and SYSC. If a Flash
Copy is performed on SYSA, there will be two active BRMS partitions named SYSA. In order to
prevent this, we will deactivate BRMS on SYSA prior to the Flash Copy. After the Flash Copy is
complete, we will activate BRMS on only one of the two instances of BRMS. The backups should be
performed on the active BRMS partition. Backups can be performed on the inactive BRMS partition,
but the information generated from the backups on the inactive BRMS partition will not be shared with
the BRMS network group, and will be overwritten when QUSRBRM is copied back from the target
partition. Restores can be performed on both inactive and active BRMS partitions since it does not
change any BRMS information. After the backups have finished, and you wish to switch which
partition has BRMS active, both partitions will be deactivated, the current data (library QUSRBRM)
will be moved from where the backups were performed to the other partition, and BRMS on that
partition will be activated. Following these procedures will maintain the integrity of the BRMS
database.
The Flash Copy Toolkit has the ability to extract only changed BRMS media, save history and object
detail from the target LPAR and insert it into the source LPAR’s BRMS database. To enable this
feature use the CRTCSEDTA/CHGCSEDTA parameter BRMS Transfer method (*CHGONLY). When
using this, it is recommended that each target LPAR have a dedicated BRMS media class to select
from.
The Flash Copy Toolki also has the ability to restrict the use of BRMS media classes on the source and
target LPAR’s. This is necessary to prevent the LPAR’s from using media from the same media class
during simultaneous operations, as BRMS on each LPAR is not able to communicate with the other
LPAR. To enable this feature use the CRTCSEDTA/CHGCSEDTA parameter Restricted media
class(es). This will use the Functional Authority to manage access to the specified media classes when
BRMS is vulnerable to overwriting media.

64
Monitoring Control Group Status in Batch Restricted State
The FSFC Toolkit has the ability to monitor the BRMS control groups when they are running in batch
restricted state on the target LPAR. When the control group exit program is set to
QZRDHASM/QZBRMSEXIT format BKUI0100 it will send messages to STRFSFLASH as each exit
point is processed. This will appears in the STRFSFLASH joblog and ctl.log.
Monitoring Control Group for Abnormal End
The FSFC Toolkit has the ability to monitor the BRMS control groups and notify the controller
(STRFSFLASH) if they end abnormally. the control group exit program must be set to
QZRDHASM/QZBRMSEXIT format BKUI0100 and do not use ENDFSFLASH as the last exit.
BRMS Network Feature
If BRMS is the configured backup application, the Full System Flash Copy Toolkit will integrate with
it to ensure that the BRMS database is kept intact and updated from the target LPAR. BRMS requires
that the Networking Feature be installed and licensed on the controlling LPAR to use Flash Copy.
However, the purpose of the Flash Copy function is to protect the BRMS database when it is
participating in a BRMS Network Group; if the LPAR is not in a Network Group and does not have
Network Feature installed, the Flash Copy Toolkit will not change the BRMS Flash Copy states.
Moving QUSRBRM
After the backups have been performed on the target partition, media, history, and object level detail
must be moved from the target to the source partition. This information is stored in the library
QUSRBRM and is illustrated by performing WRKMEDIBRM on both partitions after the backups
have finished but before QUSRBRM has been moved. On the target partition, the command will
display your new backup history. On the source partition there will be no record of the backup, even if
the source partition is receiving media information, because incoming networking operations have been
blocked. To keep this new information, QUSRBRM must be moved from the target partition to the
source partition before the source partition is activated.
Note that QUSRBRM can be a large library and must be moved in its entirety. This move can take a
while. To minimize the amount of data to transfer, and thus the time required to transfer QUSRBRM,
consider reducing the amount of object detail retained and not receiving saved history information from
other systems. If BRMS is not the specified backup application, this step will be not be performed.
Specifying the data compression for the save of QUSRBRM will only apply saving QUSRBRM to the
virtual tape; *MEDIUM is usually the best compromise between time spent on compression vs. how
much smaller the virtual tape file is. QUSRBRM is easily compressed to nearly one tenth of its size, so
it is highly recommended that compression be tried. Ultimately, the effectiveness of the compression is
going to depend on CPU and network resources.
65
Prior to version 4.3 QUSRBRM was saved to a savefile and then groups of records from the savefile
were sent to the source LPAR. At version 4.3 virtual tape is used. The change to use the IFS
dramatically reduced the time it took to transfer the data. The data is encrypted during the transfer.
The default method to move BRMS is *ALL, i.e. the entire library is sent from the target to the source
partitions, and in most cases this is preferred. If the customer must retain access to the BRMS library on
the source LPAR or is using Multi-Flash, then *CHGONLY must be used.
Partial Changes Only (*CHGONLY)
*CHGONLY only moves the new and changed records from the target LPAR to the source LPAR. The
toolkit will only move the new records related to the media, history information, object detail, reference
date/time, and log entries.. Changes to other BRMS artifacts such as control groups or system policies
will not be brought back to the source LPAR. While this method will dramatically reduce the amount of
data to transfer over the network, there is a time penalty for extracting that information on the target
LPAR and then inserting it into the source LPAR. Whether this method is faster than bringing all of
QUSRBRM back depends on many factors, such as the size of QUSRBRM, how much object detail is
generated, CPW, disk arms and network speed.
The merge of records will be performed in two steps. First the save and object detail records for the
media used will be removed from the BRMS files. Then media inventory and save history will be
moved and BRMS will be unlocked and the merge exit program will be called with the “*MERGE1”
option. The next step is to clean out old history from the volumes merged, then the exit program is
called with ‘*MERGE2’. Finally, the object detail will be merged and the exit program will be called
with the “*MERGE3” parameter and the process will be finished.
A benefit of using this method is that BRMS can be active on both LPAR’s. In other words, you can
perform backups on both the target and source LPAR at the same time, with the changes being merged
back with the source LPAR. However, to avoid media collisions, it is HIGHLY recommended that each
target LPAR have its own media class to select media from, since it will not be able to communicate
with other LPAR’s during the backup. See the RSTDMEDCLS parameter on CRTCSEDTA and
CHGCSEDTA to restrict and allow specific media classes, and LOCKBRMS to block other BRMS
activities. Use the STRBALBRM command to balance media across multiple LPARs and media
classes.
Incremental Backups
With BRMS you can perform incremental (*INCR and *CUML) backups with Flash Copy. However,
most Full System Flash Copy customers choose not to. The reason most non-Flash Copy customers
perform incremental backups is to reduce the amount of time it takes to perform the backup. Since the
Flash Copy technology removes the impact to the users, most Flash Copy customers will perform full
backups instead, and that is our recommendation. Not only does it result in a more complete backup,
but it also significantly reduces the complexity of restoring data, as only one restore is necessary vs.
one full and then subsequent incrementals.
Each i5/OS object has internal information including when it was last saved. This information is used
by SAVCHGOBJ to determine whether to save it again. When you perform a Flash Copy, that data is

66
copied from the source LPAR to the target LPAR. However, that information is not moved back to the
source LPAR after backups on the target LPAR, therefore native SAVCHGOBJ on the source LPAR
will not be effective. However, BRMS retains a record of the full save, and thus BRMS will build the
commands using the REFDATE and REFTIME parameters, with information from the BRMS files.
These parameters will default to the actual backup date and time on the target LPAR; to truly reflect
the object changes, it should be based on the Flash Copy timestamp. The Toolkit creates data area
QZRDHASM/QZRFLSHTME on the source LPAR immediately before flushing memory and it
contains the timestamp of the Flash Copy. This data area is then available on the target LPAR for use.
BRMS does have a “customer timestamp” feature which can change the backup time, however it is
only supported for saving objects in an IASP, not in *SYSBAS.
Note that in order to effectively perform incremental backups in BRMS, object detail must be saved.
Media Device Configuration
A side effect of performing Flash Copies with BRMS is that the device configurations on the paired
partitions may not be identical. This poses a difficulty within BRMS because BRMS will retrieve the
device capabilities when associating devices to densities in control groups and system policies. If the
densities cannot be retrieved, BRMS cannot verify compatibility with the devices and will not allow
you to change them.
In most environments both the source and target partitions are attached to the same tape devices, which
allows configuring BRMS to use those devices on the source LPAR. When the LPAR is Flash Copied,
the IPL process may identify the tape device attached to the target LPAR as a new device, and then
auto-configure a new resource name and device description. BRMS is not aware of these devices, and
67
rather than change the BRMS device tables and control groups, the Toolkit has the ability to identify
the resource name based on the desired serial number, and then change the specified device description
to use the new resource name. This configuration is performed in CRTCSEDTA and CHGCSEDTA.
Please refer to those commands elsewhere in this document for more details.
The easiest method to configure BRMS when the source partition will not normally have a device
attached is to temporarily attach a device and then perform the necessary configurations. Another
option is to perform a test Flash Copy, configure BRMS on the target partition with the device, and
then copy the entire QUSRBRM library back to the source partition.
A less common but equally valid configuration is where the source and target LPARs are at different
sites and attached to different devices. In BRMS, this will be reflected as two different locations. The
source LPAR must still know about the remote location’s inventory so that the target LPAR has this
information after a Flash Copy. The best way to implement this is to have a controlling LPAR at the
remote site attached to the device, and which is also in a BRMS Network Group with the source LPAR.
When the controlling LPAR performs media maintenance (ADDMLMBRM, MOVMEDBRM etc) the
BRMS Network will ensure that the inventory awareness is shared with the source LPAR. It may be
beneficial to use CHGBRMSOBJ and RUNLPARCMD to modify which location a device is associated
with, based on which serial number it is currently running on.
Restricted State TCP/IP
BRMS has the ability to start a restricted state TCP/IP interface to communicate with other BRMS
partitions. The Flash Copy Toolkit will automatically configure this if the BRMS integration is enabled
and a TCP/IP interface is specified on the IP Interface parameter.
On the target partition, the Flash Copy Toolkit will remove all restricted state TCP/IP interfaces and
add the interfaces specified on the IP Interface parameter. These values will not be moved back to the
source partition. After QUSRBRM is moved to the source partition, the original restricted state TCP/IP
interfaces on the source partition will remain unchanged.
Locking the QUSRBRM Library
If the Flash Copy Toolkit is configured to bring back the entire QUSRBRM library, access to it should
be locked. After the backups have been performed on the target partition the QUSRBRM library will be
moved to the source partition, overwriting any BRMS changes there. To prevent inadvertently
performing backups, maintenance or other procedures which will change BRMS, and then be lost, use
the Lock BRMS and Lock type parameters on the CRTCSEDTA and CHGCSEDTA commands. This
will cause the Flash Copy Toolkit to first save the current BRMS Functional Usage settings, then
modify the following Functional Usage areas to prevent changing BRMS:
• QIBM_Q1A_ARC
• QIBM_Q1A_ARC_PCY
• QIBM_Q1A_BKU
• QIBM_Q1A_BKU_PCY
• QIBM_Q1A_MED

68
• QIBM_Q1A_MED_ADV
• QIBM_Q1A_MED_INF
• QIBM_Q1A_MGR
• QIBM_Q1A_MGR_ADV
• QIBM_Q1A_MGR_PCY
• QIBM_Q1A_MOV
• QIBM_Q1A_MOV_VFY
• QIBM_Q1A_INZBRM
• QIBM_Q1A_SYS
• QIBM_Q1A_SYS_ASP
• QIBM_Q1A_SYS_PCY
• QIBM_Q1A_SYS_MNT
• QIBM_Q1A_SYS_DEV
This will take effect on the source partition until QUSRBRM has been moved. If specified, the
restrictions will be implemented on the target partition after QUSRBRM has been moved.
The Flash Copy Toolkit also has the option to use the BRMS “STOPJOBS” mechanism to prevent
BRMS jobs from from running.
If the process fails and you need to restore the original Functional Usage settings, issue the following
command:
ENDFSFLASH *RSTFCNUSG
If the user space is found, it will restore from it.
Restricting BRMS by Media Class
The toolkit has the ability to restrict backup activity by media class. On the CRTCSEDTA and
CHGCSEDTA commands there is a Restricted media class(es) parameter. Media classes entered here
will behave in the following manner:
• Before FlashCopy:
No Restrictions.
• During backups on target:
Source: Cannot use restricted media classes.
Target: Can only use restricted media classes.
• After backups on target:
Source: No restrictions.
Target: All media classes restricted.
The toolkit uses a combination of Functional Usage and the Tape management exit program to achieve
this functionality.
69
Control Group Modifications
If the backup commands specified on the CRTCSEDTA and CHGCSEDTA commands are
asynchronous, i.e. they submit backup commands to other jobs and return control back to the caller
before the backups are finished, the controlling partition needs to be notified when the backups have
finished. By default, STRBKUBRM will submit the backup to batch, and control will return to the
caller immediately. In order to notify the controller that it must wait for a notification that the backups
have finished, specify Wait for ENDFSFLASH *YES on the CRTCSEDTA and CHGCSEDTA
commands, and issue QZRDHASM/ENDFSFLASH on the target partition after the backups have
finished, for example as the last exit of the control group (which is called after any subsystems have
been started) . On the source LPAR, QZRDIAEXT2 will block until it has reached the controlling
partition. When the controlling partition receives the ENDBACKUPS notification from
ENDFSFLASH, it will initiate moving QUSRBRM from the target partition to the source LPAR.
If your backup commands are synchronous, i.e. SAVLIBBRM or STRBKUBRM SBMJOB(*NO) then
specify Wait for ENDFSFLASH *NO on the CRTCSEDTA and CHGCSEDTA commands and the
controlling partition will proceed to move QUSRBRM immediately after the backup commands have
returned control, instead of waiting for ENDFSFLASH.
The common element of these operations is that the control group must process the final *EXIT. If it
ends abnormally it will not do so.
A recent (summer 2019) BRMS PTF enabled exit point processing which we take advantage of in
version 4.5 of the toolkit. Instead of placing ENDFSFLASH in the last *EXIT, specify exit program
QZRDHASM/QZBRMSEXIT format BKUI0100 in the control group attributes (WRKCTLGBRM opt
8). If the control group ends abnormally or with errors, the exit program will be called, ENDFSFLASH
will start TCP and send a failure signal to the controller. STRFSFLASH will then notify the user with a
message (also sent to QSYSOPR) that the backups have failed and require intervention. To resolve this
situation restart the backups on the target or issue ENDFSFLASH manually there.
System Policy
If your backup strategy involves SAVSYS which requires operating in restricted state, change the
BRMS system policy to allow backups to run in restricted state. To do so, issue WRKSYSPCY *SYS,
then option 1, and page down to see the "Controlling subsystem: Allow backups in batch" parameter
and change it to *YES. Consider whether it is necessary to specify a maximum time to remain in
restricted state, in case your backups fail and BRMS fails to restart the subsystems. Most customers use
*NOMAX.
Duplication and Maintenance
It is not uncommon to perform duplications (DUPMEDBRM) and maintenance (STRMNTBRM) after
the backup. This can be performed on either the source partition after QUSRBRM has been moved, or
on the target partition before QUSRBRM has been moved.
You may choose to perform these operations on the target partition to minimize CPU, disk arm, I/O and
device contention on the source system. However, it will keep BRMS locked on the source longer,
70
therefore our recommendation is to perform these tasks on the source LPAR after the process has
finished.
Many customers choose to place these tasks on the source LPAR job scheduler. It is crucial that these
jobs start after the Flash Copy process has finished. An alternative which has worked well for many of
our customers is to use the Toolkit Exit Program to launch post-backup tasks on the source LPAR. That
ensures that maintenance and duplication is performed immediately after the BRMS data has been
copied back.
Recoveries and Reports
The Toolkit makes as few changes as necessary to the target LPAR prior to the backups running, with
the intent to keep the backup of the target LPAR as similar as a backup on the source LPAR would
have been. However, there are some key changes performed to minimize the chance that the target
LPAR can come online with the source LPAR IP addresses, running applications etc. These changes
include:
• System value for startup program (QSTRUPPGM) is set to *NONE to prevent the customer’s
program from running when BRMS leave restricted state, if a user starts QCTL, or if the LPAR
is IPL’d
• CHGIPLA STRTCP is set to *NO to prevent TCP from starting if the system is IPL’d
• Line descriptions are set to not vary on at IPL
• Removes the autostart job entry for the BRMS system start detection (QBRMSTRUP)
• Optionally holds all basic job scheduler entries
• Additional customizations
Based on the above, if a recovery from a Flash Copy backup is performed, these items must be changed
back to the original values after the configuration is restored (RSTCFG). To assist recovery efforts, it is
recommended to add these steps to the BRMS recovery reports. To do so, on the source LPAR edit the
members in QUSRBRM/QO1AUSRRCY. Each member (STEP001 etc) corresponds to the step in the
recovery report and any text in that member will be inserted at that step. Note that the steps are relative
and may change at different releases; it is suggested that you view a complete recovery report from
your system to determine the correct step for RSTCFG. Typically that is at Step 14 up to V7R2, and
Step 19 thereafter.
Here is an example of a report with the custom user-recovery steps:
__ STEP 011 : Recover Configuration Data Start date/time __________________ Stop date/time __________________ You should restore a current version of your system configuration. If the "Select Recovery Items" display is not shown and you are performing a complete system restore, run the following command. STRRCYBRM OPTION(*RESUME) Otherwise, run the following command. STRRCYBRM OPTION(*SYSBAS) ACTION(*RESTORE) Type the command choice and press "Enter". Select the saved item(s) listed below from the "Select Recovery Items"
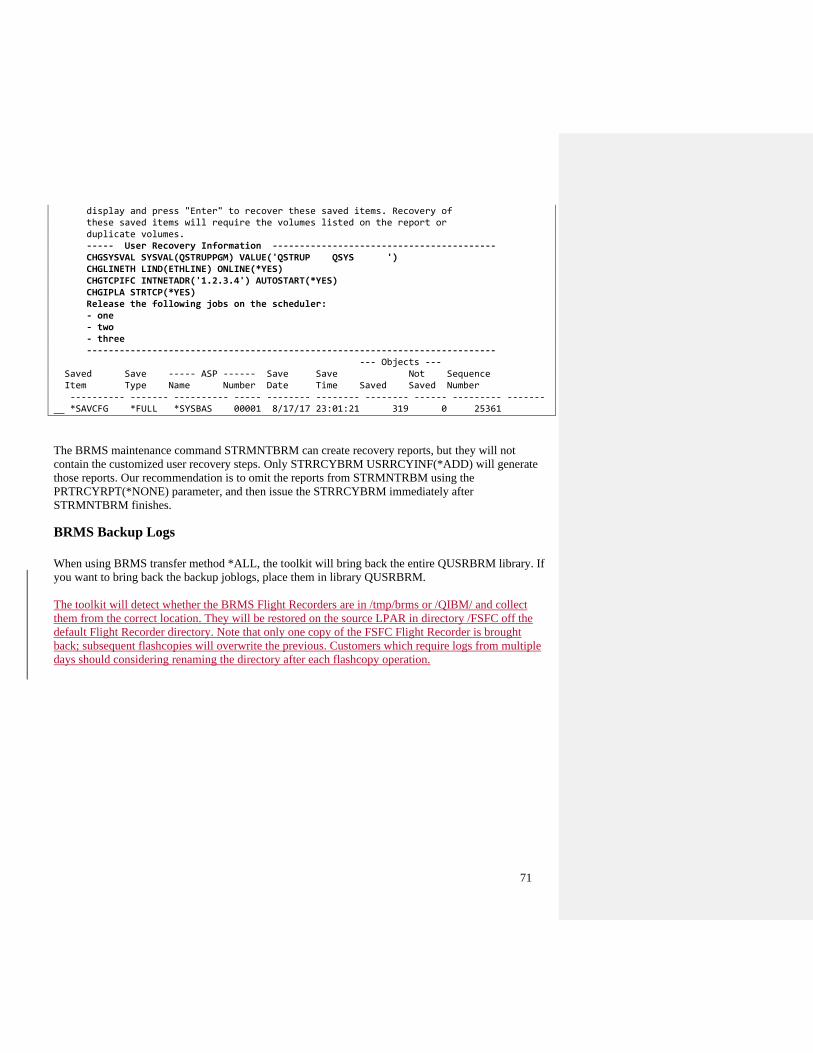
71
display and press "Enter" to recover these saved items. Recovery of these saved items will require the volumes listed on the report or duplicate volumes. ----- User Recovery Information ----------------------------------------- CHGSYSVAL SYSVAL(QSTRUPPGM) VALUE('QSTRUP QSYS ') CHGLINETH LIND(ETHLINE) ONLINE(*YES) CHGTCPIFC INTNETADR('1.2.3.4') AUTOSTART(*YES) CHGIPLA STRTCP(*YES) Release the following jobs on the scheduler: - one - two - three --------------------------------------------------------------------------- --- Objects --- Saved Save ----- ASP ------ Save Save Not Sequence Item Type Name Number Date Time Saved Saved Number ---------- ------- ---------- ----- -------- -------- -------- ------ --------- ------- __ *SAVCFG *FULL *SYSBAS 00001 8/17/17 23:01:21 319 0 25361
The BRMS maintenance command STRMNTBRM can create recovery reports, but they will not
contain the customized user recovery steps. Only STRRCYBRM USRRCYINF(*ADD) will generate
those reports. Our recommendation is to omit the reports from STRMNTRBM using the
PRTRCYRPT(*NONE) parameter, and then issue the STRRCYBRM immediately after
STRMNTBRM finishes.
BRMS Backup Logs
When using BRMS transfer method *ALL, the toolkit will bring back the entire QUSRBRM library. If
you want to bring back the backup joblogs, place them in library QUSRBRM.
The toolkit will detect whether the BRMS Flight Recorders are in /tmp/brms or /QIBM/ and collect
them from the correct location. They will be restored on the source LPAR in directory /FSFC off the
default Flight Recorder directory. Note that only one copy of the FSFC Flight Recorder is brought
back; subsequent flashcopies will overwrite the previous. Customers which require logs from multiple
days should considering renaming the directory after each flashcopy operation.

72
Recovery Point FlashCopy
A Recovery Point FlashCopy (RPF) differs from a standard Full System FlashCopy (FSFC) in that the
purpose of the FlashCopy isn’t to create a backup, but rather to create a point in time copy which can
easily be recovered from. System values, line descriptions etc are not changed prior the FlashCopy.
The methods to flush memory remain the same as FSFC: *FRCWRT, *QUIESCE and *IPL. There are
no BRMS integrations and no target LPAR communications resources to manage. There should be no
target LPAR or host connections attached to the target LUNs. It is currently only supported for
Storwize storage devices.
The intent is that customers will schedule the FlashCopy to occur on a periodic basis, perhaps every
couple hours, to thin-provisioned LUNs. Fully provisioned LUNs can also be used. There may be a
performance penalty to the source LPAR while data (changed and unchanged) is copied to the RPF
LUNs.
To use RPF, follow these steps:
• WRKCSE opt 1 to create an SVC FlashCopy Environment
o Use Opt 16 to define the host connections from the production host to the RPF LUNs.
• Create environment variable QZRDHASM_RECOVERY_POINT
• WRKCSEDTA opt 1 to create a *SYSTEM SVC FlashCopy CSE Data. Note the “Recovery
Point Flash” parameter. Enter *YES and press <ENTER>
• Provide the remaining information
• Use CHKFSFLASH assess whether a FlashCopy is possible
• Use STRFSFLASH to create the FlashCopy
o Place the STRFSFLASH on the job scheduler to create a RPF on a periodic basis or
issue the command prior to large changes you may want to back out (i.e. upgrades or
batch processing)
• The command CHKRCYPNT can be used to check that there is a FlashCopy available to
recover from. It will list the timestamp of the FlashCopy
• In the event a recovery is required, used the command SWRCYPNT. This will shut down the
production LPAR, change host connections to attach it to the target LUNs, modify the copy
rate, and IPL.
Switching the production LPAR back to the original LUNs is a manual process. If the goal to revert to
the original LUNs and discard changes to the RPF LUNs:
1. Shut down the LPAR
2. Change the host connections to the original LUNs
3. IPL the LPAR.
If there is a need to retain the changes made to the RPF LUNs:
1. Create a reverse-flash consistency group
a. Ensure that the copy and cleaning rates are greater than 1
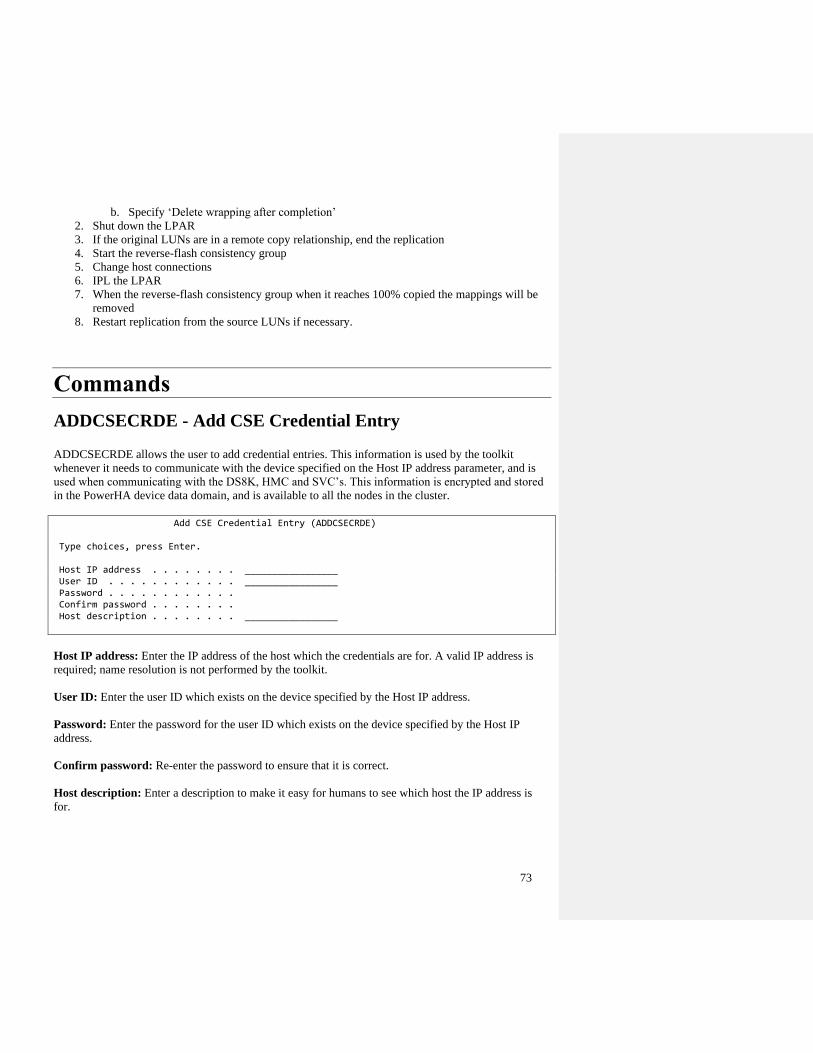
73
b. Specify ‘Delete wrapping after completion’
2. Shut down the LPAR
3. If the original LUNs are in a remote copy relationship, end the replication
4. Start the reverse-flash consistency group
5. Change host connections
6. IPL the LPAR
7. When the reverse-flash consistency group when it reaches 100% copied the mappings will be
removed
8. Restart replication from the source LUNs if necessary.
Commands
ADDCSECRDE - Add CSE Credential Entry
ADDCSECRDE allows the user to add credential entries. This information is used by the toolkit
whenever it needs to communicate with the device specified on the Host IP address parameter, and is
used when communicating with the DS8K, HMC and SVC’s. This information is encrypted and stored
in the PowerHA device data domain, and is available to all the nodes in the cluster.
Add CSE Credential Entry (ADDCSECRDE) Type choices, press Enter. Host IP address . . . . . . . . _________________ User ID . . . . . . . . . . . . _________________ Password . . . . . . . . . . . . Confirm password . . . . . . . . Host description . . . . . . . . _________________
Host IP address: Enter the IP address of the host which the credentials are for. A valid IP address is
required; name resolution is not performed by the toolkit.
User ID: Enter the user ID which exists on the device specified by the Host IP address.
Password: Enter the password for the user ID which exists on the device specified by the Host IP
address.
Confirm password: Re-enter the password to ensure that it is correct.
Host description: Enter a description to make it easy for humans to see which host the IP address is
for.
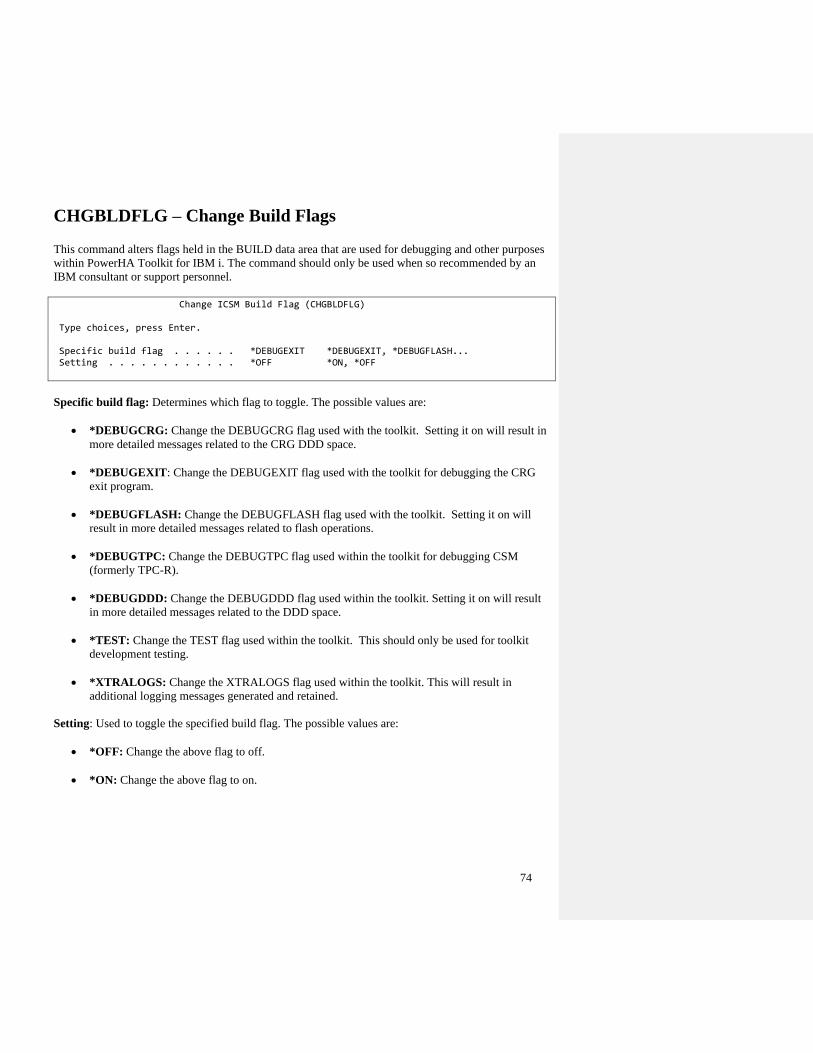
74
CHGBLDFLG – Change Build Flags
This command alters flags held in the BUILD data area that are used for debugging and other purposes
within PowerHA Toolkit for IBM i. The command should only be used when so recommended by an
IBM consultant or support personnel.
Change ICSM Build Flag (CHGBLDFLG) Type choices, press Enter. Specific build flag . . . . . . *DEBUGEXIT *DEBUGEXIT, *DEBUGFLASH... Setting . . . . . . . . . . . . *OFF *ON, *OFF
Specific build flag: Determines which flag to toggle. The possible values are:
• *DEBUGCRG: Change the DEBUGCRG flag used with the toolkit. Setting it on will result in
more detailed messages related to the CRG DDD space.
• *DEBUGEXIT: Change the DEBUGEXIT flag used with the toolkit for debugging the CRG
exit program.
• *DEBUGFLASH: Change the DEBUGFLASH flag used with the toolkit. Setting it on will
result in more detailed messages related to flash operations.
• *DEBUGTPC: Change the DEBUGTPC flag used within the toolkit for debugging CSM
(formerly TPC-R).
• *DEBUGDDD: Change the DEBUGDDD flag used within the toolkit. Setting it on will result
in more detailed messages related to the DDD space.
• *TEST: Change the TEST flag used within the toolkit. This should only be used for toolkit
development testing.
• *XTRALOGS: Change the XTRALOGS flag used within the toolkit. This will result in
additional logging messages generated and retained.
Setting: Used to toggle the specified build flag. The possible values are:
• *OFF: Change the above flag to off.
• *ON: Change the above flag to on.
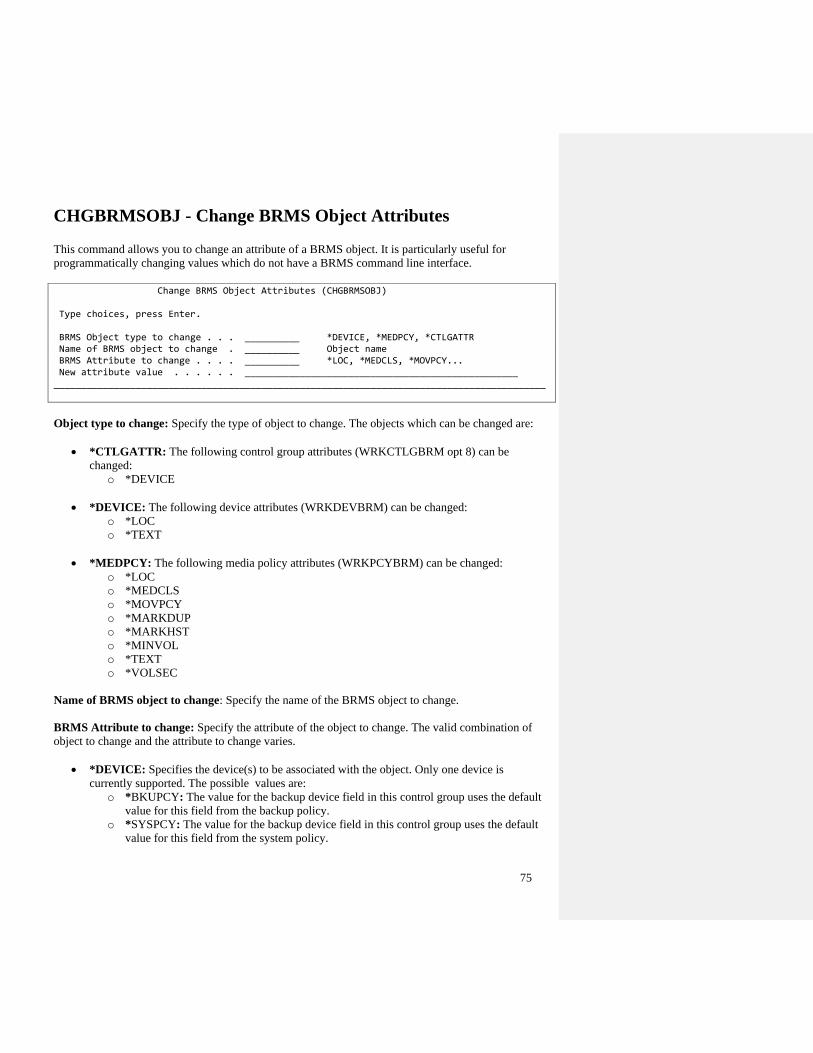
75
CHGBRMSOBJ - Change BRMS Object Attributes
This command allows you to change an attribute of a BRMS object. It is particularly useful for
programmatically changing values which do not have a BRMS command line interface.
Change BRMS Object Attributes (CHGBRMSOBJ) Type choices, press Enter. BRMS Object type to change . . . __________ *DEVICE, *MEDPCY, *CTLGATTR Name of BRMS object to change . __________ Object name BRMS Attribute to change . . . . __________ *LOC, *MEDCLS, *MOVPCY... New attribute value . . . . . . __________________________________________________ __________________________________________________________________________________________
Object type to change: Specify the type of object to change. The objects which can be changed are:
• *CTLGATTR: The following control group attributes (WRKCTLGBRM opt 8) can be
changed:
o *DEVICE
• *DEVICE: The following device attributes (WRKDEVBRM) can be changed:
o *LOC
o *TEXT
• *MEDPCY: The following media policy attributes (WRKPCYBRM) can be changed:
o *LOC
o *MEDCLS
o *MOVPCY
o *MARKDUP
o *MARKHST
o *MINVOL
o *TEXT
o *VOLSEC
Name of BRMS object to change: Specify the name of the BRMS object to change.
BRMS Attribute to change: Specify the attribute of the object to change. The valid combination of
object to change and the attribute to change varies.
• *DEVICE: Specifies the device(s) to be associated with the object. Only one device is
currently supported. The possible values are:
o *BKUPCY: The value for the backup device field in this control group uses the default
value for this field from the backup policy.
o *SYSPCY: The value for the backup device field in this control group uses the default
value for this field from the system policy.

76
o device-name: Specify the names of the devices that are used in processing this backup
control group. Only one device is currently supported.
o *NONE: There is no device for this save operation. Save files are used to store the
saved data.
o *MEDCLS: Devices for this policy or control group are selected based on device types
that support the density for the media class specified in the media policy. The
*MEDCLS special value is used for devices that are part of a device pool, such as
several systems that share a single or set of devices.
• *LOC: Specifies the storage location to be associated with the object. The possible values
are:
o *ANY: Any device in any location capable of saving to the specified media class can be
utilized for the save operation.
o location-name: Specifies the location name of the device that is to be used with this
policy. Only devices assigned this location name can be used for the save operation.
• *MEDCLS: Specifies the name of the media class to be used for any volume created using this
media policy.The possible values are:
o *NONE: No media class is assigned for this media policy.
o *ADSM: No media class is assigned for this media policy. The media is managed by
the TSM server.
o media-class-name: Specify the name of the media class that is to be used with this media
policy.
• *MOVPCY: Specifies the name of the move policy to be associated with this object. The
possible values are:
o *NONE: Specifies that no move policy is associated with this media policy.
o *ADSM: Specifies no move policy is associated with this media policy. A TSM server
is responsible for movement and storage of the media.
o move-policy-name: Specifies the name of the move policy that is to be assigned to
volumes used by this media policy.
• *MARKDUP: Specifies whether history items created by the save will be marked for
duplication. You can use DUPMEDBRM VOL(*SRCHHST) command to duplicate the marked
saved items. The possible values are:
o *NO: History items created during a save operation that use this media policy will not
be marked for duplication.
o *YES: History items created during a save operation that use this media policy will be
marked for duplication.
• *MARKHST:Specifies whether media volumes will be marked for duplication. If a volume is a
member of a media set and it is marked for duplication, all members of the media set will be
marked for duplication. When the DUPMEDBRM VOL(*SEARCH) command is used, active
volumes that have been marked will be selected and duplicated. The possible values are:
o *NO: Volumes written to during a save operation that use this media policy will not be
marked for duplication.

77
o *YES: Volumes written to during a save operation that use this media policy will be
marked for duplication.
• *MINVOL: Specifies the minimum number of expired volumes that must be present before
any save can begin. The possible values are:
o *NONE: There is no check done to determine the minimum number of required volumes
before a save operation begins.
o number-of-required-volumes: Specify the number of expired media volumes that must
be available before any BRMS save operation will begin. The number of volumes can
range from 1 to 9,999.
• *TEXT: Specifies text that describes the object. The possible values are:
o *NONE: No text will be used to describe the object.
o text-description: Specifies the text description to be used.
• *VOLSEC: The secure volume attribute will be changed. Value values are:
o *NO: Volume security will not be applied to this media class. Volumes that do not have
volume security can be read by anyone.
o *YES: Volume security will not be applied to this media class. Only users with special
authorities *ALLOBJ or *SECADM can read media volumes in this media class. *
o *ADSM: Volume security will not be applied. Volume security is managed by the TSM
server.
New attribute value: Specify the new value value.
CHGCSECRDE - Change CSE Credential Entry
This command can be used to change a user credential entry in the Device Domain Data associated
with IBM i Copy Services Manager. The information is encrypted using a 128 bit AES key before it is
retained.
For a description of the parameters, see the command ADDCSECRDE.
CHGCSEDTA – Change CSE Data
CHGCSEDTA is used to change the CSE Data as it relates to the operational characteristics of the
toolkit. The parameters of CRTCSEDTA and DSPCSEDTA are similar and these descriptions apply to
those commands as well. Please refer to CRTCSEDTA for parameter details.
CHKFSFLASH - Check Full System Flash
The Check Full System FlashCopy Readiness (CHKFSFLASH) command performs checks to
determine if the prerequisite conditions have been met for the identified CSE Data configuration to be
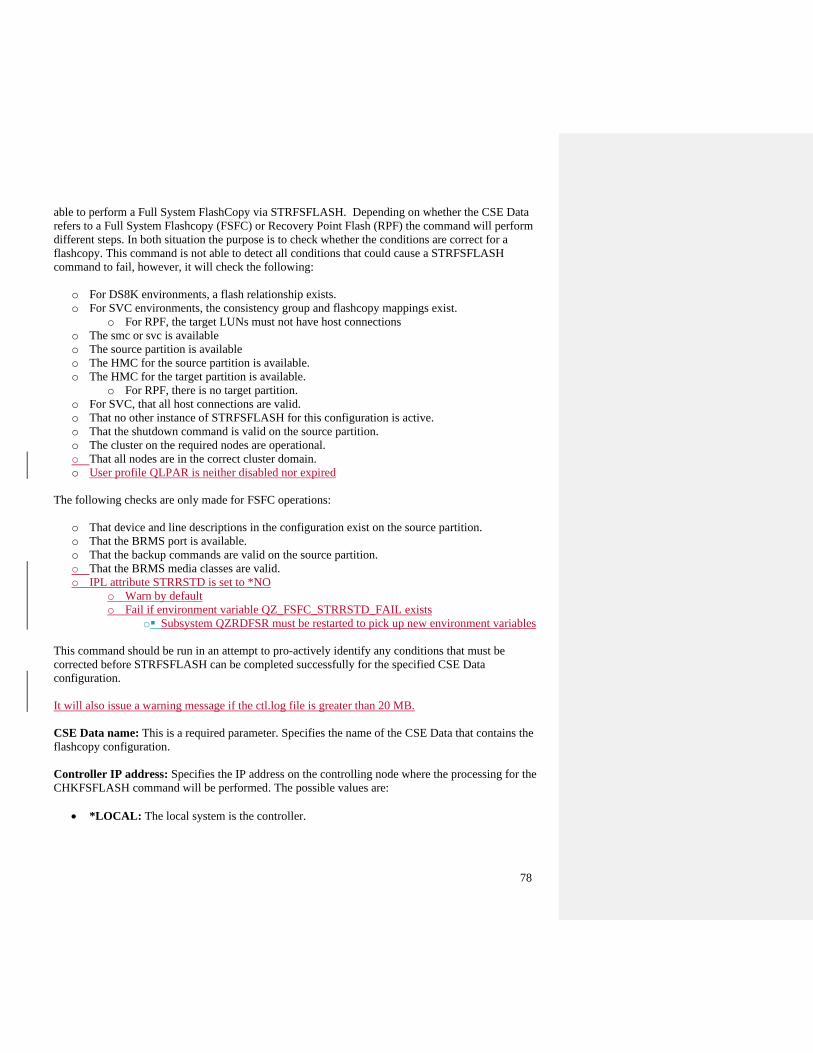
78
able to perform a Full System FlashCopy via STRFSFLASH. Depending on whether the CSE Data
refers to a Full System Flashcopy (FSFC) or Recovery Point Flash (RPF) the command will perform
different steps. In both situation the purpose is to check whether the conditions are correct for a
flashcopy. This command is not able to detect all conditions that could cause a STRFSFLASH
command to fail, however, it will check the following:
o For DS8K environments, a flash relationship exists.
o For SVC environments, the consistency group and flashcopy mappings exist.
o For RPF, the target LUNs must not have host connections
o The smc or svc is available
o The source partition is available
o The HMC for the source partition is available.
o The HMC for the target partition is available.
o For RPF, there is no target partition.
o For SVC, that all host connections are valid.
o That no other instance of STRFSFLASH for this configuration is active.
o That the shutdown command is valid on the source partition.
o The cluster on the required nodes are operational.
o That all nodes are in the correct cluster domain.
o User profile QLPAR is neither disabled nor expired
The following checks are only made for FSFC operations:
o That device and line descriptions in the configuration exist on the source partition.
o That the BRMS port is available.
o That the backup commands are valid on the source partition.
o That the BRMS media classes are valid.
o IPL attribute STRRSTD is set to *NO
o Warn by default
o Fail if environment variable QZ_FSFC_STRRSTD_FAIL exists
o▪ Subsystem QZRDFSR must be restarted to pick up new environment variables
This command should be run in an attempt to pro-actively identify any conditions that must be
corrected before STRFSFLASH can be completed successfully for the specified CSE Data
configuration.
It will also issue a warning message if the ctl.log file is greater than 20 MB.
CSE Data name: This is a required parameter. Specifies the name of the CSE Data that contains the
flashcopy configuration.
Controller IP address: Specifies the IP address on the controlling node where the processing for the
CHKFSFLASH command will be performed. The possible values are:
• *LOCAL: The local system is the controller.
79
• IP address: IPv4 formatted address
Controller port: The port on which the controller is listening for remote commands.
This parameter is ignored for CTLR(*LOCAL).
CHKRCYPNT – Check Recovery Point Flash
The Check Recovery Point Copy Readiness (CHKRCYPNT) command performs checks to determine
if the prerequisite conditions have been met for the identified CSE Data configuration to be able to
switch the partition LUNs to a recovery point copy via SWRCYPNT. This command is not able to
detect all conditions that could cause a SWRCYPNT command to fail, however, it will check the
following:
o That the environment is an SVC environments.
o That the consistency group and flashcopy mappings exist.
o The smc or svc is available.
o The source partition is available
o The HMC for the source partition is available.
o That all host connections are valid.
o That no other instance of STRFSFLASH for this configuration is active.
o That the shutdown command is valid on the source partition.
o The cluster on the required nodes are operational.
o That all nodes are in the correct cluster domain.
This command should be run in an attempt to pro-actively identify any conditions that must be
corrected before SWRCYPNT can be completed successfully for the specified CSE Data configuration
CSE Data name (CSEDTA) This is a required parameter. Specifies the name of the CSE Data that
contains the flashcopy configuration.
CLEANLOGS – Clean Toolkit Logs
This command will clean the logs related to the IASP Copy Services Manager, Full System Replication
Manager, or Full System FlashCopy Manager. CLEANLOGS removes specified entries from the
/QIBM/Qzrdhasm/Qzrdhasm.log, removes any temporary directories created by DMPINF, dmpinf zip
files and toolkit joblogs in /QIBM/Qzrdhasm/joblogs/ which are older than the number of days
specified on this command. This command should be run periodically to prevent log files from
consuming excessive space.
Days of information to retain: How many days of information to retain.
FSFC environment: The name of the FSFC environment to be cleaned.
80
• *NONE: Do not clean up the logs for any environment.
• *ALL: Clean up the logs for all environments.
• environment-name: Clean up the logs for the named environment.
CLNICSMLOG – Clean ICSM Log
This command has ben replaced with CLEANLOGS.
This command has ben replaced with CLEANLOGS.
CLRDDD – Clear Device Data Domain
CLRDDD is a utility command used to clear data out of PowerHA device data domains. It should only
be used when instructed by IBM personnel and may remove toolkit configuration data.
CNLFSFLASH – Cancel Full System FlashCopy
Cancel a FlashCopy previously paused with STRFSFLASH. This is necessary if the intent is to issue
another STRFSFLASH instead of RSMFSFLASH.
CPYCSEDTA – Copy CSE Data
This interactive command will create a new Cluster Resource Group and write configuration data to the
CSE Data device domain based on information from an existing CRG and existing CSE Data. The
configuration data may be modified before the CSE Data is created.
Please refer to the command CRTCSEDTA for a detailed description of the parameters.
CSE Data name: The name that identifies both the CRG and the CSE Data.
To CRG: Specifies the name of the CRG device which is to be prepared for backup. This name
identifies a CRG device description on the owning cluster node. This is also the Environment name
referenced elsewhere within ICSM. The environment is configured using WRKCSE.
CRTCSEDTA - Create Copy Services Environment Data
CRTCSEDTA is used to enter the CSE Data as it relates to the operational characteristics of the toolkit.
The parameters of CHGCSEDTA and DSPCSEDTA are similar and these descriptions apply to those
commands as well.
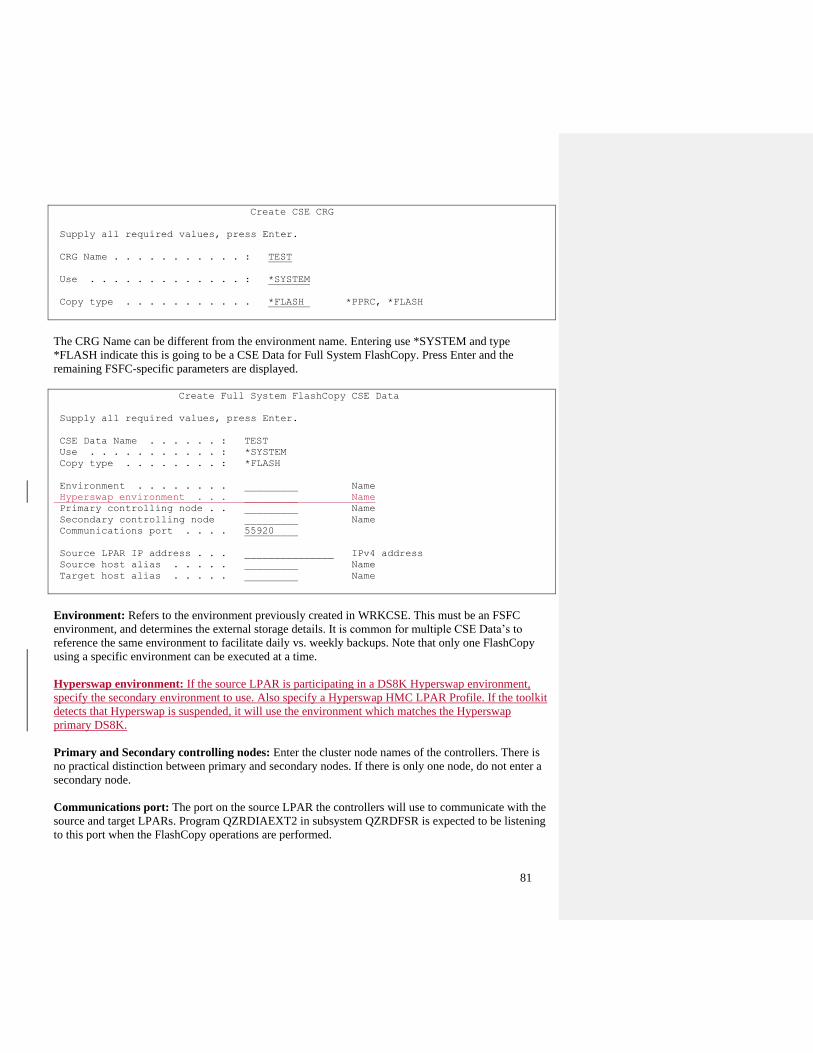
81
Create CSE CRG
Supply all required values, press Enter.
CRG Name . . . . . . . . . . . : TEST
Use . . . . . . . . . . . . . : *SYSTEM
Copy type . . . . . . . . . . . *FLASH *PPRC, *FLASH
The CRG Name can be different from the environment name. Entering use *SYSTEM and type
*FLASH indicate this is going to be a CSE Data for Full System FlashCopy. Press Enter and the
remaining FSFC-specific parameters are displayed.
Create Full System FlashCopy CSE Data
Supply all required values, press Enter.
CSE Data Name . . . . . . : TEST
Use . . . . . . . . . . . : *SYSTEM
Copy type . . . . . . . . : *FLASH
Environment . . . . . . . . _________ Name
Hyperswap environment . . . _________ Name
Primary controlling node . . _________ Name
Secondary controlling node _________ Name
Communications port . . . . 55920____
Source LPAR IP address . . . _______________ IPv4 address
Source host alias . . . . . _________ Name
Target host alias . . . . . Name
Environment: Refers to the environment previously created in WRKCSE. This must be an FSFC
environment, and determines the external storage details. It is common for multiple CSE Data’s to
reference the same environment to facilitate daily vs. weekly backups. Note that only one FlashCopy
using a specific environment can be executed at a time.
Hyperswap environment: If the source LPAR is participating in a DS8K Hyperswap environment,
specify the secondary environment to use. Also specify a Hyperswap HMC LPAR Profile. If the toolkit
detects that Hyperswap is suspended, it will use the environment which matches the Hyperswap
primary DS8K.
Primary and Secondary controlling nodes: Enter the cluster node names of the controllers. There is
no practical distinction between primary and secondary nodes. If there is only one node, do not enter a
secondary node.
Communications port: The port on the source LPAR the controllers will use to communicate with the
source and target LPARs. Program QZRDIAEXT2 in subsystem QZRDFSR is expected to be listening
to this port when the FlashCopy operations are performed.
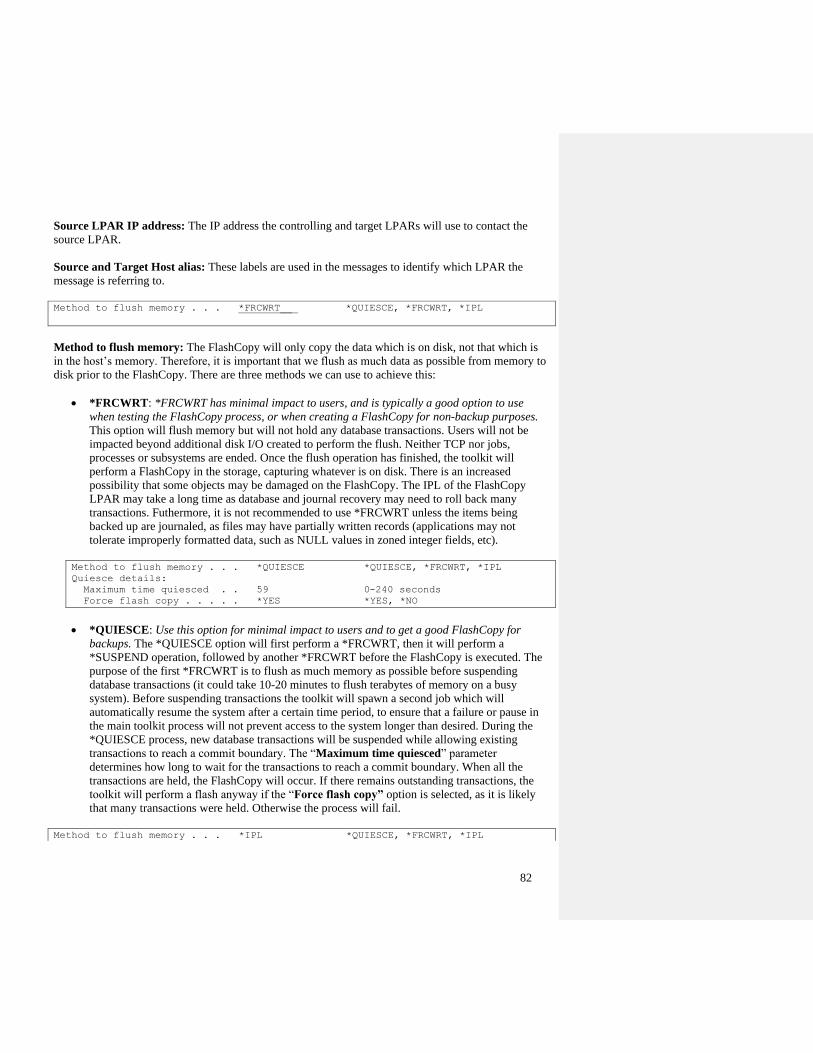
82
Source LPAR IP address: The IP address the controlling and target LPARs will use to contact the
source LPAR.
Source and Target Host alias: These labels are used in the messages to identify which LPAR the
message is referring to.
Method to flush memory . . . *FRCWRT__ *QUIESCE, *FRCWRT, *IPL
Method to flush memory: The FlashCopy will only copy the data which is on disk, not that which is
in the host’s memory. Therefore, it is important that we flush as much data as possible from memory to
disk prior to the FlashCopy. There are three methods we can use to achieve this:
• *FRCWRT: *FRCWRT has minimal impact to users, and is typically a good option to use
when testing the FlashCopy process, or when creating a FlashCopy for non-backup purposes.
This option will flush memory but will not hold any database transactions. Users will not be
impacted beyond additional disk I/O created to perform the flush. Neither TCP nor jobs,
processes or subsystems are ended. Once the flush operation has finished, the toolkit will
perform a FlashCopy in the storage, capturing whatever is on disk. There is an increased
possibility that some objects may be damaged on the FlashCopy. The IPL of the FlashCopy
LPAR may take a long time as database and journal recovery may need to roll back many
transactions. Futhermore, it is not recommended to use *FRCWRT unless the items being
backed up are journaled, as files may have partially written records (applications may not
tolerate improperly formatted data, such as NULL values in zoned integer fields, etc).
Method to flush memory . . . *QUIESCE *QUIESCE, *FRCWRT, *IPL
Quiesce details:
Maximum time quiesced . . 59 0-240 seconds
Force flash copy . . . . . *YES *YES, *NO
• *QUIESCE: Use this option for minimal impact to users and to get a good FlashCopy for
backups. The *QUIESCE option will first perform a *FRCWRT, then it will perform a
*SUSPEND operation, followed by another *FRCWRT before the FlashCopy is executed. The
purpose of the first *FRCWRT is to flush as much memory as possible before suspending
database transactions (it could take 10-20 minutes to flush terabytes of memory on a busy
system). Before suspending transactions the toolkit will spawn a second job which will
automatically resume the system after a certain time period, to ensure that a failure or pause in
the main toolkit process will not prevent access to the system longer than desired. During the
*QUIESCE process, new database transactions will be suspended while allowing existing
transactions to reach a commit boundary. The “Maximum time quiesced” parameter
determines how long to wait for the transactions to reach a commit boundary. When all the
transactions are held, the FlashCopy will occur. If there remains outstanding transactions, the
toolkit will perform a flash anyway if the “Force flash copy” option is selected, as it is likely
that many transactions were held. Otherwise the process will fail.
Method to flush memory . . . *IPL *QUIESCE, *FRCWRT, *IPL
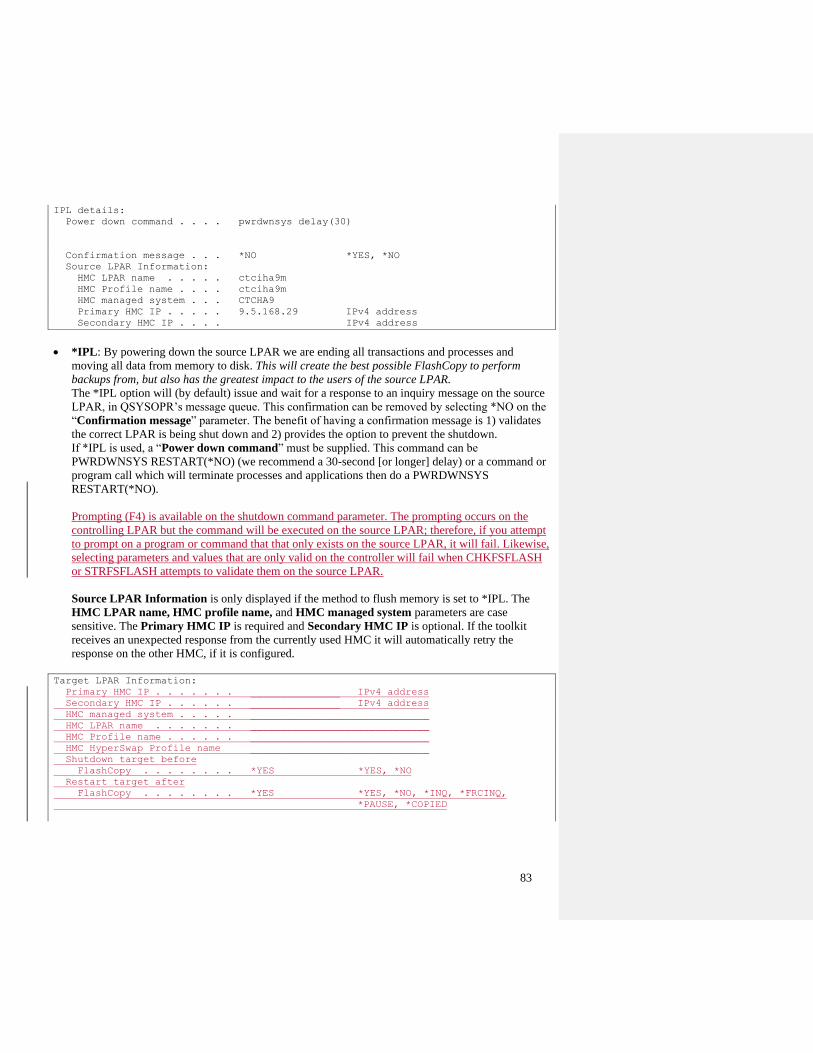
83
IPL details:
Power down command . . . . pwrdwnsys delay(30)
Confirmation message . . . *NO *YES, *NO
Source LPAR Information:
HMC LPAR name . . . . . ctciha9m
HMC Profile name . . . . ctciha9m
HMC managed system . . . CTCHA9
Primary HMC IP . . . . . 9.5.168.29 IPv4 address
Secondary HMC IP . . . . IPv4 address
• *IPL: By powering down the source LPAR we are ending all transactions and processes and
moving all data from memory to disk. This will create the best possible FlashCopy to perform
backups from, but also has the greatest impact to the users of the source LPAR.
The *IPL option will (by default) issue and wait for a response to an inquiry message on the source
LPAR, in QSYSOPR’s message queue. This confirmation can be removed by selecting *NO on the
“Confirmation message” parameter. The benefit of having a confirmation message is 1) validates
the correct LPAR is being shut down and 2) provides the option to prevent the shutdown.
If *IPL is used, a “Power down command” must be supplied. This command can be
PWRDWNSYS RESTART(*NO) (we recommend a 30-second [or longer] delay) or a command or
program call which will terminate processes and applications then do a PWRDWNSYS
RESTART(*NO).
Prompting (F4) is available on the shutdown command parameter. The prompting occurs on the
controlling LPAR but the command will be executed on the source LPAR; therefore, if you attempt
to prompt on a program or command that that only exists on the source LPAR, it will fail. Likewise,
selecting parameters and values that are only valid on the controller will fail when CHKFSFLASH
or STRFSFLASH attempts to validate them on the source LPAR.
Source LPAR Information is only displayed if the method to flush memory is set to *IPL. The
HMC LPAR name, HMC profile name, and HMC managed system parameters are case
sensitive. The Primary HMC IP is required and Secondary HMC IP is optional. If the toolkit
receives an unexpected response from the currently used HMC it will automatically retry the
response on the other HMC, if it is configured.
Target LPAR Information:
Primary HMC IP . . . . . . . _______________ IPv4 address
Secondary HMC IP . . . . . . _______________ IPv4 address
HMC managed system . . . . . ______________________________
HMC LPAR name . . . . . . . ______________________________
HMC Profile name . . . . . . ______________________________
HMC HyperSwap Profile name ______________________________
Shutdown target before
FlashCopy . . . . . . . . *YES *YES, *NO
Restart target after
FlashCopy . . . . . . . . *YES *YES, *NO, *INQ, *FRCINQ,
*PAUSE, *COPIED
84
Target LPAR Information: Specify the details for the target LPAR. The HMC LPAR name, HMC
profile name, and HMC managed system parameters are case sensitive. The Primary HMC IP is
required and Secondary HMC IP is optional. If the toolkit receives an unexpected response from the
currently used HMC it will automatically retry the response on the other HMC, if it is configured.
If the source LPAR is participating in a DS8K Hyperswap environment, specify the Hyperswap HMC
LPAR Profile to use. Each profile should contain the fiber channel adapters to connect to each DS8K,
with the zoning required for each one. Otherwise the profiles should be similar or tape and
communications resources may not configure correctly.
Shutdown target before FlashCopy: It is necessary that an LPAR not be running on the LUNs that
• *YES: Shut down the target LPAR immediately before the FlashCopy. This is the most
common option. If there are multiple STRFSFLASH operations vying for the use of the target
LPAR, one will randomly get a lock on it and the rest will continue to wait until they can also
get a lock on it.
• *NO: Do not deactivate the target LPAR before the FlashCopy. It is not necessary to deactivate
the target LPAR prior to performing a FlashCopy if the target LPAR is attached to other
FlashCopy LUNs. This may be the case if two source LPARs with dedicated
target disks share a common target LPAR
. The toolkit will check whether the LPAR is
running on the target LUNs and issue message IAS1627. The target LPAR must be available on
the IP address listed in WRKCSEDTA.
•
Restart target after FlashCopy: The toolkit has several options for restarting the target LPAR. Note
that if host connection changes are specified, they will be processed immediately prior to activating the
target LPAR.
• *YES: Restart the target LPAR immediately after the FlashCopy. This is the most common
option. If there are multiple STRFSFLASH operations vying for the use of the target LPAR,
one will randomly get a lock on it and the rest will continue to wait until they can also get a lock
on it.
• *NO: Do not restart the target LPAR after the FlashCopy. Some customers use this to create a
FlashCopy immediately before a critical operation on the source LPAR, such as batch
processing, for the purposes of performing a reverse FlashCopy. Backups are not usually
performed in this scenario.
• *INQ: Issue an inquiry message to QSYSOPR on the controller prior to restarting the target
LPAR to allow an operator to control whether and when to start the target LPAR. This can also
be used with multiple concurrent STRFSFLASH operations to control the order of target LPAR
IPL’s.
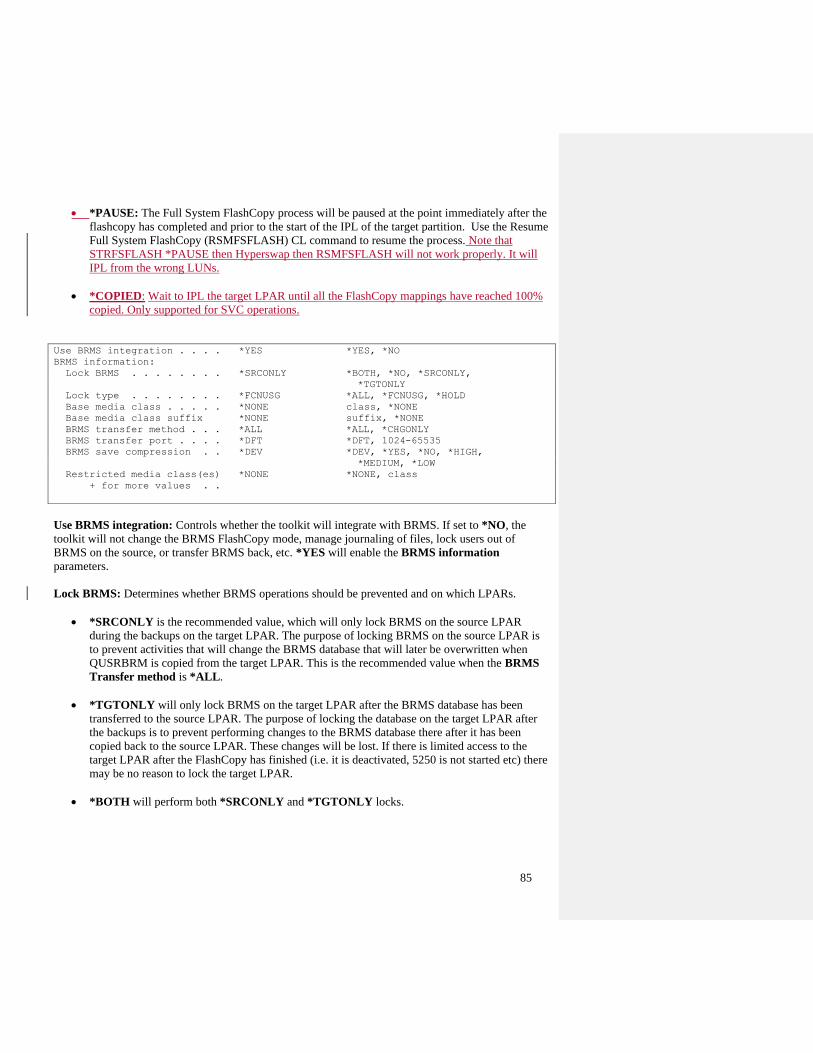
85
• *PAUSE: The Full System FlashCopy process will be paused at the point immediately after the
flashcopy has completed and prior to the start of the IPL of the target partition. Use the Resume
Full System FlashCopy (RSMFSFLASH) CL command to resume the process. Note that
STRFSFLASH *PAUSE then Hyperswap then RSMFSFLASH will not work properly. It will
IPL from the wrong LUNs.
• *COPIED: Wait to IPL the target LPAR until all the FlashCopy mappings have reached 100%
copied. Only supported for SVC operations.
Use BRMS integration . . . . *YES *YES, *NO
BRMS information:
Lock BRMS . . . . . . . . *SRCONLY *BOTH, *NO, *SRCONLY,
*TGTONLY
Lock type . . . . . . . . *FCNUSG *ALL, *FCNUSG, *HOLD
Base media class . . . . . *NONE class, *NONE
Base media class suffix *NONE suffix, *NONE
BRMS transfer method . . . *ALL *ALL, *CHGONLY
BRMS transfer port . . . . *DFT *DFT, 1024-65535
BRMS save compression . . *DEV *DEV, *YES, *NO, *HIGH,
*MEDIUM, *LOW
Restricted media class(es) *NONE *NONE, class
+ for more values . .
Use BRMS integration: Controls whether the toolkit will integrate with BRMS. If set to *NO, the
toolkit will not change the BRMS FlashCopy mode, manage journaling of files, lock users out of
BRMS on the source, or transfer BRMS back, etc. *YES will enable the BRMS information
parameters.
Lock BRMS: Determines whether BRMS operations should be prevented and on which LPARs.
• *SRCONLY is the recommended value, which will only lock BRMS on the source LPAR
during the backups on the target LPAR. The purpose of locking BRMS on the source LPAR is
to prevent activities that will change the BRMS database that will later be overwritten when
QUSRBRM is copied from the target LPAR. This is the recommended value when the BRMS
Transfer method is *ALL.
• *TGTONLY will only lock BRMS on the target LPAR after the BRMS database has been
transferred to the source LPAR. The purpose of locking the database on the target LPAR after
the backups is to prevent performing changes to the BRMS database there after it has been
copied back to the source LPAR. These changes will be lost. If there is limited access to the
target LPAR after the FlashCopy has finished (i.e. it is deactivated, 5250 is not started etc) there
may be no reason to lock the target LPAR.
• *BOTH will perform both *SRCONLY and *TGTONLY locks.
86
• *NO will not perform any BRMS locking. This is the recommended value when the BRMS
transfer method is *CHGONLY.
Lock type: If locking of BRMS is desired, how it is locked can be decided.
• *FCNUSG will use the functional usage model to prevent backups from occurring. Recoveries
and viewing logs, media and history is allowed. Attempts to change the BRMS database (i.e.
backups, editing control groups etc) will be denied with a message indicating the user is not
authorized to that function. Use WRKFCNUSG to view/change individual functional areas. To
temporarily override the lock, use the command SETUSRBRM to give *ADMIN to a user to
perform a locked function. This authority will be reset to the pre-FlashCopy state after the
BRMS database has been transferred back to the source LPAR.
• *HOLD will use the BRMS ‘halt’ method to hold any jobs accessing BRMS. This method’s
purpose is to allow BRMS to force an exclusive single-threaded environment for critical
functions such as STRMNTBRM. To remove this lock, perform this program call: QSYS/CALL PGM(QBRM/Q1AOLD) PARM('STOPJOBS ' '*RELEASE ')
Or delete data area QUSRBRM/Q1AMNTHALT.
• *ALL will implement both *HOLD and *FCNUSG
• *NONE will not implement any locking mechanism and is appropriate when using BRMS
Transfer method *CHGONLY.
Base media class: Only use this option with BRMS transfer method *CHGONLY. When using
dynamic media classes, the toolkit will create a new media class from an existing base media class. The
new media class will be named using the base media class and the Base media class suffix. The
combined length of these two must be less than ten characters. The dynamic media class is created
immediately prior to the FlashCopy, and is added to the Restricted media class list. Media previously
used in a dynamic media class will be moved to the dynamic media class, and scratch volumes will also
be moved to it. The toolkit will find all the media policies which use the base media class and specify
the same media location as the device location of the devices specified on the CRTCSEDTA command,
and use the “Required Volumes” parameter to determine how many scratch media are required at each
location. The toolkit will move that number of expired media to the dynamic media class. After the
backups are finished the toolkit will write the text ‘#FSFC#’ to the media used during the backup to
identify for future use in a dynamic media class. Then the media will be moved back to the base media
class and the dynamic media class will be removed.
BRMS transfer method: This parameter determines how to transfer the BRMS database from the
target to the source LPAR. This process is triggered when ENDFSFLASH *NORMAL is called on the
target LPAR.
• *ALL will transfer the entire BRMS data library (QUSRBRM). This is the BRMS-supported
method of managing the FlashCopy data, and will also perform the BRMS operations to set the
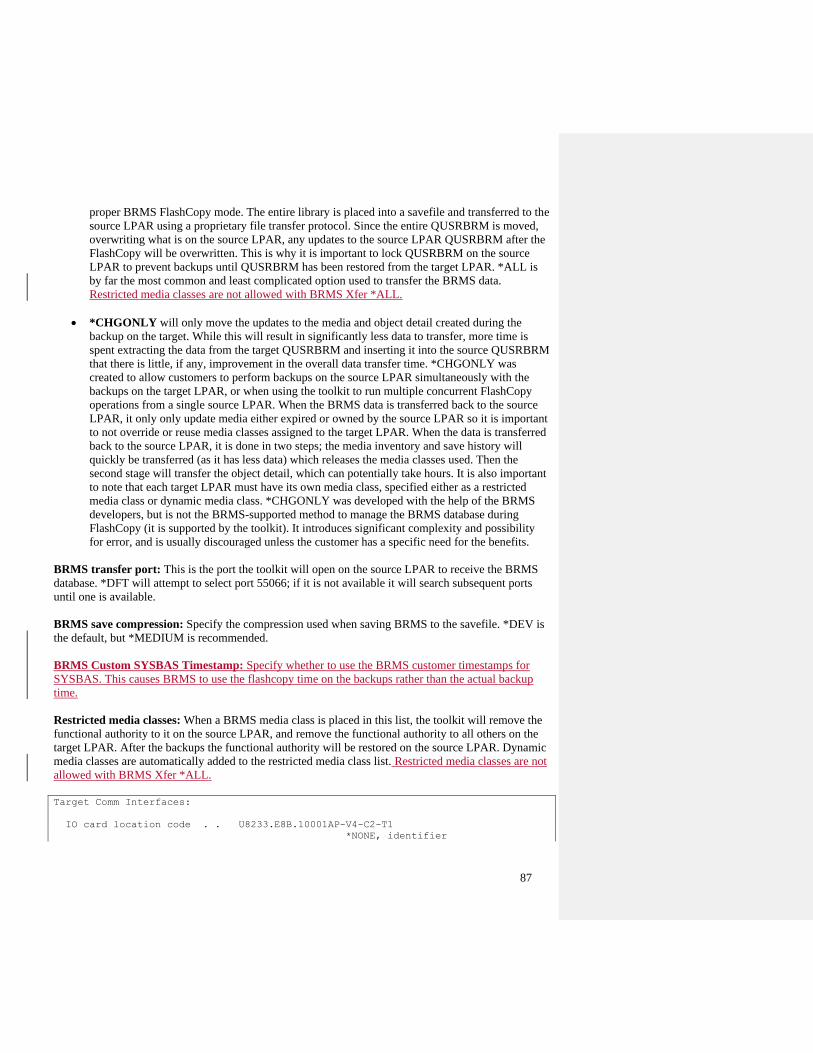
87
proper BRMS FlashCopy mode. The entire library is placed into a savefile and transferred to the
source LPAR using a proprietary file transfer protocol. Since the entire QUSRBRM is moved,
overwriting what is on the source LPAR, any updates to the source LPAR QUSRBRM after the
FlashCopy will be overwritten. This is why it is important to lock QUSRBRM on the source
LPAR to prevent backups until QUSRBRM has been restored from the target LPAR. *ALL is
by far the most common and least complicated option used to transfer the BRMS data.
Restricted media classes are not allowed with BRMS Xfer *ALL.
• *CHGONLY will only move the updates to the media and object detail created during the
backup on the target. While this will result in significantly less data to transfer, more time is
spent extracting the data from the target QUSRBRM and inserting it into the source QUSRBRM
that there is little, if any, improvement in the overall data transfer time. *CHGONLY was
created to allow customers to perform backups on the source LPAR simultaneously with the
backups on the target LPAR, or when using the toolkit to run multiple concurrent FlashCopy
operations from a single source LPAR. When the BRMS data is transferred back to the source
LPAR, it only only update media either expired or owned by the source LPAR so it is important
to not override or reuse media classes assigned to the target LPAR. When the data is transferred
back to the source LPAR, it is done in two steps; the media inventory and save history will
quickly be transferred (as it has less data) which releases the media classes used. Then the
second stage will transfer the object detail, which can potentially take hours. It is also important
to note that each target LPAR must have its own media class, specified either as a restricted
media class or dynamic media class. *CHGONLY was developed with the help of the BRMS
developers, but is not the BRMS-supported method to manage the BRMS database during
FlashCopy (it is supported by the toolkit). It introduces significant complexity and possibility
for error, and is usually discouraged unless the customer has a specific need for the benefits.
BRMS transfer port: This is the port the toolkit will open on the source LPAR to receive the BRMS
database. *DFT will attempt to select port 55066; if it is not available it will search subsequent ports
until one is available.
BRMS save compression: Specify the compression used when saving BRMS to the savefile. *DEV is
the default, but *MEDIUM is recommended.
BRMS Custom SYSBAS Timestamp: Specify whether to use the BRMS customer timestamps for
SYSBAS. This causes BRMS to use the flashcopy time on the backups rather than the actual backup
time.
Restricted media classes: When a BRMS media class is placed in this list, the toolkit will remove the
functional authority to it on the source LPAR, and remove the functional authority to all others on the
target LPAR. After the backups the functional authority will be restored on the source LPAR. Dynamic
media classes are automatically added to the restricted media class list. Restricted media classes are not
allowed with BRMS Xfer *ALL.
Target Comm Interfaces:
IO card location code . . U8233.E8B.10001AP-V4-C2-T1
*NONE, identifier
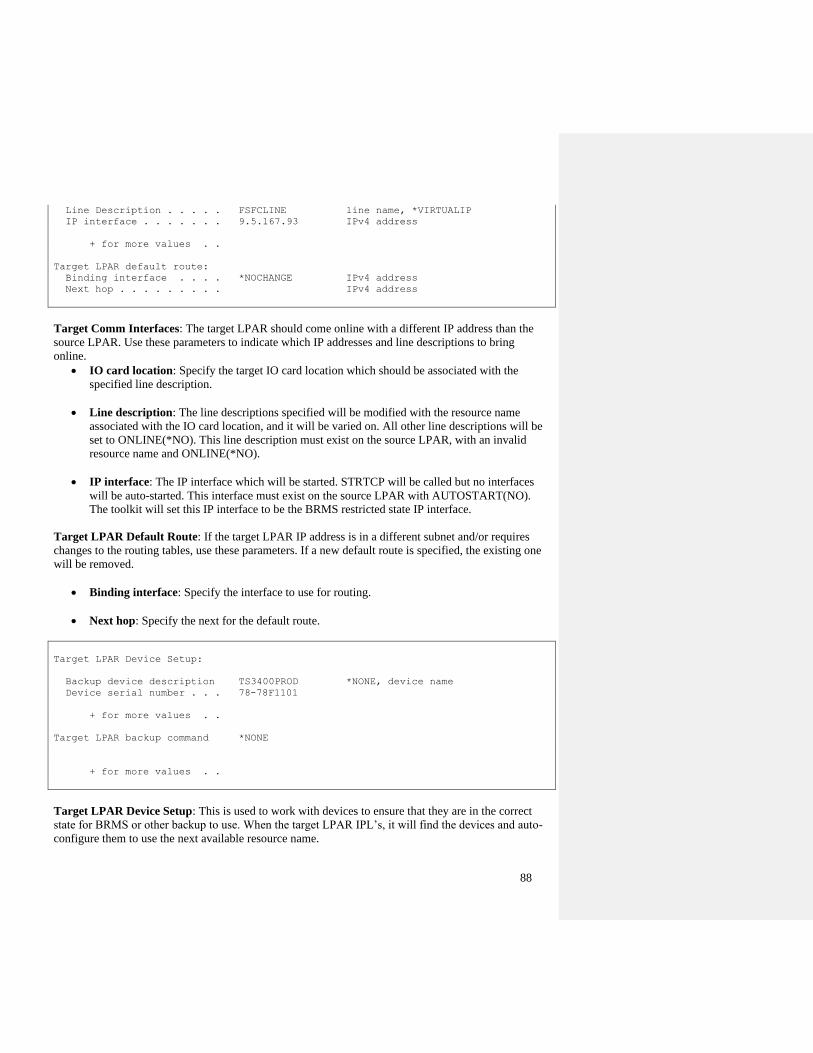
88
Line Description . . . . . FSFCLINE line name, *VIRTUALIP
IP interface . . . . . . . 9.5.167.93 IPv4 address
+ for more values . .
Target LPAR default route:
Binding interface . . . . *NOCHANGE IPv4 address
Next hop . . . . . . . . . IPv4 address
Target Comm Interfaces: The target LPAR should come online with a different IP address than the
source LPAR. Use these parameters to indicate which IP addresses and line descriptions to bring
online.
• IO card location: Specify the target IO card location which should be associated with the
specified line description.
• Line description: The line descriptions specified will be modified with the resource name
associated with the IO card location, and it will be varied on. All other line descriptions will be
set to ONLINE(*NO). This line description must exist on the source LPAR, with an invalid
resource name and ONLINE(*NO).
• IP interface: The IP interface which will be started. STRTCP will be called but no interfaces
will be auto-started. This interface must exist on the source LPAR with AUTOSTART(NO).
The toolkit will set this IP interface to be the BRMS restricted state IP interface.
Target LPAR Default Route: If the target LPAR IP address is in a different subnet and/or requires
changes to the routing tables, use these parameters. If a new default route is specified, the existing one
will be removed.
• Binding interface: Specify the interface to use for routing.
• Next hop: Specify the next for the default route.
Target LPAR Device Setup:
Backup device description TS3400PROD *NONE, device name
Device serial number . . . 78-78F1101
+ for more values . .
Target LPAR backup command *NONE
+ for more values . .
Target LPAR Device Setup: This is used to work with devices to ensure that they are in the correct
state for BRMS or other backup to use. When the target LPAR IPL’s, it will find the devices and auto-
configure them to use the next available resource name.
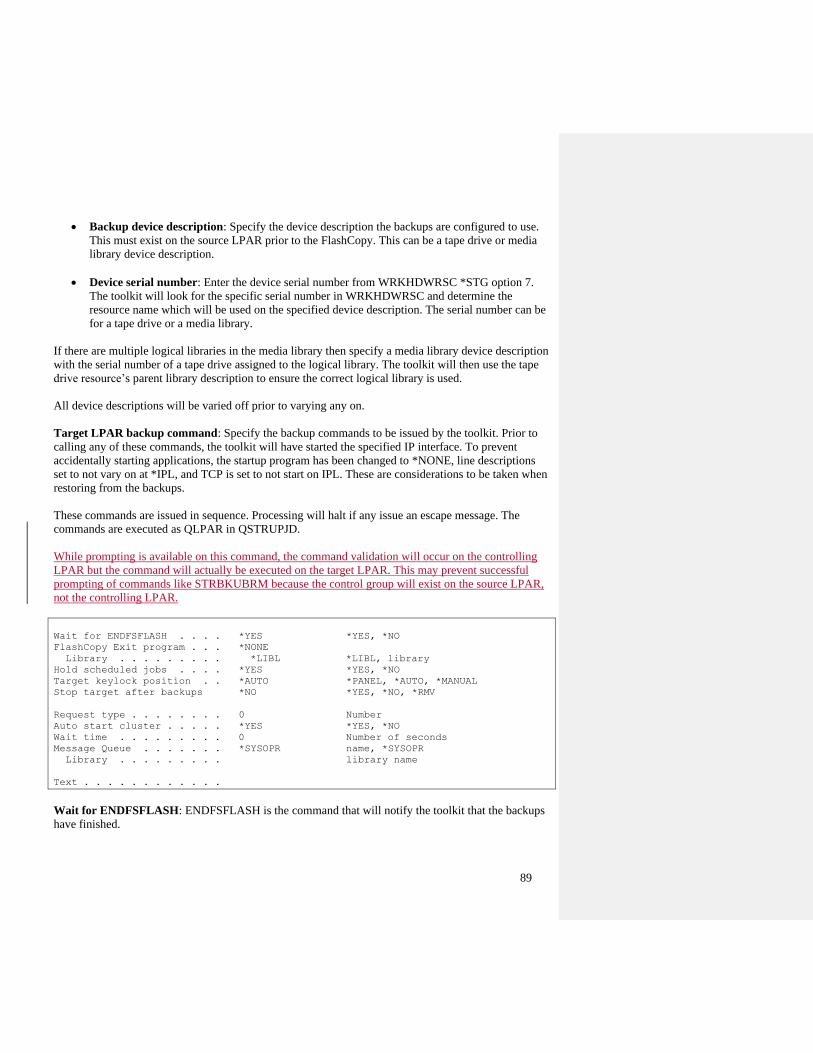
89
• Backup device description: Specify the device description the backups are configured to use.
This must exist on the source LPAR prior to the FlashCopy. This can be a tape drive or media
library device description.
• Device serial number: Enter the device serial number from WRKHDWRSC *STG option 7.
The toolkit will look for the specific serial number in WRKHDWRSC and determine the
resource name which will be used on the specified device description. The serial number can be
for a tape drive or a media library.
If there are multiple logical libraries in the media library then specify a media library device description
with the serial number of a tape drive assigned to the logical library. The toolkit will then use the tape
drive resource’s parent library description to ensure the correct logical library is used.
All device descriptions will be varied off prior to varying any on.
Target LPAR backup command: Specify the backup commands to be issued by the toolkit. Prior to
calling any of these commands, the toolkit will have started the specified IP interface. To prevent
accidentally starting applications, the startup program has been changed to *NONE, line descriptions
set to not vary on at *IPL, and TCP is set to not start on IPL. These are considerations to be taken when
restoring from the backups.
These commands are issued in sequence. Processing will halt if any issue an escape message. The
commands are executed as QLPAR in QSTRUPJD.
While prompting is available on this command, the command validation will occur on the controlling
LPAR but the command will actually be executed on the target LPAR. This may prevent successful
prompting of commands like STRBKUBRM because the control group will exist on the source LPAR,
not the controlling LPAR.
Wait for ENDFSFLASH . . . . *YES *YES, *NO
FlashCopy Exit program . . . *NONE
Library . . . . . . . . . *LIBL *LIBL, library
Hold scheduled jobs . . . . *YES *YES, *NO
Target keylock position . . *AUTO *PANEL, *AUTO, *MANUAL
Stop target after backups *NO *YES, *NO, *RMV
Request type . . . . . . . . 0 Number
Auto start cluster . . . . . *YES *YES, *NO
Wait time . . . . . . . . . 0 Number of seconds
Message Queue . . . . . . . *SYSOPR name, *SYSOPR
Library . . . . . . . . . library name
Text . . . . . . . . . . . .
Wait for ENDFSFLASH: ENDFSFLASH is the command that will notify the toolkit that the backups
have finished.

90
• *NO: The toolkit will not wait for ENDFSFLASH to be called. It will be processed implicitly
when the backup commands have all completed without issuing an escape message. Note that
the toolkit is not able to monitor submitted backups.
• *YES: The toolkit will wait for ENDFSFLASH to be called. This is expected to be submitted
from the last *EXIT in a control group, in SAVSYSBCH, a command line, etc. If any backups
are submitted (for example to the controlling subsystem) *YES is the correct option.
Flash Copy Exit Program: The FlashCopy Exit Program is described elsewhere in this guide. It’s
purpose is to allow for additional custom automation steps.
Hold scheduled jobs: This applies only to the basic job scheduler. The job entries are held
immediately at the beginning of the startup program.
Target keylock position: Indicate how to start the target LPAR.
• *AUTO: Start the LPAR in automatic / unattended mode. This is the recommended option.
• *MANUAL: Start the LPAR in manual / attended mode. The recommendation is to use this
option the first FlashCopy to bring the LPAR up in restricted state and verify the startup
program is properly set. This will validate that the correct LUNs are being FlashCopied.
• *PANEL: Use the default setting as defined in the HMC.
Stop target after backups: After the backups (and QUSRBRM transfer) the toolkit can deactivate and
remove/stop the FlashCopy relationship.
• *NO: Do not deactivate the target LPAR after backups. The LPAR will remain running, using
CPU and memory resources.
• *YES: Deactivate the LPAR from the HMC. The FlashCopy will remain active so the LPAR
can be IPL’d later. This will free up CPU and memory resources and prevent users from
accidentally signing on to the LPAR.
• *RMV: The LPAR will be deactivated and the FlashCopy relationship will be stopped /
removed. The LPAR cannot be IPL’d until another FlashCopy is performed. This is the best
option if using thin provisioned or space efficient FlashCopy.
Request type: Internal code used by the toolkit to record it’s state. In the case of a restart, this should
be manually changed to 0.
DLTCSEDTA - Delete CSE Data
91
This command will delete the specific CSE Data from the CRG device domain data. It also deletes the
CRG.
CSE Data name: The name that identifies the CSE Data.
DSPCSEDTA - Display Copy Services Data
This interactive command displays the specific CSE Data configuration information in the CRG device
domain data space. It also displays CRG exit data.
CSE Data name: Specifies the name of the CSE Data and the exit data that is to be
displayed.
DSPDDDLCK - Display DDD lock holder
This is a utility command for display the job and user who holds a cluster-wide lock on the specified
artifact. This command should be used if a log message indicates a lock is preventing an operation.
Name: Enter the name of the object to display a lock for.
Type: Enter the type of object to display a lock for.
ENDFSFLASH - End Full System Flash
Notifies the controlling partition that backups are finished.
If ENDFSFLASH is unable to reach the source LPAR IP address it will try the *PS and *PT IP
addresses listed in WRKSTRPRSC *CMN. This is done at the beginning of the ENDFSFLASH
process; if you are presented with IAS0735 and you want to change the IP then enter C to Cancel,
modify WRKSTRPRSC *CMN, and execute ENDFSFLASH again. Note that if the IP address change
is done before the backups start, STRFSFLASH may not be able to reach the source LPAR and there
will be errors in both the source and target log files but BRMS will still transfer to the source LPAR.
Action: Indicates whether the backups finished successfully or failed.
• *NORMAL: The backups finished with success. Will trigger moving QUSRBRM to the source
partition if configured. The source partition will become the active BRMS instance. This is
valid to run on the target partition.
92
• *FAILBKU: The backups did not finish with success. Will not move QUSRBRM to the source
partition. The source partition will become the active BRMS instance. This is valid to run on the
target partition.
• *RSTFCNUSG: Restore the Functional Usage values which were saved prior to the
FlashCopy. Use this option if the backups or transfer of BRMS from the target partition failed
and you will discard the BRMS backup history changes on the target partition. This is valid to
run on the source partition.
• *CLNDYNMED: Clean up the dynamic media class. This will mark and move any media in
the specified media class to the base media class and restore the BRMS functional usage for the
specific media class.
Config: Specifies a configuration If used with ACTION(*RSTFCNUSG) this will restore the restricted
media classes provided in the specified configuration. This may be further limited with the MEDCLS
parameter.
• *DFT: The toolkit will use the standard configuration, typically only used with
LOCKBRMS(*BOTH).
• *MEDCLS: Restore the function usage for the specified restricted media classes specified on
the MEDCLS parameter, regardless which configuration they may be associated with.
• Config-name: The toolkit will use the configuration specified. You must specify the
configuration if you have multiple flashcopies sending BRMS back to the source LPAR, or if
using restricted media classes.
Media class: Specifies which media classes to restore function authority for or to clean up the
dynamic media in. If a configuration is specified on the CONFIG parameter, only the function
authorities for the media classes associated with the specified configuration will be restored.
• *ALL: All of the outstanding media class function authorities associated with the specified
configuration will be restored.
• Config-name: Only the function authorities for the specified media class will be restored.
Base media class: If *CLNDYNMED is specified on the ACTION parameter, the Base Media
Class specifies the class to merge the dynamic media class into.
• *NONE: This parameter is ignored.
• Media-class-name: Specifies the base media class.
Dynamic media class: If *CLNDYNMED is specified on the ACTION parameter, the Dynamic
Media Class specifies the class to merge into the base media class. The dynamic media class will then
be removed.
93
• *NONE: No media will be merged.
• Dynamic-media-class-name: The media class to merge from and remove.
The functional usage authorities are restored after the dynamic media class has been removed.
IPLLPAR – IPL Partition
This command will activate the specified LPAR.
HMC partition name: Specify the name of the LPAR to activate. This parameter is case sensitive.
Partition profile: Specify the partition profile to use when activating the partition. This parameter is
case sensitive.
• *LPARNAME: The name of the profile is the same as the partition name.
Managing system: The managed system name must be specified. This parameter is case sensitive.
Primary HMC IP address: Enter the IP address of the primary HMC. This address must have
credentials listed in WRKCSECRDL.
Secondary HMC IP address: Enter the IP address of the secondary HMC. This address must have
credentials listed in WRKCSECRDL. This IP address is optional and will only be used if an
unexpected response is received from the primary HMC.
IPL Source: Specifies whether an initial-program-load (IPL) is started from the A-source, B-source or
D-source of the system. This parameter allows you to control which Licensed Internal Code (LIC)
storage source of the system to IPL. Also, the source of the system determines where LIC program
temporary fixes (PTFs) are applied. This parameter also allows the system to be upgraded to a new
release from an install image on DASD.
LIC has three storage areas known as the A-source, the B-source and the D-source. The D-source is the
install media. The A- and B-sources are part of the system memory. Initially, the A- and B-sources
are identical, but when Licensed Internal Code fixes are performed temporarily (PTF), the temporary
fixes are stored on the B-source. When the same fixes become permanent, they are copied from the B-
source to the A-source; therefore, the fixes reside on both the A-source and the B-source.
When you want to send temporary fixes to the B-source, you must start the system from the A-source,
which causes the fixes to be sent to the B-source.
When you start the system from the A-source, you are running the system from the permanent fixes.
When you start the system from the B-source, you are running the system from a mixture of temporary
and permanent fixes. When you start the system from the D-source, you are using the Licensed
Internal Code loaded from the install media.

94
It is recommended that you specify RESTART(*YES); otherwise, you cannot be assured which source
of the system is actually started. This precaution can save you some time.
• *PANEL: The partition is started from the source that is currently shown on the operator's
panel, the A-source, the B-source, or the D-source.
• A: The partition is started from the A-source.
• B: The partition is started from the B-source.
• D: The system is started from the D-source, the install media.
Keylock position: Specifies whether the LPAR will be activated for attended (manual) or unattended
(auto) mode.
• *PANEL: The partition is started in the mode that is currently shown on the operator's panel.
• *AUTO: The partition is started in unattended mode.
• *MANUAL: The partition is started in attended mode.
Block until LPAR is active: This parameter determines whether IPLLPAR will return control to the
caller immediately or after the LPAR has reached the “Running” state.
• *YES: IPLLPAR will remain active until the LPAR has reached a “Running” state.
• *NO: IPLLPAR will terminate immediately after activating the LPAR.
Max minutes to block: Specifies how long IPLLPAR will wait for the partition to reach a “Running”
state. This is ignored if Block until LPAR is active is *NO. If the partition does not enter the
“Running” state before the specified number of minutes has elapsed, IPLLPAR will issue and escape
message.
Confirm activation: Configures IPLLPAR to wait on an inquiry message before activating the
partition.
• *YES: IPLLPAR will issue an inquiry message and will wait for a positive response before
activating the partition.
• *NO: IPLLPAR will activate the partition immediately.
95
LOGMSG – Log Message
The default log is in /QIBM/Qzrdhasm/qzrdhasm.log but some toolkit processes will change to a
different log. LOGMSG will insert the specified message to the current log in use by the job.
Message: Enter the message to be inserted, from 20-120 characters.
Message format: Determines how the message will look in the log.
• *STD: Use the standard message format. An example:
2017-07-27 12:46:00 standard message (logmsg)
• *CMDSTR: Use the ‘command start’ message format. An example:
682401 2017-07-27 12:51:10 Start command start message starting from job
682401/AASLAND/QPADEV001Q
Message type: Indicates the message status tag. The possible values are:
• *INFO: The message does not have a tag.
• *ERROR: The message is tagged with ‘Error’
• *WARNING: The message is tagged with ‘Warning’
PRTCSE – Print CSE Information
The PRTCSE command prints Copy Services Environment (CSE) information, that was entered by the
WRKCSE command and stored in cluster Device Domain Data (DDD). The information is printed to a
QPRINT spool file. Unlike the environment list generated within WRKCSE, this command can access
defined enviromnents from any node within the cluster. Any combination of ENV and TYPE parameter
values may be used.
Environment name: Specifies the name of the environments for which all information is to be
dumped. The possible values are:
• *ALL: All types of environments with the Copy Service Type below or all environments may
be dumped.
• Environment name: All types of environments with the supplied environment name may be
dumped.
96
Copy Service Type: The type of Advanced Copy Service enviromnent. This parameter is required.
The possible values are:
• *ALL: All types of environments with the environment name or all environments may be
dumped.
• *FLASH: The FlashCopy environment with the environment name or all FlashCopy
environments may be dumped.
• *GMIR: The PPRC Global Mirroring environment with this environment name or all GMIR
environments may be dumped.
• *LUN: The LUN Level connection switching environment with this environment name or all
LUN environments may be dumped.
• *MMIR: The PPRC Metro Mirroring environment with this environment name or all MMIR
environments may be dumped.
RLSCSELCK - Release Copy Services Lock
This command releases a cluster wide environment lock used within IASP Copy Services Manager.
Environment name: Specifies the name of the Environment (which may be an Independent ASP). A
special value of *ALL may be used with RLSTYPE(*OVR) to override all ICSM locks for the cluster.
Release type: The possible values are:
• *JOB: Releae the lock that is held by this process.
• *OVR: Release a cluster wide environment lock which may be held by another process or when
used with ENV(*ALL), release all ICSM locks for the cluster. Use this only to override locks
held by processes which are no longer active.
RMVCSECRDE - Remove CSE Credential Entry
This command can be used to remove a user credential entry from the Device Domain Data associated
with IBM i Copy Services Manager.
Host IP address: The address of the host to be removed.
RSMFSFLASH – Resume Full System FlashCopy
97
The Resume Full System FlashCopy (RSMFSFLASH) command resumes the processing of a previous
invocation of Start Full System FlashCopy (STRFSFLASH) from the point immediately after the
flashcopy and prior to the IPL of the target partition. The Restart Target parameter in the CSE Data
must have been set to *PAUSE.
Note that STRFSFLASH *PAUSE then Hyperswap then RSMFSFLASH will not work properly. It will
IPL from the wrong LUNs.
RSTDDD – Restore Toolkit Device Data Domains
The Toolkits uses Device Data Domains (DDD) to store WRKCSE, WRKCSEDTA and
WRKCSECRDL information. Use RSTDDD to restore the DDD from files created by SAVDDD.
The sole parameter is the path to the directory which contains the DDD backup files generated by
SAVDDD.
RTVINF - Retrieve ICSM Information
The Retrieve Information (RTVINF) command retrieves specific information from IASP Copy
Services Manager. This command is only valid when executed within a CL program.
Environment name: This is a required parameter. Specifies the name of the Environment (which may
be an Independent ASP) for which information is to be retreived.
Information: This is a required parameter and specified the type of information to be returned. The
possible values are:
• *CLUNODENAME: The node name of this system within the cluster. The length of the first
CL return variable below must be at least eight characters.
• *FLASHNODES: The backup Flash Copy node names for the Flash configurations. Up to six
FlashCopy environments may be configured. All six CL return variables must be specified and
each of their lengths must be at least eight characters.
• *FLASHSTATUS: First Flashcopy status. The length of the first CL return variable below
must be at least three characters.
o 0 = Ready
o 100 = Flashed
o other number = Flash in process
o blank = undetermined.
• *FLASH2STATUS: Second Flashcopy status. The length of the first CL return variable below
must be at least three characters.

98
o 0 = Ready
o 100 = Flashed
o other number = Flash in process
o blank = undetermined.
• *FLASH3STATUS: Third Flashcopy status. The length of the first CL return variable below
must be at least three characters.
o 0 = Ready
o 100 = Flashed
o other number = Flash in process
o blank = undetermined.
• *FLASH4STATUS: Fourth Flashcopy status. The length of the first CL return variable below
must be at least three characters.
o 0 = Ready
o 100 = Flashed
o other number = Flash in process
o blank = undetermined.
• *FLASH5STATUS: Fifth Flashcopy status. The length of the first CL return variable below
must be at least three characters.
o 0 = Ready
o 100 = Flashed
o other number = Flash in process
o blank = undetermined.
• *FLASH6STATUS: Sixth Flashcopy status. The length of the first CL return variable below
must be at least three characters.
o 0 = Ready
o 100 = Flashed
o other number = Flash in process
o blank = undetermined.
• *GMIRDIRECTION: The length of the first CL return variable below must be at least one
character.
o N = Normal
o R = Reversed
o Blank = undetermined.
• *GMIRNODEROLE: This key value MUST replace any use of *PPRCNODEROLE for
GMIR type environments, else unpredictable results may occur. The length of the first CL
return variable below must be at least one character.
o S = Source
o T = Target
o blank = undetermined

99
• *GMIRSTATE: The length of the first CL return variable below must be at least one character.
o 0 = Stopped
o 1 = Running
o 2 = Failover
o 3 = Suspended
o 4 = Lagging
o 5 = Extreme Lagging
o 6 = Paused
o 9 = Other
o M = Multi-target Incremental Resync Pair
o blank = undetermined. RTVLPARINF
• *GMIRSTATEDIRECT: State is returned in RTNVALUE and the direction is returned in
RTNVALUE2. The length of the first and second variables must be at least one character.
o State (RTNVALUE):
▪ 0 = Stopped
▪ 1 = Running
▪ 2 = Failover
▪ 3 = Suspended
▪ 4 = Lagging
▪ 5 = Extreme lagging
▪ 6 = Paused
▪ 9 = Other
o Direction: (RTNVALUE2):
▪ M = Multi-target Incremental Resync Pair
▪ N = Normal
▪ R = Reversed
▪ blank = undetermined
• *GMIR2DIRECTION: The length of the first CL return variable below must be at least one
character:
o N = Normal
o R = Reversed
o Blank = undetermined
• *GMIR2NODEROLE: This key value MUST replace any use of *PPRCNODEROLE for
GMIR2 type environments, else unpredictable results may occur. The length of the first CL
return variable below must be at least one character
o S = Source
o T = Target
o blank = undetermined.
• *GMIR2STATE: The length of the first CL return variable below must be at least one
character
o 0 = Stopped
o 1 = Running

100
o 2 = Failover
o 3 = Suspended
o 4 = Lagging
o 5 = Extreme Lagging
o 6 = Paused
o 9 = Other
o M = Multi-target Incremental Resync Pair
o blank = undetermined.
• *GMIR2STATEDIRECT: State is returned in RTNVALUE and direction is returned in
RTNVALUE2. The length of first and second CL return variables below must be at least one
character.
o State (RTNVALUE):
▪ 0 = Stopped
▪ 1 = Running
▪ 2 = Failover
▪ 3 = Suspended
▪ 4 = Lagging
▪ 5 = Extreme lagging
▪ 6 = Paused
▪ 9 = Other
o Direction: (RTNVALUE2):
▪ M = Multi-target Incremental Resync Pair
▪ N = Normal
▪ R = Reversed
▪ blank = undetermined
• *IASPNAME: The name of the Independent ASP used for the VRYCFG commands. The
length of the first CL return variable below must be at least ten characters.
• *LUNCONNECTION: The length of the first CL return variable below must be at least one
character.
o P = Connected to the Production Node
o H = Connected to the HA node
o Blank = undetermined
• *LUNNODEROLE: The values indicate the normal role of this node. The length of the first
CL return variable below must be at least one character.
o P = Production Node
o H = HA node
o Blank = undetermined
• *MMIRDIRECTION: The length of the first CL return variable below much be at least one
character.
o N = Normal
o R = Reversed

101
o Blank = undetermined
• *MMIRNODEROLE: This key value should replace any use of *PPRCNODEROLE for
MMIR type environments. The length of the first CL return variable below must be at least one
character.
o S = Source
o T = Target
o Blank = undetermined
• *MMIRSTATE: The length of the first CL return variable below must be at least one
character.
o 0 = Failed
o 1 = Running
o 2 = Failover
o 3 = Suspended
o 4 = Resuming
o 6 = Paused
o M = Multi-target Incremental Resync Pair
o blank = undetermined.
• *MMIRSTATEDIRECT: State is returned in RTNVALUE and direction is returned in
RTNVALUE2. The length of first and second CL return variables below must be at least one
character.
o States:
▪ 0 = Failed
▪ 1 = Running
▪ 2 = Failover
▪ 3 = Suspended
▪ 6 = Paused
▪ M = Multi-target Incremental Resync Pair
▪ blank = undetermined.
o Directions:
▪ N = Normal
▪ R = Reversed
▪ blank = undetermined.
• *MMIR2DIRECTION: The length of the first CL return variable below must be at least one
character.
o N = Normal
o R = Reversed
o blank = undetermined.
• *MMIR2NODEROLE: This key value should replace any use of *PPRCNODEROLE for
MMIR2 type environments. The length of the first CL return variable below must be at least
one character.
o S = Source

102
o T = Target
o blank = undetermined.
• *MMIR2STATE: The length of the first CL return variable below must be at least one
character.
o 0 = Failed
o 1 = Running
o 2 = Failover
o 3 = Suspended
o 4 = Resuming
o 6 = Paused
o M = Multi-target Incremental Resync Pair
o blank = undetermined
• *MMIR2STATEDIRECT: State is returned in RTNVALUE and direction is returned in
RTNVALUE2. The length of first and second CL return variables below must be at least one
character.
o States:
▪ 0 = Failed
▪ 1 = Running
▪ 2 = Failover
▪ 3 = Suspended
▪ 6 = Paused
▪ M = Multi-target Incremental Resync Pair
▪ blank = undetermined.
o Directions:
▪ N = Normal
▪ R = Reversed
▪ blank = undetermined.
• *MMIR3DIRECTION: The length of the first CL return variable below must be at least one
character.
o N = Normal
o R = Reversed
o blank = undetermined.
• *MMIR3NODEROLE: This key value should replace any use of *PPRCNODEROLE for
MMIR3 type environments. The length of the first CL return variable below must be at least
one character.
o S = Source
o T = Target
o blank = undetermined.
• *MMIR3STATE: The length of the first CL return variable below must be at least one
character.
o 0 = Failed
103
o 1 = Running
o 2 = Failover
o 3 = Suspended
o 4 = Resuming
o 6 = Paused
o M = Multi-target Incremental Resync Pair
o blank = undetermined
• *MMIR3STATEDIRECT: State is returned in RTNVALUE and direction is returned in
RTNVALUE2. The length of first and second CL return variables below must be at least one
character.
o States:
▪ 0 = Failed
▪ 1 = Running
▪ 2 = Failover
▪ 3 = Suspended
▪ 6 = Paused
▪ M = Multi-target Incremental Resync Pair
▪ blank = undetermined.
o Directions:
▪ N = Normal
▪ R = Reversed
▪ blank = undetermined.
• *MULTITARGET: Multi-target configuration
o N = None
o M = Multi-target using two Metro Mirror environments
o G = Multi-target using one Metro Mirror environment and one Global Mirror
environment.
• *PPRCNODEROLE: The length of the first CL return variable below must be at least one
character.
o S = Source
o T = Target
o blank = undetermined
• *PPRCNODES: The backup PPRC node names for the up to three PPRC configurations.
RTNVALUE will contain the MMIR configuration node name. RTNVALUE2 will contain the
GMIR configuration node name. RTNVALUE3 will contain the LUN configuration node
name. All three CL return variables must be specified and each of their lengths must be at least
eight characters.
• PPRCNODE: The Production node name. RTNVALUE will contain the node name. The CL
return variable must be specified with a length of at least eight characters.
Return value: This is a required parameter. Specifies a CL character variable name for returned value.
104
Return value 2: This is a required parameter for *MMIRSTATEDIRECT, *GMIRSTATEDIRECT,
*FLASHNODES and *PPRCNODES. For *MMIRSTATEDIRECT and *GMIRSTATEDIRECT, the
PPRC direction ('N' or 'R') is returned here. For *FLASHNODES, the second FlashCopy node will be
returned here. For *PPRCNODES, the GMIR target node will be returned here. Specifies a CL
character variable name for the second returned value.
Return value 3: This is a required parameter for *FLASHNODES and *PPRCNODES. Specifies a CL
character variable name for the third returned value. For *FLASHNODES, the third FlashCopy node
will be returned here. For *PPRCNODES, the LUN HA node will be returned here.
Return value 4: This is a required parameter for *FLASHNODES if a forth FlashCopy environment is
configured. Specifies a CL character variable name for the fourth returned value. The fourth
FlashCopy node will be returned here.
Return value 5: This is a required parameter for *FLASHNODES if a fifth FlashCopy environment is
configured. Specifies a CL character variable name for the fifth returned value. The fifth FlashCopy
node will be returned here.
Return value 6: This is a required parameter for *FLASHNODES if a sixth FlashCopy environment is
configured. Specifies a CL character variable name for the sixth returned value. The sixth FlashCopy
node will be returned here.
RUNDSCMD - Run DS Scripted Command
The RUNDSCMD command is used in a CL program to run a scripted command through DSCLI and
validate the results from the expected result list provided in the command parameters. The command
optionally returns the total of numeric values in a specified column of the results.
Three exception messages may be issued:
• IAS0301 - Parameter error detected.
• IAS0302 - Result file error detected.
• IAS0303 - Results not as expected.
Script input file: The complete path and name of the script stream file. A value of '*' is allowed when
no script is to be executed, and only prior results are to be validated.
Profile input file: The complete path and name of the profile stream file. A value of '*' is allowed
when that value is also used for the script parameter.
Results output file: The complete path and name of the results stream file. This parameter is always
required.

105
User: Specify the user profile name to be used to run the DSCLI scripted command.
Result validation list: A list of from one to ten validation entries to be matched against the results
returned by the scripted command. The columns in the result file must be comma separated (refer to
the profile that is in use).
Each validation list entry contains two or three elements:
• Column position: The comma separated column position for this element. This required value
must be from one through 20.
• Expected value: The case sensitive character string that is expected. This value is required,
must be enclosed in apostrophes, and may contain alphanumeric characters, blanks and
punctuation marks except commas. Strings that are not to be found may be specified by placing
a minus sign (-) as the first character of the string.
• Logic to next in list: The locical operator (*AND or *OR) to the next expected value in the list.
This value is required on all list elements except the last. Note that the results of each file row
are evaluated from the first to the last expected value. Careful consideration must be made
when this value is mixed (both *AND and *OR used on a single RUNDSCMD command). If
more complex result checking is required, the RUNDSCMD command may be run again
specifying '*' for the SCRIPT parameter and combined results may be evaluated within the
user's CL program.
Result file rows: The rows that are to be validated. The possible values are:
• *ALL: The results specified in the validation list are expected to be found in at all of the result
file rows.
• *ONE: The results specified in the validation list are expected to be found in at least one of the
result file rows.
Summation column: The comma separated column positional value that is to be summed and returned
in the TOTAL parameter. Numeric values from one through 20 are allowed. The default is *NONE.
If a numeric value is specified, the content of that column in the result file may only contain numeric
data.
CL variable for returned total: Specifies the name of the CL program variable that receives the
total value being returned. The type and length for the CL variable must be TYPE(*DEC) LEN(9 0).
This parameter is required when the value of SUMCOLUMN is other than *NONE.
Return column: The comma separated column positional value that is to be returned in the
RTNVALUE parameter. Numeric values from one through 20 are allowed. The default is *NONE.
Refer to the RTNKEY parameter below. This parameter is requires that the RTNCOLUMN parameter
is also specified.

106
Return key value:Specifies the key string used to locate the row in the result file where the return
value (RTNVALUE) will be extracted. The default is *NONE.If a numeric value is specified for
RTNCOLUMN and this parameter is *NONE, the value in the first row of the result file is returned in
RTNVALUE. If a numeric value is specified for RTNCOLUMN and this parameter specifies a key
value, the value in the first row of the result file that contains that key is returned in RTNVALUE.
This parameter is requires that the RTNCOLUMN and RTNVALUE parameters are also specified.
CL variable for returned value: Specifies the name of the CL program variable that receives the
character value being returned. The type and length for the CL variable must be TYPE(*CHAR)
LEN(80). This parameter requires that the RTNCOLUMN parameter is also specified.
RUNLPARCMD - Run command based on LPAR/SRLN
This command will run a specific command based on the specified LPAR and serial numbers detected.
This command is usually used in the startup program to perform different tasks based on the serial and
LPAR numbers.
NOTE: It is possible to test the behavior of this command on different serial and LPAR numbers by
creating the following data areas:
CRTDTAARA DTAARA(QZRDHASM/FAKELPAR) TYPE(*CHAR) LEN(3)
VALUE('123')
CRTDTAARA DTAARA(QZRDHASM/FAKESRLN) TYPE(*CHAR) LEN(8)
VALUE('1234567')
The command RUNLPARCMD will look for these data areas and use them instead of detecting the
actual serial or LPAR numbers.
Serial number: Specify the serial number required to run this command. NOTE: Prompt (F4) to see
the current serial number.
• *ANY: Run this command on any LPAR, regardless of serial number.
• Serial-number: Run the command on the LPAR with the specified serial number.
LPAR number: Specify the LPAR number required to run this command. NOTE: Prompt (F4) to see
the current LPAR number.
• *ANY: Run this command on any LPAR regardless of the LPAR number.
• lpar-number: Run the command on the LPAR with the specified number.
107
Command to execute: Run this command if the LPAR and serial numbers match those of the current
LPAR. NOTE: Prompt (F4) to assist with building the command.
RUNSVCCMD - Run SVC Command
This command establishes an ssh session to an SVC, runs the user entered command, and stores the
results in a stream file. NOTE: This command can establish an ssh session with any type of host, not
just SVCs.
Command: Specifies the command to be run.
SVC IP address: Specifies the IPv4 formatted IP address of the SVC to be used.
Results output file: Specifies the IFS path name of the output file containing the results of the SVC
command.
Display results: Specifies whether the results of the SVC command should be displayed in addition to
be written to the output file.
SAVDDD – Save Toolkit Device Data Domains
The Device Data Domains (DDD) are where the Toolkit stores WRKCSE, WRKCSEDTA and
WRKCSECRDL information. The command SAVDDD will extract that information and place it into
IFS files. Any sensitive information including passwords will be encrypted.
Use the RSTDDD command to restore / recreate the DDD information.
The sole parameter specifies the path to the directory in which to place the files. The directory must
exist.
SETCSELCK - Set Copy Services Lock
This command sets a cluster wide environment lock used within IASP Copy Services Manager.
Environment name: This is a required parameter. Specifies the name of the Environment (which may
be an Independent ASP).
Timeout minutes: The number of minutes before the environment lock will self time out. The default
is fifteen minutes.
108
SETDDDLCK - Set DDD lock holder
This is a utility command for setting the job and user who holds a cluster-wide lock on a specified
artifact.
Name: Enter the name of the object to display a lock for.
Type: Enter the type of object to display a lock for.
SETUPFSFC - Set up IBM Pwr HA tools – FSFC
This command prepares IBM Power HA toolkit for IBM i for Full System FlashCopy operation after its
has operational library (QZRDHASM) has been restored. Caution should be taken before running this
command.
Node Role: Special values indicating which role the system will be acting. The possible values are:
• *CTL: The system is a controlling node in Full System FlashCopy.
• *SRC: The system is the source LPAR in Full System FlashCopy.
FSFC Communications Port: The port to which the production node will be using for
communications. This value must match the FSFC communications port value specified in either
CRTCSEDTA or CHGCSEDTA that is run on the controlling node. The possible values are:
• *SAME: The value does not change. This is the only valid value for NODETYPE(*CTL)
• *DFT: The default port (55920) will be used.
• 1 – 65535: Specify the port number that is to be used.
Toolkit access code:A hexadecimal character representation of a Product Access Code supplied by
IBM. Specify the access code within single quotes. The access code must be provided in order to
authorize any Full System FlashCopy operations. The access code may be entered on this command or
entered on the ADDPRDACS CL command. If access code was previously entered, it does not need to
be entered again.
Target line description: Line description to be created on the target LPAR for communicating with the
controlling node. The possible values are:
• *NONE: No line description will be created
• Name: The name of line description to be created.

109
Target TCP/IP interface: TCP/IP interface to be created on the target LPAR for communicating with
the controlling node. The possible values are:
• *NONE: No interface will be created
• IPv4 address: IPv4 formatted interface to be created.
Target TCP/IP interface Mask: The subnet mask of the TCP/IP interface to be created on the target
LPAR. The possible values are:
• *NONE: No subnet mask provided
• IPv4 address: IPv4 formatted subnet mask.
STRFSFLASH - Start Full System Flash
This interactive command starts a Full System Flash Copy (FSFC) or Recovery Point Flash (RPF), as
determined by the CSE Data it is performed on. For RPF it will create the flashcopy. For FSFC it will
also perform the backup commands specified for the CSE Data. Use WRKCSEDTA or CRTCSEDTA
and CHGCSEDTA to configure the FSFC or RPF.
STRFSFLASH for FSFC will perform these steps:
• Power down the target partition, if not already down,
• Flush memory in the source partition using a method specified in the CSE Data.
• Perform the flash of the external storage.
• Activate the source partition if not already up.
• Activate the target partition.
• Perform the backups on the backup partition.
• Check that IPL attribute STRRSTD is set to *NO
o Warn by default
o Fail if environment variable QZ_FSFC_STRRSTD_FAIL exists
•▪ Subsystem QZRDFSR must be restarted to pick up new environment variables
STRFSFLASH for RPF will perform these steps:
• Flush memory in the source partition using a method specified in the CSE Data.
110
• Perform the flash of the external storage.
• Activate the source partition if not already up.
CSE Data name: Specify the name of the CSE Data that contains configuration information for the
FlashCopy to be performed.
Controller IP address: Specifies the IP address on the controlling node where the processing for the
STRFSFLASH command will be performed. The possible values are:
• *LOCAL: The local system is the controller.
• *AUTO: Use the controller IP addresses from WRKSTRPRSC *CMN. The toolkit will look
for entries with *CTLx usage and try them in order until one responds. The port supplied in
WRKSTRPRSC *CMN is used.
• IP address: IPv4 formatted address
Controller port: The port on which the controller is listening for remote commands. This parameter is
ignored for CTLR(*LOCAL).
STRGMTGTFL - Start a GMIR Target Flash
This command starts Global Mirroring enviromnent D-Copy Target FlashCopy Backup as defined by
the WRKCSE GMIR environment.
Environment name: This is a required parameter.Specifies the name of the environment for which the
backup is to be started.
CSE Data name: Specifies the name of the CSE Data used for the flash. The possible values are:
• *ENV: Use the CSE data that is named the same as the environment
• Name: The name of a specific CSE data
SWRCYPNT – Switch Recovery Point Copy
The Switch Recovery Point Copy (SWRCYPNT) command causes the Production Node to be powered
down, the host connections to be changed to another set of LUNs to which previously a recovery point
copy had been written, and the production node powered back up.
Switch option (SWITCHTYPE): The possible values are:
• *SCHEDULED: This CSE switch is planned. The Production system is available.
• *UNSCHEDULED: This CSE switch is not planned. The Production system is not available.
111
VIEWLOG - View Log File
This interactive command allows editing of the Advanced Copy Services log file on the local system
and displaying the same on another system. This utility can also view any stream file on the systems.
System name: The system where the file is located. The possible values are:
• *LOCAL: View the main log file on the local system.
• *SNMP: View the SNMP log file on the local system.
• System name: View the main log file on the named system.
Stream file: The specific file to be viewed. The possible values are:
• *SNMP: View the SNMP log file. This option allows the SNMP log file on another system to
be viewed.
• Path and name of the stream file: The default is /QIBM/Qzrdhasm/qzrdhasm.log
WRKCSE - Work with Copy Services Environment
This interactive command allows creation and editing of Flash Copy, Metro-Mirroring, Global-
Mirroring and LUN environments defined for use within IBM i Copy Services Manager. Menus are
also provided for basic operations. The information is retained in cluster Device Domain Data
associated with IBM i Copy Services Manager.
There are no command parameters.
From the WRKCSE main panel the following options are available:
1. Create a new environment. Follow the prompts for the type of environment you are creating.
2. Change an existing environment.
4. Delete an existing environment.
5. Display an existing environment.
12. Work with and existing environment. The type of environment dictates the options available.
For example, Storwize flashcopy environments allow for changing the copy and clean rates,
DS8K replication environments have options for switching, etc.
- Pause / Resume replication
- Start / Stop flashcopies
- Detach / Re-attach LPARs
- Switch Replication direction
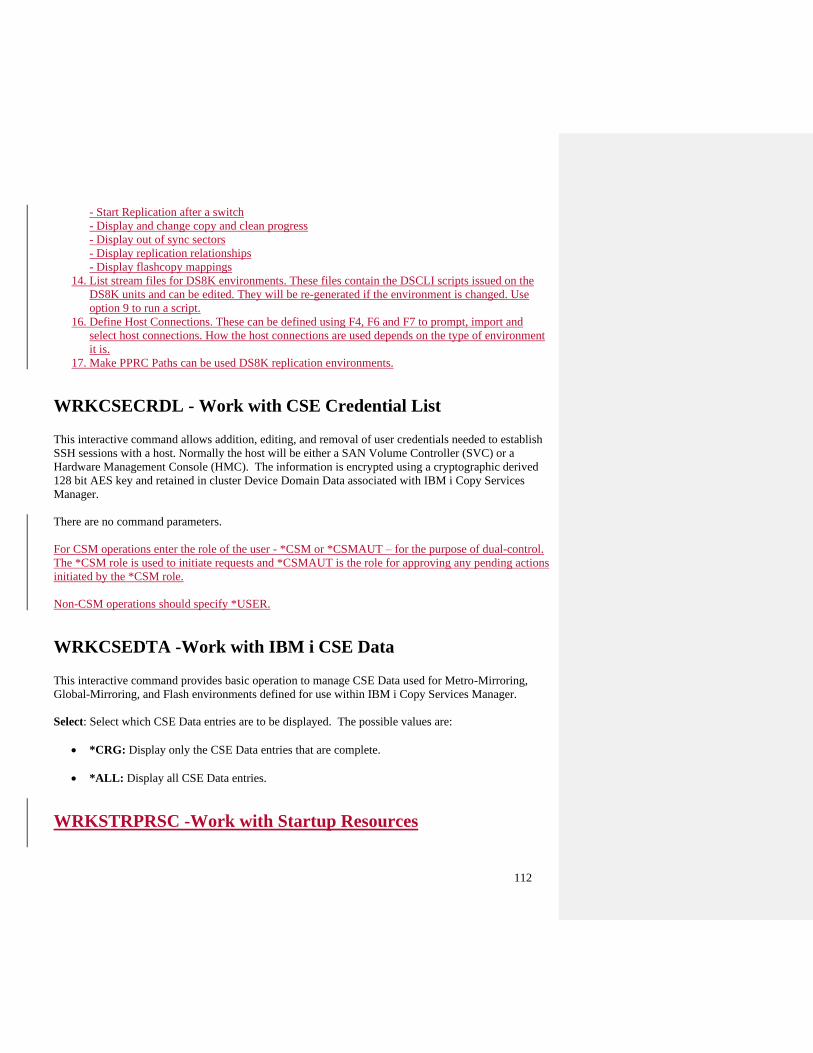
112
- Start Replication after a switch
- Display and change copy and clean progress
- Display out of sync sectors
- Display replication relationships
- Display flashcopy mappings
14. List stream files for DS8K environments. These files contain the DSCLI scripts issued on the
DS8K units and can be edited. They will be re-generated if the environment is changed. Use
option 9 to run a script.
16. Define Host Connections. These can be defined using F4, F6 and F7 to prompt, import and
select host connections. How the host connections are used depends on the type of environment
it is.
17. Make PPRC Paths can be used DS8K replication environments.
WRKCSECRDL - Work with CSE Credential List
This interactive command allows addition, editing, and removal of user credentials needed to establish
SSH sessions with a host. Normally the host will be either a SAN Volume Controller (SVC) or a
Hardware Management Console (HMC). The information is encrypted using a cryptographic derived
128 bit AES key and retained in cluster Device Domain Data associated with IBM i Copy Services
Manager.
There are no command parameters.
For CSM operations enter the role of the user - *CSM or *CSMAUT – for the purpose of dual-control.
The *CSM role is used to initiate requests and *CSMAUT is the role for approving any pending actions
initiated by the *CSM role.
Non-CSM operations should specify *USER.
WRKCSEDTA -Work with IBM i CSE Data
This interactive command provides basic operation to manage CSE Data used for Metro-Mirroring,
Global-Mirroring, and Flash environments defined for use within IBM i Copy Services Manager.
Select: Select which CSE Data entries are to be displayed. The possible values are:
• *CRG: Display only the CSE Data entries that are complete.
• *ALL: Display all CSE Data entries.
WRKSTRPRSC -Work with Startup Resources
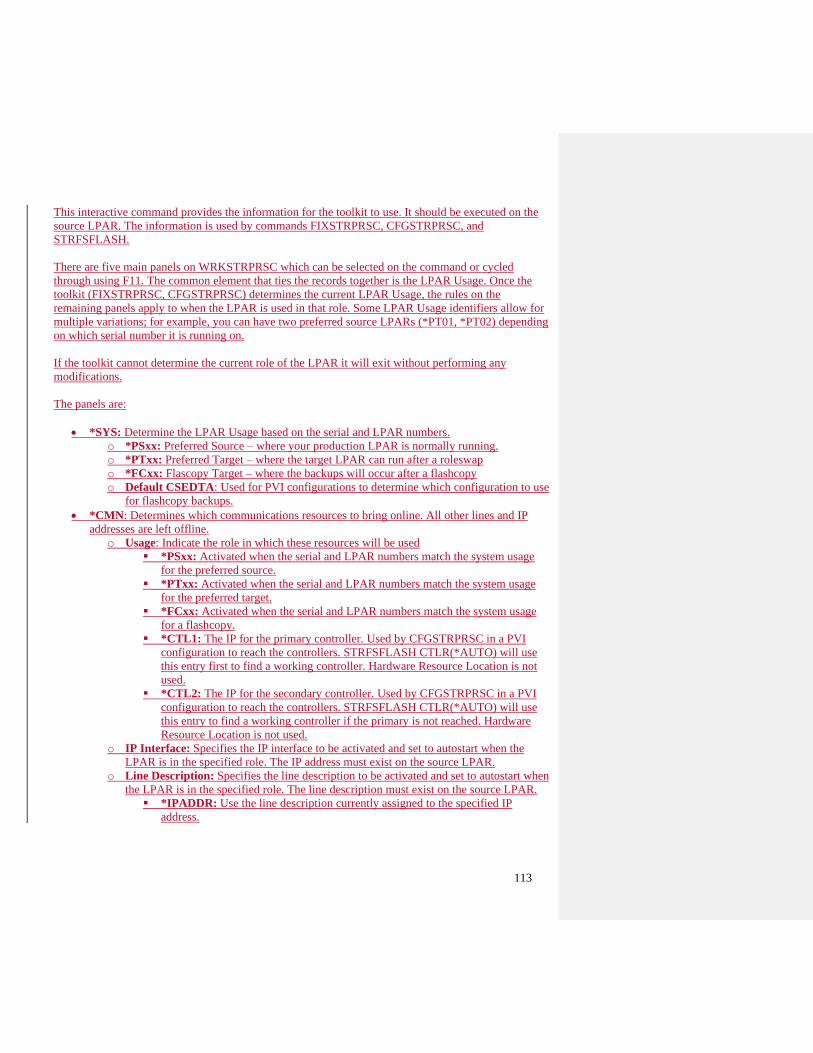
113
This interactive command provides the information for the toolkit to use. It should be executed on the
source LPAR. The information is used by commands FIXSTRPRSC, CFGSTRPRSC, and
STRFSFLASH.
There are five main panels on WRKSTRPRSC which can be selected on the command or cycled
through using F11. The common element that ties the records together is the LPAR Usage. Once the
toolkit (FIXSTRPRSC, CFGSTRPRSC) determines the current LPAR Usage, the rules on the
remaining panels apply to when the LPAR is used in that role. Some LPAR Usage identifiers allow for
multiple variations; for example, you can have two preferred source LPARs (*PT01, *PT02) depending
on which serial number it is running on.
If the toolkit cannot determine the current role of the LPAR it will exit without performing any
modifications.
The panels are:
• *SYS: Determine the LPAR Usage based on the serial and LPAR numbers.
o *PSxx: Preferred Source – where your production LPAR is normally running.
o *PTxx: Preferred Target – where the target LPAR can run after a roleswap
o *FCxx: Flascopy Target – where the backups will occur after a flashcopy
o Default CSEDTA: Used for PVI configurations to determine which configuration to use
for flashcopy backups.
• *CMN: Determines which communications resources to bring online. All other lines and IP
addresses are left offline.
o Usage: Indicate the role in which these resources will be used
▪ *PSxx: Activated when the serial and LPAR numbers match the system usage
for the preferred source.
▪ *PTxx: Activated when the serial and LPAR numbers match the system usage
for the preferred target.
▪ *FCxx: Activated when the serial and LPAR numbers match the system usage
for a flashcopy.
▪ *CTL1: The IP for the primary controller. Used by CFGSTRPRSC in a PVI
configuration to reach the controllers. STRFSFLASH CTLR(*AUTO) will use
this entry first to find a working controller. Hardware Resource Location is not
used.
▪ *CTL2: The IP for the secondary controller. Used by CFGSTRPRSC in a PVI
configuration to reach the controllers. STRFSFLASH CTLR(*AUTO) will use
this entry to find a working controller if the primary is not reached. Hardware
Resource Location is not used.
o IP Interface: Specifies the IP interface to be activated and set to autostart when the
LPAR is in the specified role. The IP address must exist on the source LPAR.
o Line Description: Specifies the line description to be activated and set to autostart when
the LPAR is in the specified role. The line description must exist on the source LPAR.
▪ *IPADDR: Use the line description currently assigned to the specified IP
address.
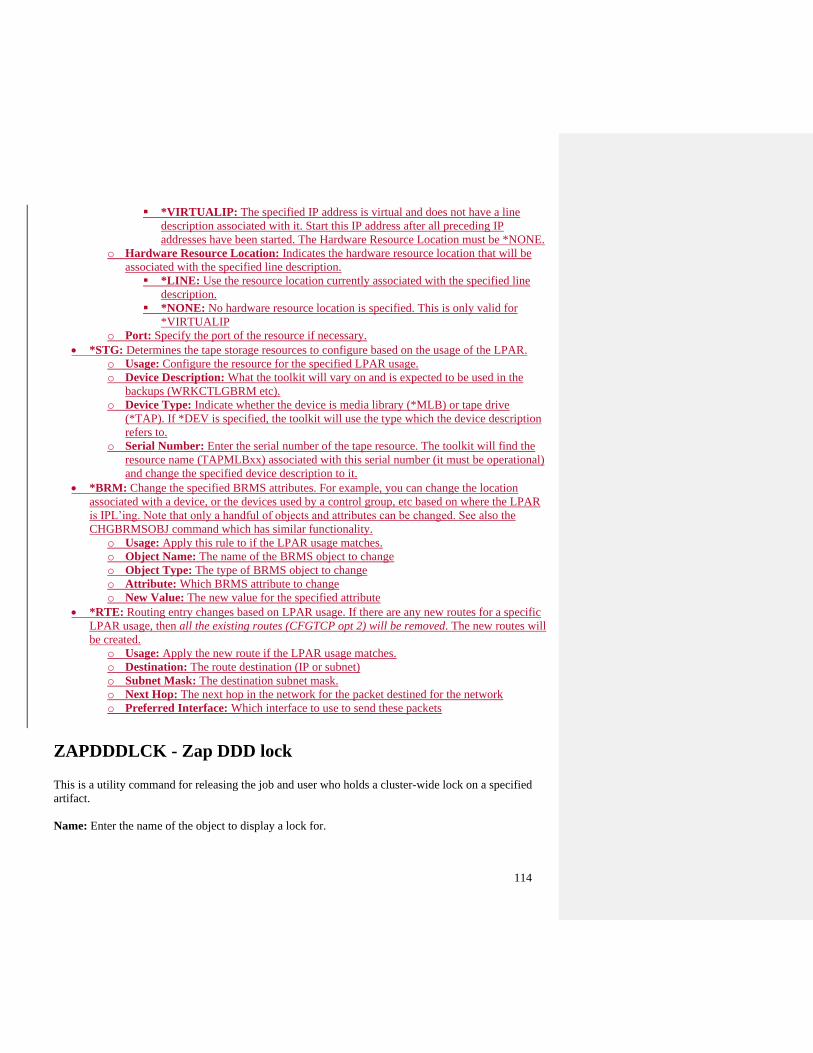
114
▪ *VIRTUALIP: The specified IP address is virtual and does not have a line
description associated with it. Start this IP address after all preceding IP
addresses have been started. The Hardware Resource Location must be *NONE.
o Hardware Resource Location: Indicates the hardware resource location that will be
associated with the specified line description.
▪ *LINE: Use the resource location currently associated with the specified line
description.
▪ *NONE: No hardware resource location is specified. This is only valid for
*VIRTUALIP
o Port: Specify the port of the resource if necessary.
• *STG: Determines the tape storage resources to configure based on the usage of the LPAR.
o Usage: Configure the resource for the specified LPAR usage.
o Device Description: What the toolkit will vary on and is expected to be used in the
backups (WRKCTLGBRM etc).
o Device Type: Indicate whether the device is media library (*MLB) or tape drive
(*TAP). If *DEV is specified, the toolkit will use the type which the device description
refers to.
o Serial Number: Enter the serial number of the tape resource. The toolkit will find the
resource name (TAPMLBxx) associated with this serial number (it must be operational)
and change the specified device description to it.
• *BRM: Change the specified BRMS attributes. For example, you can change the location
associated with a device, or the devices used by a control group, etc based on where the LPAR
is IPL’ing. Note that only a handful of objects and attributes can be changed. See also the
CHGBRMSOBJ command which has similar functionality.
o Usage: Apply this rule to if the LPAR usage matches.
o Object Name: The name of the BRMS object to change
o Object Type: The type of BRMS object to change
o Attribute: Which BRMS attribute to change
o New Value: The new value for the specified attribute
• *RTE: Routing entry changes based on LPAR usage. If there are any new routes for a specific
LPAR usage, then all the existing routes (CFGTCP opt 2) will be removed. The new routes will
be created.
o Usage: Apply the new route if the LPAR usage matches.
o Destination: The route destination (IP or subnet)
o Subnet Mask: The destination subnet mask.
o Next Hop: The next hop in the network for the packet destined for the network
o Preferred Interface: Which interface to use to send these packets
ZAPDDDLCK - Zap DDD lock
This is a utility command for releasing the job and user who holds a cluster-wide lock on a specified
artifact.
Name: Enter the name of the object to display a lock for.

115
Type: Enter the type of object to display a lock for.
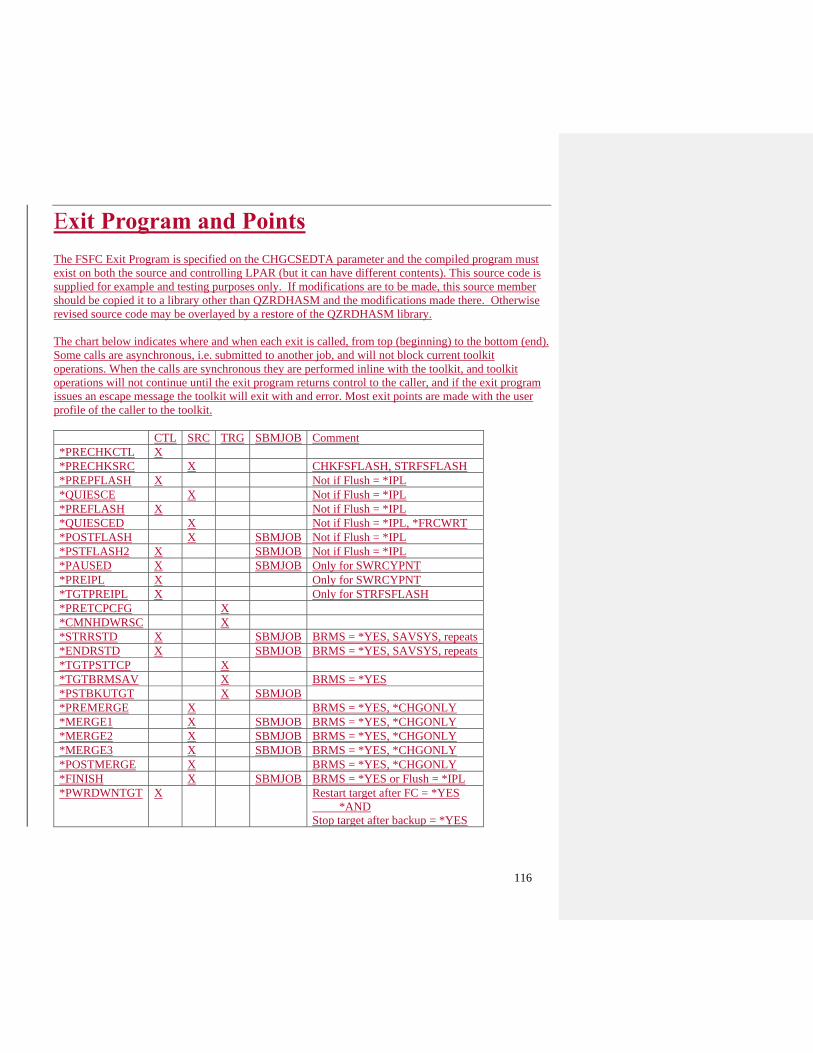
116
Exit Program and Points
The FSFC Exit Program is specified on the CHGCSEDTA parameter and the compiled program must
exist on both the source and controlling LPAR (but it can have different contents). This source code is
supplied for example and testing purposes only. If modifications are to be made, this source member
should be copied it to a library other than QZRDHASM and the modifications made there. Otherwise
revised source code may be overlayed by a restore of the QZRDHASM library.
The chart below indicates where and when each exit is called, from top (beginning) to the bottom (end).
Some calls are asynchronous, i.e. submitted to another job, and will not block current toolkit
operations. When the calls are synchronous they are performed inline with the toolkit, and toolkit
operations will not continue until the exit program returns control to the caller, and if the exit program
issues an escape message the toolkit will exit with and error. Most exit points are made with the user
profile of the caller to the toolkit.
CTL SRC TRG SBMJOB Comment
*PRECHKCTL X
*PRECHKSRC X CHKFSFLASH, STRFSFLASH
*PREPFLASH X Not if Flush = *IPL
*QUIESCE X Not if Flush = *IPL
*PREFLASH X Not if Flush = *IPL
*QUIESCED X Not if Flush = *IPL, *FRCWRT
*POSTFLASH X SBMJOB Not if Flush = *IPL
*PSTFLASH2 X SBMJOB Not if Flush = *IPL
*PAUSED X SBMJOB Only for SWRCYPNT
*PREIPL X Only for SWRCYPNT
*TGTPREIPL X Only for STRFSFLASH
*PRETCPCFG X
*CMNHDWRSC X
*STRRSTD X SBMJOB BRMS = *YES, SAVSYS, repeats
*ENDRSTD X SBMJOB BRMS = *YES, SAVSYS, repeats
*TGTPSTTCP X
*TGTBRMSAV X BRMS = *YES
*PSTBKUTGT X SBMJOB
*PREMERGE X BRMS = *YES, *CHGONLY
*MERGE1 X SBMJOB BRMS = *YES, *CHGONLY
*MERGE2 X SBMJOB BRMS = *YES, *CHGONLY
*MERGE3 X SBMJOB BRMS = *YES, *CHGONLY
*POSTMERGE X BRMS = *YES, *CHGONLY
*FINISH X SBMJOB BRMS = *YES or Flush = *IPL
*PWRDWNTGT X
Restart target after FC = *YES
*AND
Stop target after backup = *YES
Related Documents