FT & SUPER SIX FINE TURF CASSETTE MOWER INSTRUCTION MANUAL DENNIS, Ashbourne Road, Kirk Langley, Derby, DE6 4NJ, United Kingdom Telephone:- 01332 824777 Fax:- 01332 824 525 E-mail:- [email protected] E-mail:- [email protected] www.dennisuk.com SP20001_REV_6 05/13

Welcome message from author
This document is posted to help you gain knowledge. Please leave a comment to let me know what you think about it! Share it to your friends and learn new things together.
Transcript

FT & SUPER SIX
FINE TURF CASSETTE MOWERINSTRUCTION MANUAL
DENNIS, Ashbourne Road, Kirk Langley, Derby, DE6 4NJ, United KingdomTelephone:- 01332 824777
Fax:- 01332 824 525E-mail:- [email protected]
E-mail:- [email protected]
www.dennisuk.comSP20001_REV_6
05/13

THIS
INFO
RM
ATIO
N IS
INTE
ND
ED
FO
R G
UID
AN
CE
PU
RP
OS
ES
ON
LY. W
E R
EC
OM
ME
ND
TH
AT Y
OU
DIS
CU
SS
YO
UR
SP
EC
IFIC
RE
QU
IRE
ME
NT
WIT
H O
UR
HE
AD
OFF
ICE
, SA
LES
MA
NA
GE
RS
OR
YO
UR
LO
CA
L D
EN
NIS
DE
ALE
R.
NO
TE
Prod
uct A
pplic
atio
n M
atrix 3
3
Hel
pin
g y
ou s
pec
ify
you
r D
enn
is m
ower
This
in
form
atio
n i
s in
ten
ded
fo
r g
uid
ance
pu
rpo
ses
on
ly.
We
reco
mm
end
th
at y
ou
dis
cuss
yo
ur
spec
ific
req
uir
emen
t w
ith
ou
r h
ead
off
ice,
Sal
es M
anag
ers
or
you
r lo
cal
Den
nis
dea
ler.
This
gu
ide
is s
ub
ject
to
mac
hin
e sp
ecif
icat
ion
ch
ang
e. A
t D
enn
is w
e ar
e al
way
s se
ekin
g t
o i
mp
rove
ou
r p
rod
uct
s. F
or
the
late
st in
form
atio
n o
n v
ibra
tio
n a
nd
no
ise
emis
sio
ns
ple
ase
visi
tw
ww
.den
nis
uk.
com
in t
he
man
ual
s se
ctio
n.
Appli
cati
ons
FT
Ran
ge
Razo
rU
ltra
Razo
rS
imple
xR
an
ge
G560
G680
Su
per
Six
Ran
ge
G660
G760
G860
Cro
qu
et a
nd
Ten
nis
on
lyC
roq
uet
an
dTe
nn
is o
nly
Ten
nis
on
ly
Pre
mie
rR
an
ge
Ver
ticu
tT
TS
500
PLU
S
Bra
yH
an
dT
ools
Gan
gM
ower
Bo
wls
Cro
qu
etTe
nn
is
Foo
tbal
lH
ock
eyR
ug
by
- W
icke
t
Cri
cket
- Sq
uar
e
- O
utf
ield
Go
lf-
Tees
- G
reen
s
Orn
amen
tal/
Law
ns
Loca
l A
uth
ori
ty/
Co
ntr
acto
rs

3FT & Super Six SP20001_REV_6
Certificate of ConformityFine Turf (FT) Cylinder mowers powered by Honda GX Petrol Engine
Manufacturer:- Howardson Ltd, Howardson Works, Kirk Langley, Derby, DE6 4NJ. UK
Owner of Technical Document:- Mr I.D. Howard, Howardson Ltd, Howardson Works Kirk Langley, Derby, DE6 4NJ, UK
Notified Body:- AV Technology Ltd, AVTECH house, Arkle Avenue, Stanley Green Trading Estate, Handforth, Cheshire, SK9 3RW, UK
I the under signed Declare that these machines:-
The reliability and quality of performance of the DENNIS FT depends upon some simple care maintenance carried out regularly. This manual has been prepared to allow the user to carry out all such work.
It is advisable to read the instructions carefully. Proper care and attention will enable the machine to give a continuous, satisfactory, and reliable service. Failure to carry out regular lubrication and maintenance as outlined in this manual may render any guarantee or warranty invalid.
In the case of any difficulty, or if further information or advice is required, our Service Department is always at your call. In the interests of speed and accuracy of information please quote the serial numbers of the machine and engine whenmaking enquiries.
For the mower, this is to be found on a plate attached to the side frame. The engine number is stamped on either the crank case or the gear casing facing towards the front of the machine. We suggest you write the numbers on the front page of this book.
Introduction
Serial Numbers
MACHINE SERIAL NUMBER
MAKE A NOTE OF THE SERIAL NUMBERS OF YOUR MACHINE & ENGINE AND ALWAYS QUOTE THEM IN ANY COMMUNICATION WITH PERSONNEL AT DENNIS.NOTE
ENGINE SERIAL NUMBER
Model Cutting Width Power (Honda) Measured Sound Power Level
Guaranteed Sound Power Level Serial Number
FT 430 17” (430mm) GX120 91dB Lwa 94dB Lwa See Product ID rangeFT 510 20” (510mm) GX160 95dB Lwa 98dB Lwa See Product ID rangeFT 610 24” (610mm) GX160 95dB Lwa 98dB Lwa See Product ID range
Tested at:- Howardson Works test site September 2011
Complies with the applicable requirements of:- - Machine Directive 2006/42/EC - Noise Directive 2000/14/EC (Annex VI Procedure 1)
Managing Director
Ian Howard

4FT & Super Six SP20001_REV_6
Contents PageProduct Application Matrix .................................................................................................................................................... 2Declaration of Conformity ..................................................................................................................................................... 3Serial Numbers ..................................................................................................................................................................... 3Introduction ........................................................................................................................................................................... 3Technical Data ...................................................................................................................................................................... 4Machine Description ............................................................................................................................................................. 5Important Safety Instructions ................................................................................................................................................ 6Operating Instructions ..................................................................................................................................................... 7 - 8General Adjustments ......................................................................................................................................................9 - 11Removing The Cassette Unit .............................................................................................................................................. 12Routine Maintenance................................................................................................................................................... 13 - 14General Lubrication ..................................................................................................................................................... 15 - 16Storage ............................................................................................................................................................................... 16Guide to Replacement Parts .............................................................................................................................................. 16Guide To Cassette Use ....................................................................................................................................................... 17Parts Listings ............................................................................................................................................................... 18 - 39
Technical Data
Model FT430 FT510 FT610A - Width (mm) 675 750 840B - Length with Grassbox (mm) 1592 1592 1592C - Length without Grassbox (mm) 1229 1229 1229D - Height (mm) 971 971 971Weight (Kg) 100 110 120Cutting Width (mm) 430 510 610Cylinder 9 or 5 bladeHeight of Cut (mm) 2 - 25Cut Performance (9 Blade) 180 cuts/m (168 cuts/yd)Engine Honda GX120 Honda GX160 Honda GX160
Drive SystemBrake band for roller and dog drive to disengage
cutter for transport
Final DrivePoly “V” high performance
belts under constant tensionHand Arm Vibration (m/sec2) (EN836) 2.7 2.5 2.8Measured Sound Power Level dB(A) LWA 91 95 95Guaranteed Sound Power Level dB(A) LWA 94 98 98Measured Sound Pressure Level dB LPA 77 81 81
AB C
D
NOTE:- Mandatory Ear Protection required when Sound Pressure Levels reach 85 dB LPA.

5FT & Super Six SP20001_REV_6
Machine DescriptionManufactured with a 17” (43cm) 20” (51cm) or 24” (61cm) cutting width this mower is powered by a 5.5 h.p. air cooled single cylinder four stroke petrol engine (3.5hp FT430) The rear roller is powered via a slipping brake band clutchmechanism that allows infinite speed control independent of the cutter unit. The drive to the roller is engaged by a lever situated on the right handlebar.
Where possible, steps have been taken during the design of this machinery to reduce noise emission***.To take full advantage of this, it is essential that the machine only be used when setup correctly and is fully serviceable (see instructions).
*** including fitment of low noise variant Honda engine.
In the design of the machine, special attention has been given to the importance of easy service and maintenance with the construction based on a sectional assembly system. These are the Engine Unit, the Cassette Unit, the Rear Roller Unit, and the Front Roller Unit, each of which can be readily removed individually from the main Frame Chassis Unit.
The interchangeable cassette system allows a variety of cassettes to be used for varying applications.
1. Cassette 9. Grassbox2. Bottom Blade Adjuster Knob 10. Cutting Height Adjustment Knob (FT Only)3. Belt Guard 11. Cassette Retaining Pin Hand Wheel4. Throttle Lever 12. Cassette Disengage Knob 5. Operating Handle 13. Air Filter6. Exhaust 14. Driving Clutch Lever7. Fuel Tank 15. Deadmans Handle8. Centrifugal Clutch Drum
12
3
8
4
5
6
7
2
9
15
10
11
12
13
14

6FT & Super Six SP20001_REV_6
Important Safety InstructionsIn order to operate the machine safely please follow these Health and Safety guidelines.
TRAINING
READ THE INSTRUCTIONS CONTAINED IN THIS MANUAL WITH CARE. IF YOU ARE IN ANY DOUBT PLEASE ASK YOUR EMPLOYER OR CONTACT US DIRECT AT DENNIS.CAUTION
• Be familiar with the controls and the proper use of the equipment.• Never allow children or people unfamiliar with these instructions to use the mower. Local regulations or insurance may restrict the age of the operator.• Never mow while people, especially children, or pets are nearby.• Keep in mind that the operator or user is responsible for accidents or hazards occurring to other people or their property.
PREPARATION
• While mowing always wear substantial footwear and long trousers. Do not operate the mower barefoot or in open sandals.• Thoroughly inspect where the equipment is to be used and remove all stones, sticks, wire, bones and other foreign objects.
PETROL IS HIGHLY FLAMMABLE AND WILL DAMAGE GRASS IF SPILT.WARNING
A) Store fuel in containers specifically designed for this purpose.B) Refuel out doors and do not refuel whilst smoking.C) Add fuel before starting the engine. Never remove the cap of the fuel tank or add petrol while the engine is running or when the engine is hot.D) If petrol is spilled do not attempt to start the engine but move the machine away from the area of spill and avoid creating any sources of ignition until the vapours have dissipated.
• Replace damaged or faulty silencers.• Before using the machine always inspect the safety devices including the cut off switch and the blades for excessive wear or damage. Replace if necessary.
OPERATION
• Do not operate the engine in a confined space where dangerous CARBON MONOXIDE fumes can collect.• Mow only in daylight or good artificial light.• Avoid operating the machine in wet grass where feasible.• Always be sure of your footing on slopes.• Walk. Never run.• Walk across the face of slopes, never up and down.• Exercise extreme care on slopes when changing direction.• Do not mow excessively steep slopes.• Use extreme caution when reversing or pulling the machine towards you.• Stop the blades if the mower has to be tilted for transportation when crossing surfaces other than grass and when transporting the mower to and from the area to be mown.• Never operate the mower with defective guards or shields or without the safety devices, for example without the deflector plate or grassbox in place.• Do not change the engine governor settings or overspeed the engine.• Disengage all blades and drive clutches before starting.• Start the engine carefully following the instructions with feet well away from the blades.• Do not tilt the mower when starting the engine.• Do not put hands or feet near or under rotating parts. Keep clear of the discharge opening at all times.• Never pick up or carry the mower while the engine is running.

7FT & Super Six SP20001_REV_6
Operating Instructions
PREPARATION FOR USE
• Before commencing ensure the turf is free from stones or other obstructions which may damage the cassette unit.• Set the height of cut to the required level (see page 9)• Check the engine.• Fill the fuel tank 3/4 full with unleaded petrol.• Always check the oil levels of the machine prior to commencing. Full details are given in the ENGINE Manual, which accompanies this book. A daily check is recommended. (Recommended grade oil is SAE 10W-40).• Disengage the cassette unit. (see next page)• Set the throttle control on the handle bars to the idle position.• In the case of deadmans handle control depress the lever onto the handlebar then start the engine as per the manufacturers instructions.
BEFORE YOU OPERATE THIS MACHINE YOU MUST READ AND STUDY THIS MANUAL. IF YOU ARE IN ANY DOUBT PLEASE ASK YOUR EMPLOYER OR CONTACT US DIRECT.CAUTION
IMPORTANT INFORMATION PLEASE READ ALL THE DETAILS IN THIS SECTION AND FAMILIARIZE YOURSELF AND ALL MACHINE OPERATORS WITH THE CONTENTS.CAUTION
GENERAL
A centrifugal clutch is fitted in the primary drive system. When the engine revs are attickover the clutch disengages and neither the cutter nor the rear roller controls willfunction. Under these conditions the Deadmans Control can be released and the engine will continue to tick over.On increasing the revs of the engine with the throttle control the clutch engages thusallowing cutter and roller to operate.
TO ASSIST THE SLOWING OF THE BLACK CENTRIFUGAL CLUTCH DRUM APPLY THE BRAKE BAND LEVER.NOTE
THE DEADMANS LEVER MUST BE DEPRESSED WHEN INCREASING THE ENGINE REVS OR THE MACHINE WILL STOP
NOTE
The drive to the cutter unit can be engaged or disengaged in one of two ways:-A) By reducing the engine revs to tickover the centrifugal clutch will disengage. This method will be performed when emptying the grassbox.b) By having the dog drive disengaged. Use this method when transporting the machine.
When the centrifugal clutch is engaged the rear roller drive can be activated by the brake band lever.
TRANSPORT (Disengaging the Cassette Drive)
To ensure the safety of operator and machine we strongly recommend disengaging thecassette drive when transporting under power between sites. Do not operate anycassettes with dog drive disengaged except for the sorrel roller, ironing roller and slitter. This is achieved by performing the following procedure:
1) Reduce engine revs to tickover. This will cause the black clutch drum to cease rotating.2) Lift the red ball knob (attached to horizontal rod behind engine) and push towards the machine. Locate the rod between the two nuts in the slotted catch plate.3) Once in position the dog drive is disengaged.
To re-engage the dog clutch:1) Reduce engine revs to tickover as above (1).2) Lift control rod clear of the locating slot and allow it to spring back towards you.3) Slowly increase engine revs until an audible click is heard when the dogs engage. Alternatively rotate the black clutch drum about half a turn by hand and the same click will be heard. Do not rev the engine until the rod has moved right across and fully engaged.

8FT & Super Six SP20001_REV_6
STARTING THE ENGINE
Once the preparatory steps have been completed as outlined on page 7 the engine may be started. (See manufacturer operating manual for full details).
1) Switch on the fuel tap.2) Switch the handlebar cut off switch to ON, or depress deadmans handle (Item 1)3) Set the throttle control to a half open position.3) Shift the choke lever to the appropriate position (Kubota engine set to START : Honda engine set to the CLOSE position). The choke is not required if the engine is warm or the air temperature high.4) Grasp the recoil start handle until resistance is felt, then pull it with force.5) Do not allow the starter grip to snap back against the engine. Return it gently to prevent damage to the starter.6) Once the engine is started gradually ‘open’ the choke lever (move the lever towards the RUNNING, or OPEN position). Warm-up running of 3-5 minutes is recommended.
STOPPING THE ENGINE
1) Set the throttle control to the CLOSED position.2) Switch the handlebar cut off to OFF or switch off at engine.3) Close the fuel tap.
TO COMMENCE MOWING
With the starting preparations completed and all of the adjustments from the ‘GeneralAdjustments’ section made, the machine can be put into motion.
Firstly ensure the dog clutch is engaged. Open the throttle control on the left handlebar which will engage the inertia clutch and spin the cassette reel. The engine speedcontrols the rotational velocity of the cassette. Set the throttle to an approximately half open position.
To engage the rear roller drive, gently raise the driving clutch lever on the right handle bar (Item 2). The amount of depression on the lever dictates the speed of travel giving the operator total control over the speed and handling of the mower.
When the handle is released the machine will stop. To stop the unit head rotating, reduce the throttle to tick over and this will disengage the inertia clutch.
1
2
Operating Instructions
9FT & Super Six SP20001_REV_6
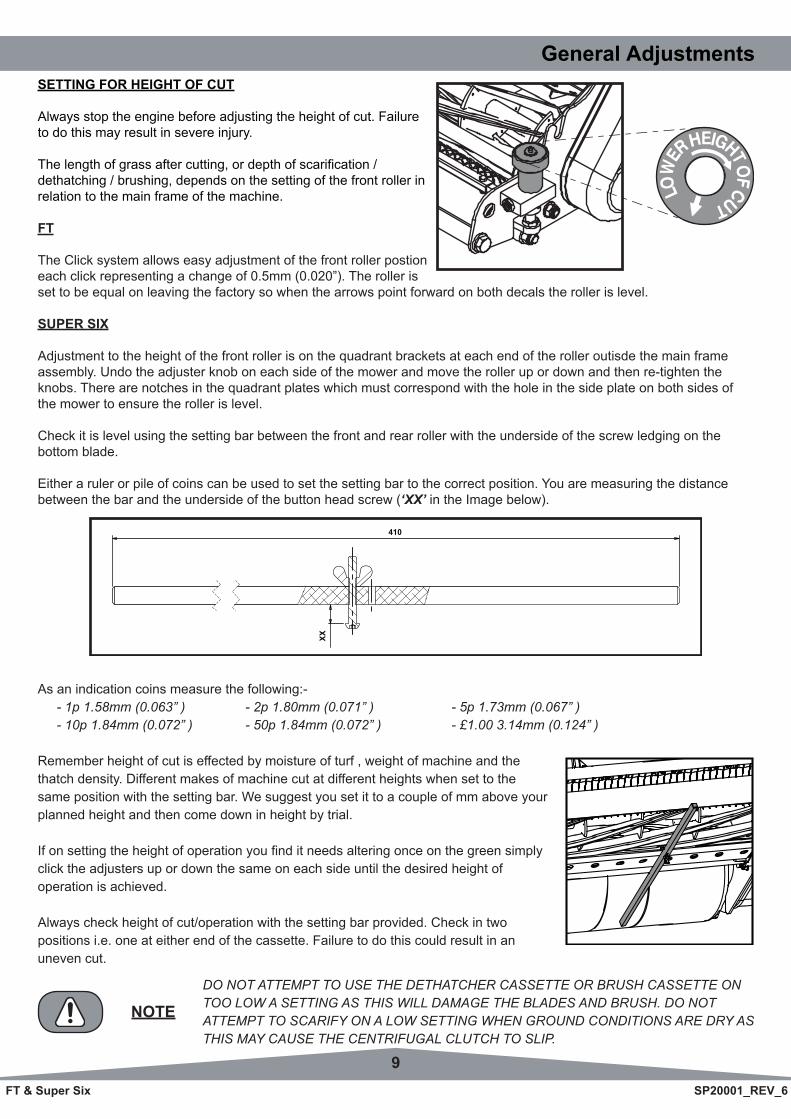
As an indication coins measure the following:- - 1p 1.58mm (0.063” ) - 2p 1.80mm (0.071” ) - 5p 1.73mm (0.067” ) - 10p 1.84mm (0.072” ) - 50p 1.84mm (0.072” ) - £1.00 3.14mm (0.124” )
Remember height of cut is effected by moisture of turf , weight of machine and the thatch density. Different makes of machine cut at different heights when set to the same position with the setting bar. We suggest you set it to a couple of mm above your planned height and then come down in height by trial.
If on setting the height of operation you find it needs altering once on the green simply click the adjusters up or down the same on each side until the desired height ofoperation is achieved.
Always check height of cut/operation with the setting bar provided. Check in twopositions i.e. one at either end of the cassette. Failure to do this could result in anuneven cut.
Operating Instructions General AdjustmentsSETTING FOR HEIGHT OF CUT
Always stop the engine before adjusting the height of cut. Failure to do this may result in severe injury.
The length of grass after cutting, or depth of scarification /dethatching / brushing, depends on the setting of the front roller in relation to the main frame of the machine.
FT
The Click system allows easy adjustment of the front roller postion each click representing a change of 0.5mm (0.020”). The roller is set to be equal on leaving the factory so when the arrows point forward on both decals the roller is level.
SUPER SIX
Adjustment to the height of the front roller is on the quadrant brackets at each end of the roller outisde the main frame assembly. Undo the adjuster knob on each side of the mower and move the roller up or down and then re-tighten the knobs. There are notches in the quadrant plates which must correspond with the hole in the side plate on both sides of the mower to ensure the roller is level.
Check it is level using the setting bar between the front and rear roller with the underside of the screw ledging on thebottom blade.
Either a ruler or pile of coins can be used to set the setting bar to the correct position. You are measuring the distance between the bar and the underside of the button head screw (‘XX’ in the Image below).
DO NOT ATTEMPT TO USE THE DETHATCHER CASSETTE OR BRUSH CASSETTE ON TOO LOW A SETTING AS THIS WILL DAMAGE THE BLADES AND BRUSH. DO NOTATTEMPT TO SCARIFY ON A LOW SETTING WHEN GROUND CONDITIONS ARE DRY AS THIS MAY CAUSE THE CENTRIFUGAL CLUTCH TO SLIP.
NOTE
XX
410

10FT & Super Six SP20001_REV_6
The FT cylinder is fixed inposition in self-aligningbearings with aluminiumhousings spigotted to theside frames. The bottomblade assembly isadjusted up and down byusing a knurled knobsystem.
To operate this systemfirstly slacken the two locknutson the adjuster stems – The Lock Nut (A) is directly on top of the Knurled Knobs (B). Use a 9/16 AF spanner. Each knurled knob has a decal to indicate ON or OFF cut. ON cut brings the bottom blade closer to the cylinder. OFF cut moves it away.
A = Locknut (9/16” Spanner)B = Lubricate occasionally with OilC = Circlip
Rotate the knurled knobs to gain light contact between the shear blade and cylinder on both sides of the cassette. The adjustment should be made so that the cylinder will spin with a light audible contact with the bottom blade. Check the setting using thin paper along the length of the cylinder adjusting until it cuts along its whole length.
When a satisfactory set is achieved tighten the lock nuts whilst holding the knurled knob firmly (to stop it turning), recheck adjustment.
Do not set the cylinder hard on, as this will cause excessive wear of the cylinder, bottom blade the drive system and increase fuel consumption.
General AdjustmentsCUTTER SETTING ADJUSTMENT
For cutter cylinder cassettes (5 or 9 blade units).
For a full view of the setting operation we suggest you remove the cassette from the machine and place on the back flat edge of the frame at a comfortable height. It is now possible to make adjustments in the machine without cassetteremoval should you prefer.
CYLINDERS AND BOTTOM BLADES ARE SHARP, WEAR GLOVES TO PROTECT YOUR HANDS AND FINGERS.WARNING

11FT & Super Six SP20001_REV_6
General AdjustmentsHANDLEBAR ADJUSTMENT
The height of the Handle Bars can be adjusted to suit various operators. Follow the below instructions:-
1. Remove Bolt (Item 1) on both sides of the machine.2. Select the require position out of the 3 available.3. Replace the Bolt on both sides of the machine.
GRASS BOX
If using the grass box, place the two locating tabs (projecting from the grass box support plates) into the slots on the machine side plate. Lower the front of the box until the box support plate’s rest on the front cross bar of the machine. Ensure both box support plates are properly located before proceeding.
Always disengage the cassette drive before removing the grass box for emptying or access by reducing the engine revs to tick over. Wait for the cutter to stop before removing.
Always keep fingers away from the cassette when the engine is running. Stop the machine before making anyadjustments.
Hold the grass box firmly on the lip of the aperture and place the other hand in the handle on the front edge of the box.
A
Item 1

12FT & Super Six SP20001_REV_6
Removing The Cassette UnitTo remove the cassette unit for maintenance or to exchange cassettes the following procedure should be followed:-
1) Unscrew the hand wheel of the retaining pin for about half-an-inch (13mm) until the pip end is inside the nut on the side frame.
2) Slide the cassette unit along the tie bars as far as it will go until the cutter nut and coupling is clear of the three pins in the driving coupling.
3) Remove the unit from the chassis by lifting in a swinging motion from the back.
To replace the cassette unit :-
1) Place the front slots of the cassette unit frames on the two front retaining pins seen projecting from inside each frame.
2) Carefully lower the unit in a downward swinging motion until the rear slots of the cassette unit frame rest on the cross tie bar.
3) Move in a lateral direction away from the retaining pin until the three holes of the cassette nut and coupling are in full engagement with the three pins of the driving coupling.
4) Screw up the hand wheel with the retaining pin, engaging the hole in the side frame on the opposite side. Do not over tighten.

13FT & Super Six SP20001_REV_6
Routine Maintenance
DRIVING BELTS
The main drive to both rear roller and cassette is via hard wearing TBA poly-V type belts which provide for smooth trouble free operation. To ensure the best performance thefollowing instructions should be carefully followed.
Belt tension is the single most important factor necessary for long, satisfactory service life of any belt drive.Under-tensioning leads to belt slip causing rapid wear; over tensioning meansexcessive strain on belt and bearings. Between these two extreme conditions is areasonable range of tension within which the belt will operate. Belt tension can beassessed by the ‘deflection’ method.
CORRECTION CAN BE MADE BY ADJUSTMENT OF THE BELT TENSIONERS. REMOVE THE DRIVING BELT COVER. THE BELT TENSIONERS ARE RETAINED IN A SLOTTED HOLE ALLOWING ADJUSTMENT TO BE MADE ONCE THE HOLDING HEXAGONHEADED BOLTS HAVE BEEN LOOSENED. WHEN ADJUSTED CORRECTLY THETENSIONERS SHOULD STILL ROTATE EASILY WITH FINGER PRESSURE. ENSURE THE TENSIONER BOLTS ARE SECURE BEFORE REPLACING THE COVER.
NOTE
“Belts will be sufficiently tensioned if the deflection force applied at mid span to produce a deflection equal to 16mm per meter of span distance falls between 5 and 9 Newtons per Rib” (TBA Belting).
In practical terms this relates to about 5mm of deflection under moderate finger pressure on the non tensioner side.
If fitting new belts it is advisable to observe the drive for the first 20-30 minutes. It may be necessary to make anadjustment to compensate for the normal drop in tension during the run-in period.
FOR BELT DETAILS, REF. 1.02 (Pg. 19)
Do not overtighten belts as this may cause excessive wear on the dog clutch.
OIL / FUEL TYPE & QUANTITY - SPARK PLUG TYPE
Engine Model Oil Type Quantity(Ltr) Fuel Type Capacity
(Ltr) Spark Plug Type Electrode Gap(mm)
Honda GX120 & GX160 Petrol SAE 10W-40 0.6 Unleaded 2.5 BM6ES or BPR6ES 0.7 - 0.8
Area Maintenance First 4 Hours First Month / 20 Hours 3 Months / 50 Hours 6 Months / 100 HoursEngine Oil Check Level Engine Oil Change
Air Filter Check Condition / Clean
Spark Plug Change
ENGINE
The FT is fitted with a Honda GX160 (GX120 on FT 430) petrol engine. All are single cylinder, overhead valve, 4 stroke, forced air colled engines. For full specifications please refer to the manufacturers instruction manual included.

14FT & Super Six SP20001_REV_6
Routine MaintenanceBRAKE BAND ADJUSTMENT (Rear Axle Drive)
The brake band assembly is mounted on the end of the rear axle spindle on the righthand side of the machine. The assembly comprises a cast iron drum inner member,which is stopped or braked with a lined steel brake band. This operates dry and nolubrication of any kind is required.
Adjustment is provided for tightening the band on the inner member should this benecessary through wear. The procedure to take up any slack is as follows :-
1. Remove the clutch cover by unscrewing the two hexagon headed screws seen on the outside of the cover.2. Unscrew the lock nut on the adjuster screw situated between the two clutch band lugs.
ENSURE THE LOCK NUTS ARE TIGHT AND SECURE AND CHECK OPERATION ISSATISFACTORY BEFORE REPLACING THE CLUTCH COVER AND SCREWS.NOTE
Adjust Here
Adjustment of the brake band can be set to suit your preference but always ensure that there is sufficient free play so that when the engine revs are increased the machine does not move in any way until the lever is pulled up.
On some models there is adjustment on the handle grip itself to allow any wear to be taken up.

15FT & Super Six SP20001_REV_6
General LubricationREAR ROLLER
The centre section gear case chamber of the rear roller is an assembly in two halves and contains the epicyclic gear system, which runs in an oil bath.
The chamber is charged with gear oil EP 90 before the machine leaves the works and should require no further fillingduring the cutting season. If in every day use then a topping up charge of about one egg cup full every two months may be appropriate.
DO NOT OVERCHARGE. AT NO TIME SHOULD THERE BE MORE THAN 100CC OF OIL IN THE CHAMBER.WARNING
Access to the chamber is gained by unscrewing the hexagon screw found in the recess of the centre section of roller. Clean away all dirt and grit before removing this screw. On replacing the screw, make sure it is tight and secure.
Recommended grade gearbox oil EP90.
RATCHET PAWLS AND DRUM HUBS OF THE REAR ROLLER (Every 2 Months)
Projecting from the side face towards the centre of each outer drum will be seen two grease nipples which provide access for lubrication to the rear roller driving pawls and the drum hub bearing sleeve.
A small charge of light grease should be applied every two months.
FRONT ROLLERS
The bearings used on the front rollers are pre packed with grease and rubber shielded, therefore requiring no additional greasing.
CYLINDER CASSETTE BEARINGS (Every Day)
To apply lubrication to the cylinder cassette bearings it is first necessary to remove thecassette unit from the chassis as described on page 9.
Projecting from each bearing cover will be seen a grease nipple through which a small charge of grease should be applied using the grease gun
MEDIUM GREASE = GOOD QUALITY
SCARIFIER / DE-THATCHER / BRUSH CASSETTES
No grease or oiling is required.

16FT & Super Six SP20001_REV_6
General LubricationDOG DRIVE (Every Day) - VERY IMPORTANT
Apply a small squirt of lubricating oil (2-3 drops) directly into each hole in the top of thedrive shaft cover. This keeps the clutch slippers lubricated.
CONTROL LEVERS AND CABLES (Every 2 Months)
To keep the controls free from rust and corrosion apply a small charge of oil to thethrottle and clutch control levers every two months. Oil flow can be assisted by workingthe levers open and closed a few times after the lubrication is applied.
FRONT ROLLER ADJUSTERS (Every 2 Months)
Apply a small quantity of copper grease or similar to the adjuster studs to prevent corrosion and ease adjustment.
LubricateDaily
StorageThe machine should always be kept in a clean dry place, free from condensation. After use ensure that the machine is thoroughly clean, dry and free from grass and mud. Before off season storage smear a thin layer of grease on to thecutter blades and the shear blade.
Under no circumstances must the machine be steam cleaned as this may remove grease from the pre packed bearings.
Because of the nature of lead free petrol we recomend that if the machine is being left unused for more than 2 weeks the carburetor is run dry. Allow the engine to run out of fuel with the fuel tap switched off.
Guide To Replacement Parts
WHEN ORDERING PARTS PLEASE QUOTE YOUR MACHINE SERIAL NUMBER AND ENGINE NUMBER. A BOX TO ENTER THESE FOR EASY REFERENCE IS AT THE BEGINNING OF THE MANUAL.
NOTE
This manual contains listing of parts for the Dennis FT430, FT510 and FT610 machines. An illustration of the parts as an assembly is shown above the list.
Where parts are given a description of LH or RH (left hand or right hand) this is as viewed from the users position.
The Parts Listings for FT Range can be found in this manual from page 18 onwards.

17FT & Super Six SP20001_REV_6
FT Guide to Cassette Use
RESULT - Speed improvement on greens,reduced end of season maintenance. Promotes healthy plant growth, promotes strong roots, and maximizes fertilizer penetration.
SCARIFIER (SEE PAGE 36)
Used for ground to ground -10mm controlling thatch, removing thatch, cutting lateral growth, pruning roots, removing moss, aerating top layer for ingress of water, air, fertilizer and seed. Choice of 1mm or 2mm thick blades (generally 1mm used in summer, 2mm used in winter). Do not try to cut too deep - must be adjusted to suit conditions.Keep engine revs reasonably high with a slow forward movement to remove as much material as possible. The machine may tend to walk along on its own in some conditions.
RESULT - Speed increase of playing surface. Maximizes fertilizer penetration & promotes strong healthy plant growth and strong roots.
BRUSH (SEE PAGE 35)
Used for light scarifying, brushing, removing debris, cigarette ends, pine needles moss, excess top dressing etc. Set at +3mm to +1mm for ground debris depending on conditions. Remove comb.
IRONING ROLLER NON DRIVEN (NOT SHOWN)
Ballastable for extra weight. Used for ironing greens. Set level or lift up front roller.
SORREL ROLLER NOT DRIVEN (SEE PAGE 38)
Used for surface pricking. Lets air, water, fertilizer into the root zone. Good for over seeding and preparing damaged areas for repair. Reduces surface tension.
9 BLADE CYLINDER (SEE PAGE 34)
• For cutting fine turf areas.• Three bottom blade options.• Comb active or passive.
5 BLADE CYLINDER (SEE PAGE 34)
• For general purpose cutting.• Comb active or passive.
Settings - Expressed as above and below ground level i.e. by placing the setting bar between the front and rear rollers, the top of the bar represents ground level.
VERTICUTTER (SEE PAGE 39)
Used from ground +3mm to ground -3mm to control thatch, cutting lateral growths and standing up lying grasses ready for cutting and lifting with the comb. Good for removing mosses. Start on the green at (say) +3mm.
NOT FOR CUTTING SOIL, ONLY THATCH.NOTE
Bowls Cricket GolfVerticutter Monthly Fortnightly MonthlyScarifier 1 - 2 Months 1 - 2 Months 1 - 2 MonthsBrush As Required As Required As RequiredIroning roller Match Days Pre-Season As RequiredSorrel Roller 1 - 2 Weeks Monthly (As Required for Repair) Monthly (As Required for Repair)
18FT & Super Six SP20001_REV_6
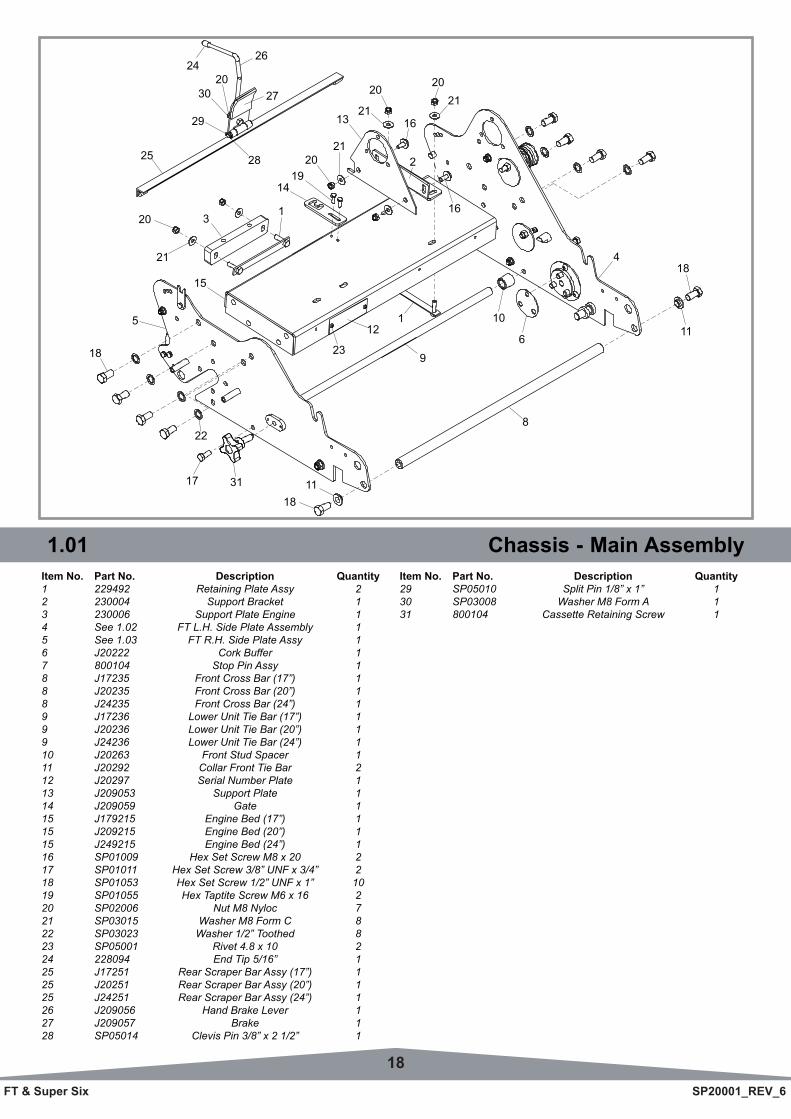
Item No. Part No. Description Quantity1 229492 Retaining Plate Assy 22 230004 Support Bracket 13 230006 Support Plate Engine 14 See 1.02 FT L.H. Side Plate Assembly 15 See 1.03 FT R.H. Side Plate Assy 16 J20222 Cork Buffer 17 800104 Stop Pin Assy 18 J17235 Front Cross Bar (17”) 18 J20235 Front Cross Bar (20”) 18 J24235 Front Cross Bar (24”) 19 J17236 Lower Unit Tie Bar (17”) 19 J20236 Lower Unit Tie Bar (20”) 19 J24236 Lower Unit Tie Bar (24”) 110 J20263 Front Stud Spacer 111 J20292 Collar Front Tie Bar 212 J20297 Serial Number Plate 113 J209053 Support Plate 114 J209059 Gate 115 J179215 Engine Bed (17”) 115 J209215 Engine Bed (20”) 115 J249215 Engine Bed (24”) 116 SP01009 Hex Set Screw M8 x 20 217 SP01011 Hex Set Screw 3/8” UNF x 3/4” 218 SP01053 Hex Set Screw 1/2” UNF x 1” 1019 SP01055 Hex Taptite Screw M6 x 16 220 SP02006 Nut M8 Nyloc 721 SP03015 Washer M8 Form C 822 SP03023 Washer 1/2” Toothed 823 SP05001 Rivet 4.8 x 10 224 228094 End Tip 5/16” 125 J17251 Rear Scraper Bar Assy (17”) 125 J20251 Rear Scraper Bar Assy (20”) 125 J24251 Rear Scraper Bar Assy (24”) 126 J209056 Hand Brake Lever 127 J209057 Brake 128 SP05014 Clevis Pin 3/8” x 2 1/2” 1
1.01 Chassis - Main Assembly
20
2019
14
31
8
6
10
9
112
23
181117
22
18
5
15
2118
4
21
16
16
2120
20
2113
11
20
28
29
27
2624
30
25
31
2
Item No. Part No. Description Quantity29 SP05010 Split Pin 1/8” x 1” 130 SP03008 Washer M8 Form A 131 800104 Cassette Retaining Screw 1

19FT & Super Six SP20001_REV_6
1.02 Chassis - LH Side Plate (800020)Item No. Part No. Description Quantity1 J209253 Side Plate LH (FT) 11 J209218 Side Plate LH (Super Six) 1 2 229741 Buffer Block 13 229742 Buffer 14 J209072 Chain Case Stud ( > 08/2010) 25 J20216 Unit Limiting Stud 16 J20238 Shoulded Bearing Stud (FT) 16 J209110 Unit Bearing Stud (Super Six) 1 7 J20008 Back Plate With Hole 18 J20221 Male Coupling 19 J209203 Cassette Driven Pulley / Shaft 110 J209206 Cassette Drive Bearing Housing 111 J20255 Bearing 5205 - 3205 2RS 112 J20023 Unit Limiting Stud 113 SP03008 Washer M8 Form A 314 J209043 Tensioner Back Plate 215 J209047 Tensioner Pulley ( > 08/2010) 216 J209049 Spacer Roller Tensioner ( > 08/2010) 117 SP01008 Hex Set Screw M6 x 16 218 SP01012 Button Head M8 x 12 319 SP02006 Nut M8 Nyloc 420 SP03003 Washer M6 Toothed 221 SP01013 Hex Set Screw 3/8” UNF x 2” 122 SP02015 Nut 3/8” UNF 323 SP01057 Screw 3/8” UNF x 3 1/4” ( > 08/2010) 124 SP02008 Nut M10 Nyloc 225 SP03011 Washer M10 Form A 226 230490 Belt Tensioner ( < 08/2010) 127 230493 Pulley Retainer ( < 08/2010) 128 J209047 Tensioner Pulley ( < 08/2010) 1 29 SP01056 CSK Cap Head M6 x 25 ( < 08/2010) 130 SP02006 Nut M8 Nyloc ( < 08/2010) 131 SP03008 Washer M8 Form A ( < 08/2010) 132 800222 Belt Tensioner Assembly ( < 08/2010) 1 (Includes Items 26, 27, 28, 29, 30, 31)
AA
A
B
13
22
141913
3 2
12
1422
19
68
18
75
1720
19
13
15
21
25
244
2524
1
9
11
10
423
15
16
2628
3130
29
27
> 08/2010
Not Shown- J209003 3 Groove Drive Belt (Rear Roller) 1- J209005 5 Groove Drive Belt (Cylinder) 1

20FT & Super Six SP20001_REV_6
1.03 Chassis - RH Side Plate (800021)Item No. Part No. Description Quantity1 J209254 Side Plate RH (FT) 11 209219 Side Plate RH (Super Six) 12 J20023 Unit Limiting Stud 13 229741 Buffer Block 14 229742 Buffer 15 SP03003 Washer M6 Toothed 26 SP01008 Hex Set Screw M6 x 16 37 J209229 Clutch Rod Stop 18 J209078 Retaining Screw Plate 19 SP01016 Button Head M6 x 12 210 J20207 Stud Brake Band Cover 211 J20237 Unit Bearing Stud (FT) 111 J209110 Unit Bearing Stud (Super Six) 112 SP02006 Nut M8 Nyloc 413 SP02004 Nut M6 Nyloc 114 SP03010 Washer M6 Form A 115 SP02008 Nut M10 Nyloc 116 SP03008 Washer M8 Form A 317 SP03011 Washer M10 Form A 1
7
15
178
10
1065
12
16
6
1
4
3
12
1216
911
1216
13
14
2
21FT & Super Six SP20001_REV_6
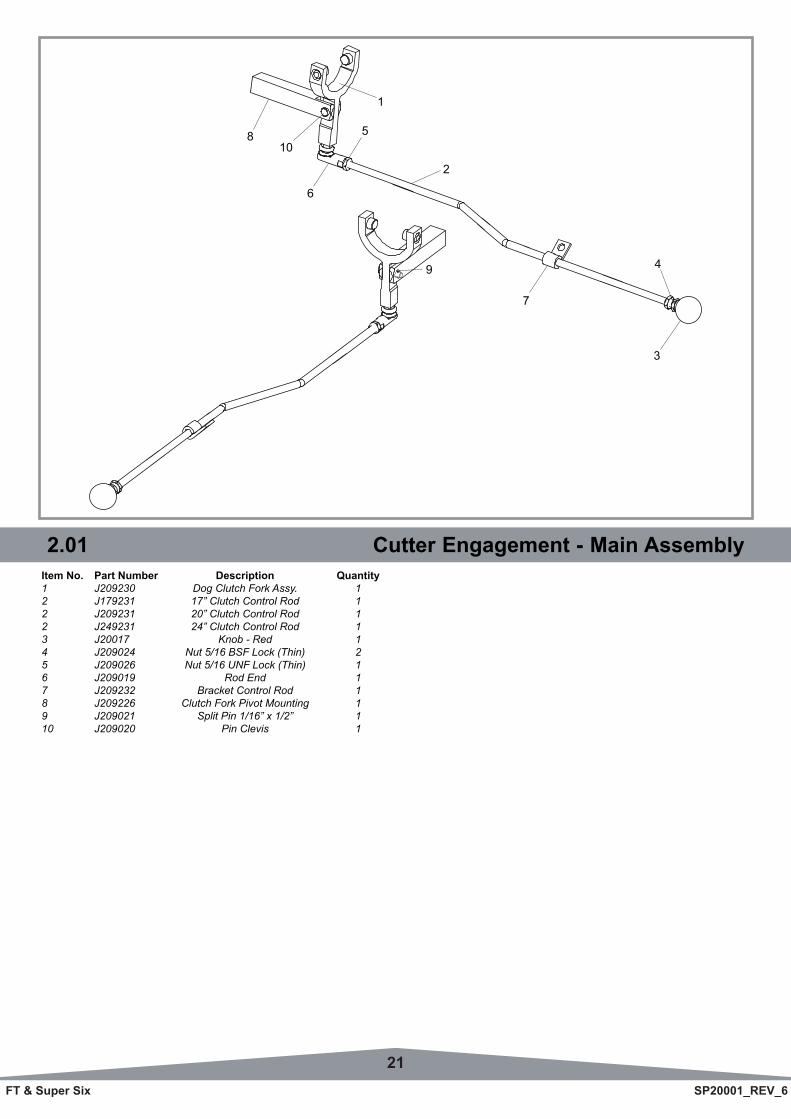
2.01 Cutter Engagement - Main AssemblyItem No. Part Number Description Quantity1 J209230 Dog Clutch Fork Assy. 12 J179231 17” Clutch Control Rod 12 J209231 20” Clutch Control Rod 12 J249231 24” Clutch Control Rod 13 J20017 Knob - Red 14 J209024 Nut 5/16 BSF Lock (Thin) 25 J209026 Nut 5/16 UNF Lock (Thin) 16 J209019 Rod End 17 J209232 Bracket Control Rod 18 J209226 Clutch Fork Pivot Mounting 19 J209021 Split Pin 1/16” x 1/2” 110 J209020 Pin Clevis 1
810
9
2
6
1
5
3
4
7
22FT & Super Six SP20001_REV_6
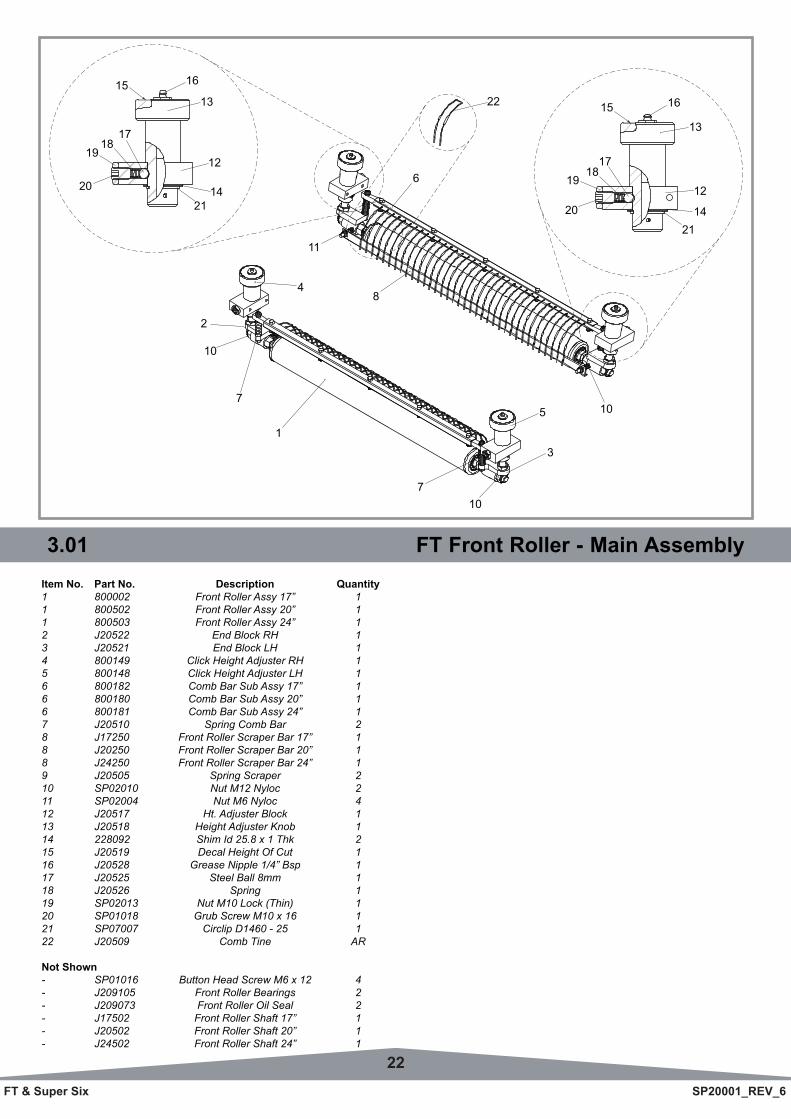
3.01 FT Front Roller - Main AssemblyItem No. Part No. Description Quantity1 800002 Front Roller Assy 17” 1 1 800502 Front Roller Assy 20” 11 800503 Front Roller Assy 24” 12 J20522 End Block RH 13 J20521 End Block LH 14 800149 Click Height Adjuster RH 15 800148 Click Height Adjuster LH 16 800182 Comb Bar Sub Assy 17” 16 800180 Comb Bar Sub Assy 20” 16 800181 Comb Bar Sub Assy 24” 17 J20510 Spring Comb Bar 28 J17250 Front Roller Scraper Bar 17” 18 J20250 Front Roller Scraper Bar 20” 18 J24250 Front Roller Scraper Bar 24” 19 J20505 Spring Scraper 210 SP02010 Nut M12 Nyloc 211 SP02004 Nut M6 Nyloc 412 J20517 Ht. Adjuster Block 113 J20518 Height Adjuster Knob 114 228092 Shim Id 25.8 x 1 Thk 215 J20519 Decal Height Of Cut 116 J20528 Grease Nipple 1/4” Bsp 117 J20525 Steel Ball 8mm 118 J20526 Spring 119 SP02013 Nut M10 Lock (Thin) 120 SP01018 Grub Screw M10 x 16 121 SP07007 Circlip D1460 - 25 122 J20509 Comb Tine AR
Not Shown- SP01016 Button Head Screw M6 x 12 4- J209105 Front Roller Bearings 2- J209073 Front Roller Oil Seal 2- J17502 Front Roller Shaft 17” 1- J20502 Front Roller Shaft 20” 1 - J24502 Front Roller Shaft 24” 1
6
3
7
5
1
7
10
8
2
4
11
10
10
15 16
13
20
1918
2114
12
17
191817
2114
12
15
13
16
20
22

23FT & Super Six SP20001_REV_6
3.02 Super Six Front Roller - Main AssemblyItem No. Part No. Description Quantity1 J20235 20” Front Cross Bar 11 J24235 24” Front Cross Bar 12 J20292 Collar Front Tie Bar 23 J20550 20” Front Roller 13 J24550 24” Front Roller 14 J20551 Scraper Bar Ear 25 J20552 20” SS Scraper Bar 15 J24552 24” SS Scraper Bar 16 J209110 Unit Bearing Stud 27 J209111 Bush Quadrant 28 J209112 Knob Plastic 29 J179215 Engine Bed 17” 19 J209215 Engine Bed 20” 19 J249215 Engine Bed 24” 110 J209218 Side Plate L.H. S.S. 111 J209219 Side Plate R.H. S.S. 112 J209225 Roller Quadrant S.S. 213 J209252 Lock Screw 214 SP01016 Button Head M6 x 12 215 SP01053 Hex Set Screw 1/2” UNF x 1” 216 SP02004 Nut M6 Nyloc 217 SP02006 Nut M8 Nyloc (T) 218 SP02008 Nut M10 Nyloc (T) 219 SP02010 Nut M12 Nyloc (T) 220 SP02012 M10 Thin Lock Nut 221 SP02014 Nut M12 Lock (Thin) 422 SP03011 Washer M10 Form A 223 SP03012 Washer M12 Form A 8
9 20
11
10
12
23
23
15
213
141621
1
7
23
21
617
4
5
3
19231822
8

24FT & Super Six SP20001_REV_6
4.01 Grassbox - Main AssemblyItem No. Part No. Description Quantity1 J179237 FT430 Grassbox Moulding 11 J209237 FT510 Grassbox Moulding 11 J249237 FT610 Grassbox Moulding 12 J209062 Mesh (FT510) 12 J249062 Mesh (FT610) 13 J17257 17” Grassbox Edging Strip 13 J209063 20” Grassbox Edging Strip 13 J249063 24” Grassbox Edging Strip 14 J209064 Handle Plate Grass Box 15 J209222 LH Grassbox Wing 16 J209224 RH Grassbox Wing 17 J209243 Handle Grassbox 18 J209060 Grassbox Support Plate 29 800008 17” Grassbox Complete 19 800017 20” Grassbox Complete 19 800042 24” Grassbox Complete 1
Not Shown- SP04002 ScrewM6x16Slotted(TofitItem5&6) 8- SP02004 NutM6Nyloc(TofitItem5&6) 8- SP01008 HexSetScrewM6x16(TofitItem7) 2- SP03007 WasherM6x20(TofitItem7) 2
5
1 3
8
2
4
6
8
7
9

25FT & Super Six SP20001_REV_6
5.01 Guards - Main AssemblyItem No. Part No. Description Quantity1 B32902 Decal Dennis 22 J209074 Brake Band Cover Screw 23 194946 Chain Case Screw 24 228031 Belt Guard Seal 1.23m5 J20712 Belt Guard 16 J20206 Brake Band Cover 17 B32903 Decal Union Jack 18 228031 Brake Band Seal 0.62m9 J179221 Transmission Cover 17” 19 J209221 Transmission Cover 20” 19 J249221 Transmission Cover 24” 110 B32904 Oil Daily Decal 111 229605 98dB Decal 1
8 8
2
2
6
3
35
4
7 1
9
1110

26FT & Super Six SP20001_REV_6
6.01 Handle - Main AssemblyItem No. Part No. Description Quantity1 SP04001 Screw M5 x 16 Slotted 42 SP03009 Washer M5 Form A 43 228094 End Tip 5/16” 44 SP02005 Nut M8 STD 45 SP03004 Washer M8 Toothed 36 SP03004 Washer M8 Toothed 17 SP03008 Washer M8 Form A 88 J20109 Brake Band Lever 19 800514 Deadmans Handle Kit ( > 02/2012) 19 SP12010 Deadmans Lever ( < 03/2012) 110 J20108 Throttle Control Lever 111 J20107 Handle Grip Rubber 212 230013 Console Cover (No Switch) 113 SP02006 Nut M8 Nyloc 414 SP02008 Nut M10 Nyloc 415 228093 Bolt Saddle M8 x 43 416 SP01020 Hex Set Screw M10 x 40 417 SP03018 Washer M10 Form G 818 229724 Arm Pivot Bush 419 229725 Pivot Arm Lower Handle 420 229726 Bush Handle Pivot 421 229736 Pivot Bolt 422 B32902 Decal Dennis 123 230035 Handle Lower 17” W.A. 123 230020 Handle Lower 20” W.A. 123 230030 Handle Lower 24” W.A. 124 230040 Handle Upper W.A. 125 230487 Micro Switch Bracket 126 SP01070 Cap Head M2 x 12 127 SP02032 Nut M2 STD 128 SP012022 Electrical Loom Micro Switch 129 SP01081 Cap Head M5 x 12 130 J20110 Lever Grip 1
Not Shown- J20112 Throttle Cable (Honds MKII & Kubota MKI) 1- J20113 Brake Band Cable 1- J20123 Electric Loom (Deadmans) ( > 02/2012) 1- SP12021 Electric Loom (Deadmans) ( < 03/2012) 1- J20110 Brake Band Lever Grip 1
15 34
5
7
23
1816
17
19 16
21
1417
20
101010
9
8
1 2
11
24
10
12
22
25
29
28
2726
30
27FT & Super Six SP20001_REV_6
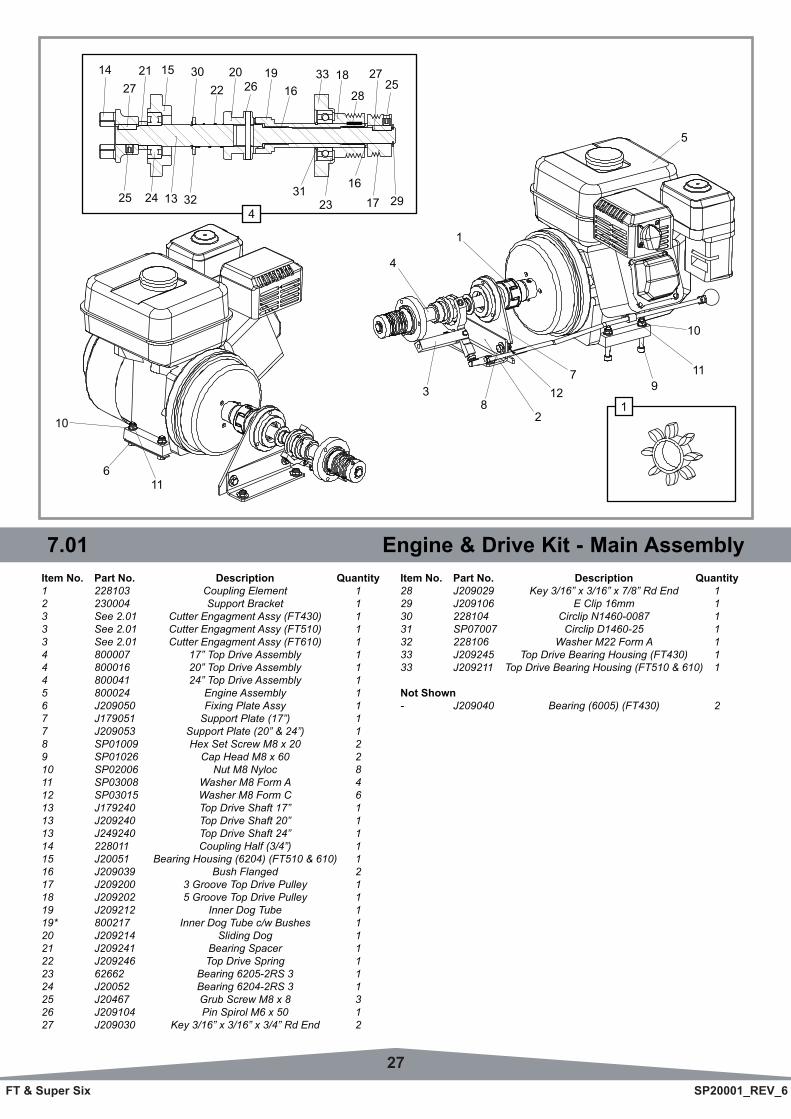
7.01 Engine & Drive Kit - Main AssemblyItem No. Part No. Description Quantity1 228103 Coupling Element 12 230004 Support Bracket 13 See 2.01 Cutter Engagment Assy (FT430) 13 See 2.01 Cutter Engagment Assy (FT510) 13 See 2.01 Cutter Engagment Assy (FT610) 14 800007 17” Top Drive Assembly 14 800016 20” Top Drive Assembly 14 800041 24” Top Drive Assembly 15 800024 Engine Assembly 16 J209050 Fixing Plate Assy 17 J179051 Support Plate (17”) 17 J209053 Support Plate (20” & 24”) 18 SP01009 Hex Set Screw M8 x 20 29 SP01026 Cap Head M8 x 60 210 SP02006 Nut M8 Nyloc 811 SP03008 Washer M8 Form A 412 SP03015 Washer M8 Form C 613 J179240 Top Drive Shaft 17” 113 J209240 Top Drive Shaft 20” 113 J249240 Top Drive Shaft 24” 114 228011 Coupling Half (3/4”) 115 J20051 Bearing Housing (6204) (FT510 & 610) 116 J209039 Bush Flanged 217 J209200 3 Groove Top Drive Pulley 118 J209202 5 Groove Top Drive Pulley 119 J209212 Inner Dog Tube 119* 800217 Inner Dog Tube c/w Bushes 120 J209214 Sliding Dog 121 J209241 Bearing Spacer 122 J209246 Top Drive Spring 123 62662 Bearing 6205-2RS 3 124 J20052 Bearing 6204-2RS 3 125 J20467 Grub Screw M8 x 8 326 J209104 Pin Spirol M6 x 50 127 J209030 Key 3/16” x 3/16” x 3/4” Rd End 2
Item No. Part No. Description Quantity28 J209029 Key 3/16” x 3/16” x 7/8” Rd End 129 J209106 E Clip 16mm 1 30 228104 Circlip N1460-0087 131 SP07007 Circlip D1460-25 132 228106 Washer M22 Form A 133 J209245 Top Drive Bearing Housing (FT430) 133 J209211 Top Drive Bearing Housing (FT510 & 610) 1
Not Shown- J209040 Bearing (6005) (FT430) 2
4
2022
30152127
14
32132425
10
611
5
10
119
712
28
3
1
3123
1617 29
25271833
1619
26
4
1
28
28FT & Super Six SP20001_REV_6
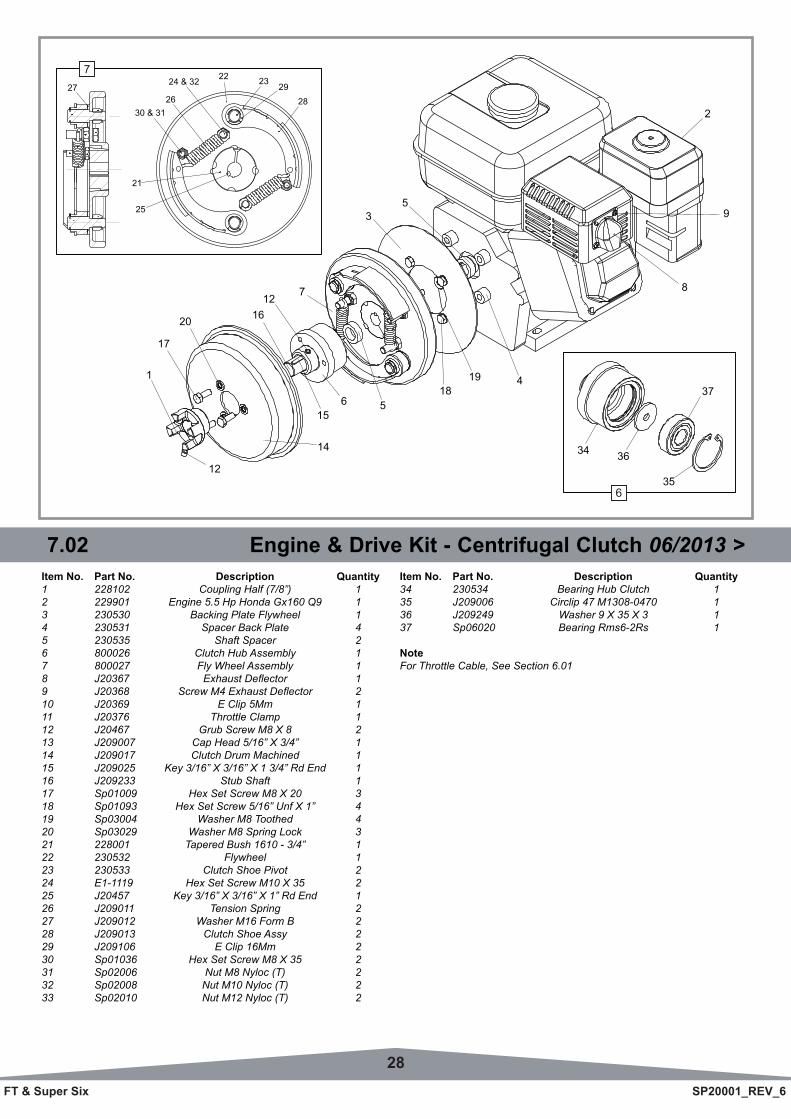
7.02 Engine & Drive Kit - Centrifugal Clutch 06/2013 >Item No. Part No. Description Quantity1 228102 Coupling Half (7/8”) 12 229901 Engine 5.5 Hp Honda Gx160 Q9 13 230530 Backing Plate Flywheel 14 230531 Spacer Back Plate 45 230535 Shaft Spacer 26 800026 Clutch Hub Assembly 17 800027 Fly Wheel Assembly 18 J20367 ExhaustDeflector 19 J20368 ScrewM4ExhaustDeflector 210 J20369 E Clip 5Mm 111 J20376 Throttle Clamp 112 J20467 Grub Screw M8 X 8 213 J209007 Cap Head 5/16” X 3/4” 114 J209017 Clutch Drum Machined 115 J209025 Key 3/16” X 3/16” X 1 3/4” Rd End 116 J209233 Stub Shaft 117 Sp01009 Hex Set Screw M8 X 20 318 Sp01093 Hex Set Screw 5/16” Unf X 1” 419 Sp03004 Washer M8 Toothed 420 Sp03029 Washer M8 Spring Lock 321 228001 Tapered Bush 1610 - 3/4” 122 230532 Flywheel 123 230533 Clutch Shoe Pivot 224 E1-1119 Hex Set Screw M10 X 35 225 J20457 Key 3/16” X 3/16” X 1” Rd End 126 J209011 Tension Spring 227 J209012 Washer M16 Form B 228 J209013 Clutch Shoe Assy 229 J209106 E Clip 16Mm 230 Sp01036 Hex Set Screw M8 X 35 231 Sp02006 Nut M8 Nyloc (T) 232 Sp02008 Nut M10 Nyloc (T) 233 Sp02010 Nut M12 Nyloc (T) 2
Item No. Part No. Description Quantity34 230534 Bearing Hub Clutch 135 J209006 Circlip 47 M1308-0470 136 J209249 Washer 9 X 35 X 3 137 Sp06020 Bearing Rms6-2Rs 1
NoteFor Throttle Cable, See Section 6.01
12
4
3
1918
56
14
712
15
1620
17
1
59
2
8
7
21
25
2829232224 & 32
2630 & 31
27
6
34 36
37
35
29FT & Super Six SP20001_REV_6
8
9
1
3
5
7
6
2
10
11
121113
14
7
3
1821
20
2216 19
171821
20
22161915
172
24
25
26
6
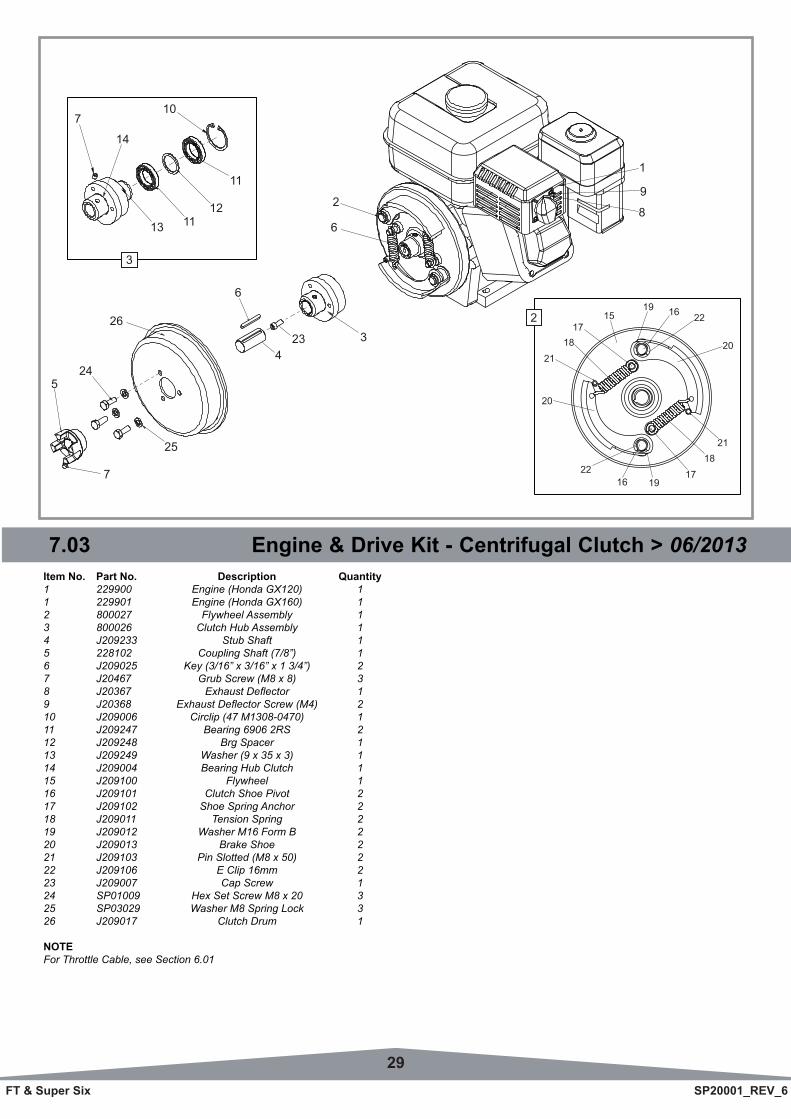
423
7.03 Engine & Drive Kit - Centrifugal Clutch > 06/2013Item No. Part No. Description Quantity1 229900 Engine (Honda GX120) 11 229901 Engine (Honda GX160) 12 800027 Flywheel Assembly 13 800026 Clutch Hub Assembly 14 J209233 Stub Shaft 15 228102 Coupling Shaft (7/8”) 16 J209025 Key (3/16” x 3/16” x 1 3/4”) 27 J20467 Grub Screw (M8 x 8) 38 J20367 ExhaustDeflector 19 J20368 ExhaustDeflectorScrew(M4) 210 J209006 Circlip (47 M1308-0470) 111 J209247 Bearing 6906 2RS 212 J209248 Brg Spacer 113 J209249 Washer (9 x 35 x 3) 114 J209004 Bearing Hub Clutch 115 J209100 Flywheel 116 J209101 Clutch Shoe Pivot 217 J209102 Shoe Spring Anchor 218 J209011 Tension Spring 219 J209012 Washer M16 Form B 220 J209013 Brake Shoe 221 J209103 Pin Slotted (M8 x 50) 222 J209106 E Clip 16mm 223 J209007 Cap Screw 124 SP01009 Hex Set Screw M8 x 20 325 SP03029 Washer M8 Spring Lock 326 J209017 Clutch Drum 1
NOTEFor Throttle Cable, see Section 6.01

30FT & Super Six SP20001_REV_6
8.01 Rear Roller - Main AssemblyItem No. Description Part Number Quantity1 See 8.02 Rear Roller Assy 12 J20119 Spring Scraper Brake Band 13 J20256 Roller Slot Cover Plate 24 J20461 Brake Drum 15 J20463 Brake Band Assy 16 J209201 Rear Roller Driven Pulley 17 SP03016 Washer M10 Form C 28 SP02008 Nut M10 Nyloc 29 J20462 Key Woodruff (606) 3/16” x 3/4” 110 J20457 Key 3/16” x 3/16” x 1” Rd End 111 SP01008 Hex Set Screw M6 x 16 212 SP01035 Hex Set Screw M10 x 25 8
NOTEFor Brake Band Cable, see Section 6.01
7
12
3
11
85
42
9
11
87
6
3
12
10
1

31FT & Super Six SP20001_REV_6
8.01 Rear Roller - Main Assembly 8.02 Rear Roller - Roller AssemblyItem No. Description Part Number Quantity1 See 8.05 RH Differential Assy 2 See 8.04 LH Differential Assy 3 See 8.03 Outer Roller Assy 4 See 8.03 Outer Roller Assy 5 J20477 LH Spacer Collar 16 J20450 LH Bearing Housing 17 J20454 Bearing R18 2RS 28 J20475 Circlip Internal 54 x 2 29 J20474 Circlip Internal 57 x 2 110 J20455 Bearing RLS8 2RS 111 J20467 Grub Screw M8 x 8 212 J20464 RH Spacer Collar 113 J20453 RH Bearing Housing 114 J20494 Gasket Rear Roller 1
2
1
3
10
9
8
7
6
5
11
12
4117
8
13
14

32FT & Super Six SP20001_REV_6
8.03 Rear Roller - Outer Roller AssemblyItem No. Part Number Description Quantity1 J179540 17” LH Outer Roller c/w Bush 11 J179541 17” RH Outer Roller c/w Bush 11 800019L 20” LH Outer Roller c/w Bush 11 800019R 20” RH Outer Roller c/w Bush 11 800044L 24” LH Outer Roller c/w Bush 11 800044R 24” RH Outer Roller c/w Bush 12 J20476 Plunger Bush 13 J20435 Spring Plunger 14 J20437 Plunger Pawl 16 J20480 Grease Nipple 67 Deg 1/8” Bsp T 17 J20481 Grease Nipple Extension 1/8” Bsp T 18 J20473 Roller Bush 2
Not Shown- J20404 Pin Spirol M5 x 24 1
3
1
2
4
6
7
8
33FT & Super Six SP20001_REV_6
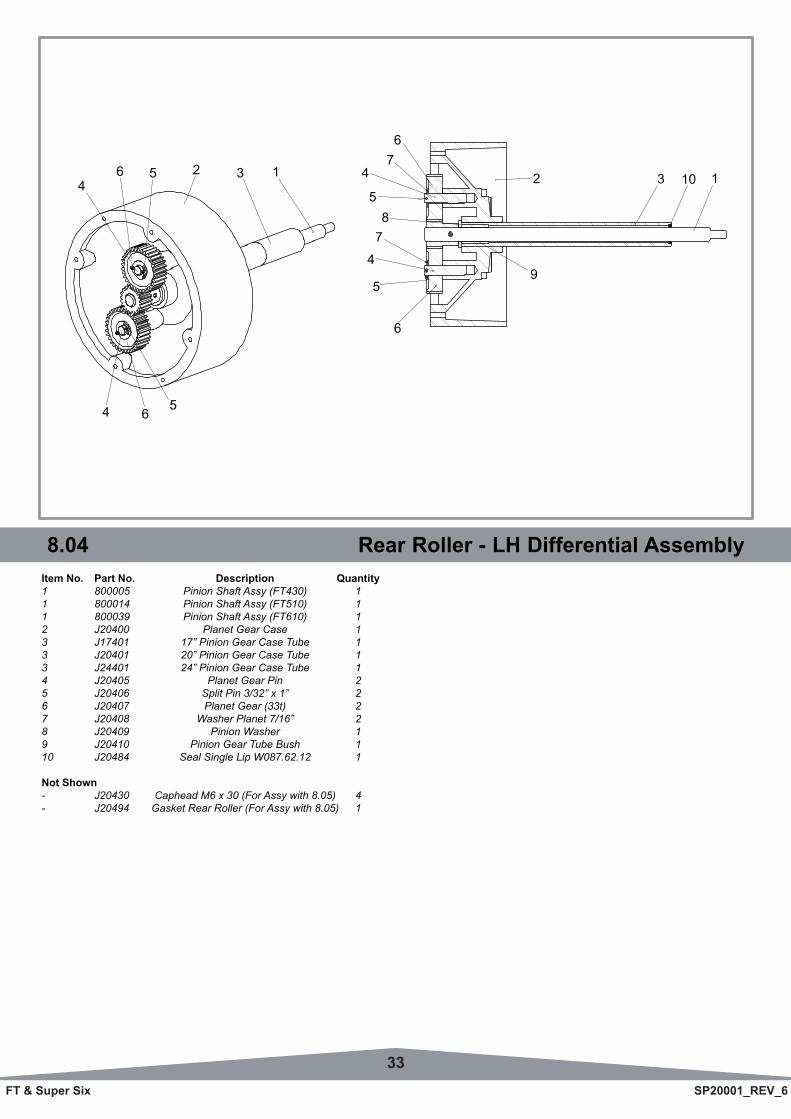
8.04 Rear Roller - LH Differential AssemblyItem No. Part No. Description Quantity1 800005 Pinion Shaft Assy (FT430) 11 800014 Pinion Shaft Assy (FT510) 11 800039 Pinion Shaft Assy (FT610) 12 J20400 Planet Gear Case 13 J17401 17” Pinion Gear Case Tube 13 J20401 20” Pinion Gear Case Tube 13 J24401 24” Pinion Gear Case Tube 14 J20405 Planet Gear Pin 25 J20406 Split Pin 3/32” x 1” 26 J20407 Planet Gear (33t) 27 J20408 Washer Planet 7/16” 28 J20409 Pinion Washer 19 J20410 Pinion Gear Tube Bush 110 J20484 Seal Single Lip W087.62.12 1
Not Shown- J20430 Caphead M6 x 30 (For Assy with 8.05) 4- J20494 Gasket Rear Roller (For Assy with 8.05) 1
41
4 56
3256 2
95
6
1103
67
4
587
4

34FT & Super Six SP20001_REV_6
8.05 Rear Roller - RH Differential Assembly
1
6
4
5
2
5
3
7
1
23
Item No. Part No. Description Quantity1 800006 17” Annular Gear Shaft Assy 11 800015 20” Annular Gear Shaft Assy 11 800040 24” Annular Gear Shaft Assy 12 J20420 Annular Gear Case 13 J17421 17” Annular Gear Case Tube 13 J20421 20” Annular Gear Case Tube 13 J24421 24” Annular Gear Case Tube 14 J20424 Washer Annular 15 J20426 Bush Annular Gear Tube 26 J20432 Oil Plug (14” BSP) 17 J20482 Seal Single Lip R21 1
Not Shown- J20430 Caphead M6 x 30 (For Assy with 8.04) 4- J20494 Gasket Rear Roller (For Assy with 8.04) 1

35FT & Super Six SP20001_REV_6
9.01 Cassette - CutterItem No. Part No. Description Quantity1 J19998 Cassette Side Plate W.A. L.H. 12 J19999 Cassette Side Plate W.A. R.H. 13 J17040 Cylinder 5 Blade 17” 13 J20040 Cylinder 5 Blade 20” 13 J24040 Cylinder 5 Blade 24” 1 3 J17039 Cylinder 9 Blade 17” 13 J20039 Cylinder 9 Blade 20” 13 J24039 Cylinder 9 Blade 24” 14 J17033 DeflectorPlateAssy17”(Vane) 14 J20033 DeflectorPlateAssy20”(Vane) 14 J24033 DeflectorPlateAssy24”(Vane) 15 J179305 17” Shear Blade Adj Bar Assy 15 J209305 20” Shear Blade Adj Bar Assy 15 J249305 24” Shear Blade Adj Bar Assy 16 J209076 Bearing Blank Plate 17 J20003 Cutter Bearing Housing 28 J17011 17” Cassette Tie Bar 28 J20011 20” Cassette Tie Bar 28 J24011 24” Cassette Tie Bar 29 J17012 17” Rectangular Bar 19 J20012 20” Rectangular Bar 19 J24012 24” Rectangular Bar 110 J17025 Shear Blade Carrier 17” 110 J20025 Shear Blade Carrier 20” 110 J24025 Shear Blade Carrier 24” 111 J20065 Shear Blade 20” x 0.060” 111 J24065 Shear Blade 24” x 0.060” 111 J17030 Shear Blade 17” x 0.090” 111 J20030 Shear Blade 20” x 0.090” 111 J24030 Shear Blade 24” x 0.090” 111 J20031 Lipped Blade 20” 111 J24031 Lipped Blade 24” 112 J20032 Screw Bottom Blade 8/10/1213 J209061 DeflectorBracket 214 J209300 Adjuster Knob Cylinder 215 J209302 Decal Cut On / Off 2
Item No. Part No. Description Quantity16 J209303 Adjuster Rod 217 J209304 Shim Od: 22 Id:16 THK 0.3 218 J20008 Back Plate With Hole 119 J20023 Unit Limiting Stud 120 J20004 Bearing Self-aligning RI6 221 J20064 Grease Nipple 1/4” UNF 222 J20041 Female Coupling 123 J20063 Seal Single Lip 22 x 40 224 J209301 Circlip N1460 / 0062 (5/8 EXT) 225 SP01006 Button Head M8 x 20 3 26 SP01007 Coach Bolt M6 227 SP01008 Hex Set Screw M6 x 16 228 SP01009 Hex Set Screw M8 x 20 329 SP01010 Cap Head M10 x 30 (Low Hd) 230 SP01011 Hex Set Screw 3/8” UNF x 3/4” 231 SP02004 Nut M6 Nyloc 232 SP02005 Nut M8 STD 133 SP02015 Nut 3/8” UNF 434 SP02016 Nut 1/2” UNF 435 SP03002 Washer 3/8” 436 SP03004 Washer M8 Toothed 437 SP03005 Washer M10 Toothed 438 SP03006 Washer M12 Toothed 439 SP03007 Washer M6 x 18 440 SP03008 Washer M8 Form A 1
39
10
286
36
34
162
8
5
14
1535
31
9
12
3
23
38
11
40
3730
1
7
20
21
25
18 22
27
1326
4
29
24
17 33
1932
8

36FT & Super Six SP20001_REV_6
9.02 Cassette - BrushItem No. Part No. Description Quantity1 228062 3/4” Tube Bung (3132) 22 800174 Brush Shaft Assembly (17” Multi) 12 800186 Brush Shaft Assembly (20” Multi) 12 800185 Brush Shaft Assembly (24” Multi) 12 800175 Brush Shaft Assembly (17” Standard) 12 800187 Brush Shaft Assembly (20” Standard) 12 800177 Brush Shaft Assembly (24” Standard) 13 J20001 Cassette Side Plate WA NC LH 14 J20002 Cassette Side Plate WA NC RH 15 J20008 Back Plate With Hole 16 J17011 Cassette Tie Bar (17”) 16 J20011 Cassette Tie Bar (20”) 16 J24011 Cassette Tie Bar (24”) 17 J20023 Unit Limiting Stud 18 J20041 Female Coupling 19 J20051 Bearing Housing (6204) 210 J20052 Bearing 6204-2RS 3 211 J17053 Tie Bar (17”) 111 J20053 Tie Bar (20”) 111 J24053 Tie Bar (24”) 112 J17054 DeflectorPlateAssy(17”) 112 J20054 DeflectorPlateAssy(20”) 112 J24054 DeflectorPlateAssy(24”) 113 J17061 Front Tie Bar All Cassettes (17”) 113 J20061 Front Tie Bar All Cassettes (20”) 113 J24061 Front Tie Bar All Cassettes (24”) 114 J209061 DeflectorBracket 215 J209076 Bearing Blank Plate 116 J179305 Shear Blade Adj Bar Assy (17”) 116 J209305 Shear Blade Adj Bar Assy (20”) 116 J249305 Shear Blade Adj Bar Assy (24”) 117 SP01006 Button Head (M8 x 20) 318 SP01007 Coach Bolt (M6) 219 SP01008 Hex Set Screw (M6 x 16) 220 SP01009 Hex Set Screw (M8 x 20) 3
20 16
14
1112
8
17
7
21
3023
6
1
53
913
25
10
1526
18
19
29
*2
224
282724
* - Multi Brush Shown
Item No. Part No. Description Quantity21 SP01011 Hex Set Screw (3/8” UNF x 3/4”) 222 SP02004 Nut Nyloc (M6) 223 SP02005 Nut Std (M8) 124 SP02015 Nut (3/8” UNF) 225 SP02016 Nut (1/2” UNF) 626 SP03004 Washer (M8 Toothed) 427 SP03005 Washer (M10 Toothed) 428 SP03006 Washer (M12 Toothed) 229 SP03007 Washer (M6 x 18) 430 SP03008 Washer (M8 Form A) 1
NOTEMulti Brush shown in diagram (Item 2)

37FT & Super Six SP20001_REV_6
9.02 Cassette - Brush 9.03 Cassette - ScarifiersItem No. Part No. Description Quantity1 228062 3/4” Tube Bung (3132) 22 800047 1mmScarifierHobAssy(17”) 12 800052 1mmScarifierHobAssy(20”) 12 800057 1mmScarifierHobAssy(24”) 12 800048 2mmScarifierHobAssy(17”) 12 800053 2mmScarifierHobAssy(20”) 12 800058 2mmScarifierHobAssy(24”) 12 800207 2mmTTScarifierHobAssy(17”) 12 800206 2mmTTScarifierHobAssy(20”) 12 800208 2mmTTScarifierHobAssy(24”) 13 J20001 Cassette Side Plate WA NC LH 14 J20002 Cassette Side Plate WA NC RH 15 J20008 Back Plate With Hole 16 J17011 Cassette Tie Bar (17”) 16 J20011 Cassette Tie Bar (20”) 16 J24011 Cassette Tie Bar (24”) 17 J20023 Unit Limiting Stud 18 J20041 Female Coupling 19 J20051 Bearing Housing (6204) 210 J20052 Bearing 6204-2RS 3 211 J17053 Tie Bar (17”) 111 J20053 Tie Bar (20”) 111 J24053 Tie Bar (24”) 112 J17054 DeflectorPlateAssy(17”) 112 J20054 DeflectorPlateAssy(20”) 112 J24054 DeflectorPlateAssy(24”) 113 J17061 Front Tie Bar All Cassettes (FT430) 113 J20061 Front Tie Bar All Cassettes (FT510) 113 J24061 Front Tie Bar All Cassettes (FT610) 114 J209061 DeflectorBracket 215 J209076 Bearing Blank Plate 116 J179305 Shear Blade Adj Bar Assy (17”) 116 J209305 Shear Blade Adj Bar Assy (20”) 116 J249305 Shear Blade Adj Bar Assy (24”) 117 SP01006 Button Head (M8 x 20) 318 SP01007 Coach Bolt (M6) 2
Item No. Part No. Description Quantity19 SP01008 Hex Set Screw (M6 x 16) 220 SP01009 Hex Set Screw (M8 x 20) 321 SP01011 Hex Set Screw (3/8” UNF x 3/4”) 222 SP02004 Nut (M6 Nyloc) 223 SP02005 Nut (M8 Std) 124 SP02015 Nut (3/8” UNF) 225 SP02016 Nut (1/2” UNF) 626 SP03004 Washer (M8 Toothed) 427 SP03005 Washer (M10 Toothed) 428 SP03006 Washer (M12 Toothed) 229 SP03007 Washer (M6 x 18) 430 SP03008 Washer (M8 Form A) 131 J17055 Square Shaft (17”) 131 J20055 Square Shaft (20”) 131 J24055 Square Shaft (24”) 132 J20056 Spacer AR33 J20059 Nut 7/8” UNF Lock (Thin) 134 J20060 Lock Washer (Small) 135 J209080 Flange Stop 136 J20058 Scarifer Blade 1mm AR36 J20057 Scarifer Blade 2mm AR36 230105 Scarifer Blade TT AR
26
25
15
20
10
1418
16
199
2
22
4
28 27
24
30
1
11
12
17
7
31
623
8
53
9
13
33
35
31 32
34
36
2mm Tungsten36 36
1 & 2mm Std

38FT & Super Six SP20001_REV_6
9.04 Cassette - SlitterItem No. Part No. Description Quantity1 230318 Blanking Plate 12 J20000 Cassette Side Plate WA ND 23 J17011 Cassette Tie Bar (17”) 23 J20011 Cassette Tie Bar (20”) 23 J24011 Cassette Tie Bar (24”) 24 J20023 Unit Limiting Stud 15 J20051 Bearing Housing (6204) 26 J20052 Bearing 6204-2RS 3 27 J17053 Tie Bar (17”) 17 J20053 Tie Bar (20”) 17 J24053 Tie Bar (24”) 18 J209076 Bearing Blank Plate 19 J179305 Shear Blade Adj Bar Assy (17”) 19 J209305 Shear Blade Adj Bar Assy (20”) 19 J249305 Shear Blade Adj Bar Assy (24”) 1 10 SP01006 Button Head (M8 x 20) 311 SP01009 Hex Set Screw (M8 x 20) 312 SP01011 Hex Set Screw (3/8” UNF x 3/4”) 213 SP02005 Nut (M8 Std) 114 SP02015 Nut (3/8” UNF) 215 SP02016 Nut (1/2” UNF) 416 SP03004 Washer (M8 Toothed) 417 SP03005 Washer (M10 Toothed) 418 SP03006 Washer (M12 Toothed) 219 SP03008 Washer (M8 Form A) 120 228062 3/4” Tube Bung (3132) 221 800051 Slitter Hob Assy (17”) 121 800056 Slitter Hob Assy (20”) 121 800061 Slitter Hob Assy (24”) 122 230334 Slitter Shaft FT (17”) 122 230335 Slitter Shaft FT (20”) 122 230336 Slitter Shaft FT (24”) 123 J20056 Spacer AR24 J20060 Lock Washer (Small) 125 J209080 Flange Stop 1
11 9205
18
17
15
8
16
14
10
12
4
1913
3
7
6 21
21
26
24
23
2225
Item No. Part No. Description Quantity26 J20057 Scarifer Blade 2mm AR
Not Shown- J20059 Nut 7/8” UNF Lock (Thin) 1

39FT & Super Six SP20001_REV_6
9.05 Cassette - SorrelItem No. Part No. Description Quantity1 228062 3/4” Tube Bung (3132) 22 230318 Blanking Plate 13 J20000 Cassette Side Plate WA ND 24 J17011 Cassette Tie Bar (17”) 24 J20011 Cassette Tie Bar (20”) 24 J24011 Cassette Tie Bar (24”) 25 J20023 Unit Limiting Stud 16 J20051 Bearing Housing (6204) 27 J20052 Bearing 6204-2RS 3 28 J17053 Tie Bar (17”) 18 J20053 Tie Bar (20”) 18 J24053 Tie Bar (24”) 19 J17810 Sorrel Roller (17”) 19 J20810 Sorrel Roller (20”) 19 J24810 Sorrel Roller (24”) 110 J20811 Spike Sorrel Roller 126/150/18611 J209076 Bearing Blank Plate 112 J179305 Shear Blade Adj Bar Assy (17”) 112 J209305 Shear Blade Adj Bar Assy (20”) 112 J249305 Shear Blade Adj Bar Assy (24”) 113 SP01006 Button Head (M8 x 20) 314 SP01009 Hex Set Screw (M8 x 20) 315 SP01011 Hex Set Screw (3/8” UNF x 3/4”) 216 SP02005 Nut (M8 Std) 117 SP02015 Nut (3/8” UNF) 218 SP02016 Nut (1/2” UNF) 419 SP03004 Washer (M8 Toothed) 420 SP03005 Washer (M10 Toothed) 421 SP03006 Washer (M12 Toothed) 222 SP03008 Washer (M8 Form A) 1
Not Shown- J17816 Weight Bar 17” 1- J20816 Weight Bar 20” 1- J24816 Weight Bar 24” 1
14
5
2216
1216
21
20
18
11
19
10
94 8
7
3
2
17
13
15
40FT & Super Six SP20001_REV_6
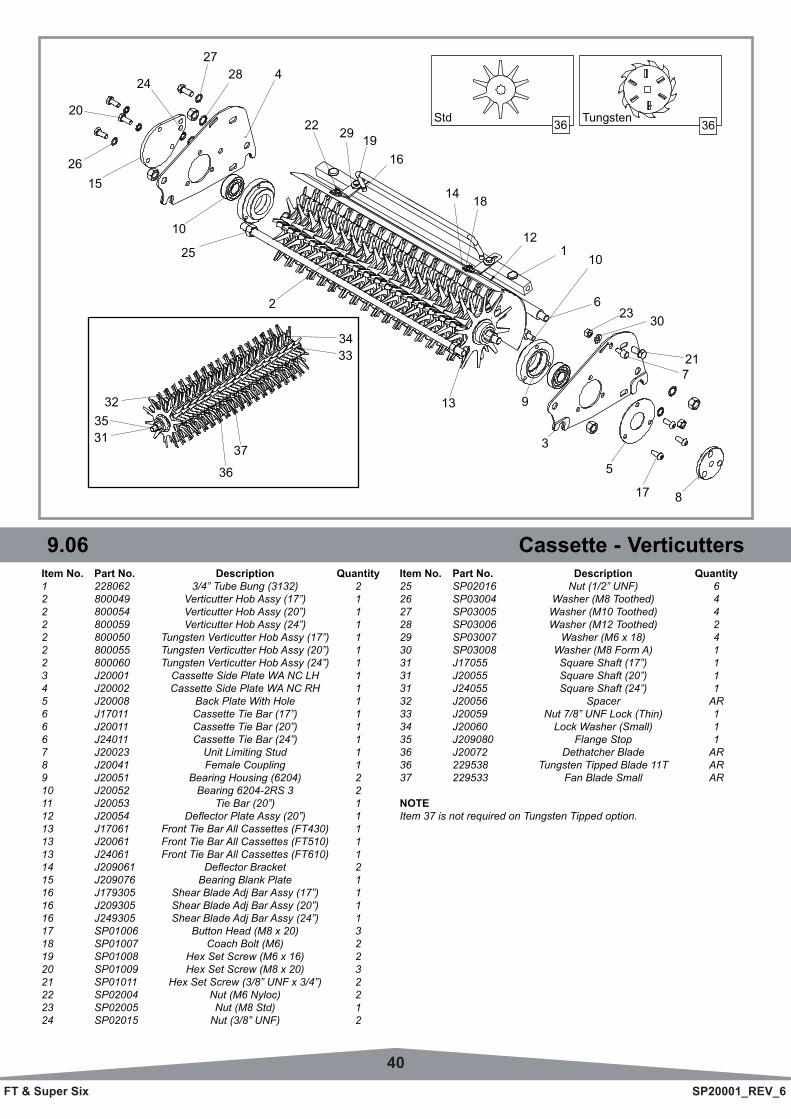
9.06 Cassette - VerticuttersItem No. Part No. Description Quantity1 228062 3/4” Tube Bung (3132) 22 800049 Verticutter Hob Assy (17”) 12 800054 Verticutter Hob Assy (20”) 12 800059 Verticutter Hob Assy (24”) 12 800050 Tungsten Verticutter Hob Assy (17”) 12 800055 Tungsten Verticutter Hob Assy (20”) 12 800060 Tungsten Verticutter Hob Assy (24”) 13 J20001 Cassette Side Plate WA NC LH 14 J20002 Cassette Side Plate WA NC RH 15 J20008 Back Plate With Hole 16 J17011 Cassette Tie Bar (17”) 16 J20011 Cassette Tie Bar (20”) 16 J24011 Cassette Tie Bar (24”) 17 J20023 Unit Limiting Stud 18 J20041 Female Coupling 19 J20051 Bearing Housing (6204) 210 J20052 Bearing 6204-2RS 3 211 J20053 Tie Bar (20”) 112 J20054 DeflectorPlateAssy(20”) 113 J17061 Front Tie Bar All Cassettes (FT430) 113 J20061 Front Tie Bar All Cassettes (FT510) 113 J24061 Front Tie Bar All Cassettes (FT610) 114 J209061 DeflectorBracket 215 J209076 Bearing Blank Plate 116 J179305 Shear Blade Adj Bar Assy (17”) 116 J209305 Shear Blade Adj Bar Assy (20”) 116 J249305 Shear Blade Adj Bar Assy (24”) 117 SP01006 Button Head (M8 x 20) 318 SP01007 Coach Bolt (M6) 219 SP01008 Hex Set Screw (M6 x 16) 220 SP01009 Hex Set Screw (M8 x 20) 321 SP01011 Hex Set Screw (3/8” UNF x 3/4”) 222 SP02004 Nut (M6 Nyloc) 223 SP02005 Nut (M8 Std) 124 SP02015 Nut (3/8” UNF) 2
20
10
12
1814
161929
2
22
42827
24
25
10
1526
817
721
30236
1
3
913
537
36
313532
3334
Tungsten36 36Std
Item No. Part No. Description Quantity25 SP02016 Nut (1/2” UNF) 626 SP03004 Washer (M8 Toothed) 427 SP03005 Washer (M10 Toothed) 428 SP03006 Washer (M12 Toothed) 2 29 SP03007 Washer (M6 x 18) 430 SP03008 Washer (M8 Form A) 131 J17055 Square Shaft (17”) 131 J20055 Square Shaft (20”) 131 J24055 Square Shaft (24”) 132 J20056 Spacer AR33 J20059 Nut 7/8” UNF Lock (Thin) 134 J20060 Lock Washer (Small) 135 J209080 Flange Stop 136 J20072 Dethatcher Blade AR36 229538 Tungsten Tipped Blade 11T AR37 229533 Fan Blade Small AR
NOTEItem 37 is not required on Tungsten Tipped option.

DENNIS, Ashbourne Road, Kirk Langley, Derby, DE6 4NJ, United KingdomTelephone:- 01332 824777
Fax:- 01332 824 525E-mail:- [email protected]
E-mail:- [email protected]
www.dennisuk.com
Related Documents