FreeSWITCH IP PBX with Secure Twilio Elastic SIP Trunking (Updated: 3/14/2017) Implementing security mechanisms in the Twilio Elastic SIP trunk provides secure and reliable data transfer between your SIP device and Twilio infrastructure. TLS secures and controls SIP connections between your existing IP Telephony infrastructure and Twilio. You can add secure RTP (SRTP) to TLS services for the next level of security on devices that support SRTP. SRTP authenticates and encrypts the media stream (voice packets) to ensure that voice conversations that originate at or terminate to Twilio Elastic SIP Trunk are protected from eavesdroppers who may have gained access to the voice domain. This document provides the configuration steps required to implement FreeSwitch PBX using a Twilio Elastic SIP trunk with SIP TLS and SRTP. With the Introduction of TLS and SRTP support Twilio Elastic SIP trunking greatly enhances the SIP portion of your customer communications. Using certificates signed by a Public CA (as opposed to self-signed certs) you can prevent MITM (man in the middle) compromises. However, TLS by itself “does not protect voice rtp traffic”. Voice RTP traffic is protected by using SRTP. This tutorial will help you to implement TLS and SRTP for incoming and outgoing voice calls from your Freeswitch IP PBX using self-signed certificates. Please look at the references below to get more detail information for each component. Software Requirements ● Freeswitch 1.4+ ● Twilio Elastic SIP Trunk Secure Trunking Installation instructions This guide assumes you have a Freeswitch system already installed. For Freeswitch installation instructions please take a look at: https://freeswitch.org/confluence/display/FREESWITCH/Installation

Welcome message from author
This document is posted to help you gain knowledge. Please leave a comment to let me know what you think about it! Share it to your friends and learn new things together.
Transcript

FreeSWITCH IP PBX with Secure Twilio Elastic SIP Trunking
(Updated: 3/14/2017)
Implementing security mechanisms in the Twilio Elastic SIP trunk provides secure and reliable data transfer between your SIP device and Twilio infrastructure. TLS secures and controls SIP connections between your existing IP Telephony infrastructure and Twilio. You can add secure RTP (SRTP) to TLS services for the next level of security on devices that support SRTP. SRTP authenticates and encrypts the media stream (voice packets) to ensure that voice conversations that originate at or terminate to Twilio Elastic SIP Trunk are protected from eavesdroppers who may have gained access to the voice domain. This document provides the configuration steps required to implement FreeSwitch PBX using a Twilio Elastic SIP trunk with SIP TLS and SRTP. With the Introduction of TLS and SRTP support Twilio Elastic SIP trunking greatly enhances the SIP portion of your customer communications. Using certificates signed by a Public CA (as opposed to self-signed certs) you can prevent MITM (man in the middle) compromises. However, TLS by itself “does not protect voice rtp traffic”. Voice RTP traffic is protected by using SRTP. This tutorial will help you to implement TLS and SRTP for incoming and outgoing voice calls from your Freeswitch IP PBX using self-signed certificates. Please look at the references below to get more detail information for each component.
Software Requirements
● Freeswitch 1.4+
● Twilio Elastic SIP Trunk Secure Trunking
Installation instructions This guide assumes you have a Freeswitch system already installed. For Freeswitch installation instructions please take a look at: https://freeswitch.org/confluence/display/FREESWITCH/Installation

Setting up your Twilio Elastic SIP Trunk
In order to enable SIP TLS and SRTP go to the General tab and open Secure Trunking section, in
here enable Secure Trunking which will allow Secure TLS and SRTP calls in your Twilio Elastic SIP
Trunking.
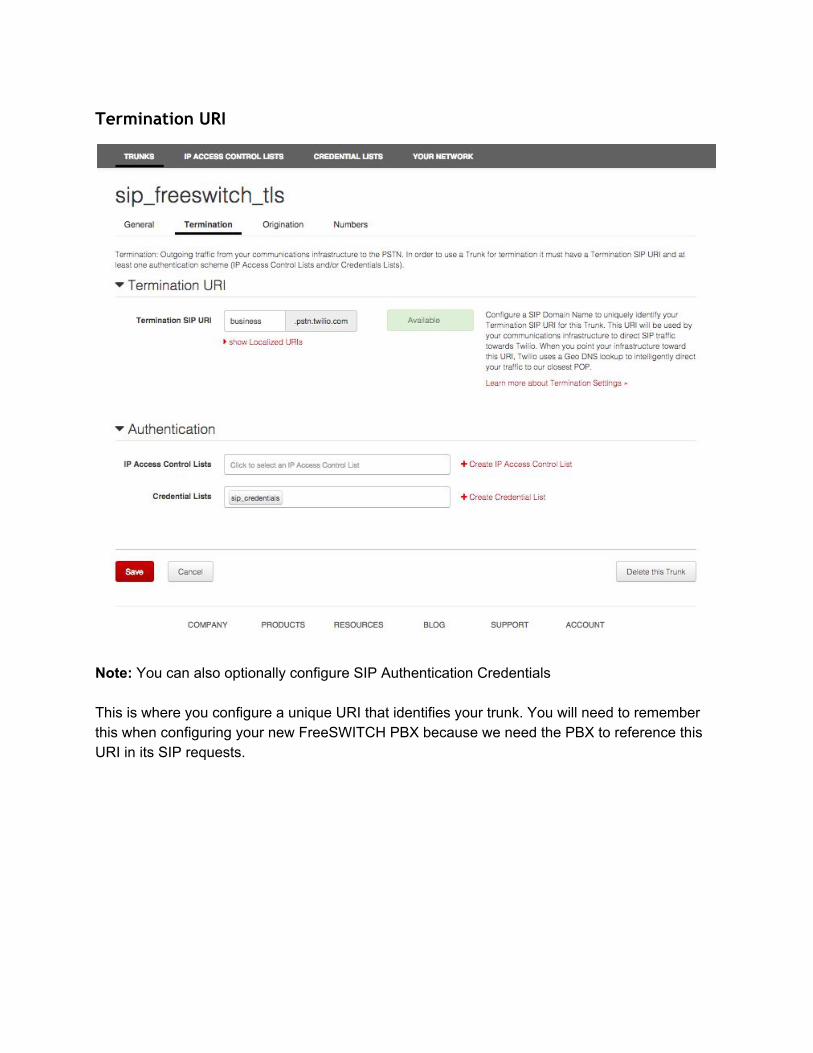
Termination URI
Note: You can also optionally configure SIP Authentication Credentials This is where you configure a unique URI that identifies your trunk. You will need to remember this when configuring your new FreeSWITCH PBX because we need the PBX to reference this URI in its SIP requests.
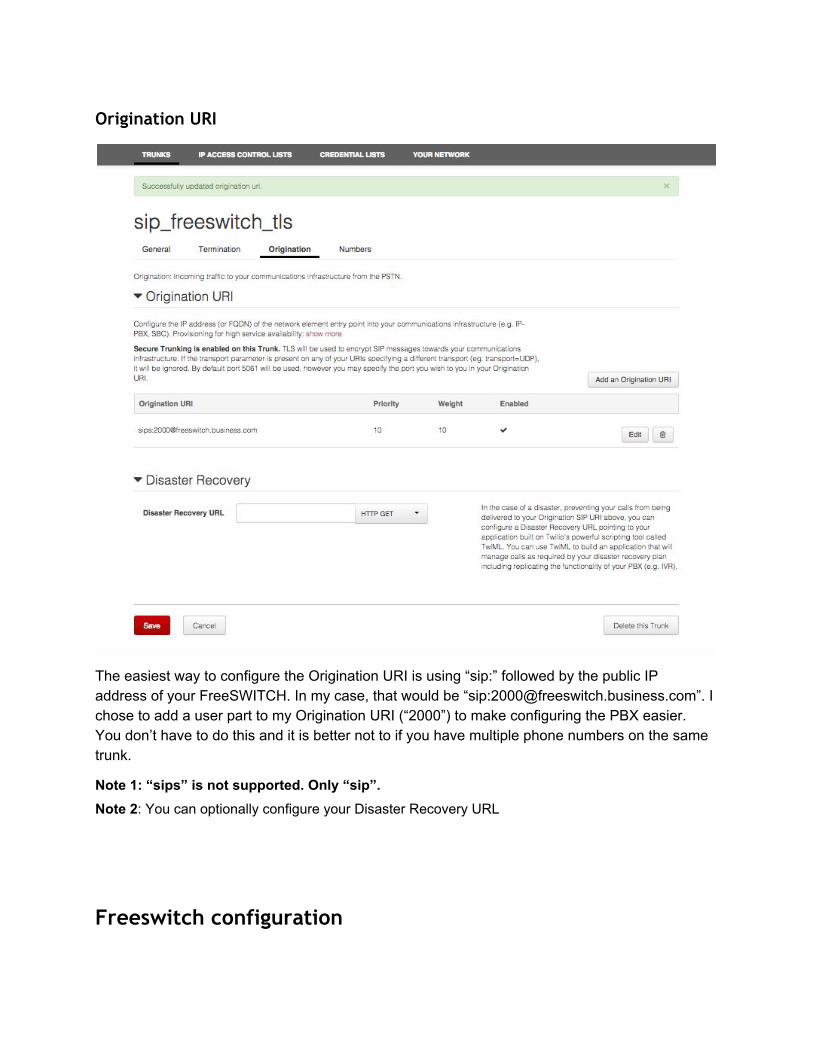
Origination URI
The easiest way to configure the Origination URI is using “sip:” followed by the public IP address of your FreeSWITCH. In my case, that would be “sip:[email protected]”. I chose to add a user part to my Origination URI (“2000”) to make configuring the PBX easier. You don’t have to do this and it is better not to if you have multiple phone numbers on the same trunk.
Note 1: “sips” is not supported. Only “sip”. Note 2: You can optionally configure your Disaster Recovery URL
Freeswitch configuration
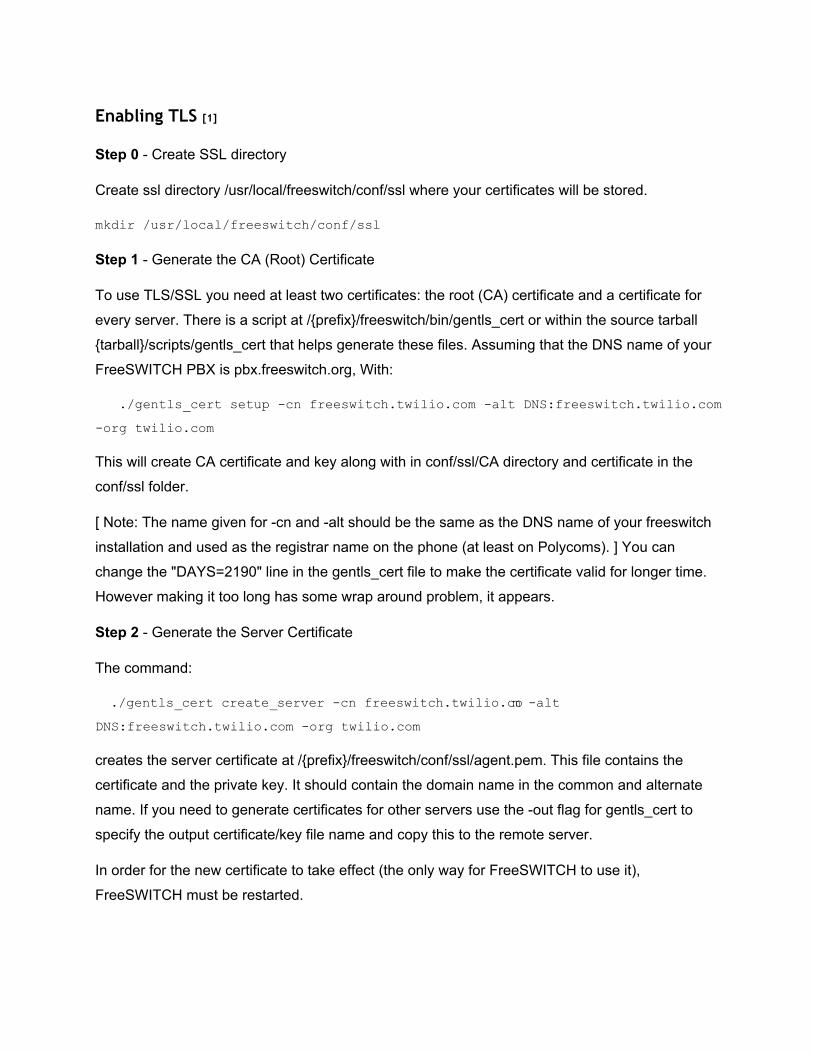
Enabling TLS [1]
Step 0 - Create SSL directory
Create ssl directory /usr/local/freeswitch/conf/ssl where your certificates will be stored.
mkdir /usr/local/freeswitch/conf/ssl
Step 1 - Generate the CA (Root) Certificate
To use TLS/SSL you need at least two certificates: the root (CA) certificate and a certificate for
every server. There is a script at /{prefix}/freeswitch/bin/gentls_cert or within the source tarball
{tarball}/scripts/gentls_cert that helps generate these files. Assuming that the DNS name of your
FreeSWITCH PBX is pbx.freeswitch.org, With:
./gentls_cert setup -cn freeswitch.twilio.com -alt DNS:freeswitch.twilio.com
-org twilio.com
This will create CA certificate and key along with in conf/ssl/CA directory and certificate in the
conf/ssl folder.
[ Note: The name given for -cn and -alt should be the same as the DNS name of your freeswitch
installation and used as the registrar name on the phone (at least on Polycoms). ] You can
change the "DAYS=2190" line in the gentls_cert file to make the certificate valid for longer time.
However making it too long has some wrap around problem, it appears.
Step 2 - Generate the Server Certificate
The command:
./gentls_cert create_server -cn freeswitch.twilio.com -alt
DNS:freeswitch.twilio.com -org twilio.com
creates the server certificate at /{prefix}/freeswitch/conf/ssl/agent.pem. This file contains the
certificate and the private key. It should contain the domain name in the common and alternate
name. If you need to generate certificates for other servers use the -out flag for gentls_cert to
specify the output certificate/key file name and copy this to the remote server.
In order for the new certificate to take effect (the only way for FreeSWITCH to use it),
FreeSWITCH must be restarted.
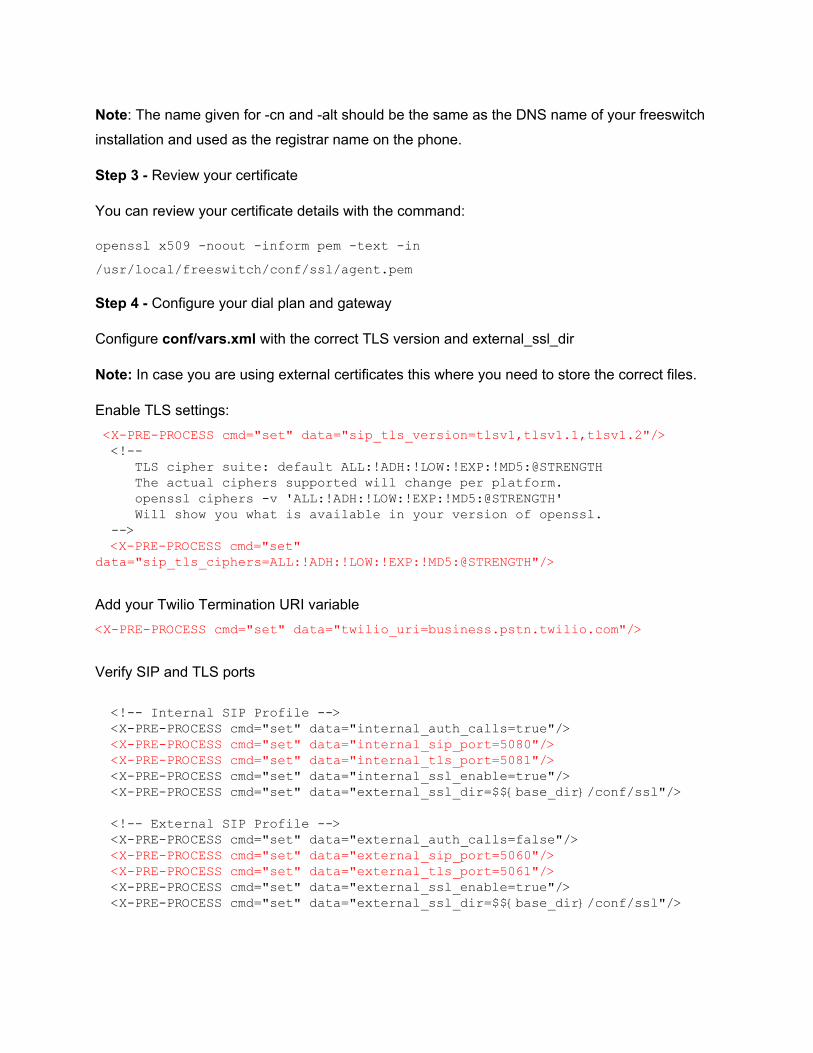
Note: The name given for -cn and -alt should be the same as the DNS name of your freeswitch
installation and used as the registrar name on the phone.
Step 3 - Review your certificate
You can review your certificate details with the command:
openssl x509 -noout -inform pem -text -in
/usr/local/freeswitch/conf/ssl/agent.pem
Step 4 - Configure your dial plan and gateway
Configure conf/vars.xml with the correct TLS version and external_ssl_dir
Note: In case you are using external certificates this where you need to store the correct files.
Enable TLS settings: <X-PRE-PROCESS cmd="set" data="sip_tls_version=tlsv1,tlsv1.1,tlsv1.2"/> <!-- TLS cipher suite: default ALL:!ADH:!LOW:!EXP:!MD5:@STRENGTH The actual ciphers supported will change per platform. openssl ciphers -v 'ALL:!ADH:!LOW:!EXP:!MD5:@STRENGTH' Will show you what is available in your version of openssl. --> <X-PRE-PROCESS cmd="set" data="sip_tls_ciphers=ALL:!ADH:!LOW:!EXP:!MD5:@STRENGTH"/>
Add your Twilio Termination URI variable <X-PRE-PROCESS cmd="set" data="twilio_uri=business.pstn.twilio.com"/>
Verify SIP and TLS ports <!-- Internal SIP Profile --> <X-PRE-PROCESS cmd="set" data="internal_auth_calls=true"/> <X-PRE-PROCESS cmd="set" data="internal_sip_port=5080"/> <X-PRE-PROCESS cmd="set" data="internal_tls_port=5081"/> <X-PRE-PROCESS cmd="set" data="internal_ssl_enable=true"/> <X-PRE-PROCESS cmd="set" data="external_ssl_dir=$${base_dir}/conf/ssl"/> <!-- External SIP Profile --> <X-PRE-PROCESS cmd="set" data="external_auth_calls=false"/> <X-PRE-PROCESS cmd="set" data="external_sip_port=5060"/> <X-PRE-PROCESS cmd="set" data="external_tls_port=5061"/> <X-PRE-PROCESS cmd="set" data="external_ssl_enable=true"/> <X-PRE-PROCESS cmd="set" data="external_ssl_dir=$${base_dir}/conf/ssl"/>

Configure your dial plan to use Twilio SIP Trunk under dialplan/public.xml Note: You can look at the Twilio Freeswitch integration for more details.
The two commonly used crypto suites are:
■ AES_CM_128_HMAC_SHA1_80
■ AES_CM_128_HMAC_SHA1_32
In trunking termination, where customers send call setup requests to Twilio, we accept either of
above. In trunking origination, SRTP calls from Twilio will be in AES_CM_128_HMAC_SHA1_80
only.
In the example below we send to Twilio AES_CM_128_HMAC_SHA1_80 <extension name="us_twilio_secure"> <action application="log" data="INFO Processing REGEX"/> <condition field="destination_number" expression="^9(\d{11})$"> <action application="set" data="proxy_media=false"/> <action application="set" data="bypass_media=false"/> <action application="export" data="zrtp_secure_media=false"/> <action application="export" data="nolocal:rtp_secure_media=true:AES_CM_128_HMAC_SHA1_80"/> <action application="set" data="dialed_number=+$1"/> <action application="log" data="INFO Processing US call to Twilio Secure ${dialed_number}"/>
<action application="bridge" data="{sip_invite_req_uri=sip:${dialed_number}@${twilio_uri}}sofia/gateway/Twilio-tls-outbound/${dialed_number}"/> </condition> </extension>
Configure your Twilio gateway <include> <gateway name="Twilio-tls-outbound">
<param name="tls-version" value="tlsv1"/> <param name="register-transport" value="tls"/> <param name="username" value="username********"/> <!-- (your Twilio IP
Credentials username) --> <param name="password" value="password********"/> <!-- (your Twilio IP
Credentials password) --> <param name="realm" value="sip.twilio.com"/> <param name="proxy" value="business.pstn.twilio.com"/> <!-- (your
configured Twilio Trunk SIP URI) --> <param name="register" value="false"/>
</gateway> </include>
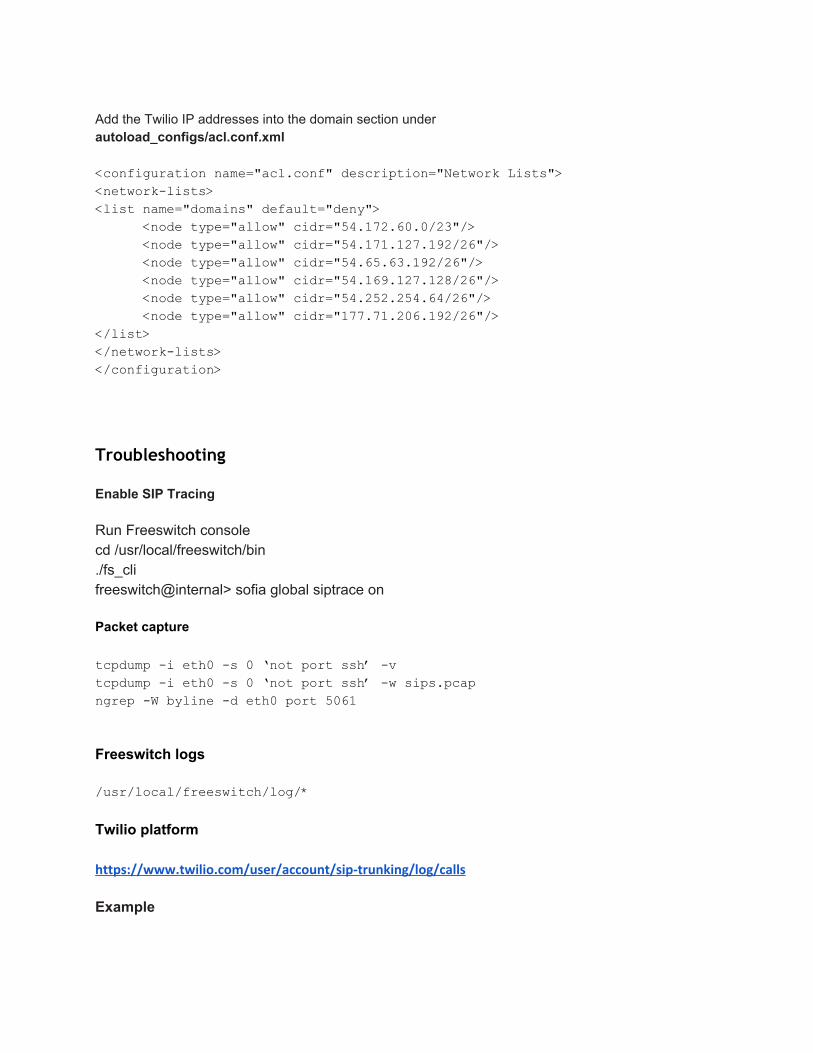
Add the Twilio IP addresses into the domain section under autoload_configs/acl.conf.xml <configuration name="acl.conf" description="Network Lists"> <network-lists> <list name="domains" default="deny">
<node type="allow" cidr="54.172.60.0/23"/> <node type="allow" cidr="54.171.127.192/26"/> <node type="allow" cidr="54.65.63.192/26"/> <node type="allow" cidr="54.169.127.128/26"/> <node type="allow" cidr="54.252.254.64/26"/> <node type="allow" cidr="177.71.206.192/26"/>
</list> </network-lists> </configuration>
Troubleshooting Enable SIP Tracing Run Freeswitch console cd /usr/local/freeswitch/bin ./fs_cli freeswitch@internal> sofia global siptrace on Packet capture tcpdump -i eth0 -s 0 ‘not port ssh’ -v tcpdump -i eth0 -s 0 ‘not port ssh’ -w sips.pcap ngrep -W byline -d eth0 port 5061 Freeswitch logs /usr/local/freeswitch/log/* Twilio platform
https://www.twilio.com/user/account/sip-trunking/log/calls Example
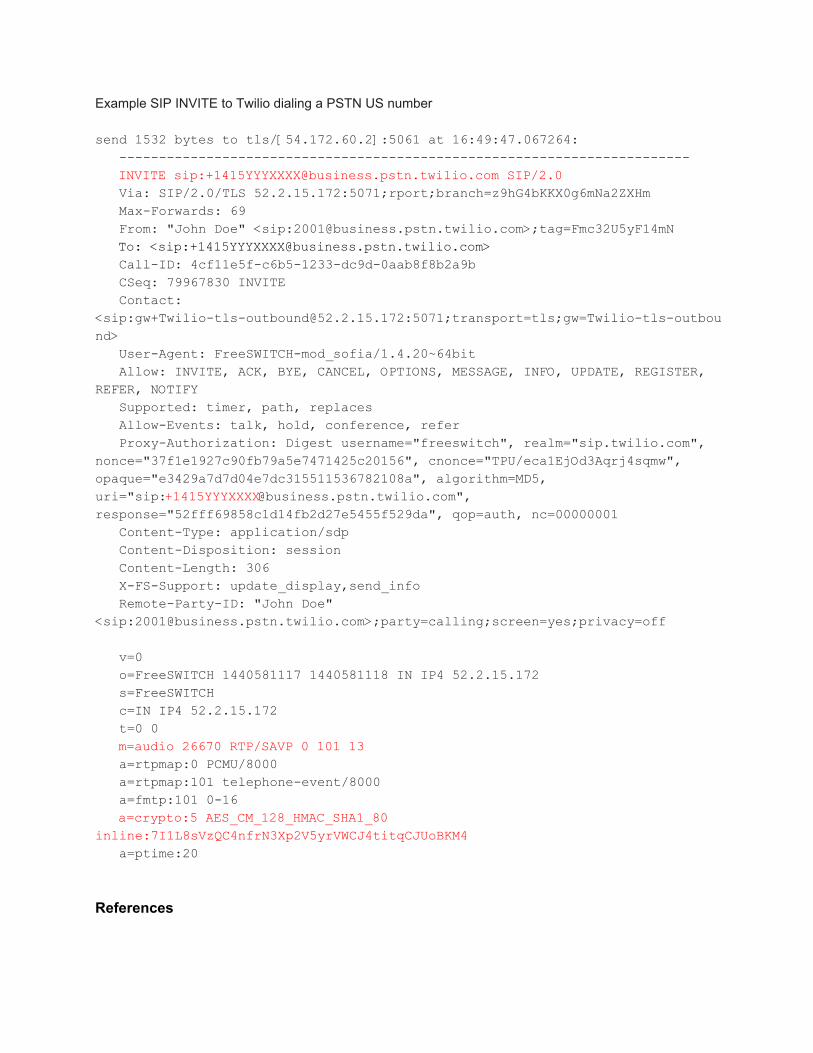
Example SIP INVITE to Twilio dialing a PSTN US number send 1532 bytes to tls/[54.172.60.2]:5061 at 16:49:47.067264: ------------------------------------------------------------------------ INVITE sip:[email protected] SIP/2.0 Via: SIP/2.0/TLS 52.2.15.172:5071;rport;branch=z9hG4bKKX0g6mNa2ZXHm Max-Forwards: 69 From: "John Doe" <sip:[email protected]>;tag=Fmc32U5yF14mN To: <sip:[email protected]> Call-ID: 4cf11e5f-c6b5-1233-dc9d-0aab8f8b2a9b CSeq: 79967830 INVITE Contact: <sip:[email protected]:5071;transport=tls;gw=Twilio-tls-outbound> User-Agent: FreeSWITCH-mod_sofia/1.4.20~64bit Allow: INVITE, ACK, BYE, CANCEL, OPTIONS, MESSAGE, INFO, UPDATE, REGISTER, REFER, NOTIFY Supported: timer, path, replaces Allow-Events: talk, hold, conference, refer Proxy-Authorization: Digest username="freeswitch", realm="sip.twilio.com", nonce="37f1e1927c90fb79a5e7471425c20156", cnonce="TPU/eca1EjOd3Aqrj4sqmw", opaque="e3429a7d7d04e7dc315511536782108a", algorithm=MD5, uri="sip:[email protected]", response="52fff69858c1d14fb2d27e5455f529da", qop=auth, nc=00000001 Content-Type: application/sdp Content-Disposition: session Content-Length: 306 X-FS-Support: update_display,send_info Remote-Party-ID: "John Doe" <sip:[email protected]>;party=calling;screen=yes;privacy=off v=0 o=FreeSWITCH 1440581117 1440581118 IN IP4 52.2.15.172 s=FreeSWITCH c=IN IP4 52.2.15.172 t=0 0 m=audio 26670 RTP/SAVP 0 101 13 a=rtpmap:0 PCMU/8000 a=rtpmap:101 telephone-event/8000 a=fmtp:101 0-16 a=crypto:5 AES_CM_128_HMAC_SHA1_80 inline:7I1L8sVzQC4nfrN3Xp2V5yrVWCJ4titqCJUoBKM4 a=ptime:20 References

[1] http://wiki.freeswitch.org/wiki/SIP_TLS


Related Documents


