Framework 8.1 Deployment Guide

Welcome message from author
This document is posted to help you gain knowledge. Please leave a comment to let me know what you think about it! Share it to your friends and learn new things together.
Transcript
Framework 8.1
Deployment Guide

The information contained herein is proprietary and confidential and cannot be disclosed or duplicated without the prior written consent of Genesys Telecommunications Laboratories, Inc.
Copyright © 2000–2013 Genesys Telecommunications Laboratories, Inc. All rights reserved.
About GenesysGenesys is the world's leading provider of customer service and contact center software - with more than 4,000 customers in 80 countries. Drawing on its more than 20 years of customer service innovation and experience, Genesys is uniquely positioned to help companies bring their people, insights and customer channels together to effectively drive today's customer conversation. Genesys software directs more than 100 million interactions every day, maximizing the value of customer engagement and differentiating the experience by driving personalization and multi-channel customer service - and extending customer service across the enterprise to optimize processes and the performance of customer-facing employees. Go to www.genesyslab.com for more information.
Each product has its own documentation for online viewing at the Genesys Technical Support website or on the Documentation Library DVD, which is available from Genesys upon request. For more information, contact your sales representative.
NoticeAlthough reasonable effort is made to ensure that the information in this document is complete and accurate at the time of release, Genesys Telecommunications Laboratories, Inc., cannot assume responsibility for any existing errors. Changes and/or corrections to the information contained in this document may be incorporated in future versions.
Your Responsibility for Your System’s SecurityYou are responsible for the security of your system. Product administration to prevent unauthorized use is your responsibility. Your system administrator should read all documents provided with this product to fully understand the features available that reduce your risk of incurring charges for unlicensed use of Genesys products.
TrademarksGenesys, the Genesys logo, and T-Server are registered trademarks of Genesys Telecommunications Laboratories, Inc. All other trademarks and trade names referred to in this document are the property of other companies. © 2013 Genesys Telecommunications Laboratories, Inc. All rights reserved.The Crystal monospace font is used by permission of Software Renovation Corporation, www.SoftwareRenovation.com.
Technical Support from VARsIf you have purchased support from a value-added reseller (VAR), please contact the VAR for technical support.
Technical Support from GenesysIf you have purchased support directly from Genesys, please contact Genesys Technical Support. Before contacting technical support, please refer to the Genesys Care Program Guide for complete contact information and procedures.
Ordering and Licensing InformationComplete information on ordering and licensing Genesys products can be found in the Genesys Licensing Guide.
Released by
Genesys Telecommunications Laboratories, Inc. www.genesyslab.com
Document Version: 81fr_dep_06-2013_v8.1.301.00
Deployment Guide 3
Table of ContentsList ofProcedures ................................................................................................................. 11
Preface ................................................................................................................. 17
About Genesys Framework ..................................................................... 17Intended Audience................................................................................... 18Making Comments on This Document .................................................... 18Contacting Genesys Technical Support................................................... 18Changes in This Document ..................................................................... 19
Version 8.1.301.00.............................................................................. 19Version 8.1.201.00.............................................................................. 19Version 8.1.101.00.............................................................................. 19Version 8.1.001.00.............................................................................. 20
Chapter 1 Framework Overview ........................................................................... 21
Major Functions ....................................................................................... 21New in This Release................................................................................ 22
Chapter 2 Framework Architecture ...................................................................... 27
High-Level Framework Architecture ........................................................ 27Configuration Layer ................................................................................. 28
Configuration Layer Functions............................................................ 28Configuration Layer Architecture ........................................................ 29
Management Layer.................................................................................. 31Management Layer Functions ............................................................ 31Management Layer Architecture......................................................... 31
User Interaction Layer ............................................................................. 33Functions ............................................................................................ 33Architecture......................................................................................... 33
Media Layer............................................................................................. 34Media Layer Functions ....................................................................... 34Media Layer Architecture.................................................................... 34
Table of Contents
4 Framework 8.1
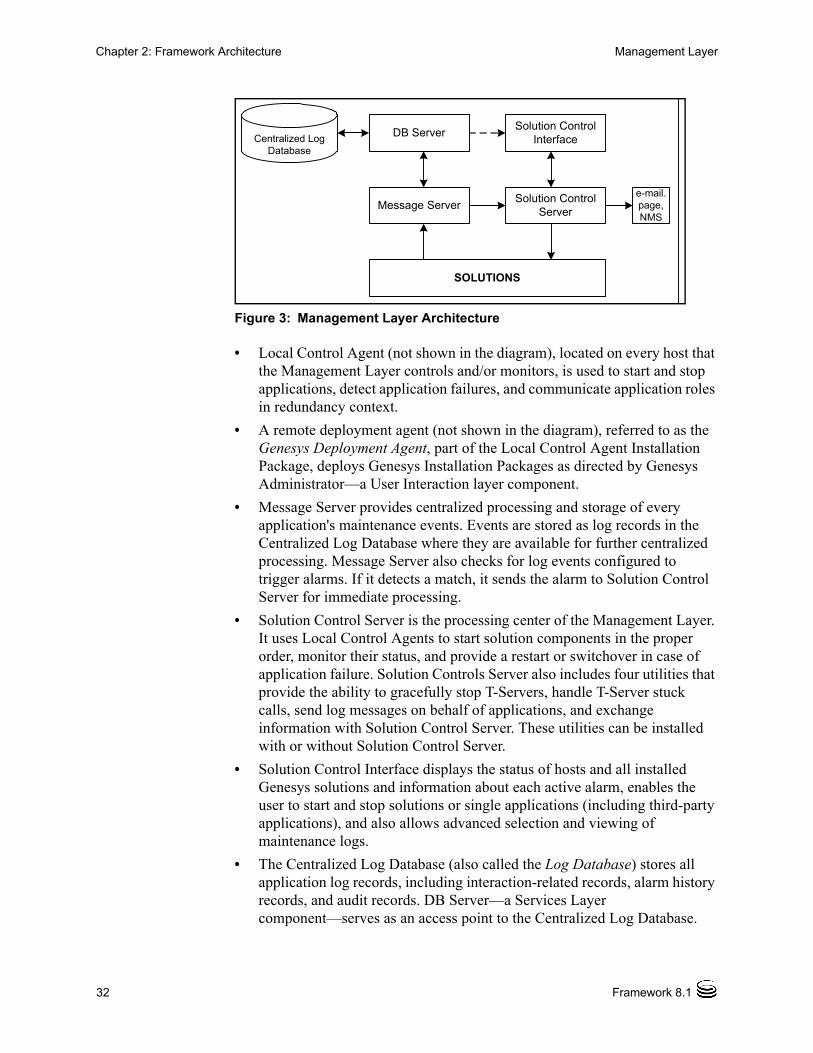
Services Layer......................................................................................... 35Services Layer Overview .................................................................... 35Services Layer Architecture................................................................ 35
Framework Connections.......................................................................... 36IPv6 Support ....................................................................................... 37
Chapter 3 Planning the Installation ...................................................................... 39
Initial Considerations ............................................................................... 39Major Planning Steps.......................................................................... 39Telephony Network Description .......................................................... 40Licensing Your Applications ................................................................ 41Configuration Environment Types....................................................... 41
Multi-language Environments (UTF-8 Support)....................................... 44Framework Support for UTF-8............................................................ 44Converting from a non-UTF-8 Database to a UTF-8 Database.......... 45
Network Locations for Framework Components ..................................... 46Configuration Layer ............................................................................ 46Management Layer............................................................................. 50User Interaction Layer (Genesys Administrator)................................. 56Media Layer ........................................................................................ 56Services Layer .................................................................................... 57
Solution Availability.................................................................................. 58IPv6 vs. IPv4 Overview....................................................................... 59Communication Session Failures ....................................................... 62Software Exceptions ........................................................................... 65Application Failures ............................................................................ 66Database Failures............................................................................... 66Remote Site Failures .......................................................................... 67Common Log Options......................................................................... 67
Security Considerations........................................................................... 67Access to Hosts File at Start-up ......................................................... 67User Authentication ............................................................................ 67User Authorization .............................................................................. 68Genesys Security Using the TLS Protocol.......................................... 71European Data Protection Directive Disclaimer.................................. 72
Chapter 4 Deployment Overview.......................................................................... 73
Prerequisites............................................................................................ 73Databases........................................................................................... 73Hardware and Network Environment.................................................. 75Internet Browsers................................................................................ 75Licensing............................................................................................. 75
Deployment Guide 5
Table of Contents
Deployment Sequence ............................................................................ 76Deployment Using Genesys Administrator.............................................. 78Genesys Wizards .................................................................................... 78
Genesys Installation Wizard ............................................................... 79Genesys Configuration Wizards ......................................................... 79
Chapter 5 Setting Up the Configuration Layer .................................................... 85
Task Summary......................................................................................... 86Installing DB Server................................................................................. 87Configuring DB Server............................................................................. 91
DB Server Configuration File .............................................................. 92Configuring DB Server on UNIX ......................................................... 92Configuring DB Server Logging .......................................................... 93
Starting Configuration DB Server ............................................................ 93Installing Configuration Server ................................................................ 94Initializing the Configuration Database .................................................... 99
About the Initialized Configuration Database.................................... 102Configuring Configuration Server .......................................................... 103
Configuration Server Configuration File............................................ 103Configuring Configuration Server Logging........................................ 105Configuring Configuration Server for Multi-language Environment
Support ......................................................................................... 105Encrypting the Configuration Database Password ................................ 106Starting Configuration Server ................................................................ 106Installing an Interface to Deploy Your System....................................... 107
Installing Genesys Administrator ...................................................... 107Installing Configuration Manager ...................................................... 107
Starting the Interface ............................................................................. 109Starting Genesys Administrator ........................................................ 109Starting Configuration Manager........................................................ 109
Changing Configuration Server Port Assignments ................................ 110Configuring Hosts .................................................................................. 112Enabling Management Layer Control of Configuration Layer................ 114Next Steps ............................................................................................. 119
Continuing the Installation of Your System ....................................... 120
Chapter 6 Setting Up the Management Layer.................................................... 121
Overview................................................................................................ 121Deploying Local Control Agent .............................................................. 122
Notes on Configuring the LCA Port .................................................. 122Specifying the Genesys Deployment Agent Port .............................. 123Installing Local Control Agent ........................................................... 123
Table of Contents
6 Framework 8.1
LCA Log Options .............................................................................. 126Configuring ADDP Between Solution Control Server and
Local Control Agent ...................................................................... 126Deploying the Management Layer Using Genesys Administrator ......... 127Deploying the Management Layer Using Wizard Manager ................... 128
Deploying Management Layer Components on Windows................ 129Deploying Management Layer Components on UNIX...................... 129
Manually Deploying the Management Layer ......................................... 134Task Summary .................................................................................. 134Deploying Log DB Server ................................................................. 136Configuring Database Access Points ............................................... 142Deploying Message Server............................................................... 147Initializing the Log Database............................................................. 153Deploying Solution Control Server.................................................... 153Deploying Solution Control Interface ................................................ 158Deploying SNMP Master Agent ........................................................ 162
Installing Solution Control Server Utilities Separately ........................... 168Next Steps ............................................................................................. 170
Continuing the Installation of Your System ....................................... 170
Chapter 7 Starting and Stopping Framework Components............................. 171
Introduction............................................................................................ 171Logging In to Interface Components................................................. 173
Starting and Stopping with the Management Layer............................... 173Stop vs. Graceful Shutdown ............................................................. 174
Starting with Startup Files...................................................................... 175Starting Manually................................................................................... 176
DB Server ......................................................................................... 176Configuration Server......................................................................... 178Configuration Server Proxy............................................................... 179Configuration Manager ..................................................................... 180License Manager .............................................................................. 181Message Server................................................................................ 181Local Control Agent .......................................................................... 182Genesys Deployment Agent ............................................................. 184Solution Control Server..................................................................... 185Solution Control Interface ................................................................. 188SNMP Master Agent ......................................................................... 188Genesys Administrator ..................................................................... 189HA Proxy........................................................................................... 189T-Server ............................................................................................ 190Stat Server........................................................................................ 190

Deployment Guide 7
Table of Contents
Stopping Manually ................................................................................. 191Server Applications........................................................................... 191GUI Applications ............................................................................... 191
Starting and Stopping with Windows Services Manager ....................... 191
Chapter 8 Setting Up Redundant Components................................................. 193
Introduction............................................................................................ 193Redundant Configuration DB Servers ................................................... 194
Redundancy...................................................................................... 194Setting Up Redundant Configuration DB Servers............................. 194Starting a Backup Configuration DB Server ..................................... 202
Redundant Configuration Servers ......................................................... 203Redundancy...................................................................................... 203Setting Up Redundant Configuration Servers................................... 203Synchronizing HA Ports Between Redundant Configuration
Servers ......................................................................................... 216Starting a Backup Configuration Server ........................................... 217Configuring ADDP Between Redundant Configuration Servers ....... 218
Redundant Client DB Servers ............................................................... 220Redundancy...................................................................................... 221Setting Up Redundant Client DB Servers......................................... 221Starting a Backup Client DB Server.................................................. 226
Redundant Message Servers ................................................................ 227Redundancy...................................................................................... 227Setting Up Redundant Message Servers ......................................... 227Starting a Backup Message Server .................................................. 233
Redundant Solution Control Servers ..................................................... 234Redundancy...................................................................................... 234Setting Up Redundant Solution Control Servers .............................. 235Synchronizing HA Ports Between Redundant Solution Control
Servers ......................................................................................... 240Starting a Backup Solution Control Server ....................................... 242
Redundant SNMP Master Agents ......................................................... 243Redundancy...................................................................................... 243Setting Up Redundant SNMP Master Agents................................... 243Starting a Backup SNMP Master Agent............................................ 250
Chapter 9 Setting Up the Rest of Your System................................................. 253
Recommended Order ............................................................................ 253Media Layer........................................................................................... 255Telephony Objects ................................................................................. 255
Table of Contents
8 Framework 8.1
Contact Center Objects ......................................................................... 255Access Groups ................................................................................. 255Skills ................................................................................................. 256Users ................................................................................................ 256Agent Groups.................................................................................... 257Places ............................................................................................... 257Place Groups .................................................................................... 258
Services Layer....................................................................................... 258Stat Server........................................................................................ 258DB Server for Solutions .................................................................... 258
Next Steps ............................................................................................. 258
Chapter 10 Setting Up Geographically Distributed Systems............................. 259
Overview................................................................................................ 259Licensing Requirements ................................................................... 260
Architecture ........................................................................................... 260Configuration Server Proxy Functions .............................................. 260Distributed Solution Control Server Functions.................................. 261When to Use This Architecture ......................................................... 261
Configuration Server Proxy ................................................................... 261Setting Up Configuration Server Proxy............................................. 263Starting Configuration Server Proxy ................................................. 271Configuring Redundant Configuration Server Proxies...................... 273Failure of Configuration Server Proxy............................................... 275Failure of Master Configuration Server............................................. 275
Distributed Solution Control Servers ..................................................... 276SCS in Distributed Mode .................................................................. 276Configuring Distributed Solution Control Servers ............................. 277Dividing Configuration Among Solution Control Servers .................. 279Specifying Message Server for SCS Communications..................... 280Notes on Configuring SCI ................................................................. 282Notes on Configuring Message Server for Centralized Logging....... 282Installing Applications ....................................................................... 284
Redundancy Support............................................................................. 284
Appendix A Minimum Permissions ....................................................................... 285
System Permissions .............................................................................. 285Database User Privileges ...................................................................... 286
Oracle ............................................................................................... 287MS SQL ............................................................................................ 287DB2................................................................................................... 287PostgreSQL ...................................................................................... 287
Deployment Guide 9
Table of Contents
SYBASE ........................................................................................... 288INFORMIX ........................................................................................ 288
Sample Scripts ...................................................................................... 288LCA Startup Script—gctilca .............................................................. 288GDA Startup Script—gctigda ............................................................ 290
Appendix B Standard Configuration Procedure................................................... 293
Application Templates............................................................................ 293Using Genesys Administrator ........................................................... 293Using Configuration Manager ........................................................... 296
Server Applications................................................................................ 298Using Genesys Administrator ........................................................... 298Using Configuration Manager ........................................................... 301
Graphical User Interface Applications ................................................... 306
Appendix C Standard Installation Procedure ....................................................... 309
Server Applications................................................................................ 309Graphical User Interface Applications ................................................... 313Troubleshooting the Installation............................................................. 314
Appendix D Login Procedure ................................................................................. 317
Logging In.............................................................................................. 317User Password Requirements and Restrictions .................................... 318
Appendix E Internet Protocol version 6 (IPv6) ..................................................... 321
Overview of IPv6 ................................................................................... 321Addressing........................................................................................ 322Notation ............................................................................................ 322Literal IPv6 Addresses in URLs ........................................................ 323Network Notation .............................................................................. 323Kinds of IPv6 addresses ................................................................... 323Transition Mechanisms ..................................................................... 325
IPv6 Architecture ................................................................................... 326Dual-Stack IPv6 Implementation ...................................................... 326Microsoft Windows Implementation .................................................. 326Operating Systems Supporting Dual-Stack Architecture for IPv6..... 327
DNS....................................................................................................... 328Virtualization .......................................................................................... 329License Control...................................................................................... 329
Deploying License Servers in Mixed Protocol Environments ........... 330Using Wildcards in an IPv6 Address................................................. 331

Table of Contents
10 Framework 8.1
Genesys 8.1 IPv6 Support..................................................................... 331Common Principles........................................................................... 331Implementation Characteristics ........................................................ 333IPv6 Support by Genesys Products.................................................. 333
Deployment Considerations .................................................................. 333Security............................................................................................. 334IP Tunneling...................................................................................... 334Licensing........................................................................................... 335SIP .................................................................................................... 335Thin Clients....................................................................................... 335External Interfaces............................................................................ 335Dynamic Runtime Changes .............................................................. 336Third-Party Dependencies ................................................................ 336
Appendix F Silent Setup......................................................................................... 337
Introduction............................................................................................ 337Creating the Response File ................................................................... 338Running the Silent Installation ............................................................... 339About the Silent Setup Log File ............................................................. 339
Appendix G Installation Worksheet ....................................................................... 341
How to Prepare a Worksheet ................................................................ 341Database Connections .......................................................................... 347
Supplements Related Documentation Resources ................................................... 351
Document Conventions ...................................................................... 353
Index ............................................................................................................... 355

Deployment Guide 11
List of ProceduresEnabling and disabling IPv6 support using an environment variable . . . 60
Enabling and disabling IPv6 support using a configuration option . . . . . 60
Installing Configuration DB Server on UNIX. . . . . . . . . . . . . . . . . . . . . . 88
Installing Configuration DB Server on Windows. . . . . . . . . . . . . . . . . . . 90
Configuring Configuration DB Server on UNIX. . . . . . . . . . . . . . . . . . . . 92
Starting Configuration DB Server . . . . . . . . . . . . . . . . . . . . . . . . . . . . . . 93
Installing Configuration Server in Master mode on UNIX. . . . . . . . . . . . 95
Installing Configuration Server in Master mode on Windows. . . . . . . . . 97
Populating History Change Adapter tables. . . . . . . . . . . . . . . . . . . . . . . 99
Initializing the Configuration Database. . . . . . . . . . . . . . . . . . . . . . . . . 100
Running Genesys SQL scripts using the DB2 Command-Line Processor . . . . . . . . . . . . . . . . . . . . . . . . . . . . . . . . . . . . . . . . . . . . 102
Configuring Configuration Server on UNIX. . . . . . . . . . . . . . . . . . . . . . 104
Starting Configuration Server . . . . . . . . . . . . . . . . . . . . . . . . . . . . . . . . 106
Installing Configuration Manager on Windows . . . . . . . . . . . . . . . . . . . 108
Starting Configuration Manager . . . . . . . . . . . . . . . . . . . . . . . . . . . . . . 109
Changing the Configuration Server listening port using Genesys Administrator . . . . . . . . . . . . . . . . . . . . . . . . . . . . . . . . . . 110
Changing the Configuration Server listening port using Configuration Manager . . . . . . . . . . . . . . . . . . . . . . . . . . . . . . . . . . 111
Creating a Host object using Genesys Administrator . . . . . . . . . . . . . . 112
Creating a Host object in Configuration Manager. . . . . . . . . . . . . . . . . 113
Modifying a Configuration Server Application object using Genesys Administrator . . . . . . . . . . . . . . . . . . . . . . . . . . . . . . . . . . 115
Modifying a Configuration Server Application object using Configuration Manager . . . . . . . . . . . . . . . . . . . . . . . . . . . . . . . . . . 116
Configuring a DB Server Application object using GenesysAdministrator . . . . . . . . . . . . . . . . . . . . . . . . . . . . . . . . . . . . . . . . . 116
Configuring a DB Server Application object using ConfigurationManager . . . . . . . . . . . . . . . . . . . . . . . . . . . . . . . . . . . . . . . . . . . . . 117
List of Procedures
12 Framework 8.1
Modifying a DB Server Application object using GenesysAdministrator . . . . . . . . . . . . . . . . . . . . . . . . . . . . . . . . . . . . . . . . . 118
Modifying a DB Server Application object using ConfigurationManager . . . . . . . . . . . . . . . . . . . . . . . . . . . . . . . . . . . . . . . . . . . . . 119
Manually Installing Local Control Agent on UNIX. . . . . . . . . . . . . . . . . 123
Manually Installing Local Control Agent on Windows. . . . . . . . . . . . . . 125
Deploying Management Layer components using Genesys Administrator . . . . . . . . . . . . . . . . . . . . . . . . . . . . . . . . . . . . . . . . . 127
Wizard Manager—Installing Log DB Server on UNIX . . . . . . . . . . . . . 129
Wizard Manager—Installing Message Server on UNIX . . . . . . . . . . . . 130
Initializing the Log Database . . . . . . . . . . . . . . . . . . . . . . . . . . . . . . . . 131
Wizard Manager—Installing Solution Control Server on UNIX. . . . . . . 132
Configuring a Log DB Server Application object using Genesys Administrator . . . . . . . . . . . . . . . . . . . . . . . . . . . . . . . . . . 137
Configuring a Log DB Server Application object using Configuration Manager . . . . . . . . . . . . . . . . . . . . . . . . . . . . . . . . . . 138
Manually installing Log DB Server on UNIX . . . . . . . . . . . . . . . . . . . . . 139
Manually installing Log DB Server on Windows . . . . . . . . . . . . . . . . . . 141
Configuring a Database Access Point for the Log DB Server using Genesys Administrator . . . . . . . . . . . . . . . . . . . . . . . . . . . . . . . . . . 143
Configuring a Database Access Point for the Log DB Server using Configuration Manager . . . . . . . . . . . . . . . . . . . . . . . . . . . . . . . . . . 145
Configuring a Message Server Application object using Genesys Administrator . . . . . . . . . . . . . . . . . . . . . . . . . . . . . . . . . . 148
Configuring a Message Server Application object using Configuration Manager . . . . . . . . . . . . . . . . . . . . . . . . . . . . . . . . . . 149
Manually installing Message Server on UNIX . . . . . . . . . . . . . . . . . . . 151
Manually installing Message Server on Windows . . . . . . . . . . . . . . . . 152
Configuring a Solution Control Server Application object using Genesys Administrator . . . . . . . . . . . . . . . . . . . . . . . . . . . . . . . . . . 153
Configuring a Solution Control Server Application object using Configuration Manager . . . . . . . . . . . . . . . . . . . . . . . . . . . . . . . . . . 154
Manually installing Solution Control Server on UNIX . . . . . . . . . . . . . . 156
Manually installing Solution Control Server on Windows . . . . . . . . . . . 157
Configuring a Solution Control Interface Application object using Genesys Administrator . . . . . . . . . . . . . . . . . . . . . . . . . . . . . . . . . . 159
Configuring a Solution Control Interface Application object using Configuration Manager . . . . . . . . . . . . . . . . . . . . . . . . . . . . . . . . . . 160
Manually installing Solution Control Interface. . . . . . . . . . . . . . . . . . . . 161

Deployment Guide 13
List of Procedures
Configuring an SNMP Master Agent Application object using Genesys Administrator . . . . . . . . . . . . . . . . . . . . . . . . . . . . . . . . . . 163
Configuring an SNMP Master Agent Application object using Configuration Manager . . . . . . . . . . . . . . . . . . . . . . . . . . . . . . . . . . 164
Manually installing SNMP Master Agent on UNIX . . . . . . . . . . . . . . . . 166
Manually installing SNMP Master Agent on Windows . . . . . . . . . . . . . 167
Installing only Solution Control Server utilities on UNIX . . . . . . . . . . . . 169
Installing only Solution Control Server utilities on Windows . . . . . . . . . 169
Starting an application using its startup file . . . . . . . . . . . . . . . . . . . . . 175
Starting DB Server manually . . . . . . . . . . . . . . . . . . . . . . . . . . . . . . . . 177
Starting Configuration Server manually . . . . . . . . . . . . . . . . . . . . . . . . 179
Starting Configuration Server Proxy manually . . . . . . . . . . . . . . . . . . . 180
Starting Configuration Manager manually . . . . . . . . . . . . . . . . . . . . . . 180
Starting Message Server manually. . . . . . . . . . . . . . . . . . . . . . . . . . . . 181
Configuring different (but non-root) <user> and <group> for LCA and GDA on Linux . . . . . . . . . . . . . . . . . . . . . . . . . . . . . . . . . . . . . 183
Starting Genesys Deployment Agent on UNIX. . . . . . . . . . . . . . . . . . . 184
Starting Genesys Deployment Agent on Windows. . . . . . . . . . . . . . . . 185
Starting Solution Control Server manually . . . . . . . . . . . . . . . . . . . . . . 186
Starting Solution Control Interface manually . . . . . . . . . . . . . . . . . . . . 188
Starting Genesys SNMP Master Agent manually. . . . . . . . . . . . . . . . . 188
Stopping server applications manually . . . . . . . . . . . . . . . . . . . . . . . . . 191
Stopping GUI applications manually. . . . . . . . . . . . . . . . . . . . . . . . . . . 191
Configuring a backup Configuration DB Server Application object using Genesys Administrator . . . . . . . . . . . . . . . . . . . . . . . . . . . . . 196
Configuring a backup Configuration DB Server Application object using Configuration Manager . . . . . . . . . . . . . . . . . . . . . . . . . . . . . 197
Modifying a primary Configuration DB Server Application object using Genesys Administrator . . . . . . . . . . . . . . . . . . . . . . . . . . . . . 198
Modifying a primary Configuration DB Server Application object using Configuration Manager . . . . . . . . . . . . . . . . . . . . . . . . . . . . . 199
Adding LCA port information to the configuration files . . . . . . . . . . . . . 200
Modifying a backup Configuration DB Server start file . . . . . . . . . . . . . 201
Starting a backup Configuration DB Server . . . . . . . . . . . . . . . . . . . . . 202
Configuring a backup Configuration Server Application object using Genesys Administrator . . . . . . . . . . . . . . . . . . . . . . . . . . . . . . . . . . 205
Configuring a backup Configuration Server Application object using Configuration Manager . . . . . . . . . . . . . . . . . . . . . . . . . . . . . . . . . . 206
List of Procedures
14 Framework 8.1
Installing a backup Configuration Server on UNIX . . . . . . . . . . . . . . . . 207
Installing a backup Configuration Server on Windows . . . . . . . . . . . . . 210
Modifying a primary Configuration Server Application object using Genesys Administrator . . . . . . . . . . . . . . . . . . . . . . . . . . . . . . . . . . 212
Modifying a primary Configuration Server Application object using Configuration Manager . . . . . . . . . . . . . . . . . . . . . . . . . . . . . . . . . . 213
Modifying a backup Configuration Server start file . . . . . . . . . . . . . . . . 215
Synchronizing HA ports between redundant Configuration Servers . . 216
Starting a backup Configuration Server . . . . . . . . . . . . . . . . . . . . . . . . 217
Configuring a backup Client DB Server Application object using Genesys Administrator . . . . . . . . . . . . . . . . . . . . . . . . . . . . . . . . . . 222
Configuring a backup Client DB Server Application object using Configuration Manager . . . . . . . . . . . . . . . . . . . . . . . . . . . . . . . . . . 224
Modifying a primary Client DB Server Application object using Genesys Administrator . . . . . . . . . . . . . . . . . . . . . . . . . . . . . . . . . . 225
Modifying a primary Client DB Server Application object using Configuration Manager . . . . . . . . . . . . . . . . . . . . . . . . . . . . . . . . . . 225
Starting a backup Client DB Server . . . . . . . . . . . . . . . . . . . . . . . . . . . 226
Configuring a backup Message Server Application object using Genesys Administrator . . . . . . . . . . . . . . . . . . . . . . . . . . . . . . . . . . 229
Configuring a backup Message Server Application object using Configuration Manager . . . . . . . . . . . . . . . . . . . . . . . . . . . . . . . . . . 230
Modifying a primary Message Server Application object using Genesys Administrator . . . . . . . . . . . . . . . . . . . . . . . . . . . . . . . . . . 231
Modifying a primary Message Server Application object using Configuration Manager . . . . . . . . . . . . . . . . . . . . . . . . . . . . . . . . . . 232
Modifying a backup Message Server start file . . . . . . . . . . . . . . . . . . . 233
Starting a backup Message Server . . . . . . . . . . . . . . . . . . . . . . . . . . . 233
Configuring a backup Solution Control Server Application object using Genesys Administrator . . . . . . . . . . . . . . . . . . . . . . . . . . . . . 236
Configuring a backup Solution Control Server Application object using Configuration Manager . . . . . . . . . . . . . . . . . . . . . . . . . . . . . 237
Modifying a primary Solution Control Server Application object using Genesys Administrator . . . . . . . . . . . . . . . . . . . . . . . . . . . . . 238
Modifying a primary Solution Control Server Application object using Configuration Manager . . . . . . . . . . . . . . . . . . . . . . . . . . . . . 239
Modifying a backup Solution Control Server start file. . . . . . . . . . . . . . 240
Synchronizing HA ports between redundant Solution Control Servers . . . . . . . . . . . . . . . . . . . . . . . . . . . . . . . . . . . . . . . . . . . . . . 241
Starting a backup Solution Control Server . . . . . . . . . . . . . . . . . . . . . . 242
Deployment Guide 15
List of Procedures
Configuring a backup SNMP Master Agent Application object using Genesys Administrator . . . . . . . . . . . . . . . . . . . . . . . . . . . . . . . . . . 245
Configuring a backup SNMP Master Agent Application object using Configuration Manager . . . . . . . . . . . . . . . . . . . . . . . . . . . . . . . . . . 246
Modifying a primary SNMP Master Agent Application object using Genesys Administrator . . . . . . . . . . . . . . . . . . . . . . . . . . . . . . . . . . 248
Modifying a primary SNMP Master Agent Application object using Configuration Manager . . . . . . . . . . . . . . . . . . . . . . . . . . . . . . . . . . 248
Modifying a backup SNMP Master Agent start file . . . . . . . . . . . . . . . . 249
Starting a backup SNMP Master Agent . . . . . . . . . . . . . . . . . . . . . . . . 250
Configuring a Configuration Server Proxy Application object using Genesys Administrator . . . . . . . . . . . . . . . . . . . . . . . . . . . . . . . . . . 264
Configuring a Configuration Server Proxy Application object using Configuration Manager . . . . . . . . . . . . . . . . . . . . . . . . . . . . . . . . . . 266
Installing Configuration Server Proxy on UNIX. . . . . . . . . . . . . . . . . . . 267
Installing Configuration Server Proxy on Windows. . . . . . . . . . . . . . . . 268
Modifying a Client Application using Genesys Administrator . . . . . . . . 270
Modifying a Client Application using Configuration Manager . . . . . . . . 271
Starting Configuration Server Proxy . . . . . . . . . . . . . . . . . . . . . . . . . . . 272
Setting up a backup redundant Configuration Server Proxy using Genesys Administrator . . . . . . . . . . . . . . . . . . . . . . . . . . . . . . . . . . 273
Setting up a backup redundant Configuration Server Proxy using Configuration Manager . . . . . . . . . . . . . . . . . . . . . . . . . . . . . . . . . . 274
Configuring Distributed Solution Control Servers . . . . . . . . . . . . . . . . . 278
Specifying a Distributed Solution Control Server to control a Host, Application, or Solution. . . . . . . . . . . . . . . . . . . . . . . . . . . . . . . . . . 279
Configuring a dedicated Message Server for Distributed Solution Control Servers using Genesys Administrator . . . . . . . . . 280
Configuring a dedicated Message Server for Distributed Solution Control Servers using Configuration Manager . . . . . . . . . 281
Verifying configuration of Message Servers used for centralized logging in a Distributed Solution Control Server environment using Genesys Administrator . . . . . . . . . . . . . . . . . . . . . . . . . . . . . 283
Verifying configuration of Message Servers used for centralized logging in a Distributed Solution Control Server environment using Configuration Manager . . . . . . . . . . . . . . . . . . . . . . . . . . . . . 283
Importing a predefined application template using GenesysAdministrator . . . . . . . . . . . . . . . . . . . . . . . . . . . . . . . . . . . . . . . . . 294
Creating a new application template using Genesys Administrator . . . 295
Importing metadata for an application template . . . . . . . . . . . . . . . . . . 296
List of Procedures
16 Framework 8.1
Importing a predefined application template using ConfigurationManager . . . . . . . . . . . . . . . . . . . . . . . . . . . . . . . . . . . . . . . . . . . . . 297
Creating a new application template using Configuration Manager . . . 297
Creating and configuring a Server Application object using Genesys Administrator . . . . . . . . . . . . . . . . . . . . . . . . . . . . . . . . . . 298
Configuring Advanced Disconnect Detection Protocol using Genesys Administrator . . . . . . . . . . . . . . . . . . . . . . . . . . . . . . . . . . 300
Creating and configuring a Server Application object using Configuration Manager . . . . . . . . . . . . . . . . . . . . . . . . . . . . . . . . . . 301
Configuring Advanced Disconnect Detection Protocol using Configuration Manager . . . . . . . . . . . . . . . . . . . . . . . . . . . . . . . . . . 303
Synchronizing options between primary and backup servers . . . . . . . 305
Synchronizing ports between primary and backup servers . . . . . . . . . 305
Creating and configuring a GUI Application object using Genesys Administrator . . . . . . . . . . . . . . . . . . . . . . . . . . . . . . . . . . 306
Creating and configuring a GUI Application object using Configuration Manager . . . . . . . . . . . . . . . . . . . . . . . . . . . . . . . . . . 307
Installing a server application on UNIX. . . . . . . . . . . . . . . . . . . . . . . . . 309
Installing a server application on Windows. . . . . . . . . . . . . . . . . . . . . . 311
Installing a GUI application on Windows . . . . . . . . . . . . . . . . . . . . . . . 313
Troubleshooting the installation of a Genesys application . . . . . . . . . . 314
Logging in to a Framework GUI application . . . . . . . . . . . . . . . . . . . . . 317

Deployment Guide 17
PrefaceWelcome to the Framework 8.1 Deployment Guide. This document describes the configuration, installation, starting, and stopping procedures relevant to the Genesys Framework.
This document is valid only for the 8.1.x releases of this product.
This preface contains the following sections: About Genesys Framework, page 17 Intended Audience, page 18 Making Comments on This Document, page 18 Contacting Genesys Technical Support, page 18 Changes in This Document, page 19
For information about related resources and about the conventions that are used in this document, see the supplementary material starting on page 351.
About Genesys FrameworkThe Genesys Framework, a mandatory part of any Genesys-based interaction management system, provides functions required for the normal operation of any Genesys solution.
In brief, you will find the following information in this manual:
• How to install and use Wizard Manager
• How to configure all Framework components with wizards or manually
• How to install Framework components
• How to configure redundancy—that is, backup and primary servers—for Framework components, including DB Server and Configuration Server
Note: For versions of this document created for other releases of this product, visit the Genesys Technical Support website, or request the Documentation Library DVD, which you can order by e-mail from Genesys Order Management at [email protected].
18 Framework 8.1
Preface Intended Audience
• How to start and stop Framework components with the Management Layer or manually
• How to log in to a Genesys GUI application
Intended AudienceThis document is intended primarily for system integrators, system administrators, contact center managers, and operations personnel. It has been written with the assumption that you have a basic understanding of:
• Computer-telephony integration (CTI) concepts, processes, terminology, and applications
• Network design and operation
• Your own network configurations
You should also be familiar with Genesys Framework architecture and functions, as described in Chapter 2 on page 27, the Framework Management Layer User’s Guide, and Framework 8.0 Architecture Help.
Making Comments on This DocumentIf you especially like or dislike anything about this document, feel free to e-mail your comments to [email protected].
You can comment on what you regard as specific errors or omissions, and on the accuracy, organization, subject matter, or completeness of this document. Please limit your comments to the scope of this document only and to the way in which the information is presented. Contact your Genesys Account Representative or Genesys Technical Support if you have suggestions about the product itself.
When you send us comments, you grant Genesys a nonexclusive right to use or distribute your comments in any way it believes appropriate, without incurring any obligation to you.
Contacting Genesys Technical SupportIf you have purchased support directly from Genesys, please contact Genesys Technical Support.
Before contacting technical support, please refer to the Genesys Care Program Guide for complete contact information and procedures.
Deployment Guide 19
Preface Changes in This Document
Changes in This Document
Version 8.1.301.00
This document has been updated as appropriate for features that are new in this release of Management Framework, as described in “New in This Release” on page 22, including:
• Updated description and implementation of multi-language environments and UTF-8 support. See “Multi-language Environments (UTF-8 Support)” on page 44, “Databases” on page 73, and the procedure “Initializing the Configuration Database” on page 100.
• Updated description of HA Configuration Server Proxy configuration to include restoration of client connections; see “Configuring Redundant Configuration Server Proxies” on page 273.
• Appendix A, “Minimum Permissions,” on page 285, provides the minimum installation and database permissions required for Management framework.
Version 8.1.201.00
This document has been updated as appropriate for features that are new in this release of Management Framework, as described in “New in This Release” on page 22, including:
• Added optional installation of Solution Control Services utilities separately; see “Installing Solution Control Server Utilities Separately” on page 168.
In addition, with all 6.x products reaching the End of Support milestone, all references to these products have been removed.
Version 8.1.101.00
This document has been updated as appropriate for features that are new in this release of Management Framework as described in “New in This Release” on page 22, including:
• Updated implementation of Configuration History Log; see “Configuration History Log” on page 63.
• Added configuration of LDAP external authentication on Configuration Server Proxy; see “External Authentication” on page 262.
• Added use of Configuration History Log on Configuration Server Proxy; see “Configuration History Log” on page 263.
• Added password restrictions for users; see “User Password Requirements and Restrictions” on page 318.

20 Framework 8.1
Preface Changes in This Document
Version 8.1.001.00
This is the first release of the Framework 8.1 Deployment Guide. In the future, this section will list topics that are new or have changed significantly since the first release of this document.
Deployment Guide 21
Chapter
1 Framework OverviewThis chapter lists major Framework functions and highlights new features added in each release.
This chapter contains the following sections: Major Functions, page 21 New in This Release, page 22
Major FunctionsThe Genesys Framework, a mandatory part of any Genesys-based interaction management system, provides functions required for the normal operation of any Genesys solution:
• Configuration centralizes processing and storage of all the data required for Genesys solutions to work within a particular environment.
• Access Control sets and verifies users’ permissions for access to, and manipulation of, solution functions and data.
• Solution Control starts and stops solutions and monitors their status.
• Alarm Processing defines and manages conditions critical to the operation of solutions.
• Troubleshooting hosts a user-oriented, unified logging system with advanced storage, sorting, and viewing capabilities.
• Fault Management automatically detects and corrects situations that might cause operational problems in solutions.
• External Interfaces enable communication with a variety of telephony systems and database management systems (DBMS).
• Attached Data Distribution supports the distribution of business data attached to interactions, within and across solutions.

22 Framework 8.1
Chapter 1: Framework Overview New in This Release
New in This ReleaseBefore you familiarize yourself with the Genesys Framework architecture and functionality, note the following major changes that were implemented in the 8.1 release of Framework, and the sources that describe them in detail:
General Features
• Support of IPv6: Genesys Framework now supports IPv6 on most connections. Refer to “IPv6 vs. IPv4 Overview” on page 59 and Appendix D, “Internet Protocol version 6 (IPv6)” on page 321 for more information.
• Support of FlexLM 11.9: Genesys Framework now supports the FlexLM 11.9 license manager. Refer to the Genesys Licensing Guide for information about this licensing upgrade.
• Enhanced failure detection: Configuration Server and Solution Control Server now support heartbeat detection functionality used by Local Control Agent (LCA) to detect unresponsive Genesys applications. For more information, refer to the Framework Management Layer User’s Guide.
Configuration Layer
• New types of Application, Script, and Switch configuration objects: Users can now define new types of configuration objects, as follows: Application types
Advisors–Advisors Cisco Adapter, Advisors–Advisors Genesys Adapter, Advisors–Advisors Platform, Advisors–Contact Center Advisor, Advisors–Frontline Advisor
Business Rules Application Server, Business Rules Execution Server
CSTA Connector Federation Server, Federation Stat Provider Genesys Administrator Server OT ICS OMP Infra, OT ICS Server Social Messaging Server UCM Connector VP MRCP Proxy, VP Policy Server Web Engagement Backend Server, Web Engagement Frontend Server WebRTC Gateway
Script types—Business Rules Data
Switch types—Aastra MX-ONE, Broadsoft BroadWorks

Deployment Guide 23
Chapter 1: Framework Overview New in This Release
• Enhanced Configuration Conversion Wizard (CCW): You can now use CCW to convert: An existing Configuration Database from its current character
encoding to a multi-language Configuration Database using UTF-8 encoding
A single-tenant Configuration Database to a multi-tenant Configuration Database
• Writable Configuration Server Proxy: Users can now configure a writable Configuration Server Proxy to allow its clients to add, delete, or modify configuration objects and their permissions. Refer to “Writable Configuration Server Proxy” on page 262 for information about this feature.
• Enhanced Client Reconnection with HA Configuration Server Proxies: Client connections are now restored automatically by the backup Configuration Server Proxy after a switchover of the proxy servers. See “Configuring Redundant Configuration Server Proxies” on page 273.
• Support for Multi-language Environments: Multi-language environments are supported starting in release 8.1.2. Configuration Database and client DBMS must be configured appropriately when the database is first created. See “Multi-language Environments (UTF-8 Support)” on page 44 for more information.
• Support for storage of UTF-8 encoded data: Configuration Server has a new multi-language startup mode that enables storage of data in UTF-8 format. See “Multi-language Environments (UTF-8 Support)” on page 44 for more information.
• Simpler upgrade of Configuration Database: Migration is not required for Configuration Database 8.1.1; if users require additional applications and enumerators in a new release of Configuration Server 8.1.x, upgrade of locale information using CCW is all that is required. Refer to the Genesys Migration Guide for more information about this new migration path.
• Synchronized display of Wrap-up Time changes between Agents and Agent Logins: If the Wrap-up Time is changed at the Agent Login level, the new value now appears in the Agents’ configuration.
• Enhanced support for Outbound Contact Solution: When configuring a Campaign Group, users can now select Average Distribution Time or Maximum Gain as an optimization method. Target Value for Maximum Gain is a calculated value based on Established Gain and Abandoned Loss.
• Enhanced support for Routing solutions: Support of Oracle’s large objects (LOB) data type for Routing
Strategies, making storage of Routing Strategies more efficient. Support of UTF-8 encoding for Business Attributes and Attribute
Values.
24 Framework 8.1
Chapter 1: Framework Overview New in This Release
Management Layer
See the Framework Management Layer User’s Guide for information about the following new features that are specific to the Management Layer:
• Ability to enable and disable log filtering at the application level: Log filtering can be enabled and disabled for individual applications.
• Alarm Detection and Reaction scripts are environment independent: Alarm Detection and Alarm Reaction scripts now use the name of the affected configuration object by default, instead of the database identifier (DBID). This ensures seamless XML import and export of Alarm Detection and Alarm Reaction script definitions.
• Enhanced robustness of connections between Local Control Agent (LCA) and Applications on a Host: Applications on a Host now connect to the LCA on that Host using a loopback interface. This enables the connection to remain stable regardless of the status of the Network Interface Card.
• Enhanced audit logs: Host and Tenant attributes have been added to audit logs generated by Configuration Server and Solution Control Server.
• Enhanced reporting of Log Database failure: If Message Server is unable to enter a log into the Log Database, a log event is generated, and can be used to trigger an alarm.
• Enhanced monitoring of the state of NTP Services: Local Control Agent can now monitor the state of NTP services. New logs report when an NTP service ceases to be available and when it becomes available. In addition, users can now change the signature of an NTP service/daemon.
• Ability to install Solution Control Server utilities separately: Users can now install the Solution Control Server utilities without installing Solution Control Server. Previously, the utilities were only installed automatically with Solution Control Server. See “Installing Solution Control Server Utilities Separately” on page 168.
• Enhancements to mlcmd command-line interface: Access to mlcmd is now restricted to authorized users. In addition, the parameters now use a name or a DBID, and new parameters enable users created to: Clear all active alarms raised by an application or on the basis of a
specific Alarm Condition. Report CPU usage for each thread of a given process of a given
application, and to store the results in an XML file for which you can set the path and filename.

Deployment Guide 25
Chapter 1: Framework Overview New in This Release
Security Features
Unless otherwise stated, refer to the Genesys Security Deployment Guide for information about the following new security-related features in release 8.1:
• Enhanced password protection: A system administrator, or a user with equivalent access rights and permissions, can configure the following: Additional attributes for user passwords, such as case, punctuation,
character type, expiration, and reuse. A user to be required to change his or her password at next login (if
forced password reset is supported by the user interface). An account to be locked out after a specified time of inactivity. The maximum number of concurrent connections (logins) to
Configuration Server that a single account can have.
In addition, the hash algorithm for the secure storage of passwords has also been updated.
• Enhanced security for linked configuration: In a situation where a user is editing an object that is linked to other objects, only a user with access to one or more of those linked objects can change the link between their linked objects and the object being edited.
• Enhanced security for high-availability (HA) pairs: When configuring two applications as an HA pair, both applications must be started from the same account. See chapter 8 on page 193 for more information.
• Limited display of sensitive information: Error messages for authentication errors no longer contain a hint or direct indication of the reason that authentication failed. In logs, new options enable sensitive data in logs to be marked for post-processing by the user, such as deletion, replacement, or hiding.
• Support for database encryption: The Configuration Database and Log Database can now store encrypted data using database encryption capabilities, but only if the Database Management System (DBMS) supports the encryption.
• Extended support of Client-Side Port Definition: Message Server and Configuration Server Proxy now support Client-Side Port Definition on all their connections.
• Extended support of TLS: LCA, Genesys Deployment Agent, and Message Server now support TLS. All Management Framework components now support TLS implemented with OpenSSL.
• Compliance with FIPS: TLS as implemented by Genesys meets the Federal Information Processing Standards (FIPS).
• Enhanced configuration of external authentication: LDAP external authentication can now be configured on the Master
Configuration Server and on each Configuration Server Proxy, so

26 Framework 8.1
Chapter 1: Framework Overview New in This Release
authentication requests will be performed directly without forwarding them to the Master Configuration Server.
Configuration Server Proxy can also support multiple LDAP servers. LDAP and RADIUS external authentication can now be configured on
the Configuration Server and Configuration Server Proxy Application object’s Options tab, instead of using configuration files.
Configuration Server and Configuration Server Proxy now supports LDAP full referrals returned by Microsoft Active Directory.
Refer to “External Authentication” on page 262 and the Framework External Authentication Reference Manual for more information.
User Interaction Layer
For information about changes in the 8.1 release of Genesys Administrator, see the Framework 8.1 Genesys Administrator Deployment Guide.
Retired Features
• The IDEA, RC4, RCS, and MDC2 algorithms, part of OpenSSL software, are no longer used by Genesys Framework.

Deployment Guide 27
Chapter
2 Framework ArchitectureThis chapter describes the architecture and functionality of Framework 8.1 and its layers.
This chapter contains the following sections: High-Level Framework Architecture, page 27 Configuration Layer, page 28 Management Layer, page 31 User Interaction Layer, page 33 Media Layer, page 34 Services Layer, page 35 Framework Connections, page 36
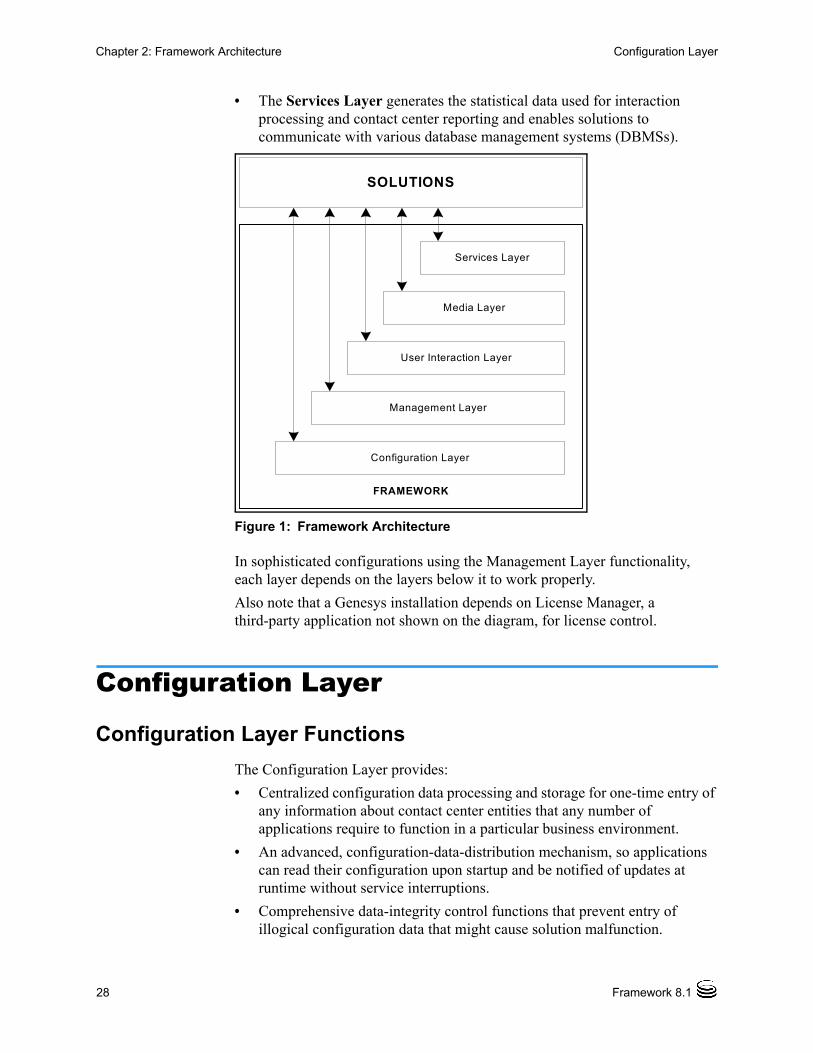
High-Level Framework ArchitectureThe Genesys Framework consists of five layers (see Figure 1 on page 28):
• The Configuration Layer processes and stores all the data required for running Genesys solutions in a particular environment; it notifies clients of any configuration changes. The Configuration Layer also controls user access to a solution’s functions and data.
• The Management Layer controls the startup and status of solutions, logging of maintenance events, generation and processing of alarms, and management of application failures.
• The User Interaction Layer provides a comprehensive user interface to configure, monitor, and control the management environment.
• The Media Layer enables Genesys solutions to communicate across media, including traditional telephony systems, Voice over IP (VOIP), e-mail, and the Web. This layer also provides the mechanism to distribute interaction-related business data within and across solutions.
28 Framework 8.1
Chapter 2: Framework Architecture Configuration Layer
• The Services Layer generates the statistical data used for interaction processing and contact center reporting and enables solutions to communicate with various database management systems (DBMSs).
Figure 1: Framework Architecture
In sophisticated configurations using the Management Layer functionality, each layer depends on the layers below it to work properly.
Also note that a Genesys installation depends on License Manager, a third-party application not shown on the diagram, for license control.
Configuration Layer
Configuration Layer Functions
The Configuration Layer provides:
• Centralized configuration data processing and storage for one-time entry of any information about contact center entities that any number of applications require to function in a particular business environment.
• An advanced, configuration-data-distribution mechanism, so applications can read their configuration upon startup and be notified of updates at runtime without service interruptions.
• Comprehensive data-integrity control functions that prevent entry of illogical configuration data that might cause solution malfunction.
SOLUTIONS
Services Layer
Media Layer
Management Layer
Configuration Layer
FRAMEWORK
User Interaction Layer
Deployment Guide 29
Chapter 2: Framework Architecture Configuration Layer
• Advanced reconnection management which ensures that applications have up-to-date data after reestablishing connection to Configuration Server.
• Access control functions to regulate user access to solution functions and data, based on the access privileges set for each item.
• Wizards to help users through the automated process of solution deployment.
• Universal, open, Simple Object Access Protocol (SOAP) interface to the configuration, so that a broad range of third-party applications can read and write the information.
Warning! SOAP functionality is restricted to certain environments.
• Support for geographically distributed environments.
• Integration with external data sources.
• Import and export of configuration data to and from the Configuration Database.
Configuration Layer Architecture
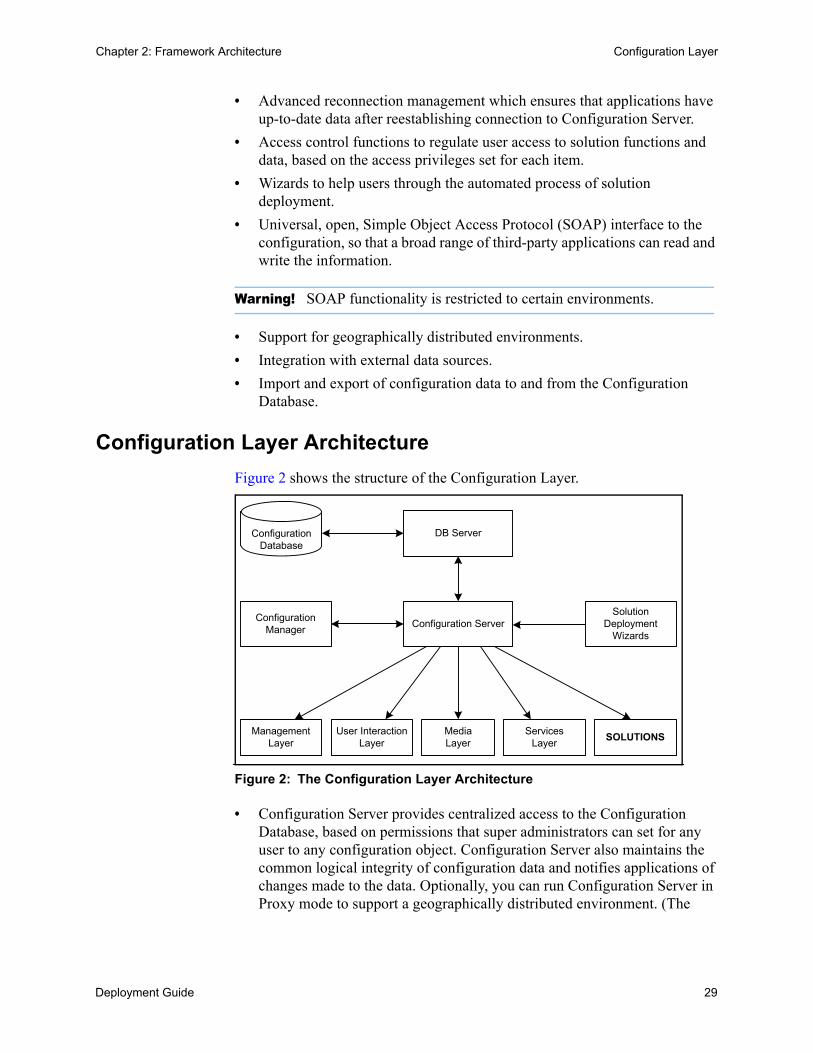
Figure 2 shows the structure of the Configuration Layer.
Figure 2: The Configuration Layer Architecture
• Configuration Server provides centralized access to the Configuration Database, based on permissions that super administrators can set for any user to any configuration object. Configuration Server also maintains the common logical integrity of configuration data and notifies applications of changes made to the data. Optionally, you can run Configuration Server in Proxy mode to support a geographically distributed environment. (The
ConfigurationDatabase
Solution Deployment
Wizards
ManagementLayer
MediaLayer
ServicesLayer
SOLUTIONSUser Interaction
Layer
Configuration ServerConfiguration
Manager
DB Server
30 Framework 8.1
Chapter 2: Framework Architecture Configuration Layer
geographically distributed architecture is more complex than shown in the diagram. See “Architecture” on page 260 for details.)
• Configuration Manager provides a user-friendly interface for manipulating the contact center configuration data that solutions use and for setting user permissions for solution functions and data.
• The Configuration Database stores all configuration data. DB Server—a Services Layer component—is the access point to the Configuration Database.
• Solution Deployment Wizards automate deployment and upgrade. These wizards also handle solution-specific data integrity.
• Configuration Conversion Wizard (CCW) (not shown in the diagram) provides a user-friendly interface for migrating Genesys configuration data to the 8.1 data format. Starting in release 8.1.3, CCW also enables you to migrate the Configuration Database to a multi-language format using UTF-8, and to migrate a single-tenant (enterprise) Configuration Database to a hierarchical multi-tenant database. Refer to the Genesys Migration Guide for more information about CCW.
• Configuration Import Wizard (not shown in the diagram) makes it easier to integrate data from external data sources into the Genesys Configuration Database. It provides a user-friendly interface to automatically import agent data from Lightweight Directory Access Protocol (LDAP) and Microsoft Active Directory databases and switch configuration data from various switches. The Wizard capabilities also include import and export of configuration data to and from Extensible Markup Language (XML) files, generation of custom reports from the Configuration Database, and comparison of two configuration sets (including import of configuration differences).
Warning! Never add, delete, or modify any data in the Configuration Database, except through applications developed by Genesys, or through applications instrumented with the Genesys Configuration Server application programming interface (API). If you have compelling reasons for accessing the database directly, consult Genesys Technical Support before you do so.
Deployment Guide 31
Chapter 2: Framework Architecture Management Layer
Management Layer
Management Layer Functions
The Management Layer provides:
• Centralized solution control and monitoring, displaying the real-time status of every configured Solution object, and activating and deactivating solutions and single applications, including user-defined solutions.
• Centralized logging that records applications maintenance events. The unified log format enables easy selection of required log records and centralized log storage for convenient access and solution-level troubleshooting. Centralized logging also allows you to track individual interactions, audit activities in your contact center, and store alarm history.
• Flexible alarm signaling that triggers alarms based on application maintenance events, system performance parameters, or Simple Network Management Protocol (SNMP) thresholds. Alarms are communicated to Solution Control Interface and can be written to system logs. You can configure the system to convert alarms into SNMP traps and send them as e-mails to a specified Internet address. (The latter automatically enables paging notifications.) The Management Layer automatically associates alarms with the solutions they affect and stores alarms as active conditions in the system until they are either removed by another maintenance event or cleared by the user.
• Fault-management functions, consisting of detection, isolation, and correction of application failures. For nonredundant configurations, the Management Layer automatically restarts applications that fail. For redundant configurations, this layer supports a switchover to the standby applications and also automatically restarts applications that fail.
• Remote deployment of Genesys components.
• Built-in SNMP support for both alarm processing and SNMP data exchange with an SNMP-compliant network management system (NMS). As a result, you can integrate a third-party NMS with a Genesys system to serve as an end-user interface for control and monitoring function and for alarm signaling function.
• Individual host monitoring, including CPU and memory usage records and information about running processes and services.
• Support for geographically distributed environments.
Management Layer Architecture
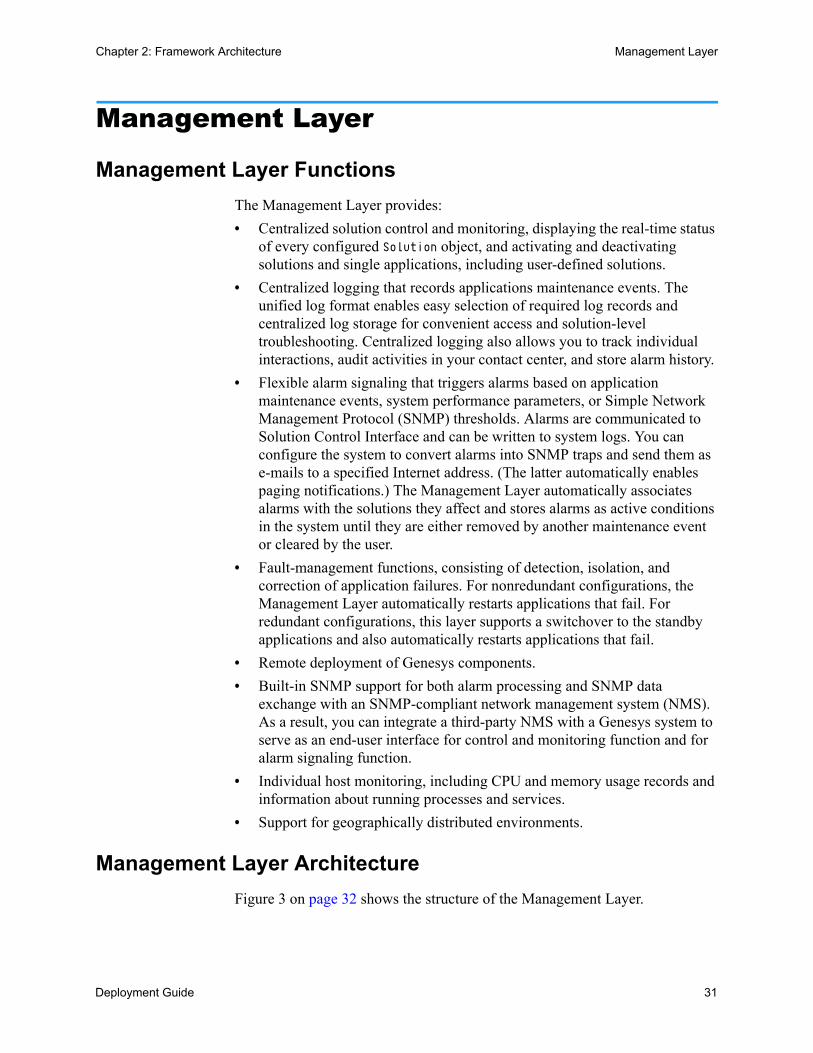
Figure 3 on page 32 shows the structure of the Management Layer.
32 Framework 8.1
Chapter 2: Framework Architecture Management Layer
Figure 3: Management Layer Architecture
• Local Control Agent (not shown in the diagram), located on every host that the Management Layer controls and/or monitors, is used to start and stop applications, detect application failures, and communicate application roles in redundancy context.
• A remote deployment agent (not shown in the diagram), referred to as the Genesys Deployment Agent, part of the Local Control Agent Installation Package, deploys Genesys Installation Packages as directed by Genesys Administrator—a User Interaction layer component.
• Message Server provides centralized processing and storage of every application's maintenance events. Events are stored as log records in the Centralized Log Database where they are available for further centralized processing. Message Server also checks for log events configured to trigger alarms. If it detects a match, it sends the alarm to Solution Control Server for immediate processing.
• Solution Control Server is the processing center of the Management Layer. It uses Local Control Agents to start solution components in the proper order, monitor their status, and provide a restart or switchover in case of application failure. Solution Controls Server also includes four utilities that provide the ability to gracefully stop T-Servers, handle T-Server stuck calls, send log messages on behalf of applications, and exchange information with Solution Control Server. These utilities can be installed with or without Solution Control Server.
• Solution Control Interface displays the status of hosts and all installed Genesys solutions and information about each active alarm, enables the user to start and stop solutions or single applications (including third-party applications), and also allows advanced selection and viewing of maintenance logs.
• The Centralized Log Database (also called the Log Database) stores all application log records, including interaction-related records, alarm history records, and audit records. DB Server—a Services Layer component—serves as an access point to the Centralized Log Database.
Centralized LogDatabase
SOLUTIONS
e-mail. page, NMS
Message ServerSolution Control
Server
Solution Control Interface
DB Server

Deployment Guide 33
Chapter 2: Framework Architecture User Interaction Layer
• Genesys SNMP Master Agent (an optional component not shown in the diagram) provides an interface between the Management Layer and an SNMP-compliant NMS.
User Interaction Layer
Functions
The User Interaction Layer provides centralized web-based functionality and interfaces for the following:
• Deployment of Genesys components to any computer on the network using the Genesys Deployment Agent (a Management Layer component).
• Configuration, monitoring, and control of applications and solutions.
Currently, Genesys Administrator is the only component in the User Interaction layer.
Architecture
Figure 4 shows the structure of the User Interaction Layer (only Genesys Administrator for now), and how it fits into a Genesys environment.
Figure 4: User Interaction Layer Architecture
• The browser-based Genesys Administrator includes a comprehensive user interface to configure, monitor, and control the management environment.
• Genesys Administrator: Communicates with the Configuration Server (a Configuration Layer
component) to exchange configuration information.
Centralized Log Database
Solution Control Server
ConfigurationServer
Genesys Administrator
Web Browser
SOLUTIONS

34 Framework 8.1
Chapter 2: Framework Architecture Media Layer
Communicates with the Solution Control Server (a Management Layer component) to exchange status, operations, and control information.
Reads logs from the Centralized Log Database (a Management Layer component).
• Depending on the solutions deployed in the system, Genesys Administrator may also communicate with other back end servers to retrieve solution-specific information.
Media Layer
Media Layer Functions
The Media Layer provides:
• Interfaces to communication media.
• Distribution of interaction-related business data within and across solutions.
Media Layer Architecture
Figure 5 shows the structure of the Media Layer.
Figure 5: Media Layer Architecture
• Interaction Server provides an interface with Internet media like e-mail and web communications. T-Server provides an interface with traditional telephony systems.
• T-Servers provide an interface with traditional telephony systems.
• T-Servers for IP Solutions provide an interface with VoIP telephony systems.
All of these servers communicate interaction-processing requests from the Genesys solutions to the media devices and distribute interaction-processing events in the opposite direction. They also maintain the current state of each
SOLUTIONS
Interaction Server
T-Servers forIP Solutions
T-Servers
VoIP Telephony
Traditional Telephony
Internet Media
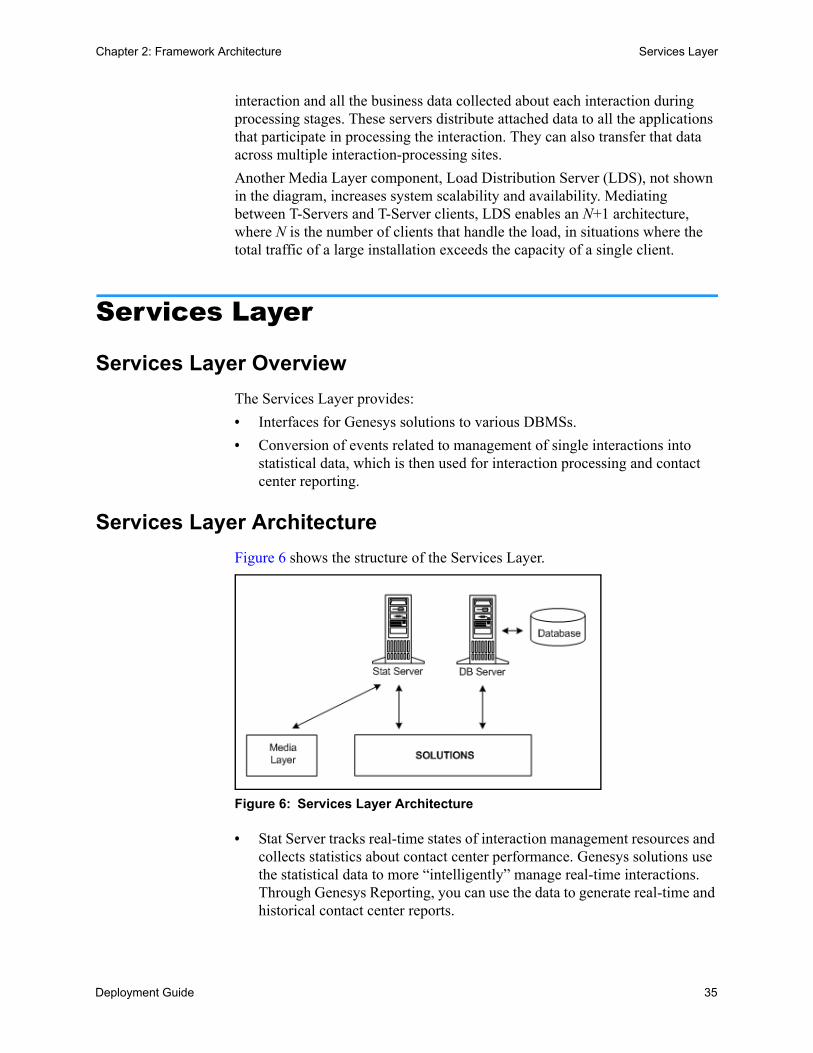
Deployment Guide 35
Chapter 2: Framework Architecture Services Layer
interaction and all the business data collected about each interaction during processing stages. These servers distribute attached data to all the applications that participate in processing the interaction. They can also transfer that data across multiple interaction-processing sites.
Another Media Layer component, Load Distribution Server (LDS), not shown in the diagram, increases system scalability and availability. Mediating between T-Servers and T-Server clients, LDS enables an N+1 architecture, where N is the number of clients that handle the load, in situations where the total traffic of a large installation exceeds the capacity of a single client.
Services Layer
Services Layer Overview
The Services Layer provides:
• Interfaces for Genesys solutions to various DBMSs.
• Conversion of events related to management of single interactions into statistical data, which is then used for interaction processing and contact center reporting.
Services Layer Architecture
Figure 6 shows the structure of the Services Layer.
Figure 6: Services Layer Architecture
• Stat Server tracks real-time states of interaction management resources and collects statistics about contact center performance. Genesys solutions use the statistical data to more “intelligently” manage real-time interactions. Through Genesys Reporting, you can use the data to generate real-time and historical contact center reports.
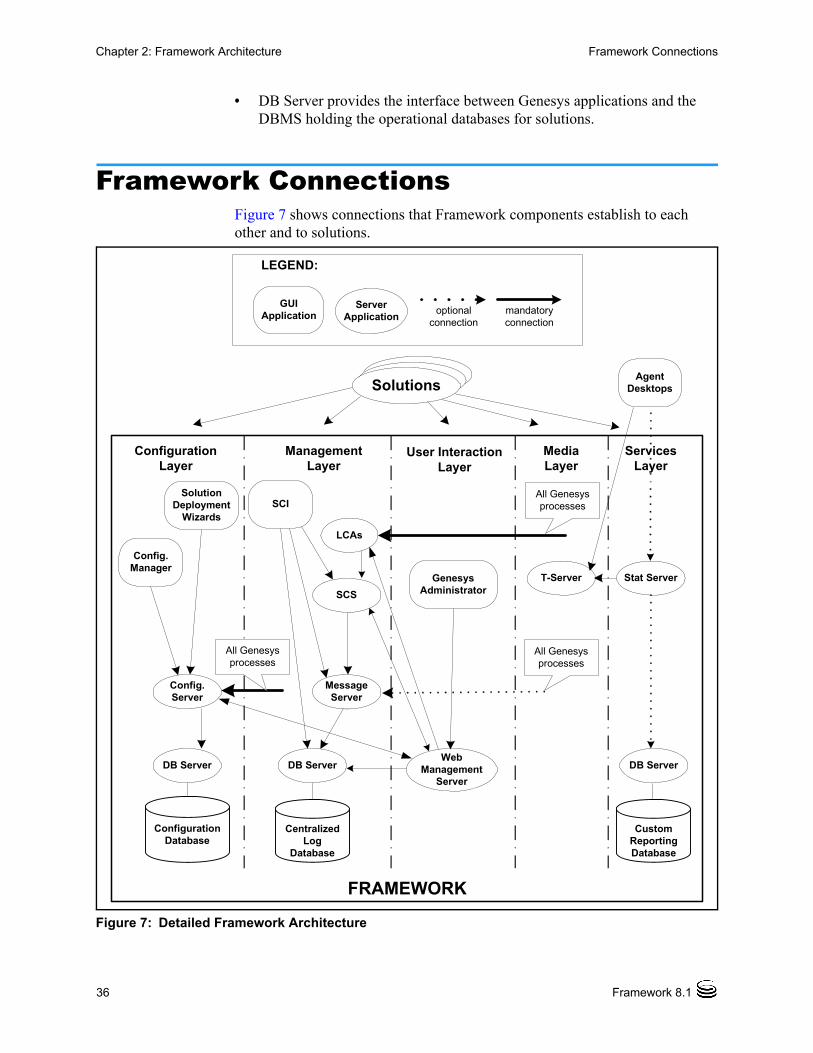
36 Framework 8.1
Chapter 2: Framework Architecture Framework Connections
• DB Server provides the interface between Genesys applications and the DBMS holding the operational databases for solutions.
Framework ConnectionsFigure 7 shows connections that Framework components establish to each other and to solutions.
Figure 7: Detailed Framework Architecture
FRAMEWORK
T-Server Stat Server
DB Server
Media Layer
CustomReporting Database
mandatory connection
optional connection
All Genesys processes
GUI Application
Server Application
LEGEND:
All Genesys processes
Agent Desktops
Services Layer
Services Layer
User Interaction Layer
Genesys Administrator
Message Server
SCS
Config. Server
Configuration Database
LCAs
Centralized Log
Database
Configuration Layer
ManagementLayer
DB Server DB Server
All Genesys processes
Config. Manager
Solution Deployment
WizardsSCI
Web Management
Server
SolutionsSolutionsSolutions
Deployment Guide 37
Chapter 2: Framework Architecture Framework Connections
IPv6 Support
All Framework server components support IPv6, except for the following:
• When connecting to FlexNet Publisher 11.9 license server, all Framework servers support IPv6 on only the RHEL 5 64-bit, Windows 2008 64-bit, and HP-UX 11i v3 Integrity (Itanium) operating systems.
For more information about IPv6, see Appendix E on page 321, and “IPv6 vs. IPv4 Overview” on page 59.

38 Framework 8.1
Chapter 2: Framework Architecture Framework Connections
Deployment Guide 39
Chapter
3 Planning the InstallationThis chapter describes the main tasks that you should complete, and the considerations you should take, when planning your Framework installation.
This chapter contains the following sections: Initial Considerations, page 39 Multi-language Environments (UTF-8 Support), page 44 Network Locations for Framework Components, page 46 Solution Availability, page 58 Security Considerations, page 67
Initial Considerations
Major Planning Steps
Achieving optimal performance with your Genesys installation requires comprehensive planning. How well Genesys Framework components function in a particular environment depends on a number of variables, including amount of computer memory, network location of the applications, and the specific tasks the applications perform. This document describes various characteristics of Framework components and looks at how they interact with each other and the applications they serve. It provides basic data and makes recommendations that will help you select the optimal components for your specific needs, choose a computer for each component, and define the optimal location for each component on the network.
Start your deployment planning by identifying the existing telephony resources in your contact center environment. Then follow the deployment recommendations for each architecture layer given in “Network Locations for Framework Components” on page 46.
40 Framework 8.1
Chapter 3: Planning the Installation Initial Considerations
Consider whether you can benefit from:
• Using the Management Layer (see “Management Layer” on page 50).
• Having redundant configurations (see “Application Failures” on page 66).
• Installing an additional Configuration Server in Proxy mode (see “Solution Availability” on page 58).
• Installing a number of Solution Control Servers in Distributed mode (see “Solution Availability” on page 58).
• Using Load Distribution Server (refer to LDS documentation for information).
In addition, review “Solution Availability” on page 58 and “Security Considerations” on page 67, which are common aspects of any Genesys installation.
Finally, prepare an installation worksheet based on the sample given in appendix G, “Installation Worksheet,” on page 341.
Telephony Network Description
Certain information is required to deploy Framework, so prepare a description of your telephony and media network as discussed in this section. You will use data from this description when supplying configuration parameters to Deployment Wizards or when configuring objects for your contact center using Genesys Administrator or Configuration Manager.
You must have the following information available for every switch that you plan to use in your interaction management solution:
1. Switch type, which usually corresponds to the switch vendor, brand name, and model number.
2. Version of the switch software.
3. Type of CTI Link (TCP/IP, X.25, or ISDN).
4. Version of the CTI Link software.
5. Information required to connect to the CTI Link (for example, for TCP/IP connection, host name and port number), including password, service id, and other parameters required for switch security.
6. Types and numbers of telephony devices, also called Directory Numbers or DNs. You may have to configure specific types of DNs (for example, Routing Points) on the switches to support functions of the interaction management solutions.
7. Login codes to be assigned to agents for runtime associations between agents and their working places.
8. Information about how the switch DNs are arranged into working places.
9. Information about how DNs that belong to a particular switch can be reached from other switches in a multi-site installation.

Deployment Guide 41
Chapter 3: Planning the Installation Initial Considerations
In addition, describe your contact center resources:
1. For every user who must access any interaction management application, define the following parameters: a unique employee ID, unique user name, and password. The role of a user in the contact center defines the set of access privileges for this user in the system. For more information, see “Security Considerations” on page 67.
2. For agents, define Login codes in every switch at which they might be working.
3. For agents, define skills that might be considered as criteria for effective interaction processing.
4. Note how agents are arranged into groups.
5. Decide how to arrange the working places into groups.
Guidelines for Naming Hosts
To ensure that the operating systems properly interpret host names, follow these guidelines when naming the host computers in your system:
1. If possible, use the host’s DNS name.
2. If it is not possible to use the DNS name, use the host’s IP address, in the format x.x.x.x. However, verify the availability of that IP address by using the command ping <IP address> on the command-line before starting the installation process.
Licensing Your Applications
Genesys licenses its applications using the FlexLM License Manager, produced by Macrovision. At startup, all licensed Genesys servers establish a client connection to License Manager, providing a computer host ID or IP address along with various information about the application. If the application has a valid license, License Manager allows the application to start and run properly. Note that the Management Layer can control and monitor License Manager as a third-party application but not as a Genesys server application.
To find more information about how Framework and other Genesys components are licensed, refer to the Genesys Licensing Guide.
Configuration Environment Types
Genesys provides its software to two types of companies:
• Companies that own their telephony equipment and use it for their own needs.
• Companies (such as service providers) that make their telephony equipment available to other companies.
42 Framework 8.1
Chapter 3: Planning the Installation Initial Considerations
Two types of the Genesys configuration environment address the difference in the needs of these two types of companies—enterprise and hierarchical multi-tenant.
You establish a particular configuration environment when you create the Configuration Database structure during the Configuration Layer installation.
For more information about the two configuration environments and resulting differences in configuration objects, refer to Framework Configuration Manager Help.
Enterprise
The enterprise (also referred to as single-tenant) configuration environment serves the needs of a single company that owns its telephony equipment and uses it for its own needs. In an enterprise configuration environment, all configuration information is visible to all users—employees of the company—given that they have sufficient permissions.
Starting in release 8.1.3, you can now convert your enterprise configuration environment to a hierarchical multi-tenant environment, using the Configuration Conversion Wizard. Refer to the Genesys Migration Guide for more information.
Hierarchical Multi-Tenant
The hierarchical multi-tenant configuration environment serves the needs of a company—typically, a service provider—making its telephony equipment available to other companies. So, this configuration environment also serves the needs of every company using the service. In this environment, configuration information about the resources that are managed exclusively by the service provider is visible on the service provider side only. Only personnel from the service provider company can register the entities that provide the technical foundation for setting up the CTI services, such as switching offices, data network hosts, and CTI applications. These resources may be shared by some or all of the companies using the service (“Tenants”). The resources of the individual companies, such as user accounts, agent groups, outbound campaigns, and so forth, are configured separately by the personnel of these companies. This configuration is visible only to that company's users.
This general structure can be extended to an unlimited number of layers. The service provider can provide its services not only to companies that use its services directly (as existed prior to release 8.0), but to other companies, such as resellers, who in turn sell those services to other companies. The customers of these resellers can, in turn, be direct users and perhaps other resellers. This hierarchical layering can be from one to an unlimited number of levels. Tenants that provide services to other tenants are called parent tenants; those that use these services are called child tenants. Therefore, a single Tenant object can be a parent, a child, or both.

Deployment Guide 43
Chapter 3: Planning the Installation Initial Considerations
LargeConfigurationEnvironments
A single instance of Configuration Server can support over 500,000 objects with a start-up time of less than 5 minutes. This configuration would require at least 1 GB of RAM for storage.
Genesys defines a large configuration environment as one in which the Configuration Database stores 50,000 or more configuration objects. Genesys strongly recommends that you consider these guidelines when operating within a large configuration environment:
• Use Genesys Administrator, Configuration Manager and other Configuration Server clients with special care, to prevent loading problems. For example, create user accounts with different configuration access capabilities, so that contact center staff can log in to Genesys Administrator and Configuration Manager and perform only those tasks they are required to perform over the configuration objects for which they have permissions. This saves Genesys Administrator and Configuration Manager from loading all the objects from the Configuration Database.
• Consider using Configuration Unit and Folder objects when creating a large number of configuration objects. The recommended number of configuration objects per folder is up to 4,000. Anything larger significantly increases Configuration Manager time for loading configuration objects.
• When creating configuration objects of the Script type (for example, routing strategies), keep in mind that both the number of Script objects and the script size significantly affect the time it takes Configuration Manager to load the Script configuration objects. If you create large scripts, reduce the number of Script objects in a subfolder to achieve an acceptable loading speed. For instance, for the script-type configuration objects approximately 150 KB in size, limiting the number of script-type objects to 30 per subfolder guarantees an acceptable loading speed.
• When creating a large number of configuration objects of the Agent Login type, assign them to User configuration objects as you create the logins. When the Configuration Database contains too many unassigned agent logins, Genesys Administrator and Configuration Manager takes a long time to open the Agent Login browse dialog box from the Configuration tab or the Person Properties dialog box. To guarantee an acceptable loading speed, keep the number of unassigned Agent Login objects below 1000 per Tenant object.
Notes: Prior to release 8.0, the hierarchical multi-tenant environment was known as the multi-tenant environment, because the latter was limited to one layer of hierarchy. In release 8.0 and later, the two terms are used interchangeably, but always refer to a hierarchical multi-tenant environment.

44 Framework 8.1
Chapter 3: Planning the Installation Multi-language Environments (UTF-8 Support)
• For all configuration objects, do not store large amounts of data as text properties in an object’s Annex, unless it is explicitly required by Genesys applications.
Multi-language Environments (UTF-8 Support)
UTF-8 data encoding enables a system to work with multi-language data that is encoded with UTF-8. In release 8.1.2, Configuration Server introduced this functionality for string fields of some configuration objects (Business Attribute and Attribute Value objects). In release 8.1.3, this support was extended to all string fields of all configuration objects, with some exceptions noted later in this section. This functionality is optional, and must be enabled to take effect.
You can perform an object search of data encoded in UTF-8, using the standard wildcard symbols, with search data supplied by UTF-8. The search parameters, in UTF-8, are compared with the data. All fields that are searchable with non-UTF-8 data are searchable with the UTF-8 data.
To configure your system to support multiple languages, satisfy the database prerequisites in “Databases” on page 73, then follow the steps in Chapter 5 on page 85, taking note of the special requirements to support UTF-8.
Framework Support for UTF-8
Framework supports UTF-8 encoding of the following:
• Most configuration fields (exceptions below)
• Solution Control Server alarm names, messages, and display thereof
• Content of log messages in Message Server and in the centralized Log Database
• UTF-8 initialization of the Configuration Database and the Log Database
Framework does not support UTF-8 encoding of the following items; they must be in ASCII.
• Names of Application objects
Warning! You must enable Configuration Server to handle UTF-8 data within the following time frame:• After the database has been initialized.• Before you start Configuration Server for the first time. Trying
to enable a Configuration Server for UTF-8 that has already been started at least once will result in a warning message being logged.
Deployment Guide 45
Chapter 3: Planning the Installation Multi-language Environments (UTF-8 Support)
• Command-line arguments specified during configuration in the Start Info section
• Command-line arguments used by mlcmd and logutility
• Local configuration file used by Configuration Server
• SNMP traps and scalar data
• Database access credentials in the [dbserver] configuration option section of DB Server
• Database parameters in Database Access Points
• Host names
• Database table name in Table Access objects
• Log names and log file names specified in the [log] configuration option section
DBMS Supporting for UTF-8 Encoding
The following DBMS can be used with UTF-8 encoding:
• DB2
• MS SQL (uses UCS-2 encoding)
• Oracle
• PostgreSQL
The following database do not support UTF-8 encoding:
• Sybase
• Informix
Converting from a non-UTF-8 Database to a UTF-8 Database
Starting in release 8.1.3, you can use the Configuration Conversion Wizard (CCW) to convert a non-UTF-8 compatible Configuration Database into a database that can store and work with encoded data. Refer to the Genesys Migration Guide for information about using CCW to convert your configuration database.
Except for the conversion of the Configuration Database, Genesys does not otherwise provide any tools to support the migration of an existing database, that cannot work with UTF-8 data, into a database than can store and work with encoded data. Genesys recommends that you use tools and utilities provided by the DBMS you are using to do any such conversion.

46 Framework 8.1
Chapter 3: Planning the Installation Network Locations for Framework Components
Network Locations for Framework Components
This section provides basic data and makes recommendations that will help you select the optimal components for your specific needs, choose a computer for each component, and define the optimal location for each component on the network.
A separate section presents the information for each layer of Framework.
Note: In release 8.x, Genesys Administrator performs the same functions as, and can be used instead of, Configuration Manager and Solution Control Interface. Accordingly, both Configuration Manager and Solution Control Interface are marked in this section as optional, although they are still available in this release.
For more information, refer to “User Interaction Layer (Genesys Administrator)” on page 56, and to the Framework Genesys Administrator Deployment Guide.
Configuration Layer
The Configuration Layer is a mandatory part of any Genesys CTI installation. You cannot configure and run any other layers of Framework—or any solutions—unless Configuration Layer components are running.
Configuration Database
The Configuration Database stores all configuration data.
Warnings! • Never add, delete, or modify any data in the Configuration Database except through applications developed or those instrumented with Genesys Configuration Server API. If you have compelling reasons for accessing the database directly, consult Genesys Technical Support before you do so.
• Configuration Server treats its information and checks integrity constraints in a case-sensitive manner. Therefore, your SQL database must be installed and configured in case-sensitive mode. Refer to your SQL Server Administrator documentation for additional information.
Deployment Guide 47
Chapter 3: Planning the Installation Network Locations for Framework Components
When planning your installation, follow these recommendations for the Configuration Database:
• The size of the Configuration Database depends on the size of the contact center, or—more precisely—on the number of entities in the contact center that you specify as configuration data objects. If data storage capacity is limited, consider allocating 10 KB of space for every object in the contact center as a general guideline. Otherwise, allocating 300 MB accommodates a Configuration Database for a typical enterprise installation.
• Treat the Configuration Database as a mission-critical data storage. Ensure that only the properly qualified personnel gain access to the DBMS that contains the Configuration Database itself. Information about access to the database is stored in the configuration file of Configuration Server. To protect this file, place it in a directory that is accessible only to the people directly involved with Configuration Layer maintenance.
• Consider encrypting the database access password via Configuration Server.
• As with any mission-critical data, regularly back up the Configuration Database. Base the frequency of scheduled backups on the rate of modifications in a particular configuration environment. Always back up the database before making any essential modifications, such as the addition of a new site or solution.
• Switch Configuration Server to Read-Only mode before performing any maintenance activities related to the Configuration Database.
• Save the records of all maintenance activities related to the Configuration Database.
• Users of the Configuration Database should have at least the following privileges for all tables in the database: Select Insert Update Delete
DB Server
DB Server provides the interface between Configuration Server and the DBMS holding the Configuration Database.
When planning your installation, follow these recommendations for DB Server:
• The Configuration Layer requires a dedicated DB Server that should not be used for any other purposes. This DB Server has a special installation and startup procedure. Refer to the DB Server sections of Chapter 5 on page 85 and Chapter 7 on page 171 for more information about installing and starting the Configuration DB Server.
48 Framework 8.1
Chapter 3: Planning the Installation Network Locations for Framework Components
• Locate DB Server on the computer on which the DBMS client runs.
• Install DB Server on a multiprocessor computer to optimize its performance. As the DBMS itself, DB Server can spawn child processes that benefit from multiprocessor capabilities.
• Provide sufficient RAM to run DB Server processes. To ensure adequate performance, do not run DB Server processes in Swap mode.
Configuration Server
Configuration Server provides centralized access to the Configuration Database, based on permissions that you can set for any user to any configuration object. Configuration Server also maintains the common logical integrity of configuration data and notifies applications of changes made to the data.
When planning your installation, follow these recommendations for Configuration Server:
• Genesys solutions installed in a particular environment can have only one Configuration Database managed though one Configuration Server at a time.
• Because Configuration Server keeps all configuration data in its memory, allocate memory for this server based on the expected size of the Configuration Database.
• Although you can install Configuration Server anywhere on the network because it does not generate heavy traffic, the most logical location for it is on the computer running DB Server.
Note: If you are using Configuration Server in high-availability (HA) mode, Genesys recommends that you configure redundant DB Servers for both Configuration Servers, or else move DB Server to a host other than the one on which primary or backup Configuration Server is running.
• When you install Configuration Server on a UNIX host computer, increase the swap area of the host to at least 600 MB to accommodate a large Configuration Database.
Configuration Server Proxy
To support geographically distributed installations, Configuration Server can operate in Proxy mode. In this document, a Configuration Server that operates in Proxy mode, and that provides similar functionality to Configuration Server 7.x, is called Configuration Server Proxy. For more information about Configuration Server Proxy, see “Solution Availability” on page 58.
Deployment Guide 49
Chapter 3: Planning the Installation Network Locations for Framework Components
When planning your installation, follow these recommendations for Configuration Server Proxy:
• Genesys solutions installed in a particular environment can have only one Configuration Database managed though one Configuration Server at a time.
• Configuration Server Proxy keeps all configuration data in its memory which improves data processing performance. Proxy consumes approximately the same amount of RAM as Configuration Server Proxy 7.x and 8.0, and Configuration Server 8.x.
• You can install Configuration Server Proxy anywhere on the network because it does not generate heavy traffic.
• When you install Configuration Server Proxy on a UNIX host computer, increase the swap area of the host to at least 600 MB to accommodate a large Configuration Database.
Configuration Manager
Note: In release 8.x, Genesys Administrator performs the same functions as, and can be used instead of, Configuration Manager. For more information, refer to “User Interaction Layer (Genesys Administrator)” on page 56, and to the Framework Genesys Administrator Deployment Guide.
Configuration Manager provides a user-friendly interface for manipulating the contact center configuration data that solutions use and for setting user permissions for solution functions and data.
When planning your installation, follow this recommendation for Configuration Manager:
• Install and run as many instances of Configuration Manager on the network as needed.
Note: You can launch multiple instances of Configuration Manager on the same computer and connect them to different Configuration Servers or to the same Configuration Server. You can also open as many object Property dialog boxes as you need from a single instance of Configuration Manager.
Genesys Security Pack on UNIX
Genesys Security Pack on UNIX, an optional component of the Configuration Layer, provides the components, such as shared libraries, which are used for generation of certificates and their deployment on UNIX computers on which
50 Framework 8.1
Chapter 3: Planning the Installation Network Locations for Framework Components
Genesys components are installed. For more information, refer to the Genesys Security Deployment Guide.
Configuration Import Wizard
Use the Configuration Import Wizard (CIW), an optional component of the Configuration Layer, to import the following data into the Genesys Configuration Database:
• Agent data from Lightweight Directory Access Protocol (LDAP) and Microsoft Active Directory databases.
• Switch configuration data from various switches.
You can also use CIW to import and export configuration data to and from Extensible Markup Language (XML) files, generate custom reports from the Configuration Database, and compare two configuration sets (including import of the configuration differences). For more information about CIW, refer to the Framework Imported Configuration Data Formats Reference Manual.
When working with CIW, Genesys recommends that you allow up to 1 GB memory for import and export operations to and from a large Configuration Database.
Management Layer
The exact configuration of the Management Layer depends on which of the following management functions you would like to use:
• Solution and application control and monitoring
• Centralized logging
• Alarm signaling
• Application failure management
Genesys recommends that you use all these capabilities to optimize solution management.
Management Layer Capabilities—Required Components
If you intend to use one or more of the Management Layer capabilities, plan to install the components required for each capability, as outlined in this section.
Note: In release 8.x, Genesys Administrator performs the same functions as, and can be used instead of, Solution Control Interface. For more information, refer to “User Interaction Layer (Genesys Administrator)” on page 56, and to the Framework Genesys Administrator Deployment Guide.

Deployment Guide 51
Chapter 3: Planning the Installation Network Locations for Framework Components
Solution and Application Control and Monitoring
Install these components to control and monitor solutions and applications:
• Local Control Agent
• Solution Control Server
• Solution Control Interface (optional)
Refer to the Framework Management Layer User’s Guide for descriptions of, and recommendations for, these components.
Centralized Logging
Install these components to use centralized logging:
• Centralized Log Database
• DB Server (as a client of Configuration Server)
• Message Server
• Solution Control Interface (optional)
Note: Although Solution Control Server is not required, it is a source of log events vital for solution maintenance. For example, Solution Control Server generates log events related to detection and correction of application failures. As such, it is useful for centralized logging.
Refer to the Framework Management Layer User’s Guide for descriptions of and recommendations for these components.
Alarm Signaling
Install these components to provide alarm signaling:
• Message Server
• Solution Control Server
• Solution Control Interface (optional)
• Genesys SNMP Master Agent, if SNMP alarm signaling is required. See also “Built-in SNMP Support” on page 52.
Note: You do not need to install the Genesys application called G-Proxy to provide the alarm-signaling functions of the Management Layer.
Refer to the Framework Management Layer User’s Guide for descriptions of and recommendations for these components.
Application Failure Management
Install these components to detect and correct application failures:
• Local Control Agent

52 Framework 8.1
Chapter 3: Planning the Installation Network Locations for Framework Components
• Solution Control Server
• Solution Control Interface (optional)
Refer to the Framework Management Layer User’s Guide for descriptions of and recommendations for these components.
See the section “Application Failures” on page 66 and for information about the application-failure management mechanism.
Built-in SNMP Support
Install the following components to integrate Genesys Framework with an SNMP-compliant third-party NMS (network management system):
• Local Control Agent
• Solution Control Server
• Genesys SNMP Master Agent or a third-party SNMP master agent compliant with the AgentX protocol
• Message Server if SNMP alarm signaling is required
Refer to the Framework Management Layer User’s Guide for descriptions of and recommendations for these components.
Management Layer Components
This section provides recommendations for planning and installing the Management Layer components.
Local Control Agent
When planning your installation, follow these recommendations for Local Control Agent:
• Install an instance of LCA on each computer running a monitored application, whether a Genesys daemon or a third-party application. LCA is installed at the port number you specify in the LCA Port property of the corresponding Host object in the Configuration Database. If you do not specify a value for LCA Port, the LCA default port number is 4999.By default, LCA runs automatically on computer startup.
Note: On Windows operating systems, the installation script always installs LCA as a Windows Service. If you are changing the LCA port number in the host configuration after the installation, you must also change the port number in the ImagePath in the application folder, which you can find in the Registry Editor. Refer to “Notes on Configuring the LCA Port” on page 122 for instructions.
Deployment Guide 53
Chapter 3: Planning the Installation Network Locations for Framework Components
• On UNIX platforms, LCA must be added to the r/c files during the installation, so that LCA can start automatically on computer startup. In practice, this means that the person installing LCA must have sufficient permissions.
• If you will be using Genesys Administrator to deploy Genesys applications and solutions to any hosts in your network, you must install and run the latest instance of LCA on each target host. This will install a remote deployment agent (referred to as the Genesys Deployment Agent), which is used by Genesys Administrator to carry out the deployment on that host.
Message Server
When planning your installation, follow these recommendations for Message Server:
• Genesys recommends the use of one Message Server and of one Log Database for all but large installations. If you are working within a large installation and think about evenly dividing the total log-event traffic among number of Message Servers, each serving any number of clients, keep the following facts in mind: Although any number of Message Servers can store log records in the
same Log Database, one Message Server cannot store log records to more than one Log Database.
Because any number of Message Servers can send log records to Solution Control Server, Solution Control Interface can display alarms based on log records from a few Message Servers.
• If you want an application to generate alarms, you must configure it to send log events to Message Server. Use the same Message Server for both the centralized logging and alarm signaling.
• If you want Message Server to provide alarms, you must connect it to Solution Control Server. This means that you must configure a connection to every Message Server in the SCS Application object’s Properties dialog box.
• As with any other daemon application, you can deploy redundant Message Servers.
• To optimize the performance of the connection with DB Server, configure the number of messages that the Message Server sends to DB Server before receiving a response. The smaller the number of messages, the greater the decrease in performance. See the “Message Server” section of the Framework Configuration Options Reference Manual for more information.

54 Framework 8.1
Chapter 3: Planning the Installation Network Locations for Framework Components
Solution Control Server
When planning your installation, follow these recommendations for Solution Control Server:
• Given that you can install and use more than one SCS that is operating in Distributed mode within a given configuration environment, consider deploying a few Solution Control Servers in this mode for large or geographically distributed installations. In these installations, each server controls its own subset of Host, Application, and Solution objects. Distributed Solution Control Servers communicate with each other through the dedicated Message Server.
• As with any other daemon application, you can deploy redundant Solution Control Servers. Redundancy support for SCS is implemented through direct communication between the backup SCS and the LCA of the host on which the primary SCS runs. To set up HA port synchronization between primary and backup Solution Control Servers, see “Synchronizing HA Ports Between Redundant Solution Control Servers” on page 240.
Note: You cannot perform a manual switchover for Solution Control Server.
Solution Control Interface
Note: In release 8.x, Genesys Administrator performs the same functions as, and can be used instead of, Solution Control Interface. For more information, refer to “User Interaction Layer (Genesys Administrator)” on page 56, and to the Framework Genesys Administrator Deployment Guide.
When planning your installation, follow these recommendations for SCI:
• Install and run as many instances of SCI on the network as needed.
Note: Launch only one instance of SCI per host computer.
• Keep in mind that although you can configure SCI to work with more than one Solution Control Server and more than one Log Database, SCI can only work with one SCS and one Log Database at a time.
• Use SCI for advanced viewing and handling of the log.
• Use SCI to view active alarms and define what solutions the alarms might affect.

Deployment Guide 55
Chapter 3: Planning the Installation Network Locations for Framework Components
DB Server for Log Database
When planning your installation, follow these recommendations for DB Server:
• Locate DB Server on the same computer on which the DBMS client runs.
• Install DB Server on a multiprocessor computer to optimize its performance. As with the DBMS itself, DB Server can spawn child processes that benefit from multiprocessor capabilities.
Centralized Log Database
As with any historical database, the size of the Centralized Log Database grows with time. So, when you are planning your installation, keep in mind that:
• The maximum allowable record size is 1 KB.
• The size of the Centralized Log Database depends on: The number of applications in the system. The log level you have set for the network output for each application. The required time the log records should be kept in the database.
Table 1 on page 56 provides general timing recommendations.
With these limits in mind, follow these recommendations for the Centralized Log Database:
• For efficient online log viewing, allocate temporary database space of at least 30 percent of the expected Centralized Log Database size.
• Limit permissions to modify the Centralized Log Database content to Message Server(s) only.
• Define how long the log records are to be kept in the database before they become obsolete. Use the Log Database Maintenance Wizard to delete obsolete records or configure the removal of obsolete records using the DBMS mechanisms.
• Users of the Centralized Log Database should have at least the following privileges for all tables in the database: Select Insert Update Delete
• Make a trade-off between how long the log records are to be kept and the ability to access them efficiently. If both a considerable period of record storage and quick online access to the log records are important, back up the more dated records in a separate database.
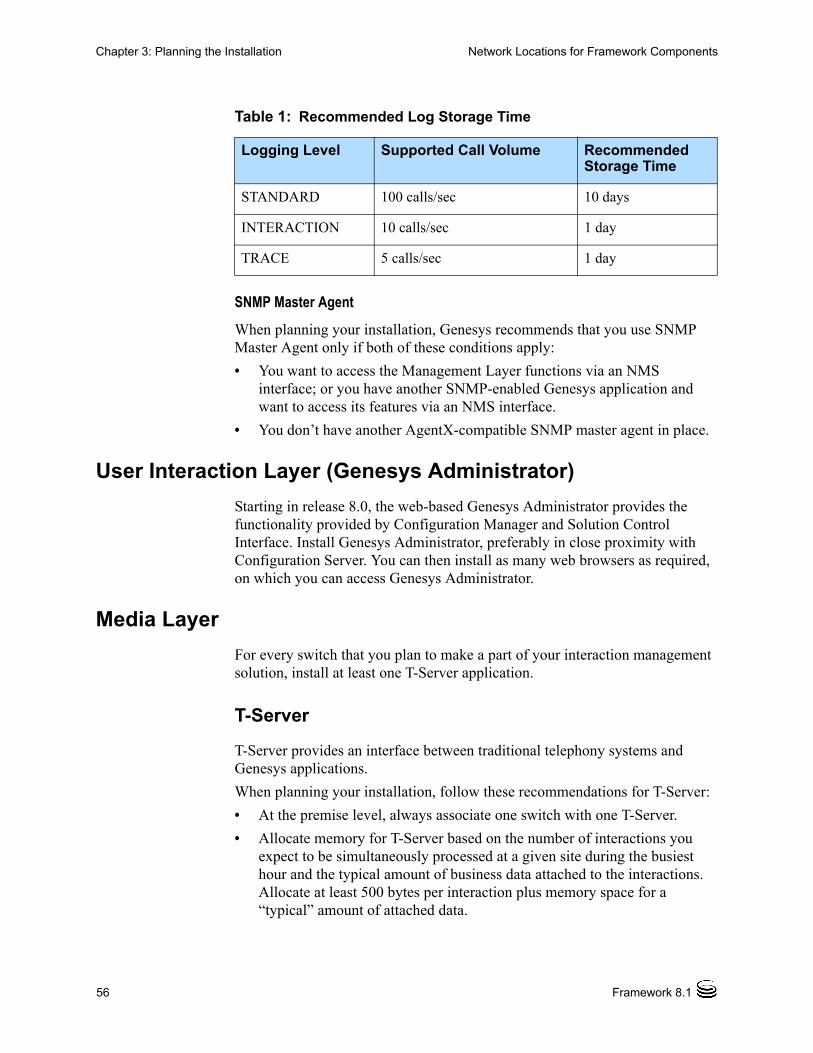
56 Framework 8.1
Chapter 3: Planning the Installation Network Locations for Framework Components
SNMP Master Agent
When planning your installation, Genesys recommends that you use SNMP Master Agent only if both of these conditions apply:
• You want to access the Management Layer functions via an NMS interface; or you have another SNMP-enabled Genesys application and want to access its features via an NMS interface.
• You don’t have another AgentX-compatible SNMP master agent in place.
User Interaction Layer (Genesys Administrator)
Starting in release 8.0, the web-based Genesys Administrator provides the functionality provided by Configuration Manager and Solution Control Interface. Install Genesys Administrator, preferably in close proximity with Configuration Server. You can then install as many web browsers as required, on which you can access Genesys Administrator.
Media Layer
For every switch that you plan to make a part of your interaction management solution, install at least one T-Server application.
T-Server
T-Server provides an interface between traditional telephony systems and Genesys applications.
When planning your installation, follow these recommendations for T-Server:
• At the premise level, always associate one switch with one T-Server.
• Allocate memory for T-Server based on the number of interactions you expect to be simultaneously processed at a given site during the busiest hour and the typical amount of business data attached to the interactions. Allocate at least 500 bytes per interaction plus memory space for a “typical” amount of attached data.
Table 1: Recommended Log Storage Time
Logging Level Supported Call Volume Recommended Storage Time
STANDARD 100 calls/sec 10 days
INTERACTION 10 calls/sec 1 day
TRACE 5 calls/sec 1 day

Deployment Guide 57
Chapter 3: Planning the Installation Network Locations for Framework Components
• Provide sufficient RAM to run T-Server processes. To ensure adequate performance, do not run T-Server processes in Swap mode.
• Do not install real-time third-party applications on the computer running T-Server.
• Consider using a dedicated subnetwork for T-Server connection to the link.
• Do not enable IP routing between the link subnet and the network when T-Server is installed on a computer with two or more network cards (one of which is used for link connection and the others for connection to the rest of the network).
Services Layer
Although the Services Layer components are considered elements of Framework, it is logical to install them when you install the solution that they will serve. When deploying these, consider the following recommendations.
DB Server
DB Server provides the interface between Genesys applications and the DBMS holding the operational databases for solutions.
When planning your installation, follow these recommendations for DB Server:
• Do not use the DB Server that provides access to the Configuration Layer to access any databases other than the Configuration Database. (See “DB Server” on page 47.)
• Consider dividing database-related traffic evenly among any number of DB Servers, each serving up to 255 clients.
• Locate DB Servers on the computer on which the DBMS client runs.
• Install DB Server on a multiprocessor computer, to optimize its performance. As the DBMS itself, DB Server can spawn child processes that benefit from multiprocessor capabilities.
• Provide sufficient RAM to run DB Server processes. To ensure adequate performance, do not run DB Server processes in Swap mode.
Stat Server
Stat Server tracks real-time states of interaction management resources and collects statistics about contact center performance. Genesys solutions use the statistical data to more “intelligently” manage interactions. Use Genesys Reporting to generate real-time and historical contact center reports based on data that Stat Server collects.
For specific recommendations on Stat Server installation, refer to Stat Server documentation.
58 Framework 8.1
Chapter 3: Planning the Installation Solution Availability
Solution AvailabilityThis section describes the events that affect the availability of Genesys solutions.
Think of the availability of an interaction management solution as the amount of time that the solution is available to process enterprise interactions. Two major categories of events affect availability: changes in the operating conditions and failures. The first category combines the various operational and maintenance activities that require temporary shutdown and restart of the entire system or of one of its components. The second category deals with the temporary inability of the solution to perform its required functions because of operator errors or software faults.
Given the complexity of the solution architecture, remember that:
• Any interaction management solution relies on functionality provided by a number of components, each performing a specific task. The overall availability of a solution depends on the availability of each of the components involved.
• Interaction management solutions do not operate in isolation. On the contrary, they essentially bring together various business resources, such as telephony switches, call-processing telephony terminations, database management systems, and Internet communication servers. As such, the inability of an interaction management solution to perform its required function may be the result of the unavailability of an external component or system.
• Genesys solutions, which consist of software components only, operate on hardware platforms that require maintenance and that are subject to failures. For example, running redundant processes on the same host may work in the presence of a software failure; however, it offers no protection if the computer itself or a communication link to it fails. The availability of a solution can never be greater than the availability of the underlying hardware platform.
The Genesys Framework is designed to minimize the impact on solution availability associated with operational and maintenance activities. Because the Configuration Layer updates solutions about any configuration changes at runtime, uninterrupted solution operations are guaranteed regardless of the number or frequency of changes made to the contact center environment. Dynamic reconfiguration is a standard feature of every Genesys 7.x and 8.x component and does not require you to make any special adjustments to enable configuration settings.
Solution availability can also be affected by accidental operator errors, unauthorized actions, or actions that are carried out in a less than skillful manner. The data integrity rules implemented in the Configuration Layer greatly reduce errors of the first type. The basic integrity rules common across all solutions are supported by Configuration Server, and therefore enforced
Deployment Guide 59
Chapter 3: Planning the Installation Solution Availability
regardless of the type of client application through which the data is managed. More advanced integrity rules specific to a particular solution are implemented in the solution wizards. Genesys recommends that you use wizards for the initial deployment of solutions and major configuration updates in the course of solution operation.
Genesys Framework also provides a comprehensive set of access control functions that help minimize the risk of failures associated with unskilled or unauthorized operator actions. For more information about these functions, see “Security Considerations” on page 67.
Finally, to reduce the impact on solution operations, schedule all operational and maintenance activities that directly affect system behavior for off-peak hours, when solutions operate at minimum loads.
Faults—accidental and unplanned events causing a system to fail—present the biggest challenge to solution availability. The functions that detect, isolate, and correct various types of faults are partly incorporated into every Genesys component and partly implemented in the Management Layer of the Genesys Framework. Refer to the Framework Management Layer User’s Guide for more information about the various fault-detection mechanisms implemented in Genesys software.
IPv6 vs. IPv4 Overview
Internet Protocol version 6, commonly known as IPv6, is a network layer protocol for packet-switched inter-networks. It is designated as the successor of IPv4, the current version of the Internet Protocol, for general use on the Internet.
IPv6 must be configured on each component that is going to support it. There are two ways to enable it, as follows:
• Use the environment variable GCTI_CONN_IPV6_ON. Use the procedure “Enabling and disabling IPv6 support using an environment variable” on page 60.
• Use the configuration option enable-ipv6. Use the procedure “Enabling and disabling IPv6 support using a configuration option” on page 60.
Note: This section provides a high-level view of IPv6, and how to enable it in a Genesys component. For detailed information about IPv6, the operating systems that support it, and things to consider when deploying it, see Appendix D, “Internet Protocol version 6 (IPv6)” on page 321. For a list of Framework connections that support IPv6, see “IPv6 Support” on page 37.

60 Framework 8.1
Chapter 3: Planning the Installation Solution Availability
Procedure:Enabling and disabling IPv6 support using an environment variable
When to use this procedure:
• If an IPv6 connection is to be established before an application is able to, or must, read information from Configuration Server.
• If you want all Genesys applications on the same host to support IPv6. You only have to configure the host once, rather than configure each application on that host individually. In addition, this host-level setting will override any application-level setting.
If neither of these situations apply to you, you can choose to enable or disable IPv6 using this procedure, or use the procedure “Enabling and disabling IPv6 support using a configuration option” on page 60.
Start of procedure
Set the environment variable GCTI_CONN_IPV6_ON to true, represented by any non-zero integer value, to enable IPv6; or to false, represented by zero (0), to disable IPv6.
The default value of this environment variable is false (0), indicating that IPv6 support is disabled. This default value ensures backward compatibility.
End of procedure
Procedure:Enabling and disabling IPv6 support using a configuration option
Do not use this procedure if:
• An IPv6 connection is to be established before an application is able to, or must, read information from Configuration Server.
• You want all Genesys applications on a specific host to support IPv6, and you want to set it only once.
If neither of these situations apply to you, you can choose to enable or disable IPv6 using this procedure, or use the previous procedure “Enabling and disabling IPv6 support using an environment variable” on page 60.
Start of procedure
Using either Genesys Administrator or Configuration Manager, set the enable-ipv6 option in the common section of the options of the component’s Application object.

Deployment Guide 61
Chapter 3: Planning the Installation Solution Availability
Refer to component-specific documentation and Appendix D on page 321 for more information about IPv6 and any specific considerations for deploying IPv6 in your situation. Refer to the Framework Configuration Options Reference Manual for more information about this option.
End of procedure
Mixed IPv4 and IPv6 Environments
You can configure IPv6 and IPv4 in the same environment, as described in Appendix D. In this mixed environment, you can configure connections with servers that support IPv4, IPv6, and both. For connections with servers that support both IPv4 and IPv6, you can specify which version you prefer to use. For example, if you are setting up a connection to a DB Server that supports both IP4 and IPv6, you can choose to use IPv4 or IPv6 for that connection. There is no universal rule that determines what version should be used, so the choice is up to you.
To configure this choice, use the Transport parameter ip-version on the Advanced tab of the Connection Info dialog box for the connection:
ip-versionDefault Value: 4,6Valid Values: 4,6 and 6,4
Specifies the order in which IPv4 (4) and IPv6 (6) are used for the connection with a server that has a mixed IPv4/IPv6 configuration. This parameter has no effect if the environment variable GCTI_CONN_IPV6_ON or the option enable-ipv6 is set to 0.
This option also has no affect on connections to Configuration Server that are established before the option value can be read from the Configuration Database.
The same option can also be set in the transport section of the Host’s Annex to set the IP version used on the connection between Solution Control Server and LCA. Otherwise, Management Framework components do not support this option. Refer to the Framework Configuration Options Reference Manual for more information about setting this option in the host.
Table 2 summarizes how this parameter or option affects the connection for which it is configured.
Table 2: IP Version Selected by ip-version Parameter/Option
Connecting Server ip-version=4,6 ip-version=6,4
Supports only IPv4 IPv4 is used IPv4 is used

62 Framework 8.1
Chapter 3: Planning the Installation Solution Availability
Communication Session Failures
In a distributed interaction management solution, components must communicate continuously with each other and with some external resources. A communication session with a required resource can fail for any of these reasons:
• Failure of the resource itself
• Problem with the hardware where the resource is located
• Network connectivity problem between the two points
• Forced termination of the connection that has not shown any activity for a specified amount of time
Any time a solution component cannot communicate with a required resource, the solution may not be able to perform its required function.
After a failure is detected, the fault correction procedure normally consists of repeated attempts to regain access to either the resource in question or to a redundant resource, if one is available.
Each underlying communication protocol is typically equipped with functions that monitor open communication sessions. When a failure is detected, the communication software signals an abnormal condition to the interacting processes. This detection mechanism is fully supported in the Genesys solutions, whose connection layer translates system messages into appropriate events on the application level.
However, communication protocols do not always provide adequate detection times. The TCP/IP stack, for example, may take several minutes to report a failure associated with a hardware problem (such as when a computer goes down or a cable is disconnected). This delay presents a serious challenge to the availability of any interaction management solution.
Advanced Disconnect Detection Protocol
All but a few Genesys interfaces use the TCP/IP stack. To compensate for the manner in which this stack operates, Genesys components use the Advanced Disconnect Detection Protocol (ADDP), which periodically polls the opposite process when no actual activity occurs at a given connection. If a configurable
Supports both IPv4 and IPv6 IPv4 is used IPv6 is used
Supports only IPv6 IPv6 is used IPv6 is used
Warning! Genesys does not recommend or support IPv6-only environments.
Table 2: IP Version Selected by ip-version Parameter/Option
Connecting Server ip-version=4,6 ip-version=6,4
Deployment Guide 63
Chapter 3: Planning the Installation Solution Availability
timeout expires without a response from the opposite process, the connection is considered lost and an appropriate event is sent to the application.
Genesys recommends enabling ADDP on the links between any pair of Genesys components. ADDP helps detect a connection failure on both the client and the server side. For most connections, enabling detection on the client side only is sufficient and it reduces network traffic. However, Genesys strongly recommends that you use detection on both sides for all connections between Configuration Server and its clients (including Solution Control Interface), as well as between any two T-Servers.
To enable ADDP between two applications, specify addp as the Connection Protocol when configuring the connection between applications; also, set values for the Local Timeout, Remote Timeout, and Trace Mode properties. For more information, refer to Framework Configuration Manager Help.
For complete instructions on configuring ADDP between two applications, refer to Appendix B on page 293. For instructions on configuring ADDP between the primary and backup T-Servers, refer to the Deployment Guide for your specific T-Server.
After a communication session failure is detected, the application makes repeated attempts to regain access to the required resource. If a redundant process is not configured, the reaction is a repeated attempt to restore the communication session with the same process. If a redundant process is configured, the application makes alternate attempts to restore the failed communication session and to establish a session with the redundant process. This way, if the session has terminated because of a failure of the opposite process, the application eventually connects to the standby process configured to provide the same type of service.
Note: Beginning with release 7.5, backwards compatibility of the Keep-Alive Protocol (KPL) is no longer supported. If you used KPL in previous versions of Genesys, consider using ADDP instead.
Configuration History Log
The Configuration History Log consists of a set of a records that contains historical information about client sessions and changes to configuration objects. It enables a client to restore a session that was terminated by a service interruption, and request any changes to configuration objects that occurred during that service interruption.
For all Configuration Servers except Configuration Server Proxies, the records are stored in the Configuration Database. For Configuration Server Proxy, the records are stored in a separate database referred to as the History Log Database.
The History Log is installed with default parameters when you install Configuration Server or Configuration Server Proxy. You configure the

64 Framework 8.1
Chapter 3: Planning the Installation Solution Availability
History Log parameters in the options of the Configuration Server Application object in Genesys Administrator or Configuration Manager. Refer to the Framework Configuration Options Reference Manual for detailed descriptions of the configuration options that relate to the History Log.
When requested by a client that is recovering from a service interruption, Configuration Server or Configuration Server Proxy does the following:
• Restores the client’s session according to a client session record.
• Returns all data that has been changed since that client disconnected.
History Log functionality is mandatory, and cannot be turned off permanently.
Maintenance No maintenance is required for the History Log, because it is maintained automatically by Configuration Server or Configuration Server Proxy. At startup, Configuration Server Proxy checks whether there is a pre-existing History Log database with the same name as that defined in the configuration file. If it does not find a match, it creates a new one. If it does find a match, Configuration Server Proxy backs up that file, appending the .bak file extension. This is not required for other Configuration Servers, because the history log records are stored in the Configuration Database and are maintained with the configuration records. Based on the expiration parameters, Configuration Server and Configuration Server Proxy purges information from the database, both at startup and during normal operations.
Errors Any errors that occur when writing to the History Log generate Log Event 21-22138.If persistent or fatal errors occur as a result of a corrupt History Log Database on Configuration Server Proxy, remove the corrupt file and, optionally, replace it with the backup file created during Configuration Server Proxy startup. Then, restart Configuration Server Proxy.
MinimizingPerformance
Impacts
Depending partially on the size of the updates, the History Log can affect the performance of Configuration Server. To minimize these performance impacts, you can turn off the History Log functionality temporarily by setting the active option to false for the Configuration Server Application object. The functionality will be turned back on either when you manually reset the option (to true), or when you restart Configuration Server..
Note: Genesys strongly recommends that you associate an alarm with this Log Event, and that you inform Genesys Technical Support if you encounter any errors or corruption.
Warning! When History Log functionality is turned off, current activities are not recorded. Therefore, clients that are disconnected during this time cannot retrieve the updates necessary to restore their sessions.
Deployment Guide 65
Chapter 3: Planning the Installation Solution Availability
To minimize the performance impacts on Configuration Server Proxy, you can also:
• Save the History Log in memory instead of on the hard drive, by setting the all option to :memory: for the Configuration Server Proxy Application object.
• Limit the ensured integrity of the internal history database to only in cases of Configuration Server Proxy failure. Default History Log operation on Configuration Server Proxy ensures the integrity of the internal History Log Database if both Configuration Server Proxy and the operating system fail. However, this is CPU-intensive. Instead, you can limit the scope of this protection to failure of Configuration Server Proxy only by setting the failsafe-store-processing option to false. If the operating system fails, the History Log Database may not be wholly preserved. However, this operation has less impact on system performance.
Refer to the Framework Configuration Options Reference Manual for more information about the configuration options used to configure the configuration history log.
Software Exceptions
A software exception is an interruption in the normal flow of a program caused by an internal defect. An operating system generates exceptions in response to illegal operations that a software program attempts to perform. After generating an exception, the operating system terminates the process, which may make unavailable all solutions that use the functionality of this component.
Genesys provides an exception-handling function that monitors the exceptions the operating system generates. The function attempts to prevent application termination by skipping the program block from which the exception originated. In most cases, this action amounts to losing one processing step with respect to a single interaction in favor of preventing an application failure.
Although the function attempts to prevent application termination, it still reports the exception with the highest priority marking. This ensures that operators know about the exception and can take appropriate measures.
You can configure the number of times during which the function tries to prevent an application from failing if it continues to generate the same exception. If this threshold is exceeded, the exception-handling function abandons the recovery procedure, allowing the operating system to terminate the application. This termination can then be detected and corrected by external fault-management functions.
By default, the exception-handling function is enabled in any daemon application; six exceptions occurring in 10 seconds will not cause an application to terminate. To change these parameters or disable the exception handling, use a corresponding command-line parameter when starting an application.
66 Framework 8.1
Chapter 3: Planning the Installation Solution Availability
Application Failures
A complete application failure may be a result of either an internal defect (for example, an infinite loop) or an external event (for example, a power failure). It may manifest as either a process nonresponse or termination. Typically, if a solution component stops working, the solution is no longer available to process customer interactions.
Because the application that fails cannot perform any functions, you must use an external mechanism for both detection and correction of faults of this type. In Framework, the Management Layer is this mechanism.
For information about the architecture and components in the Management Layer, see the Framework Management Layer User’s Guide.
Database Failures
Starting in release 8.0, any DB Server can detect a connection failure with the corresponding database and attempt to reconnect. To detect the failure, DB Server clients monitor the responses they receive from the DBMS. If a response is not received within the interval specified by the configuration option db-request-timeout, the client process stops executing. This is understood by DB Server as a failure of the DBMS, and it tries to reconnect.
The option db-request-timeout is configured in the DB Server Application object via the Query Timeout field for Database Access Point (DAP) Application objects for the database. The timeout set in the DAP overrides the timeout set in DB Server, but applies only to client processes that connect to the database through this DAP.
Refer to the Framework Configuration Options Reference Manual for more information about using the option db-request-timeout to implement this
feature.
Failure of an Oracle 11g RAC Database
The Oracle 11g Real Application Cluster (RAC) DBMS includes a client-side feature called Transparent Application Failover (TAF). If an instance of a database fails, TAF automatically reconnects to a surviving database instance (node).
However, TAF only restores the connection; it is the responsibility of the application to restart on the new node any operations that were in process on the failed node. These operations could be any of the following:
• Individual Data Manipulation Language (DML) statements, such as INSERT, UPDATE, and DELETE.
• Active transaction involving DML statements, issuing ROLLBACK instructions to these transactions first.
• Active binding packages.
Deployment Guide 67
Chapter 3: Planning the Installation Security Considerations
To support Oracle 11g RAC in TAF mode, Configuration Server can optionally resubmit DML statements (DML transactions or binding package execution) when the appropriate error messages are received from the DBMS. This is implemented using the configuration option dml-retry.Refer to the Framework Configuration Options Reference Manual for the full description of this option.
Remote Site Failures
Starting in release 8.0, each Solution Control Server in a Distributed Solution Controls Server environment can detect the failure of a remote site controlled by another Solution Control Server. Refer to the Framework Management Layer User’s Guide for more information.
Common Log Options
Local Control Agent supports the unified set of log options (common log options) to allow precise configuration of log output. For a complete list of unified log options and their descriptions, see the “Common Log Options” chapter of the Framework Configuration Options Reference Manual.
Security ConsiderationsThis section outlines some of the security capabilities provided in Configuration Layer for your data, both from access by unauthorized users and during its transfer between components.
For more information about these and other security features, and for full implementation instructions, refer to the Genesys Security Deployment Guide.
Access to Hosts File at Start-up
By default, Genesys components try to read from the hosts file at startup to enable them to resolve host names. If an organization has a security policy against this, they can configure the environment variable GCTI_DNS_USE_HOSTSFILE=0 to disable this access.
User Authentication
User authentication refers to ensuring that the user is actually who he or she claims to be. In Genesys software, this is implemented by the Configuration Server. The data that a Genesys solution requires for operating in a particular environment, as well as the applications and the solutions, is represented as Configuration Database objects. Any person who needs access to this data or these applications must have an account in this database.
68 Framework 8.1
Chapter 3: Planning the Installation Security Considerations
Logging In
At startup, every Genesys GUI application opens a Login dialog box for users to supply a User Name and Password, which are used for authentication. The authentication procedure succeeds only if a User with the specified User Name and Password is registered in the Configuration Database. Otherwise, the working session is stopped.
Last Logged In
Starting in release 8.0, you can configure Configuration Server so that some Genesys GUI applications display the date and time of the previous login for the currently logged-in user. Each user can then detect if someone else had accessed the system using their credentials.
Forced Re-Login for Inactivity
You can configure some Genesys GUIs, including Configuration Manager, Solution Control Interface, and Wizard Manager, to automatically force a logged-in user to log in again if he or she has not interacted with any element of the interface for a set period of time. In some interfaces, open windows are also minimized, and are restored only when the user logs back in.
This functionality is configured in each interface, and is therefore specific to that interface. By default, this functionality is not active, and must be activated on an instance-by-instance basis for those GUI applications that are to use the feature.
User Authorization
User authorization refers to ensuring that an authenticated user is entitled to access the system, either all or parts thereof, and defines what the user can do to or with the data that they can access.
The security mechanism implemented in Configuration Server allows the system administrator to define, for each valid user account, a level of access to sets of objects. The access privileges of valid user accounts define what the user can and cannot do within the corresponding set of objects.
Starting in release 8.0, an additional layer of security is available through Genesys Administrator, called Role-Based Access Control. This enables the
Note: The inactivity feature survives reconnection timeouts. In other words, if the interface application becomes disconnected from Configuration Server after the forced re-login timeout has expired but before the user has logged in again, the user must still log in before he or she can access the system.

Deployment Guide 69
Chapter 3: Planning the Installation Security Considerations
system administrator (or a designated individual) to define access to objects based on what is to be done (viewed, modified, deleted) to the objects.
This section provides an overview of the various mechanisms in place to ensure data is accessed by only authorized users. For detailed information about how Genesys software implements user authorization, refer to the Genesys Security Deployment Guide.
Access Permissions
The level of access to sets of objects granted by the system administrator is defined by a combination of elementary permissions. Each user must be assigned at least one permission; without it, the user has no access to any data.
Access control for daemon applications is different from that for GUI applications. Access permissions for GUI applications are determined by the profile of the person who is currently logged in.
Access Groups
Access Groups are groups of Users who need to have the same set of permissions for Configuration Database objects. By adding individuals to Access Groups—and then setting permissions for those groups—access control is greatly simplified.
Genesys provides preconfigured default Access Groups. You can also create your own Access Groups to customize your own security environment.
Master Account and Super Administrators
The Configuration Database contains a predefined User object, otherwise known as the Master Account or Default User. The Default User, named default and with a password of password, is not associated with any Access Group. The Master Account always exists in the system and has a full set of permissions with respect to all objects in the Configuration Database. You must use this account when you log in to the Configuration Layer for the first time since the Configuration Database initialization. Genesys recommends changing the default name and password of the Master Account, storing them securely, and using this account only for emergency purposes or whenever it is specifically required.
Changing Default Permissions
The default permissions that the Configuration Layer sets provide users with a broad range of access privileges. You can always change those default settings to match the access needs of a particular contact center environment.

70 Framework 8.1
Chapter 3: Planning the Installation Security Considerations
Genesys provides two mechanisms to help you manage changes to your permissions—propagation and recursion. Refer to the Genesys Security Deployment Guide for details about these mechanisms and how to use them.
New Users
Starting with release 7.6, Configuration Server does not assign a new user to an Access Group when the user is created. In effect, the new user has no privileges, and cannot log in to any interface or use a daemon application. The new user must be explicitly added to appropriate Access Groups by an Administrator or by existing users with access rights to modify the user’s account. Refer to Framework Configuration Manager Help for more information about adding a user to an Access Group.
By default, this behavior applies to all new users added by Configuration Server release 7.6 or later. Users created before release 7.6 keep their existing set of permissions and Access Group assignments. If you want new users to be added automatically to pre-defined Access Groups, as was the behavior prior to release 7.6, you must manually disable this feature by using the Configuration Server configuration option no-default-access.
For more information about this feature, including how it works and how to modify it, refer to the Genesys Security Deployment Guide.
Login Security Banner
Starting in release 7.6, you can create your own security banner to be displayed to a user logging in to Configuration Manager, Solution Control Interface, or any Framework Wizard. You define the content of the banner, typically the terms of use of the application. Users must accept the terms to proceed, or they can reject the terms to close the application without access.
The user-defined security banner is specified during the installation of each instance of a GUI application, such as Configuration Manager and Solution Control Interface, and during the installation of any Framework Wizard.
Refer to the Genesys Security Deployment Guide for more details about the security banner.
Note: Genesys does not recommend changing the default access control setting unless absolutely necessary. Remember, the more complex the security system is, the more difficult it becomes to manage the data and the more it affects the performance of the Configuration Layer software.

Deployment Guide 71
Chapter 3: Planning the Installation Security Considerations
Genesys Security Using the TLS Protocol
Starting with release 7.5, Genesys supports the optional use of the Transport Layer Security (TLS) protocol to secure data transfer between its components. TLS is supported on Windows and UNIX platforms.
To enable secure data transfer between Genesys components that support this functionality, you must configure additional parameters in the Host objects and Application objects that represent these components. Certificates and corresponding private keys are generated using standard Public Key Infrastructure (PKI) tools, such as OpenSSL and Windows Certification services.
For detailed information about Genesys Security Using the TLS Protocol, refer to the Genesys Security Deployment Guide.
Multiple Ports
To provide flexibility in configuring a system with the Genesys Security using the TLS Protocol feature, you can configure multiple ports on a given server with either secure or unsecured connections. You specify the additional ports in the Server Info of the server’s Application object.
Each port can have one of the following listening modes:
• unsecured—The port is not secured by TLS. This is the default status of a port.
• secured—The port is secured by TLS.
• auto-detect—This status applies only to ports on the Configuration Server, and is used only when configuring secure connections to the Configuration Server. If an application that is trying to connect to an auto-detect port has security settings specified in its configuration, Configuration Server checks the validity of those settings. Depending on the results, the client will be connected in secure or unsecured mode.
Refer to the Genesys Security Deployment Guide and Framework Configuration Manager Help for more information about multiple ports.
Multiple Ports on Configuration Server
When you install Configuration Server, the listening port that you specify during installation is stored in the configuration file as the port option. When Configuration Server first starts with an initialized database, it reads the port option in the configuration file. The value of the port option is also propagated to the Configuration Database, where it is stored as part of the Configuration Server Application object. As additional ports are configured, they are also stored in the Configuration Database as part of the Configuration Server Application object. On subsequent startups of Configuration Server— that is, on all startups after the first—Configuration Server reads the port information
72 Framework 8.1
Chapter 3: Planning the Installation Security Considerations
from the Configuration Server Application object, ignoring the port option in the configuration file.
If necessary, you can specify an additional unsecured listening port in the Configuration Server command line during subsequent startups. This additional port is not written to the Configuration Server Application object, and does not survive a restart of Configuration Server. Use this option only when regular ports cannot be opened. See -cfglib_port on page 178 for more information about this option.
Secure Connections
In addition to configuring secure ports on your server applications, you must configure your client applications, both server and user interface types, to connect to these ports. Use Genesys Administrator or Configuration Manager to configure these connections.
There are only two exceptions to this standard procedure, as follows:
• Configuring secure connections to the Configuration Server—You must configure a Configuration Server port as an auto-detect port.
• Configuring a secure connection between DB Server and Configuration Server—You must configure the secure connection in the configuration files of the two components.
Refer to the Genesys Security Deployment Guide for detailed instructions for configuring secure connections.
European Data Protection Directive Disclaimer
The Genesys suite of products is designed to make up part of a fully functioning contact center solution, which may include certain non-Genesys components and customer systems. Genesys products are intended to provide customers with reasonable flexibility in designing their own contact center solutions. As such, it is possible for a customer to use the Genesys suite of products in a manner that complies with the European Data Protection Directive (EDPD). However, the Genesys products are merely tools to be used by the customer and cannot ensure or enforce compliance with the EDPD. It is solely the customer’s responsibility to ensure that any use of the Genesys suite of products complies with the EDPD. Genesys recommends that the customer take steps to ensure compliance with the EDPD as well as any other applicable local security requirements.

Deployment Guide 73
Chapter
4 Deployment OverviewThis chapter lists the prerequisites for installing the Genesys Framework, and prescribes the deployment order. This chapter also describes the Genesys Installation Wizard and the Genesys Configuration Wizards, and how to access them.
This chapter contains the following sections: Prerequisites, page 73 Deployment Sequence, page 76 Deployment Using Genesys Administrator, page 78 Genesys Wizards, page 78
PrerequisitesBefore you deploy Framework, investigate aspects of its size, security, availability and performance, as applied to the specific environment of your contact center. See Chapter 3 on page 39 for recommendations on these issues. Ensure that applications that require licenses are licensed properly (see the Genesys Licensing Guide).
Review the prerequisites for your Framework installation as described in this section. For prerequisites for Genesys Administrator, refer to the Framework Genesys Administrator Deployment Guide.
Databases
Genesys recommends that you or your database administrator create database(s) in your database management system (DBMS) before you start Genesys installation. For the Framework installation, you must create two databases:
• Configuration Database—Mandatory for any Genesys installation.
74 Framework 8.1
Chapter 4: Deployment Overview Prerequisites
• Centralized Log Database—Required only if you are using the Management Layer’s centralized-logging function.
Genesys also recommends that you or your database administrator back up your Genesys database(s) on a regular basis.
Refer to “Network Locations for Framework Components” on page 46 for recommendations on database sizing. Refer to your DBMS documentation for instructions on how to create a new database.
If your system will be configured in a multi-language environment, or at least be required to handle data encoded in UTF-8 format, you may have to take special steps when creating your database, depending on the DBMS you will be using, as listed in Table 3.
Refer to appendix G on page 341 for the list of database parameters you must use in Genesys installation.
Note: Consider using the Genesys Database Initialization Wizard when creating database structures for the Configuration Database and Centralized Log Database during the Framework deployment process.
Warning! Databases not listed in the table are not supported for multi-language environments.
Table 3: Creating Databases for Multi-language Environments
DBMS Requirements or Special Steps
MS SQL 2008 Requires DB Server 8.1.2 or later.
Oracle 11g or later Create a database instance with the AL32UTF8 character set. For example:
CREATE DATABASE db utf8 CHARACTER SET AL32UTF8
DB2 9.7 or later Create a database instance with the UNICODE format, and with a default page size of 16 KB. For example:
CREATE DATABASE db utf8 USING CODESET UTF-8 TERRITORY US PAGESIZE 16 K
PostgreSQL 9 or later
Create a database instance with the UTF-8 format. For example:
CREATE DATABASE db config ENCODING UTF8
Deployment Guide 75
Chapter 4: Deployment Overview Prerequisites
Hardware and Network Environment
Genesys recommends that you or your IT specialist assign host computers to Genesys software before you start Genesys installation. Keep in mind the following restrictions:
• Do not install all the Genesys server applications on the same host computer.
• When installing a few server applications on the same host computer, prevent them (except for Configuration Server and Configuration Server Proxy) from using the swap area.
Refer to “Network Locations for Framework Components” on page 46 for recommendations on server locations.
Refer to the Genesys Supported Operating Environment Reference Guide for the list of operating systems and database systems supported in Genesys releases 7.x. Refer to the Genesys Supported Media Interfaces Reference Manual for the list of supported switch and PBX versions. For the location of both of these documents, refer to “Related Documentation Resources” on page 351.
For UNIX operating systems, also review the list of patches Genesys uses for software product builds and upgrade your patch configuration if necessary. A description of patch configuration is linked to installation read_me.html files for the Genesys applications that operate on UNIX.
Internet Browsers
To view all elements of the Configuration Manager interface, you need Internet Explorer version 6.0 or later.
To view all elements of Genesys Administrator, you need any combination of Internet Explorer 6.x or 7.x and Mozilla Firefox 2.0 or 3.0. Refer to the Framework Genesys Administrator Deployment Guide for information about requirements for the Genesys Administrator web server.
Licensing
Before configuring and installing Framework components, note that Genesys applications require licenses. Genesys recommends that you configure and install License Manager and license files at this point. For information about which products require what types of licenses and on the installation procedure for License Manager, refer to the Genesys Licensing Guide document available on the Genesys Documentation Library DVD.
If you are planning to deploy redundant configurations for any Genesys servers, you must have a special high-availability (HA) license. Otherwise, the Management Layer does not perform a switchover between the primary and backup servers.
76 Framework 8.1
Chapter 4: Deployment Overview Deployment Sequence
Deployment SequenceThe various Framework components are distributed on a number of product CDs. This document covers the deployment of Framework components shipped on the following CDs:
• Management Framework
• Media
• HA Proxy
• Real-Time Metrics Engine
The Framework deployment process involves the configuration and installation of one or more components of the same type within each architecture layer, as outlined here.
1. Configuration Layer: DB Server (providing access to the Configuration Database) Configuration Database Configuration Server Configuration Manager Configuration Server Proxy (optional) Wizard Manager (optional; no configuration is required) Database Initialization Wizard (optional; no configuration is required) Configuration Import Wizard (optional; no configuration is required)
2. User Interaction Layer: Genesys Administrator
Note: Genesys Administrator can be installed at any time, so long as the the Configuration Layer is installed. Placing Genesys Administrator at this point in the sequence is only a suggestion.
3. Management Layer: DB Server (as a client of Configuration Server, providing access to the
Centralized Log Database and other databases) Message Server Centralized Log Database Local Control Agent (required for each computer running Genesys
server applications or monitored third-party server applications) Solution Control Server (SCS) Solution Control Interface (SCI) Genesys SNMP (Simple Network Management Protocol) required to
support Microsoft Operational Manager (MOM) technology and optional to support Master Agent or a third-party AgentX protocol-compliant SNMP master agent
Deployment Guide 77
Chapter 4: Deployment Overview Deployment Sequence
4. Media Layer: T-Server HA Proxy for a specific type of T-Server (if applicable)
Note: Configuration and installation instructions for T-Servers apply to Network T-Servers as well. You can find detailed deployment information about T-Server and HA Proxy in the latest version of the Framework T-Server Deployment Guide for your specific T-Server.
5. Services Layer DB Server Stat Server
Use the sample worksheet in appendix 21, “Installation Worksheet” on page 341 as you prepare for and perform the Framework installation.
Note: Although Interaction Server, SMCP (Simple Media Control Protocol) T-Server, and Services Layer components are all parts of the Framework architecture, configuring them directly depends on their usage in a Genesys solution. Therefore, you must install them during deployment of a specific solution.
In addition to installed Framework components, the following resources must be registered as Configuration Database objects (or configuration objects) at the time of the Framework deployment:
• Hosts
• Switching Offices
• Switches
• Agent Logins
• DNs
• Access Groups
• Skills
• Persons
• Agent Groups
• Places
• Place Groups
Note: You will find detailed information about configuring telephony objects in the latest version of the Framework T-Server Deployment Guide for your specific server.
78 Framework 8.1
Chapter 4: Deployment Overview Deployment Using Genesys Administrator
The configuration and installation procedures depend on whether you employ Wizard Manager for configuration. Whichever method you choose, you must first install and configure components of the Configuration Layer, as described in Chapter 5 on page 85.
You can choose the manual installation procedure or use the Deployment Tool introduced in release 8.0 to install Configuration and Management Layer components.
Warning! Never add, delete, or modify any data in the Configuration Database except through applications developed by Genesys or those instrumented with Genesys Configuration Server API. If you have compelling reasons for accessing the database directly, consult Genesys Technical Support before you do so.
Deployment Using Genesys AdministratorGenesys Administrator contains deployment functionality to help users deploy Genesys applications and solutions to any host in their network. This functionality replaces Framework Management Deployment Manager.
The deployment functionality in Genesys Administrator copies all of the necessary software components to the target host, and installs them. If a corresponding object does not already exist on that host, Genesys Administrator creates a new one during the installation.
For information about using Genesys Administrator to deploy Management Layer components, see “Deploying the Management Layer Using Genesys Administrator” on page 127.
For information about using Genesys Administrator to deploy other Genesys applications and solutions, refer to the on-line Framework Genesys Administrator Help file and your product-specific documentation.
Genesys WizardsYou can deploy Genesys Framework in one of two ways, but both use Genesys wizards. You can manually install Framework with help from the Genesys Installation Wizard, or you can use the Genesys Configuration Wizards to help you install it.
This section describes the Genesys Installation Wizard and the Genesys Configuration Wizards, and how to access them.
Deployment Guide 79
Chapter 4: Deployment Overview Genesys Wizards
Genesys Installation Wizard
The Genesys Installation Wizard is the standard interface for manually installing all components on Windows platforms, with the exception of Genesys Configuration Wizards. When you install a component from the appropriate setup.exe file, the Installation Wizard is automatically invoked to guide you through the process.
Warning! If you are using Genesys Configuration Wizards to deploy a component, do not use the Genesys Installation Wizard.
Genesys Installation Wizard uses a standard design for installation pages and provides a consistent look across all installations for Genesys products.
Names of all components start with the word Genesys in both Add or Remove Programs and Windows Services windows; also, the Genesys logo appears next to components names in these windows. In the Windows Registry, Services names are nicknames.
Uninstalling Genesys Components
There are no uninstall shortcuts in the Start > Programs menu; instead, uninstall components from the standard Windows Add or Remove Programs window.
Genesys Configuration Wizards
Genesys product CDs that contain installation packages for a set of Genesys components also contain Configuration Wizards that facilitate component deployment. Genesys Configuration Wizards help users set up Genesys products, including the configuration of solutions, applications, and options required to provide desired functionality.
From a security standpoint, Configuration Server treats Configuration Wizards as regular graphical user interface (GUI) applications. When Configuration Wizards are invoked from a GUI application, the account that you used to log in to that application controls your actions in the wizards. Since the wizards are designed to change configuration, rather than to review existing configuration, you must have modification-level permissions (create, change, delete) with respect to the configuration objects that need to be created or configured through the wizards.
Wizard Manager
The primary application that invokes Configuration Wizards for Genesys Framework and Genesys solutions is Wizard Manager. This application is designed solely for deployment and upgrade tasks. Wizard Manager launches
80 Framework 8.1
Chapter 4: Deployment Overview Genesys Wizards
Configuration Wizards in the order required for the requested task. Some Genesys GUI applications can also invoke wizards designed to facilitate elementary configuration tasks. For example, the wizards invoked from Solution Control Interface (SCI) allow a user to define a new alarm condition or modify the logging process of a specific application. All applications from which you can launch Configuration Wizards are clients of Configuration Server. Therefore, the computers on which such applications are installed must have network connectivity with the computer on which Configuration Server runs.
Wizard Manager does not operate on UNIX, only on Windows. However, you must use this tool to configure the Framework components, regardless of whether the components are run on UNIX or Windows.
To install all the wizards that are on a particular CD, run the setup.exe program located in the root directory of the CD. This also installs the Wizard Manager. Only one instance of Wizard Manager is installed on your computer, even though you install wizards from multiple applications. You can access all installed Configuration Wizards from this single instance of Wizard Manager.
To install Wizard Manager and the Management Framework Configuration Wizard, run setup.exe from the root directory of the Management Framework CD. Wizards that you invoke from other Genesys graphical user interface (GUI) applications are installed during the installation of those applications.
Warning! When you install wizards on a given computer, close all Genesys GUI applications that run on it.
Configuration Wizard Tasks
Genesys Configuration Wizards do not physically install applications on computers, but they do accomplish two tasks:
1. Prepare the configuration data for the Genesys environment and store the prepared data in the Configuration Database.
2. Customize the installation package to the environment, so that the installation script does not ask for parameters you have already submitted during the configuration process. To achieve this, wizards record all required data into an INI file, which becomes a part of the customized installation. This data is then used during the actual setup process to correctly install the application on a desired computer.
Warning! It is your responsibility to provide wizards with correct directories for installations. See “Specifying Directories for Installations” for recommendations.
Configuration Wizards configure both Windows and UNIX applications, and prepare installation packages for these operating systems. After a wizard
Deployment Guide 81
Chapter 4: Deployment Overview Genesys Wizards
creates a customized installation package, the user has to run setup manually on a computer designated for a particular application.
Specifying Directories for Installations
After you have entered all required data about an application, the wizard prompts you to insert the CD where the installation package can be found and to specify a location to which the wizard should copy the customized installation. Keep in mind that when you are specifying:
1. The CD drive where the product CD is inserted, type or select only the first letter of the CD drive as opposed to the full path to the product installation on the CD.
2. A destination location to copy the installation package for an application installation on another computer than the computer running the wizard, specify a disk location accessible from a remote computer.
Copying Installations to Remote Computers
Often an application should be installed on another computer than the computer running the wizard. If this is the case, specify a temporary folder on the wizard’s host computer as the destination location and then copy the customized installation package from this folder to a temporary directory on the host computer for the application.
When the application’s future host computer is a UNIX box, follow the recommendations in this section for copying the customized installation packages from the wizard’s Windows computer to the target UNIX computer.
GeneralRecommendations
for UNIX
When copying to a UNIX box, note the following:
• Use a sharing application, such as Samba, to make disks on computers running UNIX visible from computers running Windows.
• Use an ftp server.
Using FTP ServersRunning on UNIX
To use an FTP Server running on UNIX:
1. Using the command prompt, locate the folder on the Windows-based computer to which the wizard copied the customized installation package.
2. Run the ftp client on Windows. Type the ftp command, followed by the actual host name of the UNIX-based computer in the command prompt:ftp <server_host_name>
3. Define the BIN mode of transfer. Type the following command in the command prompt:bin
4. Define the folder on the remote UNIX-based computer to which the package is to be copied.

82 Framework 8.1
Chapter 4: Deployment Overview Genesys Wizards
Type the cd command followed by the actual folder name in the command prompt:cd <folder_name>
5. To avoid a request for transfer confirmation for each file in the package, turn off the Interactive mode. Type the following command in the command prompt:prompt
6. Transfer the files. Type the following command in the command prompt:mput *
After the customized installation package is transferred, manually run the setup. The instructions for installing Framework components begin on page 87.
Using FTP ServersRunning on
Windows
To use an FTP Server running on Windows:
1. Locate the folder on the UNIX-based computer to which the package is to be copied.
2. Run the ftp client on UNIX. Type the ftp command followed by the actual host name of the Windows-based computer in the command prompt:ftp <server_host_name>
3. Define BIN mode of transfer. Type the following command in the command prompt:bin
4. Define the folder on the remote Windows-based computer from which the package is to be copied. Type the cd command, followed by the actual folder name in the command prompt:cd <folder_name>
5. To avoid a request for transfer confirmation for each file in the package, turn off Interactive mode. Type the following command in the command prompt:prompt
6. Transfer the files. Type the following command in the command prompt:mget *
After the customized installation package is transferred, manually run the setup. The instructions for installing Framework components begin on page 87.
Application State Disabled
An application prepared by wizards but not yet physically installed is marked as disabled in Configuration Manager. Disabled means that the application has been created and configured as an object in the Configuration Layer, that its
Deployment Guide 83
Chapter 4: Deployment Overview Genesys Wizards
installation package has been customized and copied over to a location on the wizard’s host computer, but that the application has not been physically set up on the computer on which it is to run. When a user runs the actual setup using the customized installation package, the corresponding Application object in the Configuration Layer is automatically enabled.
Preparing Installations for Redundant Applications
Warning! When configuring redundant applications, do not select the redundancy type Not Specified unless using a switchover mechanism other than that provided by the Management Layer. It is acceptable, however, to leave the redundancy type Not Specified for nonredundant applications (that is, applications that do not have backup servers associated with them).
When you choose to install redundant applications, two possibilities exist. If the host computers on which redundant applications are to run have operating systems of the same type, the wizard copies one installation package, which can be used to install both primary and backup applications. If the host computers have operating systems of different types, the wizard prepares a separate installation package for each application in the redundant pair.
Installing and Starting Configuration Wizards
To configure Genesys components through Configuration Wizards, install the wizards directly from your Genesys product CD. This will also install the Wizard Manager, or add the new wizards to an already existing Wizard Manager. Wizard Manager operates only on Windows.
Warning! Genesys does not recommend installation of its components via a Microsoft Remote Desktop connection. The installation should be performed locally.
To install Management Framework wizards:
1. In the root directory of either the Management Framework, double-click setup.exe to start the installation.
Notes: • Do not use Configuration Wizards on the Red Hat Enterprise Linux 5 (64-bit), HP-UX 11i v3 Integrity (Itanium), and Windows Server 2008 (64-bit) operating systems.
• If you are going to use the Configuration Wizards, install them from every product CD before you deploy the Genesys components from those CDs.
• Genesys recommends that you install wizards on the same host computer on which Configuration Manager is installed.
84 Framework 8.1
Chapter 4: Deployment Overview Genesys Wizards
2. Specify the destination directory in which you want to install the wizards.
3. Specify the Program Folder to which you want to add the wizards.
When the setup program is finished, Wizard Manager is ready to run.
Now start Wizard Manager from the Windows Start > Programs menu. Click log into the Configuration Layer, and specify the necessary parameters in the Login dialog box as described in “Login Procedure” on page 317. Provide the same application name as if you were logging in to Configuration Manager.
Using Wizard Manager on Windows
Wizard Manager guides you through the deployment process for Genesys components, and the configuration process for Configuration Database objects.
When you start Wizard Manager, the Framework page opens. The left panel in Wizard Manager contains links to the configuration wizards for specific solutions. Before you deploy any solutions with Wizard Manager, click Framework in the left panel to run the Management Framework Configuration Manager, and configure the Framework as follows:
1. Configure the Management Layer.
2. Create Tenants, if you are setting up a multi-tenant environment.
3. Create Switch objects and deploy the T-Servers associated with them.
4. Configure the Switch objects— DNs and Places.
5. Create other required Framework configuration objects, such as Agent Logins, Agents, and Place Groups.
After this configuration process is complete, the Framework instance is configured and registered in the Configuration Database. You can now use Wizard Manager to deploy any solution by using the appropriate Configuration Wizard.
Note: Before starting Wizard Manager, make sure that the Configuration Layer components are installed, configured, and running. (See Chapter 5 on page 85.)

Deployment Guide 85
Chapter
5 Setting Up the Configuration LayerThis chapter describes how to set up the Framework Configuration Layer, which is a mandatory part of any Genesys installation and the first step of the Framework deployment. Before deploying other Framework components manually, follow the steps described in the following topics: Task Summary, page 86 Installing DB Server, page 87 Configuring DB Server, page 91 Starting Configuration DB Server, page 93 Installing Configuration Server, page 94 Initializing the Configuration Database, page 99 Configuring Configuration Server, page 103 Encrypting the Configuration Database Password, page 106 Starting Configuration Server, page 106 Installing an Interface to Deploy Your System, page 107 Starting the Interface, page 109 Changing Configuration Server Port Assignments, page 110 Configuring Hosts, page 112 Enabling Management Layer Control of Configuration Layer, page 114 Next Steps, page 119
Before you install Framework components:
• Consult “Network Locations for Framework Components” on page 46 for recommendations on the network locations of these components.
• Create a new database following the instructions in your DBMS documentation.
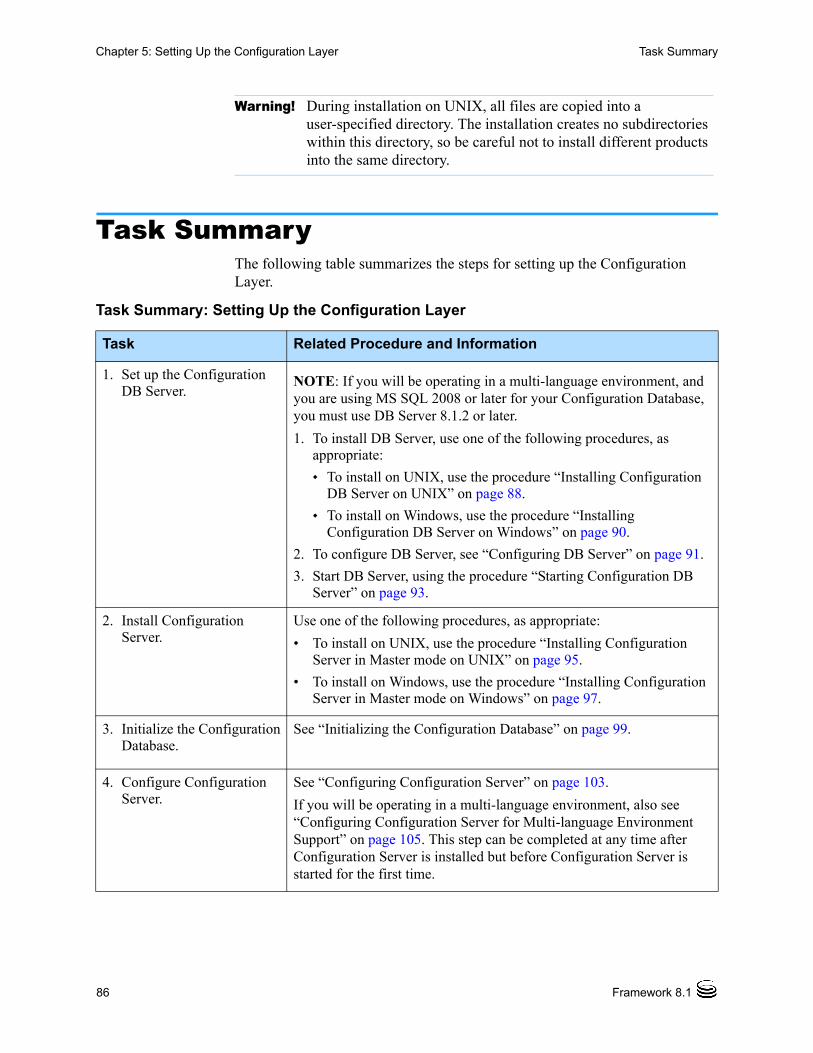
86 Framework 8.1
Chapter 5: Setting Up the Configuration Layer Task Summary
Task SummaryThe following table summarizes the steps for setting up the Configuration Layer.
Warning! During installation on UNIX, all files are copied into a user-specified directory. The installation creates no subdirectories within this directory, so be careful not to install different products into the same directory.
Task Summary: Setting Up the Configuration Layer
Task Related Procedure and Information
1. Set up the Configuration DB Server.
NOTE: If you will be operating in a multi-language environment, and you are using MS SQL 2008 or later for your Configuration Database, you must use DB Server 8.1.2 or later.
1. To install DB Server, use one of the following procedures, as appropriate: To install on UNIX, use the procedure “Installing Configuration
DB Server on UNIX” on page 88. To install on Windows, use the procedure “Installing
Configuration DB Server on Windows” on page 90.
2. To configure DB Server, see “Configuring DB Server” on page 91.
3. Start DB Server, using the procedure “Starting Configuration DB Server” on page 93.
2. Install Configuration Server.
Use one of the following procedures, as appropriate:
• To install on UNIX, use the procedure “Installing Configuration Server in Master mode on UNIX” on page 95.
• To install on Windows, use the procedure “Installing Configuration Server in Master mode on Windows” on page 97.
3. Initialize the Configuration Database.
See “Initializing the Configuration Database” on page 99.
4. Configure Configuration Server.
See “Configuring Configuration Server” on page 103.
If you will be operating in a multi-language environment, also see “Configuring Configuration Server for Multi-language Environment Support” on page 105. This step can be completed at any time after Configuration Server is installed but before Configuration Server is started for the first time.

Deployment Guide 87
Chapter 5: Setting Up the Configuration Layer Installing DB Server
Installing DB Server
This section describes the installation of the DB Server that serves the Configuration Layer. This DB Server provides Configuration Server with
5. (Optional) Encrypt the password for the Configuration Database.
Note: This task can be carried out now or at a later time, as required.
See “Encrypting the Configuration Database Password” on page 106.
6. Start Configuration Server. Use the procedure “Starting Configuration Server” on page 106.
7. Setup and start an interface to deploy the rest of your system.
You can use Genesys Administrator, Configuration Manager or both. You must install at least one GUI at this stage.
To setup and start Genesys Administrator, use the procedures in the Framework Genesys Administrator Deployment Guide.
To setup and start Configuration Manager, use the following procedures:
1. “Installing Configuration Manager on Windows” on page 108
2. “Starting Configuration Manager” on page 109
8. Change the listening port of Configuration Server in the Configuration Database.
Use one of the following procedures, as appropriate:
• “Changing the Configuration Server listening port using Genesys Administrator” on page 110
• “Changing the Configuration Server listening port using Configuration Manager” on page 111.
9. Create Hosts for each computer in your network.
Use one of the following procedures, as appropriate:
• “Creating a Host object using Genesys Administrator” on page 112
• “Creating a Host object in Configuration Manager” on page 113.
10.(Optional) Enable the Management Layer to control the Configuration Layer.
See “Enabling Management Layer Control of Configuration Layer” on page 114.
Task Summary: Setting Up the Configuration Layer (Continued)
Task Related Procedure and Information
Note: If you will be using this DB Server in a multi-language environment, and you are using MS SQL 2008 or later for your Configuration Database, you must use DB Server 8.1.2.
88 Framework 8.1
Chapter 5: Setting Up the Configuration Layer Installing DB Server
access to the Configuration Database, and is often referred to as the Configuration DB Server. Consequently, this DB Server must start before any other component does, meaning that you must configure it through a local configuration file.
Although DB Server is installed before Configuration Server, decide on the host and port for Configuration Server prior to DB Server installation.
Warning! Do not use the DB Server that provides access to the Configuration Database for access to any other database.
Procedure:Installing Configuration DB Server on UNIX
Purpose: To install the DB Server that will provide access to the Configuration Database.
Start of procedure
1. On the Management Framework 8.1 product CD in the appropriate services_layer/dbserver/<operating_system> directory, locate a shell script called install.sh.
2. Run this script from the command prompt by typing sh and the file name. For example: sh install.sh. Then, press Enter.
3. To specify the hostname for this DB Server, do one of the following:• Type the name of the host, and press Enter.• Press Enter to select the current host.
4. Type y to specify that this DB Server will be dedicated to providing access to the Configuration Database, and press Enter.
Warning! Do not use the DB Server that provides access to the Configuration Database for access to any other database.
5. Specify the full path of the destination directory, and press Enter.
6. If the target installation directory has files in it, do one of the following:• Type 1 to back up all the files in the directory, and press Enter.
Specify the path to which you want the files backed up, and press Enter.
• Type 2 to overwrite only the files in this installation package, and press Enter. Then type y to confirm your selection, and press Enter.
Use this option only if the application already installed operates properly.
Deployment Guide 89
Chapter 5: Setting Up the Configuration Layer Installing DB Server
• Type 3 to erase all files in this directory before continuing with the installation, and press Enter. Then, type y to confirm your selection, and press Enter.
7. Do one of the following: • Type y to configure DB Server (during installation), and press Enter.
Go to Step 8 to specify values for the configuration file. For information about the DB Server configuration options and their values, refer to the Framework Configuration Options Reference Manual.
• Type n to not configure DB Server (during installation), and press Enter. In this case, you have finished installing DB Server—do not continue to the next step in this procedure. Before you can start DB Server, however, you must create a configuration file and set the configuration options in it. That procedure is described in “Configuring DB Server” on page 91.
8. Enter the Configuration Server hostname, and press Enter.
9. Enter the Configuration Server network port, and press Enter.
10. To specify the hostname for this DB Server, do one of the following:• Type the name of the host, and press Enter.• Press Enter to select the default, which is the host selected in Step 3.
11. (Optional) The default port of DB Server is 4040. To specify a different network port for this DB Server, do one of the following:• Type the number of the network port, and press Enter.• Press Enter to select the default port (4040).
12. To specify the management network port for this DB Server, do one of the following:• Type the number of the management port, and press Enter.• Press Enter to select the default port (4041).
The installation extracts the files from the package and displays the names of the database client processes for different types of SQL servers.
13. Type the number corresponding to the database type and the database client bit-type (if applicable), and press Enter.
If you do not know the bit-type, you can configure it later using the appropriate <DBMS type>_name configuration option. Refer to the Framework Configuration Options Reference Manual for more information about these options.
When the installation process is finished, a message indicates that installation was successful. The process places DB Server in the directory specified during the installation process. The installation script also writes a sample configuration file, dbserver.conf.sample, in the directory in which DB Server is installed.
90 Framework 8.1
Chapter 5: Setting Up the Configuration Layer Installing DB Server
If you chose to configure DB Server during installation, a copy of the sample configuration file, dbserver.conf.sample, is created and saved as dbserver.conf, and the parameters specified in Steps 8 through 13 are written to this file.
End of procedure
Next Steps
• If you chose to configure DB Server after installation, you must manually rename the sample file as dbserver.conf, and modify the configuration options before you start DB Server. See “Configuring DB Server” on page 91. For information about DB Server configuration options and their values, refer to the Framework Configuration Options Reference Manual.
Procedure:Installing Configuration DB Server on Windows
Warning! Genesys does not recommend installation of its components via a Microsoft Remote Desktop connection. The installation should be performed locally.
Purpose: To install the DB Server that will provide access to the Configuration Database.
Start of procedure
1. On the Management Framework 8.1 product CD in the services_layer/dbserver/windows directory, locate and double-click setup.exe to start the Genesys Installation Wizard.
2. Use the About button on the wizard’s Welcome page to review the read_me file. The file also contains a link to the server’s Release Notes file.
3. On the Welcome page, click Next to start the installation.
4. On the DB Server Run Mode page, select DB Server as an independent
server to install DB Server so it runs independently of Configuration Server so that it provides access to the Configuration Database. Click Next.
5. On the Database Engine Option page, select the appropriate database engine, and then click Next.
6. On the DB Server Parameters page, specify the DB Server Host,
DB Server Port, and Management Port, and then click Next.
7. On the Connection Parameters to the Genesys Configuration Server page, specify the Host name and Port of Configuration Server, and then click Next.
Deployment Guide 91
Chapter 5: Setting Up the Configuration Layer Configuring DB Server
Even if DB Server will be running independent of Configuration Server, these parameters are required to start DB Server via the Management Layer.
8. On the Choose Destination Location page, the wizard displays the destination directory, as specified in the Working Directory property of the server’s Application object. If the path configured as Working Directory is invalid, the wizard generates a path to the destination directory in the C:\Program Files\GCTI\<Product Name> format.
If necessary, use the:• Browse button to select another destination folder. In this case, the
wizard will update the Application object’s Working Directory in the Configuration Database.
• Default button to reinstate the path specified in Working Directory.
Click Next to proceed.
9. On the Ready to Install page, click:• Back to update any installation information.• Install to proceed with the installation. Installation Status displays
the installation progress.
10. On the Installation Complete page, click Finish.
As a result of the installation, the wizard adds Application icons to the:• Windows Start menu, under Programs > Genesys Solutions >
Framework.
• Windows Add or Remove Programs window, as a Genesys server.• Windows Services list, as a Genesys service, with Automatic startup
type.
End of procedure
For information about the DB Server configuration file, see the following section, “Configuring DB Server”. For information about DB Server configuration options and their values, refer to the Framework Configuration Options Reference Manual.
Configuring DB ServerDB Server can run either as an independent server or as a client of Configuration Server. The DB Server dedicated to the Configuration Database must run as an independent server and reads its configuration settings from a local configuration file. Any DB Server used for handling data other than configuration data must run as a client of Configuration Server and reads its configuration settings from the Configuration Database.
92 Framework 8.1
Chapter 5: Setting Up the Configuration Layer Configuring DB Server
DB Server Configuration File
The configuration file contains the DB Server, Log, and Local Control Agent (LCA) sections. It can also contain additional DB Server sections for any additional ports.
The name of the DB Server section is dbserver. This section contains configuration information about DB Server, including settings and the type of DBMS with which DB Server operates.
The dbserver section contains configuration options for one port. If there is more than one port configured for DB Server, configuration options for the additional ports is contained in additional DB Server sections called dbserver-n, where n is a nonzero consecutive integer. Each dbserver-n section contains the configuration options for one port.
The name of the Log section is log. This section contains configuration information about the log.
The name of the LCA section is lca. If configured, this section contains an option that enables the Management Layer to control the DB Server dedicated to the Configuration Database.
You can find a sample DB Server configuration file in the Framework Configuration Options Reference Manual.
Configuring DB Server on UNIX
Procedure:Configuring Configuration DB Server on UNIX
Purpose: To configure the DB Server providing access to the Configuration Database.
Prerequisites
• You manually installed DB Server on UNIX, as described in the procedure “Installing Configuration DB Server on UNIX” on page 88.
• You chose not to configure DB Server during the installation process (that is, you entered n in Step 7 on page 89).
Start of procedure
1. From the directory in which DB Server is installed, open the sample configuration file (dbserver.conf.sample) in a text editor.
2. Set the configuration options to work with the Configuration Database. Consult the relevant chapters in the Framework Configuration Options Reference Manual for option descriptions and values. See “DB Server
Deployment Guide 93
Chapter 5: Setting Up the Configuration Layer Starting Configuration DB Server
Configuration File” on page 92 for a description of the DB Server configuration file.
3. Save the sample configuration file as dbserver.conf.
End of procedure
Configuring DB Server Logging
If you plan to use the centralized logging and auditing functionality of the Management Layer, be sure to specify appropriate log options in the DB Server configuration file before you start using DB Server. Most importantly, enable the network log output (for example, create a new option in the log section called standard and set its value to network). See the Framework Configuration Options Reference Manual for more information.
Starting Configuration DB ServerAlthough DB Server is started before Configuration Server, you must specify the host and port parameters of Configuration Server in the command line for DB Server to start. Specify cfg_dbserver as a value for the -app command-line parameter (the DB Server application name).
Note: For information about starting DB Server as a client of Configuration Server, see Chapter 7, “Starting and Stopping Framework Components,” on page 171. That chapter also provides a complete description of the command-line parameters used for startup.
Procedure:Starting Configuration DB Server
Prerequisites
• DB Server is installed.
Notes: If you will be using this DB Server in a multi-language environment and you are using Oracle 11g or later, you must insert the set variable NLS_LANG, with the character set of UTF8, in your environment. For example:
NLS_LANG=AMERICAN.AMERICA.UTF8
or at least:NLS_LANG=.UTF8

94 Framework 8.1
Chapter 5: Setting Up the Configuration Layer Installing Configuration Server
• The DB Server configuration file is configured. DB Server uses this file for startup.
Start of procedure
1. To start DB Server on UNIX, go to the directory in which DB Server is installed, and do one of the following:• To use only the required command-line parameters, type the following
command line:sh run.sh
• To specify the command line yourself, or to use additional command-line parameters, type the following command line:multiserver -host <Configuration Server host> -port <Configuration Server port> -app cfg_dbserver[<additional parameters and arguments as required>]
2. To start DB Server on Windows, do one of the following:• Use the Windows Start > Programs menu.• To use only the required command-line parameters, go to the directory
in which DB Server is installed, and double-click the startServer.bat file.
• To specify the command line yourself, or to use additional command-line parameters, open the MS-DOS window, go to the directory in which DB Server is installed, and type the following command line:multiserver.exe -host <Configuration Server host> -port <Configuration Server port> -app <DB Server Application> [<additional parameters and arguments as required>]
• Use Windows Service Manager. Refer to “Starting and Stopping with Windows Services Manager” on page 191 for more information.
End of procedure
Installing Configuration ServerIf you want Configuration Server to operate with the Configuration Database, you must install Configuration Server in Master mode. This Configuration Server must be configured through a local configuration file.
Notes: The procedures given in this section are for installing a primary Configuration Server. To install a Proxy Configuration Server, refer to “Setting Up Configuration Server Proxy” on page 263 for relevant installation instructions. To install a backup Configuration Server, refer to “Redundant Configuration Servers” on page 203.

Deployment Guide 95
Chapter 5: Setting Up the Configuration Layer Installing Configuration Server
Refer to the Framework External Authentication Reference Manual for information about Configuration Server’s External Authentication feature and for relevant installation instructions.
Procedure:Installing Configuration Server in Master mode on UNIX
Start of procedure
1. On the Management Framework 8.1 product CD, locate and open the installation directory appropriate for your environment:• For an enterprise (single-tenant) environment, the installation directory
is configuration_layer/configserver/single/<operating_system>• For a multi-tenant environment, the installation directory is
configuration_layer/configserver/multi/<operating_system>
The installation script, called install.sh, is located in the appropriate directory.
2. Type the file name at the command prompt, and press Enter.
3. For the installation type, type 1 to select Configuration Server Master Primary, and press Enter.
4. For the external authentication option, type the number corresponding to the type of external authentication that will be used (LDAP, Radius, both, or neither), and press Enter.
5. Specify the full path of the destination directory, and press Enter.
6. If the target installation directory has files in it, do one of the following:• Type 1 to back up all the files in the directory, and press Enter.
Specify the path to where you want the files backed up, and press Enter.
• Type 2 to overwrite only the files in this installation package, and press Enter. Then type y to confirm your selection, and press Enter.
Use this option only if the application already installed operates properly.
• Type 3 to erase all files in this directory before continuing with the installation, and press Enter. Then type y to confirm your selection, and press Enter.
The list of file names will appear on the screen as the files are copied to the destination directory.
Tip: If you select LDAP, be prepared with the URL to access the LDAP Server. For more information about LDAP configuration, see the Framework External Authentication Reference Manual.
96 Framework 8.1
Chapter 5: Setting Up the Configuration Layer Installing Configuration Server
7. For the product version to install, do one of the following:• Type 32 to select the 32-bit version, and press Enter.• Type 64 to select the 64-bit version, and press Enter.
8. To configure the Configuration Server during, or after, installation, do one of the following: • Type y to configure Configuration Server during installation (now), and
press Enter. Go to Step 9 to specify values for the configuration file. For information about the Configuration Server configuration options and their values, refer to the Framework Configuration Options Reference Manual.
• Type n to not configure Configuration Server during installation. In this case, you have finished installing Configuration Server—do not continue to the next step in this procedure. Before you can start Configuration Server, however, you must create a configuration file and set the configuration options in it. Go to “Configuring Configuration Server” on page 103.
9. For the [confserv] section:
a. Specify a value for the Configuration Server port, and press Enter.
b. Specify a value for the Configuration Server management port, and press Enter.
10. For the [soap] section, do one of the following:• Specify a value for the SOAP port, and press Enter.• If you are not using SOAP functionality, press Enter to leave this field
blank.
11. For the [dbserver] section:
a. Specify the name of the DB Server host, and press Enter.
b. Specify a value for the DB Server port, and press Enter.
c. Type the number corresponding to the database engine that this Configuration Server uses (dbengine), and press Enter.
d. Specify the name or alias of the DBMS that handles Configuration Database (dbserver), and press Enter.
e. To specify the name of the Configuration Database (dbname), do one of the following:• If you are using an Oracle database engine (that is, you typed 3 in
Step c), press Enter. This value is not required for Oracle.• If you are using any other database engine, specify the name of the
Configuration Database, and press Enter.
f. Specify the Configuration Database username, and press Enter.
g. To specify the Configuration Database password, do one of the following:• Specify the password, and press Enter.
Deployment Guide 97
Chapter 5: Setting Up the Configuration Layer Installing Configuration Server
• Press Enter if there is no password; that is, the password is empty, with no spaces.
When the installation process is finished, a message indicates that installation was successful. The process places Configuration Server in the directory specified during the installation process. The installation script also writes a sample configuration file, confserv.sample, in the directory in which Configuration Server is installed.
If you chose to configure the Configuration Server during installation, the sample configuration file, confserv.sample, is renamed confserv.conf, and the parameters specified in Steps 9 through 11 are written to this file.
End of procedure
Next Steps
• If you chose to configure the Configuration Server after installation, you must manually rename the sample file as confserv.conf and modify the configuration options before you start Configuration Server. See “Configuring Configuration Server” on page 103.
Procedure:Installing Configuration Server in Master mode on Windows
Warning! Genesys does not recommend installation of its components via a Microsoft Remote Desktop connection. The installation should be performed locally.
Start of procedure
1. On the Management Framework 8.1 product CD, locate and open the installation directory appropriate for your environment:• For an enterprise (single-tenant) environment, the installation directory
is configuration_layer/configserver/single/windows• For a multi-tenant environment, the installation directory is
configuration_layer/configserver/multi/windows
2. Locate and double-click setup.exe to start the Genesys Installation Wizard.
3. Use the About button on the wizard’s Welcome page to review the read_me file. The file also contains a link to the server’s Release Notes file.
4. On the Welcome page, click Next.
5. On the Configuration Server Run Mode page, select Configuration Server Master Primary.
98 Framework 8.1
Chapter 5: Setting Up the Configuration Layer Installing Configuration Server
6. On the Configuration Server Parameters page:
a. Specify the Server Port and Management Port for Configuration Server.
b. Click Next.
7. On the Database Engine Option page, select the database engine that the Configuration Server uses, and click Next.
8. On the DB Server Parameters page:
a. Specify the DB Server Host name and DB Server Port.
b. Specify the Database Server Name and Database Name.
c. Specify the Database User Name and Password.
9. On the Configuration Server External Authentication page, select the type of external authentication that the Configuration Server uses, or select None if Configuration Server is not using external authentication.
10. On the Choose Destination Location page, the wizard displays the destination directory specified in the Working Directory property of the server’s Application object. If the path configured as Working Directory is invalid, the wizard generates a path to C:\Program Files\GCTI\<Singletenant or Multitenant> Configuration Server.
If necessary, use the:• Browse button to select another destination folder. In this case, the
wizard will update the Application object’s Working Directory in the Configuration Database.
• Default button to reinstate the path specified in Working Directory.
Click Next to proceed.
11. On the Ready to Install information page, click one of the following:• Back to update any installation information.• Install to proceed with the installation.
12. On the Installation Complete page, click Finish.
As a result of the installation, the wizard adds Application icons to the:• Windows Start menu, under Programs > Genesys Solutions >
Framework.
• Windows Add or Remove Programs window, as a Genesys server.• Windows Services list, as a Genesys service, with Automatic startup
type.
End of procedure
For more information about the Configuration Server configuration file, see “Configuring Configuration Server” on page 103. For information about Configuration Server configuration options and their values, refer to the relevant chapters in the Framework Configuration Options Reference Manual.

Deployment Guide 99
Chapter 5: Setting Up the Configuration Layer Initializing the Configuration Database
Procedure:Populating History Change Adapter tables
Note: HCA tables are applicable only if you are using Genesys Info Mart 7.2 or earlier. Users of Genesys Info Mart 7.5 or later do not require HCA.
Purpose: To populate HCA tables with Virtual Agent Group information immediately after database migration.
Prerequisites
• You have Genesys Info Mart 7.2 or earlier installed in your environment.
• You have activated the History of Changes Adapter functionality in Configuration Server.
• You have created Virtual Agent Groups in Configuration Server.
Start of procedure
1. Stop the Primary Configuration Server.
2. Start Configuration Server using these command line options:-hca -s mm/dd/yyyy
where mm/dd/yyyy is the creation date that you are setting for the records in the HCA tables. The format is month/day/year.
Starting Configuration Server with these command line options will refresh data about existing configuration objects in HCA tables and add data about Virtual Agent Groups. It will not affect historic data already stored in HCA tables. See the Genesys Info Mart Deployment Guide for your version of Genesys Info Mart.
3. After the HCA tables are populated and Configuration Server has exited (automatically), restart Configuration Server in normal operational mode.
End of procedure
Initializing the Configuration DatabaseAfter you created a database in your DBMS (see “Prerequisites” on page 73), you can populate the tables of the Configuration Database manually (using your DBMS tools) or using the Database Initialization Wizard.
100 Framework 8.1
Chapter 5: Setting Up the Configuration Layer Initializing the Configuration Database
DBMS Adjustment
If you install DB Server and Configuration Database separately, you must install and configure an SQL Server client for your database type. Please refer to the Framework DB Server User's Guide for recommendations on environment settings for your database client.
Procedure:Initializing the Configuration Database
Warning! Configuration Server treats its information and checks integrity constraints in a case-sensitive manner. Therefore, your SQL database must be installed and configured in case-sensitive mode. Refer to your SQL Server Administrator documentation for additional information.
Start of procedure
1. In the directory in which Configuration Server is installed, open the sql_scripts folder.
2. Open the folder that matches your database type.
3. Load and execute the initialization script that corresponds to your DBMS.
Table 4 lists the DBMS and their corresponding initialization script names for an enterprise or multi-tenant environment.
Tip: Genesys recommends using the DB2 Command-Line Processor to run Genesys SQL scripts. See the procedure “Running Genesys SQL scripts using the DB2 Command-Line Processor” on page 102.
Table 4: Configuration Database Initialization Scripts
DBMS Enterprise Script Name
Multi-Tenant Script Name
Multi-language Script Name(see Note)
DB2 init_single_db2.sql init_multi_db2.sql init_multi_multilang_db2.sql
Informix init_single_ifx.sql init_multi_ifx.sql Not supported
Microsoft SQL init_single_mssql.sql init_multi_mssql.sql Enterprise: init_single_multilang_mssql.sql
Multi-tenant: init_multi_multilang_mssql.sql
Oracle init_single_ora.sql init_multi_ora.sql init_multi_multilang_ora.sql
PostgreSQL init_single_postgre.sql init_multi_postgre.sql init_multi_multilang_postgre.sql
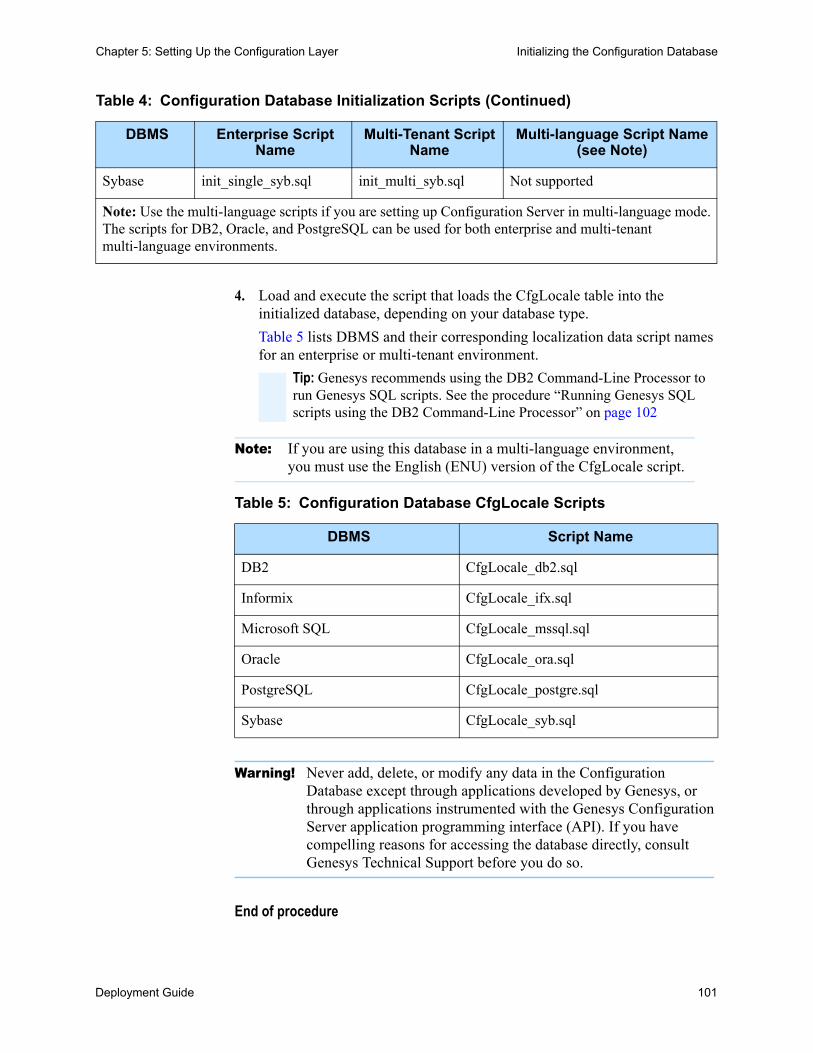
Deployment Guide 101
Chapter 5: Setting Up the Configuration Layer Initializing the Configuration Database
4. Load and execute the script that loads the CfgLocale table into the initialized database, depending on your database type.
Table 5 lists DBMS and their corresponding localization data script names for an enterprise or multi-tenant environment.
Warning! Never add, delete, or modify any data in the Configuration Database except through applications developed by Genesys, or through applications instrumented with the Genesys Configuration Server application programming interface (API). If you have compelling reasons for accessing the database directly, consult Genesys Technical Support before you do so.
End of procedure
Sybase init_single_syb.sql init_multi_syb.sql Not supported
Note: Use the multi-language scripts if you are setting up Configuration Server in multi-language mode. The scripts for DB2, Oracle, and PostgreSQL can be used for both enterprise and multi-tenant multi-language environments.
Table 4: Configuration Database Initialization Scripts (Continued)
DBMS Enterprise Script Name
Multi-Tenant Script Name
Multi-language Script Name(see Note)
Tip: Genesys recommends using the DB2 Command-Line Processor to run Genesys SQL scripts. See the procedure “Running Genesys SQL scripts using the DB2 Command-Line Processor” on page 102
Note: If you are using this database in a multi-language environment, you must use the English (ENU) version of the CfgLocale script.
Table 5: Configuration Database CfgLocale Scripts
DBMS Script Name
DB2 CfgLocale_db2.sql
Informix CfgLocale_ifx.sql
Microsoft SQL CfgLocale_mssql.sql
Oracle CfgLocale_ora.sql
PostgreSQL CfgLocale_postgre.sql
Sybase CfgLocale_syb.sql
102 Framework 8.1
Chapter 5: Setting Up the Configuration Layer Initializing the Configuration Database
Procedure:Running Genesys SQL scripts using the DB2 Command-Line Processor
Start of procedure
1. Start the Command-Line Processor.
2. Type quit at the DB2 prompt to exit the DB2.exe process.
3. Specify the database connection parameters by typing the following command line, substituting values in brackets with the actual values:db2 connect to <database name> user <user> using <password>
4. Execute the script by typing the following command line, substituting the value in brackets with the actual value:db2 -f <script name including full path>
For example, to execute the initialization script for the enterprise version of the Configuration Database, type (all on one line):db2 -f C:\GCTI\ConfigurationServer\sql_scripts\db2\init_single_db2.sql
End of procedure
About the Initialized Configuration Database
The Configuration Database contains the following predefined objects, which allow initial access to the database through Configuration Manager:
• A User object with user name set to default, and password set to password.
Use this Master Account to log in to the Configuration Layer for the first time. A user logged on through this Master Account has all possible privileges with respect to objects in the Configuration Database.
The Master Account is not alterable in any way, and you should not use it to perform regular contact center administrative tasks. Rather, it exists as a guarantee that, no matter what happens to the regular accounts, you will always be able to access the Configuration Database.
Genesys recommends changing the default user name and password of the Master Account during the first session, securing these login parameters, and using the Master Account for emergency purposes only. For regular operations, create a real working account and add it to the access group Super Administrators. (By default, this Access Group has the same privileges as the Master Account.) Use this real working account for any subsequent sessions.
Deployment Guide 103
Chapter 5: Setting Up the Configuration Layer Configuring Configuration Server
Note: For instructions on creating new configuration objects, and working with existing configuration objects, refer to Framework Configuration Manager Help or Framework Genesys Administrator Help.
• An application template object for Configuration Manager.
• An application template object for Configuration Server.
• A Configuration Manager Application object with the name set to default.
When you run Configuration Manager for the first time, you must specify this name in the Application property under Details in the Login dialog box. Consider changing the name of this application during the first session.
• A Configuration Server Application object with the name set to confserv.
• The default Access Groups objects: Users, Administrators, and Super Administrators. For more information, refer to “Security Considerations” on page 67.
• Folders for all types of objects managed by the Configuration Layer.
• An Installation Configuration Utility Application object with the name set to ITCUtility. This utility supports configuration updates during installation processes for Genesys components. No additional configuration is needed.
The Configuration Database also contains a number of other predefined objects (for example, Alarm Conditions) that help you set up some Genesys functionality as you deploy other Framework and solution components.
Configuring Configuration Server
Configuration Server Configuration File
At a minimum, the configuration file contains the Configuration Server, Configuration Database, Log, and History of Changes Adapter sections, and possibly an additional section called SOAP.
The Configuration Server section contains the configuration options that define Configuration Server. The name of the section corresponds to the name of the Configuration Server Application object. For the initial installation of Configuration Server, it is called confserv by default. You can choose to rename this Configuration Server later. In all other cases, or if you rename the initial Configuration Server, the name of this section will be different. The server configuration option in this section specifies the name of the Configuration Database section.
104 Framework 8.1
Chapter 5: Setting Up the Configuration Layer Configuring Configuration Server
By default, the Configuration Database section does not have a name. The section name must be the same as the value of the server configuration option that you specified in the Configuration Server section. The Configuration Database section contains information about the Configuration Database and about the DB Server used to access this database.
Note: If you plan to use one or more DB Servers as a backup, you must also configure the same number of Configuration Database sections in the configuration file. The server configuration option within a given Configuration Database section must specify the name for the subsequent Configuration Database section.
The name of the Log section is log. This section contains configuration information about the log.
The name of the History of Changes Adapter (change tracking) section is hca. This section controls Configuration Server’s change-tracking functionality.
The name of the SOAP section is soap. This section contains information about the Simple Object Access Protocol (SOAP) port that clients can use to access Configuration Server. If you work with SOAP, you must add a [soap] section to the Configuration Server configuration file before you start Configuration Server.
You can find a sample Configuration Server configuration file in the Framework Configuration Options Reference Manual.
Procedure:Configuring Configuration Server on UNIX
Prerequisites
• You manually installed Configuration Server on UNIX, as described in “Installing Configuration Server in Master mode on UNIX” on page 95.
• You chose not to configure Configuration Server during the installation process (that is, you entered n in Step 8 on page 96).
Start of procedure
1. From the directory in which Configuration Server is installed, open the sample configuration file (confserv.sample) in a text editor.
2. Set the configuration options to work with the Configuration Database and DB Server. Consult the relevant chapters in the Framework Configuration Options Reference Manual for option descriptions and values. See “Configuring Configuration Server” on page 103 for a description of the Configuration Server configuration file.
Deployment Guide 105
Chapter 5: Setting Up the Configuration Layer Configuring Configuration Server
3. Save the configuration file as confserv.conf.
End of procedure
Configuring Configuration Server Logging
If you plan to use the centralized logging and auditing functionality of the Management Layer, specify appropriate log options in the Configuration Server configuration file before you start using Configuration Server. Most importantly, enable the network log output (for example, create a new option called standard and set its value to network). See the Framework Configuration Options Reference Manual for more information.
Configuring Configuration Server for Multi-language Environment Support
To enable Configuration Server to support UTF-8 encoding in multi-language environments, add the following options to the configuration file:
• In Configuration Server (section confserv) or Configuration Server Proxy (section csproxy): Set the locale option to the value corresponding to English (US). The
database against which a UTF-8 enabled Configuration Server or Configuration Server Proxy is launched must be initialized using English locale scripts.
Set the encoding option to utf-8. Set the multi-languages option to true. You must set this option after
initializing the database and before you start Configuration Server against the UTF-8 enabled database.
For more information about these options, refer to the Framework 8.1 Configuration Options Reference Manual.
Warning! If you want to support multi-language environments, you must enable Configuration Server to handle UTF-8 data in the following time frame:• After the database has been initialized.• Before you start Configuration Server for the first time. Trying
to enable a Configuration Server for UTF-8 that has already been started at least once will result in a warning message being logged.
106 Framework 8.1
Chapter 5: Setting Up the Configuration Layer Encrypting the Configuration Database Password
Encrypting the Configuration Database Password
You can use Configuration Server to encrypt your password for accessing the Configuration Database so that it does not appear in plain text in the Configuration Server logs. This improves the security of your configuration data.
You can encrypt the password at any time, either during installation, or later. However, keep in mind that the Configuration Server must be stopped during the encryption process.
For detailed information about encrypting the Configuration Database password, refer to the Genesys Security Deployment Guide.
Starting Configuration ServerFor descriptions of the command-line parameters specific to Configuration Server, refer to “Configuration Server” on page 178.
Note: Use the -c command line option to point Configuration Server to a configuration file with the name other than the default name (confserv.conf on UNIX or confserv.cfg on Windows). For example, confserv -c <configuration file name>.
Procedure:Starting Configuration Server
Prerequisites
• Configuration Database is initialized.
• DB Server is installed and running.
• Configuration Server is installed.
• The Configuration Server configuration file is configured. Configuration Server uses this file for startup.
Start of procedure
1. To start Configuration Server on UNIX, go to the directory in which Configuration Server is installed and do one of the following:• To use only the required command-line parameters, type the following
command line:sh run.sh
Deployment Guide 107
Chapter 5: Setting Up the Configuration Layer Installing an Interface to Deploy Your System
• To specify the command line yourself, or to use additional command-line parameters, type the following command line:confserv [<additional parameters and arguments as required>]
2. To start Configuration Server on Windows, do one of the following:• Use the Start > Programs menu.• To use only the required command-line parameters, go to the directory
in which Configuration Server is installed, and double-click the startServer.bat file.
• To specify the command line yourself, or to use additional command-line parameters, open the MS-DOS window, go to the directory in which Configuration Server is installed, and type the following command line:confserv.exe [<additional parameters and arguments as required>]
• Use Windows Services Manager. Refer to “Starting and Stopping with Windows Services Manager” on page 191 for more information.
End of procedure
Installing an Interface to Deploy Your System
You must install Configuration Manager or Genesys Administrator before you can deploy the rest of your system. You can use one or both of them, depending on your operating environment. Refer to the Genesys Supported Operating Environment Reference Guide for more information.
Installing Genesys Administrator
Genesys Administrator is a web-based GUI application that provides the same functionality as Configuration Manager and Solution Control Interface. If you are deploying Management Framework 8.1 or later, you can use Genesys Administrator in place of both Configuration Manager and Solution Control Interface.
Refer to the detailed instructions in Framework Genesys Administrator Deployment Guide to deploy Genesys Administrator in your system.
Installing Configuration Manager
Configuration Manager is a GUI application and operates only on Windows.
108 Framework 8.1
Chapter 5: Setting Up the Configuration Layer Installing an Interface to Deploy Your System
Procedure:Installing Configuration Manager on Windows
Warning! Genesys does not recommend installation of its components via a Microsoft Remote Desktop connection. The installation should be performed locally.
Prerequisites
• Configuration Server is installed and running.
• If you want to implement a security banner with Configuration Manager, make sure that you have the necessary files prepared before you start installing Configuration Manager. Refer to the Genesys Security Deployment Guide for detailed information about the security banner.
Start of procedure
1. On the Management Framework 8.1 product CD, locate and open the installation directory configuration_layer_interfaces/configmanager/windows
2. Locate and double-click setup.exe to start the Genesys Installation Wizard.
3. On the Welcome page, click About to review the read_me file. The file also contains a link to the server’s Release Notes file.
4. On the Welcome page, click Next to continue with the installation.
5. On the Security Banner Configuration page, choose whether you want to configure a security banner for this Configuration Manager application. Refer to the Genesys Security Deployment Guide for detailed information about the security banner. Do one of the following:• If you do not want to configure a security banner for this application,
clear the Enable Security Banner check box, and click Next. • If you want to configure a security banner for this application:
i. Select Enable Security Banner.
ii. Follow the instructions in the procedure “Installing and configuring the Security Banner” in the Genesys Security Deployment Guide. When you are finished that procedure, return here and finish this procedure.
6. On the Choose Destination Location page, the wizard displays the destination directory.
If necessary, click:• Browse to select another destination folder.• Default to reinstate that selection.
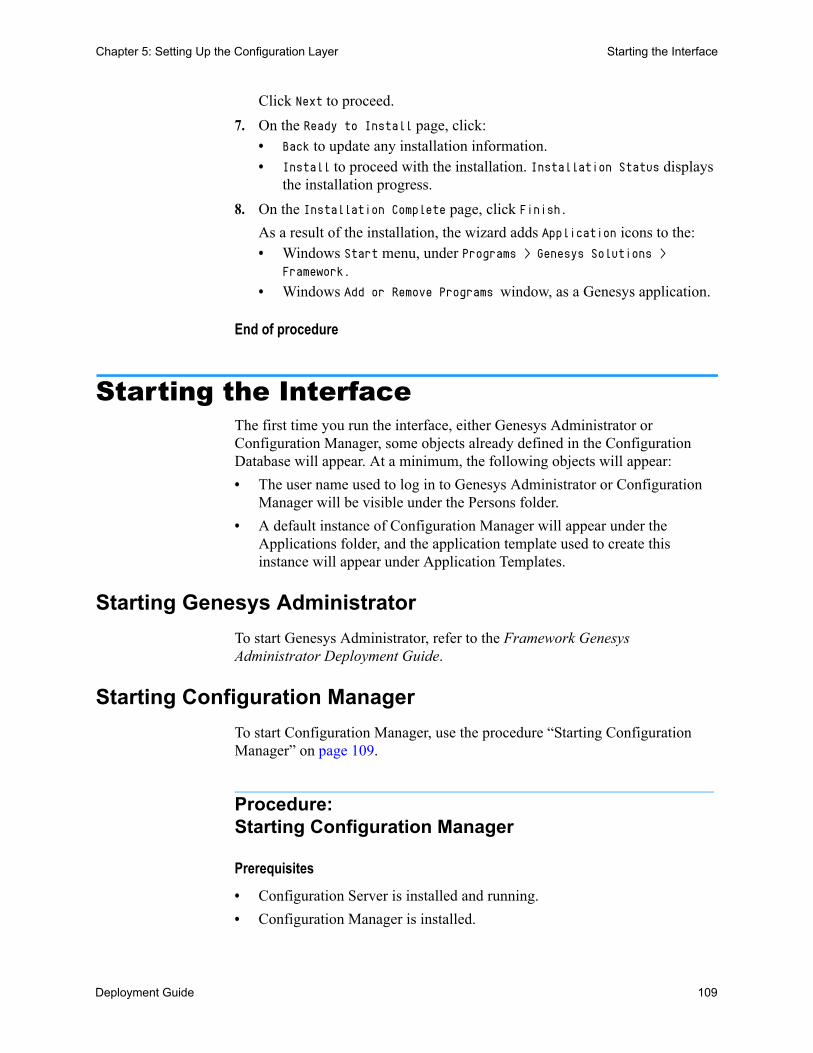
Deployment Guide 109
Chapter 5: Setting Up the Configuration Layer Starting the Interface
Click Next to proceed.
7. On the Ready to Install page, click:• Back to update any installation information.• Install to proceed with the installation. Installation Status displays
the installation progress.
8. On the Installation Complete page, click Finish.
As a result of the installation, the wizard adds Application icons to the:• Windows Start menu, under Programs > Genesys Solutions >
Framework.
• Windows Add or Remove Programs window, as a Genesys application.
End of procedure
Starting the InterfaceThe first time you run the interface, either Genesys Administrator or Configuration Manager, some objects already defined in the Configuration Database will appear. At a minimum, the following objects will appear:
• The user name used to log in to Genesys Administrator or Configuration Manager will be visible under the Persons folder.
• A default instance of Configuration Manager will appear under the Applications folder, and the application template used to create this instance will appear under Application Templates.
Starting Genesys Administrator
To start Genesys Administrator, refer to the Framework Genesys Administrator Deployment Guide.
Starting Configuration Manager
To start Configuration Manager, use the procedure “Starting Configuration Manager” on page 109.
Procedure:Starting Configuration Manager
Prerequisites
• Configuration Server is installed and running.
• Configuration Manager is installed.
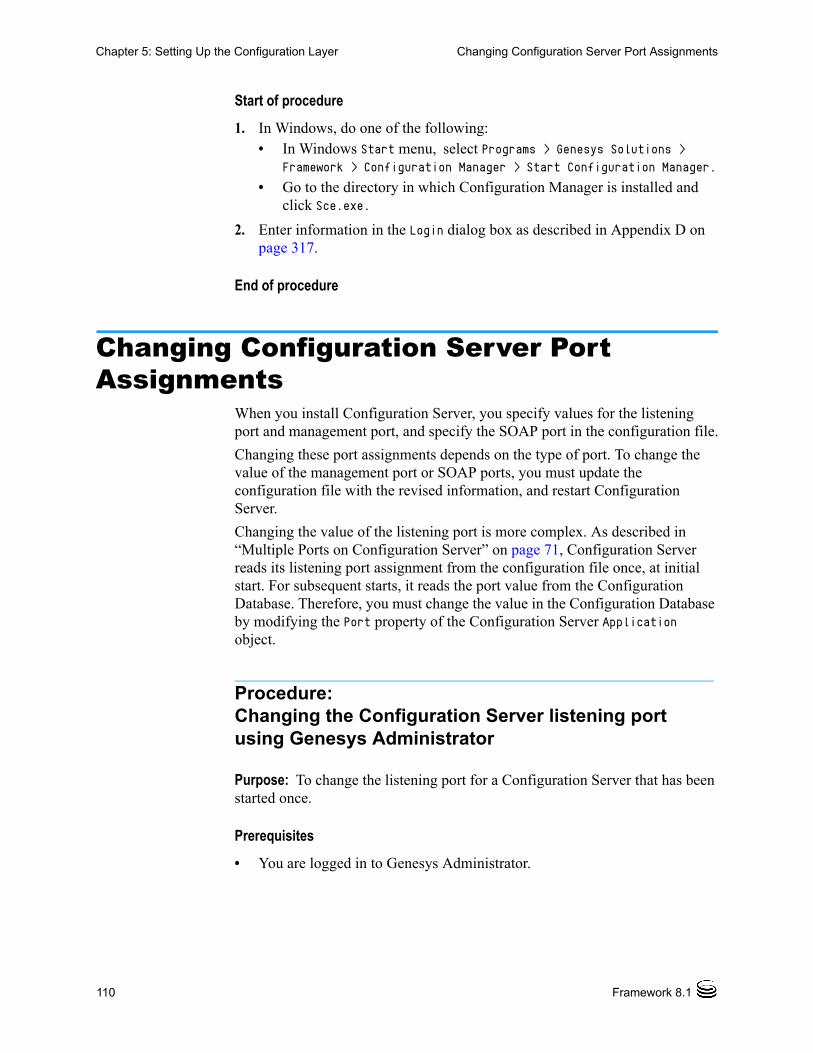
110 Framework 8.1
Chapter 5: Setting Up the Configuration Layer Changing Configuration Server Port Assignments
Start of procedure
1. In Windows, do one of the following:• In Windows Start menu, select Programs > Genesys Solutions >
Framework > Configuration Manager > Start Configuration Manager.
• Go to the directory in which Configuration Manager is installed and click Sce.exe.
2. Enter information in the Login dialog box as described in Appendix D on page 317.
End of procedure
Changing Configuration Server Port Assignments
When you install Configuration Server, you specify values for the listening port and management port, and specify the SOAP port in the configuration file.
Changing these port assignments depends on the type of port. To change the value of the management port or SOAP ports, you must update the configuration file with the revised information, and restart Configuration Server.
Changing the value of the listening port is more complex. As described in “Multiple Ports on Configuration Server” on page 71, Configuration Server reads its listening port assignment from the configuration file once, at initial start. For subsequent starts, it reads the port value from the Configuration Database. Therefore, you must change the value in the Configuration Database by modifying the Port property of the Configuration Server Application object.
Procedure:Changing the Configuration Server listening port using Genesys Administrator
Purpose: To change the listening port for a Configuration Server that has been started once.
Prerequisites
• You are logged in to Genesys Administrator.
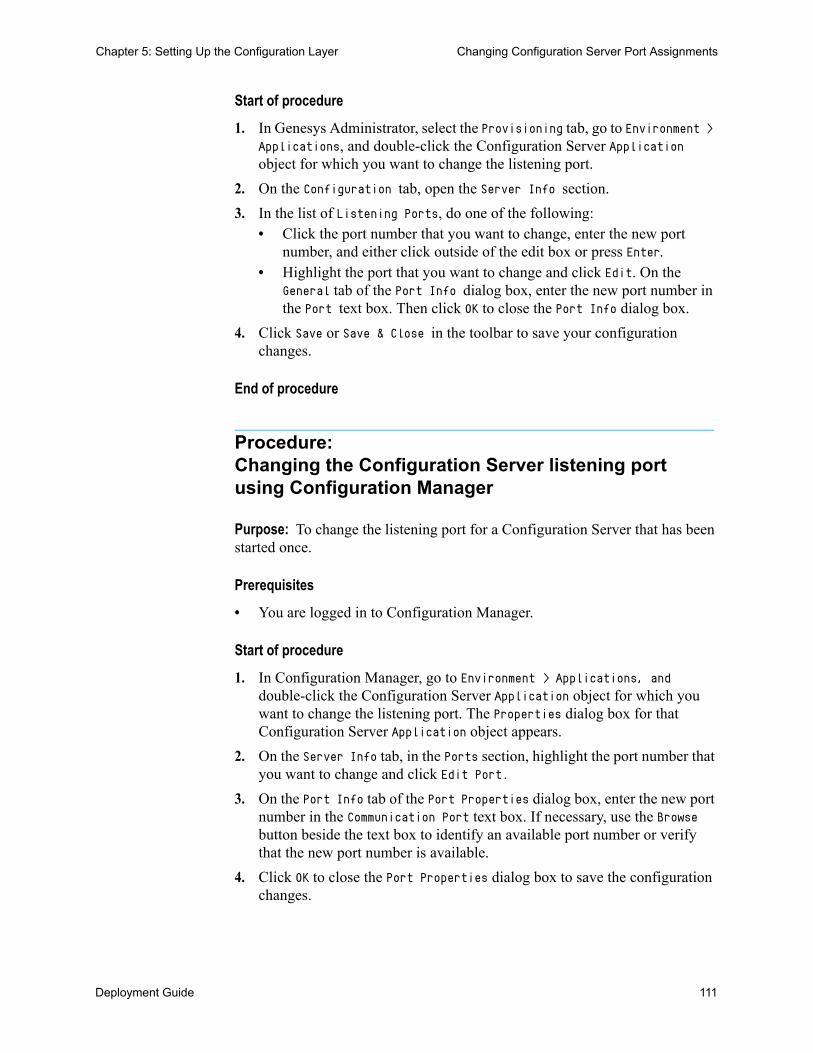
Deployment Guide 111
Chapter 5: Setting Up the Configuration Layer Changing Configuration Server Port Assignments
Start of procedure
1. In Genesys Administrator, select the Provisioning tab, go to Environment > Applications, and double-click the Configuration Server Application object for which you want to change the listening port.
2. On the Configuration tab, open the Server Info section.
3. In the list of Listening Ports, do one of the following:• Click the port number that you want to change, enter the new port
number, and either click outside of the edit box or press Enter.• Highlight the port that you want to change and click Edit. On the
General tab of the Port Info dialog box, enter the new port number in the Port text box. Then click OK to close the Port Info dialog box.
4. Click Save or Save & Close in the toolbar to save your configuration changes.
End of procedure
Procedure:Changing the Configuration Server listening port using Configuration Manager
Purpose: To change the listening port for a Configuration Server that has been started once.
Prerequisites
• You are logged in to Configuration Manager.
Start of procedure
1. In Configuration Manager, go to Environment > Applications, and double-click the Configuration Server Application object for which you want to change the listening port. The Properties dialog box for that Configuration Server Application object appears.
2. On the Server Info tab, in the Ports section, highlight the port number that you want to change and click Edit Port.
3. On the Port Info tab of the Port Properties dialog box, enter the new port number in the Communication Port text box. If necessary, use the Browse button beside the text box to identify an available port number or verify that the new port number is available.
4. Click OK to close the Port Properties dialog box to save the configuration changes.
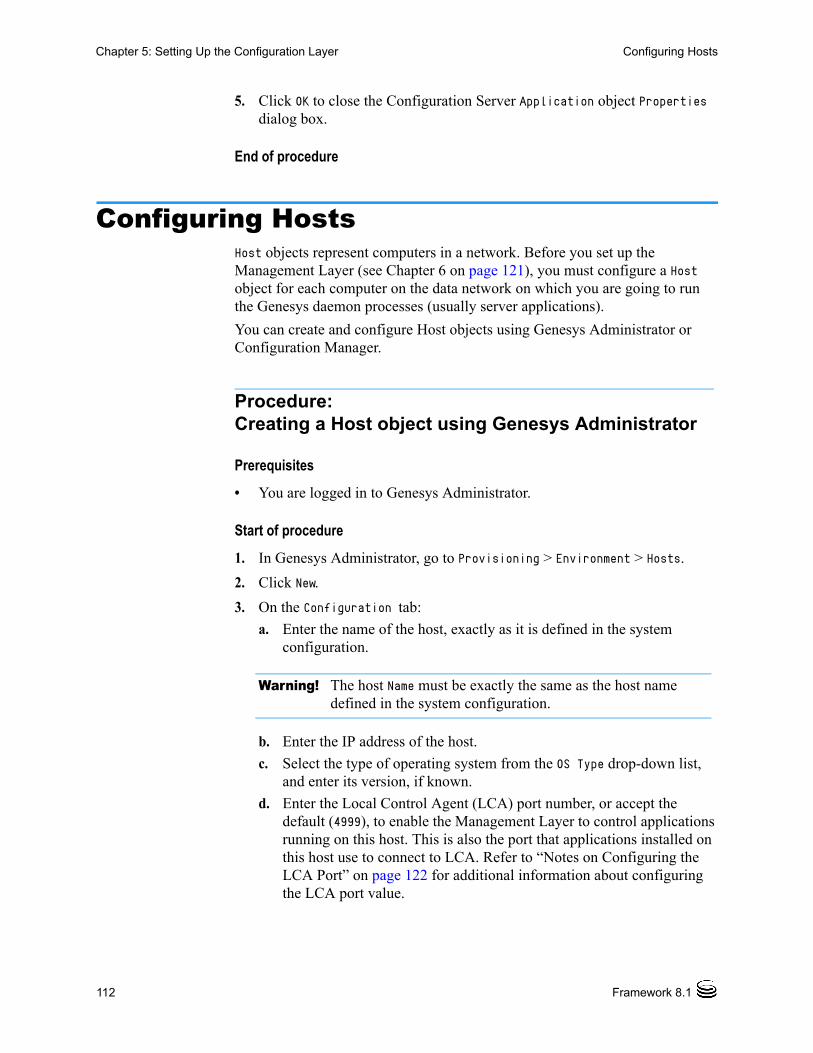
112 Framework 8.1
Chapter 5: Setting Up the Configuration Layer Configuring Hosts
5. Click OK to close the Configuration Server Application object Properties dialog box.
End of procedure
Configuring HostsHost objects represent computers in a network. Before you set up the Management Layer (see Chapter 6 on page 121), you must configure a Host object for each computer on the data network on which you are going to run the Genesys daemon processes (usually server applications).
You can create and configure Host objects using Genesys Administrator or Configuration Manager.
Procedure:Creating a Host object using Genesys Administrator
Prerequisites
• You are logged in to Genesys Administrator.
Start of procedure
1. In Genesys Administrator, go to Provisioning > Environment > Hosts.
2. Click New.
3. On the Configuration tab:
a. Enter the name of the host, exactly as it is defined in the system configuration.
Warning! The host Name must be exactly the same as the host name defined in the system configuration.
b. Enter the IP address of the host.
c. Select the type of operating system from the OS Type drop-down list, and enter its version, if known.
d. Enter the Local Control Agent (LCA) port number, or accept the default (4999), to enable the Management Layer to control applications running on this host. This is also the port that applications installed on this host use to connect to LCA. Refer to “Notes on Configuring the LCA Port” on page 122 for additional information about configuring the LCA port value.
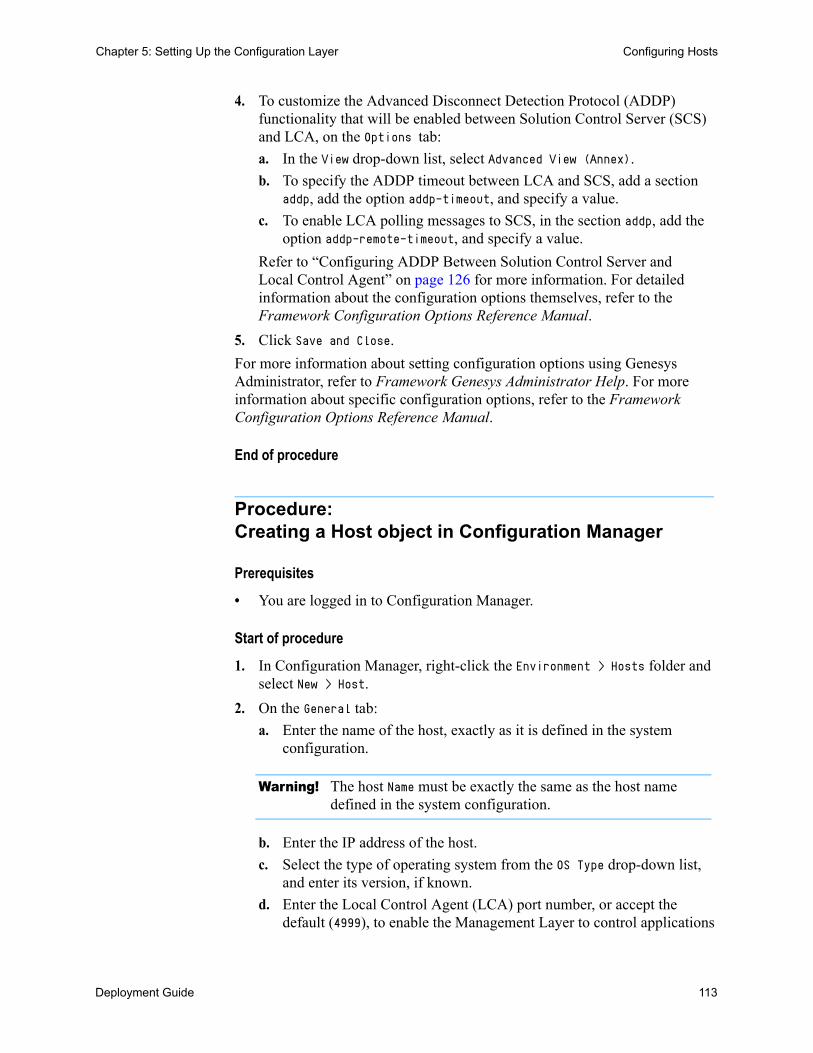
Deployment Guide 113
Chapter 5: Setting Up the Configuration Layer Configuring Hosts
4. To customize the Advanced Disconnect Detection Protocol (ADDP) functionality that will be enabled between Solution Control Server (SCS) and LCA, on the Options tab:
a. In the View drop-down list, select Advanced View (Annex).
b. To specify the ADDP timeout between LCA and SCS, add a section addp, add the option addp-timeout, and specify a value.
c. To enable LCA polling messages to SCS, in the section addp, add the option addp-remote-timeout, and specify a value.
Refer to “Configuring ADDP Between Solution Control Server and Local Control Agent” on page 126 for more information. For detailed information about the configuration options themselves, refer to the Framework Configuration Options Reference Manual.
5. Click Save and Close.
For more information about setting configuration options using Genesys Administrator, refer to Framework Genesys Administrator Help. For more information about specific configuration options, refer to the Framework Configuration Options Reference Manual.
End of procedure
Procedure:Creating a Host object in Configuration Manager
Prerequisites
• You are logged in to Configuration Manager.
Start of procedure
1. In Configuration Manager, right-click the Environment > Hosts folder and select New > Host.
2. On the General tab:
a. Enter the name of the host, exactly as it is defined in the system configuration.
Warning! The host Name must be exactly the same as the host name defined in the system configuration.
b. Enter the IP address of the host.
c. Select the type of operating system from the OS Type drop-down list, and enter its version, if known.
d. Enter the Local Control Agent (LCA) port number, or accept the default (4999), to enable the Management Layer to control applications
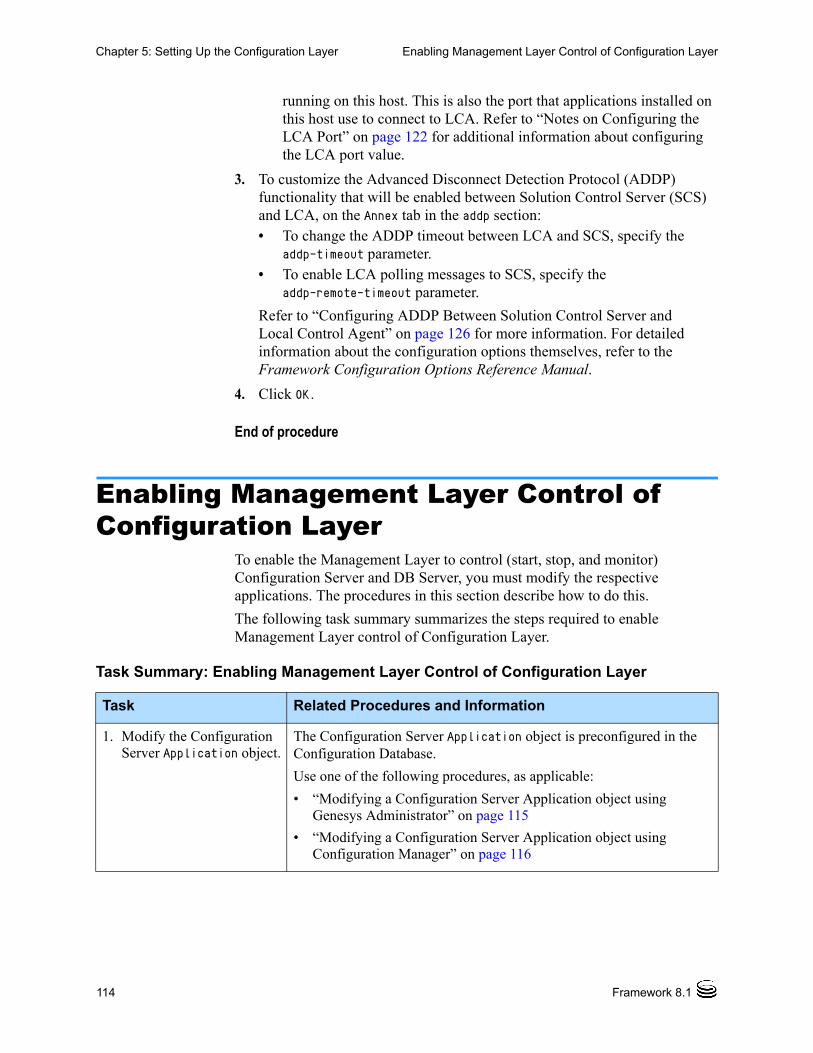
114 Framework 8.1
Chapter 5: Setting Up the Configuration Layer Enabling Management Layer Control of Configuration Layer
running on this host. This is also the port that applications installed on this host use to connect to LCA. Refer to “Notes on Configuring the LCA Port” on page 122 for additional information about configuring the LCA port value.
3. To customize the Advanced Disconnect Detection Protocol (ADDP) functionality that will be enabled between Solution Control Server (SCS) and LCA, on the Annex tab in the addp section:• To change the ADDP timeout between LCA and SCS, specify the
addp-timeout parameter.• To enable LCA polling messages to SCS, specify the
addp-remote-timeout parameter.
Refer to “Configuring ADDP Between Solution Control Server and Local Control Agent” on page 126 for more information. For detailed information about the configuration options themselves, refer to the Framework Configuration Options Reference Manual.
4. Click OK.
End of procedure
Enabling Management Layer Control of Configuration Layer
To enable the Management Layer to control (start, stop, and monitor) Configuration Server and DB Server, you must modify the respective applications. The procedures in this section describe how to do this.
The following task summary summarizes the steps required to enable Management Layer control of Configuration Layer.
Task Summary: Enabling Management Layer Control of Configuration Layer
Task Related Procedures and Information
1. Modify the Configuration Server Application object.
The Configuration Server Application object is preconfigured in the Configuration Database.
Use one of the following procedures, as applicable:
• “Modifying a Configuration Server Application object using Genesys Administrator” on page 115
• “Modifying a Configuration Server Application object using Configuration Manager” on page 116
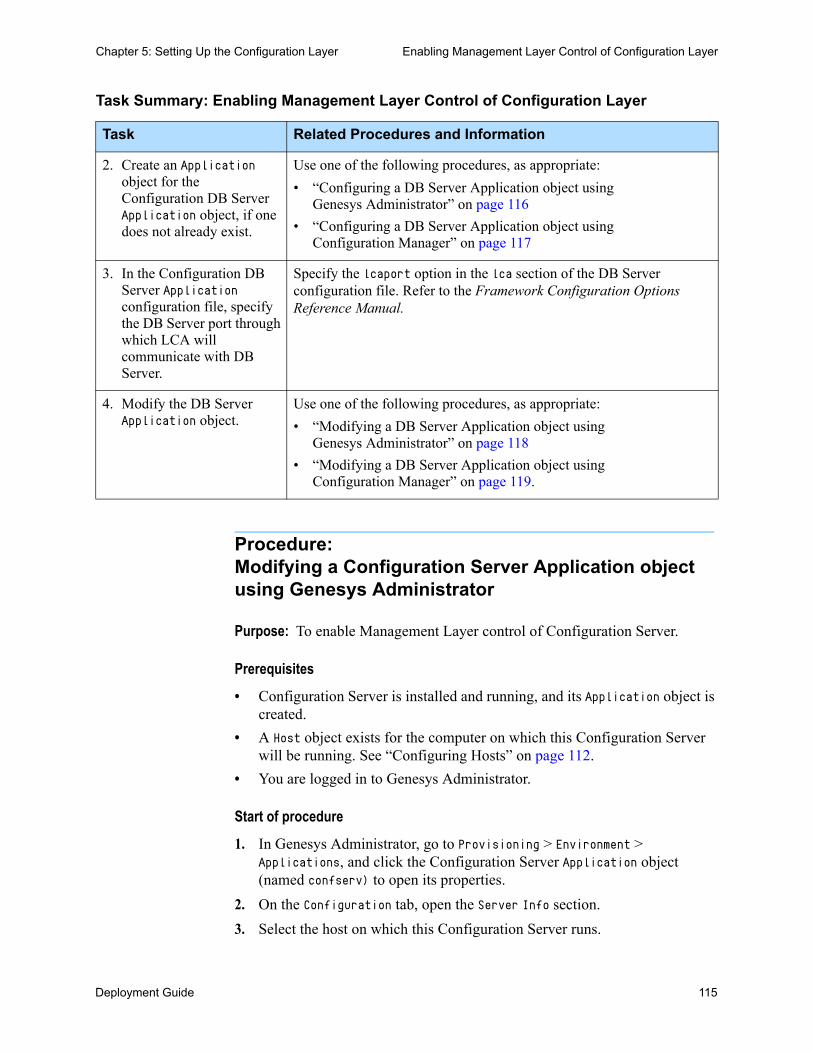
Deployment Guide 115
Chapter 5: Setting Up the Configuration Layer Enabling Management Layer Control of Configuration Layer
Procedure:Modifying a Configuration Server Application object using Genesys Administrator
Purpose: To enable Management Layer control of Configuration Server.
Prerequisites
• Configuration Server is installed and running, and its Application object is created.
• A Host object exists for the computer on which this Configuration Server will be running. See “Configuring Hosts” on page 112.
• You are logged in to Genesys Administrator.
Start of procedure
1. In Genesys Administrator, go to Provisioning > Environment > Applications, and click the Configuration Server Application object (named confserv) to open its properties.
2. On the Configuration tab, open the Server Info section.
3. Select the host on which this Configuration Server runs.
2. Create an Application object for the Configuration DB Server Application object, if one does not already exist.
Use one of the following procedures, as appropriate:
• “Configuring a DB Server Application object using Genesys Administrator” on page 116
• “Configuring a DB Server Application object using Configuration Manager” on page 117
3. In the Configuration DB Server Application configuration file, specify the DB Server port through which LCA will communicate with DB Server.
Specify the lcaport option in the lca section of the DB Server configuration file. Refer to the Framework Configuration Options Reference Manual.
4. Modify the DB Server Application object.
Use one of the following procedures, as appropriate:
• “Modifying a DB Server Application object using Genesys Administrator” on page 118
• “Modifying a DB Server Application object using Configuration Manager” on page 119.
Task Summary: Enabling Management Layer Control of Configuration Layer
Task Related Procedures and Information
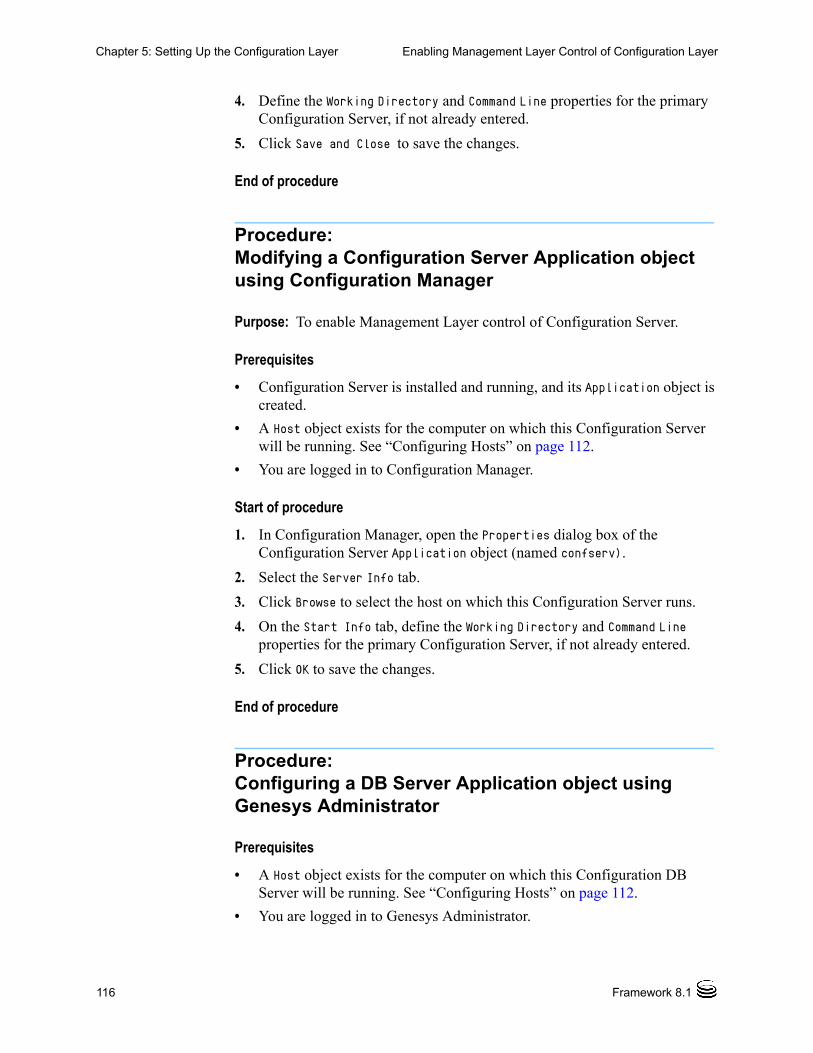
116 Framework 8.1
Chapter 5: Setting Up the Configuration Layer Enabling Management Layer Control of Configuration Layer
4. Define the Working Directory and Command Line properties for the primary Configuration Server, if not already entered.
5. Click Save and Close to save the changes.
End of procedure
Procedure:Modifying a Configuration Server Application object using Configuration Manager
Purpose: To enable Management Layer control of Configuration Server.
Prerequisites
• Configuration Server is installed and running, and its Application object is created.
• A Host object exists for the computer on which this Configuration Server will be running. See “Configuring Hosts” on page 112.
• You are logged in to Configuration Manager.
Start of procedure
1. In Configuration Manager, open the Properties dialog box of the Configuration Server Application object (named confserv).
2. Select the Server Info tab.
3. Click Browse to select the host on which this Configuration Server runs.
4. On the Start Info tab, define the Working Directory and Command Line properties for the primary Configuration Server, if not already entered.
5. Click OK to save the changes.
End of procedure
Procedure:Configuring a DB Server Application object using Genesys Administrator
Prerequisites
• A Host object exists for the computer on which this Configuration DB Server will be running. See “Configuring Hosts” on page 112.
• You are logged in to Genesys Administrator.
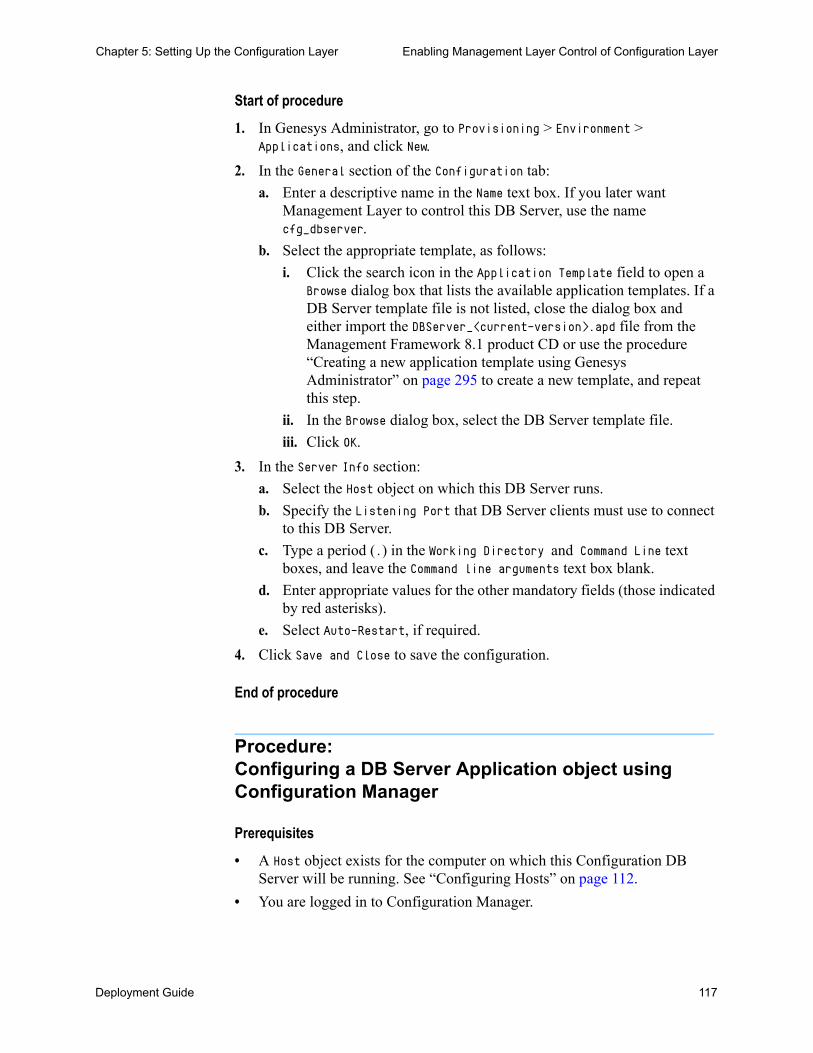
Deployment Guide 117
Chapter 5: Setting Up the Configuration Layer Enabling Management Layer Control of Configuration Layer
Start of procedure
1. In Genesys Administrator, go to Provisioning > Environment > Applications, and click New.
2. In the General section of the Configuration tab:
a. Enter a descriptive name in the Name text box. If you later want Management Layer to control this DB Server, use the name cfg_dbserver.
b. Select the appropriate template, as follows:
i. Click the search icon in the Application Template field to open a Browse dialog box that lists the available application templates. If a DB Server template file is not listed, close the dialog box and either import the DBServer_<current-version>.apd file from the Management Framework 8.1 product CD or use the procedure “Creating a new application template using Genesys Administrator” on page 295 to create a new template, and repeat this step.
ii. In the Browse dialog box, select the DB Server template file.
iii. Click OK.
3. In the Server Info section:
a. Select the Host object on which this DB Server runs.
b. Specify the Listening Port that DB Server clients must use to connect to this DB Server.
c. Type a period (.) in the Working Directory and Command Line text boxes, and leave the Command line arguments text box blank.
d. Enter appropriate values for the other mandatory fields (those indicated by red asterisks).
e. Select Auto-Restart, if required.
4. Click Save and Close to save the configuration.
End of procedure
Procedure:Configuring a DB Server Application object using Configuration Manager
Prerequisites
• A Host object exists for the computer on which this Configuration DB Server will be running. See “Configuring Hosts” on page 112.
• You are logged in to Configuration Manager.
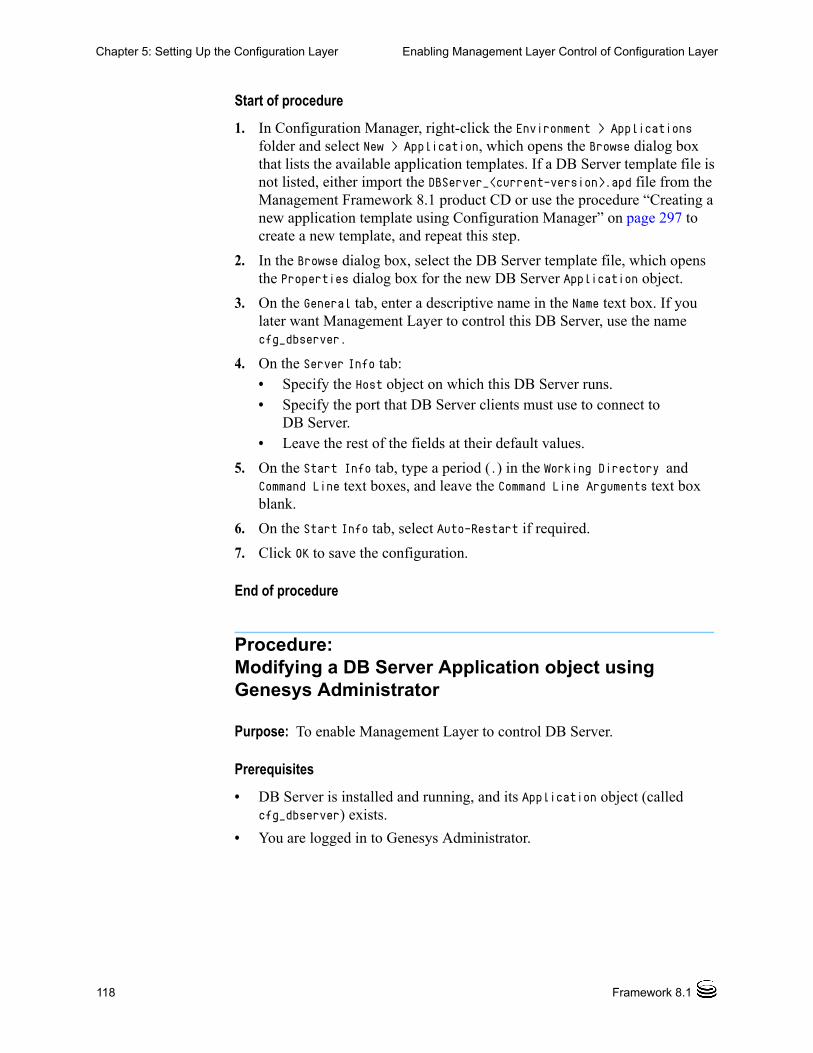
118 Framework 8.1
Chapter 5: Setting Up the Configuration Layer Enabling Management Layer Control of Configuration Layer
Start of procedure
1. In Configuration Manager, right-click the Environment > Applications folder and select New > Application, which opens the Browse dialog box that lists the available application templates. If a DB Server template file is not listed, either import the DBServer_<current-version>.apd file from the Management Framework 8.1 product CD or use the procedure “Creating a new application template using Configuration Manager” on page 297 to create a new template, and repeat this step.
2. In the Browse dialog box, select the DB Server template file, which opens the Properties dialog box for the new DB Server Application object.
3. On the General tab, enter a descriptive name in the Name text box. If you later want Management Layer to control this DB Server, use the name cfg_dbserver.
4. On the Server Info tab:• Specify the Host object on which this DB Server runs.• Specify the port that DB Server clients must use to connect to
DB Server.• Leave the rest of the fields at their default values.
5. On the Start Info tab, type a period (.) in the Working Directory and Command Line text boxes, and leave the Command Line Arguments text box blank.
6. On the Start Info tab, select Auto-Restart if required.
7. Click OK to save the configuration.
End of procedure
Procedure:Modifying a DB Server Application object using Genesys Administrator
Purpose: To enable Management Layer to control DB Server.
Prerequisites
• DB Server is installed and running, and its Application object (called cfg_dbserver) exists.
• You are logged in to Genesys Administrator.

Deployment Guide 119
Chapter 5: Setting Up the Configuration Layer Next Steps
Start of procedure
1. In Genesys Administrator, go to Provisioning > Environment > Applications, and double-click the DB Server Application object cfg_dbserver to open its properties.
2. In the Server Info section of the Configuration tab, enter the appropriate information in the Working Directory, Command Line, and Command Line Arguments text boxes. For information about command-line parameters, see Chapter 7 on page 171.
3. Click Save and Close to save the configuration.
End of procedure
Procedure:Modifying a DB Server Application object using Configuration Manager
Purpose: To enable Management Layer to control DB Server.
Prerequisites
• DB Server is installed and running, and its Application object (called cfg_dbserver) exists.
• You are logged in to Configuration Manager.
Start of procedure
1. In Configuration Manager, open the Properties dialog box for the cfg_dbserver Application object.
2. On the Start Info tab, enter the appropriate information in the Working Directory, Command Line, and Command Line Arguments text boxes. For information about command-line parameters, see Chapter 7 on page 171.
3. Click OK to save the configuration.
End of procedure
Next StepsAfter you have successfully installed and configured the Configuration Layer components as described in this chapter, consider whether you would like to do the following:
• Configure a user inactivity timeout to disable logged-in users after a period of inactivity. Refer to the Genesys Security Deployment Guide.
120 Framework 8.1
Chapter 5: Setting Up the Configuration Layer Next Steps
• Configure redundant DB Servers or Configuration Servers. Refer to chapter 8 on page 193.
• Configure one or more Configuration Server Proxies. Refer to Chapter 10 on page 259.
Continuing the Installation of Your System
If you plan to use Genesys Administrator but have not already installed it, you can do so now, following the instructions in the Framework Genesys Administrator Deployment Guide. Then, you can deploy the Management Layer, as described in Chapter 6 on page 121.

Deployment Guide 121
Chapter
6 Setting Up the Management LayerThis chapter describes how to configure and install components of the Management Layer.
This chapter contains the following sections: Overview, page 121 Deploying Local Control Agent, page 122 Deploying the Management Layer Using Genesys Administrator, page 127 Deploying the Management Layer Using Wizard Manager, page 128 Manually Deploying the Management Layer, page 134 Installing Solution Control Server Utilities Separately, page 168 Next Steps, page 170
OverviewThe Management Layer controls the startup and status of solutions, logging of maintenance events, generation and processing of alarms, and management of application failures.
To enable the Management Layer’s solution-control and fault-management capabilities, you must install Local Control Agent (LCA) on each host running a Genesys server application.
Note: An application started by LCA inherits the environment variables from LCA. Therefore, when an application (such as DB Server) requires that particular environment variables be set, the same environment variables must be set for the account that runs LCA.
122 Framework 8.1
Chapter 6: Setting Up the Management Layer Deploying Local Control Agent
To enable the Management Layer’s centralized-logging and alarm-signaling capabilities, you must configure a connection to Message Server for each Genesys server application.
You can deploy Management Layer in one of three ways:
• Use Genesys Administrator, as described in “Deploying the Management Layer Using Genesys Administrator” on page 127.
• Use Wizard Manager, as described in “Deploying the Management Layer Using Wizard Manager” on page 128. Wizard Manager assists you in deploying all the required Management Layer components in the proper order.
• Manually, as described in “Manually Deploying the Management Layer” on page 134.
Note: The Local Control Agent can only be installed manually.
Deploying Local Control AgentTo enable the Management Layer to control the startup and status of applications and solutions, and manage application failures, you must install an instance of Local Control Agent on every computer that is to run either Genesys server applications or third-party server applications you want to control with Management Layer.
Installing LCA also installs and activates a remote deployment agent, called the Genesys Deployment Agent, on that computer. See “Deployment Using Genesys Administrator” on page 78 for more information.
Notes on Configuring the LCA Port
1. The LCA port must be set to a value of 2000 or greater. When the LCA port is specified within the range of 1-1999, LCA starts on port number 4999 (default value).
2. If the LCA port value is changed in the Host configuration while Solution Control Server (SCS) is connected to LCA, SCS does not disconnect from and reconnect to LCA; instead, the new LCA port value takes effect after LCA restarts.
Warning! When setting up the Genesys Deployment Agent, set up the Service under an account with administrative privileges. This will ensure that it is able to properly deploy applications on its Host.
Deployment Guide 123
Chapter 6: Setting Up the Management Layer Deploying Local Control Agent
3. If you change the LCA port value for the LCA installed as a Windows Service, you must also change the LCA port number in the LCA startup parameters in the Registry Editor. The LCA Registry Key is located at:
(HKEY_LOCAL_MACHINE\SYSTEM\CurrentControlSet\Services\lca_service\ImagePath).
The value must have the following format:“<full path>\lca.exe” <LCA port number> -service <lca_service_name>
Change the LCA port number to the current value.
Specifying the Genesys Deployment Agent Port
When you install LCA, the Installation Wizard configures the port used by the Genesys Deployment Agent as follows:
• On UNIX, you are prompted to provide a port number, in the same way that you are prompted for other parameters during installation. See Step 10 on page 124.
• On Windows, the port number 5000 is automatically assigned.
If the port number was already specified during a previous installation of LCA on this host, it is not prompted for again or changed during LCA installation.
You can change this value at any time. Refer to Framework Genesys Administrator Deployment Guide for more information about remote deployment using Genesys Administrator, including instructions for changing the port number.
Installing Local Control Agent
This section describes how to install LCA on UNIX or on Windows.
Note: All running LCA processes must be stopped before installing another LCA.
Procedure:Manually Installing Local Control Agent on UNIX
Start of procedure
1. Stop all LCA processes that are running. If there are any LCA processes that are running when you begin the installation, the installation process will stop, and not restart until you have stopped those processes (see Step 4).
124 Framework 8.1
Chapter 6: Setting Up the Management Layer Deploying Local Control Agent
2. On the Management Framework 8.1 product CD in the appropriate management_layer/lca/<operating_system> directory, locate a shell script called install.sh.
3. Type the file name at the command prompt, and press Enter.
4. Type Enter. This action will have one of the two following results.• If there are any LCA processes still running, you will exit from the
installation and have to stop these processes before you can restart it.• Otherwise, you will continue with the installation.
5. To specify the hostname for this LCA, do one of the following:• Type the name of the host, and press Enter.• Press Enter to select the current host.
6. Enter the Configuration Server host name, and press Enter.
7. Enter the Configuration Server network port, and press Enter.
8. Enter the Configuration Server user name, and press Enter.
9. Enter the Configuration Server password, and press Enter.
10. To specify the destination directory, do one of the following:• Press Enter to accept the default.• Enter the full path of the directory, and press Enter.
11. If the target installation directory has files in it, do one of the following:• Type 1 to back up all the files in the directory, and press Enter.
Specify the path to which you want the files backed up, and press Enter.
• Type 2 to overwrite only the files in this installation package, and press Enter. Then type y to confirm your selection, and press Enter.
Use this option only if the application already installed operates properly.
• Type 3 to erase all files in this directory before continuing with the installation, and press Enter. Then type y to confirm your selection, and press Enter.
The list of file names will appear on the screen as the files are copied to the destination directory.
12. For the product version to install, do one of the following:• Type 32 to select the 32-bit version, and press Enter.• Type 64 to select the 64-bit version, and press Enter.
13. If prompted, enter the number of the port used by the Genesys Deployment Agent, and press Enter.
Note: This prompt appears only if the port for the Genesys Deployment Agent is not already configured
Deployment Guide 125
Chapter 6: Setting Up the Management Layer Deploying Local Control Agent
14. If you are authorized to modify startup (RC) files, you are prompted to add LCA to the startup files. Do one of the following:• Press Enter to add LCA to the startup files.• Type n to leave LCA out of the startup files, and press Enter.
End of procedure
Procedure:Manually Installing Local Control Agent on Windows
Start of procedure
1. Stop all LCA processes that are running.
2. On the Management Framework 8.1 product CD in the appropriate management_layer\lca\windows directory, locate and double-click setup.exe to start the Genesys Installation Wizard.
3. Use the About button on the wizard’s Welcome page to review the read_me file. The file also contains a link to the server’s Release Notes file.
4. Click Next to start the installation.
5. On the Connection Parameters to the Genesys Configuration Server page, specify the host name, port, user name, and password for Configuration Server, and then click Next.
6. On the Choose Destination Location page, the wizard displays the default folder C:\Program Files\GCTI\Local Control Agent.
If necessary, use the:• Browse button to select another destination folder. • Default button to reinstate the default folder, C:\Program
Files\GCTI\Local Control Agent.
7. On the Ready to Install page, click:• Back to update any installation information.• Install to proceed with the installation.
8. On the Installation Complete page, click Finish.
As a result of the installation, the wizard adds Application icons to the:• Windows Start menu, under Programs > Genesys Solutions >
Management Layer.
• Windows Add or Remove Programs window, as a Genesys server.
Note: On UNIX systems, LCA 8.1.0 and earlier is installed with the autostart capability created automatically for run level 3. If you are using another run level, you must modify your operating system startup scripts by adding the startup of LCA.

126 Framework 8.1
Chapter 6: Setting Up the Management Layer Deploying Local Control Agent
• Windows Services list, as a Genesys service, with Automatic startup type.
End of procedure
LCA Log Options
If you do not specify any log options for LCA, the default values apply. To specify log options for LCA, create the lca.cfg configuration file and locate it in the same directory as the LCA executable. The LCA configuration file must have the following format:[log]
<log option name> = <log option value><log option name> = <log option value>...
A sample LCA configuration file is available in the Framework Configuration Options Reference Manual.
Configuring ADDP Between Solution Control Server and Local Control Agent
Advanced Disconnection Detection Protocol (ADDP) is enabled automatically between Solution Control Server (SCS) and Local Control Agent (LCA). By default, SCS generates polling messages to LCA. If SCS does not receive messages from LCA within this interval, SCS sends a polling message. A lack of response to the polling message from LCA within the same time period is interpreted as a loss of connection.
If you want to change the ADDP timeout between SCS and LCA, configure the addp-timeout option. If you also want to enable LCA polling messages to SCS, configure the addp-remote-timeout option. Both of these options are set in the Annex of the Host object configured for the computer on which LCA runs. For detailed instructions on specifying these options, refer to the procedures “Creating a Host object using Genesys Administrator” on page 112 or “Creating a Host object in Configuration Manager” on page 113, or to the Framework Configuration Options Reference Manual.
Notes: • Because the Management Layer functionality requires LCA to be always running while its host computer is up, LCA is installed as a Windows Service with the autostart capability.
• In addition, if the port used by the Genesys Deployment Agent was not previously configured, it is set to 5000 automatically. See “Specifying the Genesys Deployment Agent Port” on page 123.

Deployment Guide 127
Chapter 6: Setting Up the Management Layer Deploying the Management Layer Using Genesys Administrator
To avoid false disconnect states that might occur because of delays in the data network, Genesys recommends setting the ADDP timeouts to values equal to or greater than ten seconds.
Refer to the Framework Configuration Options Reference Manual for detailed descriptions of these options.
Deploying the Management Layer Using Genesys Administrator
You can deploy the Management Layer to any host on your network using the Deployment Wizard in Genesys Administrator. Genesys Administrator copies all of the necessary software components to the host, and installs them. For each component to be installed, Genesys Administrator uses a corresponding Application object of the specified name, or if one does not exist, creates a new object. You can then configure the object as required.
Procedure:Deploying Management Layer components using Genesys Administrator
Purpose: To install Log DB Server, Message Server, Solution Control Server, and Genesys SNMP Master Agent on specified hosts in the network, using existing corresponding Application objects or creating new ones as required.
Prerequisites
• Configuration Layer must be installed and running.
• Each destination location must have a Host object configured in the Configuration Database.
• The latest LCA Installation Package (IP) and Genesys Deployment Agent must be deployed and running on the target host. This installs the Genesys Deployment Agent at that location. See “Specifying the Genesys Deployment Agent Port” on page 123.
• The IPs to be installed must be located on an Installation CD or in a shareable folder in your network.
• You are logged in to Genesys Administrator.
Note: To use the Deployment Wizard, you must deploy LCA to all target hosts, which also installs the Genesys Deployment Agent on those hosts. You then must start the Genesys Deployment Agent on each of those hosts.

128 Framework 8.1
Chapter 6: Setting Up the Management Layer Deploying the Management Layer Using Wizard Manager
Start of procedure
1. Go to Deployment > Repository > Installation Packages.
2. Do one of the following, as appropriate:• If the IP has been imported into an IP Repository, navigate to that
repository, using the Repository drop-down list if necessary.• Otherwise, import the component IP into an IP Repository, following
the detailed instructions in Framework.Genesys Administrator Help.
3. Install the IP on the specified Host. Refer to Framework Genesys Administrator Help for detailed instructions.
End of procedure
Next Steps
Complete the configuration of the deployed components. In addition to what was configured during deployment, you must also, for example, do the following:
• In your DBMS, create a database which will serve as the Log Database.
• Configure at least one Database Access Point for the Log Database.
• Initialize the Log Database.
• Configure connections between components, and between components and the Log Database, as required.
Review the section “Manually Deploying the Management Layer” on page 134 to ensure that you have completed all necessary configuration and initialization tasks for each deployed component
Deploying the Management Layer Using Wizard Manager
You can deploy the Management Layer using Wizard Manager. Wizard Manager helps you deploy all the required Management Layer components in the proper order.
Note: If you are deploying more than one component, you can continue with this procedure in one of the following ways:
• Proceed to the next step and complete the procedure for this component, and then return and repeat both steps for each component.
• Repeat this step for all components and then proceed to the next step, repeating it for all components.
Deployment Guide 129
Chapter 6: Setting Up the Management Layer Deploying the Management Layer Using Wizard Manager
Wizard Manager does not operate on UNIX, only on Windows. However, you can use this tool to configure the Framework components, regardless of whether the components are run on UNIX or Windows.
Deploying Management Layer Components on Windows
When you deploy Management Layer components on Windows, Wizard Manager configures and installs the necessary components. The components are set up and ready to run.
Deploying Management Layer Components on UNIX
When you deploy Management Layer components on UNIX, Wizard Manager configures the components but does not physically install them. Instead, Wizard Manager prepares a customized installation package for each component. You must copy the appropriate package to the host computer for each component, and then manually install each component on its host computer using the customized installation package.
This section describes how to install Management Layer components on UNIX.
Procedure:Wizard Manager—Installing Log DB Server on UNIX
Purpose: To install the Log DB Server corresponding to the Application object configured in Wizard Manager.
Prerequisites
• The Log DB Server installation package has been created using Wizard Manager.
• The Configuration Layer components are installed and running.
Start of procedure
1. Copy the Log DB Server installation package from the location you specified in Wizard Manager to the host computer for Log DB Server.
2. In the directory to which the DB Server installation package was copied, locate a shell script called install.sh.
3. Run this script from the command prompt by typing the file name.
4. When prompted, specify the Host Name of the computer on which DB Server is to be installed.
5. Type n when asked whether this DB Server will provide access to the Configuration Database.
130 Framework 8.1
Chapter 6: Setting Up the Management Layer Deploying the Management Layer Using Wizard Manager
6. Specify the destination directory into which DB Server is to be installed, with the full path to it.
7. The installation displays the names of the DB client processes for different types of SQL servers. Type the number of the DB client process name that should be configured.
8. If asked which version of the product to install, either the 32- or the 64-bit, choose the one appropriate to your environment.
As soon as the installation process is finished, a message appears announcing that installation was successful. The process places DB Server in the directory specified during the installation.
End of procedure
Procedure:Wizard Manager—Installing Message Server on UNIX
Purpose: To install the Message Server corresponding to the Application object configured in Wizard Manager.
Prerequisites
• The Message Server installation package has been created using Wizard Manager.
• The Configuration Layer components are installed and running.
Start of procedure
1. Copy the Message Server installation package from the location you specified in Wizard Manager to the host computer for Message Server.
2. In the directory to which the Message Server installation package was copied, locate a shell script called install.sh.
3. Run this script from the command prompt by typing the file name.
4. When prompted, specify the Host Name of the computer on which Message Server is to be installed.
5. Specify the destination directory into which Message Server is to be installed, with the full path to it.
6. If asked which version of the product to install, either the 32-bit or the 64-bit, choose the one appropriate to your environment.
Note: Message Server can only write logs to a PostgreSQL DBMS if the corresponding DB Server also supports PostgreSQL.
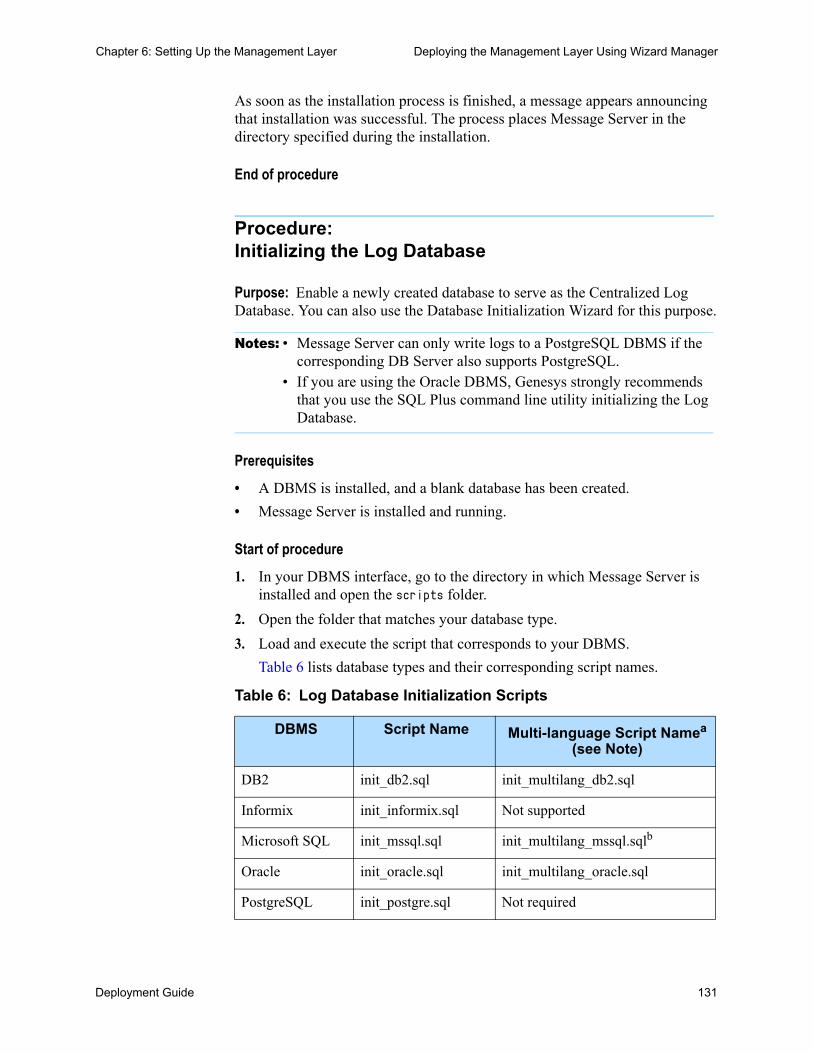
Deployment Guide 131
Chapter 6: Setting Up the Management Layer Deploying the Management Layer Using Wizard Manager
As soon as the installation process is finished, a message appears announcing that installation was successful. The process places Message Server in the directory specified during the installation.
End of procedure
Procedure:Initializing the Log Database
Purpose: Enable a newly created database to serve as the Centralized Log Database. You can also use the Database Initialization Wizard for this purpose.
Prerequisites
• A DBMS is installed, and a blank database has been created.
• Message Server is installed and running.
Start of procedure
1. In your DBMS interface, go to the directory in which Message Server is installed and open the scripts folder.
2. Open the folder that matches your database type.
3. Load and execute the script that corresponds to your DBMS.
Table 6 lists database types and their corresponding script names.
Notes: • Message Server can only write logs to a PostgreSQL DBMS if the corresponding DB Server also supports PostgreSQL.
• If you are using the Oracle DBMS, Genesys strongly recommends that you use the SQL Plus command line utility initializing the Log Database.
Table 6: Log Database Initialization Scripts
DBMS Script Name Multi-language Script Namea
(see Note)
DB2 init_db2.sql init_multilang_db2.sql
Informix init_informix.sql Not supported
Microsoft SQL init_mssql.sql init_multilang_mssql.sqlb
Oracle init_oracle.sql init_multilang_oracle.sql
PostgreSQL init_postgre.sql Not required
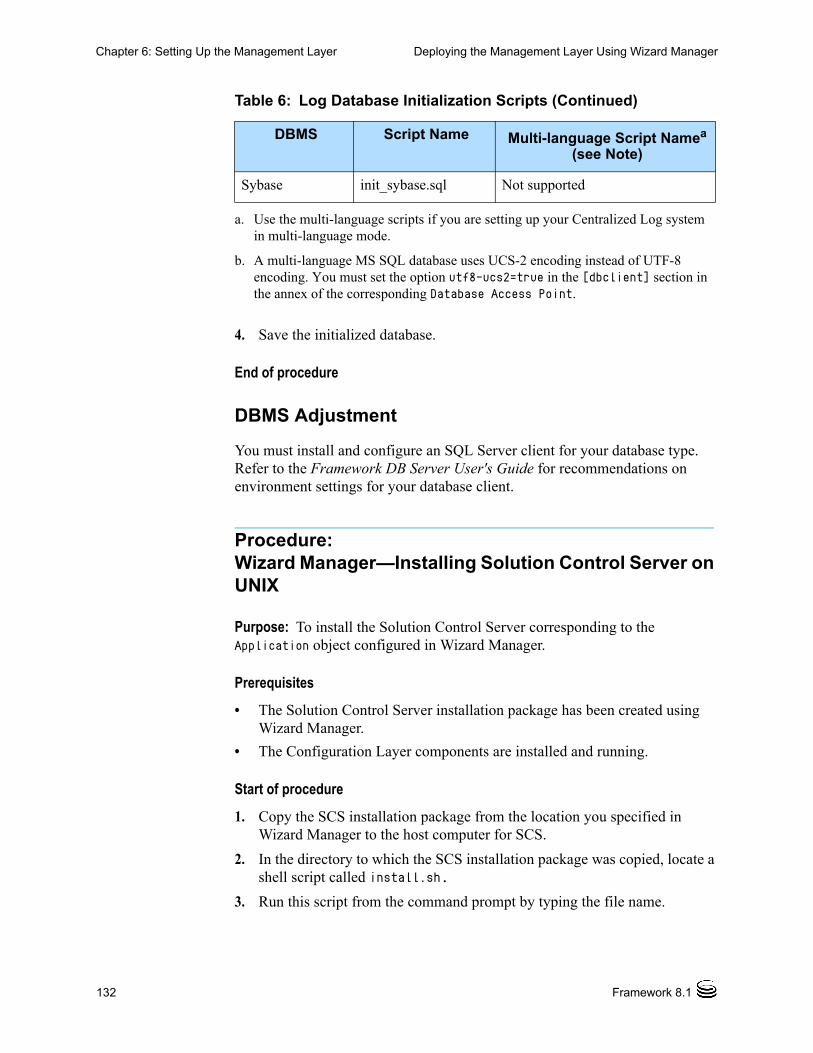
132 Framework 8.1
Chapter 6: Setting Up the Management Layer Deploying the Management Layer Using Wizard Manager
4. Save the initialized database.
End of procedure
DBMS Adjustment
You must install and configure an SQL Server client for your database type. Refer to the Framework DB Server User's Guide for recommendations on environment settings for your database client.
Procedure:Wizard Manager—Installing Solution Control Server on UNIX
Purpose: To install the Solution Control Server corresponding to the Application object configured in Wizard Manager.
Prerequisites
• The Solution Control Server installation package has been created using Wizard Manager.
• The Configuration Layer components are installed and running.
Start of procedure
1. Copy the SCS installation package from the location you specified in Wizard Manager to the host computer for SCS.
2. In the directory to which the SCS installation package was copied, locate a shell script called install.sh.
3. Run this script from the command prompt by typing the file name.
Sybase init_sybase.sql Not supported
a. Use the multi-language scripts if you are setting up your Centralized Log system in multi-language mode.
b. A multi-language MS SQL database uses UCS-2 encoding instead of UTF-8 encoding. You must set the option utf8-ucs2=true in the [dbclient] section in the annex of the corresponding Database Access Point.
Table 6: Log Database Initialization Scripts (Continued)
DBMS Script Name Multi-language Script Namea
(see Note)
Deployment Guide 133
Chapter 6: Setting Up the Management Layer Deploying the Management Layer Using Wizard Manager
4. When prompted, specify the Host Name of the computer on which Solution Control Server is to be installed.
5. Specify the destination directory into which SCS is to be installed, with the full path to it.
6. If asked which version of the product to install, either the 32-bit or the 64-bit, choose the one appropriate to your environment.
7. If you plan to use functionality that requires a license, answer y when asked that question, and then be prepared to give either the full path to the license file or the License Manager port and host.
As soon as the installation process is finished, a message appears announcing that installation was successful. The process places Solution Control Server in the directory with the name specified during the installation.
End of procedure
Installing SNMP Master Agent
If you agreed to configure Simple Network Management Protocol (SNMP) support while running the Management Layer Wizard, the wizard creates an application of the SNMP Master Agent type in the Configuration Database. With current implementation, you may use either Genesys SNMP Master Agent or a third-party SNMP master agent that is compliant with the AgentX protocol.
In the first case, the Management Framework CD contains the installation package; in the second case, you must obtain the installation package from a third-party vendor. Therefore, the wizard does not suggest that you copy an installation package to the SNMP Master Agent host computer. Instead, manually install the SNMP master agent of your choice:
• If installing Genesys SNMP Master Agent, follow the instructions for “Deploying SNMP Master Agent” on page 162.
• If installing a third-party SNMP master agent, follow the instructions in the relevant third-party documentation.
Regardless of your choice, review the Framework Configuration Options Reference Manual to decide whether your environment requires configuring any configuration options for your SNMP master agent application.
For more information about SNMP functionality built into the Management Layer and on Genesys SNMP Master Agent, see the Framework Management Layer User’s Guide.
Note: You must have a special license to enable the SNMP functionality. Refer to the Genesys Licensing Guide for more information.

134 Framework 8.1
Chapter 6: Setting Up the Management Layer Manually Deploying the Management Layer
Manually Deploying the Management Layer
This sections contains instructions describing how to manually deploy Management Layer.
Task Summary
The following task table summarizes the steps for manually deploying Management Layer using Genesys Administrator or Configuration Manager.
Note: Message Server can only write logs to a PostgreSQL DBMS if the corresponding DB Server also supports PostgreSQL.
Task Summary: Manually Deploying Management Layer
Task Related Procedures and Information
1. Deploy a DB Server for the Log Database.
1. Configure a Client DB Server Application object for the Log Database using one of the following procedures, as appropriate: “Configuring a Log DB Server Application object using
Genesys Administrator” on page 137 “Configuring a Log DB Server Application object using
Configuration Manager” on page 138
2. Install the DB Server Application using one of the following procedures, as appropriate: “Manually installing Log DB Server on UNIX” on page 139 “Manually installing Log DB Server on Windows” on page 141
2. Configure a Database Access Point (DAP) for the Log DB Server.
Use one of the following procedures, as appropriate:
• “Configuring a Database Access Point for the Log DB Server using Genesys Administrator” on page 143
• “Configuring a Database Access Point for the Log DB Server using Configuration Manager” on page 145

Deployment Guide 135
Chapter 6: Setting Up the Management Layer Manually Deploying the Management Layer
3. Deploy Message Server. 1. Configure a Message Server Application object using one of the following procedures, as appropriate: “Configuring a Message Server Application object using
Genesys Administrator” on page 148 “Configuring a Message Server Application object using
Configuration Manager” on page 149
2. Install the Message Server Application using one of the following procedures, as appropriate: “Manually installing Message Server on UNIX” on page 151 “Manually installing Message Server on Windows” on page 152
4. Create and initialize the Log Database.
1. Create an empty database in your DBMS.
2. Initialize the empty database so that it can be used as the Log Database. Use the procedure “Initializing the Log Database” on page 131.
5. Deploy Solution Control Server.
1. Configure a Solution Control Server Application object using one of the following procedures, as appropriate: “Configuring a Solution Control Server Application object using
Genesys Administrator” on page 153 “Configuring a Solution Control Server Application object using
Configuration Manager” on page 154
2. Install the Solution Control Server Application using one of the following procedures, as appropriate: “Manually installing Solution Control Server on UNIX” on
page 156 “Manually installing Solution Control Server on Windows” on
page 157
Task Summary: Manually Deploying Management Layer (Continued)
Task Related Procedures and Information
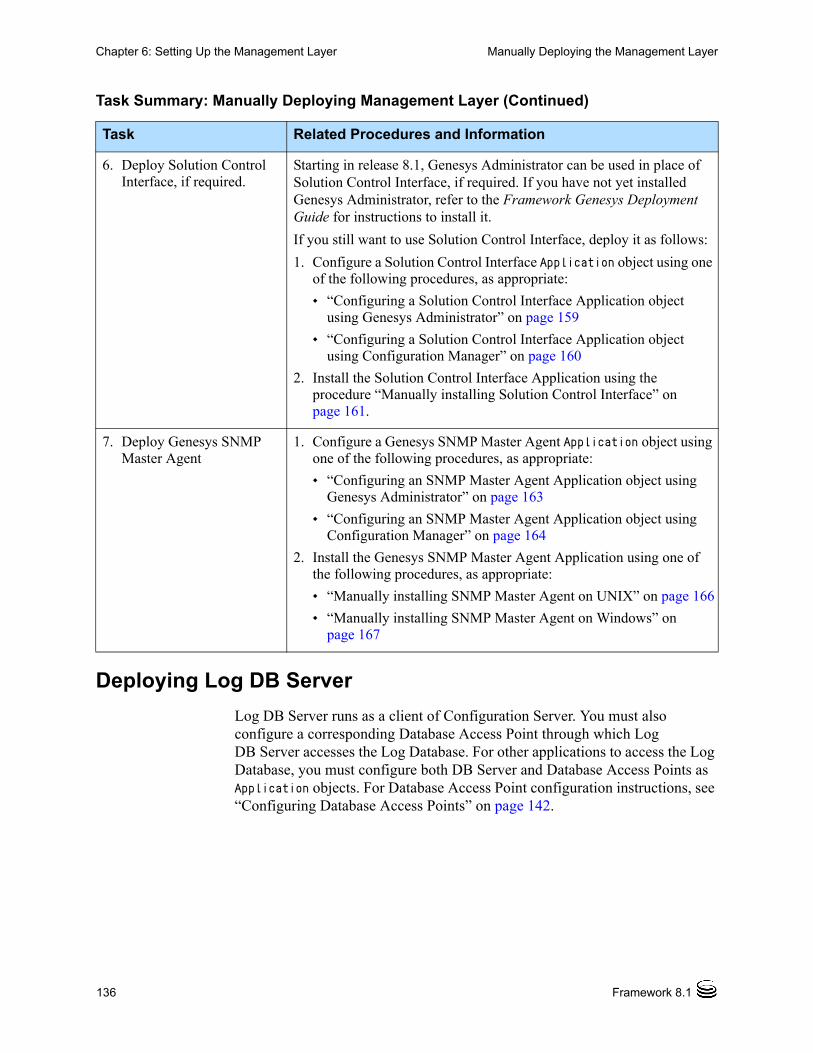
136 Framework 8.1
Chapter 6: Setting Up the Management Layer Manually Deploying the Management Layer
Deploying Log DB Server
Log DB Server runs as a client of Configuration Server. You must also configure a corresponding Database Access Point through which Log DB Server accesses the Log Database. For other applications to access the Log Database, you must configure both DB Server and Database Access Points as Application objects. For Database Access Point configuration instructions, see “Configuring Database Access Points” on page 142.
6. Deploy Solution Control Interface, if required.
Starting in release 8.1, Genesys Administrator can be used in place of Solution Control Interface, if required. If you have not yet installed Genesys Administrator, refer to the Framework Genesys Deployment Guide for instructions to install it.
If you still want to use Solution Control Interface, deploy it as follows:
1. Configure a Solution Control Interface Application object using one of the following procedures, as appropriate: “Configuring a Solution Control Interface Application object
using Genesys Administrator” on page 159 “Configuring a Solution Control Interface Application object
using Configuration Manager” on page 160
2. Install the Solution Control Interface Application using the procedure “Manually installing Solution Control Interface” on page 161.
7. Deploy Genesys SNMP Master Agent
1. Configure a Genesys SNMP Master Agent Application object using one of the following procedures, as appropriate: “Configuring an SNMP Master Agent Application object using
Genesys Administrator” on page 163 “Configuring an SNMP Master Agent Application object using
Configuration Manager” on page 164
2. Install the Genesys SNMP Master Agent Application using one of the following procedures, as appropriate: “Manually installing SNMP Master Agent on UNIX” on page 166 “Manually installing SNMP Master Agent on Windows” on
page 167
Task Summary: Manually Deploying Management Layer (Continued)
Task Related Procedures and Information
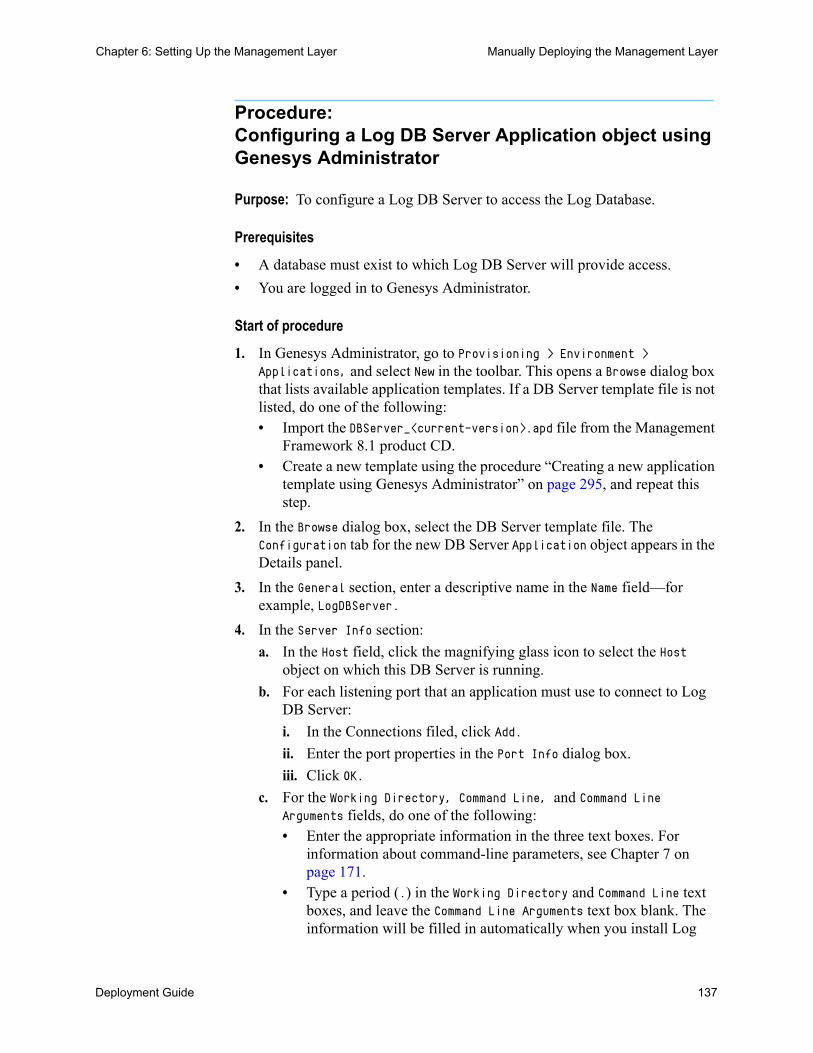
Deployment Guide 137
Chapter 6: Setting Up the Management Layer Manually Deploying the Management Layer
Procedure:Configuring a Log DB Server Application object using Genesys Administrator
Purpose: To configure a Log DB Server to access the Log Database.
Prerequisites
• A database must exist to which Log DB Server will provide access.
• You are logged in to Genesys Administrator.
Start of procedure
1. In Genesys Administrator, go to Provisioning > Environment > Applications, and select New in the toolbar. This opens a Browse dialog box that lists available application templates. If a DB Server template file is not listed, do one of the following:• Import the DBServer_<current-version>.apd file from the Management
Framework 8.1 product CD.• Create a new template using the procedure “Creating a new application
template using Genesys Administrator” on page 295, and repeat this step.
2. In the Browse dialog box, select the DB Server template file. The Configuration tab for the new DB Server Application object appears in the Details panel.
3. In the General section, enter a descriptive name in the Name field—for example, LogDBServer.
4. In the Server Info section:
a. In the Host field, click the magnifying glass icon to select the Host object on which this DB Server is running.
b. For each listening port that an application must use to connect to Log DB Server:
i. In the Connections filed, click Add.
ii. Enter the port properties in the Port Info dialog box.
iii. Click OK.
c. For the Working Directory, Command Line, and Command Line Arguments fields, do one of the following:• Enter the appropriate information in the three text boxes. For
information about command-line parameters, see Chapter 7 on page 171.
• Type a period (.) in the Working Directory and Command Line text boxes, and leave the Command Line Arguments text box blank. The information will be filled in automatically when you install Log

138 Framework 8.1
Chapter 6: Setting Up the Management Layer Manually Deploying the Management Layer
DB Server, but only if the Installation Package can connect to Configuration Server.
5. On the Options tab:
a. In the drop-down list in the top-right corner, select Options if not already selected.
b. In the dbserver section:
i. Change the value of the dbprocess_name option to the value of the option <DBMS you are using)_name. For example, if you are using Microsoft SQL Server DBMS, set the value of dbprocess_name to ./dbclient_msql.
ii. Change the value of the management-port option to the management port number for this DB Server.
6. Click Save or Apply in the toolbar to save the new object. The new object will appear in the list of applications.
End of procedure
Procedure:Configuring a Log DB Server Application object using Configuration Manager
Purpose: To configure a Log DB Server to access the Log Database
Prerequisites
• A database must exist to which Log DB Server will provide access.
• You are logged in to Configuration Manager.
Start of procedure
1. In Configuration Manager, right-click the Environment > Applications folder and select New > Application, which opens the Browse dialog box that lists the available application templates. If a DB Server template file is not listed, do one of the following:• Import the DBServer_<current-version>.apd file from the Management
Framework 8.1 product CD.• Create a new template using the procedure “Creating a new application
template using Configuration Manager” on page 297, and repeat this step.
2. In the Browse dialog box, select the DB Server template file, which opens the Properties dialog box for the new DB Server Application object.
3. On the General tab, enter a descriptive name in the Name text box—for example, LogDBServer.

Deployment Guide 139
Chapter 6: Setting Up the Management Layer Manually Deploying the Management Layer
4. On the Server Info tab:
a. Click the Browse button next to the Host drop-down list, and select the host on which this DB Server will run.
b. Specify the listening port(s) and select whether or not each is secure. Refer to the Genesys Security Deployment Guide for detailed information about specifying ports and securing connections to them.
c. Leave the rest of the fields at their default values.
5. On the Start Info tab, do one of the following:• Enter the appropriate information in the Working Directory, Command
Line, and Command Line Arguments text boxes. For information about command-line parameters, see Chapter 7 on page 171.
• Type a period (.) in the Working Directory and Command Line text boxes, and leave the Command Line Arguments text box blank. The information will be filled in automatically when you install Log DB Server, but only if the Installation Package can connect to Configuration Server.
6. On the Options tab, in the dbserver section:• Change the value of the dbprocess_name option to the value
corresponding to the <DBMS you are using>_name option. For example, if you are using Microsoft SQL Server DBMS, set the value dbprocess_name to ./dblient_msql.
• Change the value of the management-port option to the number of the management port for this DB Server.
7. Click OK.
End of procedure
Procedure:Manually installing Log DB Server on UNIX
Warning! During installation on UNIX, all files are copied into the directory you specify. The install process does not create any subdirectories within this directory, so do not install different products into the same directory.
Prerequisites
• The Log DB Server Application object exists.

140 Framework 8.1
Chapter 6: Setting Up the Management Layer Manually Deploying the Management Layer
Start of procedure
1. On the Management Framework 8.1 product CD in the appropriate services_layer/dbserver/<operating_system> directory, locate a shell script called install.sh.
2. Run this script from the command prompt by typing sh and the file name—for example, sh install.sh. Then, press Enter.
3. To specify the host name for this DB Server, do one of the following:• Type the name of the host, and press Enter.• Press Enter to select the current host.
4. Type n to specify that this DB Server will provide access to databases other than the Configuration Database (in this case, the Log Database), and press Enter.
5. When prompted, specify the: • Host name of the computer on which Configuration Server is running. • Network port used by client applications to connect to Configuration
Server.• User name used to log in to the Configuration Layer.• Password used to log in to the Configuration Layer.
6. The installation displays the list of Application objects of the specified type configured on this Host object. Type the number corresponding to the DB Server Application object you configured in the procedure “Configuring a Log DB Server Application object using Configuration Manager” on page 138.
7. Specify the destination directory into which this server is to be installed, with the full path to it.
8. If the target installation directory has files in it, do one of the following:• Type 1 to back up all the files in the directory, and press Enter.
Specify the path to which you want the files backed up, and press Enter.
• Type 2 to overwrite only the files in this installation package, and press Enter. Then type y to confirm your selection, and press Enter.
Use this option only if the application already installed operates properly.
• Type 3 to erase all files in this directory before continuing with the installation, and press Enter. Then type y to confirm your selection, and press Enter.
9. The installation displays a list of database types. Type the number corresponding to the database you are using.
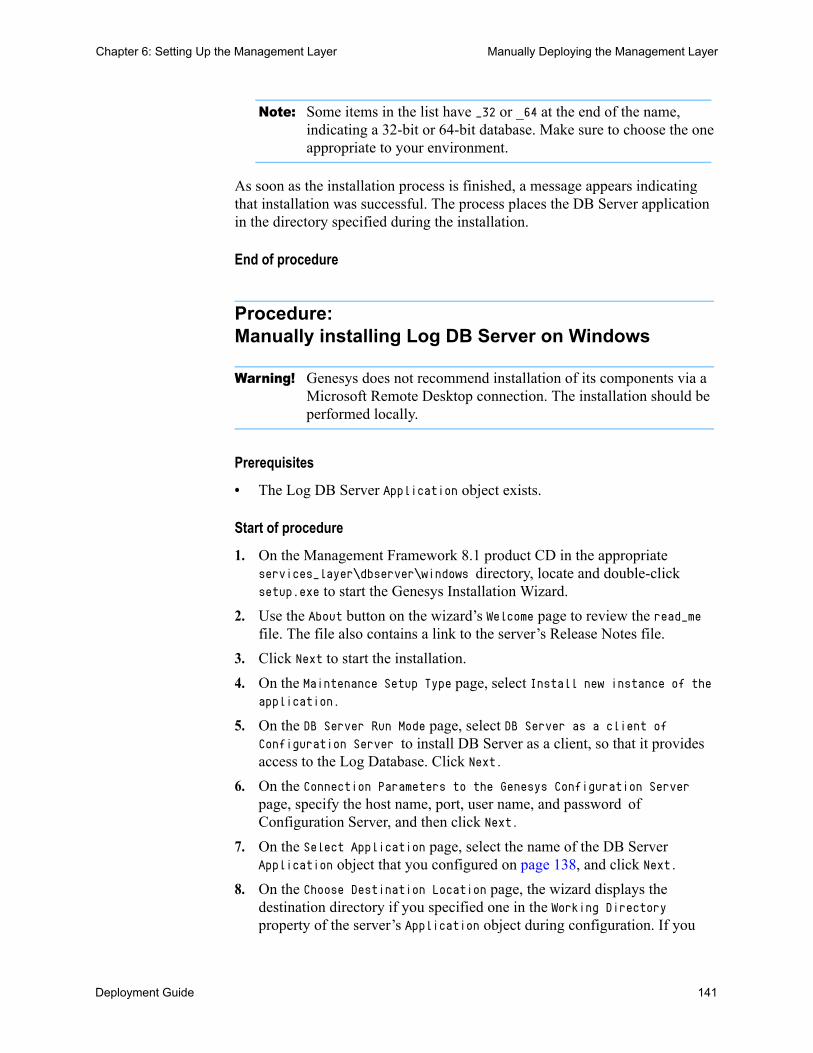
Deployment Guide 141
Chapter 6: Setting Up the Management Layer Manually Deploying the Management Layer
Note: Some items in the list have _32 or _64 at the end of the name, indicating a 32-bit or 64-bit database. Make sure to choose the one appropriate to your environment.
As soon as the installation process is finished, a message appears indicating that installation was successful. The process places the DB Server application in the directory specified during the installation.
End of procedure
Procedure:Manually installing Log DB Server on Windows
Warning! Genesys does not recommend installation of its components via a Microsoft Remote Desktop connection. The installation should be performed locally.
Prerequisites
• The Log DB Server Application object exists.
Start of procedure
1. On the Management Framework 8.1 product CD in the appropriate services_layer\dbserver\windows directory, locate and double-click setup.exe to start the Genesys Installation Wizard.
2. Use the About button on the wizard’s Welcome page to review the read_me file. The file also contains a link to the server’s Release Notes file.
3. Click Next to start the installation.
4. On the Maintenance Setup Type page, select Install new instance of the application.
5. On the DB Server Run Mode page, select DB Server as a client of
Configuration Server to install DB Server as a client, so that it provides access to the Log Database. Click Next.
6. On the Connection Parameters to the Genesys Configuration Server page, specify the host name, port, user name, and password of Configuration Server, and then click Next.
7. On the Select Application page, select the name of the DB Server Application object that you configured on page 138, and click Next.
8. On the Choose Destination Location page, the wizard displays the destination directory if you specified one in the Working Directory property of the server’s Application object during configuration. If you
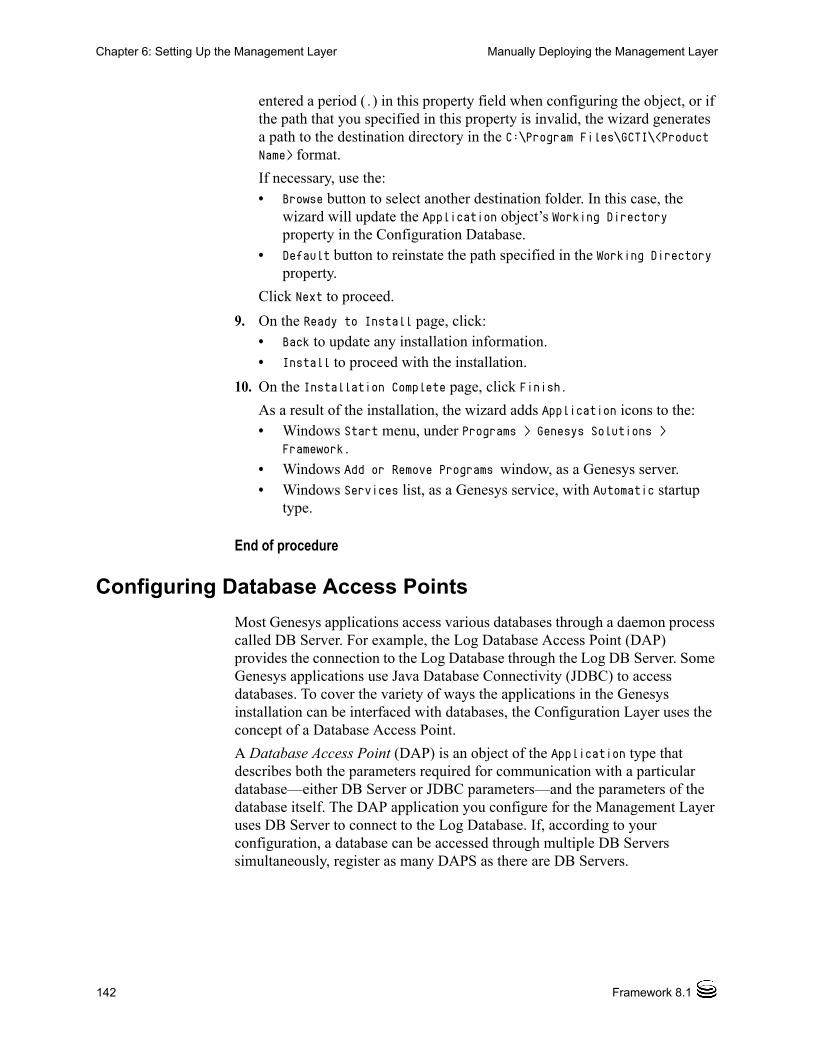
142 Framework 8.1
Chapter 6: Setting Up the Management Layer Manually Deploying the Management Layer
entered a period (.) in this property field when configuring the object, or if the path that you specified in this property is invalid, the wizard generates a path to the destination directory in the C:\Program Files\GCTI\<Product Name> format.
If necessary, use the:• Browse button to select another destination folder. In this case, the
wizard will update the Application object’s Working Directory property in the Configuration Database.
• Default button to reinstate the path specified in the Working Directory property.
Click Next to proceed.
9. On the Ready to Install page, click:• Back to update any installation information.• Install to proceed with the installation.
10. On the Installation Complete page, click Finish.
As a result of the installation, the wizard adds Application icons to the:• Windows Start menu, under Programs > Genesys Solutions >
Framework.
• Windows Add or Remove Programs window, as a Genesys server.• Windows Services list, as a Genesys service, with Automatic startup
type.
End of procedure
Configuring Database Access Points
Most Genesys applications access various databases through a daemon process called DB Server. For example, the Log Database Access Point (DAP) provides the connection to the Log Database through the Log DB Server. Some Genesys applications use Java Database Connectivity (JDBC) to access databases. To cover the variety of ways the applications in the Genesys installation can be interfaced with databases, the Configuration Layer uses the concept of a Database Access Point.
A Database Access Point (DAP) is an object of the Application type that describes both the parameters required for communication with a particular database—either DB Server or JDBC parameters—and the parameters of the database itself. The DAP application you configure for the Management Layer uses DB Server to connect to the Log Database. If, according to your configuration, a database can be accessed through multiple DB Servers simultaneously, register as many DAPS as there are DB Servers.
Deployment Guide 143
Chapter 6: Setting Up the Management Layer Manually Deploying the Management Layer
Procedure:Configuring a Database Access Point for the Log DB Server using Genesys Administrator
Prerequisites
• Log DB Server is installed and running.
• You are logged in to Genesys Administrator.
Start of procedure
1. In Genesys Administrator, go to Provisioning > Environment > Applications, and select New in the toolbar. This opens a Browse dialog box that lists available application templates. If a Database Access Point template file is not listed, do one of the following:• Import the Database_Access_Point_<current-version>.apd file from
the Management Framework 8.1 product CD.• Create a new template using the procedure “Creating a new application
template using Genesys Administrator” on page 295, and repeat this step.
2. In the Browse dialog box, select the DAP template file. The Configuration tab for the new DAP Application object appears in the Details panel.
3. In the General section, enter a descriptive name in the Name field—for example, LogDAP.
A DAP can have the same name as the database itself. However, it is recommended that you make their names unique if you are using multiple access points for the same database.
4. In Host field of the Server Info section, click the magnifying glass icon to select the Host object to which this DAP is assigned.
5. In the DB Info section, provide the following information about the Log Database:• Connection Type—The type of connection to the DBMS. Select
Default.
• Query Timeout—The period of time for which client processes using this DAP expect a response from the DBMS. If they do not receive a response within this period, they stop executing. DB Server interprets this as a failure of the DBMS and tries to reconnect to the DBMS. The timeout set in this DAP overrides that set in the DB Server Application object, but applies only to client processes using this DAP.
Note: Do not select a Connection Type of JDBC for Database Access Points.
144 Framework 8.1
Chapter 6: Setting Up the Management Layer Manually Deploying the Management Layer
For more information about how DB Server uses this value, see “Database Failures” on page 66.
• DB Server—The Application object corresponding to the database to which this DAP will provide access.
• DBMS Name—The name or alias identifying the DBMS that handles the database. The value of this option is communicated to DB Server so that it connects to the correct DBMS: — For DB2, set this value to the name or alias-name of the database
specified in the db2 client configuration.— For Informix, this value is the name of SQL server, specified in the
sqlhosts file. — For Microsoft SQL, set this value to the SQL server name (usually
the same as the host name of the computer on which Microsoft SQL runs).
— For Oracle, the value is the name of the Listener service.— For PostgreSQL, set this value to the SQL server name (usually the
same as the host name of the computer on which PostgreSQL runs).
— For Sybase, this value is the server name stored in the Sybase interface file.
• DBMS Type—The type of DBMS that handles the database. You must set a value for this property.
• Database Name—The name of the database to be accessed, as it is specified in the DBMS that handles this database. You must set a value for this property unless oracle or db2 is specified as the DBMS Type. For Sybase, Informix, Microsoft SQL, and PostgreSQL, this value is the name of the database where the client will connect.
• User Name—The user name established in the SQL server to access the database. You must set a value for this property.
• User Password—The password established in the SQL server to access the database.
• Re-enter Password—Confirmation for the value entered for Password.• Case Conversion—Case conversion method for key names of key-value
lists coming from DB Server. This value specifies whether and how a client application converts the field names of a database table when receiving data from DB Server. If you select upper, field names are converted into uppercase; if you select lower, field names are
Note: The Query Timeout field sets the value of the configuration option db-request-timeout and stores it in the Annex of the DAP.
Note: A DAP has the same listening ports as the DB Server to which it provides access.

Deployment Guide 145
Chapter 6: Setting Up the Management Layer Manually Deploying the Management Layer
converted into lowercase; and if you select any, field names are not converted. This setting does not affect the values of key-value lists coming from DB Server. That is, actual data is being presented exactly as in the database tables.
Note: For the Case Conversion option, use the default value (any) unless directed to do otherwise by Genesys Technical Support.
6. If the Log Database is an MS SQL database, and has been initialized for use in multi-language environments (see the procedure “Initializing the Log Database” on page 131), set the option utf8-ucs2=true in the [dbclient] section on the Options tab, in the Annex of the DAP.
7. Click Save or Apply in the toolbar to save the new object. The new object will appear in the list of applications.
End of procedure
Procedure:Configuring a Database Access Point for the Log DB Server using Configuration Manager
Prerequisites
• Log DB Server is installed and running.
• You are logged in to Configuration Manager.
Start of procedure
1. In Configuration Manager, right-click the Environment > Applications folder and select New > Application, which opens the Browse dialog box that lists the available application templates. If a DAP template file is not listed, do one of the following:• Import the Database_Access_Point_<current-version>.apd file from
the Management Framework product CD.• Create a new template using the procedure “Creating a new application
template using Configuration Manager” on page 297, and then repeat this step.
2. In the Browse dialog box, select the DAP template file, and click OK, which opens the Properties dialog box for the new DAP Application object.
3. On the General tab:• Enter a descriptive name—for example, LogDAP.
A DAP can have the same name as the database itself. However, it is recommended that you make their names unique if you are using multiple access points for the same database.
146 Framework 8.1
Chapter 6: Setting Up the Management Layer Manually Deploying the Management Layer
• In the DB Server field, use the Browse button to select the Application object corresponding to the Log DB Server that you just installed.
Note: Do not select the JDBC Connection check box when you configure Database Access Points.
4. On the DB Info tab, specify information about the database as follows:• DBMS Name—The name or alias identifying the DBMS that handles the
database. The value of this option is communicated to DB Server so that it connects to the correct DBMS: — For DB2, set this value to the name or alias-name of the database
specified in the db2 client configuration.— For Informix, this value is the name of SQL server, specified in the
sqlhosts file. — For Microsoft SQL, set this value to the SQL server name (usually
the same as the host name of the computer on which Microsoft SQL runs).
— For Oracle, the value is the name of the Listener service.— For PostgreSQL, set this value to the SQL server name (usually the
same as the host name of the computer on which PostgreSQL runs).
— For Sybase, this value is the server name stored in the Sybase interface file.
• DBMS Type—The type of DBMS that handles the database. You must set a value for this property.
• Database Name—The name of the database to be accessed, as it is specified in the DBMS that handles this database. You must set a value for this property unless oracle or db2 is specified as the DBMS Type. For Sybase, Informix, Microsoft SQL, and PostgreSQL, this value is the name of the database where the client will connect.
• User Name—The user name established in the SQL server to access the database. You must set a value for this property.
• Password—The password established in the SQL server to access the database.
• Re-enter Password—Confirmation for the value entered for Password.• Case Conversion—Case conversion method for key names of key-value
lists coming from DB Server. This value specifies whether and how a client application converts the field names of a database table when receiving data from DB Server. If you select upper, field names are converted into uppercase; if you select lower, field names are converted into lowercase; and if you select any, field names are not converted. This setting does not affect the values of key-value lists coming from DB Server. That is, actual data is being presented exactly as in the database tables.
Deployment Guide 147
Chapter 6: Setting Up the Management Layer Manually Deploying the Management Layer
Note: For the Case Conversion field, use the default value (any) unless directed to do otherwise by Genesys Technical Support.
• Query Timeout—The period of time for which client processes using this DAP expect a response from the DBMS. If they do not receive a response within this period, they stop executing. DB Server interprets this as a failure of the DBMS and tries to reconnect to the DBMS. The timeout set in this DAP overrides that set in the DB Server Application object, but applies only to client processes using this DAP.
For more information about how DB Server uses this value, see “Database Failures” on page 66.
Note: Do not configure any properties on the JDBC Info tab when configuring a DAP application for the Management Layer.
5. On the Server Info tab:• Click the Browse button next to the Host drop-down list, and select the
host on which this Log DB Server will run.• Specify the listening port(s) and select whether or not each is secure.
Refer to the Genesys Security Deployment Guide for detailed information on specifying ports and securing connections to them.
6. If the Log Database is an MS SQL database, and has been initialized for use in multi-language environments (see the procedure “Initializing the Log Database” on page 131), set the option utf8-ucs2=true in the [dbclient] section on the Annex tab of this DAP.
End of procedure
To interface an Application object with a database through a certain Database Access Point, add this access point to the list of the application’s Connections.
Deploying Message Server
This section describes how to configure and install a Message Server Application object.
Notes: The Query Timeout field sets the value of the configuration option db-request-timeout and stores it in the Annex of the DAP. The DAP Annex is not visible in Configuration Manager.

148 Framework 8.1
Chapter 6: Setting Up the Management Layer Manually Deploying the Management Layer
Procedure:Configuring a Message Server Application object using Genesys Administrator
Prerequisites
• A Database Access Point for the Log DB Server is configured.
• You are logged in to Genesys Administrator.
Start of procedure
1. In Genesys Administrator, go to Provisioning > Environment > Applications, and select New in the toolbar. This opens a Browse dialog box that lists the available application templates. If a Message Server template file is not listed, do one of the following:• Import the Message_Server_<current-version>.apd file from the
Management Framework 8.1 product CD.• Create a new template using the procedure “Creating a new application
template using Genesys Administrator” on page 295, and repeat this step.
2. In the Browse dialog box, select the Message Server template file. The Configuration tab for the new Message Server Application object appears in the Details panel.
3. In the General section:
a. Enter a descriptive name in the Name field—for example, MsgServer.
b. Add a connection to the Log Database DAP. In the Connections field:
i. Click Add.
ii. Enter the properties of the connection in the Connection Info dialog box.
iii. Click OK.
4. In the Server Info section:
a. In the Host field, click the magnifying glass icon to select the Host object on which this Message Server is running.
b. For each listening port that an application must use to connect to Message Server:
i. In the Listening Ports field, click Add.
ii. Enter the port properties in the Port Info dialog box.
iii. Click OK.
Deployment Guide 149
Chapter 6: Setting Up the Management Layer Manually Deploying the Management Layer
c. For the Working Directory, Command Line, and Command Line Arguments fields, do one of the following:• Enter the appropriate information in the three text boxes. For
information about command-line parameters, see Chapter 7 on page 171.
• Type a period (.) in the Working Directory and Command Line text boxes, and leave the Command Line Arguments text box blank. The information will be filled in automatically when you install Message Server, but only if the Installation Package can connect to Configuration Server.
5. If you want Message Server to direct log events to the Log Database, on the Options tab:
a. In the drop-down list in the top-right corner, select Options if not already selected.
b. In the dbserver section, change the value of the db_storage option to true.
6. Click Save or Apply in the toolbar to save the new object. The new object will appear in the list of applications.
End of procedure
Procedure:Configuring a Message Server Application object using Configuration Manager
Prerequisites
• A Database Access Point for the Log DB Server is configured.
• You are logged in to Configuration Manager.
Start of procedure
1. In Configuration Manager, right-click the Environment > Applications folder and select New > Application, which opens the Browse dialog box that lists the available application templates. If a Message Server template is not listed, do one of the following:• Import the Message_Server_<current-version>.apd file from the
Management Framework product CD.
Note: Message Server can only write logs to a PostgreSQL DBMS if the corresponding DB Server also supports PostgreSQL.
150 Framework 8.1
Chapter 6: Setting Up the Management Layer Manually Deploying the Management Layer
• Create a new template using the procedure “Creating a new application template using Configuration Manager” on page 297, and then repeat this step.
2. In the Browse dialog box, select the Message Server template file, which opens the Properties dialog box for the new Message Server Application object.
3. On the General tab, enter a descriptive name in the Name text box.
4. On the Server Info tab:• Click the Browse button next to the Host drop-down list, and select the
host on which this Message Server will run.• Specify the listening port(s).• Leave the rest of the fields at their default values.
5. On the Start Info tab, do one of the following:• Enter the appropriate information in each of the Working Directory,
Command Line, and Command Line Arguments text boxes. For information about command-line parameters, see Chapter 7 on page 171.
• Type a period (.) in the Working Directory and Command Line text boxes, and leave the Command Line Arguments text box blank. The information will be filled in automatically when you install Message Server, but only if the Installation Package can connect to Configuration Server.
6. On the Connections tab, add a connection to the Database Access Point for the Log Database.
7. If you want Message Server to direct log events to the Log Database, do the following:
a. On the Options tab, double-click the messages section.b. Change the value of db_storage to true.c. Click OK.
8. Click OK.
End of procedure
If you want to use centralized logging and alarm signaling for Configuration Server, Configuration Server Proxy, and the Configuration DB Server, add a connection to the Message Server Application object to the Connections tab of the respective Application objects.
Note: Message Server can only write logs to a PostgreSQL DBMS if the corresponding DB Server also supports PostgreSQL.

Deployment Guide 151
Chapter 6: Setting Up the Management Layer Manually Deploying the Management Layer
Procedure:Manually installing Message Server on UNIX
Prerequisites
• A Message Server Application object exists.
Start of procedure
1. On the Management Framework 8.1 product CD in the appropriate management_layer/message_server/<operating_system> directory, locate a shell script called install.sh.
2. Type the file name at the command prompt, and press Enter.
3. To specify the host name for this Message Server, do one of the following:• Type the name of the host, and press Enter.• Press Enter to select the current host.
4. Enter the Configuration Server host name, and press Enter.
5. Enter the Configuration Server network port, and press Enter.
6. Enter the Configuration Server user name, and press Enter.
7. Enter the Configuration Server password, and press Enter.
8. The installation displays the list of Application objects of the specified type configured on this Host object. Type the number corresponding to the Message Server Application object you configured on page 149, and press Enter.
9. To specify the destination directory, do one of the following:• Press Enter to accept the default.• Enter the full path of the directory, and press Enter.
10. If the target installation directory has files in it, do one of the following:• Type 1 to back up all the files in the directory, and press Enter.
Specify the path to which you want the files backed up, and press Enter.
• Type 2 to overwrite only the files in this installation package, and press Enter. Then type y to confirm your selection, and press Enter.
Use this option only if the application already installed operates properly.
• Type 3 to erase all files in this directory before continuing with the installation, and press Enter. Then type y to confirm your selection, and press Enter.
The list of file names will appear on the screen as the files are copied to the destination directory.

152 Framework 8.1
Chapter 6: Setting Up the Management Layer Manually Deploying the Management Layer
11. For the product version to install, do one of the following:• Type 32 to select the 32-bit version, and press Enter.• Type 64 to select the 64-bit version, and press Enter.
End of procedure
Procedure:Manually installing Message Server on Windows
Warning! Genesys does not recommend installation of its components via a Microsoft Remote Desktop connection. The installation should be performed locally.
Prerequisites
• A Message Server Application object exists.
Start of procedure
1. On the Management Framework 8.1 product CD in the appropriate management_layer\message_server\windows directory, locate and double-click setup.exe to start the Genesys Installation Wizard.
2. Use the About button on the wizard’s Welcome page to review the read_me file. The file also contains a link to the server’s Release Notes file.
3. Click Next to start the installation.
4. On the Connection Parameters to the Genesys Configuration Server page, specify the host name, port, user name, and password of Configuration Server, and then click Next.
5. On the Select Application page, select the name of the Message Server Application object that you configured on page 149, and then click Next.
6. On the Choose Destination Location page, the wizard displays the destination directory if specified in the Working Directory property of the server’s Application object during configuration. If you entered a period (.) in this field when configuring the object, or if the path specified in this property is invalid, the wizard generates a path to the destination directory in the C:\Program Files\GCTI\<Product Name> format.
If necessary, use the:• Browse button to select another destination folder. In this case, the
wizard will update the Application object’s Working Directory property in the Configuration Database.
• Default button to reinstate the path specified in the Working Directory property.
Deployment Guide 153
Chapter 6: Setting Up the Management Layer Manually Deploying the Management Layer
Click Next to proceed.
7. On the Ready to Install page, click:• Back to update any installation information.• Install to proceed with the installation.
8. On the Installation Complete page, click Finish.
As a result of the installation, the wizard adds Application icons to the:• Windows Start menu, under Programs > Genesys Solutions >
Management Layer.
• Windows Add or Remove Programs window, as a Genesys server.• Windows Services list, as a Genesys service, with Automatic startup
type.
End of procedure
Initializing the Log Database
Use the procedure “Initializing the Log Database” on page 131 for full instructions on how to initialize a newly created database so that it can serve as the Log Database.
Deploying Solution Control Server
This section describes how to configure and install Solution Control Server.
Procedure:Configuring a Solution Control Server Application object using Genesys Administrator
Prerequisites
• You are logged in to Genesys Administrator.
Start of procedure
1. In Genesys Administrator, go to Provisioning > Environment > Applications, and select New in the toolbar. This opens a Browse dialog box that lists available application templates. If a Solution Control Server template file is not listed, do one of the following:• Import the Solution_Control_Server_<current-version>.apd file from
the Management Framework 8.1 product CD.• Create a new template using the procedure “Creating a new application
template using Genesys Administrator” on page 295, and repeat this step.
154 Framework 8.1
Chapter 6: Setting Up the Management Layer Manually Deploying the Management Layer
2. In the Browse dialog box, select the Solution Control Server template file. The Configuration tab for the new Solution Control Server Application object appears in the Details panel.
3. In the General section:
a. Enter a descriptive name in the Name field—for example, SCS.
b. If you want to enable alarm signaling, add a connection to the Message Server. In the Connections field:
i. Click Add.
ii. Enter the properties of the connection in the Connection Info dialog box.
iii. Click OK.
4. In the Server Info section:
a. In the Host field, click the magnifying glass icon to select the Host object on which this Solution Control Server is running.
b. For each listening port that an application must use to connect to Solution Control Server:
i. In the Listening Ports field, click Add.
ii. Enter the port properties in the Port Info dialog box.
iii. Click OK.
c. For the Working Directory, Command Line, and Command Line Arguments fields, do one of the following:• Enter the appropriate information in the three text boxes. For
information about command-line parameters, see Chapter 7 on page 171.
• Type a period (.) in the Working Directory and Command Line text boxes, and leave the Command Line Arguments text box blank. The information will be filled in automatically when you install Solution Control Server, but only if the Installation Package can connect to Configuration Server.
5. Click Save or Apply in the toolbar to save the new object. The new object will appear in the list of applications.
End of procedure
Procedure:Configuring a Solution Control Server Application object using Configuration Manager
Prerequisites
• You are logged in to Configuration Manager.

Deployment Guide 155
Chapter 6: Setting Up the Management Layer Manually Deploying the Management Layer
Start of procedure
1. In Configuration Manager, right-click the Environment > Applications folder and select New > Application, which opens the Browse dialog box that lists the available application templates. If a Solution Control Server template is not listed, do one of the following:• Import the solution_Control_Server_<current-version>.apd template
file from the Management Framework CD.• Create a new template by using the procedure “Creating a new
application template using Configuration Manager” on page 297, and then repeat this step.
2. In the Browse dialog box, select the Solution Control Server template file, which opens the Properties dialog box for the new Solution Control, Server Application object.
3. On the General tab, enter a descriptive name in the Name text box.
4. On the Server Info tab:• Click the Browse button next to the Host drop-down list, and select the
host on which Solution Control Server will run.• Specify the listening port(s), and select whether or not each is secure.
Refer to the Genesys Security Deployment Guide for detailed information on specifying ports and securing them.
• Leave the rest of the fields at their default values.
5. On the Start Info tab, do one of the following:• Enter the appropriate information in each of the Working Directory,
Command Line, and Command Line Arguments text boxes. For information about command-line parameters, see Chapter 7 on page 171.
• Type a period (.) in the Working Directory and Command Line text boxes, and leave the Command Line Arguments text box blank. The information will be filled in automatically when you install Solution Control Server, but only if the Installation Package can connect to Configuration Server.
6. If you want to enable alarm signaling, on the Connections tab, add a connection to the Message Server.
7. Click OK.
End of procedure
156 Framework 8.1
Chapter 6: Setting Up the Management Layer Manually Deploying the Management Layer
Procedure:Manually installing Solution Control Server on UNIX
Prerequisites
• A Solution Control Server Application object exists.
Start of procedure
1. On the Management Framework 8.1 product CD in the appropriate management_layer/solution_control_server/<operating_system> directory, locate a shell script called install.sh.
2. Type the file name at the command prompt, and press Enter.
3. When prompted to install only the utilities, type n to install Solution Control Server and its utilities, and press Enter.
4. To specify the host name for this SCS, do one of the following:• Type the name of the host, and press Enter.• Press Enter to select the current host.
5. Enter the Configuration Server host name, and press Enter.
6. Enter the Configuration Server network port, and press Enter.
7. Enter the Configuration Server user name, and press Enter.
8. Enter the Configuration Server password, and press Enter.
9. The installation displays the list of Application objects of the specified type configured on this Host object. Type the number corresponding to the SCS Application object you just configured, and press Enter.
10. To specify the destination directory, do one of the following:• Press Enter to accept the default.• Enter the full path of the directory, and press Enter.
11. If the target installation directory has files in it, do one of the following:• Type 1 to back up all the files in the directory, and press Enter.
Specify the path to which you want the files backed up, and press Enter.
• Type 2 to overwrite only the files in this installation package, and press Enter. Then type y to confirm your selection, and press Enter.
Use this option only if the application already installed operates properly.
• Type 3 to erase all files in this directory before continuing with the installation, and press Enter. Then type y to confirm your selection, and press Enter.
The list of file names will appear on the screen as the files are copied to the destination directory.
Deployment Guide 157
Chapter 6: Setting Up the Management Layer Manually Deploying the Management Layer
12. For the product version to install, do one of the following:• Type 32 to select the 32-bit version, and press Enter.• Type 64 to select the 64-bit version, and press Enter.
13. To decide whether you require a license, refer to the Genesys Licensing Guide for information about licensing requirements. Then, do one of the following:• Type y if you require a license, and press Enter.• Type n if you do not require a license, and press Enter.
14. If you typed y in the previous step, enter the license location format, press Enter, and enter the required parameters.
End of procedure
Procedure:Manually installing Solution Control Server on Windows
Warning! Genesys does not recommend installation of its components via a Microsoft Remote Desktop connection. The installation should be performed locally.
Prerequisites
• A Solution Control Server Application object exists.
Start of procedure
1. On the Management Framework 8.1 product CD in the appropriate management_layer\solution_control_server\windows directory, locate and double-click setup.exe to start the Genesys Installation Wizard.
2. Use the About button on the wizard’s Welcome page to review the read_me file. The file also contains a link to the server’s Release Notes file.
3. Click Next to start the installation.
4. On the Solution Control Server Installation Mode page, select Solution Control Server and Utilities, and then click Next.
5. On the Connection Parameters to the Genesys Configuration Server page, specify the host name, port, user name, and password of Configuration Server, and then click Next.
6. On the Select Application page, select the name of the Solution Control Server Application object that you just configured, and then click Next.
158 Framework 8.1
Chapter 6: Setting Up the Management Layer Manually Deploying the Management Layer
7. On the Run-time License Configuration page, select whether you are using a license. Refer to the Genesys Licensing Guide for information about licensing requirements, and then click Next.
8. If you selected Use License in Step 7, on the Access to License page, enter the license access type and required parameters.
9. On the Choose Destination Location page, the wizard displays the destination directory if specified in the Working Directory property of the server’s Application object during configuration. If you entered a period (.) in this field when configuring the object, or if the path specified in the Working Directory property is invalid, the wizard generates a path to the destination directory in the C:\Program Files\GCTI\<Product Name> format.
If necessary, use the:• Browse button to select another destination folder. In this case, the
wizard will update the Application object’s Working Directory property in the Configuration Database.
• Default button to reinstate the path specified in the Working Directory property.
Click Next to proceed.
10. On the Ready to Install page, click:• Back to update any installation information.• Install to proceed with the installation.
11. On the Installation Complete page, click Finish.
As a result of the installation, the wizard adds Application icons to the:• Windows Start menu, under Programs > Genesys Solutions >
Management Layer.
• Windows Add or Remove Programs window, as a Genesys server.• Windows Services list, as a Genesys service, with Automatic startup
type.
End of procedure
If you plan to use SNMP functionality, deploy SNMP Master Agent (see “Deploying SNMP Master Agent” on page 162). For information about SNMP functionality built into the Management Layer, refer to the Framework Management Layer User’s Guide.
Deploying Solution Control Interface
This section describes how to configure and install Solution Control Interface (SCI).
Deployment Guide 159
Chapter 6: Setting Up the Management Layer Manually Deploying the Management Layer
Note: If you configure more than one instance of Solution Control Server, and/or more than one Log Database exist in your system, you can configure SCI connections to any combination of these instances. However, note that at runtime, SCI works with only one Solution Control Server and one Log Database. If you have defined connections to more than one SCS and/or Log Database, then at startup SCI prompts you to select the SCS and the Log Database for the current working session.
Procedure:Configuring a Solution Control Interface Application object using Genesys Administrator
Prerequisites
• At least one Solution Control Server is installed.
• If you want to display log messages, a DAP Application object for the Log Database exists.
• You are logged in to Genesys Administrator.
Start of procedure
1. In Genesys Administrator, go to Provisioning > Environment > Applications, and select New in the toolbar. This opens a Browse dialog box that lists available application templates. If a Solution Control Interface template file is not listed, do one of the following:• Import the Solution_Control_Interface_<current-version>.apd file
from the Management Framework 8.1 product CD.• Create a new template using the procedure “Creating a new application
template using Genesys Administrator” on page 295, and repeat this step.
2. In the Browse dialog box, select the Solution Control Interface template file. The Configuration tab for the new Solution Control Interface Application object appears in the Details panel.
3. In the General section:
a. Enter a descriptive name in the Name field—for example, SCI.
b. In the Connections field:
i. Add a connection to the Solution Control Server Application object that you just created.
ii. If you want to display log messages in SCI, add a connection to the Log Database Access Point Application object configured on page 143.

160 Framework 8.1
Chapter 6: Setting Up the Management Layer Manually Deploying the Management Layer
As you add server applications to your system, you can add connections to them as required.
Note: You can enable the ADDP protocol for SCI connections to SCS. Use the procedure “Configuring Advanced Disconnect Detection Protocol using Genesys Administrator” on page 300. Enable ADDP-related logging on the server side.
4. Click Save or Apply in the toolbar to save the new object. The new object will appear in the list of applications.
End of procedure
Procedure:Configuring a Solution Control Interface Application object using Configuration Manager
Prerequisites
• At least one Solution Control Server is installed.
• If you want to display log messages, a DAP Application object for the Log Database exists.
• You are logged in to Configuration Manager.
Start of procedure
1. In Configuration Manager, right-click the Environment > Applications folder and select New > Application, which opens the Browse dialog box that lists the available application templates. If an SCI template is not listed, do one of the following:• Import the solution_Control_Interface_<current-version>.apd
template file from the Management Framework product CD.• Create a new template by using the procedure “Creating a new
application template using Configuration Manager” on page 297, and then repeat this step.
2. In the Browse dialog box, select the SCI template file and click OK, which opens the Properties window for the SCI Application object.
3. On the General tab, enter a descriptive name.
Note: You can enable the ADDP protocol for SCI connections to SCS. Use the procedure “Configuring Advanced Disconnect Detection Protocol using Configuration Manager” on page 303. Enable ADDP-related logging on the server side.

Deployment Guide 161
Chapter 6: Setting Up the Management Layer Manually Deploying the Management Layer
4. On the Connections tab:• Add a connection to the Solution Control Server Application object
configured on page 154.• If you want to display log messages in SCI, add a connection to the
Log Database Access Point Application object configured on page 145.
As you add server applications to your system, you can add connections to them as required.
5. Click OK to save your changes and close the Properties dialog box.
End of procedure
Procedure:Manually installing Solution Control Interface
Warning! Genesys does not recommend installation of its components via a Microsoft Remote Desktop connection. The installation should be performed locally.
Note: Solution Control Interface operates only on Windows.
Prerequisites
• The Solution Control Interface Application object exists.
• If you want to implement a security banner with SCI, make sure that you have the necessary files prepared before you start installing SCI. Refer to the Genesys Security Deployment Guide for detailed information about the security banner.
Start of procedure
1. On the Management Framework 8.1 product CD, in the appropriate management_layer\solution_control_interface\windows directory, locate and double-click setup.exe to start the Genesys Installation Wizard.
2. Use the About button on the wizard’s Welcome page to review the read_me file. The file also contains a link to the server’s Release Notes file.
3. Click Next to start the installation.
162 Framework 8.1
Chapter 6: Setting Up the Management Layer Manually Deploying the Management Layer
4. On the Security Banner Configuration page, choose whether you want to configure a security banner for this SCI application. Refer to the Genesys Security Deployment Guide for detailed information about the security banner. Do one of the following:• If you do not want to configure a security banner for this application,
clear the Enable Security Banner checkbox, and click Next.• If you want to configure a security banner for this application:
i. Select Enable Security Banner.
ii. Follow the instructions in the procedure “Installing and configuring the Security Banner” in the Genesys Security Deployment Guide. When you are finished that procedure, return here and finish this procedure.
5. On the Choose Destination Location page, the wizard displays the destination directory, as specified in the Working Directory property of the server’s Application object. If the specified path is invalid, the wizard generates a path to the destination directory in the C:\Program Files\GCTI\<Product Name> format.
If necessary, use the:• Browse button to select another destination folder. In this case, the
wizard will update the Application object’s Working Directory property in the Configuration Database.
• Default button to reinstate the path specified in the Working Directory property.
Click Next to proceed.
6. On the Ready to Install page, click:• Back to update any installation information.• Install to proceed with the installation.
7. On the Installation Complete page, click Finish.
As a result of the installation, the wizard adds Application icons to the:• Windows Start menu, under Programs > Genesys Solutions >
Management Layer.
• Windows Add or Remove Programs window, as a Genesys application.
End of procedure
Deploying SNMP Master Agent
For the Management Layer to communicate with an SNMP master agent, provided by either a third-party or Genesys, you must configure an Application object of the SNMP Agent type in the Configuration Database, and configure a connection to this Application object in Solution Control Server.
Deployment Guide 163
Chapter 6: Setting Up the Management Layer Manually Deploying the Management Layer
If you do not want to use a redundant configuration or your SNMP master agent application does not support redundant configuration, configure your SNMP master agent as a stand-alone application. This section provides instructions for deploying a stand-alone SNMP Master Agent application.
For more information about Genesys SNMP Master Agent, refer to the Framework Management Layer User’s Guide.
Procedure:Configuring an SNMP Master Agent Application object using Genesys Administrator
Purpose: To enable SNMP functionality.
Prerequisites
• You are logged in to Genesys Administrator.
Start of procedure
1. In Genesys Administrator, go to Provisioning > Environment > Applications, and select New in the toolbar. This opens a Browse dialog box that lists available application templates. If an SNMP Master Agent template file is not listed, do one of the following:• Import the SNMP_Master_Agent_<current-version>.apd file from the
Management Framework 8.1 product CD.• Create a new template using the procedure “Creating a new application
template using Genesys Administrator” on page 295, and repeat this step.
2. In the Browse dialog box, select the SNMP Master Agent template file. The Configuration tab for the new SNMP Master Agent Application object appears in the Details panel.
3. In the General section, enter a descriptive name in the Name field—for example, SNMP_MA.
4. In the Server Info section:
a. In the Host field, click the magnifying glass icon to select the Host object on which this SNMP Master Agent is running.
Note: Depending on the solutions for which you want to enable SNMP monitoring, you may need to install several instances of SNMP Master Agent, using the same approach given in this section.
Generally, you have to install and configure one instance of Genesys SNMP Master Agent on each computer on which you will be using SMNP functionality.
164 Framework 8.1
Chapter 6: Setting Up the Management Layer Manually Deploying the Management Layer
b. For each listening port that an application must use to connect to SNMP Master Agent:
i. In the Listening Ports field, click Add.
ii. Enter the port properties in the Port Info dialog box.
iii. Click OK.
c. For the Working Directory, Command Line, and Command Line Arguments fields, do one of the following:• Enter the appropriate information in the three text boxes. For
information about command-line parameters, see Chapter 7 on page 171.
• Type a period (.) in the Working Directory and Command Line text boxes, and leave the Command Line Arguments text box blank. The information will be filled in automatically when you install SNMP Master Agent, but only if the Installation Package can connect to Configuration Server.
5. Click Save or Apply in the toolbar to save the new object. The new object will appear in the list of applications.
6. Add a connection from Solution Control Server to this SNMP Master Agent, as follows:
a. Open the Solution Control Server Application object Configuration tab.
b. In the General section, add the connection to the SNMP Master Agent object just created. In the Connections field:
i. Click Add to open the Connection Info dialog box.
ii. Enter the properties of the connection.
iii. Click OK.
c. Click Save or Apply in the toolbar to save the configuration changes.
End of procedure
Procedure:Configuring an SNMP Master Agent Application object using Configuration Manager
Purpose: To enable SNMP functionality.
Prerequisites
• You are logged in to Configuration Manager.

Deployment Guide 165
Chapter 6: Setting Up the Management Layer Manually Deploying the Management Layer
Start of procedure
1. In Configuration Manager, right-click the Environment > Applications folder and select New > Application, which opens the Browse dialog box that lists the available application templates. If an SNMP Master Agent template is not listed, do one of the following:• Import the SNMP_Master_Agent_<current-version>.apd template file
from the Management Framework product CD.• Create a new template using the procedure “Creating a new application
template using Configuration Manager” on page 297, and then repeat this step.
2. In the Browse dialog box, select the SNMP Master Agent template file, which opens the Properties dialog box for the new SNMP Master Agent Application object.
3. On the General tab, enter a descriptive name.
4. On the Server Info tab:• Click the Browse button next to the Host drop-down list, and select the
host on which this SNMP Master Agent will run.• Specify the listening port(s) that SNMP Master Agent must use for
communications with NMS.• Leave the rest of the fields at their default values.
5. On the Start Info tab, do one of the following:• Enter the appropriate information in each of the Working Directory,
Command Line, and Command Line Arguments text boxes. For information about command-line parameters, see Chapter 7 on page 171.
• Type a period (.) in the Working Directory and Command Line text boxes, and leave the Command Line Arguments text box blank. The information will be filled in automatically when you install SNMP Master Agent, but only if the Installation Package can connect to Configuration Server.
6. Click OK to save the configuration.
7. Add a connection from Solution Control Server to this SNMP Master Agent, as follows:
a. Open the Solution Control Server Application object Properties dialog box.
b. Select the Connections tab and click Add to open the Connection Info Properties dialog box.
c. Use the Browse button next to the Server field to select the SNMP Master Agent object just created.
d. Click OK to save the connection and close the Connection Info Properties dialog box.

166 Framework 8.1
Chapter 6: Setting Up the Management Layer Manually Deploying the Management Layer
e. Click OK to close the Solution Control Server Properties dialog box.
End of procedure
Procedure:Manually installing SNMP Master Agent on UNIX
Purpose: To enable SNMP functionality.
Prerequisites
• An SNMP Master Agent Application object exists.
Start of procedure
1. On the Management Framework 8.1 product CD, in the appropriate management_layer/snmp_master_agent/<operating_system> directory, locate a shell script called install.sh.
2. Type the file name at the command prompt, and press Enter.
3. To specify the host name for this SMNP Master Agent, do one of the following:• Type the name of the host, and press Enter.• Press Enter to select the current host.
4. Enter the Configuration Server host name, and press Enter.
5. Enter the Configuration Server network port, and press Enter.
6. Enter the Configuration Server user name, and press Enter.
7. Enter the Configuration Server password, and press Enter.
8. The installation displays the list of Application objects of the specified type configured on this Host object. Type the number corresponding to the SNMP Master Agent Application object you configured on page 164, and press Enter.
9. To specify the destination directory, do one of the following:• Press Enter to accept the default.• Enter the full path of the directory, and press Enter.
10. If the target installation directory has files in it, do one of the following:• Type 1 to back up all the files in the directory, and press Enter.
Specify the path to which you want the files backed up, and press Enter.
• Type 2 to overwrite only the files in this installation package, and press Enter. Type y to confirm your selection, and press Enter.
Use this option only if the application already installed operates properly.

Deployment Guide 167
Chapter 6: Setting Up the Management Layer Manually Deploying the Management Layer
• Type 3 to erase all files in this directory before continuing with the installation, and press Enter. Type y to confirm your selection, and press Enter.
The list of file names will appear on the screen as the files are copied to the destination directory.
11. For the product version to install, do one of the following:• Type 32 to select the 32-bit version, and press Enter.• Type 64 to select the 64-bit version, and press Enter.
End of procedure
Procedure:Manually installing SNMP Master Agent on Windows
Warning! Genesys does not recommend installation of its components via a Microsoft Remote Desktop connection. The installation should be performed locally.
Purpose: To enable SNMP functionality.
Prerequisites
• An SNMP Master Agent Application object exists.
Start of procedure
1. On the Management Framework 8.1 product CD in the appropriate management_layer\snmp_master_agent\windows directory, locate and double-click setup.exe to start the Genesys Installation Wizard.
2. Use the About button on the wizard’s Welcome page to review the read_me file. The file also contains a link to the server’s Release Notes file.
3. Click Next to start the installation.
4. On the Connection Parameters to the Genesys Configuration Server page, specify the host name, port, user name, and password of Configuration Server, and then click Next.
5. On the Select Application page, select the name of the SNMP Master Application object that you configured on page 164, and then click Next.
6. On the Choose Destination Location page, the wizard displays the destination directory if specified in the Working Directory property of the server’s Application object during configuration. If you entered a period (.) in this field when configuring the object, or if the specified path is
168 Framework 8.1
Chapter 6: Setting Up the Management Layer Installing Solution Control Server Utilities Separately
invalid, the wizard generates a path to the destination directory in the C:\Program Files\GCTI\<Product Name> format.
If necessary, use the:• Browse button to select another destination folder. In this case, the
wizard will update the Application object’s Working Directory property in the Configuration Database.
• Default button to reinstate the path specified in the Working Directory property.
Click Next to proceed.
7. On the Ready to Install page, click:• Back to update any installation information.• Install to proceed with the installation.
8. On the Installation Complete page, click Finish.
As a result of the installation, the wizard adds Application icons to the:• Windows Start menu, under Programs > Genesys Solutions >
Management Layer.
• Windows Add or Remove Programs window, as a Genesys server.• Windows Services list, as a Genesys service, with Automatic startup
type.
End of procedure
Installing Solution Control Server Utilities Separately
Starting in release 8.1, you can install the following Solution Control Server utilities without installing Solution Control Server itself:
• ccgs.pl—Graceful Call Center T-Servers stop script.
• gstuckcalls utility and Stuck Calls detection and deletion scripts—To handle T-Server stuck calls and raise alarms.
• logmsg utility—To send log messages on behalf of applications.
• mlcmd utility—To send and receive information to and from Solution Control Server.
Use one of the procedures in this section to install the utilities. Refer to the Framework 8.1 Management Layer User’s Guide for more information about these utilities.
Note: Genesys recommends that the utilities be used with the same version of Solution Control Server with which they were shipped.
Deployment Guide 169
Chapter 6: Setting Up the Management Layer Installing Solution Control Server Utilities Separately
Procedure:Installing only Solution Control Server utilities on UNIX
Purpose: To install Solution Control Server utilities on UNIX without installing Solution Control Server.
Start of procedure
1. On the Management Framework 8.1 product CD in the appropriate management_layer/solution_control_server/<operating_system> directory, locate a shell script called install.sh.
2. Type the file name at the command prompt, and press Enter.
3. Type y to specify that you want to install only the utilities, and press Enter.
4. Enter the full path of the directory in which you want to install the utilities. for example, /opt/genesys/scsutil, and press Enter. The installation displays the list of files being extracted and copied to the destination directory.
5. Enter the bit version of the system on which you are installing the utilities, either 32 or 64, and press Enter.
End of procedure
Procedure:Installing only Solution Control Server utilities on Windows
Purpose: To install Solution Control Server utilities on Windows without installing Solution Control Server.
Start of procedure
1. On the Management Framework 8.1 product CD in the appropriate management_layer\solution_control_server\windows directory, locate and double-click setup.exe to start the Genesys Installation Wizard.
2. On the wizard’s Welcome page, click Next to start the installation.
3. On the Solution Control Server Installation Mode page, select Solution Control Server Utilities, and then click Next.
4. On the Choose Destination Location page, do one of the following to specify the directory where the utilities will be installed:• Click Next to accept the default directory.
170 Framework 8.1
Chapter 6: Setting Up the Management Layer Next Steps
• Specify a different path and directory by entering it in the text box or using the Browse button. If necessary, use the Default button to reinstate the original default. Click Next to proceed.
5. On the Ready to Install page, click:• Back to update any installation information.• Install to proceed with the installation.
6. On the Installation Complete page, click Finish.
End of procedure
Next StepsAfter you successfully install and configure the Management Layer components as described in this chapter, consider whether you would like to configure the following:
• Force logged-in users to log in again after a period of inactivity. Refer to “Forced Re-Login for Inactivity” on page 68.
• Redundant Message Servers, Solution Control Servers, or SNMP Master Agents. Refer to chapter 8 on page 193.
• Distributed Solution Control Servers. Refer to Chapter 10 on page 259.
Continuing the Installation of Your System
Once the Management Layer is set up, you can then deployed:
• Genesys Administrator, if you are going to use it and you have not deployed it already. To do so, use the instructions in the Framework Genesys Administrator Deployment Guide.
• The rest of the Framework components and the contact center environment, as described in Chapter 9 on page 253.
Deployment Guide 171
Chapter
7 Starting and Stopping Framework ComponentsThis chapter provides instructions on how to start and stop most Framework components by using either the Management Layer or manual procedures.
This chapter contains the following sections: Introduction, page 171 Starting and Stopping with the Management Layer, page 173 Starting with Startup Files, page 175 Starting Manually, page 176 Stopping Manually, page 191 Starting and Stopping with Windows Services Manager, page 191
Note: This chapter applies to all Framework components except Genesys Administrator. For information about this component, refer to the Framework Genesys Administrator Deployment Guide.
IntroductionYou can start and stop most Framework components by using the Management Layer, a startup file, a manual procedure, or the Services Manager.
With all these methods, command-line parameters are usually required for a server application in addition to an executable file name.
Common command-line parameters are as follows:
-host The name of the host on which Configuration Server is running.
-port The communication port that client applications must use to connect to Configuration Server.

172 Framework 8.1
Chapter 7: Starting and Stopping Framework Components Introduction
-app The exact name of an application as configured in the Configuration Database.
-l The license address. Use for the server applications that check out technical licenses. Can be either of the following: Full path to and the exact name of the license file used
by an application. For example, -l /opt/mlink/license/license.dat.
The host name and port of the license server, as specified in the SERVER line of the license file, in the port@host format. For example, -l 7260@ctiserver.
-v The version of a Framework component.Note that specifying this parameter does not start an application, but returns its version number instead. Either uppercase (V) or lowercase (v) letter can be used.
-nco X/Y The Nonstop Operation feature is activated; X exceptions occurring within Y seconds do not cause an application to exit. If the specified number of exceptions is exceeded within the specified number of seconds, the application exits or, if so configured, the Management Layer restarts the application. If you do not specify a value for the -nco parameter, the default value (6 exceptions handled in 10 seconds) applies. To disable the Nonstop Operation feature, specify -nco 0 when starting the application.
-lmspath The full path to log messages files (the common file named common.lms and the application-specific file with the extension *.lms) that an application uses to generate log events. This parameter is used when the common and application-specific log message files are located in a directory other than the application’s working directory, for example, when the application’s working directory differs from the directory to which the application is originally installed. Note that if the full path to the executable file is specified in the startup command line (for instance, c:\gcti\multiserver.exe), the path specified for the executable file is used for locating the *.lms files, and the value of the lmspath parameter is ignored.
Warning! An application that does not find its *.lms file at startup cannot generate application-specific log events and send them to Message Server.
Note: In the command-line examples in this document, angle brackets indicate variables that you must replace with appropriate values.
Deployment Guide 173
Chapter 7: Starting and Stopping Framework Components Starting and Stopping with the Management Layer
Logging In to Interface Components
Some Genesys interface components require that you log in to them using preassigned login credentials. Use the procedure “Logging in to a Framework GUI application” on page 317.
Starting and Stopping with the Management Layer
You can use Genesys Administrator or Solution Control Interface (SCI) to start and stop applications via the Management Layer.
Before starting an Application with the Management Layer, make sure the Application’s startup parameters are correctly specified in the Application’s properties. In the Server Info section of the Application’s Configuration tab (in Genesys Administrator), or on the Start Info tab (in Configuration Manager), check that the following entries are correct:
• Working Directory—The directory in which the application is installed and/or is to run
• Command Line—The name of the executable file
• Command Line Arguments—The command-line parameters
The command-line parameters common to Framework server components are described on page 171.
After you correctly specify the command-line parameters, you can start and stop the following Framework components from Genesys Administrator or SCI:
• Configuration Server (the Command Line Arguments are not required for the primary Configuration Server)
Note: For the Management Layer to start Configuration Server, you must modify the Configuration Server application in the Configuration Database, using the procedure “Modifying a Configuration Server Application object using Configuration Manager” on page 116.
• Configuration Server Proxy
• DB Server
Note: To operate with the Management Layer, Genesys Administrator must be configured as described in the Framework Genesys Administrator Deployment Guide.
174 Framework 8.1
Chapter 7: Starting and Stopping Framework Components Starting and Stopping with the Management Layer
Note: For the Management Layer to start the DB Server dedicated to the Configuration Database, you must create and modify a DB Server Application object in the Configuration Database, as described in “Enabling Management Layer Control of Configuration Layer” on page 114.
• Message Server
• SNMP Master Agent
• T-Server
• HA Proxy
• Stat Server
The Management Layer can also restart failed applications; to enable the autorestart functionality for a particular application, select the corresponding check box in the applications’s properties.
Note that when an application is started (or restarted) via the Management Layer, it inherits environment variables from Local Control Agent (LCA), which executes the startup command. Therefore, you must also set the environment variables required for the application (such as DB Server) for the account that runs LCA.
Warning! Stopping an application via the Management Layer is not considered an application failure. Therefore, the Management Layer does not restart applications that it has stopped unless you have configured an appropriate alarm condition and alarm reaction for them.
Stop vs. Graceful Shutdown
When you stop an application or a solution, the application or solution shuts down, ceasing all processing immediately. This may have a detrimental effect on the rest of the system.
Starting in release 8.0, you can stop an application or a solution gracefully, known as a graceful shutdown or graceful stop. Applications refuse any new requests, but continue to process their current requests. A solution gracefully shuts down all of its composite applications, then stops.
Note: Because a number of solutions can share the same applications, some solution components may continue to have Started status after you stop the solution.
Only applications and solutions that support the graceful stop functionality can be stopped gracefully. Applications and solutions that do not support this functionality shut down ungracefully.
Deployment Guide 175
Chapter 7: Starting and Stopping Framework Components Starting with Startup Files
If you are unsure if the application supports graceful shutdown, you can use the configuration option suspending-wait-timeout to configure a timeout. If the status of the application changes to Suspending within this time, the application supports graceful shutdown. If the status does not change to Suspending within the timeout, the application does not support graceful shutdown, and the application will then stop ungracefully after the timeout expires. Refer to the Framework Configuration Options Reference Manual for a detailed description of this configuration option and how to use it.
Refer to Framework Genesys Administrator Help Framework or Solution Control Interface Help for more information about stopping gracefully, and about configuring the timeout.
Starting with Startup FilesStartup files are files named (or have an extension of) run.sh (on UNIX) or startServer.bat (on Windows) and which installation scripts create and place into the applications’ directories during installation. For additional information about how to use startup files, refer to the Framework Management Layer User’s Guide.
Note: You must manually modify the run.sh file created for a redundant server before you can use it to start the server. Refer to chapter 8 on page 193 for more information.
Procedure:Starting an application using its startup file
Prerequisites
• The startup parameters in the startup file are correct.
• The required applications that should be running for this application to start are installed and running. See the appropriate sections in “Starting Manually” on page 176 to identify which applications should be running for a particular application to start.
Start of procedure
1. To start the application on UNIX, go to the directory in which the application is installed and type the following command line:sh run.sh
2. To start the application on Windows, do one of the following:• Double-click the startServer.bat icon in the directory in which the
application is installed.
176 Framework 8.1
Chapter 7: Starting and Stopping Framework Components Starting Manually
• From the MS-DOS window, go to the directory in which the application is installed and type startServer.bat at the command line.
End of procedure
Starting ManuallyWhen using a manual procedure to start an application, specify the startup parameters in the command prompt, whether starting on UNIX or Windows. In the command prompt, command-line parameters must follow the name of the executable file. On the Shortcut tab of the Program Properties dialog box, command-line parameters must also follow the name of the executable file.
The command-line parameters common to Framework server components are described on page 171.
General Limitation When an application is installed on a UNIX operating system and the application name, as configured in the Configuration Database, contains spaces (for example, T-Server Avaya), you must surround the application name by quotation marks (“ ”) in the command line, as follows:
-app “T-Server Avaya”
Specify the rest of the command-line parameters as for any other application.
DB Server
The DB Server startup procedure depends on the database to which this DB Server provides access. If DB Server provides access to the Configuration Database, it must operate as an independent server; that is, DB Server must read all configuration information from its configuration file. When you start DB Server with the application name cfg_dbserver, DB Server reads all configuration information from its configuration file.
If DB Server provides access to a database other than the Configuration Database—for example, to the Log Database—it must operate as a client of Configuration Server; that is, DB Server must be started with an application name other than cfg_dbserver, as configured in the Configuration Database. When you start DB Server with an application name specified in the Configuration Database, DB Server reads all configuration information from Configuration Database. During operation, DB Server constantly receives updates on configuration changes from Configuration Server.
Whether you start DB Server as an independent server or as a client of Configuration Server, DB Server requires that you specify the Configuration Server host and port in the startup command line.
The command-line parameters common to Framework server components are described on page 171.
Deployment Guide 177
Chapter 7: Starting and Stopping Framework Components Starting Manually
In addition, you can use these command-line parameters when starting DB Server:
-c DB Server reads its configuration settings from a configuration file with the specified name. If you set this parameter, its value overrides the default name of the configuration file (dbserver.conf on UNIX or dbserver.cfg on Windows).
-cfg DB Server for the Configuration Database starts with an application name other than cfg_dbserver, but still reads its configuration from a configuration file. When you specify this parameter, the Management Layer can restart DB Server that is configured as an application even when Configuration Server is not available. Use this parameter for starting a backup DB Server for the Configuration Database. This parameter does not require any value. For more information, see chapter 8 on page 193.
Procedure:Starting DB Server manually
Prerequisites
• The DBMS server is running.
Start of procedure
1. To start DB Server on UNIX, go to the directory in which DB Server is installed and do one of the following:• To use only the required command-line parameters, type the following
command line:sh run.sh
• To specify the command line yourself, or to use additional command-line parameters, type the following command line:multiserver -host <Configuration Server host> -port <Configuration Server port> -app <DB Server Application> [<additional parameters and arguments as required>]
2. To start DB Server on Windows, do one of the following:• Use the Start > Programs menu.• To use only the required command-line parameters, go to the directory
in which DB Server is installed, and double-click the startServer.bat file.
• To specify the command line yourself, or to use additional command-line parameters, open the MS-DOS window, go to the
178 Framework 8.1
Chapter 7: Starting and Stopping Framework Components Starting Manually
directory in which DB Server is installed, and type the following command line:multiserver.exe -host <Configuration Server host> -port <Configuration Server port> -app <DB Server Application> [<additional parameters and arguments as required>]
End of procedure
Configuration Server
Configuration Server does not require any of the common command-line parameters for startup. To verify the database object integrity, you can specify the following additional command-line parameters that are specific to Configuration Server:
-checkdb An instance of Configuration Server starts, verifies the database object integrity, and terminates; all log messages are written in the log output.
-checkerrors An instance of Configuration Server starts, verifies the database object integrity, and terminates; error log messages are written in the log output.
You can also use the following command-line parameters when starting Configuration Server:
-c Configuration Server reads its configuration settings from a configuration file with the specified name. If you set this parameter, its value overrides the default name of the configuration file (confserv.conf on UNIX or confserv.cfg on Windows).
-s Configuration Server reads its configuration settings from a configuration section with the specified name. The section must be configured within Configuration Server’s configuration file; the section name must be the same as the name of the Configuration Server application configured in the Configuration Database. Use this parameter to start a backup Configuration Server.
-p Forces an instance of Configuration Server to start, encrypt the database password in the configuration file, and terminate. Refer to “Encrypting the Configuration Database Password” on page 106 for instructions on encrypting the Configuration Database password.
-cfglib_port Configuration Server opens the listening port specified in the command line. The port is opened in unsecured mode. This port is not written to the Configuration Server Application object, and does not survive a restart of Configuration Server. Do not use this option as a part of normal startup. Use it only as a last resort when regular

Deployment Guide 179
Chapter 7: Starting and Stopping Framework Components Starting Manually
secure ports cannot be accessed because of a configuration problem, such as incorrect or expired certificates, or when a duplicate port (not necessarily secure) is specified in the configuration and therefore cannot be opened.
Procedure:Starting Configuration Server manually
Prerequisites
• The DB Server that provides access to the Configuration Database is installed and running.
Start of procedure
1. To start Configuration Server on UNIX, go to the directory in which Configuration Server is installed, and do one of the following:• To use only the required command-line parameters, type the following
command line:sh run.sh
• To specify the command line yourself, or to use additional command-line parameters, type the following command line:confserv [<additional parameters and arguments as required>]
2. To start Configuration Server on Windows, do one of the following:• Use the Start > Programs menu.• To use only the required command-line parameters, go to the directory
in which Configuration Server is installed, and double-click the startServer.bat file.
• To specify the command line yourself, or to use additional command-line parameters, open the MS-DOS window, go to the directory in which Configuration Server is installed, and type the following command line:confserv.exe [<additional parameters and arguments as required>]
End of procedure
Configuration Server Proxy
The command-line parameters common to Framework server components are described on page 171.
Note: Configuration Server Proxy does not support additional command-line parameters specific to Configuration Server.
180 Framework 8.1
Chapter 7: Starting and Stopping Framework Components Starting Manually
Procedure:Starting Configuration Server Proxy manually
Prerequisites
• The DB Server that provides access to the Configuration Database is installed and running.
• The Master Configuration Server is installed and running.
• License Manager is installed and running.
Start of procedure
1. To start Configuration Server Proxy on UNIX, go to the directory in which Configuration Server Proxy is installed and do one of the following:• To use only the required command-line parameters, type the following
command line:sh run.sh
• To specify the command line yourself, or to use additional command-line parameters, type the following command line:confserv [<additional parameters and arguments as required>]
2. To start Configuration Server Proxy on Windows, do one of the following:• Use the Start > Programs menu.• To use only the required command-line parameters, go to the directory
in which Configuration Server Proxy is installed and double-click the startServer.bat file.
• To specify the command line yourself, or to use additional command-line parameters, open the MS-DOS window, go to the directory in which Configuration Server Proxy is installed, and type the following command line:confserv.exe [<additional parameters and arguments as required>]
End of procedure
Configuration Manager
Procedure:Starting Configuration Manager manually
Prerequisites
• The DB Server that provides access to the Configuration Database is installing and running.
• Configuration Server is installed and running.

Deployment Guide 181
Chapter 7: Starting and Stopping Framework Components Starting Manually
Note: Configuration Manager runs only on Windows.
Start of procedure
1. To start Configuration Manager on Windows, do one of the following:• From the Windows Start menu, select Programs > Genesys Solutions
> Framework > Configuration Manager > Start Configuration
Manager.
• Go to the directory in which Configuration Manager is installed and double-click the Sce.exe icon.
2. If prompted, log in to Configuration Manager as described in Appendix D on page 317.
End of procedure
License Manager
For information about starting License Manager, see the Genesys Licensing Guide, which is available on the Genesys Documentation Library DVD.
Message Server
The command-line parameters common to Framework server components are described on page 171.
Procedure:Starting Message Server manually
Prerequisites
• The DB Server that provides access to the Configuration Database is installed and running.
• If you plan to use centralized logging, the DB Server that provides access to the Log Database must be installed and running.
Start of procedure
1. To start Message Server on UNIX, go to the directory in which Message Server is installed, and do one of the following:• To use only the required command-line parameters, type the following
command line:sh run.sh
182 Framework 8.1
Chapter 7: Starting and Stopping Framework Components Starting Manually
• To specify the command line yourself, or to use additional command-line parameters, type the following command line:MessageServer -host <Configuration Server host> -port <Configuration Server port> -app <Message Server Application> [<additional parameters and arguments as required>]
2. To start Message Server on UNIX, do one of the following:• Use the Start > Programs menu.• To use only the required command-line parameters, go to the directory
in which Message Server is installed, and double-click the startServer.bat file.
• To specify the command line yourself, or to use additional command-line parameters, open the MS-DOS window, go to the directory in which Message Server is installed, and type the following command line:MessageServer.exe -host <Configuration Server host> -port <Configuration Server port> -app <Message Server Application> [<additional parameters and arguments as required>]
End of procedure
Local Control Agent
With default settings, Local Control Agent starts automatically every time a computer is started or rebooted. You can start LCA from the Start > Programs menu on Windows.
For instructions on changing the default LCA port value, refer to Step 2 in the procedure “Creating a Host object in Configuration Manager” on page 113.
Starting LCA on Linux Without Root Privileges
On Red Hat Enterprise Linux systems, you can configure LCA to start automatically when the Host starts, and without root privileges.
Configuringrunlevel
To configure the runlevel for LCA and Genesys Deployment Agent (GDA) on Linux, do one of the following:
• For runlevel 3: LCA: ln -s /etc/init.d/gctilca /etc/rc3.d/S99gctilca GDA: ln -s /etc/init.d/gctigda /etc/rc3.d/S98gctigda
• For runlevel 5 LCA: ln -s /etc/init.d/gctilca /etc/rc5.d/S99gctilca GDA: ln -s /etc/init.d/gctigda /etc/rc5.d/S98gctigda
Note: Do not use /etc/rc.local, which will cause LCA and GDA to start at run levels 2, 3, 4, and 5, which you do not need.
Deployment Guide 183
Chapter 7: Starting and Stopping Framework Components Starting Manually
LinuxRun Levels
There are various run levels available for Linux, and some of them are listed here. Refer to the Linux website for a complete list of run levels.
Procedure:Configuring different (but non-root) <user> and <group> for LCA and GDA on Linux
Start of procedure
1. Install the LCA as root.
2. Select the <user> and <group> that you want to use as a replacement for the user “root” and the group “root”.
3. Ensure that the <user> and <group> each have the adequate privileges for the folders/directories in which LCA is installed, and for the other applications and modules that will be controlled/managed by LCA.
4. Change the owner and group for LCA:
a. Set the current working directory to the location where LCA is installed.
b. Enter the following commands and press Enter after each:• chown <user> lca• chgrp <group> lca
5. Change the current user from root to <user>.
6. On the command line, enter su - <user>, and press Enter.
7. Set the setUID and setGID attributes for LCA. On the command line, enter chmod ug+s lca, and press Enter.
This essentially equates the user/group ID to <user>/<group> when LCA is launched by another user.
Table 7: Some Linux Run Levels
Run Level Description
0 System halt; no activity, the system can be safely powered down.
1 Single user; rarely used.
2 Multiple users, no Network File System (NFS); rarely used.
3 Multiple users, command-line (all-text mode) interface; the standard runlevel for most Linux-based server hardware.
4 User-definable.
5 Multiple users, graphical user interface; the standard runlevel for most Linux-based desktop systems.
184 Framework 8.1
Chapter 7: Starting and Stopping Framework Components Starting Manually
8. Change the current user from <user> to root, and check how LCA will be launched using the root account, by entering the following command on the command line, pressing Enter after each:• su -• ./lca &• ps -ef | grep lca
You should see something like this:UID process
<user> ./lca
This indicates that the effective user for LCA is <user> and all applications launched by LCA should have the same effective user id <user>. Normally, this approach of setting UID and GID is used to elevate privileges, but in this case, it is used to downgrade privileges.
End of procedure
Genesys Deployment Agent
Genesys Deployment Agent is installed automatically with Local Control Agent. Use one of the following procedures to start it.
Procedure:Starting Genesys Deployment Agent on UNIX
Prerequisites
• LCA is installed
Start of procedure
1. Open the directory in which Genesys Deployment Agent is installed.
2. Do one of the following:• To use the default port (5000), enter the following at the command
line:/etc/init.d/gctigda start
• To use a different port:
a. In a text editor, open the script file /etc/init.d/gctigda that was created by the IP when Genesys Deployment Agent was installed.
b. Edit the following line in the script, entering the desired port:/tmp/lcainst/gda <new port number> >/dev/null &
Deployment Guide 185
Chapter 7: Starting and Stopping Framework Components Starting Manually
c. Save the script.
d. Enter the following at the command line:/etc/init.d/gctigda start
End of procedure
Procedure:Starting Genesys Deployment Agent on Windows
Prerequisites
• LCA is installed
Start of procedure
1. Open the directory in which Genesys Deployment Agent is installed.
2. Do one of the following:• To use the default port (5000), run the gda.exe file.• To use a different port, enter the following command at the command
line, with the desired port as the parameter of the command:gda.exe <new port number>
End of procedure
Solution Control Server
The command-line parameters common to Framework server components are described on page 171.
Note: The port number entered in the command line must be the same value as the port option configured in the rdm section of the corresponding Host object. Refer to the Framework Configuration Options Manual for information about this option.
Note: The port number entered in the command line must be the same value as the port option configured in the rdm section of the corresponding Host object. Refer to the Framework Configuration Options Manual for information about this option.
186 Framework 8.1
Chapter 7: Starting and Stopping Framework Components Starting Manually
Procedure:Starting Solution Control Server manually
Prerequisites
• The DB Server that provides access to the Configuration Database is installed and running.
• Configuration Server is installed and running.
• If you are starting SCS in Distributed mode, or if HA support or SNMP functionality is required, License Manager must be installed and running.
Start of procedure
1. To start SCS on UNIX, go to the directory in which SCS is installed, and do one of the following:• To use only the required command-line parameters, type the following
command line:sh run.sh
• To specify the command line yourself, or to use additional command-line parameters, type the following command line:scs -host <Configuration Server host> -port <Configuration Server port> -app <Solution Control Server Application> [<additional parameters and arguments as required>]
2. To start SCS on Windows, do one of the following:• Use the Start > Programs menu.• To use only the required command-line parameters, go to the directory
in which SCS is installed, and double-click the startServer.bat file.• To specify the command line yourself, or to use additional
command-line parameters, open the MS-DOS window, go to the directory in which SCS is installed, and type the following command line:scs.exe -host <Configuration Server host> -port <Configuration Server port> -app <Solution Control Server Application> [<additional parameters and arguments as required>]
Note: If you are operating on a dual-stack machine, and dual stack is enabled, add the following start-up parameter on the command line:
-transport-ip-version 6,4
This specifies what internet protocol versions you are using, in this case IPv4 and IPv6.
Deployment Guide 187
Chapter 7: Starting and Stopping Framework Components Starting Manually
End of procedure
Optional Command-line Parameter
This parameter can be used on UNIX or on Windows:
-f <SCS Configuration file>
SCS gets Configuration Server's settings from the SCS configuration file. Because the SCS configuration file contains a list of Configuration Servers to which it should try to connect, this option allows SCS to connect to Configuration Server which is running in the Primary mode.
SCS Configuration File
For Windows, use the filename extension .cfg. For UNIX, use the extension .conf.
Here is a sample of the contents:
[backup_configserver]host=<backup CS host name>port=<backup CS port>name=<SCS application name>server=primary_configserver
[primary_configserver]host=<primary CS host name>port=<primary CS port>name=<SCS application name>server=backup_configserver
Note: If you are operating on a dual-stack machine, and dual stack is enabled, add the following start-up parameter on the command line:
-transport-ip-version 6,4
This specifies what internet protocol versions you are using, in this case IPv4 and IPv6.

188 Framework 8.1
Chapter 7: Starting and Stopping Framework Components Starting Manually
Solution Control Interface
Procedure:Starting Solution Control Interface manually
Prerequisites
• The DB Server that provides access to the Configuration Database is installing and running.
• Configuration Server is installed and running.
• Solution Control Server is installed and running.
• If you plan to use centralized logging, the DB Server that provides access to the Log Database must be installed and running.
Note: SCI runs only on Windows.
Start of procedure
1. To start SCI on Windows, do one of the following:• From the Windows Start menu, select Programs > Genesys Solutions
> Management Layer > Solution Control Interface Manager > Start
Solution Control Interface.
• Go to the directory in which SCI is installed and double-click the Sci.exe icon.
2. If prompted, log in to SCI as described in Appendix D on page 317.
End of procedure
SNMP Master Agent
The command-line parameters common to Framework server components are described on page 171.
Procedure:Starting Genesys SNMP Master Agent manually
Prerequisites
• The DB Server that provides access to the Configuration Database is installing and running.
• Configuration Server is installed and running.
Deployment Guide 189
Chapter 7: Starting and Stopping Framework Components Starting Manually
• If you plan to use SNMP alarm signaling, Message Server must be installed and running.
Start of procedure
1. To install SNMP Master Agent on UNIX, go to the directory in which SNMP Master Agent is installed, and do one of the following:• To use only the required command-line parameters, type the following
command line:sh run.sh
• To specify the command line yourself, or to use additional command-line parameters, type the following command line:gsnmpmasteragent -host <Configuration Server host> -port <Configuration Server port> -app <SNMP Master Agent Application> [<additional parameters and arguments as required>]
2. To install SNMP Master Agent on Windows, do one of the following:• Use the Start > Programs menu.• To use only the required command-line parameters, go to the directory
in which SNMP Master Agent is installed, and double-click the startServer.bat file.
• To specify the command line yourself, or to use additional command-line parameters, open the MS-DOS window, go to the directory in which SNMP Master Agent is installed, and type the following command line:gsnmpmasteragent.exe -host <Configuration Server host> -port <Configuration Server port> -app <SNMP Master Agent Application> [<additional parameters and arguments as required>]
End of procedure
Genesys Administrator
Information about starting and stopping Genesys Administrator is located in the Framework Genesys Administrator Deployment Guide.
Before starting Genesys Administrator, be sure that the following components are running:
• DB Server that provides access to the Configuration Database
• Configuration Server
HA Proxy
Details on starting and stopping HA Proxy, if applicable, are located in the latest version of the Framework T-Server Deployment Guide for your specific T-Server.

190 Framework 8.1
Chapter 7: Starting and Stopping Framework Components Starting Manually
If one or more HA Proxy components are required for T-Server connection to its switch, start HA Proxy before starting T-Server.
Before starting HA Proxy, be sure that the following components are running:
• DB Server that provides access to the Configuration Database
• Configuration Server
T-Server
Details on starting and stopping T-Server are located in the latest version of the Framework T-Server Deployment Guide for your specific T-Server.
Before starting T-Server, be sure that the following components are running:
• DB Server that provides access to the Configuration Database
• Configuration Server
• License Manager
Note: If an HA Proxy component is required for T-Server connection to its switch, you must start HA Proxy before starting T-Server.
Stat Server
Details on starting and stopping Stat Server are located in the documentation for your release of Stat Server.
Before starting Stat Server, be sure that the following components are running:
• The DB Server that provides access to the Configuration Database
• Configuration Server
Note: For Stat Server to operate correctly, T-Server must also be running.
Deployment Guide 191
Chapter 7: Starting and Stopping Framework Components Stopping Manually
Stopping Manually
Server Applications
Procedure:Stopping server applications manually
Start of procedure
1. To stop a server application on UNIX, use one of the following commands: • Ctrl+C
• kill <process number>
2. To stop a server application on Windows, do one of the following:• Type Ctrl+C in the application’s console window.• Click End Task in the Windows Task Manager.
End of procedure
GUI Applications
Procedure:Stopping GUI applications manually
Start of procedure
1. To stop a Windows-based GUI application, such as Configuration Manager or Solution Control Interface, select File > Exit in the main window.
2. To stop a web-based GUI application, such as Genesys Administrator, click Logout in the main page.
End of procedure
Starting and Stopping with Windows Services Manager
The Genesys setup procedures on Windows operating systems automatically install Genesys daemon applications as Windows Services, with the autostart capability.

192 Framework 8.1
Chapter 7: Starting and Stopping Framework Components Starting and Stopping with Windows Services Manager
When starting an application installed as a Windows Service, make sure that the startup parameters of the application are correctly specified in the ImagePath in the application folder that you can find in the Registry Editor.
The ImagePath must have the following value data:
<full path>\<executable file name> -service <Application Name as
Service> -host <Configuration Server host> -port <Configuration
Server port> -app <Application Name> -l <license address>
where the command-line parameters common to Framework server components are described on page 171 and where
-service Name of the application running as a Windows service (typically, it matches the application name specified in the -app command-line parameter).
Framework components installed as Windows services with autostart capability are automatically started each time a computer on which they are installed is rebooted.
You can start Framework components installed as Windows Services with manual start capability by clicking on Start in Services Manager.
Note: Use the Windows Services window to change the startup mode from Automatic to Manual and vice versa.
You can stop any Framework components installed as Windows Services, regardless of the start capability, with the Stop button in Services Manager.
Deployment Guide 193
chapter
8 Setting Up Redundant ComponentsThis chapter provides instructions for configuring primary and backup Framework Servers.
This chapter contains the following sections: Introduction, page 193 Redundant Configuration DB Servers, page 194 Redundant Configuration Servers, page 203 Redundant Client DB Servers, page 220 Redundant Message Servers, page 227 Redundant Solution Control Servers, page 234 Redundant SNMP Master Agents, page 243
IntroductionThe high availability architecture implies the existence of redundant applications, a primary and a backup, monitored by a management application.
The Configuration Layer and Management Layer support the warm standby redundancy type between redundant pairs of components within those layers. Both components in the pair must be configured with the warm standby redundancy type. The redundant architecture is described in Framework Architecture Help. Redundancy types are described in the Genesys Security Deployment Guide.
Configuration Layer and Management Layer also support switchovers between redundant client applications, regardless of the redundancy type specified by those applications.
194 Framework 8.1
chapter 8: Setting Up Redundant Components Redundant Configuration DB Servers
Redundant Configuration DB ServersThis section describes how to set up redundant Configuration DB Servers—that is, DB Servers that are dedicated to provide access to the Configuration Database and that are not clients of Configuration Server.
To set up redundant DB Servers that provide access to databases other than the Configuration Database (such as the Log Database) and that are not clients of Configuration Server (such as Log DB Server), refer to “Redundant Client DB Servers” on page 220.
Note: In this section only, the term DB Server denotes a Configuration DB Server, not a Client DB Server.
Redundancy
Redundant DB Servers support only the warm standby redundancy type.
Setting Up Redundant Configuration DB Servers
The procedures in this section describe how to install and set up redundant Configuration DB Servers.
Installation Recommendations
If you are installing the primary and backup DB Servers on the same host computer, it is recommended that you:
• Install them in different directories.
• Specify a different port number for each server.
Notes: • This chapter assumes that the primary server is already installed and operating. This chapter provides only instructions for installing the backup server and configuring the primary and backup servers to operate as a redundant pair.
• When configuring the backup component in a redundant pair, use the same account as for the primary component. Two applications with different accounts cannot be linked (configured) as a redundant high availability (HA) pair.
• If you need to make changes in the configuration of one or both servers in the HA pair. You must unlink the two servers before any changes are made. They can then be linked together and restarted.
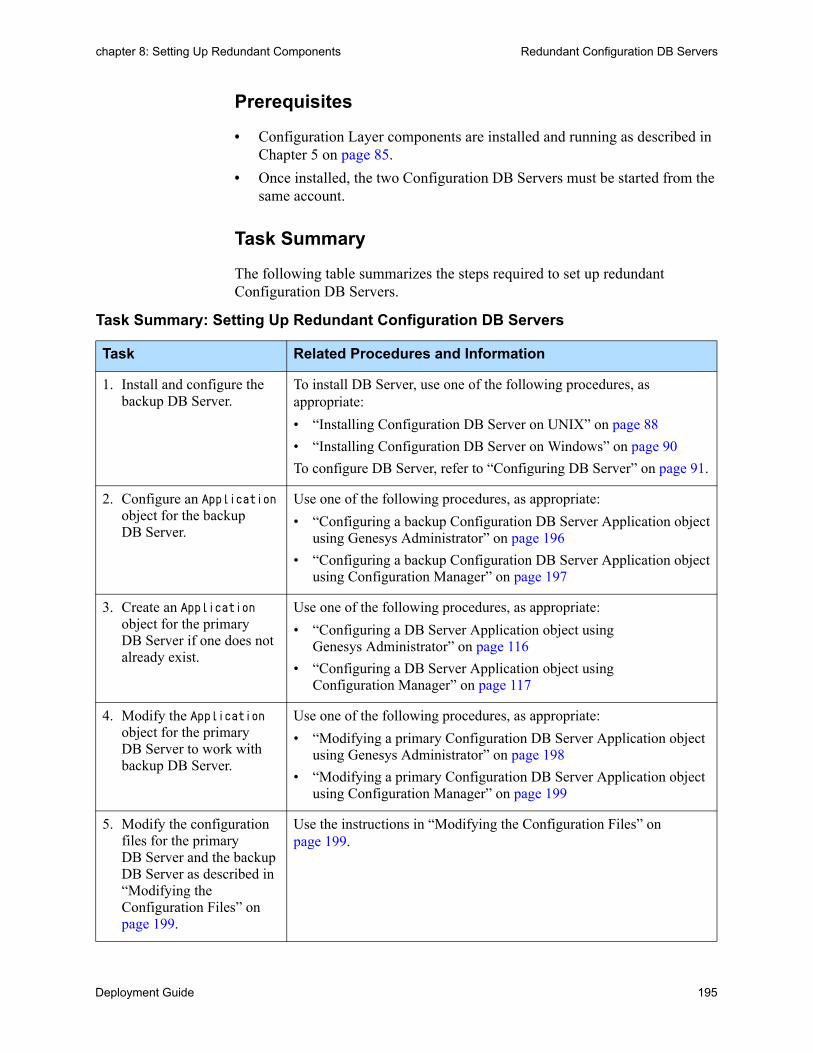
Deployment Guide 195
chapter 8: Setting Up Redundant Components Redundant Configuration DB Servers
Prerequisites
• Configuration Layer components are installed and running as described in Chapter 5 on page 85.
• Once installed, the two Configuration DB Servers must be started from the same account.
Task Summary
The following table summarizes the steps required to set up redundant Configuration DB Servers.
Task Summary: Setting Up Redundant Configuration DB Servers
Task Related Procedures and Information
1. Install and configure the backup DB Server.
To install DB Server, use one of the following procedures, as appropriate:
• “Installing Configuration DB Server on UNIX” on page 88
• “Installing Configuration DB Server on Windows” on page 90
To configure DB Server, refer to “Configuring DB Server” on page 91.
2. Configure an Application object for the backup DB Server.
Use one of the following procedures, as appropriate:
• “Configuring a backup Configuration DB Server Application object using Genesys Administrator” on page 196
• “Configuring a backup Configuration DB Server Application object using Configuration Manager” on page 197
3. Create an Application object for the primary DB Server if one does not already exist.
Use one of the following procedures, as appropriate:
• “Configuring a DB Server Application object using Genesys Administrator” on page 116
• “Configuring a DB Server Application object using Configuration Manager” on page 117
4. Modify the Application object for the primary DB Server to work with backup DB Server.
Use one of the following procedures, as appropriate:
• “Modifying a primary Configuration DB Server Application object using Genesys Administrator” on page 198
• “Modifying a primary Configuration DB Server Application object using Configuration Manager” on page 199
5. Modify the configuration files for the primary DB Server and the backup DB Server as described in “Modifying the Configuration Files” on page 199.
Use the instructions in “Modifying the Configuration Files” on page 199.
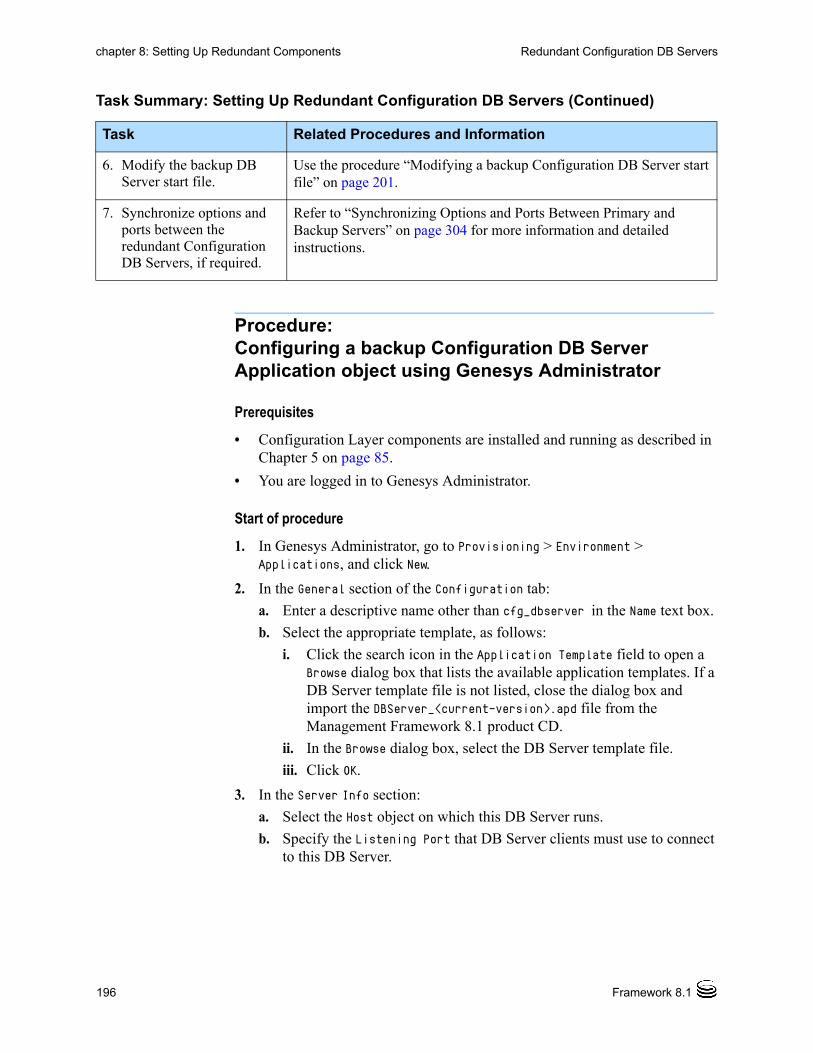
196 Framework 8.1
chapter 8: Setting Up Redundant Components Redundant Configuration DB Servers
Procedure:Configuring a backup Configuration DB Server Application object using Genesys Administrator
Prerequisites
• Configuration Layer components are installed and running as described in Chapter 5 on page 85.
• You are logged in to Genesys Administrator.
Start of procedure
1. In Genesys Administrator, go to Provisioning > Environment > Applications, and click New.
2. In the General section of the Configuration tab:
a. Enter a descriptive name other than cfg_dbserver in the Name text box.
b. Select the appropriate template, as follows:
i. Click the search icon in the Application Template field to open a Browse dialog box that lists the available application templates. If a DB Server template file is not listed, close the dialog box and import the DBServer_<current-version>.apd file from the Management Framework 8.1 product CD.
ii. In the Browse dialog box, select the DB Server template file.
iii. Click OK.
3. In the Server Info section:
a. Select the Host object on which this DB Server runs.
b. Specify the Listening Port that DB Server clients must use to connect to this DB Server.
6. Modify the backup DB Server start file.
Use the procedure “Modifying a backup Configuration DB Server start file” on page 201.
7. Synchronize options and ports between the redundant Configuration DB Servers, if required.
Refer to “Synchronizing Options and Ports Between Primary and Backup Servers” on page 304 for more information and detailed instructions.
Task Summary: Setting Up Redundant Configuration DB Servers (Continued)
Task Related Procedures and Information

Deployment Guide 197
chapter 8: Setting Up Redundant Components Redundant Configuration DB Servers
c. In the Working Directory, Command Line, and Command Line Arguments text boxes, do one of the following:• Enter the appropriate information in each of the text boxes. For
information about command-line parameters, see “Starting a Backup Configuration DB Server” on page 202.
• Type a period (.) in the Working Directory and Command Line text boxes, and leave the Command Line Arguments text box blank. The information will be filled in automatically when you install the backup DB Server, but only if the Installation Package can connect to the primary Configuration Server.
d. Enter appropriate values for the other mandatory fields (those indicated by red asterisks).
e. Select Auto-Restart.
4. Click Save and Close to save the configuration.
End of procedure
Procedure:Configuring a backup Configuration DB Server Application object using Configuration Manager
Prerequisites
• Configuration Layer components are installed and running as described in Chapter 5 on page 85.
• You are logged in to Configuration Manager.
Start of procedure
1. In Configuration Manager, right-click the Environment > Applications folder and select New > Application, which opens the Browse dialog box that lists the available application templates. If a DB Server template file is not listed, import the DBServer_<current-version>.apd file from the Management Framework 8.1 product CD.
2. In the Browse dialog box, select the DB Server template file, which opens the Properties dialog box for the new DB Server Application object.
3. On the General tab, specify an application name other than cfg_dbserver.
4. On the Server Info tab, specify:
a. The host on which the backup DB Server is running.
b. The port that DB Server clients must use to connect to DB Server.

198 Framework 8.1
chapter 8: Setting Up Redundant Components Redundant Configuration DB Servers
5. On the Start Info tab:
a. In the Working Directory, Command Line, and Command Line Arguments text boxes, do one of the following:• Enter the appropriate information in each of the text boxes. For
information about command-line parameters, see “Starting a Backup Configuration DB Server” on page 202.
• Type a period (.) in the Working Directory and Command Line text boxes, and leave the Command Line Arguments text box blank. The information will be filled in automatically when you install the backup DB Server, but only if the Installation Package can connect to the primary Configuration Server.
b. Select the Auto-Restart check box.
6. Click OK.
End of procedure
Procedure:Modifying a primary Configuration DB Server Application object using Genesys Administrator
Purpose: To enable the primary Configuration DB Server to work with the backup Configuration DB Server.
Prerequisites
• The primary and backup Configuration DB Server Application objects exist.
• You are logged in to Genesys Administrator.
Start of procedure
1. Log in to Genesys Administrator.
2. Go to Provisioning > Environment > Applications, and double-click the DB Server Application object cfg_dbserver to open its properties.
3. In the Server Info section of the Configuration tab:
a. Select the Application object corresponding to the backup DB Server you want to use as the backup server.
b. Select Warm Standby as the redundancy type.
4. Click Save and Close to save the configuration.
End of procedure
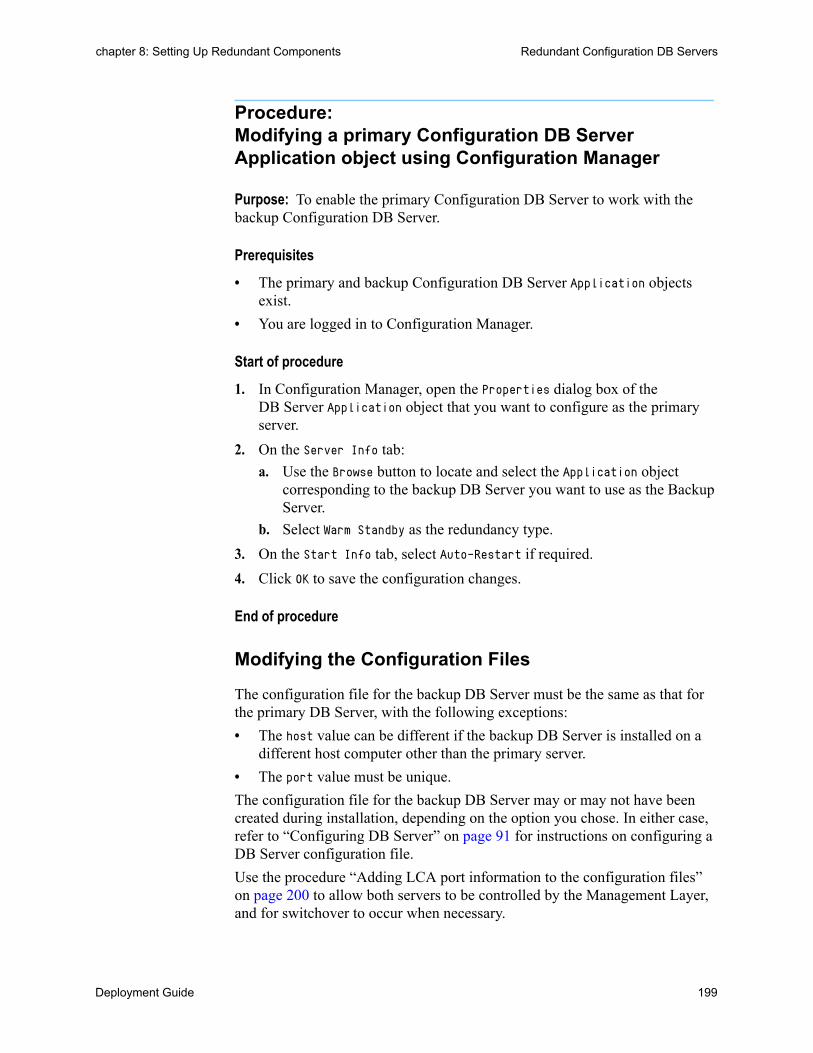
Deployment Guide 199
chapter 8: Setting Up Redundant Components Redundant Configuration DB Servers
Procedure:Modifying a primary Configuration DB Server Application object using Configuration Manager
Purpose: To enable the primary Configuration DB Server to work with the backup Configuration DB Server.
Prerequisites
• The primary and backup Configuration DB Server Application objects exist.
• You are logged in to Configuration Manager.
Start of procedure
1. In Configuration Manager, open the Properties dialog box of the DB Server Application object that you want to configure as the primary server.
2. On the Server Info tab:
a. Use the Browse button to locate and select the Application object corresponding to the backup DB Server you want to use as the Backup Server.
b. Select Warm Standby as the redundancy type.
3. On the Start Info tab, select Auto-Restart if required.
4. Click OK to save the configuration changes.
End of procedure
Modifying the Configuration Files
The configuration file for the backup DB Server must be the same as that for the primary DB Server, with the following exceptions:
• The host value can be different if the backup DB Server is installed on a different host computer other than the primary server.
• The port value must be unique.
The configuration file for the backup DB Server may or may not have been created during installation, depending on the option you chose. In either case, refer to “Configuring DB Server” on page 91 for instructions on configuring a DB Server configuration file.
Use the procedure “Adding LCA port information to the configuration files” on page 200 to allow both servers to be controlled by the Management Layer, and for switchover to occur when necessary.
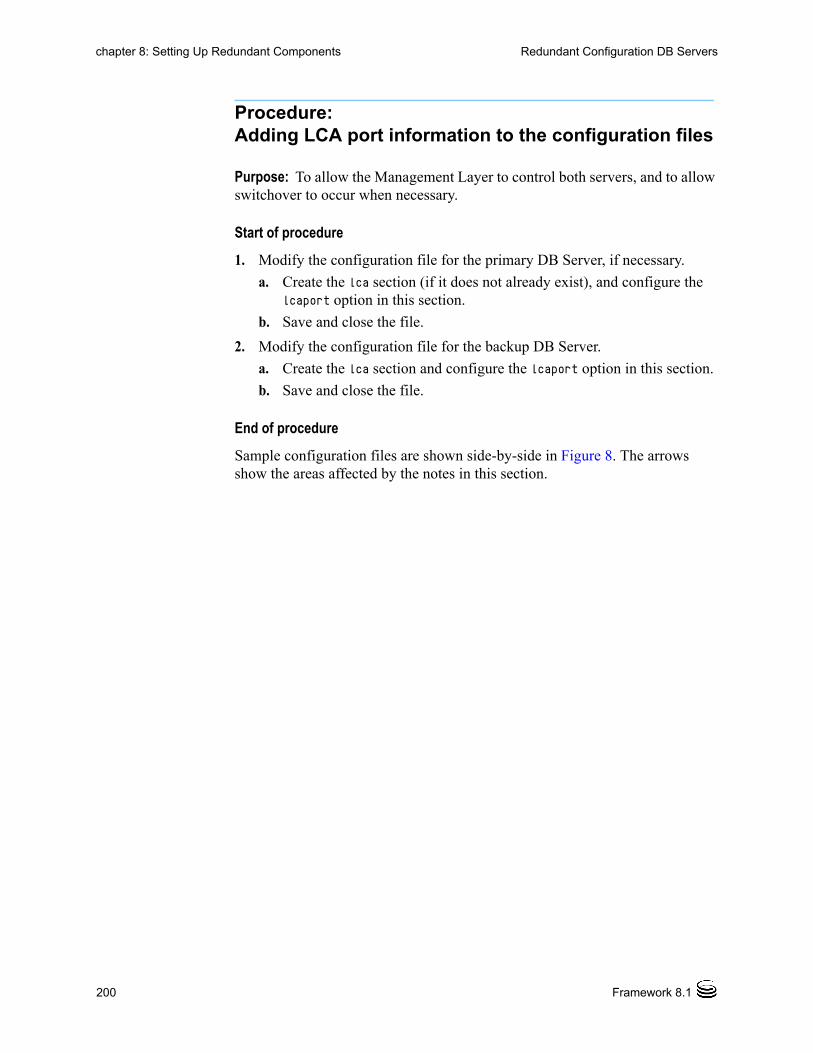
200 Framework 8.1
chapter 8: Setting Up Redundant Components Redundant Configuration DB Servers
Procedure:Adding LCA port information to the configuration files
Purpose: To allow the Management Layer to control both servers, and to allow switchover to occur when necessary.
Start of procedure
1. Modify the configuration file for the primary DB Server, if necessary.
a. Create the lca section (if it does not already exist), and configure the lcaport option in this section.
b. Save and close the file.
2. Modify the configuration file for the backup DB Server.
a. Create the lca section and configure the lcaport option in this section.
b. Save and close the file.
End of procedure
Sample configuration files are shown side-by-side in Figure 8. The arrows show the areas affected by the notes in this section.
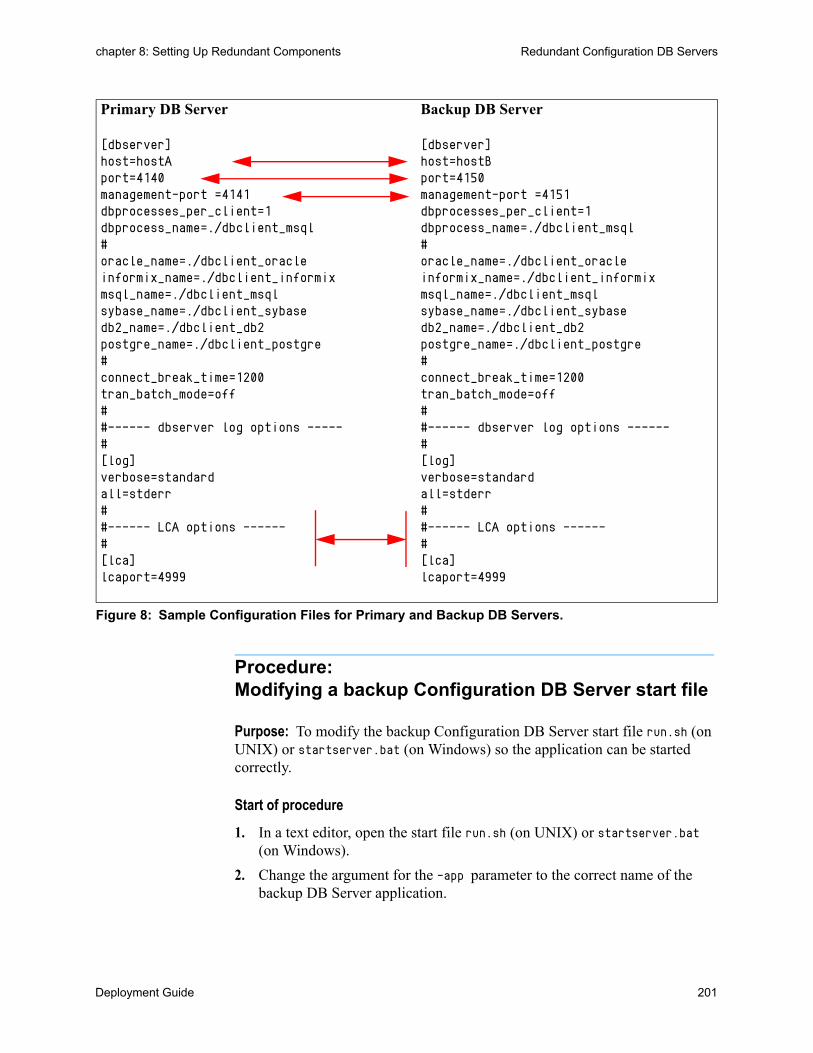
Deployment Guide 201
chapter 8: Setting Up Redundant Components Redundant Configuration DB Servers
Figure 8: Sample Configuration Files for Primary and Backup DB Servers.
Procedure:Modifying a backup Configuration DB Server start file
Purpose: To modify the backup Configuration DB Server start file run.sh (on UNIX) or startserver.bat (on Windows) so the application can be started correctly.
Start of procedure
1. In a text editor, open the start file run.sh (on UNIX) or startserver.bat (on Windows).
2. Change the argument for the -app parameter to the correct name of the backup DB Server application.
Primary DB Server
[dbserver]host=hostAport=4140management-port =4141dbprocesses_per_client=1dbprocess_name=./dbclient_msql#oracle_name=./dbclient_oracleinformix_name=./dbclient_informixmsql_name=./dbclient_msqlsybase_name=./dbclient_sybasedb2_name=./dbclient_db2postgre_name=./dbclient_postgre#connect_break_time=1200tran_batch_mode=off##------ dbserver log options -----#[log]verbose=standardall=stderr##------ LCA options ------#[lca]lcaport=4999
Backup DB Server
[dbserver]host=hostBport=4150management-port =4151dbprocesses_per_client=1dbprocess_name=./dbclient_msql#oracle_name=./dbclient_oracleinformix_name=./dbclient_informixmsql_name=./dbclient_msqlsybase_name=./dbclient_sybasedb2_name=./dbclient_db2postgre_name=./dbclient_postgre#connect_break_time=1200tran_batch_mode=off##------ dbserver log options ------#[log]verbose=standardall=stderr##------ LCA options ------#[lca]lcaport=4999
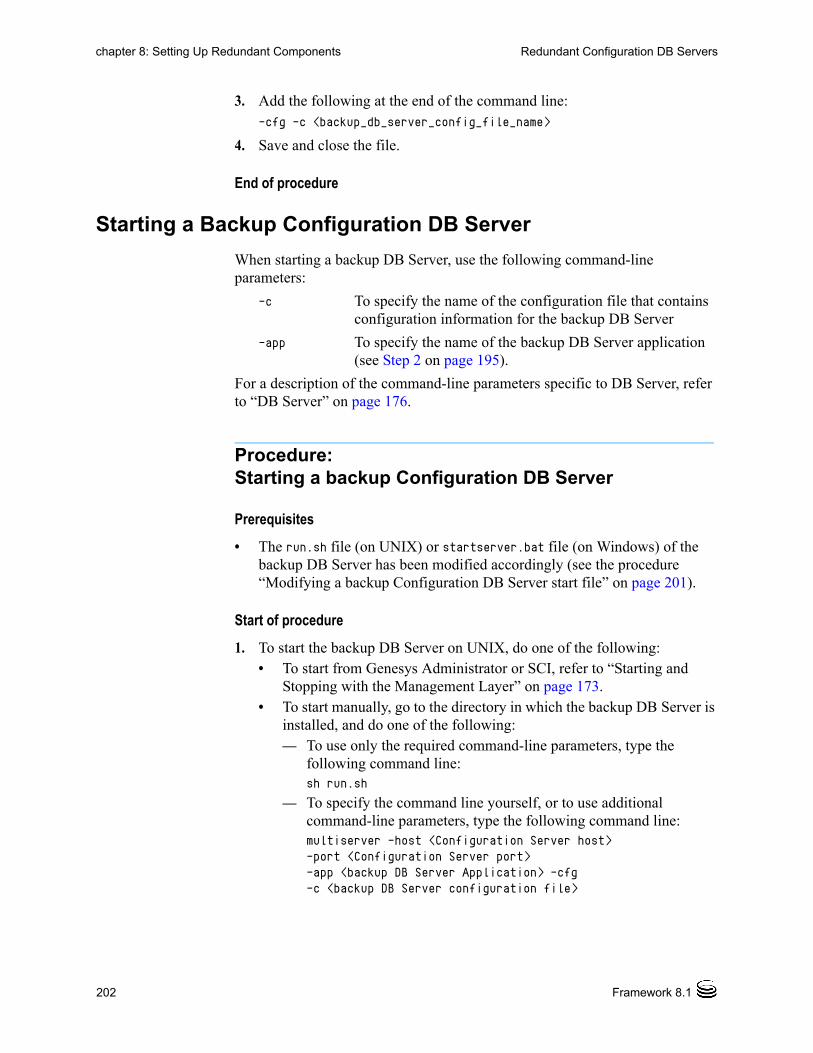
202 Framework 8.1
chapter 8: Setting Up Redundant Components Redundant Configuration DB Servers
3. Add the following at the end of the command line:-cfg -c <backup_db_server_config_file_name>
4. Save and close the file.
End of procedure
Starting a Backup Configuration DB Server
When starting a backup DB Server, use the following command-line parameters:
-c To specify the name of the configuration file that contains configuration information for the backup DB Server
-app To specify the name of the backup DB Server application (see Step 2 on page 195).
For a description of the command-line parameters specific to DB Server, refer to “DB Server” on page 176.
Procedure:Starting a backup Configuration DB Server
Prerequisites
• The run.sh file (on UNIX) or startserver.bat file (on Windows) of the backup DB Server has been modified accordingly (see the procedure “Modifying a backup Configuration DB Server start file” on page 201).
Start of procedure
1. To start the backup DB Server on UNIX, do one of the following:• To start from Genesys Administrator or SCI, refer to “Starting and
Stopping with the Management Layer” on page 173.• To start manually, go to the directory in which the backup DB Server is
installed, and do one of the following:— To use only the required command-line parameters, type the
following command line:sh run.sh
— To specify the command line yourself, or to use additional command-line parameters, type the following command line:multiserver -host <Configuration Server host> -port <Configuration Server port> -app <backup DB Server Application> -cfg -c <backup DB Server configuration file>

Deployment Guide 203
chapter 8: Setting Up Redundant Components Redundant Configuration Servers
2. To start the backup DB Server on Windows, do one of the following:• To start as a Windows Service, refer to “Starting and Stopping with
Windows Services Manager” on page 191.• To start from Genesys Administrator or SCI, refer to “Starting and
Stopping with the Management Layer” on page 173.• To start manually, do one of the following:
— Use the Start > Programs menu.— To use only the required command-line parameters, go to the
directory in which the backup DB Server is installed, and double-click the file startServer.bat
— To specify the command line yourself, or to use additional command-line parameters, open the MS-DOS window, go to the directory in which the backup DB Server is installed, and type the following command line:multiserver.exe -host <Configuration Server host> -port <Configuration Server port> -app <backup DB Server Application> -cfg -c <backup DB Server configuration file>
End of procedure
Redundant Configuration Servers
Redundancy
Redundant Configuration Servers support only the warm standby redundancy type.
Both the primary and backup Configuration Servers operate with the same Configuration Database. The backup Configuration Server does not accept client connections or make changes to the data until its role is switched to primary. When the backup Configuration Server starts, it establishes a connection to the primary Configuration Server. During the operation, the primary Configuration Server sends notifications about all changes made in the Configuration Database to the backup Configuration Server.
If there are any Configuration Server Proxies connected to the primary Configuration Server when it fails, those Proxy servers connect to the backup Configuration Server when it assumes the primary role.
Setting Up Redundant Configuration Servers
The procedures in this section describe how to install and set up redundant Configuration Servers.
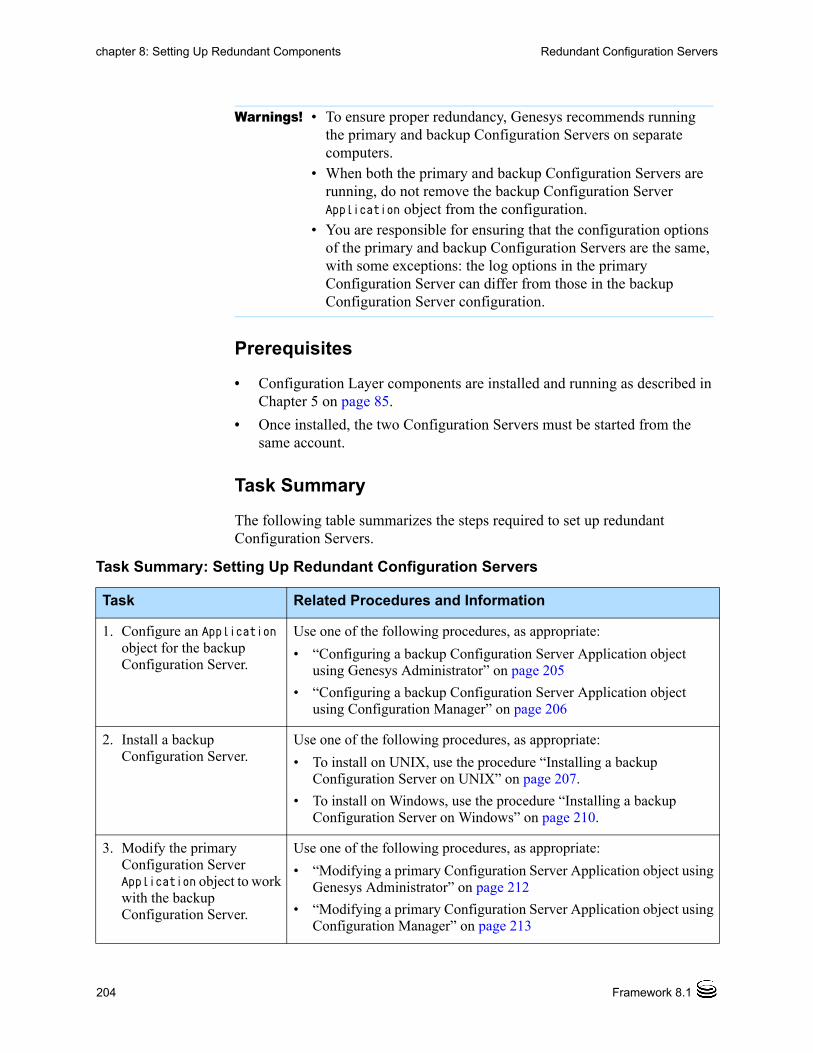
204 Framework 8.1
chapter 8: Setting Up Redundant Components Redundant Configuration Servers
Prerequisites
• Configuration Layer components are installed and running as described in Chapter 5 on page 85.
• Once installed, the two Configuration Servers must be started from the same account.
Task Summary
The following table summarizes the steps required to set up redundant Configuration Servers.
Warnings! • To ensure proper redundancy, Genesys recommends running the primary and backup Configuration Servers on separate computers.
• When both the primary and backup Configuration Servers are running, do not remove the backup Configuration Server Application object from the configuration.
• You are responsible for ensuring that the configuration options of the primary and backup Configuration Servers are the same, with some exceptions: the log options in the primary Configuration Server can differ from those in the backup Configuration Server configuration.
Task Summary: Setting Up Redundant Configuration Servers
Task Related Procedures and Information
1. Configure an Application object for the backup Configuration Server.
Use one of the following procedures, as appropriate:
• “Configuring a backup Configuration Server Application object using Genesys Administrator” on page 205
• “Configuring a backup Configuration Server Application object using Configuration Manager” on page 206
2. Install a backup Configuration Server.
Use one of the following procedures, as appropriate:
• To install on UNIX, use the procedure “Installing a backup Configuration Server on UNIX” on page 207.
• To install on Windows, use the procedure “Installing a backup Configuration Server on Windows” on page 210.
3. Modify the primary Configuration Server Application object to work with the backup Configuration Server.
Use one of the following procedures, as appropriate:
• “Modifying a primary Configuration Server Application object using Genesys Administrator” on page 212
• “Modifying a primary Configuration Server Application object using Configuration Manager” on page 213
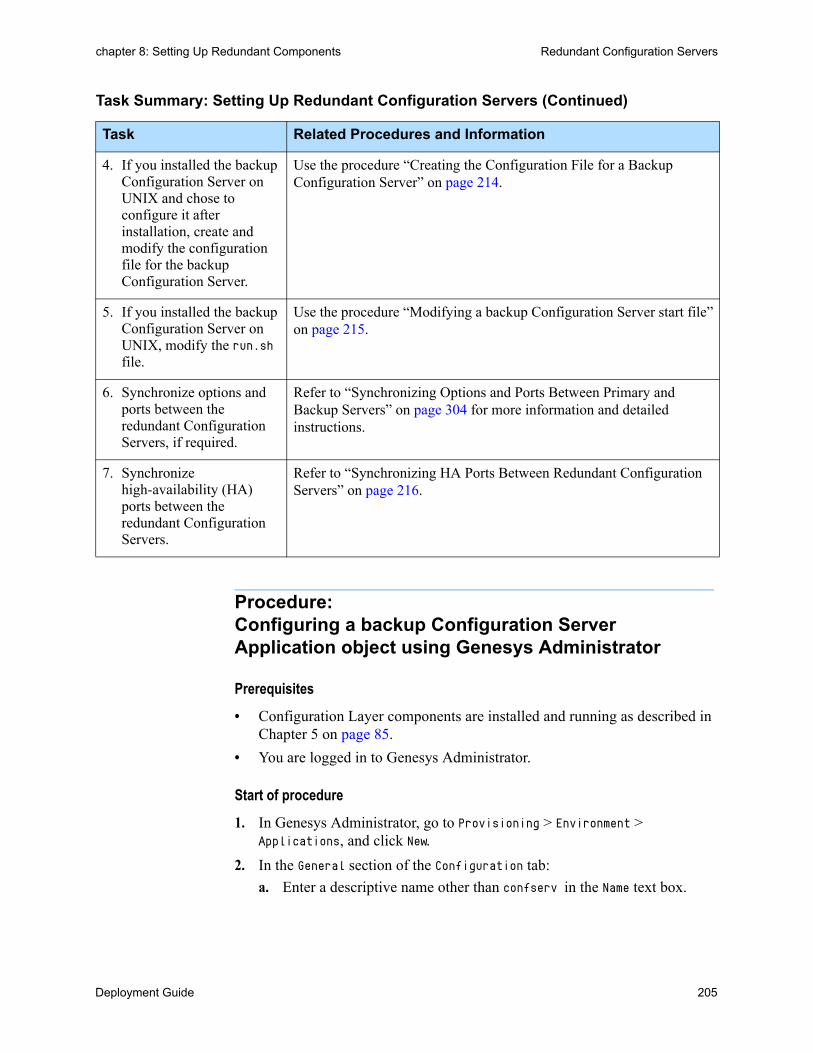
Deployment Guide 205
chapter 8: Setting Up Redundant Components Redundant Configuration Servers
Procedure:Configuring a backup Configuration Server Application object using Genesys Administrator
Prerequisites
• Configuration Layer components are installed and running as described in Chapter 5 on page 85.
• You are logged in to Genesys Administrator.
Start of procedure
1. In Genesys Administrator, go to Provisioning > Environment > Applications, and click New.
2. In the General section of the Configuration tab:
a. Enter a descriptive name other than confserv in the Name text box.
4. If you installed the backup Configuration Server on UNIX and chose to configure it after installation, create and modify the configuration file for the backup Configuration Server.
Use the procedure “Creating the Configuration File for a Backup Configuration Server” on page 214.
5. If you installed the backup Configuration Server on UNIX, modify the run.sh file.
Use the procedure “Modifying a backup Configuration Server start file” on page 215.
6. Synchronize options and ports between the redundant Configuration Servers, if required.
Refer to “Synchronizing Options and Ports Between Primary and Backup Servers” on page 304 for more information and detailed instructions.
7. Synchronize high-availability (HA) ports between the redundant Configuration Servers.
Refer to “Synchronizing HA Ports Between Redundant Configuration Servers” on page 216.
Task Summary: Setting Up Redundant Configuration Servers (Continued)
Task Related Procedures and Information

206 Framework 8.1
chapter 8: Setting Up Redundant Components Redundant Configuration Servers
b. Select the appropriate template, as follows:
i. Click the search icon in the Application Template field to open a Browse dialog box that lists the available application templates. If a Configuration Server template file is not listed, close the dialog box and import the Configuration_Server_<current-version>.apd file from the Management Framework 8.1 product CD.
ii. In the Browse dialog box, select the Configuration Server template file.
iii. Click OK.
3. In the Server Info section:
a. Select the Host object on which this Configuration Server runs.
b. Specify the Listening Ports that Configuration Server clients must use to connect to this Configuration Server.
c. In the Working Directory, Command Line, and Command Line Arguments text boxes, do one of the following:• Enter the appropriate information in each of the text boxes. For
information about command-line parameters, see “Starting a Backup Configuration Server” on page 217.
• Type a period (.) in the Working Directory and Command Line text boxes, and leave the Command Line Arguments text box blank. The information will be filled in automatically when you install the backup Configuration Server, but only if the Installation Package can connect to the primary Configuration Server.
d. Enter appropriate values for the other mandatory fields (those indicated by red asterisks).
4. Click Save and Close to save the configuration.
End of procedure
Procedure:Configuring a backup Configuration Server Application object using Configuration Manager
Prerequisites
• You are logged in to Configuration Manager.
Start of procedure
1. In Configuration Manager, right-click the Environment > Applications folder and select New > Application, which opens the Browse dialog box that lists the available application templates. If a Configuration Server
Deployment Guide 207
chapter 8: Setting Up Redundant Components Redundant Configuration Servers
template is not listed, import the Configuration_Server_<current-version>.apd template file from the Management Framework product CD.
2. In the Browse dialog box, select the Configuration Server template file, which opens the Properties dialog box for the new backup Configuration Server Application object.
3. On the General tab of the Properties dialog box, enter a name for the backup Configuration Server Application object. The application template provides information for the application Type and Version.
4. On the Server Info tab, specify:
a. the host on which the backup Configuration Server is to be installed.
b. the communication ports that clients must use to connect to this Configuration Server.
5. On the Start Info tab, in the Working Directory, Command Line, and Command Line Arguments text boxes, do one of the following:• Enter the appropriate information in each of the text boxes. For
information about command-line parameters, see “Starting a Backup Configuration Server” on page 217.
• Type a period (.) in the Working Directory and Command Line text boxes, and leave the Command Line Arguments text box blank. The information will be filled in automatically when you install the backup Configuration Server, but only if the Installation Package can connect to the primary Configuration Server.
6. Click OK to create the Application object for the backup Configuration Server.
7. Open the Properties dialog box of the backup Configuration Server Application object.
8. Click the Security tab.
9. In the Log On As group section, make sure that This Account is selected, and that the account name matches the name of the Master Account.
10. Click OK to save any configuration changes.
End of procedure
Procedure:Installing a backup Configuration Server on UNIX
Note: Refer to “Installing Configuration Server” on page 94 for general comments about installing Configuration Server.

208 Framework 8.1
chapter 8: Setting Up Redundant Components Redundant Configuration Servers
Prerequisites
• The backup Configuration Server Application object exists.
Start of procedure
1. On the Management Framework 8.1 product CD, locate and open the appropriate installation directory for your environment:• For an enterprise (single-tenant) environment, the installation directory
is configuration_layer/configserver/single/<operating_system>• For a multi-tenant environment, the installation directory is
configuration_layer/configserver/multi/<operating_system>
The installation script, called install.sh, is located in the appropriate directory.
2. Type the file name at the command prompt, and press Enter.
3. For the installation type, type 2 to select Configuration Server Master Backup, and press Enter.
4. For the external authentication option, type the number corresponding to the type of External Authentication that will be used (LDAP, Radius, both, or neither), and press Enter.
5. For the host name of this backup Configuration Server, do one of the following:• Specify the host name, and press Enter.• Press Enter to select the host on which this backup Configuration
Server is being installed.
6. Specify the primary Configuration Server, as follows:
a. Specify the primary Configuration Server Hostname, and press Enter.
b. Specify a value for the port for the primary Configuration Server, and press Enter.
c. Specify the User name of the primary Configuration Server, and press Enter.
d. Specify the Password for the primary Configuration Server, and press Enter.
7. Type the number corresponding to the Application object for the backup Configuration Server that you created, and press Enter.
8. Specify the full path of the destination directory, and press Enter.
Tip: If you select LDAP, be prepared with the URL to access the LDAP Server. For more information about LDAP configuration, see the Framework External Authentication Reference Manual.

Deployment Guide 209
chapter 8: Setting Up Redundant Components Redundant Configuration Servers
9. If the target installation directory has files in it, do one of the following:• Type 1 to back up all the files in the directory, and press Enter.
Specify the path to where you want the files backed up, and press Enter.
• Type 2 to overwrite only the files in this installation package, and press Enter. Then, type y to confirm your selection, and press Enter.
Use this option only if the application already installed operates properly.
• Type 3 to erase all files in this directory before continuing with the installation, and press Enter. Then, type y to confirm your selection, and press Enter.
The list of file names will appear on the screen as they are extracted and written to the destination directory.
10. For the product version to install, do one of the following:• Type 32 to select the 32-bit version, and press Enter.• Type 64 to select the 64-bit version, and press Enter.
11. Do one of the following: • Type y to configure the backup Configuration Server during
installation (now), and press Enter. Go to Step 12 to specify values for the configuration file. For information about Configuration Server configuration options and their values, refer to the Framework Configuration Options Reference Manual.
• Type n to not configure backup Configuration Server during installation. In this case, you have finished installing Configuration Server; do not continue to the next step in this procedure. Before you can start Configuration Server, however, you must create a configuration file and set the configuration options in it. See “Configuring Configuration Server” on page 103.
12. For the [confserv] section:
a. Specify a value for the backup Configuration Server port, and press Enter.
b. Specify a value for the backup Configuration Server management port, and press Enter.
13. For the [soap] section, do one of the following:• Specify a value for the SOAP port, and press Enter.• Press Enter to leave this field blank if you are not using SOAP
functionality.
14. For the [dbserver] section:
a. Specify the name of the DB Server host, and press Enter.
b. Specify a value for the DB Server port, and press Enter.
c. Type the number corresponding to the database engine that this Configuration Server uses (dbengine), and press Enter.
210 Framework 8.1
chapter 8: Setting Up Redundant Components Redundant Configuration Servers
d. Specify the name or alias of the DBMS that handles the Configuration Database (dbserver), and press Enter.
e. To specify the name of the Configuration Database (dbname), do one of the following:• If you are using an Oracle database engine (that is, you typed 3 in
Step c), press Enter. This value is not required for Oracle.• If you are using any other database engine, specify the name of the
Configuration Database, and press Enter.
f. Specify the Configuration Database username, and press Enter.
g. To specify the Configuration Database password, do one of the following:• Specify the password, and press Enter.• Press Enter if there is no password; that is, the password is empty,
with no spaces.
End of procedure
When the installation process is finished, a message indicates that installation was successful. The process places the backup Configuration Server in the directory specified during the installation process. The installation script also writes a sample configuration file, confserv.sample, in the directory in which the backup Configuration Server is installed.
If you chose to configure the backup Configuration Server during installation, the sample configuration file, confserv.sample, is renamed confserv.conf, and the parameters specified in Steps 12 through 14 are written to this file.
Next Steps
If you chose to configure the backup Configuration Server after installation, you must manually rename the sample file as confserv.conf and modify the configuration options before you start the backup Configuration Server. See “Configuring Configuration Server” on page 103.
Procedure:Installing a backup Configuration Server on Windows
Warning! Genesys does not recommend installation of its components via a Microsoft Remote Desktop connection. The installation should be performed locally.
Note: Refer to “Installing Configuration Server” on page 94 for general comments about installing Configuration Server.
Deployment Guide 211
chapter 8: Setting Up Redundant Components Redundant Configuration Servers
Prerequisites
• The backup Configuration Server Application object exists.
Start of procedure
1. On the Management Framework 8.1 product CD, locate and open the appropriate installation directory for your environment:• For an enterprise (single-tenant) environment, the installation directory
is configuration_layer/configserver/single/windows• For a multi-tenant environment, the installation directory is
configuration_layer/configserver/multi/windows
The installation script, called setup.exe, is located in the appropriate directory.
2. Double-click setup.exe to start the Genesys Installation Wizard.
3. Use the About button on the wizard’s Welcome page to review the read_me file. The file also contains a link to the server’s Release Notes file.
4. Click Next on the Welcome page to proceed with the installation.
5. On the Maintenance Setup Type page, select Install new instance of the application and click Next.
6. On the Configuration Server Run Mode page, select Configuration Server Master Backup and click Next.
7. On the Configuration Server Parameters page:
a. Specify the Server Port and Management Port for Configuration Server.
b. Click Next.
8. On the Database Engine Option page, select the database engine used by Configuration Server, and click Next.
9. On the DB Server Parameters page:
a. Specify the DB Server Host name and DB Server Port.
b. Specify the Database Server Name and Database Name.
c. Specify the Database User Name and Password.
d. Click Next.
10. On the Configuration Server External Authentication page, select the type of external authentication Configuration Server uses, or select None if Configuration Server is not using external authentication. Click Next.
11. On the Connection Parameters to the Genesys Configuration Server page:
a. Specify the Host name and Port of the primary Configuration Server.
b. Specify the User name and Password for the primary Configuration Server.
c. Click Next.
212 Framework 8.1
chapter 8: Setting Up Redundant Components Redundant Configuration Servers
12. In the upper pane of the Select Application page, select the backup Configuration Server Application object that you just configured, and click Next.
13. On the Choose Destination Location page, the wizard displays the destination directory, if specified in Step 5 on page 207 in the Working Directory property of the server’s Application object. If you entered a period (.) in this property, or if the specified path is invalid, the wizard generates a path to the destination directory in the C:\Program Files\GCTI\<Product Name> format.
If necessary, click:• Browse to select another destination folder. In this case, the wizard will
update the Application object’s Working Directory in the Configuration Database.
• Default to reinstate the path specified in the Working Directory property.
Click Next to proceed.
14. On the Ready to Install information page, click:• Back to update any installation information.• Install to proceed with the installation.
15. On the Installation Complete page, click Finish.
As a result of the installation, the wizard adds Application icons to the:• Windows Add or Remove Programs window, as a Genesys server.• Windows Services list, as a Genesys service, with Automatic startup
type.
End of procedure
For more information about the Configuration Server configuration file, see “Configuring Configuration Server” on page 103. For information about Configuration Server configuration options and their values, refer to the relevant chapters in the Framework Configuration Options Reference Manual.
Procedure:Modifying a primary Configuration Server Application object using Genesys Administrator
Purpose: To enable the primary Configuration Server to work with the backup Configuration object.
Prerequisites
• The primary and backup Configuration Server Application objects exist.
• You are logged in to Genesys Administrator.

Deployment Guide 213
chapter 8: Setting Up Redundant Components Redundant Configuration Servers
Start of procedure
1. In Genesys Administrator, go to Provisioning > Environment > Applications, and click the Configuration Server Application object (named confserv) to open its properties.
2. On the Configuration tab, open the Server Info section.
3. Use the Browse button next to the Backup Server property to locate the backup Configuration Server Application object you want to use as the backup server.
4. Select Warm Standby as the Redundancy Type.
5. Select Auto-Restart.
6. Click Save and Close to save the changes.
End of procedure
Procedure:Modifying a primary Configuration Server Application object using Configuration Manager
Purpose: To enable the primary Configuration Server to work with the backup Configuration object.
Prerequisites
• The primary and backup Configuration Server Application objects exist.
• You are logged in to Configuration Manager.
Start of procedure
1. In Configuration Manager, open the Properties dialog box of the Configuration Server Application object that you want to configure as a primary server.
2. Click the Server Info tab.
3. Use the Browse button next to the Backup Server property to locate the backup Configuration Server Application object you want to use as the backup server.
4. Select Warm Standby as the Redundancy Type.
5. Click the Start Info tab.
6. Select Auto-Restart.
7. Click the Security tab.
8. In the Log On As group section, select This Account. Make sure that the account name matches the name of the Master Account.
214 Framework 8.1
chapter 8: Setting Up Redundant Components Redundant Configuration Servers
9. Click OK to save the configuration changes.
End of procedure
Creating the Configuration File for a Backup Configuration Server
The configuration file for the backup Configuration Server must be the same as that for the primary Configuration Server with the following exceptions:
• The name of the section in the backup Configuration Server configuration file must match the name of the backup Configuration Server Application object.
• The values for the port and management-port options in the backup Configuration Server configuration file must be those values specified as Communication Port and Management Port values, respectively, during installation of the backup Configuration Server.
• The log options can be different.
Specify the same database and the same user account for accessing this database, for both the primary and backup Configuration Servers. Note that specifying multiple DB Server sections that describe backup DB Servers is acceptable for the backup Configuration Server, as long as these sections are identical to similar sections in the configuration file of the primary Configuration Server.
The No Default Access for New Users feature must be configured the same in both the primary and backup Configuration Servers. In other words, both Configuration Servers must have the feature either configured or not.
Sample configuration files are shown side-by-side in Figure 9. The arrows show the differences described in this section.
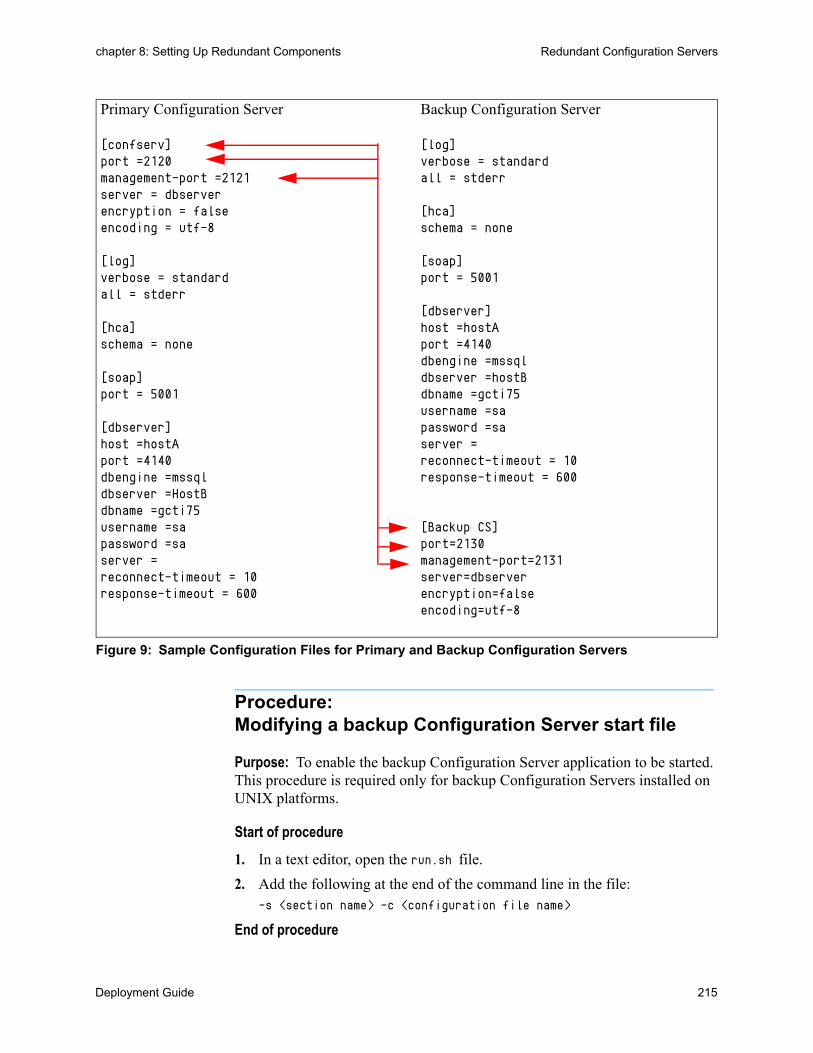
Deployment Guide 215
chapter 8: Setting Up Redundant Components Redundant Configuration Servers
Figure 9: Sample Configuration Files for Primary and Backup Configuration Servers
Procedure:Modifying a backup Configuration Server start file
Purpose: To enable the backup Configuration Server application to be started. This procedure is required only for backup Configuration Servers installed on UNIX platforms.
Start of procedure
1. In a text editor, open the run.sh file.
2. Add the following at the end of the command line in the file:-s <section name> -c <configuration file name>
End of procedure
Primary Configuration Server
[confserv]port =2120management-port =2121server = dbserverencryption = falseencoding = utf-8
[log]verbose = standardall = stderr
[hca]schema = none
[soap]port = 5001
[dbserver]host =hostAport =4140dbengine =mssqldbserver =HostBdbname =gcti75username =sapassword =saserver = reconnect-timeout = 10response-timeout = 600
Backup Configuration Server
[log]verbose = standardall = stderr
[hca]schema = none
[soap]port = 5001
[dbserver]host =hostAport =4140dbengine =mssqldbserver =hostBdbname =gcti75username =sapassword =saserver = reconnect-timeout = 10response-timeout = 600
[Backup CS]port=2130management-port=2131server=dbserverencryption=falseencoding=utf-8

216 Framework 8.1
chapter 8: Setting Up Redundant Components Redundant Configuration Servers
Synchronizing HA Ports Between Redundant Configuration Servers
When Configuration Servers operate in a high-availability (HA) environment, the backup Configuration Server must be ready to take on the primary role when required. This requires that both Configuration Servers are running and that they must have the same information. When you configure redundant Configuration Servers to operate with the warm standby redundancy type, the primary Configuration Server uses the connection to the backup to deliver synchronization updates. Genesys recommends that you enable the Advanced Disconnect Detection Protocol (ADDP), described on page 303, for this connection.
Currently, Genesys Administrator does not support this functionality.
Procedure:Synchronizing HA ports between redundant Configuration Servers
Purpose: To enable Configuration Manager to synchronize options between primary and backup Configuration Servers automatically.
Start of procedure
1. Decide in advance what port on the primary Configuration Server you want to use as the port to which the backup Configuration Server connects. If you want to use a new port, do the following:
a. On the Server Info tab of the properties of both the primary and backup servers, create a new port with the same Port ID.
b. In the Port Properties dialog box of each server, click OK to save the new configuration.
c. In the Application Properties dialog box of each server, click Apply.
2. If you want to use a new or existing port other than the default port of the primary server, do the following:
a. In the Application Properties dialog box of the primary server, select the port to which the backup server will connect, and click Edit.
Note: Starting with release 7.5, you can configure multiple ports for any application of type server. When multiple ports are configured for a server in a warm standby redundancy pair, the number of ports, their Port IDs, and the Listening Mode settings of the primary and backup servers must match respectively.
Deployment Guide 217
chapter 8: Setting Up Redundant Components Redundant Configuration Servers
b. In the Port Properties dialog box, select the HA sync check box, and click OK. The Port section of the Application Properties dialog box now displays this port as a port for an HA synchronization connection.
Note: If the HA sync check box is not selected, the backup server will connect to the default port of the primary server.
3. Click Apply to save the configuration changes.
End of procedure
Starting a Backup Configuration Server
When starting a backup Configuration Server, specify the following values in the startup command line:
-s The name of the Configuration Server section within the configuration file for the backup Configuration Server
-c The name of the configuration file that contains configuration information for the backup Configuration Server.
Note: Make sure the name of the Configuration Server section is exactly the same as the name of the Application object for the backup Configuration Server.
For a description of the command-line parameters specific to Configuration Server, refer to the section “Configuration Server” on page 178.
Procedure:Starting a backup Configuration Server
Prerequisites
• If the backup Configuration Server is installed on UNIX, make sure that the run.sh file has been modified accordingly (see the procedure “Modifying a backup Configuration Server start file” on page 215).
Start of procedure
1. To start the backup Configuration Server on UNIX, do one of the following:• To start from Genesys Administrator or SCI, refer to “Starting and
Stopping with the Management Layer” on page 173.
218 Framework 8.1
chapter 8: Setting Up Redundant Components Redundant Configuration Servers
• To start manually, go to the directory in which the backup Configuration Server is installed, and do one of the following:• To use only the required command-line parameters, type the
following command line:sh run.sh
• To specify the command line yourself, or to use additional command-line parameters, type the following command line:confserv -s <section name> -c <configuration file name> [<additional parameters as required>]
Note: Make sure the name of the Configuration Server section is exactly the same as the name of the Application object for the backup Configuration Server.
2. To start the backup Configuration Server on Windows, do one of the following:• To start as a Windows Service, refer to “Starting and Stopping with
Windows Services Manager” on page 191.• To start from Genesys Administrator or SCI, refer to “Starting and
Stopping with the Management Layer” on page 173.• To start manually, do one of the following:
• Use the Start > Programs menu.• To use only the required command-line parameters, go to the
directory in which the backup Configuration Server is installed, and double-click the file startServer.bat
• To specify the command line yourself, or to use additional command-line parameters, open the MS-DOS window, go to the directory in which the backup Configuration Server is installed, and type the following command line:confserv.exe -s <section name> -c <configuration file name> [<additional parameters as required>]
Note: Make sure the name of the Configuration Server section is exactly the same as the name of the Application object for the backup Configuration Server.
End of procedure
Configuring ADDP Between Redundant Configuration Servers
Advanced Disconnect Detection Protocol (ADDP) is now supported between primary and backup Configuration Servers. Use the new configuration options protocol, addp-timeout, addp-remote-timeout, and addp-trace, setting them in

Deployment Guide 219
chapter 8: Setting Up Redundant Components Redundant Configuration Servers
the configuration server section of the configuration files for both Configuration Servers. For the primary Configuration Server, this section is called confserv. For the backup Configuration Server, this section has the same name as the backup Configuration Server Application object.
protocolDefault Value: No default valueValid Values: addpChanges Take Effect: After restart
Specifies if ADDP is to be used between the primary and backup Configuration Servers. If set to addp, the ADDP protocol is implemented as defined by the ADDP-related configuration options addp-timeout, addp-remote-timeout, and addp-trace in the same configuration server section (confserv, or its equivalent in the backup Configuration Server) of the configuration file. If this option is set to any other value, or if it is not specified at all, ADDP is not used and the ADDP-related configuration options in this section are ignored.
addp-timeoutDefault Value: 0Valid Values: 0–3600Changes Take Effect: After restart
Specifies the time interval, in seconds, that Configuration Server in backup mode waits before polling the other Configuration Server in the redundant pair. If set to zero (0), Configuration Server in backup mode does not poll the other Configuration Server in the redundant pair. This option applies only if the value of the protocol option is addp.
addp-remote-timeoutDefault Value: 0Valid Values: Any positive integerChanges Take Effect: After restart
Specifies the time interval, in seconds, that Configuration Server in backup mode instructs the other Configuration Server in the redundant pair to use
Note: The three following options below have the same names as other options that already exist in Genesys software. While all are used to implement ADDP, the placement of each option (in configuration section and, in some cases, configuration object) is unique and determines the use thereof. The options described below do not replace these pre-existing options.
Note: Because any Configuration Server can be in primary or backup mode, regardless of how it is configured, you must set this option to the same value in both the primary and backup Configuration Servers.
220 Framework 8.1
chapter 8: Setting Up Redundant Components Redundant Client DB Servers
when polling to check the connection between the two servers. If set to zero (0), Configuration Server in backup mode does not send any such instruction. This option applies only if the value of the protocol option is addp.
addp-traceDefault Value: offValid Values:
Changes Take Effect: After restart
Determines whether ADDP messages are written to the primary and backup Configuration Servers log files. This option applies only if the value of the protocol option is addp.
Example
In the Configuration Server configuration file, the ADDP options would appear as follows:[confserv]...protocol=addpaddp-timeout=16addp-remote-timeout=32addp-trace=both...
Redundant Client DB ServersThis section describes how to set up redundant Client DB Servers—that is, DB Servers that provide access to databases other than the Configuration Database (such as the Log Database), and that are clients of Configuration Server (such as Log DB Server).
To set up redundant Configuration DB Servers that are dedicated to provide access to the Configuration Database, and that are not clients of Configuration Server, refer to “Redundant Configuration DB Servers” on page 194.
Note: Because any Configuration Server can be in primary or backup mode, regardless of how it is configured, you must set this option to the same value in both the primary and backup Configuration Servers.
false, no, off No ADDP trace occurs.true, yes, on, local
ADDP trace occurs on the side of the Configuration Server in backup mode.
remote ADDP trace occurs on the side of the Configuration Server in primary mode.
both, full ADDP trace occurs at both the primary and backup Configuration Servers.
Deployment Guide 221
chapter 8: Setting Up Redundant Components Redundant Client DB Servers
Note: In this section only, the term DB Server denotes a Client DB Server, not a Configuration DB Server.
Redundancy
Redundant DB Servers support only the warm standby redundancy type.
Setting Up Redundant Client DB Servers
The procedures in this section describe how to install and set up redundant Client DB Servers.
Installation Recommendations
If you are installing the primary and backup DB Servers on the same host computer:
• Install them in different directories.
• Specify a different port number for each server.
Prerequisites
Set up redundant Client DB Servers, such as Log DB Servers, only after you have installed and run the following:
• Configuration Layer components as described in Chapter 5 on page 85.
• Management Layer components as described in Chapter 6 on page 121.
• Once installed, the two Client DB Servers must be started from the same account.
Task Summary
The table on the next page summarizes the steps required to install and set up redundant Client DB Servers.
Task Summary: Setting Up Redundant Client DB Servers
Task Related Procedures and Information
1. If the backup DB Server is to reside on a remote Host, you can deploy it to that Host using Genesys Administrator.
Use the procedure “Deploying Management Layer components using Genesys Administrator” on page 127.

222 Framework 8.1
chapter 8: Setting Up Redundant Components Redundant Client DB Servers
Procedure:Configuring a backup Client DB Server Application object using Genesys Administrator
Prerequisites
• Configuration Layer components are installed and running as described in Chapter 5 on page 85.
• Management Layer components are installed and running as described in Chapter 6 on page 121.
• You are logged in to Genesys Administrator.
Start of procedure
1. In Genesys Administrator, go to Provisioning > Environment > Applications.
2. Configure an Application object for the backup DB Server.
Use one of the following procedures, as appropriate:
• “Configuring a backup Client DB Server Application object using Genesys Administrator” on page 222.
• “Configuring a backup Client DB Server Application object using Configuration Manager” on page 224.
3. If you did not deploy the backup DB Server in Step 1, install the backup DB Server.
Use one of the following procedures, as appropriate:
• To install on UNIX, use the procedure “Manually installing Log DB Server on UNIX” on page 139.
• To install on Windows, use the procedure “Manually installing Log DB Server on Windows” on page 141.
4. Modify the Application object for the primary DB Server.
Use one of the following procedures, as appropriate:
• “Modifying a primary Client DB Server Application object using Genesys Administrator” on page 225.
• “Modifying a primary Client DB Server Application object using Configuration Manager” on page 225.
5. Synchronize options and ports between the redundant Client DB Servers, if required.
Refer to “Synchronizing Options and Ports Between Primary and Backup Servers” on page 304 for more information and detailed instructions.
Task Summary: Setting Up Redundant Client DB Servers (Continued)
Task Related Procedures and Information
Deployment Guide 223
chapter 8: Setting Up Redundant Components Redundant Client DB Servers
2. If the Application object for this backup DB Server does not already exist, create it as follows:
a. Click New.
b. In the General section of the Configuration tab:
i. Enter a descriptive name in the Name text box.
ii. Select the appropriate template, as follows: Click the search icon in the Application Template field to open a
Browse dialog box that lists the available application templates. If a DB Server template file is not listed, close the dialog box and import the DBServer_<current-version>.apd file from the Management Framework 8.1 product CD.
In the Browse dialog box, select the DB Server template file. Click OK.
3. In the Server Info section of the Configuration tab, enter the following information as required:
a. Select the Host object on which this backup DB Server runs.
b. Specify the Listening Port that DB Server clients must use to connect to this DB Server.
c. In the Working Directory, Command Line, and Command Line Arguments text boxes, do one of the following:• Enter the appropriate information in each of the text boxes. For
information about command-line parameters, see “Starting a Backup Client DB Server” on page 226.
• Type a period (.) in the Working Directory and Command Line text boxes, and leave the Command Line Arguments text box blank. The information will be filled in automatically when the backup DB Server starts, but only if the Installation Package can connect to the primary Configuration Server.
d. Enter appropriate values for the other mandatory fields (those indicated by red asterisks).
e. Select Auto-Restart, if required.
4. Click Save and Close to save the configuration.
End of procedure
224 Framework 8.1
chapter 8: Setting Up Redundant Components Redundant Client DB Servers
Procedure:Configuring a backup Client DB Server Application object using Configuration Manager
Prerequisites
• Configuration Layer components are installed and running as described in Chapter 5 on page 85.
• Management Layer components are installed and running as described in Chapter 6 on page 121.
• You are logged in to Configuration Manager.
Start of procedure
1. In Configuration Manager, right-click the Environment > Applications folder and select New > Application, which opens the Browse dialog box that lists the available application templates. If a DB Server template is not listed, import the DBServer_<current-version>.apd template file from the Management Framework product CD.
2. In the Browse dialog box, select the DB Server template file, which opens the Properties dialog box for the new DB Server Application object.
3. On the General tab, enter a descriptive name in the Name text box—for example, LogDBS_backup.
4. On the Server Info tab, specify:
a. The host on which the backup DB Server is running.
b. The port that DB Server clients must use to connect to DB Server.
5. On the Start Info tab:
a. In the Working Directory, Command Line, and Command Line Arguments text boxes, do one of the following:• Enter the appropriate information in each of the text boxes. For
information about command-line parameters, see “Starting a Backup Client DB Server” on page 226.
• Type a period (.) in the Working Directory and Command Line text boxes, and leave the Command Line Arguments text box blank. The information will be filled in automatically when the backup DB Server starts, but only if the Installation Package can connect to the primary Configuration Server.
b. Select the Auto-Restart check box.
6. Click OK to save the configuration data.
End of procedure

Deployment Guide 225
chapter 8: Setting Up Redundant Components Redundant Client DB Servers
Procedure:Modifying a primary Client DB Server Application object using Genesys Administrator
Purpose: To enable the primary Client DB Server to work with the backup Client DB Server.
Prerequisites
• Configuration Layer components are installed and running as described in Chapter 5 on page 85.
• Management Layer components are installed and running as described in Chapter 6 on page 121.
• The primary and backup Client DB Server Application objects exist.
• You are logged in to Genesys Administrator.
Start of procedure
1. In Genesys Administrator, go to Provisioning > Environment > Applications, and double-click the DB Server Application object cfg_dbserver to open its properties.
2. In the Server Info section of the Configuration tab:
a. Select the Application object corresponding to the backup DB Server you want to use as the backup server.
b. Select Warm Standby as the redundancy type.
c. Select Auto-Restart if required.
3. Click Save and Close to save the configuration.
End of procedure
Procedure:Modifying a primary Client DB Server Application object using Configuration Manager
Purpose: To enable the primary Client DB Server to work with the backup Client DB Server.
Prerequisites
• Configuration Layer components are installed and running as described in Chapter 5 on page 85.

226 Framework 8.1
chapter 8: Setting Up Redundant Components Redundant Client DB Servers
• Management Layer components are installed and running as described in Chapter 6 on page 121.
• The primary and backup Client DB Server Application objects exist.
• You are logged in to Configuration Manager.
Start of procedure
1. In Configuration Manager, open the Properties dialog box of the DB Server Application object that you want to configure as the primary server.
2. On the Server Info tab:
a. Use the Browse button to locate and select the Application object corresponding to the backup DB Server you want to use as the backup server.
b. Select Warm Standby as the redundancy type.
3. On the Start Info tab, select Auto-Restart if required.
4. Click OK to save the configuration changes.
End of procedure
Starting a Backup Client DB Server
When starting a backup Client DB Server, be sure to use the command line parameter -app to specify the name of the backup DB Server application. For a description of the command-line parameters specific to DB Server, refer to “DB Server” on page 176.
Procedure:Starting a backup Client DB Server
Start of procedure
1. To start the backup DB Server on UNIX, do one of the following:• To start from Genesys Administrator or SCI, refer to “Starting and
Stopping with the Management Layer” on page 173.• To start manually, go to the directory in which the backup DB Server is
installed, and do one of the following:— To use only the required command-line parameters, type the
following command line:sh run.sh

Deployment Guide 227
chapter 8: Setting Up Redundant Components Redundant Message Servers
— To specify the command line yourself, or to use additional command-line parameters, type the following command line:multiserver -host <Configuration Server host> -port <Configuration Server port> -app <DB Server Application>
2. To start the backup DB Server on Windows, do one of the following:• To start as a Windows Service, refer to “Starting and Stopping with
Windows Services Manager” on page 191.• To start from Genesys Administrator or SCI, refer to “Starting and
Stopping with the Management Layer” on page 173.• To start manually, do one of the following:
— Use the Start > Programs menu.— To use only the required command-line parameters, go to the
directory in which the backup DB Server is installed, and double-click the startServer.bat file.
— To specify the command line yourself, or to use additional command-line parameters, open the MS-DOS window, go to the directory in which the backup DB Server is installed, and type the following command line:multiserver.exe -host <Configuration Server host> -port <Configuration Server port> -app <DB Server Application>
End of procedure
Redundant Message Servers
Redundancy
Redundant Message Servers support only the warm standby redundancy type, with the addition that the data is synchronized between the primary and backup servers.
Setting Up Redundant Message Servers
The procedures in this section describe how to install and set up redundant Message Servers.
Installation Recommendations
If you are installing the primary and backup Message Servers on the same host computer:
• Install them in different directories.
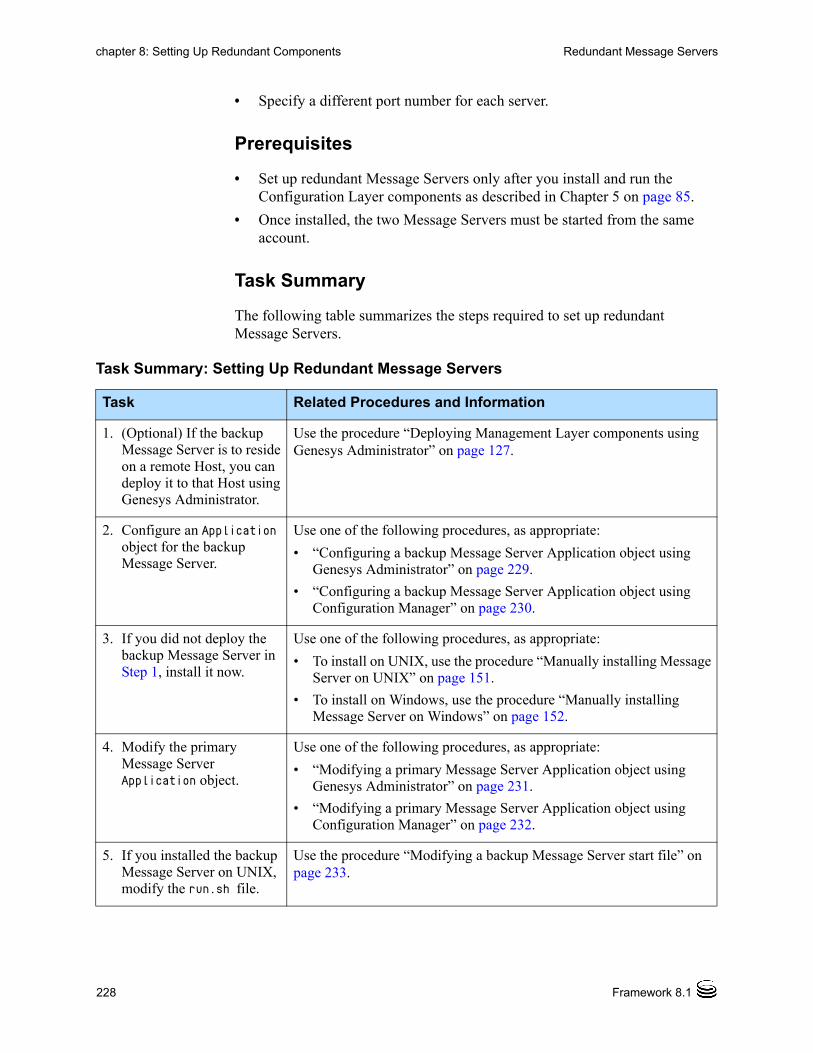
228 Framework 8.1
chapter 8: Setting Up Redundant Components Redundant Message Servers
• Specify a different port number for each server.
Prerequisites
• Set up redundant Message Servers only after you install and run the Configuration Layer components as described in Chapter 5 on page 85.
• Once installed, the two Message Servers must be started from the same account.
Task Summary
The following table summarizes the steps required to set up redundant Message Servers.
Task Summary: Setting Up Redundant Message Servers
Task Related Procedures and Information
1. (Optional) If the backup Message Server is to reside on a remote Host, you can deploy it to that Host using Genesys Administrator.
Use the procedure “Deploying Management Layer components using Genesys Administrator” on page 127.
2. Configure an Application object for the backup Message Server.
Use one of the following procedures, as appropriate:
• “Configuring a backup Message Server Application object using Genesys Administrator” on page 229.
• “Configuring a backup Message Server Application object using Configuration Manager” on page 230.
3. If you did not deploy the backup Message Server in Step 1, install it now.
Use one of the following procedures, as appropriate:
• To install on UNIX, use the procedure “Manually installing Message Server on UNIX” on page 151.
• To install on Windows, use the procedure “Manually installing Message Server on Windows” on page 152.
4. Modify the primary Message Server Application object.
Use one of the following procedures, as appropriate:
• “Modifying a primary Message Server Application object using Genesys Administrator” on page 231.
• “Modifying a primary Message Server Application object using Configuration Manager” on page 232.
5. If you installed the backup Message Server on UNIX, modify the run.sh file.
Use the procedure “Modifying a backup Message Server start file” on page 233.
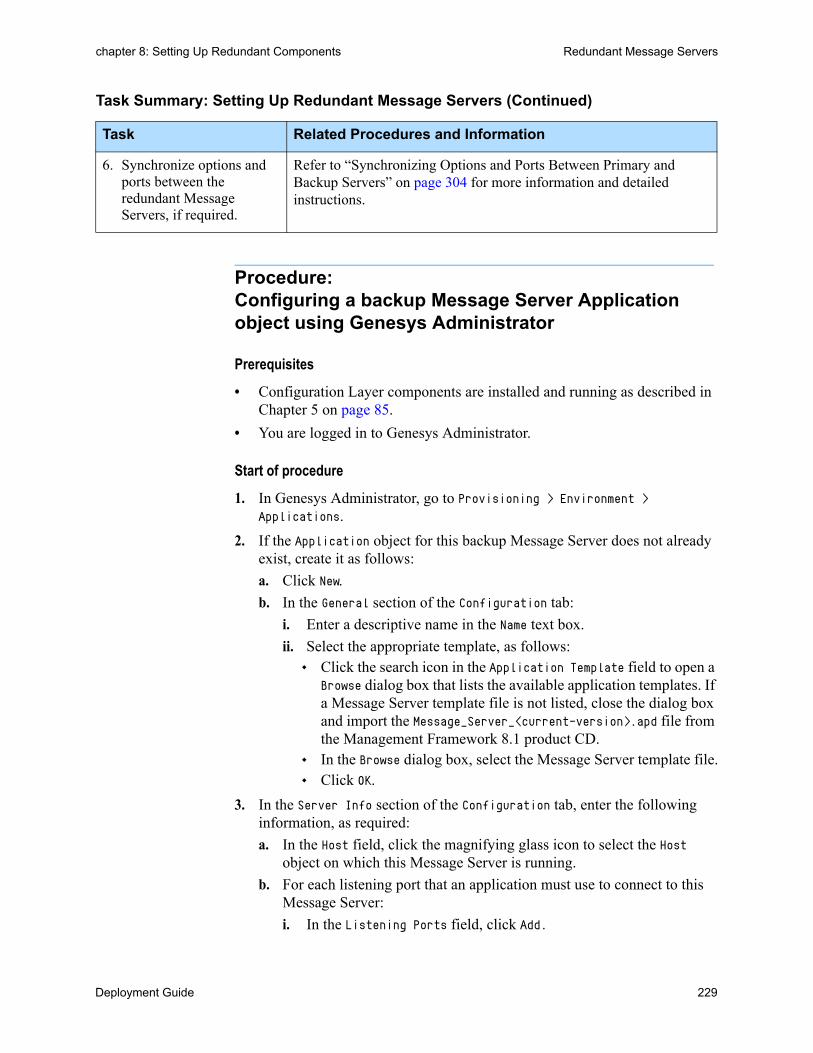
Deployment Guide 229
chapter 8: Setting Up Redundant Components Redundant Message Servers
Procedure:Configuring a backup Message Server Application object using Genesys Administrator
Prerequisites
• Configuration Layer components are installed and running as described in Chapter 5 on page 85.
• You are logged in to Genesys Administrator.
Start of procedure
1. In Genesys Administrator, go to Provisioning > Environment > Applications.
2. If the Application object for this backup Message Server does not already exist, create it as follows:
a. Click New.
b. In the General section of the Configuration tab:
i. Enter a descriptive name in the Name text box.
ii. Select the appropriate template, as follows: Click the search icon in the Application Template field to open a
Browse dialog box that lists the available application templates. If a Message Server template file is not listed, close the dialog box and import the Message_Server_<current-version>.apd file from the Management Framework 8.1 product CD.
In the Browse dialog box, select the Message Server template file. Click OK.
3. In the Server Info section of the Configuration tab, enter the following information, as required:
a. In the Host field, click the magnifying glass icon to select the Host object on which this Message Server is running.
b. For each listening port that an application must use to connect to this Message Server:
i. In the Listening Ports field, click Add.
6. Synchronize options and ports between the redundant Message Servers, if required.
Refer to “Synchronizing Options and Ports Between Primary and Backup Servers” on page 304 for more information and detailed instructions.
Task Summary: Setting Up Redundant Message Servers (Continued)
Task Related Procedures and Information

230 Framework 8.1
chapter 8: Setting Up Redundant Components Redundant Message Servers
ii. Enter the port properties in the Port Info dialog box.
iii. Click OK.
c. For the Working Directory, Command Line, and Command Line Arguments fields, do one of the following:• Enter the appropriate information in each of the text boxes. For
information about command-line parameters, see “Starting a Backup Message Server” on page 233.
• Type a period (.) in the Working Directory and Command Line text boxes, and leave the Command Line Arguments text box blank. The information will be filled in automatically when you install Message Server, but only if the Installation Package can connect to Configuration Server.
d. Select the Auto-Restart check box.
4. Click Save and Close in the toolbar to save the new object.
End of procedure
Procedure:Configuring a backup Message Server Application object using Configuration Manager
Prerequisites
• Configuration Layer components are installed and running as described in Chapter 5 on page 85.
• You are logged in to Configuration Manager.
Start of procedure
1. In Configuration Manager, right-click the Environment > Applications folder and select New > Application, which opens the Browse dialog box that lists the available application templates. If a Message Server template is not listed, import the Message_Server_<current-version>.apd file from the Management Framework product CD.
2. In the Browse dialog box, select the Message Server template file, which opens the Properties dialog box for the new Message Server Application object.
3. On the General tab, enter a descriptive name in the Name text box—for example, MS_backup.
4. On the Server Info tab, specify:
a. The host on which the backup Message Server is to be installed.
b. The communication ports that clients must use to connect to this Message Server.

Deployment Guide 231
chapter 8: Setting Up Redundant Components Redundant Message Servers
5. On the Start Info tab:
a. In the Working Directory, Command Line, and Command Line Arguments text boxes, do one of the following:• Enter the appropriate information in each of the text boxes. For
information about command-line parameters, see “Starting a Backup Message Server” on page 233.
• Type a period (.) in the Working Directory and Command Line text boxes, and leave the Command Line Arguments text box blank. The information will be filled in automatically when you install the backup Message Server, but only if the Installation Package can connect to the primary Configuration Server.
b. Select the Auto-Restart check box.
6. Click OK to create the Application object for the backup Message Server.
7. Open the Properties dialog box of the backup Message Server Application object that you just created.
8. On the Security tab, select This Account, making sure that the account name matches the name of the Master Account.
9. Click OK to save the configuration changes.
End of procedure
Procedure:Modifying a primary Message Server Application object using Genesys Administrator
Purpose: To enable the primary Message Server to work with the backup Message Server.
Prerequisites
• Configuration Layer components are installed and running as described in Chapter 5 on page 85.
• The primary and backup Message Server Application objects exist.
• You are logged in to Genesys Administrator.
Start of procedure
1. In Genesys Administrator, go to Provisioning > Environment > Applications, and double-click the primary Message Server Application object to open its properties.
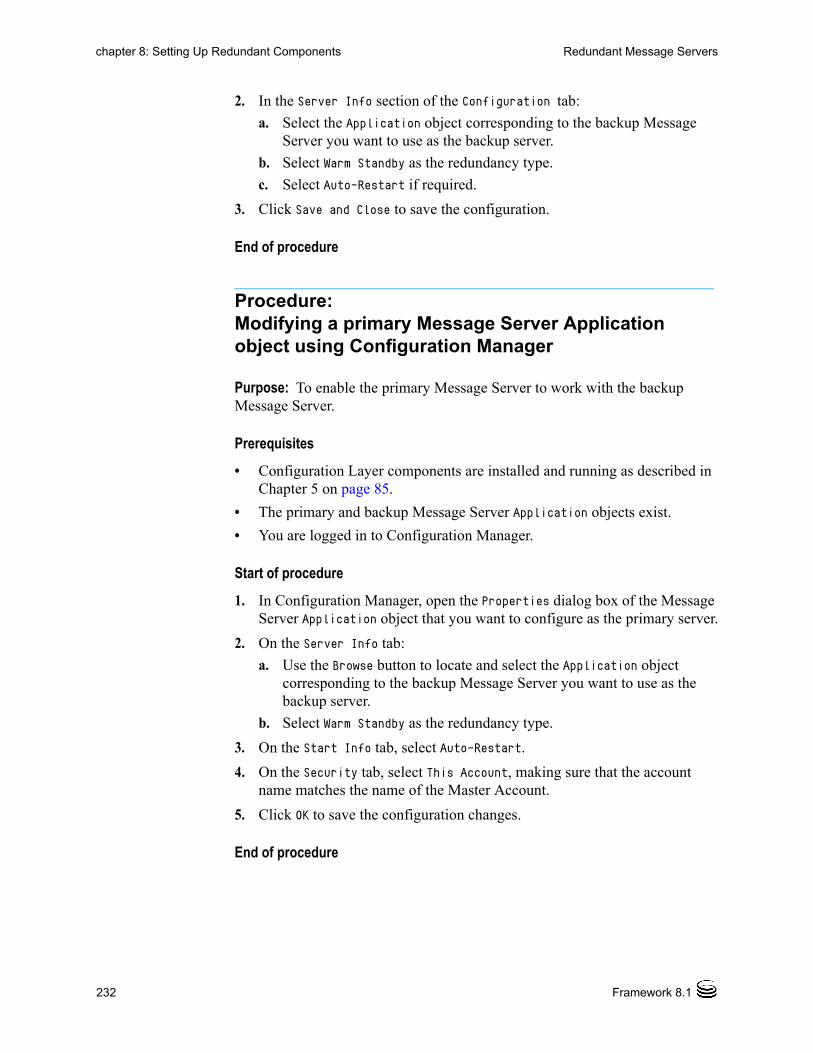
232 Framework 8.1
chapter 8: Setting Up Redundant Components Redundant Message Servers
2. In the Server Info section of the Configuration tab:
a. Select the Application object corresponding to the backup Message Server you want to use as the backup server.
b. Select Warm Standby as the redundancy type.
c. Select Auto-Restart if required.
3. Click Save and Close to save the configuration.
End of procedure
Procedure:Modifying a primary Message Server Application object using Configuration Manager
Purpose: To enable the primary Message Server to work with the backup Message Server.
Prerequisites
• Configuration Layer components are installed and running as described in Chapter 5 on page 85.
• The primary and backup Message Server Application objects exist.
• You are logged in to Configuration Manager.
Start of procedure
1. In Configuration Manager, open the Properties dialog box of the Message Server Application object that you want to configure as the primary server.
2. On the Server Info tab:
a. Use the Browse button to locate and select the Application object corresponding to the backup Message Server you want to use as the backup server.
b. Select Warm Standby as the redundancy type.
3. On the Start Info tab, select Auto-Restart.
4. On the Security tab, select This Account, making sure that the account name matches the name of the Master Account.
5. Click OK to save the configuration changes.
End of procedure

Deployment Guide 233
chapter 8: Setting Up Redundant Components Redundant Message Servers
Procedure:Modifying a backup Message Server start file
Purpose: To enable the backup Message Server application to be started properly. This procedure is required only for backup Message Servers installed on UNIX platforms.
Start of procedure
1. In a text editor, open the run.sh file.
2. Add the following at the end of the command line in the file:-host <configuration server host> -port <configuration server port> -app <application object name>
End of procedure
Starting a Backup Message Server
When starting a backup Message Server, be sure to use the following command-line options:
-host The name of the host on which Configuration Server is running.
-port The communication port that client applications must use to connect to Configuration Server.
-app The exact name of the backup Message Server Application object as configured in the Configuration Database.
If you installed the backup Message Server on UNIX, make sure that you modified the run.sh file accordingly (see the procedure “Modifying a backup Message Server start file” on page 233). For a description of the command-line parameters specific to Message Server, refer to “Message Server” on page 181.
Procedure:Starting a backup Message Server
Start of procedure
1. To start the backup Message Server on UNIX, do one of the following:• To start from Genesys Administrator or SCI, refer to “Starting and
Stopping with the Management Layer” on page 173.

234 Framework 8.1
chapter 8: Setting Up Redundant Components Redundant Solution Control Servers
• To start manually, go to the directory in which Message Server is installed, and do one of the following:— To use only the required command-line parameters, type the
following command line:sh run.sh
— To specify the command line yourself, or to use additional command-line parameters, type the following command line:MessageServer -host <Configuration Server host> -port <Configuration Server port> -app <backup Message Server Application> [<additional parameters and arguments as required>]
2. To start the backup Message Server on Windows, do one of the following:• To start as a Windows Service, refer to “Starting and Stopping with
Windows Services Manager” on page 191.• To start from Genesys Administrator or SCI, refer to “Starting and
Stopping with the Management Layer” on page 173.• To start manually, do one of the following:
— Use the Start > Programs menu.— To use only the required command-line parameters, go to the
directory in which Message Server is installed, and double-click the startServer.bat file.
— To specify the command line yourself, or to use additional command-line parameters, open the MS-DOS window, go to the directory in which Message Server is installed, and type the following command line:MessageServer.exe -host <Configuration Server host> -port <Configuration Server port> -app <backup Message Server Application> [<additional parameters and arguments as required>]
End of procedure
Redundant Solution Control Servers
Redundancy
Redundant Solution Control Servers support only the warm standby redundancy type, with the addition that the data is synchronized between the primary and backup servers.
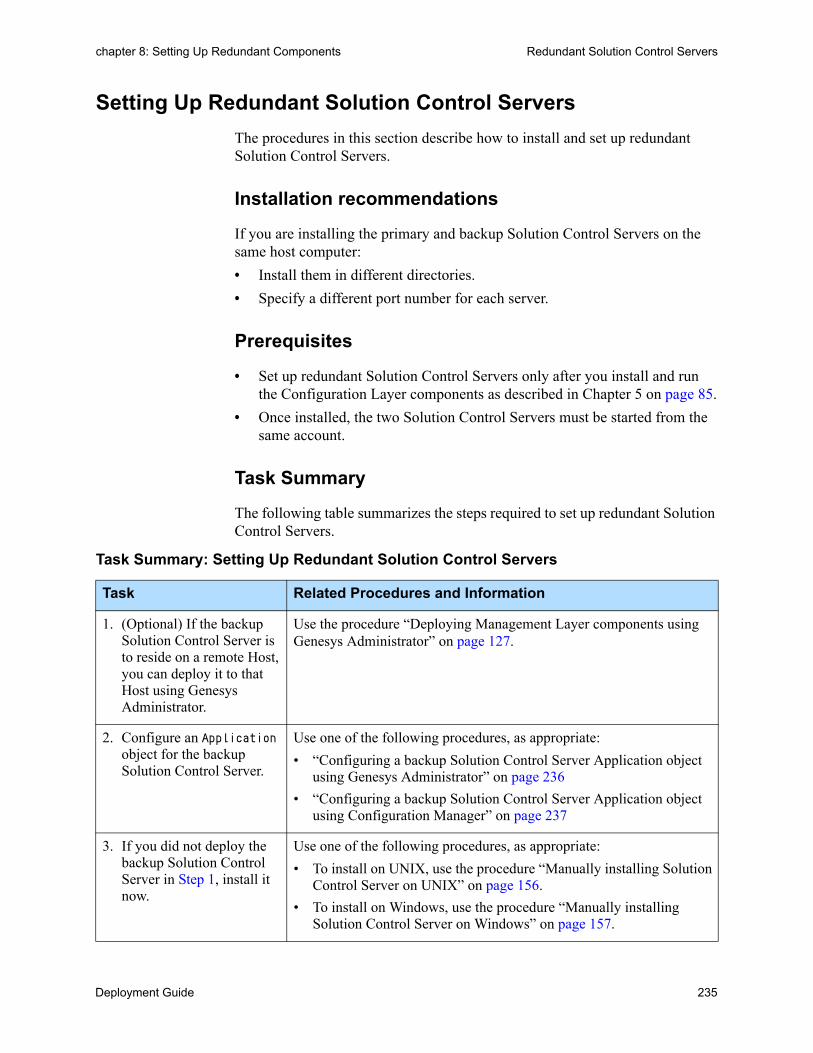
Deployment Guide 235
chapter 8: Setting Up Redundant Components Redundant Solution Control Servers
Setting Up Redundant Solution Control Servers
The procedures in this section describe how to install and set up redundant Solution Control Servers.
Installation recommendations
If you are installing the primary and backup Solution Control Servers on the same host computer:
• Install them in different directories.
• Specify a different port number for each server.
Prerequisites
• Set up redundant Solution Control Servers only after you install and run the Configuration Layer components as described in Chapter 5 on page 85.
• Once installed, the two Solution Control Servers must be started from the same account.
Task Summary
The following table summarizes the steps required to set up redundant Solution Control Servers.
Task Summary: Setting Up Redundant Solution Control Servers
Task Related Procedures and Information
1. (Optional) If the backup Solution Control Server is to reside on a remote Host, you can deploy it to that Host using Genesys Administrator.
Use the procedure “Deploying Management Layer components using Genesys Administrator” on page 127.
2. Configure an Application object for the backup Solution Control Server.
Use one of the following procedures, as appropriate:
• “Configuring a backup Solution Control Server Application object using Genesys Administrator” on page 236
• “Configuring a backup Solution Control Server Application object using Configuration Manager” on page 237
3. If you did not deploy the backup Solution Control Server in Step 1, install it now.
Use one of the following procedures, as appropriate:
• To install on UNIX, use the procedure “Manually installing Solution Control Server on UNIX” on page 156.
• To install on Windows, use the procedure “Manually installing Solution Control Server on Windows” on page 157.
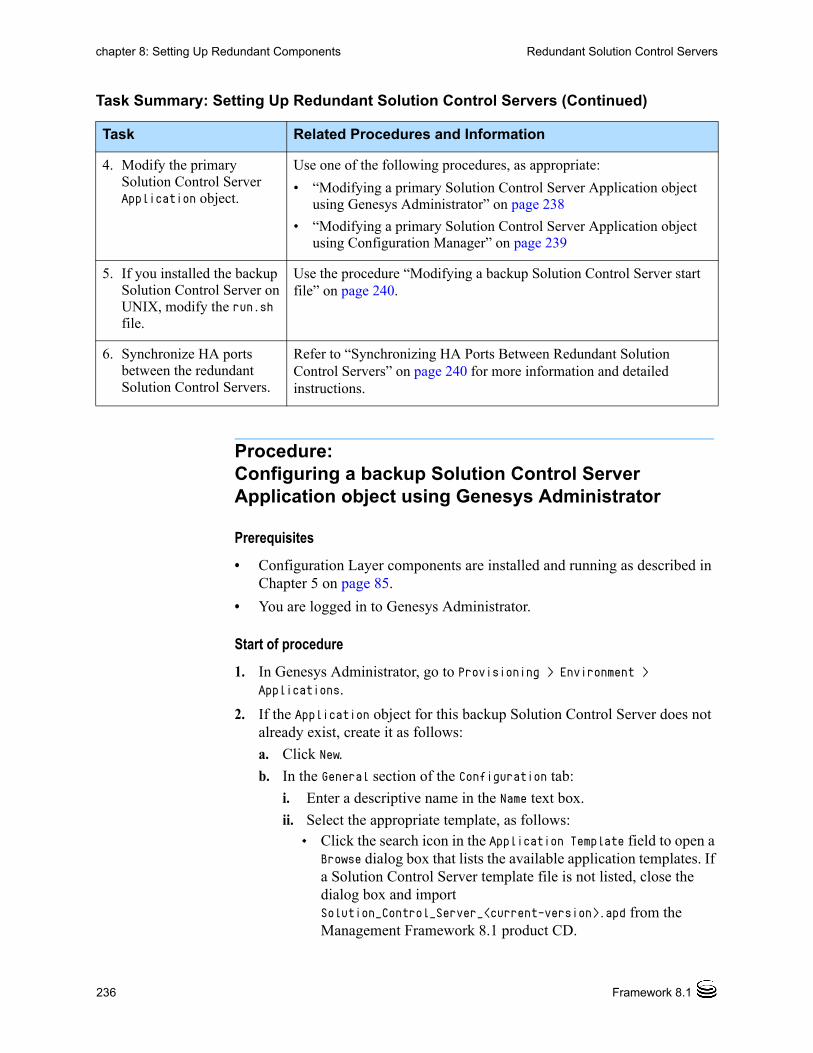
236 Framework 8.1
chapter 8: Setting Up Redundant Components Redundant Solution Control Servers
Procedure:Configuring a backup Solution Control Server Application object using Genesys Administrator
Prerequisites
• Configuration Layer components are installed and running as described in Chapter 5 on page 85.
• You are logged in to Genesys Administrator.
Start of procedure
1. In Genesys Administrator, go to Provisioning > Environment > Applications.
2. If the Application object for this backup Solution Control Server does not already exist, create it as follows:
a. Click New.
b. In the General section of the Configuration tab:
i. Enter a descriptive name in the Name text box.
ii. Select the appropriate template, as follows: Click the search icon in the Application Template field to open a
Browse dialog box that lists the available application templates. If a Solution Control Server template file is not listed, close the dialog box and import Solution_Control_Server_<current-version>.apd from the Management Framework 8.1 product CD.
4. Modify the primary Solution Control Server Application object.
Use one of the following procedures, as appropriate:
• “Modifying a primary Solution Control Server Application object using Genesys Administrator” on page 238
• “Modifying a primary Solution Control Server Application object using Configuration Manager” on page 239
5. If you installed the backup Solution Control Server on UNIX, modify the run.sh file.
Use the procedure “Modifying a backup Solution Control Server start file” on page 240.
6. Synchronize HA ports between the redundant Solution Control Servers.
Refer to “Synchronizing HA Ports Between Redundant Solution Control Servers” on page 240 for more information and detailed instructions.
Task Summary: Setting Up Redundant Solution Control Servers (Continued)
Task Related Procedures and Information

Deployment Guide 237
chapter 8: Setting Up Redundant Components Redundant Solution Control Servers
In the Browse dialog box, select the Solution Control Server template file.
Click OK.
3. In the Server Info section of the Configuration tab, enter the following information, as required:
a. In the Host field, click the magnifying glass icon to select the Host object on which this Solution Control Server is running.
b. For each listening port that an application must use to connect to this Solution Control Server:
i. In the Listening Ports field, click Add.
ii. Enter the port properties in the Port Info dialog box.
iii. Click OK.
c. For the Working Directory, Command Line, and Command Line Arguments fields, do one of the following:• Enter the appropriate information in each of the text boxes. For
information about command-line parameters, see “Starting a Backup Solution Control Server” on page 242.
• Type a period (.) in the Working Directory and Command Line text boxes, and leave the Command Line Arguments text box blank. The information will be filled in automatically when you install Solution Control Server, but only if the Installation Package can connect to Configuration Server.
d. Select the Auto-Restart check box.
4. Click Save and Close in the toolbar to save the new object.
End of procedure
Procedure:Configuring a backup Solution Control Server Application object using Configuration Manager
Prerequisites
• Configuration Layer components are installed and running as described in Chapter 5 on page 85.
• You are logged in to Configuration Manager.
Start of procedure
1. In Configuration Manager, right-click the Environment > Applications folder and select New > Application, which opens the Browse dialog box that lists the available application templates. If a Solution Control Server
238 Framework 8.1
chapter 8: Setting Up Redundant Components Redundant Solution Control Servers
template is not listed, import the Solution_Control_Server_<current-version>.apd template file from the Management Framework CD.
2. In the Browse dialog box, select the Solution Control Server template file, which opens the Properties dialog box for the new Solution Control, Server Application object.
3. On the General tab, enter a descriptive name in the Name text box—for example, SCS_backup.
4. On the Server Info tab, specify:
a. The host on which the backup Solution Control Server is to be installed.
b. The communication ports that clients must use to connect to this Solution Control Server.
5. On the Start Info tab:
a. In the Working Directory, Command Line, and Command Line Arguments text boxes, do one of the following:• Enter the appropriate information in each of the text boxes. For
information about command-line parameters, see “Starting a Backup Solution Control Server” on page 242.
• Type a period (.) in the Working Directory and Command Line text boxes, and leave the Command Line Arguments text box blank. The information will be filled in automatically when you install the backup Solution Control Server, but only if the Installation Package can connect to the primary Configuration Server.
b. Select the Auto-Restart check box.
6. Click OK to create the Application object for the backup Solution Control Server.
7. Open the Properties dialog box of the backup Solution Control Server Application object.
8. On the Security tab, select This Account, making sure that the account name matches the name of the Master Account.
9. Click OK to save the configuration changes.
End of procedure
Procedure:Modifying a primary Solution Control Server Application object using Genesys Administrator
Purpose: To enable the primary Solution Control Server to work with the backup Solution Control Server.
Deployment Guide 239
chapter 8: Setting Up Redundant Components Redundant Solution Control Servers
Prerequisites
• Configuration Layer components are installed and running as described in Chapter 5 on page 85.
• The primary and backup Solution Control Server Application objects exist.
• You are logged in to Genesys Administrator.
Start of procedure
1. In Genesys Administrator, go to Provisioning > Environment > Applications, and double-click the primary Solution Control Server Application object to open its properties.
2. In the Server Info section of the Configuration tab:
a. Select the Application object corresponding to the backup Solution Control Server you want to use as the Backup Server.
b. Select Warm Standby as the redundancy type.
c. Select Auto-Restart if required.
3. Click Save and Close to save the configuration.
End of procedure
Procedure:Modifying a primary Solution Control Server Application object using Configuration Manager
Purpose: To enable the primary Solution Control Server to work with the backup Solution Control Server.
Prerequisites
• Configuration Layer components are installed and running as described in Chapter 5 on page 85.
• The primary and backup Solution Control Server Application objects exist.
• You are logged in to Configuration Manager.
Start of procedure
1. In Configuration Manager, open the Properties dialog box of the Solution Control Server Application object that you want to configure as the primary server.
240 Framework 8.1
chapter 8: Setting Up Redundant Components Redundant Solution Control Servers
2. On the Server Info tab:
a. Use the Browse button to locate and select the Application object corresponding to the backup Solution Control Server you want to use as the backup server.
b. Select Warm Standby as the redundancy type.
3. On the Start Info tab, select Auto-Restart.
4. On the Security tab, select This Account, making sure that the account name matches the name of the Master Account.
5. Click OK to save the configuration changes.
End of procedure
Procedure:Modifying a backup Solution Control Server start file
Purpose: To enable the backup Solution Control Server application to be started properly. This procedure is required only for backup Solution Control Servers installed on UNIX platforms.
Start of procedure
1. In a text editor, open the run.sh file.
2. Add the following at the end of the command line in the file:-host <configuration server host> -port <configuration server port> -app <Solution Control Server application object name>
End of procedure
Synchronizing HA Ports Between Redundant Solution Control Servers
When Solution Control Servers operate in a high-availability (HA) environment, the backup SCS must be ready to take on the primary role when required. This requires that both Solution Control Servers are running and that they must have the same information. When you configure redundant Solution Control Servers to operate with the warm standby redundancy type, the primary SCS uses the connection to the backup to deliver synchronization updates. Genesys recommends that you enable the Advanced Disconnect Detection Protocol (ADDP), described on page 303, for this connection.
Currently, Genesys Administrator does not support this functionality.
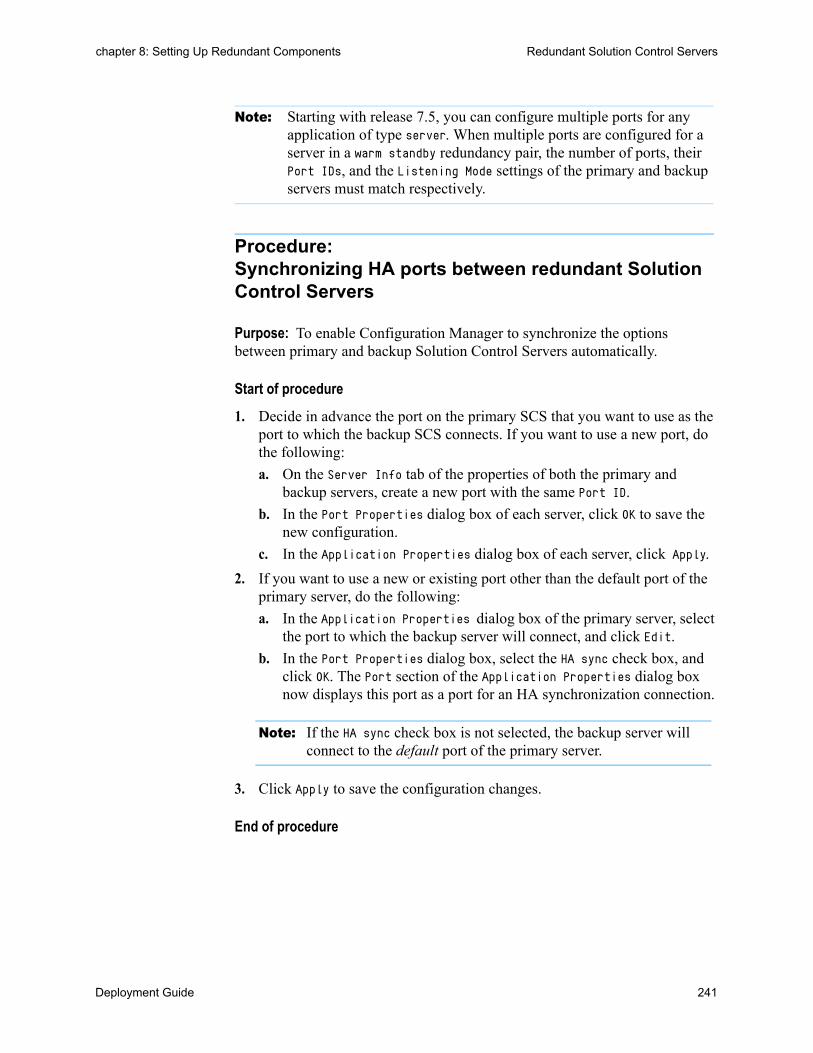
Deployment Guide 241
chapter 8: Setting Up Redundant Components Redundant Solution Control Servers
Procedure:Synchronizing HA ports between redundant Solution Control Servers
Purpose: To enable Configuration Manager to synchronize the options between primary and backup Solution Control Servers automatically.
Start of procedure
1. Decide in advance the port on the primary SCS that you want to use as the port to which the backup SCS connects. If you want to use a new port, do the following:
a. On the Server Info tab of the properties of both the primary and backup servers, create a new port with the same Port ID.
b. In the Port Properties dialog box of each server, click OK to save the new configuration.
c. In the Application Properties dialog box of each server, click Apply.
2. If you want to use a new or existing port other than the default port of the primary server, do the following:
a. In the Application Properties dialog box of the primary server, select the port to which the backup server will connect, and click Edit.
b. In the Port Properties dialog box, select the HA sync check box, and click OK. The Port section of the Application Properties dialog box now displays this port as a port for an HA synchronization connection.
Note: If the HA sync check box is not selected, the backup server will connect to the default port of the primary server.
3. Click Apply to save the configuration changes.
End of procedure
Note: Starting with release 7.5, you can configure multiple ports for any application of type server. When multiple ports are configured for a server in a warm standby redundancy pair, the number of ports, their Port IDs, and the Listening Mode settings of the primary and backup servers must match respectively.
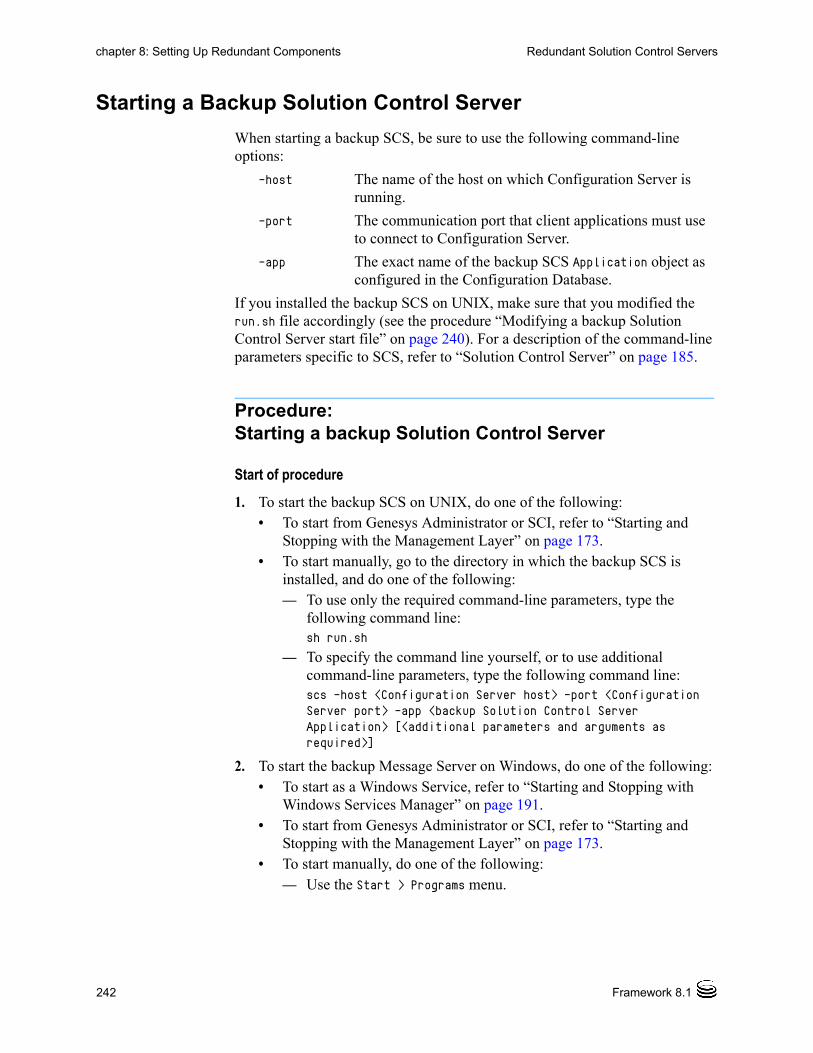
242 Framework 8.1
chapter 8: Setting Up Redundant Components Redundant Solution Control Servers
Starting a Backup Solution Control Server
When starting a backup SCS, be sure to use the following command-line options:
-host The name of the host on which Configuration Server is running.
-port The communication port that client applications must use to connect to Configuration Server.
-app The exact name of the backup SCS Application object as configured in the Configuration Database.
If you installed the backup SCS on UNIX, make sure that you modified the run.sh file accordingly (see the procedure “Modifying a backup Solution Control Server start file” on page 240). For a description of the command-line parameters specific to SCS, refer to “Solution Control Server” on page 185.
Procedure:Starting a backup Solution Control Server
Start of procedure
1. To start the backup SCS on UNIX, do one of the following:• To start from Genesys Administrator or SCI, refer to “Starting and
Stopping with the Management Layer” on page 173.• To start manually, go to the directory in which the backup SCS is
installed, and do one of the following:— To use only the required command-line parameters, type the
following command line:sh run.sh
— To specify the command line yourself, or to use additional command-line parameters, type the following command line:scs -host <Configuration Server host> -port <Configuration Server port> -app <backup Solution Control Server Application> [<additional parameters and arguments as required>]
2. To start the backup Message Server on Windows, do one of the following:• To start as a Windows Service, refer to “Starting and Stopping with
Windows Services Manager” on page 191.• To start from Genesys Administrator or SCI, refer to “Starting and
Stopping with the Management Layer” on page 173.• To start manually, do one of the following:
— Use the Start > Programs menu.
Deployment Guide 243
chapter 8: Setting Up Redundant Components Redundant SNMP Master Agents
— To use only the required command-line parameters, go to the directory in which the backup SCS is installed, and double-click the startServer.bat file.
— To specify the command line yourself, or to use additional command-line parameters, open the MS-DOS window, go to the directory in which the backup SCS is installed, and type the following command line:scs.exe -host <Configuration Server host> -port <Configuration Server port> -app <Solution Control Server Application> [<additional parameters and arguments as required>]
End of procedure
Redundant SNMP Master AgentsThe Management Layer supports configuration with a redundant pair of SNMP master agents. Redundant configuration assumes the presence of two SNMP master agent applications, one primary and one backup. When Solution Control Server loses a connection with the primary SNMP master agent, SCS switches all NMS communications to the backup SNMP master agent.
If your SNMP master agent application can operate in a redundant mode (as does, for example, Genesys SNMP Master Agent), and you would like to deploy this configuration, follow the instructions in this section.
Redundancy
Redundant SNMP Master Agents support only the warm standby redundancy type.
Setting Up Redundant SNMP Master Agents
The procedures in this section describe how to install and set up redundant SNMP Master Agents.
Installation Recommendations
If you are installing the primary and backup SNMP Master Agents on the same host computer:
• Install them in different directories.
• Specify a different port number for each server.
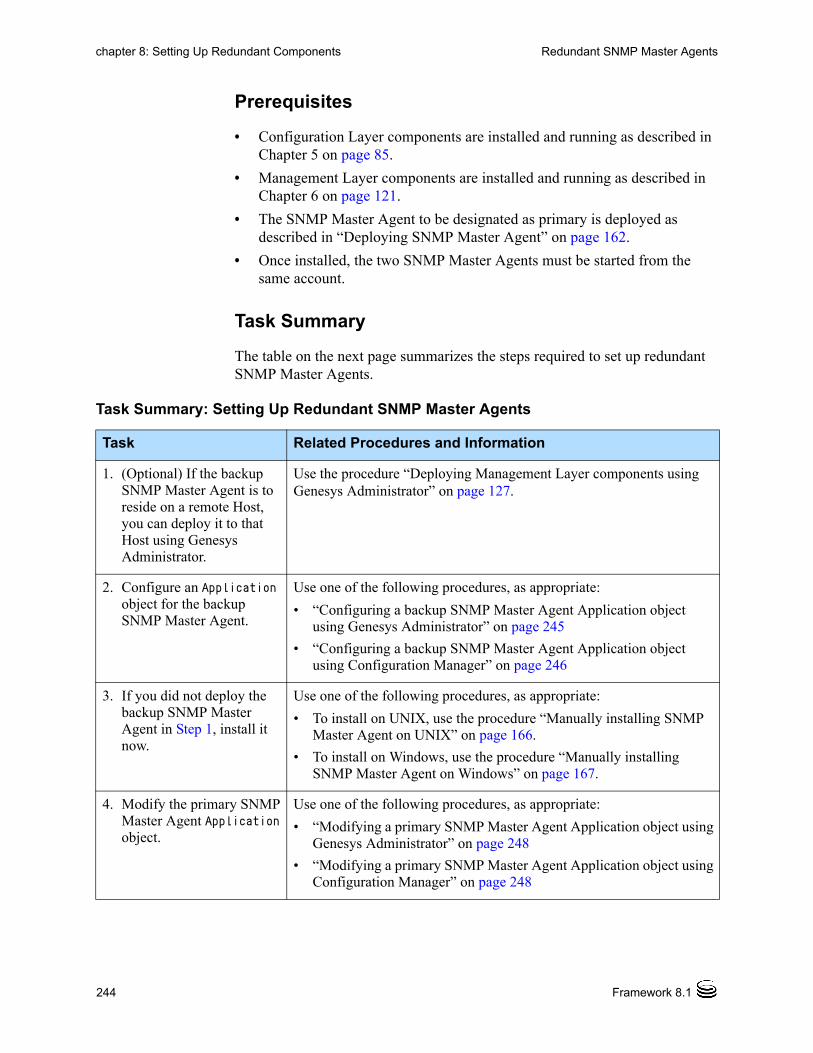
244 Framework 8.1
chapter 8: Setting Up Redundant Components Redundant SNMP Master Agents
Prerequisites
• Configuration Layer components are installed and running as described in Chapter 5 on page 85.
• Management Layer components are installed and running as described in Chapter 6 on page 121.
• The SNMP Master Agent to be designated as primary is deployed as described in “Deploying SNMP Master Agent” on page 162.
• Once installed, the two SNMP Master Agents must be started from the same account.
Task Summary
The table on the next page summarizes the steps required to set up redundant SNMP Master Agents.
Task Summary: Setting Up Redundant SNMP Master Agents
Task Related Procedures and Information
1. (Optional) If the backup SNMP Master Agent is to reside on a remote Host, you can deploy it to that Host using Genesys Administrator.
Use the procedure “Deploying Management Layer components using Genesys Administrator” on page 127.
2. Configure an Application object for the backup SNMP Master Agent.
Use one of the following procedures, as appropriate:
• “Configuring a backup SNMP Master Agent Application object using Genesys Administrator” on page 245
• “Configuring a backup SNMP Master Agent Application object using Configuration Manager” on page 246
3. If you did not deploy the backup SNMP Master Agent in Step 1, install it now.
Use one of the following procedures, as appropriate:
• To install on UNIX, use the procedure “Manually installing SNMP Master Agent on UNIX” on page 166.
• To install on Windows, use the procedure “Manually installing SNMP Master Agent on Windows” on page 167.
4. Modify the primary SNMP Master Agent Application object.
Use one of the following procedures, as appropriate:
• “Modifying a primary SNMP Master Agent Application object using Genesys Administrator” on page 248
• “Modifying a primary SNMP Master Agent Application object using Configuration Manager” on page 248

Deployment Guide 245
chapter 8: Setting Up Redundant Components Redundant SNMP Master Agents
Procedure:Configuring a backup SNMP Master Agent Application object using Genesys Administrator
Prerequisites
• Configuration Layer components are installed and running as described in Chapter 5 on page 85.
• Management Layer components are installed and running as described in Chapter 6 on page 121.
• The SNMP Master Agent to be designated as primary is deployed as described in “Deploying SNMP Master Agent” on page 162.
• You are logged in to Genesys Administrator.
Start of procedure
1. In Genesys Administrator, go to Provisioning > Environment > Applications.
2. If the Application object for this backup SNMP Master Agent does not already exist, create it as follows:
a. Click New.
b. In the General section of the Configuration tab:
i. Enter a descriptive name in the Name text box.
ii. Select the appropriate template, as follows: Click the search icon in the Application Template field to open a
Browse dialog box that lists the available application templates. If an SNMP Master Agent template file is not listed, close the dialog box and import the template file SNMP_Master_Agent_<current-version>.apd from the Management Framework 8.1 product CD.
5. If you installed the backup SNMP Master Agent on UNIX, modify the run.sh file.
Use the procedure “Modifying a backup SNMP Master Agent start file” on page 249.
6. Synchronize options and ports between the redundant SNMP Master Agents, if required.
Refer to “Synchronizing Options and Ports Between Primary and Backup Servers” on page 304 for more information and detailed instructions.
Task Summary: Setting Up Redundant SNMP Master Agents (Continued)
Task Related Procedures and Information
246 Framework 8.1
chapter 8: Setting Up Redundant Components Redundant SNMP Master Agents
In the Browse dialog box, select the SNMP Master Agent template file.
Click OK.
3. In the Server Info section of the Configuration tab, enter the following information, as required:
a. In the Host field, click the magnifying glass icon to select the Host object on which this SNMP Master Agent is running.
b. For each listening port that an application must use to connect to SNMP Master Agent:
i. In the Listening Ports field, click Add.
ii. Enter the port properties in the Port Info dialog box.
iii. Click OK.
c. For the Working Directory, Command Line, and Command Line Arguments fields, do one of the following:• Enter the appropriate information in each of the text boxes. For
information about command-line parameters, see “Starting a Backup SNMP Master Agent” on page 250.
• Type a period (.) in the Working Directory and Command Line text boxes, and leave the Command Line Arguments text box blank. The information will be filled in automatically when you install the backup SNMP Master Agent, but only if the Installation Package can connect to the primary Configuration Server.
d. Select the Auto-Restart check box.
4. Click Save and Close in the toolbar to save the new object. The new object will appear in the list of applications.
End of procedure
Procedure:Configuring a backup SNMP Master Agent Application object using Configuration Manager
Prerequisites
• Configuration Layer components are installed and running as described in Chapter 5 on page 85.
• Management Layer components are installed and running as described in Chapter 6 on page 121.
• The SNMP Master Agent to be designated as primary is deployed as described in “Deploying SNMP Master Agent” on page 162.
• You are logged in to Configuration Manager.

Deployment Guide 247
chapter 8: Setting Up Redundant Components Redundant SNMP Master Agents
Start of procedure
1. In Configuration Manager, right-click the Environment > Applications folder and select New > Application, which opens the Browse dialog box that lists the available application templates. If an SNMP Master Agent template is not listed, import the SNMP_Master_Agent_<current-version>.apd template file from the Management Framework product CD.
2. In the Browse dialog box, select the SNMP Master Agent template file, which opens the Properties dialog box for the new SNMP Master Agent Application object.
3. On the General tab, enter a descriptive name in the Name text box—for example, SNMP_MA_backup.
4. On the Server Info tab, specify:
a. The host on which the backup SNMP Master Agent is to be installed.
b. The communication ports that clients must use to connect to this SNMP Master Agent.
5. On the Start Info tab:
a. In the Working Directory, Command Line, and Command Line Arguments text boxes, do one of the following:• Enter the appropriate information in each of the text boxes. For
information about command-line parameters, see “Starting a Backup SNMP Master Agent” on page 250.
• Type a period (.) in the Working Directory and Command Line text boxes, and leave the Command Line Arguments text box blank. The information will be filled in automatically when you install the backup SNMP Master Agent, but only if the Installation Package can connect to the primary Configuration Server.
b. Select the Auto-Restart check box.
6. Click OK to create the Application object for the backup SNMP Master Agent.
7. Open the Properties dialog box of the backup SNMP Master Agent Application object.
8. On the Security tab, select This Account, making sure that the account name matches the name of the Master Account.
9. Click OK to save the configuration data.
End of procedure
248 Framework 8.1
chapter 8: Setting Up Redundant Components Redundant SNMP Master Agents
Procedure:Modifying a primary SNMP Master Agent Application object using Genesys Administrator
Purpose: To enable the primary SNMP Master Agent to work with the backup SNMP Master Agent.
Prerequisites
• Configuration Layer components are installed and running as described in Chapter 5 on page 85.
• Management Layer components are installed and running as described in Chapter 6 on page 121.
• The SNMP Master Agent to be designated as primary is deployed as described in “Deploying SNMP Master Agent” on page 162.
• The primary and backup SNMP Master Agent Application objects exist.
• You are logged in to Genesys Administrator.
Start of procedure
1. In Genesys Administrator, go to Provisioning > Environment > Applications, and double-click the primary SNMP Master Agent Application object to open its properties.
2. In the Server Info section of the Configuration tab:
a. Select the Application object corresponding to the backup SNMP Master Agent you want to use as the backup server.
b. Select Warm Standby as the redundancy type.
c. Select Auto-Restart.
3. Click Save and Close to save the configuration.
End of procedure
Procedure:Modifying a primary SNMP Master Agent Application object using Configuration Manager
Purpose: To enable the primary SNMP Master Agent Application object to work with the backup SNMP Master Agent.

Deployment Guide 249
chapter 8: Setting Up Redundant Components Redundant SNMP Master Agents
Prerequisites
• Configuration Layer components are installed and running as described in Chapter 5 on page 85.
• Management Layer components are installed and running as described in Chapter 6 on page 121.
• The SNMP Master Agent to be designated as primary is deployed as described in “Deploying SNMP Master Agent” on page 162.
• The primary and backup SNMP Master Agent Application objects exist.
• You are logged in to Configuration Manager.
Start of procedure
1. In Configuration Manager, open the Properties dialog box of the SNMP Master Agent Application object that you want to configure as the primary server.
2. On the Server Info tab:
a. Use the Browse button to locate and select the Application object corresponding to the backup SNMP Master Agent you want to use as the backup server.
b. Select Warm Standby as the redundancy type.
3. On the Start Info tab, select Auto-Restart.
4. On the Security tab, select This Account, making sure that the account name matches the name of the Master Account.
5. Click OK to save the configuration changes.
End of procedure
Procedure:Modifying a backup SNMP Master Agent start file
Purpose: To enable the backup SNMP Master Agent application to be started properly. This procedure is required only for backup Solution Control Servers installed on UNIX platforms.
Start of procedure
1. In a text editor, open the run.sh file.
2. Add the following at the end of the command line in the file:-host <configuration server host> -port <configuration server port> -app <backup SNMP Master Agent Application object name>
End of procedure

250 Framework 8.1
chapter 8: Setting Up Redundant Components Redundant SNMP Master Agents
Starting a Backup SNMP Master Agent
When starting a backup Message Server, be sure to use the following command-line options:
-host The name of the host on which Configuration Server is running.
-port The communication port that client applications must use to connect to Configuration Server.
-app The exact name of the backup SNMP Master Server Application object as configured in the Configuration Database.
If you installed the backup SNMP Master Server on UNIX, make sure that you modified the run.sh file accordingly (see the procedure “Modifying a backup SNMP Master Agent start file” on page 249). For a description of the command-line parameters specific to SNMP Master Agent, refer to “SNMP Master Agent” on page 188.
Procedure:Starting a backup SNMP Master Agent
Start of procedure
1. To start the backup SNMP Master Agent on UNIX, go to the directory in which Genesys SNMP Master Agent is installed, and do one of the following:• To use only the required command-line parameters, type the following
command line:sh run.sh
• To specify the command line yourself, or to use additional command-line parameters, type the following command line:gsnmpmasteragent -host <Configuration Server host> -port <Configuration Server port> -app <SNMP Master Agent Application> [<additional parameters and arguments as required>]
2. To start the backup SNMP Master Agent on Windows, do one of the following:• To start as a Windows Service, refer to “Starting and Stopping with
Windows Services Manager” on page 191.• To start from Genesys Administrator or SCI, refer to “Starting and
Stopping with the Management Layer” on page 173.• To start manually, do one of the following:
— Use the Start > Programs menu.

Deployment Guide 251
chapter 8: Setting Up Redundant Components Redundant SNMP Master Agents
— To use only the required command-line parameters, go to the directory in which SNMP Master Agent is installed, and double-click the startServer.bat file.
— To specify the command line yourself, or to use additional command-line parameters, open the MS-DOS window, go to the directory in which SNMP Master Agent is installed, and type the following command line:gsnmpmasteragent.exe -host <Configuration Server host> -port <Configuration Server port> -app <SNMP Master Agent Application> [<additional parameters and arguments as required>]
End of procedure

252 Framework 8.1
chapter 8: Setting Up Redundant Components Redundant SNMP Master Agents
Deployment Guide 253
Chapter
9 Setting Up the Rest of Your SystemNow that you deployed the Configuration Layer and, if required, the Management Layer, you can deploy the rest of the Framework components and the contact center environment. This chapter provides a brief overview of this process.
This chapter contains the following sections: Recommended Order, page 253 Media Layer, page 255 Telephony Objects, page 255 Contact Center Objects, page 255 Services Layer, page 258 Next Steps, page 258
Recommended OrderNote: If you are using Genesys Configuration Wizards, this section does not
apply to you. Configuration Wizards automatically use the recommended order.
Manual deployment of the other Framework components and contact center environment objects involves:
• Configuring the components using Genesys Administrator or Configuration Manager. Refer to the Help files for the respective interfaces for more information.
• Manually installing the configured components.
254 Framework 8.1
Chapter 9: Setting Up the Rest of Your System Recommended Order
Before you proceed, make sure that the Configuration Layer and Management Layer components are installed, configured, and running (see Chapter 5 on page 85 and Chapter 6 on page 121, respectively). To help you prepare accurate configuration information and become familiar with the configuration process, read Chapter 3, “Planning the Installation,” on page 39 for help with object-configuration information.
Follow this order for the manual deployment of the other Framework components and contact center environment objects:
1. Media Layer: T-Server HA Proxy for a specific type of T-Server (if applicable)
Note: Deployment instructions for T-Server and HA Proxy (if applicable) are located in the latest version of the Framework T-Server Deployment Guide for your specific T-Server.
2. Telephony Objects: Switching Offices Switches Agent Logins DNs
Note: Configuration instructions for telephony objects are located in the latest version of the Framework T-Server Deployment Guide for your specific T-Server.
3. Contact Center Objects: Access Groups Skills Persons Agent Groups Places Place Groups
4. Services Layer: Stat Server DB Server for solutions
Genesys recommends registering only those entities that you plan to use in the current configuration. The more data in the Configuration Database, the longer it takes for your system to start up, and the longer it takes to process configuration data. Remember that adding configuration objects to the Genesys Configuration Database does not cause any interruption in the contact center operation.
Deployment Guide 255
Chapter 9: Setting Up the Rest of Your System Media Layer
Depending on how much work it is to configure all applications and objects, consider registering more User objects first, with a set of privileges that lets them perform configuration tasks.
Warning! When configuring redundant applications, do not select the redundancy type Not Specified unless using a switchover mechanism other than that provided by the Management Layer. It is acceptable, however, to leave the redundancy type Not Specified for nonredundant applications (that is, applications that do not have backup servers associated with them).
Media LayerComponent (T-Server and HA Proxy, if applicable) configuration and installation for the Media Layer is covered in the latest version of the Framework T-Server Deployment Guide for your specific T-Server. Also covered in that Guide is information about deploying components for redundant and multi-site configurations.
Telephony ObjectsThe configuration of Configuration Database objects for the telephony equipment used in the contact center is described in the latest version of the Framework T-Server Deployment Guide for your specific T-Server.
Contact Center ObjectsConfigure Configuration Database objects for the contact center personnel and related entities.
Access Groups
Before deciding what kind of Access Groups you must configure, look at the default Access Groups the Configuration Layer supports and the default access control settings in general.
The default security system may cover all of your needs. If a more complex access control system makes sense for your contact center, Genesys recommends managing it through Access Groups and folders rather than at the level of individuals and objects.
256 Framework 8.1
Chapter 9: Setting Up the Rest of Your System Contact Center Objects
To define an Access Group and its permissions:
1. Identify groups of people that are handling specific activities in the customer interaction network.
2. Create the required Access Group objects.
3. Set Access Group privileges with respect to the object types, using the folders’ Permissions or Security tabs, as appropriate.
In addition, to simplify the security settings, make sure that permissions are set and changed recursively using the permission propagation mechanism.
Skills
Define agent skills that might be considered as criteria for interaction processing. Skills are configured as independent configuration objects; any Agent can be associated with more than one configured Skill. Therefore, it may be more practical to register Skills before the Agents are configured.
Users
There are two major categories of Users: Agents and Non-agents. The latter category includes all Users other than agents that need access to the CTI applications; for example, Center Administrators, Data Network and Telephony Network personnel, designers of interaction-processing algorithms, or Supervisors.
The characteristics of your business environment and your current priorities completely determine the order of registering Persons. Most often, you will want to first configure a few registered Non-agents with a high level of access to help you set up the Configuration Database.
Assign Agent Logins and Skills when registering Agents.
Note: You create Agent Logins when you are configuring the Switch object. Refer to the latest version of the Framework T-Server Deployment Guide for your specific T-Server for instructions.
If a few Agents have a certain Skill of the same level, consider using a wizard that adds the Skill to multiple User objects after you create them. To launch the wizard, select two or more User objects that have the Is Agent check box selected, right-click, and select Manage Skills. Refer to Framework Configuration Manager Help for more information.
Remember that the Configuration Layer requires that you assign a unique user name to each User, including agents. Consider using employee IDs configured in User objects as default user names and passwords.
Starting in release 7.6, new Users by default are not automatically assigned to any access group, by default. They must be assigned to one or more Access Groups explicitly. Users created in release 7.5 or earlier keep their existing set

Deployment Guide 257
Chapter 9: Setting Up the Rest of Your System Contact Center Objects
of permissions and Access Group assignments. If you want new users to be added automatically to predefined Access Groups, as was the behavior in release 7.5 and earlier, you must manually disable this feature using the configuration option no-default-access. Refer to the chapter “No Default Access for New Users” in the Genesys Security Deployment Guide for more information about this feature, and how to use or disable it.
Some GUI applications also use Ranks to determine what functionality is made available to the User currently logged in. Unless Agents are required to use rank-dependent applications in their work, you do not have to assign any specific Ranks to them.
Ranks, as well as access privileges, are more important when registering non-agents. When registering non-agents, consider the role they have in the customer interaction business. Do these Users need to monitor agents’ performance? Will they need to configure the telephony resources? Are they going to design routing strategies? Having answers to these questions makes it easier to correctly set up the access privileges with respect to configuration objects, and Ranks with respect to different applications objects.
Remember that Ranks with respect to applications are not the same as access privileges with respect to the configuration objects. You must explicitly define Ranks. Access privileges are assigned by default, according to whether the User is an agent or not.
Genesys does not recommend changing the default access-control setting, unless absolutely necessary. Remember, the more complex the security system implemented, the more difficult it becomes to administer the database, and the more it affects the performance of the Configuration Layer software.
Note: See also the Security Considerations section of Chapter 3, “Planning the Installation,” on page 39.
Agent Groups
Agent Groups are an indispensable element of almost every contact center. Remember that you can assign an agent to more than one group at a time. If you create agent groups based on Skills, use the Find command or the Dependency tab of a Skill to quickly identify all the agents that have the Skill in question.
Places
If you use Genesys CTI applications to distribute calls to individual agents or agent groups that are not limited by the switch ACD configuration, set up Places and assign individual DNs to them. Because a typical Place consists of more than one DN, prepare the actual layout of the numbering plan to correctly configure the Places, and assign DNs to them.

258 Framework 8.1
Chapter 9: Setting Up the Rest of Your System Services Layer
Place Groups
Define Place Groups and assign individual Places to them only if they will be used for distributing calls to groups of Places and, therefore, you will need to collect availability information and real-time statistics for such groups.
Services LayerGenesys recommends that you configure and install components of the Services Layer when you deploy the solution they will serve.
Stat Server
The configuration and installation procedures for Stat Server are described in the documentation for Stat Server.
DB Server for Solutions
The configuration and installation procedures for a DB Server being used to access databases other than the Configuration Database and Log Database are identical to those for the DB Server for the Log Database (see “Deploying Log DB Server” on page 136). The procedures are also described in the Framework DB Server User’s Guide.
Next StepsAfter you have completed all of this configuration, the Framework instance is configured and registered in the Configuration Database. You can now use Wizard Manager to deploy any solution by using the appropriate Configuration Wizard.
Deployment Guide 259
Chapter
10 Setting Up Geographically Distributed SystemsThis chapter describes Genesys Framework support for geographically distributed systems. It also describes how to set up Configuration Server Proxy and Distributed Solution Control Servers, and how to configure their clients to work with them.
This chapter contains the following sections: Overview, page 259 Architecture, page 260 Configuration Server Proxy, page 261 Distributed Solution Control Servers, page 276 Redundancy Support, page 284
OverviewLarge enterprises often run contact-center operations at numerous locations worldwide. Yet, for Genesys software to function as a single unit it is usually critical that all configuration objects comprising an enterprise be stored in a single Genesys Configuration Database. Under these circumstances, network delays, component failures, and similar factors might complicate or slow down the operations of a large enterprise.
However, by operating two Framework components in different modes you can somewhat simplify the operation of a geographically distributed installation with a single Configuration Database:
• Use Configuration Server operating in Proxy mode (referred to as Configuration Server Proxy) in addition to the master Configuration Server to distribute configuration-related tasks among the sites.

260 Framework 8.1
Chapter 10: Setting Up Geographically Distributed Systems Architecture
• Operate two or more Solution Control Servers in Distributed mode (referred to as Distributed Solution Control Servers), to distribute management-related tasks among the sites.
Licensing Requirements
Starting Configuration Server in Proxy mode or Solution Control Server in Distributed mode requires special licenses. Refer to the Genesys Licensing Guide for more information.
ArchitectureFigure 10 shows how Configuration Server Proxy and Distributed SCS fit into a Genesys configuration environment.
Figure 10: Geographically Distributed Installation
Configuration Server Proxy Functions
Configuration Server Proxy:
• Receives subscription requests from clients and handles them without passing the requests to Configuration Server.
• Stores in internal memory all configuration data it receives from Configuration Server.
Deployment Guide 261
Chapter 10: Setting Up Geographically Distributed Systems Configuration Server Proxy
• Receives notifications on data changes from Configuration Server, updates internal memory, and passes notifications to clients.
• Receives read-data requests from clients and responds to them using the data stored in the internal memory.
Note: A hierarchical configuration of Configuration Server Proxies—for example a Configuration Server Proxy application working with another Configuration Server Proxy that operates directly with Configuration Server—is not supported.
Distributed Solution Control Server Functions
Distributed Solution Control Server:
• Performs the same functions of monitoring, control, alarm detection, and alarm processing as the SCS in non-Distributed mode, but on a subset of hosts, applications and solutions explicitly assigned to this SCS in the Configuration Database.
• Communicates all the updates to statuses of the assigned objects to other Distributed Solution Control Servers, using a dedicated Message Server.
• Receives notifications about updates to the status of non-assigned objects (that is, objects assigned to other Solution Control Servers) from Message Server.
• When receiving a control command on an object not assigned to this SCS, forwards this command via Message Server to the appropriate SCS.
When to Use This Architecture
Genesys recommends using Configuration Server Proxy and Distributed Solution Control Server in a multi-site and/or multi-tenant environments. Using Configuration Server Proxy in a single-site environment does not reduce network traffic or increase system robustness.
Configuration Server ProxyIn a geographically distributed configuration environment, the master Configuration Server is running at the site where the Configuration Database is located. Configuration Server Proxies at multiple remote sites are connecting to the master Configuration Server.
Instead of sending all the requests to Configuration Server, Configuration Server clients that require read-only access to Configuration Server can operate with one or more Configuration Server Proxies. Configuration Server Proxy passes messages to and from Configuration Server. Moreover, the proxy keeps the configuration data in its memory and responds to client data requests. Any

262 Framework 8.1
Chapter 10: Setting Up Geographically Distributed Systems Configuration Server Proxy
configuration data updates are passed immediately to Configuration Server Proxy, so that it is always up to date; no additional configuration is required to specify an update interval.
Using Configuration Server Proxy increases the robustness of the whole system, decreases the number of client connections to Configuration Server, and minimizes network traffic. That is, clients continue their operations, and new clients can start theirs, when Configuration Server fails. Also, after Configuration Server recovers, the client reconnect takes far less time than if all clients were directly connected to Configuration Server.
In Genesys configuration terms, Configuration Server Proxy is an application of the Configuration Server type operating in a special mode. As such, it replaces Configuration Server seamlessly for the clients.
You can also configure Configuration Server Proxy permissions so that clients of a particular proxy access only the part of configuration environment relevant to their site. See “Security Considerations” on page 67, and Framework Security Deployment Guide for more information about setting permissions.
ExternalAuthentication
In geographically distributed systems prior to release 8.0, external authentication was configured only on the Master Configuration Server, and each Configuration Server Proxy passed authentication requests to it. RADIUS external authentication starting in release 8.0, and LDAP external authentication starting in release 8.1, can be configured on the Master Configuration Server and on each Configuration Server Proxy. Therefore, each Configuration Server Proxy can process authentication requests itself, and not pass them on to the Master Configuration Server. For more information about setting up external configuration on Configuration Server Proxy, refer to the Framework External Authentication Reference Manual.
Default Behavior By default, Configuration Server Proxy provides read-only access to configuration data. Configuration Server clients that require write access to Configuration Server (such as Configuration Manager, Deployment Wizards, and some others) must still connect directly to Configuration Server.
WritableConfigurationServer Proxy
Starting in release 8.1, you can configure a Configuration Server Proxy that allows its clients to also add, delete, or modify configuration objects and permissions through the proxy to which they are connected. The requests for these changes are passed to the master Configuration Server by Configuration Server Proxy. The master Configuration Server then sends data updates to the Configuration Server Proxy that sent the requests, which passes them to its clients. The main benefit of this type of configuration is fewer connections—clients of Configuration Server Proxy do not have to connect directly to the master Configuration Server when requesting changes to configuration objects.
To configure a Configuration Server Proxy as writable, set the configuration option proxy-writable to true in the csproxy section of the Configuration Server Proxy Application object. This option has been extended in release 8.1
Deployment Guide 263
Chapter 10: Setting Up Geographically Distributed Systems Configuration Server Proxy
to apply to all clients of Configuration Server Proxy, not just Genesys Agent Desktop.
Support forMulti-Language
Environments
You do not need to perform any additional configuration to have Configuration Server Proxy support multi-language environments. If the master Configuration Server supports UTF-8 encoded data, all Configuration Server Proxies connected to that master Configuration Server also support UTF-8 encoding. See “Multi-language Environments (UTF-8 Support)” on page 44 for more information about using UTF-8 encoding to enable multi-language environments.
ConfigurationHistory Log
You can also use a history log with Configuration Server Proxy to store historical information about client sessions and changes to configuration objects. Refer to “Configuration History Log” on page 63 for more information.
Setting Up Configuration Server Proxy
Configuration Server operating in Proxy mode is referred to as Configuration Server Proxy.
Prerequisite
• The Configuration Layer components, including master Configuration Server, are installed and running, as described in “Setting Up the Configuration Layer” on page 85.
Task Summary
The task summary on page 264 summarizes the steps required to install and set up Configuration Server Proxy.
Note: To ensure faultless operation, all Configuration Servers in the configuration environment must be running the same release. Configuration Server Proxy may start with a master Configuration Server running a later release, but only during the migration process. Refer to the Genesys Migration Guide for more information.
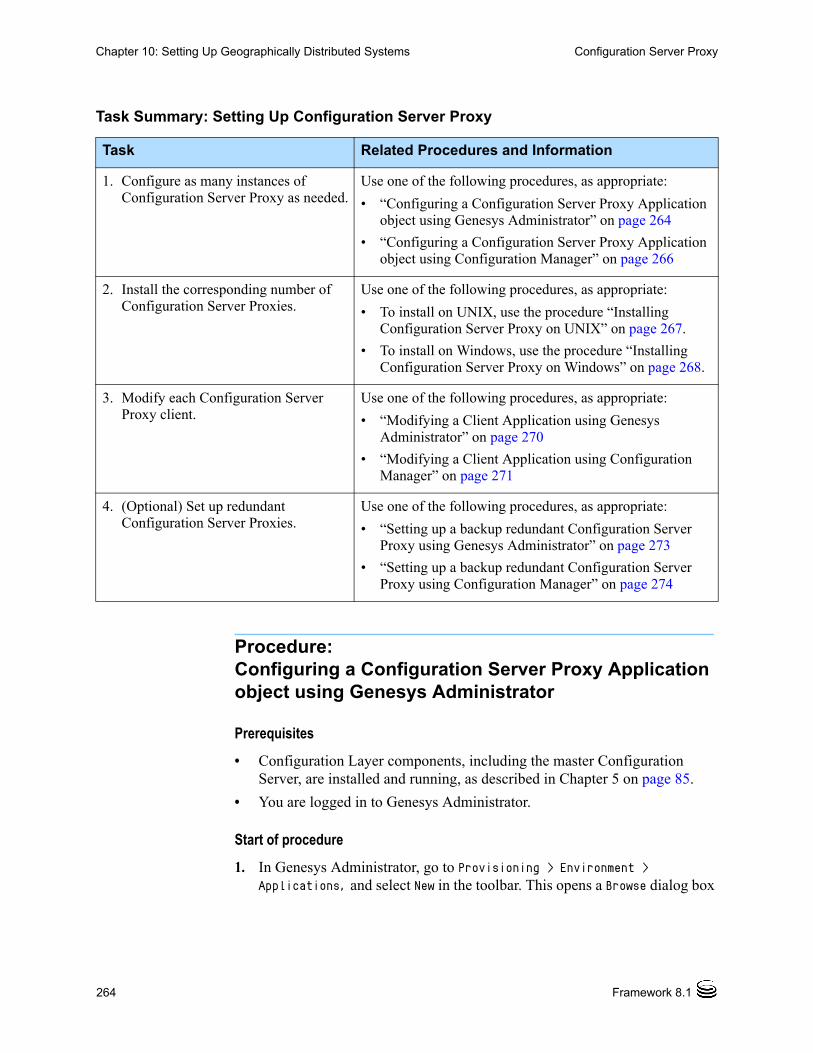
264 Framework 8.1
Chapter 10: Setting Up Geographically Distributed Systems Configuration Server Proxy
Procedure:Configuring a Configuration Server Proxy Application object using Genesys Administrator
Prerequisites
• Configuration Layer components, including the master Configuration Server, are installed and running, as described in Chapter 5 on page 85.
• You are logged in to Genesys Administrator.
Start of procedure
1. In Genesys Administrator, go to Provisioning > Environment > Applications, and select New in the toolbar. This opens a Browse dialog box
Task Summary: Setting Up Configuration Server Proxy
Task Related Procedures and Information
1. Configure as many instances of Configuration Server Proxy as needed.
Use one of the following procedures, as appropriate:
• “Configuring a Configuration Server Proxy Application object using Genesys Administrator” on page 264
• “Configuring a Configuration Server Proxy Application object using Configuration Manager” on page 266
2. Install the corresponding number of Configuration Server Proxies.
Use one of the following procedures, as appropriate:
• To install on UNIX, use the procedure “Installing Configuration Server Proxy on UNIX” on page 267.
• To install on Windows, use the procedure “Installing Configuration Server Proxy on Windows” on page 268.
3. Modify each Configuration Server Proxy client.
Use one of the following procedures, as appropriate:
• “Modifying a Client Application using Genesys Administrator” on page 270
• “Modifying a Client Application using Configuration Manager” on page 271
4. (Optional) Set up redundant Configuration Server Proxies.
Use one of the following procedures, as appropriate:
• “Setting up a backup redundant Configuration Server Proxy using Genesys Administrator” on page 273
• “Setting up a backup redundant Configuration Server Proxy using Configuration Manager” on page 274

Deployment Guide 265
Chapter 10: Setting Up Geographically Distributed Systems Configuration Server Proxy
that lists available application templates. If a Configuration Server Proxy template file is not listed, do one of the following:• Import the Configuration Server Proxy_<current-version>.apd file
from the Management Framework 8.1 product CD.• Create a new template using the procedure “Creating a new application
template using Genesys Administrator” on page 295, and repeat this step.
2. In the Browse dialog box, select the Configuration Server Proxy template file. The Configuration tab for the new Configuration Server Proxy Application object appears in the Details panel.
3. In the General section of the Configuration tab:
a. Enter a descriptive name in the Name text box.
b. In the list of Connections, add a connection to the master Configuration Server Application object. If redundant master Configuration Servers are configured, specify a connection to the primary Configuration Server.
4. In the Server Info section:
a. Select the Host object on which this Configuration Server Proxy runs.
b. Specify the Listening Ports that Configuration Server Proxy clients must use to connect to this Configuration Server.
c. In the Working Directory, Command Line, and Command Line Arguments text boxes, do one of the following:• Enter the appropriate information in each of the text boxes. For
information about command-line parameters, see “Starting Configuration Server Proxy” on page 271.
• Type a period (.) in the Working Directory and Command Line text boxes, and leave the Command Line Arguments text box blank. The information will be filled in automatically when you install Configuration Server Proxy, but only if the Installation Package can connect to the master Configuration Server.
d. Enter appropriate values for the other mandatory fields (those indicated by red asterisks).
e. In the Log On As Account field, Genesys strongly recommends that you use the default account, Environment\default.
5. (Optional) On the Options tab, do any of the following as required:
a. If you want this Configuration Server Proxy to be writable, set the option proxy-writable in the csproxy section to true.
b. Set the values of the log configuration options.
6. Click Save and Close to save the configuration.
End of procedure

266 Framework 8.1
Chapter 10: Setting Up Geographically Distributed Systems Configuration Server Proxy
Procedure:Configuring a Configuration Server Proxy Application object using Configuration Manager
Prerequisites
• Configuration Layer components, including the master Configuration Server, are installed and running, as described in Chapter 5 on page 85.
• You are logged in to Configuration Manager.
Start of procedure
1. In Configuration Manager, right-click the Applications folder and select New > Application, which opens the Browse dialog box that lists the available application templates. If a Configuration Server Proxy template is not listed, either import the Configuration Server Proxy_<current-version>.apd file from the Management Framework product CD or use the procedure “Importing a predefined application template using Configuration Manager” on page 297 to import it, and repeat this step.
2. In the Browse dialog box, select the Configuration Server Proxy template file, which opens the Properties dialog box for the new Configuration Server Proxy Application object.
3. On the General tab, enter a name for the Configuration Server Proxy application.
4. On the Server Info tab, specify:• The host on which the Configuration Server Proxy is to be installed.• The communication ports that clients must use to connect to this
Configuration Server Proxy.
5. On the Connections tab, add a connection to the Configuration Server Application object (confserv). If redundant Configuration Servers are configured, specify a connection to the primary Configuration Server.
6. On the Start Info tab, in the Working Directory, Command Line, and Command Line Arguments text boxes, do one of the following:• Enter the appropriate information in each of the text boxes. For
information about command-line parameters, see “Starting Configuration Server Proxy” on page 271.
• Type a period (.) in the Working Directory and Command Line text boxes, and leave the Command Line Arguments text box blank. The information will be filled in automatically when you install Configuration Server Proxy, but only if the Installation Package can connect to the primary Configuration Server.
Deployment Guide 267
Chapter 10: Setting Up Geographically Distributed Systems Configuration Server Proxy
7. (Optional) On the Options tab, do any of the following as required:
a. If you want this Configuration Server Proxy to be writable, set the option proxy-writable in the csproxy section to true.
b. Set the values of the log configuration options.
8. Click OK to save the configuration changes.
End of procedure
Procedure:Installing Configuration Server Proxy on UNIX
Prerequisites
• The Configuration Server Proxy Application object is created.
Start of procedure
1. On the Management Framework 8.1 product CD, locate and open the installation directory appropriate for your environment:• For an enterprise (single-tenant) environment, the installation directory
is configuration_layer/configserver/single/<operating_system>.• For a multi-tenant environment, the installation directory is
configuration_layer/configserver/multi/<operating_system>.
The installation script, called install.sh, is located in the appropriate directory.
2. Type the file name at the command prompt, and press Enter.
3. For the installation type, type 3 to select Configuration Server Proxy, and press Enter.
4. To specify the host name for this Configuration Server Proxy, do one of the following:• Type the name of the host, and press Enter.• Press Enter to select the current host.
5. Enter the Master Configuration Server host name, and press Enter.
6. Enter the Master Configuration Server network port, and press Enter.
7. Enter the Master Configuration Server user name, and press Enter.
8. Enter the Master Configuration Server password, and press Enter.
9. The installation displays the list of Application objects of the specified type configured for this Host object. Type the number corresponding to the Configuration Server Proxy Application object you configured on page 266, and press Enter.
268 Framework 8.1
Chapter 10: Setting Up Geographically Distributed Systems Configuration Server Proxy
10. To specify the destination directory, do one of the following:• Press Enter to accept the default.• Enter the full path of the directory, and press Enter.
11. If the target installation directory has files in it, do one of the following:• Type 1 to back up all the files in the directory, and press Enter.
Specify the path to which you want the files backed up, and press Enter.
• Type 2 to overwrite only the files in this installation package, and press Enter. Then type y to confirm your selection, and press Enter.
Use this option only if the application already installed operates properly.
• Type 3 to erase all files in this directory before continuing with the installation, and press Enter. Then type y to confirm your selection, and press Enter.
The list of file names will appear on the screen as the files are copied to the destination directory.
12. Specify the full path to, and the exact name of, the license file that Configuration Server Proxy will use, and press Enter.
When the installation process is finished, a message indicates that installation was successful. The process places Configuration Server Proxy in the directory that you specified during installation.
End of procedure
Procedure:Installing Configuration Server Proxy on Windows
Warning! Genesys does not recommend installation of its components via a Microsoft Remote Desktop connection. The installation should be performed locally.
Prerequisites
• The Configuration Server Proxy Application object is created.
Start of procedure
1. On the Management Framework 8.1 product CD, locate and open the installation directory appropriate for your environment:• For an enterprise (single-tenant) environment, the installation directory
is configuration_layer/configserver/single/windows.• For a multi-tenant environment, the installation directory is
configuration_layer/configserver/multi/windows.
Deployment Guide 269
Chapter 10: Setting Up Geographically Distributed Systems Configuration Server Proxy
The installation script, called setup.exe, is located in the appropriate directory.
2. Locate and double-click setup.exe to start the Genesys Installation Wizard.
3. Use the About button on the wizard’s Welcome page to review the read_me file. The file also contains a link to the server’s Release Notes file.
4. Click Next.
5. On the Configuration Server Run Mode page, select Configuration Server Proxy.
6. On the Connection Parameters to the Genesys Configuration Server page, specify the host name, port, user name, and password for the Master Configuration Server, then click Next.
7. On the Select Application page, select the name of the Configuration Server Application object that you created on page 266, and click Next.
8. On the Access to License page, specify the license access type and the appropriate parameters, and click Next.
9. On the Choose Destination Location page, the wizard displays the destination directory specified in the Working Directory property of the server’s Application object. If the specified path is invalid, the wizard generates a path to C:\Program Files\GCTI\<Singletenant or Multitenant> Configuration Server.
If necessary, use the:• Browse button to select another destination folder. In this case, the
wizard will update the Application object’s Working Directory property in the Configuration Database.
• Default button to reinstate the path specified in the Working Directory property.
Click Next to proceed.
10. On the Ready to Install information page, click:• Back to update any installation information.• Install to proceed with the installation.
11. On the Installation Complete page, click Finish.
When the installation process is finished, a message indicates that installation was successful. The process places Configuration Server Proxy in the directory that you specified during the installation process.
End of procedure

270 Framework 8.1
Chapter 10: Setting Up Geographically Distributed Systems Configuration Server Proxy
Procedure:Modifying a Client Application using Genesys Administrator
Purpose: To enable a client application to work with Configuration Server Proxy.
Note: Repeat this procedure for each application that is to be a client of Configuration Server Proxy.
Prerequisites
• The Configuration Server Proxy Application object exists.
• You have identified the client applications that are to operate with this particular Configuration Server Proxy.
• You are logged in to Genesys Administrator.
Start of procedure
1. In Genesys Administrator, go to Provisioning > Environment > Applications, and double-click the client Application object that you want to connect to Configuration Server Proxy.
2. On the Configuration tab, open the General section.
3. Add a connection to the Configuration Server Proxy to which the client application should connect.
4. Click Save and Close to save the configuration changes.
Now, when you start the client application, it will operate with the given Configuration Server Proxy.
5. Start the client application using one of the following methods:• From Genesys Administrator or Solution Control Interface.• From the command line. In this case, you must use the parameters
-host and -port to point to the Configuration Server Proxy with which the application will be operating.
6. Click Save and Close to save the changes.
End of procedure
Deployment Guide 271
Chapter 10: Setting Up Geographically Distributed Systems Configuration Server Proxy
Procedure:Modifying a Client Application using Configuration Manager
Purpose: To enable a client application to work with Configuration Server Proxy.
Note: Repeat this procedure for each application that is to be a client of Configuration Server Proxy.
Prerequisites
• The Configuration Server Proxy Application object exists.
• You have identified the client applications that are to operate with this particular Configuration Server Proxy.
• You are logged in to Configuration Manager.
Start of procedure
1. In Configuration Manager, open the Properties dialog box of the client Application object that you want to connect to Configuration Server Proxy.
2. Click the Connections tab.
3. Add a connection to the Configuration Server Proxy to which the client application should connect.
4. Click Apply and OK to save the configuration changes.
Now, when you start the client application, it will operate with the given Configuration Server Proxy.
5. Start the client application using one of the following methods:• From Solution Control Interface.• From the command line. In this case, you must use the parameters
-host and -port to point to Configuration Server Proxy with which the application will be operating.
End of procedure
Starting Configuration Server Proxy
The startup command line for Configuration Server Proxy must identify the:
• Configuration Server Proxy executable file.
• Configuration Server Proxy application name (the -app parameter).
272 Framework 8.1
Chapter 10: Setting Up Geographically Distributed Systems Configuration Server Proxy
• Configuration Server host (the -host parameter).
• Configuration Server port (the -port parameter).
• Configuration Server Proxy license file or license server location (the -l parameter).
Configuration Server Proxy supports the command-line parameters common to Genesys server applications. For a description of these parameters, refer to Chapter 7 on page 171.
Note: If using a primary-backup pair of Configuration Server Proxies, follow the same starting procedure for both primary and backup applications but make sure you specify the correct application name for each.
Procedure:Starting Configuration Server Proxy
Prerequisites
• You have set up Configuration Server Proxy, as described in “Setting Up Configuration Server Proxy” on page 263
Start of procedure
1. To start Configuration Server Proxy on UNIX, go to the directory in which Configuration Server Proxy is installed, and do one of the following:• To use only the required command-line parameters, type the following
command line:sh run.sh
• To specify the command line yourself, or to use additional command-line parameters, type the following command line:confserv [<additional parameters and arguments as required>]
2. To start Configuration Server on Windows, do one of the following:• Use the Start > Programs menu.• To use only the required command-line parameters, go to the directory
in which Configuration Server Proxy is installed, and double-click the startServer.bat file.
• To specify the command line yourself, or to use additional command-line parameters, open the MS-DOS window, go to the directory in which Configuration Server Proxy is installed, and type the following command line:confserv.exe [<additional parameters and arguments as required>]
End of procedure
Deployment Guide 273
Chapter 10: Setting Up Geographically Distributed Systems Configuration Server Proxy
Configuring Redundant Configuration Server Proxies
The high-availability (HA) architecture implies the existence of redundant applications, a primary and a backup, monitored by a management application. Like Configuration Server, Configuration Server Proxy supports the warm standby redundancy type between redundant Configuration Server Proxies. The redundant architecture is described in Framework Architecture Help.
Prior to release 8.1.3, when a switchover occurred between the primary and backup Configuration Server Proxies, Configuration Server Proxy clients had to read configuration information anew and reestablish the connections to the backup server themselves. Especially in large configuration environments, this often led to detrimental effects on system performance, and leading clients to question the usefulness of the backup proxy server.
Starting in release 8.1.3, client connections are restored automatically by the backup Configuration Server Proxy when it switches to primary mode if the connection between the main Configuration Server and Configuration Server Proxy is lost because the main Configuration Server is stopped via the Management Layer. This makes the switchover practically invisible to the clients, and essentially eliminates the performance impact on the system. This restoration is made possible by the backup Configuration Server Proxy keeping its own record of client connections and disconnections. Under normal conditions, the primary proxy server notifies the backup proxy of client connections and disconnections, which the backup stores in its History Log Database (“Configuration History Log” on page 263). When the backup switches to primary, it is able to restore client connections based on the connection and disconnection information it has stored.
If the connection between the main and proxy servers, and ADDP is configured between Configuration Server Proxy and the main Configuration Server and also between the proxy server and its client, the session is not restored. Clients of the Configuration Server Proxy must reregister and read all data from scratch.
Two Configuration Server Proxies configured as an HA pair cannot be separated into two standalone servers in runtime. Each of the servers must be stopped, re-configured, and then restarted.
Procedure:Setting up a backup redundant Configuration Server Proxy using Genesys Administrator
Prerequisites
• A primary Configuration Server Proxy Application object already exists.
• You are logged in to Genesys Administrator.
274 Framework 8.1
Chapter 10: Setting Up Geographically Distributed Systems Configuration Server Proxy
Start of procedure
1. Configure an Application object for the backup Configuration Server Proxy following the procedure “Configuring a Configuration Server Proxy Application object using Genesys Administrator” on page 264.
2. Install a backup Configuration Server Proxy following either the procedure “Installing Configuration Server Proxy on UNIX” on page 267 or the procedure “Installing Configuration Server Proxy on Windows” on page 268.
3. In Genesys Administrator, go to Provisioning > Environment > Applications and double-click the primary Configuration Server Proxy client Application object.
4. On the Configuration tab, open the Server Info section.
5. In the Backup Server field, specify the Configuration Server Proxy application you want to use as the backup server.
6. In Genesys Administrator, Configuration Manager, open the Properties dialog box of the Configuration Server Proxy application that you want to configure as a primary server.
7. In the Redundancy Type field, select Warm Standby.
8. Select Auto-Restart.
9. Click Save and Close to save the configuration changes.
End of procedure
Procedure:Setting up a backup redundant Configuration Server Proxy using Configuration Manager
Prerequisites
• A primary Configuration Server Proxy Application object already exists.
• You are logged in to Configuration Manager.
Start of procedure
1. Configure an Application object for the backup Configuration Server Proxy following the procedure described in “Configuring a Configuration Server Proxy Application object using Configuration Manager” on page 266.
2. Install a backup Configuration Server Proxy following either the procedure “Installing Configuration Server Proxy on UNIX” on page 267 or the procedure “Installing Configuration Server Proxy on Windows” on page 268.
Deployment Guide 275
Chapter 10: Setting Up Geographically Distributed Systems Configuration Server Proxy
3. In Configuration Manager, open the Properties dialog box of the Configuration Server Proxy application that you want to configure as a primary server.
4. Click the Start Info tab.
5. Select Auto-Restart.
6. Click the Server Info tab.
7. Select Warm Standby as the Redundancy Type.
8. Specify the Configuration Server Proxy application you want to use as the backup server. Use the Browse button next to the Backup Server property field to locate the backup Configuration Server Proxy application.
9. Click Apply and OK to save the configuration changes.
End of procedure
Failure of Configuration Server Proxy
When Configuration Server Proxy fails or disconnects from its clients, the clients attempt to reconnect to Configuration Server Proxy. If it is not available and if a backup Configuration Server Proxy is configured, the clients attempt to connect to the backup.
When Configuration Server Proxy fails, you must restart it manually or use the Management Layer for autorestart.
Failure of Master Configuration Server
When the master Configuration Server fails or the connection to it is lost, the clients of Configuration Server Proxy continue their normal operations. Configuration Server Proxy initiates reconnect attempts to the master Configuration Server. Meanwhile, Configuration Server Proxy responds to client requests using the configuration data stored in its memory.
When the master Configuration Server fails, you must restart it manually or use the Management Layer for autorestart.
Figure 11 on page 276 shows Configuration Server Proxy behavior when a primary-backup pair of master Configuration Servers is configured.
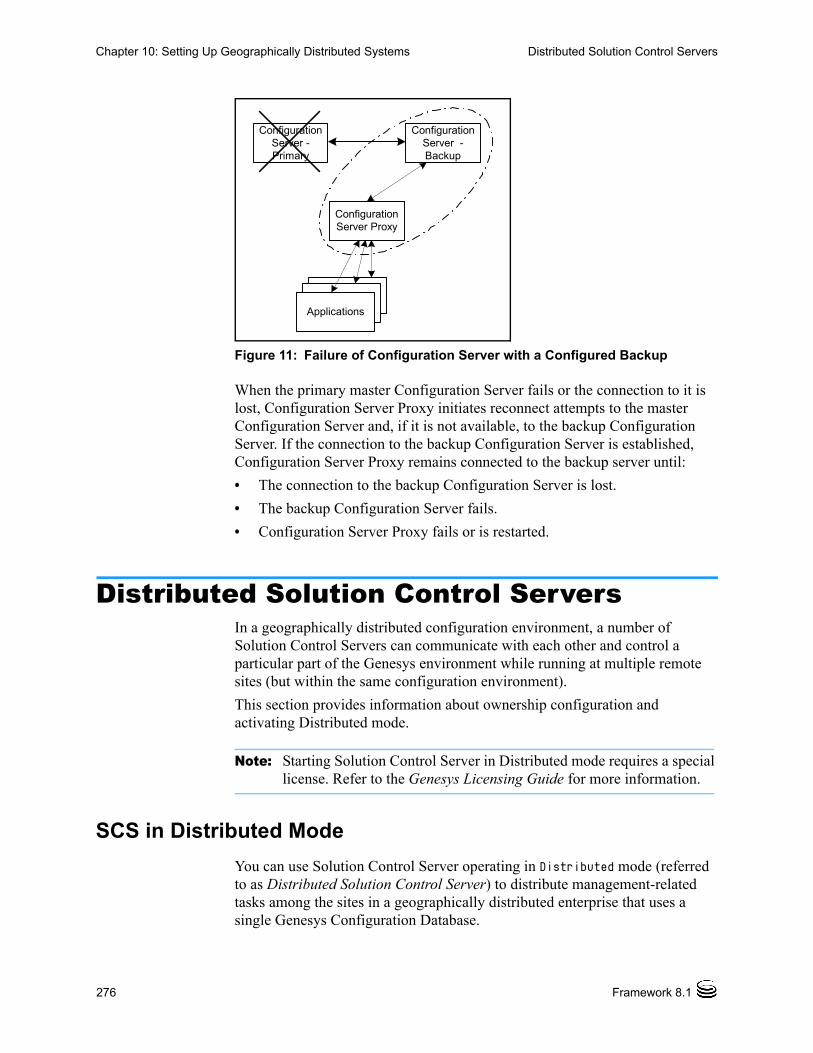
276 Framework 8.1
Chapter 10: Setting Up Geographically Distributed Systems Distributed Solution Control Servers
Figure 11: Failure of Configuration Server with a Configured Backup
When the primary master Configuration Server fails or the connection to it is lost, Configuration Server Proxy initiates reconnect attempts to the master Configuration Server and, if it is not available, to the backup Configuration Server. If the connection to the backup Configuration Server is established, Configuration Server Proxy remains connected to the backup server until:
• The connection to the backup Configuration Server is lost.
• The backup Configuration Server fails.
• Configuration Server Proxy fails or is restarted.
Distributed Solution Control ServersIn a geographically distributed configuration environment, a number of Solution Control Servers can communicate with each other and control a particular part of the Genesys environment while running at multiple remote sites (but within the same configuration environment).
This section provides information about ownership configuration and activating Distributed mode.
Note: Starting Solution Control Server in Distributed mode requires a special license. Refer to the Genesys Licensing Guide for more information.
SCS in Distributed Mode
You can use Solution Control Server operating in Distributed mode (referred to as Distributed Solution Control Server) to distribute management-related tasks among the sites in a geographically distributed enterprise that uses a single Genesys Configuration Database.
ConfigurationServer -Primary
ConfigurationServer Proxy
ConfigurationServer -Backup
Applications
Deployment Guide 277
Chapter 10: Setting Up Geographically Distributed Systems Distributed Solution Control Servers
You can install and use more than one Distributed Solution Control Server within a single configuration environment. In these installations, each such server controls its own subset of the hosts, applications, and solutions. Distributed Solution Control Servers communicate with each other through the dedicated Message Server.
When you are using Distributed Solution Control Servers, you must explicitly configure the servers’ ownership of hosts, applications, and solutions. That is, you must associate each host, application, and solution object with a particular SCS.
Using Distributed Solution Control Servers helps you resolve some problems common to geographically distributed installation:
• It eliminates false switchovers that occur when SCS disconnects from LCA at a remote site because of the slow network connection between sites or because of temporary network problems.
• It prevents a single point of failure. A failure of one Distributed SCS only means a temporary loss of control over a subset of hosts, applications, and solutions; other Distributed Solution Control Servers continue to control the rest of the environment.
Because Distributed Solution Control Servers communicate with each other, they all have the same information about all hosts, applications, and solutions. Therefore, given appropriate permissions, you can connect Solution Control Interface to any Distributed Solution Control Server and monitor and control the whole environment as a single entity.
Configuring Distributed Solution Control Servers
Warnings! • Do not use Solution Control Servers in Distributed and non-Distributed modes simultaneously within the same Configuration environment. If you plan to use Distributed SCS in your installation, turn on Distributed mode for all Solution Control Servers you install.
• When using Distributed Solution Control Servers, always ensure that each Solution Control Server, either by itself or as part of a high-availability pair, is running on the host which it controls. Failure to do so can, in some cases, result in unpredictable behavior of the Solution Control Servers in the Distributed configuration. For example, different Solution Control Servers may start competing for control over applications on the host.
278 Framework 8.1
Chapter 10: Setting Up Geographically Distributed Systems Distributed Solution Control Servers
Procedure:Configuring Distributed Solution Control Servers
Purpose: To configure Solution Control Servers so that they can function in Distributed mode.
Start of procedure
1. Configure as many Solution Control Server Application objects as necessary, as described in Chapter 6 on page 121.
2. For each Solution Control Server application, turn on Distributed mode. To do so, specify the following values for configuration options in the general section:• distributed_mode = ON• distributed_rights = DEFAULT
3. If you are planning to leave unassigned any of the host, application, or solution objects unassigned—that is, without specifying which SCS is to control them—dedicate one SCS to the control of all unassigned hosts, applications, and solutions. To instruct one SCS to work in this mode, specify the following values for configuration options in the general section for that particular Solution Control Server application:• distributed_mode = ON• distributed_rights = MAIN.
Note: Only one of the Distributed Solution Control Servers can have the value MAIN for the distributed_rights configuration option.
End of procedure
Redundant Configurations for Distributed SCS
Distributed SCS supports the warm standby redundant configuration in the same way as other Genesys servers, with the added benefit that the backup maintains data synchronization with the primary. That is, you can configure a primary and a backup pair of Distributed Solution Control Servers to operate with warm-standby redundancy.
To set up HA port synchronization between Primary and Backup Solution Control Servers, refer to “Synchronizing HA Ports Between Redundant Solution Control Servers” on page 240.

Deployment Guide 279
Chapter 10: Setting Up Geographically Distributed Systems Distributed Solution Control Servers
Dividing Configuration Among Solution Control Servers
When you are using Distributed Solution Control Servers, you must specify which SCS controls which subset of the following objects:
• Hosts
• Applications
• Solutions
Do this by changing the object’s properties, as described in the following sections.
Procedure:Specifying a Distributed Solution Control Server to control a Host, Application, or Solution
Start of procedure
1. To assign a Distributed SCS to control a host, specify the SCS application in the Solution Control Server field in the General section of the Configuration tab (in Genesys Administrator), or on the General tab (in Configuration Manager), of the Host object.
2. To assign a Distributed SCS to control an application, do not make any changes to the Application object. Specifying SCS ownership of the application’s host is enough. The Distributed SCS automatically controls any applications assigned to the host this SCS controls.
3. To assign a Distributed SCS to control a solution, specify the SCS application in the Solution Control Server field in the General section of the Configuration tab (in Genesys Administrator), or on the General tab (in Configuration Manager), of the Solution object.
End of procedure
Recommendations
• Do not distribute control over the primary and backup servers in a redundant pair between different Distributed Solution Control Servers if any SCS in the configuration environment is running a pre-7.5 release. Genesys recommends that you configure the same SCS to control both the primary and backup servers in a redundant pair.
Note: To distribute control over the primary and backup servers in a redundant pair between different Distributed Solution Control Servers, all Solution Control Servers in the configuration must be running release 7.5 or later.
280 Framework 8.1
Chapter 10: Setting Up Geographically Distributed Systems Distributed Solution Control Servers
• When you are distributing control over the configuration objects among Distributed Solution Control Servers, ensure that the same SCS that controls a solution also controls all applications included in this solution. While one SCS can technically control a solution while other servers control applications included in that solution, avoiding this configuration helps minimize network traffic between Solution Control Servers.
• Genesys strongly recommends that you not assign each component in an HA pair to different Solution Control Servers in a distributed environment. In this configuration, the functionality of each Solution Control Server in the HA pair might be limited to handling simple application failures only (the failure of an application within the pair). In addition, the state of each component in the monitored HA pair might become inconsistent if network failures occur between the Distributed Solution Control Servers.
Specifying Message Server for SCS Communications
Distributed Solution Control Servers communicate with each other through Message Server. Genesys recommends that you use a dedicated Message Server for this purpose.
Procedure:Configuring a dedicated Message Server for Distributed Solution Control Servers using Genesys Administrator
Prerequisites
• An Application object exists for each Distributed Solution Control Server in the configuration environment.
• You are logged in to Genesys Administrator.
Start of procedure
1. In Genesys Administrator, configure a Message Server Application object with appropriate configuration parameters. Refer to Chapter 6 on page 121 for instructions.
2. Double-click the Message Server Application object, and click the Options tab.
3. Create a new section called MessageServer.
4. In this section, create a new configuration option called signature and set its value to scs_distributed. Each Distributed SCS processes this option to determine which of the Message Servers specified in SCS connections to use for communications with other Solution Control Servers.
Deployment Guide 281
Chapter 10: Setting Up Geographically Distributed Systems Distributed Solution Control Servers
5. In the Application object for each Distributed Solution Control Server, add a connection to this Message Server, as follows:
a. Enter ADDP as the Connection protocol.
b. Set the ADDP Local Timeout and Remote Timeout to values that are less than half the minimum alive_timeout values between all Distributed Solution Control Servers in the configuration environment. In other words:
Taddp < Tscs * 0.5
where:
Taddp = ADDP timeout
Tscs = minimum alive_timeout between all Distributed Solution Control Servers
Refer to the Framework Configuration Options Reference Manual for a detailed description of the alive_timeout option.
End of procedure
Procedure:Configuring a dedicated Message Server for Distributed Solution Control Servers using Configuration Manager
Prerequisites
• An Application object exists for each Distributed Solution Control Server in the configuration environment.
• You are logged in to Configuration Manager.
Start of procedure
1. In Configuration Manager, configure a Message Server Application object with appropriate configuration parameters.
2. Go to the Options tab of the Message Server Application Properties dialog box and create a new section called MessageServer.
3. Within this section, create a new configuration option called signature and set its value to scs_distributed. Each Distributed SCS processes this option to determine which of the Message Servers specified in SCS connections to use for communications with other Solution Control Servers.
4. In the Application object for each Distributed Solution Control Server, add a connection to this Message Server, as follows:
a. Enter ADDP as the Connection protocol.
282 Framework 8.1
Chapter 10: Setting Up Geographically Distributed Systems Distributed Solution Control Servers
b. Set the ADDP Local Timeout and Remote Timeout to values that are less than half the minimum alive_timeout values between all Distributed Solution Control Servers in the configuration environment. In other words:
Taddp < Tscs * 0.5
where:
Taddp = ADDP timeout
Tscs = minimum alive_timeout between all Distributed Solution Control Servers
Refer to the Framework Configuration Options Reference Manual for a detailed description of the alive_timeout option.
End of procedure
Notes on Configuring SCI
Because Distributed Solution Control Servers communicate with each other, they all have the same information about all hosts, applications, and solutions. Thus, you can connect Solution Control Interface to any Distributed SCS and monitor and control the whole environment as a single entity (given appropriate permissions).
When Distributed SCS receives a control command for an object that this SCS does not control, it forwards this command to the appropriate SCS and passes any further notifications back to the requestor.
Notes on Configuring Message Server for Centralized Logging
For distributed environments using a single Configuration Database, Genesys recommends using a dedicated Message Server for centralized logging at each site. In most cases, you have to configure as many Message Servers as there are Distributed Solution Control Servers.
Notes: You can configure as many Message Servers for centralized logging as you need per site.
You also need an additional Message Server to handle SCS communications (see page 280).
Deployment Guide 283
Chapter 10: Setting Up Geographically Distributed Systems Distributed Solution Control Servers
Procedure:Verifying configuration of Message Servers used for centralized logging in a Distributed Solution Control Server environment using Genesys Administrator
Purpose: To verify that each Message Server used for centralized logging is configured and connected to a Solution Control Server and to each of the applications controlled by that Solution Control Server.
Prerequisites
• Distributed Solution Control Servers are set up in the configuration environment.
• The Message Server used for centralized logging in this environment is installed.
• You are logged in to Genesys Administrator.
Start of procedure
1. In Genesys Administrator, go to Provisioning > Applications, and double-click a particular Solution Control Server Application object to open its Configuration tab.
2. In the General section, make sure that a connection to the Message Server that is providing the centralized logging is added to the list of Connections.
3. For each Application object that this particular Solution Control Server controls:
a. Open the Configuration tab of the object.
b. In the General section, make sure that a connection to that same Message Server is added to the list of Connections.
End of procedure
Procedure:Verifying configuration of Message Servers used for centralized logging in a Distributed Solution Control Server environment using Configuration Manager
Purpose: To verify that each Message Server used for centralized logging is configured and connected to a Solution Control Server and to each of the applications controlled by that Solution Control Server.
284 Framework 8.1
Chapter 10: Setting Up Geographically Distributed Systems Redundancy Support
Prerequisites
• Distributed Solution Control Servers are set up in the configuration environment.
• The Message Server used for centralized logging in this environment is installed.
• You are logged in to Configuration Manager.
Start of procedure
1. Open the Properties dialog box for a particular Solution Control Server Application object.
2. Make sure that a connection to the Message Server that is providing the centralized logging is added on the Connections tab.
3. For each Application object that this particular Solution Control Server controls:
a. Open the Properties dialog box.
b. Make sure that a connection to that same Message Server is added on the Connections tab.
End of procedure
Installing Applications
After you are finished with the configuration tasks, physically install all instances of Solution Control Server, Solution Control Interface, and Message Server to match the configuration.
Redundancy SupportBoth Configuration Server Proxy and Distributed Solution Control Server currently support warm standby redundant configuration in the same way as other Genesys servers. That is, you can configure a primary and a backup Configuration Server Proxy or Distributed SCS to operate with warm standby redundancy, so that if the primary application fails, the backup can take over current operations. The backup Distributed SCS synchronizes its data with the primary SCS; however, the backup Configuration Server Proxy does not.
Distributed SCS can handle switchovers between other redundant client applications, regardless of the redundancy type configured for those other applications. For example, redundant T-Servers can be configured as hot standby, whereas redundant Universal Routing Servers can be configured as warm standby. Distributed SCS will handle the switchover for both applications.

Deployment Guide 285
Appendix
A Minimum PermissionsThis appendix describes the minimum permissions required to install and run Management Framework components. For information about minimum permissions required for other Genesys components, refer to product- or component-specific documentation.
This appendix contains the following sections:
• System Permissions, page 285
• Database User Privileges, page 286
• Sample Scripts, page 288
System PermissionsTable 8 provides the minimum permissions required to install and run Framework components.
Table 8: Minimum System Permissions for Installation
Component Minimum Permissions (Windows)
Minimum Permissions (UNIX)
Configuration Server Administrators groupa users group
Solution Control Server Administrators group users group
Message Server Administrators group users group
DB Server Administrators group users group
SNMP Master Agent Administrators group users group
Local Control Agentb Administrators group root
286 Framework 8.1
Appendix A: Minimum Permissions Database User Privileges
After a component is installed, you can update the component to start under a different user account with lower privileges. However, before doing so, make sure that you updated the working directories with the correct read and write permissions.
Example
To run LCA and Genesys Deployment Agent (GDA) as a non-root user, do one of the following, depending on your operating system:
• Windows—Change the account associated with the LCA service. One way to do this is through Windows Administrative Services, as follows:
1. Go to Start > Settings > Control Panel > Administrative Services > Services, right-click LCA and select Properties.
2. Open the Log On tab and in the Log on as section, select This account, and change the account associated with the LCA server.
• UNIX—Create startup scripts for LCA and GDA that set up LCA and GDA to be running under the non-root user. For these scripts, it is assumed that LCA is installed in /home/genesys/GCTI, and the name of the non-root user is genesys. See “LCA Startup Script—gctilca” on page 288 and “GDA Startup Script—gctigda” on page 290 for examples of these scripts.
To install the startup scripts, put them in the directory /etc/rc/d/init.d/ and run one or both of the following commands, as required:
chkconfig -add gctilcachkconfig -add gctigda
Database User PrivilegesA database user that accesses the Configuration Database on behalf of Configuration Server, that is, the user identified in the Configuration Server configuration file, requires basic database privileges, as defined in this section. When the database is created, it is assumed that it is created under the new user and the initialization scripts are under that user account, unless otherwise stated.
a. The user account for the running process is usually determined by the user or object that started the process. For example, if a process is started by LCA, then the process inherits its permissions from LCA
b. Administrators or root permission is required to install the component because, during installation, it up-dates the startup file and registry.
Deployment Guide 287
Appendix A: Minimum Permissions Database User Privileges
Oracle
After the new database user is created, grant the necessary privileges as follows:
GRANT CONNECT TO <DB user>GRANT CREATE TABLE TO <DB user>GRANT UNLIMITED TABLESPACE TO <DB user>GRANT CREATE PROCEDURE TO <DB user>
MS SQL
For MS SQL2000, grant the public role to the new database user on the Database Access tab of the SQL Server Login Properties dialog box for the new user. In addition, grant the following privileges:
GRANT CREATE TABLE TO <DB user>GRANT CREATE PROCEDURE TO <DB user>
For MS SQL 2005 and later, grant the public and db_owner roles to the new database user.
DB2
Grant the necessary privileges as follows:CONNECT TO <database>;GRANT CREATE TAB,CONNECT ON DATABASE TO USER <DB user>;CONNECT RESET;
PostgreSQL
From pgAdmin, grant the following privileges:
• Can create database object
• Can create roles
Or, you can execute the following query:CREATE ROLE <DB user> LOGIN ENCRYPTED PASSWORD <encrypted password> NOINHERIT CREATEDB CREATEROLE VALID UNTIL ‘infinity’;
To configure client authentication, update the pg_hba.conf file, located in the data directory under the PostgreSQL installation folder. For example:
host GCTI_Test gctitest <IP address1>/32 trusthost GCTI_Test gctitest <IP address2>/32 trust
This enables the DB user gctitest to connect to the GCTI_Test database from the hosts <IP address1> and <IP address2>.

288 Framework 8.1
Appendix A: Minimum Permissions Sample Scripts
SYBASE
To configure a new database user, who is not also the Database Administrator (DBA), do the following:
1. Create a new database under the DBA account, and run the Genesys Configuration Manager database initialization scripts (init_multi_syb.sql and CfgLocale_sby.sql).
2. Add the new database user login using the following commands under dbaccess:
sp_addlogin <DB user>, <DB password>, <DB name>
3. Issue the following commands to transfer ownership of the new database to the new user:
1> user <new DB>2> go1> exec sp_changedbowner <DB user>2> go
INFORMIX
The configured DB user must be informix.
Sample ScriptsThis section contains sample scripts referred to in earlier section of this Appendix.
LCA Startup Script—gctilca
The following is an example of a script to allow LCA to run under a non-root user.#!/bin/bash## chkconfig: 345 80 20# description: run lca## You should put this script to /etc/rc.d/init.d and run command:# chkconfig --add gctilca
#GCTI home dirGCTI=/home/genesys/GCTIDIRNAME=LCAHOMEDIR=$GCTI/$DIRNAMEUSER=genesysSCRIPTNAME=gctilcaHOME_USER=/home/genesys
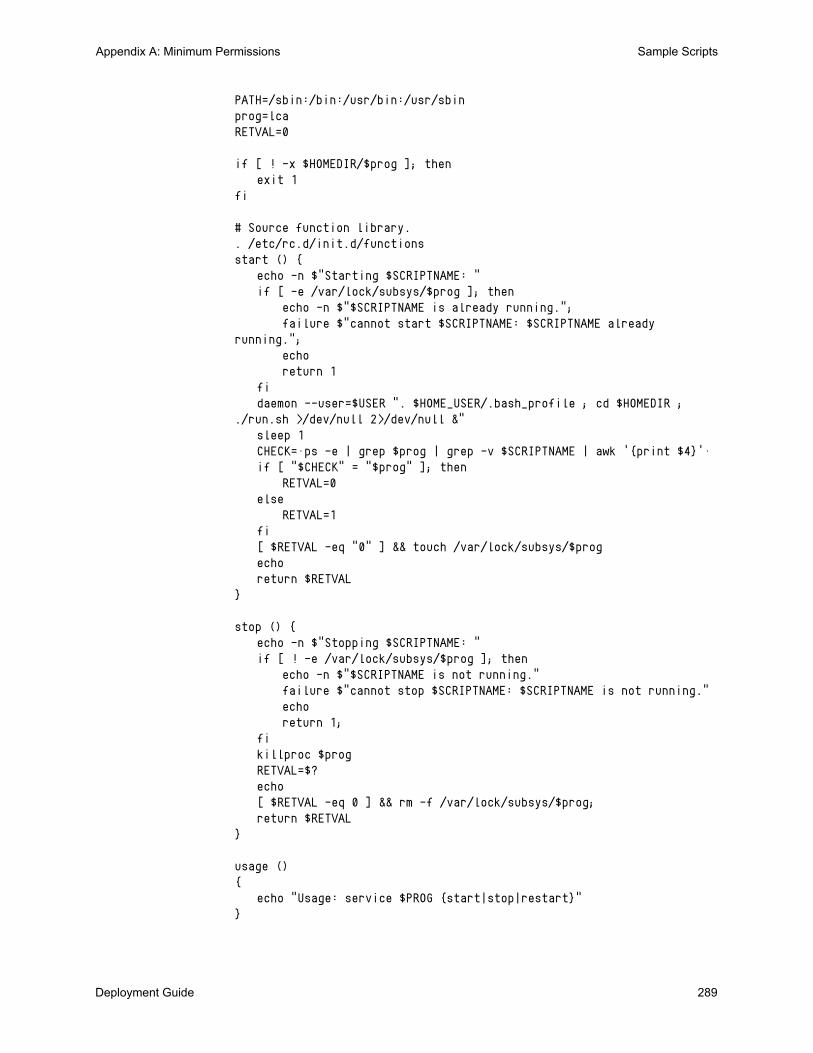
Deployment Guide 289
Appendix A: Minimum Permissions Sample Scripts
PATH=/sbin:/bin:/usr/bin:/usr/sbinprog=lcaRETVAL=0
if [ ! -x $HOMEDIR/$prog ]; thenexit 1
fi
# Source function library.. /etc/rc.d/init.d/functionsstart () {
echo -n $"Starting $SCRIPTNAME: "if [ -e /var/lock/subsys/$prog ]; then
echo -n $"$SCRIPTNAME is already running.";failure $"cannot start $SCRIPTNAME: $SCRIPTNAME already
running.";echoreturn 1
fidaemon --user=$USER ". $HOME_USER/.bash_profile ; cd $HOMEDIR ;
./run.sh >/dev/null 2>/dev/null &"sleep 1CHECK=`ps -e | grep $prog | grep -v $SCRIPTNAME | awk '{print $4}'`if [ "$CHECK" = "$prog" ]; then
RETVAL=0else
RETVAL=1fi[ $RETVAL -eq "0" ] && touch /var/lock/subsys/$progechoreturn $RETVAL
}
stop () {echo -n $"Stopping $SCRIPTNAME: "if [ ! -e /var/lock/subsys/$prog ]; then
echo -n $"$SCRIPTNAME is not running."failure $"cannot stop $SCRIPTNAME: $SCRIPTNAME is not running."echoreturn 1;
fikillproc $progRETVAL=$?echo[ $RETVAL -eq 0 ] && rm -f /var/lock/subsys/$prog;return $RETVAL
}
usage (){
echo "Usage: service $PROG {start|stop|restart}"}

290 Framework 8.1
Appendix A: Minimum Permissions Sample Scripts
case $1 instart)
start;;
stop)stop;;
restart)stop
start;;
*)usage ; RETVAL=2;;
esac
exit $RETVAL
GDA Startup Script—gctigda
The following is an example of a script to allow GDA to run under a non-root user.#!/bin/bash## chkconfig: 345 80 20# description: run gda## You should put this script in /etc/rc.d/init.d and run command:# chkconfig --add gctigda
#GCTI home dirGCTI=/home/genesys/GCTIDIRNAME=LCAHOMEDIR=$GCTI/$DIRNAMEUSER=genesysSCRIPTNAME=gctigdaHOME_USER=/home/genesys
PATH=/sbin:/bin:/usr/bin:/usr/sbinprog=gdaRETVAL=0
if [ ! -x $HOMEDIR/$prog ]; thenexit 1
fi
# Source function library.. /etc/rc.d/init.d/functions

Deployment Guide 291
Appendix A: Minimum Permissions Sample Scripts
start () {echo -n $"Starting $SCRIPTNAME: "if [ -e /var/lock/subsys/$prog ]; then
echo -n $"$SCRIPTNAME is already running.";failure $"cannot start $SCRIPTNAME: $SCRIPTNAME already
running.";echoreturn 1
fidaemon --user=$USER ". $HOME_USER/.bash_profile ; cd $HOMEDIR ;
./gda >/dev/null 2>/dev/null &"sleep 1CHECK=`ps -e | grep $prog | grep -v $SCRIPTNAME | awk '{print $4}'`if [ "$CHECK" = "$prog" ]; then
RETVAL=0else
RETVAL=1fi[ $RETVAL -eq "0" ] && touch /var/lock/subsys/$progechoreturn $RETVAL
}
stop () {echo -n $"Stopping $SCRIPTNAME: "if [ ! -e /var/lock/subsys/$prog ]; then
echo -n $"$SCRIPTNAME is not running."failure $"cannot stop $SCRIPTNAME: $SCRIPTNAME is not running."echoreturn 1;
fikillproc $progRETVAL=$?echo[ $RETVAL -eq 0 ] && rm -f /var/lock/subsys/$prog;return $RETVAL
}
usage (){
echo "Usage: service $PROG {start|stop|restart}"}
case $1 instart)
start;;
stop)stop;;
restart)stopstart

292 Framework 8.1
Appendix A: Minimum Permissions Sample Scripts
;;*)
usage ; RETVAL=2;;
esac
exit $RETVAL
Deployment Guide 293
Appendix
B Standard Configuration ProcedureThis appendix provides generic instructions for using Configuration Manager or Genesys Administrator to configure a Genesys Framework Application object.
This appendix contains the following sections: Application Templates, page 293 Server Applications, page 298 Graphical User Interface Applications, page 306
Refer to instructions for a particular application for any application-specific deviations from the standard configuration procedure.
Application TemplatesThe application template provides a majority of the configuration options for server applications and the option default values. Using one application template, you can create as many Application objects of the same type as you need.
Before you configure an Application object, import a template for this application. If a suitable predefined template is not available, create a new template.
Using Genesys Administrator
The procedures in this section describe how use Genesys Administrator to import a predefined application template, and how to create a new application template.
294 Framework 8.1
Appendix B: Standard Configuration Procedure Application Templates
Procedure:Importing a predefined application template using Genesys Administrator
Purpose: To obtain a predefined template for an application, from which one or more Application objects of that type can be created.
Start of procedure
1. In Genesys Administrator, go to Provisioning > Environment > Application Templates, and select Import template, located in the slide-out Tasks panel on the right.
2. In the window that appears, click Add.
3. In the Choose file dialog box, locate the installation CD for your product and open the TEMPLATES folder.
4. Select the template file for your application.
5. Click Open to import the template file. The Configuration tab for this template is displayed.
6. Make any changes that you require, then click Save to save your changes and return to the list of available templates.
End of procedure
Next Steps
• If there is metadata associated with this template, import the metadata file. Use the procedure “Importing metadata for an application template” on page 296.
Tip: Before you continue, make sure you have selected Show Advanced views in User Preferences. Refer to Framework Genesys Administrator Help for more information about setting your User Preferences.
Note: If Application Templates is not listed under Environment, open user preferences, and select Show advanced views on the General tab. Refer to Framework Genesys Administrator Help, if necessary.
Deployment Guide 295
Appendix B: Standard Configuration Procedure Application Templates
Procedure:Creating a new application template using Genesys Administrator
Purpose: To create a new application template for an application, from which one or more Application objects of that type can be created.
Start of procedure
1. In Genesys Administrator, go to Provisioning > Environment > Application Templates, and click New in the toolbar.
2. Specify the template Name, select a template Type, and specify a Version.
3. If required, define default configuration options on the Options tab.
4. Click Save to save the changes and return to the list of available templates.
The new template is stored in the Environment > Application Templates folder, and can be used to create a new Application object; you do not have to import it
End of procedure
Application Metadata
Starting with release 8.0, application templates for some Genesys components come with additional XML files called Application Metadata files. These files are used by only Genesys Administrator, and provide a user-friendly way to further configure an object. The metadata file contains all of the configuration options that can be used for the particular application, including those that are already in the template.
The metadata file is located in the same folder with the corresponding application template, and has the same filename with the extension .xml. To enable the metadata, you must import the metadata file and associate it with the application template.
For more information about metadata, refer to Framework Genesys Administrator Help.
Note: If Application Templates is not listed under Environment, open user preferences, and select the Show advanced views checkbox on the General tab. Refer to Framework Genesys Administrator Help if necessary.
296 Framework 8.1
Appendix B: Standard Configuration Procedure Application Templates
Procedure:Importing metadata for an application template
Note: Genesys Administrator must be used for this procedure. Configuration Manager does not support metadata.
Prerequisites
• The application template to be associated with the metadata is available.
• You are logged in to Genesys Administrator.
Start of procedure
1. In Genesys Administrator, go to Provisioning > Environment > Application Templates, and select the application template to which the metadata is to be imported. The Configuration tab for this template is displayed.
2. Click Import Metadata in the toolbar.
3. In the window that appears, click Add.
4. In the Choose file dialog box, locate the installation CD for your particular product and open the TEMPLATES folder.
5. Select the metadata file for the application.
6. Click Open to import the metadata file, and associate the metadata with the application template.
End of procedure
After the metadata is imported for a template, a new tab, Settings, appears in the details pane for each Application object created from that template. In that new tab, Genesys Administrator displays additional detailed information about configuration options that can be used with that application.
Using Configuration Manager
The procedures in this section describe how to use Configuration Manager to import a predefined application template, and how to create a new application template.

Deployment Guide 297
Appendix B: Standard Configuration Procedure Application Templates
Procedure:Importing a predefined application template using Configuration Manager
Purpose: To obtain predefined template for an application, from which one or more Application objects of that type can be created.
Prerequisites
• You are logged in to Configuration Manager.
Start of procedure
1. In Configuration Manager, select the Environment > Application Templates folder.
2. Select File > Import > Application Template.
3. Click the down arrow for the Look In field.
4. Locate the installation CD for your particular product and open the TEMPLATES folder.
5. Select the template file for your particular application.
6. Click Open to open the Properties dialog box for this template.
7. Make any changes that you require, then click OK to save them and exit the Properties dialog box.
End of procedure
Procedure:Creating a new application template using Configuration Manager
Purpose: To create a new application template for an application, from which one or more Application objects of that type can be created.
Prerequisites
• You are logged in to Configuration Manager.
Start of procedure
1. In Configuration Manager, select the Environment > Application Templates folder.
2. Select File > New > Application Template.

298 Framework 8.1
Appendix B: Standard Configuration Procedure Server Applications
3. Specify the template Name, select a template Type, and specify a Version.
4. If required, define default configuration options on the Options and Annex tabs.
5. Click OK to save your changes and exit the Properties dialog box.
The new template is stored in the Environment > Application Templates folder, and is available to be used to create a new Application object; you do not have to import it
End of procedure
Server ApplicationsThis section contains the procedures necessary to create and configure Server applications.
Using Genesys Administrator
Procedure:Creating and configuring a Server Application object using Genesys Administrator
Prerequisites
• The Configuration Layer is installed and running.
• You are logged in to Genesys Administrator.
Start of procedure
1. In Genesys Administrator, go to Provisioning > Environment > Applications, and select New in the toolbar.
2. From the available application templates in the Browse dialog box, choose the template for this application. (See “Application Templates” on page 293 for information about templates.)
3. In the General section of the Configuration tab:• Enter a name for this application in the text box. The application
template provides information for the application type and version.• If you are in a multi-tenant environment, add the tenants who will be
using this application.• In the Connections field, do any of the following as required:
• Add a connection to any server application to which this application should be a client. To enable Advanced Disconnect

Deployment Guide 299
Appendix B: Standard Configuration Procedure Server Applications
Detection Protocol (ADDP) for this connection, see “Configuring ADDP” on page 303.
• To enable ADDP between this server and Configuration Server, add the Configuration Server application (named confserv) to the Connections and specify the values for the connection protocol in seconds (see “Configuring ADDP” on page 303.) For more information, refer to Framework Genesys Administrator Help.
• Add a connection to Message Server to provide alarm-signaling and centralized-logging capabilities.
4. In the Server Info section, specify the following:• The host computer on which this server is to be installed and/or to run.• Listening ports that applications must use to connect to this server. • Working Directory—the full path to the directory from which the
application starts.• Command Line properties—The command line used for starting the
application; usually, it is the name of the executable file.• Command Line Arguments—Additional parameters, if any, used for
starting the application.
Note that the path, command line, and command-line parameters are updated automatically during the application’s installation procedure.• If another server application is used as a backup for this one, specify
the Backup Server and the Redundancy Type.
Warning! You must have a special high-availability (HA) license to use redundant configurations. Otherwise, the Management Layer does not perform a switchover between the primary and backup servers. Refer to the Genesys Licensing Guide for details.
5. Select the Options tab and specify or change the values of the configuration options. For option descriptions, see:• The Framework Configuration Options Reference Manual for
Configuration and Management Layer components’ options.• The latest version of the Framework T-Server Deployment Guide for
your specific T-Server and HA Proxy (if applicable) options.• The latest version of the Framework Stat Server User’s Guide for Stat
Server options.
If the application’s working directory differs from the directory in which the application was originally installed, configure an option named messagefile in the log section. Specify the full path to the application-specific log messages file (*.lms) as the option value. Otherwise, the application is unable to generate its specific log events.
300 Framework 8.1
Appendix B: Standard Configuration Procedure Server Applications
6. Click Save or Apply to save your changes. The new GUI application is now listed in the list of applications.
End of procedure
Configuring ADDP
You can enable ADDP for a connection between any two Genesys applications that support it.
Procedure:Configuring Advanced Disconnect Detection Protocol using Genesys Administrator
Purpose: To configure ADDP-related parameters for a connection between two applications that form a client-server pair.
Note: Some applications do not support ADDP for certain connections. Refer to application-specific documentation or Release Notes to determine if your application supports ADDP.
Prerequisites
• The Configuration Layer is installed and running.
• Application objects for each application in the client-server pair exist.
• You are logged in to Genesys Administrator.
Start of procedure
1. In Genesys Administrator, go to Provisioning > Environment > Applications, and select the client application in the client-server pair.
2. Select the Configuration tab, and expand the General section.
3. In the Connections list, click Add.
4. In the CfgConnectionInfo dialog box that opens:
a. From the list of servers, select the application name that represents the connection for which you want to configure ADDP.
b. Specify addp as the value for the Connection Protocol field.
c. Specify any integer as the value for the Local Timeout field. This indicates how often, in seconds, the client application sends polling signals to the server application.

Deployment Guide 301
Appendix B: Standard Configuration Procedure Server Applications
d. If you also want to enable polling signals from the server application to the client, specify any integer as the value for the Remote Timeout field. This timeout is also measured in seconds.
e. If you do not want either the client or the server application to print ADDP-related messages in its log, select the Trace Is Turned Off value for the Trace Mode field. Otherwise, do one of the following:• Select Trace On Client Side for the client application to print
ADDP-related messages in its log.• Select Trace On Server Side for the server application to print
ADDP-related messages in its log.• Select Trace On Both Sides for both client and server applications
to print ADDP-related messages in their log.
5. Click OK, and then Save to save the configuration changes.
End of procedure
Using Configuration Manager
Procedure:Creating and configuring a Server Application object using Configuration Manager
Prerequisites
• The Configuration Layer is installed and running.
• You are logged in to Configuration Manager.
Start of procedure
1. In Configuration Manager, select the Environment > Applications folder.
2. Select File > New > Application.
3. From the available application templates in the Browse dialog box, choose the template for this application. (See “Application Templates” on page 293 for information about application templates.)
4. Select the General tab of the Properties dialog box and enter a name for this application. The application template provides information for the application type and version.
Tip: To avoid false disconnect states that might occur because of delays in the data network, Genesys recommends setting the ADDP timeouts to values equal to or greater than ten seconds.

302 Framework 8.1
Appendix B: Standard Configuration Procedure Server Applications
5. The Tenants tab displays only in a multi-tenant environment. You can add tenants for this application by selecting the Tenants tab and clicking the Add button.
6. Select the Server Info tab and specify the:• Host computer on which this server is to be installed and/or to run.• One or more communication ports that applications must use to
connect to this server.
7. If another server application is used as a backup for this one, specify the Redundancy Type and the Backup Server on the Server Info tab.
Warning! You must have a special high-availability (HA) license to use redundant configurations. Otherwise, the Management Layer does not perform a switchover between the primary and backup servers. Refer to the Genesys Licensing Guide for details.
Note: See “Synchronizing Options and Ports Between Primary and Backup Servers” on page 304 for information about enabling options and ports synchronization between primary and backup servers.
8. Select the Start Info tab and define the:• Working Directory—The full path to the directory from which the
application starts.• Command Line properties—The command line used for starting the
application; usually, it is the name of the executable file.• Command Line Arguments—Additional parameters, if any, used for
starting the application.
Note that these properties are updated automatically during the application’s installation procedure.
9. Select the Options tab and specify or change the values of the configuration options. For option descriptions, see:• The Framework Configuration Options Reference Manual for
Configuration and Management Layer components’ options.• The latest version of the Framework T-Server Deployment Guide for
your specific T-Server and HA Proxy (if applicable) options.• The latest version of the Framework Stat Server User’s Guide for Stat
Server options.
If the application’s working directory differs from the directory to which the application is originally installed, configure an option named messagefile in the log section. Specify the full path to the application-specific log messages file (*.lms) as the option value. Otherwise, the application is unable to generate its specific log events.
Deployment Guide 303
Appendix B: Standard Configuration Procedure Server Applications
10. Select the Connections tab, and do any of the following as required:• Add a connection to any server application this application should be a
client to. To enable Advanced Disconnect Detection Protocol (ADDP) for this connection, see “Configuring ADDP” on page 303.
• To enable ADDP between this server and Configuration Server, add the Configuration Server application (named confserv) to the Connections and specify the values for the connection protocol in seconds (see “Configuring ADDP” on page 303). For more information, refer to Framework Configuration Manager Help.
• Add a connection to Message Server to provide alarm-signaling and centralized-logging capabilities.
11. Click OK to save your changes and exit the Properties dialog box.
End of procedure
Configuring ADDP
You can enable the Advanced Disconnect Detection Protocol (ADDP) for a connection between any two Genesys applications that support ADDP.
Procedure:Configuring Advanced Disconnect Detection Protocol using Configuration Manager
Purpose: To configure ADDP-related parameters for a connection between two applications that form a client-server pair.
Note: Some applications do not support ADDP for certain connections. Refer to documentation or Release Notes to find this information for particular applications.
Prerequisites
• The Configuration Layer is installed and running.
• Application objects for each application in the client-server pair exist.
• You are logged in to Configuration Manager.
Tip: You can add a connection to Message Server for all or a set of Application objects after you configure them. To launch a Wizard that configures connections for multiple Application objects, select two or more Application objects, right-click, and select Manage Connections. Refer to Framework Configuration Manager Help for more information.
304 Framework 8.1
Appendix B: Standard Configuration Procedure Server Applications
Start of procedure
1. In Configuration Manager, open the Application Properties dialog box for the client application in the client-server pair.
2. Select the Connections tab.
3. Double-click the application name that represents the connection for which you want to configure ADDP.
4. In the Properties dialog box that opens:
a. Specify addp as the value for the Connection Protocol field.
b. Specify any integer as the value for the Local Timeout field. This indicates how often, in seconds, the client application sends polling signals to the server application.
c. If you also want to enable polling signals from the server application to the client, specify any integer as the value for the Remote Timeout field. This timeout is also measured in seconds.
d. If you do not want either the client or the server application to print ADDP-related messages in its log, select the Trace Is Turned Off value for the Trace Mode field. Otherwise, do one of the following:• Select Trace On Client Side for the client application to print
ADDP-related messages in its log.• Select Trace On Server Side for the server application to print
ADDP-related messages in its log.• Select Trace On Both Sides for both client and server applications
to print ADDP-related messages in their logs.
5. Click OK to save the configuration changes, and exit the Properties dialog box.
End of procedure
Synchronizing Options and Ports Between Primary and Backup Servers
Configuration Manager can automatically synchronize the options and ports between primary and backup server applications. This section contains the procedures necessary to set up this automatic synchronization.
Genesys Administrator does not support this functionality.
Tip: To avoid false disconnect states that might occur because of delays in the data network, Genesys recommends setting the ADDP timeouts to values equal to or greater than ten seconds.

Deployment Guide 305
Appendix B: Standard Configuration Procedure Server Applications
Procedure:Synchronizing options between primary and backup servers
Purpose: To enable Configuration Manager to synchronize the options between primary and backup applications automatically.
Prerequisites
• The Configuration Layer is installed and running.
• The primary and backup servers have been installed and configured.
• You are logged in to Configuration Manager.
Start of procedure
1. Assign an application template to the primary server before using that template for a backup server. (This is the default behavior for Configuration Manager, but not for Configuration Wizards.)
2. On the application template’s Annex tab, list the options that you want synchronized between the corresponding Application objects. You must list both the section and option names exactly as they appear in the primary application. However, instead of entering the actual option values, use one of the following values:• 1— Indicates that the corresponding option in the primary server
should be copied into the backup server only at the moment when the backup is assigned to the primary. This leaves the option available for later independent changes in the primary and backup servers.
• 2—Indicates that Configuration Server should not only copy the option to the backup during its assignment to the primary, but also that it should synchronize the options any time that the option is changed on the primary server.
3. Click OK.
End of procedure
Procedure:Synchronizing ports between primary and backup servers
Purpose: To enable Configuration Manager to synchronize the ports between primary and backup server applications automatically.

306 Framework 8.1
Appendix B: Standard Configuration Procedure Graphical User Interface Applications
Prerequisites
• The Configuration Layer is installed and running.
• You are logged in to Configuration Manager.
Start of procedure
1. In Configuration Manager, select View > Options to open the Options dialog box.
2. On the General tab, in the Server Ports Assignment section:
a. Select Auto, and enter a starting number for the range of port numbers that will automatically be assigned for ports on server applications.
b. Select Auto For Backup, and enter the first number of a range of ports that will automatically be assigned on backup applications.
When the Auto For Backup option is selected, ports are automatically synchronized between the primary and backup server applications.
When a port is defined on the primary server application, a compatible port is automatically allocated on the backup server application. If the two server applications are configured as a redundant pair, you cannot remove or change the ports on the backup server. If the two are not linked as a redundant pair, you can delete the ports on the application that had been the backup. Refer to Framework Configuration Manager Help for more information.
3. Click OK.
End of procedure
Graphical User Interface ApplicationsThe section contains the procedures necessary to create and configure graphical user interface (GUI) Application objects.
Procedure:Creating and configuring a GUI Application object using Genesys Administrator
Prerequisites
• The Configuration Layer is installed and running.
• At least one of the servers to which the GUI connects is installed.
• You are logged in to Genesys Administrator.
Deployment Guide 307
Appendix B: Standard Configuration Procedure Graphical User Interface Applications
Start of procedure
1. In Genesys Administrator, go to Provisioning > Environment > Applications, and select New in the toolbar.
2. From the available application templates in the Browse dialog box, choose the template for this application. (See “Application Templates” on page 293 for information about templates.)
3. In the General section of the Configuration tab, enter a name for this application in the text box. The application template provides information for the application type and version.
4. Select the Connections tab. If necessary, add connections to any server applications to which this GUI application must connect.
5. Click Save to save your changes. The new GUI application is now listed in the list of applications.
End of procedure
Procedure:Creating and configuring a GUI Application object using Configuration Manager
Prerequisites
• The Configuration Layer is installed and running.
• At least one of the servers to which the GUI connects is installed.
• You are logged in to Configuration Manager.
Start of procedure
1. In Configuration Manager, select the Environment > Applications folder.
2. Select File > New > Application.
3. From the available application templates in the Browse dialog box, choose the template for this application. (See “Application Templates” on page 293 for information about templates.)
4. Select the General tab of the Properties dialog box and enter a name for this Application in the text box. The application template provides information for the application type and version.
5. Select the Connections tab. If necessary, add connections to any server applications to which this GUI application must connect.
6. Click OK to save your changes and exit the Properties dialog box.
End of procedure

308 Framework 8.1
Appendix B: Standard Configuration Procedure Graphical User Interface Applications
Deployment Guide 309
Appendix
C Standard Installation ProcedureThis appendix provides instructions for installing a typical Genesys application that you have configured using Configuration Manager.
This appendix contains the following sections: Server Applications, page 309 Graphical User Interface Applications, page 313 Troubleshooting the Installation, page 314
Refer to the instructions for a particular application for the location of installation packages on a product CD and for any application-specific deviations from the standard installation procedure.
Server ApplicationsThis section describes a standard installation procedure for a server application on UNIX and Windows operating systems.
Procedure:Installing a server application on UNIX
Warning! During installation on UNIX, all files are copied into the directory you specify. The install process does not create any subdirectories within this directory,; therefore, do not install different products into the same directory.
310 Framework 8.1
Appendix C: Standard Installation Procedure Server Applications
Prerequisites
• An Application object exists for the server application. See either the procedure or “Creating and configuring a Server Application object using Genesys Administrator” on page 298 or the procedure “Creating and configuring a Server Application object using Configuration Manager” on page 301.
Start of procedure
1. Insert the product CD with this application into the CD-ROM drive of the application host computer.
2. In the appropriate directory, locate a shell script called install.sh.
3. Run this script from the command prompt by typing the file name.
4. When prompted, specify the Host Name of the computer on which this server is to run.
5. When prompted, specify the: • Host Name of the computer on which Configuration Server is running. • Port used by client applications to connect to Configuration Server.• User Name used to log in to the Configuration Layer.• Password used to log in to the Configuration Layer.
6. The installation displays the list of applications of the specified type configured for this host. Type the number of the server application that should be installed.
7. Specify the destination directory into which this server is to be installed, with the full path to it.
If the installation script finds that the destination directory is not empty, it suggests that you do one of the following:• Back up all files in the directory.• Overwrite only the files contained in this package.• Wipe the directory clean.
Type the number that corresponds to your selection and confirm your choice.
8. If asked which version of the product to install, either the 32-bit or the 64-bit, choose the one appropriate to your environment.
9. If you plan to use functionality that requires a license, such as Solution Control Server (SCS) with Simple Network Management Protocol (SNMP), type y when prompted and enter one of the following:• The full path to the license file• The License Manager port and host
End of procedure
Deployment Guide 311
Appendix C: Standard Installation Procedure Server Applications
As soon as the installation process is finished, a message appears indicating that installation was successful. The process places the server application in the directory specified during the installation.
Procedure:Installing a server application on Windows
Warning! Genesys does not recommend installation of its components via a Microsoft Remote Desktop connection. The installation should be performed locally.
Prerequisites
• An Application object exists for the server application. See either the procedure or “Creating and configuring a Server Application object using Genesys Administrator” on page 298 or the procedure “Creating and configuring a Server Application object using Configuration Manager” on page 301.
Start of procedure
1. From the product CD with this server application, open the appropriate directory.
2. Locate and double-click setup.exe to start the Genesys Installation Wizard.
3. Use the About button on the wizard’s Welcome page to review the read_me file. The file also contains a link to the server’s Release Notes file.
4. Click Next on the Welcome page to proceed with the installation.
5. On the Connection Parameters to the Genesys Configuration Server page, specify the following login parameters:• Host and port of Configuration Server• User name and password used to log in to the Configuration Layer.
6. The Select Application page displays all applications of this type that the Configuration Database contains. When you select one application from the list, the wizard displays some parameters configured for the selected application (such as application type, host, working directory, command line, and command-line arguments).
Select the application to install.
Tip: Click Next at the end of each step to proceed to the next page.

312 Framework 8.1
Appendix C: Standard Installation Procedure Server Applications
7. On the Run-time License Configuration page, select one of the following options: • Use License if you plan to use features that require special licenses.• Without License if you do not plan to use features that require special
licenses. In this instance, go to Step 9.
If you decide to use a licensed feature later on, reinstall the server and enter the appropriate license information through the Genesys Installation Wizard.
8. On the Access to License page, select one of the following options: • License Manager—You want your server application to use host name
and port number parameters to connect to the license server. In this instance, you must enter values for the host and the port of the license server.
• License File—You want your server application to retrieve license server information from the license file. Use the Browse button to navigate to the license file.
9. On the Choose Destination Location page, the wizard displays the destination directory, as specified in the Working Directory property of the server’s Application object. If the path configured as Working Directory is invalid, the wizard generates a path to the destination directory in the C:\Program Files\GCTI\<Product Name> format.
If necessary, use the:• Browse button to select another destination folder. In this case, the
wizard will update the Application object’s Working Directory in the Configuration Database.
• Default button to reinstate the path specified in Working Directory.
10. On the Ready to Install information page, click:• Back to update any installation information.• Install to proceed with installation. Installation Status displays the
installation progress.
11. On the Installation Complete page, click Finish.
As a result of the installation, the wizard adds Application icons to the:• Windows Start menu, under Programs > Genesys Solutions.• Windows Add or Remove Programs window, as a Genesys server.• Windows Services list, as a Genesys service, with Automatic startup
type.
End of procedure
Tip: If the component does not require a technical license, omit Steps 7 and 8. If the component requires a technical license for startup, omit Step 7. If the component requires a technical license to enable a certain feature, but the license is not otherwise required, proceed with Step 7.

Deployment Guide 313
Appendix C: Standard Installation Procedure Graphical User Interface Applications
Graphical User Interface ApplicationsThis section describes a standard installation procedure for a graphical user interface (GUI) application on Windows operating systems. Genesys GUI applications are designed to operate on Windows only.
If you want to implement a security banner with the Genesys GUI application, make sure that you have the necessary files prepared before you start installing the GUI application. Refer to the Genesys Security Deployment Guide for detailed information about the security banner.
Procedure:Installing a GUI application on Windows
Warning! Genesys does not recommend installation of its components via a Microsoft Remote Desktop connection. The installation should be performed locally.
Prerequisites
• If you want to implement a security banner with the Genesys GUI application, make sure that you have the necessary files prepared before you start installing the GUI application. Refer to the Genesys Security Deployment Guide for detailed information about the security banner.
Start of procedure
1. From the product CD with this application, open the appropriate directory.
2. Locate and double-click setup.exe to start the Genesys Installation Wizard.
3. Use the About button on the wizard’s Welcome page to review the read_me file. The file also contains a link to the application’s Release Notes file.
4. Click Next to proceed with the installation.
5. On the Security Banner Configuration page, choose whether you want to configure a security banner for this GUI application. Refer to the Genesys Security Deployment Guide for detailed information about the security banner. Do one of the following:• If you do not want to configure a security banner for this application,
clear the Enable Security Banner check box, and click Next. • If you want to configure a security banner for this application:
i. Select Enable Security Banner.
ii. Follow the instructions in the procedure “Installing and configuring the Security Banner” in the Genesys Security
314 Framework 8.1
Appendix C: Standard Installation Procedure Troubleshooting the Installation
Deployment Guide. When you are finished that procedure, return here and finish this procedure.
6. On the Choose Destination Location page, the wizard displays the path to the destination directory in the C:\Program Files\GCTI\<Product Name> format.
If necessary, use the:• Browse button to select another destination folder.• Default button to reinstate the wizard-generated path (C:\Program
Files\GCTI\<Product Name>).
Click Next.
Note: If the GUI application requires any nonstandard installation input from the user, extra pages appear here.
7. On the Ready to Install page, click:• Back to update any installation information.• Install to proceed with the installation. Installation Status displays
the installation progress.
8. On the Installation Complete page, click Finish.
As a result of the installation, the wizard adds Application icons to the:• Windows Start menu, under Programs > Genesys Solutions.• Windows Add or Remove Programs window, as a Genesys application.
End of procedure
Troubleshooting the Installation
Procedure:Troubleshooting the installation of a Genesys application
Purpose: To determine and fix the cause of a warning—generated during the installation procedure for any Genesys application—that Configuration Server is unavailable and that configuration cannot be updated.
Start of procedure
1. Finish installing the Genesys application.
Deployment Guide 315
Appendix C: Standard Installation Procedure Troubleshooting the Installation
2. When installation of the application is complete, open the Configuration tab (in Genesys Administrator) or the Properties dialog box (in Configuration Manager) of the corresponding Application object.
3. Select the State Enabled check box.
4. Verify that the Working Directory, Command Line, and Command Line Arguments are specified correctly.
5. Save the configuration updates.
End of procedure

316 Framework 8.1
Appendix C: Standard Installation Procedure Troubleshooting the Installation
Deployment Guide 317
Appendix
D Login ProcedureThis appendix describes how to log in to a Framework graphical user interface (GUI) application.
This appendix contains the following sections:
• Logging In, page 317
• User Password Requirements and Restrictions, page 318
Logging InWhen you start a Framework graphical user interface (GUI) application, or if you are being forced to log in again after a period of inactivity, a Login dialog box displays. The Configuration Layer checks the information specified in the Login dialog box and determines the user’s permission to view, create, and modify objects in the Configuration Database.
Procedure:Logging in to a Framework GUI application
Start of procedure
1. Start the application. Refer to the documentation for the particular application for specific instructions.
2. In the Login dialog box:
a. Enter a user name. If you are logging in to the Configuration Layer for the first time, use the Master Account user name, which is default.
Note: Configuration Layer will not allow users whose use of Genesys Administrator or Configuration Manager has been disabled to log into Genesys applications.
318 Framework 8.1
Appendix D: Login Procedure User Password Requirements and Restrictions
After the appropriate configuration objects of the User type are added to the configuration, use a customized user name.
b. Enter a user password. If you are logging in to the Configuration Layer for the first time, use the Master Account password, which is password. After the appropriate configuration objects of the User type are added to the configuration, use your own password. Your System Administrator will notify you if any requirements or restrictions apply to your password (see page 318).
If you have configured Configuration Server to allow access with a blank password, you can optionally leave the Password field empty. Refer to the Framework Configuration Options Reference Manual for information on configuring this functionality.
c. Click either Details or More options to display additional input login fields.
d. Enter the application name, which is the instance of the application to which you are logging in, as it is registered in the Configuration Database.
e. Enter a host name, which is the name of the computer on which Configuration Server runs.
f. Enter a port number, which is the number of the communication port that client applications use to connect to Configuration Server.
End of procedure
If your configuration uses both primary and backup Configuration Servers, Configuration Manager and Solution Control Interface automatically reconnect to the backup server if they lose their connection to the primary server. You can specify automatic or manual reconnection; refer to the on-line Help file of your GUI application.
User Password Requirements and Restrictions
Starting in release 8.1.1, the System Administrator or other authorized person can configure restrictions for user passwords and how they are used. The restrictions include:
• The type and case of characters allowed in a password.
• Whether a password can expire, and the expiration time interval.
Note: The predefined name of the Configuration Manager Application object is default. You can rename it later.

Deployment Guide 319
Appendix D: Login Procedure User Password Requirements and Restrictions
• After using a given password, how many different passwords must be used before using that given password again, or if re-use is permitted at all.
• Whether the user must change their password the next time they log in.
• The number of unsuccessful login attempts can be made after which the account is locked.
For more information about these requirements, and how to configure them, refer to the Framework Security Deployment Guide.

320 Framework 8.1
Appendix D: Login Procedure User Password Requirements and Restrictions

Deployment Guide 321
Appendix
E Internet Protocol version 6 (IPv6)This appendix describes Internet Protocol version 6, commonly known as IPv6, and how it is supported and implemented in Genesys software.
This appendix contains the following sections: Overview of IPv6, page 321 IPv6 Architecture, page 326 DNS, page 328 Virtualization, page 329 License Control, page 329 Genesys 8.1 IPv6 Support, page 331 Deployment Considerations, page 333
Overview of IPv6IPv6 is a network layer for packet-switched inter-networks. It is designated as the successor of IPv4, the current version of the Internet Protocol, for general use on the Internet.
Notes: • This appendix contains a detailed description of IPv6 and deployment considerations associated with it. See “IPv6 vs. IPv4 Overview” on page 59 for information about activating support for IPv6 for a Genesys component. For a list of Framework connections that support IPv6, see “IPv6 Support” on page 37.
• This appendix includes material that is freely available on the Internet and from other public sources.
322 Framework 8.1
Appendix E: Internet Protocol version 6 (IPv6) Overview of IPv6
Addressing
The primary change from IPv4 to IPv6 is the length of network addresses. IPv6 addresses are 128 bits long (as defined by RFC 4291), whereas IPv4 addresses are 32 bits. This amounts to an address space for IPv4 of approximately 4 billion addresses, compared to 3.4 x 1038 unique addresses for IPv6.
IPv6 addresses are typically composed of two logical parts: a 64-bit network or subnetwork prefix, and a 64-bit host part. This host part is either generated automatically from the MAC address of the interface, or assigned sequentially. Because globally unique MAC addresses offer an opportunity to track user equipment (and therefore users) across IPv6 address changes, RFC 3041 was developed to reduce the chance of user identity being permanently tied to an IPv6 address, thus restoring some of the anonymity existing with IPv4. RFC 3041 specifies a mechanism by which time-varying random bit strings can be used as interface circuit identifiers, replacing unchanging and traceable MAC addresses.
Notation
IPv6 addresses are normally written as eight groups of four hexadecimal digits separated by colons (:). For example:
2001:0db8:85a3:08d3:1319:8a2e:0370:7334
If one or more four-digit groups is 0000, the zeros can be omitted and replaced with two colons (::). For example:
2001:0db8:0000:0000:0000:0000:1428:57ab
can be shortened to
2001:0db8::1428:57ab
Following this rule, any number of consecutive 0000 groups can be reduced to two colons, as long as there is only one double colon used in an address. Leading zeros in a group can also be omitted (as in ::1 for a localhost address). Therefore, the following addresses are all valid and are equivalent:
2001:0db8:0000:0000:0000:0000:1428:57ab
2001:0db8:0000:0000:0000::1428:57ab
2001:0db8:0:0:0:0:1428:57ab
2001:0db8:0:0::1428:57ab
2001:0db8::1428:57ab
2001:db8::1428:57ab
Note that having more than one double-colon syntax element in an address is invalid, as it would make the notation ambiguous. For example, the following address:
2001:0000:0000:FFD3:0000:0000:0000:57ab
abbreviated to
2001::FFD3::57ab
Deployment Guide 323
Appendix E: Internet Protocol version 6 (IPv6) Overview of IPv6
could imply any of the following:2001:0000:0000:0000:0000:FFD3:0000:57ab2001:0000:FFD3:0000:0000:0000:0000:57ab
or any other similar permutation.
For more information about IPV6 addressing, refer to RFC 4291.
Literal IPv6 Addresses in URLs
In a URL, the IPv6 address is enclosed in brackets. For example:
http://[2001:0db8:85a3:08d3:1319:8a2e:0370:7344]/
This notation enables the parsing of a URL without confusing the IPv6 address and port number, such as in:
https://[2001:0db8:85a3:08d3:1319:8a2e:0370:7344]:443/
Additional information can be found in RFCs 2732 and 3986.
Network Notation
IPv6 networks are written using Classless Inter-Domain Routing (CIDR) notation.
An IPv6 network (or subnet) is a contiguous group of IPv6 addresses, the size of which must be a power of two. The initial bits of any address in the network are called the prefix, and are identical for all hosts in the network.
A network is denoted by the first address in the network, and the size (in bits) of the prefix (in decimal), separated with a forward-slash (/). For example:
2001:0db8:1234::/48
stands for the network with addresses2001:0db8:1234:0000:0000:0000:0000:0000
through2001:0db8:1234:ffff:ffff:ffff:ffff:ffff
Because a single host can be seen as a network with a 128-bit prefix, host addresses are often followed with /128.
Kinds of IPv6 addresses
IPv6 addresses are divided into the following categories (see RFC 4291 – IP Version 6 Addressing Architecture):
• unicast addresses
• multicast addresses
• anycast addresses
324 Framework 8.1
Appendix E: Internet Protocol version 6 (IPv6) Overview of IPv6
Unicast Addresses
A unicast address identifies a single network interface. A packet sent to a unicast address is delivered to that specific computer. The following types of addresses are unicast IPv6 addresses:
• Global unicast addresses
• Link-local addresses (prefix fe80::/10): Valid only on a single link; analogous to 169.254.0.0/16 in IPv4
• Unique local IPv6 unicast addresses
• Special addresses (see examples in Table 9)
Multicast Addresses
Multicast addresses are used to define a set of interfaces that typically belong to different nodes instead of just one. When a packet is sent to a multicast address, the protocol delivers the packet to all interfaces identified by that address. Multicast addresses begin with the prefix FF00::/8. The second octet identifies the scope of the addresses, that is, the range over which the multicast address is propagated. Commonly used scopes include link-local (0x2), site-local (0x5) and global (0xE).
Anycast Addresses
Anycast addresses are also assigned to more than one interface belonging to different nodes. However, a packet sent to an anycast address is delivered to just one of the member interfaces, typically the closest as defined by the routing protocol. Anycast addresses cannot be easily identified. They have the structure of normal unicast addresses, and differ only by being injected into the routing protocol at multiple points in the network.
Table 9: Examples of Special Addresses
::/128 The address with all zeros is an unspecified address, and is to be used only in software.
::1/128 The loopback address is a localhost address. It corresponds to 127.0.0.1 in IPv4.
::ffff:0:0/96 This prefix is used for IPv4-mapped addresses (see “Transition Mechanisms” on page 325).
2002::/16 This prefix is used for 6to4 addressing.
2001:db8::/32 This prefix is used in documentation (RFC 3849). Anywhere where an example of an IPv6 address is given, addresses from this prefix should be used.
Deployment Guide 325
Appendix E: Internet Protocol version 6 (IPv6) Overview of IPv6
Broadcast Addresses
There are no address ranges reserved for broadcast in IPv6. Applications use multicast to the all-hosts group instead. The Internet Assigned Numbers Authority (IANA) maintains the official list of the IPv6 address space. Global unicast assignments can be found on the various Regional Internet Registries (RIR) or on the Ghost Route Hunter Default Free Prefixes (GRH DFP) pages.
Transition Mechanisms
Until IPv6 completely supplants IPv4, which is not expected to occur in the foreseeable future, a number of transition mechanisms are needed to enable IPv6-only hosts to reach IPv4 services and to allow isolated IPv6 hosts and networks to reach the IPv6 Internet over the IPv4 infrastructure. An overview of some of the various IPv6 transitions that currently exist are provided at:
http://www.sixxs.net/faq/connectivity/?faq=comparison
Dual Stack
Because IPv6 is a conservative extension of IPv4, it is relatively easy to write a network stack that supports both IPv4 and IPv6 while sharing most of the source code. Such an implementation is called a dual stack, and a host implementing a dual stack is called a dual-stack host. This approach is described in RFC 4213.
Most current implementations of IPv6 use a dual stack. Some early experimental implementations used independent IPv4 and IPv6 stacks. There are no known implementations that implement IPv6 only.
Tunneling
To reach the IPv6 Internet, an isolated host or network must be able to use the existing IPv4 infrastructure to carry IPv6 packets. This is done using a technique referred to as tunneling. Tunneling consists of encapsulating IPv6 packets within IPv4, in effect using IPv4 as a link layer for IPv6.
IPv6 packets can be directly encapsulated within IPv4 packets using Protocol 41. They can also be encapsulated within User Datagram Protocol (UDP) packets, for example, to cross a router or Network Address Translation (NAT) device that blocks Protocol 41 traffic. They can also use generic encapsulation schemes, such as Anything In Anything (AYIYA) or Generic Routing Encapsulation (GRE).
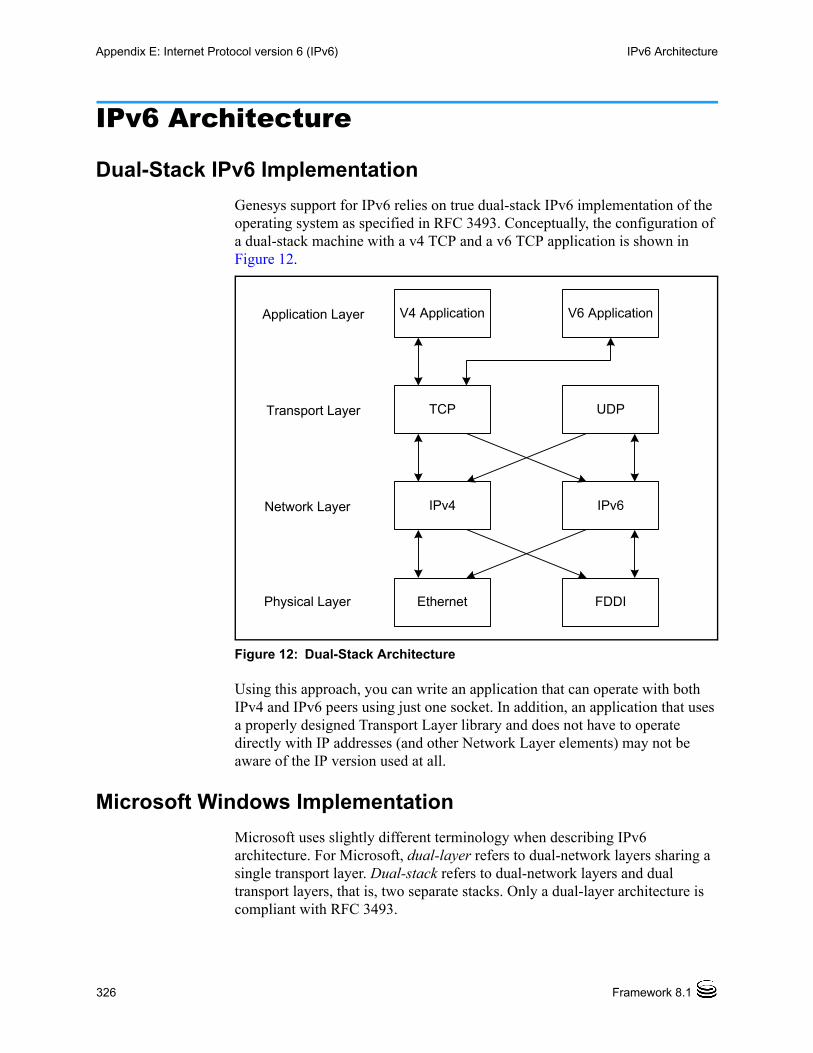
326 Framework 8.1
Appendix E: Internet Protocol version 6 (IPv6) IPv6 Architecture
IPv6 Architecture
Dual-Stack IPv6 Implementation
Genesys support for IPv6 relies on true dual-stack IPv6 implementation of the operating system as specified in RFC 3493. Conceptually, the configuration of a dual-stack machine with a v4 TCP and a v6 TCP application is shown in Figure 12.
Figure 12: Dual-Stack Architecture
Using this approach, you can write an application that can operate with both IPv4 and IPv6 peers using just one socket. In addition, an application that uses a properly designed Transport Layer library and does not have to operate directly with IP addresses (and other Network Layer elements) may not be aware of the IP version used at all.
Microsoft Windows Implementation
Microsoft uses slightly different terminology when describing IPv6 architecture. For Microsoft, dual-layer refers to dual-network layers sharing a single transport layer. Dual-stack refers to dual-network layers and dual transport layers, that is, two separate stacks. Only a dual-layer architecture is compliant with RFC 3493.
V4 Application V6 Application
TCP UDP
Ethernet FDDI
IPv4 IPv6
Application Layer
Transport Layer
Network Layer
Physical Layer

Deployment Guide 327
Appendix E: Internet Protocol version 6 (IPv6) IPv6 Architecture
Windows Server 2000/2003 and Windows XP
Figure 13 diagrams Microsoft Windows IPv6 implementation prior to Windows Vista. Microsoft calls this a dual-stack architecture, but it is actually implemented as two separate stacks with separate TCP and UDP paths. This implementation forces an application to open separate sockets to talk to IPv4 and IPv6 peers.
Figure 13: Microsoft IPv6 Stack Prior to Windows Vista
Windows Vista
In Windows Vista, Microsoft calls its next generation IP stack dual-layer architecture, but it is actually a correct dual-stack implementation as described previously in this appendix, where there is only a single transport layer component for TCP and UDP.
Operating Systems Supporting Dual-Stack Architecture for IPv6
Operating system support of dual-stack IPv6 implementation (RFC 3493-compliant) by different operating system platforms is provided in
Tip: In this document dual-stack always refers to RFC 3493-compliant implementations, not the Microsoft definition.
V4 Application
TCP for IPv4
UDP for IPv4
Ethernet
IPv4
V6 Application
TCP for IPv6
UDP for IPv6
FDDI
IPv6

328 Framework 8.1
Appendix E: Internet Protocol version 6 (IPv6) DNS
Table 10. Refer to platform-specific documentation (including web sites) for additional information about supporting and implementing IPv6.
DNSGenesys products are using Domain Name System (DNS) resolution of hostnames specified in configuration, and require that the DNS is operating according to the AAAA schema. IPv6 addresses are represented in the Domain Name System by AAAA records (so-called quad-A records) for forward lookups; reverse lookups take place under ip6.arpa (previously ip6.int), where the address space is delegated on nibble boundaries. This scheme, which is a straightforward adaptation of the familiar A record and in-addr.arpa schemes, is defined in RFC 3596. Table 11 describes the fields in an AAAA record.
Table 10: Operating Systems Supporting Dual-Stack Architecture for IPv6
Operating System Supporting Releases
AIX AIX 4.3.3 and later
HP-UX HP-UX v11i and later
Linux kernel 2.6 (Red Hat Enterprise Linux release 4) and later
Mac OS X Mac OS 10.3 Panther and later
Solaris Solaris 8 and later
Windows Windows Vista and later, Windows Server 2008 and later
Table 11: AAAA Record Fields
Field Name Description
NAME Domain name
TYPE AAAA (28)
CLASS Internet (1)
TTL Time to live (seconds)
RDLENGTH Length of RDATA field
RDATA String form of the IPv6 address as described in RFC 3513
Deployment Guide 329
Appendix E: Internet Protocol version 6 (IPv6) Virtualization
RFC 3484 specifies how applications should select an IPv6 or IPv4 address for use, including addresses retrieved from DNS. For mixed networks, the DNS must provide both A and AAAA records.
On a historical note, the AAAA schema was one of two proposals at the time the IPv6 architecture was being designed. The other proposal, designed to facilitate network renumbering, would have had A6 records for the forward lookup and a number of other innovations such as bit-string labels and DNAME records. It is defined in the experimental RFC 2874 and its references (with further discussion of the advantages and disadvantages of both schemes in RFC 3364).
VirtualizationThere are no known restrictions from the Genesys side for deploying IPv6 in a virtual operating environment. Check with the documentation specific to the virtual environment you are using for more information and any limitations.
License Control
Genesys uses FlexLM 9.5 and FlexNet Publisher 11.9-based license control, but only the FlexNet Publisher Licensing toolkit 11.9 supports IPv6. Genesys License Server 8.1 uses FlexNet Publisher 11.9 for all platforms.
Table 12 on page 330 summarizes the addressing compatibility of a FlexNet License Server Machine and a Flex-enabled Application Server, as described in this section.
In the license file, an IPv6 address should be defined as the host value in the SERVER line. Entries in the license search path that use the port@host convention to identify the license serve, can also specify an IPv6 address as the host value.
Note: The information in this section is based on information provided in Flexera documentation, and may be specific to their products. For information about IPv6 support and implementation for other licensing products, consult documentation specific to the product.
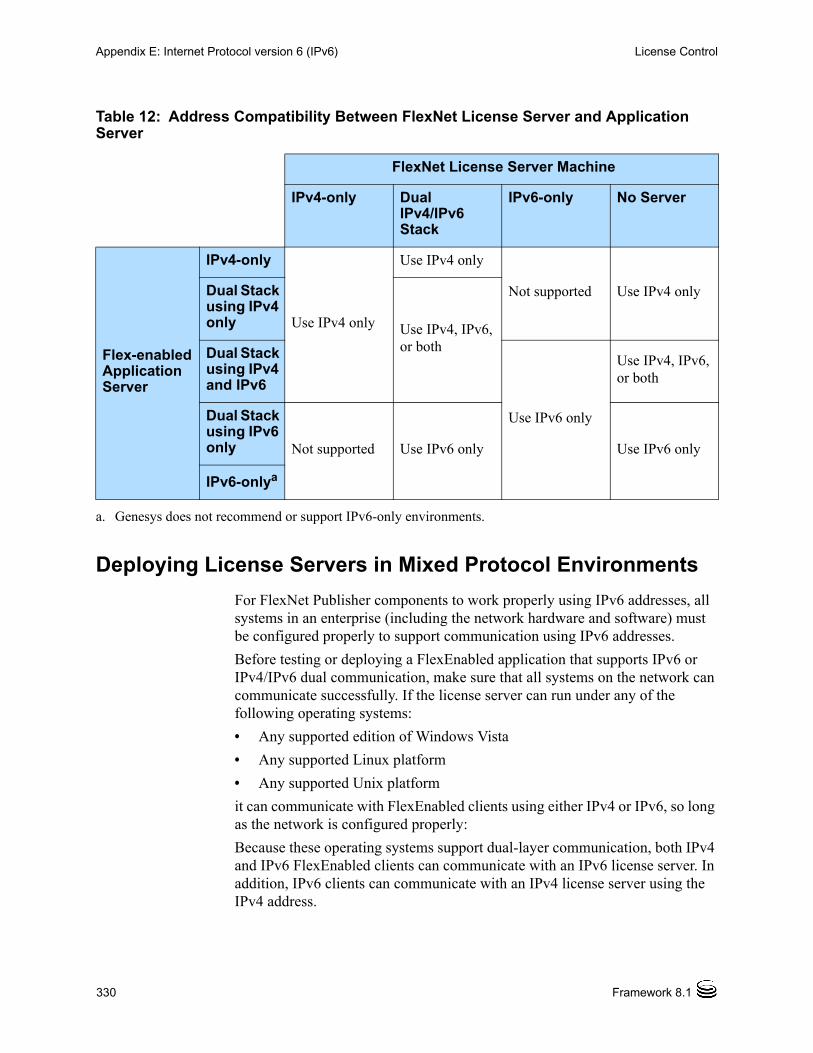
330 Framework 8.1
Appendix E: Internet Protocol version 6 (IPv6) License Control
Deploying License Servers in Mixed Protocol Environments
For FlexNet Publisher components to work properly using IPv6 addresses, all systems in an enterprise (including the network hardware and software) must be configured properly to support communication using IPv6 addresses.
Before testing or deploying a FlexEnabled application that supports IPv6 or IPv4/IPv6 dual communication, make sure that all systems on the network can communicate successfully. If the license server can run under any of the following operating systems:
• Any supported edition of Windows Vista
• Any supported Linux platform
• Any supported Unix platform
it can communicate with FlexEnabled clients using either IPv4 or IPv6, so long as the network is configured properly:
Because these operating systems support dual-layer communication, both IPv4 and IPv6 FlexEnabled clients can communicate with an IPv6 license server. In addition, IPv6 clients can communicate with an IPv4 license server using the IPv4 address.
Table 12: Address Compatibility Between FlexNet License Server and Application Server
FlexNet License Server Machine
IPv4-only Dual IPv4/IPv6 Stack
IPv6-only No Server
Flex-enabled Application Server
IPv4-only
Use IPv4 only
Use IPv4 only
Not supported Use IPv4 onlyDual Stack using IPv4 only Use IPv4, IPv6,
or bothDual Stack using IPv4 and IPv6
Use IPv6 only
Use IPv4, IPv6, or both
Dual Stack using IPv6 only Not supported Use IPv6 only Use IPv6 only
IPv6-onlya
a. Genesys does not recommend or support IPv6-only environments.
Deployment Guide 331
Appendix E: Internet Protocol version 6 (IPv6) Genesys 8.1 IPv6 Support
The FlexNet Publisher license sever lmadmin supports both IPv4 and IPv6 clients. If you are using it, you must rename one of your vendor daemon executable files, because separate IPv4 and IPv6 vendor daemons are required.
If the license server runs on Windows XP or Windows Server 2003, there are certain limitations because of the limited dual-layer support on these operating systems (see “Windows Server 2000/2003 and Windows XP” on page 327). IPv4 FlexEnabled clients cannot communicate with an IPv6 license server running on these operating systems. However, IPv6 FlexEnabled clients can communicate with an IPv4 license server running on these operating systems.
If an enterprise runs license servers on Windows 2003 or Windows XP, the license administrators should create and maintain two separate networks - one for IPv6 FlexEnabled clients that will use the IPv6 license server, and one for IPv4 FlexEnabled clients that will use the IPv4 license server.
Using Wildcards in an IPv6 Address
An asterisk (*) can be used as a wildcard character in place of an entire field or on a byte-by-byte basis to specify a range of addresses without having to list them all. See the following example:
The following feature definition line is locked to four specific addresses:FEATURE f1 myvendor 1.0 1-jan-2010 uncounted \
HOSTID="INTERNET=127.17.0.1,\INTERNET=2001:0db8:0000:0000:ff8f:effa:13da:0001,\INTERNET=127.17.0.4,\INTERNET=2001:0db8:0000:0000:ff8f:effa:13da:0004" \
SIGN=”<...>”
The following feature definition line specifies an entire range of addresses, including the four specific ones from the line above:
FEATURE f1 myvendor 1.0 1-jan-2010 uncounted \HOSTID="INTERNET=127.17.0.*,\
INTERNET=2001:0db8:0000:0000:*:*:*:000*"\SIGN=”<...>”
Genesys 8.1 IPv6 SupportGenesys supports IPv6 as described in this section.
Common Principles
The implementation of IPv6 in Genesys is based on the following assumptions:
• Dual-stack requirement and backward compatibility
• Dual IPv4/IPv6 server sockets
• IPv4 preference for DNS
332 Framework 8.1
Appendix E: Internet Protocol version 6 (IPv6) Genesys 8.1 IPv6 Support
Dual-Stack Requirement and Backward Compatibility
Only dual-stack IPv6 implementations are supported. Support of IPv6 on Windows 2002/2003 and XP is not required, while all recent versions of UNIX have dual-stack support already. However, the connection layer must still operate on all other platforms in IPv4 mode only.
On the platforms where IPv6 support is available, the default mode of operation is IPv4 for backward compatibility. IPv6 support must be turned on explicitly by each application using one of the following methods:
• Set the environment variable GCTI_CONN_IPV6_ON to 1.
• In the common section of the Application object’s options, set enable-ipv6 to 1.
Refer to “IPv6 vs. IPv4 Overview” on page 59 for more details about enabling IPv6 in Genesys software.
Dual IPv4/IPv6 Server Sockets
By default, a server socket opened by a standard method should accept both IPv4 and IPv6 client connections. That is, unless IPv6 is disabled on a particular node, unbound server sockets are opened with the AF_INET6 family and use the AI_V4MAPPED flag to interact with IPv4 clients. However, a server socket bound to a particular IP address (either IPv4 or IPv6) only accepts a connection of the same IP family.
IPv4 Preference for DNS
Within an application, a name service should be used whenever possible. An AAAA record may return both a IPv4 and IPv6 address for dual stack nodes. For backward compatibility reasons, client connections in this case should prefer IPv4 over IPv6. That preference can be set using the configuration option ip-version.
However, a client connection bound to a particular IP address (either IPv4 or IPv6) can only interact with the server using a connection of the same IP family.
Note: IPv6 is, by default, not enabled. But once it is enabled using one of the methods described above, it can only be disabled by turning it off in both places—the environment variable and the option. That is, turning it off in one location only disables it if it is not enabled in the other.
Deployment Guide 333
Appendix E: Internet Protocol version 6 (IPv6) Deployment Considerations
Implementation Characteristics
Individual Genesys components support the following features related to IPv6:
• Full IPv6 support in DNS lookup: Support both AAAA records and DNS over IPv6.
• Transparent server-side socket handling: The existing server-side interface allows IPv6 connections whenever possible using the AI_V4MAPPED flag.
• Transparent client-side connection: The existing client-side connection interface allows IPv6 connections by host name or explicit IP address in text format.
• DNS Lookup modes: Full DNS support using the synchronous method (name lookup using standard system calls) and asynchronous DNS (enabled by the enable-async-dns option in the common section of an Application object’s options). Server and client side IPv6 sockets and connections are supported transparently, including hosts being addressed either by name, or by textual IP address in either IPv4 or IPv6 format.
• IPv6-related changes in the configuration environment: Configuration Server keeps IP addresses for all configured hosts, but it is not a replacement for DNS. However it is expected to be affected very little. In particular, a new field for the IPv6 address is not added to the CfgHost structure; while the new configuration option ip-version set at the connection level determines whether the connection uses IPv4 first (4,6; the default), or IPv6 first (6,4). To achieve compatibility with legacy servers (that is, a server without IPv6 support running on a dual-stack host, while IPv6-enabled clients try to connect), the suggested solution is to create an IPv4-only hostname alias for that host.
For more information about the two configuration options, refer to “IPv6 vs. IPv4 Overview” on page 59.
IPv6 Support by Genesys Products
To determine if a Genesys product supports IPv6, refer to the documentation for that product. Framework connections that support IPv6 are listed in “IPv6 Support” on page 37.
Deployment ConsiderationsWhen deploying IPv6 in your Genesys environment, you must take into consideration the factors discussed in this section.

334 Framework 8.1
Appendix E: Internet Protocol version 6 (IPv6) Deployment Considerations
Security
Preparation for IPv6 utilization will require careful planning of security measures, because IPv6 presents new challenges compared to IPv4. Some, but not all, of the challenges are discussed in this section.
TLS
In some deployments, multiple hostnames are assigned to a given computer, and are resolved to different IP versions. In this case, the TLS certificate of the given computer will have to be generated for all assigned hostnames.
Refer to the Genesys 8.x Security Deployment Guide for information about generating certificates.
Firewall and Client-Side Port
Genesys supports fine-grain firewall configuration at the port-level and applied both to incoming client connections and their target server destinations.
In IPv6 deployments, this might become even more valuable, for example, as a countermeasure against Network Discovery (ND) attacks. ND in IPv6 utilizes five different types of ICMPv6 messages for several purposes. ND attacks in IPv6 will likely replace ARP spoofing in IPv4.
Internet Protocol Security
Internet Protocol Security (IPSec) is an optional feature in IPv4, but is mandatory in IPv6. In certain deployments, it could make the use of TLS unnecessary.
DNS Security Extensions
Genesys recommends the use of DNS Security Extensions (DNSSEC), but it is not mandatory. There are no dependencies from the Genesys side.
IP Tunneling
When connecting sites, you may want to use IP tunneling. For example, two sites could be operating in IPv4 mode while the interconnection requires IPv6. In this case, one could consider embedding the IPv4 protocol into an IPv6 connection between sites.
Deployment Guide 335
Appendix E: Internet Protocol version 6 (IPv6) Deployment Considerations
Licensing
The G8.1 License Server (the Genesys vendor daemon) is based on FlexNet Publisher 11.9, and is IPv6 enabled.
However, within G8.1 the IPv6-enabled licensing client libraries (FlexNet Publisher 11.9) are implemented for only the RHEL 5 64-bit, Windows 2008 64-bit, and HP-UX Integrity (Itanium) operating systems. For all other platforms, the G8.1 applications are still using the older client libraries, which are not IPv6 enabled. This is done for to provide backward compatibility; otherwise, the deployment of a G8.1 application in an existing environment would have required a complete upgrade of the licensing system.
Therefore, Genesys recommends that IPv4 be used for licensing.
SIP
The SIP protocol can contain explicit IP address values. This creates additional challenges, for example at the NAT level, but also if the same SIP Server instance has to concurrently support multiple SIP interfaces where one is operating in IPv4 mode and another in IPv6 mode.
It is recommended to address those scenarios by using a dedicated SIP Server for IPv4 only and another one for IPv6 only.
You could also consider using available NAT solutions that perform configurable SIP protocol inspection and conversion. One example is F5 Networks Big-IP LTM.
Thin Clients
Some Genesys client applications offer a web browser interface with an HTTP connection to a web server. These connections are under control of the given web technology, and all modern browsers already support IPv6. However, IPv6 must be enabled at both the client computer and server computer sides, and the DNS involved must also support IPv6.
External Interfaces
IPv4 dependencies at external interfaces must be considered. This includes, for example, interfaces to Session Border Controllers (SBC), media gateways, switches, and databases.
Note: IPv6 support for SIP is not yet implemented in Genesys components.

336 Framework 8.1
Appendix E: Internet Protocol version 6 (IPv6) Deployment Considerations
Dynamic Runtime Changes
Changes in the IPv4/IPv6 configuration should be performed during maintenance windows, as they will require a restart of impacted processes. These changes will include setting the following:
• Transport parameter ip-version
• DNS entries for hostnames
• Local computing node settings
Third-Party Dependencies
Genesys uses several third-party products as part of the suite. The IPv6 capabilities of those products must be considered.
Deployment Guide 337
Appendix
F Silent SetupThis appendix describes the purpose and configuration of Silent Setup.
This appendix contains the following sections: Introduction, page 337 Creating the Response File, page 338 Running the Silent Installation, page 339 About the Silent Setup Log File, page 339
IntroductionInstallShield Silent allows for an automated electronic software distribution, also known as a silent setup. InstallShield Silent only works on Windows operating systems. With InstallShield Silent, you do not have to monitor the setup or provide input via dialog boxes. Once this information is stored in a response file, an InstallShield Silent setup runs on its own, without any intervention by the end-user.
An installation procedure for a server application differs slightly from an installation procedure for a GUI application. Both, however, require that you create a response file with the necessary parameters and then use it for the actual installation.
The following Framework components support Silent Setup installation:
• DB Server
• Configuration Server
• Configuration Manager
• Message Server
• Solution Control Server
• Solution Control Interface
• T-Server
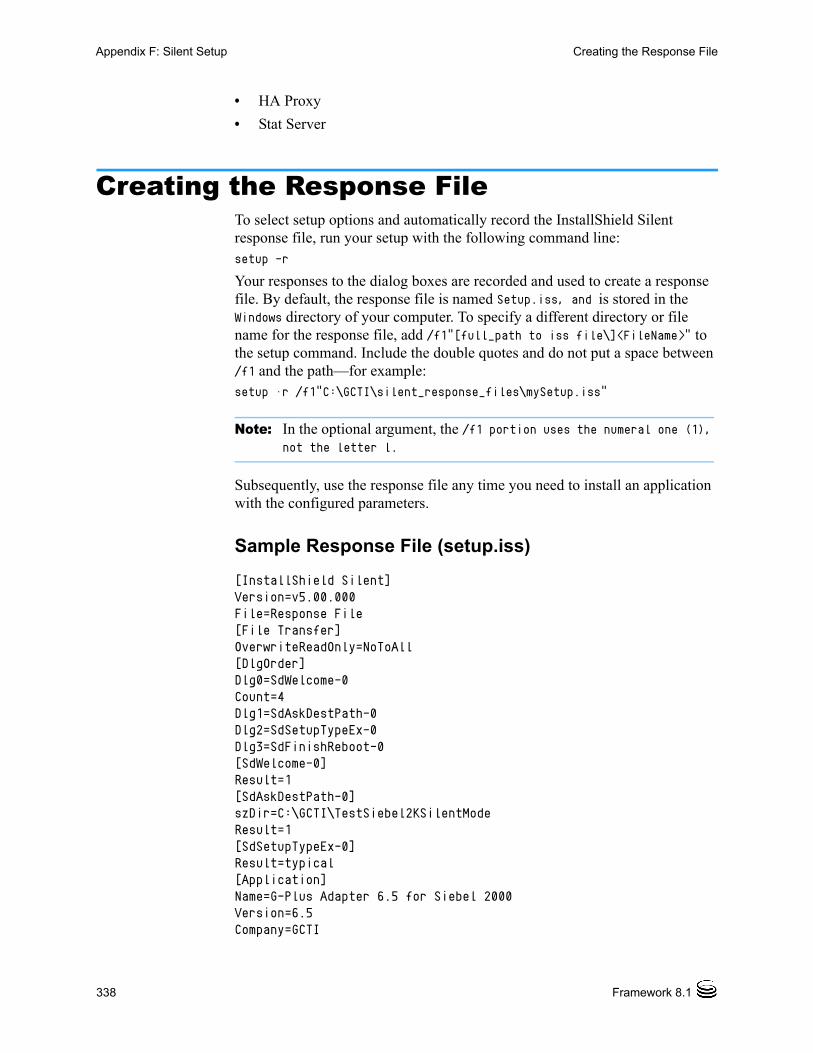
338 Framework 8.1
Appendix F: Silent Setup Creating the Response File
• HA Proxy
• Stat Server
Creating the Response FileTo select setup options and automatically record the InstallShield Silent response file, run your setup with the following command line:setup -r
Your responses to the dialog boxes are recorded and used to create a response file. By default, the response file is named Setup.iss, and is stored in the Windows directory of your computer. To specify a different directory or file name for the response file, add /f1“[full_path to iss file\]<FileName>” to the setup command. Include the double quotes and do not put a space between /f1 and the path—for example:setup –r /f1”C:\GCTI\silent_response_files\mySetup.iss”
Note: In the optional argument, the /f1 portion uses the numeral one (1), not the letter l.
Subsequently, use the response file any time you need to install an application with the configured parameters.
Sample Response File (setup.iss)
[InstallShield Silent]Version=v5.00.000File=Response File[File Transfer]OverwriteReadOnly=NoToAll[DlgOrder]Dlg0=SdWelcome-0Count=4Dlg1=SdAskDestPath-0Dlg2=SdSetupTypeEx-0Dlg3=SdFinishReboot-0[SdWelcome-0]Result=1[SdAskDestPath-0]szDir=C:\GCTI\TestSiebel2KSilentModeResult=1[SdSetupTypeEx-0]Result=typical[Application]Name=G-Plus Adapter 6.5 for Siebel 2000Version=6.5Company=GCTI
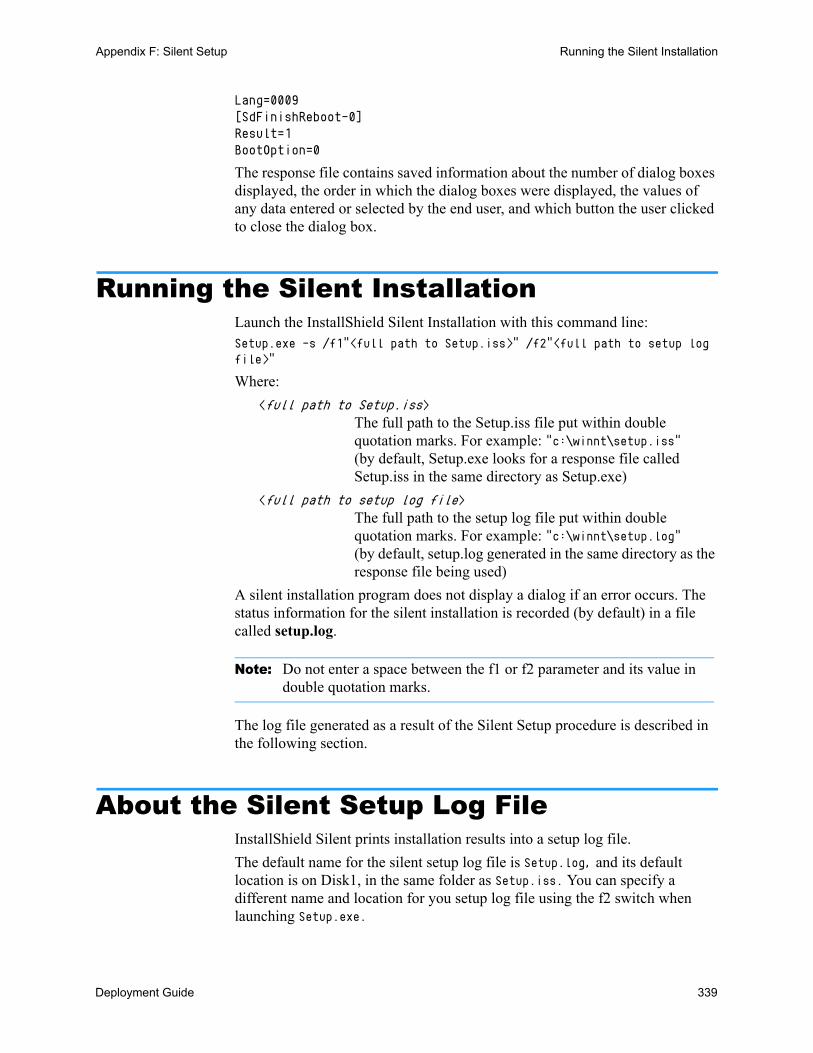
Deployment Guide 339
Appendix F: Silent Setup Running the Silent Installation
Lang=0009[SdFinishReboot-0]Result=1BootOption=0
The response file contains saved information about the number of dialog boxes displayed, the order in which the dialog boxes were displayed, the values of any data entered or selected by the end user, and which button the user clicked to close the dialog box.
Running the Silent InstallationLaunch the InstallShield Silent Installation with this command line:Setup.exe -s /f1“<full path to Setup.iss>” /f2“<full path to setup log file>”
Where:
<full path to Setup.iss>The full path to the Setup.iss file put within double quotation marks. For example: "c:\winnt\setup.iss"(by default, Setup.exe looks for a response file called Setup.iss in the same directory as Setup.exe)
<full path to setup log file>The full path to the setup log file put within double quotation marks. For example: "c:\winnt\setup.log"(by default, setup.log generated in the same directory as the response file being used)
A silent installation program does not display a dialog if an error occurs. The status information for the silent installation is recorded (by default) in a file called setup.log.
Note: Do not enter a space between the f1 or f2 parameter and its value in double quotation marks.
The log file generated as a result of the Silent Setup procedure is described in the following section.
About the Silent Setup Log FileInstallShield Silent prints installation results into a setup log file.
The default name for the silent setup log file is Setup.log, and its default location is on Disk1, in the same folder as Setup.iss. You can specify a different name and location for you setup log file using the f2 switch when launching Setup.exe.
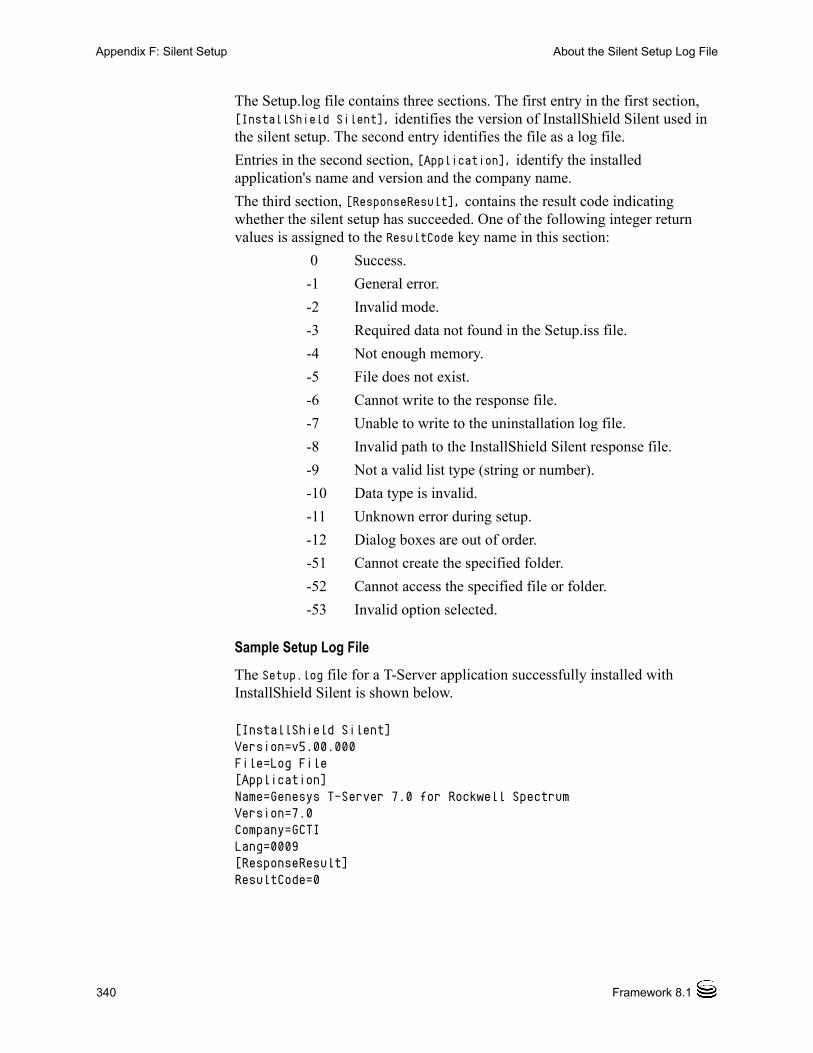
340 Framework 8.1
Appendix F: Silent Setup About the Silent Setup Log File
The Setup.log file contains three sections. The first entry in the first section, [InstallShield Silent], identifies the version of InstallShield Silent used in the silent setup. The second entry identifies the file as a log file.
Entries in the second section, [Application], identify the installed application's name and version and the company name.
The third section, [ResponseResult], contains the result code indicating whether the silent setup has succeeded. One of the following integer return values is assigned to the ResultCode key name in this section:
0 Success.
-1 General error.
-2 Invalid mode.
-3 Required data not found in the Setup.iss file.
-4 Not enough memory.
-5 File does not exist.
-6 Cannot write to the response file.
-7 Unable to write to the uninstallation log file.
-8 Invalid path to the InstallShield Silent response file.
-9 Not a valid list type (string or number).
-10 Data type is invalid.
-11 Unknown error during setup.
-12 Dialog boxes are out of order.
-51 Cannot create the specified folder.
-52 Cannot access the specified file or folder.
-53 Invalid option selected.
Sample Setup Log File
The Setup.log file for a T-Server application successfully installed with InstallShield Silent is shown below.
[InstallShield Silent]Version=v5.00.000File=Log File[Application]Name=Genesys T-Server 7.0 for Rockwell SpectrumVersion=7.0Company=GCTILang=0009[ResponseResult]ResultCode=0
Deployment Guide 341
appendix
G Installation WorksheetThis appendix contains tables that you can use to help prepare for and perform the installation of Framework components.
This appendix contains the following sections: How to Prepare a Worksheet, page 341 Database Connections, page 347
How to Prepare a Worksheet1. Fill in the database information in Table 14 on page 342.
2. Fill in the License Manager and license file(s) information in Table 15 on page 344.
3. Fill in the main configuration parameters you specify for Framework applications in Table 16 on page 344. Note that: All applications must be configured in the Configuration Layer unless
otherwise noted. Host name or IP address can be specified as the value for the host
parameter. Application port and working directory are only specified for server
applications. Working directory is the full path to the directory in which the
application is installed and/or is to be running.
4. For Windows applications, fill in the Program Folder information in Table 17 on page 346.
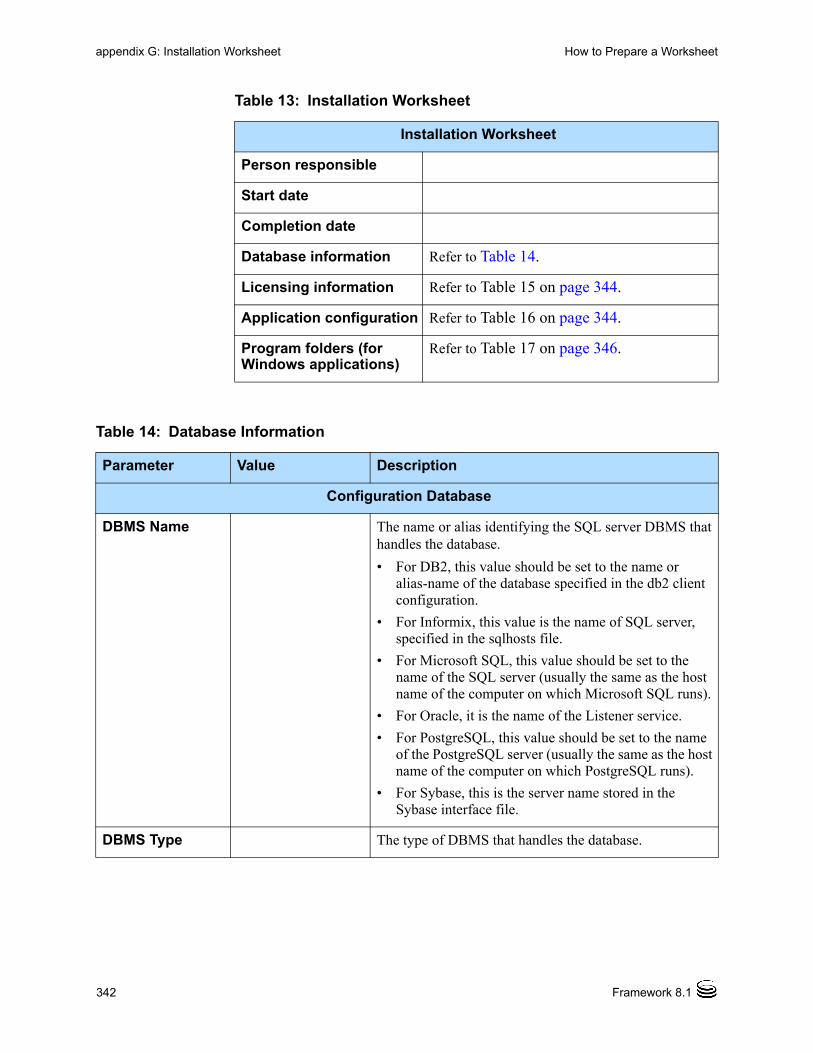
342 Framework 8.1
appendix G: Installation Worksheet How to Prepare a Worksheet
Table 13: Installation Worksheet
Installation Worksheet
Person responsible
Start date
Completion date
Database information Refer to Table 14.
Licensing information Refer to Table 15 on page 344.
Application configuration Refer to Table 16 on page 344.
Program folders (for Windows applications)
Refer to Table 17 on page 346.
Table 14: Database Information
Parameter Value Description
Configuration Database
DBMS Name The name or alias identifying the SQL server DBMS that handles the database.
• For DB2, this value should be set to the name or alias-name of the database specified in the db2 client configuration.
• For Informix, this value is the name of SQL server, specified in the sqlhosts file.
• For Microsoft SQL, this value should be set to the name of the SQL server (usually the same as the host name of the computer on which Microsoft SQL runs).
• For Oracle, it is the name of the Listener service.
• For PostgreSQL, this value should be set to the name of the PostgreSQL server (usually the same as the host name of the computer on which PostgreSQL runs).
• For Sybase, this is the server name stored in the Sybase interface file.
DBMS Type The type of DBMS that handles the database.
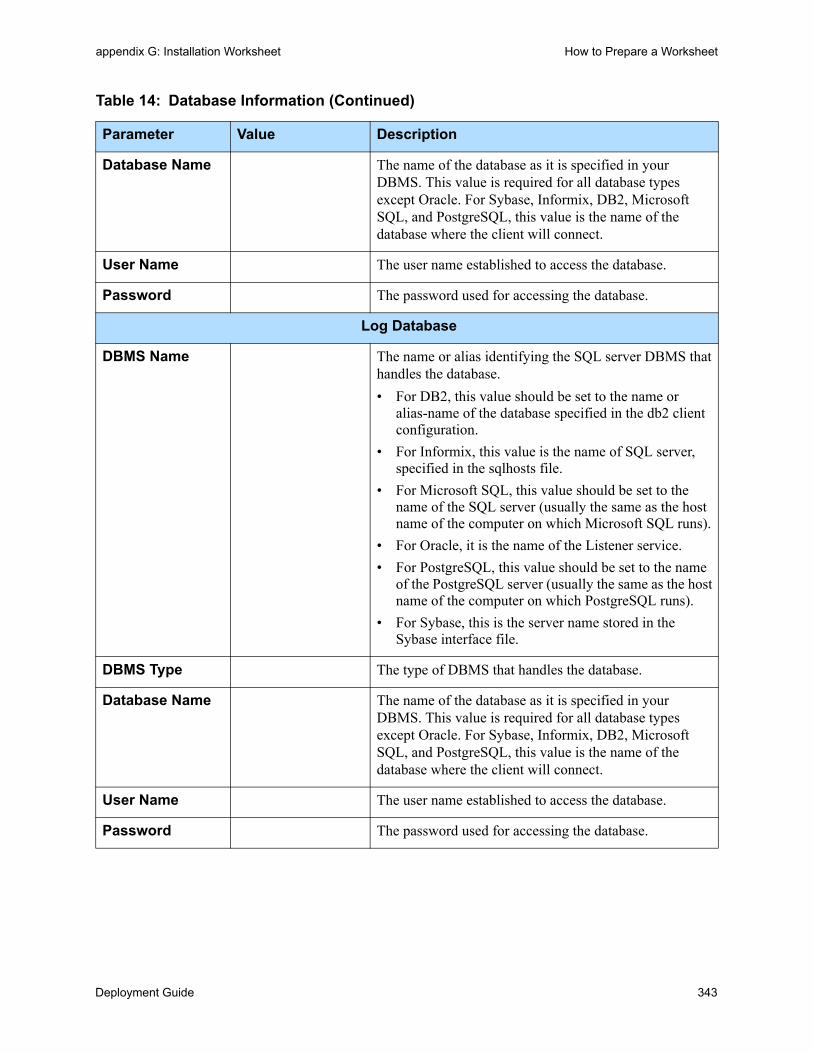
Deployment Guide 343
appendix G: Installation Worksheet How to Prepare a Worksheet
Database Name The name of the database as it is specified in your DBMS. This value is required for all database types except Oracle. For Sybase, Informix, DB2, Microsoft SQL, and PostgreSQL, this value is the name of the database where the client will connect.
User Name The user name established to access the database.
Password The password used for accessing the database.
Log Database
DBMS Name The name or alias identifying the SQL server DBMS that handles the database.
• For DB2, this value should be set to the name or alias-name of the database specified in the db2 client configuration.
• For Informix, this value is the name of SQL server, specified in the sqlhosts file.
• For Microsoft SQL, this value should be set to the name of the SQL server (usually the same as the host name of the computer on which Microsoft SQL runs).
• For Oracle, it is the name of the Listener service.
• For PostgreSQL, this value should be set to the name of the PostgreSQL server (usually the same as the host name of the computer on which PostgreSQL runs).
• For Sybase, this is the server name stored in the Sybase interface file.
DBMS Type The type of DBMS that handles the database.
Database Name The name of the database as it is specified in your DBMS. This value is required for all database types except Oracle. For Sybase, Informix, DB2, Microsoft SQL, and PostgreSQL, this value is the name of the database where the client will connect.
User Name The user name established to access the database.
Password The password used for accessing the database.
Table 14: Database Information (Continued)
Parameter Value Description
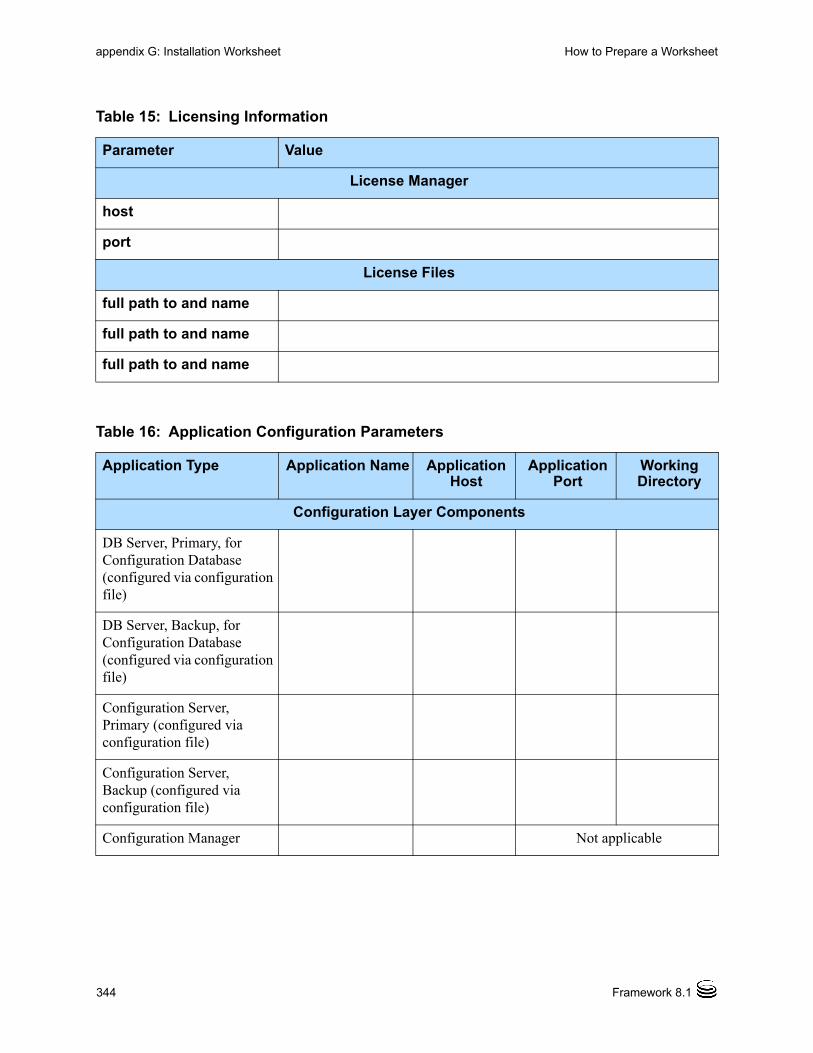
344 Framework 8.1
appendix G: Installation Worksheet How to Prepare a Worksheet
Table 15: Licensing Information
Parameter Value
License Manager
host
port
License Files
full path to and name
full path to and name
full path to and name
Table 16: Application Configuration Parameters
Application Type Application Name Application Host
Application Port
Working Directory
Configuration Layer Components
DB Server, Primary, for Configuration Database (configured via configuration file)
DB Server, Backup, for Configuration Database (configured via configuration file)
Configuration Server, Primary (configured via configuration file)
Configuration Server, Backup (configured via configuration file)
Configuration Manager Not applicable

Deployment Guide 345
appendix G: Installation Worksheet How to Prepare a Worksheet
Management Layer Components
Local Control Agent Not applicable (Configured in Host
Properties)
Not applicable
DB Server, Primary, for Log Database
DB Server, Backup, for Log Database
Database Access Point Not applicable
Message Server, Primary
Message Server, Backup
Solution Control Server, Primary
Solution Control Server, Backup
Solution Control Interface Not applicable
SNMP Master Agent, Primary
SNMP Master Agent, Backup
User Interaction Layer Components
Genesys Administrator Not applicable
Media Layer Components
T-Server, Primary, for switch ...
T-Server, Backup, for switch ...
T-Server, Primary, for switch ...
Table 16: Application Configuration Parameters (Continued)
Application Type Application Name Application Host
Application Port
Working Directory
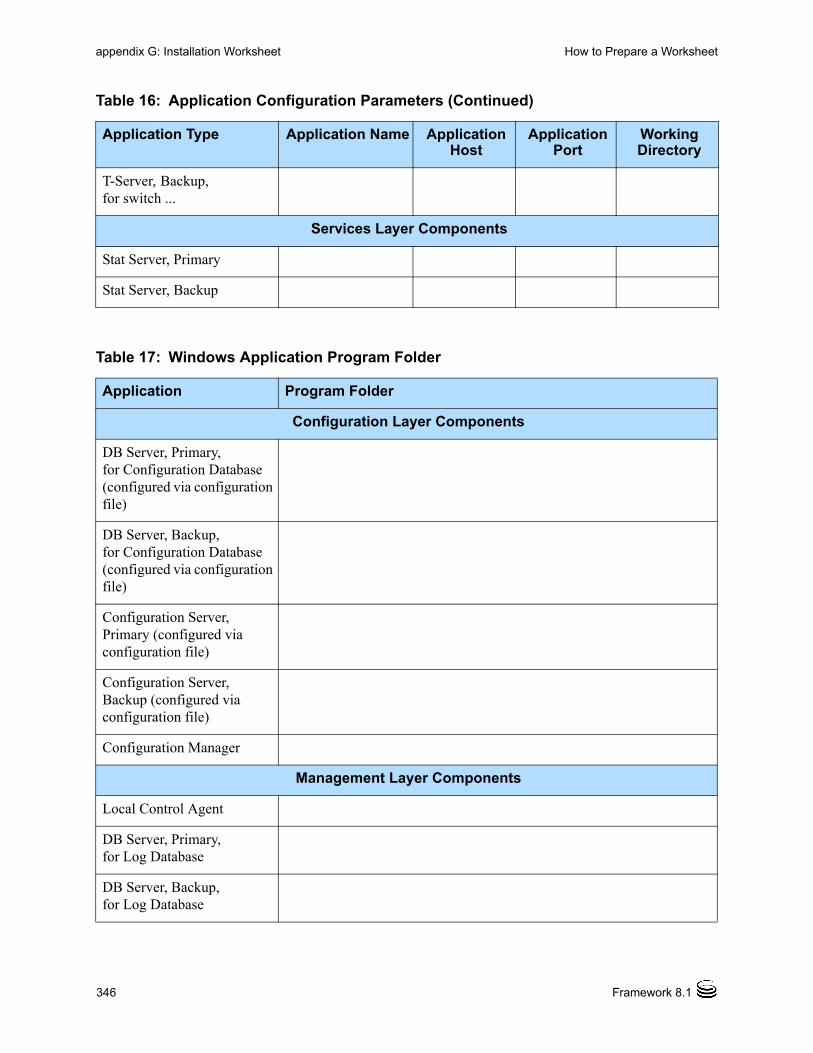
346 Framework 8.1
appendix G: Installation Worksheet How to Prepare a Worksheet
T-Server, Backup, for switch ...
Services Layer Components
Stat Server, Primary
Stat Server, Backup
Table 16: Application Configuration Parameters (Continued)
Application Type Application Name Application Host
Application Port
Working Directory
Table 17: Windows Application Program Folder
Application Program Folder
Configuration Layer Components
DB Server, Primary, for Configuration Database (configured via configuration file)
DB Server, Backup, for Configuration Database (configured via configuration file)
Configuration Server, Primary (configured via configuration file)
Configuration Server, Backup (configured via configuration file)
Configuration Manager
Management Layer Components
Local Control Agent
DB Server, Primary, for Log Database
DB Server, Backup, for Log Database
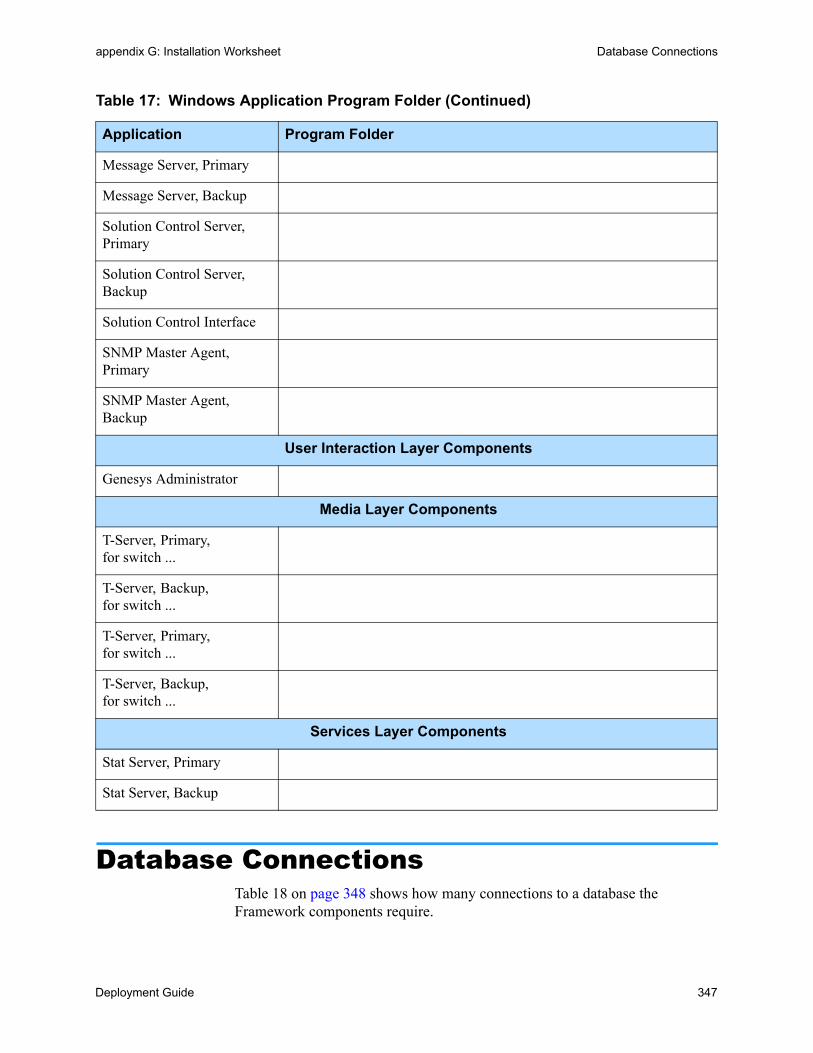
Deployment Guide 347
appendix G: Installation Worksheet Database Connections
Database ConnectionsTable 18 on page 348 shows how many connections to a database the Framework components require.
Message Server, Primary
Message Server, Backup
Solution Control Server, Primary
Solution Control Server, Backup
Solution Control Interface
SNMP Master Agent, Primary
SNMP Master Agent, Backup
User Interaction Layer Components
Genesys Administrator
Media Layer Components
T-Server, Primary, for switch ...
T-Server, Backup, for switch ...
T-Server, Primary, for switch ...
T-Server, Backup, for switch ...
Services Layer Components
Stat Server, Primary
Stat Server, Backup
Table 17: Windows Application Program Folder (Continued)
Application Program Folder
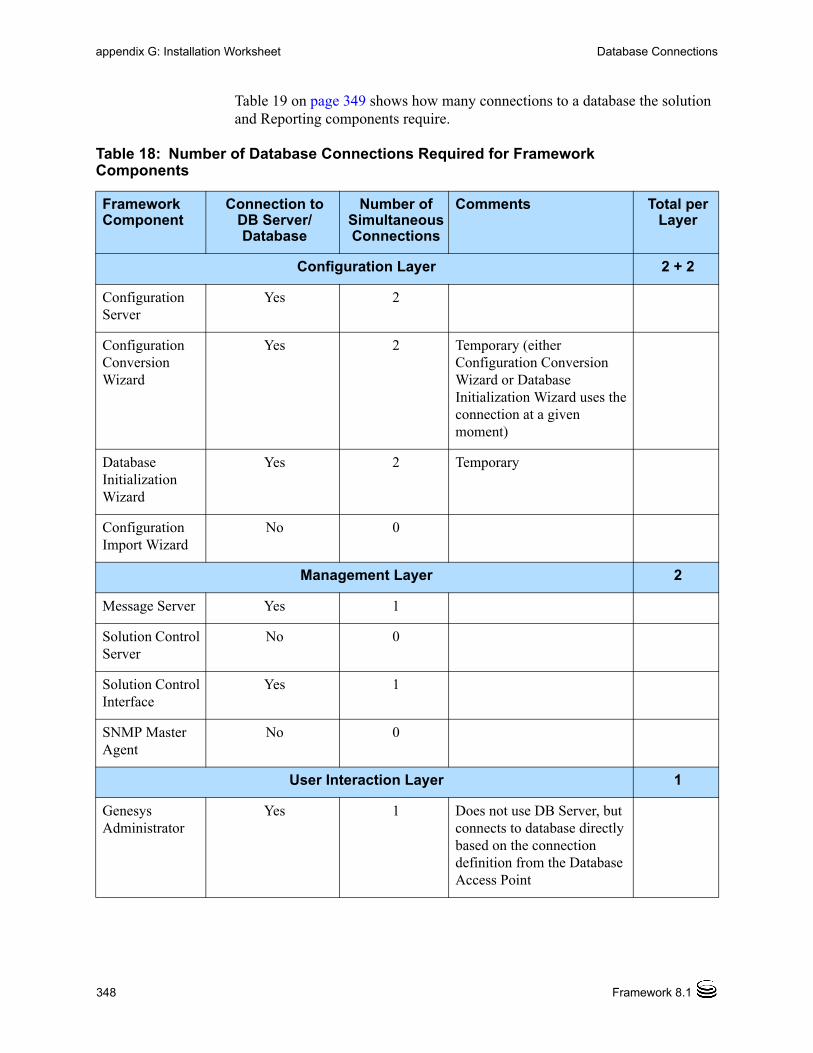
348 Framework 8.1
appendix G: Installation Worksheet Database Connections
Table 19 on page 349 shows how many connections to a database the solution and Reporting components require.
Table 18: Number of Database Connections Required for FrameworkComponents
Framework Component
Connection to DB Server/Database
Number of Simultaneous Connections
Comments Total per Layer
Configuration Layer 2 + 2
Configuration Server
Yes 2
Configuration Conversion Wizard
Yes 2 Temporary (either Configuration Conversion Wizard or Database Initialization Wizard uses the connection at a given moment)
Database Initialization Wizard
Yes 2 Temporary
Configuration Import Wizard
No 0
Management Layer 2
Message Server Yes 1
Solution Control Server
No 0
Solution Control Interface
Yes 1
SNMP Master Agent
No 0
User Interaction Layer 1
Genesys Administrator
Yes 1 Does not use DB Server, but connects to database directly based on the connection definition from the Database Access Point
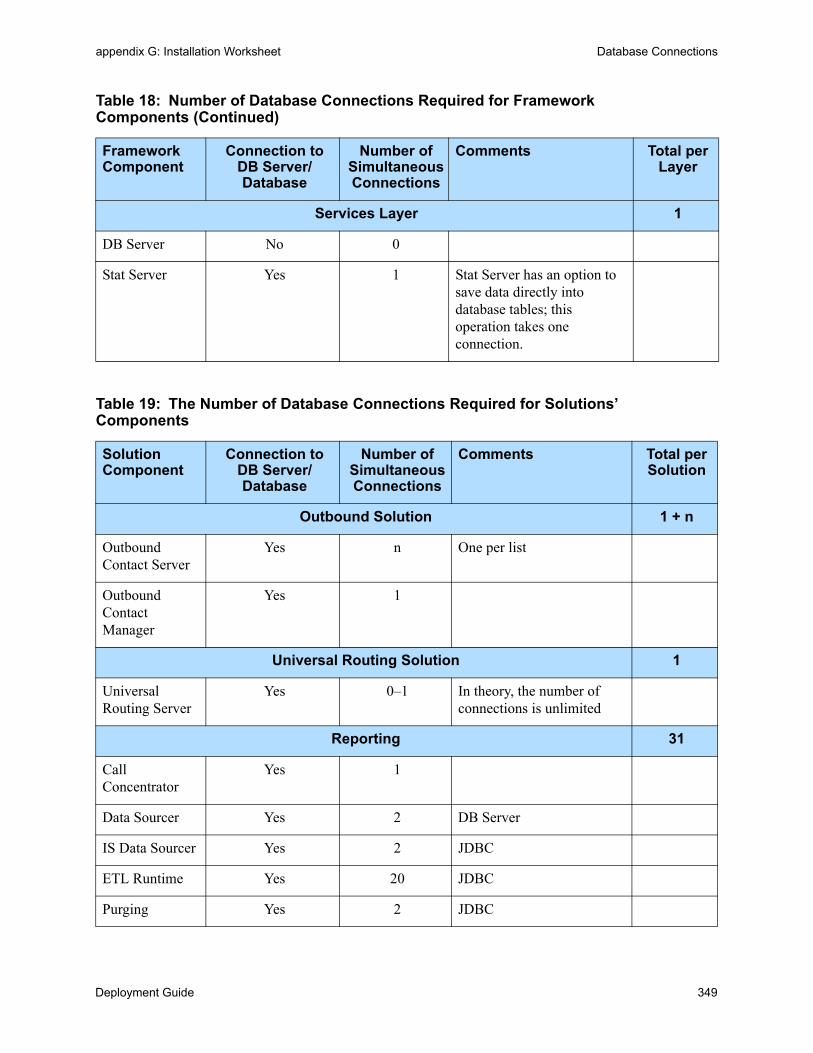
Deployment Guide 349
appendix G: Installation Worksheet Database Connections
Services Layer 1
DB Server No 0
Stat Server Yes 1 Stat Server has an option to save data directly into database tables; this operation takes one connection.
Table 18: Number of Database Connections Required for FrameworkComponents (Continued)
Framework Component
Connection to DB Server/Database
Number of Simultaneous Connections
Comments Total per Layer
Table 19: The Number of Database Connections Required for Solutions’ Components
Solution Component
Connection to DB Server/Database
Number of Simultaneous Connections
Comments Total per Solution
Outbound Solution 1 + n
Outbound Contact Server
Yes n One per list
Outbound Contact Manager
Yes 1
Universal Routing Solution 1
Universal Routing Server
Yes 0–1 In theory, the number of connections is unlimited
Reporting 31
Call Concentrator
Yes 1
Data Sourcer Yes 2 DB Server
IS Data Sourcer Yes 2 JDBC
ETL Runtime Yes 20 JDBC
Purging Yes 2 JDBC

350 Framework 8.1
appendix G: Installation Worksheet Database Connections
Object Tracking Yes 1 JDBC
BRIO Server Yes 2 SQLNet/ODBC
BRIO Report Designer
Yes 1 SQLNet/ODBC
Table 19: The Number of Database Connections Required for Solutions’ Components (Continued)
Solution Component
Connection to DB Server/Database
Number of Simultaneous Connections
Comments Total per Solution

Deployment Guide 351
Supplements
Related Documentation ResourcesThe following resources provide additional information that is relevant to this software. Consult these additional resources as necessary.
Genesys Framework
• Framework 8.0 Architecture Help, which helps you view the place of a particular component in the Framework architecture and learn about Framework functionality that is new to release 8.x.
• Framework 8.1 Genesys Administrator Deployment Guide, which helps you deploy Genesys Administrator.
• Framework 8.1 Genesys Administrator Help, which helps you use Genesys Administrator.
• Framework 8.1 Configuration Manager Help, which helps you use Configuration Manager.
• Framework 8.1 Configuration Options Reference Manual, which provides descriptions of configuration options for Framework components.
• Framework 8.1 Management Layer User’s Guide, which helps you better understand how the Management Layer works and how to enable its functions.
• Framework 8.0 Solution Control Interface Help, which helps you use Solution Control Interface.
• Release Notes and Product Advisories for this product, which are available on the Genesys Technical Support website at http://genesyslab.com/support.
Genesys
• Genesys 8.1 Security Deployment Guide, which describes the security features provided by Genesys software and provides detailed instructions on deploying the features.

352 Framework 8.1
Related Documentation Resources
• Genesys Technical Publications Glossary, which ships on the Genesys Documentation Library DVD and which provides a comprehensive list of the Genesys and computer-telephony integration (CTI) terminology and acronyms used in this document.
• Genesys Migration Guide, which ships on the Genesys Documentation Library DVD, and which provides documented migration strategies for Genesys product releases. Contact Genesys Technical Support for more information.
Information about supported hardware and third-party software is available on the Genesys Technical Support website in the following documents:
• Genesys Supported Operating Environment Reference Guide
• Genesys Supported Media Interfaces Reference Guide
Consult the following additional resources as necessary:
• Genesys Hardware Sizing Guide, which provides information about Genesys hardware sizing guidelines for the Genesys 8.x releases.
• Genesys Interoperability Guide, which provides information on the compatibility of Genesys products with various Configuration Layer Environments; Interoperability of Reporting Templates and Solutions; and Gplus Adapters Interoperability.
• Genesys Licensing Guide, which introduces you to the concepts, terminology, and procedures that are relevant to the Genesys licensing system.
• Genesys Database Sizing Estimator 8.x Worksheets, which provides a range of expected database sizes for various Genesys products.
For additional system-wide planning tools and information, see the release-specific listings of System Level Documents on the Genesys Technical Support website, accessible from the system level documents by release tab in the Knowledge Base Browse Documents Section.
Genesys product documentation is available on the:
• Genesys Technical Support website at http://genesyslab.com/support.
• Genesys Documentation Library DVD, which you can order by e-mail from Genesys Order Management at [email protected].

Deployment Guide—Title of Book, if Needed (Title2) 353
Document Conventions
Document ConventionsThis document uses certain stylistic and typographical conventions—introduced here—that serve as shorthands for particular kinds of information.
Document Version Number
A version number appears at the bottom of the inside front cover of this document. Version numbers change as new information is added to this document. Here is a sample version number:
81fr_dep_04-2012_v8.1.101.00
You will need this number when you are talking with Genesys Technical Support about this product.
Screen Captures Used in This Document
Screen captures from the product graphical user interface (GUI), as used in this document, may sometimes contain minor spelling, capitalization, or grammatical errors. The text accompanying and explaining the screen captures corrects such errors except when such a correction would prevent you from installing, configuring, or successfully using the product. For example, if the name of an option contains a usage error, the name would be presented exactly as it appears in the product GUI; the error would not be corrected in any accompanying text.
Type Styles
Table 20 describes and illustrates the type conventions that are used in this document.

354 Framework 8.1
Document Conventions
Table 20: Type Styles
Type Style Used For Examples
Italic • Document titles
• Emphasis
• Definitions of (or first references to) unfamiliar terms
• Mathematical variables
Also used to indicate placeholder text within code samples or commands, in the special case where angle brackets are a required part of the syntax (see the note about angle brackets on page 354).
Please consult the Genesys Migration Guide for more information.
Do not use this value for this option.
A customary and usual practice is one that is widely accepted and used within a particular industry or profession.
The formula, x +1 = 7 where x stands for...
Monospace font
(Looks like teletype or typewriter text)
All programming identifiers and GUI elements. This convention includes:
• The names of directories, files, folders, configuration objects, paths, scripts, dialog boxes, options, fields, text and list boxes, operational modes, all buttons (including radio buttons), check boxes, commands, tabs, CTI events, and error messages.
• The values of options.
• Logical arguments and command syntax.
• Code samples.
Also used for any text that users must manually enter during a configuration or installation procedure, or on a command line.
Select the Show variables on screen check box.
In the Operand text box, enter your formula.
Click OK to exit the Properties dialog box.
T-Server distributes the error messages in EventError events.
If you select true for the inbound-bsns-calls option, all established inbound calls on a local agent are considered business calls.
Enter exit on the command line.
Square brackets ([ ])
A particular parameter or value that is optional within a logical argument, a command, or some programming syntax. That is, the presence of the parameter or value is not required to resolve the argument, command, or block of code. The user decides whether to include this optional information.
smcp_server -host [/flags]
Angle brackets (< >)
A placeholder for a value that the user must specify. This might be a DN or a port number specific to your enterprise.
Note: In some cases, angle brackets are required characters in code syntax (for example, in XML schemas). In these cases, italic text is used for placeholder values.
smcp_server -host <confighost>
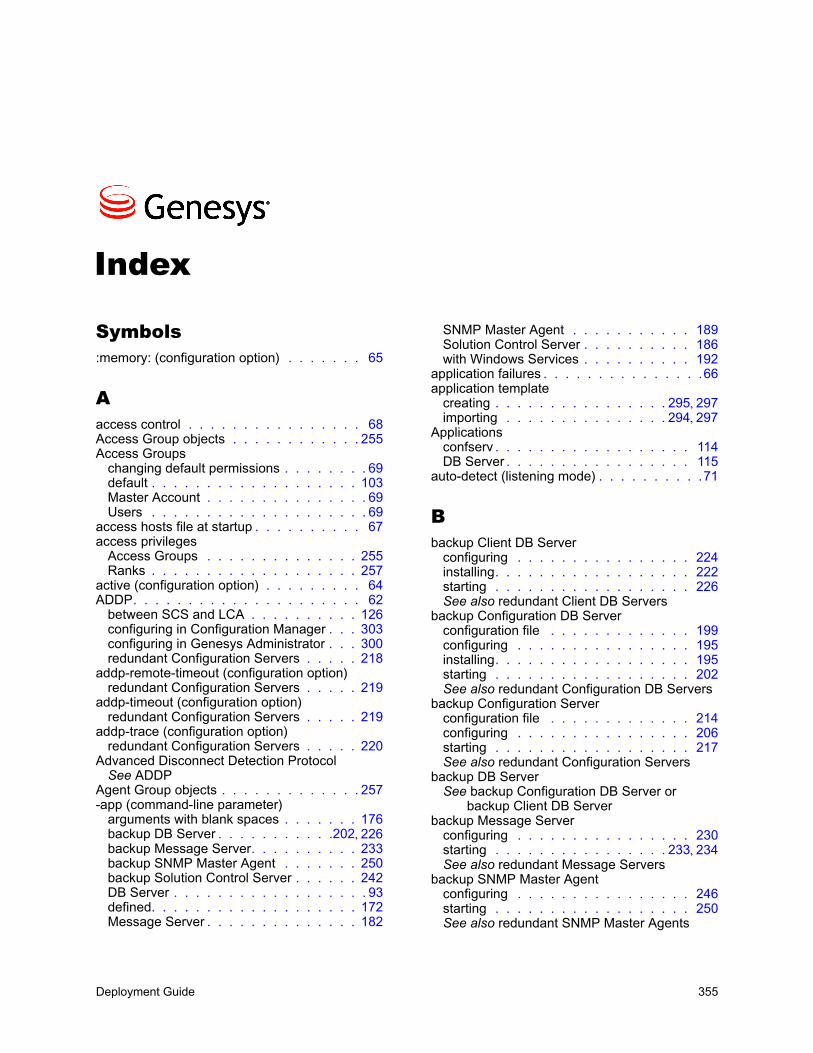
Deployment Guide 355
Index
Symbols:memory: (configuration option) . . . . . . . 65
Aaccess control . . . . . . . . . . . . . . . . 68Access Group objects . . . . . . . . . . . . 255Access Groups
changing default permissions . . . . . . . . 69default . . . . . . . . . . . . . . . . . . . 103Master Account . . . . . . . . . . . . . . . 69Users . . . . . . . . . . . . . . . . . . . . 69
access hosts file at startup . . . . . . . . . . 67access privileges
Access Groups . . . . . . . . . . . . . . 255Ranks . . . . . . . . . . . . . . . . . . . 257
active (configuration option) . . . . . . . . . 64ADDP. . . . . . . . . . . . . . . . . . . . . 62
between SCS and LCA . . . . . . . . . . 126configuring in Configuration Manager . . . 303configuring in Genesys Administrator . . . 300redundant Configuration Servers . . . . . 218
addp-remote-timeout (configuration option)redundant Configuration Servers . . . . . 219
addp-timeout (configuration option)redundant Configuration Servers . . . . . 219
addp-trace (configuration option)redundant Configuration Servers . . . . . 220
Advanced Disconnect Detection ProtocolSee ADDP
Agent Group objects . . . . . . . . . . . . . 257-app (command-line parameter)
arguments with blank spaces . . . . . . . 176backup DB Server . . . . . . . . . . .202, 226backup Message Server. . . . . . . . . . 233backup SNMP Master Agent . . . . . . . 250backup Solution Control Server . . . . . . 242DB Server . . . . . . . . . . . . . . . . . . 93defined. . . . . . . . . . . . . . . . . . . 172Message Server . . . . . . . . . . . . . . 182
SNMP Master Agent . . . . . . . . . . . 189Solution Control Server . . . . . . . . . . 186with Windows Services . . . . . . . . . . 192
application failures . . . . . . . . . . . . . . .66application template
creating . . . . . . . . . . . . . . . . 295, 297importing . . . . . . . . . . . . . . . 294, 297
Applicationsconfserv . . . . . . . . . . . . . . . . . . 114DB Server . . . . . . . . . . . . . . . . . 115
auto-detect (listening mode) . . . . . . . . . .71
Bbackup Client DB Server
configuring . . . . . . . . . . . . . . . . 224installing. . . . . . . . . . . . . . . . . . 222starting . . . . . . . . . . . . . . . . . . 226See also redundant Client DB Servers
backup Configuration DB Serverconfiguration file . . . . . . . . . . . . . 199configuring . . . . . . . . . . . . . . . . 195installing. . . . . . . . . . . . . . . . . . 195starting . . . . . . . . . . . . . . . . . . 202See also redundant Configuration DB Servers
backup Configuration Serverconfiguration file . . . . . . . . . . . . . 214configuring . . . . . . . . . . . . . . . . 206starting . . . . . . . . . . . . . . . . . . 217See also redundant Configuration Servers
backup DB ServerSee backup Configuration DB Server or
backup Client DB Serverbackup Message Server
configuring . . . . . . . . . . . . . . . . 230starting . . . . . . . . . . . . . . . . 233, 234See also redundant Message Servers
backup SNMP Master Agentconfiguring . . . . . . . . . . . . . . . . 246starting . . . . . . . . . . . . . . . . . . 250See also redundant SNMP Master Agents

Index
356 Framework 8.1
backup Solution Control Serverconfiguring. . . . . . . . . . . . . . . . . 237starting. . . . . . . . . . . . . . . . . . . 242See also redundant Solution Control Servers
C-c (command-line parameter)
backup Configuration Server . . . . . . . 217backup DB Server . . . . . . . . . . . . . 202Configuration Server . . . . . . . . . . . 178DB Server . . . . . . . . . . . . . . . . . 177Solution Control Server . . . . . . . . . . 187
Centralized Log DatabaseSee Log Database
-cfg (command-line parameter)DB Server . . . . . . . . . . . . . . . . . 177
-cfglib_port (command-line parameter)Configuration Server . . . . . . . . . 72, 178
-checkdb (command-line parameter)Configuration Server . . . . . . . . . . . 178
-checkerrors (command-line parameter)Configuration Server . . . . . . . . . . . 178
command-line parameters . . . . . . . . . . 171-app . . . . . . . . . . . . . . . . . . . . 172-c . . . . . . . . . . . 177, 178, 187, 202, 217-cfg . . . . . . . . . . . . . . . . . . . . 177-cfglib_port. . . . . . . . . . . . . . . 72, 178-checkdb. . . . . . . . . . . . . . . . . . 178-checkerrors . . . . . . . . . . . . . . . . 178-host . . . . . . . . . . . . 171, 233, 242, 250-l . . . . . . . . . . . . . . . . . . . . . . 172-lmspath . . . . . . . . . . . . . . . . . . 172-nco . . . . . . . . . . . . . . . . . . . . 172-p . . . . . . . . . . . . . . . . . . . . . 178-port . . . . . . . . . . . . 171, 233, 242, 250-s . . . . . . . . . . . . . . . . . . .178, 217-v . . . . . . . . . . . . . . . . . . . . . 172
common log options . . . . . . . . . . . . . 67Configuration Database
contents . . . . . . . . . . . . . . . . . . 102database CfgLocale scripts . . . . . . . . 101database initialization scripts . . . . . . . 100database types . . . . . . . . . . . . . . 101initial installation . . . . . . . . . . . . . . 102initializing . . . . . . . . . . . . . . . . . . 99size . . . . . . . . . . . . . . . . . . . . . 47
Configuration Database section . . . . . . . 104Configuration DB Servers
warm standby . . . . . . . . . . . . . . . 194configuration environments
enterprise . . . . . . . . . . . . . . . . . . 42hierarchical multi-tenant . . . . . . . . . . . 42multi-language. . . . . . . . . . . . . . . . 44
configuration filesConfiguration Server . . . . . . . . . . . 103
DB Server . . . . . . . . . . . . . . . . . . 92SCS . . . . . . . . . . . . . . . . . . . . 187
Configuration History Log . . . . . . . . . . .63Configuration Import Wizard
recommendations . . . . . . . . . . . . . . 50Configuration Layer
overview . . . . . . . . . . . . . . . . . . 76setting up . . . . . . . . . . . . . . . . . . 85
Configuration Managerconfiguring ADDP . . . . . . . . . . . . . 303configuring Configuration Server . . . . . 114configuring DB Server . . . . . . . . . . 115configuring Log DB Server . . . . . . . . 138configuring Message Server . . . . . . . 147configuring SNMP Master Agent . . . . . 162configuring Solution Control Interface . . 158configuring Solution Control Server. . . . 153creating DB Server . . . . . . . . . . . . 115creating templates . . . . . . . . . . . . 297importing templates . . . . . . . . . . . . 297installing. . . . . . . . . . . . . . . . . . 107logging in . . . . . . . . . . . . . . . . . 110recommendations . . . . . . . . . . . . . . 49starting . . . . . . . . . . . . . . . . 109, 180
configuration objectslist . . . . . . . . . . . . . . . . . . . . . . 77
configuration options:memory: . . . . . . . . . . . . . . . . . . 65active . . . . . . . . . . . . . . . . . . . . 64addp-remote-timeout . . . . . . . . . . . 219addp-timeout . . . . . . . . . . . . . . . 219addp-trace . . . . . . . . . . . . . . . . 220failsafe-store-processing . . . . . . . . . . 65protocol . . . . . . . . . . . . . . . . . . 219
configuration procedurestandard. . . . . . . . . . . . . . . . . . 293
Configuration Serverconfiguration files . . . . . . . . . . . . . 103configuring . . . . . . . . . . . . . . . . 103external authentication . . . . . . . . . . . 95History Log . . . . . . . . . . . . . . . . . 63installing on UNIX . . . . . . . . . . . . . . 95installing on Windows . . . . . . . . . . . . 97multiple ports . . . . . . . . . . . . . . . . 71read-only mode . . . . . . . . . . . . . . . 47recommendations . . . . . . . . . . . . . . 48redundancy . . . . . . . . . . . . . . . . 203starting . . . . . . . . . . . . . 106, 178, 179
Configuration Server Proxy . . . . . . . . . 261configuring . . . . . . . . . . . . . . . . 266description . . . . . . . . . . . . . . . . 259external authentication . . . . . . . . . . 262History Log . . . . . . . . . . . . . . 63, 263installing. . . . . . . . . . . . . . . . 267, 268modifying Client Applications . . . . . 270, 271proxy-writable . . . . . . . . . . . . . . . 262
Index
Deployment Guide 357
recommendations . . . . . . . . . . . . . . 48redundancy . . . . . . . . . . . . . .273, 284starting. . . . . . . . . . . . . . 179, 180, 271task summary . . . . . . . . . . . . . . . 264writable . . . . . . . . . . . . . . . . . . 262
Configuration Server section . . . . . . 103, 214Configuration Unit . . . . . . . . . . . . . . 43configuring
Configuration Server . . . . . . . . . . . 103Configuration Server Proxy . . . . . . . . 266Database Access Points . . . . . . . . . 142DB Server . . . . . . . . . . . . . . . . . . 91GUI applications . . . . . . . . . . . .306, 307Log DB Server. . . . . . . . . . . . . . . 138Message Server . . . . . . . . . . . . . . 147SNMP Master Agent. . . . . . . . . . . . 164Solution Control Interface . . . . . . . . . 158Solution Control Server . . . . . . . . . . 154Stat Server . . . . . . . . . . . . . . . . 258
confserv . . . . . . . . . . . . . . . . . . . 103Application. . . . . . . . . . . . . . . . . 114
confserv.conf . . . . . . . . . . . . 97, 105, 210confserv.conf.sample. . . . . . . . 97, 104, 210Contact Center objects . . . . . . . . . 254, 255
Ddatabase
configuration objects . . . . . . . . . . . . 77Database Access Points
configuring. . . . . . . . . . . . . . . . . 142defined. . . . . . . . . . . . . . . . . . . 142
database CfgLocale scriptsConfiguration Database . . . . . . . . . . 101
database failureOracle 11g RAC . . . . . . . . . . . . . . . 66
database failures . . . . . . . . . . . . . . . 66database initialization scripts
Configuration Database . . . . . . . . . . 100Log Database . . . . . . . . . . . . . . . 131
database typesscripts for
Configuration Database . . . . . . . . 101DB Server
Application. . . . . . . . . . . . . . . . . 115configuration files . . . . . . . . . . . . . . 92configuring. . . . . . . . . . . . . . . . . . 91detecting DBMS failure . . . . . . . . . . . 66installing . . . . . . . . . . . . . . . . . . . 87recommendations . . . . . . . . . . 47, 55, 57redundancy . . . . . . . . . . . . . .194, 220starting. . . . . . . . . . . . . . .93, 176, 177
DB2initialization script for Log Database. . . . 131scripts for Configuration Database . .100, 101
dbserver (section) . . . . . . . . . . . . . . 92
dbserver.conf . . . . . . . . . . . . . . . 90, 93dbserver.conf.sample . . . . . . . . . 89, 90, 92dbserver-n . . . . . . . . . . . . . . . . . . .92default Access Groups
Users . . . . . . . . . . . . . . . . . . . . 69defaults
initial Configuration Database. . . . . . . 102deploying
Database Access Points . . . . . . . . . 142DB Server for Solutions . . . . . . . . . . 258LCA . . . . . . . . . . . . . . . . . . . . 122Log DB Server . . . . . . . . . . . . 136, 138Message Server . . . . . . . . . . . . . 147SNMP Master Agent . . . . . . . . . . . 162Solution Control Interface . . . . . . . . . 158Solution Control Server . . . . . . . . . . 153using Genesys Administrator . . . . . . . . 78
deploying Management Layerusing Configuration Manager . . . . . . . 134using Genesys Administrator . . . . . . . 127using Wizard Manager . . . . . . . . . . 128
deployment . . . . . . . . . . . . . . . . . .78introduction . . . . . . . . . . . . . . . . . 76sequence . . . . . . . . . . . . . . . . . . 76
Distributed Solution Control Servers. . . 54, 276application ownership . . . . . . . . . . . 279dividing configuration . . . . . . . . . . . 279host ownership . . . . . . . . . . . . . . 279recommendations . . . . . . . . . . . . . 279redundancy . . . . . . . . . . . . . . 278, 284remote site failure . . . . . . . . . . . . . . 67solutions ownership . . . . . . . . . . . . 279
documentcommenting on . . . . . . . . . . . . . . . 18typographical conventions . . . . . . . . 353version number . . . . . . . . . . . . . . 353
Eenterprise environment . . . . . . . . . . . .42external authentication
Configuration Server . . . . . . . . . . . . 95Configuration Server Proxy . . . . . . . . 262
Ffailsafe-store-processing
(configuration option) . . . . . . . . . . . . 65Folder . . . . . . . . . . . . . . . . . . . . .43forced re-login for inactivity . . . . . . . . . .68Framework . . . . . . . . . . . . . . . . . . .21
Access Control function. . . . . . . . . . . 21Alarm-Processing function . . . . . . . . . 21Attached Data Distribution function . . . . . 21Configuration function. . . . . . . . . . . . 21
Index
358 Framework 8.1
External Interfaces function . . . . . . . . . 21Fault-Management function . . . . . . . . . 21Solution Control function . . . . . . . . . . 21Troubleshooting function . . . . . . . . . . 21
Framework componentsConfiguration Import Wizard. . . . . . . . . 50Configuration Manager . . . . . . . . . . . 49Configuration Server . . . . . . . . . . . . 48Configuration Server Proxy . . . . . . . . . 48DB Server . . . . . . . . . . . . . . . . 47, 57memory allocation . . . . . . . . . . . . . . 39sizing . . . . . . . . . . . . . . . . . . . . 39starting. . . . . . . . . . . . . . . . . . . 171Stat Server . . . . . . . . . . . . . . . . . 57stopping . . . . . . . . . . . . . . . . . . 171T-Server . . . . . . . . . . . . . . . . . . . 56
Framework deploymentsequence . . . . . . . . . . . . . . . . . . 76
GGCTI_CONN_IPV6_ON
(environment variable). . . . . . . . . . . . 60GCTI_DNS_USE_HOSTSFILE
environment variable . . . . . . . . . . . . 67Genesys Administrator . . . . . . . . . . .56, 78
configuring ADDP . . . . . . . . . . . . . 300creating templates . . . . . . . . . . . . . 295deploying Management Layer . . . . . . . 127Genesys Deployment Agent. . 32, 33, 53, 122importing templates . . . . . . . . . . . . 294installing . . . . . . . . . . . . . . . . . . 107Role-Based Access Control . . . . . . . . . 68starting. . . . . . . . . . . . . . . . .109, 189
Genesys Deployment Agent . . . 32, 33, 53, 122starting. . . . . . . . . . . . . . . . . . . 184
geographically distributed environmentConfiguration Server Proxy . . . . . . . . 259Solution Control Servers . . . . . . . 54, 260
graceful shutdown . . . . . . . . . . . . . . 174graceful stop . . . . . . . . . . . . . . . . . 174
HHA port synchronization
redundant Configuration Servers . . . . . 216redundant Solution Control Servers . . . . 240
HA ProxyMedia Layer . . . . . . . . . . . . . . . . . 77starting. . . . . . . . . . . . . . . . . . . 189
hierarchical multi-tenant environment . . . . 42History Log . . . . . . . . . . . . . . . . . . 63
:memory: option . . . . . . . . . . . . . . . 65active option . . . . . . . . . . . . . . . . . 64failsafe-store-processing option . . . . . . . 65
maintenance . . . . . . . . . . . . . . . . 64on Configuration Server. . . . . . . . . . . 63on Configuration Server Proxy . . . . 63, 263performance improvements. . . . . . . . . 64
History of Changes Adapter section . . . . . 104-host (command-line parameter)
backup Message Server . . . . . . . . . 233backup SNMP Master Agent . . . . . . . 250backup Solution Control Server. . . . . . 242defined . . . . . . . . . . . . . . . . . . 171
host namesdefining . . . . . . . . . . . . . . . . . . . 41
IInformix
script for Log Database . . . . . . . . . . 131scripts for Configuration Database . . 100, 101
initializingConfiguration Database. . . . . . . . . . . 99Log Database . . . . . . . . . . . . . 131, 153
installation procedurestandard. . . . . . . . . . . . . . . . . . 309
installingbackup Client DB Server . . . . . . . . . 222backup Configuration DB Server . . . . . 195Configuration Manager . . . . . . . . . . 107Configuration Server . . . . . . . . . . . . 94Configuration Server Proxy . . . . . . 267, 268DB Server . . . . . . . . . . . . . . . . . . 87Genesys Administrator . . . . . . . . . . 107interfaces . . . . . . . . . . . . . . . . . 107LCA . . . . . . . . . . . . . . . . . . 123, 125Log DB Server . . . . . . . . . 129, 139, 141Message Server . . . . . . . . 130, 151, 152SNMP Master Agent . . . . . . . . . 166, 167Solution Control Interface . . . . . . . . . 161Solution Control Server . . . . . 132, 156, 157Stat Server . . . . . . . . . . . . . . . . 258Wizard Manager . . . . . . . . . . . . . . 83Wizards . . . . . . . . . . . . . . . . . . . 83
interfacesconfiguration layer . . . . . . . . . . . . 107installing. . . . . . . . . . . . . . . . . . 107See also Genesys Administrator, Configuration
Manager, Solution Control Interface (SCI)IPv6
client-side port . . . . . . . . . . . . . . 334configuring . . . . . . . . . . . . . . . . . 59
configuration option . . . . . . . . . . . .60environment variable . . . . . . . . . . .60
DNS . . . . . . . . . . . . . . . . . . 328, 332DNSSEC . . . . . . . . . . . . . . . . . 334dual-stack implementation
. . . . . . . . . . 325, 326, 327, 331, 332

Index
Deployment Guide 359
dynamic runtime changes . . . . . . . . . 336external interfaces . . . . . . . . . . . . . 335firewalls . . . . . . . . . . . . . . . . . . 334GCTI_CONN_IPV6_ON
(environment variable) . . . . . . . . . . 60Genesys support . . . . . . . . . . . . . 331IPSec . . . . . . . . . . . . . . . . . . . 334ip-version (configuration option) . . . . . . . 61licensing . . . . . . . . . . . . . . . .329, 335mixed environments . . . . . . . . . . 61, 330notation . . . . . . . . . . . . . . . . . . 322server sockets . . . . . . . . . . . . . . . 332SIP. . . . . . . . . . . . . . . . . . . . . 335supporting connections . . . . . . . . . . . 37thin clients . . . . . . . . . . . . . . . . . 335third-party dependencies . . . . . . . . . 336TLS . . . . . . . . . . . . . . . . . . . . 334tunneling. . . . . . . . . . . . . . . .325, 334
ipv6addressing. . . . . . . . . . . . . . . . . 322
ip-version (configuration option) . . . . . . . 61ip-version (Transport Parameter). . . . . . . 61ITCUtility . . . . . . . . . . . . . . . . . . . 103
KKeep-Alive Protocol (KPL) . . . . . . . . . . 63
L-l (command-line parameter) . . . . . . . . . 172last logged in
user authentication . . . . . . . . . . . . . 68LCA
deploying . . . . . . . . . . . . . . . . . 122installing . . . . . . . . . . . . . . . .123, 125log options . . . . . . . . . . . . . . . . . 126recommendations . . . . . . . . . . . . . . 52starting. . . . . . . . . . . . . . . . . . . 182
LCA section . . . . . . . . . . . . . . . . . 92LDAP external authentication
Configuration Server . . . . . . . . . . . . 95Configuration Server Proxy . . . . . . . . 262
License Manager . . . . . . . . . . . . . . . 181listening modes
auto-detect . . . . . . . . . . . . . . . . . 71secured . . . . . . . . . . . . . . . . . . . 71unsecured . . . . . . . . . . . . . . . . . . 71
-lmspath (command-line parameter)defined. . . . . . . . . . . . . . . . . . . 172
Local Control AgentSee LCA
Log Databasedatabase initialization scripts . . . . . . . 131initializing . . . . . . . . . . . . . . .131, 153
recommendations . . . . . . . . . . . . . . 55Log DB Server
configuring . . . . . . . . . . . . . . . . 138deploying . . . . . . . . . . . . . . . . . 136installing. . . . . . . . . . . . . 129, 139, 141redundancy . . . . . . . . . . . . . . . . 220
Log section . . . . . . . . . . . . . . . 92, 104logging in
Configuration Manager . . . . . . . . . . 110last logged in . . . . . . . . . . . . . . . . 68standard procedure . . . . . . . . . . . . 317user authentication . . . . . . . . . . . . . 68Wizard Manager . . . . . . . . . . . . . . 84
MManagement Layer
overview . . . . . . . . . . . . . . . . . . 76setting up . . . . . . . . . . . . . . . . . 121
Master Account . . . . . . . . . . . . . 69, 102Media Layer . . . . . . . . . . . . . . 254, 255
overview . . . . . . . . . . . . . . . . . . 77Message Server
installing. . . . . . . . . . . . . 130, 151, 152recommendations . . . . . . . . . . . . . . 53redundancy . . . . . . . . . . . . . . . . 227starting . . . . . . . . . . . . . . . . 181, 182using Configuration Manager . . . . . . . 147
Microsoft SQLscripts for Configuration Database . . 100, 101scripts for Log Database . . . . . . . . . 131
multi-language support . . . . . . . . . . . .44configuring Configuration Server . . . . . 105database prerequisites . . . . . . . . . . . 74
multiple ports. . . . . . . . . . . . . . . . . .71Configuration Server . . . . . . . . . . . . 71
multi-tenant environmentSee hierarchical multi-tenant environment
Nnaming hosts . . . . . . . . . . . . . . . . .41-nco (command-line parameter)
defined . . . . . . . . . . . . . . . . . . 172new features . . . . . . . . . . . . . . . . . .22New Users
assignment to Access Groups . . . . . . . 70
Oobjects
Access Groups . . . . . . . . . . . . . . 255Agent Groups . . . . . . . . . . . . . . . 257contact centers . . . . . . . . . . . . 254, 255
Index
360 Framework 8.1
list of configuration . . . . . . . . . . . . . 77Place Groups . . . . . . . . . . . . . . . 258Places . . . . . . . . . . . . . . . . . . . 257Skills . . . . . . . . . . . . . . . . . . . . 256telephony . . . . . . . . . . . . . . .254, 255Users . . . . . . . . . . . . . . . . . . . 256
options synchronizationClient DB Servers . . . . . . . . . . . . . 222Configuration DB Servers . . . . . . . . . 196Configuration Servers . . . . . . . . . . . 205Message Servers . . . . . . . . . . . . . 229SNMP Master Agents . . . . . . . . . . . 245
Oraclescript for Log Database . . . . . . . . . . 131scripts for Configuration Database . .100, 101
Oracle 11g RAC DBMSfailure . . . . . . . . . . . . . . . . . . . . 66
overviewConfiguration Layer . . . . . . . . . . . . . 76Management Layer . . . . . . . . . . . . . 76Media Layer . . . . . . . . . . . . . . . . . 77Services Layer. . . . . . . . . . . . . . . . 77User Interaction Layer . . . . . . . . . . . . 76
P-p (command-line parameter)
Configuration Server . . . . . . . . . . . 178password
Configuration Database . . . . . . . . . . 106passwords
logging in . . . . . . . . . . . . . . . . . 318requirements . . . . . . . . . . . . . . . 318restrictions . . . . . . . . . . . . . . . . . 318
Place Group objects . . . . . . . . . . . . . 258Place objects . . . . . . . . . . . . . . . . . 257-port (command-line parameter)
backup Message Server. . . . . . . . . . 233backup SNMP Master Agent . . . . . . . 250backup Solution Control Server . . . . . . 242defined. . . . . . . . . . . . . . . . . . . 171
port assignmentmultiple ports . . . . . . . . . . . . . . . . 71
portslistening modes . . . . . . . . . . . . . . . 71
ports synchronizationClient DB Servers . . . . . . . . . . . . . 222Configuration DB Servers . . . . . . . . . 196Configuration Servers . . . . . . . . . . . 205Message Servers . . . . . . . . . . . . . 229SNMP Master Agents . . . . . . . . . . . 245
PostgreSQLscript for Log Database . . . . . . . . . . 131scripts for Configuration Database . .100, 101
protocol (configuration option)redundant Configuration Servers . . . . . 219
proxy-writable (configuration option)Configuration Server Proxy . . . . . . . . 262
RRADIUS external authentication
Configuration Server . . . . . . . . . . . . 95Configuration Server Proxy . . . . . . . . 262
Ranks . . . . . . . . . . . . . . . . . . . . 257recommendations
DB Server . . . . . . . . . . . . . . . . . . 55Distributed Solution Control Server . . . . 279LCA . . . . . . . . . . . . . . . . . . . . . 52Log Database . . . . . . . . . . . . . . . . 55Message Server . . . . . . . . . . . . . . 53redundant Configuration DB Servers . . . 194redundant Message Servers . . . . . . . 227redundant SNMP Master Agents . . . . . 243redundant Solution Control Servers . . . 235SNMP Master Agent . . . . . . . . . . . . 56Solution Control Interface . . . . . . . . . . 54Solution Control Server . . . . . . . . . . . 54
redundancyHA port synchronization . . . . . . . . . . 54redundant components . . . . . . . . . . 193warm standby . . . . . . . . . . . . . . . 193
redundancy typeClient DB Server . . . . . . . . . . . . . 221Configuration DB Server . . . . . . . . . 194Configuration Server . . . . . . . . . . . 203Configuration Server Proxy . . . . . . . . 273Distributed Solution Control Server . . . . 278Message Server . . . . . . . . . . . . . 227SNMP Master Agents . . . . . . . . . . . 243Solution Control Server . . . . . . . . . . 234warm standby . . . . . . . . . . . . . . . 193
redundant Client DB Serversoptions synchronization . . . . . . . . . . 222ports synchronization . . . . . . . . . . . 222prerequisites . . . . . . . . . . . . . . . 221redundancy type . . . . . . . . . . . . . 221setting up . . . . . . . . . . . . . . . . . 221starting . . . . . . . . . . . . . . . . . . 226task summary . . . . . . . . . . . . . . . 221warm standby . . . . . . . . . . . . . . . 221
redundant componentsClient DB Servers . . . . . . . . . . . . . 220Configuration DB Servers. . . . . . . . . 194Configuration Server Proxy . . . . . . 273, 284Configuration Servers. . . . . . . . . . . 203Distributed Solution Control Servers . 278, 284Message Servers . . . . . . . . . . . . . 227SNMP Master Agents . . . . . . . . . . . 243Solution Control Servers . . . . . . . . . 234synchronizing options . . . . . . . . . . . 304synchronizing ports . . . . . . . . . . . . 304

Index
Deployment Guide 361
redundant Configuration DB Serversinstallation recommendations . . . . . . . 194options synchronization . . . . . . . . . . 196ports synchronization . . . . . . . . . . . 196prerequisites. . . . . . . . . . . . . . . . 195redundancy type. . . . . . . . . . . . . . 194setting up . . . . . . . . . . . . . . . . . 194starting. . . . . . . . . . . . . . . . . . . 202task summary . . . . . . . . . . . . . . . 195
redundant Configuration ServersADDP . . . . . . . . . . . . . . . . . . . 218addp-remote-timeout (configuration
option). . . . . . . . . . . . . . . . . 219addp-timeout (configuration option) . . . . 219addp-trace (configuration option) . . . . . 220HA port synchronization . . . . . . . . . . 216options synchronization . . . . . . . . . . 205ports synchronization . . . . . . . . . . . 205redundancy type. . . . . . . . . . . . . . 203setting up . . . . . . . . . . . . . . . . . 203starting. . . . . . . . . . . . . . . . . . . 217task summary . . . . . . . . . . . . . . . 204warm standby . . . . . . . . . . . . . . . 203
redundant DB ServersClient DB Servers . . . . . . . . . . . . . 220Configuration DB Servers . . . . . . . . . 194
redundant Message Servers . . . . . . . . . 227installation recommendations . . . . . . . 227options synchronization . . . . . . . . . . 229ports synchronization . . . . . . . . . . . 229prerequisites. . . . . . . . . . . . . .227, 228redundancy type. . . . . . . . . . . . . . 227setting up . . . . . . . . . . . . . . . . . 227starting. . . . . . . . . . . . . . . . . . . 233task summary . . . . . . . . . . . . . . . 228
redundant SNMP Master Agents. . . . . . . 243installation recommendations . . . . . . . 243options synchronization . . . . . . . . . . 245ports synchronization . . . . . . . . . . . 245prerequisites. . . . . . . . . . . . . .243, 244redundancy type. . . . . . . . . . . . . . 243setting up . . . . . . . . . . . . . . . . . 243starting. . . . . . . . . . . . . . . . . . . 250task summary . . . . . . . . . . . . . . . 244warm standby . . . . . . . . . . . . . . . 243
redundant Solution Control Servers . . . 54, 234installation recommendations . . . . . . . 235prerequisites. . . . . . . . . . . . . .234, 235redundancy type. . . . . . . . . . . . . . 234setting up . . . . . . . . . . . . . . . . . 235starting. . . . . . . . . . . . . . . . . . . 242synchronizing HA ports . . . . . . . . . . 240task summary . . . . . . . . . . . . . . . 235warm standby . . . . . . . . . . . . . . . 234
remote deployment. . . . . . . . . . .33, 53, 78
remote deployment agentSee Genesys Deployment Agent
retired features. . . . . . . . . . . . . . . . .26Role-Based Access Control . . . . . . . . . .68run.sh (UNIX file) . . . . . . . . . . . . . . 175
S-s (command-line parameter)
Configuration Server . . . . . . . . . . . 178Configuration Server parameter . . . . . 217
Sce.exe . . . . . . . . . . . . . . . . 181, 188scripts
Configuration Database. . . . . . . . 100, 101Log Database . . . . . . . . . . . . . . . 131
scripts folderConfiguration Database. . . . . . . . . . 100Log Database . . . . . . . . . . . . . . . 131
secure connections . . . . . . . . . . . . 71, 72secure data transfer . . . . . . . . . . . . . .71secured (listening mode). . . . . . . . . . . .71security banner . . . . . . . . . . . . . . . .70
configuring . . . . . . . . . . . 108, 162, 313security features
access permissions . . . . . . . . . . . . . 69database password encryption . . . . . . 106forced re-login for inactivity . . . . . . . . . 68secure connections . . . . . . . . . . . 71, 72security banner . . . . . . . . . . . . . . . 70TLS . . . . . . . . . . . . . . . . . . . . . 71
Services Layer . . . . . . . . . . . .77, 254, 258setting up
Configuration Layer . . . . . . . . . . . . . 85Management Layer . . . . . . . . . . . . 121
Silent Setup . . . . . . . . . . . . . . 321, 337single-tenant environment . . . . . . . . . . .42Skill objects . . . . . . . . . . . . . . . . . 256SNMP Master Agent
deploying with Configuration Manager . . 162installing. . . . . . . . . . . . . . . . 166, 167recommendations . . . . . . . . . . . . . . 56starting . . . . . . . . . . . . . . . . 188, 189
SNMP Master Agentsredundancy . . . . . . . . . . . . . . . . 243
SNMP support . . . . . . . . . . . . . . . . 158SOAP section . . . . . . . . . . . . . . . . 104Solution Control Interface
deploying with Configuration Manager . . 158installing. . . . . . . . . . . . . . . . . . 161recommendations . . . . . . . . . . . . . . 54starting . . . . . . . . . . . . . . . . . . 188
Solution Control Serverconfiguration file . . . . . . . . . . . . . 187deploying with Configuration Manager . . 153description . . . . . . . . . . . . . . . . 260installing. . . . . . . . . . . . . 132, 156, 157

Index
362 Framework 8.1
recommendations . . . . . . . . . . . 54, 235redundancy . . . . . . . . . . . . . . . . 234starting. . . . . . . . . . . . . . . . .185, 186
Solutionsapplication failures. . . . . . . . . . . . . . 66availability . . . . . . . . . . . . . . . . . . 58communication session failures . . . . . . . 62DB Server for . . . . . . . . . . . . . . . 258software exceptions . . . . . . . . . . . . . 65
SQLscripts for Configuration Database . .100, 101scripts for Log Database . . . . . . . . . 131
sql_scripts folderConfiguration Database . . . . . . . . . . 100
startingbackup Client DB Server . . . . . . . . . 226backup Configuration DB Server . . . . . 202backup Configuration Server . . . . . . . 217backup Message Server. . . . . . . . . . 233backup SNMP Master Agent . . . . . . . 250backup Solution Control Server . . . . . . 242Configuration Manager . . . . . . . .109, 180Configuration Server . . . . . . . . .106, 178Configuration Server Proxy . . . . . .179, 271DB Server . . . . . . . . . . . . . . . 93, 176Framework components. . . . . . . . . . 171Genesys Administrator . . . . . . . .109, 189Genesys Deployment Agent. . . . . . . . 184HA Proxy . . . . . . . . . . . . . . . . . 189LCA . . . . . . . . . . . . . . . . . . . . 182License Manager . . . . . . . . . . . . . 181Message Server . . . . . . . . . . . . . . 181SNMP Master Agent. . . . . . . . . . . . 188Solution Control Interface . . . . . . . . . 188Solution Control Server . . . . . . . . . . 185Stat Server . . . . . . . . . . . . . . . . 190T-Server . . . . . . . . . . . . . . . . . . 190with run.sh . . . . . . . . . . . . . . . . . 175with startServer.bat . . . . . . . . . . . . 175Wizard Manager . . . . . . . . . . . . . . . 83Wizards . . . . . . . . . . . . . . . . . . . 83
startServer.bat (Windows file) . . . . . . . . 175startup files
run.sh (UNIX) . . . . . . . . . . . . . . . 175startServer.bat (Windows) . . . . . . . . . 175
Stat Server . . . . . . . . . . . . . . . . . . 258recommendations . . . . . . . . . . . . . . 57starting. . . . . . . . . . . . . . . . . . . 190
stoppingFramework components. . . . . . . . . . 171gracefully . . . . . . . . . . . . . . . . . 174
Sybasescript for Log Database . . . . . . . . . . 132scripts for Configuration Database . . . . 101
synchronizing HA portsredundant Configuration Servers . . . . . 216
redundant Solution Control Servers . . . 240synchronizing options . . . . . . . . . . . . 304
Client DB Servers . . . . . . . . . . . . . 222Configuration DB Servers. . . . . . . . . 196Configuration Servers. . . . . . . . . . . 205Message Servers . . . . . . . . . . . . . 229SNMP Master Agents . . . . . . . . . . . 245
synchronizing ports . . . . . . . . . . . . . 304Client DB Servers . . . . . . . . . . . . . 222Configuration DB Servers. . . . . . . . . 196Configuration Servers. . . . . . . . . . . 205Message Servers . . . . . . . . . . . . . 229SNMP Master Agents . . . . . . . . . . . 245
Ttask summaries
enabling Management Layer control of Configuration Layer. . . . . . . . . . 114
manually deploying Management Layer . 134setting up Configuration Layer . . . . . . . 86setting up Configuration Server Proxy . . 264setting up redundant Client DB Servers . 221setting up redundant Configuration
DB Servers . . . . . . . . . . . . . . 195setting up redundant Configuration
Servers . . . . . . . . . . . . . . . . 204setting up redundant Message Servers. . 228setting up redundant SNMP Master
Agents . . . . . . . . . . . . . . . . 244setting up redundant Solution Control
Servers . . . . . . . . . . . . . . . . 235telephony objects . . . . . . . . . . . 254, 255TLS security . . . . . . . . . . . . . . . . . .71
multiple ports . . . . . . . . . . . . . . . . 71Transparent Application Failure
Oracle 11g RAC database . . . . . . . . . 66T-Server
recommendations . . . . . . . . . . . . . . 56starting . . . . . . . . . . . . . . . . . . 190
UUNIX
installing backup Client DB Server . . . . 222installing backup Configuration
DB Server. . . . . . . . . . . . . . . 195installing backup Configuration Server . . 207installing Configuration Server . . . . . . . 95installing Configuration Server Proxy . . . 267installing DB Server . . . . . . . . . . 88, 139installing LCA . . . . . . . . . . . . . . . 123installing Log DB Server . . . . . . . . . 129installing Message Server . . . . . . 130, 151installing server applications . . . . . . . 309

Index
Deployment Guide 363
installing SNMP Master Agent. . . . . . . 166installing Solution Control Server . . .132, 156starting applications . . . . . . . . . . . . 176starting backup Configuration
DB Server . . . . . . . . . . . . .202, 226starting backup Configuration Server . . . 217starting backup Message Server . . . . . 233starting backup SNMP Master Agent . . . 250starting backup Solution Control Server. . 242starting Configuration Server . . . . .106, 179starting Configuration Server Proxy . .180, 272starting DB Server . . . . . . . . . . . 94, 177starting Message Server . . . . . . . . . 181starting SNMP Master Agent . . . . . . . 189starting Solution Control Server . . . . . . 186starting with run.sh . . . . . . . . . . . . 175
unsecured (listening mode) . . . . . . . . . 71user access permissions . . . . . . . . . . . 69user authentication . . . . . . . . . . . . . . 67
at login. . . . . . . . . . . . . . . . . . . . 68forced re-login for inactivity . . . . . . . . . 68
user authorization . . . . . . . . . . . . . . 68User Interaction Layer
overview . . . . . . . . . . . . . . . . . . . 76User objects . . . . . . . . . . . . . . . . . 256user password
logging in . . . . . . . . . . . . . . . . . 318Users
default Access Group . . . . . . . . . . . . 69UTF-8 encoding . . . . . . . . . . . . . . . 44
V-v (command-line parameter) . . . . . . . . 172
Wwarm standby . . . . . . . . . . . . . 193, 227
redundant Client DB Servers . . . . . . . 221redundant Configuration DB Servers . . . 194redundant Configuration Server Proxies . 273redundant Configuration Servers . . . . . 203redundant Distributed Solution Control
Servers . . . . . . . . . . . . . . . . 278redundant Message Servers . . . . . . . 227redundant SNMP Master Agents . . . . . 243redundant Solution Control Servers . . . . 234
Windowsinstalling backup Client DB Server . . . . 222installing backup Configuration
DB Server . . . . . . . . . . . . . . . 195installing backup Configuration Server . . 210installing Configuration Manager . . . . . 107installing Configuration Server . . . . . . . 97installing Configuration Server Proxy . . . 268
installing DB Server . . . . . . . . . . 90, 141installing GUI applications . . . . . . . . 313installing LCA . . . . . . . . . . . . . . . 125installing Message Server . . . . . . . . 152installing server applications . . . . . . . 311installing SNMP Master Agent . . . . . . 167installing Solution Control Interface . . . . 161installing Solution Control Server . . . . . 157starting applications. . . . . . . . . . . . 176starting backup Client DB Server . . . . . 227starting backup Configuration DB Server . 203starting backup Configuration Server . . . 218starting backup Message Server . . . . . 234starting backup SNMP Master Agent . . . 250starting backup Solution Control Server . 242starting Configuration Manager . . . . . . 109starting Configuration Server . . . . . 107, 179starting Configuration Server Proxy. . 180, 272starting DB Server . . . . . . . . . . 94, 177starting Genesys Deployment Agent . . . 185starting Message Server . . . . . . . . . 182starting SNMP Master Agent . . . . . . . 189starting Solution Control Interface . . . . 188starting Solution Control Server. . . . . . 186starting with startServer.bat . . . . . . . . 175
Windows Service . . . . . . . . . . . . . . 191Wizard Manager
logging in . . . . . . . . . . . . . . . . . . 84overview . . . . . . . . . . . . . . . . . . 79using . . . . . . . . . . . . . . . . . . . . 84
writable Configuration Server Proxy . . . . . 262

Index
364 Framework 8.1
Related Documents