BRUXZIR® SHADED MILLING BLANKS ENGLISH DO NOT DISCARD INSTRUCTIONS DURING PRODUCT USE. Instructions for Use 1. Product Description BruxZir ® Shaded Zirconia Milling Blanks (BruxZir Shaded & BruxZir Shaded-A) BruxZir Shaded Blanks are used for the production of full-contour zirconia and zirconia-based substructures for crowns and bridges. The manufactured full- contour crowns and substructures are made utilizing the CAD/CAM system for design and manufacture. The designed and manufactured full-contour crowns and substructures are then sintered at a high temperature. No color needs to be added to BruxZir Shaded Blanks before sintering. Basic staining and glazing techniques need to be used after sintering to achieve the desired VITA® shade for full-contour crowns and bridges. The sintered material exhibits maximum strength and translucency similar to natural dentition. Because shrinkage occurs during sintering, it is vital to take into account the appropriate size ratio (enlargement factor) during milling. Attention to the proper enlargement factor (EF) during milling ensures precision fit and marginal accuracy of the sintered coping and/or crowns, with each block labeled with the specific EF to be applied. 2. Indications for Use The device is indicated for use by dental technicians in the construction of custom- made all-ceramic restorations for anterior and posterior locations. 3. Contraindications None. 4. Technical Data Table As measured according to ISO 6872 Table 1 Classification - Type II, Class 6 Coefficient of Thermal Expansion (CTE) (25–500ºC) 11 x 10 -6 /K Flexural Strength > 800 MPa Sintered Density 6.05 g/cm 3 Table 2 BruxZir Shaded Final VITA Shade 100 A1, B1, C1 200 A2, A3, B2 300 A3.5, B3, C2, D2, D3, D4 400 A4, B4, C3, C4 5. Design of Understructure Failure to observe the wall and connector thickness recommendations as shown in Table 3 may result in fracture of the final restoration. For specific instructions on design of the substructures please refer to the applicable CAD manual designated for your CAD system. Full-contour bridges should follow the same minimum connector rules. Table 3 Recommended Wall and Connector Thickness Chart for Sintered Understructures and Full Contours Single Copings (standard) Bridges Anterior Wall Thickness (substructure) Circular Incisal/Occlusal ≥ 0.5 mm ≥ 0.7 mm ≥ 0.5 mm ≥ 0.7 mm Connector Dimensions (substructure) 3-unit bridge 4-unit & more (bridge) --- --- ≥ 7.0 mm 2 ≥ 9.0 mm 2 Connector Dimensions (full contour) 3-unit bridge 4-unit & more (bridge) --- --- ≥ 7.0 mm 2 ≥ 9.0 mm 2 Posterior Wall Thickness (substructure) Circular Incisal/Occlusal ≥ 0.5 mm ≥ 0.7 mm ≥ 0.9 mm ≥ 0.9 mm Connector Dimensions (substructure & full contour) 3-unit bridge 4-unit & more (bridge) Cantilever --- --- --- ≥ 9 mm 2 ≥ 12 mm 2 ≥ 12 mm 2 6. Milling After the restorations have been digitally designed, program your milling machine and enter the enlargement factor (EF) for the blank if prompted by the program to do so. The mill operator should refer to the operating instructions for the applicable milling system used, for the specified programming method for input of the EF, and for milling the zirconia blanks. The specific EF for the block used can be located on the label affixed to the side of the BruxZir Shaded Blank. 7. Sintering All BruxZir Shaded substructures and full-contour crowns and bridges must go through a final sintering cycle prior to finishing. The recommended sintering temperature is 1580 °C as shown in Sintering Temperature Chart below in order to achieve dense zirconia. Once milled, carefully remove the restorations from the blank. Remove all residual dust by placing the restorations in an ultrasonic cleaner filled with fresh distilled or deionized water ONLY. Ultrasonically clean the restorations for 30 seconds. Thoroughly dry the restorations before sintering; otherwise, they may fracture. The drying of the restorations can be accelerated by the use of microwave convection or a heat lamp. Place the restorations in a sintering tray containing the appropriate-sized zirconia beads (not provided by Prismatik) in the sintering oven. Please note: BruxZir Shaded restorations do not need to be dipped in any coloring liquids, or undergo any shade alteration prior to sintering. Program your sintering oven using your oven manual in order to achieve the recommended heating profile as shown in Sintering Temperature Chart below. For proper sintering, ensure that the oven reaches 1580 °C and holds at this temperature for 2.5 hours. Allow the oven to cool sufficiently in order to safely remove the restorations. Carefully inspect the restorations to verify that there are no cracks or chips. Temperature (ºC) Time (min) Time (hour) 0 0 100 200 300 400 500 2 4 6 8 Temperature (ºC) 1800 1800 1600 1600 1400 1400 1200 1200 1000 1000 800 800 600 600 400 400 200 200 0 0 (C5) (T5) (T2) 2 ºC/min (T3) (C1) (C7) 15 ºC/min (T1) 10 ºC/min (T4) 15 ºC/min (T6) (C6) Sintering Temperature Chart (C2) (C4) (C3) Temperature (ºC) Time (minutes) C1 25 ºC T1 78 minutes C2 1200 ºC T2 60 minutes C3 1200 ºC T3 50 minutes C4 1300 ºC T4 28 minutes C5 1580 ºC T5 150 minutes C6 1580 ºC T6 90 minutes C7 155 ºC T7 Off Sintering Cycle Recommendations • 1st Heating Rate – 15ºC/min to 1200ºC • 1st Holding Time at 1200ºC – 60 minutes • 2nd Heating Rate – 2ºC/min to 1300ºC • 3rd Heating Rate at 10ºC/min to 1580ºC • Sintering Temperature – 1580ºC • 2nd Holding Time at 1580ºC – 150 minutes • Cooling Rate – 15ºC WARNING: Do not open the furnace or remove the sintered restorations until your furnace cools sufficiently for safe removal. WARNING: Please refer to the operating instructions for the particular oven used for proper use, placement of the product, and calibration. Ensure that the sintering oven used is calibrated according to the particular manufacturer’s specifications. Contact your sintering oven manufacturer for further instructions. 8. Adjusting the Sintered Restorations After sintering, make adjustments to the anatomy of the restorations as necessary using the appropriate low-pressure or water-cooled grinding instruments, being careful to observe the recommended wall and connector thicknesses shown in Table 3 under Section 5. 9. Achieving Final Shade After sintering, the color of the BruxZir Shaded restoration will become visible. BruxZir Shaded base shades have to be stained and glazed to match the desired final shade. As shown in Table 2, the BruxZir Shaded formulations match multiple VITA Classical shades. Use standard staining techniques to adjust the final color of the restoration per the Rx. It is recommended to use a low-fusing glaze and stain materials, since higher fusing materials can cause a slight brightening of the BruxZir restoration above 860 °C. Using a porcelain or laboratory oven (not provided by Prismatik), follow the stain and glaze instructions from the manufacturer. It might be needed to perform a second staining cycle in order to match the needed shade. Please follow the instructions of the manufacturer when glazing the restoration. WARNING: Do not remove the restorations until they cool sufficiently for safe removal. WARNING: Please refer to the operating instructions for the particular oven used for proper use, placement of the product and calibration. Ensure that the sintering oven used is calibrated according to the particular manufacturer’s specifications. Contact your sintering oven manufacturer for further instructions. After the staining cycle, check the quality of the shade, and re-stain if needed. If additional staining adjustments are needed, bake the restorations again using the BruxZir Shaded stain/glaze bake cycle. Once desired shade is reached, apply the desired amount of glaze to the restorations and bake the restorations using the BruxZir stain/glaze bake cycle. 10. Cementation The dental processional should use resin-reinforced glass ionomers, resin cements, or self-adhesive resin cements to cement the BruxZir Shaded restorations. 11. Storage Before storing BruxZir Shaded Blanks, ensure there is no damage from shipping. Shipping damage may include cracks and chips of the blank. The blanks should be stored at room temperature and away from dust and potential contamination sources. When not in use, store the BruxZir Shaded Blanks in their original packaging. 12. WARNINGS Do not inhale dust. Do not get dust into eyes or have prolonged contact directly with the skin. Personal protective equipment (PPE) such as gloves, masks, and lab coats are recommended in order to avoid possible contact and irritation to skin or eyes during processing. NOTE: To request the MSDS for this product, call Glidewell Direct at 888-303-3975. 13. Questions/Comments For questions and/or comments or for further instructions regarding the use of the product, please contact Glidewell Direct in the U.S. at 18651 Von Karman Ave., Irvine, CA 92612 or by calling 888-303-3975. MDSS GmbH Schiffgraben 41 30175 Hannover, Germany Manufactured by Prismatik Dentalcraft, Inc. (A wholly owned subsidiary of Glidewell Laboratories) 2212 Dupont Drive Irvine, CA 92612, USA Tel: 888-303-6470 Fax: 800-579-8233 Sponsored by Emergo Australia 201 Sussex Street Darling Park, Tower II, Level 20 Sydney, NSW, 2000 Australia VITA is a registered trademark of VITA Zahnfabrik. BRUXZIR® SHADED MILLING BLANKS ČESKY Návod k použití 1. Popis produktu Stínované zirkonové frézovací bločky BruxZir® Shaded (BruxZir Shaded a BruxZir Shaded-A) Stínované bločky BruxZir Shaded slouží k vytváření plně konturovaných zirkonových struktur a struktur na bázi zirkonu pro korunky a můstky. Vyrobené plně konturované korunky a substruktury se vytváří pomocí systému CAD/CAM, který slouží k návrhu a výrobě. Navržené a vyrobené plně konturované korunky a substruktury se poté sintrují při vysoké teplotě. Ke stínovaným bločkům BruxZir Shaded není nutné přidat před sintrováním žádnou barvu. Po sintrování je třeba pomocí základních technik barvení a glazování dosáhnout požadovaného odstínu VITA® pro plně konturované korunky a můstky. Sintrovaný materiál vykazuje maximální sílu a průsvitnou perlovou třpytivost. Jelikož při sintrování dochází ke zmenšování, je nutné při frézování vzít v potaz příslušný poměr velikostí (faktor zvětšení). Pozornost věnovaná faktoru zvětšení (EF) při frézování zajišťuje přesné dosednutí a okrajovou přesnost sintrovaných kapen a/ nebo korunek. Na každém bločku je uveden specifický EF, který je nutné použít. 2. Indikace použití Zařízení je určeno k použití zubními techniky při vytváření celokeramických náhrad na míru pro přední a zadní lokality. 3. Kontraindikace Žádné. 4. Technical Data Table Měřeno dle ISO 6872 Tabulka 1 Klasifikace – typ II, třída 6 Koeficient tepelné expanze (CTE) (25–500 °C) 11 x 10 -6 /K Mez pevnosti v ohybu > 800 MPa Hustota 6,05 g/cm 3 Tabulka 2 BruxZir Shaded Konečný odstín VITA 100 A1, B1, C1 200 A2, A3, B2 300 A3.5, B3, C2, D2, D3, D4 400 A4, B4, C3, C4 5. Návrh substruktury Nedodržení doporučené tloušťky stěny a konektoru (viz tabulka 3) může vést ke zlomení konečné náhrady. Specifické pokyny k návrhu substruktur naleznete v příslušné příručce CAD určené pro váš systém CAD. Plně konturované můstky by měly dodržovat stejná pravidla pro minimální sílu konektoru. Tabulka 3 Tabulka doporučované tloušťky stěny a konektoru pro sintrované substruk- tury a plné kontury Jednoduché kapny (standard) Můstky Přední Tloušťka stěny (substruktura) Kruhový incizální/okluzní ≥ 0,5 mm ≥ 0,7 mm ≥ 0,5 mm ≥ 0,7 mm Rozměry konektoru (substruktura) 3jednotkový můstek 4 a více jednotkový (můstek) --- --- ≥ 7,0 mm 2 ≥ 9,0 mm 2 Rozměry konektoru (plné kontury) 3jednotkový můstek 4 a více jednotkový (můstek) --- --- ≥ 7,0 mm 2 ≥ 9,0 mm 2 Zadní Tloušťka stěny (substruktura) Kruhový incizální/okluzní ≥ 0,5 mm ≥ 0,7 mm ≥ 0,9 mm ≥ 0,9 mm Rozměry konektoru (substruktura a plné kontury) 3jednotkový můstek 4 a více jednotkový (můstek) Konzola --- --- --- ≥ 9 mm 2 ≥ 12 mm 2 ≥ 12 mm 2 6. Frézování Po dokončení návrhu CAD náhrad naprogramujte svou frézu a zadejte faktor zvětšení (EF) pro bloček, pokud vás o to program požádá. Informace o způsobu zadávání EF a frézování zirkonových bločků nalezne obsluha v provozní příručce relevantního frézovacího systému. Specifickou EF bločku naleznete na štítku připojeném na straně stínovaného bločku BruxZir Shaded. 7. Sintrování Všechny stínované substruktury BruxZir Shaded, plně konturované korunky a můstky musí před dokončením projít konečným sintrovacím cyklem. Doporučovaná teplota sintrování, při které získáte dostatečně hustý zirkon, je 1 580 °C (viz tabulka sintrovacích teplot níže). Po vyfrézování opatrně vyjměte náhrady z bločku. Odstraňte veškerý reziduální prach vložením náhrad do ultrazvukové čističky naplněné VÝHRADNĚ čerstvou destilovanou nebo deionizovanou vodou. Čistěte náhrady ultrazvukem po dobu 30 sekund. Náhrady před sintrováním pečlivě vysušte, v opačném případě může dojít ke zlomení. Sušení náhrady lze urychlit použitím mikrovlnné konvekční trouby nebo infračervené lampy. Uložte náhrady na sintrovací nosič obsahující zirkonové kuličky o příslušné velikosti (společnost Prismatik je nedodává) do sintrovací pece. Nezapomínejte: stínované náhrady BruxZir Shaded není nutné vkládat do žádných barvicích tekutin ani není potřeba provádět po sintrování úpravy stínování. Naprogramujte sintrovací pec dle příručky pece, abyste dosáhli doporučovaného profilu zahřívání dle tabulky sintrovacích teplot níže. Ujistěte se, že teplota v peci dosáhla 1 580 °C a zůstala stabilní 2,5 hodiny. V opačném případě nelze zajistit správný výsledek sintrování. Nechejte pec dostatečně vychladnout, abyste mohli bezpečně vytáhnout náhrady. Pečlivě náhrady zkontrolujte a ujistěte se, že se na nich nenachází žádné praskliny ani vylomené kusy. Teplota (ºC) Čas (min) Čas (h) 0 0 100 200 300 400 500 2 4 6 8 Teplota (ºC) 1 800 1 800 1 600 1 600 1 400 1 400 1 200 1 200 1 000 1 000 800 800 600 600 400 400 200 200 0 0 (C5) (T5) (T2) 2 ºC/min (T3) (C1) (C7) 15 ºC/min (T1) 10 ºC/min (T4) 15 ºC/min (T6) (C6) Tabulka sintrovacích teplot (C2) (C4) (C3) Teplota (ºC) Čas (minuty) C1 25 ºC T1 78 minut C2 1 200 ºC T2 60 minut C3 1 200 ºC T3 50 minut C4 1 300 ºC T4 28 minut C5 1 580 ºC T5 150 minut C6 1 580 ºC T6 90 minut C7 155 ºC T7 Vyp. Doporučení pro sintrovací cyklus • 1. rychlost zahřívání – 15 °C/min na 1 200 °C • 1. stabilní doba při 1 200 °C – 60 minut • 2. cyklus zahřívání – 2 °C/min na 1 300 °C • 3. cyklus zahřívání 10 °C/min na 1 580 °C • Sintrovací teplota – 1 580 °C • 2. stabilní doba při 1 580 °C – 150 minut • Rychlost chlazení – 15 °C VAROVÁNÍ: Neotevírejte pec ani nevytahujte sintrované náhrady, dokud se pec nevychladí dostatečně na to, aby bylo možné produkty bezpečně vyjmout. VAROVÁNÍ: Informace o správném použití, uložení produktu a kalibraci naleznete v provozní příručce příslušné pece. Ujistěte se, že je používaná sintrovací pec nakalibrována dle příslušných specifikací výrobce. Pokud budete potřebovat další pokyny, obraťte se na výrobce sintrovací pece. 8. Úprava sintrovaných náhrad Po sintrování upravte náhrady dle anatomických poměrů pomocí vhodných nízkotlakových nebo vodou chlazených brusných nástrojů. Dávejte pozor, aby byla dodržena doporučená tloušťka zdi a konektoru uvedená v tabulce 3, část 5. 9. Dosažení konečného odstínu Po sintrování uvidíte konečnou barvu stínované náhrady BruxZir Shaded. Základní odstíny stínovaných náhrad BruxZir Shaded je nutné obarvit a glazovat, aby odpovídaly požadovanému odstínu. Jak uvádí tabulka 2, složení stínovaných náhrad BruxZir Shaded odpovídá několika klasickým odstínům Vita. Standardními technikami upravte konečnou barvu náhrady. Doporučujeme použít glazovací látky a barvicí materiály s nízkou mírou fúze – materiály s vyšší mírou fúze můžou způsobit mírné projasnění náhrady BruxZir nad 860 °C. Dále postupujte dle pokynů výrobce k barvení a glazování porcelánové nebo laboratorní pece (nedodává společnost Prismatik). Někdy může být potřebné provést další cyklus barvení, aby byl dosažen potřebný odstín. Při glazování náhrady dodržujte pokyny výrobce. VAROVÁNÍ: Nevytahujte náhrady, dokud se nevychladí dostatečně na to, aby je bylo možné bezpečně vyjmout. VAROVÁNÍ: Informace o správném použití, uložení produktu a kalibraci naleznete v provozní příručce příslušné pece. Ujistěte se, že je používaná sintrovací pec nakalibrována dle příslušných specifikací výrobce. Pokud budete potřebovat další pokyny, obraťte se na výrobce sintrovací pece. Po dokončení cyklu barvení zkontrolujte kvalitu odstínu a v případě potřeby barvení zopakujte. Pokud je nutné provést další úpravy barvení, zpracujte náhrady znovu pomocí tepelného cyklu barvení/glazurování pro stínované náhrady BruxZir Shaded. Po dosažení požadovaného odstínu naneste potřebné množství glazovacího materiálu a náhrady tepelně zpracujte v tepelném cyklu barvení/glazování BruxZir. 10. Cementování Stínované náhrady BruxZir Shaded je třeba cementovat pomocí pryskyřicí zpevněných skloionomerů, pryskyřicových cementů a samoadhezivních pryskyřicových cementů. 11. Skladování Než stínované bločky BruxZir Shaded uložíte, ujistěte se, že nebyly při přepravě poškozeny. Mezi škody způsobené přepravou mohou patřit praskliny a vylomené kusy z bločku. Bločky skladujte při pokojové teplotě a chraňte je před prachem a zdroji potenciální kontaminace. Když stínované bločky BruxZir Shaded nepoužíváte, uchovávejte je v původním balení. 12. VAROVÁNÍ Nevdechujte prach. Dávejte pozor, aby se vám prach nedostal do očí nebo nepřišel do delšího přímého kontaktu s kůží. Doporučujeme používat osobní ochranné pomůcky (PPE) jako např. rukavice, masky a laboratorní pláště v rámci prevence kontaktu s kůží nebo očima během zpracování. POZNÁMKA: Požadavky na MSDS k tomuto produktu směřujte na společnost Glidewell Direct na tel. č. 1-888-303-3975. 13. Otázky/komentáře Pokud máte jakékoli otázky a/nebo komentáře či dotazy k dalším pokynům k použití tohoto produktu, obraťte se v USA na společnost Glidewell Direct na adrese 18651 Von Karman Ave., Irvine, CA 92612 či telefonicky na čísle 1-888-303-3975. 0086 MDSS GmbH Schiffgraben 41 30175 Hannover, Německo Výrobce Prismatik Dentalcraft, Inc. (Stoprocentní dceřiná společnost Glidewell Laboratories) 2212 Dupont Drive Irvine, CA 92612, USA Tel: 888-303-6470 Fax: 800-579-8233 VITA je registrovaná ochranná známka společnosti VITA Zahnfabrik. BRUXZIR® SHADED MILLING BLANKS DEUTSCH Gebrauchsanweisung 1. Produktbeschreibung BruxZir® Getönte Zirkonoxid-Fräsrohlinge (BruxZir Getönt und BruxZir Getönt-A) BruxZir Getönte Fräsrohlinge werden zur Herstellung von voll konturierten Zirkonoxid- und zirkonoxidbasierten Gerüsten für Kronen und Brücken verwendet. Die voll konturierten Kronen und Gerüste werden unter Verwendung eines CAD/ CAM-Systems konstruiert und gefertigt. Anschließend werden die voll konturierten Kronen und Gerüste bei hoher Temperatur gesintert. Bei den BruxZir Getönten Fräsrohlingen ist das Hinzufügen von Farbe vor dem Sintern überflüssig. Nach dem Sintern ist nur eine einfache Färbe- und Glasurtechnik erforderlich, um den gewünschten VITA®-Farbton für die voll konturierten Kronen und Brücken zu erhalten. Das gesinterte Material zeichnet sich durch maximale Festigkeit und einen ästhetischen transluszenten Perleffekt aus. Infolge der Schrumpfung während des Sinterns muss beim Fräsvorgang unbedingt ein entsprechendes Größenverhältnis (Größenfaktor) berücksichtigt werden. Die Beachtung des richtigen Größenfaktors (GF) beim Fräsen gewährleistet eine präzise Passung und Randgenauigkeit der gesinterten Kappen und/oder Kronen. Jeder Block ist mit dem jeweils anzuwendenden Größenfaktor (GF) gekennzeichnet. 2. Indikationen Zařízení je určeno k použití zubními techniky při vytváření celokeramických náhrad na míru pro přední a zadní lokality. 3. Kontraindikationen Keine. 4. Tabelle - Technische Daten Gemessen gemäß ISO 6872 Tabelle 1 Klassifizierung - Typ II, Klasse 6 Wärmeausdehnungskoeffizient (WAK) (25–500 ºC) 11 x 10 -6 /K Biegefestigkeit > 800 MPa Dichte 6,05 g/cm 3 Tabelle 2 BruxZir Getönt Endgültiger VITA-Farbton 100 A1, B1, C1 200 A2, A3, B2 300 A3.5, B3, C2, D2, D3, D4 400 A4, B4, C3, C4 5. Gerüstdesign Bei Nichtbeachtung der in Tabelle 3 empfohlenen Wand- und Verbinderstärken kann es zum Bruch der endgültigen Restauration kommen. Anweisungen zum Gerüstdesign sind dem jeweiligen Handbuch zum CAD-System zu entnehmen. Für konturierte Brücken gelten dieselben Verbinder-Mindeststärken. Tabelle 3 Tabelle mit empfohlenen Wand- und Verbinderstärken für gesinterte Gerüste und voll konturierte Restaurationen Einzelne Kappen (Standard) Brücken Anterior Wandstärke (Gerüst) Zirkulär Inzisal/Okklusal ≥ 0,5 mm ≥ 0,7 mm ≥ 0,5 mm ≥ 0,7 mm Verbindermaße (Gerüst) 3-gliedrige Brücke 4- und mehrgliedrige (Brücke) --- --- ≥ 7,0 mm 2 ≥ 9,0 mm 2 Verbindermaße (voll konturiert) 3-gliedrige Brücke 4- und mehrgliedrige (Brücke) --- --- ≥ 7,0 mm 2 ≥ 9,0 mm 2 Posterior Wandstärke (Gerüst) Zirkulär Inzisal/Okklusal ≥ 0,5 mm ≥ 0,7 mm ≥ 0,9 mm ≥ 0,9 mm Verbindermaße (Gerüst und voll konturiert) 3-gliedrige Brücke 4- und mehrgliedrige (Brücke) Freiendbrücke --- --- --- ≥ 9 mm 2 ≥ 12 mm 2 ≥ 12 mm 2 6. Fräsen Nach dem CAD-Design der Restaurationen die Fräse programmieren und nach Aufforderung den Größenfaktor (GF) für den Rohling eingeben. Der Benutzer muss die Betriebsanweisung des Fräsensystems befolgen, das für die jeweilige Programmierungsmethode zur Eingabe des GF und zum Fräsen von Zirkonoxidrohlingen verwendet wird. Der für den verwendeten Block passende GF ist auf dem Etikett an der Seite des BruxZir Getönten Rohlings angegeben. 7. Sinterung Alle BruxZir Getönten Gerüste und Kronen müssen vor der Finierung ein letztes Mal gesintert werden. Damit das Zirkonoxid die nötige Dichte erreicht, wird eine Sintertemperatur von 1580 °C empfohlen, wie der Sintertemperatur-Tabelle unten zu entnehmen ist. Nach dem Fräsen die Restaurationen vorsichtig aus dem Rohling lösen. Restlichen Staub komplett entfernen. Dazu die Restaurationen in ein NUR mit destilliertem oder deionisiertem Wasser gefülltes Ultraschallbad geben. Die Restaurationen 30 Sekunden im Ultraschallbad reinigen. Vor dem Sintern müssen die Restaurationen gründlich getrocknet werden, um einen Bruch zu vermeiden. Die Trocknung der Restaurationen kann durch Verwendung eines Umluftmikrowellenherds oder einer Wärmelampe beschleunigt werden. Die Restaurationen in einer Sinterschale mit entsprechend großen Zirkonoxidkugeln (nicht von Prismatik bereitgestellt) in den Sinterofen stellen. Bitte beachten: BruxZir Getönte Restaurationen müssen vor dem Sintern nicht in eine Färbeflüssigkeit gegeben oder einer anderen Färbemethode unterzogen werden. Den Sinterofen gemäß den Anweisungen im Handbuch zum Ofen so programmieren, dass das in der Sintertemperatur-Tabelle unten aufgeführte Wärmeprofil erreicht wird. Um eine korrekte Sinterung sicherzustellen, muss der Ofen eine Temperatur von 1580 °C erreichen und 2.5 Stunden lang aufrechterhalten. Den Ofen ausreichend abkühlen lassen, bevor die Restaurationen herausgenommen werden. Die Restaurationen sorgfältig auf Risse oder Absplitterungen überprüfen. Temperatur (ºC) Zeit (Minuten) Zeit (Stunden) 0 0 100 200 300 400 500 2 4 6 8 Temperatur (ºC) 1800 1800 1600 1600 1400 1400 1200 1200 1000 1000 800 800 600 600 400 400 200 200 0 0 (C5) (T5) (T2) 2 ºC/min (T3) (C1) (C7) 15 ºC/min (T1) 10 ºC/min (T4) 15 ºC/min (T6) (C6) Sintertemperatur-Tabelle (C2) (C4) (C3) Temperatur (ºC) Zeit (Minuten) C1 25 ºC T1 78 Minuten C2 1200 ºC T2 60 Minuten C3 1200 ºC T3 50 Minuten C4 1300 ºC T4 28 Minuten C5 1580 ºC T5 150 Minuten C6 1580 ºC T6 90 Minuten C7 155 ºC T7 Aus Empfehlungen für den Sinterzyklus • 1. Aufheizgeschwindigkeit – 15 ºC/min bis 1200 ºC • 1. Haltezeit bei 1200 ºC – 60 Minuten • 2. Aufheizgeschwindigkeit – 2 ºC/min bis 1300 ºC • 3. Aufheizgeschwindigkeit – 10 ºC/min bis1580 ºC • Sintertemperatur – 1580 ºC • 2. Haltezeit bei 1580 ºC – 150 Minuten • Abkühlgeschwindigkeit – 15 ºC WARNHINWEIS: Aus Sicherheitsgründen den Ofen nicht öffnen bzw. gesinterte Restaurationen herausnehmen, bevor der Ofen ausreichend abgekühlt ist. WARNHINWEIS: Die ordnungsgemäße Verwendung, Platzierung des Produkts und die Kalibrierung sind der Bedienungsanleitung zum jeweiligen Ofen zu entnehmen. Sicherstellen, dass der Sinterofen gemäß den Spezifikationen des jeweiligen Herstellers kalibriert wurde. Für weitere Anweisungen wenden Sie sich bitte an den Hersteller des Sinterofens. 8. Überarbeitung der gesinterten Restaurationen Nach dem Sintern müssen die Restaurationen eventuell überarbeitet werden. Dazu die richtigen Schleifinstrumente mit niedrigem Schleifdruck bzw. wassergekühlte Schleifinstrumente verwenden. Darauf achten, dass die in Tabelle 3 in Abschnitt 5 empfohlenen Wandund Verbinderstärken eingehalten werden. 9. Erreichen des endgültigen Farbtons Die Farbe der BruxZir Getönten Restauration wird nach dem Sintern sichtbar. BruxZir Getönte Restaurationen müssen gefärbt und glasiert werden, um den gewünschten endgültigen Farbton zu erreichen. Wie in Tabelle 2 gezeigt, stimmen die BruxZir Getönt-Formulierungen mit mehreren VITA Classical-Farbtönen überein. Zum Justieren auf den endgültigen auf dem Rezept beschriebenen Farbton der Restauration sind standardmäßige Färbetechniken anzuwenden. Es wird empfohlen, niedrigschmelzende Glasur- und Farbstoffe zu verwenden, da hochschmelzende Materialien bei über 860 °C eine leichte Aufhellung der BruxZir- Restauration bewirken können. Einen Keramik- oder Laborofen (wird nicht von Prismatik bereitgestellt) verwenden und die Färbe- und Glasuranleitung des Herstellers befolgen. Eventuell muss zum Erreichen des benötigten Farbtons ein zweiter Färbezyklus angewendet werden. Bitte folgen Sie beim Glasieren der Restauration den Herstelleranweisungen. WARNHINWEIS: Die Restaurationen nicht herausnehmen, bis sie ausreichend abgekühlt sind. WARNHINWEIS: Die ordnungsgemäße Verwendung, Platzierung des Produkts und die Kalibrierung sind der Bedienungsanleitung zum jeweiligen Ofen zu entnehmen. Sicherstellen, dass der Sinterofen gemäß den Spezifikationen des jeweiligen Herstellers kalibriert wurde. Für weitere Anweisungen wenden Sie sich bitte an den Hersteller des Sinterofens. Nach dem Färbezyklus die Farbqualität beurteilen und bei Bedarf erneut färben. Wenn weitere Farbjustierungen notwendig sind, die Restaurationen in einem BruxZir Getönt Färbe- und Glasurbrennzyklus erneut brennen. Nachdem der gewünschte Farbton erreicht wurde, die gewünschte Glasurmenge auftragen und die Restaurationen in einem BruxZir Färbeund Glasurbrennzyklus erneut brennen. 10. Zementierung Für die Zementierung der BruxZir Getönten Restaurationen sollten kunstharzverstärkte Glasionomere, Kunstharzzement oder selbsthaftender Kunstharzzement verwendet werden. 11. Lagerung Vor der Lagerung von BruxZir Getönten Fräsrohlingen sicherstellen, dass keine Transportschäden, wie z. B. Risse und Absplitterungen am Block, vorliegen. Die Rohlinge müssen bei Raumtemperatur an einem staubfreien und vor Kontaminierung geschützten Ort geschützt aufbewahrt werden. Wenn sie nicht verwendet werden, sollten die BruxZir Getönten Fräsrohlinge in ihrer Originalverpackung aufbewahrt werden. 12. WARNHINWEISE Den Staub nicht einatmen. Der Staub darf nicht in die Augen gelangen und nicht längere Zeit mit der Haut in Kontakt sein. Es wird empfohlen, persönliche Schutzausrüstung (PSA), wie Handschuhe, Gesichtsmaske und Laborkittel, zu tragen, um jeglichen Kontakt sowie Haut- oder Augenreizungen während der Verarbeitung zu vermeiden. HINWEIS: Das Sicherheitsdatenblatt für dieses Produkt kann telefonisch von Glidewell Direct unter der Nummer 888-303-3975 angefordert werden. 13. Fragen/Kommentare Bei Fragen und/oder Kommentaren oder für weitere Anweisungen zur Verwendung dieses Produkts wenden Sie sich bitte in den USA an Glidewell Direct unter der Anschrift 18651 Von Karman Ave., Irvine, CA 92612, Telefon 888-303-3975. 0086 MDSS GmbH Schiffgraben 41 30175 Hannover, Deutschland Hergestellt von Prismatik Dentalcraft, Inc. (Eine hundertprozentige Tochtergesellschaft der Glidewell Laboratories) 2212 Dupont Drive Irvine, CA 92612, USA Tel: 888-303-6470 Fax: 800-579-8233 VITA ist eine eingetragene Marke der VITA Zahnfabrik. BRUXZIR® SHADED MILLING BLANKS ESPAÑOL Instrucciones de uso 1. Descripción del producto Piezas en bruto de zirconia coloreada para fresar BruxZir® (BruxZir Shaded & BruxZir Shaded-A) BruxZir se emplea para confeccionar subestructuras con base de zirconia y piezas monolíticas de zirconia para coronas y puentes. Las subestructuras y coronas monolíticas se confeccionan usando un sistema de CAD/CAM para diseño y fabricación. Las subestructuras y coronas monolíticas diseñadas y manufacturadas se sinterizan después a alta temperatura. No es necesario añadir pigmentos a las piezas en bruto coloreadas BruxZir antes de la sinterización. Después de la sinterización hay que emplear técnicas de tinción y glaseado para darles a las coronas y puentes monolíticos el tono deseado de la guía VITA®. El material sinterizado presenta una gran resistencia y un aspecto traslúcido nacarado. Como el material se contrae durante el sinterizado, a la hora de fresar es fundamental tener en cuenta cuál es la relación de tamaño (factor de contracción) apropiada. Mantener el factor de contracción (FC) correcto durante el fresado garantiza la precisión del ajuste y la exactitud marginal de las cofias y coronas sinterizadas; todos los bloques llevan una etiqueta donde se indica el FC específico que hay que aplicar. 2. Indicaciones de uso Este producto se emplea para la fabricación por parte de protésicos dentales de restauraciones a medida totalmente cerámicas en posiciones anteriores y posteriores. 3. Kontraindikationen Ninguna. 4. Tabelle - Technische Daten Medidos conforme a la norma ISO 6872 Tabla 1 Clasificación: tipo II, clase 6 Coeficiente de dilatación térmica (CDT) (25–500 ºC) 11 x 10 -6 /K Resistencia a la flexión > 800 MPa Densidad 6,05 g/cm 3 Tabla 2 Color BruxZir Tono VITA final 100 A1, B1, C1 200 A2, A3, B2 300 A3.5, B3, C2, D2, D3, D4 400 A4, B4, C3, C4 5. Diseño de la subestructura Si no se respetan las recomendaciones relativas al grosor de la pared y el conector que se indican en la tabla 3, al final de la restauración puede producirse una fractura. Consulte el manual de su sistema de CAD para obtener instrucciones específicas sobre el diseño de las subestructuras. Los puentes monolíticos deben respetar las mismas reglas mínimas del conector. Tabla 3 Cuadro de grosor recomendado de pared y conector para subestructuras y contornos completos sinterizados Cofias simples (estándar) Puentes Anterior Grosor de la pared (subestructura) Circular Incisal/Oclusal ≥ 0,5 mm ≥ 0,7 mm ≥ 0,5 mm ≥ 0,7 mm Dimensiones del conector (subestructura) Puente de 3 unidades 4 o más unidades (puente) --- --- ≥ 7,0 mm 2 ≥ 9,0 mm 2 Dimensiones del conector (contorno completo) Puente de 3 unidades 4 o más unidades (puente) --- --- ≥ 7,0 mm 2 ≥ 9,0 mm 2 Posterior Grosor de la pared (subestructura) Circular Incisal/Oclusal ≥ 0,5 mm ≥ 0,7 mm ≥ 0,9 mm ≥ 0,9 mm Dimensiones del conector (subestructura y contorno completo) Puente de 3 unidades 4 o más unidades (puente) Puente voladizo (cantiléver) --- --- --- ≥ 9 mm 2 ≥ 12 mm 2 ≥ 12 mm 2 6. Fresado Después de diseñar las restauraciones con el sistema CAD, programe la máquina de fresado e introduzca el factor de contracción (FC) para la pieza en bruto si el programa lo solicita. El fresador debe consultar las instrucciones de funcionamiento del sistema de fresado para ver el método de programación especificado para introducir el FC y trabajar las piezas en bruto de zirconia. El FC específico del bloque utilizado se puede ver en la etiqueta colocada en el lateral de la pieza en bruto coloreada BruxZir. 7. Sinterung Todas las subestructuras y coronas y puentes monolíticos coloreados BruxZir deben someterse a un ciclo de sinterizado final antes del acabado. La temperatura de sinterización recomendada para poder conseguir una zirconia densa es de 1580 °C, como se indica en el gráfico de temperaturas de sinterización que figura más abajo. Una vez fresada, quite con cuidado la restauración de la pieza en bruto. Limpie cualquier resto de polvo que pudiera quedar poniendo las restauraciones en un baño ultrasónico lleno de agua recién destilada o desionizada ÚNICAMENTE. Limpie las restauraciones aplicando los ultrasonidos durante 30 segundos. Seque muy bien las restauraciones antes de sinterizarlas; si no lo hace podrían fracturarse. Para secar las restauraciones más deprisa se puede usar un microondas con convección o una lámpara de infrarrojos. Coloque las restauraciones en una bandeja de sinterización con perlas de zirconia del tamaño apropiado (no suministradas por Prismatik) en el horno de sinterizado. No hace falta sumergir las restauraciones coloreadas BruxZir en ningún líquido de tinción ni cambiarles el tono antes de la sinterización. Programe el horno siguiendo las instrucciones del manual correspondiente para conseguir el perfil de calentamiento recomendado en el gráfico de temperaturas de sinterización que figura más abajo. Para que la sinterización salga bien, asegúrese de que el horno alcanza los 1580 °C y mantiene esa temperatura durante al menos 2.5 horas. Espere a que el horno se haya enfriado lo suficiente para sacar las restauraciones sin peligro. Examine cuidadosamente las restauraciones para comprobar que no tienen grietas ni mellas. Temperatura (ºC) Tiempo (minutos) Tiempo (hora) 0 0 100 200 300 400 500 2 4 6 8 Temperatura (ºC) 1800 1800 1600 1600 1400 1400 1200 1200 1000 1000 800 800 600 600 400 400 200 200 0 0 (C5) (T5) (T2) 2 ºC/min (T3) (C1) (C7) 15 ºC/min (T1) 10 ºC/min (T4) 15 ºC/min (T6) (C6) Cuadro de temperatura de sinterización (C2) (C4) (C3) Temperatura (ºC) Tiempo (minutos) C1 25 ºC T1 78 minutos C2 1200 ºC T2 60 minutos C3 1200 ºC T3 50 minutos C4 1300 ºC T4 28 minutos C5 1580 ºC T5 150 minutos C6 1580 ºC T6 90 minutos C7 155 ºC T7 Apagado Recomendaciones para el ciclo de sinterización • 1 er velocidad de calentamiento: 15 ºC/min a 1200 ºC • 1 er tiempo de mantenimiento a 1200 ºC – 60 minutos • 2ª velocidad de calentamiento – 2 ºC/min a 1300 ºC • 3ª velocidad de calentamiento a 10 ºC/min a 1580 ºC • Temperatura de sinterización – 1580 ºC • 2º tiempo de mantenimiento a 1580 ºC – 150 minutos • Velocidad de enfriamiento – 15 ºC ADVERTENCIA: no abra el horno ni saque las restauraciones sinterizadas hasta que el horno se haya enfriado lo suficiente para que sea seguro hacerlo. ADVERTENCIA: consulte las instrucciones de funcionamiento del horno para saber cuál es la forma correcta de usarlo, de colocar el producto y de calibrarlo. Asegúrese de que el horno utilizado para la sinterización está calibrado conforme a las especificaciones del fabricante. Póngase en contacto con el fabricante del horno de sinterización si necesita instrucciones adicionales. 8. Adaptación de las restauraciones sinterizadas Después de la sinterización, ajuste las restauraciones como corresponda, usando instrumentos adecuados de tallado de poca presión o enfriados por agua y procurando respetar los grosores recomendados para la pared y el conector que se indican en la tabla 3 del apartado 5. 9. Obtención del tono final Después de la sinterización se podrá apreciar el color de la restauración BruxZir coloreada. Los tonos básicos BruxZir tienen que teñirse y glasearse para conseguir el tono final buscado. Como se indica en la tabla 2, los colores BruxZir se corresponden con varios tonos de la guía de color VITA Classical. Use las técnicas de tinción convencionales para ajustar el color final de la restauración al color prescrito. Se recomienda utilizar materiales de tinción y glaseado con una temperatura de fusión baja, ya que por encima de los 860 °C, el uso de materiales con una temperatura de fusión mayor puede aumentar ligeramente el brillo de la restauración BruxZir. Si usa un horno para porcelana o un horno de laboratorio (no suministrado por Prismatik), siga las instrucciones de tinción y glaseado del fabricante. Para conseguir el tono buscado puede que haga falta un segundo ciclo de tinción. Siga las instrucciones del fabricante para glasear la restauración. ADVERTENCIA: no saque las restauraciones hasta que se hayan enfriado lo suficiente como para que sea seguro hacerlo. ADVERTENCIA: consulte las instrucciones de funcionamiento del horno para saber cuál es la forma correcta de usarlo, de colocar el producto y de calibrarlo. Asegúrese de que el horno utilizado para la sinterización está calibrado conforme a las especificaciones del fabricante. Póngase en contacto con el fabricante del horno de sinterización si necesita instrucciones adicionales. Después del ciclo de tinción, compruebe la calidad del tono y repita la tinción si es necesario. Si es necesario ajustar aún más el color, vuelva a cocer al horno las restauraciones usando el ciclo de cocción para tinción/glaseado de las piezas coloreadas BruxZir. Cuando haya obtenido el tono buscado, aplique la cantidad de glaseado que desee y hornee las restauraciones usando el ciclo de cocción para tinción/glaseado de las piezas BruxZir. 10. Cementación El dentista debe emplear resina reforzada con ionómeros de vidrio, cementos de resina o cementos de resina autoadhesivos para cementar las restauraciones coloreadas BruxZir. 11. Almacenamiento Antes de guardar las piezas en bruto coloreadas BruxZir, compruebe que no han sufrido daños durante el envío. Posibles daños del envío pueden ser la presencia de grietas y mellas en el bloque. Las piezas en bruto deben guardarse a temperatura ambiente protegidas del polvo y alejadas de posibles fuentes de contaminación. Cuando no se usen, guarde las piezas en bruto coloreadas BruxZir en el envase original. 12. ADVERTENCIAS No inhale el polvo. Procure que no le entre polvo en los ojos y evite el contacto directo prolongado con la piel. Para evitar un posible contacto e irritación de la piel o los ojos durante el procesamiento, se recomienda utilizar equipo de protección individual (EPI), como guantes, máscaras y batas de laboratorio. NOTA: para solicitar la FDS de este producto, llame a Glidewell Direct al número 888-303-3975. 13. Preguntas y comentarios Para cualquier pregunta o comentario, o para obtener instrucciones adicionales sobre el uso de este producto, póngase en contacto con Glidewell Direct (18651 Von Karman Ave., Irvine, CA 92612) o llame al 888-303-3975 en EE. UU. 0086 MDSS GmbH Schiffgraben 41 30175 Hannover, Alemania Fabricado por Prismatik Dentalcraft, Inc. (Una filial propiedad exclusiva de Glidewell Laboratories) 2212 Dupont Drive Irvine, CA 92612, EE. UU. Tel: 888-303-6470 Fax: 800-579-8233 VITA es una marca registrada de VITA Zahnfabrik. BRUXZIR® SHADED MILLING BLANKS FRANÇAIS Mode d’emploi 1. Description du produit Ébauches de rodage en zircone BruxZir® teintées (BruxZir Shaded & BruxZir Shaded-A) Les ébauches BruxZir teintées permettent de créer des armatures à base de zircone pour les couronnes et les bridges, et aussi pour les couronnes et les bridges complets en zircone. Les couronnes complètes et les armatures sont réalisées à l’aide du système de CFAO de conception et de fabrication assistées. Les armatures et les couronnes complètes ainsi conçues et fabriquées sont ensuite frittées à haute température. Nul besoin d’ajouter de la couleur aux ébauches BruxZir teintées avant le frittage. Après le frittage, il faut utiliser des techniques de coloration et d’émaillage pour obtenir la nuance VITA® souhaitée pour les couronnes et bridges complets. Le matériau fritté offre une résistance maximale et un nacré translucide. Lors du rodage, pour le respect des proportions, il est indispensable de tenir compte du rétrécissement qui se produit pendant le frittage. Un bon respect du facteur d’agrandissement (FA) pendant le rodage permet d’optimiser le degré d’ajustement et la précision marginale des coiffes et/ou des couronnes frittées, chaque bloc portant la mention du FA à appliquer. 2. Indications Ce dispositif est indiqué pour la fabrication, par des techniciens dentaires, de restaurations personnalisées 100 % céramique destinées aux emplacements antérieurs et postérieurs. 3. Contre-indications Aucune. 4. Tableau de données techniques Mesures effectuées conformément à la norme ISO 6872 Tableau 1 Classification - Type II, Classe 6 Coefficient de dilatation thermique (25–500 ºC) 11 x 10 -6 /K Résistance à la flexion > 800 MPa Densité 6,05 g/cm 3 Tableau 2 BruxZir teinté Nuance VITA finale 100 A1, B1, C1 200 A2, A3, B2 300 A3.5, B3, C2, D2, D3, D4 400 A4, B4, C3, C4 5. Conception des armatures Le non-respect des recommandations d’épaisseur de la paroi et des connecteurs (voir tableau 3) peut provoquer une fracture de la restauration finale. Pour des instructions spécifiques sur la conception des armatures, consulter le manuel du système de CAO. Les règles minimum relatives aux connecteurs s’appliquent aussi aux bridges complets. Tableau 3 Épaisseurs recommandées pour la paroi et les connecteurs des armatures et restaurations complètes Coiffes uniques (standard) Bridges Antérieure Épaisseur de la paroi (armature) Circulaire Incisive/Occlusale ≥ 0,5 mm ≥ 0,7 mm ≥ 0,5 mm ≥ 0,7 mm Dimensions des connecteurs (armature) Bridge à 3 unités 4 unités et plus (bridge) --- --- ≥ 7,0 mm 2 ≥ 9,0 mm 2 Dimensions des connecteurs (restauration complète) Bridge à 3 unités 4 unités et plus (bridge) --- --- ≥ 7,0 mm 2 ≥ 9,0 mm 2 Postérieure Épaisseur de la paroi (armature) Circulaire Incisive/Occlusale ≥ 0,5 mm ≥ 0,7 mm ≥ 0,9 mm ≥ 0,9 mm Dimensions des connecteurs (armatures et restaurations complètes) Bridge à 3 unités 4 unités et plus (bridge) Cantilever --- --- --- ≥ 9 mm 2 ≥ 12 mm 2 ≥ 12 mm 2 6. Rodage Une fois les restaurations conçues par CAO, programmer la fraiseuse et entrer le facteur d’agrandissement (FA) pour l’ébauche, si le logiciel le demande. L’opérateur doit consulter les instructions du système utilisé pour le rodage afin de connaître la méthode de programmation adéquate pour la saisie du FA et le rodage des ébauches en zircone. Le FA spécifique du bloc utilisé peut se trouver sur l’étiquette fixée sur le côté de l’ébauche BruxZir teintée. 7. Frittage Toutes les armatures et couronnes et tous les bridges complets BruxZir teintés doivent être soumis à un cycle final de frittage avant la finition. La température de frittage recommandée est de 1 580 °C comme indiqué dans le graphique des températures de frittage ci-dessous pour obtenir une zircone dense. Après le rodage, retirer avec précaution les restaurations de l’ébauche. Retirer toute poussière résiduelle en plaçant les restaurations dans un nettoyeur à ultrasons rempli UNIQUEMENT d’eau fraîche distillée ou désionisée. Nettoyer les restaurations aux ultrasons pendant 30 secondes. Bien sécher les restaurations avant le frittage, sans quoi elles risquent de se fracturer. Il est possible d’accélérer ce séchage dans un four à micro-ondes/convection ou avec une lampe chauffante. Placer les restaurations dans un plateau de frittage contenant les perles de zircone de la taille adéquate (non fournies par Prismatik) dans le four de frittage. À noter que les restaurations teintées BruxZir n’ont pas besoin d’être trempées dans des liquides de coloration ni de recevoir un quelconque traitement de teinte avant le frittage. Programmer le four conformément aux instructions du manuel correspondant pour obtenir le profil de cuisson recommandé, indiqué dans le graphique des températures de frittage ci-dessous. Pour obtenir un frittage adéquat, veiller à ce que le four atteigne 1 580 °C et conserve cette température pendant deux (2) heures. Laisser le four refroidir suffisamment pour retirer les restaurations en toute sécurité. Examiner attentivement les restaurations à la recherche de possibles fissures ou éclats. Température (ºC) Durée (minutes) Durée (heures) 0 0 100 200 300 400 500 2 4 6 8 Température (ºC) 1 800 1 800 1 600 1 600 1 400 1 400 1 200 1 200 1 000 1 000 800 800 600 600 400 400 200 200 0 0 (C5) (T5) (T2) 2 ºC/min (T3) (C1) (C7) 15 ºC/min (T1) 10 ºC/min (T4) 15 ºC/min (T6) (C6) Graphique des températures de frittage (C2) (C4) (C3) Température (ºC) Durée (minutes) C1 25 ºC T1 78 minutes C2 1 200 ºC T2 60 minutes C3 1 200 ºC T3 50 minutes C4 1 300 ºC T4 28 minutes C5 1 580 ºC T5 150 minutes C6 1 580 ºC T6 90 minutes C7 155ºC T7 Éteint Recommandations pour le cycle de frittage • 1 ère vitesse de montée en température – 15 ºC/min à 1 200 ºC • 1 ère temps de maintien à 1 200 ºC – 60 minutes • 2 e vitesse de montée en température – 2 ºC/min à 1 300 ºC • 3 e vitesse de montée en température – 10 ºC/min à 1 580 ºC • Température de frittage – 1 580 ºC • 2 e temps de maintien à 1 580 ºC – 150 minutes • Vitesse de refroidissement – 15 ºC AVERTISSEMENT : ne pas ouvrir le four et ne pas retirer les restaurations frittées tant que le four n’est pas assez froid pour un retrait en toute sécurité. AVERTISSEMENT : se reporter aux instructions de fonctionnement du four pour l’utilisation, le positionnement du produit et l’étalonnage. Veiller à utiliser et étalonner le four de frittage conformément aux spécifications du fabricant. Contacter ce dernier pour de plus amples informations. 8. Ajustage des restaurations frittées Après le frittage, procéder à l’ajustage de la forme des restaurations en fonction des besoins au moyen des instruments de rectification adéquats, à faible pression ou refroidis à l’eau, en veillant à respecter les épaisseurs de la paroi et des connecteurs indiquées au tableau 3 de la section 5. 9. Obtention de la teinte finale Après le frittage, la couleur de la restauration BruxZir teintée sera apparente. Les nuances de base des BruxZir teintées doivent subir une coloration et un émaillage avant d’obtenir la nuance finale souhaitée. Comme indiqué dans le tableau 2, les formulations BruxZir teintées correspondent à diverses nuances VITA classiques. Utiliser des techniques de coloration standard pour obtenir la couleur finale de la restauration en fonction de la demande. Il est recommandé d’utiliser des produits d’émaillage et de coloration à basse fusion, car les matériaux à point de fusion élevé peuvent provoquer un léger éclaircissement de la restauration BruxZir au-dessus de 860 °C. Utiliser un four porcelaine ou de laboratoire (non fourni par Prismatik) et suivre les instructions du fabricant relatives à la coloration et à l’émaillage. Un deuxième cycle de coloration peut s’avérer nécessaire pour obtenir la nuance souhaitée. Suivre les instructions du fabricant pour l’émaillage de la restauration. AVERTISSEMENT : ne pas retirer les restaurations tant qu’elles ne sont pas assez froides pour être manipulées en toute sécurité. AVERTISSEMENT : se reporter aux instructions de fonctionnement du four pour l’utilisation, le positionnement du produit et l’étalonnage. Veiller à utiliser et étalonner le four de frittage conformément aux spécifications du fabricant. Contacter ce dernier pour de plus amples informations. Une fois le cycle de coloration terminé, vérifier la nuance et colorer de nouveau au besoin. Si des modifications de coloration supplémentaires s’avèrent nécessaires, recuire les restaurations en utilisant le cycle de cuisson coloration/émaillage pour les BruxZir teintées. Une fois la nuance souhaitée obtenue, appliquer la quantité souhaitée d’émail sur les restaurations et les cuire en utilisant le cycle de cuisson coloration/émaillage pour les BruxZir. 10. Cémentation Le dentiste doit utiliser un ciment au verre ionomère renforcé à la résine, un ciment résine ou un ciment résine auto-adhésif pour cémenter les restaurations BruxZir teintées. 11. Stockage Avant de stocker les ébauches BruxZir teintées, vérifier qu’elles n’ont subi aucun dommage pendant le transport, et que les blocs ne sont pas fissurés ni ébréchés. Les ébauches doivent être stockées à température ambiante, à l’abri de toute poussière et de toute source de contamination potentielle. Lorsqu’elles ne sont pas utilisées, conserver les ébauches BruxZir teintées dans leur emballage d’origine. 12. AVERTISSEMENTS Ne pas inhaler la poussière. La poussière ne doit pas pénétrer dans les yeux ni se trouver en contact direct prolongé avec la peau. Le port d’un équipement de protection individuel (EPI) composé de gants, d’un masque et d’une blouse de laboratoire est recommandé afin d’éviter tout contact irritant avec les yeux et la peau pendant l’opération. REMARQUE : pour obtenir la fiche de données de sécurité de ce produit, appeler Glidewell Direct au +1 888 303 3975. 13. Questions/Commentaires Pour toute question ou commentaire, ou pour obtenir d’autres d’instructions sur l’utilisation de ce produit, contacter Glidewell Direct aux États-Unis à l’adresse 18651 Von Karman Ave., Irvine, CA 92612 ou par téléphone au +1 888 303 3975. 0086 MDSS GmbH Schiffgraben 41 30175 Hannover, Allemagne Fabriqué par Prismatik Dentalcraft, Inc. (Filiale à part entière de Glidewell Laboratories) 2212 Dupont Drive Irvine, CA 92612, États-Unis Tél: 888-303-6470 Fax: 800-579-8233 VITA est une marque déposée de VITA Zahnfabrik. BRUXZIR® SHADED MILLING BLANKS ITALIANO Istruzioni per l’uso 1. Descrizione del prodotto Blocchi di fresatura in zirconia colorati BruxZir® (BruxZir Shaded & BruxZir Shaded-A) I blocchi di fresatura in zirconia BruxZir vengono utilizzati per la realizzazione di strutture portanti in zirconia a contorno pieno e a base di zirconia per corone e ponti. Per la progettazione e la realizzazione delle strutture portanti e delle corone a contorno pieno viene utilizzato il sistema CAD/CAM. Una volta progettate e realizzate, le strutture portanti e le corone a contorno pieno vengono poi sinterizzate ad alta temperatura. Prima della sinterizzazione non occorre aggiungere alcun colore ai blocchi colorati BruxZir. Dopo la sinterizzazione, è necessario utilizzare le tecniche di base di colorazione e smaltatura per ottenere la colorazione VITA® desiderata per corone e ponti a contorno pieno. Il materiale sinterizzato offre la massima resistenza e presenta un pigmento perlescente traslucido. Poiché il processo di sinterizzazione produce contrazione volumetrica, è di fondamentale importanza tenere in considerazione il giusto rapporto delle dimensioni (fattore di ingrandimento) durante la fresatura. L’attenzione al corretto fattore di ingrandimento durante la fresatura assicura un perfetto posizionamento e la massima precisione dei margini delle corone e/o cappette sinterizzate, con ogni blocco contrassegnato con il fattore di ingrandimento (EF) specifico da applicare. 2. Indicazioni per l’uso Ce dispositif est indiqué pour la fabrication, par des techniciens dentaires, de restaurations personnalisées 100 % céramique destinées aux emplacements antérieurs et postérieurs. 3. Controindicazioni Nessuna. 4. Tabella dei dati tecnici In conformità alla norma ISO 6872 Tabella 1 Classificazione - Tipo II, Classe 6 Coefficiente di espansione termica (CET) (25–500 ºC) 11 x 10 -6 /K Resistenza alla flessione > 800 MPa Densità 6,05 g/cm 3 Tabella 2 Colorazione BruxZir Colorazione VITA finale 100 A1, B1, C1 200 A2, A3, B2 300 A3.5, B3, C2, D2, D3, D4 400 A4, B4, C3, C4 5. Progettazione della struttura portante Il mancato rispetto delle raccomandazioni relative allo spessore delle pareti e dei connettori illustrate nella Tabella 3 può portare alla rottura del restauro finale. Per istruzioni specifiche relative alla progettazione delle strutture portanti, consultare il manuale CAD appropriato del sistema CAD in uso. Per i ponti a contorno pieno è necessario seguire le stesse regole minime dei connettori. Tabella 3 Tabella di riferimento dello spessore delle pareti e dei connettori per strut- ture sinterizzate e contorni pieni Cappette singole (standard) Ponti Anteriore Spessore delle pareti (struttura) Circolare incisale/occlusale ≥ 0,5 mm ≥ 0,7 mm ≥ 0,5 mm ≥ 0,7 mm Dimensioni dei connettori (struttura) Ponte a 3 unità 4 e più unità (ponte) --- --- ≥ 7,0 mm 2 ≥ 9,0 mm 2 Dimensioni dei connettori (contorno pieno) Ponte a 3 unità 4 e più unità (ponte) --- --- ≥ 7,0 mm 2 ≥ 9,0 mm 2 Posteriore Spessore delle pareti (struttura) Circolare incisale/occlusale ≥ 0,5 mm ≥ 0,7 mm ≥ 0,9 mm ≥ 0,9 mm Dimensioni dei connettori (struttura e contorno pieno) Ponte a 3 unità 4 unita e più (ponte) Cantilever --- --- --- ≥ 9 mm 2 ≥ 12 mm 2 ≥ 12 mm 2 6. Fresatura Una volta completata la progettazione CAD dei restauri, programmare la fresatrice ed inserire il fattore di ingrandimento (EF) per il blocco, se richiesto dal programma. Per il metodo di programmazione specificato per l’inserimento del fattore di ingrandimento e per la fresatura dei blocchi in zirconia, l’operatore deve consultare le istruzioni d’uso del sistema di fresatura utilizzato. Il fattore di ingrandimento specifico per il blocco utilizzato è riportato sull’etichetta presente sul lato del blocco colorato BruxZir. 7. Sinterizzazione Tutte le strutture portanti colorate e le corone e i ponti a contorno pieno BruxZir devono essere sottoposti a un ciclo di sinterizzazione finale prima della finitura. Per ottenere zirconia densa, la temperatura di sinterizzazione raccomandata è di 1580 ºC come illustrato nel grafico della temperatura di sinterizzazione riportato di seguito. Una volta completata la fresatura, rimuovere con cautela i restauri dal blocco. Rimuovere tutti i residui di polvere collocando i restauri in un pulitore a ultrasuoni riempito SOLO con acqua distillata o deionizzata. Pulire a ultrasuoni i restauri per 30 secondi. Asciugare accuratamente i restauri prima della sinterizzazione, altrimenti potrebbero rompersi. L’asciugatura dei restauri può essere accelerata mediante l’uso della convezione a microonde o di una lampada riscaldante. Collocare i restauri in un vassoio di sinterizzazione contenente le sfere di zirconia delle dimensioni appropriate (non fornite da Prismatik) e introdurre il vassoio nel forno di sinterizzazione. Nota: i restauri colorati BruxZir non devono essere immersi in liquidi coloranti o subire alcuna alterazione della colorazione prima della sinterizzazione. Programmare il forno di sinterizzazione utilizzando il relativo manuale in modo da ottenere il profilo di riscaldamento raccomandato illustrato nel grafico delle temperature di sinterizzazione riportato di seguito. Per una corretta sinterizzazione, assicurarsi che il forno raggiunga 1580 ºC e che mantenga questa temperatura per 2.5 ore. Per rimuovere i restauri in sicurezza, attendere che il forno si raffreddi a sufficienza. Ispezionare attentamente i restauri per verificare che non presentino crepe o scheggiature. Temperatura (°C) Tempo (min) Tempo (ore) 0 0 100 200 300 400 500 2 4 6 8 Temperatura (°C) 1800 1800 1600 1600 1400 1400 1200 1200 1000 1000 800 800 600 600 400 400 200 200 0 0 (C5) (T5) (T2) 2 ºC/min (T3) (C1) (C7) 15 ºC/min (T1) 10 ºC/min (T4) 15 ºC/min (T6) (C6) Grafico delle temperature di sinterizzazione (C2) (C4) (C3) Temperatura (ºC) Tempo (minuti) C1 25 ºC T1 78 minuti C2 1200 ºC T2 60 minuti C3 1200 ºC T3 50 minuti C4 1300 ºC T4 28 minuti C5 1580 ºC T5 150 minuti C6 1580 ºC T6 90 minuti C7 155 ºC T7 Disattivato Raccomandazioni per il ciclo di sinterizzazione • 1° velocità di riscaldamento – 15 °C/min a 1200 °C • 1° tempo di attesa a 1200 °C – 60 minuti • 2° velocità di riscaldamento – 2 °C/min a 1300 °C • 3° velocità di riscaldamento – 10 °C/min a 1580 °C • Temperatura di sinterizzazione – 1580ºC • 2° tempo di attesa a 1580 ºC – 150 minuti • Velocità di raffreddamento – 15 ºC AVVERTENZA: per una rimozione sicura, attendere che il forno si raffreddi a sufficienza prima di aprirlo o rimuovere i restauri sinterizzati. AVVERTENZA: per un corretto utilizzo, posizionamento del prodotto e calibrazione, consultare le istruzioni per l’uso del forno utilizzato. Assicurarsi che il forno di sinterizzazione utilizzato sia calibrato in conformità alle specifiche del produttore. Per ulteriori istruzioni, contattare il produttore del forno di sinterizzazione. 8. Rettifiche dei restauri sinterizzati Dopo la sinterizzazione, rettificare l’anatomia dei restauri secondo necessità utilizzando strumenti di rettifica a bassa pressione appropriati o dotati di raffreddamento ad acqua, facendo attenzione a osservare gli spessori raccomandati per le pareti e i connettori illustrati nella Tabella 3 riportata nella Sezione 5. 9. Ottenimento del colore finale Dopo la sinterizzazione, il colore del restauro colorato BruxZir diventerà visibile. Le colorazioni di base dei blocchi colorati BruxZir devono essere colorate e smaltate per raggiungere la colorazione finale desiderata. Come illustrato nella Tabella 2, le formulazioni dei blocchi colorati BruxZir corrispondono a diverse colorazioni VITA Classical. Utilizzare le tecniche standard di colorazione per regolare il colore finale del restauro secondo la prescrizione. Si raccomanda di utilizzare materiali di colorazione e smaltatura a basso punto di fusione, in quanto i materiali ad alto punto di fusione possono causare un leggero schiarimento del restauro BruxZir a temperature superiori a 860 ºC. Utilizzando un forno per porcellana o da laboratorio (non fornito da Prismatik), seguire le istruzioni di colorazione e smaltatura fornite dal produttore. Per ottenere la colorazione desiderata, potrebbe essere necessario eseguire un secondo ciclo di colorazione. Per la smaltatura del restauro, seguire le istruzioni del produttore. AVVERTENZA: per una rimozione sicura, attendere che i restauri si siano raffreddati a sufficienza prima di rimuoverli. AVVERTENZA: per un corretto utilizzo, posizionamento del prodotto e calibrazione, consultare le istruzioni per l’uso del forno utilizzato. Assicurarsi che il forno di sinterizzazione utilizzato sia calibrato in conformità alle specifiche del produttore. Per ulteriori istruzioni, contattare il produttore del forno di sinterizzazione. Dopo il ciclo di colorazione, controllare la qualità della colorazione e, se necessario, rieseguirla. Se sono necessarie ulteriori correzioni della colorazione, infornare nuovamente i restauri utilizzando il ciclo di cottura per la colorazione/smaltatura dei blocchi colorati BruxZir. Una volta ottenuta la colorazione desiderata, applicare la quantità necessaria di smalto e infornare i restauri utilizzando il ciclo di cottura per la colorazione/smaltatura BruxZir. 10. Cementazione Per cementare i restauri colorati BruxZir il dentista deve utilizzare vetroionomeri rinforzati con resina, cementi resinati o cementi resinati autoadesivi. 11. Conservazione Prima di conservare i blocchi colorati BruxZir, assicurarsi che non presentino danni da trasporto. I danni da trasporto possono includere, ad esempio, crepe e scheggiature del blocco. I blocchi devono essere conservati a temperatura ambiente e lontano da polvere e da potenziali fonti di contaminazione. Quando non in uso, conservare i blocchi colorati BruxZir nella confezione originale. 12. AVVERTENZE Non respirare le polveri. Evitare il contatto delle polveri con gli occhi o il prolungato contatto diretto con la pelle. Al fine di evitare il potenziale contatto e l’irritazione della pelle o degli occhi durante la lavorazione, si raccomanda di utilizzare dispositivi di protezione individuale (DPI) quali guanti, maschere e camici da laboratorio. NOTA: per richiedere la scheda di sicurezza di questo prodotto, contattare Glidewell Direct al numero 888-303-3975. 13. Domande/commenti Per domande e/o commenti o per ulteriori istruzioni relative all’uso di questo prodotto, contattare Glidewell Direct negli Stati Uniti all’indirizzo 18651 Von Karman Ave., Irvine, CA 92612 o al numero 888-303-3975. 0086 MDSS GmbH Schiffgraben 41 30175 Hannover, Germania Prodotto da Prismatik Dentalcraft, Inc. (Una consociata interamente controllata da Glidewell Laboratories) 2212 Dupont Drive Irvine, CA 92612, USA Tel: 888-303-6470 Fax: 800-579-8233 VITA è un marchio registrato di VITA Zahnfabrik. BRUXZIR® SHADED MILLING BLANKS MAGYAR Használati utasítás 1. A termék bemutatása BruxZir® marógépbe illeszthető előszínezett cirkónium tömbök (BruxZir Shaded & Shaded-A) BruxZir előszínezett tömbök cirkónium borítóelemek vagy cirkónium-alapú vázak készítésére koronák és hidak számára. A borítókoronák és vázak tervezése és elkészítése CAD/CAM rendszerekkel történik. Ezt követően a megtervezett és elkészített borítókoronák és vázak magas hőmérsékletű szinterezésen esnek át. A BruxZir előszínezett tömbök esetében a szinterezés előtt nincs szükség színezőanyag hozzáadására. A borítókoronák és -hidak kívánt VITA® árnyalatának eléréséhez a szinterezést követően szükség van az alapvető színezési technikák alkalmazására és a zománc ráégetésére. A szinterezett anyag maximálisan ellenálló, áttetsző és gyöngyházfényű. A szinterezés zsugorodásssal jár, ezért faragáskor nagyon fontos a megfelelő méret (zsugorodási tényező) alkalmazása. A megfelelő zsugorodási tényező figyelembe vétele a faragás során biztosítja a szinterezett leplezés és/vagy korona tökéletes illeszkedését és az oldalak pontosságát. Minden tömbön szerepel az alkalmazandó zsugorodási tényező. 2. Felhasználási javallat A terméket fogtechnikusok használhatják, első és hátsó, egyedi, kerámia fogpótlások készítésére. 3. Ellenjavallatok Nincsenek. 4. Műszaki adatokat tartalmazó táblázat A mérések az ISO 6872 szabványnak megfelelően történtek 1. táblázat Osztályozás - II. típus, 6. osztály Hőtágulási együttható (25–500 ºC) 11 x 10 -6 /K Hajlítószilárdság > 800 MPa Sűrűség 6,05 g/cm 3 2. táblázat Előszínezett BruxZir Végleges VITA árnyalat 100 A1, B1, C1 200 A2, A3, B2 300 A3.5, B3, C2, D2, D3, D4 400 A4, B4, C3, C4 5. A váz kialakítása A fal és az összekötő elem vastagságára vonatkozó, 3. táblázatban szereplő ajánlások figyelmen kívül hagyása a végső fogpótlás törését eredményezheti. A vázak kialakítására vonatkozó speciális utasításokat illetően tájékozódjon a CAD rendszeréhez mellékelt megfelelő CAD kézikönyvből. A borítóhidak esetében az összekötő elemekre ugyanazok a minimális követelmények vonatkoznak. 3. táblázat Szinterezett vázak és borítások falainak és összekötő elemeinek javasolt vastagságát tartalmazó táblázat Egyetlen leplezés (standard) Hidak Elülső Falvastagság (váz) Kör alakú Incizális/Okkluzális ≥ 0,5 mm ≥ 0,7 mm ≥ 0,5 mm ≥ 0,7 mm Összekötő elem méretei (váz) 3 tagból álló híd 4 vagy több tagból álló (híd) --- --- ≥ 7,0 mm 2 ≥ 9,0 mm 2 Összekötő elem méretei (borítás) 3 tagból álló híd 4 vagy több tagból álló (híd) --- --- ≥ 7,0 mm 2 ≥ 9,0 mm 2 Hátsó Falvastagság (váz) Kör alakú Incizális/Okkluzális ≥ 0,5 mm ≥ 0,7 mm ≥ 0,9 mm ≥ 0,9 mm Összekötő elem méretei (váz és borítás) 3 tagból álló híd 4 vagy több tagból álló (híd) Szabadvégű --- --- --- ≥ 9 mm 2 ≥ 12 mm 2 ≥ 12 mm 2 6. Faragás A fogpótlás CAD rendszerrel történő megtervezése után programozza be a marógépet, valamint adja meg a tömbre jellemző zsugorodási tényezőt, amennyiben a szoftver felkéri erre. A használt marórendszert, a beprogramozást és a zsugorodási tényező megadását, valamint a cirkónium tömbök faragását illetően a marógép kezelőjének tájékozódnia kell a használati utasításból. A használt tömb zsugorodási tényezője a BruxZir előszínezett tömb oldalára ragasztott címkén van feltüntetve. 7. Szinterezés Befejezés előtt az összes BruxZir előszínezett váznak, borítókoronának és hídnak egy végső szinterezési szakaszon kell átesnie. A cirkónium megfelelő tömörségének eléréséhez az ajánlott szinterezési hőmérséklet 1580 °C, ahogy az az alábbi, szinterezési hőmérsékleteket tartalmazó grafikonon is fel van tüntetve. A kifaragás végeztével óvatosan távolítsa el a fogpótlást a tömbből. A por eltávolítása érdekében helyezze a fogpótlásokat KIZÁRÓLAG desztillált vagy deionizált vízzel feltöltött ultrahangos tisztító berendezésbe. Ultrahangos módszerrel tisztítsa a fogpótlásokat 30 másodpercig. Szinterezés előtt szárítsa meg alaposan a fogpótlásokat, különben eltörhetnek. A fogpótlások száradása felgyorsítható konvekciós mikrohullámú berendezés vagy hőlámpa segítségével. A fogpótlásokat helyezze megfelelő méretű (a Prismatik vállalattól nem beszerezhető) cirkónium szemcséket tartalmazó szinterező tálcán a szinterező kályhába. Ne feledje: A BruxZir előszínezett fogpótlásokat a szinterezés előtt nem szükséges belemeríteni semmilyen színezőfolyadékba, valamint nincs szükség az árnyalat semmilyen módon történő megváltoztatására. A kályha kézikönyvének segítségével programozza be a szinterező kályhát a szinterezési hőmérsékleteket tartalmazó alábbi grafikonon feltüntetett javasolt hevítési profil elérése érdekében. A megfelelő szinterezés érdekében bizonyosodjon meg arról, hogy a kályha 1580 °C hőmérsékletre melegszik, és 2.5 órán keresztül tartja ezt az értéket. A fogpótlások biztonságos eltávolítása érdekében hagyja, hogy a kályha megfelelő mértékben kihűljön. Vizsgálja meg alaposan a fogpótlásokat, hogy nincsenek-e rajtuk repedések vagy lepattogzott részek. Hőmérséklet (ºC) Idő (perc) Idő (óra) 0 0 100 200 300 400 500 2 4 6 8 Hőmérséklet (ºC) 1800 1800 1600 1600 1400 1400 1200 1200 1000 1000 800 800 600 600 400 400 200 200 0 0 (C5) (T5) (T2) 2 ºC/perc(T3) (C1) (C7) 10 ºC/perc (T4) 15 ºC/perc (T6) (C6) Szinterezési hőmérséklet grafikonja (C2) (C4) (C3) 15 ºC/perc (T1) Hőmérséklet (ºC) Idő (perc) C1 25 ºC T1 78 perc C2 1200 ºC T2 60 perc C3 1200 ºC T3 50 perc C4 1300 ºC T4 28 perc C5 1580 ºC T5 150 perc C6 1580 ºC T6 90 perc C7 155 ºC T7 Kikapcsolva A szinterezési ciklusra vonatkozó ajánlások • Első hőmérséklet-emelkedési ráta – 15 °C/perc 1200 °C-ig • Első hőmérséklet fenntartási idő 1200 °C-on – 60 perc • Második hőmérséklet-emelkedési ráta – 2 °C/perc 1300 °C-ig • Harmadik hőmérséklet-emelkedési ráta – 10 °C/perc 1580 °C-ig • Szinterezési hőmérséklet – 1580 °C • Második hőmérséklet fenntartási idő 1580 °C-on – 150 perc • Hőmérséklet-csökkenési ráta – 15 °C FIGYELMEZTETÉS: ne nyissa ki a kályhát vagy ne vegye ki a szinterezett fogpótlásokat, amíg a kályha eléggé le nem hűlt a biztonságos eltávolításhoz. FIGYELMEZTETÉS: a termék behelyezését illetően, valamint a megfelelő használat és beállítás érdekében tájékozódjon a kályha használati utasításából. Bizonyosodjon meg arról, hogy a szinterező kályhát a gyártó specifikációinak megfelelően állította be. További utasításokért vegye fel a kapcsolatot a szinterező kályha gyártójával. 8. A szinterezett fogpótlások kiigazítása Szinterezést követően szükség esetén igazítsa ki a fogpótlások alakját megfelelő, kis nyomást kifejtő vagy vízhűtéses csiszolóberendezéssel. Ügyeljen arra, hogy betartsa a falak és az összekötő elemek vastagságát, az 5. pontban található 3. táblázat értékeinek megfelelően. 9. A végső árnyalat kialakítása Szinterezést követően a BruxZir előszínezett fogpótlás színe láthatóvá válik. A BruxZir alapárnyalatai színezést igényelnek, valamint szükség van a zománc ráégetésére a kívánt végső árnyalat elérése érdekében. Ahogy az a 2. táblázatban látható, az előszínezett BruxZir tömbök több VITA Classic árnyalattal kompatibilisek. Alkalmazzon standard színezési technikákat, hogy elérje a fogpótlás munkalap szerinti végső árnyalatát. Alacsony olvadáspontú zománc és színezékanyagok használata javasolt, mivel a magas olvadáspontú anyagok 860 °C fölött a BruxZir fogpótlás enyhe kifényesedését okozhatják. Használjon porcelán vagy laboratóriumi (a Prismatik vállalattól nem beszerezhető) kályhát, és tartsa be a gyártó utasításait a színezésre és a zománc ráégetésére vonatkozóan. Előfordulhat, hogy a kívánt árnyalat eléréséhez második színezésre is szükség van. A zománc fogpótlásra égetésekor kövesse a gyártó utasításait. FIGYELMEZTETÉS: ne vegye ki a fogpótlásokat, amíg eléggé le nem hűlnek a biztonságos eltávolításhoz. FIGYELMEZTETÉS: a termék behelyezését illetően, valamint a megfelelő használat és beállítás érdekében tájékozódjon a kályha használati utasításából. Bizonyosodjon meg arról, hogy a szinterező kályhát a gyártó specifikációinak megfelelően állította be. További utasításokért vegye fel a kapcsolatot a szinterező kályha gyártójával. A színezést követően ellenőrizze az árnyalat minőségét, majd szükség esetén hajtson végre egy újabb színezési fázist. Amennyiben az árnyalat további igazítására van szükség, alkalmazza ismét az előszínezett BruxZir színezék/zománc ráégetési eljárását. A kívánt árnyalat elérését követően vigye fel a fogpótlásra a kívánt mennyiségű zománcot, majd égesse rá a BruxZir színezék/zománc ráégetési eljárás alkalmazásával. 10. Cementezés A fogászati szakembernek műgyantával megerősített üveg-ionomer ragasztócementet, műgyanta cementet vagy öntapadó műgyanta cementet kell használnia az előszínezett BruxZir fogpótlások cementezéséhez. 11. Tárolás Az előszínezett BruxZir tömbök tárolása előtt győződjön meg arról, hogy a termék nem sérült meg a szállítás során. A szállítási sérülések között megemlíthető a tömbök repedése és lepattogzása. A tömbök tárolása szobahőmérsékleten kell történjen, portól és potenciális szennyezési forrásoktól védett helyen. Használaton kívül tárolja az előszínezett BruxZir tömböket az eredeti csomagolásukban. 12. FIGYELMEZTETÉSEK Ne lélegezze be a port. Ne hagyja, hogy a por a szemébe kerüljön vagy huzamosabb ideig érintkezzen a bőrével. Személyi védőfelszerelések, mint például kesztyű, maszk és laboratóriumi köpeny használata javasolt annak érdekében, hogy megmunkálás során elkerülje az esetleges érintkezést, és ezáltal a szem és a bőr irritációját. MEGJEGYZÉS: a termék anyagbiztonsági adatlapjáért hívja a Glidewell Direct vállalatot az 888-303-3975-ös telefonszámon. 13. Kérdések/megjegyzések Kérdések és/vagy megjegyzések esetén, illetve a termék használatára vonatkozó további utasításokért vegye fel a kapcsolatot a Glidewell Direct vállalattal az Amerikai Egyesült Államokban a következő címen: 18651 Von Karman Ave., Irvine, CA 92612 vagy hívja az 888-303-3975-ös telefonszámot. 0086 MDSS GmbH Schiffgraben 41 30175 Hannover, Németország Gyártó Prismatik Dentalcraft, Inc. (A Glidewell Laboratories 100%-os tulajdonában álló leányvállalat) 2212 Dupont Drive Irvine, CA 92612, Amerikai Egyesült Államok Tel: + 888-303-6470 Fax: + 800-579-8233 A VITA a VITA Zahnfabrik bejegyzett védjegye. BRUXZIR® SHADED MILLING BLANKS NEDERLANDS Instructies voor gebruik 1. Productbeschrijving BruxZir ® Shaded zirkoniumfreesblanks (BruxZir Shaded & BruxZir Shaded-A) BruxZir Shaded-blanks worden gebruikt voor de productie van volledig gecontoureerde zirkonium onderstructuren en onderstructuren op zirkoniumbasis voor kronen en bruggen. De volledig gecontoureerde kronen en onderstructuren worden vervaardigd met het CAD/CAM-systeem voor ontwerp en fabricage. De ontworpen en vervaardigde volledig gecontoureerde kronen en onderstructuren worden vervolgens bij hoge temperatuur gesinterd. Vóór het sinteren hoeft geen kleur te worden toegevoegd aan BruxZir Shaded-blanks. Na het sinteren dienen elementaire kleur- en glazuurtechnieken te worden toegepast om de gewenste VITA®-tint te verkrijgen voor volledig gecontoureerde kronen en bruggen. Het gesinterde materiaal vertoont een optimale sterkte en een doorschijnend parelmoereffect. Aangezien tijdens het sinteren krimp optreedt, is het van essentieel belang om tijdens het frezen de juiste afmetingsverhouding (EF; vergrotingsfactor [enlargement factor]) Door tijdens het frezen aandacht te schenken aan de juiste vergrotingsfactor worden een precieze pasvorm en accurate marges van de gesinterde kap en/of kroon gewaarborgd, waarbij elk blok wordt gelabeld met de specifieke toe te passen EF. 2. Indicaties voor gebruik Het hulpmiddel is geïndiceerd voor gebruik door de tandtechnicus bij de constructie van volkeramische restauraties voor anterieure en posterieure locaties op maat. FOR REFERENCE ONLY

Welcome message from author
This document is posted to help you gain knowledge. Please leave a comment to let me know what you think about it! Share it to your friends and learn new things together.
Transcript
BRUXZIR® SHADED MILLING BLANKS
ENGLISH
DO NOT DISCARD INSTRUCTIONS DURING PRODUCT USE.
Instructions for Use
1. Product DescriptionBruxZir ® Shaded Zirconia Milling Blanks (BruxZir Shaded & BruxZir Shaded-A)
BruxZir Shaded Blanks are used for the production of full-contour zirconia and zirconia-based substructures for crowns and bridges. The manufactured full-contour crowns and substructures are made utilizing the CAD/CAM system for design and manufacture. The designed and manufactured full-contour crowns and substructures are then sintered at a high temperature. No color needs to be added to BruxZir Shaded Blanks before sintering. Basic staining and glazing techniques need to be used after sintering to achieve the desired VITA® shade for full-contour crowns and bridges. The sintered material exhibits maximum strength and translucency similar to natural dentition.
Because shrinkage occurs during sintering, it is vital to take into account the appropriate size ratio (enlargement factor) during milling. Attention to the proper enlargement factor (EF) during milling ensures precision fit and marginal accuracy of the sintered coping and/or crowns, with each block labeled with the specific EF to be applied.
2. Indications for UseThe device is indicated for use by dental technicians in the construction of custom-made all-ceramic restorations for anterior and posterior locations.
3. Contraindications None.
4. Technical Data TableAs measured according to ISO 6872
Table 1 Classification - Type II, Class 6
Coefficient of Thermal Expansion (CTE) (25–500ºC) 11 x 10-6/K
Flexural Strength > 800 MPaSintered Density 6.05 g/cm3
Table 2BruxZir Shaded Final VITA Shade
100 A1, B1, C1200 A2, A3, B2300 A3.5, B3, C2, D2, D3, D4400 A4, B4, C3, C4
5. Design of UnderstructureFailure to observe the wall and connector thickness recommendations as shown in Table 3 may result in fracture of the final restoration. For specific instructions on design of the substructures please refer to the applicable CAD manual designated for your CAD system. Full-contour bridges should follow the same minimum connector rules.
Table 3 Recommended Wall and Connector
Thickness Chart for Sintered Understructures and Full Contours
Single Copings (standard) Bridges
Anterior
Wall Thickness(substructure)
CircularIncisal/Occlusal
≥ 0.5 mm≥ 0.7 mm
≥ 0.5 mm≥ 0.7 mm
Connector Dimensions(substructure)
3-unit bridge4-unit & more
(bridge)
--- ---
≥ 7.0 mm2
≥ 9.0 mm2
Connector Dimensions(full contour)
3-unit bridge4-unit & more
(bridge)
--- ---
≥ 7.0 mm2
≥ 9.0 mm2
Posterior
Wall Thickness(substructure)
CircularIncisal/Occlusal
≥ 0.5 mm≥ 0.7 mm
≥ 0.9 mm≥ 0.9 mm
Connector Dimensions(substructure & full contour)
3-unit bridge4-unit & more (bridge)
Cantilever
------ ---
≥ 9 mm2
≥ 12 mm2
≥ 12 mm2
6. MillingAfter the restorations have been digitally designed, program your milling machine and enter the enlargement factor (EF) for the blank if prompted by the program to do so. The mill operator should refer to the operating instructions for the applicable milling system used, for the specified programming method for input of the EF, and for milling the zirconia blanks. The specific EF for the block used can be located on the label affixed to the side of the BruxZir Shaded Blank.
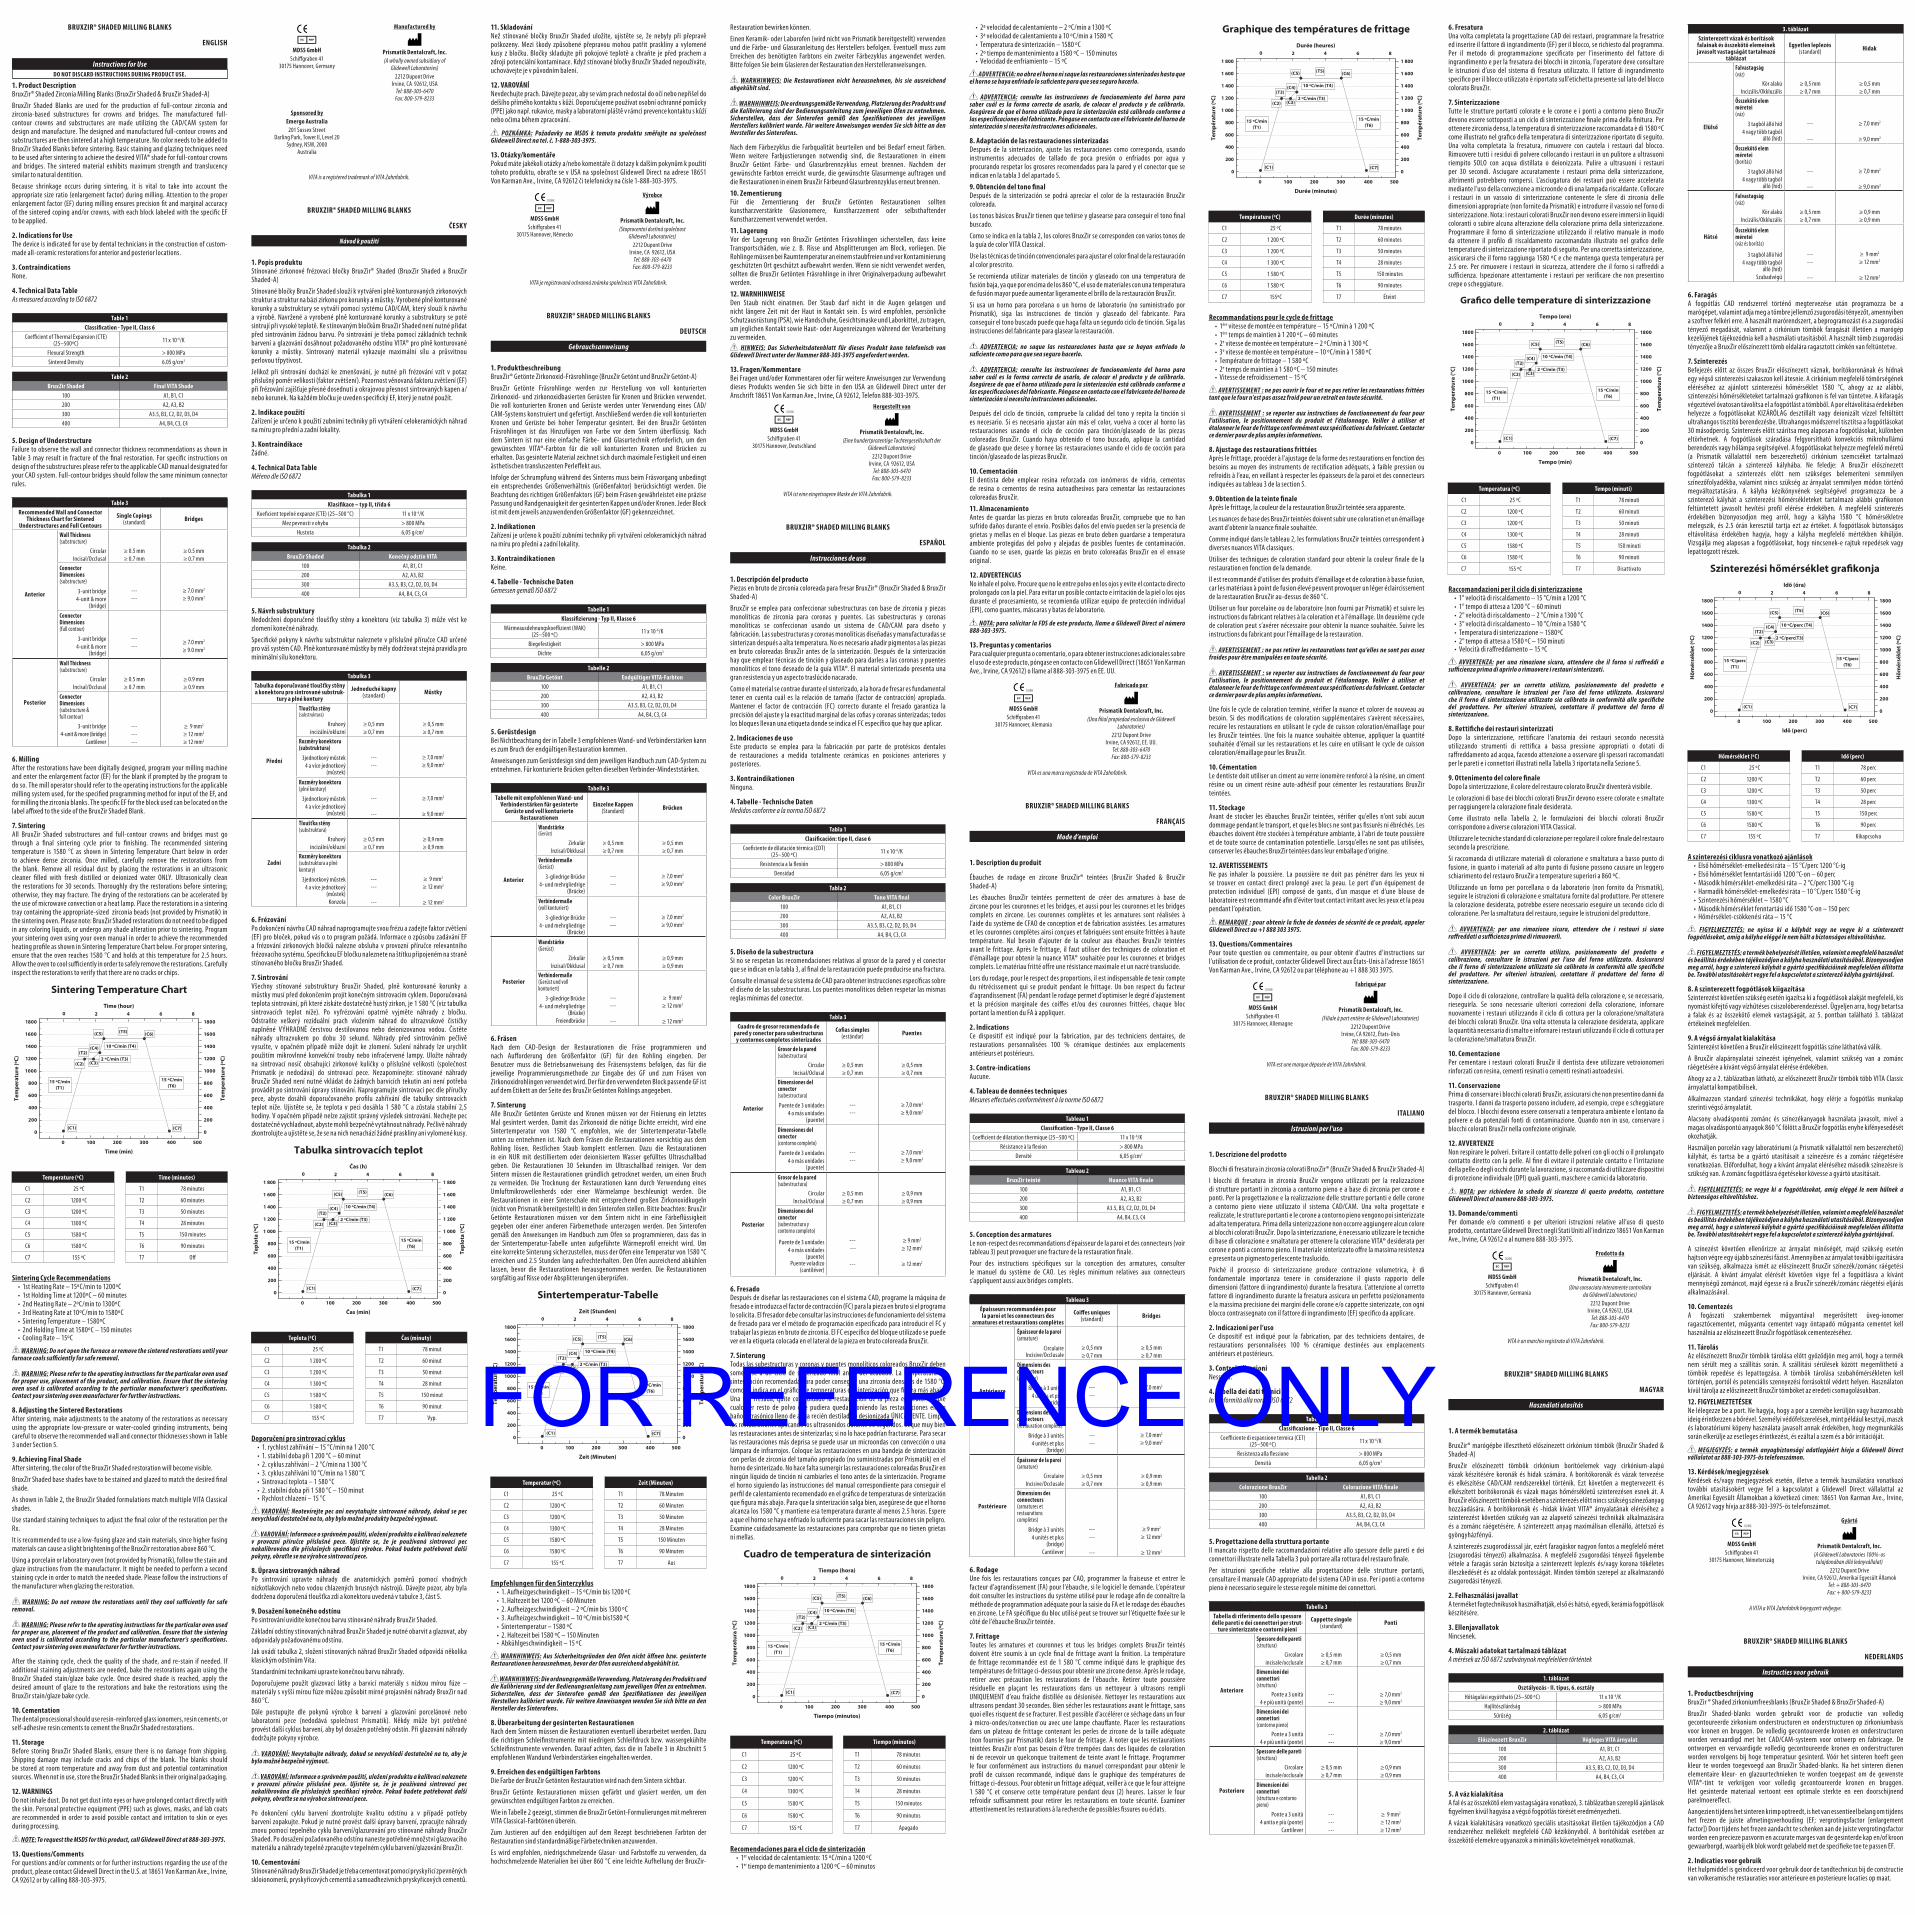
7. SinteringAll BruxZir Shaded substructures and full-contour crowns and bridges must go through a final sintering cycle prior to finishing. The recommended sintering temperature is 1580 °C as shown in Sintering Temperature Chart below in order to achieve dense zirconia. Once milled, carefully remove the restorations from the blank. Remove all residual dust by placing the restorations in an ultrasonic cleaner filled with fresh distilled or deionized water ONLY. Ultrasonically clean the restorations for 30 seconds. Thoroughly dry the restorations before sintering; otherwise, they may fracture. The drying of the restorations can be accelerated by the use of microwave convection or a heat lamp. Place the restorations in a sintering tray containing the appropriate-sized zirconia beads (not provided by Prismatik) in the sintering oven. Please note: BruxZir Shaded restorations do not need to be dipped in any coloring liquids, or undergo any shade alteration prior to sintering. Program your sintering oven using your oven manual in order to achieve the recommended heating profile as shown in Sintering Temperature Chart below. For proper sintering, ensure that the oven reaches 1580 °C and holds at this temperature for 2.5 hours. Allow the oven to cool sufficiently in order to safely remove the restorations. Carefully inspect the restorations to verify that there are no cracks or chips.
Tem
per
atu
re (º
C)
Time (min)
Time (hour)0
0 100 200 300 400 500
2 4 6 8
Tem
per
atu
re (º
C)
1800 1800
1600 1600
1400 1400
1200 1200
1000 1000
800 800
600 600
400 400
200 200
0 0
(C5) (T5)
(T2)2 ºC/min (T3)
(C1) (C7)
15 ºC/min(T1)
10 ºC/min (T4)
15 ºC/min(T6)
(C6)
Sintering Temperature Chart
(C2)
(C4)
(C3)
Temperature (ºC) Time (minutes)
C1 25 ºC T1 78 minutes
C2 1200 ºC T2 60 minutes
C3 1200 ºC T3 50 minutes
C4 1300 ºC T4 28 minutes
C5 1580 ºC T5 150 minutes
C6 1580 ºC T6 90 minutes
C7 155 ºC T7 Off
Sintering Cycle Recommendations• 1st Heating Rate – 15ºC/min to 1200ºC • 1st Holding Time at 1200ºC – 60 minutes • 2nd Heating Rate – 2ºC/min to 1300ºC • 3rd Heating Rate at 10ºC/min to 1580ºC • Sintering Temperature – 1580ºC • 2nd Holding Time at 1580ºC – 150 minutes• Cooling Rate – 15ºC
WARNING: Do not open the furnace or remove the sintered restorations until your furnace cools sufficiently for safe removal.
WARNING: Please refer to the operating instructions for the particular oven used for proper use, placement of the product, and calibration. Ensure that the sintering oven used is calibrated according to the particular manufacturer’s specifications. Contact your sintering oven manufacturer for further instructions.
8. Adjusting the Sintered RestorationsAfter sintering, make adjustments to the anatomy of the restorations as necessary using the appropriate low-pressure or water-cooled grinding instruments, being careful to observe the recommended wall and connector thicknesses shown in Table 3 under Section 5.
9. Achieving Final ShadeAfter sintering, the color of the BruxZir Shaded restoration will become visible.
BruxZir Shaded base shades have to be stained and glazed to match the desired final shade.
As shown in Table 2, the BruxZir Shaded formulations match multiple VITA Classical shades.
Use standard staining techniques to adjust the final color of the restoration per the Rx.
It is recommended to use a low-fusing glaze and stain materials, since higher fusing materials can cause a slight brightening of the BruxZir restoration above 860 °C.
Using a porcelain or laboratory oven (not provided by Prismatik), follow the stain and glaze instructions from the manufacturer. It might be needed to perform a second staining cycle in order to match the needed shade. Please follow the instructions of the manufacturer when glazing the restoration.
WARNING: Do not remove the restorations until they cool sufficiently for safe removal.
WARNING: Please refer to the operating instructions for the particular oven used for proper use, placement of the product and calibration. Ensure that the sintering oven used is calibrated according to the particular manufacturer’s specifications. Contact your sintering oven manufacturer for further instructions.
After the staining cycle, check the quality of the shade, and re-stain if needed. If additional staining adjustments are needed, bake the restorations again using the BruxZir Shaded stain/glaze bake cycle. Once desired shade is reached, apply the desired amount of glaze to the restorations and bake the restorations using the BruxZir stain/glaze bake cycle.
10. CementationThe dental processional should use resin-reinforced glass ionomers, resin cements, or self-adhesive resin cements to cement the BruxZir Shaded restorations.
11. StorageBefore storing BruxZir Shaded Blanks, ensure there is no damage from shipping. Shipping damage may include cracks and chips of the blank. The blanks should be stored at room temperature and away from dust and potential contamination sources. When not in use, store the BruxZir Shaded Blanks in their original packaging.
12. WARNINGSDo not inhale dust. Do not get dust into eyes or have prolonged contact directly with the skin. Personal protective equipment (PPE) such as gloves, masks, and lab coats are recommended in order to avoid possible contact and irritation to skin or eyes during processing.
NOTE: To request the MSDS for this product, call Glidewell Direct at 888-303-3975.
13. Questions/CommentsFor questions and/or comments or for further instructions regarding the use of the product, please contact Glidewell Direct in the U.S. at 18651 Von Karman Ave., Irvine, CA 92612 or by calling 888-303-3975.
MDSS GmbHSchiffgraben 41
30175 Hannover, Germany
Manufactured by
Prismatik Dentalcraft, Inc.(A wholly owned subsidiary of
Glidewell Laboratories)2212 Dupont Drive
Irvine, CA 92612, USA Tel: 888-303-6470 Fax: 800-579-8233
Sponsored byEmergo Australia
201 Sussex Street Darling Park, Tower II, Level 20
Sydney, NSW, 2000 Australia
VITA is a registered trademark of VITA Zahnfabrik.
BRUXZIR® SHADED MILLING BLANKS
ČESKY
Návod k použití
1. Popis produktuStínované zirkonové frézovací bločky BruxZir® Shaded (BruxZir Shaded a BruxZir Shaded-A)
Stínované bločky BruxZir Shaded slouží k vytváření plně konturovaných zirkonových struktur a struktur na bázi zirkonu pro korunky a můstky. Vyrobené plně konturované korunky a substruktury se vytváří pomocí systému CAD/CAM, který slouží k návrhu a výrobě. Navržené a vyrobené plně konturované korunky a substruktury se poté sintrují při vysoké teplotě. Ke stínovaným bločkům BruxZir Shaded není nutné přidat před sintrováním žádnou barvu. Po sintrování je třeba pomocí základních technik barvení a glazování dosáhnout požadovaného odstínu VITA® pro plně konturované korunky a můstky. Sintrovaný materiál vykazuje maximální sílu a průsvitnou perlovou třpytivost.
Jelikož při sintrování dochází ke zmenšování, je nutné při frézování vzít v potaz příslušný poměr velikostí (faktor zvětšení). Pozornost věnovaná faktoru zvětšení (EF) při frézování zajišťuje přesné dosednutí a okrajovou přesnost sintrovaných kapen a/nebo korunek. Na každém bločku je uveden specifický EF, který je nutné použít.
2. Indikace použitíZařízení je určeno k použití zubními techniky při vytváření celokeramických náhrad na míru pro přední a zadní lokality.
3. KontraindikaceŽádné.
4. Technical Data TableMěřeno dle ISO 6872
Tabulka 1 Klasifikace – typ II, třída 6
Koeficient tepelné expanze (CTE) (25–500 °C) 11 x 10-6/KMez pevnosti v ohybu > 800 MPa
Hustota 6,05 g/cm3
Tabulka 2BruxZir Shaded Konečný odstín VITA
100 A1, B1, C1200 A2, A3, B2300 A3.5, B3, C2, D2, D3, D4400 A4, B4, C3, C4
5. Návrh substrukturyNedodržení doporučené tloušťky stěny a konektoru (viz tabulka 3) může vést ke zlomení konečné náhrady.
Specifické pokyny k návrhu substruktur naleznete v příslušné příručce CAD určené pro váš systém CAD. Plně konturované můstky by měly dodržovat stejná pravidla pro minimální sílu konektoru.
Tabulka 3 Tabulka doporučované tloušťky stěny a konektoru pro sintrované substruk-
tury a plné kontury
Jednoduché kapny (standard) Můstky
Přední
Tloušťka stěny(substruktura)
Kruhový incizální/okluzní
≥ 0,5 mm≥ 0,7 mm
≥ 0,5 mm≥ 0,7 mm
Rozměry konektoru(substruktura)
3jednotkový můstek4 a více jednotkový
(můstek)
--- ---
≥ 7,0 mm2
≥ 9,0 mm2
Rozměry konektoru(plné kontury)
3jednotkový můstek4 a více jednotkový
(můstek)
---
---
≥ 7,0 mm2
≥ 9,0 mm2
Zadní
Tloušťka stěny(substruktura)
Kruhový incizální/okluzní
≥ 0,5 mm≥ 0,7 mm
≥ 0,9 mm≥ 0,9 mm
Rozměry konektoru(substruktura a plné kontury)
3jednotkový můstek4 a více jednotkový
(můstek) Konzola
------
---
≥ 9 mm2
≥ 12 mm2
≥ 12 mm2
6. FrézováníPo dokončení návrhu CAD náhrad naprogramujte svou frézu a zadejte faktor zvětšení (EF) pro bloček, pokud vás o to program požádá. Informace o způsobu zadávání EF a frézování zirkonových bločků nalezne obsluha v provozní příručce relevantního frézovacího systému. Specifickou EF bločku naleznete na štítku připojeném na straně stínovaného bločku BruxZir Shaded.
7. SintrováníVšechny stínované substruktury BruxZir Shaded, plně konturované korunky a můstky musí před dokončením projít konečným sintrovacím cyklem. Doporučovaná teplota sintrování, při které získáte dostatečně hustý zirkon, je 1 580 °C (viz tabulka sintrovacích teplot níže). Po vyfrézování opatrně vyjměte náhrady z bločku. Odstraňte veškerý reziduální prach vložením náhrad do ultrazvukové čističky naplněné VÝHRADNĚ čerstvou destilovanou nebo deionizovanou vodou. Čistěte náhrady ultrazvukem po dobu 30 sekund. Náhrady před sintrováním pečlivě vysušte, v opačném případě může dojít ke zlomení. Sušení náhrady lze urychlit použitím mikrovlnné konvekční trouby nebo infračervené lampy. Uložte náhrady na sintrovací nosič obsahující zirkonové kuličky o příslušné velikosti (společnost Prismatik je nedodává) do sintrovací pece. Nezapomínejte: stínované náhrady BruxZir Shaded není nutné vkládat do žádných barvicích tekutin ani není potřeba provádět po sintrování úpravy stínování. Naprogramujte sintrovací pec dle příručky pece, abyste dosáhli doporučovaného profilu zahřívání dle tabulky sintrovacích teplot níže. Ujistěte se, že teplota v peci dosáhla 1 580 °C a zůstala stabilní 2,5 hodiny. V opačném případě nelze zajistit správný výsledek sintrování. Nechejte pec dostatečně vychladnout, abyste mohli bezpečně vytáhnout náhrady. Pečlivě náhrady zkontrolujte a ujistěte se, že se na nich nenachází žádné praskliny ani vylomené kusy.
Tep
lota
(ºC
)
Čas (min)
Čas (h)0
0 100 200 300 400 500
2 4 6 8
Tep
lota
(ºC
)
1 800 1 800
1 600 1 600
1 400 1 400
1 200 1 200
1 000 1 000
800 800
600 600
400 400
200 200
0 0
(C5) (T5)
(T2)2 ºC/min (T3)
(C1) (C7)
15 ºC/min(T1)
10 ºC/min (T4)
15 ºC/min(T6)
(C6)
Tabulka sintrovacích teplot
(C2)
(C4)
(C3)
Teplota (ºC) Čas (minuty)
C1 25 ºC T1 78 minut
C2 1 200 ºC T2 60 minut
C3 1 200 ºC T3 50 minut
C4 1 300 ºC T4 28 minut
C5 1 580 ºC T5 150 minut
C6 1 580 ºC T6 90 minut
C7 155 ºC T7 Vyp.
Doporučení pro sintrovací cyklus• 1. rychlost zahřívání – 15 °C/min na 1 200 °C • 1. stabilní doba při 1 200 °C – 60 minut • 2. cyklus zahřívání – 2 °C/min na 1 300 °C • 3. cyklus zahřívání 10 °C/min na 1 580 °C • Sintrovací teplota – 1 580 °C • 2. stabilní doba při 1 580 °C – 150 minut• Rychlost chlazení – 15 °C
VAROVÁNÍ: Neotevírejte pec ani nevytahujte sintrované náhrady, dokud se pec nevychladí dostatečně na to, aby bylo možné produkty bezpečně vyjmout.
VAROVÁNÍ: Informace o správném použití, uložení produktu a kalibraci naleznete v provozní příručce příslušné pece. Ujistěte se, že je používaná sintrovací pec nakalibrována dle příslušných specifikací výrobce. Pokud budete potřebovat další pokyny, obraťte se na výrobce sintrovací pece.
8. Úprava sintrovaných náhradPo sintrování upravte náhrady dle anatomických poměrů pomocí vhodných nízkotlakových nebo vodou chlazených brusných nástrojů. Dávejte pozor, aby byla dodržena doporučená tloušťka zdi a konektoru uvedená v tabulce 3, část 5.
9. Dosažení konečného odstínuPo sintrování uvidíte konečnou barvu stínované náhrady BruxZir Shaded.
Základní odstíny stínovaných náhrad BruxZir Shaded je nutné obarvit a glazovat, aby odpovídaly požadovanému odstínu.
Jak uvádí tabulka 2, složení stínovaných náhrad BruxZir Shaded odpovídá několika klasickým odstínům Vita.
Standardními technikami upravte konečnou barvu náhrady.
Doporučujeme použít glazovací látky a barvicí materiály s nízkou mírou fúze – materiály s vyšší mírou fúze můžou způsobit mírné projasnění náhrady BruxZir nad 860 °C.
Dále postupujte dle pokynů výrobce k barvení a glazování porcelánové nebo laboratorní pece (nedodává společnost Prismatik). Někdy může být potřebné provést další cyklus barvení, aby byl dosažen potřebný odstín. Při glazování náhrady dodržujte pokyny výrobce.
VAROVÁNÍ: Nevytahujte náhrady, dokud se nevychladí dostatečně na to, aby je bylo možné bezpečně vyjmout.
VAROVÁNÍ: Informace o správném použití, uložení produktu a kalibraci naleznete v provozní příručce příslušné pece. Ujistěte se, že je používaná sintrovací pec nakalibrována dle příslušných specifikací výrobce. Pokud budete potřebovat další pokyny, obraťte se na výrobce sintrovací pece.
Po dokončení cyklu barvení zkontrolujte kvalitu odstínu a v případě potřeby barvení zopakujte. Pokud je nutné provést další úpravy barvení, zpracujte náhrady znovu pomocí tepelného cyklu barvení/glazurování pro stínované náhrady BruxZir Shaded. Po dosažení požadovaného odstínu naneste potřebné množství glazovacího materiálu a náhrady tepelně zpracujte v tepelném cyklu barvení/glazování BruxZir.
10. CementováníStínované náhrady BruxZir Shaded je třeba cementovat pomocí pryskyřicí zpevněných skloionomerů, pryskyřicových cementů a samoadhezivních pryskyřicových cementů.
11. SkladováníNež stínované bločky BruxZir Shaded uložíte, ujistěte se, že nebyly při přepravě poškozeny. Mezi škody způsobené přepravou mohou patřit praskliny a vylomené kusy z bločku. Bločky skladujte při pokojové teplotě a chraňte je před prachem a zdroji potenciální kontaminace. Když stínované bločky BruxZir Shaded nepoužíváte, uchovávejte je v původním balení.
12. VAROVÁNÍNevdechujte prach. Dávejte pozor, aby se vám prach nedostal do očí nebo nepřišel do delšího přímého kontaktu s kůží. Doporučujeme používat osobní ochranné pomůcky (PPE) jako např. rukavice, masky a laboratorní pláště v rámci prevence kontaktu s kůží nebo očima během zpracování.
POZNÁMKA: Požadavky na MSDS k tomuto produktu směřujte na společnost Glidewell Direct na tel. č. 1-888-303-3975.
13. Otázky/komentářePokud máte jakékoli otázky a/nebo komentáře či dotazy k dalším pokynům k použití tohoto produktu, obraťte se v USA na společnost Glidewell Direct na adrese 18651 Von Karman Ave., Irvine, CA 92612 či telefonicky na čísle 1-888-303-3975.
0086
MDSS GmbHSchiffgraben 41
30175 Hannover, Německo
Výrobce
Prismatik Dentalcraft, Inc.(Stoprocentní dceřiná společnost
Glidewell Laboratories)2212 Dupont Drive
Irvine, CA 92612, USA Tel: 888-303-6470 Fax: 800-579-8233
VITA je registrovaná ochranná známka společnosti VITA Zahnfabrik.
BRUXZIR® SHADED MILLING BLANKS
DEUTSCH
Gebrauchsanweisung
1. ProduktbeschreibungBruxZir® Getönte Zirkonoxid-Fräsrohlinge (BruxZir Getönt und BruxZir Getönt-A)
BruxZir Getönte Fräsrohlinge werden zur Herstellung von voll konturierten Zirkonoxid- und zirkonoxidbasierten Gerüsten für Kronen und Brücken verwendet. Die voll konturierten Kronen und Gerüste werden unter Verwendung eines CAD/CAM-Systems konstruiert und gefertigt. Anschließend werden die voll konturierten Kronen und Gerüste bei hoher Temperatur gesintert. Bei den BruxZir Getönten Fräsrohlingen ist das Hinzufügen von Farbe vor dem Sintern überflüssig. Nach dem Sintern ist nur eine einfache Färbe- und Glasurtechnik erforderlich, um den gewünschten VITA®-Farbton für die voll konturierten Kronen und Brücken zu erhalten. Das gesinterte Material zeichnet sich durch maximale Festigkeit und einen ästhetischen transluszenten Perleffekt aus.
Infolge der Schrumpfung während des Sinterns muss beim Fräsvorgang unbedingt ein entsprechendes Größenverhältnis (Größenfaktor) berücksichtigt werden. Die Beachtung des richtigen Größenfaktors (GF) beim Fräsen gewährleistet eine präzise Passung und Randgenauigkeit der gesinterten Kappen und/oder Kronen. Jeder Block ist mit dem jeweils anzuwendenden Größenfaktor (GF) gekennzeichnet.
2. IndikationenZařízení je určeno k použití zubními techniky při vytváření celokeramických náhrad na míru pro přední a zadní lokality.
3. KontraindikationenKeine.
4. Tabelle - Technische DatenGemessen gemäß ISO 6872
Tabelle 1 Klassifizierung - Typ II, Klasse 6
Wärmeausdehnungskoeffizient (WAK) (25–500 ºC) 11 x 10-6/K
Biegefestigkeit > 800 MPaDichte 6,05 g/cm3
Tabelle 2BruxZir Getönt Endgültiger VITA-Farbton
100 A1, B1, C1200 A2, A3, B2300 A3.5, B3, C2, D2, D3, D4400 A4, B4, C3, C4
5. GerüstdesignBei Nichtbeachtung der in Tabelle 3 empfohlenen Wand- und Verbinderstärken kann es zum Bruch der endgültigen Restauration kommen.
Anweisungen zum Gerüstdesign sind dem jeweiligen Handbuch zum CAD-System zu entnehmen. Für konturierte Brücken gelten dieselben Verbinder-Mindeststärken.
Tabelle 3 Tabelle mit empfohlenen Wand- und
Verbinderstärken für gesinterte Gerüste und voll konturierte
Restaurationen
Einzelne Kappen (Standard) Brücken
Anterior
Wandstärke(Gerüst)
Zirkulär Inzisal/Okklusal
≥ 0,5 mm≥ 0,7 mm
≥ 0,5 mm≥ 0,7 mm
Verbindermaße(Gerüst)
3-gliedrige Brücke4- und mehrgliedrige
(Brücke)
--- ---
≥ 7,0 mm2
≥ 9,0 mm2
Verbindermaße(voll konturiert)
3-gliedrige Brücke4- und mehrgliedrige
(Brücke)
--- ---
≥ 7,0 mm2
≥ 9,0 mm2
Posterior
Wandstärke(Gerüst)
Zirkulär Inzisal/Okklusal
≥ 0,5 mm≥ 0,7 mm
≥ 0,9 mm≥ 0,9 mm
Verbindermaße(Gerüst und voll konturiert)
3-gliedrige Brücke4- und mehrgliedrige
(Brücke) Freiendbrücke
--- ---
---
≥ 9 mm2
≥ 12 mm2
≥ 12 mm2
6. FräsenNach dem CAD-Design der Restaurationen die Fräse programmieren und nach Aufforderung den Größenfaktor (GF) für den Rohling eingeben. Der Benutzer muss die Betriebsanweisung des Fräsensystems befolgen, das für die jeweilige Programmierungsmethode zur Eingabe des GF und zum Fräsen von Zirkonoxidrohlingen verwendet wird. Der für den verwendeten Block passende GF ist auf dem Etikett an der Seite des BruxZir Getönten Rohlings angegeben.
7. SinterungAlle BruxZir Getönten Gerüste und Kronen müssen vor der Finierung ein letztes Mal gesintert werden. Damit das Zirkonoxid die nötige Dichte erreicht, wird eine Sintertemperatur von 1580 °C empfohlen, wie der Sintertemperatur-Tabelle unten zu entnehmen ist. Nach dem Fräsen die Restaurationen vorsichtig aus dem Rohling lösen. Restlichen Staub komplett entfernen. Dazu die Restaurationen in ein NUR mit destilliertem oder deionisiertem Wasser gefülltes Ultraschallbad geben. Die Restaurationen 30 Sekunden im Ultraschallbad reinigen. Vor dem Sintern müssen die Restaurationen gründlich getrocknet werden, um einen Bruch zu vermeiden. Die Trocknung der Restaurationen kann durch Verwendung eines Umluftmikrowellenherds oder einer Wärmelampe beschleunigt werden. Die Restaurationen in einer Sinterschale mit entsprechend großen Zirkonoxidkugeln (nicht von Prismatik bereitgestellt) in den Sinterofen stellen. Bitte beachten: BruxZir Getönte Restaurationen müssen vor dem Sintern nicht in eine Färbeflüssigkeit gegeben oder einer anderen Färbemethode unterzogen werden. Den Sinterofen gemäß den Anweisungen im Handbuch zum Ofen so programmieren, dass das in der Sintertemperatur-Tabelle unten aufgeführte Wärmeprofil erreicht wird. Um eine korrekte Sinterung sicherzustellen, muss der Ofen eine Temperatur von 1580 °C erreichen und 2.5 Stunden lang aufrechterhalten. Den Ofen ausreichend abkühlen lassen, bevor die Restaurationen herausgenommen werden. Die Restaurationen sorgfältig auf Risse oder Absplitterungen überprüfen.
Tem
per
atu
r (º
C)
Zeit (Minuten)
Zeit (Stunden)0
0 100 200 300 400 500
2 4 6 8
Tem
per
atu
r (º
C)
1800 1800
1600 1600
1400 1400
1200 1200
1000 1000
800 800
600 600
400 400
200 200
0 0
(C5) (T5)
(T2)2 ºC/min (T3)
(C1) (C7)
15 ºC/min(T1)
10 ºC/min (T4)
15 ºC/min(T6)
(C6)
Sintertemperatur-Tabelle
(C2)
(C4)
(C3)
Temperatur (ºC) Zeit (Minuten)
C1 25 ºC T1 78 Minuten
C2 1200 ºC T2 60 Minuten
C3 1200 ºC T3 50 Minuten
C4 1300 ºC T4 28 Minuten
C5 1580 ºC T5 150 Minuten
C6 1580 ºC T6 90 Minuten
C7 155 ºC T7 Aus
Empfehlungen für den Sinterzyklus• 1. Aufheizgeschwindigkeit – 15 ºC/min bis 1200 ºC • 1. Haltezeit bei 1200 ºC – 60 Minuten • 2. Aufheizgeschwindigkeit – 2 ºC/min bis 1300 ºC • 3. Aufheizgeschwindigkeit – 10 ºC/min bis1580 ºC • Sintertemperatur – 1580 ºC • 2. Haltezeit bei 1580 ºC – 150 Minuten• Abkühlgeschwindigkeit – 15 ºC
WARNHINWEIS: Aus Sicherheitsgründen den Ofen nicht öffnen bzw. gesinterte Restaurationen herausnehmen, bevor der Ofen ausreichend abgekühlt ist.
WARNHINWEIS: Die ordnungsgemäße Verwendung, Platzierung des Produkts und die Kalibrierung sind der Bedienungsanleitung zum jeweiligen Ofen zu entnehmen. Sicherstellen, dass der Sinterofen gemäß den Spezifikationen des jeweiligen Herstellers kalibriert wurde. Für weitere Anweisungen wenden Sie sich bitte an den Hersteller des Sinterofens.
8. Überarbeitung der gesinterten RestaurationenNach dem Sintern müssen die Restaurationen eventuell überarbeitet werden. Dazu die richtigen Schleifinstrumente mit niedrigem Schleifdruck bzw. wassergekühlte Schleifinstrumente verwenden. Darauf achten, dass die in Tabelle 3 in Abschnitt 5 empfohlenen Wandund Verbinderstärken eingehalten werden.
9. Erreichen des endgültigen FarbtonsDie Farbe der BruxZir Getönten Restauration wird nach dem Sintern sichtbar.
BruxZir Getönte Restaurationen müssen gefärbt und glasiert werden, um den gewünschten endgültigen Farbton zu erreichen.
Wie in Tabelle 2 gezeigt, stimmen die BruxZir Getönt-Formulierungen mit mehreren VITA Classical-Farbtönen überein.
Zum Justieren auf den endgültigen auf dem Rezept beschriebenen Farbton der Restauration sind standardmäßige Färbetechniken anzuwenden.
Es wird empfohlen, niedrigschmelzende Glasur- und Farbstoffe zu verwenden, da hochschmelzende Materialien bei über 860 °C eine leichte Aufhellung der BruxZir-
Restauration bewirken können.
Einen Keramik- oder Laborofen (wird nicht von Prismatik bereitgestellt) verwenden und die Färbe- und Glasuranleitung des Herstellers befolgen. Eventuell muss zum Erreichen des benötigten Farbtons ein zweiter Färbezyklus angewendet werden. Bitte folgen Sie beim Glasieren der Restauration den Herstelleranweisungen.
WARNHINWEIS: Die Restaurationen nicht herausnehmen, bis sie ausreichend abgekühlt sind.
WARNHINWEIS: Die ordnungsgemäße Verwendung, Platzierung des Produkts und die Kalibrierung sind der Bedienungsanleitung zum jeweiligen Ofen zu entnehmen. Sicherstellen, dass der Sinterofen gemäß den Spezifikationen des jeweiligen Herstellers kalibriert wurde. Für weitere Anweisungen wenden Sie sich bitte an den Hersteller des Sinterofens.
Nach dem Färbezyklus die Farbqualität beurteilen und bei Bedarf erneut färben. Wenn weitere Farbjustierungen notwendig sind, die Restaurationen in einem BruxZir Getönt Färbe- und Glasurbrennzyklus erneut brennen. Nachdem der gewünschte Farbton erreicht wurde, die gewünschte Glasurmenge auftragen und die Restaurationen in einem BruxZir Färbeund Glasurbrennzyklus erneut brennen.
10. ZementierungFür die Zementierung der BruxZir Getönten Restaurationen sollten kunstharzverstärkte Glasionomere, Kunstharzzement oder selbsthaftender Kunstharzzement verwendet werden.
11. LagerungVor der Lagerung von BruxZir Getönten Fräsrohlingen sicherstellen, dass keine Transportschäden, wie z. B. Risse und Absplitterungen am Block, vorliegen. Die Rohlinge müssen bei Raumtemperatur an einem staubfreien und vor Kontaminierung geschützten Ort geschützt aufbewahrt werden. Wenn sie nicht verwendet werden, sollten die BruxZir Getönten Fräsrohlinge in ihrer Originalverpackung aufbewahrt werden.
12. WARNHINWEISEDen Staub nicht einatmen. Der Staub darf nicht in die Augen gelangen und nicht längere Zeit mit der Haut in Kontakt sein. Es wird empfohlen, persönliche Schutzausrüstung (PSA), wie Handschuhe, Gesichtsmaske und Laborkittel, zu tragen, um jeglichen Kontakt sowie Haut- oder Augenreizungen während der Verarbeitung zu vermeiden.
HINWEIS: Das Sicherheitsdatenblatt für dieses Produkt kann telefonisch von Glidewell Direct unter der Nummer 888-303-3975 angefordert werden.
13. Fragen/KommentareBei Fragen und/oder Kommentaren oder für weitere Anweisungen zur Verwendung dieses Produkts wenden Sie sich bitte in den USA an Glidewell Direct unter der Anschrift 18651 Von Karman Ave., Irvine, CA 92612, Telefon 888-303-3975.
0086
MDSS GmbHSchiffgraben 41
30175 Hannover, Deutschland
Hergestellt von
Prismatik Dentalcraft, Inc.(Eine hundertprozentige Tochtergesellschaft der
Glidewell Laboratories)2212 Dupont Drive
Irvine, CA 92612, USA Tel: 888-303-6470 Fax: 800-579-8233
VITA ist eine eingetragene Marke der VITA Zahnfabrik.
BRUXZIR® SHADED MILLING BLANKS
ESPAÑOL
Instrucciones de uso
1. Descripción del productoPiezas en bruto de zirconia coloreada para fresar BruxZir® (BruxZir Shaded & BruxZir Shaded-A)
BruxZir se emplea para confeccionar subestructuras con base de zirconia y piezas monolíticas de zirconia para coronas y puentes. Las subestructuras y coronas monolíticas se confeccionan usando un sistema de CAD/CAM para diseño y fabricación. Las subestructuras y coronas monolíticas diseñadas y manufacturadas se sinterizan después a alta temperatura. No es necesario añadir pigmentos a las piezas en bruto coloreadas BruxZir antes de la sinterización. Después de la sinterización hay que emplear técnicas de tinción y glaseado para darles a las coronas y puentes monolíticos el tono deseado de la guía VITA®. El material sinterizado presenta una gran resistencia y un aspecto traslúcido nacarado.
Como el material se contrae durante el sinterizado, a la hora de fresar es fundamental tener en cuenta cuál es la relación de tamaño (factor de contracción) apropiada. Mantener el factor de contracción (FC) correcto durante el fresado garantiza la precisión del ajuste y la exactitud marginal de las cofias y coronas sinterizadas; todos los bloques llevan una etiqueta donde se indica el FC específico que hay que aplicar.
2. Indicaciones de usoEste producto se emplea para la fabricación por parte de protésicos dentales de restauraciones a medida totalmente cerámicas en posiciones anteriores y posteriores.
3. KontraindikationenNinguna.
4. Tabelle - Technische DatenMedidos conforme a la norma ISO 6872
Tabla 1Clasificación: tipo II, clase 6
Coeficiente de dilatación térmica (CDT) (25–500 ºC) 11 x 10-6/K
Resistencia a la flexión > 800 MPaDensidad 6,05 g/cm3
Tabla 2Color BruxZir Tono VITA final
100 A1, B1, C1200 A2, A3, B2300 A3.5, B3, C2, D2, D3, D4400 A4, B4, C3, C4
5. Diseño de la subestructuraSi no se respetan las recomendaciones relativas al grosor de la pared y el conector que se indican en la tabla 3, al final de la restauración puede producirse una fractura.
Consulte el manual de su sistema de CAD para obtener instrucciones específicas sobre el diseño de las subestructuras. Los puentes monolíticos deben respetar las mismas reglas mínimas del conector.
Tabla 3 Cuadro de grosor recomendado de
pared y conector para subestructuras y contornos completos sinterizados
Cofias simples (estándar) Puentes
Anterior
Grosor de la pared(subestructura)
Circular Incisal/Oclusal
≥ 0,5 mm≥ 0,7 mm
≥ 0,5 mm≥ 0,7 mm
Dimensiones del conector(subestructura)
Puente de 3 unidades4 o más unidades
(puente)
--- ---
≥ 7,0 mm2
≥ 9,0 mm2
Dimensiones del conector(contorno completo)
Puente de 3 unidades4 o más unidades
(puente)
--- ---
≥ 7,0 mm2
≥ 9,0 mm2
Posterior
Grosor de la pared(subestructura)
Circular Incisal/Oclusal
≥ 0,5 mm≥ 0,7 mm
≥ 0,9 mm≥ 0,9 mm
Dimensiones del conector(subestructura y contorno completo)
Puente de 3 unidades4 o más unidades
(puente) Puente voladizo
(cantiléver)
--- ---
---
≥ 9 mm2
≥ 12 mm2
≥ 12 mm2
6. FresadoDespués de diseñar las restauraciones con el sistema CAD, programe la máquina de fresado e introduzca el factor de contracción (FC) para la pieza en bruto si el programa lo solicita. El fresador debe consultar las instrucciones de funcionamiento del sistema de fresado para ver el método de programación especificado para introducir el FC y trabajar las piezas en bruto de zirconia. El FC específico del bloque utilizado se puede ver en la etiqueta colocada en el lateral de la pieza en bruto coloreada BruxZir.
7. SinterungTodas las subestructuras y coronas y puentes monolíticos coloreados BruxZir deben someterse a un ciclo de sinterizado final antes del acabado. La temperatura de sinterización recomendada para poder conseguir una zirconia densa es de 1580 °C, como se indica en el gráfico de temperaturas de sinterización que figura más abajo. Una vez fresada, quite con cuidado la restauración de la pieza en bruto. Limpie cualquier resto de polvo que pudiera quedar poniendo las restauraciones en un baño ultrasónico lleno de agua recién destilada o desionizada ÚNICAMENTE. Limpie las restauraciones aplicando los ultrasonidos durante 30 segundos. Seque muy bien las restauraciones antes de sinterizarlas; si no lo hace podrían fracturarse. Para secar las restauraciones más deprisa se puede usar un microondas con convección o una lámpara de infrarrojos. Coloque las restauraciones en una bandeja de sinterización con perlas de zirconia del tamaño apropiado (no suministradas por Prismatik) en el horno de sinterizado. No hace falta sumergir las restauraciones coloreadas BruxZir en ningún líquido de tinción ni cambiarles el tono antes de la sinterización. Programe el horno siguiendo las instrucciones del manual correspondiente para conseguir el perfil de calentamiento recomendado en el gráfico de temperaturas de sinterización que figura más abajo. Para que la sinterización salga bien, asegúrese de que el horno alcanza los 1580 °C y mantiene esa temperatura durante al menos 2.5 horas. Espere a que el horno se haya enfriado lo suficiente para sacar las restauraciones sin peligro. Examine cuidadosamente las restauraciones para comprobar que no tienen grietas ni mellas.
Tem
per
atu
ra (º
C)
Tiempo (minutos)
Tiempo (hora)0
0 100 200 300 400 500
2 4 6 8
Tem
per
atu
ra (º
C)
1800 1800
1600 1600
1400 1400
1200 1200
1000 1000
800 800
600 600
400 400
200 200
0 0
(C5) (T5)
(T2)2 ºC/min (T3)
(C1) (C7)
15 ºC/min(T1)
10 ºC/min (T4)
15 ºC/min(T6)
(C6)
Cuadro de temperatura de sinterización
(C2)
(C4)
(C3)
Temperatura (ºC) Tiempo (minutos)
C1 25 ºC T1 78 minutos
C2 1200 ºC T2 60 minutos
C3 1200 ºC T3 50 minutos
C4 1300 ºC T4 28 minutos
C5 1580 ºC T5 150 minutos
C6 1580 ºC T6 90 minutos
C7 155 ºC T7 Apagado
Recomendaciones para el ciclo de sinterización• 1er velocidad de calentamiento: 15 ºC/min a 1200 ºC • 1er tiempo de mantenimiento a 1200 ºC – 60 minutos
• 2ª velocidad de calentamiento – 2 ºC/min a 1300 ºC • 3ª velocidad de calentamiento a 10 ºC/min a 1580 ºC • Temperatura de sinterización – 1580 ºC • 2º tiempo de mantenimiento a 1580 ºC – 150 minutos• Velocidad de enfriamiento – 15 ºC
ADVERTENCIA: no abra el horno ni saque las restauraciones sinterizadas hasta que el horno se haya enfriado lo suficiente para que sea seguro hacerlo.
ADVERTENCIA: consulte las instrucciones de funcionamiento del horno para saber cuál es la forma correcta de usarlo, de colocar el producto y de calibrarlo. Asegúrese de que el horno utilizado para la sinterización está calibrado conforme a las especificaciones del fabricante. Póngase en contacto con el fabricante del horno de sinterización si necesita instrucciones adicionales.
8. Adaptación de las restauraciones sinterizadasDespués de la sinterización, ajuste las restauraciones como corresponda, usando instrumentos adecuados de tallado de poca presión o enfriados por agua y procurando respetar los grosores recomendados para la pared y el conector que se indican en la tabla 3 del apartado 5.
9. Obtención del tono finalDespués de la sinterización se podrá apreciar el color de la restauración BruxZir coloreada.
Los tonos básicos BruxZir tienen que teñirse y glasearse para conseguir el tono final buscado.
Como se indica en la tabla 2, los colores BruxZir se corresponden con varios tonos de la guía de color VITA Classical.
Use las técnicas de tinción convencionales para ajustar el color final de la restauración al color prescrito.
Se recomienda utilizar materiales de tinción y glaseado con una temperatura de fusión baja, ya que por encima de los 860 °C, el uso de materiales con una temperatura de fusión mayor puede aumentar ligeramente el brillo de la restauración BruxZir.
Si usa un horno para porcelana o un horno de laboratorio (no suministrado por Prismatik), siga las instrucciones de tinción y glaseado del fabricante. Para conseguir el tono buscado puede que haga falta un segundo ciclo de tinción. Siga las instrucciones del fabricante para glasear la restauración.
ADVERTENCIA: no saque las restauraciones hasta que se hayan enfriado lo suficiente como para que sea seguro hacerlo.
ADVERTENCIA: consulte las instrucciones de funcionamiento del horno para saber cuál es la forma correcta de usarlo, de colocar el producto y de calibrarlo. Asegúrese de que el horno utilizado para la sinterización está calibrado conforme a las especificaciones del fabricante. Póngase en contacto con el fabricante del horno de sinterización si necesita instrucciones adicionales.
Después del ciclo de tinción, compruebe la calidad del tono y repita la tinción si es necesario. Si es necesario ajustar aún más el color, vuelva a cocer al horno las restauraciones usando el ciclo de cocción para tinción/glaseado de las piezas coloreadas BruxZir. Cuando haya obtenido el tono buscado, aplique la cantidad de glaseado que desee y hornee las restauraciones usando el ciclo de cocción para tinción/glaseado de las piezas BruxZir.
10. CementaciónEl dentista debe emplear resina reforzada con ionómeros de vidrio, cementos de resina o cementos de resina autoadhesivos para cementar las restauraciones coloreadas BruxZir.
11. AlmacenamientoAntes de guardar las piezas en bruto coloreadas BruxZir, compruebe que no han sufrido daños durante el envío. Posibles daños del envío pueden ser la presencia de grietas y mellas en el bloque. Las piezas en bruto deben guardarse a temperatura ambiente protegidas del polvo y alejadas de posibles fuentes de contaminación. Cuando no se usen, guarde las piezas en bruto coloreadas BruxZir en el envase original.
12. ADVERTENCIASNo inhale el polvo. Procure que no le entre polvo en los ojos y evite el contacto directo prolongado con la piel. Para evitar un posible contacto e irritación de la piel o los ojos durante el procesamiento, se recomienda utilizar equipo de protección individual (EPI), como guantes, máscaras y batas de laboratorio.
NOTA: para solicitar la FDS de este producto, llame a Glidewell Direct al número 888-303-3975.
13. Preguntas y comentariosPara cualquier pregunta o comentario, o para obtener instrucciones adicionales sobre el uso de este producto, póngase en contacto con Glidewell Direct (18651 Von Karman Ave., Irvine, CA 92612) o llame al 888-303-3975 en EE. UU.
0086
MDSS GmbHSchiffgraben 41
30175 Hannover, Alemania
Fabricado por
Prismatik Dentalcraft, Inc.(Una filial propiedad exclusiva de Glidewell
Laboratories)2212 Dupont Drive
Irvine, CA 92612, EE. UU. Tel: 888-303-6470 Fax: 800-579-8233
VITA es una marca registrada de VITA Zahnfabrik.
BRUXZIR® SHADED MILLING BLANKS
FRANÇAIS
Mode d’emploi
1. Description du produit
Ébauches de rodage en zircone BruxZir® teintées (BruxZir Shaded & BruxZir Shaded-A)
Les ébauches BruxZir teintées permettent de créer des armatures à base de zircone pour les couronnes et les bridges, et aussi pour les couronnes et les bridges complets en zircone. Les couronnes complètes et les armatures sont réalisées à l’aide du système de CFAO de conception et de fabrication assistées. Les armatures et les couronnes complètes ainsi conçues et fabriquées sont ensuite frittées à haute température. Nul besoin d’ajouter de la couleur aux ébauches BruxZir teintées avant le frittage. Après le frittage, il faut utiliser des techniques de coloration et d’émaillage pour obtenir la nuance VITA® souhaitée pour les couronnes et bridges complets. Le matériau fritté offre une résistance maximale et un nacré translucide.
Lors du rodage, pour le respect des proportions, il est indispensable de tenir compte du rétrécissement qui se produit pendant le frittage. Un bon respect du facteur d’agrandissement (FA) pendant le rodage permet d’optimiser le degré d’ajustement et la précision marginale des coiffes et/ou des couronnes frittées, chaque bloc portant la mention du FA à appliquer.
2. IndicationsCe dispositif est indiqué pour la fabrication, par des techniciens dentaires, de restaurations personnalisées 100 % céramique destinées aux emplacements antérieurs et postérieurs.
3. Contre-indicationsAucune.
4. Tableau de données techniquesMesures effectuées conformément à la norme ISO 6872
Tableau 1Classification - Type II, Classe 6
Coefficient de dilatation thermique (25–500 ºC) 11 x 10-6/KRésistance à la flexion > 800 MPa
Densité 6,05 g/cm3
Tableau 2BruxZir teinté Nuance VITA finale
100 A1, B1, C1200 A2, A3, B2300 A3.5, B3, C2, D2, D3, D4400 A4, B4, C3, C4
5. Conception des armaturesLe non-respect des recommandations d’épaisseur de la paroi et des connecteurs (voir tableau 3) peut provoquer une fracture de la restauration finale.
Pour des instructions spécifiques sur la conception des armatures, consulter le manuel du système de CAO. Les règles minimum relatives aux connecteurs s’appliquent aussi aux bridges complets.
Tableau 3 Épaisseurs recommandées pour la paroi et les connecteurs des
armatures et restaurations complètes
Coiffes uniques (standard) Bridges
Antérieure
Épaisseur de la paroi(armature)
Circulaire Incisive/Occlusale
≥ 0,5 mm≥ 0,7 mm
≥ 0,5 mm≥ 0,7 mm
Dimensions des connecteurs(armature)
Bridge à 3 unités4 unités et plus
(bridge)
--- ---
≥ 7,0 mm2
≥ 9,0 mm2
Dimensions des connecteurs(restauration complète)
Bridge à 3 unités4 unités et plus
(bridge)
--- ---
≥ 7,0 mm2
≥ 9,0 mm2
Postérieure
Épaisseur de la paroi(armature)
Circulaire Incisive/Occlusale
≥ 0,5 mm≥ 0,7 mm
≥ 0,9 mm≥ 0,9 mm
Dimensions des connecteurs(armatures et restaurations complètes)
Bridge à 3 unités4 unités et plus
(bridge)Cantilever
------
---
≥ 9 mm2
≥ 12 mm2
≥ 12 mm2
6. RodageUne fois les restaurations conçues par CAO, programmer la fraiseuse et entrer le facteur d’agrandissement (FA) pour l’ébauche, si le logiciel le demande. L’opérateur doit consulter les instructions du système utilisé pour le rodage afin de connaître la méthode de programmation adéquate pour la saisie du FA et le rodage des ébauches en zircone. Le FA spécifique du bloc utilisé peut se trouver sur l’étiquette fixée sur le côté de l’ébauche BruxZir teintée.
7. FrittageToutes les armatures et couronnes et tous les bridges complets BruxZir teintés doivent être soumis à un cycle final de frittage avant la finition. La température de frittage recommandée est de 1 580 °C comme indiqué dans le graphique des températures de frittage ci-dessous pour obtenir une zircone dense. Après le rodage, retirer avec précaution les restaurations de l’ébauche. Retirer toute poussière résiduelle en plaçant les restaurations dans un nettoyeur à ultrasons rempli UNIQUEMENT d’eau fraîche distillée ou désionisée. Nettoyer les restaurations aux ultrasons pendant 30 secondes. Bien sécher les restaurations avant le frittage, sans quoi elles risquent de se fracturer. Il est possible d’accélérer ce séchage dans un four à micro-ondes/convection ou avec une lampe chauffante. Placer les restaurations dans un plateau de frittage contenant les perles de zircone de la taille adéquate (non fournies par Prismatik) dans le four de frittage. À noter que les restaurations teintées BruxZir n’ont pas besoin d’être trempées dans des liquides de coloration ni de recevoir un quelconque traitement de teinte avant le frittage. Programmer le four conformément aux instructions du manuel correspondant pour obtenir le profil de cuisson recommandé, indiqué dans le graphique des températures de frittage ci-dessous. Pour obtenir un frittage adéquat, veiller à ce que le four atteigne 1 580 °C et conserve cette température pendant deux (2) heures. Laisser le four refroidir suffisamment pour retirer les restaurations en toute sécurité. Examiner attentivement les restaurations à la recherche de possibles fissures ou éclats.
Tem
pér
atu
re (º
C)
Durée (minutes)
Durée (heures)0
0 100 200 300 400 500
2 4 6 8
Tem
pér
atu
re (º
C)
1 800 1 800
1 600 1 600
1 400 1 400
1 200 1 200
1 000 1 000
800 800
600 600
400 400
200 200
0 0
(C5) (T5)
(T2)2 ºC/min (T3)
(C1) (C7)
15 ºC/min(T1)
10 ºC/min (T4)
15 ºC/min(T6)
(C6)
Graphique des températures de frittage
(C2)
(C4)
(C3)
Température (ºC) Durée (minutes)
C1 25 ºC T1 78 minutes
C2 1 200 ºC T2 60 minutes
C3 1 200 ºC T3 50 minutes
C4 1 300 ºC T4 28 minutes
C5 1 580 ºC T5 150 minutes
C6 1 580 ºC T6 90 minutes
C7 155ºC T7 Éteint
Recommandations pour le cycle de frittage• 1ère vitesse de montée en température – 15 ºC/min à 1 200 ºC • 1ère temps de maintien à 1 200 ºC – 60 minutes • 2e vitesse de montée en température – 2 ºC/min à 1 300 ºC • 3e vitesse de montée en température – 10 ºC/min à 1 580 ºC • Température de frittage – 1 580 ºC • 2e temps de maintien à 1 580 ºC – 150 minutes• Vitesse de refroidissement – 15 ºC
AVERTISSEMENT : ne pas ouvrir le four et ne pas retirer les restaurations frittées tant que le four n’est pas assez froid pour un retrait en toute sécurité.
AVERTISSEMENT : se reporter aux instructions de fonctionnement du four pour l’utilisation, le positionnement du produit et l’étalonnage. Veiller à utiliser et étalonner le four de frittage conformément aux spécifications du fabricant. Contacter ce dernier pour de plus amples informations.
8. Ajustage des restaurations frittéesAprès le frittage, procéder à l’ajustage de la forme des restaurations en fonction des besoins au moyen des instruments de rectification adéquats, à faible pression ou refroidis à l’eau, en veillant à respecter les épaisseurs de la paroi et des connecteurs indiquées au tableau 3 de la section 5.
9. Obtention de la teinte finaleAprès le frittage, la couleur de la restauration BruxZir teintée sera apparente.
Les nuances de base des BruxZir teintées doivent subir une coloration et un émaillage avant d’obtenir la nuance finale souhaitée.
Comme indiqué dans le tableau 2, les formulations BruxZir teintées correspondent à diverses nuances VITA classiques.
Utiliser des techniques de coloration standard pour obtenir la couleur finale de la restauration en fonction de la demande.
Il est recommandé d’utiliser des produits d’émaillage et de coloration à basse fusion, car les matériaux à point de fusion élevé peuvent provoquer un léger éclaircissement de la restauration BruxZir au-dessus de 860 °C.
Utiliser un four porcelaine ou de laboratoire (non fourni par Prismatik) et suivre les instructions du fabricant relatives à la coloration et à l’émaillage. Un deuxième cycle de coloration peut s’avérer nécessaire pour obtenir la nuance souhaitée. Suivre les instructions du fabricant pour l’émaillage de la restauration.
AVERTISSEMENT : ne pas retirer les restaurations tant qu’elles ne sont pas assez froides pour être manipulées en toute sécurité.
AVERTISSEMENT : se reporter aux instructions de fonctionnement du four pour l’utilisation, le positionnement du produit et l’étalonnage. Veiller à utiliser et étalonner le four de frittage conformément aux spécifications du fabricant. Contacter ce dernier pour de plus amples informations.
Une fois le cycle de coloration terminé, vérifier la nuance et colorer de nouveau au besoin. Si des modifications de coloration supplémentaires s’avèrent nécessaires, recuire les restaurations en utilisant le cycle de cuisson coloration/émaillage pour les BruxZir teintées. Une fois la nuance souhaitée obtenue, appliquer la quantité souhaitée d’émail sur les restaurations et les cuire en utilisant le cycle de cuisson coloration/émaillage pour les BruxZir.
10. CémentationLe dentiste doit utiliser un ciment au verre ionomère renforcé à la résine, un ciment résine ou un ciment résine auto-adhésif pour cémenter les restaurations BruxZir teintées.
11. StockageAvant de stocker les ébauches BruxZir teintées, vérifier qu’elles n’ont subi aucun dommage pendant le transport, et que les blocs ne sont pas fissurés ni ébréchés. Les ébauches doivent être stockées à température ambiante, à l’abri de toute poussière et de toute source de contamination potentielle. Lorsqu’elles ne sont pas utilisées, conserver les ébauches BruxZir teintées dans leur emballage d’origine.
12. AVERTISSEMENTSNe pas inhaler la poussière. La poussière ne doit pas pénétrer dans les yeux ni se trouver en contact direct prolongé avec la peau. Le port d’un équipement de protection individuel (EPI) composé de gants, d’un masque et d’une blouse de laboratoire est recommandé afin d’éviter tout contact irritant avec les yeux et la peau pendant l’opération.
REMARQUE : pour obtenir la fiche de données de sécurité de ce produit, appeler Glidewell Direct au +1 888 303 3975.
13. Questions/CommentairesPour toute question ou commentaire, ou pour obtenir d’autres d’instructions sur l’utilisation de ce produit, contacter Glidewell Direct aux États-Unis à l’adresse 18651 Von Karman Ave., Irvine, CA 92612 ou par téléphone au +1 888 303 3975.
0086
MDSS GmbHSchiffgraben 41
30175 Hannover, Allemagne
Fabriqué par
Prismatik Dentalcraft, Inc.(Filiale à part entière de Glidewell Laboratories)
2212 Dupont Drive Irvine, CA 92612, États-Unis
Tél: 888-303-6470 Fax: 800-579-8233
VITA est une marque déposée de VITA Zahnfabrik.
BRUXZIR® SHADED MILLING BLANKS
ITALIANO
Istruzioni per l’uso
1. Descrizione del prodotto
Blocchi di fresatura in zirconia colorati BruxZir® (BruxZir Shaded & BruxZir Shaded-A)
I blocchi di fresatura in zirconia BruxZir vengono utilizzati per la realizzazione di strutture portanti in zirconia a contorno pieno e a base di zirconia per corone e ponti. Per la progettazione e la realizzazione delle strutture portanti e delle corone a contorno pieno viene utilizzato il sistema CAD/CAM. Una volta progettate e realizzate, le strutture portanti e le corone a contorno pieno vengono poi sinterizzate ad alta temperatura. Prima della sinterizzazione non occorre aggiungere alcun colore ai blocchi colorati BruxZir. Dopo la sinterizzazione, è necessario utilizzare le tecniche di base di colorazione e smaltatura per ottenere la colorazione VITA® desiderata per corone e ponti a contorno pieno. Il materiale sinterizzato offre la massima resistenza e presenta un pigmento perlescente traslucido.
Poiché il processo di sinterizzazione produce contrazione volumetrica, è di fondamentale importanza tenere in considerazione il giusto rapporto delle dimensioni (fattore di ingrandimento) durante la fresatura. L’attenzione al corretto fattore di ingrandimento durante la fresatura assicura un perfetto posizionamento e la massima precisione dei margini delle corone e/o cappette sinterizzate, con ogni blocco contrassegnato con il fattore di ingrandimento (EF) specifico da applicare.
2. Indicazioni per l’usoCe dispositif est indiqué pour la fabrication, par des techniciens dentaires, de restaurations personnalisées 100 % céramique destinées aux emplacements antérieurs et postérieurs.
3. ControindicazioniNessuna.
4. Tabella dei dati tecniciIn conformità alla norma ISO 6872
Tabella 1Classificazione - Tipo II, Classe 6
Coefficiente di espansione termica (CET) (25–500 ºC) 11 x 10-6/K
Resistenza alla flessione > 800 MPaDensità 6,05 g/cm3
Tabella 2Colorazione BruxZir Colorazione VITA finale
100 A1, B1, C1200 A2, A3, B2300 A3.5, B3, C2, D2, D3, D4400 A4, B4, C3, C4
5. Progettazione della struttura portanteIl mancato rispetto delle raccomandazioni relative allo spessore delle pareti e dei connettori illustrate nella Tabella 3 può portare alla rottura del restauro finale.
Per istruzioni specifiche relative alla progettazione delle strutture portanti, consultare il manuale CAD appropriato del sistema CAD in uso. Per i ponti a contorno pieno è necessario seguire le stesse regole minime dei connettori.
Tabella 3 Tabella di riferimento dello spessore
delle pareti e dei connettori per strut-ture sinterizzate e contorni pieni
Cappette singole (standard) Ponti
Anteriore
Spessore delle pareti(struttura)
Circolare incisale/occlusale
≥ 0,5 mm≥ 0,7 mm
≥ 0,5 mm≥ 0,7 mm
Dimensioni dei connettori(struttura)
Ponte a 3 unità4 e più unità (ponte)
--- ---
≥ 7,0 mm2
≥ 9,0 mm2
Dimensioni dei connettori(contorno pieno)
Ponte a 3 unità4 e più unità (ponte)
--- ---
≥ 7,0 mm2
≥ 9,0 mm2
Posteriore
Spessore delle pareti(struttura)
Circolare incisale/occlusale
≥ 0,5 mm≥ 0,7 mm
≥ 0,9 mm≥ 0,9 mm
Dimensioni dei connettori(struttura e contorno pieno)
Ponte a 3 unità4 unita e più (ponte)
Cantilever
------ ---
≥ 9 mm2
≥ 12 mm2
≥ 12 mm2
6. FresaturaUna volta completata la progettazione CAD dei restauri, programmare la fresatrice ed inserire il fattore di ingrandimento (EF) per il blocco, se richiesto dal programma. Per il metodo di programmazione specificato per l’inserimento del fattore di ingrandimento e per la fresatura dei blocchi in zirconia, l’operatore deve consultare le istruzioni d’uso del sistema di fresatura utilizzato. Il fattore di ingrandimento specifico per il blocco utilizzato è riportato sull’etichetta presente sul lato del blocco colorato BruxZir.
7. SinterizzazioneTutte le strutture portanti colorate e le corone e i ponti a contorno pieno BruxZir devono essere sottoposti a un ciclo di sinterizzazione finale prima della finitura. Per ottenere zirconia densa, la temperatura di sinterizzazione raccomandata è di 1580 ºC come illustrato nel grafico della temperatura di sinterizzazione riportato di seguito. Una volta completata la fresatura, rimuovere con cautela i restauri dal blocco. Rimuovere tutti i residui di polvere collocando i restauri in un pulitore a ultrasuoni riempito SOLO con acqua distillata o deionizzata. Pulire a ultrasuoni i restauri per 30 secondi. Asciugare accuratamente i restauri prima della sinterizzazione, altrimenti potrebbero rompersi. L’asciugatura dei restauri può essere accelerata mediante l’uso della convezione a microonde o di una lampada riscaldante. Collocare i restauri in un vassoio di sinterizzazione contenente le sfere di zirconia delle dimensioni appropriate (non fornite da Prismatik) e introdurre il vassoio nel forno di sinterizzazione. Nota: i restauri colorati BruxZir non devono essere immersi in liquidi coloranti o subire alcuna alterazione della colorazione prima della sinterizzazione. Programmare il forno di sinterizzazione utilizzando il relativo manuale in modo da ottenere il profilo di riscaldamento raccomandato illustrato nel grafico delle temperature di sinterizzazione riportato di seguito. Per una corretta sinterizzazione, assicurarsi che il forno raggiunga 1580 ºC e che mantenga questa temperatura per 2.5 ore. Per rimuovere i restauri in sicurezza, attendere che il forno si raffreddi a sufficienza. Ispezionare attentamente i restauri per verificare che non presentino crepe o scheggiature.
Tem
per
atu
ra (°
C)
Tempo (min)
Tempo (ore)0
0 100 200 300 400 500
2 4 6 8
Tem
per
atu
ra (°
C)
1800 1800
1600 1600
1400 1400
1200 1200
1000 1000
800 800
600 600
400 400
200 200
0 0
(C5) (T5)
(T2)2 ºC/min (T3)
(C1) (C7)
15 ºC/min(T1)
10 ºC/min (T4)
15 ºC/min(T6)
(C6)
Grafico delle temperature di sinterizzazione
(C2)
(C4)
(C3)
Temperatura (ºC) Tempo (minuti)
C1 25 ºC T1 78 minuti
C2 1200 ºC T2 60 minuti
C3 1200 ºC T3 50 minuti
C4 1300 ºC T4 28 minuti
C5 1580 ºC T5 150 minuti
C6 1580 ºC T6 90 minuti
C7 155 ºC T7 Disattivato
Raccomandazioni per il ciclo di sinterizzazione• 1° velocità di riscaldamento – 15 °C/min a 1200 °C • 1° tempo di attesa a 1200 °C – 60 minuti • 2° velocità di riscaldamento – 2 °C/min a 1300 °C • 3° velocità di riscaldamento – 10 °C/min a 1580 °C • Temperatura di sinterizzazione – 1580ºC • 2° tempo di attesa a 1580 ºC – 150 minuti• Velocità di raffreddamento – 15 ºC
AVVERTENZA: per una rimozione sicura, attendere che il forno si raffreddi a sufficienza prima di aprirlo o rimuovere i restauri sinterizzati.
AVVERTENZA: per un corretto utilizzo, posizionamento del prodotto e calibrazione, consultare le istruzioni per l’uso del forno utilizzato. Assicurarsi che il forno di sinterizzazione utilizzato sia calibrato in conformità alle specifiche del produttore. Per ulteriori istruzioni, contattare il produttore del forno di sinterizzazione.
8. Rettifiche dei restauri sinterizzatiDopo la sinterizzazione, rettificare l’anatomia dei restauri secondo necessità utilizzando strumenti di rettifica a bassa pressione appropriati o dotati di raffreddamento ad acqua, facendo attenzione a osservare gli spessori raccomandati per le pareti e i connettori illustrati nella Tabella 3 riportata nella Sezione 5.
9. Ottenimento del colore finaleDopo la sinterizzazione, il colore del restauro colorato BruxZir diventerà visibile.
Le colorazioni di base dei blocchi colorati BruxZir devono essere colorate e smaltate per raggiungere la colorazione finale desiderata.
Come illustrato nella Tabella 2, le formulazioni dei blocchi colorati BruxZir corrispondono a diverse colorazioni VITA Classical.
Utilizzare le tecniche standard di colorazione per regolare il colore finale del restauro secondo la prescrizione.
Si raccomanda di utilizzare materiali di colorazione e smaltatura a basso punto di fusione, in quanto i materiali ad alto punto di fusione possono causare un leggero schiarimento del restauro BruxZir a temperature superiori a 860 ºC.
Utilizzando un forno per porcellana o da laboratorio (non fornito da Prismatik), seguire le istruzioni di colorazione e smaltatura fornite dal produttore. Per ottenere la colorazione desiderata, potrebbe essere necessario eseguire un secondo ciclo di colorazione. Per la smaltatura del restauro, seguire le istruzioni del produttore.
AVVERTENZA: per una rimozione sicura, attendere che i restauri si siano raffreddati a sufficienza prima di rimuoverli.
AVVERTENZA: per un corretto utilizzo, posizionamento del prodotto e calibrazione, consultare le istruzioni per l’uso del forno utilizzato. Assicurarsi che il forno di sinterizzazione utilizzato sia calibrato in conformità alle specifiche del produttore. Per ulteriori istruzioni, contattare il produttore del forno di sinterizzazione.
Dopo il ciclo di colorazione, controllare la qualità della colorazione e, se necessario, rieseguirla. Se sono necessarie ulteriori correzioni della colorazione, infornare nuovamente i restauri utilizzando il ciclo di cottura per la colorazione/smaltatura dei blocchi colorati BruxZir. Una volta ottenuta la colorazione desiderata, applicare la quantità necessaria di smalto e infornare i restauri utilizzando il ciclo di cottura per la colorazione/smaltatura BruxZir.
10. CementazionePer cementare i restauri colorati BruxZir il dentista deve utilizzare vetroionomeri rinforzati con resina, cementi resinati o cementi resinati autoadesivi.
11. ConservazionePrima di conservare i blocchi colorati BruxZir, assicurarsi che non presentino danni da trasporto. I danni da trasporto possono includere, ad esempio, crepe e scheggiature del blocco. I blocchi devono essere conservati a temperatura ambiente e lontano da polvere e da potenziali fonti di contaminazione. Quando non in uso, conservare i blocchi colorati BruxZir nella confezione originale.
12. AVVERTENZENon respirare le polveri. Evitare il contatto delle polveri con gli occhi o il prolungato contatto diretto con la pelle. Al fine di evitare il potenziale contatto e l’irritazione della pelle o degli occhi durante la lavorazione, si raccomanda di utilizzare dispositivi di protezione individuale (DPI) quali guanti, maschere e camici da laboratorio.
NOTA: per richiedere la scheda di sicurezza di questo prodotto, contattare Glidewell Direct al numero 888-303-3975.
13. Domande/commentiPer domande e/o commenti o per ulteriori istruzioni relative all’uso di questo prodotto, contattare Glidewell Direct negli Stati Uniti all’indirizzo 18651 Von Karman Ave., Irvine, CA 92612 o al numero 888-303-3975.
0086
MDSS GmbHSchiffgraben 41
30175 Hannover, Germania
Prodotto da
Prismatik Dentalcraft, Inc.(Una consociata interamente controllata
da Glidewell Laboratories)2212 Dupont Drive
Irvine, CA 92612, USA Tel: 888-303-6470 Fax: 800-579-8233
VITA è un marchio registrato di VITA Zahnfabrik.
BRUXZIR® SHADED MILLING BLANKS
MAGYAR
Használati utasítás
1. A termék bemutatása
BruxZir® marógépbe illeszthető előszínezett cirkónium tömbök (BruxZir Shaded & Shaded-A)
BruxZir előszínezett tömbök cirkónium borítóelemek vagy cirkónium-alapú vázak készítésére koronák és hidak számára. A borítókoronák és vázak tervezése és elkészítése CAD/CAM rendszerekkel történik. Ezt követően a megtervezett és elkészített borítókoronák és vázak magas hőmérsékletű szinterezésen esnek át. A BruxZir előszínezett tömbök esetében a szinterezés előtt nincs szükség színezőanyag hozzáadására. A borítókoronák és -hidak kívánt VITA® árnyalatának eléréséhez a szinterezést követően szükség van az alapvető színezési technikák alkalmazására és a zománc ráégetésére. A szinterezett anyag maximálisan ellenálló, áttetsző és gyöngyházfényű.
A szinterezés zsugorodásssal jár, ezért faragáskor nagyon fontos a megfelelő méret (zsugorodási tényező) alkalmazása. A megfelelő zsugorodási tényező figyelembe vétele a faragás során biztosítja a szinterezett leplezés és/vagy korona tökéletes illeszkedését és az oldalak pontosságát. Minden tömbön szerepel az alkalmazandó zsugorodási tényező.
2. Felhasználási javallatA terméket fogtechnikusok használhatják, első és hátsó, egyedi, kerámia fogpótlások készítésére.
3. EllenjavallatokNincsenek.
4. Műszaki adatokat tartalmazó táblázatA mérések az ISO 6872 szabványnak megfelelően történtek
1. táblázatOsztályozás - II. típus, 6. osztály
Hőtágulási együttható (25–500 ºC) 11 x 10-6/KHajlítószilárdság > 800 MPa
Sűrűség 6,05 g/cm3
2. táblázatElőszínezett BruxZir Végleges VITA árnyalat
100 A1, B1, C1200 A2, A3, B2300 A3.5, B3, C2, D2, D3, D4400 A4, B4, C3, C4
5. A váz kialakításaA fal és az összekötő elem vastagságára vonatkozó, 3. táblázatban szereplő ajánlások figyelmen kívül hagyása a végső fogpótlás törését eredményezheti.
A vázak kialakítására vonatkozó speciális utasításokat illetően tájékozódjon a CAD rendszeréhez mellékelt megfelelő CAD kézikönyvből. A borítóhidak esetében az összekötő elemekre ugyanazok a minimális követelmények vonatkoznak.
3. táblázat Szinterezett vázak és borítások
falainak és összekötő elemeinek javasolt vastagságát tartalmazó
táblázat
Egyetlen leplezés (standard) Hidak
Elülső
Falvastagság(váz)
Kör alakú Incizális/Okkluzális
≥ 0,5 mm≥ 0,7 mm
≥ 0,5 mm≥ 0,7 mm
Összekötő elem méretei(váz)
3 tagból álló híd4 vagy több tagból
álló (híd)
---
---
≥ 7,0 mm2
≥ 9,0 mm2
Összekötő elem méretei(borítás)
3 tagból álló híd4 vagy több tagból
álló (híd)
---
---
≥ 7,0 mm2
≥ 9,0 mm2
Hátsó
Falvastagság(váz)
Kör alakú Incizális/Okkluzális
≥ 0,5 mm≥ 0,7 mm
≥ 0,9 mm≥ 0,9 mm
Összekötő elem méretei(váz és borítás)
3 tagból álló híd4 vagy több tagból
álló (híd) Szabadvégű
--- ---
---
≥ 9 mm2
≥ 12 mm2
≥ 12 mm2
6. FaragásA fogpótlás CAD rendszerrel történő megtervezése után programozza be a marógépet, valamint adja meg a tömbre jellemző zsugorodási tényezőt, amennyiben a szoftver felkéri erre. A használt marórendszert, a beprogramozást és a zsugorodási tényező megadását, valamint a cirkónium tömbök faragását illetően a marógép kezelőjének tájékozódnia kell a használati utasításból. A használt tömb zsugorodási tényezője a BruxZir előszínezett tömb oldalára ragasztott címkén van feltüntetve.
7. SzinterezésBefejezés előtt az összes BruxZir előszínezett váznak, borítókoronának és hídnak egy végső szinterezési szakaszon kell átesnie. A cirkónium megfelelő tömörségének eléréséhez az ajánlott szinterezési hőmérséklet 1580 °C, ahogy az az alábbi, szinterezési hőmérsékleteket tartalmazó grafikonon is fel van tüntetve. A kifaragás végeztével óvatosan távolítsa el a fogpótlást a tömbből. A por eltávolítása érdekében helyezze a fogpótlásokat KIZÁRÓLAG desztillált vagy deionizált vízzel feltöltött ultrahangos tisztító berendezésbe. Ultrahangos módszerrel tisztítsa a fogpótlásokat 30 másodpercig. Szinterezés előtt szárítsa meg alaposan a fogpótlásokat, különben eltörhetnek. A fogpótlások száradása felgyorsítható konvekciós mikrohullámú berendezés vagy hőlámpa segítségével. A fogpótlásokat helyezze megfelelő méretű (a Prismatik vállalattól nem beszerezhető) cirkónium szemcséket tartalmazó szinterező tálcán a szinterező kályhába. Ne feledje: A BruxZir előszínezett fogpótlásokat a szinterezés előtt nem szükséges belemeríteni semmilyen színezőfolyadékba, valamint nincs szükség az árnyalat semmilyen módon történő megváltoztatására. A kályha kézikönyvének segítségével programozza be a szinterező kályhát a szinterezési hőmérsékleteket tartalmazó alábbi grafikonon feltüntetett javasolt hevítési profil elérése érdekében. A megfelelő szinterezés érdekében bizonyosodjon meg arról, hogy a kályha 1580 °C hőmérsékletre melegszik, és 2.5 órán keresztül tartja ezt az értéket. A fogpótlások biztonságos eltávolítása érdekében hagyja, hogy a kályha megfelelő mértékben kihűljön. Vizsgálja meg alaposan a fogpótlásokat, hogy nincsenek-e rajtuk repedések vagy lepattogzott részek.
Hő
mér
sékl
et (º
C)
Idő (perc)
Idő (óra)0
0 100 200 300 400 500
2 4 6 8
Hő
mér
sékl
et (º
C)
1800 1800
1600 1600
1400 1400
1200 1200
1000 1000
800 800
600 600
400 400
200 200
0 0
(C5) (T5)
(T2)2 ºC/perc(T3)
(C1) (C7)
10 ºC/perc (T4)
15 ºC/perc(T6)
(C6)
Szinterezési hőmérséklet grafikonja
(C2)
(C4)
(C3)
15 ºC/perc(T1)
Hőmérséklet (ºC) Idő (perc)
C1 25 ºC T1 78 perc
C2 1200 ºC T2 60 perc
C3 1200 ºC T3 50 perc
C4 1300 ºC T4 28 perc
C5 1580 ºC T5 150 perc
C6 1580 ºC T6 90 perc
C7 155 ºC T7 Kikapcsolva
A szinterezési ciklusra vonatkozó ajánlások• Első hőmérséklet-emelkedési ráta – 15 °C/perc 1200 °C-ig • Első hőmérséklet fenntartási idő 1200 °C-on – 60 perc • Második hőmérséklet-emelkedési ráta – 2 °C/perc 1300 °C-ig • Harmadik hőmérséklet-emelkedési ráta – 10 °C/perc 1580 °C-ig • Szinterezési hőmérséklet – 1580 °C • Második hőmérséklet fenntartási idő 1580 °C-on – 150 perc• Hőmérséklet-csökkenési ráta – 15 °C
FIGYELMEZTETÉS: ne nyissa ki a kályhát vagy ne vegye ki a szinterezett fogpótlásokat, amíg a kályha eléggé le nem hűlt a biztonságos eltávolításhoz.
FIGYELMEZTETÉS: a termék behelyezését illetően, valamint a megfelelő használat és beállítás érdekében tájékozódjon a kályha használati utasításából. Bizonyosodjon meg arról, hogy a szinterező kályhát a gyártó specifikációinak megfelelően állította be. További utasításokért vegye fel a kapcsolatot a szinterező kályha gyártójával.
8. A szinterezett fogpótlások kiigazításaSzinterezést követően szükség esetén igazítsa ki a fogpótlások alakját megfelelő, kis nyomást kifejtő vagy vízhűtéses csiszolóberendezéssel. Ügyeljen arra, hogy betartsa a falak és az összekötő elemek vastagságát, az 5. pontban található 3. táblázat értékeinek megfelelően.
9. A végső árnyalat kialakításaSzinterezést követően a BruxZir előszínezett fogpótlás színe láthatóvá válik.
A BruxZir alapárnyalatai színezést igényelnek, valamint szükség van a zománc ráégetésére a kívánt végső árnyalat elérése érdekében.
Ahogy az a 2. táblázatban látható, az előszínezett BruxZir tömbök több VITA Classic árnyalattal kompatibilisek.
Alkalmazzon standard színezési technikákat, hogy elérje a fogpótlás munkalap szerinti végső árnyalatát.
Alacsony olvadáspontú zománc és színezékanyagok használata javasolt, mivel a magas olvadáspontú anyagok 860 °C fölött a BruxZir fogpótlás enyhe kifényesedését okozhatják.
Használjon porcelán vagy laboratóriumi (a Prismatik vállalattól nem beszerezhető) kályhát, és tartsa be a gyártó utasításait a színezésre és a zománc ráégetésére vonatkozóan. Előfordulhat, hogy a kívánt árnyalat eléréséhez második színezésre is szükség van. A zománc fogpótlásra égetésekor kövesse a gyártó utasításait.
FIGYELMEZTETÉS: ne vegye ki a fogpótlásokat, amíg eléggé le nem hűlnek a biztonságos eltávolításhoz.
FIGYELMEZTETÉS: a termék behelyezését illetően, valamint a megfelelő használat és beállítás érdekében tájékozódjon a kályha használati utasításából. Bizonyosodjon meg arról, hogy a szinterező kályhát a gyártó specifikációinak megfelelően állította be. További utasításokért vegye fel a kapcsolatot a szinterező kályha gyártójával.
A színezést követően ellenőrizze az árnyalat minőségét, majd szükség esetén hajtson végre egy újabb színezési fázist. Amennyiben az árnyalat további igazítására van szükség, alkalmazza ismét az előszínezett BruxZir színezék/zománc ráégetési eljárását. A kívánt árnyalat elérését követően vigye fel a fogpótlásra a kívánt mennyiségű zománcot, majd égesse rá a BruxZir színezék/zománc ráégetési eljárás alkalmazásával.
10. CementezésA fogászati szakembernek műgyantával megerősített üveg-ionomer ragasztócementet, műgyanta cementet vagy öntapadó műgyanta cementet kell használnia az előszínezett BruxZir fogpótlások cementezéséhez.
11. TárolásAz előszínezett BruxZir tömbök tárolása előtt győződjön meg arról, hogy a termék nem sérült meg a szállítás során. A szállítási sérülések között megemlíthető a tömbök repedése és lepattogzása. A tömbök tárolása szobahőmérsékleten kell történjen, portól és potenciális szennyezési forrásoktól védett helyen. Használaton kívül tárolja az előszínezett BruxZir tömböket az eredeti csomagolásukban.
12. FIGYELMEZTETÉSEKNe lélegezze be a port. Ne hagyja, hogy a por a szemébe kerüljön vagy huzamosabb ideig érintkezzen a bőrével. Személyi védőfelszerelések, mint például kesztyű, maszk és laboratóriumi köpeny használata javasolt annak érdekében, hogy megmunkálás során elkerülje az esetleges érintkezést, és ezáltal a szem és a bőr irritációját.
MEGJEGYZÉS: a termék anyagbiztonsági adatlapjáért hívja a Glidewell Direct vállalatot az 888-303-3975-ös telefonszámon.
13. Kérdések/megjegyzésekKérdések és/vagy megjegyzések esetén, illetve a termék használatára vonatkozó további utasításokért vegye fel a kapcsolatot a Glidewell Direct vállalattal az Amerikai Egyesült Államokban a következő címen: 18651 Von Karman Ave., Irvine, CA 92612 vagy hívja az 888-303-3975-ös telefonszámot.
0086
MDSS GmbHSchiffgraben 41
30175 Hannover, Németország
Gyártó
Prismatik Dentalcraft, Inc.(A Glidewell Laboratories 100%-os
tulajdonában álló leányvállalat)2212 Dupont Drive
Irvine, CA 92612, Amerikai Egyesült Államok Tel: + 888-303-6470 Fax: + 800-579-8233
A VITA a VITA Zahnfabrik bejegyzett védjegye.
BRUXZIR® SHADED MILLING BLANKS
NEDERLANDS
Instructies voor gebruik
1. ProductbeschrijvingBruxZir ® Shaded zirkoniumfreesblanks (BruxZir Shaded & BruxZir Shaded-A)
BruxZir Shaded-blanks worden gebruikt voor de productie van volledig gecontoureerde zirkonium onderstructuren en onderstructuren op zirkoniumbasis voor kronen en bruggen. De volledig gecontoureerde kronen en onderstructuren worden vervaardigd met het CAD/CAM-systeem voor ontwerp en fabricage. De ontworpen en vervaardigde volledig gecontoureerde kronen en onderstructuren worden vervolgens bij hoge temperatuur gesinterd. Vóór het sinteren hoeft geen kleur te worden toegevoegd aan BruxZir Shaded-blanks. Na het sinteren dienen elementaire kleur- en glazuurtechnieken te worden toegepast om de gewenste VITA®-tint te verkrijgen voor volledig gecontoureerde kronen en bruggen. Het gesinterde materiaal vertoont een optimale sterkte en een doorschijnend parelmoereffect.
Aangezien tijdens het sinteren krimp optreedt, is het van essentieel belang om tijdens het frezen de juiste afmetingsverhouding (EF; vergrotingsfactor [enlargement factor]) Door tijdens het frezen aandacht te schenken aan de juiste vergrotingsfactor worden een precieze pasvorm en accurate marges van de gesinterde kap en/of kroon gewaarborgd, waarbij elk blok wordt gelabeld met de specifieke toe te passen EF.
2. Indicaties voor gebruikHet hulpmiddel is geïndiceerd voor gebruik door de tandtechnicus bij de constructie van volkeramische restauraties voor anterieure en posterieure locaties op maat.
FOR REFERENCE ONLY

3. Contra-indicatiesGeen.
4. Tabel met technische gegevensZoals gemeten conform ISO 6872
Tabel 1Classificatie - Type II, klasse 6
Coëfficiënt thermische expansie (CTE) (25–500 °C) 11 x 10-6/K
Buigsterkte > 800 MPaDichtheid 6,05 g/cm3
Tabel 2BruxZir Shaded Definitieve VITA-tint
100 A1, B1, C1200 A2, A3, B2300 A3.5, B3, C2, D2, D3, D4400 A4, B4, C3, C4
5. Ontwerp van onderstructuurWanneer de aanbevelingen voor de wand- en connectordikte zoals vermeld in tabel 3 niet in acht worden genomen, kan dat leiden tot breken van de eindrestauratie.
Raadpleeg de toepasselijke CAD-handleiding voor uw CAD-systeem voor specifieke aanwijzingen over het ontwerp van de onderstructuren. Volledig gecontoureerde bruggen moeten aan dezelfde regels voor een minimale connectordikte voldoen.
Tabel 3Tabel met aanbevolen wand- en
connectordikten voor gesinterde onderstructuren en volledige
contouren
Enkelvoudige kappen
(standard)Bruggen
Anterieur
Wanddikte(onderstructuur)
Rond Incisaal/occlusaal
≥ 0,5 mm≥ 0,7 mm
≥ 0,5 mm≥ 0,7 mm
Connectorafmetingen(onderstructuur)
driedelige brugvier- en meerdelige
(brug)
--- ---
≥ 7,0 mm2
≥ 9,0 mm2
Connectorafmetingen(volledige contour)
driedelige brugvier- en meerdelige
(brug)
--- ---
≥ 7,0 mm2
≥ 9,0 mm2
Posterieur
Wanddikte(onderstructuur)
Rond Incisaal/occlusaal
≥ 0,5 mm≥ 0,7 mm
≥ 0,9 mm≥ 0,9 mm
Connectorafmetingen(onderstructuur en volledige contour)
driedelige brugvier- en meerdelig
(brug)Cantileverbrug
------
---
≥ 9 mm2
≥ 12 mm2
≥ 12 mm2
6. FrezenNadat de restauraties met het CAD-systeem zijn ontworpen, programmeert u uw freesmachine en voert u de vergrotingsfactor (EF) in voor de blank als het programma hierom vraagt. De bediener van de frees moet de bedieningsinstructies van het betreffende freessysteem raadplegen voor de gespecificeerde programmeringsmethode om de EF in te voeren en om de blanks van zirkoniumoxide te frezen. De specifieke EF voor het gebruikte blok staat op het label dat op de zijkant van de BruxZir Shaded-blank is aangebracht.
7. SinterenAlle BruxZir Shaded-onderstructuren en volledig gecontoureerde kronen en bruggen moeten een laatste sintercyclus ondergaan voorafgaand aan de afwerking. Ter verkrijging van zirkonium met een hoge dichtheid is de aanbevolen sintertemperatuur 1580 °C, zoals staat weergegeven in onderstaande sintertemperatuurgrafiek. Na het frezen verwijdert u de restauraties voorzichtig van de blank. Verwijder alle reststof door de restauraties te plaatsen in een ultrasoonreiniger die is gevuld met UITSLUITEND schoon gedestilleerd of gedeïoniseerd water. Laat de restauraties gedurende 30 seconden ultrasoon reinigen. Droog de restauraties grondig voordat ze worden gesinterd, om te voorkomen dat ze breken. Het droogproces kan worden versneld door het gebruik van een magnetron/heteluchtoven of een warmtelamp. Plaats de restauraties in een sintertray met zirkoniumkralen van de juiste afmeting (niet door Prismatik geleverd) in de sinteroven. Let op: de BruxZir Shaded-restauraties hoeven niet in een kleurvloeistof te worden gedompeld of van kleur te worden veranderd voordat ze worden gesinterd. Programmeer uw sinteroven aan de hand van de bijbehorende handleiding ter verkrijging van het aanbevolen warmteprofiel, zoals staat weergegeven in onderstaande sintertemperatuurgrafiek. Voor goede sinterresultaten dient de oven tot 1580 °C te worden verwarmd en dient de oven gedurende 2,5 uur op deze temperatuur te blijven. Laat de oven voldoende afkoelen om de restauraties veilig te kunnen verwijderen. Inspecteer de restauraties zorgvuldig om te controleren dat er geen barsten of schilfers zijn.
Tem
per
atu
ur
(ºC
)
Tijd (min)
Tijd (uur)0
0 100 200 300 400 500
2 4 6 8
Tem
per
atu
ur
(ºC
)
1800 1800
1600 1600
1400 1400
1200 1200
1000 1000
800 800
600 600
400 400
200 200
0 0
(C5) (T5)
(T2)2 ºC/min (T3)
(C1) (C7)
15 ºC/min(T1)
10 ºC/min (T4)
15 ºC/min(T6)
(C6)
Tabel met sintertemperaturen
(C2)
(C4)
(C3)
Temperatuur (°C) Tijd (minuten)
C1 25 ºC T1 78 minuten
C2 1200 ºC T2 60 minuten
C3 1200 ºC T3 50 minuten
C4 1300 ºC T4 28 minuten
C5 1580 ºC T5 150 minuten
C6 1580 ºC T6 90 minuten
C7 155 ºC T7 Uit
Aanbevelingen voor de sintercyclus• 1ste verwarmingssnelheid – 15 ºC/min tot 1200 ºC • 1ste gehandhaafde sintertijd op 1200 ºC – 60 minuten • 2de verwarmingssnelheid – 2 ºC/min tot 1300 ºC • 3de verwarmingssnelheid op 10 ºC/min tot 1580 ºC • Sintertemperatuur – 1580 ºC • 2de gehandhaafde sintertijd op 1580 ºC – 150 minuten• Afkoelsnelheid – 15 ºC
WAARSCHUWING: Open de oven en verwijder de gesinterde restauraties pas wanneer de oven voldoende is afgekoeld, zodat u ze veilig kunt verwijderen.
WAARSCHUWING: Raadpleeg de bedieningsinstructies van de gebruikte oven voor het juiste gebruik, plaatsing van het product en kalibratie. Zorg dat de gebruikte sinteroven gekalibreerd is volgens de specificaties van de fabrikant. Neem contact op met de fabrikant van de oven voor nadere instructies.
8. De gesinterde restauraties aanpassenNa het sinteren maakt u waar nodig wijzigingen in de anatomie van de restauraties met geschikte lagedruk- of watergekoelde slijpinstrumenten; zorg dat u hierbij de aanbevolen wand- en connectordikte aanhoudt zoals weergegeven in tabel 3 in paragraaf 5.
9. De eindkleur tot stand brengenNa het sinteren wordt de kleur van de BruxZir Shaded-restauratie zichtbaar.
BruxZir Shaded-basistinten moeten worden gekleurd en geglazuurd tot de gewenste eindtint.
Zoals is te zien in tabel 2 komt de BruxZir Shaded-formulering overeen met meerdere Vita Classic-tinten.
Pas met gebruikmaking van standaardkleurtechnieken de eindkleur van de restauratie volgens voorschrift van de arts.
Het gebruik van laagsmeltende glazuur- en kleurmaterialen wordt aanbevolen, omdat hoger smeltende materialen een lichte verheldering van de BruxZir-restauratie kan veroorzaken boven 860 °C.
Gebruik een porselein- of laboratoriumoven (niet door Prismatik geleverd) en volg de instructies voor kleuring en glazuren van de fabrikant. Het kan nodig zijn om een tweede kleurcyclus uit te voeren om de gewenste tint te verkrijgen. Volg tijdens het glazuren van de restauratie de instructies van de fabrikant.
WAARSCHUWING: Verwijder de restauraties pas wanneer ze voldoende zijn afgekoeld om dit veilig te kunnen doen.
WAARSCHUWING: Raadpleeg de bedieningsinstructies van de gebruikte oven voor het juiste gebruik, plaatsing van het product en kalibratie. Zorg dat de gebruikte sinteroven gekalibreerd is volgens de specificaties van de fabrikant. Neem contact op met de fabrikant van de oven voor nadere instructies.
Controleer na de kleurcyclus de kwaliteit van de tint en voer zo nodig nog een kleurcyclus uit. Indien aanvullende kleuraanpassingen nodig zijn, bak de restauraties dan opnieuw met behulp van de BruxZir Shaded-bakcyclus voor kleuren/glazuren. Wanneer de gewenste kleur verkregen is, brengt u de gewenste hoeveelheid glazuur aan op de restauraties en bakt u de restauratie met de BruxZir-bakcyclus voor kleuren/glazuren.
10. CementeringDe tandheelkundige moet met kunsthars versterkte glasionomeren, kunstharscement of zelfhechtend kunstharscement gebruiken om de BruxZir Shaded-restauraties te cementeren.
11. OpslagControleer voordat u BruxZir Shaded-blanks opbergt of ze tijdens het vervoer geen schade hebben opgelopen. Vervoerschade kan barsten in en schilfers uit het blok omvatten. De blanks moeten bij kamertemperatuur en uit de buurt van stof en mogelijke verontreinigingsbronnen worden bewaard. Bewaar de BruxZir Shaded-blanks in hun oorspronkelijke verpakking wanneer ze niet worden gebruikt.
12. WAARSCHUWINGENAdem het stof niet in. Zorg dat u geen stof in uw ogen krijgt en voorkom dat uw huid er langdurig direct mee in contact komt. Het gebruik van persoonlijke beschermingsmiddelen zoals handschoenen, gezichtsmaskers en laboratoriumjassen wordt aanbevolen om mogelijk contact en irritatie aan de huid of ogen tijdens hantering te voorkomen.
OPMERKING: Om voor dit product een veiligheidsinformatieblad aan te vragen, belt u Glidewell Direct op 1-888-303-3975.
13. Vragen/opmerkingenVoor vragen en/of opmerkingen of voor nadere instructies over het gebruik van het product, kunt u contact opnemen met Glidewell Direct in de VS op 18651 Von Karman Ave., Irvine, CA 92612, VS; u kunt ook bellen naar 1-888-303-3975
0086
MDSS GmbHSchiffgraben 41
30175 Hannover, Duitsland
Fabrikant
Prismatik Dentalcraft, Inc.(een dochteronderneming in volledig eigendom
van Glidewell Laboratories)2212 Dupont Drive
Irvine, CA 92612, VS Tel: 888-303-6470 Fax: 800-579-8233
VITA is een gedeponeerd handelsmerk van VITA Zahnfabrik.
BRUXZIR® SHADED MILLING BLANKS
POLSKI
Instrukcja użytkowania
1. Opis produktuWstępnie barwione bloczki do frezowania BruxZir® z cyrkonu (BruxZir Shaded & BruxZir Shaded-A)
Wstępnie barwione bloczki do frezowania BruxZir są stosowane w produkcji cyrkonowych uzupełnień pełnokonturowych oraz podbudów cyrkonowych do koron i mostów. Produkowane pełnokonturowe korony i podbudowy są wykonywane przy użyciu systemu CAD/CAM dla projektowania i produkcji. Zaprojektowane i wyprodukowane pełnokonturowe korony i podbudowy są następnie spiekane w wysokiej temperaturze. Nie ma potrzeby dodawania koloru do wstępnie barwionych bloczków BruxZir przed ich spiekaniem. Podstawowe barwienie i glazurowanie należy zastosować po spieczeniu, aby osiągnąć pożądany odcień VITA® dla koron pełnokonturowych i mostów. Materiał po spieczeniu cechuje się maksymalną wytrzymałością i półprzezroczystą perłowością.
Ponieważ podczas spiekania zachodzi kurczenie, istotne jest, aby wziąć pod uwagę odpowiedni stosunek wielkości (współczynnik powiększenia) podczas frezowania. Zwrócenie uwagi na odpowiedni współczynnik powiększenia (EF) w trakcie frezowania zapewni precyzyjne dopasowanie i dokładność brzeżną spiekanych czapeczek i/lub koron; należy stosować właściwy EF oznaczony na każdym bloczku.
2. Wskazania do stosowaniaNiniejszy produkt jest przeznaczony do użycia przez techników dentystycznych do konstrukcji pełnoceramicznych uzupełnień przednich i tylnych wykonywanych na zamówienie.
3. PrzeciwwskazniaBrak.
4. Tabela danych technicznychPomiary zgodnie z ISO 6872
Tabela 1Klasyfikacja - Typ II, klasa 6
Współczynnik rozszerzalności termicznej (CTE) (25–500ºC) 11 x 10-6/K
Wytrzymałość na zginanie > 800 MPaGęstość 6,05 g/cm3
Tabela 2Wstępnie barwione bloczki BruxZir Końcowy odcień VITA
100 A1, B1, C1200 A2, A3, B2300 A3.5, B3, C2, D2, D3, D4400 A4, B4, C3, C4
5. Projektowanie podbudowyNieprzestrzeganie zaleceń dotyczących grubości ściany i łącznika, przedstawionych w Tabeli 3, może skutkować złamaniem końcowego uzupełnienia.
Szczegółowe instrukcje dotyczące projektowania podbudów można znaleźć w odpowiednich podręcznikach CAD przeznaczonych dla stosowanego przez Państwa systemu CAD. W przypadku pełnokonturowych mostów należy stosować te same minimalne zasady jak dla łączników.
Tabela 3Karta zalecanych grubości ściany i
łącznika dla spieczonych podbudów i uzupełnień pełnokonturowych
Pojedyncze czapeczki (standard)
Mosty
Przednie
Grubość ściany(podbudowa)
Okrężna Sieczna/Zwarciowa
≥ 0,5 mm≥ 0,7 mm
≥ 0,5 mm≥ 0,7 mm
Wymiary łącznika(podbudowa)
3-punktowy most4-punktowy i więcej
(most)
--- ---
≥ 7,0 mm2
≥ 9,0 mm2
Wymiary łącznika(pełnokonturowy)
3-punktowy most4-punktowy i więcej
(most)
--- ---
≥ 7,0 mm2
≥ 9,0 mm2
Tylne
Grubość ściany(podbudowa)
Okrężna Sieczna/Zwarciowa
≥ 0,5 mm≥ 0,7 mm
≥ 0,9 mm≥ 0,9 mm
Wymiary łącznika(podbudowa i pełnokonturowa)
3-punktowy most4-punktowy i więcej
(most)Dźwignia
--- ---
---
≥ 9 mm2
≥ 12 mm2
≥ 12 mm2
6. FrezowaniePo zaprojektowaniu uzupełnień w CAD należy zaprogramować frezarkę i wprowadzić współczynnik powiększenia (EF) dla bloczka, jeśli program wyświetla odpowiedni monit. Operator frezarki powinien zapoznać się z instrukcją obsługi odpowiedniego używanego systemu frezowania w zakresie właściwej metody programowania dla wprowadzania EF i frezowania bloczków cyrkonowych. Właściwy EF dla stosowanego bloczku znajduje się na etykiecie przyklejonej z boku wstępnie barwionego bloczka BruxZir.
7. SpiekanieWszystkie podbudowy i korony pełnokonturowe z wstępnie barwionego bloczka BruxZir muszą przejść końcowy cykl spiekania przed wykończeniem. Zalecana temperatura spiekania dla uzyskania gęstego cyrkonu wynosi 1580°C, jak pokazano w Karcie temperatur spiekania poniżej. Po wyfrezowaniu ostrożnie zdjąć uzupełnienia z bloczka. Usunąć resztki pyłu, umieszczając uzupełnienia w myjce ultradźwiękowej wypełnionej WYŁĄCZNIE świeżą wodą destylowaną lub dejonizowaną. Czyścić ultradźwiękowo uzupełnienia przez 30 sekund. Starannie osuszyć uzupełnienia przed spiekaniem; w przeciwnym przypadku mogą popękać. Suszenie uzupełnień można przyśpieszyć, stosując konwekcyjną kuchenkę mikrofalową lub lampę grzewczą. Umieścić uzupełnienia w tacy do spiekania zawierającej granulat cyrkonu o odpowiedniej wielkości ziaren (nie dostarczany przez Prismatik) i włożyć do pieca do spiekania. Uwaga: Uzupełnienia z wstępnie barwionych bloczków BruxZir nie wymagają zanurzania w żadnym płynie kolorującym, ani nie należy poddawać ich jakimkolwiek zmianom odcienia przed spiekaniem. Zaprogramować swój piec do spiekania zgodnie z podręcznikiem danego pieca w celu uzyskania zalecanego profilu nagrzewania, jak pokazano w Karcie temperatur spiekania poniżej. Dla uzyskania właściwego spiekania należy się upewnić, że piec osiągnął 1580°C i utrzymuje tę temperaturę przez 2.5 godziny. Pozwolić, aby piec wystygł wystarczająco dla bezpiecznego wyjęcia uzupełnień. Starannie obejrzeć uzupełnienia, aby się upewnić, że nie ma spękań ani ułamań.
Tem
per
atu
ra (º
C)
Czas (min.)
Czas (godz.)0
0 100 200 300 400 500
2 4 6 8
Tem
per
atu
ra (º
C)
1800 1800
1600 1600
1400 1400
1200 1200
1000 1000
800 800
600 600
400 400
200 200
0 0
(C5) (T5)
(T2)2ºC/min (T3)
(C1) (C7)
15ºC/min(T1)
10ºC/min (T4)
15ºC/min(T6)
(C6)
Karta temperatur spiekania
(C2)
(C4)
(C3)
Temperatura (ºC) Czas (minuty)
C1 25ºC T1 78 minut
C2 1200ºC T2 60 minut
C3 1200ºC T3 50 minut
C4 1300ºC T4 28 minut
C5 1580ºC T5 150 minut
C6 1580ºC T6 90 minut
C7 155ºC T7 Wyłączony
Aanbevelingen voor de sintercyclus• 1. współczynnik nagrzewania – 15ºC/min do 1200ºC • 1. czas pozostawania w 1200ºC – 60 minut • 2. współczynnik nagrzewania – 2ºC/min do 1300ºC • 3. współczynnik nagrzewania przy 10ºC/min do 1580ºC • Temperatura spiekania – 1580ºC • 2. czas pozostawania w 1580ºC – 150 minut• Współczynnik schładzania – 15ºC
OSTRZEŻENIE: Nie otwierać pieca ani nie wyjmować spieczonych uzupełnień, dopóki piec nie ulegnie wystarczającemu schłodzeniu, aby je bezpiecznie wyjąć.
OSTRZEŻENIE: Należy się zapoznać z instrukcją obsługi stosowanego pieca w celu jego właściwego użytkowania, umieszczania produktu i kalibracji. Upewnić się, że używany piec do spiekania jest kalibrowany zgodnie z określonymi specyfikacjami producenta. W celu uzyskania dalszych instrukcji należy się skontaktować z producentem pieca.
8. Dopasowywanie uzupełnień po spieczeniuPo spieczeniu dopasować anatomię uzupełnień wedle potrzeb za pomocą odpowiedniego niskociśnieniowego lub chłodzonego wodą narzędzia szlifującego, uważając, żeby przestrzegać zalecanych grubości ściany i łącznika, przedstawionych w Tabeli 3, w sekcji 5.
9. Osiąganie końcowego odcieniaKolor uzupełnienia z wstępnie barwionego bloczka BruxZir uwidoczni się po spieczeniu.
Podstawowe odcienie wstępnie barwionych bloczków BruxZir należy poddać barwieniu i glazurowaniu, aby odpowiadały pożądanemu odcieniowi końcowemu.
Jak pokazano w Tabeli 2, formuły wstępnie barwionych bloczków BruxZir pasują do wielu odcieni VITA Classical.
Zastosować standardowe techniki barwienia w celu dopasowania końcowego koloru uzupełnienia zgodnie z przepisem.
Zaleca się stosowanie glazury i materiałów barwiących napalanych w niskich temperaturach, ponieważ materiały napalane w wyższych temperaturach mogą spowodować lekkie rozjaśnienie uzupełnień BruxZir powyżej 860°C.
Przy stosowaniu pieca do porcelany lub pieca laboratoryjnego (nie dostarczanego przez Prismatik), należy postępować zgodnie z instrukcjami producenta dot. barwienia i glazurowania. Może być konieczne przeprowadzenie drugiego cyklu barwienia w celu dopasowania do wymaganego odcienia. Przy glazurowaniu uzupełnienia należy przestrzegać instrukcji producenta.
OSTRZEŻENIE: Nie wyjmować uzupełnień, dopóki nie ulegną wystarczającemu schłodzeniu, aby je bezpiecznie wyjąć.
OSTRZEŻENIE: Należy się zapoznać z instrukcją obsługi stosowanego pieca w celu jego właściwego użytkowania, umieszczania produktu i kalibracji. Upewnić się, że piec do spiekania jest kalibrowany zgodnie z określonymi specyfikacjami producenta. W celu uzyskania dalszych instrukcji należy się skontaktować z producentem pieca.
Po wykonaniu cyklu barwienia sprawdzić jakość odcienia i przeprowadzić ponowne barwienie, jeśli to konieczne. Jeśli potrzebna jest dodatkowa korekta koloru, wypalić ponownie uzupełnienia, stosując cykl wypalania koloru/glazury wstępnie barwionych bloczków BruxZir. Po osiągnięciu żądanego odcienia nałożyć pożądaną ilość glazury na uzupełnienia i wypalić uzupełnienia, stosując cykl wypalania koloru/glazury BruxZir.
10. CementowanieDentyści powinni stosować szkłojonomery wzmocnione żywicą, cementy na bazie żywic lub cementy samoadhezyjne na bazie żywic do cementowania uzupełnień wstępnie barwionych bloczków BruxZir.
11. PrzechowywaniePrzed zmagazynowaniem wstępnie barwionych bloczków BruxZir upewnić się, że nie ma uszkodzeń wynikających z transportu. Uszkodzenia wynikające z transportu mogą obejmować spękania i ułamania bloczków. Bloczki należy przechowywać w temperaturze pokojowej i z dala od kurzu i potencjalnych źródeł zanieczyszczeń. Wstępnie barwione bloczki BruxZir przechowywać w oryginalnych opakowaniach, gdy nie są używane.
12. OSTRZEŻENIANie wdychać proszku. Nie dopuszczać do przedostania się proszku do oczu lub do przedłużonego kontaktu bezpośrednio ze skórą. W trakcie pracy z produktem zaleca się stosowanie środków ochrony osobistej, takich jak rękawiczki, maski i fartuchy laboratoryjne w celu uniknięcia możliwego kontaktu i podrażnienia skóry lub oczu.
UWAGA: Aby uzyskać kartę charakterystyki tego produktu, należy skontaktować się z Glidewell Direct pod numerem 888-303-3975.
13. Pytania/uwagiW przypadku pytań i/lub uwag lub w celu uzyskania dalszych instrukcji stosowania produktu należy skontaktować się z Glidewell Direct w USA pod adresem 18651 Von Karman Ave., Irvine, CA 92612 lub dzwoniąc na numer 888-303-3975.
0086
MDSS GmbHSchiffgraben 41
30175 Hannover, Niemcy
Wyprodukowane przez
Prismatik Dentalcraft, Inc.(Spółka zależna w całości należąca
do Glidewell Laboratories)2212 Dupont Drive
Irvine, CA 92612, VS Tel.: + 888-303-6470
Faks: + 800-579-8233
VITA jest zarejestrowanym znakiem handlowym VITA Zahnfabrik.
BRUXZIR® SHADED MILLING BLANKS
PORTUGUÊS
Instruções de Utilização
1. Descrição do produtoDiscos de moagem de óxido de zircónio sombreados BruxZir® (BruxZir Shaded & BruxZir Shaded-A)
Os Discos sombreados BruxZir são utilizados para a produção de infra-estruturas de óxido de zircónio de contorno completo e de infra-estruturas à base de óxido de zircónio para coroas e pontes. As coroas de contorno completo e infra-estruturas fabricadas são feitas utilizando o sistema CAD/CAM para a concepção e fabrico. As coroas e infra-estruturas concebidas e fabricadas são, em seguida, sinterizadas a uma elevada temperatura. Não é necessário adicionar qualquer cor aos Discos sombreados BruxZir antes da sinterização. Devem ser utilizadas técnicas básicas de coloração e polimento após a sinterização para obter o sombreado VITA® pretendido para as coroas e pontes de contorno completo. O material sinterizado apresenta uma perolescência translúcida e de máxima intensidade.
Uma vez que ocorre retracção durante a sinterização, é importante ter em consideração a proporção de tamanho apropriada (Factor de ampliação) durante a moagem. A atenção ao Factor de ampliação (FA) adequado durante a moagem assegura um encaixe preciso e a exactidão das margens das capas e/ou coroas, com cada bloco rotulado com o FA específico a ser aplicado.
2. Indicações de utilizaçãoEste dispositivo está indicado para utilização por protésicos dentários na construção de restaurações em cerâmica feitas à medida para localização anterior e posterior.
3. Contra-indicaçõesNenhuma.
4. Tabela de dados técnicosMedições efectuadas em conformidade com a norma ISO 6872
Tabela 1Classificação - Tipo II, Classe 6
Coeficiente de dilatação térmica (CDT) (25–500 ºC) 11 x 10-6/K
Resistência à flexão > 800 MPaDensidade 6,05 g/cm3
Tabela 2BruxZir sombreado Sombreado VITA final
100 A1, B1, C1200 A2, A3, B2300 A3.5, B3, C2, D2, D3, D4400 A4, B4, C3, C4
5. Projektowanie podbudowyO não seguimento das recomendações da espessura da parede e dos conectores, conforme apresentado na Tabela 3, pode resultar na fractura da restauração final.
Para obter instruções específicas acerca da concepção das infra-estruturas, consulte o manual CAD aplicável concebido para o seu sistema CAD. As pontes de contorno completo devem seguir as mesmas regras de espessura mínima dos conectores.
Tabela 3Gráfico de espessuras recomendadas
para a parede e conectores para infraestruturas e contornos completos
Capas individuais (padrão) Pontes
Anterior
Espessura da parede(infraestrutura)
Circular Incisiva/Oclusal
≥ 0,5 mm≥ 0,7 mm
≥ 0,5 mm≥ 0,7 mm
Espessura dos conectores(infraestrutura)
Ponte de 3 unidades4 unidades e mais
(ponte)
--- ---
≥ 7,0 mm2
≥ 9,0 mm2
Espessura dos conectores(contorno completo)
3-punktowy most4-punktowy i więcej
(most)
--- ---
≥ 7,0 mm2
≥ 9,0 mm2
Posterior
Espessura da parede(infraestrutura)
Circular Incisiva/Oclusal
≥ 0,5 mm≥ 0,7 mm
≥ 0,9 mm≥ 0,9 mm
Espessura dos conectores(infraestrutura e contorno completo)
Ponte de 3 unidades4 unidades ou mais
(ponte)Cantilever
------
---
≥ 9 mm2
≥ 12 mm2
≥ 12 mm2
6. MoagemDepois de as restaurações terem sido concebidas no sistema CAD, programe o seu equipamento de moagem e introduza o Factor de ampliação (FA) para o disco, se assim for solicitado pelo programa. O operador de moagem deve consultar as instruções de funcionamento do sistema de moagem aplicável utilizado para obter informações sobre o método de programação específico para a introdução do FA e para a moagem de discos de óxido de zircónio. O FA específico para o bloco utilizado pode estar situado no rótulo afixado na parte lateral do Disco sombreado BruxZir.
7. SinterizaçãoTodas as infra-estruturas, coroas e pontes sombreadas de contorno completo BruxZir devem ser submetidas a um ciclo de sinterização final antes da aplicação do acabamento. A temperatura de sinterização recomendada para a obtenção de óxido de zircónio denso é de 1580 ºC, conforme apresentado no Gráfico de temperaturas de sinterização. Após a moagem, retire cuidadosamente as restaurações do disco. Remova todo o pó residual colocando as restaurações num dispositivo de limpeza por ultra-sons APENAS com água destilada ou desionizada. Limpe as restaurações durante 30 segundos através de método ultra-sónico. Seque devidamente as restaurações antes de proceder à sinterização, caso contrário estas poderão sofrer fracturas. A secagem das restaurações pode ser acelerada pela utilização de convecção por micro-ondas ou de uma lâmpada de calor. Coloque as restaurações num tabuleiro de sinterização contendo as esferas de óxido de zircónio de tamanho apropriado (não fornecidas pela Prismatik) no forno de sinterização. Nota: as restaurações sombreadas BruxZir não necessitam de ser mergulhadas em líquidos de coloração nem submetidas a qualquer alteração de sombreado antes da sinterização. Programe o seu forno de sinterização utilizando o manual do forno para obter informações acerca do perfil de aquecimento recomendado, conforme apresentado no Gráfico de temperaturas de sinterização abaixo. Para assegurar que obtém uma sinterização apropriada, certifique-se de que o forno atinge os 1580 ºC e mantém essa temperatura durante 2.5 horas. Aguarde que o forno arrefeça o suficiente para poder remover as restaurações em segurança. Inspeccione cuidadosamente as restaurações para se certificar de que não existem quaisquer fendas ou lascas.
Tem
per
atu
ra (º
C)
Tempo (min.)
Tempo (horas)0
0 100 200 300 400 500
2 4 6 8
Tem
per
atu
ra (º
C)
1800 1800
1600 1600
1400 1400
1200 1200
1000 1000
800 800
600 600
400 400
200 200
0 0
(C5) (T5)
(T2)2 ºC/min (T3)
(C1) (C7)
15 ºC/min(T1)
10 ºC/min (T4)
15 ºC/min(T6)
(C6)
Gráfico de temperaturas de sinterização
(C2)
(C4)
(C3)
Temperatura (ºC) Tempo (minutos)
C1 25 ºC T1 78 minutos
C2 1200 ºC T2 60 minutos
C3 1200 ºC T3 50 minutos
C4 1300 ºC T4 28 minutos
C5 1580 ºC T5 150 minutos
C6 1580 ºC T6 90 minutos
C7 155 ºC T7 Deslig
Recomendações de ciclos de sinterização• 1ª taxa de aquecimento – 15 ºC/min até 1200 ºC • 1ª tempo de manutenção a 1200 ºC – 60 minutos • 2ª taxa de aquecimento – 2 ºC/min até 1300 ºC • 3ª taxa de aquecimento a 10 ºC/min até 1580 ºC • Temperatura de sinterização – 1580 ºC • 2º tempo de manutenção a 1580 ºC – 150 minutos• Taxa de arrefecimento – 15 ºC
ADVERTÊNCIA: não abra o forno nem remova as restaurações sinterizadas até o forno arrefecer o suficiente para permitir uma remoção em segurança.
ADVERTÊNCIA: consulte as instruções de funcionamento do forno que utilizar para uma utilização, colocação do produto e calibração adequadas. Certifique-se de que o forno de sinterização utilizado está calibrado de acordo com as especificações do respectivo fabricante. Contacte o fabricante do seu forno de sinterização para obter instruções adicionais.
8. Ajuste das restaurações sinterizadasApós a sinterização, efectue os ajustes necessários na anatomia das restaurações utilizando instrumentos de rectificação de baixa pressão ou refrigerados com água apropriados, tendo em consideração a espessura recomendada da parede e dos conectores apresentada na Tabela 3, na Secção 5.
9. Obter o sombreado finalApós a sinterização, a cor da restauração sombreada BruxZir fica visível.
Os sombreados base dos discos BruxZir devem ser submetidos a coloração e polimento para obter o sombreado final pretendido.
Conforme apresentado na Tabela 2, as formulações sombreadas BruxZir correspondem a múltiplos sombreados VITA Classical.
Utilize técnicas de coloração padrão para ajustar a cor final da restauração de acordo com a prescrição.
Recomenda-se a utilização de materiais de coloração e polimento com baixo ponto de fusão, uma vez que os materiais com ponto de fusão elevado podem causar um ligeiro aclaramento da restauração BruxZir acima dos 860 ºC.
Utilizando um forno de porcelana ou de laboratório (não fornecido pela Prismatik), siga as instruções de coloração e polimento do fabricante. Poderá ser necessário realizar um segundo ciclo de coloração para obter o sombreado necessário. Siga as instruções do fabricante aquando do polimento da restauração.
ADVERTÊNCIA: não remova as restaurações até o forno arrefecer o suficiente para permitir uma remoção em segurança.
ADVERTÊNCIA: consulte as instruções de funcionamento do forno que utilizar para uma utilização, colocação do produto e calibração adequadas. Certifique-se de que o forno de sinterização utilizado está calibrado de acordo com as especificações do respectivo fabricante. Contacte o fabricante do seu forno de sinterização para obter instruções adicionais.
Após o ciclo de coloração, verifique a qualidade do sombreado e realize um novo ciclo de coloração, se necessário. Se forem necessários ajustes de coloração adicionais, coloque as restaurações novamente no forno utilizando o Ciclo de cozedura de coloração/polimento sombreado BruxZir. Depois de obter o sombreado pretendido, aplique a quantidade necessária de polimento nas restaurações e coza-as utilizando o Ciclo de cozedura de coloração/polimento BruxZir.
10. CimentaçãoO profissional dentário deve utilizar ionómeros de vidro reforçado com resina, cimentos de resina ou cimentos de resina auto-adesivos para cimentar as restaurações sombreadas BruxZir.
11. ArmazenamentoAntes de armazenar os discos sombreados BruxZir, certifique-se de que não existem quaisquer danos resultantes do transporte. Os danos resultantes do transporte podem incluir fendas ou lascas do bloco. Os discos devem ser armazenados à temperatura ambiente e num local sem pó e potenciais fontes de contaminação. Quando não precisar de utilizar os discos sombreados BruxZir, armazene-os na embalagem original.
12. ADVERTÊNCIASNão inale pó. Não deixe entrar pó para os olhos nem permita um contacto directo prolongado com a pele. Recomenda-se a utilização de Equipamento de protecção individual (EPI) como luvas, máscaras e batas de laboratório para evitar um possível contacto e irritação na pele ou olhos durante o processamento.
NOTA: para solicitar a Ficha de segurança deste produto, contacte a Glidewell Direct através do número 888-303-3975.
13. Questões/ComentáriosPara colocar quaisquer questões e/ou comentários ou para obter instruções adicionais acerca da utilização deste produto, contacte a Glidewell Direct nos EUA através do endereço 18651 Von Karman Ave., Irvine, CA 92612 ou através do número 888-303-3975.
0086
MDSS GmbHSchiffgraben 41
30175 Hannover, Alemanha
Fabricado por
Prismatik Dentalcraft, Inc.(Uma filial detida a 100% pela Glidewell
Laboratories)2212 Dupont Drive
Irvine, CA 92612, EUA Tel.: + 888-303-6470 Fax: + 800-579-8233
VITA é uma marca comercial registada da VITA Zahnfabrik.
BRUXZIR® SHADED MILLING BLANKS
ROMÂNĂ
Instrucţiuni de utilizare
1. Descrierea produsuluiBlocuri brute pentru frezare BruxZir®, de zirconiu, cu nuanţe de culoare (BruxZir Shaded & BruxZir Shaded-A)
Blocurile brute BruxZir, cu nuanţe de culoare, sunt utilizate pentru producerea reconstituirilor complete din zirconiu şi a structurilor de sprijin pentru coroane şi punţi pe bază de zirconiu. Coroanele complete şi structurile de sprijin finale sunt realizate prin utilizarea sistemului CAD/CAM pentru proiectare şi prelucrare. Structurile de sprijin şi coroanele complete proiectate şi prelucrate sunt apoi sinterizate la temperatură înaltă. Nu este necesară adăugarea de culoare blocurilor brute cu nuanţe de culoare BruxZir înainte de sinterizare. După sinterizare este necesară utilizarea de tehnici standard de colorare şi lustruire pentru obţinerea nuanţei VITA® dorite pentru punţile şi coroanele complete. Materialul sinterizat prezintă o rezistenţă maximă şi un aspect perlat translucid.
Întrucât în cursul sinterizării se produce un fenomen de contractare, este esenţial să fie avută în vedere o proporţie adecvată a dimensiunilor (factorul de mărire) în cursul frezării. Acordarea de atenţie factorului de mărire (FM) adecvat în cursul frezării asigură o fixare precisă şi o acurateţe în realizarea marginilor şi a crestelor şi/sau coroanelor sinterizate; fiecare bloc este marcat cu FM corespunzător care urmează să fie utilizat.
2. Indicaţii de utilizareDispozitivul este indicat pentru a fi utilizat de către tehnicienii dentari la realizarea reconstituirilor ceramice integrale personalizate pentru locaţii anterioare şi posterioare.
3. ContraindicaţiiNiciuna.
4. Tabelul datelor tehniceÎn urma măsurătorilor conform ISO 6872
Tabelul 1Clasificare - Tip II, Clasa 6
Coeficientul de Dilatare termică (CDT) (25–500º C) 11 x 10-6/K
Rezistenţa la îndoire > 800 MPaDensitatea 6,05 g/cm3
Tabelul 2BruxZir cu nuanţe de culoare Nuanţa finală VITA
100 A1, B1, C1200 A2, A3, B2300 A3.5, B3, C2, D2, D3, D4400 A4, B4, C3, C4
5. Proiectarea structurii de sprijinNerespectarea recomandărilor referitoare la grosimea peretelui şi a elementelor de prindere, conform indicaţiilor din Tabelul 3, poate să aibă ca rezultat crăparea reconstituirii finale.
Pentru instrucţiuni specifice referitoare la proiectarea structurilor de sprijin, vă rugăm să consultaţi manualul CAD corespunzător, recomandat pentru sistemul dvs. CAD. Punţile complete trebuie să respecte aceleaşi reguli minimale referitoare la elementele de prindere.
Tabelul 3Diagrama grosimii recomandate
a peretelui și a elementelor de prindere pentru structurile de sprijin
și lucrările complete sinterizate
Cape unice (standard) Punţi
Anterioară
Grosimea peretelui(structură de sprijin)
Circular Incizal/Ocluzal
≥ 0,5 mm≥ 0,7 mm
≥ 0,5 mm≥ 0,7 mm
Dimensiunile elementelor de prindere(structură de sprijin)
Punte cu 3 componente
Cu 4 componente sau mai multe (punte)
---
---
≥ 7,0 mm2
≥ 9,0 mm2
Dimensiunile elementelor de prindere(complete)
Punte cu 3 componente
Cu 4 componente sau mai multe (punte)
---
---
≥ 7,0 mm2
≥ 9,0 mm2
Posterior
Grosimea peretelui(structură de sprijin)
Circular Incisiva/Oclusal
≥ 0,5 mm≥ 0,7 mm
≥ 0,9 mm≥ 0,9 mm
Dimensiunile elementelor de prindere(structură de sprijin și lucrare completă)
Punte cu 3 componente
Cu 4 componente sau mai multe (punte)
Cantilever
---
---
---
≥ 9 mm2
≥ 12 mm2
≥ 12 mm2
6. FrezareaDupă ce reconstituirile au fost proiectate cu ajutorul CAD, programaţi dispozitivul dvs. de frezare şi introduceţi factorul de mărire (FM) pentru blocul brut respectiv, în cazul în care programul vă cere acest lucru. Utilizatorul dispozitivului de frezare trebuie să consulte instrucţiunile de utilizare corespunzătoare sistemului de frezare utilizat pentru metoda de programare pecificată pentru introducerea FM şi pentru frezarea blocurilor brute de zirconiu. FM specific pentru blocul utilizat poate să fie găsit pe eticheta ataşată pe partea laterală a blocului brut cu nuanţe de culoare BruxZir.
7. SinterizareaBruxZir cu nuanţe de culoare trebuie să treacă printr-un ciclu final de sinterizare. Temperatura recomandată de sinterizare este de 1580° C, aşa cum este prezentat în Diagrama temperaturii de sinterizare de mai jos, pentru a se putea obţine un zirconiu cu densitate corespunzătoare. După frezare, extrageţi cu grijă reconstituirile din blocul brut. Îndepărtaţi în totalitate praful rezidual prin introducerea reconstituirilor într-un aparat de curăţare cu ultrasunete umplut NUMAI cu apă proaspăt distilată sau deionizată. Curăţaţi reconstituirile cu ultrasunete timp de 30 de secunde. Uscaţi bine reconstituirile înainte de sinterizare deoarece, în caz contrar, acestea se pot crăpa. Uscarea reconstituirilor poate să fie accelerată prin utilizarea unui convector cu microunde sau a unei lămpi termice. Plasaţi reconstituirile într-o tavă de sinterizare care conţine mărgele de zirconiu de o mărime adecvată (nu sunt furnizate de către Prismatik) în cuptorul de sinterizare. Vă rugăm să reţineţi: reconstituirile BruxZir cu nuanţe de culoare nu necesită scufundare în lichide de colorare sau să fie supuse unei modificări a nuanţei de culoare înainte de sinterizare. Programaţi cuptorul dvs. de sinterizare utilizând manualul de utilizare al acestuia pentru a atinge profilul termic recomandat după cum este prezentat în Diagrama temperaturii de sinterizare de mai jos. Pentru o sinterizare corectă, asiguraţi-vă de faptul că cuptorul atinge 1580° C şi menţine această temperatură timp de 2.5 ore. Lăsaţi cuptorul să se răcească suficient astfel încât reconstituirile să poată fi scoase în siguranţă. Inspectaţi cu atenţie reconstituirile pentru a vă asigura că nu există fisuri sau ciobituri.
Tem
per
atu
ră (º
C)
Durată (minute)
Durată (ore)0
0 100 200 300 400 500
2 4 6 8
Tem
per
atu
ră (º
C)
1.800 1.800
1.600 1.600
1.400 1.400
1.200 1.200
1.000 1.000
800 800
600 600
400 400
200 200
0 0
(C5) (T5)
(T2)2ºC/min (T3)
(C1) (C7)
15ºC/min(T1)
10ºC/min (T4)
15ºC/min(T6)
(C6)
Diagrama temperaturii de sinterizare
(C2)
(C4)
(C3)
Temperatură (ºC) Durată (minute)
C1 25ºC T1 78 minute
C2 1.200ºC T2 60 minute
C3 1.200ºC T3 50 minute
C4 1.300ºC T4 28 minute
C5 1.580ºC T5 150 minute
C6 1.580ºC T6 90 minute
C7 155ºC T7 Oprit
Recomandări referitoare la ciclul de sinterizare• Prima rată de încălzire – 15°C/min până la 1.200°C • Prima durată de menţinere la 1.200°C – 60 de minute • A doua rată de încălzire – 2°C/min până la 1.300°C • A treia rată de încălzire la 10°C/min până la 1.580°C • Temperatura de sinterizare - 1.580°C • A doua durată de menţinere la 1.580°C – 150 de minute• Rata de răcire – 15°C
AVERTIZARE: Nu deschideţi uşa cuptorului şi nu scoateţi reconstituirile sinterizate până când cuptorul nu se răceşte suficient pentru scoaterea în siguranţă.
AVERTIZARE: Vă rugăm să consultaţi instrucţiunile de utilizare corespunzătoare cuptorului utilizat pentru o utilizare, o poziţionare a produsului şi o calibrare corecte. Asiguraţi-vă de faptul că cuptorul de sinterizare este calibrat în conformitate cu specificaţiile producătorului acestuia. Pentru instrucţiuni suplimentare, contactaţi producătorul cuptorului dvs. de sinterizare.
8. Finisarea reconstituirilor sinterizateDupă sinterizare, efectuaţi finisajele necesare aspectelor anatomice ale reconstituirilor utilizând instrumentele de şlefuire de joasă presiune sau răcite cu apă adecvate, acordând atenţie respectării recomandărilor referitoare la grosimea peretelui şi a elementelor de prindere prezentate în Tabelul 3 din Capitolul 5.
9. Obţinerea nuanţei finaleDupă sinterizare va deveni vizibilă culoarea reconstituirii BruxZir cu nuanţe de culoare.
Nuanţele de bază ale BruxZir cu nuanţe de culoare trebuie să fie colorate şi lustruite pentru a corespunde cu nuanţa finală dorită.
Aşa cum este prezentat în Tabelul 2, formulările BruxZir cu nuanţe de culoare corespund mai multor nuanţe VITA Classical.
Utilizaţi tehnici standard de colorare pentru a ajusta culoarea finală a reconstituirii conform Rx. Este recomandată utilizarea unor materiale de lustruire şi de colorare cu o temperatură redusă de topire deoarece materialele cu o temperatură ridicată de topire pot să provoace o uşoară deschidere a culorii reconstituirii BruxZir la temperaturi mai mari de 860° C.
Utilizând un cuptor pentru porţelan sau de laborator (nu sunt furnizate de către Prismatik), urmaţi instrucţiunile de colorare şi de lustruire ale producătorului. Este posibil să fie necesară efectuarea unui al doilea ciclu de colorare pentru obţinerea nuanţei necesare. Vă rugăm să respectaţi instrucţiunile producătorului atunci când lustruiţi reconstituirea.
AVERTIZARE: Nu scoateţi reconstituirile până când acestea nu se răcesc suficient pentru a fi scoase în siguranţă.
AVERTIZARE: Vă rugăm să consultaţi instrucţiunile de utilizare corespunzătoare cuptorului utilizat pentru o utilizare, o poziţionare a produsului şi o calibrare corecte. Asiguraţi-vă de faptul că cuptorul de sinterizare este calibrat în conformitate cu specificaţiile producătorului acestuia. Pentru instrucţiuni suplimentare, contactaţi producătorul cuptorului dvs. de sinterizare.
După încheierea ciclului de colorare, verificaţi calitatea nuanţei şi dacă este necesar, coloraţi din nou. În cazul în care sunt necesare ajustări suplimentare ale nuanţei, coaceţi din nou reconstituirea utilizând ciclul de coacere pentru colorare / lustruire al BruxZir cu nuanţe de culoare. După obţinerea nuanţei dorite, aplicaţi pe reconstituiri cantitatea dorită de material de lustruire şi coaceţi reconstituirile utilizând ciclul de coacere pentru colorare / lustruire BruxZir.
10. CimentareaSpecialistul în domeniul medicinii dentare trebuie să utilizeze ionomeri de sticlă armaţi cu răşină, cimenturi pe bază de răşină sau cimenturi autoadezive pe bază de răşină pentru cimentarea reconstituirilor BruxZir.
11. DepozitareaÎnainte de a depozita blocurile brute cu nuanţe de culoare BruxZir, asiguraţivă că nu există deteriorări în urma transportului. Deteriorările în urma transportului pot include fisuri şi ciobituri ale blocurilor. Blocurile brute trebuie să fie depozitate la temperatura camerei şi protejate împotriva prafului şi a surselor potenţiale de contaminare. Atunci când nu sunt utilizate, depozitaţi locurile brute cu nuanţe de culoare BruxZir în ambalajul original.
12. AVERTIZĂRINu inhalaţi praful. Evitaţi pătrunderea prafului în ochi sau contactul prelungit direct cu pielea. Se recomandă utilizarea echipamentului de protecţie personală (EPP) cum sunt mănuşile, măştile şi halatele de protecţie pentru a evita posibilitatea producerii contactului şi iritaţiei pielii sau ochilor în cursul prelucrării.
OBSERVAŢIE: Pentru a solicita fişa MSDS pentru acest produs, contactaţi Glidewell Direct la numărul de telefon 1-888-303-3975.
13. Întrebări / ObservaţiiPentru întrebări şi/sau observaţii, sau pentru instrucţiuni suplimentare referitoare la utilizarea produsului, vă rugăm să contactaţi Glidewell Direct în SUA la adresa 18651 Von Karman Ave., Irvine, CA 92612 sau telefonic la numărul 1-888-303-3975.
0086
MDSS GmbHSchiffgraben 41
30175 Hannover, Germania
Produs de
Prismatik Dentalcraft, Inc.(O filială proprietate integrală
a Glidewell Laboratories)2212 Dupont Drive
Irvine, CA 92612, SUA Telefon: + 888-303-6470
Fax: + 800-579-8233
VITA este o marcă comercială înregistrată a VITA Zahnfabrik.
BRUXZIR® SHADED MILLING BLANKS
TÜRKÇE
Kullanma Talimatı
1. Ürün TanımıBruxZir ® Ton Oluşturulmuş Zirkonyum Frezeleme Boşları (BruxZir Ton Oluşturulmuş ve BruxZir Ton Oluşturulmuş-A)
BruxZir Ton Oluşturulmuş Boşları kronlar ve köprüler için tam kontur zirkonyum ve zirkonyum tabanlı alt yapılar üretilmesi için kullanılır. Üretilen tam kontur kronlar ve alt yapılar tasarım ve üretim için CAD/CAM sistemi kullanılarak yapılır. Tasarlanan ve üretilen tam kontur kronlar ve alt yapılar daha sonra yüksek sıcaklıkta sertleştirilir. BruxZir Ton Oluşturulmuş Boşlarına sertleştirme öncesinde renk eklemeye gerek yoktur. Tam kontur kronlar ve köprülerde sertleştirme sonrasında istenen VITA® tonunu elde etmek üzere temel boyama ve parlatma tekniklerinin kullanılması gerekir. Sertleştirilmiş materyal maksimum güç ve translüsan bir parlaklığa sahiptir.
Sertleştirme sırasında küçülme olduğundan frezeleme sırasında uygun büyüklük oranını (Büyütme Faktörü) dikkate almak çok önemlidir. Her blok uygulanacak spesifik Büyütme Faktörü (EF) ile etiketlenmiş olarak frezeleme sırasında uygun Büyütme Faktörüne dikkat edilmesi, sertleştirilmiş koping ve/veya kronların tam olarak oturmasını ve marjinal doğruluğunu sağlar.
2. Kullanım EndikasyonlarıCihazın dental teknisyenler tarafından anterior ve posterior konumlar için özel yapılan, tümüyle seramik restorasyonların üretilmesinde kullanılması amaçlanmıştır.
3. KontrendikasyonlarYok.
4. Teknik Veri TablosuISO 6872 uyarınca ölçüldüğü şekilde
Tablo 1Sınıflandırma - Tip II, Sınıf 6
Isıl Genleşme Katsayısı (CTE) (25–500ºC) 11 x 10-6/KEğilme Dayanımı > 800 MPa
Yoğunluk 6,05 g/cm3
Tablo 2BruxZir Ton Oluşturulmuş Son VITA Tonu
100 A1, B1, C1200 A2, A3, B2300 A3.5, B3, C2, D2, D3, D4400 A4, B4, C3, C4
5. Alt Yapının TasarımıTablo 3’te gösterildiği şekilde duvar ve konektör kalınlığı önerilerini izlememek son restorasyonun çatlamasına neden olabilir.
Alt yapıların tasarımı konusunda spesifik talimat için lütfen CAD sisteminiz için belirlenmiş ilgili CAD el kitabına başvurun. Tam kontur köprüler aynı minimum konektör kurallarına bağlı kalmalıdır.
Tablo 3Sertleştirilmiş Alt Yapılar ve Tam Konturlar için Önerilen Duvar ve
Konektör Kalınlık Tablosu
Tekli Kopingler (standard) Köprüler
Anterior
Duvar Kalınlığı(alt yapı)
Sirküler İnsizal/Oklüzal
≥ 0,5 mm≥ 0,7 mm
≥ 0,5 mm≥ 0,7 mm
Konektör Boyutları(alt yapı)
3 üniteli köprü4 ünite ve üstü
(köprü)
--- ---
≥ 7,0 mm2
≥ 9,0 mm2
Konektör Boyutları(tam kontur)
3 üniteli köprü4 ünite ve üstü
(köprü)
--- ---
≥ 7,0 mm2
≥ 9,0 mm2
Posterior
Duvar Kalınlığı(alt yapı)
Sirküler İnsizal/Oklüzal
≥ 0,5 mm≥ 0,7 mm
≥ 0,9 mm≥ 0,9 mm
Konektör Boyutları(alt yapı ve tam kontur)
3 üniteli köprü4 ünite ve üstü (köprü)
Cantilever
--- ------
≥ 9 mm2
≥ 12 mm2
≥ 12 mm2
6. FrezelemeRestorasyonlar CAD ile tasarlandıktan sonra frezeleme makinenizi programlayın ve program eğer komut verirse boş için Büyütme Faktörünü (EF) girin. Freze operatörü EF girilmesi için belirlenen programlama yöntemi ve zirkonyum boşlarının frezelenmesi açısından kullanılan uygun frezeleme sistemi çalıştırma talimatına başvurmalıdır. Kullanılan blok için spesifik EF, BruxZir Ton Oluşturulmuş Boş ürününün yan tarafına tutturulmuş etikette bulunabilir.
7. SertleştirmeTüm BruxZir Ton Oluşturulmuş alt yapıları ve tam kontur kronları ve köprülerinde finisaj öncesinde son bir sertleştirme döngüsü kullanılmalıdır. Aşağıdaki Sertleştirme Sıcaklık Tablosunda gösterildiği gibi, yoğun zirkonyum elde etmek üzere önerilen sertleştirme sıcaklığı 1580°C şeklindedir. Frezelendikten sonra restorasyonları boştan dikkatle ayırın. Restorasyonları, SADECE yeni distile veya deiyonize suyla doldurulmuş bir ultrasonik temizleyiciye yerleştirerek tüm kalan tozu giderin. Restorasyonları ultrasonik olarak 30 saniye temizleyin. Sertleştirmeden önce restorasyonları iyice kurutun yoksa çatlayabilirler. Restorasyonların kuruması bir mikrodalga konveksiyon veya ısı lambası kullanımıyla hızlandırılabilir. Restorasyonları uygun büyüklükte zirkonyum boncuklarını (Prismatik tarafından sağlanmaz) içeren bir sertleştirme tepsisinde sertleştirme fırınına koyun. Lütfen dikkat: Sertleştirme öncesinde BruxZir Ton Oluşturulmuş restorasyonlarının herhangi bir renklendirici sıvıya batırılması veya herhangi bir ton değişikliği yapılması gerekmez. Önerilen ısıtma profilini elde etmek üzere fırın el kitabınızı kullanarak sertleştirme fırınınızı aşağıdaki Sertleştirme Sıcaklığı Tablosunda gösterildiği gibi programlayın. Uygun sertleştirme için fırının 1580°C’ye ulaştığından ve bu sıcaklıkta 2,5 saat kaldığından emin olun. Restorasyonları güvenli bir şekilde çıkarmak için fırının yeterince soğumasını bekleyin. Restorasyonları herhangi bir çatlak veya kopmuş parça olmadığını doğrulamak üzere dikkatle inceleyin.
Sıca
klık
(ºC
)
Süre (dakika)
Süre (saat)0
0 100 200 300 400 500
2 4 6 8
Sıca
klık
(ºC
)
1800 1800
1600 1600
1400 1400
1200 1200
1000 1000
800 800
600 600
400 400
200 200
0 0
(C5) (T5)
(T2)2ºC/min (T3)
(C1) (C7)
15ºC/min(T1)
10ºC/min (T4)
15ºC/min(T6)
(C6)
Sertleştirme Sıcaklıgı Tablosu
(C2)
(C4)
(C3)
Sıcaklık (ºC) Süre (dakika)
C1 25ºC T1 78 dakika
C2 1200ºC T2 60 dakika
C3 1200ºC T3 50 dakika
C4 1300ºC T4 28 dakika
C5 1580ºC T5 150 dakika
C6 1580ºC T6 90 dakika
C7 155ºC T7 Kapalı
Sertleştirme Döngüsü Önerileri• 1. Isıtma Hızı – 15ºC/dk ile 1200ºC’ye • 1. Tutma Süresi 1200ºC’de – 60 dakika • 2. Isıtma Hızı – 2ºC/dk ile 1300ºC’ye • 3. Isıtma Hızı 10ºC/dk ile 1580ºC’ye • Sertleştirme Sıcaklığı – 1580ºC • 2. Tutma Süresi 1580ºC’de – 150 dakika• Soğutma Hızı – 15ºC
UYARI: Fırınınız güvenli çıkarma için yeterince soğumadan fırını açmayın veya sertleştirilmiş restorasyonları çıkarmayın.
UYARI: Lütfen uygun kullanım, ürünün yerleştirilmesi ve kalibrasyon açısından kullanılan belirli fırın için çalıştırma talimatına başvurun. Kullanılan sertleştirme fırınının belirli üreticinin spesifikasyonlarına göre kalibre edildiğinden emin olun. Ek talimat için sertleştirme fırınınızın üreticisiyle irtibat kurun.
8. Sertleştirilmiş Restorasyonları AyarlamaSertleştirme sonrasında uygun düşük basınçlı veya suyla soğutulan taşlama aletlerini kullanarak ve Bölüm 5 altında Tablo 3’te gösterilen önerilen duvar ve konektör kalınlıklarını izlemeye dikkat ederek restorasyonların anatomisinde gerekli ayarlamaları yapın.
9. Son Tonun Elde EdilmesiSertleştirme sonrasında BruxZir Ton Oluşturulmuş restorasyonun rengi görünür hale gelecektir.
BruxZir Ton Oluşturulmuş temel tonlarının istenen son tonla eşleşmesi için boyanması ve parlatılması gerekir.
Tablo 2’de gösterildiği gibi BruxZir Ton Oluşturulmuş formülasyonları çok sayıda Vita Classic tonuyla eşleşir.
Reçete uyarınca restorasyonun son rengini ayarlamak için standart boyama teknikleri kullanın.
Düşük ısı parlatma ve boyama materyalleri kullanılması önerilir çünkü yüksek ısı materyalleri 860°C üzerinde BruxZir restorasyonlarında hafif bir renk açılmasına neden olabilir.
Bir Porselen veya Laboratuvar fırını (Prismatik tarafından sağlanmaz) kullanarak Üreticinin boyama ve parlatma talimatını izleyin. İstenen tonla eşleştirmek üzere ikinci bir boyama döngüsü gerçekleştirmek gerekebilir. Lütfen restorasyonda parlatma sırasında üreticinin talimatını izleyin.
UYARI: Restorasyonları, güvenli çıkarmak için yeterince soğumadan çıkarmayın.
UYARI: Lütfen uygun kullanım, ürünün yerleştirilmesi ve kalibrasyon açısından kullanılan belirli fırın için çalıştırma talimatına başvurun. Kullanılan sertleştirme fırınının belirli üreticinin spesifikasyonlarına göre kalibre edildiğinden emin olun. Ek talimat için sertleştirme fırınınızın üreticisiyle irtibat kurun.
Boyama döngüsünden sonra tonun kalitesini kontrol edin ve gerekirse tekrar boyayın. Ek boyama ayarlamaları gerekirse restorasyonları BruxZir Ton Oluşturulmuş Boyama/Parlatma Pişirme Döngüsünü kullanarak tekrar pişirin. İstenen ton elde edilince restorasyonlara istenen parlatma miktarını uygulayın ve restorasyonları BruxZir Boyama/Parlatma Pişirme döngüsünü kullanarak pişirin.
10. SimanlamaUzman diş hekimi BruxZir Ton Oluşturulmuş restorasyonlarının simanlaması için reçineyle güçlendirilmiş cam iyonomerler, reçine simanlar veya kendiliğinden yapışan reçine simanlar kullanmalıdır.
11. SaklamaBruxZir Ton Oluşturulmuş Boşlarını depolamadan önce sevkıyat nedeniyle bir hasar olmadığını kontrol edin. Sevkıyat hasarı blokta çatlamalar ve parça kopmasını içerebilir. Boşlar oda sıcaklığında ve toz ve olası kontaminasyon kaynaklarından uzakta depolanmalıdır. Kullanılmadıklarında BruxZir Ton Oluşturulmuş Boşlarını orijinal ambalajında saklayın.
12. UYARILARTozu solumayın. Tozun gözlere girmesine veya cilde doğrudan uzun süre temasına izin vermeyin. İşleme sırasında olası temas ve cilt veya göz tahrişinden kaçınmak için eldivenler, maskeler ve önlükler gibi Kişisel Koruyucu Ekipman (PPE) önerilir.
NOT: Bu ürün için Malzeme Güvenlik Veri Sayfasını istemek üzere 1-888-303-3975 numarasından Glidewell Direct’i arayın.
13. Sorular/YorumlarSorular ve/veya yorumlar veya ürün kullanımıyla ilgili ek talimat için lütfen A.B.D.’de 18651 Von Karman Ave., Irvine, CA 92612 adresinden veya 1-888-303-3975 numarasını arayarak Glidewell Direct ile irtibat kurun.
0086
MDSS GmbHSchiffgraben 41
30175 Hannover, Almanya
Üretici
Prismatik Dentalcraft, Inc.(Glidewell Laboratories’in yüzde yüz iştiraki)
2212 Dupont Drive Irvine, CA 92612, A.B.D.
Tel: 888-303-6470 Fax: 800-579-8233
VITA, VITA Zahnfabrik Şirketinin tescilli bir ticari markasıdır.
BRUXZIR® SHADED MILLING BLANKS
VLAAMS
Instructies voor gebruik
1. ProductbeschrijvingBruxZir ® Shaded zirkonium freesblanks (BruxZir Shaded & BruxZir Shaded-A)
BruxZir Shaded blanks worden gebruikt voor de productie van volledige zirkonium onderstructuren en onderstructuren op zirkoniumbasis voor kronen en bruggen. De volledige kronen en onderstructuren worden geproduceerd met het CAD/CAM-systeem voor ontwerp en fabricage. De ontworpen en geproduceerde volledige kronen en onderstructuren worden vervolgens bij hoge temperatuur gesinterd. Vóór het sinteren hoeft geen kleur te worden toegevoegd aan BruxZir Shaded blanks. Na het sinteren dienen elementaire kleur- en glazuurtechnieken te worden toegepast om de gewenste VITA® tint te verkrijgen voor volledige kronen en bruggen. Het gesinterde materiaal vertoont een optimale sterkte en een doorschijnend parelmoereffect.
Aangezien tijdens het sinteren krimp optreedt, is het van essentieel belang om de juiste afmetingsverhouding (vergrotingsfactor) in aanmerking te nemen tijdens het frezen. Door tijdens het frezen aandacht te schenken aan de juiste vergrotingsfactor (EF, enlargement factor) worden een precieze pasvorm en accurate marges van de gesinterde kap en/of kroon gewaarborgd, waarbij elk blok wordt gelabeld met de specifieke toe te passen EF.
2. Indicaties voor gebruikHet hulpmiddel is geïndiceerd voor gebruik door de tandtechnicus bij de constructie van volkeramische restauraties op maat voor anterieure en posterieure locaties.
3. Contra-indicatiesGeen.
4. Tabel met technische gegevensZoals gemeten conform ISO 6872
Tabel 1Classificatie - Type II, klasse 6
Coëfficiënt thermische expansie (CTE) (25–500 °C) 11 x 10-6/K
Buigsterkte > 800 MPaDichtheid 6,05 g/cm3
Tabel 2BruxZir Shaded Definitieve VITA-tint
100 A1, B1, C1200 A2, A3, B2300 A3.5, B3, C2, D2, D3, D4400 A4, B4, C3, C4
5. Ontwerp van onderstructuurWanneer de aanbevelingen voor de wand- en connectordikte zoals vermeld in tabel 3 niet in acht genomen worden, kan dat leiden tot breken van de eindrestauratie.
Raadpleeg de toepasselijke CAD-handleiding voor uw CAD-systeem voor specifieke aanwijzingen over het ontwerp van de onderstructuren. Volledige bruggen moeten aan dezelfde regels voor een minimale connectordikte voldoen.
Tabel 3Tabel met aanbevolen wand- en
connectordikten voor gesinterde onderstructuren en volledige
contouren
Enkelvoudigekappen
(standaard)Bruggen
Anterieur
Wanddikte(onderstructuur)
Rond Incisaal/occlusaal
≥ 0,5 mm≥ 0,7 mm
≥ 0,5 mm≥ 0,7 mm
Connectorafmetingen(onderstructuur)
driedelige brugvier- en meerdelige
(brug)
--- ---
≥ 7,0 mm2
≥ 9,0 mm2
Connectorafmetingen(volledige contour)
driedelige brugvier- en meerdelige
(brug)
--- ---
≥ 7,0 mm2
≥ 9,0 mm2
Posterieur
Wanddikte(onderstructuur)
Rond Incisaal/occlusaal
≥ 0,5 mm≥ 0,7 mm
≥ 0,9 mm≥ 0,9 mm
Connectorafmetingen(onderstructuur en volledige contour)
driedelige brugvier- en meerdelig
(brug) Cantileverbrug
--- ---
---
≥ 9 mm2
≥ 12 mm2
≥ 12 mm2
6. FrezenNadat de restauraties met het CAD-systeem ontworpen zijn, programmeert u uw freesmachine en voert u de vergrotingsfactor (EF) in voor de blank als het programma hierom vraagt. De bediener van de frees moet de bedieningsinstructies van het betreffende freessysteem raadplegen voor de gespecificeerde programmeringsmethode om de EF in te voeren en om de blanks van zirkoniumoxide te frezen. De specifieke EF voor het gebruikte blok staat op het label dat op de zijkant van de BruxZir Shaded blank is aangebracht.
7. SinterenAlle BruxZir Shaded-onderstructuren en volledige kronen en bruggen moeten een laatste sintercyclus ondergaan voorafgaand aan de afwerking. Ter verkrijging van zirkonium met een hoge dichtheid is de aanbevolen sintertemperatuur 1580°C, zoals weergegeven staat in onderstaande sintertemperatuurgrafiek. Na het frezen verwijdert u de restauraties voorzichtig van de blank. Verwijder alle reststof door de restauraties in een ultrasone reiniger te plaatsen die gevuld is met UITSLUITEND schoon gedestilleerd of gedeïoniseerd water. Laat de restauraties gedurende 30 seconden ultrasoon reinigen. Droog de restauraties grondig voordat ze gesinterd worden, om te voorkomen dat ze breken. Het droogproces kan versneld worden door het gebruik van een magnetron/heteluchtoven of een warmtelamp. Plaats de restauraties in een sinterschaal met zirkoniumkralen van de juiste afmeting (niet door Prismatik geleverd) in de sinteroven. Let op: De BruxZir Shaded-restauraties hoeven niet in een kleurvloeistof gedompeld te worden of van kleur veranderd te worden voordat ze gesinterd worden. Programmeer uw sinteroven aan de hand van de bijbehorende handleiding ter verkrijging van het aanbevolen warmteprofiel, zoals weergegeven staat in onderstaande sintertemperatuurgrafiek. Voor goede sinterresultaten dient de oven tot 1580°C te worden verwarmd en dient de oven gedurende 2,5 uur op deze temperatuur te blijven. Laat de oven voldoende afkoelen om de restauraties veilig te kunnen verwijderen. Inspecteer de restauraties zorgvuldig om te controleren dat er geen barsten of schilfers zijn.
Tem
per
atu
ur
(ºC
)
Tijd (min)
Tijd (uur)0
0 100 200 300 400 500
2 4 6 8
Tem
per
atu
ur
(ºC
)
1800 1800
1600 1600
1400 1400
1200 1200
1000 1000
800 800
600 600
400 400
200 200
0 0
(C5) (T5)
(T2)2 ºC/min (T3)
(C1) (C7)
15 ºC/min(T1)
10 ºC/min (T4)
15 ºC/min(T6)
(C6)
Tabel met sintertemperaturen
(C2)
(C4)
(C3)
Temperatuur (°C) Tijd (minuten)
C1 25ºC T1 78 minuten
C2 1200ºC T2 60 minuten
C3 1200ºC T3 50 minuten
C4 1300ºC T4 28 minuten
C5 1580ºC T5 150 minuten
C6 1580ºC T6 90 minuten
C7 155ºC T7 Uit
Aanbevelingen voor de sintercyclus• 1ste verwarmingssnelheid – 15ºC/min tot 1200ºC • 1ste gehandhaafde sintertijd op 1200ºC – 60 minuten • 2de verwarmingssnelheid – 2ºC/min tot 1300ºC • 3de verwarmingssnelheid op 10 ºC/min tot 1580ºC • Sintertemperatuur – 1580ºC • 2de gehandhaafde sintertijd op 1580ºC – 150 minuten• Afkoelsnelheid – 15ºC
WAARSCHUWING: Open de oven en verwijder de gesinterde restauraties pas wanneer de oven voldoende afgekoeld is, zodat u ze veilig kunt verwijderen.
WAARSCHUWING: Raadpleeg de bedieningsinstructies van de gebruikte oven voor het juiste gebruik, plaatsing van het product en kalibratie. Zorg dat de gebruikte sinteroven gekalibreerd is volgens de specificaties van de fabrikant. Neem contact op met de fabrikant van de oven voor nadere instructies.
8. De gesinterde restauraties aanpassenNa het sinteren maakt u waar nodig wijzigingen in de anatomie van de restauraties met geschikte lagedruk- of watergekoelde slijpinstrumenten; zorg dat u hierbij de aanbevolen wand- en connectordikte aanhoudt zoals weergegeven in tabel 3 in paragraaf 5.
9. De eindkleur tot stand brengenNa het sinteren wordt de kleur van de BruxZir Shaded-restauratie zichtbaar.
BruxZir Shaded basistinten moeten gekleurd en geglazuurd worden tot de gewenste eindtint.
Zoals te zien is in tabel 2 komt de BruxZir Shaded-formulering overeen met meerdere Vita Classic-tinten.
Pas met gebruikmaking van standaardkleurtechnieken de eindkleur van de restauratie aan volgens voorschrift van de arts.
Het gebruik van laagsmeltende glazuur- en kleurmaterialen wordt aanbevolen, omdat hoger smeltende materialen een lichte verheldering van de BruxZir restauratie kan veroorzaken boven 860°C.
Gebruik een porselein- of laboratoriumoven (niet door Prismatik geleverd) en volg de instructies voor kleuring en glazuren van de fabrikant. Het kan nodig zijn om een tweede kleurcyclus uit te voeren om de gewenste tint te verkrijgen. Volg tijdens het glazuren van de restauratie de instructies van de fabrikant.
WAARSCHUWING: Verwijder de restauraties pas wanneer ze voldoende afgekoeld zijn om dit veilig te kunnen doen.
WAARSCHUWING: Raadpleeg de bedieningsinstructies van de gebruikte oven voor het juiste gebruik, plaatsing van het product en kalibratie. Zorg dat de gebruikte sinteroven gekalibreerd is volgens de specificaties van de fabrikant. Neem contact op met de fabrikant van de oven voor nadere instructies.
Controleer na de kleurcyclus de kwaliteit van de tint en voer zo nodig nog een kleurcyclus uit. Indien aanvullende kleuraanpassingen nodig zijn, bak de restauraties dan opnieuw met behulp van de BruxZir Shaded kleur/glazuur bakcyclus. Wanneer de gewenste kleur verkregen is, brengt u de gewenste hoeveelheid glazuur aan op de restauraties en bakt u de restauratie met de BruxZir kleur/glazuur bakcyclus.
10. CementeringDe tandheelkundige moet met kunsthars versterkte glasionomeren, kunstharscement of zelfhechtend kunstharscement gebruiken om de BruxZir Shaded-restauraties te cementeren.
11. OpslagControleer voordat u BruxZir Shaded blanks opbergt of ze tijdens het vervoer geen schade opgelopen hebben. Vervoerschade kan barsten in en schilfers uit het blok omvatten. De blanks moeten bij kamertemperatuur en uit de buurt van stof en mogelijke verontreinigingsbronnen bewaard worden. Bewaar de BruxZir Shaded blanks in hun oorspronkelijke verpakking wanneer ze niet gebruikt worden.
12. WAARSCHUWINGENAdem het stof niet in. Zorg dat u geen stof in uw ogen krijgt en voorkom dat uw huid er langdurig direct mee in contact komt. Het gebruik van persoonlijke beschermingsmiddelen zoals handschoenen, gezichtsmaskers en laboratoriumjassen wordt aanbevolen om mogelijk contact en irritatie aan de huid of ogen tijdens de verwerking te voorkomen.
OPMERKING: Om voor dit product een veiligheidsinformatieblad aan te vragen, belt u Glidewell Direct op 1-888-303-3975.
13. Vragen/opmerkingenVoor vragen en/of opmerkingen of voor nadere instructies over het gebruik van het product, kunt u contact opnemen met Glidewell Direct in de VS op 18651 Von Karman Ave., Irvine, CA 92612, VS; u kunt ook bellen naar 1-888-303-3975
0086
MDSS GmbHSchiffgraben 41
30175 Hannover, Duitsland
Fabrikant
Prismatik Dentalcraft, Inc.(een volledige dochteronderneming van
Glidewell Laboratories)2212 Dupont Drive
Irvine, CA 92612, VS Tel: 888-303-6470 Fax: 800-579-8233
VITA is een geregistreerd handelsmerk van VITA Zahnfabrik.
Manufacturer / Výrobce / Hersteller / Fabricante / Fabricant / Produttore / Gyártó / Fabrikant / Producent / Fabricante / Producător / Üretici / Fabrikant
European Authorized Representative / Autorizovaný zástupce pro Evropu / Autorisierte Vertretung in Europa / Representante europeo autorizado / Représentant européen agréé / Rappresentante europeo autorizzato / Hivatalos európai képviselő / Erkende vertegenwoordiger in Europa / Autoryzowany przedstawiciel w Europie / Representante europeu autorizado / Reprezentant autorizat pentru Europa / Avrupa Yetkili Temsilcisi / Erkende vertegenwoordiger in Europa
Catalogue Number / Katalogové číslo / Artikelnummer / N.º de referencia / Référence catalogue / Numero di catalogo / Katalógusszám / Catalogusnummer / Numer katalogowy / Número de catálogo / Numărul de catalog / Katalog Numarası / Catalogusnummer
Use By Date / Datum spotřeby / Verwendbar bis / Fecha de caducidad / Date limite d’utilisation / Szavatossági idő / Uiterste gebruiksdatum / Użyć przed / Data de validade / A se utiliza înainte de data / Son Kullanma Tarihi / Uiterste gebruiksdatum
Keep dry / Uchovávejte v suchu / Trocken halten / Mantener en un sitio seco / Conserver au sec / Data di scadenza / Conservare in luogo asciutto / Tartsa szárazon / Droog bewaren / Przechowywać w suchym miejscu / Manter seco / A se feri de umezeală / Kuru Tutun / Droog bewaren
Caution / Upozornění / Achtung / Precaución / Mise en garde / Attenzione / Vigyázat / Let op / Uwaga / Atenção / Atenţie / Dikkat / Let op
Consult Instructions for Use / Prostudujte si návod k použití / Anleitung beachten / Seguir las instrucciones / Respecter les instructions / Consultare le istruzioni / Tartsa be az utasításokat / Raadpleeg de instructies voor gebruik / Przestrzegać instrukcji / Consultar as instruções / Respectaţi instrucţiunile / Kullanma Talimatına Başvurun / Raadpleeg de instructies voor gebruik
SNSerial number / Sériové číslo / Seriennummer / Número de serie / Numéro de série / Numero di serie / Sorozatszám / Serienummer / Numer seryjny / Número de série / Număr de serie / Seri Numarası / Serienummer
Manaufactured date /Datum výroby / Herstellungsdatum / Fecha de fabricación / Date de fabrication / Data di fabbricazione / Gyártás időpontja / Productiedatum / Data produkcji / Data de fabrico / Data fabricaţiei / Üretim Tarihi / Productiedatum
Only
Prescription Only / Pouze na předpis / Rezeptpflichtig / Solo por prescripción médica / Uniquement sur ordonnance / Solo con prescrizione / Kizárólag vényre kapható / Alleen op recept / Tylko na receptę / Sujeito a receita médica / Numai pe bază de prescripţie medicală / Sadece Reçeteyle Satılır / Alleen op voorschrift
REV ID: 2774 IFU: 1062_2.0 GD-1128-113015
FOR REFERENCE ONLY
Related Documents


