1 R062EV for PIAGGIO MP3

Welcome message from author
This document is posted to help you gain knowledge. Please leave a comment to let me know what you think about it! Share it to your friends and learn new things together.
Transcript

1
R062EV
for
PIAGGIO MP3

2

3
VISTA RIEPILOGATIVASummary view
R062EV
PIAGGIO MP3
x 2
L x 2B
x 2C
KIT DI MONTAGGIOASSEMBLY KIT
step Astep B1
step C3 bis3
step D2
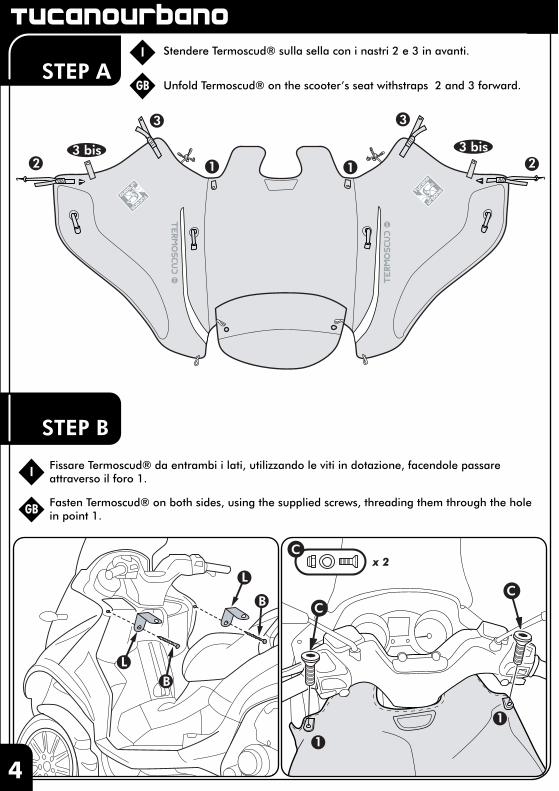
STEP AStendere Termoscud® sulla sella con i nastri 2 e 3 in avanti.
Unfold Termoscud® on the scooter’s seat withstraps 2 and 3 forward.
STEP B
Fissare Termoscud® da entrambi i lati, utilizzando le viti in dotazione, facendole passare attraverso il foro 1.
Fasten Termoscud® on both sides, using the supplied screws, threading them through the hole in point 1.
I
GB
I
GB
4
12
3
1
3
3 bis
2
L
B
L
B
1
1
C
C
Cx 2
3 bis
R062EV
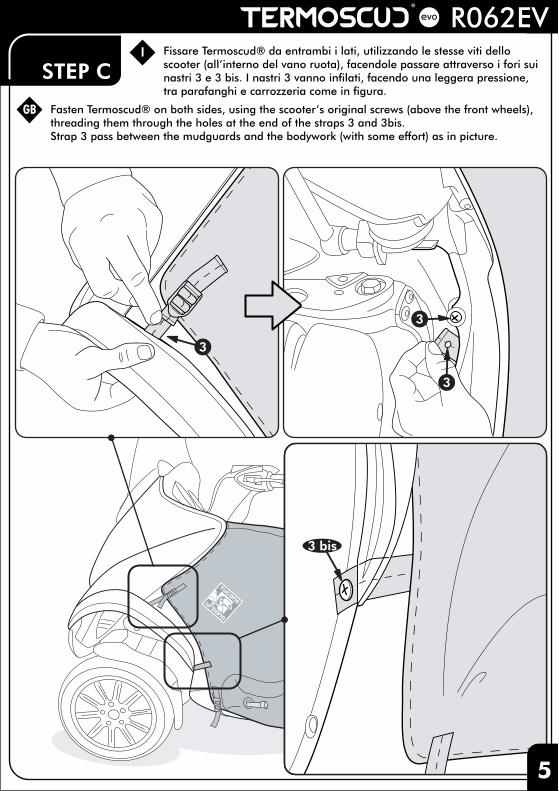
STEP CFissare Termoscud® da entrambi i lati, utilizzando le stesse viti dello scooter (all’interno del vano ruota), facendole passare attraverso i fori sui nastri 3 e 3 bis. I nastri 3 vanno infilati, facendo una leggera pressione, tra parafanghi e carrozzeria come in figura.
Fasten Termoscud® on both sides, using the scooter’s original screws (above the front wheels), threading them through the holes at the end of the straps 3 and 3bis.Strap 3 pass between the mudguards and the bodywork (with some effort) as in picture.
I
GB
3 bis
3
3
3
5

STEP D
Agganciare i moschettoni dei nastri blu 2 al bordo inferiore
della carrozzeria sotto la pedana.
ATTENZIONE: tesare correttamente, se la forza è troppo alta il velcro di
sicurezza tenderà ad aprirsi. Regolarsi di conseguenza.
Fasten the hooks of the blue straps 2 to the edge of the bodywork under the footboard.
ATTENTION: stretch properly, if the force is too high, security Velcro could open up.
Adjust accordingly.
NOTE
Utilizzare i punti di regolazione dei nastri per adattare Termoscud® alla
forma dello scooter e metterlo bene in tensione, così da evitare lo
sventolio e l’entrata di spifferi.
Tesare forte soprattutto i nastri 2 e 3.
Infine gonfiare le camere d’aria S.G.A.S.
Terminate le regolazioni, le porzioni di nastro libere vanno rimboccate
all’interno sotto i bordi di Termoscud®.
Adjust the position of Termoscud® using the regulations of the straps to fit perfectly on the
shield and pull straps tightly, specially the strap 2 and 3.
Finally inflate S.G.A.S. tubes.
Exceeding portions of the straps must be tucked under the Termoscud® cover to avoid flapping.
I
GB
I
GB
6
2
2

R062EV
STEP C
7

Tucano Urbano S.r.l.Via 2 Giugno, 60/B5
20068 Peschiera BorromeoMilano - Italy

1
R062EV
for
PIAGGIO MP3

2

3
VUE SOMMAIREVista resumen
R062EV
PIAGGIO MP3
x 2
L x 2B
x 2C
KIT DE MONTAGEKIT DE MONTAJE
step Astep B1
step C3 bis3
step D2

STEP ADérouler Termoscud® sur la selle en mettant les rubans 2, 3 et 3 bis en avant.
Extienda el Termoscud® sobre el asiento del scooter, de manera que las cintas 2, 3 y 3bis queden hacia delante.
STEP B
Fixer Termoscud® sur les deux côtes, à l’aide des vis (il est préférable d’utiliser les vis livrée) et les faire passer dans les trous pratiques dans Termoscud® sur les points 1.
Abroche el Termoscud® a ambos lados introduciendo los tornillos incluidos en el pack de montaje primeramente en los orificios 1 de la cubierta del faldon.
F
E
F
E
4
12
3
1
3
3 bis
2
L
B
L
B
1
1
C
C
Cx 2
3 bis

R062EV
STEP CFixer Termoscud® sur les deux côtes, à l’aide des vis du scooter a l’intérieur du logement de la roué et les faire passer dans les trous pratiques sur les ruban 3 et 3bis. Introduire les rubans 3 entre les garde-boues et la carrosserie (forcer doucement) voir photo.
Abroche el Termoscud® a ambos lados, detrás de la rueda delantera, introduciendo los tornillos que incorpora el scooter en los orificios que hay en los extrtemos de las cintas 3 y 3bis. Las cintas 3 se colocan entre el guardabarros y el carenado, como en la imagen.
F
E
3 bis
3
3
3
5

STEP D
Accrocher les crochets des rubans 2 au bord inferieur de la carrosserie
sous le repose-pied.
ATTENTION: tendre correctement, si la force est trop haute, le Velcro de
sécurité aura tendance à s’ouvrir. Ajuster en conséquence.
Ate los engaches de las cintas 2 por debajo del reposapiés del scooter.
ATENCIÓN: estirar adecuadamente, si la fuerza es demasiado alta, el velcro de seguridad
tenderá a abrirse. Ajuste de manera acorde.
NOTE
Utiliser les points de réglage des rubans 2 et 3 pour adapter Termoscud® à la forme du scooter
et pour bien le tendre afin d’éviter qu’il flotte et que de l’air s’y glisse par les ouvertures. Tendre
particulièrement bien les rubans 2 et 3.
En conclusion, gonfler les chambres à air S.G.A.S.
Les parties de ruban qui dépassent doivent être repliées à l’intérieur, sous les bords de
Termoscud®, après avoir terminé leur réglage.
Ajuste la tensión de todas las cintas para que la funda cubra bien todo el scooter y evitar que
flanee y se escape aire.
Tire especialmente de las cintas 2 y 3.
Por último, infle las cámaras S.G.A.S.
Las partes sobrantes de las cintas deben meterse dentro de la funda Termoscud®.
F
E
F
E
6
2
2

R062EV
STEP C
7

Tucano Urbano S.r.l.Via 2 Giugno, 60/B5
20068 Peschiera BorromeoMilano - Italy
Related Documents