DEVELOPING PORTAL APPLICATIONS USING SAP PORTAL DEVELOPMENT KIT FOR .NET TUTORIAL DEVELOPING THE MAPPOINTLAB PORTAL APPLICATION ANNE TARNORUDER SAP NETWEAVER PRODUCT MANAGEMENT FEBRUARY 2006

Welcome message from author
This document is posted to help you gain knowledge. Please leave a comment to let me know what you think about it! Share it to your friends and learn new things together.
Transcript

DEVELOPING PORTAL APPLICATIONS USING SAP PORTAL DEVELOPMENT KIT FOR .NET TUTORIAL
DEVELOPING THE MAPPOINTLAB PORTAL APPLICATION
ANNE TARNORUDER
SAP NETWEAVER PRODUCT MANAGEMENT
FEBRUARY 2006

1
Contents
Developing Portal Applications using SAP Portal Development Kit for .NET .................................................. 3 Introduction.......................................................................................................................................................................3 Required skills ...................................................................................................................................................................3 Prerequisites ......................................................................................................................................................................3 Additional Installations ....................................................................................................................................................3 Installing the Demo Database ..........................................................................................................................................4 Installing the Web Service Proxy.....................................................................................................................................4
Exercise 1: Creating the MapPoint Portal System............................................................................................... 5 Introduction.......................................................................................................................................................................5 Creating the SAP Portal Application Project.................................................................................................................5 Adding a New Portal System............................................................................................................................................5 Adding Properties for the Portal System Configuration...............................................................................................5 Configuring a Portal Connection in Server Explorer....................................................................................................6 Deploying the SAP Portal Application Project to the Portal ........................................................................................7 Creating and Configuring the Portal System in the Portal ...........................................................................................8 Defining User Mapping for the System.........................................................................................................................11
Exercise 2: Creating the CustomerFind Portal Component.............................................................................. 12 Introduction.....................................................................................................................................................................12 Adding a New Portal Component ..................................................................................................................................12 Creating and Configuring a Typed Dataset..................................................................................................................12 Configuring a Data Adapter and a Data Connection ..................................................................................................12 Creating a Typed Dataset...............................................................................................................................................15 Adding Controls to the Portal Component ...................................................................................................................15 Binding the SAP Table Control to the Dataset.............................................................................................................16 Adding Code to Retrieve Customer’s Data from the Database .................................................................................16 Deploying the Portal Application to the Portal ............................................................................................................16
Exercise 3: Creating the FindNearby Portal Component.................................................................................. 17 Introduction.....................................................................................................................................................................17 Adding a New Portal Component ..................................................................................................................................17 Adding a Web Reference to the Web Service ...............................................................................................................17 Adding Controls to the Portal Component ...................................................................................................................18 Adding Code to Bind the DropDownByKey Control to the Data Retrieved from the Web Service .......................18 Adding Code to Bind the Table Control to the Data Retrieved from the Web Service............................................19 Defining Server-Side Events to Enable Communication Between the iViews on the Page ......................................21 Creating a Page and iViews with Page Designer..........................................................................................................22 Linking Server-side Events ............................................................................................................................................23
Exercise 4: Creating the ShowDirections Portal Component ........................................................................... 24 Introduction.....................................................................................................................................................................24 Adding a New Portal Component ..................................................................................................................................24
2
Adding Controls to the Portal Component ...................................................................................................................24 Defining Server-Side Events to Enable Communication Between the iViews on the Page ......................................24 Deploying the Portal Application to the Portal ............................................................................................................25 Adding ShowDirections to the Page ..............................................................................................................................25 Linking Server-side Events ............................................................................................................................................25 Previewing the Page and Testing the Application........................................................................................................25

3
DEVELOPING PORTAL APPLICATIONS USING SAP PORTAL DEVELOPMENT KIT FOR .NET Introduction Your organization has decided to implement SAP NetWeaver Portal to replace all those web pages and information sites that were developed over the years. You, as an intranet team leader, were given the responsibility for the creation of new portal content. Based on your previous programming experience in VB, ASP and .NET, the CEO expects to see some great content coming from you and your team. He is certain that your development skills and experience with Microsoft technologies, the ASP.NET training he sent you to, and the investment in the latest development tools from Microsoft will make the creation of portal content an easy task for you. To help you complete this task, we have compiled a tutorial that demonstrates how to create an SAP portal application using Visual Studio.NET 2003 and SAP Portal Development Kit 2.0 for .NET. It uses SAP user interface controls, thereby ensuring the consistent look and feel of SAP applications. Suppose you are have a business appointment with your customer, and you want to take him to a good restaurant. The MapPoint portal application that you are going to create now, will help you to search restaurants in the location of your customer, and view the route map from the customer’s premises to the restaurant of your choice. It will also enable you to find other points of interest such as ATMs, hotels, stores, etc. The customer’s data will be retrieved from a database on your local Microsoft SQL Server. The information about places of interest available in the location of the customer and the route maps will be retrieved using the SAP.Demo.WebService.Maps Web service deployed on your local Web server. This Web service is a proxy for the Microsoft MapPoint Web Service. In this tutorial you will develop a portal application that includes a portal system, three portal components, and a portal page. The tutorial comprises the following steps:
1. Creating a portal system that enables connection to the Demo database. 2. Creating the CustomerFind portal component that displays the customers’ information from the database. 3. Creating the FindNearby portal component that finds the points of interest in the vicinity of the customer. 4. Creating the ShowDirections portal component that displays the route map from the customer to the selected point. 5. Creating a portal page with all the portal components, and configuring server-side events that enable communication between
the components. In this tutorial you will bind SAP user interface controls to data sources such as an SQL Server table or a Web Service. Required skills
• Experience in development of Web-based applications with Microsoft Visual Studio .NET • Working knowledge of either C# or VB.NET development languages • Experience in the SAP NetWeaver Portal administration • Familiarity with the main concepts and architecture of SAP NetWeaver
Prerequisites
• Microsoft Visual Studio 2003 is installed on a development host • SAP Portal Development Kit 2.0 for .NET is installed • SAP NetWeaver Portal 6.0 SPS15 or higher is installed and running • A portal user account with administrative rights is available • Portal Runtime 2.0 for .NET is installed and running • Microsoft SQL Server 8.00 or higher with the Demo database is installed and running • IIS is installed and running • SAP.Demo.WebService.Maps Web service is installed and configured in IIS • A user account for Microsoft MapPoint Web service is available
Additional Installations To meet the prerequisites of this tutorial, you need to perform a number of additional installations. Note In a standalone configuration, everything is installed on the same host. Otherwise, the Demo database and the SAP.Demo.WebService.Maps Web service should be installed on a host accessible both from the design-time and the runtime (portal) environment, and the configuration parameters should be set accordingly.

4
Extract the contents of the supplied .zip file to a folder of your choice on your local hard drive. It contains the following files and subfolders:
• The MapPointLab subfolder that contains a ready solution to use for reference while doing this tutorial. • The SAP.Demo.WebService.Maps subfolder that contains the SAP MapPoint Web service. • The DBInstall.sql query file that installs the Demo database.
Installing the Demo Database
1. Go to Programs → Microsoft SQL Server → Enterprise Manager. 2. Expand all nodes in the Console Root. 3. In the Tools menu, select SQL Query Analyzer. 4. In the File menu, select Open… and open the query file DBInstall.sql. 5. Click the Execute Query button, and view the results of query execution in the Messages pane below. 6. Close the SQL Query Analyzer window. 7. In the Enterprise Manager, click the Refresh button. The Demo database is added and appears in the Databases tree.
Installing the Web Service Proxy Configuring a Virtual Directory
1. Right-click My Computer and select Manage. In the tree, expand Services and Applications, Internet Information Services and Default Web Site.
2. Right-click the Default Web Site node, and select New → Virtual Directory. 3. In the Virtual Directory Creation Wizard window, enter SAP.Demo.WebService.Maps in the Alias field, and click
Next. 4. Browse to the SAP.Demo.WebService.Maps folder, and click Next. 5. Select the Execute check box, and click Next. 6. Click Finish. The virtual directory is created.
Obtaining a User Account for the MapPoint Web Service (optional) The SAP.Demo.WebService.Maps proxy service is supplied with existing user credentials. If you prefer to use another account, do the following:
1. Go to the MapPoint Web service main page: http://www.microsoft.com/mappoint/products/webservice/default.mspx. 2. Send a registration request by clicking Request Free Developer Account. 3. When you obtain your user name and password, update the appsettings section in the Web.config file in the
SAP.Demo.WebService.Maps folder: <appSettings> <add key="MP_USER" value="[Your User Name]" /> <add key="MP_PASSWORD" value="[Your Password]" /> <add key="MP_LOCATION_TYPE" value="NA" /> </appSettings>

5
EXERCISE 1: CREATING THE MAPPOINT PORTAL SYSTEM Introduction In this exercise you will create a portal application that contains a portal system. The portal system enables configuring application settings, such as the database connection string, in the portal for the runtime access to data sources. Creating the SAP Portal Application Project
1. Open Microsoft Visual Studio. 2. From the File menu, choose New → Project. 3. In the New Project dialog box, do the following:
a. In the Project Types pane, choose Visual C# Projects. b. In the Templates pane, choose SAP Portal Application. c. Specify the location of your choice and change the project name to MapPointLab. d. Click OK.
A new SAP Portal Application project is created at the specified location. In addition, a new portal component named PortalComponent1.ascx is automatically added to your project, opened and displayed. Adding a New Portal System
1. Delete the default portal component (PortalComponent1.aspx), created with the project, by right-clicking it in the Solution Explorer, and choosing Delete.
2. From the File menu, select Add New Item. 3. In the Add New Item dialog box, do the following:
a. In the Categories pane, under Local Project Items, choose SAP. b. In the Templates pane, choose SAP Portal System Template. c. Specify the name as MapPointSystem.cs, and click Open.
A new portal system item is created in the project. Adding Properties for the Portal System Configuration To define properties that will be available from the portal system profile, use the PortalComponentFieldProperty attribute. Double-click the MapPointSystem.cs in Solution Explorer, and add the following code to the MapPointSystem class. Important: if your database is installed on a remote server, replace localhost with this server’s name. [PortalComponentFieldProperty(PlainDescription="SQL Connection String", PropertyType=PropertyValueType.String , LongDescription="The SQL Connection String", AdminPersonalization=PersonalizationType.Dialog, Category="Application Settings")] [DefaultValue("Server=localhost;Database=Demo;Trusted_Connection=False;User ID={0};Password={1}")] public string ConnectionString { get { return String.Format(this.GetValue("ConnectionString"),
this.MappedUser,this.MappedPassword); } }

6
Configuring a Portal Connection in Server Explorer To deploy a SAP Portal Application to a portal, you need to configure a connection to this portal. To configure a new portal connection:
1. From the View menu, choose Server Explorer. 2. In the Server Explorer window, expand the SAP node, right-click the Portals node, and select Add Portal from the context
menu.
a. In the Add SAP Portal dialog, enter the portal connection details: Display name: a unique name of the portal to be displayed in Server Explorer. Host: localhost or the host name of the remote portal server Port: 50000 User: the name of a user with administrator permissions Password: the password of this user Remember Password: true. If selected, the password will be saved between Visual Studio sessions. Portal response timeout (leave default value): 15. Use SSL protocol: unselected. If selected, the portal uses the secured protocol (HTTPS).
b. Once all required information is entered, click OK . c. Set the newly defined portal as the current portal by right-clicking it in Server Explorer, and selecting Set as
Current.

7
Deploying the SAP Portal Application Project to the Portal To build and deploy your portal application project:
1. Right-click the project in Solution Explorer and select Deploy. 2. During the deployment process, and depending upon the SAP Options settings, a deployment progress bar dialog may
appear. When deployment is finished, the dialog displays the deployment process results.
3. Click OK. If you do not want the progress bar to appear at the next deployment, select the Don’t show again checkbox.

8
Creating and Configuring the Portal System in the Portal 1. Log on to the portal (http://localhost:50000/irj/portal) as a user with administrator permissions. 2. Navigate to System Administration → System Configuration. 3. In the Portal Content Catalog, right-click a folder of your choice and select New From Par→ System
4. In the Portal Archive Selection screen (step 1) select MapPointLab from the list of the available PARs, and click Next. 5. In the Portal Component Selection screen (step 1) click Next. 6. In the General Properties screen (step 3), set both System name and System ID properties to MapPointSystem, click Next. 7. In the Summary screen (step 4), click OK.

9
8. In the Property Editor that opens, select Application Settings from the Property Category list. The SQL Connection String property contains the connection parameters to the Demo database that you have defined in the code of the MapPointSystem. If the database is installed on a different server, adjust the settings accordingly.
9. To set the user mapping properties, select User Mapping in the Property Category list, admin,user in the User Mapping Type list, and click Save.

10
10. To define a system alias, select System Aliases in the Display list. Set the Alias property to MapPointSystem, and click Add.
11. Click Save and Close to close the editor.
11
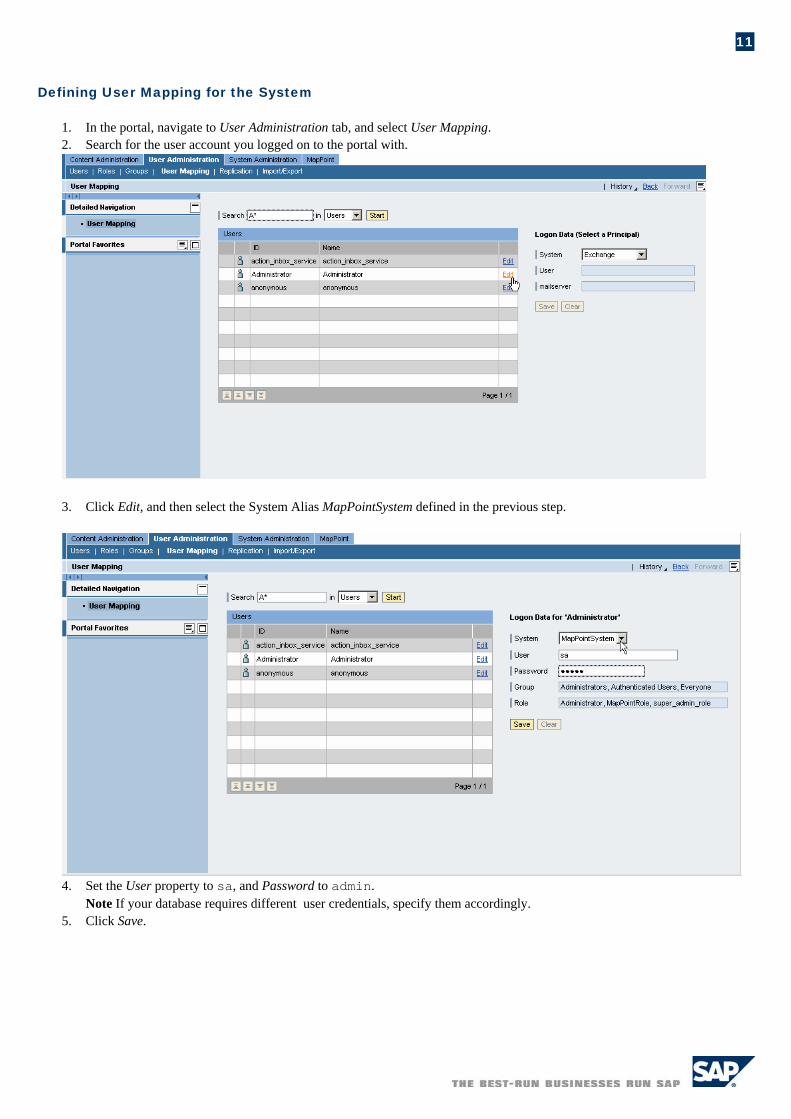
Defining User Mapping for the System
1. In the portal, navigate to User Administration tab, and select User Mapping. 2. Search for the user account you logged on to the portal with.
3. Click Edit, and then select the System Alias MapPointSystem defined in the previous step.
4. Set the User property to sa, and Password to admin.
Note If your database requires different user credentials, specify them accordingly. 5. Click Save.

12
EXERCISE 2: CREATING THE CUSTOMERFIND PORTAL COMPONENT Introduction In this exercise you will create a portal component that uses the portal system, created in the previous exercise, to connect to the Demo database and retrieve the list of customers. This exercise includes the following steps:
1. Adding a new portal component 2. Creating a typed dataset for the customers’ data. 3. Adding controls to the portal component and binding the table control to the dataset.
Adding a New Portal Component
1. Go to the MapPoint solution in the Visual Studio. 2. From the File menu, select Add New Item. 3. In the displayed Add New Item dialog box, do the following:
a. In the Categories pane, under Local Project Items, choose SAP. b. In the Templates pane, choose SAP Portal Component. c. Specify the name as CustomerFind.ascx, and click Open. A new portal component is created in the project.
Creating and Configuring a Typed Dataset To retrieve data from the Demo database you will use several wizards provided by Visual Studio 2003: Data Adapter Wizard helps you to create a connection to a database and define the SQL statements needed to retrieve and modify the data. Configuring a Data Adapter and a Data Connection
1. In Solution Explorer, double-click CustomerFind.ascx to open it in Design view. 2. From the View menu, select Toolbox, and click Data tab. 3. From the toolbox drag a SqlDataAdapter object onto the component. 4. In the Data Adapter Configuration Wizard that opens, do the following:
a. In the first welcome screen click Next. b. In the second screen you need to define a new connection. Click New Connection and create a new connection
pointing to the SQL Server Demo database, as shown below.

13
a) For the server name, enter a dot, if your database is installed on the local host. Otherwise, specify the remote server’s name.
b) Check Use a specific user name and password. c) Set User Name to sa, and Password to admin.
Note If your database requires different user credentials, specify them accordingly. d) Select the Demo database. e) Click Test Connection to check that a connection can be established, click OK to return to the wizard, and
click Next. b. Select “Use SQL statement”, and click Next.
c. Enter the SQL statement to select records of customers according to a filter parameter:
SELECT Name, Street, City, Zip FROM Customers WHERE (Name LIKE @fname)

14
d. Click Advanced Options. e. Unselect the first checkbox, and click OK to return to the previous screen.
f. Click Next, and Finish.
The wizard creates the SqlConnection1 connection containing information about how to access your database, and the SqlDataAdapter data adapter that contains a query defining the data in the database you want to retrieve.

15
Creating a Typed Dataset After you have established the means to connect to the database and specified the information you want to retrieve via the SQL command in the data adapter, you can create a dataset:
1. From the Data menu, choose Generate DataSet. This menu is enabled only when the focus is on the form or one of its controls.
2. In the displayed Generate Dataset dialog box: a. Select the New option. b. Name the dataset customersDS. c. From the list in the lower pane choose the Customers table to add to the dataset. d. Check Add this dataset to the designer, and click OK.
Adding Controls to the Portal Component
1. In Solution Explorer, right-click CustomerFind.ascx and choose View Designer. 2. From the View menu, select Toolbox, and click the SAP NetWeaver tab. 3. Drag and drop the following controls onto your component, and set their properties as follows:
Control ID Text Value
Label customerLabel Customer
InputField filterInput A*
Button searchBtn Search
Table customersTable

16
Binding the SAP Table Control to the Dataset Set the data binding properties of the Table control as follows:
Property Value
DataSource customersDS1
DataMember Customers
SelectionMode SINGLE
Adding Code to Retrieve Customer’s Data from the Database
1. Double-click the CustomerFind portal component to open its code-behind class. 2. Add the statement using System.Data.SqlClient; to the declaration section. 3. Add the BindData() method to retrieve the connection string from the MapPointSystem, retrieve the data from the database,
and bind it to the table control: private void BindData() { MapPointSystem sys = new MapPointSystem("MapPointSystem"); SqlConnection conn = new SqlConnection(sys.ConnectionString); sqlDataAdapter1.SelectCommand.Connection = conn; sqlDataAdapter1.SelectCommand.Parameters["@fname"].Value =
filterInput.Value.Replace("*","%"); sqlDataAdapter1.Fill(customersDS1.Customers); customersTable.DataBind();
}
4. Open the CustomerFind portal component in design view, double-click the button to open the SearchBtn_ Action event
handler, and add the highlighted code to the event handler: private void SearchBtn_Action(object sender, SAP.Web.UI.Controls.AbstractButton.ActionEventArgs e) { BindData(); }
5. Add a call to the BindData method in the Page_Load event:
private void Page_Load(object sender, System.EventArgs e) { BindData(); }
Deploying the Portal Application to the Portal 1. Deploy the SAP Portal Application project to the Portal:
a. Right-click the project and select Deploy. b. Check in the Output Window that the process completed successfully.
2. Preview the component by right-clicking CustomerFind.ascx in Solution Explorer, and selecting View in Portal….

17
EXERCISE 3: CREATING THE FINDNEARBY PORTAL COMPONENT Introduction In this exercise you will create a portal component that displays the points of interests available in your customer’s location. This exercise includes the following steps:
1. Adding a new portal component. 2. Adding a Web reference to the MapPoint web service. 3. Adding controls to the portal component. 4. Configuring server-side events to communicate with other portal components on a page.
Adding a New Portal Component
1. Select the MapPoint project in Solution Explorer. 2. From the File menu, select Add New Item. 3. In the Add New Item dialog box, do the following:
a. In the Categories pane, under Local Project Items, choose SAP. b. In the Templates pane, choose SAP Portal Component. c. Set the name to FindNearby.ascx, and click Open. A new portal component item is created in the project.
Adding a Web Reference to the Web Service
1. In Solution Explorer, right-click the project and select Add Web Reference. 2. In the dialog box:
a. Set the URL property to the Web service URL: http://<host name>/SAP.Demo.WebService.Maps/MapService.asmx, where <host name> is the name of the server on which the Web service is installed.
b. Set the Web reference name property to MapPoint. c. Click Add Reference. The Web reference is added to the project.

18
Adding Controls to the Portal Component
1. In Solution Explorer, right-click FindNearby.ascx and choose View Designer. 2. From the View menu, select Toolbox and click the SAP NetWeaver tab. 3. Drag and drop the following controls onto your portal component, and set their properties as follows:
Control ID Text Value Label searchLabel Search for
DropDownByKey nearbyTypeDrop
Table resultsTable
4. Right-click the Table control and select Edit Columns. 5. In the TableCell Collection Editor, modify the three default columns. For each column, set the ID and Title properties to the
respective names Name, Address and Phone, and the Width to 100. 6. In the Table control property editor, set the SelectionMode property to SINGLE.
Adding Code to Bind the DropDownByKey Control to the Data Retrieved from the Web Service The DropDownByKey control will be bound to the list of points of interest types available for the search, such as hotels, restaurants, ATM etc. This data will be retrieved only once on the first load, and saved in the cache for posting back.
1. Double-click the FindNearby portal component to open its code-behind class FindNearby.ascx.cs, and paste the highlighted code into the Page_ Load event handler code:
private void Page_Load(object sender, System.EventArgs e) { MapPointLab.MapPoint.MapService mapService = new MapPointLab.MapPoint.MapService(); string[][] entityTypes; if(Cache["EntityTypes"]==null) { entityTypes = mapService.GetEntityTypes(); Cache["EntityTypes"] = entityTypes; } else { entityTypes = (string[][])Cache["EntityTypes"]; } foreach (string[] type in entityTypes) { DropDownListItem item = new DropDownListItem(); item.Key = type[0]; item.Text = type[1];
19
nearbyTypeDrop.Items.Add(item); } if(!IsPostBack) { nearbyTypeDrop.SelectedKey = nearbyTypeDrop.Items[0].Key; } }
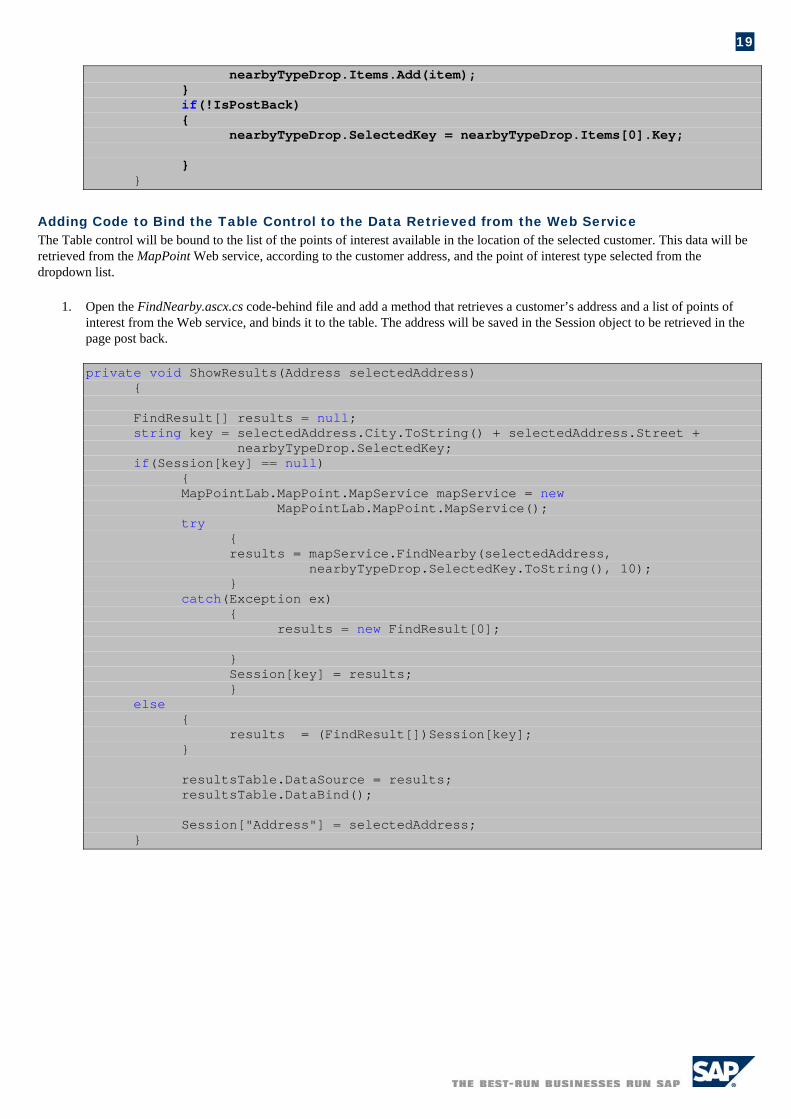
Adding Code to Bind the Table Control to the Data Retrieved from the Web Service The Table control will be bound to the list of the points of interest available in the location of the selected customer. This data will be retrieved from the MapPoint Web service, according to the customer address, and the point of interest type selected from the dropdown list.
1. Open the FindNearby.ascx.cs code-behind file and add a method that retrieves a customer’s address and a list of points of interest from the Web service, and binds it to the table. The address will be saved in the Session object to be retrieved in the page post back.
private void ShowResults(Address selectedAddress) { FindResult[] results = null; string key = selectedAddress.City.ToString() + selectedAddress.Street +
nearbyTypeDrop.SelectedKey; if(Session[key] == null) { MapPointLab.MapPoint.MapService mapService = new MapPointLab.MapPoint.MapService(); try { results = mapService.FindNearby(selectedAddress,
nearbyTypeDrop.SelectedKey.ToString(), 10); } catch(Exception ex) { results = new FindResult[0]; } Session[key] = results; } else { results = (FindResult[])Session[key]; } resultsTable.DataSource = results; resultsTable.DataBind(); Session["Address"] = selectedAddress; }

20
2. To define how the data from the Web service is displayed in the table, use the ItemDataBound event handler that is called each time the data is bound.
a. Open the FindNearby component in the design view, right-click the table, and select Properties. b. In the Properties window, click the Events button. c. Find the ItemDataBound event, and double-click it to open the ItemDatabound event handler, and add the
highlighted code into the handler:
private void resultsTable_ItemDatabound(object sender, SAP.Web.UI.Controls.Table.ItemEventArgs e) { FindResult findResult = (FindResult)e.Item.DataSourceRow.DataItem; ((SAP.Web.UI.Controls.TextView)e.Item.Cells[0].TableCellEditor).Text =
findResult.Name; ((SAP.Web.UI.Controls.TextView)e.Item.Cells[1].TableCellEditor).Text =
findResult.Address.Street; ((SAP.Web.UI.Controls.TextView)e.Item.Cells[2].TableCellEditor).Text =
findResult.Phone; }
3. To bind the table to the data source after post back, add the following code to the Page_ Load event handler:
if (IsPostBack && Session["Address"]!=null) { Address address = (Address)Session["Address"]; FindResult[] results; string key = address.City.ToString() + address.Street + nearbyTypeDrop.SelectedKey; results = (FindResult[])Session[key]; if (results != null) { resultsTable.DataSource = results; this.DataBind(); } }
4. Add the nearbyTypeDrop_Select event handler to set the binding of the table:
a. Open the FindNearby component, right-click the nearbyTypeDrop control, and select Properties. b. In the Properties window, click the Events button. c. Find the nearbyTypeDrop_Select event, double-click it to open the nearbyTypeDrop_Select event handler, and add
the highlighted code into the handler:
private void nearbyTypeDrop_Select(object sender, SAP.Web.UI.Controls.AbstractDropDownByKey.SelectEventArgs e)
{ Address address = (Address)Session["Address"]; ShowResults(address); }

21
Defining Server-Side Events to Enable Communication Between the iViews on the Page To display details for the customer selected in the CustomerFind portal component, define the server-side events that enable communication between the iViews on the page. 1. Double-click the CustomerFind portal component to open its code-behind class, and add the following code:
a. The using MapPointLab.MapPoint; reference to the declarations section. b. The highlighted code (ProducerEvent attribute) under the namespace declaration:
namespace MapPointLab { [ProducerEvent("AddressSelected",EventType.ServerSide)]
2. Open the CustomerFind portal component in design view, double-click the table to open the customersTable_LeadSelect
event handler, and insert the highlighted code into the event handler:
private void customersTable_LeadSelect(object sender, SAP.Web.UI.Controls.Table.LeadSelectEventArgs e) { customersDS.CustomersRow row = (customersDS.CustomersRow)customersDS1.Customers.Rows[e.Row]; Address address = new Address(); address.City = row.City; address.Street = row.Street; address.ZipCode = row.Zip.ToString(); Raise("AddressSelected",new object[]{address}); }
3. Double-click the FindNearby portal component to open its code-behind class, and add the following code:
a. The using MapPointLab.MapPoint; reference to the declarations section. b. The highlighted code (ConsumerEvent attribute) under the namespace declaration:
namespace MapPointLab { [ConsumerEvent("OnAddressSelected",EventType.ServerSide)]
c. The override of the OnPortalComponentEvent event:
public override void OnPortalComponentEvent(object sender, string eventName, object[] args) { base.OnPortalComponentEvent (sender, eventName, args); if (eventName == "OnAddressSelected") onAddressSelected((Address)args[0]);
d. Code to handle the OnAddressSelected event:
private void onAddressSelected(Address selectedAddress) { ShowResults(selectedAddress); }
4. Deploy the project to the portal.

22
Creating a Page and iViews with Page Designer
1. In Solution Explorer, right-click your project, and then click Add->Add New Item in the context menu. The Add New Item dialog box appears.
2. In the Categories pane, expand the Local Project Items node and click SAP. 3. In the Templates pane, click SAP Portal Page. In the Name box, set the name of your page to MapPoint.sappage.
4. In Solution Explorer, right-click your project and select Publish Project. By doing so, you deploy your project and create a subfolder containing iViews and pages in the Content Created with PDK for .NET folder of the Portal Content Catalog.
5. In Solution Explorer, double-click the page you have added. 6. In the page window that opens, click the Layout tab. 7. From Solution Explorer, drag and drop the CustomerFind and FindNearby portal components onto the page. By doing this,
you create iViews from your portal components and place them on the page.

23
8. To enable proper display of the portal components on a page, publish it in the portal by right-clicking the page in Solution Explorer and selecting Publish Page.
Note
• When the iViews are first placed on a page, they might display an error message. Click on Events tab, and then click Layout again. After a short delay the page is refreshed, and the iViews are displayed properly.
• When you modify and republish your portal components, the iViews on the page inherit the changes automatically. Linking Server-side Events
In the Events tab of the page, link the server-side events that you have previously defined in the code. 1. In the page window, click the Events tab. The portal components are displayed along with their events. 2. Click on the AddressSelected source event in the MapPoint_CustomerFind iView, press and hold the mouse while dragging
it to the target event onAddressSelected in the MapPoint_FindNearby iView. By doing so, you create a link between the two events.

24
EXERCISE 4: CREATING THE SHOWDIRECTIONS PORTAL COMPONENT Introduction In this exercise you will create a portal component that displays the route map from one address to the other. The exercise includes:
1. Adding a new portal component 2. Adding controls to the portal component. 3. Using server-side events to communicate with other iViews on a page.
Adding a New Portal Component
1. Right-click the MapPointLab project in Solution Explorer, and select Add ->Add New Item… 2. In the displayed Add New Item dialog box, do the following:
a. In the Categories pane, under Local Project Items, choose SAP. b. In the Templates pane, choose SAP Portal Component. c. Specify the name as ShowDirections.ascx. d. Click Open. A new portal component is created in the project.
Adding Controls to the Portal Component
1. In Solution Explorer, double-click ShowDirections.ascx. 2. From the View menu, select Toolbox and click the SAP NetWeaver tab. 3. Drag and drop an Image control to your component, and set its ID property to mapImage, and Width and Height to 450.
Defining Server-Side Events to Enable Communication Between the iViews on the Page
To display the map route from the customer’s location to the selected point of interest, implement a server-side event. 1. Double-click the FindNearby portal component to open its code-behind class, and add the highlighted code
(ProducerEvent attribute) under the namespace declaration: namespace MapPointLab { [ConsumerEvent("OnAddressSelected",EventType.ServerSide)] [ProducerEvent("RequestRoute",EventType.ServerSide)]
2. To raise the event, when a row in the table is selected:
a. Open the FindNearby portal component in design view, and double-click the table to open the resultsTable_LeadSelect event handler in the code-behind class.
b. Insert the highlighted code into the event handler: private void resultsTable_LeadSelect(object sender, SAP.Web.UI.Controls.Table.LeadSelectEventArgs e) { FindResult findResult = ((FindResult[])resultsTable.DataSource)[e.Row]; Address fromAddress = (Address)Session["Address"]; Address toAddress = new Address(); toAddress.City = findResult.Address.City; toAddress.Street = findResult.Address.Street; toAddress.ZipCode = findResult.Address.ZipCode.ToString(); Raise("RequestRoute",new object[]{fromAddress,toAddress}); }
25
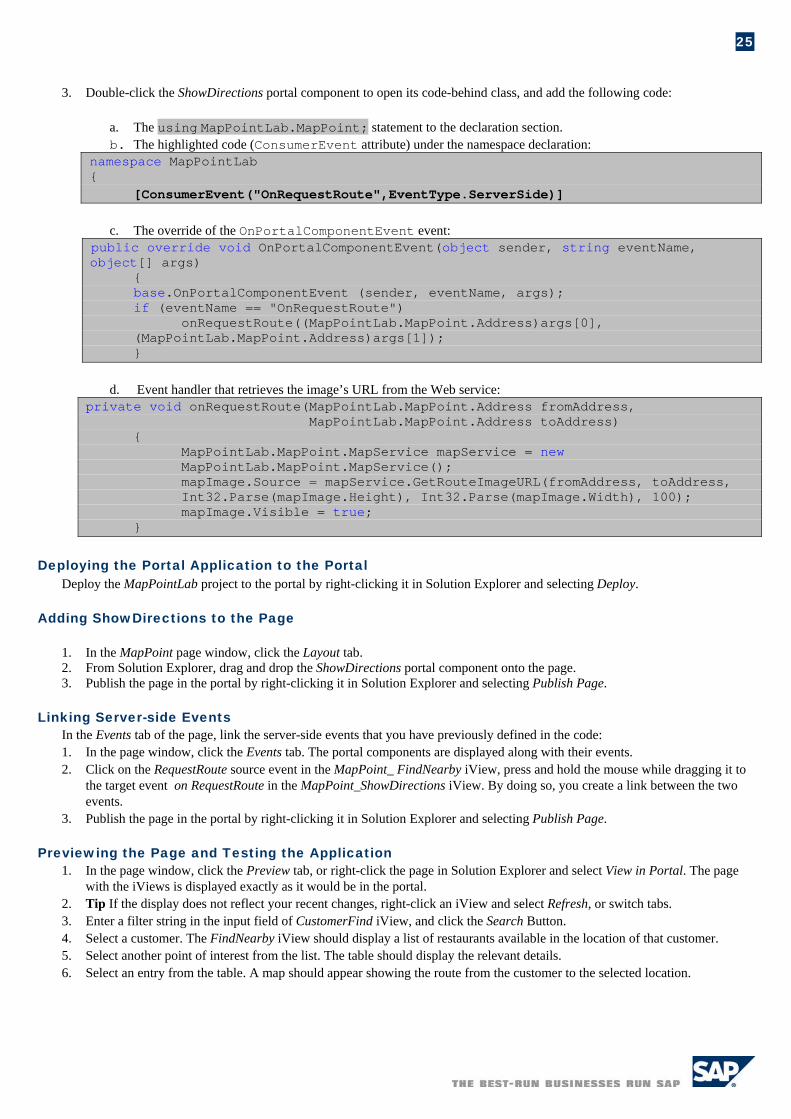
3. Double-click the ShowDirections portal component to open its code-behind class, and add the following code:
a. The using MapPointLab.MapPoint; statement to the declaration section. b. The highlighted code (ConsumerEvent attribute) under the namespace declaration:
namespace MapPointLab { [ConsumerEvent("OnRequestRoute",EventType.ServerSide)]
c. The override of the OnPortalComponentEvent event:
public override void OnPortalComponentEvent(object sender, string eventName, object[] args) { base.OnPortalComponentEvent (sender, eventName, args); if (eventName == "OnRequestRoute") onRequestRoute((MapPointLab.MapPoint.Address)args[0], (MapPointLab.MapPoint.Address)args[1]); }
d. Event handler that retrieves the image’s URL from the Web service:
private void onRequestRoute(MapPointLab.MapPoint.Address fromAddress, MapPointLab.MapPoint.Address toAddress)
{ MapPointLab.MapPoint.MapService mapService = new MapPointLab.MapPoint.MapService(); mapImage.Source = mapService.GetRouteImageURL(fromAddress, toAddress, Int32.Parse(mapImage.Height), Int32.Parse(mapImage.Width), 100); mapImage.Visible = true; }
Deploying the Portal Application to the Portal
Deploy the MapPointLab project to the portal by right-clicking it in Solution Explorer and selecting Deploy. Adding ShowDirections to the Page
1. In the MapPoint page window, click the Layout tab. 2. From Solution Explorer, drag and drop the ShowDirections portal component onto the page. 3. Publish the page in the portal by right-clicking it in Solution Explorer and selecting Publish Page.
Linking Server-side Events In the Events tab of the page, link the server-side events that you have previously defined in the code: 1. In the page window, click the Events tab. The portal components are displayed along with their events. 2. Click on the RequestRoute source event in the MapPoint_ FindNearby iView, press and hold the mouse while dragging it to
the target event on RequestRoute in the MapPoint_ShowDirections iView. By doing so, you create a link between the two events.
3. Publish the page in the portal by right-clicking it in Solution Explorer and selecting Publish Page. Previewing the Page and Testing the Application
1. In the page window, click the Preview tab, or right-click the page in Solution Explorer and select View in Portal. The page with the iViews is displayed exactly as it would be in the portal.
2. Tip If the display does not reflect your recent changes, right-click an iView and select Refresh, or switch tabs. 3. Enter a filter string in the input field of CustomerFind iView, and click the Search Button. 4. Select a customer. The FindNearby iView should display a list of restaurants available in the location of that customer. 5. Select another point of interest from the list. The table should display the relevant details. 6. Select an entry from the table. A map should appear showing the route from the customer to the selected location.

26
The page should look similar to this:

27
Copyright 2006 SAP AG. All Rights Reserved
No part of this publication may be reproduced or transmitted in any form or for any purpose without the
express permission of SAP AG. The information contained herein may be changed without prior notice. Some software products marketed by SAP AG and its distributors contain proprietary software components
of other software vendors. Microsoft, Windows, Outlook, and PowerPoint are registered trademarks of Microsoft Corporation. IBM, DB2, DB2 Universal Database, OS/2, Parallel Sysplex, MVS/ESA, AIX, S/390, AS/400, OS/390,
OS/400, iSeries, pSeries, xSeries, zSeries, z/OS, AFP, Intelligent Miner, WebSphere, Netfinity, Tivoli, and Informix are trademarks or registered trademarks of IBM Corporation in the United States and/or other countries.
Oracle is a registered trademark of Oracle Corporation. UNIX, X/Open, OSF/1, and Motif are registered trademarks of the Open Group. Citrix, ICA, Program Neighborhood, MetaFrame, WinFrame, VideoFrame, and MultiWin are trademarks or
registered trademarks of Citrix Systems, Inc. HTML, XML, XHTML and W3C are trademarks or registered trademarks of W3C®, World Wide Web
Consortium, Massachusetts Institute of Technology. Java is a registered trademark of Sun Microsystems, Inc. JavaScript is a registered trademark of Sun Microsystems, Inc., used under license for technology invented
and implemented by Netscape. MaxDB is a trademark of MySQL AB, Sweden. SAP, R/3, mySAP, mySAP.com, xApps, xApp, SAP NetWeaver and other SAP products and services
mentioned herein as well as their respective logos are trademarks or registered trademarks of SAP AG in Germany and in several other countries all over the world. All other product and service names mentioned are the trademarks of their respective companies. Data contained in this document serves informational purposes only. National product specifications may vary.
These materials are subject to change without notice. These materials are provided by SAP AG and its affiliated companies ("SAP Group") for informational purposes only, without representation or warranty of any kind, and SAP Group shall not be liable for errors or omissions with respect to the materials. The only warranties for SAP Group products and services are those that are set forth in the express warranty statements accompanying such products and services, if any. Nothing herein should be construed as constituting an additional warranty.
SAP assumes no responsibility for errors or omissions in these materials.
Related Documents