Welcome message from author
This document is posted to help you gain knowledge. Please leave a comment to let me know what you think about it! Share it to your friends and learn new things together.
Transcript

by Nancy Muir
Microsoft® Office
Project 2007FOR
DUMmIES‰
01_036516 ffirs.qxp 11/20/06 1:37 PM Page i

Microsoft® Project 2007 For Dummies®
Published byWiley Publishing, Inc.111 River StreetHoboken, NJ 07030-5774www.wiley.com
Copyright © 2007 by Wiley Publishing, Inc., Indianapolis, Indiana
Published by Wiley Publishing, Inc., Indianapolis, Indiana
Published simultaneously in Canada
No part of this publication may be reproduced, stored in a retrieval system or transmitted in any form orby any means, electronic, mechanical, photocopying, recording, scanning or otherwise, except as permit-ted under Sections 107 or 108 of the 1976 United States Copyright Act, without either the prior writtenpermission of the Publisher, or authorization through payment of the appropriate per-copy fee to theCopyright Clearance Center, 222 Rosewood Drive, Danvers, MA 01923, (978) 750-8400, fax (978) 646-8600.Requests to the Publisher for permission should be addressed to the Legal Department, Wiley Publishing,Inc., 10475 Crosspoint Blvd., Indianapolis, IN 46256, (317) 572-3447, fax (317) 572-4355, or online athttp://www.wiley.com/go/permissions.
Trademarks: Wiley, the Wiley Publishing logo, For Dummies, the Dummies Man logo, A Reference for theRest of Us!, The Dummies Way, Dummies Daily, The Fun and Easy Way, Dummies.com, and related tradedress are trademarks or registered trademarks of John Wiley & Sons, Inc. and/or its affiliates in the UnitedStates and other countries, and may not be used without written permission. Microsoft is a registeredtrademark of Microsoft Corporation in the United States and/or other countries. All other trademarks arethe property of their respective owners. Wiley Publishing, Inc., is not associated with any product orvendor mentioned in this book.
LIMIT OF LIABILITY/DISCLAIMER OF WARRANTY: THE PUBLISHER AND THE AUTHOR MAKE NO REP-RESENTATIONS OR WARRANTIES WITH RESPECT TO THE ACCURACY OR COMPLETENESS OF THECONTENTS OF THIS WORK AND SPECIFICALLY DISCLAIM ALL WARRANTIES, INCLUDING WITHOUTLIMITATION WARRANTIES OF FITNESS FOR A PARTICULAR PURPOSE. NO WARRANTY MAY BE CRE-ATED OR EXTENDED BY SALES OR PROMOTIONAL MATERIALS. THE ADVICE AND STRATEGIES CON-TAINED HEREIN MAY NOT BE SUITABLE FOR EVERY SITUATION. THIS WORK IS SOLD WITH THEUNDERSTANDING THAT THE PUBLISHER IS NOT ENGAGED IN RENDERING LEGAL, ACCOUNTING, OROTHER PROFESSIONAL SERVICES. IF PROFESSIONAL ASSISTANCE IS REQUIRED, THE SERVICES OF ACOMPETENT PROFESSIONAL PERSON SHOULD BE SOUGHT. NEITHER THE PUBLISHER NOR THEAUTHOR SHALL BE LIABLE FOR DAMAGES ARISING HEREFROM. THE FACT THAT AN ORGANIZATIONOR WEBSITE IS REFERRED TO IN THIS WORK AS A CITATION AND/OR A POTENTIAL SOURCE OF FUR-THER INFORMATION DOES NOT MEAN THAT THE AUTHOR OR THE PUBLISHER ENDORSES THEINFORMATION THE ORGANIZATION OR WEBSITE MAY PROVIDE OR RECOMMENDATIONS IT MAYMAKE. FURTHER, READERS SHOULD BE AWARE THAT INTERNET WEBSITES LISTED IN THIS WORKMAY HAVE CHANGED OR DISAPPEARED BETWEEN WHEN THIS WORK WAS WRITTEN AND WHEN ITIS READ.
For general information on our other products and services, please contact our Customer CareDepartment within the U.S. at 800-762-2974, outside the U.S. at 317-572-3993, or fax 317-572-4002.
For technical support, please visit www.wiley.com/techsupport.
Wiley also publishes its books in a variety of electronic formats. Some content that appears in print maynot be available in electronic books.
Library of Congress Control Number: 2006934842
ISBN-10: 0-470-03651-6
ISBN-13: 978-0-470-03651-8
Manufactured in the United States of America
10 9 8 7 6 5 4 3 2 1
1B/RS/RS/QW/IN
01_036516 ffirs.qxp 11/20/06 1:37 PM Page ii

About the AuthorNancy Muir has written dozens of books on topics ranging from desktopapplications, project management, and distance learning, to an award-winning book on character education for middle-schoolers. Prior to her freelance writing career, Nancy taught workshops in project management to Fortune 500 companies and was a manager in both the computer and publishing industries. She lives in the Pacific Northwest with her husbandEarl, with whom she has collaborated on three books, including ElectronicsProjects For Dummies.
01_036516 ffirs.qxp 11/20/06 1:37 PM Page iii

01_036516 ffirs.qxp 11/20/06 1:37 PM Page iv

DedicationTo Earl for putting up with my hectic book schedule in our first year of mar-riage. You’re the best! That long-promised cutting back on work time isalmost here, my love.
Author’s AcknowledgmentsFirst, many thanks to my friend Elaine Marmel, author of the MicrosoftProject Bible from Wiley. Her advice and insight into the workings of Projectalways help me see the forest for the trees. Did the chocolate arrive okay,Elaine?
Second I thank the folks at Wiley, including Kyle Looper, my able acquisitionseditor, and Blair Pottenger, the book’s project editor who was incredibly supportive and patient and helped me hold all the pieces together. Thanksalso to development editor Linda Morris, copy editors Teresa Artman andBecky Whitney, and technical editor Jennifer Pendleton for keeping the proseaccurate and intelligible.
01_036516 ffirs.qxp 11/20/06 1:37 PM Page v

Publisher’s AcknowledgmentsWe’re proud of this book; please send us your comments through our online registration formlocated at www.dummies.com/register/.
Some of the people who helped bring this book to market include the following:
Acquisitions, Editorial, and Media Development
Project Editor: Blair J. Pottenger
Development Editor: Linda Morris
Acquisitions Editor: Kyle Looper
Senior Copy Editor: Teresa Artman
Copy Editor: Becky Whitney
Technical Editor: Jennifer Pendleton
Editorial Manager: Kevin Kirschner
Media Development Specialist: Steven Kudirka
Media Project Supervisor: Laura Moss
Media Development Manager:Laura VanWinkle
Editorial Assistant: Amanda Foxworth
Senior Editorial Assistant: Cherie Case
Cartoons: Rich Tennant (www.the5thwave.com)
Composition Services
Project Coordinator: Ryan Steffen
Layout and Graphics: Carl Byers, Denny Hager,Stephanie D. Jumper, Barry Offringa,Lynsey Osborn, Alicia South
Proofreaders: Jessica Kramer, Techbooks
Indexer: Techbooks
Anniversary Logo Design: Richard Pacifico
Special Help
Jodi Jensen
Publishing and Editorial for Technology Dummies
Richard Swadley, Vice President and Executive Group Publisher
Andy Cummings, Vice President and Publisher
Mary Bednarek, Executive Acquisitions Director
Mary C. Corder, Editorial Director
Publishing for Consumer Dummies
Diane Graves Steele, Vice President and Publisher
Joyce Pepple, Acquisitions Director
Composition Services
Gerry Fahey, Vice President of Production Services
Debbie Stailey, Director of Composition Services
01_036516 ffirs.qxp 11/20/06 1:37 PM Page vi
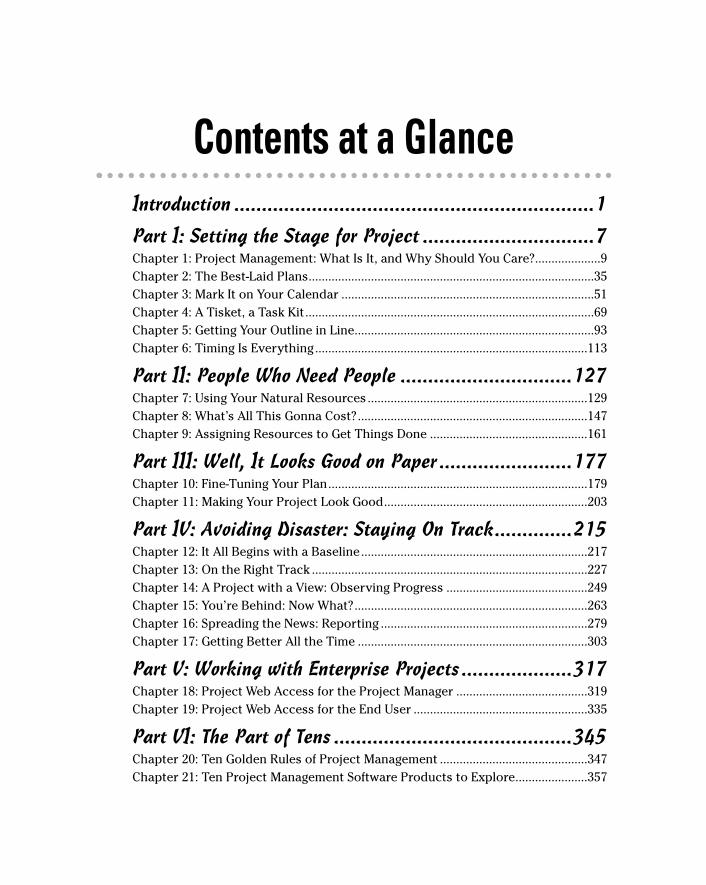
Contents at a GlanceIntroduction .................................................................1
Part I: Setting the Stage for Project ...............................7Chapter 1: Project Management: What Is It, and Why Should You Care?....................9Chapter 2: The Best-Laid Plans.......................................................................................35Chapter 3: Mark It on Your Calendar .............................................................................51Chapter 4: A Tisket, a Task Kit........................................................................................69Chapter 5: Getting Your Outline in Line.........................................................................93Chapter 6: Timing Is Everything...................................................................................113
Part II: People Who Need People ...............................127Chapter 7: Using Your Natural Resources ...................................................................129Chapter 8: What’s All This Gonna Cost?......................................................................147Chapter 9: Assigning Resources to Get Things Done ................................................161
Part III: Well, It Looks Good on Paper ........................177Chapter 10: Fine-Tuning Your Plan...............................................................................179Chapter 11: Making Your Project Look Good..............................................................203
Part IV: Avoiding Disaster: Staying On Track..............215Chapter 12: It All Begins with a Baseline.....................................................................217Chapter 13: On the Right Track ....................................................................................227Chapter 14: A Project with a View: Observing Progress ...........................................249Chapter 15: You’re Behind: Now What?.......................................................................263Chapter 16: Spreading the News: Reporting ...............................................................279Chapter 17: Getting Better All the Time ......................................................................303
Part V: Working with Enterprise Projects ....................317Chapter 18: Project Web Access for the Project Manager ........................................319Chapter 19: Project Web Access for the End User .....................................................335
Part VI: The Part of Tens ...........................................345Chapter 20: Ten Golden Rules of Project Management .............................................347Chapter 21: Ten Project Management Software Products to Explore......................357
02_036516 fftoc.qxp 11/20/06 1:37 PM Page vii
Part VII: Appendixes .................................................363Appendix A: On the CD..................................................................................................365Appendix B: Glossary ....................................................................................................371
Index .......................................................................379
02_036516 fftoc.qxp 11/20/06 1:37 PM Page viii

Table of ContentsIntroduction..................................................................1
About This Book...............................................................................................1Foolish Assumptions .......................................................................................1Conventions Used in This Book .....................................................................2How This Book Is Organized...........................................................................2
Part I: Setting the Stage for Project ......................................................2Part II: People Who Need People..........................................................3Part III: Well, It Looks Good on Paper ..................................................3Part IV: Avoiding Disaster: Staying on Track ......................................3Part V: Working with Enterprise Projects............................................3Part VI: The Part of Tens .......................................................................4Part VII: Appendixes...............................................................................4
What You’re Not to Read.................................................................................4Icons Used in This Book..................................................................................4Where to Go from Here....................................................................................5
Part I: Setting the Stage for Project ................................7
Chapter 1: Project Management: What Is It, and Why Should You Care? . . . . . . . . . . . . . . . . . . . . . . . . . . . . . . . . . . . . .9
The ABCs of Project Management ...............................................................10The three Ts: Tasks, timing, and dependencies
(well, two Ts and a D).......................................................................10Lining up your resources.....................................................................14Spreading the news ..............................................................................16Planning to keep things on track........................................................17
The Role of the Project Manager..................................................................18What exactly does a project manager do? ........................................18Understanding the dreaded triple constraint...................................19Applying tried-and-true methodologies ............................................19
From To-Do List to Hard Drive......................................................................22Getting up to speed with Project........................................................22Collaborating with your project team online....................................23
Getting Started ...............................................................................................23Getting going with help from Project Guide......................................24Starting from scratch ...........................................................................25Starting with templates .......................................................................30
Saving a Project for Posterity .......................................................................32Getting Help from Project .............................................................................32
02_036516 fftoc.qxp 11/20/06 1:37 PM Page ix
Chapter 2: The Best-Laid Plans . . . . . . . . . . . . . . . . . . . . . . . . . . . . . . . . .35Navigating Project..........................................................................................35
Changing views.....................................................................................35Scrolling around ...................................................................................37Getting to a specific spot in your plan...............................................39
A Project with a View.....................................................................................39Home base: Gantt Chart view .............................................................40Going with the flow: Network Diagram view.....................................41Calling up Calendar view.....................................................................42
Customizing Views.........................................................................................43Working with view panes.....................................................................44Modifying the contents of the Network Diagram boxes..................48
Chapter 3: Mark It on Your Calendar . . . . . . . . . . . . . . . . . . . . . . . . . . . .51Mastering Base, Project, Resource, and Task Calendars ..........................52
How calendars work ............................................................................52How one calendar relates to another ................................................54
Calendar Options and Working Times.........................................................54Setting calendar options......................................................................55Setting exceptions to working times..................................................57
Setting the Project calendar .........................................................................58Using Project Guide to Make Calendar Settings.........................................60Modifying Task Calendars.............................................................................62Making Resource Calendar Settings ............................................................63
Which resources get calendars?.........................................................63Making the change to a resource’s calendar ....................................63
Do It Yourself: Creating a Custom Calendar Template ..............................65Sharing Copies of Calendars.........................................................................67
Chapter 4: A Tisket, a Task Kit . . . . . . . . . . . . . . . . . . . . . . . . . . . . . . . . . .69Tackling Your First Task ................................................................................69
Identifying what makes up a task .......................................................70Creating a task ......................................................................................71
You’re in It for the Duration..........................................................................78Tasks come in all flavors: Identifying task type................................78Setting task duration............................................................................80Setting tasks with no duration: Milestones.......................................81Showing up again and again: Recurring tasks ..................................81
Starting and Pausing Tasks ...........................................................................83Entering the task start date ................................................................84Taking a break: Splitting tasks ............................................................84
It’s Such an Effort: Effort-Driven Tasks........................................................85Constraints You Can Live With.....................................................................86
Understanding how constraints work ...............................................86Establishing constraints ......................................................................87Setting a deadline .................................................................................88
Microsoft Project 2007 For Dummies x
02_036516 fftoc.qxp 11/20/06 1:37 PM Page x

Making a Task Note ........................................................................................88Saving Your Project — and Your Tasks .......................................................89Task Information in Action: Planning Your Next Space Launch...............91
Chapter 5: Getting Your Outline in Line . . . . . . . . . . . . . . . . . . . . . . . . . .93Summary Tasks and Subtasks ......................................................................93
Project phases ......................................................................................94How many levels can you go? .............................................................95
The One-and-Only Project Summary Task ..................................................95Structuring the Project’s Outline .................................................................97
Everything but the kitchen sink: What to include ...........................98Building the outline............................................................................100
Moving Tasks All around Your Outline......................................................101The outdent-and-indent shuffle ........................................................101Moving tasks up and down ...............................................................102
Now You See It, Now You Don’t: Collapsing and Expanding Tasks ........104Cracking the WBS Code...............................................................................107
Displaying a WBS code ......................................................................108Customizing the code ........................................................................109
Chapter 6: Timing Is Everything . . . . . . . . . . . . . . . . . . . . . . . . . . . . . . . .113How Tasks Become Codependent..............................................................114
Dependent tasks: Which comes first?..............................................114Dependency types..............................................................................115Allowing for Murphy’s Law: Lag and lead time...............................118
Making the Dependency Connection.........................................................118Adding the missing (dependency) link............................................119Extending your reach with external dependencies .......................121Understanding that things change: Deleting dependencies .........122
Just Look at All These Task Dependencies! ..............................................124
Part II: People Who Need People ................................127
Chapter 7: Using Your Natural Resources . . . . . . . . . . . . . . . . . . . . . . .129Resources: People, Places, and Things .....................................................130Becoming Resource-full...............................................................................130
Understanding resources ..................................................................131Resource types: Work, material, and cost.......................................133How resources affect task timing .....................................................134Estimating resource requirements...................................................135Committed versus proposed resources ..........................................135
The Birth of a Resource...............................................................................136Creating one at a time........................................................................136Identifying resources before you know their names .....................137Resources that hang out in groups ..................................................138
xiTable of Contents
02_036516 fftoc.qxp 11/20/06 1:37 PM Page xi

Sharing Resources........................................................................................138In the swim: Drawing on resource pools .........................................139Importing resources from Outlook ..................................................140
Say, When Do These Guys Work? ...............................................................142Now That I’ve Got ’Em, How Do I Manage ’Em? .......................................144
Acquiring the right resources...........................................................144Balancing workload............................................................................145Managing conflict gracefully .............................................................146
Chapter 8: What’s All This Gonna Cost? . . . . . . . . . . . . . . . . . . . . . . . .147Mary, Mary, How Do Your Costs Accrue? .................................................147
It all adds up........................................................................................148When will this hit the bottom line? ..................................................149
Pay Day: Assigning Resources to Your Project ........................................149There’s no avoiding fixed costs........................................................149When resources get paid per hour...................................................151If you use ten gallons at $2 per gallon . . . .......................................151Making allowances for overtime ......................................................152
It’s an Availability Thing..............................................................................153Setting availability..............................................................................153When a resource comes and goes....................................................154
Adding It Up: How Your Settings Affect Your Budget ..............................155Customizing Cost Fields ..............................................................................156Working with Budgets..................................................................................159
Chapter 9: Assigning Resources to Get Things Done . . . . . . . . . . . . .161You’d Be Surprised What Assignments Can Do to Your Timing.............162
Pinning down your type ....................................................................162When effort is in the driver’s seat ....................................................163Suppose task calendars prevail? ......................................................164
Finding the Right Resource.........................................................................165Needed: One good resource willing to work...................................165Custom fields: It’s a skill ....................................................................167
A Useful Assignation ....................................................................................168Determining work material and cost-resource
assignment units.............................................................................168Making your assignments..................................................................168Getting the contour that’s right for you ..........................................171
Communicating an Assignment to Your Team .........................................173It’s in the e-mail...................................................................................173Report your findings ..........................................................................174
Microsoft Project 2007 For Dummies xii
02_036516 fftoc.qxp 11/20/06 1:37 PM Page xii

Part III: Well, It Looks Good on Paper.........................177
Chapter 10: Fine-Tuning Your Plan . . . . . . . . . . . . . . . . . . . . . . . . . . . . .179Everything Filters to the Bottom Line .......................................................179
Predesigned filters .............................................................................180Putting AutoFilters to work...............................................................181Do-it-yourself filters ...........................................................................182
Hanging Out in Groups ................................................................................184Applying predefined groups..............................................................184Devising your own groups.................................................................185
Figuring Out What’s Driving Your Project.................................................187Spotting Task Drivers.........................................................................188Undo, undo, undo...............................................................................188Highlighting changes..........................................................................189
It’s About Time .............................................................................................191Giving yourself some slack................................................................191Doing it in less time............................................................................194
Getting It for Less.........................................................................................195Your Resource Recourse .............................................................................196
Checking resource availability..........................................................196Deleting or modifying a resource assignment ................................198Getting some help ..............................................................................199Getting your resources level .............................................................200
Mixing Solutions Up .....................................................................................202
Chapter 11: Making Your Project Look Good . . . . . . . . . . . . . . . . . . . .203Putting Your Best Foot Forward.................................................................203Formatting Taskbars....................................................................................204Formatting Task Boxes ................................................................................207Adjusting the Layout ...................................................................................208Modifying Gridlines......................................................................................212When a Picture Can Say It All .....................................................................213
Part IV: Avoiding Disaster: Staying On Track ..............215
Chapter 12: It All Begins with a Baseline . . . . . . . . . . . . . . . . . . . . . . .217All about Baselines.......................................................................................217
What does a baseline look like?........................................................218How do I save a baseline?..................................................................218What if I want more than one baseline? ..........................................220How do I clear and reset a baseline? ...............................................221
In the Interim ................................................................................................222Saving an interim plan .......................................................................223Clearing and resetting a plan ............................................................224
xiiiTable of Contents
02_036516 fftoc.qxp 11/20/06 1:37 PM Page xiii
Chapter 13: On the Right Track . . . . . . . . . . . . . . . . . . . . . . . . . . . . . . . .227Gathering Your Data ....................................................................................227
A method to your tracking madness ...............................................228Going door to door.............................................................................229
Where Does All This Information Go? .......................................................230Doing things with the Tracking toolbar...........................................230For everything there is a view ..........................................................231
Tracking your work for the record ............................................................233Progress as of when?..........................................................................233Percentage complete: How to tell?...................................................234When did you start? When did you finish? .....................................236John worked three hours, Maisie worked ten ................................237Uh-oh, we’re into overtime................................................................239Specifying remaining durations........................................................239Entering fixed-cost updates ..............................................................240
Update Project: Sweeping Changes for Dummies ....................................241Tracking Materials Usage............................................................................243Tracking More Than One: Consolidated Projects ....................................244
Consolidating projects.......................................................................244Updating consolidated projects .......................................................246Changing linking settings ..................................................................246
Chapter 14: A Project with a View: Observing Progress . . . . . . . . . .249Look at What Tracking Did!.........................................................................250
Getting an indication..........................................................................250Lines of progress ................................................................................251When worlds collide: Baseline versus actual .................................255
Learn by the Numbers.................................................................................256Acronym Soup: BCWP, ACWP, EAC, and CV..............................................257Calculations behind the Scenes .................................................................258
Going automatic or manual...............................................................258Earned-value options .........................................................................260How many critical paths are enough? .............................................261
Chapter 15: You’re Behind: Now What? . . . . . . . . . . . . . . . . . . . . . . . .263Justifying Yourself: Notes, Baselines, and Interim Plans.........................263What If?..........................................................................................................265
Sorting things out...............................................................................265Filtering................................................................................................266Examining the critical path ...............................................................268Use resource leveling one more time...............................................268What’s driving the timing of this task? ............................................268
Using the Analysis Toolbar .........................................................................270How Adding People or Time Affects Your Project ...................................272
Hurry up! .............................................................................................272Throwing people at the problem......................................................272Shifting dependencies and task timing............................................274
Microsoft Project 2007 For Dummies xiv
02_036516 fftoc.qxp 11/20/06 1:37 PM Page xiv
When All Else Fails .......................................................................................275All the time in the world....................................................................275And now for something completely different .................................276
What Does Project Have to Say About This?............................................277
Chapter 16: Spreading the News: Reporting . . . . . . . . . . . . . . . . . . . .279Off the Rack: Standard Reports..................................................................279
What’s available..................................................................................280Going with the standard ....................................................................280A standard report, with a twist.........................................................281Crosstabs: A different animal............................................................285
A Custom Job................................................................................................285Get a New Perspective on Data with Visual Reports...............................286
Getting an overview of what’s available..........................................287Creating a Visual Report....................................................................287
Spiffing Things Up ........................................................................................289Using graphics in Project ..................................................................289Formatting reports .............................................................................292
Call the Printer!.............................................................................................294Working with Page Setup...................................................................294Get a preview ......................................................................................299
So Let’s Print! ................................................................................................300
Chapter 17: Getting Better All the Time . . . . . . . . . . . . . . . . . . . . . . . . .303Learning from Your Mistakes......................................................................303
It was only an estimate ......................................................................304Debrief your team...............................................................................305
Building on Your Success............................................................................306Create a template ...............................................................................306Master the Organizer .........................................................................308Handy little timesavers: Macros.......................................................310
Customizing Project Guide .........................................................................314
Part V: Working with Enterprise Projects.....................317
Chapter 18: Project Web Access for the Project Manager . . . . . . . .319Figuring Out Whether Project Web Access Is for You .............................320Getting a Handle on What You Can Do with Project Web Access ..........322Planning to Use Project Server and Project Web Access........................323
Get a team together............................................................................323Gather information.............................................................................324Standardize processes.......................................................................324Coordinate with IT..............................................................................325Planning for problems .......................................................................325
xvTable of Contents
02_036516 fftoc.qxp 11/20/06 1:37 PM Page xv
Looking Over the Project Web Access Tools............................................325Make assignments and delegate tasks.............................................326Track your progress...........................................................................327Figure out what’s going on with status reports..............................328
Working with the Gang Online....................................................................329Check resource availability and assignments.................................329Build a project team...........................................................................330Request a status report .....................................................................332Share documents................................................................................332
Chapter 19: Project Web Access for the End User . . . . . . . . . . . . . . .335Seeing Project Web Access from the User’s Perspective ........................335Reporting Work Completed ........................................................................336Viewing Project Information .......................................................................339Setting Up Alerts and Reminders ...............................................................340Viewing Information about Other Users ...................................................341
Part VI: The Part of Tens............................................345
Chapter 20: Ten Golden Rules of Project Management . . . . . . . . . . .347Don’t Bite Off More Than You Can Manage ..............................................347Get Your Ducks in a Row .............................................................................348Plan for Murphy ...........................................................................................349Don’t Put Off Until Tomorrow.....................................................................350Delegate, Delegate, Delegate!......................................................................350CYA (Document!) ..........................................................................................351Keep Your Team in the Loop ......................................................................352Measure Success ..........................................................................................352Have a Flexible Strategy ..............................................................................354Learn from Your Mistakes ...........................................................................355
Chapter 21: Ten Project Management Software Products to Explore . . . . . . . . . . . . . . . . . . . . . . . . . . . . . . . . . . . . . . . . . . . . . . . . . .357
DecisionEdge Chart and Report Products Enhance Project’s Own Tools .................................................................................358
Cobra Squeezes the Most from Cost/Earned Value .................................358MindManuals Helps You Visualize Project Information ..........................359Innate Integrates Projects Large and Small ..............................................359PlanView Models Your Workforce Capacity..............................................360Tenrox Streamlines Business Processes ...................................................360Project KickStart Gives Your Project a Head Start...................................361Project Manager’s Assistant Organizes Drawings
for Construction Projects ........................................................................361TeamTrack Solves Mission-Critical Issues ................................................362EPK-Suite Eases Portfolio Mangement Chores .........................................362
Microsoft Project 2007 For Dummies xvi
02_036516 fftoc.qxp 11/20/06 1:37 PM Page xvi

Part VII: Appendixes..................................................363
Appendix A: On the CD . . . . . . . . . . . . . . . . . . . . . . . . . . . . . . . . . . . . . . .365System Requirements..................................................................................365Using the CD .................................................................................................365What You’ll Find on the CD .........................................................................366
Empire Suite, from WSG System Corp. ............................................366EPK Suite 4.1, from EPK GROUP, LLC...............................................367Milestones Professional, from Kidasa Software .............................367Milestones Project Companion 2006, from Kidasa Software ........367MindManager Pro 6, from Mindjet Corporation .............................368PERT Chart Expert, from Critical Tools, Inc....................................368PertMaster Project Risk, from PertMaster ......................................368PlanView Project Portfolio, from PlanView.....................................368Project KickStart, from Experience in Software .............................369WBS Chart Pro, from Critical Tools, Inc. .........................................369
Troubleshooting...........................................................................................369Customer Care ....................................................................................370
Appendix B: Glossary . . . . . . . . . . . . . . . . . . . . . . . . . . . . . . . . . . . . . . . .371
Index . . . . . . . . . . . . . . . . . . . . . . . . . . . . . . . . .379
xviiTable of Contents
02_036516 fftoc.qxp 11/20/06 1:37 PM Page xvii

Microsoft Project 2007 For Dummies xviii
02_036516 fftoc.qxp 11/20/06 1:37 PM Page xviii
Introduction
Project management probably started back when a few cave dwellers gottogether and figured out how to work as a team to bag a wooly mam-
moth for their Sunday dinner. Some fellow — I’ll call him Ogg — probablytook the lead as the very first project manager. He drew things in the dirtwith a stick to help his team members understand the strategy of the hunt,and communicated with them in ughs and grunts. Unlike you, he had no bossto report to, no budget, and no deadlines (lucky Ogg), but the fundamentalspirit of a project was there.
Over the years, project management has evolved as a discipline that involvessophisticated analyses and techniques, projections, tracking of time andmoney, and reporting. Project management software — which has beenaround only about 25 years or so — has brought a new face and functionalityto project management that would have left our friend Ogg ughless.
About This BookMicrosoft Office Project 2007, the most recent incarnation of the world’s mostpopular project management software, offers a tremendous wealth of function-ality to users. However, it’s probably not like any other software you’ve everused, so mastering it can seem a daunting process. One trick is to understandhow its features relate to what you do every day as a project manager. Anotheris to get someone like me to tell you all about its features and how to use them.
In Microsoft Office Project 2007 For Dummies, my goal is to help you exploreall that Project offers, providing information on relevant project managementconcepts while also offering specific procedures to build and track yourProject plans. But more importantly, I offer advice on how to make all thesefeatures and procedures mesh with what you already know as a project man-ager to make the transition easier.
Foolish AssumptionsI’ve made some assumptions about you, gentle reader. I figure that you arecomputer literate and know how to use a mouse, a keyboard, software menus,
03_036516 intro.qxp 11/20/06 1:37 PM Page 1

and toolbars. I assume you know how to use most common Windows func-tions (such as the Clipboard) as well as many basic software functions (suchas selecting text and dragging and dropping things with your mouse).
I do not assume that you’ve used Project or any other project managementsoftware before. If you’re new to Project, you’ll find what you need to get upto speed, including information on how Project works, finding your way around,and building your first Project plan. If you’ve used an earlier version of Project,you’ll find out about Project 2007 and all the new features it provides.
Conventions Used in This BookI should explain a few odds and ends to make using this book easier:
� Web site addresses, known as URLs, are highlighted like this:www.microsoft.com.
� Menu commands are given in the order in which you select them, forexample, “Choose Tools➪Resource Sharing➪Share Resources.”
� Options in dialog boxes use initial caps even if they aren’t capitalized onyour screen to make it easier to identify them in sentences. For example,what appears as Show summary tasks in the Options dialog box willappear as Show Summary Tasks in this book.
How This Book Is OrganizedThis book is designed to help you begin to use Microsoft Office Project 2007to plan, build, and track progress on projects, keeping in mind tried-and-trueproject management practices and principles. I divided the book into logicalparts that follow the process of building and tracking a typical project plan.
Part I: Setting the Stage for ProjectPart I explains what Project 2007 can do for you as well as what types of inputyou have to provide to use it successfully on your projects. You’ll get yourfirst glimpse of Project views and discover how to navigate around them.You’ll begin to build Project plans by making calendar settings, building atask outline, and then entering timing and timing relationships for thosetasks.
2 Microsoft Project 2007 For Dummies
03_036516 intro.qxp 11/20/06 1:37 PM Page 2

Part II: People Who Need PeoplePart II is the Project resources section: You discover all you need to knowabout creating and assigning work resources, material resources, and fixedcosts to tasks in a project. You also discover how using resources on yourproject relates to the costs you accrue over time.
Part III: Well, It Looks Good on PaperUp to now, you’ve been mapping out your project plan. Now it’s time to seewhether that plan meets your needs in terms of budget and timing. Projectoffers a whole toolbox to help you modify resource assignments and tasktiming to trim your costs and meet your deadlines so you can finalize yourplan. You also get briefed on how to modify the format of items in your projectto make your plan look as polished as possible, both on-screen and in print.
Part IV: Avoiding Disaster: Staying on TrackAs any experienced project manager knows, projects just about neverhappen the way you thought they would. In this part, you save a picture ofyour plan — a baseline — and then begin to track actual activity against yourplan. You also take a look at methods of reporting your progress, and how toget back on track when you find yourself derailed. In the final chapter, I pro-vide advice on how to use what you glean from your projects to make betterplanning choices going forward.
Part V: Working with Enterprise ProjectsWith all that Project Professional has to offer the enterprise via its ProjectServer and Project Web Access functionalities and SharePoint online ser-vices, you can share documents online with your project team, have yourhuman resources report their work time, and even integrate Project informa-tion with Outlook. This part shows you the basics of what Project Server cando, and how to use Project Web Access from both the manager and users’perspective.
3Introduction
03_036516 intro.qxp 11/20/06 1:37 PM Page 3
Part VI: The Part of TensTen seems to be a handy number of items for humans to put into lists, so thispart gives you two such lists: Ten Golden Rules of Project Management andTen Project Management Software Products to Explore. The first of thesechapters tells you about some dos and don’ts that can save you a lot of griefwhen you’re using Project for the first time (or the fifth time, for that matter).The second offers a look at some add-on products and complementary soft-ware products that bring even more functionality to Microsoft Office Project.
Part VII: AppendixesThis book is accompanied by a handy CD filled with project managementgoodies, including project management add-on software and MicrosoftProject templates. Appendix A is where I explain how to work with the CDand exactly what you can find there.
Earned value? Budgeted cost of work performed? Work breakdown structure?I’m telling you, project management has more terminology than a medicaltextbook. That’s why I provide a Glossary that contains a lot of terms, somefrom the discipline of project management and some project-specific.Definitions of key terms are included throughout this book, but when youneed a refresher course, look here.
What You’re Not to ReadFirst, you don’t have to read this book from front to back unless you reallywant to. If you want to just get information about a certain topic, you canopen this book to any chapter and get the information you need.
That said, I have structured the book to move from some basic concepts thatequip you to understand how Project works through the steps involved inbuilding a typical project. If you have an overpowering need to find out thewhole shebang, you can start at the beginning and work your way throughthe book to build your first Project plan.
Icons Used in This BookOne picture is worth . . . well, you know. That’s why For Dummies books useicons to give you a visual clue as to what’s going on. Essentially, icons call
4 Microsoft Project 2007 For Dummies
03_036516 intro.qxp 11/20/06 1:37 PM Page 4

your attention to bits of special information that might very well make yourlife easier. Following are the icons used in this book.
Remember icons signal either a pertinent fact that relates to what you’rereading at the time (but is also mentioned elsewhere in the book), or a reiter-ation of a particularly important piece of information that’s, well, worthrepeating.
Tips are the advice columns of computer books: They offer sage advice, a bitmore information about a topic under discussion that might be of interest, orways to do things a bit more efficiently.
Warning icons spell trouble with a capital T: When you see a Warning, read it.If you’re not careful, you might do something at this point that could causedisaster.
Where to Go from HereTime to take what you’ve learned in the project management school of hardknocks and jump into the world of Microsoft Office Project 2007. When youdo, you’ll be rewarded with a wealth of tools and information that help you tomanage your projects much more efficiently.
Here’s where you step out of the world of cave-dweller project managementand into the brave, new world of Microsoft Office Project 2007.
5Introduction
03_036516 intro.qxp 11/20/06 1:37 PM Page 5

6 Microsoft Project 2007 For Dummies
03_036516 intro.qxp 11/20/06 1:37 PM Page 6
Part ISetting the Stage
for Project
04_036516 pt01.qxp 11/20/06 1:37 PM Page 7

In this part . . .
Part I explains the types of input you have to giveProject to make best use of its capabilities. You get a
briefing on using Project views, using calendar settings tobuild Project plans, creating task outlines, and then speci-fying the timing and relationships that organize your pro-ject’s tasks.
04_036516 pt01.qxp 11/20/06 1:37 PM Page 8

Chapter 1
Project Management: What Is It,and Why Should You Care?
In This Chapter� Discovering how traditional project management makes the move to software
� Understanding what elements of a project are managed in Project
� Understanding the project manager’s role
� Exploring the role of the Internet in project management
� Getting started using Project Guide
� Using a template to start a new project
� Saving a project file
� Finding help in Project
Welcome to the world of computerized project management withMicrosoft Project. If you’ve never used project management software,
you’re entering a brave, new world. It’s like walking from the office of 25 yearsago — with no fax, voicemail, or e-mail — into the office of today with itswealth of high-tech devices.
Everything you used to do with handwritten to-do lists, word processors, andspreadsheets all magically comes together in Project. However, this transi-tion won’t come in a moment, and you need a basic understanding of whatproject management software can do to get you up to speed. If you’ve usedprevious versions of Project, this little overview can help you refresh yourmemory as well as ease you into a few of the new features of Project 2007.
So, even if you’re a seasoned project manager, take a minute to review this chap-ter. It provides the foundation for how you’ll work with Project from here on.
05_036516 ch01.qxp 11/20/06 1:38 PM Page 9

The ABCs of Project ManagementYou probably handle projects day in and day out. Some are obvious, becauseyour boss named them so that any fool would know that they’re projects: theAcme Drilling Project or the Network Expansion IT Project, for example.Others are less obvious, such as that speech thing you have to do onSaturday for your professional association or washing the dog.
If you need to organize a company holiday party, it’s a project. If you werehanded a three-year Earth-exploration initiative to find oil in Iowa, coordinatesubcontractors and government permits, and work with a team of 300 people,that’s definitely a project. Yes, even that speech you have to present is a project because it has certain characteristics.
Understanding what your projects, large or small, have in common is thebasis of understanding what Project can do for you. All projects have
� An overall goal
� A project manager
� Individual tasks to be performed
� Timing for those tasks to be completed (such as three hours, three days,or three months)
� Timing relationships between those tasks (For example, you can’t put anew manufacturing process in place until you train people in how to usethe process.)
� Resources (people, equipment, facilities, and supplies, for example) toaccomplish the work
� A budget (the costs associated with those people, equipment, facilities,and supplies)
Project management is simply the process of managing all the elements of aproject, whether that project is large or small.
The three Ts: Tasks, timing, and dependencies (well, two Ts and a D)As Lewis Carroll said, “If you don’t know where you’re going, any road will getyou there.” So, first things first: You have to understand the goal of your projectso you can begin to build the tasks that have to be performed to get you there.
10 Part I: Setting the Stage for Project
05_036516 ch01.qxp 11/20/06 1:38 PM Page 10

A task is simply one of those items you used to scribble on your handwrittento-do lists, such as Write final report or Apply for permits. Tasks are typicallyorganized into phases (appropriate stages) in Project, arranged in an outline-like structure, as you can see in the project shown in Figure 1-1. Because timingis essential in any project, Project helps you set up and view the timing rela-tionships among tasks.
Becoming a task masterA task can be as broad or as detailed as you like. For example, you can createa single task to research your competition, or you can create a project phasethat consists of a summary task and subtasks below it. For example, the sum-mary task might be Competitive Research, with the subtasks ResearchingOnline Business Databases, Assembling Company Annual Reports, andReviewing Competitive Product Lines.
Adding tasks to a Project file doesn’t cost you a thing (except a nanobit ofmemory), so a project can have as many tasks and as many phases as youlike. You simply use the outlining structure in Project to indent various levelsof tasks. The more deeply indented in an outline a task is, the more detailedthe task.
Figure 1-1:You’ll
probablyspend mostof your timein Project inoutline-likeGantt Chart
view.
11Chapter 1: Project Management: What Is It, and Why Should You Care?
05_036516 ch01.qxp 11/20/06 1:38 PM Page 11

One handy thing about this outlining structure is that you can roll up all thetiming and cost data from the subtasks within your phases into summary-level tasks. Three sequential subtasks that take a day each to complete andcost you $200 apiece result in a summary task that spans three days andcosts $600. You can view your project at various levels of detail or get auto-matic tallies of timing and costs if you prefer to simply view the summarylevel of tasks.
For more about defining and creating tasks, check out Chapter 4.
All in the timingThey say that timing is everything: Rome wasn’t built in a day, a stitch in timesaves nine, and don’t even ask me about choosing exactly when to sell yourhigh-tech stocks. The importance of timing applies to Project tasks, too.Almost all tasks have timing — referred to as duration — which is the amountof time needed to complete the task.
The only tasks without duration are milestones. A milestone is a task of zeroduration; in essence, it simply marks a moment in time that must be reflectedin your Project outline. Typical milestones are the approval of a brochuredesign and an assembly line startup.
Project doesn’t provide magic formulas for duration: You assign durationbased on your own experience and judgment. Does designing a product pack-age take three days or three weeks? Will obtaining a building permit happenin a day or a month? (Remember that you’re dealing with city hall, so thinkbefore you answer!) Project isn’t an oracle: You have to provide facts, figures,and educated guesses to build your Project schedule. After that informationis entered, though, Project can do some wonderful things to help you main-tain your schedule and monitor your progress.
Task co-dependenciesThe final piece in the puzzle of how long your project will take is the conceptof dependencies, or the timing relationships among tasks. If you have a sched-ule that includes ten tasks that all begin at the same time, your entire projectwill take as long as the longest task (see Figure 1-2).
After you define and implement timing relationships among tasks, yourschedule can stretch over time like a long rubber band. For example, one taskmight begin only after another is finished. Another task can start halfwaythrough the preceding task. The second task cannot start until a week afterthe first task is finished. Only after you start to assign these relationships canyou begin to see a project’s timing as related to not just each task’s durationbut also the specific ways in which the tasks relate to each other.
12 Part I: Setting the Stage for Project
05_036516 ch01.qxp 11/20/06 1:38 PM Page 12
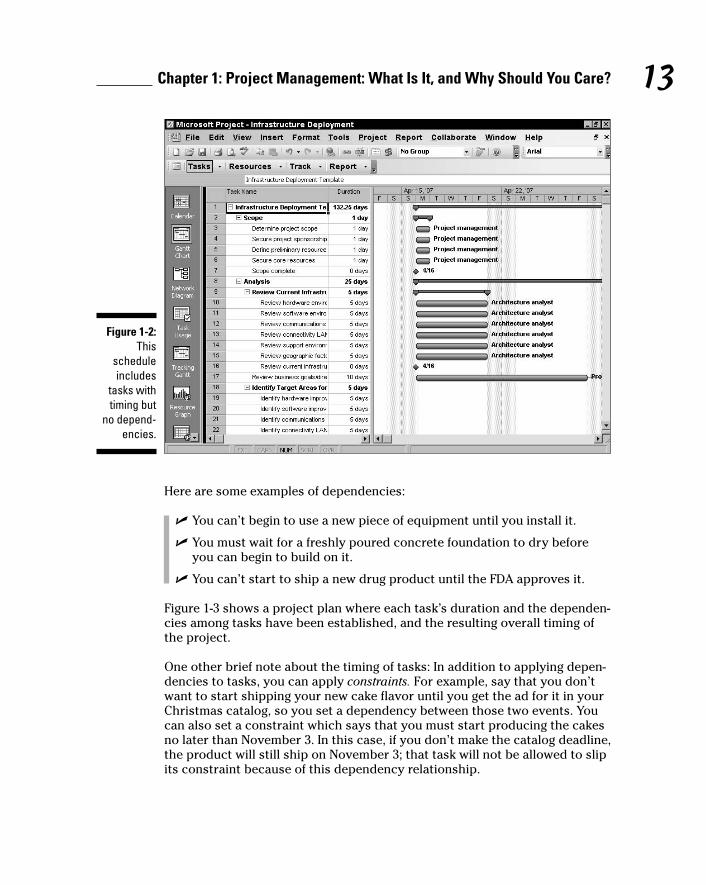
Here are some examples of dependencies:
� You can’t begin to use a new piece of equipment until you install it.
� You must wait for a freshly poured concrete foundation to dry beforeyou can begin to build on it.
� You can’t start to ship a new drug product until the FDA approves it.
Figure 1-3 shows a project plan where each task’s duration and the dependen-cies among tasks have been established, and the resulting overall timing ofthe project.
One other brief note about the timing of tasks: In addition to applying depen-dencies to tasks, you can apply constraints. For example, say that you don’twant to start shipping your new cake flavor until you get the ad for it in yourChristmas catalog, so you set a dependency between those two events. Youcan also set a constraint which says that you must start producing the cakesno later than November 3. In this case, if you don’t make the catalog deadline,the product will still ship on November 3; that task will not be allowed to slipits constraint because of this dependency relationship.
Figure 1-2:This
scheduleincludes
tasks withtiming but
no depend-encies.
13Chapter 1: Project Management: What Is It, and Why Should You Care?
05_036516 ch01.qxp 11/20/06 1:38 PM Page 13

You can find out more about constraints in Chapter 4 and about the fine artof managing dependencies in Chapter 6.
Lining up your resourcesWhen people first use Project, some get a bit confused about resources.Resources aren’t just people: A resource can be a piece of equipment yourent, a meeting room that you have to pay an hourly fee to use, or a box ofnails or a software program you have to buy.
Project allows for three kinds of resources: work resources, materialresources, and cost resources. A work resource is charged by how manyhours or days the resource (often human) works on a task. A materialresource, such as sewing supplies or steel, is charged by a per-use cost or bya unit of measurement (such as square yards or linear feet or tons). A costresource has a set cost, such as a conference fee of $250; this cost doesn’tvary by how much time you spend at the conference or how many peopleattend.
Some resources, such as people, perform their work according to a workingcalendar. If a person works an 8-hour day and you assign him to a task thattakes 24 hours to complete, that person has to put in three workdays to
Figure 1-3:This
scheduleincludes
tasks withboth timing
anddepend-
encies.
14 Part I: Setting the Stage for Project
05_036516 ch01.qxp 11/20/06 1:38 PM Page 14

complete the task. In comparison, someone with a 12-hour workday takesonly two days to complete the same task. In addition, you can set workingand nonworking days for your human resources, which accommodates varia-tions such as 4-day weeks or shift work.
You can set different rates for resources, such as a standard hourly rate and anovertime rate. Project applies the appropriate rate based on each resource’s cal-endar and work assigned. For more about resources and costs, see Chapter 7.
Several views in Project let you see information about resources and howtheir assignment to tasks has an effect on project costs. Figure 1-4 shows youthe Resource sheet which has columns of information about resources andtheir costs.
Here’s one other important thing you should know about resources: Theytend to have conflicts. No, I’m not talking about conference room brawls(although that happens). These conflicts have to do with assigned resourcesthat become overallocated for their available work time. For example, if youassign one poor soul to three 8-hour tasks that must all happen on the sameday — and in the same eight hours — Project has features that do everythingbut jump up on your desk and turn on an alarm to warn you of the conflict.(Luckily, Project also provides tools that help you resolve those conflicts.)
Figure 1-4:Resources
charged at arate per
hour are thebasis of how
Projecttallies costs.
15Chapter 1: Project Management: What Is It, and Why Should You Care?
05_036516 ch01.qxp 11/20/06 1:38 PM Page 15
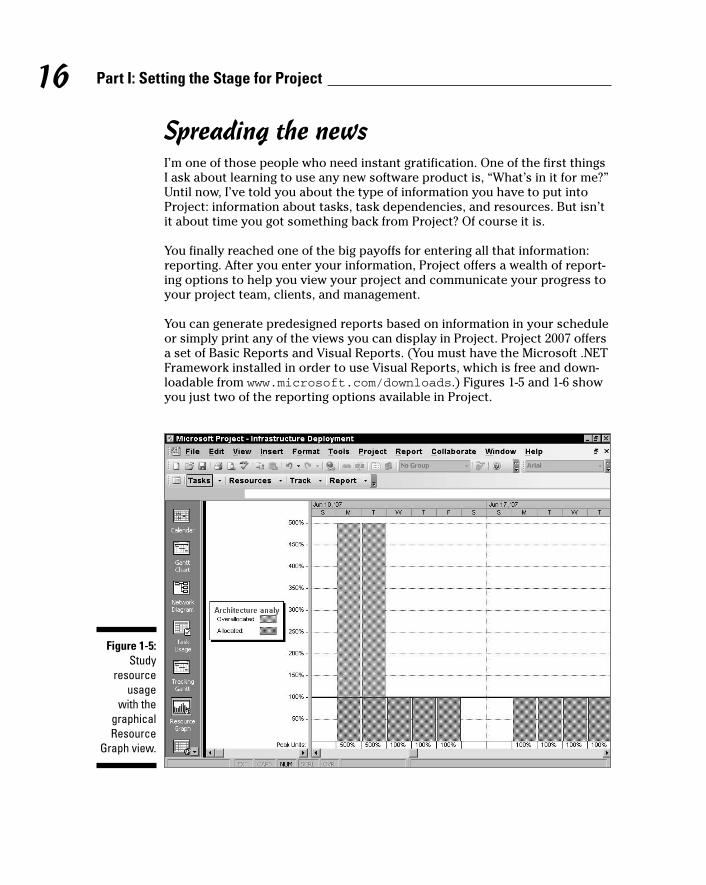
Spreading the newsI’m one of those people who need instant gratification. One of the first thingsI ask about learning to use any new software product is, “What’s in it for me?”Until now, I’ve told you about the type of information you have to put intoProject: information about tasks, task dependencies, and resources. But isn’tit about time you got something back from Project? Of course it is.
You finally reached one of the big payoffs for entering all that information:reporting. After you enter your information, Project offers a wealth of report-ing options to help you view your project and communicate your progress toyour project team, clients, and management.
You can generate predesigned reports based on information in your scheduleor simply print any of the views you can display in Project. Project 2007 offersa set of Basic Reports and Visual Reports. (You must have the Microsoft .NETFramework installed in order to use Visual Reports, which is free and down-loadable from www.microsoft.com/downloads.) Figures 1-5 and 1-6 showyou just two of the reporting options available in Project.
Figure 1-5:Study
resourceusage
with thegraphicalResource
Graph view.
16 Part I: Setting the Stage for Project
05_036516 ch01.qxp 11/20/06 1:38 PM Page 16

Planning to keep things on trackProjects aren’t frozen in amber like some organizational mosquito: They gothrough more changes than a politician’s platform in a campaign year. That’swhere Project’s capability to make changes to your project data comes inhandy.
After you build all your tasks, give them durations and dependencies, andassign all your resources and costs, you set a baseline. A baseline is a snap-shot of your project at the moment you feel your plan is final and you’reready to proceed with the project. After you set a baseline, you record someactivity on your tasks. Then you can compare that actual activity with yourbaseline because Project saves both sets of data in your schedule.
Tracking activity in your project involves recording the actual timing of tasksand recording the time that your resources have spent on those tasks, as wellas entering any actual costs that accrue. You can then display Project viewsthat show you how far off you are at any time (compared with your baseline)in terms of the actual timing of tasks and cost of your project.
Figure 1-6:An
UnstartedTasks
report.
17Chapter 1: Project Management: What Is It, and Why Should You Care?
05_036516 ch01.qxp 11/20/06 1:38 PM Page 17
Whether you have good news or bad, you can use reports to show your bosshow things are going compared with how you thought they would go. Then,after you peel your boss off the ceiling, you can use many more Project toolsto make adjustments to get everything back on track.
The Role of the Project ManagerAlthough understanding the role (let alone the usefulness) of some managersisn’t always easy, it’s always easy to spot the value of a project manager. Thisperson creates the master plan for a project and tries to ensure that it getsimplemented successfully. Along the way, this key person uses skills andmethods that have evolved over time, always seeking to manage how thingsget done and generally keeping schedules on track.
What exactly does a project manager do?A project manager isn’t always the highest authority in a project; often thatrole belongs to whomever manages the project manager, up to and includingmembers of senior management. Rather, the project manager is the personon the front lines who makes sure that the parts of the project come togetherand assumes hands-on responsibility for successes as well as failures.
In project management parlance, the person who champions (and has theultimate responsibility for) a project is the project sponsor.
A project manager manages these essential pieces of a project:
� The project plan or schedule: This is what you create with MicrosoftProject. It includes the estimated steps and associated timing and costsinvolved in reaching the project goal.
� Resources: Managing resources involves resolving resource conflictsand building consensus as well as assigning resources and tracking theiractivities on the project. This part of the job also involves managingnonhuman resources, such as materials and equipment.
� Communication with the project team, management, and customers:Communicating the project’s status to everyone who has a legitimatestake in its success (stakeholders) is a key responsibility.
Although a project manager might work for a project sponsor, the projectoften also has a customer for whom the end product is produced. That cus-tomer can be outside the project manager’s own company, or within.
18 Part I: Setting the Stage for Project
05_036516 ch01.qxp 11/20/06 1:38 PM Page 18

Understanding the dreaded triple constraintYou’ve seen the signs at the copy store or the auto repair place: You can haveit fast, cheap, or right; pick two. That, my friend, is the triple constraint ofproject management in a nutshell.
In a project, you have timing, resources (which are essentially costs), andquality of the product or service produced at the end of the project. MicrosoftProject helps you manage the resources and timing of your project. The qual-ity of your project is often affected directly by how well you manage them. Ifyou add time, costs increase because resources are working longer hours at acertain wage. If you take away resources, you save money, but this can affectquality — and so on.
Coming to a logical balance of time, money, and quality is at the core of whata good project manager does throughout the life of a project.
Applying tried-and-true methodologiesMicrosoft Project incorporates some scheduling and tracking tools that arethe result of many years of developing project management methods. A fewof these are worth noting:
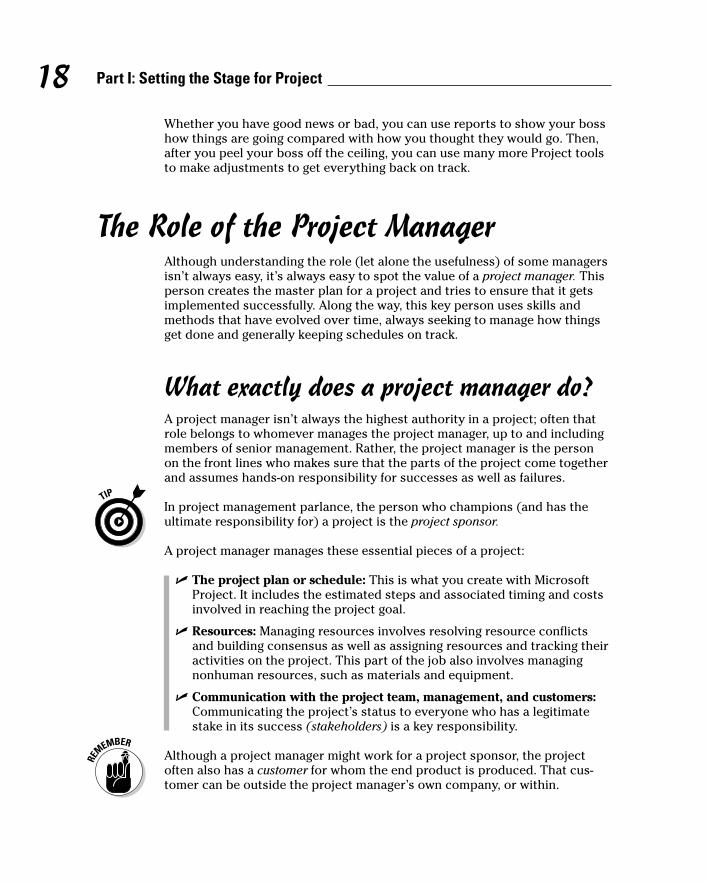
� The Gantt Chart (shown in Gantt Chart view of Figure 1-7), which is the main view of Project, shows you a spreadsheet with columns of data along with a graphical representation of the tasks in the projectarranged along a horizontal timeline. By using the data in the columns(such as task name, start date, finish date, and resources assigned totasks), you can understand the parameters of each task and see itstiming in the graphical area. Being able to view all this information onone page helps you understand what’s happening in your project interms of time and costs.
� The Network Diagram (also called a logic diagram), shown in Figure1-8, is essentially the Microsoft version of a PERT chart. PERT (ProgramEvaluation and Review Technique) was developed during the construc-tion of the Polaris submarine in the 1950s. This mostly graphical repre-sentation of the tasks in your project reflects the flow of work in yourproject rather than the literal timing of tasks. This view helps you to seehow one task flows into another and to get a sense of where you are —not so much in time, but rather in terms of the work you have to accomplish.
19Chapter 1: Project Management: What Is It, and Why Should You Care?
05_036516 ch01.qxp 11/20/06 1:38 PM Page 19
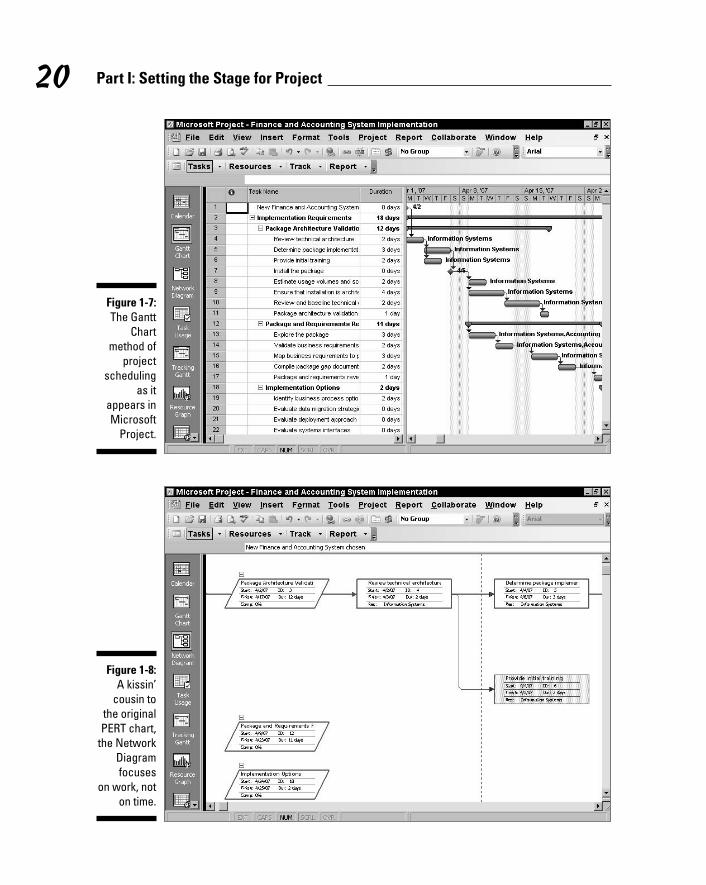
Figure 1-8:A kissin’
cousin tothe originalPERT chart,
the NetworkDiagramfocuses
on work, noton time.
Figure 1-7:The Gantt
Chartmethod of
projectscheduling
as itappears inMicrosoft
Project.
20 Part I: Setting the Stage for Project
05_036516 ch01.qxp 11/20/06 1:38 PM Page 20
� Risk management is a central part of project management because,frankly, projects are chock-full of risk. You run the risk that yourresources won’t perform, that materials will arrive late, that your cus-tomer will change all the parameters of the project halfway through —well, you get the picture.
Risk management is the art of anticipating risks, ranking them from mostto least likely, and determining strategies to prevent the most likely onesfrom occurring. Project helps you with risk management by allowing youto try out what-if scenarios: You can change the start date or length of a task or phase of tasks (for example) and see just what that changedoes to your schedule, such as the delays, cost overruns, and resourceconflicts that might occur in such a scenario, down to the last hour andpenny. Having this kind of information at your fingertips makes risk man-agement easier and (almost) painless.
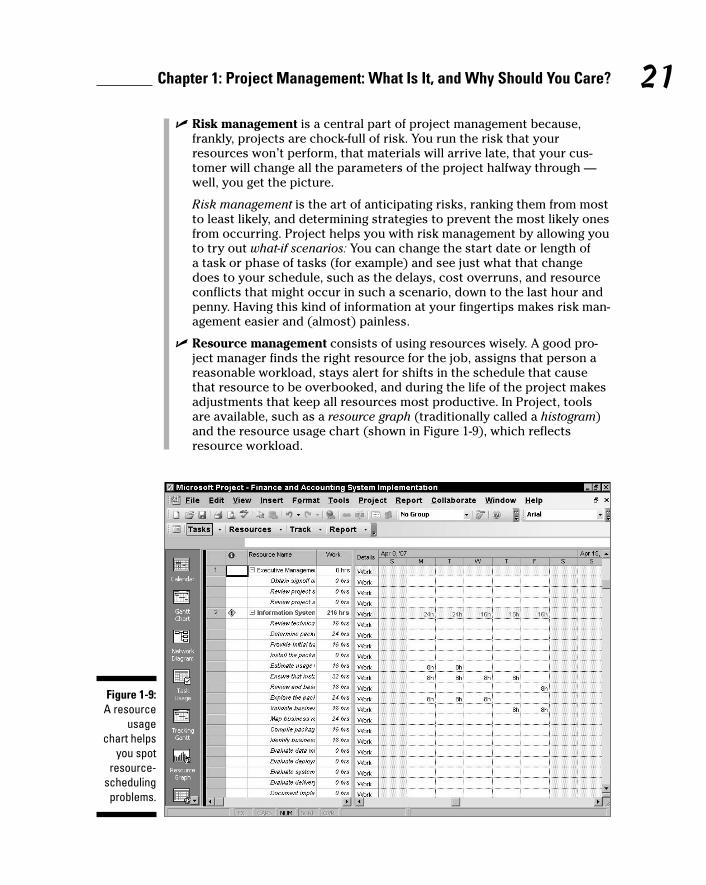
� Resource management consists of using resources wisely. A good pro-ject manager finds the right resource for the job, assigns that person areasonable workload, stays alert for shifts in the schedule that causethat resource to be overbooked, and during the life of the project makesadjustments that keep all resources most productive. In Project, toolsare available, such as a resource graph (traditionally called a histogram)and the resource usage chart (shown in Figure 1-9), which reflectsresource workload.
Figure 1-9:A resource
usage chart helps
you spotresource-
schedulingproblems.
21Chapter 1: Project Management: What Is It, and Why Should You Care?
05_036516 ch01.qxp 11/20/06 1:38 PM Page 21
Figure 1-9 also shows resource leveling (a calculation that automaticallyreschedules resources to resolve overbooking), which can enable you tomanage resources much more effectively. You can see how overbookedthe Information Systems Analyst is on this date.
You can use codes for resources that designate skill levels or abilities so thatfinding the right resource for each job is as simple as performing a search.
From To-Do List to Hard DriveIf you’re reading from start to finish in this chapter, you’re probably shakingyour head and saying, “Boy, handwritten to-do lists look pretty good rightnow. Beats creating hundreds of tasks, assigning them durations, establishingdependencies among them, creating resources, entering resource calendarand rate information, assigning resources and costs to tasks, entering activityperformed on tasks . . .” and so on.
Well, you’re right and wrong about that. You do have to enter a lot of informa-tion into Project to get the benefit of its features. But you can also get a lotout of Project.
Getting up to speed with ProjectTake a moment to look at some of the wonderful things Project can do foryou. This list describes why you (or your company) bought it and why you’reinvesting your time to read this book.
With Project, you enjoy the following benefits:
� Project automatically calculates costs and timing for you based on yourinput. You can quickly recalculate what-if scenarios to solve resourceconflicts, get your costs within budget, or meet your final deadline.
� Project offers views and reports that, with the click of a button, make awealth of information available to you and those you report to. No moremanually building a report on total-costs-to-date to meet a last-minuterequest from your boss. If she wants to know total-costs-to-date, you canjust print your Tracking Gantt view with the Tracking table displayed.See Chapter 16 for information about reporting.
� You can use built-in templates to get a head start on your project. Projecttemplates are prebuilt plans for a typical business project, such as com-mercial construction, an engineering project, a new product rollout,
22 Part I: Setting the Stage for Project
05_036516 ch01.qxp 11/20/06 1:38 PM Page 22
software development, or an office move. See “Starting with templates”later in this chapter for more about this time-saving feature.
You likely do similar types of projects all the time. After you create oneproject, you use it as a template for future projects.
� You can create resources for your project according to information youalready created in your Outlook Address Book. You can even create oneset of company resources and give access to every project manager inthe company (see Chapters 18 and 19 for how to set up centralizedenterprise resources).
� A number of tools in Project employ complex algorithms (that you couldn’teven begin to figure out) to do such tasks as level resource assignments tosolve resource conflicts, filter tasks by various criteria, model what-if sce-narios, and calculate in dollars the value of work performed to date.
Collaborating with your project team onlineYou can take advantage of all the Internet has to offer by using Project fea-tures to collaborate with others. In fact, Project 2007 begins to step into theworld of Enterprise Project Management (EPM), where easily sharing ideas,information, and documents across your enterprise becomes possible.
For example, Project allows you to request updates on a task’s progress fromteam members via e-mail. You can post documents and ask for team input.You can even publish your project on the Web.
The Professional version of Project includes Project Server and Project WebAccess, which enhance workgroup collaboration. You can take advantage ofan online project center and resource center with areas for discussions,progress tracking, document exchange, and more.
Part V of this book, “Working with Enterprise Projects,” looks at how to takeadvantage of the enterprise-wide features of Project Server and Project WebAccess.
Getting StartedAs Shakespeare said, “In delay there lies no plenty.” I don’t know about you,but I need all the plenty I can get, so it’s time to jump in and start using Project.
23Chapter 1: Project Management: What Is It, and Why Should You Care?
05_036516 ch01.qxp 11/20/06 1:38 PM Page 23

You have three choices when starting a new project. You can use ProjectGuide to get Project’s assistance creating a project, you can build a projecton your own from scratch by entering individual task and resource details, oryou can use a project template that already contains data related to yourindustry or the type of project you’re doing.
Getting going with help from Project GuideProject Guide is like some of those wizards you see in Microsoft products: Itwalks you through a series of steps that ask you to enter some informationand then automates a process for you. However, in many ways, Project Guideis like no wizard you’ve ever seen.
Taking a first look at the GuideProject Guide has four different sections: Tasks, Resources, Track, andReport. Within each of those categories might be ten or so links for you toclick to initiate an action. When you do so, you might have to choose a vari-ety of subactions, depending on your particular project. Also, the sections ofProject Guide span the entire life of your project, from the time you first entertask information to the time you generate your final report.
If you’ve never used project management software (or Project itself), you mightfind it helpful to run through Project Guide to set up your first schedule, enterresources, track activities on tasks, or generate reports. However, to knowhow to make intelligent choices in Project Guide, you have to have somebasic understanding of how a project is built, which I provide in the next fewchapters. My advice is to walk with me through many of the steps in thisbook and then use Project Guide to practice building your first project. Thenyou can see whether its structure works the way your mind does — or not.
Using Project GuideA Project Guide toolbar displays by default in the toolbar area at the top ofyour Project screen. The toolbar has an icon you click to show or hide theProject Guide, so if the Project Guide doesn’t appear on the left side of yourscreen, just click the Show/Hide Project Guide button.
To use the Project Guide, you click a category (such as Tasks) and then clicka link (such as List the Tasks in the Project) in that category. This action dis-plays additional information in the Project Guide pane (see Figure 1-10) askingyou to enter data or choose or accept a setting and move through a series ofscreens. When you finish working through one set of screens, you return tothe Project Guide pane and can click another task or category to proceed.
24 Part I: Setting the Stage for Project
05_036516 ch01.qxp 11/20/06 1:38 PM Page 24
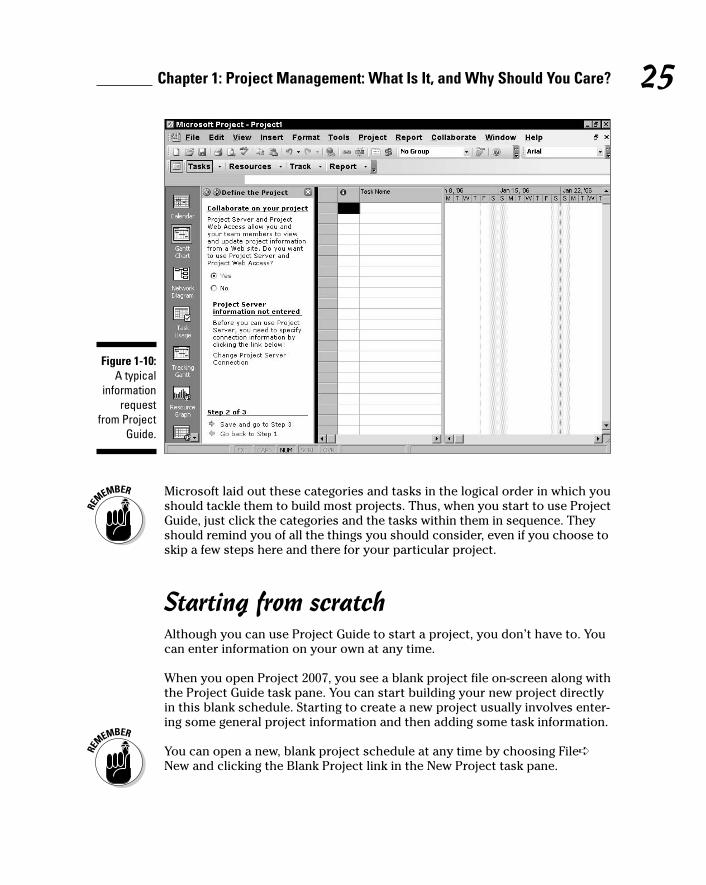
Microsoft laid out these categories and tasks in the logical order in which youshould tackle them to build most projects. Thus, when you start to use ProjectGuide, just click the categories and the tasks within them in sequence. Theyshould remind you of all the things you should consider, even if you choose toskip a few steps here and there for your particular project.
Starting from scratchAlthough you can use Project Guide to start a project, you don’t have to. Youcan enter information on your own at any time.
When you open Project 2007, you see a blank project file on-screen along withthe Project Guide task pane. You can start building your new project directlyin this blank schedule. Starting to create a new project usually involves enter-ing some general project information and then adding some task information.
You can open a new, blank project schedule at any time by choosing File➪New and clicking the Blank Project link in the New Project task pane.
Figure 1-10:A typical
informationrequest
from ProjectGuide.
25Chapter 1: Project Management: What Is It, and Why Should You Care?
05_036516 ch01.qxp 11/20/06 1:38 PM Page 25

You need to enter much more information in addition to general project infor-mation and tasks in order to build a complete project, as you discover in thenext few chapters. Entering general project information and task informationis your usual starting point, however.
Tell Project about your projectWith a blank project open, a logical first step is to enter some general projectinformation, such as the project start date. To do so, you choose Project➪Project Information. The Project Information dialog box appears, as shown inFigure 1-11.
Here’s what you can do in this dialog box:
� Set the start date for the project. If you’re not sure when the project willstart, set the start date about a month from today. Then, after you buildsome tasks and have a better handle on the entire length of your project,you can come back and set a real start date. Project automatically recal-culates all dates when you do.
� Set the finish date for the project. Especially if you have a drop-deaddate (an attention-getting term!) beyond which the project cannotwander and still reach completion, you can set the finish date. In such acase, be sure to look at the next setting in this list — and change itaccordingly.
� Schedule from the start or finish of the project. Most projects work for-ward from the start date. However, if you have an absolute drop-dead
Figure 1-11:Use theProject
Informationdialog box
for somebasic
projectsettings.
26 Part I: Setting the Stage for Project
05_036516 ch01.qxp 11/20/06 1:38 PM Page 26

date for the end of your project (for example, if you’re organizing asports event that must occur on New Year’s Day next year), you mightwant to set the finish date and then work backward to fit all your tasksinto the allotted length of time. If you change this setting to ProjectFinish Date, the Finish Date field becomes available.
� Set the current date. You can fill in the current date according to yourcomputer calendar. Or, you can choose another date if you like, but thatusually doesn’t make much sense unless you’re in a different time zonefrom where the project will occur.
� Set a status date. By default there is no status date set for the project.You use a status date when you’re tracking the progress of your projectat regular intervals. If you set a status date, your computer assumes thatany activity you record in your project is being tracked as of this date.You can find out more about this feature in Chapters 12, 13, and 14.
� Set the working calendar for your project. You have three choices:Standard, Night Shift, and 24 Hours. Base your choice on the workinghabits of your organization. For example, if your company usesresources in three shifts per day — a total of 24 hours of straight work-ing time — and all those shifts would contribute work to your project,choose 24 Hours. If you use a day shift and a night shift, choose NightShift. If you work a standard 8-hour day, choose Standard. (Most projectsuse a standard calendar with a typical 8-hour workday.)
Calendars can get a little confusing. A project calendar that you set inthis dialog box indicates what the usual workday is like in your com-pany, but you can set up individual calendars for each resource youcreate. You can then more easily accommodate both shift workers andnine-to-fivers in the same schedule. See Chapter 3 for more aboutresource calendars.
� Assign a priority to your project. Assigning a priority (such as 500 forhigh priority or 100 for a lower priority) can be especially useful if youuse the same resources across several projects. With your priorities seton all projects, Project tools can then automatically reallocateresources.
You can also create custom project information fields for your organization inthe Enterprise Custom Fields section of this dialog box. For example, youmight want a field that explains which department in the company is runningthe project.
Clicking the Statistics button in this dialog box presents an overview of yourproject, as shown in Figure 1-12.
27Chapter 1: Project Management: What Is It, and Why Should You Care?
05_036516 ch01.qxp 11/20/06 1:38 PM Page 27
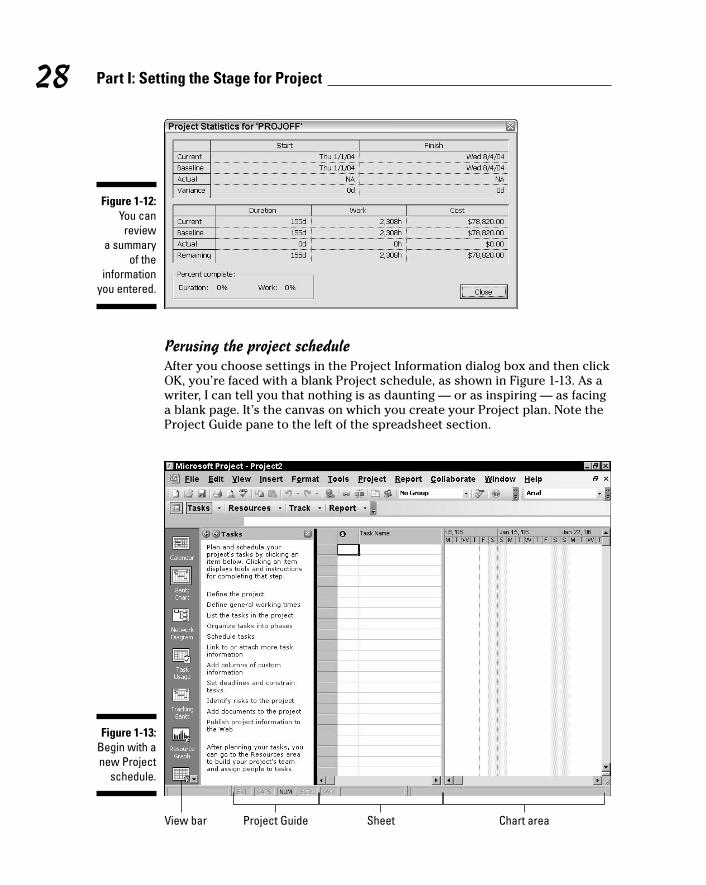
Perusing the project scheduleAfter you choose settings in the Project Information dialog box and then clickOK, you’re faced with a blank Project schedule, as shown in Figure 1-13. As awriter, I can tell you that nothing is as daunting — or as inspiring — as facinga blank page. It’s the canvas on which you create your Project plan. Note theProject Guide pane to the left of the spreadsheet section.
Project GuideView bar Sheet Chart area
Figure 1-13:Begin with anew Project
schedule.
Figure 1-12:You canreview
a summaryof the
informationyou entered.
28 Part I: Setting the Stage for Project
05_036516 ch01.qxp 11/20/06 1:38 PM Page 28
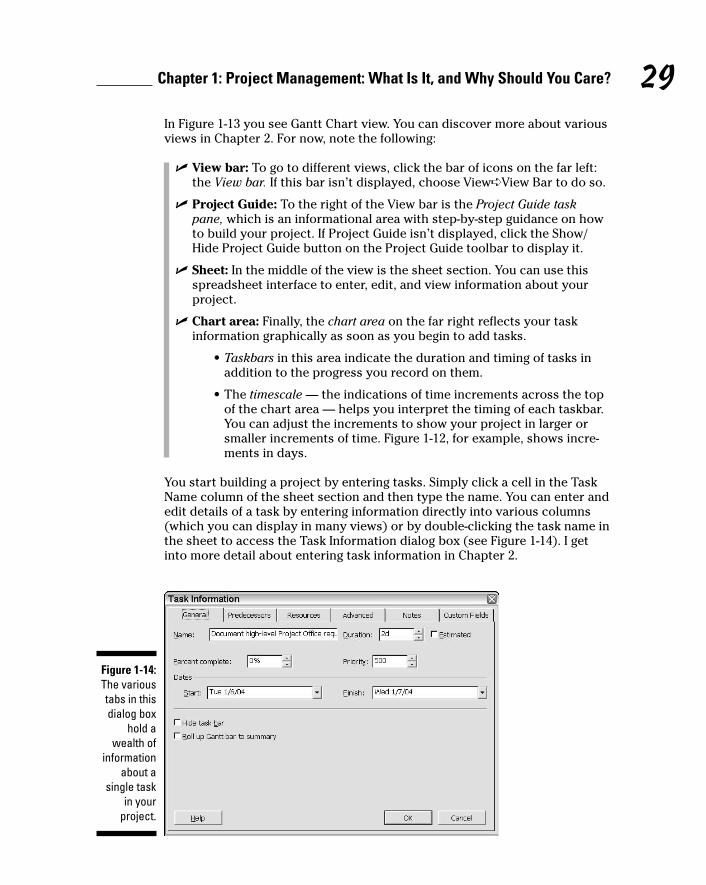
In Figure 1-13 you see Gantt Chart view. You can discover more about variousviews in Chapter 2. For now, note the following:
� View bar: To go to different views, click the bar of icons on the far left:the View bar. If this bar isn’t displayed, choose View➪View Bar to do so.
� Project Guide: To the right of the View bar is the Project Guide taskpane, which is an informational area with step-by-step guidance on howto build your project. If Project Guide isn’t displayed, click the Show/Hide Project Guide button on the Project Guide toolbar to display it.
� Sheet: In the middle of the view is the sheet section. You can use thisspreadsheet interface to enter, edit, and view information about yourproject.
� Chart area: Finally, the chart area on the far right reflects your taskinformation graphically as soon as you begin to add tasks.
• Taskbars in this area indicate the duration and timing of tasks inaddition to the progress you record on them.
• The timescale — the indications of time increments across the topof the chart area — helps you interpret the timing of each taskbar.You can adjust the increments to show your project in larger orsmaller increments of time. Figure 1-12, for example, shows incre-ments in days.
You start building a project by entering tasks. Simply click a cell in the TaskName column of the sheet section and then type the name. You can enter andedit details of a task by entering information directly into various columns(which you can display in many views) or by double-clicking the task name inthe sheet to access the Task Information dialog box (see Figure 1-14). I getinto more detail about entering task information in Chapter 2.
Figure 1-14:The varioustabs in thisdialog box
hold awealth of
informationabout a
single taskin your
project.
29Chapter 1: Project Management: What Is It, and Why Should You Care?
05_036516 ch01.qxp 11/20/06 1:38 PM Page 29
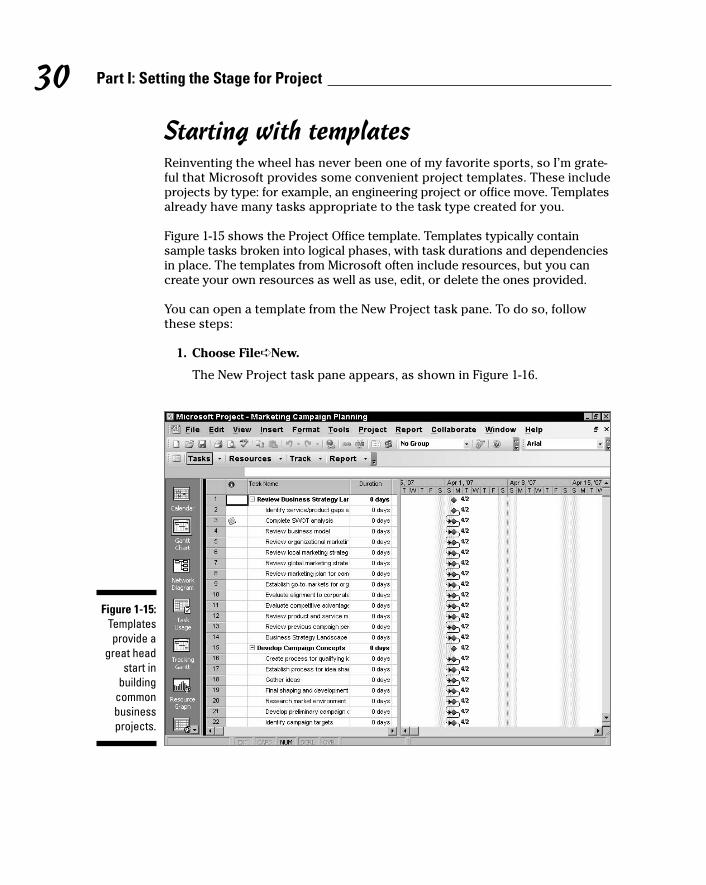
Starting with templatesReinventing the wheel has never been one of my favorite sports, so I’m grate-ful that Microsoft provides some convenient project templates. These includeprojects by type: for example, an engineering project or office move. Templatesalready have many tasks appropriate to the task type created for you.
Figure 1-15 shows the Project Office template. Templates typically containsample tasks broken into logical phases, with task durations and dependenciesin place. The templates from Microsoft often include resources, but you cancreate your own resources as well as use, edit, or delete the ones provided.
You can open a template from the New Project task pane. To do so, followthese steps:
1. Choose File➪New.
The New Project task pane appears, as shown in Figure 1-16.
Figure 1-15:Templatesprovide a
great headstart in
buildingcommonbusinessprojects.
30 Part I: Setting the Stage for Project
05_036516 ch01.qxp 11/20/06 1:38 PM Page 30

2. Click the On My Computer link.
The Templates dialog box opens. You can also use the On My Web Sitesand Templates on Office Online links to access online templates.
3. Click the Project Templates tab, which is shown in Figure 1-17.
4. Click a template to display a preview.
5. When you find the template you want to use, click OK.
The template opens in Project document format (MPP). You can thensave the file with a new name. You can also delete tasks, move themaround, or add tasks as necessary for your project.
After opening a template, be sure to check its Project Information(choose Project➪Project Information) to make sure that the Start Dateand Calendar options are set as you want.
If you modify a template and think that you might use that set of tasks againfor future projects, consider saving the file as a custom template. Just chooseFile➪Save As, and then select Template in the Save As Type list.
Figure 1-16:Open a
templatefrom the
New Projecttask pane.
31Chapter 1: Project Management: What Is It, and Why Should You Care?
05_036516 ch01.qxp 11/20/06 1:38 PM Page 31
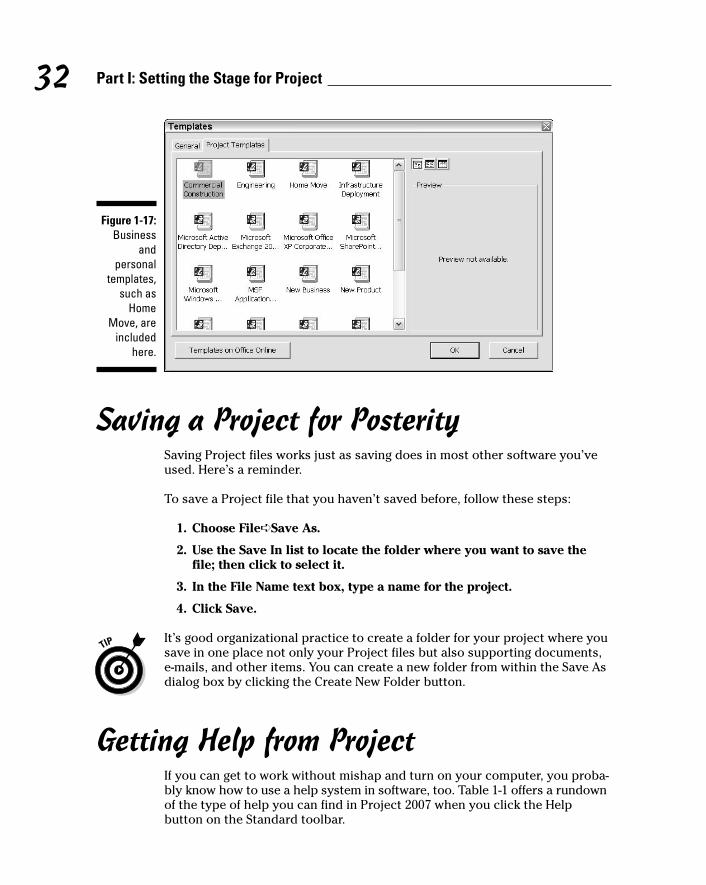
Saving a Project for PosteritySaving Project files works just as saving does in most other software you’veused. Here’s a reminder.
To save a Project file that you haven’t saved before, follow these steps:
1. Choose File➪Save As.
2. Use the Save In list to locate the folder where you want to save thefile; then click to select it.
3. In the File Name text box, type a name for the project.
4. Click Save.
It’s good organizational practice to create a folder for your project where yousave in one place not only your Project files but also supporting documents,e-mails, and other items. You can create a new folder from within the Save Asdialog box by clicking the Create New Folder button.
Getting Help from ProjectIf you can get to work without mishap and turn on your computer, you proba-bly know how to use a help system in software, too. Table 1-1 offers a rundownof the type of help you can find in Project 2007 when you click the Helpbutton on the Standard toolbar.
Figure 1-17:Business
andpersonal
templates,such as
HomeMove, are
includedhere.
32 Part I: Setting the Stage for Project
05_036516 ch01.qxp 11/20/06 1:38 PM Page 32

Table 1-1 Project Help FeaturesHelp Option How to Use It
Microsoft Project Help This option displays the full Help feature with atable of contents and a search field.
Show the Office Assistant Displays the annoying little icon that asks you toenter your question in a natural-language style(that is, a sentence) and offers topics to try toaddress your questions.
Contents and Index Displays the same thing as Microsoft ProjectHelp. Go figure.
Reference Provides reference information such as a com-prehensive list of all fields in Project, a glossary,and a table of mouse and keyboard shortcuts.
Getting Started A side menu for this Help menu option offers atutorial and project map. The tutorial provides aset of topics explaining Project from the basicsof what is project management through creat-ing a plan. The project map is another take onthe phases involved in building your project.
Microsoft Office Online Because Project is part of the Office family ofproducts, this link is provided to the Officeonline Assistance Center.
Microsoft Office Diagnostics This option automatically identifies errors andtries to correct them. Use it if you have seriousproblems using the software (for example, if thesoftware continually shuts down and gives youerror messages).
Project Guide The one option not accessed from the Helpmenu, Project Guide is new in Version 12.Project Guide, which appears when you open anew project, offers links to step-by-step infor-mation on how to build your project.
As you can see, you could spend a year just working your way through all thehelp topics in Project. Don’t worry: They’re there when you need them, andsome, such as Project Guide, even pop up automatically to offer help.
33Chapter 1: Project Management: What Is It, and Why Should You Care?
05_036516 ch01.qxp 11/20/06 1:38 PM Page 33

34 Part I: Setting the Stage for Project
05_036516 ch01.qxp 11/20/06 1:38 PM Page 34
Chapter 2
The Best-Laid PlansIn This Chapter� Finding your way around Project
� Exploring Project views
� Personalizing views for your needs
Homer (not Simpson — the other one) once said, “The evil plan is mostharmful to the planner.” In the interest of helping you avoid the evils of
bad planning, take a moment to get comfortable with various aspects of yourProject plan.
The file that you create in Project is called a Project plan, or schedule. Thisplan is like a multidimensional chess game from Star Trek, with a plethora ofdata about various aspects of your project as well as graphical representa-tions of that information.
To see that information, Project provides more views than the Grand Canyon.These views help you observe the structure of your plan and see the progressin your project. Project also offers many ways to move around and displaydifferent information in your views. Navigating Project and displaying (andmodifying) its views are the topics covered in this chapter.
Navigating ProjectHaving a lot of views from which to observe your project information is great,but all those views don’t do you any good if you don’t know how to get fromone to the other or how to move around in a view after you find it.
Changing viewsYou can move from one view to another in Project by using the View bar orthe View menu. The View bar runs along the far left side of every view, asshown in Figure 2-1. Simply click any view icon there to display that view.
06_036516 ch02.qxp 11/20/06 1:38 PM Page 35
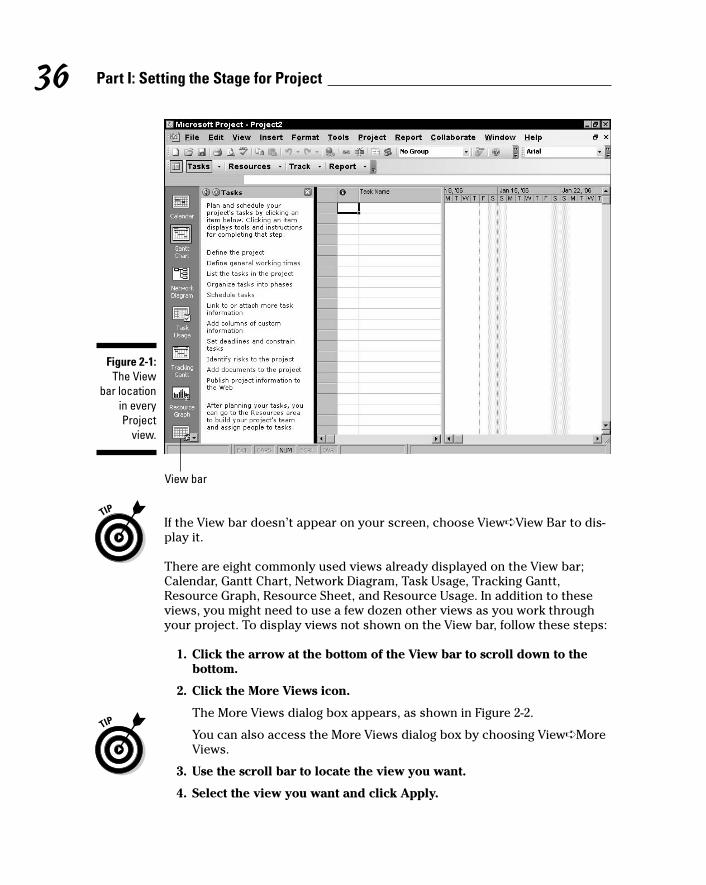
If the View bar doesn’t appear on your screen, choose View➪View Bar to dis-play it.
There are eight commonly used views already displayed on the View bar;Calendar, Gantt Chart, Network Diagram, Task Usage, Tracking Gantt,Resource Graph, Resource Sheet, and Resource Usage. In addition to theseviews, you might need to use a few dozen other views as you work throughyour project. To display views not shown on the View bar, follow these steps:
1. Click the arrow at the bottom of the View bar to scroll down to thebottom.
2. Click the More Views icon.
The More Views dialog box appears, as shown in Figure 2-2.
You can also access the More Views dialog box by choosing View➪MoreViews.
3. Use the scroll bar to locate the view you want.
4. Select the view you want and click Apply.
View bar
Figure 2-1:The View
bar locationin everyProject
view.
36 Part I: Setting the Stage for Project
06_036516 ch02.qxp 11/20/06 1:38 PM Page 36
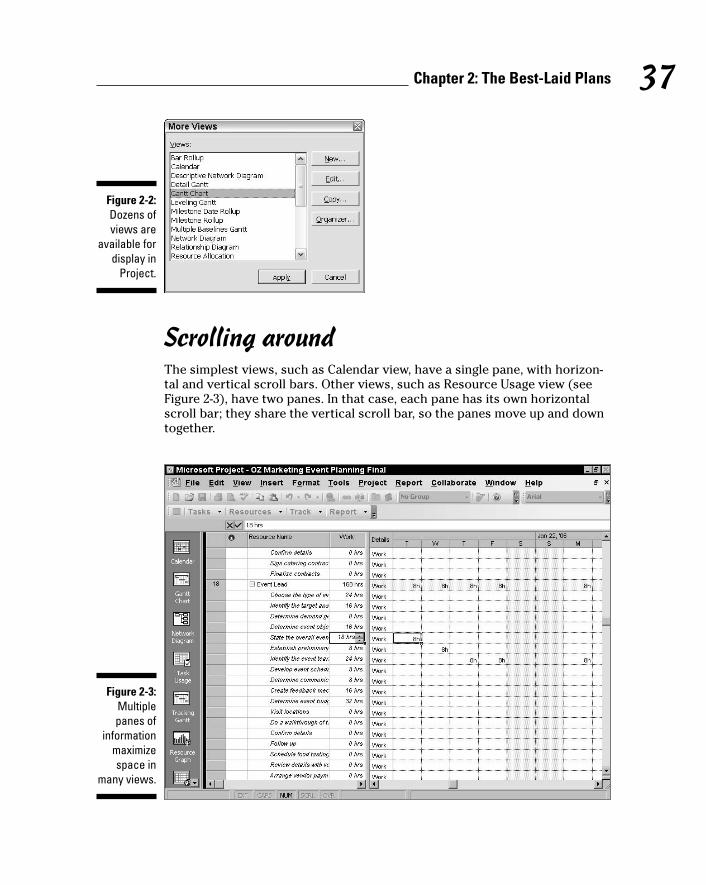
Scrolling aroundThe simplest views, such as Calendar view, have a single pane, with horizon-tal and vertical scroll bars. Other views, such as Resource Usage view (seeFigure 2-3), have two panes. In that case, each pane has its own horizontalscroll bar; they share the vertical scroll bar, so the panes move up and downtogether.
Figure 2-3:Multiplepanes of
informationmaximizespace in
many views.
Figure 2-2:Dozens ofviews are
available fordisplay in
Project.
37Chapter 2: The Best-Laid Plans
06_036516 ch02.qxp 11/20/06 1:38 PM Page 37

In most views with two panes, the pane to the left is called the sheet, which isa spreadsheet-like interface with columns of information. To the right of thisview is the chart. The chart uses bars, symbols, and lines to represent eachtask in your project and the dependency relationships among them.
At the top of the chart area is the timescale. This tool is used as a scaleagainst which you can interpret the timing of the taskbars. To see your planin greater or lesser timing detail, you can modify the time units used in thetimescale. For example, you can look at your tasks in detail over days or in abroader overview in months. Figure 2-4 shows a two-pane view with a sheet,chart, and timescale.
See the “Changing the timescale” section, later in this chapter, to find outhow to change the time increments displayed in the timescale.
By using the horizontal scroll bars in each pane, you can view additionalcolumns or additional time periods in any pane with a timescale. Timescalepanes cover the life of the project; in longer projects, you can scroll throughyears of time.
Sheet Chart area
Timescale
Figure 2-4:The sheet,chart, and
timescale ofGantt Chart
view.
38 Part I: Setting the Stage for Project
06_036516 ch02.qxp 11/20/06 1:38 PM Page 38

Use these different methods to work with scroll bars:
� Click the scroll box and drag it until you reach the location in thepane that you want to look at. When you click and drag the scroll boxto move through a timescale display, the date display indicates whereyou are at any time in your scrolling calendar. Release the mouse buttonwhen the date display matches the date you want to view.
� Click to the left or right of the horizontal scroll box to move one pageat a time. Note that a page in this instance is controlled to some extentby how you resize a given pane. For example, with a timescale pane anda timescale set to weeks, you move one week at a time. In a sheet panedisplaying three columns, you move to the next (or preceding) column.
� Click the right or left arrow at either end of a scroll bar to move insmaller increments. With a sheet pane, you move about one-half columnper click. In a timescale view with weeks displayed, you move about oneday at a time.
Getting to a specific spot in your planTo reach a particular area of your Project plan, you can also use the Go Tocommand on the Edit menu. With the Go To command, you can enter eitherof two items in the Go To dialog box when you want to find a task:
� A date from a drop-down calendar
� A task ID
You can also click the Go To Selected Task tool (or press Ctrl+Shift+F5) toscroll the timescale to show the taskbar for a selected task in the sheet pane.
The task ID is assigned automatically when you create tasks; this numberprovides a unique identifier for tasks in the plan.
A Project with a ViewViews are one way software designers organize information so that you can get to it in logical ways. Because of the complexity of information in atypical Project plan, many views are available to examine it. If an averageword-processed document is as complex as a cookie, your average Projectplan is more like a five-tier wedding cake adorned with intricate flowers andgarlands in delicate swirls of sugary icing.
39Chapter 2: The Best-Laid Plans
06_036516 ch02.qxp 11/20/06 1:38 PM Page 39

In a typical Project plan, you have information about the following:
� Resources: The resource name, resource type, rate per hour, overtimerate, assignments, department, cost per use, and more
� Tasks: The task name, duration, start and finish date, assignedresources, costs, constraints, and dependencies, for example
� Project timing and progress: Several types of calendars, project startand finish dates, percentage of tasks completed, resource hours spent,baseline information, critical path information, and more
� Financial information: Earned value, time and cost variance, and pro-jected costs for uncompleted work, for example
Want to get closer? In every view, you can use the Zoom command on theView menu to see more or less detail in your schedule. Read more aboutusing the Zoom command in the sidebar “Zooming in and out,” later in thischapter.
Finding out how to use the many Project views to enter, edit, look at, and ana-lyze Project data is important. Don’t worry that you’ll be overwhelmed: Aftera while, using all those views is . . . well, a piece of cake.
For more about modifying the format of elements displayed in a view, seeChapter 11.
Home base: Gantt Chart viewGantt Chart view is like a favorite room in your house, the place where mostpeople end up. It’s the view that appears first when you open a new project.This view, shown in Figure 2-5, is a combination of spreadsheet data and agraphical representation of tasks; it offers a wealth of information in one place.
Gantt Chart view has two major sections: the sheet pane and the chart pane.This view is an electronic version of the original Gantt Chart, developed byengineer Henry L. Gantt in 1917 to deal with production-control projects inmanufacturing. (See? Invent a project management tool, and you too canbecome immortal.)
In Gantt Chart view (and any view with a sheet pane), you can change whatinformation is shown in the sheet by using tables. Tables are preset combina-tions of columns of data that you can easily display by choosing View➪Tableand then choosing a table (such as Entry or Cost) from the submenu thatappears.
40 Part I: Setting the Stage for Project
06_036516 ch02.qxp 11/20/06 1:38 PM Page 40
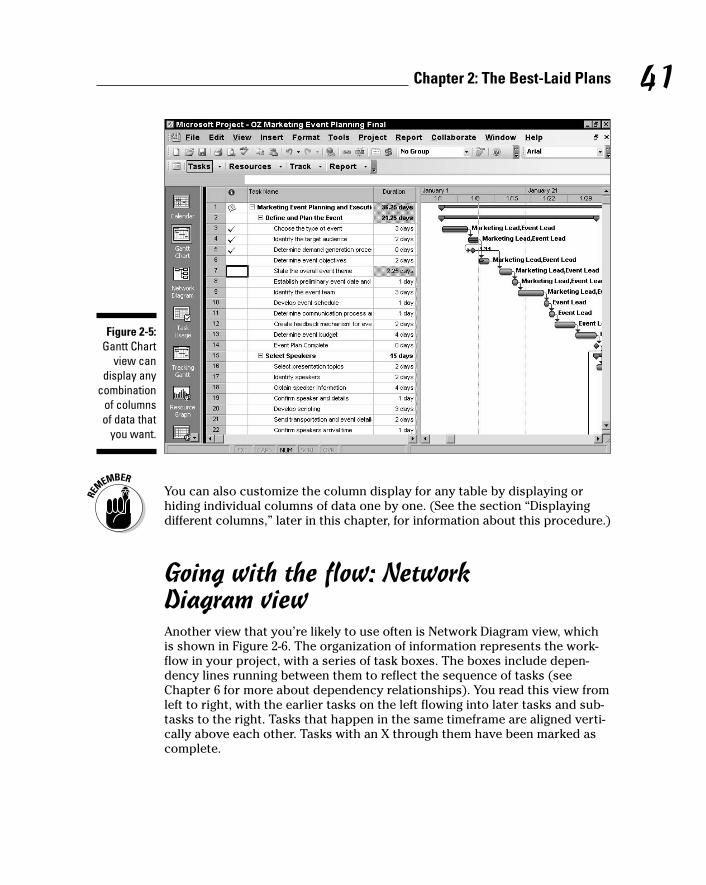
You can also customize the column display for any table by displaying orhiding individual columns of data one by one. (See the section “Displayingdifferent columns,” later in this chapter, for information about this procedure.)
Going with the flow: Network Diagram viewAnother view that you’re likely to use often is Network Diagram view, whichis shown in Figure 2-6. The organization of information represents the work-flow in your project, with a series of task boxes. The boxes include depen-dency lines running between them to reflect the sequence of tasks (seeChapter 6 for more about dependency relationships). You read this view fromleft to right, with the earlier tasks on the left flowing into later tasks and sub-tasks to the right. Tasks that happen in the same timeframe are aligned verti-cally above each other. Tasks with an X through them have been marked ascomplete.
Figure 2-5:Gantt Chart
view candisplay any
combinationof columnsof data that
you want.
41Chapter 2: The Best-Laid Plans
06_036516 ch02.qxp 11/20/06 1:38 PM Page 41
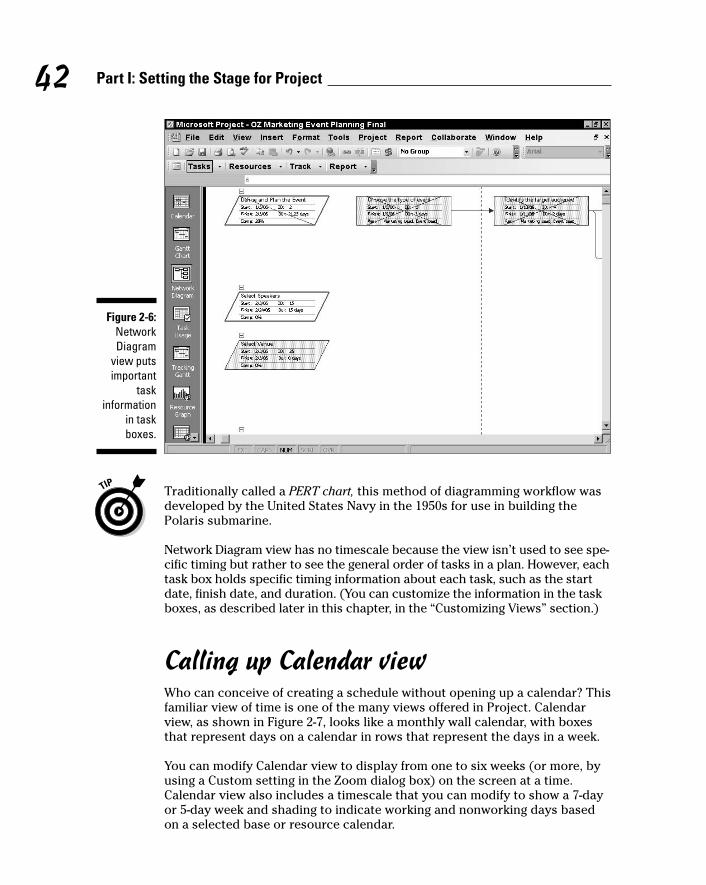
Traditionally called a PERT chart, this method of diagramming workflow wasdeveloped by the United States Navy in the 1950s for use in building thePolaris submarine.
Network Diagram view has no timescale because the view isn’t used to see spe-cific timing but rather to see the general order of tasks in a plan. However, eachtask box holds specific timing information about each task, such as the startdate, finish date, and duration. (You can customize the information in the taskboxes, as described later in this chapter, in the “Customizing Views” section.)
Calling up Calendar viewWho can conceive of creating a schedule without opening up a calendar? Thisfamiliar view of time is one of the many views offered in Project. Calendarview, as shown in Figure 2-7, looks like a monthly wall calendar, with boxesthat represent days on a calendar in rows that represent the days in a week.
You can modify Calendar view to display from one to six weeks (or more, byusing a Custom setting in the Zoom dialog box) on the screen at a time.Calendar view also includes a timescale that you can modify to show a 7-dayor 5-day week and shading to indicate working and nonworking days basedon a selected base or resource calendar.
Figure 2-6:NetworkDiagram
view putsimportant
taskinformation
in taskboxes.
42 Part I: Setting the Stage for Project
06_036516 ch02.qxp 11/20/06 1:38 PM Page 42

Dozens of views are built into Project. You encounter many more as you workthrough specific elements of Project in this book.
Customizing ViewsJust when you thought you were starting to get a handle on the two dozen orso views available in Project, I dazzle you with even more possibilities: Everyone of those views can be customized to show different information. Now thepossible view variations become astronomical.
You can customize every view in Project to show different information; forexample, you can choose to show different columns of information in spread-sheets, different labels in Network Diagram boxes or taskbars, or differentsets of data in graph views. You can modify the size of panes of informationand adjust the timescale.
Why all this flexibility with what you see on-screen? At various times in a project, you need to focus on different aspects of your tasks. Having a problemwith costs? Take a look at Resource Usage view and insert several columns ofcost information, such as resource rates and total actual costs. Is your plantaking longer than the Hundred Years’ War? You might want to display Tracking
Figure 2-7:The familiar
calendarinterface
shows youhow onetask canstraddle
several days(or evenweeks).
43Chapter 2: The Best-Laid Plans
06_036516 ch02.qxp 11/20/06 1:38 PM Page 43

Gantt view and look at a bunch of columns with timing and dependency dataor examine the project’s critical path in the chart pane. Need to display moreof the sheet area so that you can read those columns without having toscroll? You can do that, too. In this section, you find out how to do all thethings you need to do to show a variety of information in each view.
Working with view panesIn addition to Gantt Chart view, several other views have two panes, such asTask Usage, Tracking Gantt, and Resource Usage. You can modify the informa-tion that you see in the sheet pane as well as the scale for timing in the chartpane. You can also display information near taskbars in the chart pane.
Resizing a paneIn views that show more than one pane, you can reduce or enlarge each pane.This capability helps you see more information in one area, depending onwhat your focus is at the time.
The overall area taken up by the two panes is constant, so when you enlargeone pane, you reduce the size of the other.
Follow these steps to change the size of a pane in a view:
1. Place your mouse cursor over the edge of a pane.
2. When you see a cursor that’s a line with two arrows (one pointing leftand one pointing right), click and drag.
• Dragging to the left enlarges the pane on the right.
• Dragging to the right enlarges the pane on the left.
3. Release the mouse button.
The panes are resized.
Note that if you display the Project Guide or another task pane, such as NewProject or Search Results, Project automatically resizes the sheet and chartpanes to accommodate the additional pane.
Because the Project Guide takes up space on-screen, a quick way to see moreof any of the project information in any view is to hide the Project Guide; thisadvice also applies for the View bar. The Project Guide toolbar offers a Hide/Show Guide button that you can click to hide or display it, and you canchoose View➪View Bar to turn the View bar on and off.
44 Part I: Setting the Stage for Project
06_036516 ch02.qxp 11/20/06 1:38 PM Page 44
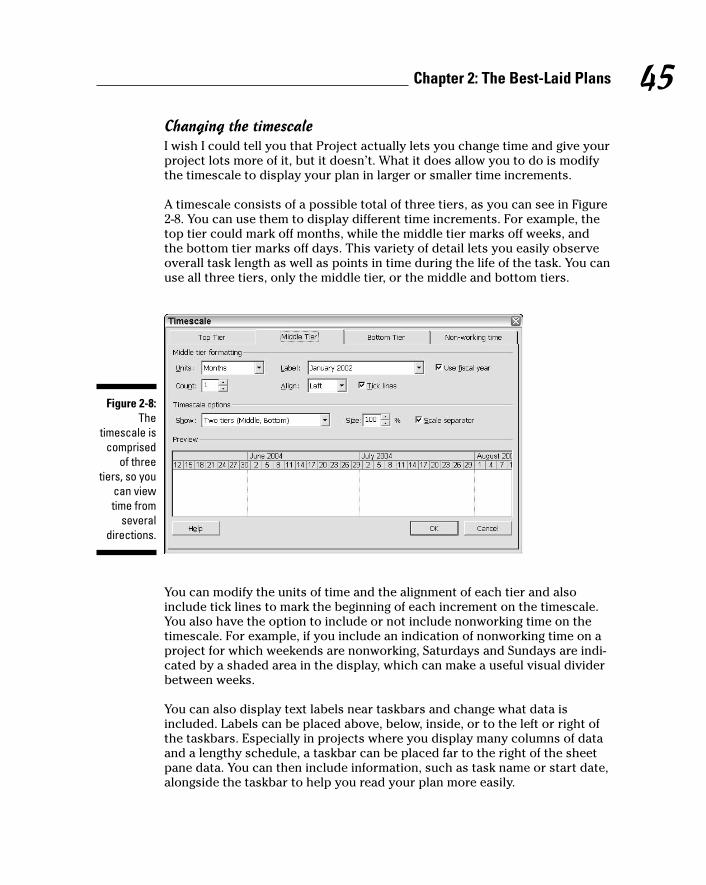
Changing the timescaleI wish I could tell you that Project actually lets you change time and give yourproject lots more of it, but it doesn’t. What it does allow you to do is modifythe timescale to display your plan in larger or smaller time increments.
A timescale consists of a possible total of three tiers, as you can see in Figure2-8. You can use them to display different time increments. For example, thetop tier could mark off months, while the middle tier marks off weeks, andthe bottom tier marks off days. This variety of detail lets you easily observeoverall task length as well as points in time during the life of the task. You canuse all three tiers, only the middle tier, or the middle and bottom tiers.
You can modify the units of time and the alignment of each tier and alsoinclude tick lines to mark the beginning of each increment on the timescale.You also have the option to include or not include nonworking time on thetimescale. For example, if you include an indication of nonworking time on aproject for which weekends are nonworking, Saturdays and Sundays are indi-cated by a shaded area in the display, which can make a useful visual dividerbetween weeks.
You can also display text labels near taskbars and change what data isincluded. Labels can be placed above, below, inside, or to the left or right ofthe taskbars. Especially in projects where you display many columns of dataand a lengthy schedule, a taskbar can be placed far to the right of the sheetpane data. You can then include information, such as task name or start date,alongside the taskbar to help you read your plan more easily.
Figure 2-8:The
timescale iscomprised
of threetiers, so you
can viewtime from
severaldirections.
45Chapter 2: The Best-Laid Plans
06_036516 ch02.qxp 11/20/06 1:38 PM Page 45
To modify the timescale, follow these steps:
1. Right-click the timescale in any view that contains one and then clickTimescale.
The Timescale dialog box appears. (Refer to Figure 2-8.)
2. Click a tier tab and select a style for Units, Label, and Align.
3. Set the count.
For example, if your Units choice is weeks and you change the Countoption to 2, the timescale appears in two-week increments.
4. If you don’t want to display a certain tier, select One Tiers or Two Tiersfrom the Show drop-down list (under the Timescale Options section).
5. If you want Project to use fiscal year notation in the timescale, selectthe Use Fiscal Year check box.
For example, if your 2006 fiscal year begins July 1, 2006, 2007 is used onall months in the fiscal year. The fiscal year is set in the Options dialogbox on the Calendar tab.
6. To show marks at the beginning of each unit of time, select the TickLines check box.
7. Repeat Steps 2–6 for each tier you want to modify.
8. Click the Non-working Time tab.
9. In the Draw options, select the one you prefer.
Your choices are to have the shaded area for nonworking time appearbehind taskbars or in front of them or just not appear.
10. In the Color or Pattern list, select different options for the shadingformat.
46 Part I: Setting the Stage for Project
Zooming in and outOne way to modify your display for any Projectview is to use the Zoom In and Zoom Out but-tons on the Standard toolbar. This featureshows you a longer or shorter period of time in your project without having to change thetimescale settings. When you need to see sev-eral years at a time in your project, for example,
click Zoom Out several times until you fit asmany months or years as you like in the view.You can also choose View➪Zoom and specifyperiods of time to display in the Zoom dialogbox, or even choose to have the entire projectappear on-screen.
06_036516 ch02.qxp 11/20/06 1:38 PM Page 46

11. Click the Calendar setting and select a different calendar to base thetimescale on.
You can find out more about calendar choices in Chapter 3.
12. Click OK to save your new settings which apply only to the timescalefor the currently displayed view.
You can use the Size setting on the three tier tabs to shrink the display pro-portionately to get more information on your screen or the printed page.
Displaying different columnsEach spreadsheet view has certain default columns of data that are stored intables. Gantt Chart view with the Tracking table displayed, for example, hasdata related to the progress of tasks. The Resource sheet contains manycolumns of data about resources that can be useful for entering new resourceinformation. In addition to displaying predefined tables of columns, you canmodify any spreadsheet table to display any columns you like.
Follow this procedure to show selected columns of data:
1. Right-click the column heading area and then choose Insert Column.
The Column Definition dialog box appears, as shown in Figure 2-9.
2. In the Field Name list, select the field that contains the informationyou want to include.
3. If you want to enter a different title for the field, type it in the Title box.
The title in the current view appears in the column heading for this field.
4. Use the Align Title, Align Data, and Width options to modify thecolumn format.
5. Click OK to insert the column.
Figure 2-9:Here you
can selectnew
columns toinsert.
47Chapter 2: The Best-Laid Plans
06_036516 ch02.qxp 11/20/06 1:38 PM Page 47

To hide a column, right-click its heading in the sheet pane and then chooseHide Column.
You can also display preset tables of sheet data, such as Tracking for record-ing activity on tasks or Entry for entering new task information. You do thisby simply choosing View➪Table and then clicking the name of the table youwant to display.
Modifying the contents of the Network Diagram boxesWhen you first display Network Diagram view, you see rectangular boxes, onefor each task in your project. You can change the information contained inthose boxes and change the box formatting.
By default, a typical subtask contains the task name, task ID, start date, finishdate, duration, and resource names. For a milestone, you get only the mile-stone date, milestone name, and task ID number.
See Chapter 4 for more about adding information about tasks and milestones.
Different categories of tasks (such as critical or noncritical) can contain differ-ent information, and you can change the information contained in any indi-vidual box or category of boxes.
Changing what’s in the boxSometimes you want to see information about task timing; other times, youfocus on other issues, such as resources. To accommodate these variousinformation needs, Network Diagram view allows you to use various tem-plates for what’s contained in the diagram boxes.
To modify the information included in these boxes, follow these steps:
1. Right-click anywhere in Network Diagram view outside any box andthen choose Box Styles.
The Box Styles dialog box appears, as shown in Figure 2-10.
2. In the Style Settings For list, select a task category.
3. To modify the data included in the task boxes, select a different tem-plate from the Data Template list.
You can choose additional templates (and edit any template to includewhatever data you like) by clicking the More Templates button.
A preview of the data included in the template appears in the Preview area.
48 Part I: Setting the Stage for Project
06_036516 ch02.qxp 11/20/06 1:38 PM Page 48

4. Click OK to save the new template.
You can also apply different templates to each box separately by right-clickinga box (rather than clicking outside a box), choosing Format Box, selecting adifferent template from the Data Template drop-down list, and then clicking OK.
Making boxes prettyAre you the creative type? Don’t like the shape or color of the boxes in theNetwork Diagram boxes? Want to add shading to the background of theboxes? Project lets you do all that and more.
Follow these steps to modify the format of Network Diagram boxes:
1. Right-click anywhere in Network Diagram view outside any box andthen choose Box Styles.
The Box Styles dialog box appears, as shown in Figure 2-11.
2. Click the Shape drop-down list and select a different shape from thelist that appears.
3. Click the Color drop-down list and select a different color from the listof colors.
Note: This choice specifies the color of the line that forms the box, not abackground color. For that, see Step 5 of this list.
Figure 2-10:You can usetemplates of
data forNetworkDiagram
view taskboxes.
49Chapter 2: The Best-Laid Plans
06_036516 ch02.qxp 11/20/06 1:38 PM Page 49

4. Click the Width drop-down list and select a line width from those displayed.
5. Click the Color drop-down list in the Background section and select acolor for the background that fills the inside of each box.
6. Click the Pattern drop-down list and select a pattern of lines to fill theinterior of each box.
Combinations of some patterns and colors in backgrounds can make thetext in the box difficult to read, so look at the preview in this dialog boxto be sure that the combination works.
7. Click OK to save the new settings.
You can also format individual boxes by right-clicking a box, choosingFormat Box, and then making the settings outlined in this set of steps.
Figure 2-11:Modify the
format of allboxes byusing the
settings inthis dialog
box.
50 Part I: Setting the Stage for Project
06_036516 ch02.qxp 11/20/06 1:38 PM Page 50

Chapter 3
Mark It on Your CalendarIn This Chapter� Exploring the Base, Project, Resource, and Task calendars
� Understanding how calendars work together
� Setting calendar options, working times
� Creating the Project calendar
� Utilizing Project Guide to make calendar settings
� Working with Task calendars
� Using Resource calendars
� Creating your own calendar templates
� Copying calendars to another project
Most people live their lives based on clocks and calendars. Think aboutit: You wake up, and your first thoughts are about what day it is, what
time it is, and whether it’s a working day.
You have a familiar definition for what your typical workday is, whetheryou’re a 9-to-5 kind of person or your particular job calls for you to work frommidnight to 8 a.m. You also vary from that routine now and then by putting ina 12-hour marathon in a crunch or slipping away after half a day to go fishingon a nice summer day.
Project 2007 calendars are sort of like your life in that they set some stan-dards for a typical working time and then allow for variation. Unlike you,Project 2007 has several types of calendars to account for.
07_036516 ch03.qxp 11/20/06 1:39 PM Page 51

Mastering Base, Project, Resource, and Task Calendars
Bear with me because I won’t kid you: Mastering the four calendars in Project2007 can be tricky. Understanding how calendars work in Project 2007, how-ever, is essential to mastering the software. Tasks are scheduled and resourcesare assigned based on the calendar settings that you make. Thus, the costsaccumulated by resource work hours won’t be accurate if you don’t under-stand your calendar settings from the get-go.
Because the use of the term “project” can get confusing as it refers to thesoftware, your project plan, and one of the calendar types (the Project calen-dar), I need to explain the terminology I use in this chapter. I use Project 2007when referring to the software itself, Project calendar when referring to thecalendar, and just plain project when talking about your project plan.
How calendars workHere’s the lowdown on the role of each of the four calendars in Project 2007(with more in the next section about how they interact with each other):
� Base calendar: This is the calendar template that all other calendars arebuilt on top of. Three Base calendars are available: Standard, 24 Hours,and Night Shift. (You read more about them shortly.)
� Project calendar: This is the default calendar for scheduling. This iswhere you choose which Base calendar template this particular projectshould use.
� Resource calendar: This combines the Base calendar settings with anyexceptions (nonworking times) that you set for a particular resource.
� Task calendar: This is where you can set exceptions for a particular task.
When you create tasks and assign resources to work on them, Project 2007has to base that work on a timing standard. For example, if you say that atask should be completed in one workday, Project 2007 knows that a workdaymeans 8 hours (or 12 hours or whatever) because that’s how you set up astandard workday in your Project calendar. Likewise, suppose that you assigna resource to put in two weeks of work on a task in a company that uses astandard five-day workweek. If that resource’s own calendar is set for a stan-dard four-day workweek, the two weeks of work put in by that resource deferto the timing of the Resource calendar for a total of only eight workdays.
52 Part I: Setting the Stage for Project
07_036516 ch03.qxp 11/20/06 1:39 PM Page 52

The nature of a task can have an effect on resource time. A two-week, effort-driven task isn’t complete until its resources have put in two weeks (accord-ing to the Project or Task calendar) of effort. Find out more abouteffort-driven tasks in Chapter 4.
Not everyone in a company works the same schedule, and not every task canbe performed in the same eight-hour workday. To deal with the variations inschedules that occur in most workforces, Project 2007 offers various calen-dar settings. As I mentioned earlier in this chapter, Project, Resource, andTask calendars can be set to use one of three Base calendar templates builtinto Project 2007. The three Base calendar templates are as follows:
� Standard: The default setting. Sets a working day as 8 a.m.–5 p.m. withan hour for lunch and a five-day, Monday–Friday workweek.
� 24 Hours: Allows work to go on around the clock every day of the week.
� Night Shift: Sets the working time as 11 p.m.–8 a.m. with an hour fordinner and a six-night, Monday–Saturday workweek. Working times for aNight Shift calendar are shown in Figure 3-1.
Check out the legend in Figure 3-1; it explains how different hours are shadedin the calendar display.
Figure 3-1:Different
hours areshaded in
the calendardisplay.
53Chapter 3: Mark It on Your Calendar
07_036516 ch03.qxp 11/20/06 1:39 PM Page 53

You can modify the three Base calendar templates and create new templatesfrom them. See the section “Creating a Custom Calendar Template,” later inthis chapter.
How one calendar relates to anotherAll calendars in your project are controlled, by default, by the Project calen-dar setting. Here’s the tricky part, though: When you change a Task orResource calendar (this type of change is referred to as an exception), youhave to understand which setting takes precedence.
Here’s how this precedence thing works:
� With no other settings made, the Base calendar template you select forthe Project calendar when you first create the project controls the work-ing times and days of all tasks and resources.
� If you make changes in the working hours for a resource, those settingstake precedence over the Project calendar for that resource when youassign it to a task. Likewise, if you assign a different Base calendar for a task, that calendar takes precedence over the Project calendar for that task.
� If you apply one calendar to a resource and a different calendar to a taskthat the resource is assigned to, Project 2007 uses only common hours toschedule the resource. For example, if the Task calendar allows work from8 a.m.–5 p.m. and the Resource calendar allows work from 6 a.m.–2 p.m.,the resource works from 8 a.m.–2 p.m., which is the only period the cal-endars have in common.
� You can set a task to ignore Resource calendar settings by opening theTask Information dialog box (double-click the task name in Gantt Chartview) and selecting the Scheduling Ignores Resource Calendars checkbox on the Advanced tab. (This setting isn’t available if the Task calen-dar is set to None.) You might make this setting if you know that allresources are required to be involved in a task (such as a quarterly com-pany meeting), regardless of their usual work hours.
Calendar Options and Working TimesJust when you thought that you were out of the woods, I’ll throw two moretiming elements at you — calendar options and working times.
54 Part I: Setting the Stage for Project
07_036516 ch03.qxp 11/20/06 1:39 PM Page 54

Calendar options are used to change the standards for a working day, week,and year. If you set a Project calendar to Standard (by default, 8 a.m. to 5 p.m.,five days a week), for example, the Calendar tab of the Options dialog box iswhere you can designate which five days are working days or modify theworking hours to 9 a.m.–6 p.m.
Working time is used to adjust the time available for work on a particular dateor days. Suppose you make a change to the calendar options so that youhave 8-hour days and 32-hour workweeks. You should also check your work-ing time and be sure that you specify three days of the seven-day weekshould be nonworking to jibe with the 32-hour week. If you want to set a cer-tain date as nonworking for your project, such as your company offsite meet-ing day, you can do that with the working time settings.
If you use Project Server for enterprise-wide project management, you canmake settings in the Enterprise Global Template, which sets the working timefor all projects across your company. See Chapter 18 for more about enter-prise settings.
Setting calendar optionsWhen you make changes to a Resource or Task calendar, you simply adjustthe times that a resource is available to work or the time during which a taskoccurs. You don’t change the length of a typical workday for the project. A dayis still eight hours long if that’s the Project calendar setting, even if you say thata task that takes place on that day uses the 24-hour Base calendar template.
If you want to change the length of a typical workday to ten hours rather than eight, for example, you must do so on the Calendar tab of the Optionsdialog box.
Follow these steps to modify the calendar options:
1. Choose Tools➪Options.
The Options dialog box appears.
2. Click the Calendar tab, as shown in Figure 3-2.
You can also display these settings by clicking the Options button in theChange Working Time dialog box. Read about the settings there in thefollowing section.
3. From the Week Starts On drop-down list, choose a day.
55Chapter 3: Mark It on Your Calendar
07_036516 ch03.qxp 11/20/06 1:39 PM Page 55

4. To modify the start of your fiscal year, select the month you wantfrom the Fiscal Year Starts In drop-down list.
5. To change the working hours for a typical day, type new times in theDefault Start Time and Default End Time fields.
If you change the Default Start or End Time setting, you should alsochange the corresponding working times. See the following section todiscover how to do this.
6. Modify the Hours Per Day, Hours Per Week, and Days Per Monthfields as needed.
7. Click OK to save the settings.
If your company uses these settings for most projects, you can click the SetAs Default button on the Calendar tab of the Options dialog box to make yoursettings the default settings for any new project you create.
Setting exceptions to working timesIf you want to change the available working hours for a particular day (suchas December 24), you use the working time settings. For example, if you want
Figure 3-2:Define your
typicalworking
day, week,month, and
year.
56 Part I: Setting the Stage for Project
07_036516 ch03.qxp 11/20/06 1:39 PM Page 56

the day before Christmas to be a half day, you can modify the working timesettings for that day; then any resources assigned to a task on this date put inonly one-half day of work. You also use these settings to specify global work-ing and nonworking days to match the calendar options settings.
Here’s how to change working times:
1. Choose Tools➪Change Working Time.
The Change Working Time dialog box appears, as shown in Figure 3-3.
2. In the Click On a Day to See Its Working Times calendar section, clickthe day you want to change.
3. Click the Exceptions tab to display it; then click a blank row and typea name for the exception.
4. Click the Details button.
The Details box for this calendar dialog box appears (see Figure 3-4).
5. Select either the Nonworking or Working Times radio button.
Figure 3-3:The working
times youset here for
your projectshould
correspondto settings
in thecalendaroptions.
57Chapter 3: Mark It on Your Calendar
07_036516 ch03.qxp 11/20/06 1:39 PM Page 57

6. Enter a time range in the From and To fields.
If you want to set nonconsecutive hours (for example, to build in a lunchbreak), you have to put two or more sets of numbers here (such as 8 to12 and 1 to 5).
7. Select a recurrence pattern and then set an interval in the RecurEvery x Week(s) On field.
For example, if you select Weekly and click the arrows to set the intervalfield to 3, this pattern recurs every three weeks.
8. Set the range of recurrence.
You can do this step by entering Start and End By dates or by selectingthe End After radio button and setting the number of occurrences there.
9. Click OK twice to close the dialog boxes and save your changes.
The Nondefault Work Week legend item that you find in the Change WorkingTime dialog box (refer to Figure 3-3) designates working time that isn’t part ofthe working time established by the Base calendar template for this calendar.
Setting the Project calendarThe first calendar that you should set up for your project is the Project calen-dar. You set the Project calendar in the Project Information dialog box (shownin Figure 3-5), which you can display at any time by choosing Project➪ProjectInformation.
Figure 3-4:
calendar.
58 Part I: Setting the Stage for Project
07_036516 ch03.qxp 11/20/06 1:39 PM Page 58

Here are the settings that you can make in the Project Information dialog box:
� Calendar: Select the Base calendar template to use for the Project calen-dar from this drop-down list. I list this setting first because it’s the onlyone you have to deal with when you start a new project.
� Start Date and Finish Date: You might want to wait to set these datesuntil you build in most of your tasks and resources. Then, when youreally know when you can start work, set the start date and let Project2007 calculate the finish date based on your tasks’ timing and dependen-cies. See more about these settings in Chapter 4.
� Schedule From: You can choose to have tasks scheduled backward fromthe finish date or forward from the start date. Most folks go forwardfrom the start date.
� Current Date: By default, this setting matches your computer clock set-ting. However, you can change this so that it does not match your com-puter clock setting. Changing this date is useful for looking at what-ifscenarios or for tracking progress as of a certain date in the past.
� Status Date: You typically set this to the current date to track progresson your project. When tracking you usually want to see the status ofyour project as of now, so you don’t really need to deal with this setting.However if you want to track as of the end of a fiscal period or anothertimeframe, you can change this to track the status of your tasks as ofany other date.
� Priority: This field is useful if your organization has many projects andyou create links among them. If you use a tool such as resource leveling(see Chapter 10 for more about this topic) to resolve conflicts, it canconsider this project priority setting when making its calculations aboutwhat to delay and what to keep on track.
Figure 3-5:Your choice
of calendarsincludes
one of thesethree Base
calendartemplates.
59Chapter 3: Mark It on Your Calendar
07_036516 ch03.qxp 11/20/06 1:39 PM Page 59
Using Project Guide to Make Calendar Settings
Project Guide offers a useful Calendar Wizard that can help you set both cal-endar options and working time settings, which can be useful when you’renew to Project 2007. Follow these steps to make calendar options and Projectcalendar settings using this wizard:
1. If Project Guide isn’t already visible, you can display it at any time bychoosing View➪Toolbars➪Project Guide.
If the Project Guide toolbar is displayed and you want to hide it, you canclick the Show/Hide Project Guide button on the Project Guide toolbarto hide it.
2. Click the Task button if the task pane isn’t already displayed.
3. Click the Define General Working Times item listed in the ProjectGuide task pane.
The Preview Working Time calendar appears, as shown in Figure 3-6.
4. From the Select a Calendar Template drop-down list, choose the Basecalendar that you want your project to use.
The Calendar setting offers the three Base calendar templates: Standard,Night Shift, and 24 Hours, as described in the “How calendars work” sec-tion, earlier in this chapter.
5. Click the Save and Go to Step 2 option at the bottom of the ProjectGuide pane.
The task pane contents change to show check boxes for each day of theweek (see Figure 3-7). If you want to change the working days in yourcalendar for this project, click to select or deselect any day.
6. Click the Save and Go to Step 3 option, and then click ChangeWorking Time in the task pane.
The Change Working Time dialog box, described in the preceding section,appears. Refer to that section to find out about changes you can make here.
7. Click OK to close the Change Working Time dialog box and then clickthe Continue to Step 4option.
8. Use the three text boxes that appear in the task pane to change the HoursPer Day, Hours Per Week, and Days Per Month settings, if you want.
9. Click the Continue to Step 5 option.
A message appears in the task pane to say that the Project calendar isnow set. If you want to work with other calendars at this point, you canclick the Define Additional Calendars option.
10. Click Save and Finish.
60 Part I: Setting the Stage for Project
07_036516 ch03.qxp 11/20/06 1:39 PM Page 60

Figure 3-7:Click and
choosewhich days
you wantresources
to work.
Figure 3-6:You can
choose yourBase
calendarand see agraphicalview of it
here.
61Chapter 3: Mark It on Your Calendar
07_036516 ch03.qxp 11/20/06 1:39 PM Page 61

When you choose a Base calendar template, it sets the typical working timefor your company. If a few resources on your project work the night shift butthe majority of your resources work a standard workday, you may want tochoose the Base calendar template that applies to the majority of yourresources (in this case, Standard). You can make changes to specificResource and Task calendars later (see the next two sections).
Modifying Task CalendarsYou can set a Task calendar to use a different Base calendar template thanthe one you selected for the Project calendar. Doing so takes precedenceover the Project calendar for that task. Suppose that you select the Standardcalendar template for a project and a 24 Hours Task calendar template. If youthen specify that the task has a duration of one day, its one 24-hour day.
To modify settings for a Task calendar, follow these steps:
1. Double-click the task name.
The Task Information dialog box appears.
2. Click the Advanced tab.
3. From the Calendar drop-down list, choose a different Base calendar,as shown in Figure 3-8.
4. Click OK to save your new calendar setting.
If a resource assigned to this task has a modified calendar, that resourceworks only during the specific hours that the Task calendar and Resource cal-endar have in common.
Figure 3-8:You can
apply any ofthe threecalendartypes to
tasks in yourproject.
62 Part I: Setting the Stage for Project
07_036516 ch03.qxp 11/20/06 1:39 PM Page 62

Making Resource Calendar SettingsEven the most resourceful resources have only so many hours in a day towork. When you have to deal with variations in resource schedules, considermodifying the Resource calendars.
Which resources get calendars?Projects can have three types of resource: work, material, and cost, whichyou can read more about in Chapter 7. For now, you should know that onlyone resource type — the work resource — has its own calendar. That’sbecause material resources are charged not by time worked but rather byunits used, and a cost resource gets assigned a set cost that also doesn’trelate to any time worked on a task.
You can change the Base calendar template for each work resource and set spe-cific dates as working or nonworking. These exceptions take precedence overyour Project and Task calendars, and control when a specific resource can work.
I have one word of caution about modifying Resource calendars: Unless aresource truly has a unique working schedule, don’t change its Base calendartemplate. For example, if a resource usually works a day shift but works anight shift for only a few days during the life of the project, don’t change thatresource’s Base calendar template to Night Shift. If one person works from 10 a.m.–7 p.m. because the company allows him to, you probably don’t haveto vary his schedule from the typical 8-to-5 work schedule that’s set in theProject calendar because he puts in eight hours a day like everyone else.Unless your project deals with the most detailed level of time, where hoursand not days are the typical units of measure for tasks, making these types ofchanges is more work than it’s worth.
Making the change to a resource’s calendarTo modify a resource’s calendar settings, follow these steps:
1. Display a view that includes a resource column, such as the Resourcesheet.
Just click the view in the View bar. Chapter 1 covers how to display different views.
2. Double-click a resource name.
The Resource Information dialog box appears.
63Chapter 3: Mark It on Your Calendar
07_036516 ch03.qxp 11/20/06 1:39 PM Page 63
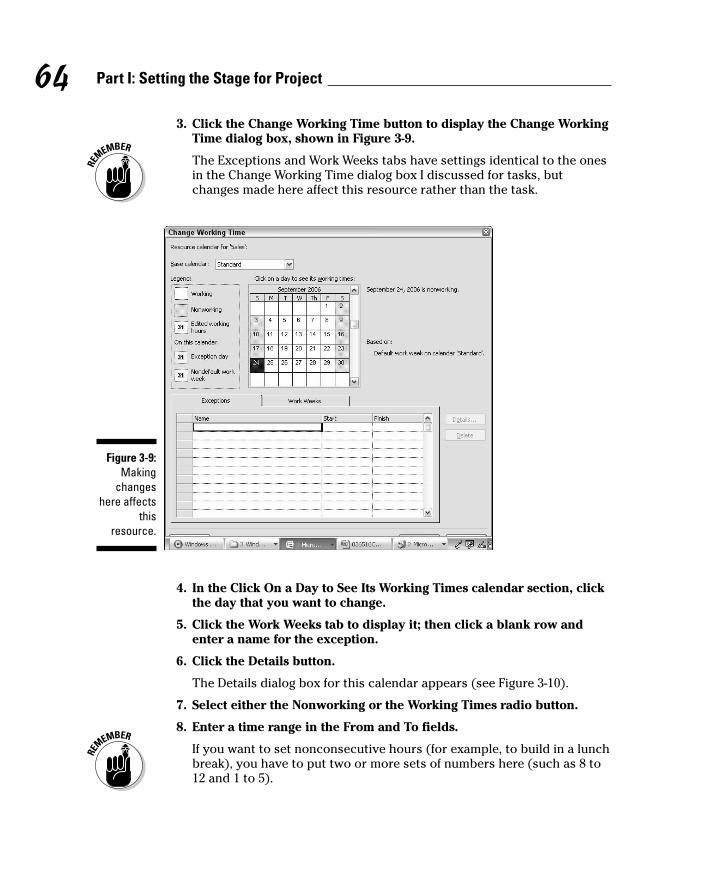
3. Click the Change Working Time button to display the Change WorkingTime dialog box, shown in Figure 3-9.
The Exceptions and Work Weeks tabs have settings identical to the onesin the Change Working Time dialog box I discussed for tasks, butchanges made here affect this resource rather than the task.
4. In the Click On a Day to See Its Working Times calendar section, clickthe day that you want to change.
5. Click the Work Weeks tab to display it; then click a blank row andenter a name for the exception.
6. Click the Details button.
The Details dialog box for this calendar appears (see Figure 3-10).
7. Select either the Nonworking or the Working Times radio button.
8. Enter a time range in the From and To fields.
If you want to set nonconsecutive hours (for example, to build in a lunchbreak), you have to put two or more sets of numbers here (such as 8 to12 and 1 to 5).
Figure 3-9:Making
changeshere affects
thisresource.
64 Part I: Setting the Stage for Project
07_036516 ch03.qxp 11/20/06 1:39 PM Page 64
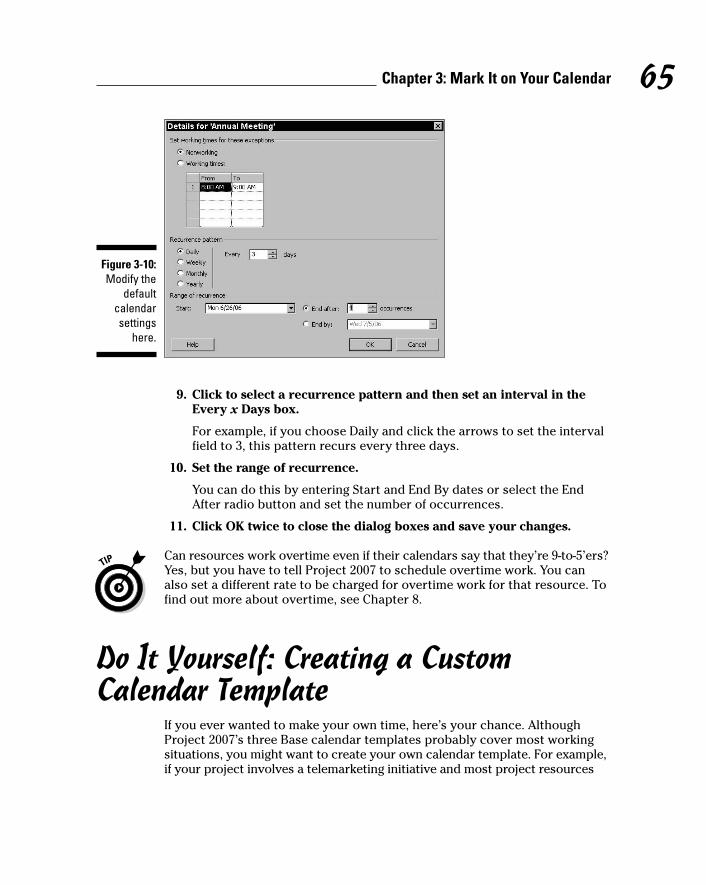
9. Click to select a recurrence pattern and then set an interval in theEvery x Days box.
For example, if you choose Daily and click the arrows to set the intervalfield to 3, this pattern recurs every three days.
10. Set the range of recurrence.
You can do this by entering Start and End By dates or select the EndAfter radio button and set the number of occurrences.
11. Click OK twice to close the dialog boxes and save your changes.
Can resources work overtime even if their calendars say that they’re 9-to-5’ers?Yes, but you have to tell Project 2007 to schedule overtime work. You canalso set a different rate to be charged for overtime work for that resource. Tofind out more about overtime, see Chapter 8.
Do It Yourself: Creating a CustomCalendar Template
If you ever wanted to make your own time, here’s your chance. AlthoughProject 2007’s three Base calendar templates probably cover most workingsituations, you might want to create your own calendar template. For example,if your project involves a telemarketing initiative and most project resources
Figure 3-10:Modify the
defaultcalendarsettings
here.
65Chapter 3: Mark It on Your Calendar
07_036516 ch03.qxp 11/20/06 1:39 PM Page 65
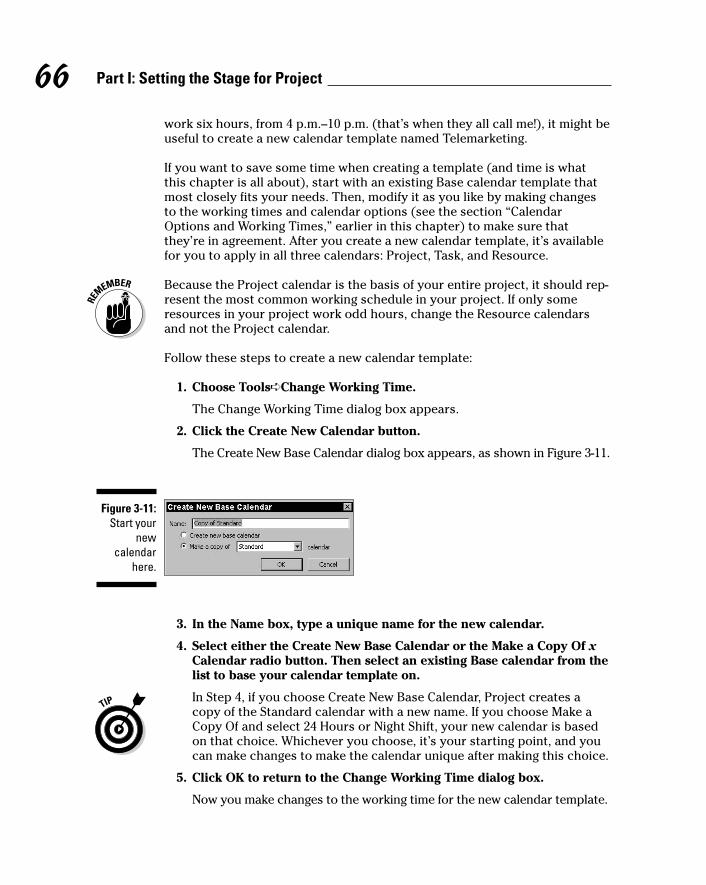
work six hours, from 4 p.m.–10 p.m. (that’s when they all call me!), it might beuseful to create a new calendar template named Telemarketing.
If you want to save some time when creating a template (and time is whatthis chapter is all about), start with an existing Base calendar template thatmost closely fits your needs. Then, modify it as you like by making changesto the working times and calendar options (see the section “CalendarOptions and Working Times,” earlier in this chapter) to make sure thatthey’re in agreement. After you create a new calendar template, it’s availablefor you to apply in all three calendars: Project, Task, and Resource.
Because the Project calendar is the basis of your entire project, it should rep-resent the most common working schedule in your project. If only someresources in your project work odd hours, change the Resource calendarsand not the Project calendar.
Follow these steps to create a new calendar template:
1. Choose Tools➪Change Working Time.
The Change Working Time dialog box appears.
2. Click the Create New Calendar button.
The Create New Base Calendar dialog box appears, as shown in Figure 3-11.
3. In the Name box, type a unique name for the new calendar.
4. Select either the Create New Base Calendar or the Make a Copy Of xCalendar radio button. Then select an existing Base calendar from thelist to base your calendar template on.
In Step 4, if you choose Create New Base Calendar, Project creates acopy of the Standard calendar with a new name. If you choose Make aCopy Of and select 24 Hours or Night Shift, your new calendar is basedon that choice. Whichever you choose, it’s your starting point, and youcan make changes to make the calendar unique after making this choice.
5. Click OK to return to the Change Working Time dialog box.
Now you make changes to the working time for the new calendar template.
Figure 3-11:Start your
newcalendar
here.
66 Part I: Setting the Stage for Project
07_036516 ch03.qxp 11/20/06 1:39 PM Page 66
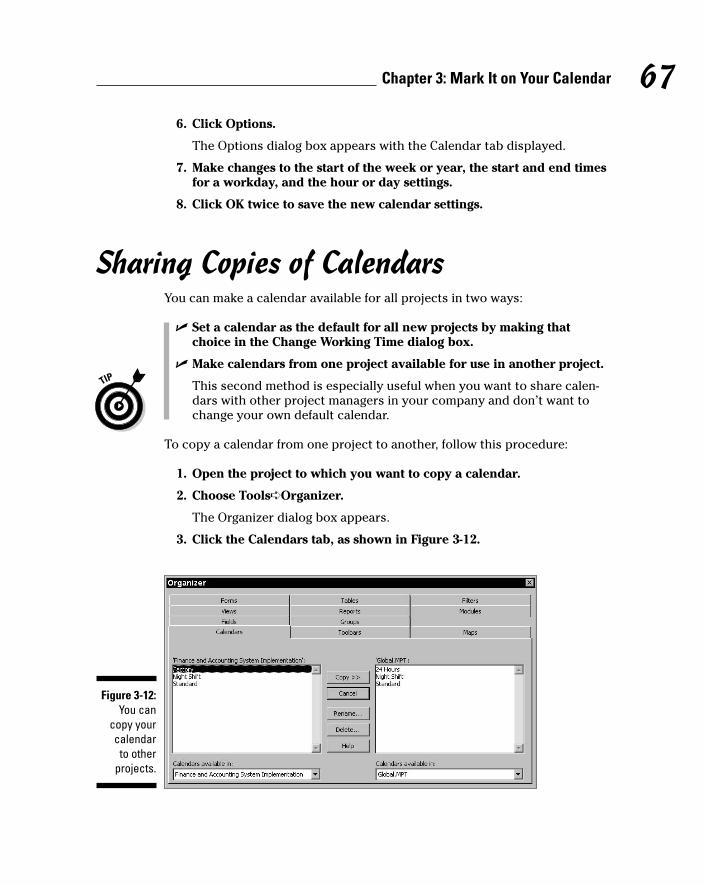
6. Click Options.
The Options dialog box appears with the Calendar tab displayed.
7. Make changes to the start of the week or year, the start and end timesfor a workday, and the hour or day settings.
8. Click OK twice to save the new calendar settings.
Sharing Copies of CalendarsYou can make a calendar available for all projects in two ways:
� Set a calendar as the default for all new projects by making thatchoice in the Change Working Time dialog box.
� Make calendars from one project available for use in another project.
This second method is especially useful when you want to share calen-dars with other project managers in your company and don’t want tochange your own default calendar.
To copy a calendar from one project to another, follow this procedure:
1. Open the project to which you want to copy a calendar.
2. Choose Tools➪Organizer.
The Organizer dialog box appears.
3. Click the Calendars tab, as shown in Figure 3-12.
Figure 3-12:You can
copy yourcalendar
to otherprojects.
67Chapter 3: Mark It on Your Calendar
07_036516 ch03.qxp 11/20/06 1:39 PM Page 67

4. From the Calendars Available In drop-down list (lower left), select theProject 2007 file that contains the calendar you want to copy. In theCalendars Available In drop-down list (lower right), choose whetheryou want to make the calendar available in another currently openproject or the Global template.
5. In the list on the left, click the calendar you want to copy and thenclick the Copy button.
The calendar is copied to the current project.
6. If you want to give the calendar a different name, click the Renamebutton, type a new name in the Rename dialog box that appears, andthen click OK.
7. Close the Organizer by clicking the close button (the X) in the upper-right corner.
Here are a few pointers about copying calendars from project to project:
� Make sure that the name you give the calendar is descriptive.Providing an appropriate name helps you remember the calendar’s gen-eral parameters.
� If your company has standard calendars, try having one resourcecreate and disseminate them. If ten versions of a management calendarfloat around and you grab the wrong one, it can cause problems.
� Put the project manager’s initials in each calendar template name youcreate. That way, you know which ones you created.
68 Part I: Setting the Stage for Project
07_036516 ch03.qxp 11/20/06 1:39 PM Page 68
Chapter 4
A Tisket, a Task KitIn This Chapter� Creating and importing tasks
� Establishing task types and durations
� Creating recurring tasks
� Defining effort-driven tasks
� Setting task constraints
� Entering task notes
� Saving a project
A project manager is, by necessity, a taskmaster because tasks form theto-do list of your project. Tasks incorporate the What, When, Who, and
Where information of your plan. Resources work on a project by gettingassigned to tasks. The timing of tasks and the relationships between themform the schedule for your project. By tracking the activity on tasks, you cansee the progress of your project over time.
You can create tasks in a few different ways: by typing information in thesheet area of Gantt Chart view (or any other view that displays information incolumns) or by using the Task Information dialog box. You can also importtasks from Outlook or Excel.
You have to make some choices when you create tasks. For example, youhave to determine and specify settings for a task that control its timing andits priority, as well as certain constraints regarding how its timing might ormight not shift during the life of your project.
In this chapter, you find out all about tasks and the various settings that giveeach task its own, unique personality.
Tackling Your First TaskThe first step in creating tasks is to identify the individual action items in yourproject. Then you can create each of those steps as individual tasks in Project.
08_036516 ch04.qxp 11/20/06 1:39 PM Page 69

After you create some tasks, you begin to build some structure to your to-dolist by creating phases consisting of summary tasks with subtasks belowthem in an outline structure. For example, you might have a summary tasknamed Permits with two subtasks: Submit Application and Pay Fees.
You can find out how to organize tasks into outlines in Chapter 5. All youhave to focus on in this section is making the settings that are required tosimply create tasks.
Identifying what makes up a taskDetermining all the settings that characterize a task is a bit more complicatedthan writing an item on a to-do list. Think of each task in your project as arecord — like a database record that lists a person’s name, address, birthday,and shoe size. In a similar way, a task in Project contains data about that task:not only a task name but also other vital data about how that task fits intoyour project.
To create a task, you enter information such as
Task name
Task duration
Task type
Task priority
Constraints for scheduling the task
Some settings, such as task type (fixed duration) and priority (none), canoften be left at default settings. Others, such as task duration, almost alwaysrequire some input from you.
Pretty much everything that you enter about a task (except the task nameand resources assigned to the task) involves how the task timing is con-trolled. Several of these settings work in combination, with Project perform-ing complex algorithms to set the timing of the task according to the value ofeach setting. Other elements, such as the task finish date, don’t determinetiming but rather cause Project to display a symbol in the Indicator column(the column to the right of the task number column with a small blue circlecontaining an “i” at the top) to alert you when a task has moved beyond itsestimated deadline.
You can also specify a unique Task calendar in the Task Information dialogbox; calendars are covered in Chapter 3.
70 Part I: Setting the Stage for Project
08_036516 ch04.qxp 11/20/06 1:39 PM Page 70

Creating a taskYou can create a task, on the simplest level, by entering a name for it. You canfill in the details of task duration and task type, for example, at the same timeor later.
You can enter task names in three ways:
� Enter names in a Gantt Chart view sheet pane.
� Enter names in a Task Information dialog box.
� Import tasks from Excel or Outlook.
Generating tasks in Gantt Chart viewMany people who work on lengthy projects find that entering all task namesin the sheet pane of Gantt Chart view is the quickest and easiest way to go.You can simply enter one task name in the Task Name column, press thedown arrow on your keyboard to move to the next blank row, enter anothertask, and so on.
Follow these simple steps to enter a task in Gantt Chart view:
1. In the Task Name column, click a blank cell.
2. Type a task name.
You can edit what you type by clicking in the entry box above the sheetand pressing the Delete or Backspace key to clear characters (see Figure4-1). You can also click the X and check mark buttons to the left of theentry box to clear or accept your entry.
3. Press the down arrow on your keyboard to move to the next cell inthe column and then type the next task name.
When you move to the next task cell, Project automatically assigns asequential task number in the far-left column. This number is a handyway to identify tasks in larger schedules.
4. Repeat Step 3 until you enter all task names.
You can display whatever columns you like in Gantt Chart view to enteradditional task information, such as duration, type, start date, and finishdate. To display additional columns, simply right-click any column head-ing, choose Insert Column, and select the column to display from theField Name list.
You can also use the Entry table (choose View➪Table➪Entry to displayit) to access the most common task information columns.
71Chapter 4: A Tisket, a Task Kit
08_036516 ch04.qxp 11/20/06 1:39 PM Page 71

Producing tasks via the Task Information dialog boxIf dialog boxes provide the kind of centralized information form that fits theway you like to work, consider using the Task Information dialog box to entertask information. The series of tabs in this dialog box contain all the informa-tion about a task.
Follow these steps to create a task via the Task Information dialog box:
1. In the Task Name column, double-click a blank cell.
The Task Information dialog box appears, as shown in Figure 4-2. TheGeneral and Advanced tabs in this dialog box contain various timing set-tings for the task.
2. In the Name field, type a task name.
3. Click OK to save the new task.
The task name appears in Gantt Chart view in the cell you clicked inStep 1.
4. Press the down arrow key to move to the next cell.
5. Repeat Steps 1–4 to add as many tasks as you like.
Figure 4-1:You canclear or
accept textin the entry
field.
72 Part I: Setting the Stage for Project
08_036516 ch04.qxp 11/20/06 1:39 PM Page 72

As you name tasks, try to the keep task names in your project both descrip-tive and unique. However, if you can’t make all the names unique (for exam-ple, you have three tasks named Hire Staff), you can use the automaticallyassigned task number or the work breakdown structure (WBS) code (seeChapter 5) to identify tasks; these numbers are always unique for each task.
Importing tasks from OutlookAfter you get started thinking about what has to be accomplished in yourproject, tasks are like rabbits breeding. What might start as a series of simpleto-do tasks in Outlook often becomes a full-fledged project with hundreds oftasks. When that happens, you’ll be glad to know that Microsoft provides aneasy-to-use import feature that puts the tasks you create in Outlook intoProject.
Although the Project import-mapping feature allows you to map fields in a filecreated in another application to fields in Project to import data, the processcan be tedious. The Import Outlook Tasks feature is essentially an import mapthat’s preset to work with Outlook task fields.
Follow these steps to import Outlook tasks into Project:
1. Open the plan that you want to insert tasks into, or open a new pro-ject (choose File➪New).
2. Choose Tools➪Import Outlook Tasks.
The Import Outlook Tasks dialog box appears, as shown in Figure 4-3.
Figure 4-2:Determine
various tasktiming
settingshere.
73Chapter 4: A Tisket, a Task Kit
08_036516 ch04.qxp 11/20/06 1:39 PM Page 73
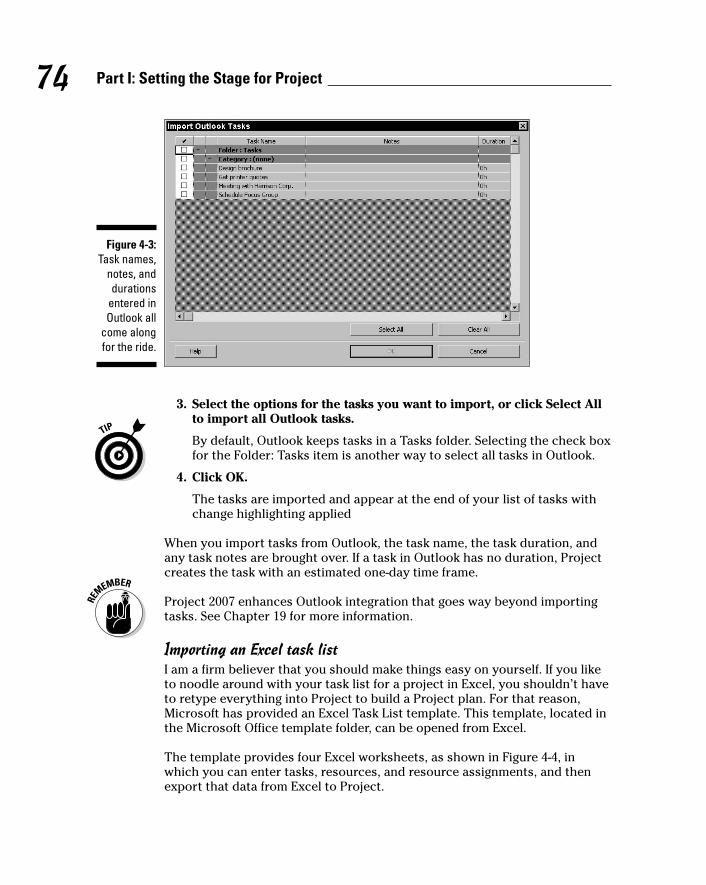
3. Select the options for the tasks you want to import, or click Select Allto import all Outlook tasks.
By default, Outlook keeps tasks in a Tasks folder. Selecting the check boxfor the Folder: Tasks item is another way to select all tasks in Outlook.
4. Click OK.
The tasks are imported and appear at the end of your list of tasks withchange highlighting applied
When you import tasks from Outlook, the task name, the task duration, andany task notes are brought over. If a task in Outlook has no duration, Projectcreates the task with an estimated one-day time frame.
Project 2007 enhances Outlook integration that goes way beyond importingtasks. See Chapter 19 for more information.
Importing an Excel task listI am a firm believer that you should make things easy on yourself. If you liketo noodle around with your task list for a project in Excel, you shouldn’t haveto retype everything into Project to build a Project plan. For that reason,Microsoft has provided an Excel Task List template. This template, located inthe Microsoft Office template folder, can be opened from Excel.
The template provides four Excel worksheets, as shown in Figure 4-4, inwhich you can enter tasks, resources, and resource assignments, and thenexport that data from Excel to Project.
Figure 4-3:Task names,
notes, anddurations
entered inOutlook all
come alongfor the ride.
74 Part I: Setting the Stage for Project
08_036516 ch04.qxp 11/20/06 1:39 PM Page 74
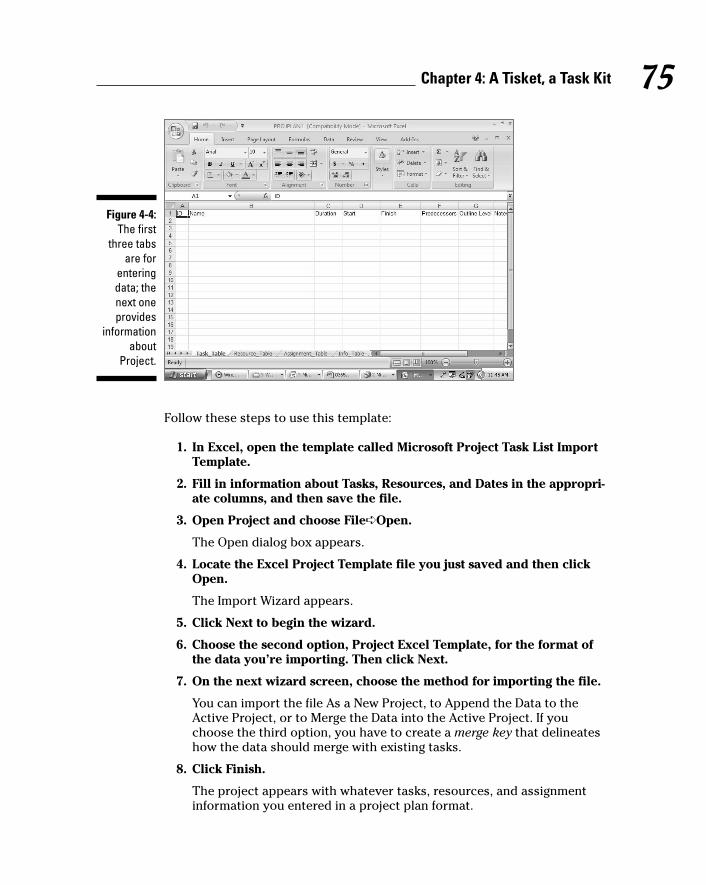
Follow these steps to use this template:
1. In Excel, open the template called Microsoft Project Task List ImportTemplate.
2. Fill in information about Tasks, Resources, and Dates in the appropri-ate columns, and then save the file.
3. Open Project and choose File➪Open.
The Open dialog box appears.
4. Locate the Excel Project Template file you just saved and then clickOpen.
The Import Wizard appears.
5. Click Next to begin the wizard.
6. Choose the second option, Project Excel Template, for the format ofthe data you’re importing. Then click Next.
7. On the next wizard screen, choose the method for importing the file.
You can import the file As a New Project, to Append the Data to theActive Project, or to Merge the Data into the Active Project. If youchoose the third option, you have to create a merge key that delineateshow the data should merge with existing tasks.
8. Click Finish.
The project appears with whatever tasks, resources, and assignmentinformation you entered in a project plan format.
Figure 4-4:The first
three tabsare for
enteringdata; thenext oneprovides
informationabout
Project.
75Chapter 4: A Tisket, a Task Kit
08_036516 ch04.qxp 11/20/06 1:39 PM Page 75

Linking to tasks that live somewhere elseYou can insert hyperlinks in a project outline, which provides a handy way toquickly open another project.
Inserting a hyperlink creates a task that you can use to represent the timingor costs of another project or subproject in your plan. However, you have toenter timing and cost information yourself — it isn’t brought over from thehyperlinked project.
To insert a hyperlink to another Project file in your project, follow these steps:
1. Click to select the blank task name cell where you want the hyper-linked task to appear.
2. Choose Insert➪Hyperlink.
The Insert Hyperlink dialog box appears, as shown in Figure 4-5.
3. In the Text to Display box, type a name for the hyperlinked file.
Make sure that this text makes clear what information is being summarized.
4. In the Link To area, click the Existing File or Web Page icon.
You can link to a document, an e-mail address, or a Web page.
5. In the Look In list, locate and select the file to which you want toinsert a hyperlink.
6. Click OK.
The link text is inserted, and a hyperlink symbol appears in the Indicatorfield. You can simply click that link symbol to open the other file.
Figure 4-5:Choose a
linkingdestination.
76 Part I: Setting the Stage for Project
08_036516 ch04.qxp 11/20/06 1:39 PM Page 76

Inserting one project into anotherYou can also insert tasks from one project into another. You accomplish thisby inserting an entire, existing project into another project; The project thatis inserted is known as a subproject. This method is useful when various pro-ject team members manage different phases of a larger project. The capabil-ity to assemble subprojects in one place allows you to create a master schedulefrom which you can view, all in one place, all the pieces of a larger, more com-plex project.
Follow these steps to insert another Project file into your plan:
1. In Gantt Chart view, select the task in your task list above which youwant the other project to be inserted.
2. Choose Insert➪Project.
The Insert Project dialog box appears, as shown in Figure 4-6.
3. From the Look In list, locate the file that you want to insert and clickit to select it.
4. If you want to link to the other file so that any updates to it arereflected in the copy of the project you’re inserting, select the Link toProject check box.
Figure 4-6:Insert a link
to anotherproject from
here.
77Chapter 4: A Tisket, a Task Kit
08_036516 ch04.qxp 11/20/06 1:39 PM Page 77

5. Click Insert to insert the file.
The inserted project appears above the task you selected when youbegan the insert process.
Note that the inserted project’s highest-level task appears at the level of thetask you selected when you inserted the project, with all other tasks below itin outline order. If you need to, use the Indent and Outdent tools on theFormatting toolbar (arrows pointing to the left and right, respectively) toplace the inserted tasks at the appropriate level in your project. You can findout more about how to organize tasks into outlines in Chapter 5.
You’re in It for the DurationIn projects, as in life, timing is everything. Timing in your projects starts withthe durations that you assign to tasks. Although Project helps you see theeffect that the timing of your tasks has on the overall length of your plan, itcan’t tell you how much time each task will take: That’s up to you.
Estimating the duration of tasks isn’t always easy; it has to be based on yourexperience with similar tasks and your knowledge of the specifics of yourproject.
If you often do projects with similar tasks, consider saving a copy of yourschedule as a template that you can use in the future, thereby saving yourselfthe effort of re-estimating durations every time you start a similar project.Find out about saving templates in Chapter 17.
Tasks come in all flavors: Identifying task typeBefore you begin to enter task durations, you need to be aware of the threetask types. These types have an effect on how Project schedules the work ofa task.
Essentially, your choice of task type determines which element of the taskdoesn’t vary when you make changes to the task:
� Fixed Duration: This task type takes a set amount of time to complete,no matter how many resources you add to the mix. For example, a teston a substance that requires that you leave the test running for 24 hourshas a fixed duration, even if you add 20 scientists to oversee the test.
78 Part I: Setting the Stage for Project
08_036516 ch04.qxp 11/20/06 1:39 PM Page 78
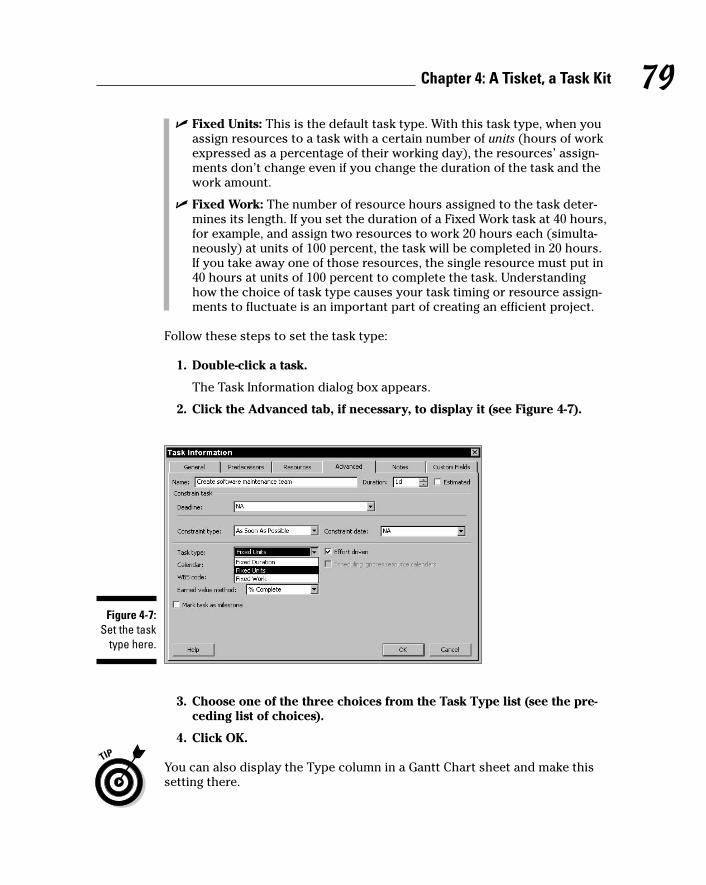
� Fixed Units: This is the default task type. With this task type, when youassign resources to a task with a certain number of units (hours of workexpressed as a percentage of their working day), the resources’ assign-ments don’t change even if you change the duration of the task and thework amount.
� Fixed Work: The number of resource hours assigned to the task deter-mines its length. If you set the duration of a Fixed Work task at 40 hours,for example, and assign two resources to work 20 hours each (simulta-neously) at units of 100 percent, the task will be completed in 20 hours.If you take away one of those resources, the single resource must put in40 hours at units of 100 percent to complete the task. Understandinghow the choice of task type causes your task timing or resource assign-ments to fluctuate is an important part of creating an efficient project.
Follow these steps to set the task type:
1. Double-click a task.
The Task Information dialog box appears.
2. Click the Advanced tab, if necessary, to display it (see Figure 4-7).
3. Choose one of the three choices from the Task Type list (see the pre-ceding list of choices).
4. Click OK.
You can also display the Type column in a Gantt Chart sheet and make thissetting there.
Figure 4-7:Set the task
type here.
79Chapter 4: A Tisket, a Task Kit
08_036516 ch04.qxp 11/20/06 1:39 PM Page 79
Setting task durationMost tasks in a project have a duration, whether it’s ten minutes or a year orsomething in between. (For milestone tasks, which have no duration, see thenext section.) Deciding how finely to break down your tasks can affect howefficiently you track progress on those tasks: Tasks that wander on for a yearare usually too broad, and tasks that take ten minutes are too narrow. Whateveryour best guess at task duration is, Project can accommodate you.
If your project is to run a one-day event, getting to the level of ten-minutetasks might make sense. In most projects, however, such finely detailedtiming doesn’t make sense because it defeats the point of all the tracking andreporting features of Project. (That’s true unless you have people trackingtheir progress minute by minute, but in that case, what else would they havetime to do?) On the flip side, creating a 12-month-long task suggests that youmight be defining your project too broadly to accurately keep track of all thatcan happen in a year.
As with all task information, you can enter a duration in a Gantt Chart sheet(see the section “Generating tasks in Gantt Chart view,” earlier in this chap-ter) or in the Task Information dialog box. Follow these steps to enter a dura-tion by using the dialog box:
1. Double-click a task to display the Task Information dialog box.
2. If necessary, click the General tab to display it (refer to Figure 4-2).
3. In the Duration box, use the spinner arrows to increase or decreasethe duration.
4. If the current duration units aren’t appropriate (for example, dayswhen you want hours), type a new duration in the Duration box.
New tasks are created with an estimated duration of one day unless youchange the duration. You can use the following abbreviations for varioustime units:
• m: Minutes
• h: Hours
• d: Days
• w: Weeks
• mo: Months
Don’t assume that changing the start and finish dates of a task changesits duration — it doesn’t. You have to manually change the duration; ifyou don’t, your project plan will not be what you intend it to be.
5. Click OK to accept the duration setting.
80 Part I: Setting the Stage for Project
08_036516 ch04.qxp 11/20/06 1:39 PM Page 80

If you aren’t sure about the timing of a particular task and want to alertpeople to your lack of certainty or if you need a way to find such tasks andenter more solid timing when you have better information, select theEstimated check box (on the General tab) when you enter the duration. Thenapply a filter for tasks with estimated durations (see Chapter 15 for moreabout using filters).
Setting tasks with no duration: MilestonesI mention in the preceding section that almost all tasks have durations; theexception is a milestone — a task with no duration. (Now, that’s the type I liketo be assigned to.) In fact, milestones are less like tasks than they are likesignposts that mark moments in time. Examples of milestones are theapproval of a prototype (although the deliberations to make that decisionmight have taken months) or the completion of a phase of tests.
Some people include tasks such as Design Complete or Testing Complete atthe end of each phase of their project. They can then create timing relation-ships to the moment of completion — for example, allowing production of adrug to proceed after the testing and approval is complete. Such milestonesalso alert you and your team members to a moment of progress in your project that can help to keep the team motivated.
Note that new tasks are created with an estimated duration of one day unlessyou enter a duration. To create a milestone, you indicate that the task haszero duration. The quickest way to do that is to simply type 0 in the Durationcolumn in Gantt Chart view. Or, you can click the Advanced tab of the TaskInformation dialog box (refer to Figure 4-6) and select the Mark Task asMilestone check box. When you do, the milestone is designated in GanttChart view with a black diamond shape rather than a task bar.
Showing up again and again: Recurring tasksSome tasks occur again and again in projects. For example, attending a monthlyproject debriefing or generating a quarterly project report is considered arecurring task.
No one wants to create all the tasks for the monthly debriefing in a projectthat will take a year to complete. Instead, you can designate the recurrence,and Project automatically creates the 12 tasks for you.
81Chapter 4: A Tisket, a Task Kit
08_036516 ch04.qxp 11/20/06 1:39 PM Page 81
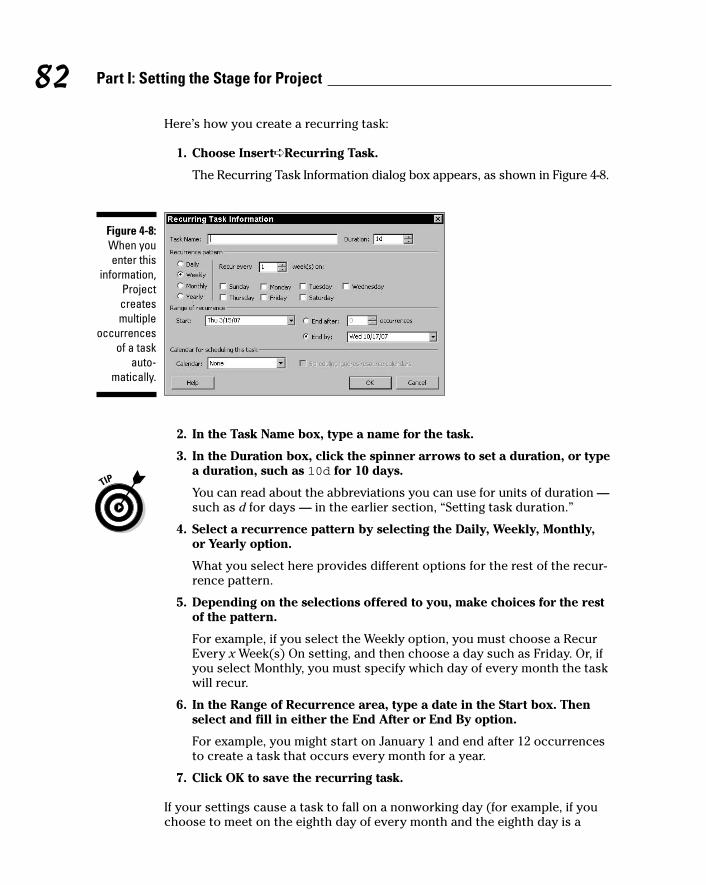
Here’s how you create a recurring task:
1. Choose Insert➪Recurring Task.
The Recurring Task Information dialog box appears, as shown in Figure 4-8.
2. In the Task Name box, type a name for the task.
3. In the Duration box, click the spinner arrows to set a duration, or typea duration, such as 10d for 10 days.
You can read about the abbreviations you can use for units of duration —such as d for days — in the earlier section, “Setting task duration.”
4. Select a recurrence pattern by selecting the Daily, Weekly, Monthly,or Yearly option.
What you select here provides different options for the rest of the recur-rence pattern.
5. Depending on the selections offered to you, make choices for the restof the pattern.
For example, if you select the Weekly option, you must choose a RecurEvery x Week(s) On setting, and then choose a day such as Friday. Or, ifyou select Monthly, you must specify which day of every month the taskwill recur.
6. In the Range of Recurrence area, type a date in the Start box. Thenselect and fill in either the End After or End By option.
For example, you might start on January 1 and end after 12 occurrencesto create a task that occurs every month for a year.
7. Click OK to save the recurring task.
If your settings cause a task to fall on a nonworking day (for example, if youchoose to meet on the eighth day of every month and the eighth day is a
Figure 4-8:When youenter this
information,Projectcreatesmultiple
occurrencesof a task
auto-matically.
82 Part I: Setting the Stage for Project
08_036516 ch04.qxp 11/20/06 1:39 PM Page 82
Sunday in one of those months), a dialog box appears, asking you how tohandle this situation. You can choose not to create the task, or you can letProject adjust the day to the next working day in that period.
To assign resources to a recurring task, you can use the resource column inGantt Chart view. (The Recurring Task Information dialog box doesn’t have aResources tab.)
Starting and Pausing TasksWhen most people start using Project, one of the first things they try to do isenter a start date for every task in their project. After all, you always includedates when you write up a to-do list, right? Well, for one thing, you’re jumpingthe gun — and missing out on one of the great strengths of project manage-ment software: the capability to schedule tasks for you according to some-times-complex combinations of factors, such as dependencies between tasksand task constraints. By allowing Project to determine the start date of atask, you allow it to make adjustments automatically when changes occur.
If you enter a task duration and don’t enter a start date for the task, that taskstarts by default as soon as possible after the project start date you set in theProject Information dialog box, based on any dependencies you set upbetween tasks.
Typically, to establish a task’s start date, you look for something in the pro-ject that would dictate its timing; for example, if you don’t want constructionto begin until you obtain permits, set a dependency between the permits taskand the construction task in such a way that construction can’t start beforethe permit task ends.
Certain tasks, however, must start on a specific date. Examples are a holiday,an annual meeting, or the start of the fishing season.
Project sets the finish date of a task based on when that task starts as well asthe task duration. If a task must finish on a certain date, however, you can seta finish date and let Project determine the start date.
Entering the task start dateSetting a start date or a finish date for a task applies a kind of constraint on itthat can override dependency relationships or other timing factors. Task con-straints, discussed in the upcoming “Constraints You Can Live With” section,are the preferred way to force a task to start or end on a certain day. If youdetermine, however, that a particular task must begin or end on a set date no
83Chapter 4: A Tisket, a Task Kit
08_036516 ch04.qxp 11/20/06 1:39 PM Page 83
matter what, you can enter a specific start or finish date. Setting the start orfinish date is simple.
To enter a start or finish date for a task, simply follow these steps:
1. Double-click a task.
The Task Information dialog box appears.
2. Click the General tab if it’s not already displayed; refer to Figure 4-2.
3. Click the arrow on the Start or Finish box.
A calendar appears.
4. Click a date to select it, or click the forward or backward arrow tomove to a different month and select a date.
If the current date is the date you want, use the shortcut of clicking theToday button on the drop-down calendar.
5. Click OK.
Note that setting a start date isn’t quite as strong a factor in how Projectdetermines timing as applying the Must Start On constraint. You can find outmore about how constraints work in the “Constraints You Can Live With” sec-tion, later in this chapter.
Taking a break: Splitting tasksDid you ever start something — your taxes, for example — and find that youjust had to drop everything before you were done and go do something else?(In the case of taxes, I usually need a break for a good cry.)
It’s the same in projects. Sometimes tasks start and then you have to putthem on hold before they can start again later — for example, if you experi-ence a work shutdown due to labor negotiations. Or, perhaps you can antici-pate a delay in the course of a task and want to structure it that way whenyou create it. In that case, you can use a Project feature to split a task so thata second or third portion starts at a later date, with no activity between. Youcan place as many splits in a task as you like.
Follow these steps to split a task:
1. Click the Split Task button on the Standard toolbar.
A box appears, as shown in Figure 4-9. The box provides a readout toguide you as you set the start date for the continuation of the task.
2. Click the task at the date where you want to split the task, and thendrag until the box contains the date on which you want the task tobegin again.
84 Part I: Setting the Stage for Project
08_036516 ch04.qxp 11/20/06 1:39 PM Page 84

3. Release the mouse button.
The task is split.
You can rejoin a split task by placing your mouse over the taskbar until themove cursor appears and then clicking the split taskbar and dragging it backto join with the other portion of the taskbar.
Don’t use the split-task approach to put an artificial hold on a task until someother task is complete. Suppose that you start testing a product but thenhave to wait for final approval before finalizing the test results. In that case,you should create a Testing task, a Final Approval milestone, and a FinalizeTest Results task — and then create dependency relationships among them.That way, if one task runs late, your final task shifts along with it instead ofbeing set in stone (as a split task can be).
It’s Such an Effort: Effort-Driven TasksWhen you hear the word effort in Project, you can think work. When you createa task, by default it is effort driven, which means that if you adjust resource
Split Task button
Figure 4-9:Check out
this guide tosetting thestart date
for thecontinuation
of the task.
85Chapter 4: A Tisket, a Task Kit
08_036516 ch04.qxp 11/20/06 1:39 PM Page 85

assignments, the duration might change but the number of hours of effort(work) you need to put in to complete the task stays the same. When you addor delete a resource assignment on an effort-driven task, work is spreadaround equally among resources.
Here’s how an effort-driven task works. Suppose that you have a two-day taskto set up a computer network in a new office. With one resource assigned tothe task, working 8 hours a day, it will take 16 hours to complete the work (two8-hour days). If you assign a second resource, the task no longer takes twodays because the hours of effort required will be completed more quickly bythe two people working simultaneously — in this case, in one 8-hour period.
An example of a task that is not effort driven is attending a daylong seminar.No matter how many people attend or how many people are present, theseminar takes one day to complete.
Effort Driven is a simple check box choice on the Advanced tab in the TaskInformation dialog box (refer to Figure 4-6). Select this check box to enable ordisable the Effort Driven setting; it’s selected by default. When you clear thissetting, the same task that you set to run two days takes two days, no matterhow much effort your resources put in. In other words, adding resourcesdoesn’t cause the task to be completed sooner.
Constraints You Can Live WithA constraint is more than something you’re forced to live with, such as dan-druff or noisy neighbors. In Project, constraints are timing conditions thatcontrol a task. You tell Project what, if anything, to constrain for each task.
Understanding how constraints workWhen you create a task, the As Soon As Possible constraint is selected bydefault. In other words, the task starts as soon as the project starts, assumingthat no dependencies with other tasks exist that would delay its start.
Task start and finish dates — working with dependencies, the task type, theEffort Driven setting, and constraints — set the timing of each task. However,when Project performs calculations to try to save you time in a project that’srunning late, it considers constraints to be the most sacred timing settings.For example, if you set a constraint that a task must finish on a certain date,Project shifts around almost any other task in a schedule in recalculatingtiming before it suggests that that task might finish on another date.
86 Part I: Setting the Stage for Project
08_036516 ch04.qxp 11/20/06 1:39 PM Page 86

Here’s a word to the wise: Use constraints only when you absolutely need toforce a task’s timing.
Table 4-1 lists all the constraints and an explanation of their effects on yourtask’s timing.
Table 4-1 Task ConstraintsConstraint Effect
As Soon As Possible The default setting; the task starts as early in the scheduleas possible based on dependencies and the project startdate.
As Late As Possible The task occurs as late as possible in your schedule,based on dependencies and the project finish date.
Finish No Earlier Than The end of the task cannot occur any earlier than the dateyou specify.
Finish No Later Than The end of the task cannot occur any later than the dateyou specify.
Must Finish On The task must finish on an absolute date.
Must Start On The task must start on an absolute date.
Start No Earlier Than The task cannot start any earlier than the date you specify.
Start No Later Than The task cannot start any later than the date you specify.
Establishing constraintsYou can set only one constraint for a task. Setting a constraint involves select-ing the type of constraint you want in the Task Information dialog box. Someconstraints work together with a date you choose. For example, if you want atask to start no later than a certain date, you need to select a date by whichthe task must start. Other settings, such as As Soon As Possible, work off adifferent date — in this case, the start date you set for the whole project orany dependency relationships you set up with other tasks. (See Chapter 6 formore about dependency relationships.)
To set a task constraint, follow these steps:
1. Double-click a task.
The Task Information dialog box appears.
87Chapter 4: A Tisket, a Task Kit
08_036516 ch04.qxp 11/20/06 1:39 PM Page 87

2. Click the Advanced tab; refer to Figure 4-6.
3. Select a constraint from the Constraint Type list.
4. If the constraint requires a date, select one from the Constraint Date list.
5. Click OK to save the settings.
Setting a deadlineI don’t know about you, but sometimes I think deadlines were made to beoverlooked. Project agrees because strictly speaking, deadlines aren’t con-straints (although the setting for the deadline is in the Constraint Task area ofthe Task Information dialog box, on the Advanced tab). Deadlines aren’t thesame as constraints because they don’t force the timing of your tasks in anysense. If you set a deadline, it simply causes Project to display a symbol inthe Indicator column if the task has run past the deadline to alert you so thatyou can panic (I mean, take action) appropriately.
To set a deadline, follow these steps:
1. Double-click a task.
The Task Information dialog box appears.
2. Click the Advanced tab; refer to Figure 4-6.
3. Click the arrow in the Deadline field to display a calendar, and thenselect a date.
If necessary, use the forward or backward arrow to move to a differentmonth.
4. Click OK to save the deadline setting.
You can also display a deadline column in your Gantt Chart sheet pane toenter the deadline or to show yourself and others what your targeted dead-line date is.
Making a Task NoteDespite the wealth of information that you can enter about a task and its timing,not everything can be said with settings. That’s why every task includes anarea to enter notes. You might use this feature, for example, to enter somebackground information about changes in timing or other changes that occurduring the schedule, or to list vendor contact information relevant to the task.
88 Part I: Setting the Stage for Project
08_036516 ch04.qxp 11/20/06 1:39 PM Page 88
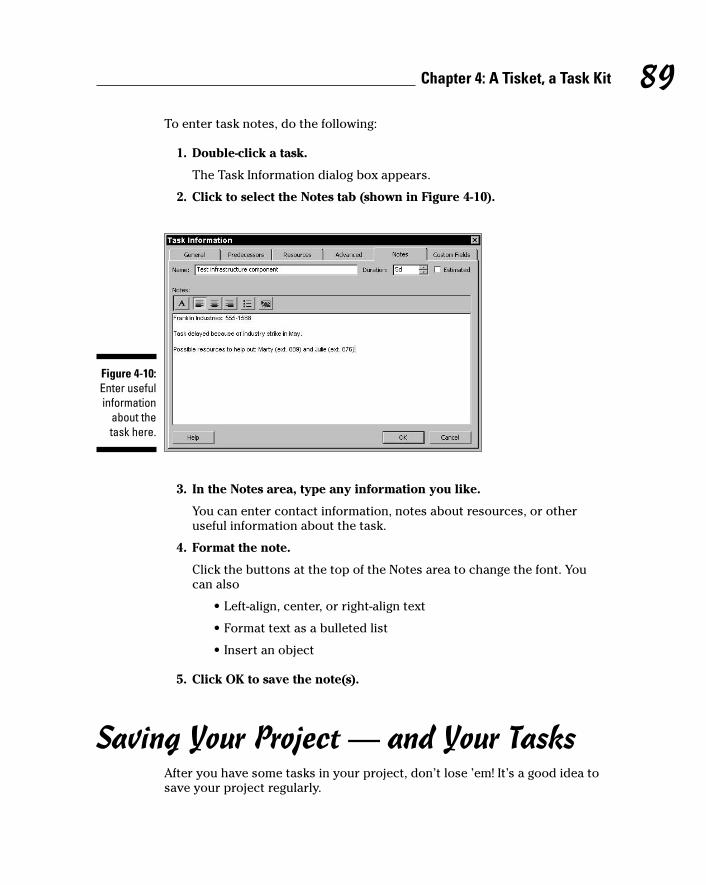
To enter task notes, do the following:
1. Double-click a task.
The Task Information dialog box appears.
2. Click to select the Notes tab (shown in Figure 4-10).
3. In the Notes area, type any information you like.
You can enter contact information, notes about resources, or otheruseful information about the task.
4. Format the note.
Click the buttons at the top of the Notes area to change the font. You can also
• Left-align, center, or right-align text
• Format text as a bulleted list
• Insert an object
5. Click OK to save the note(s).
Saving Your Project — and Your TasksAfter you have some tasks in your project, don’t lose ’em! It’s a good idea tosave your project regularly.
Figure 4-10:Enter usefulinformation
about thetask here.
89Chapter 4: A Tisket, a Task Kit
08_036516 ch04.qxp 11/20/06 1:39 PM Page 89

You save a Project file by using the same process you’ve used hundreds oftimes to save files in other software applications.
To save a Project file, do this:
1. Choose File➪Save.
The Save As dialog box appears, as shown in Figure 4-11. If you use othersoftware, you’ve probably seen this dialog box about 2 million times.
2. From the Save In list, locate the folder in which you want to save the file.
3. In the File Name box, type a name.
4. Click Save.
If you want to save changes to a previously saved Project file by using a dif-ferent filename or file format (for example saving as an Excel spreadsheet ora Project template), choose File➪Save As and provide a new filename or filetype at the bottom of the Save As dialog box.
If you want to share your file with others and you have Project Server set upin your organization, you can do so by using Project Web Access to publish itonline. See Chapter 19 for the lowdown on this useful collaborative tool.
Figure 4-11:Save your
tasks here.
90 Part I: Setting the Stage for Project
08_036516 ch04.qxp 11/20/06 1:39 PM Page 90
Task Information in Action: PlanningYour Next Space Launch
If you want to tie together all the task-setting information covered in thischapter, you can look at it in the context of a specific project. Suppose thatyou’re managing a space shuttle launch and you have these main tasks:
� Train personnel
� Launch public relations
� Check equipment
� Launch operation
Under the public relations task, suppose that you have three subtasks:
� Write press releases
� Hold press conference
� Set up interviews with astronauts
Your first step is to set durations for each task. They’re determined to a greatextent by your experience with similar projects, but suppose that you deter-mine that writing press releases will take two days, a press conference willtake two hours, and setting up interviews will take three days. You enterthese durations in one of two locations: in the Durations column or in eachindividual Task Information dialog box.
Next, you have to determine the task types. Write Press Releases is an effort-driven, fixed-work task. (If you get somebody to help you, it takes less time tocomplete the work.) Hold Press Conference, on the other hand, has a fixedtiming (after two hours, you cut off the press); in this case, it’s a fixed-durationtask. Finally, Set Up Interviews with Astronauts could be a fixed-units task: It takes a certain number of hours to make all the phone calls and arrange-ments, but when the arrangements are done, you might still want the resourcesavailable for confirmations or to deal with changes. With a fixed-units task(which is the Project default), completing the number of units of work doesn’tchange the resource hours you assigned.
Finally, what task constraints might you apply to these tasks? Although I’mnot a fan of applying too many constraints to any project, here are a couple ofpossibilities:
91Chapter 4: A Tisket, a Task Kit
08_036516 ch04.qxp 11/20/06 1:39 PM Page 91
� The press conference might take place no later than the task to launchthe shuttle. After the shuttle has left orbit, the press conference to briefthe press on the mission must already have been completed.
� You could set the interviews with astronauts so that they must start onthe day before the launch — when the members of the media hold themost interest in the event and the astronauts are still available.
If, in the end, the entire launch is scrubbed because of unexpected weatheror a faulty hatch door, won’t you be glad that you used the Project depen-dency structure to cause all tasks to move out when you change the startdate for the project for the sixth time?
92 Part I: Setting the Stage for Project
08_036516 ch04.qxp 11/20/06 1:39 PM Page 92

Chapter 5
Getting Your Outline in LineIn This Chapter� Understanding the summary task/subtask structure
� Creating a project summary task
� Promoting and demoting tasks
� Displaying and hiding outline levels
� Working with WBS codes
Certain things bring order to the universe: Clocks, stop signs, and out-lines, to name just a few. Whereas clocks bring order to time and stop
signs bring order to rush hour, outlines bring order to information by impos-ing a hierarchy. An outline breaks down one idea or topic or category of infor-mation into smaller units with some logical sequence.
Project uses an outline structure to organize tasks in your project, as well astools and functionality to help you build, reorganize, and view the outlinestructure. Learning how to create an outline is something you did back inMrs. Plotkin’s fourth-grade English class, and now, showing you how to usean outline to organize the many tasks in your project is my job. Welcome toOutlining 101.
Summary Tasks and SubtasksWhen you take a look at a project outline, such as the one shown in Figure5-1, you see that it organizes tasks into levels; each level represents a phaseof your project. A task that has other tasks indented below it in this outlinestructure is a parent task, or summary task. The tasks indented below it arechild tasks, or subtasks. Summary tasks are indicated in bold in your Projectoutline. You can tell when a summary task has a family of subtasks clinging toits skirts: When a subtask is hidden, a little plus-sign symbol is displayed nextto its summary task. When you click the plus sign, the task expands to showits whole clan of subtasks.
09_036516 ch05.qxp 11/20/06 1:40 PM Page 93

You can build several of these little families of tasks to represent project phasesin your outline. Think of a project outline as a set of little wooden nesting dolls,with each successively smaller doll representing a deeper level of detail. Thehighest-level task is the outer doll, which is the biggest of the bunch. The nextdoll in the group is a little smaller, just as the next level of tasks in an outlinereflects a little narrower level of detail, and so on, right down to the littlest babydoll. The largest task in a project might be Build New Plant, and the smallestdetailed task might be Empty Dumpster, with a whole lot of tasks in between.
Project phasesAll information about a family of tasks (that is, a phase of your project) isrolled up into its highest-level summary task. Therefore, any task with sub-tasks has no timing or cost information of its own: It gets its total durationand cost from the sum of its parts.
You can, though, assign resources and costs to a summary task; for example,you might assign a project manager for an entire phase of tasks. However, asummary task also includes the total of the costs of any tasks below it.
This roll-up functionality is cumulative: The lowest-level task rolls up to itsparent, which might roll up into another summary task, which rolls up (for
Figure 5-1:A project
outline is acollection of
subtasksnestedwithin
summarytasks.
94 Part I: Setting the Stage for Project
09_036516 ch05.qxp 11/20/06 1:40 PM Page 94

example) into a project summary task. Any task with tasks below it gets itsduration and cost information from its subtasks, no matter how deeplynested it might be in the hierarchy.
The structure of phases in an outline is also useful when you need to reorga-nize an outline: When you move a summary task, all its subtasks come rightalong for the ride!
How many levels can you go?You have no real limit on how many levels of tasks you can create in an outline(except perhaps how much memory you have in your computer to accommo-date a monster schedule!). Remember, though: At some point, you have to dealwith assigning timing and resources to each of these tasks — and then tracktheir progress. Too much detail can make your project plan difficult to manage.
Also, if you find that you build in three, four, or five levels of detail through-out your plan, consider that you might really be building several projects at atime. Having too many levels suggests that a few of these project phasesmight be more manageable if you break them off and make them projects ontheir own — with their own project managers. Unless you want the mainte-nance of your Project plan to become a project in and of itself, don’t overdothe level of detail in your outline; two or three levels are usually sufficient.
The One-and-Only Project Summary TaskJust as a ship has only one captain, only one task summarizes all other tasksin each project. I strongly suggest that you create a project summary task,which represents the highest (least detailed) level of information and is oftensimply the title of the project, such as New Product Rollout or Space ShuttleLaunch. A project summary task is created when every task in the projectfalls under it in the outline and is indented to become subordinate, as shownin Figure 5-2. You can see in the figure that Implementation Requirements isthe project summary task.
When you think about it, an upper-level headline in an outline is the sum ofits parts; the headline reflects the overall topic for all the items below it. Theproject summary task takes this concept a step further: This task rolls up allthe actual data from other tasks into one line item. Thus, the project summarytask’s duration reflects the duration of the entire project. From a monetaryangle, the project summary task’s total cost reflects the total costs for theentire project. Figures like these can be handy to have at your fingertips —and that’s one value of a summary task.
95Chapter 5: Getting Your Outline in Line
09_036516 ch05.qxp 11/20/06 1:40 PM Page 95

If you’re confused about the length of your summary task, remember that thesummary task duration is the difference between the earliest task start dateand latest task end date. However, nonworking days aren’t counted in thesummary task duration. The length of the summary task, therefore, equalsthe number of days of work over the course of the subtasks, not the numberof calendar days between the start of the first task and end of the last.
Not everyone uses project summary tasks. You can simply create, at the high-est level of your outline, tasks that represent major project phases — withsubphases and subtasks below them — and not create one task that’s higherin the order than all others. However, my advice is to always have a projectsummary task, for two reasons:
� You can quickly view totals for the project at a glance in the columnsof data in Gantt Chart view and other views.
� You can place a link to your project summary task in another project sothat all data for one project is reflected in another. For example, if youcreate five schedules for new product launches in your company, you caneasily create a master schedule for all company product launches by link-ing to the project summary tasks in each of the projects. (Neat, huh?)
Figure 5-2:The highest-level task in
the outlinewith all
tasksindented
below it isthe project
summarytask.
96 Part I: Setting the Stage for Project
09_036516 ch05.qxp 11/20/06 1:40 PM Page 96

As you build your project, you can easily create a project summary task your-self (indent other tasks beneath it) or use a Project feature to generate oneautomatically at any time — even after you build all the phases of your project. To have Project automatically create a project summary task, followthese steps:
1. Choose Tools➪Options.
The Options dialog box appears.
2. Click the View tab to display it.
3. Select the Show Project Summary Task option.
4. Click OK to insert the upper-level task.
Structuring the Project’s OutlineIf you already read the first few pages of this chapter, your tantalizing glimpseof how outlines work in Project has doubtlessly left you eager to start build-ing your own, but project outlines take a little upfront thought. You have tosettle two important matters about your project before you start building alogical project outline:
� The goal: What do you want to achieve at the completion of your project?Is your goal to manage an entire space shuttle mission? Then you need asmany tasks as it takes to get from here to splashdown. If your goal is onlyto launch the space shuttle, however, your focus is narrower, and the levelof detail of certain tasks will probably be different.
� The scope: Scope is a little more specific than the goal. Do you want tobuild a new warehouse from scratch, outfit it with equipment and furni-ture, and deal with moving people into their offices by December 1 withina budget of $20 million? Or, is the scope of your project to hook up thecomputer network by November 1 within a budget of $50,000? Under-standing what your overall deliverables are helps you further definewhere to start and stop your project.
To help you to sketch the early draft of your project, Project lets you create aproposal schedule with major deliverables and no specific tasks. See Chapter6 for more about deliverables and proposals.
Look around your own office: You’ll be surprised to find that many projectsthat go off track never had a clear goal. In fact, entering project data into project management software is a waste of time if you don’t know what yourmission is. Go ahead: Ask three people working on the same project in your
97Chapter 5: Getting Your Outline in Line
09_036516 ch05.qxp 11/20/06 1:40 PM Page 97
company to state the goal of the project. I would bet the farm that you getthree different answers. For an IT project, for example, the IT director mighttell you the goal is to reduce tech support calls, the project manager mightsay the goal is to upgrade all server software to the latest version, and thetechnician might specify that the goal is to get all the software installed bynext Thursday. (Sound familiar?)
To define a goal and scope for your project, answer these questions:
� For a goal:
• What will be different when the project is complete?
• What will the project achieve? Will a building be built, a workforcetrained, or a space shuttle launched?
� For the scope:
• What will the project cost?
• How many people will be involved?
• Whom does the project affect: A workgroup, division, company, orclients?
• What deadlines does the project have?
Everything but the kitchen sink: What to includeAfter you have a clear picture of your project goal and the scope of the workto be done, you can begin to think about what your outline should contain.For example, here’s the first of three approaches to an outline of tasks forplanning a company party:
I. Send invitations
II. Reserve Conference Room B
III. Order food
Perhaps a little more detail would be helpful:
I. Company Christmas party
A. Invitations
1. Design invitations
2. Mail invitations
98 Part I: Setting the Stage for Project
09_036516 ch05.qxp 11/20/06 1:40 PM Page 98

B. Location
1. Reserve Conference Room B
2. Order extra chairs
3. Decorate space
C. Food
1. Hire caterer
2. Clean up
Or, you can take a really detailed approach:
I. Company events
A. Company Christmas party
1. Planning
a. Set party date
b. Invitations
1) Design
2) Send out
c. Budget
1) Research costs
2) Create budget
3) Obtain budget approval
2. Location and furniture
a. Location
1) Reserve Conference Room B
2) Arrange for carpet cleaning
3) Pick decoration theme
4) Decorate space
b. Furniture
1) Order extra chairs
2) Arrange for serving table
3. Food
a. Research caterers
b. Set food budget
99Chapter 5: Getting Your Outline in Line
09_036516 ch05.qxp 11/20/06 1:40 PM Page 99
c. Hire caterer
d. Provide kitchen access to caterers
e. Assign clean-up committee
f. Clean up
B. Halloween party
1. And so on . . .
Which one of these outlines is best for this project? That depends on howcomplex these arrangements are — and on how narrowly you define the project. Are you planning the entire year of company events or only oneparty? How many people will perform the tasks and over what period oftime? Will one person research, budget, and hire the caterers in a singlehour? If so, a single task — Hire Caterer — might be enough. Will one person do the research, another set the budget, and another hire the caterer — andmight these tasks be separated by days (or even weeks)? If so, having severaltasks might be the way to go.
If one task must happen before another can start, you might have to breakdown the tasks to reflect the causality between certain events. For example,if you can’t begin a new manufacturing process before people are trained, it’sprobably not prudent to lump training and the implementation of the newprocess into a single task.
Too little detail might let some tasks slip through the cracks, while too muchdetail might cause your project team to be inefficient, spending more timereporting progress and breaking down activities than doing the work. Here’sthe bottom line: When you understand the scope of your project and the rela-tionship of each task as you create your project outline, you’re likely to buildin the right level of detail.
Building the outlinePeople approach building a project outline in different ways. Some create allthe tasks they can think of in random order and then promote and demotetasks to different levels and move them around to appear in the correct order.Other people create upper-level tasks first and then go back and fill in detailsbelow each task. Still other people work one phase at a time, by creating oneupper-level task and filling in every possible task underneath it. Then they goon to the next phase and create every task under that, and so on.
The approach that you use depends to some extent on how you think. Somepeople think chronologically, and others group like information. You eventually
100 Part I: Setting the Stage for Project
09_036516 ch05.qxp 11/20/06 1:40 PM Page 100

have to deal with all levels of structure in your final outline, but which levelyou tackle first is up to you.
Moving Tasks All around Your OutlineYou discover how to create tasks in Chapter 4. In this section, you move thosetasks around to create the outline structure. If you use any word processingoutlining feature, this stuff is pretty easy. If this is new turf for you, it’s still easy!
The outdent-and-indent shuffleOutdenting and indenting are the functions that you use to move tasks tohigher or lower levels of detail in your outline. In some software programs,these terms are promoting and demoting, respectively.
� Outdenting a task moves it up a level in the outline (literally shifting itto the left in the outline). When outdented, a task is moved to a higherlevel of detail; in other words, it’s less detailed.
� Indenting a task moves it down a level in the outline (literally indentingthe task to the right in the outline) and puts it at a deeper level of detail.
You use tools on the Formatting toolbar (shown in Figure 5-3) to outdent andindent tasks in a project outline. The Outdent tool is a left-facing arrow; theIndent tool is a right-facing arrow.
You can outdent and indent tasks from any view, even Network Diagram view.However, seeing the effect in Network Diagram view is tricky, and I recommendusing Gantt Chart view when manipulating tasks in an outline structure.
If you use an outlining feature in other software, you might be tempted topress Tab to indent a task in an outline and Shift+Tab to outdent a task. InProject, though, don’t. It doesn’t cause disaster, but it doesn’t do you muchgood either. It only moves your cursor from one column to the other in acolumnar view (like Gantt Chart view). And in Network Diagram view, itmoves the cursor from field to field in a single task box.
To outdent or indent a task, follow these steps:
1. Click a task in a columnar view to select it.
2. Click the Outdent or Indent button according to what action you wantto take.
101Chapter 5: Getting Your Outline in Line
09_036516 ch05.qxp 11/20/06 1:40 PM Page 101

Moving tasks up and downA maxim of project management says that things change: Tasks that youthought you could do early on can’t happen yet because the people, materi-als, or money are in short supply. Or, a task that you thought you couldn’tstart until next July gets bumped up in priority when your customer changeshis mind (again) about deliverables. Because of this changeability, when youenter tasks in a project outline, odds are that you’ll need to move those tasksaround at some point. You can move subtasks to other phases of the outlineby simply clicking and dragging them.
You should understand that moving a task can change its outline level. A taskretains its level in the outline only when you move the task to follow a task atthe same level. (Okay, there’s an exception, which I get to in a minute.) Com-paratively, if you move a lower-level task to a section of tasks at a higher level —for example, move a third-level task to a section of second-level tasks — themoved task takes on the level of the task preceding it. And the converse istrue when you move a higher-level task to follow a lower-level task.
Outdent and Indent tools
Figure 5-3:Click these
tools tomove a task
in or out inthe outline.
102 Part I: Setting the Stage for Project
09_036516 ch05.qxp 11/20/06 1:40 PM Page 102

The exception I hinted at happens when you move a lower-level task to followa summary task. For example, a second-level task that you move to immedi-ately follow a summary task stays at the second level rather than take on thesummary task level of the task that now precedes it because there’s only onesummary task.
Using the click-and-drag methodIf you ask me, click-and-drag is to computing what the remote control is totelevision. It’s a quick, no-brainer method of moving stuff around in softwarethat just makes life simpler. Here’s an example: The quickest way to move atask in an outline is to use the click-and-drag method.
To move a task up and down with the click-and-drag method, follow these steps:
1. Display a columnar view, such as Gantt Chart view.
2. Select a task by clicking its task ID number.
3. Drag the task to where you want it to appear in the outline.
A gray line appears, indicating the new task position, as shown in Figure 5-4.
Gray line
Figure 5-4:This gray
line showsyou where
the task willappear if
you releasethe mouse
button.
103Chapter 5: Getting Your Outline in Line
09_036516 ch05.qxp 11/20/06 1:40 PM Page 103

4. When the gray line is located where you want to insert the task,release the mouse button.
The task appears in its new location. If you want the task to be at a dif-ferent level of the outline, you can now indent or outdent it as needed.
To move more than one task at a time, click and drag to select multiple taskIDs, and then drag them en masse to a new location. You can also use thestandard Shift+click and Ctrl+click selection methods to select multiple tasksin a Project outline. Use Shift+click to select contiguous tasks, and useCtrl+click to select discrete tasks.
Using the cut-and-paste (or copy-and-paste) methodClicking and dragging works fine in most cases, but in very large projects —with a few hundred or more tasks, for example — this method can be like drag-ging a peanut to Tibet: It’s not the process; it’s the distance you have to travel.
In a larger outline, simply use the cut-and-paste method to move tasks:
1. Select a task by clicking its task ID number.
2. Click the Cut Task tool on the Standard toolbar.
The task is removed from its current location and placed on theWindows Clipboard.
3. Scroll to display the location where you want the task to appear.
4. Click the task after which you want to insert the task.
5. Click the Paste tool.
If you want to insert a copy of a task in a project outline, you can follow thepreceding steps and click Copy Task rather than Cut Task.
If you’re cutting and copying only a single cell and not a whole task, click inthe cell — the toolbar buttons will be named Cut Cell and Copy Cell instead.
Now You See It, Now You Don’t:Collapsing and Expanding Tasks
Since caveman days (or whenever the first fourth-grade teacher taught thefirst set of kids how to outline their book reports), outlines have allowed youto focus on different levels of detail. Outlines do this on paper by essentiallyordering information so that you can more easily focus on the level of infor-mation you need and ignore the rest.
104 Part I: Setting the Stage for Project
09_036516 ch05.qxp 11/20/06 1:40 PM Page 104

With the invention of computer outlining, the capability to focus on only cer-tain portions of an outline comes into its own because you can easily openand close an outline to show or hide different levels of information — or entiresections of your outline. The minus symbol next to the “Analysis” summarytask shown in Figure 5-5 indicates that all subtasks below it are displayed.
This capability means that you can hide all but the upper level of tasks in aproject to give your manager an overview of progress. Or, you can closeevery phase of your project except the one in progress, so your team canfocus on just those tasks in a status meeting. Or, you can close most of youroutline so that jumping to a late phase of a very large schedule doesn’tinvolve more scroll work than a Baroque fireplace.
A summary task with all tasks displayed has a minus sign to its left. A sum-mary task with hidden subtasks sports a plus sign to its left. All summarytasks are indicated in bold in the project outline. When a summary task has aminus sign next to it, you can select the summary task and do one of threethings:
� Click the minus sign to hide all subtasks.
� Click the Hide Subtasks button on the Formatting toolbar to hide all sub-tasks below the selected summary.
Figure 5-5:This project
outlineshows you
details ofjust one
phase of theproject.
105Chapter 5: Getting Your Outline in Line
09_036516 ch05.qxp 11/20/06 1:40 PM Page 105
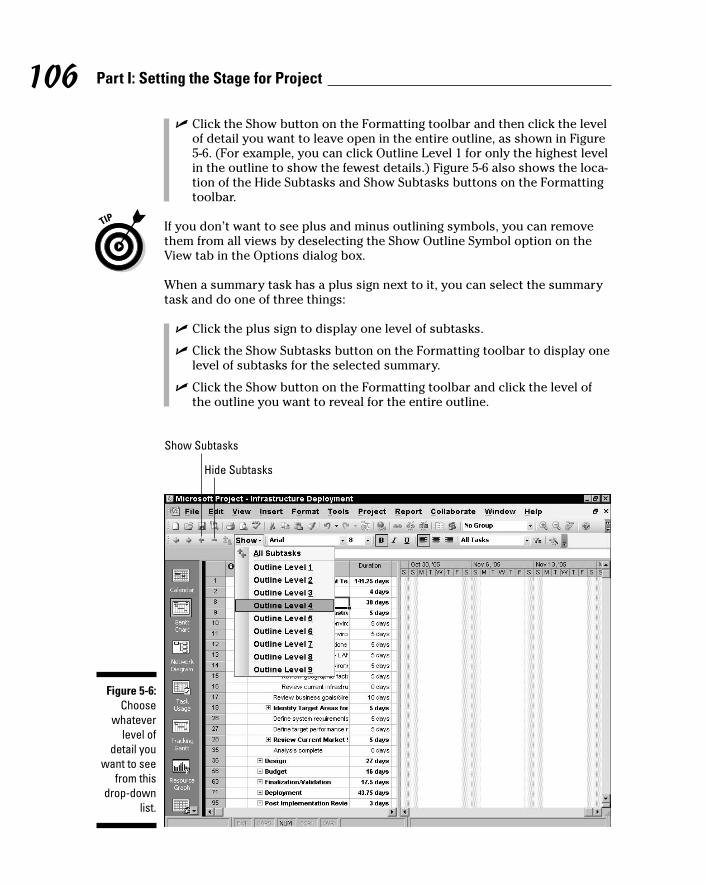
� Click the Show button on the Formatting toolbar and then click the levelof detail you want to leave open in the entire outline, as shown in Figure5-6. (For example, you can click Outline Level 1 for only the highest levelin the outline to show the fewest details.) Figure 5-6 also shows the loca-tion of the Hide Subtasks and Show Subtasks buttons on the Formattingtoolbar.
If you don’t want to see plus and minus outlining symbols, you can removethem from all views by deselecting the Show Outline Symbol option on theView tab in the Options dialog box.
When a summary task has a plus sign next to it, you can select the summarytask and do one of three things:
� Click the plus sign to display one level of subtasks.
� Click the Show Subtasks button on the Formatting toolbar to display onelevel of subtasks for the selected summary.
� Click the Show button on the Formatting toolbar and click the level ofthe outline you want to reveal for the entire outline.
Show Subtasks
Hide Subtasks
Figure 5-6:Choose
whateverlevel of
detail youwant to see
from thisdrop-down
list.
106 Part I: Setting the Stage for Project
09_036516 ch05.qxp 11/20/06 1:40 PM Page 106
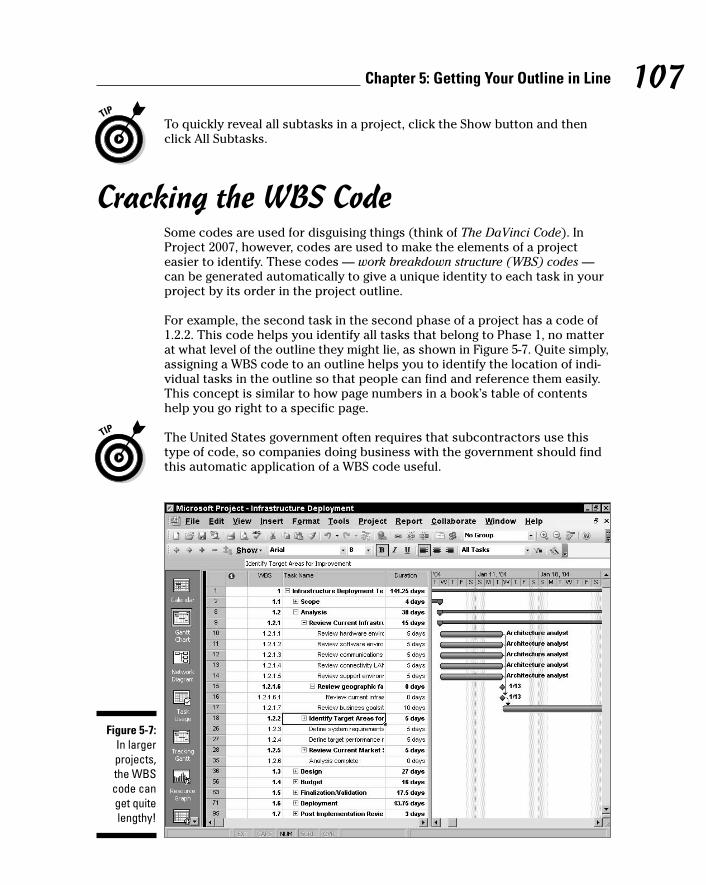
To quickly reveal all subtasks in a project, click the Show button and thenclick All Subtasks.
Cracking the WBS CodeSome codes are used for disguising things (think of The DaVinci Code). InProject 2007, however, codes are used to make the elements of a projecteasier to identify. These codes — work breakdown structure (WBS) codes —can be generated automatically to give a unique identity to each task in yourproject by its order in the project outline.
For example, the second task in the second phase of a project has a code of1.2.2. This code helps you identify all tasks that belong to Phase 1, no matterat what level of the outline they might lie, as shown in Figure 5-7. Quite simply,assigning a WBS code to an outline helps you to identify the location of indi-vidual tasks in the outline so that people can find and reference them easily.This concept is similar to how page numbers in a book’s table of contentshelp you go right to a specific page.
The United States government often requires that subcontractors use thistype of code, so companies doing business with the government should findthis automatic application of a WBS code useful.
Figure 5-7:In largerprojects, the WBScode canget quitelengthy!
107Chapter 5: Getting Your Outline in Line
09_036516 ch05.qxp 11/20/06 1:40 PM Page 107

Standard WBS code uses numbers for each level of the code. You can alsocreate custom codes that provide a few options for how the code is defined.Read how in the upcoming section, “Customizing the code.”
If you want to visualize your WBS code, consider using Visio WBS ChartWizard. If Microsoft Visio is installed on your computer, you can use thiswizard to generate a Visio WBS chart for selected tasks — or all the tasks inyour project. You can use the settings in the wizard to generate a chart for aspecified level in the project outline, such as only level-1 tasks, or level-1 andlevel-2 tasks, and so on.
Displaying a WBS codeHere’s the good news: You don’t really have to create a WBS code per sebecause the very structure of your outline creates the code. All you have todo is display it. To do that, follow these steps:
1. Click the Gantt Chart icon on the View bar.
Gantt Chart view appears.
2. Right-click anywhere in the column headings and then choose InsertColumn.
The Column Definition dialog box appears, as shown in Figure 5-8.
You use this dialog box to set options such as column width and alignment.
3. Click the arrow for the Field Name drop-down list and then selectWBS.
Use the scroll bar, if necessary, to locate the field name.
108 Part I: Setting the Stage for Project
RBS: Kind of like WBS, but for peopleIf you use the Enterprise Global Template, youcan make use of the RBS (resource breakdownstructure) field, which is a way of rankingresources in your organization. RBS representsthe organizational structure for resources. RBS codes assigned by the project manager or enterprise administrator can help you tostreamline the process of granting permis-sions to access online data or to filter forresources at a certain level in your organization.
The Resource Substitution Wizard and PortfolioModeler also make use of RBS levels in theircalculations. You can also use the Group fea-ture to group tasks by the resource hierarchy ofassignments. After an administrator with theability to modify the Enterprise Global Templatesets the RBS field, everybody and their brother(in your enterprise) can view it. All these tasksrequire Project Server, so see Chapter 18 formore about RBS.
09_036516 ch05.qxp 11/20/06 1:40 PM Page 108
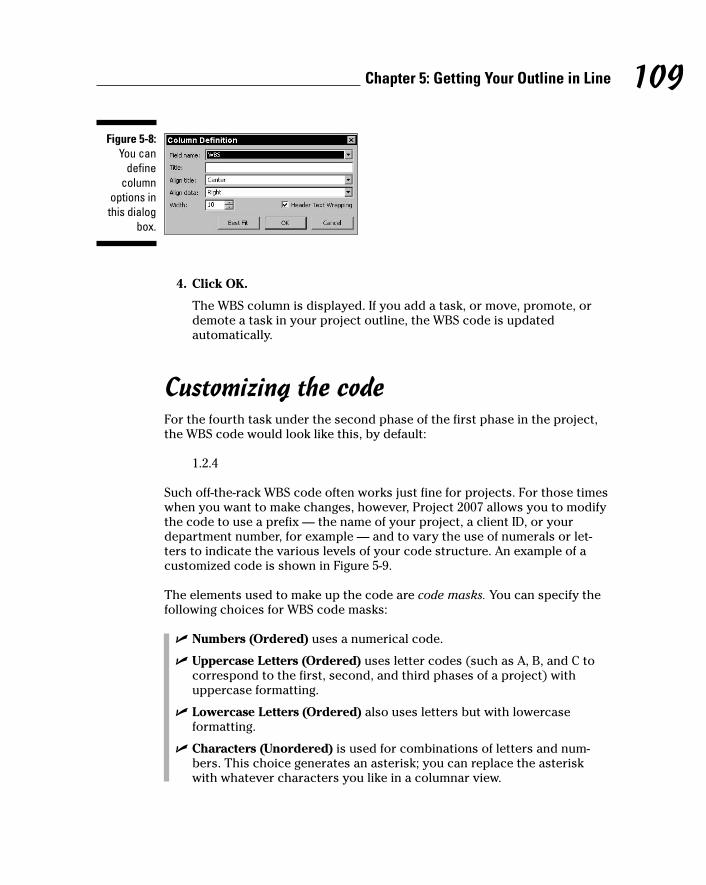
4. Click OK.
The WBS column is displayed. If you add a task, or move, promote, ordemote a task in your project outline, the WBS code is updated automatically.
Customizing the codeFor the fourth task under the second phase of the first phase in the project,the WBS code would look like this, by default:
1.2.4
Such off-the-rack WBS code often works just fine for projects. For those timeswhen you want to make changes, however, Project 2007 allows you to modifythe code to use a prefix — the name of your project, a client ID, or yourdepartment number, for example — and to vary the use of numerals or let-ters to indicate the various levels of your code structure. An example of acustomized code is shown in Figure 5-9.
The elements used to make up the code are code masks. You can specify thefollowing choices for WBS code masks:
� Numbers (Ordered) uses a numerical code.
� Uppercase Letters (Ordered) uses letter codes (such as A, B, and C tocorrespond to the first, second, and third phases of a project) withuppercase formatting.
� Lowercase Letters (Ordered) also uses letters but with lowercase formatting.
� Characters (Unordered) is used for combinations of letters and num-bers. This choice generates an asterisk; you can replace the asteriskwith whatever characters you like in a columnar view.
Figure 5-8:You can
definecolumn
options inthis dialog
box.
109Chapter 5: Getting Your Outline in Line
09_036516 ch05.qxp 11/20/06 1:40 PM Page 109
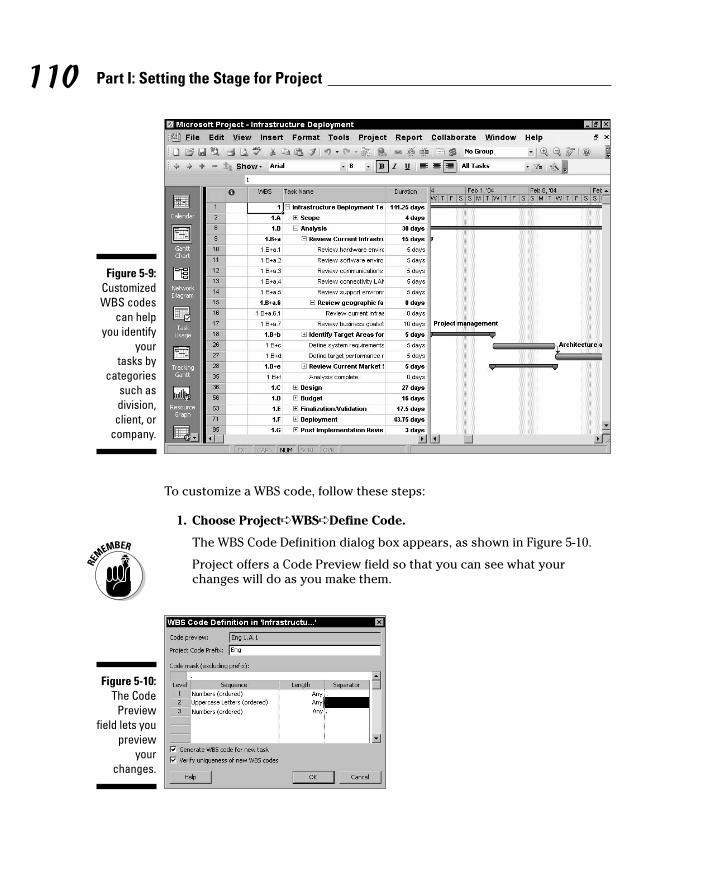
To customize a WBS code, follow these steps:
1. Choose Project➪WBS➪Define Code.
The WBS Code Definition dialog box appears, as shown in Figure 5-10.
Project offers a Code Preview field so that you can see what yourchanges will do as you make them.
Figure 5-10:The Code
Previewfield lets you
previewyour
changes.
Figure 5-9:CustomizedWBS codes
can helpyou identify
your tasks by
categoriessuch asdivision,client, or
company.
110 Part I: Setting the Stage for Project
09_036516 ch05.qxp 11/20/06 1:40 PM Page 110

2. In the Project Code Prefix box, type a prefix.
3. Click at the top of the Sequence column and then select a mask for thefirst level.
4. Click the Length column and then select a length for the masksequence that corresponds to the number of tasks you expect to haveat that level.
Each number represents a single character. If you choose 4, for example,your first task at this level is numbered 0001. If you aren’t sure, leave thedefault choice of Any, which allows for any length.
5. Click under the Separator column and then select a separator.
The choices are a period, hyphen, plus sign, or forward slash.
6. To define WBS code elements for additional levels of your outline,repeat Steps 3–5.
7. When you’re finished, click OK to save the new code.
The essential point of a WBS code is to provide a unique identifier for eachtask in your project. The WBS Code Definition dialog box offers the VerifyUniqueness of New WBS Codes option, which is active by default. If you turnoff this option, you aren’t alerted if you insert, for example, a subproject thatcontains duplicate WBS numbers.
If you don’t want Project 2007 to automatically add a custom WBS code whenyou insert new tasks, clear the Generate WBS Code for New Task option inthe WBS Code Definition dialog box. (Alternatively, choose Project➪WBS➪Define Code.) If you later want to renumber all tasks to accommodate newtasks, changes, and subprojects you’ve inserted, choose Project➪WBS➪Renumber. This technique can be useful if you want to try what-if scenariosand don’t want all your tasks to change.
111Chapter 5: Getting Your Outline in Line
09_036516 ch05.qxp 11/20/06 1:40 PM Page 111

112 Part I: Setting the Stage for Project
09_036516 ch05.qxp 11/20/06 1:40 PM Page 112
Chapter 6
Timing Is EverythingIn This Chapter� Discovering how dependency links affect timing
� Reviewing the different kinds of dependency relationships
� Allowing for lag and lead time
� Creating dependency links
� Reflecting the timing of external tasks in your project
� Examining workflow in Gantt Chart and Network Diagram views
Imagine this: If you create a hundred tasks and leave their default con-straints so that they start as soon as possible and have no dependencies,
all those tasks start on the project start date and occur simultaneously. Theproject consisting of a hundred tasks takes exactly as long to complete as thelongest task.
Wander back over here to reality for a moment. When was the last time thatevery task in your project could be performed at the same time? When didyou last have enough resources to even begin to make that feasible? Whendid you ever have a set of tasks in which not a single task had to be com-pleted before another could start? Imagine what would happen if you poureda building’s foundation before you got the building permit. Or, consider thechaos if you tried to train your employees to use a new piece of equipmentbefore the equipment even arrived.
The reality is that tasks in a project don’t all start at the same time. To reflectthat reality in a Project plan, you have to build in a timing logic. That logicconsists of setting dependency links between tasks. Dependencies are timingrelationships between tasks — for example, when one task depends on thecompletion of another. Dependencies are caused by either
� The nature of the tasks: You can’t frame a house, for example, until itsconcrete foundation is dry; otherwise, the building will sink.
� A lack of available resources: Your operations manager can’t attendtwo plant inspections simultaneously.
10_036516 ch06.qxp 11/20/06 1:40 PM Page 113
How Tasks Become CodependentIn Chapter 4, I mention that you shouldn’t set task start dates very oftenbecause projects are fluid — they change and grow faster than bad guyscome at you in the average computer game. If you build in timing logic ratherthan assign specific dates to tasks, Project can reflect changes by adjustingyour project based on that logic.
If the task of getting materials in-house is delayed by a week, for example, thedependent task of starting the manufacturing process moves out a week auto-matically. You can note the change when you’re tracking activity in your plan,and Project makes adjustments accordingly. The alternative is to go in andchange the start date of just about every task in your schedule every time atask is running late — you don’t even want to think about doing that!
Dependent tasks: Which comes first?As with human relationships, every dependency relationship involves roles:Every task is either a predecessor or a successor. Any two tasks with a timingrelationship can be a predecessor-successor pair, even if the timing of thetwo tasks overlaps or they’re set to happen concurrently.
Figure 6-1 shows you how the taskbars in Gantt Chart view graphically depictthe predecessors and successors in dependency relationships between tasks.Notice how taskbars represent the relationship when a task starts after (orduring the life of) another task. Also notice the lines drawn between tasks:These lines indicate dependency links.
Here’s some important advice about dependencies, so listen up: You can have more than one dependency link to a task, but don’t overdo it. Manypeople who are new to Project make the mistake of building every logicaltiming relationship that could exist. If things change and the dependencieshave to be deleted or changed (for example, to shorten a schedule), the webof dependencies starts to get convoluted — and can easily create a nightmare.
For example, you must complete the tasks of obtaining a permit and pouringa foundation for a building before you can start framing it. However, if you setup a dependency between obtaining the permit and pouring the foundation,setting a dependency from foundation to framing is sufficient to establish thecorrect timing. Because you can’t start pouring the foundation until you havea permit and you can’t frame until you pour the foundation, framing cannotstart before you have a permit.
114 Part I: Setting the Stage for Project
10_036516 ch06.qxp 11/20/06 1:40 PM Page 114
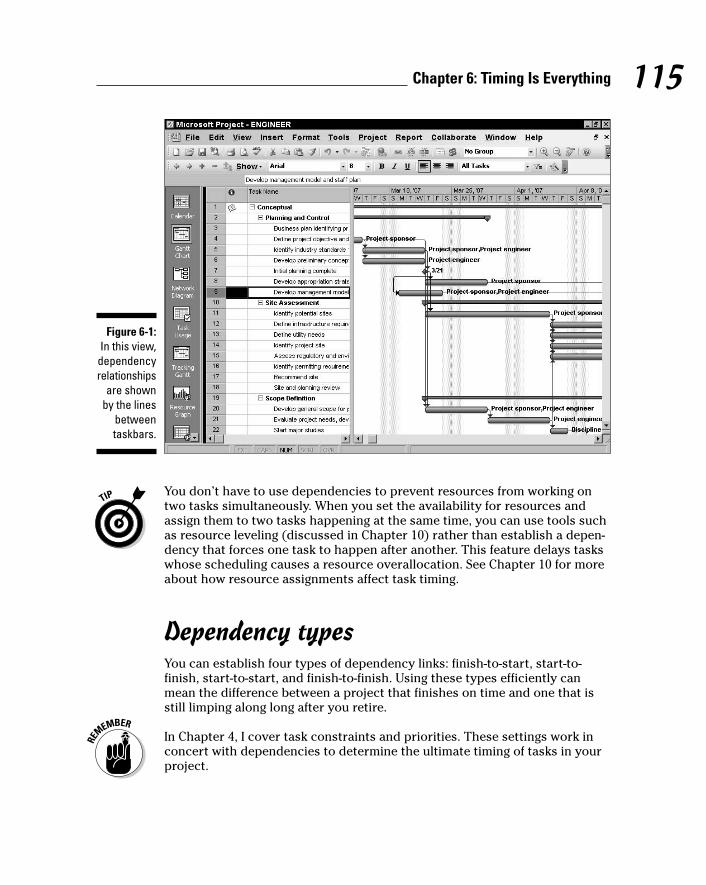
You don’t have to use dependencies to prevent resources from working ontwo tasks simultaneously. When you set the availability for resources andassign them to two tasks happening at the same time, you can use tools suchas resource leveling (discussed in Chapter 10) rather than establish a depen-dency that forces one task to happen after another. This feature delays taskswhose scheduling causes a resource overallocation. See Chapter 10 for moreabout how resource assignments affect task timing.
Dependency typesYou can establish four types of dependency links: finish-to-start, start-to-finish, start-to-start, and finish-to-finish. Using these types efficiently canmean the difference between a project that finishes on time and one that isstill limping along long after you retire.
In Chapter 4, I cover task constraints and priorities. These settings work inconcert with dependencies to determine the ultimate timing of tasks in yourproject.
Figure 6-1:In this view,dependencyrelationships
are shownby the lines
betweentaskbars.
115Chapter 6: Timing Is Everything
10_036516 ch06.qxp 11/20/06 1:40 PM Page 115
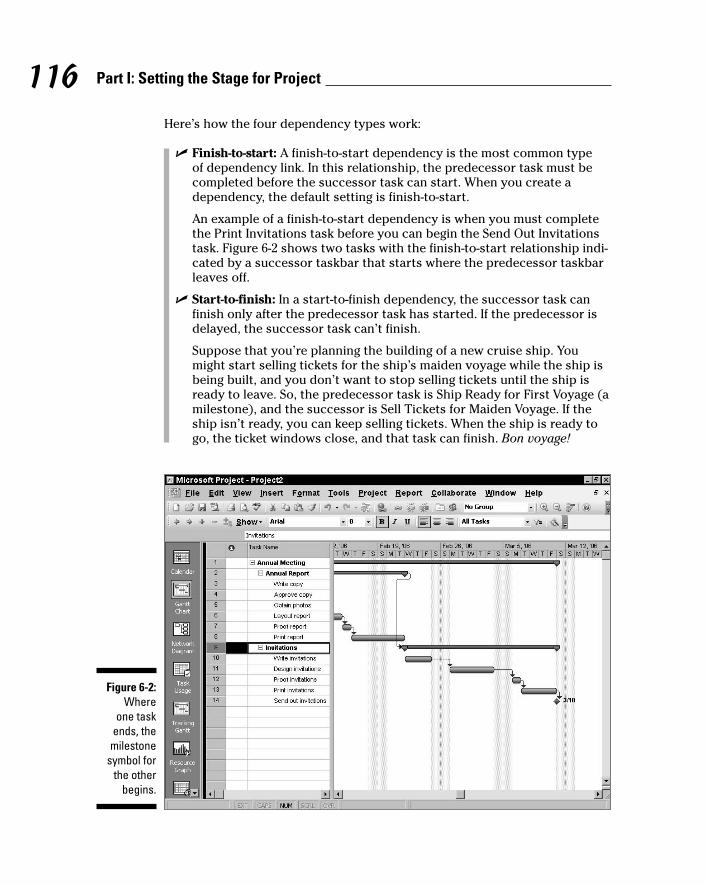
Here’s how the four dependency types work:
� Finish-to-start: A finish-to-start dependency is the most common type of dependency link. In this relationship, the predecessor task must becompleted before the successor task can start. When you create adependency, the default setting is finish-to-start.
An example of a finish-to-start dependency is when you must completethe Print Invitations task before you can begin the Send Out Invitationstask. Figure 6-2 shows two tasks with the finish-to-start relationship indi-cated by a successor taskbar that starts where the predecessor taskbarleaves off.
� Start-to-finish: In a start-to-finish dependency, the successor task canfinish only after the predecessor task has started. If the predecessor isdelayed, the successor task can’t finish.
Suppose that you’re planning the building of a new cruise ship. Youmight start selling tickets for the ship’s maiden voyage while the ship isbeing built, and you don’t want to stop selling tickets until the ship isready to leave. So, the predecessor task is Ship Ready for First Voyage (amilestone), and the successor is Sell Tickets for Maiden Voyage. If theship isn’t ready, you can keep selling tickets. When the ship is ready togo, the ticket windows close, and that task can finish. Bon voyage!
Figure 6-2:Where
one task ends, themilestone
symbol forthe other
begins.
116 Part I: Setting the Stage for Project
10_036516 ch06.qxp 11/20/06 1:40 PM Page 116

� Start-to-start: Start-to-start means what it says: Two tasks must startsimultaneously. For example, even though they are being created by different designers, you might want to ensure that you send posters and invitations for your blockbuster event to the printer at the sametime for cost efficiency.
Figure 6-3 shows the start-to-start relationship between the two tasks.
� Finish-to-finish: Finish-to-finish has nothing to do with warm relationsbetween citizens of Finland. Finish-to-finish means that (you guessed it)two tasks must finish at the same time.
Suppose that you’re preparing an annual report for your adventure-travel company. You have to obtain photographs of travel destina-tions and have the brochure copy laid out. You need both items in hand before you can forward the report to the printer. If you set a finish-to-finish dependency between these two tasks, you allow bothtasks the greatest length of time to be completed. (Why have the photos sitting around for four weeks, for example, when the copy isn’t ready?)
Figure 6-3:The start-
to-startrelationship
betweentwo tasks.
117Chapter 6: Timing Is Everything
10_036516 ch06.qxp 11/20/06 1:40 PM Page 117
Allowing for Murphy’s Law: Lag and lead timeDependencies can get a little more complex than simply applying the fourtypes of dependency links I describe in the preceding section. You can uselag time or lead time to fine-tune your timing relationships:
� Lag time occurs when you add time to the start or finish of a predeces-sor task; lag time causes a gap in timing.
� Lead time is created when you subtract time from the start or finish ofthe predecessor; lead time causes an overlap between two tasks.
Here are a couple of examples:
� You want to launch a new toy product into the market and set up a start-to-start dependency relationship between the Begin Print MediaAdvertising predecessor task and the Begin TV and Radio Advertisingsuccessor task in your project. In a simple start-to-start relationship,both tasks start at the same time. If you want the TV and radio ads tocome out a week after the print ads begin, though, you build in a week of lag time to the start-to-start relationship where Begin Print MediaAdvertising is the predecessor and Begin TV and Radio Advertising isthe successor. TV and Radio ads will now start one week after print adsbegin to appear.
� In a project to train a new set of volunteer docents to give tours of a historic mansion, suppose that you create a finish-to-start relationshipbetween the two tasks Locate Recruits and Train Recruits. However, tosave time in your project, you decide to incorporate two days of leadtime — that is, allow the training of the earliest hires to start before allthe recruits are hired. In that case, you essentially deduct time from thefinish-to-start relationship that allows you to start training two daysbefore the finish of the Locate Recruits predecessor.
Making the Dependency ConnectionMaking dependency relationships is simple. You simply create a dependency,make settings to select the dependency type, and build in any lag or leadtime. The tricky part comes in understanding how each type of dependencyaffects your plan when your project goes live and you start to record actualactivity that resources perform on tasks.
118 Part I: Setting the Stage for Project
10_036516 ch06.qxp 11/20/06 1:40 PM Page 118

Adding the missing (dependency) linkWhen you create a dependency, by default, it’s a finish-to-start relationship:One task must finish before another can start. If that’s just the kind of depen-dency you want, that’s all there is to it. If not, after you create this link, youcan edit it to change the dependency type or to build in lag or lead time.
To establish a simple finish-to-start link, follow these steps:
1. Display Gantt Chart view and make sure that the two tasks you wantto link are visible.
You might have to collapse some tasks in your project or use the Zoomcommand on the View menu to fit more tasks on your screen.
2. Click the predecessor taskbar and drag your mouse pointer to the successor taskbar.
As you drag, a box appears, as shown in Figure 6-4, and your cursorchanges to the shape of a little chain link.
3. When the readout indicates the task number you want to link to,release your mouse button.
Figure 6-4:This box lets
you knowwhen your
cursor isresting over
the task towhich you
want to link.
119Chapter 6: Timing Is Everything
10_036516 ch06.qxp 11/20/06 1:40 PM Page 119
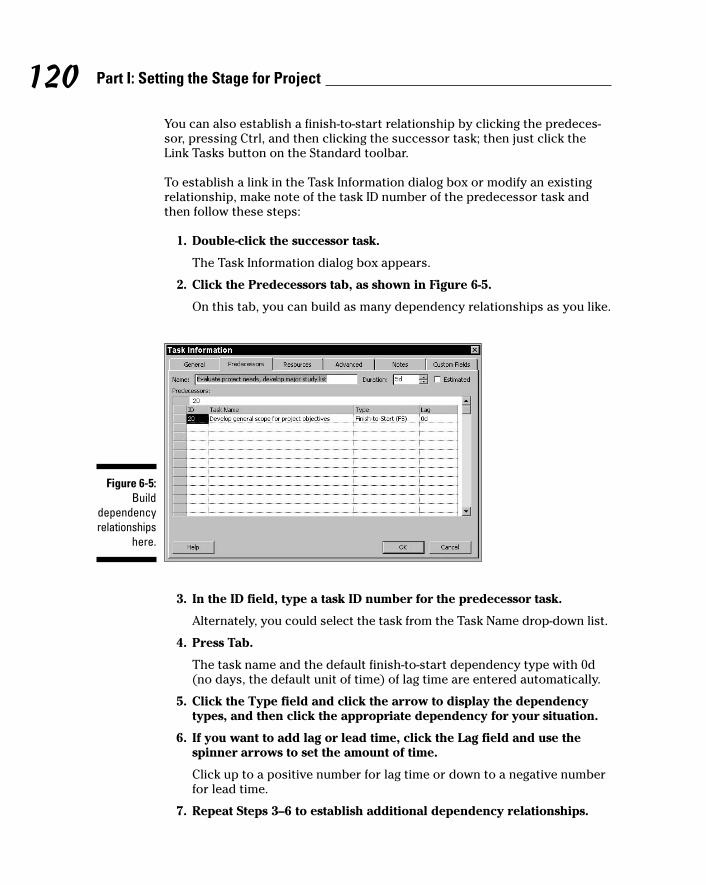
You can also establish a finish-to-start relationship by clicking the predeces-sor, pressing Ctrl, and then clicking the successor task; then just click theLink Tasks button on the Standard toolbar.
To establish a link in the Task Information dialog box or modify an existingrelationship, make note of the task ID number of the predecessor task andthen follow these steps:
1. Double-click the successor task.
The Task Information dialog box appears.
2. Click the Predecessors tab, as shown in Figure 6-5.
On this tab, you can build as many dependency relationships as you like.
3. In the ID field, type a task ID number for the predecessor task.
Alternately, you could select the task from the Task Name drop-down list.
4. Press Tab.
The task name and the default finish-to-start dependency type with 0d(no days, the default unit of time) of lag time are entered automatically.
5. Click the Type field and click the arrow to display the dependencytypes, and then click the appropriate dependency for your situation.
6. If you want to add lag or lead time, click the Lag field and use thespinner arrows to set the amount of time.
Click up to a positive number for lag time or down to a negative numberfor lead time.
7. Repeat Steps 3–6 to establish additional dependency relationships.
Figure 6-5:Build
dependencyrelationships
here.
120 Part I: Setting the Stage for Project
10_036516 ch06.qxp 11/20/06 1:40 PM Page 120

8. When you’re finished, click OK to save the dependencies.
The Gantt chart displays your dependencies with lines and arrows, asshown in the project displayed in Figure 6-6.
Most dependency links are between tasks that are reasonably close to eachother in the Project outline. However, if you have to link tasks that don’t fit on a single screen of information, the click-and-drag method can be tricky. In that case, use the successor Task Information dialog box to create the relationship by entering the predecessor task ID number or name.
Extending your reach with external dependenciesNo person is an island — and no project exists in isolation. Many times,another project you’re managing or another project going on somewhere else in your organization affects your project. Perhaps resources or facilitiesare shared, or perhaps the timing of tasks in other projects affects the timingof tasks in yours. For example, if your project is to plan the opening of a newstore, you might have to create a dependency from your Begin Move-In taskto the Final Building Inspection Complete task in someone else’s constructionproject.
Figure 6-6:The more
complex theproject and
its timingrelation-
ships, themore lines
you see.
121Chapter 6: Timing Is Everything
10_036516 ch06.qxp 11/20/06 1:40 PM Page 121

To deal with this balancing act, you can create a hyperlinked task that repre-sents the timing of the other project (or of a particular task in it). Enter astart date and duration for the task in your project. You can then createdependencies between that task and other tasks in your project to reflect theexternal timing. Use the hyperlink to jump quickly to the other project when-ever you want to update your timing information. (See Chapter 4 for informa-tion about hyperlinking tasks and entering the start date and duration.)
You can also insert an entire project and add a link to it so that updates tothe other file are reflected in your plan automatically.
Understanding that things change:Deleting dependenciesJust like the latest trend in fashion, dependencies in a project can suddenlychange. For example, sometimes they’re no longer needed because of a shiftin resources or overall project timing. When you need to get rid of a depen-dency, you can undo what you did in either the Gantt Chart or the TaskInformation dialog box.
With Gantt Chart view displayed, follow these steps:
1. Select the two tasks whose dependency you want to delete.
• For two adjacent tasks: Click and drag to select their ID numbers.
• For nonadjacent tasks: Click one task, press and hold the Ctrl key,and then click a nonadjacent task.
2. Click the Unlink Tasks button on the Standard toolbar.
122 Part I: Setting the Stage for Project
When linked dependencies don’t do a thingIf you want to set up important project dates andset up dependencies among them but you don’twant those dates to cause any delay in your pro-ject (as a linked task might do), try deliverables.New to Project 12, deliverables are importantdates in your project that you can use to build a proposal for your project before you evenbegin to add tasks. You can publish deliverables
and report on them. They offer an alternativeway to audit changes among several projects.Deliverables, which are essentially a WindowsSharePoint Server list accessed through ProjectWeb Access, provide a tool that you can use tocontrol the effect of dependencies on yourschedule. See Chapters 18 and 19 for moreabout Project Web Access.
10_036516 ch06.qxp 11/20/06 1:40 PM Page 122
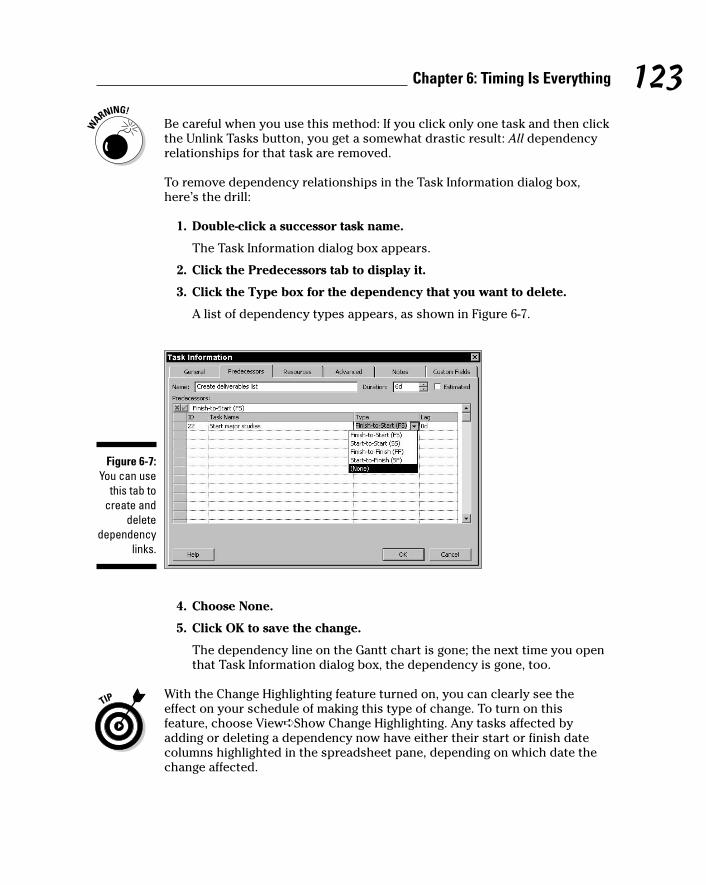
Be careful when you use this method: If you click only one task and then clickthe Unlink Tasks button, you get a somewhat drastic result: All dependencyrelationships for that task are removed.
To remove dependency relationships in the Task Information dialog box,here’s the drill:
1. Double-click a successor task name.
The Task Information dialog box appears.
2. Click the Predecessors tab to display it.
3. Click the Type box for the dependency that you want to delete.
A list of dependency types appears, as shown in Figure 6-7.
4. Choose None.
5. Click OK to save the change.
The dependency line on the Gantt chart is gone; the next time you openthat Task Information dialog box, the dependency is gone, too.
With the Change Highlighting feature turned on, you can clearly see the effect on your schedule of making this type of change. To turn on this feature, choose View➪Show Change Highlighting. Any tasks affected byadding or deleting a dependency now have either their start or finish datecolumns highlighted in the spreadsheet pane, depending on which date thechange affected.
Figure 6-7:You can use
this tab tocreate and
deletedependency
links.
123Chapter 6: Timing Is Everything
10_036516 ch06.qxp 11/20/06 1:40 PM Page 123

Just Look at All These Task Dependencies!
Project provides several ways to view dependencies in your project. Themethod you choose probably relates to how you visualize data, so there’s no absolute right or wrong way here!
You might have already seen the dependency link lines that appear in theGantt chart (refer to Figure 6-6). Another great way to see the flow of depen-dencies is in Network Diagram view. This workflow view uses similar linesand arrows to reveal dependency relationships, but it allows you to get a dif-ferent perspective on them.
You can display the Task Drivers pane (choose Project➪Task Drivers) to seea list of everything in the schedule that’s driving the timing of a selected task.For more about the Task Drivers feature, see Chapter 10.
Figure 6-8 shows the Network Diagram view of an engineering project. Noticethat each task has a node containing its vital statistics. Between the nodesare lines revealing dependency relationships among tasks. Although youcan’t see the effect in this black-and-white image, any task dependency linkson the critical path are displayed in red by default, and noncritical tasks aredisplayed in blue. (Critical-path tasks have no slack: They can’t be delayedwithout delaying the entire project.)
A neat trick in Network Diagram view is to edit the layout to show link labels.(Right-click outside any task nodes, choose Layout, and then select the ShowLink Labels check box.) A code, such as FS for finish-to-start, is displayed toexplain the type of dependency that each dependency line represents, asshown in Figure 6-8.
You can also display columns that itemize, by task ID number, successors orpredecessors for each task in any view with a sheet area, such as Gantt Chartview. Figure 6-9 shows Gantt Chart view for the same engineering project withsuccessor and predecessor columns displayed. These columns also display anotation of any type of dependency other than the default finish-to-start typeand any lead or lag time using percentages or lengths of time. For example,71SS+50% is a start-to-start link to task 71, with lag time set so that the suc-cessor begins halfway through the predecessor task. Similarly, 71SS+2 days isa start-to-start link to task 71, with lag time set so that the successor beginstwo days after the predecessor task starts.
Note that you can also edit the contents of Network Diagram nodes to includepredecessor and successor data.
124 Part I: Setting the Stage for Project
10_036516 ch06.qxp 11/20/06 1:40 PM Page 124

Figure 6-9:Of course,
you have toknow whichtask number
is whichbefore you
can use theinformation
in thesecolumns!
Figure 6-8:Following
the flow ofdependencylines is a bit
easier inNetworkDiagram
view.
125Chapter 6: Timing Is Everything
10_036516 ch06.qxp 11/20/06 1:40 PM Page 125

126 Part I: Setting the Stage for Project
10_036516 ch06.qxp 11/20/06 1:40 PM Page 126
Part IIPeople Who Need People
11_036516 pt02.qxp 11/20/06 1:41 PM Page 127
In this part . . .
Here’s where you get to know Project resources —human and otherwise — and how to orchestrate
people, material and other costs most effectively to dis-patch your project’s tasks. This part also shows you howresources relate to project costs, and how to makeresource assignments most effectively.
11_036516 pt02.qxp 11/20/06 1:41 PM Page 128

Chapter 7
Using Your Natural ResourcesIn This Chapter� Understanding work and material resources
� Creating resources to get your project done
� Using resource groups and shared resources
� Dealing with resource calendar settings
Projects are like giant water coolers — they’re gathering places forpeople. Projects also utilize equipment and materials. Those people,
equipment, and materials are your project resources.
Unlike water coolers (you can take an analogy only so far), resources are also the means by which Project tallies up costs in your plan. Assign aresource to work for ten hours on a task, give that resource an hourly rate of $20, and you’ve just added a $200 cost to your project. Create a resourcecalled cement, give it a unit cost of $200, and assign ten units (for example,ten tons of cement), and you’ve added a whopping $2,000 to the bottom line.
Using resources wisely in Project doesn’t involve only assigning them a cost.Rather, it’s a delicate art of combining the right resource with the right skillsand assigning that resource to put in the right amount of time (or units) fortasks. And you have to do this all without overbooking anyone at any point inyour schedule.
Because they affect timing and costs, resources are a big deal in Project. For that reason, many tools are available to help you create resources, makesettings for how and when they’ll work, assign them to tasks, manage costs,and manipulate their workload. The first step in working with resources is to create them and enter certain information about them. That’s what thischapter is all about.
12_036516 ch07.qxp 11/20/06 1:41 PM Page 129
Resources: People, Places, and ThingsMany people hear the word resources and think of people. Well, people areindeed a frequently used project resource, but they’re not the whole story.Resources can also be equipment that you rent or buy as well as materials,such as paper clips or scrap iron. You can even create resources that repre-sent facilities you have to rent by the hour, such as a laboratory or a meetingspace. For example, you could create a resource named Plant Visit and assignit a unit cost of $400, which covers the average cost for a trip to your plant,including airfare, hotel, and rental car.
Here are some typical and not-so-typical project resources:
� Engineers
� Trade show booth
� Office supplies
� Hotel ballroom
� Administrative assistants
� Rocket fuel
� Speaker fees
� Furniture
� Computer software
� Printing services
� Graphic designers
� Prototype design
You get the picture. Resources can be practically anything or anyone that youuse to complete your project.
Becoming Resource-fullAfter you create and organize the tasks in your project, the next typical step isto create resources. You can also borrow resources that have been created byothers and assign them to your project. Before you start creating resourceswilly-nilly, though, you must understand how they affect your project.
130 Part II: People Who Need People
12_036516 ch07.qxp 11/20/06 1:41 PM Page 130

Understanding resourcesThe key to understanding resources is to realize that resources in Projectequal costs. If you want to account for costs in your project — such as aperson putting in hours working on a task, computers that you have to buy,or monthly rent — you must create resources and assign them to one ormore tasks. When you do, you can see the resulting costs in the Total Costcolumn of the Gantt Chart spreadsheet, as shown in Figure 7-1.
One other way to add costs to a project is to use a fixed cost. Fixed costs arenot assigned through resources because they don’t accumulate costs byhours of work or units used. Instead, a fixed cost is a set cost applied directlyto individual tasks. (For more on fixed costs, see Chapter 8.)
If a cost is not task-specific — such as a flat $10,000 consulting fee to a firmthat’s advising you on an overall project — you can create and assign aresource or fixed cost to the summary task for the entire project.
Figure 7-1:Tasks with
assignedresourcesshow the
associatedtotal costsin the Total
Costcolumn.
131Chapter 7: Using Your Natural Resources
12_036516 ch07.qxp 11/20/06 1:41 PM Page 131
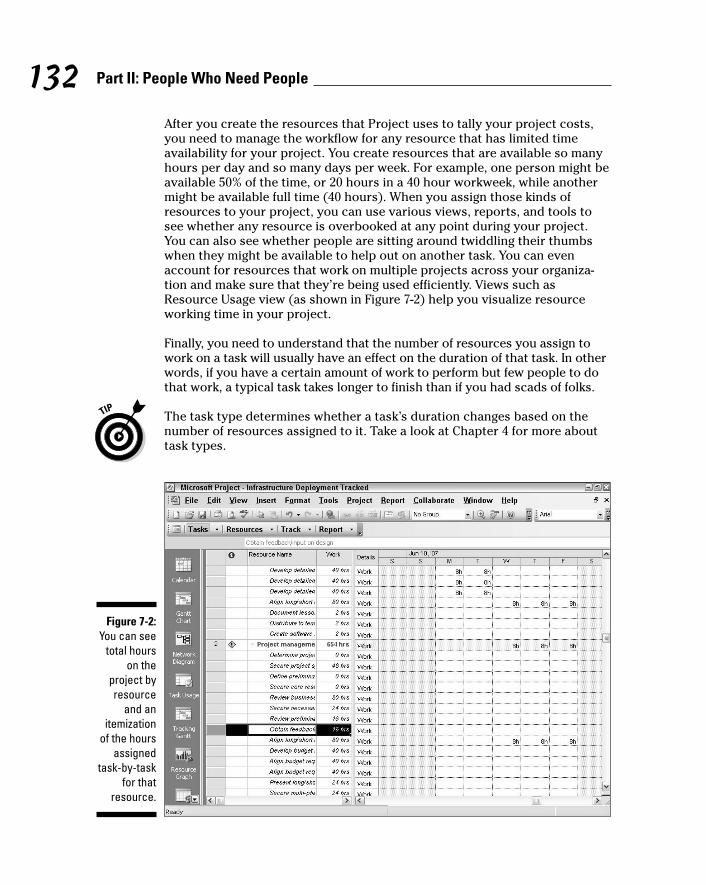
After you create the resources that Project uses to tally your project costs,you need to manage the workflow for any resource that has limited timeavailability for your project. You create resources that are available so manyhours per day and so many days per week. For example, one person might beavailable 50% of the time, or 20 hours in a 40 hour workweek, while anothermight be available full time (40 hours). When you assign those kinds ofresources to your project, you can use various views, reports, and tools tosee whether any resource is overbooked at any point during your project.You can also see whether people are sitting around twiddling their thumbswhen they might be available to help out on another task. You can evenaccount for resources that work on multiple projects across your organiza-tion and make sure that they’re being used efficiently. Views such asResource Usage view (as shown in Figure 7-2) help you visualize resourceworking time in your project.
Finally, you need to understand that the number of resources you assign towork on a task will usually have an effect on the duration of that task. In otherwords, if you have a certain amount of work to perform but few people to dothat work, a typical task takes longer to finish than if you had scads of folks.
The task type determines whether a task’s duration changes based on thenumber of resources assigned to it. Take a look at Chapter 4 for more abouttask types.
Figure 7-2:You can see
total hourson the
project byresource
and anitemization
of the hoursassigned
task-by-taskfor that
resource.
132 Part II: People Who Need People
12_036516 ch07.qxp 11/20/06 1:41 PM Page 132
Resource types: Work, material, and costAlthough people and things come in all shapes and sizes, only three types ofresources exist as far as Project is concerned: work resources, materialresources, and cost resources:
� Work resources are typically (but not always) people. They can’t bedepleted but can be reassigned. Their costs are associated with theamount of work time they put in, usually at an hourly rate. Workresources are assigned to tasks based on a Working Time calendar (asshown in Figure 7-3), where you specify their working and nonworkinghours. You can select one of three base calendars and then modify spe-cific working hours.
� Material resources can have an hourly rate or a unit cost, and they alsohave an unlimited working time. This type of resource has no calendar,and you make no settings for working and nonworking time.
� Cost resources have a set cost associated with them. Calendars andunits of work or unit costs have nothing to do with the amount suchresources deduct from the bottom line of your project.
A typical work resource is a person working eight hours a day at a standardrate of $20 per hour and an overtime rate of $30 per hour. Another example ofa work resource is a meeting facility available only eight hours a day at anhourly rate. Even though it’s not a person, the meeting facility would proba-bly be created as a working resource because it has limited “working” hours.
The three kinds of calendars are Project, Task, and Resource. Calendars, theirsettings, and how those settings interact are discussed at some length inChapter 3.
A typical material resource is any material — such as steel, rubber, paper orbooks, chairs, and shoes — assigned to a task with an associated unit cost.
133Chapter 7: Using Your Natural Resources
Enterprise or local?If your organization has you choose resourcesfrom an organization-wide group, you canassign enterprise resources to your project. Toassign resources created for your enterprise inProject Server, you use the Build Team fromEnterprise command, located on the Toolsmenu; this command is available to you only ifyou are nicely set up on a network with Project
Server in place. (See Chapter 18 for more aboutProject Server.)
To set up so-called local or non-enterprise re-sources, you simply create your own resourcelist in your projects; these resources are notavailable to other project managers.
12_036516 ch07.qxp 11/20/06 1:41 PM Page 133

For example, a resource called Books with a unit price of $12.95, assigned to atask called Computer Training at ten units, accrues a cost of $129.50 to thetask. Another example of a material cost is anyone performing a service for afee where working time is not an issue. A speaker who presents at a confer-ence for a fee of $1,000 but whose working calendar and time are not yourconcerns might be created as a material resource with a unit cost of $1,000.
An example of a cost resource is a consultant working for a set fee. The costmight be $2,500, for example, and would not change based on the length ofthe project, nor is it based on a volume of units used.
How resources affect task timingFor a fixed-unit or fixed-work task type, the addition or removal of resourcesassigned to the task has an impact on the time it takes to complete the task.In essence, the old saying that “two heads are better than one” might be mod-ified to “two heads are faster than one.”
Here’s an example: Suppose that one person is assigned to the Dig Ditch task, which should take four hours of effort. Two people assigned to the Dig Ditch task will finish the job in two hours because two hours are beingworked by each resource simultaneously, which achieves four hours of effortin half the time.
Figure 7-3:Work
resourcesare
assigned totasks based
on aWorking
Timecalendar.
134 Part II: People Who Need People
12_036516 ch07.qxp 11/20/06 1:41 PM Page 134
One BIG word of warning here: Assigning additional people to tasks doesn’talways cut work time down proportionately even though that’s how Projectcalculates it. When you have more people, you have more meetings, memos,duplicated effort, conflicts, and so on. If you add more resources to a task,you might consider upping the amount of effort required to complete thattask to account for inevitable workgroup inefficiencies.
Estimating resource requirementsYou usually know how many material resources it takes to complete a task: Inmost cases, you can calculate the number of pounds, tons, yards, and so onwith a standard formula. But how do you know how much effort it will takeon the part of work resources to complete the tasks in your project?
As with many aspects of information you put into a Project plan, this judg-ment rests to a great degree on your own experience with similar tasks andresources. Still, remember these guidelines:
� Skill counts. A less skilled or experienced resource is likely to take moretime to finish something.
� History repeats itself. Look at previous projects and tasks. If you’vetracked people’s time, you can probably see how much effort wasrequired to complete various types of tasks on other projects and drawparallels to your project.
� Ask and you shall receive. Ask the resources themselves how long theythink it will take. Then add 10 percent to that time to cover yourself!
Committed versus proposed resourcesIf you’ve ever asked somebody to work on your project and gotten a half-hearted, “Well, maybe, if I have time, if my manager says it’s okay, if it falls ona Leap Year . . .” in response, you may well ask: So is that resource availableor not? It’s not always easy to tell. How can Project help? One feature thatwas new in Project 2003 is the capability to designate a resource as eitherproposed or committed. You can use the Booking Type field in the ResourceInformation dialog box to make this setting.
What does this setting do? Well, if you’re not quite sure about a resource’scommitment to your project, you call that resource proposed. Then you candisplay the booking type column in a resource view (such as the ResourceSheet), and keep track of resources you might have to firm up as you getcloser to finalizing your project plan.
135Chapter 7: Using Your Natural Resources
12_036516 ch07.qxp 11/20/06 1:41 PM Page 135
The Birth of a ResourceWhen a person is born, someone fills out a birth certificate. Creating a resourcein Project involves filling out a form, too. On the Resource Information form,you enter information, such as the resource name, rate per hour or cost peruse, and availability. You can also enter optional information, such as the work-group the resource belongs to or the resource’s e-mail address.
You can create a resource as a single person or thing, a generic resource(that is, a skill set with no person attached, such as Assistant or Engineer),and even a group of several resources that work together.
Creating one at a timeOn the simplest level, you create a resource — whether it’s a person, a pieceof equipment, or a material — as a single entity. In this case, you’re thinkingof a particular person, or meeting room, or piece of equipment. You createthe resource by entering information in the Resource Information dialog box.
Another method for entering resource information is to display ResourceSheet view and enter information in the columns included there. This is oftena faster way to create several resources at once.
When you create a resource, you must at a minimum type the ResourceName, but you can also include as much information as you want. Somepeople prefer to create all the resources first and deal with contact and costinformation at a later stage.
To create a resource, follow these steps:
1. Click Resource Sheet view in the View bar.
2. Double-click a blank Resource Name cell.
The Resource Information dialog box appears, as shown in Figure 7-4.
3. In the Resource Name box, type a name.
4. From the Type box, choose Work, Material, or Cost.
The settings available to you differ slightly depending on what youchoose. For example, a material resource won’t have the Email box available, and a work or cost resource won’t have the Material Labelbox available.
5. In the Initials box, type an abbreviation or initials for the resource.
If you don’t enter anything here, the first letter of the resource name isinserted when you save the resource.
136 Part II: People Who Need People
12_036516 ch07.qxp 11/20/06 1:41 PM Page 136

6. Continue to enter any information you want to include for the resource.
That information might include an e-mail address, the group (a depart-ment, division, or workgroup, for example), Material Label (for example,pounds for food coloring or tons for steel), Booking Type (Proposed orCommitted), or Code (such as a cost center code).
If you enter information in the Group box, you can then use filters, sortfeatures, and the Group feature to look at sets of resources. See Chapter10 for more about filtering and working with groups.
7. Click OK to save the new resource.
If you use Project Server (a feature of Project Professional used along withSharePoint for online collaboration, covered in Chapter 18), you can choosethe Microsoft Project Server option in the Workgroup box. You can also usethe Windows Account option in the Resource Information dialog box to spec-ify how you’ll communicate with the team.
Identifying resources before you know their namesIn the planning stages of a project, you’ll often find that all your resourcesaren’t assembled. Sometimes even well into the project, you don’t know whatresource you’ll be using; you know only that you need a resource with a cer-tain skill set to complete upcoming tasks. In that case, you might be better offcreating some resources as generic resources.
Figure 7-4:These four
tabs canhold a
wealth ofinformation
about anyresource.
137Chapter 7: Using Your Natural Resources
12_036516 ch07.qxp 11/20/06 1:41 PM Page 137

If you want to create a generic resource, you should give it a name thatdescribes its skill, such as Engineer, or Designer, or even Meeting Space (asopposed to a specific resource named Conference Room B). Then, in theResource Information dialog box, be sure to select the Generic check box.
You can then display a Yes/No column titled Generic to identify theseresources, and you can create a resource filter to filter for a Yes or No entry in the Generic column to filter resources by this characteristic.
No formula takes the Generic setting into account in recalculating your sched-ule based on resource availability. However, many people find this settinguseful in long-range planning and in situations where they aren’t responsiblefor specific resource assignments (for example, assigning a temporary workerto a task when the specific worker will be chosen by the temp agency).
Resources that hang out in groupsAlthough you’ll probably have little use for chain gangs in your project, theyexemplify the principle of a resource that represents multiple resources.Rather than assigning people one by one to some tasks, you’ll want to assigna group of people who typically work together. Being able to make one assign-ment of a consolidated resource rather than several separate resources andassignments can be a timesaver in larger projects.
Here’s an example of a consolidated resource: Suppose that you’re managing a project to get a new Web site up and running. You have four Web designersof equal skill at your disposal, so you create a resource named Web Designers.You can assign Web Designers to a task at 400 percent, and have all fourdesigners working at once. Or you can assign the Web Designer resource to work on a task at 100 percent, thereby assigning one resource to it.
There is no special setting to designate a multiple resource: However, youmight want to include some indication of the number of resources in theresource name. For example, you could name your designer resource FourWeb Designers (if you know the Web design group consists of four people) orWeb Design Group. What really defines this type of resource is the maximumassignment units; 400 percent would indicate four resources in the group.
Sharing ResourcesMany organizations have lots of projects going on at the same time. Some,such as a project to organize an office move, are the only project of its typehappening in a company. Others, such as a building design project in an archi-tectural firm, will happen simultaneously with several other similar projectsand draw on many of the same resources, such as architects and draftspeople.
138 Part II: People Who Need People
12_036516 ch07.qxp 11/20/06 1:41 PM Page 138

When an organization has projects of a similar nature going on at the sametime, creating centralized resources is useful. This can save you time becauseyou don’t have to create resources when they already exist. It can also helpto track resources across projects.
Another timesaving Project feature allows you to pull existing resources froma company address book or your own Address Book in Outlook.
In the swim: Drawing on resource poolsIf you use Project throughout your company, it can be beneficial to create acentralized repository of common resources and allow project managers toassign those resources to their various projects. This collection of enterpriseresources is a resource pool. By using a resource pool, you can get a more real-istic idea of how busy resources are across all projects at any point in time.
Don’t confuse a resource pool with enterprise resources, which require thatyou have Project 2007 Professional, Project Server 2007, and Microsoft OfficeProject Web Access set up. With all this in place (see Chapters 18 and 19 formore about enterprise projects), you can track and assign resources acrossan entire enterprise. A resource pool, on the other hand, is simply a list ofresources, saved on your company server, that several people can assign toprojects. A resource pool saves everybody the trouble of creating theseresources again and again in their individual projects.
Both individual resources and consolidated resources can be created in ablank project as a resource pool and saved to an accessible location on yourcompany server. Then, any project manager can call on those resources forhis or her own projects; those projects are then referred to as sharer filesbecause they share resources with the resource pool. For example, if youhave a pool of maintenance people that everyone in your manufacturing com-pany assigns to projects, create a project called Resource Pools and thencreate all your enterprise resources in this project. Or you could create aresource called CEO and let all the people managing projects that require theCEO’s involvement assign him or her from that central location. Then use theresource-sharing tools in Project to assign these resources to your plan.
When anyone makes resource assignments in a sharer file, that information isalso saved in the resource pool file. Then, anyone can use that file to look atresource allocations across all projects in the organization.
To access a resource that’s available to your entire organization, follow thisprocedure:
1. Choose Tools➪Resource Sharing➪Share Resources.
The Share Resources dialog box appears, as shown in Figure 7-5.
139Chapter 7: Using Your Natural Resources
12_036516 ch07.qxp 11/20/06 1:41 PM Page 139
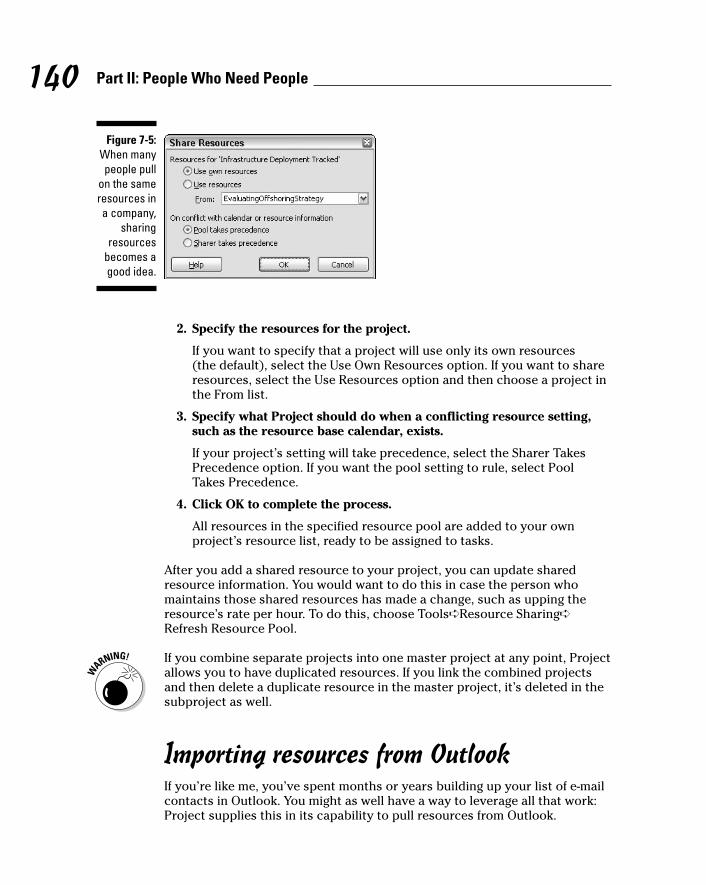
2. Specify the resources for the project.
If you want to specify that a project will use only its own resources (the default), select the Use Own Resources option. If you want to shareresources, select the Use Resources option and then choose a project inthe From list.
3. Specify what Project should do when a conflicting resource setting,such as the resource base calendar, exists.
If your project’s setting will take precedence, select the Sharer TakesPrecedence option. If you want the pool setting to rule, select Pool Takes Precedence.
4. Click OK to complete the process.
All resources in the specified resource pool are added to your own project’s resource list, ready to be assigned to tasks.
After you add a shared resource to your project, you can update sharedresource information. You would want to do this in case the person whomaintains those shared resources has made a change, such as upping theresource’s rate per hour. To do this, choose Tools➪Resource Sharing➪Refresh Resource Pool.
If you combine separate projects into one master project at any point, Projectallows you to have duplicated resources. If you link the combined projectsand then delete a duplicate resource in the master project, it’s deleted in thesubproject as well.
Importing resources from OutlookIf you’re like me, you’ve spent months or years building up your list of e-mailcontacts in Outlook. You might as well have a way to leverage all that work:Project supplies this in its capability to pull resources from Outlook.
Figure 7-5:When manypeople pull
on the sameresources ina company,
sharingresources
becomes agood idea.
140 Part II: People Who Need People
12_036516 ch07.qxp 11/20/06 1:41 PM Page 140

You must have Outlook specified as your default e-mail program in order forthis to work. Do that by opening Outlook; when you’re asked whether youwant it to be your default program, say yes.
When you insert one or more Outlook resources in your project, they’re addedto your project list, taking the resource name and e-mail address as they existin the Outlook Address Book. The default first-letter initial and work type isalso preassigned. You can then add any details you like to the resource.
To insert resources from your Outlook Address Book, display Resource viewand then follow these steps:
1. Choose Insert➪New Resource From➪Address Book.
The Choose Profile dialog box appears.
2. Select Outlook.
The Select Resources dialog box appears.
3. Specify a name.
You can type a name in the Type Name or Select from List box, or youcan click a contact name in the Name list.
4. Click Add to place the selected name in the Resources list.
5. Repeat Steps 2 and 3 to add all the resource names that you want toimport to your project.
6. When you’re finished, click OK.
141Chapter 7: Using Your Natural Resources
Drowning in the resource poolDrawing resources from resource pools savesyou time because you don’t have to re-createthose resources again and again. However,should you track your resource’s time in theresource pool file to see whether the resourceis overbooked? Most projects in the real worlduse resources that are not solely dedicated to asingle project. New users of Project often getconfused because almost every person workingon their projects puts in time on other work, fromgeneral communication with co-workers andclients to efforts put in on other projects. Shouldthey build resource pools to account for timeshared among several projects at one time?
Generally speaking, it would be chaos to try totrack every minute of all your resources’ days to
see whether they’re working 100 percent or 50percent on your tasks or are being sharedamong multiple projects. Ask yourself this ques-tion: When this resource works on a task in yourproject, “Will he or she put his entire focus onthat task at that time?” If so, you might not needto fool around with tracking shared resourcesacross many projects. Especially on shortertasks, not trying to micromanage the efforts ofyour resources outside of your own project usu-ally works just fine. If, on the other hand, youhave resources who work only half time or splittheir time between two projects routinely, con-sider using shared resource tools to keep trackof those resources across projects.
12_036516 ch07.qxp 11/20/06 1:41 PM Page 141

The names now appear in your project resource list, ready for you to addadditional information.
Say, When Do These Guys Work?In Chapter 3, you can read all about calendars, including Project, Task, andResource calendars. Now that you’re working with resources, it’s worth acloser look at how Resource calendars work.
First you create your Resource calendar based on a base calendar templatethat can be Standard, Night Shift, or 24 Hours. (You can also create customcalendars.)
� Standard is a typical 9-to-5 workday and five-day workweek.
� Night Shift is an eight-hour work day, scheduled between 11 p.m. and 8a.m., with an hour off for a meal, from Monday through Friday.
� The 24 Hours base calendar shows just what it says: 24 hours per day, 7days per week.
After you specify a base template for your Resource calendar, you can specifyworking hours, such as 9 a.m. to 12 p.m. and 1 p.m. to 5 p.m. for a standardeight-hour day, or 8 a.m. to 12 p.m. and 1 p.m. to 4 p.m. for a variation on thateight-hour day. Finally, you can select specific days when a resource is notavailable (for example, when someone will be on vacation, at an off-site semi-nar, or busy with another commitment) and mark them as nonworking.
Avoid micromanaging nonworking time for your resources because it couldleave you no time to manage anything. For example, if someone is taking offhalf a day to go to a doctor’s appointment, it’s probably not necessary toblock a day off. However, if a resource is taking a two-week vacation or athree-month sabbatical, it’s probably useful to modify that resource’sWorking Time calendar.
To make all these settings, you can click the Change Working Time button onthe General tab of the Resource Information dialog box (refer to Figure 7-4).The Change Working Time dialog box opens, which is shown in Figure 7-6.
To make changes to a resource’s calendar, follow these steps:
1. Display the Resource sheet.
2. Double-click a resource name.
The Resource Information dialog box appears.
3. Click the Change Working Time button on the General tab.
The Change Working Time dialog box opens.
142 Part II: People Who Need People
12_036516 ch07.qxp 11/20/06 1:41 PM Page 142
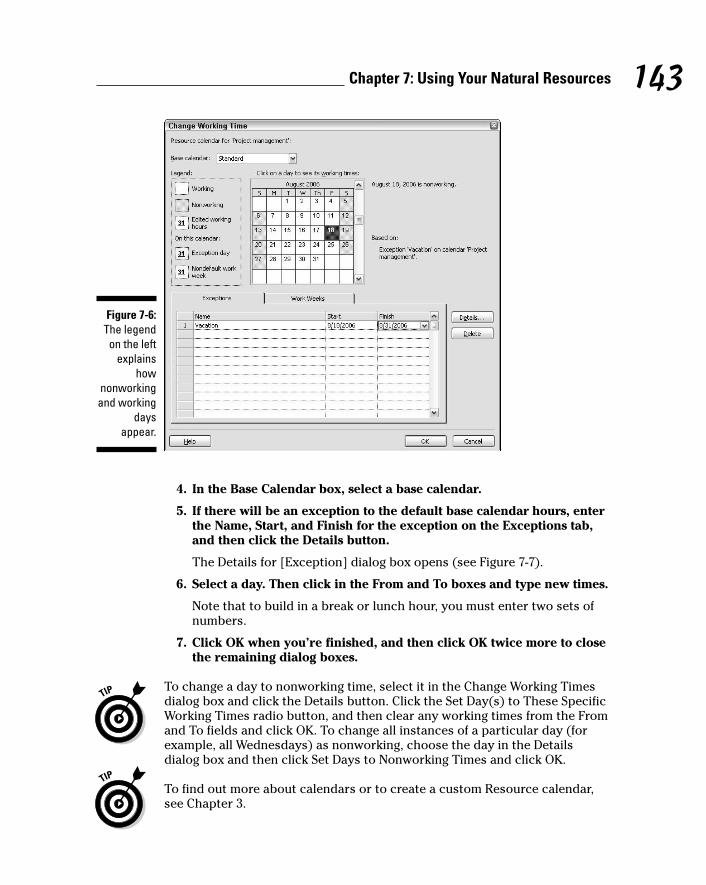
4. In the Base Calendar box, select a base calendar.
5. If there will be an exception to the default base calendar hours, enterthe Name, Start, and Finish for the exception on the Exceptions tab,and then click the Details button.
The Details for [Exception] dialog box opens (see Figure 7-7).
6. Select a day. Then click in the From and To boxes and type new times.
Note that to build in a break or lunch hour, you must enter two sets ofnumbers.
7. Click OK when you’re finished, and then click OK twice more to closethe remaining dialog boxes.
To change a day to nonworking time, select it in the Change Working Timesdialog box and click the Details button. Click the Set Day(s) to These SpecificWorking Times radio button, and then clear any working times from the Fromand To fields and click OK. To change all instances of a particular day (forexample, all Wednesdays) as nonworking, choose the day in the Detailsdialog box and then click Set Days to Nonworking Times and click OK.
To find out more about calendars or to create a custom Resource calendar,see Chapter 3.
Figure 7-6:The legend
on the leftexplains
hownonworkingand working
daysappear.
143Chapter 7: Using Your Natural Resources
12_036516 ch07.qxp 11/20/06 1:41 PM Page 143

Now That I’ve Got ’Em, How Do I Manage ’Em?
Before I leave the topic of resources, I’d be remiss if I didn’t tell you a bitabout the vital project management skill of resource management. Here, in anutshell, is your nickel tour of the art of managing the people who will makeyour project happen.
Acquiring the right resourcesJust like an award-winning performance in a movie begins with casting theright actor, resource management starts with finding the right resources foryour tasks. What makes a resource is a combination of factors. The rightresource for a task is somebody who has
� The right skills for the task at hand (or who is trainable, if training ispart of your budget)
� Enough time available to complete the task according to your schedule
� The ability to commit to the project (This sometimes involves gettinganother manager’s buy-in.)
� A cost that fits in your budget
Although the above list covers the basic requirements, consider other details,such as whether the resource is set up to work with the project team, and
Figure 7-7:You can setthe details
for aworking
timeexception
here.
144 Part II: People Who Need People
12_036516 ch07.qxp 11/20/06 1:41 PM Page 144
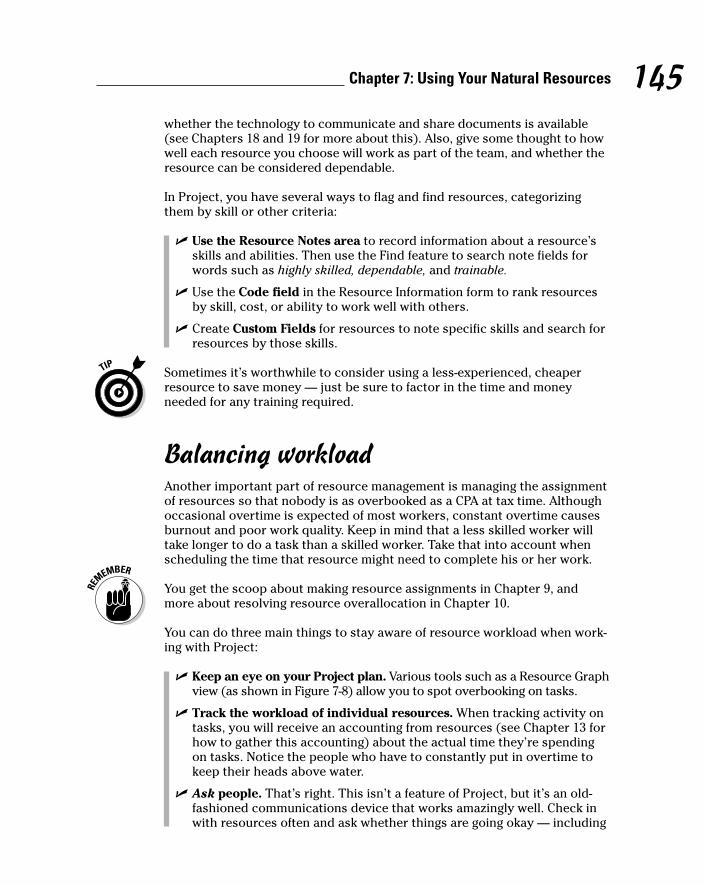
whether the technology to communicate and share documents is available(see Chapters 18 and 19 for more about this). Also, give some thought to howwell each resource you choose will work as part of the team, and whether theresource can be considered dependable.
In Project, you have several ways to flag and find resources, categorizingthem by skill or other criteria:
� Use the Resource Notes area to record information about a resource’sskills and abilities. Then use the Find feature to search note fields forwords such as highly skilled, dependable, and trainable.
� Use the Code field in the Resource Information form to rank resourcesby skill, cost, or ability to work well with others.
� Create Custom Fields for resources to note specific skills and search forresources by those skills.
Sometimes it’s worthwhile to consider using a less-experienced, cheaperresource to save money — just be sure to factor in the time and moneyneeded for any training required.
Balancing workloadAnother important part of resource management is managing the assignmentof resources so that nobody is as overbooked as a CPA at tax time. Althoughoccasional overtime is expected of most workers, constant overtime causesburnout and poor work quality. Keep in mind that a less skilled worker willtake longer to do a task than a skilled worker. Take that into account whenscheduling the time that resource might need to complete his or her work.
You get the scoop about making resource assignments in Chapter 9, andmore about resolving resource overallocation in Chapter 10.
You can do three main things to stay aware of resource workload when work-ing with Project:
� Keep an eye on your Project plan. Various tools such as a Resource Graphview (as shown in Figure 7-8) allow you to spot overbooking on tasks.
� Track the workload of individual resources. When tracking activity ontasks, you will receive an accounting from resources (see Chapter 13 forhow to gather this accounting) about the actual time they’re spendingon tasks. Notice the people who have to constantly put in overtime tokeep their heads above water.
� Ask people. That’s right. This isn’t a feature of Project, but it’s an old-fashioned communications device that works amazingly well. Check inwith resources often and ask whether things are going okay — including
145Chapter 7: Using Your Natural Resources
12_036516 ch07.qxp 11/20/06 1:41 PM Page 145
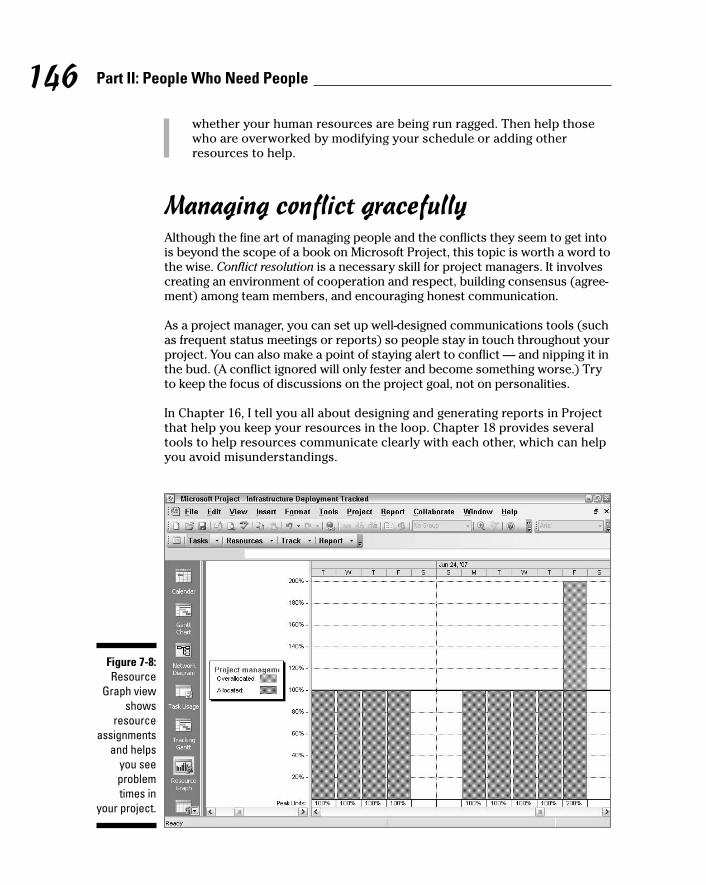
whether your human resources are being run ragged. Then help thosewho are overworked by modifying your schedule or adding otherresources to help.
Managing conflict gracefullyAlthough the fine art of managing people and the conflicts they seem to get intois beyond the scope of a book on Microsoft Project, this topic is worth a word tothe wise. Conflict resolution is a necessary skill for project managers. It involvescreating an environment of cooperation and respect, building consensus (agree-ment) among team members, and encouraging honest communication.
As a project manager, you can set up well-designed communications tools (suchas frequent status meetings or reports) so people stay in touch throughout yourproject. You can also make a point of staying alert to conflict — and nipping it inthe bud. (A conflict ignored will only fester and become something worse.) Tryto keep the focus of discussions on the project goal, not on personalities.
In Chapter 16, I tell you all about designing and generating reports in Projectthat help you keep your resources in the loop. Chapter 18 provides severaltools to help resources communicate clearly with each other, which can helpyou avoid misunderstandings.
Figure 7-8:Resource
Graph viewshows
resourceassignments
and helpsyou seeproblemtimes in
your project.
146 Part II: People Who Need People
12_036516 ch07.qxp 11/20/06 1:41 PM Page 146

Chapter 8
What’s All This Gonna Cost?In This Chapter� Understanding how costs accrue
� Establishing work resource rates
� Specifying unit costs
� Adding fixed costs
� Allowing for overtime
� Estimating resource availability
� Working with budget resources
There’s no such thing as a free lunch — and if you use Project to track costs,there’s no such thing as a free resource because Project uses resources
working on tasks as a way of calculating most of the costs of your project.
When you create a resource, you specify a work resource rate (by default,this rate is tallied up per hour) or a material resource per use cost. You canalso create cost resources: that is, a set cost for a task that isn’t calculatedusing a per-use or hourly rate, such as a trade show fee.
Some other factors come into play as well, such as how many hours a day aresource is available to work and any overtime rates. At the end of the day,all these settings come together to put you over — or under — budget.
In this chapter, you explore the relationship between resources and costs andalso find out how to set resource standard and overtime rates, create fixedcosts, and set the availability of resources on individual tasks in your project.
Mary, Mary, How Do Your Costs Accrue?Project helps to account for costs on your various tasks with a combinationof costs per hour, costs per unit, and fixed costs. Before you begin to fleshout cost information about your resources, you have to understand howthese calculations work.
13_036516 ch08.qxp 11/20/06 1:41 PM Page 147
You’ll have two main pictures of the budget in your project: one at themoment you freeze your original plan (a baseline plan) and the ongoing picture of actual costs that comes from the activity and material usage yourecord as your project moves along. You record a certain amount of workeffort on tasks, and tasks with resources assigned to them then run up costsbased on the effort expended or units of materials used.
It all adds upThe best way to understand how costs add up in your project is to look at anexample. John Smith (that’s not his real name) is managing a project involv-ing the building of a new gourmet ice-cream packaging plant. John has cre-ated a task called Install Ice-Cream Mixers. Here are the costs John anticipatesfor that task:
� About ten person-hours of effort to do the installation
� A fixed cost of $500 paid to the mixer manufacturer to oversee the installation and train workers on the machine
� Twenty pounds of ice-cream ingredients to test the mixers
The ten hours of effort will be expended by work resources. The total cost forthe ten hours is a calculation: 10 × the resource rate. If the resource rate is$20, this cost totals $200. If two resources work on the task, one at a rate of$20 and one at a rate of $30, then (by default) Project splits the ten hours ofeffort between them, and the resulting cost is $250.
The fixed cost of $500 for a fee to the manufacturer is created as a costresource. When you assign this resource to a task, you enter a cost for thatresource on that task. This cost won’t change based on the number ofresources or the time involved.
Finally, the cost for 20 pounds of ice cream (any flavor you like) is calculatedas 20 × the unit cost of the ice-cream ingredients. If the unit cost is $2, thiscost would be $40.
And that’s how costs are assigned and how they add up on your projects.
You can create and assign resources that have no associated costs. For exam-ple, if you want your boss to be available to review status reports but yourcompany doesn’t require that your boss be charged to your project, you cansimply use those resource assignments to remind you about the need foryour boss’s availability on that day or at that time.
148 Part II: People Who Need People
13_036516 ch08.qxp 11/20/06 1:41 PM Page 148

When will this hit the bottom line?In business, you rarely get to choose when you pay your own bills. In Project,however, you can choose when your costs hit your budget.
Resources can be set to accrue at the start or end of the task that they’reassociated with or to be prorated throughout the life of the task. So, if athree-month-long task begins April 1, a $90 cost resource could be added toyour actual costs to date on day 1, on day 90, or at a dollar per day until theend of the task.
This isn’t exactly a purely realistic reflection of how you have to pay forcosts, because face it: Most bills come due 30 days after they hit your desk.It’s more a factor of when you want that cost to show up for the purposes oftracking costs and reporting expenses on your project.
Pay Day: Assigning Resources to Your Project
Most projects involve a combination of cost types: cost, work, and material.You have to do your homework before you can enter the information at thetask or resource level. You have to find out the fixed costs as well as thehourly or unit rates for all your resources.
During the planning stages, you might not be able to anticipate exactly what a particular cost will be or know every resource’s rates. If you have to, buildthe resource or fixed cost with your best estimate. That way, at least somecost will be reflected in your plan, and you can go back to enter more accu-rate information as soon as you know it.
Use a field in your Resource Sheet, such as Code, to designate resources ashaving estimated rates or costs so you can easily go back to those tasks andupdate the estimates as your plan progresses.
There’s no avoiding fixed costsMaybe it’s that huge fee for the consulting company your boss insisted youuse, even though you knew that the report wouldn’t tell you a thing youdidn’t already know. Or perhaps it’s the $2,000 for a laptop computer youtalked your boss into getting you so you could manage your project whenyou’re on the road. Whatever it is, it’s a cost that won’t change no matterhow many hours the task goes on or how many people work on the task. Ithas no unit cost or rate per hour. It’s a fixed cost.
149Chapter 8: What’s All This Gonna Cost?
13_036516 ch08.qxp 11/20/06 1:41 PM Page 149
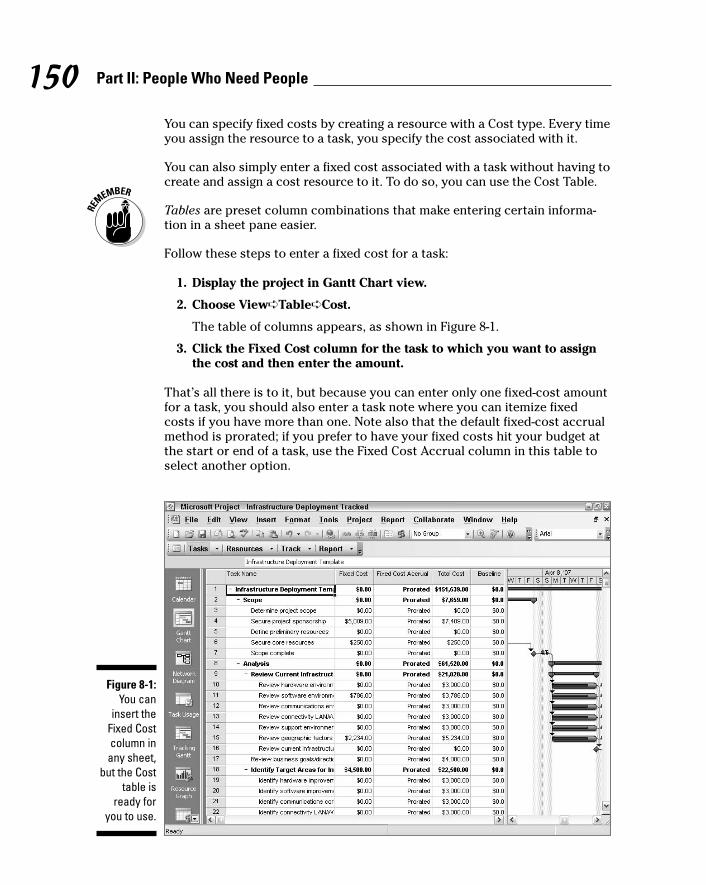
You can specify fixed costs by creating a resource with a Cost type. Every timeyou assign the resource to a task, you specify the cost associated with it.
You can also simply enter a fixed cost associated with a task without having tocreate and assign a cost resource to it. To do so, you can use the Cost Table.
Tables are preset column combinations that make entering certain informa-tion in a sheet pane easier.
Follow these steps to enter a fixed cost for a task:
1. Display the project in Gantt Chart view.
2. Choose View➪Table➪Cost.
The table of columns appears, as shown in Figure 8-1.
3. Click the Fixed Cost column for the task to which you want to assignthe cost and then enter the amount.
That’s all there is to it, but because you can enter only one fixed-cost amountfor a task, you should also enter a task note where you can itemize fixedcosts if you have more than one. Note also that the default fixed-cost accrualmethod is prorated; if you prefer to have your fixed costs hit your budget atthe start or end of a task, use the Fixed Cost Accrual column in this table toselect another option.
Figure 8-1:You can
insert theFixed Costcolumn inany sheet,
but the Costtable is
ready foryou to use.
150 Part II: People Who Need People
13_036516 ch08.qxp 11/20/06 1:41 PM Page 150

When resources get paid per hourWhether it’s minimum wage or the astronomical fees your lawyer chargesyou every time you sneeze, most people get paid something per hour. To represent most people involved in your project, you create work resourcesand charge them to your project at an hourly rate.
After a resource has an hourly rate, when you then enter the estimate of howmany hours that person will work on each task that he’s assigned to, Projecttotals his estimated costs in your plan. When you track actual effort expendedon tasks, a calculation of actual effort times the hourly rate returns actualcosts.
By comparing estimated costs and actual costs, you get an ongoing picture ofwhether your project is on track.
To set resource rates per hour, follow these steps:
1. Display Resource Sheet view.
2. Click the Std. Rate column for the resource to which you want toassign a cost.
3. Type a dollar amount.
If you’re entering a rate for a unit other than hours, type a slash (/) andthen the unit (for example, minute or month).
4. Press Enter.
The entry is saved.
Note that you can also make cost-rate entries in the Resource Informationdialog box. The Costs tab of this dialog box, which is shown in Figure 8-2,offers a Standard Rate, an Overtime Rate, and a Per Use Cost.
In addition, five tabs labeled A through E allow you to enter different rates for the resource. By using the Effective Date column, a resource could workfor several months at one rate and then start working at a different rate on apreset date. This helps you account for periodic raises or seasonal shifts inrates (for example, paying a premium for construction resources in monthswith better weather when they are more in demand).
If you use ten gallons at $2 per gallon . . .This one might feel like a problem from your high school algebra class. (Somany gallons of water in a bathtub with a leak. . . . ) Well, if you weren’t thatgreat at algebra, you’ll be glad to hear that there is a pretty straightforwardcalculation Project makes to arrive at cost per use.
151Chapter 8: What’s All This Gonna Cost?
13_036516 ch08.qxp 11/20/06 1:41 PM Page 151
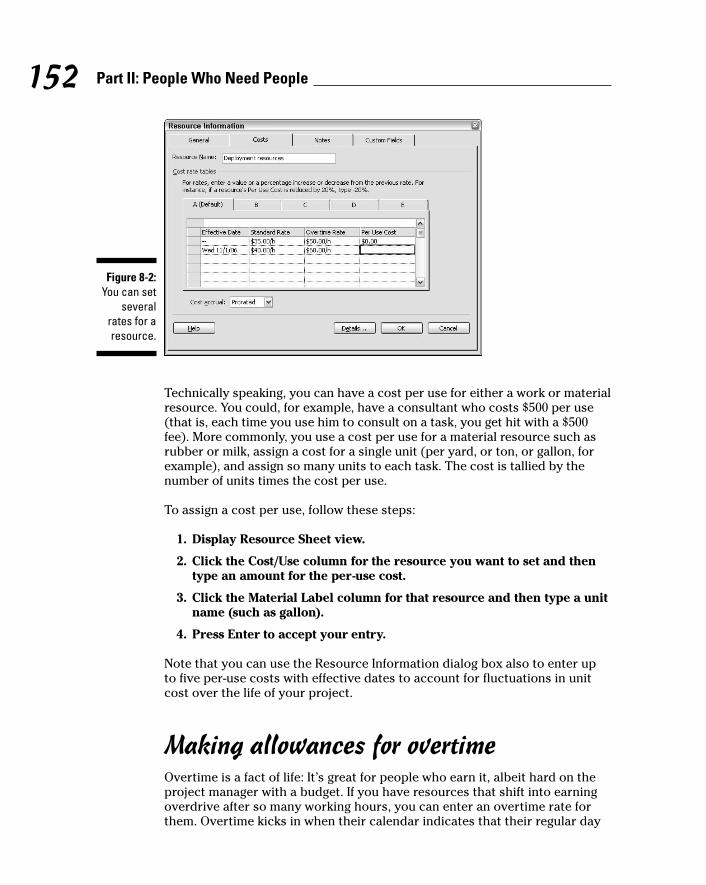
Technically speaking, you can have a cost per use for either a work or materialresource. You could, for example, have a consultant who costs $500 per use(that is, each time you use him to consult on a task, you get hit with a $500fee). More commonly, you use a cost per use for a material resource such asrubber or milk, assign a cost for a single unit (per yard, or ton, or gallon, forexample), and assign so many units to each task. The cost is tallied by thenumber of units times the cost per use.
To assign a cost per use, follow these steps:
1. Display Resource Sheet view.
2. Click the Cost/Use column for the resource you want to set and thentype an amount for the per-use cost.
3. Click the Material Label column for that resource and then type a unitname (such as gallon).
4. Press Enter to accept your entry.
Note that you can use the Resource Information dialog box also to enter upto five per-use costs with effective dates to account for fluctuations in unitcost over the life of your project.
Making allowances for overtimeOvertime is a fact of life: It’s great for people who earn it, albeit hard on theproject manager with a budget. If you have resources that shift into earningoverdrive after so many working hours, you can enter an overtime rate forthem. Overtime kicks in when their calendar indicates that their regular day
Figure 8-2:You can set
severalrates for aresource.
152 Part II: People Who Need People
13_036516 ch08.qxp 11/20/06 1:41 PM Page 152

is over. For example, a resource with a standard eight-hour-day calendar whoputs in ten hours on a one-day task will be charged by Project with eighthours at the standard rate and two hours at the overtime rate.
To enter an overtime rate for a resource, follow this procedure:
1. Display Resource Sheet view.
2. Click the Ovt. Rate column for the resource.
3. Type an amount.
4. Press Enter.
The entry is saved.
It’s an Availability ThingLots of Project features deal with resources — in particular, helping you spot resource overallocation. Overallocation is a calculation involving theresource’s calendar and availability.
So, consider Monica Melendez, an engineer who works a standard, eight-hourday based on her calendar. Monica is assigned to the Write Final Report taskat 50 percent of her availability and to the Create Design Specs task — whichoccurs at the same time as the report task — at 100 percent of her availabil-ity. Monica is now working at 150 percent of her availability, or 12 hours perday. Poor Monica is overbooked.
By default, a resource is assigned to a task at 100 percent availability, but youcan modify that if you know a resource will be assigned to several tasks andis likely to put in only part of that person’s time over the course of a task.
Setting availabilityAvailability is easier to estimate for some resources than for others. A man-ager isn’t likely to give an entire day over to any single task because he has todeal with all the people who report to him, or she has to sign authorizations,go to meetings concerning various projects, work on budgets, and so on.With a production worker, it might be simpler to pin down availability to asingle task: If one manufacturing job is going through the line for three daysand one person is working on the line all that time, it’s closer to the mark tosay that he or she is working on that task full-time.
153Chapter 8: What’s All This Gonna Cost?
13_036516 ch08.qxp 11/20/06 1:41 PM Page 153
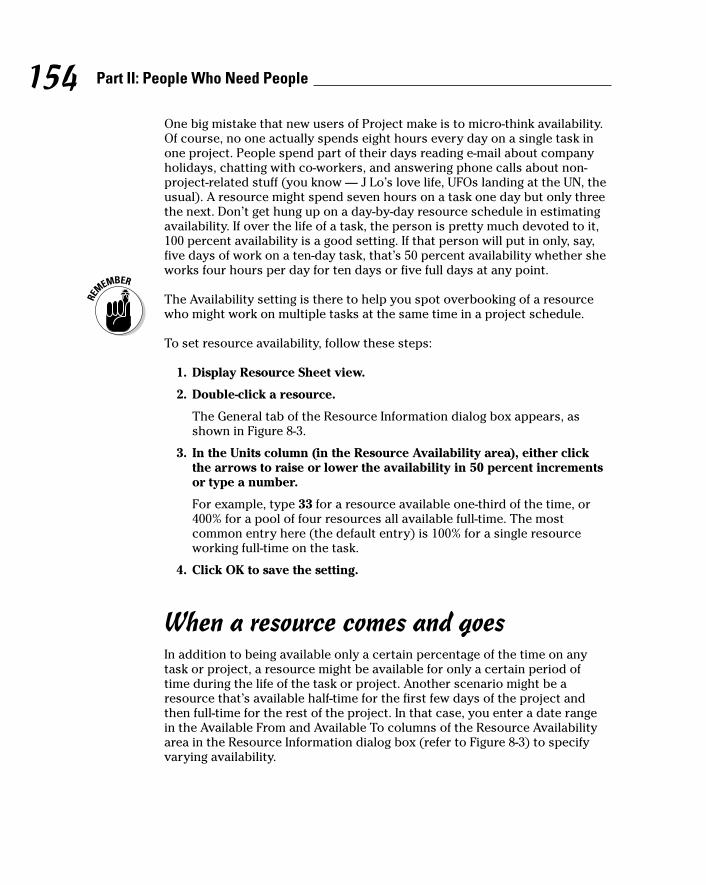
One big mistake that new users of Project make is to micro-think availability.Of course, no one actually spends eight hours every day on a single task inone project. People spend part of their days reading e-mail about companyholidays, chatting with co-workers, and answering phone calls about non-project-related stuff (you know — J Lo’s love life, UFOs landing at the UN, theusual). A resource might spend seven hours on a task one day but only threethe next. Don’t get hung up on a day-by-day resource schedule in estimatingavailability. If over the life of a task, the person is pretty much devoted to it,100 percent availability is a good setting. If that person will put in only, say,five days of work on a ten-day task, that’s 50 percent availability whether sheworks four hours per day for ten days or five full days at any point.
The Availability setting is there to help you spot overbooking of a resourcewho might work on multiple tasks at the same time in a project schedule.
To set resource availability, follow these steps:
1. Display Resource Sheet view.
2. Double-click a resource.
The General tab of the Resource Information dialog box appears, asshown in Figure 8-3.
3. In the Units column (in the Resource Availability area), either clickthe arrows to raise or lower the availability in 50 percent incrementsor type a number.
For example, type 33 for a resource available one-third of the time, or400% for a pool of four resources all available full-time. The mostcommon entry here (the default entry) is 100% for a single resourceworking full-time on the task.
4. Click OK to save the setting.
When a resource comes and goesIn addition to being available only a certain percentage of the time on anytask or project, a resource might be available for only a certain period of time during the life of the task or project. Another scenario might be aresource that’s available half-time for the first few days of the project andthen full-time for the rest of the project. In that case, you enter a date rangein the Available From and Available To columns of the Resource Availabilityarea in the Resource Information dialog box (refer to Figure 8-3) to specifyvarying availability.
154 Part II: People Who Need People
13_036516 ch08.qxp 11/20/06 1:41 PM Page 154

Adding It Up: How Your Settings Affect Your Budget
In Chapter 9, you explore assigning resources to tasks. But to help round outthis discussion of costs, you should know that in addition to a resource costper hour and a resource base calendar and availability, you assign resourcesto tasks at certain percentages. All these factors work together in calculatingthe cost of the resource when assigned to tasks.
Don’t worry about the calculations — Project does those for you. That’s thebeauty of entering information in Project: After you make settings for yourresources, Project does the work of tallying and showing total costs to you inviews, such as the Cost table of Gantt Chart view shown in Figure 8-4.
For example, suppose you want to assign a mechanic to a task. Here are thespecifics:
Base calendar: Night Shift (eight hours, six days per week, between 11 p.m. and 8 a.m.)
Cost per hour: $20
Overtime cost: $30
Availability: 100 percent
Assigned to a two-day task: 50 percent
Figure 8-3:You can
enter anynumber you
like in theUnits box.
155Chapter 8: What’s All This Gonna Cost?
13_036516 ch08.qxp 11/20/06 1:41 PM Page 155
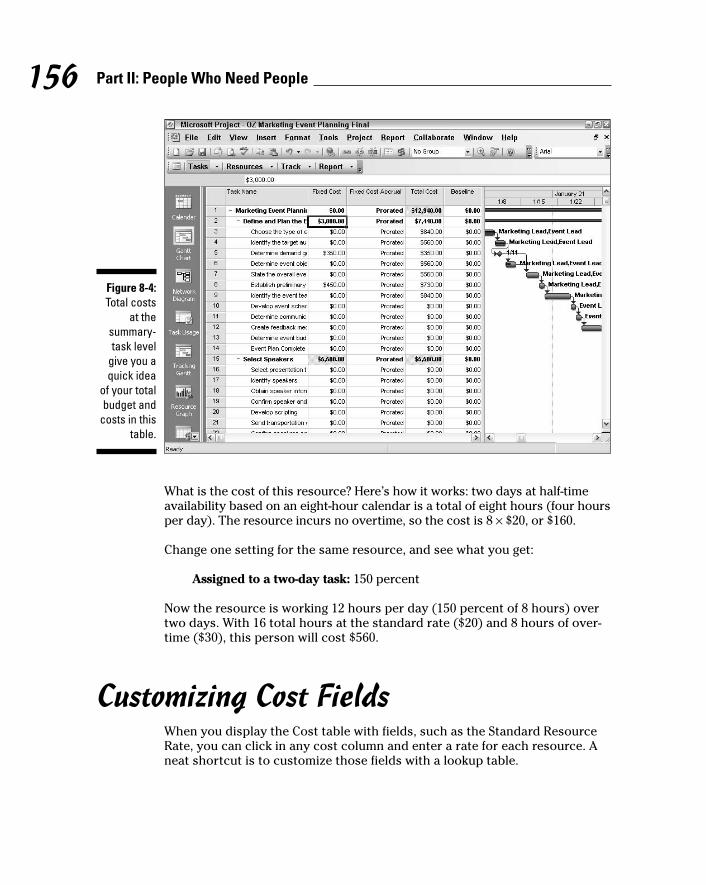
What is the cost of this resource? Here’s how it works: two days at half-timeavailability based on an eight-hour calendar is a total of eight hours (four hoursper day). The resource incurs no overtime, so the cost is 8 × $20, or $160.
Change one setting for the same resource, and see what you get:
Assigned to a two-day task: 150 percent
Now the resource is working 12 hours per day (150 percent of 8 hours) overtwo days. With 16 total hours at the standard rate ($20) and 8 hours of over-time ($30), this person will cost $560.
Customizing Cost FieldsWhen you display the Cost table with fields, such as the Standard ResourceRate, you can click in any cost column and enter a rate for each resource. Aneat shortcut is to customize those fields with a lookup table.
Figure 8-4:Total costs
at thesummary-task level
give you aquick idea
of your totalbudget and
costs in thistable.
156 Part II: People Who Need People
13_036516 ch08.qxp 11/20/06 1:41 PM Page 156
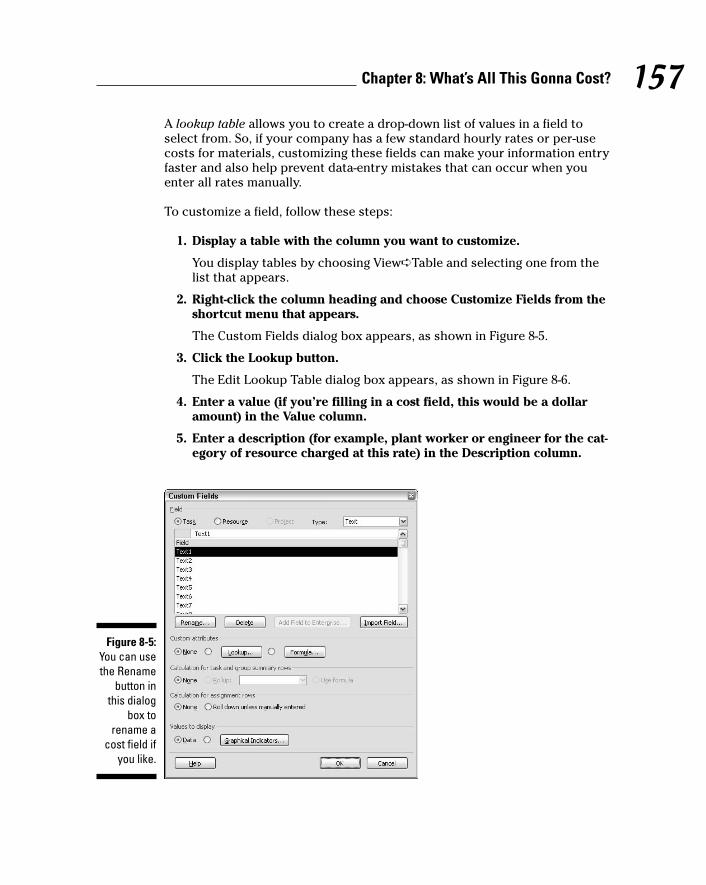
A lookup table allows you to create a drop-down list of values in a field toselect from. So, if your company has a few standard hourly rates or per-usecosts for materials, customizing these fields can make your information entryfaster and also help prevent data-entry mistakes that can occur when youenter all rates manually.
To customize a field, follow these steps:
1. Display a table with the column you want to customize.
You display tables by choosing View➪Table and selecting one from thelist that appears.
2. Right-click the column heading and choose Customize Fields from theshortcut menu that appears.
The Custom Fields dialog box appears, as shown in Figure 8-5.
3. Click the Lookup button.
The Edit Lookup Table dialog box appears, as shown in Figure 8-6.
4. Enter a value (if you’re filling in a cost field, this would be a dollaramount) in the Value column.
5. Enter a description (for example, plant worker or engineer for the cat-egory of resource charged at this rate) in the Description column.
Figure 8-5:You can usethe Rename
button inthis dialog
box torename a
cost field ifyou like.
157Chapter 8: What’s All This Gonna Cost?
13_036516 ch08.qxp 11/20/06 1:41 PM Page 157
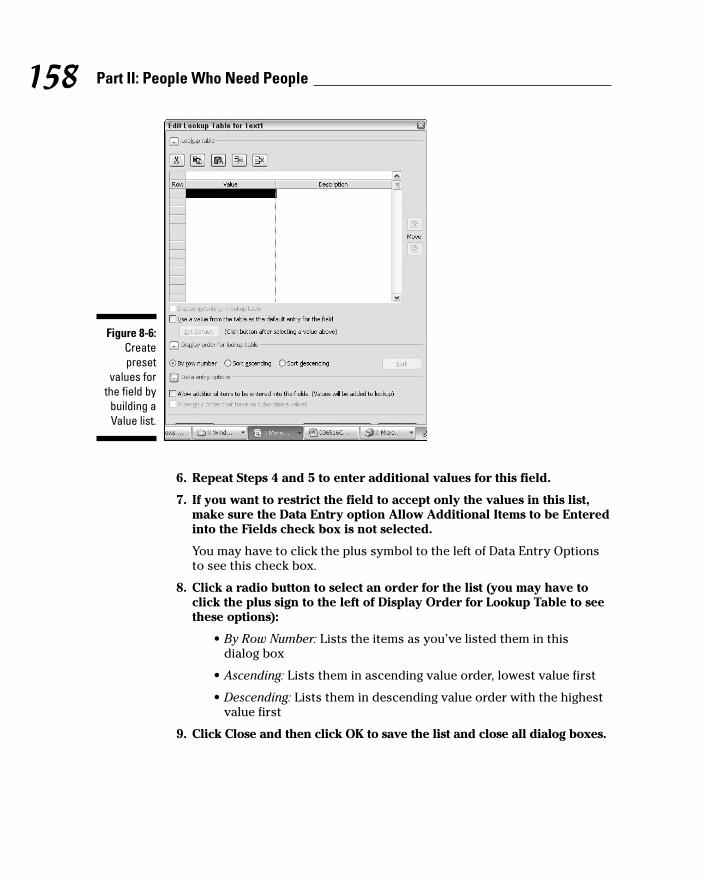
6. Repeat Steps 4 and 5 to enter additional values for this field.
7. If you want to restrict the field to accept only the values in this list,make sure the Data Entry option Allow Additional Items to be Enteredinto the Fields check box is not selected.
You may have to click the plus symbol to the left of Data Entry Optionsto see this check box.
8. Click a radio button to select an order for the list (you may have toclick the plus sign to the left of Display Order for Lookup Table to seethese options):
• By Row Number: Lists the items as you’ve listed them in this dialog box
• Ascending: Lists them in ascending value order, lowest value first
• Descending: Lists them in descending value order with the highestvalue first
9. Click Close and then click OK to save the list and close all dialog boxes.
Figure 8-6:Createpreset
values forthe field by
building aValue list.
158 Part II: People Who Need People
13_036516 ch08.qxp 11/20/06 1:41 PM Page 158
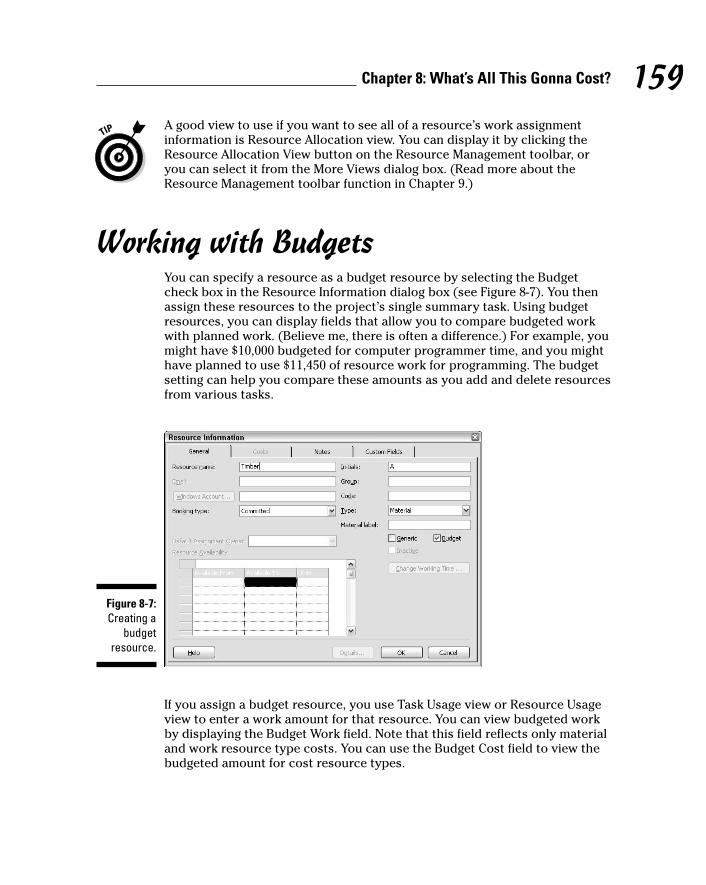
A good view to use if you want to see all of a resource’s work assignmentinformation is Resource Allocation view. You can display it by clicking theResource Allocation View button on the Resource Management toolbar, oryou can select it from the More Views dialog box. (Read more about theResource Management toolbar function in Chapter 9.)
Working with BudgetsYou can specify a resource as a budget resource by selecting the Budgetcheck box in the Resource Information dialog box (see Figure 8-7). You thenassign these resources to the project’s single summary task. Using budgetresources, you can display fields that allow you to compare budgeted workwith planned work. (Believe me, there is often a difference.) For example, youmight have $10,000 budgeted for computer programmer time, and you mighthave planned to use $11,450 of resource work for programming. The budgetsetting can help you compare these amounts as you add and delete resourcesfrom various tasks.
If you assign a budget resource, you use Task Usage view or Resource Usageview to enter a work amount for that resource. You can view budgeted workby displaying the Budget Work field. Note that this field reflects only materialand work resource type costs. You can use the Budget Cost field to view thebudgeted amount for cost resource types.
Figure 8-7:Creating a
budgetresource.
159Chapter 8: What’s All This Gonna Cost?
13_036516 ch08.qxp 11/20/06 1:41 PM Page 159

160 Part II: People Who Need People
13_036516 ch08.qxp 11/20/06 1:41 PM Page 160

Chapter 9
Assigning Resources to Get Things Done
In This Chapter� Understanding how assigning resources affects task timing
� Making resource assignments
� Checking resource availability
� Notifying team members of their assignments
You might have entered a cost per hour (or per use) for every resource in your project, but those resources won’t cost you a
thing — or, for that matter, get anything done — until you assign them to tasks.
When you do begin making assignments, several interesting things happen. Not only will your budget start to swell, but also some of your tasks may actually change duration. You may also start to see evidence of people who are overbooked on several tasks that happen around the same time. Understanding how those results occur is key to making intel-ligent assignments.
However, your work won’t be over even when everything about your assign-ments looks hunky-dory. That’s when you have to communicate the assign-ments to your team and make sure that each resource agrees to take themon. If they don’t, it’s back to the assignment drawing board.
In fact, assigning resources is something of an ongoing process throughoutyour project. As usual, Project provides the tools to help you manage thisentire process relatively painlessly.
14_036516 ch09.qxp 11/20/06 1:42 PM Page 161

You’d Be Surprised What AssignmentsCan Do to Your Timing
The three task types (as described in Chapter 4) are fixed units, fixed work,and fixed duration. Each defines the relationship that balances a task’s dura-tion, the work required to complete the task, and resource availability. This isknown as the golden triangle.
Your selection of task type — in combination with a setting that determineswhether a task is effort-driven — has an effect on the timing of your tasks rel-ative to your resource assignments.
Pinning down your typeEssentially, task types specify what will remain constant in a task when youadd or remove work resources to it after making the initial resource assign-ment. Although this whole work and duration and resource assignment per-centage calculation can be complicated, you need to understand it if youwant Project to accurately determine task durations in your plan accordingto resource assignments.
The default task type is fixed units. With a fixed-units task, the task durationyou enter and the resource effort (work) assigned to that task jointly deter-mine the timing of the task. With this task type, the assignment units youspecify for your resources won’t change even if the number of hours requiredto complete the task shrinks or grows.
With a fixed-units task, if you increase the duration of Task A from two tothree days, your resources will continue to work on it at the assigned unitsfor the specified duration; Project increases the Work amount accordingly.When you add or take away resources, Project changes the task durationaccordingly, based on the assignment units you specify.
The fixed-work task type, on the other hand, takes a specified number ofwork units to be completed. A one-day task requires eight hours to be com-pleted (assuming a Standard calendar). This type of task changes its durationin response to the number of resource units you assign.
With a fixed-work task, resource assignments may change in response to awork change. For example, suppose Task A takes four days to complete whenone person is assigned; with a fixed-work task, the same task takes only twodays when two people are assigned. Project doesn’t modify the hours of workrequired to complete the task, but it does modify resource assignment unitsto complete that work within the specified timeframe. Thus, if you up the
162 Part II: People Who Need People
14_036516 ch09.qxp 11/20/06 1:42 PM Page 162

duration of Task A, resource assignment units shrink in response. If youreduce the time to complete Task A, resource assignments increase to com-plete the unchanged amount of work hours in less time.
A fixed-duration task does not vary its length, no matter what resourceassignments you make.
With a fixed-duration task, Task A will take four days. If you assign additionalresources or remove resources, the task still takes four days, but the resource-assignment units will change.
Figure 9-1 shows the same task with the three different types specified. Eachtask was created with a four-day duration and one resource at 100 percent.Then an additional resource was added at 100 percent. Note the resultingchange — or lack of change — with each type. The fixed-duration task didn’tchange duration but did reduce resource assignments. The fixed-units task keptresource assignments constant at 100 percent — but reduced the task duration.Fixed work was accomplished faster, and the work (32 hours) stayed constant.
When effort is in the driver’s seatProject’s complex calculation of work, task duration, and assignment unitsinvolves not only task types but also the effort-driven setting. (In Figure 9-1,the effort-driven setting is active for all tasks.)
Figure 9-1:Select thetask type
that reflectswhat is
variable onyour task.
163Chapter 9: Assigning Resources to Get Things Done
14_036516 ch09.qxp 11/20/06 1:42 PM Page 163
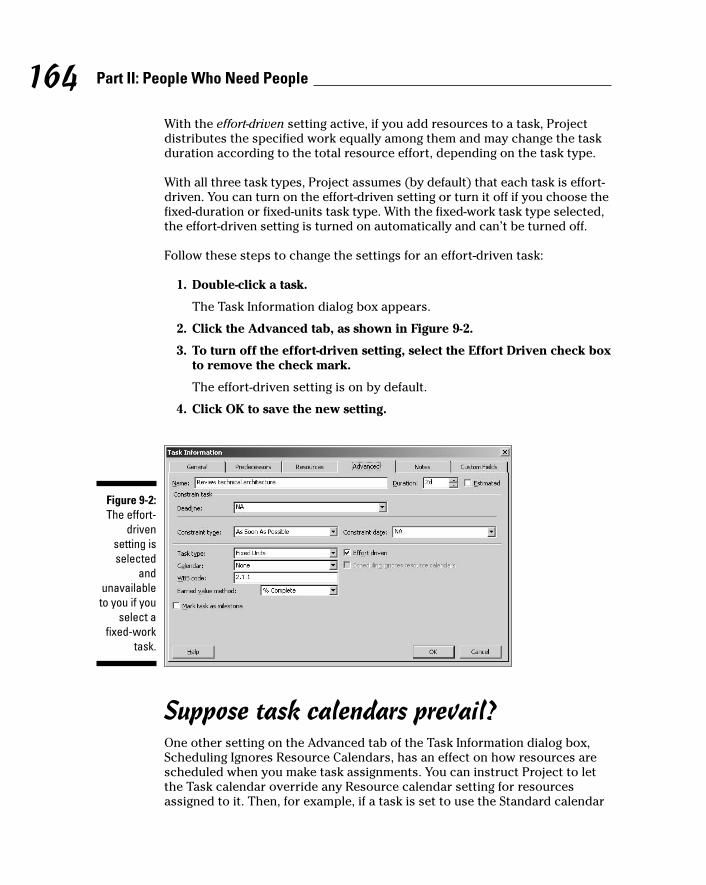
With the effort-driven setting active, if you add resources to a task, Projectdistributes the specified work equally among them and may change the taskduration according to the total resource effort, depending on the task type.
With all three task types, Project assumes (by default) that each task is effort-driven. You can turn on the effort-driven setting or turn it off if you choose thefixed-duration or fixed-units task type. With the fixed-work task type selected,the effort-driven setting is turned on automatically and can’t be turned off.
Follow these steps to change the settings for an effort-driven task:
1. Double-click a task.
The Task Information dialog box appears.
2. Click the Advanced tab, as shown in Figure 9-2.
3. To turn off the effort-driven setting, select the Effort Driven check boxto remove the check mark.
The effort-driven setting is on by default.
4. Click OK to save the new setting.
Suppose task calendars prevail?One other setting on the Advanced tab of the Task Information dialog box,Scheduling Ignores Resource Calendars, has an effect on how resources arescheduled when you make task assignments. You can instruct Project to letthe Task calendar override any Resource calendar setting for resourcesassigned to it. Then, for example, if a task is set to use the Standard calendar
Figure 9-2:The effort-
drivensetting isselected
andunavailableto you if you
select afixed-work
task.
164 Part II: People Who Need People
14_036516 ch09.qxp 11/20/06 1:42 PM Page 164

and a resource assigned to it uses a Night Shift calendar, that resource willwork standard hours on that task.
In some situations, certain calendar settings won’t be available. Chapters 3and 7 provide details about how all kinds of Resource calendar settings workif you need a refresher course about this.
Use this setting to provide some timing flexibility in your task: for example, ifsomeone who normally works the night shift will be called on to attend a two-day seminar that takes place during standard working hours.
Finding the Right ResourceSometimes there’s no one in the world who can perform a certain task likeAlbert, and you’ll get Albert to do that job if it kills you. Other times, justabout anyone could handle the work.
If any Tom, Dick, or Mary with a certain skill level (or a certain rate per hour)will do, you can use Project features to find the right resource and make surehe or she has enough time to take on just one more task.
Needed: One good resource willing to workYou’ve probably used the Find feature in other software to find a word orphrase or number. That’s child’s play compared with Project’s Find feature,which can find you a backhoe, a corporate jet, or even a person! You can useProject’s Find feature to look for resources with certain rates or in a certainworkgroup. You can search for resources by their initials, their maximumassignment units, their standard or overtime rate, and so on.
For example, you might need to find a resource whose standard rate is lessthan $50. Or you might want to find someone who can put in extra work on atask, so you search for any resource whose maximum units are greater than100 percent. (In other words, the resource can put in a longer than usual daybefore he or she is considered overallocated.) Perhaps you need to find amaterial resource that is a chemical measured in gallons, but you can’tremember the exact chemical name. In that case, you can search forresources whose material label includes the word gallons.
First display any resource view and then follow these steps to find resourcesin Project:
1. Choose Edit➪Find.
The Find dialog box appears, as shown in Figure 9-3.
165Chapter 9: Assigning Resources to Get Things Done
14_036516 ch09.qxp 11/20/06 1:42 PM Page 165

2. In the Find What box, type the text you want to find.
For example, type 50 if you want to search for a resource with a stan-dard rate of $50 or less, or laboratory if you want to find a resourcewhose material label contains that word.
3. From the Look In Field list, choose the name of the field you want tosearch in.
For example, to search for resources that have a maximum unit assignmentpercentage of more than 100 percent, choose the Max Units field here.
4. In the Test box, select a criterion.
For maximum units of more than 100 percent, for example, this choicewould be Is Greater Than.
5. If you prefer to search backward from your current location (that is,the currently selected cell in the task list) instead of forward, chooseUp from the Search box.
6. If you want to match the case of the text, select the Match Case check box.
7. To begin the search, click Find Next.
8. Continue to click Find Next until you find the instance you’re looking for.
You can use the Find feature also to find and replace an entry. For example,if your Manufacturing department (MFG) changes its name to Production(PDTN), you can search the Group field for the code MFG. In the Replacedialog box that appears, click the Replace button, and type the words PDTN, as shown in Figure 9-4. Then click the Replace button to replace each instance one by one or click the Replace All button to replace everyinstance of that entry in that field, wherever it occurs in your project.
Figure 9-3:Searchingcombines
looking forsome
element in aparticularfield thatmeets acertain
criterion.
166 Part II: People Who Need People
14_036516 ch09.qxp 11/20/06 1:42 PM Page 166
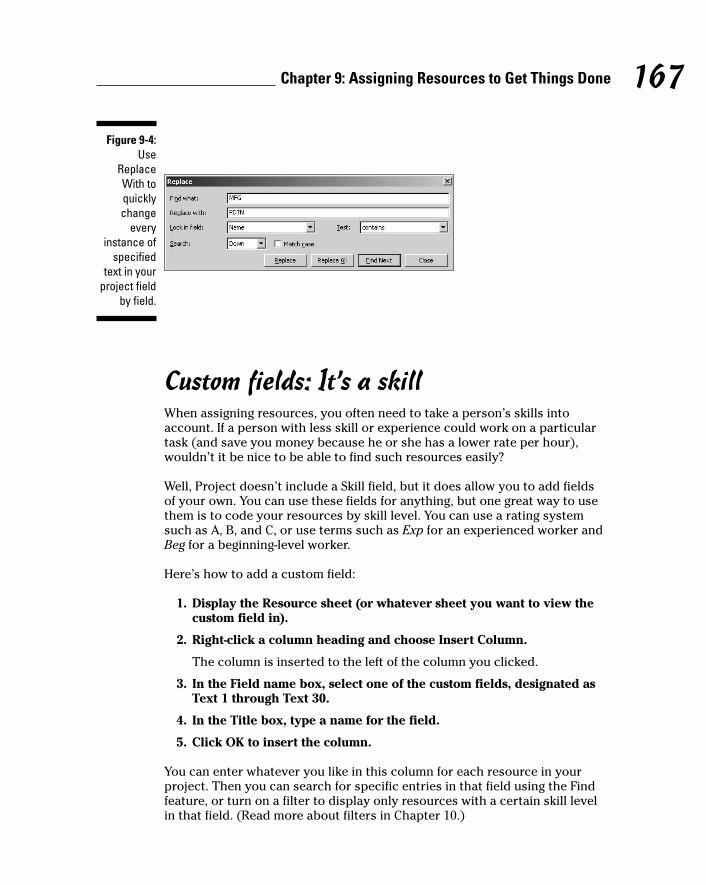
Custom fields: It’s a skillWhen assigning resources, you often need to take a person’s skills intoaccount. If a person with less skill or experience could work on a particulartask (and save you money because he or she has a lower rate per hour),wouldn’t it be nice to be able to find such resources easily?
Well, Project doesn’t include a Skill field, but it does allow you to add fields of your own. You can use these fields for anything, but one great way to usethem is to code your resources by skill level. You can use a rating systemsuch as A, B, and C, or use terms such as Exp for an experienced worker andBeg for a beginning-level worker.
Here’s how to add a custom field:
1. Display the Resource sheet (or whatever sheet you want to view thecustom field in).
2. Right-click a column heading and choose Insert Column.
The column is inserted to the left of the column you clicked.
3. In the Field name box, select one of the custom fields, designated asText 1 through Text 30.
4. In the Title box, type a name for the field.
5. Click OK to insert the column.
You can enter whatever you like in this column for each resource in your project. Then you can search for specific entries in that field using the Findfeature, or turn on a filter to display only resources with a certain skill levelin that field. (Read more about filters in Chapter 10.)
Figure 9-4:Use
ReplaceWith toquicklychange
everyinstance of
specifiedtext in your
project fieldby field.
167Chapter 9: Assigning Resources to Get Things Done
14_036516 ch09.qxp 11/20/06 1:42 PM Page 167
Some organizations designate custom fields for certain company informationsuch as an accounting code or vendor rating. If you have a Project adminis-trator who is in charge of these enterprise-wide standards, check with him orher before you choose a custom field to designate skill level.
A Useful AssignationIf you understand how task types and effort-driven scheduling can affect yourtasks’ timing, you’ve fought 95 percent of the battle in assigning resources.The rest is just the software equivalent of paperwork. First, you have tocreate resources before you can assign them. (If you haven’t, wander toChapters 7 and 8 for a refresher course.) After you create resources, you can use a couple of methods to assign them to tasks and also specify theresource assignment units. These assignment units differ slightly betweenwork resources and material resources, however, so read on.
Determining work material and cost-resource assignment unitsWork resources, which are typically people, are assigned to a task using apercentage: for example, 100 percent, 50 percent, or 150 percent. When youassign a resource at a percentage, the assignment is based on the Resourcecalendar. A resource with a Standard calendar will put in eight hours a day ifyou assign it at 100 percent assignment units. Theoretically, a resource with a24-hour calendar will work a grueling 24 hours a day at 100 percent (andprobably fall right over) or 12 hours at 50 percent.
A material resource is assigned in units, such as gallons, consulting sessions,yards, or tons. When you assign a material resource to a task, you designatehow many units of that resource will go to that task.
A cost resource is one that incurs a certain cost every time you assign it. Forexample, if you create a cost resource called Permit Fee and assign a cost of$100, every time you assign a permit fee to a task, it is assigned at $100.
Note that material resource units are part of the entire work-unit-duration cal-culation that can cause work resource assignments to change task durations.
Making your assignmentsYou have four methods of making resource assignments in Project. You canselect resources from the Resources tab of the Task Information dialog box,
168 Part II: People Who Need People
14_036516 ch09.qxp 11/20/06 1:42 PM Page 168

enter resource information in the Resource column in the Entry table (dis-played in Gantt Chart view), split the window and use the Resources andPredecessors form in a pane, or use the Assign Resources dialog box.
Which method you use depends to some extent on your own preferences, butgenerally speaking, here are some parameters for using each method:
� When you use the Resource column, you’re assigning at a default 100percent assignment. If you want to assign a different percentage, don’tuse this method.
� Use the Assign Resources dialog box if you may want to replace oneresource with another (there’s a handy Replace feature in this dialogbox) or if you want to filter the list of available resources by a criterion(for example, resources with a cost of less than a specified amount).This is very useful for making multiple resource assignments.
� Work in the Task Information dialog box if it’s helpful to have task details(such as task type or the constraints contained on other tabs of thisdialog box) handy when you make the assignment.
Picking resources from the Resource columnYou can use this method to add resources in a resource column, whetherfrom Gantt Chart view or Tracking Gantt view.
Even though it lists tasks in its sheet pane and can even display a Resourcecolumn, Task Usage view cannot be used to add resource assignments.
Follow these steps to assign resources at a default percentage:
1. Display Gantt Chart view by clicking it in the View bar.
2. Choose View➪Table➪Entry.
3. Click in the Resource Names column for the task on which you wantto make a resource assignment.
An arrow appears at the end of the cell.
4. Click the arrow to display a list of resources.
5. Click the resource you want to assign.
The resource name appears in the Resource column, assigned at 100percent.
You can always change the assignment units later by opening the Task Information dialog box and changing the assignment units on the Resources tab.
169Chapter 9: Assigning Resources to Get Things Done
14_036516 ch09.qxp 11/20/06 1:42 PM Page 169

Using the Assign Resources dialog boxTo assign a work or material resource to a task, you can select a task andthen use the Assign Resources dialog box to make assignments. To do so,follow these steps:
1. Click a task to select it.
2. Click the Assign Resources button on the Standard toolbar.
The Assign Resources dialog box appears, as shown in Figure 9-5.
3. Click a resource to select it and then click the Assign button.
A check mark appears next to the assigned resource in the ResourceName column.
4. Click the Units column for the resource you just assigned.
If it’s a work resource, the default assignment of 100% appears. If it’s amaterial resource, the default is one unit.
5. Specify a percentage of assignment units for the resource.
Click the spinner arrows in the box to increase or decrease the setting.For a work resource, change the percentage units in 50-percent incre-ments by clicking the arrows; or, you can simply type a percentage. For amaterial resource, use the spinner arrows in the Units column toincrease or decrease the unit assignment, or type in a number of units.
6. Repeat Steps 3–5 to add all resources.
7. If you want to replace one resource with another, click an assignedresource (indicated with a check mark), click Replace, select anothername on the list, set its units, and click OK.
8. Click the Close button to save all the assignments.
Figure 9-5:Every
resourceyou’ve
created isshown in
this list.
170 Part II: People Who Need People
14_036516 ch09.qxp 11/20/06 1:42 PM Page 170

You can also get to the Assign Resources dialog box from the ResourceManagement toolbar. This toolbar also offers handy tools for addingresources to your project from sources such as your Outlook Address Book and managing overallocated resources.
Adding assignments in the Task Information dialog boxFinally, you can assign resources on the Resources tab of any TaskInformation dialog box by following these steps:
1. Double-click a task name in Gantt Chart view.
The Task Information dialog box appears.
2. Click the Resources tab to display it.
3. Click in a blank Resource Name box and then click the arrow thatappears at the right side of the box.
A drop-down list of resources appears.
4. Click the resource you want to assign.
5. Click the Units column and use the spinner arrows to set an assign-ment percentage.
6. Repeat Steps 3–5 to assign additional resources.
7. Click OK.
If assigning a material resource, the Units default is a single unit. (If yourunits are pounds, the default assignment is 1 lb.) Use the spinner arrows inthe Unit field to assign additional material units.
Getting the contour that’s right for youWhen you make a work resource assignment, Project spreads the work outevenly over the life of the task. However, you can modify the level of workthat goes on during the life of the task — called a work contour — so thatmore work takes place near the beginning, middle, or end of the task.
For example, if you know that the people on a task to install a new com-puter network will have to spend some time up front studying the manualsand reviewing the schematics for the wiring before they can begin to makemeasurable progress on the installation, you might use a late-peaking con-tour. Or, if you know that people are likely to put in a lot of work up front on a survey — and then sit back and wait for the results to come in — you mightchoose an early-peaking contour.
Using a different contour on a particular resource’s task assignment couldfree up that resource to work on a second task that occurs during the life ofthe first task. This can help you resolve a resource conflict.
171Chapter 9: Assigning Resources to Get Things Done
14_036516 ch09.qxp 11/20/06 1:42 PM Page 171

The contour you select will have slightly different effects depending on thetask type. Trust me: Most project managers don’t even want to try to under-stand this complex equation. Simply try a different contour and see whetherit solves your problem and doesn’t make too dramatic a change to your taskduration or other resource assignments.
To set a task’s contour, follow these steps:
1. Display Task Usage view.
This view shows resource assignments by task.
2. Double-click a resource.
The Assignment Information dialog box appears, as shown in Figure 9-6.
3. From the Work Contour box, choose one of the preset patterns.
4. Click OK to save the setting.
A symbol for the contour pattern is displayed in the Indicator columnfor the resource.
If none of these patterns fits your situation, you can manually modify aresource’s work by changing the number of hours the resource puts inday by day on a task in Task Usage view.
Before you save, make sure your modifications add up to the number of hoursyou want, or you could inadvertently change the resource’s assignment.
Resource Allocation view is useful for reviewing resource assignments at thisstage. This view gives a side-by-side comparison between a single resource’sworkload and all the tasks going on during a particular time period in yourproject.
Figure 9-6:This is
a handysummary
of allassignmentinformation
for aresource on a task.
172 Part II: People Who Need People
14_036516 ch09.qxp 11/20/06 1:42 PM Page 172
Communicating an Assignment to Your Team
After you work out all your resource assignments on paper, see whether yourideas will work for your resources’ schedules.
Of course, you should check to see who is available for your project. Andbecause things can change in the time it takes to work out your plan andmake assignments, make sure that your resources are committed to youbefore you commit yourself to a final plan.
If you use Project Server and Project Web Access with Project, you can usecollaborative tools to publish assignments to a server, where people canreview them and accept or decline. For more on Project Web Access, seeChapters 18 and 19.
You can send your entire project plan to resources as an e-mail attachment orjust send selected tasks. You can also generate a resource assignment reportand send that to people so that they can review their assignments in detail.
It’s in the e-mailE-mail can be a project manager’s best friend. You can use it to communicatethroughout the life of your project and to send your project plan for review atvarious stages. One of those stages is the point at which you want yourresources to commit to their task assignments.
You can send your project as an e-mail attachment or as a schedule note,which is an e-mail with only updated tasks attached. You also have the choice of sending an entire plan or just selected tasks from it.
To send a project as an e-mail attachment, follow these steps:
1. Choose File➪Send To➪Mail Recipient (as Attachment).
An e-mail form is displayed.
2. Fill in a subject and your e-mail message.
3. Click Send to send the message.
If you want to send a schedule note, follow these steps:
1. Choose File➪Send To➪Mail Recipient (as Schedule Note).
The Send Schedule Note dialog box, as shown in Figure 9-7, appears.
173Chapter 9: Assigning Resources to Get Things Done
14_036516 ch09.qxp 11/20/06 1:42 PM Page 173

2. Choose any intended recipients of the message from among ProjectManager, Resources, and Contacts.
3. Select either Entire Project or Selected Tasks to specify what toinclude in the schedule note.
4. In the Attach area, select what to attach to the e-mail message.
If you select the File option, the entire file will be attached. If you insteadselect the Picture of Selected Tasks option, Project will attach a bitmappicture of the selected tasks in the view you had active when youstarted the Send procedure.
Note: If you were in a Resource view when you began this process, thisoption will read Picture of Selected Resources, and the resources youhad selected will be sent.
5. Click OK.
An e-mail form is displayed.
6. Fill in a subject and your e-mail message.
7. Click Send to send the message.
To help you track e-mails to resources on your project, set your e-mail program to provide return receipts when messages are received or read.
Report your findingsRemember the days when you read a report on paper, instead of on yourcomputer screen? Those days aren’t gone: In lots of situations, a printedreport is your best bet for clear communication about your project.
Figure 9-7:Use this
dialog boxto specify
who willreceive your
note.
174 Part II: People Who Need People
14_036516 ch09.qxp 11/20/06 1:42 PM Page 174

You can use several assignment reports to inform your human resources oftheir assignments on projects. To help you out, the four assignment reporttypes provide the following information:
� Who Does What report: Provides a list of tasks organized by resourcewith total work hours, number of days delay from the original schedule,and start and finish dates. It also reflects a total number of work hoursfor a resource on all tasks in the project.
� Who Does What When report: Shows a calendar listing tasks organizedby time period with resource assignment totals.
� To-Do List report: Generated for a single resource (not all resources, aswith the other report types) week by week in a project. It lists the tasknames, durations, start and finish dates, and predecessor tasks by tasknumber.
� Overallocated Resources report: Shows resource assignments forhuman resources who are overbooked on tasks during the project,including total hours, unit assignments, total hours of work on eachtask, and any delay from the original schedule.
Follow these steps to generate an assignment report:
1. Choose Report➪Reports.
2. Click Assignments and then click Select.
The Assignment Reports dialog box appears, as shown in Figure 9-8.
3. Click one of the four reports.
4. Click Select.
A preview of the report appears. Figure 9-9 shows a sample Who DoesWhat report.
175Chapter 9: Assigning Resources to Get Things Done
Going the Project Web Access routeProject Web Access allows you to do a lot ofcommunicating and interacting with your teamonline, including notifying people of assign-ments, allowing them to see your Project plan(even if they don’t have Project installed), andrequesting status reports. You can also use fea-tures of Project Web Access to view resourceavailability, build a resource team from an
enterprise resource pool, and review resourceassignments across projects. Chapters 18 and19 give you an overview of Project Web Access,which requires that your organization haveProject Server installed. If your organizationdecides to implement this enterprise approachto project management, it can make your lifemuch easier!
14_036516 ch09.qxp 11/20/06 1:42 PM Page 175

5. If you need to modify the Page Setup, click Page Setup.
For example, you might want to modify the margins or set the documentto print landscape or portrait.
6. To print the report, click Print.
See Chapter 16 for much more about reporting options in Project 2007,including the new Visual Reports feature.
Figure 9-9:A wealth ofassignmentinformation
can becontained in
thesereports.
Figure 9-8:Assignmentreports deal
withresource
assignmentsto individual
tasks.
176 Part II: People Who Need People
14_036516 ch09.qxp 11/20/06 1:42 PM Page 176

Part IIIWell, It LooksGood on Paper
15_036516 pt03.qxp 11/20/06 1:42 PM Page 177

In this part . . .
When you’ve charted a course for your project, it’stime for the critical eye: Does your project plan
pass muster in terms of budget and timing? If not, you can use the built-in Project tools to tinker with resourceassignments, adjust task timing, trim costs, and meetdeadlines. Result: a better final plan. You also get a look atmodifying how items in your project are formatted. (Afterall, a polished presentation, whether on-screen or in print,is invaluable.)
15_036516 pt03.qxp 11/20/06 1:42 PM Page 178
Chapter 10
Fine-Tuning Your PlanIn This Chapter� Using filters to view timing and resource issues
� Determining what’s driving your tasks
� Using Multiple Undo to try out solutions
� Turning on change highlighting
� Adding slack to your tasks to plan for change
� Making adjustments to shorten your schedule
� Reigning in your costs
� Resolving resource conflicts
As they say, the best-laid schemes of mice and project managers go oftawry (or is that “gang aft agley?”), and your plans are no different. After
you take your best shot at laying out your project plan, creating every task, andassigning every resource — and you think you’re ready to start your project —think again.
A close look at almost any plan will reveal some issues that you shouldresolve before you begin working on your first task. These might include aschedule that ends a month after your deadline, human resources who areassigned to work 36-hour days, or a budget that exceeds the national debt.(Details, details. . . . )
But even if you don’t see any glaring problems in the areas of time, workload,or money, you should do a few things to make sure that your project is asrealistic as possible before you commit to it. So take a moment to give yourproject the once-over.
Everything Filters to the Bottom LineA first step in making sure that your plan is solid is simply looking at it from a few different perspectives. It’s like walking around a car to see all its features
16_036516 ch10.qxp 11/20/06 1:42 PM Page 179

before you fork over the down payment. Filters help you get that kind of perspective.
Two major problem areas that filters can help you examine at this stage are
� Overallocated resources: These are resources working more than thenumber of hours you specified.
� Tasks on a critical path: A critical path consists of the series of tasks inyour project that must happen on time for the project to meet its finaldeadline.
Any task that has slack — that is, any length of time that it could bedelayed without delaying the entire project’s timing — is not on the critical path. If your project has little in the way of slack, any delays that occur are likely to derail your project.
Predesigned filtersFilters are like the Zoom feature in your word processor: They give you acloser look at various aspects of your plan and help you spot clues aboutproblems (such as overallocated resources). You can set a filter to highlighttasks or resources that meet certain criteria or to remove any tasks orresources from view that don’t meet such criteria.
Project provides predesigned filters that you can simply turn on for tasks orresources, using criteria such as
� Tasks with a cost greater than a specified amount
� Tasks on the critical path
� Tasks that occur within a certain date range
� Milestone tasks
� Tasks that use resources in a resource group
� Tasks with overallocated resources
Several filters, such as Slipping Tasks and Overbudget Work, help you spotproblems after you’ve finalized your plan and are tracking actual progress.(See Chapter 13 for more about tracking.)
You can access filters in a couple of ways. When you use the Filter button,you choose from a list of built-in filters. The filters act to remove any tasksfrom view that don’t meet specified criteria.
To turn on such filters from the Formatting toolbar, follow these steps:
180 Part III: Well, It Looks Good on Paper
16_036516 ch10.qxp 11/20/06 1:42 PM Page 180

1. Display a resource view (such as Resource Sheet view) to filter forresources or a task view (such as Gantt Chart view) to filter for tasks.
2. Click the Filter list on the Formatting toolbar and then choose a criterion.
The Filter list is a drop-down list; when no filter is applied, All Tasks orAll Resources appear in the list. If you choose a filter that requires input,you’ll see a dialog box such as the one in Figure 10-1. Otherwise, thefilter is applied immediately and removes from view any resources ortasks that don’t match your criteria.
3. If a dialog box is displayed, fill in the information and then click OK.
The filter is applied.
To redisplay all tasks or resources, click Filter on the Formatting toolbar and then click either All Resources or All Tasks (depending on whether aResource or Task filter is currently applied).
Putting AutoFilters to workYou can also use the AutoFilter button on the Formatting toolbar to turn onan AutoFilter feature. When you click the AutoFilter button, arrows appear atthe head of columns in the currently displayed sheet. Click the arrow for theTask Name column (for example), and the name of every task in your projectis listed in alphabetical order. Click a task name, and all tasks but that taskand any parent tasks for it are removed from view. You can also choose aCustom setting from each of these menus (as shown in Figure 10-2) to cus-tomize AutoFilter with certain criteria.
Follow these steps to activate and use AutoFilter:
1. Display the view that contains the fields (columns) you want to filter.
2. Click the AutoFilter button.
Arrows appear at the top of each column.
3. Click the arrow on the column that you want to filter.
Figure 10-1:Some filtersrequire that
you enterparameters.
181Chapter 10: Fine-Tuning Your Plan
16_036516 ch10.qxp 11/20/06 1:42 PM Page 181

4. Click the criterion you want for your filter.
For example, if you are filtering for task duration, in the Durationcolumn, you can choose >1 day, >1 week, or a specific number of days(such as 5 days or 100 days). All tasks or resources that don’t meet yourcriteria disappear.
If you want to apply a highlight to each item that meets your filter criteriarather than remove nonmatching items from view, choose Project➪FilteredFor➪More Filters. Click the filter you want and then click Highlight.
Do-it-yourself filtersYou don’t have to use predesigned filters: You can get creative and design yourown filters. To define a new filter, you specify a field name, a test, and a value.
For example, the following filters for any task on the critical path:
Critical (field name) Equals (test) Yes (value)
You can also include additional qualifiers to the filter. The following filters fortasks that are both on the critical path and have a baseline cost of more than$5,000:
Critical (field name) Equals (test) Yes (value)
and
Baseline Cost (field name) Is Greater Than (test) 5000 (value)
Here’s how to build your own filter definition:
1. Choose Project➪Filtered For➪More Filters.
The More Filters dialog box appears, as shown in Figure 10-3.
Figure 10-2:AutoFilter
choices arespecific to
each field ofinformation
in yoursheet.
182 Part III: Well, It Looks Good on Paper
16_036516 ch10.qxp 11/20/06 1:42 PM Page 182
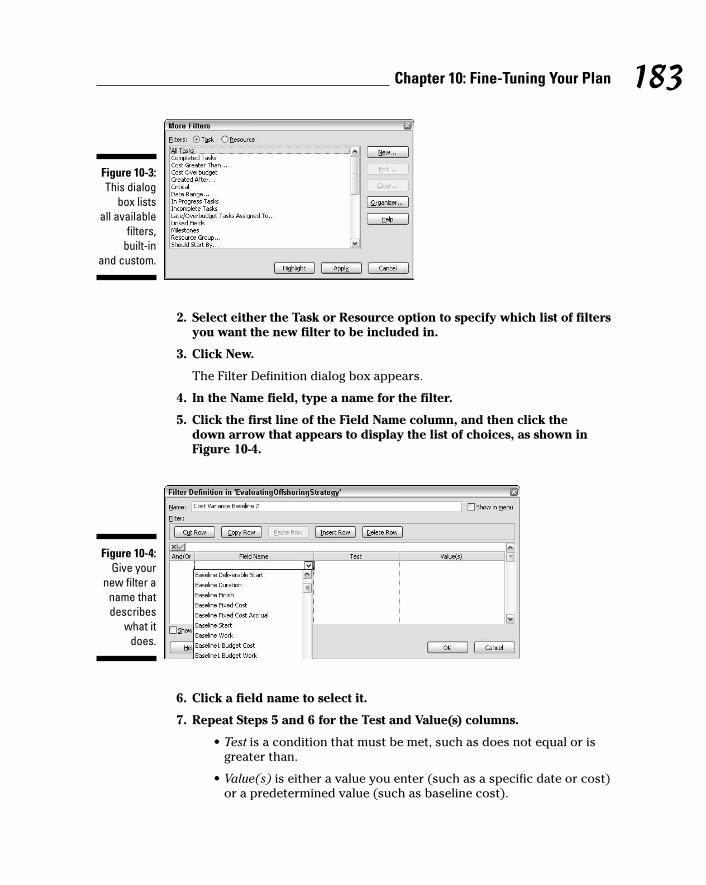
2. Select either the Task or Resource option to specify which list of filtersyou want the new filter to be included in.
3. Click New.
The Filter Definition dialog box appears.
4. In the Name field, type a name for the filter.
5. Click the first line of the Field Name column, and then click the down arrow that appears to display the list of choices, as shown inFigure 10-4.
6. Click a field name to select it.
7. Repeat Steps 5 and 6 for the Test and Value(s) columns.
• Test is a condition that must be met, such as does not equal or isgreater than.
• Value(s) is either a value you enter (such as a specific date or cost)or a predetermined value (such as baseline cost).
Figure 10-4:Give your
new filter aname thatdescribes
what itdoes.
Figure 10-3:This dialog
box lists all available
filters, built-in
and custom.
183Chapter 10: Fine-Tuning Your Plan
16_036516 ch10.qxp 11/20/06 1:42 PM Page 183

8. If you want to enter a qualifier, such as a dollar amount, click theentry box above the column headings and then type the amount at the end of the filter definition.
For example, if you choose Cost for the field name and Equals for thetest, you might enter the number 5000 at the end of the definition in theentry box.
9. If you want to add another condition, choose And or Or from theAnd/Or column, and then make choices for the next set of Field Name,Test, and Value(s) boxes.
Note that you can cut and paste rows of settings you’ve made torearrange them in the list, or use the Copy Row or Delete Row button toperform those actions for filters with several lines of criteria.
10. If you want the new filter to be shown in the list when you click theFilter box on the Formatting toolbar, select the Show in Menu check box.
11. Click OK to save the new filter and then click Apply to apply the filterto your plan.
You can click the Organizer button in the More Filters dialog box to copy filters you’ve created in one Project file to another file.
Hanging Out in GroupsRemember those groups you used to hang out with in high school? (I’m sure you were part of the cool group!) Groups helped you see the underlying order ofyour adolescent hierarchy. Project lets you group things, too. The Group featureessentially allows you to organize information by certain criteria. For example,you can use the Group feature if you want to see resources organized by workgroup, or you might organize tasks by their duration, shortest to longest.
Organizing tasks or resources in this way may help you spot a potential problem in your project: for example, if you find that the majority of yourresources at project startup are unskilled or that most of the tasks at the endof your project are on the critical path. Like filters, groups come predefinedor you can create custom groups.
Applying predefined groupsPredefined groups are quick and easy to apply and cover a host of commonrequirements in projects. Follow these steps to apply a predefined groupstructure to your project:
1. Display either a resource view (such as Resource Sheet view) to groupresources, or a task view (such as Gantt Chart view) to group tasks.
184 Part III: Well, It Looks Good on Paper
16_036516 ch10.qxp 11/20/06 1:42 PM Page 184

2. On the Standard toolbar, click the Group By list and then choose a criterion.
The information is organized according to your selection. Figure 10-5shows an example.
To redisplay all tasks or resources in their original order, click the arrow inthe Group box on the toolbar to display the list and click No Group. (Whenno group is applied, the Group box displays No Group.)
Devising your own groupsCustom groups include three elements: a field name, a field type, and anorder. For example, you might create a group that shows the field name (such as Baseline Work) and a field type (such as Tasks, Resources, orAssignments) in a certain order (Descending or Ascending). A group thatshows Baseline Work for Tasks in Descending order, for example, would listtasks in order from the most work hours required to the least. Other settingsyou can make for groups control the format of the group’s appearance, suchas the font used or a font color applied.
Figure 10-5:Organizing
tasks toshow only
tasks inprogressprovides
this view ofyour project.
185Chapter 10: Fine-Tuning Your Plan
16_036516 ch10.qxp 11/20/06 1:42 PM Page 185
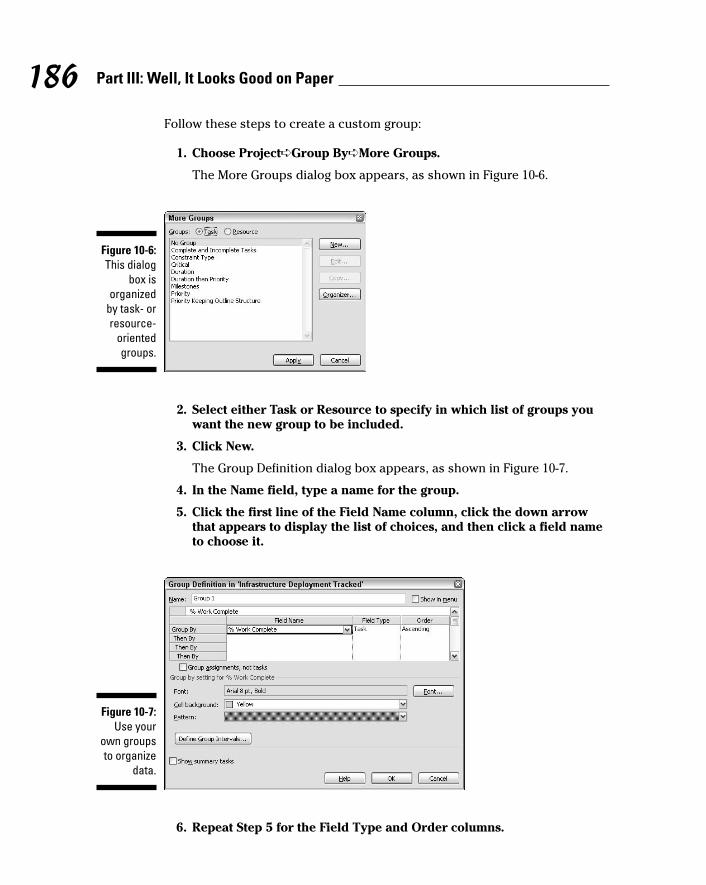
Follow these steps to create a custom group:
1. Choose Project➪Group By➪More Groups.
The More Groups dialog box appears, as shown in Figure 10-6.
2. Select either Task or Resource to specify in which list of groups youwant the new group to be included.
3. Click New.
The Group Definition dialog box appears, as shown in Figure 10-7.
4. In the Name field, type a name for the group.
5. Click the first line of the Field Name column, click the down arrowthat appears to display the list of choices, and then click a field nameto choose it.
6. Repeat Step 5 for the Field Type and Order columns.
Figure 10-7:Use your
own groupsto organize
data.
Figure 10-6:This dialog
box isorganized
by task- orresource-
orientedgroups.
186 Part III: Well, It Looks Good on Paper
16_036516 ch10.qxp 11/20/06 1:42 PM Page 186
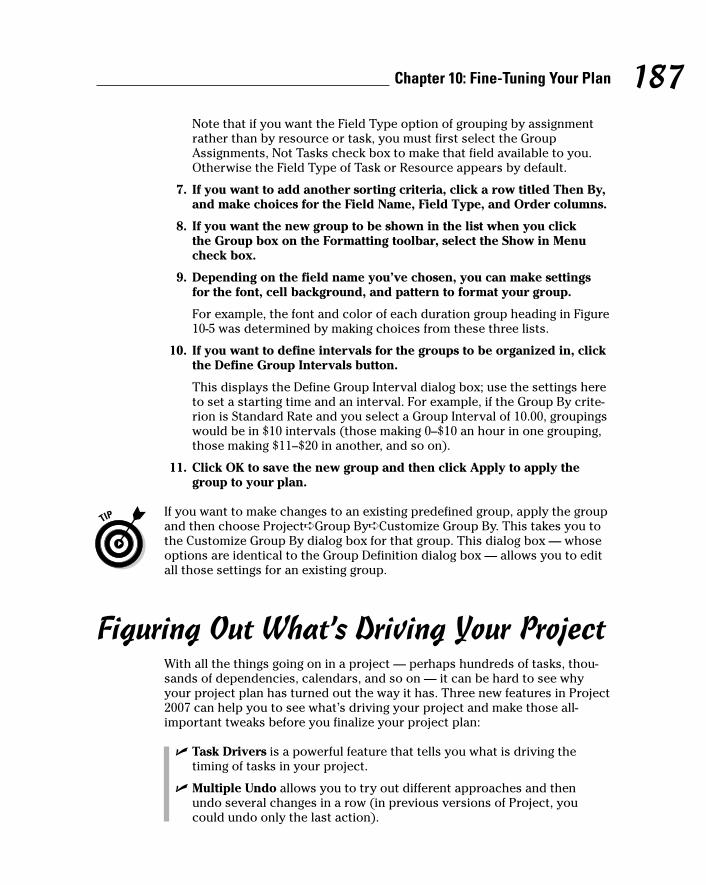
Note that if you want the Field Type option of grouping by assignmentrather than by resource or task, you must first select the GroupAssignments, Not Tasks check box to make that field available to you.Otherwise the Field Type of Task or Resource appears by default.
7. If you want to add another sorting criteria, click a row titled Then By,and make choices for the Field Name, Field Type, and Order columns.
8. If you want the new group to be shown in the list when you click the Group box on the Formatting toolbar, select the Show in Menucheck box.
9. Depending on the field name you’ve chosen, you can make settingsfor the font, cell background, and pattern to format your group.
For example, the font and color of each duration group heading in Figure10-5 was determined by making choices from these three lists.
10. If you want to define intervals for the groups to be organized in, clickthe Define Group Intervals button.
This displays the Define Group Interval dialog box; use the settings hereto set a starting time and an interval. For example, if the Group By crite-rion is Standard Rate and you select a Group Interval of 10.00, groupingswould be in $10 intervals (those making 0–$10 an hour in one grouping,those making $11–$20 in another, and so on).
11. Click OK to save the new group and then click Apply to apply thegroup to your plan.
If you want to make changes to an existing predefined group, apply the groupand then choose Project➪Group By➪Customize Group By. This takes you tothe Customize Group By dialog box for that group. This dialog box — whoseoptions are identical to the Group Definition dialog box — allows you to editall those settings for an existing group.
Figuring Out What’s Driving Your ProjectWith all the things going on in a project — perhaps hundreds of tasks, thou-sands of dependencies, calendars, and so on — it can be hard to see whyyour project plan has turned out the way it has. Three new features in Project2007 can help you to see what’s driving your project and make those all-important tweaks before you finalize your project plan:
� Task Drivers is a powerful feature that tells you what is driving thetiming of tasks in your project.
� Multiple Undo allows you to try out different approaches and then undo several changes in a row (in previous versions of Project, youcould undo only the last action).
187Chapter 10: Fine-Tuning Your Plan
16_036516 ch10.qxp 11/20/06 1:42 PM Page 187
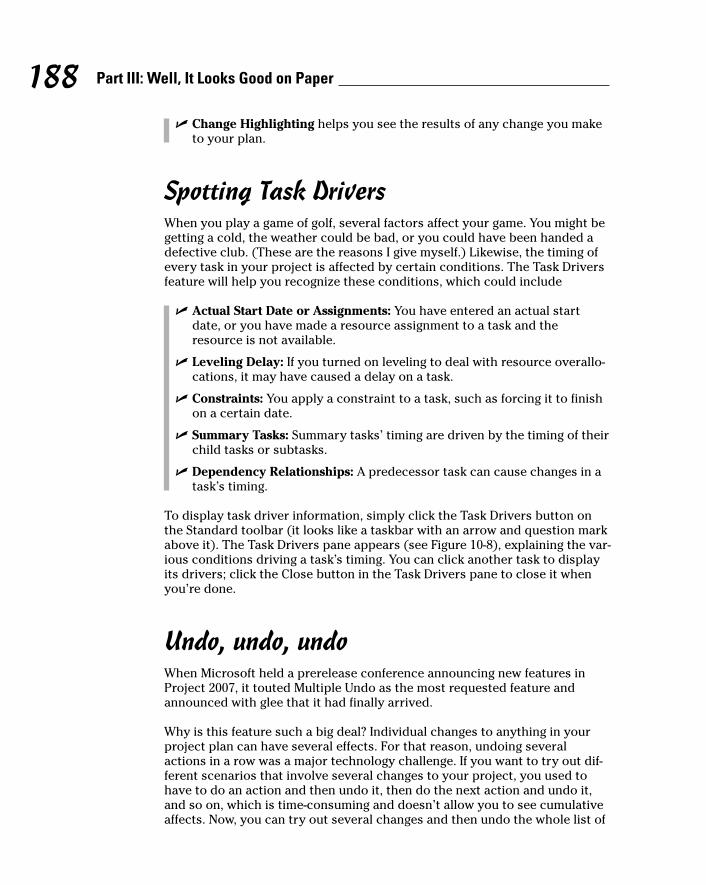
� Change Highlighting helps you see the results of any change you maketo your plan.
Spotting Task DriversWhen you play a game of golf, several factors affect your game. You might begetting a cold, the weather could be bad, or you could have been handed adefective club. (These are the reasons I give myself.) Likewise, the timing ofevery task in your project is affected by certain conditions. The Task Driversfeature will help you recognize these conditions, which could include
� Actual Start Date or Assignments: You have entered an actual startdate, or you have made a resource assignment to a task and theresource is not available.
� Leveling Delay: If you turned on leveling to deal with resource overallo-cations, it may have caused a delay on a task.
� Constraints: You apply a constraint to a task, such as forcing it to finishon a certain date.
� Summary Tasks: Summary tasks’ timing are driven by the timing of theirchild tasks or subtasks.
� Dependency Relationships: A predecessor task can cause changes in atask’s timing.
To display task driver information, simply click the Task Drivers button onthe Standard toolbar (it looks like a taskbar with an arrow and question markabove it). The Task Drivers pane appears (see Figure 10-8), explaining the var-ious conditions driving a task’s timing. You can click another task to displayits drivers; click the Close button in the Task Drivers pane to close it whenyou’re done.
Undo, undo, undoWhen Microsoft held a prerelease conference announcing new features inProject 2007, it touted Multiple Undo as the most requested feature andannounced with glee that it had finally arrived.
Why is this feature such a big deal? Individual changes to anything in yourproject plan can have several effects. For that reason, undoing severalactions in a row was a major technology challenge. If you want to try out dif-ferent scenarios that involve several changes to your project, you used tohave to do an action and then undo it, then do the next action and undo it,and so on, which is time-consuming and doesn’t allow you to see cumulativeaffects. Now, you can try out several changes and then undo the whole list of
188 Part III: Well, It Looks Good on Paper
16_036516 ch10.qxp 11/20/06 1:42 PM Page 188

changes or a portion of them at once. Because you often want to try out several changes when finalizing or making adjustments to a project — forexample, changing the timing of several tasks or the hourly rates of severalresources — Multiple Undo is very handy.
You do have to undo all changes in order. For example, if you made fivechanges and you want to undo the fourth change, you have to undo changesone through four. To undo a change, click the down arrow of the Undo buttonon the Standard toolbar and then choose the change you want to undo (seeFigure 10-9). That change and all others you performed subsequent to it areundone.
Highlighting changesAnother useful tool you can use to see how changes you make to fine-tune your project schedule have an impact on your project is ChangeHighlighting. You can toggle this feature on and off by clicking the ShowChange Highlighting/Hide Change Highlighting button on the Standard tool-bar. When you turn Change Highlighting on and take any action to changeyour project’s schedule, a highlight appears on every task that the changehas had an impact on (see Figure 10-10).
Figure 10-8:The Task
Driverspane shows
you theinfluences
on yourtask’s
timing.
189Chapter 10: Fine-Tuning Your Plan
16_036516 ch10.qxp 11/20/06 1:42 PM Page 189
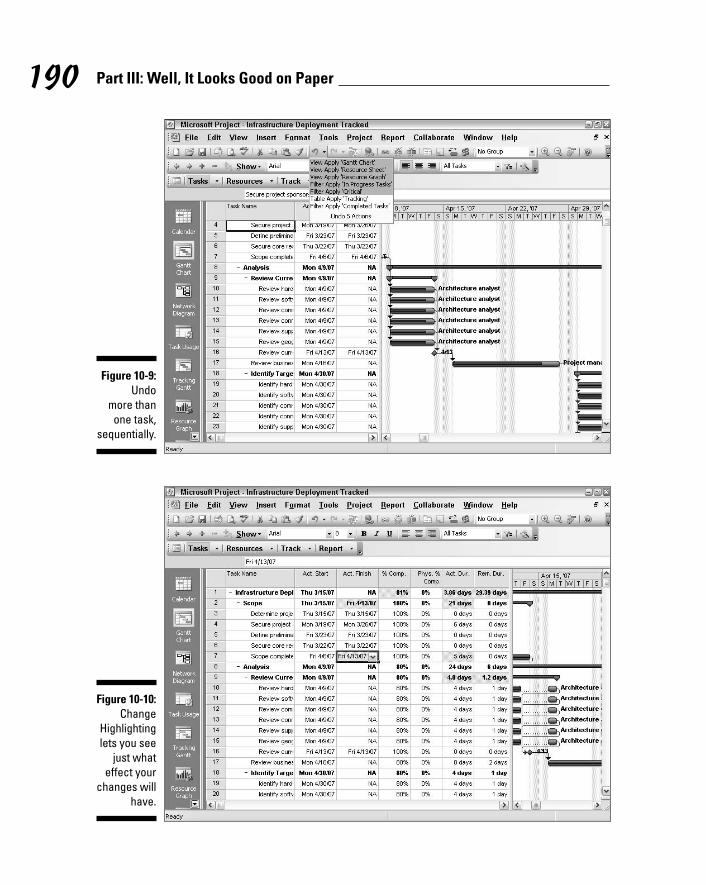
Figure 10-10:Change
Highlightinglets you see
just whateffect your
changes willhave.
Figure 10-9:Undo
more than one task,
sequentially.
190 Part III: Well, It Looks Good on Paper
16_036516 ch10.qxp 11/20/06 1:42 PM Page 190

Change Highlighting shows you only the results of the last change you madeand works only on scheduling changes.
It’s About TimeWe’ve all had this experience: Your boss asks you to commit to getting a pro-ject finished by a certain date. Your palms sweat, you get a sick feeling in thepit of your stomach, you add a week onto the deadline the boss suggests tocover yourself, and then you promise to deliver the impossible. You hope youcan do it. You want to do it. But can you do it?
Project allows you to feel much more confident about committing to a time-frame because you can see how long all your tasks will take to complete.Before you go to your boss and make any promises, make sure you’re com-fortable with two things: the total time it takes to complete the project andthe critical path (the longest series of tasks that must be completed on timein order for you to meet the overall project deadline).
The timing data for your project summary task tells you how long the entireproject will take. Just display Gantt Chart view and look at the Duration,Start, and Finish columns. If your finish date doesn’t work, you’ll have to goback and modify some tasks.
You should also make sure that there’s room for error. You can use filters andgroups to identify the critical path in, for example, Gantt Chart view orNetwork Diagram view. If you judge that too many tasks are on the criticalpath, it’s wise to add some slack to the plan to allow for inevitable delays.
Giving yourself some slackHow many tasks should be on the critical path in your project, and how manyshould have some slack — that is, some time that they could be delayed with-out delaying the entire project? I wish I could give you a formula, but sadly, it’snot a science. Ideally, every task in your project should have slack becausethings can come up that you never expected (shortages of vital materials,asteroid strikes, management turnover that places you in an entirely differentdepartment). If you add slack to each and every task, however, your project isprobably going to go on into the next millennium. Figure 10-11 shows a moretypical scenario, with a mix of noncritical and critical tasks.
191Chapter 10: Fine-Tuning Your Plan
16_036516 ch10.qxp 11/20/06 1:42 PM Page 191
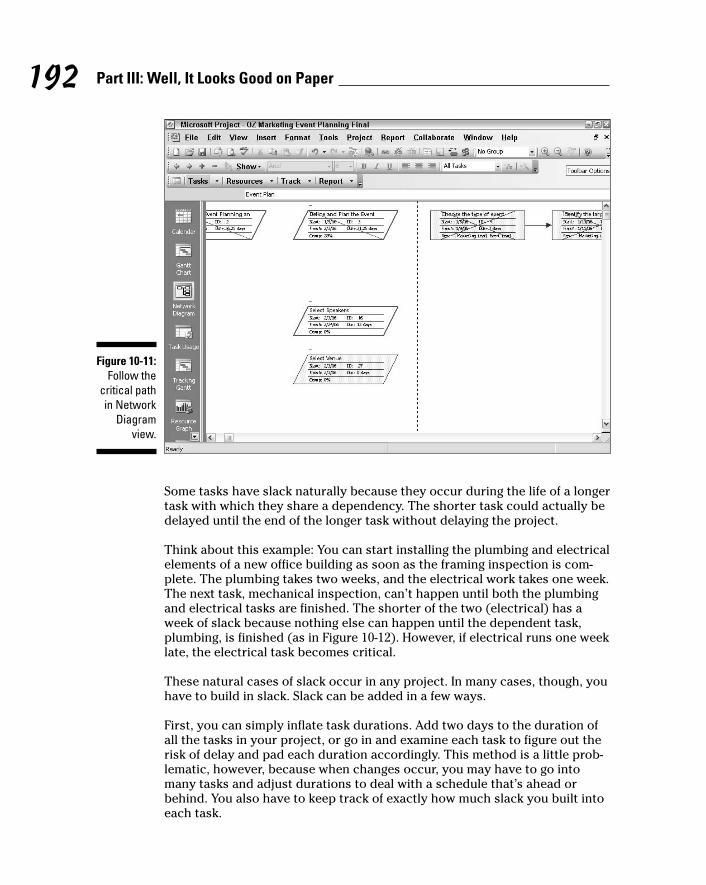
Some tasks have slack naturally because they occur during the life of a longertask with which they share a dependency. The shorter task could actually bedelayed until the end of the longer task without delaying the project.
Think about this example: You can start installing the plumbing and electricalelements of a new office building as soon as the framing inspection is com-plete. The plumbing takes two weeks, and the electrical work takes one week.The next task, mechanical inspection, can’t happen until both the plumbingand electrical tasks are finished. The shorter of the two (electrical) has aweek of slack because nothing else can happen until the dependent task,plumbing, is finished (as in Figure 10-12). However, if electrical runs one weeklate, the electrical task becomes critical.
These natural cases of slack occur in any project. In many cases, though, youhave to build in slack. Slack can be added in a few ways.
First, you can simply inflate task durations. Add two days to the duration ofall the tasks in your project, or go in and examine each task to figure out therisk of delay and pad each duration accordingly. This method is a little prob-lematic, however, because when changes occur, you may have to go intomany tasks and adjust durations to deal with a schedule that’s ahead orbehind. You also have to keep track of exactly how much slack you built intoeach task.
Figure 10-11:Follow the
critical pathin Network
Diagramview.
192 Part III: Well, It Looks Good on Paper
16_036516 ch10.qxp 11/20/06 1:42 PM Page 192
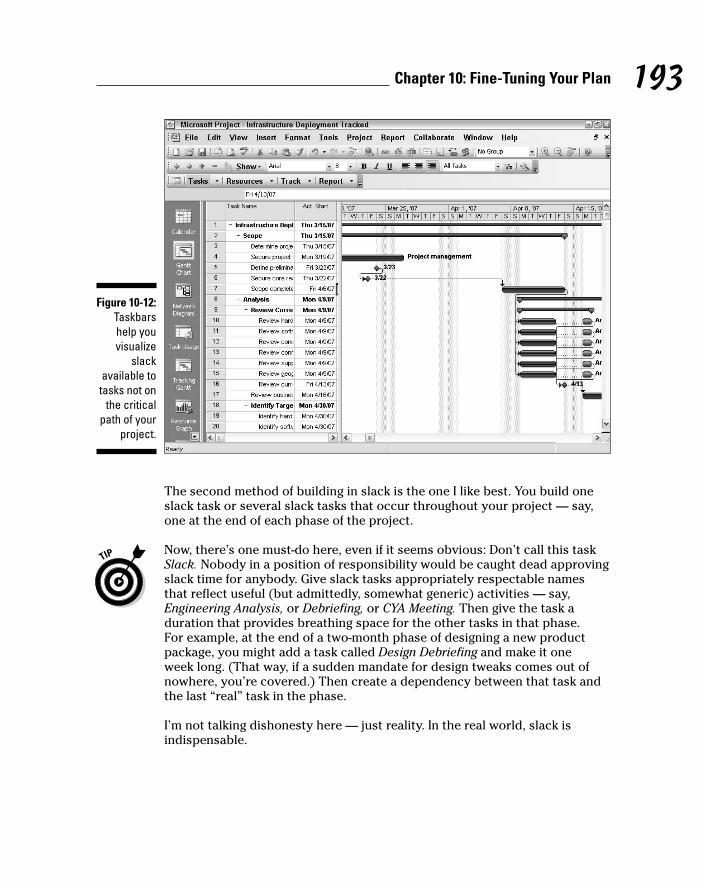
The second method of building in slack is the one I like best. You build oneslack task or several slack tasks that occur throughout your project — say,one at the end of each phase of the project.
Now, there’s one must-do here, even if it seems obvious: Don’t call this taskSlack. Nobody in a position of responsibility would be caught dead approvingslack time for anybody. Give slack tasks appropriately respectable namesthat reflect useful (but admittedly, somewhat generic) activities — say,Engineering Analysis, or Debriefing, or CYA Meeting. Then give the task a duration that provides breathing space for the other tasks in that phase. For example, at the end of a two-month phase of designing a new productpackage, you might add a task called Design Debriefing and make it one week long. (That way, if a sudden mandate for design tweaks comes out ofnowhere, you’re covered.) Then create a dependency between that task andthe last “real” task in the phase.
I’m not talking dishonesty here — just reality. In the real world, slack is indispensable.
Figure 10-12:Taskbarshelp youvisualize
slackavailable totasks not on
the criticalpath of your
project.
193Chapter 10: Fine-Tuning Your Plan
16_036516 ch10.qxp 11/20/06 1:42 PM Page 193

As things slide in your project (and they will, trust me), you’ll spot that slackis being eaten up because the slack task is suddenly ending later than thedate you’d wanted the phase to end. You can change the duration of the slacktask, reflecting the fact that your slack is being used up. The duration of thattask will give you a good indication of how much more time you have beforethe entire phase will go critical.
Doing it in less timeIf you do your homework and add slack to tasks, you’re making your planrealistic, but the price you pay is that you’re adding time to your project.What happens when your project finish date just won’t cut it with thepowers-that-be? That’s when you have to try a few tactics to chop yourtiming down to size.
Check your dependenciesThe timing of your plan is determined, to a great extent, by the timing rela-tionships you build among tasks: that is, by dependencies. So ask yourself,Did I build all my dependencies in the best way I could? Perhaps you didn’tstart one task until another was completely finished, but you could actuallystart the second task two days before the end of its predecessor. Building inthat kind of overlap will save you time.
Use the Task Drivers feature, covered in the earlier section of this chapter,“Spotting Task Drivers,” to help you scope out dependencies.
Here’s an example: You created a finish-to-start relationship for the DoResearch and Write Speech tasks, such that you could not start writing thespeech until your research was finished. But is that true? Couldn’t you do afirst draft of the speech starting three-fourths of the way through the research?Especially when you have two different resources working on those tasks, get-ting the second task going before the first is complete can save you time.
Over the life of a project with hundreds of tasks, adding that kind of overlapto even a few dozen tasks could save you a month of time or more!
You can take a refresher course in creating and changing dependencies inChapter 6.
We could use some help here!Another factor that drives timing is the availability of resources. Sometimesyou set a dependency relationship where one task can’t start before anotheris over simply because the resources aren’t available until the predecessortask is over. Here are a few things to look for with resource-dependent timing:
194 Part III: Well, It Looks Good on Paper
16_036516 ch10.qxp 11/20/06 1:42 PM Page 194

� Maybe you delayed the start of a task because a resource wasn’t avail-able. But could some other resource do the work? If so, switch resourcesand let the task start sooner.
� Project calculates the duration of some tasks (fixed work and fixed unitswith effort-driven scheduling) according to the number of resourcesavailable to do the work. If you add resources to those tasks, Projectshortens their duration.
� If you assign a more skilled resource to some tasks, you might be able toshorten the hours of work required to complete the task because theskilled person will finish the work more quickly.
� Could you hire an outside vendor to handle the work? If you have moneybut no time or resources, that’s sometimes a viable option.
Chapter 9 covers the mechanics of making and changing resource assignments.
Cut to the chase: Deleting some tasks and slashing slackWhen all else fails, it’s time to cut some very specific corners. Can you skipsome tasks, such as that final quality check, the one that occurs after theother three you already built in? Or should you pull back on some of theslack you’ve allowed yourself?
Never, I repeat, never get rid of all the slack in your schedule. Otherwise, itwill come back and haunt you like the Ghost of Christmas Past. Just tell yourboss I said so.
Could you get some other project manager to handle some of your tasks foryou with different sets of resources? If your buddy has a project that involveswriting specs for a new product, could you convince him to also write theuser’s manual, which was your responsibility in designing product packag-ing? It’s worth a shot.
Getting It for LessAfter you assign all your resources to tasks and set all your fixed costs, it’stime for sticker shock. Project will tally all those costs and show you the pro-ject’s budget. But what if those numbers just won’t work? Here are some tipsfor trimming that bottom line:
� Use cheaper resources. Do you have a high-priced engineer on a taskthat could be performed by a junior engineer? Did you assign a high-priced manager to supervise a task that could be handled by a lower-priced line supervisor?
195Chapter 10: Fine-Tuning Your Plan
16_036516 ch10.qxp 11/20/06 1:42 PM Page 195
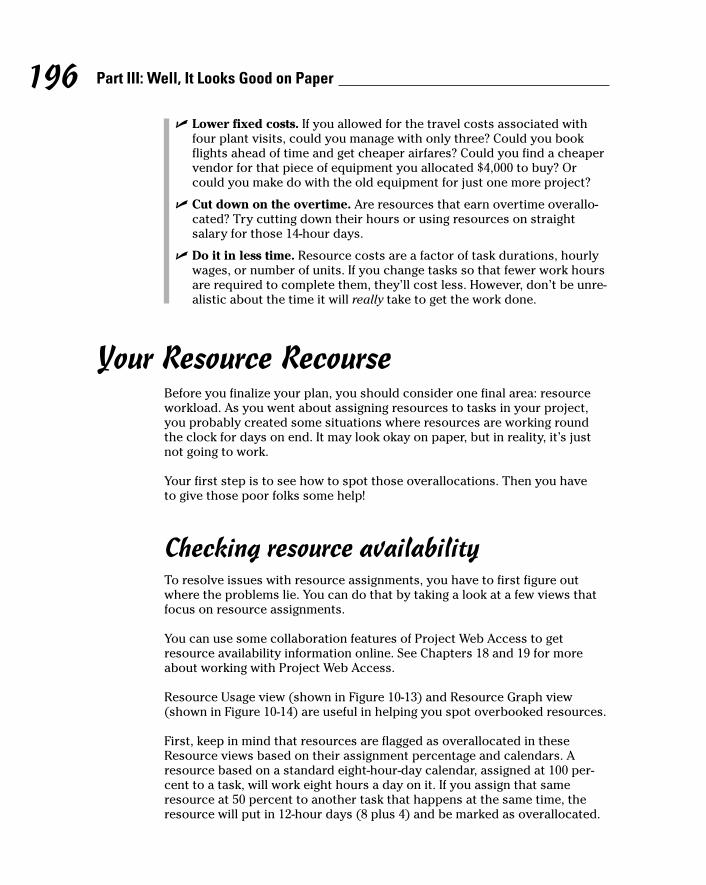
� Lower fixed costs. If you allowed for the travel costs associated withfour plant visits, could you manage with only three? Could you bookflights ahead of time and get cheaper airfares? Could you find a cheapervendor for that piece of equipment you allocated $4,000 to buy? Orcould you make do with the old equipment for just one more project?
� Cut down on the overtime. Are resources that earn overtime overallo-cated? Try cutting down their hours or using resources on straightsalary for those 14-hour days.
� Do it in less time. Resource costs are a factor of task durations, hourlywages, or number of units. If you change tasks so that fewer work hoursare required to complete them, they’ll cost less. However, don’t be unre-alistic about the time it will really take to get the work done.
Your Resource RecourseBefore you finalize your plan, you should consider one final area: resourceworkload. As you went about assigning resources to tasks in your project,you probably created some situations where resources are working round the clock for days on end. It may look okay on paper, but in reality, it’s justnot going to work.
Your first step is to see how to spot those overallocations. Then you have to give those poor folks some help!
Checking resource availabilityTo resolve issues with resource assignments, you have to first figure outwhere the problems lie. You can do that by taking a look at a few views thatfocus on resource assignments.
You can use some collaboration features of Project Web Access to getresource availability information online. See Chapters 18 and 19 for moreabout working with Project Web Access.
Resource Usage view (shown in Figure 10-13) and Resource Graph view(shown in Figure 10-14) are useful in helping you spot overbooked resources.
First, keep in mind that resources are flagged as overallocated in theseResource views based on their assignment percentage and calendars. Aresource based on a standard eight-hour-day calendar, assigned at 100 per-cent to a task, will work eight hours a day on it. If you assign that sameresource at 50 percent to another task that happens at the same time, theresource will put in 12-hour days (8 plus 4) and be marked as overallocated.
196 Part III: Well, It Looks Good on Paper
16_036516 ch10.qxp 11/20/06 1:42 PM Page 196
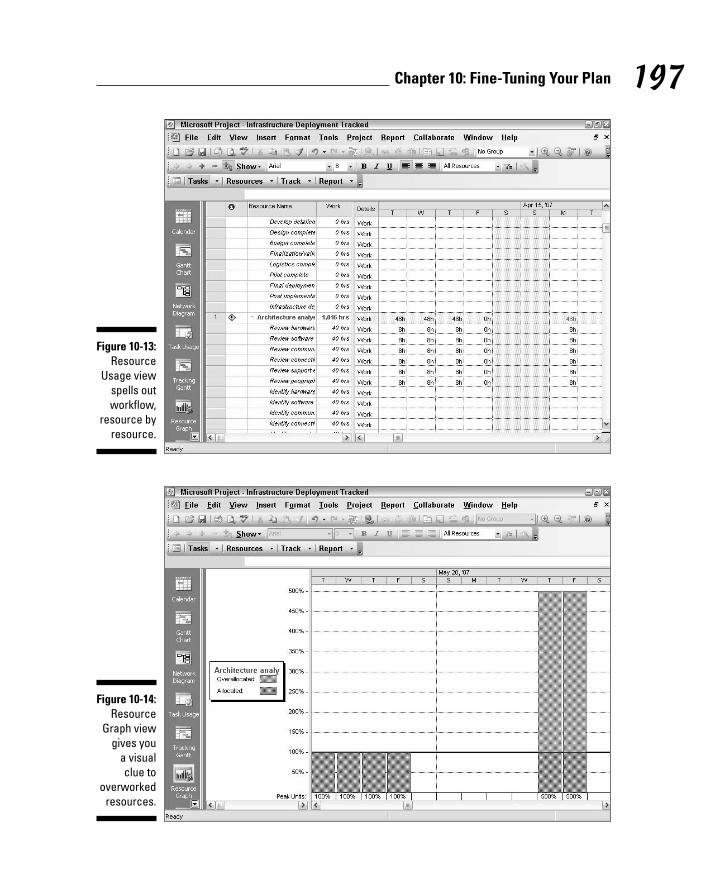
Figure 10-14:Resource
Graph viewgives you
a visual clue to
overworkedresources.
Figure 10-13:Resource
Usage viewspells outworkflow,
resource byresource.
197Chapter 10: Fine-Tuning Your Plan
16_036516 ch10.qxp 11/20/06 1:42 PM Page 197
In Resource Graph view, work is summarized in the Peak Units row, and allwork in the part of the bar graphic that’s above the 100 percent mark is high-lighted. In the Resource Usage view, any overallocated resource has a yellowdiamond with an exclamation point in the Indicator column. The total hoursthat the resource is working each day on his or her combined tasks is sum-marized on the line that lists the resource’s name.
Deleting or modifying a resource assignmentSo, you discover that poor Henrietta is working 42 hours on Tuesday and 83hours on Friday. What to do?
You have a few options:
� Remove Henrietta from a few tasks to free up some time.
� Change Henrietta’s Resource calendar to allow for a longer workday:for example, 12 hours. Keep in mind that this means a 100-percentassignment will have Henrietta working 12 hours on any one task in a day.If you stretch a resource’s workday, you should probably reduce theresource’s assignments. For example, if someone frequently puts in 16hours on two tasks in one day (based on an 8-hour calendar) and two 100-percent assignments, try changing to a 12-hour calendar and 50-percentassignments (6 hours on each of the two tasks, totaling 12 hours a day).However, if the person typically works an 8-hour day and 12- or 16-hourdays are the exception, you shouldn’t change the resource’s base calendarbecause that will have an effect on all assignments for that resource.
Keep in mind that the two previous options may lengthen the tasks that the resource is assigned to, regardless of whether you remove the resource or reduce the resource’s assignment.
� Change Henrietta’s availability by upping her assignment units tomore than 100 percent in the Resource Information dialog box. Forexample, if you enter 150% as her available units, you’re saying it’s okayfor her to work 12 hours a day, and Project will then consider her fairgame and not overallocated until she exceeds that 12 hours.
� Ignore the problem. I don’t mean this facetiously: Sometimes some-one working 14 hours for a day or two during the life of a project isacceptable, and there’s no need to change the resource’s usual workingallocation to make that overwork indicator go away. (However, considertelling Henrietta it’s okay to order pizza on the company on those longworkdays — and make sure you don’t let them become the norm.)
198 Part III: Well, It Looks Good on Paper
16_036516 ch10.qxp 11/20/06 1:42 PM Page 198
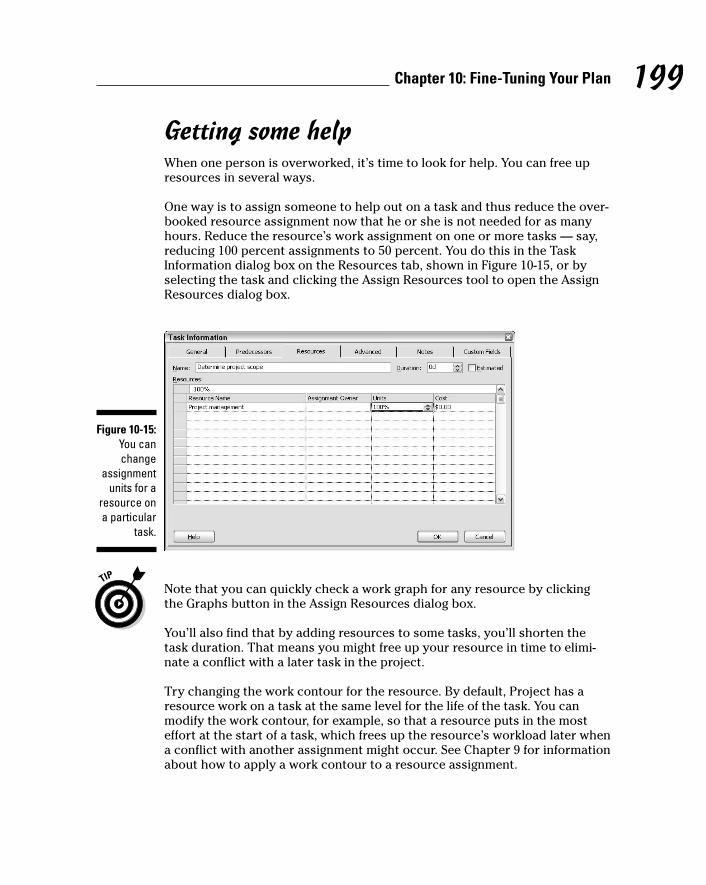
Getting some helpWhen one person is overworked, it’s time to look for help. You can free upresources in several ways.
One way is to assign someone to help out on a task and thus reduce the over-booked resource assignment now that he or she is not needed for as manyhours. Reduce the resource’s work assignment on one or more tasks — say,reducing 100 percent assignments to 50 percent. You do this in the TaskInformation dialog box on the Resources tab, shown in Figure 10-15, or byselecting the task and clicking the Assign Resources tool to open the AssignResources dialog box.
Note that you can quickly check a work graph for any resource by clickingthe Graphs button in the Assign Resources dialog box.
You’ll also find that by adding resources to some tasks, you’ll shorten thetask duration. That means you might free up your resource in time to elimi-nate a conflict with a later task in the project.
Try changing the work contour for the resource. By default, Project has aresource work on a task at the same level for the life of the task. You canmodify the work contour, for example, so that a resource puts in the mosteffort at the start of a task, which frees up the resource’s workload later whena conflict with another assignment might occur. See Chapter 9 for informationabout how to apply a work contour to a resource assignment.
Figure 10-15:You canchange
assignmentunits for a
resource ona particular
task.
199Chapter 10: Fine-Tuning Your Plan
16_036516 ch10.qxp 11/20/06 1:42 PM Page 199
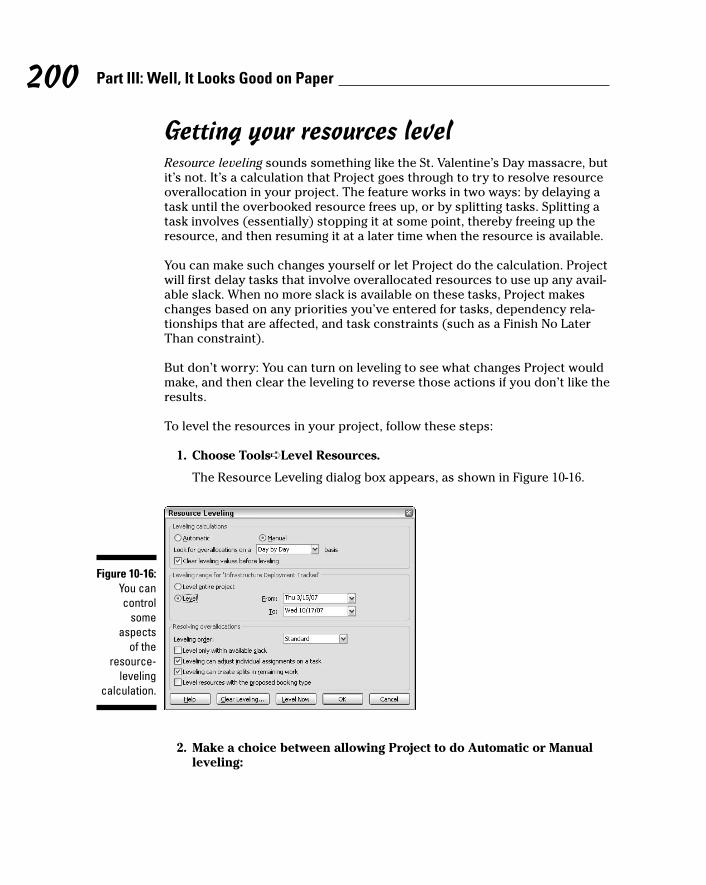
Getting your resources levelResource leveling sounds something like the St. Valentine’s Day massacre, butit’s not. It’s a calculation that Project goes through to try to resolve resourceoverallocation in your project. The feature works in two ways: by delaying atask until the overbooked resource frees up, or by splitting tasks. Splitting atask involves (essentially) stopping it at some point, thereby freeing up theresource, and then resuming it at a later time when the resource is available.
You can make such changes yourself or let Project do the calculation. Projectwill first delay tasks that involve overallocated resources to use up any avail-able slack. When no more slack is available on these tasks, Project makeschanges based on any priorities you’ve entered for tasks, dependency rela-tionships that are affected, and task constraints (such as a Finish No LaterThan constraint).
But don’t worry: You can turn on leveling to see what changes Project wouldmake, and then clear the leveling to reverse those actions if you don’t like theresults.
To level the resources in your project, follow these steps:
1. Choose Tools➪Level Resources.
The Resource Leveling dialog box appears, as shown in Figure 10-16.
2. Make a choice between allowing Project to do Automatic or Manualleveling:
Figure 10-16:You cancontrol
someaspects
of theresource-
levelingcalculation.
200 Part III: Well, It Looks Good on Paper
16_036516 ch10.qxp 11/20/06 1:42 PM Page 200
• Automatic tells Project to level every time you change your plan.
• Manual requires that you go to the Resource Leveling dialog boxand click Level Now.
3. If you choose to level automatically, be sure to enable the ClearLeveling Values Before Leveling check box, if you want previous leveling actions reversed before you level the next time.
4. Set the leveling range to either:
• Level Entire Project.
• Level: <a date range>. Then fill in a date range by making choices inthe From and To boxes.
5. From the Leveling Order drop-down list, click the down arrow andmake a choice:
• Standard considers slack, dependencies, priorities, and constraints.
• ID Only delays or splits the task with the highest ID number: inother words, the last task in the project.
• Priority, Standard uses task priority as the first criteria in makingchoices to delay or split tasks (rather than using up slack).
6. Select any of the four check boxes at the bottom to control howProject will level:
• Within available slack: No critical tasks are delayed, and your cur-rent finish date for the project is retained.
• Adjusting resource assignments: This allows Project to remove orchange assignments.
• Splitting tasks only for unstarted work in the project: This can putsome tasks on hold for a period of time until resources are freed upfor work.
• Relative to booking type: Booking type (proposed or committed)relates to how firm you are in using that particular resource.Allowing resource leveling to consider a resource’s booking typemeans that committed resource assignments are considered moresacred when Project goes about making changes than proposedassignments.
7. Click Level Now to have Project perform the leveling operation.
To reverse leveling, go to the Resource Leveling dialog box (Tools➪LevelResources) and click Clear Leveling.
201Chapter 10: Fine-Tuning Your Plan
16_036516 ch10.qxp 11/20/06 1:42 PM Page 201

Mixing Solutions UpOne final word about all the solutions suggested in this chapter to deal withtime, cost, and overallocation problems. To be most successful, you’ll probablyhave to use a combination of all these methods. Solving these problems is oftena trial-and-error process. Although you might initially look for one quick fix(who doesn’t?), in reality, the best solution might come through making a dozensmall changes. Take the time to find the best combination for your project.
202 Part III: Well, It Looks Good on Paper
To level or not to level?As both a process and a program feature,resource leveling has pros and cons. It can makechanges that you might not want it to make — forexample, taking a resource off a task where youabsolutely need that person’s unique skills. It fre-quently delays your project’s finish date, whichmight not be acceptable to you (or your boss).
The safest setting for Resource Leveling — thatis, the one that makes the least drastic changesto your timing — is to level only within slack. Thissetting may delay some tasks, but it won’t delayyour project completion date.
If you just can’t live with everything ResourceLeveling did, the capability to turn ResourceLeveling on and off is your best ally. You can turnthe feature on and look at the things it did toresolve resource problems, and then turn it offand manually institute the portions of the solutionthat work for you. Also remember that theMultiple Undo feature now allows you to makeseveral changes manually and undo them to getback to where you started.
16_036516 ch10.qxp 11/20/06 1:42 PM Page 202

Chapter 11
Making Your Project Look GoodIn This Chapter� Changing the look of taskbars
� Formatting Network Diagram task boxes
� Modifying the layout of a view
� Changing the gridlines in a view
� Adding graphics to your project
An old chestnut would have you believe clothes make the man. Well, inthe same spirit, sometimes the look of your schedule makes the project.
Having a project that looks good serves two purposes. One, it impressespeople with your professionalism (sometimes to the point where they’ll over-look a little cost overrun); second, it allows people looking at your projectboth on-screen and on hard copy to easily make out what the different boxes,bars, and lines indicate.
Project uses default formatting that’s pretty good in most cases. However, if you have certain company standards for reporting — say, representingbaseline data in yellow and actual data in blue, or more frequent gridlines to help your nearsighted CEO read Project reports more easily — Project has you covered.
Whatever you need, Project provides tremendous flexibility in formatting various elements in your plan.
Putting Your Best Foot ForwardMicrosoft has decided to capitulate to the artist in all of us by allowing you tomodify shapes, colors, patterns, and other graphic elements in your Projectplans. This gives you great flexibility in determining how your plan looks.
17_036516 ch11.qxp 11/20/06 1:43 PM Page 203
When you print Project views (covered in Chapter 16), you can print a legendon every page. The legend helps those reading the plan understand themeaning of the various colors and shapes that you set for elements.
One important thing to realize is that all the views and formatting choicesthat Project offers you aren’t confined to the screen. You can print your pro-ject or reports. What displays on-screen when you print a view is what willprint. So, knowing how to make all kinds of changes to what’s on your screenallows you to present information to team members, managers, vendors, andclients in hard copy too.
With all the improved methods of collaborating on projects, such as sharingdocuments via Project Web Access, a visually appealing schedule can be seenby even more people across the Web.
Printing in color is useful because you can provide the full visual impact andnuance of the various colors used for graphic elements (such as taskbars andindicators). If you print in black and white, you might find that certain colorsthat look good on-screen aren’t as distinct when you print. Being able tomodify formatting allows your project to look good in both color and blackand white, both on-screen and in print.
Formatting TaskbarsTaskbars are the horizontal boxes that represent the timing of a task in the chart pane of Gantt Chart view. You can format each bar individually or change global formatting settings for different types of taskbars.
You can change several things about taskbars:
� The shape that appears at the start and end of the bar. You can changethe shape’s type and color. Each end can be formatted differently.
� The shape, pattern, and color of the middle of the bar.
� The text that you can set to appear in five locations around the bar:left, right, above, below, or inside the bar. You can include text in anyor all of these locations, but keep in mind that too many text items canquickly become impossible to read. As a rule, use just enough text tohelp readers of your plan identify information, especially on printouts oflarge schedules where a task might appear far to the right of the TaskName column that identifies it by name in the sheet area.
When you track progress on a task, a progress bar is superimposed on thetaskbar. You can format the shape, pattern, and color of the progress bar. Thegoal is to contrast the progress bar with the baseline taskbar so that you cansee both clearly.
204 Part III: Well, It Looks Good on Paper
17_036516 ch11.qxp 11/20/06 1:43 PM Page 204

By formatting taskbars, you can help readers of your plan identify variouselements, such as progress or milestones. If you make changes to individualtaskbars, people who are accustomed to Project’s standard formatting mighthave trouble reading your plan.
To create formatting settings for various types of taskbars, follow these steps:
1. Right-click the chart area outside any single taskbar and then chooseBar Styles.
The Bar Styles dialog box appears, as shown in Figure 11-1.
2. Click the Text tab.
3. In the spreadsheet, along the top in the Name column, click the typeof task that you want to modify (Split, Progress, Milestone, and so on).
For example, if you want to modify the styles used for all summarytasks, click Summary. The choices in the Bars tab in the bottom half of the dialog box change based on the task type that you click.
4. Click in the Show For . . . Tasks column for the task type you want tomodify and then select criteria for the task from the drop down listthat appears, such as Critical or Finished.
5. Click the Bars tab to display it, if necessary, and then do the following:
a. Click any of the Shape lists to modify the shape of either end or themiddle of the taskbar.
Shapes on either end might be an arrow, a diamond, or a circle.The shape in the middle consists of a bar of a certain width.
Figure 11-1:You can
modify thelook of
taskbarsand the textyou displayalong with
them.
205Chapter 11: Making Your Project Look Good
17_036516 ch11.qxp 11/20/06 1:43 PM Page 205

b. Click any of the Color lists to modify the color used on either end orin the middle of the taskbar.
The Automatic choice is the default color for this type of taskbarelement.
c. Click either of the Type lists to modify the type of formatting for theshape on either end of the taskbar.
This setting controls how such a shape is outlined: framed with a solid line, surrounded by a dashed line, or filled in with a solidcolor.
d. Click the Pattern list to select another pattern for the middle of the bar.
6. Click the Text tab (as shown in Figure 11-2), and then do the following:
a. Click any of the text locations.
An arrow appears at the end of that line.
b. Click the arrow to display an alphabetical list of possible data thatyou can include, and then click a field name to select it.
c. Repeat Steps 6a and 6b to choose additional text locations.
7. Click OK to accept all new taskbar settings.
If you want to make the same types of changes to an individual taskbar ratherthan to all taskbars of a certain type, right-click the taskbar and then chooseFormat Bar. A Format Bar dialog box appears, offering the same Text and Bartabs found in the Bar Styles dialog box without the options at the top toselect the type of item to format.
Figure 11-2:You can
place text inup to fourlocations
around yourtaskbars.
206 Part III: Well, It Looks Good on Paper
17_036516 ch11.qxp 11/20/06 1:43 PM Page 206
Formatting Task BoxesNetwork Diagram task boxes use different shapes to help you spot differenttypes of tasks:
� Summary tasks use a slightly slanted box shape and include a plus orminus symbol, depending on whether the summary task’s subtasks arehidden or displayed. Click the symbol to hide or display subtasks.
� Subtasks show up in simple rectangular boxes.
� Milestones are shown in diamond-shaped boxes with blue shading.
You can change the formatting of each task box individually or by type. To change the formatting of task boxes displayed in Network Diagram view,do this:
1. Display Network Diagram view.
2. Right-click the task box that you want to change and then chooseFormat Box. Alternatively, right-click anywhere outside the task boxes and then choose Box Styles to change formatting for all boxesof a certain style.
The Format Box or Box Styles dialog box appears (as shown in Figure 11-3).
3. To modify the border style, make your selection in the Shape, Color,and Width lists.
4. To modify the background area inside the box, make a selection inthe Color list, Pattern list, or both (at the bottom of the dialog box).
5. Click OK to save your new settings.
207Chapter 11: Making Your Project Look Good
The Gantt Chart WizardWhat would formatting be without a wizard to help you make all your settings quickly? TheGantt Chart Wizard allows you to make format-ting settings to the entire Gantt chart, includingwhat information to display (standard, criticalpath, baseline, or several combinations of these),one piece of information to include with yourtaskbars, and whether you want to display linesto show dependencies among tasks.
If you choose to make custom settings whileusing the Gantt Chart Wizard, you can specifymany of the settings that you see in the BarStyles dialog box, but those choices affect alltaskbar elements of that type in the project,not just individual taskbars. You access theGantt Chart Wizard by selecting it from theFormat menu.
17_036516 ch11.qxp 11/20/06 1:43 PM Page 207

When you modify the formatting of individual boxes in Network Diagramview, the standard settings of slanted summary tasks and shaded milestonesno longer serve as a visual guide to all tasks. If you make changes and decidethat you’d like to put a task box back to its default setting, click Reset in theFormat Box dialog box.
Adjusting the LayoutIn addition to displaying particular columns and formatting taskbars, you canmake certain changes to the layout of your view. These options vary a greatdeal, depending on what view you’re working with. The layout of Calendarand Network Diagram views is quite different than the layout choices offeredin Gantt Chart view, for example.
To display the Layout dialog box for a view, right-click the area (for example,the chart area of the Gantt Chart view) or anywhere in Calendar view orNetwork Diagram view, and then choose Layout from the menu that appears.The appropriate dialog box appears. Figures 11-4, 11-5, and 11-6 show the var-ious layout choices available in the different views.
Figure 11-3:Change
styles for allboxes in the
Box Stylesdialog box.
208 Part III: Well, It Looks Good on Paper
17_036516 ch11.qxp 11/20/06 1:43 PM Page 208
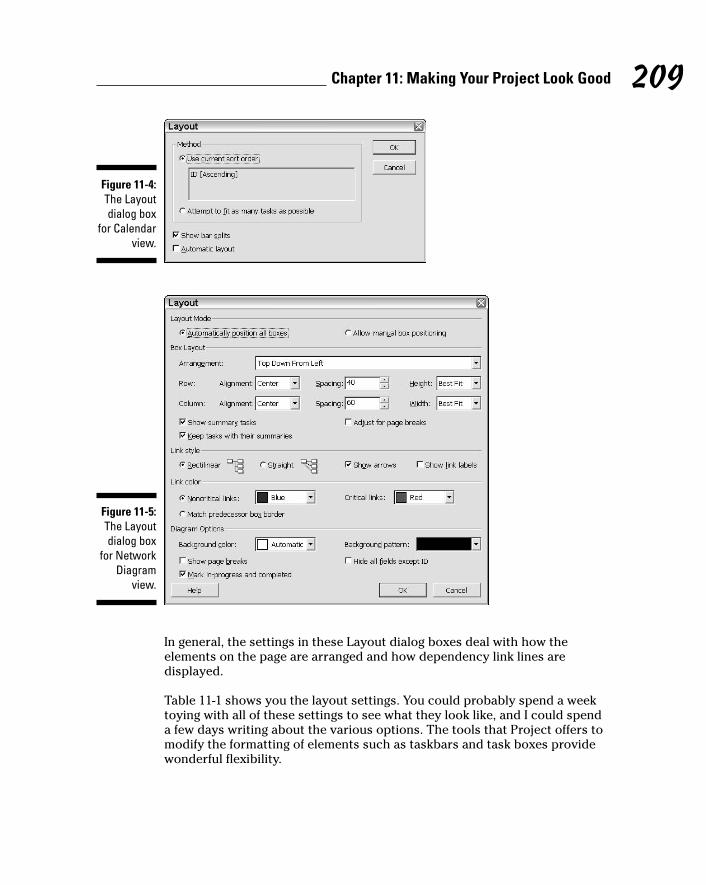
In general, the settings in these Layout dialog boxes deal with how the elements on the page are arranged and how dependency link lines are displayed.
Table 11-1 shows you the layout settings. You could probably spend a weektoying with all of these settings to see what they look like, and I could spenda few days writing about the various options. The tools that Project offers tomodify the formatting of elements such as taskbars and task boxes providewonderful flexibility.
Figure 11-5:The Layoutdialog box
for NetworkDiagram
view.
Figure 11-4:The Layoutdialog box
for Calendarview.
209Chapter 11: Making Your Project Look Good
17_036516 ch11.qxp 11/20/06 1:43 PM Page 209

Table 11-1 Layout OptionsLayout Type Option Use
Calendar view Use Current Sort Order Project uses the latest sort orderyou’ve applied to tasks.
Attempt to Fit as Many Ignores the sort order and fits as Tasks as Possible many tasks in a date box as possible.
Show Bar Splits When a task includes a period ofinactivity, that task can be shown assplit into different parts over time.
Automatic Layout Project modifies the layout inresponse to the insertion of addi-tional tasks.
Network Layout Mode area Allows automatic or manualDiagram view positioning.
Box Layout area The settings in this section arrangeand align boxes, adjusting alignment,spacing, and height, and also modifyhow summary tasks are displayed.
Link Style area Modifies the style for dependencylink lines and labels.
Link Color area Sets the color for links both on andoff the critical path.
Figure 11-6:The Layoutdialog box
for GanttChart view.
210 Part III: Well, It Looks Good on Paper
17_036516 ch11.qxp 11/20/06 1:43 PM Page 210

Layout Type Option Use
Diagram Options area Controls the background color andpattern for boxes as well as howpage breaks and progress on tasksare indicated.
Gantt Chart Links Style of lines indicating view dependency links.
Date Format Modifies the format of the date usedto label taskbars.
Bar Height Sets the height of taskbars in points.
Always Roll up When checked, taskbar details roll Gantt Bars up to the highest-level summary
task.
Round Bars to When you have portions of days, Whole Days allows bars to represent the nearest
whole-day increment.
Show Bar Splits When a task includes a period ofinactivity, that task can be shown assplit into different parts over time.
Show Drawings When you include drawings, theyare displayed on-screen and in theprintout.
Now that you’ve seen the many options available for modifying view layouts,I have some advice: Stick with default settings unless you have a specificreason to make a change (such as when you want to highlight certain typesof information for a project presentation). When you don’t need that layoutchange anymore, go right back to the default settings. Or, if you want to makechanges, make them globally across your organization and stick to them.That makes it much easier for those reading your project plan to interpretthe different kinds of information presented in views. Generally speaking, ifyou tinker too often with the way Project displays information, it just makesyour own learning curve steeper — and confuses those who know Project’sdefault settings.
One other change that you can make to your overall interface is to create a custom Project Guide. You do this by providing an XML file with customcontent. For example, you might add to the four Guide sections of Tasks,Resources, Track, and Report another section titled Accounting that provideslinks to accounting codes and procedures within your organization. SeeChapter 17 for more about this procedure.
211Chapter 11: Making Your Project Look Good
17_036516 ch11.qxp 11/20/06 1:43 PM Page 211

Modifying GridlinesJust as phone numbers are broken up into several shorter sets of numbers to help you remember them, visual elements are often broken up to help youunderstand information in chunks. Tables use lines, calendars use boxes,football fields use yard lines, and so on.
Several views in Project include gridlines to indicate certain things, such as the break between weeks or the status date (that is, the date as of whichprogress has been tracked on a project). These lines help the reader of yourplan discern intervals of time or breaks in information; for example, gridlinescan be used to indicate major and minor column breaks. You can modifythese gridlines in several ways, including changing the color and style of the lines and the interval at which they appear.
To modify gridlines, use the Gridlines dialog box, as follows:
1. Right-click any area of a view that contains a grid (for example, thechart area of Gantt Chart view or Calendar view) and then chooseGridlines.
The Gridlines dialog box appears, as shown in Figure 11-7.
2. In the Line to Change list, click the gridline that you want to modify.
3. Use the Normal Type and Color lists to select a line style and color.
4. If you want to use a contrasting color at various intervals in the gridto make it easier to read, do the following:
a. Select an interval at which to include a contrasting line.
This setting is typically used with a different style or color from theNormal line setting to mark minor intervals for a grid. Note thatnot all types of gridlines can use contrasting intervals.
b. Choose the Type and Color of that line from the lists.
5. Click OK to save your settings.
Figure 11-7:The possible
lines youcan change
varysomewhat
from oneview to
another.
212 Part III: Well, It Looks Good on Paper
17_036516 ch11.qxp 11/20/06 1:43 PM Page 212

You make choices for modifying gridlines one by one, and there is no Resetbutton to put these settings back the way they were. Also note that gridlinesmodified in one view don’t affect gridlines in any other view.
When a Picture Can Say It AllWords and numbers and taskbars and task boxes are fine, but what if youwant to add something of your own? For example, you might want to drawattention to a task by drawing a circle around it, or you might want to includea simple drawing to show a process or working relationship in your plan.
You can use a Drawing toolbar to draw images in the chart area of GanttChart view. Follow these steps to add a drawing:
1. Display Gantt Chart view.
2. Choose Insert➪Drawing.
The Drawing toolbar appears, as shown in Figure 11-8.
3. Click the drawing tool that represents the type of object you want todraw, such as an oval or a rectangle.
Figure 11-8:This
Drawingtoolbar hassome toolsin commonwith other
Officeproductsyou may
have used.
213Chapter 11: Making Your Project Look Good
17_036516 ch11.qxp 11/20/06 1:43 PM Page 213

4. Click at the location on the chart where you want to draw the object,and drag your mouse until the item is drawn approximately to thescale you want.
5. Release the mouse button.
When you draw an object over an element such as a taskbar, the drawnobject is solid white and covers up what’s beneath it. You have a couple of choices if you want the item underneath to show throw:
� Click the Cycle Fill Color button until you hit the No Fill option.
� Use the Draw menu to change the order of objects.
At this point, you have a few options:
� Add text. If you drew a text box, you can click in it and then type whatever text you like.
� Resize objects. Resize any object you’ve drawn by selecting it and then clicking and dragging any of the resize handles (little black boxes)around its edges outward to enlarge it or inward to shrink it.
� Move objects. Move the mouse over the object until the cursor becomes afour-way arrow. Then click the object and drag it elsewhere on the chart.
� Use fill color. You can use the Cycle Fill Color tool to choose a color fora selected object. Each time you click this tool, it displays another colorin the available palette. Just keep clicking the tool until the color youwant appears.
� Layer objects. If you have several drawings or objects that you want tolayer on your page, click the Draw button on the Drawing toolbar andchoose an order for a selected object, bringing it to the front of otherimages or sending it behind them.
� Attach an object to a task. Attach a drawn object to any task by movingit next to a task and then clicking the Attach to Task drawing tool. If youshould add or delete tasks to your task list or move the attached task,the drawing moves along with that task.
214 Part III: Well, It Looks Good on Paper
17_036516 ch11.qxp 11/20/06 1:43 PM Page 214
Part IVAvoiding Disaster:Staying On Track
18_036516 pt04.qxp 11/20/06 1:43 PM Page 215

In this part . . .
And behold, Murphy decreed: No project shall happenthe way you thought it would. To head off project
manager’s frustration, this part shows you how to save abaseline picture of your project and to use it as you trackthe ongoing struggle between actual activity and your idealplan. You get a look at tracking and reporting progress, pickup tips on how to get back on track if the project straysfrom the strait and narrow, and get handy new tools forusing past data to make better future project plans.
18_036516 pt04.qxp 11/20/06 1:43 PM Page 216

Chapter 12
It All Begins with a BaselineIn This Chapter� Saving plan information with a baseline
� Making use of multiple baselines
� Setting a baseline
� Saving interim plans
When you go on a diet (and I know you all have at one time or another!),you step on the scale the first day to check your weight. Then, as your
diet progresses, you have a benchmark against which you can compare yourdieting ups and downs.
Project doesn’t have a weight problem, but it does have a method of bench-marking your project data so that you can compare the actual activity thattakes place on your tasks against your original plan. This saved version ofyour plan data is called a baseline, and it includes all the information in yourproject, such as task timing, resource assignments, and costs.
Project also provides something called an interim plan, which is essentially atiming checklist. It includes only the actual start and finish dates of tasks aswell as the estimated start and finish dates for tasks not yet started.
This chapter shows you when, why, and how to save a baseline and interimplan for your project.
All about BaselinesSaving a baseline is like freezing a mosquito in amber: It’s a permanent recordof your estimates of time, money, and resource workload for your project atthe moment when you consider your plan final and before you begin anyactivity. A baseline is saved in your original Project file and exists right along-side any actual activity that you record on your tasks.
19_036516 ch12.qxp 11/20/06 1:44 PM Page 217
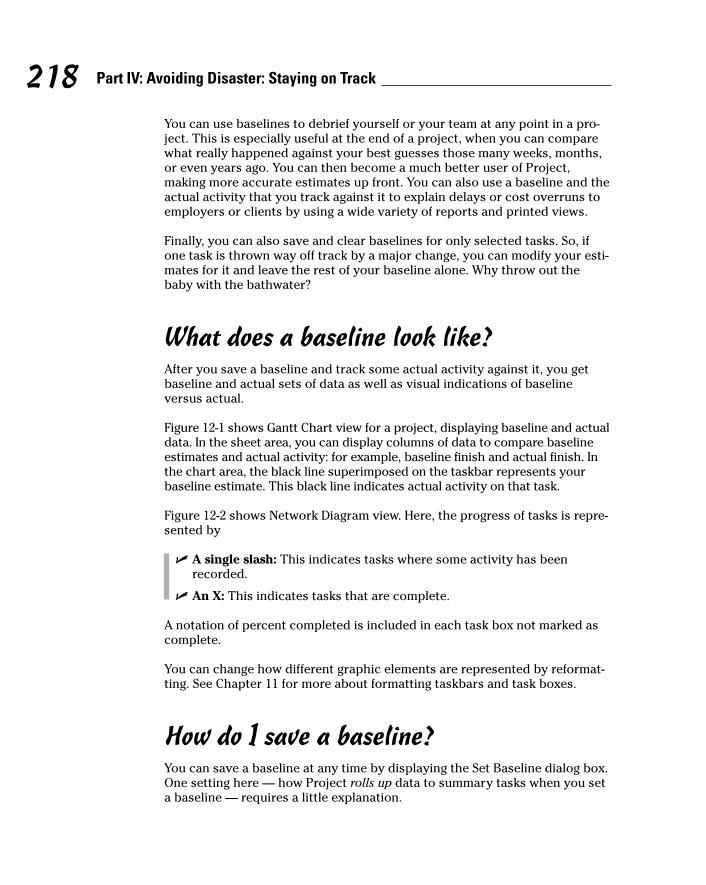
You can use baselines to debrief yourself or your team at any point in a pro-ject. This is especially useful at the end of a project, when you can comparewhat really happened against your best guesses those many weeks, months,or even years ago. You can then become a much better user of Project,making more accurate estimates up front. You can also use a baseline and theactual activity that you track against it to explain delays or cost overruns toemployers or clients by using a wide variety of reports and printed views.
Finally, you can also save and clear baselines for only selected tasks. So, ifone task is thrown way off track by a major change, you can modify your esti-mates for it and leave the rest of your baseline alone. Why throw out thebaby with the bathwater?
What does a baseline look like?After you save a baseline and track some actual activity against it, you getbaseline and actual sets of data as well as visual indications of baselineversus actual.
Figure 12-1 shows Gantt Chart view for a project, displaying baseline and actualdata. In the sheet area, you can display columns of data to compare baselineestimates and actual activity: for example, baseline finish and actual finish. Inthe chart area, the black line superimposed on the taskbar represents yourbaseline estimate. This black line indicates actual activity on that task.
Figure 12-2 shows Network Diagram view. Here, the progress of tasks is repre-sented by
� A single slash: This indicates tasks where some activity has beenrecorded.
� An X: This indicates tasks that are complete.
A notation of percent completed is included in each task box not marked ascomplete.
You can change how different graphic elements are represented by reformat-ting. See Chapter 11 for more about formatting taskbars and task boxes.
How do I save a baseline?You can save a baseline at any time by displaying the Set Baseline dialog box.One setting here — how Project rolls up data to summary tasks when you seta baseline — requires a little explanation.
218 Part IV: Avoiding Disaster: Staying on Track
19_036516 ch12.qxp 11/20/06 1:44 PM Page 218
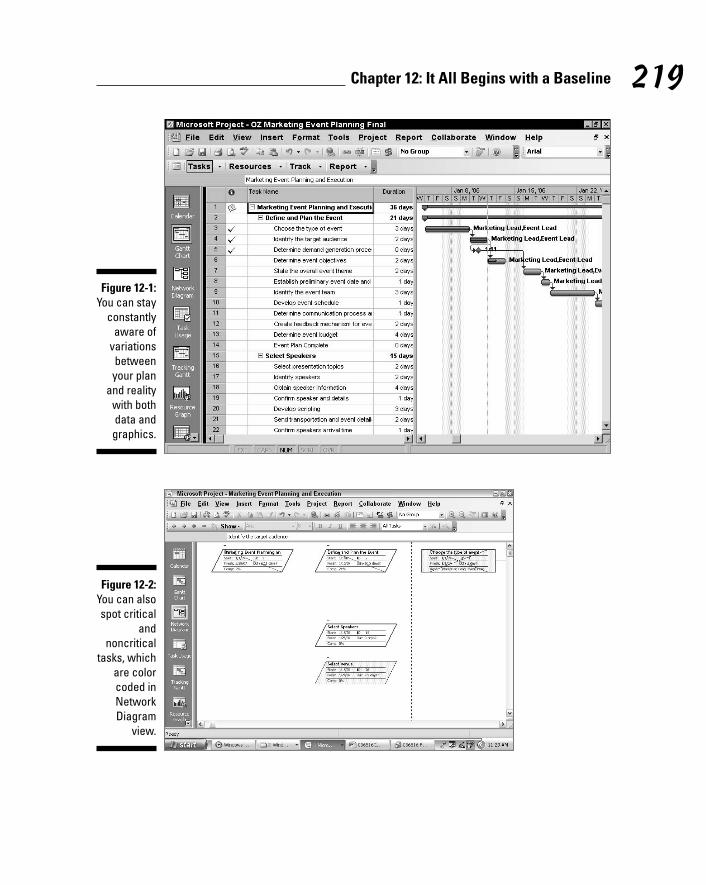
Figure 12-2:You can alsospot critical
andnoncritical
tasks, whichare colorcoded inNetworkDiagram
view.
Figure 12-1:You can stay
constantlyaware of
variationsbetweenyour plan
and realitywith bothdata andgraphics.
219Chapter 12: It All Begins with a Baseline
19_036516 ch12.qxp 11/20/06 1:44 PM Page 219

By default, after you save a baseline the first time, a summary task’s baselinedata isn’t updated if you make changes to a subtask below it, even if youdelete a subtask. However, you can change that functionality by making achoice about how the baseline rolls up data. You can choose to have modifi-cations rolled up to all summary tasks or only from subtasks for any sum-mary tasks that you select. This second option works only if you’ve selectedsummary tasks but not selected their subtasks.
You can save a baseline by following these steps:
1. If you want to save a baseline for only certain tasks, select them.
2. Choose Tools➪Tracking➪Set Baseline.
The Set Baseline dialog box appears with the Set Baseline optionselected, as shown in Figure 12-3.
3. Select the Entire Project or the Selected Tasks radio button.
4. Make selections for how the baseline rolls up, or summarizes, changesto task data.
You can have changed data summarized in all summary tasks or only forthe summary tasks that you select.
5. Click OK to set the baseline.
What if I want more than one baseline?I know you love to hear about features in Project 2007 that you might nevertake full advantage of. (Who doesn’t?) Here’s one: You can save your baselineup to 11 times during the life of your project. That’s 11 potentially cata-strophic events you can adjust for by resaving your baseline!
Figure 12-3:This dialogbox is used
forbaselines
and interimplans.
220 Part IV: Avoiding Disaster: Staying on Track
19_036516 ch12.qxp 11/20/06 1:44 PM Page 220

Although you might never use all 11 possible baselines, the ability to savemultiple baselines can help you see the progress of your planning over thelife of a longer project. They are also a sneaky but effective way of showingyour boss that, yes, you really did anticipate that budget overrun, eventhough you didn’t include it in your original saved plan. (I’m not advocatingthis, but it works as long as your boss didn’t keep a copy of the original plan.)
The Set Baseline dialog box includes a list of these baselines, with the lastdate each was saved, as shown in Figure 12-4. When you save a baseline, youcan save without overwriting an existing baseline by simply selecting anotherone of the baselines in this list before saving.
If you save multiple baselines or interim plans, you can view them by display-ing columns in any sheet view for those plans. For example, if you want todisplay information for a baseline you saved with the name Baseline 7, youwould insert the column named Baseline 7 in your Gantt Chart view sheet.
You can view multiple baselines at one time by displaying the MultipleBaselines Gantt view.
How do I clear and reset a baseline?Okay, if you read the first part of this chapter, you know that I said that abaseline is intended to be a frozen picture of your project plan that you keepsacrosanct and never change. Well, that’s the theory. In practice, things canhappen that make an original baseline so obsolete that it’s less than useful.It’s not even worth keeping as one of your 11 possible baselines.
Figure 12-4:Each
baseline towhichyou’vesaved
somethingincludes the
last saveddate in this
list.
221Chapter 12: It All Begins with a Baseline
19_036516 ch12.qxp 11/20/06 1:44 PM Page 221

For example, if you have a project that takes four years from beginning toend, you might want to save a new baseline every year because costs go upor resources change. Then you can see incremental versions of your esti-mates that reflect the changes you made based on changes in the real world.Or, perhaps you start your project with a wonderful, well-thought-out base-line plan, but a week later, the entire industry shuts down with a massivestrike that goes on for three months. All your original estimates of timingwould be bogus, so it’s better to make adjustments to your plan, save a newbaseline, and move ahead after the strike is resolved.
To clear an existing baseline, follow these steps:
1. If you want to clear the baseline for only certain tasks, select them.
2. Choose Tools➪Tracking➪Clear Baseline.
The Clear Baseline dialog box appears with the Clear Baseline Planoption selected by default, as shown in Figure 12-5.
3. From the Clear Baseline Plan drop-down list, choose the baseline thatyou want to clear.
4. Select either the Entire Project radio button to clear the baseline forthe entire project or the Selected Tasks radio button for selected tasks.
5. Click OK.
The project baseline or selected tasks are cleared.
In the InterimAn interim plan is sort of like Baseline Lite. With an interim plan, you saveonly the actual start and finish dates of tasks that have had activity trackedon them as well as the baseline start and finish dates for all unstarted tasks.
Why save an interim plan rather than a baseline? An interim plan saves onlytiming information. If that’s all you need, why save all the data aboutresource assignments and costs and so on? (Keep in mind that you’ll end upwith a huge file if you save a large number of baselines.)
Figure 12-5:Use this to
clear thebaseline or
interim plan.
222 Part IV: Avoiding Disaster: Staying on Track
19_036516 ch12.qxp 11/20/06 1:44 PM Page 222

Another issue with a baseline is that because there’s so much data, the base-line can become obsolete at some point. An interim plan can be saved torecord date changes but not overwrite your original baseline cost data.
Finally, although you’re allowed to save up to 11 baseline plans, if you needmore than that, consider using some interim and some baseline data toexpand the number of sets of data that you can save.
Do not go baseline and interim plan crazy. Even in a long project, saving toomany sets of plans can get confusing. When you do save a plan, print a copyfor your records and make a notation of when and why the plan was saved tohelp you keep track.
Saving an interim planInterim plans and baselines are saved via the same dialog box. The differenceis that with an interim plan, you have to specify where the data is comingfrom. For example, if you want to save the start and finish dates from yourBaseline2 plan into the third interim plan, you copy from Baseline2 toStart/Finish3. If you want the current scheduled start and finish dates for alltasks, choose to copy from Start/Finish.
If you want to change currently scheduled start and finish dates in a baselinebut you don’t want to change all the other data typically saved in a baseline,you can copy from Start/Finish to the baseline plan that you want to change.
To save an interim plan, do this:
1. If you want to save an interim plan for only certain tasks, select them.
2. Choose Tools➪Tracking➪Set Baseline.
The Save Baseline dialog box appears, as shown in Figure 12-6.
Figure 12-6:You can
copysettings
from anysaved
baseline toan interim
plan.
223Chapter 12: It All Begins with a Baseline
19_036516 ch12.qxp 11/20/06 1:44 PM Page 223

3. Select the Save Interim Plan radio button.
4. From the Copy drop-down list box, select the set of data that you wantto copy to the interim plan.
5. From the Into drop-down list box, select the fields in which you wantto store the interim plan data.
6. Select the appropriate radio buttons to save the plan for the entireproject or selected tasks.
7. If you choose to save the plan for selected tasks, use the check boxesto indicate how Roll Up Baseline options should work.
8. Click OK to save the plan.
By using the Copy and Into fields in the Set Baseline dialog box, you can saveup to ten interim plans based on baseline or actual data.
Clearing and resetting a planTen interim plans might seem like a lot now, but in the thick of a busy andever-changing project, it might actually end up falling short of what you need.Because you can save only ten interim plans, you might need to clear one atsome point and resave it.
Project piggybacks baseline and interim plan settings, so you actually choosea Clear Baseline menu command to clear an interim plan. This can be fright-ening to those who think that clicking a Clear Baseline command will sendtheir baseline into oblivion. Don’t worry — it won’t!
To clear an interim plan, follow these steps:
1. If you want to clear only some tasks in an interim plan, select them.
2. Choose Tools➪Tracking➪Clear Baseline.
The Clear Baseline dialog box appears, as shown in Figure 12-7.
Figure 12-7:Clear and
reset interimplans as
often as youlike.
224 Part IV: Avoiding Disaster: Staying on Track
19_036516 ch12.qxp 11/20/06 1:44 PM Page 224

3. Select the Clear Interim Plan option, and then choose the plan thatyou want to clear from the accompanying list.
4. Click to clear the specified interim plan for the entire project or forany tasks you have selected.
5. Click OK to clear the plan.
You can now save a new set of information to that interim plan, if you like.
You might want to save a backup of various versions of your file with interimand baseline data. If you clear a baseline or an interim plan, that data is goneforever!
225Chapter 12: It All Begins with a Baseline
19_036516 ch12.qxp 11/20/06 1:44 PM Page 225

226 Part IV: Avoiding Disaster: Staying on Track
19_036516 ch12.qxp 11/20/06 1:44 PM Page 226
Chapter 13
On the Right TrackIn This Chapter� Using the Tracking toolbar
� Recording actual activity on tasks
� Specifying percentage of work complete
� Updating fixed costs
� Using Update Project to make big-picture changes
After a project moves out of the planning stage and into action, it’s like aconstantly changing game in which there are rules, goals, and a general
timeframe, but no one really knows which team will win (and sometimeswhere the ball is) until it’s over.
Whether a task happens as planned or wanders off in an unexpected direc-tion, your job at this stage of the game is to record that activity, an activityreferred to as tracking.
Tracking starts when your team reports their activity on the project. Thenyou (or someone else assigned to deal with tracking) must manage inputtingthat activity task by task.
When you track activity, you’ll be amazed at what data Project returns to you.Some of it will be good news, some bad, but all of it is useful in managingyour project throughout its lifetime.
Gathering Your DataThe first step in tracking progress on your project is to get information aboutwhat’s been going on. The amount of data you collect will be determined bywhat you need to track and at what level of detail. For example, some peopledon’t even create and assign resources to tasks because they use Projectonly to create a timeline for their activities, not to manage resource time ortally costs. Others use resources and want to track their total work on tasks,just not to the level of detail that scrutinizes hourly work performed. For
20_036516 ch13.qxp 11/20/06 1:44 PM Page 227

some people, simply marking one task 50 percent complete and another 100percent complete — and letting Project assume all resources put in their esti-mated amount of work — is fine. Your tracking method is determined by theamount and type of information you need to monitor.
Therefore, the first thing you have to do is identify the best tracking methodfor you.
A method to your tracking madnessMicrosoft has identified four tracking methods:
� Task-total method
� Task-timephased method
� Assignment-total method
� Assignment-timephased method
You can begin to understand these by looking at the difference between taskand assignment tracking. You can track information at the task level, indicat-ing total work or costs for the task up to the present or as of a status dateyou select. Or you can track costs by resource assignment, which is the moredetailed way of tracking.
For example, suppose that the Test Electrical Components task is estimatedto take 12 hours of work, according to your project baseline. Three humanresources — Engineer, Electrician, and Assistant — are assigned at 100 per-cent of their time. Tracking by task, you can simply note that the task is 75percent complete, which translates into nine hours of work finished.
Project assumes that the three resources split that work up equally. In reality,however, the Engineer put in one hour, the Electrician put in six, and theAssistant put in two. If you want more detailed tracking that shows you totalsof work for each resource assignment and accurately tracks them, you wouldtrack the work at the resource-assignment level.
But here’s where the timephased variable comes in: Whether you choose totrack work on a task or the work done by individual resources on the task,you can also track by specific time increments — which Microsoft callstimephased tracking.
So, with the Test Electrical Components task, you can use a task approach oftracking nine hours of work to date or use a timephased approach to recordthose hours on a day-by-day basis. With a resource assignment approach,you can go to the very deepest level of tracking detail by tracking each andevery resource’s work hour by hour, day by day.
228 Part IV: Avoiding Disaster: Staying on Track
20_036516 ch13.qxp 11/20/06 1:44 PM Page 228
Finally, if you want Project to keep an eye on costs, be sure to track fixedcosts and material used on each task.
Going door to doorHow do you get all the information about what work has been performed, bywhom, and when? Well, the first method is the one you’ve probably beenusing for years: Hunt down the people on your project and ask them. Askthem in the hallway, in your weekly one-on-one meeting, or over lunch. Giveeach person a call or have everyone turn in a form.
This isn’t rocket science, but you still have to determine upfront what infor-mation you want, when you want it, and what form it should be in. The sim-pler you can keep manual reporting of progress on a project, the better,because people will actually do it. The more routine you can make it — suchas every Friday, on a set form turned into the same person, and so on — theeasier it will be.
If you need only a summary of where the task stands — say 25, 50, 75, or 100percent complete — have the person in charge of the task give you thatinformed estimate. If you need total hours put into a task to date, resourcescan summarize their hours for you. If you need a blow-by-blow, hour-by-hour,day-by-day report, you’re likely to collect some form of timesheet fromresources.
If your company is set up to use the Project Server feature, you can useProject Web Access to gather resource timesheets in one convenient loca-tion. (See Chapter 19 for more about how to do this.)
229Chapter 13: On the Right Track
Let your project make the roundsYou can use the Send To feature on the Filemenu of Project to send your project to othersand have them update their own activity. Youcan do this by either e-mailing a file or selectedtasks as a file attachment, or you can route onefile and have people make their changes in oneplace.
The challenge with the first method is that youneed to manually incorporate the changes inthe various files into a single file.
The challenge with the second approach is get-ting people to do the updating accurately andforward the file to the next person on the rout-ing slip in a timely fashion. Generally, the bestuse of e-mail for updating projects is simply tohave team members send an e-mail with theiractivity to the person updating the project andthen let that person make all the changes in onecentral location.
20_036516 ch13.qxp 11/20/06 1:44 PM Page 229

You can probably get information about fixed costs that have been incurred ifyou ask your accounting department for it, or by getting a copy of a purchaseorder or receipt from the human who spent the money.
Consider a third-party add-on product such as Timesheet Professional(http://timesheetprofessional.com) for reporting resource activity.You make Timesheet available to every resource on the project. Theresources record their work time on it, and you can use Timesheet’s tools toautomatically update your project. If you’re using Project Professional edi-tion, Timesheet’s features are incorporated into Project Web Access.
Where Does All This Information Go?After you gather information about task progress, fixed costs, and resourcehours, you can input that information in several ways. You can use variousviews and tables to enter information in sheets of data; you can input infor-mation in the Task Information dialog box; or you can use the Tracking toolbar.
Doing things with the Tracking toolbarSometimes it seems like Microsoft provides a toolbar for everything, so whyshould tracking be any different? You can use the Tracking toolbar to performupdates on selected tasks in any sheet view. Figure 13-1 shows the Trackingtoolbar and the tools it has to offer.
The Tracking toolbar allows you to open the Project Statistics dialog box ordisplay the Collaborate toolbar. (The tools on the Collaborate toolbar onlybecome available to you if your organization has implemented ProjectServer.) You can use other tools to make specific updates to selected tasks:
� Selecting a task and clicking the Update as Scheduled tool automaticallyrecords activity to date as you anticipated in your baseline.
Figure 13-1:Select atask and
click one ofthese tools
to update it.
230 Part IV: Avoiding Disaster: Staying on Track
20_036516 ch13.qxp 11/20/06 1:44 PM Page 230

� The Reschedule Work tool reschedules all tasks that begin after thestatus date you set or the current date if you didn’t set a status date.
� The Add Progress Line tool turns on a kind of drawing tool. When youselect the tool and then click the mouse cursor over a spot on the chartarea, a progress line is placed at that point on the timescale. A progressline indicates which tasks are ahead of schedule as well as which onesare behind schedule, by means of a line that connects in-progress tasks.
� By clicking a Percentage Complete tool (0% to 100%), you can quicklymark a task’s progress using a calculation of the percentage of workcompleted based on the type of activity (fixed units, work, or duration).
� The Update Tasks tool displays a dialog box containing tracking fieldsthat you might recognize from the Task Information dialog box as well assome other fields you can use for updating your project.
You can also choose Tools➪Tracking➪Update Tasks to display the trackingfields from the Update Tasks dialog box; this is the same dialog box that theUpdate Tasks button on the Tracking toolbar displays.
For everything there is a viewBy now, you probably know that Project has a view for everything you wantto do. For example, Task Sheet view and Task Usage view (as shown inFigures 13-2 and 13-3, respectively) allow you to update either task orresource information easily. So many variations are available, you might thinkthat Microsoft charged by the view!
Depending on the method of tracking you need (see “A method to your track-ing madness,” earlier in this chapter), different views serve different pur-poses. Table 13-1 shows the best view to use for each tracking method.
Table 13-1 Tracking ViewsTracking Method Best View to Use Table or Column Displayed
Task Task Sheet Tracking table
Task timephased Task Usage Actual Work column
Assignment Task Usage Tracking table
Assignment timephased Task Usage Actual Work column
When you find the right view with the right columns displayed, enteringtracking information is as simple as typing a number of hours, a dollaramount for fixed costs, or a start or finish date in the appropriate column forthe task you’re updating.
231Chapter 13: On the Right Track
20_036516 ch13.qxp 11/20/06 1:44 PM Page 231

Figure 13-3:Task Usageview allowsyou to enter
specificresourcehours on
task day-by-day on your
project.
Figure 13-2:Task Sheet
view is agreat placefor trackingwork, start,
and finishdates.
232 Part IV: Avoiding Disaster: Staying on Track
20_036516 ch13.qxp 11/20/06 1:44 PM Page 232

Tracking your work for the recordYou need to input several types of information to track progress on your pro-ject. First, you have to tell Project as of when you want to track progress: Bydefault, it records information as of the current date based on your com-puter’s calendar settings. However, if you want to record progress as of, say,the end of your company’s quarter, you can do that, too.
You can record actual start and finish dates for tasks, the percentage of a taskthat is complete (for example, a task might be 75 percent complete), andactual work performed (that is, the number of hours that resources put in oneach task). If you think that the task will take less or more time than youanticipated, based on progress to date, you can modify the remaining dura-tion for the task. You can also enter units of materials used, and fixed-costinformation for expenditures incurred, such as equipment rental or consult-ing fees.
Progress as of when?If you don’t know what day of the week it is, you can’t very well gaugewhether you’re making the right amount of headway through your week’swork. Well, tracking is like that: The first thing you have to do is establish astatus date: that is, the date as of which you are tracking progress.
By default, Project uses the calendar setting of your computer as the currentdate when you enter actual activity information. However, sometimes you’llwant to time-travel. For example, suppose that your boss asks for a reportshowing the status of the project as of the last day of the quarter, December31. You gathered all your resources’ timesheets up through that date, but youdidn’t get around to inputting those updates until three days after the end ofthe quarter. You can deal with this situation by setting the status date inProject to December 31 and then entering your tracking data.
After you set the status date and enter information, Project uses that date tomake calculations such as earned value (the value of work completed todate). Also, any task-complete or percentage-complete information recordsas of that date and progress lines in the chart area reflect that timing. Anyreports or printouts of views that you generate give a picture of the status ofyour project as of that date.
233Chapter 13: On the Right Track
20_036516 ch13.qxp 11/20/06 1:44 PM Page 233

Here’s how to set the status date:
1. Choose Project➪Project Information.
The Project Information dialog box appears, as shown in Figure 13-4.When you first open this dialog box, the status date is not set; your pro-ject is controlled by the current date.
2. In the Status Date field, click the down arrow to display the calendar.
3. If you want to set the status date in another month, use the right orleft arrow at the top of the calendar to navigate to that month.
4. Click the date you want.
5. Click OK.
Now you’re ready to start inputting tracking data.
Percentage complete: How to tell?When people ask me how to figure out whether a task is 25 percent, 50 per-cent, or even 36.5 percent complete, I usually refer them to their own intu-ition. If your boss asks you how things are coming on that report, youtypically go through a quick internal calculation and come back with a roughestimate with no problem. A rough estimate, based on your experience andthe information your resources provide you about their progress, is oftengood enough.
Figure 13-4:Set the
status datehere.
234 Part IV: Avoiding Disaster: Staying on Track
20_036516 ch13.qxp 11/20/06 1:44 PM Page 234
You can also calculate percentage complete in more precise ways. For exam-ple, if you estimate that a task should take ten hours of effort and yourresources report performing five hours of effort, you could say you’re 50 per-cent there. But be careful. Just because people have spent half the allocatedtime doesn’t mean that they have accomplished half the work.
You could go by costs: If your original estimates said that your four resourcesassigned to a four-day task would tally $4,000 of costs and the time yourresources report spending on the task add up to $3,000, you could guess thatthe task is 75 percent finished. But again, just because you’ve spent threequarters of the money doesn’t mean you’ve accomplished three quarters ofwhat you set out to do.
When a task’s deliverable is measurable, that helps a lot. For example, if youhave a task to produce 100 cars on the assembly line in four days and you’veproduced 25 cars, you might be about 25 percent finished with the task. Or ifyou were supposed to install software on ten computers in a computer laband you’ve installed it on five of them, that’s an easy 50 percent.
But not every task can be calculated so neatly. The best rule of thumb is to trustyour instincts and review what your team is telling you about their progress.
The simplest and quickest way to update percent complete on a task is toclick the task to select it in any view, and then click the 0%, 25%, 50%, 75%, or100% button on the Tracking toolbar. Alternatively, you can double-click anytask to open the Task Information dialog box and then enter the percent com-plete there. You can also select a task and click the Update Tasks button onthe Tracking toolbar to open the Update Tasks dialog box and make thechange there. If you want to enter a percentage in increments other than 25percent, you’ll have to enter it in the Task Information or Update Tasks dialogbox or the Percent Complete column in any sheet view.
235Chapter 13: On the Right Track
Can tracking get too detailed?Does it make sense to track 2.25 percent ofprogress every other day on a two-month task?Probably not. Except on the lengthiest tasks,entering a percentage more finely broken downthan 25, 50, 75, and 100 percent complete prob-ably isn’t worth it. That’s partly because taskslonger than a few weeks should probably bebroken down into subtasks for ease of tracking,and partly because one of the main purposes oftracking is reporting. If your boss or board orclient could really care less about when you hit
your exact 33.75 percent-complete point, whytrack it?
On the other hand, if (for some reason knownonly to you) your project must include a six-month task and you can’t break it into subtasks,you might use percentages such as 10, 20, 30,40, 50, and so on to prevent having to wait amonth between updates with (apparently) noprogress to show.
20_036516 ch13.qxp 11/20/06 1:44 PM Page 235
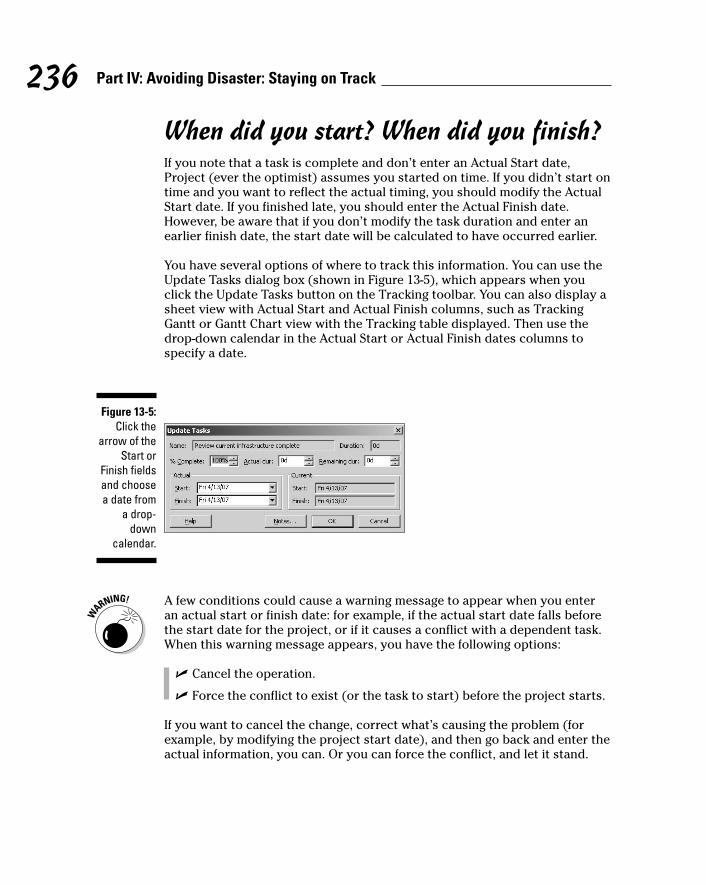
When did you start? When did you finish?If you note that a task is complete and don’t enter an Actual Start date,Project (ever the optimist) assumes you started on time. If you didn’t start ontime and you want to reflect the actual timing, you should modify the ActualStart date. If you finished late, you should enter the Actual Finish date.However, be aware that if you don’t modify the task duration and enter anearlier finish date, the start date will be calculated to have occurred earlier.
You have several options of where to track this information. You can use theUpdate Tasks dialog box (shown in Figure 13-5), which appears when youclick the Update Tasks button on the Tracking toolbar. You can also display asheet view with Actual Start and Actual Finish columns, such as TrackingGantt or Gantt Chart view with the Tracking table displayed. Then use thedrop-down calendar in the Actual Start or Actual Finish dates columns tospecify a date.
A few conditions could cause a warning message to appear when you enteran actual start or finish date: for example, if the actual start date falls beforethe start date for the project, or if it causes a conflict with a dependent task.When this warning message appears, you have the following options:
� Cancel the operation.
� Force the conflict to exist (or the task to start) before the project starts.
If you want to cancel the change, correct what’s causing the problem (forexample, by modifying the project start date), and then go back and enter theactual information, you can. Or you can force the conflict, and let it stand.
Figure 13-5:Click the
arrow of theStart or
Finish fieldsand choosea date from
a drop-down
calendar.
236 Part IV: Avoiding Disaster: Staying on Track
20_036516 ch13.qxp 11/20/06 1:44 PM Page 236

John worked three hours, Maisie worked tenIf you want to get to the blow-by-blow level of tracking, you need to recordexactly how many hours each resource put in on your tasks. This can beabout as much fun as typing the New York City phone book into a database,but it has some benefits. After you track actual hours, you can get tallies oftotal hours put in by each resource in your project by day, week, or month. Ifyou have to bill clients based on resource hours (for example, if you’re alawyer), you have a clear record to refer to. If you’re tracking a budget indetail, resource hours multiplied by their individual rates will tally an accu-rate accounting of costs as finely as day by day.
If you don’t enter specific hours, Project just averages the work done on thetask according to the total duration. For many people, that’s fine; for others,more detail is better. If you’re in the detail camp, specify actual resourcehours as a total by task or day-by-day through the life of each task.
To enter resource hours, follow these steps:
1. Display Resource Usage view, which is shown in Figure 13-6.
2. In the Resource Name column, scroll down to locate the resource youwant to track.
Figure 13-6:Track
resourceactivity day
by day inthis view.
237Chapter 13: On the Right Track
20_036516 ch13.qxp 11/20/06 1:44 PM Page 237

The tasks that each resource is assigned to are listed underneath theresource name.
3. Enter the hours put in by the resource:
• If you want to enter only total hours: Locate the task name under theresource listing. Display the Actual Work column and enter thetotal hours there.
• If you want to enter hours on the task day by day: Scroll in the chartpane to locate the timeframe for the task. Click the cell for a daythat the resource worked and enter a number. Repeat this for eachday that the resource worked on that task.
If the hours you enter for a resource total more or less than the baseline esti-mate for that resource on that task, here’s what happens:
� When you enter an amount and press Enter, the Work column total recal-culates to reflect the total hours worked on that task.
� The hour notation on that date is displayed in red, showing some varia-tion from baseline hours.
� A little pencil symbol appears in the ID column for that task, indicatingthat the assignment has been edited.
� A yellow box with an exclamation point appears in the ID column to theleft of the task’s summary task, indicating a resource overallocation.
Note that you can easily look up the total hours put in by each resource onthe project by checking the summary number of work hours listed next tothe resource in the Resource Name column of Resource Usage view.
238 Part IV: Avoiding Disaster: Staying on Track
Automating updates via Project Web AccessIf your organization uses Project Server withProject Web Access to handle projects acrossyour enterprise, you can use tools from theCollaborate menu to help automate your track-ing. By using the Request Progress Informationcommand, you can notify your resources toupdate their progress with a status report, orthey can enter their specific hours worked in anonline timesheet. By using the Update ProjectProgress command, you can access thosetimesheet updates and accept or reject the data there as updates to your project plan.
Improvements to timesheets in Project 2007include the ability to track billable and non-billable hours as well as future time reporting,which is required by some organizations.
Note: If you have Project Standard, you will notsee the Collaborate menu. Additionally, if youdon’t have Project Server and Project WebAccess set up, most of the Collaborate menucommands are not available. See Chapters 18and 19 for more about using Project WebAccess.
20_036516 ch13.qxp 11/20/06 1:44 PM Page 238
Uh-oh, we’re into overtimeWhen you enter 16 hours of work on a single day for a resource, even thoughthat resource is based on a calendar with an 8-hour day, Project doesn’t rec-ognize any of those hours as overtime. This is one case where you have tolead Project by the hand and actually tell it to specify overtime work.
When you enter hours in the Overtime Work field, Project interprets that asthe number of total Work hours that are overtime hours. So, if you enter 16hours of work on a task in the Work column and then enter 4 in the OvertimeWork column, Project assumes that there were 12 hours of work at the stan-dard resource rate and 4 hours at the overtime rate.
To enter overtime hours, follow these steps:
1. Display Resource Usage view.
2. Right-click a column heading and then click Insert Column.
The Column Definition dialog box appears.
3. In the Field Name box, click Overtime Work.
4. Click OK to display the column.
5. Click in the Overtime Work column for the resource and task youwant to modify, and then use the spinner arrows to specify the over-time hours.
Note that if you specify overtime, Project assumes that effort-driven tasks are happening in less time. After all, if the task was to take three 8-hour days(24 hours of work) to complete and you recorded that the resource worked12 hours for two days in a row, Project figures that all the effort got accom-plished in less time. The duration for the task will actually shrink. If that’s notwhat happened, you have to go in and modify the task duration yourself.
Specifying remaining durationsA lot of tracking information has a weird and wonderful relationship inProject. For example, Project tries to help you out by calculating durationsbased on other entries you make, such as actual start and finish dates. In thatparticular case, Project figures out task duration according to those dates.(This works in reverse, too: If you enter the task duration, Project recalcu-lates the finish date to reflect it.)
239Chapter 13: On the Right Track
20_036516 ch13.qxp 11/20/06 1:44 PM Page 239

Sometimes you want to enter a duration rather than have Project base it onother information you input. For example, you might have entered a startdate and 20 hours of work on a task that had a baseline of 16 hours of work.What Project can’t know is that the scope of the task changed, and now thetask is not complete and will also take another 20 hours of work. You have totell Project about that.
The way in which Project calculates task duration has changed in Project2007. Previously, if you marked an assignment as 100% complete and thenextended the task duration, Project automatically extended the assignmentand work. In Project 2007, if you mark work as complete and then extend thetask duration, Project extends the duration but doesn’t extend the work.
To modify the duration on a task in progress or completed, follow thesesteps:
1. Display Gantt Chart view.
2. Choose View➪Table➪Tracking.
The Tracking table is displayed.
3. Click in the Actual Duration column for the task you want to modifyand then use the arrows to adjust the actual duration up or down.
4. If you want to enter a remaining duration, click in the RemainingDuration column and type a number as well as an increment symbol.
For example, you might type 25d (where d is the increment symbol fordays).
If you enter a percentage-of-completion for a task and then modify the dura-tion to differ from the baseline, Project automatically recalculates the per-centage considered complete to reflect the new duration. So, if you enter 50%complete on a 10-hour task and then modify the actual duration to 20 hours,Project considers that 5 hours (50% of 10 hours) as only 25% of the 20 hours.
Entering fixed-cost updatesFixed costs are costs that aren’t influenced by time, such as equipment pur-chases and consulting fees. Compared with the calculations and interactionsof percentage completions and start and finish dates for hourly resources,fixed-cost tracking will seem like simplicity itself!
Here’s how to do it:
1. Display Gantt Chart view.
2. Right-click in a column heading and then click Insert Column.
The Column Definition dialog box appears.
240 Part IV: Avoiding Disaster: Staying on Track
20_036516 ch13.qxp 11/20/06 1:44 PM Page 240
3. In the Field Name box, select Fixed Cost.
4. Click OK.
5. Click in the Fixed Cost column for the task you want to update.
6. Type the fixed cost, or a total of several fixed costs, for the task.
That’s it! However, because Project lets you enter only one fixed-cost amountper task, consider adding a note to the task itemizing the costs you’veincluded in the total. Also, there is no baseline fixed cost column, so to com-pare how your actual fixed costs outstripped your baseline estimates, youhave to do a little math to find the difference between baseline costs andactual costs: Deduct non-fixed costs to get the variation in fixed costs.
Consider using some of the 30 customizable Text columns for itemized fixed-cost entry. Rename one Equipment Purchase, another Facility Rental, and soon, and then enter those costs in those columns. Of course, these columns ofdata won’t perform calculations such as rolling up total costs to the summarytasks in your project, but they’ll serve as a reminder about itemized fixedcosts.
In Project 2007, you can designate a resource type as Cost and assign a costto that resource. The Cost column then reflects the amount spent for Costresources on tasks. See Chapter 7 for more about resource types.
Update Project: Sweeping Changes for Dummies
If it’s been a while since you tracked activity and you want to update yourschedule, Update Project might be for you. It allows you to track chunks ofactivity for a period of time. Update Project works best, however, if mosttasks happened pretty much on schedule.
This is not fine-tuned tracking: It’s akin to getting your bank balance, drawinga line in your checkbook, and writing down that balance as gospel ratherthan accounting for your balance check by check. (If you’re like most of us,you’ve done this at least once.) Doing so assumes that all your checks anddeposits probably tally with what the bank says as of that date; thus, goingforward, you’re back on track.
Here are the setting choices Update Project offers you:
� Update Work as Complete Through: You can update your projectthrough the date you specify in this box in one of two ways. The Set 0% –100% Complete setting lets Project figure out the percent complete onevery task that should have begun by that time. By making this choice,
241Chapter 13: On the Right Track
20_036516 ch13.qxp 11/20/06 1:44 PM Page 241

you tell Project to assume that the tasks started and progressed exactlyon time. The Set 0% or 100% Complete Only setting works a little differ-ently. This setting says to Project, just record 100% complete on tasksthat the baseline said would be complete by now, but leave all othertasks at 0% complete.
� Reschedule Uncompleted Work to Start After: This setting reschedulesthe portions of tasks that aren’t yet complete to start after the date youspecify in this dialog box.
To use Update Project, do this:
1. Display Gantt Chart view.
2. If you want to update only certain tasks, select them.
3. Choose Tools➪Tracking➪Update Project.
The Update Project dialog box appears, as shown in Figure 13-7.
4. Choose the Update method you prefer: Set 0% – 100% Complete or Set 0% or 100% Complete Only.
5. If you want a status date other than the current date, set it in the fieldin the upper-right corner.
6. If you want Project to reschedule any work rather than updating workas complete, select the Reschedule Uncompleted Work to Start Afteroption and then select a date from the list.
7. Choose whether you want these changes to apply to the entire projector only to selected tasks.
8. Click OK to save the settings and have Project make updates.
If you want, you can use Update Project to make some global changes, suchas marking all tasks that should be complete according to baseline as 100percent complete. Then go in and perform more detailed task-by-task track-ing on individual tasks that are only partially complete.
Figure 13-7:You can
update onlyselected
tasks or theentire
project.
242 Part IV: Avoiding Disaster: Staying on Track
20_036516 ch13.qxp 11/20/06 1:44 PM Page 242

Tracking Materials UsageTracking the amount of materials used on tasks involves tracking actual unitsat the material resource level. So, if you create a resource called rubber andassign it to the task Manufacture Tires at 500 tons, but you actually used only450 tons (in other words, you made 450 tons of rubber streeeetch) you wouldgo in and enter the actual units used.
This situation is akin to the way you track work resource hours on tasks. Tomake it happen, just follow these steps:
1. Display Resource Usage view (see Figure 13-8).
2. Locate the material resource in the list and scroll in the right paneuntil the assignment timeframe appears.
3. Enter the actual units used on each task to which you assigned thatresource.
Just keep in mind that if you assign the material resource of, say, 500 tons toa five-day task, Resource Usage view reflects that Project spread the usageout — 100 tons for each of the five days of the task. If you don’t care on whatday of the task the materials were used, you can simply modify one of the set-tings to be higher or lower to make up for any difference in actual usage.
Figure 13-8:Change the
baselineunits here
and theactual
usage willchange inthe Work
column.
243Chapter 13: On the Right Track
20_036516 ch13.qxp 11/20/06 1:44 PM Page 243
Tracking More Than One: Consolidated Projects
Often you’ll have either projects that are related in some fashion (such assharing resources or having timing dependencies between them) or a seriesof smaller projects that make up a larger project. In that case, you can consol-idate those separate projects into one file, either as a series of summarytasks or with all summary and subtasks included.
When you consolidate projects, you can choose to link to the source file.When you do, any changes to the source file are represented in the consoli-dated file.
If it’s your job to keep track of the big picture, you have to understand howconsolidated projects get updated.
Consolidating projectsCreating a consolidated project is sort of like going to a Chinese restaurant —one from Column A, one from Column B, and so on, until you build yourself atasty meal. In Project, you open a blank file and then insert existing projectsto build a satisfying master project plan.
The neat thing about consolidated projects is that you have some choicesabout how the consolidated project and the source files you insert in it inter-act. For example, you can link to a source file so that changes made in thesource file will be reflected in the consolidated project. This is a great tool forsomebody who has to keep his or her eye on multiple phases or manysmaller projects.
You can also create dependencies between inserted projects in the consoli-dated file. If you have (for example) one project that can’t start until anotherone finishes, you can clearly see in the consolidated file how various sepa-rate projects in your organization have an impact on each other.
The other thing you can do to relate consolidated projects to their sourcefiles is to make your consolidated project a two-way street, allowing changesin it to be reflected in the source files. You can also make the choice to havethe source files be read-only so your changes won’t go mucking around withother people’s files — whichever suits your purposes.
244 Part IV: Avoiding Disaster: Staying on Track
20_036516 ch13.qxp 11/20/06 1:44 PM Page 244
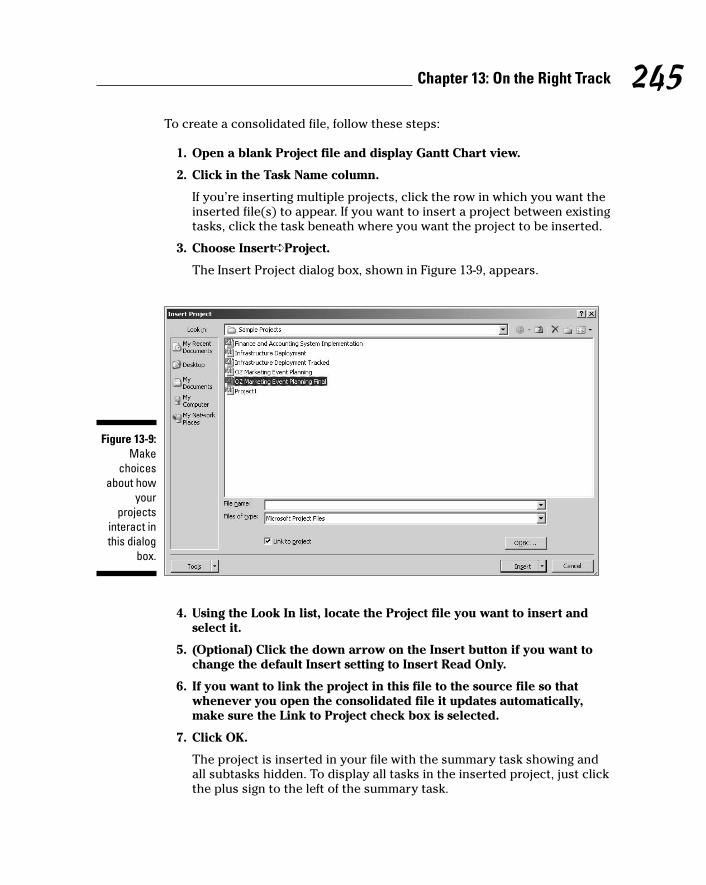
To create a consolidated file, follow these steps:
1. Open a blank Project file and display Gantt Chart view.
2. Click in the Task Name column.
If you’re inserting multiple projects, click the row in which you want theinserted file(s) to appear. If you want to insert a project between existingtasks, click the task beneath where you want the project to be inserted.
3. Choose Insert➪Project.
The Insert Project dialog box, shown in Figure 13-9, appears.
4. Using the Look In list, locate the Project file you want to insert andselect it.
5. (Optional) Click the down arrow on the Insert button if you want tochange the default Insert setting to Insert Read Only.
6. If you want to link the project in this file to the source file so thatwhenever you open the consolidated file it updates automatically,make sure the Link to Project check box is selected.
7. Click OK.
The project is inserted in your file with the summary task showing andall subtasks hidden. To display all tasks in the inserted project, just clickthe plus sign to the left of the summary task.
Figure 13-9:Make
choicesabout how
yourprojects
interact inthis dialog
box.
245Chapter 13: On the Right Track
20_036516 ch13.qxp 11/20/06 1:44 PM Page 245

Updating consolidated projectsThere are two ways to skin the cat called updating a consolidated project, andthe one you use depends on whether you linked to the source files when youinserted them. If you linked the files and you inserted them without the read-only setting, changes in source files are reflected in the consolidated file (andvice versa). Updating is simply a matter of making sure all the files are avail-able in their original linked locations (for example, in a folder on your net-work), and then Project updates automatically.
If you haven’t linked the files, changes in source files won’t be reflected inconsolidated files, and the consolidated file information will have no effect onthe source information. You might create such an unlinked consolidated file ifyou simply want to see a snapshot of how all projects are going at themoment, and you don’t want to run the risk of having your settings changingthe source information. In this case, however, if you want to track progress,you have to create a new consolidated project, or manually enter all updates.
After you insert projects in a file, you can move them around using Cut andPaste tools. When you do, the Planning Wizard may appear, offering youoptions to resolve any conflicts that may occur because of dependency linksyou’ve created between inserted projects.
Changing linking settingsChanging your mind is a project manager’s prerogative. So, if, after you haveinserted a source file in a consolidated file, you find you didn’t initially estab-lish a link, you can go in and change that setting so the files update eachother automatically.
Follow these steps to make changes to the inserted project:
1. Open the consolidated file.
2. Display Gantt Chart view.
3. Click the Task Name of the inserted project you want to update.
4. Click the Task Information button on the Standard toolbar.
The Inserted Project Information dialog box (as shown in Figure 13-10)appears.
5. Display the Advanced tab.
6. Select the Link to Project check box and then click the Browse button.
The Inserted Project dialog box appears.
246 Part IV: Avoiding Disaster: Staying on Track
20_036516 ch13.qxp 11/20/06 1:44 PM Page 246
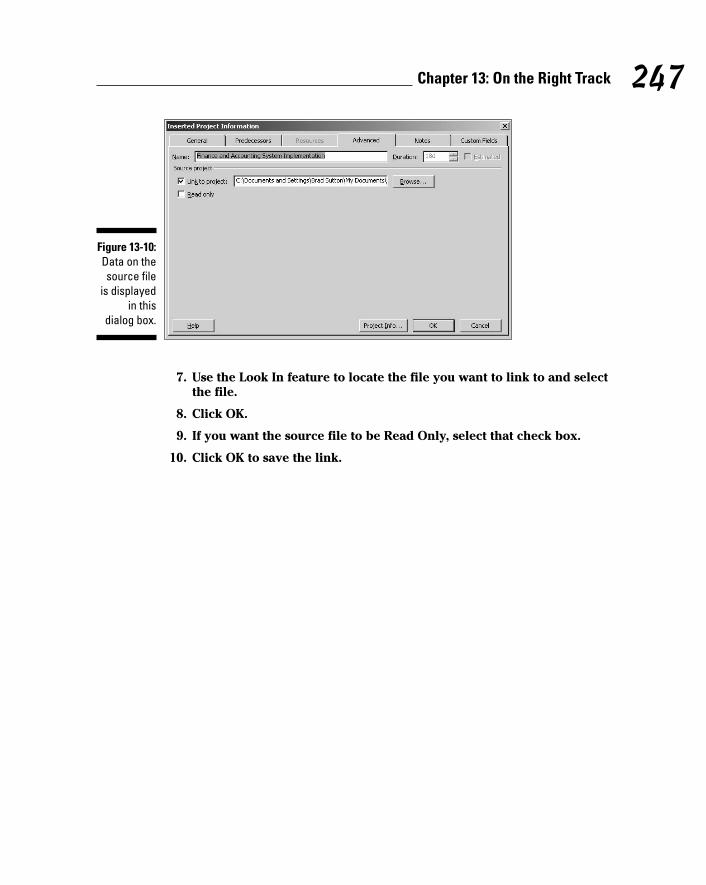
7. Use the Look In feature to locate the file you want to link to and selectthe file.
8. Click OK.
9. If you want the source file to be Read Only, select that check box.
10. Click OK to save the link.
Figure 13-10:Data on thesource file
is displayedin this
dialog box.
247Chapter 13: On the Right Track
20_036516 ch13.qxp 11/20/06 1:44 PM Page 247

248 Part IV: Avoiding Disaster: Staying on Track
20_036516 ch13.qxp 11/20/06 1:44 PM Page 248

Chapter 14
A Project with a View: Observing Progress
In This Chapter� Seeing what your progress looks like with indicators and taskbars
� Seeing progress from various Project views
� Examining cost and time variances
� Understanding earned value
� Modifying calculation options
Some people use Project just to paint a pretty picture of what their projectwill entail and then put the plan in a drawer. That’s a mistake. After you
enter all your project data, save a baseline, and then track actual activity onyour project, you get an amazing array of information back from Project thathelps you to stay on time and on budget.
After you track some actual activity on tasks, Project allows you to view base-line estimates right alongside your real-time plan. Project alerts you to tasksthat are running late and also shows how the critical path shifts over time.
Project also provides detailed budget information. In fact, the informationthat you can get about your costs might just make your accounting depart-ment’s heart sing. The information is detailed and uses terms that accoun-tants love (such as earned value, cost variance, and budgeted cost of workperformed, all translated in a later section of this chapter).
So keep that project file close at hand — and take a look at how Project canmake you the most informed project manager in town.
21_036516 ch14.qxp 11/20/06 1:45 PM Page 249
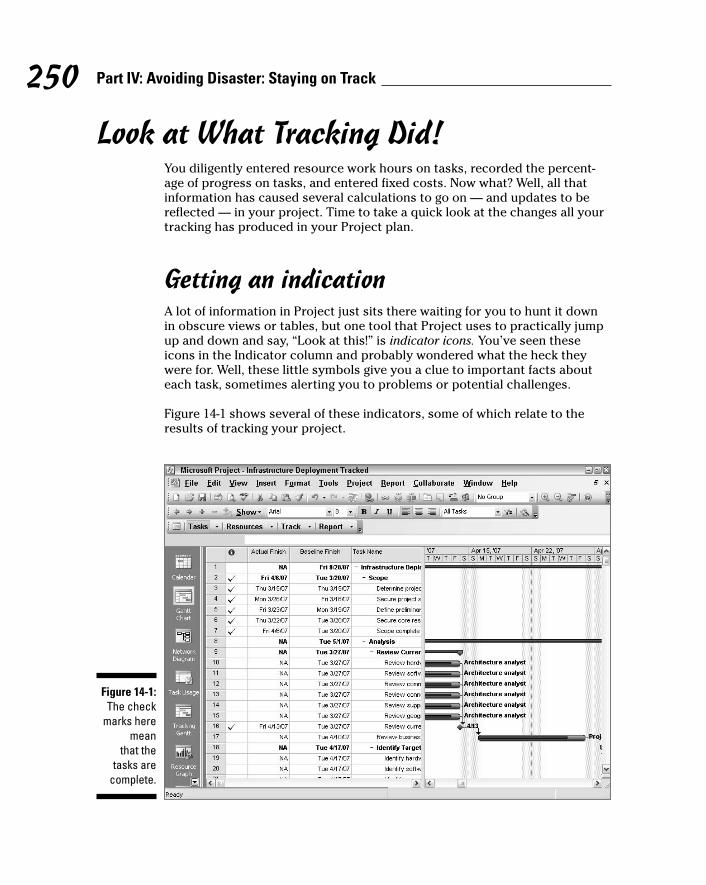
Look at What Tracking Did!You diligently entered resource work hours on tasks, recorded the percent-age of progress on tasks, and entered fixed costs. Now what? Well, all thatinformation has caused several calculations to go on — and updates to bereflected — in your project. Time to take a quick look at the changes all yourtracking has produced in your Project plan.
Getting an indicationA lot of information in Project just sits there waiting for you to hunt it downin obscure views or tables, but one tool that Project uses to practically jumpup and down and say, “Look at this!” is indicator icons. You’ve seen theseicons in the Indicator column and probably wondered what the heck theywere for. Well, these little symbols give you a clue to important facts abouteach task, sometimes alerting you to problems or potential challenges.
Figure 14-1 shows several of these indicators, some of which relate to theresults of tracking your project.
Figure 14-1:The check
marks heremean
that thetasks are
complete.
250 Part IV: Avoiding Disaster: Staying on Track
21_036516 ch14.qxp 11/20/06 1:45 PM Page 250

If you see an unfamiliar indicator icon crop up in your project, hold yourmouse cursor over the indicator. A box describing its meaning appears. Toget a list of Project icons and their meanings, go to Help, click the Index tab,and type icon in the Search box. Click Search and then click Indicator Fields.
Lines of progressProgress lines offer an additional visual indicator of how you’re doing. As youcan see in Figure 14-2, a progress line zigzags between tasks and forms, show-ing left-or-right-pointing peaks. These peaks indicate late or early tasks (cal-culated according to the status date you use when tracking). A progress linethat points to the left of a task indicates that the task is running late. Progresslines that point to the right show that, wonder of wonders, you’re runningahead of schedule. (Treasure these: They don’t seem to appear often in projects!)
Displaying progress linesBy default, Project doesn’t display progress lines. You have to turn them on.And while you’re at it, you might as well specify when and how they appear.Here’s how to make settings for and display progress lines:
1. Display Gantt Chart view.
2. Choose Tools➪Tracking➪Progress Lines.
The Progress Lines dialog box appears, as shown in Figure 14-3.
3. If you want Project to always show a progress line for the current orstatus date, select Always Display Current Progress Line and thenselect At Project Status Date or At Current Date.
4. If you want progress lines to be displayed at set intervals, do the following:
a. Select Display Progress Lines at Recurring Intervals, and then selectDaily, Weekly, or Monthly.
b. Specify the interval settings.
For example, if you select Weekly, you can choose every week,every other week, and so on, as well as which day of the week theline should be displayed for on the timescale. Figure 14-4 shows aproject with progress lines at regular intervals.
5. Choose whether you want to display progress lines beginning at theProject Start or on another date.
To use the Project Start date, simply select the Project Start option inthe Begin At section of the dialog box. To select an alternate start date,select the second option and then select a date from the calendar drop-down list.
251Chapter 14: A Project with a View: Observing Progress
21_036516 ch14.qxp 11/20/06 1:45 PM Page 251
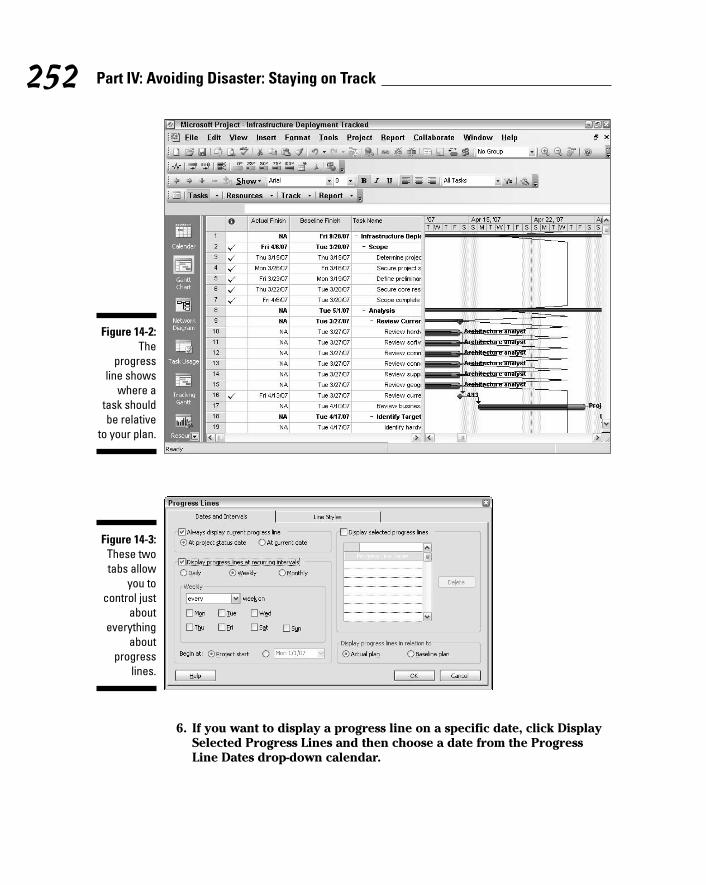
6. If you want to display a progress line on a specific date, click DisplaySelected Progress Lines and then choose a date from the ProgressLine Dates drop-down calendar.
Figure 14-3:These twotabs allow
you tocontrol just
abouteverything
aboutprogress
lines.
Figure 14-2:The
progressline shows
where atask shouldbe relative
to your plan.
252 Part IV: Avoiding Disaster: Staying on Track
21_036516 ch14.qxp 11/20/06 1:45 PM Page 252

You can make this setting for multiple dates by clicking subsequent linesin this list and selecting additional dates.
7. Finally, you can choose to display progress lines in relation to actualor baseline information.
If a task has been tracked to show 50 percent complete and you chooseto have Project display progress lines based on actual information, thepeak appears relative to the 50 percent actual line, not the completebaseline taskbar.
8. Click OK to save your settings.
You can use your mouse to add a single progress line quickly. On theTracking toolbar, click the Add Progress Line tool. Then click the Gantt chartat the location on the timescale where you want the line to appear in thechart. To delete the line, right-click it and choose Progress Lines. In theProgress Lines dialog box, click the item you want to delete in the ProgressLine Dates list, click Delete, and then click OK.
Figure 14-4:Multiple
progresslines can
get ratherbusy, but
they doshow
clearly howdelays grew
over time.
253Chapter 14: A Project with a View: Observing Progress
21_036516 ch14.qxp 11/20/06 1:45 PM Page 253
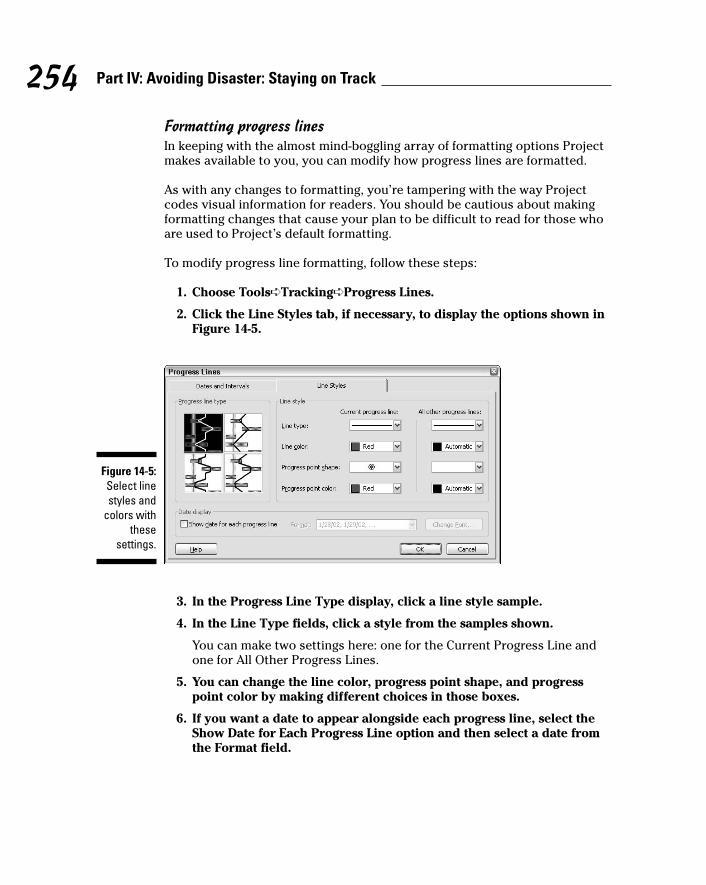
Formatting progress linesIn keeping with the almost mind-boggling array of formatting options Projectmakes available to you, you can modify how progress lines are formatted.
As with any changes to formatting, you’re tampering with the way Projectcodes visual information for readers. You should be cautious about makingformatting changes that cause your plan to be difficult to read for those whoare used to Project’s default formatting.
To modify progress line formatting, follow these steps:
1. Choose Tools➪Tracking➪Progress Lines.
2. Click the Line Styles tab, if necessary, to display the options shown inFigure 14-5.
3. In the Progress Line Type display, click a line style sample.
4. In the Line Type fields, click a style from the samples shown.
You can make two settings here: one for the Current Progress Line andone for All Other Progress Lines.
5. You can change the line color, progress point shape, and progresspoint color by making different choices in those boxes.
6. If you want a date to appear alongside each progress line, select theShow Date for Each Progress Line option and then select a date fromthe Format field.
Figure 14-5:Select linestyles and
colors withthese
settings.
254 Part IV: Avoiding Disaster: Staying on Track
21_036516 ch14.qxp 11/20/06 1:45 PM Page 254
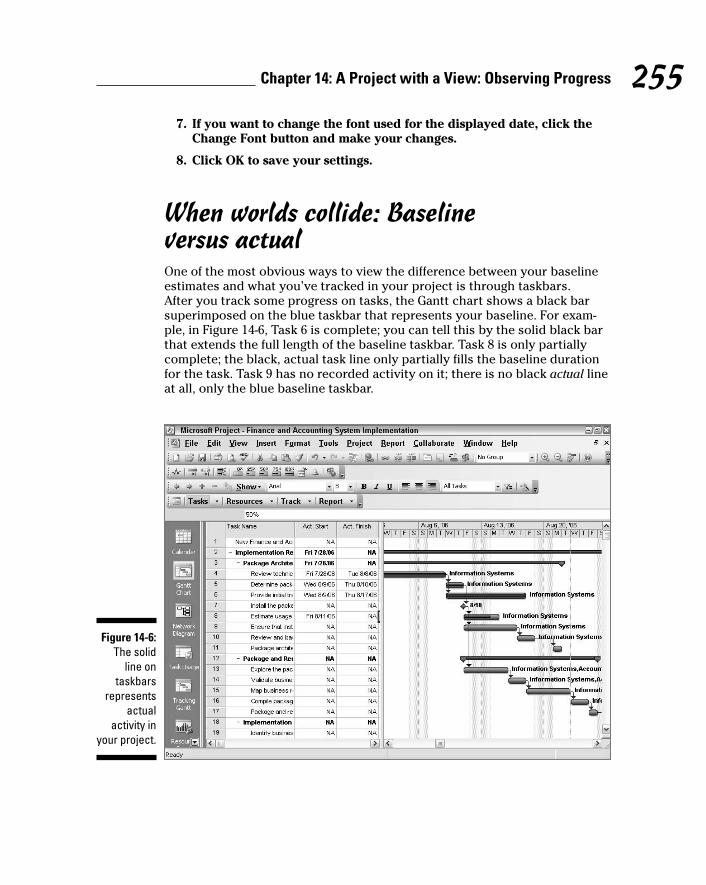
7. If you want to change the font used for the displayed date, click theChange Font button and make your changes.
8. Click OK to save your settings.
When worlds collide: Baseline versus actualOne of the most obvious ways to view the difference between your baselineestimates and what you’ve tracked in your project is through taskbars. After you track some progress on tasks, the Gantt chart shows a black barsuperimposed on the blue taskbar that represents your baseline. For exam-ple, in Figure 14-6, Task 6 is complete; you can tell this by the solid black barthat extends the full length of the baseline taskbar. Task 8 is only partiallycomplete; the black, actual task line only partially fills the baseline durationfor the task. Task 9 has no recorded activity on it; there is no black actual lineat all, only the blue baseline taskbar.
Figure 14-6:The solid
line ontaskbars
representsactual
activity inyour project.
255Chapter 14: A Project with a View: Observing Progress
21_036516 ch14.qxp 11/20/06 1:45 PM Page 255

Learn by the NumbersVisual indicators such as taskbars and indicator icons are useful to alert youto delays or variances between estimated and actual performance, but theydon’t provide any detailed information. To get the real lowdown on how farahead (or behind) you are, down to the day or penny, you need to give thenumbers a scan. The numbers that Project provides reveal much aboutwhether you’re on schedule and within your budget.
Two tables you can display in Gantt Chart view bring your situation into boldrelief. The Cost table and Variance table provide information about dollarsspent and variations in timing between baseline and actual activity.
The Cost table is shown in Figure 14-7. Here you can review data that com-pares baseline estimates of fixed costs and actual costs. These two sets of data are presented side-by-side in columns. In the project shown in Fig-ure 14-7, you’ve spent $190,350 so far, and your baseline estimate was$182,750, giving you a variance of $7,600 over your budget.
Figure 14-7:The
Variancecolumn
shows thedifference
between thetotal cost
and thebaseline.
256 Part IV: Avoiding Disaster: Staying on Track
21_036516 ch14.qxp 11/20/06 1:45 PM Page 256

To display a table, choose View➪Table and click the table name.
Figure 14-8 shows the Variance table. This table is to your scheduling whatthe Cost table is to your budget. It shows the variance between baseline startand finish dates and task durations, as well as the timing that actuallyoccurred on tasks after your project got going.
If you created a slack task to help you deal with delays that might come up,the total variance shown here will tell you how many days you may have todeduct from the duration of the slack task to get back on track. Read moreabout making adjustments in your plan to deal with delays and cost overrunsin Chapter 15 and about slack in Chapter 10.
Acronym Soup: BCWP, ACWP, EAC, and CV
In any view, you can insert several columns of data to give you some calcu-lated analyses of what’s going on in your project budget. Much of this datawill mean more to an accountant than to most in-the-trenches project man-agers. If only to make your accountant feel more comfortable, you shouldbecome familiar with some of the most common calculations. Also, manyorganizations require information on these specific numbers in projectreports:
Figure 14-8:Use this
table to seewhat delaysare doing to
yourschedule.
257Chapter 14: A Project with a View: Observing Progress
21_036516 ch14.qxp 11/20/06 1:45 PM Page 257

� BCWP (budgeted cost of work performed): Referred to in some circlesas earned value, BCWP is essentially a calculation of the value of thework that you’ve completed expressed in dollars. For example, if a taskhas $2,000 of costs associated with it and you record that the task is 50percent complete, the earned value for that task is $1,000 (50 percent ofthe baseline estimated costs).
� ACWP (actual cost of work performed): This calculation looks at actualcosts, including tracked resource hours or units expended on the taskplus fixed costs. Whereas BCWP looks at the baseline value of work,ACWP looks at actual tracked costs.
� EAC (estimate at completion): This is a total of all costs on a task. For atask in progress, EAC calculates the actual costs recorded to date plusthe remaining baseline estimated costs.
� CV (cost variance): This represents the difference between planned costs(that is, costs included in the baseline for a task) and the combination ofactual costs recorded to date plus any remaining estimated costs. Thisnumber is expressed as a negative number if you’re under budget and asa positive number if you’re like the rest of us (over budget).
Studying these numbers can help you see what it has cost to get where youare today on your project.
Calculations behind the ScenesWhile you’re happily entering resource hours and fixed costs into your pro-ject, Project is busy making calculations that can shift around task timing andresource workload in your plan. These calculations relate to how tasks areupdated, how the critical path is determined, and how earned value is calcu-lated. If you’re a control freak, you’ll be happy to know that you can, to someextent, control how Project goes about making these calculations.
Remember that the new Change Highlighting feature helps you see whateffect an individual change has on your project. See Chapter 10 for moreabout this feature.
Going automatic or manualBy default, Project is on automatic as far as calculations go. When you make achange to your plan, Project recalculates totals, the critical path, and so onwithout you having to lift a finger. However, you can change that default set-ting and have Project wait for you to initiate calculations manually. You do soin the Calculation tab of the Options dialog box (Tools➪Options). Figure 14-9shows the settings available there.
258 Part IV: Avoiding Disaster: Staying on Track
21_036516 ch14.qxp 11/20/06 1:45 PM Page 258

If you change the Calculation mode to Manual, you must click the CalculateNow button in this dialog box any time you want Project to perform all its cal-culations. You also have the choice here of setting different modes for onlythe current project or for all open projects.
So why would you choose to use manual calculation? You might want tomake a lot of changes and not have Project take the milliseconds required torecalculate between each change, slowing down your entry work. You canput things on manual, make all your changes, and then use the Calculate Nowbutton to make all the changes at once.
In addition, because even with Change Highlighting on it’s not always easy tospot all the items that have been recalculated when you make a series ofchanges, it might be easier to make all the changes in manual mode, printyour Gantt Chart view, and then recalculate and compare the two. Thisapproach shows you the cumulative calculations that occurred when all yourchanges were made so you can see whether you’re happy with the revisedplan. (This feature is especially useful for trying out what-if scenarios.)
In Project 2007, you can also take advantage of the Multiple Undo feature.This means you can leave your calculations on automatic, make changes, andthen undo them, thereby undoing the calculations in sequence. For more onMultiple Undo, see Chapter 10.
Figure 14-9:Click the
CalculateNow button
to makeProject
performcalculations
on yourcommand.
259Chapter 14: A Project with a View: Observing Progress
21_036516 ch14.qxp 11/20/06 1:45 PM Page 259

Earned-value optionsYour first question about earned value probably is, “Why does Project useBCWP in its column names but earned value in the Options dialog box?” Don’task. Just be glad I explained both terms in a previous section (“AcronymSoup: BCWP, ACWP, EAC, and CV”).
The second question you probably have is, “What do the settings you canmake to the earned-value calculation do to your project?” Well, start by look-ing at Figure 14-10, which shows you what’s behind the Earned Value buttonon the Calculation tab of the Options dialog box.
The Default Task Earned Value Method setting provides two choices:
� % Complete: This setting calculates earned value using the percent com-plete that you record on each task. This assumes that for a task that’shalfway complete, half the work hours have been used.
� Physical % Complete: Use this setting if you want to enter a percent ofcompletion that is not based on a straight percent-complete calculation.For example, if you have a four-week task to complete a mail survey, 50percent of the effort might happen in the first 25 percent of the durationof the project: designing, printing, and mailing the survey. Nothing hap-pens for two weeks while you wait for responses, and then there’s aflurry of activity when the responses come back. So a straight calcula-tion that 50 percent of the task is completed 50 percent of the waythrough wouldn’t be accurate. If your projects have a lot of tasks likethis, you might consider changing your settings to use this method.Then, you can display the Physical % Complete column in your Ganttchart sheet, and enter what you consider more accurate percent-complete information for each task.
Figure 14-10:Here are
two simplesettings to
use forcalculating
earnedvalue.
260 Part IV: Avoiding Disaster: Staying on Track
21_036516 ch14.qxp 11/20/06 1:45 PM Page 260

The second setting in the Earned Value dialog box is the Baseline for EarnedValue Calculations drop-down list. As I mention earlier, earned value is thevalue of work completed, expressed in dollars, according to the baseline: A$2,000 task at 50 percent complete (for example) has a $1,000 earned value ofwork performed. Therefore, the baseline against which you calculate thisvalue is hugely important. Choose any of the 11 possible baselines you mayhave saved in your project here. After you make these two choices, clickClose to close the Earned Value dialog box.
You should explore one more option in the Options dialog box that concernsearned value calculation. The Edits to Total Task % Complete Will Be Spreadto the Status Date option, which is not selected by default, affects howProject distributes changes in your schedule. If this option is left deselected,calculations go to the end of the duration of tasks in progress, rather than upto the status date or the current date. If you do select this option, calcula-tions spread changes across your plan up to the status date or the currentdate, and no farther. Selecting this choice helps you see changes to your pro-ject in increments of time, rather than across the life of tasks in progress.
If I were you, I’d leave the Edits to Total Task % option not selected for themost accurate reflection of progress on your project.
How many critical paths are enough?The last group of settings on the Calculation tab of the Options dialog boxconcerns critical path calculations.
The Inserted Projects Are Calculated Like Summary Tasks option is straight-forward. If you insert another project as a task in your project, having thissetting selected allows Project to calculate one critical path for your entireproject. If you don’t select it, any projects you insert are treated like outsiders — that is, they’re not taken into account in the master project’scritical-path calculations. If an inserted project won’t have an effect on yourproject’s timing, you may want to clear this option.
If following one project’s critical path is too tame for you, try getting criticalwith multiple paths. By selecting the Calculate Multiple Critical Paths option,you set up Project to calculate a different critical path for each set of tasks inyour project. Doing so can be helpful if you want to identify tasks that, ifdelayed, will cause you to miss your final project deadline or the goals of asingle phase in your project.
261Chapter 14: A Project with a View: Observing Progress
21_036516 ch14.qxp 11/20/06 1:45 PM Page 261

Finally, you can establish what puts a task on the critical path by specifyingthe number of days of slack critical tasks might have. By default, tasks withno slack are on the critical path. However, you can change this situation ifyou want to be alerted that tasks with only one day of slack are critical — figuring that one day isn’t much padding and that these tasks are still in jeopardy.
If you want all the settings on the Calculation tab to pertain to all projects,click the Set as Default button before clicking OK to save the new settings inthe Options dialog box.
262 Part IV: Avoiding Disaster: Staying on Track
21_036516 ch14.qxp 11/20/06 1:45 PM Page 262

Chapter 15
You’re Behind: Now What?In This Chapter� Reviewing your plan versions and notes to understand what went wrong
� Trying out what-if scenarios
� Working with the Analysis toolbar
� Understanding how getting more time or more people will help
� Adjusting your timing going forward
In almost every project comes a time when you feel like the floor droppedout from under you. Suddenly — and this one just snuck up on you —
you’re $20,000 over budget. Or you’re going to miss that drop-dead deadlineby two weeks. All the aspirin in the world isn’t going to solve this one.
Of course, you have a general idea of what happened because you’re smart,you kept in touch with your team, and you have Project and all its columns ofdata. Still, somehow things are off track, and you need to take action at thispoint. First, you have to justify what occurred (abbreviated CYA), and thenyou have to fix things so that you can go forward and just maybe save yourproject, your job, or both.
How do you save the day when things go off track? What you have to do atthis point involves analyzing your options and making some tough choices.This is stuff you did before you ever heard of Microsoft Project. However,Project can help you try out some possible solutions and anticipate the likelyresults. After you decide what to do, you have to implement your solutions inProject.
Justifying Yourself: Notes, Baselines,and Interim Plans
If you’ve kept interim plans, multiple baselines, and task notes in Project, it’smuch easier to explain how you got into this mess to the powers-that-be.
22_036516 ch15.qxp 11/20/06 1:45 PM Page 263

Interim plans and multiple baselines demonstrate how you made adjustmentswhen major changes or problems occurred. Using these two items indicatesto your boss that you were on top of things all the way and probably kepthim or her in the loop by generating printouts or reports reflecting majorchanges as they came up. (If you didn’t, print them now from the interimplans or baselines you saved along the way — and let them paint a picture ofwhat happened.)
A baseline saves all project data; an interim plan saves only the start andfinish dates of tasks in the project. Chapter 12 deals with interim plans andbaselines.
To view or print information from various baselines or interim plans, followthese steps:
1. Display Gantt Chart view.
2. Right-click the column heading area of the sheet pane and then clickInsert Column.
The Column Definition dialog box appears, as shown in Figure 15-1.
3. In the Field Name box, choose a column name.
For example, you might choose Start 1-10 and Finish 1-10 for any one ofyour interim plans (or choose Baseline through Baseline 10 for baselinedata).
4. If you need to, repeat Steps 2 and 3 to display additional columns.Click OK to display the column(s).
In addition to interim plans and baselines, task notes should include informa-tion about resource performance on a task, vendor problems, or late deliver-ies. Notes that are especially important to add are those you make whensomeone in authority over you has asked for a change and okayed moremoney or time to make that change. (Don’t worry, this hardly ever happens.)
Figure 15-1:Insert as
manycolumns as
you like inany view
with a sheetpane.
264 Part IV: Avoiding Disaster: Staying on Track
22_036516 ch15.qxp 11/20/06 1:45 PM Page 264

To add a note to a task, either display the task note column in a sheet pane ordouble-click a task and add the note on the Notes tab of the Task Informationdialog box.
What If?Just as you can get too close to a problem to see a solution, you can get tooclose to your project to recognize what you need to do. With Project’s filter-ing and sorting features, though, you can slice and dice various aspects ofyour project a little differently to get a fresh perspective.
You can also use tools such as resource leveling to solve resource conflicts.Resource leveling might not always solve problems to your taste, but it’s agood way to let Project show you one what-if scenario that will solve mostresource problems instantly.
See Chapter 10 for more information about how to use resource leveling.
Sorting things outSometimes when things won’t sort themselves out, it’s time to sort yourtasks. Project allows you to sort tasks by several criteria, including startdate, finish date, priority, and cost.
How can sorting help you? Well, here are a few examples:
� To cut costs: Consider sorting tasks by cost. Then you can focus on themost expensive tasks first to see whether there’s room to trim nice-to-have-but-pricey items.
� To delete tasks to save time: Display tasks by priority and then look atthe low-priority tasks as the first candidates for the waste bin.
� To review task timing: Sort by duration in descending order to see thelongest tasks first.
If you want to apply a preset sorting order, simply choose Project➪Sort andthen choose an option from the submenu, such as by Start Date or by Cost.
If you want to see additional sort criteria — or sort by more than one criterion — follow these steps:
1. Choose Project➪Sort➪Sort By.
The Sort dialog box appears, as shown in Figure 15-2.
265Chapter 15: You’re Behind: Now What?
22_036516 ch15.qxp 11/20/06 1:45 PM Page 265

2. In the Sort By list, select a criterion.
3. Select either Ascending (to sort from lowest to highest) or Descending(to sort from highest to lowest).
With a date field, the sorting order would be soonest to latest and latestto soonest, respectively; with a text field, alphabetical would be theorder.
4. (Optional) If you want a second criterion, click the first Then By boxand make a selection.
For example, if you choose to sort first by Cost and then by Type, tasksare sorted from least expensive to most expensive, and then (withineach cost level) by type (Fixed Duration, Fixed Units, and Fixed Work).
5. (Optional) If you want to add a third criterion, click the second ThenBy box and make a selection.
6. Click Sort.
To return to your original task order, choose Project➪Sort➪By ID. Tasks are now back in task ID number order, which is Project’s standard sorting criterion.
FilteringChapter 10 deals with how you create and apply filters in Project. Now is agood time to call on your knowledge of those features. Especially in largerprojects, where it’s not always easy to scan hundreds of tasks and noticewhich are running late or over budget, filters can home in on exactly whereyour trouble lies.
You can choose to have tasks that don’t meet filter criteria removed fromyour display or simply highlight tasks that meet the criteria on-screen.
Figure 15-2:Sort by up to
threecriteria in
ascendingor
descendingorder.
266 Part IV: Avoiding Disaster: Staying on Track
22_036516 ch15.qxp 11/20/06 1:45 PM Page 266

Table 15-1 lists some filters that are useful when you’re trying to identify andsolve problems with your schedule.
Table 15-1 Filters to Isolate ProblemsFilter Name What It Displays
Critical Tasks in the project that must be completed accordingto schedule to make your final deadline (critical path)
Cost Overbudget Tasks that exceed budgeted expenditures
Incomplete Tasks Tasks that haven’t been marked as complete
Late/Overbudget Tasks Tasks that are running later than their baseline esti-mate and are over budget
Should Start By Tasks that should have started as of a specified date
Slipped/Late Progress Tasks that are running late and have no progressrecorded
Update Needed A task that should have had progress tracked by now
Overallocated Resources Tasks with resources assigned that are overbooked atsome point during the life of the task
Slipping Assignments Tasks that involve resource work that should havebegun by now
Work Incomplete Tasks that should have had all their work recorded by now
Work Overbudget More work hours have been put in on the task thanyou had estimated
Don’t see all these choices in the More Filters dialog box? Remember, whenyou use this dialog box (Project➪Filtered For➪More Filters), you have toenable the Task option to see task-related filters and the Resource option tosee resource-related filters.
You might also consider exporting your Project information to a programsuch as Excel so you can use analysis tools, such as pivot tables, to figure outwhat’s going on. If that idea excites you, you might want to check out ExcelData Analysis For Dummies by Steven Nelson.
267Chapter 15: You’re Behind: Now What?
22_036516 ch15.qxp 11/20/06 1:45 PM Page 267
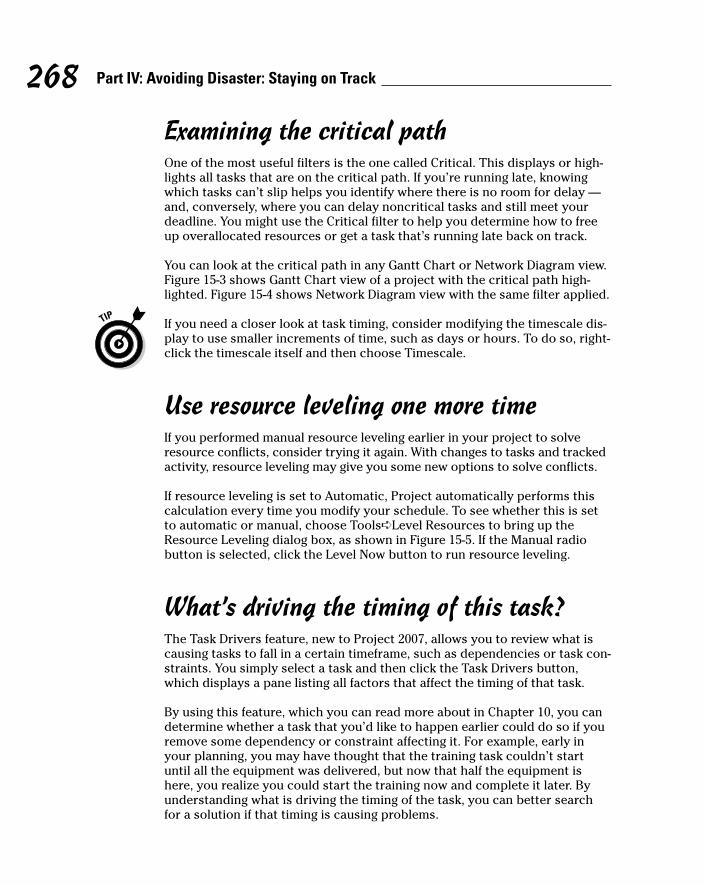
Examining the critical pathOne of the most useful filters is the one called Critical. This displays or high-lights all tasks that are on the critical path. If you’re running late, knowingwhich tasks can’t slip helps you identify where there is no room for delay —and, conversely, where you can delay noncritical tasks and still meet yourdeadline. You might use the Critical filter to help you determine how to freeup overallocated resources or get a task that’s running late back on track.
You can look at the critical path in any Gantt Chart or Network Diagram view.Figure 15-3 shows Gantt Chart view of a project with the critical path high-lighted. Figure 15-4 shows Network Diagram view with the same filter applied.
If you need a closer look at task timing, consider modifying the timescale dis-play to use smaller increments of time, such as days or hours. To do so, right-click the timescale itself and then choose Timescale.
Use resource leveling one more timeIf you performed manual resource leveling earlier in your project to solveresource conflicts, consider trying it again. With changes to tasks and trackedactivity, resource leveling may give you some new options to solve conflicts.
If resource leveling is set to Automatic, Project automatically performs thiscalculation every time you modify your schedule. To see whether this is setto automatic or manual, choose Tools➪Level Resources to bring up theResource Leveling dialog box, as shown in Figure 15-5. If the Manual radiobutton is selected, click the Level Now button to run resource leveling.
What’s driving the timing of this task?The Task Drivers feature, new to Project 2007, allows you to review what iscausing tasks to fall in a certain timeframe, such as dependencies or task con-straints. You simply select a task and then click the Task Drivers button,which displays a pane listing all factors that affect the timing of that task.
By using this feature, which you can read more about in Chapter 10, you candetermine whether a task that you’d like to happen earlier could do so if youremove some dependency or constraint affecting it. For example, early inyour planning, you may have thought that the training task couldn’t startuntil all the equipment was delivered, but now that half the equipment ishere, you realize you could start the training now and complete it later. Byunderstanding what is driving the timing of the task, you can better searchfor a solution if that timing is causing problems.
268 Part IV: Avoiding Disaster: Staying on Track
22_036516 ch15.qxp 11/20/06 1:45 PM Page 268

Figure 15-4:NetworkDiagram
view givesyou a feel
for workflowand
dependen-cies among
tasks.
Figure 15-3:Gantt Chartview shows
youcolumns ofdata and a
moreprecise
timescalefor each
task.
269Chapter 15: You’re Behind: Now What?
22_036516 ch15.qxp 11/20/06 1:45 PM Page 269

Using the Analysis ToolbarAlthough your project woes might make you feel like entering analysis withan expensive shrink, save some money and just use the Analysis toolbarinstead.
The Analysis toolbar allows you to use the Program Evaluation and ReviewTechnique (PERT) to figure out a task’s duration based on information youenter about optimistic, pessimistic, and expected scenarios. Getting informa-tion about these three possible futures can help you analyze where your pro-ject is headed if you don’t make some changes.
The default settings for pessimistic, optimistic, and expected durations of atask suggest that the expected outcome is most likely and also that both theoptimistic and pessimistic outcomes are equally likely. You can change thatby modifying the weight you give to each task scenario. For example, thedefault probability for expected is 4 of 6; pessimistic and optimistic are each 1 of 6. If you adjust the pessimistic setting to 3 of 6, you’re saying it’s morelikely than the optimistic outcome. Project then performs a calculation tocreate a weighted average of the three. This weighted average provides alikely task duration, a pessimistic task duration, and an optimistic task duration.
To display the Pert Analysis toolbar, right-click the toolbar area and choosePERT Analysis from the toolbar list to display the PERT Analysis toolbar, asshown in Figure 15-6 with the PERT Entry Sheet displayed.
Figure 15-5:Here’s
where youdetermine
whether youor Project
will controlresourceleveling.
270 Part IV: Avoiding Disaster: Staying on Track
22_036516 ch15.qxp 11/20/06 1:45 PM Page 270
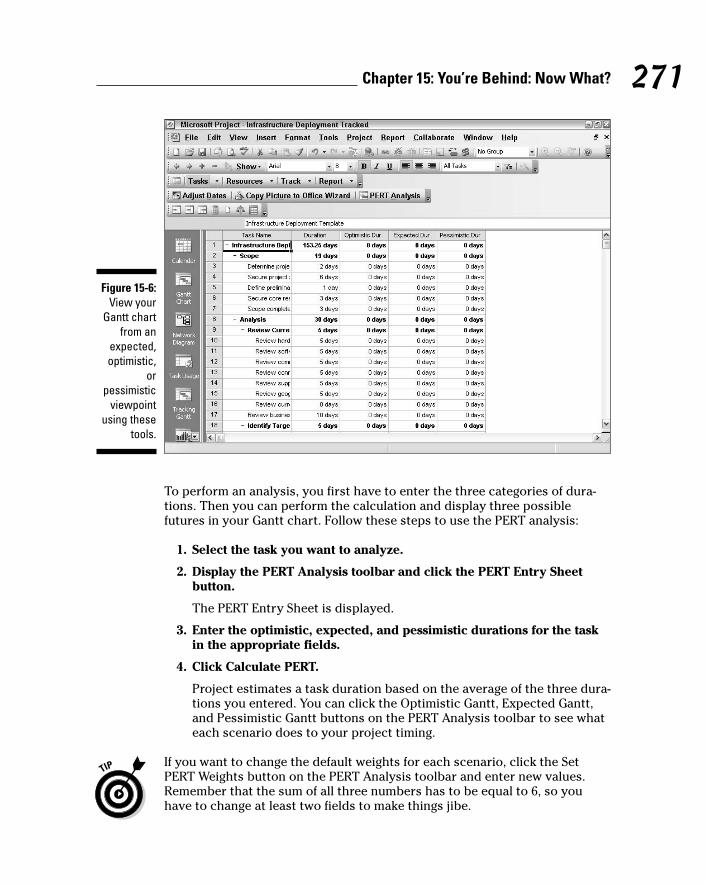
To perform an analysis, you first have to enter the three categories of dura-tions. Then you can perform the calculation and display three possiblefutures in your Gantt chart. Follow these steps to use the PERT analysis:
1. Select the task you want to analyze.
2. Display the PERT Analysis toolbar and click the PERT Entry Sheetbutton.
The PERT Entry Sheet is displayed.
3. Enter the optimistic, expected, and pessimistic durations for the taskin the appropriate fields.
4. Click Calculate PERT.
Project estimates a task duration based on the average of the three dura-tions you entered. You can click the Optimistic Gantt, Expected Gantt,and Pessimistic Gantt buttons on the PERT Analysis toolbar to see whateach scenario does to your project timing.
If you want to change the default weights for each scenario, click the SetPERT Weights button on the PERT Analysis toolbar and enter new values.Remember that the sum of all three numbers has to be equal to 6, so youhave to change at least two fields to make things jibe.
Figure 15-6:View your
Gantt chartfrom an
expected,optimistic,
orpessimistic
viewpointusing these
tools.
271Chapter 15: You’re Behind: Now What?
22_036516 ch15.qxp 11/20/06 1:45 PM Page 271

How Adding People or Time Affects Your Project
It’s part of corporate human nature to want to throw money and people atproblems; in some cases, that instinct is on target. However, you don’t alwayshave the ability to draw on endless supplies of resources or an endlessamount of time to play with. Because of this, you may have to play aroundwith a combination of options involving time and resources.
Hurry up!Saving time in Project means doing things faster or adjusting the timing ofthings to use up slack. You are likely to find that making this adjustment islike an intricate puzzle: Correct one thing, and something else pops up tocause you aggravation.
To accomplish work faster, you have two options:
� Get more people to help with tasks. Adding people adds money, so youmight get back on track time-wise — but it will cost you.
� Modify the scope of tasks. Modifying the scope of the task may have aneffect on its quality. If you do two inspections instead of three or youshorten your QA cycle by a week, you may run the risk of other types ofproblems down the road.
Changing the timing of tasks and shifting dependencies uses up slack to makeup for delays but may leave you with no wiggle room. The next time a prob-lem comes up, you’ll be up against the wall with no slack to save you.
In reality, combining small modifications for both time and money is oftenwhat helps you save the day.
Throwing people at the problemWith effort-driven tasks, things get accomplished when the specified amountof effort is expended. So, a task with a duration of 3 days based on a standardcalendar requires 3 days × 8 hours per day to be completed (a total of 24hours of effort). One resource performing this task working full time takesthree days to complete it; three resources working full time take one day tocomplete 24 hours of work. When you add resources to such a task, Projectautomatically recalculates its duration.
272 Part IV: Avoiding Disaster: Staying on Track
22_036516 ch15.qxp 11/20/06 1:45 PM Page 272

Changing how resources are assignedBeyond simply adding resources to a task, you can also make modificationsto existing assignments. On any given project, you might have dozens (oreven hundreds) of resources working on tasks. All those people are workingaccording to their working calendars, the percentage of resource time youassigned to particular tasks, and their ability to do the job. Take a look athow you assigned folks to begin with to see whether you could save sometime or money by modifying those assignments.
You can modify assignments in several ways:
� If someone is working at, say, only 50 percent capacity on a task, con-sider upping the person’s assignment units.
� If you have someone available who could perform a given task morequickly, switch resources on a task and then shorten its duration.
� Consider having some people work overtime or be overbooked at vari-ous points during the project. You may have modified an overbookedresource’s assignments earlier to get rid of a conflict, but now you findthat there’s no choice but to have the resource work that occasional 12- or 14-hour day!
Remembering the consequencesBefore you get carried away making changes to resources, think a minute.Adding resources to effort-driven tasks can shrink them, helping your projectget back on track. However, depending on the resources’ hourly rates, thisapproach may cost you more.
Remember that three people working on a task won’t necessarily geometri-cally shrink the duration of the task. That’s because three people have tocoordinate their efforts, hold meetings, and generally do the things people dowhen they interact that make their work a tad less efficient than when theywork alone. If you add resources, Project shrinks the task geometrically:Consider going in and adding a little time to the task to accommodate theinefficiencies of multiple resources.
The other concern about adding resources to tasks is that it could causemore resource conflicts, with already busy people getting overbooked on toomany tasks that happen in the same timeframe. If you have the resources andthey have the skills and the time, though, beefing up the workforce is defi-nitely one way to perform some tasks more quickly.
To add resources to a task, you can use the Resources tab in the TaskInformation dialog box or choose the task and click the Assign Resourcestool button on the Standard toolbar.
273Chapter 15: You’re Behind: Now What?
22_036516 ch15.qxp 11/20/06 1:45 PM Page 273

Shifting dependencies and task timingTime is a project manager’s greatest enemy. There’s never enough time, andwhat there is gets eaten up like a bag of chips in a room full of hungry LittleLeaguers.
Here are some ways you can modify task timing to save time:
� Delete a task. You heard me. If a task represents a step that could beskipped, just get rid of it. This doesn’t happen often, but sometimes —on rethinking your project — you realize that a few things aren’t neces-sary or have already been handled by someone else.
� Adjust dependencies. Couldn’t the revision of the manual start a fewdays before all the feedback comes back? Could the electrical andplumbing go on at the same time instead of one after the other (assum-ing that the electrician and the plumber can stay out of each other’sway)? Use the Predecessors tab of the Task Information dialog boxshown in Figure 15-7 to modify dependencies. In the Lag column, youcan enter a negative number to allow tasks to overlap.
� Modify constraints. Perhaps you set a task to start no earlier than thefirst of the year because you don’t want to spend money on it until thenew fiscal year budget kicks in. To save time, consider whether youcould allow it to start a week before the end of the year but bill the costsin January. Examine any constraints such as this — specifically, thosecreated to verify the timing logic.
Figure 15-7:Review a
task’sdependen-
cies hereand modifylag to allow
tasks tooverlap.
274 Part IV: Avoiding Disaster: Staying on Track
22_036516 ch15.qxp 11/20/06 1:45 PM Page 274
� Check external dependencies. If you’ve inserted a hyperlinked task torepresent another project and set dependencies with tasks in your pro-ject, check with the other project manager to see whether he or she canhurry up some tasks. Or if the timing relationship isn’t absolutely criti-cal, delete the hyperlink to the other project. It could be slowing youdown more than you realize.
If you’ve set resource leveling to automatic, Project may have delayed sometasks until overbooked resources are freed up. Choose Tools➪LevelResources and change the setting to Manual.
When All Else FailsOkay. You’ve monkeyed with resource assignments and shifted task depen-dencies around to save time, and deleted tasks and assigned cheaper work-ers to save money. Still, it’s not enough. This is the scenario where you haveto say to your boss, “You can have it on time, you can have it on budget, oryou can have quality work: Choose two.”
If your boss throws money at you, go ahead and add resources to tasks, asdiscussed in the earlier section, “Throwing people at the problem.” If sheopts for time or quality, read on.
All the time in the worldIf your boss is willing to give you more time, grab it. When you do, you haveto update your project in a few ways:
� Add to slack. If you have a Slack task, you can simply add to its dura-tion, giving more waffle room to all other tasks. (See Chapter 10 for moreabout slack.)
� Modify task durations. Take tasks that are running late and give themmore time to be accomplished. In Project, this means increasing theirdurations or pushing out their start dates to a later time.
� Review your task constraints. If you specified that some tasks couldn’tfinish any later than a certain date but now you’re moving your deadlineout three months, you may be able to remove or adjust those originalconstraints accordingly.
275Chapter 15: You’re Behind: Now What?
22_036516 ch15.qxp 11/20/06 1:45 PM Page 275

After you work in the extra time provided to you, make sure that the newtiming of tasks doesn’t cause new resource conflicts, review the ResourceGraph view, and then reset your baseline to reflect the new schedule. Youreset a baseline by choosing Tools➪Tracking➪Save Baseline. When askedwhether you’re sure that you want to overwrite the existing baseline, replyYes. Or choose Baseline 1-10 in the Save Baseline dialog box to save to a dif-ferent baseline and preserve the original.
Don’t forget to inform your team members of the new timing and providethem with an updated version of your plan. You can do that easily usingProject Web Access, which I discuss in Chapters 18 and 19.
And now for something completely differentIf your manager tells you to cut some corners and sacrifice quality, you havelicense to modify the scope of the project. You can cut out some tasks thatmight ensure higher quality, such as a final proofreading of the employeemanual. You can hire cheaper workers. You can use cheaper paper or com-puter equipment.
In Project, this means you have to do the following:
� Take less steps: Delete tasks. (Click the ID of the task in Gantt Chart viewand click Delete.)
� Use less expensive resources: Delete one set of resource assignmentsand assign other resources to tasks in the Assign Resources dialog box.
� Use less expensive materials: Change the unit price for materials you’vecreated in Resource Sheet view, as shown in Figure 15-8, or lower theprice of a Cost resource.
You can also take a more sweeping approach: Just redefine the goal of theproject. If your goal was to launch a new product line, perhaps you canmodify your goal to simply manage the design of the new product and thenleave the launch to a later date or another project manager. If you were sup-posed to produce 10,000 widgets, could your company get along with 7,500?To make such changes, you may have to slice and dice entire phases of yourproject — or even start from scratch and build a new plan.
Consider saving your current project plan with a new name to give you ahead start. Clear the baseline (Tools➪Tracking➪Clear Baseline), make yourmodifications, and then save a new baseline.
276 Part IV: Avoiding Disaster: Staying on Track
22_036516 ch15.qxp 11/20/06 1:45 PM Page 276

What Does Project Have to Say About This?
One final word of caution: When you take certain steps, such as deletingtasks or modifying dependency relationships, your action may just causeProject to alert you to a potential problem you hadn’t thought of. If that hap-pens, Project shows you a Planning Wizard dialog box like the one in Figure15-9. If you make changes on your own instead of using the Planning Wizard,you may be more apt to back yourself into a problem situation.
These dialog boxes offer you options — typically to go ahead and proceed, tocancel, or to proceed but with some modification. Read these alerts carefullyand consider the pros and cons of what will happen if you proceed.
Figure 15-8:Use the
Resourcesheet toquickly
modify unitprices.
277Chapter 15: You’re Behind: Now What?
22_036516 ch15.qxp 11/20/06 1:45 PM Page 277
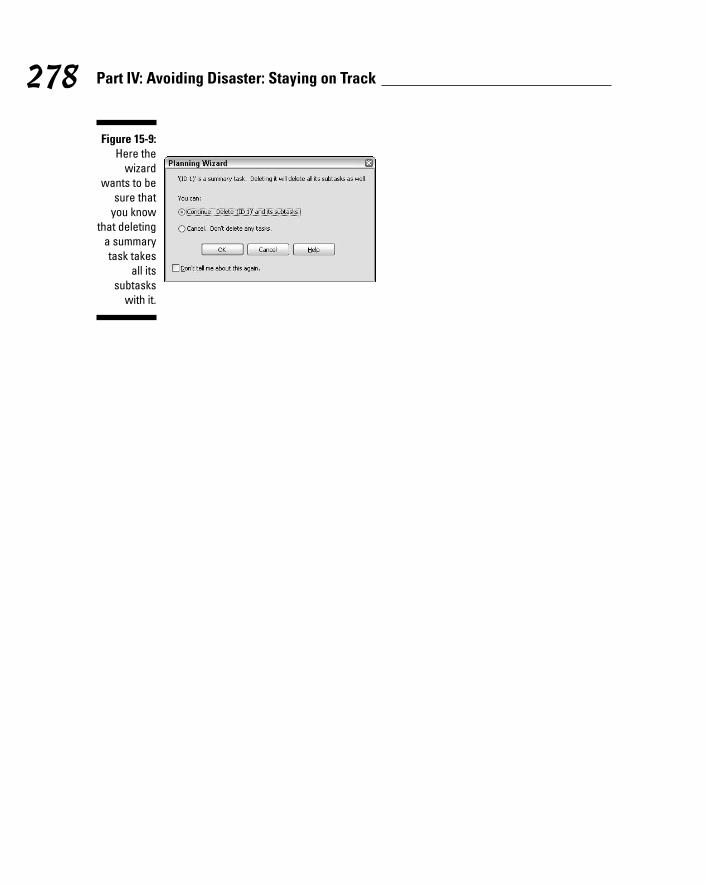
Figure 15-9:Here the
wizardwants to be
sure thatyou know
that deletinga summarytask takes
all itssubtasks
with it.
278 Part IV: Avoiding Disaster: Staying on Track
22_036516 ch15.qxp 11/20/06 1:45 PM Page 278
Chapter 16
Spreading the News: ReportingIn This Chapter� Generating standard reports
� Creating custom reports
� Dazzling people with Visual Reports
� Using graphics and formatting in reports
� Making printer settings
Here it is. The big payoff. The reward you get for inputting all those tasknames, entering all those resource hourly rates, and tracking activity
on dozens of tasks during those late-hour sessions in the first hectic weeks ofyour project. You finally get to print a report, getting something tangible outof Project that you can hand out at meetings and use to impress your boss.
Reports help you communicate about your project, conveying informationabout resource assignments, how costs are accumulating, and what activitiesare in progress or coming up soon. You can take advantage of built-in reportsor customize those reports to include the data that’s most relevant to you.New to Project 2007 are Visual Reports that offer graphic possibilities to helppaint a picture of your progress.
Knowing that you’ll want to impress people, Project also makes it possible toapply certain formatting settings to reports and add drawings to help getyour point across.
Off the Rack: Standard ReportsStandard reports are already designed for you, offering a lot of choicesregarding the information you can include. You don’t have to do much morethan click a few buttons to generate them. Essentially, you select a categoryof report, choose a specific report, and print it. If the plain-vanilla version of areport isn’t quite right, you can modify standard reports in a variety of ways.
23_036516 ch16.qxp 11/20/06 1:46 PM Page 279
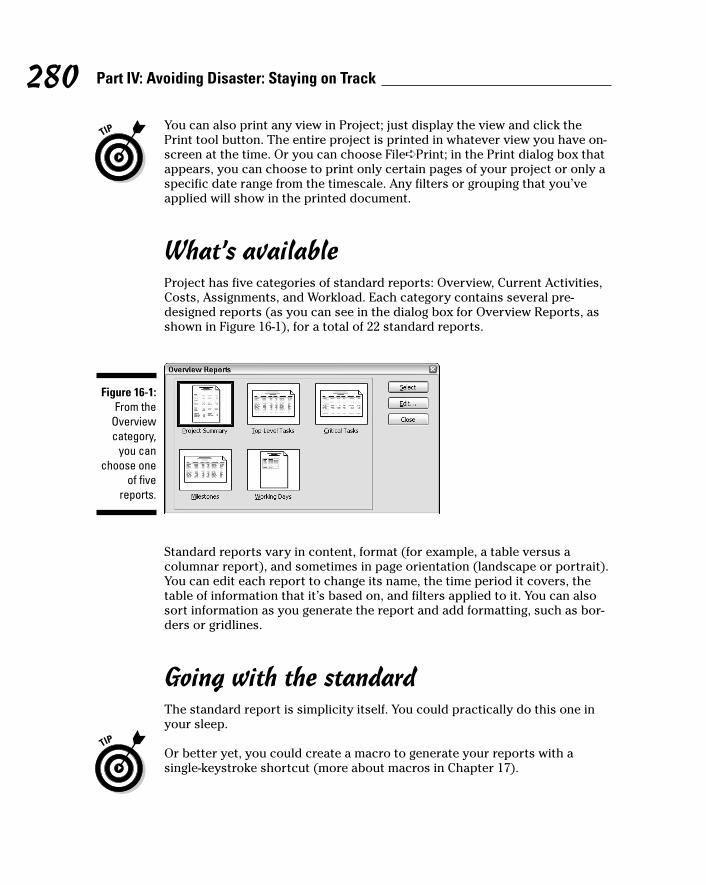
You can also print any view in Project; just display the view and click thePrint tool button. The entire project is printed in whatever view you have on-screen at the time. Or you can choose File➪Print; in the Print dialog box thatappears, you can choose to print only certain pages of your project or only aspecific date range from the timescale. Any filters or grouping that you’veapplied will show in the printed document.
What’s availableProject has five categories of standard reports: Overview, Current Activities,Costs, Assignments, and Workload. Each category contains several pre-designed reports (as you can see in the dialog box for Overview Reports, asshown in Figure 16-1), for a total of 22 standard reports.
Standard reports vary in content, format (for example, a table versus acolumnar report), and sometimes in page orientation (landscape or portrait).You can edit each report to change its name, the time period it covers, thetable of information that it’s based on, and filters applied to it. You can alsosort information as you generate the report and add formatting, such as bor-ders or gridlines.
Going with the standardThe standard report is simplicity itself. You could practically do this one inyour sleep.
Or better yet, you could create a macro to generate your reports with asingle-keystroke shortcut (more about macros in Chapter 17).
Figure 16-1:From the
Overviewcategory,
you canchoose one
of fivereports.
280 Part IV: Avoiding Disaster: Staying on Track
23_036516 ch16.qxp 11/20/06 1:46 PM Page 280
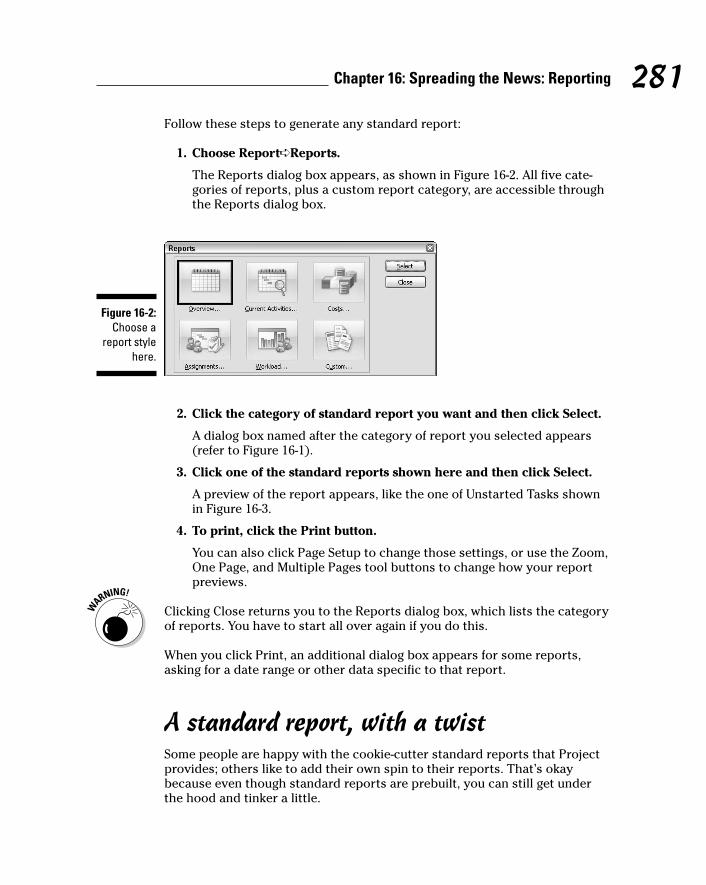
Follow these steps to generate any standard report:
1. Choose Report➪Reports.
The Reports dialog box appears, as shown in Figure 16-2. All five cate-gories of reports, plus a custom report category, are accessible throughthe Reports dialog box.
2. Click the category of standard report you want and then click Select.
A dialog box named after the category of report you selected appears(refer to Figure 16-1).
3. Click one of the standard reports shown here and then click Select.
A preview of the report appears, like the one of Unstarted Tasks shownin Figure 16-3.
4. To print, click the Print button.
You can also click Page Setup to change those settings, or use the Zoom,One Page, and Multiple Pages tool buttons to change how your reportpreviews.
Clicking Close returns you to the Reports dialog box, which lists the categoryof reports. You have to start all over again if you do this.
When you click Print, an additional dialog box appears for some reports,asking for a date range or other data specific to that report.
A standard report, with a twistSome people are happy with the cookie-cutter standard reports that Projectprovides; others like to add their own spin to their reports. That’s okaybecause even though standard reports are prebuilt, you can still get underthe hood and tinker a little.
Figure 16-2:Choose a
report stylehere.
281Chapter 16: Spreading the News: Reporting
23_036516 ch16.qxp 11/20/06 1:46 PM Page 281

You can edit three categories of modifications for a standard report:
� Definition: This includes the report name, the time period, the table ofinformation, any filters applied, and whether summary tasks shouldappear.
� Details: Details can be included for tasks (such as notes or predeces-sors) and for resource assignments (such as notes or cost). You can alsochoose to show totals, and add a border around the report or gridlinesbetween details.
� Sort: You can sort by up to three criteria in ascending or descendingorder.
When modifying standard reports, you’ll encounter some variations. Forexample, when you try to edit a Project Summary report, all you get is a textformatting dialog box. However, the majority of reports are edited throughone dialog box, as shown in the procedure that follows.
To edit a standard report, follow these steps:
1. Choose Report➪Reports.
The Reports dialog box appears.
Figure 16-3:You may
have to clicka report
preview tozoom in so
you canread itsdetails.
282 Part IV: Avoiding Disaster: Staying on Track
23_036516 ch16.qxp 11/20/06 1:46 PM Page 282
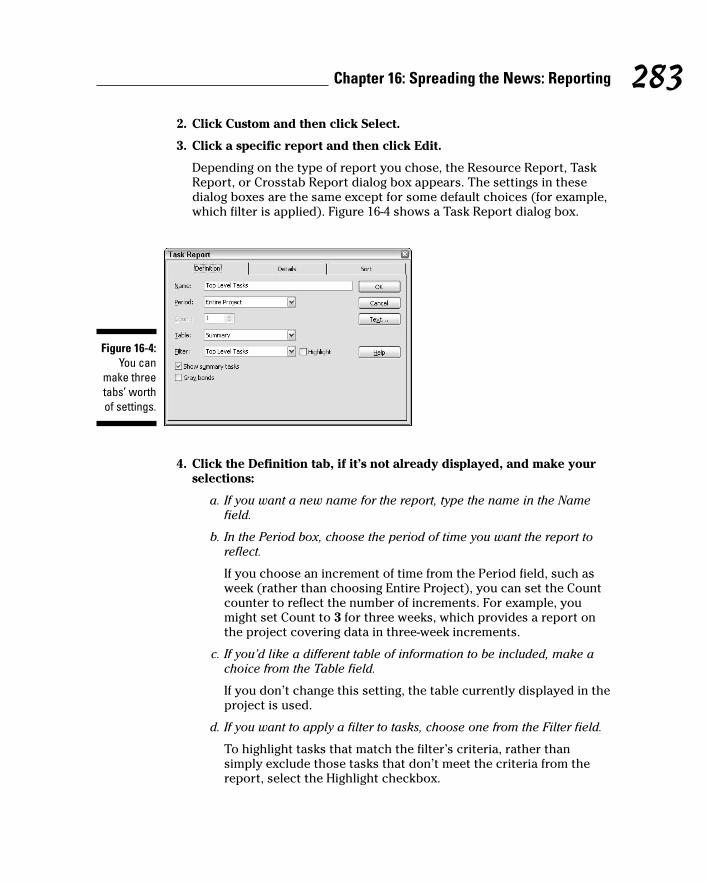
2. Click Custom and then click Select.
3. Click a specific report and then click Edit.
Depending on the type of report you chose, the Resource Report, TaskReport, or Crosstab Report dialog box appears. The settings in thesedialog boxes are the same except for some default choices (for example,which filter is applied). Figure 16-4 shows a Task Report dialog box.
4. Click the Definition tab, if it’s not already displayed, and make yourselections:
a. If you want a new name for the report, type the name in the Namefield.
b. In the Period box, choose the period of time you want the report toreflect.
If you choose an increment of time from the Period field, such asweek (rather than choosing Entire Project), you can set the Countcounter to reflect the number of increments. For example, youmight set Count to 3 for three weeks, which provides a report onthe project covering data in three-week increments.
c. If you’d like a different table of information to be included, make achoice from the Table field.
If you don’t change this setting, the table currently displayed in theproject is used.
d. If you want to apply a filter to tasks, choose one from the Filter field.
To highlight tasks that match the filter’s criteria, rather thansimply exclude those tasks that don’t meet the criteria from thereport, select the Highlight checkbox.
Figure 16-4:You can
make threetabs’ worthof settings.
283Chapter 16: Spreading the News: Reporting
23_036516 ch16.qxp 11/20/06 1:46 PM Page 283
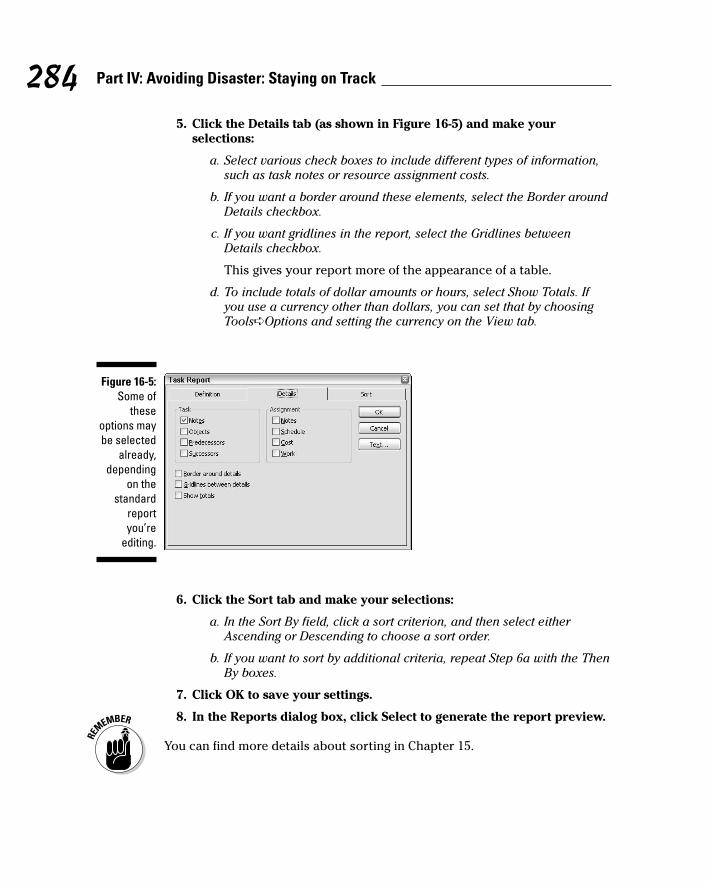
5. Click the Details tab (as shown in Figure 16-5) and make your selections:
a. Select various check boxes to include different types of information,such as task notes or resource assignment costs.
b. If you want a border around these elements, select the Border aroundDetails checkbox.
c. If you want gridlines in the report, select the Gridlines betweenDetails checkbox.
This gives your report more of the appearance of a table.
d. To include totals of dollar amounts or hours, select Show Totals. Ifyou use a currency other than dollars, you can set that by choosingTools➪Options and setting the currency on the View tab.
6. Click the Sort tab and make your selections:
a. In the Sort By field, click a sort criterion, and then select eitherAscending or Descending to choose a sort order.
b. If you want to sort by additional criteria, repeat Step 6a with the ThenBy boxes.
7. Click OK to save your settings.
8. In the Reports dialog box, click Select to generate the report preview.
You can find more details about sorting in Chapter 15.
Figure 16-5:Some of
theseoptions maybe selected
already,depending
on thestandard
reportyou’re
editing.
284 Part IV: Avoiding Disaster: Staying on Track
23_036516 ch16.qxp 11/20/06 1:46 PM Page 284

Crosstabs: A different animalCrosstab reports present slightly different settings when you edit them.Figure 16-6 shows the Definition tab of the Crosstab Report dialog box. Acrosstab report tabulates a unique piece of data relative to column and rowdefinitions. Essentially, the cell formed by the column and row intersectionrepresents the unique data.
For example, you may have columns that list days and rows that listresources. The piece of information where the column and row intersects isresource work on a particular day. The report shows the hours of work byeach resource day by day.
When you edit a crosstab, you define the column, the row, and the piece ofdata being compared. On the Details tab for the Crosstab Report dialog box,you can make settings such as whether to include row or column totals, toinsert gridlines, and to display values of 0.
A Custom JobNot impressed with the standard reports? Or perhaps none of those reportsquite fits your information needs? That’s okay. You can create as manycustom reports as your heart desires.
A custom report starts out with a report type, which can be task, resource,monthly calendar, or crosstab. After you choose that basic category, yousimply work with the same Reports dialog box that you use to edit a standardreport.
Figure 16-6:Here you
have tochoose
which threeelements
define thecrosstab.
285Chapter 16: Spreading the News: Reporting
23_036516 ch16.qxp 11/20/06 1:46 PM Page 285
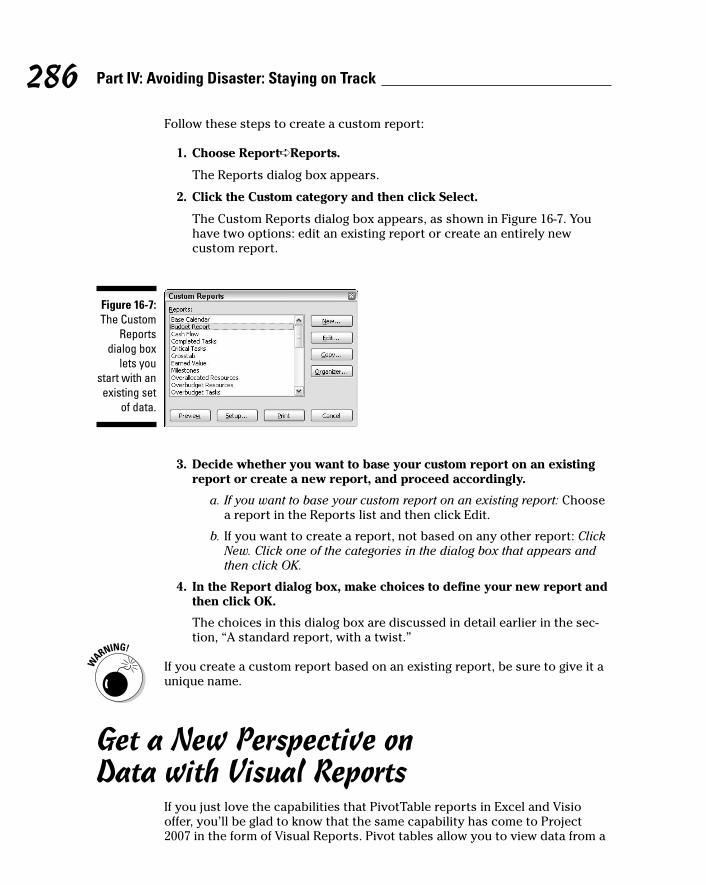
Follow these steps to create a custom report:
1. Choose Report➪Reports.
The Reports dialog box appears.
2. Click the Custom category and then click Select.
The Custom Reports dialog box appears, as shown in Figure 16-7. Youhave two options: edit an existing report or create an entirely newcustom report.
3. Decide whether you want to base your custom report on an existingreport or create a new report, and proceed accordingly.
a. If you want to base your custom report on an existing report: Choosea report in the Reports list and then click Edit.
b. If you want to create a report, not based on any other report: ClickNew. Click one of the categories in the dialog box that appears andthen click OK.
4. In the Report dialog box, make choices to define your new report andthen click OK.
The choices in this dialog box are discussed in detail earlier in the sec-tion, “A standard report, with a twist.”
If you create a custom report based on an existing report, be sure to give it aunique name.
Get a New Perspective on Data with Visual Reports
If you just love the capabilities that PivotTable reports in Excel and Visiooffer, you’ll be glad to know that the same capability has come to Project2007 in the form of Visual Reports. Pivot tables allow you to view data from a
Figure 16-7:The Custom
Reportsdialog box
lets youstart with anexisting set
of data.
286 Part IV: Avoiding Disaster: Staying on Track
23_036516 ch16.qxp 11/20/06 1:46 PM Page 286
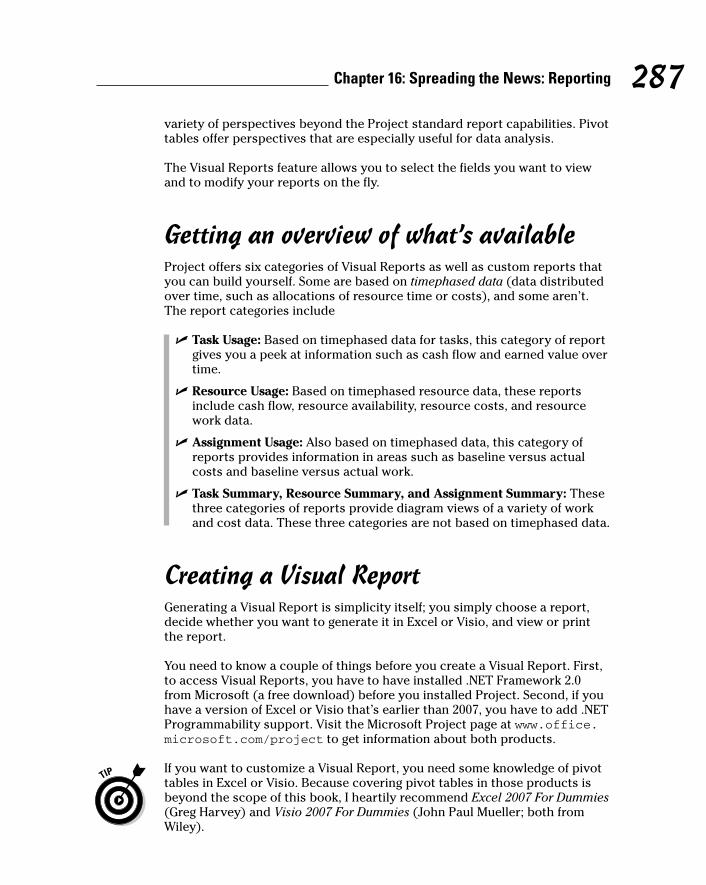
variety of perspectives beyond the Project standard report capabilities. Pivottables offer perspectives that are especially useful for data analysis.
The Visual Reports feature allows you to select the fields you want to viewand to modify your reports on the fly.
Getting an overview of what’s availableProject offers six categories of Visual Reports as well as custom reports thatyou can build yourself. Some are based on timephased data (data distributedover time, such as allocations of resource time or costs), and some aren’t.The report categories include
� Task Usage: Based on timephased data for tasks, this category of reportgives you a peek at information such as cash flow and earned value overtime.
� Resource Usage: Based on timephased resource data, these reportsinclude cash flow, resource availability, resource costs, and resourcework data.
� Assignment Usage: Also based on timephased data, this category ofreports provides information in areas such as baseline versus actualcosts and baseline versus actual work.
� Task Summary, Resource Summary, and Assignment Summary: Thesethree categories of reports provide diagram views of a variety of workand cost data. These three categories are not based on timephased data.
Creating a Visual ReportGenerating a Visual Report is simplicity itself; you simply choose a report,decide whether you want to generate it in Excel or Visio, and view or printthe report.
You need to know a couple of things before you create a Visual Report. First,to access Visual Reports, you have to have installed .NET Framework 2.0from Microsoft (a free download) before you installed Project. Second, if youhave a version of Excel or Visio that’s earlier than 2007, you have to add .NETProgrammability support. Visit the Microsoft Project page at www.office.microsoft.com/project to get information about both products.
If you want to customize a Visual Report, you need some knowledge of pivottables in Excel or Visio. Because covering pivot tables in those products isbeyond the scope of this book, I heartily recommend Excel 2007 For Dummies(Greg Harvey) and Visio 2007 For Dummies (John Paul Mueller; both fromWiley).
287Chapter 16: Spreading the News: Reporting
23_036516 ch16.qxp 11/20/06 1:46 PM Page 287
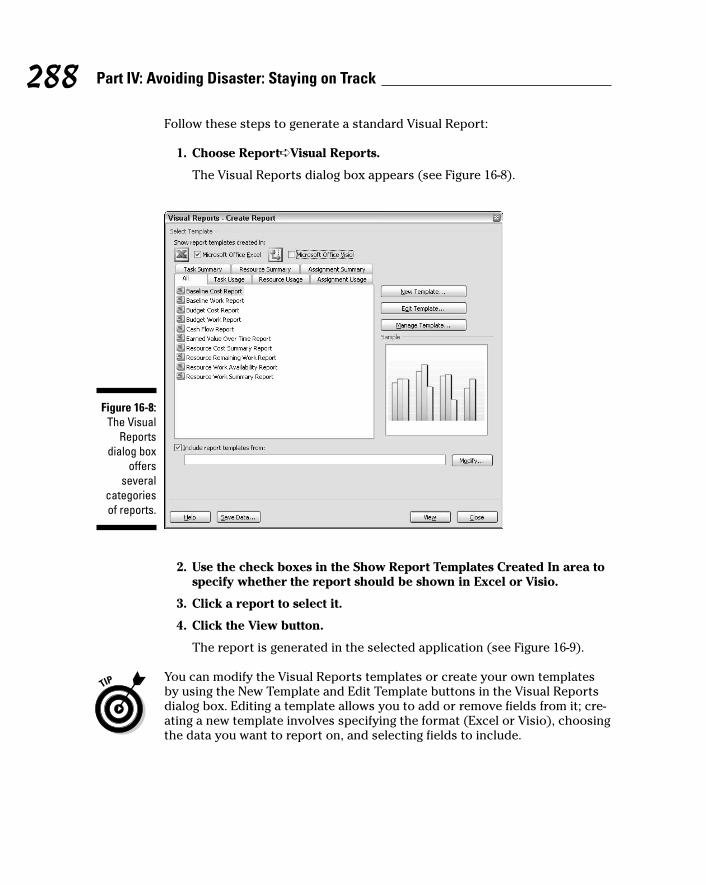
Follow these steps to generate a standard Visual Report:
1. Choose Report➪Visual Reports.
The Visual Reports dialog box appears (see Figure 16-8).
2. Use the check boxes in the Show Report Templates Created In area tospecify whether the report should be shown in Excel or Visio.
3. Click a report to select it.
4. Click the View button.
The report is generated in the selected application (see Figure 16-9).
You can modify the Visual Reports templates or create your own templatesby using the New Template and Edit Template buttons in the Visual Reportsdialog box. Editing a template allows you to add or remove fields from it; cre-ating a new template involves specifying the format (Excel or Visio), choosingthe data you want to report on, and selecting fields to include.
Figure 16-8:The Visual
Reportsdialog box
offersseveral
categoriesof reports.
288 Part IV: Avoiding Disaster: Staying on Track
23_036516 ch16.qxp 11/20/06 1:46 PM Page 288
Spiffing Things UpThese days, image is everything. You and your project may be judged tosome extent by how professional your printed information looks. Even if yourproject is a million dollars over budget and four months behind, making yourreports or other printouts look good can make delivering bad news easier.
To create impressive documents, make sure you cross the t’s of formattingtext and dot the i’s of visual design.
Using graphics in ProjectWouldn’t your company logo look spiffy in the header of your report? Orwhat about including a picture of the new product box in Gantt Chart view ofyour New Product Launch project?
Figure 16-9:A Visual
Report onprojectcosts.
289Chapter 16: Spreading the News: Reporting
23_036516 ch16.qxp 11/20/06 1:46 PM Page 289

Graphics can add visual information or just plain make your plan look nicer.You can insert graphics in your project file by using three methods. You can
� Cut and paste a graphic from another file. A graphic you cut and pasteessentially can’t be edited by you in Project.
� Insert a link to an existing graphics file. Linking keeps your Project filesmaller.
� Embed a graphic. Embedding lets you edit the graphic’s contents inProject, using the tools of an image program such as Paint.
You can’t add graphics willy-nilly, however. You can add graphics in only afew places: the chart pane of any Gantt Chart view; a task note; a resourcenote; or a header, footer, or legend used in reports or printouts of views.
For example, you may put pictures of resources in the resource note field sothat you can remember who’s who. Or you may include a photo of your cor-porate headquarters in the header of your report.
Remember, graphics swell the size of your Project file like a sponge in a pailof water. If you’re thinking of using a lot of graphics, be sure they don’tdetract from the main information in your printouts. Or, try linking to theminstead of inserting them in the file.
Follow these steps to insert a graphic in your Gantt chart, using object link-ing and embedding:
1. Display Gantt Chart view.
2. Choose Insert➪Object.
The Insert Object dialog box appears, as shown in Figure 16-10.
Figure 16-10:You caninsert a
wide varietyof objectsusing this
dialog box.
290 Part IV: Avoiding Disaster: Staying on Track
23_036516 ch16.qxp 11/20/06 1:46 PM Page 290
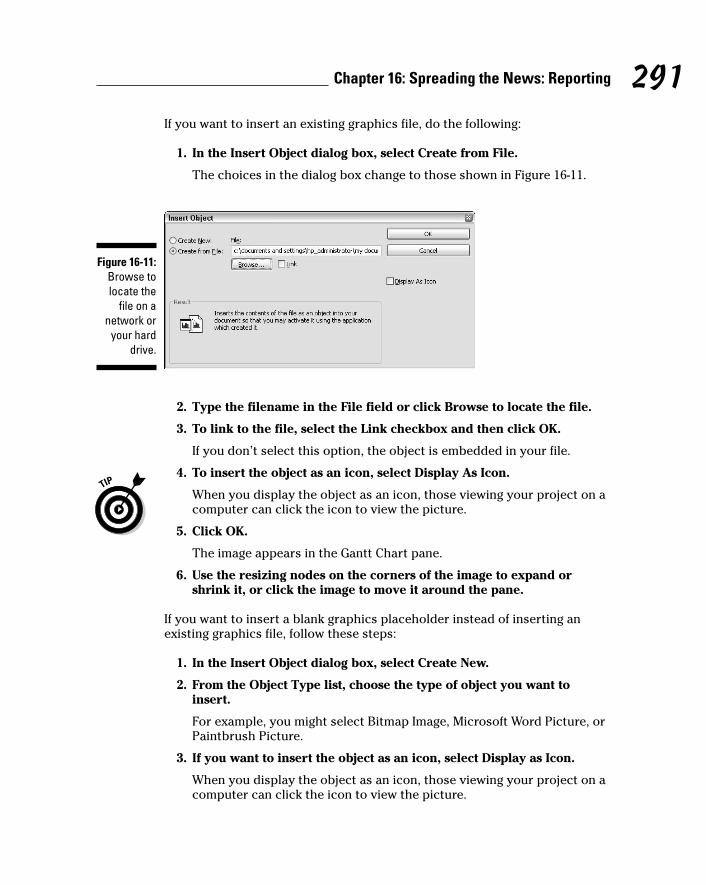
If you want to insert an existing graphics file, do the following:
1. In the Insert Object dialog box, select Create from File.
The choices in the dialog box change to those shown in Figure 16-11.
2. Type the filename in the File field or click Browse to locate the file.
3. To link to the file, select the Link checkbox and then click OK.
If you don’t select this option, the object is embedded in your file.
4. To insert the object as an icon, select Display As Icon.
When you display the object as an icon, those viewing your project on acomputer can click the icon to view the picture.
5. Click OK.
The image appears in the Gantt Chart pane.
6. Use the resizing nodes on the corners of the image to expand orshrink it, or click the image to move it around the pane.
If you want to insert a blank graphics placeholder instead of inserting anexisting graphics file, follow these steps:
1. In the Insert Object dialog box, select Create New.
2. From the Object Type list, choose the type of object you want toinsert.
For example, you might select Bitmap Image, Microsoft Word Picture, orPaintbrush Picture.
3. If you want to insert the object as an icon, select Display as Icon.
When you display the object as an icon, those viewing your project on acomputer can click the icon to view the picture.
Figure 16-11:Browse tolocate the
file on anetwork or
your harddrive.
291Chapter 16: Spreading the News: Reporting
23_036516 ch16.qxp 11/20/06 1:46 PM Page 291
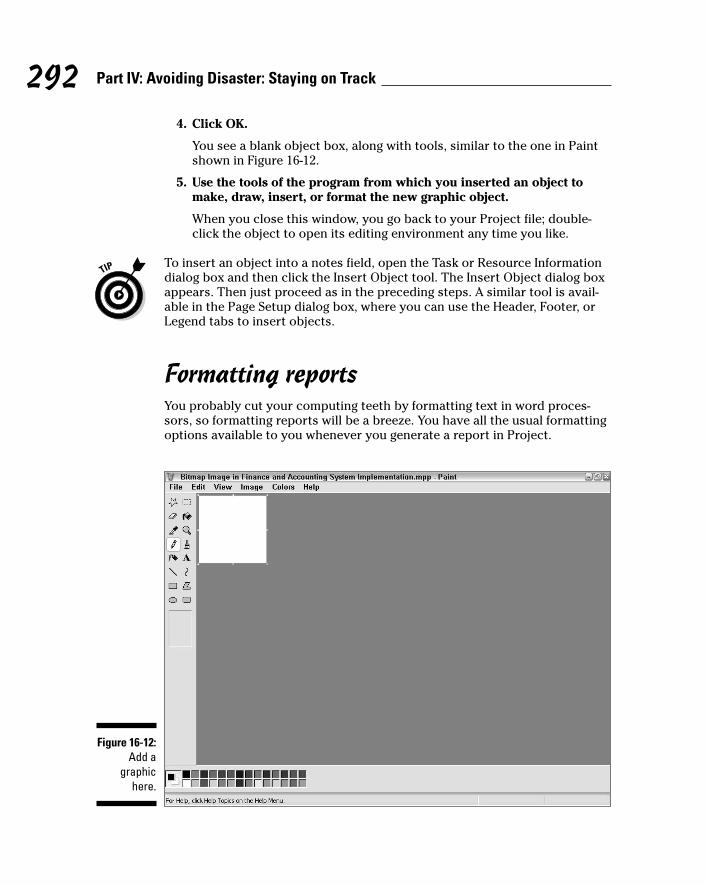
4. Click OK.
You see a blank object box, along with tools, similar to the one in Paintshown in Figure 16-12.
5. Use the tools of the program from which you inserted an object tomake, draw, insert, or format the new graphic object.
When you close this window, you go back to your Project file; double-click the object to open its editing environment any time you like.
To insert an object into a notes field, open the Task or Resource Informationdialog box and then click the Insert Object tool. The Insert Object dialog boxappears. Then just proceed as in the preceding steps. A similar tool is avail-able in the Page Setup dialog box, where you can use the Header, Footer, orLegend tabs to insert objects.
Formatting reportsYou probably cut your computing teeth by formatting text in word proces-sors, so formatting reports will be a breeze. You have all the usual formattingoptions available to you whenever you generate a report in Project.
Figure 16-12:Add a
graphichere.
292 Part IV: Avoiding Disaster: Staying on Track
23_036516 ch16.qxp 11/20/06 1:46 PM Page 292
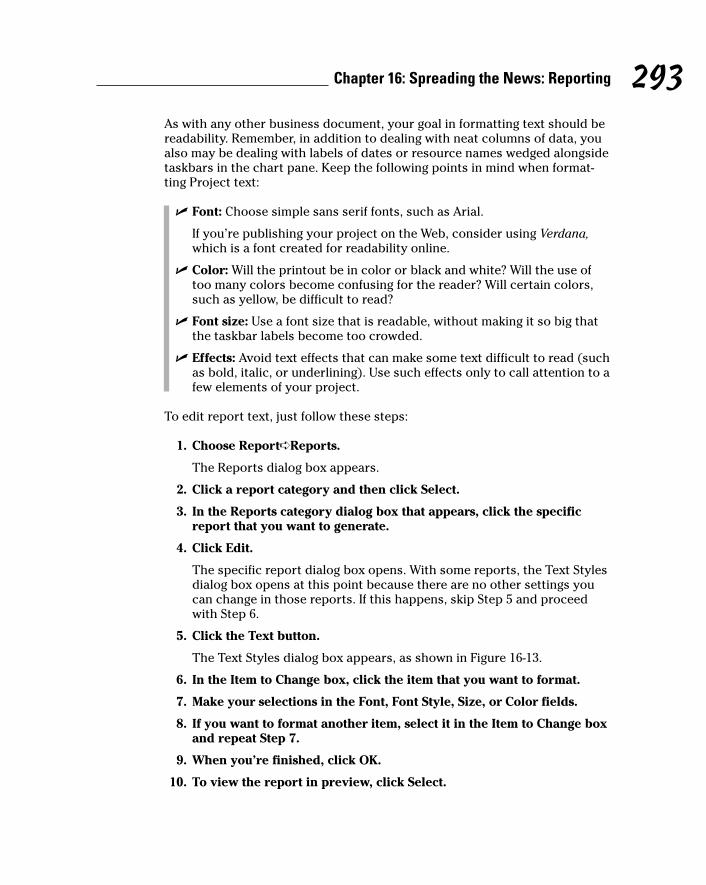
As with any other business document, your goal in formatting text should bereadability. Remember, in addition to dealing with neat columns of data, youalso may be dealing with labels of dates or resource names wedged alongsidetaskbars in the chart pane. Keep the following points in mind when format-ting Project text:
� Font: Choose simple sans serif fonts, such as Arial.
If you’re publishing your project on the Web, consider using Verdana,which is a font created for readability online.
� Color: Will the printout be in color or black and white? Will the use oftoo many colors become confusing for the reader? Will certain colors,such as yellow, be difficult to read?
� Font size: Use a font size that is readable, without making it so big thatthe taskbar labels become too crowded.
� Effects: Avoid text effects that can make some text difficult to read (suchas bold, italic, or underlining). Use such effects only to call attention to afew elements of your project.
To edit report text, just follow these steps:
1. Choose Report➪Reports.
The Reports dialog box appears.
2. Click a report category and then click Select.
3. In the Reports category dialog box that appears, click the specificreport that you want to generate.
4. Click Edit.
The specific report dialog box opens. With some reports, the Text Stylesdialog box opens at this point because there are no other settings youcan change in those reports. If this happens, skip Step 5 and proceedwith Step 6.
5. Click the Text button.
The Text Styles dialog box appears, as shown in Figure 16-13.
6. In the Item to Change box, click the item that you want to format.
7. Make your selections in the Font, Font Style, Size, or Color fields.
8. If you want to format another item, select it in the Item to Change boxand repeat Step 7.
9. When you’re finished, click OK.
10. To view the report in preview, click Select.
293Chapter 16: Spreading the News: Reporting
23_036516 ch16.qxp 11/20/06 1:46 PM Page 293

Call the Printer!The proof of the report is in the printing, but you should see to severaladjustments before you click that button to print. With Project, it’s not justmargins or page orientation that you need to set (although you do have to setthose, too). You can also put useful information in headers and footers aswell as set legends that help your reader understand the many bars, dia-monds, and other graphic elements many Project views and reports display.
Working with Page SetupThe Page Setup dialog box can be used to control printouts of both reportsand any currently displayed Project view. You can get to this dialog box in afew different ways:
� To make settings for printing the current view: Choose File➪Page Setup.
� To modify the page setup for a report: Select Page Setup from the pre-view of the report. Choose Report➪Reports, click a report category, andthen click a specific report. When you click Select to generate a specificreport, the print preview appears. Click the Page Setup button thatappears there.
The Page Setup dialog box, as shown in Figure 16-14, contains six tabs. In thecase of reports, all tabs may not be available to you. For example, reportsdon’t contain graphic elements such as taskbars, so you can’t set a legend toappear on them. Also, you have access to the View tab only when you’reprinting the currently displayed view.
Figure 16-13:This dialog
boxcontains
manyfamiliar text
settings.
294 Part IV: Avoiding Disaster: Staying on Track
23_036516 ch16.qxp 11/20/06 1:46 PM Page 294

When size is importantThe Page tab contains some basic page settings that determine the orienta-tion, the paper size, and the way the contents are scaled to fit the page. Bymaking these settings, you influence how much can fit on each page and howmany pages long your document will be.
Here are the choices you have on this tab (shown in Figure 16-14):
� Portrait or Landscape orientation: No doubt you’ve dealt with thesebefore. Portrait is set up like the Mona Lisa with the short edge of thepaper running across the top of the page; Landscape is when the longedge of the paper runs across the top instead.
� Scaling: You can use the Adjust To or Fit To settings. The Adjust To set-ting is based on a percentage of the original size. The Fit To setting givesyou some control over scaling to fit to the width of a single page or theheight of a single page.
� Other: This area is a catchall for two options: Paper Size and First PageNumber. All the standard choices for paper size are available in thePaper Size list, including index cards and envelopes. First Page Numbercan be left as Auto (in which case the first page is numbered 1, thesecond page, 2, and so on), or you can enter another number there yourself.
Keeping things within the marginsI won’t bore you by defining what a margin is. However, I will remind you thatmargins serve the dual purpose of controlling how much information can fiton each page and also creating a border of white space that frames your doc-ument (making it cleaner looking and easier to read).
Figure 16-14:You can
control howyour
document islaid out and
printed.
295Chapter 16: Spreading the News: Reporting
23_036516 ch16.qxp 11/20/06 1:46 PM Page 295
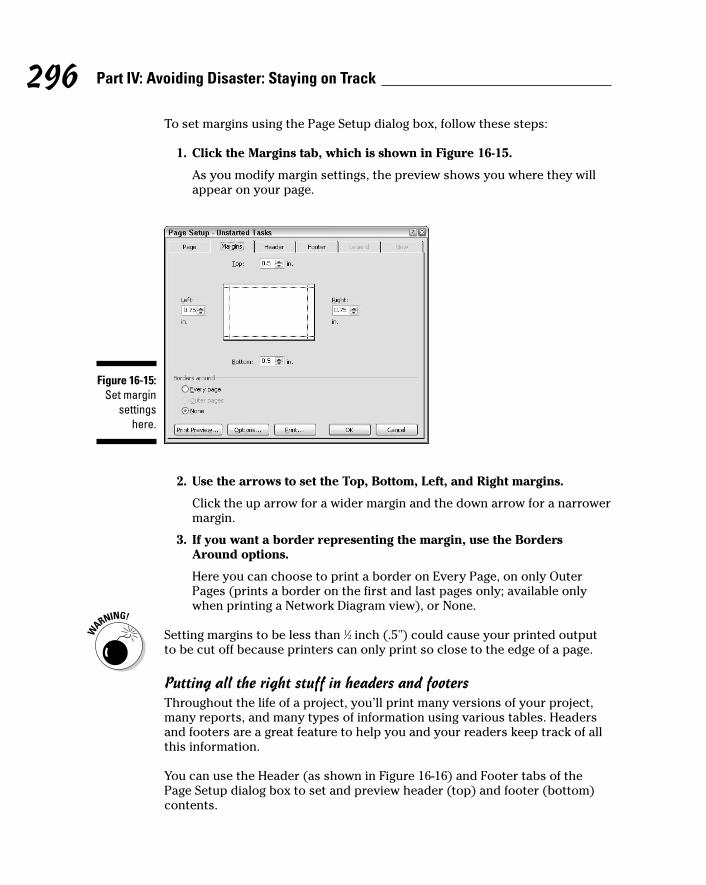
To set margins using the Page Setup dialog box, follow these steps:
1. Click the Margins tab, which is shown in Figure 16-15.
As you modify margin settings, the preview shows you where they willappear on your page.
2. Use the arrows to set the Top, Bottom, Left, and Right margins.
Click the up arrow for a wider margin and the down arrow for a narrowermargin.
3. If you want a border representing the margin, use the BordersAround options.
Here you can choose to print a border on Every Page, on only OuterPages (prints a border on the first and last pages only; available onlywhen printing a Network Diagram view), or None.
Setting margins to be less than 1⁄2 inch (.5") could cause your printed outputto be cut off because printers can only print so close to the edge of a page.
Putting all the right stuff in headers and footersThroughout the life of a project, you’ll print many versions of your project,many reports, and many types of information using various tables. Headersand footers are a great feature to help you and your readers keep track of allthis information.
You can use the Header (as shown in Figure 16-16) and Footer tabs of thePage Setup dialog box to set and preview header (top) and footer (bottom)contents.
Figure 16-15:Set margin
settingshere.
296 Part IV: Avoiding Disaster: Staying on Track
23_036516 ch16.qxp 11/20/06 1:46 PM Page 296
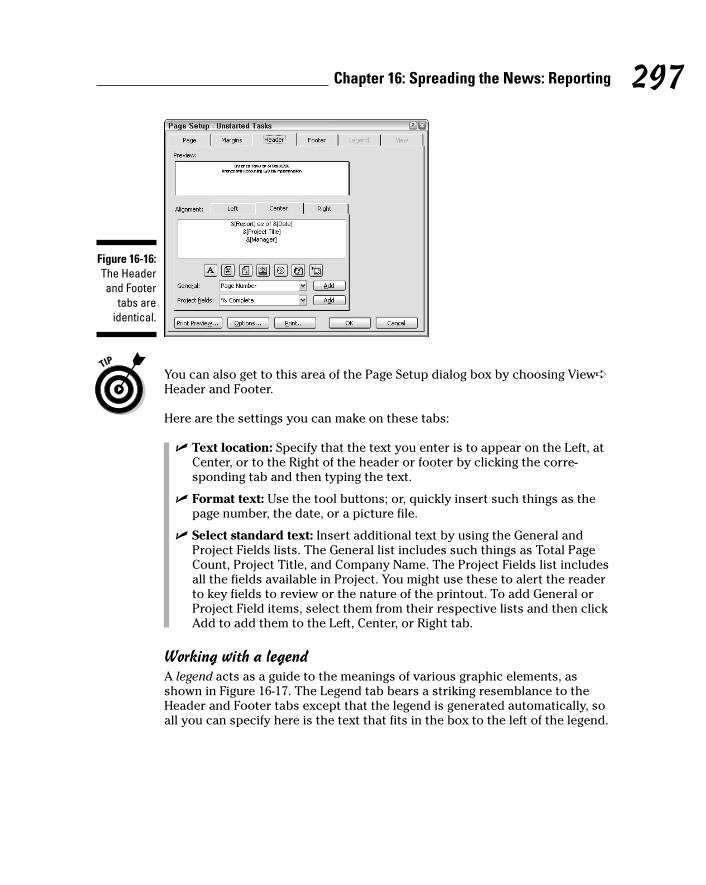
You can also get to this area of the Page Setup dialog box by choosing View➪Header and Footer.
Here are the settings you can make on these tabs:
� Text location: Specify that the text you enter is to appear on the Left, atCenter, or to the Right of the header or footer by clicking the corre-sponding tab and then typing the text.
� Format text: Use the tool buttons; or, quickly insert such things as thepage number, the date, or a picture file.
� Select standard text: Insert additional text by using the General andProject Fields lists. The General list includes such things as Total PageCount, Project Title, and Company Name. The Project Fields list includesall the fields available in Project. You might use these to alert the readerto key fields to review or the nature of the printout. To add General orProject Field items, select them from their respective lists and then clickAdd to add them to the Left, Center, or Right tab.
Working with a legendA legend acts as a guide to the meanings of various graphic elements, asshown in Figure 16-17. The Legend tab bears a striking resemblance to theHeader and Footer tabs except that the legend is generated automatically, soall you can specify here is the text that fits in the box to the left of the legend.
Figure 16-16:The Headerand Footer
tabs areidentical.
297Chapter 16: Spreading the News: Reporting
23_036516 ch16.qxp 11/20/06 1:46 PM Page 297

The Legend tab of the Page Setup dialog box has only two settings that differfrom the Header and Footer tabs:
� You can print the legend on every page or on a separate legend page; or,you can decide to not print a legend.
� You can establish the width of the text area of the legend (the areawhere you can insert elements such as the page number or the date).
Unlike a header or footer, where you have to enter something to have any-thing appear, a legend prints by default. If you don’t want a legend to print,choose this tab and then set the Legend On setting to None.
What to print?If you’re printing a currently displayed view, the View tab of the Page Setupdialog box is available to you, as shown in Figure 16-18.
You can make the following settings here:
� Print All Sheet Columns: Prints every sheet column in the view, regard-less of whether it’s currently visible on-screen. With this option notselected, only the columns that show in your view will print.
� Print First # Columns on All Pages: Allows you to control a specificnumber of columns to print.
� Print Notes: Prints every task, resource, and assignment note. Theseitems are printed on a separate notes page.
� Print Blank Pages: Choose this setting if you want to print blank pages:for example, use this setting to print a page that represents a time inyour project when no tasks are occurring. If you want a smaller numberof pages in your printout, don’t choose this setting.
Figure 16-17:The legend
is printedautomat-ically, but
you caninsert
informationin the box tothe left of it.
298 Part IV: Avoiding Disaster: Staying on Track
23_036516 ch16.qxp 11/20/06 1:46 PM Page 298

� Fit Timescale to End of Page: Scales the timescale to allow you to fitmore of your project on the page.
� Print Row Totals for Values within Print Date Range: Adds a columncontaining row totals. Pertains to printouts of Usage views.
� Print Column Totals: Adds a column containing column totals. Pertainsto printouts of Usage views.
Get a previewGranted, although software print previews aren’t quite as exciting as moviepreviews, they help you get everything right before you print your project.The Print Preview feature is accessible from many places in Project:
� Choose File➪Print Preview (to preview the current view).
� Click the Print Preview button on the Standard toolbar.
� Click Print Preview on any tab of the Page Setup dialog box.
� Generate a print preview when you select a specific report to print.
You can use the tool buttons in this view to do the following:
� Move around the pages of the report by using the Page Left, Right, Up,and Down arrows on the toolbar, as well as the horizontal and verticalscroll bars.
� View more detail by clicking the Zoom tool button and then clicking thereport.
� Focus on a single page or all the pages of your report by using the OnePage and Multiple Pages tool buttons.
Figure 16-18:This tab
is notavailable if
you’reprinting a
report.
299Chapter 16: Spreading the News: Reporting
23_036516 ch16.qxp 11/20/06 1:46 PM Page 299

� Modify margins and the orientation of the printout by displaying thePage Setup dialog box.
� Display the Print dialog box by clicking Print.
� Close the preview by clicking Close.
So Let’s Print!Last but not least, here’s how to actually print that document for whichyou’ve made all the wonderful settings discussed in this chapter. For this,you need to deal with the Print dialog box, which you’ve seen a million timesin almost any other Windows program on the planet. (See Figure 16-19 for aquick refresher.)
Here are the settings you encounter in this dialog box:
� The first area of this dialog box concerns the printer you will use. Youcan choose a printer in the Name list, and click the Properties button tocontrol printer settings such as color quality and paper source.
� The Print Range area allows you to print All pages or to select a pagerange From one page number To another.
� The Copies area contains one simple setting: Click the up arrow here toprint more copies or the down arrow to print fewer (but no less than 1).
� The Timescale settings are unique to Project’s Print dialog box: Here youcan choose to print the entire timescale (the entire length of your pro-ject) or only a range of dates within your project. Along with PrintRange, this setting helps control how much of your Project will print.
Figure 16-19:Control theprinter, thenumber of
copies, andwhat prints.
300 Part IV: Avoiding Disaster: Staying on Track
23_036516 ch16.qxp 11/20/06 1:46 PM Page 300

� If you want the leftmost column of the page to print on every page,select Print Left Column of Pages Only. For example, you may want thetask ID number column to print on both pages when a printout widthstretches over two pages.
� Finally, if you’ve inserted manual page breaks in your project, you canselect the Manual Page Breaks check box to include these breaks in yourprinted report. Leave this deselected if you want the Print feature tocontrol where pages break.
After you make all your settings and you’re ready to print, just click OK.
301Chapter 16: Spreading the News: Reporting
23_036516 ch16.qxp 11/20/06 1:46 PM Page 301

302 Part IV: Avoiding Disaster: Staying on Track
23_036516 ch16.qxp 11/20/06 1:46 PM Page 302
Chapter 17
Getting Better All the TimeIn This Chapter� Reviewing your successes and failures
� Creating a template for future projects
� Developing macros to make things easier
� Customizing Project Guide to work the way you do
Have you ever finished a project and then wondered how the heck every-thing ended up the way it did? The total budget numbers mystically
appear to be several thousand dollars over estimate; you missed your finaldeadline by three weeks; and somewhere along the line, you lost track ofthree people who were supposed to be working on tasks. But you deliveredyour deliverables (somehow), and you can finally stuff your project file in thebottom of your drawer. Or can you?
Don’t think of Microsoft Project as just a giant electronic to-do list; rather, it’sa sophisticated tool to manage your projects. And the logical by-product ofthat management is a fantastic treasure trove of information that you can useto become a better Project user — and thus a better project manager.
After you send out the last memo on your project and accept your last kudosor criticism from your boss, take a moment to look over your Project planone more time.
Learning from Your MistakesWhen I teach classes in using project management software, people are oftena bit overwhelmed at all that a product such as Project can do. They’re reelingfrom all the data that they have to input as well as all the information thatProject throws back at them. They can’t see straight for all the views, reports,tables, and filters that they can use to access information on their projects.
24_036516 ch17.qxp 11/20/06 1:46 PM Page 303
Here’s the secret that I tell them: You won’t understand every nuance of yourProject plan on your first project. You won’t even uncover all that Project cando on your second project. But gradually, as you master the ins and outs ofProject and understand what you can get out of it, you’ll become better atabsorbing all that information — and at understanding how it can help youavoid mistakes on your future projects.
The best way to gain that benefit is to review every project when it’s finishedto see what you did right and what you did wrong. Then you can use whatyou discover to do better on your next project.
It was only an estimateYou know what they say: If you don’t study history, you’re doomed to repeatit. And repeating mistakes is the last thing you want to do where project man-agement is concerned.
Consider these strategies to debrief yourself on what happened in your lastproject:
� Compare your original baseline plan against the final actual activity(as shown in Figure 17-1). Even if you created interim or baseline plansto adjust for drastic changes, look at the widest gap between what youexpected to happen in your initial plan and what did happen. This canbe the best way to see the areas where you tend to underestimate most.
� Review the notes you made on your tasks to remind yourself ofchanges or problems that came up along the way. Insert the columnnamed Notes on your Gantt Chart sheet and read through all the notesat one sitting.
� Note which resources delivered on their promises and which didn’t; ifyou manage some of them, provide them with constructive feedback.For those you don’t manage, keep some notes on hand about how wellor how fast they worked and make future assignments with those notesin mind. Also note which outside vendors performed and which didn’t(and consider crossing the latter off your vendor list).
� Assess your own communications to others in saved e-mails or memos.Did you give your team enough information to perform effectively? Did you keep management informed about changes or problems in atimely way?
304 Part IV: Avoiding Disaster: Staying on Track
24_036516 ch17.qxp 11/20/06 1:46 PM Page 304
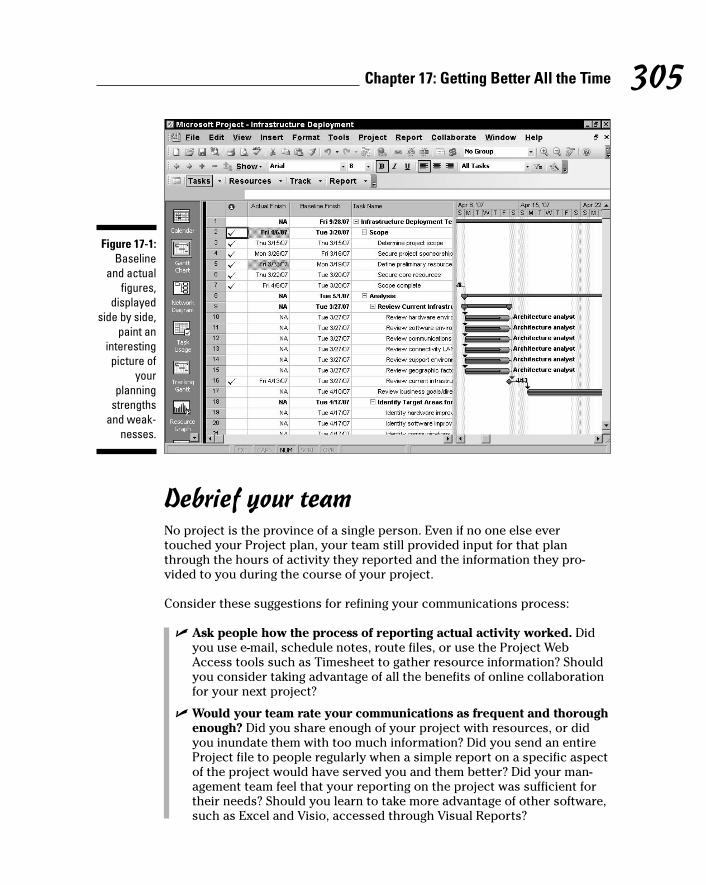
Debrief your teamNo project is the province of a single person. Even if no one else evertouched your Project plan, your team still provided input for that planthrough the hours of activity they reported and the information they pro-vided to you during the course of your project.
Consider these suggestions for refining your communications process:
� Ask people how the process of reporting actual activity worked. Didyou use e-mail, schedule notes, route files, or use the Project WebAccess tools such as Timesheet to gather resource information? Shouldyou consider taking advantage of all the benefits of online collaborationfor your next project?
� Would your team rate your communications as frequent and thoroughenough? Did you share enough of your project with resources, or didyou inundate them with too much information? Did you send an entireProject file to people regularly when a simple report on a specific aspectof the project would have served you and them better? Did your man-agement team feel that your reporting on the project was sufficient fortheir needs? Should you learn to take more advantage of other software,such as Excel and Visio, accessed through Visual Reports?
Figure 17-1:Baseline
and actualfigures,
displayedside by side,
paint aninterestingpicture of
yourplanning
strengthsand weak-
nesses.
305Chapter 17: Getting Better All the Time
24_036516 ch17.qxp 11/20/06 1:46 PM Page 305

� Did you integrate activity on various projects successfully so thatresources weren’t overbooked or underutilized? If people on yourteam reported conflicts with other projects, consider using some specialProject tools, such as hyperlinking to tasks in other project plans, creat-ing a deliverable-based plan, or developing a master project (whichinvolves inserting several projects into a master plan so you can viewresource conflicts across them).
Building on Your SuccessAlthough it’s human nature to focus on all the things that went wrong with aproject, the fact is that you probably did many, many things right. So beforeyou start planning your next project, take the good stuff and put it in a placewhere you can find it easily later.
Create a templateOne option is to create a template. Templates are simply files you save thatcontain certain settings. When you open a template, you can save it as aProject document with a new name and have all those settings already built in.
Project contains its own templates for common projects (see Chapter 1 formore about starting projects based on a template), but you can save any ofyour projects as templates. If you often use the same set of tasks in your projects — as people in many industries do — you’ll save yourself the time ofcreating all those tasks again.
306 Part IV: Avoiding Disaster: Staying on Track
Debrief yourself?Don’t forget to sit down and have a good talkwith yourself about what went on during yourproject. Did your team give you the kind of infor-mation you needed to operate efficiently, orshould you lay down more stringent groundrules for reporting in the next project? Were youswamped with work throughout the project, andwould it be wise to find someone to make updat-ing entries for you the next time around? Didmanagement give you information about com-pany changes in a timely way so that you could
make adjustments to keep your project onschedule?
It’s often the case that in the heat of the projectbattle, many of us don’t have time to stop andchange processes or get the help we need.Review the notes you kept in the Project notesareas to see what types of snafus made you pullyour hair out. Then institute changes before youbegin the next project.
24_036516 ch17.qxp 11/20/06 1:46 PM Page 306

If you work with Project Server and Project Web Access on an enterpriselevel, consider adding templates on a global level for use across your com-pany. See Chapters 18 and 19 for more about enterprise-level project management.
In addition to any tasks in the project, templates can contain any or all of thefollowing information for those tasks:
� All the information for each baseline
� Actual values
� Rates for all resources
� Fixed costs
� Notations of tasks that you publish to Microsoft Project Web Access
You can save all this information or only selected items. For example, if youcreated a lot of fixed costs (such as equipment) and resources with associ-ated rates — and you’ll use those in most of your projects — you could savea template with only fixed costs and resource rates.
To save a file as a template, follow these steps:
1. Open the file you want to save and then choose File➪Save As.
The Save As dialog box appears, as shown in Figure 17-2.
Microsoft saves templates in a central folder called Templates.
Figure 17-2:Save a file
as atemplate.
307Chapter 17: Getting Better All the Time
24_036516 ch17.qxp 11/20/06 1:46 PM Page 307
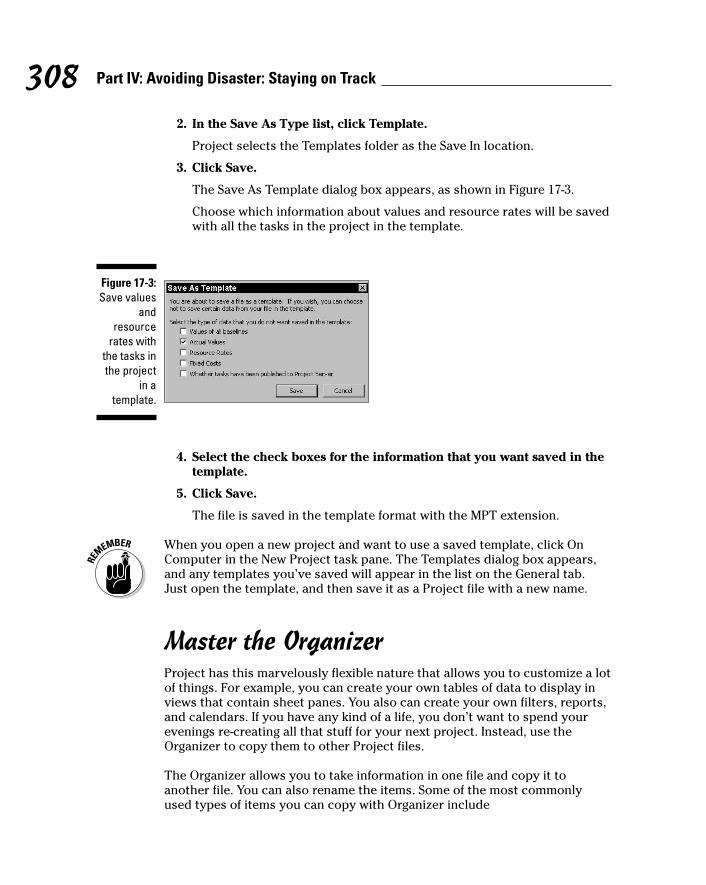
2. In the Save As Type list, click Template.
Project selects the Templates folder as the Save In location.
3. Click Save.
The Save As Template dialog box appears, as shown in Figure 17-3.
Choose which information about values and resource rates will be savedwith all the tasks in the project in the template.
4. Select the check boxes for the information that you want saved in thetemplate.
5. Click Save.
The file is saved in the template format with the MPT extension.
When you open a new project and want to use a saved template, click OnComputer in the New Project task pane. The Templates dialog box appears,and any templates you’ve saved will appear in the list on the General tab.Just open the template, and then save it as a Project file with a new name.
Master the OrganizerProject has this marvelously flexible nature that allows you to customize a lotof things. For example, you can create your own tables of data to display inviews that contain sheet panes. You also can create your own filters, reports,and calendars. If you have any kind of a life, you don’t want to spend yourevenings re-creating all that stuff for your next project. Instead, use theOrganizer to copy them to other Project files.
The Organizer allows you to take information in one file and copy it toanother file. You can also rename the items. Some of the most commonlyused types of items you can copy with Organizer include
Figure 17-3:Save values
andresource
rates withthe tasks inthe project
in atemplate.
308 Part IV: Avoiding Disaster: Staying on Track
24_036516 ch17.qxp 11/20/06 1:46 PM Page 308

� Calendars
� Forms
� Tables
� Reports
� Views
� Fields
� Groups
� Toolbars
� Filters
Follow these steps to use the Organizer:
1. Open the project that you want to copy things from and the projectthat you want to copy things to.
2. In the file you want to copy to, choose Tools➪Organizer.
The Organizer dialog box appears, as shown in Figure 17-4.
3. Click the tab for the type of information you want to copy.
4. If necessary, choose other files to copy to or from.
By default, Project uses the Global template as the file to copy from; thefile from which you open the Organizer becomes the file to copy to. To useother files, select another file from the [Item] Available In box on the left(copy from) or right (copy to) of the dialog box. (Depending on the tabyou display, this item might be Views Groups, Reports, and so on.) Theseboxes contain the Global.mpt file and any other files you have open.
Figure 17-4:You have
elevensheets’
worth ofstuff you
can copyhere!
309Chapter 17: Getting Better All the Time
24_036516 ch17.qxp 11/20/06 1:46 PM Page 309
5. Click an item in the list on the left that you want to include in the fileon the right and then click the Copy button.
The item appears in the list on the right.
6. (Optional) To rename an item
a. Click it and then click the Rename button.
b. In the Rename dialog box that appears, enter a new name and thenclick OK.
7. To copy additional items on the same tab, repeat Step 5.
8. To copy an item on a different tab, repeat Steps 3–7.
9. When you finish copying items from one file to another, click the X inthe upper-right corner.
All the items are copied, and the Organizer dialog box closes.
Handy little timesavers: MacrosIf you were paying attention, you noticed a lot of activities in your projectthat you did again, and again, and again. No, I’m not talking about all thosecups of coffee you downed in the wee hours. I’m talking about things such asgenerating a weekly report, or inserting your five department projects into asingle master schedule, once every quarter, to review resource allocations.
You don’t have to reinvent the wheel to perform actions such as these.Instead, you can create a macro — a combination of keystrokes, text entries,and so on that you can record and play back any time you like.
For example, suppose you generate and print a report on current activitiesevery week. Doing so requires the following keystrokes and entries:
1. Choose Report➪Basic Reports.
2. Click Current Activities.
3. Click Select.
4. Click Tasks Starting Soon.
5. Click Select.
6. Type a unique date for tasks that start or finish after a point in time.
7. Click OK.
8. Type a unique date for tasks that start or finish before a point in timeto complete the specified range.
9. Click OK.
10. Click Print to print the report.
310 Part IV: Avoiding Disaster: Staying on Track
24_036516 ch17.qxp 11/20/06 1:46 PM Page 310

If you record all those keystrokes, you have to go through a ten-step process.But, after they’re recorded, that process is reduced to three steps when youplay back the macro.
1. Start your macro.
2. Enter the first part of the date range.
3. Enter the last part of the date range.
One great use I’ve seen for macros is to copy a range of tasks that is repeatedagain and again in your project — for example, a Q&A procedure that’srepeated ten times throughout a project. In recording the macro, just selectthe absolute range and copy it, go to the first blank task and paste it, tentimes. While the macro’s running, you can go get yourself another cup ofcoffee.
Recording a macroRecording a macro is a simple process: You just start recording, do whateveryou usually do to perform the action, and then stop recording. You runmacros by selecting them from a list of macros or by using a keystroke short-cut. You also can edit them if you need a slightly different series of keystrokesfor a slightly altered sequence of steps.
Here’s how you record a macro:
1. Choose Tools➪Macro➪Record New Macro.
The Record Macro dialog box appears, as shown in Figure 17-5. Macrosthat you record can be played back by using a shortcut key that you des-ignate here.
Figure 17-5:Designate a
shortcut key here.
311Chapter 17: Getting Better All the Time
24_036516 ch17.qxp 11/20/06 1:46 PM Page 311
2. In the Macro Name box, type a name.
Make the name descriptive of what the macro does.
3. In the Shortcut Key box, type a letter (numbers or symbols won’twork).
When you press Ctrl plus that key, the macro plays back.
4. If you like, edit or add to the description of the macro.
This is especially useful if you think others will use it.
5. Select whether row and column references will be relative orabsolute.
• Relative references: If you select (say) the task in the third row dis-played in a sheet and perform an action on it, Project selects thetask in the third row whenever you run the macro.
• Absolute references: Project selects a specific, named task, nomatter what row it occupies.
6. Click OK to begin recording.
Every keystroke you make during this time becomes part of the macro.
7. After you complete your keystrokes, choose Tools➪Macro➪Stop Recorder.
Here are some points to keep in mind about recording macros:
� Naming: Macro names have to start with a letter and can’t containspaces. Use the underscore to separate words in a macro name(Weekly_Report, for example).
� Keystroke presets: Several keystroke shortcuts are already reserved byProject for use with built-in functions. For example, pressing Ctrl+Kinserts a hyperlink. Project displays a message telling you this if youchoose such a shortcut and then gives you an opportunity to chooseanother letter or number.
� Entering unique information: If what you record includes entering spe-cific information (such as a name or a date range), you’re presented witha blank box into which you enter new information when you run themacro — even if you entered information while recording the macro.
Running and editing macrosTo run a macro, your best bet is to use the shortcut key that you enteredwhen you created it. (See the preceding section.) This two-keystroke combi-nation runs the macro, pausing for you to fill in any requested information.
312 Part IV: Avoiding Disaster: Staying on Track
24_036516 ch17.qxp 11/20/06 1:46 PM Page 312

Alternatively, you can do the following:
1. Choose Tools➪Macro➪Macros.
2. Choose a macro in the list of macros shown in the Macros dialog box,as shown in Figure 17-6.
3. Click Run.
To edit a macro, you might want to simply re-record it, which is sometimesthe quickest way to do it. If you prefer to edit it instead, do the following:
1. Choose Tools➪Macro➪Macros.
2. In the Macros dialog box that appears, choose the macro that youwant to modify and then click Edit.
The Microsoft Visual Basic editor opens; your macro is displayed inVisual Basic code, as shown in Figure 17-7. Visual Basic code uses certain syntax to code keystrokes and text entry.
• To edit the code:
You can edit this code much as you edit text in a word processor-generated document. Although you have to be familiar with theVisual Basic programming language to make most changes, you canmake some edits without being a programmer. For example, anyitems in quotes are text entries or names of things, such as reports.For example, it’s pretty easy to change a macro that generates thereport named “Tasks Starting Soon” so that it generates thereport “Tasks in Progress”. Just replace the existing reportname (within the quotation marks) with the new report name.
Figure 17-6:The Macros
dialog boxlists all
availablemacros inany openprojects.
313Chapter 17: Getting Better All the Time
24_036516 ch17.qxp 11/20/06 1:46 PM Page 313
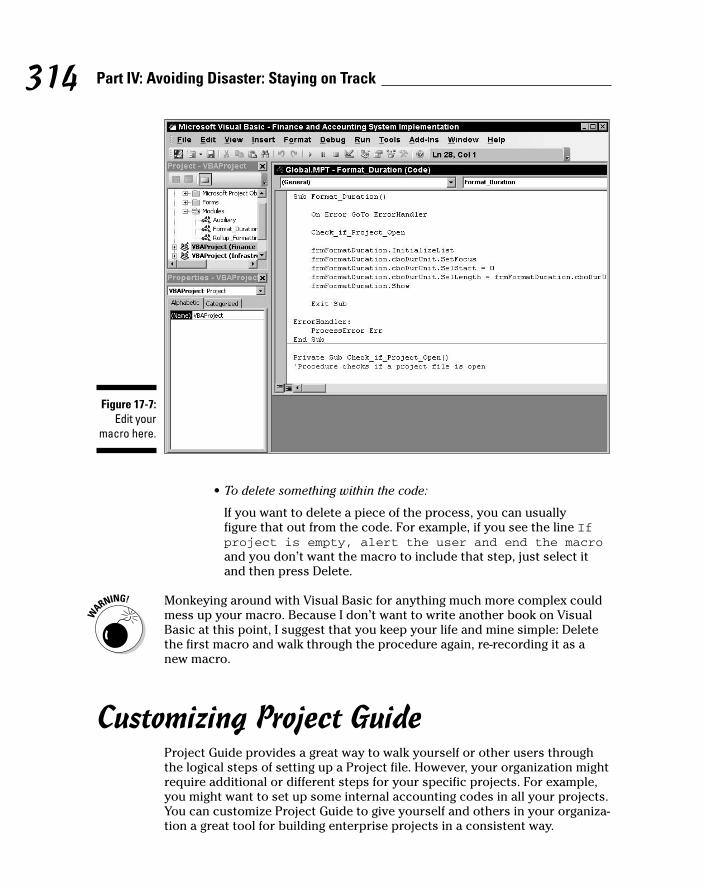
• To delete something within the code:
If you want to delete a piece of the process, you can usually figure that out from the code. For example, if you see the line Ifproject is empty, alert the user and end the macroand you don’t want the macro to include that step, just select itand then press Delete.
Monkeying around with Visual Basic for anything much more complex couldmess up your macro. Because I don’t want to write another book on VisualBasic at this point, I suggest that you keep your life and mine simple: Deletethe first macro and walk through the procedure again, re-recording it as anew macro.
Customizing Project GuideProject Guide provides a great way to walk yourself or other users throughthe logical steps of setting up a Project file. However, your organization mightrequire additional or different steps for your specific projects. For example,you might want to set up some internal accounting codes in all your projects.You can customize Project Guide to give yourself and others in your organiza-tion a great tool for building enterprise projects in a consistent way.
Figure 17-7:Edit your
macro here.
314 Part IV: Avoiding Disaster: Staying on Track
24_036516 ch17.qxp 11/20/06 1:46 PM Page 314

By creating an XML format file, you can customize Project Guide content foryour organization. Essentially, you build a series of XML pages that you directProject to use for Guide content. I won’t give you a primer in creating XMLfiles, but I will tell you the procedure for directing Project to use your customcontent.
To specify custom Project Guide content, do the following:
1. Choose Tools➪Options.
The Options dialog box appears.
2. Click the Interface tab to display it, as shown in Figure 17-8.
3. In the Project Guide Content section of the dialog box, select the UseCustom Content radio button.
4. Enter the location of your XML file in the XML File for Custom Contentfield.
You can also click the Browse button there to locate the file, find it in theBrowse dialog box that opens, and then click OK.
5. Click OK.
The new Project Guide content is displayed in the Project Guide areaand toolbar.
Figure 17-8:Specify the
XML file youwant to use
for ProjectGuide
contentshere.
315Chapter 17: Getting Better All the Time
24_036516 ch17.qxp 11/20/06 1:46 PM Page 315

316 Part IV: Avoiding Disaster: Staying on Track
24_036516 ch17.qxp 11/20/06 1:46 PM Page 316
Part VWorking with
EnterpriseProjects
25_036516 pt05.qxp 11/20/06 1:47 PM Page 317
In this part . . .
Here’s where Project Professional comes into its own:Serving the enterprise via Project Server and Project
Web Access, you can get some serious online collabora-tion going. You can share documents online with yourteam, get perspective on your organization’s resourcepool to make efficient assignments, and get your humanresources to report their work time. This part gives you aglimpse of what Project Server and Project Web Accesscan do if your organization decides to go the enterpriseroute with Project.
25_036516 pt05.qxp 11/20/06 1:47 PM Page 318
Chapter 18
Project Web Access for theProject Manager
In This Chapter� Understanding Project Server and Project Web Access
� Looking at the tools Project Web Access makes available to you
� Reviewing resource availability and assignments
� Building a team of resources in the Resource Center
� Requesting status reports from Project team members
� Sharing documents with your team
If you think that Project Server is like an add-on applet (a tiny application)that works with Project, you’re wrong. It’s actually a full-fledged software
product that enables you to take your project — and all its accompanyingresources, tracking, and reporting — into the world of the Internet.
Project Server comprises two main components: the Project Server databasewhere project data is stored; and Project Web Access, the browser-like inter-face that connects you and others to that database.
Note: To make life simple, I mostly simply refer to Project Web Access goingforward because that’s the interface and set of tools you’ll be working with.However, Project Web Access is useless without Project Server: Before youcan actually perform the steps in this chapter and use Project Web Access,somebody must install Project Server on your company network and config-ure it for your company’s standards and requirements. This usually requiresthat IT-type people stay up nights installing and configuring software and thatanother team of people design the implementation. After all that is accom-plished, you can actually perform the steps listed here and not just readabout them.
26_036516 ch18.qxp 11/20/06 1:47 PM Page 319

With Project Web Access (which works only with the Professional edition ofMicrosoft Project), you can enhance communications, interactions, and docu-mentation for each and every project you undertake. This chapter looks atwho should use Project Web Access as well as how it can help any projectmanager.
Figuring Out Whether Project Web Access Is for You
Just as you don’t need a Hummer to run to the corner grocery store for milkonce a week, Project Web Access can be too high-powered a solution forsome organizations. Implementing Project Server and Project Web Accessinvolves not only money for product licenses but also requires some otherspecific commitments:
� Time to install and configure it
� Effort to standardize how Project is used across your organization
� Time and money to train people to use the tools
� Ongoing maintenance of the Project Server database
Therefore, before you jump in with both feet to the Project Web Accessworld, you should be sure that the benefits of using it outweigh the effortrequired.
Project Web Access is useful to organizations that have an enterprise orienta-tion, which means they make the effort to centralize information online insome fashion so it’s standardized and available throughout the company.
Typically, this scenario is worthwhile for mid- to large-sized companies thatmanage several projects at once across departments or disciplines. The fea-tures accessed through Project Web Access provide the managers of thesecompanies with a way to orchestrate resources more efficiently and also geta broad perspective on the efficiency and success of their project manage-ment efforts across the organization.
Another plus to using Project Web Access is that it can make all project infor-mation for the company available online through a company intranet that canbe accessed from anywhere in the world.
The benefits of using a Project Web Access solution include
� Standard formats, reports, and resource information that can beaccessed and shared by all project managers for consistency amongmultiple projects
320 Part V: Working with Enterprise Projects
26_036516 ch18.qxp 11/20/06 1:47 PM Page 320

� The ability to see, on an enterprise-wide level, how resources are beingallocated (as in Figure 18-1, where you can assign resources with an eyeto the big picture)
� A perspective on all the projects in the company, which can help man-agement prioritize and strategize overall enterprise efforts
� A greater capability to collaborate among projects
� More efficient methods for resources to track their time on project taskswithout anybody having to reenter the information in Project
If you have a company LAN or intranet, you can set up Project Server andProject Web Access to deliver all these benefits and more.
Not every member of your team has to have Project installed to interact withit as long as he has access to your LAN or intranet, access to Project WebAccess, and appropriate network permissions.
The downsides to Project Server with Project Web Access include
� The cost for licenses
� The time to install and maintain the server as well as to train users
� The need to ensure that projects are handled in a uniform way acrossyour enterprise (If you don’t do this, the information you receivethrough Project Server may be inaccurate and out of date.)
Figure 18-1:The
ResourceCenter
feature ofProject Web
Accesshelps you
build aproject
using all theresources
in yourorganizationat a glance.
321Chapter 18: Project Web Access for the Project Manager
26_036516 ch18.qxp 11/20/06 1:47 PM Page 321
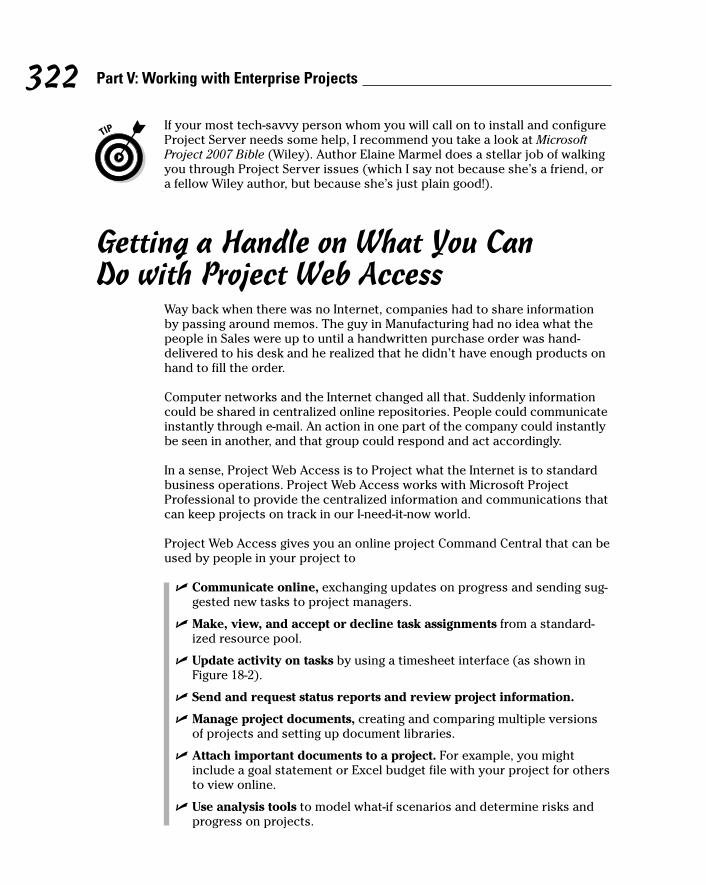
If your most tech-savvy person whom you will call on to install and configureProject Server needs some help, I recommend you take a look at MicrosoftProject 2007 Bible (Wiley). Author Elaine Marmel does a stellar job of walkingyou through Project Server issues (which I say not because she’s a friend, ora fellow Wiley author, but because she’s just plain good!).
Getting a Handle on What You Can Do with Project Web Access
Way back when there was no Internet, companies had to share informationby passing around memos. The guy in Manufacturing had no idea what thepeople in Sales were up to until a handwritten purchase order was hand-delivered to his desk and he realized that he didn’t have enough products onhand to fill the order.
Computer networks and the Internet changed all that. Suddenly informationcould be shared in centralized online repositories. People could communicateinstantly through e-mail. An action in one part of the company could instantlybe seen in another, and that group could respond and act accordingly.
In a sense, Project Web Access is to Project what the Internet is to standardbusiness operations. Project Web Access works with Microsoft ProjectProfessional to provide the centralized information and communications thatcan keep projects on track in our I-need-it-now world.
Project Web Access gives you an online project Command Central that can beused by people in your project to
� Communicate online, exchanging updates on progress and sending sug-gested new tasks to project managers.
� Make, view, and accept or decline task assignments from a standard-ized resource pool.
� Update activity on tasks by using a timesheet interface (as shown inFigure 18-2).
� Send and request status reports and review project information.
� Manage project documents, creating and comparing multiple versionsof projects and setting up document libraries.
� Attach important documents to a project. For example, you mightinclude a goal statement or Excel budget file with your project for othersto view online.
� Use analysis tools to model what-if scenarios and determine risks andprogress on projects.
322 Part V: Working with Enterprise Projects
26_036516 ch18.qxp 11/20/06 1:47 PM Page 322

� Create and refine proposals. This is a new feature in Project 2007 thatallows you to begin to build your project ideas before you’re ready tocommit the time to building a full-blown project plan.
Planning to Use Project Server and Project Web Access
Before your administrator begins installing Project Server, you have to sitdown and do some thinking about how you’ll use it in your organization.During the installation process, you have to make some design choices basedon how you want to use the product.
Tools built into the Project Collaborate menu become available to you whenProject Server is installed, so you can perform much of your work withProject Web Access right from your copy of Microsoft Project.
Get a team togetherFirst figure out who at your organization should be part of this process. Forexample, you’ll probably need senior management input, end user (the peopleon your project teams) input, the experience and expertise of all the project
Figure 18-2:The
timesheetentry formprovides a
handy way for
resources toenter time
spent onprojects.
323Chapter 18: Project Web Access for the Project Manager
26_036516 ch18.qxp 11/20/06 1:47 PM Page 323
managers in your company who use the enterprise features, and somebody(or three or four somebodies) from your IT department who actually have toset the thing up.
As with most network-oriented computing, everybody has a role to play andhas to be set up to use features on the network based on that role. ProjectServer provides a user model with three types of participants, providing vari-ous information and access requirements accordingly:
� Managers, who oversee the day-to-day operations of a project
� Team members, who perform the work on the project
� Shareholders, such as clients and senior management, who require reg-ular updating on project progress, often across several projects in anorganization
You should analyze how these roles relate to the functions in your projectteams and work with your IT folks to set up Project Server permissionsaccordingly.
Gather informationNext, set up a process to research and come to an agreement on all the enter-prise-wide information you need to enter into Project Server, such asresources, their rates, their calendars of availability; WBS (work breakdownstructure) code structure; standard report formats; custom fields you’d liketo include in the Project Server Enterprise Global Template (kind of like theGlobal Template in Project 2007, but available online); and filters, views,tables, and so on.
The key word in this planning process is standardization. By standardizingthe information in your projects and making that information availableonline, you increase efficiency in building projects and provide mechanismsfor comparing projects in an apples-to-apples way.
Standardize processesPay special attention to the reporting process that different people use ontheir projects. Standardizing reporting processes and formats ensures thatthose who read reports about multiple projects can easily and quickly under-stand what they’re looking at. Also, determine how project performance willbe assessed. For example, the way in which earned value is used in creatingtasks produces different measures of progress on projects.
324 Part V: Working with Enterprise Projects
26_036516 ch18.qxp 11/20/06 1:47 PM Page 324

You can bone up on reporting by going to Chapter 16.
Coordinate with ITFinally, work with your IT people to identify the Project Server features thatyou want to use in your organization. For example, if maintaining an onlinediscussion is important to your company, you may want to create discussionboards on your Project Web Access site.
Planning for problemsOne final word about implementing Project Server and Project Web Access atyour organization: Because you will now be sharing resources and informa-tion with others on a daily basis, put a little thought into how you’ll deal withproblems when they come up. For example, what happens if you want to usea resource but another project manager already has that resource assignedto a project? Or how do various project managers make use of tools, such asresource leveling, to resolve resource conflicts?
Make sure that everybody understands the rules of etiquette involved in work-ing in an enterprise-wide fashion, sharing people, equipment, and information.
Looking Over the Project Web Access Tools
So what goodies become available to you after your organization has beenthrough the somewhat daunting task of getting everything set up? It’s timefor a closer look at how you’ll use specific Project Web Access features inyour projects.
325Chapter 18: Project Web Access for the Project Manager
Don’t forget the training!Project Web Access requires that differentpeople in your organization learn new tricks.Your IT people need time to get up to speed onsetting up and maintaining the Project Serverdatabase. Project managers have to learn touse the timesheet reports to track projects.
Team members require some training on thestatus report and timesheet features in ProjectWeb Access. Build in time and money to yourimplementation process to make effective train-ing happen.
26_036516 ch18.qxp 11/20/06 1:47 PM Page 325
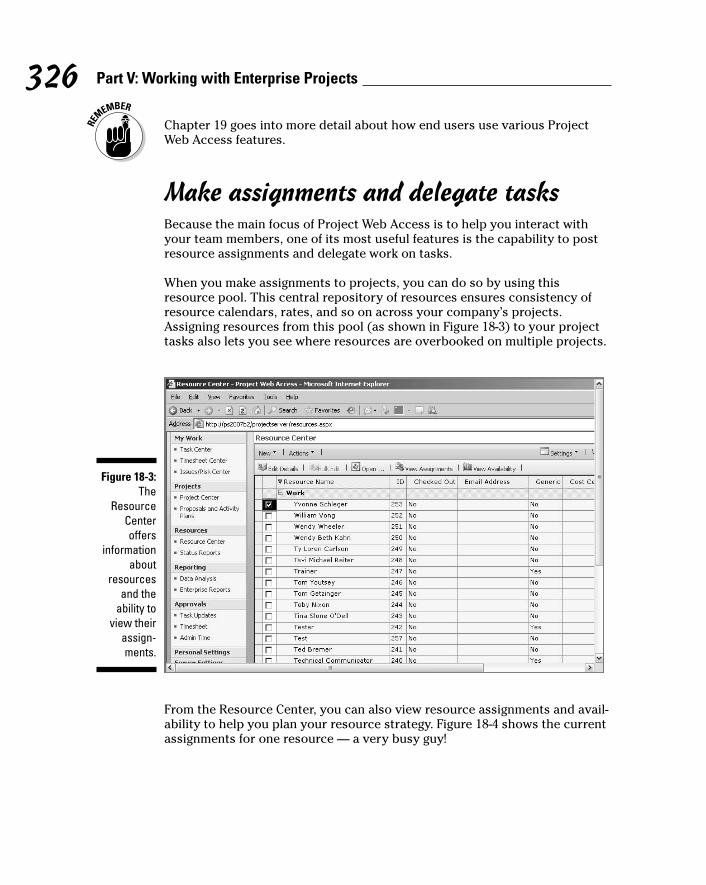
Chapter 19 goes into more detail about how end users use various ProjectWeb Access features.
Make assignments and delegate tasksBecause the main focus of Project Web Access is to help you interact withyour team members, one of its most useful features is the capability to postresource assignments and delegate work on tasks.
When you make assignments to projects, you can do so by using thisresource pool. This central repository of resources ensures consistency ofresource calendars, rates, and so on across your company’s projects.Assigning resources from this pool (as shown in Figure 18-3) to your projecttasks also lets you see where resources are overbooked on multiple projects.
From the Resource Center, you can also view resource assignments and avail-ability to help you plan your resource strategy. Figure 18-4 shows the currentassignments for one resource — a very busy guy!
Figure 18-3:The
ResourceCenteroffers
informationabout
resourcesand the
ability toview their
assign-ments.
326 Part V: Working with Enterprise Projects
26_036516 ch18.qxp 11/20/06 1:47 PM Page 326

After you make assignments, the folks on your team can access timesheetsfor their specific assignments and can get e-mail notification of those assign-ments. Team members can delegate assignments to others on the team.Then, the team member can review and approve status reports on work per-formed on the task before sending those reports on to the project manager.
Of course, you don’t want everyone on a project to be able to pass the buckwhen it comes to assignments: The project manager has control over whocan — and can’t — delegate tasks in a project.
Track your progressIn Chapter 13 of this book, I tell you all about gathering resource-activityinformation and entering it in your Project file to track progress. This can bea somewhat tedious process. Wouldn’t it be nice if your resources could justenter their work in timesheets that could be automatically imported intoProject to do your tracking for you? Well, I’ve got a surprise for you. . . .
One huge perk to using Project Web Access is the functionality that it givesyour team members to track their activity on tasks and also report theirprogress to you online. Project managers can request updates or sendreminders shortly before updates are due.
Figure 18-4:Viewing
resourcedata in a
centrallocation
helps anybusy project
manager.
327Chapter 18: Project Web Access for the Project Manager
26_036516 ch18.qxp 11/20/06 1:47 PM Page 327

Team members can use the Microsoft Project Web Access interface to enteractual activity into a timesheet. Web Access communicates directly withProject on the project manager’s computer. As the project manager, you canthen make manual updates to your project plan or let Project make its ownupdates automatically. You can also generate task update requests to helpyou remind your team to keep you apprised of their activity and progress.
You can find out how to use features such as the tracking sheet in Chapter 19.
Figure out what’s going on with status reportsYou can design and request status reports, such as the one shown in Figure18-5, which are essentially forms that the people on your project can com-plete to explain the status of their tasks. These aren’t used to track andrecord actual work performed. Instead, they help team members describevarious issues that come up and what’s going on with the progress of tasks.
You can request status reports and then work with your team’s responses.One of the nice things about status reports for you, as a project manager, isthat you can assemble all the individual reports into a complete status reportfor the project. Then you can make that report available to shareholders toupdate them on the latest news.
Figure 18-5:You specify
exactlywhat you
want to seein a status
report.
328 Part V: Working with Enterprise Projects
26_036516 ch18.qxp 11/20/06 1:47 PM Page 328
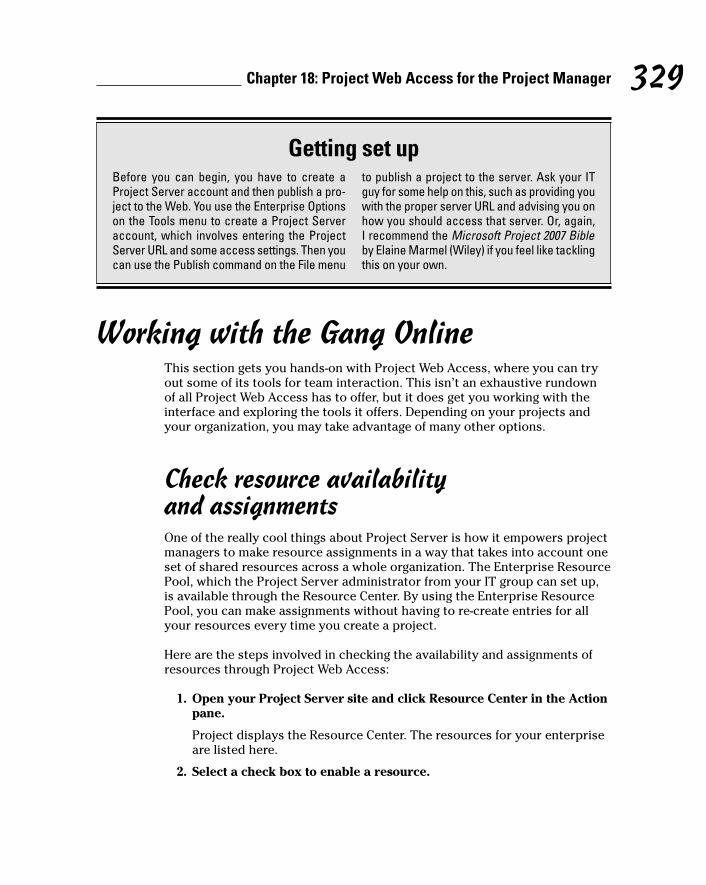
Working with the Gang OnlineThis section gets you hands-on with Project Web Access, where you can tryout some of its tools for team interaction. This isn’t an exhaustive rundownof all Project Web Access has to offer, but it does get you working with theinterface and exploring the tools it offers. Depending on your projects andyour organization, you may take advantage of many other options.
Check resource availability and assignmentsOne of the really cool things about Project Server is how it empowers projectmanagers to make resource assignments in a way that takes into account oneset of shared resources across a whole organization. The Enterprise ResourcePool, which the Project Server administrator from your IT group can set up,is available through the Resource Center. By using the Enterprise ResourcePool, you can make assignments without having to re-create entries for allyour resources every time you create a project.
Here are the steps involved in checking the availability and assignments ofresources through Project Web Access:
1. Open your Project Server site and click Resource Center in the Actionpane.
Project displays the Resource Center. The resources for your enterpriseare listed here.
2. Select a check box to enable a resource.
329Chapter 18: Project Web Access for the Project Manager
Getting set upBefore you can begin, you have to create aProject Server account and then publish a pro-ject to the Web. You use the Enterprise Optionson the Tools menu to create a Project Serveraccount, which involves entering the ProjectServer URL and some access settings. Then youcan use the Publish command on the File menu
to publish a project to the server. Ask your ITguy for some help on this, such as providing youwith the proper server URL and advising you onhow you should access that server. Or, again, I recommend the Microsoft Project 2007 Bibleby Elaine Marmel (Wiley) if you feel like tacklingthis on your own.
26_036516 ch18.qxp 11/20/06 1:47 PM Page 329

3. Click the View Assignments button.
The amount of work hours that the selected resource is assigned to onspecific tasks, along with the remaining hours of work on those tasks,are listed, as shown in Figure 18-6. This list also shows the scheduledstart and finish dates of tasks.
4. Choose Go To➪View Availability.
The resource’s available work hours are listed day by day, starting withthe current date (see Figure 18-7).
While viewing assignments, you can quickly view the taskbar for any task byclicking it and then clicking the Scroll to Task button.
Build a project teamWith an entire resource pool at your disposal, after you know who is avail-able for your project, you can build a project team.
Follow these steps to build your project team:
1. Click the Project Center link on the Action pane to display it.
The Project Center is displayed.
Figure 18-6:The
resourceshere are set
up by theperson
administer-ing yourProjectServersetup.
330 Part V: Working with Enterprise Projects
26_036516 ch18.qxp 11/20/06 1:47 PM Page 330
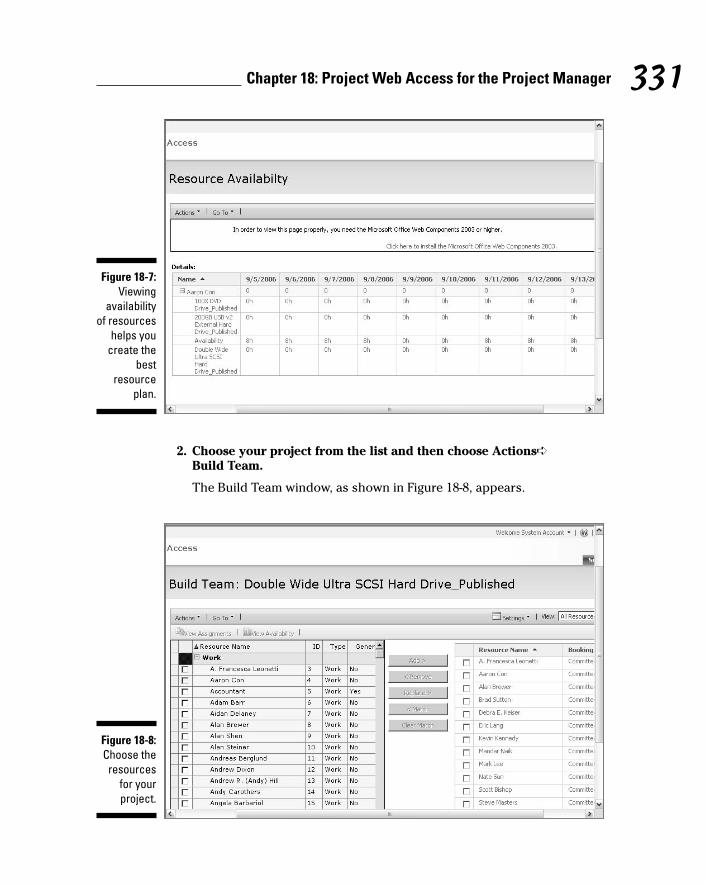
2. Choose your project from the list and then choose Actions➪Build Team.
The Build Team window, as shown in Figure 18-8, appears.
Figure 18-8:Choose theresources
for yourproject.
Figure 18-7:Viewing
availabilityof resources
helps youcreate the
bestresource
plan.
331Chapter 18: Project Web Access for the Project Manager
26_036516 ch18.qxp 11/20/06 1:47 PM Page 331

3. Select various check boxes for the people you want to add to your project.
4. Click Add.
All selected resources are added to your team.
5. Click Save.
The new team list is saved.
Request a status reportIn an ideal world, every resource on your project would report to you faith-fully on his or her progress (and the news would all be good). In reality, thenews is often not so good, but there’s nothing Project or I can do about that. However, Project Server does provide a way for you to design statusreports — and regularly nudge your team to submit them to you.
You can design a status report and also request that your team submit thesereports at intervals by using a handy wizard.
To request a status report, follow these steps:
1. From the Project Web Access home page, click the Status Reports linkon the Action pane.
The Status Reports page appears.
2. In the Request area, choose New➪New Request.
The Status Report Request page, as shown in Figure 18-9, appears.
3. Complete the form by entering a report name, the frequency that thereport should be submitted to you, the start date for the report, andthe resources you want to have send it to you.
4. In the last area of the report titled Sections, click the Insert Sectionbutton and type a name for the new section. Repeat this for every sec-tion you want included in the report.
5. Click Send.
The request for the report is sent to each of the resources you indicated.
Share documentsOne other great use of Project Web Access is as a place to share documentswith your team. Follow these steps to work with shared documents:
332 Part V: Working with Enterprise Projects
26_036516 ch18.qxp 11/20/06 1:47 PM Page 332
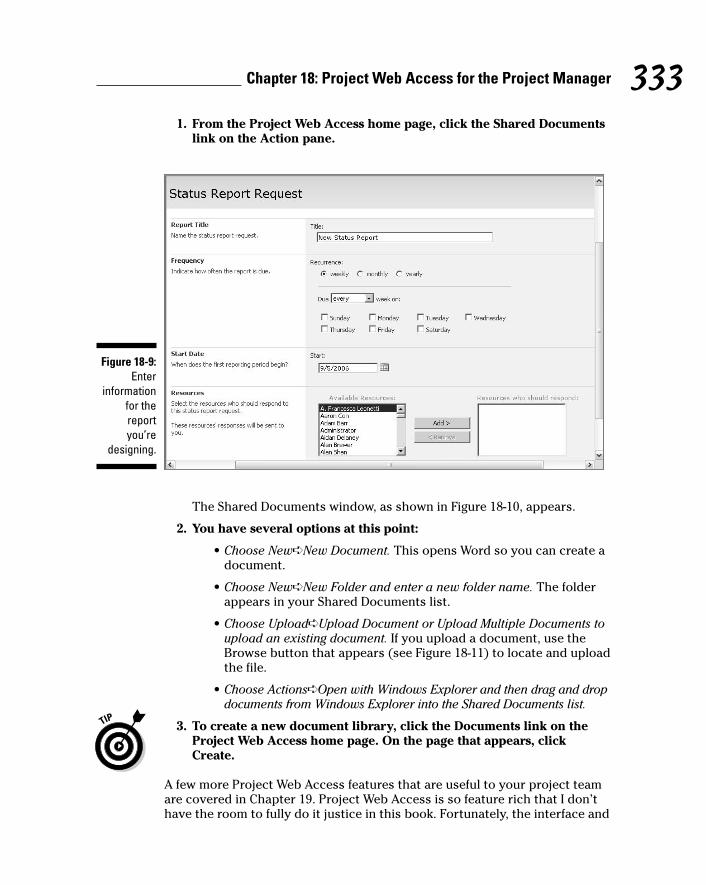
1. From the Project Web Access home page, click the Shared Documentslink on the Action pane.
The Shared Documents window, as shown in Figure 18-10, appears.
2. You have several options at this point:
• Choose New➪New Document. This opens Word so you can create adocument.
• Choose New➪New Folder and enter a new folder name. The folderappears in your Shared Documents list.
• Choose Upload➪Upload Document or Upload Multiple Documents toupload an existing document. If you upload a document, use theBrowse button that appears (see Figure 18-11) to locate and uploadthe file.
• Choose Actions➪Open with Windows Explorer and then drag and dropdocuments from Windows Explorer into the Shared Documents list.
3. To create a new document library, click the Documents link on theProject Web Access home page. On the page that appears, clickCreate.
A few more Project Web Access features that are useful to your project teamare covered in Chapter 19. Project Web Access is so feature rich that I don’thave the room to fully do it justice in this book. Fortunately, the interface and
Figure 18-9:Enter
informationfor thereportyou’re
designing.
333Chapter 18: Project Web Access for the Project Manager
26_036516 ch18.qxp 11/20/06 1:47 PM Page 333

tools are easy to use, and the Help information is actually quite helpful.Explore the topics of interest to you, and you’ll be a Project Web Access proin no time.
Figure 18-11:Browse for
a documentto upload
to yourdocument
library.
Figure 18-10:All docu-
ments youshare withyour team
are placedhere.
334 Part V: Working with Enterprise Projects
26_036516 ch18.qxp 11/20/06 1:47 PM Page 334

Chapter 19
Project Web Access for the End User
In This Chapter� Using Timesheet to enter actual work
� Looking at project information
� Setting up alerts and reminders
� Viewing information about a Project Web Access user
Project Web Access is a marvelous tool for project managers to makeassignments, track progress, and communicate, but it also offers great
advantages to project team members.
Essentially, you can think of Project Web Access as a metaphorical two-waystreet. That is, project managers can post projects, notify resources of assign-ments, and request status reports, but the members of your project team canalso initiate actions. For example, they can record the time they’ve spent ontasks, take a look at project information, send status reports to managers,and set up alerts and reminders to keep them on top of their commitments.
Seeing Project Web Access from the User’s Perspective
The main Project Web Access home page is shown in Figure 19-1. In the vari-ous categories shown on the left here (My Work, Projects, Resources,Reporting, and so on), you can view a wealth of project information. You canalso use the links in the Actions pane along the left side of the screen to movearound the site.
27_036516 ch19.qxp 11/20/06 1:48 PM Page 335

By using the various categories in the Actions pane, you can accomplishmany things, including entering the hours you have spent on tasks, viewingproject information, getting reminders of what is coming due (or is overdue),and communicating with other resources on your project.
For information about the features of Project Web Access that are useful to aproject manager, see Chapter 18.
Reporting Work CompletedOkay, put aside your project manager hat (if you have one) and imagine for amoment that you’re working on a project team. Your project manager — I’llcall him Milt — has assigned you to tasks, and you have deadlines (way toomany in your humble opinion) to meet.
The Timesheet feature (which you access through Project Web Access)enables you to view your tasks and enter information about the actual timeyou spent on them. Milt can check your timesheet (as shown in Figure 19-2)and track progress automatically.
Here’s how to get to Timesheet view:
1. Display the main Project Web Access page for your project.
2. Click the Timesheet Center link in the Actions pane.
Figure 19-1:The Project
WebAccess
home pageis filled with
various linksyou use to
get around.
336 Part V: Working with Enterprise Projects
27_036516 ch19.qxp 11/20/06 1:48 PM Page 336
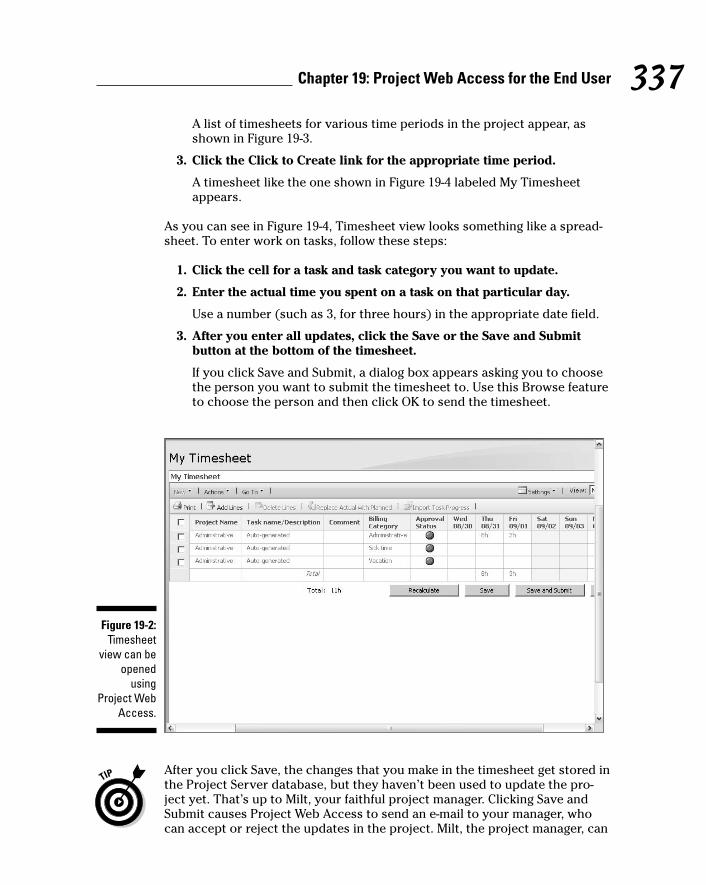
A list of timesheets for various time periods in the project appear, asshown in Figure 19-3.
3. Click the Click to Create link for the appropriate time period.
A timesheet like the one shown in Figure 19-4 labeled My Timesheetappears.
As you can see in Figure 19-4, Timesheet view looks something like a spread-sheet. To enter work on tasks, follow these steps:
1. Click the cell for a task and task category you want to update.
2. Enter the actual time you spent on a task on that particular day.
Use a number (such as 3, for three hours) in the appropriate date field.
3. After you enter all updates, click the Save or the Save and Submitbutton at the bottom of the timesheet.
If you click Save and Submit, a dialog box appears asking you to choosethe person you want to submit the timesheet to. Use this Browse featureto choose the person and then click OK to send the timesheet.
After you click Save, the changes that you make in the timesheet get stored inthe Project Server database, but they haven’t been used to update the pro-ject yet. That’s up to Milt, your faithful project manager. Clicking Save andSubmit causes Project Web Access to send an e-mail to your manager, whocan accept or reject the updates in the project. Milt, the project manager, can
Figure 19-2:Timesheet
view can beopened
usingProject Web
Access.
337Chapter 19: Project Web Access for the End User
27_036516 ch19.qxp 11/20/06 1:48 PM Page 337

log on to Project Web Access and then click the Approvals link. Alltimesheets are displayed. You can accept or reject these by clicking theApprove or Reject button.
Figure 19-4:Timesheet
view allowsresources to
track timespent on
tasks.
Figure 19-3:The
TimesheetList.
338 Part V: Working with Enterprise Projects
27_036516 ch19.qxp 11/20/06 1:48 PM Page 338

Viewing Project InformationProject team members often don’t have Project itself loaded on their comput-ers, so they need a way to view the project plan. They can do that by usingProject Web Access. (Viewing project information works pretty much thesame whether you’re wearing a project manager or team member hat.)
To view a project, follow these steps:
1. Display the Project Web Access page.
2. Click the Project Center link in the Actions pane.
All the projects you have access to (as shown in Figure 19-5) are displayed.
3. Click the link for the project that you want to view and then clickOpen.
The project is displayed (see Figure 19-6).
Your team members cannot edit this project plan, which is just as well: I recommend that one person be responsible for making all the edits to theplan to avoid confusion.
Figure 19-5:See an
overview ofseveral
projectsgoing on at
once.
339Chapter 19: Project Web Access for the End User
27_036516 ch19.qxp 11/20/06 1:48 PM Page 339
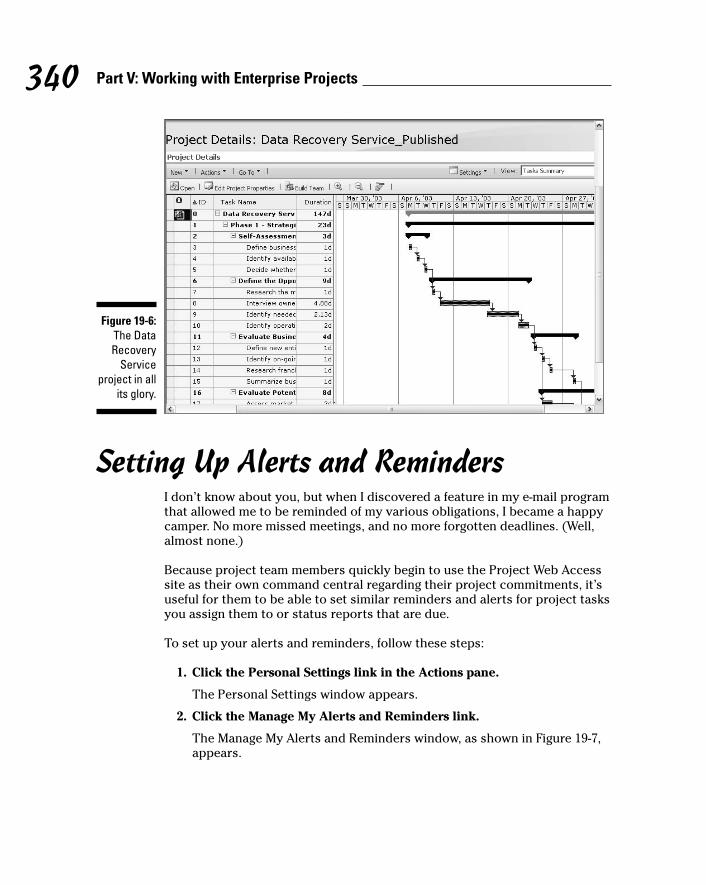
Setting Up Alerts and RemindersI don’t know about you, but when I discovered a feature in my e-mail programthat allowed me to be reminded of my various obligations, I became a happycamper. No more missed meetings, and no more forgotten deadlines. (Well,almost none.)
Because project team members quickly begin to use the Project Web Accesssite as their own command central regarding their project commitments, it’suseful for them to be able to set similar reminders and alerts for project tasksyou assign them to or status reports that are due.
To set up your alerts and reminders, follow these steps:
1. Click the Personal Settings link in the Actions pane.
The Personal Settings window appears.
2. Click the Manage My Alerts and Reminders link.
The Manage My Alerts and Reminders window, as shown in Figure 19-7,appears.
Figure 19-6:The DataRecovery
Serviceproject in all
its glory.
340 Part V: Working with Enterprise Projects
27_036516 ch19.qxp 11/20/06 1:48 PM Page 340

3. In the Task Alerts area, you can request to be notified about variousevents.
Make settings here to be notified when you are assigned to a task orwhen the task is modified.
4. In the Task Reminders area, you can set up all kinds of reminders tolet you know a task will start or be due soon.
You can even make a setting to be reminded periodically about anyincomplete or overdue task.
5. In the Status Report Alerts area, adjust settings to alert you to respondto status report requests.
You can choose to be notified when a new status report request appearsor when a status report is due or overdue.
6. Click Save to save all your settings.
Viewing Information about Other UsersWhen you work on projects, you work with other people for the most part.How many times have you been working on a deadline and found you had tocontact somebody only to forget that person’s name, e-mail address, or evenwhat department he works for?
Figure 19-7:Create and
managehelpful
reminders tokeep you on
track.
341Chapter 19: Project Web Access for the End User
27_036516 ch19.qxp 11/20/06 1:48 PM Page 341

By using the People and Groups tools in Project Web Access, you can updateyour own information and look up information about others in your organization.
Follow these steps to look up information about people in Project WebAccess:
1. From the Project Web Access home page, click the People and Groupslink in the Actions pane.
The People and Groups window, as shown in Figure 19-8, appears.
2. Double-click any person’s name in the list to display a detailed infor-mation form, as shown in Figure 19-9.
3. If an e-mail address is listed and you want to e-mail this person,simply click the e-mail address.
A blank message opens.
4. When you finish viewing the person’s information, click Close.
Figure 19-8:Access
informationabout your
co-workershere.
342 Part V: Working with Enterprise Projects
27_036516 ch19.qxp 11/20/06 1:48 PM Page 342

If you prefer talking with somebody over the phone rather than sending ane-mail, use NetMeeting, an online meeting software program from Microsoft.From the People and Groups window, select a check box to select a person,and then choose Actions➪Call/Message Selected Users. This opensNetMeeting, which allows you to connect with this person in a variety ofways such as with text, video, or by phone.
If you want to discover more about Project Web Access, see Chapter 18,which covers several tasks a project manager might find useful.
Figure 19-9:View details
for a co-worker.
343Chapter 19: Project Web Access for the End User
27_036516 ch19.qxp 11/20/06 1:48 PM Page 343

344 Part V: Working with Enterprise Projects
27_036516 ch19.qxp 11/20/06 1:48 PM Page 344

Part VIThe Part of Tens
28_036516 pt06.qxp 11/27/06 2:02 PM Page 345

In this part . . .
Ten fingers, ten toes — things that come in tens are justa natural! This part gives you two handy lists of ten:
Ten Golden Rules of Project Management, and Ten Project-Management Software Products to Explore. The first ofthese chapters offers new users of Project (as well as sea-soned veterans) some pointers on getting your project toperform. The second chapter looks at add-on productsand supplemental software to enhance Microsoft Project
28_036516 pt06.qxp 11/27/06 2:02 PM Page 346

Chapter 20
Ten Golden Rules of ProjectManagement
In This Chapter� Putting good project management practices to work using Microsoft Project
� Creating and tracking Project schedules more efficiently
� Learning from your mistakes
You’ve heard this one: You can have your deliverable on time, on budget,or done right: Choose two. That’s an example of some traditional project
management wisdom. But how does that wisdom translate to the use of pro-ject management software?
Well, it’s simple: If you assign additional resources to a Project schedule, youadd costs and time to your schedule because resources have costs attachedand can work only according to their work calendars. So, clearly, makingchanges that might improve quality — such as adding more or higher-pricedresources — affects the time and money needed for your project. That adageabout time being money is still true, but now you can clearly see the effectthat one action has on other aspects of your project (especially if somethingyou do tinkers with time or money) — and it’s all visible in Project’s manyviews and reports.
So what project management adages should you be aware of as you begin touse Project? Here are ten to tack up on your office wall.
Don’t Bite Off More Than You Can Manage
As I mention elsewhere in this book (see Chapter 1), you must have an under-standing of the goal of your project as well as the scope of its activitiesbefore you start to build a Project schedule. Don’t plan a full marketing
29_036516 ch20.qxp 11/20/06 1:49 PM Page 347

campaign if all you can anticipate at this point is what the market-researchphase will look like. Because the additional elements of an actual marketingcampaign hinge on that market research, do first things first: Build your pro-ject in phases. That way, you’ll have less reworking of later tasks that simplycouldn’t be anticipated when you began. You’ll also have less need to manip-ulate the baseline for those later tasks: If they’re too far in the future, by thetime you get there, their time demands won’t look anything like what youoriginally set aside for them.
Don’t set tasks that are far in the future in stone too early in the game.
Here are some Project features that help you with this process:
� The capability to combine subprojects into a master project with linking
� Network Diagram view, which helps you visualize phases of your projectgraphically
� The flexible nature of Project outlines, allowing you to hide or displaydifferent phases of a project
See Chapter 5 for more about the best ways to manipulate outlines.
Get Your Ducks in a RowBefore you start creating your project, do your homework. If you don’t haveall the information that you need when you sit down at your computer towork with Project, you’ll find yourself constantly stopping, mid-plan, and run-ning off to find that information. This isn’t a very efficient way to work.
Here are some things to research before you sit down to build a projectschedule:
� Resource information: For people, this includes the full name, contactinformation, manager and manager’s contact information, skills, cost,schedule, and timing conflicts. For equipment or facilities, find out theiravailability and cost.
� Team structure: Does everyone do his or her own tracking, or doessomeone else on the team input everyone’s progress? Who updates theschedule for changes? Who gets copies of which reports? Should yourteam have access to the master schedule online? Does everyone on theteam have the technology to communicate using collaborative featuressuch as Project Web Access?
348 Part VI: The Part of Tens
29_036516 ch20.qxp 11/20/06 1:49 PM Page 348
� Management expectations: Does management expect to see Basicreports on a regular basis? Would they prefer that you use Visualreports, instead? Do you need to get budget approval at various phasesin your project planning; if so, from whom? Are cross-enterprise inter-ests involved that require you to report to or get approval from multiplesources? (See Chapter 16 for the lowdown on reports.)
� Company policies: These include company work policies regardingresource hours and overtime, the holiday calendar, how your companycharges overhead costs or markups to projects, and what informationcan — and can’t — be shared with clients or vendors.
The Enterprise resource features in Project 2007 help you call on companyinformation stored on your server, such as obtaining a list of enterpriseresources, for consistency across projects.
Now you’re ready to sit down and start inputting a Project project! (Is therean echo in here?)
Plan for MurphyYou know he’s out there: Murphy and his darn law! Most projects don’thappen on time or on budget. This is especially true of lengthier and more complex projects. Your job is to do the most accurate planning that youcan — and make prudent adjustments whenever a wrench is thrown into theworks. Project gives you lots of tools to do that. But beyond all the auto-mated features of Project, you can anticipate change by planning for it.
As I describe in Chapter 6, the critical path in a project is indeed critical.Every wise project manager builds extra time, and even extra money, intoschedules. When the project comes in but a week late and $5,000 overbudget, only the project manager knows that it was really four weeks laterand $25,000 costlier than what the first schedule — the one with noallowance for Murphy — reflected.
Add time to the duration of every task if possible to account for shifts inschedule. Also add a resource to every phase of your project to pad yourbudget just a bit to help you deal with overages.
Instead of a work or material resource, use the new Project 2007 costresource type to add a set amount to a task or phase. You can even name theextra cost resource Murphy, if you like!
349Chapter 20: Ten Golden Rules of Project Management
29_036516 ch20.qxp 11/20/06 1:49 PM Page 349

Don’t Put Off Until TomorrowProject management software can make many aspects of your life easier, butthe thing that overwhelms most people when they begin to use Project is theamount of time spent inputting data and keeping it up to date. True, thosetasks can be cumbersome, but what you can get back from those automatedupdating and reporting capabilities more than makes up for the upfront work.
Don’t forget about the capability to import tasks from Outlook into Project.This helps speed up some of that data entry in the planning phase.
However, if you don’t tend to the task of tracking progress on a project, youcan wind up behind the proverbial eight-ball. Track just as often as you can — at least once a week. This not only saves you from facing a mountainof tracking data to be entered, but this also means that you and your teamcan see the true picture of your project at any point in time. That way, you can promptly spot disaster coming and make adjustments accordingly.
Delegate, Delegate, Delegate!Don’t try to do everything on a project yourself. Although creating and main-taining your Project file on your own might seem to give you more control,doing so is just about impossible in larger projects. Of course, you don’t wantdozens of people going in and making changes to your plan because you runthe risk of losing track of who did what and when. However, a few simplepractices make a few fingers in the project pie helpful, not harmful:
� Designate one person whose mission is to enter all tracking data into themaster file for you. Or, you can automate tracking by using the RequestProgress Information feature.
� Break your project into a few subprojects and assign people whom youtrust to act as managers of those phases. Let them deal with their owntracking and adjustments, and then assemble the phase projects into amaster project so you can monitor their changes.
� Enlist the help of your IS/IT person(s) to set up Project Server withProject Web Access to provide enhanced collaborative features andshare documents with your team.
� Set uniform procedures for your team up front. Don’t have one personreport time on an inter-office memo sheet, somebody else e-mail you hisprogress, and let others stick the work they did on tasks into theTimesheet willy-nilly. Work up a strategy that uses Project features tocommunicate consistently.
350 Part VI: The Part of Tens
29_036516 ch20.qxp 11/20/06 1:49 PM Page 350
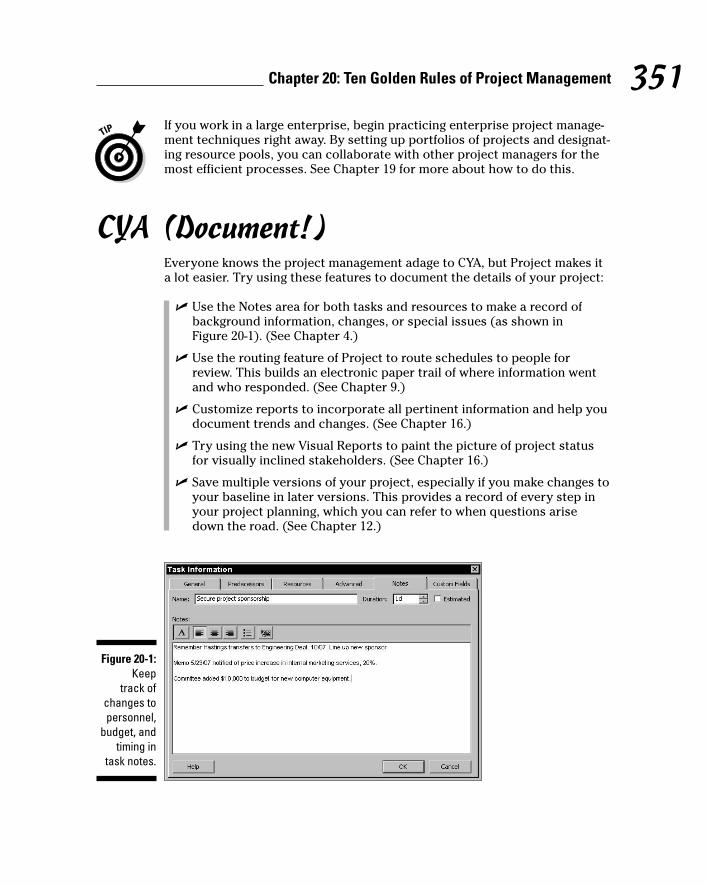
If you work in a large enterprise, begin practicing enterprise project manage-ment techniques right away. By setting up portfolios of projects and designat-ing resource pools, you can collaborate with other project managers for themost efficient processes. See Chapter 19 for more about how to do this.
CYA (Document!)Everyone knows the project management adage to CYA, but Project makes ita lot easier. Try using these features to document the details of your project:
� Use the Notes area for both tasks and resources to make a record ofbackground information, changes, or special issues (as shown in Figure 20-1). (See Chapter 4.)
� Use the routing feature of Project to route schedules to people forreview. This builds an electronic paper trail of where information wentand who responded. (See Chapter 9.)
� Customize reports to incorporate all pertinent information and help youdocument trends and changes. (See Chapter 16.)
� Try using the new Visual Reports to paint the picture of project statusfor visually inclined stakeholders. (See Chapter 16.)
� Save multiple versions of your project, especially if you make changes toyour baseline in later versions. This provides a record of every step inyour project planning, which you can refer to when questions arisedown the road. (See Chapter 12.)
Figure 20-1:Keep
track ofchanges topersonnel,
budget, andtiming in
task notes.
351Chapter 20: Ten Golden Rules of Project Management
29_036516 ch20.qxp 11/20/06 1:49 PM Page 351

� Share updates to your plan through Project Web Access so that nobodycan say he or she was out of the loop when some important changecame down. (See Chapter 18.)
Keep Your Team in the LoopI’ve worked in offices where I spent more time wrestling with whom to keepinformed about what than I did working. If I didn’t include marketing andfinance in every e-mail on a new product launch, I’d be called on the carpetthe next day, or (worse) some vital action step would fall through the cracksbecause someone didn’t know he or she was supposed to take action. Trythese methods of keeping communication channels open:
� Use Project features that allow you to integrate with Outlook or othere-mail programs to route Project files or other communications.
� Build address lists in your e-mail program specific to your project teamso that every message goes to everyone, every time.
� Review progress with your team by meeting regularly, whether inperson, over the phone, online in a chat area, or by using meeting soft-ware. Make sure that each team member has the latest version of theProject schedule to refer to during these meetings.
� Use the Send to: Exchange Folder command to post the latest version ofa project in a folder on your network so others know what’s going on.
� If you run SharePoint Services, you can use the integrated task pane inProject to work with the Shared Workspace feature. Shared Workspace isa great, centralized place to post and exchange project-related docu-ments created in any Office 2007 application.
� Display the work-breakdown structure code on reports so you can easilyrefer to specific tasks in large projects without confusion.
Take advantage of the Printing wizard in the Project Guide. This feature helpsyou find the best way to print various views of your project to share hardcopy updates with your team.
Measure SuccessWhen you begin your project, you should have an idea of what constitutessuccess and a way to measure that success. Success can involve attainingmany goals, such as
352 Part VI: The Part of Tens
29_036516 ch20.qxp 11/20/06 1:49 PM Page 352

� Customer satisfaction
� Management satisfaction
� Being on budget
� Being on time
When you start your project planning, know how you’ll measure your suc-cess. Will success in budgeting mean that you don’t exceed your original esti-mates by more than ten percent? Will your project be considered on time ifyou worked the estimated amount of weeks on it minus a two-month periodwhen you went on hold for a union strike, or is the total working time lessimportant than meeting a specific deadline? How will you measure customersatisfaction? Will management satisfaction be a done deal if you get a promo-tion or if your division receives more funding? Does a successful productlaunch include high sales figures after the launch, or was your project suc-cessful merely because you got it out the door?
Place milestones in your project (as shown in Figure 20-2) that reflect theachievement of each type of success. When you reach each milestone, youcan pat your team on the back. Knowing what success looks like helps youmotivate your team to get there.
Figure 20-2:Milestones
providemarkers
along theway thatgive your
team afeeling ofachieve-
ment.
353Chapter 20: Ten Golden Rules of Project Management
29_036516 ch20.qxp 11/20/06 1:49 PM Page 353
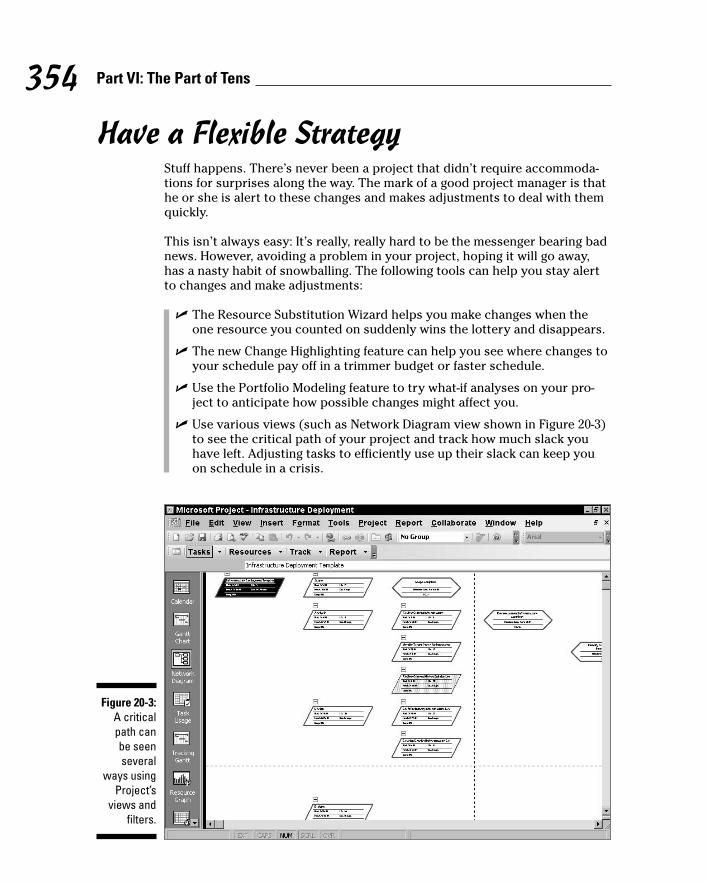
Have a Flexible StrategyStuff happens. There’s never been a project that didn’t require accommoda-tions for surprises along the way. The mark of a good project manager is thathe or she is alert to these changes and makes adjustments to deal with themquickly.
This isn’t always easy: It’s really, really hard to be the messenger bearing badnews. However, avoiding a problem in your project, hoping it will go away,has a nasty habit of snowballing. The following tools can help you stay alertto changes and make adjustments:
� The Resource Substitution Wizard helps you make changes when theone resource you counted on suddenly wins the lottery and disappears.
� The new Change Highlighting feature can help you see where changes toyour schedule pay off in a trimmer budget or faster schedule.
� Use the Portfolio Modeling feature to try what-if analyses on your pro-ject to anticipate how possible changes might affect you.
� Use various views (such as Network Diagram view shown in Figure 20-3)to see the critical path of your project and track how much slack youhave left. Adjusting tasks to efficiently use up their slack can keep youon schedule in a crisis.
Figure 20-3:A criticalpath can be seenseveral
ways usingProject’s
views andfilters.
354 Part VI: The Part of Tens
29_036516 ch20.qxp 11/20/06 1:49 PM Page 354

Remember that Project 2007 offers new features to help you try out what-ifscenarios and determine what’s driving the timing of tasks (see Chapter 15).Use these to figure out the best way to proceed.
Learn from Your MistakesOne of the greatest gifts that Project offers you is the capability to look backafter you complete a project so that you can learn from your mistakes. Youcan review your original schedule and every version after that to see howwell you estimated time and money and figure out how to do it better.
By using records of your project, you can spot trends. Where do you alwaysseem to miss on timing? Do you always allow way too little time on marketresearch and way too much time for Q&A? Do you always forget to budget fortemporary help during rush times, or do you overstaff early on when youcould get by with fewer people?
Use the wealth of information in Project schedules to educate yourself onyour own strengths and weaknesses as a project planner and manager and toget better with each project you take on.
Use the Portfolio Analyzer tool to get the bigger picture across all the projects and programs for which you’re responsible.
355Chapter 20: Ten Golden Rules of Project Management
29_036516 ch20.qxp 11/20/06 1:49 PM Page 355

356 Part VI: The Part of Tens
29_036516 ch20.qxp 11/20/06 1:49 PM Page 356

Chapter 21
Ten Project ManagementSoftware Products to Explore
In This Chapter� Looking at add-on software
� Discovering software that integrates with Project-generated plans
� Reviewing separate software products that help project managers with project-relatedtasks
If you’ve followed this book to this point, you’ve probably figured out bynow that project management software — just like a project manager —
wears a lot of hats. Microsoft Office Project does everything from allowingyou to create tasks and assign resources to tracking progress, analyzing costoverruns, and analyzing scheduling conflicts. It handles graphics, complexcalculations, and interactions with the Web.
Software designers always have to make trade-offs among features, decidingwhich ones to include and how much functionality to give each feature. MostProject features do everything you need, but others are less complete. Somefeatures might not quite get the job done as well as a more specialized toolthat you can use in conjunction with Project. Third-party software partnerswork with Microsoft to create add-on software to provide Project with greaterfunctionality: for example, generating a greater variety of graphic reports. In other cases, software handles specialized functions that Project doesn’tincorporate, such as managing the hundreds of drawings involved in con-struction projects.
Consider this the when-two-heads-are-better-than-one chapter. This chapterdescribes ten interesting software tools that you can use with Project. Mostof the makers of these tools offer some kind of free demo of their product oncompany Web sites. Plenty of products are out there, so use this chapter as a starting point as you consider ways to extend Project’s functionality.
30_036516 ch21.qxp 11/27/06 2:02 PM Page 357

DecisionEdge Chart and Report ProductsEnhance Project’s Own Tools
Makers of business intelligence software such as DecisionCharts andDecisionReports for Microsoft Project, DecisionEdge (www.decisionedge.com) offers reporting and graphics software products that add functionalityto Project. You can use these tools to help you visualize resource challenges,get a handle on your project schedule status, and gauge how well you’re performing.
Go to the DecisionEdge Web site to see a sample gallery of charts and reportsthat use a variety of graphic effects and colors to get your message across.Check out the Dashboard charts, which show a combination of several different charts in one report; these help your executives get a one-glanceoverview of your progress.
Even with the more graphical options in Project’s new Visual Reports feature, you can benefit from the more advanced graphics capabilities ofDecisionEdge’s products.
Cobra Squeezes the Most from Cost/Earned Value
WST Corporation (www.welcom.com), which makes its own complete projectmanagement package called Open Plan, also produces Cobra, a cost/earnedvalue management software package that you can use with Project plans.Cobra tools offer functionality in estimating, what-if modeling of costs, andbudget forecasting based on information in your Project schedule. I espe-cially like the multiple rate files feature that makes it easy to juggle severalresource rates within a single project.
Cobra not only allows you to define certain budget calculations yourself, butit also offers more flexibility than some of Project’s costing features. In addi-tion, the Chart Template Designer lets you play around with a variety of 3-Dcharts, which you can manipulate and rotate in several ways, expanding youroptions for presenting Project data in three dimensions.
358 Part VI: The Part of Tens
30_036516 ch21.qxp 11/27/06 2:02 PM Page 358

MindManuals Helps You VisualizeProject Information
MindManuals (www.mindjet.com/us) offers MindManager Pro, which is a software product that helps you get your team thinking together in cre-ative ways. This visual mapping software is touted as a visual thinking tool.MindManager is offered in Basic and Pro versions, and you can also getMindManager Viewer 6, which allows you to view and navigate MindManagermaps.
MindManager maps allow you to attach files, connect to RSS feeds, and more.After you organize your ideas and information, you can use these details asthe basis for your Project file. As of this writing, you can download a free 21-day trial to see all the power MindManager offers.
Innate Integrates Projects Large and Small
Innate Timesheets and Innate Resource Manager from Innate ManagementSystems (www.innateus.com) are especially helpful if you’re juggling multi-ple projects that range from small to large. You can use Innate to manage the human resources who work on smaller projects in your organization andare also busy on larger projects that you plan in Microsoft Project. InnateTimesheets can group resources in various useful ways.
The Innate Resource Manager helps you scope out resource availability andprioritize resource assignments. Innate Timesheets is tracking software, butit offers more than Project does in this area. You can do productivity compar-isons across several tasks or projects. You can also tap into sophisticatedbilling systems and integrate project information with accounting and payrollsystems in ways that enhance Project 12 budget-tracking features.
359Chapter 21: Ten Project Management Software Products to Explore
30_036516 ch21.qxp 11/27/06 2:02 PM Page 359

PlanView Models Your Workforce Capacity
PlanView, Inc. (www.planview.com) produces the software product PlanViewEnterprise, which helps you sort through the various layers in your organiza-tion. The role-modeling features in PlanView allow you to analyze and manage risk, give priorities to strategies, and set up scenarios to prepare forinevitable emergencies in your project.
The PlanView Project Portfolio Management product focuses on specific project work, featuring easy-to-use dashboards for managing your projectportfolios.
PlanView is closely integrated with Microsoft Project, so you can share infor-mation about processes and people on a project between the two products.PlanView templates can also be used to give you a head start on your Projectplan.
Tenrox Streamlines Business ProcessesThe buzzword today is enterprise, and Tenrox (www.tenrox.com) puts thefocus on business processes, such as performance analysis, resource plan-ning, purchasing, and revenue and cost accounting. One of the best uses ofthis software for the Microsoft Project user is as a bridge to various enter-prise and accounting packages such as SAP and ADP Payroll.
Project Portfolio Management and Professional Services Automation for ser-vice delivery and invoicing are Web-based solutions that can be very usefulin a geographically diverse project team setting. You should take a look atthese packages also if you have a need for RFI, quotation, and evaluationfunctions in your projects. Tenrox also offers a set of proposal managementtools to help you get the project off the ground in the first place.
360 Part VI: The Part of Tens
30_036516 ch21.qxp 11/27/06 2:02 PM Page 360
Project KickStart Gives Your Project a Head Start
Project KickStart from Experience In Software (www.experienceware.com)is a simple-to-use program with a wizard-like approach that helps you lay thegroundwork for small to midsize projects. If you need a little help gettingstarted with a project, you can create your plan here in 30 minutes or less,and then use the hot link to port information to Microsoft Project.
Project KickStart is designed to help you figure out your project strategy asyou come up with a list of tasks. Planning icons remind you to map out thegoals of your project and plan for obstacles. Libraries of typical goals andchallenges make building them into your plan simple, and you can add yourown specific company or industry phrases to the libraries. Links to Outlook,Word, and Excel also offer you some flexibility in sharing information amongthe Office family of products, which includes Project. Check out the free trialdownload and online demo to get an idea of what Project KickStart can do foryour projects.
Project Manager’s Assistant OrganizesDrawings for Construction Projects
Originally created for the construction industry, Project Manager’s Assistant,CS Project Lite, and CS Project Professional from Crest Software (www.crestsoft.com) are useful for any industry that uses a lot of drawings.
Essentially, these are database products that help you track drawings, issuecopies, develop production plans, and manage changes over the life of the project. Although the product doesn’t integrate directly to Project, it’s an additional software product that might prove useful to many project managers — and it does integrate to any ODBC (open database connectivity)database.
Graphic designers and new product designers who generate drawings cancatalog them here. If you manage scientific or engineering projects, you mightalso find this software useful for managing schematics or diagrams. By plac-ing links to this database in your Project plan, you can make this informationavailable to your project team.
361Chapter 21: Ten Project Management Software Products to Explore
30_036516 ch21.qxp 11/27/06 2:02 PM Page 361
TeamTrack Solves Mission-Critical IssuesTeamTrack from Serena Software, Inc. (www.serena.com) offers “Web-architected workflow management solutions.” In English, that means that thesoftware helps you identify problems and defects that may crop up in yourprocesses — and find solutions. The software allows you to create visualmaps for your processes and share that data among your team members. The Web focus here means that people can get to the process data onlinewithout having Project running. Serena offers ProjectBridge to help integratetheir system with Microsoft Project.
One nice feature of this software is that it notifies you when a problem occursor deadlines have passed without activity. TeamTrack even helps you identifyissues that might arise when “non-talking” systems communicate. In otherwords, if you integrate two pieces of software to share data and data comesinto Project that causes a problem, you won’t even know it because you’renot inputting it. TeamTrack flags such problems to help you avoid missing acritical situation before it’s too late.
Serena’s Web site offers a free evaluation download and online case studiesto help you decide whether TeamTrack is right for you.
EPK-Suite Eases Portfolio Mangement Chores
EPK-Suite from EPK Group (www.epkgroup.com) is built on Project Server2003 and Windows SharePoint Services platforms and integrates throughProject Web Access, so this technology works seamlessly with Project.
EPK-Suite offers portfolio management, resource and capacity planning,timesheets, and collaboration features with an easy-to-use interface. Checkout the new features in version 4, including Web-based planning and resourcerequest/planning tools.
362 Part VI: The Part of Tens
30_036516 ch21.qxp 11/27/06 2:02 PM Page 362

Part VIIAppendixes
31_036516 pt07.qxp 11/20/06 1:49 PM Page 363
In this part . . .
This part of the book dives into the incredibly usefulcompanion CD (chock full of project-management
goodies). You get the lowdown on what’s on the CD andhow to make use of it.
Then — by way of the last word(s) — you get a handyglossary that will have you talking like a project managerin no time.
31_036516 pt07.qxp 11/20/06 1:49 PM Page 364
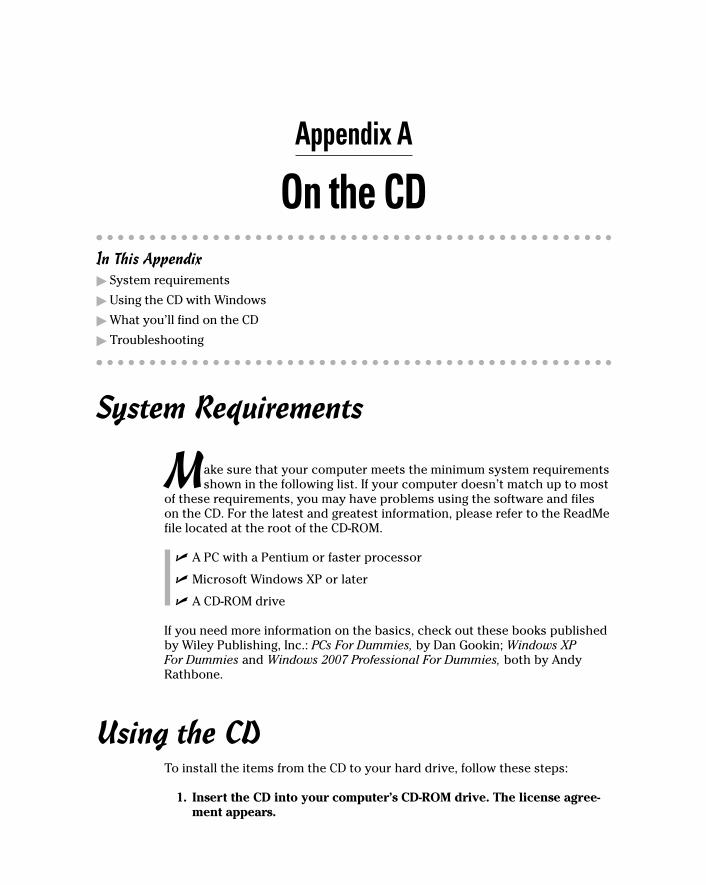
Appendix A
On the CDIn This Appendix� System requirements
� Using the CD with Windows
� What you’ll find on the CD
� Troubleshooting
System Requirements
Make sure that your computer meets the minimum system requirementsshown in the following list. If your computer doesn’t match up to most
of these requirements, you may have problems using the software and fileson the CD. For the latest and greatest information, please refer to the ReadMefile located at the root of the CD-ROM.
� A PC with a Pentium or faster processor
� Microsoft Windows XP or later
� A CD-ROM drive
If you need more information on the basics, check out these books publishedby Wiley Publishing, Inc.: PCs For Dummies, by Dan Gookin; Windows XP For Dummies and Windows 2007 Professional For Dummies, both by AndyRathbone.
Using the CDTo install the items from the CD to your hard drive, follow these steps:
1. Insert the CD into your computer’s CD-ROM drive. The license agree-ment appears.
32_036516 appa.qxp 11/20/06 1:50 PM Page 365

Note to Windows users: The interface won’t launch if you have autorundisabled. In that case, choose Start➪Run. In the dialog box that appears,type D:\start.exe. (Replace D with the proper letter if your CD-ROMdrive uses a different letter. If you don’t know the letter, see how yourCD-ROM drive is listed under My Computer.) Click OK.
2. Read through the license agreement, and then click the Accept buttonif you want to use the CD.
3. The CD interface appears. The interface allows you to install the pro-grams and run the demos with just a click of a button (or two).
What You’ll Find on the CDThe following sections are arranged by category and provide a summary ofthe software and other goodies you’ll find on the CD. If you need help withinstalling the items provided on the CD, refer back to the installation instruc-tions in the preceding section.
Shareware programs are fully functional, free, trial versions of copyrightedprograms. If you like particular programs, register with their authors for anominal fee and receive licenses, enhanced versions, and technical support.
Freeware programs are free, copyrighted games, applications, and utilities.You can copy them to as many PCs as you like — for free — but they offer notechnical support.
GNU software is governed by its own license, which is included inside thefolder of the GNU software. There are no restrictions on distribution of GNUsoftware. See the GNU license at the root of the CD for more details.
Trial, demo, or evaluation versions of software are usually limited either bytime or functionality (such as not letting you save a project after you create it).
Empire Suite, from WSG System Corp.Demo version, Windows
This suite of solutions includes Empire Time for both Project FinancialManagement and Resource Skills Management. Customized user interfaces
366 Part VII: Appendixes
32_036516 appa.qxp 11/20/06 1:50 PM Page 366

make managing these aspects of projects simple for all users, and advancedreporting and analytics help you get the most from your Project data.
Learn more at www.wsg.com.
EPK Suite 4.1, from EPK GROUP, LLCThis software, based on Project Server, offers an integrated approach to planning for your projects. You can inventory resources, prioritize projects, control processes, and more with EPK Suite. Before running the EPK-SuiteSETUP, you must obtain a product installation key. To get one simply go towww.epkgroup.com/productkey.htm.
EPK GROUP Web site: Http://epkgroup.com/
Milestones Professional, from Kidasa SoftwareTrial version
Milestones Professional offers you advanced formatting, calculation, Webpublishing, and reporting features that take you beyond what you can dowith Project alone.
Go to Kidasa’s Web site at www.kidasa.com to learn more about all theirproducts.
Milestones Project Companion 2006, from Kidasa SoftwareTrial version
Milestones provides advanced formatting, calculation, Web publishing, andreporting tools compatible with Microsoft Project 2007.
Kidasa Software Web site: www.kidasa.com
367Appendix A: On the CD
32_036516 appa.qxp 11/20/06 1:50 PM Page 367

MindManager Pro 6, from Mindjet CorporationTrial version
If you’ve always wanted to see what your ideas look like, try MindManager tomap brainstorming and plans into graphical strategy blueprints. At the timeof publication, the new trial version wasn’t available. You can now downloadit at www.mindjet.com/us/download/.
Mindjet Web site: www.mindjet.com/us
PERT Chart Expert, from Critical Tools, Inc.Demo version
With this software you can create stunning PERT chart project plans withway more bells and whistles than Microsoft Project provides. If you want toimpress people with graphical views of your workflow, this is one to check out.
Critical Tools Web site: www.criticaltools.com
PertMaster Project Risk, from PertMasterEvaluation copy
You can use this as stand-alone software or as an add-on for MicrosoftProject. Use the tools provided here to run schedule and cost risk analyses.
Go to www.pertmaster.com to explore the full feature set.
PlanView Project Portfolio, from PlanViewDemo version
PlanView is touted as a comprehensive decision-making platform for enter-prises, meaning it can help you prioritize and strategize the goals for yourproject.
PlanView Web site: http://planview.com
368 Part VII: Appendixes
32_036516 appa.qxp 11/20/06 1:50 PM Page 368

Project KickStart, from Experience in SoftwareTrial version
Project KickStart offers a wizard-like brainstorming tool to help you with pro-ject planning and scheduling.
Visit www.projectkickstart.com for more information.
WBS Chart Pro, from Critical Tools, Inc.Trial version
You can use the underlying structure of your project’s WBS code to createtree-style diagrams of your task hierarchies using WBS Chart Pro.
Critical Tools Web site: www.criticaltools.com
TroubleshootingI tried my best to compile programs that work on most computers with theminimum system requirements. Alas, your computer may differ, and someprograms may not work properly for some reason.
The two likeliest problems are that you don’t have enough memory (RAM)for the programs you want to use, or you have other programs running thatare affecting installation or running of a program. If you get an error messagesuch as Not enough memory or Setup cannot continue, try one ormore of the following suggestions and then try using the software again:
� Turn off any antivirus software running on your computer. Installationprograms sometimes mimic virus activity and may make your computerincorrectly believe that it’s being infected by a virus.
� Close all running programs. The more programs you have running, theless memory is available to other programs. Installation programs typi-cally update files and programs; so if you keep other programs running,installation may not work properly.
� Have your local computer store add more RAM to your computer. Thisis, admittedly, a drastic and somewhat expensive step. However, addingmore memory can really help the speed of your computer and allowmore programs to run at the same time.
369Appendix A: On the CD
32_036516 appa.qxp 11/20/06 1:50 PM Page 369
Customer CareIf you have trouble with the CD-ROM, please call the Wiley Product TechnicalSupport phone number at 800-762-2974. Outside the United States, call1-317-572-3994. You can also contact Wiley Product Technical Support athttp://support.wiley.com. Wiley Publishing, Inc., will provide technicalsupport only for installation and other general quality control items. Fortechnical support on the applications themselves, consult the program’svendor or author.
To place additional orders or to request information about other Wiley prod-ucts, please call 877-762-2974.
370 Part VII: Appendixes
32_036516 appa.qxp 11/20/06 1:50 PM Page 370

Appendix B
Glossary
Atual: The cost of the percentage of work that has been completed on a task.
ACWP (actual cost of work performed): Cost of the actual, real work doneon a project to date, plus any fixed costs.
ALAP (as late as possible): A constraint put on a task’s timing to make thetask occur as late as possible in the project schedule, taking into account anydependency relationships. See also dependency.
ASAP (as soon as possible): A constraint put on a task’s timing to make thetask occur as early as possible in the project schedule, taking into accountany dependency relationships. See also dependency.
BAC (budget at completion): The sum total of all costs involved in complet-ing a task. See also baseline cost.
baseline: The detailed project plan against which actual work is tracked.
baseline cost: The total planned costs for a project’s tasks, before any actualcosts are incurred.
BCWP (budgeted cost of work performed): Also called earned value, thisterm refers to the value of work that has been completed. For example, a taskwith $1,000 of costs accrues a BCWP of $750 when it’s 75 percent complete.
BCWS (budgeted cost of work scheduled): The percentage of the plan that’scompleted multiplied by the planned costs. This calculated value totals atask’s completed work and its remaining planned costs.
booking type: A category for resources that specifies whether they are com-mitted to the project or simply proposed to be involved.
calendar: The various settings for hours in a workday, days in a workweek,holidays, and nonworking days on which a project schedule is based. You canset Project, Task, and Resource calendars.
33_036516 appb.qxp 11/20/06 1:50 PM Page 371

change highlighting: A feature that highlights any changes you make in yourproject since you last saved it.
circular dependency: A timing relationship among tasks that creates an end-less loop that can’t be resolved.
collapse: To close a project outline to hide subtasks from view.
combination view: A Project view with task details appearing at the bottomof the screen.
constraint: A parameter that forces a task to fit a specific timing. For exam-ple, a task can be constrained to start as late as possible in a project.Constraints interact with dependency links to determine a task’s timing.
cost: The amount of money associated with a project task when you assignresources, which are equipment, materials, or people with associated fees orhourly rates.
critical path: The series of tasks that must occur on time for the overall pro-ject to meet its deadline.
critical task: A task on the critical path. See also critical path.
crosstab: A report format that compares two intersecting sets of data. Forexample, you can generate a crosstab report showing the costs of criticaltasks that are running late.
cumulative cost: The planned total cost to date for a resource’s effort on aparticular task. This calculation adds the costs already incurred on a task toany planned costs remaining for the uncompleted portion of the task.
cumulative work: The planned total work of a resource on a particular task.This calculation adds the work completed on a task to any planned workremaining for the uncompleted portion of the task.
current date line: The vertical line in a Gantt Chart indicating today’s dateand time. See also Gantt Chart.
CV (cost variance): The difference between the baseline costs and the combi-nation of actual costs to date and estimated costs remaining (scheduledcosts). The cost variance is either positive (over budget) or negative (underbudget).
deadline date: A date you assign to a task that doesn’t constrain the task’stiming. However, if a deadline date is assigned, Project displays an indicatorsymbol if the task runs past the deadline.
372 Part VII: Appendixes
33_036516 appb.qxp 11/20/06 1:50 PM Page 372
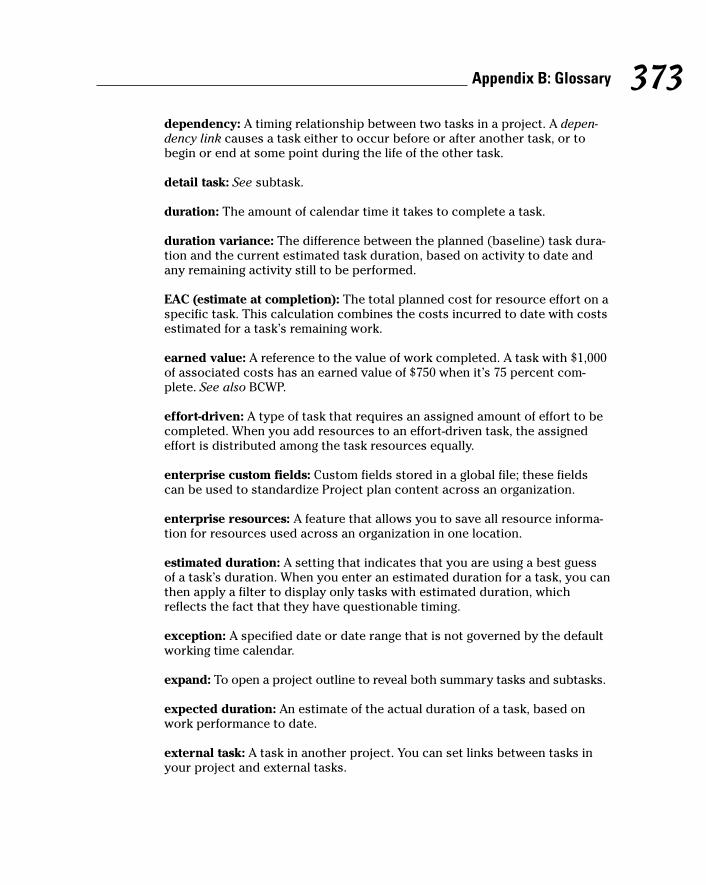
dependency: A timing relationship between two tasks in a project. A depen-dency link causes a task either to occur before or after another task, or tobegin or end at some point during the life of the other task.
detail task: See subtask.
duration: The amount of calendar time it takes to complete a task.
duration variance: The difference between the planned (baseline) task dura-tion and the current estimated task duration, based on activity to date andany remaining activity still to be performed.
EAC (estimate at completion): The total planned cost for resource effort on aspecific task. This calculation combines the costs incurred to date with costsestimated for a task’s remaining work.
earned value: A reference to the value of work completed. A task with $1,000of associated costs has an earned value of $750 when it’s 75 percent com-plete. See also BCWP.
effort-driven: A type of task that requires an assigned amount of effort to becompleted. When you add resources to an effort-driven task, the assignedeffort is distributed among the task resources equally.
enterprise custom fields: Custom fields stored in a global file; these fieldscan be used to standardize Project plan content across an organization.
enterprise resources: A feature that allows you to save all resource informa-tion for resources used across an organization in one location.
estimated duration: A setting that indicates that you are using a best guessof a task’s duration. When you enter an estimated duration for a task, you canthen apply a filter to display only tasks with estimated duration, whichreflects the fact that they have questionable timing.
exception: A specified date or date range that is not governed by the defaultworking time calendar.
expand: To open a project outline to reveal both summary tasks and subtasks.
expected duration: An estimate of the actual duration of a task, based onwork performance to date.
external task: A task in another project. You can set links between tasks inyour project and external tasks.
373Appendix B: Glossary
33_036516 appb.qxp 11/20/06 1:50 PM Page 373
finish date: The date on which a project or task is estimated to be — or actu-ally is — completed.
finish-to-finish relationship: A dependency relationship in which the finish ofone task determines the finish of another task.
finish-to-start relationship: A dependency relationship in which the finish ofone task determines the start of another task.
fixed duration: The length of time required to complete a task remains con-stant no matter how many resources are assigned to the task. A half-day sem-inar is an example of a fixed-duration task.
fixed-unit: A type of cost for which the resource units are constant; if youchange the duration of the task, resource units don’t change. This is thedefault task type.
fixed-work: A type of task for which the number of resource hours assignedto the task determine its length.
float: See slack.
Gantt Chart: A standard Project view that displays columns of task informa-tion alongside a chart that shows task timing in bar chart format.
gap: See lag.
generic resources: A type of resource that allows you to make skill-basedassignments based on a skill/code profile.
grouping: The organization of tasks by a customized field to summarize costsor other factors.
ID number: The number automatically assigned to a task by Project based onits vertical sequence in the project list.
indent: To move a task to a lower level of detail in the project’s outline hierarchy.
lag: The amount of downtime that can occur between the end of one task andthe beginning of another. Lag is built into a dependency relationship betweentasks when you indicate that a certain amount of time must pass before thesecond task can begin.
leveling: A calculation used by Project that modifies resource work assign-ments for the purpose of resolving resource conflicts.
374 Part VII: Appendixes
33_036516 appb.qxp 11/20/06 1:50 PM Page 374
linking: (1) To establish a connection between tasks in separate schedules sothat task changes in the first schedule are reflected in the second. (2) Toestablish dependencies among project tasks.
material resources: The supplies or other items used to complete a task (oneof two resource categories; the other is work resources).
milestone: A task of zero duration, which marks a moment in time or anevent in a schedule.
network diagram: An illustration that graphically represents workflowamong a project’s tasks; one of the Microsoft Project standard views.
node: In Network Diagram view, a box containing information about individ-ual project tasks.
nonworking time: The time when a resource is not available to be assignedto work on any task in a project.
outdent: To move a task to a higher level in a project’s outline hierarchy.
outline: The structure of the summary and subtasks in a project.
overallocation: When a resource is assigned to spend more time on a singletask or a combination of tasks occurring at the same than that resource’swork calendar permits.
overtime: Any work scheduled beyond a resource’s standard work hours.You can assign a different rate than a resource’s regular rate to overtimework.
percent complete: The amount of work on a task that has already beenaccomplished, expressed as a percentage.
PERT chart: A standard project management tracking form indicating work-flow among project tasks. This is a network diagram in Project. See also net-work diagram.
predecessor: In a dependency link, the task designated to occur beforeanother task. See also dependency and successor.
priorities: A ranking of importance assigned to tasks. When you use resourceleveling to resolve project conflicts, priority is a factor in the leveling calcula-tion. A higher-priority task is less likely than a lower-priority task to incur adelay during the leveling process. See also resource leveling.
375Appendix B: Glossary
33_036516 appb.qxp 11/20/06 1:50 PM Page 375
progress lines: Gantt Chart view bars that overlap the baseline taskbar andallow you to compare the baseline plan with a task’s tracked progress.
project: A series of tasks that achieves a specific goal. A project seeks tomeet the triple requirements of timeliness, quality, and budget.
project calendar: The calendar on which all new tasks are based; the projectcalendar can be standard, 24 Hour, or use a Night Shift.
Project Guide: A wizard-like help feature that takes Project users throughvarious steps to build a Project schedule.
project management: The discipline that studies various methods, proce-dures, and concepts used to control the progress and outcome of projects.
Project Server: A Web-based companion product of Microsoft Project thatenables team members to enter information about their tasks into an overallproject schedule without having Project installed on their own computers.
recurring task: A task that will occur several times during the life of a pro-ject. Regular project team meetings or quarterly inspections are examples ofrecurring tasks.
resource: A cost associated with a task. A resource can be a person, a pieceof equipment, materials, or a fee.
resource driven: A task whose timing is determined by the number ofresources assigned to it.
resource leveling: A process used to modify resource assignments to resolveresource conflicts.
resource pool: (1) Resources that are assigned as a group to an individualtask, such as a pool of administrative workers assigned to generate a report.(2) A group of resources created in a centralized location that multiple pro-ject managers can access and assign to their projects.
resource sharing: A feature that allows you to copy resources you created inanother project to your current plan.
Resource Substitution Wizard: A wizard that replaces an unavailableresource with another of similar skill and cost.
roll up: The calculation by which all subtask values are rolled up — summarized — in a single summary task.
376 Part VII: Appendixes
33_036516 appb.qxp 11/20/06 1:50 PM Page 376

Shared Workspace: A feature of Windows SharePoint Services in which youcan share documents online that were created with various Microsoft Office2007 applications.
slack: The amount of time that you can delay a task before the task becomescritical. Slack is used up when any delay in a task will delay the overall pro-ject deadline. Also called float.
split tasks: Tasks that have one or more breaks in their timing. When yousplit a task, you stop it part way and then start it again at a later time.
start date: The date on which a project or task begins.
start-to-finish relationship: A dependency relationship in which the start ofone task determines the finish of another task.
start-to-start relationship: A dependency relationship in which the start ofone task determines the start of another task.
subproject: A copy of a second project inserted in a project. The insertedproject becomes a phase of the project in which it is inserted.
subtask: A task detailing a specific step in a project phase. This detail isrolled up into a higher-level summary task. Also called a subordinate task. Seealso roll up.
successor: In a dependency relationship, the later of two tasks. See alsodependency.
summary task: In a project outline, a task that has subordinate tasks. A sum-mary task rolls up the details of its subtasks and has no timing of its own. Seealso roll up.
task: An individual step performed to reach a project’s goal.
template: A format in which a file can be saved. The template saves elementssuch as calendar settings, formatting, and tasks. New project files can bebased on a template to save the time involved in reentering settings.
timescale: The area of a Gantt Chart view that displays units of time; whenplaced against those units of time, taskbars graphically represent the timingof tasks.
tracking: Recording the actual progress of work completed and the costsaccrued for a project’s tasks.
377Appendix B: Glossary
33_036516 appb.qxp 11/20/06 1:50 PM Page 377

Value List: An alternative to entering data manually: a customizable feature ofProject that allows you to create a list of values in a field from which a usercan choose.
variable rate: A shift in resource cost that can be set to occur at specifictimes during a project. For example, if a resource is expected to receive araise or if equipment lease rates are scheduled to increase, you can assignvariable rates for those resources.
WBS (work breakdown structure): Automatically assigned numbers thatdesignate an outline structure for each project task. Government projectsoften require WBS codes.
work breakdown structure: See WBS.
work resources: The people or equipment that perform work necessary toaccomplish a task. See also material resources.
workload: The amount of work that any resource is performing at any giventime, taking into account all tasks to which the resource is assigned.
workspace: A set of files and project settings that you can save and reopentogether so that you pick up where you left off on a set of projects.
378 Part VII: Appendixes
33_036516 appb.qxp 11/20/06 1:50 PM Page 378
• Numerics •24 hours template, 53
• A •actual finish date, 236actual start date, 236ACWP (actual cost of work performed),
258, 371advantages of Project, 22–23ALAP (as late as possible) constraint,
87, 371alerts, 340–341Analysis toolbar, 270–271ASAP (as soon as possible) constraint,
87, 371AutoFilter, 181–182availability of resources
checking, 196–198overview, 153setting, 153–154timing of project affected by, 194–195varying availability, 154
• B •BAC (budget at completion), 371Base calendar, 52–53baseline cost, 371baselines
clearing, 221–222defined, 371multiple baselines, 220–221overview, 17, 217–218printing information in, 264saving, 218–220viewing information in, 264
BCWP (budgeted cost of work performed),258, 371
BCWS (budgeted cost of work scheduled), 371
blank project schedule, 28budget
calculating, 155–156fixed costs, using less expensive, 196less time, completing project in, 196overtime, cutting down on, 196overview, 195–196resources, using less expensive, 195
budget at completion (BAC), 371budget resource, 159
• C •calculations
automatic calculations, 258–259critical path calculations, 261–262earned value, 260–261manual calculations, 258–259overview, 258
Calendar view, 42–43, 210Calendar Wizard, 60–62calendars. See also Project calendar
Base calendar, 52–53copying calendars from one project to
another, 67–68custom calendar template, creating,
65–67defined, 371how it works, 52–54options, setting, 55–56overview, 52precedence of settings, 54Project Guide used to make calendar
settings, 60–62Resource calendar, 52, 63–65, 142–143setting, 27sharing copies of, 67–68Task calendar, 52, 62, 164–165working times, 55–58
CDcustomer support for, 370Empire Suite, 366EPK Suite 4.1, 367
Index
34_036516 bindex.qxp 11/20/06 1:50 PM Page 379
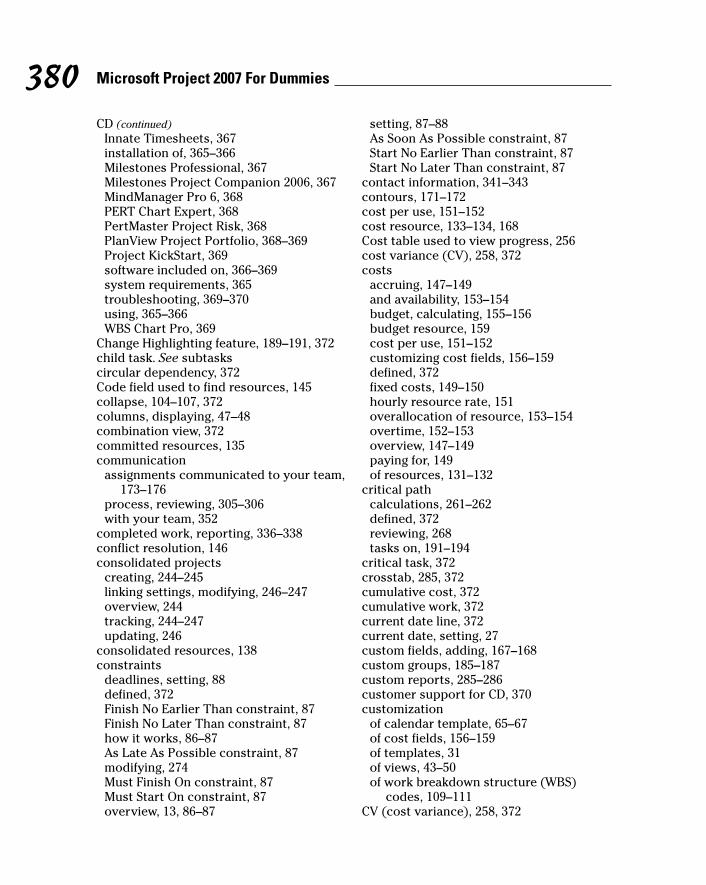
CD (continued)Innate Timesheets, 367installation of, 365–366Milestones Professional, 367Milestones Project Companion 2006, 367MindManager Pro 6, 368PERT Chart Expert, 368PertMaster Project Risk, 368PlanView Project Portfolio, 368–369Project KickStart, 369software included on, 366–369system requirements, 365troubleshooting, 369–370using, 365–366WBS Chart Pro, 369
Change Highlighting feature, 189–191, 372child task. See subtaskscircular dependency, 372Code field used to find resources, 145collapse, 104–107, 372columns, displaying, 47–48combination view, 372committed resources, 135communication
assignments communicated to your team,173–176
process, reviewing, 305–306with your team, 352
completed work, reporting, 336–338conflict resolution, 146consolidated projects
creating, 244–245linking settings, modifying, 246–247overview, 244tracking, 244–247updating, 246
consolidated resources, 138constraints
deadlines, setting, 88defined, 372Finish No Earlier Than constraint, 87Finish No Later Than constraint, 87how it works, 86–87As Late As Possible constraint, 87modifying, 274Must Finish On constraint, 87Must Start On constraint, 87overview, 13, 86–87
setting, 87–88As Soon As Possible constraint, 87Start No Earlier Than constraint, 87Start No Later Than constraint, 87
contact information, 341–343contours, 171–172cost per use, 151–152cost resource, 133–134, 168Cost table used to view progress, 256cost variance (CV), 258, 372costs
accruing, 147–149and availability, 153–154budget, calculating, 155–156budget resource, 159cost per use, 151–152customizing cost fields, 156–159defined, 372fixed costs, 149–150hourly resource rate, 151overallocation of resource, 153–154overtime, 152–153overview, 147–149paying for, 149of resources, 131–132
critical pathcalculations, 261–262defined, 372reviewing, 268tasks on, 191–194
critical task, 372crosstab, 285, 372cumulative cost, 372cumulative work, 372current date line, 372current date, setting, 27custom fields, adding, 167–168custom groups, 185–187custom reports, 285–286customer support for CD, 370customization
of calendar template, 65–67of cost fields, 156–159of templates, 31of views, 43–50of work breakdown structure (WBS)
codes, 109–111CV (cost variance), 258, 372
380 Microsoft Project 2007 For Dummies
34_036516 bindex.qxp 11/20/06 1:50 PM Page 380

• D •deadline date, 88, 372debriefings, 304–306delegating work, 350–351deliverables, 122dependencies
creating, 119–121defined, 373deleting, 122–123dependency links, 114external dependencies, 121–122, 275finish-to-finish dependency, 117finish-to-start dependency, 116Gantt Chart view of, 124–125lag time, 118lead time, 118modifying, 274Network Diagram view of, 124–125overview, 12–14, 113–114start-to-finish dependency, 116start-to-start dependency, 117timing of project affected by, 194types of, 115–117viewing, 124–125
dependency links, 114detail task, 373documentation, 351–352documents, sharing, 332–334Drawing toolbar, 213–214drawings, adding, 213–214duration
defined, 373modifying, 239–240no durations, setting tasks with, 81overview, 12recurring tasks, 81–83setting, 80–81
duration variance, 373duties of project manager, 18
• E •EAC (estimate at completion), 258, 373earned value, 260–261, 373
effort-driven settings, 163–164effort-driven tasks, 85–86e-mail
attachment used to communicateresource assignment, 173–174
used to update projects, 229enterprise custom fields, 373Enterprise Global Template, 108enterprise resources, 133entire organization, creating resources
available to, 139–140EPM (Enterprise Project Management), 23estimate at completion (EAC), 258, 373estimated duration, 373estimating resource requirements, 135Excel 2007 For Dummies (Harvey), 287Excel Data Analysis For Dummies
(Nelson), 267Excel task list, importing, 74–75Excel Task List template, 74–75exception, 373existing project inserted into another
project including tasks, 77–78expanding tasks, 104–107expected duration, 373external dependencies, 121–122, 275external task, 373
• F •filter criteria, 266–267filters
AutoFilter, 181–182new filter, creating, 182–184overview, 179–180predesigned filters, 180–181
finish date, 26, 83–84, 374finish-to-finish relationship, 117, 374finish-to-start relationship, 116, 374fixed costs, 149–150, 196fixed duration tasks, 78, 163, 374fixed unit tasks, 79, 162, 374fixed work tasks, 79, 162–163, 374fixed-cost updates, entering, 240–241flexibility, need for, 354–355footers, 296–297
381Index
34_036516 bindex.qxp 11/20/06 1:50 PM Page 381

formattingCalendar view, 210drawings, adding, 213–214Gantt Chart view, 211with Gantt Chart Wizard, 207gridlines, 212–213layout, adjusting, 208–211Network Diagram view, 210–211overview, 203–204progress lines, 254–255reports, 292–294task boxes, 207–208taskbars, 204–206
• G •Gantt Chart view
defined, 374deleting dependencies, 122–123of dependencies, 124–125formatting, 211generating tasks in, 71layout options, 211overview, 19, 20, 40–41
Gantt Chart Wizard, 207generic resources, 137–138, 374Go To command, 39goal of project, 97–98, 276graphics in reports, 289–292gridlines, 212–213grouping, 374groups
custom groups, 185–187new groups, creating, 185–187overview, 184predefined groups, 184–185
guidelines for project managementcommunication with your team, 352delegating work, 350–351documentation, 351–352flexibility, need for, 354–355mistakes, learning from your, 355Murphy’s law, planning for, 349overview, 347phases, building project in, 347–348research before building project
schedule, 348–349
success, measuring, 352–353upfront work, putting in time for, 350
• H •Harvey, Greg (Excel 2007 For Dummies), 287headers, 296–297help features. See also Project Guide
Contents and Index, 33Getting Started, 33Microsoft Office Diagnostics, 33Microsoft Office Online, 33Microsoft Project Help, 33overview, 32–33Reference, 33Show the Office Assistant, 33
help, finding resource, 199hourly resource rate, 151hyperlinks to tasks, 76, 122
• I •ID number, 374indenting tasks, 101–102, 374indicator icons used to show progress,
250–251information, gathering, 324interim plans
clearing, 224–225overview, 222–223printing information in, 264saving, 223–224viewing information in, 264
IT, coordinating with, 325
• L •lag time, 118, 374layout, adjusting, 208–211layout options, 210–211lead time, 118legends, 297–298leveling, 374linking, 375linking settings, modifying, 246–247local resources, 133lookup table, 157
382 Microsoft Project 2007 For Dummies
34_036516 bindex.qxp 11/20/06 1:50 PM Page 382
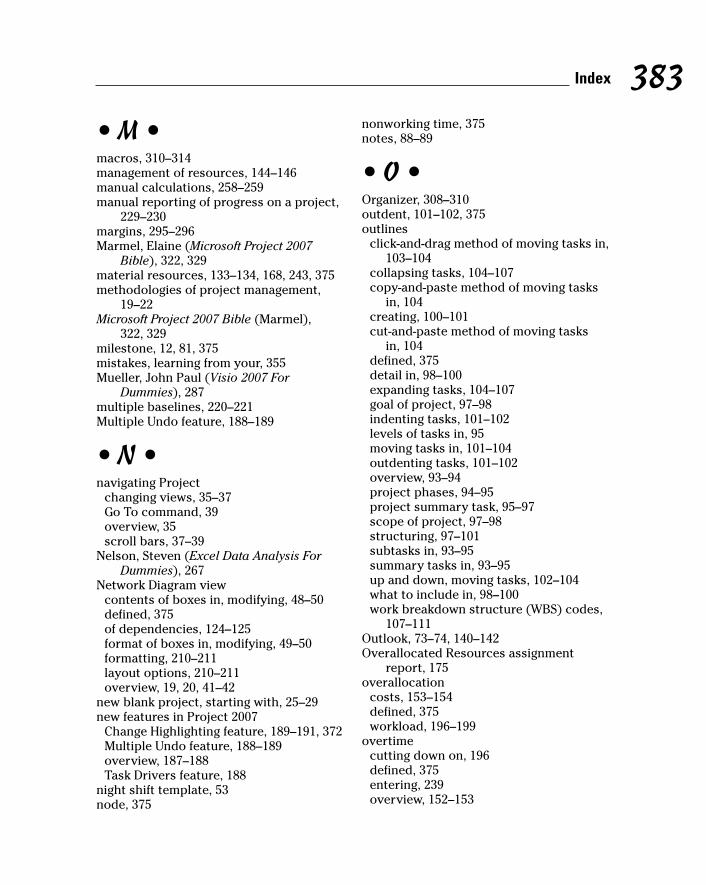
• M •macros, 310–314management of resources, 144–146manual calculations, 258–259manual reporting of progress on a project,
229–230margins, 295–296Marmel, Elaine (Microsoft Project 2007
Bible), 322, 329material resources, 133–134, 168, 243, 375methodologies of project management,
19–22Microsoft Project 2007 Bible (Marmel),
322, 329milestone, 12, 81, 375mistakes, learning from your, 355Mueller, John Paul (Visio 2007 For
Dummies), 287multiple baselines, 220–221Multiple Undo feature, 188–189
• N •navigating Project
changing views, 35–37Go To command, 39overview, 35scroll bars, 37–39
Nelson, Steven (Excel Data Analysis ForDummies), 267
Network Diagram viewcontents of boxes in, modifying, 48–50defined, 375of dependencies, 124–125format of boxes in, modifying, 49–50formatting, 210–211layout options, 210–211overview, 19, 20, 41–42
new blank project, starting with, 25–29new features in Project 2007
Change Highlighting feature, 189–191, 372Multiple Undo feature, 188–189overview, 187–188Task Drivers feature, 188
night shift template, 53node, 375
nonworking time, 375notes, 88–89
• O •Organizer, 308–310outdent, 101–102, 375outlines
click-and-drag method of moving tasks in,103–104
collapsing tasks, 104–107copy-and-paste method of moving tasks
in, 104creating, 100–101cut-and-paste method of moving tasks
in, 104defined, 375detail in, 98–100expanding tasks, 104–107goal of project, 97–98indenting tasks, 101–102levels of tasks in, 95moving tasks in, 101–104outdenting tasks, 101–102overview, 93–94project phases, 94–95project summary task, 95–97scope of project, 97–98structuring, 97–101subtasks in, 93–95summary tasks in, 93–95up and down, moving tasks, 102–104what to include in, 98–100work breakdown structure (WBS) codes,
107–111Outlook, 73–74, 140–142Overallocated Resources assignment
report, 175overallocation
costs, 153–154defined, 375workload, 196–199
overtimecutting down on, 196defined, 375entering, 239overview, 152–153
383Index
34_036516 bindex.qxp 11/20/06 1:50 PM Page 383
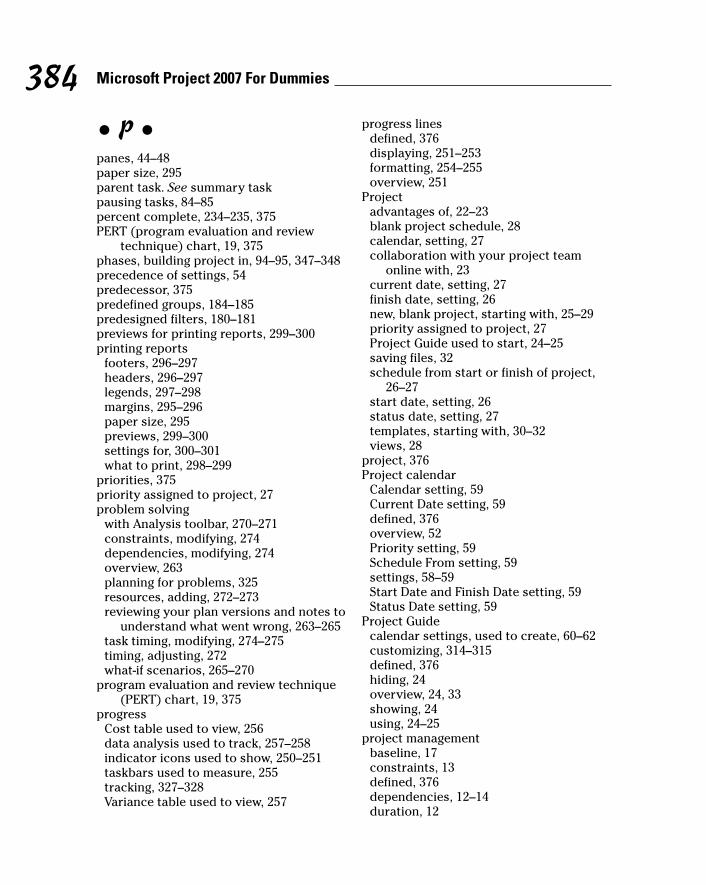
• P •panes, 44–48paper size, 295parent task. See summary taskpausing tasks, 84–85percent complete, 234–235, 375PERT (program evaluation and review
technique) chart, 19, 375phases, building project in, 94–95, 347–348precedence of settings, 54predecessor, 375predefined groups, 184–185predesigned filters, 180–181previews for printing reports, 299–300printing reports
footers, 296–297headers, 296–297legends, 297–298margins, 295–296paper size, 295previews, 299–300settings for, 300–301what to print, 298–299
priorities, 375priority assigned to project, 27problem solving
with Analysis toolbar, 270–271constraints, modifying, 274dependencies, modifying, 274overview, 263planning for problems, 325resources, adding, 272–273reviewing your plan versions and notes to
understand what went wrong, 263–265task timing, modifying, 274–275timing, adjusting, 272what-if scenarios, 265–270
program evaluation and review technique(PERT) chart, 19, 375
progressCost table used to view, 256data analysis used to track, 257–258indicator icons used to show, 250–251taskbars used to measure, 255tracking, 327–328Variance table used to view, 257
progress linesdefined, 376displaying, 251–253formatting, 254–255overview, 251
Projectadvantages of, 22–23blank project schedule, 28calendar, setting, 27collaboration with your project team
online with, 23current date, setting, 27finish date, setting, 26new, blank project, starting with, 25–29priority assigned to project, 27Project Guide used to start, 24–25saving files, 32schedule from start or finish of project,
26–27start date, setting, 26status date, setting, 27templates, starting with, 30–32views, 28
project, 376Project calendar
Calendar setting, 59Current Date setting, 59defined, 376overview, 52Priority setting, 59Schedule From setting, 59settings, 58–59Start Date and Finish Date setting, 59Status Date setting, 59
Project Guidecalendar settings, used to create, 60–62customizing, 314–315defined, 376hiding, 24overview, 24, 33showing, 24using, 24–25
project managementbaseline, 17constraints, 13defined, 376dependencies, 12–14duration, 12
384 Microsoft Project 2007 For Dummies
34_036516 bindex.qxp 11/20/06 1:50 PM Page 384
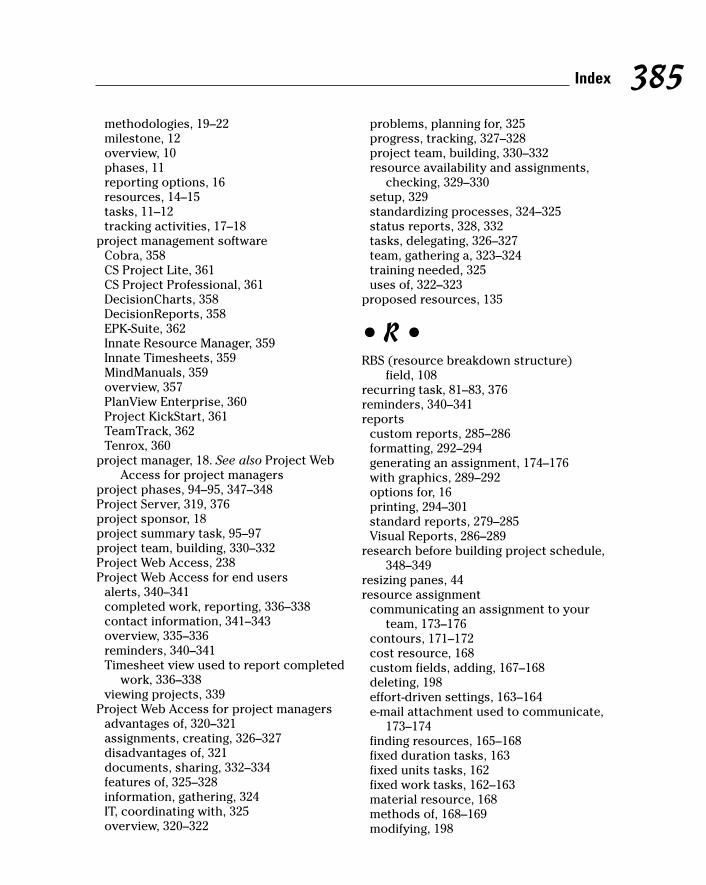
methodologies, 19–22milestone, 12overview, 10phases, 11reporting options, 16resources, 14–15tasks, 11–12tracking activities, 17–18
project management softwareCobra, 358CS Project Lite, 361CS Project Professional, 361DecisionCharts, 358DecisionReports, 358EPK-Suite, 362Innate Resource Manager, 359Innate Timesheets, 359MindManuals, 359overview, 357PlanView Enterprise, 360Project KickStart, 361TeamTrack, 362Tenrox, 360
project manager, 18. See also Project WebAccess for project managers
project phases, 94–95, 347–348Project Server, 319, 376project sponsor, 18project summary task, 95–97project team, building, 330–332Project Web Access, 238Project Web Access for end users
alerts, 340–341completed work, reporting, 336–338contact information, 341–343overview, 335–336reminders, 340–341Timesheet view used to report completed
work, 336–338viewing projects, 339
Project Web Access for project managersadvantages of, 320–321assignments, creating, 326–327disadvantages of, 321documents, sharing, 332–334features of, 325–328information, gathering, 324IT, coordinating with, 325overview, 320–322
problems, planning for, 325progress, tracking, 327–328project team, building, 330–332resource availability and assignments,
checking, 329–330setup, 329standardizing processes, 324–325status reports, 328, 332tasks, delegating, 326–327team, gathering a, 323–324training needed, 325uses of, 322–323
proposed resources, 135
• R •RBS (resource breakdown structure)
field, 108recurring task, 81–83, 376reminders, 340–341reports
custom reports, 285–286formatting, 292–294generating an assignment, 174–176with graphics, 289–292options for, 16printing, 294–301standard reports, 279–285Visual Reports, 286–289
research before building project schedule,348–349
resizing panes, 44resource assignment
communicating an assignment to yourteam, 173–176
contours, 171–172cost resource, 168custom fields, adding, 167–168deleting, 198effort-driven settings, 163–164e-mail attachment used to communicate,
173–174finding resources, 165–168fixed duration tasks, 163fixed units tasks, 162fixed work tasks, 162–163material resource, 168methods of, 168–169modifying, 198
385Index
34_036516 bindex.qxp 11/20/06 1:50 PM Page 385
resource assignment (continued)Overallocated Resources assignment
report, 175overview, 161report, generating an assignment,
174–176Resource column, adding resources
from, 169Task calendar for, 164–165timing of tasks effected by, 162–165To-Do List assignment report, 175troubleshooting, 196–198Who Does What assignment report, 175Who Does What When assignment
report, 175work resource, 168
resource breakdown structure (RBS) field, 108
Resource calendar, 52, 63–65, 142–143Resource column, adding resources
from, 169resource driven, 376resource graph, 21resource hours, entering, 237–238resource leveling, 22, 200–202, 268, 376resource management
Code field used to find resources, 145conflict resolution, 146Custom Fields used to find resources, 145finding resources, 145overview, 21, 144–145Resource Notes area used to find
resources, 145workload, balancing, 145–146
Resource Notes area used to findresources, 145
resource pools, 139–140, 141, 376resource sharing, 376Resource Substitution Wizard, 376resource usage chart, 21resource workload
availability of resources, checking,196–198
deleting resource assignments, 198help, finding, 199modifying resource assignments, 198overview, 196
resourcesadding, 272–273committed resources, 135consolidated resources, 138cost resources, 133–134costs of, 131–132creating, 136–138defined, 376enterprise resources, 133entire organization, creating resources
available to, 139–140estimating resource requirements, 135generic resources, 137–138local resources, 133management of, 144–146material resources, 133–134one resource at a time, creating, 136–137Outlook, importing resources from,
140–142overview, 14–15, 129–132proposed resources, 135resource pools, 139–140, 141sharing, 138–142task timing affected by, 134–135types of, 133–134using less expensive, 195work resources, 133–134
review of finished projectscommunication process, reviewing,
305–306debriefings, 304–306macros, 310–314Organizer, using the, 308–310overview, 303–304Project Guide, customizing, 314–315success, building on your, 306–314template, creating a, 306–308
risk management, 21roll up, 376
• S •schedule from start or finish of project,
26–27scope of project, 97–98, 276scroll bars, 37–39Shared Workspace, 377
386 Microsoft Project 2007 For Dummies
34_036516 bindex.qxp 11/20/06 1:50 PM Page 386

sharing resources, 138–142sheet, 38slack
cutting back on, 195defined, 377overview, 191–194
softwareproject management software, 357–362on CD, 366–369
sort criteria, 265–266space launch example tasks, 91–92split tasks, 84–85, 377standard reports
crosstab reports, 285generating, 280–281modifying, 281–284overview, 279–280types of, 280
standard template, 53standardizing processes, 324–325start date
defined, 377entering, 83–84setting, 26
starting tasks, 83–84start-to-finish relationship, 116, 377start-to-start relationship, 117, 377status date, 27, 233–234status reports, 328, 332subproject, 377subtasks
defined, 377hiding, 104–107in outlines, 93–95showing, 104–107
successbuilding on your, 306–314measuring, 352–353
successor, 377summary task, 93–95, 377
• T •task boxes, 207–208Task calendar, 52, 62, 164–165Task Drivers feature, 188Task Sheet view, 231–232task timing
affected by resources, 134–135
modifying, 274–275Task Usage view, 231–232taskbars
formatting, 204–206used to measure progress, 255
tasks. See also durationconstraints on, 86–88creating, 71–78defined, 377delegating, 326–327effort-driven tasks, 85–86Excel task list, importing, 74–75existing project inserted into another
project including, 77–78finish date, entering, 83–84fixed duration tasks, 78, 163, 374fixed unit tasks, 79, 162, 374fixed work tasks, 79, 162–163, 374Gantt Chart view, generating tasks in, 71hyperlinks to, 76milestones, 81notes, 88–89Outlook, importing tasks from, 73–74overview, 11–12, 69–70pausing, 84–85recurring tasks, 81–83saving, 89–90settings that characterize a task,
determining, 70space launch example, 91–92splitting, 84–85start date, entering, 83–84starting, 83–84in subprojects, 77–78types of, 78–79
team, gathering a, 323–324templates
creating, 306–308custom calendar template, creating, 65–67custom templates, saving, 31defined, 377Excel Task List template, 74–75night shift template, 53opening, 30–31overview, 30standard template, 53starting with, 30–3224 hours template, 53
387Index
34_036516 bindex.qxp 11/20/06 1:50 PM Page 387
time, updating project when given more,275–276
timescale, 38, 45–47, 377Timesheet Professional, 230Timesheet view used to report completed
work, 336–338timing of project
adjusting, 272availability of resources affecting, 194–195critical path, tasks on, 191–194deleting tasks, 195dependencies affecting, 194less time, completing project in, 194–195overview, 191slack, cutting back on, 195slack, tasks with, 191–194
timing of task, 162–165, 268toolbars. See also Tracking toolbar
Analysis toolbar, 270–271Drawing toolbar, 213–214
trackingassignment-timephased tracking
method, 228assignment-total tracking method, 228consolidated projects, 244–247defined, 377e-mail used to update projects, 229gathering data, 227–230manual reporting of progress on a
project, 229–230material resource usage, 243methods for, 228–229overview, 17–18, 227–228task-timephased tracking method, 228task-total tracking method, 228with Update Project, 241–242
Tracking toolbaractual finish date, 236actual start date, 236durations, modifying, 239–240fixed-cost updates, entering, 240–241overtime, entering, 239overview, 230–231percentage complete, calculating, 234–235resource hours, entering, 237–238status date, 233–234Task Sheet view, 231–232Task Usage view, 231–232
training, 32524 hours template, 53
• U •Update Project, 241–242upfront work, putting in time for, 350
• V •Value List, 378variable rate, 378views
Calendar view, 42–43changing, 35–37columns, displaying, 47–48customizing, 43–50Gantt Chart view, 40–41Network Diagram view, 41–42, 48–50overview, 39–40panes, 44–48timescale, modifying, 45–47
Visio 2007 For Dummies (Mueller), 287Visio WBS Chart Wizard, 108Visual Reports, 286–289
• W •WBS (work breakdown structure)
code masks, 109customizing, 109–111defined, 378displaying, 108–109outlines, 107–111overview, 107–108
what-if scenarios, 265–270work resources, 133–134, 168, 378working times, 55–58workload
balancing, 145–146defined, 378
workspace, 378
• Z •Zoom command, 40Zoom In button, 46Zoom Out button, 46
388 Microsoft Project 2007 For Dummies
34_036516 bindex.qxp 11/20/06 1:50 PM Page 388
Related Documents