FLY TYING: SALTWATER MANUAL ALL FISH, ALL WATERS ®

Welcome message from author
This document is posted to help you gain knowledge. Please leave a comment to let me know what you think about it! Share it to your friends and learn new things together.
Transcript
FLY TYING: SALTWATER MANUAL
ALL FISH, ALL WATERS®

table of contents
FLY TYING: SALTWATER MANUAL
Introduction 3Authors 4BAIT FISH / STREAMERS
Bob Popovics’s Surf Candy 6
Polar Fiber Streamer 11
Craft Fur Streamer 17
Resin Sand Eel 24
Lefty’s Deceiver (Olive Version) 28
Clouser Minnow 34
Blonde 39
Seaducer 43
Squirrel Tail Eel Streamer 47
Deer Hair Bunny 52
Lemon Drop Tarpon Fly 56
SHRIMP/CRABS/WORMSUV Ultra Shrimp 59Gotcha 66Bonefish Special 70The Crazy Charlie (Pink Version) 73Lefty’s Craft Fur Shrimp 77Borski’s Redfish Slider 81Del Brown’s Merkin Crab 86Benthos Worm 89
TOP WATERCrease Fly 91Bob’s Banger 96Gurgler 101Pink Lady 105
HOW TO USE THIS MANUAL 114
—3—
FLY TYING: SALTWATER MANUAL
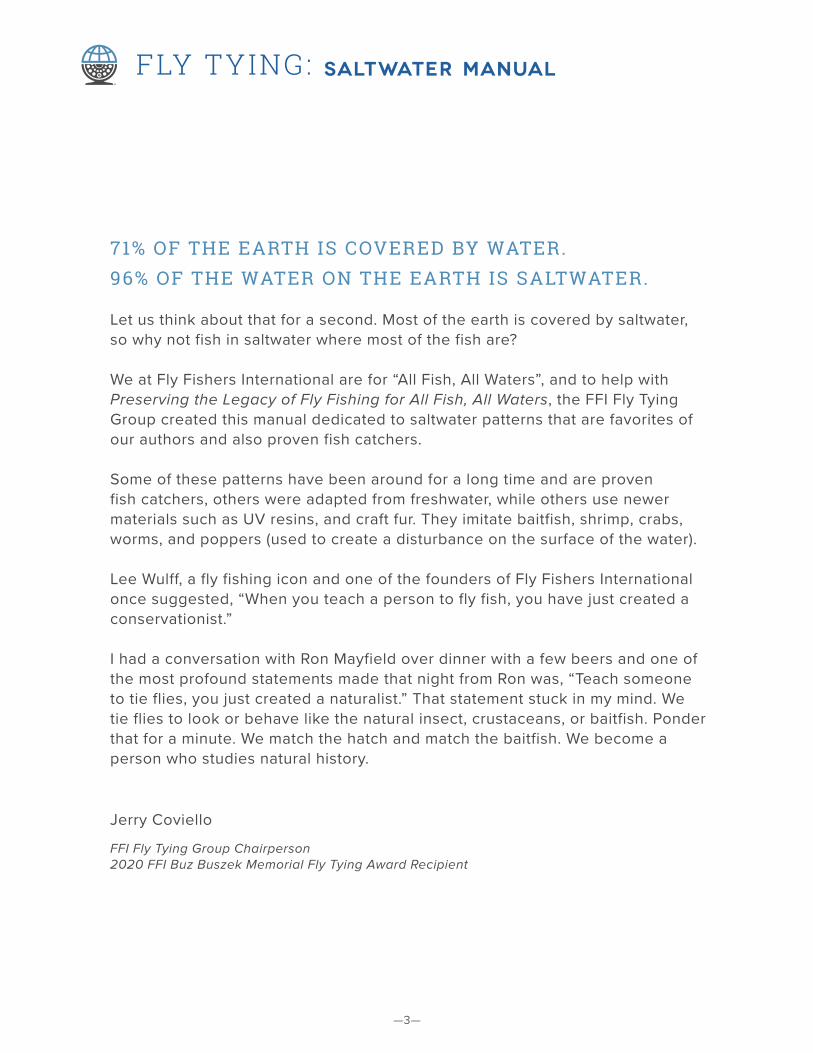
71% OF THE EARTH IS COVERED BY WATER. 96% OF THE WATER ON THE EARTH IS SALTWATER.
Let us think about that for a second. Most of the earth is covered by saltwater, so why not fish in saltwater where most of the fish are?
We at Fly Fishers International are for “All Fish, All Waters”, and to help with Preserving the Legacy of Fly Fishing for All Fish, All Waters, the FFI Fly Tying Group created this manual dedicated to saltwater patterns that are favorites of our authors and also proven fish catchers.
Some of these patterns have been around for a long time and are proven fish catchers, others were adapted from freshwater, while others use newer materials such as UV resins, and craft fur. They imitate baitfish, shrimp, crabs, worms, and poppers (used to create a disturbance on the surface of the water).
Lee Wulff, a fly fishing icon and one of the founders of Fly Fishers International once suggested, “When you teach a person to fly fish, you have just created a conservationist.”
I had a conversation with Ron Mayfield over dinner with a few beers and one of the most profound statements made that night from Ron was, “Teach someone to tie flies, you just created a naturalist.” That statement stuck in my mind. We tie flies to look or behave like the natural insect, crustaceans, or baitfish. Ponder that for a minute. We match the hatch and match the baitfish. We become a person who studies natural history.
Jerry Coviello
FFI Fly Tying Group Chairperson2020 FFI Buz Buszek Memorial Fly Tying Award Recipient

—4—
FLY TYING: SALTWATER MANUAL
RON MAYFIELDRon has been fishing since he was 3 years old and fly fishing and fly tying since he was 13. Ron primarily fishes warm and saltwater environments in east Texas and along the Texas Gulf Coast — but has fly fished from British Colombia to Belize. Ron is an FFI Certified Casting Instructor and a Signature Tier for Umpqua and has been featured in books and magazines including Fly Tier Magazine. Ron is currently the Fly Tying Director of the Texas Council of FFI.
ABOUT THE AUTHORS
PEGGY BRENNERPeggy Brenner resides in NH, one hour from some of the best saltwater and freshwater fly fishing in New England. She has been tying for over two decades. Her specialty is flies that fish well in New England and on down to the Florida Keys. She started tying basic trout and saltwater flies, progressed to Classic Maine Streamers at United Fly Tyers and now, Classic Salmon flies with a one-year apprenticeship through the NH State Council on the Arts: Traditional Arts Apprenticeship Grant. Newly retired, she has her second apprenticeship through the same program for a year (2018) to pass on the skills. She was awarded the Dick Nelson Teaching Award in 2019 by FFI. She ties for a select group of customers, and teaches with a focus on ladies and children’s classes, presentations, and demonstrations around the country for shops and clubs.
CAPTAIN HUGH “UNK” SMITHBorn and reared in the State of Florida, Capt. “Unk” returned home in 1998 after 30 years of flying fast jets in the USAF. He has been a fly fisherman and tier since the age of 8 — more than 60 years. He ran a tarpon camp in the Florida Panhandle. He is Past President of The Emerald Coast Flyfishers and he is a member of CCA, FFI-FTG BOG, Bonefish and Tarpon Trust, Captains for Clean Water, IGFA, and TU. As a USCG Certified Maritime Captain, a certified IGFA Captain and a sanctioned CCA Guide he guided along the Emerald Coast for several years. He holds a Saltwater Inshore Grand Slam from the IGFA. Unk is currently in the FFI Fly Tying Group, on the Board of Governors, and is Saltwater Fly Tying Committee Chair.
JERRY COVIELLOOriginally from New Jersey, Jerry now lives in the Philadelphia, PA area where he fishes in fresh and saltwater, catching Stripers, Bluefish, seatrout, shark and Bonefish. He is an FFI Buz Buszek Memorial Fly Tying Award Recipient and is currently the FFI Fly Tying Group Chairperson and writes for Fly Tyer and Flyfisher Magazines.
Jerry is a Pro Team member for Dyna King Vices, Solarez UV resin, Ewing Hackle, and Daiichi Hooks.
—5—
FLY TYING: SALTWATER MANUAL
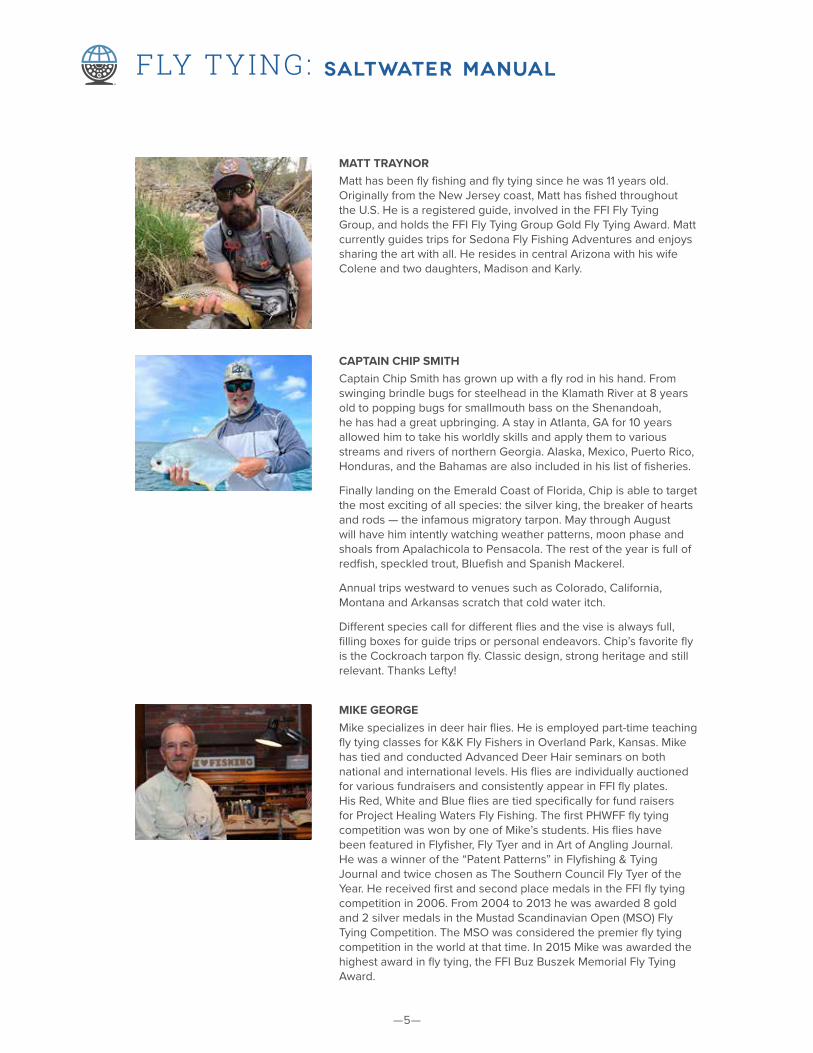
MATT TRAYNOR Matt has been fly fishing and fly tying since he was 11 years old. Originally from the New Jersey coast, Matt has fished throughout the U.S. He is a registered guide, involved in the FFI Fly Tying Group, and holds the FFI Fly Tying Group Gold Fly Tying Award. Matt currently guides trips for Sedona Fly Fishing Adventures and enjoys sharing the art with all. He resides in central Arizona with his wife Colene and two daughters, Madison and Karly.
CAPTAIN CHIP SMITHCaptain Chip Smith has grown up with a fly rod in his hand. From swinging brindle bugs for steelhead in the Klamath River at 8 years old to popping bugs for smallmouth bass on the Shenandoah, he has had a great upbringing. A stay in Atlanta, GA for 10 years allowed him to take his worldly skills and apply them to various streams and rivers of northern Georgia. Alaska, Mexico, Puerto Rico, Honduras, and the Bahamas are also included in his list of fisheries.
Finally landing on the Emerald Coast of Florida, Chip is able to target the most exciting of all species: the silver king, the breaker of hearts and rods — the infamous migratory tarpon. May through August will have him intently watching weather patterns, moon phase and shoals from Apalachicola to Pensacola. The rest of the year is full of redfish, speckled trout, Bluefish and Spanish Mackerel.
Annual trips westward to venues such as Colorado, California, Montana and Arkansas scratch that cold water itch.
Different species call for different flies and the vise is always full, filling boxes for guide trips or personal endeavors. Chip’s favorite fly is the Cockroach tarpon fly. Classic design, strong heritage and still relevant. Thanks Lefty!
MIKE GEORGEMike specializes in deer hair flies. He is employed part-time teaching fly tying classes for K&K Fly Fishers in Overland Park, Kansas. Mike has tied and conducted Advanced Deer Hair seminars on both national and international levels. His flies are individually auctioned for various fundraisers and consistently appear in FFI fly plates. His Red, White and Blue flies are tied specifically for fund raisers for Project Healing Waters Fly Fishing. The first PHWFF fly tying competition was won by one of Mike’s students. His flies have been featured in Flyfisher, Fly Tyer and in Art of Angling Journal. He was a winner of the “Patent Patterns” in Flyfishing & Tying Journal and twice chosen as The Southern Council Fly Tyer of the Year. He received first and second place medals in the FFI fly tying competition in 2006. From 2004 to 2013 he was awarded 8 gold and 2 silver medals in the Mustad Scandinavian Open (MSO) Fly Tying Competition. The MSO was considered the premier fly tying competition in the world at that time. In 2015 Mike was awarded the highest award in fly tying, the FFI Buz Buszek Memorial Fly Tying Award.
—6—
FLY TYING: SALTWATER MANUAL
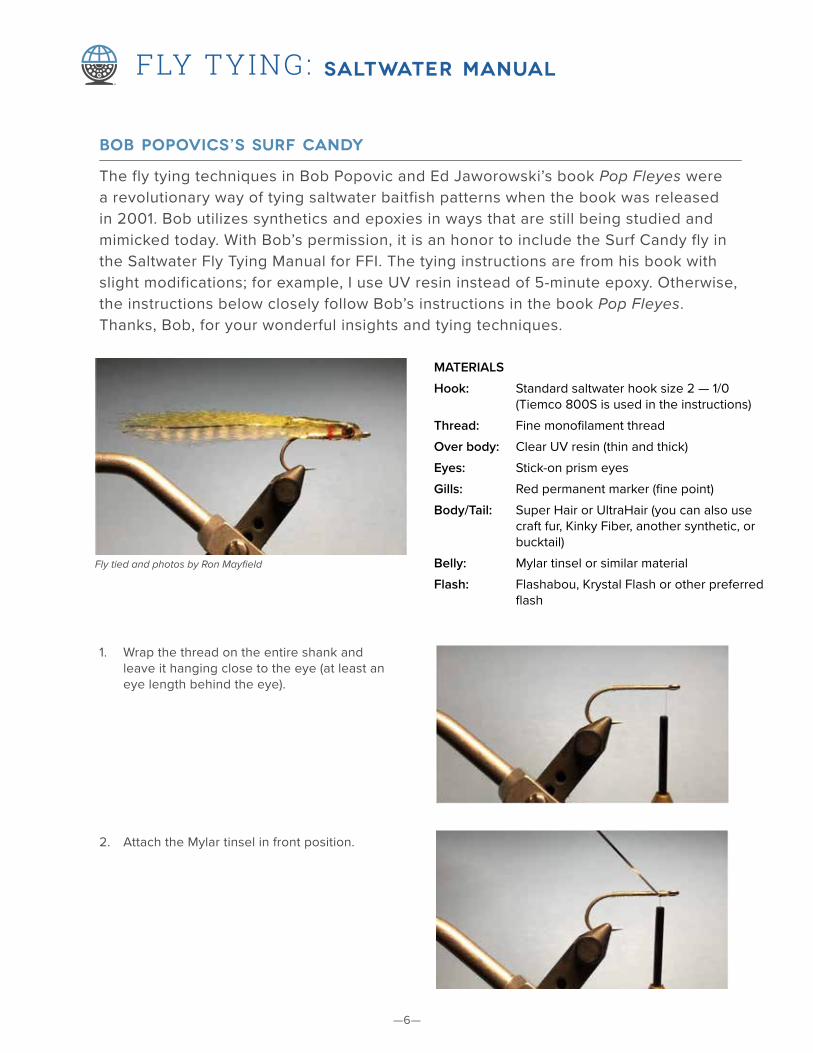
BOB POPOVICS’S SURF CANDY
The fly tying techniques in Bob Popovic and Ed Jaworowski’s book Pop Fleyes were a revolutionary way of tying saltwater baitfish patterns when the book was released in 2001. Bob utilizes synthetics and epoxies in ways that are still being studied and mimicked today. With Bob’s permission, it is an honor to include the Surf Candy fly in the Saltwater Fly Tying Manual for FFI. The tying instructions are from his book with slight modifications; for example, I use UV resin instead of 5-minute epoxy. Otherwise, the instructions below closely follow Bob’s instructions in the book Pop Fleyes. Thanks, Bob, for your wonderful insights and tying techniques.
MATERIALS
Hook: Standard saltwater hook size 2 — 1/0 (Tiemco 800S is used in the instructions)
Thread: Fine monofilament threadOver body: Clear UV resin (thin and thick)Eyes: Stick-on prism eyesGills: Red permanent marker (fine point)Body/Tail: Super Hair or UltraHair (you can also use
craft fur, Kinky Fiber, another synthetic, or bucktail)
Belly: Mylar tinsel or similar materialFlash: Flashabou, Krystal Flash or other preferred
flash
1. Wrap the thread on the entire shank and leave it hanging close to the eye (at least an eye length behind the eye).
2. Attach the Mylar tinsel in front position.
Fly tied and photos by Ron Mayfield
—7—
FLY TYING: SALTWATER MANUAL
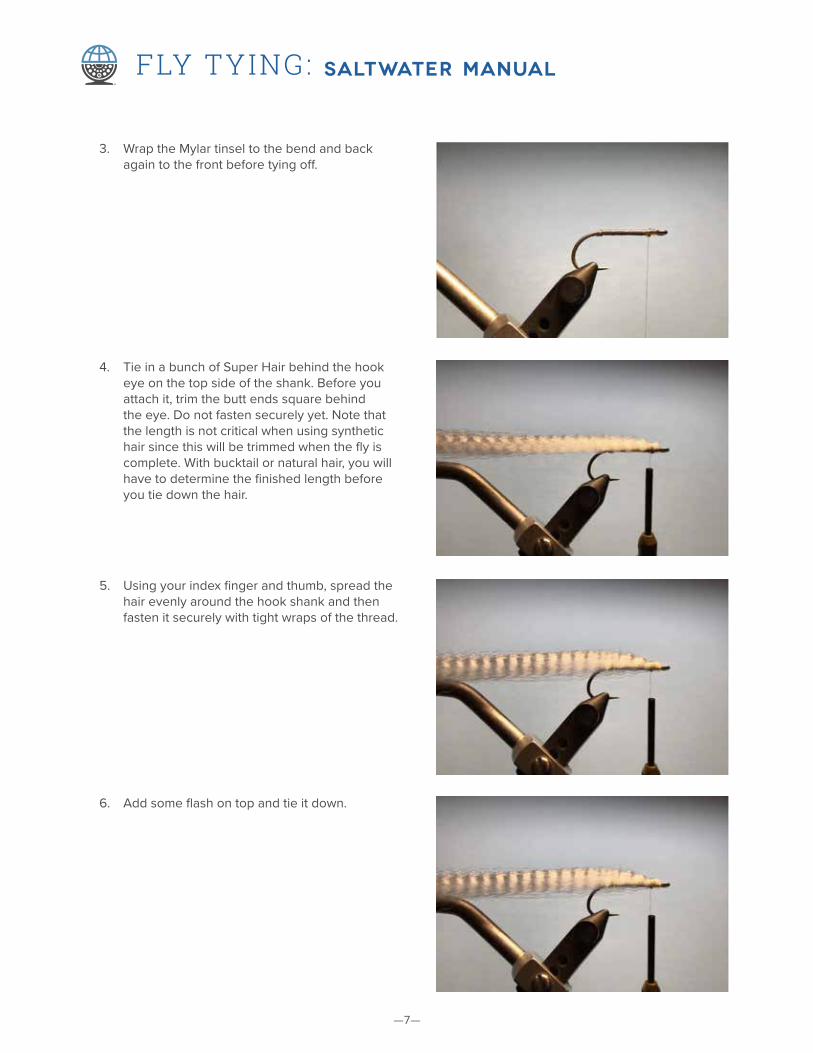
3. Wrap the Mylar tinsel to the bend and back again to the front before tying off.
4. Tie in a bunch of Super Hair behind the hook eye on the top side of the shank. Before you attach it, trim the butt ends square behind the eye. Do not fasten securely yet. Note that the length is not critical when using synthetic hair since this will be trimmed when the fly is complete. With bucktail or natural hair, you will have to determine the finished length before you tie down the hair.
5. Using your index finger and thumb, spread the hair evenly around the hook shank and then fasten it securely with tight wraps of the thread.
6. Add some flash on top and tie it down.

—8—
FLY TYING: SALTWATER MANUAL
7. Prepare a second bunch of hair as above and attach it to the top of the fly. This is normally a contrasting color but need not be.
8. Apply UV resin starting from the front of the fly and working back to the bend of the hook. It’s best to use the thin UV resin on the first coat so the UV resin can be worked into the fibers easily. This first coat of UV resin will determine the body shape and thickness.
9. Work the UV resin into the Super Hair with your bodkin to ensure all the fibers have UV resin on them.
10. Hold the Super Hair near the tail with one hand to ensure the fibers are straight. Then use the curing light to harden the UV resin.
—9—
FLY TYING: SALTWATER MANUAL
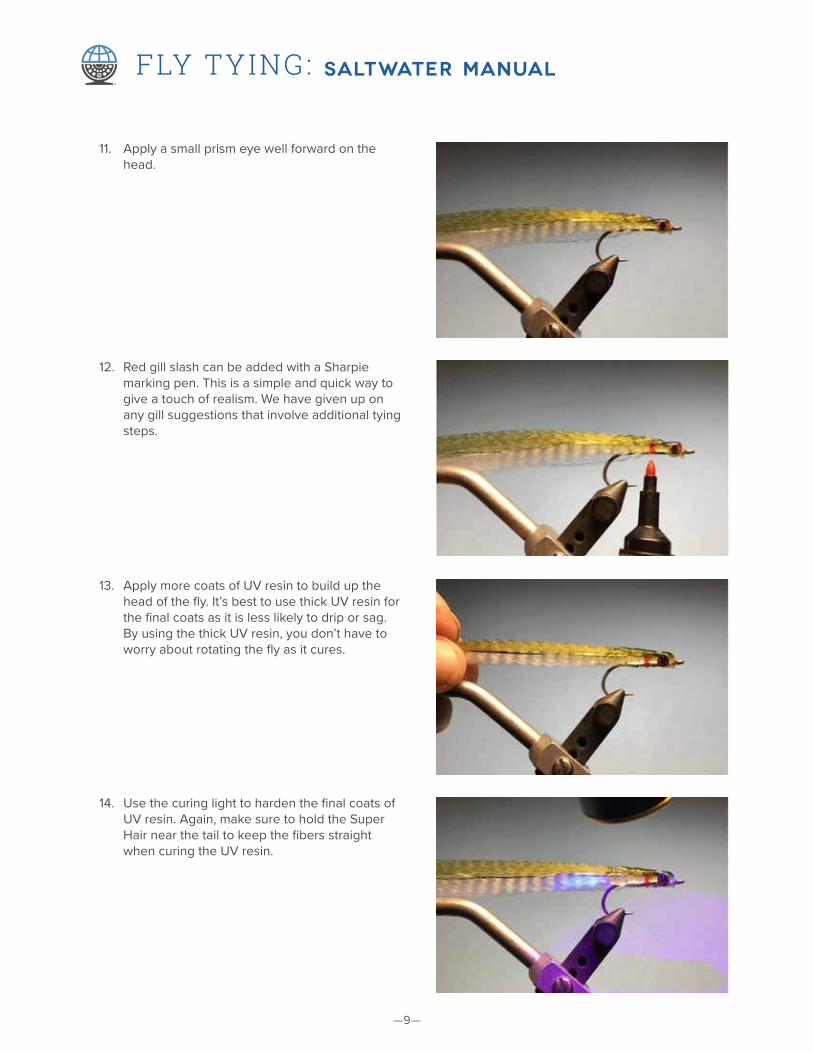
11. Apply a small prism eye well forward on the head.
12. Red gill slash can be added with a Sharpie marking pen. This is a simple and quick way to give a touch of realism. We have given up on any gill suggestions that involve additional tying steps.
13. Apply more coats of UV resin to build up the head of the fly. It’s best to use thick UV resin for the final coats as it is less likely to drip or sag. By using the thick UV resin, you don’t have to worry about rotating the fly as it cures.
14. Use the curing light to harden the final coats of UV resin. Again, make sure to hold the Super Hair near the tail to keep the fibers straight when curing the UV resin.

—10—
FLY TYING: SALTWATER MANUAL
15. Using the tips of your scissors (serrated scissors work best), snip small amounts of material to get the shape you desire. Start near the bend of the hook and work to the rear. Do not just cut the tail square. Remember, most synthetics do not have a taper of their own, but you can make a wonderful tapered fly with your scissor work.
—11—
FLY TYING: SALTWATER MANUAL
POLAR FIBER STREAMER
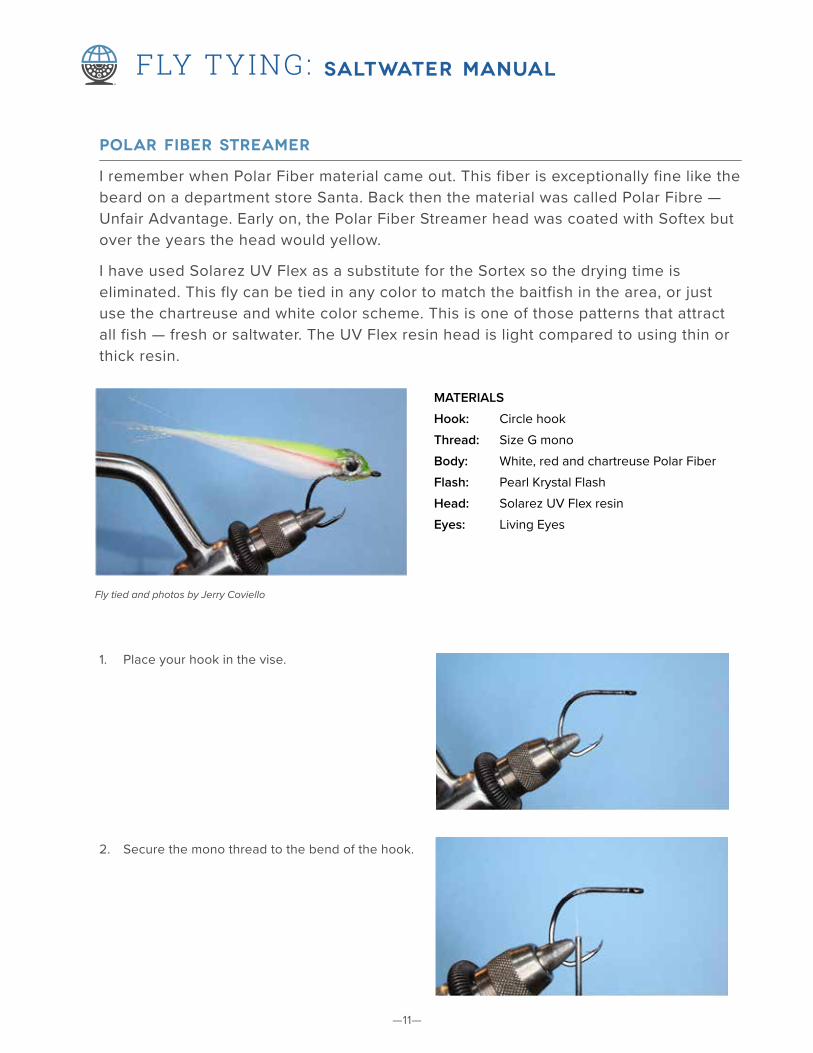
I remember when Polar Fiber material came out. This fiber is exceptionally fine like the beard on a department store Santa. Back then the material was called Polar Fibre — Unfair Advantage. Early on, the Polar Fiber Streamer head was coated with Softex but over the years the head would yellow.
I have used Solarez UV Flex as a substitute for the Sortex so the drying time is eliminated. This fly can be tied in any color to match the baitfish in the area, or just use the chartreuse and white color scheme. This is one of those patterns that attract all fish — fresh or saltwater. The UV Flex resin head is light compared to using thin or thick resin.
MATERIALS
Hook: Circle hookThread: Size G monoBody: White, red and chartreuse Polar FiberFlash: Pearl Krystal FlashHead: Solarez UV Flex resinEyes: Living Eyes
1. Place your hook in the vise.
2. Secure the mono thread to the bend of the hook.
Fly tied and photos by Jerry Coviello
—12—
FLY TYING: SALTWATER MANUAL
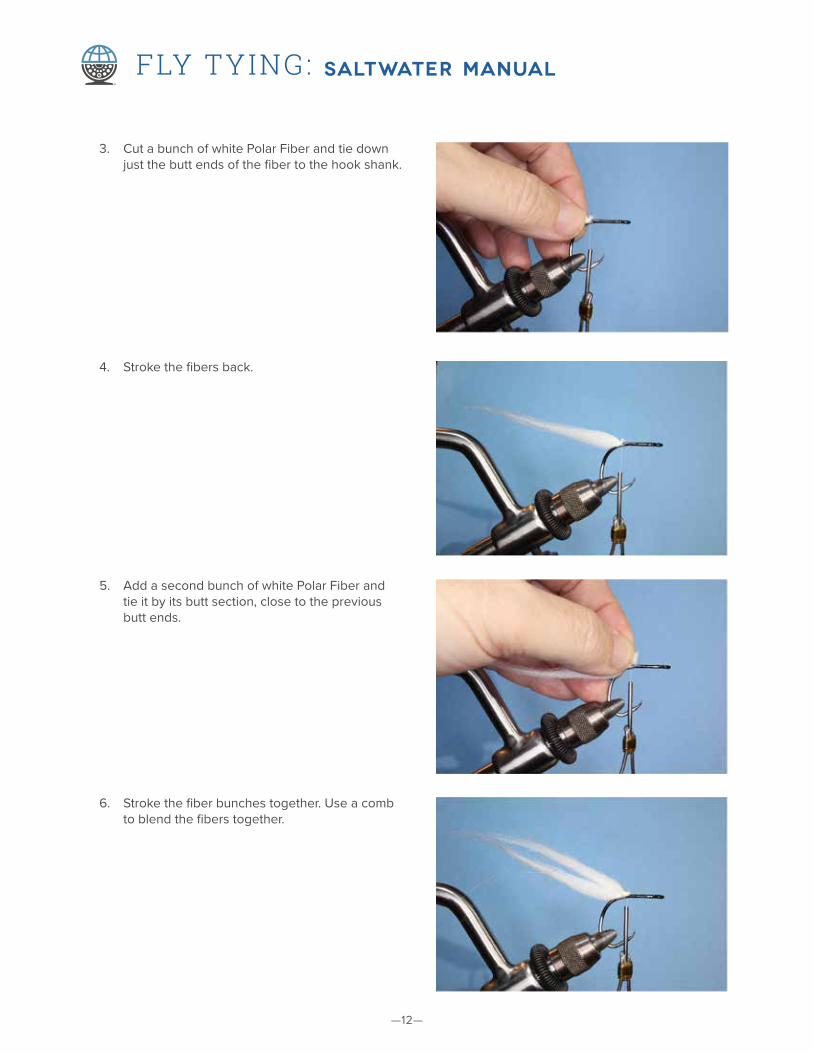
3. Cut a bunch of white Polar Fiber and tie down just the butt ends of the fiber to the hook shank.
4. Stroke the fibers back.
5. Add a second bunch of white Polar Fiber and tie it by its butt section, close to the previous butt ends.
6. Stroke the fiber bunches together. Use a comb to blend the fibers together.

—13—
FLY TYING: SALTWATER MANUAL
7. Add a third bunch of white Polar Fiber, again tying it in catching the butt ends.
8. Using a comb, blend all the fibers together to make one.
9. Add a bunch of red Polar Fiber.
10. The red Polar Fiber needs to be shorter in length than the rest of the fibers. Comb them all together.
—14—
FLY TYING: SALTWATER MANUAL
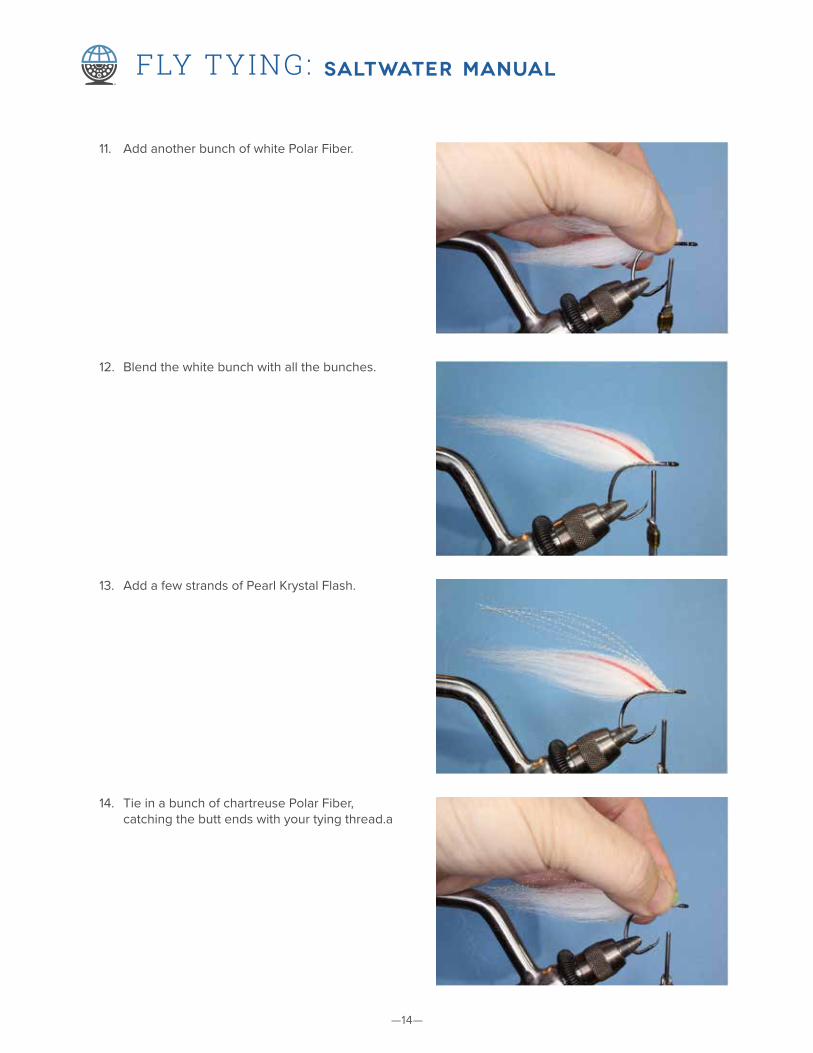
11. Add another bunch of white Polar Fiber.
12. Blend the white bunch with all the bunches.
13. Add a few strands of Pearl Krystal Flash.
14. Tie in a bunch of chartreuse Polar Fiber, catching the butt ends with your tying thread.a
—15—
FLY TYING: SALTWATER MANUAL
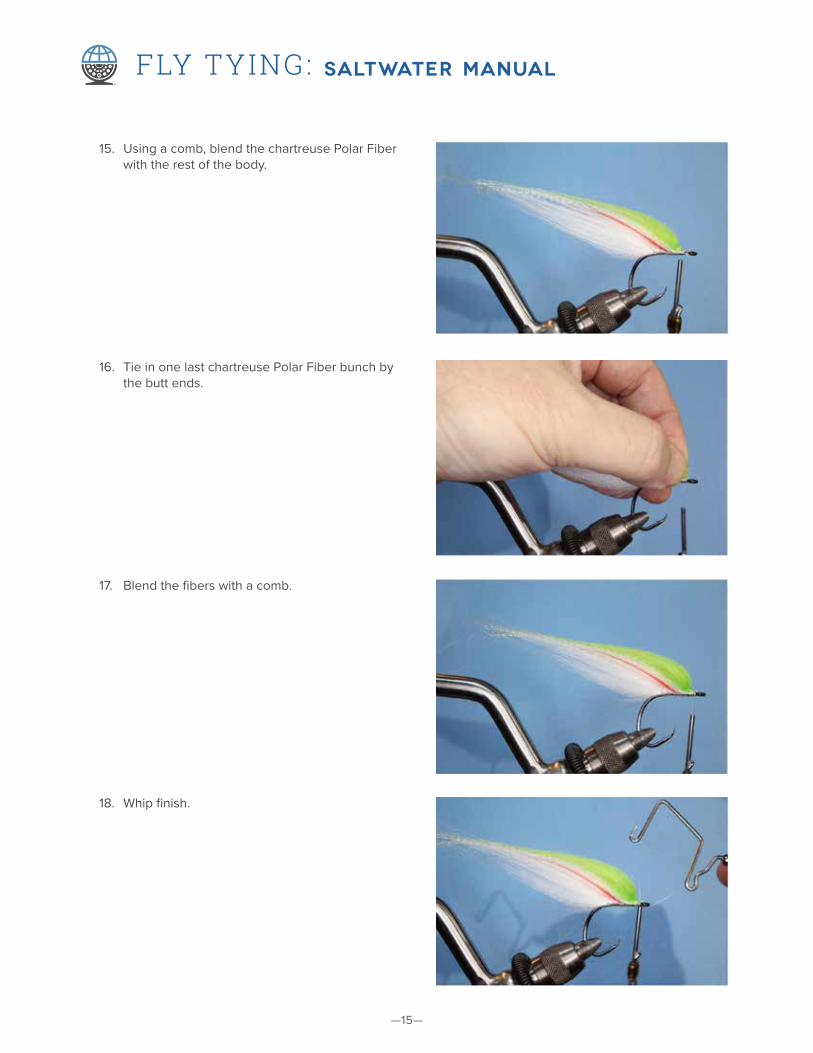
15. Using a comb, blend the chartreuse Polar Fiber with the rest of the body.
16. Tie in one last chartreuse Polar Fiber bunch by the butt ends.
17. Blend the fibers with a comb.
18. Whip finish.
—16—
FLY TYING: SALTWATER MANUAL
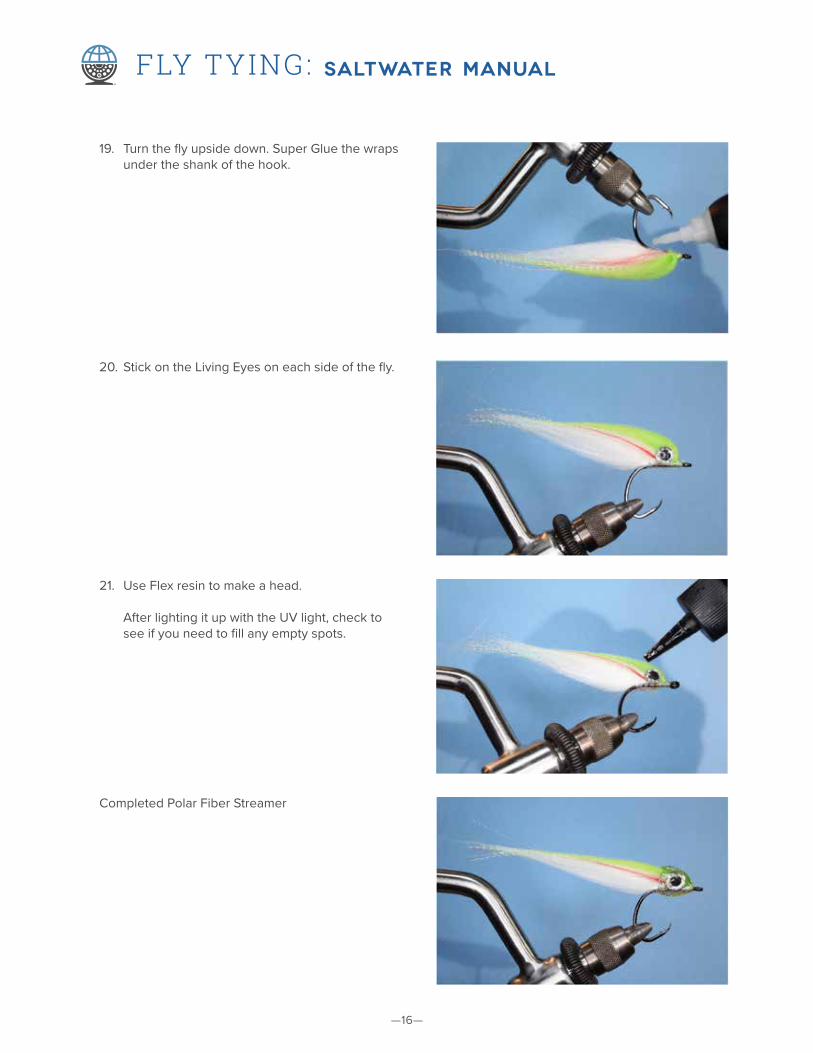
19. Turn the fly upside down. Super Glue the wraps under the shank of the hook.
20. Stick on the Living Eyes on each side of the fly.
21. Use Flex resin to make a head. After lighting it up with the UV light, check to see if you need to fill any empty spots.
Completed Polar Fiber Streamer
—17—
FLY TYING: SALTWATER MANUAL
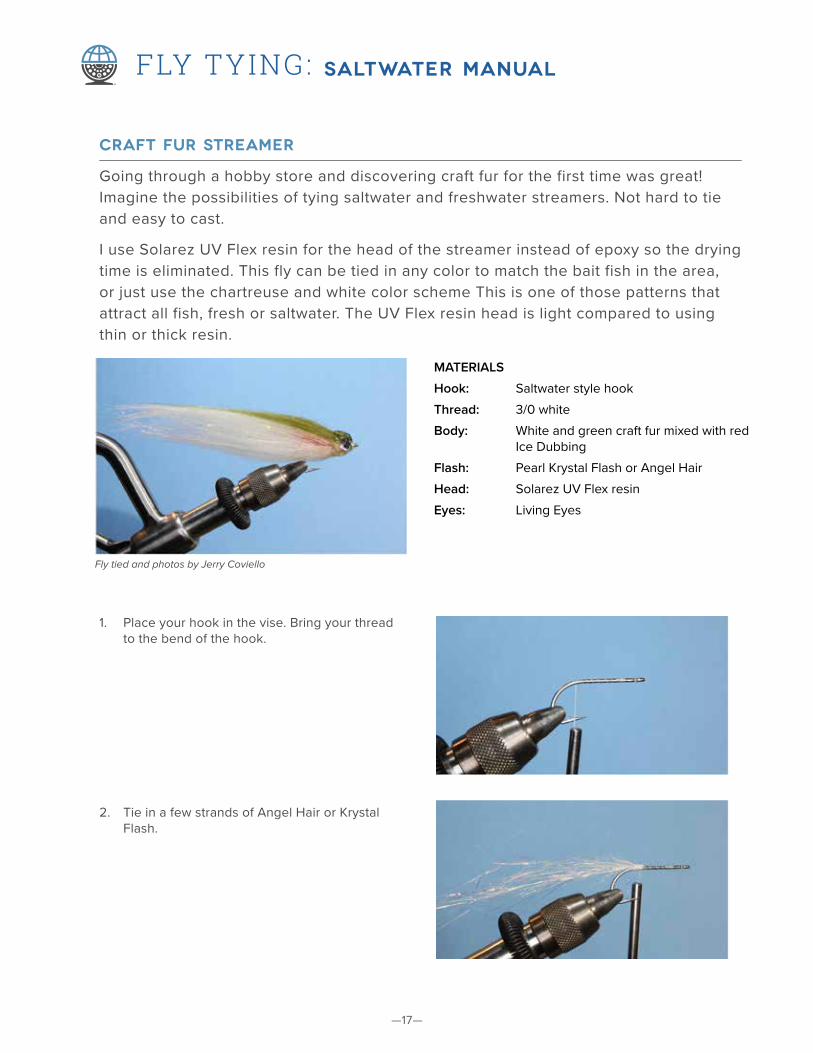
CRAFT FUR STREAMER
Going through a hobby store and discovering craft fur for the first time was great! Imagine the possibilities of tying saltwater and freshwater streamers. Not hard to tie and easy to cast.
I use Solarez UV Flex resin for the head of the streamer instead of epoxy so the drying time is eliminated. This fly can be tied in any color to match the bait fish in the area, or just use the chartreuse and white color scheme This is one of those patterns that attract all fish, fresh or saltwater. The UV Flex resin head is light compared to using thin or thick resin.
MATERIALS
Hook: Saltwater style hookThread: 3/0 whiteBody: White and green craft fur mixed with red
Ice DubbingFlash: Pearl Krystal Flash or Angel HairHead: Solarez UV Flex resinEyes: Living Eyes
1. Place your hook in the vise. Bring your thread to the bend of the hook.
2. Tie in a few strands of Angel Hair or Krystal Flash.
Fly tied and photos by Jerry Coviello
—18—
FLY TYING: SALTWATER MANUAL
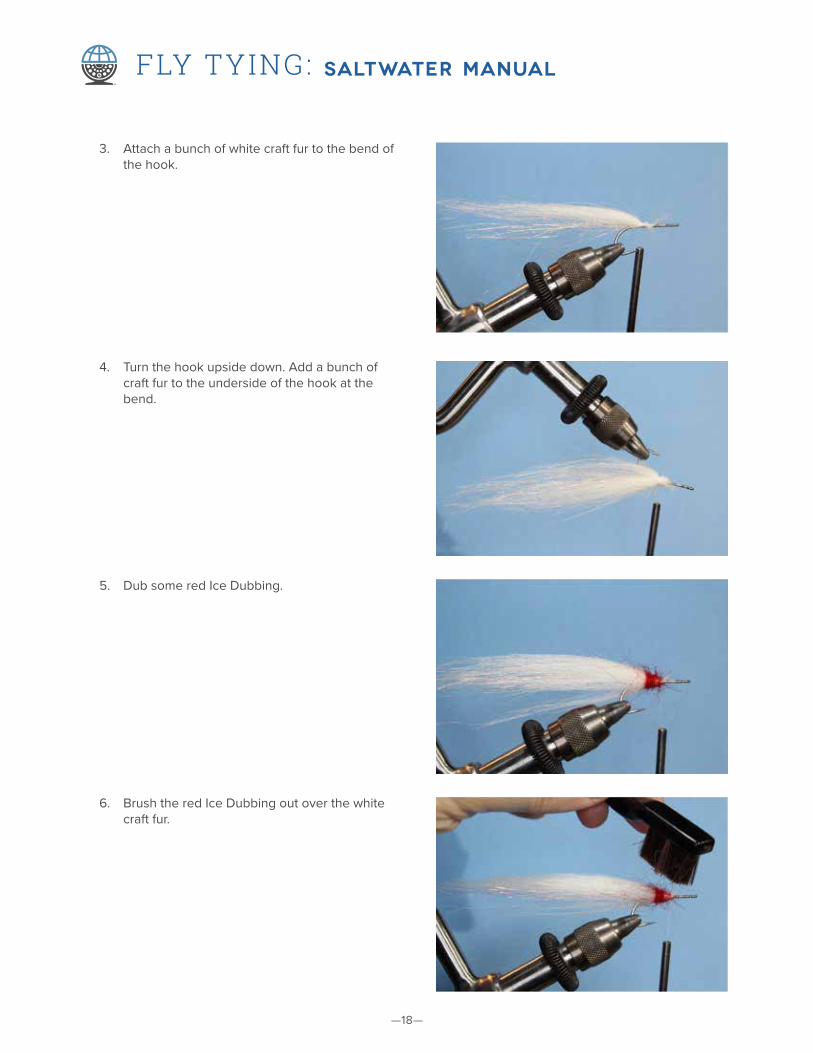
3. Attach a bunch of white craft fur to the bend of the hook.
4. Turn the hook upside down. Add a bunch of craft fur to the underside of the hook at the bend.
5. Dub some red Ice Dubbing.
6. Brush the red Ice Dubbing out over the white craft fur.

—19—
FLY TYING: SALTWATER MANUAL
7. Add a few strands of Angel Hair Flash to the top and bottom of the hook shank.
8. Cut a bunch of white craft fur. Tie the tips toward the eye of the hook.
9. Turn the fly upside down and tie a bunch of white craft fur. Tie the tips toward the eye of the hook on the underside of the hook shank.
10. Stroke the top and bottom so the tips go toward the bend of the hook starting to give a fish shape look.a

—20—
FLY TYING: SALTWATER MANUAL
11. Dub more red Ice Dubbing and brush over the wing body.
12. Add more white craft fur. As before, tie the tips toward the eye of the hook.
13. Turn the fly upside down and do the same thing on the underside of the shank
14. Stroke them back toward the bend of the hook and put a few wraps of thread in the front.
—21—
FLY TYING: SALTWATER MANUAL
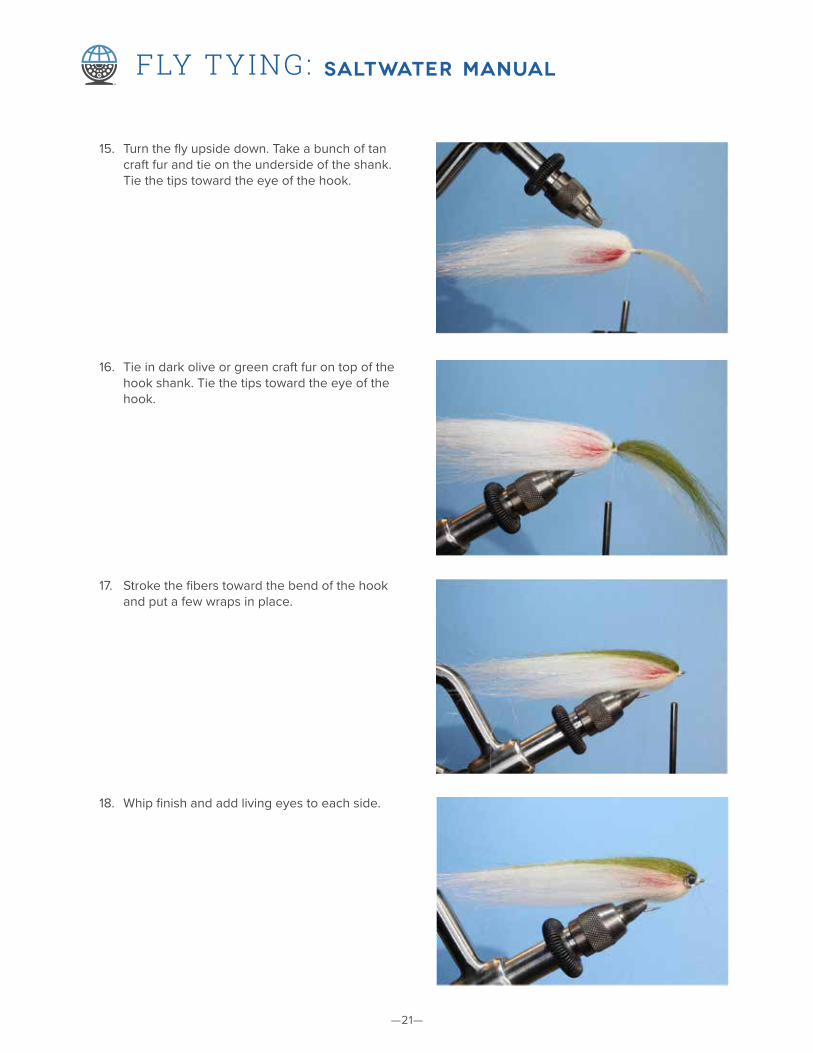
15. Turn the fly upside down. Take a bunch of tan craft fur and tie on the underside of the shank. Tie the tips toward the eye of the hook.
16. Tie in dark olive or green craft fur on top of the hook shank. Tie the tips toward the eye of the hook.
17. Stroke the fibers toward the bend of the hook and put a few wraps in place.
18. Whip finish and add living eyes to each side.

—22—
FLY TYING: SALTWATER MANUAL
19. Apply Solarez Flex UV to the head.

—23—
FLY TYING: SALTWATER MANUAL
RESIN SAND EEL
The Resin Sand Eel was one of the first patterns I was introduced to while fishing the East Coast beaches.
During the Fall bass runs, the sand eels would be present in droves. So much so that when the waves would crash onto the beaches at night, using your headlamp you could see the silver sides of the eels scrambling back into the darkness, then being taken by awaiting bass.
This fly will help you develop several skills including using and working with UV resins, fly proportions and tying with mono thread. (This can be challenging. Keep a tight thread and don’t be afraid to use half hitches.)
MATERIALS
Hook: Mustad 34007 #2 stainless Thread: Clear mono thread #7 Body Lower: White bucktail Body Upper: Olive bucktail Lateral Line: Thin strip of Flash etcHead: UV resin Eye: Holographic Eye 1/8-inch silver (day fishing)
Holographic large red eye (night fishing)
1. Attach clear mono thread behind the eye of the hook at least 2 to 3 eye lengths behind the eye.
2. Turn the hook upside down. Measure a bunch of white bucktail to be 2 1/2 to 3 times the length of the shank of the hook.
Fly tied and photo by Matt Traynor Step by step photos by Jerry Coviello

—24—
FLY TYING: SALTWATER MANUAL
3. Secure the white bucktail to the underside of the hook.
4. Separate the white bucktail to be on each side of the hook bend.
5. Place the hook back in the upright position. Cut a bunch of olive bucktail. Measure it to the tips of the white bucktail.
6. Tie in the olive bucktail on top of the shank of the hook. The heads should make a nice tapered look and cup each other.

—25—
FLY TYING: SALTWATER MANUAL
7. Tie the olive bucktail on top of the shank. Make sure the top and bottom hair meet.
8. Tie in a strip of Mylar or holographic tinsel on both sides of the fly for the lateral line.
9. Whip finish.
10. Stick holographic eyes on each side of the fly.

—26—
FLY TYING: SALTWATER MANUAL
11. Coat the fly with a thick UV resin. Use the UV lamp to harden. Coat until you get the desired shape.
Completed Resin Sand Eel. Just add saltwater.

—27—
FLY TYING: SALTWATER MANUAL
LEFTY’S DECEIVER (OLIVE VERSION)
Lefty Kreh designed this fly in the 1950’s as a great bait fish imitation tied in various colors and sizes. The bucktail collar should extend past the bend of the hook to keep a bait fish shape. Tie the feather wing at the bend instead of how the “Ghost fly patterns” Feather wings are tied behind the eye of the hook; this keeps the wing from fouling around the hook. Eyes can be added to the head.
MATERIALS
Hook: Saltwater (any size you need to tie) example tied on a 3/0
Wing: Tied at the bend of the hook: 6 to 12 white Ewing saddle hackles with an olive Ewing grizzly hackle tied on each side and 10 to 15 strands of olive or gold Krystal Flash
Body: Silver MylarBeard: 1/2-inch strands of red Krystal FlashCollar: White bucktail and on each side a short
olive Ewing grizzly saddle hackleTopping: 10 to 15 strands of olive Krystal Flash and
10 to 15 strands of peacock herlHead: Green Translucent Solarez Bone Dry
1. Place your hook in the vise.
2. Select 10 white saddle hackles. Separate them into two groups of 5 saddle hackles each. Select two olive grizzly saddle hackles.
Fly tied and photos by Jerry Coviello

—28—
FLY TYING: SALTWATER MANUAL
3. Create the wing by placing the dull sides facing each other. On the outside of the wing, put an olive grizzly saddle hackle on each side. I like to add head cement on the stems of the hackle so the wing is one component.
4. Tie the tying thread one eye length behind the eye.
5. Bring your thread to the bend of the hook.
6. Tie the wing at the bend of the hook securing the hackle stems to the shank of the hook.
—29—
FLY TYING: SALTWATER MANUAL
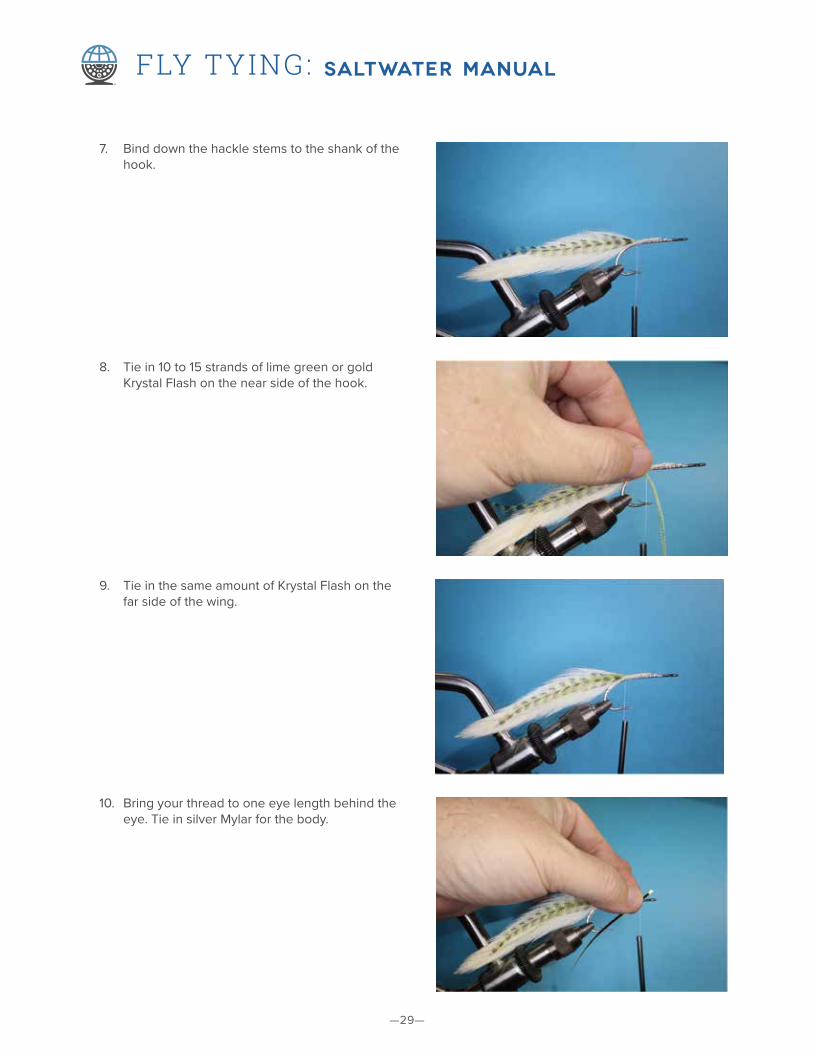
7. Bind down the hackle stems to the shank of the hook.
8. Tie in 10 to 15 strands of lime green or gold Krystal Flash on the near side of the hook.
9. Tie in the same amount of Krystal Flash on the far side of the wing.
10. Bring your thread to one eye length behind the eye. Tie in silver Mylar for the body.
—30—
FLY TYING: SALTWATER MANUAL
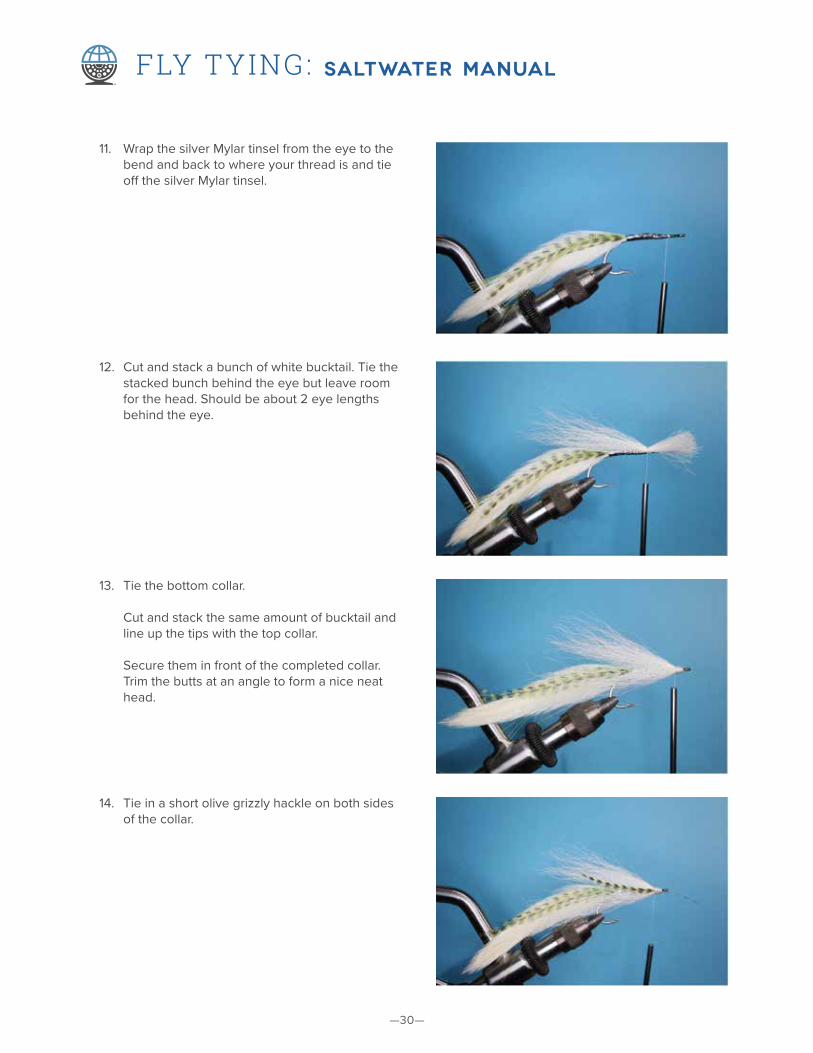
11. Wrap the silver Mylar tinsel from the eye to the bend and back to where your thread is and tie off the silver Mylar tinsel.
12. Cut and stack a bunch of white bucktail. Tie the stacked bunch behind the eye but leave room for the head. Should be about 2 eye lengths behind the eye.
13. Tie the bottom collar. Cut and stack the same amount of bucktail and line up the tips with the top collar. Secure them in front of the completed collar. Trim the butts at an angle to form a nice neat head.
14. Tie in a short olive grizzly hackle on both sides of the collar.
—31—
FLY TYING: SALTWATER MANUAL
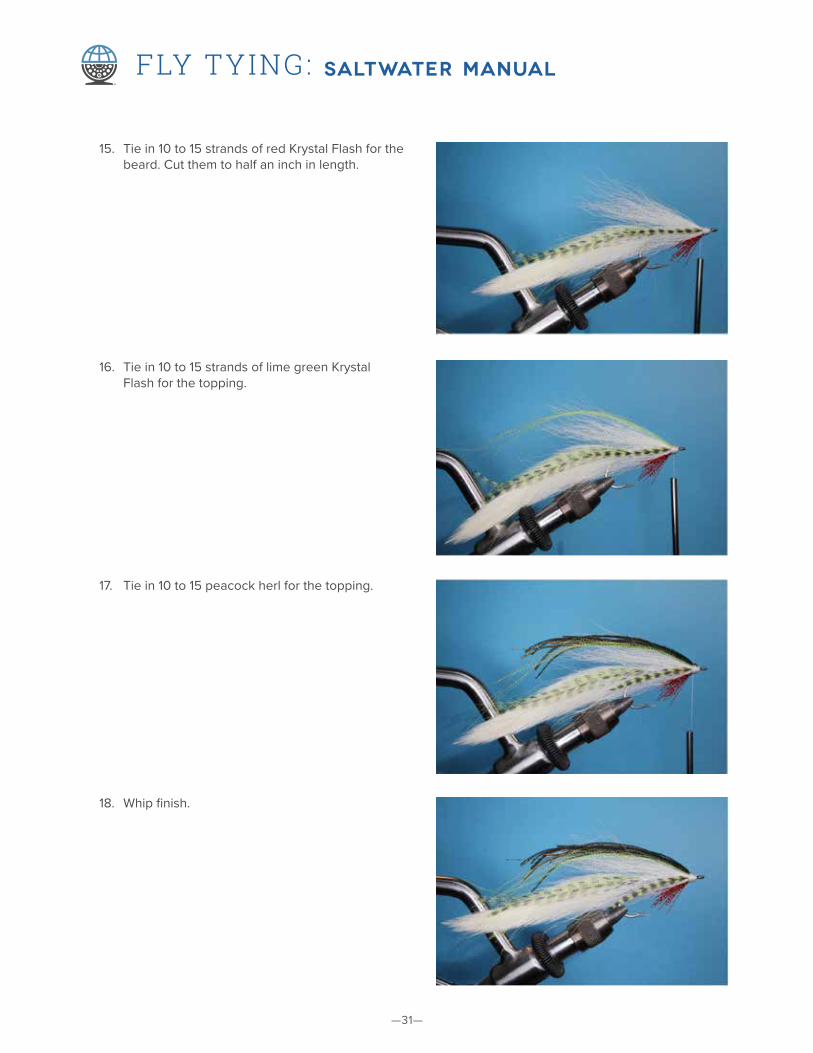
15. Tie in 10 to 15 strands of red Krystal Flash for the beard. Cut them to half an inch in length.
16. Tie in 10 to 15 strands of lime green Krystal Flash for the topping.
17. Tie in 10 to 15 peacock herl for the topping.
18. Whip finish.
—32—
FLY TYING: SALTWATER MANUAL
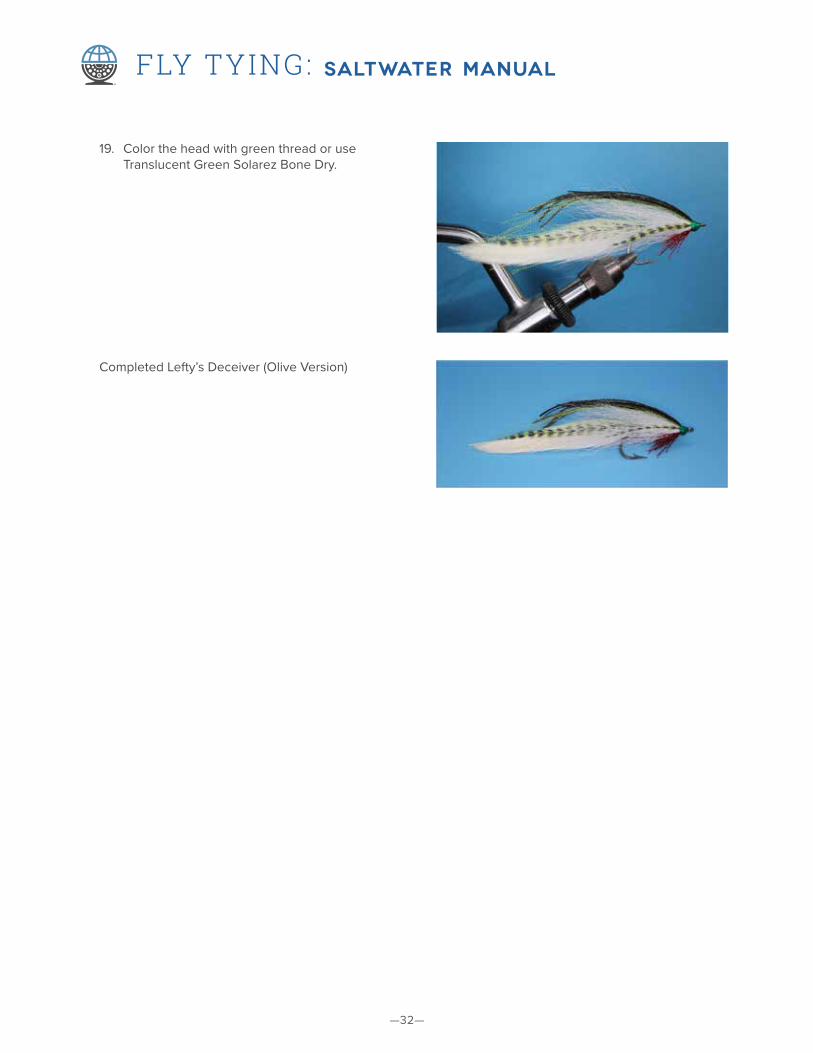
19. Color the head with green thread or use Translucent Green Solarez Bone Dry.
Completed Lefty’s Deceiver (Olive Version)

—33—
FLY TYING: SALTWATER MANUAL
CLOUSER MINNOW
Bob Clouser, known as the Admiral of the Susquehanna River, designed this fly for the smallmouth on the Susquehanna River. The fly is designed so that the hook point rides up so it does not get caught on the bottom. This fly can be tied on a saltwater hook and is a favorite for many saltwater fly fishers. Stripers, bonefish, Bluefish, jacks, small tuna and mackerel species, flounder, redfish, seatrout, and just about every other saltwater gamefish that you can think of will go for one of these. Tie it in any color combination to match the baitfish in your ecosystem.
MATERIALS
Hook: Saltwater Daiichi 2546Eyes: Dumbbell eyes painted with Solarez UV
Cure Color resin (red and black)Belly: White bucktailWing: Chartreuse over Krystal FlashHead: Thread covered with Solarez Bone Dry
Plus
1. Tie your thread behind the eye of the hook.
2. Wrap the thread to between the eye of the hook and the barb. This is where you will tie in the dumbbell eyes.
Fly tied and photos by Jerry Coviello
—34—
FLY TYING: SALTWATER MANUAL
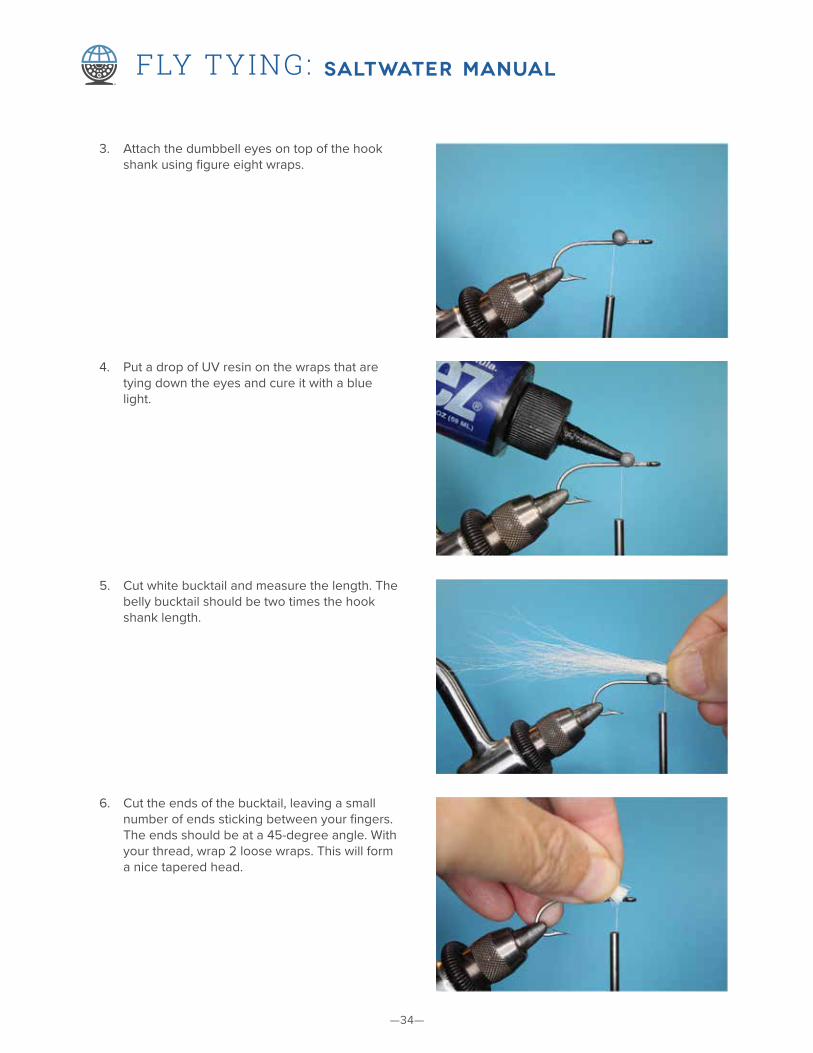
3. Attach the dumbbell eyes on top of the hook shank using figure eight wraps.
4. Put a drop of UV resin on the wraps that are tying down the eyes and cure it with a blue light.
5. Cut white bucktail and measure the length. The belly bucktail should be two times the hook shank length.
6. Cut the ends of the bucktail, leaving a small number of ends sticking between your fingers. The ends should be at a 45-degree angle. With your thread, wrap 2 loose wraps. This will form a nice tapered head.

—35—
FLY TYING: SALTWATER MANUAL
7. Tie in the white bucktail. Loose wrap near the eyes making a head.
8. Hold the belly hair and make loose open wraps toward the bend of the hook while keeping the hair on top of the hook shank.
9. Bring the thread back making loose wraps toward the eye of the hook.
10. Turn the hook upside down. Tie in 4 to 8 strands of Krystal Flash in front of the dumbbell eyes. Evenly separate the strands on each side of the hook.
—36—
FLY TYING: SALTWATER MANUAL
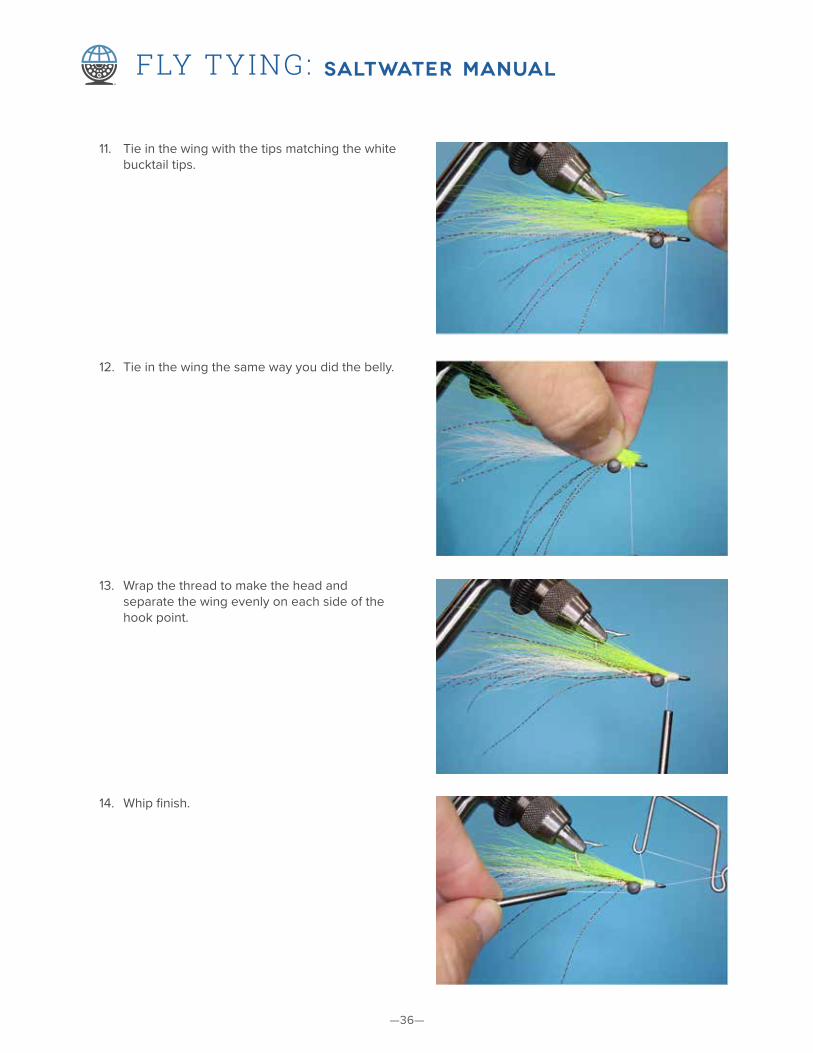
11. Tie in the wing with the tips matching the white bucktail tips.
12. Tie in the wing the same way you did the belly.
13. Wrap the thread to make the head and separate the wing evenly on each side of the hook point.
14. Whip finish.
—37—
FLY TYING: SALTWATER MANUAL
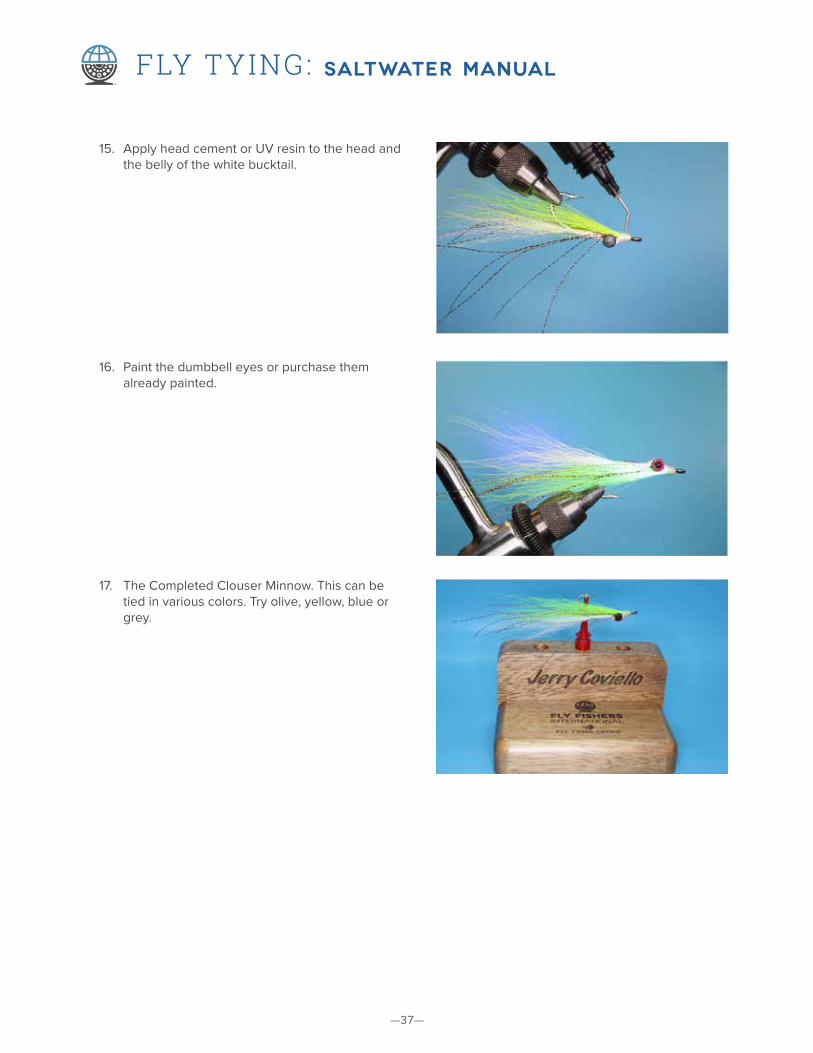
15. Apply head cement or UV resin to the head and the belly of the white bucktail.
16. Paint the dumbbell eyes or purchase them already painted.
17. The Completed Clouser Minnow. This can be tied in various colors. Try olive, yellow, blue or grey.
—38—
FLY TYING: SALTWATER MANUAL
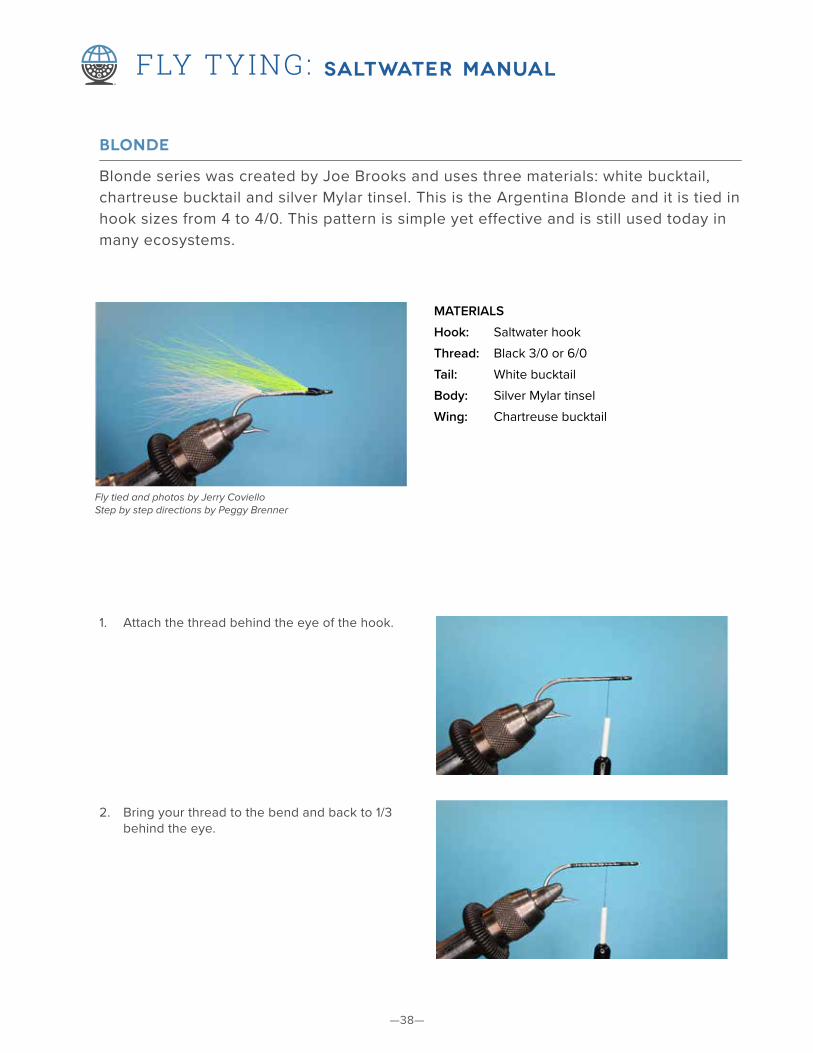
BLONDE
Blonde series was created by Joe Brooks and uses three materials: white bucktail, chartreuse bucktail and silver Mylar tinsel. This is the Argentina Blonde and it is tied in hook sizes from 4 to 4/0. This pattern is simple yet effective and is still used today in many ecosystems.
MATERIALS
Hook: Saltwater hookThread: Black 3/0 or 6/0Tail: White bucktailBody: Silver Mylar tinselWing: Chartreuse bucktail
1. Attach the thread behind the eye of the hook.
2. Bring your thread to the bend and back to 1/3 behind the eye.
Fly tied and photos by Jerry CovielloStep by step directions by Peggy Brenner
—39—
FLY TYING: SALTWATER MANUAL
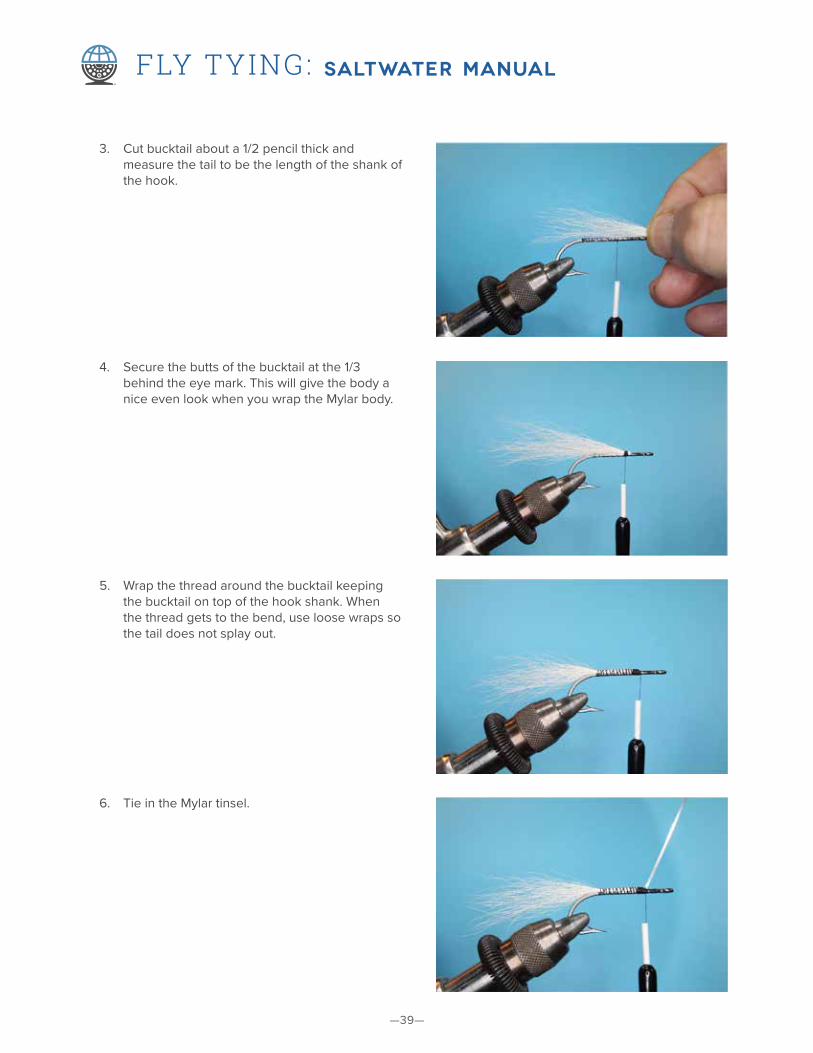
3. Cut bucktail about a 1/2 pencil thick and measure the tail to be the length of the shank of the hook.
4. Secure the butts of the bucktail at the 1/3 behind the eye mark. This will give the body a nice even look when you wrap the Mylar body.
5. Wrap the thread around the bucktail keeping the bucktail on top of the hook shank. When the thread gets to the bend, use loose wraps so the tail does not splay out.
6. Tie in the Mylar tinsel.
—40—
FLY TYING: SALTWATER MANUAL
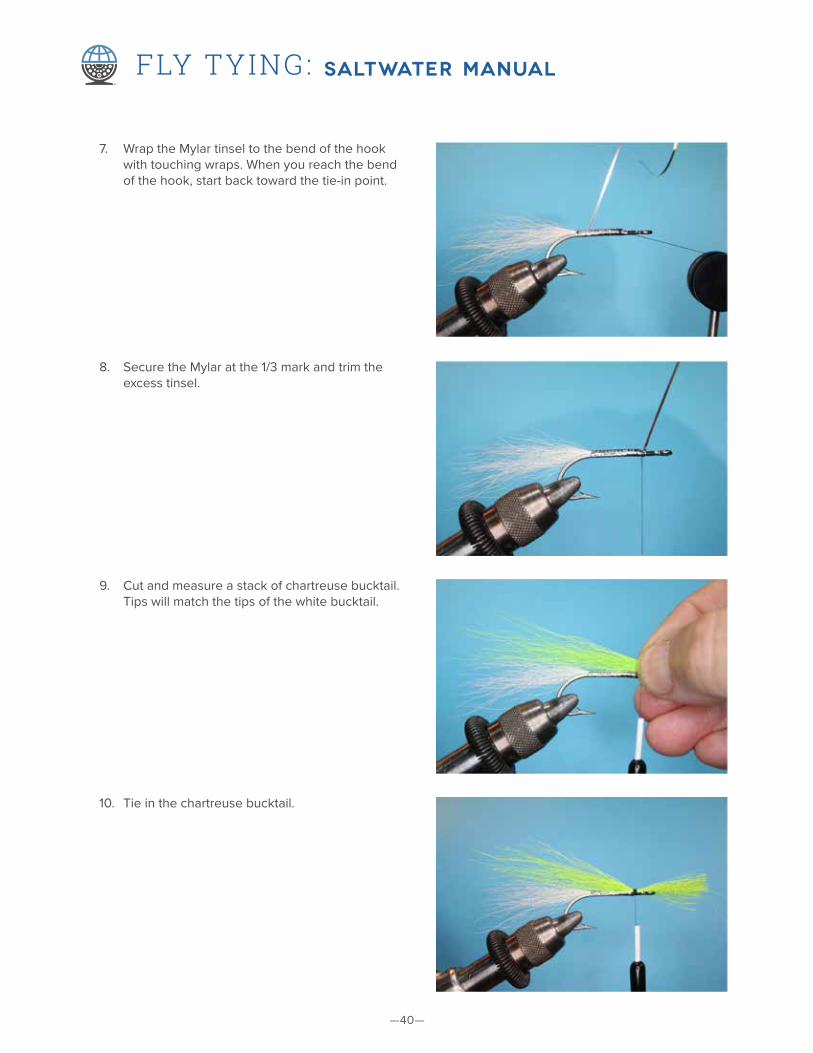
7. Wrap the Mylar tinsel to the bend of the hook with touching wraps. When you reach the bend of the hook, start back toward the tie-in point.
8. Secure the Mylar at the 1/3 mark and trim the excess tinsel.
9. Cut and measure a stack of chartreuse bucktail. Tips will match the tips of the white bucktail.
10. Tie in the chartreuse bucktail.
—41—
FLY TYING: SALTWATER MANUAL
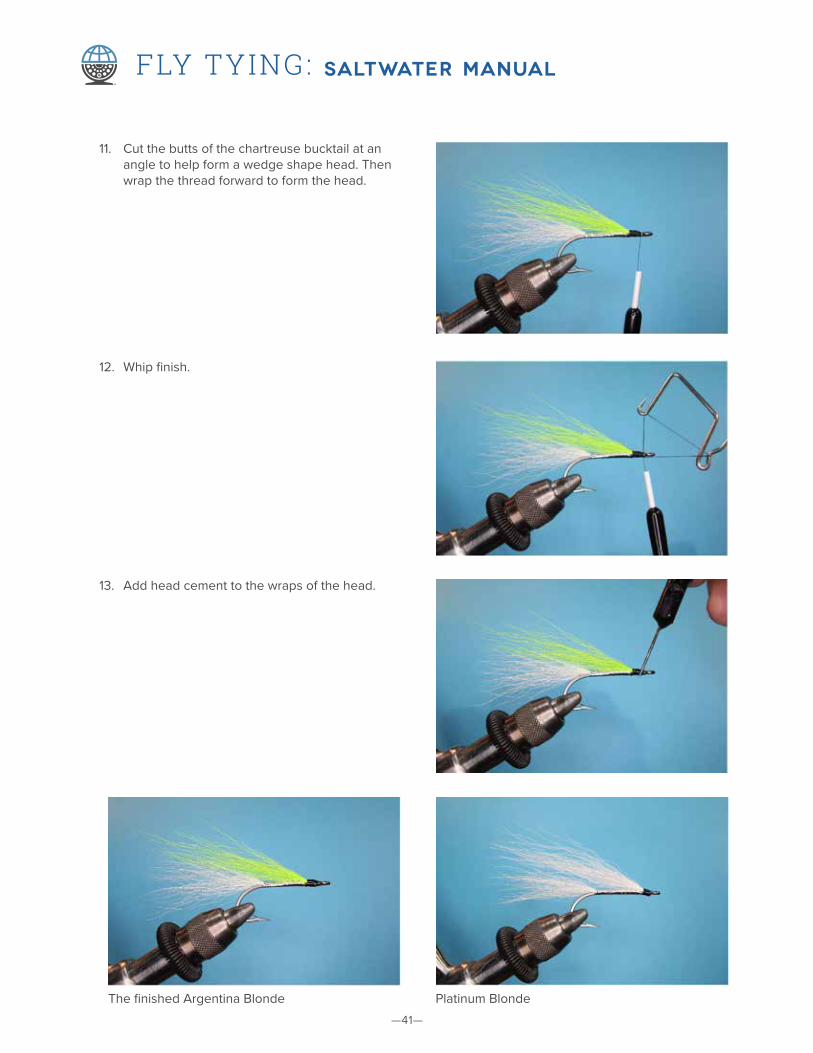
11. Cut the butts of the chartreuse bucktail at an angle to help form a wedge shape head. Then wrap the thread forward to form the head.
12. Whip finish.
13. Add head cement to the wraps of the head.
The finished Argentina Blonde Platinum Blonde
—42—
FLY TYING: SALTWATER MANUAL
SEADUCER
Yellow/Red Seaducer Designed by Homer Rhodes, the Seaducer is a simple pattern tied with saddle hackles. Another variation is red/white.
MATERIALS
Hook: Standard saltwater hook (Daiichi 2546) Sizes 4 — 2/0
Thread: 3/0 monocord whiteTail: 4 to 6 yellow saddle hackles flared and 6
strands of Krystal FlashBody: Yellow saddle hackle palmer wrapped for
3/4 of the body. Red saddle hackle palmer wrapped for the 1/4 of the shank at the head. 30 LB Mono loop at bend to keep the tail from fouling.
Optional: Dumbbell eyes for weight.
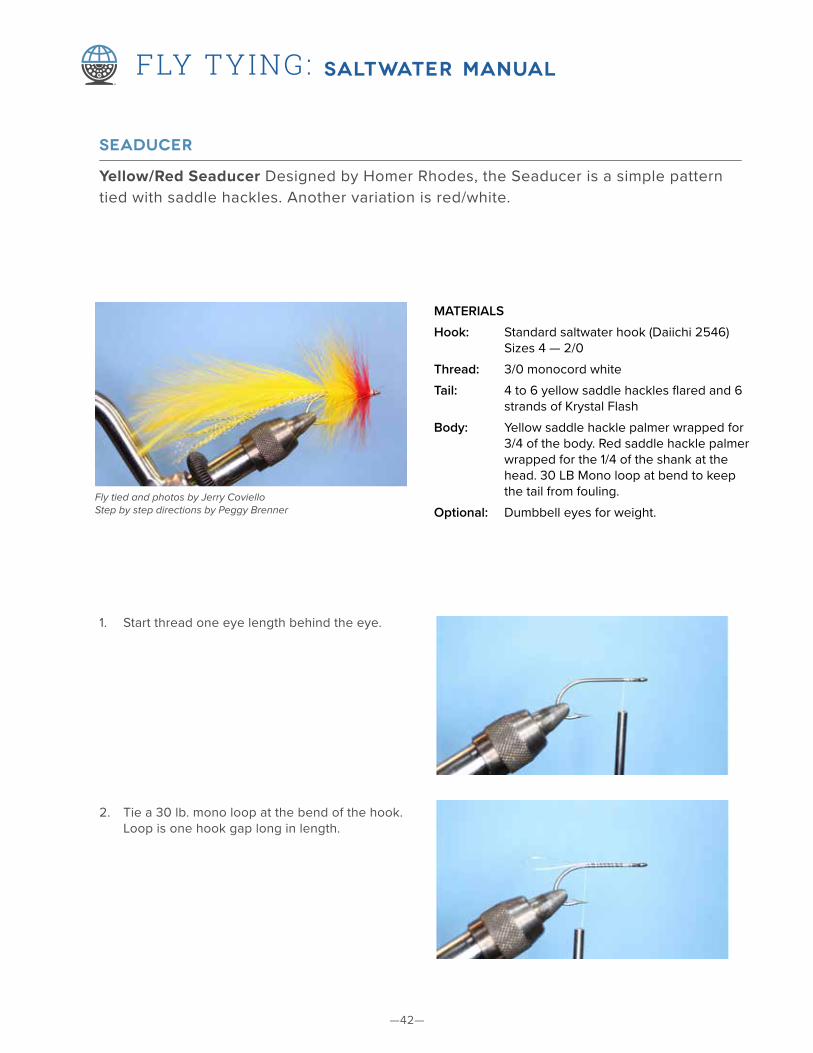
1. Start thread one eye length behind the eye.
2. Tie a 30 lb. mono loop at the bend of the hook. Loop is one hook gap long in length.
Fly tied and photos by Jerry CovielloStep by step directions by Peggy Brenner

—43—
FLY TYING: SALTWATER MANUAL
3. Tie in 4 to 6 yellow saddle feathers splayed. Tie in at the bend of the hook. Length of the tail is 3 times the shank of the hook.
4. Tie in 6 strands of Krystal Flash on each side at the bend of the hook. Flash should not exceed the length of the tail feather.
5. Tie in the body hackle. This will be palmered around the shank of the hook.
6. Start palmering the yellow hackle around the shank of the hook.

—44—
FLY TYING: SALTWATER MANUAL
7. Continue to fill the body with yellow hackle for ¾ the length of the shank of the hook.
8. For the last 1/4 of the shank of the hook, tie in a red hackle.
9. Palmer the red hackle for the last part of the body.
10. Whip finish and add head cement.
—45—
FLY TYING: SALTWATER MANUAL
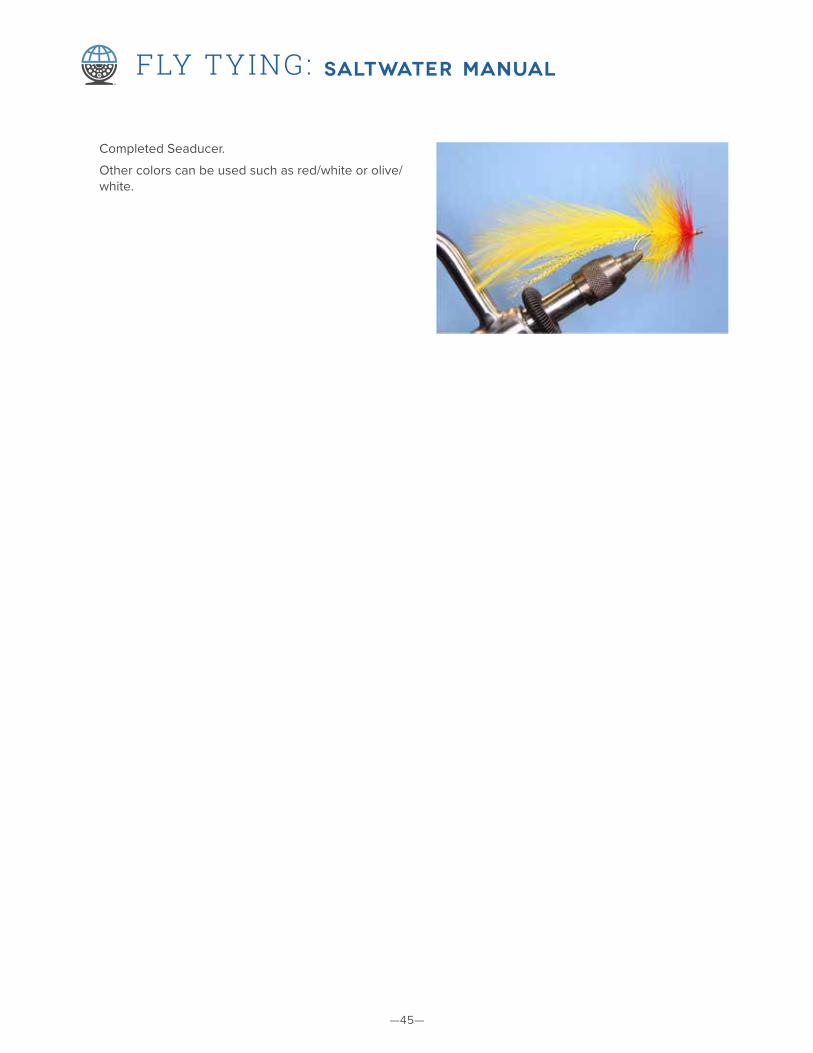
Completed Seaducer.Other colors can be used such as red/white or olive/white.

—46—
FLY TYING: SALTWATER MANUAL
SQUIRREL TAIL EEL STREAMER
Over 20 years ago I was at the Worcester Massachusetts Fishing and Hunting Expo. I was judging a fly tying contest with Jack Gartside and had the privilege of meeting a few FFI members. One member showed me this pattern. He was a guide in the Boston area and swore that this was his secret pattern for stripers.
MATERIALS
Hook: Standard saltwater hookThread: 3/0 whiteTail: Dun Ewing Feathers Deceiver Pac, with
Krystal Flash and squirrel tail tied around the bend
Body: Medium Mylar tubeWing: Squirrel tail tips to bendThroat: White calf tail and red Krystal FlashHead: Red Solerez UV resinEyes: Small stick-on eyes covered with Solarez
Bone Dry
1. Place your hook in the vise.
2. Secure your thread behind the eye of the hook and bring your thread to the bend of the hook.
Fly tied and photos by Jerry Coviello

—47—
FLY TYING: SALTWATER MANUAL
3. Tie in one pair of dun saddle hackles. Should be 21/2 to 3 times the length of the shank of the hook. Tie at the bend of the hook.
4. Add a few strands of Krystal Flash to each side of the tail.
5. Tie the squirrel tail tips on top of the shank at the bend of the hook. These should be the length of the shank of the hook.
6. Turn the fly upside down and tie the squirrel tail at the bend of the hook matching the length of the top bunch.
—48—
FLY TYING: SALTWATER MANUAL
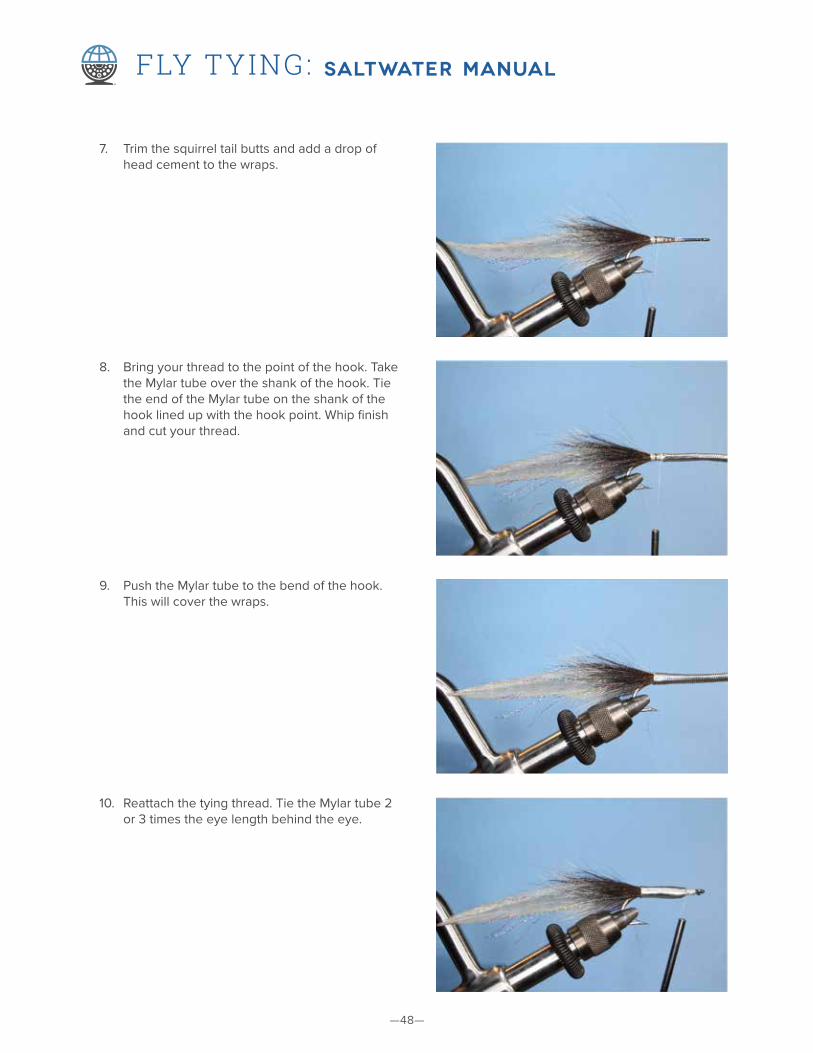
7. Trim the squirrel tail butts and add a drop of head cement to the wraps.
8. Bring your thread to the point of the hook. Take the Mylar tube over the shank of the hook. Tie the end of the Mylar tube on the shank of the hook lined up with the hook point. Whip finish and cut your thread.
9. Push the Mylar tube to the bend of the hook. This will cover the wraps.
10. Reattach the tying thread. Tie the Mylar tube 2 or 3 times the eye length behind the eye.

—49—
FLY TYING: SALTWATER MANUAL
11. Tie in a few strands of Krystal Flash.
12. Turn the fly upside down. Tie in the throat with white calf tail then red Krystal Flash.
13. Tie in squirrel tail for the wing. Tips should extend past the bend of the hook.
14. Make a head and whip finish. Coat the head with Solarez UV thin color resin. I used fluorescent red.
—50—
FLY TYING: SALTWATER MANUAL
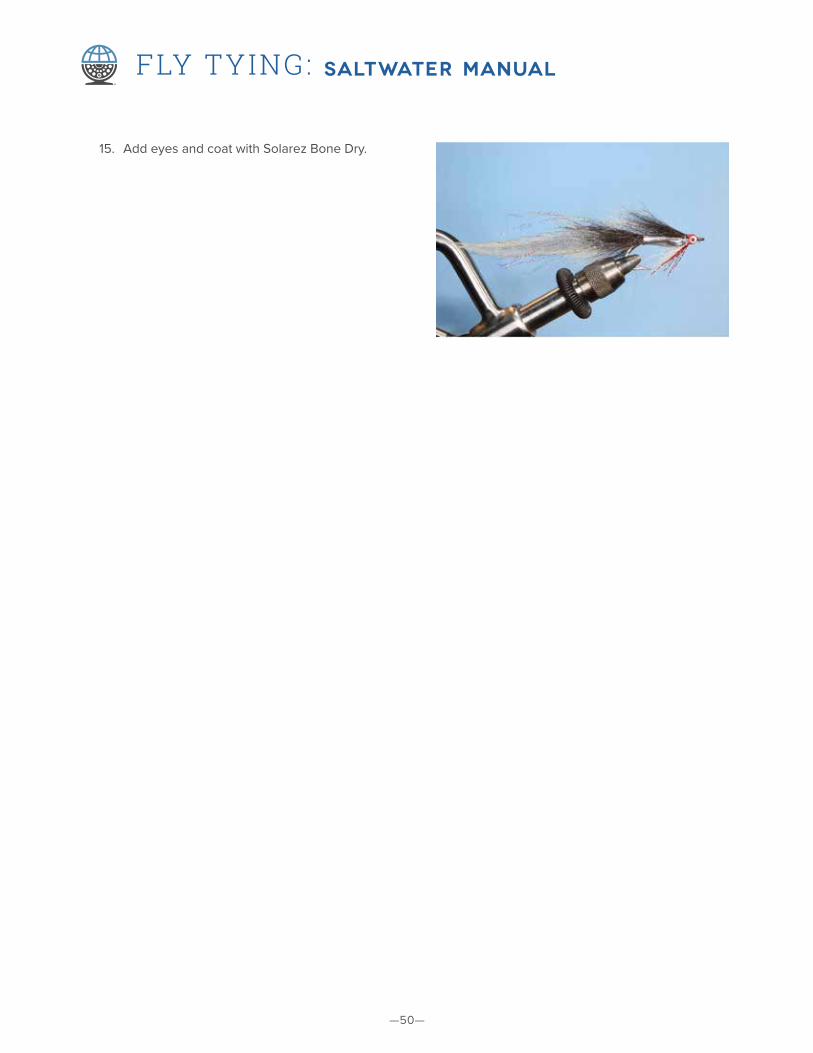
15. Add eyes and coat with Solarez Bone Dry.
—51—
FLY TYING: SALTWATER MANUAL
DEER HAIR BUNNY
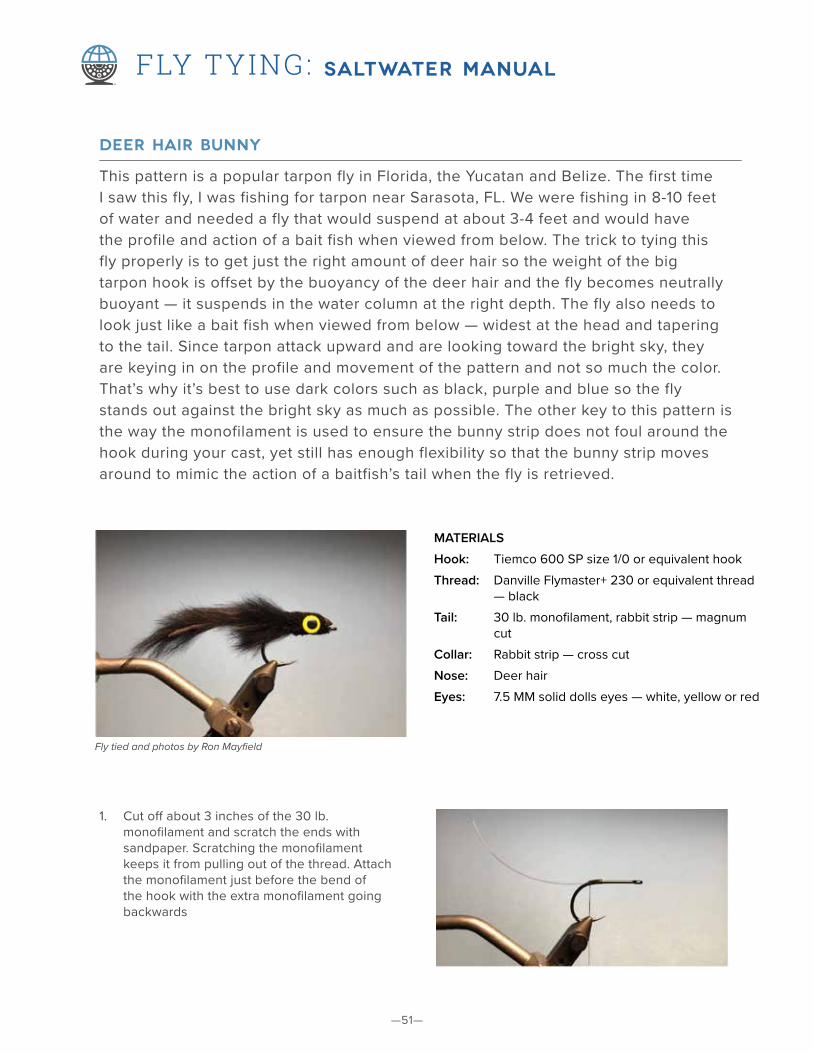
This pattern is a popular tarpon fly in Florida, the Yucatan and Belize. The first time I saw this fly, I was fishing for tarpon near Sarasota, FL. We were fishing in 8-10 feet of water and needed a fly that would suspend at about 3-4 feet and would have the profile and action of a bait fish when viewed from below. The trick to tying this fly properly is to get just the right amount of deer hair so the weight of the big tarpon hook is offset by the buoyancy of the deer hair and the fly becomes neutrally buoyant — it suspends in the water column at the right depth. The fly also needs to look just like a bait fish when viewed from below — widest at the head and tapering to the tail. Since tarpon attack upward and are looking toward the bright sky, they are keying in on the profile and movement of the pattern and not so much the color. That’s why it’s best to use dark colors such as black, purple and blue so the fly stands out against the bright sky as much as possible. The other key to this pattern is the way the monofilament is used to ensure the bunny strip does not foul around the hook during your cast, yet still has enough flexibility so that the bunny strip moves around to mimic the action of a baitfish’s tail when the fly is retrieved.
MATERIALS
Hook: Tiemco 600 SP size 1/0 or equivalent hookThread: Danville Flymaster+ 230 or equivalent thread
— blackTail: 30 lb. monofilament, rabbit strip — magnum
cutCollar: Rabbit strip — cross cutNose: Deer hairEyes: 7.5 MM solid dolls eyes — white, yellow or red
1. Cut off about 3 inches of the 30 lb. monofilament and scratch the ends with sandpaper. Scratching the monofilament keeps it from pulling out of the thread. Attach the monofilament just before the bend of the hook with the extra monofilament going backwards
Fly tied and photos by Ron Mayfield

—52—
FLY TYING: SALTWATER MANUAL
2. Cut 2 1/4 inches of the magnum rabbit strip. Taper one end to a point. Then 1 inch from the tapered end, poke a hole in the rabbit strip with your dubbing needle. The hole must be large enough for the monofilament to easily go through.
3. Attach the magnum rabbit strip on top of where you tied in the monofilament — just before the bend of the hook. Then run the monofilament through the hole in the magnum rabbit strip.
4. Bend the tag end of the monofilament over so it forms a loop and attach it to the hook at the same place as the magnum rabbit strip. Trim the excess monofilament. Make sure the monofilament is exactly in a straight line with the hook. If the monofilament bends to one side or the other, the fly will not go through the water in a natural way when retrieved.

—53—
FLY TYING: SALTWATER MANUAL
5. Attach the crosscut rabbit strip on top of where you tied in the monofilament.
6. Make two wraps of the crosscut rabbit strip around the hook then tie off the crosscut rabbit strip and trim the excess. Apply a drop or two of a water-based head cement.
7. Spin deer hair from the point where the crosscut rabbit strip was tied to the eye of the hook. Do not pack the hair tightly. Too much deer hair will cause the fly to float instead of becoming neutrally buoyant.
8. Trim the deer hair as shown. The nose should be rounded on the top and sides. Below the hook shank should be trimmed flat and as close to the hook as possible.
—54—
FLY TYING: SALTWATER MANUAL
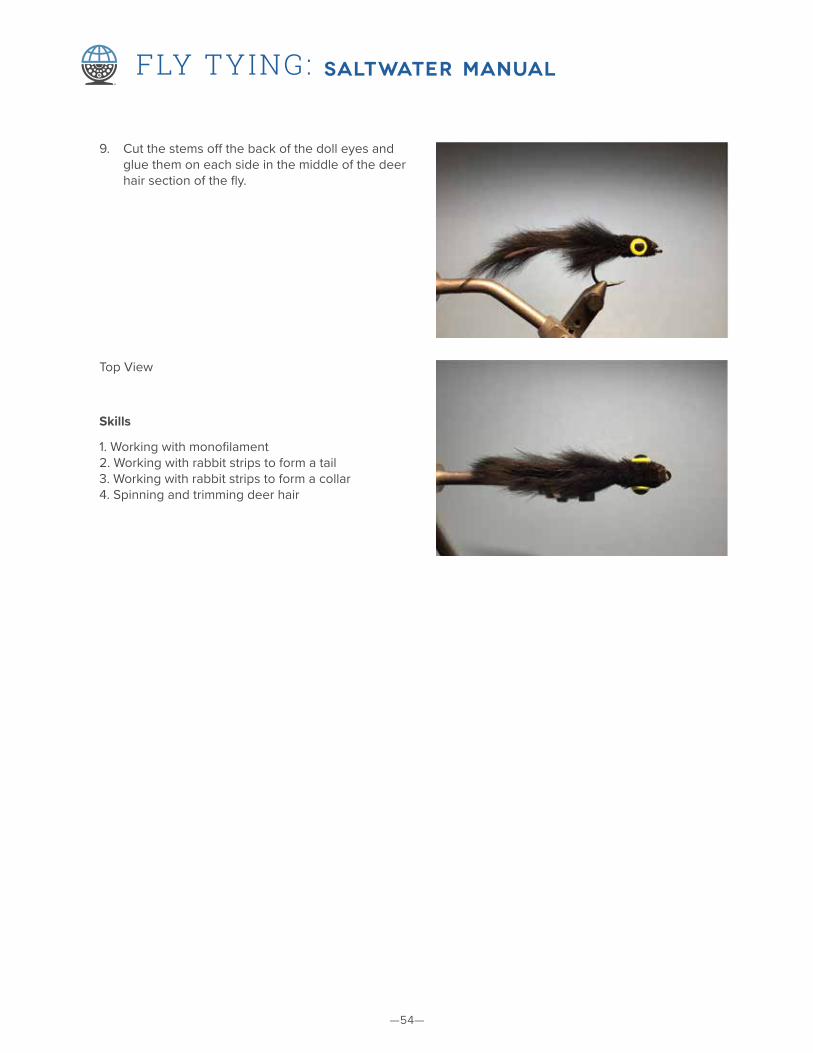
9. Cut the stems off the back of the doll eyes and glue them on each side in the middle of the deer hair section of the fly.
Top View
Skills
1. Working with monofilament2. Working with rabbit strips to form a tail3. Working with rabbit strips to form a collar4. Spinning and trimming deer hair

—55—
FLY TYING: SALTWATER MANUAL
LEMON DROP TARPON FLY
This is Steve Huff’s legendary tarpon fly for the Keys and beyond. Classic styling with “Key’s” style exposed shank to compensate for snelling to leaders and monofilament overlay on the head.
The Lemon Drop was originally tied using monofilament for the head. Harry Speer, iconic tarpon guide, fly tyer, and now skiff builder, tells me the ladies tying these in one of the first commercial tying outfits in the Keys came up with using mono for head finishing so they could tie faster. They did not have the mess of head cement, nor time waiting for the head to dry. Nowadays, the finish is with larva lace d-rib, etc. and advanced head finish of epoxy resin, or cement.
MATERIALS
Hook: Owner AKI 2/0 or 3/0Thread: YellowDanville: Flat wax nylon or UNI-Thread 6/0 or UTC
Waxed 280Tail: White rooster neckHackle: Yellow saltwater rooster cape and select
marabou yellowHead: Clear ribbing or #40 monofilament
1. Catch thread mid-shank and wrap back toward bend between barb and point.
2. Select and prepare four white cape feathers two times the length of the hook shank. Tie in on top of hook shank and lightly cement.
Fly tied and photos by Chip and Hugh Smith

—56—
FLY TYING: SALTWATER MANUAL
3. Tie in marabou in even clumps around shank and trim waste.
4. Select, prepare, tie in and palmer yellow rooster hackle.
5. Tie in clear ribbing and wrap around head. Tie off below the shank. Whip finish behind head and cement.
6. Wrap the clear ribbing back toward the bend of the hook and secure in front of hackle at bend of the hook.

—57—
FLY TYING: SALTWATER MANUAL
7. Whip finish and add cement to wraps.
Finished Lemon Drop
—58—
FLY TYING: SALTWATER MANUAL
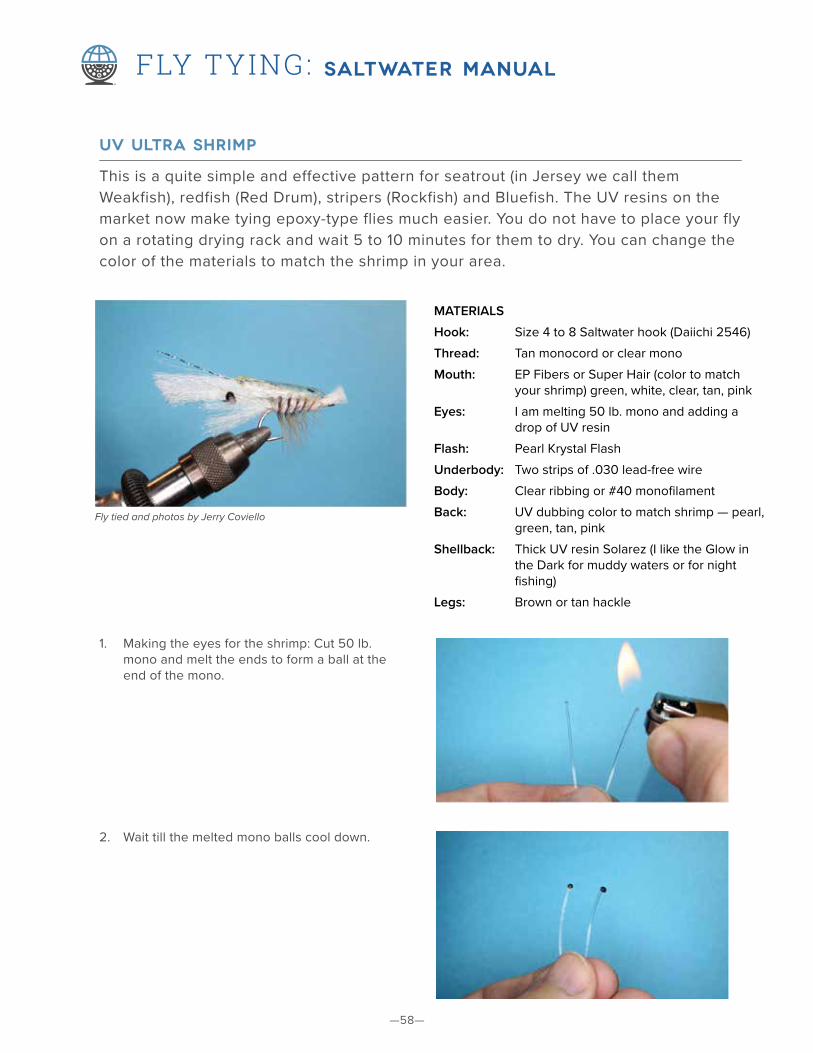
UV ULTRA SHRIMP
This is a quite simple and effective pattern for seatrout (in Jersey we call them Weakfish), redfish (Red Drum), stripers (Rockfish) and Bluefish. The UV resins on the market now make tying epoxy-type flies much easier. You do not have to place your fly on a rotating drying rack and wait 5 to 10 minutes for them to dry. You can change the color of the materials to match the shrimp in your area.
MATERIALS
Hook: Size 4 to 8 Saltwater hook (Daiichi 2546)Thread: Tan monocord or clear monoMouth: EP Fibers or Super Hair (color to match
your shrimp) green, white, clear, tan, pinkEyes: I am melting 50 lb. mono and adding a
drop of UV resinFlash: Pearl Krystal FlashUnderbody: Two strips of .030 lead-free wireBody: Clear ribbing or #40 monofilamentBack: UV dubbing color to match shrimp — pearl,
green, tan, pinkShellback: Thick UV resin Solarez (I like the Glow in
the Dark for muddy waters or for night fishing)
Legs: Brown or tan hackle
1. Making the eyes for the shrimp: Cut 50 lb. mono and melt the ends to form a ball at the end of the mono.
Fly tied and photos by Jerry Coviello
2. Wait till the melted mono balls cool down.
—59—
FLY TYING: SALTWATER MANUAL
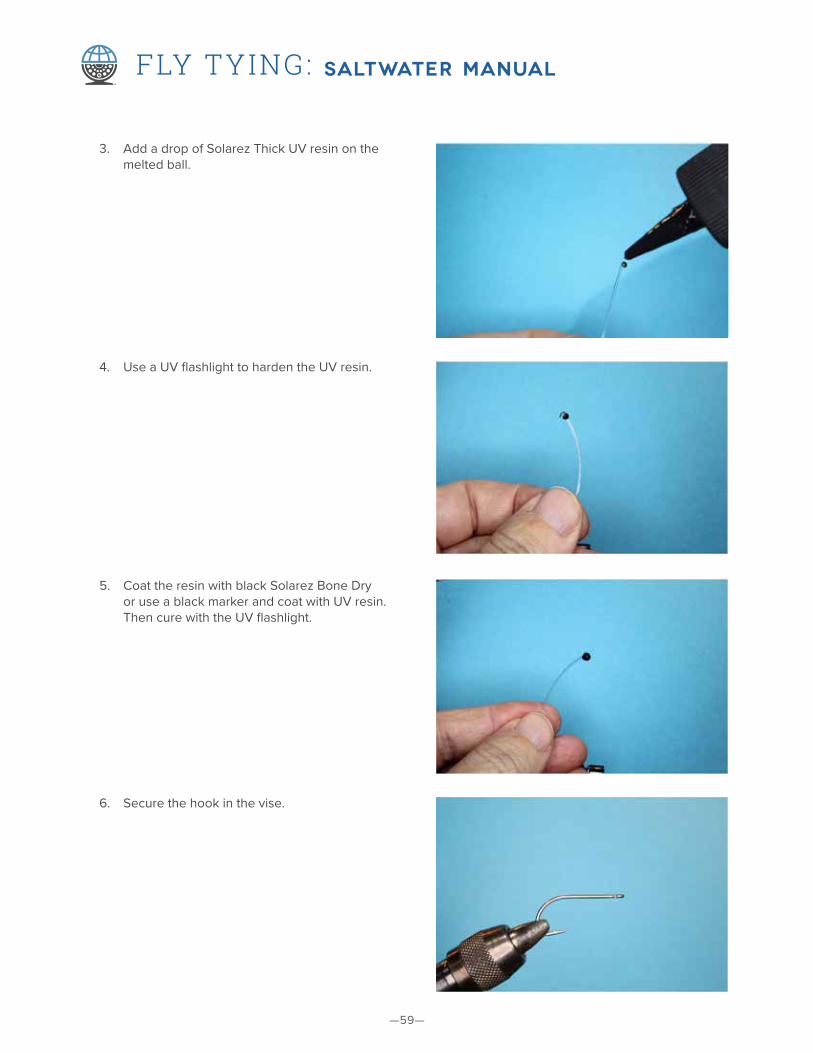
3. Add a drop of Solarez Thick UV resin on the melted ball.
4. Use a UV flashlight to harden the UV resin.
5. Coat the resin with black Solarez Bone Dry or use a black marker and coat with UV resin. Then cure with the UV flashlight.
6. Secure the hook in the vise.
—60—
FLY TYING: SALTWATER MANUAL
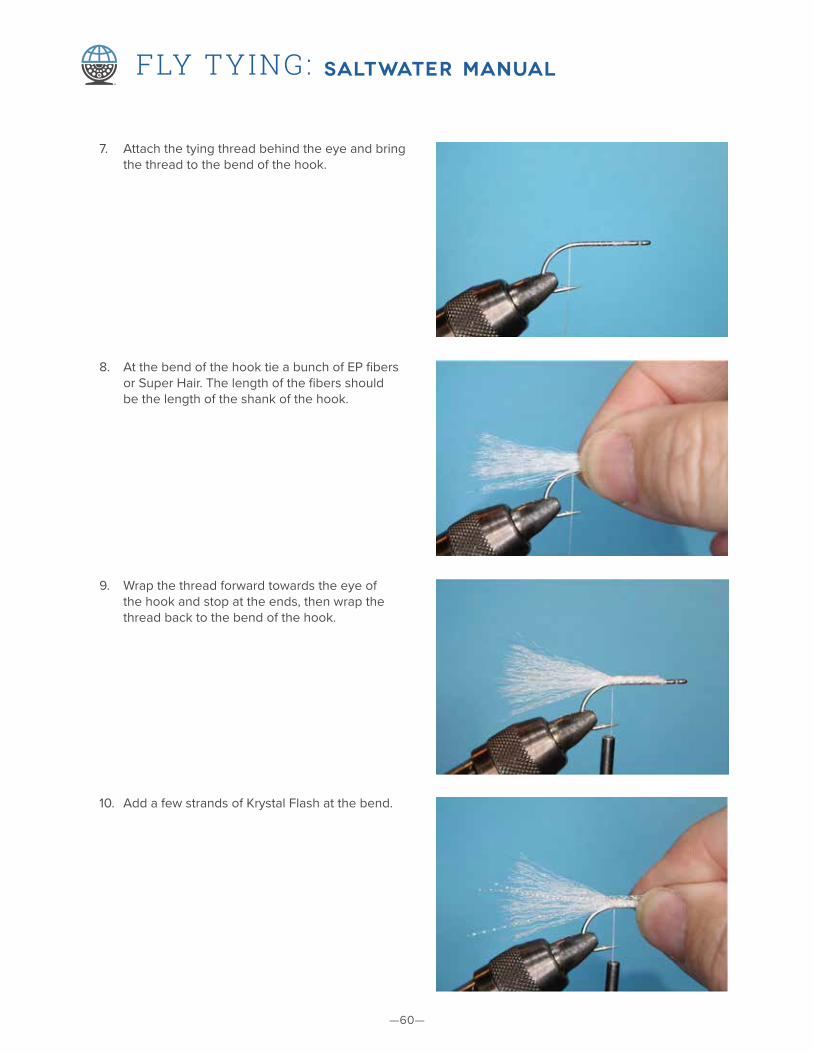
7. Attach the tying thread behind the eye and bring the thread to the bend of the hook.
8. At the bend of the hook tie a bunch of EP fibers or Super Hair. The length of the fibers should be the length of the shank of the hook.
9. Wrap the thread forward towards the eye of the hook and stop at the ends, then wrap the thread back to the bend of the hook.
10. Add a few strands of Krystal Flash at the bend.

—61—
FLY TYING: SALTWATER MANUAL
11. Leave some Krystal Flash strand long for feelers.
12. Tie the mono eyes on each side of the shank. To turn them upwards, use a heated bodkin (needle) and hold against the mono. Be careful not to melt the mono.
13. Tie in 2 strips of non-lead wire on the bottom of the body.
14. Tie in a brown or tan hackle at the bend of the hook.
—62—
FLY TYING: SALTWATER MANUAL
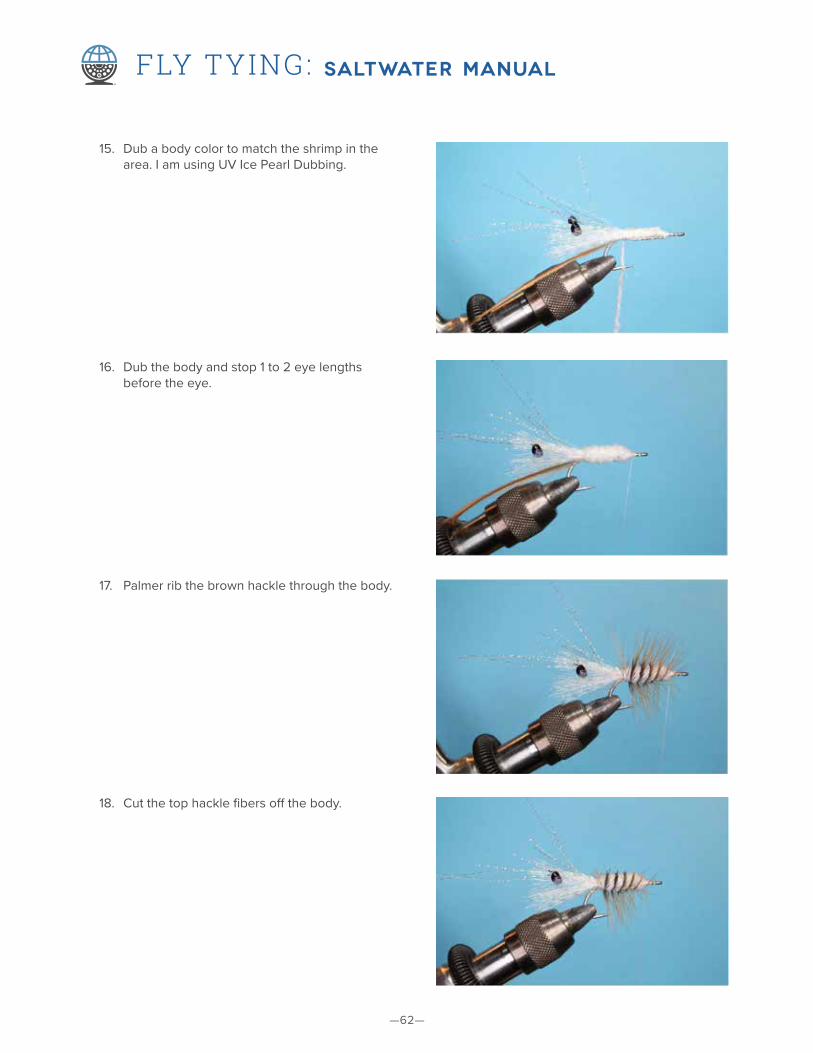
15. Dub a body color to match the shrimp in the area. I am using UV Ice Pearl Dubbing.
16. Dub the body and stop 1 to 2 eye lengths before the eye.
17. Palmer rib the brown hackle through the body.
18. Cut the top hackle fibers off the body.
—63—
FLY TYING: SALTWATER MANUAL
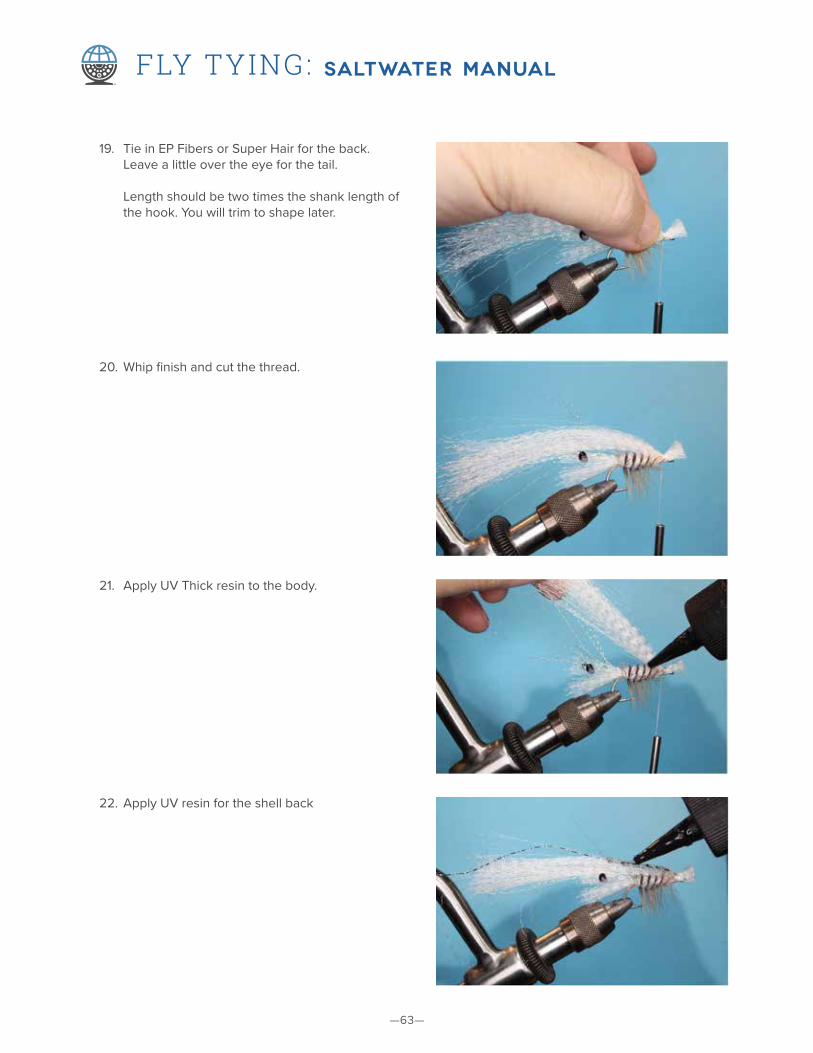
19. Tie in EP Fibers or Super Hair for the back. Leave a little over the eye for the tail. Length should be two times the shank length of the hook. You will trim to shape later.
20. Whip finish and cut the thread.
21. Apply UV Thick resin to the body.
22. Apply UV resin for the shell back

—64—
FLY TYING: SALTWATER MANUAL
23. Also add to the sides of the back, creating a shell back shape.
24. Cut the EP fibers to shape. This is done and ready to fish.

—65—
FLY TYING: SALTWATER MANUAL
GOTCHA
A quintessential bonefish fly from Jim McVay originally tied from frayed fabric from a Bahamian taxi. The name was coined after his guide said “gotcha” every time a bonefish hit this new fly.
MATERIALS
Hook: Mustad 34007 #4 or equivalentThread: Pink, Danville Flatwax Nylon or UNI-Thread
6/0 or UTC Waxed 280Eyes: Medium bead chainBody: Pearl Diamond Braid and clear ribbing —
mediumTail: Pearlescent Mylar tubingWing: Calf tail tan Flash: Krystal Flash Gray Ghost
1. Catch thread at hook eye and wrap back toward bend/hook point.
Fly tied and photos by Chip and Hugh Smith
2. Wrap forward to 1/3 portion of the shank.
—66—
FLY TYING: SALTWATER MANUAL
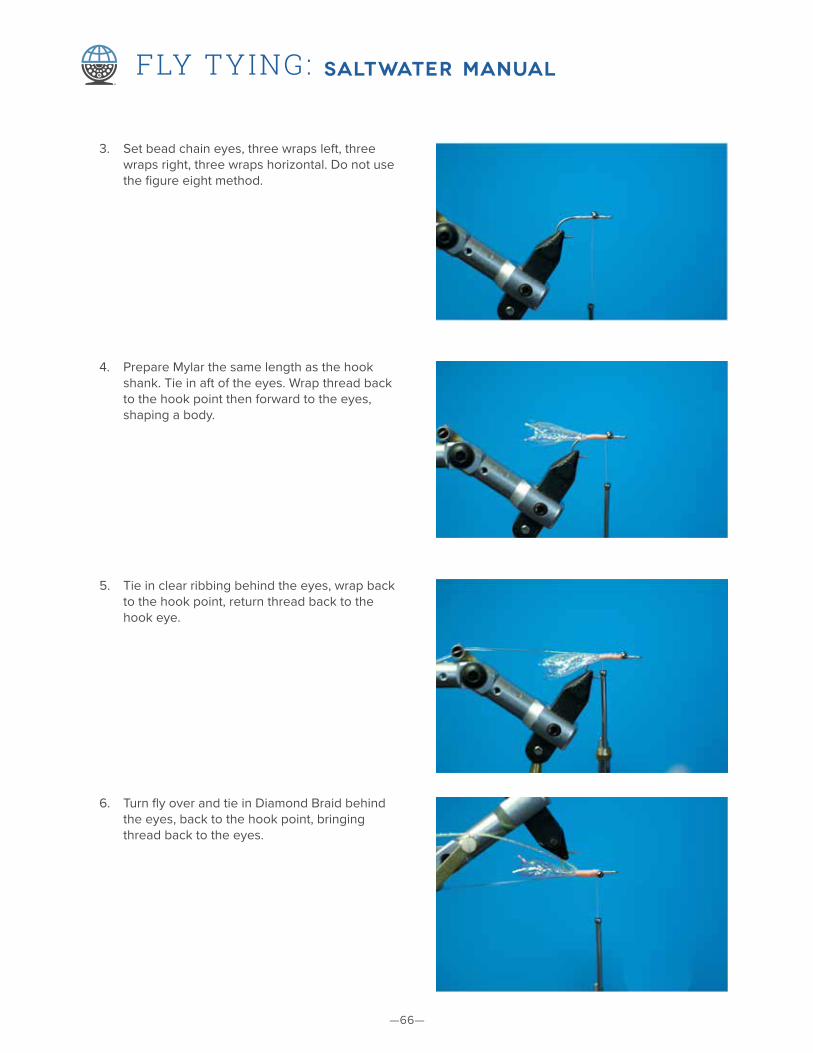
3. Set bead chain eyes, three wraps left, three wraps right, three wraps horizontal. Do not use the figure eight method.
4. Prepare Mylar the same length as the hook shank. Tie in aft of the eyes. Wrap thread back to the hook point then forward to the eyes, shaping a body.
5. Tie in clear ribbing behind the eyes, wrap back to the hook point, return thread back to the hook eye.
6. Turn fly over and tie in Diamond Braid behind the eyes, back to the hook point, bringing thread back to the eyes.
—67—
FLY TYING: SALTWATER MANUAL
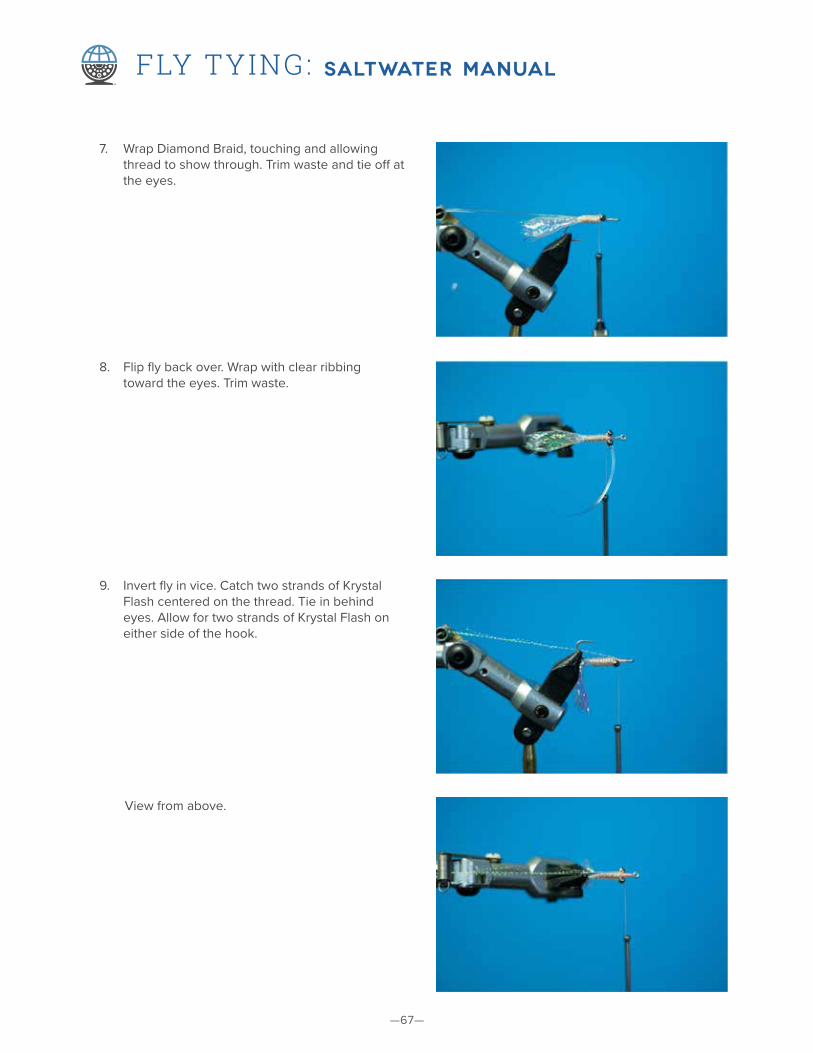
7. Wrap Diamond Braid, touching and allowing thread to show through. Trim waste and tie off at the eyes.
8. Flip fly back over. Wrap with clear ribbing toward the eyes. Trim waste.
9. Invert fly in vice. Catch two strands of Krystal Flash centered on the thread. Tie in behind eyes. Allow for two strands of Krystal Flash on either side of the hook.
View from above.

—68—
FLY TYING: SALTWATER MANUAL
10. Build up thread in front of the eyes. Trim and prepare tan calf tail. Invert and tie in forward of the eyes. Shape head, whip finish, cement. Use bodkin to unweave Mylar tail.
—69—
FLY TYING: SALTWATER MANUAL
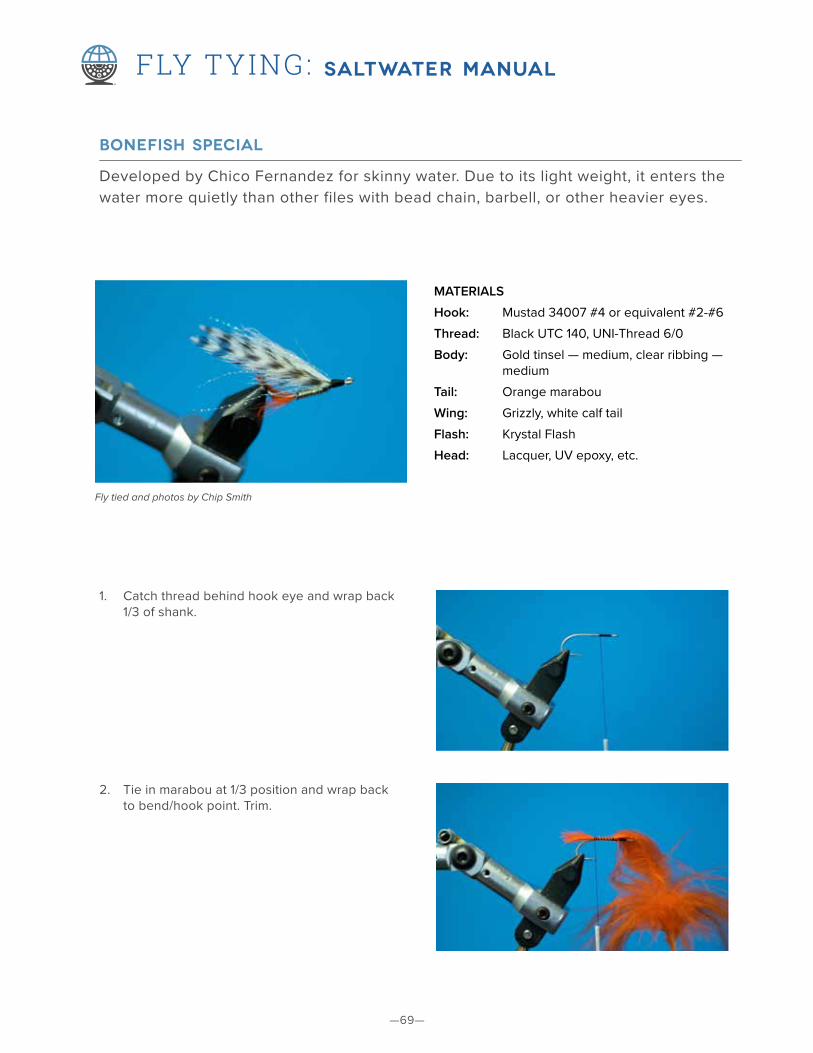
BONEFISH SPECIAL
Developed by Chico Fernandez for skinny water. Due to its light weight, it enters the water more quietly than other files with bead chain, barbell, or other heavier eyes.
MATERIALS
Hook: Mustad 34007 #4 or equivalent #2-#6Thread: Black UTC 140, UNI-Thread 6/0Body: Gold tinsel — medium, clear ribbing —
mediumTail: Orange marabouWing: Grizzly, white calf tailFlash: Krystal Flash Head: Lacquer, UV epoxy, etc.
1. Catch thread behind hook eye and wrap back 1/3 of shank.
Fly tied and photos by Chip Smith
2. Tie in marabou at 1/3 position and wrap back to bend/hook point. Trim.
—70—
FLY TYING: SALTWATER MANUAL
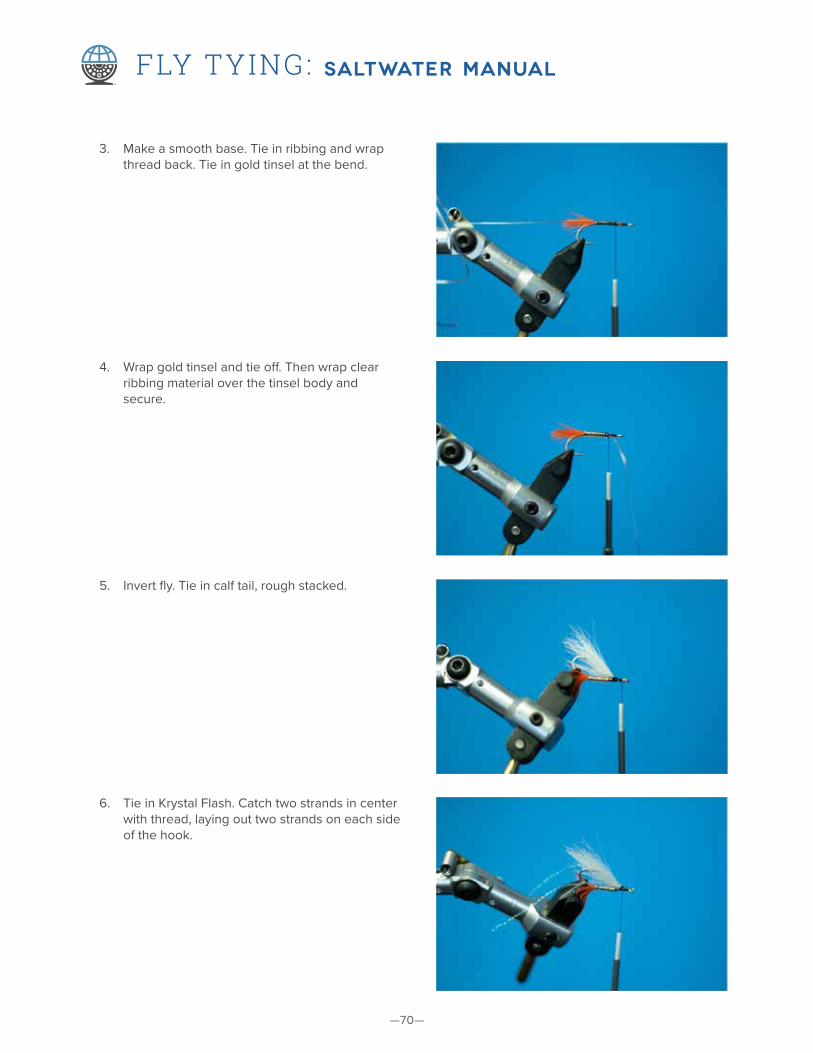
3. Make a smooth base. Tie in ribbing and wrap thread back. Tie in gold tinsel at the bend.
4. Wrap gold tinsel and tie off. Then wrap clear ribbing material over the tinsel body and secure.
5. Invert fly. Tie in calf tail, rough stacked.
6. Tie in Krystal Flash. Catch two strands in center with thread, laying out two strands on each side of the hook.
—71—
FLY TYING: SALTWATER MANUAL
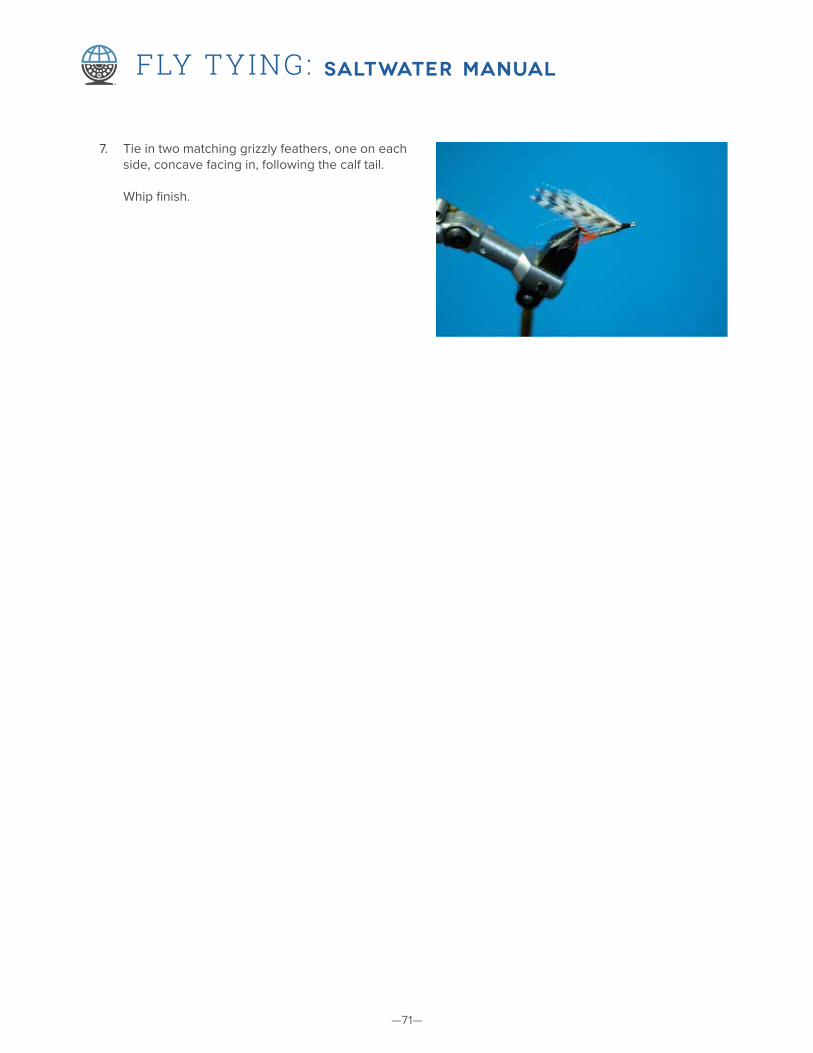
7. Tie in two matching grizzly feathers, one on each side, concave facing in, following the calf tail. Whip finish.

—72—
FLY TYING: SALTWATER MANUAL
THE CRAZY CHARLIE (PINK VERSION)
The Crazy Charlie is considered a bonefish fly that was developed for saltwater fly fishing on Andros Island in 1977 by local bonefish guide Charlie Smith. The original fly was developed to imitate glass minnows. This fly is a staple for bonefish and Permit anglers around the globe.
In the Northeast I have used this fly to imitate the grass shrimp in the bays, and have caught weakfish (seatrout), Bluefish, and Striped Bass using various colors, such as tan, olive and white.
MATERIALS
Hook: Standard saltwater hook (Daiichi 2546) size 2 through 8
Thread: Pink 6/0Eyes: Bead chain Underbody: 4 to 6 strands of pink Krystal Flash,
wrapped over the hook shankOver Body: Clear vinyl tubing, wrapped over the pink
Krystal FlashWing: Pink calf tailOver Wing: 4 strands of pink Krystal FlashHead: Pink thread coated with head cement or
Solarez UV Bone Dry resin
1. Place your hook in the vise, secure the tying thread one eye length behind the eye.
Fly tied and photos by Jerry Coviello
2. Tie in the bead chain eyes on top of the hook shank, tying them at least 1/4 of the shank from the eye of the hook. Tie them on top of the hook shank so the point of the hook rides upside down.
—73—
FLY TYING: SALTWATER MANUAL
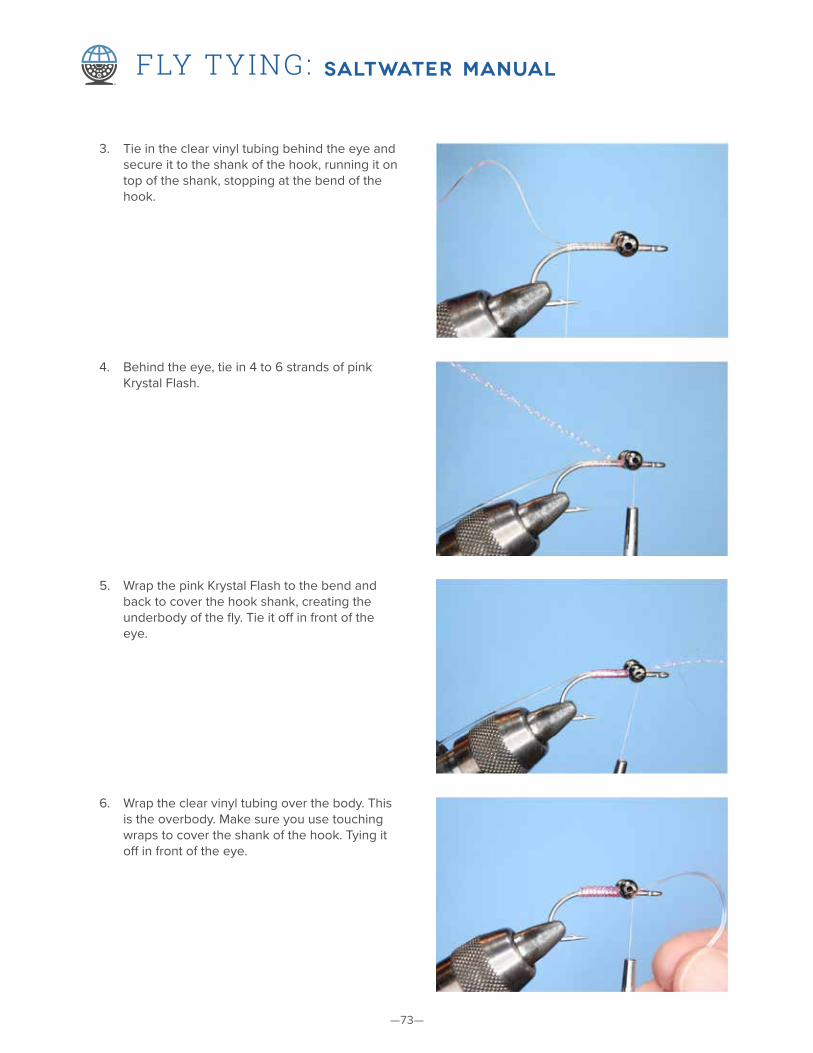
3. Tie in the clear vinyl tubing behind the eye and secure it to the shank of the hook, running it on top of the shank, stopping at the bend of the hook.
4. Behind the eye, tie in 4 to 6 strands of pink Krystal Flash.
5. Wrap the pink Krystal Flash to the bend and back to cover the hook shank, creating the underbody of the fly. Tie it off in front of the eye.
6. Wrap the clear vinyl tubing over the body. This is the overbody. Make sure you use touching wraps to cover the shank of the hook. Tying it off in front of the eye.

—74—
FLY TYING: SALTWATER MANUAL
7. Stack and measure the pink calf tail. The tips are a half gap length past the bend of the hook.
8. To make a nice neat head that is smooth and wedge shaped, I cut the butts even. Then place them behind the eye so that when I start my first wrap of tying thread this will make a nice head.
9. As you wrap the thread over the butt ends of the calf tail, have them roll onto the shank behind the eye.
10. Secure the calf tail and form a nice tapered head.
—75—
FLY TYING: SALTWATER MANUAL
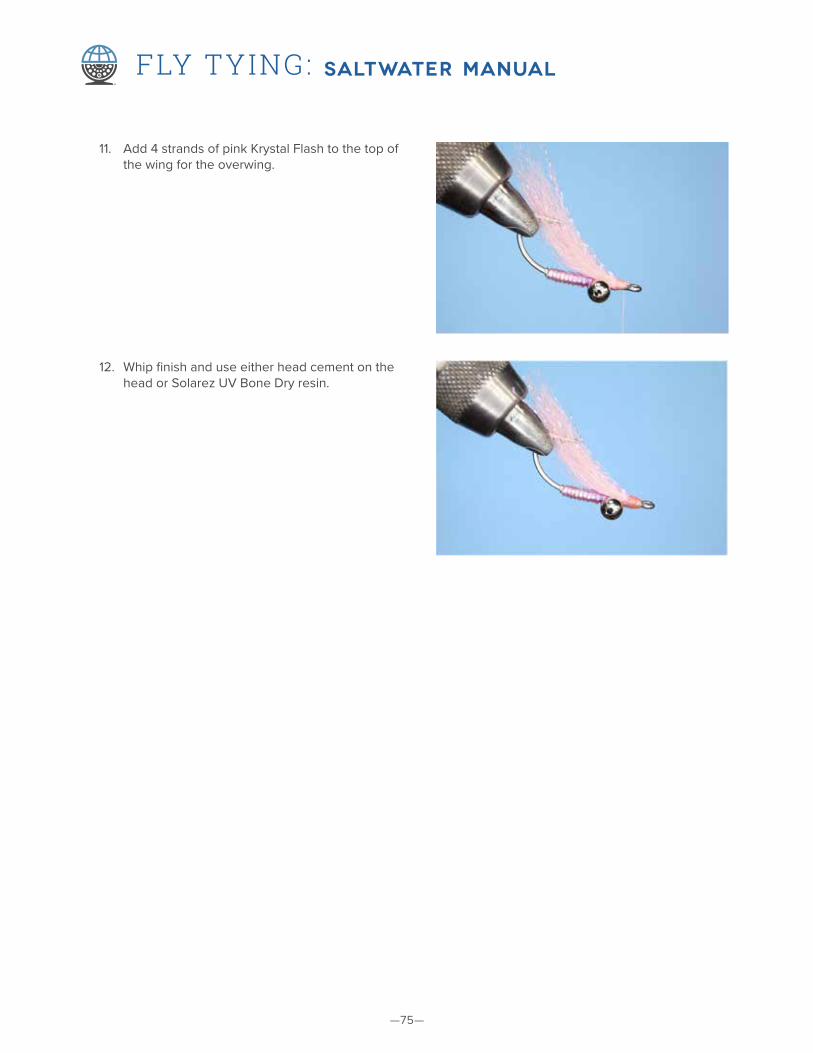
11. Add 4 strands of pink Krystal Flash to the top of the wing for the overwing.
12. Whip finish and use either head cement on the head or Solarez UV Bone Dry resin.
—76—
FLY TYING: SALTWATER MANUAL
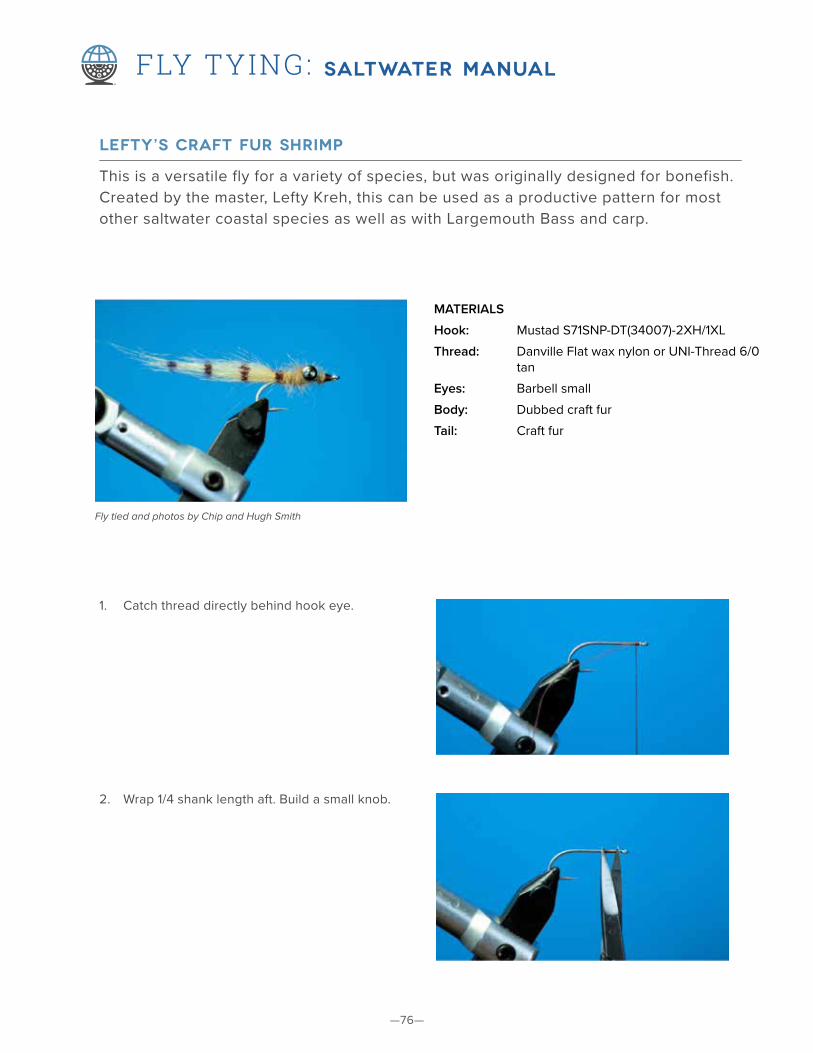
LEFTY’S CRAFT FUR SHRIMP
This is a versatile fly for a variety of species, but was originally designed for bonefish. Created by the master, Lefty Kreh, this can be used as a productive pattern for most other saltwater coastal species as well as with Largemouth Bass and carp.
MATERIALS
Hook: Mustad S71SNP-DT(34007)-2XH/1XLThread: Danville Flat wax nylon or UNI-Thread 6/0
tanEyes: Barbell smallBody: Dubbed craft furTail: Craft fur
1. Catch thread directly behind hook eye.
Fly tied and photos by Chip and Hugh Smith
2. Wrap 1/4 shank length aft. Build a small knob.
—77—
FLY TYING: SALTWATER MANUAL
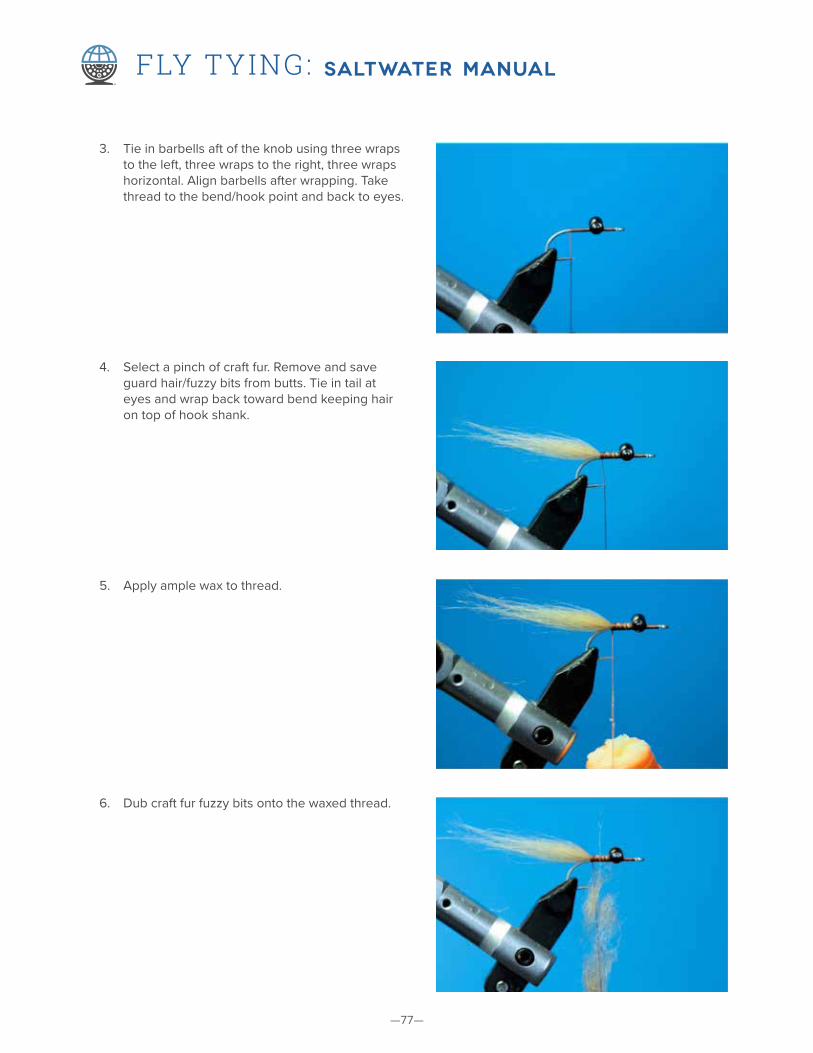
3. Tie in barbells aft of the knob using three wraps to the left, three wraps to the right, three wraps horizontal. Align barbells after wrapping. Take thread to the bend/hook point and back to eyes.
4. Select a pinch of craft fur. Remove and save guard hair/fuzzy bits from butts. Tie in tail at eyes and wrap back toward bend keeping hair on top of hook shank.
5. Apply ample wax to thread.
6. Dub craft fur fuzzy bits onto the waxed thread.
—78—
FLY TYING: SALTWATER MANUAL
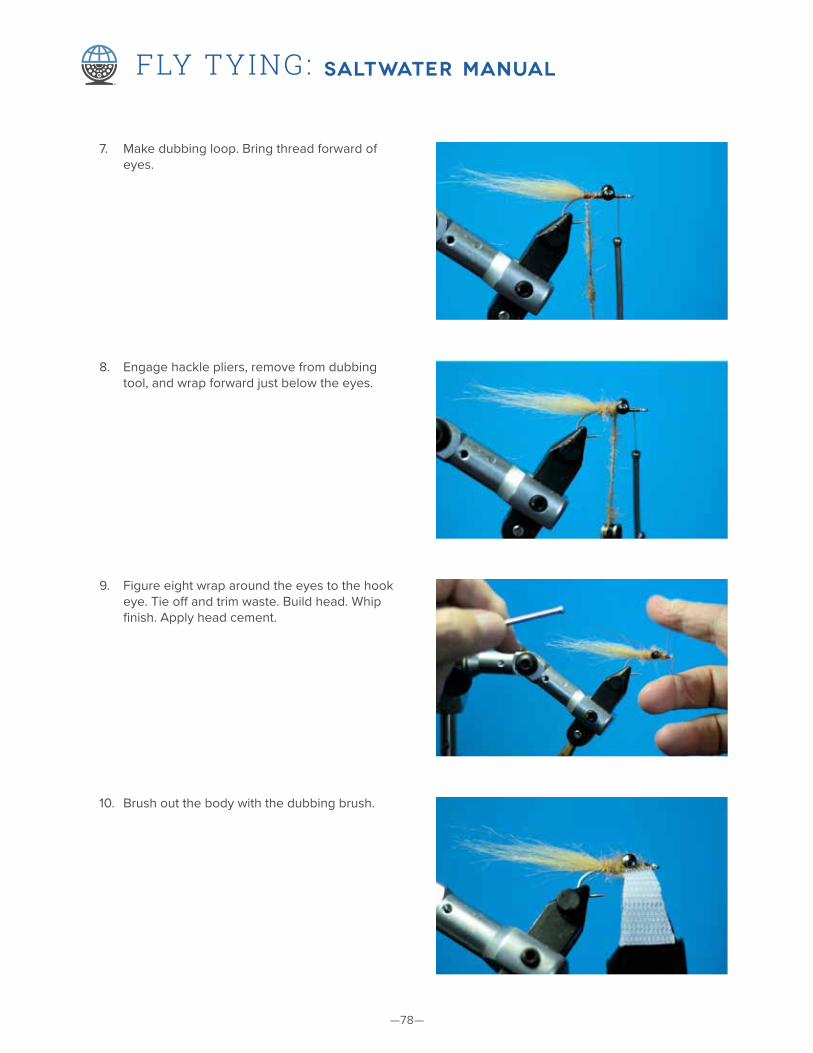
7. Make dubbing loop. Bring thread forward of eyes.
8. Engage hackle pliers, remove from dubbing tool, and wrap forward just below the eyes.
9. Figure eight wrap around the eyes to the hook eye. Tie off and trim waste. Build head. Whip finish. Apply head cement.
10. Brush out the body with the dubbing brush.

—79—
FLY TYING: SALTWATER MANUAL
11. With a marker, bar the tail.

—80—
FLY TYING: SALTWATER MANUAL
BORSKI’S REDFISH SLIDER
The Borski Slider was originally invented for Bonefish, but became a great pattern for redfish in the Southeastern US. It works in the shallows. The deer hair collar makes this fly weedless.
MATERIALS
Hook: Saltwater hook size 2Thread: 3/0 MonocordEyes: Dumbbell eyes — mediumTail: Tan Extra Select craft fur marked with
brown markerBody: Palmer wrapped brown hackleHead: Spun deer hair
1. Wrap the shank of the hook with your tying thread and bring the thread to the 1/3 from the eye hook. This is where the dumbbell eyes are tied in.
Fly tied and photos by Jerry Coviello
2. Tie in the dumbbell eyes on top of the shank of the hook. Apply head cement to lock the eyes in place.
—81—
FLY TYING: SALTWATER MANUAL
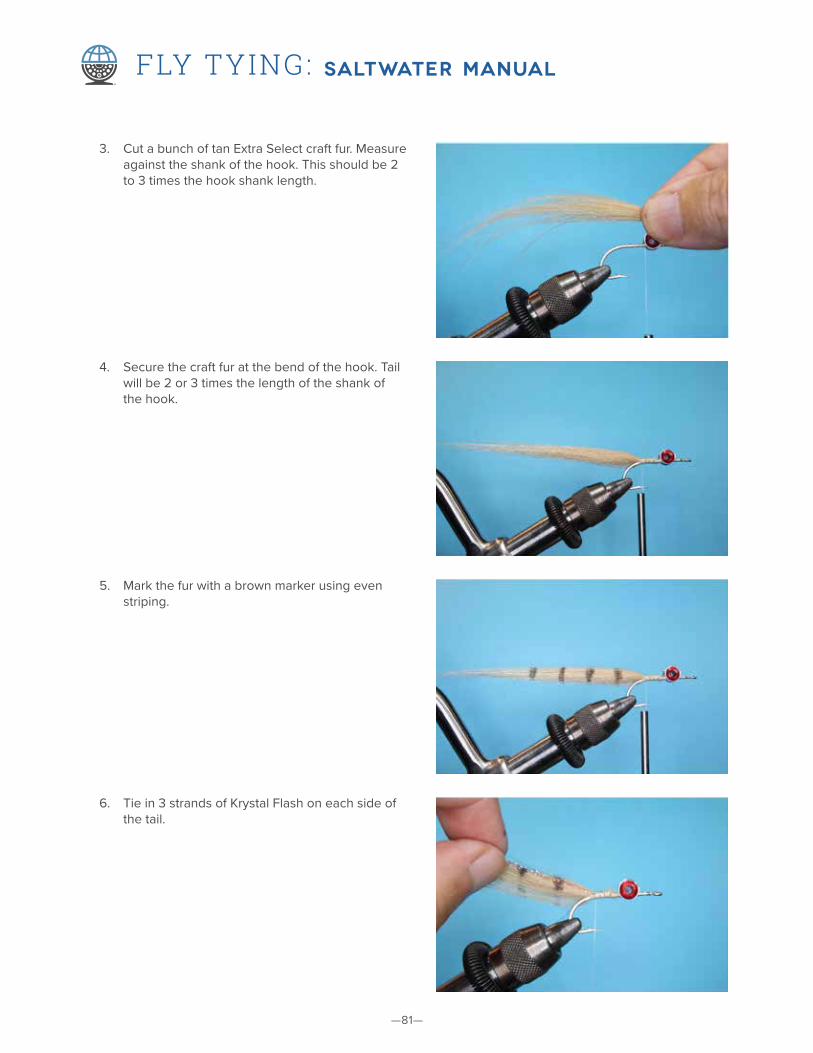
3. Cut a bunch of tan Extra Select craft fur. Measure against the shank of the hook. This should be 2 to 3 times the hook shank length.
4. Secure the craft fur at the bend of the hook. Tail will be 2 or 3 times the length of the shank of the hook.
5. Mark the fur with a brown marker using even striping.
6. Tie in 3 strands of Krystal Flash on each side of the tail.
—82—
FLY TYING: SALTWATER MANUAL
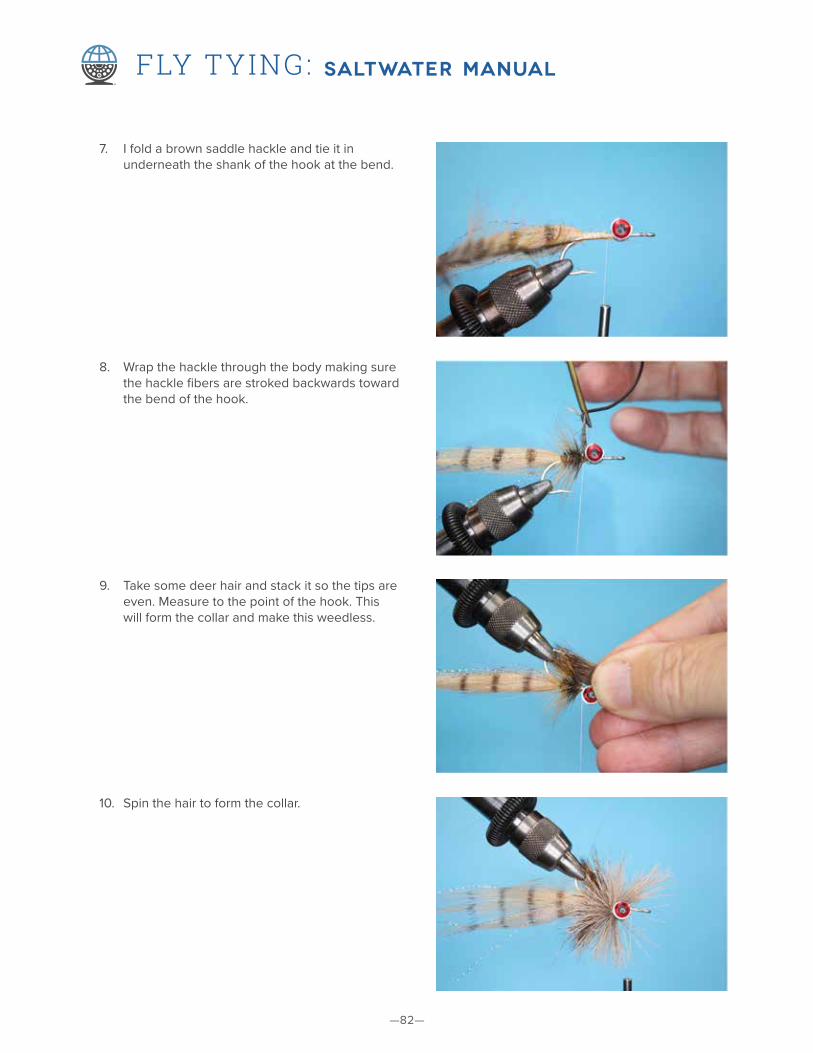
7. I fold a brown saddle hackle and tie it in underneath the shank of the hook at the bend.
8. Wrap the hackle through the body making sure the hackle fibers are stroked backwards toward the bend of the hook.
9. Take some deer hair and stack it so the tips are even. Measure to the point of the hook. This will form the collar and make this weedless.
10. Spin the hair to form the collar.
—83—
FLY TYING: SALTWATER MANUAL
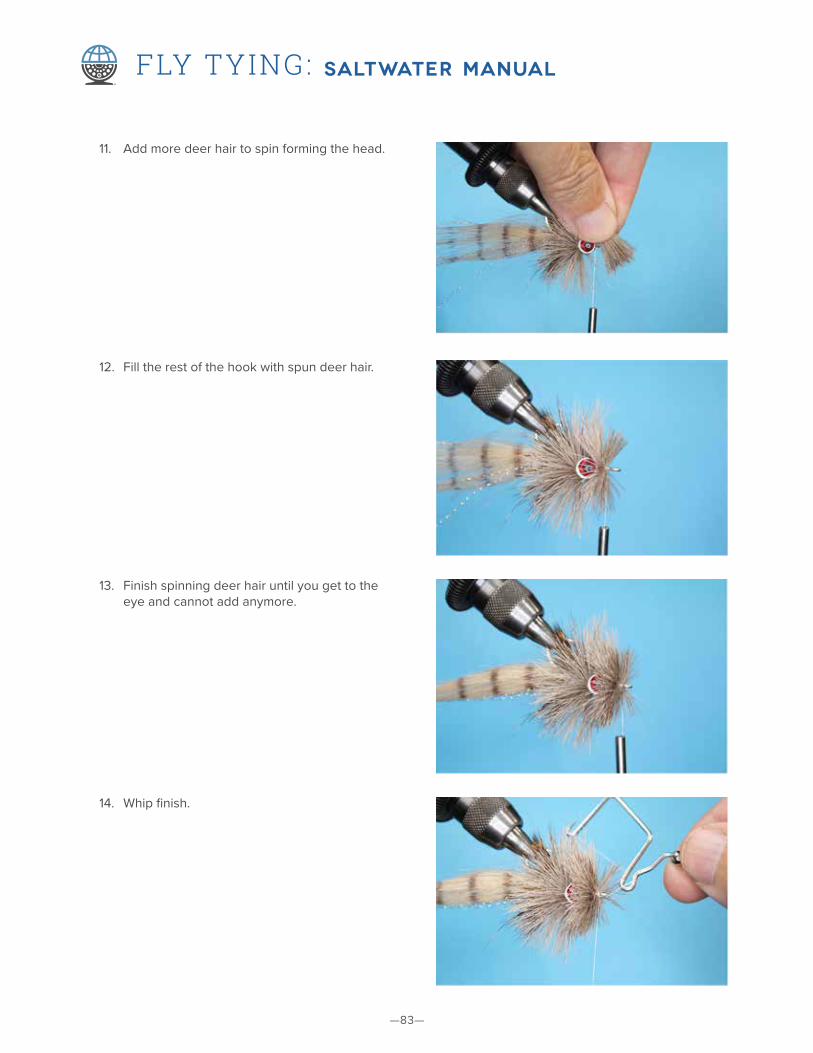
11. Add more deer hair to spin forming the head.
12. Fill the rest of the hook with spun deer hair.
13. Finish spinning deer hair until you get to the eye and cannot add anymore.
14. Whip finish.
—84—
FLY TYING: SALTWATER MANUAL
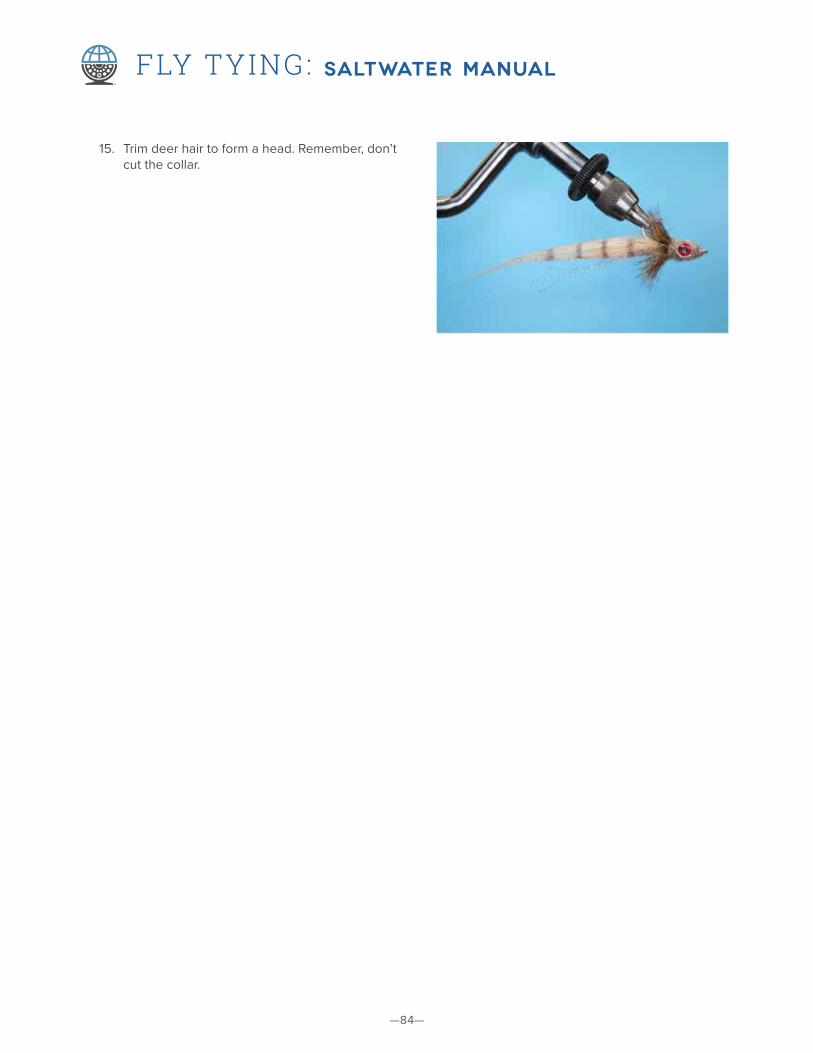
15. Trim deer hair to form a head. Remember, don’t cut the collar.
—85—
FLY TYING: SALTWATER MANUAL
DEL BROWN’S MERKIN CRAB
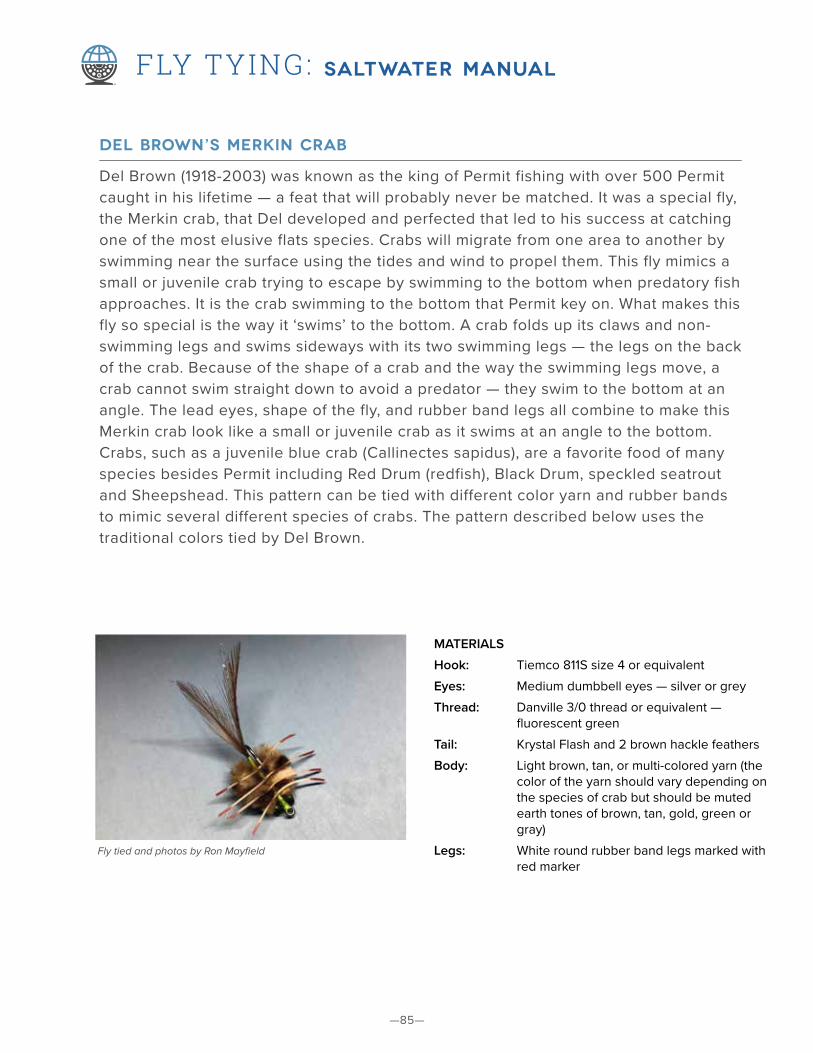
Del Brown (1918-2003) was known as the king of Permit fishing with over 500 Permit caught in his lifetime — a feat that will probably never be matched. It was a special fly, the Merkin crab, that Del developed and perfected that led to his success at catching one of the most elusive flats species. Crabs will migrate from one area to another by swimming near the surface using the tides and wind to propel them. This fly mimics a small or juvenile crab trying to escape by swimming to the bottom when predatory fish approaches. It is the crab swimming to the bottom that Permit key on. What makes this fly so special is the way it ‘swims’ to the bottom. A crab folds up its claws and non-swimming legs and swims sideways with its two swimming legs — the legs on the back of the crab. Because of the shape of a crab and the way the swimming legs move, a crab cannot swim straight down to avoid a predator — they swim to the bottom at an angle. The lead eyes, shape of the fly, and rubber band legs all combine to make this Merkin crab look like a small or juvenile crab as it swims at an angle to the bottom. Crabs, such as a juvenile blue crab (Callinectes sapidus), are a favorite food of many species besides Permit including Red Drum (redfish), Black Drum, speckled seatrout and Sheepshead. This pattern can be tied with different color yarn and rubber bands to mimic several different species of crabs. The pattern described below uses the traditional colors tied by Del Brown.
MATERIALS
Hook: Tiemco 811S size 4 or equivalentEyes: Medium dumbbell eyes — silver or greyThread: Danville 3/0 thread or equivalent —
fluorescent greenTail: Krystal Flash and 2 brown hackle feathers Body: Light brown, tan, or multi-colored yarn (the
color of the yarn should vary depending on the species of crab but should be muted earth tones of brown, tan, gold, green or gray)
Legs: White round rubber band legs marked with red marker
Fly tied and photos by Ron Mayfield

—86—
FLY TYING: SALTWATER MANUAL
1. Tie the thread in just behind the eye as a thread base for the lead eyes. Then tie the dumbbell eyes right behind the eye of the hook on the top of the hook. This will make the hook point ride up.
2. Wrap the thread from the dumbbell eyes to just a little past the bend of the hook.
3. Tie in 4-6 strands of Krystal Flash at the bend of the hook so they point up at about a 30-degree angle when the fly is riding hook point up. Then splay 2 brown hackles at the bend of the hook making sure they point out from each other and up at about a 30-degree angle like the Krystal Flash. These feathers mimic the claws of the crab. The feathers should be 11/2 times the length of the hook.
4. Cut 5 lengths of yarn about 1 1/2 inches long. Tie in the yarn on the top of the hook using X wraps, starting at the bend of the hook and finishing just behind the dumbbell eyes. The yarn should be evenly spaced and exactly perpendicular to the hook shank. If you are using multiple colors of yarn, vary the colors to give the fly a mottled look.
—87—
FLY TYING: SALTWATER MANUAL
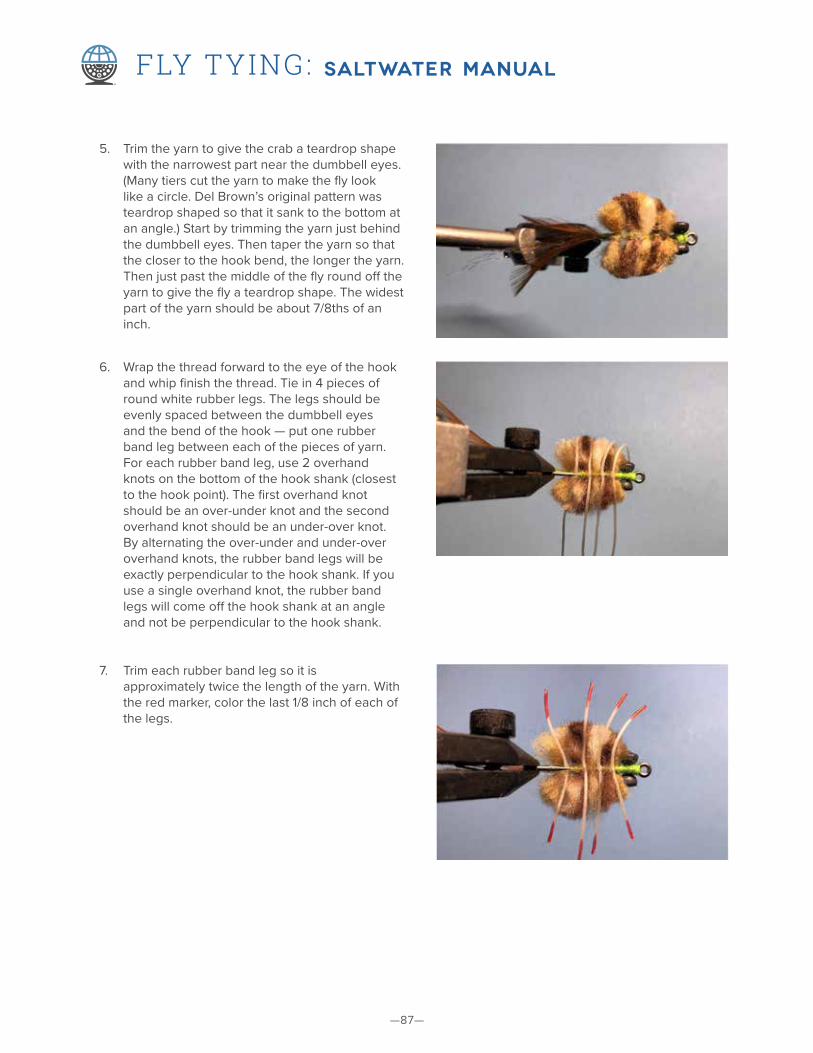
5. Trim the yarn to give the crab a teardrop shape with the narrowest part near the dumbbell eyes. (Many tiers cut the yarn to make the fly look like a circle. Del Brown’s original pattern was teardrop shaped so that it sank to the bottom at an angle.) Start by trimming the yarn just behind the dumbbell eyes. Then taper the yarn so that the closer to the hook bend, the longer the yarn. Then just past the middle of the fly round off the yarn to give the fly a teardrop shape. The widest part of the yarn should be about 7/8ths of an inch.
6. Wrap the thread forward to the eye of the hook and whip finish the thread. Tie in 4 pieces of round white rubber legs. The legs should be evenly spaced between the dumbbell eyes and the bend of the hook — put one rubber band leg between each of the pieces of yarn. For each rubber band leg, use 2 overhand knots on the bottom of the hook shank (closest to the hook point). The first overhand knot should be an over-under knot and the second overhand knot should be an under-over knot.By alternating the over-under and under-over overhand knots, the rubber band legs will be exactly perpendicular to the hook shank. If you use a single overhand knot, the rubber band legs will come off the hook shank at an angle and not be perpendicular to the hook shank.
7. Trim each rubber band leg so it is approximately twice the length of the yarn. With the red marker, color the last 1/8 inch of each of the legs.

—88—
FLY TYING: SALTWATER MANUAL
BENTHOS WORM
There are many species of marine benthos (bottom dwelling) worms in almost every coastal area from the Texas coast across the Gulf of Mexico and up the eastern seaboard. These worms are a food source for species such as Red Drum (redfish), Black Drum and Sheepshead. Along the Texas coast in the wintertime, Sheepshead will leave their usual habitat around piers, docks and jetties and move into the flats. They are very skittish when in swallow water and are difficult to approach and catch — which is why they are a prize catch. Sight casting and catching a Sheepshead is almost as difficult as Permit fishing, which is why Sheepshead have the nickname of ‘prison permit’ — they are difficult to catch and have stripes like prison wardrobes. In designing a fly for Sheepshead sight casting, the fly needs to make as little splash as possible so as not to scare the fish but also get to the bottom as quickly as possible. The Benthos Worm pattern has lead eyes to get down quickly but uses the palmered hackle to minimize splash as the fly hits the water. The chenille is tied so that when the fly settles to the bottom, the chenille points straight up like a benthos worm sticking its head out of the bottom. This is an easy and quick fly to tie and is highly effective when targeting Sheepshead and other species that feed on the bottom.
MATERIALS
Hook: Tiemco 811S size 4 or 6 or an equivalent Thread: Black or brown flat waxed nylon threadEyes: Small dumbbell lead eyes Collar: 1 small grizzly hackle — black and whiteTail and Body: Black or brown chenille — size medium
Fly tied and photos by Ron Mayfield
1. Tie on the lead dumbbell eyes just behind the eye of the hook on the top side of the hook so the fly will ride hook point up.
—89—
FLY TYING: SALTWATER MANUAL
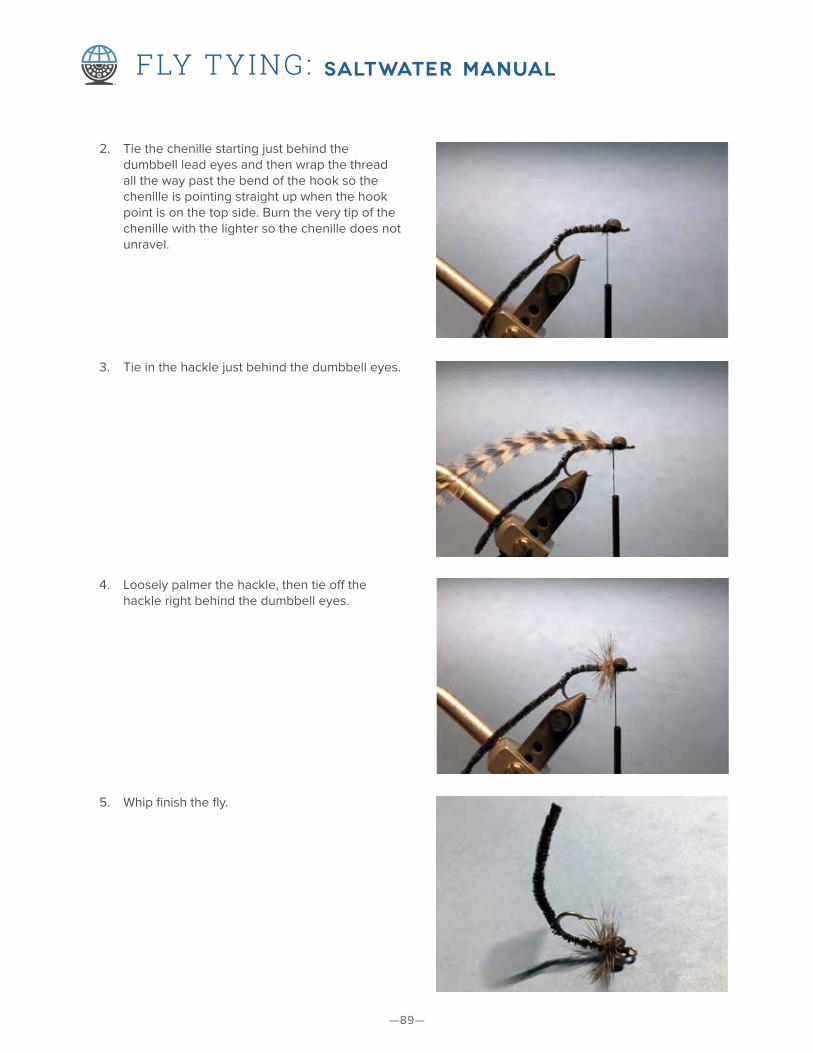
2. Tie the chenille starting just behind the dumbbell lead eyes and then wrap the thread all the way past the bend of the hook so the chenille is pointing straight up when the hook point is on the top side. Burn the very tip of the chenille with the lighter so the chenille does not unravel.
3. Tie in the hackle just behind the dumbbell eyes.
4. Loosely palmer the hackle, then tie off the hackle right behind the dumbbell eyes.
5. Whip finish the fly.
—90—
FLY TYING: SALTWATER MANUAL
CREASE FLY
The Crease Fly, developed by Joe Blados, is sort of like a popper — but not exactly. It has a thin baitfish look, floats on the water and you can pop it on the surface.
The only part to tie is the tail. The rest is coloring and applying resin to the body. The body is as wide as the gap of the hook. You will need to cut a rectangle shaped piece of foam that is twice the width of the gap of the hook and as long as the shank of the hook. I use body cutters for my Crease Flies.
MATERIALS
Hook: 3XL or 4XL saltwater hook your choice in sizes
Thread: 3/0 WhiteTail: Grey EP Fibers and pearl Krystal FlashBody: 2mm white foam
Color body with markers and coat with Thick Solarez UV resin. Option: you can mix fine glitter into the resin.
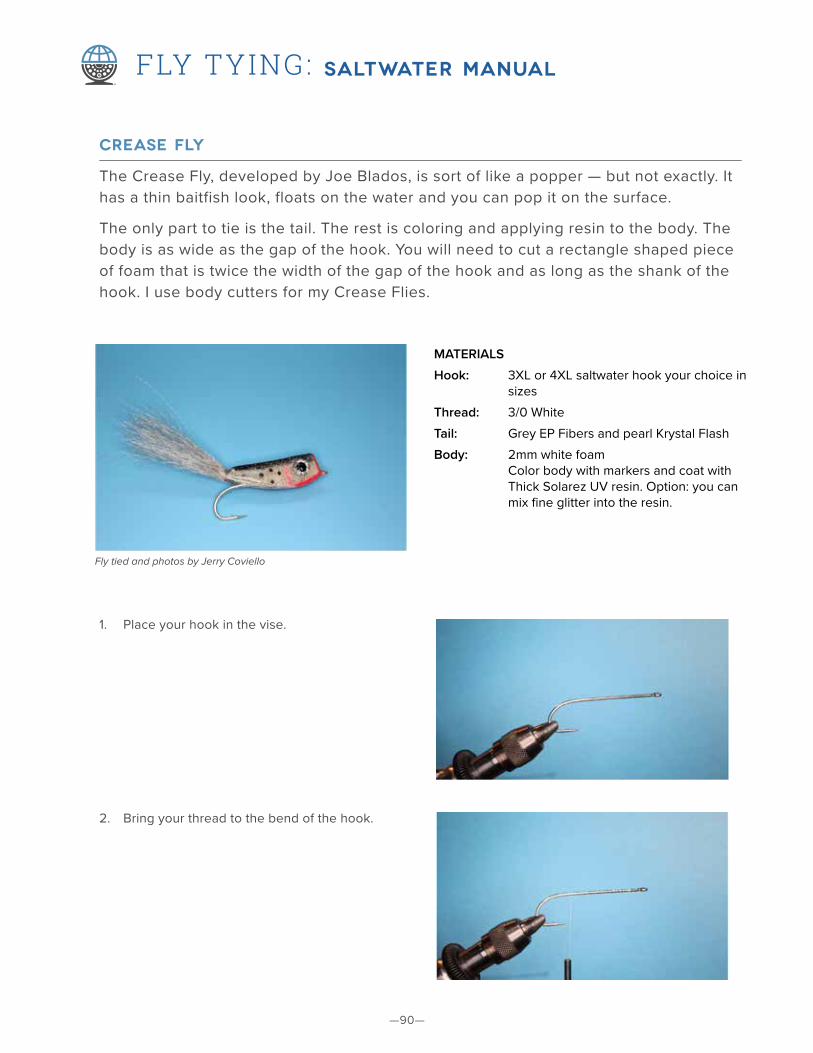
1. Place your hook in the vise.
Fly tied and photos by Jerry Coviello
2. Bring your thread to the bend of the hook.

—91—
FLY TYING: SALTWATER MANUAL
3. Tie in the tail of EP Fibers or bucktail to the bend of the hook. Secure the ends to the shank of the hook. This will help with the gluing of the foam body.
4. Add a few strands of Krystal Flash — your choice of color.
5. Make a few thread wraps at the base of the tail so the tail is slightly upright.
6. Whip finish. The tying part is done.

—92—
FLY TYING: SALTWATER MANUAL
7. BE CAREFUL…Apply a bead of Loctite or any other brand of CA Glue on both sides of the shank and the top, also to the part of the tail that you tied a base around.
8. Turn hook upside down and attach the body to the hook making sure the belly just covers the hook shank. Do not get your fingers glued to the body.
9. Use a dark grey marker (Pentone) for the back. The foam will soak the color in.
10. Stick an eye on both sides of the foam body.

—93—
FLY TYING: SALTWATER MANUAL
11. Using a red marker, color the mouth and gills.
12. Finish coloring the body: light grey for the sides and I put black dots with a Sharpie.
13. Here is where you can get creative. Instead of just pouring out the UV resin, I put some in a mixing cup and add fine glitter. Then I use a paint brush to get an even coat.
14. Cure the resin with a UV light. You will be done in seconds.
—94—
FLY TYING: SALTWATER MANUAL
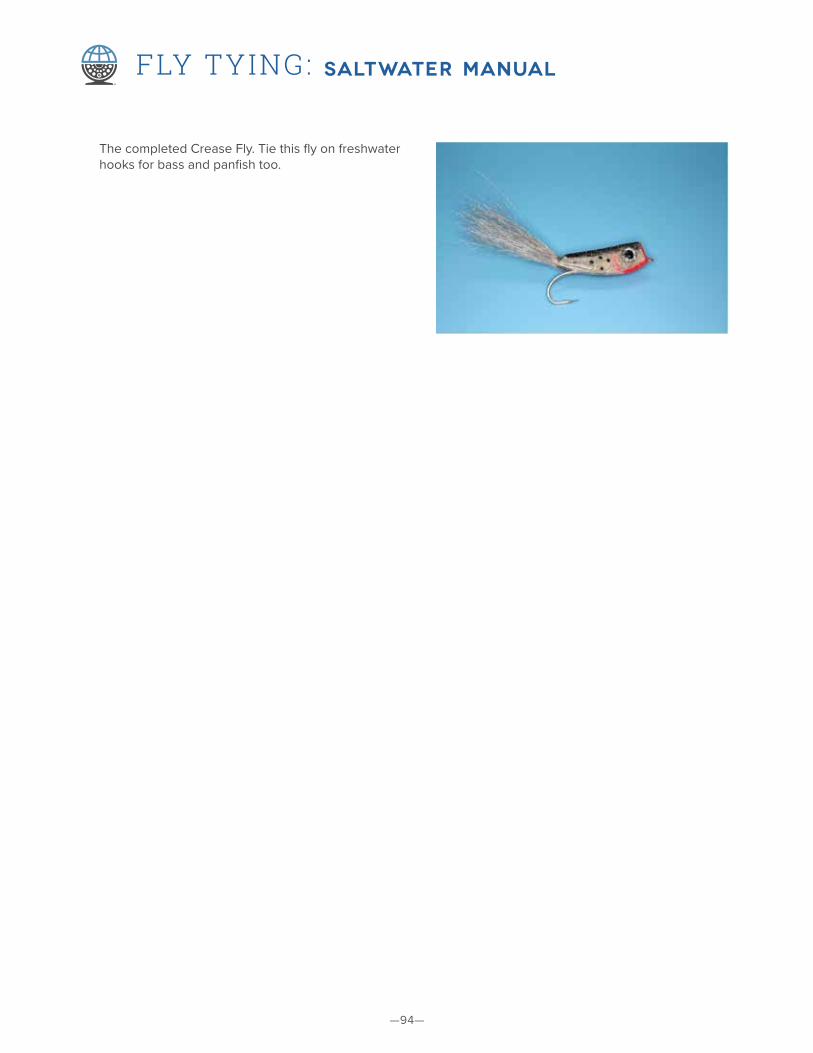
The completed Crease Fly. Tie this fly on freshwater hooks for bass and panfish too.

—95—
FLY TYING: SALTWATER MANUAL
BOB’S BANGER
Bob Popovics of New Jersey designed this fly, Bob’s Banger, for top water action. It is easy to tie, simple and almost indestructible. When this fly is popped on the surface, the Bluefish go crazy for them. Their teeth do not cause much damage, and if you do not glue the foam cylinder down you can change the cylinder head with another if needed. Any fish that takes top water poppers will take this fly.
MATERIALS
Hook: 4XL saltwater hook 2/0Thread: 3/0 WhiteTail: BucktailRear Body: 2mm white foam
Color body with markers and coat with Thick Solarez UV resin. Option: you can mix fine glitter into the resin.
Head: Foam cylinder covered with reflective tape or WTP decorative tape
1. Take a foam cylinder (sizes 1/2 or 5/8-inch diameter will work) and cut it in half. Now you will have 2 foam bodies to work with.
Fly tied and photos by Jerry Coviello
2. With your bodkin, poke halfway through the center of the cylinder and repeat on the other side so the openings meet.
—96—
FLY TYING: SALTWATER MANUAL
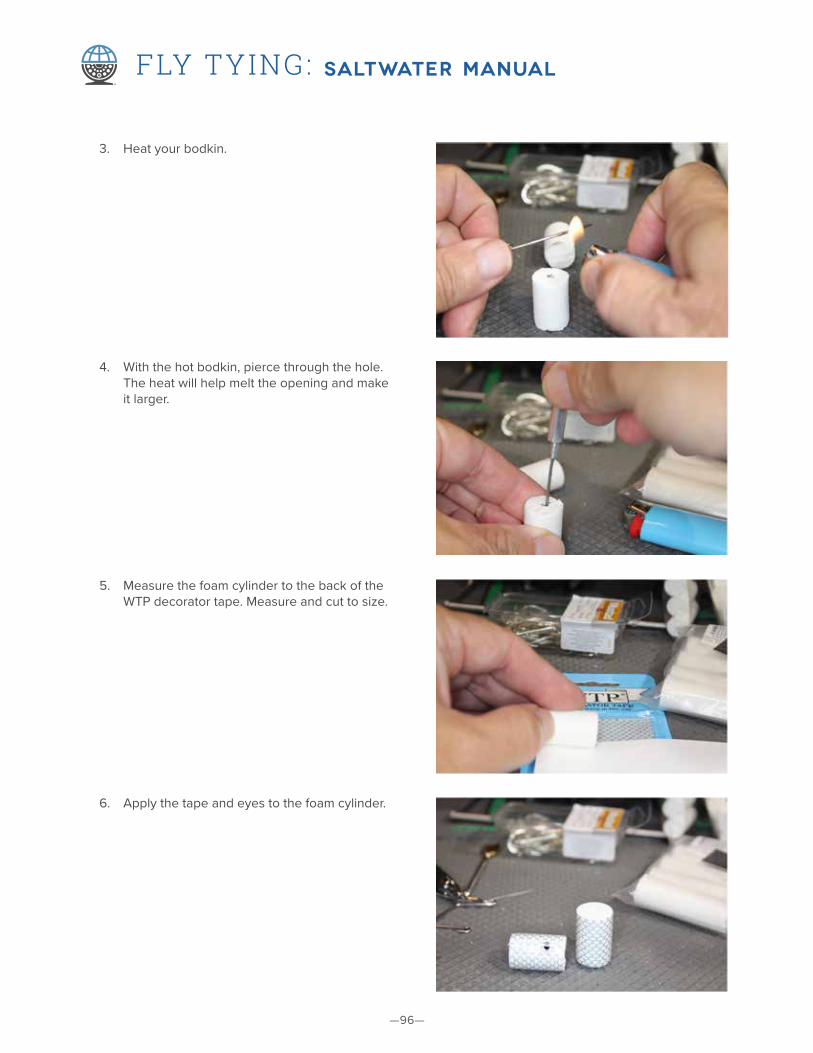
3. Heat your bodkin.
4. With the hot bodkin, pierce through the hole. The heat will help melt the opening and make it larger.
5. Measure the foam cylinder to the back of the WTP decorator tape. Measure and cut to size.
6. Apply the tape and eyes to the foam cylinder.
—97—
FLY TYING: SALTWATER MANUAL
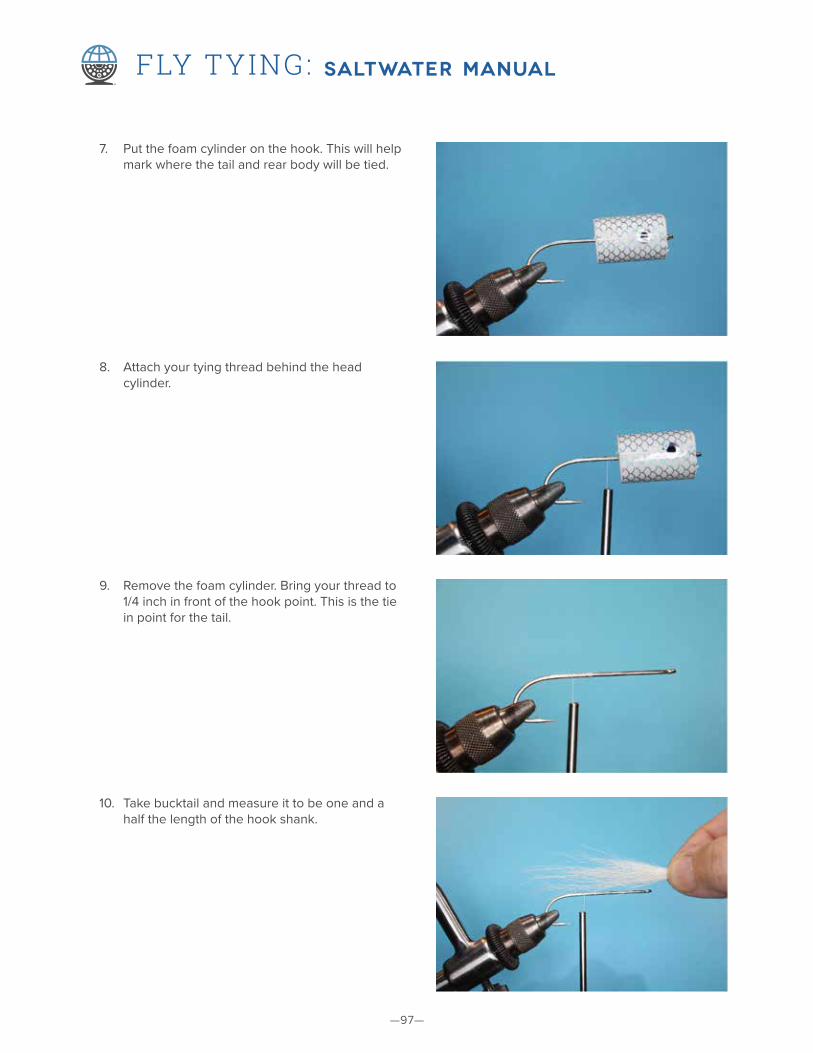
7. Put the foam cylinder on the hook. This will help mark where the tail and rear body will be tied.
8. Attach your tying thread behind the head cylinder.
9. Remove the foam cylinder. Bring your thread to 1/4 inch in front of the hook point. This is the tie in point for the tail.
10. Take bucktail and measure it to be one and a half the length of the hook shank.

—98—
FLY TYING: SALTWATER MANUAL
11. Tie in the bucktail on the hook shank and coat it with head cement or UV resin.
12. Tie in the rear body material, either Cactus chenille or Estaz chenille.
13. Wrap the chenille to the point where the foam cylinder will be. Tie off the chenille.
14. Wrap over the shank of the hook to the eye several times to add a thread thickness to the shank. This will help make the foam cylinder fit snugly.

—99—
FLY TYING: SALTWATER MANUAL
15. Whip finish.
16. Coat the threads with cement if you want to make the foam head permanent.
17. Push the foam head onto the shank of the hook.
18. Coat the seams of the tape with head cement Ready for fishing. Smaller sizes for freshwater fishing work great too.

—100—
FLY TYING: SALTWATER MANUAL
GURGLER
The Gurgler was developed by Jack Gartside to push water on the surface. This simple foam fly pops when stripped and floats in the surface film. He would use this to catch stripers in the Boston Harbor on his Giraffe Pool Float. Today this fly is not only used for saltwater but also in freshwater for bass and panfish.
MATERIALS
Hook: Saltwater hook tied in 4 to 2/0 Thread: 3/0 MonocordTail: Bucktail and you can add flash material Hackle: Palmer ribbed through bodyBody: Dubbing or braidOverbody: Foam tied over the body with a lip over the
eye of the hook
1. Attach your thread behind the eye of the hook.
Fly tied and photos by Jerry Coviello
2. Cut and stack bucktail and measure it to the shank of the hook. Tail is as long as the shank of the hook.

—101—
FLY TYING: SALTWATER MANUAL
3. Secure the tail at the bend of the hook. Use the butts of the bucktail to help bulk up the body.
4. Tie in a strip of foam for the overbody. The folding point will be at the bend of the hook.
5. Tie in a hackle at the bend of the hook for the palmer ribbing of the hackle.
6. Start dubbing the body. I am using pearl ice dubbing.

—102—
FLY TYING: SALTWATER MANUAL
7. Dub the body to an eye length behind the eye.
8. Palmer rib hackle with open and equal spaces through the body.
9. Fold over the foam, leaving the end of the foam sticking out over the eye.
10. Lift the lip up and bring the thread behind the eye.

—103—
FLY TYING: SALTWATER MANUAL
11. Whip finish.
12. Trim the foam over the eye. Have it extend over the eye.

—104—
FLY TYING: SALTWATER MANUAL
PINK LADY
The Pink Lady was developed by Mike George to fish for bill fish.
MATERIALS
Base Hook: Partridge Sea Beast 6/0Trailer Hook: Owner 5311-151 5/0Connecting Wire:
Terminator Titanium 70 lb.
Threads: GSP200 white and Danville’s 210 Fly Master Plus black schlappen feathers: 12 pink approximately 6 inches in length
Saltwater Flashabou:
12 strips — pink to match the color of the fly
Deer Hair: As long as possible and full bodied — bright pink, black, lime green, orange, yellow
Adhesive: Wapsi Fly Tyers Z-ment and Bug Bond UV cure resin
Masking Tape: Standard size or tape that you would use for rod building
Specialty Tools:
Dyna King Voyager vice, half hitch tool big enough to accept the eye of the Owner hook, and trimming template the size of a nickel — mine is made from the lid of an old MUSTAD hook box
1. Make a loop: Fold or bend the wire in half to form an open loop. I hold the trailer hook in my right hand by the bend. The hook shaft is up and the eye is to my right. With the leader wire formed in a loop, use your left hand to guide the open ends of the loop through the eye of the trailer hook. This will form a loop on top of the trailer hook.
Fly tied by Mike George, Photos by Doug Oatman
2. With the loop behind and over the bend of the hook, pull the hook bend up through the loop. Pull on the open ends of the wire to make the loop a little smaller. Slip the sharp point of the hook around or through the loop so the wire loop is now on the bottom of the hook shaft.
—105—
FLY TYING: SALTWATER MANUAL
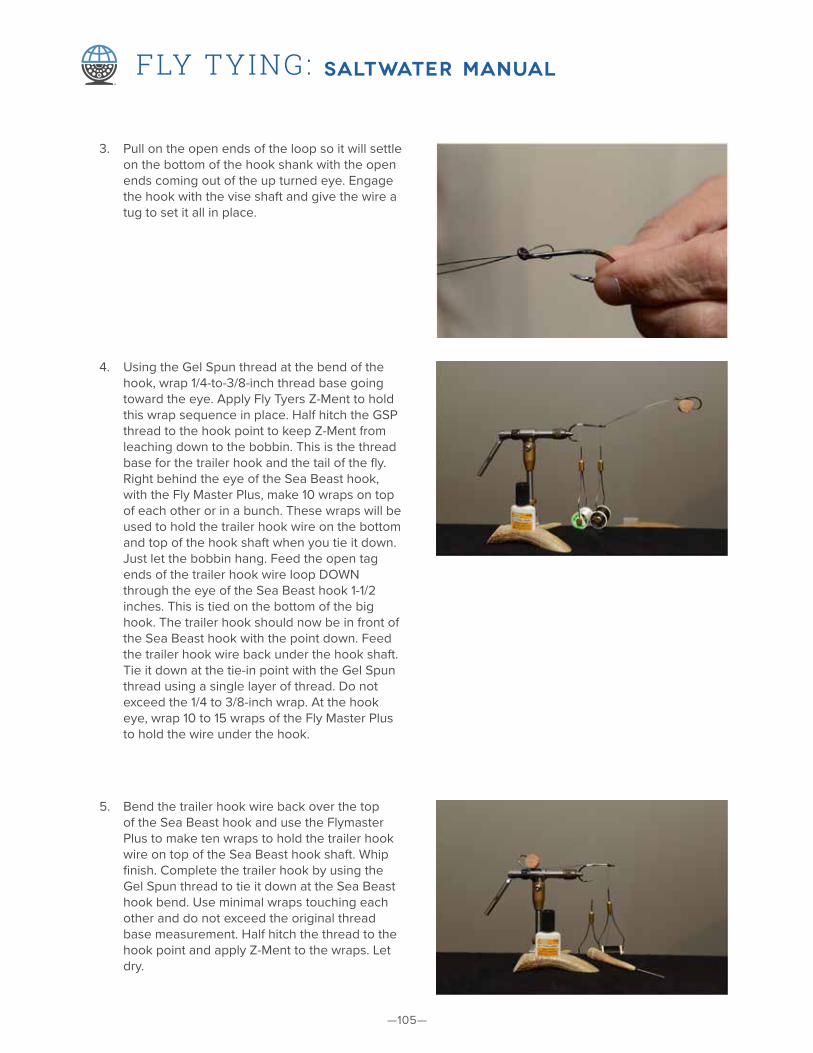
3. Pull on the open ends of the loop so it will settle on the bottom of the hook shank with the open ends coming out of the up turned eye. Engage the hook with the vise shaft and give the wire a tug to set it all in place.
4. Using the Gel Spun thread at the bend of the hook, wrap 1/4-to-3/8-inch thread base going toward the eye. Apply Fly Tyers Z-Ment to hold this wrap sequence in place. Half hitch the GSP thread to the hook point to keep Z-Ment from leaching down to the bobbin. This is the thread base for the trailer hook and the tail of the fly. Right behind the eye of the Sea Beast hook, with the Fly Master Plus, make 10 wraps on top of each other or in a bunch. These wraps will be used to hold the trailer hook wire on the bottom and top of the hook shaft when you tie it down. Just let the bobbin hang. Feed the open tag ends of the trailer hook wire loop DOWN through the eye of the Sea Beast hook 1-1/2 inches. This is tied on the bottom of the big hook. The trailer hook should now be in front of the Sea Beast hook with the point down. Feed the trailer hook wire back under the hook shaft. Tie it down at the tie-in point with the Gel Spun thread using a single layer of thread. Do not exceed the 1/4 to 3/8-inch wrap. At the hook eye, wrap 10 to 15 wraps of the Fly Master Plus to hold the wire under the hook.
5. Bend the trailer hook wire back over the top of the Sea Beast hook and use the Flymaster Plus to make ten wraps to hold the trailer hook wire on top of the Sea Beast hook shaft. Whip finish. Complete the trailer hook by using the Gel Spun thread to tie it down at the Sea Beast hook bend. Use minimal wraps touching each other and do not exceed the original thread base measurement. Half hitch the thread to the hook point and apply Z-Ment to the wraps. Let dry.
—106—
FLY TYING: SALTWATER MANUAL
6. Prepare the schlappen feathers by removing the quills from the shaft to match the base thread wraps on the hook shaft for the tail.
7. Each feather measures 6 inches. The barbules have been stripped from the quill enough to match the five wraps of the base thread on the hook. Each feather is tied in with five wraps of thread. The first feather’s thread wrap starts at the back and wraps forward ONLY. The next feather is tied in next to it with five wraps going back to the quills. Use the very minimum wraps. All feathers in each layer are tied this way. You must not build up unnecessary bulk. Tie in six feathers and finish each of the two layers of feathers and Flashabou with Fly Tyers Z-ment.
8. Each strip of flashabou is tied in with minimum wraps. Fold the flashabou around the thread and place it at the front of the tie-in point and use three wraps back and two wraps forward. Repeat the process for each strip, once again keeping the wraps to an absolute minimum. Apply Fly Tyers Z-ment.a
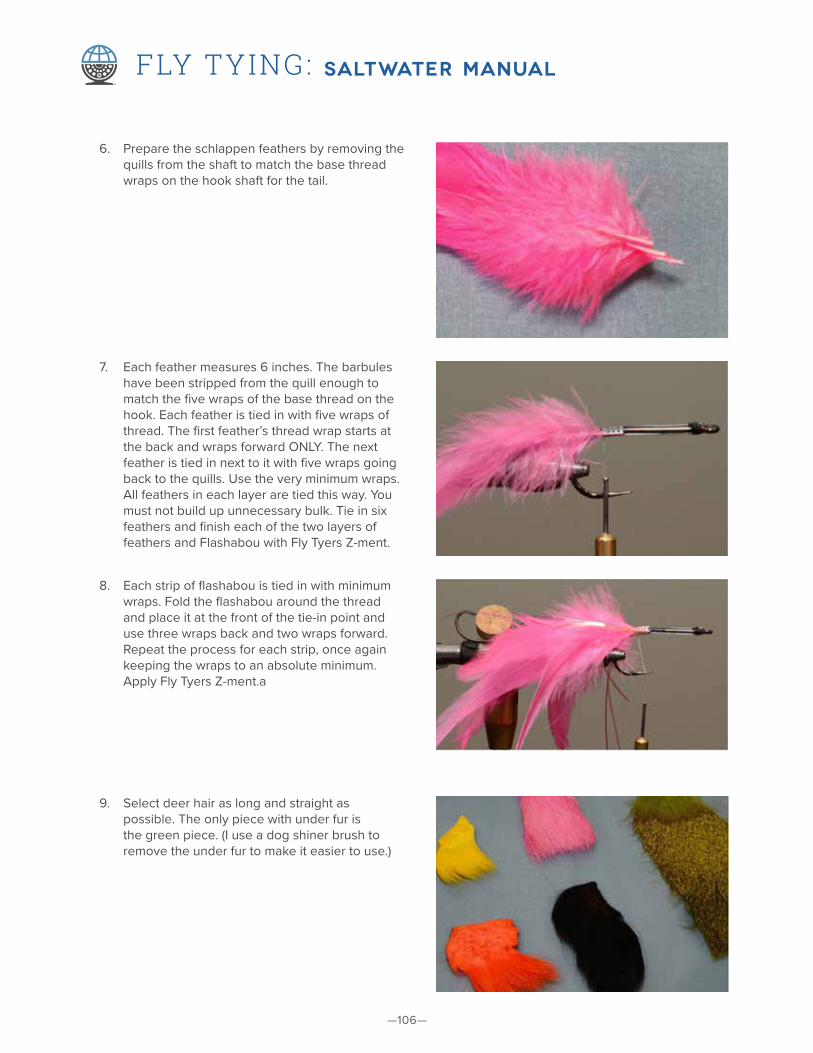
9. Select deer hair as long and straight as possible. The only piece with under fur is the green piece. (I use a dog shiner brush to remove the under fur to make it easier to use.)
—107—
FLY TYING: SALTWATER MANUAL
10. Trim a bunch of deer hair as close to the skin as possible and as big as you can control. Most deer hair bunches are referred to in pencil sizes. This is 3 to 4 pencil sizes.
11. Apply the first bunch of hair to the bottom of the hook. The hook is turned so the hook point is on top. Wrap the thread around the bunch of hair one complete wrap and place it on the upside of the hook. (BEWARE THE HOOK POINT.)
12. Finish the hair on the bottom of the hook. Pinch the bunch tightly and pull down on the thread to flair the hair in place. Wrap the thread one more complete wrap and pull the thread tight. Keep thread wraps to a minimum.
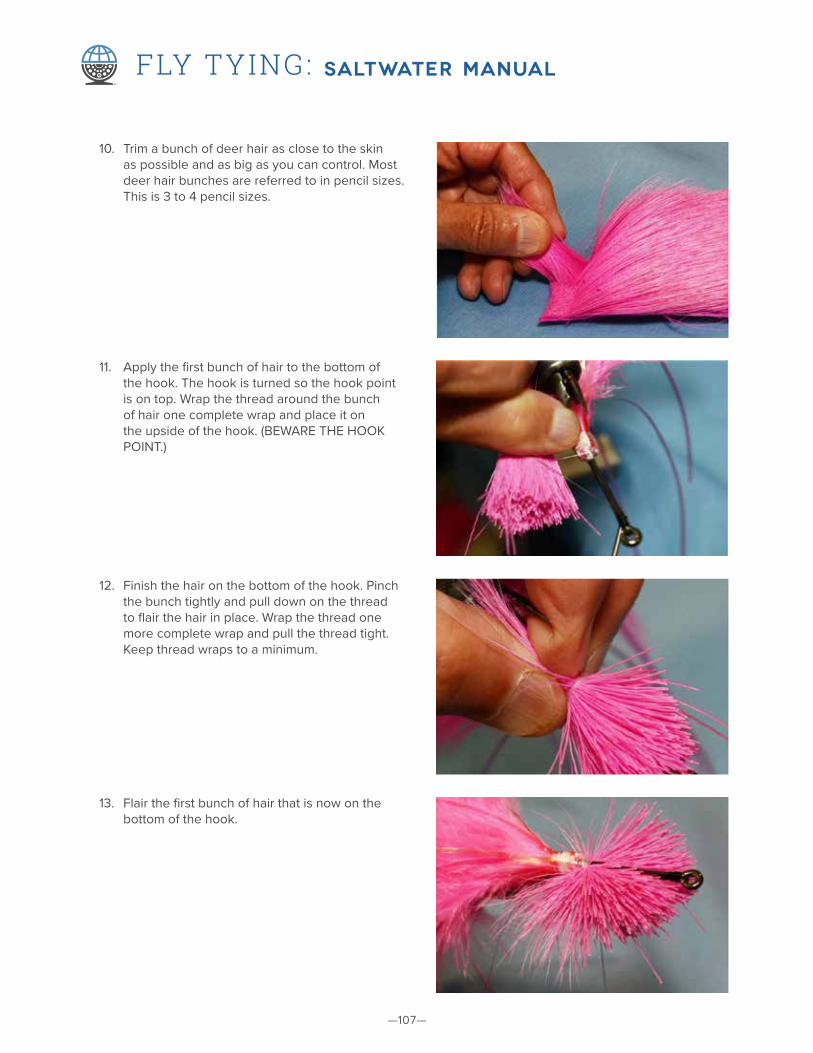
13. Flair the first bunch of hair that is now on the bottom of the hook.

—108—
FLY TYING: SALTWATER MANUAL
14. Pinch the tips tightly so the bunch does not rotate. Wrap the thread over and pull down tightly to flair the hair with the first wrap and finish it with one more wrap directly on top of the first. *NOTE: USE THE MINIMUM NUMBER OF THREAD WRAPS
15. Apply the black outline to the pattern on the top of the hook. I used two wraps to hold the black deer hair in place: one to flair it, the second to hold it.
16. Apply the final layer or green cap to the top of the first segment. The green bunch is equal in size to the black bunch. Place in the center of the black deer hair. Wrap twice through the middle and pull tight.
—109—
FLY TYING: SALTWATER MANUAL
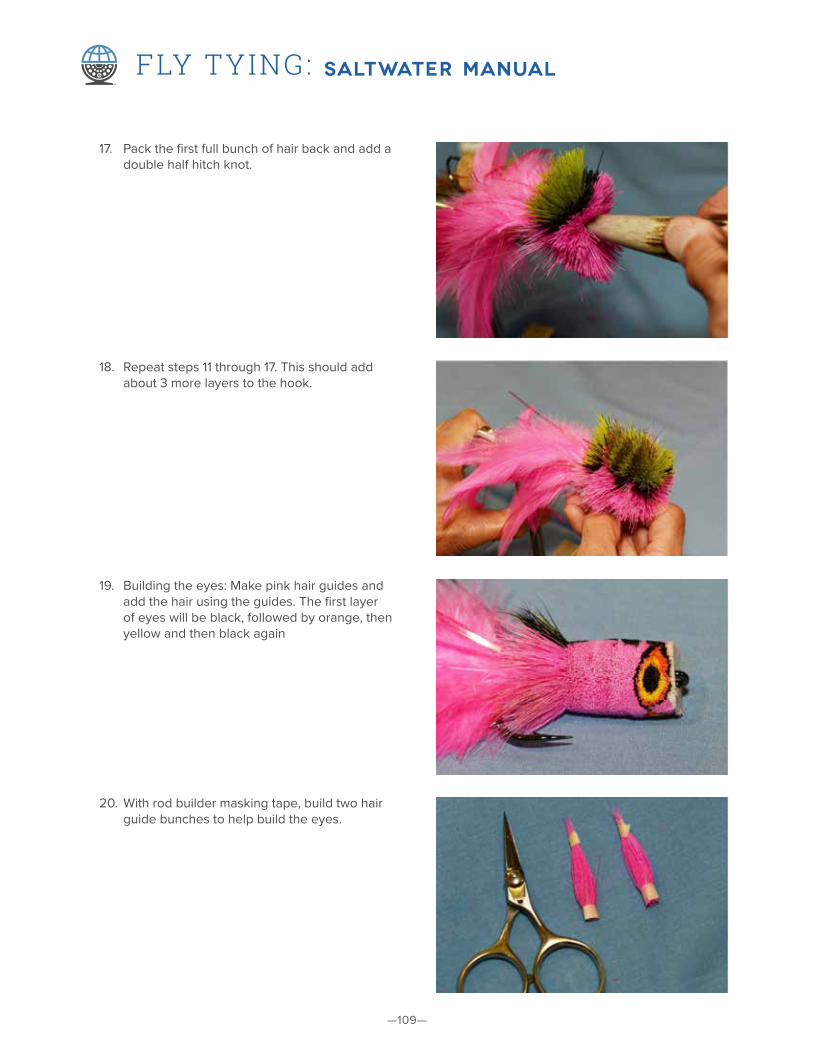
17. Pack the first full bunch of hair back and add a double half hitch knot.
18. Repeat steps 11 through 17. This should add about 3 more layers to the hook.
19. Building the eyes: Make pink hair guides and add the hair using the guides. The first layer of eyes will be black, followed by orange, then yellow and then black again
20. With rod builder masking tape, build two hair guide bunches to help build the eyes.
—110—
FLY TYING: SALTWATER MANUAL
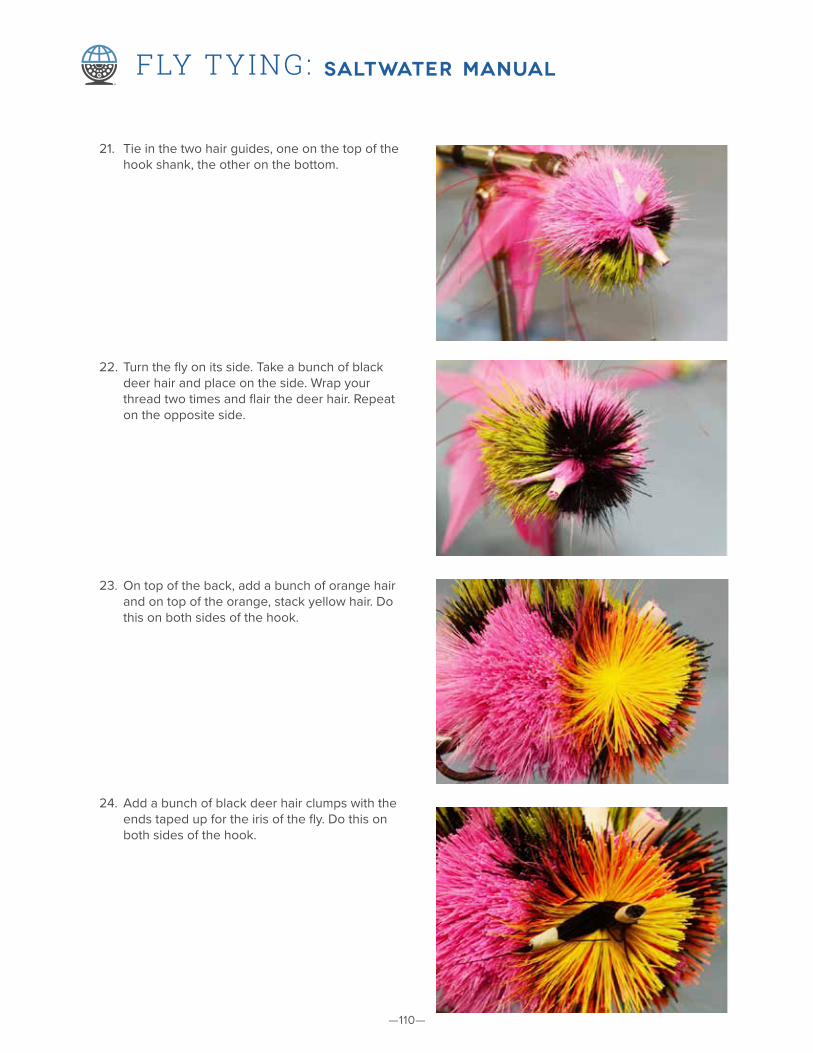
21. Tie in the two hair guides, one on the top of the hook shank, the other on the bottom.
22. Turn the fly on its side. Take a bunch of black deer hair and place on the side. Wrap your thread two times and flair the deer hair. Repeat on the opposite side.
23. On top of the back, add a bunch of orange hair and on top of the orange, stack yellow hair. Do this on both sides of the hook.
24. Add a bunch of black deer hair clumps with the ends taped up for the iris of the fly. Do this on both sides of the hook.
—111—
FLY TYING: SALTWATER MANUAL
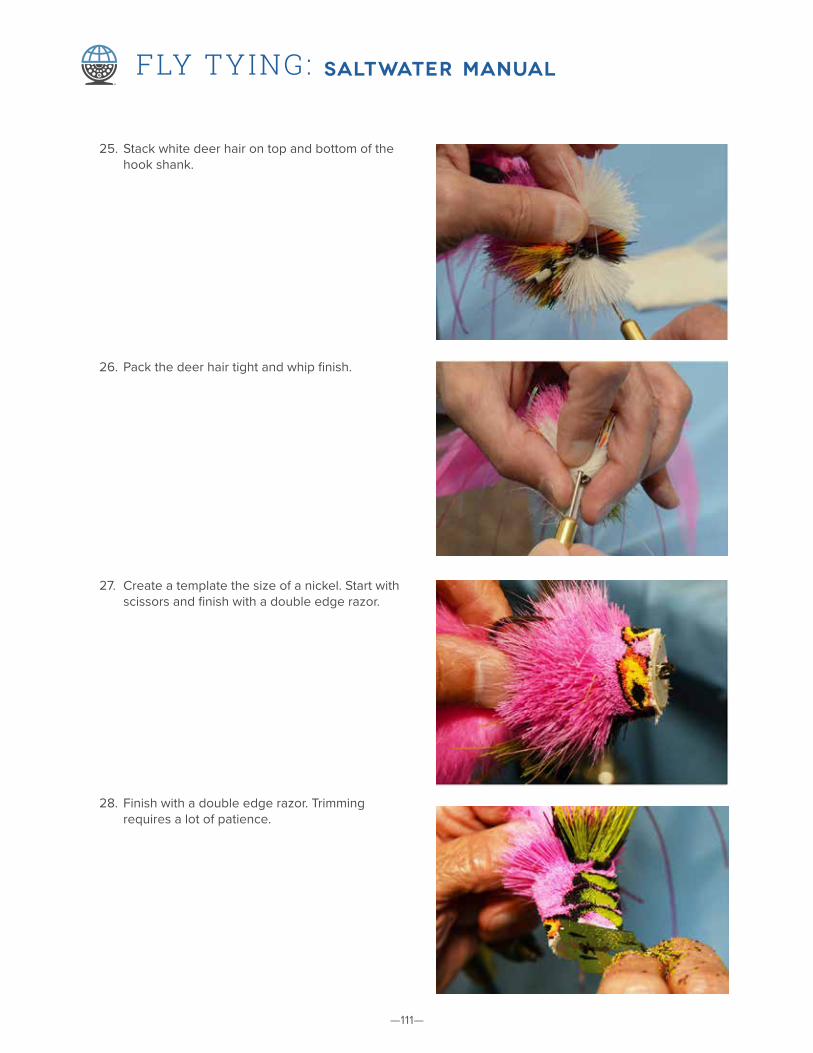
25. Stack white deer hair on top and bottom of the hook shank.
26. Pack the deer hair tight and whip finish.
27. Create a template the size of a nickel. Start with scissors and finish with a double edge razor.
28. Finish with a double edge razor. Trimming requires a lot of patience.
—112—
FLY TYING: SALTWATER MANUAL
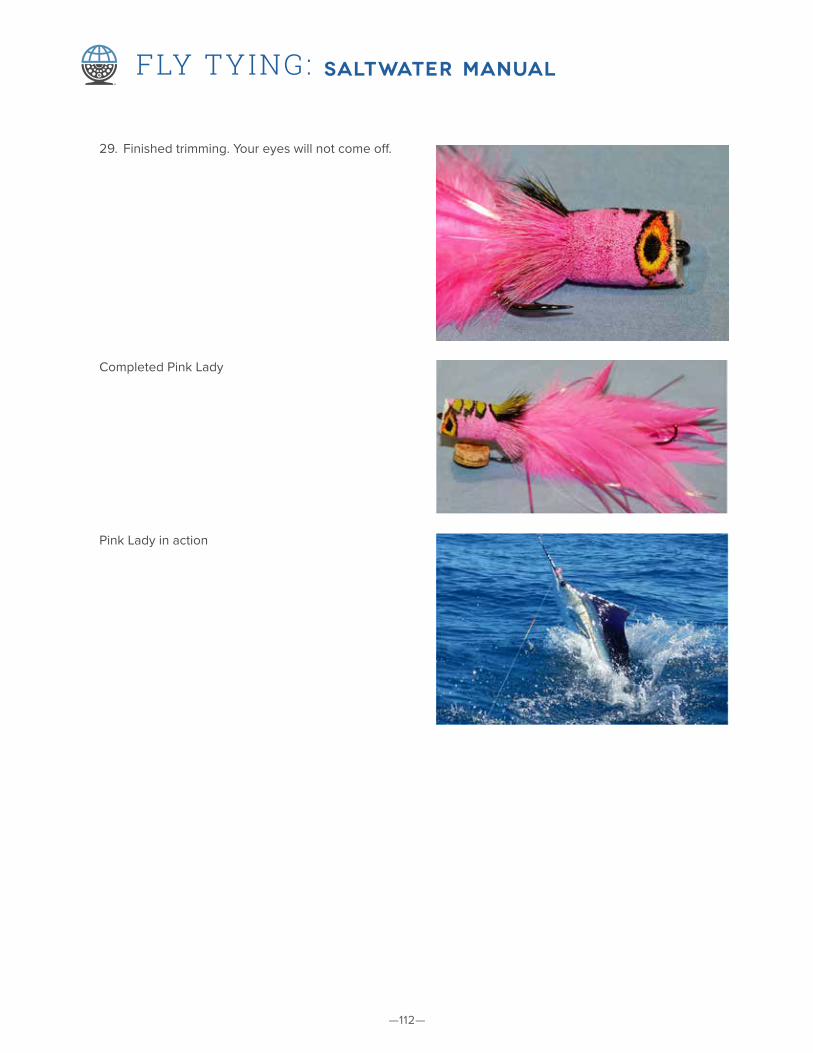
29. Finished trimming. Your eyes will not come off.
Completed Pink Lady
Pink Lady in action

—113—
FLY TYING: SALTWATER MANUAL
HOW TO USE THE FFI SALTWATER FLY TYING MANUAL
This manual is for use by our Fly Fishers International Council, clubs, and members. This in no way is meant to replace any council or club’s existing fly tying classes, but we hope to help those that need a start in how-to-teach-a-fly-tying-class without having to reinvent the process.
Each fly uses different tying techniques and materials. We wanted to teach these simple yet effective flies. This manual can be adapted for use by a club/council for their own fly tying classes or needs.
Any questions or comments may be sent to [email protected]
Fly Fishers International has express permission from the authors to use this material. The material may be
reproduced but cannot be altered without written permission from the author(s).

OURMISSION
1201 US Highway 10 West, Suite E | Livingston, MT 59047 P 406.222.9369 / F 406.222.5823
flyfishersinternational.org
Conservation / education / communityConservation / education / community
Fly Fishers International (FFI) has the distinctive mission to preserve the legacy of fly fishing for all fish in all waters. Formed by some of the most influential luminaries in the world of fly fishing and conservation back in 1964, and dedicated to innovative strategies to inspire a new generation of fly fishers, FFI provides opportunities for members and the fly fishing community to leave a legacy in the sport we love.
A 501c3 non-profit organization, FFI is driven by three fundamental pillars: Conservation, Education, and Community. Together, these pillars provide the foundation for our vision of the future of fly fishing—a future in which anglers have access to prime waters and fish can thrive in healthy, protected habitats; in which learning never stops and artistry is not forgotten; and that recognizes the true value of camaraderie. If we want this legacy to be experienced by future generations, we have to work to make that happen.
Join Fly Fishers International today to help ensure that fly fishing can continue to instill the kind of passion it does today in so many of us.
Related Documents