GET RID FROM FLOPPIES Use new Invention of USB Drives instead of your existing Floppy Drives and Upgrade your machine to the latest Technology. Works Successfully on : CNC Machines, Keyboards, Embroidery machines, Knitting machines, Cutters, Robotics, Mills and most of devices using legacy 1.44 mb FDD's Advantages of using USB Drives ♦ Easy loading of the designs of any format & any type Electronic Jacquard from an USB (Pen Drive) to the Jacquard Controller. ♦ No need to use the floppies to load the design. ♦ Reducing the cost involved in purchasing of floppies repeatedly. With this drive you can use a single USB (Pen drive) for a longer time. ♦ Quick & confirm transfer of the design from USB (Pen drive) to the Jacquard machine controller. As floppies get corrupted or damaged very easily. Also the data transfer is not very reliable from floppies. ♦ No Software change in your existing Jacquard Controller. Your existing Floppy Drive will be replaced by an USB Drive. ♦ Upload Music into your Musical Keyboards ( Yamaha / Korg / Roland - Selected Models ) with usb flash drives Designs / Data is loaded to the Jacquard/keyboards Data Punch file is loaded to floppy. This Floppy using 1.44MB Floppies. In the Computer System, the is to be loaded in the Jacquard/Appratus controller. Many times, there are chances of errors in writing file from Computer System to Floppy Due to the bad Quality of Floppy Disk, So the while loading data to equipment the loading error comes. Then the w hole operation needs to be repeated by Formatting floppies. After a limited writing (Once or twice) of design to floppy it become un-useable / defective and finally need to throw it out. We have introduced the New Invention of USB Drives, where we change your existing Floppy Drives with an USB Drive. You need to Copy your design files from Design System to an USB. The USB is connected to USB Drives. You need to perform same steps on the Jacquard Controller (Which you were taking to load Floppy) to load the design. The Design will get copied from USB to Jacquard Controller Hard Drive. So, upgrade your machine to Latest Technology using our New Invention of USB Drives. From: HP World Kwality Enterprises Email : [email protected] 80, Queens Road,Near Hotel SunCity Towers, Amritsar ( Punjab , India ) Phone : +91-9780485865 , +91-183-2224554

Floppy to usb converter manual
Jun 11, 2015
Just replace existing floppy drive to Floppy to usb converter and enjoy using old industrial machines or keyboards or any thing else/
Welcome message from author
This document is posted to help you gain knowledge. Please leave a comment to let me know what you think about it! Share it to your friends and learn new things together.
Transcript

GET RID FROM FLOPPIES Use new Invention of USB Drives instead of your existing Floppy
Drives and Upgrade your machine to the latest Technology.
Works Successfully on : CNC Machines, Keyboards, Embroidery machines, Knitting machines, Cutters, Robotics, Mills and most of devices using legacy 1.44 mb FDD's
Advantages of using USB Drives
♦ Easy loading of the designs of any format & any type Electronic Jacquard from an USB (Pen Drive)
to the Jacquard Controller.
♦ No need to use the floppies to load the design.
♦ Reducing the cost involved in purchasing of floppies repeatedly. With this drive you can use a
single USB (Pen drive) for a longer time.
♦ Quick & confirm transfer of the design from USB (Pen drive) to the Jacquard machine controller. As
floppies get corrupted or damaged very easily. Also the data transfer is not very reliable from floppies.
♦ No Software change in your existing Jacquard Controller. Your existing Floppy Drive will be
replaced by an USB Drive.
♦ Upload Music into your Musical Keyboards ( Yamaha / Korg / Roland - Selected Models )
with usb flash drives
Designs / Data is loaded to the Jacquard/keyboards Data Punch file is loaded to floppy. This Floppy
using 1.44MB Floppies. In the Computer System, the is to be loaded in the Jacquard/Appratus controller.
Many times, there are chances of errors in writing file from Computer System to Floppy Due to the bad
Quality of Floppy Disk, So the while loading data to equipment the loading error comes. Then the w hole operation needs to be repeated by Formatting floppies. After a limited writing (Once or twice) of design to floppy it become un-useable / defective and finally need to throw it out.
We have introduced the New Invention of USB Drives, where we change your existing Floppy Drives with an USB Drive. You need to Copy your design files from Design System to an USB. The USB is connected to USB Drives. You need to perform same steps on the Jacquard Controller (Which you were taking to load Floppy) to load the design. The Design will get copied from USB to Jacquard Controller Hard Drive.
So, upgrade your machine to Latest Technology using our New Invention of USB Drives.
From:
HP World Kwality Enterprises
Email : [email protected]
80, Queens Road,Near Hotel SunCity Towers,
Amritsar ( Punjab , India )
Phone : +91-9780485865 , +91-183-2224554

USB Floppy USB Floppy Disk Converter
Manual

USB Floppy Disk Converter – USB Floppy v0.2
Introducing the device
The USB Floppy Disk Converter of Kwality Enterprises replaces 1.44mb drives.
The floppy is replaced by a USB Stick. Up to 100 virtual floppy disks can
be stored on one USB Stick.
Retrofitting of your machines/systems is no longer required. Just replace
the disk drive 1:1.
Comparison: Left: 3.5 inch disk drive with 100 x 1.44 MB floppies
Right: USB Floppy Disk with USB Stick
In the industrial sector many machines are still equipped with floppy disk
drives. The floppy disk is often the only means of importing updates or
reading out data. This could become a source of future problems.
Floppies are sensitive and short-lived. The maintenance of disk drives is
expensive, and quite often they can be no longer replaced.
The Floppy Disk converter depends on USB Sticks as data carriers, which
are far more compact, practical and long-lived than the old- fashioned
floppy disk. So the "Floppy" makes your machine/system
The Floppy Disk converter can also replace other forms of disk drives
and disk storage systems. Refer to the comparison with a 5¼ inch floppy
disk drive with 1.2 MB floppies. (Please ask for models before buying. )
Subject to change without prior notice

USB Floppy Disk Converter – USB Floppy v0.2
A 5¼ inch installation frame for 3.5 inch disk drives and a 34-pin adapter are optionally
available.
Front panel – description, connections
*** Colour and Layout may change without Notice
LED 1 – Busy (red): lights up when system is reading or writing.
LED 2 - Power (green): lights up when the voltage supply is connected.
Display (2 digits): displays the status of the disk drive or the currently
selected floppy (00 to 99).
USB: USB socket (USB type A) to connect a USB Stick (the data carrier
replacing the floppy disk).
Subject to change without prior notice

USB Floppy Disk Converter – USB Floppy v0.2
Selection button (Disk Selectors in above Diagram) to select the
desired virtual foppy disk (00-99 if previously preset)
When the virtual floppy changes from one to another, dots light up
next to the digits. Please wait before you use the disk drive until the
dots disappear.
• Caution: When LED 1 – Busy – lights up, do not under any
circumstances remove the USB Stick or deploy the selection
button, or else you might incur data losses.
• The virtual floppy images must be in correct sequence in order
to be selected with the selection button.
Back – description, connections
At the back of the disk drive you will find the connection for the
voltage supply (+5V DC) and the 34-pin interface to connect the
floppy disk drive controller.
Please check for correct polarity of voltage supply when connecting
the floppy disk drive. GND (ground) is usually indicated by a black
wire, and +5V by red wire.
Please also correctly attach the 34-pin connection cable.
Subject to change without prior notice

USB Floppy Disk Converter – USB Floppy v0.2
On modern flatcables the 34-pin plugs have a gib at the bottom.
When connecting, the gib has to settle into the corresponding
sliding notch at the drive housing below the header.
Also make sure the correct pin sequence is observed (Wire 1 on Pin
1, etc.). Wire 1 is usually indicated by color at the floppy cable
(often red or blue).
Illustration of a connected disk drive
Caution: If the connection cable is attached incorrectly the drive
disk will not function properly and may also be damaged thereby.
Installation
Connect the disk drive as described under Back – description,
connections.
One USB Stick replaces one floppy
You have just installed the disk drive and switched on your
machine/system.
The display of the USB Floppy Disk Emulator shows (0.0.), the
power LED lights up (green).
Subject to change without prior notice

USB Floppy Disk Converter – USB Floppy v0.2
The display of (0.0.) indicates that the disk drive is ready and
is waiting for the USB Stick to be connected.
The power LED is always on when the disk drive is supplied with
sufficient voltage.
Insert a customary USB Stick into the USB socket of the disk drive.
Pls Note: The USB Stick must be formatted with Software
suppied into (720kb /1.2/1.44 mb ) blocks as required.
The display stops at (00). 00 is the first floppy
created by using software supplied alongwith.
The disk drive can be used immediately. You may use the USB Stick
in the same way as you used your floppy.
***Software & Video Tutorial Available at Website www.floppytousb.net
Or Youtube links as mentioned below :
http://www.youtube.com/watch?v=WiXbYkVdcwc
http://www.youtube.com/watch?v=IjqXtEmQbog
.
Subject to change without prior notice
USB Floppy Disk Converter – USB Floppy v0.2
One USB Stick replaces 100 floppies
The USB Floppy Disk Converter in multi-disk mode behaves as if only one floppy were to be emulated. Please first read Chapter 1.USB Stick replaces 1 floppy.
When more than one floppy are managed by just one USB Stick, the desired
floppy can be selected with the selection button ( ). The display
always shows you the currently set floppy to (from 0 to
99).
Preliminary steps: To manage up to 100 virtual floppies on one USB Stick, you must first create virtual floppies on the USB Stick. Connect the USB Stick into the USB port on your PC. Format the USB Stick with tool provided.
Subject to change without prior notice
USB Floppy Disk Converter – USB Floppy v0.2
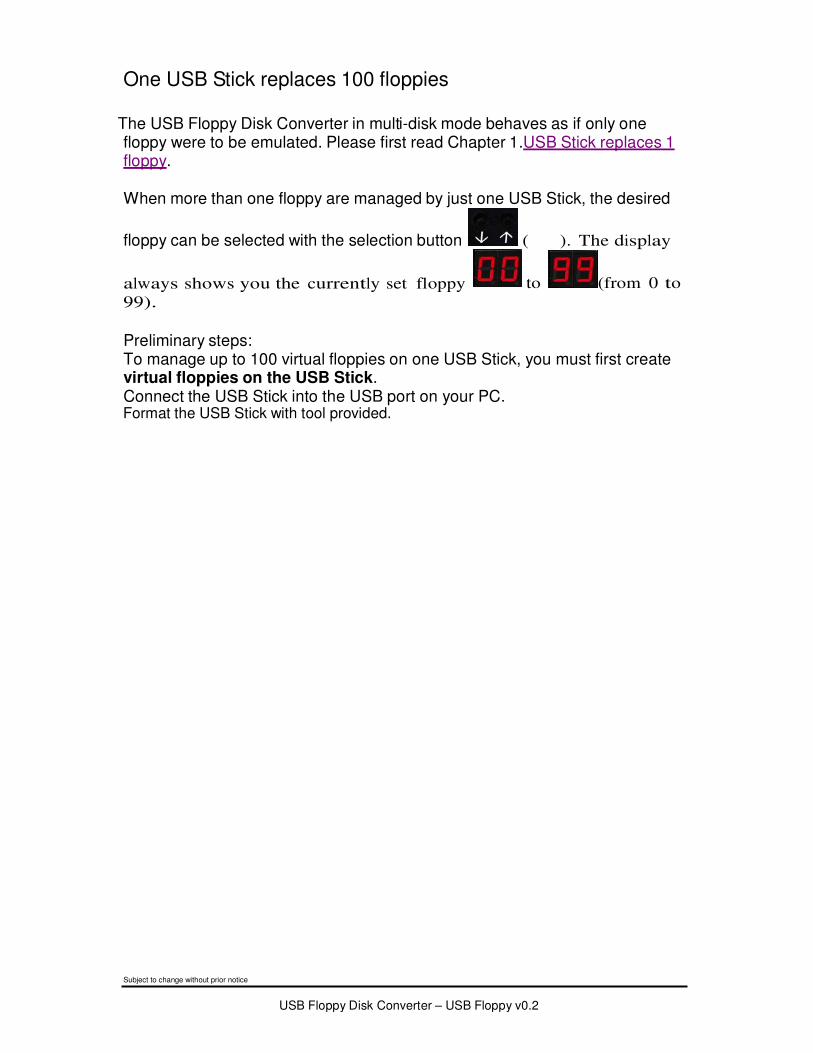
Switching from one virtual floppy to another Example:
Let us assume you want to use the 4th floppy (i.e. Floppy 03) and the USB Stick is not yet connected to the USB Disk Converter. Insert the USB Stick into the USB Floppy Disk Converter.
The display of the USB Disk Converter now shows (00), i.e.
the first floppy.
Use the right selection button to change over to Floppy (just
tap lightly until "03" appears on the display).
When you have selected Floppy 03, the display shows (03
with dots) for some time. The dots indicate that the selected Floppy
is just being initialized.
Please wait until the dots disappear from the display before you
continue to use the USB Stick (reading, writing or removing).
Please make sure the Busy LED (red) is not on. Should the
Busy LED be on, this indicates an ongoing reading or writing
process. In that case, please wait until the read/write process has
been completed.
You can now use the selected (virtual) floppy just as you used to do
with your customary floppies.
If you want to now change from Floppy 03 to 01, proceed in the
same way. Here are the individual steps to take:
Starting point: The display shows , and you want to select
.
1. Make sure the Busy LED (red) is not on.
2. Press right button 8 times to cycle thru 4,5,6,7,8,9,0 and then 1
Note: Once you have selected the desired floppy, you should
always wait until the dots next to the digits in the display
disappear. These indicate that the selected floppy is still being
initialized. If you start writing on the floppy during the
initialization phase, you may incur faults or data loss.
Subject to change without prior notice

USB Floppy Disk Converter – USB Floppy v0.2
Reading and writing
During the reading or writing process (data are being saved on or
read from the virtual floppy) the red Busy LED lights up. During
this process, do not under any circumstances remove the USB Stick
or deploy the selection buttons.
Please always wait until a read or write process has been
completed, before you continue, or else you may thereby cause
data loss.
Safely remove USB Stick from USB Floppy Disk Converter Only
remove the USB Stick when the Busy LED (red) is not on.
When a read/write process has just been completed, but the LED is
still on for a moment, please wait for a couple of seconds before you
remove the USB Stick.
Also do not remove the USB Stick as long as the two dots are still
visible in the display as here, for example, 03 with dots:
Safely remove USB Stick from Computer/PC
Please always remove the USB Stick safely from your computer or
PC. Proceed safely as usual with your operating system (Windows:
safely remove or log out; Linux/Unix: unmount; Mac OS: eject).
Note : The Colour and LED/Switch patterns may be changed without any prior intimation
Subject to change without prior notice
Related Documents