FLIPR Calcium 6 and Calcium 6-QF Assay Kits 1 FLIPR® Calcium 6 Evaluation Kit Product # R8194 About the FLIPR ® Calcium 6 Evaluation Assay Kit The FLIPR® Calcium 6 Evaluation Assay Kit from Molecular Devices, LLC (hereafter referred to as Molecular Devices) offers a convenient way to compare the performance of the FLIPR® Calcium 6 Assay Kit (R8290) and the FLIPR® Calcium 6-QF Assay kit (R8192) side by side and determine the optimal kit for assay conditions, targets, cell lines, or application. If required, this kit can be compared with materials in the FLIPR® Calcium Assay Evaluation Kit (R8172), which contains FLIPR® Calcium 3, 4 and 5 formulations. The FLIPR® Calcium Assay kits provide a fast, simple, and reliable fluorescence-based assay for detecting changes in intracellular calcium. The Calcium 6 kits are based on a novel calcium indicator that provides a larger signal window. The Calcium 6 kit also uses the same proprietary quench technology used in the Calcium 4 and 5 Assay Kits. The Calcium 6-QF kit provides a quench free option, with no masking dye included in the formulation. Each kit provides mix-and-read procedures for calcium flux assays in which cells are incubated with the kit reagents for two hours and transferred directly to the FLIPR® or FlexStation® instruments for evaluation. There are no intermediate wash-steps required with these kits. TABLE OF CONTENTS INTRODUCTION Page Assay Principle 2 Applications 3 MATERIALS AND EQUIPMENT Kit Components 3 Materials required but not provided 4 Storage and handling 4 CALCIUM 6 AND CALCIUM 6-QF EXPERIMENTAL PROTOCOLS Quick Start Protocol 4 Cell handling 5 Preparation of Loading Buffer 5 Cell loading 6 Running the calcium mobilization assay 6 FLIPR® instrument settings 7 FLIPR® Tetra instrument settings (EMCCD and ICCD cameras) 8-9 FlexStation® instrument settings 9 EXAMPLE DATA 9-10 TROUBLE SHOOTING GUIDE 11-12 PRODUCT USE LIMITATIONS AND WARRANTY 13

Welcome message from author
This document is posted to help you gain knowledge. Please leave a comment to let me know what you think about it! Share it to your friends and learn new things together.
Transcript

FLIPR Calcium 6 and Calcium 6-QF Assay Kits 1
FLIPR® Calcium 6 Evaluation Kit Product # R8194
About the FLIPR® Calcium 6 Evaluation Assay Kit The FLIPR® Calcium 6 Evaluation Assay Kit from Molecular Devices, LLC (hereafter referred to as Molecular Devices) offers a convenient way to compare the performance of the FLIPR® Calcium 6 Assay Kit (R8290) and the FLIPR® Calcium 6-QF Assay kit (R8192) side by side and determine the optimal kit for assay conditions, targets, cell lines, or application. If required, this kit can be compared with materials in the FLIPR® Calcium Assay Evaluation Kit (R8172), which contains FLIPR® Calcium 3, 4 and 5 formulations. The FLIPR® Calcium Assay kits provide a fast, simple, and reliable fluorescence-based assay for detecting changes in intracellular calcium. The Calcium 6 kits are based on a novel calcium indicator that provides a larger signal window. The Calcium 6 kit also uses the same proprietary quench technology used in the Calcium 4 and 5 Assay Kits. The Calcium 6-QF kit provides a quench free option, with no masking dye included in the formulation. Each kit provides mix-and-read procedures for calcium flux assays in which cells are incubated with the kit reagents for two hours and transferred directly to the FLIPR® or FlexStation® instruments for evaluation. There are no intermediate wash-steps required with these kits.
TABLE OF CONTENTS
INTRODUCTION Page
Assay Principle 2 Applications 3
MATERIALS AND EQUIPMENT
Kit Components 3 Materials required but not provided 4 Storage and handling 4
CALCIUM 6 AND CALCIUM 6-QF EXPERIMENTAL PROTOCOLS
Quick Start Protocol 4 Cell handling 5 Preparation of Loading Buffer 5 Cell loading 6 Running the calcium mobilization assay 6 FLIPR® instrument settings 7 FLIPR® Tetra instrument settings (EMCCD and ICCD cameras) 8-9 FlexStation® instrument settings 9
EXAMPLE DATA 9-10
TROUBLE SHOOTING GUIDE 11-12
PRODUCT USE LIMITATIONS AND WARRANTY 13
FLIPR Calcium 6 and Calcium 6-QF Assay Kits 2
INTRODUCTION
About the FLIPR® Calcium 6 and Calcium 6-QF Assay Kits
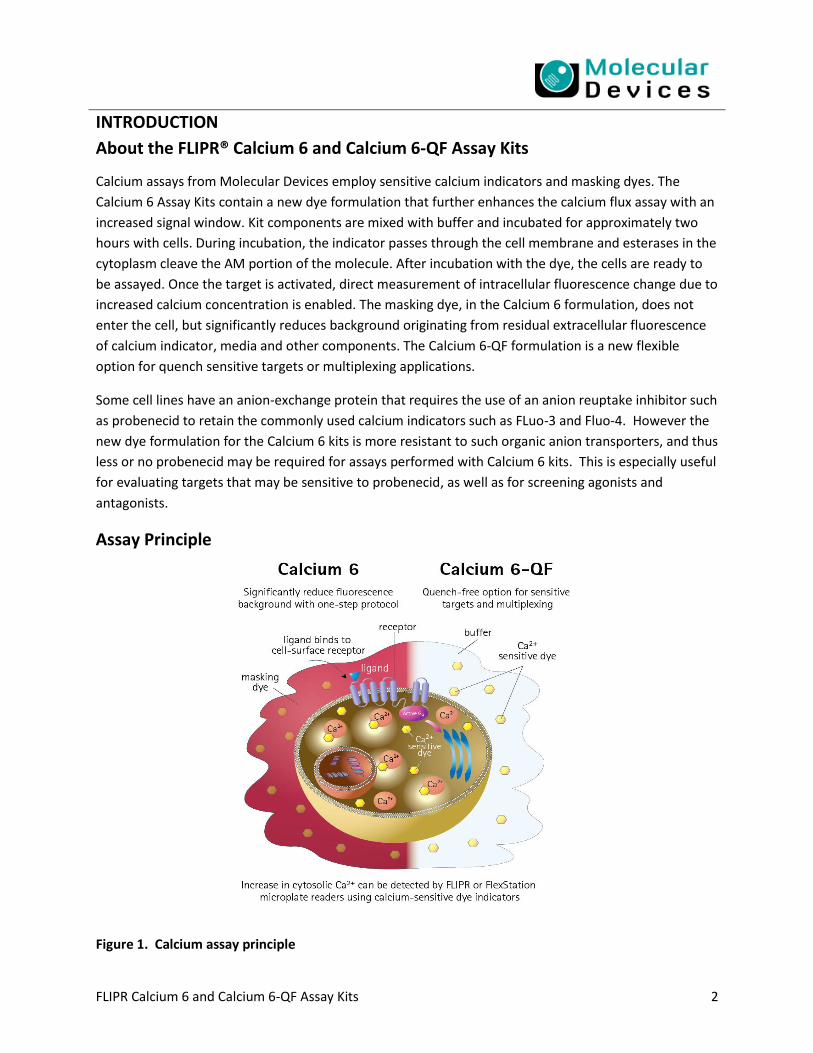
Calcium assays from Molecular Devices employ sensitive calcium indicators and masking dyes. The
Calcium 6 Assay Kits contain a new dye formulation that further enhances the calcium flux assay with an
increased signal window. Kit components are mixed with buffer and incubated for approximately two
hours with cells. During incubation, the indicator passes through the cell membrane and esterases in the
cytoplasm cleave the AM portion of the molecule. After incubation with the dye, the cells are ready to
be assayed. Once the target is activated, direct measurement of intracellular fluorescence change due to
increased calcium concentration is enabled. The masking dye, in the Calcium 6 formulation, does not
enter the cell, but significantly reduces background originating from residual extracellular fluorescence
of calcium indicator, media and other components. The Calcium 6-QF formulation is a new flexible
option for quench sensitive targets or multiplexing applications.
Some cell lines have an anion-exchange protein that requires the use of an anion reuptake inhibitor such
as probenecid to retain the commonly used calcium indicators such as FLuo-3 and Fluo-4. However the
new dye formulation for the Calcium 6 kits is more resistant to such organic anion transporters, and thus
less or no probenecid may be required for assays performed with Calcium 6 kits. This is especially useful
for evaluating targets that may be sensitive to probenecid, as well as for screening agonists and
antagonists.
Assay Principle
Figure 1. Calcium assay principle

FLIPR Calcium 6 and Calcium 6-QF Assay Kits 3
APPLICATION The FLIPR® Calcium 6 Evaluation Kit includes 3 explorer-size vials each of Calcium 6 and 3 vials each or
Calcium 6-QF. It is designed to help you evaluate which of the FLIPR® Calcium Kits will work best with
your target, whether it be GPCR or calcium channel.
FLIPR Calcium 6 kits use a newly improved calcium dye formula that further enhances the signal window
of the assay and makes difficult assays more amenable for high-throughput screening. The Calcium 6 kit
provides a homogeneous assay designed to work for the majority of GPCRs, including Chemokine and
other difficult receptors, sticky compounds and allosteric modulators, as well as with calcium channels.
In addition, the new Calcium 6-QF formulation is a flexible option for quench sensitive targets or
multiplexing applications. Identification of the optimal kit for your applications will result in the
following improvements for most cell systems: Increased assay signal; Reduced background; Increased z-
factor; Ability to multiplex with luminescent assays (QF format only)
Which FLIPR® Calcium 6 Assay Kit is right for your application?
Media containing serum
Assay Buffer Multiplexing Probenecid
Sensitive Cell Lines
Calcium 6 Assay Kit X X X
Calcium 6-QF Assay Kit X X X
MATERIALS AND EQUIPMENT Kit Components
Table 1: FLIPR® Calcium 6 Assay Kit and FLIPR® Calcium 6-QF Assay Kit Contents
Reagent Description R8194 FLIPR Calcium 6 (Evaluation Kit) 3 vials Calcium 6 Explorer Kit Component A (R8190)
3 vials each Calcium 6-QF Explorer Kit Component A & Component C (R8192)
1 bottle Component B 1X Hank’s Balanced Salt solution (HBSS) plus 20 mM HEPES buffer, pH 7.4
The entire kit is sufficient for six 96-, 384-, or 1536-well plates. Each vial is sufficient for one 96-, 384-, or 1536-well plate.
Materials required but not provided
Table 2: Reagents and supplies
Item Suggested Vendor Component B*: HBSS Buffer (1X Hank’s Balanced Salt solution plus 20 mM HEPES buffer) pH 7.4 *Component B is provided for Explorer kits only.
10X Hank’s Balanced Salt Solution (#14065-056, Gibco or equivalent)
1M HEPES buffer solution (#9319, Irvine Scientific or equivalent)
Water for cell culture (# 9312, Irvine Scientific or equivalent)

FLIPR Calcium 6 and Calcium 6-QF Assay Kits 4
Probenecid (inhibitor for the anion-exchange protein) may be required with some cell lines to insure the dye stays inside the cell and is not pumped back out. Prepare a stock solution of 500 mM in 1N NaOH, then dilute to 250 mM in HBSS buffer. Prepare loading buffer such that the final in-well concentration of probenecid is 2.5 mM when added to cells.
Sigma (# P8761) or other chemical suppliers TIP: Use of water soluble probenecid is also possible following individual manufacturer instructions TIP: With Calcium 6 Kit and Calcium 6-QF Kit, it may also be possible to run with less probenecid or none at all if the target is sensitive to probenecid. Assay development is required to determine the best concentration.
Storage and Handling
On receipt of the FLIPR® Calcium 6 Evaluation Kit, store contents at -20o C. Under these conditions the
reagents are stable for six months in the original packaging.
After formulation, the Loading Buffer is stable for up to eight hours at room temperature. Aliquots
can be frozen and stored for up to 5 days (without probenecid) without loss of activity.
Quick Start Protocol
Plate cells in microplates and incubate overnight at 37oC, 5% CO2
Prepare the loading buffer the following day
Remove cell plates from the incubator
o Calcium 6 Kit - add an equal volume of loading buffer to each well (i.e. 25 L of loading
buffer to 25 L of cells and media for a 384-well plate)
o Calcium 6 QF Kit – remove the culture media and add 25 L HBSS + 20mM HEPES
followed by 25 L dye loading buffer.
Note: Serum and other components in media will cause hydrolysis of the dye and lower the
overall signal window. While the masking dye in the Calcium 6 kit will significantly reduce
extracellular background caused by hydrolysis of dye, the Calcium 6-QF kit is quench free and
does not provide the same benefit. Removal of the culture media will prevent hydrolysis and
increased background in assays run with Calcium 6-QF.
Return plates to the incubator and incubate two hours at 37oC, 5% CO2
Prepare compound plates
Run experiment on FLIPR® or FlexStation® instruments

FLIPR Calcium 6 and Calcium 6-QF Assay Kits 5
Experimental Protocol A. Cell Handling
The FLIPR® Calcium 6 and FLIPR® Calcium 6-QF Assays are designed to work with many cell types, both
adherent and non-adherent. Standard procedures vary across laboratories and we recognize that a
variety of cell handling conditions might be adopted at the discretion of the user. In this section, we
provide general guidelines for preparing cells for use with the assay kit.
Adherent cells are the most frequently used cells with the kits. They are typically plated the day prior to
an experiment and then incubated in a 5% CO2, 37C incubator overnight. See Table 3 for suggested
plating volumes and seeding densities to create an 80-90% confluent cell monolayer before placing the
plates in the FLIPR® or FlexStation® instruments.
Table 3: Suggested plating volumes and seeding densities
Cells/Well Cells/Well
Cell Type (cells/well)
96-well plate
(100 L growth medium)
384-well plate
(25 L growth medium)
Adherent cells 20,000 – 80,000 5,000 – 20,000
Non-adherent cells 40,000 – 200,000 10,000 – 50,000
For non-adherent cells, we recommend centrifuging cells from culture medium and re-suspending the pellet in culture medium or appropriate buffer of choice on the day of the experiment. Cells can be dye-loaded in a tube or while plated. It is recommended after the cells are plated, the plates be centrifuged at 100 x g for up to 4 minutes (with brake off). Alternatively, non-adherent cells can be treated like adherent cells, plating the day before the assay using the same plating volumes and seeding densities, as long as the cells are seeded onto coated plates (e.g.: poly-D-lysine or collagen) to ensure good attachment to the plate bottom.
B. Preparation of Loading Buffer
The following procedure is designed for preparation of the Calcium 6 Assay Kit Loading Buffer per vial of the Explorer Kit.
1. Remove one vial of Calcium 6 Assay Reagent (Component A) from the freezer and equilibrate to
room temperature. Remove Component B if also stored in the freezer and bring to room
temperature.
2. Dissolve contents of one Component A vial by adding 10 mLs of Component B or 1X HBSS Buffer
plus 20 mM HEPES. Mix by vortexing (~1-2 min) until contents of vial are dissolved. It is
important that contents are completely dissolved to ensure reproducibility between
experiments.
The following procedure is designed for preparation of the Calcium 6-QF Assay Kit Loading Buffer per vial of the Explorer Kit.
1. Remove one vial each of Calcium 6-QF Assay Reagents (Components A, C) from the freezer and
equilibrate to room temperature. Remove Component B if also stored in the freezer and bring to
room temperature.

FLIPR Calcium 6 and Calcium 6-QF Assay Kits 6
2. Dissolve contents of one vial Component A by adding 10 mLs of Component B or 1X HBSS Buffer
plus 20 mM HEPES. Mix by vortexing (~1-2 min) until contents of vial are dissolved. It is
important that contents are completely dissolved to ensure reproducibility between
experiments. Transfer contents to a polypropylene tube.
3. Dissolve one vial of Component C in 25L DMSO, mix by pipetting. Transfer contents to same
tube as listed in step 2.
4. Rinse vial of Component C with 100L Component B or 1X HBSS Buffer plus 20 mM HEPES, and
transfer content to same tube as listed in step 2. Mix by vortexing (~1-2 min).
Note: If the cells require probenecid (such as CHO or other cells containing an organic anion
transporter), then a 500 mM stock solution should be prepared by adding 1 N NaOH in tissue culture
treated water, vortexing and diluting to 250 mM with 1X HBSS buffer plus 20 mM HEPES. Prepare
the Loading Buffer so that the final in-well working concentration is 2.5 mM. Adjust Loading Buffer
pH to 7.4 after addition of probenecid. Refer to the procedure for making probenecid on page four.
It may also be possible to run with less probenecid or none at all if the target is sensitive to
probenecid. Assay development is required to determine the best concentration
Do not store frozen aliquots of Loading Buffer with probenecid and always prepare fresh probenecid
on the day of the experiment. Water soluble probenecid may also be used following supplier
instructions.
Warning: The components supplied are sufficient for proper cell loading. For optimum results it is
important NOT to add any additional reagents or change volumes and concentrations.
C. Cell Loading Using Loading Buffer
Remove cell plates from the incubator or centrifuge. For the Calcium 6 kit, it is not necessary to remove
the culture media. For the Calcium 6-QF kit it is important to remove the culture media and replace it
with HBSS + 20 mM HEPES to maintain the signal.
1. Add an equal volume of Loading Buffer to each well (100 µL per well for 96-well plates, 25 µL for
384-well plates.
Note: Molecular Devices does not recommend washing cells before dye loading. However,
growth medium and serum may interfere with certain assays. In this case, the supernatant can
be aspirated and replaced with an equal volume of serum-free HBSS plus 20 mM HEPES buffer
before adding the Loading Buffer. Alternatively, cells can be grown in reduced serum or serum-
free conditions.
2. After adding dye, incubate cell plates for 2 hours at 37oC then keep the plates at room
temperature until used (loading time should be optimized for each cell line and target).
Note: some assays perform optimally when the plates are incubated at room temperature or
for different loading times.
Warning: Do NOT wash the cells after dye loading for either the Calcium 6 or Calcium 6-QF kits.

FLIPR Calcium 6 and Calcium 6-QF Assay Kits 7
D. Running the Calcium Mobilization Assay
FLIPR® Instrument
1. After incubation, transfer the plates directly to the FLIPR® instrument and begin the calcium
assay as described in the instrument manual.
2. When performing a signal test prior to an experiment, adjust typical average baseline counts to
range from 8,000 – 12,000 RFU (FLIPR 1, FLIPR384, or FLIPR3 instruments), 800-1,100 RFU on the
FLIPR Tetra instrument with EMCCD camera, or 5,000 – 7,000 RFU on FLIPR Tetra with ICCD
camera.
3. Suggested experimental setup parameters for each FLIPR system are listed in Tables 6, 7, and 8:
Faster addition speeds closer to the cell monolayer are recommended to ensure better mixing
of compounds and lower signal variance across the plate. However, further assay development,
adjustment of the volume, height and speed of dispense, is recommended to optimize the
individual cell response.
Table 4: Experimental setup parameters for FLIPR 1, FLIPR384, and FLIPR3 instruments
Parameters
96-well plate FLIPR 1, FLIPR384
384-well plate FLIPR384 384-well plate FLIPR3
Exposure (sec) 0.4 0.4 0.4
Camera Gain N/A N/A 50-80
Addition Volume (L) 50 12.5 12.5
Addition Height (L) 210-230 35-45 35-45
Compound Concentration (Fold) 5X 5X 5X
Addition Speed (L/sec) Adherent Cells
50-100 10-20 25-40
Addition Speed (L/sec) Non adherent Cells
10-20 5-10 10-25
Table 5: Experimental setup parameters for FLIPR Tetra system with EMCCD camera
Parameters 96-well plate 384-well plate
Exposure (sec) 0.4 0.4
Camera Gain 50-130 50-130
Addition Volume (L) 50 12.5
Compound Concentration (Fold) 5X 5X
Excitation LED (nm) 470-495 470-495
Emission Filter (nm) 515-575 515-575
LED Intensity (%) 80 80
Addition Height (L) 210-230 35-45
Tip Up Speed (mm/sec) 10 10
Addition Speed (L/sec) Adherent Cells 50-100 30-40
Addition Speed (L/sec) Non Adherent Cells 10-20 10-20

FLIPR Calcium 6 and Calcium 6-QF Assay Kits 8
Table 6: Experimental setup parameters for FLIPR Tetra system with ICCD camera
Parameters 96-well plate 384-well plate
Exposure (sec) 0.53 0.53
Camera Gain Fixed at 2,000 Fixed at 2,000
Camera Gate 6% 6%
Addition Volume (L) 50 12.5
Compound Concentration (Fold) 5X 5X
Excitation LED (nm) 470-495 470-495
Emission Filter (nm) 515-575 515-575
LED Intensity (%) 50 50
Addition Height (L) 210-230 35-45
Tip Up Speed (mm/sec) 10 10
Addition Speed (L/sec) Adherent Cells
50-100 30-40
Addition Speed (L/sec) Non Adherent Cells
10-20 10-20
FlexStation® Instrument
1. Recommended experimental setup parameters for the FlexStation® instrument follow: Setup
up your FlexStation instrument using a SoftMax® Pro software protocol before you read the
plate. The experimental parameters are listed in Table 7.
Table 7. Experimental setup parameters for 96- and 384-well plates on the FlexStation® instrument
Fluorescence Parameters 96-well 384-well
Excitation Wavelength (nm) 485 485
Emission Wavelength (nm) 525 525
Automatic Emission Cut-Off (nm) 515 515
Other Parameters 96-well 384-well
PMT Sensitivity 6 6
Pipette Height (L) 230 50
Transfer Volume (L) 50 12.5
Compound Concentration (Fold) 5X 5X
Addition Speed (Rate) Adherent Cells
3 2-3
Addition Speed (Rate) Non-Adherent Cells
1 1

FLIPR Calcium 6 and Calcium 6-QF Assay Kits 9
2. After incubation (see notes in FLIPR® instrument assay section), transfer the assay plate directly
to the FlexStation® instrument assay plate carriage and run the assay.
3. In an individual well or column of wells, the calcium flux peak(s) should be complete within 1 to
3 minutes after addition. For an entire plate however, the protocol will not complete until all
chosen columns are finished. The assays are run one column at a time.
4. It is strongly recommended that parameters be optimized for each cell line and target to deliver
the best performance for your assay.
5. Analyze the data using SoftMax® Pro software.
Data Analysis: FLIPR® Calcium 6 and Calcium 6-QF Assay Examples
Figure 2. Calcium 6 Assay Kit in media:
CHOM1 Cells: Agonism by Carbachol
-5 -4 -3 -2 -1 0 10
1
2
3
4
5
EC50 = 0.013
Z @ EC80 = 0.79
Log [CarbacholM
F
/F (
max-m
in)
CHOM1 Cells: Atropine antagonism
-5 -4 -3 -2 -1 0 10
1
2
3
4
5
IC50 = 0.004
Z @ EC80 = 0.75
Log [Atropine] M
F
/F (
max-m
in)
2a 2b
Figure 2. Carbachol concentration response curve in WT3 CHO M1 cells. Cells were seeded overnight
at 25 L per well in a 384-well black wall clear bottom plate. On the day of the assay, cells were
incubated in media with 25 L of Calcium 6 Kit. All plates were incubated for 2 hours @ 37oC and 5%
CO2. In Figure 2a, a volume of 12.5 L 5X Carbachol was added per well as agonist during detection on a
FLIPR® Tetra instrument with ICCD camera. The Z factor @ EC80 was 0.79 and the EC50 values were
comparable to published values. Figure 2b shows the antagonism response to 50 nM Carbachol by
Atropine. The Z factor @ IC50 was 0.75. The IC50 value is comparable to published values.

FLIPR Calcium 6 and Calcium 6-QF Assay Kits 10
Figure 3. FLIPR Calcium 6-QF Assay Kit in Buffer:
HEK 293 Muscarinic M3 receptorcarbachol agonism
-4 -3 -2 -1 0 1 20
1
2
3
4
EC50 = 1.26 M
Z @ EC80 = 0.83
Log [Carbachol]M
F
/F (
max-m
in)
HEK 293 muscarinic M3 receptor:atropine antagonism
-5 -4 -3 -2 -1 0 10
1
2
3
4
IC50 = 0.001
Z @ IC50 = 0.65
Log [Atropine] M
F
/F (
max-m
in)
3a 3b
Figure 3. HEK-293 cells were seeded overnight at 25 L per well in a 384-well black wall clear bottom
Poly-D-Lysine coated plate. On the day of the assay, culture media was removed and the cells were
incubated in 25 L HBSS + 20mM HEPES and 25 L of Calcium 6-QF dye. Cells were incubated for 2
hours @ 37oC and 5% CO2. Figure 3a shows the agonist response of the endogenous Muscarinic M3
receptor to Carbachol. The EC50 value was comparable to other assays. The Z factor at EC80 was 0.83. In
Figure 3b, a 5X volume of the antagonist, atropine, was added per well and the plate was incubated for
10 minutes at room temperature. A 6X concentration of Carbachol (0.6 M final in well) was added as
challenge agonist during detection on a FLIPR® Tetra instrument with ICCD camera to achieve the final
indicated concentration.

FLIPR Calcium 6 and Calcium 6-QF Assay Kits 11
Figure 4. FLIPR Calcium 6 Assay probenecid signal window comparison
CHOM1 Cells: Carbachol agonism
-5 -4 -3 -2 -1 0 10
1
2
3
4
5
Ca6 Kit -PBX
Ca6 Kit +PBX
Calcium 6
+PBX
Calcium 6
- PBX
EC50 (M) 0.014 0.019
Z @ EC80 0.79 0.68
Log [CarbacholM
F
/F (
max-m
in)
Detail graphCHOM1 Cells: Carbachol agonism assay
without probenecid
-5 -4 -3 -2 -1 0 10.0
0.5
1.0
1.5
2.0
EC50 = 0.019 M
Z @ EC80 = 0.68
Log [CarbacholM
F
/F (
max-m
in)
4a 4b
Figure 4. Carbachol concentration response curve as seen in Figure 2a with additional comparison to an
assay run at the same time in Calcium 6 kit dye without probenecid in the loading buffer. In figure 4a,
both curves are shown. The EC50 values are both within the range of published values and very close to
each other. Figure 4b is a larger version of the same curve from the assay run without probenecid.
Despite the smaller signal window, the EC50 value is conserved and the Z factor @ EC80 is 0.68. This
suggests that the new dye formulation is less sensitive to the organic-anion transporter and requires
less, or even no, anion transporter inhibitors (probenecid) to be present in the assay system. A target
that is sensitive to the presence of probenecid in the loading buffer will benefit from the ability to
remove it
.
Troubleshooting Guide
Fluorescence drop upon compound addition (“dip”)
This may be the result of dislodging cells from the well bottom during addition. Lowering the
addition/dispense speed or adjusting addition height or both should solve the problem in this case.
Another potential reason is the dilution of the non-fluorescent compound into a plate with media
containing fluorescent components (like DMEM media). This Calcium 6 kit mediates this issue compared
to earlier developed Calcium Kits.

FLIPR Calcium 6 and Calcium 6-QF Assay Kits 12
Adding volumes greater than recommended may increase the initial fluorescence drop. In these cases it
may be necessary to adjust the volumes of the components. The recommended volume of the Loading
Buffer is 100 L for 96-well plates, 25 L for 384-well plates and 2 L for 1536-well plates.
Warning: Decreasing the final in-well concentration of the Loading Buffer may decrease the response of
the assay. If only one addition is required, then adding a higher concentration of compound in low
volume could help reduce any fluorescence drop upon addition.
Serum-sensitive cells or targets
Some cells are serum-sensitive resulting in oscillations of intracellular calcium that could interfere with
results. Also, some target receptors or test compounds may interact with serum factors. In these cases,
serum-containing growth medium should be removed prior to addition of loading buffer. The volume of
growth medium removed should be replaced with an equal volume of 1X HBSS plus 20mM HEPES buffer
before loading. Alternatively cells could be incubated overnight in lower concentrations of FBS and not
washed prior to the addition of Dye Loading Buffer.
Cells tested with buffer plus DMSO show a calcium response.
Buffer used for the negative control wells should contain the same final concentration of DMSO as is
present in the wells containing the test compounds. However, this concentration of DMSO could cause
a calcium flux. In these cases, add DMSO to the Loading Buffer such that the final concentration of
DMSO in the wells does not change after buffer addition.
Precipitation in the Reagent Buffer.
The FLIPR® Calcium 6 Assay Kits are compatible with numerous buffers. Use buffers shown to work in
previously established assays, if available.
Response is smaller than expected.
Agonists and antagonists may stick to the tips and trays. Use 0.1% BSA in all compound buffer diluents
and presoak tips in compound buffer containing 0.1% BSA. (Note: Do not use the same compound plate
for presoaking and compound addition when using a 384 Pipettor head in the FLIPR® System. Instead,
use a ‘Boat’ for the presoak.)
Apparent well-to-well variation is observed.
A liquid dispenser compatible with cell handling is recommended for use with all additions off the FLIPR®
or FlexStation® instrument if apparent well-to-well variation is observed. 1536-well plates can be loaded
in quadrants by a 384-well pipettor or 1536-well liquid handling device. In some cases spinning the
compound plate or allowing the cell plates to stand at room temperature prior to use in the assay may
decrease well-to-well variation.

FLIPR Calcium 6 and Calcium 6-QF Assay Kits 13
Product Use Limitations and Warranty
All Molecular Devices, LLC reagent products are sold for research use only and are not intended for use
in diagnostic procedures. Reagents may contain chemicals that are harmful. Due care should be
exercised to prevent direct human contact with the reagent. The MSDS is available on the
MolecularDevices.com website for more information.
Each product is shipped with documentation stating specifications and other technical information.
Molecular Devices, LLC products are warranted to meet or exceed the state specifications. The sole
obligation of Molecular Devices, LLC and the customer’s sole remedy are limited to replacement of the
products free of charge in the event that the products fails to perform as warranted.
Molecular Devices, LLC makes no other warranties, either expressed or implied, including without
limitation the implied warranties of merchantability and fitness for a particular purpose or use.
Regional Offices USA & Canada +1-800-635-5577 • Brazil +55-11-3626-6607 • China (Beijing) +86-10-6410-8669 • China (Shanghai) +86-21-3372-1088 • Germany 00800-665-32860 • Japan (Osaka) +81-6-7174-8831 • Japan (Tokyo) +81-3-6362-5260 • South Korea +82-2-3471-9531 • UK+44-118-944-8000 Check our web site for a current listing of our worldwide distributors. www.moleculardevices.com FOR RESEARCH USE ONLY. NOT FOR USE IN DIAGNOSTIC PROCEDURES. The trademarks mentioned herein are the property of Molecular Devices, LLC or their respective owners. ©2013 Molecular Devices, LLC Printed in U.S.A. 5024582 Rev. C 01/31/2013 D5042723
Related Documents