FlipDiva’s Guide to Quick and Easy Blog Transfers written by: FlipDiva ©Copyright 2009 FlipDiva BlogsbyFlipDiva.com FlipDiva’s Guide to Quick and Easy Blog Transfers Eight Simple Steps and It’s Cocktail Time! By FlipDiva Page 1

Welcome message from author
This document is posted to help you gain knowledge. Please leave a comment to let me know what you think about it! Share it to your friends and learn new things together.
Transcript

7/27/2019 FlipDivas Guide to Easy Blog Transfers
http://slidepdf.com/reader/full/flipdivas-guide-to-easy-blog-transfers 1/39
FlipDiva’s Guide to Quick and Easy Blog Transfers written by: FlipDiva
©Copyright 2009 FlipDiva BlogsbyFlipDiva.com
FlipDiva’s Guide to Quick and Easy Blog Transfers
Eight Simple Steps and It’s
Cocktail Time!
By FlipDiva
Page 1

7/27/2019 FlipDivas Guide to Easy Blog Transfers
http://slidepdf.com/reader/full/flipdivas-guide-to-easy-blog-transfers 2/39
FlipDiva’s Guide to Quick and Easy Blog Transfers written by: FlipDiva
©Copyright 2009 FlipDiva BlogsbyFlipDiva.com Page 2
Legal Disclaimers
All contents copyright © 2009 by Terri Tutten, aka FlipDiva. All rights reserved.No part of this document or accompanying files may be modified in any form, butthe ebook may be freely given away as you wish.
This ebook is presented to you for informational purposes only and is not asubstitution for any professional advice. The contents herein are based on theviews and opinions of the author and all associated contributors.
While every effort has been made by the author and all associated contributors topresent accurate and up to date information within this document, it is apparenttechnologies rapidly change. Therefore, the author and all associated contributorsreserve the right to update the contents and information provided herein as thesechanges progress. The author and/or all associated contributors take noresponsibility for any errors or omissions if such discrepancies exist within thisdocument.
The author and all other contributors accept no responsibility for any consequentialactions taken, whether monetary, legal, or otherwise, by any and all readers of thematerials provided. It is the readers sole responsibility to seek professional advicebefore taking any action on their part.
Readers results will vary based on their skill level and individual perception of thecontents herein, and thusly no guarantees, monetarily or otherwise, can be madeaccurately. Therefore, no guarantees are made.
7/27/2019 FlipDivas Guide to Easy Blog Transfers
http://slidepdf.com/reader/full/flipdivas-guide-to-easy-blog-transfers 3/39
FlipDiva’s Guide to Quick and Easy Blog Transfers written by: FlipDiva
©Copyright 2009 FlipDiva BlogsbyFlipDiva.com Page 3
Resell Rights License Documentation
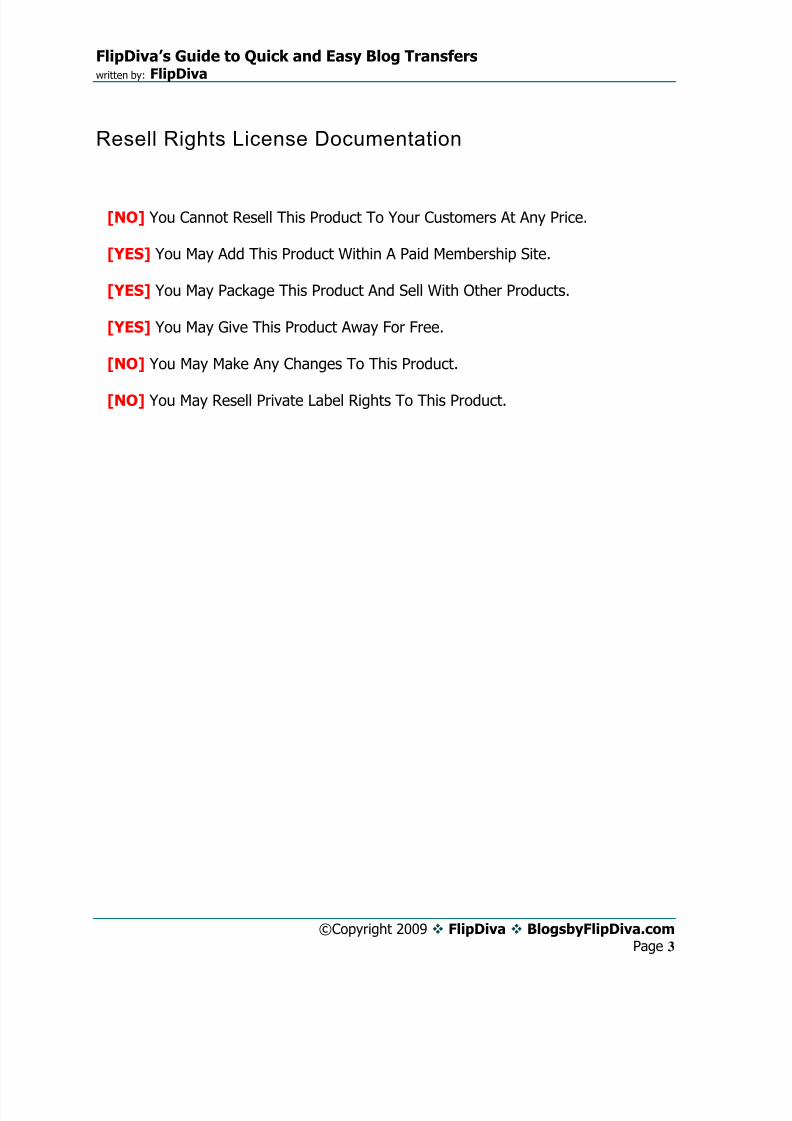
[NO] You Cannot Resell This Product To Your Customers At Any Price.
[YES] You May Add This Product Within A Paid Membership Site.
[YES] You May Package This Product And Sell With Other Products.
[YES] You May Give This Product Away For Free.
[NO] You May Make Any Changes To This Product.
[NO] You May Resell Private Label Rights To This Product.

7/27/2019 FlipDivas Guide to Easy Blog Transfers
http://slidepdf.com/reader/full/flipdivas-guide-to-easy-blog-transfers 4/39
FlipDiva’s Guide to Quick and Easy Blog Transfers written by: FlipDiva
©Copyright 2009 FlipDiva BlogsbyFlipDiva.com Page 4
Table of Contents
Legal Disclaimers ..................................................................................................................... 2
Resell Rights License Documentation ...................................................................................... 3Table of Contents...................................................................................................................... 4
Step 1 – Unzip Your Folder and Look Inside........................................................................... 6Step 2 – Install Wordpress ........................................................................................................ 9
Step 3 - Import Your Database ............................................................................................... 19
Step 4 – Changing the Database Options to Your Domain Name.......................................... 23Step 5 – Upload the Files to Your Server ............................................................................... 27
Step 5 – Login to Your New Blog for the First Time............................................................. 29
Step 6 – Add Your New Username......................................................................................... 30Step 7 – Delete the User that Came With Your Blog ............................................................. 32
Step 8 – Login to Your New Blog and Finalize Your Settings .............................................. 33
What If I Want to Transfer My Blog to Someone Else??....................................................... 34

7/27/2019 FlipDivas Guide to Easy Blog Transfers
http://slidepdf.com/reader/full/flipdivas-guide-to-easy-blog-transfers 5/39
FlipDiva’s Guide to Quick and Easy Blog Transfers written by: FlipDiva
©Copyright 2009 FlipDiva BlogsbyFlipDiva.com Page 5
Introduction
Ok, here’s the dilemma. You’ve just bought a blog over on Flippa, or maybe it was
on the Warrior Forum. Or you could have bought it from Beamer over at
97DollareBooks - or even from me! It doesn’t matter where it came from, because
now all you have is a zipped up file and you don’t know what in the heck to do with
it.
Nice… There it sits on your desktop, teasing you. You thought someone – maybe
the good fairy – was going to tiptoe onto your computer while you weren’t looking
and install it for you, didn’t you? Wrong! You have to do it.
Now here’s the thing. I decided it was time for someone to explain the easiest and
fastest way possible to transfer blogs, because you know me, I’m always buying
this blog, selling that blog, that’s why everybody started calling me FlipDiva!
So let’s do this together, and I’ll show you the easy way to get that shiny new blog
installed onto your cPanel, and up and running.
Follow Me!

7/27/2019 FlipDivas Guide to Easy Blog Transfers
http://slidepdf.com/reader/full/flipdivas-guide-to-easy-blog-transfers 6/39
FlipDiva’s Guide to Quick and Easy Blog Transfers written by: FlipDiva
©Copyright 2009 FlipDiva BlogsbyFlipDiva.com Page 6
Step 1 – Unzip Your Folder and Look Inside
The first thing you have to do is unzip that folder. Now I’m assuming that you have
either WinZip on your computer, or you’ve downloaded 7-Zip ( a nice little freebie –
I love free things!). So all you have to do is right click on the folder, and unzip it
into a new folder, preferably called the same name.
So, for our example, you’ve received a folder called Martinis.zip. The seller has sent
you instructions telling you that the username is barshake, and the password is
flipdiva44. You need to unzip the folder called Martinis.zip into a folder called
Martinis.
With me so far?

7/27/2019 FlipDivas Guide to Easy Blog Transfers
http://slidepdf.com/reader/full/flipdivas-guide-to-easy-blog-transfers 7/39
FlipDiva’s Guide to Quick and Easy Blog Transfers written by: FlipDiva
©Copyright 2009 FlipDiva BlogsbyFlipDiva.com
Now let’s peek inside the folder, and this is what you’ll see:
That’s all we have to do with that folder right now, just unzip it, but make sure that
you know exactly where it is – you’re going to need the location when we upload
that database and those files. Now let’s talk about what is in the folder.
The wp-content folder contains all of your theme and plugin folders and files. The
wp-config file will contain the database information, should you ever need it, which
you usually don’t. But some people prefer to install blogs a slightly different way
than I’m going to show you, so they do need that information. The .htaccess file is
what tells Wordpress where to go find the files and the database, and the file called
wrdp1.sql.gz is a zipped up sql database.
Page 7

7/27/2019 FlipDivas Guide to Easy Blog Transfers
http://slidepdf.com/reader/full/flipdivas-guide-to-easy-blog-transfers 8/39
FlipDiva’s Guide to Quick and Easy Blog Transfers written by: FlipDiva
©Copyright 2009 FlipDiva BlogsbyFlipDiva.com Page 8
For you non-techies, the database is what holds all of the content itself, the name of
the blog, the posts, what’s in your widgets, etc. If you’ve had a blog transferred to
you from someone who had addon domains, the database may have a different
number, or a different name altogether. It could be called johnny.sql.gz, it doesn’t
matter what it’s called, because we’re going to create our own database and just
import this database.
No no, don’t walk away – that’s all the tech stuff you’re really going to need to
know. I just want you to know what a database is really for. I’ll show you exactly
what you need to do with it.
7/27/2019 FlipDivas Guide to Easy Blog Transfers
http://slidepdf.com/reader/full/flipdivas-guide-to-easy-blog-transfers 9/39
FlipDiva’s Guide to Quick and Easy Blog Transfers written by: FlipDiva
©Copyright 2009 FlipDiva BlogsbyFlipDiva.com Page 9
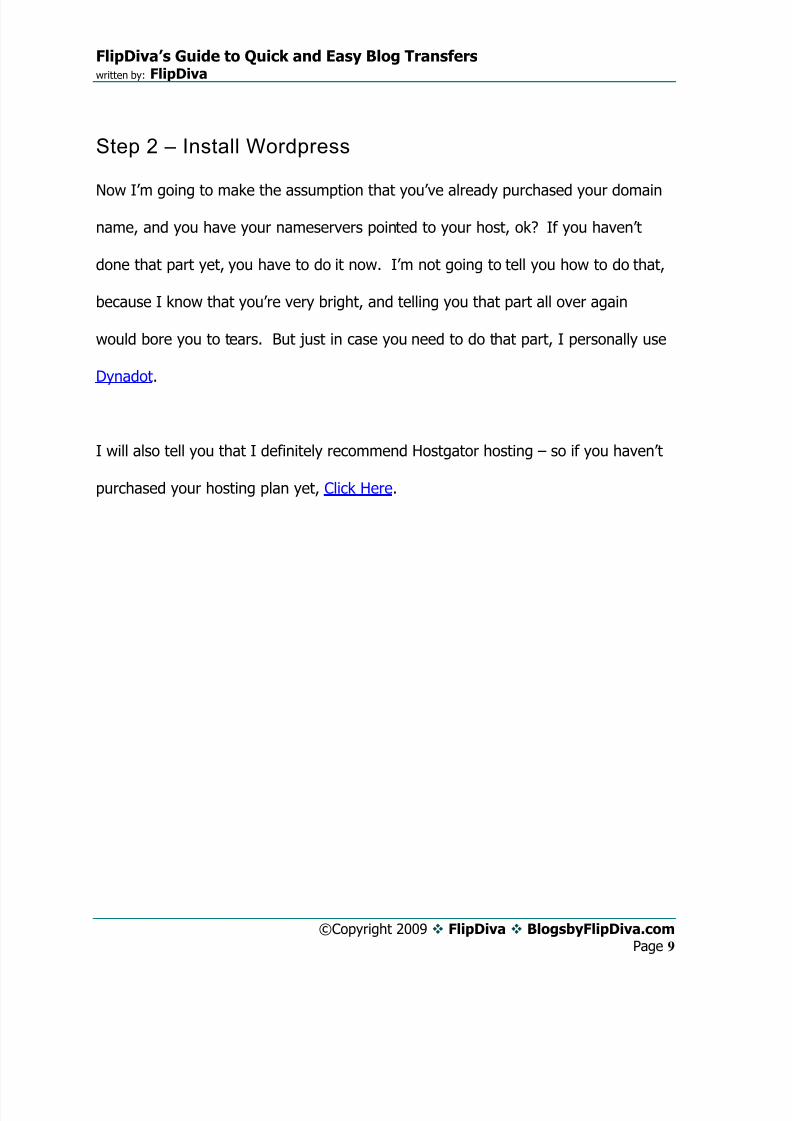
Step 2 – Install Wordpress
Now I’m going to make the assumption that you’ve already purchased your domain
name, and you have your nameservers pointed to your host, ok? If you haven’t
done that part yet, you have to do it now. I’m not going to tell you how to do that,
because I know that you’re very bright, and telling you that part all over again
would bore you to tears. But just in case you need to do that part, I personally use
Dynadot.
I will also tell you that I definitely recommend Hostgator hosting – so if you haven’t
purchased your hosting plan yet, Click Here.
7/27/2019 FlipDivas Guide to Easy Blog Transfers
http://slidepdf.com/reader/full/flipdivas-guide-to-easy-blog-transfers 10/39
FlipDiva’s Guide to Quick and Easy Blog Transfers written by: FlipDiva
©Copyright 2009 FlipDiva BlogsbyFlipDiva.com
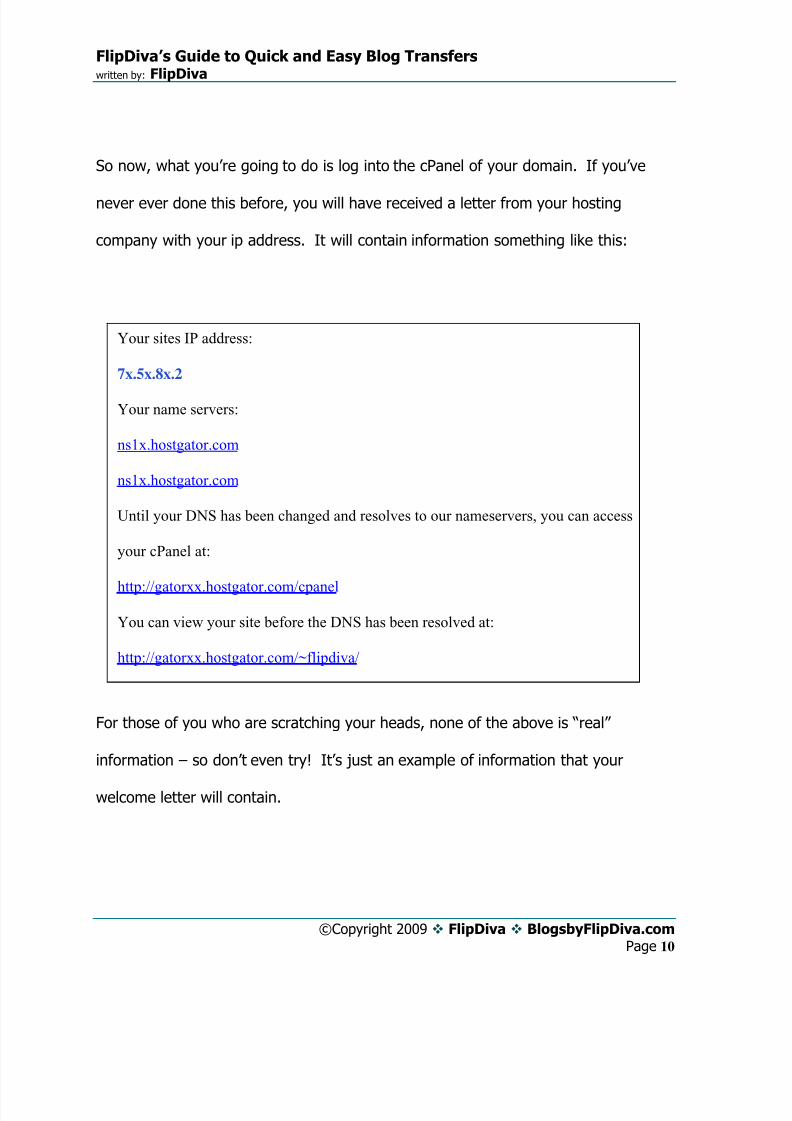
So now, what you’re going to do is log into the cPanel of your domain. If you’ve
never ever done this before, you will have received a letter from your hosting
company with your ip address. It will contain information something like this:
Your sites IP address:
7x.5x.8x.2
Your name servers:
ns1x.hostgator.com
ns1x.hostgator.com
Until your DNS has been changed and resolves to our nameservers, you can access
your cPanel at:
http://gatorxx.hostgator.com/cpanel
You can view your site before the DNS has been resolved at:
http://gatorxx.hostgator.com/~flipdiva/
For those of you who are scratching your heads, none of the above is “real”
information – so don’t even try! It’s just an example of information that your
welcome letter will contain.
Page 10

7/27/2019 FlipDivas Guide to Easy Blog Transfers
http://slidepdf.com/reader/full/flipdivas-guide-to-easy-blog-transfers 11/39
FlipDiva’s Guide to Quick and Easy Blog Transfers written by: FlipDiva
©Copyright 2009 FlipDiva BlogsbyFlipDiva.com Page 11
Now, back to logging on to your domain. If you’re using an account with Addon
Domains, it will be your maindomainname.com/cpanel. If you have an account such
as a Reseller, it will be yournewdomain.com/cpanel – so let’s go do that. Hint: You
can always login to your cPanel using your ip address and your username and
password – did you know that? It would look like http://7x.5x.8x.2/cpanel – then
just enter your username and password!
I’m not going to go over adding your domain as an addon, because if you have that
type of account, or that’s how you’re using this account, you already know how to
add the addon domain by clicking on Addon Domains and simply adding it.
7/27/2019 FlipDivas Guide to Easy Blog Transfers
http://slidepdf.com/reader/full/flipdivas-guide-to-easy-blog-transfers 12/39
FlipDiva’s Guide to Quick and Easy Blog Transfers written by: FlipDiva
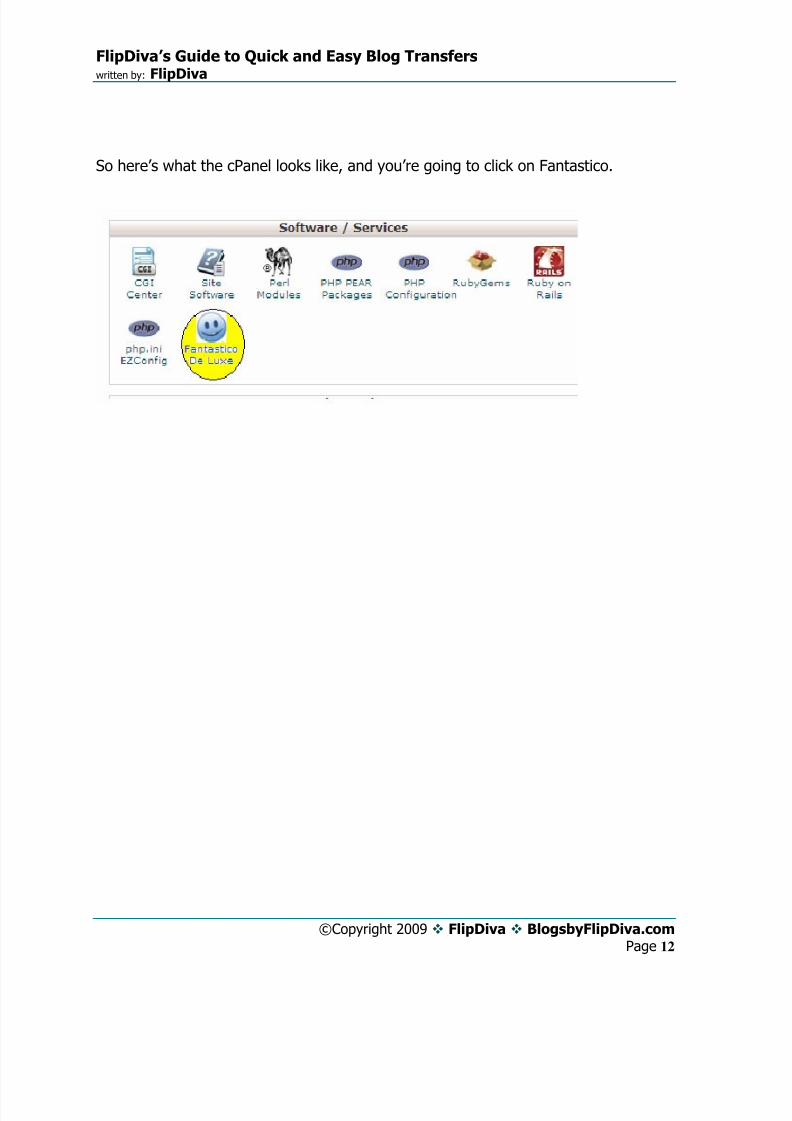
©Copyright 2009 FlipDiva BlogsbyFlipDiva.com
So here’s what the cPanel looks like, and you’re going to click on Fantastico.
Page 12

7/27/2019 FlipDivas Guide to Easy Blog Transfers
http://slidepdf.com/reader/full/flipdivas-guide-to-easy-blog-transfers 13/39
FlipDiva’s Guide to Quick and Easy Blog Transfers written by: FlipDiva
©Copyright 2009 FlipDiva BlogsbyFlipDiva.com
Now you’ll see a blank screen, and on the left you’ll see some different options. I
want you to find Wordpress – if you don’t have Hostgator hosting, which is what I
use and recommend, it might look slightly different.
Page 13
7/27/2019 FlipDivas Guide to Easy Blog Transfers
http://slidepdf.com/reader/full/flipdivas-guide-to-easy-blog-transfers 14/39
FlipDiva’s Guide to Quick and Easy Blog Transfers written by: FlipDiva
©Copyright 2009 FlipDiva BlogsbyFlipDiva.com
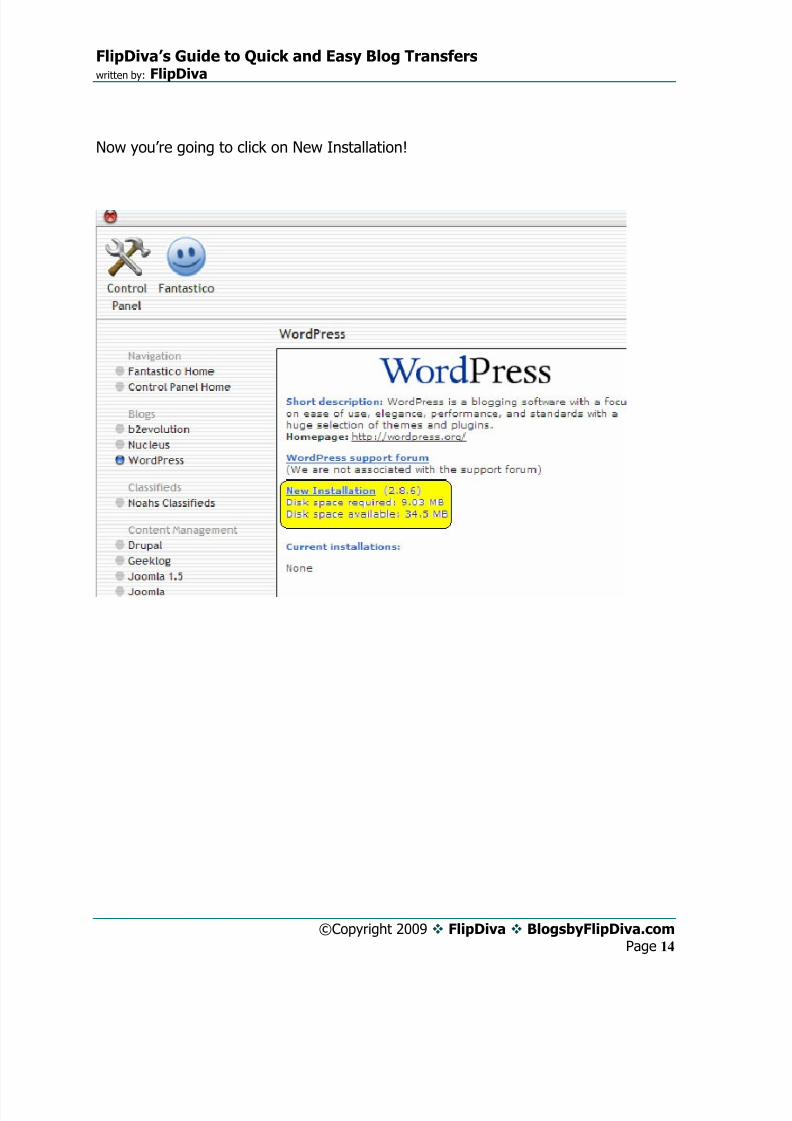
Now you’re going to click on New Installation!
Page 14

7/27/2019 FlipDivas Guide to Easy Blog Transfers
http://slidepdf.com/reader/full/flipdivas-guide-to-easy-blog-transfers 15/39
FlipDiva’s Guide to Quick and Easy Blog Transfers written by: FlipDiva
©Copyright 2009 FlipDiva BlogsbyFlipDiva.com
For our example, you’ve purchased a domain name called shaken-notstirred.com,
and your username is shakenn, and your password is flipdiva44. Fill in the correct
information, just like you see below, and then click that big Install Button. Make
sure that you leave the Install in Directory blank, unless you have a reason to want
to install Wordpress in another directory, such as a subdirectory.
Page 15

7/27/2019 FlipDivas Guide to Easy Blog Transfers
http://slidepdf.com/reader/full/flipdivas-guide-to-easy-blog-transfers 16/39
FlipDiva’s Guide to Quick and Easy Blog Transfers written by: FlipDiva
©Copyright 2009 FlipDiva BlogsbyFlipDiva.com
Now just click Finish Installation!
Page 16
7/27/2019 FlipDivas Guide to Easy Blog Transfers
http://slidepdf.com/reader/full/flipdivas-guide-to-easy-blog-transfers 17/39
FlipDiva’s Guide to Quick and Easy Blog Transfers written by: FlipDiva
©Copyright 2009 FlipDiva BlogsbyFlipDiva.com
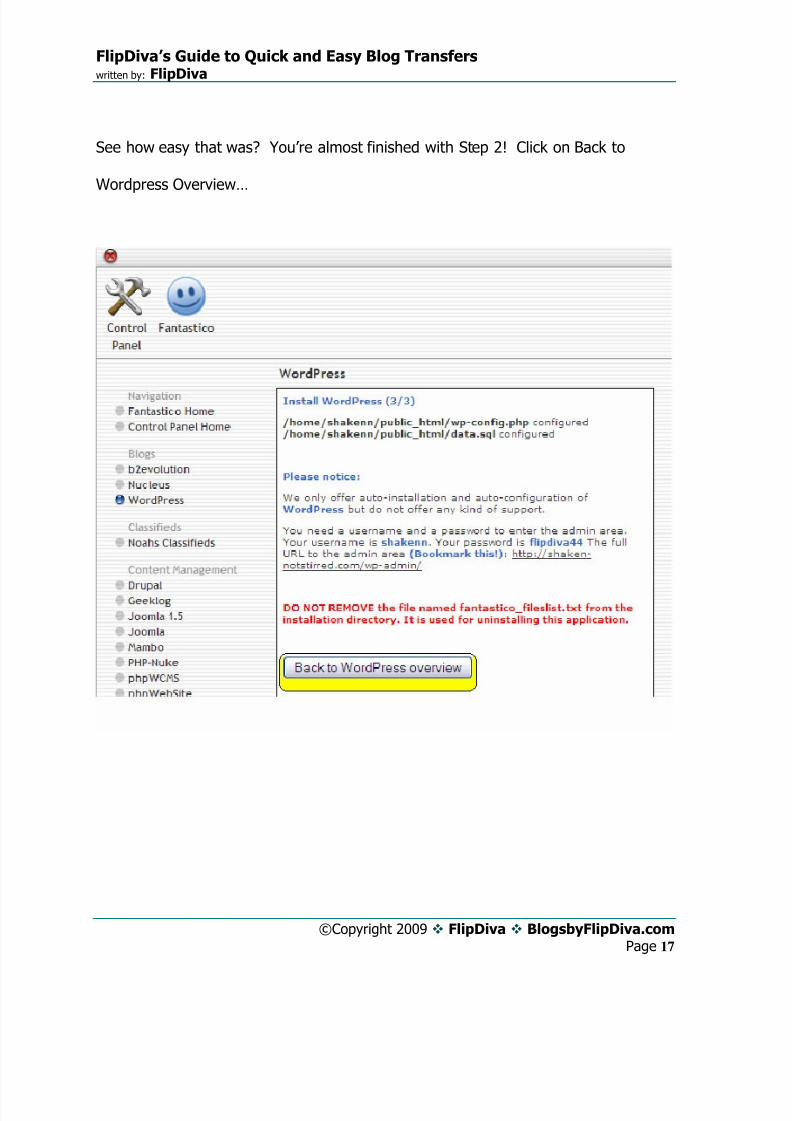
See how easy that was? You’re almost finished with Step 2! Click on Back to
Wordpress Overview…
Page 17

7/27/2019 FlipDivas Guide to Easy Blog Transfers
http://slidepdf.com/reader/full/flipdivas-guide-to-easy-blog-transfers 18/39
FlipDiva’s Guide to Quick and Easy Blog Transfers written by: FlipDiva
©Copyright 2009 FlipDiva BlogsbyFlipDiva.com
The last thing you have to do is go back to your Control Panel, and then we’ll go do
something that’s really fun!
Page 18

7/27/2019 FlipDivas Guide to Easy Blog Transfers
http://slidepdf.com/reader/full/flipdivas-guide-to-easy-blog-transfers 19/39
FlipDiva’s Guide to Quick and Easy Blog Transfers written by: FlipDiva
©Copyright 2009 FlipDiva BlogsbyFlipDiva.com
Step 3 - Import Your Database
Now for you non-techies out there, I’m going to make this as easy as mixing up a
good dry Martini. Maybe you should go do that part first…. LOL – Just kidding!
Now we’re back at our cPanel main page, and we’re going to select phpMyAdmin.
Page 19

7/27/2019 FlipDivas Guide to Easy Blog Transfers
http://slidepdf.com/reader/full/flipdivas-guide-to-easy-blog-transfers 20/39
FlipDiva’s Guide to Quick and Easy Blog Transfers written by: FlipDiva
©Copyright 2009 FlipDiva BlogsbyFlipDiva.com
Once inside there, the first thing to do is to select your database. In this example,
we’ve selected shakenn_wrdp1. You don’t ever have to worry about
information_schema – we will never go in there.
Page 20

7/27/2019 FlipDivas Guide to Easy Blog Transfers
http://slidepdf.com/reader/full/flipdivas-guide-to-easy-blog-transfers 21/39
FlipDiva’s Guide to Quick and Easy Blog Transfers written by: FlipDiva
©Copyright 2009 FlipDiva BlogsbyFlipDiva.com
Next we’ll see the following screen. We want to import the database that is in your
Martini folder. So browse to the folder, and select the database; it will have a .sql
extension, with probably a .gz after it, which means it’s in zipped format. Once
you’ve selected your database, just press the Go button.
Page 21

7/27/2019 FlipDivas Guide to Easy Blog Transfers
http://slidepdf.com/reader/full/flipdivas-guide-to-easy-blog-transfers 22/39
FlipDiva’s Guide to Quick and Easy Blog Transfers written by: FlipDiva
©Copyright 2009 FlipDiva BlogsbyFlipDiva.com
Now you’ll see a Successful message.
That’s it – you have the database installed!
Page 22

7/27/2019 FlipDivas Guide to Easy Blog Transfers
http://slidepdf.com/reader/full/flipdivas-guide-to-easy-blog-transfers 23/39
FlipDiva’s Guide to Quick and Easy Blog Transfers written by: FlipDiva
©Copyright 2009 FlipDiva BlogsbyFlipDiva.com
Step 4 – Changing the Database Options to Your DomainName
Now when you go look in wp-options, you’re going to see the original domain that
this site was installed on. You need to change that in four places; all of these fields
are on the first two pages of options, so it’s not complicated at all.
Now you’re going to select wp-options on the left side like you see below, and make
sure that you click in the little box, and it will open the screen on the next page.
Page 23

7/27/2019 FlipDivas Guide to Easy Blog Transfers
http://slidepdf.com/reader/full/flipdivas-guide-to-easy-blog-transfers 24/39
FlipDiva’s Guide to Quick and Easy Blog Transfers written by: FlipDiva
©Copyright 2009 FlipDiva BlogsbyFlipDiva.com
Find the field for site_url and blog_name, and change those to reflect your own
domain and blog. All you have to do is click on the little pencil!
Page 24
7/27/2019 FlipDivas Guide to Easy Blog Transfers
http://slidepdf.com/reader/full/flipdivas-guide-to-easy-blog-transfers 25/39
FlipDiva’s Guide to Quick and Easy Blog Transfers written by: FlipDiva
©Copyright 2009 FlipDiva BlogsbyFlipDiva.com
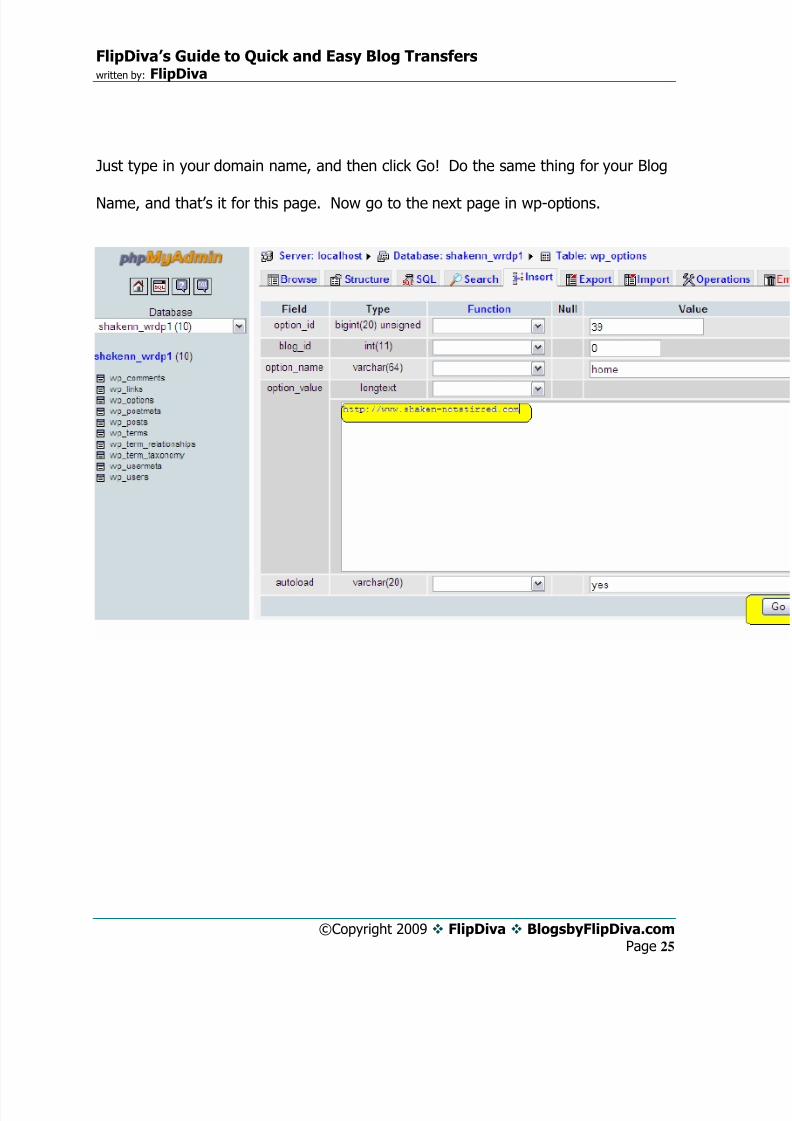
Just type in your domain name, and then click Go! Do the same thing for your Blog
Name, and that’s it for this page. Now go to the next page in wp-options.
Page 25

7/27/2019 FlipDivas Guide to Easy Blog Transfers
http://slidepdf.com/reader/full/flipdivas-guide-to-easy-blog-transfers 26/39
FlipDiva’s Guide to Quick and Easy Blog Transfers written by: FlipDiva
©Copyright 2009 FlipDiva BlogsbyFlipDiva.com
On this page of the database, you need to change the home path, and the upload
path. Again, just click on the pencil and type in your domain name for the home
path, and type in your username in place of the default username that you were
provided. In this case, we’re going to replace barshake with shakenn. (The
upload_path contains the username.)
Now you’re finished editing the database, but leave this window open, because there’s
one more little thing we’ll have to do in there.
Page 26

7/27/2019 FlipDivas Guide to Easy Blog Transfers
http://slidepdf.com/reader/full/flipdivas-guide-to-easy-blog-transfers 27/39
FlipDiva’s Guide to Quick and Easy Blog Transfers written by: FlipDiva
©Copyright 2009 FlipDiva BlogsbyFlipDiva.com
Step 5 – Upload the Files to Your Server
I’m going to assume that you’re familiar with uploading files to your server, but if you’re
not and you’re on a PC, go right now and download Filezilla – it’s free. You need that
to upload the files onto your server. If you have a Mac, you can use CyberDuck .
Your host is either your domain name or your IP address; either will work. Enter your
username and your password and click on Quickconnect – on Filezilla. I’m not a Mac
user, so I don’t know exactly what you’ll see in CyberDuck.
You need to browse to your www folder, which is referred to as “root”. Upload wp-
content folder and the .htaccess file. Just select both and right click, and upload.
Note: If you’re using an addon domain, the root will be immediately under your domain
name folder.
Page 27

7/27/2019 FlipDivas Guide to Easy Blog Transfers
http://slidepdf.com/reader/full/flipdivas-guide-to-easy-blog-transfers 28/39
FlipDiva’s Guide to Quick and Easy Blog Transfers written by: FlipDiva
©Copyright 2009 FlipDiva BlogsbyFlipDiva.com
There’s already a wp-content folder on your server, so you’ll be prompted asking
you if your want to overwrite it, and you do, so using the example below, select
Always use this action and Apply to current queue only. Then click Ok.
That’s it – you’ve now uploaded all the files that make your blog, well, your blog.
You’ve just copied in the theme, all the plugins, everything that makes it look the
way it looks.
Page 28

7/27/2019 FlipDivas Guide to Easy Blog Transfers
http://slidepdf.com/reader/full/flipdivas-guide-to-easy-blog-transfers 29/39
FlipDiva’s Guide to Quick and Easy Blog Transfers written by: FlipDiva
©Copyright 2009 FlipDiva BlogsbyFlipDiva.com
Step 5 – Login to Your New Blog for the First Time
Login with the username and p/w provided to by the seller and go to the users, and
add in your own user as admin.
Page 29
7/27/2019 FlipDivas Guide to Easy Blog Transfers
http://slidepdf.com/reader/full/flipdivas-guide-to-easy-blog-transfers 30/39
FlipDiva’s Guide to Quick and Easy Blog Transfers written by: FlipDiva
©Copyright 2009 FlipDiva BlogsbyFlipDiva.com
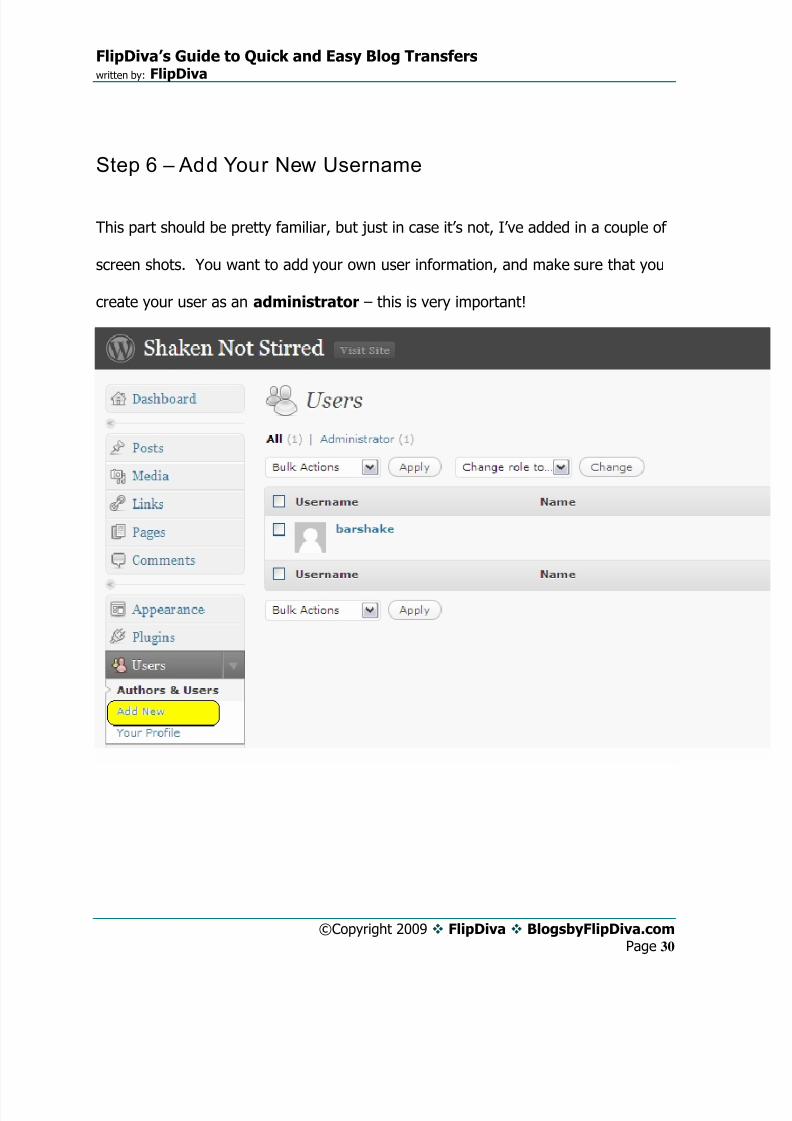
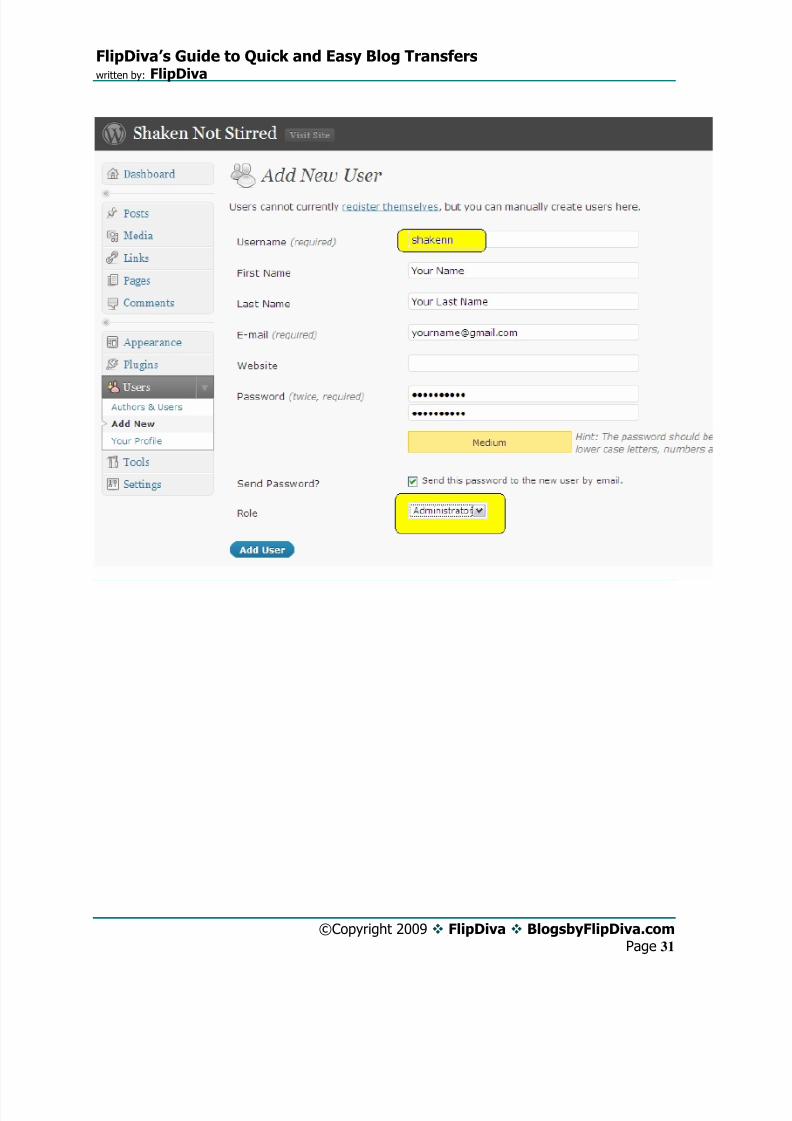
Step 6 – Add Your New Username
This part should be pretty familiar, but just in case it’s not, I’ve added in a couple of
screen shots. You want to add your own user information, and make sure that you
create your user as an administrator – this is very important!
Page 30
7/27/2019 FlipDivas Guide to Easy Blog Transfers
http://slidepdf.com/reader/full/flipdivas-guide-to-easy-blog-transfers 31/39
FlipDiva’s Guide to Quick and Easy Blog Transfers written by: FlipDiva
©Copyright 2009 FlipDiva BlogsbyFlipDiva.com Page 31

7/27/2019 FlipDivas Guide to Easy Blog Transfers
http://slidepdf.com/reader/full/flipdivas-guide-to-easy-blog-transfers 32/39
FlipDiva’s Guide to Quick and Easy Blog Transfers written by: FlipDiva
©Copyright 2009 FlipDiva BlogsbyFlipDiva.com
Step 7 – Delete the User that Came With Your Blog
You need to complete this step so that the blog can’t be accessed by the original
owner – unless you want them to maintain a login.
Go back to the phpMyAdmin window and wp-users, delete the user you were
provided, leaving your NEW user.
Page 32

7/27/2019 FlipDivas Guide to Easy Blog Transfers
http://slidepdf.com/reader/full/flipdivas-guide-to-easy-blog-transfers 33/39
FlipDiva’s Guide to Quick and Easy Blog Transfers written by: FlipDiva
©Copyright 2009 FlipDiva BlogsbyFlipDiva.com
Step 8 – Login to Your New Blog and Finalize Your Settings
Go back to yourdomain.com/wp-admin and login with your new user, and activate
your plugins, make any modifications that you’d like.
Congratulations! You’ve now installed your blog and you’re ready to start blogging!
If you have any further questions or if you’d like to buy this beautiful Martinis and
Cosmos blog - or if you just want to stop by for a cocktail, please visit me at Blogs
by FlipDiva!
Page 33

7/27/2019 FlipDivas Guide to Easy Blog Transfers
http://slidepdf.com/reader/full/flipdivas-guide-to-easy-blog-transfers 34/39
FlipDiva’s Guide to Quick and Easy Blog Transfers written by: FlipDiva
©Copyright 2009 FlipDiva BlogsbyFlipDiva.com Page 34
What If I Want to Transfer My Blog to Someone Else??
Somehow I just knew you were going to ask that question!
You’ve built a great blog, and you want to sell it and transfer it to someone else. I
do this all the time, and I know it seems as mysterious as which really is the best
brand of Vodka to put in that Martini, but it’s not.
It’s actually quite simple!
Now that you’ve read the first part of this guide, I know that you’re already familiar
with your cPanel, and how to FTP files.
7/27/2019 FlipDivas Guide to Easy Blog Transfers
http://slidepdf.com/reader/full/flipdivas-guide-to-easy-blog-transfers 35/39
FlipDiva’s Guide to Quick and Easy Blog Transfers written by: FlipDiva
©Copyright 2009 FlipDiva BlogsbyFlipDiva.com
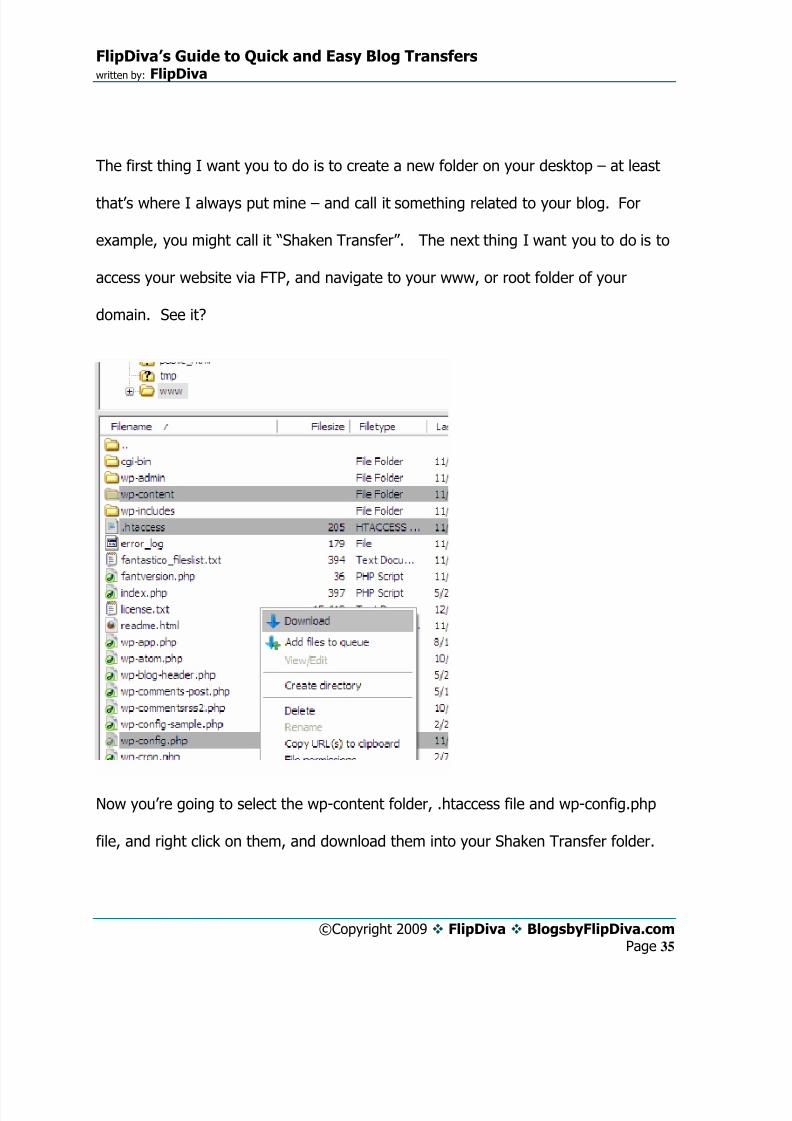
The first thing I want you to do is to create a new folder on your desktop – at least
that’s where I always put mine – and call it something related to your blog. For
example, you might call it “Shaken Transfer”. The next thing I want you to do is to
access your website via FTP, and navigate to your www, or root folder of your
domain. See it?
Now you’re going to select the wp-content folder, .htaccess file and wp-config.php
file, and right click on them, and download them into your Shaken Transfer folder.
Page 35

7/27/2019 FlipDivas Guide to Easy Blog Transfers
http://slidepdf.com/reader/full/flipdivas-guide-to-easy-blog-transfers 36/39
FlipDiva’s Guide to Quick and Easy Blog Transfers written by: FlipDiva
©Copyright 2009 FlipDiva BlogsbyFlipDiva.com
Next, you’ll go to your cPanel, and scroll down until you see the Files section, just
like below, and click on Backups:
Next you’ll see this screen:
Just click on the database name, in this case shaken_wrdp1, and it will download
onto your own computer.
Page 36

7/27/2019 FlipDivas Guide to Easy Blog Transfers
http://slidepdf.com/reader/full/flipdivas-guide-to-easy-blog-transfers 37/39
FlipDiva’s Guide to Quick and Easy Blog Transfers written by: FlipDiva
©Copyright 2009 FlipDiva BlogsbyFlipDiva.com
Now your transfer folder should look like this:
If you don’t see your sql.gz database, you will have to go to your download folder
and move the database file into this folder. Since we each have our own download
area, I can’t tell you exactly where yours is. Mine is inside My Documents,
Downloads.
You should also create a nice little document to email to your buyer that gives them
all the usernames and passwords, and any other information that you might have.
You would also place that into this folder.
Page 37

7/27/2019 FlipDivas Guide to Easy Blog Transfers
http://slidepdf.com/reader/full/flipdivas-guide-to-easy-blog-transfers 38/39
FlipDiva’s Guide to Quick and Easy Blog Transfers written by: FlipDiva
©Copyright 2009 FlipDiva BlogsbyFlipDiva.com Page 38
Now I know that some of you may have other folders that you want to send along
to your purchaser, so this isn’t necessarily all the files that you will need. 95% of
the time, it is. But if you have lots of other folders, you probably already know how
to do this, and you’re already sipping on that martini, bored to tears with my
explanation!
The only thing that you have left to do is “push” the domain to the new user, if you
haven’t already done that. The buyer needs to have an account on the same
registrar that you have your domain, and then you can simply unlock it and initiate
the transfer. Your buyer will then accept the domain. Most registrars offer free
domain accounts, so this is very easy.
Then simply zip up this folder by right clicking on it and choosing your zip program
to zip it, and send it off to your happy buyer!

7/27/2019 FlipDivas Guide to Easy Blog Transfers
http://slidepdf.com/reader/full/flipdivas-guide-to-easy-blog-transfers 39/39
FlipDiva’s Guide to Quick and Easy Blog Transfers written by: FlipDiva
Now you can take some of that hard earned cash that you made from the sale, and
treat yourself to something special!
Join me for cocktails over at Blogs by FlipDiva – Where it’s always Happy Hour!
Related Documents