Using Flash Remoting MX for Java to Create Dynamic Flash Widgets Introduction --------------------------------------------------------------------------------------- 2 Required Software Configuration --------------------------------------------------------- 2 Installing the Software ------------------------------------------------------------------------ 3 Creating a JavaBean to Invoke from Flash -------------------------------------------- 5 Accessing your JavaBean using Flash Remoting ---------------------------------- 8 Populating a Combo Box with Dynamic Data --------------------------------------- 11 Linking a Combo Box to a List Box ----------------------------------------------------- 14 Populating a Datagrid with Dynamic Data -------------------------------------------- 17 2003 Macromedia, Inc. 1

Welcome message from author
This document is posted to help you gain knowledge. Please leave a comment to let me know what you think about it! Share it to your friends and learn new things together.
Transcript

8/14/2019 flash remoting for java
http://slidepdf.com/reader/full/flash-remoting-for-java 1/18
Using Flash Remoting MX for Java toCreate Dynamic Flash Widgets
Introduction --------------------------------------------------------------------------------------- 2
Required Software Configuration --------------------------------------------------------- 2
Installing the Software ------------------------------------------------------------------------ 3
Creating a JavaBean to Invoke from Flash -------------------------------------------- 5
Accessing your JavaBean using Flash Remoting ---------------------------------- 8
Populating a Combo Box with Dynamic Data --------------------------------------- 11
Linking a Combo Box to a List Box ----------------------------------------------------- 14
Populating a Datagrid with Dynamic Data -------------------------------------------- 17
2003 Macromedia, Inc. 1

8/14/2019 flash remoting for java
http://slidepdf.com/reader/full/flash-remoting-for-java 2/18
Introduction
Greetings fellow Java/Flash developers and welcome to Macromedia FlashRemoting MX. With the introduction of Macromedia Flash RemotingMX, you now have the opportunity to create highly reusable, data-drivenwidgets for use in your web applications. This tutorial will guide you
through the creation of simple Flash MX widgets that retrieve data fromJava objects hosted on your Java server. These widgets allow you to easilyimplement behavior that is difficult or impossible to implement in html- based pages. If you can answer “yes” to any of the following questions,this tutorial is for you:
• Have you ever needed to show a master-detail relationship such as aselect control that upon selection displays related items on a list?
• Do you wish that you could dump the results of a database query intabular format and enable your users to sort, resize and hide columnseasily?
If so, then plan on spending the next 4-6 hours to learn how. You will onlyneed to have a basic familiarity with Java to complete these examples.
Required Software Configuration
To complete this tutorial you will need to first set up your machine withsome important software and a set of example files.
• Software not bundled, but required to complete the tutorial:
J2EE 1.2/3-compliant server or later version installed
Macromedia Flash MX (Download a free 30-day trial at:http://www.macromedia.com/software/flash/trial)
• Software included with this tutorial:
Macromedia Flash Remoting MX (This is the server gateway)
Macromedia Flash Remoting Components (Extends Flash MX toinclude the Flash Remoting ActionScript commands)
• Sample files included in remotesamples.war:
RemoteCatalog.class
RemoteCatalog.java
RemoteCatalog_raw.fla
RemoteCatalogFinished.fla
RemoteCatalogFinished.html
RemoteCatalogFinished.swf
RemoteDatagrid_raw.fla
RemoteDatagridFinished.fla
RemoteDatagridFinished.html
RemoteDatagridFinished.swf
2003 Macromedia, Inc. 2

8/14/2019 flash remoting for java
http://slidepdf.com/reader/full/flash-remoting-for-java 3/18
• Example Database
MS Access or Pointbase
• Instructional Document
“Flash Remoting for Java” instructional document (pdf format)
Installing the Software
This section reviews the installation details for each product. This initialsetup is required to complete the tutorial.
Macromedia Flash Remoting MX
Flash Remoting is deployed as a Servlet. The Macromedia FlashRemoting MX installer allows you to lay down either an EAR or WAR file
that you will then need to deploy using the deployment mechanism fromyour Java server. Once deployed, Flash Remoting MX will enable you toconnect Flash to JavaBeans, EJBs, and MBeans as well as other non-javaresources such as ColdFusion Components and Web Services. You willneed to install this application such that it is available to all server instances.
Macromedia Flash MX
Macromedia Flash MX is the authoring environment for Flash UIs. In this
tutorial we will show you only the basic steps required to implement thewidgets we are creating. If you haven’t already installed Flash MX, installit now. Once installed you will need to install the Flash RemotingComponents to add the new ActionScript commands required to use FlashRemoting.
Flash Remoting Components
The Flash Remoting Components are included in this tutorial. They getinstalled in the Flash MX/configuration/includes directory and enable
remote connectivity to your Java server. After installing Flash MX, simplyrun the Flash Remoting Components installer to add the Flash RemotingAPIs.
2003 Macromedia, Inc. 3

8/14/2019 flash remoting for java
http://slidepdf.com/reader/full/flash-remoting-for-java 4/18
Example Database Setup
Create a JDBC datasource named “sports” on the server instance whereyou will be deploying the .war file that comes with this tutorial (for JRun,use the default server). Two versions of the database are provided:
• MS Access version:
Create a ODBC datasource for the sports.mdb file
Use the JDBC_ODBC bridge to connect to it
• Pointbase 4.2 server with the following files:
sports.dbn: a database file containing products, categories,customers and orders, among other tables.
sports$1.wal: required with the database file above
pbserver42RE.jar: Pointbase v4.2 database driver
sports.sql: sql commands to create the database on other DBMSs
To start the PointBase server, use the following command line syntax:
java -Ddatabase.home=[folder containing sports.dbn] -classpath [location of the pbserver42RE.jar] com.pointbase.net.netServer /database:sports/port:[any unused port]
Here is a JRun 4 specific example:
java -Ddatabase.home=.\databases -classpath..\servers\lib\pbserver42RE.jar com.
pointbase.net.netServer /database:sports /port:9492
2003 Macromedia, Inc. 4
8/14/2019 flash remoting for java
http://slidepdf.com/reader/full/flash-remoting-for-java 5/18
Creating a JavaBean to Invoke from Flash
In this tutorial you will create the RemoteCatalog JavaBean, which is asimple repository for queries from the “sports” database. It is easy toimplement. Using a JavaBean has the added advantage of being stateful inthe user’s http session, similar to the way the jsp:useBean tag works in JSP.
Although we will only be using a simple JavaBean in this example, thereare several ways to retrieve dynamic data in Java and make it available toFlash Remoting, including Java classes, JavaBeans and EJBs. (You mayrefer to Chapter 6: Using Flash Remoting MX for Java in the FlashRemoting documentation for additional information). Our example does,however use some advanced Java APIs, including JDBC and Collections.
* If you want to start with a simpler JavaBean example (the “hello world”version), please refer to the article How to connect to a JavaBean using Flash Remoting and JRun 4.0/J2EE athttp://www.macromedia.com/support/flash_remoting/ts/documents/javabean-helloworld.htm.
Steps
The following needs to be performed by you:
• Examine the JavaBean. Source code is provided inside theremotesamples.war file in RemoteCatalog.java.
• Compile the package to a directory where your Java server can find it.
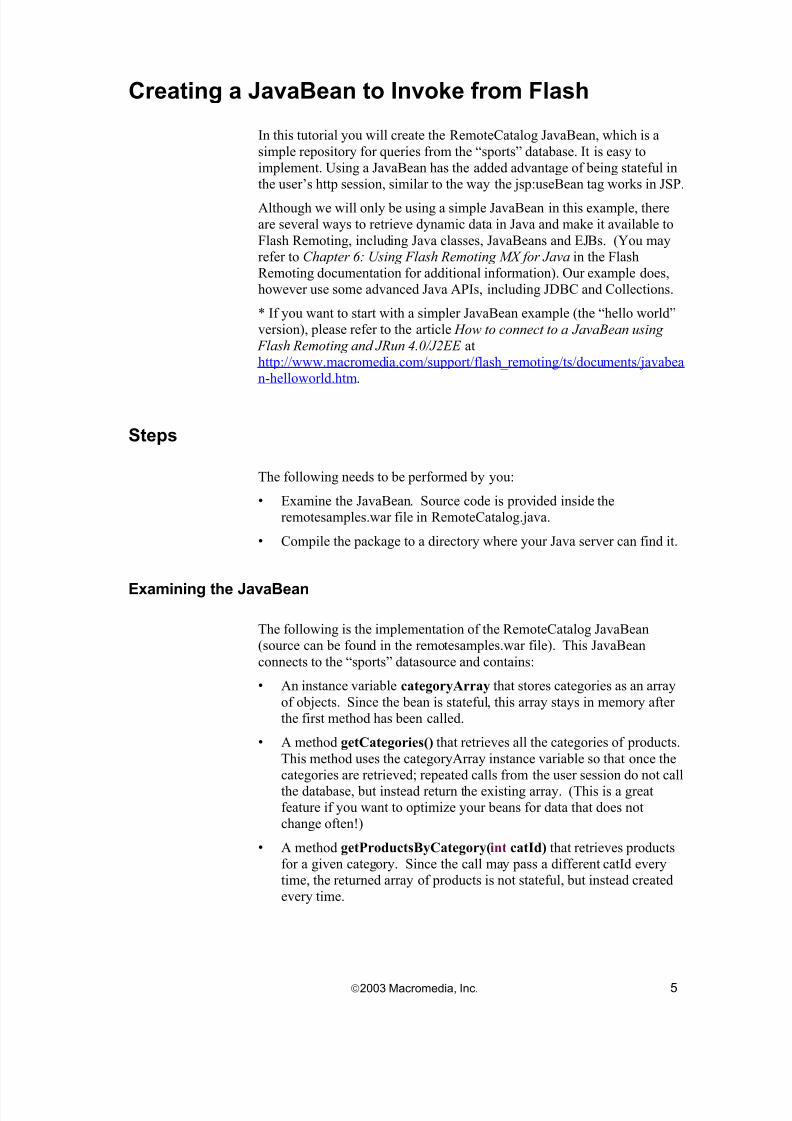
Examining the JavaBean
The following is the implementation of the RemoteCatalog JavaBean(source can be found in the remotesamples.war file). This JavaBeanconnects to the “sports” datasource and contains:
• An instance variable categoryArray that stores categories as an arrayof objects. Since the bean is stateful, this array stays in memory after the first method has been called.
• A method getCategories() that retrieves all the categories of products.This method uses the categoryArray instance variable so that once thecategories are retrieved; repeated calls from the user session do not call
the database, but instead return the existing array. (This is a greatfeature if you want to optimize your beans for data that does notchange often!)
• A method getProductsByCategory(int catId) that retrieves productsfor a given category. Since the call may pass a different catId everytime, the returned array of products is not stateful, but instead createdevery time.
2003 Macromedia, Inc. 5

8/14/2019 flash remoting for java
http://slidepdf.com/reader/full/flash-remoting-for-java 6/18
Here’s what the code looks like:
package samples.remoting;
import java.sql.*;import java.io.Serializable;import java.util.*;import javax.sql.*;
import javax.naming.*;
public class RemoteCatalog implements Serializable {
private List categoryArray;
//Get all categories of products public List getCategories() {
System.out.println(">>>>> in getCategories() <<<<<<");//Because a JavaBean is stateful, return the category array if it //already exists. Otherwise, populate from db if (categoryArray != null) {
System.out.println(">>>>> categoryArray already in memory! <<<return categoryArray;
}
categoryArray = new ArrayList();String sql = "SELECT categoryId, name, image FROM Category";Connection connection = null;Statement stmt = null;ResultSet rs = null;//connect to sports datasource try {InitialContext ctx = new InitialContext();DataSource ds = (DataSource) ctx.lookup("sports");connection=ds.getConnection();stmt = connection.createStatement();rs = stmt.executeQuery(sql);//For each category: create a hashmap and add to array while (rs.next()) {
Map category = new HashMap();
category.put("categoryId", rs.getObject("categoryId"));category.put("name", rs.getObject("name"));category.put("image", rs.getObject("image"));categoryArray.add(category);
}} catch (Exception e) {System.out.println(e);
} finally {try {rs.close();stmt.close();connection.close();
} catch (Exception e) {}}
return categoryArray;} //end getCategories()
//Get products for one category public List getProductsByCategory(int catId) {
System.out.println(">>>>> in getProductsByCategory() <<<<<<");List productArray = new ArrayList();String sql = "SELECT productId, name, description, categoryId,
image, price FROM Product WHERE categoryId = ?";Connection connection = null;PreparedStatement stmt = null;ResultSet rs = null;//connect to sports datasource try {
InitialContext ctx = new InitialContext();
2003 Macromedia, Inc. 6

8/14/2019 flash remoting for java
http://slidepdf.com/reader/full/flash-remoting-for-java 7/18
DataSource ds = (DataSource) ctx.lookup("sports");connection=ds.getConnection();stmt = connection.prepareStatement(sql);stmt.setInt(1, catId);rs = stmt.executeQuery();//For each product: create a hashmap and add to array while (rs.next()) { Map product = new HashMap(); product.put("productId", rs.getObject("productId"));
product.put("categoryId", rs.getObject("categoryId")); product.put("description", rs.getObject("description")); product.put("categoryId", rs.getObject("categoryId")); product.put("image", rs.getObject("image")); product.put("price", rs.getObject("price")); productArray.add(product);
}} catch (Exception e) {
System.out.println(e);} finally {
try {rs.close();stmt.close();connection.close();
} catch (Exception e) {}
}
return productArray;} //end getProductsByCategory()
} //end class RemoteCatalog
Compiling RemoteCatalog.java
How you compile will depend on the Java server you are running, but theimportant thing is that the JavaBean package (samples.remoting) ends up
somewhere in the classpath. You have two options:
• Copy the \samples\remoting folder which is inside the .war file in theWEB-INF\classes folder to a location where it can be found by your Java server.
• Compile the source file RemoteCatalog.java to a destination directoryfound in your server’s classpath. The following is a JRun 4 example:
javac -d c:\JRun4\servers\default\SERVER-INF\classes-classpath c:\JRun4\lib\jrun.jar RemoteCatalog.java
JRun 4 uses {MyServer}/SERVER-INF/classes. Refer to Chapter 6: Using Flash Remoting MX for Java in the Flash Remoting documentation for suggestions on compiling for other servers.
2003 Macromedia, Inc. 7
8/14/2019 flash remoting for java
http://slidepdf.com/reader/full/flash-remoting-for-java 8/18
Accessing your JavaBean using Flash Remoting
Now that your JavaBean is compiled let’s get our Flash widget in place.We will only need to perform a few functions inside of Flash MX to getour UI ready to call our JavaBean. Open Flash MX. Don’t worry aboutmastering Flash MX and all the animations and tools. The tutorial will
provide step-by-step instructions to create the widgets.
Steps
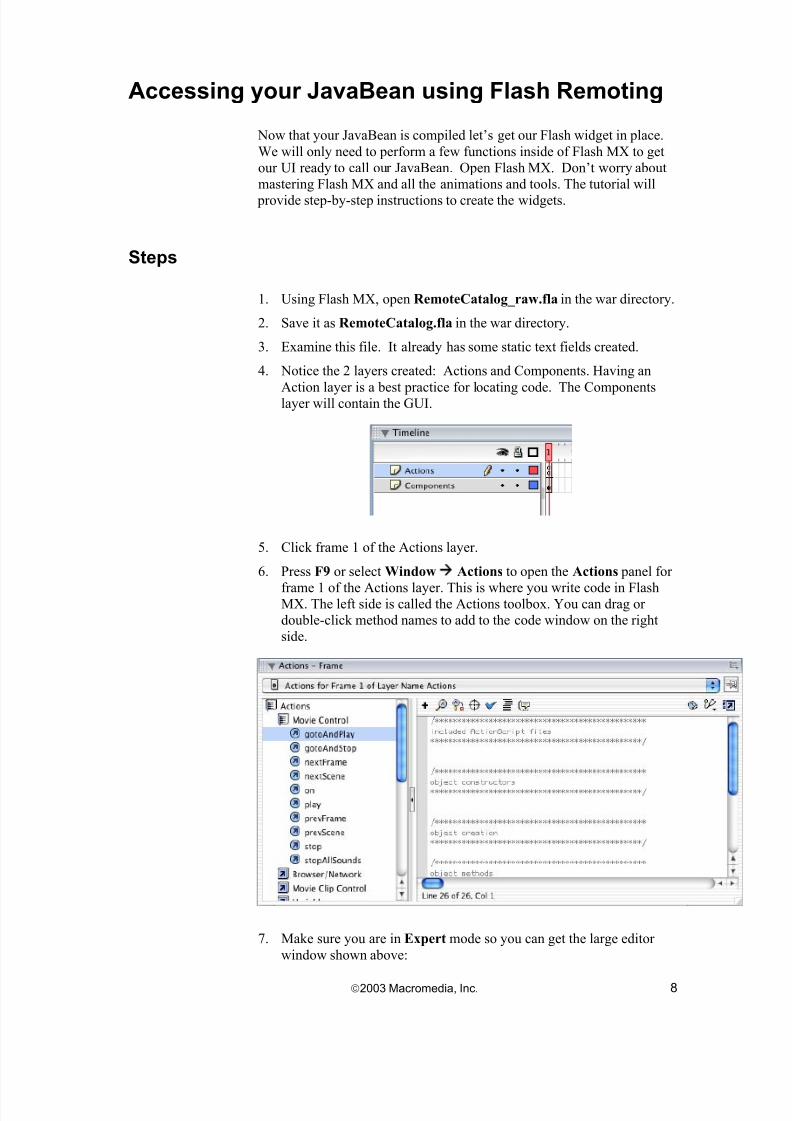
1. Using Flash MX, open RemoteCatalog_raw.fla in the war directory.
2. Save it as RemoteCatalog.fla in the war directory.
3. Examine this file. It already has some static text fields created.
4. Notice the 2 layers created: Actions and Components. Having an
Action layer is a best practice for locating code. The Componentslayer will contain the GUI.
5. Click frame 1 of the Actions layer.
6. Press F9 or select Window Actions to open the Actions panel for
frame 1 of the Actions layer. This is where you write code in FlashMX. The left side is called the Actions toolbox. You can drag or double-click method names to add to the code window on the rightside.
7. Make sure you are in Expert mode so you can get the large editor window shown above:
2003 Macromedia, Inc. 8

8/14/2019 flash remoting for java
http://slidepdf.com/reader/full/flash-remoting-for-java 9/18
Setting the Connection to the Remoting Gateway
8. From the Actions toolbox, expand the Remoting tree view. (If youdon’t see the Remoting tree view, check to be sure you installed theFlash Remoting Components.)
9. Position your cursor below the included ActionScript files section.
10. Double-click #include NetServices.as and #include NetDebug.as toadd them to the code. These files provide the objects to connect to theremote server and debug the connection. We’ll do this later.
11. Position your cursor below the run at once commands section at the
bottom of the code window.
12. In the Actions toolbox, drill down to Remoting NetServices
Methods, and double click setDefaultGatewayURL(). This methodidentifies the location of the Flash Remoting gateway on a server.
13. Inside the parenthesis, type“http://localhost:8100/flashservices/gateway” for the location of theFlash Remoting servlet that handles all remote requests. Use the portnumber of the server where you deployed the Flash Remoting MXserver.
14. Create a connection to the remote server called connection using the
NetServices.createGatewayConnection() method:connection = NetServices.createGatewayConnection();
Invoking a Remote Method
15. Access the remote service RemoteCatalog using its fully-qualifiedname, as follows:
Create a variable named catalogService to store the service.
Using the connection object, invoke the getService() method.This method identifies the remote component (JavaBean, EJB,CFC or Web Service) to access during method invocations.
Inside the parenthesis, specify the fully-qualified class name of theRemoteCatalog bean inside quotes:
“samples.remoting.RemoteCatalog”
Use this as the default responder object. It means that the currentFlash movie (RemoteCatalog) will be the object that will receivethe returned data from the remote call:
catalogService =connection.getService("samples.remoting.RemoteCatalog", this);
2003 Macromedia, Inc. 9
8/14/2019 flash remoting for java
http://slidepdf.com/reader/full/flash-remoting-for-java 10/18
16. Use the catalogService remote service to invoke the getCategories() method:
catalogService.getCategories();
17. Save the document.
18. Test the movie: Cntl + enter
19. The Output panel should display the message NetServices info 1:getCategories_Result was received from server: [object Object].
20. Go back to the authoring environment: Cntl + W.
21. Select Window NetConnection Debugger.
22. Test the movie again.
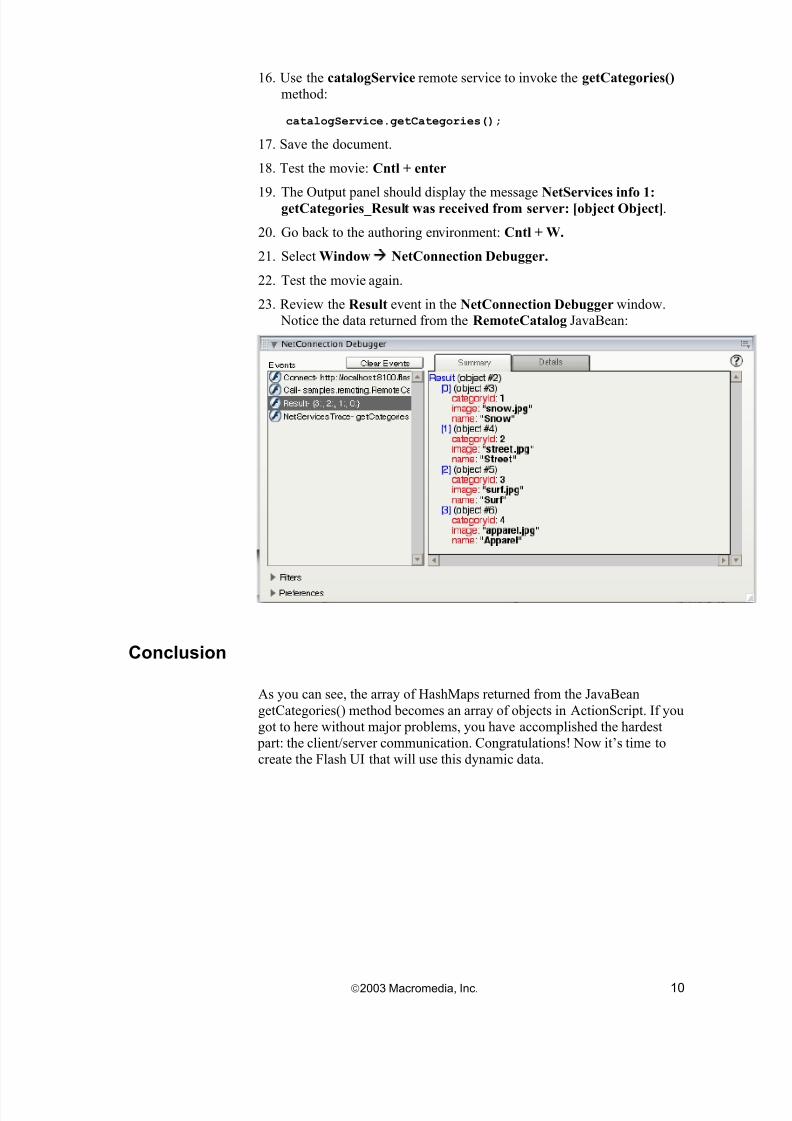
23. Review the Result event in the NetConnection Debugger window. Notice the data returned from the RemoteCatalog JavaBean:
Conclusion
As you can see, the array of HashMaps returned from the JavaBeangetCategories() method becomes an array of objects in ActionScript. If yougot to here without major problems, you have accomplished the hardest part: the client/server communication. Congratulations! Now it’s time tocreate the Flash UI that will use this dynamic data.
2003 Macromedia, Inc. 10

8/14/2019 flash remoting for java
http://slidepdf.com/reader/full/flash-remoting-for-java 11/18
Populating a Combo Box with Dynamic Data
Flash comes with a set of pre-built UI components for you to use in your UI. The first widget you will create is a Flash MX Combo Box populatedwith dynamic data that you will later link to a List Box. Here you will populate an instance of the “Combo Box” component from your JavaBean.
A beginning set of Flash UI components comes bundled with Flash MX. Newer sets of components (currently at 4) may be downloaded from theFlash MX site at a later time.
Steps
1. Return to RemoteCatalog.fla in the war directory.
Adding a Flash MX Component to the Stage
2. Expand the Components panel. Click Window Components if notopen already.
3. Select Flash UI Components.
4. Drag an instance of the ComboBox component just below theCategory List text on the stage. (Don’t worry about alignment or sizefor now.)
5. Open the Properties panel for the ComboBox. Click Window
Components if not open already.
6. Give the ComboBox an instance name of category_cb. This is the
instance variable you will use to refer to this visual component in your code.
Populating the Component with Dynamic Data
7. Open the Actions panel for frame 1 of the Actions layer (press F9).
8. In the functions section, create a responder function that will receivethe returned data from the getCategories() call, as follows:
2003 Macromedia, Inc. 11
8/14/2019 flash remoting for java
http://slidepdf.com/reader/full/flash-remoting-for-java 12/18
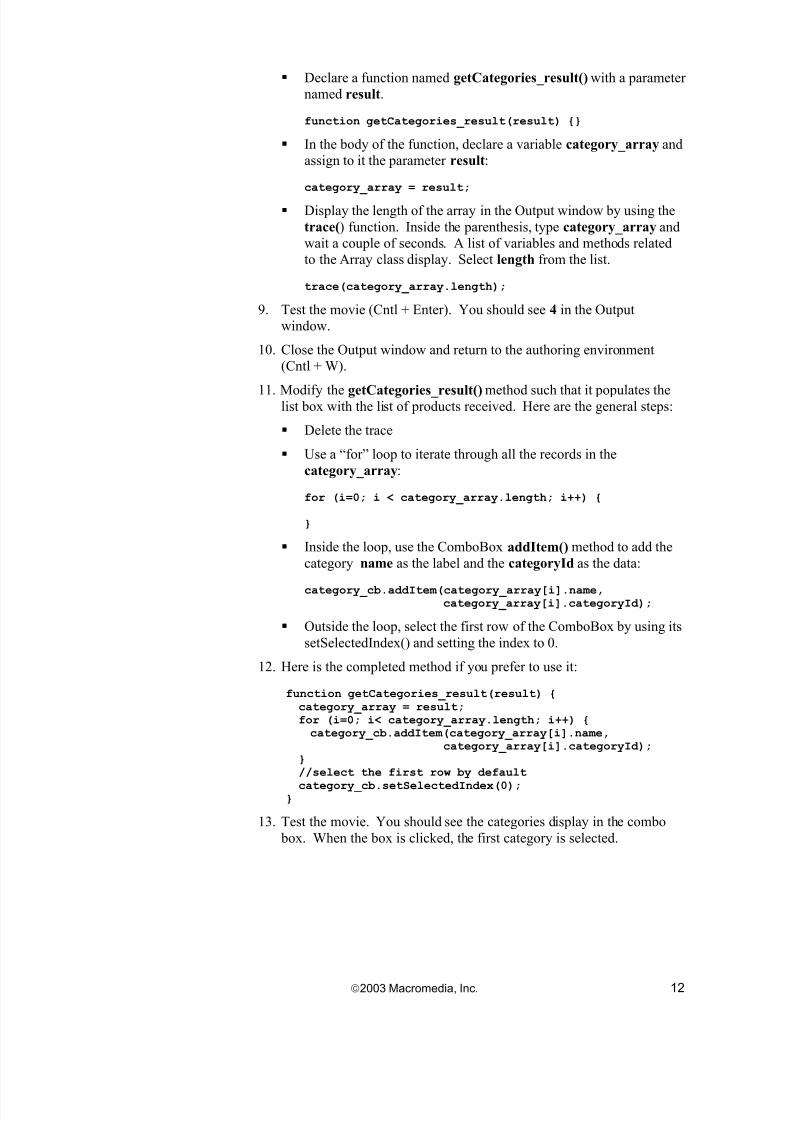
Declare a function named getCategories_result() with a parameter named result.
function getCategories_result(result) {}
In the body of the function, declare a variable category_array andassign to it the parameter result:
category_array = result;
Display the length of the array in the Output window by using thetrace() function. Inside the parenthesis, type category_array andwait a couple of seconds. A list of variables and methods relatedto the Array class display. Select length from the list.
trace(category_array.length);
9. Test the movie (Cntl + Enter). You should see 4 in the Outputwindow.
10. Close the Output window and return to the authoring environment(Cntl + W).
11. Modify the getCategories_result() method such that it populates thelist box with the list of products received. Here are the general steps:
Delete the trace
Use a “for” loop to iterate through all the records in thecategory_array:
for (i=0; i < category_array.length; i++) {
}
Inside the loop, use the ComboBox addItem() method to add thecategory name as the label and the categoryId as the data:
category_cb.addItem(category_array[i].name,category_array[i].categoryId);
Outside the loop, select the first row of the ComboBox by using itssetSelectedIndex() and setting the index to 0.
12. Here is the completed method if you prefer to use it:
function getCategories_result(result) {category_array = result;for (i=0; i< category_array.length; i++) {category_cb.addItem(category_array[i].name,
category_array[i].categoryId);}//select the first row by default
category_cb.setSelectedIndex(0);}
13. Test the movie. You should see the categories display in the combo box. When the box is clicked, the first category is selected.
2003 Macromedia, Inc. 12
8/14/2019 flash remoting for java
http://slidepdf.com/reader/full/flash-remoting-for-java 13/18
Conclusion
You have now manipulated the returned array to populate a Combo Box UIcomponent. As you can see, Flash Remoting MX allows you to display
complex data structures from the server in rich, Flash UI components andgives you the power to manipulate the data in many ways.
2003 Macromedia, Inc. 13
8/14/2019 flash remoting for java
http://slidepdf.com/reader/full/flash-remoting-for-java 14/18
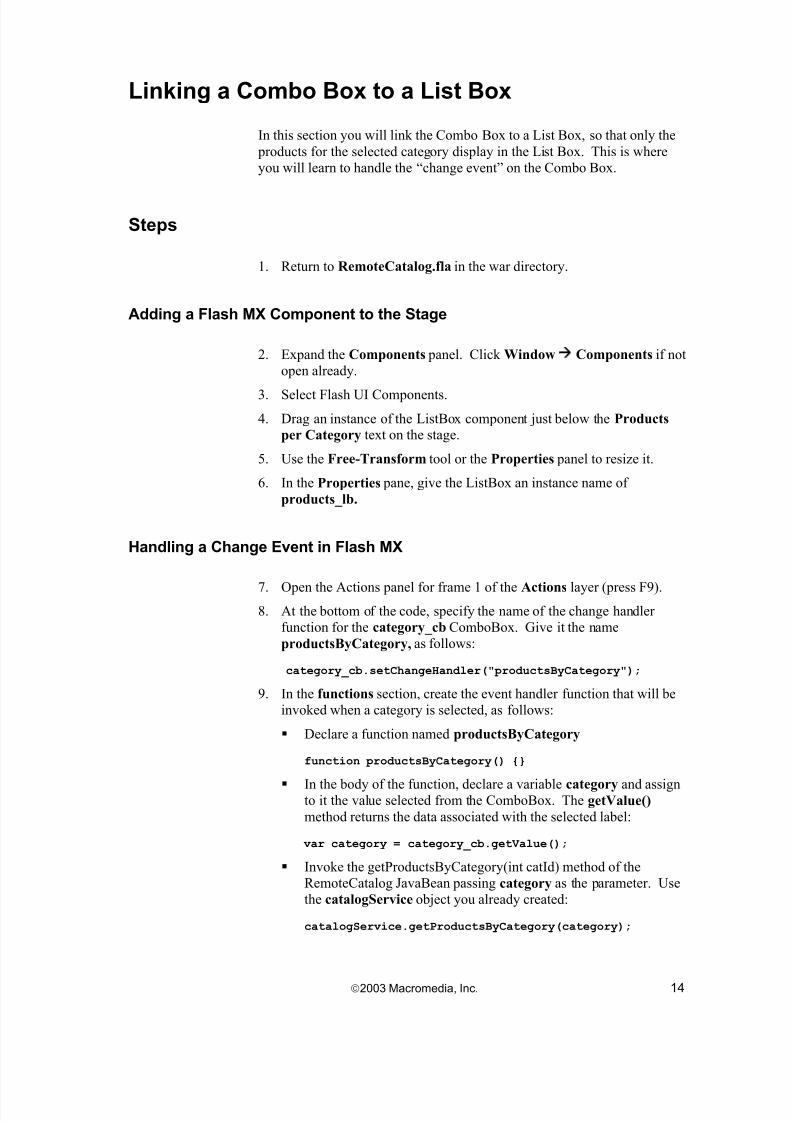
Linking a Combo Box to a List Box
In this section you will link the Combo Box to a List Box, so that only the products for the selected category display in the List Box. This is whereyou will learn to handle the “change event” on the Combo Box.
Steps
1. Return to RemoteCatalog.fla in the war directory.
Adding a Flash MX Component to the Stage
2. Expand the Components panel. Click Window Components if notopen already.
3. Select Flash UI Components.
4. Drag an instance of the ListBox component just below the Products
per Category text on the stage.
5. Use the Free-Transform tool or the Properties panel to resize it.
6. In the Properties pane, give the ListBox an instance name of products_lb.
Handling a Change Event in Flash MX
7. Open the Actions panel for frame 1 of the Actions layer (press F9).8. At the bottom of the code, specify the name of the change handler
function for the category_cb ComboBox. Give it the nameproductsByCategory, as follows:
category_cb.setChangeHandler("productsByCategory");
9. In the functions section, create the event handler function that will beinvoked when a category is selected, as follows:
Declare a function named productsByCategory
function productsByCategory() {}
In the body of the function, declare a variable category and assignto it the value selected from the ComboBox. The getValue() method returns the data associated with the selected label:
var category = category_cb.getValue();
Invoke the getProductsByCategory(int catId) method of theRemoteCatalog JavaBean passing category as the parameter. Usethe catalogService object you already created:
catalogService.getProductsByCategory(category);
2003 Macromedia, Inc. 14

8/14/2019 flash remoting for java
http://slidepdf.com/reader/full/flash-remoting-for-java 15/18
Test the invocation using the NetConnection Debugger. Noticethat an array of 3 products gets returned for the “snow” category.
Populating the Component with Dynamic Data
10. In the functions section, create a responder function that will receive
the returned data from the getProductsByCategory() call, and populatethe product_lb ListBox. This responder is similar to the one alreadycoded:
Copy the getCategories_result() method.
Rename the function as getProductsByCategory_result().
Inside the function, add a new line of code to remove any existingitems in the ListBox by calling the removeAll().
Replace references to category_array with product_array andcategory_cb with product_lb.
Inside the loop, use the product name as the label, and the wholeobject contained in the product as the data item.
Here is the completed code for your reference:
function getProductsByCategory_result(result) { product_lb.removeAll(); product_array = result;for (i=0; i< product_array.length; i++) { product_lb.addItem(product_array[i].name,
product_array[i]);}
product_lb.setSelectedIndex(0);}
11. Test the movie (Cntl + Enter). You should see related products for
every selected category.
12. Open a browser and test the generated .swf using a URL that points toyour web application. In JRun, you would use:
http://localhost:8100/RemoteCatalog.swf
13. Publish an html document that embeds the .swf file you just created.Click File Publish Settings. Make sure Flash and HTML areselected. Click the Publish button to generate .swf and .html versionsof the Flash document.
14. Open RemoteCatalog.html in a text editor. Notice the basic html filegenerated. Change the title and add any html content before or after
the <object> tag.
15. Browse the new version of RemoteCatalog.html.
2003 Macromedia, Inc. 15

8/14/2019 flash remoting for java
http://slidepdf.com/reader/full/flash-remoting-for-java 16/18
Conclusion
You have now manipulated your dynamic data effectively in order to provide a powerful UI to present a product catalog to users. Since you can
store whole objects in the data member of the UI component, you have theability to populate text boxes, images and other UI elements from thecomponent’s data member. Using dot notation expressions such as product_lb.getSelectedItem().data.image, you could load an image of the product into an empty movie clip.
Now, if you were wondering how you could display all that data for the products retrieved, you just need to complete the last section of thistutorial.
2003 Macromedia, Inc. 16

8/14/2019 flash remoting for java
http://slidepdf.com/reader/full/flash-remoting-for-java 17/18
Populating a Datagrid with Dynamic Data
In this section you will link the Combo Box to a Flash MX DataGrid, sothat only the products for the selected category display on the grid. Youwill then modify column headers, set default widths, and make somecolumns invisible.
Steps
1. In Flash MX, open RemoteDatagrid_raw.fla in the war directory.
2. Save it as RemoteDatagrid.fla in the war directory.
Linking the Combo Box to the Datagrid
3. Open the Actions panel for frame 1 of the Actions layer (press F9).
4. Examine the code. It should be very similar to the previous widget,since the Categories ComboBox has the same handler functions as before, namely the responder and the change handler.
5. Implement the getProductsByCategory_result() responder functionsuch that it populates the datagrid with the rows retrieved by theremote call, as follows:
Inside the function, remove any existing items in the DataGrid bycalling its removeAllItems() method.
The array of objects received from the remote call is already in the
format that the Flash DataGrid expects it: every object has property names that can be references. Just invoke thesetDataProvider() method on the datagrid passing result as theinput :
product_dg.setDataProvider(result);
Here is the completed code for your reference:
function getProductsByCategory_result(result) { product_dg.removeAllItems(); product_dg.setDataProvider(result);
}
6. Test the movie (Cntl + Enter). You should see all the data retrieved for all the products in the “snow” category.
Formatting Column on the Datagrid
In order to hide columns, provide headers, and resize the widths of thecolumns, you must format the DataGrid using methods of this class. Thefollowing steps accomplish this:
7. Position the cursor at the bottom of the code, under any existing code.
8. Create a reference called name_col.
2003 Macromedia, Inc. 17
8/14/2019 flash remoting for java
http://slidepdf.com/reader/full/flash-remoting-for-java 18/18
9. Use the FGridColumn(colname) constructor to create a new datagridcolumn. The argument must match the name of the object propertythat you want to display in this column (case is not important). For example, if you want the name property to appear, use Name as theargument:
name_col = new FGridColumn("Name");
10. The string Name will appear in the header by default. If you wantsomething different, use the setHeader() method to specify a differentheader for this column:
name_col.setHeader("Product Name");
11. Set the width of this column. Use the width of the DataGrid as a guideto the number of pixels a certain column may use. Start with 150 pixels for the name:
name_col.setWidth(150);
12. Finally, add the name_col column to the datagrid:
product_dg.addColumn(name_col);
13. Create new columns for the description and price properties, using 550and 80 as the respective widths.
14. The finished code could look like this:
name_col = new FGridColumn("Name");name_col.setHeader("Product Name");name_col.setWidth(150);
product_dg.addColumn(name_col);
desc_col = new FGridColumn("Description");desc_col.setWidth(550);
product_dg.addColumn(desc_col);
price_col = new FGridColumn("Price"); price_col.setWidth(80); product_dg.addColumn(price_col);
15. Test the movie. Click the headers to sort the data. Resize the columns by dragging the vertical bars between the headers.
16. Publish this document as Flash and HTML.
17. Edit the html to include other text you want to display on the page inaddition to the flash documents.
Conclusion
With the DataGrid you have a powerful component that allows you todisplay large amounts of data, format it and even edit it. Macromedia isworking hard to release additional new components that use APIs similar to the one you used for the DataGrid. Now that you are familiar with howthe APIs work, you are on your way to using Macromedia Flash and FlashRemoting MX to create the next generation of applications for the web.
Related Documents