HIGH FIDELITY 6 CO LO R IN K JET PRIN TER HIGH FIDELITY 6 CO LO R IN K JET PRIN TER CLEANING GUIDE T hank you for purchasing the HI -FI JE T . T he FJ-50/40 provides the highest quality printing possible with a resolution of 1440dpi and 6 colors of ink. Dust has a big influence on printing quality. S ome dust can not be removed perfectly even with the built-in head cleaning function. I f the printing result doesn't improve even after performing the built-in head cleaning function, please clean the H eads manually by referring to this guide. Please perform the manual head cleaning as quickly as possible by following the steps carefully. I nk could dry up and cause the head to clog when inkjet heads are out from their original locking position for a long time. Please perform manual head cleaning all the way to the end once started. July16,1999Ver.1.3

fj_cleaning_guide.pdf
Feb 14, 2016
Welcome message from author
This document is posted to help you gain knowledge. Please leave a comment to let me know what you think about it! Share it to your friends and learn new things together.
Transcript

H IG H FIDELITY 6 CO LO R IN K J ET P R IN TERH IG H FIDELITY 6 CO LO R IN K J ET P R IN TER
C L E A N I N G G U I D E
T hank you for purchasing the HI-FI JE T . T he FJ-50/40 provides the highest
quality printing possible with a resolution of 1440dpi and 6 colors of ink.
Dust has a big influence on printing quality. Some dust can not be removed
perfectly even with the built-in head cleaning function.
I f the printing result doesn't improve even after performing the built-in head
cleaning function, please clean the Heads manually by referring to this guide.
Please perform the manual head cleaning as quickly as possible by following the
steps carefully.
Ink could dry up and cause the head to clog when inkjet heads are out from
their original locking position for a long time.
Please perform manual head cleaning all the way to the end once started.
July16,1999Ver.1.3

H IG H FIDELITY 6 CO LO R IN K J ET P R IN TERH IG H FIDELITY 6 CO LO R IN K J ET P R IN TER
1 / Turn off the power while pressing the key.
4 / Now, you should find the R ubber Cap, Sponge and T ubes as shown below..
R ubber C ap
(B lack color)
S ponge
Tube
(White color)
3 / Move the Print Head towards the left side with your hands. I t is slightly heavy. Use a little
strength when pulling it.
2 / R emove the B lack Cover as below. . Use the screw driver to unfasten the 4 screws fixing
the B lack Cover.. When B lack C over is removed . . .

H IG H FIDELITY 6 CO LO R IN K J ET P R IN TERH IG H FIDELITY 6 CO LO R IN K J ET P R IN TER
Clean the portion of the Heads as indicated on the next page.
It is easier to clean the head by moving the HE A D instead of moving the Cleaning Stick as shown
in the picture on the next page.
C A U T I O N ! C A U T I O N !
¥ Don't touch the sponge inside the rubber cap if
there is no dust.
¥ Don't squeeze the sponge when removing the dust
inside the sponge.
¥ Use the edge of the Cleaning Stick to rub out the
dust.
¥ Don't use other tools than the C leaning Stick
for cleaning. C leaning S tick
C leaning S tickC leaning Liquid
N O T E S !N O T E S !
¥ Put the Cleaning L iquid on the Cleaning Stick, if
necessary, when performing the procedure after
6.
7 / Next, remove the dust around the Heads with a Cleaning Stick. T here are two Heads aligned
as below.
Don't touch the
surface of HE AD.
Don't touch the
surface of HE AD.
5 / Put some Cleaning L iquid on the Cleaning Stick.
6 / R emove the dust around both L eft and R ight
R ubber Caps with the Cleaning Stick.

H IG H FIDELITY 6 CO LO R IN K J ET P R IN TERH IG H FIDELITY 6 CO LO R IN K J ET P R IN TER
8 / Clean the Wiper using the Cleaning Stick the same
as cleaning the HE A D. One side of the Wiper is
made of Felt and the other side is made of R ubber.
(L eft side..Felt, R ight side...R ubber)
Clean mainly the R ubber side and the top part.
C A U T I O N ! C A U T I O N !
¥ Felt becomes fluffy when it is rubbed strongly.
R emove the dust by rubbing it very softly.
Wiper
C lean the left edge of the HE AD. C lean the right edge of the HE AD.
C A U T I O N !C A U T I O N !
¥ Don't wipe or touch the surface of the HE A D.
¥ Wipe only the metal part of the HE A D.
¥ I t is not necessary to wipe the HE A D hard, but just enough that the dust is removed.
¥ R emove the dust stuck to the Cleaning Stick with tissue paper each time after cleaning.
B end the Cleaning Stick as shown below to clean the
back rear side of the Head.
H IG H FIDELITY 6 CO LO R IN K J ET P R IN TERH IG H FIDELITY 6 CO LO R IN K J ET P R IN TER
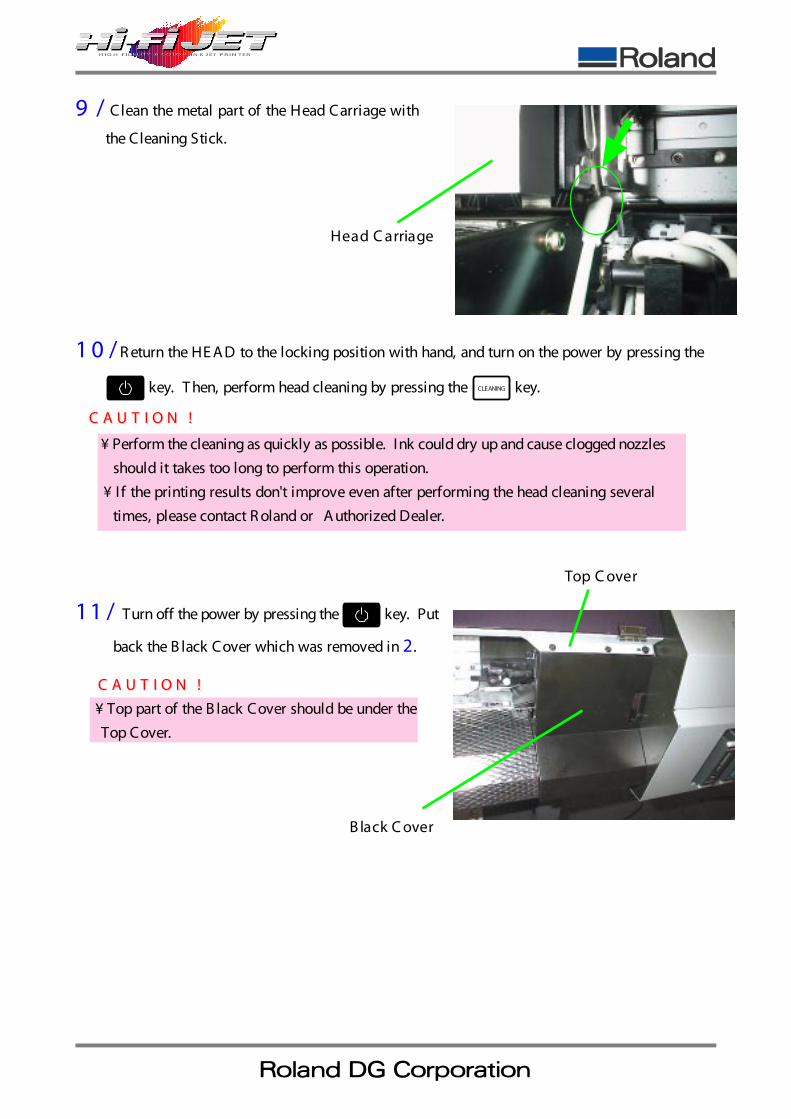
Top C over
B lack C over
C A U T I O N ! C A U T I O N !
¥ Top part of the B lack Cover should be under the
Top Cover.
¥ Perform the cleaning as quickly as possible. Ink could dry up and cause clogged nozzles
should it takes too long to perform this operation.
¥ I f the printing results don't improve even after performing the head cleaning several
times, please contact R oland or A uthorized Dealer.
1 0 / R eturn the HE A D to the locking position with hand, and turn on the power by pressing the
key. T hen, perform head cleaning by pressing the CLEANING key.
C A U T I O N ! C A U T I O N !
11 / Turn off the power by pressing the key. Put
back the B lack Cover which was removed in 2.
9 / Clean the metal part of the Head Carriage with
the Cleaning Stick.
Head C arriage