SIDE-IMPLANTED PIEZORESISTIVE SHEAR STRESS SENSOR FOR TURBULENT BOUNDARY LAYER MEASUREMENT By YAWEI LI A DISSERTATION PRESENTED TO THE GRADUATE SCHOOL OF THE UNIVERSITY OF FLORIDA IN PARTIAL FULFILLMENT OF THE REQUIREMENTS FOR THE DEGREE OF DOCTOR OF PHILOSOPHY UNIVERSITY OF FLORIDA 2008 1

Welcome message from author
This document is posted to help you gain knowledge. Please leave a comment to let me know what you think about it! Share it to your friends and learn new things together.
Transcript

SIDE-IMPLANTED PIEZORESISTIVE SHEAR STRESS SENSOR FOR TURBULENT BOUNDARY LAYER MEASUREMENT
By
YAWEI LI
A DISSERTATION PRESENTED TO THE GRADUATE SCHOOL OF THE UNIVERSITY OF FLORIDA IN PARTIAL FULFILLMENT
OF THE REQUIREMENTS FOR THE DEGREE OF DOCTOR OF PHILOSOPHY
UNIVERSITY OF FLORIDA
2008
1

© 2008 Yawei Li
2

To my husband Zhongmin and my parents
3

ACKNOWLEDGMENTS
Financial support for the research project is provided by National Science Foundation
(CTS-04352835 and CMS-0428593) and AFOSR grant (F49620-03-C-0114). A doctoral
dissertation is never the work of an individual, but instead a miracle that encompasses the efforts
of many people. I would like to recognize a number of people who have helped me in various
ways during my time in University of Florida.
First and foremost, I extend my sincerest gratitude to my advisor, Dr. Mark Sheplak, who
gave me the opportunity to work in MEMS research field. I sincerely appreciate his guidance,
continuous encouragement and support in my research, tirelessly sharing with me his expertise
and wisdom. His profound knowledge in MEMS, fluids, acoustics and so on is the invaluable
source I always rely on.
I also wish to extend gracious thanks to my committee members, Drs. Toshikazu Nishida,
Louis N. Cattafesta, Bhavani V. Sankar and David Arnold for their instruction and assistance on
this interdisciplinary project. They are always generous on their time and expertise, and I am
grateful for their efforts.
I would give special thanks to professors in Department of Electrical and Computer
Engineering, Material Science Engineering and Mechanical and Aerospace Engineering at
University of Florida, especially Dr. Mark Law and his student Ljubo Radic, Dr. Kevin Jones
and Dr. Raphael Haftka for their invaluable suggestions on my device fabrication, process
simulation and design optimization. I would especially like to thank Dr. Melih Pepila at
Sabanchi University (Turkey) and Dr. Jaco F. Schutte for their suggestions in optimization
design.
My thanks go to Dr. Venketaraman Chandrasekaran at Sensata Technologies, Sean Knight
in University of South Florida, Alvin A Barlian in Stanford University and Core Systems
4

Company for their help in device fabrications, and Keck Pathammavong at Engent for his help in
device packaging. I would also express my thanks to Al Ogden, Dr. Ivan Kravchenko and Bill
Lewis at UFNF for the facility maintenance and help on the fabrication.
I was fortunate enough to have great colleagues throughout my graduate school
experience. My thanks go to IMG members, especially Hongwei Qu for his suggestions and
discussions in device fabrication; Brandon Bertolucci, Alex Phipps, David Martin for their kind
help and assistance in device package design, Vijay Chandrasekharan, Qi Song, Benjamin
Griffin and John Griffin for their kind help in device characterization, Matt Williams, Benjamin
Griffin, Brandon Bertolucci and Brian Homeijier for their great editing and suggestions in my
dissertation writing. It has been a pleasure to have work with them, and I will carry these
invaluable memories on rest of life.
Finally, I reserve the special thanks to my families for their support and encouragement. I
am always grateful to my husband, Zhongmin Liu for his endless love and support in my life.
My parents always encouraged me to be the best and do my best on what I want to do. I would
like to thank them for believing me every time I said I would graduate “next year”. Without
their love and support this dissertation would not be possible.
5

TABLE OF CONTENTS page
ACKNOWLEDGMENTS ...............................................................................................................4
LIST OF TABLES...........................................................................................................................9
LIST OF FIGURES .......................................................................................................................10
ABSTRACT...................................................................................................................................14
CHAPTER
1 INTRODUCTION ..................................................................................................................16
Motivation for Wall Shear Stress Measurement.....................................................................16 Wall Shear Stress.............................................................................................................17 Turbulent Boundary Layer ..............................................................................................19
Research Objectives................................................................................................................22 Dissertation Overview ............................................................................................................24
2 BACKGROUND ....................................................................................................................29
Techniques for Shear Stress Measurement.............................................................................29 Conventional Techniques ................................................................................................30 MEMS-Based Techniques...............................................................................................31
Floating Element Sensors .......................................................................................................32 Sensor Modeling and Scaling..........................................................................................32 Error Analysis and Challenges ........................................................................................34
Effect of misalignment .............................................................................................34 Effect of pressure gradient .......................................................................................35 Effect of cross-axis vibration and pressure fluctuations ..........................................36
Previous MEMS Floating Element Shear Stress Sensors.......................................................38 Capacitive Shear Stress Sensors......................................................................................38 Optical Shear Stress Sensors ...........................................................................................40 Piezoresistive Shear Stress Sensors.................................................................................42
A Fully-Bridge Side-Implanted Piezoresistive Shear Stress Sensor ......................................43
3 SHEAR STRESS SENSOR MODELING .............................................................................53
Quasi-Static Modeling ............................................................................................................54 Structural Modeling.........................................................................................................54 Small Deflection Theory .................................................................................................55 Large Deflection Theory .................................................................................................56
Energy method .........................................................................................................57 Exact analytical model .............................................................................................57
Lumped Element Modeling ....................................................................................................58
6

Finite Element Analysis..........................................................................................................60 Piezoresistive Transduction ....................................................................................................62
Piezoresistive Coefficients ..............................................................................................64 Piezoresistive Sensitivity.................................................................................................66 Electromechanical Sensitivity .........................................................................................68
Noise Model............................................................................................................................69 Thermal Noise .................................................................................................................69 1 f Noise........................................................................................................................70
Device Specific Issues ............................................................................................................72 Transverse Sensitivity .....................................................................................................72 Temperature Compensation.............................................................................................73 Device Junction Isolation ................................................................................................74
Summary.................................................................................................................................78
4 DEVICE OPTIMIZATION....................................................................................................91
Problem Formulation ..............................................................................................................91 Design Variables .............................................................................................................91 Objective Function ..........................................................................................................93 Constraints.......................................................................................................................94
Candidate Flows .....................................................................................................................95 Methodology...........................................................................................................................96 Optimization Results and Discussion .....................................................................................97 Sensitivity Analysis ................................................................................................................98 Summary...............................................................................................................................100
5 FABRICATION AND PACKAGING .................................................................................105
Fabrication Overview and Challenges..................................................................................105 Fabrication Process...............................................................................................................105 Sensor Packaging for Wind Tunnel Testing.........................................................................110
6 EXPERIMENTAL CHARACTERIZATION ......................................................................118
Experimental Characterization Issues...................................................................................118 Experimental Setup...............................................................................................................119
Electrical Characterization ............................................................................................119 Dynamic Calibration .....................................................................................................120 Noise Measurement .......................................................................................................121
Experimental Results ............................................................................................................122 Electrical Characterization ............................................................................................122 Dynamic Calibration Results and Discussion ...............................................................122
Summary...............................................................................................................................126
7

7 CONCLUSION AND FUTURE WORK .............................................................................137
Summary and Conclusions ...................................................................................................137 Future Work..........................................................................................................................138
Temperature Compensation...........................................................................................139 Static Characterization...................................................................................................141 Noise Measurement .......................................................................................................142
Recommendations for Future Sensor Designs......................................................................142 APPENDIX
A MECHANICAL ANALYSIS...............................................................................................145
Small Deflection ...................................................................................................................145 Large Deflection-Energy Method.........................................................................................147 Large Deflection-Analytical Method....................................................................................149 Stress Analysis......................................................................................................................152 Effective Mechanical Mass and Compliance .......................................................................153
B NOISE FLOOR OF THE WHEATSTONE BRIDGE .........................................................157
C PROCESS TRAVELER .......................................................................................................160
Masks....................................................................................................................................160 Process Steps ........................................................................................................................160
D PROCESS SIMULATION ...................................................................................................166
E MICROFABRICATION RECIPE FOR RIE AND DRIE PROCESS.................................169
F PACKAGING DRAWINGS ................................................................................................170
LIST OF REFERENCES.............................................................................................................173
BIOGRAPHICAL SKETCH .......................................................................................................180
8

LIST OF TABLES
Table page 1-1 Summary of typical skin friction contributions for various vehicles.................................25
1-2 Parameters in the turbulent boundary layer. ......................................................................25
3-1 Material properties and geometry parameters used for model validation..........................79
3-2 Resonant frequency and effective mass predicted by LEM and FEA. ..............................79
3-3 First 6 modes and effective mass predicted by FEA for the representative structure........79
3-4 Piezoresistive coefficients for n-type and p-type silicon. ..................................................79
3-5 Piezoresistive coefficients for n-type and p-type silicon in the <110> direction. .............80
3-6 Space parameter dimensions for junction isolation. ..........................................................80
4-1 The candidate shear stress sensor specifications. ............................................................102
4-2 Upper and lower bounds associated with the specifications in Table 4-1. ......................102
4-3 Optimization results for the cases specified in Table 4-1. ...............................................103
6-1 LabVIEW settings for noise PSD measurement..............................................................128
6-2 The optimal geometry of the shear stress sensor that was characterized.........................128
6-3 Sensitivity at different bias voltage for the tested sensor. ...............................................128
6-4 A comparison of the predicted versus realized performance of the sensor under test for a bias voltage of 1.5V.................................................................................................129
E-1 Input parameters in the ASE on STS DRIE systems. ......................................................169
E-2 Anisotropic oxide/nitride etch recipe on the Unaxis ICP Etcher system.........................169
E-3 Anisotropic aluminum etch recipe on the Unaxis ICP Etcher system. ............................169
9

LIST OF FIGURES
Figure page 1-1 Schematic of wall shear stress in a laminar boundary layer on an airfoil section. ............26
1-2 Schematic representation of the boundary layer transition process for a flat-plate flow at a ZPG . ...................................................................................................................26
1-3. Schematic of typical velocity profile for low-speed laminar and turbulent boundary layers [9]. ...........................................................................................................................27
1-4 The structure of a typical turbulent boundary layer.........................................................27
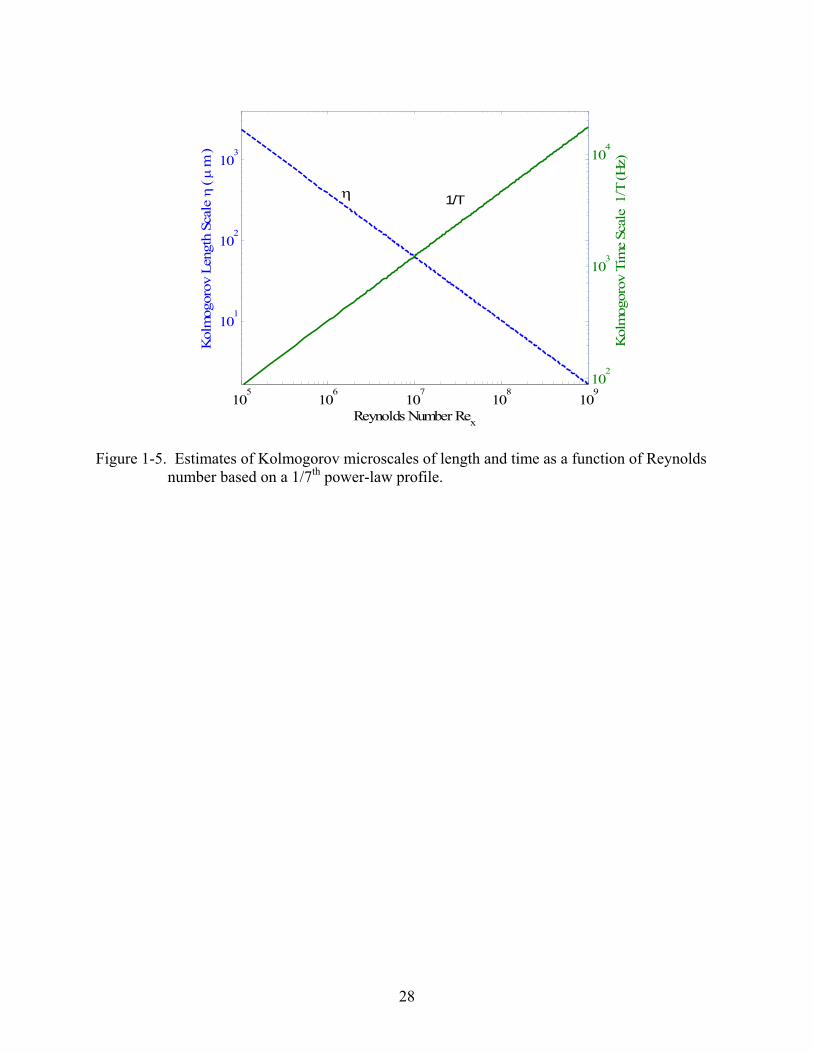
1-5 Estimates of Kolmogorov microscales of length and time as a function of Reynolds number based on a 1/7th power-law profile. ......................................................................28
2-1 Schematic cross-sectional view of the floating element based sensor.............................46
2-2 Schematic plan view and cross-section of a typical floating element sensor . ..................46
2-3 Integrated shear force variation as a function of sensor resolution for different element areas......................................................................................................................47
2-4 Schematic illustrating pressure gradient effects on the force balance of a floating element...............................................................................................................................47
2-5 Schematic cross-sectional view of the capacitive floating element sensor .......................48
2-6 Plan-view of a horizontal-electrode capacitive floating element sensor . .........................48
2-7 Schematic top-view of a differential capacitive shear stress sensor . ................................49
2-8 A schematic cross-sectional view of an optical differential shutter-based floating element shear stress sensor . ..............................................................................................49
2-9 Schematic top and cross-sectional view of a Febry-Perot shear stress sensor ..................50
2-10 Top and cross-sectional view of Moiré optical shear stress sensor . .................................50
2-11 A schematic top view of an axial piezoresistive floating element sensor .........................51
2-12 A schematic top view of a laterally-implanted piezoresistive shear stress sensor ............51
2-13 A schematic 3D view of the side-implanted piezoresistive floating element sensor.........52
3-1 Schematic top view of the structure of a piezoresistive floating element sensor. .............81
3-2 The simplified clamped-clamped beam model of the floating element structure..............81
10

3-3 Lumped element model of a floating element sensor: (a) spring-mass-dashpot system (mechanical) and (b) equivalent electrical LCR circuit. ....................................................81
3-4 Representative results of displacement of tethers for the representative structure............82
3-5 Representative load-deflection characteristics of analytical models and FEA for the representative structure. .....................................................................................................82
3-6 Verification of the analytically predicted stress profile with FEA results for the representative structure. .....................................................................................................83
3-7 The mode shape for the representative structure. ..............................................................83
3-8 Geometry used in computation of Euler’s angles. .............................................................84
3-9 Polar dependence of piezoresistive coefficients for p-type silicon in the (100) plane. .....84
3-10 Polar dependence of piezoresistive coefficients for n-type silicon in the (100) plane. .....85
3-11 Piezoresistive factor as a function of impurity concentration for p- type silicon at . ................................................................................................................................85 300K
3-12 Schematic illustrating the relevant geometric parameters for piezoresistor sensitivity calculations. .......................................................................................................................86
3-13 Schematic representative of a deflected side-implanted piezoresistive shear stress sensor and corresponding resistance changes in Wheatstone bridge.................................86
3-14 Wheatstone bridge subjected to cross-axis acceleration (a) and pressure (b)....................87
3-15 Schematic of the double-bridge temperature compensation configuration. ......................87
3-16 Top view schematic of the side-implanted piezoresistor and p++ interconnect in an n-well (a) and equivalent electric circuit indicating that the sensor and leads are junction isolated (b). ..........................................................................................................88
3-17 Doping profile of n-well, p++ interconnect, and piezoresistor using FLOOPS simulation...........................................................................................................................88
3-18 Cross view of isolation width between p++ interconnects. ...............................................89
3-19 Cross view of isolation width between p++ interconnect and piezoresistor......................89
3-20 Top view of the isolation widths on a sensor tether...........................................................90
3-21 Top view schematic of the side-implanted piezoresistor with a metal line contact...........90
4-1 Flow chart of design optimization of the piezoresistive shear stress sensor....................104
11

4-2 Logarithmic derivative of objective function minτ with respect to parameters. ...............104
5-1 Process flow of the side-implanted piezoresistive shear stress sensor. ...........................112
5-2 SEM side view of side wall trench after DRIE Si. ..........................................................113
5-3 SEM side view of the notch at the interface of oxide and Si after DRIE. .......................113
5-4 SEM top view of the trench after DRIE oxide and Si......................................................114
5-5 SEM top views of the trench after DRIE oxide and Si with oxide overetch. ..................114
5-6 SEM top views of the trench with silicon grass through a micromasking effect due to oxide underetch................................................................................................................115
5-7 SEM side view of the trench after DRIE oxide and Si. ...................................................115
5-8 Photograph of the fabricated device. ...............................................................................116
5-9 A photograph of the device with a close up view of the side-implanted piezoresistor. ..116
5-10 Photograph of the PCB embedded in Lucite package. ....................................................117
5-11 Interface circuit board for offset compensation. ..............................................................117
6-1 The bridge dc offset voltage as a function of bias voltages for the tested sensor............130
6-2 An electrical schematic of the interface circuit for offset compensation.........................130
6-3 A schematic of the experimental setup for the dynamic calibration experiements. ........131
6-4 Forward and reverse bias characteristics of the p/n junction...........................................131
6-5 Reverse bias breakdown voltage of the P/N junction. .....................................................132
6-7 The nonlinearity of the I-V curve in Figure 6-6 at different sweeping voltages. ............133
6-8 The output voltage as a function of shear stress magnitude of the sensor at a forcing frequency of 2.088 kHz as a function bias voltage..........................................................133
6-9 The normalized output voltage as a function of shear stress magnitude of the sensor at a forcing frequency of 2.088 kHz for several bias voltages.........................................134
6-10 Gain and phase factors of the frequency response function. ...........................................134
6-11 The magnitude and phase angle of the reflection coefficient of the plane wave tube. ....135
6-12 Output–referred noise floor of the measurement system at a bias voltage of 1.5V.........136
12

7-1 Pressure drops versus length between taps in the flow cell. ............................................144
7-2 Experimental setup of static calibration...........................................................................144
A-1 The clamped beam and free body diagram. a) Clamped-clamped beam. b) Free body diagram of the beam. c) Free body diagram of part of the beam.....................................156
A-2 Clamped-clamped beam in large deflection. ...................................................................156
A-3 Clamped-clamped beam in small deflection (a) and free body diagram of the clamped beam (b).............................................................................................................156
B-1 The Wheatstone bridge. ...................................................................................................159
B-2 The thermal noise model of the Wheatstone bridge. .......................................................159
B-3 The 1 f noise model of the Wheatstone bridge..............................................................159
E-1 The drawing illustrating the Lucite packaging. ...............................................................170
E-2 The aluminum plate for the plane wave tube interface connection. ................................171
E-3 Aluminum packaging for pressure sensitivity testing......................................................172
13

Abstract of Dissertation Presented to the Graduate School of the University of Florida in Partial Fulfillment of the Requirements for the Degree of Doctor of Philosophy
SIDE-IMPLANTED PIEZORESISTIVE SHEAR STRESS SENSOR FOR TURBULENT
BOUNDARY LAYER MEASUREMENT
By
Yawei Li
August 2008 Chair: Mark Sheplak Major: Aerospace Engineering
In this dissertation, I discuss the device modeling, design optimization, fabrication,
packaging and characterization of a micromachined floating element piezoresistive shear stress
sensor for the time-resolved, direct measurement of fluctuating wall shear stress in a turbulent
flow. This device impacts a broad range of applications from fundamental scientific research to
industrial flow control and biomedical applications.
The sensor structure integrates side-implanted, diffused resistors into the silicon tethers for
piezoresistive detection. Temperature compensation is enabled by integrating a fixed, dummy
Wheatstone bridge adjacent to the active shear-stress sensor. A theoretical nonlinear mechanical
model is combined with a piezoresistive sensing model to determine the electromechanical
sensitivity. Lumped element modeling (LEM) is used to estimate the resonant frequency. Finite
element modeling is employed to verify the quasi-static and dynamic models. Two dominant
electrical noise sources in the piezoresistive shear stress sensor, 1 f noise and thermal noise,
and amplifier noise were considered to determine the noise floor. These models were then
leveraged to obtain optimal sensor designs for several sets of specifications. The cost function,
minimum detectable shear stress (MDS) formulated in terms of sensitivity and noise floor, is
14

minimized subject to nonlinear constraints of geometry, linearity, bandwidth, power, resistance,
and manufacturing limitations. The optimization results indicate a predicted optimal device
performance with a MDS of and a dynamic range greater than 75 dB. A sensitivity
analysis indicates that the device performance is most responsive to variations in tether width.
(0.1 mPaO )
The sensors are fabricated using an 8-mask, bulk micromachining process on a silicon
wafer. An n-well layer is formed to control the space-charge layer thickness of reverse-biased
p/n junction-isolated piezoresistors. The sensor geometry is realized using reactive ion etch
(RIE) and deep reactive ion etch (DRIE). Hydrogen annealing is employed to smooth the
sidewall scalloping caused by DRIE. The piezoresistors are achieved by side-wall boron
implantation. The structure is finally released from the backside using the combination of DRIE
and RIE.
Electrical characterization indicates linear junction-isolated resistors, and a negligible
leakage current (< ) for the junction-isolated diffused piezoresistors up to a reverse bias
voltage of -10 V. Using a known acoustically-excited wall shear stress for calibration, the sensor
exhibited a sensitivity of , a noise floor of
0.12 μA
4.24 µV/Pa 11.4 mPa/ Hz at 1 kHz , a linear
response up to the maximum testing range of , and a flat dynamic response up to the testing
limit of . These results, coupled with a wind-tunnel suitable package, result in a suitable
transducer for turbulence measurements in low-speed flows, a first for piezoresistive MEMS-
based direct shear stress sensors.
2 Pa
6.7 kHz
15

CHAPTER 1 INTRODUCTION
This chapter provides an introduction to wall shear stress and motivation for its
measurement. Then the scaling turbulent boundary layer is reviewed as it applies to dictating the
requirements for wall shear stress sensors. The research objectives and contributions are
presented. This chapter ends with the dissertation overview.
Motivation for Wall Shear Stress Measurement
The quantification of wall shear stress is important in a variety of engineering applications,
specifically in the development of aerospace and naval vehicles. These vehicles span a wide
range of Reynolds numbers ( )Re from low (unmanned air vehicles for homeland security
surveillance and detection) to a very high (hypersonic vehicles for rapid global and space
access). Across the range, unsteady, complex flow phenomena associated with transitional,
turbulent, and separating boundary layers play an important role in aerodynamics and propulsion
efficiency of these vehicles [1, 2]. Furthermore, since shear stress is a vector field, it may
provide advantages over pressure sensing in active flow control applications involving separated
flows [3].
Re
Re
Re
The accurate measurement of the wall shear stress is of vital importance for understanding
the critical vehicle characteristics, such as lift, drag, and propulsion efficiency. Therefore, the
ability to obtain quantitative, time-resolved shear stress measurements may elucidate complex
physics and ultimately help engineers improve the performance of these vehicles [4]. Viscous
drag or skin friction drag is formed due to shear stress in the boundary layer. The viscous loss is
highly dependent on the physical aerodynamic/hydrodynamic system; typical viscous losses for
different systems are listed in Table 1-1 [5]. For aircraft, reducing skin friction by 20% results in
a 10% annual fuel savings, and for underwater vehicles, a reduction of skin friction drag of 20%
16

would result in a 6.8% increase in speed [5]. Therefore, shear stress measurement attracts
attention in sensor-actuator systems for use in active control of the turbulent boundary layer with
an aim of minimizing the skin friction [6].
Wall Shear Stress
When a continuum viscous fluid flows over an object, the no slip boundary condition at the
surface results in a velocity gradient within a very thin boundary layer [7]; the streamwise
velocity increases from zero at the wall to its free-stream value at the edge of the boundary layer.
The velocity profile is shown in Figure 1-1. The viscous effects are confined to the boundary
layer, while outside of the boundary layer the flow is essentially inviscid [7]. Two classes of
surface forces act on the aerodynamic body: the normal force per unit area (pressure) , and the
tangential force per unit area (shear stress) . For a Newtonian flow, the wall shear stress is
proportional to the velocity gradient at the wall.
P
wτ
The boundary layer is classified as laminar or turbulent depending on Reynolds number or
flow structure [7]. A laminar boundary layer forms at low Reynolds numbers and is
characterized by its smooth and orderly motion, where microscopic mixing of mass, momentum
and energy occurs only between adjacent vertical fluid layers. A turbulent boundary layer forms
at high Reynolds numbers and is characterized by random and chaotic motion [8]. The
macroscopic mixing traverses several regions within the boundary layer. There is a transition
range between laminar and turbulent boundary layers, partially laminar and partially turbulent, as
shown in Figure 1-2. In the transition range, the flow is very sensitive to small disturbances [8].
Typical velocity profiles for low speed laminar and turbulent boundary layer are shown in
Figure 1-3. Due to the intense mixing, the turbulent boundary layer has a fuller velocity profile;
thus, the shear stress in the turbulent boundary layer is larger than in a laminar boundary layer.
17

The boundary layer thickness, ( )xδ , is defined as the distance from the wall to the point at
which the velocity is 99% of the free-stream velocity [7]. The laminar boundary layer thickness
in a zero pressure gradient flat-plate flow is given by Blasius as [7]
5.0
xx Reδ= , (1-1)
where xRe is the free stream Reynolds number and given by νU x∞ , x is the streamwise
distance, U is the free stream velocity, and is the kinematic viscosity of the fluid. For
turbulent flow, the boundary layer thickness is estimated by the 1/7th power law velocity profile
is [7]
∞ v
( )1 7
0.16
xx Reδ= . (1-2)
The shear stress is related to skin friction by the skin-friction coefficient
21
2
wfC
U
τ
ρ ∞
= , (1-3)
The wall shear stress wτ for a one dimensional laminar flow is given by Newton’s law of
viscosity [7],
0
w
y
dudy
τ μ=
= , (1-4)
where μ is the dynamic viscosity of the fluid and is the local streamwise velocity in the
boundary layer. For turbulent flow, the shear stress is decomposed into mean shear stress
u
wτ
and fluctuating shear stress wτ ′ in terms of the Reynolds decomposition,
w w wτ τ τ ′= + . (1-5)
The mean skin friction for laminar and turbulent flow are given by [7]
18

, 2
2 0.664wf lplate
x
CU Reτ
ρ ∞
= = , (1-6)
and ( ),
0.027f tplate
x
CRe
= 1 7 , (1-7)
respectively. Equation (1-2) and (1-7) are based on the assumption of the 1/7th power law form
of the velocity profile proposed by Prandtl [7],
17u y
U δ∞
⎛ ⎞= ⎜ ⎟⎝ ⎠
. (1-8)
These formulas are in reasonable agreement with turbulent flat-plate data and are appropriate for
a general scaling analysis [7].
Turbulent Boundary Layer
To understand the temporal and spatial resolution requirements for the shear stress sensor,
we need to understand the relevant time and length scales associated with a turbulent boundary
layer. There are two regions in a turbulent boundary layer: the inner layer and outer layer [9]
The semi-log plot of the structure of a typical turbulent boundary layer is shown in Figure 1-4.
The outer layer (wake region), is turbulent (eddy) shear-dominated and the effect of the wall is
communicated via shear stress. The inner 20% of the boundary layer is defined as the inner
layer, where viscous shear dominates. The overlap layer smoothly connects the inner and outer
layer. There are three regions within the inner layer:
0 5y+< < viscous sublayer (or linear) region u y+ +=5 4y+< < 5 buffer region
45 0.2y δ+< < + log region 1 lnu yk
+ + B= +
where is the Karman constant and k B is the intercept. They are universal constants with
and [7]. . The non-dimensional velocity u0.41k = 5.0B = + is defined as
19

*u u u+ = , (1-9)
where is given by *u
*wu τ ρ= , (1-10)
u is the mean velocity, and ρ is the density of the fluid. The non-dimensional distance y+ is
defined as
* *y y l yu v+ = = , (1-11)
where *l v u= * is the characteristic viscous length scale. A turbulent flow possesses different
length scales. The largest eddies are on the order of the boundary layer thickness, while the
smallest eddies can approach the Kolmogorov length scales [8]. Kolmogorov’s universal
equilibrium theory states that the small scale motions are statistically independent of the slower
large-scale turbulent structures, but depend on the rate at which the energy is supplied by large-
scale motions and on the kinematic viscosity [8]. In addition, the rate at which energy is
supplied is assumed to be equal to the rate of dissipation. Thus, the small eddies must have a
smaller time scale and are assumed to be locally isotropic. Therefore, the dissipation rate and
kinetic viscosity are parameters governing small scale motions. The scaling relationships
between the small and large scale structures in a boundary layer flow are [4, 8, 10]
( )3 4
3 4~ eu Reδδη
δ ν
−−⎛ ⎞ =⎜ ⎟
⎝ ⎠ (1-12)
and ( )1 2
1 2~ euTu Reδδ
δ ν
−−⎛ ⎞ =⎜ ⎟
⎝ ⎠, (1-13)
20

where η and T are the Kolmogorov length and time scales respectively, is the eddy velocity
(typically [4]. Substitution of Equation
eu
(~ 0.01e )U∞u O (1-2) into Equation (1-12) and Equation
(1-13) leads to estimates of the Kolmogorov microscales in terms of Rex ,
( ) 11 14~ 20 xx Reη − (1-14)
and ( ) 4 7400~ x
xT ReU
−
∞
. (1-15)
The relationship between the Kolmogorov microscales and Reynolds number is given in Figure
1-5 for a zero pressure gradient turbulent boundary layer with 50 m sU∞ = , and at a distance
downstream of the leading edge assuming a 1 mx = 1 7th power-law velocity profile.
In order to detect the wall shear stress generated by the smallest eddies in a turbulent
boundary layer, the sensor size must be of the same order of magnitude as the Kolmogorov
length scale [10], and have a flat frequency range greater than the reciprocal of the Kolmogorov
time scale [4]. These microscales are rough estimates, so some researchers used the viscous
length scale and time scale, *l *t u*2ν= , to estimate the required sensor size and bandwidth [11,
12]. For example, Padmanabahn et al. [11] used in their sensor design, and Alfredsson et
al.[12] used , and in their experiments. Gad-el-Hak and Bandyopadhyay [13]
reported these viscous scales are on the same order of the Kolmogorov scales.
*4l
*10l *8l *2l
If the sensor size is larger than the Kolmogorov length scale, the fluctuating component
will be spatially averaged, which results in spectral attenuation and a corresponding
underestimation of the turbulent parameters [14, 15]. It has been reported that the sensor smaller
than wall units were free from spatial averaging effects [16] , while the sensor lager than
wall units suffered shear stress underestimation [17]. Equation
20 30
(1-12) and (1-13) indicate that as
21

the Reynolds number increases, the sensor size should decrease and the bandwidth of the sensor
should increase. For example, at 710xRe = , the Kolmogorov length scale is and the
characteristic frequency is . From experiments and numerical simulation results,
and Gad-el-Hak stated that a sensor size of 3-5 times of Kolmogorov length is reliable
for accurate turbulence measurement [10]. A summary of parameters and their analytical
expressions for a zero pressure gradient turbulent boundary layer are listed in
65 μm
3.7 kHz
Lofdahl&&
Table 1-2 [7, 8].
In addition, roughness is another factor that may disturb the turbulent boundary layer. The
roughness height due to the flatness of the device die in the package, misalignment in tunnel
installation, and gap size is denoted by sk , and the characterized roughness is given by
*
ss
k ukν
+ = . (1-16)
In turbulent flow if the roughness protrudes above the thin viscous layer, causing wall
friction to increase significantly [7]. If
5sk + >
4sk + < , the wall surface is deemed hydraulically smooth
and the roughness does not significantly disturb the turbulent boundary layer [7].
Research Objectives
The goal of this dissertation is to develop a robust, high resolution, and high bandwidth
silicon micromachined piezoresistive floating element shear stress sensor for turbulent boundary
layer measurement. The shear stress sensor should possess high spatial and temporal resolution
and a low minimum detectable signal (MDS). To date, the quantitative, time-resolved,
continuous, direct measurement of fluctuating shear stress has not yet been realized [4]. Further
effort is required to developed standard, reliable MEMS shear-stress sensors with quantifiable
uncertainties. The detailed description of the choice of the piezoresistive sensing scheme is
discussed in Chapter 2.
22

Depending on the application, there are several challenges in the development of this
device. An ideal shear stress sensor should have a large dynamic range ( ( )80 dBO ), large
bandwidth , and a spatial resolution of (( 10 kHzO )) ( )100 μmO to capture the spectra of the
fluctuating shear stress without spatial averaging. The resolvable shear stress would to be on the
order of , resulting in force resolution of (0.1 mPaO ) ( )10 pNO for the desired spatial resolution
of . In addition, an ideal sensor should be packaged to allow for flush-mounting on
the measurement wall surface to avoid flow disturbances.
(100 μmO )
Traditional intrusive instruments suffer from insufficient spatial and temporal resolution.
Microelectromechanical systems (MEMS) technology offers the potential to meet these
requirements by extending silicon-based integrated circuit manufacturing approaches to
microfabrication of miniature structures [4]. From the perspective of measurement
instrumentation, the small physical size and reduced inertia of microsensors vastly improves both
the temporal and spatial measurement resolution relative to conventional macroscale sensors.
Thus, MEMS shear stress sensors offer the possibility of satisfying transduction challenges
associated with measuring very small forces while maintaining a large dynamic range and high
bandwidth.
The previous research in MEMS shear stress sensors [18-25] is discussed in detail in
Chapter 2. Three transduction schemes have been developed for direct measurement of shear
stress: capacitive [18, 21, 24], optical [20, 22, 23] and piezoresistive [19, 25]. These previously
developed sensors possess performance limitations and cannot be used for quantitative shear
stress measurements.
23

This research effort is the combination of multidisciplinary design and optimization,
fabrication, packaging and calibration, which results in a truly flush-mounted, MEMS direct wall
shear stress sensor. The contributions to the above efforts are:
• Development of electromechanical modeling and nonlinear constrained design optimization to achieve good sensor performance for aerospace applications.
• Development and execution of a novel micro-fabrication process accounting for p/n junction isolation and high-quality electrical and moisture passivation.
• Development of a sensor package that can be flush-mounted on the wall surface.
• Realization and preliminary characterization of a functioning device.
Dissertation Overview
This dissertation is organized into seven chapters and five appendices. Chapter 1 provides
the motivation for the topic of this dissertation. Background information regarding previous
shear stress measurement technology is discussed in Chapter 2. Sensor modeling is discussed in
Chapter 3. This includes the electromechanical modeling, finite element analysis for model
verification as well as specific design issues. Chapter 4 discusses device optimization subjected
to manufacturing constraints and specifications. Chapter 5 describes the detailed fabrication
process and device packaging. Experimental characterization setups and results are presented in
Chapter 6. The conclusion and future work are presented in Chapter 7.
Information supporting this dissertation is given in appendices. Appendix A provides
detailed derivations of the quasi-static beam models and dynamic models. The detailed
modeling of the noise floor of the fully active Wheatstone bridge is discussed in Appendix B. A
fabrication process flow is presented in Appendix C. The process simulation using FLOOPS
[26] is given in Appendix D. The recipes for plasma etching are given in Appendix E. Finally,
packaging details, vendors, and engineering drawings are provided in Appendix F.
24

Table 1-1. Summary of typical skin friction contributions for various vehicles [5]. Vehicles Typical viscous loss
Supersonic fighter 25-30 % Large transport aircraft 40 % Executive aircraft 50 % Underwater bodies 70 % Ships at low/high speed 90-30 %
Table 1-2. Parameters in the turbulent boundary layer. Parameters Analytical expression
Free stream velocity ( )m sU∞ U∞
Typical eddy velocity ( )m seu ~ 0.01eu U∞
Streamwise distance ( )mx x
Kinematic viscosity ν Reynolds number based on streamwise distance x
U xReν∞=
Boundary layer thickness ( )mδ ( ) 1 70.16 xx Reδ −=
Momentum thickness ( )mθ 772
θδ≈
Reynolds number based on momentum thickness Reθ
UReθθ
ν∞=
Reynolds number based on boundary layer thickness
euReδδν
=
Skin friction coefficient fC ( ) 1 70.027f xC Re −=
Wall shear stress ( )Pawτ21
2w fC Uτ ρ ∞=
Kolmogorov length scale ( )mη ( ) 3 4~ Reδη δ −
Kolmogorov time scale ( )sT ( ) 0.5
~e
ReT
uδδ −
25

P
δyx
( )u y
wτ
( )xδ
Figure 1-1. Schematic of wall shear stress in a laminar boundary layer on an airfoil section.
Figure 1-2. Schematic representation of the boundary layer transition process for a flat-plate flow at a ZPG [7].
26

TurbulentLaminar
Velocity
y
u
Figure 1-3. Schematic of typical velocity profile for low-speed laminar and turbulent boundary layers [9].
Figure 1-4. The structure of a typical turbulent boundary layer [8].
27
105
106
107
108
109
101
102
103
Kol
mog
orov
Len
gth
Scal
e η
( μ m
)
Reynolds Number Rex
102
103
104
Kol
mog
orov
Tim
e Sc
ale
1/T
(Hz)
η 1/T
Figure 1-5. Estimates of Kolmogorov microscales of length and time as a function of Reynolds
number based on a 1/7th power-law profile.
28

CHAPTER 2 BACKGROUND
This chapter provides an overview of the techniques for shear stress sensor measurement
with a focus on floating element sensors. Previous MEMS shear stress sensors are reviewed and
their merits and limitations discussed. A side-implanted piezoresistive shear stress sensor is then
proposed to achieve high spatial and temporal resolution and quantifiable uncertainties.
Techniques for Shear Stress Measurement
The current techniques employed in shear stress measurement are grouped into two
categories: direct and indirect [27]. Indirect techniques infer the shear stress from other
measured flow parameters, such as Joulean heating rate for thermal sensors, velocity profile for
curve-fitting techniques or Doppler shift for optical sensors [27]. The uncertainty in these
measurements is dominated by the validity of the model relating the flow parameter to wall shear
stress [27]. The direct technique measures the integrated shear force generated by wall shear
stress on surface [4]. This technique includes three areas: floating-element skin friction balance
techniques, thin-oil-film techniques and liquid crystal techniques. The floating-element skin
friction balance techniques are addressed in this dissertation. A floating element sensor directly
measures the integrated shear force produced by shear stress on a flush-mounted movable
“floating” element [27]. Direct measurement techniques are more attractive since no
assumptions must be made about the relationship between the wall shear stress and the measured
quantity and/or fluid properties. In addition, direct sensors can be used to calibrate indirect
devices.
Conventional shear stress sensors and MEMS-based shear stress sensors are described in
the following sections, with specific focus on the MEMS floating element technique.
29

Conventional Techniques
Many conventional techniques have been developed to measure the wall shear stress [28],
including indirect measurement techniques such as surface obstacle devices and heat
transfer/mass transfer-based devices, and direct measurement techniques such as a floating-
element skin friction balance. Several review papers [27-29] catalog the merits and drawbacks
of these devices in various flow situations and a wide range of applications. The indirect
conventional techniques are summarized in the following paragraph.
Surface obstacle devices include the Preston tube, Stanton tube/razor blade and sub-layer
fence. These devices are easy to fabricate and favorable in thick turbulent boundary layers.
However, they are sensitive to the size and geometry of the obstacle in the turbulent boundary
layer. The device can only measure mean shear stress, and unable to measure the time-resolved
fluctuating shear stress. In addition, they rely on an empirical correlation between a 2-D
turbulent boundary layer profile and property measured.
Heat transfer/mass transfer-based devices include hot films and hot wires. They have
advantages of fast response, high sensitivity and simple structure. However, they are sensitive to
temperature drift, have tedious calibration procedures, and suffer calibration repeatability
problems due to heat loss to the substrate/air. In general, these devices are considered to be
qualitative measurement tools [4].
The direct measurement techniques, known as “skin friction balance” or “floating element
balance”, have been widely used in wind tunnel measurements since the early 1950’s [28].
These techniques measure the integrated shear force produced by the wall shear stress on a flush-
mounted laterally-movable floating element [29]. The typical device is shown in Figure 2-1.
The floating element is attached to either a displacement transducer or to part of a feedback
30

force-rebalance configuration. Winter [28] cataloged the limitations of this technique, which are
summarized as follows:
• Compromise between sensor spatial resolution and detectable shear force. • Measurement errors associated with misalignment, necessary gap and pressure gradient. • Cross-axis sensitivity to acceleration, pressure, thermal expansion and vibration. Some of these limitations can be significantly mitigated if the dimension of the device is
reduced, which is a motivation for the development of MEMS floating element sensors.
MEMS-Based Techniques
MEMS is a revolutionary new field that extends silicon integrated circuit (IC)
micromachining technology for fabrication of miniature systems. The MEMS-based sensors
possess small physical size and large usable bandwidth. The utilization of these devices
broadens the spectrum of applications, which range from fundamental scientific research to
industrial flow control [6] and biomedical applications [30].
From the fluid dynamics perspective, MEMS-based sensors provide a means of measuring
fluctuating pressure and wall shear stress in turbulent boundary layers because the
micromachined sensors can be fabricated on the same order of magnitude of the Kolmogorov
microscale [10]. and Gad-el-Hak reviewed MEMS-based pressure sensors for turbulent
flow diagnosis [10] including background, design criteria, and calibration procedures. Recently,
Naughton and Sheplak reviewed modern skin-friction measurement techniques, such as MEMS-
based sensors, thin-oil film interferometry and liquid crystal coatings. They summarized the
theory, development, limitations, uncertainties and misconceptions surrounding these techniques
[4].
Lofdahl&&
Several microfabricated shear stress sensors of both direct and indirect types have been
reported. The indirect MEMS wall shear-stress sensors include thermal devices [31-34], laser-
31

based sensors [35], micro-pillars [36, 37] and micro-fences [38]. Thermal shear stress sensors
operate on heat transfer principles. Laser Doppler sensors operate on the measurement of
Doppler shift of light scattered by particles passing through a diverging fringe pattern in the
viscous sublayer of a turbulent boundary layer to yield the velocity gradient. Micro-pillars are
based on a sensor film with micropillars arrays that are essentially vertical cantilever arrays
within the viscous sublayer. These sensors employ optical techniques to detect the wall shear
stress in the viscous sublayer via pillar tip deflection. Micro-fences employ a cantilever structure
to detect the shear stress via piezoresistive transduction.
Direct shear stress sensors include floating-element devices [18-25]. Three transduction
schemes have been used in floating element sensors: capacitive [18, 21, 24], piezoresistive [19,
25] and optical [20, 22, 23].
Floating Element Sensors
Sensor Modeling and Scaling
The typical MEMS floating element shear stress sensor is shown in Figure 2-2. The
floating element, with a length of , width of and thickness of , is suspended over a
recessed gap by four silicon tethers. These tethers act as restoring springs. The shear force
induced displacement of the floating element is determined by Euler-Bernoulli beam theory to
be [11] (the detailed derivation is given in Appendix A)
eL eW tT
Δ
3
214w e e t t t
t t e e
L W L LWET W L W
τ ⎛ ⎞ ⎛Δ = +⎜ ⎟ ⎜
⎝ ⎠ ⎝
⎞⎟⎠
, (2-1)
where , and are tether length, width and thickness respectively, and tL tW tT E is the elastic
modulus of tether material. The mechanical sensitivity of the sensor with respect to the applied
32

shear force, w e eF W Lτ= , is directly proportional to the mechanical compliance of the tethers 1 k
[18]
3
21 1 14
t ty
t t e e
tL LWCk F ET W L W
⎛ ⎞ ⎛Δ= = = +⎜ ⎟ ⎜
⎝ ⎠ ⎝
⎞⎟⎠
. (2-2)
The trade-off associated with spatial resolution versus decreasing shear stress sensitivity is
illustrated in Equation (2-1) and Figure 2-3. For example, a sensor with floating element area of
, the integrated shear fore is 100 μm 100 μm× ( )10 pNO for a shear stress of ( )1 mPaO , which
requires the tethers to have a high compliance to get an appreciable element detection. The
compliance is limited by the maximum shear stress achievable before failure occurs or before
nonlinearity in the force-displacement relationship [4] becomes substantial. The minimum
detectable shear stress is determined by the sensitivity and the total sensor noise [39].
Assuming a perfectly damped or under-damped system, the bandwidth is proportional to
the first resonant frequency, k M , where M is the effective mass,
e e tM L W Tρ≈ , (2-3)
where ρ is the density of the floating element material and it is assumed that .
Therefore, the shear stress sensitivity-bandwidth product is obtained as
e e t tL W L W>>
3
2
1 14
t
e e t t
LE L W T WkM ρ
⎛ ⎞∝ ⎜ ⎟
⎝ ⎠. (2-4)
The sensitivity-bandwidth product is a parameter useful in investigations of the scaling of
mechanical sensors. MEMS technology enables the fabrication of sensors with small thickness
and low mass, in addition to large compliance and a superior sensitivity-bandwidth product
comparable to conventional techniques [4]. A MEMS floating element has lengths of
33

( )1000 μme eL W O= = and , whereas conventional floating element lengths are
. Therefore, with the scaling of mass alone, MEMS-based sensors have a
sensitivity-bandwidth product at least three-orders of magnitude larger than conventional
sensors. MEMS-based sensors also possess spatial resolution at least one-order of magnitude
higher than conventional sensors, which is vital for turbulence measurements to avoid spatial
averaging [4].
(10 μmtT O= )
)(1 cme eL W O= =
Error Analysis and Challenges
Compared to conventional techniques, MEMS shear stress sensors have a negligible
misalignment error. This error is limited by the flatness of the device die [18] because the
floating element, tethers and substrate are fabricated monolithically in the same wafer. Other
sources of misalignment include packaging and tunnel installation, with packaging the dominant
source [4]. Packaging-induced compressive or tensile force may drastically alter the device
sensitivity [18]. The necessary gap between the wall and floating element is also reduced, with a
typical gap size smaller than [4]. 5 μm
Effect of misalignment
Misalignment of the floating element results in the element not being perfectly flush-
mounted with the wall surface, which disturbs the flow field around the sensor. The effective
shear stress is estimated by integrating the “stagnation pressure ( )2yuρ ” over the floating
element surface and dividing by the element area [39] to get
2
0
ks
y
MAe
u dz
L
ρτ = ∫ , (2-5)
34

where sk is the height of protrusion or recession above or below the wall. Streamwise velocity
is obtained via relationship between shear stress and velocity gradient in the sublayer, yu
yw
uz
τ μ= , (2-6)
where ρ and μ are the density and dynamic viscosity of the fluid, respectively, and z is the
distance from the wall. Substituting Equation (2-6) into Equation (2-5) to obtain the effective
shear stress yields
3
2
13
s wMA
e
kL
ρ ττμ
= . (2-7)
For a sensor with , 1000 μmeL = 10 μmsk = under the surface, and 5 Pawτ = in air, the
misalignment error is about 0.12% . Therefore it may be neglected.
Effect of pressure gradient
Error due to a pressure gradient is also greatly decreased for MEMS sensors. As illustrated
in Figure 2-4, there are two sources which introduce pressure gradient errors; one is the recessed
gap beneath the floating element and the other is the net pressure force acting on the lip of the
floating element [26]. The net force acting on the lip of the floating element is given as
p t e t e e
dPF TW P TW Ldy
= Δ = . (2-8)
The associated effective shear stress is obtained by dividing by the sensor area, , e eW L
p t
dP Tdy
τ = . (2-9)
The pressure gradient also introduces a shear stress underneath the floating element that can be
estimated to first-order by assuming fully-developed Poiseuille flow,
35

2g
g dPdy
τ = , (2-10)
where is the height of the recessed gap beneath the floating element. The total effective shear
stress acting on the floating element is
g
* *
12 2
teff w t w
TdP g gTdy
τ τ τ βδ δ
⎛ ⎞⎛⎛ ⎞= + + = + +⎜ ⎟ ⎜ ⎜⎝ ⎠ ⎝ ⎠⎝ ⎠
⎞⎟⎟ , (2-11)
where *
w
dPdy
δβτ
= is called Clauser’s equilibrium parameter, which is employed to compare the
external pressure gradient to wall friction in a turbulent boundary layer [7]. The displacement
thickness *δ is a parameter quantifying the mass flux deficit due to viscous effects. As indicated
in Equation (2-11), the error is dependent on the gap size and thickness of the floating element
and independent of the size of the floating element. The smaller gap and thickness of the
MEMS sensors result in smaller errors compared to conventional floating element sensors; the
MEMS sensors provide approximately a two-order of magnitude improvement in lip force
induced error. To get a more accurate estimate of these errors, direct numerical simulation of the
flow around the sensor is required.
Effect of cross-axis vibration and pressure fluctuations
Errors due to stream-wise acceleration scale favorably for low mass MEMS sensors [28].
The equivalent shear stress due to acceleration is approximated as
e e ta
f f e e
W L T aF Ma T aA A W L t
ρτ ρ= = = = , (2-12)
where is the acceleration and a fA is the surface area of the floating element, respectively.
Equation (2-12) indicates that the effective shear stress due to stream-wise acceleration is
proportional to the tether thickness. Assuming the stream-wise acceleration is 1 g , for a
36

proposed optimum sensor design with element dimensions of 1000 μm 1000 μm 50 μm× × , and
the tethers dimension of 1 , the effective stress is found to be 1.14 in
the
000 μm 30 μm 50 μm× × Pa
y -direction. Depending on the aerodynamic body acceleration levels, local acceleration
measurements in conjunction with coherent power data analysis may be used to mitigate
acceleration effects [40]. The stream-wise deflection is obtained from
cc
MayMaC
kδ = = . (2-13)
where and are the stream-wise stiffness and compliance of the tethers, respectively.
Therefore, the stream-wise acceleration sensitivity is proportional to . Assuming flow over
the floating element in the -direction (
ck yC
yC
y Figure 2-4), the cross-axis compliances according to
small-deflection beam theory are
4
tx
t t
LCEWT
= (2-14)
and 3
14
tz
t t
LCEW T
⎛ ⎞= ⎜ ⎟
⎝ ⎠. (2-15)
The ratios of transverse compliances to compliance in the flow direction are
2
y t
x t
C LC W
⎛ ⎞= ⎜ ⎟⎝ ⎠
(2-16)
and 2
y t
z t
C TC W
⎛ ⎞= ⎜ ⎟⎝ ⎠
. (2-17)
If and , the compliance in the ( ), ~ 50 μmt tT W O (~ 1 mmtL O ) x -direction is four orders of
magnitude less than the compliance in the flow direction ( y -direction). Since the deflection is
proportional to the compliance in the associated direction, the transverse deflection ( x -direction)
37

is four-orders of magnitude smaller than in the flow direction ( -direction). Therefore, the
transverse acceleration effect in
y
x -direction is negligible. However, the compliances in the -
and
z
y -directions are of the same order, and thus transverse acceleration effects in the z direction
must be taken into account. This can be mitigated by using piezoresistive transduction scheme
via a fully-active Wheatstone bridge configuration. The transverse acceleration and pressure in
the -direction supplies a common mode signal to the Wheatstone bridge, which can be rejected
by the differential voltage output. It is critical to minimize the pressure sensitivity as pressure
fluctuations in wall-bounded turbulent flows are much larger in magnitude than wall shear stress
fluctuations [41]. Hu et al. [41] found that the wall pressure fluctuations is
(depending on frequency) higher than the fluctuations for the streamwise wall shear stress, and
higher than that for spanwise component. The detailed discussion is given in
Chapter 3.
z
7 20 dB−
15 20 dB−
Previous MEMS Floating Element Shear Stress Sensors
Previous research in the floating element shear stress sensor is reviewed in this section.
This review is divided into capacitive, optical and piezoresistive sensing in terms of transduction
schemes. Their respective performance merits and drawbacks are discussed.
Capacitive Shear Stress Sensors
Realizing the merits of scaling shear stress sensors to the microscale, Schmidt et al. [18,
39] first reported the development of a micromachined floating element shear stress sensor with
an integrated readout for applications in low speed turbulent boundary layers, As shown in
Figure 2-5, the sensor was comprised a square floating element (500 μm 500 μm 32 μm× × )
suspended by four tethers (1000 μm 5 μm 32 μm× × ) and fabricated using polyimide/aluminum
surface micromachining techniques. A differential capacitive scheme was employed to sense the
38

deflection of the floating element. This differential capacitive scheme is insensitive to the
transverse movement to first order. The sensor was calibrated in a laminar flow using dry
compressed air up to a shear stress of 1 P . The achieved minimum detectable shear stress was
with a bandwidth of 10 . The measurement data was in agreement with the design
model. However, the sensor was sensitive to electromagnetic interference (EMI) due to the high
input impedance, and suffered from the sensitivity drift due to moisture-induced polyimide
property variation. In addition, the capacitive sensing scheme was limited to nonconductive
fluids.
a
0.1 Pa kHz
Pan et al. [21, 42] presented a force-feedback capacitive design that monolithically
integrated sensing, actuation and electronics control on a single chip using polysilicon-surface-
micromachining technology. The sensor has a comb finger structure with folded beam
suspension. The folded beam provided higher sensitivity and internal stress relief. The floating
element motion was measured by a differential capacitive sensing scheme while the folded beam
served as mechanical springs (Figure 2-6). A linear measurement sensitivity of 1.02 V Pa over
a pressure range of to 3.7 was achieved in a 2-D continuum laminar flow channel. No
dynamic response, linearity and noise floor results were reported. In addition, the front wire
bonds may disturb the flow in turbulent flow measurements.
0.5 Pa
Zhe et al. [24] developed a floating element shear stress sensor using a differential
capacitive sensing technique, with an optical technique as a self-test. The sensor was fabricated
on an ultra-thin ( ) silicon wafer using wafer bonding and DRIE techniques. As shown in 50 μm
Figure 2-7, the sensor consisted of two sensor electrodes, two actuation electrodes, a floating
element ( 20 in width and 500 in length) and a cantilever beam ( in length). The
shear stress was detected by a cantilever beam deflection, with a mechanical sensitivity of
0 μm μm 3 mm
39

1 μm Pa . This sensor was capable of measuring a shear force as small as 5 n that
corresponded to a shear stress of 50 . The static calibration in a rectangular channel shows
a minimum detectable shear stress of with 8% uncertainty up to , which is the
limit of the calibration technique. No frequency response results were reported.
N
mPa
0.04 Pa 0.2 Pa
Optical Shear Stress Sensors
Padmanabhan et al. [20] developed two generations of differential optical shutter-based
floating element sensors for turbulent flow measurement. As shown in Figure 2-8, the floating
element (120 and 500 μm 120 μm 7 μm× × μm 500 μm 7 μm× × ) is suspended 1. above the
silicon substrate by four tethers. Two photodiodes were integrated into the substrate under the
leading and trailing edges of the opaque floating element. The floating element motion induced
by shear force causes the photodiodes shuttering. Under uniform illumination from above, the
normalized differential photocurrent is proportional to the lateral displacement of the element
and the wall shear stress. The sensor could measure a wall shear stress from up to 10 ,
with a sensitivity of
0 μm
3 mPa Pa
0.4 V mPa (without integration of detection electronics ). The dynamic
response of the sensor was quantified up to the characterization limit of [43]. The
measured shear stress was consistent with predicted theoretical values. The sensor showed very
good repeatability, long-term stability, minimal drift, and EMI immunity. The main drawback to
this sensor was that vibrations of the light source relative to the sensor resulted in erroneous
signals.
4 kHz
Tseng et al. [22] developed a novel Febry-Perot shear stress sensor that employed optical
fibers and a polymer MEMS-based structure. The sensor was micromachined using
micromolding, UV lithography and RIE processes. As shown in Figure 2-9, a membrane was
used to protect the inner sensing parts and support the floating element displacement
40

measurement. The displacement of the floating element ( 40 high, wide) induced
by the wall shear stress on the membrane (1
0 μm 200 μm
.5 mm 1.5 mm 20 μm× × ) was detected via an optical
fiber using Fabry-Perot interferometer. The sensor was tested in a steady laminar flow between
parallel plates and the results demonstrated a shear stress resolution of 0.65 Pa nm . The
minimum detectable shear stress was . The fragile sensing parts were not exposed to
the testing environment, making the sensor suitable for applications in harsh environments. This
sensor was not tested in flows. The dynamic response and linearity of this sensor are
questionable due to the potential buckling of diaphragm. Furthermore, cross-axis sensitivity due
to vibration and pressure may be significant given the geometry of the sensing element.
0.065 Pa
Horowitz et al. [23] developed a floating-element shear stress sensor based on geometric
Moiré interferometer (Figure 2-10). The device structure consisted of a silicon floating element
(1280 ) suspended above a Pyrex wafer by four tethers
( ). The sensor was fabricated via DRIE and a wafer bonding/thin back
process. When the device was illuminated through the Pyrex, light was reflected by the top and
bottom gratings, creating a translation-dependent Moiré fringe pattern. The shift of the Moiré
fringe was amplified with respect to the element displacement by the ratio of fringe pitch G to
the movable grating pitch . The sensor die was flush-mounted on a Lucite plug front side, and
the imaging optics and a CCD camera was installed on the backside for the displacement
measurement. Experimental characterization indicated a static sensitivity of
μm 400 μm 10 μm× × 2.0 μm
545 μm 6 μm 10 μm× ×
2g
0.26 μm Pa , a
resonant frequency of 1.7 , and a noise floor of kHz 6.2 mPa Hz . Drawbacks to this sensor
included an optical packaging scheme not feasible for wind tunnel measurement and limited
bandwidth.
41

Piezoresistive Shear Stress Sensors
Shajii et al. [19] and Goldberg et al. [44] extended Schmidt’s work to develop a
piezoresistive based floating element sensor for polymer extrusion feedback control (Figure 2-
11). The polyimide/aluminum composite floating element was replaced by single crystal silicon.
These sensors were designed for operation in high shear stress ( )1 kPa 100 kPa− , high static
pressure (up to ) and high temperature (up to 300 ) flow conditions. The floating
element size was 120 in Ng’s design, and 500
40 MPa °C
μm 140 μm× μm 500 μm× in Goldberg’s design.
The element motion was sensed by axial surface piezoresistors in the tethers via configuration
these piezoresistors to a half Whitestone bridge. This sensor was not suitable for turbulent flow
measurement due to low sensitivity as it was designed for maximum shear-stress levels 5 orders-
of–magnitude larger than those in a typical turbulent flow. However, Goldberg et al. [44]
developed a backside contact structure to protect the wire-bonds from the harsh external
environment, which reduced the flow disturbance and associated measurement uncertainty for
turbulence measurement.
Barlian et al [25] developed a piezoresistive shear stress sensor for direct measurement of
shear stress underwater. The sidewall-implanted piezoresistors measured the integrated shear
force, and the top-implanted piezoresistors detected the pressure (Figure 2-12). The
displacement of the floating element was detected using a Wheatstone bridge. The experimental
measurements indicated the in-plane force sensitivity ranged from 0.041 0.063 mV Pa− , while
the predicted sensitivity was 0.068 mV Pa . The transverse sensitivity was 0.04 mV Pa with a
corresponding transverse resonant frequency of 18 . This was done by using a mechanical
cantilever as an input. The dynamic analysis was performed using a laser Doppler vibrometer
with a piezoelectric shaker to drive the in-plane or out-of-plane motion. The in-plane resonant
.4 kHz
42

frequency was experimentally found to be 19 compared to a predicted value of 13.4 .
The integrated noise floor was 0.16 over bandwidth of 1
kHz kHz
μV Hz 100 kHz− . The sensitivity of
the piezoresistors to changes in temperature was investigated in a de-ionized (DI) water bath, and
the temperature coefficient of sensitivity was found to be o0.0081 kΩ C . No electrical
characteristics of p/n junction isolation and flow characterization are reported and no fluid
mechanics characterization was performed.
A Full-Bridge Side-Implanted Piezoresistive Shear Stress Sensor
According the above discussion, the most successful MEMS floating element sensor to
date used integrated photodiodes to detect the lateral displacement via a differential optical
shutter [20]. This sensor can detect the shear stress as low as 1.4 . However, it is not
suitable for wind tunnel testing because the sensing system is sensitive to tunnel shock and
vibration. The capacitive transduction technique integrated the mechanical sensor and
electronics on one chip to eliminate the parasitic capacitance [45], and has the capability to
measure small signals. Unfortunately, the sensitivity drifted due to the charge accumulation in
the electrodes [18], which can be mitigated by hermetic sealing [46] or by employing metal
electrodes. However, the shear stress sensor must be exposed to the flow for shear stress
measurement and wind tunnels are typically not humidity controlled environments.
mPa
The piezoresistive transduction scheme is widely used in commercial pressure sensors and
microphones due to its low cost, simple fabrication, and higher reliability than capacitive
transduction. In addition, piezoresistive technology can resolve sufficiently small forces up to
[47]. Shajii et al. [19] proposed a backside-contact, piezoresistive sensor to measure
very high shear stress in a polymer extruder. Axial mode piezoresistive transducers [19, 25] for
high-shear industrial applications have been fabricated using standard ion-implantation
( 1510 NO − )
43

techniques, but more sensitive bending-mode transducers require that the piezoresistors be
located on the tether sidewall. This concept has been proposed by Sheplak et al.[48] and applied
by Barlian et al. who presented an integrated pressure/shear stress sensors for underwater
applications [25]. The authors did not present a comprehensive fluid-induced shear stress
characterization of their sensor. Rather, the sensor was statically characterized using a
mechanical cantilever and dynamically characterized using an acceleration input. In a
conference paper, the authors presented some water flow results possessing a large uncertainty
and an unexplained sensitivity that was larger than the value predicted by beam mechanics [49].
None of these devices have successfully transitioned to wind tunnel measurement tools
because of performance limitations and/or packaging impracticalities [2]. For use in a wind
tunnel, the sensor package must be flush mounted in an aerodynamic model, robust enough to
tolerate humidity variations and immune to electromagnetic interference (EMI). We have
attempted to address these limitations via the development of a fully-active Wheatstone bridge
side-implanted piezoresistive sensor. This approach was motivated by the following two side-
implanted piezoresistive transducer concepts. Chui et al. [50] first presented a dual-axis
piezoresistive cantilever using a novel oblique ion implantation technique. Later, Partridge et al.
[51] leveraged the side-implant process to fabricate a high performance lateral accelerometer.
The device structure developed in this dissertation is illustrated in Figure 2-13 which
shows an isometric view of the floating element, sidewall implanted p-type silicon piezoresistors,
heavily doped end-cap region, and bond pads. In this transduction scheme, the integrated force
produced by the wall shear stress on the floating element causes the tethers to deform and thus
induces a mechanical stress field. The piezoresistors respond to the stress field with a change in
resistance from its nominal, unstressed value due to a change in the mobility (or number of
44

charge carriers) within the piezoresistor [52]. The conversion of the shear stress induced
resistance change into an electrical voltage is accomplished via configuration of the
piezoresistors into a fully-active Wheatstone bridge to increase the sensitivity of the circuit
compared to half bridge configuration. This bridge requires the presence of a bias current
through the piezoresistors, typically, it is driven by constant voltage excitation. This sensor is
designed to measure shear stress only and to mitigate pressure sensitivity. An on-chip dummy
bridge located next to the sensor is used for temperature corrections.
Ideally, common mode disturbances do not have any effect while differential disturbances
are linearly converted into the bridge output. To achieve a differential signal, the piezoresistors
are oriented such that the resistance modulation in each resistor of a given leg is equal in
magnitude but opposite in sign. These conditions are achieved by placing the side implanted
resistors facing one another such that when one resistor is in tension, the other is in compression.
This results in equal mean resistance but opposite perturbation.
Once the transduction scheme is selected, the mechanical models and transduction sensing
models need to be developed to get sensor performance, such as sensitivity, linearity, bandwidth,
noise floor, dynamic range, MDS. The detailed discussion of the electromechanical modeling is
given in Chapter 3.
45

Figure 2-1. Schematic cross-sectional view of the floating element based sensor.
Figure 2-2. Schematic plan view and cross-section of a typical floating element sensor [4].
46

10-2
100
10210
-12
10-10
10-8
10-6
10-4
10-2
Shear Stress τw (Pa)
Shea
r For
ce (N
)
100X100 μm2
250X250 μm2
500X500 μm2
1X1 mm2
2X2 mm2
10-3 103
Figure 2-3. Integrated shear force variation as a function of sensor resolution for different
element areas.
Figure 2-4. Schematic illustrating pressure gradient effects on the force balance of a floating
element.
47

EmbededConductor
Floating Element
Cps1 Cps2Cdp
VDS PassivatedElectrodes
Csb1 Csb2
Silicon
on chipoff chip
Sense Capacitor Sense Capacitor
Drive Capacitor
Figure 2-5. Schematic cross-sectional view of the capacitive floating element sensor developed
by Schmidt et al. [18].
Release Holes
Floating ElementTether
Expanded View of Comb Finger Structures
C1
C2V-
V+
Figure 2-6. Plan-view of a horizontal-electrode capacitive floating element sensor [21].
48

Figure 2-7. Schematic top-view of a differential capacitive shear stress sensor [24].
Figure 2-8. A schematic cross-sectional view of an optical differential shutter-based floating
element shear stress sensor [11].
49
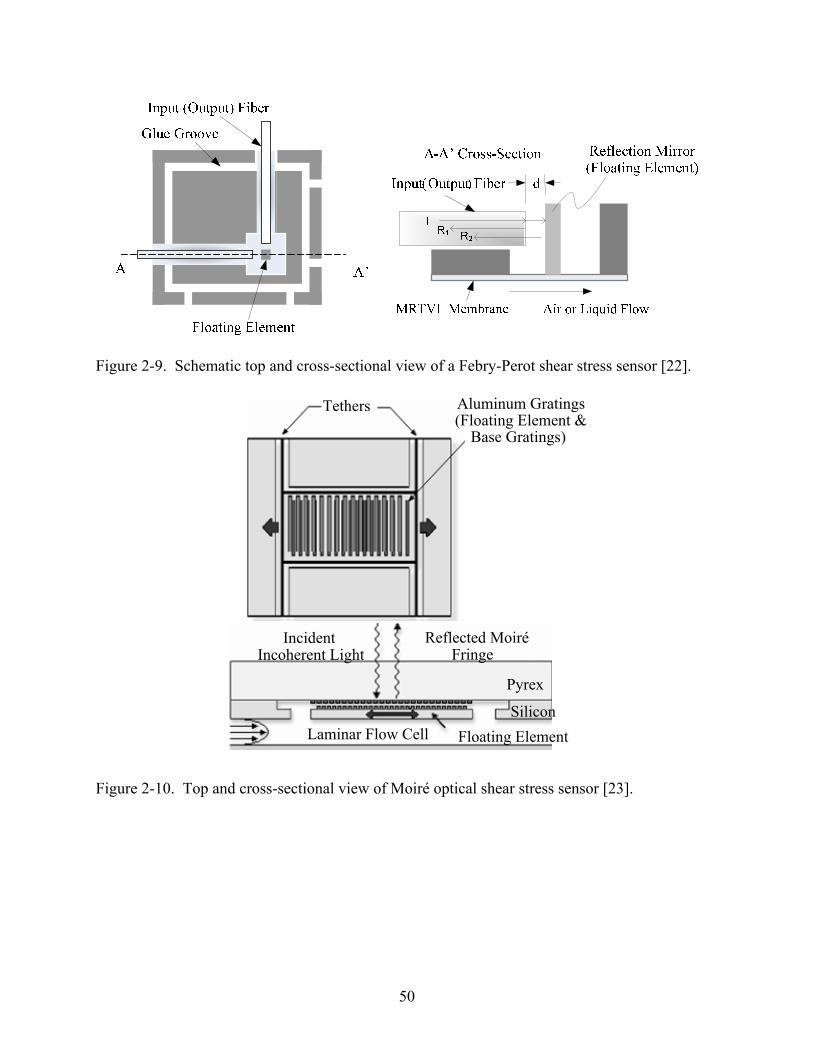
Figure 2-9. Schematic top and cross-sectional view of a Febry-Perot shear stress sensor [22].
Tethers Aluminum Gratings(Floating Element &
Base Gratings)
Reflected MoiréFringe
Floating ElementSilicon
Pyrex
Laminar Flow Cell
Incident Incoherent Light
Figure 2-10. Top and cross-sectional view of Moiré optical shear stress sensor [23].
50

Flow
180 m
120
120 m
10 m
m
Figure 2-11. A schematic top view of an axial piezoresistive floating element sensor [19].
Figure 2-12. A schematic top view of a laterally-implanted piezoresistive shear stress sensor
[25].
51

+ ΔR R
+ ΔR R
− ΔR R
− ΔR R
oV +−
BV
1V2V
Figure 2-13. A schematic 3D view of the side-implanted piezoresistive floating element sensor.
52

CHAPTER 3 SHEAR STRESS SENSOR MODELING
This chapter presents the electromechanical modeling of the MEMS side-implanted
piezoresistive shear stress sensor. These models are leveraged for use in finding an optimal
sensor design (detailed discussion in Chapter 4). Formulation of the objective function for
performance optimization begins with structural and electronic device models of the shear stress
sensors. The structural response directly determines the mechanical sensitivity, bandwidth, and
linearity of the dynamic response. The piezoresistor design determines the overall sensitivity
and contributes to the electronic noise floor of the device. The organization of this chapter is as
follows.
First, the mechanical modeling is discussed, including quasi-static modeling and dynamic
response analysis. Linear and non-linear quasi-static behaviors are presented. Lumped element
modeling is employed to find the dynamic behavior of the sensor. These analytical models were
verified using finite element analysis (FEA) in CoventorWare®.
Second, the piezoresistive sensing electromechanical model is developed, where the
resistance and piezoresistive sensitivity for non-uniform doping are derived via stress averaging
and a conductance-weighted piezoresistance coefficient. Two dominant electrical noise sources
in the piezoresistive shear stress sensor, 1 f noise and thermal noise, as well as amplifier noise
are considered to determine the noise floor.
Finally, some device specific issues are addressed, including transverse sensitivity,
acceleration sensitivity, pressure sensitivity, junction isolation issues and temperature
compensation via a dummy bridge.
53

Quasi-Static Modeling
In this section, the sensor structure is discussed and modeled. Quasi-static models for
small and large floating element deflections that make use of Euler-Bernoulli beam theory and
the von Kármán stain assumption, respectively, are presented. Two methods are used in large
deflection analysis, an energy method and an exact analytical method.
Structural Modeling
Floating element sensors are composed of four tethers and a square floating element. A
schematic of the piezoresistive shear stress sensor is shown in Figure 3-1. The floating element
is suspended above the surface of the silicon wafer by tethers, each of which is attached at its end
to the substrate. Side-implanted boron in the sidewalls of the tethers forms the four
piezoresistors. These resistors are aligned in the <110> direction and located near the edge zone
of the tethers to achieve the maximum sensitivity. Two resistors are oriented along opposite
sides of each tether. When the fluid flows over the floating element, the integrated shear force
causes the tethers to deform and induces a bending stress.
For the mechanical analysis, the floating elements and tethers are assumed to be
homogeneous, linearly elastic, and symmetric. In practice, this is not strictly valid as the beam is
partially covered by thin silicon dioxide and silicon nitride layers. The floating element is
assumed to move rigidly under the applied shear stress, and the motion is permitted in-plane
only. The tethers are assumed to be perfectly clamped on the edge. The effects of pressure
gradient and gap errors are ignored. Furthermore, the Young’s modulus and Poisson ratio are
assumed to be constant and do not change with processing.
54

Small Deflection Theory
Assuming that , the tethers can be modeled as a pair of clamped-clamped
beams with a length of , subjected to a uniform distributed load (per unit length) and a
central point load [39], as shown in
, t tL W>> tT
2 tL Q
P Figure 3-2. The distributed load is due to the shear stress
acting on the tethers and is given as
w tQ Wτ= . (3-1)
The point load, , is the effect of the resultant shear force on the floating element and is given
by
P
2w e eP W Lτ= , (3-2)
where the factor of 1/2 comes from the symmetry of the problem. The maximum deflection and
bending stress distribution is obtained using Euler Bernoulli beam theory. The detailed
derivation is given in Appendix A. The lateral displacement of the beam is given by
( ) ( )2 2 3 43( ) 3 8 2 8 2 (0 )
4w
e e t t t e e t t t tt t
w x W L L W L x W L W L x W x x LEW Tτ− ⎡ ⎤= + − + +⎣ ⎦ ≤ ≤
Pa
, (3-3)
where is the Young’s modulus of silicon in the 168 E G= 110 direction [53]. The
maximum deflection occurs at the center of the beam and is obtained by substituting tx L= into
Equation (3-3) to get
3
1 24w e e t t t
t t e e
W L L W LET W W L
τ ⎡ ⎤ ⎡ ⎤Δ = +⎢ ⎥ ⎢ ⎥
⎣ ⎦ ⎣ ⎦. (3-4)
This corresponds to the floating element displacement. The second term in the brackets of
Equation (3-4) is a correction for the distributed wall shear stress on the tethers. Equation (3-4)
indicates that the important parameters affecting the scaling of the device are the area of the
floating element, , ratio of the tether length to the tether width, e eW L tL Wt , and ratio of the area
55

of a tether to that of the floating element, t t e eW L W L . If the tether surface area , the
stiffness is approximated as
t t e eW L W L<<
3
1 14
t
w e e t t
Lk W L ET Wτ
⎡ ⎤Δ= = ⎢ ⎥
⎣ ⎦. (3-5)
This indicates that the stiffness is proportional to the tether thickness and ratio of the tether width
and length. The bending stress distribution through the width and length of the tether is given by
( )2
2
02 6 32 3 3, 1 04 2
tw e e t t t t t t tl
tt t t e e e e t e e t
x LW L L W L W L W Ly x xx yy WW T W W L W L L W L L
τσ⎡ ⎤ ≤ ≤⎛ ⎞ ⎛ ⎞ ⎛ ⎞⎛ ⎞ ⎛ ⎞ ⎛ ⎞⎢ ⎥= − + − + +⎜ ⎟ ⎜ ⎟ ⎜ ⎟⎜ ⎟ ⎜ ⎟ ⎜ ⎟≤ ≤⎢ ⎥ ⎝ ⎠⎝ ⎠ ⎝ ⎠ ⎝ ⎠⎝ ⎠ ⎝ ⎠⎣ ⎦
,(3-6)
where is at the end of the beam, and 0x = 0y = is on the side wall surface. Equation (3-6)
indicates that the maximum shear stress is located at the end of the beam and on the side wall
surface ( in ,x y = 0 Figure 3-2).
Linear Euler-Bernoulli beam theory [54] fails for sufficiently large wall shear stresses
because the mid-plane of the beam is strained [46]. The beam grows stiffer as the deflection
becomes large. Furthermore, the nonlinear motion generates undesired harmonic distortion in
the frequency domain. The sensor is required to maintain a linear relationship between shear
stress and displacement in order to preserve spectral fidelity for time resolved measurement.
This requirement places a nonlinear constraint in the sensor design optimization (discussed in
Chapter 4). A large deflection mechanical model was therefore developed for use in determining
this constraint.
Large Deflection Theory
Large deflection theory provides a measure of the maximum shear stress that may be
measured while maintaining mechanical linearity. Two analysis techniques are pursued to
56

determine the nonlinear mechanical behavior of the sensor: the strain energy method [46] and an
exact analytical method. The detailed derivations are given in Appendix A.
Energy method
The deflection predicted by the strain energy method [46] is obtained by assuming a trial
function which meets both the clamped boundary condition and symmetry condition of the beam,
( ) ( )1 cos2
tNL
t
L xw x
Lπ⎡ ⎤−⎛ ⎞Δ
= +⎢ ⎥⎜ ⎟⎢ ⎥⎝ ⎠⎣ ⎦
(3-7)
where NLΔ is the floating element deflection. The trial function is substituted into the expression
for strain energy in the beam and the principle of minimum potential energy is applied. The
result is
2 3
term
314 4
NL w e e t t tNL
t t t
N L
W L L W LW ET W W
τ
−
⎡ ⎤⎢ ⎥⎛ ⎞ ⎡ ⎤ ⎡Δ⎛ ⎞Δ + = +⎢ ⎥⎜ ⎟ 1 2
e eL⎤
⎢ ⎥ ⎢ ⎥⎜ ⎟⎝ ⎠⎝ ⎠ ⎣ ⎦ ⎣⎢ ⎥
⎢ ⎥⎣ ⎦14243 ⎦
. (3-8)
Comparing this result to Equation (3-4), one can see that cubic nonlinearity term has been added.
The mechanical response of the floating element sensor will be linear provided that the non-
linear term is small with respect to unity; that is, if the displacement of the sensor is small in
comparison to the tether width, ( )2 1NL tWΔ << . The nonlinear term is cubic and therefore
represents a Duffing spring behavior, or stiffening of the beam as deflections become large. This
means that the nonlinear deflection is smaller than the ideal linear deflection for large shear
stresses.
Exact analytical model
In the large deflection model, the neutral axis tension force is taken into account. The
average axial tension force is obtained by integrating the neutral axis strain along the length of
aF
57

the beam. It then serves as a constitutive equation between axial force and strain. The detailed
model development procedure is given in Appendix A. The maximum deflection predicted by
the exact analytical method is obtained using von Kármán strain assumption,
2cosh( ) 1 sinh( ) cosh( ) +
2 sinh( ) 2 2 2 2t t
AL t t ta a t a
L QP P PL QL LF F L F
λλ λλ λ λ
− ⎛ ⎞Δ = − − + − +⎜ ⎟⎝ ⎠
t
a
L PLF
, (3-9)
where the axial force is given by aF
( ) 2
02
Ltt t
at
dw xETWF dxL dx
⎛ ⎞= ⎜ ⎟
⎝ ⎠∫ , (3-10)
and λ is given by
3= 12 a t tF ETWλ . (3-11)
There are five variables, four boundary conditions and one constitutive equation. But the
equation is indeterminate, so the final solution is obtained using an iterative technique to find λ ,
and therefore obtain the maximum deflection.
Lumped Element Modeling
Lumped element modeling is used to represent the fluidic to mechanical transduction of
the shear stress sensor and facilitates the prediction of the dynamic response. The main
assumption of LEM is that the length scale of the physical phenomena of interest is be much
larger than the characteristic length scale of the device [55]. For the shear stress sensor, this
means that the bending wavelength of the beam must be much larger than the length of the
tethers. The LEM provides a simple way to estimate the dynamic response of a system for low
frequencies, up to just beyond the first resonant frequency, which is appropriate for design
purposes [56].
58

There are several types of elements in the lumped element model. For example, in a
lumped mechanical system, mass represents the storage of kinetic energy, compliance of a spring
(inverse of stiffness) represents the storage of potential energy, and a damper represents the loss
of energy through dissipation. Similarly, in lumped electrical systems, generalized potential
energy is stored in a capacitor, generalized kinetic energy is stored in an inductor, and energy is
dissipated via a resistor.
From a LEM perspective, the two sets of tethers are modeled as a spring possessing an
effective compliance . In an impedance analogy, this compliance shares a common
displacement with the effective mass
meC
meM of the tethers and floating element as well as the
damper, dR , of the system. The main source of damping is the viscous damping underneath the
element, and thermoelastic damping, compliant boundaries and vibration radiation to the
structure boundaries are neglected in this research. Therefore, the sensor is modeled as a spring-
mass-dashpot system, as schematically shown in Figure 3-3. In the equivalent circuit, the
voltage and current are analogous to force and velocity, respectively. The motion of the mass-
spring-dashpot system is described by the classic second-order differential equation,
2
2( ) 1me d med dF t M R Cdt dtΔ Δ
= + + Δ . (3-12)
Therefore, the frequency response function of the device is found to be
( )( )2
1( )( ) 1me d me
jH j
F j j M j R Cω
ωω ω ω
Δ= =
+ +, (3-13)
where the angular frequency 2 fω π= , f is the cyclic frequency, and 1j = − . Assuming a
lightly damped system, the first resonant frequency rf is
59

12r
me me
fC Mπ
= . (3-14)
The detailed derivation of the lumped elements is given in Appendix A. The effective
mechanical compliance is determined by equating the potential energy stored in the beam to that
of an equivalent lumped system and is
3 2
1 1 2 1 42 1
t t t t t t tme
t t e e e e e e
L W L W L W LCET W W L W L W L
⎛ ⎞⎛ ⎞ ⎛ ⎞ ⎛ ⎞⎜= + + +⎜ ⎟ ⎜ ⎟ ⎜ ⎟⎜⎝ ⎠ ⎝ ⎠ ⎝ ⎠⎝ ⎠
2645
⎟⎟
. (3-15)
The effective mass is obtained by equating the kinetic energy of the sensor to that of a lumped
system and is
2 3
1494 2238 10241 1315 315 315
t t t t t t t tme si e e t
e e e e e e e e
W L W L W L W LM W L TW L W L W L W L
ρ⎛ ⎞⎛ ⎞ ⎛ ⎞ ⎛⎜ ⎟= + + + +⎜ ⎟ ⎜ ⎟ ⎜⎜ ⎟⎝ ⎠ ⎝ ⎠ ⎝⎝ ⎠
2
2⎞⎟⎠
, (3-16)
where 32331 kg msiρ = is the density of silicon [53].
Finite Element Analysis
To verify the analytical models, a finite element analysis with a clamped boundary
condition on the edge of the tethers is performed. The material properties of silicon and the
geometry of a representative structure are given in Table 3-1.
Finite element analysis is performed in CoventorWare® using the multi-mesh model by
partitioning the continuum solid model into plate and tether volumes. A fine mesh is used in the
tethers because of the large stress gradients with respect to those found in the plate. These
volumes are joined to form one volume via RigidLink after meshing. The mesh is composed of
parabolic Manhattan brick elements. A mesh refinement study revealed sufficient elements
dimensions are 3 in length, width and thickness within the tethers, μm,0.5 μm and 1 μm
60

respectively, and 10 within the plate. Since the device is symmetric, only half
of the structure is analyzed in the model, with 6600 elements in the analysis.
μm,10 μm,1 μm
A representative displacement field of the tethers at 5 Pawτ = is shown in Figure 3-4. The
comparison in Figure 3-4 indicates that the nonlinear analytical model is in agreement with FEA
simulation results. Figure 3-5 shows the maximum displacement of the floating element as a
function of applied shear stress for analytical linear and nonlinear models, nonlinear energy
method model and FEA model. This comparison in Figure 3-5 indicates that all results are in
agreement in the linear range ( approximately), while the nonlinear analytical model,
nonlinear energy method model and FEA models agree in this nonlinear deflection region.
50 Pa
Figure 3-6 shows the stress distribution using analytical linear model (Equation (3-6)) and FEA
results along the tether length on the sidewall surface ( 0y = ) for the representative structure.
Figure 3-6 demonstrates that the analytical model is in agreement with the FEA model. The
bending stress varies from tensile to compressive in a parabolic distribution along the tether
length. Figure 3-6 shows that the maximum stress occurs on the edge zone ( ) of the
tether.
,x y = 0
The resonant frequency obtained from LEM (12.44 ) and FEA (12.47 ) agree
well, as shown in
kHz kHz
Table 3-2. The next 5 modes were also found using FEA and are given in
Table 3-3. The first six mode shapes are shown in Figure 3-7. The in-plane resonant frequency
(second mode) is 17.08 , greater than the out-of-plane resonant frequency (first mode)
because the tether width is greater than the tether thickness for the verification studies (
kHz
Table 3-
1). Clearly, the representative dimensions used for model verification are not a preferred design,
let alone an optimized design.
61

Piezoresistive Transduction
In 1954, Smith [52] discovered the piezoresistance effect in silicon and germanium. The
piezoresistance effect is defined as the change of semiconductor resistivity due to a change in
carrier mobility that results from an applied mechanical stress. In piezoresistive transduction, the
resistance modulation is a function of the applied stress and piezoresistive coefficients ( )ijπ [57].
For the cubic crystal structure of silicon under small strain, the correlation of normalized
piezoresistivity ( )ρ ρΔ and stress for reduced tensor notation reduces to
1 11 12 12
2 12 11 12
3 12 12 11
23 44 23
13 44 13
12 44 12
0 0 00 0 00 0 01
0 0 0 0 00 0 0 0 00 0 0 0 0
1
2
3
ρ π π π σρ π π π σρ π π π σρ π τρρ π τρ π τ
Δ⎧ ⎫ ⎡ ⎤ ⎧⎪ ⎪ ⎢ ⎥ ⎪Δ⎪ ⎪ ⎢ ⎥ ⎪⎪ ⎪ ⎢ ⎥ ⎪Δ⎪ ⎪ ⎪= ⎢⎨ ⎬ ⎨Δ ⎢ ⎥⎪ ⎪ ⎪
⎢ ⎥⎪ ⎪ ⎪Δ⎢ ⎥⎪ ⎪ ⎪
Δ ⎢ ⎥⎪ ⎪ ⎪⎩ ⎭ ⎣ ⎦ ⎩
⎫⎪⎪⎪⎪
⎥ ⎬⎪⎪⎪⎪⎭
, (3-17)
where ρΔ is the change in resistivity, iσ are normal stresses along the cubic crystal
axes, and
100< >
ijτ are shear stresses.
For a given resistor geometry, there are two piezoresistive coefficients used for
piezoresistive sensing analysis in terms of stress orientation with respect to the current. The
longitudinal piezoresistive coefficient captures the effect of an applied stress in the same
direction as the current, and the transverse piezoresistance coefficient captures the effect of an
applied stress in the direction perpendicular to the current. The longitudinal and transverse
piezoresistive coefficients in terms of the fundamental piezoresistive coefficients and direction
cosines are given by, respectively [58],
( )( )2 2 2 2 2 211 44 12 11 1 1 1 1 1 12 l m l n m nπ π π π π= + + − + +l , (3-18)
and ( )( )2 2 2 2 2 212 44 12 11 1 2 1 2 1 2l l m m n nπ π π π π= − + − + +t , (3-19)
62

where ( )1 1 1, ,l m n is the set of direction cosines between the longitudinal direction and the crystal
axis, and is the set of direction cosines between the transverse direction and the
crystal axis. The direction cosines are given in terms of Euler’s angles [59]
( 2 2 2, ,l m n )
1 1 1
2 2 2
3 3 3
l m n c c c s s s c c c s s cl m n c c s s c s c s c c s sl m n c s s s c
φ θ ψ φ ψ φ θ ψ φ ψ θ ψφ θ ψ φ ψ φ θ ψ φ ψ θ ψ
φ θ φ θ θ
− + −⎡ ⎤ ⎡⎢ ⎥ ⎢= − − + −⎢ ⎥ ⎢⎢ ⎥ ⎢⎣ ⎦ ⎣
⎤⎥⎥⎥⎦
, (3-20)
where ( )coscφ φ= , ( )sinsφ φ= , and etc. The geometry of the Euler’s angle is shown in Figure
3-8. In this research, a wafer is used, thus (100) 0θ = , 0ψ = and φ sweeps from 0 to 180
degree in Figure 3-8. Therefore, the matrix (3-20) reduces to,
. (3-21) 1 1 1
2 2 2
3 3 3
00
0 0 1
l m n c sl m n s cl m n
φ φφ φ
⎡ ⎤ ⎡⎢ ⎥ ⎢= −⎢ ⎥ ⎢⎢ ⎥ ⎢⎣ ⎦ ⎣
⎤⎥⎥⎥⎦
The piezoresistive coefficients, 11 12 44, andπ π π are given in Table 3-4 for both p-type and n-type
piezoresistors at room temperature for low doping concentrations.
For this piezoresistive device, the floating element sensor features integrated side-
implanted diffused resistors [25, 50, 51] in the element tethers for piezoresistive detection. In
this transduction scheme, the integrated force produced by the wall shear stress on the floating
element causes the tethers to deform and thus creates a mechanical stress field in the tethers. The
piezoresistors respond to the mechanical stress field with a change in resistance from its nominal
unstressed value [46] as indicated by
l l t tR
Rρ π σ π σρ
Δ Δ= = + , (3-22)
63

where ρ and R are the resistivity and resistance of the piezoresistor, respectively, signifies
the perturbation in the resistance and resistivity due to the piezoresistive effect,
Δ
lσ is the bending
stress along the beam, and tσ is the transverse stress. For a beam subjected to pure bending,
Equation (3-22) simplifies to
l lR
Rπ σΔ
= . (3-23)
Piezoresistive Coefficients
The piezoresistive coefficients depend on crystal orientation, doping type and level, and
temperature. This dependence is typically expressed as a product of the coefficient’s low-doped
room temperature value 0π and a piezoresistive factor [59] ( , )P N T
( ) 0, (N T P N Tπ π= , ) , (3-24)
where is the doping concentration and T is the temperature. For a N ( )100 wafer, the
dependence of the piezoresistive coefficient on the crystal direction is given in Figure 3-9 and
Figure 3-10 for p-type and n-type piezoresistors, respectively. This indicates that the maximum
piezoresistive coefficient for p-type silicon is in the 110 direction, while for n-type silicon the
maximum is in the 100 direction. Also note that n-type silicon has a larger achievable
piezoresistive coefficient than p-type silicon. The longitudinal and transverse piezoresistive
coefficients lπ and tπ in the 110 direction for n-type and p-type silicon are given in Table 3-5
[52]. As shown in Table 3-5, piezoresistors in p-type silicon are more sensitive than for n-type
in the 110 direction, which is parallel or perpendicular to the flat of a ( )100 wafer. In this
design, the p-type piezoresistors are chosen due to its high sensitivity in the 110 direction and
64

because of the lower temperature sensitivity at higher doping concentrations compared to n-type
piezoresistors [60].
Many theoretical [59] and experimental [61-63] studies have reported the dependence of
the piezoresistive factor on doping concentration at room temperature. Kanda’s model
[59] is most popular and is accurate for low concentrations. However, when compared to
experimental data [61-63], Kanda’s model under predicts the roll-off of for
concentrations above . For doping concentration above , the fundamental
piezoresistive coefficient is expressed as a product of its lightly-doped room temperature value
( , )P N T
( , )P N T
17 -310 cm 17 -310 cm
0π and the experimentally fitted piezoresistive factor [47], ( , )P N T
( )0.201422 -3
0 01.53 10 cm, ( , ) logN T P N T
Nπ π π
⎛ ×= = ⎜
⎝ ⎠
⎞⎟ . (3-25)
The piezoresistive factor is plotted in Figure 3-11 versus concentration at room temperature. The
piezoresistive coefficient is also temperature dependent. At higher doping concentrations, there
will be a reduction in both thermal noise and 1 f noise compared to lower doping concentrations
[47]. In addition, the temperature dependence of the piezoresistance coefficient is reduced
significantly as the concentration increases at low doping concentration. For doping
concentrations above , the piezoresistance coefficient is almost independent of
temperature variation [61]. However, the sensitivity degrades due to the reduced piezoresistive
coefficient at a high doping level [62]. Thus, there is a tradeoff between sensitivity and noise
floor. This tradeoff suggests optimization is necessary to obtain the best performance, as will be
discussed in chapter 4.
20 -310 cm
65

Piezoresistive Sensitivity
For the structure shown in Figure 3-12, the side-implanted piezoresistors are fabricated by
first implanting p-type impurities (boron) into the sidewall, followed by a diffusion step to drive-
in and to electronically activate the impurities. The impurities diffuse laterally, and the resulting
impurity concentration profile decreases from the surface of the side wall to the junction depth.
If the unstrained impurity profile as a function of depth, ( )N y , is known, the piezoresistive
coefficient profile ( )yπ can be determined. As shown in Equation (3-6), the stress varies along
the beam, and varies across the junction depth, jy , as well. Therefore, the product of the stress
and the piezoresistive coefficient distributions need to be integrated in the electromechanical
model.
Several models have been developed for piezoresistive sensitivity. Tortonese [64] and
Harley [65] built a two-step model for non-uniform doping concentration and formulated an
efficiency factorβ to be inserted into the numerator of the surface sensitivity equation. In
integrating across the beam, their model does not account for the junction isolation of diffused
resistors. Senturia [46] presents the piezoresistive coefficient dependence of the doping
concentration, but does not account for stress variation as a function of depth. Sze’s model [57]
addresses stress variations across the resistors ( -direction) and incorporates a conductance-
weighted piezoresistance coefficient. Sze, however, did not account for the stress variation along
the piezoresistor (
y
x -direction). Based on Harley’s work, a new model was developed by
involving stress averaging along the tether length and across the depth of piezoresistor, and using
a conductance-weighted piezoresistive coefficient.
Two issues need to be considered in calculating the piezoresistive response. One is that
the piezoresistors are typically formed by diffusion, thus have a non-uniform doping profile with
66

respect to junction depth. The second issue is that piezoresistors also span a finite area on the
device, and hence have non-uniform stress with respect to length and depth. The derivation of
the resistance of the piezoresistor begins with the non-uniform doping concentration that varies
from the sidewall surface to the junction depth ( -direction). The stress varies in this direction
as well. As shown in
y
Figure 3-12, the resistor can be considered as a stack of slices, where each
slice has a slightly different doping concentration and stress. The current flow is in x direction,
so the slices ( ) are connected electrically in parallel because they share the same potential.
The stress also varies along the length of the resistor (
dy
x - direction). Thus, the resistor is also
segmented along its length. These segments ( ) are connected in series due to the same current
flow. The mechanical model assumes that , thus the differential resistance of a
unit cell for a small segment and a small slice with width of is given by
dx
and t tL W>> tT
dx dy rW
( ) ( )( ),1,
,e
unitunit r
x y dxdR x y
dG x y W dyρ
= = , (3-26)
where it is assumed that at the surface and 0y = 2ty W= at the neutral axis. In Equation
(3-26), ( ,e )x yρ is the stressed resistivity determined by [46]
( )( , ) ( ) 1 ( ) ( , )e eo l lx y y y xρ ρ π σ= + y , (3-27)
where ( )eo yρ is the unstressed resistivity and ( , )l x yσ is given in Equation (3-6). For non-
uniform doping, ( )eo yρ is given by [66]
1( )( ) ( )eo
p A
yy qN y
ρμ
= , (3-28)
where is the electronic charge of an electron and 191.602 10 q −= × C ( )p yμ is the boron
mobility. In this research, the mobility is obtained from [67]. To simply the calculation process,
67

we use conductance 1G = R rather than resistance in the derivation. The total conductance for
segment is obtained by summing the conductance of each unit dx
( )0 0
1( ) 1 ( ) ( , )
jjyy
rslice unit
eo l l
W dydG dGdx y y x yρ π σ
= =+∑ ∫ . (3-29)
The total resistance is determined by summing the resistance of the small segments, dx
( )0
11/
( ) 1 ( ) ( , )
R r R r
j
R R
L L L L
slice yL L r
eo l l
R R dGW dy
y y x yρ π σ
+ +
+ Δ = =
+
∫ ∫∫
dx , (3-30)
where is the overlap end cap and it does not change the resistance value. The total
unstressed resistance is similarly found by integrating along the length of the resistor using the
unstressed resistivity,
10 μmRL =
0
11
( )
R rR r
jR R
L LL L
slice yL L r
eo
R dG dxW dy
yρ
++
= =∑ ∫∫
. (3-31)
Then the resistance modulation is obtained by arranging Equation (3-30) and (3-31),
( )
0
0
( ) 1 1
( ) 1 ( ) ( , )
y j
L LR reo
y jLr R
eo l l
dyyR R R R dx
R R L dyy y x y
ρ
ρ π σ
+Δ + Δ −= =
+
∫∫∫
− . (3-32)
Electromechanical Sensitivity
The four side-wall implanted piezoresistors form a full Wheatstone bridge circuit that
provides sensitivity enhancement for a small change in resistance. As illustrated in Figure 3-13,
when the tether deflects in the y direction, piezoresistors 1 and 3 experience a compressive
stress while 2 and 4 experience a tensile stress. These resistors experience a change in resistance
68

of R−Δ and RΔ , respectively. For an ideal bridge, 1 3R R R R= = −Δ and 2 4R R R R= = + Δ , so
that the output voltage, , for a given bias voltage , is oV BV
4 1
3 4 1 2o
R RB B
RV VR R R R R
⎛ ⎞ Δ= − =⎜ ⎟+ +⎝ ⎠
V . (3-33)
The sensitivity of the piezoresistive sensor is defined as the change of output voltage per unit of
applied shear stress and for a linear sensor is expressed as
oEM
w w
V VS o
τ τ∂
= =∂
. (3-34)
Substituting in Equation (3-33), the electromechanical sensitivity is rewritten as
BEM
w
VRSR τΔ
= . (3-35)
Noise Model
The key sources of the electrical noise in piezoresistive sensors are thermal noise, low
frequency 1 f noise, and amplifier noise [65]. Physical fluctuations of the floating element at
an equilibrium temperature, T , can result in random motion of the device; however, the
contribution of thermomechanical displacement noise has been found to be much smaller than
the electronic noise sources except at mechanical resonance [47]. For an ideally balanced
Wheatstone bridge, the bias source noise will be common mode rejected.
Thermal Noise
Thermal noise, also known as “Nyquist” or “Johnson noise”, is produced when electrons
are scattered by thermal vibration of the lattice structure [68]. Since higher temperatures lead to
increased vibrational motion, thermal noise power spectral density (PSD) is directly proportional
to temperature. Moreover, thermal noise is present in thermodynamic equilibrium, and its PSD
is independent of frequency since random thermal vibrations are not characterized by discrete
69

time constants. The thermal noise PSD ( ) is modeled by Nyquist [68], which was
experimentally verified by Johnson [69], as
vTS
4vT BS k TR= , (3-36)
where 1.38e-23 Bk = J K is the Boltzmann constant, R is the total resistance in the resistor, and
is the temperature in Kelvin. In a piezoresistor, the rms noise voltage, , due to thermal
noise is obtained by taking the square root of the thermal noise PSD integrated over the bin
width of interest
T tRV
2 1f f fΔ = − [68],
2
1
4f
tR vT Bf
V S df k TR f= =∫ Δ , (3-37)
1 f Noise
The dominant noise source for most ion-implanted piezoresistors is 1 f noise. Hooge
[70] first reported that the 1 f noise PSD of a piezoresistor is inversely proportional to the total
number of carriers in the resistor when an external dc bias voltage is applied, and is given by
2
1H R
v fc
VSN fα
= , (3-38)
where is the voltage across the resistor, is the total number of ionized carriers in the
resistor,
RV cN
f is frequency, and Hα is Hooge parameter, with the experimental values ranging from
to [71]. Hooge’s parameter is sensitive to bulk crystalline silicon imperfections
and the interface quality. Low frequency noise occurs under non-equilibrium conditions and its
spectra is proportional to the square of the applied voltage. Two physical mechanisms have been
proposed to account for the low frequency noise: random trapping/detrapping of carriers at the
65 10−× 32 10−×
70

surface and bulk electronic traps, and random mobility fluctuations [72]. The noise power of
1 f noise is obtained by integrating Equation (3-38) over a frequency range of operation
2
21
1
lnH RfR
c
V fVN f
α ⎛ ⎞= ⎜ ⎟
⎝ ⎠. (3-39)
The total number of ionized carriers in the resistors for the piezoresistor geometry in Figure 3-12
is given as
, (3-40) 0
( )jy
c r r AN L W N y d= ∫ y
where is the -type doping concentration. As indicated in Equation ( )AN y p (3-39), 1 f noise
increases for small volumes and highly resistive piezoresistors.
In this dissertation, the typical input noise of a low noise amplifier at 1k , Hz
4 nV Hz [73], is used in the noise floor model. For an ideally balanced Wheatstone bridge
assuming a unity gain amplifier, the total rms output noise voltage is NV
( )2
22
1
1 ln 4 4 94
H BN B
c
V fV k TR fN f
α ⎛ ⎞= + Δ +⎜ ⎟
⎝ ⎠e f− Δ , (3-41)
where the first, second and third terms in Equation (3-41) are the contribution of 1 f noise,
thermal noise, and the amplifier noise, respectively. The detailed derivation of Equation (3-41)
is given in Appendix B. Since narrow bin turbulence spectra are desired, a figure of merit bin
width of centered at 1 k is used in this dissertation; therefore, and
.
1 HzfΔ = Hz 1 999.5 Hzf =
2 1000.5 Hzf =
The minimum detectable shear stress (MDS) or input noise, minτ , is the minimum shear
stress that the shear stress sensor can resolve in the presence of noise, and is defined as
71

minN
EM
VS
τ = . (3-42)
The dynamic range (DR) is then given by
max
min
20logDR ττ⎛ ⎞
= ⎜⎝ ⎠
⎟ . (3-43)
Device Specific Issues
In this section, a few specific design issues are addressed, including transverse sensitivity,
acceleration sensitivity, pressure sensitivity, temperature compensation and device junction
isolation issues.
Transverse Sensitivity
Transverse sensitivity was discussed in Chapter 2 (Equation (2-16)), and restated here
briefly. Recall that the transverse mechanical sensitivity in the x -direction can be neglected due
to the large differences in bending versus axial stiffness, while transverse mechanical sensitivity
in the direction is of the same order as in the flow direction. The z x -direction also possesses
electromechanical rejection for an ideally balanced bridge.
Assuming the flow is in the direction, when the sensor is subjected to an x-axis
acceleration, piezoresistors 1 and 2 experience a tensile stress while 3 and 4 experience a
compressive stress. These resistors experience a change in resistance of
y
RΔ (piezoresistors 1
and 2 and R−Δ (piezoresistors 3 and 4), respectively (Figure 3-14 (a)). The resistances in the
bridge become 1 2R R R R= = + Δ , 3 4R R R R= = −Δ . The output voltage, , for a given bias
voltage , is given by
oV
BV
31
1 2 3 4
02 2 2 2o
RR R R RVR R R R R R R R
R+ Δ −Δ= − = −
+ + + Δ − Δ= . (3-44)
72

When the fluctuating pressure load acts in the direction, the stress distribution in all four
tethers is the same, leading to equal resistance perturbations (
z
RΔ ) in all four piezoresistors. The
reaction of the Wheatstone bridge due to pressure is shown in Figure 3-14 (b). The total pressure
effect is to supply a common mode signal into this differential sensing scheme, which does not
affect the voltage output. Therefore, the ideal electromechanical sensitivity due to the x-axis load
and pressure disturbance is ideally equal to zero. In reality, there will still be transverse
sensitivity due to bridge mismatch.
Temperature Compensation
The output voltage of a piezoresistive sensor is dependent on temperature due to the
thermal sensitivity of the resistance, strain and piezoresistive coefficient [46]. In this
dissertation, it is assumed that the thermal coefficient of resistance will dominate over thermal
strain effects and changes in the piezoresistive coefficient. The typical temperature coefficient of
resistance for a laterally implanted sensor is reported to be o0.0081 kΩ C , which is much larger
than the shear stress sensitivity [25]. Since it is impossible in practice to have absolute
temperature control in a wind tunnel, temperature compensation of the output signal must be
employed. In it important that the temperature is measure as close as possible to the sensing
element to avoid compensation errors due to temperature gradients in the flow. In this thesis, the
temperature compensation of the resistors are achieved using a double bridge configuration [74].
As shown in Figure 3-15, two Wheatstone bridges are used on one chip; one is the active
Wheatstone bridge with output that is a function of shear stress and temperature, while the other
is a dummy compensation Wheatstone bridge with output that acts as a thermometer and only
depends on temperature. The dimension of the compensation bridge resistors is identical to the
active bridge and is kept as close as possible to the active bridge (safe distance of 10 0 μm
73

suggested for the peripheral circuits [75] ). The detailed temperature compensation procedure
for the non-ideal case of a statically unbalanced bridge is discussed in Chapter 6.
For ideally balanced Wheatstone bridge, the power supply noise is just a common mode
signal to the bridge and would not affect the bridge voltage output. In most physically realized
devices, the bridge is not exactly balanced. Therefore, the power supply noise contribution to the
noise scales with the bridge offset voltage output normalized by the bias voltage.
Device Junction Isolation
One design issue is the difficulty of realizing a junction-isolated, laterally diffused resistor
in the sidewall of a tether. As shown in Figure 3-16, the p-type piezoresistor (with resistance
SR ), the p++ interconnects (with resistance LR ) and the n-type substrate form a p/n diode. For
an ideal p/n diode, the leakage current is negligible in the reverse bias region [76]. When the
reverse voltage exceeds a certain value, the reverse current will increase rapidly and the diode
will breakdown. To ensure the current flows exclusively through the p-type regions, the p/n
junction must be reverse-biased for all possible bias voltages along the entire length of the
piezoresistor and interconnect. This section addressed design issues associated with this design
constraint.
Two issues must be taken into account in the design: (1) maintaining junction isolation and
(2) avoiding p/n junction breakdown while achieving the desired piezoresistor sensitivity. When
a voltage is applied between the two p++ interconnects, the p/n junction voltage varies linearly
with position due to a linear voltage drop across a distributed resistance. For junction isolation,
the p/n junction must be reverse-biased at all spatial locations.
Under reverse bias, a p/n junction develops a space charge layer due to the depletion of
carriers [76]. In order to maintain electrical isolation, it is necessary to ensure that the space
74

charge layers for adjacent p-type regions extending into the n-type substrate do not overlap or
‘punch-through’. The space charge layers punch-through will cause the corresponding p regions
to become shorted, resulting in a non-functional device. Assuming uniform doping, the acceptor
concentration in the p region is assumed to be , and the donor concentration in the n region is
assumed to be
AN
DN . The space charge layer widths on the p-side ( )px and n-side ( )nx are given
as a function of the junction voltage [76], jV
( ) ( ) ( )2 Si Dp j
A A D
Nbi jx V
q N N Nε
=+
V V− , (3-45)
and ( ) ( ) ( )2 Si An j bi j
D A D
Nx Vq N N Nε
=+
V V− , (3-46)
where 12Si 1.045 10 F cmε −= × is the silicon permittivity, and the intrinsic number of electrons is
10 310 cmin = in silicon at room temperature. The built-in voltage is given as
2ln A D
bii
N NkTVq n
⎛ ⎞= ⎜
⎝ ⎠⎟
)
(3-47)
In order to electrically isolate the p++ regions, the entire length of the p/n junction must be
reverse-biased ( . The space charge layer width in the p and n region, 0jV < px and nx ,
respectively, increases with reverse bias. The total space charge width on the n side is given by
( ) ( ) ( )( )j n j n B jW V x V x V V= + − + . (3-48)
If the total space charge layer width on the n side, ( )jW V , increases to the width between the
piezoresistor and the p++ interconnect, , or to the width between the p++ interconnects, ,
the space charge layers will punch-through, causing the corresponding p regions to be shorted.
1L 2L
75

To avoid punch-through, ( ) 1jW V L<< must be satisfied for all junction voltages, .
Additionally, lateral diffusion that occurs during high temperature process steps, leading to an
increase in the actual width of the p-type region compared to the designed width, must be taken
into account. Therefore, the total isolation width is approximated by
jV
( ) ( ) ( )( )2iso j d n j n B jW V L x V x V V= + + − + , (3-49)
where is the lateral diffusion width estimated from the net effect of high temperature process
time on the diffusion length (thermal budget) [77]. The total thermal budget (
dL
)totDt is equal to
the sum of the diffusion × time, Dt , products for all high temperature cycles affecting the lateral
diffusion, ( ) itot iDt =∑Dt , where and are the diffusion coefficient and time associated
with each processing step.
iD it
In this design, the doping profile is non-uniform, and the acceptor concentration in the p
region and the donor concentration in the n region ( )AN y ( )DN y vary with depth, as shown in
Figure 3-17. The non-uniform doping profiles are obtained by FLOOPS® simulation [78], where
sidewall boron implantation in amorphosized silicon is simulated by SRIM [79] and then
imported to FLOOPS ®. The cross-sectional view of the isolation width for a doping profile at a
bias voltage of 10 V is shown in Figure 3-18 and Figure 3-19, which are associated with the A-A
and B-B cuts shown in Figure 3-20. The dimensions of the tether width , the sidewall
implanted piezoresistor depth , the p++ interconnect width , and the space parameters, ,
and are listed in
tW
4L 3L 1L
2L 5L Table 3-6 for the actual device.
There is a tradeoff between the p++ interconnect widths, and , and the punch-
through width . A large value of and is desired to reduce the lead resistance. The
3L 4L
1L 3L 4L
76

resulting narrow gap, , may cause p/n junction punch-through. On the edge of the tethers, the
p++ interconnects are tilted degrees from the tether centerline to increase the isolation gap
spacing. For the worst case, at left and 0 V on the right, as shown in
1L
24
10 VjV = − Figure 3-20,
there is about between adjacent p++ interconnects assuming a lateral diffusion of
. Meanwhile, a crossover between the piezoresistor and p++ interconnects must be
avoided. As shown in
9 μm
~ 1.1 μm
Figure 3-19, the space charge layer of the piezoresistor in the n-well
increases as the depth increases. If the space between the piezoresistor and the p++ interconnect
is too close, there will be crossover and the p-region will punch through. A top view of the
isolation width is shown in Figure 3-20. The blue region is the tether, the cyan region is the p++
interconnects, the green region is the piezoresistor, and the pink line is the final isolation width
considering lateral diffusion and space charge diffusion to the n-well at (worst case). 10 VjV = −
In order to minimize the space charge width in the n-well, one can increase the doping
concentration of the n-well, DN . There is, however, a tradeoff between increased n-well doping
concentration and reduced reverse breakdown voltage. With increasing doping, the internal
electric field increases and the reverse junction breakdown voltage decreases [80, 81]. The
breakdown voltage decreases from to ~ 1 when the impurity concentration increases
from to .
~ 50 V 0 V
16 -31.0 10 cm× 17 -31.0 10 cm×
The curvature of the tether corner and the curvature of the junction regions must also be
considered. A sharp corner dramatically increases the mechanical stress, which could lead to
possible failure of the materials [82]. Additionally, a sharp corner in the p/n junction may
increase the local electric field and decrease the breakdown voltage [83]. Thus, the corner is
rounded. The stress concentration factor, K, depends on the fillet radius for a given thickness
[82] and is relatively high when the ratio of the fillet radius and tether width is less than 0.5. In
77

this design, K is chosen as 0.9. In addition, 4 slots in the substrate near the edge of each tether
are designed to relieve stress concentrations that arise during fabrication [51].
In order to avoid these issues, a metal contact design is employed, where the metal lines
run on the top of the tethers to connect either side of the laterally implanted piezoresistors, as
shown in Figure 3-21. Because there are two deep trenches on both sides of the tether
for tether release, the fabrication process of this design is very challenging and is discussed in
detail in Chapter 5.
50 μm
Summary
Electromechanical modeling of a side-implanted piezoresistive floating element shear
stress sensor has been developed for aerospace applications. Two Wheatstone bridges are
employed, an active bridge for shear stress sensing and a dummy bridge for temperature
compensation. The predicted sensitivity, noise floor, dynamic range and MDS have been
modeled and verified by FEA.
To accurately resolve the fluctuating shear stress in a turbulent boundary layer, the shear
stress sensor is desired to possess a small size, large usable bandwidth and a low MDS. MDS
depends on the geometry of sensors and piezoresistors, dopant profile, process parameters, and
sensor excitation. To achieve a low MDS, it is favorable to maximize sensitivity and minimize
noise. However, there are tradeoffs between sensitivity and noise floor. It is necessary to
perform design optimization to balance these conflicting requirements. Additionally, the sensor
design is constrained by temporal and spatial resolution requirements as well as structural limits.
The detailed optimization is discussed in Chapter 4.
78

Table 3-1. Material properties [53] and geometry parameters used for model validation. Density of silicon ( )3kg/mSiρ 2330
Young’s modulus in [110] orientation ( )GPaE 168
Poisson ratio pν 0.27
Length of tethers ( )μmtL 400
Thickness of the tethers ( )μmtT 3
Width of the tethers ( )μmtW 4
Length of the square floating element ( )μmeL 150
Table 3-2. Resonant frequency and effective mass predicted by LEM and FEA for the
representative structure given in Table 3-1. Frequency ( )kHz Effective Mass ( ) kgLEM 12.44 1.66e-10
FEA 12.47 1.72e-10
Table 3-3. First 6 modes and effective mass predicted by FEA for the representative structure
given in Table 3-1. Mode Domain Frequency ( )kHz Effective Mass ( ) kg
1 12.47 (translational in -direction) z 1.72e-10
2 17.08 (translational in -direction) y 1.74e-10
3 34.95 (rocking mode about x -axis) 6.82e-10
4 162.33 (rocking mode about -axis) y 1.81e-11
5 170.11 (rocking mode about -axis) z 1.84e-11
6 219.50 (translational in x -direction) 1.70e-11
Table 3-4. Piezoresistive coefficients for n-type and p-type silicon [53].
11π (10-11Pa-1) 12π (10-11Pa-1) 44π (10-11Pa-1)
n-type -102.2 53.4 -13.6 p-type 6.6 -1.1 138.1
79

Table 3-5. Piezoresistive coefficients for n-type and p-type silicon in the <110> direction [53].
lπ (*10-11Pa-1) tπ (*10-11Pa-1)
n-type -31.2 -17.6
p-type 71.8 -66.3
Table 3-6. Space parameter dimensions for junction isolation.
tW tL 2L 3L 4L 5L 30 μm 9 μm 13.6 μm 15 μm 1 μm 33 μm
80

Figure 3-1. Schematic top view of the structure of a piezoresistive floating element sensor.
P Q
0 x
Floating ElementTetherWt
Lt
y
LtLe
We/2
Wt Tt2Lt
Figure 3-2. The simplified clamped-clamped beam model of the floating element structure.
Δ
Figure 3-3. Lumped element model of a floating element sensor: (a) spring-mass-dashpot system
(mechanical) and (b) equivalent electrical LCR circuit.
81

0 0.2 0.4 0.6 0.8 10
0.01
0.02
0.03
0.04
0.05
0.06
0.07
Normalized Tether Length x/Lt
Dis
plac
emen
t ( μ
m )
FEANonlinear Analytical
Figure 3-4. Representative results of displacement of tethers for the representative structure
given in Table 3-1 at 5 Pawτ = .
0 20 40 60 80 1000
0.2
0.4
0.6
0.8
1
1.2
1.4
Wall Shear Stress τw (Pa)
Max
imum
Dis
plac
emen
t ( μ m
)
NonlinearLinear
EnergyFEA
Figure 3-5. Representative load-deflection characteristics of analytical models and FEA for the
representative structure given in Table 3-1 and 5 Pawτ = .
82

0 0.2 0.4 0.6 0.8 1-1
-0.5
0
0.5
1
Normalized Tether Length x/Lt
Bend
ing
Stre
ss (
MPa
)
FEALinear Analytical
Figure 3-6. Verification of the analytically predicted stress profile (Equation (3-6)) with FEA
results for the representative structure of Table 3-1 and 5 Pawτ = .
Translational in -direction Translational in -direction Rocking mode about z y x -axis
Rocking mode about -axis Rocking mode about -axis Translational in
y z x -direction
Figure 3-7. The mode shape for the representative structure of Table 3-1 and 5 Pawτ = .
83

φ
φ
θ
θ
ψ
z
x
y
*y
*z
*x
Figure 3-8. Geometry used in computation of Euler’s angles [59].
2e-010
4e-010
6e-010
8e-010
30
210
60
240
90
270
120
300
150
330
180 0
πt
πl
<110><110>
Figure 3-9. Polar dependence of piezoresistive coefficients for p-type silicon in the (100) plane.
84

5e-010
1e-009
1.5e-009
30
210
60
240
90
270
120
300
150
330
180 0
πl
πt
<100><100>
Figure 3-10. Polar dependence of piezoresistive coefficients for n-type silicon in the (100) plane.
1016
1017
1018
1019
1020
0.65
0.7
0.75
0.8
0.85
0.9
0.95
1
1.05
Boron Concentration (cm-3)
Piez
ores
ista
nce
Fact
or
KandaHarley
Figure 3-11. Piezoresistive factor as a function of impurity concentration for p- type silicon at
[47]. 300K
85

Figure 3-12. Schematic illustrating the relevant geometric parameters for piezoresistor
sensitivity calculations.
Figure 3-13. Schematic representative of a deflected side-implanted piezoresistive shear stress
sensor and corresponding resistance changes in Wheatstone bridge.
86

VB
R1
R2 R3
R4
Vo
VB
R1
R2 R3
R4
Vo
(a) (b) Figure 3-14. Wheatstone bridge subjected to cross-axis acceleration (a) and pressure (b).
Figure 3-15. Schematic of the double-bridge temperature compensation configuration.
87

++ -n++p++ p++
RS
RL
RL
(a) (b) Figure 3-16. Top view schematic of the side-implanted piezoresistor and p++ interconnect in an
n-well (a) and equivalent electric circuit indicating that the sensor and leads are junction isolated (b).
0 0.5 1 1.5 210
5
1010
1015
1020
1025
Depth(um)
Dop
ing
Conc
entra
tion(
cm- 3)
nwellp++ interconnectpiezoresistor
Figure 3-17. Doping profile of n-well, p++ interconnect, and piezoresistor using FLOOPS
simulation.
88

0 5 10 15 20
0
0.4
0.8
1.2
1.6
2
Dep
th (μ
m)
Isolation Width (μm)
p++p++
Piezoresistor
n-well
Figure 3-18. Cross view of isolation width between p++ interconnects (A-A cut in Figure 3-20).
0 2 4 6 8 10 12 14
0
0.4
0.8
1.2
1.6
2
Dep
th (μ
m)
Isolation Width (μm)
p++
Piezoresistor
4.8 μm
n-well
Figure 3-19. Cross view of isolation width between p++ interconnect and piezoresistor (B-B cut
in Figure 3-20).
89

Figure 3-20. Top view of the isolation widths on a sensor tether.
Figure 3-21. Top view schematic of the side-implanted piezoresistor with a metal line contact.
90

CHAPTER 4 DEVICE OPTIMIZATION
This chapter presents the nonlinearly constrained design optimization of a micromachined
floating element piezoresistive shear stress sensor. First, the problem formulation is discussed,
including the objective function and constraints based on flow conditions. Next, the
optimization methodology is outlined. The optimization results are then presented and
discussed. Finally, a post-optimization sensitivity analysis of the objective function is
performed.
Problem Formulation
The objective function is selected based on tradeoffs identified between the sensitivity and
noise floor of the shear stress sensor. The constraints are formed due to physical bounds,
manufacturing limits and operational requirements [84], and are dependent on the flow
conditions of the desired applications.
The objective function and constraints are functions of the design variables, including the
geometry of the floating element structure and the piezoresistors, the surface doping
concentration, and sensor excitation. The detailed discussion of the design variables chosen is
presented in next subsection.
Design Variables
The objective function and constraints depend on geometry of sensors structures and
piezoresistors, process related parameters, and sensor operational parameters. The geometry
parameters include tether length , tether width , tether thickness, , floating element length
, and piezoresistor length , piezoresistor width . The process related parameters include
piezoresistor surface concentration and junction depth (assuming a uniform doping
profile). The sensor operational parameter is the supplied bias voltage.
tL tW tT
eL rL rW
SN jy
91

The geometry parameters of the sensor structure determine the mechanical characteristics
of the sensor, such as sensitivity, linearity and bandwidth. Design issues related to the tether
width and tether thickness are addressed here. As discussed in Chapter 3, the minimum
tether width is set to to avoid p/n junction punch through. The tether thickness must
be larger than the tether width to ensure that the cross-axis resonant frequency is larger than the
in-plane resonant frequency. As shown in the representative structure in
tW tT
tW 30 μm
Table 3-1, the first
mode is out of plane due to the tether thickness larger than the tether width. The increases in
tether thickness results in bending stress decreases (Equation (3-6)), and thus sensitivity
decreases (Equation (3-23)). On the other hand, the piezoresistor related parameters, such as
piezoresistor length , piezoresistor width , and p/n junction depthrL rW jy and surface
concentration , are related to noise floor and sensitivity. SN
For each design optimization, different tether thickness, junction depth and tether width
may be achieved, but all designs are fabricated in one wafer due to economic constraints. Thus
these parameters for each design must be set to the same value. In this research, the tether
thickness is set to 50 considering the sensitivity of the shear stress sensor and SOI wafer
availability. Due to the rough sidewall surface near the buried oxide layer after DRIE process
and no passivation on the bottom of the tethers after final release, the high
μm
1 f noise and current
leakage became issues in the piezoresistor design [85]. Partridge et al.[51] investigated the
accelerators with piezoresistors implanted in the top 15 (total thickness), 5 , of the
flexures, and found that 3 case has large sensitivity and low
μm μm 3 μm
μm 1 f noise. In this research,
piezoresistor width 5 μmrW = is chosen to avoid current leakage while maintaining high
92

performance. A junction depth of 1 μm jy = is chosen taking account the piezoresistor and p++
interconnection and the manufacturing constraint.
In summary, six design variables are included in the optimization design, and they are
tether length , tether width , floating element length , and piezoresistor length ,
piezoresistor surface doping concentration and bias voltage
tL tW eL rL
SN BV .
Objective Function
As stated in Chapter 1, to accurately recognize the fluctuating wall shear stress in the
turbulent boundary layer, the measurement device must possess sufficiently high spatial and
temporal resolution as well as a low MDS, which is defined as the ratio of noise floor to the
sensitivity. Therefore, lowering the noise floor and increasing sensitivity are favorable in shear
stress sensor design to achieve a low MDS [84]. Some parameters, such as junction depth,
surface doping concentration and bias voltage, affect both sensitivity and noise floor creating
tradeoffs between these performance parameters. The following discusses the tradeoffs in
sensitivity and noise floor and the arrival at the MDS as the objective function of the
optimization.
Junction depth, jy , and surface doping concentration, , are two major factors involved
in processing that affect sensitivity and noise floor. As discussed in chapter 3, changes in
while keeping
SN
SN
jy constant invoke tradeoffs between noise and sensitivity. If increases, the
resistivity of the piezoresistor decreases and the total carrier number increases. This leads to the
reduction of thermal noise and
SN
1 f noise. Conversely, sensitivity decreases due to the reduction
of the piezoresistive coefficient lπ from high doping concentration (Equation (3-23)).
93

The bias voltage BV also affects both sensitivity and noise floor. As BV increases, the
sensitivity increases (Equation (3-35)) because the output voltage is directly proportional to the
bias voltage. The voltage noise contribution from 1 f noise also increases squarely as indicated
by Equation (3-38).
By establishing the MDS as the objective function, a balance between noise floor and
sensitivity is achieved. Previous researchers have investigated the potential and methods in
piezoresistive sensor optimization. Harley and Kenny [47] presented an informal graphical
design optimization guidelines in the form of design charts by varying the dimensions of the
cantilever, the geometry of the piezoresistor, doping level, and process issues related to
sensitivity and noise floor. Papila et al. [84] performed a piezoresistive microphone Pareto
design optimization, in which the tradeoff between pressure sensitivity and electronic noise is
investigated. The Pareto curve indicated that the MDS in units of pressure is the appropriate
parameter for performance optimization.
Constraints
The constraints are determined by physical bounds, fabrication limits and performance
requirements [84]. The constraints used in this optimization and their associated physical
explanations are listed below:
• Piezoresistor geometry: 0.4r tL L ≤ , as discussed in Chapter 3, stress changes sign at the longitudinal center of the tether (shown in Figure 3-6). Thus, the sensitivity will be reduced if the length of the piezoresistor is larger than 2tL . As a result, the maximum piezoresistor length is limited to of the tether length 40%
• Resistance: 3S LR R ≥ , represents a balance between the sensor resistance SR being 3 times larger than the interconnect resistance LR , but small enough to minimize electromagnetic interference (EMI).
• Frequency: minrf f≥ , puts a bandwidth constraint in the design. The constraint changes with flow conditions.
94

• Power consumption: , where 0.1owP ≤ ( )2ow B S LP V R R= + . When increases to a large
value, the temperature of the piezoresistor will increase due to Joule heating resulting in voltage drift and eventually electromigration.
owP
• Nonlinearity: 3%NL L NLΔ −Δ Δ ≤ , device linearity is required to keep spectral fidelity for time-resolved measurements.
• In-plane resonant frequency: . To avoid disturbing the flow at the sensor resonance, the tether thickness is required to be larger than tether width to ensure the onset of the in-plane resonant frequency occurs before the out of plane. In this dissertation, the minimum tether width is 30 and its upper bound is set to 40 , thus the tether thickness is set to 50 .
tT W> t
tT tW
μm μm μm
• Lower bounds (LB) and upper bounds (UB): ( ), , , , ,t t e r S BLB L W W L N V UB≤ ≤ , present the limitation of the design variables. LB and UB are given in Table 4-2 based on the candidate shear stress design specifications and design issues related to fabrication.
In summary, both the objective function and constraints are nonlinear. Therefore, the
optimal performance design deals with solving the constrained nonlinear optimization problem.
Candidate Flows
Several sensor specifications associated with various flow phenomena, ranging from low
speed flow to supersonic and hypersonic flow, are listed in Table 4-1. Here maxτ is the maximum
shear stress to be measured and constrained by non-linearity, minf is the minimum resonant
frequency to provide adequate temporal resolution and is the maximum floating element
size that determines the lowest tolerable spatial resolution, is the minimum tether width
that is limited by the junction isolation, and is the minimum thickness that is constrained by
the in-plane resonant frequency. The temporal and spatial resolution
maxeL
mintW
tT
minf and are chosen
to approach the Kolmogorov time and length scales, but are sufficiently conservative to yield a
proof of concept device.
maxeL
95

Methodology
The design problem is formulated to find the optimum dimensions of the floating element
and tethers, geometry and surface doping concentration of piezoresistors, and bias voltage for
each candidate flow. Mathematically, the optimization seeks to minimize the MDS subject to
constraints. The key points regarding the optimization of the minimum detectable shear stress,
minτ , are summarized below:
Design variables: , , , , tL tW eW rL BV and . SN
Objective function: minimize ( ) minF X τ= , where X is the design variable vector.
Constraints:
( )1 0.4 1 0r tg L L= − ≤ ; 2 min 1 0rg f f= − ≤ ; 3 1 3S Lg R R= − ≤ 0 ;
( )24 10 1 0B S Lg V R R= + − ≤ ; 5 0.03 1 0NL L NLg δ δ δ= − − ≤ ;
1 0, 6,8,...,11i i ig LB x i= − ≤ = ; 1 0, 12, 13...17j i ig x UB j= − ≤ = .
where , , , , and i t t e r S B x L W W L N V= . Since the magnitudes of design variables differ by several
order of magnitude (Table 4-2), all variables are non-dimensionalized to avoid singularities in
the program. This nonlinear constrained optimization is implemented using the function fmincon
in MATLAB® (2006b) [86] optimization Toolbox, which employs sequential quadratic
programming (SQP) for nonlinear constrained problems and calculates the gradients by finite
difference method. The optimum value of for different designs might be different. All
designs, however, are fabricated on one wafer. Therefore, surface concentration, , for all
designs must be set to the same value. In this dissertation, the optimal for first three cases
were the same and is . This value was chosen as the surface concentration for
SN
SN
SN
19 -3=7.7 10 cmSN ×
96

all designs. The optimization was re-implemented using this fixed concentration following the
same steps described above.
The SQP method is a local optimizer and is highly dependent on the initial value. The
initial designs are selected randomly, and a number of local optimum solutions from different
initial designs were obtained. The solution identifies one best design points as the optimal
solution. A global optimization algorithm using particle swarms [87] is also employed to
investigate the possibility of improving the optimum solutions. It is found that global
optimization solution is very similar to the optimization results obtained by fmincon function.
The global optimization results have a large computational cost.
Optimization Results and Discussion
In the optimization, the doping profile is assumed to be uniform to simplify the modeling.
The Gaussian profile is more accurate than a uniform profile, but it is not employed in this
research to avoid computational cost. The doping concentration for p++ interconnect is achieved
as , with a junction depth of 1 for all designs. In this research, the material
properties of silicon is fixed.
20 -32.0×10 cm μm
The resulting optimization design is shown in Table 4-3. The highlights are active
constraints. Since the low resistance results in low thermal noise, but the power dissipation
increases. Therefore, the power constraint is always active (close for case 9). For each device,
the dynamic range from the optimum design is in excess of . Kuhn-Tucker conditions
[88] are conducted to check the optimality and active constraints, which are stated as follows:
75 dB
• Lagrange multipliers jλ are nonnegative, and satisfy equation (4-1)
1
0 i=1,2...mgn
jj
ji i
gFx x
λ=
∂∂− =
∂ ∂∑ , (4-1)
97

where gn is the total number of constraints, and is the total number of design variables.
Lagrange multipliers
m
jλ are obtained by the fmincon MATLAB function.
• The corresponding jλ is zero if a constraint is not active. The active constraints for each case are indicated in bold font in Table 4-3.
Once the optimum design for uniform doping is obtained, non-uniform doping profiles are
applied to achieve the final performance of the sensor. The optimization flow chart is shown in
Figure 4-1. The non-uniform doping profiles are obtained by FLOOPS simulation [26], where
sidewall boron implantation to amorphous silicon is simulated by SRIM simulation [79] and
imported to FLOOPS. The surface concentration of the piezoresistor, the piezoresistive
interconnection, and n-well are achieved to , , and ,
respectively, as shown in
19 -37.7×10 cm 20 -32.0×10 cm 16 -37×10 cm
Figure 3-17. The results indicate that non-uniform doping profiles
yield approximately a decrease in dynamic range. Therefore, implementing a Gaussian
profile as part of the optimization would result in a more accurate model and thus optimal
design.
5 dB
Sensitivity Analysis
Due to parameter uncertainty caused by process, minτ may achieve different values than
theoretical optimization. The sensitivity analysis is implemented to understand sensitivity of
MDS to the variations of the design variables, constraints, and fixed parameters at the optimum
design. Therefore, sensitivity analysis is a post-optimization step, which involves two parts:
• Sensitivity of the objective function to design variables at the optimum design.
• Sensitivity of the objective functions to the fixed parameters at the optimum design, where the effect of a change in the active constraints on the objective function is taken into account.
98

For the sensitivity analysis with respect to the design variables, logarithmic derivative [88]
is employed to measure the sensitivity of MDS to uncertainty of design parameters at the
optimum design,
( )( )
min min
min
loglog
i
i i
xx xτ τ
τ∂ ∂
=∂ ∂
, (4-2)
where , , , , and i t t e r B Sx L W W L V N= .
For the sensitivity analysis with respect to the fixed parameters, equation (4-2) is invalid if
the nonlinear inequality constraints are active. Lagrange multipliers based on the Kuhn-Tucker
conditions [88] is employed to calculate the sensitivity of the optimal solution to the fixed
parameters. Assuming that the objective function and the constraints depend on a fixed
parameter p , so that the optimization problem is defines as,
( )( )j
minimize ,
such that g , 0 j=1,2...17.
F X p
X p ≥ (4-3)
The gradient of with respect to is given as [88], F p
T agdF Fdp p p
λ ∂∂= −∂ ∂
, (4-4)
where denotes the active constraint functions and ag 0ag = from Kuhn-Tucker conditions. The
equation (4-4) indicates that the Lagrange multipliers are a measure of the effect of a change of
the constraints to the objective function. Lagrange multipliers 0λ = for active constraints,
otherwise it is obtained by
( ) 1T TN N N Fλ−
= ∇ , (4-5)
where and are defined as N F∇
, j=1,2...17, i=1,2...6j
i
gN
x∂
=∂
(4-6)
99

and FF= i=1,2...6ix
∂∇
∂. (4-7)
The sensitivity of minτ to uncertainty of the fixed parameters is given as
min min min
min
T ag pp p p p
τ τ τ λτ
⎛ ⎞∂∂ ∂= −⎜∂ ∂ ∂⎝ ⎠
⎟ . (4-8)
λ can be obtained from the output of fmincon function directly. The fixed parameters are
. , , ,j r tp y W T N= S
For case 1, power is the active inequality constraint, and the associated Lagrange
multiplier, 0.0026179λ = , is obtained from MATLAB calculation. Therefore, Equation (4-2) is
employed to calculate the sensitivity of MDS to uncertainty of design parameters ( , , ,
and
tL tW eW
rL BV ) at the optimum design. Equation (4-8) is employed for the fixed parameters ( ,
, and ).
jy
rW tT SN Figure 4-1 shows the sensitivity of minτ to uncertainty of the design variables
and fixed parameters for case 1, i.e., 10% change of the tether width causes 19% change of the
minimum detectable shear stress. It is illustrated that minτ is sensitive to variation of tether
width, , tether length, , floating element width, , and junction depth, . The MDS is
less sensitive to variation of piezoresistor length . In summary,
tW tL eW jy
rL minτ is very sensitive to
uncertainties of tether and element dimensions, junction depth and width of the piezoresistors,
and less sensitive to uncertainties of piezoresistor length.
Summary
This section described the choice of objective function and associated constraints. The
optimization has been implemented for nine designs, from low Reynolds number flow to
supersonic and hypersonic flow. The optimization results indicate that the dynamic range
exceeds 75 for all designs based on a uniform doping profile. Accounting for non-uniform dB
100

doping profile results in a 5 d decrease in dynamic range. The sensitivity analysis indicates
that the MDS is very sensitive to uncertainties of tether and element dimensions, junction depth
and width of the piezoresistors, and less sensitivity to uncertainties of piezoresistor length.
B
101

Table 4-1. The candidate shear stress sensor specifications. Low Speed Supersonic, High Re Hypersonic, Underwater
Device 1 2 3 4 5 6 7 8 9
( )max Paτ 5 5 5 50 50 100 100 500 500
( )min kHzf 5 5 10 10 50 50 100 100 200
( )max μmeL 1000 1500 1000 1000 1000 1000 500 500 500
( )min μmtW 30 30 30 30 30 30 30 30 30
( )μmtT 50 50 50 50 50 50 50 50 50
Table 4-2. Upper and lower bounds associated with the specifications in Table 4-1. Design Variables and -UB LB Flow Description ( )μmtL ( )μmtW
( )μmeL ( )μmrL ( )VBV ( )-3cmSN ( )min Paτ
( )min kHzf
1 100 - 1000 30– 40 100 - 1000 50 - 400 5 - 10 5e+18 - 2e+20 5 5 2 100 - 1000 30– 40 100 - 1500 50 - 400 5 - 10 5e+18 - 2e+20 5 5 3 100 - 1000 30– 40 100 - 1000 50 - 400 5 - 10 5e+18 - 2e+20 5 10 4 100 - 1000 30– 40 100 - 1000 50 - 400 5 - 10 5e+18 - 2e+20 50 10 5 100 - 1000 30– 40 100 - 1000 50 - 400 5 - 10 5e+18 - 2e+20 50 50 6 100 - 1000 30– 40 100 - 1000 50 - 400 5 - 10 5e+18 - 2e+20 100 50 7 100 - 1000 30– 40 100 - 500 50 - 400 5 - 10 5e+18 - 2e+20 100 100 8 100 - 1000 30– 40 100 - 500 50 - 400 5 - 10 5e+18 - 2e+20 500 100 9 100 - 1000 30– 40 100 - 500 50 - 400 5 - 10 5e+18 - 2e+20 500 200
102

Table 4-3. Optimization results for the cases specified in Table 4-1 (bold for active constraints). Parameter Case1 Case2 Case3 Case4 Case5 Case6 Case7 Case8 Case9
( )max Paτ
5 5 5 50 50 100 100 500 500
( )μmtL 1000 1000 1000 991.2 343.6 348.7 308.8 500.4 500
( )μmtW 30 30 30 30 30 30.7 30 30 30
( )μmeW 1000 1500 983.5 996.1 1000 993.3 499.1 250.2 100
( )μmrL 228.5 228.5 228.5 228.5 98.8 99.9 88.6 126.8 117.7
( )VBV 10 10 10 10 6.8 6.8 6.5 7.6 6.0
( )WowP 0.1 0.1 0.1 0.1 0.1 0.1 0.1 0.1 0.07
( )kHzrf 9.8 6.60 10 10 50.53 50.01 130.15 104.07 231.11
( )SR Ω 851 851 851 851 368 372 330 470 438
( )LR Ω 149 149 149 149 94 94 89 105 102
( )V PaMS
3.65e-5 7.92e-5 3.54e-5 3.58e-5 6.64e-6 6.40e-6 1.47e-6 1.13e-6 4.20e-7
( )nVNV 21.1 21.1 21.1 21.1 11.0 10.97 10.95 11.19 9.54
( )min mPaτ
0.58 0.27 0.60 0.33 1.66 1.72 7.44 9.88 2.28e-2
( )dBDR 78.7 85.4 78.5 103.7 89.6 95.3 82.6 94.1 86.8
103

Figure 4-1. Flow chart of design optimization of the piezoresistive shear stress sensor.
Lt Wt We Tt VB Ns yj Wr Lr-1.5
-1
-0.5
0
0.5
1
1.5
2
dτm
in/d
x i*xi/τ m
in
Figure 4-2. Logarithmic derivative of objective function minτ with respect to parameters (Case1).
104

CHAPTER 5 FABRICATION AND PACKAGING
The fabrication process and packaging of the side-implanted piezoresistive shear stress
sensor are presented in this chapter, with the aid of masks and schematic cross section drawings.
A detailed process flow is given in Appendix C, which lists all the process parameters,
equipments and labs for each step. The detailed packaging approach for wind tunnel testing is
also presented.
Fabrication Overview and Challenges
The first generation of the shear stress sensor is fabricated in an 8-mask, silicon bulk-
micromachining process. All the masks are generated using AutoCAD® 2002 and manufactured
in Photo Sciences, Inc (PSI). It is described in detail in the following sections. Some challenges
in this process are addressed before starting the process flow:
• Side-implanted piezoresistors: boron is side implanted into the silicon tethers to form the piezoresistors with an oblique angle of normal to the top surface. The traditional piezoresistor is formed by top implantation. The doping profile for side-implantation is simulated via FLOOPS, and the accuracy of the profile needs to be judged only after device testing.
o54
• Trench filling: 50-μm-deep trenches were etched on the top surface to define the tethers. Trench filling is required to obtain good photoresist coverage before subsequent deposition and patterning of the metallization layer.
• Junction isolation: the space between piezoresistors and p++ interconnects should be larger than the isolation width to avoid p/n punch through, as discussed in chapter 3.
Fabrication Process
The fabrication process starts with a 100-mm (100) silicon-on-insulator (SOI) wafer with a
50-μm-thick 1~5 Ω-cm n-type silicon device layer above a 1.5-μm-thick buried silicon dioxide
(BOX) layer. The corresponding background doping concentration is from to
. The total wafer thickness is 45 . A brief overview of the process is as
follows. The four side-implanted piezoresistors are first formed by boron oblique implantation.
15 -32.5 10 cm×
14 -35 10 cm× 0 μm
105

The structure of the sensor is then defined by DRIE Si etch. Thermal dry oxide is grown for high
quality passivation. Al-Si (1%) is deposited and patterned to form the bond pads. PECVD
nitride is deposited as a moisture barrier layer. Finally, the structure is released from the
backside via DRIE Si and RIE of the oxide and nitride. The process flow is broken down into 8
major steps as follows:
a. The n-well formation: the fabrication begins with the formation of the n-well by a
phosphorus blanket implantation (Figure 5-1 (2)). An energy of 150 and a dose of
are used to achieve a surface concentration of
keV
12 -24.0 10 cm× 16 -36.5 10 cm× to control the space-
charge layer thickness of the reverse-biased p/n junction-isolated piezoresistors.
b. Reverse bias contact: a 100 thin oxide layer is then deposited via plasma-enhanced
chemical vapor deposition (PECVD) and patterned, then etched via buffered oxide etch (BOE) in
preparation of the reverse-bias contact implant. This step also creates alignment marks on the
top surface. Phosphorus is then implanted with energy of 80 and dose of to
achieve a n++ region with a surface concentration of
nm
keV 13 -29.0 10 cm×
18 -31.8 10 cm× (Figure 5-1 (4)). The device
is then annealed at 1000 for minutes to drive-in the inpurities. °C 450
c. Piezoresistor interconnects: the oxide is selectively removed by BOE. Then, a two-step
Ge preamorphization implant is performed to minimize the effect of random channeling tail
caused by the subsequent high-dose boron implantation [66], which provides a heavily doped
Ohmic body contact. The preamorphization implant energies are 16 and ,
respectively, and a dose of . This preamorphization is to ensure no more than 2% of the
implanted boron dose penetrates into the substrate [89]. Then boron is implanted into the silicon
with a dose of and an energy of 50 to provide Ohmic contacts (
0 keV 50 keV
15 -210 cm
16 -21.2 10 cm× keV Figure 5-1
(5)). The resulting surface concentration and junction depth, j px , while taking into account the
106

thermal budget of the entire process, are simulated by FLOOPS to be and 1 ,
respectively. The interconnect region begins from the edge of the tether and distributes
symmetrically along the centerline of the tethers to minimize the sensitivity error, with a larger
width on the end cap to decrease the resistance. The FLOOPS simulation file is given in
Appendix D.
20 -31.96 10 cm× μm
d. “Nested” mask release: a 1 oxide layer is deposited via PECVD and patterned via
reactive ion etch (RIE) [90] to serve as a nested mask for the deep reactive ion etch (DRIE) [91]
that defines the tethers and floating element (
μm
Figure 5-1 (7)). New alignment marks are also
created in this step.
e. Side wall etch and side wall implantation: the wafers are then patterned using the mask
SIM (Figure 5-1 (8)). To ensure good contact between the piezoresistor and the p++
interconnect, the SIM mask has a 4 overlap with the p++ interconnect on the edge of the
tether, 10 overlap with the p++ interconnect on the end cap, and 4 overlap with
sidewall. Prior to DRIE, the native oxide or oxide residues are etched via BOE about one
1minute. The Si is then etched vertically to approximately deep by DRIE to form the
trenches for the sidewall oblique implant, as shown in
μm
μm μm
8 μm
Figure 5-2 (scanning electron microscope
(SEM) top view). The trench width is set to ( ) ( )5 1.1 μm tan 54 8.5 μm+ × ≈o to achieve a 5
implant, where 54 is the implant tilt angle from the normal axis, and 1.1 is the thickness of
the oxide layer. The sidewall implantation is restricted on the top 5 to ensure the silicon
surface on which the boron implanted is smooth and avoid forming the current leakage path on
the bottom [85]. This can reduce the
μm
o μm
μm
1 f noise at low frequency [85]. The basic recipes on STS
DRIE system and Unaxis RIE systems are shown in Appendix E.
107

The extruded oxide resulting from the DRIE is etched via BOE (6:1) for one minute, as
shown via the scanning electron microscope image in Figure 5-3. This avoids the protruded
oxide blocking the implant dosage to the side wall. Hydrogen annealing (1000 , 10 mTorr for
5 minutes) [92] is performed to smooth the scallops on the sidewalls that arise from the DRIE
process, which will improve the noise floor [25]. A oxide layer is thermally grown as a
thin implant oxide layer on the sidewall, which must be accounted for in the thermal budget.
Co
0.1 μm
After a two-step Germanium preamorphization implant, boron is then implanted with an
energy of , a dose of (two times of the simulation dose to compensate the
solubility loss at high dosage) and an oblique angle of 54˚ to achieve a 5 shadow side wall
implantation (shown in
50 keV 16 -22 10 cm×
μm
Figure 5-1 (9)).
f. Tether definition: the oxide on the trench bottom is then etched via DRIE while the
oxide on the sidewall is left to protect the doped sidewall, as shown in Figure 5-4. This is a time-
controlled process: an over-etch will expose silicon on the edge of the sidewall of the tether
(Figure 5-5), while an under-etch will create a “silicon grass” effect [93] after the subsequent
DRIE silicon etch due to the oxide residues that acts as a micromask (Figure 5-6). The
channels/trenches are then etched via DRIE with the BOX as an etch stop, as shown in Figure 5-
7 (note the rough surface is caused by the dicing saw). The tether sidewall oxide is then etched
for two minutes by BOE (6:1). Subsequently, the wafers are annealed at 1000 for 60 min to
drive in the boron to form the piezoresistors. A thin dry oxide layer was thermally
grown at 975 as an electrical passivation layer. The temperature 975 is selected to avoid
excessive diffusion and excessive compressive stress when the temperature is below 9
[94]. Meanwhile, the boron is segregated into the oxide from the silicon.
Co
0.1 μm
Co Co
50 Co
108

g. Metallization and nitride passivation: since there are 50-μm-deep trenches on the wafer
for tether release, it is necessary to fill the trench to achieve good photoresist coverage before
subsequent wafer patterning. A two-step trench filling process is performed as follows: first, a
thin layer of photoresist AZ1512 is coated and soft baked, then a thick photoresist AZ9260 is
coated and soft baked; second, the wafer is flood exposed for 300 seconds and developed using
developer AZ400 until the surface is clear. Thus, the trench can be reduced from to only
deep if following the above process once or twice.
50 μm
5~6 μm
After filling the trenches with photoresist, the oxide is patterned and then etched via BOE
(6:1) to open contact vias for Al sputtering. This step is very critical for the quality of the metal
contact. Since the boron laden silicon dioxide etches much slower than the standard oxide
etching (1000 A mino
), an over etch is required to remove all oxide to ensure an Ohmic contact.
Any residual oxide left over will result in Schottky diode effect. A 1-μm-thick layer of Al-Si
(1%) is sputtered and patterned via RIE to form the metal interconnects (Figure 5-1 (12)). A
200-nm-thick, low-stress silicon nitride layer is deposited via PECVD to from a protective
moisture barrier. The bond pads are exposed by patterning and plasma etching the silicon nitride
via RIE.
h. Backside release: to protect the device, the front side of the wafer is coated with a 10-
μm-thick photoresist layer. The wafers are then patterned from the backside using front-to-back
alignment. The structure is released from the backside using DRIE up to the BOX layer (Figure
5-1 (14)), along with an oxide and nitride etch using RIE (Figure 5-1 (15)). Finally, a post-
metallization anneal is performed in forming gas (4% , 96% ) at for 1 hour [95].
This annealing allows the aluminum to react with the native oxide to remove the tunneling oxide,
and allow the hydrogen to passivate the interface traps. This improves the contact resistance and
2H 2N 450 Co
109

reduces the electrical noise floor [25]. The fabricated device is shown in Figure 5-8 and the
close view of the piezoresistors is shown in Figure 5-9. The trenches between each device were
patterned and created during back side release, thus the die can be easily separated by tweezers.
Sensor Packaging for Wind Tunnel Testing
After fabrication, the individual die ( 6. ) were then packaged in a custom
printed circuit board (PCB) ( ) designed for modularity. The PCB layout was
performed using Protel and was manufactured by a commercial vendor, Sierra Proto Express.
The MEMS device die and PCB were then packaged by Engent Inc. The MEMS die are flush-
mounted into a machined cavity in the PCB and sealed with epoxy at the perimeter. The
aluminum bond pads are then bonded to gold pads on the PCB. Subsequent to the bonding
process, the wire bonds are covered by non-conductive epoxy to protect the wire bonds from the
gas flow in the calibration wind tunnel or flow cell. The roughness of the epoxy is less than
and is located (3.2 ) downstream of the sensing element to mitigate flow
disturbances. The PCB package is then flush-mounted into a Lucite package, which in turn is
flush mounted in an aluminum plate to minimize flow disturbance.
2 mm×6.2 mm
20 mm×20 mm
300 μm mm
Figure 5-10 shows the PCB
embedded in the Lucite package. Copper wires (gauge 26) pass from underneath up through the
vias in the PCB and are soldered to PCB via rings. The wire is reinforced by the glue on the
backside of the Lucite package.
An interface circuit board was designed for offset compensation and signal amplification,
as shown in Figure 5-11. This board includes two sets of compensation circuitry: one for active
bridge, another for dummy bridge. Each circuit has two amplifying stages: the first stage is used
to null the amplified offset, and the second stage is to amplify the compensated signal. The
detailed description of the interface circuit for offset compensation is given in Chapter 6. This
110

board is attached on the backside of the device package and supported by two screws that
connect it to the Lucite packaging. The copper wires for the signal output and voltage supply
from the Lucite plug are soldered to this board. There are eight BNC connectors for the
amplified signal outputs and power supplies.
111

Figure 5-1. Process flow of the side-implanted piezoresistive shear stress sensor.
112
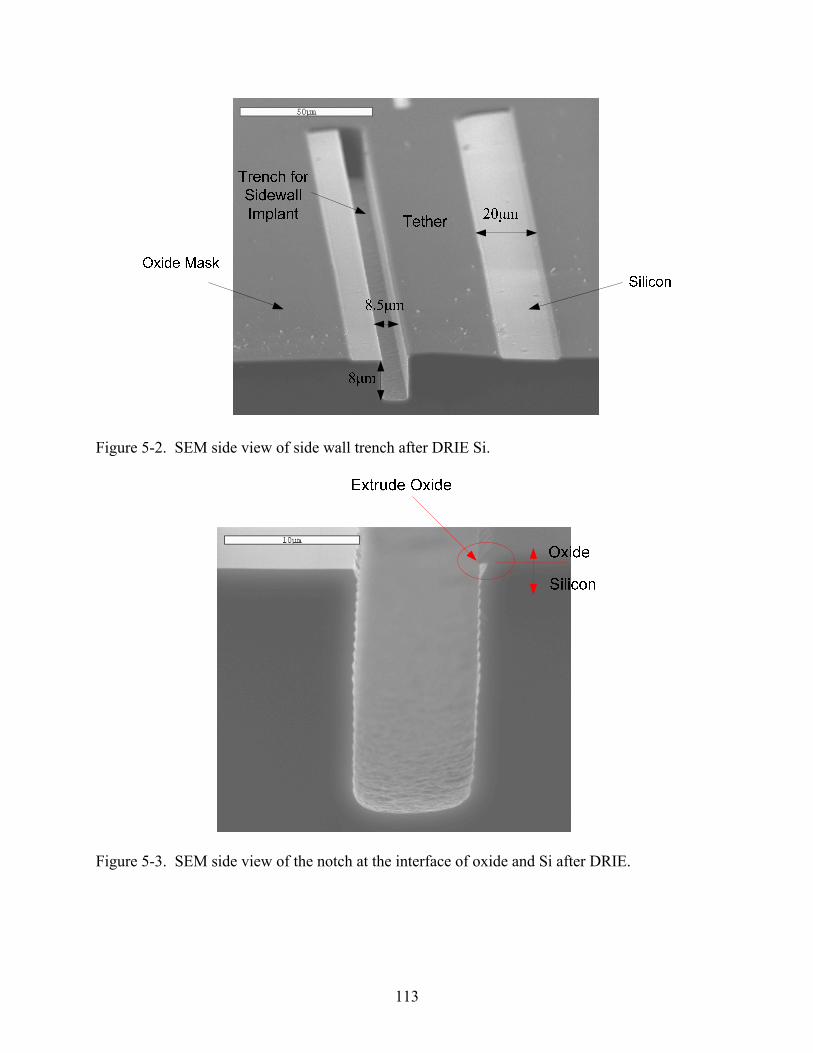
Figure 5-2. SEM side view of side wall trench after DRIE Si.
Figure 5-3. SEM side view of the notch at the interface of oxide and Si after DRIE.
113

Figure 5-4. SEM top view of the trench after DRIE oxide and Si.
Figure 5-5. SEM top views of the trench after DRIE oxide and Si with oxide overetch.
114

Figure 5-6. SEM top views of the trench with silicon grass through a micromasking effect due to
oxide underetch.
Figure 5-7. SEM side view of the trench after DRIE oxide and Si.
115

Figure 5-8. Photograph of the fabricated device.
Figure 5-9. A photograph of the device with a close up view of the side-implanted piezoresistor.
116

Figure 5-10. Photograph of the PCB embedded in Lucite package.
Figure 5-11. Interface circuit board for offset compensation.
117

CHAPTER 6 EXPERIMENTAL CHARACTERIZATION
Preliminary electrical and fluidic characterization were performed to determine the
performance of the shear stress sensor and to partially compare to the analytical models
discussed in Chapter 3. The experimental setup for sensor characterization is described and then
the results are presented. The experiments include measurement of characteristics of p/n diode,
system noise, sensor sensitivity and linearity, and frequency response.
Experimental Characterization Issues
There are two complicating issues in characterizing the sensors: the initial offset voltage
output without shear stress applied and the temperature sensitivity of the bridge output. These
two issues directly affect the measurement resolution and static sensitivity. Therefore, offset
compensation and temperature compensation must be employed for the static calibration
experiments. The motivation and methodology for offset compensation is discussed in the
following paragraphs. The temperature compensation was not performed and will be discussed
in Chapter 7.
For a balanced Wheatstone bridge, the differential voltage output of the sensor is directly
proportional to the applied shear stress. In reality, the Wheatstone bridge is not perfectly
balanced due to uncertainty in the fabrication process. As shown in Figure 6-1, the dc offset
exists without applied shear stress, and is directly proportional to the bias voltage. The offset is
typically (10 mV VO ) , or even larger in some device die. The optimization results in Chapter 4
indicate that the normalized sensitivity of the sensor designs is ( )1 μV V PaO . Such a small
sensitivity requires high gain amplification prior to being sampled by data acquisition board.
However, a dc offset will cause amplifier saturation even at a relatively low gain. Therefore, it is
imperative to minimize or eliminate the offset to maximize the dynamic range of the
118

measurement system. An approach for the interface circuit readout is discussed as follows for dc
offset compensation.
The interface circuit consists of a precision programmable instrumentation amplifier
AD625 and a high speed precision Op Amp AD 711 from Analog Devices [73], as shown in
Figure 6-2. The gain of the AD625 is set by adjusting external resistors FR and GR , and is given
by 4 F GR R +1. The AD711 acts as a unity buffer. The initial offset voltage goes through the
amplifier AD625 with a set gain of 21. Then the amplified offset voltage is precisely controlled
by adjusting the input of the AD711, which is provided by a Stanford Research Systems SIM928
isolated voltage source [96]. SIM928 is an ultra low noise voltage source (10 at 1 k
bandwidth) that provides a stable low-noise voltage reference with mV resolution.
Unfortunately, there was an error in the second amplifier stage of the PCB and a decision was
made to just proceed with AC shear stress calibrations to demonstrate “proof of concept”
functionality.
μVrms Hz
Experimental Setup
In this section, the experimental setup for the shear stress sensor characterization is
discussed. A probe station is used to measure the current-voltage (I-V) characteristics of the
sensor. A plane wave tube (PWT) is then used to determine the sensor linearity, sensitivity and
frequency response. Then sensor system noise is measured with dynamic calibration setup in the
plane wave tube with speaker amplifier off.
Electrical Characterization
Electrical characterization includes measurement of the bridge impedance and leakage
current of the junction-isolated devices, as well as the breakdown voltage. All measurements
119

were made using an Agilent 4155C semiconductor parameter analyzer and a wafer level probe
station.
As discussed in Chapter 5, the p/n junctions are formed by the p-type piezoresistor and the
p++ interconnects with the n-well. To ensure that the current flows entirely through the p-type
regions, the p/n junction must be reverse biased and the leakage current should be negligible. In
this experiment, the reverse bias characteristics of the p/n junction were measured to determine
the leakage current from the piezoresistors to the n-type substrate. The resistance is extracted
from the I-V characteristics of the piezoresistors in the p/n forward bias region.
Dynamic Calibration
The frequency response and linearity were deduced using Stokes’ layer excitation of shear-
stress in a plane-wave tube (PWT). This technique utilizes acoustic plane waves in a duct to
generate known oscillating wall shear stresses [97]. This technique relies on the fact that the
particle velocity of the acoustic waves is zero at the wall due to the no-slip boundary condition.
This leads to the generation of a frequency-dependent boundary layer thickness and a
corresponding wall shear stress. Therefore, at a given location, the relationship between the
fluctuating shear stress and acoustic pressure is theoretically known. The acoustically-generated
wall shear stress for the frequency range of excitation in this paper is approximated by [97]
(2''
j t kx
wallp j v
ec
πωωτ
⎛ ⎞− −⎜ ⎟⎝ ⎠= )tanh jη , (6-1)
where is the amplitude of the acoustic perturbation, 'p 1j = − , v is the kinematic viscosity, ω
is the angular frequency, k cω= is the acoustic wave number, 2bη ω ν= is the non-
dimensional Stokes number and is the half height of the duct. b
120

A conceptual schematic of the dynamical calibration setup is shown in Figure 6-3. The
plane wave is generated by a BMS 4590P compression driver (speaker) that is mounted at one
end of the PWT. The PWT consists of a rigid-wall 1”x1” duct with an anechoic termination (a
30.7” long fiberglass wedge), which is responsible for supporting acoustic plane progressive
waves propagation along the duct [97]. The sensor and a reference microphone (B&K 4138) are
flush-mounted at the same axial position from the driver.
The usable bandwidth for plane waves in the PWT is defined by the cut-on frequency of
the first higher order mode which is 6.7 in air and in helium. The compensated
output voltage from the AD625 interface circuit is ac-coupled and amplified 46 dB by the SR560
low noise preamplifier. A B&K PULSE Multi-Analyzer System (Type 3109) is used as the
microphone power supply, data acquisition unit, and signal generator for the source signal in the
plane wave tube.
kHz 20 kHz
Noise Measurement
A noise measurement is necessary to determine the minimum detectable signal (MDS).
The sensor is mounted on the sidewall of the plane wave tube and the speaker amplifier is turned
off. This provides a reasonable estimate of the entire sensor system noise floor as installed in a
calibration chamber. The compensated voltage output is amplified by the AD625 and the SR560
low noise preamplifier (ac coupled), and then fed into the SRS785 spectrum analyzer [98]. The
spectrum analyzer measures the noise power spectral density (PSD), using a Hanning window to
minimize PSD leakage. The measured noise PSD includes the sensor noise and the setup noise,
including noise from sources such as EMI, the amplifier, the spectrum analyzer, and the power
supply. LabVIEW is used for data acquisition and manipulation. The noise PSD is measured in
three overlapping frequency spans from 10 to 1024 . The settings for three frequency
ranges are listed in
Hz Hz
Table 6-1.
121

Experimental Results
Electrical Characterization
As shown in Figure 6-4, I-V characterization results indicate a negligible leakage current
(< ) up to a reverse bias voltage of -10 V. The reverse bias breakdown voltage for the
P/N junction is around 20 V or greater (
0.12 μA
Figure 6-5).
I-V measurements of the diffused resistors across the Wheatstone bridge are shown in
Figure 6-6 for a representative design in Table 6-2. One curve is for the resistors across the bias
voltage port and ground, another is for the resistors across the output ports and . The
nonlinearity of the I-V curve is obtained subtracting the actual voltage in the VB-GND curve (or
V1-V2) from a linear curve fit (fit between
1V 2V
0.5 V− to 0.5 and extended to ), then
normalizing by the linear curve and multiplying by 100. The nonlinearity is shown in
V 10 V±
Figure 6-
7. The linear variation of current with voltage below 5 V (3% nonlinearity in Figure 6-7)
indicates Ohmic behavior of the piezoresistors and p++ interconnects. The average resistances
across the bridge are 397 and 41 Ω 1 Ω , respectively, while the predicted value for the
individual resistor is 1 k . The smaller than predicted resistances may due to the high implant
dosage (double of the simulation value to avoid solubility loss). The asymmetry of
curve may be due to the Schottky effect. The asymmetry may also be due to residual heating as
the voltage was swept from -10 V to 10 V instead of performing two tests sweeping the voltage
from 0 to 10V and 0 to -10 V. The root cause of this asymmetry requires further study.
Ω
V1-V2
Dynamic Calibration Results and Discussion
The dynamic sensitivity and linearity of the sensor were tested with a single tone of
as a function of increasing sound pressure levels (SPL). The chosen frequency of
is far enough below the expected resonance so that it is a reasonable approximation
2.088 kHz
2.088 kHz
122

of the static sensitivity. In this measurement, the frequency span was with a
frequency resolution of 32 H . 3000 linear averages with 0% overlap were taken to minimize
the random error. The sensor was operated at bias voltages of 1.0 , 1.25 V and 1.5 . This is
substantially lower than the optimized bias voltage of 10 V because electronic testing indicated
nonlinearities in the current-voltage relationship at excitation voltages above 4.5 V from resistor
self-heating. Any resistor self-heating will lead to temperature-resistive voltage fluctuations due
to unsteady convective cooling [38]. In other words, the direct sensor will behave somewhat like
an indirect sensor. To avoid this phenomenon, testing was limited to bias voltages of 1.5 and
below.
0.2-6.4 kHz
z
V V
V
The dynamic sensitivity is the ratio of the differential sensor output voltage to the input
wall shear stress. Ideally, the lateral displacement of the floating element will be solely a
function of the acoustically generated wall shear stress. In practice, however, it is known that
there will be an additional displacement due to the local pressure gradient forces generated by
traveling acoustic waves across the floating element [43]. The magnitude of the effective shear
stress including pressure-gradient effects for a purely-traveling acoustic wave in a duct is [43]
( ) 2 212 walleff
g f ff tπ ρ π ρτ τμ μ
⎛ ⎞= + +⎜ ⎟⎟⎜⎝ ⎠
. (6-2)
The second and third terms of Equation (6-2) represent the error due to the fluctuating flow
beneath the element and the net fluctuating pressure force acting on the lip (assuming a square
element). Accounting for the fact that the actual shear stress is proportional to f , the
magnitude of the error terms is proportional to f . The second term of Equation (6-2) assumes
that so that the flow underneath the element can be approximated by fully-developed
pressure-driven flow in a slot. For the current sensor,
eL >> g
400 μmg = and . Clearly, 1000 μmeL =
123

this approximation is invalid and the flow beneath the element is sufficiently complex and must
be evaluated using computational techniques. Therefore, only an estimate for the pressure
gradient force acting on the thickness can be provided. The maximum error for this term is
(7.5 dB 2.4 wallτ ) at the highest frequency tested, . The error terms are also 6.7 kHz / 2 π out of
phase with the actual shear stress.
By adjusting the SPL from 123 dB to 157 , the induced shear stress varies from
to .
dB
0.04 Pa 2.0 Pa Figure 6-8 shows output voltages response to the shear stress variation at
different bias voltages. The slopes of the plots shown in Figure 6-8 indicate the dynamic
sensitivity of the sensor at different bias voltages. For all bias conditions, the sensors respond
linearly up to and the sensitivities are 2.0 Pa 2.905 μV Pa , 3.602μV Pa and 4.242μV Pa at
bias voltages of 1.0 V , 1.25 V and 1.5 V , respectively.
The normalized sensitivity is defined as the ratio of sensitivity to applied bias voltage. For
a Wheatstone bridge without resistor self-heating, the normalized sensitivity is a constant. If
resistor self-heating is occurring, a power-law dependence on the power dissipation is expected.
The slopes of Figure 6-9 are the normalized sensitivities at bias voltages of 1.0 V , 1.25 V and
, respectively, which are 1.5 V 2.905 μV V Pa , 2.882μV V Pa and 2.828 . The
predicted normalized sensitivity is
μV V Pa
3.65 μV V Pa . Note that for Figure 6-9, the initial offset
voltages were subtracted for normalized slope comparison purposes. The close match in
normalized sensitivities (<3% variation) indicates that the sensor is responding solely to the
piezoresistive effects and not unsteady convective cooling. This piezoresistive effect is a
combination of shear stress sensitivity, pressure gradient sensitivity and normal pressure
sensitivity.
124

The frequency response at a bias voltage of 1.5 was also investigated in this experiment.
For this test, the generator is set to a random signal with a span of and a center
frequency of to ensure that all harmonics up to 6 kH are captured. A 200 line FFT is
used corresponding to frequency resolution of . At each measurement frequency, 2000
linear averages are taken with 0% overlap. The input shear stress is desired to be . The
theoretical SPL for each measurement frequency obtained via Equation
V
6.4 kHz
3.4 kHz z
32 Hz
0.3 Pa
(6-1). By adjusting the
SPL at specific frequency, the target shear stress is then achieved. The normalized frequency res
ponse function of the shear stress sensor is given as [43]
( ) ( )( )
out
wall
V fH f
f Vτ
τ∂
=∂
, (6-3)
where is the sensor output with a known input, ( )outV f ( )wall fτ is obtained via Equation (6-1),
and Vτ∂ ∂ is the flat band sensitivity. For this experiment, the sensitivity at from
the linearity test was used for normalization.
2.088 kHz
Figure 6-10 demonstrates the magnitude and phase
of the actual frequency response function of the shear stress sensor for a nominal input shear-
stress magnitude of 0. . The gain factor is flat and is between 3 Pa 3.01 dB− to for this
test. The phase is flat up to . It is noted that the gain factor at frequency of
is not 0 d , which may be due to the setup and temperature variation in these two
measurements. These results are not corrected for non-idealities in the anechoic termination
which results in a finite reflected wave [97]. In addition, there is some suspicion that the results
above are corrupted by the scattered evanescent field near the termination.
Regardless, there is no apparent resonance in this sensor up to .
0.09 dB
4.552 kHz
2.088 kHz B
4.552 kHz
6.7 kHz
To check the wave reflection effect on the measurement, the two-microphone method [99]
is used to measure the reflection coefficient, as shown in Figure 6-11. The frequency spans from
125

0.2 Hz to 6.4 kH . The FFT line is set to 400 giving a frequency resolution of 16 H . 1000
linear averages with 0% overlap are taken. The results indicated that the magnitude of the
reflection coefficient is comparatively large when the frequency is below 1 k . Therefore, the
frequency in the measurement for both linearity and frequency response are above 1 k to
minimize the uncertainty.
z z
Hz
Hz
The lower end of the dynamic range of the sensor is ultimately limited by the device noise
floor. The output-referred noise floor of the sensor and measurement system is shown in Figure
6-12 for a bias voltage of 1.5 . As expected, the noise spectrum is dominated by V 1 f noise
indicating that the signal-to-noise ratio for this sensor is a strong function of frequency. At
(with 1 Hz bin) the output-referred noise floor of the sensor and measurement system is 1 kHz
48.2 nV Hz which corresponds to the minimum detectable shear stress of 11.4 m . Pa
Summary
Preliminary electrical and dynamic characterization and the noise determination are
presented to demonstrate device functionality. At a bias voltage of 1.5 , the dynamic
characterization of the device revealed a linear response up to at least and a flat response
up to the frequency testing limit of . The theoretically predicted resonant frequency is
. Noise floor measurements indicate that
V
2.0 Pa
6.7 kHz
9.8 kHz 1 f noise dominates and the minimum
detectable shear stress at 1 kHz is 11 . Therefore, the experimentally verified dynamic
range is 11 m . The theoretically predicted upper end of the dynamic range at 3% static
non-linearity is 5 Pa. The upper ends of the dynamic range and bandwidth, however, could not
be verified due to constraints in the calibration apparatus. A summary of the experimental
results compared to the predicted results for a bias voltage of 1.5 V are listed in
.4 mPa
Pa-2 Pa
Table 6-4. The
normalized sensitivity is close to the predicted design value, but resistor heating precluded using
126

higher bias voltages, thus lowering the maximum allowable sensitivity by 16.5 dB.
Furthermore, the noise floor is roughly a factor of 7 higher than predicted. This may be due to
the noise floor measured is the total system noise, which includes setup noise and sensor noise,
whereas the predicted value is just due to the sensor and the AD 625 circuit. There are also
substantial differences in the predicted versus realized bridge impedance which means that the
voltage noise of the resistors may also be higher than predicted.
127

Table 6-1. LabVIEW settings for noise PSD measurement Frequency Range (Hz) Bin Width ( ) Hz Number of Averages
10-200 0.25 2300 200-1600 2 4000 1600-102400 128 30000
Table 6-2. The optimal geometry of the shear stress sensor that was characterized. Parameters Design Values
Target Shear Stress ( )max Paτ 5
Tether Length ( )μmtL 1000
Tether Width ( )μmtW 30
Tether Thickness ( )μmtT 50
Floating Element Width ( )μmeW 1000
Piezoresistor Length ( )μmrL 228.5
Piezoresistor Width ( )μmrW 5
Piezoresistor Depth ( )μmjy 1
Table 6-3. Sensitivity at different bias voltage for the tested sensor. Bias Voltage (V) Sensitivity ( )mV Pa 1.5 0.27 2.95 0.71 3.1 0.93 4.8 3.0
128

Table 6-4. A comparison of the predicted versus realized performance of the sensor under test for a bias voltage of 1.5V.
Parameters Theoretical Value Experimental Result Normalized Sensitivity (μV V Pa ) 3.65 2.83
Noise Floor ( )nV 6.5 48.2
MDS ( )mPa 1.2 11.4
Bandwidth ( ) kHz 9.8 >6.7
Resistance ( ) Ω 1000 397
( )max Paτ 5 >2
129

0 1 2 3 4 5-0.06
-0.05
-0.04
-0.03
-0.02
-0.01
0
Bias Voltage( V )
Offs
et V
olta
ge (
V )
Figure 6-1. The bridge dc offset voltage as a function of bias voltages for the tested sensor.
Figure 6-2. An electrical schematic of the interface circuit for offset compensation.
130

Figure 6-3. A schematic of the experimental setup for the dynamic calibration experiements.
-10 -8 -6 -4 -2 0 2-2
0
2
4
6
8
10
Bias Voltage ( V )
Cur
rent
( μA
)
ReverseBias Forward
Bias
Figure 6-4. Forward and reverse bias characteristics of the p/n junction.
131

-20 -15 -10 -5 0-10
-8
-6
-4
-2
0
2
Bias Voltage ( V )
Cur
rent
( μA
)
Figure 6-5. Reverse bias breakdown voltage of the P/N junction.
-10 -5 0 5 10-30
-20
-10
0
10
20
30
Bias Voltage( V )
Cur
rent
( mA
)
y = 2.52*x - 0.01R2 = 0.9992
y = 2.43*x + 0.273R2 = 0.9990
VB-GND
V1-V2
Linear Fitting
VB - GND Linear Fitting
V1 - V2 Linear Fitting
Figure 6-6. I-V characteristics of the input and output terminals of the Wheatstone bridge.
132

-10 -5 0 5 10-2
0
2
4
6
8
10
12
Voltage (Volts)
Non
linea
rity
(%)
V1-V2VB-GND
Figure 6-7. The nonlinearity of the I-V curve in Figure 6-6 at different sweeping voltages.
0 0.5 1 1.5 20
1
2
3
4
5
6
7
8
9
Shear Stress (Pa)
Out
put V
olta
ge ( μ
V)
y = 3.602*x + 0.01884
y = 4.242*x + 0.0231
y = 2.905*x + 0.004146
VB=1 V
VB=1.25 V
VB=1.5 V
Figure 6-8. The output voltage as a function of shear stress magnitude of the sensor at a forcing frequency of 2.088 kHz as a function bias voltage.
133

0 0.5 1 1.5 20
1
2
3
4
5
6
Shear Stress (Pa)
Nor
mal
ized
Out
put V
olta
ge (
μV/V
)
y = 2.905*x - 0.3113 for VB=1.0V y = 2.882*x - 0.2964 for VB=1.25V
y = 2.828*x - 0.2914 for VB=1.5V
VB=1.0 V
VB=1.25 V
V-B=1.5 V Linear Fitting
Figure 6-9. The normalized output voltage as a function of shear stress magnitude of the sensor at a forcing frequency of 2.088 kHz for several bias voltages.
1 2 3 4 5 6
-10
0
10
Frequency (kHz)
|H(f)
| (dB
)
1 2 3 4 5 6
-50
0
50
Frequency (kHz)
Pha
se (D
eg)
Figure 6-10. Gain and phase factors of the frequency response function.
134

1 2 3 4 5 60
0.2
0.4
0.6
0.8
|R|
Freq [kHz]
1 2 3 4 5 6-200
-100
0
100
200
Pha
se φ
[deg
]
Freq [kHz]
Figure 6-11. The magnitude and phase angle of the reflection coefficient of the plane wave tube.
135

101
102
103
104
10510
0
101
102
103
Noi
se F
loor
(nV
/√H
z)
Frequency (Hz)
System "Thermal Noise"
System Noise
Figure 6-12. Output–referred noise floor of the measurement system at a bias voltage of 1.5V.
136

CHAPTER 7 CONCLUSION AND FUTURE WORK
Summary and Conclusions
A proof-of-concept micromachined, floating element shear-stress sensor was developed
that employs laterally-implanted piezoresistors for the direct measurement of fluctuating wall
shear stress. The shear force on the element induces a mechanical stress field in the tethers and
thus a resistance change. The piezoresistors are arranged in a fully-active Wheatstone bridge to
provide rejection to common mode disturbances, such as pressure fluctuations. A dummy bridge
located next to the sensor is used for temperature corrections. The device modeling, optimal
design, fabrication process, packaging and comprehensive calibration were presented.
Mechanical models for small and large deflection of the floating element have been
developed. These models are combined with a piezoresistive model to determine the sensitivity.
The dynamic response of the shear stress sensor was explored by combining the above
fundamental mechanical analysis with a lumped-element model. Finite element analysis is
employed to verify the mechanical models and lumped-element model results. Dominant
electrical noise sources in the piezoresistive shear stress sensor, 1 f noise and thermal noise,
together with amplifier noise, are considered to determine the noise floor. These models are then
leveraged to obtain optimal sensor designs for measuring shear stress in several flow regimes.
The cost function, minimum detectable signal (MDS) formulated in terms of sensitivity
and noise floor, is minimized subject to nonlinear constraints on geometric dimensions, linearity,
bandwidth, power, resistance, and manufacturing constraints. The optimization results indicate
that the predicted optimal device performance is improved with respect to existing shear stress
sensors, with a MDS of O(0.1 mPa) and dynamic range greater than 75 dB. A sensitivity
137

analysis indicates that the device performance is most responsive to variations in tether
geometry.
The process flow used an 8-mask bulk micromachining process, involving PECVD,
thermal oxidation, wet etch, sputtering, DRIE and RIE fabrication techniques. After fabrication,
the die was packaged for wind tunnel testing in a custom printed circuit board for modularity.
An interface circuit board was designed for amplification and offset compensation.
Then the sensor was calibrated electrically and dynamically. Electrical characterization
indicates linear junction-isolated resistors, and a negligible leakage current (< 0.12 ) for the
junction-isolated diffused piezoresistors up to a reverse bias voltage of -10 V. Using a known
acoustically-excited wall shear stress for calibration at a bias voltage of 1.5 , the sensor
exhibited a sensitivity of , a noise floor of
μA
V
4.24 µV/Pa 11.4 mPa/ Hz at 1 kHz , a linear
response up to the maximum testing range of , and a flat dynamic response up to the testing
limit of 6.7 kH . These results coupled with a wind-tunnel suitable package are a significant
first step towards the development of an instrument for turbulence measurements in low-speed
flows. The system noise is
2 Pa
z
48.2 nV Hz at 1 k (with 1 Hz bin), and is roughly 7 times
higher than predicted. Static heating limitations limited the maximum bias voltage to 1.5
instead of 10 .
Hz
V
V
Suggestions for Future Work
Future work should focus on the comprehensive characterization of the sensor to determine
absolute performance and to compare against all of the theoretical predictions. An uncertainty
analysis of all experiments and accurate measurement of the sensor geometry are required to
enable this comparison. Specifically, a temperature compensation approach must be realized that
will enable the static calibration of the sensor as well as any dc measurement application. The
138

resonant frequency of the sensors must be determined. Sensitivity to vibration and pressure
fluctuations must also be determined. Detailed noise measurements that isolate the contribution
from the piezoresistor should be carried out. Finally, the flow around the floating element will
be investigated via numerical simulations to provide an improved estimate of pressure gradient
induced errors. In the following subsection, several suggestions for carrying out these
measurements are discussed below.
Temperature Compensation
The sensitivity of the shear stress sensor changes with temperature due to the variation of
the piezoresistive coefficient with temperature, as indicated in Equation (3-23) and (3-24). In
sensor static calibration in a 2-D laminar cell, the sensitivity is defined as the slope of the curve
of voltage output versus shear stress. However, due to the temperature effect, the output voltage
is a function of shear stress and temperature. Thus the temperature induced voltage output
should be subtracted from the active bridge voltage output. For the identical active and dummy
Wheatstone bridge, the temperature effect on them should be same. Therefore, the temperature
effect on the active bridge in the static calibration can be removed by subtracting the voltage
output of the dummy bridge.
Unfortunately, the active bridge and dummy bridge are not identical due to Wheatstone
mismatch. So the voltage output dependence of the temperature need to be measured for both
active bridge and dummy bridge. The output voltage of the active bridge is a function of shear
stress and temperature variations, while the dummy bridge depends on temperature variation
only. The measured output voltages in the laminar flow are ( ),a wV Tτ for the active bridge and
for the dummy bridge, respectively. The slope of the voltage vs. temperature curve is ( )dV T TaS
139

for active bridge and for dummy bridge. In the static calibration, the output voltage
dependence of shear stress is given as
TdS
( ) ( ) ( ),a w a w aV V T Vτ τ= − T . (7-1)
Assuming that the slope of the curve remains constant and they are given as, vs. ToV
( ) ( )( ) ( )
0
0
a a Ta
d d
V T V T SV T V T S
−=
− Td
. (7-2)
Substituting from Equation ( )aV T (7-1) into (7-2) and rearranging it, the shear stress dependent
output voltage is obtained as
( ) ( ) ( )( ) ( ) ( )(0, Taa w a w a d d
Td
SV V T V T V T V TS
τ τ= − − − )0 , (7-3)
where ( )0aV T is the initial voltage value at room temperature. The Equation (7-3) indicates that
and must be obtained in order to get TaS TdS ( )a wV τ . Preliminary experiments prior to
employing dc offset nulling were performed to determine the temperature sensitivity.
Unfortunately, the large dc offset limited the quality of the results. The experimental set up is as
follows.
The voltage output dependence of temperature variation is conducted in two bath settings.
Both bathes are filled with DI water. The outer bath is the chamber of Isotemp refrigerated
circulator, and the inner bath is glass beaker. The packaged sensor is sitting on the top of the
beaker. The beaker is used to protect the sensor from flow circulation disturbance. The
compensated voltage output is connected to a HP34970A data acquisition unit and DAQ card. A
HP34970A digital voltage meter is used to minimize the 60 noise. LabVIEW is used for
data acquisition.
Hz
140

Static Characterization
Initially, we attempted to statically characterize the sensor, but the temperature sensitivity
and dc offset issues prevented any meaningful results. The goal of the static characterization is
to verify the sensor design and characterize the sensitivity and linearity. After temperature
compensation and dc nulling have been achieved, a static calibration can be performed. The
flow cell design is such that an ideal one-dimensional fully developed incompressible laminar
flow exists between two semi-infinite parallel plates (Poiseuille flow between two parallel
plates). For this case, the pressure drop is constant and the wall shear stress is given by the
theoretical relation [7]
2wh dP
dxτ = − , (7-4)
where is the height of the channel in meters and P is pressure in Pascals. Detailed setup
information can be found in [34].
h
The incompressible flow is first verified before the sensor static calibration. The
incompressible flow exhibits a linear pressure drop versus length for wall shear stress up to
, which is a necessary assumption for Equation 2 Pa (7-4). The pressure measurements are
carried out using the Scannivalve pressure measurement system. This multiplexing valve system
allows the pressure taps to be reached sequentially to measure pressure drop between the first
pressure tap and other taps downstream. The inlet flow rate is regulated using a mass flow
controller (GFC4715). A linear pressure drop versus length is displayed in Figure 7-1.
Figure 7-2 shows the experimental setup for the static calibration of the wall shear stress
sensor. The sensor is flush-mounted on one wall of the laminar flow cell and oriented for
measuring wall shear stress in the flow direction. The corresponding pressure drops across two
pressure taps and is measured using a differential pressure gauge, Heise pressure meter. 1P 2P
141

The voltage output is first fed into the compensation circuit. The compensated signal is then
supplied to a HP34970A precision digital voltage meter to eliminate 60Hz noise from the power
supply by averaging. The mass flow rates are controlled automatically by LabVIEW to obtain
different pressure drops and correspondingly wall shear stress. LabVIEW is also used for data
acquisition and manipulation.
Noise Measurement
In order to determine the isolated resistor noise characteristics, the sensor is placed in a
double-nested Faraday Cages to improve the electromagnetic interference (EMI) reduction [98].
The compensated voltage output is amplified by a SR560 preamplifier, and then fed into the
spectrum analyzer (SRS785). The spectrum analyzer (ac coupled) measures the noise power
spectral density (PSD), using a Hanning window to avoid PSD leakage. The noise PSD of the
sensor is obtained by subtracting the setup noise PSD from the total measurement noise PSD.
The setup noise sources include EMI and noise from the amplifier, spectra analyzer, and power
source.
Recommendations for Future Sensor Designs
Based on lessons learned during the first generation shear stress sensor fabrication and
characterization, there are several issues that need to be addressed in future designs.
Specifically, issues regarding resistor self-heating and pressure sensitivity need to be addressed.
In the sensor calibration, piezoresistor self-heating was clearly present when the dissipated
power was greater than 10 . A study of the normalized sensitivities indicated that self-
heating could be avoided all together for a power dissipation limit of . Therefore, the
power dissipation limit in the design optimization should be decreased from 100 down to
to avoid resistor self heating. The power limit will be a function of the tether geometry,
but the order of magnitude in power reduction will provide a better estimate of appropriate
mW
5.7 mW
mW
10 mW
142

biasing conditions for design purposes. A detailed numerical study of the resistor heating may
also provide insight into this phenomenon, but this may be challenging due to the complexity of
the convective boundary conditions at the tether surface.
For a balanced Wheatstone bridge, pressure fluctuations should not affect the voltage
output. Preliminary pressure calibrations, however, indicate that the pressure sensitivity is only
lower than the shear stress sensitivity. In addition to achieving better control of the
resistor implant process to balance the bridge, this can be mitigated by extending the side-
implanted resistor all the way down tether thickness. The fabrication process should change
correspondingly to protect the bottom of the piezoresistor with a high quality passivation. In
current sensor design, the piezoresistor is implanted on the top of the tether thickness to
avoid resistor current leakage. So in the final backside release step, the BOX layer was removed
to release the structure and the tether bottom is exposed to the flow without any protection. This
will cause sensitivity drifting if the piezoresistor is implanted on the whole tether thickness. A
process flow must be designed to realize an electrically passivated resistor that extends to the
bottom of the resistor thickness.
(10 dBO )
5 μm
In general, improved test structures are needed to provide additional information about the
side-planted resistors. Specifically, a test structure must be added into the mask design to enable
the measurement resistor doping profile via secondary ion mass spectroscopy (SIMS). In
addition, providing additional bond pads for each resistor will permit a resistor trim based
approach to bridge balancing and temperature compensation [60].
143

1 2 3 4 5 6 720
40
60
80
100
120
140
Length (Inch)
Pre
ssur
e D
rop
(Pa)
Testing Data linear Fitting
Figure 7-1. Pressure drops versus length between taps in the flow cell.
PiezoresistiveShear Stres Sensor
P1 P2
L
Amplifier
Mass FlowController
Source-Meter
u(y)
Flow Cell
Gas
PressureMeter
Voltage Meter
dPVolts
DAQ
PC(LabView)
Compensation Circuit
Figure 7-2. Experimental setup of static calibration.
144

APPENDIX A MECHANICAL ANALYSIS
A clamped-clamped beam with a central point force and a distributed pressure load is
shown in Figure A-1 (a). This is a second order statically indeterminate problem. Euler
Bernoulli beam theory is used to predict the linear, small deflection behavior and Von Kármán
strain is included in the nonlinear, large deflection models. Two methods, an energy method and
an exact analytical method, are used to solve the large deflection problem. Using Euler-
Bernoulli beam theory, the stress distribution is also derived.
Small Deflection
Equilibrium equations may be written based on the free body diagram of the symmetric
structure, Figure A-1(b). The relationships between the resultant forces, AR and BR , point load
, and distributed load Q are thus P
2A B tR R P QL= = + , (A-1)
where 2w e eP W Lτ= , w tQ Wτ= , and wτ is the wall shear stress. The nonlinear differential
equation governing the beam deflection caused by bending is given as [82]
( )
2 2
3 22
( )
1x
d w x dxEIdw dx
=⎡ ⎤+⎣ ⎦
M , (A-2)
where is the deflection in the direction, ( )w x z E is the Young’s Modulus, I is the area
moment of inertia given as 3 12t tI TW= , and xM is the resisting moment in cross of x . Writing
the equation for moment equilibrium, 0DM =∑ , yields
2 2x A AM M R x Qx= − + − , (A-3)
145

where AM is the resisting moment, and A BM M= due to the symmetry of the structure.
Assuming the rotation dw dx is very small, Equation (A-2) is simplified to
2
2
( ) xMd w xdx EI
= . (A-4)
Integrating Equation (A-4) yields the rotation and deflection of the beam along its length,
( ) 2 31
1 1 12 6A A
dw xM x R x Qx c
dx EI⎛= − + − +⎜⎝ ⎠
⎞⎟ (A-5)
and 2
3 41
1 1 1( )2 6 24A
A
M xw x R x Qx c x cEI
⎛= − + − + +⎜
⎝ ⎠2
⎞⎟ , (A-6)
where and are constants. There are three unknown quantities in Equations 1c 2c (A-5) and (A-6)
, AM , and . Therefore, three boundary conditions should be employed, 1c 2c
( )0 0 (clamped)w = , (A-7)
( )00 (clamped)
dwdx
= , (A-8)
and ( ) 0 (symmety)tdw Ldx
= . (A-9)
Substituting the above boundary conditions and AR from (A-1) into (A-6), one obtains
1 2 0c c= = , (A-10)
and 21 14 3A t tM PL QL= + . (A-11)
The displacement is then obtained by substituting Equation( )w x (A-10)-(A-11) and
momentum of inertia 3 12t tI TW= into (A-6)
( ) ( ) ( ) (2 2 3 4t3
3 8 2 8 2 , 0 x4
we e t t t e e t t t
t t
w x W L L W L x W L W L x W xEW T
)Lτ− ⎡ ⎤= + − + +⎣ ⎦ ≤ ≤ . (A-12)
146

The maximum deflection at the center of the beam is given as
( )3
214w e e t t t
L tt t e e
W L L W Lw LET W W L
τ ⎛ ⎞ ⎛Δ = − = +⎜ ⎟ ⎜
⎝ ⎠ ⎝
⎞⎟⎠
. (A-13)
Large Deflection-Energy Method
In a large lateral deflection, the beam experiences bending and stretching. The total strain
is composed of bending and stretching strain [42]
t bending strenchingε ε ε= + , (A-14)
where bendingε =2
2
d wydx
, y is the position upward. The axial strain at 2ty W= is given as [100]
21
2a
du dwdx dx
ε ⎛ ⎞= + ⎜ ⎟⎝ ⎠
. (A-15)
The total change in beam length is given by
2
2 2
0 0
12
L Lt t
a
du dwL dx dxdx dx
δ ε⎛ ⎞⎛ ⎞= = +⎜ ⎜ ⎟⎜ ⎝ ⎠⎝ ⎠
∫ ∫ ⎟⎟ . (A-16)
The integration of the first term is zero due to the clamped-clamped boundary condition. The
axial stain is the total change in beam length divided by the total length of the beam
2
2
0
12 4
Lt
strentchingt t
L dw dxL L dxδε ⎛ ⎞= = ⎜ ⎟
⎝ ⎠∫ . (A-17)
The total strain is obtained as
22 2
2 0
14
Lt
tt
d w dwydx L dx
ε ⎛ ⎞= + ⎜ ⎟⎝ ⎠∫ dx . (A-18)
For large deflection, a trial function in the form of a cosine is assumed, as it automatically
satisfies the doubly clamped boundary condition and is a maximum at the center of the beam.
The trial function is thus
147

( ) ( )1 cos2
tNL
t
L xw x
Lπ⎡ ⎤−⎛ ⎞Δ
= +⎢ ⎥⎜ ⎟⎢ ⎥⎝ ⎠⎣ ⎦
, (A-19)
where NLΔ is the maximum deflection at the center of the beam. Substituting this model into
(A-18) yields
( )sin2
tNL
t t
L xdwdx L L
ππ −⎛ ⎞Δ= ⎜
⎝ ⎠⎟ (A-20)
and ( )22
2 2cos
2tNL
t t
L xd wdx L L
ππ −⎛ ⎞Δ= − ⎜
⎝ ⎠⎟ . (A-21)
Substituting Equation (A-20) into Equation(A-18) yields
( )2 2
2cos
2 1tNL NL
tt t
L xy
L Lπ 2
26 tLπ πε
−⎛ ⎞Δ= ⎜ ⎟
⎝ ⎠
Δ+ . (A-22)
The strain energy density is given as
( )2
2 22
0 20
1 1 cos2 2 2 16
t tNL NLt
t t
L xU d E E y
L L Lε ππ πσ ε ε
2
2t
⎡ ⎤−⎛ ⎞Δ Δ= = = +⎢ ⎥⎜ ⎟
⎢ ⎥⎝ ⎠⎣ ⎦∫ (A-23)
The strain energy is then obtained
2
20 0 02
W Lt ttt
ETU U dV dxdyε= =∫ ∫ ∫ . (A-24)
The total strain energy is obtained by integrating Equation (A-24) to yield
2 4 3 4 4
396 256NL t NL t
tt t
WU ETL Lπ π⎛ ⎞Δ Δ
= +⎜⎝ ⎠
3
W⎟ . (A-25)
Based on the principle of virtual work, the total potential energy W is equal to the stored strain
energy minus the work done by the external force K ,
W U K= − , (A-26)
where K is given by
148

( ) (2
01 cos
2Lt tNL
NL tt
L xK P Q dx P QL
Lπ
δ⎡ ⎤−⎛ ⎞Δ
= + + = Δ +⎢ ⎥⎜ ⎟⎢ ⎥⎝ ⎠⎣ ⎦
∫ ) . (A-27)
The equilibrium configuration is that in which the potential energy is minimized. The minimum
is obtained when
4 3 3 4
3 3
1 048 64 2NL t NL t
t w et t
W WdW ET W L W Ld L L
π π τ τδ
⎛ ⎞Δ Δ= + − −⎜ ⎟
⎝ ⎠e w t t = . (A-28)
Rearranging Equation (A-28) yields
2 34 4 21
96 128 4NL w e e t t t
NLt t e e
W L W L LW ET W L
τπ π⎛ ⎞⎛ ⎞ ⎛ ⎞⎛Δ⎜ ⎟Δ + = +⎜ ⎟ ⎜ ⎟⎜⎜ ⎟⎝ ⎠ ⎝ ⎠⎝⎝ ⎠ tW
⎞⎟⎠
. (A-29)
Simplifying the above equation, 4
196π
≈ and4 3
128 4π
≈ , yields an approximate large deflection
solution,
2 3
231 14 4
NL w e e t t tNL
t t e e
W L W L LW ET W L
τ⎛ ⎞⎛ ⎞ ⎛ ⎞⎛Δ⎜ ⎟Δ + = +⎜ ⎟ ⎜ ⎟⎜⎜ ⎟⎝ ⎠ ⎝ ⎠⎝⎝ ⎠ tW
⎞⎟⎠
. (A-30)
Large Deflection-Analytical Method
For large deflection, axial force in the beam is not zero as in the small deflection model,
and serves as a constitutive equation in the modeling analysis. Since the beam is symmetric,
only half of the beam is analyzed, as shown in Figure A-3. For large deflections, taking axial
force into account, the differential equation governing the beam deflection caused by bending
is given as
aF
2
2
( ) ( )d w xEI Mdx
= x , (A-31)
where the slope of beam caused by large deflection is assumed 1dw dx << , and therefore
( 2dw dx) is negligible. The moment ( )M x is given by
149

20
1( ) ( (0) ( ))2 2 a
PM x Qx x M F w w x= + − − − , (A-32)
where ( )0w is an unknown constant. Substituting Equation (A-32) into Equation (A-31) yields
2
202
( ) 1( ) (0)2 2a
d w x PEI F w x Qx x M F wdx
− = + − − a . (A-33)
The above equation can be solved as a superposition of one general solution and a particular solution
nw
sw ( ) ( ) ( )n sw x w x w x= + , (A-34)
1 2where ( ) C sinh( ) cosh( )nw x x C xλ λ= + and 2 ( )sw x ax bx c= + + , assuming = aF EIλ .
Substituting sw into Equation (A-33), a, b, and c are obtained as
02
a
Qa = , , and c = (0)2F 2 a a
MP Qb wF F aF λ
− = − + − .
Equation (A-34) can be rewritten as
2 01 2 2
( ) sinh( ) cosh( ) (0) 2 2a a a a
MQ P Qw x C x C x x x wF F F F
λ λλ
= + − − + + − , (A-35)
for which the boundary conditions are:
( )0=0
dwdx
, (A-36)
( ) =0tdw Ldx
, (A-37)
and ( ) 0tw L = . (A-38)
For large deflection, the axial strain at 2ty W= is nonlinear and is given as
2
0 12
x ax
du Fdwdx dx E EA
σε ⎛ ⎞= + = =⎜ ⎟⎝ ⎠
, (A-39)
150

where . Integrating the above equation yields t tA TW=
2
0
0
12
Lt
at
duEA dwF dxL dx dx
⎛ ⎞⎛ ⎞= +⎜ ⎜ ⎟⎜ ⎝ ⎠⎝ ⎠∫ ⎟⎟ . (A-40)
The first term in the integration is zero due to the doubly clamped boundary condition. Axial
force in the neutral axis aF 2ty W= is then obtained as
2
02Lt
at
EA dwF dxL dx
⎛ ⎞= ⎜ ⎟⎝ ⎠∫ . (A-41)
There are five unknown variables: and , thus five boundary conditions are
needed to solve for these unknown variables. However, only three boundary conditions
1 2 0, , , ,aC C F M (0)w
(A-36)-
(A-38) and one constitutive equation (A-41) are available. Another condition is ( ) ( )0 0w w= .
The problem is indeterminate and an iterative technique must be used to find the final result.
First, we applied boundary conditions (A-36)-(A-38) and the constitutive equation (A-41)
into Equation (A-35) and solve it to get the maximum deflection as a function of the axial force
in the neutral axis, . The detailed procedure for solving this problem is given in the following. aF
Substituting (A-35) into boundary conditions (A-36) and (A-37) yields
1 2
1 and cosh( )2 sinh( ) 2 2t
a a t
P PC C QLF F L
λλ λ λ
⎛= = + −⎜⎝ ⎠
t
P L ⎞⎟ . (A-42)
Substituting and into 1C 2C (A-35) and setting 0x = yields
0 2
1 cosh( )sinh( ) 2 2t
t
Q P PtM QL L
Lλ
λ λ λ⎛= − + −⎜⎝ ⎠
⎞⎟ . (A-43)
Substituting 0M from (A-43) and and from 1C 2C (A-42) into (A-35) yields
( ) 2cosh( ) 1sinh( ) cosh( ) (0)2 sinh( ) 2 2 2 2t t
a a t a a
P x P P Q Pw x x QL L x x wF F L F F
λλ λλ λ λ
− ⎛ ⎞= + + − − −⎜ ⎟⎝ ⎠
+ . (A-44)
151

Substituting (A-38) into (A-44) yields deflection at the center,
2cosh( ) 1 (0) sinh( ) cosh( ) +
2 sinh( ) 2 2 2 2t t
t t ta a t a
L QP P Pw L QL LF F L F
λλ λλ λ λ
− ⎛ ⎞= − − + − +⎜ ⎟⎝ ⎠
t
a
L PLF
. (A-45)
Derivative Equation (A-44) to obtain
( ) 1 sinh( )cosh( ) cosh( )
2 sinh( ) 2 2 2
t ta t
dw x P x P Px QL L Qxdx F L
λλ λλ
⎡ ⎤⎛ ⎞= + + − −⎢ ⎥⎜ ⎟⎝ ⎠⎣ ⎦
P− . (A-46)
Secondly, we solve the maximum deflection equation (A-45) by iterating . An initial
value is selected randomly and the following steps are performed to obtain the
maximum deflection,
aF
-4aF =10 Pa
( )0w .
1) Substitute into aF (A-46) to get dwdx
, where FaEI
λ = .
2) Substitute dwdx
into (A-41) to obtain new . aF
3) Repeat 1), 2) until the relative error 1 1Fa Fa Fa 1 6n n n e+ +− ≤ − .
4) Substitute into aF (A-45) to find the maximum deflection ( )0w .
Stress Analysis
The bending stress along a beam (shown in (A-3)) is given as [82]
zx
z
M yFA I
σ = + , (A-47)
where zI is the moments of inertia for the axis, and z 3 12z t tI TW= . In small deflection, the
axial force . A free body diagram of the clamped beam is shown based on the discussion 0aF =
152

in the small deflections section, where AR and AM are obtained from Equation (A-1) and (A-11),
respectively. The moment for a certain length from the edge of the beam is obtained as,
21 1 1 14 3 2 2z t t t
2M PL QL P QL x Qx⎛ ⎞= − − + + −⎜ ⎟⎝ ⎠
. (A-48)
Substituting Equation (A-48) into (A-47) and simplifying the equation to obtain the bending
stress along the beam ( )0 tx L≤ ≤ 0y at = ,
2
2
2 6 33 34 2
w e e t t t t t t tx
t t e e e e t e e t
W L L W L W L W LxW T W L W L L W L L
τσ⎡ ⎤⎛ ⎞ ⎛ ⎞⎛ ⎞ ⎛ ⎞
= + − + +⎢ ⎥⎜ ⎟ ⎜ ⎟⎜ ⎟ ⎜ ⎟⎢ ⎥⎝ ⎠ ⎝ ⎠⎝ ⎠ ⎝ ⎠⎣ ⎦
x . (A-49)
Effective Mechanical Mass and Compliance
In this section, the mechanical lumped parameters for a clamped-clamped beam are found.
These parameters include lumped compliance obtained via the storage of potential energy and
lumped mass obtained via the storage of kinetic energy. These results are used in Chapter 3 to
develop the lumped element model of a laterally diffused piezoresistive shear stress sensor.
Recall that the lateral displacement and maximum displacement of the clamped-clamped
beam in small deflection given in Chapter 2,
( ) ( )2 2 3 43
( ) 3 8 2 8 2 (0 )4
we e t t e e t t t t
t t
w x W L L W Lt x W L W L x W x x LEW Tτ ⎡ ⎤= + − + +⎣ ⎦ ≤ ≤ (A-50)
and ( )3
1 24w e e t t t
tt t e e
W L L W Lw LET W W L
τ ⎡ ⎤ ⎡ ⎤= +⎢ ⎥ ⎢ ⎥
⎣ ⎦ ⎣ ⎦. (A-51)
The kinetic co-energy KEW of a rectilinear system with a total effective mass m moving
with velocity u is given as,
* 12KEW m= 2u . (A-52)
For a simple harmonic motion, the velocity and displacement of the beam are related by
153

( ) ( )u x j w xω= , (A-53)
where ω is the frequency and ( ) ( )t tu L . ( )u x is then expressed as j w Lω=
( ) ( )( ) ( )t
t
w xu x u L
w L= (A-54)
For an infinitesimal element on the beam with a mass of si t tWT dxρ , the kinetic co-energy
*KEdW is calculated using Equations (A-52) and (A-54) to be
( ) ( )( ) ( )
2* 2 2
2
12 2
si t t tKE si t t
t
WT u LdW WT u x w x dx
w Lρ
ρ= = (A-55)
where siρ is the density of silicon. Integrating Equation (A-55) over the beam gives the total
kinetic co-energy of the system,
( )( )
2
* * 22
0 0
2L Lt t
si t t tKE KE
t
WTu LW dW w x
w Lρ
= =∫ ( )dx∫ . (A-56)
The reference point is tx L= , which corresponds to the maximum deflection of the beam ( )tw L .
The distributed deflection of the beam can be lumped into a rectilinear piston by equating the
kinetic energy obtained in Equation (A-56) to the kinetic energy of the rectilinear piston of mass
tmeM ,
( )2
2tme t
KE
M u LW = . (A-57)
Equating Equation (A-57) and (A-56) yields effective mechanical mass as
( ) ( )2
20
2Lt
si t ttme
t
WTM w x dxw Lρ
= ∫ . (A-58)
Since the velocity of the plate is ( )tu j w Lω= , the effective mechanical mass of the device
is the sum of the mass of the plate and the effective mechanical mass of the beam,
154

me p tme si e e t tmeM M M L W T Mρ= + = + . (A-59)
The strain energy stored in the beam due to its deflection can be expressed as
22
20
( )Lt
SE
d w xW EI ddx
⎛ ⎞= ⎜ ⎟
⎝ ⎠∫ x . (A-60)
The strain energy of an equivalent spring is given by
( )21 12SE t
me
W wC
= L , (A-61)
where is the mechanical compliance of the beam. Equating Equation meC (A-61) and (A-60)
yields
( )2
22
20
( )2
tme Lt
w LC
d w xEI ddx
⎛ ⎞⎜ ⎟⎝ ⎠∫ x
. (A-62)
Substituting and in Equation ( )w x ( )tw L (A-50) and (A-51) into (A-59) and(A-62) yields
2 3
2
1494 2238 10241315 315 315
1 2
t t t t t t
e e e e e eme si e e t
t t
e e
W L W L W LW L W L W L
M W L TW LW L
ρ
⎛ ⎞ ⎛ ⎞+ + +⎜ ⎟ ⎜ ⎟
⎝ ⎠ ⎝=⎛ ⎞+⎜ ⎟
⎝ ⎠
⎠ , (A-63)
and
2
3
2
1 21
2 641 415
t t
e etme
t t t t t t
e e e e
W LW LLC
ET W W L W LW L W L
⎛ ⎞+⎜ ⎟⎛ ⎞ ⎝ ⎠= ⎜ ⎟
⎛ ⎞⎝ ⎠ + + ⎜ ⎟⎝ ⎠
. (A-64)
155

x
y
z
Figure A-1. The clamped beam and free body diagram. a) Clamped-clamped beam. b) Free body
diagram of the beam. c) Free body diagram of part of the beam.
Fa
P/2Q
Lt
M0
Figure A-2. Clamped-clamped beam in large deflection.
MyMA
V
xDA
RA
Q
x=0 (a) (b)
Figure A-3. Clamped-clamped beam in small deflection (a) and free body diagram of the
clamped beam (b).
156

APPENDIX B NOISE FLOOR OF THE WHEATSTONE BRIDGE
For a Wheatstone bridge shown in Figure B-1, assuming 1 2 3 4R R R R R= = = = , we get
1 2BV V= , therefore the voltage across each resistor is
2R B B BV V V V 2= − = . (B-1)
The current through the resistor is
2
BR
VIR
= . (B-2)
Assuming the noise sources are uncorrelated, the mean square noise can be solved as a
superposition of the mean square thermal noise, the 1 f noise, and the amplifier noise. For
thermal noise, the equivalent noise model is given in Figure B-2. The rms thermal voltage is
given as
( ) ( )2 2, 1 2 1 2 3 44 4 4n thermal B B BV E E k T R R f k T R R f k T= + = Δ + Δ = ΔR f . (B-3)
For 1 f noise, the equivalent noise model is given in Figure B-3. The mean square
current noise is
2
2 21
1 1
lnH R
c
I fIN f
α ⎛ ⎞= ⎜
⎝ ⎠⎟ . (B-4)
The mean square voltage noise 21E is obtained as
( )( )22 2 21 1 2 1 2E I I R R= + . (B-5)
Substituting Equation (B-4) and (B-2) into (B-5) to obtain
( )
( )
2 222 2 2
1 11 1 2 1
2 222 2
1 22 21 1
ln ln
= ln ln4 4
H R H R
c c
H B H B
c c
I f I fE RN f N f
V f V f
2R
R RN R f N R f
α α
α α
⎛ ⎞⎛ ⎞ ⎛ ⎞= +⎜ ⎟⎜ ⎟ ⎜ ⎟⎜ ⎟⎝ ⎠ ⎝ ⎠⎝⎛ ⎞⎛ ⎞ ⎛ ⎞
+⎜ ⎟⎜ ⎟ ⎜ ⎟⎜ ⎟⎝ ⎠ ⎝ ⎠⎝ ⎠
⎠ . (B-6)
157

Rearrange the above equation to get
2
2 21
1
= ln8H B
c
V fEN f
α ⎛ ⎞⎜ ⎟⎝ ⎠
. (B-7)
The rms 1 f voltage is obtained as
2 2
2 2 2,1 1 2
1 1
2 ln ln8 4H B H B
n fc c
V f V fV E EN f N f
α α⎛ ⎞⎛ ⎞ ⎛ ⎞= + = =⎜ ⎟⎜ ⎟ ⎜ ⎟⎜ ⎟⎝ ⎠ ⎝ ⎠⎝ ⎠
2 . (B-8)
The total noise floor is obtained via the superposition of the mean square noises
( )2
22
1
ln 4 4 94H B
n Bc
V fV k TR fN f
α ⎛ ⎞= + Δ +⎜ ⎟
⎝ ⎠e− , (B-9)
where the last term in the above equation is the low amplifier noise.
158

Figure B-1. The Wheatstone bridge.
R1
R2
R4
R3
V1 V2
R1 R2 R4 R3V1 V2
E1 E2
Figure B-2. The thermal noise model of the Wheatstone bridge.
Figure B-3. The 1 f noise model of the Wheatstone bridge.
159

APPENDIX C PROCESS TRAVELER
Wafer: n-type <100> 1-5 ohm-cm, SOI wafer
Start with SOI wafer (n-Si (100) 1-5 Ω-cm) with 50μm silicon on 1.5um buried oxide (BOX).
DI rinse
Masks
Reversed biased mask-------RBM
Piezo contact mask-------PCM
Nested mask-------NM
Side implant mask-------SIM
Bond pad cuts mask-------BPCM
Metal mask-------MM
Bond pad mask-------BPM
Process Steps
1. n-well Implant
• Ion implant- dopant = phosphorus, energy = 150 keV, dose = 4e12 cm-2. 7 degree tilt, blanket implantation. This forms the n-well. This needs to be simulated first.
• Piranha clean
2. PECVD oxide: deposit oxide 0.1 mμ via PECVD
3. Reverse Bias Contact
• Coat and pattern photoresist/oxide on front side
o HMDS evaporation for 5min o Spin AZ1529 at 4000rpm for 50sec & softbake at 90 oven for 30min Coo Pattern by mask RBM
Exposure 60sec at 8.8mJ/cm2 Develop at AZ300MIF for 50sec Hard bake at 90 oven for 60min Co
160

• BOE(7:1) : ~80sec to etch 0.1um oxide. This step puts alignment marks on the wafer
• Ion implant- dopant =phosphorus, energy = 80 keV, dose = 9e13 cm-2. 7 degree tilt
• Ash strip photoresist
• RCA clean
• Thermal annealing at , time=420sec in nitrogen 1000 CoT =
4. Inplant Interconnection Contact
• Coat and pattern photoresist/oxide on front side
o HMDS evaporation for 5min o Spin AZ1529 at 4000rpm for 50sec & softbake at 90 oven for 30min Coo Pattern by mask PCM, align to the alignment marks created via RBM
Exposure 60sec at 8.8mJ/cm2 Develop at AZ300MIF for 50sec Hard bake at 90 oven for 60min Co
• BOE(7:1) : 90sec to etch 0.1um oxide. This step puts alignment marks on the wafer
• Preamorphization Implant
Ion implant- dopant = Ge, energy = 160 keV, dose = 1e15 . 7 degree tilt -2cmIon implant- dopant = Ge, energy = 50 keV, dose = 1e15 . 7 degree tilt -2cm
• Ion implant- dopant = boron, energy = 50 keV, dose = 1.2e16 . 7 degree tilt -2cm
• Ash strip photoresist
• Piranha clean
5. Nested Mask Release
• Deposit PECVD oxide 1 μm
• Coat and pattern photoresist on front side
o HMDS evaporation for 5min o Spin AZ1529 at 2000rpm for 50sec & softbake at 95 convection oven for
25min Co
o Pattern by mask NM, align to the alignment marks created via PCM Exposure 85sec at 7.9 mJ/cm2 Develop at AZ300MIF for 60sec Hard bake at 90 oven for 60min Co
• Plasma dry oxide etch. This step puts new alignment marks on the wafer
161

• BOE(6:1) oxide etch to remove the oxide residues
6. Etch Sidewalls
• Coat and pattern photoresist on front side
o HMDS evaporation for 5min o Spin AZ1512 at 2000rpm for 40sec & softbake at 95 hotplate for 50sec Coo Pattern by side implantion mask(SIM), align to the alignment marks created via
NM Exposure 19sec at 4.5mJ/cm2 Develop at AZ300MIF for 70sec Hard bake at 90 oven for 60min Co
• BOE(6:1) oxide for 2min
• DRIE silicon to deep ~8μm
• BOE(6:1) oxide for 60sec to avoid Piezoresistor and Piezo contact disconnection due to DRIE undercut
• Ash strip photoresist
• Piranha clean
7. Hydrogen Annealing
• , P= for 5min in pure hydrogen for surface roughness reduction 1000T C= ° 5mTorr
8. Oxidation: thermal grown wet oxide 1000A at oT=1000 C
9. Side Wall Implantation
• Preamorphization implant
Ion implant- dopant = Ge, energy = 160 keV, dose = 1e15 . 54 degree tilt -2cmIon implant- dopant = Ge, energy = 50 keV, dose = 1e15 . 54 degree tilt -2cm
• Ion implant- dopant = boron, energy = 50 keV, dose = 1e16 . 54 degree tilt -2cm
• Piranha clean
10. Beam Definition
• Etch oxide by reactive ion etch via dielectric setting in STS
• DRIE silicon to BOX
• BOE(6:1) 2min to remove oxide (ensure to remove 0.1um oxide on sidewall)
162

11. Oxidation
• Piranha clean
• Annealing at for 60min in nitrogen oT=1000 C
• Thermal dry oxide grown at for 235min oT=975 C ( )0.1μm
12. Bond Pad Cuts
• Trench filling
o Spin AZ1512 at 800rpm for 40sec & softbake at 95 hotplate for 50sec Co
o Spin AZ9260 at 800rpm for 50sec & softbake at 90 oven for 30min Co
o Flood exposure Exposure 300sec at 7.9mJ/cm2 Develop at AZ400MIF till clear
• Coat and pattern photoresist on front side
o HMDS evaporation for 5min o Spin AZ1512 at 0.5k/2k for 5/40sec & softbake at 95 hotplate for 50sec Co
o Pattern by bond pad cuts mask(BPCM), align to the alignment marks created via PCM Exposure 45sec at 4.5mJ/cm2 Develop at AZ300MIF for 60sec Hard bake at 90 oven for 60min Co
• BOE(6:1) oxide for 15min
• Remove photoresist
13. Metalization
• Trench filling
• Desccum in oxygen plasma
• Deposit 1um Al-Si(1%) to avoid spiking via sputtering
• Coat and pattern photoresist on front side
o HMDS evaporation for 5min o Spin AZ1529 at 0.2k rpm and stay for 2min. Then spin at 0.2k/2k rpm for
10/50sec with ramp rate of 100/500 rmp/s o Softbake at 90 oven for 30min Co
o Pattern by metal mask (MM), align to the alignment marks created via BPCM Exposure 100sec at 7.9mJ/cm2 Develop at AZ300MIF for 1min 30sec
163

Hard bake at 90 oven for 60min Co
• Etch Al by RIE
• Remove photoresist
14. Nitride Passivation
• Deposit 2000A PECVD silicon nitride
• Trench filling
• Coat and pattern photoresist on front side
o HMDS evaporation for 5min o Spin AZ1512 at 4000rpm for 40sec & softbake at 95 hotplate for 50sec Co
o Pattern by bond pad mask(BPM), align to the alignment marks created via MM Exposure 18sec at 4.5mJ/cm2 Develop at AZ300MIF for 60sec Hard bake at 90 oven for 60min Co
• Etch nitride by RIE
• Remove photoresist
15. Final Release
(a) Device wafer
• Spin AZ9260 on front side of the device wafer
o Spin speed 200rpm, ramp rate 100rpm/s for 10s, wait for 1min. Run this recipe twice
o Spin speed 4000rpm, ramp rate 1000rpm/s for 50s o Soft bake at 90 oven for 30min Co
• HMDS on the backside
• Spin AZ9260 on backside of the device wafer
o Spin speed 2000rpm, ramp rate 1000rpm/s for 50s
o Soft bake in 90 oven for 30min Co
• Pattern by back release mask(BRM), align to the alignment marks created via NM
o Exposure 25sec in EVG520 mask aligner
o Develop at AZ300MIF for 3min 40sec
164

o Hard bake at 90 oven for 60min Co
(b) Carrier wafer
• Spin PR AZ9260 on a carrier wafer
o Spin speed 2000rpm, ramp rate 1000rpm/s for 50s
• Soft bake at 90 oven for 20-30min Co
• Put some cool grease on the edge of the carrier wafer
• Bake on hotplate, 60 for 5min Co
• Put the device wafer face down on the carrier wafer.
• Put on the hotplate, apply pressure using swab
(c) DRIE
• Run DRIE, stopped until 50um silicon left
• Put the wafer on the hotplate 6 for 5min, separate from the carrier wafer 0 Co
• Separate the wafer into individual dies
(d) Process on individual dies • Spin AZ9260 on a carrier wafer
o Spin speed 2000rpm, ramp rate 1000rpm/s for 50s
o Put the device die on the top of the carrier wafer, apply pressure using swab
o Soft bake in 90 oven for 30min Co
• DRIE to BOX layer
• RIE BOX layer for 15min, run BOE 5-10min to remove the residues
• RIE nitride for 6min
• Remove the device die using tweezers
• Put the device die in AZ400 PR stripper
• Plasma clean in Asher for 10min
165

APPENDIX D PROCESS SIMULATION
This chapter includes the FLOOPS process simulation of the piezoresistor, p++
interconnects and n-well, as well as the reverser bias connections.
(a). Piezoresistor
This program simulates the doping profile of piezoresistor in the silicon layer after ion
implantation, anneal and thermal oxidation. The boron is implanted into preamorphization Si
layer with oxide as a screen layer. Its initial doping profile is simulated by SRIM, and then
imported to FLOOPS file for subsequent process simulation.
line x loc=-0.1 spa=0.005 tag=SiO2top line x loc=0 spa=0.005 tag=top line x loc=1.5 spa=0.01 tag=bot region oxide xlo=SiO2top xhi=top region silicon xlo=top xhi=bot init #profile name=B_SRIM inf=/home/yawei/Floops_new/SRIM_B_50keV_0.1umSiO2_Si_only.txt sel z=B_SRIM*5 name=Boron sel z=log(Boron) layer etch oxide time=1 rate=0.1 iso diffuse temp=1000 time=60 diffuse temp=975 dry time=235 puts "### Oxide thickness after thermal oxide is [expr [interface oxide /silicon] - [interface gas /oxide]] um." sel z=log10(Boron) plot.1d bound !cle label=PZR set cout [open /home/yawei/Floops_new/pzrdata w] puts $cout [print.1d] close $cout sel z=log10(5.0e14) plot.1d !cle label=background sel z = Boron-5e14 puts "The Junction Depth is [interpolate silicon z=0.0]" set z=Boron layer (b). P++ interconnection and n-well
#p++ surface concentration is ~1e+21 and n-well Ns~1e+16 # generate grid
166

line x loc=0 spa=0.001 tag=top line x loc=1.0 spa=0.01 line x loc=2.5 spa=0.01 tag=bot region silicon xlo=top xhi=bot init sel z=5e14 name=Phosphorus implant phosph dose=4.0e12 energy=150 tilt=7 #deposit 0.1um PECVD oxide deposit time=4 rate =0.030 oxide grid=10 puts "Oxide thickness after PECVD oxide is [expr [interface oxide /silicon] - [interface gas /oxide]] um." diffuse temp=1000 time=450 strip oxide implant boron dose=1.2e16 energy=50 tilt=7 #strip oxide #deposit 1um PECVD oxide deposit time=41.9 rate =0.0239 oxide grid=10 puts "### Oxide thickness after 2nd PECVD oxide is [expr [interface oxide /silicon] - [interface gas /oxide]] um." diffuse temp=1000 wet time=9.2 # oxide thickness is 1000A etch oxide time=1 rate=0.1 iso diffuse temp=1000 time=60 diffuse temp=975 dry time=235 sel z=log10(Phosphorus+1) plot.1d bound !cle color=blue label=nwell set cout [open /home/yawei/Floops_new/nwelldata w] puts $cout [print.1d] close $cout sel z=log10(5e14) plot.1d !cle color=pink label=background sel z=log10(Boron+1) plot.1d bound !cle color=red label=p++ set cout [open /home/yawei/Floops_new/ohmicdata w] puts $cout [print.1d] close $cout sel z = Boron- Phosphorus layer puts "The Junction Depth is [interpolate silicon z=0.0]" (c). Reverse biased contact line x loc=0 spa=0.005 tag=top line x loc=2.5 spa=0.01 tag=bot region silicon xlo=top xhi=bot init sel z=5.0e14 name=Phosphorus implant phosph dose=4.0e12 energy=150 #deposit 0.1um PECVD oxide deposit time=4.19 rate =0.0239 oxide grid=10 puts "Oxide thickness after PECVD oxide is [expr [interface oxide /silicon] - [interface gas /oxide]] um." strip oxide smooth set t [open temp.P w+]
167

sel z=Phosphorus puts $t [print.1d] close $t # start with a new grid ... since strip oxide removes the nodes near the surface where the new phosphorus profile is about to go set former_interface [interface gas /silicon] line x loc=$former_interface spa=0.0001 tag=top line x loc=0.1 spa=0.001 line x loc=1.0 spa=0.01 line x loc=2.5 spa=0.01 tag=bot region silicon xlo=top xhi=bot init profile name=Phosphorus inf=temp.P # inplant phosphorus for reverse bias contact implant phosph dose=9.0e13 energy=80 tilt=7 sel z=log10(Phosphorus) plot.1d bound !cle color=red label=Profile_ini #Thermal Annealing 450min at T=1000 deg diffuse temp=1000 time=450 #deposit 1um PECVD oxide deposit time=41.9 rate =0.0239 oxide grid=10 puts "### Oxide thickness after 2nd PECVD oxide is [expr [interface oxide /silicon] - [interface gas /oxide]] um." # thermal grown oxide 1000A at T=975 deg diffuse temp=1000 dry time=9.2 etch oxide time=1 rate=0.1 iso diffuse temp=1000 time=60 diffuse temp=975 dry time=235 puts "### Oxide thickness after thermal oxide is [expr [interface oxide /silicon] - [interface gas /oxide]] um." sel z=log10(5.0e+14) plot.1d bound !cle color=black label=background sel z=log10(Phosphorus+1) plot.1d bound !cle color=blue label=reverse_bias set cout [open /home/yawei/Floops_new/reversedata w] puts $cout [print.1d] close $cout layers
168

APPENDIX E MICROFABRICATION RECIPE FOR RIE AND DRIE PROCESS
Table E-1. Input parameters in the ASE on STS DRIE systems. Parameters 50 μm Si etch 8 μm Si etch 2SiO etch Coil power 600 W 600 W 800 W Platen power 12 W 12 W 130 APC (mTorr) 28 (fixed) 28 (fixed) 50 (auto) Etching process 11 6 Passivation process 6.5 4
6SF flow (sccm) 130 130
2O flow (sccm) 13 13
4 8C F flow (sccm) 85 85 Etching cycle Varies Varies Varies Passivation cycle Varies Varies Varies
Table E-2. Anisotropic oxide/nitride etch recipe on the Unaxis ICP Etcher system.
Parameters Oxide Nitride 3CHF flow (sccm) 45 --
6SF flow (sccm) -- 15
2O flow (sccm) 3 5 RF2 power (W) 600 300 RF1 power (W) 100 100 Chamber pressure (mTorr) 15 20 Helium flow (sccm) 20 10
Table E-3. Anisotropic aluminum etch recipe on the Unaxis ICP Etcher system.
Parameters Settings Ar flow (sccm) 5
2Cl flow (sccm) 30
3BCl flow (sccm) 15 RF2 power (W) 500 RF1 power (W) 100 Chamber pressure (mTorr) 5 Helium flow (sccm) 20
169

APPENDIX F PACKAGING DRAWINGS
25
12.70
20
Measurements Units: mm
SIDE VIEW
TOP VIEW
Insert O-ring
19.05
??
20
Note: Sharp Corner Is Required
6.35
R 15
R 25
Screw A
Material: Lucite
Using device chip to ensure it flush-mounted
Hole Through the Lucite to Take Out the PCB Package
Holes Through the Lucite
R3
Figure E-1. The drawing illustrating the Lucite packaging.
170

Figure E-2. The aluminum plate for the plane wave tube interface connection.
171

Figure E-3. Aluminum packaging for pressure sensitivity testing.
172

LIST OF REFERENCES
[1] P. J. Johnston, J. Allen H. Whitehead, and G. T. Chapman, "Fitting Aerodynamics and Propulsion into the Puzzle," Aerospace America, pp. 32-42, 1987.
[2] W. Shyy, M. Berg, and D. Ljungqvist, "Flapping and Flexible Wings for Biological and Micro Air Vehicles," Prog. Aerosp. Sci., vol. 35, pp. 455-505, 1999.
[3] M. Sheplak, L. Cattafesta, and Y. Tian, "Micromachined Shear Stress Sensors for Flow Control Applications," IUTAM Symposium on Flow Control and MEMS, London, England 2007, pp. 67-73.
[4] J. W. Naughton and M. Sheplak, "Modern Development in Shear Stress Measurement," Prog. Aerosp. Sci., vol. 38, pp. 515-570, 2002.
[5] M. Gad-el-Hak, Flow Control: Cambridge University Press, 2000, pp. 209-210.
[6] R. Rathnasingham and K. S. Breuer, "Active Control of Turbulent Boundary Layers," J. Fluid Mech., vol. 495, pp. 209–233, 2003.
[7] F. M. White, Viscous Fluid Flow, 2nd ed.: McGraw Hill, 1991, Ch.1, 4, 5, 6.
[8] H. Tennekes and J. L. Lumley., A First Course in Turbulence: The MIT Press, 1972, Ch.1, 5.
[9] Y. A. Cengel and J. M. Cimbala, Fluid Mechanics: Fundamentals and Applications: McGraw-Hill 2006.
[10] L. Lofdahl and M. Gad-el-Hak, "MEMS-Based Pressure and Shear Stress Sensors for Turbulent Measurement," Meas. Sci. Tech., vol. 10, pp. 665-686, 1999.
[11] A. Padmanabhan, "Silicon Micromachined Sensors and Sensor Arrays for Shear-Stress Measurements in Aerodynamic Flows," Ph.D Dissertation in Department of Mechanical Engineering, Massachussets Institute of Technology, 1997.
[12] H. Alfredsson, A. V. Johansson, J. H. Haritonidis, and H. Eckelman, "The Fluctuating Wall-Shear Stress and the Velocity Field in the Viscous Sublayer," Phys. Fluids, vol. 31, pp. 1026-1033, 1988.
[13] M. Gad-el-Hak and P. R. Bandyopadhyay, "Reynolds Number Effects in Wall-Bounded Flows," Appl. Mech. Rev., vol. 47, pp. 307-365, 1994.
[14] J. M. Corcos, "Resolution of Pressure in Turbulence," J. Acoust. Soc. Am., vol. 35 (2), pp. 192-200, 1963.
[15] T. A. Brungart, G. C. Lauchle, S. Deutsch, and E. T. Riggs, "Outer-Flow Effects on Turbulent Boundary Layer Wall Pressure Fluctuations," J. Acoust. Soc. Am., vol. 105, pp. 2097-2106, 1999.
173

[16] R. F. Blackwelder and J. H. Haritonidis, "Scaling of the Bursting Frequency in Turbulent Boundary Layer," J. Fluid Mech., vol. 132, pp. 87-103, July 1983.
[17] W. W. Willmarth and L. K. Sharma, "Study of Turbulent Structure with Hot Wires Smaller than the Viscous Length," J. Fluid Mech., vol. 142, pp. 121-149, May 1984.
[18] M. A. Schmidt, R. T. Howe, S. D. Senturia, and J. H. Haritonidis, "Design and Calibration of a Micromachined Floating-Element Shear-Stress Sensor," IEEE Trans. Electron Devices, vol. 35, pp. 750-757, 1988.
[19] J. Shajii, K.-Y. Ng, and M. A.Schmidt, "A Microfabricated Floating Element Shear Stress Sensor Using Wafer-bonding Technology," J. Microelectromech. Syst., vol. 1 (2), pp. 89-94, June 1992.
[20] A. Padmanabhan, H. Goldberg, K. D. Breuer, and M. A.Schmidt, "A Wafer-Bonded Floating-Element Shear Stress Microsensor with Optical Position Sensing by Photodiodes," J. Microelectromech. Syst., vol. 5 (4), pp. 307-315, 1996.
[21] T. Pan, D. Hyman, and M. Mehregany, "Microfabricated Shear Stress Sensors, Part 1: Design and Fabrication," AIAA J., vol. 37, pp. 66-72, 1999.
[22] F.-G. Tseng and C.-J. Lin, "Polymer MEMS-Based Fabry–Perot Shear Stress Sensor," IEEE Sensors J., vol. 3, pp. 812-817, Dec. 2003.
[23] S. Horowitz, T.-A. Chen, V. Chandrasekaran, K. Tedjojuwono, L. Cattafesta, T. Nishida, and M. Sheplak, "A Micromachined Geometric Moiré Interferometry Floating-Element Shear Stress Sensor," IEEE Solid-State Sensor and Actuator Workshop, 2004, pp. 13-18.
[24] J. Zhe, V. Modi, and J. Kenneth. R. Farmer, "A Microfabricated Wall Shear-Stress Sensor with Capacitative Sensing," J. Microelectromech. Syst., vol. 14 (1), pp. 167-175, Feb. 2005.
[25] A. A. Barlian, S.-J. Park, V. Mukundan, and B. L. Pruitt, "Design and Characterization of Microfabricated Piezoresistive Floating Element-Based Shear Stress Sensors," Sensors and Actuators A, vol. 134 (1), pp. 77-87 2007.
[26] M. E. Law and S. Cea, "Continuum Based Modeling of Silicon Integrated Circuit Processing: An Object Oriented Approach," Computational Materials Science, vol. 12, pp. 289-308, August 1998.
[27] J. I. Haritonidis, "The Measurement of Wall Shear Stress," Advances in Fluid Mechanics Measurements, Springer-Verlag, pp. 229-261, 1989.
[28] K. G. Winter, "An Outline of the Techniques Available for The Measurements of Skin Friction in Turbulent Boundary Layers," Prog. Aerosp. Sci., vol. 18, pp. 1-57, 1977.
[29] T. J. Hanratty and J. A. Campbell, "Measurements of Wall Shear Stress," Fluid Mech. Measurements, 1983, pp. 559-615.
174

[30] T. K. Hsiai, S. K. Cho, P. K. Wong, M. Ing, A. Salazar, A. Sevanian, M. Navab, L. L. Demer, and C.-M. Ho, "Monocyte Recruitment to Endothelial Cells in Response to Oscillatory Shear Stress," FASEB J., vol. 17(12), pp. 1648-1657, September, 2003.
[31] B. Oudheusden and J. Huijsing, "Integrated Flow Friction Sensor," Sensors and Actuators A, vol. 15, pp. 135-144, 1988.
[32] E. Kalvesten, G. Stemme, C. Vieider, and L. Lofdahl, "An Integrated Pressure-Flow Sensor for Correlation Measurement in Turbulent Gas Flow," Sensors and Actuators A, vol. 52, pp. 51-58, 1996.
[33] C. Liu, J.-B. Huang, A. Z. Z, F. Jiang, S. Tung, Y.-C. Tai, and C.-M. Ho, "A Micromachined Flow Shear-Stress Sensor Based on Thermal Transfer Principles," J. Microelectromech. Syst., vol. 8 (1), pp. 90 - 99, March 1999.
[34] M. Sheplak, V. Chandrasekaran, A. Cain, T. Nishida, and L. N. C. III, "Characterization of a Micromachined Thermal Shear Stress Sensor," AIAA J., vol. 40, pp. 1099-1104, 2002.
[35] D. Fourguette, D. Modarress, F. Taugwalder, D. Wilson, M. Koochesfahani, and M. Gharib, "Miniature and MOEMS Flow Sensor," AIAA paper 2001-2982, 2001.
[36] C. Brücker, D. Bauer, and H. Chaves, "Dynamic Response of Micro-Pillar Sensors Measuring Fluctuating Wall-Shear-Stress," Exp .in Fluids, vol. 42 (5), 2007
[37] C. Brücker, J. Spatz, and W. Schröder, "Feasability Study of Wall Shear Stress Imaging Using Microstructured Surfaces with Flexible Micropillars," Exp. in Fluids, vol. 39 (2), pp. 464-474, Aug. 2005.
[38] T. V. Papen, H. Steffes, H. D. Ngo, and E. Obermeier, "A Micro Surface Fence Probe for the Application in Flow Reverse Area," Sensors and Actuators A, vol. 97-98, pp. 264-270, 2002.
[39] M. A. Schmidt, "Microsensors for the Measurement of Shear Forces in Turbulent Boundary Layers," Ph.D Dissertation in Mechanical Engineering, Massachussets Institute of Technology, 1988.
[40] B. Carroll, E. Boulos, M. Sytsma, L. Cattafesta, J. P. Hubner, and M. Sheplak, "Aero-Optic Measurement Facility Characterization," in 42nd Aerospace Sciences Meeting and Exhibit, AIAA Paper 2004-0936, Reno, NV, 2004.
[41] Z. W. Hu, C. L. Morfey, and N. D. Sandham, "Wall Pressure and Shear Stress Spectra from Direct Simulations of Channel Flow," AIAA J., vol. 44 (7), July 2006 2006.
[42] T. Pan, D. Hyman, and M. Mehregany, "Microfabricated Shear Stress Sensors, Part 2: Testing and Calibration," AIAA J., vol. 37, pp. 73-78, 1999.
175

[43] M. Sheplak, A. Padmanabhan, M. A. Schmidt, and K. S. Breuer, "Dynamic Calibration of a Shear-Stress Sensor Using Stokes-Layer Excitation," AIAA J., vol. 39 (5), pp. 819-823, May 2001.
[44] H. D. Goldberg, K. S. Breuer, and M. A. Schmidt, "A Silicon Wafer-Bonding Technology for Microfabricated Shear-Stress Sensors with Backside Contacts," IEEE Solid-State Sensor and Actuator Workshop, Hilton Head, SC, 1994, pp. 111-115.
[45] N. Maluf, An Introduction to Microelectromechanical Systems Engineering. Norwood, MA: Artech House, 2000.
[46] S. D. Senturia, Microsystem Design: Kluwer Academic Publishers, 2001, Ch. 10, 17, 18, 19.
[47] J. A. Harley and T. W. Kenny, "1/f Noise Considerations for the Design and Process Optimization of Piezoresistive Cantilevers," J. Microelectromech. Syst., vol. 9 (9), June 2000.
[48] M. Sheplak, L. Cattafesta, and T. Nishida, "Microelectromechanical Floating Element Flow Sensor," U.S Patent Number: 6966231, Issued on November 22, 2005.
[49] A. A. Barlian, R. Narain, J. T. Li, C. E. Quance, A. C. Ho, V. Mukundan, and B. L. Pruitt, "Piezoresistive MEMS Underwater Shear Stress Sensors," MEMS' 06, Istanbul, Turkey, 2006, p. 626.
[50] B. W. Chui, T. W. Kenny, H. J. Mamin, B. D. Terris, and D. Rugar, "Independent Detection of Vertical and Lateral Forces with a Sidewall-Implanted Dual-Axis Piezoresistive Cantilever," Appl. Phys. Lett., vol. 72 (11), pp. 1388-1394, 1998.
[51] A. Partridge, J. K. Reynolds, B. W.Chui, E. M.Chow, A. M.Fitzgerald, L. Zhang, N. I. Maluf, and T. W.Kenny, "A High-Performance Plannar Piezoresistive Accelerometer," J. Microelectromech. Syst., vol. 9 (1), March 2000.
[52] C. S. Smith, "Piezoresistance Effects in Germanium and Silicon," Physical Review, vol. 94, 1954.
[53] M. Madou, Fundamentals of Microfabrication: CRC Press, 1997, Ch. 4.
[54] A. H. Nayfeh and P. F. Pai, Linear and Nonlinear Structural Mechanics: John Wiley & Sons, Inc, 2004, pp. 183.
[55] M. Rossi, Acoustics and Electroacoustic.: Artech House, 1988, pp. 245.
[56] J. Merhaut, Theory of Electroacoustics: McGraw-Hill Inc., 1981, Ch. 1.
[57] S. M. Sze, Semiconductor Sensors: Wiley-Interscience, 1994, pp. 160.
176

[58] O. N. Tufte and D. Long, "Recent Development in Semiconductor Piezoresistive Devices," Solid State Electronics, vol. 6, pp. 323-338, 1963.
[59] Y. Kanda, "A Graphical Representation of the Piezoresistive Coefficients in Silicon," IEEE Trans. Electron Devices, vol. 29 (64), pp. 64-70, 1982.
[60] J. Brysek, K. Petersen, J. Joseph R. Mallon, L. Christel, and F. Pourahmadi, Silicon Sensors and Microstructures: Lucas NovaSensor, 1991, Ch. 4.
[61] O. N. Tufte and E. L. Stelzer, "Piezoresistive Properties of Silicon Diffused Layers," J. Appl. Phys., vol. 34 (2), pp. 313-318, 1963.
[62] W. P. Mason, J. J. Forst, and L. M. Tornillo, Recent Developments in Semiconductor Strain Transducers: New York, 1962.
[63] D. R. Kerr and A. G. Milelnes, "Piezoresistance of Diffused Layers in Cubic Semiconductors," J. Appl. Phys., vol. 34 (4), pp. 727-731, 1963.
[64] M. Tortonese, "Force Sensors for Scanning Probe Microscopy," Ph.D Dissertation in Department of Mechanical Engineering: Stanford University, 1993.
[65] J. A. Harley, "Advances in Piezoresistive Probes for Atomic Force Microscopy," Ph.D Dissertation in Department of Mechanical Engineering: Stanford University, 2000.
[66] J. D. Plummer, M. D. Deal, and P. B. Griffin, Silicon VLSI Technology: Prentice Hall, 2000, Ch. 7, 8.
[67] T. Nishida and C.-T. Sah, "A Physical Based Mobility Model for MOSFET Numerical Simulation," IEEE Trans. Electron Devices, vol. 34 (2), pp. 310-320, 1987.
[68] H. Nyquist, "Thermal Agitation of Electric Charge in Conductors," Phys. Rev., vol. 32, pp. 110-113, 1928.
[69] J. B. Johnson, "Thermal Agitation of Electricity in Conductors," Phys. Rev., vol. 32, pp. 97-109, 1928.
[70] F. N. Hooge, "1/f Noise is No Surface Effect," Phys. Lett. A, vol. 29, pp. 139-140, 1969.
[71] E. Simoen and C. Claeys, "On the Flicker Noise in Sub Micron Silicon MOSFETs," Solid State Electronics, vol. 43, pp. 865-882, 1999.
[72] A. McWhorter, "1/f noise and Germanium Surface Properties," in Semiconductor Surface Physics: University of Pennsylvania, Philadelphia, 1957, pp. 207-228.
[73] Analog Devices Inc, www.analog.com.
[74] M. Akbar and M. A. Shanblatt, "Temperature Compensation of Piezoresistive Pressure Sensors," Sensors and Actuators A, vol. 33, pp. 155-162, 1992.
177

[75] K. Suzuki, T. Ishihara, M. Hirata, and H. Tanigawa, "Nonlinear Analysis of a CMOS Integrated Silicon Pressure Sensor," IEEE Trans. Electron Devices, vol. 34, pp. 1360- 1367, 1987.
[76] R. F. Pierret, Semiconductor Device Fundamentals: Addison-Wesley, 1996, Ch.5, 6.
[77] R. C. Jaeger, Introduction to Microelectronic Fabrication, 1993, pp. 57.
[78] M. E. Law and S. M. Cea, "Continuum Based Modeling of Silicon Integrated Circuit Processing: An Object Oriented Approach," Computational Materials Science, vol. 12, pp. 289-308, Nov 1998.
[79] SRIM, www.srim.org.
[80] S. M. Sze and G. Gibbsons, "Avalanche Breakdown Voltage of Abrupt and Linearly Graded p-n junctions in Ge, Si, GaAs, and GaP," Appl. Phys. Lett., vol. 8, pp. 111, 1966.
[81] S. M. Sze, Physics of Semiconductor Devices, 2nd ed.: John Wiley & Sons, Inc, 1981, pp. 193.
[82] R. C. Hibbeler, Mechanics of Materials, Third ed.: Prentice Hall, 1997, pp. 160
[83] J. D. Plummer, M. D. Deal, and P. B. Griffin, Silicon VLSI Technology: Fundamentals, Practice, and Modeling, Prentice Hall, 2000.
[84] M. Papila, R. T. Haftka, T. Nishida, and M. Sheplak, "Piezoresistive Microphone Design Pareto Optimization: Tradeoff Between Sensitivity and Noise Floor," J. Microelectromech. Syst., vol. 15 (6), pp. 1632-1643, December 2006.
[85] A. Partridge, "Lateral Piezoresistive Accelerometor with Epipoly Encapsulation," Ph.D Dissertation in Department of Electrical Engineering, Stanford University, 2003.
[86] Mathworks Inc, MATLAB R2006b ed, 2006.
[87] J. F. Schutte and A. A. Groenwold, "A Study of Global Optimization Using Particle Swarms," J. Global Opt., vol. 31 (1), pp. 93-108, 2005.
[88] R. T. Haftka and Z. Gurdal, Elements of Structural Optimization: Kluwer Academic Publishers, 1992.
[89] B. El-Kareh, Fundamentals of Semiconductor Processing Technologies, 3rd ed.: Kluwer Academic Publisher, 1998.
[90] Unaxis, www.unaxis.com.
[91] STS, www.stsystems.com.
[92] M.-C. M. Lee, J. Yao, and M. C. Wu, "Silicon Profile Transformation and Sidewall Roughness Reduction Using Hydrogen Annealing," MEMS '05, Miami, FL, USA, 2005.
178

[93] R. Legtenberg, H. Jansen, M. d. Boer, and M. Elwenspoek, "Anisotropic Reactive Ion Etching of Silicon Using SF6/02/CHF3 Gas Mixtures," J. Electrochem. Soc., vol. 142, pp. 2020-2028, 1995.
[94] M. Ohring, The Materials Science of Thin Films: Academic Press, 1992.
[95] C.-T. Sah, Fundamentals of Solid-State Electronics: World Scientific, 1993.
[96] Stanford Research Systems, http://www.thinksrs.com/products/SIM928.htm.
[97] V. Chandrasekaran, A. Cain, T. Nishida, L. N. Cattafesta, and M. Sheplak, "Dynamic Calibration for Thermal Shear-Stress Sensors with Mean Flow," Exp. in Fluids, vol. 39, pp. 56-65, 2005.
[98] R. Dieme, G. Bosman, M. Sheplak, and T. Nishida, "Source of Excess Noise in Silicon Piezoresistive Microphones," J. Acoust. Soc. Am., vol. 119, pp. 2710-2720, May 2006.
[99] M. G. Jones and P. E. Stiede, "Comparison of Methods for Determining Specific Acoustic Impedance," J. Acoust. Soc. Am., vol. 101(5), pp. 2694-2704, 1997.
[100] J. N. Reddy, Theory and Analysis of Elastic Plates: Taylor and Francis, 1999, pp. 25.
179

BIOGRAPHICAL SKETCH
Yawei Li received her BS and MS degree in Aerospace Engineering at Beijing University
of Aeronautics and Astronautics, China. She worked with China Aerospace Corporation before
she joined University of Florida. She also received MS (2003) in Aerospace Engineering and
ME (2006) in Electrical Engineering from University of Florida, respectively.
She is currently a Ph.D student in the Department of Mechanical and Aerospace
Engineering at the University of Florida. Her current research focuses on the sensor modeling,
design optimization, fabrication, and characterization of MEMS-based piezoresistive sensors that
enable the measurement and control of wall shear stress in turbulent flow.
Related Documents


