[Type here] [Type here] [Type here] Financial Supply Chain Management Bank Communication Management Siva Kumar

Welcome message from author
This document is posted to help you gain knowledge. Please leave a comment to let me know what you think about it! Share it to your friends and learn new things together.
Transcript

[Type here] [Type here] [Type here]
Financial Supply Chain Management
Bank Communication Management Siva Kumar

[Type here] [Type here] [Type here]
Table of Contents Basic Process .................................................................................................................................................... 3
Implementing Payment Medium Workbench (PMW) ......................................................................................... 3 Maintain payment medium formats ................................................................................................................ 4 Maintain Variants for payment medium formats ............................................................................................. 4 Assign payment medium format to payment method ..................................................................................... 4 Reserve identification for Cross Payment Run Payment Media: .................................................................... 5
Configuring BCM ................................................................................................................................................ 5 Basic settings ................................................................................................................................................. 6 Payment grouping .......................................................................................................................................... 6 Payment status management ......................................................................................................................... 7 Bank statement monitor ................................................................................................................................. 7 Release strategy ............................................................................................................................................ 8
Automatic payments ..................................................................................................................................................... 8 Change and Release .................................................................................................................................................... 9 Additional Release ...................................................................................................................................................... 10 Digital signatures ........................................................................................................................................................ 12
End-User Manual ......................................................................................................................................... 13 End-User Process flow ................................................................................................................................. 13 a. Posting Payment Entry ............................................................................................................................. 14 b. Create Batches ......................................................................................................................................... 14 c. Reset Batches .......................................................................................................................................... 15 d. Process Batches ...................................................................................................................................... 16
APPROVE: ................................................................................................................................................................. 17 REJECT/ RESUBMIT ................................................................................................................................................. 19 RETURN BY APPROVER: ......................................................................................................................................... 21
e. Report for BCM Batches ........................................................................................................................... 24 Summary of Configuration ............................................................................................................................ 26 List of T Codes used in BCM: ....................................................................................................................... 27
Related Content ............................................................................................................................................... 28
Disclaimer and Liability Notice ......................................................................................................................... 29

[Type here] [Type here] [Type here]
Basic Process BCM is implemented to enable different levels of approval for outgoing payments using the Workflow methodology. For instance, based on approval limits available with finance managers, the payment shall be routed to different approving authority. With BCM, the approval action is being shifted from bank web applications to SAP ECC.
The following are the benefits derived from implementing BCM process:
· Reduction of manual efforts; ensures the payment process is automated · Reduce cycle time of payment processing · Common interface of payment processing, when there are dealing with multiple banks. · Payment runs are batched based on various criteria predefined in the system configuration. · Workflow based approval system ensures that payments are routed through a proper channel with
minimum of manual efforts. · Payment file is generated upon the final authorization and can be sent to bank directly using BCM. · Single point of reporting tool for the status of payments, showing clear visibility to the stake-holders.
The scope of implementation of BCM covers
· Implementing Payment Medium Workbench (PMW). PMW is a tool to configure and created payment
media sent by organizations to house banks. The tool replaces the classic payment media programs (RFFO*).
· Configuring BCM workflows providing two / three / four levels of payment approvals
Implementing Payment Medium Workbench (PMW) As discussed earlier, implementing PMW is one of the prerequisites for BCM functionality. The basic concepts of PMW that are relevant for BCM alone are covered in this BoK.
PMW is a tool used to create payment file formats for transferring to banks. The payment medium formats can be either a classic payment medium program or through the PMW.
There are few SAP standard PMW file formats for various countries. A new format can also be created if there is a need for custom file format or if there are no other formats available for that bank/ country. This customization can be either done through modifying the standard function modules of an existing PMW format or through developing via Data Medium Exchange Engine (DMEE). (However this document does not deal with customizing through DMEE).
Path: SPRO à IMG à Financial Accounting (New) à Accounts Receivable and Accounts Payable à Business Transactions à Outgoing Payments à Automatic Outgoing Payments à Payment Media à Make Settings for Payment Medium Formats from Payment Medium Workbench
The above path can also be accessed through the T. Codes OBPM1 / OBPM2 / OBPM3 / OBPM4.
Let us briefly go through the steps in implementing PMW: · Create/ change payment medium formats · Assign variant to the format · Assign the format to payment method

[Type here] [Type here] [Type here]
Maintain payment medium formats The payment medium formats can be changed according to the user needs in TA OBPM1. Also the user can create new format by .
In our illustration, the standard SAP format ACH has been used.
The formats have been defined using function modules in the form of events.
SAP has predefined the following events and any customizations to the codes have to be routed through the Sample Function Modules 01, 06, 11, 21 etc. For instance, if there are some changes in Event 20, the same has to be incorporated in Sample Function module in Event 21. Once event 20 is reached, event 21 will also be triggered.
Maintain Variants for payment medium formats: The variant for the payment medium format have to be maintained for the combination of Company Code & House Bank. This has to be done in the TA OBPM4.
Assign payment medium format to payment method:
In the T Code OBVCU, select the payment method for the country & assign the payment medium format as per PMW:
In the above screen, instead of “Use classic payment medium programs”, we should assign it as “Use PMW”.
This setting is a pre-requisite for BCM functionality.

[Type here] [Type here] [Type here]
Reserve identification for Cross Payment Run Payment Media: For the purpose of batch creation, we should also configure the unique identifiers. This is done in T Code OBPM5.
The payment runs, with the run ID (in F110) beginning with the identifiers reserved above, are alone considered for batching in the BCM process.
For the payment module, select FI AP/AR Payment Program for customers and vendors, and create new entries.
The above illustration means that any run ID starting with RB & ZB alone is considered for BCM batching purposes.
Configuring BCM Before looking into the basic configurations relevant for BCM, we have to first activate BCM using T Code SFW5.
Ensure the bulb is turned .
Configuration:
The relevant settings for BCM can be configured in the following path:
SPRO à IMG à Financial Supply Chain Management à Bank Communication Management
The above path is referred in future sections as SPRO à BCM
The individual steps are given in detail below:

[Type here] [Type here] [Type here]
Basic settings: Path: SPRO à BCM à Basic Settings à Basic Settings for Approval
In this activity, we need to maintain the “Rule Currency”, “Exchange Rate Type”, “Days resubmission” and whether “Signature” is required or not.
Rule Currency: For batching rules consisting of various currencies, the currency specified here is considered as the default currency. In our illustration, it is INR.
Exchange Rate Type: This is used to define different exchange rates. You can use the average rate for foreign currency translation, and the buying and selling rates for the valuation of foreign currency amounts.
Days‟ resubmission: For resubmission of payments, the date of resubmission from the current date can be set here. In the illustration, it is given as “1”, which means that the default resubmission date = current date + 1 day.
Signature required: If you tick this check-box, then the batch approval system follows a digital signature process. Every time before a batch is approved; a pop-up for the user signature appears.
Payment grouping Path: SPRO à BCM à Payment Grouping
This is the activity where we maintain the rules for batching the payments. We need to create rules by defining a unique Rule ID, giving a description to it and marking a priority. Once the rules are prioritized, the batching happens according to the priority set in the rules.
After creating and saving the rule, the same has to be maintained using the box.
[Type here] [Type here] [Type here]
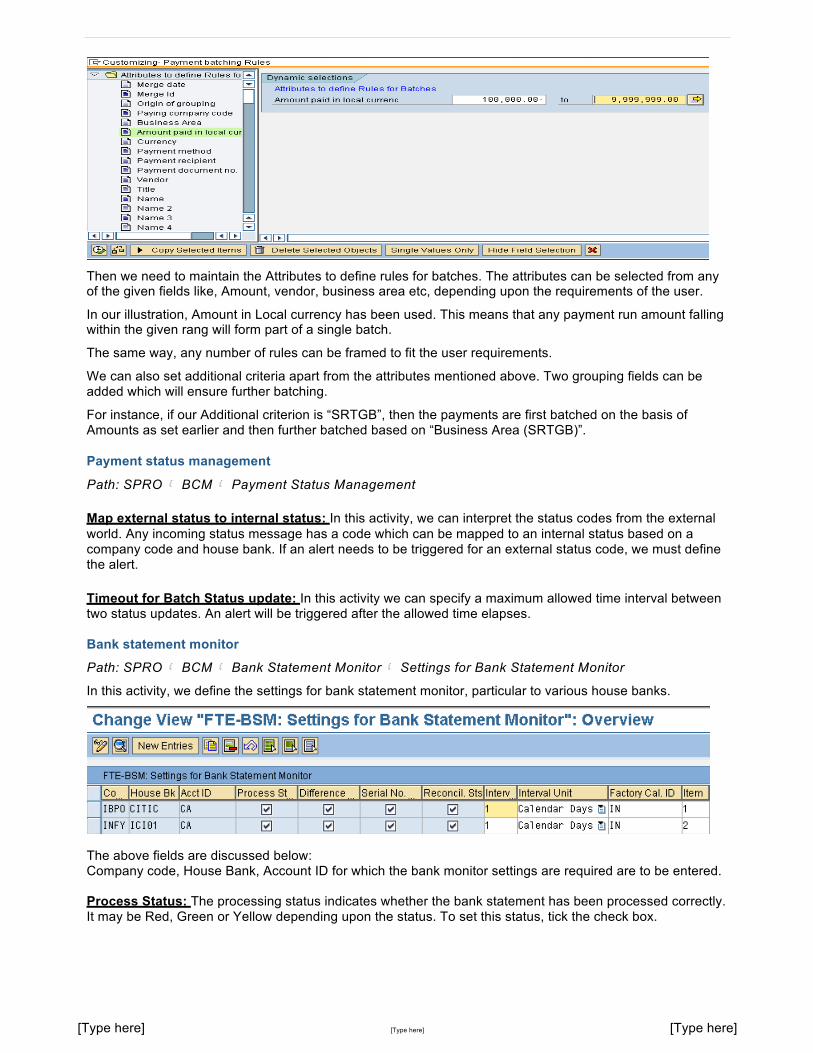
Then we need to maintain the Attributes to define rules for batches. The attributes can be selected from any of the given fields like, Amount, vendor, business area etc, depending upon the requirements of the user.
In our illustration, Amount in Local currency has been used. This means that any payment run amount falling within the given rang will form part of a single batch.
The same way, any number of rules can be framed to fit the user requirements.
We can also set additional criteria apart from the attributes mentioned above. Two grouping fields can be added which will ensure further batching.
For instance, if our Additional criterion is “SRTGB”, then the payments are first batched on the basis of Amounts as set earlier and then further batched based on “Business Area (SRTGB)”.
Payment status management
Path: SPRO à BCM à Payment Status Management
Map external status to internal status: In this activity, we can interpret the status codes from the external world. Any incoming status message has a code which can be mapped to an internal status based on a company code and house bank. If an alert needs to be triggered for an external status code, we must define the alert.
Timeout for Batch Status update: In this activity we can specify a maximum allowed time interval between two status updates. An alert will be triggered after the allowed time elapses.
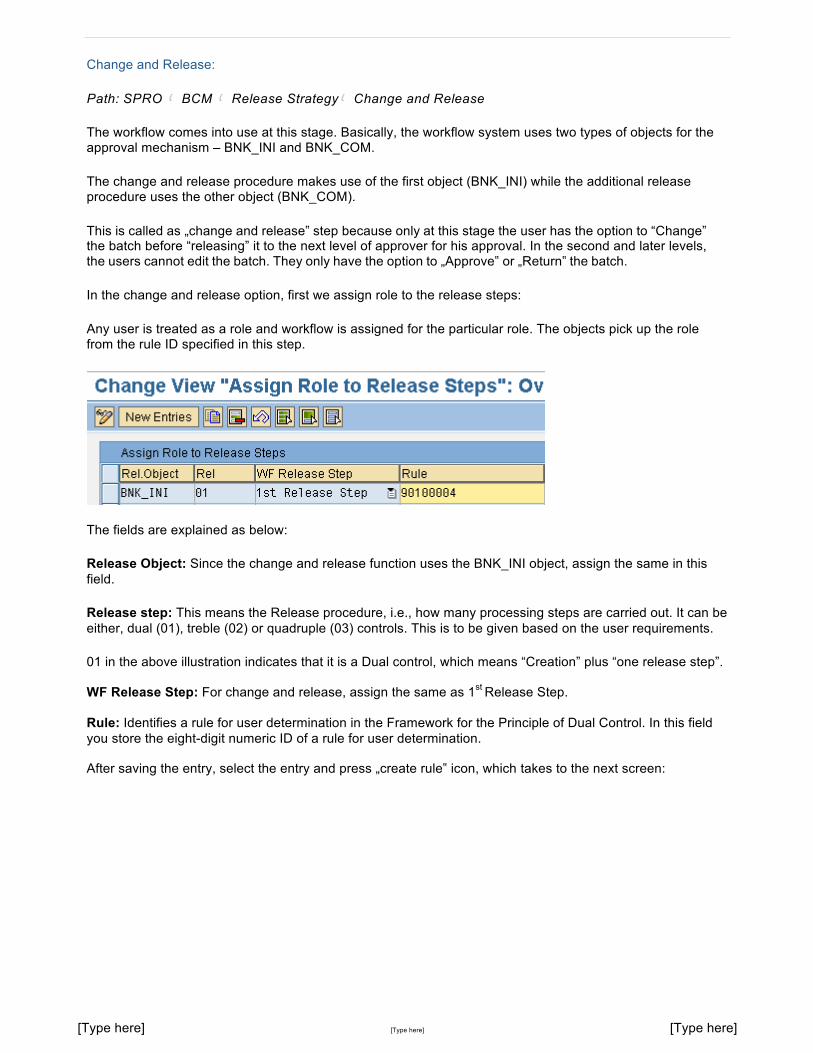
Bank statement monitor Path: SPRO à BCM à Bank Statement Monitor à Settings for Bank Statement Monitor
In this activity, we define the settings for bank statement monitor, particular to various house banks.
The above fields are discussed below: Company code, House Bank, Account ID for which the bank monitor settings are required are to be entered.
Process Status: The processing status indicates whether the bank statement has been processed correctly. It may be Red, Green or Yellow depending upon the status. To set this status, tick the check box.

[Type here] [Type here] [Type here]
Difference Status: The difference status displays whether the bank statement has the same balance as the corresponding internal bank account. To set this status, tick the check box.
Serial number status: The serial number status shows whether the sequence of the last five bank statements is complete. In case the same is not complete, Red symbol is displayed in the monitor.
Reconciliation status: The reconciliation status displays whether there are open items in the internal account.
Interval & Interval Unit: The intervals in which the bank statements are to be expected, for the corresponding set of Company code, house bank & Account ID, are maintained here. The interval unit can be either days, weeks, months or year.
For instance, if the bank statements are to be updated daily, maintain Interval as “1” and Interval unit as “Calendar Days”.
Factory Calendar ID: It is used to distinguish between working days and non-working days. In the above illustration, “IN” has been chosen as the factory calendar ID, which means that settings relevant for India will be considered.
Item: The display position of the account in the bank statement monitor. In the above illustration, „IBPO- CITIC-CA‟ has been marked as Item 1, which means that account will be displayed at the top of the bank statement monitor.
Release strategy
Path: SPRO à BCM à Release Strategy
This is where the crux of BCM lies, because release strategy is the point at which the approval workflow comes into place.
Automatic payments:
Path: SPRO à BCM à Release Strategy à Mark rules for Automatic Payments
We also have the option to mark any or all of the rules for automatic payment (without using the approval workflow). This is done in this step:
Against the particular rules, if the “Auto” check-box is ticked, then the batches which fall under the specified rule would not flow through the approval system.
For instance, in the illustration above, if “SET1” is ticked for “Auto”, then any batch with value less than Rs.100000 will be marked for automatic payment.
If “Drill down” check box is ticked, then the batch provides an option for drill down display before making payment.
[Type here] [Type here] [Type here]
Change and Release:
Path: SPRO à BCM à Release Strategyà Change and Release
The workflow comes into use at this stage. Basically, the workflow system uses two types of objects for the approval mechanism – BNK_INI and BNK_COM.
The change and release procedure makes use of the first object (BNK_INI) while the additional release procedure uses the other object (BNK_COM).
This is called as „change and release‟ step because only at this stage the user has the option to “Change” the batch before “releasing” it to the next level of approver for his approval. In the second and later levels, the users cannot edit the batch. They only have the option to „Approve‟ or „Return‟ the batch.
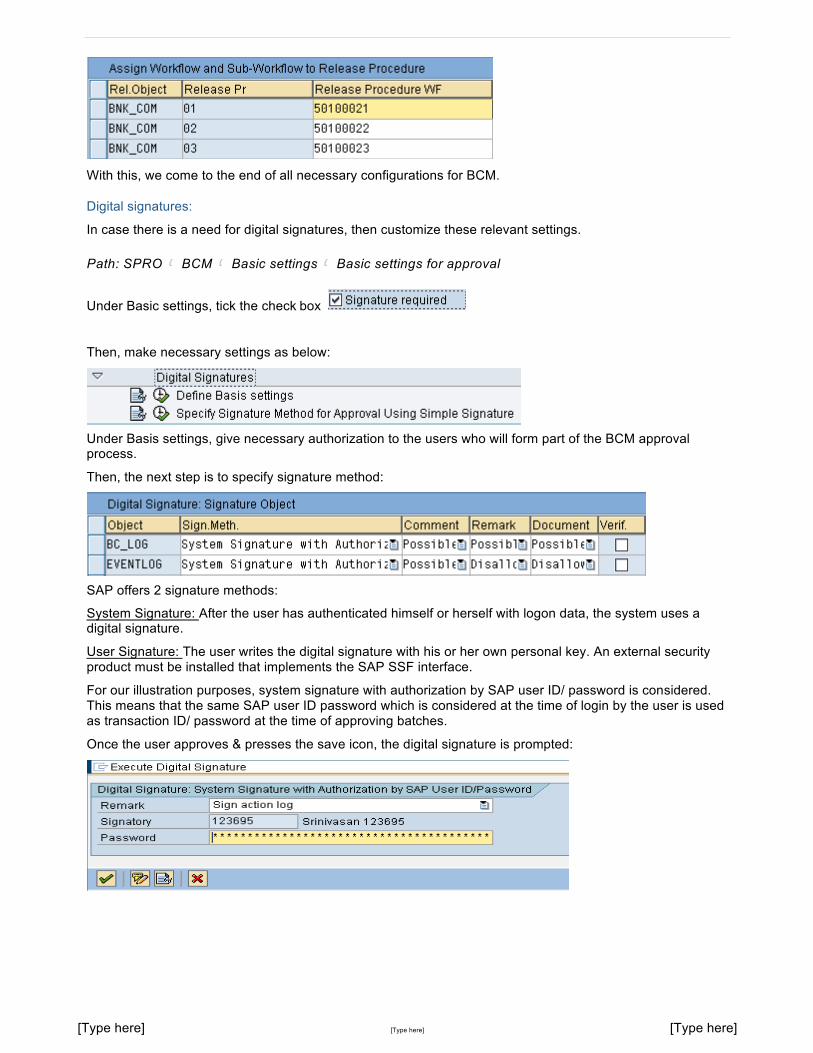
In the change and release option, first we assign role to the release steps:
Any user is treated as a role and workflow is assigned for the particular role. The objects pick up the role from the rule ID specified in this step.
The fields are explained as below:
Release Object: Since the change and release function uses the BNK_INI object, assign the same in this field.
Release step: This means the Release procedure, i.e., how many processing steps are carried out. It can be either, dual (01), treble (02) or quadruple (03) controls. This is to be given based on the user requirements.
01 in the above illustration indicates that it is a Dual control, which means “Creation” plus “one release step”.
WF Release Step: For change and release, assign the same as 1st Release Step.
Rule: Identifies a rule for user determination in the Framework for the Principle of Dual Control. In this field you store the eight-digit numeric ID of a rule for user determination.
After saving the entry, select the entry and press „create rule‟ icon, which takes to the next screen:

[Type here] [Type here] [Type here]
The objects are created using icon, while icons denote „edit‟, „display‟, „copy‟, „delete‟ or „transport‟ the object.
Next step is to assign user to the new responsibility.
Select the responsibility, Right-click , select „Assign User‟ and mention the User ID to map the users to the responsibility.
The following additional points are to be noted in creating responsibilities: · Many users can be assigned to one responsibility
• User‟s responsibility can be delimited based on time. Once the validity period lapses, the object won‟t
take any effect.
· Priority can be assigned to similar objects
· Users/ responsibilities can be deleted after creation
· Apart from users, the object can also be assigned to Work center, job, position, etc.
Additional Release:
Path: SPRO à BCM à Release Strategyà Additional Release Steps
In “define release procedure”, we maintain the basic data relating to the BNK_COM object as to whether the release procedure is Dual, treble or quadruple and how the release workflow will be run.

[Type here] [Type here] [Type here]
• If you choose “Always”, you must also select a release procedure for all release objects. • If you choose “Conditional”, you can differentiate the release of the release objects according to release
procedures and release reasons.
Once the settings are saved, in the main screen of Assign release procedure, choose option to view all the conditions specified.
The above illustration means that the Principle of Dual control is adopted.
And if the batch value falls between Rs.1 lakh and Rs.10 Lakhs, then its flown to Release reason 1. If the value is between Rs.10 Lakhs and Rs. 50 Lakhs, batch flows to Release reason 2.
Assign Role to release steps in the additional release steps function is the same as explained in Change and release function.
Assign workflow to release procedure: In this activity, you can assign a release workflow and a release procedure workflow to every release procedure of a release object. The release workflow realizes the technical processing of the release in the system. The release procedure workflows realize the technical processing of the various release procedures (such as the principle of treble control) in the system.
[Type here] [Type here] [Type here]
With this, we come to the end of all necessary configurations for BCM.
Digital signatures:
In case there is a need for digital signatures, then customize these relevant settings.
Path: SPRO à BCM à Basic settings à Basic settings for approval
Under Basic settings, tick the check box
Then, make necessary settings as below:
Under Basis settings, give necessary authorization to the users who will form part of the BCM approval process.
Then, the next step is to specify signature method:
SAP offers 2 signature methods:
System Signature: After the user has authenticated himself or herself with logon data, the system uses a digital signature.
User Signature: The user writes the digital signature with his or her own personal key. An external security product must be installed that implements the SAP SSF interface.
For our illustration purposes, system signature with authorization by SAP user ID/ password is considered. This means that the same SAP user ID password which is considered at the time of login by the user is used as transaction ID/ password at the time of approving batches.
Once the user approves & presses the save icon, the digital signature is prompted:

[Type here] [Type here] [Type here]
End-User Manual Disclaimer:
It is assumed that the reader is aware of the relevant settings for Vendor Invoice creation, Automatic payment program configurations (relevant to F110 transaction) and House bank set-up (FBZP configurations).
Note: Document is filled with useful hints. Refer sign.
End-User Process flow
Let us run through the entire BCM process with the help of an illustration:
BANK COMMUNICATION MANAGEMENT
APPROVED REJECTED
[Type here] [Type here] [Type here]
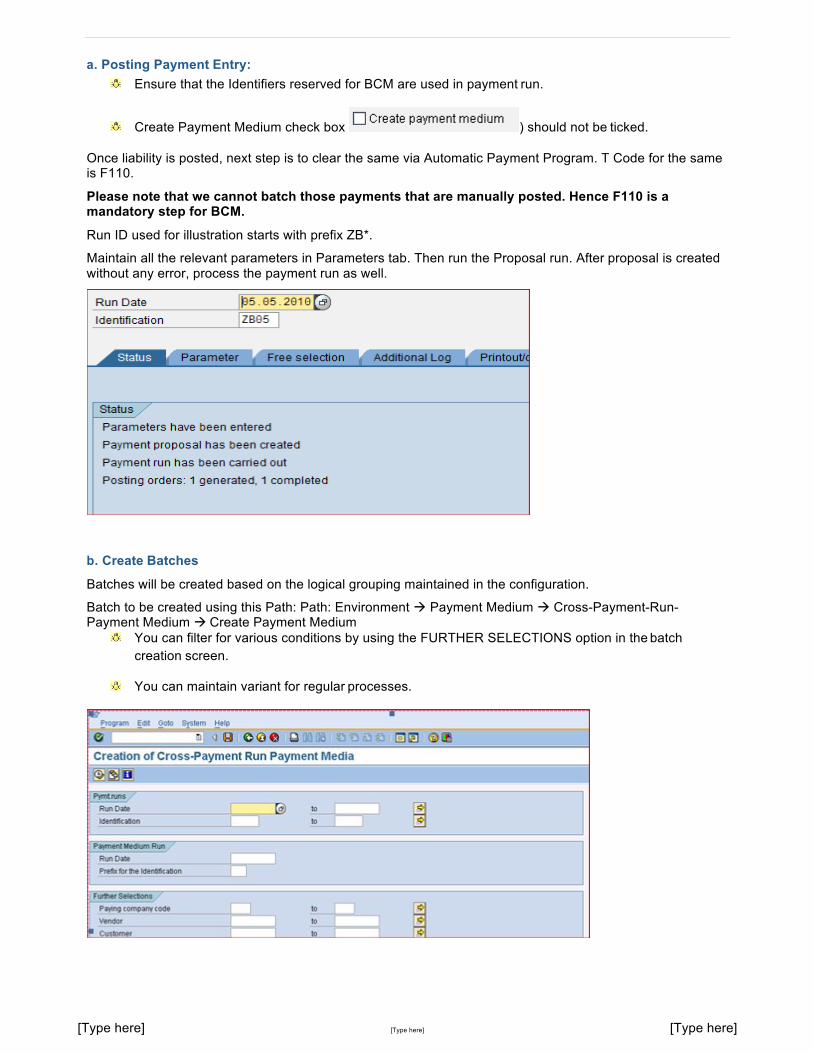
a. Posting Payment Entry: Ensure that the Identifiers reserved for BCM are used in payment run.
Create Payment Medium check box ) should not be ticked.
Once liability is posted, next step is to clear the same via Automatic Payment Program. T Code for the same is F110.
Please note that we cannot batch those payments that are manually posted. Hence F110 is a mandatory step for BCM.
Run ID used for illustration starts with prefix ZB*.
Maintain all the relevant parameters in Parameters tab. Then run the Proposal run. After proposal is created without any error, process the payment run as well.
b. Create Batches
Batches will be created based on the logical grouping maintained in the configuration.
Batch to be created using this Path: Path: Environment à Payment Medium à Cross-Payment-Run- Payment Medium à Create Payment Medium
You can filter for various conditions by using the FURTHER SELECTIONS option in the batch creation screen.
You can maintain variant for regular processes.
[Type here] [Type here] [Type here]
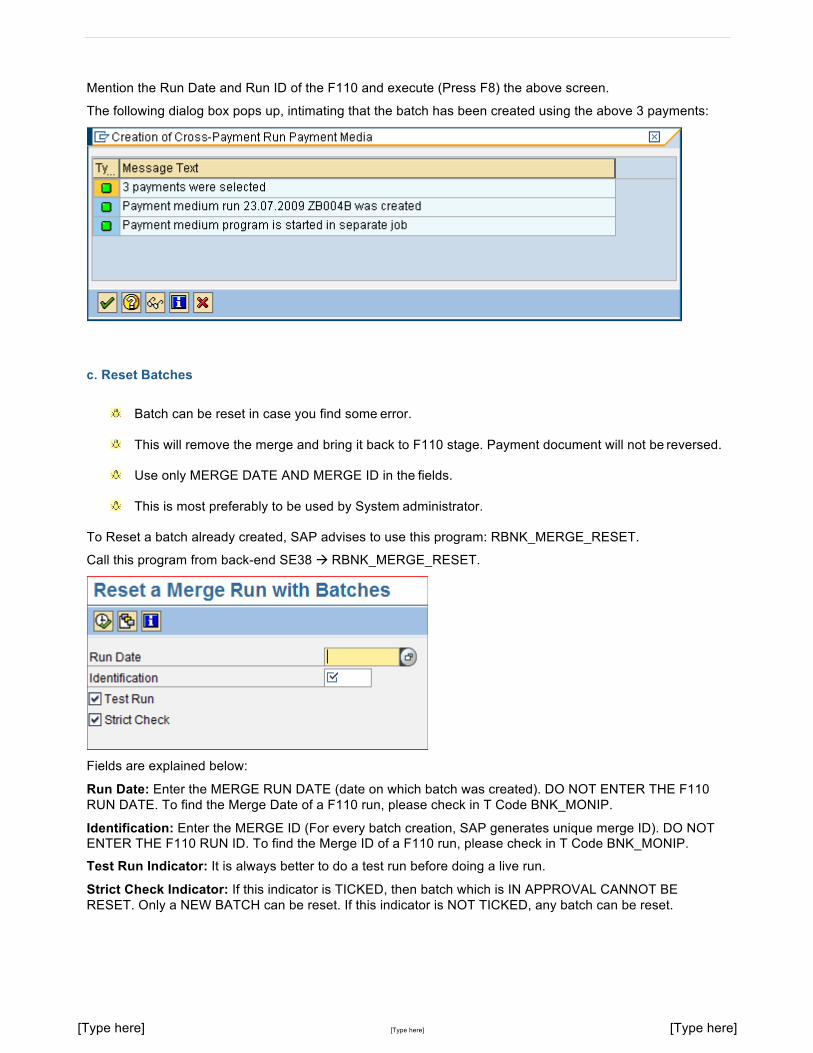
Mention the Run Date and Run ID of the F110 and execute (Press F8) the above screen.
The following dialog box pops up, intimating that the batch has been created using the above 3 payments:
c. Reset Batches
Batch can be reset in case you find some error.
This will remove the merge and bring it back to F110 stage. Payment document will not be reversed.
Use only MERGE DATE AND MERGE ID in the fields.
This is most preferably to be used by System administrator.
To Reset a batch already created, SAP advises to use this program: RBNK_MERGE_RESET.
Call this program from back-end SE38 à RBNK_MERGE_RESET.
Fields are explained below:
Run Date: Enter the MERGE RUN DATE (date on which batch was created). DO NOT ENTER THE F110 RUN DATE. To find the Merge Date of a F110 run, please check in T Code BNK_MONIP.
Identification: Enter the MERGE ID (For every batch creation, SAP generates unique merge ID). DO NOT ENTER THE F110 RUN ID. To find the Merge ID of a F110 run, please check in T Code BNK_MONIP.
Test Run Indicator: It is always better to do a test run before doing a live run.
Strict Check Indicator: If this indicator is TICKED, then batch which is IN APPROVAL CANNOT BE RESET. Only a NEW BATCH can be reset. If this indicator is NOT TICKED, any batch can be reset.
[Type here] [Type here] [Type here]
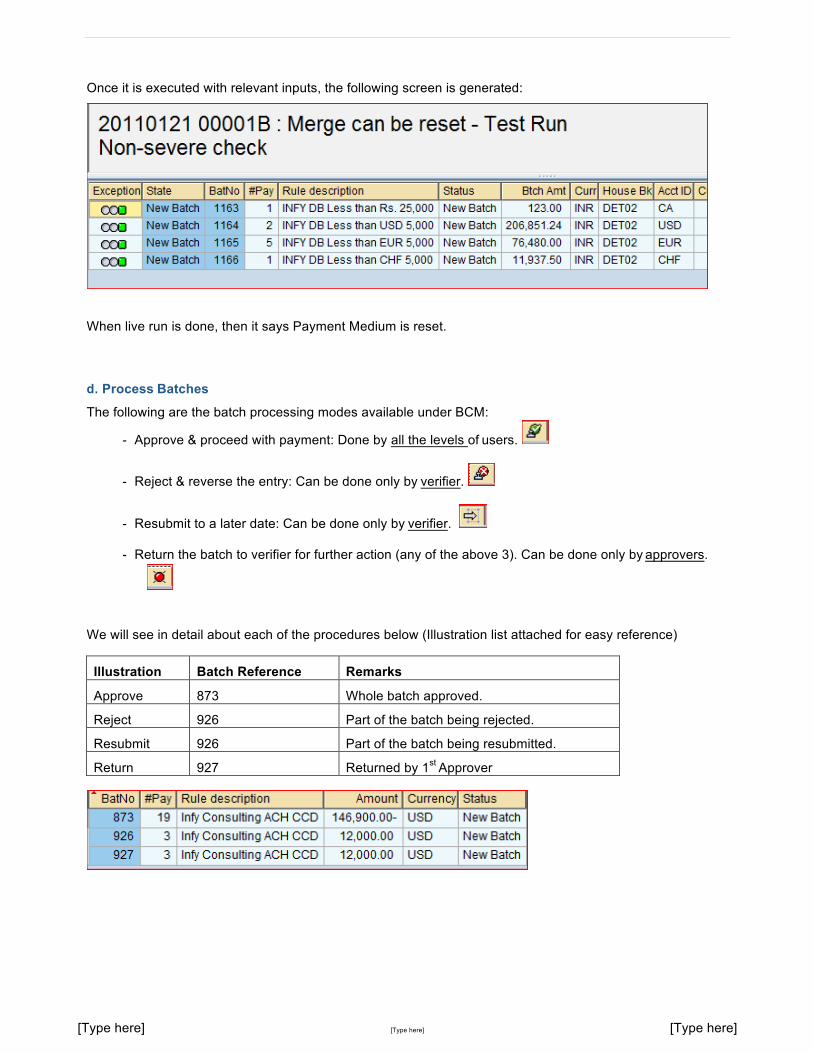
Once it is executed with relevant inputs, the following screen is generated:
When live run is done, then it says Payment Medium is reset.
d. Process Batches The following are the batch processing modes available under BCM:
- Approve & proceed with payment: Done by all the levels of users.
- Reject & reverse the entry: Can be done only by verifier.
- Resubmit to a later date: Can be done only by verifier.
- Return the batch to verifier for further action (any of the above 3). Can be done only by approvers.
We will see in detail about each of the procedures below (Illustration list attached for easy reference)
Illustration Batch Reference Remarks
Approve 873 Whole batch approved.
Reject 926 Part of the batch being rejected.
Resubmit 926 Part of the batch being resubmitted.
Return 927 Returned by 1st Approver

[Type here] [Type here] [Type here]
APPROVE:
Person doing “verification” use this TAB:
Person doing “1st/ 2nd approval” use this TAB:
Called as verification step since this is the only step where you can edit the batches at line item level.
Can do Rejection/ Approve/ Resubmit for part of a batch. For instance, if there are 10 payments in a batch, you can approve 5, reject 3 and resubmit 2 payments.
Note that without pressing SAVE button, the transaction will not have any effect
Once all the approvals for the batch are completed, File will be generated. The same can be viewed in FDTA transaction/ the same can be navigated from BNK_MONI also.
Let us consider batch 873 as an example and proceed.
The batches, which are created, move to the verifier‟s workflow inbox. This can be accessed using the T. Code BNK_APP. The verifier will be able to see only his batches.
In the above scenario, batch 873 alone lies in the “Change and Release” tab of the payment batches.
Once the batch is released from this tab, the batches move to the “Additional Release Steps” tab of the 1st
approver (BNK_APP).

[Type here] [Type here] [Type here]
In our example, batch 873 is fully approved.
Select the batch and Click .
After pressing the Save button, the following dialog box appears:
Click on OK to proceed, It will prompt for a transaction password:
Once it is adhered, the batch is approved by the user and passed on the First approver for his approval.
The status after verification step is as follows:
Detailed release history can be viewed using icon:
Whoever is eligible to approve this batch as per the company policy, they have to login to their inbox and approve the batch as explained above. For approvers, the batch will be visible in tab “Additional Release Steps”.
After all the approvals are completed, the status of batch will be displayed as BATCH APPROVED.
[Type here] [Type here] [Type here]
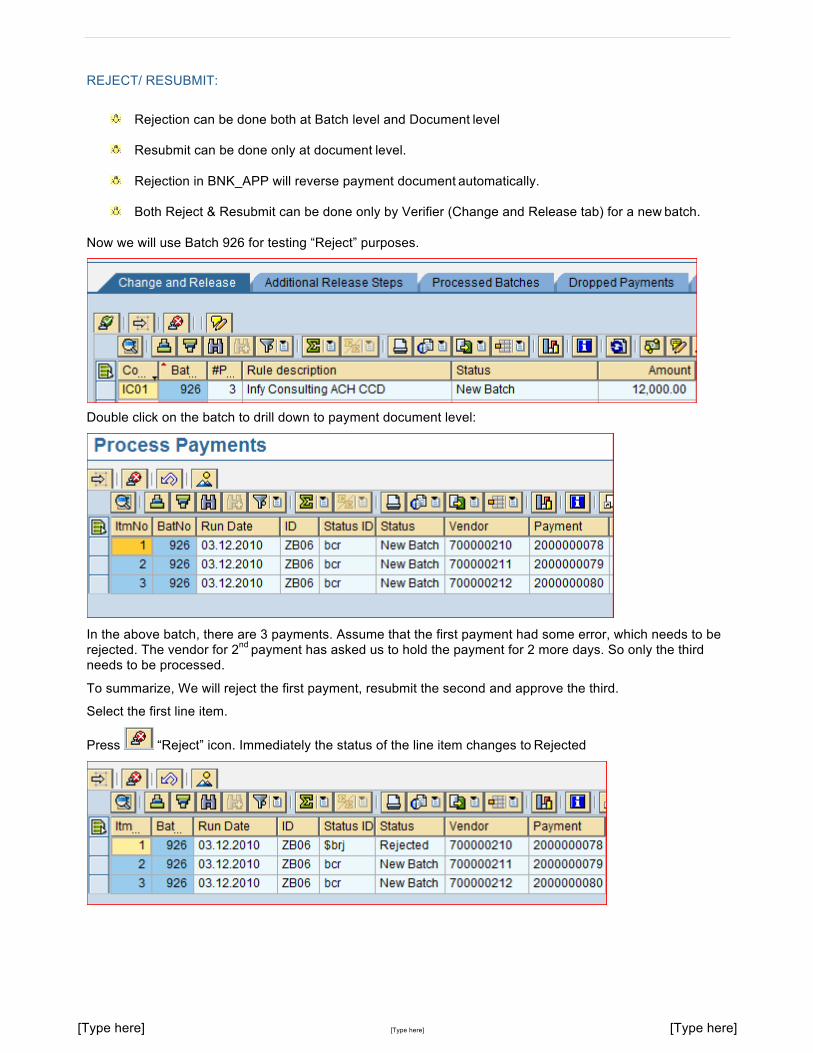
REJECT/ RESUBMIT:
Rejection can be done both at Batch level and Document level
Resubmit can be done only at document level.
Rejection in BNK_APP will reverse payment document automatically.
Both Reject & Resubmit can be done only by Verifier (Change and Release tab) for a new batch.
Now we will use Batch 926 for testing “Reject” purposes.
Double click on the batch to drill down to payment document level:
In the above batch, there are 3 payments. Assume that the first payment had some error, which needs to be rejected. The vendor for 2nd payment has asked us to hold the payment for 2 more days. So only the third needs to be processed.
To summarize, We will reject the first payment, resubmit the second and approve the third.
Select the first line item.
Press “Reject” icon. Immediately the status of the line item changes to Rejected

[Type here] [Type here] [Type here]
Same way, resubmit the second one: Once the icon is clicked, the calendar pops up. Click on the date you want this payment to be postponed. Status will show the corresponding date.
Once this is done, press back button (F3) to come to the header screen.
Now select this batch and click approve. This means we are approving the one left over payment in this batch.
After pressing the SAVE button, the following pop up appears:
In the status bar, you can see the following messages in background: “Check on reversibility”& “Cleared Items Being Reset”. This is for the document that was rejected.
BNK_MONI will show only one item for approval

[Type here] [Type here] [Type here]
RETURN BY APPROVER:
An approver can return only the Whole batch. He cannot modify any part of a batch.
Batch returned by any level of approver (1st/. 2nd/ 3rd) returns the batch to Verifier for further action.
Adding attachment for reason of return of batch is mandatory
We will use batch 927 for this purpose
Select the batch and do the approval process as explained above.
Status changed to In Approval and batch is removed from the verifier screen.
By clicking on list of approvers for the batch, we get the list:
[Type here] [Type here] [Type here]
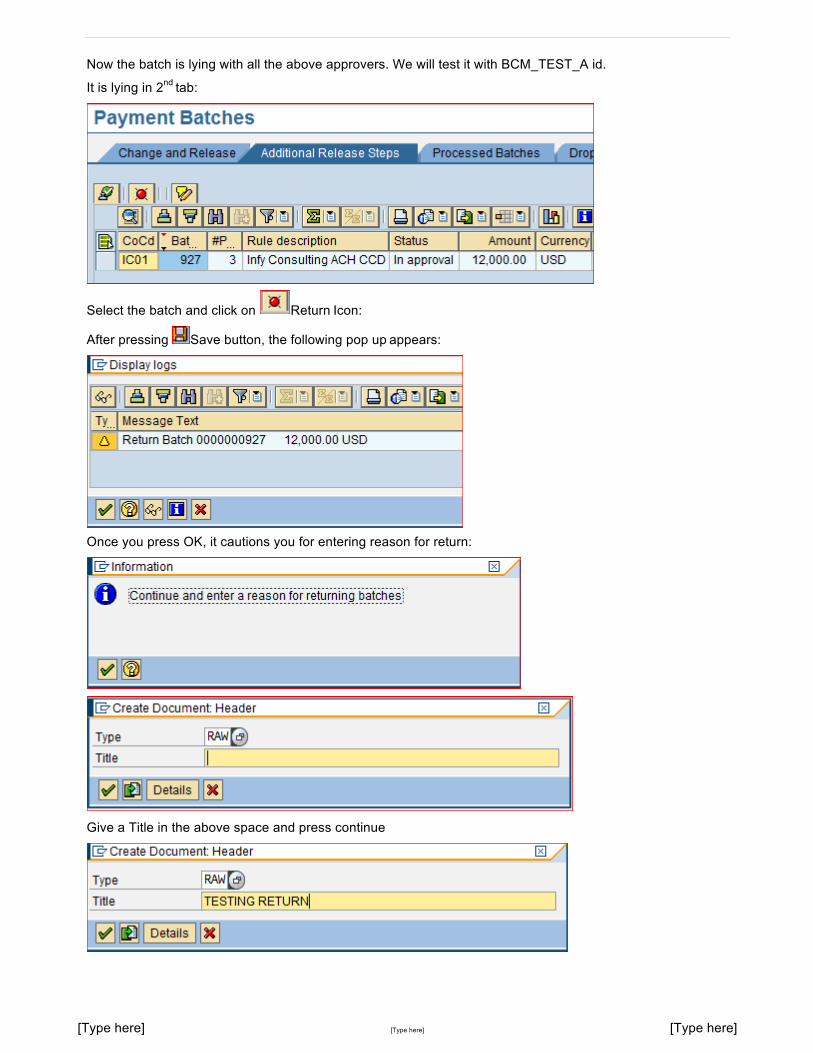
Now the batch is lying with all the above approvers. We will test it with BCM_TEST_A id.
It is lying in 2nd tab:
Select the batch and click on Return Icon:
After pressing Save button, the following pop up appears:
Once you press OK, it cautions you for entering reason for return:
Give a Title in the above space and press continue

[Type here] [Type here] [Type here]
A new screen opens.
Enter detailed remarks in the blank space and press save.
It will give the below info in the status bar:
Press back button. Another info appears in the status bar: . This completes the Return steps. Now give the transaction password.
Now you can find the status of batch as Resubmitted by Approver and is again lying with the verifier.
Verifier can look at the attachment by selecting the batch and clicking on this :

[Type here] [Type here] [Type here]
e. Report for BCM Batches The status of the batches can be seen in the Batch monitor (T. Code BNK_MONI):
Input the necessary details on the selection screen and execute the report:
Various tabs are self-explanatory.
User can sort or filter as deemed necessary. Drill down to payment level is available.
You can also drilldown into various levels by double clicking on the relevant fields – to vendor master, bank master, payment document level etc.
Few specific icons are explained here:
Icon Description
Release history/ Status history of the batch shall be checked here. For instance who created the batch, who verified and who has approved is displayed.
Shows the approver list for the batch. User can find out with whom the batch is currently lying for approval.
Shows the workflow attachment. For instance if the approver has provided some notes/ remarks for returning a batch, the user can find out the remarks mentioned via this icon.
File generated for the batch shall be verified here. The user shall also download the file to local system by navigating to the menu on this icon.

[Type here] [Type here] [Type here]
The users can have payment document wise report as well using the transaction BNK_MONIP.
User can get the report based on any of the given parameters – be it the company code/ house bank/ vendor wise/ document wise.
He can even check if batch is created for a particular Payment run (F110) or not.
For instance, user wants to know the batch details for the payment run on 27.01.2011 with the identifier ZB01.
Input the same below in BNK_MONIP and execute.
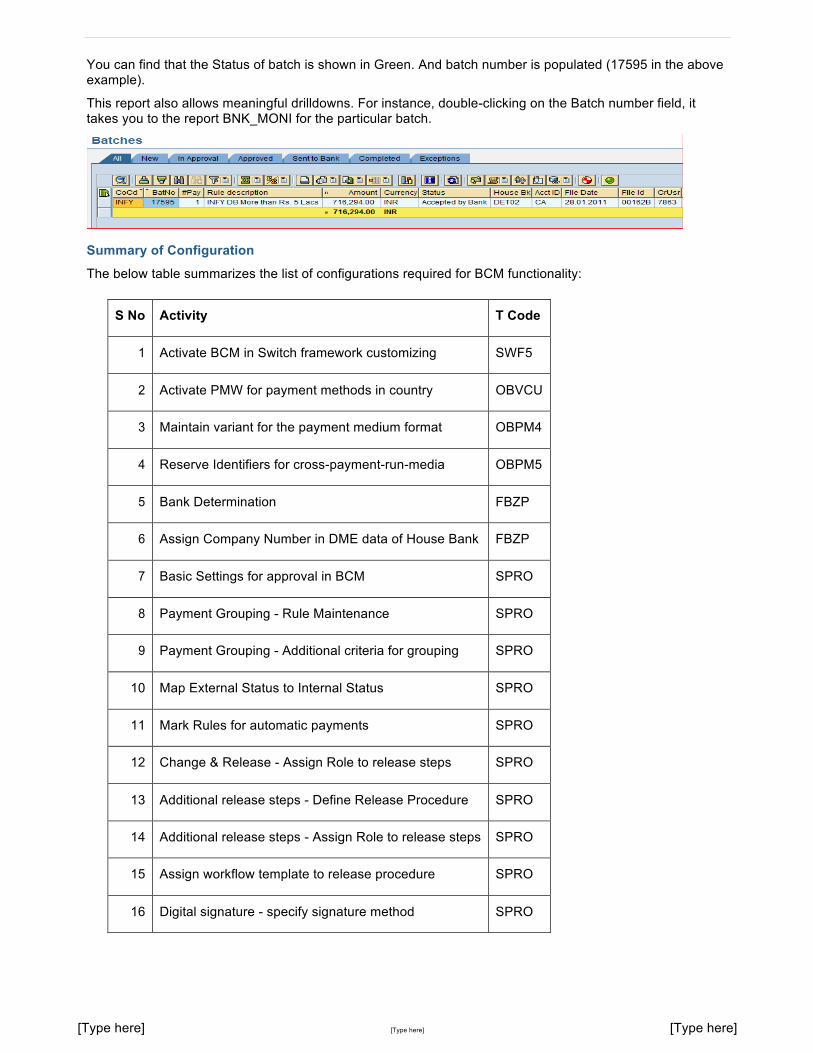
Output is as follows:
[Type here] [Type here] [Type here]
You can find that the Status of batch is shown in Green. And batch number is populated (17595 in the above example).
This report also allows meaningful drilldowns. For instance, double-clicking on the Batch number field, it takes you to the report BNK_MONI for the particular batch.
Summary of Configuration The below table summarizes the list of configurations required for BCM functionality:
S No Activity T Code
1 Activate BCM in Switch framework customizing SWF5
2 Activate PMW for payment methods in country OBVCU
3 Maintain variant for the payment medium format OBPM4
4 Reserve Identifiers for cross-payment-run-media OBPM5
5 Bank Determination FBZP
6 Assign Company Number in DME data of House Bank FBZP
7 Basic Settings for approval in BCM SPRO
8 Payment Grouping - Rule Maintenance SPRO
9 Payment Grouping - Additional criteria for grouping SPRO
10 Map External Status to Internal Status SPRO
11 Mark Rules for automatic payments SPRO
12 Change & Release - Assign Role to release steps SPRO
13 Additional release steps - Define Release Procedure SPRO
14 Additional release steps - Assign Role to release steps SPRO
15 Assign workflow template to release procedure SPRO
16 Digital signature - specify signature method SPRO
[Type here] [Type here] [Type here]
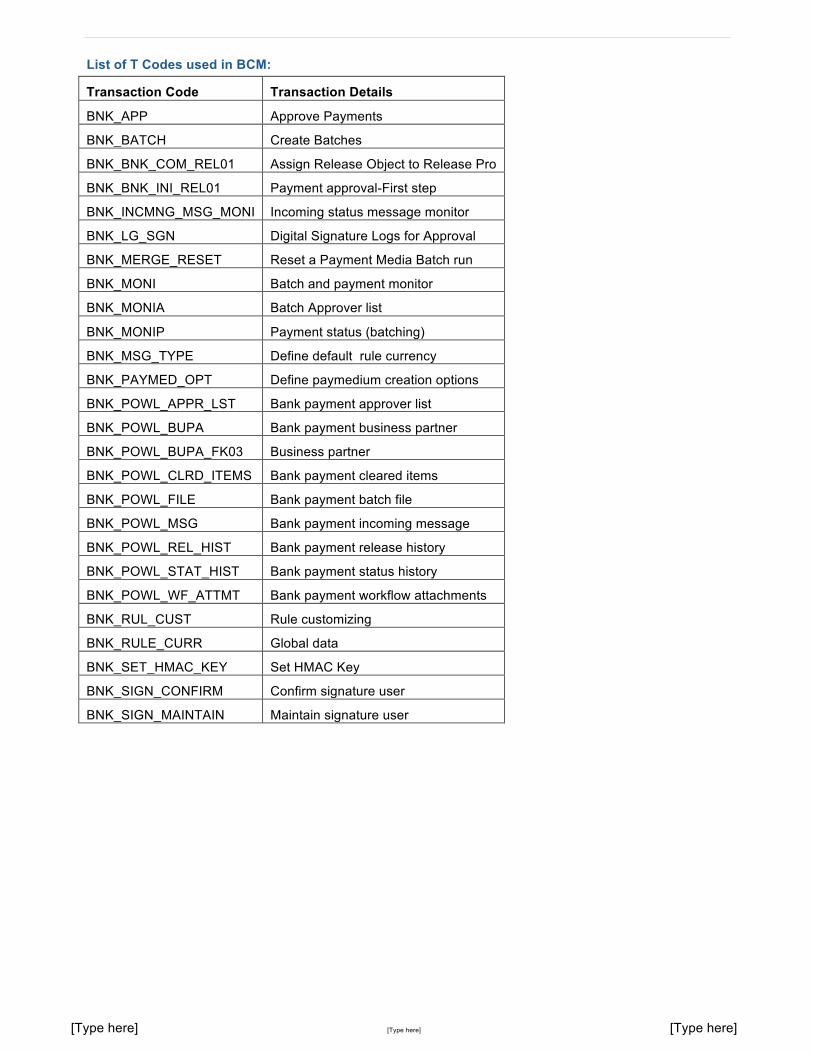
List of T Codes used in BCM:
Transaction Code Transaction Details
BNK_APP Approve Payments
BNK_BATCH Create Batches
BNK_BNK_COM_REL01 Assign Release Object to Release Pro
BNK_BNK_INI_REL01 Payment approval-First step
BNK_INCMNG_MSG_MONI Incoming status message monitor
BNK_LG_SGN Digital Signature Logs for Approval
BNK_MERGE_RESET Reset a Payment Media Batch run
BNK_MONI Batch and payment monitor
BNK_MONIA Batch Approver list
BNK_MONIP Payment status (batching)
BNK_MSG_TYPE Define default rule currency
BNK_PAYMED_OPT Define paymedium creation options
BNK_POWL_APPR_LST Bank payment approver list
BNK_POWL_BUPA Bank payment business partner
BNK_POWL_BUPA_FK03 Business partner
BNK_POWL_CLRD_ITEMS Bank payment cleared items
BNK_POWL_FILE Bank payment batch file
BNK_POWL_MSG Bank payment incoming message
BNK_POWL_REL_HIST Bank payment release history
BNK_POWL_STAT_HIST Bank payment status history
BNK_POWL_WF_ATTMT Bank payment workflow attachments
BNK_RUL_CUST Rule customizing
BNK_RULE_CURR Global data
BNK_SET_HMAC_KEY Set HMAC Key
BNK_SIGN_CONFIRM Confirm signature user
BNK_SIGN_MAINTAIN Maintain signature user
[Type here] [Type here] [Type here]
Related Content For more information, visit the Supply Chain Management homepage.
[Type here] [Type here] [Type here]
Disclaimer and Liability Notice This document may discuss sample coding or other information that does not include SAP official interfaces and therefore is not supported by SAP. Changes made based on this information are not supported and can be overwritten during an upgrade.
SAP will not be held liable for any damages caused by using or misusing the information, code or methods suggested in this document, and anyone using these methods does so at his/her own risk.
SAP offers no guarantees and assumes no responsibility or liability of any type with respect to the content of this technical article or code sample, including any liability resulting from incompatibility between the content within this document and the materials and services offered by SAP. You agree that you will not hold, or seek to hold, SAP responsible or liable with respect to the content of this document.
Related Documents