F5 Service Proxy for Kubernetes - v1.5.0 Installation and Integration 1

Welcome message from author
This document is posted to help you gain knowledge. Please leave a comment to let me know what you think about it! Share it to your friends and learn new things together.
Transcript
F5 Service Proxy for Kubernetes - v1.5.0 Installation and Integration
1
F5 Service Proxy for Kubernetes - v1.5.0 Installation and Integration
Contents
Overview 9Features . . . . . . . . . . . . . . . . . . . . . . . . . . . . . . . . . . . . . . . . . . . . . . . . . . . . . . . 9Components . . . . . . . . . . . . . . . . . . . . . . . . . . . . . . . . . . . . . . . . . . . . . . . . . . . . 9Next step . . . . . . . . . . . . . . . . . . . . . . . . . . . . . . . . . . . . . . . . . . . . . . . . . . . . . . 9Supplemental . . . . . . . . . . . . . . . . . . . . . . . . . . . . . . . . . . . . . . . . . . . . . . . . . . . . 10
Release Notes 11New Features and Improvements . . . . . . . . . . . . . . . . . . . . . . . . . . . . . . . . . . . . . . . . . 11Software upgrades . . . . . . . . . . . . . . . . . . . . . . . . . . . . . . . . . . . . . . . . . . . . . . . . . 11Limitations . . . . . . . . . . . . . . . . . . . . . . . . . . . . . . . . . . . . . . . . . . . . . . . . . . . . . 11Bug Fixes . . . . . . . . . . . . . . . . . . . . . . . . . . . . . . . . . . . . . . . . . . . . . . . . . . . . . . 11Known Issues . . . . . . . . . . . . . . . . . . . . . . . . . . . . . . . . . . . . . . . . . . . . . . . . . . . . 12Next step . . . . . . . . . . . . . . . . . . . . . . . . . . . . . . . . . . . . . . . . . . . . . . . . . . . . . . 12
Cluster Requirements 13Overview . . . . . . . . . . . . . . . . . . . . . . . . . . . . . . . . . . . . . . . . . . . . . . . . . . . . . . 13Pod Networking . . . . . . . . . . . . . . . . . . . . . . . . . . . . . . . . . . . . . . . . . . . . . . . . . . . 13CPU Allocation . . . . . . . . . . . . . . . . . . . . . . . . . . . . . . . . . . . . . . . . . . . . . . . . . . . 14Persistent storage . . . . . . . . . . . . . . . . . . . . . . . . . . . . . . . . . . . . . . . . . . . . . . . . . . 14Next step . . . . . . . . . . . . . . . . . . . . . . . . . . . . . . . . . . . . . . . . . . . . . . . . . . . . . . 14Feedback . . . . . . . . . . . . . . . . . . . . . . . . . . . . . . . . . . . . . . . . . . . . . . . . . . . . . . 14Supplemental . . . . . . . . . . . . . . . . . . . . . . . . . . . . . . . . . . . . . . . . . . . . . . . . . . . . 14
Getting started 15Integration tools . . . . . . . . . . . . . . . . . . . . . . . . . . . . . . . . . . . . . . . . . . . . . . . . . . 15Integration stages . . . . . . . . . . . . . . . . . . . . . . . . . . . . . . . . . . . . . . . . . . . . . . . . . . 15Next step . . . . . . . . . . . . . . . . . . . . . . . . . . . . . . . . . . . . . . . . . . . . . . . . . . . . . . 15Feedback . . . . . . . . . . . . . . . . . . . . . . . . . . . . . . . . . . . . . . . . . . . . . . . . . . . . . . 15Supplemental . . . . . . . . . . . . . . . . . . . . . . . . . . . . . . . . . . . . . . . . . . . . . . . . . . . . 15
SPK Software 16Overview . . . . . . . . . . . . . . . . . . . . . . . . . . . . . . . . . . . . . . . . . . . . . . . . . . . . . . 16Software images . . . . . . . . . . . . . . . . . . . . . . . . . . . . . . . . . . . . . . . . . . . . . . . . . . 16CRD Bundles . . . . . . . . . . . . . . . . . . . . . . . . . . . . . . . . . . . . . . . . . . . . . . . . . . . . 17Requirements . . . . . . . . . . . . . . . . . . . . . . . . . . . . . . . . . . . . . . . . . . . . . . . . . . . . 18Procedures . . . . . . . . . . . . . . . . . . . . . . . . . . . . . . . . . . . . . . . . . . . . . . . . . . . . . 18Next step . . . . . . . . . . . . . . . . . . . . . . . . . . . . . . . . . . . . . . . . . . . . . . . . . . . . . . 22Feedback . . . . . . . . . . . . . . . . . . . . . . . . . . . . . . . . . . . . . . . . . . . . . . . . . . . . . . 22Supplemental . . . . . . . . . . . . . . . . . . . . . . . . . . . . . . . . . . . . . . . . . . . . . . . . . . . . 22
SPK Secrets 23Overview . . . . . . . . . . . . . . . . . . . . . . . . . . . . . . . . . . . . . . . . . . . . . . . . . . . . . . 23Validity period . . . . . . . . . . . . . . . . . . . . . . . . . . . . . . . . . . . . . . . . . . . . . . . . . . . 23Updating Secrets . . . . . . . . . . . . . . . . . . . . . . . . . . . . . . . . . . . . . . . . . . . . . . . . . . 23Requirements . . . . . . . . . . . . . . . . . . . . . . . . . . . . . . . . . . . . . . . . . . . . . . . . . . . . 23Procedures . . . . . . . . . . . . . . . . . . . . . . . . . . . . . . . . . . . . . . . . . . . . . . . . . . . . . 23Next step . . . . . . . . . . . . . . . . . . . . . . . . . . . . . . . . . . . . . . . . . . . . . . . . . . . . . . 28Restarting . . . . . . . . . . . . . . . . . . . . . . . . . . . . . . . . . . . . . . . . . . . . . . . . . . . . . . 28Feedback . . . . . . . . . . . . . . . . . . . . . . . . . . . . . . . . . . . . . . . . . . . . . . . . . . . . . . 29Supplemental Information . . . . . . . . . . . . . . . . . . . . . . . . . . . . . . . . . . . . . . . . . . . . . 29
2
F5 Service Proxy for Kubernetes - v1.5.0 Installation and Integration
Commands: gRPC secrets . . . . . . . . . . . . . . . . . . . . . . . . . . . . . . . . . . . . . . . . . . . . . 29
Fluentd Logging 32Overview . . . . . . . . . . . . . . . . . . . . . . . . . . . . . . . . . . . . . . . . . . . . . . . . . . . . . . 32Fluentd Service . . . . . . . . . . . . . . . . . . . . . . . . . . . . . . . . . . . . . . . . . . . . . . . . . . . 32Log file locations . . . . . . . . . . . . . . . . . . . . . . . . . . . . . . . . . . . . . . . . . . . . . . . . . . 32Requirements . . . . . . . . . . . . . . . . . . . . . . . . . . . . . . . . . . . . . . . . . . . . . . . . . . . . 33Procedures . . . . . . . . . . . . . . . . . . . . . . . . . . . . . . . . . . . . . . . . . . . . . . . . . . . . . 33Next step . . . . . . . . . . . . . . . . . . . . . . . . . . . . . . . . . . . . . . . . . . . . . . . . . . . . . . 35Feedback . . . . . . . . . . . . . . . . . . . . . . . . . . . . . . . . . . . . . . . . . . . . . . . . . . . . . . 35Supplemental . . . . . . . . . . . . . . . . . . . . . . . . . . . . . . . . . . . . . . . . . . . . . . . . . . . . 35
dSSM Database 36Overview . . . . . . . . . . . . . . . . . . . . . . . . . . . . . . . . . . . . . . . . . . . . . . . . . . . . . . 36Sentinels and DBs . . . . . . . . . . . . . . . . . . . . . . . . . . . . . . . . . . . . . . . . . . . . . . . . . 36Sentinel Service . . . . . . . . . . . . . . . . . . . . . . . . . . . . . . . . . . . . . . . . . . . . . . . . . . . 37Secure communication . . . . . . . . . . . . . . . . . . . . . . . . . . . . . . . . . . . . . . . . . . . . . . . 38Requirements . . . . . . . . . . . . . . . . . . . . . . . . . . . . . . . . . . . . . . . . . . . . . . . . . . . . 38Procedures . . . . . . . . . . . . . . . . . . . . . . . . . . . . . . . . . . . . . . . . . . . . . . . . . . . . . 38Next step . . . . . . . . . . . . . . . . . . . . . . . . . . . . . . . . . . . . . . . . . . . . . . . . . . . . . . 43Restarting . . . . . . . . . . . . . . . . . . . . . . . . . . . . . . . . . . . . . . . . . . . . . . . . . . . . . . 43Feedback . . . . . . . . . . . . . . . . . . . . . . . . . . . . . . . . . . . . . . . . . . . . . . . . . . . . . . 44Supplemental . . . . . . . . . . . . . . . . . . . . . . . . . . . . . . . . . . . . . . . . . . . . . . . . . . . . 44
OTEL Collectors (Early Access) 46Overview . . . . . . . . . . . . . . . . . . . . . . . . . . . . . . . . . . . . . . . . . . . . . . . . . . . . . . 46OTEL Pod and container . . . . . . . . . . . . . . . . . . . . . . . . . . . . . . . . . . . . . . . . . . . . . . 46TMMOTEL Service . . . . . . . . . . . . . . . . . . . . . . . . . . . . . . . . . . . . . . . . . . . . . . . . . 46Fetching OTEL Data . . . . . . . . . . . . . . . . . . . . . . . . . . . . . . . . . . . . . . . . . . . . . . . . . 46Metrics and statistics . . . . . . . . . . . . . . . . . . . . . . . . . . . . . . . . . . . . . . . . . . . . . . . . 46Requirements . . . . . . . . . . . . . . . . . . . . . . . . . . . . . . . . . . . . . . . . . . . . . . . . . . . . 47Procedures . . . . . . . . . . . . . . . . . . . . . . . . . . . . . . . . . . . . . . . . . . . . . . . . . . . . . 47Feedback . . . . . . . . . . . . . . . . . . . . . . . . . . . . . . . . . . . . . . . . . . . . . . . . . . . . . . 48Supplemental . . . . . . . . . . . . . . . . . . . . . . . . . . . . . . . . . . . . . . . . . . . . . . . . . . . . 48
SPK CWC 49Overview . . . . . . . . . . . . . . . . . . . . . . . . . . . . . . . . . . . . . . . . . . . . . . . . . . . . . . 49CPCLmodule . . . . . . . . . . . . . . . . . . . . . . . . . . . . . . . . . . . . . . . . . . . . . . . . . . . . 49Cluster Project . . . . . . . . . . . . . . . . . . . . . . . . . . . . . . . . . . . . . . . . . . . . . . . . . . . 49RabbitMQ . . . . . . . . . . . . . . . . . . . . . . . . . . . . . . . . . . . . . . . . . . . . . . . . . . . . . . 49Requirements . . . . . . . . . . . . . . . . . . . . . . . . . . . . . . . . . . . . . . . . . . . . . . . . . . . . 50Procedures . . . . . . . . . . . . . . . . . . . . . . . . . . . . . . . . . . . . . . . . . . . . . . . . . . . . . 50Next step . . . . . . . . . . . . . . . . . . . . . . . . . . . . . . . . . . . . . . . . . . . . . . . . . . . . . . 55Feedback . . . . . . . . . . . . . . . . . . . . . . . . . . . . . . . . . . . . . . . . . . . . . . . . . . . . . . 55Supplemental . . . . . . . . . . . . . . . . . . . . . . . . . . . . . . . . . . . . . . . . . . . . . . . . . . . . 55
SPK Licensing 56Overview . . . . . . . . . . . . . . . . . . . . . . . . . . . . . . . . . . . . . . . . . . . . . . . . . . . . . . 56Licensing stages . . . . . . . . . . . . . . . . . . . . . . . . . . . . . . . . . . . . . . . . . . . . . . . . . . 56Telemetry reports . . . . . . . . . . . . . . . . . . . . . . . . . . . . . . . . . . . . . . . . . . . . . . . . . . 56License expiration . . . . . . . . . . . . . . . . . . . . . . . . . . . . . . . . . . . . . . . . . . . . . . . . . 56Licensing APIs . . . . . . . . . . . . . . . . . . . . . . . . . . . . . . . . . . . . . . . . . . . . . . . . . . . . 57
3
F5 Service Proxy for Kubernetes - v1.5.0 Installation and Integration
Requirements . . . . . . . . . . . . . . . . . . . . . . . . . . . . . . . . . . . . . . . . . . . . . . . . . . . . 58Procedures . . . . . . . . . . . . . . . . . . . . . . . . . . . . . . . . . . . . . . . . . . . . . . . . . . . . . 58Next step . . . . . . . . . . . . . . . . . . . . . . . . . . . . . . . . . . . . . . . . . . . . . . . . . . . . . . 61Feedback . . . . . . . . . . . . . . . . . . . . . . . . . . . . . . . . . . . . . . . . . . . . . . . . . . . . . . 61
SPK Controller 62Overview . . . . . . . . . . . . . . . . . . . . . . . . . . . . . . . . . . . . . . . . . . . . . . . . . . . . . . 62Requirements . . . . . . . . . . . . . . . . . . . . . . . . . . . . . . . . . . . . . . . . . . . . . . . . . . . . 62Procedures . . . . . . . . . . . . . . . . . . . . . . . . . . . . . . . . . . . . . . . . . . . . . . . . . . . . . 62Next step . . . . . . . . . . . . . . . . . . . . . . . . . . . . . . . . . . . . . . . . . . . . . . . . . . . . . . 69Feedback . . . . . . . . . . . . . . . . . . . . . . . . . . . . . . . . . . . . . . . . . . . . . . . . . . . . . . 69Supplemental . . . . . . . . . . . . . . . . . . . . . . . . . . . . . . . . . . . . . . . . . . . . . . . . . . . . 69
SPK CRs 70Overview . . . . . . . . . . . . . . . . . . . . . . . . . . . . . . . . . . . . . . . . . . . . . . . . . . . . . . 70Application traffic CRs . . . . . . . . . . . . . . . . . . . . . . . . . . . . . . . . . . . . . . . . . . . . . . . 70Networking CRs . . . . . . . . . . . . . . . . . . . . . . . . . . . . . . . . . . . . . . . . . . . . . . . . . . . 70CR installation strategies . . . . . . . . . . . . . . . . . . . . . . . . . . . . . . . . . . . . . . . . . . . . . . 70Feedback . . . . . . . . . . . . . . . . . . . . . . . . . . . . . . . . . . . . . . . . . . . . . . . . . . . . . . 71Supplemental Information . . . . . . . . . . . . . . . . . . . . . . . . . . . . . . . . . . . . . . . . . . . . . 71
F5SPKIngressTCP 72Overview . . . . . . . . . . . . . . . . . . . . . . . . . . . . . . . . . . . . . . . . . . . . . . . . . . . . . . 72CR integration stages . . . . . . . . . . . . . . . . . . . . . . . . . . . . . . . . . . . . . . . . . . . . . . . . 72CR Parameters . . . . . . . . . . . . . . . . . . . . . . . . . . . . . . . . . . . . . . . . . . . . . . . . . . . 72Dual-Stack environments . . . . . . . . . . . . . . . . . . . . . . . . . . . . . . . . . . . . . . . . . . . . . 74Ingress traffic . . . . . . . . . . . . . . . . . . . . . . . . . . . . . . . . . . . . . . . . . . . . . . . . . . . . 74Requirements . . . . . . . . . . . . . . . . . . . . . . . . . . . . . . . . . . . . . . . . . . . . . . . . . . . . 74Installation . . . . . . . . . . . . . . . . . . . . . . . . . . . . . . . . . . . . . . . . . . . . . . . . . . . . . 74Connection statistics . . . . . . . . . . . . . . . . . . . . . . . . . . . . . . . . . . . . . . . . . . . . . . . . 75Feedback . . . . . . . . . . . . . . . . . . . . . . . . . . . . . . . . . . . . . . . . . . . . . . . . . . . . . . 76Supplemental . . . . . . . . . . . . . . . . . . . . . . . . . . . . . . . . . . . . . . . . . . . . . . . . . . . . 76
F5SPKIngressUDP 77Overview . . . . . . . . . . . . . . . . . . . . . . . . . . . . . . . . . . . . . . . . . . . . . . . . . . . . . . 77CR Parameters . . . . . . . . . . . . . . . . . . . . . . . . . . . . . . . . . . . . . . . . . . . . . . . . . . . 77Application Project . . . . . . . . . . . . . . . . . . . . . . . . . . . . . . . . . . . . . . . . . . . . . . . . . 78Dual-Stack environments . . . . . . . . . . . . . . . . . . . . . . . . . . . . . . . . . . . . . . . . . . . . . 79Ingress traffic . . . . . . . . . . . . . . . . . . . . . . . . . . . . . . . . . . . . . . . . . . . . . . . . . . . . 79Requirements . . . . . . . . . . . . . . . . . . . . . . . . . . . . . . . . . . . . . . . . . . . . . . . . . . . . 79Installation . . . . . . . . . . . . . . . . . . . . . . . . . . . . . . . . . . . . . . . . . . . . . . . . . . . . . 79Connectivity statistics . . . . . . . . . . . . . . . . . . . . . . . . . . . . . . . . . . . . . . . . . . . . . . . 80Feedback . . . . . . . . . . . . . . . . . . . . . . . . . . . . . . . . . . . . . . . . . . . . . . . . . . . . . . 81Supplemental . . . . . . . . . . . . . . . . . . . . . . . . . . . . . . . . . . . . . . . . . . . . . . . . . . . . 81
F5SPKIngressDiameter 82Overview . . . . . . . . . . . . . . . . . . . . . . . . . . . . . . . . . . . . . . . . . . . . . . . . . . . . . . 82CR integration stages . . . . . . . . . . . . . . . . . . . . . . . . . . . . . . . . . . . . . . . . . . . . . . . . 82CR Parameters . . . . . . . . . . . . . . . . . . . . . . . . . . . . . . . . . . . . . . . . . . . . . . . . . . . 82Application Project . . . . . . . . . . . . . . . . . . . . . . . . . . . . . . . . . . . . . . . . . . . . . . . . . 83Dual-Stack environments . . . . . . . . . . . . . . . . . . . . . . . . . . . . . . . . . . . . . . . . . . . . . 83Ingress traffic . . . . . . . . . . . . . . . . . . . . . . . . . . . . . . . . . . . . . . . . . . . . . . . . . . . . 84
4

F5 Service Proxy for Kubernetes - v1.5.0 Installation and Integration
Endpoint availablity . . . . . . . . . . . . . . . . . . . . . . . . . . . . . . . . . . . . . . . . . . . . . . . . 84Requirements . . . . . . . . . . . . . . . . . . . . . . . . . . . . . . . . . . . . . . . . . . . . . . . . . . . . 84Installation . . . . . . . . . . . . . . . . . . . . . . . . . . . . . . . . . . . . . . . . . . . . . . . . . . . . . 84Verify Connectivity . . . . . . . . . . . . . . . . . . . . . . . . . . . . . . . . . . . . . . . . . . . . . . . . . 85Feedback . . . . . . . . . . . . . . . . . . . . . . . . . . . . . . . . . . . . . . . . . . . . . . . . . . . . . . 86Supplemental . . . . . . . . . . . . . . . . . . . . . . . . . . . . . . . . . . . . . . . . . . . . . . . . . . . . 86
F5SPKIngressNGAP 87Overview . . . . . . . . . . . . . . . . . . . . . . . . . . . . . . . . . . . . . . . . . . . . . . . . . . . . . . 87Requirements . . . . . . . . . . . . . . . . . . . . . . . . . . . . . . . . . . . . . . . . . . . . . . . . . . . . 89Installation . . . . . . . . . . . . . . . . . . . . . . . . . . . . . . . . . . . . . . . . . . . . . . . . . . . . . 90Verify connectivity . . . . . . . . . . . . . . . . . . . . . . . . . . . . . . . . . . . . . . . . . . . . . . . . . 90Supplemental . . . . . . . . . . . . . . . . . . . . . . . . . . . . . . . . . . . . . . . . . . . . . . . . . . . . 91
F5SPKSnatpool 92Overview . . . . . . . . . . . . . . . . . . . . . . . . . . . . . . . . . . . . . . . . . . . . . . . . . . . . . . 92Scaling TMM . . . . . . . . . . . . . . . . . . . . . . . . . . . . . . . . . . . . . . . . . . . . . . . . . . . . . 92Advertising address lists . . . . . . . . . . . . . . . . . . . . . . . . . . . . . . . . . . . . . . . . . . . . . . 93Referencing the SNAT Pool . . . . . . . . . . . . . . . . . . . . . . . . . . . . . . . . . . . . . . . . . . . . . 93Requirements . . . . . . . . . . . . . . . . . . . . . . . . . . . . . . . . . . . . . . . . . . . . . . . . . . . . 93Deployment . . . . . . . . . . . . . . . . . . . . . . . . . . . . . . . . . . . . . . . . . . . . . . . . . . . . . 93Feedback . . . . . . . . . . . . . . . . . . . . . . . . . . . . . . . . . . . . . . . . . . . . . . . . . . . . . . 95
F5SPKEgress 96Overview . . . . . . . . . . . . . . . . . . . . . . . . . . . . . . . . . . . . . . . . . . . . . . . . . . . . . . 96CRmodifications . . . . . . . . . . . . . . . . . . . . . . . . . . . . . . . . . . . . . . . . . . . . . . . . . . 96Requirements . . . . . . . . . . . . . . . . . . . . . . . . . . . . . . . . . . . . . . . . . . . . . . . . . . . . 96Egress SNAT . . . . . . . . . . . . . . . . . . . . . . . . . . . . . . . . . . . . . . . . . . . . . . . . . . . . . 96DNS/NAT46 . . . . . . . . . . . . . . . . . . . . . . . . . . . . . . . . . . . . . . . . . . . . . . . . . . . . . 98Feedback . . . . . . . . . . . . . . . . . . . . . . . . . . . . . . . . . . . . . . . . . . . . . . . . . . . . . . 107Supplemental . . . . . . . . . . . . . . . . . . . . . . . . . . . . . . . . . . . . . . . . . . . . . . . . . . . . 107
F5SPKVlan 108Overview . . . . . . . . . . . . . . . . . . . . . . . . . . . . . . . . . . . . . . . . . . . . . . . . . . . . . . 108Scaling TMM . . . . . . . . . . . . . . . . . . . . . . . . . . . . . . . . . . . . . . . . . . . . . . . . . . . . . 108Internal facing interfaces . . . . . . . . . . . . . . . . . . . . . . . . . . . . . . . . . . . . . . . . . . . . . . 108OVN annotations . . . . . . . . . . . . . . . . . . . . . . . . . . . . . . . . . . . . . . . . . . . . . . . . . . 108Parameters . . . . . . . . . . . . . . . . . . . . . . . . . . . . . . . . . . . . . . . . . . . . . . . . . . . . . 109Requirements . . . . . . . . . . . . . . . . . . . . . . . . . . . . . . . . . . . . . . . . . . . . . . . . . . . . 109Deployment . . . . . . . . . . . . . . . . . . . . . . . . . . . . . . . . . . . . . . . . . . . . . . . . . . . . . 110Feedback . . . . . . . . . . . . . . . . . . . . . . . . . . . . . . . . . . . . . . . . . . . . . . . . . . . . . . 111
F5SPKStaticRoute 112Overview . . . . . . . . . . . . . . . . . . . . . . . . . . . . . . . . . . . . . . . . . . . . . . . . . . . . . . 112Parameters . . . . . . . . . . . . . . . . . . . . . . . . . . . . . . . . . . . . . . . . . . . . . . . . . . . . . 112Requirements . . . . . . . . . . . . . . . . . . . . . . . . . . . . . . . . . . . . . . . . . . . . . . . . . . . . 112Deployment . . . . . . . . . . . . . . . . . . . . . . . . . . . . . . . . . . . . . . . . . . . . . . . . . . . . . 112Feedback . . . . . . . . . . . . . . . . . . . . . . . . . . . . . . . . . . . . . . . . . . . . . . . . . . . . . . 113
Upgrading dSSM 114Overview . . . . . . . . . . . . . . . . . . . . . . . . . . . . . . . . . . . . . . . . . . . . . . . . . . . . . . 114Requirements . . . . . . . . . . . . . . . . . . . . . . . . . . . . . . . . . . . . . . . . . . . . . . . . . . . . 114Procedures . . . . . . . . . . . . . . . . . . . . . . . . . . . . . . . . . . . . . . . . . . . . . . . . . . . . . 114
5

F5 Service Proxy for Kubernetes - v1.5.0 Installation and Integration
Quick Upgrade . . . . . . . . . . . . . . . . . . . . . . . . . . . . . . . . . . . . . . . . . . . . . . . . . . . 121Feedback . . . . . . . . . . . . . . . . . . . . . . . . . . . . . . . . . . . . . . . . . . . . . . . . . . . . . . 121Supplemental . . . . . . . . . . . . . . . . . . . . . . . . . . . . . . . . . . . . . . . . . . . . . . . . . . . . 122
App Hairpinning 123Overview . . . . . . . . . . . . . . . . . . . . . . . . . . . . . . . . . . . . . . . . . . . . . . . . . . . . . . 123CR Parameters . . . . . . . . . . . . . . . . . . . . . . . . . . . . . . . . . . . . . . . . . . . . . . . . . . . 123Requirements . . . . . . . . . . . . . . . . . . . . . . . . . . . . . . . . . . . . . . . . . . . . . . . . . . . . 124Installation . . . . . . . . . . . . . . . . . . . . . . . . . . . . . . . . . . . . . . . . . . . . . . . . . . . . . 124Connection Statistics . . . . . . . . . . . . . . . . . . . . . . . . . . . . . . . . . . . . . . . . . . . . . . . . 127Feedback . . . . . . . . . . . . . . . . . . . . . . . . . . . . . . . . . . . . . . . . . . . . . . . . . . . . . . 128Supplemental . . . . . . . . . . . . . . . . . . . . . . . . . . . . . . . . . . . . . . . . . . . . . . . . . . . . 128
Helm CR Integration 129Overview . . . . . . . . . . . . . . . . . . . . . . . . . . . . . . . . . . . . . . . . . . . . . . . . . . . . . . 129Templates . . . . . . . . . . . . . . . . . . . . . . . . . . . . . . . . . . . . . . . . . . . . . . . . . . . . . . 129Values . . . . . . . . . . . . . . . . . . . . . . . . . . . . . . . . . . . . . . . . . . . . . . . . . . . . . . . . 129Requirements . . . . . . . . . . . . . . . . . . . . . . . . . . . . . . . . . . . . . . . . . . . . . . . . . . . . 130Procedure . . . . . . . . . . . . . . . . . . . . . . . . . . . . . . . . . . . . . . . . . . . . . . . . . . . . . . 130Supplemental . . . . . . . . . . . . . . . . . . . . . . . . . . . . . . . . . . . . . . . . . . . . . . . . . . . . 132
TMM Core Files 133Overview . . . . . . . . . . . . . . . . . . . . . . . . . . . . . . . . . . . . . . . . . . . . . . . . . . . . . . 133Requirements . . . . . . . . . . . . . . . . . . . . . . . . . . . . . . . . . . . . . . . . . . . . . . . . . . . . 133Procedures . . . . . . . . . . . . . . . . . . . . . . . . . . . . . . . . . . . . . . . . . . . . . . . . . . . . . 133Feedback . . . . . . . . . . . . . . . . . . . . . . . . . . . . . . . . . . . . . . . . . . . . . . . . . . . . . . 135
Using Node Labels 136Overview . . . . . . . . . . . . . . . . . . . . . . . . . . . . . . . . . . . . . . . . . . . . . . . . . . . . . . 136Procedure . . . . . . . . . . . . . . . . . . . . . . . . . . . . . . . . . . . . . . . . . . . . . . . . . . . . . . 136Feedback . . . . . . . . . . . . . . . . . . . . . . . . . . . . . . . . . . . . . . . . . . . . . . . . . . . . . . 137
BGP Overview 138Overview . . . . . . . . . . . . . . . . . . . . . . . . . . . . . . . . . . . . . . . . . . . . . . . . . . . . . . 138BGP parameters . . . . . . . . . . . . . . . . . . . . . . . . . . . . . . . . . . . . . . . . . . . . . . . . . . 138BGP Secrets . . . . . . . . . . . . . . . . . . . . . . . . . . . . . . . . . . . . . . . . . . . . . . . . . . . . . 140Advertising virtual IPs . . . . . . . . . . . . . . . . . . . . . . . . . . . . . . . . . . . . . . . . . . . . . . . 140Filtering Snatpool IPs . . . . . . . . . . . . . . . . . . . . . . . . . . . . . . . . . . . . . . . . . . . . . . . . 141Scaling TMM Pods . . . . . . . . . . . . . . . . . . . . . . . . . . . . . . . . . . . . . . . . . . . . . . . . . . 143Enabling BFD . . . . . . . . . . . . . . . . . . . . . . . . . . . . . . . . . . . . . . . . . . . . . . . . . . . . 143Troubleshooting . . . . . . . . . . . . . . . . . . . . . . . . . . . . . . . . . . . . . . . . . . . . . . . . . . 144Feedback . . . . . . . . . . . . . . . . . . . . . . . . . . . . . . . . . . . . . . . . . . . . . . . . . . . . . . 146Supplemental . . . . . . . . . . . . . . . . . . . . . . . . . . . . . . . . . . . . . . . . . . . . . . . . . . . . 146
Networking Overview 147Overview . . . . . . . . . . . . . . . . . . . . . . . . . . . . . . . . . . . . . . . . . . . . . . . . . . . . . . 147SR-IOV VFs . . . . . . . . . . . . . . . . . . . . . . . . . . . . . . . . . . . . . . . . . . . . . . . . . . . . . . 147OVN-Kubernetes . . . . . . . . . . . . . . . . . . . . . . . . . . . . . . . . . . . . . . . . . . . . . . . . . . 148BGP . . . . . . . . . . . . . . . . . . . . . . . . . . . . . . . . . . . . . . . . . . . . . . . . . . . . . . . . . 150Ingress packet path . . . . . . . . . . . . . . . . . . . . . . . . . . . . . . . . . . . . . . . . . . . . . . . . . 151Feedback . . . . . . . . . . . . . . . . . . . . . . . . . . . . . . . . . . . . . . . . . . . . . . . . . . . . . . 151Supplemental . . . . . . . . . . . . . . . . . . . . . . . . . . . . . . . . . . . . . . . . . . . . . . . . . . . . 151
6

F5 Service Proxy for Kubernetes - v1.5.0 Installation and Integration
TMM Resources 152Overview . . . . . . . . . . . . . . . . . . . . . . . . . . . . . . . . . . . . . . . . . . . . . . . . . . . . . . 152TMM Pod limit values . . . . . . . . . . . . . . . . . . . . . . . . . . . . . . . . . . . . . . . . . . . . . . . . 152Guaranteed QoS class . . . . . . . . . . . . . . . . . . . . . . . . . . . . . . . . . . . . . . . . . . . . . . . 152Modifying defaults . . . . . . . . . . . . . . . . . . . . . . . . . . . . . . . . . . . . . . . . . . . . . . . . . 153Supplemental . . . . . . . . . . . . . . . . . . . . . . . . . . . . . . . . . . . . . . . . . . . . . . . . . . . . 153
Debug Sidecar 154Overview . . . . . . . . . . . . . . . . . . . . . . . . . . . . . . . . . . . . . . . . . . . . . . . . . . . . . . 154Command line tools . . . . . . . . . . . . . . . . . . . . . . . . . . . . . . . . . . . . . . . . . . . . . . . . 154Connecting to the sidecar . . . . . . . . . . . . . . . . . . . . . . . . . . . . . . . . . . . . . . . . . . . . . 154Command examples . . . . . . . . . . . . . . . . . . . . . . . . . . . . . . . . . . . . . . . . . . . . . . . . 155Persisting files . . . . . . . . . . . . . . . . . . . . . . . . . . . . . . . . . . . . . . . . . . . . . . . . . . . . 158Qkview . . . . . . . . . . . . . . . . . . . . . . . . . . . . . . . . . . . . . . . . . . . . . . . . . . . . . . . 159Disabling the sidecar . . . . . . . . . . . . . . . . . . . . . . . . . . . . . . . . . . . . . . . . . . . . . . . . 161Feedback . . . . . . . . . . . . . . . . . . . . . . . . . . . . . . . . . . . . . . . . . . . . . . . . . . . . . . 161Supplemental . . . . . . . . . . . . . . . . . . . . . . . . . . . . . . . . . . . . . . . . . . . . . . . . . . . . 161
Dual CRD Support 162Overview . . . . . . . . . . . . . . . . . . . . . . . . . . . . . . . . . . . . . . . . . . . . . . . . . . . . . . 162Installations . . . . . . . . . . . . . . . . . . . . . . . . . . . . . . . . . . . . . . . . . . . . . . . . . . . . . 162Modifications . . . . . . . . . . . . . . . . . . . . . . . . . . . . . . . . . . . . . . . . . . . . . . . . . . . . 162Deletions . . . . . . . . . . . . . . . . . . . . . . . . . . . . . . . . . . . . . . . . . . . . . . . . . . . . . . 162Naming translation . . . . . . . . . . . . . . . . . . . . . . . . . . . . . . . . . . . . . . . . . . . . . . . . . 163Feedback . . . . . . . . . . . . . . . . . . . . . . . . . . . . . . . . . . . . . . . . . . . . . . . . . . . . . . 163Supplemental . . . . . . . . . . . . . . . . . . . . . . . . . . . . . . . . . . . . . . . . . . . . . . . . . . . . 163
Troubleshooting DNS/NAT46 164Overview . . . . . . . . . . . . . . . . . . . . . . . . . . . . . . . . . . . . . . . . . . . . . . . . . . . . . . 164Configuration review . . . . . . . . . . . . . . . . . . . . . . . . . . . . . . . . . . . . . . . . . . . . . . . . 164Requirements . . . . . . . . . . . . . . . . . . . . . . . . . . . . . . . . . . . . . . . . . . . . . . . . . . . . 164Procedure . . . . . . . . . . . . . . . . . . . . . . . . . . . . . . . . . . . . . . . . . . . . . . . . . . . . . . 164Feedback . . . . . . . . . . . . . . . . . . . . . . . . . . . . . . . . . . . . . . . . . . . . . . . . . . . . . . 167
Config File Reference 168SR-IOV interfaces . . . . . . . . . . . . . . . . . . . . . . . . . . . . . . . . . . . . . . . . . . . . . . . . . . 168Helm values . . . . . . . . . . . . . . . . . . . . . . . . . . . . . . . . . . . . . . . . . . . . . . . . . . . . . 168Secret commands . . . . . . . . . . . . . . . . . . . . . . . . . . . . . . . . . . . . . . . . . . . . . . . . . 168Custom Resources . . . . . . . . . . . . . . . . . . . . . . . . . . . . . . . . . . . . . . . . . . . . . . . . . 168Supplemental . . . . . . . . . . . . . . . . . . . . . . . . . . . . . . . . . . . . . . . . . . . . . . . . . . . . 168
SPK Controller Reference 169controller . . . . . . . . . . . . . . . . . . . . . . . . . . . . . . . . . . . . . . . . . . . . . . . . . . . . . . 169tmm . . . . . . . . . . . . . . . . . . . . . . . . . . . . . . . . . . . . . . . . . . . . . . . . . . . . . . . . . 169tmm.dynamicRouting . . . . . . . . . . . . . . . . . . . . . . . . . . . . . . . . . . . . . . . . . . . . . . . 170f5-toda-logging . . . . . . . . . . . . . . . . . . . . . . . . . . . . . . . . . . . . . . . . . . . . . . . . . . . 171debug . . . . . . . . . . . . . . . . . . . . . . . . . . . . . . . . . . . . . . . . . . . . . . . . . . . . . . . . 172
F5SPKIngressTCP Reference 173service . . . . . . . . . . . . . . . . . . . . . . . . . . . . . . . . . . . . . . . . . . . . . . . . . . . . . . . . 173spec . . . . . . . . . . . . . . . . . . . . . . . . . . . . . . . . . . . . . . . . . . . . . . . . . . . . . . . . . 173monitors . . . . . . . . . . . . . . . . . . . . . . . . . . . . . . . . . . . . . . . . . . . . . . . . . . . . . . 175
7

F5 Service Proxy for Kubernetes - v1.5.0 Installation and Integration
F5SPKIngressUDP Reference 176service . . . . . . . . . . . . . . . . . . . . . . . . . . . . . . . . . . . . . . . . . . . . . . . . . . . . . . . . 176spec . . . . . . . . . . . . . . . . . . . . . . . . . . . . . . . . . . . . . . . . . . . . . . . . . . . . . . . . . 176monitors . . . . . . . . . . . . . . . . . . . . . . . . . . . . . . . . . . . . . . . . . . . . . . . . . . . . . . 177
F5SPKIngressDiameter Reference 178service . . . . . . . . . . . . . . . . . . . . . . . . . . . . . . . . . . . . . . . . . . . . . . . . . . . . . . . . 178spec . . . . . . . . . . . . . . . . . . . . . . . . . . . . . . . . . . . . . . . . . . . . . . . . . . . . . . . . . 178spec.externalTCP . . . . . . . . . . . . . . . . . . . . . . . . . . . . . . . . . . . . . . . . . . . . . . . . . . 178spec.internalTCP . . . . . . . . . . . . . . . . . . . . . . . . . . . . . . . . . . . . . . . . . . . . . . . . . . 178spec.externalSCTP . . . . . . . . . . . . . . . . . . . . . . . . . . . . . . . . . . . . . . . . . . . . . . . . . 179spec.internalSCTP . . . . . . . . . . . . . . . . . . . . . . . . . . . . . . . . . . . . . . . . . . . . . . . . . 179spec.externalSession . . . . . . . . . . . . . . . . . . . . . . . . . . . . . . . . . . . . . . . . . . . . . . . . 180spec.internalSession . . . . . . . . . . . . . . . . . . . . . . . . . . . . . . . . . . . . . . . . . . . . . . . . 180
Software Releases 182v1.5.0 . . . . . . . . . . . . . . . . . . . . . . . . . . . . . . . . . . . . . . . . . . . . . . . . . . . . . . . . 182v1.4.13 . . . . . . . . . . . . . . . . . . . . . . . . . . . . . . . . . . . . . . . . . . . . . . . . . . . . . . . . 182v1.4.12 . . . . . . . . . . . . . . . . . . . . . . . . . . . . . . . . . . . . . . . . . . . . . . . . . . . . . . . . 183v1.4.11 . . . . . . . . . . . . . . . . . . . . . . . . . . . . . . . . . . . . . . . . . . . . . . . . . . . . . . . . 184v1.4.10 . . . . . . . . . . . . . . . . . . . . . . . . . . . . . . . . . . . . . . . . . . . . . . . . . . . . . . . . 185v1.4.9 . . . . . . . . . . . . . . . . . . . . . . . . . . . . . . . . . . . . . . . . . . . . . . . . . . . . . . . . 185v1.4.8 . . . . . . . . . . . . . . . . . . . . . . . . . . . . . . . . . . . . . . . . . . . . . . . . . . . . . . . . 186v1.4.7 . . . . . . . . . . . . . . . . . . . . . . . . . . . . . . . . . . . . . . . . . . . . . . . . . . . . . . . . 187v1.4.5 . . . . . . . . . . . . . . . . . . . . . . . . . . . . . . . . . . . . . . . . . . . . . . . . . . . . . . . . 187v1.4.4 . . . . . . . . . . . . . . . . . . . . . . . . . . . . . . . . . . . . . . . . . . . . . . . . . . . . . . . . 188v1.4.3 . . . . . . . . . . . . . . . . . . . . . . . . . . . . . . . . . . . . . . . . . . . . . . . . . . . . . . . . 189v1.4.2 . . . . . . . . . . . . . . . . . . . . . . . . . . . . . . . . . . . . . . . . . . . . . . . . . . . . . . . . 189v1.4.0 . . . . . . . . . . . . . . . . . . . . . . . . . . . . . . . . . . . . . . . . . . . . . . . . . . . . . . . . 190v1.3.1 . . . . . . . . . . . . . . . . . . . . . . . . . . . . . . . . . . . . . . . . . . . . . . . . . . . . . . . . . 191v1.3.0 . . . . . . . . . . . . . . . . . . . . . . . . . . . . . . . . . . . . . . . . . . . . . . . . . . . . . . . . 191v1.2.3.3 . . . . . . . . . . . . . . . . . . . . . . . . . . . . . . . . . . . . . . . . . . . . . . . . . . . . . . . 192Feedback . . . . . . . . . . . . . . . . . . . . . . . . . . . . . . . . . . . . . . . . . . . . . . . . . . . . . . 192
8
F5 Service Proxy for Kubernetes - v1.5.0 Installation and Integration
Overview
Service Proxy for Kubernetes (SPK) is a cloud-native application traffic management solution, designed for communi-cation service provider (CoSP) 5G networks. SPK integrates F5’s containerized Traffic Management Microkernel (TMM)and CustomResource Definitions (CRDs) into theOpenShift container platform, to proxy and load balance low-latency5G workloads.
This document describes the SPK features and software components.
Features
SPK supports the following protocols and features:
• Flexible consumption licensing bills monthly only for features used.• TCP, UDP, SCTP, NGAP and Diameter application workloads.• OVN-Kubernetes CNI with SR-IOV interface networking.• Multiple dual-stack IPv4/IPv6 capabilities.• Egress request routing with NAT for internal Pods.• Pod Telemetry collection for visualization software.• Redundant data storage with persistence.• Diagnostics, statistics and debugging tools.• Centralized logging collection.• Application health monitoring.
Components
SPK software comprises three primary components:
SPK Controller
The SPK Controller watches the Kube-API for Custom Resource (CR) update events, and configures the Service ProxyPod based on the update. The Controller also monitors Kubernetes Service object Endpoints, to dynamically updateService Proxy TMM’s load balancing pool member list andmember status.
Custom Resource Definitions
Custom Resource Definitions (CRDs) extend the Kubernetes API, enabling Service Proxy TMM to be configured usingSPK’s Custom Resource (CR) objects. CRs configure TMM to proxy and load balance 5G workloads over UDP, TCP,SCTP, NGAP and Diameter. SPK CRs also configure TMM’s networking components such as self IP addresses and staticroutes.
Service Proxy
TheServiceProxyPodcomprises F5’s containerizedTMMtoproxy and loadbalance low-latency application traffic, andoptional containers to assist with dynamic routing, statistic reporting, and debugging.
Next step
Continue to the SPK Release Notes for recent software updates and bug information.
9

F5 Service Proxy for Kubernetes - v1.5.0 Installation and Integration
Supplemental
• Kubernetes API• SPK PDF: v1.5.0
10
F5 Service Proxy for Kubernetes - v1.5.0 Installation and Integration
Release Notes
F5 Service Proxy for Kubernetes (SPK) - v1.5.0
New Features and Improvements
• The SPK CWC (Cluster Wide Controller) introduces F5’s flexible consumption software licensing, billingmonthlyonly for the software features used.
• The OTEL Collectors (Early Access) gather detailed SPK Pod health statistics for third-party data collection andvisualization software such as Prometheus and Grafana. Important: The OTEL Collectors require new Secrets,review SPK Secrets for the installation steps.
• The F5SPKEgress CR now references the F5SPKDnscache CR by concatenating the CR’smetadata.namespaceandmetadata.name parameters with a hyphen (-) character. For example, dnsCacheName: ingress-dnscache.
• The tmm.bfdToOvn parameter enhances OVN Kubernetes to quickly detect loss of connectivity between TMMsand OVN gateway nodes. This parameter should be enabled when TMM is used as an egress gateway. Refer tothe SPK Controller overview.
Software upgrades
Use these steps to upgrade the SPK software components:
Important: Steps 2 through 5 should be performed together, and during a plannedmaintenance window.
1. Review the New Features and Improvements section above, and integrate any updates into the existing con-figuration. Do not apply Custom Resource (CR) updates until after the SPK Controller has been upgraded (step3).
2. Follow Install the CRDs in the SPK Software guide to upgrade the CRDs. Be aware that newly applied CRDs willreplace existing CRDs of the same name.
3. Uninstall the previous version SPK Controller, and follow the Installation procedure in the SPK Controller guideto upgrade the Controller and TMM Pods. Upgrades have not yet been tested using Helm Upgrade.
4. Once the SPK Controller and TMMPods are available, apply any updated CR configurations (step 1) using the ocapply -f <file> command.
5. Follow the Upgrading DNS46 entries section of the F5SPKEgress CR guide to upgrade any entries created inversions 1.4.9 and earlier.
6. The dSSM Databases can be upgraded at anytime using the Upgrading dSSM guide.
7. The Fluentd Logging collector can be upgraded anytime using HelmUpgrade. Review Extract the Images in theSPK Software guide for the new Fluentd Helm chart location.
Limitations
• Jumbo Frames - Themaximum transmission unit (MTU)must be the same size on both ingress and egress inter-faces. Packets over 8000 bytes are dropped.
Bug Fixes
1092013 (TMM Routing)
The IMI shell (imish) is now accessible after a TMM container restart.
11
F5 Service Proxy for Kubernetes - v1.5.0 Installation and Integration
Known Issues
1105561 (TMM)
Bidirectional Forwarding Detection (BFD) sessions with OVN-Kubernetes may fail to established after deleting andreapplying the internal F5SPKVlan CR.
Workaround:
Scale the TMM Pod down, ensure the Pod terminates (is no longer running), and then scale the Pod back up.
1. oc scale deploy/f5-tmm --replicas 02. oc get pods3. oc scale deploy/f5-tmm --replicas 1
1091997 (TMM)
In dual-stack configurations, application traffic SPK CRs remain in the TMM configuration, even when the watchedapplication is scaled to 0.
Workaround:
Scale the TMM Pod down, ensure the Pod terminates (is no longer running), and then scale the Pod back up.
1. oc scale deploy/f5-tmm --replicas 02. oc get pods3. oc scale deploy/f5-tmm --replicas 1
Next step
Continue to the Cluster Requirements guide to ensure the OpenShift cluster has the required software components.
12
F5 Service Proxy for Kubernetes - v1.5.0 Installation and Integration
Cluster Requirements
Overview
Prior to integrating Service Proxy for Kubernetes (SPK) into the OpenShift cluster, review this document to ensure therequired software components are installed and properly configured.
Note: SPK supports Red Hat OpenShift versions 4.7 and later.
Pod Networking
To support low-latency 5G workloads, SPK relies on Single Root I/O Virtualization (SR-IOV) and the Open Virtual Net-work with Kubernetes (OVN-Kubernetes) CNI. To ensure the cluster supports multi-homed Pods; the ability to selecteither the default (virtual) CNI or the SR-IOV / OVN-Kubernetes (physical) CNI, review the sections below.
Network Operator
To properly manage the cluster networks, the OpenShift Cluster Network Operator must be installed.
Important: OpenShift 4.8 requires configuring local gatewaymode using the steps below:
1. Create the manifest files:
openshift-install --dir=<install dir> create cluster
2. Create a ConfigMap in newmanifest directory, and add the following YAML code:
apiVersion: v1kind: ConfigMapmetadata:
name: gateway-mode-confignamespace: openshift-network-operator
data:mode: "local"
immutable: true
3. Create the cluster:
openshift-install create cluster --dir=<install dir>
The Cluster Network Operator installation on Github.
SR-IOV Interfaces
To define the SR-IOV Virtual Functions (VFs) used by the Service Proxy Traffic Management Microkernel (TMM), config-ure the following OpenShift network objects:
• An external and internal Network node policy.• An external and internal Network attachment definition.
– Set the spoofChk parameter to off.– Set the trust parameter to on.– Set the capabilities parameter to '{"mac": true, "ips": true}'.– Do not set the vlan parameter, set the F5SPKVlan tag parameter.– Do not set the ipam parameter, set the F5SPKVlan internal parameter.
13
F5 Service Proxy for Kubernetes - v1.5.0 Installation and Integration
Refer to the SPK Config File Reference for examples.
CPU Allocation
Multiprocessor servers divide memory and CPUs into multiple NUMA nodes, each having a non-shared system bus.When installing the SPK Controller, the CPUs and SR-IOV VFs allocated to the Service Proxy TMM container must sharethe same NUMA node. To ensure the CPU NUMA node alignment is handled properly by the cluster, install the Perfor-mance Addon Operator and ensure the following parameters are set:
• Set the Topology Manager Policy to single-numa-node.• Set the CPU Manager Policy to static in the Kubelet configuration.
Scheduler Limitations
The OpenShift Topology Manager dynamically allocates CPU resources, however, the version 4.7 Scheduler currentlylacks two features required to support low-latency 5G applications:
• Simultaneous Multi-threading (SMT), or hyper-threading awareness.• NUMA topology awareness.
Lacking these features, the scheduler can allocate CPUs to Numa core IDs that provide poor performance, or insuffi-cient resources within a NUMA node to schedule Pods. To ensure the Service Proxy TMM Pods install with sufficientNuma resources:
• Disable SMT - To install Pods with Guaranteed QoS, each OpenShift worker node must have Simultaneous Multi-threading (SMT) disabled in the BIOS.
• UseLabelsorNodeAffinity - ToassignPods toworkernodeswith sufficient resources, useLabelsorNodeAffinity.For a brief overview of using labels, refer to the Using Node Labels guide.
Persistent storage
The optional Fluentd logging collector, dSSM database and Traffic Management Microkernel (TMM) Debug Sidecar re-quire an available Kubernetes persistent storage to bind to during installation.
Next step
Continue to the Getting Started guide to begin integrating the SPK software components.
Feedback
Provide feedback to improve this document by emailing [email protected].
Supplemental
• The CNI project.• SPK Networking Overview.
14
F5 Service Proxy for Kubernetes - v1.5.0 Installation and Integration
Getting started
This document describes each stage of the Service Proxy for Kubernetes (SPK) integration process, and the commandline interface (CLI) tools required to complete the integration. A careful review of this document ensures a positiveexperience.
Note: You can clickNextat the bottomof each page, or scroll through the SPKPDF to follow the integration process.
Integration tools
Install the CLI tools listed below on your Linux based workstation:
• Helm CLI - Manages the SPK Pod and Custom Resource Defnitiion (CRD) installations.• OpenSSL toolkit - Creates SSL certificates to secure Pod communications.• Podman - Tags and pushes images to a local registry.
Integration stages
Integrating the SPK software images involves five essential stages to begin processing application traffic, and two op-tional stages to enable logging collection and session-state data persistence:
1. SPK Software - Extract and install the SPK software images and Custom Resource Definitions (CRDs).2. SPK Secrets - Secure communication between the SPK Controller and Service Proxy TMM Pods.3. Fluentd Logging - Optional: Centralize logging data sent from each of the installed SPK Pods.4. [OTEL Statistics] - Optional: Collect and view statistics from the SPK Controller and TMM Pods.5. dSSM Database - Optional: Store session-state data for the Service Proxy TMM Pod.6. SPK CWC - Install the Cluster Wide Controller to enable gathering SPK software telemetry.7. SPK Licensing - License the cluster to enable flexible consumption software use.8. SPK Controller - Prepare the cluster to proxy and load balance application traffic.9. SPK CRs - Configure a Custom Resource (CR) to begin processing application traffic.
Next step
Continue to the SPK Software guide to extract and install the SPK software.
Feedback
Provide feedback to improve this document by emailing [email protected].
Supplemental
• SPK Config File Reference• Kubernetes Custom Resources• Kubernetes Ingress
15
F5 Service Proxy for Kubernetes - v1.5.0 Installation and Integration
SPK Software
Overview
The Service Proxy for Kubernetes (SPK) custom resource definitions (CRDs), software images and installation Helmcharts are provided in a single TAR file. An SPK public signing key, and two signature files are also provided to validatethe TAR file’s integrity. Once validated and extracted, the SPK CRDs and software images can be integrated into thecluster using SPK Helm charts.
This document describes the SPK software, and guides you through validating, extracting and installing the SPK soft-ware components.
Software images
The table below lists and describes the software images for this software release. For a full list of software images byrelease, refer to the Software Releases guide.
Note: The software image name and deployed container namemay differ.
Image Version Description
f5ingress v5.0.29 The helm_release-f5ingress container is thecustom SPK controller that watches the K8S APIfor CR updates, and configures the Service ProxyTMM based on the update.
tmm-img v1.6.5 The f5-tmm container is a Traffic ManagementMicrokernel (TMM) that proxies and loadbalances application traffic between the externaland internal networks.
spk-cwc v0.19.12 The spk-cwc container enables softwarelicensing, and reports telemetry statisticsregarding monthly software usage. Refer to SPKCWC.
f5-license-helper v0.5.9 The f5-lic-helper communicates with thespk-cwc to determine the current license statusof the cluster.
rabbit v0.1.5 The rabbitmq-server container as a generalmessage bus, integrating SPK CWCwith theController Pod(s) for licensing purposes.
tmrouted-img v0.8.21 The f5-tmm-tmrouted container proxies andforwards information between thef5-tmm-routing and f5-tmm containers.
f5dr-img v0.5.8 The f5-tmm-routing container maintains thedynamic routing tables used by TMM. Refer toBGP Overview.
f5-toda-tmstatsd v1.7.5 The f5-toda-stats container collects applicationtraffic processing statistics from the f5-tmmcontainer, and forwards the data to thef5-fluentbit container.
16
F5 Service Proxy for Kubernetes - v1.5.0 Installation and Integration
Image Version Description
f5-fluentbit v0.1.29 The fluentbit container collects and forwardsstatistics to the f5-fluentd container.
f5-fluentd v1.4.8 The f5-fluentd container collects statistics andlogging data from the Controller, TMM and dSSMPods. Rrefer to Fluentd Logging.
f5-dssm-store v1.21.0 Contains two sets of software images; Thef5-dssm-db containers that store shared,persisted session state data, and thef5-dssm-sentinel containers to monitor thef5-dssm-db containers. Refer to dSSM database.
f5-debug-sidecar v5.55.6 The debug container provides diagnostic toolsfor viewing TMM’s configuration, trafficprocessing statistica and gathering TMMdiagnostic data. Refer to Debug Sidecar.
opentelemetry-collector 0.46.0 The otel-collector container gathers metricsand statistics from the TMM Pods. Refer to [OTELCollector].
f5-dssm-upgrader 1.0.4 The dssm-upgrade-hook enables dSSM DBsupgrades without service interruption or dataloss. Refer to Upgrading dSSM.
CRD Bundles
The tables below list the SPK CRD bundles, and describe the SPK CRs they support.
f5-spk-crds-service-proxy-3.0.2.tgz
CRD CR
f5-spk-egress F5SPKEgress - Enable egress traffic for Pods using SNAT or DNS/NAT46.
f5-spk-ingresstcp F5SPKIngressTCP - Layer 4 TCP application traffic management.
f5-spk-ingressudp F5SPKIngressUDP - Layer 4 UDP application traffic management.
f5-spk-ingressngap F5SPKIngressNGAP - Datagram load balancing for SCTP or NGAP signaling.
f5-spk-ingressdiameter F5SPKIngressDiameter - Diameter traffic management using TCP or SCTP.
f5-spk-crds-common.3.0.2.tgz
CRD CR
f5-spk-vlan F5SPKVlan - TMM interface configuration: VLANs, Self IP addresses, MTU sizes, etc.
f5-spk-dnscache F5SPKDnscache - Referenced by the F5SPKEgress CR to provide DNS caching.
f5-spk-snatpool F5SPKSnatpool - Allocates IP addresses for egress Pod connections.
f5-spk-staticroute F5SPKStaticRoute - Provides TMM static routing table management.
f5-spk-addresslist Not currently in use.
17
F5 Service Proxy for Kubernetes - v1.5.0 Installation and Integration
CRD CR
f5-spk-portlist Not currently in use.
f5-spk-crds-deprecated.3.0.2.tgz
A bundle containing the deprecated CRDs, beginning with SPK software version 1.4.3.
Requirements
Ensure you have:
• Obtained the SPK software tarball.• A local container registry.• A workstation with Podman and OpenSSL.
Procedures
Extract the images
Use the following steps to validate the SPK tarball, and extract the CRDs and software images.
1. Create a new directory for the SPK files:
mkdir <directory>
In this example, the new directory is named spkinstall:
mkdir spkinstall
2. Move the SPK files into the directory:
mv f5-spk-tarball* f5-spk-1.5.0.pem spkinstall
3. Change into the directory and list the files:
cd spkinstall; ls -1
The file list appears as:
f5-spk-1.5.0.pemf5-spk-tarball-1.5.0.tgzf5-spk-tarball-sha512.txt-1.5.0.sha512.sigf5-spk-tarball.tgz-1.5.0.sha512.sig
4. Use the PEM signing key and each SHA signature file to validate the SPK TAR file:
openssl dgst -verify <pem file>.pem -keyform PEM \-sha512 -signature <sig file>.sig <tar file>.tgz
The command output states Verified OK for each signature file:
openssl dgst -verify f5-spk-1.5.0.pem -keyform PEM -sha512 \-signature f5-spk-tarball.tgz-1.5.0.sha512.sig \f5-spk-tarball-1.5.0.tgz
18
F5 Service Proxy for Kubernetes - v1.5.0 Installation and Integration
Verified OK
openssl dgst -verify f5-spk-1.5.0.pem -keyform PEM -sha512 \-signature f5-spk-tarball-sha512.txt-1.5.0.sha512.sig \f5-spk-tarball-1.5.0.tgz
Verified OK
5. Extract the SPK CRD bundles and the software image TAR file:
tar xvf f5-spk-tarball-1.5.0.tgz
6. List the newly extracted files:
ls -1
The file list shows the CRD bundless and the SPK image TAR file named f5-spk-images-1.5.0.tgz:
f5-spk-1.5.0.pemf5-spk-crds-common-3.0.2.tgzf5-spk-crds-deprecated-3.0.2.tgzf5-spk-crds-service-proxy-3.0.2.tgzf5-spk-images-1.5.0.tgzf5-spk-tarball-1.5.0.tgzf5-spk-tarball-sha512.txt-1.5.0.sha512.sigf5-spk-tarball.tgz-1.5.0.sha512.sig
7. Extract the SPK software images and Helm charts:
tar xvf f5-spk-images-1.5.0.tgz
8. Recursively list the extracted software images and Helm charts:
ls -1R
The file list shows a new tar directory containing the software images and Helm charts:
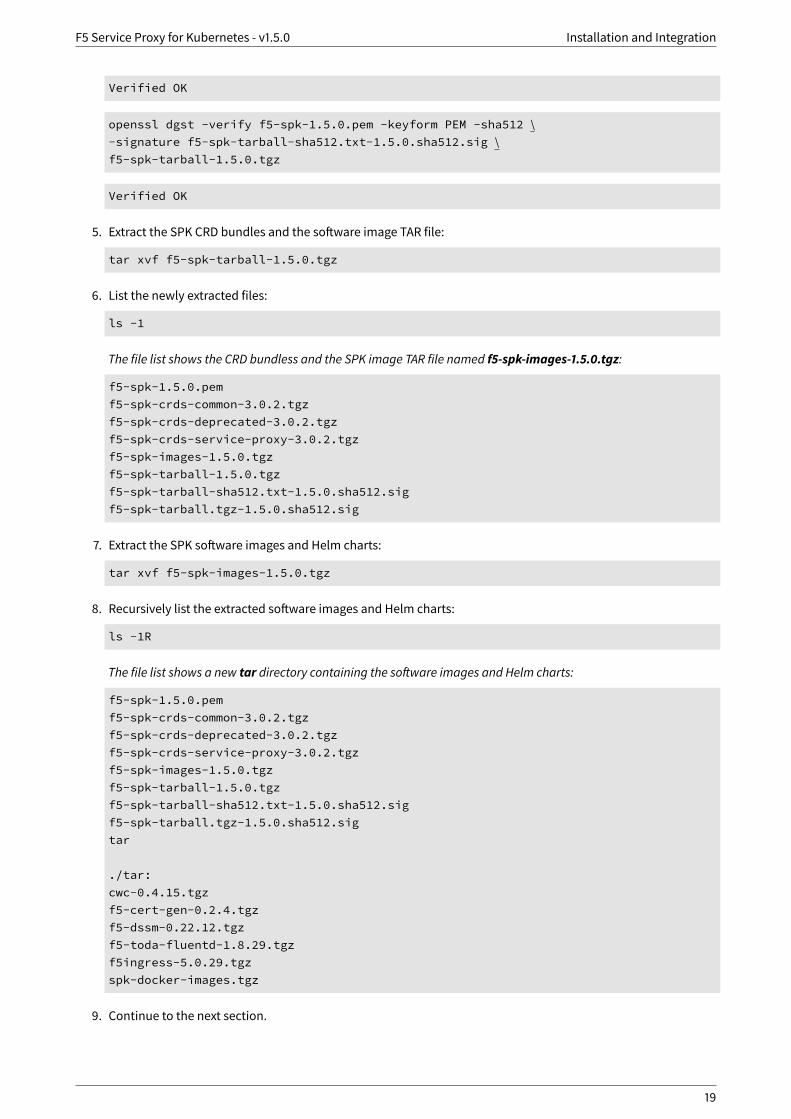
f5-spk-1.5.0.pemf5-spk-crds-common-3.0.2.tgzf5-spk-crds-deprecated-3.0.2.tgzf5-spk-crds-service-proxy-3.0.2.tgzf5-spk-images-1.5.0.tgzf5-spk-tarball-1.5.0.tgzf5-spk-tarball-sha512.txt-1.5.0.sha512.sigf5-spk-tarball.tgz-1.5.0.sha512.sigtar
./tar:cwc-0.4.15.tgzf5-cert-gen-0.2.4.tgzf5-dssm-0.22.12.tgzf5-toda-fluentd-1.8.29.tgzf5ingress-5.0.29.tgzspk-docker-images.tgz
9. Continue to the next section.
19
F5 Service Proxy for Kubernetes - v1.5.0 Installation and Integration
Install the CRDs
Use the following steps to extract and install the new SPK CRDs.
1. List the SPK CRD bundles:
ls -1 | grep crd
The file list shows three CRD bundles:
f5-spk-crds-common-3.0.2.tgzf5-spk-crds-deprecated-3.0.2.tgzf5-spk-crds-service-proxy-3.0.2.tgz
2. Extract the common CRDs from the bundle:
tar xvf f5-spk-crds-common-3.0.2.tgz
3. Install the full set of common CRDs:
oc apply -f f5-spk-crds-common/crds
Note the command output: Newly installed CRDs will be indicated by created, and updated CRDs will be indicatedby configured:
f5-spk-addresslists.k8s.f5net.com configuredf5-spk-dnscaches.k8s.f5net.com createdf5-spk-portlists.k8s.f5net.com configuredf5-spk-snatpools.k8s.f5net.com unchangedf5-spk-staticroutes.k8s.f5net.com unchangedf5-spk-vlans.k8s.f5net.com configured
4. Extract the service-proxy CRDs from the bundle:
tar xvf f5-spk-crds-service-proxy-3.0.2.tgz
5. Install the full set of service-proxy CRDs:
oc apply -f f5-spk-crds-service-proxy/crds
Note the command output: Newly installed CRDs will be indicated by created, and updated CRDs will be indicatedby configured:
f5-spk-egresses.k8s.f5net.com configuredf5-spk-ingressdiameters.k8s.f5net.com unchangedf5-spk-ingressngaps.k8s.f5net.com unchangedf5-spk-ingresstcps.ingresstcp.k8s.f5net.com unchangedf5-spk-ingressudps.ingressudp.k8s.f5net.com unchanged
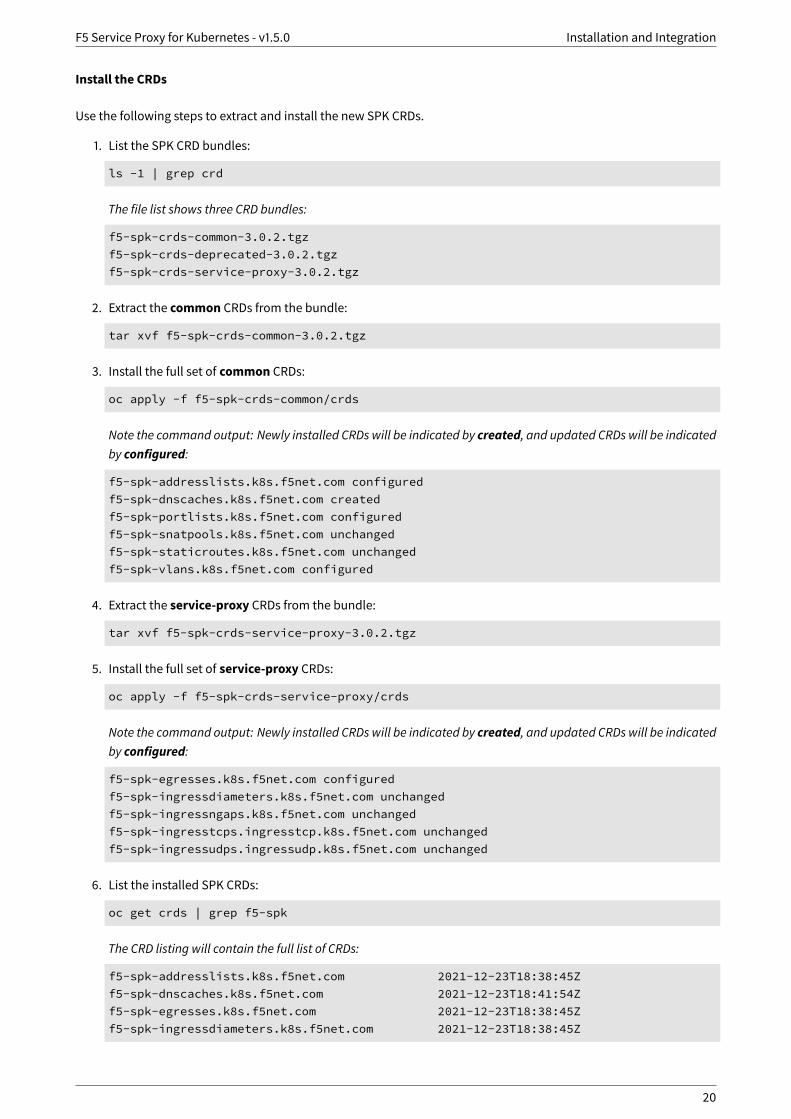
6. List the installed SPK CRDs:
oc get crds | grep f5-spk
The CRD listing will contain the full list of CRDs:
f5-spk-addresslists.k8s.f5net.com 2021-12-23T18:38:45Zf5-spk-dnscaches.k8s.f5net.com 2021-12-23T18:41:54Zf5-spk-egresses.k8s.f5net.com 2021-12-23T18:38:45Zf5-spk-ingressdiameters.k8s.f5net.com 2021-12-23T18:38:45Z
20
F5 Service Proxy for Kubernetes - v1.5.0 Installation and Integration
f5-spk-ingressgtps.k8s.f5net.com 2021-12-23T18:38:45Zf5-spk-ingresshttp2s.k8s.f5net.com 2021-12-23T18:38:45Zf5-spk-ingressngaps.k8s.f5net.com 2021-12-23T18:38:45Zf5-spk-ingresstcps.ingresstcp.k8s.f5net.com 2021-12-23T18:38:45Zf5-spk-ingressudps.ingressudp.k8s.f5net.com 2021-12-23T18:38:45Zf5-spk-portlists.k8s.f5net.com 2021-12-23T18:38:45Zf5-spk-snatpools.k8s.f5net.com 2021-12-23T18:38:45Zf5-spk-staticroutes.k8s.f5net.com 2021-12-23T18:38:45Zf5-spk-vlans.k8s.f5net.com 2021-12-23T18:38:45Z
Upload the images
Use the following steps to upload the SPK software images to a local container registry.
1. Install the SPK images to your workstation’s Docker image store:
podman load -i tar/spk-docker-images.tgz
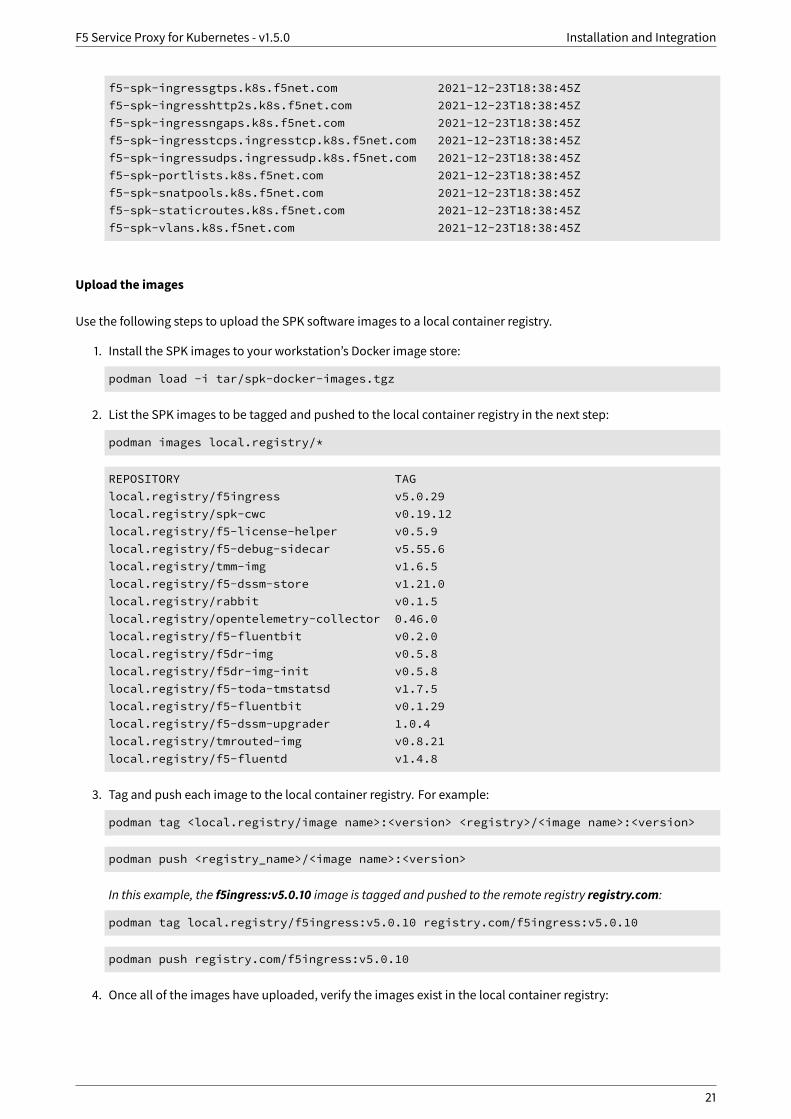
2. List the SPK images to be tagged and pushed to the local container registry in the next step:
podman images local.registry/*
REPOSITORY TAGlocal.registry/f5ingress v5.0.29local.registry/spk-cwc v0.19.12local.registry/f5-license-helper v0.5.9local.registry/f5-debug-sidecar v5.55.6local.registry/tmm-img v1.6.5local.registry/f5-dssm-store v1.21.0local.registry/rabbit v0.1.5local.registry/opentelemetry-collector 0.46.0local.registry/f5-fluentbit v0.2.0local.registry/f5dr-img v0.5.8local.registry/f5dr-img-init v0.5.8local.registry/f5-toda-tmstatsd v1.7.5local.registry/f5-fluentbit v0.1.29local.registry/f5-dssm-upgrader 1.0.4local.registry/tmrouted-img v0.8.21local.registry/f5-fluentd v1.4.8
3. Tag and push each image to the local container registry. For example:
podman tag <local.registry/image name>:<version> <registry>/<image name>:<version>
podman push <registry_name>/<image name>:<version>
In this example, the f5ingress:v5.0.10 image is tagged and pushed to the remote registry registry.com:
podman tag local.registry/f5ingress:v5.0.10 registry.com/f5ingress:v5.0.10
podman push registry.com/f5ingress:v5.0.10
4. Once all of the images have uploaded, verify the images exist in the local container registry:
21
F5 Service Proxy for Kubernetes - v1.5.0 Installation and Integration
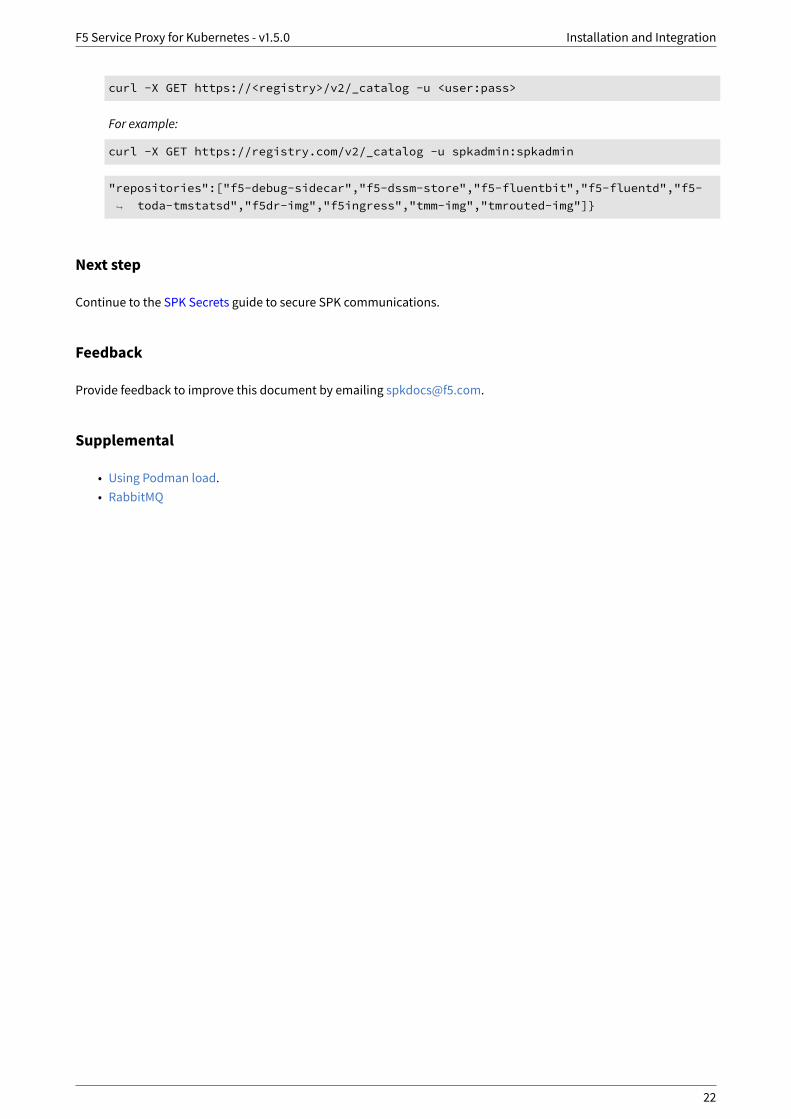
curl -X GET https://<registry>/v2/_catalog -u <user:pass>
For example:
curl -X GET https://registry.com/v2/_catalog -u spkadmin:spkadmin
"repositories":["f5-debug-sidecar","f5-dssm-store","f5-fluentbit","f5-fluentd","f5-toda-tmstatsd","f5dr-img","f5ingress","tmm-img","tmrouted-img"]}↪
Next step
Continue to the SPK Secrets guide to secure SPK communications.
Feedback
Provide feedback to improve this document by emailing [email protected].
Supplemental
• Using Podman load.• RabbitMQ
22
F5 Service Proxy for Kubernetes - v1.5.0 Installation and Integration
SPK Secrets
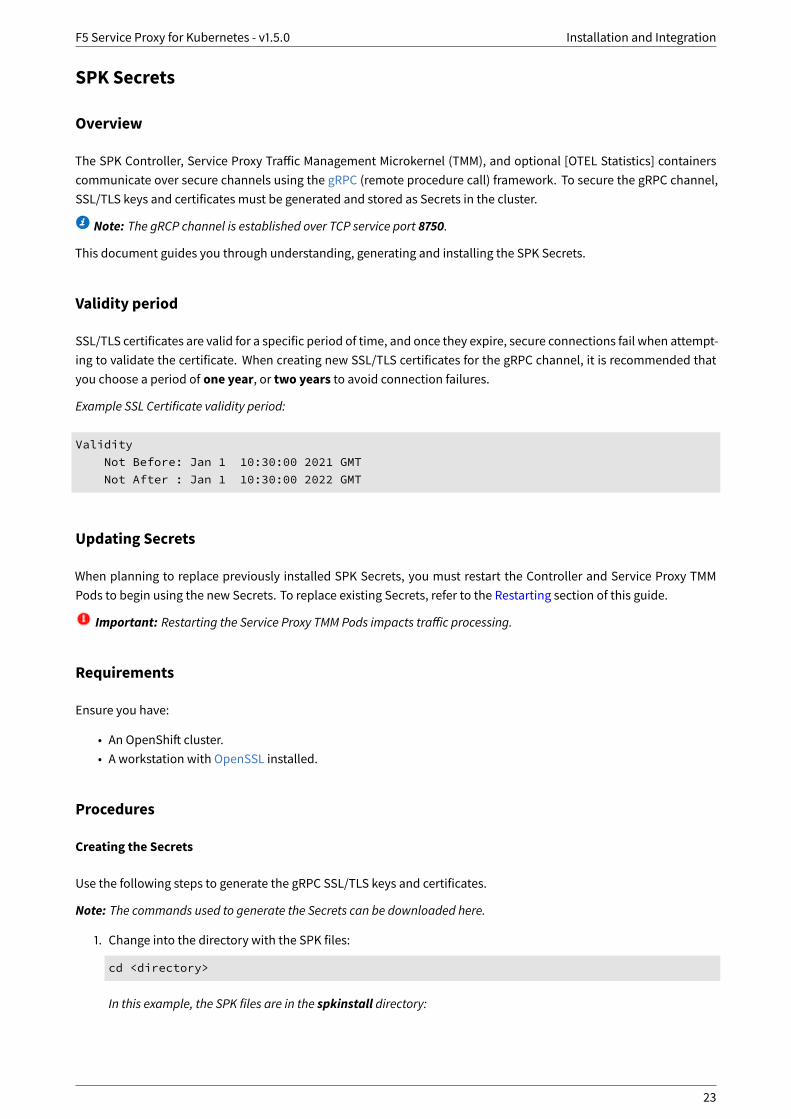
Overview
The SPK Controller, Service Proxy Traffic Management Microkernel (TMM), and optional [OTEL Statistics] containerscommunicate over secure channels using the gRPC (remote procedure call) framework. To secure the gRPC channel,SSL/TLS keys and certificates must be generated and stored as Secrets in the cluster.
Note: The gRCP channel is established over TCP service port 8750.
This document guides you through understanding, generating and installing the SPK Secrets.
Validity period
SSL/TLS certificates are valid for a specific period of time, and once they expire, secure connections fail when attempt-ing to validate the certificate. When creating new SSL/TLS certificates for the gRPC channel, it is recommended thatyou choose a period of one year, or two years to avoid connection failures.
Example SSL Certificate validity period:
ValidityNot Before: Jan 1 10:30:00 2021 GMTNot After : Jan 1 10:30:00 2022 GMT
Updating Secrets
When planning to replace previously installed SPK Secrets, you must restart the Controller and Service Proxy TMMPods to begin using the new Secrets. To replace existing Secrets, refer to the Restarting section of this guide.
Important: Restarting the Service Proxy TMM Pods impacts traffic processing.
Requirements
Ensure you have:
• An OpenShift cluster.• A workstation with OpenSSL installed.
Procedures
Creating the Secrets
Use the following steps to generate the gRPC SSL/TLS keys and certificates.
Note: The commands used to generate the Secrets can be downloaded here.
1. Change into the directory with the SPK files:
cd <directory>
In this example, the SPK files are in the spkinstall directory:
23

F5 Service Proxy for Kubernetes - v1.5.0 Installation and Integration
cd spkinstall
2. Create a new directory for the Secret SSL/TLS keys and certificates, and change into the directory:
mkdir <directory>
cd <directory>
In this example, a new directory named grpc_secrets is created and changed into:
mkdir grpc_secrets
cd grpc_secrets
3. Create the gRPC Certificate Authority (CA) signing key and certificate:
Note: Adapt the number of -days the certificate will be valid, and the -subj information for your environment.
openssl genrsa -out grpc-ca.key 4096
openssl req -x509 -new -nodes -key grpc-ca.key -sha256 -days 365 -out grpc-ca.crt \-subj "/C=US/ST=WA/L=Seattle/O=F5/OU=Dev/CN=ca"
4. The following code creates a new file named server.extwith the required SSL/TLS attributes:
echo "[req_ext]" > server.extecho " " >> server.extecho "subjectAltName = @alt_names" >> server.extecho " " >> server.extecho "[alt_names]" >> server.extecho " " >> server.extecho "DNS.1 = grpc-svc" >> server.extecho "DNS.2 = otel-collector" >> server.ext
The server.ext file should contain the following SSL/TLS attributes:
[req_ext]
subjectAltName = @alt_names
[alt_names]
DNS.1 = grpc-svcDNS.2 = otel-collector
5. Create the gRPC server SSL/TLS key, certificate signing request (CSR), and signed certificate for the Controllerand TMM channel:
Note: Adapt the number of -days the certificate will be valid, and the -subj information for your environment.
openssl genrsa -out grpc-server.key 4096
openssl req -new -key grpc-server.key -out grpc-server.csr \-subj "/C=US/ST=WA/L=Seattle/O=F5/OU=PD/CN=f5net.com"
openssl x509 -req -in grpc-server.csr -CA grpc-ca.crt -CAkey grpc-ca.key \-CAcreateserial -out grpc-server.crt -extensions req_ext -days 365 -sha256 \-extfile server.ext
24
F5 Service Proxy for Kubernetes - v1.5.0 Installation and Integration
6. Create the gRPC server SSL/TLS key, certificate signing request (CSR), and signed certificate for the Controller,TMM and OTEL channel:
Note: Adapt the number of -days the certificate will be valid, and the -subj information for your environment.
openssl genrsa -out grpc-otel-server.key 4096
openssl req -new -key grpc-otel-server.key -out grpc-otel-server.csr \-subj "/C=US/ST=WA/L=Seattle/O=F5/OU=PD/CN=f5net.com"
openssl x509 -req -in grpc-otel-server.csr -CA grpc-ca.crt -CAkey grpc-ca.key \-set_serial 101 -outform PEM -out grpc-otel-server.crt -extensions req_ext -days 365 \-sha256 -extfile server.ext
7. The following code creates a new file named client.extwith the required SSL/TLS attributes:
echo "[req_ext]" > client.extecho " " >> client.extecho "subjectAltName = @alt_names" >> client.extecho " " >> client.extecho "[alt_names]" >> client.extecho " " >> client.extecho "email.1 = [email protected]" >> client.ext
The client.ext file should contain the following SSL/TLS attributes:
[req_ext]
subjectAltName = @alt_names
[alt_names]
email.1 = [email protected]
8. Create the gRPC client key, CSR and signed certificate for the Controller and TMM channel:
Note: Adapt the number of -days the certificate will be valid, and the -subj information for your environment.
openssl genrsa -out grpc-client.key 4096
openssl req -new -key grpc-client.key -out grpc-client.csr \-subj "/C=US/ST=WA/L=Seattle/O=F5/OU=PD/CN=f5net.com"
openssl x509 -req -in grpc-client.csr -CA grpc-ca.crt -CAkey grpc-ca.key \-set_serial 101 -outform PEM -out grpc-client.crt -extensions req_ext -days 365 \-sha256 -extfile client.ext
9. Create the gRPC client key, CSR and signed certificate for the Controller, TMM and OTEL channel:
Note: Adapt the number of -days the certificate will be valid, and the -subj information for your environment.
openssl genrsa -out grpc-otel-client.key 4096
openssl req -new -key grpc-otel-client.key -out grpc-otel-client.csr \-subj "/C=US/ST=WA/L=Seattle/O=F5/OU=PD/CN=f5net.com"
openssl x509 -req -in grpc-otel-client.csr -CA grpc-ca.crt -CAkey grpc-ca.key \-set_serial 101 -outform PEM -out grpc-otel-client.crt -extensions req_ext -days 365 \
25
F5 Service Proxy for Kubernetes - v1.5.0 Installation and Integration
-sha256 -extfile client.ext
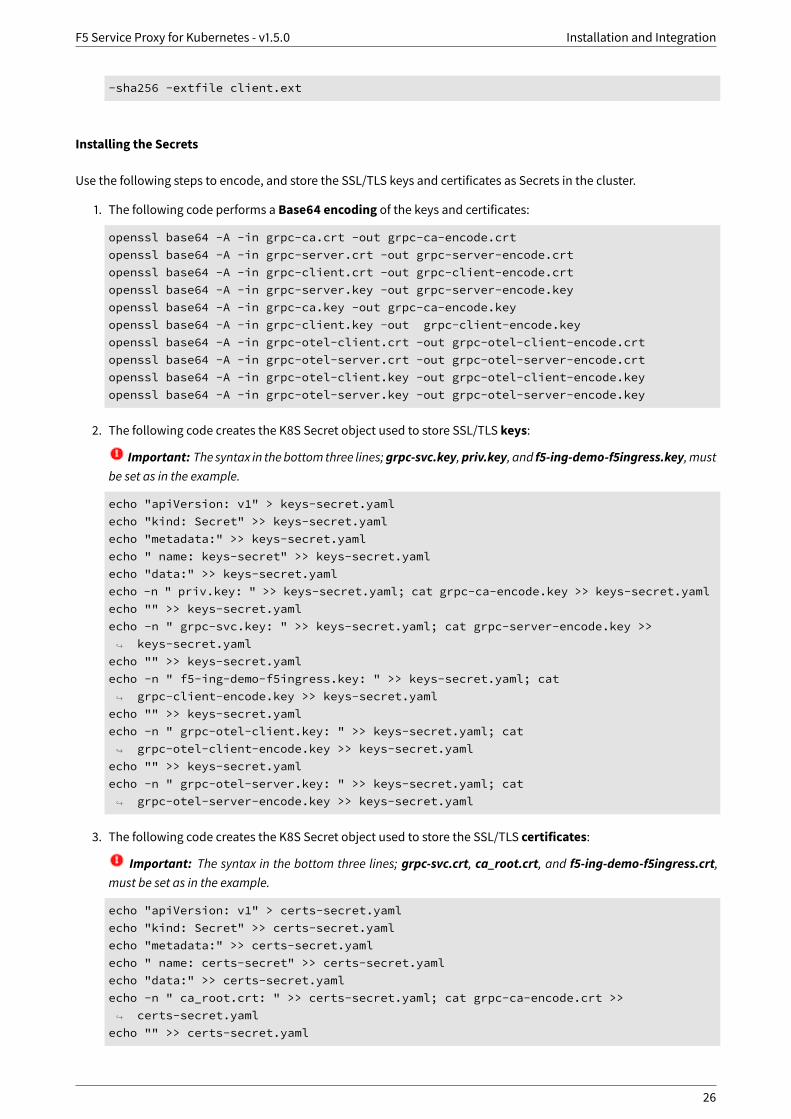
Installing the Secrets
Use the following steps to encode, and store the SSL/TLS keys and certificates as Secrets in the cluster.
1. The following code performs a Base64 encoding of the keys and certificates:
openssl base64 -A -in grpc-ca.crt -out grpc-ca-encode.crtopenssl base64 -A -in grpc-server.crt -out grpc-server-encode.crtopenssl base64 -A -in grpc-client.crt -out grpc-client-encode.crtopenssl base64 -A -in grpc-server.key -out grpc-server-encode.keyopenssl base64 -A -in grpc-ca.key -out grpc-ca-encode.keyopenssl base64 -A -in grpc-client.key -out grpc-client-encode.keyopenssl base64 -A -in grpc-otel-client.crt -out grpc-otel-client-encode.crtopenssl base64 -A -in grpc-otel-server.crt -out grpc-otel-server-encode.crtopenssl base64 -A -in grpc-otel-client.key -out grpc-otel-client-encode.keyopenssl base64 -A -in grpc-otel-server.key -out grpc-otel-server-encode.key
2. The following code creates the K8S Secret object used to store SSL/TLS keys:
Important: The syntax in thebottomthree lines;grpc-svc.key,priv.key, and f5-ing-demo-f5ingress.key,mustbe set as in the example.
echo "apiVersion: v1" > keys-secret.yamlecho "kind: Secret" >> keys-secret.yamlecho "metadata:" >> keys-secret.yamlecho " name: keys-secret" >> keys-secret.yamlecho "data:" >> keys-secret.yamlecho -n " priv.key: " >> keys-secret.yaml; cat grpc-ca-encode.key >> keys-secret.yamlecho "" >> keys-secret.yamlecho -n " grpc-svc.key: " >> keys-secret.yaml; cat grpc-server-encode.key >>
keys-secret.yaml↪
echo "" >> keys-secret.yamlecho -n " f5-ing-demo-f5ingress.key: " >> keys-secret.yaml; cat
grpc-client-encode.key >> keys-secret.yaml↪
echo "" >> keys-secret.yamlecho -n " grpc-otel-client.key: " >> keys-secret.yaml; cat
grpc-otel-client-encode.key >> keys-secret.yaml↪
echo "" >> keys-secret.yamlecho -n " grpc-otel-server.key: " >> keys-secret.yaml; cat
grpc-otel-server-encode.key >> keys-secret.yaml↪
3. The following code creates the K8S Secret object used to store the SSL/TLS certificates:
Important: The syntax in the bottom three lines; grpc-svc.crt, ca_root.crt, and f5-ing-demo-f5ingress.crt,must be set as in the example.
echo "apiVersion: v1" > certs-secret.yamlecho "kind: Secret" >> certs-secret.yamlecho "metadata:" >> certs-secret.yamlecho " name: certs-secret" >> certs-secret.yamlecho "data:" >> certs-secret.yamlecho -n " ca_root.crt: " >> certs-secret.yaml; cat grpc-ca-encode.crt >>
certs-secret.yaml↪
echo "" >> certs-secret.yaml
26

F5 Service Proxy for Kubernetes - v1.5.0 Installation and Integration
echo -n " grpc-svc.crt: " >> certs-secret.yaml; cat grpc-server-encode.crt >>certs-secret.yaml↪
echo "" >> certs-secret.yamlecho -n " f5-ing-demo-f5ingress.crt: " >> certs-secret.yaml; cat
grpc-client-encode.crt >> certs-secret.yaml↪
echo "" >> certs-secret.yamlecho -n " grpc-otel-client.crt: " >> certs-secret.yaml; cat
grpc-otel-client-encode.crt >> certs-secret.yaml↪
echo "" >> certs-secret.yamlecho -n " grpc-otel-server.crt: " >> certs-secret.yaml; cat
grpc-otel-server-encode.crt >> certs-secret.yaml↪
4. Create a new Project for the Controller and Service Proxy deployments:
oc new-project <project>
In this example, a new Project named spk-ingress is created:
oc new-project spk-ingress
5. Add the ServiceAccount for the Project to the privileged security context constraint (SCC):
A. Add the default ServiceAccount:
Note: See step 6 and to add a custom ServiceAccount to the privileged SCC.
oc adm policy add-scc-to-user privileged -n <project> -z default
In this example, the default ServiceAccount for the spk-ingress Project is added to the privileged SCC:
oc adm policy add-scc-to-user privileged -n spk-ingress -z default
B. Use a custom ServiceAccount, and update the SPK Controller Helm values file:
In this example, the custom spk-ingress ServiceAccount is added to the privileged SCC.
oc adm policy add-scc-to-user privileged -n spk-ingress -z spk-utils
In this example, the custom spk-ingress ServiceAccount is added to the Controller Helm values file.
tmm:serviceAccount:name: spk-ingress
6. Install the Secret key and certificate objects:
In this example, the Secrets install to the spk-ingress Project:
oc apply -f keys-secret.yaml -n spk-ingressoc apply -f certs-secret.yaml -n spk-ingress
The command responses should state the Secrets have been created:
secret/keys-secret createdsecret/certs-secret created
7. The new Secrets will now be used to secure the gRPC channel.
27
F5 Service Proxy for Kubernetes - v1.5.0 Installation and Integration
Next step
Continue to one of the following guides listed by installation precedence:
• Optional: Install the Fluentd Logging collector to centralize SPK container logging.• Optional: Install the [OTEL Statistics] collector to centralize SPK container statistics.• Optional: Install the dSSM Database to store session-state information.• Required: Install the SPK Controller and Service Proxy TMM Pods.
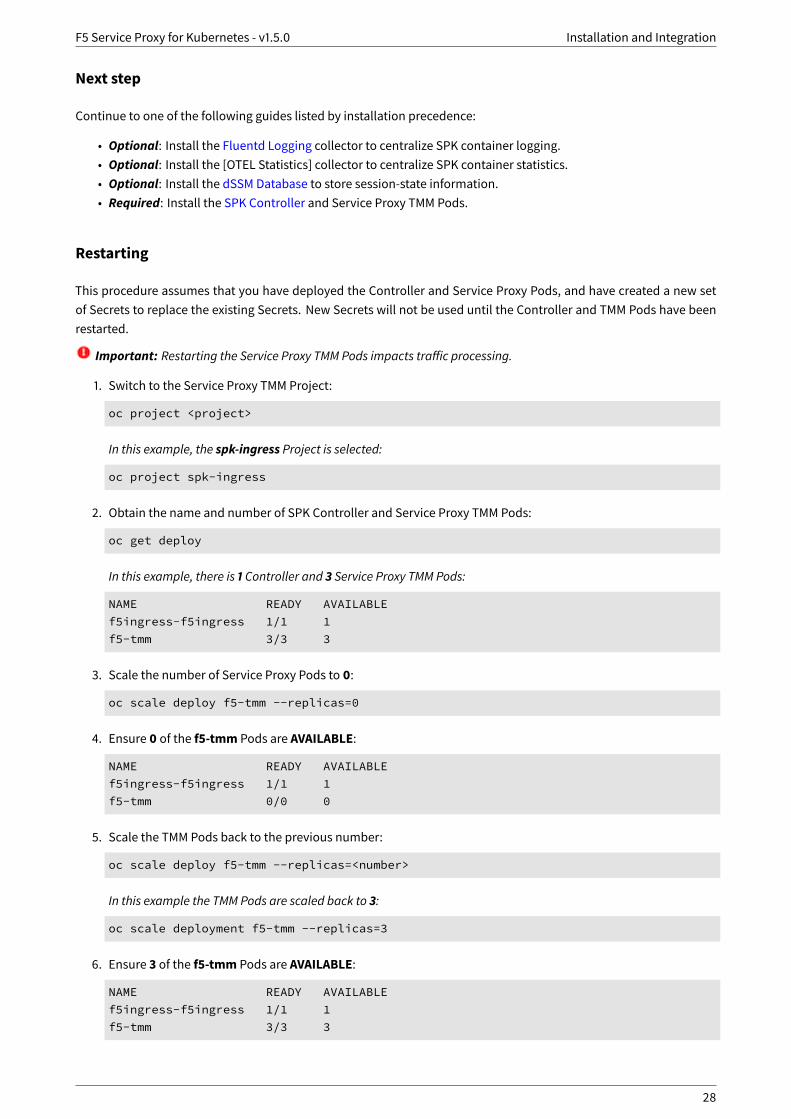
Restarting
This procedure assumes that you have deployed the Controller and Service Proxy Pods, and have created a new setof Secrets to replace the existing Secrets. New Secrets will not be used until the Controller and TMM Pods have beenrestarted.
Important: Restarting the Service Proxy TMM Pods impacts traffic processing.
1. Switch to the Service Proxy TMM Project:
oc project <project>
In this example, the spk-ingress Project is selected:
oc project spk-ingress
2. Obtain the name and number of SPK Controller and Service Proxy TMM Pods:
oc get deploy
In this example, there is 1 Controller and 3 Service Proxy TMM Pods:
NAME READY AVAILABLEf5ingress-f5ingress 1/1 1f5-tmm 3/3 3
3. Scale the number of Service Proxy Pods to 0:
oc scale deploy f5-tmm --replicas=0
4. Ensure 0 of the f5-tmm Pods are AVAILABLE:
NAME READY AVAILABLEf5ingress-f5ingress 1/1 1f5-tmm 0/0 0
5. Scale the TMM Pods back to the previous number:
oc scale deploy f5-tmm --replicas=<number>
In this example the TMM Pods are scaled back to 3:
oc scale deployment f5-tmm --replicas=3
6. Ensure 3 of the f5-tmm Pods are AVAILABLE:
NAME READY AVAILABLEf5ingress-f5ingress 1/1 1f5-tmm 3/3 3
28
F5 Service Proxy for Kubernetes - v1.5.0 Installation and Integration
7. Scale the Controller to 0:
oc scale deployment <name> --replicas=0
For example:
oc scale deploy f5ingress-f5ingress --replicas=0
8. Ensure 0 of the Controller Pods are AVAILABLE:
NAME READY AVAILABLEf5ingress-f5ingress 0/0 0f5-tmm 3/3 3
9. Scale the Controller back to the previous number:
oc scale deployment <name> --replicas=1
In this example the Controller is scaled back to 1:
oc scale deployment f5ingress-f5ingress --replicas=1
10. Ensure the Controller Pod is AVAILABLE:
NAME READY AVAILABLEf5ingress-f5ingress 1/1 1f5-tmm 3/3 3
11. The new Secrets should now be used to secure the gRPC channel.
Feedback
Provide feedback to improve this document by emailing [email protected].
Supplemental Information
• The list of commands used to create the Secrets.• Introduction to gRPC• Kubernetes Secrets
Commands: gRPC secrets
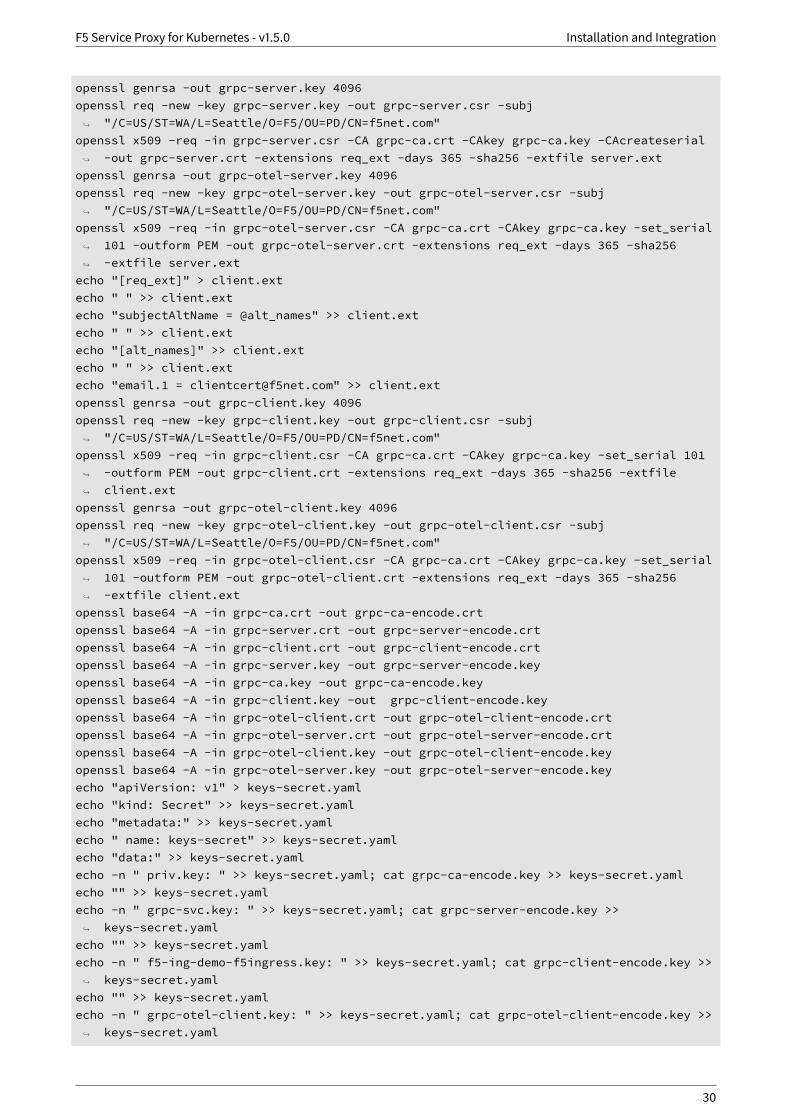
openssl genrsa -out grpc-ca.key 4096openssl req -x509 -new -nodes -key grpc-ca.key -sha256 -days 365 -out grpc-ca.crt -subj
"/C=US/ST=WA/L=Seattle/O=F5/OU=Dev/CN=ca"↪
echo "[req_ext]" > server.extecho " " >> server.extecho "subjectAltName = @alt_names" >> server.extecho " " >> server.extecho "[alt_names]" >> server.extecho " " >> server.extecho "DNS.1 = grpc-svc" >> server.extecho "DNS.2 = otel-collector" >> server.ext
29
F5 Service Proxy for Kubernetes - v1.5.0 Installation and Integration
openssl genrsa -out grpc-server.key 4096openssl req -new -key grpc-server.key -out grpc-server.csr -subj
"/C=US/ST=WA/L=Seattle/O=F5/OU=PD/CN=f5net.com"↪
openssl x509 -req -in grpc-server.csr -CA grpc-ca.crt -CAkey grpc-ca.key -CAcreateserial-out grpc-server.crt -extensions req_ext -days 365 -sha256 -extfile server.ext↪
openssl genrsa -out grpc-otel-server.key 4096openssl req -new -key grpc-otel-server.key -out grpc-otel-server.csr -subj
"/C=US/ST=WA/L=Seattle/O=F5/OU=PD/CN=f5net.com"↪
openssl x509 -req -in grpc-otel-server.csr -CA grpc-ca.crt -CAkey grpc-ca.key -set_serial101 -outform PEM -out grpc-otel-server.crt -extensions req_ext -days 365 -sha256-extfile server.ext
↪
↪
echo "[req_ext]" > client.extecho " " >> client.extecho "subjectAltName = @alt_names" >> client.extecho " " >> client.extecho "[alt_names]" >> client.extecho " " >> client.extecho "email.1 = [email protected]" >> client.extopenssl genrsa -out grpc-client.key 4096openssl req -new -key grpc-client.key -out grpc-client.csr -subj
"/C=US/ST=WA/L=Seattle/O=F5/OU=PD/CN=f5net.com"↪
openssl x509 -req -in grpc-client.csr -CA grpc-ca.crt -CAkey grpc-ca.key -set_serial 101-outform PEM -out grpc-client.crt -extensions req_ext -days 365 -sha256 -extfileclient.ext
↪
↪
openssl genrsa -out grpc-otel-client.key 4096openssl req -new -key grpc-otel-client.key -out grpc-otel-client.csr -subj
"/C=US/ST=WA/L=Seattle/O=F5/OU=PD/CN=f5net.com"↪
openssl x509 -req -in grpc-otel-client.csr -CA grpc-ca.crt -CAkey grpc-ca.key -set_serial101 -outform PEM -out grpc-otel-client.crt -extensions req_ext -days 365 -sha256-extfile client.ext
↪
↪
openssl base64 -A -in grpc-ca.crt -out grpc-ca-encode.crtopenssl base64 -A -in grpc-server.crt -out grpc-server-encode.crtopenssl base64 -A -in grpc-client.crt -out grpc-client-encode.crtopenssl base64 -A -in grpc-server.key -out grpc-server-encode.keyopenssl base64 -A -in grpc-ca.key -out grpc-ca-encode.keyopenssl base64 -A -in grpc-client.key -out grpc-client-encode.keyopenssl base64 -A -in grpc-otel-client.crt -out grpc-otel-client-encode.crtopenssl base64 -A -in grpc-otel-server.crt -out grpc-otel-server-encode.crtopenssl base64 -A -in grpc-otel-client.key -out grpc-otel-client-encode.keyopenssl base64 -A -in grpc-otel-server.key -out grpc-otel-server-encode.keyecho "apiVersion: v1" > keys-secret.yamlecho "kind: Secret" >> keys-secret.yamlecho "metadata:" >> keys-secret.yamlecho " name: keys-secret" >> keys-secret.yamlecho "data:" >> keys-secret.yamlecho -n " priv.key: " >> keys-secret.yaml; cat grpc-ca-encode.key >> keys-secret.yamlecho "" >> keys-secret.yamlecho -n " grpc-svc.key: " >> keys-secret.yaml; cat grpc-server-encode.key >>
keys-secret.yaml↪
echo "" >> keys-secret.yamlecho -n " f5-ing-demo-f5ingress.key: " >> keys-secret.yaml; cat grpc-client-encode.key >>
keys-secret.yaml↪
echo "" >> keys-secret.yamlecho -n " grpc-otel-client.key: " >> keys-secret.yaml; cat grpc-otel-client-encode.key >>
keys-secret.yaml↪
30
F5 Service Proxy for Kubernetes - v1.5.0 Installation and Integration
echo "" >> keys-secret.yamlecho -n " grpc-otel-server.key: " >> keys-secret.yaml; cat grpc-otel-server-encode.key >>
keys-secret.yaml↪
echo "apiVersion: v1" > certs-secret.yamlecho "kind: Secret" >> certs-secret.yamlecho "metadata:" >> certs-secret.yamlecho " name: certs-secret" >> certs-secret.yamlecho "data:" >> certs-secret.yamlecho -n " ca_root.crt: " >> certs-secret.yaml; cat grpc-ca-encode.crt >> certs-secret.yaml
↪
echo "" >> certs-secret.yamlecho -n " grpc-svc.crt: " >> certs-secret.yaml; cat grpc-server-encode.crt >>
certs-secret.yaml↪
echo "" >> certs-secret.yamlecho -n " f5-ing-demo-f5ingress.crt: " >> certs-secret.yaml; cat grpc-client-encode.crt >>
certs-secret.yaml↪
echo "" >> certs-secret.yamlecho -n " grpc-otel-client.crt: " >> certs-secret.yaml; cat grpc-otel-client-encode.crt >>
certs-secret.yaml↪
echo "" >> certs-secret.yamlecho -n " grpc-otel-server.crt: " >> certs-secret.yaml; cat grpc-otel-server-encode.crt >>
certs-secret.yaml↪
31
F5 Service Proxy for Kubernetes - v1.5.0 Installation and Integration
Fluentd Logging
Overview
The Service Proxy for Kubernetes (SPK) Fluentd logging Pod is an open source data collector that can be configured toreceive logging data from the SPK Controller, Service Proxy Traffic Management Microkernel (TMM), and DistributedSession State Managment (dSSM) Pods. To create log file directories for each of the SPK Pods, Fluentd must bind to aKubernetes persistence volume.
This document guides you through understanding, configuring and deploying the f5-fluentd logging container.
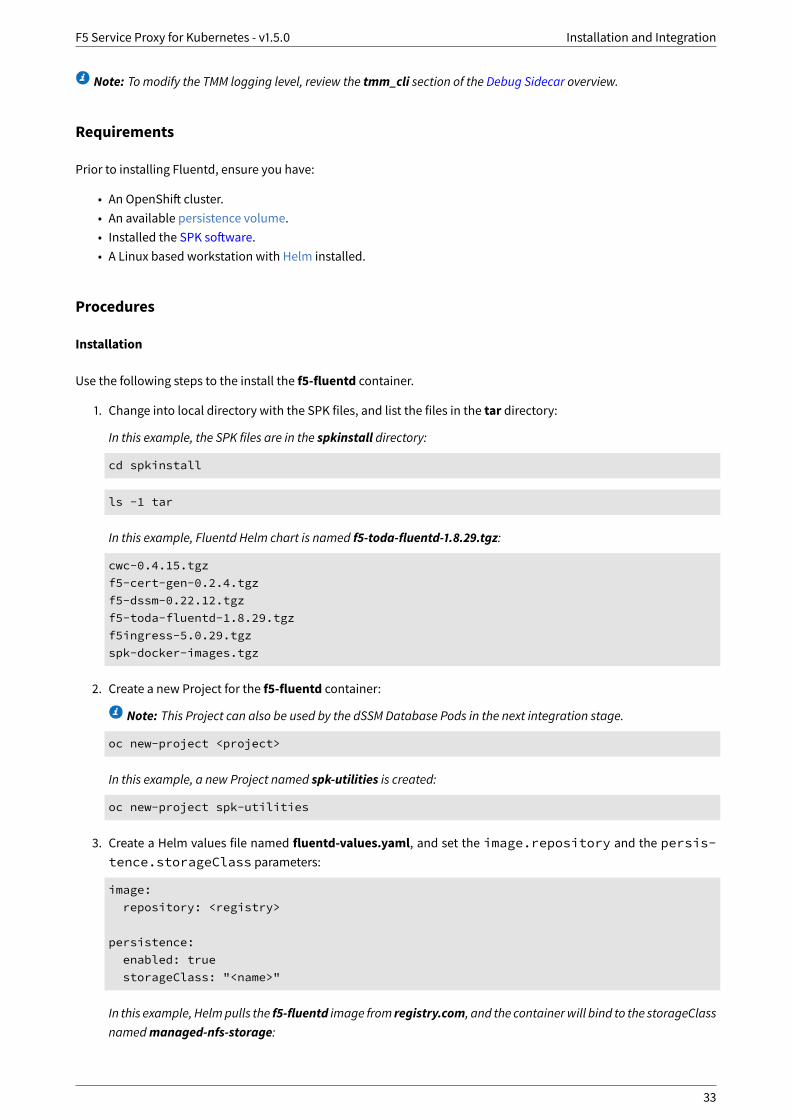
Fluentd Service
When installing Fluentd, a Service object is created to receive logging data on TCP service port 54321, and forward thedata to Fluentd on TCP service port 24224.
Example Fluentd Service:
Name: f5-toda-fluentdNamespace: spk-utilitiesIP: 10.109.102.215Port: <unset> 54321/TCPEndpoints: 10.244.1.75:24224
Example Fluentd integration:
Log file locations
Fluentd collects logging data in the following log files:
Container Log file
f5-dssm-sentinel /var/log/f5/f5-dssm-sentinel-0/sentinel.log
f5-dssm-db /var/log/f5/f5-dssm-db-0/dssm.log
f5ingress /var/log/f5/helm_release-f5ingress/pod_name/f5ingress.log
f5-tmm /var/log/f5/f5-tmm/pod_name/f5-fsm-tmm.log
f5-tmm-routing /var/log/f5/f5-tmm/pod_name/f5-tmm-routing.log
32
F5 Service Proxy for Kubernetes - v1.5.0 Installation and Integration
Note: Tomodify the TMM logging level, review the tmm_cli section of the Debug Sidecar overview.
Requirements
Prior to installing Fluentd, ensure you have:
• An OpenShift cluster.• An available persistence volume.• Installed the SPK software.• A Linux based workstation with Helm installed.
Procedures
Installation
Use the following steps to the install the f5-fluentd container.
1. Change into local directory with the SPK files, and list the files in the tar directory:
In this example, the SPK files are in the spkinstall directory:
cd spkinstall
ls -1 tar
In this example, Fluentd Helm chart is named f5-toda-fluentd-1.8.29.tgz:
cwc-0.4.15.tgzf5-cert-gen-0.2.4.tgzf5-dssm-0.22.12.tgzf5-toda-fluentd-1.8.29.tgzf5ingress-5.0.29.tgzspk-docker-images.tgz
2. Create a new Project for the f5-fluentd container:
Note: This Project can also be used by the dSSM Database Pods in the next integration stage.
oc new-project <project>
In this example, a new Project named spk-utilities is created:
oc new-project spk-utilities
3. Create a Helm values file named fluentd-values.yaml, and set the image.repository and the persis-tence.storageClass parameters:
image:repository: <registry>
persistence:enabled: truestorageClass: "<name>"
In this example, Helmpulls the f5-fluentd image from registry.com, and the containerwill bind to the storageClassnamedmanaged-nfs-storage:
33
F5 Service Proxy for Kubernetes - v1.5.0 Installation and Integration
image:repository: registry.com
persistence:enabled: truestorageClass: "managed-nfs-storage"
4. Optional: Add the following parameters to the values file to collect logging data from the Controller and dSSMPods:
# Collect logging from the Ingress Controller Podf5ingress_logs:enabled: truestdout: true
# Collect logging from the dSSM Podsdssm_logs:enabled: truestdout: true
# Configuration for sentinel logsdssm_sentinel_logs:enabled: truestdout: true
5. Install the f5-fluentd container and save the Fluentd hostname for the Controller installation:
helm install f5-fluentd tar/f5-toda-fluentd-1.8.29.tgz -f fluentd-values.yaml
Note: In this example, the Fluentd hostname is f5-toda-fluentd.spk-utilities.svc.cluster.local.:
FluentD hostname: f5-toda-fluentd.spk-utilities.svc.cluster.local.FluentD port: "54321"
6. The f5-fluentd container should now be successfully installed:
oc get pods
In this example, the Fluentd Pod STATUS is Running:
NAME READY STATUSf5-toda-fluentd-8cf96967b-jxckr 1/1 Running
7. Fluentd should also be bound to the persistent volume:
oc get pvc
In this example, the Fluentd Pod PVC displays STATUS as Bound:
NAME STATUS VOLUME STORAGECLASSf5-toda-fluentd Bound pvc-7d36b530-b718-466c-9b6e-895e8f1079a2
managed-nfs-storage↪
Viewing logs
After installing the Controller and dSSM Pods, you can use the following steps to view the logs in the f5-fluentdcontainer:
1. Log in to the fluentd container:
34
F5 Service Proxy for Kubernetes - v1.5.0 Installation and Integration
oc exec -it deploy/f5-toda-fluentd -n <project> -- bash
In this example, the container is in the spk-utilities Project:
oc exec -it deploy/f5-toda-fluentd -n spk-utilities -- bash
2. Change to the main logging directory, and list the subdirectories:
cd /var/log/f5; ls
In this example, logging directories are present for the f5ingress, f5-tmm, f5-dssm-db, and f5-dssm-sentinelPods:
f5-dssm-db-0 f5-dssm-db-1 f5-dssm-db-2 f5-dssm-sentinel-0f5-dssm-sentinel-1 f5-dssm-sentinel-2 f5-ingress-f5ingress f5-tmm
3. Change into one of the subdirectories, for example f5-dssm-db-0:
cd f5-dssm-db-0
4. View the logs using themore command:
more -d dssm.log
Next step
Continue to one of the following steps listed by installation precedence:
• Optional: Install the dSSM Database to store session-state information.• Required: Install the SPK Controller and Service Proxy TMM Pods.
Feedback
Provide feedback to improve this document by emailing [email protected].
Supplemental
• Fluentbit• Fluentd
35
F5 Service Proxy for Kubernetes - v1.5.0 Installation and Integration
dSSM Database
Overview
The Service Proxy for Kubernetes (SPK) distributed Session State Management (dSSM) Pods provide centralized andpersistent storage for the Service Proxy Traffic Management Microkernel (TMM) Pods. The dSSM Pods are Redis datastructure stores that maintain application traffic data such as DNS/NAT46 translationmappings. The dSSM Pods bindto Kubernetes persistence volumes to persist data in the event of a container restart.
This document describes the dSSMPods, and guides you through configuring and installing the f5-dssm-sentinel andf5-dssm-db containers.
Note: To upgrade the dSSM databases and preserve all persisted data, review the Upgrading dSSM guide.
Sentinels and DBs
The dSSM Pods integrate as a StatefulSet, containing three dSSM Sentinel Pods and three dSSM DB Pods to maintainhigh availability. The Sentinel Pods elect and monitor a primary dSSM DB Pod, and if the primary dSSM DB Pod fails,a secondary DB will assume the primary role.
Additional high availability
The dSSM Pods also use the standard Kubernetes node affinity and PodDisruptionBudget features to main-tain additional levels of high availability.
Affinity
Each dSSM Sentinel and DB Pod schedules onto a unique cluster node by default. The dSSM scheduling behavior canbemodified using the dSSM Helm affinity_type parameter:
Setting Description
required Ensures the target cluster node does not currently host a Pod withthe app=f5-dssm-db annotation (default).
preferred Attempt to schedule Pods onto unique nodes, but two dSSM Podsmay schedule onto a single node when no schedulable nodes exists.
custom Scheduling behavior may be tuned specifically to the cluster adminsrequirements using the dSSM values.yaml file.
Helm parameter examples:
sentinel:affinity_type: "required"
db:affinity_type: "required"
Kubernetes Assigning Pods overview.
PodDisruptionBudget
A minimum of 2 dSSM Pods remain available at all times based on the dSSM Helm pod_disruption_budget pa-rameter. This parameter blocks voluntary interruptions to the dSSM Pod’s Running status. For example, if three
36
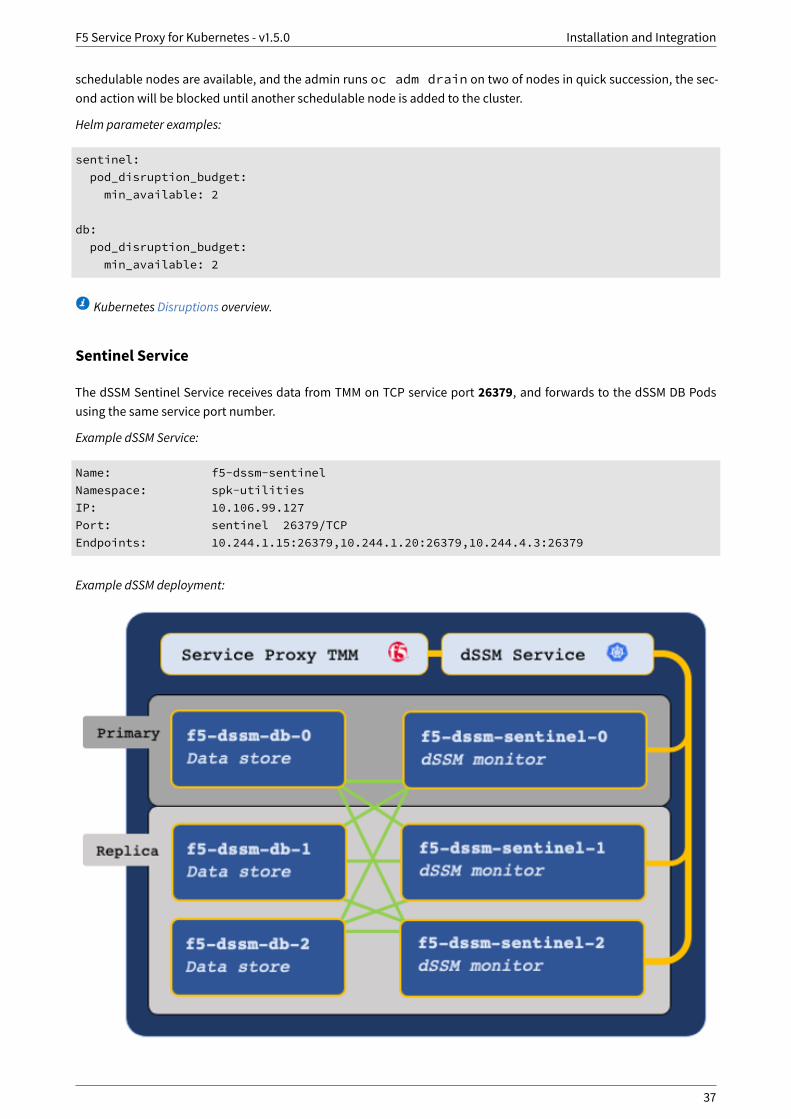
F5 Service Proxy for Kubernetes - v1.5.0 Installation and Integration
schedulable nodes are available, and the admin runs oc adm drain on two of nodes in quick succession, the sec-ond action will be blocked until another schedulable node is added to the cluster.
Helm parameter examples:
sentinel:pod_disruption_budget:min_available: 2
db:pod_disruption_budget:min_available: 2
Kubernetes Disruptions overview.
Sentinel Service
The dSSM Sentinel Service receives data from TMM on TCP service port 26379, and forwards to the dSSM DB Podsusing the same service port number.
Example dSSM Service:
Name: f5-dssm-sentinelNamespace: spk-utilitiesIP: 10.106.99.127Port: sentinel 26379/TCPEndpoints: 10.244.1.15:26379,10.244.1.20:26379,10.244.4.3:26379
Example dSSM deployment:
37
F5 Service Proxy for Kubernetes - v1.5.0 Installation and Integration
Secure communication
TheTMM,dSSMSentinel anddSSMDBPods communicateover ameshof secure channels. These channels are securedusing SSL/TLS keys and certificates stored as Secrets in the cluster. When deploying dSSM, the first step involves cre-ating the SSL/TLS keys and certificates, and installing them as Secrets. Ensure you understand the key points in thefollowing subsections:
Certificate Validity
SSL/TLScertificates are valid for a specific periodof time, andonce theyexpire, secure connections failwhenvalidatingthe certificate. When creating new SSL/TLS certificates for the secure dSSM channels, choose a period of one year, ortwo years to avoid connection failures.
Example Certificate Validity:
ValidityNot Before: Jan 1 10:30:00 2021 GMTNot After : Jan 1 10:30:00 2022 GMT
Updating Secrets
If you plan to replace a current set of Secrets with a new set, you must restart both the dSSM and Service Proxy TMMPods to begin using the new Secrets. It is important to understand that restarting the TMM Pods causes a brief inter-ruption to traffic processing, and should be performed during a planned maintenance window. To restart dSMM andthe Service Proxy TMM Pods, refer to the Restarting procedure.
Requirements
Ensure you have:
• An OpenShift cluster.• Uploaded the SPK Software.• A workstation with Helm and OpenSSL installed.
Procedures
Install the Secrets
Use the following steps to create the required SSL/TLS keys and certificates, and install them as Secrets in both theTMM and dSSM Namespaces:
1. Change into the directory with the SPK files:
cd <directory>
In this example, the SPK files are in the spkinstall directory:
cd spkinstall
2. Create a new directory for the dSSM Secret keys and certificates, and change into the directory:
38
F5 Service Proxy for Kubernetes - v1.5.0 Installation and Integration
mkdir <directory>
cd <directory>
In this example, a new directory named dssm_secrets is created and changed into:
mkdir dssm_secrets
cd dssm_secrets
3. Create the dSSM Certificate Authority (CA) key and certificate:
In this example, the CA signing certificate is valid for one year.
openssl genrsa -out dssm-ca.key 4096
openssl req -x509 -new -nodes -sha384 \-key dssm-ca.key -days 365 \-subj '/O=Redis Test/CN=Certificate Authority' \-out dssm-ca.crt
4. Create the dSSM client key and certificate:
In this example, the dSSM client certificate is valid for one year.
openssl genrsa -out dssm-key.key 4096
openssl req -new -sha384 -key dssm-key.key \-subj '/O=Redis Test/CN=Server' | \openssl x509 -req -sha384 -CA dssm-ca.crt \
-CAkey dssm-ca.key -CAserial dssm-ca.txt \-CAcreateserial -days 365 \-out dssm-cert.crt
5. Create the mTLS certificate for the TMM and dSSM communication channels:
Note: ThemTLS certificate can take up to aminute to generate.
openssl dhparam -out dhparam2048.pem 2048
6. Encode the keys and certificates:
openssl base64 -A -in dssm-ca.crt -out dssm-ca-encode.crtopenssl base64 -A -in dssm-cert.crt -out dssm-cert-encode.crtopenssl base64 -A -in dhparam2048.pem -out dhparam2048-encode.pemopenssl base64 -A -in dssm-key.key -out dssm-key-encode.key
7. Create the Secret certificate object file:
echo "apiVersion: v1" > certs-secret.yamlecho "kind: Secret" >> certs-secret.yamlecho "metadata:" >> certs-secret.yamlecho " name: dssm-certs-secret" >> certs-secret.yamlecho "data:" >> certs-secret.yamlecho " dssm-ca.crt: `cat dssm-ca-encode.crt`" >> certs-secret.yamlecho " dssm-cert.crt: `cat dssm-cert-encode.crt`" >> certs-secret.yamlecho " dhparam2048.pem: `cat dhparam2048-encode.pem`" >> certs-secret.yaml
8. Create the Secret key object file:
39
F5 Service Proxy for Kubernetes - v1.5.0 Installation and Integration
echo "apiVersion: v1" > keys-secret.yamlecho "kind: Secret" >> keys-secret.yamlecho "metadata:" >> keys-secret.yamlecho " name: dssm-keys-secret" >> keys-secret.yamlecho "data:" >> keys-secret.yamlecho " dssm-key.key: `cat dssm-key-encode.key`" >> keys-secret.yaml
9. Create a new Project for the dSSM Pods:
Note: If you created a Project for the Fluentd Pod, switch to the project withoc project spk-utilities.
oc new-project <project>
In this example, a new Project named spk-utilities is created:
oc new-project spk-utilities
10. Install the Secret key and certificate files to the dSSM Project:
oc apply -f keys-secret.yaml -n <project>oc apply -f certs-secret.yaml -n <project>
In this example, the Secrets install to the spk-utilities Project:
oc apply -f keys-secret.yaml -n spk-utilitiesoc apply -f certs-secret.yaml -n spk-utilities
The command response should state the Secrets have been created:
secret/dssm-keys-secret createdsecret/dssm-certs-secret created
11. Install the Secret key and certificate files to the SPK Controller Project:
Note: The Controller Project was created during the SPK Secrets installation.
oc apply -f keys-secret.yaml -n <project>oc apply -f certs-secret.yaml -n <project>
In the example, the Secrets install to the spk-ingress Project:
oc apply -f keys-secret.yaml -n spk-ingressoc apply -f certs-secret.yaml -n spk-ingress
The command response should state the Secrets have been created:
secret/dssm-keys-secret createdsecret/dssm-certs-secret created
Install the Pods
Use the following steps to deploy the dSSM Pods with persistence.
1. Change into local directory with the SPK TAR files, and ensure the Helm charts have been extracted:
cd <directory>
40
F5 Service Proxy for Kubernetes - v1.5.0 Installation and Integration
ls -1 tar
In this example, the SPK files are in the spkinstall directory:
cd spkinstall
ls -1 tar
In this example, the dSSM Helm chart is named f5-dssm-0.22.12.tgz:
cwc-0.4.15.tgzf5-cert-gen-0.2.4.tgzf5-dssm-0.22.12.tgzf5-toda-fluentd-1.8.29.tgzf5ingress-5.0.29.tgzspk-docker-images.tgz
2. Add the dSSM serviceAccount to the Project’s privileged security context constraint (SCC):
Note: The f5-dssm serviceAccount name is based on the Helm release name. See Step 6.
oc adm policy add-scc-to-user privileged -n <project> -z <serviceaccount>
In this example, the f5-dssm serviceAccount is added to the spk-utilities Project’s privileged SCC:
oc adm policy add-scc-to-user privileged -n spk-utilities -z f5-dssm
3. Create a Helm values file named dssm-values, and set the image.repository parameters:
image:repository: <registry>
sentinel:fluentbit_sidecar:
image:repository: <registry>
db:fluentbit_sidecar:
image:repository: <registry>
In this example, Helm pulls the f5-dssm-store images from registry.com:
image:repository: registry.com
sentinel:fluentbit_sidecar:
image:repository: registry.com
db:fluentbit_sidecar:
image:repository: registry.com
41
F5 Service Proxy for Kubernetes - v1.5.0 Installation and Integration
4. Optional: If you deployed the Fluentd Logging Pod, you can send logging data to the f5-fluentd container byadding the fluentd.host parameters to the values file:
sentinel:fluentbit_sidecar:
fluentd:host: '<fluentd hostname>'
db:fluentbit_sidecar:
fluentd:host: '<fluentd hostname>'
In this example, the Fluentd container is deployed to the spk-utilities Project:
sentinel:fluentbit_sidecar:
fluentd:host: 'f5-toda-fluentd.spk-utilities.svc.cluster.local.'
db:fluentbit_sidecar:
fluentd:host: 'f5-toda-fluentd.spk-utilities.svc.cluster.local.'
5. Change to the dSSM database Project:
oc project <dssm project>
In this example, dSSM is in the spk-utilities Project:
oc project spk-utilities
6. Install the dSSM Pods:
Important: The string f5-dssm is the Helm release name. If a different release name is used, ensure the nameis added to the privileged SCC.
helm install f5-dssm tar/f5-dssm-<tag>.tgz -f <values>.yaml
For example:
helm install f5-dssm tar/f5-dssm-0.22.12.tgz -f dssm-values.yaml
7. All dSSM Pods will be available after the election process, which can take up to a minute.
Important: DB entries may fail to be created during the election process if TMM installs prior to completion.TMMwill connect after the process completes.
oc get pods
In this example, thedSSMPods in the spk-utilitiesProject havecompleted theelectionprocess, and thePodSTATUSis Running:
NAME READY STATUSf5-dssm-db-0 1/1 Runningf5-dssm-db-1 1/1 Runningf5-dssm-db-2 1/1 Runningf5-dssm-sentinel-0 1/1 Running
42
F5 Service Proxy for Kubernetes - v1.5.0 Installation and Integration
f5-dssm-sentinel-1 1/1 Runningf5-dssm-sentinel-2 1/1 Running
8. The dSSM DB Pods should be bound to the persistent volumes:
oc get pvc
In this example, the dSSM Pod’s PVC STATUS is Bound:
NAME STATUS VOLUMEdata-f5-dssm-db-0 Bound pvc-c7060354-64d2-456b-9328-aa38f19b44b5data-f5-dssm-db-1 Bound pvc-8358b993-bf21-4fd7-a0fa-ee84ec420aacdata-f5-dssm-db-2 Bound pvc-de65ed0f-f616-4021-a158-e0e78ed4539e
Next step
Continue to the SPK Licensing installation guide. To securely connect the TMM and dSSM Pods, add the followingparameters to the SPK Controller Helm values file:
Important: Set the SESSIONDB_EXTERNAL_SERVICE parameter to the Project of the dSSM Pod.
tmm:sessiondb:useExternalStorage: "true"
customEnvVars:- name: REDIS_CA_FILEvalue: "/etc/ssl/certs/dssm-ca.crt"
- name: REDIS_AUTH_CERTvalue: "/etc/ssl/certs/dssm-cert.crt"
- name: REDIS_AUTH_KEYvalue: "/etc/ssl/private/dssm-key.key"
- name: SESSIONDB_EXTERNAL_STORAGEvalue: "true"
- name: SESSIONDB_DISCOVERY_SENTINELvalue: "true"
- name: SESSIONDB_EXTERNAL_SERVICEvalue: "f5-dssm-sentinel.spk-utilities"
Restarting
This procedure assumes that you have deployed the dSSM Pods, and have created a new set of Secrets to replace theexisting Secrets. The new Secrets will not be used until the dSSM and TMM Pods have been restarted.
Important: Restarting the Service Proxy TMM Pods impacts traffic processing.
1. Obtain the name and number of Service Proxy TMM Pods:
oc get deploy -n <project> | grep tmm
In this example, there are 3 Service Proxy TMM Pods in the spk-ingress Project:
oc get deploy -n spk-ingress | grep f5-tmm
43
F5 Service Proxy for Kubernetes - v1.5.0 Installation and Integration
f5-tmm 3/3 3 3
2. Scale the number of Service Proxy Pods to 0:
oc scale deploy/f5-tmm --replicas=0 -n <project>
In this example the TMM Pods are in the spk-ingress Project:
oc scale deploy/f5-tmm --replicas=0 -n spk-ingress
3. Wait 5 or 10 seconds for the TMM Pods to terminate, and scale the TMM Pods back to the previous number:
oc scale deploy/f5-tmm --replicas=<number> -n <project>
In this example the TMM Pods are scaled back to 3 in the spk-ingress Namespace:
oc scale deploy/f5-tmm --replicas=3 -n spk-ingress
4. Restart the dSSM Sentinel and DB Pods:
The dSSM Sentinel and DB Pods run as StatefulSets, and will be restarted automatically.
oc delete pods -l 'app in (f5-dssm-db, f5-dssm-sentinel)' -n <project>
In this example, the Sentinel and DB Pods are in the spk-utilities Namespace:
oc delete pods -l 'app in (f5-dssm-db, f5-dssm-sentinel)' -n spk-utilities
pod "f5-dssm-db-0" deletedpod "f5-dssm-db-1" deletedpod "f5-dssm-db-2" deletedpod "f5-dssm-sentinel-0" deletedpod "f5-dssm-sentinel-1" deletedpod "f5-dssm-sentinel-2" deleted
5. Verify the dSSM Pods STATUS is Running:
oc get pods -n spk-utilities
NAME READY STATUSf5-dssm-db-0 2/2 Runningf5-dssm-db-1 2/2 Runningf5-dssm-db-2 2/2 Runningf5-dssm-sentinel-0 2/2 Runningf5-dssm-sentinel-1 2/2 Runningf5-dssm-sentinel-2 2/2 Running
6. The new Secrets should now be used to secure the dSSM channels.
Feedback
Provide feedback to improve this document by emailing [email protected].
Supplemental
• The list of commands used to create the Secrets.
44

F5 Service Proxy for Kubernetes - v1.5.0 Installation and Integration
• Redis• Redis Sentinels• StatefulSet Basics
45
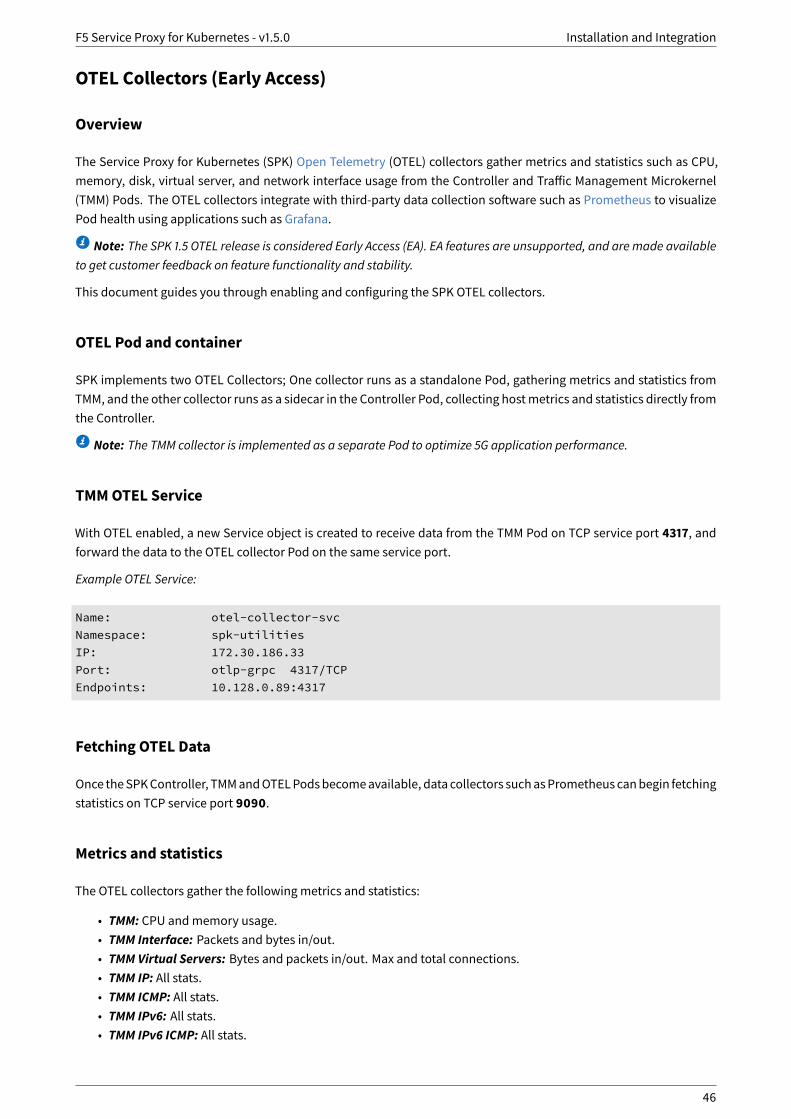
F5 Service Proxy for Kubernetes - v1.5.0 Installation and Integration
OTEL Collectors (Early Access)
Overview
The Service Proxy for Kubernetes (SPK) Open Telemetry (OTEL) collectors gather metrics and statistics such as CPU,memory, disk, virtual server, and network interface usage from the Controller and Traffic Management Microkernel(TMM) Pods. The OTEL collectors integrate with third-party data collection software such as Prometheus to visualizePod health using applications such as Grafana.
Note: The SPK 1.5 OTEL release is considered Early Access (EA). EA features are unsupported, and are made availableto get customer feedback on feature functionality and stability.
This document guides you through enabling and configuring the SPK OTEL collectors.
OTEL Pod and container
SPK implements two OTEL Collectors; One collector runs as a standalone Pod, gathering metrics and statistics fromTMM, and the other collector runs as a sidecar in the Controller Pod, collecting hostmetrics and statistics directly fromthe Controller.
Note: The TMM collector is implemented as a separate Pod to optimize 5G application performance.
TMMOTEL Service
With OTEL enabled, a new Service object is created to receive data from the TMM Pod on TCP service port 4317, andforward the data to the OTEL collector Pod on the same service port.
Example OTEL Service:
Name: otel-collector-svcNamespace: spk-utilitiesIP: 172.30.186.33Port: otlp-grpc 4317/TCPEndpoints: 10.128.0.89:4317
Fetching OTEL Data
Once theSPKController, TMMandOTELPodsbecomeavailable, data collectors suchasPrometheus canbegin fetchingstatistics on TCP service port 9090.
Metrics and statistics
The OTEL collectors gather the following metrics and statistics:
• TMM: CPU andmemory usage.• TMM Interface: Packets and bytes in/out.• TMM Virtual Servers: Bytes and packets in/out. Max and total connections.• TMM IP: All stats.• TMM ICMP: All stats.• TMM IPv6: All stats.• TMM IPv6 ICMP: All stats.
46
F5 Service Proxy for Kubernetes - v1.5.0 Installation and Integration
• TMM Reset cause: All stats.• TMM VLANMember: All stats.• Ingress: CPU andmemory usage.• Ingress: Disk I/O.• Ingress: Disk operation time.
Requirements
Prior to configuring OTEL, ensure you have:
• Installed the SPK software.• Installed new SPK Secrets that include the OTEL Collector’s Secrets.
Procedures
Helm parameters
The following steps detail theHelmparameters required to enable theOTEL collectionPod, andhow to verify theOTELcollectors status.
Note: The OTEL ollectors are disabled by default.
1. Add theHelmparameters below to the SPKController’s Helm values file, andmodify theimage.repositoryparameter for your internal image registry:
tmm:# Enables the OTEL collection Pod.otel_sidecar:
enabled: trueimage:
repository: "local.registry.com"
controller:# Enables the OTEL collection container.otel_sidecar:
enabled: trueimage:
repository: "local.registry.com"
f5-toda-logging:enabled: truetype: stdout
fluentd:host: "localhost"
tmstats:enabled: trueconfig:image:
repository: "local.registry.com"
sidecar:image:repository: "local.registry.com"
47
F5 Service Proxy for Kubernetes - v1.5.0 Installation and Integration
2. Continue to the SPK CWC installation guide. If the CWC is installed, continue to the SPK Controller guide.
Pod Status
Use these steps to obtain the OTEL Pod status:
1. Verify the TMM otel-collector Pod is Running:
oc get pods -n spk-ingress | grep otel
In this example, the OTEL Pod is Running.
otel-collector-6d558c946b-8hvz5 1/1 Running
2. Verify the F5Ingress otel-collector container is Running:
kubectl get pods -n spk-ingress | grep f5ingress
In this example, all 4/4 containers are Running.
f5ingress-f5ingress-5cbc875489-ngt9g 4/4 Running 0
3. Data collectors can now fetch metrics from the Controller and TMM on service port 9090 in the spk-ingressProject.
Feedback
Provide feedback to improve this document by emailing [email protected].
Supplemental
• Grafana• Prometheus
48
F5 Service Proxy for Kubernetes - v1.5.0 Installation and Integration
SPK CWC
Overview
The Service Proxy for Kubernetes (SPK) Cluster Wide Controller (CWC) enables SPK’s software licensing and billingcapabilities. Once the SPK software is installed and licensed, the CWC collects and reports software usage telemetrystatistics for each of the SPK Controller instances in the cluster. SPK uses F5’s flexible consumption software licensingmodel, billing only for the SPK features used.
Note: SPK Licensing applies to the cluster level, and is performed prior to installing the SPK Controller instances.
This document guides you through installing the CWC controller.
CPCLmodule
The CWC contains the Common Product Component and Libraries (CPCL) module that helps with license activation,and with generating and maintaining the monthly license reports. The CPCL requires the F5 provided SSL/TLS cer-tificate and key, and unique JSON Web Token (JWT) to identify the cluster. Installing the CPCL SSL/TLS certificateand key will be demonstrated later in this overview, and the license reporting will demonstrated in the SPK Licensingoverview.
Cluster Project
The CWC Pod can install to any cluster Project. In this document, the CWCwill install to the spk-telemetry Project.
RabbitMQ
The CWC uses the RabbitMQ open source message broker to integrate with the SPK Controller Pod(s). Ensure connec-tivity is allowed for the service ports listed below.
CWC Service
The CWC Service object receives REST API data on TCP service port 30881, and forwards the data to the CWC Pod onTCP service port 38081.
Name: f5-spk-cwcNamespace: spk-telemetryIP: 10.109.102.215Port: cwc-rest 30881/TCPEndpoints: 10.244.1.75:38081
RabbitMQ Service
The RabbitMQ Service object passes messages between the SPK Controllers and the CWC on TCP service port 5671.
Name: rabbitmq-serverNamespace: spk-telemetryIP: 10.109.105.210Port: ampqst 5671/TCPEndpoints: 10.244.1.80:5671
49
F5 Service Proxy for Kubernetes - v1.5.0 Installation and Integration
Requirements
Ensure you have:
• A workstation with OpenSSL.• Installed the SPK software.• A Linux based workstation with Helm installed.• Obtained the CPCL SSL/TLS cert and keys, and the JWT from your MyF5 account.
Procedures
Install the Secrets
Use this procedure to generate and install Kubernetes Secrets to secure communication between the CWC, RabbitMQand SPK Controller Pods. The procedure also creates the SSL/TLS certificates required to authenticate the CWC RESTAPI for licensing purposes.
Note: F5 recommendsobtainin certificateauthority (CA) signedcertificatesusing theSubject AlternativeNames (SANs)shown with -a in steps 3 and 5.
1. Change into local directory with the SPK Software files, and list the files in the tar directory:
In this example, the SPK files are in the spkinstall directory.
cd spkinstall
ls -1 tar
This procedure requires the f5-cert-gen-0.2.4.tgz file.
cwc-0.4.15.tgzf5-cert-gen-0.2.4.tgzf5-dssm-0.22.12.tgzf5-toda-fluentd-1.8.29.tgzf5ingress-5.0.29.tgzspk-docker-images.tgz
2. Extract the cert-gen utility to generate Secrets and SSL/TLS certificates:
tar xvf tar/f5-cert-gen-0.2.4.tgz
3. Generate the Secret and the SSL/TLS certificates for the CWC REST API:
Note: The SSL/TLS certificates will be used later when configuring Postman.
sh cert-gen/gen_cert.sh -s=api-server -a=f5-spk-cwc.<project> -n=1
In this example, the CWC installs to the spk-telemetry Project.
sh cert-gen/gen_cert.sh -s=api-server -a=f5-spk-cwc.spk-telemetry -n=1
The command output indicates the Secret has been created:
Generating /path/cwc-license-certs.yaml
4. Install the CWC Secret:
In this example, the CWC installs to the spk-telemetry Project.
50
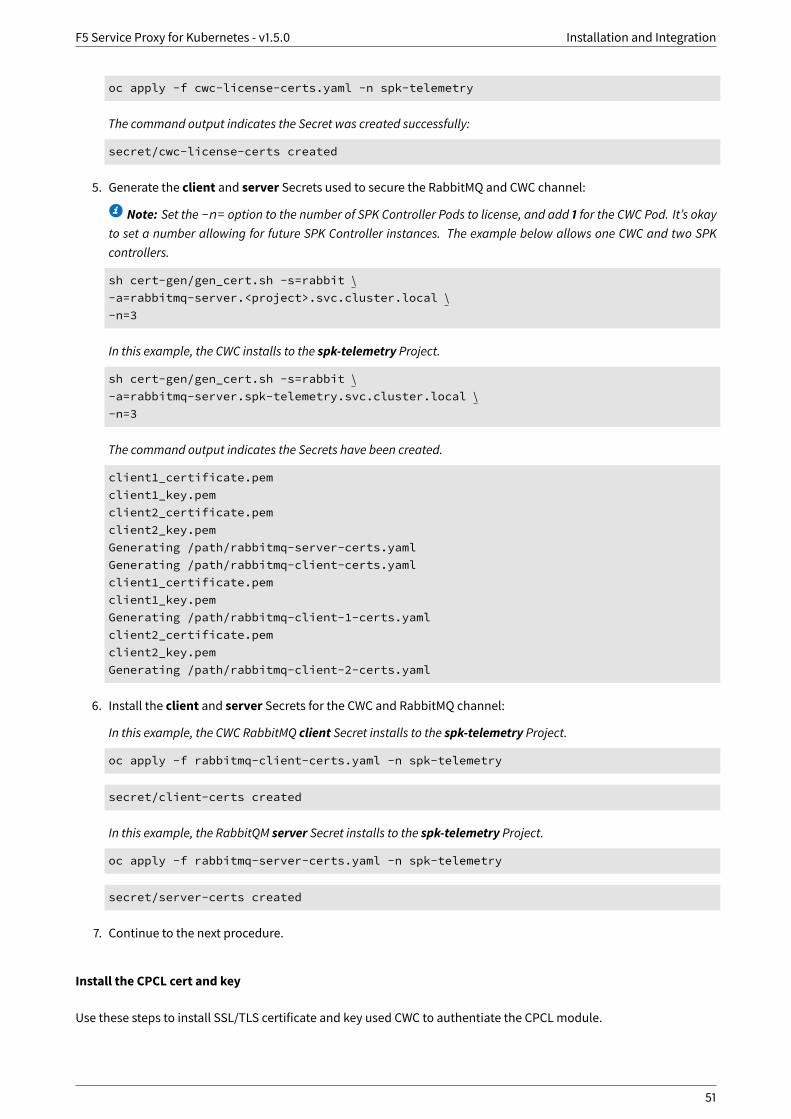
F5 Service Proxy for Kubernetes - v1.5.0 Installation and Integration
oc apply -f cwc-license-certs.yaml -n spk-telemetry
The command output indicates the Secret was created successfully:
secret/cwc-license-certs created
5. Generate the client and server Secrets used to secure the RabbitMQ and CWC channel:
Note: Set the -n= option to the number of SPK Controller Pods to license, and add 1 for the CWC Pod. It’s okayto set a number allowing for future SPK Controller instances. The example below allows one CWC and two SPKcontrollers.
sh cert-gen/gen_cert.sh -s=rabbit \-a=rabbitmq-server.<project>.svc.cluster.local \-n=3
In this example, the CWC installs to the spk-telemetry Project.
sh cert-gen/gen_cert.sh -s=rabbit \-a=rabbitmq-server.spk-telemetry.svc.cluster.local \-n=3
The command output indicates the Secrets have been created.
client1_certificate.pemclient1_key.pemclient2_certificate.pemclient2_key.pemGenerating /path/rabbitmq-server-certs.yamlGenerating /path/rabbitmq-client-certs.yamlclient1_certificate.pemclient1_key.pemGenerating /path/rabbitmq-client-1-certs.yamlclient2_certificate.pemclient2_key.pemGenerating /path/rabbitmq-client-2-certs.yaml
6. Install the client and server Secrets for the CWC and RabbitMQ channel:
In this example, the CWC RabbitMQ client Secret installs to the spk-telemetry Project.
oc apply -f rabbitmq-client-certs.yaml -n spk-telemetry
secret/client-certs created
In this example, the RabbitQM server Secret installs to the spk-telemetry Project.
oc apply -f rabbitmq-server-certs.yaml -n spk-telemetry
secret/server-certs created
7. Continue to the next procedure.
Install the CPCL cert and key
Use these steps to install SSL/TLS certificate and key used CWC to authentiate the CPCLmodule.
51
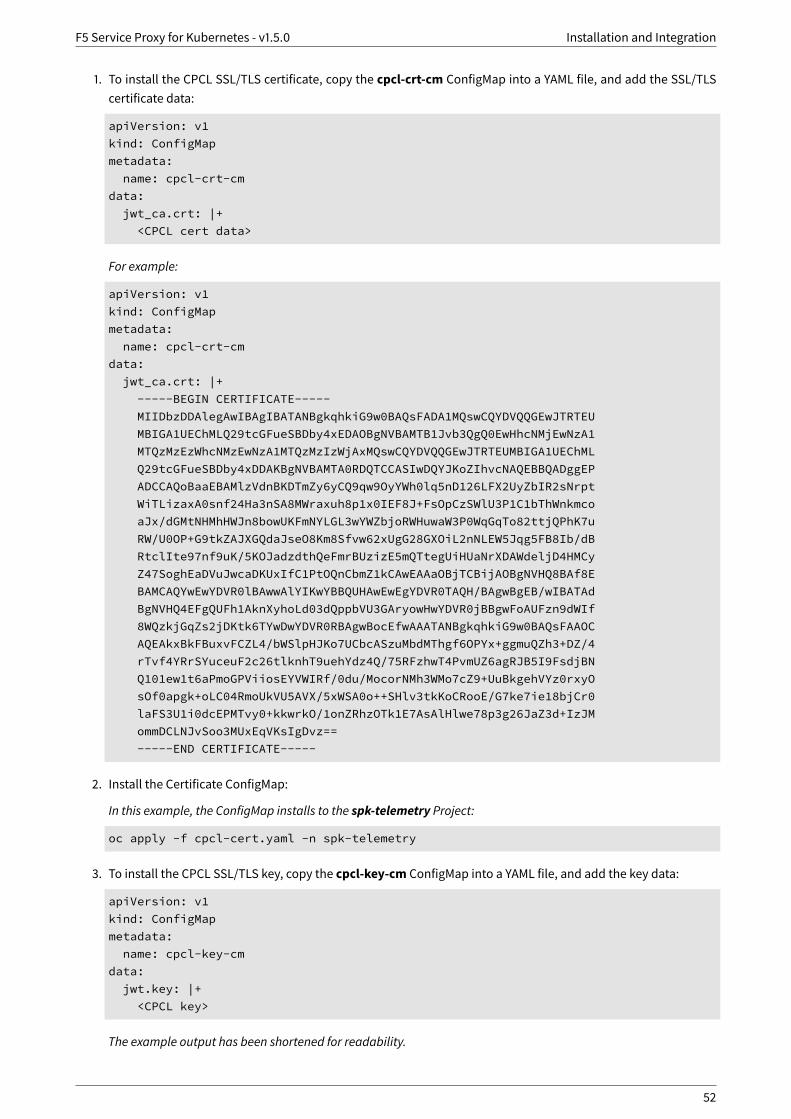
F5 Service Proxy for Kubernetes - v1.5.0 Installation and Integration
1. To install the CPCL SSL/TLS certificate, copy the cpcl-crt-cm ConfigMap into a YAML file, and add the SSL/TLScertificate data:
apiVersion: v1kind: ConfigMapmetadata:name: cpcl-crt-cm
data:jwt_ca.crt: |+
<CPCL cert data>
For example:
apiVersion: v1kind: ConfigMapmetadata:name: cpcl-crt-cm
data:jwt_ca.crt: |+
-----BEGIN CERTIFICATE-----MIIDbzDDAlegAwIBAgIBATANBgkqhkiG9w0BAQsFADA1MQswCQYDVQQGEwJTRTEUMBIGA1UEChMLQ29tcGFueSBDby4xEDAOBgNVBAMTB1Jvb3QgQ0EwHhcNMjEwNzA1MTQzMzEzWhcNMzEwNzA1MTQzMzIzWjAxMQswCQYDVQQGEwJTRTEUMBIGA1UEChMLQ29tcGFueSBDby4xDDAKBgNVBAMTA0RDQTCCASIwDQYJKoZIhvcNAQEBBQADggEPADCCAQoBaaEBAMlzVdnBKDTmZy6yCQ9qw9OyYWh0lq5nD126LFX2UyZbIR2sNrptWiTLizaxA0snf24Ha3nSA8MWraxuh8p1x0IEF8J+FsOpCzSWlU3P1C1bThWnkmcoaJx/dGMtNHMhHWJn8bowUKFmNYLGL3wYWZbjoRWHuwaW3P0WqGqTo82ttjQPhK7uRW/U0OP+G9tkZAJXGQdaJseO8Km8Sfvw62xUgG28GXOiL2nNLEW5Jqg5FB8Ib/dBRtclIte97nf9uK/5KOJadzdthQeFmrBUzizE5mQTtegUiHUaNrXDAWdeljD4HMCyZ47SoghEaDVuJwcaDKUxIfC1PtOQnCbmZ1kCAwEAAaOBjTCBijAOBgNVHQ8BAf8EBAMCAQYwEwYDVR0lBAwwAlYIKwYBBQUHAwEwEgYDVR0TAQH/BAgwBgEB/wIBATAdBgNVHQ4EFgQUFh1AknXyhoLd03dQppbVU3GAryowHwYDVR0jBBgwFoAUFzn9dWIf8WQzkjGqZs2jDKtk6TYwDwYDVR0RBAgwBocEfwAAATANBgkqhkiG9w0BAQsFAAOCAQEAkxBkFBuxvFCZL4/bWSlpHJKo7UCbcASzuMbdMThgf6OPYx+ggmuQZh3+DZ/4rTvf4YRrSYuceuF2c26tlknhT9uehYdz4Q/75RFzhwT4PvmUZ6agRJB5I9FsdjBNQ101ew1t6aPmoGPViiosEYVWIRf/0du/MocorNMh3WMo7cZ9+UuBkgehVYz0rxyOsOf0apgk+oLC04RmoUkVU5AVX/5xWSA0o++SHlv3tkKoCRooE/G7ke7ie18bjCr0laFS3U1i0dcEPMTvy0+kkwrkO/1onZRhzOTk1E7AsAlHlwe78p3g26JaZ3d+IzJMommDCLNJvSoo3MUxEqVKsIgDvz==-----END CERTIFICATE-----
2. Install the Certificate ConfigMap:
In this example, the ConfigMap installs to the spk-telemetry Project:
oc apply -f cpcl-cert.yaml -n spk-telemetry
3. To install the CPCL SSL/TLS key, copy the cpcl-key-cm ConfigMap into a YAML file, and add the key data:
apiVersion: v1kind: ConfigMapmetadata:name: cpcl-key-cm
data:jwt.key: |+
<CPCL key>
The example output has been shortened for readability.
52
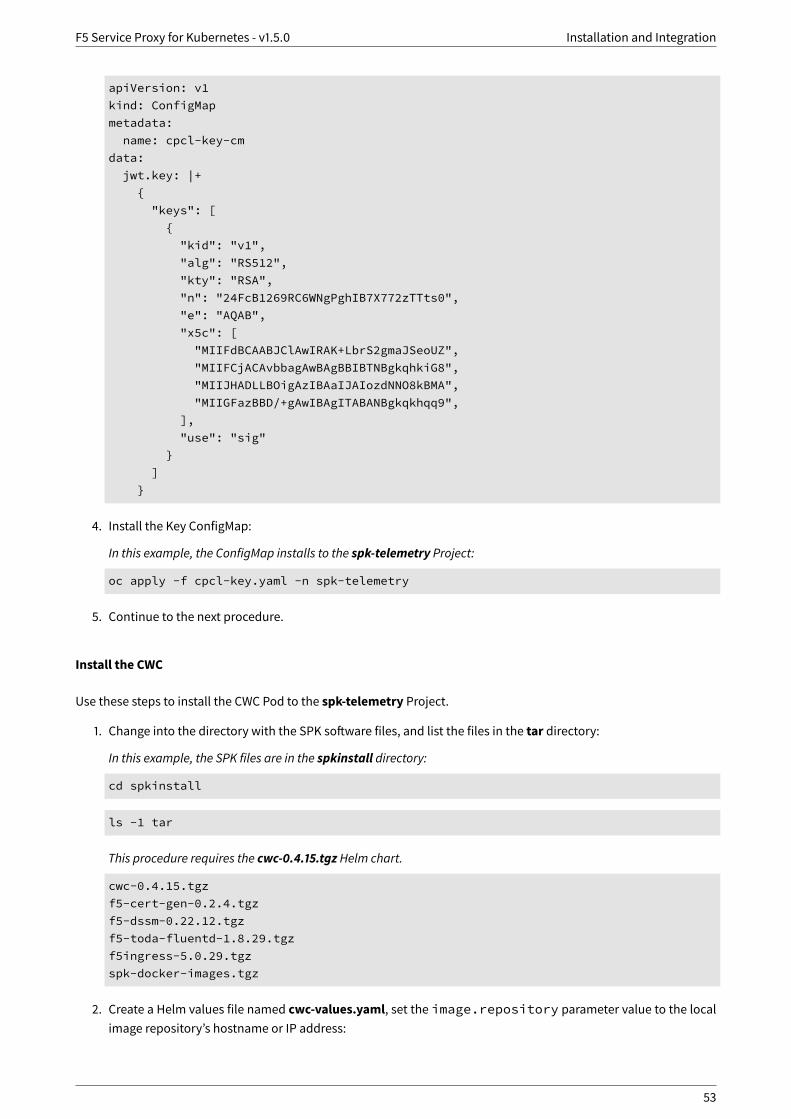
F5 Service Proxy for Kubernetes - v1.5.0 Installation and Integration
apiVersion: v1kind: ConfigMapmetadata:name: cpcl-key-cm
data:jwt.key: |+
{"keys": [
{"kid": "v1","alg": "RS512","kty": "RSA","n": "24FcB1269RC6WNgPghIB7X772zTTts0","e": "AQAB","x5c": ["MIIFdBCAABJClAwIRAK+LbrS2gmaJSeoUZ","MIIFCjACAvbbagAwBAgBBIBTNBgkqhkiG8","MIIJHADLLBOigAzIBAaIJAIozdNNO8kBMA","MIIGFazBBD/+gAwIBAgITABANBgkqkhqq9",
],"use": "sig"
}]
}
4. Install the Key ConfigMap:
In this example, the ConfigMap installs to the spk-telemetry Project:
oc apply -f cpcl-key.yaml -n spk-telemetry
5. Continue to the next procedure.
Install the CWC
Use these steps to install the CWC Pod to the spk-telemetry Project.
1. Change into the directory with the SPK software files, and list the files in the tar directory:
In this example, the SPK files are in the spkinstall directory:
cd spkinstall
ls -1 tar
This procedure requires the cwc-0.4.15.tgz Helm chart.
cwc-0.4.15.tgzf5-cert-gen-0.2.4.tgzf5-dssm-0.22.12.tgzf5-toda-fluentd-1.8.29.tgzf5ingress-5.0.29.tgzspk-docker-images.tgz
2. Create a Helm values file named cwc-values.yaml, set the image.repository parameter value to the localimage repository’s hostname or IP address:
53
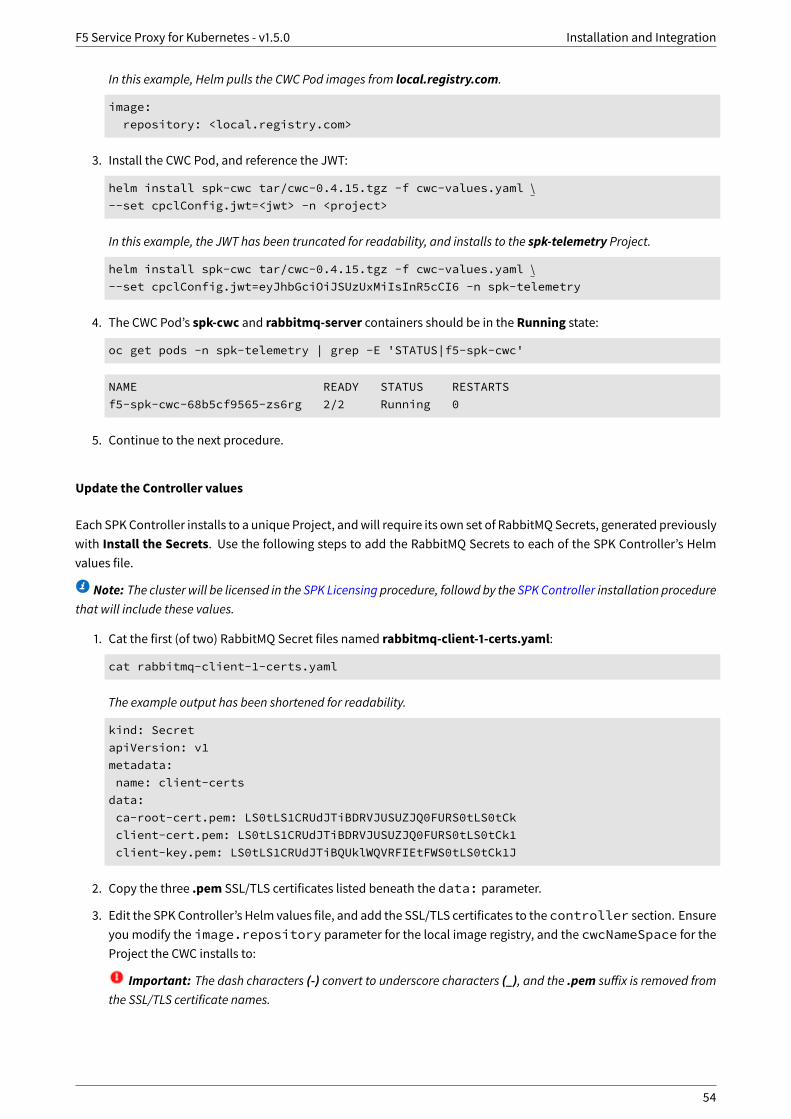
F5 Service Proxy for Kubernetes - v1.5.0 Installation and Integration
In this example, Helm pulls the CWC Pod images from local.registry.com.
image:repository: <local.registry.com>
3. Install the CWC Pod, and reference the JWT:
helm install spk-cwc tar/cwc-0.4.15.tgz -f cwc-values.yaml \--set cpclConfig.jwt=<jwt> -n <project>
In this example, the JWT has been truncated for readability, and installs to the spk-telemetry Project.
helm install spk-cwc tar/cwc-0.4.15.tgz -f cwc-values.yaml \--set cpclConfig.jwt=eyJhbGciOiJSUzUxMiIsInR5cCI6 -n spk-telemetry
4. The CWC Pod’s spk-cwc and rabbitmq-server containers should be in the Running state:
oc get pods -n spk-telemetry | grep -E 'STATUS|f5-spk-cwc'
NAME READY STATUS RESTARTSf5-spk-cwc-68b5cf9565-zs6rg 2/2 Running 0
5. Continue to the next procedure.
Update the Controller values
Each SPKController installs to a unique Project, andwill require its own set of RabbitMQSecrets, generated previouslywith Install the Secrets. Use the following steps to add the RabbitMQ Secrets to each of the SPK Controller’s Helmvalues file.
Note: The cluster will be licensed in the SPK Licensing procedure, followd by the SPK Controller installation procedurethat will include these values.
1. Cat the first (of two) RabbitMQ Secret files named rabbitmq-client-1-certs.yaml:
cat rabbitmq-client-1-certs.yaml
The example output has been shortened for readability.
kind: SecretapiVersion: v1metadata:name: client-certsdata:ca-root-cert.pem: LS0tLS1CRUdJTiBDRVJUSUZJQ0FURS0tLS0tCkclient-cert.pem: LS0tLS1CRUdJTiBDRVJUSUZJQ0FURS0tLS0tCk1client-key.pem: LS0tLS1CRUdJTiBQUklWQVRFIEtFWS0tLS0tCk1J
2. Copy the three .pem SSL/TLS certificates listed beneath the data: parameter.
3. Edit the SPK Controller’s Helm values file, and add the SSL/TLS certificates to thecontroller section. Ensureyou modify the image.repository parameter for the local image registry, and the cwcNameSpace for theProject the CWC installs to:
Important: The dash characters (-) convert to underscore characters (_), and the .pem suffix is removed fromthe SSL/TLS certificate names.
54
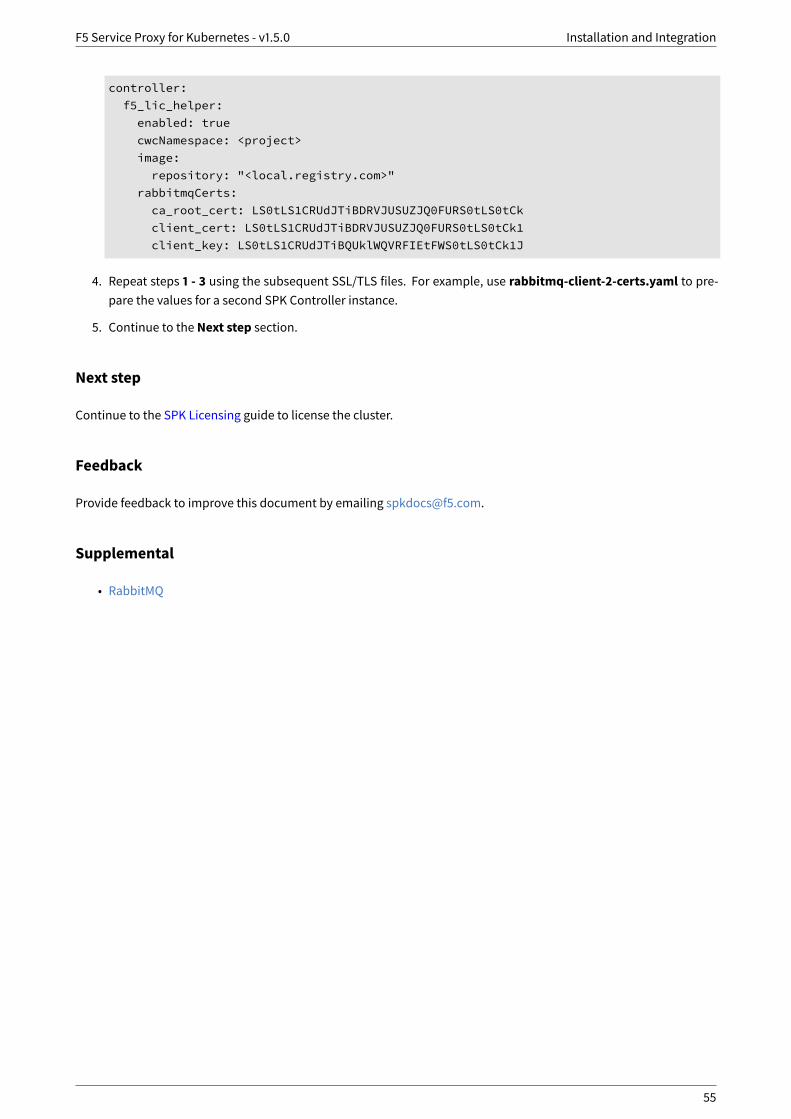
F5 Service Proxy for Kubernetes - v1.5.0 Installation and Integration
controller:f5_lic_helper:
enabled: truecwcNamespace: <project>image:repository: "<local.registry.com>"
rabbitmqCerts:ca_root_cert: LS0tLS1CRUdJTiBDRVJUSUZJQ0FURS0tLS0tCkclient_cert: LS0tLS1CRUdJTiBDRVJUSUZJQ0FURS0tLS0tCk1client_key: LS0tLS1CRUdJTiBQUklWQVRFIEtFWS0tLS0tCk1J
4. Repeat steps 1 - 3 using the subsequent SSL/TLS files. For example, use rabbitmq-client-2-certs.yaml to pre-pare the values for a second SPK Controller instance.
5. Continue to the Next step section.
Next step
Continue to the SPK Licensing guide to license the cluster.
Feedback
Provide feedback to improve this document by emailing [email protected].
Supplemental
• RabbitMQ
55
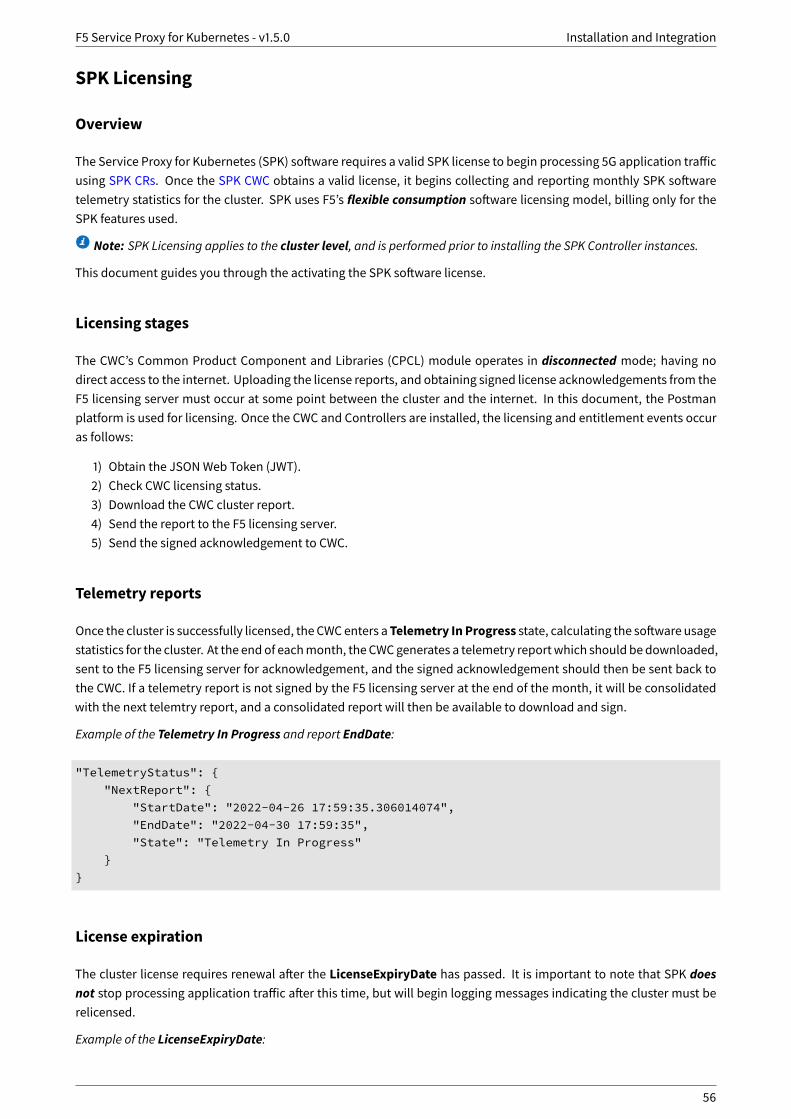
F5 Service Proxy for Kubernetes - v1.5.0 Installation and Integration
SPK Licensing
Overview
The Service Proxy for Kubernetes (SPK) software requires a valid SPK license to begin processing 5G application trafficusing SPK CRs. Once the SPK CWC obtains a valid license, it begins collecting and reporting monthly SPK softwaretelemetry statistics for the cluster. SPK uses F5’s flexible consumption software licensing model, billing only for theSPK features used.
Note: SPK Licensing applies to the cluster level, and is performed prior to installing the SPK Controller instances.
This document guides you through the activating the SPK software license.
Licensing stages
The CWC’s Common Product Component and Libraries (CPCL) module operates in disconnected mode; having nodirect access to the internet. Uploading the license reports, and obtaining signed license acknowledgements from theF5 licensing server must occur at some point between the cluster and the internet. In this document, the Postmanplatform is used for licensing. Once the CWC and Controllers are installed, the licensing and entitlement events occuras follows:
1) Obtain the JSONWeb Token (JWT).2) Check CWC licensing status.3) Download the CWC cluster report.4) Send the report to the F5 licensing server.5) Send the signed acknowledgement to CWC.
Telemetry reports
Once the cluster is successfully licensed, the CWCenters aTelemetry InProgress state, calculating the software usagestatistics for the cluster. At the endof eachmonth, the CWCgenerates a telemetry reportwhich should bedownloaded,sent to the F5 licensing server for acknowledgement, and the signed acknowledgement should then be sent back tothe CWC. If a telemetry report is not signed by the F5 licensing server at the end of the month, it will be consolidatedwith the next telemtry report, and a consolidated report will then be available to download and sign.
Example of the Telemetry In Progress and report EndDate:
"TelemetryStatus": {"NextReport": {
"StartDate": "2022-04-26 17:59:35.306014074","EndDate": "2022-04-30 17:59:35","State": "Telemetry In Progress"
}}
License expiration
The cluster license requires renewal after the LicenseExpiryDate has passed. It is important to note that SPK doesnot stop processing application traffic after this time, but will begin logging messages indicating the cluster must berelicensed.
Example of the LicenseExpiryDate:
56

F5 Service Proxy for Kubernetes - v1.5.0 Installation and Integration
"LicenseDetails": {"DigitalAssetID": "5ec9234e-8df3-4d90-9536-45142b87049f","EntitlementType": "paid","LicenseExpiryDate": "2022-11-17T00:00:00Z","LicenseExpiryInDays": "204"
}
Licensing APIs
The CWC licensing APIs listed below can be used to perform licensing tasks programmatically, or with API platformsother than Postman. Refer to the Gather API info section to obtain the CWC’s SSL/TLS certificate and IP address info.To use the Postman API platform, refer to the Procedures section of this document.
Important: The URL to contact the CWC Pod includes the Project name. In the examples below the CWC is in thespk-telemetry Project.
License status
Returns the current CWC licensing status. This API should be used both for licensing the cluster and checking thetelemetry report status. The LicenseStatus should indicate Config Report Ready to Download prior to downloadinga license report.
https://f5-spk-cwc.spk-telemetry:30881/status
License report
Downloads the CWC license report for the cluster. The license report will be sent to the F5 licensing server for acknowl-edgement.
https://f5-spk-cwc.spk-telemetry:30881/report
Send report
Sends the license report to Telemetry server for acknowledgement. Send the full report, including the {} curly brack-ets.
Note: The DigitalAssetID is obtained from the License status, and the JWT from your MyF5 account.
https://product.apis.f5.com/ee/v1/entitlements/telemetry \-H "Content-Type: application/json" -H "F5-DigitalAssetId: <DigitalAssetID>" \-H "User-Agent: SPK" -H "Authorization: Bearer <JWT Object>" -d
{"report":"eyJhbG7ImRvYZW50"}↪
Sendmanifest
Sends the acknowledgedmanifest to CWC. Send only the manifest data, no curly brackets {}, or ” quotations.
57
F5 Service Proxy for Kubernetes - v1.5.0 Installation and Integration
https://f5-spk-cwc.spk-telemetry:30881/receipt -d eyJhbGciOiJSUzUxMiIs
Requirements
Ensure you have:
• A workstation with Postman installed, and internet access.• Installed the SPK software.• Installed the SPK CWC.• Obtained the JWT for this cluster from your MyF5 account.
Procedures
Gather API info
Licensing the SPK software requires querying theCWCRESTAPI to determine the cluster’s licensing status, andupload-ing a valid license. To authenticate the CWC REST API, the SSL/TLS certificates and the IP address of the API interfacemust first be obtained. Use the steps below to obtain the API information.
1. Create a new directory for the CWC REST API certificates:
mkdir cwc_api
2. Copy each of the certificates into the new directory:
cp api-server-secrets/ssl/client/certs/client_certificate.pem cwc_api
cp api-server-secrets/ssl/ca/certs/ca_certificate.pem cwc_api
cp api-server-secrets/ssl/client/secrets/client_key.pem cwc_api
3. Obtain the name of the CWC Pod in the cluster:
In this example, the CWC is in the spk-telemetry Project.
oc get pods -n spk-telemetry | grep f5-spk-cwc
In this example, the CWC Pod is named f5-spk-cwc-86d89c4548-fmwpl.
f5-spk-cwc-86d89c4548-fmwpl 2/2 Running
4. Obtain the IP address of the node the CWC Pod is scheduled on:
In this example, the CWC is in the spk-telemetry Project.
oc describe pod f5-spk-cwc-86d89c4548-fmwpl -n spk-telemetry | grep Node:
In this example, the CWC Pod is running on worker-0.ocp.f5.comwith IP address 10.144.175.18.
Node: worker-0.ocp.f5.com/10.144.175.18
5. Edit the hosts file on your system, or setup DNS resolutionmapping the node IP address to the CWC’s hostname:
Important: The CWC hostname is required for SSL/TLS certiicate validation.
58
F5 Service Proxy for Kubernetes - v1.5.0 Installation and Integration
10.172.241.230 f5-spk-cwc.<project>
In this example, the CWC is in the spk-telemetry Project.
10.172.241.230 f5-spk-cwc.spk-telemetry
Configure Postman
Use the following steps below configure Postman to query the CWC REST API, and the remote F5 Licensing server.
1. Import the Collection:
A. Download the SPK License Collection.
B. Navigate toWorkspaces and select + Create Workspace.
C. Enter a unique Name, select the appropriate Visibility setting, and click Create workspace.
D. Select the Collections tab on the left, and then click Import to the right of the Workspace name.
E. SelectUpload Files in the middle of the page, and navigate to the file named spk-license-collection.json.
F. SelectOpen, and then click Import import on the bottom right.
2. Import the Environment:
A. Download the SPK License Environment.
B. Line 12 of the file references the spk-telemetry Project. If you’re using a different Project, edit the file andchange the entry.
C. Select the Environment tab on the left, and then click Import to the right of the Workspace name.
D. SelectUpload Files in themiddle of the page, and navigate to the file named spk-license-environment.json.
E. SelectOpen, and then click Import on the bottom right.
3. Reference the CWC SSL/TLS Certificates:
A. Select Settings (gear icon) on the right, and then select Settings at the top of the menu.
B. Select the Certificates tab near the top/middle of the page.
C. Ensure CA Certificates isON, and next to PEM file click Select File.
D. Navigate to the cwc_api folder created earlier, select ca_certificate.pem, and thenOpen.
E. Select Add Certificate in the section just below.
F. Change both theHost domain and port settings to * (asterisk).
G. Next to CRT file, click Select File, select client_certificate.pem, and thenOpen.
H. Next to KEY file, click Select File, select client_key.pem, and thenOpen.
I. Click the Add button, and then the X to the top right.
License the Software
Use the following steps to license the SPK software.
1. Click Collections on the left, and expand SPK-License to see the licensing APIs..
2. Select the No Environment drop-down on the top/right, and ensure the CWC API Environment is selected.
59
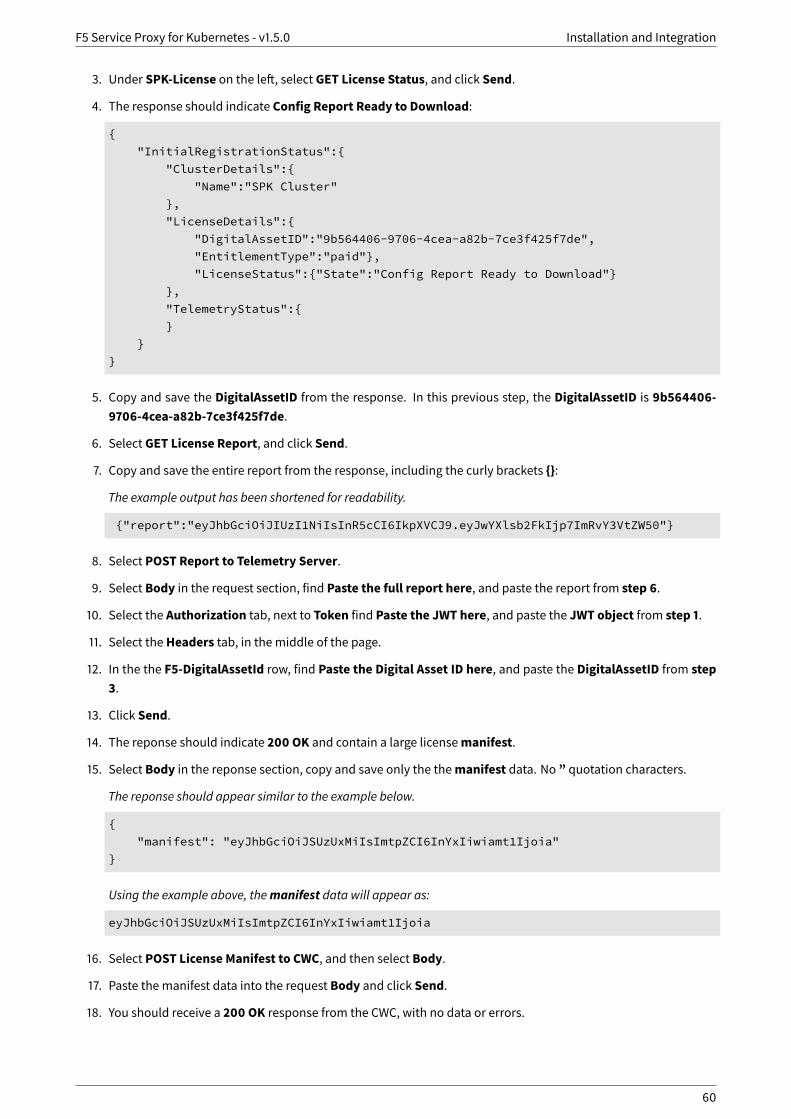
F5 Service Proxy for Kubernetes - v1.5.0 Installation and Integration
3. Under SPK-License on the left, select GET License Status, and click Send.
4. The response should indicate Config Report Ready to Download:
{"InitialRegistrationStatus":{
"ClusterDetails":{"Name":"SPK Cluster"
},"LicenseDetails":{
"DigitalAssetID":"9b564406-9706-4cea-a82b-7ce3f425f7de","EntitlementType":"paid"},"LicenseStatus":{"State":"Config Report Ready to Download"}
},"TelemetryStatus":{}
}}
5. Copy and save the DigitalAssetID from the response. In this previous step, the DigitalAssetID is 9b564406-9706-4cea-a82b-7ce3f425f7de.
6. Select GET License Report, and click Send.
7. Copy and save the entire report from the response, including the curly brackets {}:
The example output has been shortened for readability.
{"report":"eyJhbGciOiJIUzI1NiIsInR5cCI6IkpXVCJ9.eyJwYXlsb2FkIjp7ImRvY3VtZW50"}
8. Select POST Report to Telemetry Server.
9. Select Body in the request section, find Paste the full report here, and paste the report from step 6.
10. Select the Authorization tab, next to Token find Paste the JWT here, and paste the JWT object from step 1.
11. Select theHeaders tab, in the middle of the page.
12. In the the F5-DigitalAssetId row, find Paste the Digital Asset ID here, and paste the DigitalAssetID from step3.
13. Click Send.
14. The reponse should indicate 200 OK and contain a large licensemanifest.
15. Select Body in the reponse section, copy and save only the themanifest data. No ” quotation characters.
The reponse should appear similar to the example below.
{"manifest": "eyJhbGciOiJSUzUxMiIsImtpZCI6InYxIiwiamt1Ijoia"
}
Using the example above, themanifest data will appear as:
eyJhbGciOiJSUzUxMiIsImtpZCI6InYxIiwiamt1Ijoia
16. Select POST License Manifest to CWC, and then select Body.
17. Paste the manifest data into the request Body and click Send.
18. You should receive a 200 OK response from the CWC, with no data or errors.
60
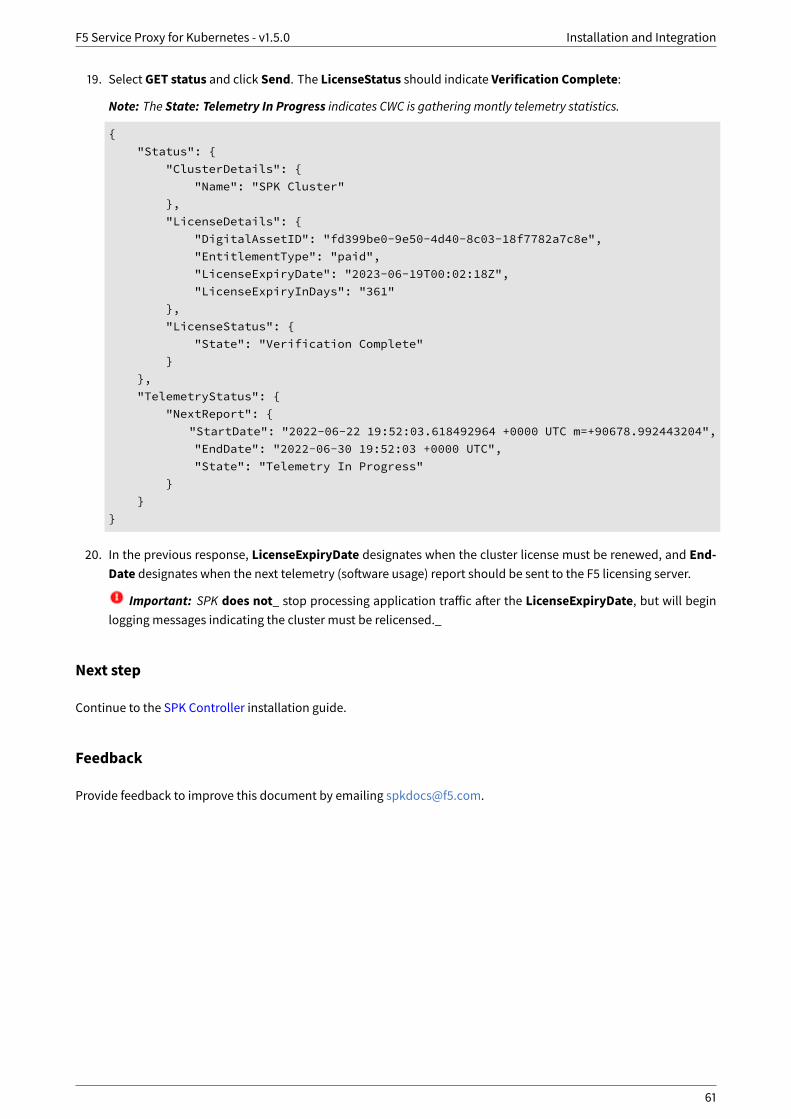
F5 Service Proxy for Kubernetes - v1.5.0 Installation and Integration
19. Select GET status and click Send. The LicenseStatus should indicate Verification Complete:
Note: The State: Telemetry In Progress indicates CWC is gathering montly telemetry statistics.
{"Status": {
"ClusterDetails": {"Name": "SPK Cluster"
},"LicenseDetails": {
"DigitalAssetID": "fd399be0-9e50-4d40-8c03-18f7782a7c8e","EntitlementType": "paid","LicenseExpiryDate": "2023-06-19T00:02:18Z","LicenseExpiryInDays": "361"
},"LicenseStatus": {
"State": "Verification Complete"}
},"TelemetryStatus": {
"NextReport": {"StartDate": "2022-06-22 19:52:03.618492964 +0000 UTC m=+90678.992443204","EndDate": "2022-06-30 19:52:03 +0000 UTC","State": "Telemetry In Progress"
}}
}
20. In the previous response, LicenseExpiryDate designates when the cluster license must be renewed, and End-Date designates when the next telemetry (software usage) report should be sent to the F5 licensing server.
Important: SPK does not_ stop processing application traffic after the LicenseExpiryDate, but will beginlogging messages indicating the cluster must be relicensed._
Next step
Continue to the SPK Controller installation guide.
Feedback
Provide feedback to improve this document by emailing [email protected].
61
F5 Service Proxy for Kubernetes - v1.5.0 Installation and Integration
SPK Controller
Overview
The Service Proxy for Kubernetes (SPK) Controller and Service Proxy Traffic Management Microkernel (TMM) Pods in-stall together, and are the primary application traffic management software components. Once integrated, ServiceProxy TMM can be configured to proxy and load balance high-performance 5G workloads using SPK CRs.
This document guides you through creating the Controller and TMMHelm values file, installing the Pods, and creatingTMM’s internal and external VLAN interfaces.
Requirements
Ensure you have:
• Uploaded the SPK Software.• Installed the SPK Secrets.• A Linux based workstation with Helm installed.
Procedures
Helm values
The Controller and Service Proxy Pods rely on a number of custom Helm values to install successfully. Use the stepsbelow to obtain important cluster configuration data, and create the proper Helm values file for the installation proce-dure.
1. Switch to the Controller Project:
Note: The Controller Project was created during the SPK Secrets installation.
oc project <project>
In this example, the spk-ingress Project is selected:
oc project spk-ingress
2. As described in the Networking Overview, the Controller uses OpenShift network node policies and networkattachment definitions to create Service Proxy TMM’s interface list. Use the steps below to obtain the nodepolicies and attachment definition names, and configure the TMM interface list:
A. Obtain the names of the network attachment definitions:
oc get net-attach-def
In this example, the network attachment definitions are named internal-netdevice and external-netdevice:
internal-netdeviceexternal-netdevice
B. Obtain the names of the network node policies using the network attachment definition resourceNameparameter:
oc describe net-attach-def | grep openshift.io
In this example, the network node policies are named internalNetPolicy and externalNetPolicy:
62
F5 Service Proxy for Kubernetes - v1.5.0 Installation and Integration
Annotations: k8s.v1.cni.cncf.io/resourceName: openshift.io/internalNetPolicyAnnotations: k8s.v1.cni.cncf.io/resourceName: openshift.io/externalNetPolicy
C. Create a Helm values file named ingress-values.yaml and set the node attachment and node policy namesto configure the TMM interface list:
In this example, thecniNetworks: parameter references the network attachments, and orders TMM’s interfacelist as: 1.1 (internal) and 1.2 (external):
tmm:cniNetworks: "project/internal-netdevice,project/external-netdevice”
customEnvVars:- name: OPENSHIFT_VFIO_RESOURCE_1value: "internalNetPolicy"
- name: OPENSHIFT_VFIO_RESOURCE_2value: "externalNetPolicy"
3. SPK supports Ethernet frames over 1500 bytes (Jumbo frames), up to amaxiumum transmission unit (MTU) sizeof 8000 bytes. To modify the MTU size, adapt thecustomEnvVars parameter:
tmm:customEnvVars:- name: TMM_DEFAULT_MTU
value: "8000"
4. TheController relies on theOpenShiftPerformanceAddonOperator to dynamically allocate andproperly alignTMM’s CPU cores. Use the steps below to enable the Performance Addon Operator:
A. Obtain the full performance profile name from the runtimeClass parameter:
oc get performanceprofile -o jsonpath='{..runtimeClass}{"\n"}'
In this example, the performance profile name is performance-spk-loadbalancer:
performance-spk-loadbalancer
B. Use the performance profile name to configure the runtimeClassName parameter, and set the the param-eters below in the Helm values file:
tmm:topologyManager: "true"runtimeClassName: "performance-spk-loadbalancer"
pod:annotations:cpu-load-balancing.crio.io: disable
5. Open Virtual Networkwith Kubernetes (OVN-Kubernetes) annotations are applied to the Service Proxy TMMPodenabling Pods use TMM’s internal interface as their egress traffic default gateway. To enable OVN-Kubernetesannotations, set the tmm.icni2.enabled parameter to true. Also when TMM is used as an egress gatewayand OVN Kubernetes uses BFD to monitor gateway nodes, set the tmm.bfdToOvn.enabled parameter totrue:
tmm:icni2:
enabled: true
63
F5 Service Proxy for Kubernetes - v1.5.0 Installation and Integration
bfdToOvn:enabled: true
6. To load balance application traffic between networks, or to scale Service Proxy TMM beyond a single instance inthe Project, the f5-tmm-routing containermust be enabled, and a Border Gateway Protocol (BGP) sessionmustbe established with an external neighbor. The parameters below configure an external BGP peering session:
Note: For additional BGP configuration parameters, refer to the BGP Overview guide.
tmm:dynamicRouting:
enabled: trueexportZebosLogs: truetmmRouting:image:
repository: "registry.com"config:
bgp:asn: 123neighbors:- ip: "192.168.10.100"asn: 456acceptsIPv4: true
tmrouted:image:
repository: "registry.com"
7. The f5-toda-loggingcontainer is enabledbydefault, and requires setting thef5-toda-logging.fluentd.hostparameter.
A. If you installed the Fluentd Logging collector, set the host parameters:
controller:fluentbit_sidecar:
fluentd:host: 'f5-toda-fluentd.spk-utilities.svc.cluster.local.'
f5-toda-logging:fluentd:
host: 'f5-toda-fluentd.spk-utilities.svc.cluster.local.'
B. If you did not install the Fluentd Logging collector, set the f5-toda-logging.enabled parameter tofalse:
f5-toda-logging:enabled: false
8. The Controller and Service Proxy TMMPods install to a different Project than the internal application (Pods). Setthe watchNamespace parameter to the Pod Project:
Important: Ensure the Project currently exists in the cluster, the Controller does not discover Projects createdafter installation.
controller:watchNamespace: "internal-app"
9. The completed Helm values file should appear similar to the following:
64
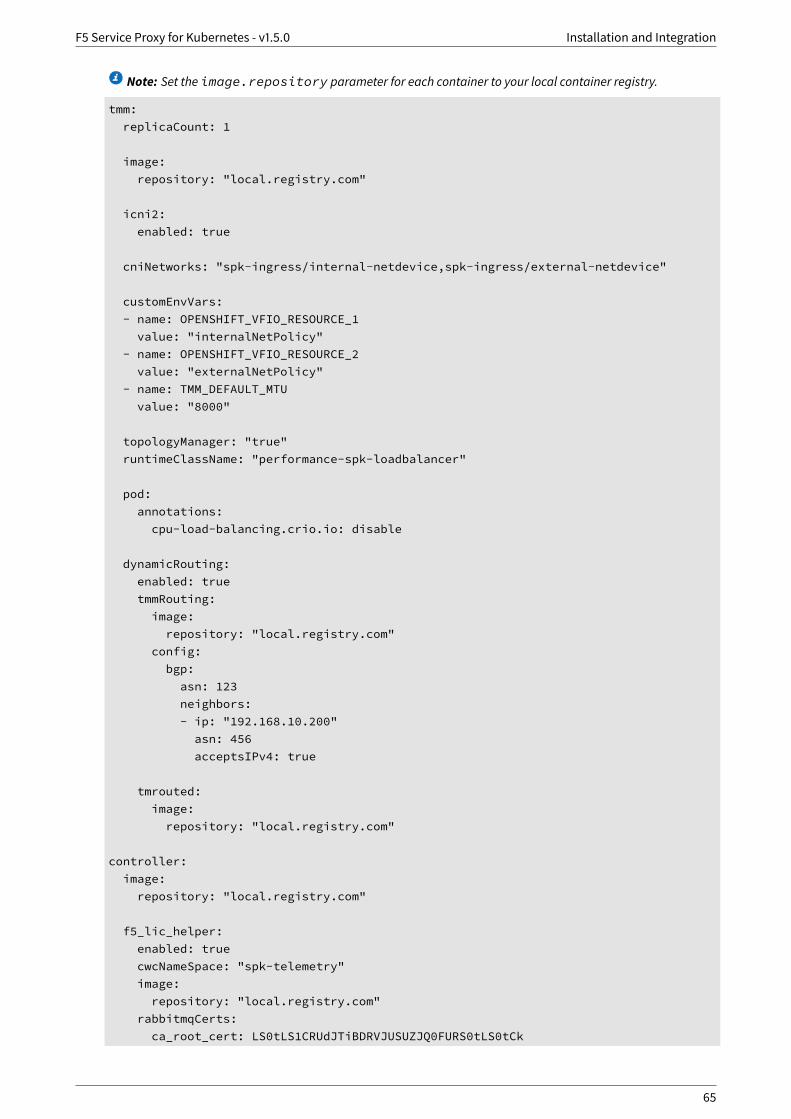
F5 Service Proxy for Kubernetes - v1.5.0 Installation and Integration
Note: Set the image.repository parameter for each container to your local container registry.
tmm:replicaCount: 1
image:repository: "local.registry.com"
icni2:enabled: true
cniNetworks: "spk-ingress/internal-netdevice,spk-ingress/external-netdevice"
customEnvVars:- name: OPENSHIFT_VFIO_RESOURCE_1
value: "internalNetPolicy"- name: OPENSHIFT_VFIO_RESOURCE_2
value: "externalNetPolicy"- name: TMM_DEFAULT_MTU
value: "8000"
topologyManager: "true"runtimeClassName: "performance-spk-loadbalancer"
pod:annotations:cpu-load-balancing.crio.io: disable
dynamicRouting:enabled: truetmmRouting:image:
repository: "local.registry.com"config:
bgp:asn: 123neighbors:- ip: "192.168.10.200"asn: 456acceptsIPv4: true
tmrouted:image:
repository: "local.registry.com"
controller:image:
repository: "local.registry.com"
f5_lic_helper:enabled: truecwcNameSpace: "spk-telemetry"image:repository: "local.registry.com"
rabbitmqCerts:ca_root_cert: LS0tLS1CRUdJTiBDRVJUSUZJQ0FURS0tLS0tCk
65
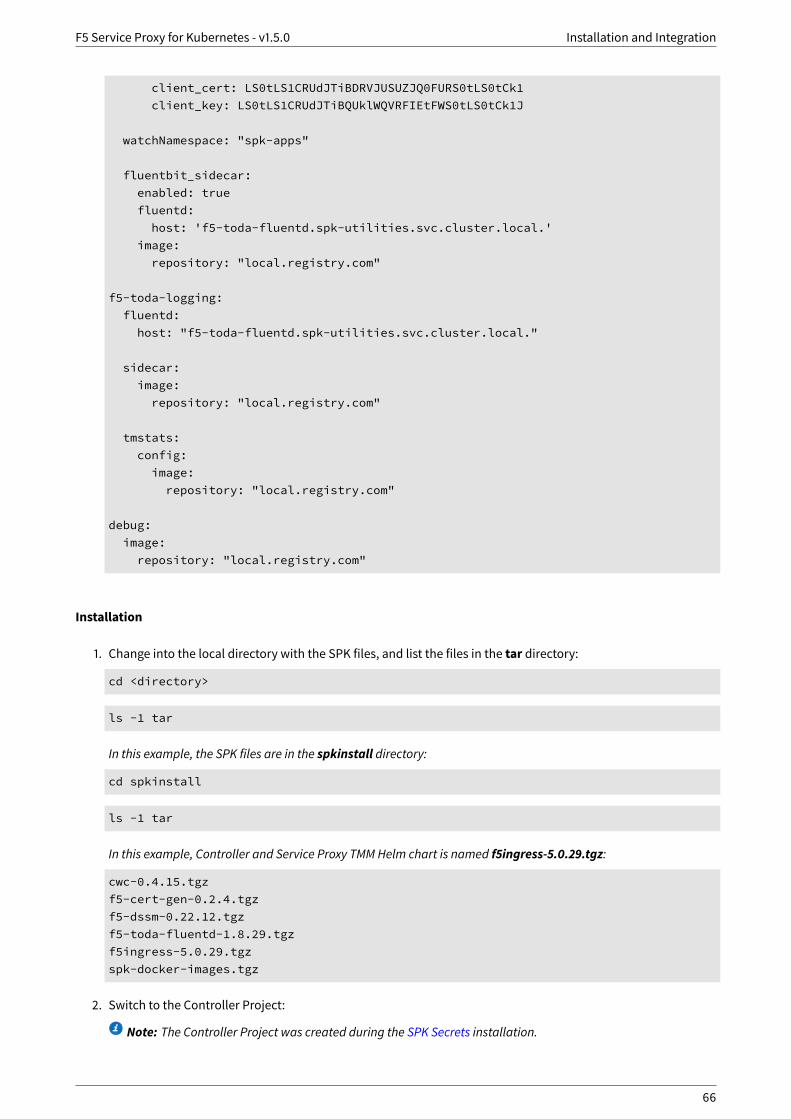
F5 Service Proxy for Kubernetes - v1.5.0 Installation and Integration
client_cert: LS0tLS1CRUdJTiBDRVJUSUZJQ0FURS0tLS0tCk1client_key: LS0tLS1CRUdJTiBQUklWQVRFIEtFWS0tLS0tCk1J
watchNamespace: "spk-apps"
fluentbit_sidecar:enabled: truefluentd:host: 'f5-toda-fluentd.spk-utilities.svc.cluster.local.'
image:repository: "local.registry.com"
f5-toda-logging:fluentd:
host: "f5-toda-fluentd.spk-utilities.svc.cluster.local."
sidecar:image:repository: "local.registry.com"
tmstats:config:image:
repository: "local.registry.com"
debug:image:
repository: "local.registry.com"
Installation
1. Change into the local directory with the SPK files, and list the files in the tar directory:
cd <directory>
ls -1 tar
In this example, the SPK files are in the spkinstall directory:
cd spkinstall
ls -1 tar
In this example, Controller and Service Proxy TMM Helm chart is named f5ingress-5.0.29.tgz:
cwc-0.4.15.tgzf5-cert-gen-0.2.4.tgzf5-dssm-0.22.12.tgzf5-toda-fluentd-1.8.29.tgzf5ingress-5.0.29.tgzspk-docker-images.tgz
2. Switch to the Controller Project:
Note: The Controller Project was created during the SPK Secrets installation.
66
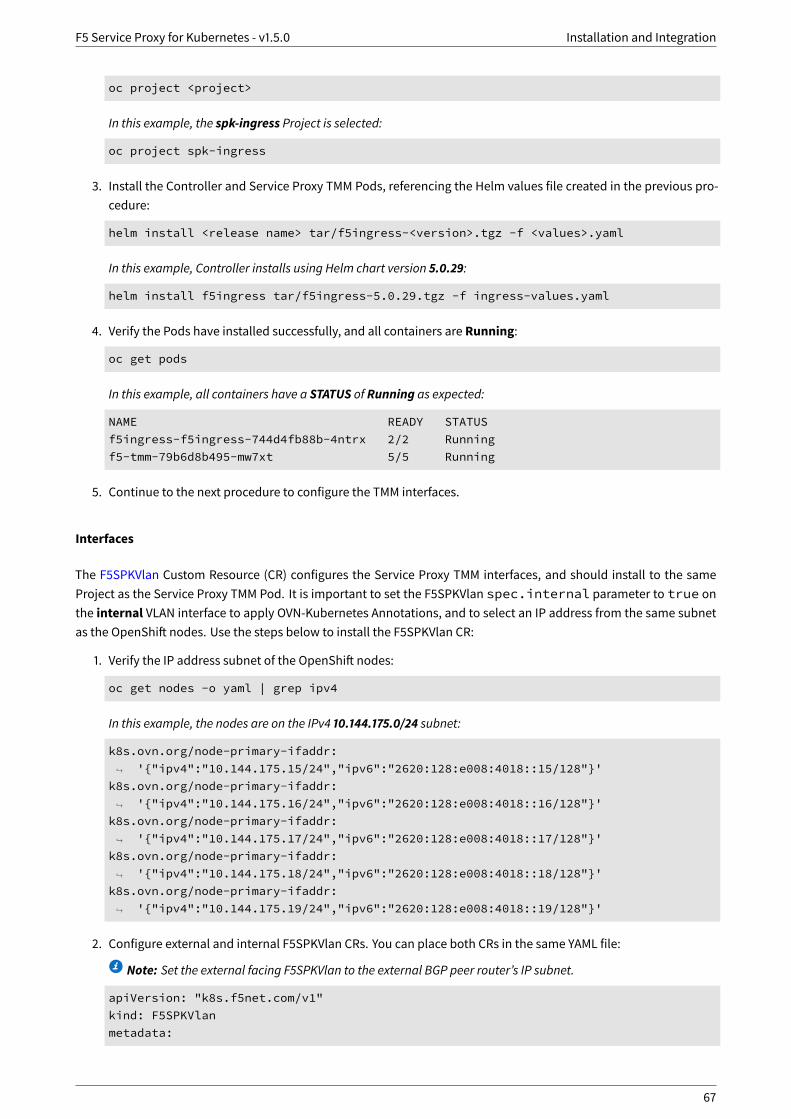
F5 Service Proxy for Kubernetes - v1.5.0 Installation and Integration
oc project <project>
In this example, the spk-ingress Project is selected:
oc project spk-ingress
3. Install the Controller and Service Proxy TMM Pods, referencing the Helm values file created in the previous pro-cedure:
helm install <release name> tar/f5ingress-<version>.tgz -f <values>.yaml
In this example, Controller installs using Helm chart version 5.0.29:
helm install f5ingress tar/f5ingress-5.0.29.tgz -f ingress-values.yaml
4. Verify the Pods have installed successfully, and all containers are Running:
oc get pods
In this example, all containers have a STATUS of Running as expected:
NAME READY STATUSf5ingress-f5ingress-744d4fb88b-4ntrx 2/2 Runningf5-tmm-79b6d8b495-mw7xt 5/5 Running
5. Continue to the next procedure to configure the TMM interfaces.
Interfaces
The F5SPKVlan Custom Resource (CR) configures the Service Proxy TMM interfaces, and should install to the sameProject as the Service Proxy TMM Pod. It is important to set the F5SPKVlan spec.internal parameter to true onthe internal VLAN interface to apply OVN-Kubernetes Annotations, and to select an IP address from the same subnetas the OpenShift nodes. Use the steps below to install the F5SPKVlan CR:
1. Verify the IP address subnet of the OpenShift nodes:
oc get nodes -o yaml | grep ipv4
In this example, the nodes are on the IPv4 10.144.175.0/24 subnet:
k8s.ovn.org/node-primary-ifaddr:'{"ipv4":"10.144.175.15/24","ipv6":"2620:128:e008:4018::15/128"}'↪
k8s.ovn.org/node-primary-ifaddr:'{"ipv4":"10.144.175.16/24","ipv6":"2620:128:e008:4018::16/128"}'↪
k8s.ovn.org/node-primary-ifaddr:'{"ipv4":"10.144.175.17/24","ipv6":"2620:128:e008:4018::17/128"}'↪
k8s.ovn.org/node-primary-ifaddr:'{"ipv4":"10.144.175.18/24","ipv6":"2620:128:e008:4018::18/128"}'↪
k8s.ovn.org/node-primary-ifaddr:'{"ipv4":"10.144.175.19/24","ipv6":"2620:128:e008:4018::19/128"}'↪
2. Configure external and internal F5SPKVlan CRs. You can place both CRs in the same YAML file:
Note: Set the external facing F5SPKVlan to the external BGP peer router’s IP subnet.
apiVersion: "k8s.f5net.com/v1"kind: F5SPKVlanmetadata:
67
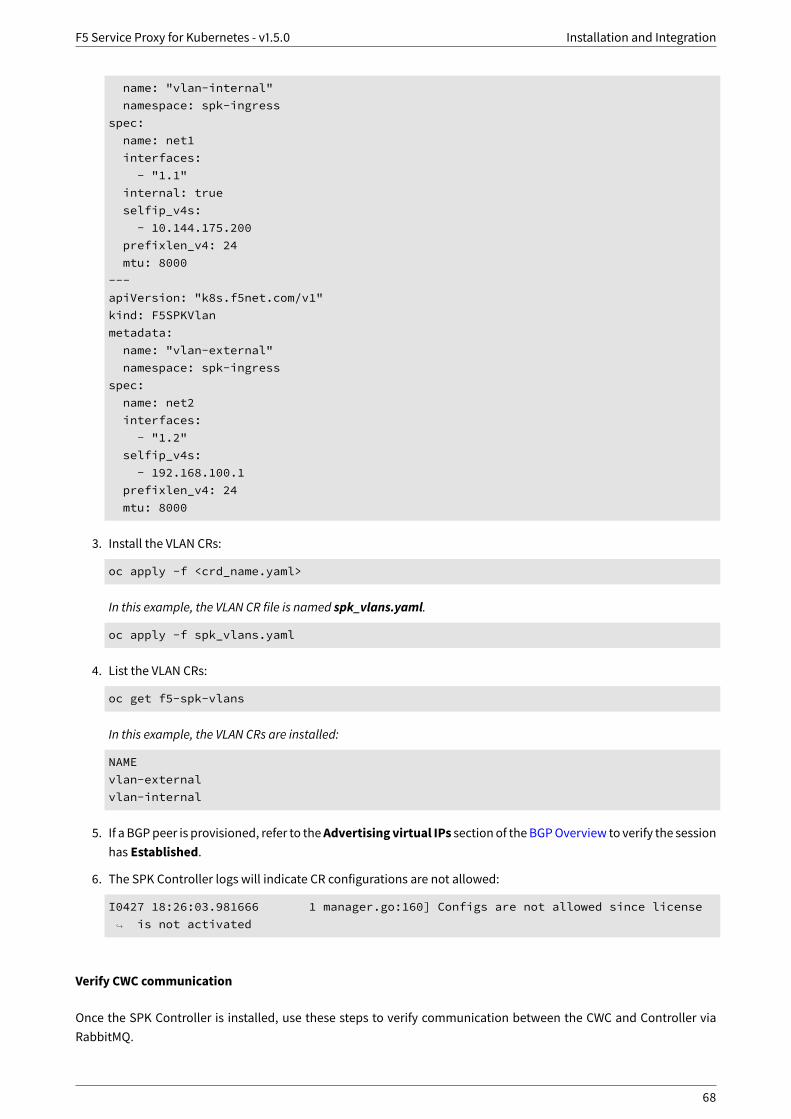
F5 Service Proxy for Kubernetes - v1.5.0 Installation and Integration
name: "vlan-internal"namespace: spk-ingress
spec:name: net1interfaces:
- "1.1"internal: trueselfip_v4s:
- 10.144.175.200prefixlen_v4: 24mtu: 8000
---apiVersion: "k8s.f5net.com/v1"kind: F5SPKVlanmetadata:name: "vlan-external"namespace: spk-ingress
spec:name: net2interfaces:
- "1.2"selfip_v4s:
- 192.168.100.1prefixlen_v4: 24mtu: 8000
3. Install the VLAN CRs:
oc apply -f <crd_name.yaml>
In this example, the VLAN CR file is named spk_vlans.yaml.
oc apply -f spk_vlans.yaml
4. List the VLAN CRs:
oc get f5-spk-vlans
In this example, the VLAN CRs are installed:
NAMEvlan-externalvlan-internal
5. If a BGPpeer is provisioned, refer to theAdvertising virtual IPs section of theBGPOverview to verify the sessionhas Established.
6. The SPK Controller logs will indicate CR configurations are not allowed:
I0427 18:26:03.981666 1 manager.go:160] Configs are not allowed since licenseis not activated↪
Verify CWC communication
Once the SPK Controller is installed, use these steps to verify communication between the CWC and Controller viaRabbitMQ.
68
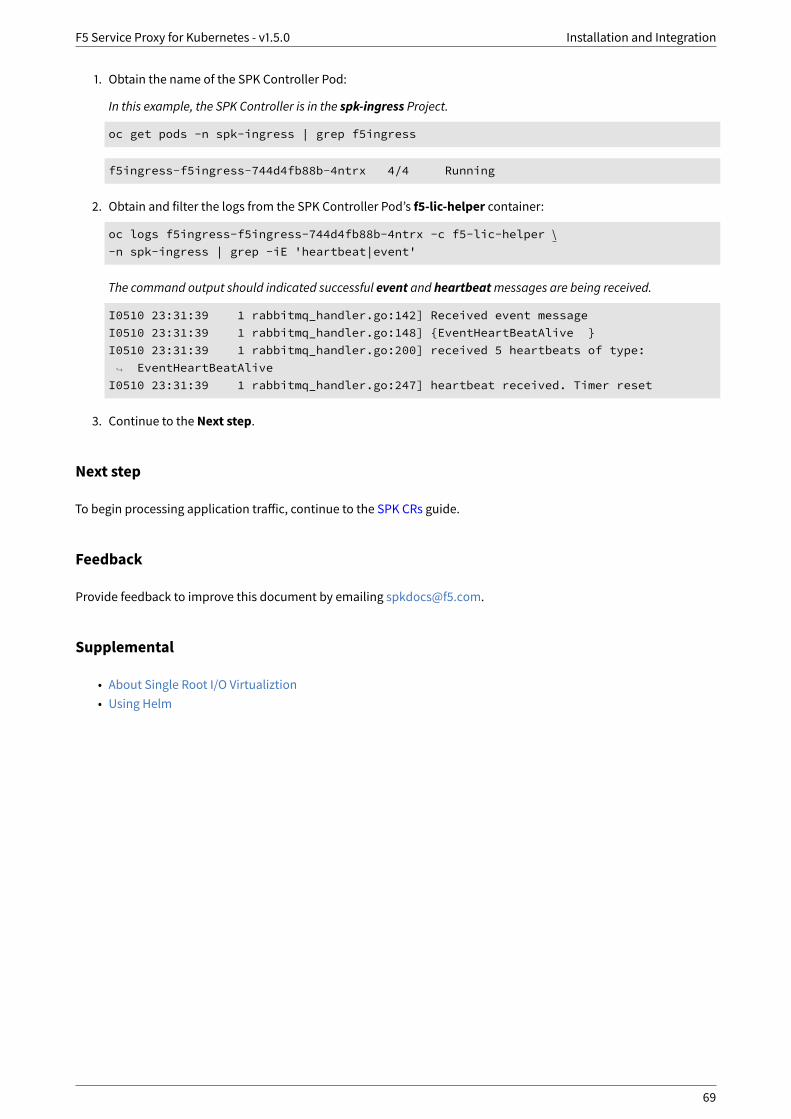
F5 Service Proxy for Kubernetes - v1.5.0 Installation and Integration
1. Obtain the name of the SPK Controller Pod:
In this example, the SPK Controller is in the spk-ingress Project.
oc get pods -n spk-ingress | grep f5ingress
f5ingress-f5ingress-744d4fb88b-4ntrx 4/4 Running
2. Obtain and filter the logs from the SPK Controller Pod’s f5-lic-helper container:
oc logs f5ingress-f5ingress-744d4fb88b-4ntrx -c f5-lic-helper \-n spk-ingress | grep -iE 'heartbeat|event'
The command output should indicated successful event and heartbeatmessages are being received.
I0510 23:31:39 1 rabbitmq_handler.go:142] Received event messageI0510 23:31:39 1 rabbitmq_handler.go:148] {EventHeartBeatAlive }I0510 23:31:39 1 rabbitmq_handler.go:200] received 5 heartbeats of type:
EventHeartBeatAlive↪
I0510 23:31:39 1 rabbitmq_handler.go:247] heartbeat received. Timer reset
3. Continue to the Next step.
Next step
To begin processing application traffic, continue to the SPK CRs guide.
Feedback
Provide feedback to improve this document by emailing [email protected].
Supplemental
• About Single Root I/O Virtualiztion• Using Helm
69
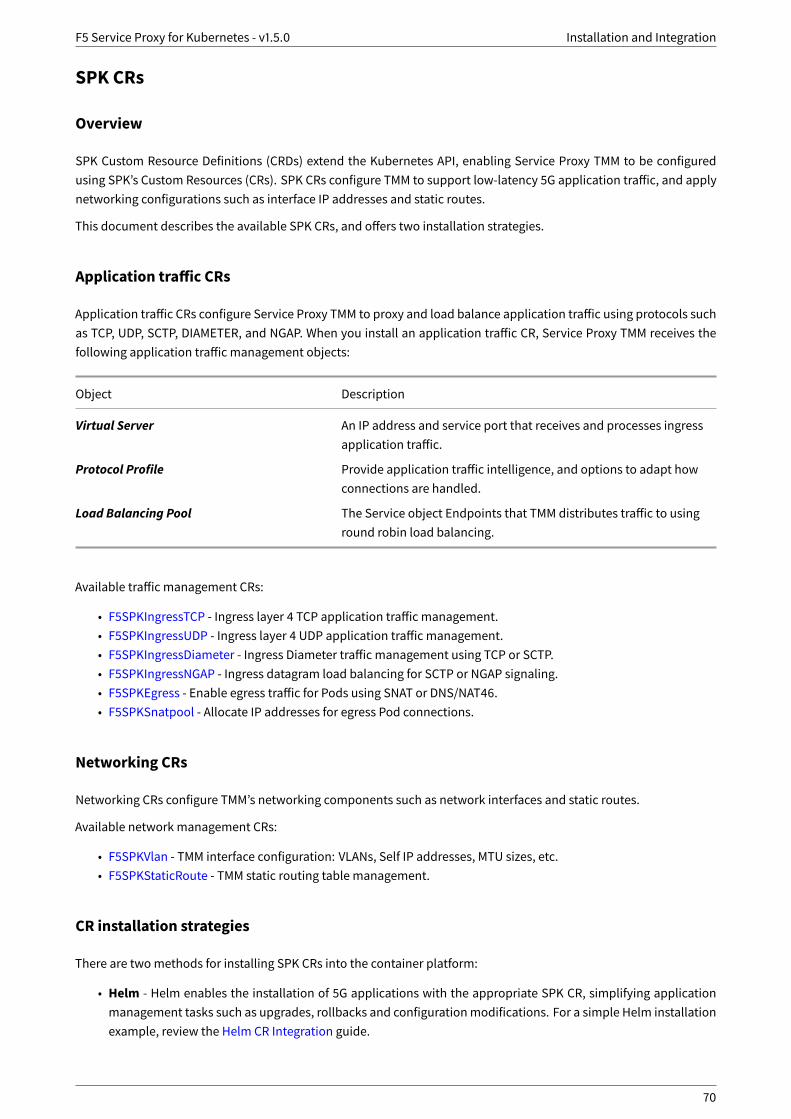
F5 Service Proxy for Kubernetes - v1.5.0 Installation and Integration
SPK CRs
Overview
SPK Custom Resource Definitions (CRDs) extend the Kubernetes API, enabling Service Proxy TMM to be configuredusing SPK’s Custom Resources (CRs). SPK CRs configure TMM to support low-latency 5G application traffic, and applynetworking configurations such as interface IP addresses and static routes.
This document describes the available SPK CRs, and offers two installation strategies.
Application traffic CRs
Application traffic CRs configure Service Proxy TMM to proxy and load balance application traffic using protocols suchas TCP, UDP, SCTP, DIAMETER, and NGAP. When you install an application traffic CR, Service Proxy TMM receives thefollowing application traffic management objects:
Object Description
Virtual Server An IP address and service port that receives and processes ingressapplication traffic.
Protocol Profile Provide application traffic intelligence, and options to adapt howconnections are handled.
Load Balancing Pool The Service object Endpoints that TMM distributes traffic to usinground robin load balancing.
Available traffic management CRs:
• F5SPKIngressTCP - Ingress layer 4 TCP application traffic management.• F5SPKIngressUDP - Ingress layer 4 UDP application traffic management.• F5SPKIngressDiameter - Ingress Diameter traffic management using TCP or SCTP.• F5SPKIngressNGAP - Ingress datagram load balancing for SCTP or NGAP signaling.• F5SPKEgress - Enable egress traffic for Pods using SNAT or DNS/NAT46.• F5SPKSnatpool - Allocate IP addresses for egress Pod connections.
Networking CRs
Networking CRs configure TMM’s networking components such as network interfaces and static routes.
Available network management CRs:
• F5SPKVlan - TMM interface configuration: VLANs, Self IP addresses, MTU sizes, etc.• F5SPKStaticRoute - TMM static routing table management.
CR installation strategies
There are twomethods for installing SPK CRs into the container platform:
• Helm - Helm enables the installation of 5G applications with the appropriate SPK CR, simplifying applicationmanagement tasks such as upgrades, rollbacks and configurationmodifications. For a simple Helm installationexample, review the Helm CR Integration guide.
70
F5 Service Proxy for Kubernetes - v1.5.0 Installation and Integration
• Kubectl - 5G Applications and their Kubernetes Service object can be deployed first, and the appropriate SPKCR can then be installed using Kubectl. Thismethod is used in the various SPK CR overview guides for simplicity,however, it does not support modifying complex 5G applications and is more error-prone.
Feedback
Provide feedback to improve this document by emailing [email protected].
Supplemental Information
• Kubernetes Custom Resources• Kubernetes Service
71
F5 Service Proxy for Kubernetes - v1.5.0 Installation and Integration
F5SPKIngressTCP
Overview
This overview discusses the F5SPKIngressTCP CR. For the full list of CRs, refer to the SPK CRs overview. TheF5SPKIngressTCP Custom Resource (CR) configures the Service Proxy Traffic Management Microkernel (TMM) to proxyand load balance low-latency TCP application traffic between networks using a virtual server and load balancing pool.The F5SPKIngressTCP CR also provides options to tune how connections are processed, and to monitor the health ofService object Endpoints.
This document guides you through understanding, configuring and installing a simple F5SPKIngressTCP CR.
CR integration stages
The graphic below displays the four integration stages used to begin processing application traffic. SPK CRs can alsobe integrated into your Helm release,managing all componentswith single interface. Refer to theHelmCR Integrationguide for more information.
CR Parameters
The table below describes the CR parameters used in this document, refer to the F5SPKIngressTCP Reference for thefull list of parameters.
service
The table below describes the CR service parameters.
Parameter Description
name Selects the Service object name for the internal applications (Pods), andcreates a round-robin load balancing pool using the Service Endpoints.
port Selects the Service object port value.
72
F5 Service Proxy for Kubernetes - v1.5.0 Installation and Integration
spec
The table below describes the CR spec parameters.
Parameter Description
destinationAddress Creates an IPv4 virtual server address for ingress connections.
destinationPort Defines the service port for inbound connections.
ipv6destinationAddress Creates an IPv6 virtual server address for ingress connections.
idleTimeout The TCP connection idle timeout period in seconds (1-4294967295). Thedefault value is 300 seconds.
loadBalancingMethod Specifies the load balancing method used to distribute traffic across poolmembers: ROUND_ROBIN distributes connections evenly across all poolmembers (default), and RATIO_LEAST_CONN_MEMBER distributesconnections first to members with the least number of active connections.
snat Enables translating the source IP address of ingress packets to TMM’s self IPaddresses: SRC_TRANS_AUTOMAP to enable, or SRC_TRANS_NONE todisable (default).
vlans.vlanList Specifies a list of F5SPKVlan CRs to listen for ingress traffic, using the CR’smetadata.name. The list can also be disabled usingdisableListedVlans.
vlans.category Specifies an F5SPKVlan CR category to listen for ingress traffic. Thecategory can also be disabled using disableListedVlans.
vlans.disableListedVlans Disables, or denies traffic specified with the vlanList or categoryparameters: true (default) or false.
monitors
The table below describes the CR monitors parameters.
Parameter Description
tcp.interval Specifies in seconds the monitor check frequency: 1 to 86400. The default is5.
tcp.timeout Specifies in seconds the time in which the target must respond: 1 to 86400.The default is 16.
Application Project
The SPK Controller and Service Proxy TMM Pods install to a different Project than the TCP application (Pods). Wheninstalling theSPKController, set thecontroller.watchNamespaceparameter to theTCPPodProject in theHelmvalues file. For example:
Important: Ensure the Project currently exists in the cluster, the SPK Controller does not discover Projects createdafter installation.
73
F5 Service Proxy for Kubernetes - v1.5.0 Installation and Integration
controller:
watchNamespace: "web-apps"
Dual-Stack environments
Service Proxy TMM’s load balancing pool is created by discovering the Kubernetes Service Endpoints in the Project. InIPv4/IPv6 dual-stack environments, to populate the loadbalancing poolwith IPv6members, set the ServicePrefer-DualStack parameter to IPv6. For example:
kind: Servicemetadata:
name: nginx-web-appnamespace: web-appslabels:app: nginx-web-app
spec:ipFamilyPolicy: PreferDualStackipFamilies:- IPv6- IPv4
Ingress traffic
To enable ingress network traffic, Service Proxy TMM must be configured to advertise virtual server IP addresses toexternal networks using the BGP dynamic routing protocol. Alternatively, you can configure appropriate routes onupstream devices. For BGP configuration assistance, refer to the BGP Overview.
Requirements
Ensure you have:
• Installed a K8S Service object and application.• Installed the SPK Controller.• A Linux based workstation.
Installation
Use the following steps to obtain the application’s Service object configuration, and configure and install theF5SPKIngressTCP CR.
1. Switch to the application Project:
oc project <project>
In this example, the application is in theweb-apps Project:
oc project web-apps
2. Use the Service objectNAME andPORT to configure the CRservice.spec andservice.port parameters:
74
F5 Service Proxy for Kubernetes - v1.5.0 Installation and Integration
oc get service
In this example, the Service object NAME is nginx-web-app and the PORT is 80:
NAME TYPE CLUSTER-IP EXTERNAL-IP PORT(S)nginx-web-app NodePort 10.99.99.99 <none> 80:30714/TCP
3. Copy the example CR into a YAML file, and adapt it for your environment if necessary:
apiVersion: "ingresstcp.k8s.f5net.com/v1"kind: F5SPKIngressTCPmetadata:namespace: web-appsname: nginx-web-cr
service:name: nginx-web-appport: 80
spec:destinationAddress: "192.168.1.123"destinationPort: 80ipv6destinationAddress: "2001::100:100"idleTimeout: 30loadBalancingMethod: "ROUND_ROBIN"snat: “SRC_TRANS_AUTOMAP”vlans:
vlanList:- vlan-external
monitors:tcp:
- interval: 3- timeout: 10
4. Install the F5SPKIngressTCP CR:
oc apply -f spk-ingress-tcp.yaml
5. Web clients should now be able to connect to the application through the Service Proxy TMM.
Connection statistics
If you installed the SPK Controller with the Debug Sidecar enabled, connect to the sidecar to view virtual server andpool member connecitivy statistics.
1. Log in to the Service Proxy Debug container:
oc exec -it deploy/f5-tmm -c debug -n spk-ingress -- bash
2. View the virtual server connection statistics:
tmctl -f /var/tmstat/blade/tmm0 virtual_server_stat -s name,serverside.tot_conns
For example:
name serverside.tot_conns----------------------------------- --------------------spk-apps-nginx-web-crd-virtual-server 31
75

F5 Service Proxy for Kubernetes - v1.5.0 Installation and Integration
3. View the load balancing pool connection statistics:
tmctl -f /var/tmstat/blade/tmm0 pool_member_stat -s pool_name,serverside.tot_conns
For example:
web-apps-nginx-web-crd-pool 15web-apps-nginx-web-crd-pool 16
Feedback
Provide feedback to improve this document by emailing [email protected].
Supplemental
• Kubernetes Service
76
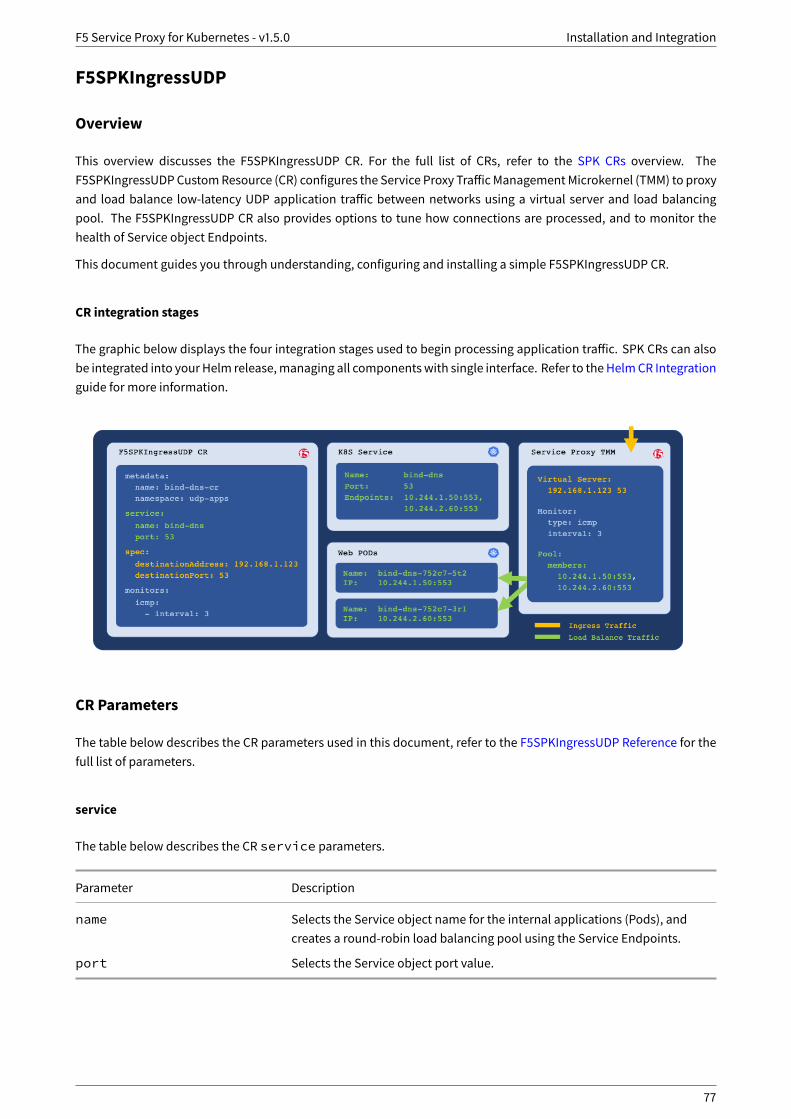
F5 Service Proxy for Kubernetes - v1.5.0 Installation and Integration
F5SPKIngressUDP
Overview
This overview discusses the F5SPKIngressUDP CR. For the full list of CRs, refer to the SPK CRs overview. TheF5SPKIngressUDPCustomResource (CR) configures the Service Proxy TrafficManagementMicrokernel (TMM) to proxyand load balance low-latency UDP application traffic between networks using a virtual server and load balancingpool. The F5SPKIngressUDP CR also provides options to tune how connections are processed, and to monitor thehealth of Service object Endpoints.
This document guides you through understanding, configuring and installing a simple F5SPKIngressUDP CR.
CR integration stages
The graphic below displays the four integration stages used to begin processing application traffic. SPK CRs can alsobe integrated into your Helm release,managing all componentswith single interface. Refer to theHelmCR Integrationguide for more information.
CR Parameters
The table below describes the CR parameters used in this document, refer to the F5SPKIngressUDP Reference for thefull list of parameters.
service
The table below describes the CR service parameters.
Parameter Description
name Selects the Service object name for the internal applications (Pods), andcreates a round-robin load balancing pool using the Service Endpoints.
port Selects the Service object port value.
77
F5 Service Proxy for Kubernetes - v1.5.0 Installation and Integration
spec
The table below describes the CR spec parameters.
Parameter Description
destinationAddress Creates an IPv4 virtual server address for ingress connections.
destinationPort Defines the service port for inbound connections.
ipv6destinationAddress Creates an IPv6 virtual server address for ingress connections.
idleTimeout The UDP connection idle timeout period in seconds (1-4294967295). Thedefault value is 60 seconds.
loadBalancingMethod Specifies the load balancing method used to distribute traffic across poolmembers: ROUND_ROBIN distributes connections evenly across all poolmembers (default), and RATIO_LEAST_CONN_MEMBER distributesconnections first to members with the least number of active connections.
snat Enables translating the source IP address of ingress packets to TMM’s self IPaddresses: SRC_TRANS_AUTOMAP to enable, or SRC_TRANS_NONE todisable (default).
vlans.vlanList Specifies a list of F5SPKVlan CRs to listen for ingress traffic, using the CR’smetadata.name. The list can also be disabled usingdisableListedVlans.
vlans.category Specifies an F5SPKVlan CR category to listen for ingress traffic. Thecategory can also be disabled using disableListedVlans.
vlans.disableListedVlans Disables, or denies traffic specified with the vlanList or categoryparameters: true (default) or false.
monitors
The table below describes the CR monitors parameters.
Parameter Description
icmp.interval Specifies in seconds the monitor check frequency: 1 to 86400. The default is5.
icmp.timeout Specifies in seconds the time in which the target must respond: 1 to 86400.The default is 16.
Application Project
The SPK Controller and Service Proxy TMM Pods install to a different Project than the UDP application (Pods). Wheninstalling theSPKController, set thecontroller.watchNamespaceparameter to theUDPPod in theHelmvaluesfile. For example:
Important: Ensure the Project currently exists in the cluster, the SPK Controller does not discover Projects createdafter installation.
78
F5 Service Proxy for Kubernetes - v1.5.0 Installation and Integration
controller:
watchNamespace: "udp-apps"
Dual-Stack environments
Service Proxy TMM’s load balancing pool is created by discovering the Kubernetes Service Endpoints in the Project. InIPv4/IPv6 dual-stack environments, to populate the loadbalancing poolwith IPv6members, set the ServicePrefer-DualStack parameter to IPv6. For example:
kind: Servicemetadata:
name: bind-dnsnamespace: udp-appslabels:app: bind-dns
spec:ipFamilyPolicy: PreferDualStackipFamilies:- IPv6- IPv4
Ingress traffic
To enable ingress network traffic, the Service Proxy Pod must be configured to advertise virtual server IP addressesto remote networks, using the BGP dynamic routing protocol. Alternatively, you can configure appropriate routes onupstream devices. For BGP configuration assistance, refer to the BGP Overview.
Requirements
Ensure you have:
• Installed a K8S Service object and application.• Installed the SPK Controller.• Have a Linux based workstation.
Installation
Use the following steps to obtain the application’s Service object configuration, and configure and install theF5SPKIngressUDP CR.
1. Switch to the application Project:
oc project <project>
In this example, the application is installed to the udp-apps Project:
oc project udp-apps
2. Obtain the Service objectNAME and PORT to configure the CR service.spec and service.port parame-ters:
79

F5 Service Proxy for Kubernetes - v1.5.0 Installation and Integration
oc get service
In this example, the Service object NAME** is bind-dns and the PORT is 53:
NAME TYPE CLUSTER-IP EXTERNAL-IP PORT(S)bind-dns NodePort 10.99.99.99 <none> 53:30714/UDP
3. Copy the example CR into a YAML file, and adapt it for your environment if necessary:
apiVersion: "ingressudp.k8s.f5net.com/v1"kind: F5SPKIngressUDPmetadata:namespace: udp-appsname: bind-dns-cr
service:name: bind-dnsport: 53
spec:destinationAddress: "192.168.1.123"destinationPort: 53ipv6destinationAddress: "2001::100:100"idleTimeout: 30loadBalancingMethod: "RATIO_LEAST_CONN_MEMBER"snat: “SRC_TRANS_AUTOMAP”vlans:
vlanList:- vlan-external
monitors:icmp:
- interval: 3- timeout: 10
4. Install the F5SPKIngressUDP CR:
oc apply -f spk-ingress-udp.yaml
5. DNS clients should now be able to connect to the application through the Service Proxy TMM.
Connectivity statistics
If you installed the SPK Controller with the Debug Sidecar enabled, connect to the sidecar to view virtual server andpool member connecitivy statistics.
1. Log in to the Service Proxy Debug container:
oc exec -it deploy/f5-tmm -c debug -n spk-ingress -- bash
2. View the virtual server connection statistics:
tmctl -f /var/tmstat/blade/tmm0 virtual_server_stat -s name,serverside.tot_conns
For example:
name serverside.tot_conns----------------------------------- --------------------udp-apps-bind-dns-crd-virtual-server 31
80
F5 Service Proxy for Kubernetes - v1.5.0 Installation and Integration
3. View the load balancing pool connection statistics:
tmctl -f /var/tmstat/blade/tmm0 pool_member_stat -s pool_name,serverside.tot_conns
For example:
udp-apps-bind-dns-crd-pool 15udp-apps-bind-dns-crd-pool 16
Feedback
Provide feedback to improve this document by emailing [email protected].
Supplemental
• Kubernetes Service
81
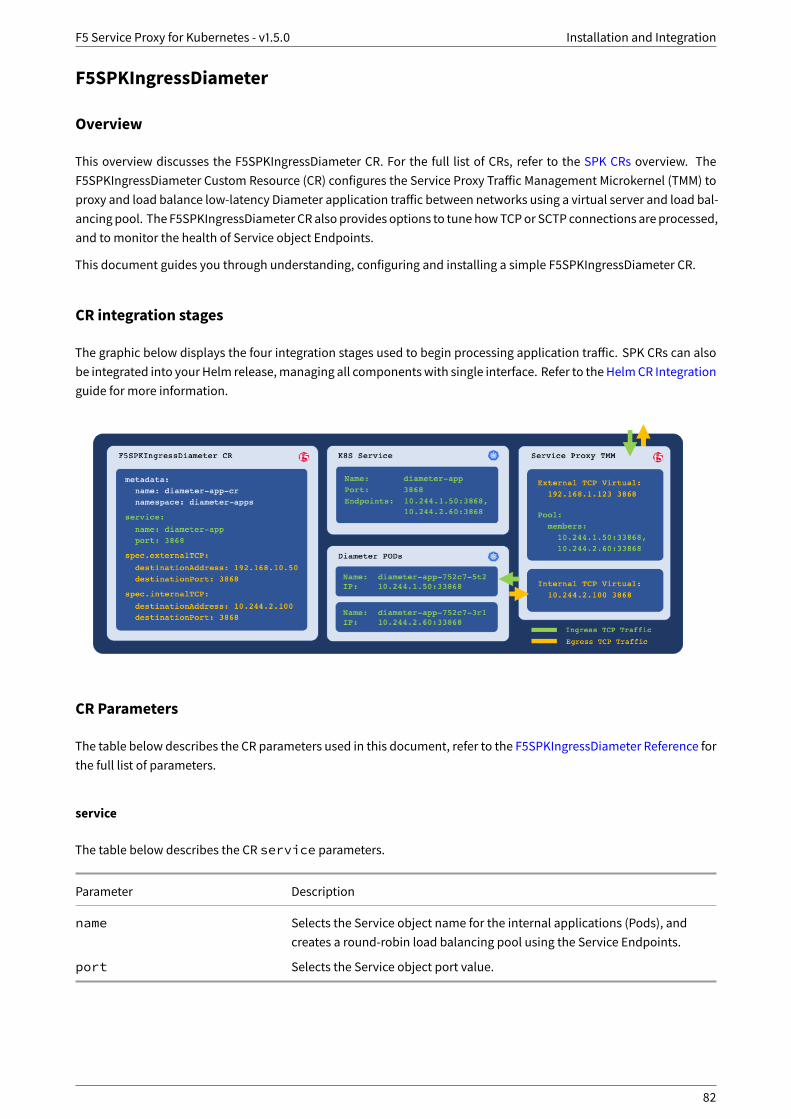
F5 Service Proxy for Kubernetes - v1.5.0 Installation and Integration
F5SPKIngressDiameter
Overview
This overview discusses the F5SPKIngressDiameter CR. For the full list of CRs, refer to the SPK CRs overview. TheF5SPKIngressDiameter Custom Resource (CR) configures the Service Proxy Traffic Management Microkernel (TMM) toproxy and load balance low-latency Diameter application traffic between networks using a virtual server and load bal-ancingpool. The F5SPKIngressDiameter CRalsoprovides options to tunehowTCPor SCTP connections are processed,and to monitor the health of Service object Endpoints.
This document guides you through understanding, configuring and installing a simple F5SPKIngressDiameter CR.
CR integration stages
The graphic below displays the four integration stages used to begin processing application traffic. SPK CRs can alsobe integrated into your Helm release,managing all componentswith single interface. Refer to theHelmCR Integrationguide for more information.
CR Parameters
The table below describes the CR parameters used in this document, refer to the F5SPKIngressDiameter Reference forthe full list of parameters.
service
The table below describes the CR service parameters.
Parameter Description
name Selects the Service object name for the internal applications (Pods), andcreates a round-robin load balancing pool using the Service Endpoints.
port Selects the Service object port value.
82
F5 Service Proxy for Kubernetes - v1.5.0 Installation and Integration
spec
The table below describes the CR spec parameters.
Parameter Description
externalTCP.destinationAddress The IP address receiving ingress TCP connections.
externalTCP.destinationPort The service port receiving ingress TCP connections.
externalSession.originHost The diameter host name sent to external peers incapabilities exchangemessages.
externalSession.originRealm The diameter realm name sent to external peers incapabilities exchangemessages.
internalTCP.destinationAddress The IP address receiving egress TCP connections.
internalTCP.destinationPort The service port receiving egress TCP connections.
internalSession.persistenceKey The diameter AVP to use as the ingress peristence record.The default is SESSION-ID[0].
internalSession.persistenceTimeout The length of time in seconds ingress idle persistencerecords remain valid. The default is 300.
loadBalancingMethod Specifies the load balancing method used to distributetraffic across pool members: ROUND_ROBIN distributesconnections evenly across all pool members (default),and RATIO_LEAST_CONN_MEMBER distributesconnections first to members with the least number ofactive connections.
Application Project
The SPK Controller and Service Proxy TMM Pods install to a different Project than the Diameter application (Pods).When installing the SPKController, set thecontroller.watchNamespaceparameter to theDiameter PodProjectin the Helm values file. For example:
Important: Ensure the Project currently exists in the cluster, the SPK Controller does not discover Projects createdafter installation.
controller:
watchNamespace: "diameter-apps"
Dual-Stack environments
Service Proxy TMM’s load balancing pool is created by discovering the Kubernetes Service Endpoints in the Project. InIPv4/IPv6 dual-stack environments, to populate the loadbalancing poolwith IPv6members, set the ServicePrefer-DualStack parameter to IPv6. For example:
kind: Servicemetadata:
name: diameter-appnamespace: diameter-apps
83
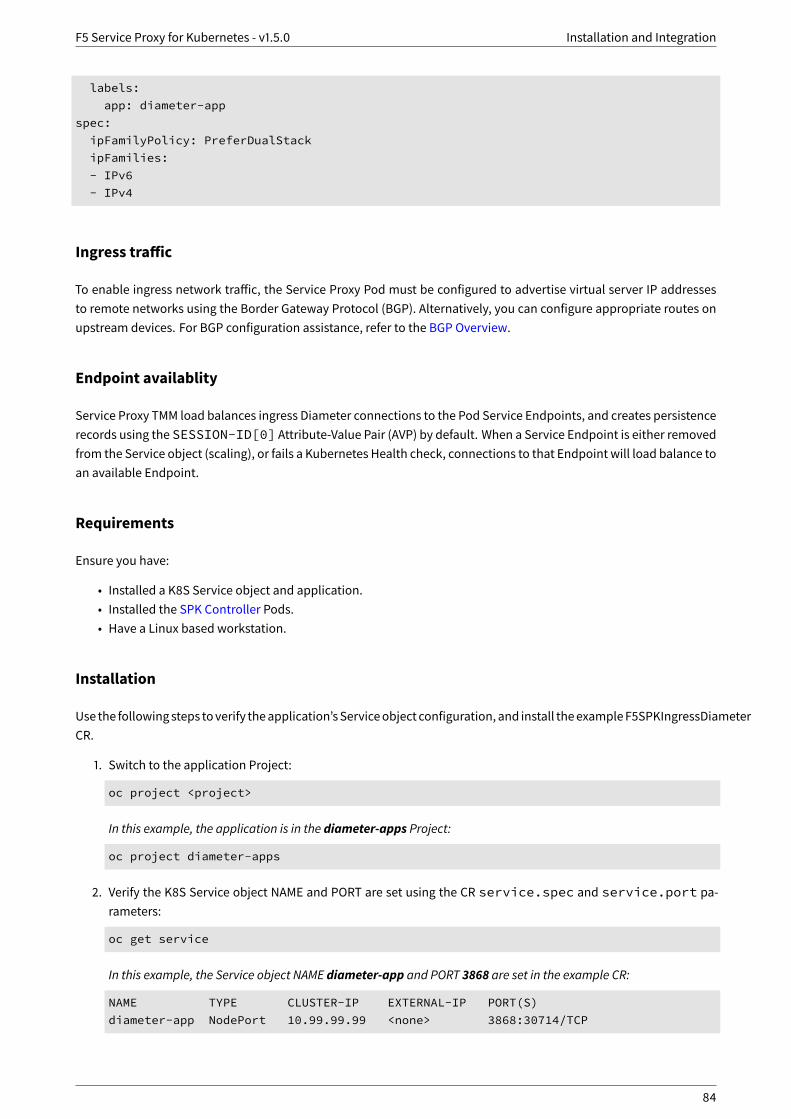
F5 Service Proxy for Kubernetes - v1.5.0 Installation and Integration
labels:app: diameter-app
spec:ipFamilyPolicy: PreferDualStackipFamilies:- IPv6- IPv4
Ingress traffic
To enable ingress network traffic, the Service Proxy Pod must be configured to advertise virtual server IP addressesto remote networks using the Border Gateway Protocol (BGP). Alternatively, you can configure appropriate routes onupstream devices. For BGP configuration assistance, refer to the BGP Overview.
Endpoint availablity
Service Proxy TMM load balances ingress Diameter connections to the Pod Service Endpoints, and creates persistencerecords using the SESSION-ID[0] Attribute-Value Pair (AVP) by default. When a Service Endpoint is either removedfrom the Service object (scaling), or fails a Kubernetes Health check, connections to that Endpoint will load balance toan available Endpoint.
Requirements
Ensure you have:
• Installed a K8S Service object and application.• Installed the SPK Controller Pods.• Have a Linux based workstation.
Installation
Use the followingsteps toverify theapplication’sServiceobject configuration, and install theexampleF5SPKIngressDiameterCR.
1. Switch to the application Project:
oc project <project>
In this example, the application is in the diameter-apps Project:
oc project diameter-apps
2. Verify the K8S Service object NAME and PORT are set using the CR service.spec and service.port pa-rameters:
oc get service
In this example, the Service object NAME diameter-app and PORT 3868 are set in the example CR:
NAME TYPE CLUSTER-IP EXTERNAL-IP PORT(S)diameter-app NodePort 10.99.99.99 <none> 3868:30714/TCP
84
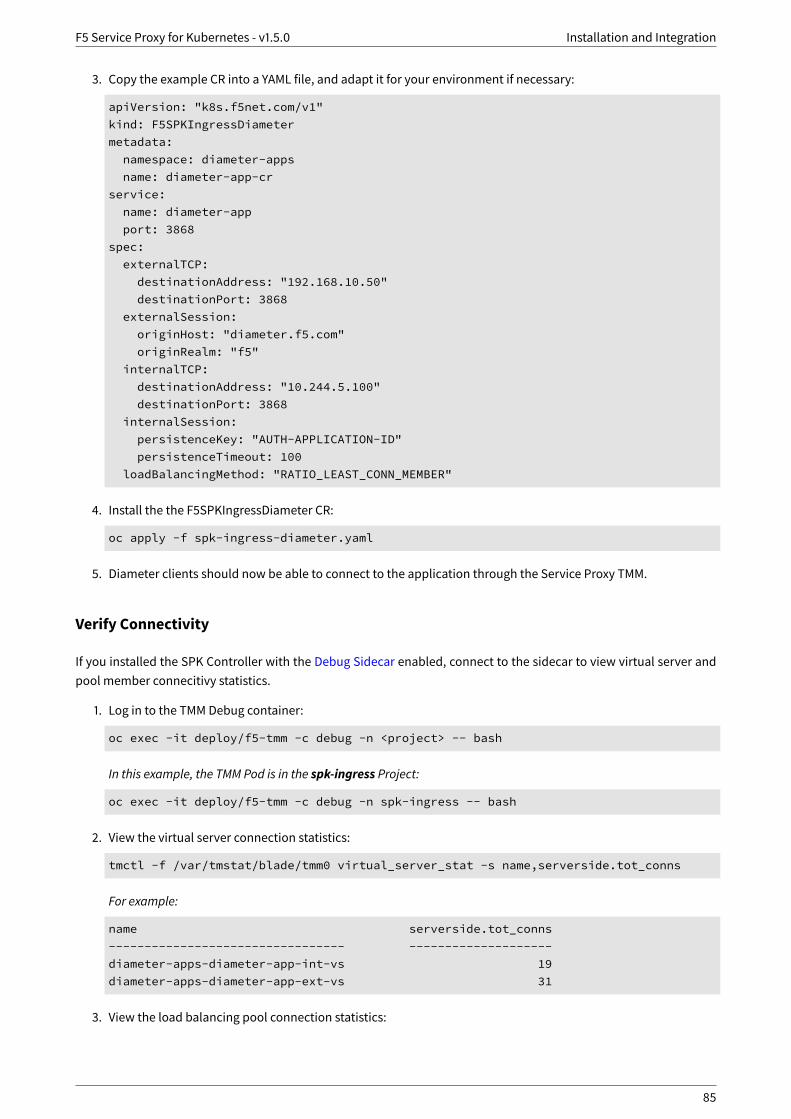
F5 Service Proxy for Kubernetes - v1.5.0 Installation and Integration
3. Copy the example CR into a YAML file, and adapt it for your environment if necessary:
apiVersion: "k8s.f5net.com/v1"kind: F5SPKIngressDiametermetadata:namespace: diameter-appsname: diameter-app-cr
service:name: diameter-appport: 3868
spec:externalTCP:
destinationAddress: "192.168.10.50"destinationPort: 3868
externalSession:originHost: "diameter.f5.com"originRealm: "f5"
internalTCP:destinationAddress: "10.244.5.100"destinationPort: 3868
internalSession:persistenceKey: "AUTH-APPLICATION-ID"persistenceTimeout: 100
loadBalancingMethod: "RATIO_LEAST_CONN_MEMBER"
4. Install the the F5SPKIngressDiameter CR:
oc apply -f spk-ingress-diameter.yaml
5. Diameter clients should now be able to connect to the application through the Service Proxy TMM.
Verify Connectivity
If you installed the SPK Controller with the Debug Sidecar enabled, connect to the sidecar to view virtual server andpool member connecitivy statistics.
1. Log in to the TMM Debug container:
oc exec -it deploy/f5-tmm -c debug -n <project> -- bash
In this example, the TMM Pod is in the spk-ingress Project:
oc exec -it deploy/f5-tmm -c debug -n spk-ingress -- bash
2. View the virtual server connection statistics:
tmctl -f /var/tmstat/blade/tmm0 virtual_server_stat -s name,serverside.tot_conns
For example:
name serverside.tot_conns--------------------------------- --------------------diameter-apps-diameter-app-int-vs 19diameter-apps-diameter-app-ext-vs 31
3. View the load balancing pool connection statistics:
85
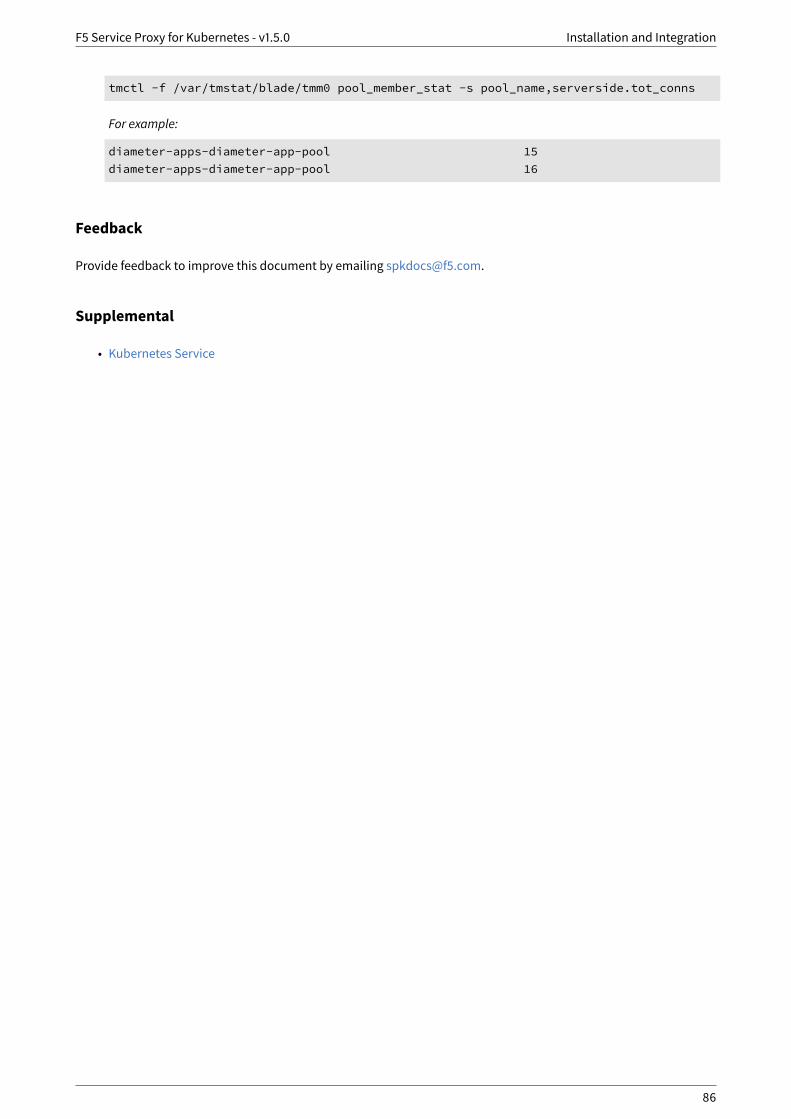
F5 Service Proxy for Kubernetes - v1.5.0 Installation and Integration
tmctl -f /var/tmstat/blade/tmm0 pool_member_stat -s pool_name,serverside.tot_conns
For example:
diameter-apps-diameter-app-pool 15diameter-apps-diameter-app-pool 16
Feedback
Provide feedback to improve this document by emailing [email protected].
Supplemental
• Kubernetes Service
86

F5 Service Proxy for Kubernetes - v1.5.0 Installation and Integration
F5SPKIngressNGAP
Overview
This overview discusses the F5SPKIngressNGAP CR. For the full list of CRs, refer to the SPK CRs overview. TheF5SPKIngressNGAP Custom Resource (CR) configures the Service Proxy Traffic Management Microkernel (TMM) toprovide low-latency datagram load balancing using the Stream Control Protocol (SCTP) and NG Application (NGAP)signaling protocols. The F5SPKIngressNGAP CR also provides options to tune how connections are processed, and tomonitor the health of Service object Endpoints.
Note: The NGAP CR does not currently support multi-homing.
This document guides you through understanding, configuring and installing a simple F5SPKIngressNGAP CR.
CR integration stages
The graphic below displays the four integration stages used to begin processing application traffic. SPK CRs can alsobe integrated into your Helm release,managing all componentswith single interface. Refer to theHelmCR Integrationguide for more information.
CR Parameters
The table below describes the CR parameters used in this document.
Option Description
service.name Selects the Service object name for the internal applications (Pods), andcreates a round-robin load balancing pool using the Service Endpoints.
service.port Selects the Service object port value.
spec.ipfamilies Should match the Service object ipFamilies parameter, ensuring SNATAutomap is applied correctly: IPv4 (default), IPv6, and IPv4andIPv6.
spec.destinationAddress Creates an IPv4 virtual server address for ingress connections.
spec.v6destinationAddress Creates an IPv6 virtual server address for ingress connections.
spec.destinationPort Defines the service port for inbound connections.
87
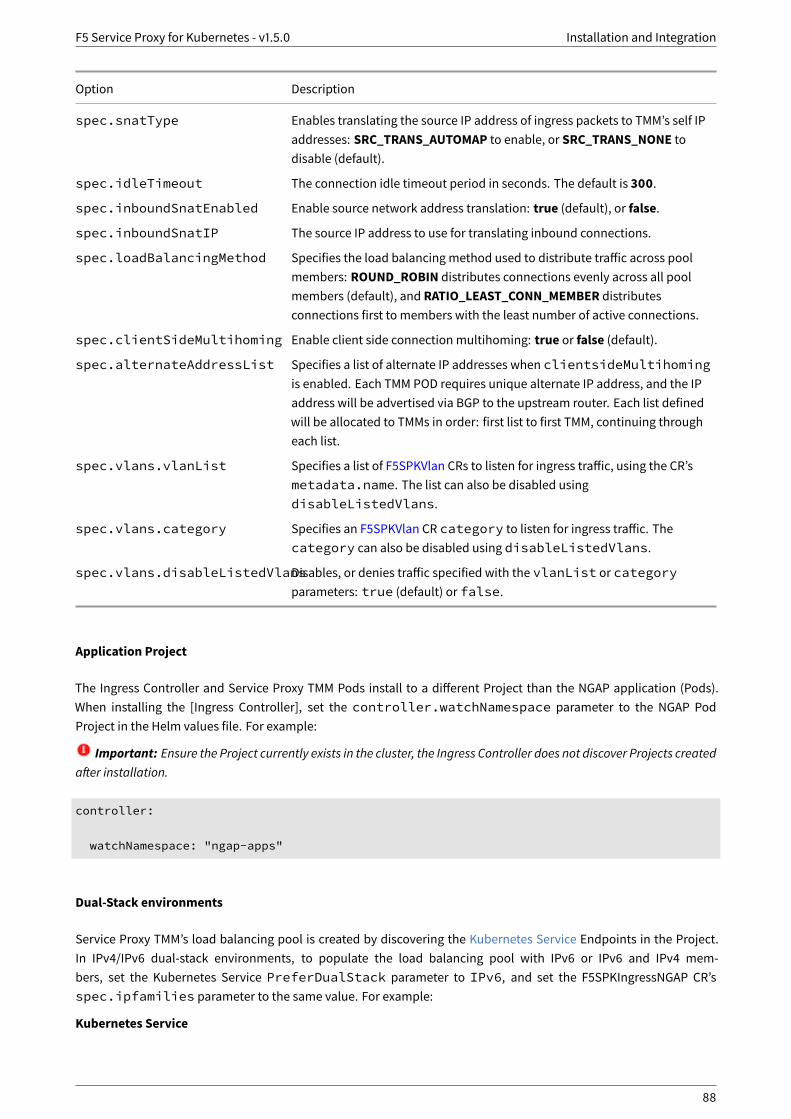
F5 Service Proxy for Kubernetes - v1.5.0 Installation and Integration
Option Description
spec.snatType Enables translating the source IP address of ingress packets to TMM’s self IPaddresses: SRC_TRANS_AUTOMAP to enable, or SRC_TRANS_NONE todisable (default).
spec.idleTimeout The connection idle timeout period in seconds. The default is 300.
spec.inboundSnatEnabled Enable source network address translation: true (default), or false.
spec.inboundSnatIP The source IP address to use for translating inbound connections.
spec.loadBalancingMethod Specifies the load balancing method used to distribute traffic across poolmembers: ROUND_ROBIN distributes connections evenly across all poolmembers (default), and RATIO_LEAST_CONN_MEMBER distributesconnections first to members with the least number of active connections.
spec.clientSideMultihoming Enable client side connection multihoming: true or false (default).
spec.alternateAddressList Specifies a list of alternate IP addresses when clientsideMultihomingis enabled. Each TMM POD requires unique alternate IP address, and the IPaddress will be advertised via BGP to the upstream router. Each list definedwill be allocated to TMMs in order: first list to first TMM, continuing througheach list.
spec.vlans.vlanList Specifies a list of F5SPKVlan CRs to listen for ingress traffic, using the CR’smetadata.name. The list can also be disabled usingdisableListedVlans.
spec.vlans.category Specifies an F5SPKVlan CR category to listen for ingress traffic. Thecategory can also be disabled using disableListedVlans.
spec.vlans.disableListedVlansDisables, or denies traffic specified with the vlanList or categoryparameters: true (default) or false.
Application Project
The Ingress Controller and Service Proxy TMM Pods install to a different Project than the NGAP application (Pods).When installing the [Ingress Controller], set the controller.watchNamespace parameter to the NGAP PodProject in the Helm values file. For example:
Important: Ensure the Project currently exists in the cluster, the Ingress Controller does not discover Projects createdafter installation.
controller:
watchNamespace: "ngap-apps"
Dual-Stack environments
Service Proxy TMM’s load balancing pool is created by discovering the Kubernetes Service Endpoints in the Project.In IPv4/IPv6 dual-stack environments, to populate the load balancing pool with IPv6 or IPv6 and IPv4 mem-bers, set the Kubernetes Service PreferDualStack parameter to IPv6, and set the F5SPKIngressNGAP CR’sspec.ipfamilies parameter to the same value. For example:
Kubernetes Service
88
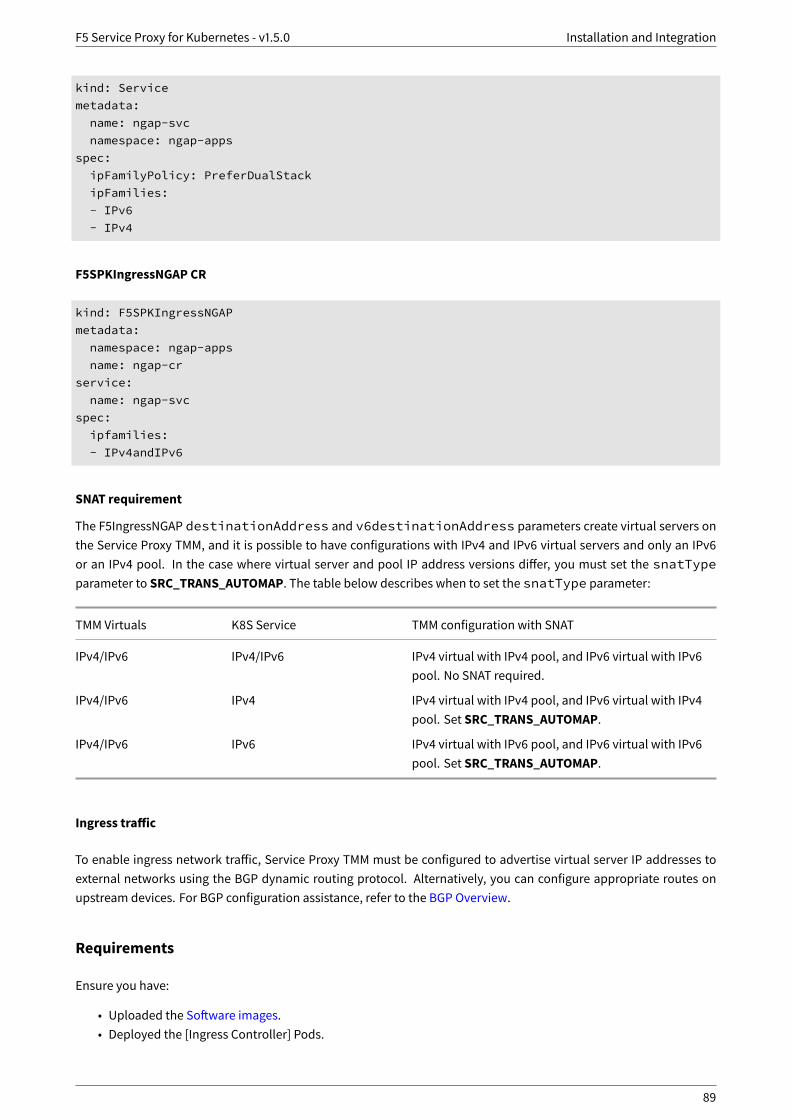
F5 Service Proxy for Kubernetes - v1.5.0 Installation and Integration
kind: Servicemetadata:
name: ngap-svcnamespace: ngap-apps
spec:ipFamilyPolicy: PreferDualStackipFamilies:- IPv6- IPv4
F5SPKIngressNGAP CR
kind: F5SPKIngressNGAPmetadata:
namespace: ngap-appsname: ngap-cr
service:name: ngap-svc
spec:ipfamilies:- IPv4andIPv6
SNAT requirement
The F5IngressNGAP destinationAddress and v6destinationAddress parameters create virtual servers onthe Service Proxy TMM, and it is possible to have configurations with IPv4 and IPv6 virtual servers and only an IPv6or an IPv4 pool. In the case where virtual server and pool IP address versions differ, you must set the snatTypeparameter to SRC_TRANS_AUTOMAP. The table below describes when to set the snatType parameter:
TMM Virtuals K8S Service TMM configuration with SNAT
IPv4/IPv6 IPv4/IPv6 IPv4 virtual with IPv4 pool, and IPv6 virtual with IPv6pool. No SNAT required.
IPv4/IPv6 IPv4 IPv4 virtual with IPv4 pool, and IPv6 virtual with IPv4pool. Set SRC_TRANS_AUTOMAP.
IPv4/IPv6 IPv6 IPv4 virtual with IPv6 pool, and IPv6 virtual with IPv6pool. Set SRC_TRANS_AUTOMAP.
Ingress traffic
To enable ingress network traffic, Service Proxy TMM must be configured to advertise virtual server IP addresses toexternal networks using the BGP dynamic routing protocol. Alternatively, you can configure appropriate routes onupstream devices. For BGP configuration assistance, refer to the BGP Overview.
Requirements
Ensure you have:
• Uploaded the Software images.• Deployed the [Ingress Controller] Pods.
89
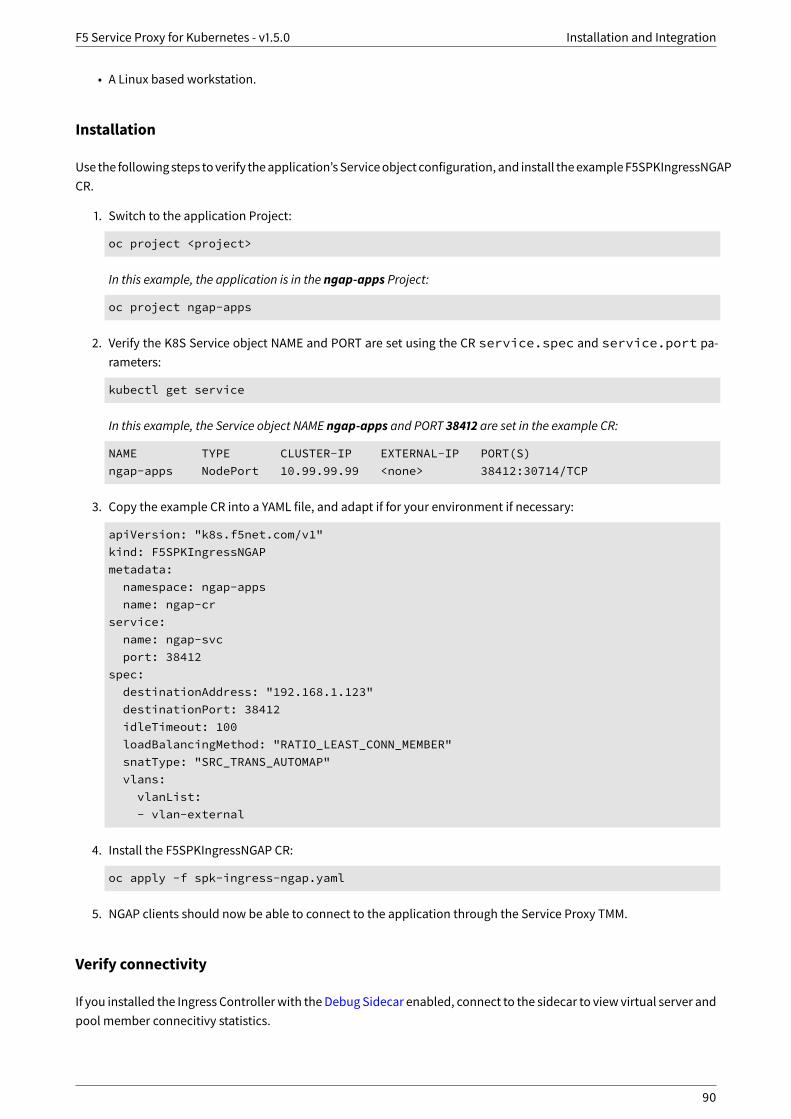
F5 Service Proxy for Kubernetes - v1.5.0 Installation and Integration
• A Linux based workstation.
Installation
Use the followingsteps toverify theapplication’sServiceobject configuration, and install theexampleF5SPKIngressNGAPCR.
1. Switch to the application Project:
oc project <project>
In this example, the application is in the ngap-apps Project:
oc project ngap-apps
2. Verify the K8S Service object NAME and PORT are set using the CR service.spec and service.port pa-rameters:
kubectl get service
In this example, the Service object NAME ngap-apps and PORT 38412 are set in the example CR:
NAME TYPE CLUSTER-IP EXTERNAL-IP PORT(S)ngap-apps NodePort 10.99.99.99 <none> 38412:30714/TCP
3. Copy the example CR into a YAML file, and adapt if for your environment if necessary:
apiVersion: "k8s.f5net.com/v1"kind: F5SPKIngressNGAPmetadata:namespace: ngap-appsname: ngap-cr
service:name: ngap-svcport: 38412
spec:destinationAddress: "192.168.1.123"destinationPort: 38412idleTimeout: 100loadBalancingMethod: "RATIO_LEAST_CONN_MEMBER"snatType: "SRC_TRANS_AUTOMAP"vlans:
vlanList:- vlan-external
4. Install the F5SPKIngressNGAP CR:
oc apply -f spk-ingress-ngap.yaml
5. NGAP clients should now be able to connect to the application through the Service Proxy TMM.
Verify connectivity
If you installed the Ingress Controllerwith theDebug Sidecar enabled, connect to the sidecar to view virtual server andpool member connecitivy statistics.
90
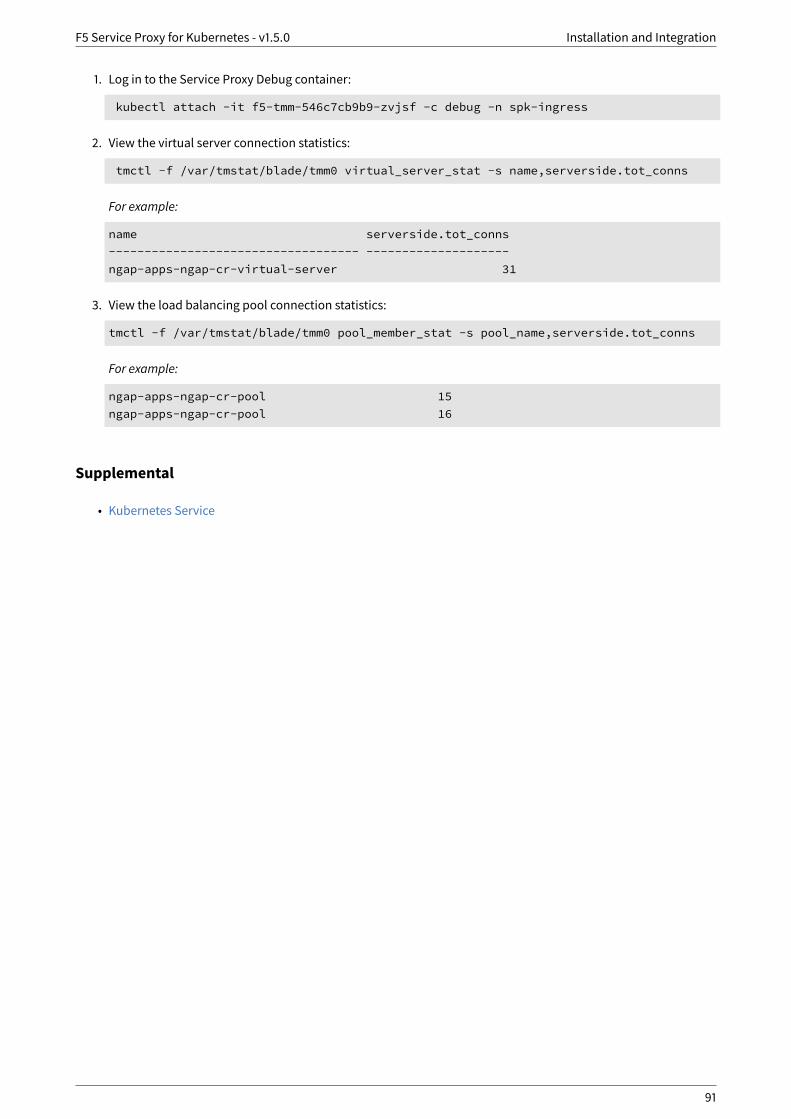
F5 Service Proxy for Kubernetes - v1.5.0 Installation and Integration
1. Log in to the Service Proxy Debug container:
kubectl attach -it f5-tmm-546c7cb9b9-zvjsf -c debug -n spk-ingress
2. View the virtual server connection statistics:
tmctl -f /var/tmstat/blade/tmm0 virtual_server_stat -s name,serverside.tot_conns
For example:
name serverside.tot_conns----------------------------------- --------------------ngap-apps-ngap-cr-virtual-server 31
3. View the load balancing pool connection statistics:
tmctl -f /var/tmstat/blade/tmm0 pool_member_stat -s pool_name,serverside.tot_conns
For example:
ngap-apps-ngap-cr-pool 15ngap-apps-ngap-cr-pool 16
Supplemental
• Kubernetes Service
91
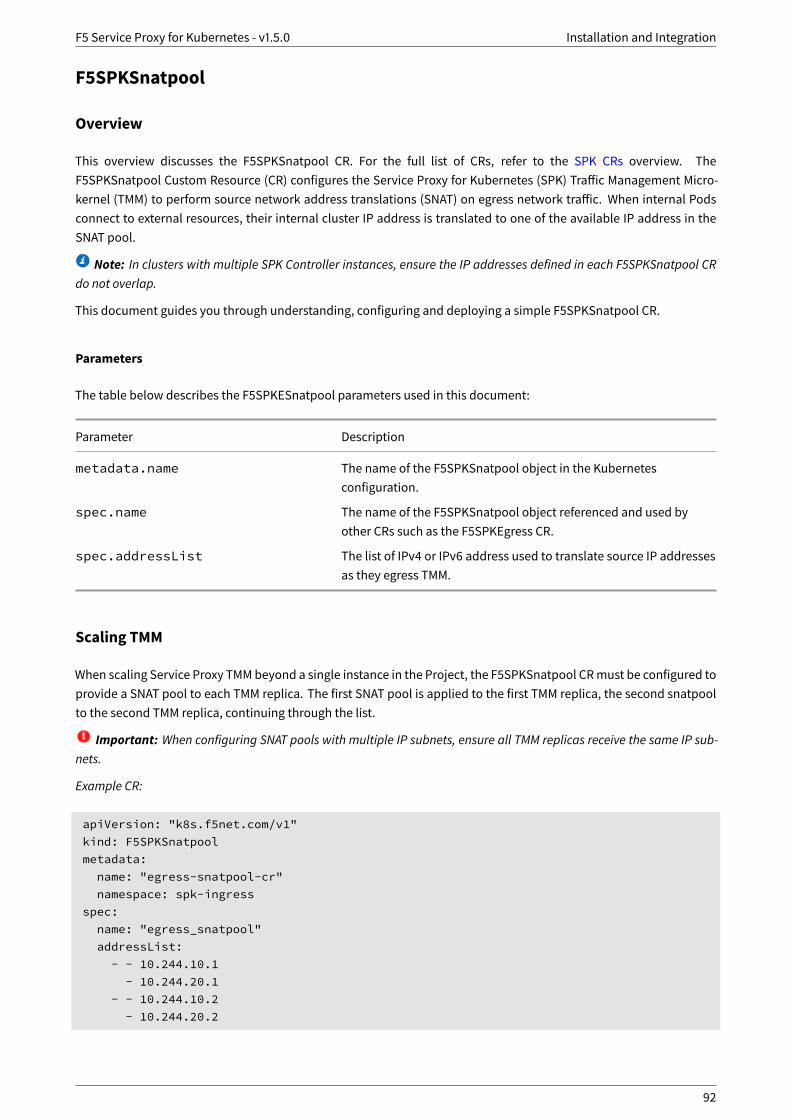
F5 Service Proxy for Kubernetes - v1.5.0 Installation and Integration
F5SPKSnatpool
Overview
This overview discusses the F5SPKSnatpool CR. For the full list of CRs, refer to the SPK CRs overview. TheF5SPKSnatpool Custom Resource (CR) configures the Service Proxy for Kubernetes (SPK) Traffic Management Micro-kernel (TMM) to perform source network address translations (SNAT) on egress network traffic. When internal Podsconnect to external resources, their internal cluster IP address is translated to one of the available IP address in theSNAT pool.
Note: In clusters with multiple SPK Controller instances, ensure the IP addresses defined in each F5SPKSnatpool CRdo not overlap.
This document guides you through understanding, configuring and deploying a simple F5SPKSnatpool CR.
Parameters
The table below describes the F5SPKESnatpool parameters used in this document:
Parameter Description
metadata.name The name of the F5SPKSnatpool object in the Kubernetesconfiguration.
spec.name The name of the F5SPKSnatpool object referenced and used byother CRs such as the F5SPKEgress CR.
spec.addressList The list of IPv4 or IPv6 address used to translate source IP addressesas they egress TMM.
Scaling TMM
When scaling Service Proxy TMMbeyond a single instance in the Project, the F5SPKSnatpool CRmust be configured toprovide a SNAT pool to each TMM replica. The first SNAT pool is applied to the first TMM replica, the second snatpoolto the second TMM replica, continuing through the list.
Important: When configuring SNAT pools with multiple IP subnets, ensure all TMM replicas receive the same IP sub-nets.
Example CR:
apiVersion: "k8s.f5net.com/v1"kind: F5SPKSnatpoolmetadata:name: "egress-snatpool-cr"namespace: spk-ingress
spec:name: "egress_snatpool"addressList:
- - 10.244.10.1- 10.244.20.1
- - 10.244.10.2- 10.244.20.2
92
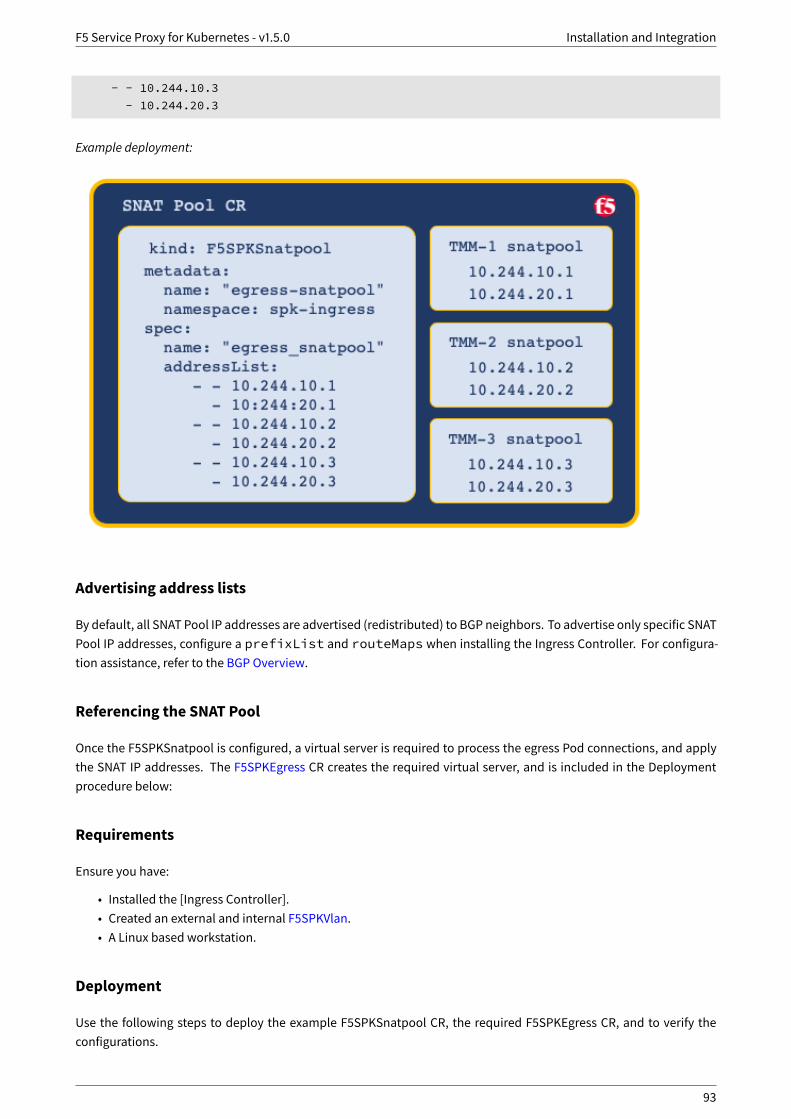
F5 Service Proxy for Kubernetes - v1.5.0 Installation and Integration
- - 10.244.10.3- 10.244.20.3
Example deployment:
Advertising address lists
By default, all SNAT Pool IP addresses are advertised (redistributed) to BGP neighbors. To advertise only specific SNATPool IP addresses, configure a prefixList and routeMaps when installing the Ingress Controller. For configura-tion assistance, refer to the BGP Overview.
Referencing the SNAT Pool
Once the F5SPKSnatpool is configured, a virtual server is required to process the egress Pod connections, and applythe SNAT IP addresses. The F5SPKEgress CR creates the required virtual server, and is included in the Deploymentprocedure below:
Requirements
Ensure you have:
• Installed the [Ingress Controller].• Created an external and internal F5SPKVlan.• A Linux based workstation.
Deployment
Use the following steps to deploy the example F5SPKSnatpool CR, the required F5SPKEgress CR, and to verify theconfigurations.
93
F5 Service Proxy for Kubernetes - v1.5.0 Installation and Integration
1. Configure SNAT Pools using the example CR, and deploy to the same Project as the Ingress Controller. For exam-ple:
In this example, the CR installs to the spk-ingress Project:
apiVersion: "k8s.f5net.com/v1"kind: F5SPKSnatpoolmetadata:name: "egress-snatpool-cr"namespace: spk-ingress
spec:name: "egress_snatpool"addressList:
- - 10.244.10.1- 10.244.20.1
- - 10.244.10.2- 10.244.20.2
- - 10.244.10.3- 10.244.20.3
2. Install the F5SPKSNATPool CR:
oc apply -f <file_name>.yaml
In this example, the CR file is named spk-snatpool-crd.yaml:
oc apply -f spk-snatpool-crd.yaml
3. Configure the F5SPKEgress CR, and install to the same Project as the Ingress Controller. For example:
apiVersion: "k8s.f5net.com/v1"kind: F5SPKEgressmetadata:name: egress-crnamespace: spk-ingress
spec:egressSnatpool: "egress_snatpool"
4. Install the F5SPKEgress CR:
oc apply -f <file_name>.yaml
In this example, the CR file is named spk-egress-crd.yaml:
oc apply -f spk-egress-crd.yaml
5. To verify the SNAT pool IP address mappings, obtain the name of the Ingress Controller’s persistmap:
Note: The persistmapmaintains SNATmappings after unexpected Pod restarts.
In this example, the CR installs to the spk-ingress Project:
oc get cm | grep persistmap -n <project>
In this example, the persistmap named persistmap-76946d464b-d5xvc is in the spk-ingress Project:
oc get cm | grep persistmap -n spk-ingress
94
F5 Service Proxy for Kubernetes - v1.5.0 Installation and Integration
persistmap-76946d464b-d5xvc
6. Verify the SNAT IP address mappings:
oc get cm persistmap-76946d464b-d5xvc \-o "custom-columns=IP Addresses:.data.snatpoolMappings" -n <project>
_In this example, the persistmap is in the spk-ingress Project, and the SNAT IPs are 10.244.10.1 and**10.244.20.1*:_
oc get cm persistmap-76946d464b-d5xvc \-o "custom-columns=IP Addresses:.data.snatpoolMappings" -n spk-ingress
IP Addresses{"ca93c77b-42bb-4b67-bf3a-d25128f3374b":"10.244.10.1,10.244.20.1"}
7. To verify connectivity statistics, log in to the Debug Sidecar:
oc exec -it deploy/f5-tmm -c debug -n <project>
In this example, the debug sidecar is in the spk-ingress Project:
oc exec -it deploy/f5-tmm -c debug -n spk-ingress
8. Verify the internal virtual servers have been configured:
tmctl -f /var/tmstat/blade/tmm0 virtual_server_stat -s name,serverside.tot_conns
In this example, 3 IPv4 connections, and 2 IPv6 connections have been initiated by internal Pods:
name serverside.tot_conns----------------- --------------------egress-ipv6 2egress-ipv4 3
Feedback
Provide feedback to improve this document by emailing [email protected].
95
F5 Service Proxy for Kubernetes - v1.5.0 Installation and Integration
F5SPKEgress
Overview
This overviewdiscusses the F5SPKEgressCR. For the full list of CRs, refer to theSPKCRsoverview. TheServiceProxy forKubernetes (SPK) F5SPKEgress CustomResource (CR) enables egress connectivity for internal Pods requiring access toexternal networks. The F5SPKEgress CR enables egress connectivity using either Source Network Address Translation(SNAT), or the DNS/NAT46 feature that supports communication between internal IPv4 Pods and external IPv6 hosts.The F5SPKEgress CRmust also reference an F5SPKDnscache CR to provide high-performance DNS caching.
Note: The DNS/NAT46 feature does not rely on Kubernetes IPv4/IPv6 dual-stack added in v1.21.
This overviewdescribes simple scenarios for configuringegress traffic usingSNATandDNS/NAT46withDNScaching.
CRmodifications
Because the F5SPKEgress CR references a number of additional CRs, F5 recommends that you always delete and reap-ply the CR, rather than using oc apply to modify the running CR configuration.
Important: The pools of allocated DNS/NAT46 IP address subnets should remain unmodified for the life of the Con-troller and TMM Pod installation.
Requirements
Ensure you have:
• Configured and installed an external and internal F5SPKVlan CR.• DNS/NAT64 only: Installed the dSSM database Pods.
Egress SNAT
SNATs are used to modify the source IP address of egress packets leaving the cluster. When the Service Proxy TrafficManagementMicrokernel (TMM) receivesan internalpacket froman internalPod, theexternal (egress) packet source IPaddresswill translate using a configured SNAT IP address. Using the F5SPKEgress CR, you can apply SNAT IP addressesusing either SNAT pools, or SNAT automap.
SNAT pools
SNAT pools are lists of routable IP addresses, used by Service Proxy TMM to translate the source IP address of egresspackets. SNAT pools provide a greater number of available IP addresses, and offer more flexibility for defining theSNAT IP addresses used for translation. For more background information and to enable SNAT pools, review theF5SPKSnatpool CR guide.
SNAT automap
SNAT automap uses Service Proxy TMM’s external F5SPKVlan IP address as the source IP for egress packets. SNATautomap is easier to implement, and conserves IP address allocations. To use SNAT automap, leave the thespec.egressSnatpool parameter undefined (default). Use the installation procedure below to enable egressconnectivity using SNAT automap.
Note: In clusters with multiple SPK Controller instances, ensure the IP addresses defined in each F5SPKSnatpool CRdo not overlap.
96
F5 Service Proxy for Kubernetes - v1.5.0 Installation and Integration
Parameters
The parameters used to configure Service Proxy TMM for SNAT automap:
Parameter Description
spec.dualStackEnabled Enables creating both IPv4 and IPv6 wildcard virtual servers foregress connections: true or false (default).
spec.egressSnatpool References an installed F5SPKsnatpool CR using the spec.nameparameter, or applies SNAT automap when undefined (default).
Installation
Use the following steps to configure the F5SPKEgress CR for SNAT automap, and verify the installation.
1. Copy the F5SPKEgress CR to a YAML file, and set the namespace parameter to the Controller’s Project:
apiVersion: "k8s.f5net.com/v1"kind: F5SPKEgressmetadata:name: egress-crdnamespace: <project>
spec:dualStackEnabled: <true|false>egressSnatpool: ""
In this example, the CR installs to the spk-ingress Project:
apiVersion: "k8s.f5net.com/v1"kind: F5SPKEgressmetadata:name: egress-crdnamespace: spk-ingress
spec:dualStackEnabled: trueegressSnatpool: ""
2. Install the F5SPKEgress CR:
oc apply -f <file name>
In this example, the CR file is named spk-egress-crd.yaml:
oc apply -f spk-egress-crd.yaml
3. Internal Pods can now connect to external resources using the external F5SPKVlan self IP address.
4. To verify traffic processing statistics, log in to the Debug Sidecar:
oc exec -it deploy/f5-tmm -c debug -n <project>
In this example, the debug sidecar is in the spk-ingress Project:
oc exec -it deploy/f5-tmm -c debug -n spk-ingress
5. Run the following tmctl command:
97
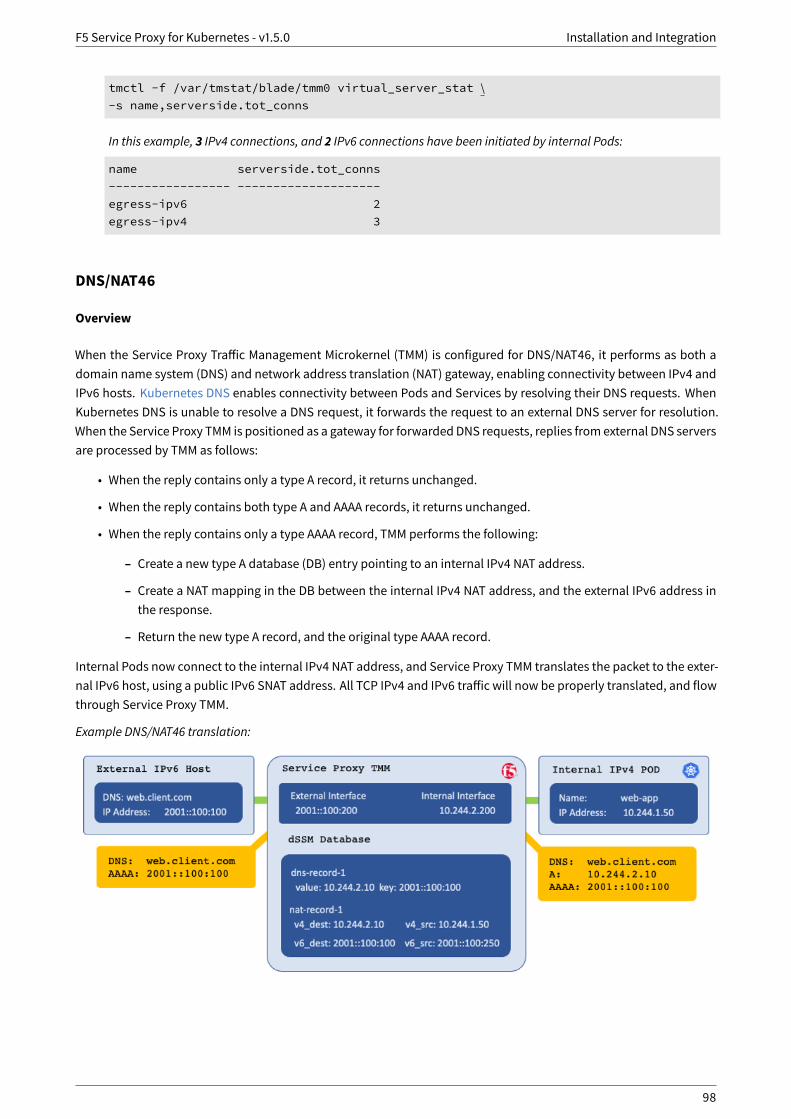
F5 Service Proxy for Kubernetes - v1.5.0 Installation and Integration
tmctl -f /var/tmstat/blade/tmm0 virtual_server_stat \-s name,serverside.tot_conns
In this example, 3 IPv4 connections, and 2 IPv6 connections have been initiated by internal Pods:
name serverside.tot_conns----------------- --------------------egress-ipv6 2egress-ipv4 3
DNS/NAT46
Overview
When the Service Proxy Traffic Management Microkernel (TMM) is configured for DNS/NAT46, it performs as both adomain name system (DNS) and network address translation (NAT) gateway, enabling connectivity between IPv4 andIPv6 hosts. Kubernetes DNS enables connectivity between Pods and Services by resolving their DNS requests. WhenKubernetes DNS is unable to resolve a DNS request, it forwards the request to an external DNS server for resolution.When the Service Proxy TMM is positioned as a gateway for forwardedDNS requests, replies from external DNS serversare processed by TMM as follows:
• When the reply contains only a type A record, it returns unchanged.
• When the reply contains both type A and AAAA records, it returns unchanged.
• When the reply contains only a type AAAA record, TMM performs the following:
– Create a new type A database (DB) entry pointing to an internal IPv4 NAT address.
– Create a NAT mapping in the DB between the internal IPv4 NAT address, and the external IPv6 address inthe response.
– Return the new type A record, and the original type AAAA record.
Internal Pods now connect to the internal IPv4 NAT address, and Service Proxy TMM translates the packet to the exter-nal IPv6 host, using a public IPv6 SNAT address. All TCP IPv4 and IPv6 traffic will now be properly translated, and flowthrough Service Proxy TMM.
Example DNS/NAT46 translation:
98

F5 Service Proxy for Kubernetes - v1.5.0 Installation and Integration
Parameters
The table below describes the F5SPKEgress CR spec parameters used to configure DNS/NAT46:
99
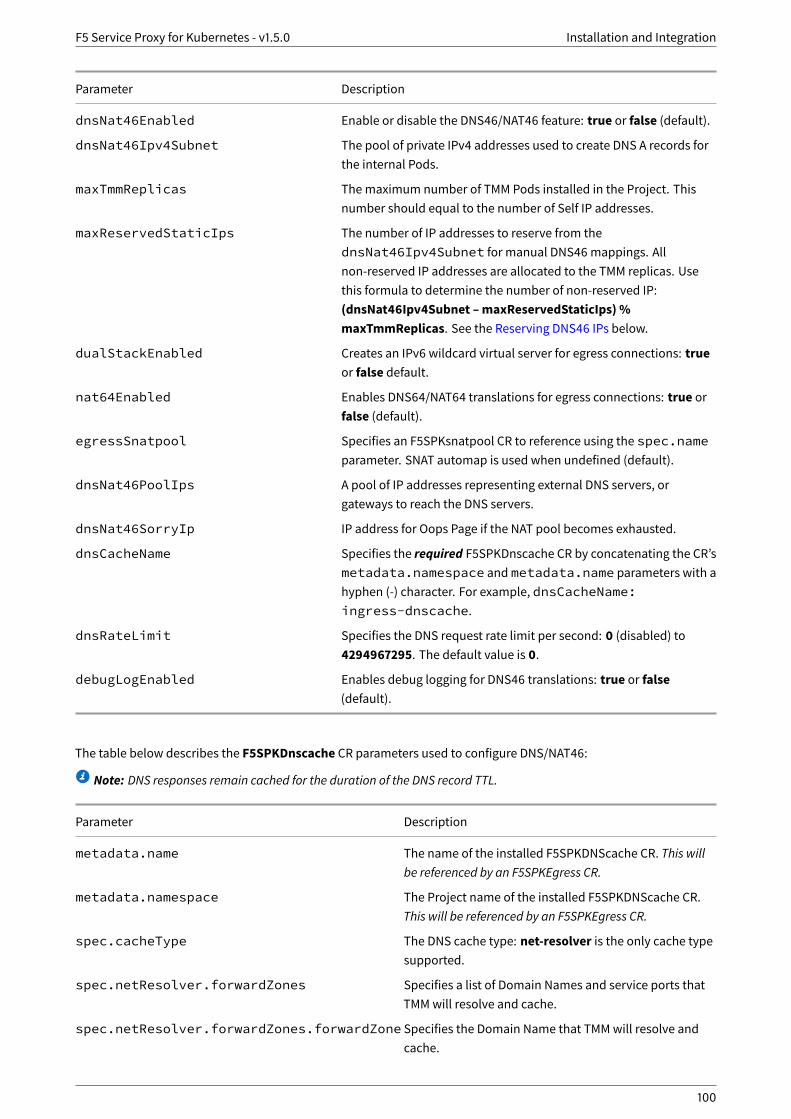
F5 Service Proxy for Kubernetes - v1.5.0 Installation and Integration
Parameter Description
dnsNat46Enabled Enable or disable the DNS46/NAT46 feature: true or false (default).
dnsNat46Ipv4Subnet The pool of private IPv4 addresses used to create DNS A records forthe internal Pods.
maxTmmReplicas Themaximum number of TMM Pods installed in the Project. Thisnumber should equal to the number of Self IP addresses.
maxReservedStaticIps The number of IP addresses to reserve from thednsNat46Ipv4Subnet for manual DNS46mappings. Allnon-reserved IP addresses are allocated to the TMM replicas. Usethis formula to determine the number of non-reserved IP:(dnsNat46Ipv4Subnet – maxReservedStaticIps) %maxTmmReplicas. See the Reserving DNS46 IPs below.
dualStackEnabled Creates an IPv6 wildcard virtual server for egress connections: trueor false default.
nat64Enabled Enables DNS64/NAT64 translations for egress connections: true orfalse (default).
egressSnatpool Specifies an F5SPKsnatpool CR to reference using the spec.nameparameter. SNAT automap is used when undefined (default).
dnsNat46PoolIps A pool of IP addresses representing external DNS servers, orgateways to reach the DNS servers.
dnsNat46SorryIp IP address for Oops Page if the NAT pool becomes exhausted.
dnsCacheName Specifies the required F5SPKDnscache CR by concatenating the CR’smetadata.namespace and metadata.name parameters with ahyphen (-) character. For example, dnsCacheName:ingress-dnscache.
dnsRateLimit Specifies the DNS request rate limit per second: 0 (disabled) to4294967295. The default value is 0.
debugLogEnabled Enables debug logging for DNS46 translations: true or false(default).
The table below describes the F5SPKDnscache CR parameters used to configure DNS/NAT46:
Note: DNS responses remain cached for the duration of the DNS record TTL.
Parameter Description
metadata.name The name of the installed F5SPKDNScache CR. This willbe referenced by an F5SPKEgress CR.
metadata.namespace The Project name of the installed F5SPKDNScache CR.This will be referenced by an F5SPKEgress CR.
spec.cacheType The DNS cache type: net-resolver is the only cache typesupported.
spec.netResolver.forwardZones Specifies a list of Domain Names and service ports thatTMMwill resolve and cache.
spec.netResolver.forwardZones.forwardZone Specifies the Domain Name that TMMwill resolve andcache.
100
F5 Service Proxy for Kubernetes - v1.5.0 Installation and Integration
Parameter Description
spec.netResolver.forwardZones.nameServers Specifies a list of IP address representing the externalDNS server(s).
spec.netResolver.forwardZones.nameServers.ipAddressMust be set to an IP address specified in the F5SPKEgressdnsNat46PoolIps parameter.
spec.netResolver.forwardZones.nameServers.portThe service port of the DNS server to query for DNSresolution.
DNS gateway
For DNS/NAT46 to function properly, it is important to enable Intelligent CNI 2 (iCNI2) when installing the SPK Con-troller. With iCNI 2 enabled, internal Pods use the Service Proxy TrafficManagementMicrokernel (TMM) as their defaultgateway. It is important that Service Proxy TMM intercepts and process all internal DNS requests.
Upstream DNS
The F5SPKEgress dnsNat46PoolIps parameter, and the F5SPKDnscache nameServers.ipAddress paramterset the upstream DNS server that Service Proxy TMM uses to resolve DNS requests. This configuration enables youto define a non-reachable DNS server on the internal Pods, and have TMM perform DNS name resolution. For exam-ple, Pods can use resolver IP address 1.2.3.4 to request DNS resolution from Service Proxy TMM, which then proxiesrequests and responses from the configured upstream DNS server.
Reserving DNS46 IPs
You can reserve DNS46 IP addresses for use when creating a Manual DNS46 entry in the dSSM database. This sectiondemonstrates how the dnsNat46Ipv4Subnet, maxTmmReplicas, and maxReservedStaticIps parameterswork together to allocate IP addresses.
• dnsNat46Ipv4Subnet: "10.10.10.0/24” - Specifies 254 usable IP addresses.• maxReservedStaticIps: 128 - Specifies 128 reserved DNS46 IPs.• maxTmmReplicas: 2 - Allocates 64 addresses to 2 TMMs: TMM-1 receives 10.10.10.128/26, and TMM-2 re-ceives 10.10.10.192/26.
IP Allocations:
101
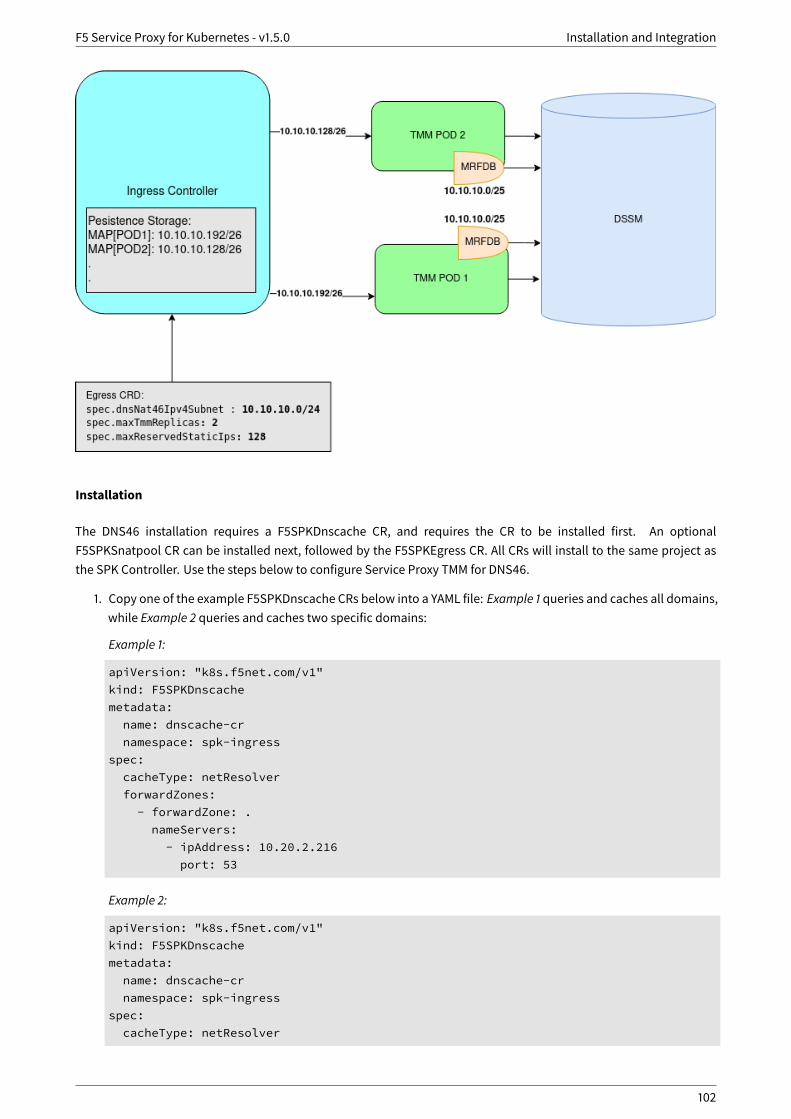
F5 Service Proxy for Kubernetes - v1.5.0 Installation and Integration
Installation
The DNS46 installation requires a F5SPKDnscache CR, and requires the CR to be installed first. An optionalF5SPKSnatpool CR can be installed next, followed by the F5SPKEgress CR. All CRs will install to the same project asthe SPK Controller. Use the steps below to configure Service Proxy TMM for DNS46.
1. Copy one of the example F5SPKDnscache CRs below into a YAML file: Example 1 queries and caches all domains,while Example 2 queries and caches two specific domains:
Example 1:
apiVersion: "k8s.f5net.com/v1"kind: F5SPKDnscachemetadata:name: dnscache-crnamespace: spk-ingress
spec:cacheType: netResolverforwardZones:
- forwardZone: .nameServers:
- ipAddress: 10.20.2.216port: 53
Example 2:
apiVersion: "k8s.f5net.com/v1"kind: F5SPKDnscachemetadata:name: dnscache-crnamespace: spk-ingress
spec:cacheType: netResolver
102
F5 Service Proxy for Kubernetes - v1.5.0 Installation and Integration
forwardZones:- forwardZone: example.netnameServers:
- ipAddress: 10.20.2.216port: 53
- forwardZone: internal.orgnameServers:
- ipAddress: 10.20.2.216port: 53
2. Install the F5SPKDnscache CR:
kubectl apply -f spk-dnscache-cr.yaml
f5spkdnscache.k8s.f5net.com/spk-egress-dnscache created
3. Verify the installation:
oc describe f5-spk-dnscache -n spk-ingress | sed '1,/Events:/d'
The command output will indicate the spk-controller has added/updated the CR:
“‘bash Type Reason From Message —- ———- ——- Normal Added/Updated spk-controller F5SPKDnscache spk-ingress/spk-egress-dnscache was added/updated Normal Added/Updated spk-controller F5SPKDnscache spk-ingress/spk-egress-dnscache was added/updated
4. Copy the example F5SPKSnatpool CR to a text file:
In this example, up to two TMMs can translate egress packets, each using two IPv6 addresses:
apiVersion: "k8s.f5net.com/v1"kind: F5SPKSnatpoolmetadata:name: "spk-dns-snat"namespace: "spk-ingress"
spec:name: "egress_snatpool"addressList:
- - 2002::10:50:20:1- 2002::10:50:20:2
- - 2002::10:50:20:3- 2002::10:50:20:4
5. Install the F5SPKSnatpool CR:
oc apply -f egress-snatpool-cr.yaml
f5spksnatpool.k8s.f5net.com/spk-dns-snat created
6. Verify the installation:
oc describe f5-spk-snatpool -n spk-ingress | sed '1,/Events:/d'
The command output will indicate the spk-controller has added/updated the CR:
Type Reason From Message---- ------ ---- -------Normal Added/Updated spk-controller F5SPKSnatpool spk-ingress/spk-dns-snat was
added/updated↪
103
F5 Service Proxy for Kubernetes - v1.5.0 Installation and Integration
7. Copy the example F5SPKEgress CR to a text file:
In this example, TMMwill query the DNS server at 10.20.2.216 and create internal DNS A records for internal clientsusing the 10.40.100.0/25 subnet minus the number of maxReservedStaticIps.
apiVersion: "k8s.f5net.com/v1"kind: F5SPKEgressmetadata:name: spk-egress-crdnamespace: spk-ingress
spec:egressSnatpool: egress_snatpooldnsNat46Enabled: truednsNat46PoolIps:
- "10.20.2.216"dnsNat46Ipv4Subnet: "10.40.100.0/25"maxTmmReplicas: 4maxReservedStaticIps: 26nat64Enabled: truednsCacheName: "spk-ingress-dnscache-cr"dnsRateLimit: 300
8. Install the F5SPKEgress CRD:
oc apply -f spk-dns-egress.yaml
f5spkegress.k8s.f5net.com/spk-egress-crd created
9. Verify the installation:
oc describe f5-spk-egress -n spk-ingress | sed '1,/Events:/d'
The command output will indicate the spk-controller has added/updated the CR:
Type Reason From Message---- ------ ---- -------Normal Added/Updated spk-controller F5SPKEgres spk-ingress/spk-egress-dns was
added/updated↪
10. Internal IPv4 Pods requesting access to IPv6 hosts (via DNS queries), can now connect to external IPv6 hosts.
Verify connectivity
If you installed the TMM Debug Sidecar, you can verify client connection statistics using the steps below.
1. Log in to the debug sidecar:
In this example, Service Proxy TMM is in the spk-ingress Project:
oc exec -it deploy/f5-tmm -c debug -n spk-ingress --bash
2. Obtain the DNS virtual server connection statistics:
tmctl -d blade virtual_server_stat -s name,clientside.tot_conns
In theexamplebelow,egress-dns-ipv4 countsDNS requests,egress-ipv4-nat46 countsnewclient translationmap-pings in dSSM, and egress-ipv4 counts connections to outside resources.
104
F5 Service Proxy for Kubernetes - v1.5.0 Installation and Integration
name clientside.tot_conns----------------- --------------------egress-ipv6-nat64 0egress-ipv4-nat46 3egress-dns-ipv4 9egress-ipv4 7
3. If you experience DNS/NAT46 connectivity issues, refer to the Troubleshooting DNS/NAT46 guide.
Manual DNS46 entry
The following steps create a newDNS/NAT46DB entry,mapping internal IPv4NAT address 10.1.1.1 to remote IPv6 host2002::10:1:1:1, and require the Debug Sidecar.
Important: Manual entries must only use IP addresses that have been reserved with the maxReservedStaticIpsparameter. See Reserving DNS46 IPs above.
1. Obtain the name of the first dSSM Sentinel:
In this example, the dSSM Sentinel is in the spk-utilities Project:
oc get pods -n spk-utilities | grep sentinel-0
In this example, the dSSM Sentinel is named f5-dssm-sentinel-0.
f5-dssm-sentinel-0 1/1 Running
2. Obtain the IP address of themaster dSSM database:
oc logs f5-dssm-sentinel-0 -n spk-utilities | grep master | tail -1
In this example, the master dSSM DB IP address is 10.128.0.221.
Apr 2022 21:02:43.543 * +slave slave 10.131.1.152:6379 10.131.1.152 6379 @ dssmmaster10.128.0.221 6379↪
3. Connect to the TMM debug sidecar:
In this example, the debug sidecar is in the spk-ingress Project:
oc exec -it deploy/f5-tmm -c debug -n spk-ingress -- bash
4. Add the DNS46 record to the dSSM DB:
In this example, the DB entry maps IPv4 address 10.1.1.1 to IPv6 address 2002::10:1:1:1.
mrfdb -ipport=10.128.0.221:6379 -serverName=server -type=dns46 -set -key=10.1.1.1-val=2002::10:1:1:1↪
5. View the new DNS46 record entry:
mrfdb -ipport=10.128.0.221:6379 -serverName=server -type=dns46 -display=all
t_dns462002::10:1:1:1 10.1.1.1t_dns4610.1.1.1 2002::10:1:1:1
6. To delete the DNS46 entry from the dSSM DB:
105
F5 Service Proxy for Kubernetes - v1.5.0 Installation and Integration
mrfdb -ipport=10.128.0.221:6379 -serverName=server -type=dns46 -delete -key=10.1.1.1-val=2002::10:1:1:1↪
7. Test connectivity to the remote host:
curl http://10.1.1.1 8080
Upgrading DNS46 entries
Starting in SPK version 1.4.10, DNS46 requires two entries; one entry for DNS 6-to-4 lookups, and one entry for NAT4-to-6 lookups. Themrfdb tool, introduced in version 1.4.10, creates these entries by default, however, manual DNS46records created in earlier versions contain only a single entry. The following steps upgrade DNS46 manual entriescreated in versions 1.4.9 and earlier, and require the Debug Sidecar.
1. Obtain the name of the first dSSM Sentinel:
In this example, the dSSM Sentinel is in the spk-utilities Project:
oc get pods -n spk-utilities | grep sentinel-0
In this example, the dSSM Sentinel is named f5-dssm-sentinel-0.
f5-dssm-sentinel-0 1/1 Running
2. Obtain the IP address of themaster dSSM database:
oc logs f5-dssm-sentinel-0 -n spk-utilities | grep master | tail -1
In this example, the master dSSM DB IP address is 10.128.0.221.
Apr 2022 21:02:43.543 * +slave slave 10.131.1.152:6379 10.131.1.152 6379 @ dssmmaster10.128.0.221 6379↪
3. Connect to the TMM debug sidecar:
In this example, the debug sidecar is in the spk-ingress Project:
oc exec -it deploy/f5-tmm -c debug -n spk-ingress -- bash
4. View the new DNS46 record entries:
mrfdb -ipport=10.128.0.221:6379 -serverName=server -type=dns46 -display=all
In this example, the version 1.4.9 and earlier records contain only a single entry:
t_dns4610.1.1.1 2002::10:1:1:1t_dns4610.1.1.2 2002::10:1:1:2
5. Upgrade the DNS46 records in the dSSM DB:
mrfdb -ipport=10.128.0.221:6379 -serverName=server -type=dns46 -set -key=10.1.1.1-val=2002::10:1:1:1↪
mrfdb -ipport=10.128.0.221:6379 -serverName=server -type=dns46 -set -key=10.1.1.2-val=2002::10:1:1:2↪
6. View the upgraded DNS46 record entries:
106
F5 Service Proxy for Kubernetes - v1.5.0 Installation and Integration
mrfdb -ipport=10.128.0.221:6379 -serverName=server -type=dns46 -display=all
In this example, the version 1.4.10 and later records contain two entries:
t_dns462002::10:1:1:1 10.1.1.1t_dns4610.1.1.1 2002::10:1:1:1t_dns462002::10:1:1:2 10.1.1.2t_dns4610.1.1.2 2002::10:1:1:2
Feedback
Provide feedback to improve this document by emailing [email protected].
Supplemental
• DNS for K8S Services and Pods• Debugging K8S DNS Resolution
107
F5 Service Proxy for Kubernetes - v1.5.0 Installation and Integration
F5SPKVlan
Overview
Thisoverviewdiscusses theF5SPKVlanCR. For the full list of CRs, refer to theSPKCRsoverview. TheF5SPKVlanCustomResource (CR) configures the Traffic Management Microkernel (TMM) network interface settings: VLAN tags, Self IP ad-dresses, Maximum Transmission Size (MTU), bonding, and packet hashing algorithms. The CR can also be configuredto apply Open Virtual Network (OVN) annotations to the TMM Pod.
This document guides you through understanding, configuring and deploying a simple F5SPKVlan CR.
Scaling TMM
When scaling the Service Proxy TMM Pod beyond a single instance in the Project, the spec.selfip_v4s andspec.selfip_v6s parameters must be configured to provide unique self IP addresses to each TMM replica. Thefirst self IP address in the list is applied to the first TMMPod, the second IP address to the second TMMPod, continuingthrough the list.
Internal facing interfaces
TMM’s internal facing IP addresses must share the same subnet as the OpenShift nodes. Run the following commandto determine the OpenShift node IP address subnet:
oc get nodes -o yaml | grep ipv4
In this example, the IPv4 addresses are in the 10.144.175.0/24 subnet:
k8s.ovn.org/node-primary-ifaddr:'{"ipv4":"10.144.175.15/24","ipv6":"2620:128:e008:4018::15/128"}'↪
k8s.ovn.org/node-primary-ifaddr:'{"ipv4":"10.144.175.16/24","ipv6":"2620:128:e008:4018::16/128"}'↪
k8s.ovn.org/node-primary-ifaddr:'{"ipv4":"10.144.175.17/24","ipv6":"2620:128:e008:4018::17/128"}'↪
k8s.ovn.org/node-primary-ifaddr:'{"ipv4":"10.144.175.18/24","ipv6":"2620:128:e008:4018::18/128"}'↪
k8s.ovn.org/node-primary-ifaddr:'{"ipv4":"10.144.175.19/24","ipv6":"2620:128:e008:4018::19/128"}'↪
OVN annotations
When the SPK Controller is installed and ICNI2 is enabled, OVN annotations are applied to the Service Proxy TMM Pod.OVN then uses SR-IOV and TMM’s internal interface as a gateway for all egress traffic in the Project. To specify TMM’sinternal VLAN interface as the gateway, set the VLANCR’sspec.internalparameter totrueon the internal facingVLAN. When set, OVN builds a routing database using the following annotations:
• k8s.ovn.org/routing-namespaces - Defines the Project for Pod egress network traffic.• k8s.ovn.org/routing-network - Defines the internal TMM VLAN to use as the gateway.
Important: Do not set OVN annotations onmultiple internal VLAN interfaces within the same Project.
108
F5 Service Proxy for Kubernetes - v1.5.0 Installation and Integration
Parameters
The CR spec parameters used to configure the Service Proxy TMM network interfaces are:
Parameter Description
name The name of the VLAN object in the TMM configuration.
tag The tagging ID applied to the VLAN object. Important: Do not set theOpenShift network attachment vlan parameter, use the CR tag parameter.
bonded Combine multiple interfaces into a single bonded interface (true/false). Thedefault false (disabled).
interfaces One or more interfaces to associate with the VLAN object.
internal Enable Routing annotations for internal Pods (true/false). The default is false(disabled).This must be set on the internal VLAN, and can only be enabled onone VLAN.
selfip_v4s Specifies a list of IPv4 Self IP addresses associated with the VLAN. Each TMMreplica receives an IP address in the element order.
prefixlen_v4 The IPv4 address subnet mask.
selfip_v6s Specifies a list of IPv6 Self IP addresses associated with the VLAN. Each TMMreplica receives an IP address in the element order.
prefixlen_v6 The IPv6 address subnet mask.
mtu Maximum transmission unit in bytes: (1500 to 8000). The default is 1500.Important: Youmust also set the SPK Controller TMM_DEFAULT_MTUparameter to the same value whenmodifying the default.
trunk_hash The hashing algorithm used to distribute packets across bonded interfaces.Options: src-dst-mac combines MAC addresses of the source and destination.dst-mac the MAC address of the destination. index combine ports of thesource and the destination. src-dst-ipport combine IP addresses and ports ofthe source and the destination (default).
auto_lasthop Disables the auto last hop feature that sends return traffic to the MAC addresstransmitting the request: AUTO_LASTHOP_ENABLED,AUTO_LASTHOP_DISABLED or AUTO_LASTHOP_DEFAULT.
category Specifies a unique, user-defined category for the VLAN, for example;serverside or clientside. The category value can then be referenced bythe F5SPKIngressTCP, F5SPKIngressUDP and F5SPKIngressNGAP SPK CRs toeither allow or deny VLAN traffic.
allowed_services Specifies a list of protocols and the protocol service ports this VLAN accepts.
allowed_services.protocol Specifies the protocol traffic the VLAN accepts.
allowed_services.port Specifies the service port traffic the VLAN accepts.
Requirements
Ensure you have:
• Installed the SPK Software.• Installed the SPK Controller.
109
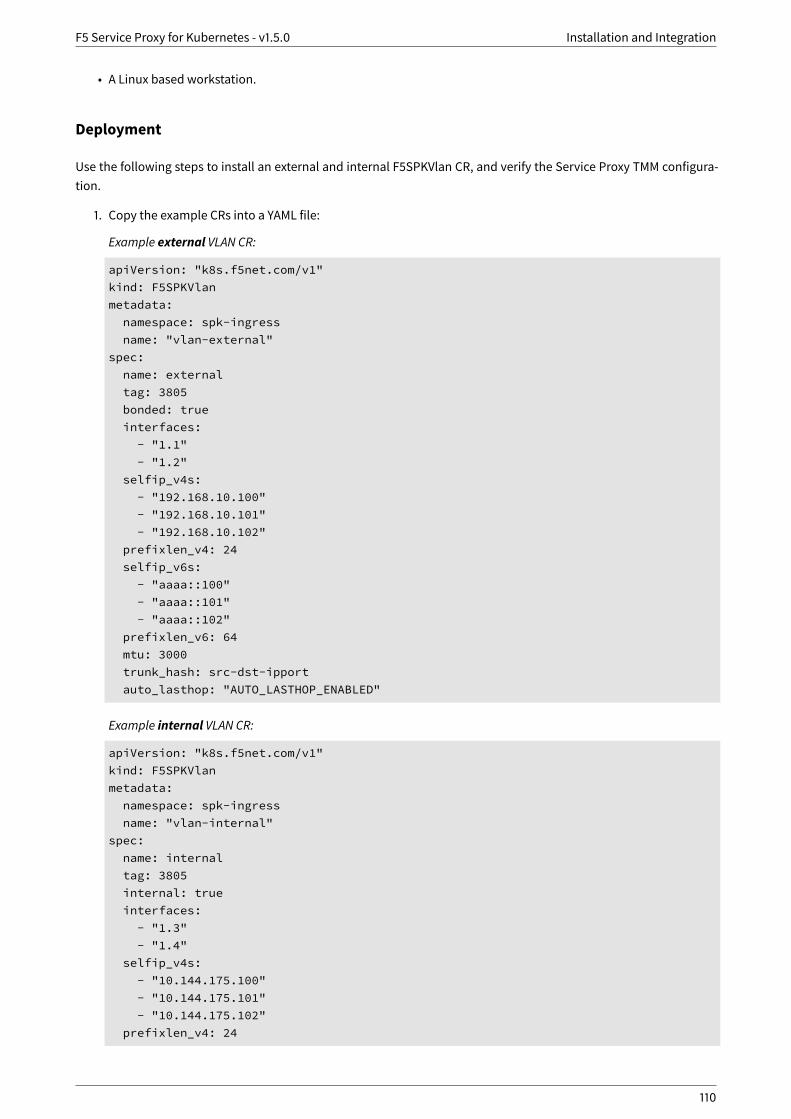
F5 Service Proxy for Kubernetes - v1.5.0 Installation and Integration
• A Linux based workstation.
Deployment
Use the following steps to install an external and internal F5SPKVlan CR, and verify the Service Proxy TMM configura-tion.
1. Copy the example CRs into a YAML file:
Example external VLAN CR:
apiVersion: "k8s.f5net.com/v1"kind: F5SPKVlanmetadata:namespace: spk-ingressname: "vlan-external"
spec:name: externaltag: 3805bonded: trueinterfaces:
- "1.1"- "1.2"
selfip_v4s:- "192.168.10.100"- "192.168.10.101"- "192.168.10.102"
prefixlen_v4: 24selfip_v6s:
- "aaaa::100"- "aaaa::101"- "aaaa::102"
prefixlen_v6: 64mtu: 3000trunk_hash: src-dst-ipportauto_lasthop: "AUTO_LASTHOP_ENABLED"
Example internal VLAN CR:
apiVersion: "k8s.f5net.com/v1"kind: F5SPKVlanmetadata:namespace: spk-ingressname: "vlan-internal"
spec:name: internaltag: 3805internal: trueinterfaces:
- "1.3"- "1.4"
selfip_v4s:- "10.144.175.100"- "10.144.175.101"- "10.144.175.102"
prefixlen_v4: 24
110
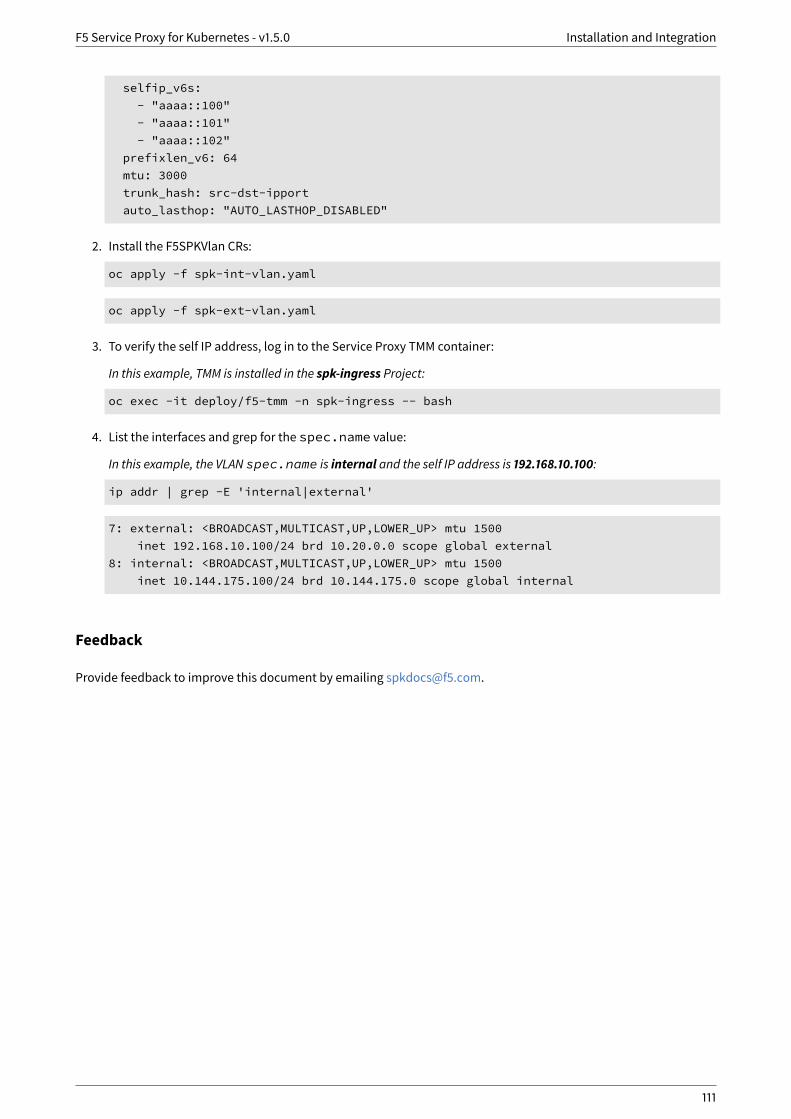
F5 Service Proxy for Kubernetes - v1.5.0 Installation and Integration
selfip_v6s:- "aaaa::100"- "aaaa::101"- "aaaa::102"
prefixlen_v6: 64mtu: 3000trunk_hash: src-dst-ipportauto_lasthop: "AUTO_LASTHOP_DISABLED"
2. Install the F5SPKVlan CRs:
oc apply -f spk-int-vlan.yaml
oc apply -f spk-ext-vlan.yaml
3. To verify the self IP address, log in to the Service Proxy TMM container:
In this example, TMM is installed in the spk-ingress Project:
oc exec -it deploy/f5-tmm -n spk-ingress -- bash
4. List the interfaces and grep for the spec.name value:
In this example, the VLAN spec.name is internal and the self IP address is 192.168.10.100:
ip addr | grep -E 'internal|external'
7: external: <BROADCAST,MULTICAST,UP,LOWER_UP> mtu 1500inet 192.168.10.100/24 brd 10.20.0.0 scope global external
8: internal: <BROADCAST,MULTICAST,UP,LOWER_UP> mtu 1500inet 10.144.175.100/24 brd 10.144.175.0 scope global internal
Feedback
Provide feedback to improve this document by emailing [email protected].
111

F5 Service Proxy for Kubernetes - v1.5.0 Installation and Integration
F5SPKStaticRoute
Overview
This overview discusses the F5SPKStaticRoute CR. For the full list of CRs, refer to the SPK CRs overview. TheF5SPKStaticRoute Custom Resource (CR) configures the Service Proxy (SPK) Traffic Management Microkernal’s (TMM)static routing table.
This document guides you through a basic static route CR deployment.
Parameters
The CR spec parameters used to configure the Service Proxy TMM static routing table are:
Parameter Description
destination The IPv4 Address routing destination.
prefixlen The IPv4 address subnet mask.
gateway The IPv4 address of the routing gateway.
destination_v6 The IPv6 Address routing destination.
prefixlen_v6 The IPv6 address subnet mask.
gateway_v6 The IPv6 address of the routing gateway.
type Type of route to set. The default is gateway.
Example CR:
apiVersion: "k8s.f5net.com/v1"kind: F5SPKStaticRoutemetadata:
name: "staticroute-ipv4"namespace: spk-ingress
spec:destination: 10.10.1.100prefixLen: 32type: gatewaygateway: 10.146.134.1
Requirements
Ensure you have:
• Uploaded the Software images.• Installed the [Ingress Controller] Pods.• Have a Linux based workstation.
Deployment
Use the following steps todeploy the example F5SPKStaticRouteCR, and verify the Service Proxy TMMconfiguration.
112
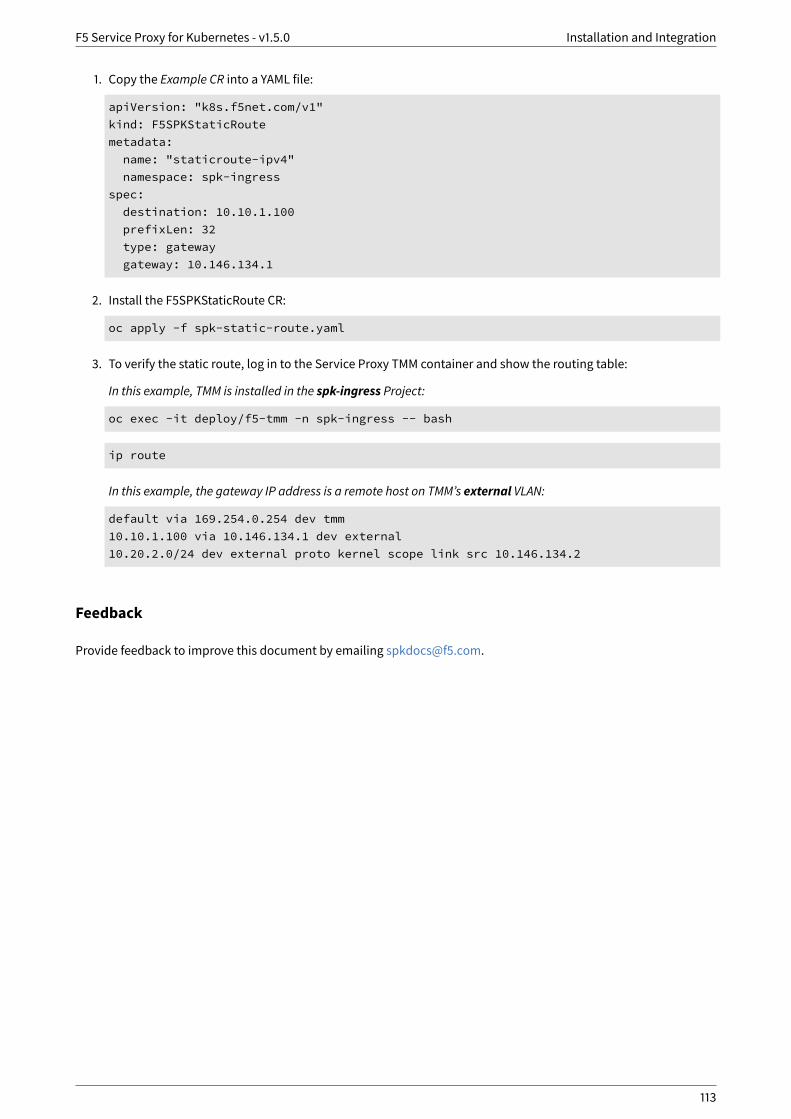
F5 Service Proxy for Kubernetes - v1.5.0 Installation and Integration
1. Copy the Example CR into a YAML file:
apiVersion: "k8s.f5net.com/v1"kind: F5SPKStaticRoutemetadata:name: "staticroute-ipv4"namespace: spk-ingress
spec:destination: 10.10.1.100prefixLen: 32type: gatewaygateway: 10.146.134.1
2. Install the F5SPKStaticRoute CR:
oc apply -f spk-static-route.yaml
3. To verify the static route, log in to the Service Proxy TMM container and show the routing table:
In this example, TMM is installed in the spk-ingress Project:
oc exec -it deploy/f5-tmm -n spk-ingress -- bash
ip route
In this example, the gateway IP address is a remote host on TMM’s external VLAN:
default via 169.254.0.254 dev tmm10.10.1.100 via 10.146.134.1 dev external10.20.2.0/24 dev external proto kernel scope link src 10.146.134.2
Feedback
Provide feedback to improve this document by emailing [email protected].
113
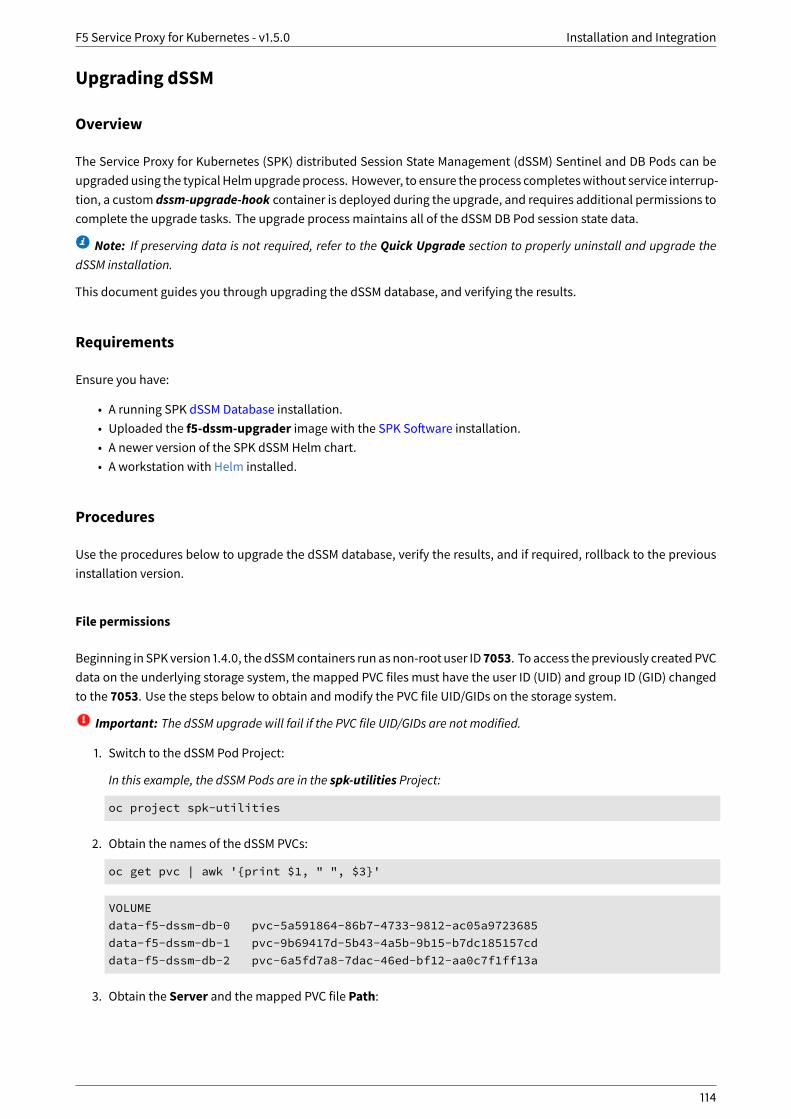
F5 Service Proxy for Kubernetes - v1.5.0 Installation and Integration
Upgrading dSSM
Overview
The Service Proxy for Kubernetes (SPK) distributed Session State Management (dSSM) Sentinel and DB Pods can beupgradedusing the typical Helmupgradeprocess. However, to ensure theprocess completeswithout service interrup-tion, a custom dssm-upgrade-hook container is deployed during the upgrade, and requires additional permissions tocomplete the upgrade tasks. The upgrade process maintains all of the dSSM DB Pod session state data.
Note: If preserving data is not required, refer to the Quick Upgrade section to properly uninstall and upgrade thedSSM installation.
This document guides you through upgrading the dSSM database, and verifying the results.
Requirements
Ensure you have:
• A running SPK dSSM Database installation.• Uploaded the f5-dssm-upgrader image with the SPK Software installation.• A newer version of the SPK dSSM Helm chart.• A workstation with Helm installed.
Procedures
Use the procedures below to upgrade the dSSM database, verify the results, and if required, rollback to the previousinstallation version.
File permissions
Beginning in SPK version 1.4.0, the dSSMcontainers run as non-root user ID7053. To access thepreviously createdPVCdata on the underlying storage system, the mapped PVC files must have the user ID (UID) and group ID (GID) changedto the 7053. Use the steps below to obtain andmodify the PVC file UID/GIDs on the storage system.
Important: The dSSM upgrade will fail if the PVC file UID/GIDs are not modified.
1. Switch to the dSSM Pod Project:
In this example, the dSSM Pods are in the spk-utilities Project:
oc project spk-utilities
2. Obtain the names of the dSSM PVCs:
oc get pvc | awk '{print $1, " ", $3}'
VOLUMEdata-f5-dssm-db-0 pvc-5a591864-86b7-4733-9812-ac05a9723685data-f5-dssm-db-1 pvc-9b69417d-5b43-4a5b-9b15-b7dc185157cddata-f5-dssm-db-2 pvc-6a5fd7a8-7dac-46ed-bf12-aa0c7f1ff13a
3. Obtain the Server and the mapped PVC file Path:
114
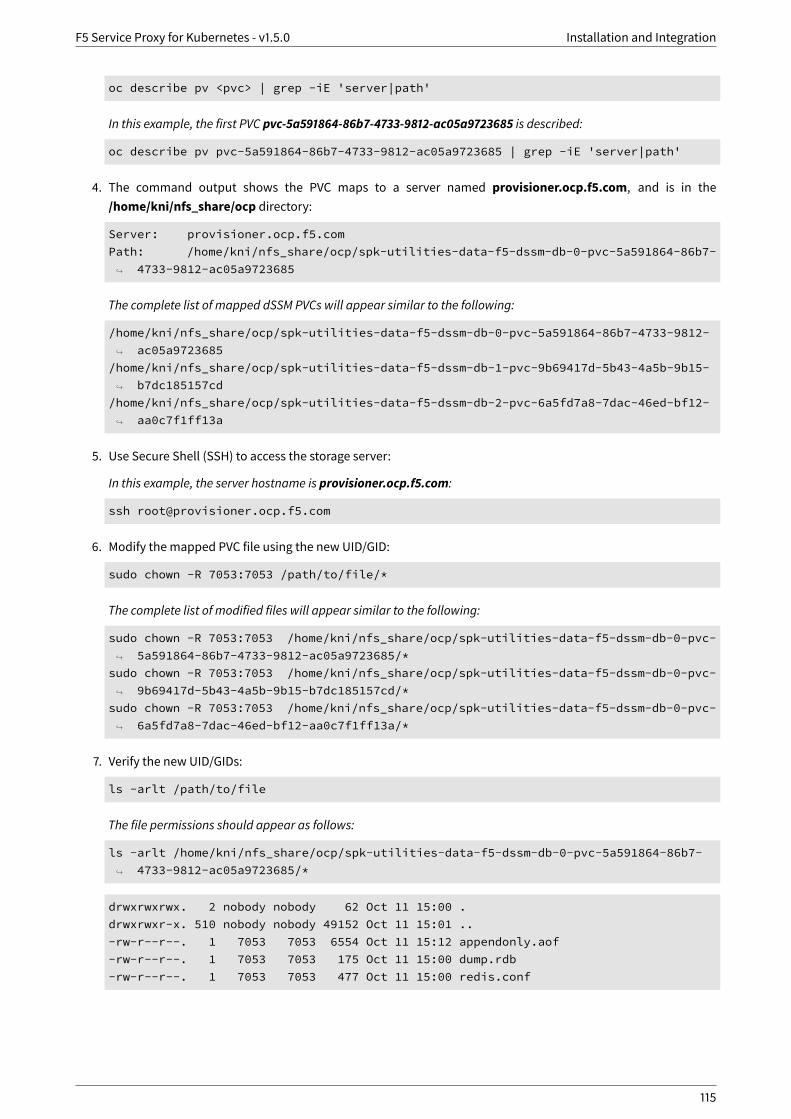
F5 Service Proxy for Kubernetes - v1.5.0 Installation and Integration
oc describe pv <pvc> | grep -iE 'server|path'
In this example, the first PVC pvc-5a591864-86b7-4733-9812-ac05a9723685 is described:
oc describe pv pvc-5a591864-86b7-4733-9812-ac05a9723685 | grep -iE 'server|path'
4. The command output shows the PVC maps to a server named provisioner.ocp.f5.com, and is in the/home/kni/nfs_share/ocp directory:
Server: provisioner.ocp.f5.comPath: /home/kni/nfs_share/ocp/spk-utilities-data-f5-dssm-db-0-pvc-5a591864-86b7-
4733-9812-ac05a9723685↪
The complete list of mapped dSSM PVCs will appear similar to the following:
/home/kni/nfs_share/ocp/spk-utilities-data-f5-dssm-db-0-pvc-5a591864-86b7-4733-9812-ac05a9723685↪
/home/kni/nfs_share/ocp/spk-utilities-data-f5-dssm-db-1-pvc-9b69417d-5b43-4a5b-9b15-b7dc185157cd↪
/home/kni/nfs_share/ocp/spk-utilities-data-f5-dssm-db-2-pvc-6a5fd7a8-7dac-46ed-bf12-aa0c7f1ff13a↪
5. Use Secure Shell (SSH) to access the storage server:
In this example, the server hostname is provisioner.ocp.f5.com:
6. Modify the mapped PVC file using the new UID/GID:
sudo chown -R 7053:7053 /path/to/file/*
The complete list of modified files will appear similar to the following:
sudo chown -R 7053:7053 /home/kni/nfs_share/ocp/spk-utilities-data-f5-dssm-db-0-pvc-5a591864-86b7-4733-9812-ac05a9723685/*↪
sudo chown -R 7053:7053 /home/kni/nfs_share/ocp/spk-utilities-data-f5-dssm-db-0-pvc-9b69417d-5b43-4a5b-9b15-b7dc185157cd/*↪
sudo chown -R 7053:7053 /home/kni/nfs_share/ocp/spk-utilities-data-f5-dssm-db-0-pvc-6a5fd7a8-7dac-46ed-bf12-aa0c7f1ff13a/*↪
7. Verify the new UID/GIDs:
ls -arlt /path/to/file
The file permissions should appear as follows:
ls -arlt /home/kni/nfs_share/ocp/spk-utilities-data-f5-dssm-db-0-pvc-5a591864-86b7-4733-9812-ac05a9723685/*↪
drwxrwxrwx. 2 nobody nobody 62 Oct 11 15:00 .drwxrwxr-x. 510 nobody nobody 49152 Oct 11 15:01 ..-rw-r--r--. 1 7053 7053 6554 Oct 11 15:12 appendonly.aof-rw-r--r--. 1 7053 7053 175 Oct 11 15:00 dump.rdb-rw-r--r--. 1 7053 7053 477 Oct 11 15:00 redis.conf
115
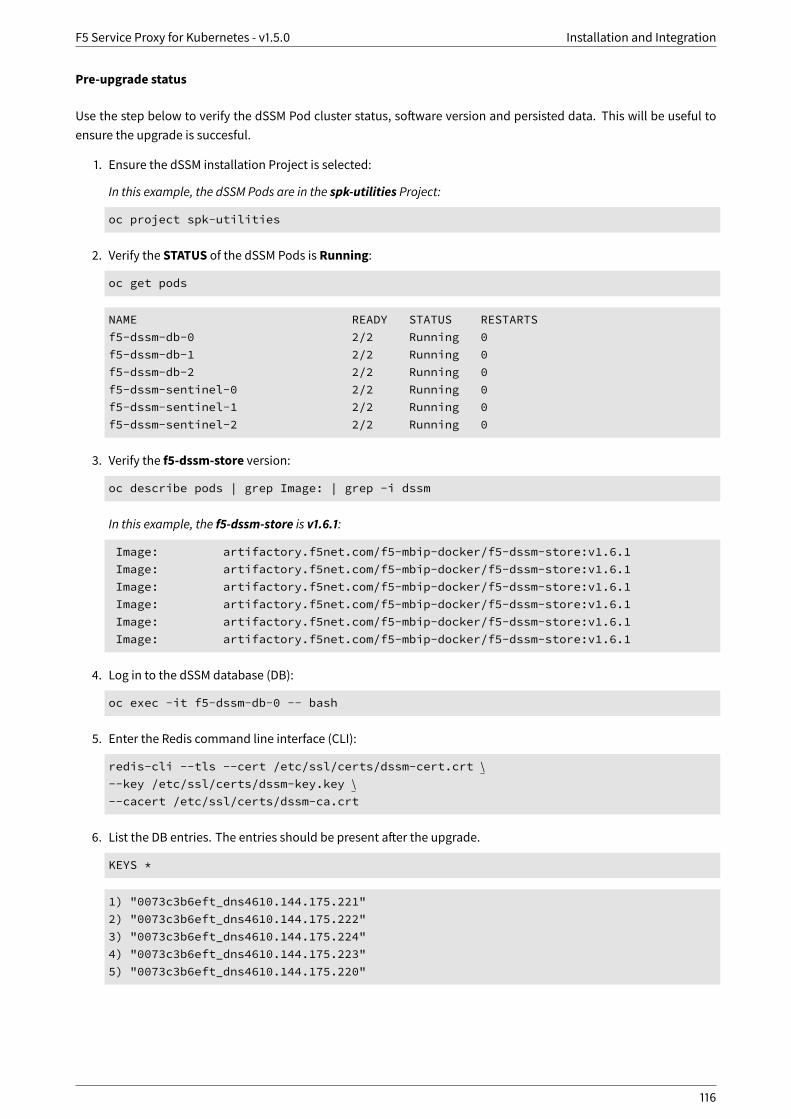
F5 Service Proxy for Kubernetes - v1.5.0 Installation and Integration
Pre-upgrade status
Use the step below to verify the dSSM Pod cluster status, software version and persisted data. This will be useful toensure the upgrade is succesful.
1. Ensure the dSSM installation Project is selected:
In this example, the dSSM Pods are in the spk-utilities Project:
oc project spk-utilities
2. Verify the STATUS of the dSSM Pods is Running:
oc get pods
NAME READY STATUS RESTARTSf5-dssm-db-0 2/2 Running 0f5-dssm-db-1 2/2 Running 0f5-dssm-db-2 2/2 Running 0f5-dssm-sentinel-0 2/2 Running 0f5-dssm-sentinel-1 2/2 Running 0f5-dssm-sentinel-2 2/2 Running 0
3. Verify the f5-dssm-store version:
oc describe pods | grep Image: | grep -i dssm
In this example, the f5-dssm-store is v1.6.1:
Image: artifactory.f5net.com/f5-mbip-docker/f5-dssm-store:v1.6.1Image: artifactory.f5net.com/f5-mbip-docker/f5-dssm-store:v1.6.1Image: artifactory.f5net.com/f5-mbip-docker/f5-dssm-store:v1.6.1Image: artifactory.f5net.com/f5-mbip-docker/f5-dssm-store:v1.6.1Image: artifactory.f5net.com/f5-mbip-docker/f5-dssm-store:v1.6.1Image: artifactory.f5net.com/f5-mbip-docker/f5-dssm-store:v1.6.1
4. Log in to the dSSM database (DB):
oc exec -it f5-dssm-db-0 -- bash
5. Enter the Redis command line interface (CLI):
redis-cli --tls --cert /etc/ssl/certs/dssm-cert.crt \--key /etc/ssl/certs/dssm-key.key \--cacert /etc/ssl/certs/dssm-ca.crt
6. List the DB entries. The entries should be present after the upgrade.
KEYS *
1) "0073c3b6eft_dns4610.144.175.221"2) "0073c3b6eft_dns4610.144.175.222"3) "0073c3b6eft_dns4610.144.175.224"4) "0073c3b6eft_dns4610.144.175.223"5) "0073c3b6eft_dns4610.144.175.220"
116
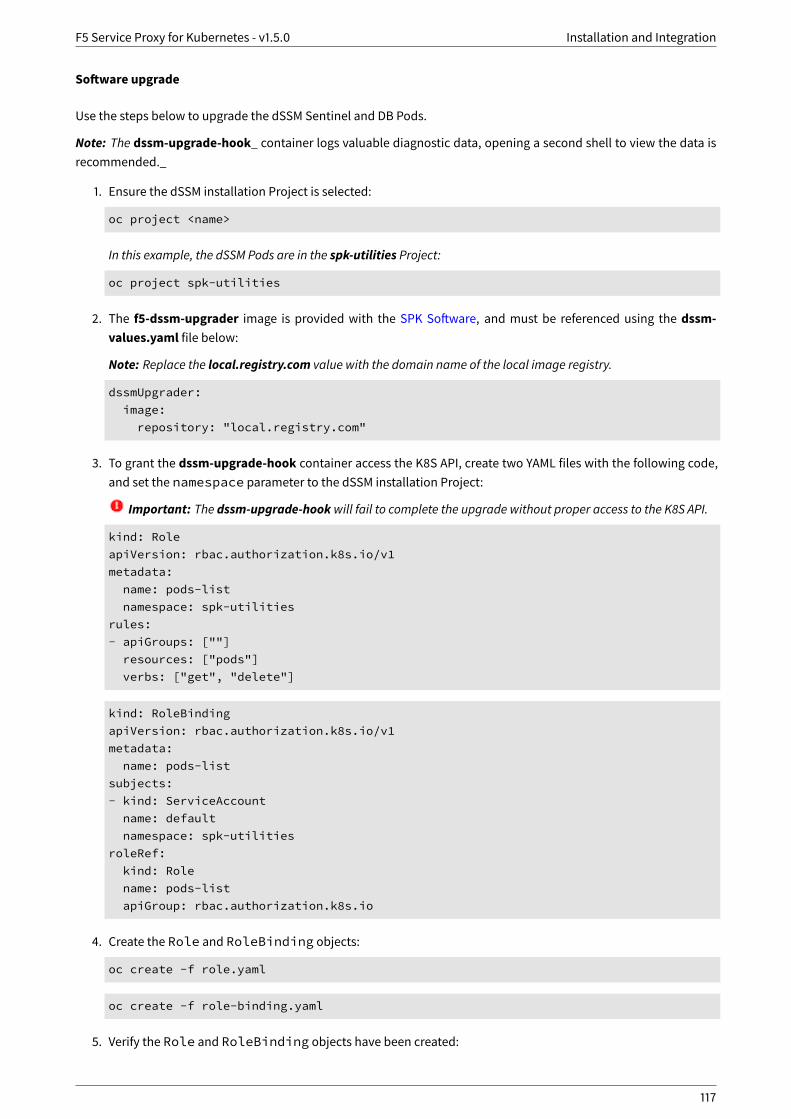
F5 Service Proxy for Kubernetes - v1.5.0 Installation and Integration
Software upgrade
Use the steps below to upgrade the dSSM Sentinel and DB Pods.
Note: The dssm-upgrade-hook_ container logs valuable diagnostic data, opening a second shell to view the data isrecommended._
1. Ensure the dSSM installation Project is selected:
oc project <name>
In this example, the dSSM Pods are in the spk-utilities Project:
oc project spk-utilities
2. The f5-dssm-upgrader image is provided with the SPK Software, and must be referenced using the dssm-values.yaml file below:
Note: Replace the local.registry.com value with the domain name of the local image registry.
dssmUpgrader:image:
repository: "local.registry.com"
3. To grant the dssm-upgrade-hook container access the K8S API, create two YAML files with the following code,and set the namespace parameter to the dSSM installation Project:
Important: The dssm-upgrade-hookwill fail to complete the upgrade without proper access to the K8S API.
kind: RoleapiVersion: rbac.authorization.k8s.io/v1metadata:name: pods-listnamespace: spk-utilities
rules:- apiGroups: [""]resources: ["pods"]verbs: ["get", "delete"]
kind: RoleBindingapiVersion: rbac.authorization.k8s.io/v1metadata:name: pods-list
subjects:- kind: ServiceAccountname: defaultnamespace: spk-utilities
roleRef:kind: Rolename: pods-listapiGroup: rbac.authorization.k8s.io
4. Create the Role and RoleBinding objects:
oc create -f role.yaml
oc create -f role-binding.yaml
5. Verify the Role and RoleBinding objects have been created:
117
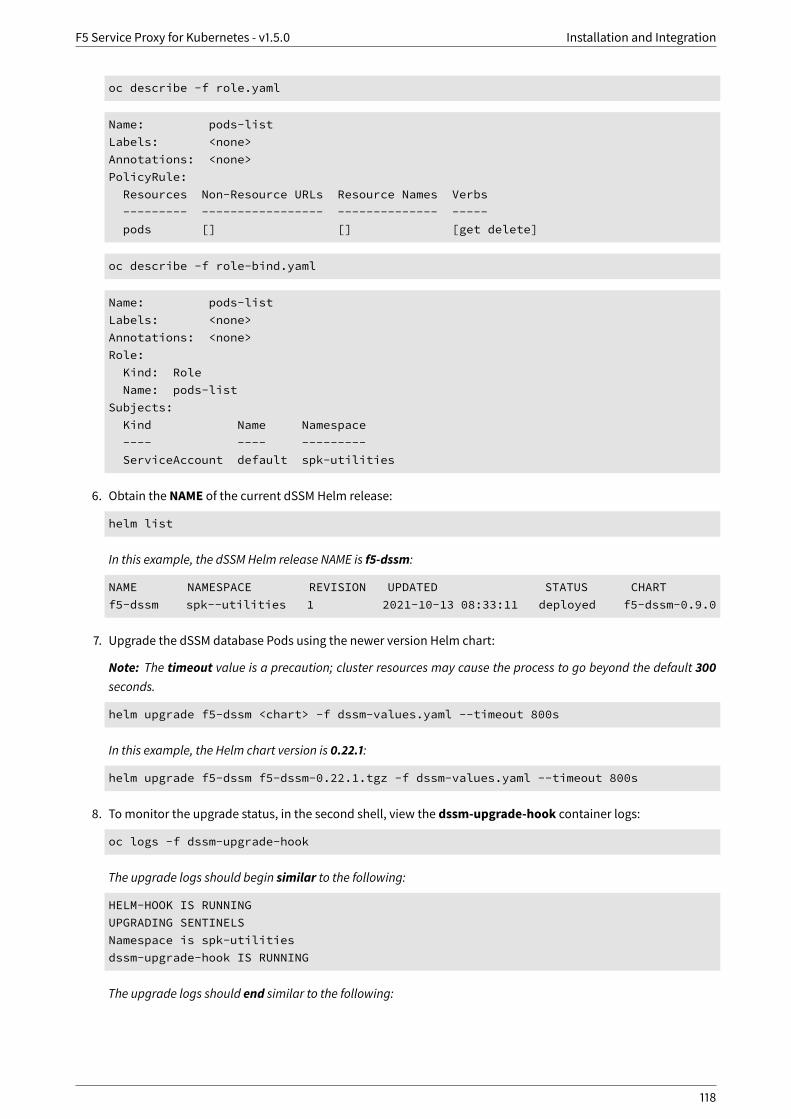
F5 Service Proxy for Kubernetes - v1.5.0 Installation and Integration
oc describe -f role.yaml
Name: pods-listLabels: <none>Annotations: <none>PolicyRule:Resources Non-Resource URLs Resource Names Verbs--------- ----------------- -------------- -----pods [] [] [get delete]
oc describe -f role-bind.yaml
Name: pods-listLabels: <none>Annotations: <none>Role:Kind: RoleName: pods-list
Subjects:Kind Name Namespace---- ---- ---------ServiceAccount default spk-utilities
6. Obtain the NAME of the current dSSM Helm release:
helm list
In this example, the dSSM Helm release NAME is f5-dssm:
NAME NAMESPACE REVISION UPDATED STATUS CHARTf5-dssm spk--utilities 1 2021-10-13 08:33:11 deployed f5-dssm-0.9.0
7. Upgrade the dSSM database Pods using the newer version Helm chart:
Note: The timeout value is a precaution; cluster resources may cause the process to go beyond the default 300seconds.
helm upgrade f5-dssm <chart> -f dssm-values.yaml --timeout 800s
In this example, the Helm chart version is 0.22.1:
helm upgrade f5-dssm f5-dssm-0.22.1.tgz -f dssm-values.yaml --timeout 800s
8. Tomonitor the upgrade status, in the second shell, view the dssm-upgrade-hook container logs:
oc logs -f dssm-upgrade-hook
The upgrade logs should begin similar to the following:
HELM-HOOK IS RUNNINGUPGRADING SENTINELSNamespace is spk-utilitiesdssm-upgrade-hook IS RUNNING
The upgrade logs should end similar to the following:
118
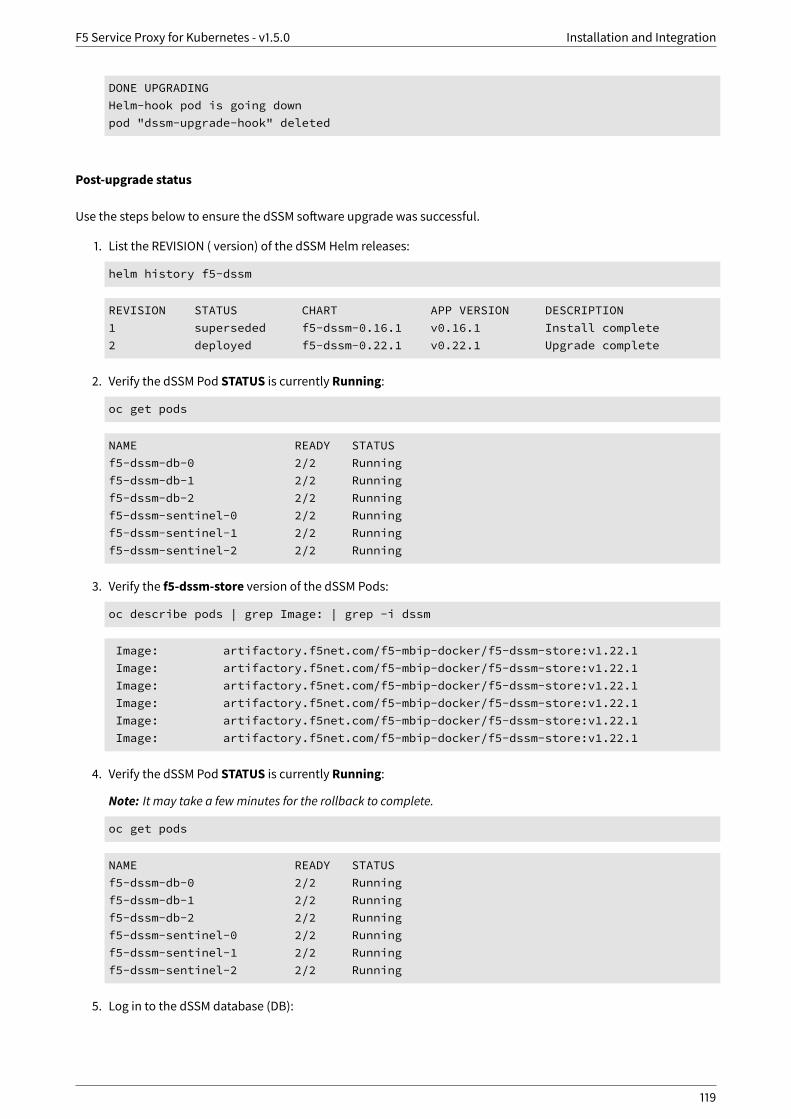
F5 Service Proxy for Kubernetes - v1.5.0 Installation and Integration
DONE UPGRADINGHelm-hook pod is going downpod "dssm-upgrade-hook" deleted
Post-upgrade status
Use the steps below to ensure the dSSM software upgrade was successful.
1. List the REVISION ( version) of the dSSM Helm releases:
helm history f5-dssm
REVISION STATUS CHART APP VERSION DESCRIPTION1 superseded f5-dssm-0.16.1 v0.16.1 Install complete2 deployed f5-dssm-0.22.1 v0.22.1 Upgrade complete
2. Verify the dSSM Pod STATUS is currently Running:
oc get pods
NAME READY STATUSf5-dssm-db-0 2/2 Runningf5-dssm-db-1 2/2 Runningf5-dssm-db-2 2/2 Runningf5-dssm-sentinel-0 2/2 Runningf5-dssm-sentinel-1 2/2 Runningf5-dssm-sentinel-2 2/2 Running
3. Verify the f5-dssm-store version of the dSSM Pods:
oc describe pods | grep Image: | grep -i dssm
Image: artifactory.f5net.com/f5-mbip-docker/f5-dssm-store:v1.22.1Image: artifactory.f5net.com/f5-mbip-docker/f5-dssm-store:v1.22.1Image: artifactory.f5net.com/f5-mbip-docker/f5-dssm-store:v1.22.1Image: artifactory.f5net.com/f5-mbip-docker/f5-dssm-store:v1.22.1Image: artifactory.f5net.com/f5-mbip-docker/f5-dssm-store:v1.22.1Image: artifactory.f5net.com/f5-mbip-docker/f5-dssm-store:v1.22.1
4. Verify the dSSM Pod STATUS is currently Running:
Note: It may take a fewminutes for the rollback to complete.
oc get pods
NAME READY STATUSf5-dssm-db-0 2/2 Runningf5-dssm-db-1 2/2 Runningf5-dssm-db-2 2/2 Runningf5-dssm-sentinel-0 2/2 Runningf5-dssm-sentinel-1 2/2 Runningf5-dssm-sentinel-2 2/2 Running
5. Log in to the dSSM database (DB):
119
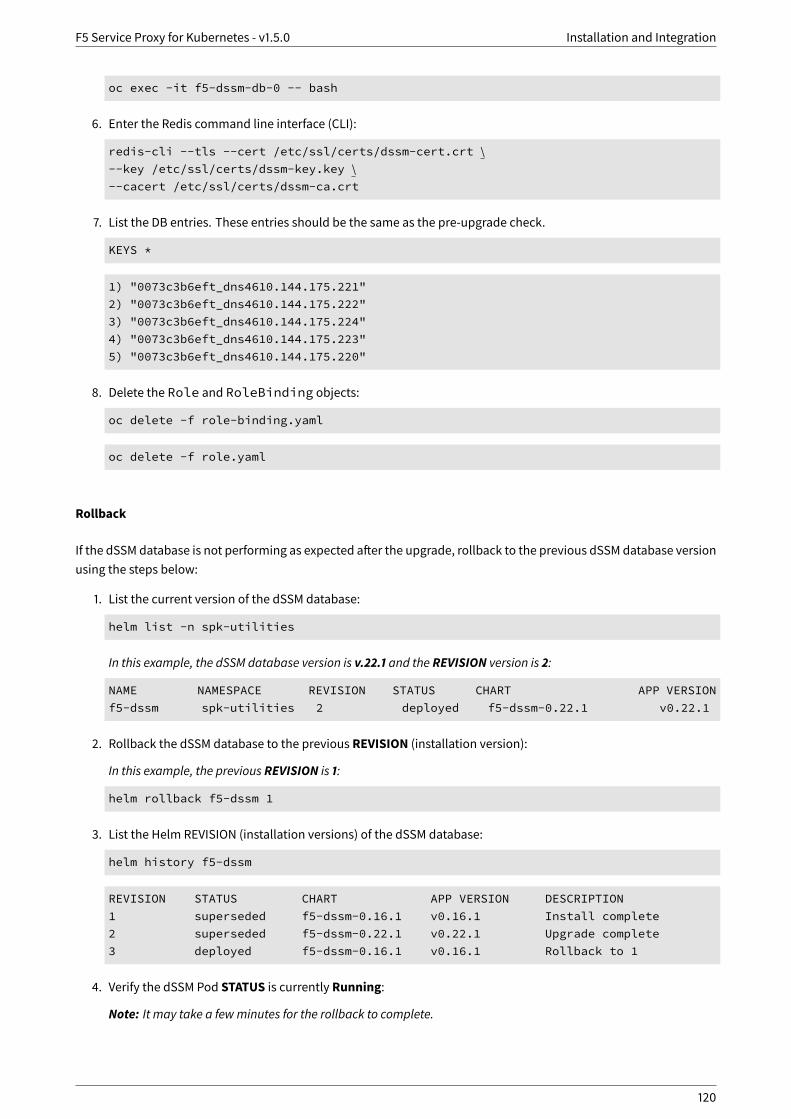
F5 Service Proxy for Kubernetes - v1.5.0 Installation and Integration
oc exec -it f5-dssm-db-0 -- bash
6. Enter the Redis command line interface (CLI):
redis-cli --tls --cert /etc/ssl/certs/dssm-cert.crt \--key /etc/ssl/certs/dssm-key.key \--cacert /etc/ssl/certs/dssm-ca.crt
7. List the DB entries. These entries should be the same as the pre-upgrade check.
KEYS *
1) "0073c3b6eft_dns4610.144.175.221"2) "0073c3b6eft_dns4610.144.175.222"3) "0073c3b6eft_dns4610.144.175.224"4) "0073c3b6eft_dns4610.144.175.223"5) "0073c3b6eft_dns4610.144.175.220"
8. Delete the Role and RoleBinding objects:
oc delete -f role-binding.yaml
oc delete -f role.yaml
Rollback
If the dSSM database is not performing as expected after the upgrade, rollback to the previous dSSM database versionusing the steps below:
1. List the current version of the dSSM database:
helm list -n spk-utilities
In this example, the dSSM database version is v.22.1 and the REVISION version is 2:
NAME NAMESPACE REVISION STATUS CHART APP VERSIONf5-dssm spk-utilities 2 deployed f5-dssm-0.22.1 v0.22.1
2. Rollback the dSSM database to the previous REVISION (installation version):
In this example, the previous REVISION is 1:
helm rollback f5-dssm 1
3. List the Helm REVISION (installation versions) of the dSSM database:
helm history f5-dssm
REVISION STATUS CHART APP VERSION DESCRIPTION1 superseded f5-dssm-0.16.1 v0.16.1 Install complete2 superseded f5-dssm-0.22.1 v0.22.1 Upgrade complete3 deployed f5-dssm-0.16.1 v0.16.1 Rollback to 1
4. Verify the dSSM Pod STATUS is currently Running:
Note: It may take a fewminutes for the rollback to complete.
120
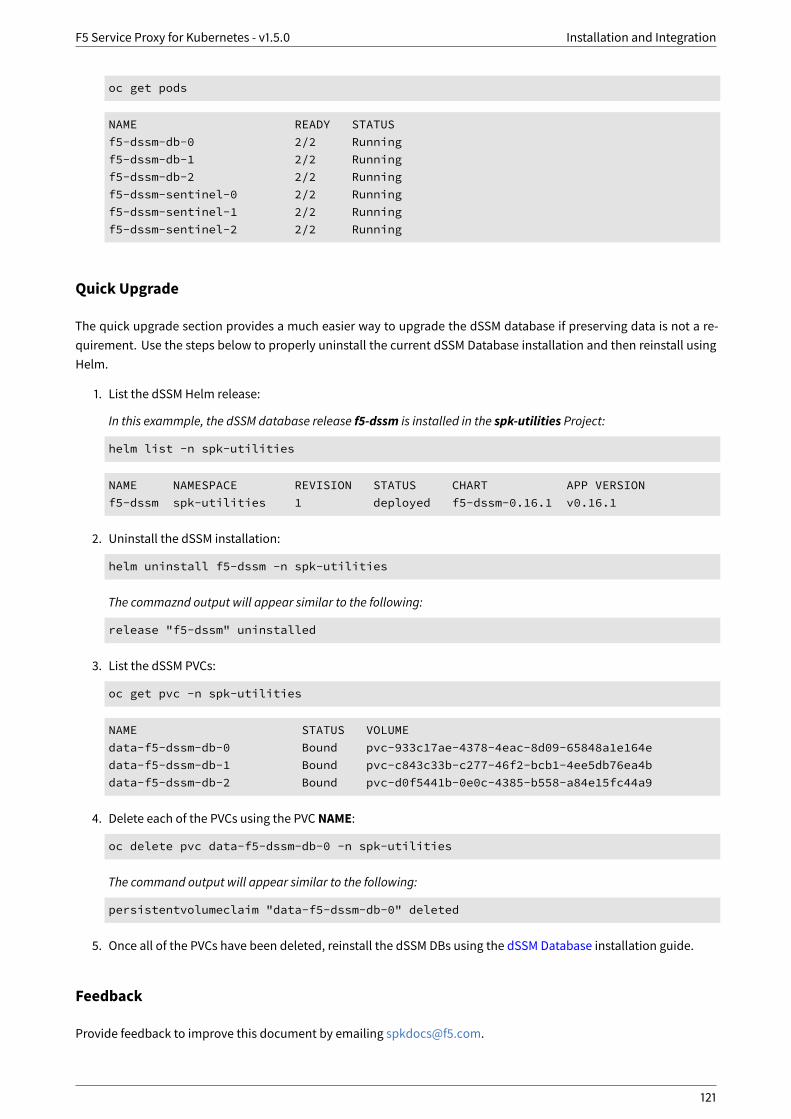
F5 Service Proxy for Kubernetes - v1.5.0 Installation and Integration
oc get pods
NAME READY STATUSf5-dssm-db-0 2/2 Runningf5-dssm-db-1 2/2 Runningf5-dssm-db-2 2/2 Runningf5-dssm-sentinel-0 2/2 Runningf5-dssm-sentinel-1 2/2 Runningf5-dssm-sentinel-2 2/2 Running
Quick Upgrade
The quick upgrade section provides a much easier way to upgrade the dSSM database if preserving data is not a re-quirement. Use the steps below to properly uninstall the current dSSM Database installation and then reinstall usingHelm.
1. List the dSSM Helm release:
In this exammple, the dSSM database release f5-dssm is installed in the spk-utilities Project:
helm list -n spk-utilities
NAME NAMESPACE REVISION STATUS CHART APP VERSIONf5-dssm spk-utilities 1 deployed f5-dssm-0.16.1 v0.16.1
2. Uninstall the dSSM installation:
helm uninstall f5-dssm -n spk-utilities
The commaznd output will appear similar to the following:
release "f5-dssm" uninstalled
3. List the dSSM PVCs:
oc get pvc -n spk-utilities
NAME STATUS VOLUMEdata-f5-dssm-db-0 Bound pvc-933c17ae-4378-4eac-8d09-65848a1e164edata-f5-dssm-db-1 Bound pvc-c843c33b-c277-46f2-bcb1-4ee5db76ea4bdata-f5-dssm-db-2 Bound pvc-d0f5441b-0e0c-4385-b558-a84e15fc44a9
4. Delete each of the PVCs using the PVC NAME:
oc delete pvc data-f5-dssm-db-0 -n spk-utilities
The command output will appear similar to the following:
persistentvolumeclaim "data-f5-dssm-db-0" deleted
5. Once all of the PVCs have been deleted, reinstall the dSSM DBs using the dSSM Database installation guide.
Feedback
Provide feedback to improve this document by emailing [email protected].
121

F5 Service Proxy for Kubernetes - v1.5.0 Installation and Integration
Supplemental
• Using Helm
122
F5 Service Proxy for Kubernetes - v1.5.0 Installation and Integration
App Hairpinning
Overview
SPK Application Hairpinning enables applications to be exposed to both external client and internal Pods, using thesame domain name or IP address. Application Hairpinning accomplishes this by installing two SPK CRs of the sametype, for example the F5SPKIngressTCP, both targeting the sameKubernetes Service. Each SPKCR then enables trafficfor the specific F5SPKVlan that client ingress traffic is expected. SNATAutomap is alsoapplied internally toensurePodsconnect back through the Traffic Management Microkernel (TMM).
This document guides you through creating a simple Application Hairpinning configuration for a TCP based applica-tion.
CR Parameters
SPK CRs configure the Service Proxy Traffic Management Microkernel (TMM) to proxy and load balance applicationtraffic using specific parameters. The CR parameter used in this document are described in the table below:
Parameter Description
service.name Selects the Service object name for the internal applications (Pods), andcreates a round-robin load balancing pool using the Service Endpoints.
service.port Selects the Service object port value.
spec.destinationAddress Creates an IPv4 virtual server address for ingress connections.
spec.destinationPort Defines the service port for inbound connections.
spec.snat Translate the source IP address of ingress packets to TMM’s self IP addresses.Use SRC_TRANS_AUTOMAP to enable, and SRC_TRANS_NONE to disable(default).
spec.vlans.vlanList Specifies a list of F5SPKVlan CRs to listen for ingress traffic, using the CR’smetadata.name. The list can also be disabled usingdisableListedVlans.
spec.vlans.category Specifies an F5SPKVlan CR category to listen for ingress traffic. Thecategory can also be disabled using disableListedVlans.
spec.vlans.disableListedVlansDisables, or denies traffic specified with the vlanList or categoryparameters: true or false (default).
Example deployment:
123
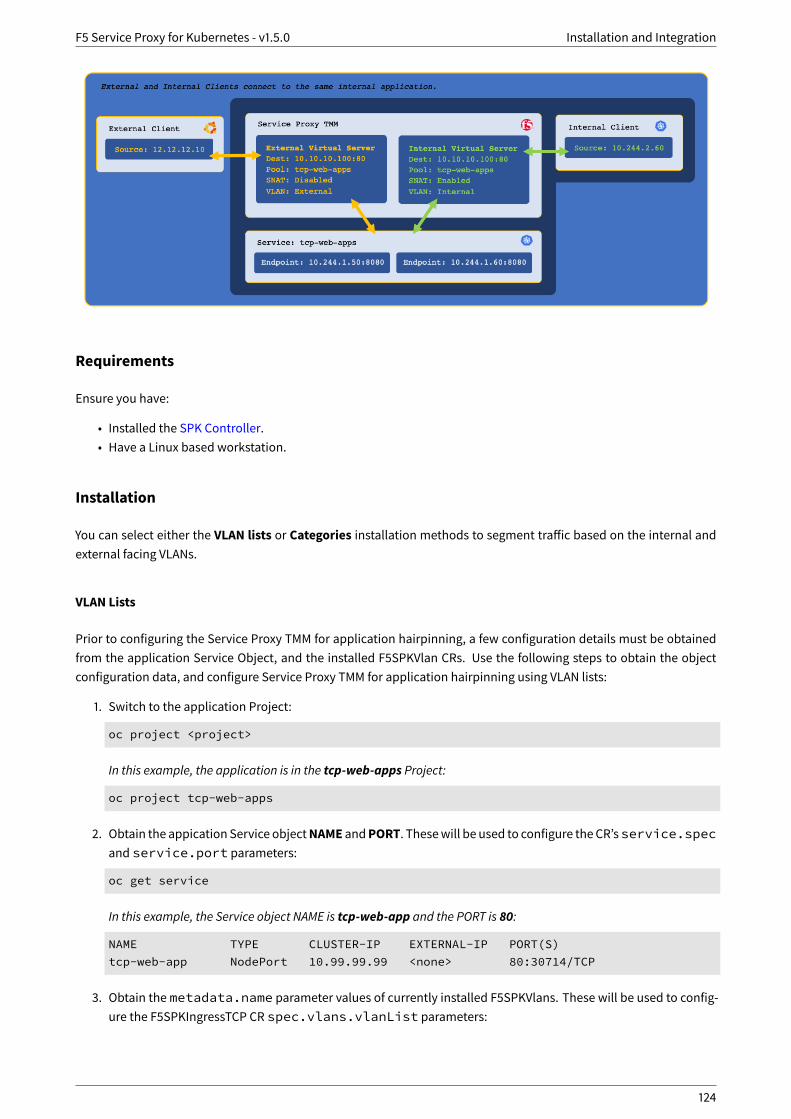
F5 Service Proxy for Kubernetes - v1.5.0 Installation and Integration
Requirements
Ensure you have:
• Installed the SPK Controller.• Have a Linux based workstation.
Installation
You can select either the VLAN lists or Categories installation methods to segment traffic based on the internal andexternal facing VLANs.
VLAN Lists
Prior to configuring the Service Proxy TMM for application hairpinning, a few configuration details must be obtainedfrom the application Service Object, and the installed F5SPKVlan CRs. Use the following steps to obtain the objectconfiguration data, and configure Service Proxy TMM for application hairpinning using VLAN lists:
1. Switch to the application Project:
oc project <project>
In this example, the application is in the tcp-web-apps Project:
oc project tcp-web-apps
2. Obtain the appication Service objectNAME andPORT. Thesewill be used to configure theCR’sservice.specand service.port parameters:
oc get service
In this example, the Service object NAME is tcp-web-app and the PORT is 80:
NAME TYPE CLUSTER-IP EXTERNAL-IP PORT(S)tcp-web-app NodePort 10.99.99.99 <none> 80:30714/TCP
3. Obtain the metadata.name parameter values of currently installed F5SPKVlans. These will be used to config-ure the F5SPKIngressTCP CR spec.vlans.vlanList parameters:
124
F5 Service Proxy for Kubernetes - v1.5.0 Installation and Integration
oc get f5-spk-vlans
In this example, the two F5SPKVlan metadata.name values are; vlan-external and vlan-internal:
NAMEvlan-externalvlan-internal
4. Copy the external CR into a YAML file:
apiVersion: "ingresstcp.k8s.f5net.com/v1"kind: F5SPKIngressTCPmetadata:namespace: tcp-web-appsname: ext-tcp-cr
service:name: tcp-web-appport: 80
spec:destinationAddress: "10.20.100.100"destinationPort: 80snat: "SRC_TRANS_NONE"vlans:
vlanList:- vlan-external
5. Copy the internal CR into a YAML file:
Note: The internal CR sets the snat parameter to SNAT_TRANS_AUTOMAP, ensuring the internal Pods connectback through TMM:
apiVersion: "ingresstcp.k8s.f5net.com/v1"kind: F5SPKIngressTCPmetadata:namespace: tcp-web-appsname: int-tcp-cr
service:name: tcp-web-appport: 80
spec:destinationAddress: "10.20.100.100"destinationPort: 80snat: "SRC_TRANS_AUTOMAP"vlans:
vlanList:- vlan-internal
6. Install the F5SPKIngressTCP CRs:
oc apply -f spk-ext-tcp.yaml
oc apply -f spk-int-tcp.yaml
7. Verify the CR objects have been installed:
oc get f5-spk-ingresstcp
125
F5 Service Proxy for Kubernetes - v1.5.0 Installation and Integration
NAME AGEext-tcp-cr 1mint-tcp-cr 1m
Categories
Prior to configuring the Service Proxy TMM for application hairpinning, a few configuration details must be obtainedfrom the application Service Object, and the installed F5SPKVlan CRs. Use the following steps to obtain the objectconfiguration data, and configure Service Proxy TMM for application hairpinning using Categories:
1. Switch to the application Project:
oc project <project>
In this example, the application is in the tcp-web-apps Project:
oc project tcp-web-apps
2. Obtain the appication Service objectNAME andPORT. Thesewill be used to configure theCR’sservice.specand service.port parameters:
oc get service
In this example, the Service object NAME is tcp-web-app and the PORT is 80:
NAME TYPE CLUSTER-IP EXTERNAL-IP PORT(S)tcp-web-app NodePort 10.99.99.99 <none> 80:30714/TCP
3. Obtain the F5SPKVlan spec.category parameter values used to configure the F5SPKIngressTCP CRspec.vlans.category parameters:
In this example, the F5SPKVlans are in the spk-ingress Project:
oc describe f5-spk-vlan -n spk-ingress | grep -E '^Name:|Category:'
In this example, the vlan-external VLAN category value is external, and the vlan-internal VLAN categoryvalue is internal:
Name: vlan-externalCategory: external
Name: vlan-internalCategory: internal
4. Copy the external CR into a YAML file:
apiVersion: "ingresstcp.k8s.f5net.com/v1"kind: F5SPKIngressTCPmetadata:namespace: tcp-web-appsname: ext-tcp-cr
service:name: tcp-web-appport: 80
spec:destinationAddress: "10.20.100.100"destinationPort: 80snat: "SRC_TRANS_NONE"
126
F5 Service Proxy for Kubernetes - v1.5.0 Installation and Integration
vlans:category: external
5. Copy the internal CR into a YAML file:
Note: The internal CR sets the snat parameter to SNAT_TRANS_AUTOMAP, ensuring the internal Pods connectback through TMM:
apiVersion: "ingresstcp.k8s.f5net.com/v1"kind: F5SPKIngressTCPmetadata:namespace: tcp-web-appsname: int-tcp-cr
service:name: tcp-web-appport: 80
spec:destinationAddress: "10.20.100.100"destinationPort: 80snat: "SRC_TRANS_AUTOMAP"vlans:
category: internal
6. Install the F5SPKIngressTCP CRs:
oc apply -f spk-ext-tcp.yaml
oc apply -f spk-int-tcp.yaml
7. Verify the CR objects have been installed:
oc get f5-spk-ingresstcp
NAME AGEext-tcp-cr 1mint-tcp-cr 1m
Connection Statistics
Theexternal and internal clients shouldnowbeable to connect to theapplication through their respective F5SPKVlans.After connecting to the application from the external and internal clients, Use the steps below to verify the connectionstatistics:
Note: Youmust have the Debug Sidecar enabled to view connection statistics.
1. Switch to the [Ingress Controller] Project:
oc project <project>
In this example, the Ingress Controller is in the spk-ingress Project:
oc project spk-ingress
2. Log in to the TMM Debug Sidecar:
127
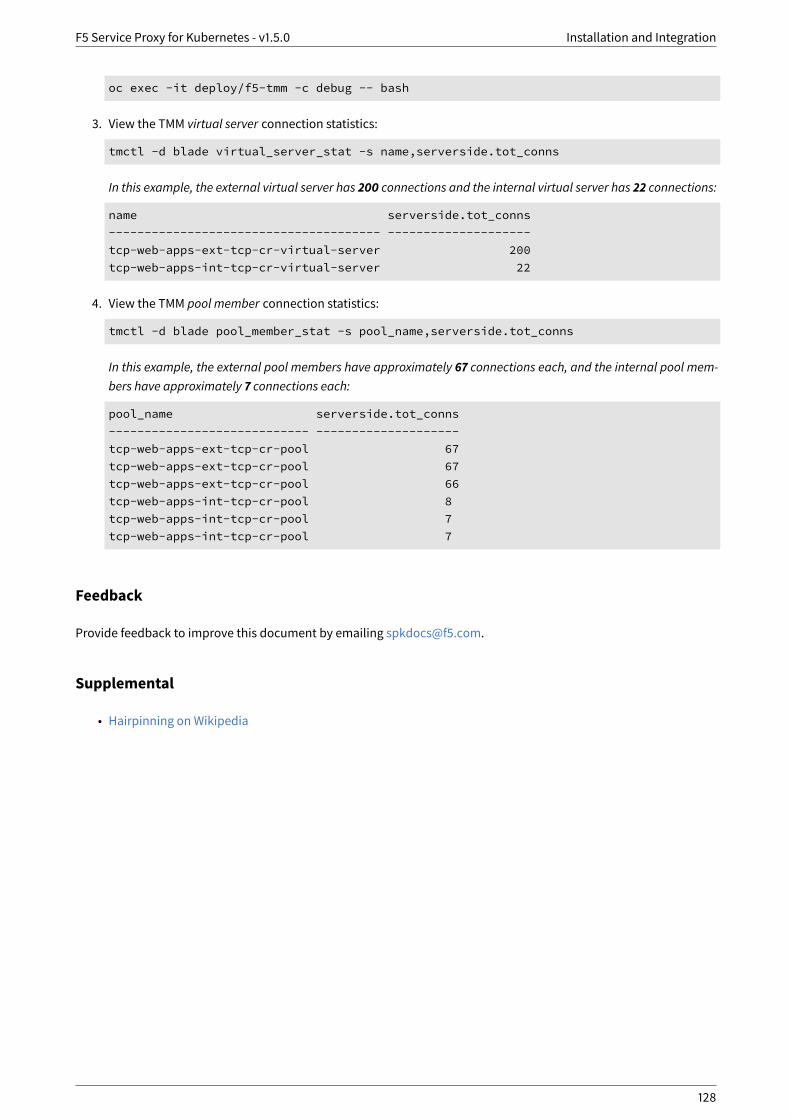
F5 Service Proxy for Kubernetes - v1.5.0 Installation and Integration
oc exec -it deploy/f5-tmm -c debug -- bash
3. View the TMM virtual server connection statistics:
tmctl -d blade virtual_server_stat -s name,serverside.tot_conns
In this example, the external virtual server has 200 connections and the internal virtual server has 22 connections:
name serverside.tot_conns-------------------------------------- --------------------tcp-web-apps-ext-tcp-cr-virtual-server 200tcp-web-apps-int-tcp-cr-virtual-server 22
4. View the TMM pool member connection statistics:
tmctl -d blade pool_member_stat -s pool_name,serverside.tot_conns
In this example, the external pool members have approximately 67 connections each, and the internal pool mem-bers have approximately 7 connections each:
pool_name serverside.tot_conns---------------------------- --------------------tcp-web-apps-ext-tcp-cr-pool 67tcp-web-apps-ext-tcp-cr-pool 67tcp-web-apps-ext-tcp-cr-pool 66tcp-web-apps-int-tcp-cr-pool 8tcp-web-apps-int-tcp-cr-pool 7tcp-web-apps-int-tcp-cr-pool 7
Feedback
Provide feedback to improve this document by emailing [email protected].
Supplemental
• Hairpinning on Wikipedia
128
F5 Service Proxy for Kubernetes - v1.5.0 Installation and Integration
Helm CR Integration
Overview
The Service Proxy for Kubernetes Custom Resources, SPK CRs, are collections of application traffic management ob-jects, used to configure the Service Proxy Traffic Management Microkernel (TMM) through the Kubernetes API. You caninstall SPK CRs after deploying a clustered application, or deploy them with the application using Helm, the recom-mendedmethod.
This document demonstrates how to install anNginxweb application, the requiredKubernetes Service object, and the[F5SPKIngress TCP] CR using Helm.
Templates
Helm templates are key for supporting complex Kubernetes deployments, and are implemented using the Go pro-gramming language. Template directives, written as a set of curly brackets, receive values from the Helm commandline interface (CLI). For example, the {{ .Values.app.object.name }} template directive receives the valuepassed using the --set app.object.name=<value> command. Helm then creates a release, sending the tem-plate data to the Kubernetes API. Helm charts often contain many templates, with many directives. The importantpoint to remember; templates enable complicated applications to be installed, deleted, modified, or upgradedwith asingle command.
Values
As mentioned, Helm parameter values provide configuration data to template directives. There are two ways to passvalues to templates using the Helm CLI; the --set option, or a YAML values file referenced using the -f option.
Note: Helm values that modify default template values are also referred to as override values, or simply overrides.
Set option
The Helm --set option provides parameter values directly on the CLI. For example:
helm install release chart --set app.name=test-app --set spec.ip=10.244.100.1 \--set spec.port=80
Values file
When a Helm chart has many template directives, it may be easier to set the values in a YAML file, and reference thefile using the -f option. For example:
1. Add the parameters and values to the values.yaml file:
app:name: test-app
spec:ip: 10.244.100.1port: 80
2. Reference the file when using the Helm CLI:
129
F5 Service Proxy for Kubernetes - v1.5.0 Installation and Integration
helm install release_name chart -f values.yaml
Requirements
Ensure you have:
• Uploaded Software images.• Installed the [Ingress Controller].• Have a Linux based workstation with Helm installed.
Procedure
1. Create a new Helm chart named cr-demo:
helm create cr-demo
2. Change into the cr-demo directory:
cd cr-demo
3. Edit the Chart.yaml file to better describe the application:
apiVersion: v2name: cr-demodescription: Integrating Nginx app and F5SPKIngressTCP CR
type: applicationversion: 0.1.0appVersion: "1.14.2"
4. Remove the default templates:
rm -rf templates/*
5. Create anNginxDeployment template named spk-nginx-deploy.yamlusing the code below, or download thefile here:
apiVersion: apps/v1kind: Deploymentmetadata:name: {{ .Values.nginx.name }}namespace: {{ .Release.Namespace }}
spec:selector:
matchLabels:app: {{ .Values.nginx.name }}
replicas: {{ .Values.nginx.replicas }}template:
metadata:labels:
app: {{ .Values.nginx.name }}spec:containers:- name: {{ .Values.nginx.image.name }}
image: "{{ .Values.nginx.image.name }}:{{ .Values.nginx.image.version }}"
130
F5 Service Proxy for Kubernetes - v1.5.0 Installation and Integration
6. Create an NginxService template named spk-nginx-service.yaml using the code below, or download the filehere:
apiVersion: v1kind: Servicemetadata:name: {{ .Values.nginx.name }}namespace: {{ .Release.Namespace }}labels:
app: {{ .Values.nginx.name }}spec:type: NodePortselector:
app: {{ .Values.nginx.name }}ports:- port: {{ .Values.service.port }}
targetPort: {{ .Values.service.targetPort }}protocol: TCP
7. Create an F5SPKIngressTCP CR template named spk-nginx-cr.yaml using the code below, or download the filehere:
Note: The if statements allow you to pass IPv4 or IPv6 address values.
apiVersion: "ingresstcp.k8s.f5net.com/v1"kind: F5SPKIngressTCPmetadata:name: {{ .Values.cr.name }}namespace: {{ .Release.Namespace }}
service:name: {{ .Values.nginx.name }}port: {{ .Values.service.port }}
spec:{{- if .Values.cr.dstIPv4 }}destinationAddress: {{ .Values.cr.dstIPv4 }}
{{- end }}{{- if .Values.cr.dstIPv6 }}ipv6destinationAddress: {{ .Values.cr.dstIPv6 }}
{{- end }}destinationPort: {{ .Values.cr.dstPort }}
8. The templates directory should now contain the following files:
ls -1 templates/
spk-nginx-cr.yamlspk-nginx-deploy.yamlspk-nginx-service.yaml
9. Create a Helm values file named nginx-values.yaml, or download the file here:
# The nginx deployment valuesnginx:name: nginx-appreplicas: 3image:
name: nginx
131
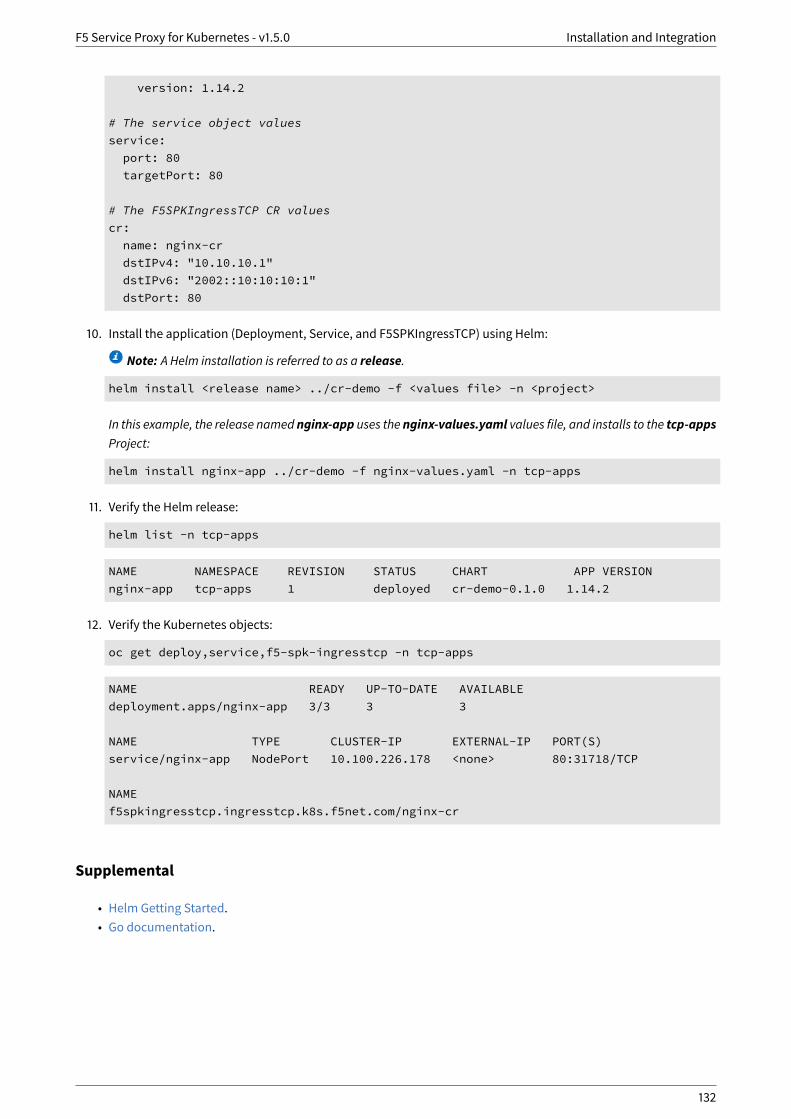
F5 Service Proxy for Kubernetes - v1.5.0 Installation and Integration
version: 1.14.2
# The service object valuesservice:port: 80targetPort: 80
# The F5SPKIngressTCP CR valuescr:name: nginx-crdstIPv4: "10.10.10.1"dstIPv6: "2002::10:10:10:1"dstPort: 80
10. Install the application (Deployment, Service, and F5SPKIngressTCP) using Helm:
Note: A Helm installation is referred to as a release.
helm install <release name> ../cr-demo -f <values file> -n <project>
In this example, the release named nginx-app uses the nginx-values.yaml values file, and installs to the tcp-appsProject:
helm install nginx-app ../cr-demo -f nginx-values.yaml -n tcp-apps
11. Verify the Helm release:
helm list -n tcp-apps
NAME NAMESPACE REVISION STATUS CHART APP VERSIONnginx-app tcp-apps 1 deployed cr-demo-0.1.0 1.14.2
12. Verify the Kubernetes objects:
oc get deploy,service,f5-spk-ingresstcp -n tcp-apps
NAME READY UP-TO-DATE AVAILABLEdeployment.apps/nginx-app 3/3 3 3
NAME TYPE CLUSTER-IP EXTERNAL-IP PORT(S)service/nginx-app NodePort 10.100.226.178 <none> 80:31718/TCP
NAMEf5spkingresstcp.ingresstcp.k8s.f5net.com/nginx-cr
Supplemental
• Helm Getting Started.• Go documentation.
132
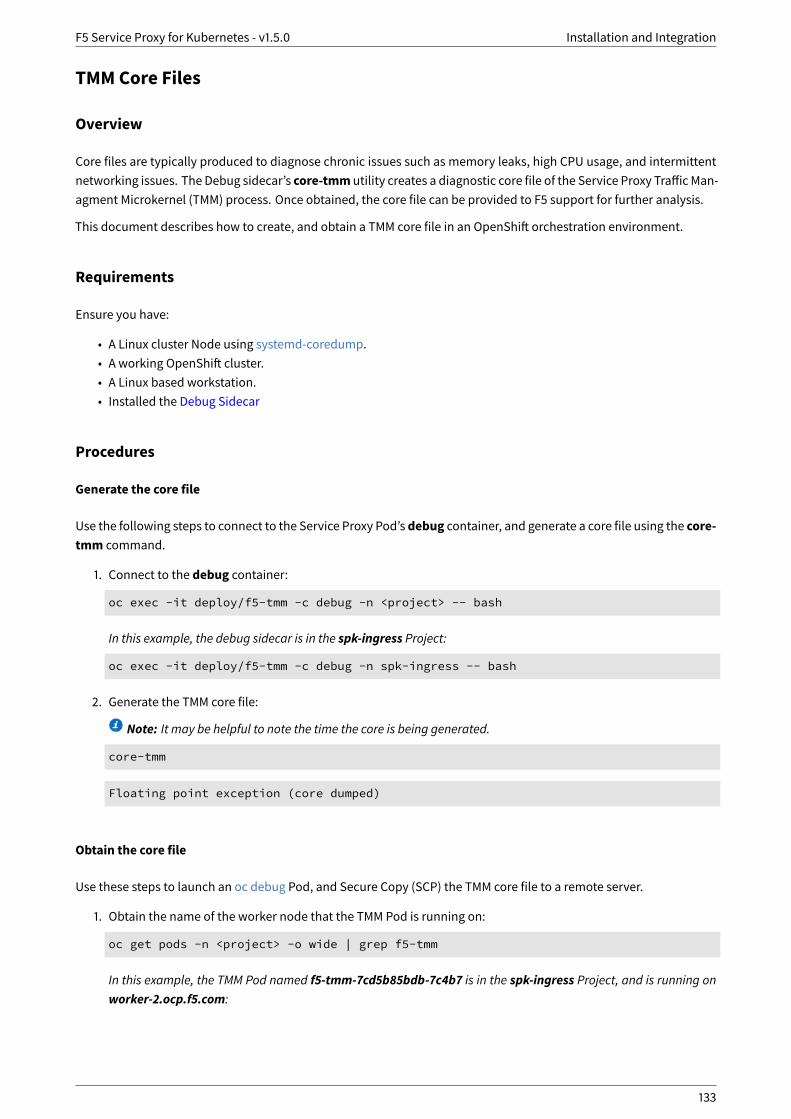
F5 Service Proxy for Kubernetes - v1.5.0 Installation and Integration
TMM Core Files
Overview
Core files are typically produced to diagnose chronic issues such as memory leaks, high CPU usage, and intermittentnetworking issues. The Debug sidecar’s core-tmm utility creates a diagnostic core file of the Service Proxy Traffic Man-agment Microkernel (TMM) process. Once obtained, the core file can be provided to F5 support for further analysis.
This document describes how to create, and obtain a TMM core file in an OpenShift orchestration environment.
Requirements
Ensure you have:
• A Linux cluster Node using systemd-coredump.• A working OpenShift cluster.• A Linux based workstation.• Installed the Debug Sidecar
Procedures
Generate the core file
Use the following steps to connect to the Service Proxy Pod’s debug container, and generate a core file using the core-tmm command.
1. Connect to the debug container:
oc exec -it deploy/f5-tmm -c debug -n <project> -- bash
In this example, the debug sidecar is in the spk-ingress Project:
oc exec -it deploy/f5-tmm -c debug -n spk-ingress -- bash
2. Generate the TMM core file:
Note: It may be helpful to note the time the core is being generated.
core-tmm
Floating point exception (core dumped)
Obtain the core file
Use these steps to launch an oc debug Pod, and Secure Copy (SCP) the TMM core file to a remote server.
1. Obtain the name of the worker node that the TMM Pod is running on:
oc get pods -n <project> -o wide | grep f5-tmm
In this example, the TMM Pod named f5-tmm-7cd5b85bdb-7c4b7 is in the spk-ingress Project, and is running onworker-2.ocp.f5.com:
133
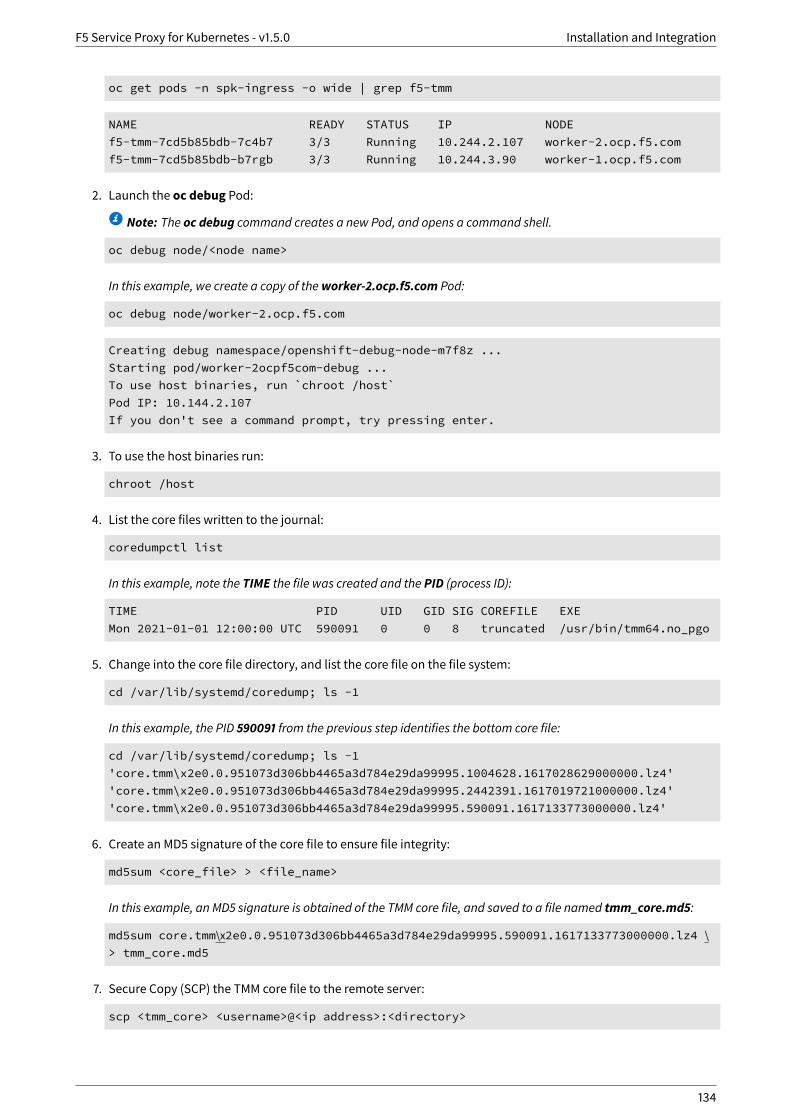
F5 Service Proxy for Kubernetes - v1.5.0 Installation and Integration
oc get pods -n spk-ingress -o wide | grep f5-tmm
NAME READY STATUS IP NODEf5-tmm-7cd5b85bdb-7c4b7 3/3 Running 10.244.2.107 worker-2.ocp.f5.comf5-tmm-7cd5b85bdb-b7rgb 3/3 Running 10.244.3.90 worker-1.ocp.f5.com
2. Launch the oc debug Pod:
Note: The oc debug command creates a new Pod, and opens a command shell.
oc debug node/<node name>
In this example, we create a copy of theworker-2.ocp.f5.com Pod:
oc debug node/worker-2.ocp.f5.com
Creating debug namespace/openshift-debug-node-m7f8z ...Starting pod/worker-2ocpf5com-debug ...To use host binaries, run `chroot /host`Pod IP: 10.144.2.107If you don't see a command prompt, try pressing enter.
3. To use the host binaries run:
chroot /host
4. List the core files written to the journal:
coredumpctl list
In this example, note the TIME the file was created and the PID (process ID):
TIME PID UID GID SIG COREFILE EXEMon 2021-01-01 12:00:00 UTC 590091 0 0 8 truncated /usr/bin/tmm64.no_pgo
5. Change into the core file directory, and list the core file on the file system:
cd /var/lib/systemd/coredump; ls -1
In this example, the PID 590091 from the previous step identifies the bottom core file:
cd /var/lib/systemd/coredump; ls -1'core.tmm\x2e0.0.951073d306bb4465a3d784e29da99995.1004628.1617028629000000.lz4''core.tmm\x2e0.0.951073d306bb4465a3d784e29da99995.2442391.1617019721000000.lz4''core.tmm\x2e0.0.951073d306bb4465a3d784e29da99995.590091.1617133773000000.lz4'
6. Create an MD5 signature of the core file to ensure file integrity:
md5sum <core_file> > <file_name>
In this example, an MD5 signature is obtained of the TMM core file, and saved to a file named tmm_core.md5:
md5sum core.tmm\x2e0.0.951073d306bb4465a3d784e29da99995.590091.1617133773000000.lz4 \> tmm_core.md5
7. Secure Copy (SCP) the TMM core file to the remote server:
scp <tmm_core> <username>@<ip address>:<directory>
134
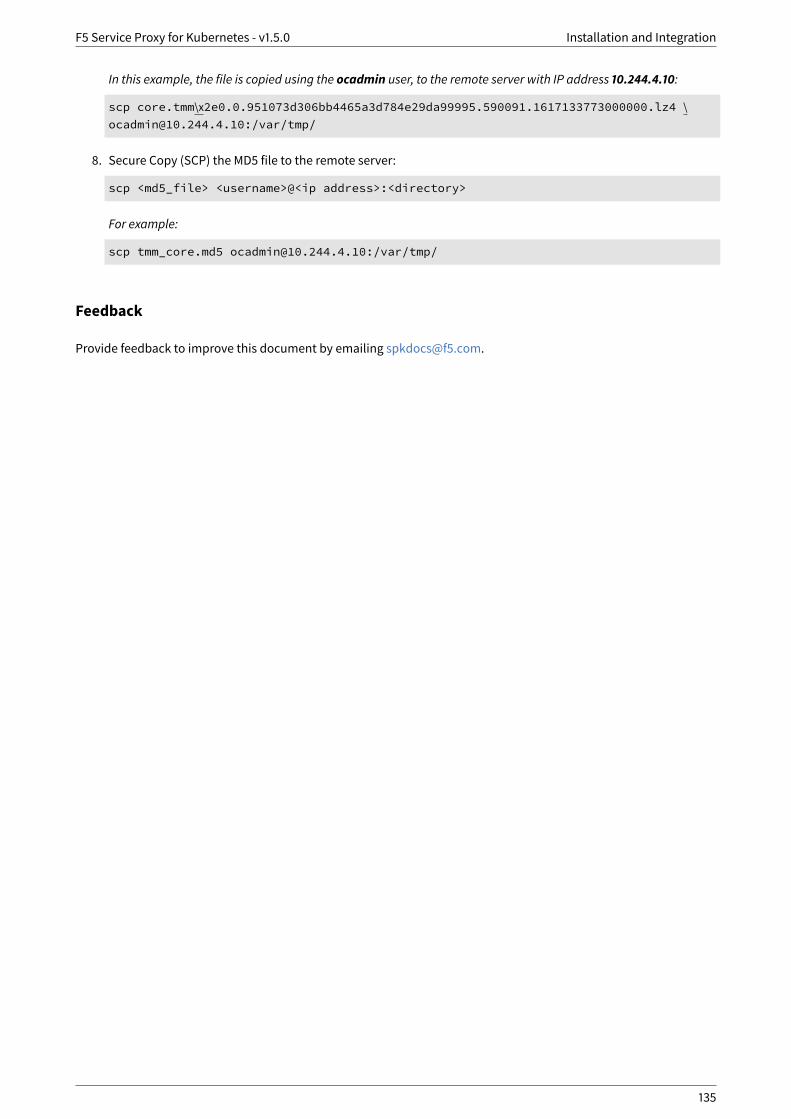
F5 Service Proxy for Kubernetes - v1.5.0 Installation and Integration
In this example, the file is copied using the ocadmin user, to the remote server with IP address 10.244.4.10:
scp core.tmm\x2e0.0.951073d306bb4465a3d784e29da99995.590091.1617133773000000.lz4 \[email protected]:/var/tmp/
8. Secure Copy (SCP) the MD5 file to the remote server:
scp <md5_file> <username>@<ip address>:<directory>
For example:
scp tmm_core.md5 [email protected]:/var/tmp/
Feedback
Provide feedback to improve this document by emailing [email protected].
135
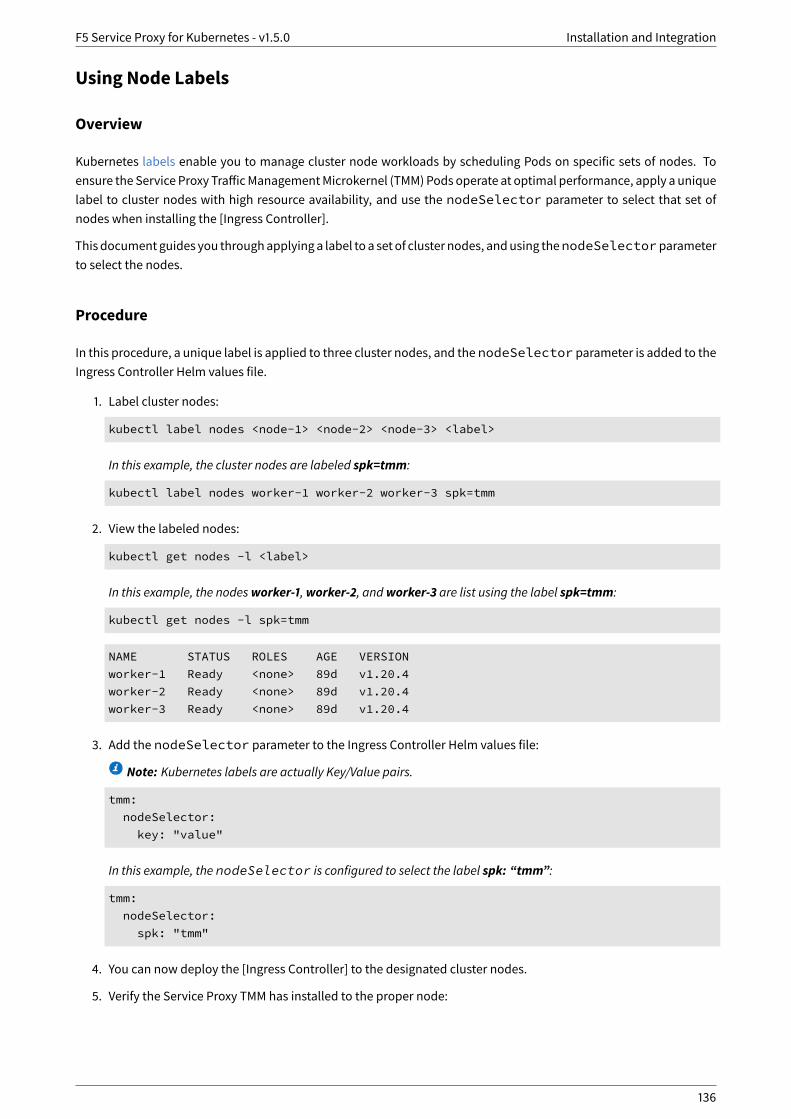
F5 Service Proxy for Kubernetes - v1.5.0 Installation and Integration
Using Node Labels
Overview
Kubernetes labels enable you to manage cluster node workloads by scheduling Pods on specific sets of nodes. Toensure the Service Proxy TrafficManagementMicrokernel (TMM) Pods operate at optimal performance, apply a uniquelabel to cluster nodes with high resource availability, and use the nodeSelector parameter to select that set ofnodes when installing the [Ingress Controller].
This document guides you throughapplyinga label to a set of cluster nodes, andusing thenodeSelectorparameterto select the nodes.
Procedure
In this procedure, a unique label is applied to three cluster nodes, and thenodeSelector parameter is added to theIngress Controller Helm values file.
1. Label cluster nodes:
kubectl label nodes <node-1> <node-2> <node-3> <label>
In this example, the cluster nodes are labeled spk=tmm:
kubectl label nodes worker-1 worker-2 worker-3 spk=tmm
2. View the labeled nodes:
kubectl get nodes -l <label>
In this example, the nodesworker-1,worker-2, andworker-3 are list using the label spk=tmm:
kubectl get nodes -l spk=tmm
NAME STATUS ROLES AGE VERSIONworker-1 Ready <none> 89d v1.20.4worker-2 Ready <none> 89d v1.20.4worker-3 Ready <none> 89d v1.20.4
3. Add the nodeSelector parameter to the Ingress Controller Helm values file:
Note: Kubernetes labels are actually Key/Value pairs.
tmm:nodeSelector:
key: "value"
In this example, the nodeSelector is configured to select the label spk: “tmm”:
tmm:nodeSelector:
spk: "tmm"
4. You can now deploy the [Ingress Controller] to the designated cluster nodes.
5. Verify the Service Proxy TMM has installed to the proper node:
136

F5 Service Proxy for Kubernetes - v1.5.0 Installation and Integration
oc get get pods -n <project> -o wide
In this example, the TMM Pod is in the spk-ingress project, and has installed to proper cluster node:
kubectl get pods -n spk-ingress -o wide
NAME READY STATUS IP NODEf5-ingress-f5ingress-59cfd4dcdd-nwwpj 2/2 Running 10.244.3.110 worker-1f5-tmm-7676db577f-725lx 5/5 Running 10.244.2.132 worker-2
Feedback
Provide feedback to improve this document by emailing [email protected].
137
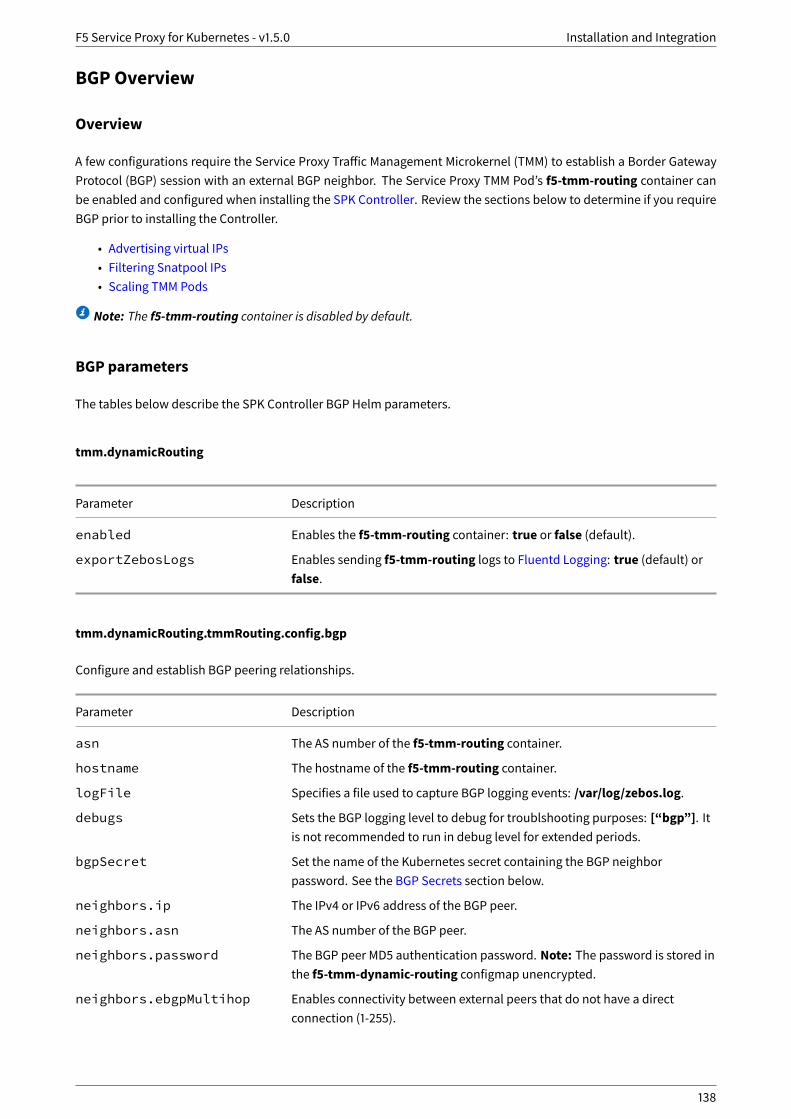
F5 Service Proxy for Kubernetes - v1.5.0 Installation and Integration
BGP Overview
Overview
A few configurations require the Service Proxy Traffic Management Microkernel (TMM) to establish a Border GatewayProtocol (BGP) session with an external BGP neighbor. The Service Proxy TMM Pod’s f5-tmm-routing container canbe enabled and configured when installing the SPK Controller. Review the sections below to determine if you requireBGP prior to installing the Controller.
• Advertising virtual IPs• Filtering Snatpool IPs• Scaling TMM Pods
Note: The f5-tmm-routing container is disabled by default.
BGP parameters
The tables below describe the SPK Controller BGP Helm parameters.
tmm.dynamicRouting
Parameter Description
enabled Enables the f5-tmm-routing container: true or false (default).
exportZebosLogs Enables sending f5-tmm-routing logs to Fluentd Logging: true (default) orfalse.
tmm.dynamicRouting.tmmRouting.config.bgp
Configure and establish BGP peering relationships.
Parameter Description
asn The AS number of the f5-tmm-routing container.
hostname The hostname of the f5-tmm-routing container.
logFile Specifies a file used to capture BGP logging events: /var/log/zebos.log.
debugs Sets the BGP logging level to debug for troublshooting purposes: [“bgp”]. Itis not recommended to run in debug level for extended periods.
bgpSecret Set the name of the Kubernetes secret containing the BGP neighborpassword. See the BGP Secrets section below.
neighbors.ip The IPv4 or IPv6 address of the BGP peer.
neighbors.asn The AS number of the BGP peer.
neighbors.password The BGP peer MD5 authentication password. Note: The password is stored inthe f5-tmm-dynamic-routing configmap unencrypted.
neighbors.ebgpMultihop Enables connectivity between external peers that do not have a directconnection (1-255).
138
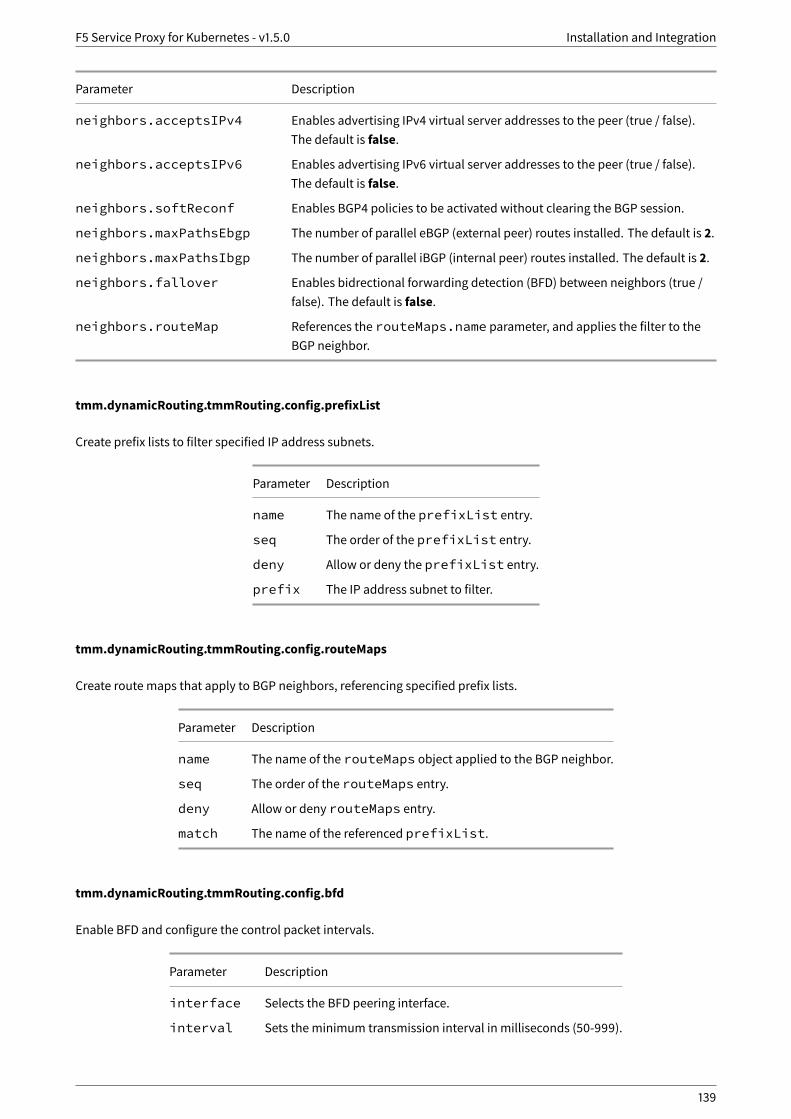
F5 Service Proxy for Kubernetes - v1.5.0 Installation and Integration
Parameter Description
neighbors.acceptsIPv4 Enables advertising IPv4 virtual server addresses to the peer (true / false).The default is false.
neighbors.acceptsIPv6 Enables advertising IPv6 virtual server addresses to the peer (true / false).The default is false.
neighbors.softReconf Enables BGP4 policies to be activated without clearing the BGP session.
neighbors.maxPathsEbgp The number of parallel eBGP (external peer) routes installed. The default is 2.
neighbors.maxPathsIbgp The number of parallel iBGP (internal peer) routes installed. The default is 2.
neighbors.fallover Enables bidrectional forwarding detection (BFD) between neighbors (true /false). The default is false.
neighbors.routeMap References the routeMaps.name parameter, and applies the filter to theBGP neighbor.
tmm.dynamicRouting.tmmRouting.config.prefixList
Create prefix lists to filter specified IP address subnets.
Parameter Description
name The name of the prefixList entry.
seq The order of the prefixList entry.
deny Allow or deny the prefixList entry.
prefix The IP address subnet to filter.
tmm.dynamicRouting.tmmRouting.config.routeMaps
Create route maps that apply to BGP neighbors, referencing specified prefix lists.
Parameter Description
name The name of the routeMaps object applied to the BGP neighbor.
seq The order of the routeMaps entry.
deny Allow or deny routeMaps entry.
match The name of the referenced prefixList.
tmm.dynamicRouting.tmmRouting.config.bfd
Enable BFD and configure the control packet intervals.
Parameter Description
interface Selects the BFD peering interface.
interval Sets the minimum transmission interval in milliseconds (50-999).
139
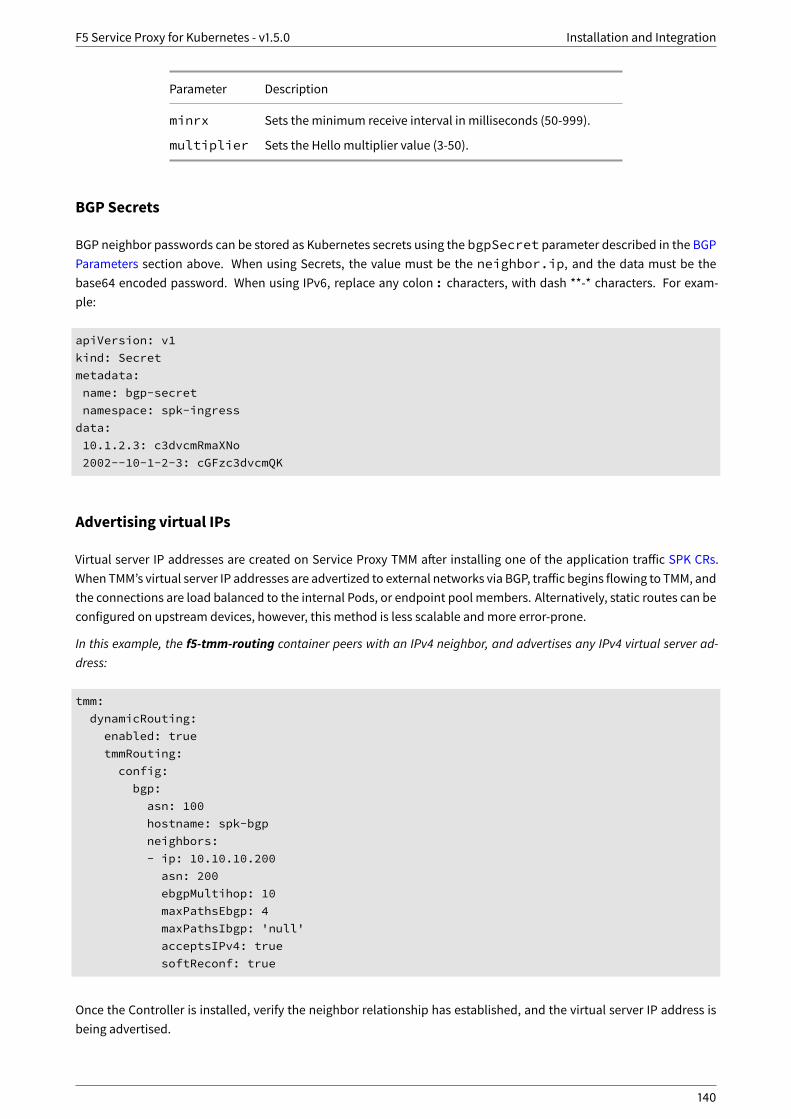
F5 Service Proxy for Kubernetes - v1.5.0 Installation and Integration
Parameter Description
minrx Sets the minimum receive interval in milliseconds (50-999).
multiplier Sets the Hello multiplier value (3-50).
BGP Secrets
BGP neighbor passwords can be stored as Kubernetes secrets using the bgpSecret parameter described in the BGPParameters section above. When using Secrets, the value must be the neighbor.ip, and the data must be thebase64 encoded password. When using IPv6, replace any colon : characters, with dash **-* characters. For exam-ple:
apiVersion: v1kind: Secretmetadata:name: bgp-secretnamespace: spk-ingress
data:10.1.2.3: c3dvcmRmaXNo2002--10-1-2-3: cGFzc3dvcmQK
Advertising virtual IPs
Virtual server IP addresses are created on Service Proxy TMM after installing one of the application traffic SPK CRs.When TMM’s virtual server IP addresses are advertized to external networks via BGP, traffic begins flowing to TMM, andthe connections are load balanced to the internal Pods, or endpoint pool members. Alternatively, static routes can beconfigured on upstream devices, however, this method is less scalable andmore error-prone.
In this example, the f5-tmm-routing container peers with an IPv4 neighbor, and advertises any IPv4 virtual server ad-dress:
tmm:dynamicRouting:enabled: truetmmRouting:
config:bgp:asn: 100hostname: spk-bgpneighbors:- ip: 10.10.10.200
asn: 200ebgpMultihop: 10maxPathsEbgp: 4maxPathsIbgp: 'null'acceptsIPv4: truesoftReconf: true
Once the Controller is installed, verify the neighbor relationship has established, and the virtual server IP address isbeing advertised.
140

F5 Service Proxy for Kubernetes - v1.5.0 Installation and Integration
1. Log in to the f5-tmm-routing container:
oc exec -it deploy/f5-tmm -c f5-tmm-routing -n <project> -- bash
In this example, the f5-tmm-routing container is in the spk-ingress Project:
oc exec -it deploy/f5-tmm -c f5-tmm-routing -n spk-ingress -- bash
2. Log in the IMI shell and turn on privilegedmode:
imishen
3. Verify the IPv4 neighbor BGP state:
show bgp ipv4 neighbors <ip address>
In this example, the neighbor address is 10.10.10.200 and the BGP state is Established:
show bgp ipv4 neighbors 10.10.10.200
BGP neighbor is 10.10.10.200, remote AS 200, local AS 100, external linkBGP version 4, remote router ID 10.10.10.200BGP state = Established
4. Install one of the application traffic SPK CRs.
5. Verify the IPv4 virtual IP address is being advertised:
show bgp ipv4 neighbors <ip address> advertised-routes
In this example, the 10.10.10.1 virtual IP address is being advertised with a Next Hop of the TMM self IP address10.10.10.250:
show bgp ipv4 neighbors 10.10.10.200 advertised-routes
Network Next Hop Metric LocPrf Weight*> 10.10.10.1/32 10.10.10.250 0 100 32768
Total number of prefixes 1
6. External hosts should now be able to connect to any IPv4 virtual IP address configured on the f5-tmm container.
Filtering Snatpool IPs
By default, all F5SPKSnatpool IP addresses are advertised (redistributed) to BGP neighbors. To advertise specificSNAT pool IP addresses, configure a prefixList defining the IP addresses to advertise, and apply a routeMapto the BGP neighbor configuration referencing the prefexList. In the example below, only the 10.244.10.0/24 and10.244.20.0/24 IP address subnets will be advertised to the BGP neighbor:
dynamicRouting:enabled: truetmmRouting:config:
prefixList:- name: 10podseq: 10
141
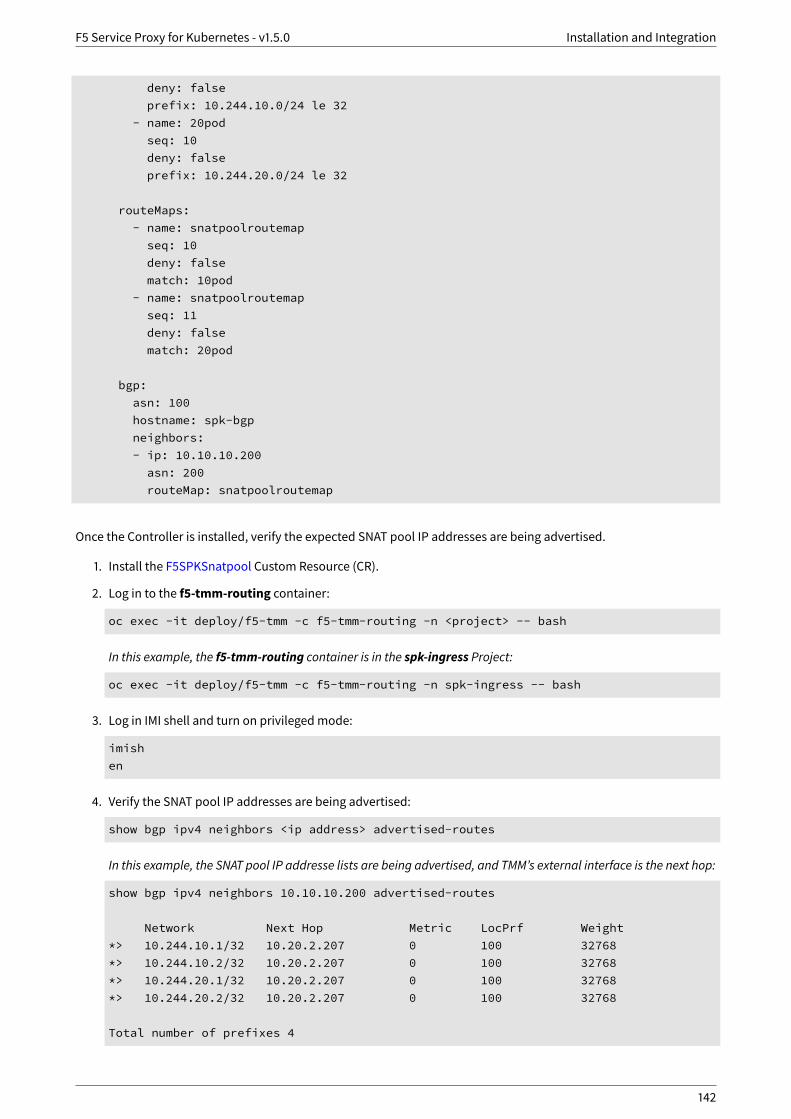
F5 Service Proxy for Kubernetes - v1.5.0 Installation and Integration
deny: falseprefix: 10.244.10.0/24 le 32
- name: 20podseq: 10deny: falseprefix: 10.244.20.0/24 le 32
routeMaps:- name: snatpoolroutemapseq: 10deny: falsematch: 10pod
- name: snatpoolroutemapseq: 11deny: falsematch: 20pod
bgp:asn: 100hostname: spk-bgpneighbors:- ip: 10.10.10.200asn: 200routeMap: snatpoolroutemap
Once the Controller is installed, verify the expected SNAT pool IP addresses are being advertised.
1. Install the F5SPKSnatpool Custom Resource (CR).
2. Log in to the f5-tmm-routing container:
oc exec -it deploy/f5-tmm -c f5-tmm-routing -n <project> -- bash
In this example, the f5-tmm-routing container is in the spk-ingress Project:
oc exec -it deploy/f5-tmm -c f5-tmm-routing -n spk-ingress -- bash
3. Log in IMI shell and turn on privilegedmode:
imishen
4. Verify the SNAT pool IP addresses are being advertised:
show bgp ipv4 neighbors <ip address> advertised-routes
In this example, the SNAT pool IP addresse lists are being advertised, and TMM’s external interface is the next hop:
show bgp ipv4 neighbors 10.10.10.200 advertised-routes
Network Next Hop Metric LocPrf Weight*> 10.244.10.1/32 10.20.2.207 0 100 32768*> 10.244.10.2/32 10.20.2.207 0 100 32768*> 10.244.20.1/32 10.20.2.207 0 100 32768*> 10.244.20.2/32 10.20.2.207 0 100 32768
Total number of prefixes 4
142
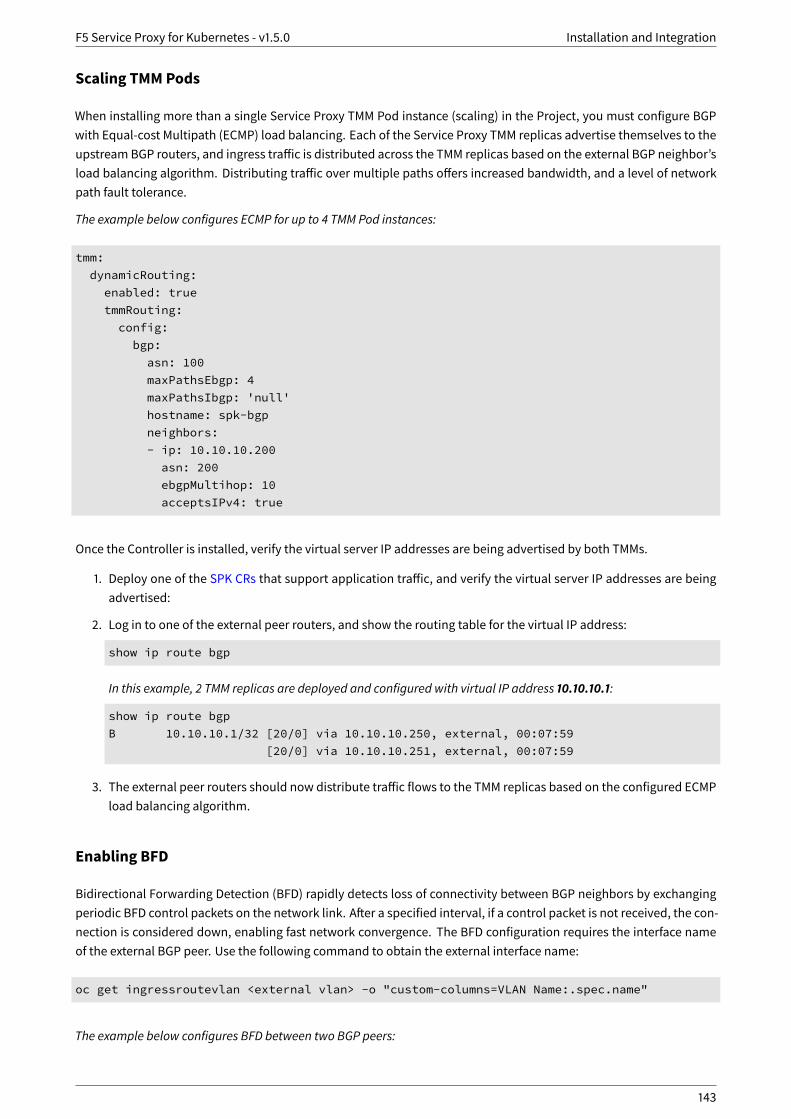
F5 Service Proxy for Kubernetes - v1.5.0 Installation and Integration
Scaling TMM Pods
When installing more than a single Service Proxy TMM Pod instance (scaling) in the Project, you must configure BGPwith Equal-cost Multipath (ECMP) load balancing. Each of the Service Proxy TMM replicas advertise themselves to theupstream BGP routers, and ingress traffic is distributed across the TMM replicas based on the external BGP neighbor’sload balancing algorithm. Distributing traffic over multiple paths offers increased bandwidth, and a level of networkpath fault tolerance.
The example below configures ECMP for up to 4 TMM Pod instances:
tmm:dynamicRouting:enabled: truetmmRouting:
config:bgp:asn: 100maxPathsEbgp: 4maxPathsIbgp: 'null'hostname: spk-bgpneighbors:- ip: 10.10.10.200
asn: 200ebgpMultihop: 10acceptsIPv4: true
Once the Controller is installed, verify the virtual server IP addresses are being advertised by both TMMs.
1. Deploy one of the SPK CRs that support application traffic, and verify the virtual server IP addresses are beingadvertised:
2. Log in to one of the external peer routers, and show the routing table for the virtual IP address:
show ip route bgp
In this example, 2 TMM replicas are deployed and configured with virtual IP address 10.10.10.1:
show ip route bgpB 10.10.10.1/32 [20/0] via 10.10.10.250, external, 00:07:59
[20/0] via 10.10.10.251, external, 00:07:59
3. The external peer routers should now distribute traffic flows to the TMM replicas based on the configured ECMPload balancing algorithm.
Enabling BFD
Bidirectional Forwarding Detection (BFD) rapidly detects loss of connectivity between BGP neighbors by exchangingperiodic BFD control packets on the network link. After a specified interval, if a control packet is not received, the con-nection is considered down, enabling fast network convergence. The BFD configuration requires the interface nameof the external BGP peer. Use the following command to obtain the external interface name:
oc get ingressroutevlan <external vlan> -o "custom-columns=VLAN Name:.spec.name"
The example below configures BFD between two BGP peers:
143
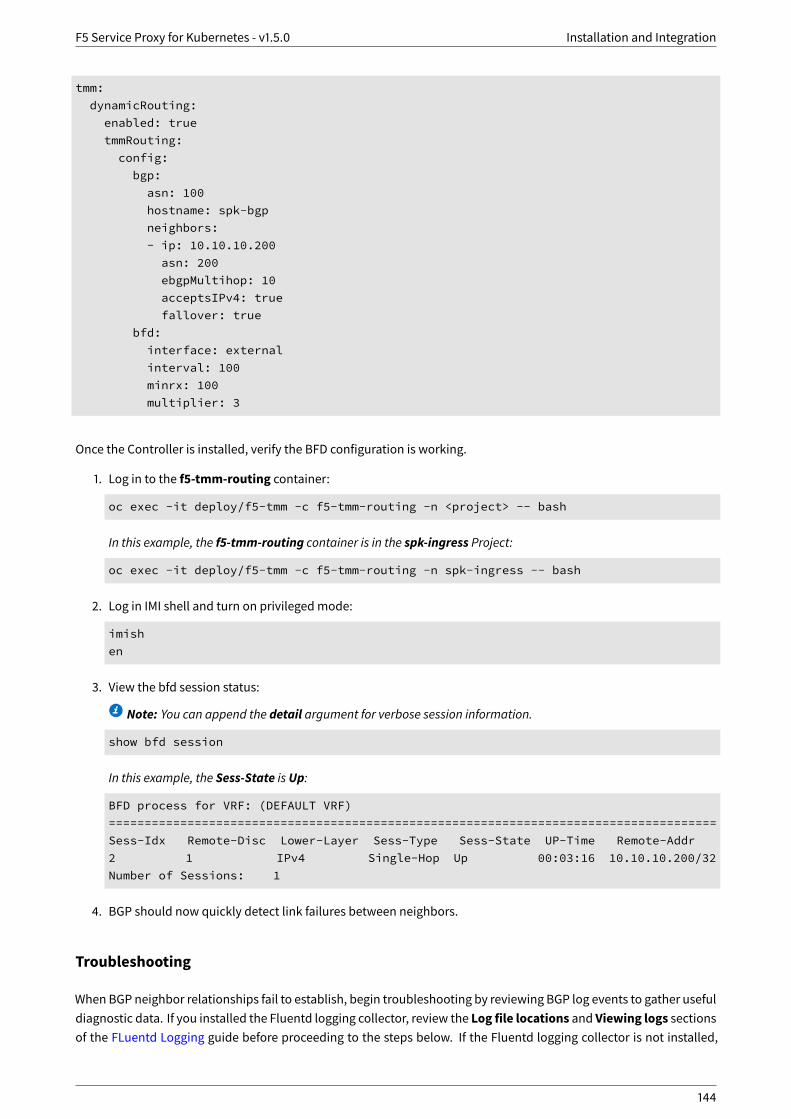
F5 Service Proxy for Kubernetes - v1.5.0 Installation and Integration
tmm:dynamicRouting:enabled: truetmmRouting:
config:bgp:asn: 100hostname: spk-bgpneighbors:- ip: 10.10.10.200
asn: 200ebgpMultihop: 10acceptsIPv4: truefallover: true
bfd:interface: externalinterval: 100minrx: 100multiplier: 3
Once the Controller is installed, verify the BFD configuration is working.
1. Log in to the f5-tmm-routing container:
oc exec -it deploy/f5-tmm -c f5-tmm-routing -n <project> -- bash
In this example, the f5-tmm-routing container is in the spk-ingress Project:
oc exec -it deploy/f5-tmm -c f5-tmm-routing -n spk-ingress -- bash
2. Log in IMI shell and turn on privilegedmode:
imishen
3. View the bfd session status:
Note: You can append the detail argument for verbose session information.
show bfd session
In this example, the Sess-State isUp:
BFD process for VRF: (DEFAULT VRF)=====================================================================================Sess-Idx Remote-Disc Lower-Layer Sess-Type Sess-State UP-Time Remote-Addr2 1 IPv4 Single-Hop Up 00:03:16 10.10.10.200/32Number of Sessions: 1
4. BGP should now quickly detect link failures between neighbors.
Troubleshooting
When BGP neighbor relationships fail to establish, begin troubleshooting by reviewing BGP log events to gather usefuldiagnostic data. If you installed the Fluentd logging collector, review the Log file locations and Viewing logs sectionsof the FLuentd Logging guide before proceeding to the steps below. If the Fluentd logging collector is not installed,
144
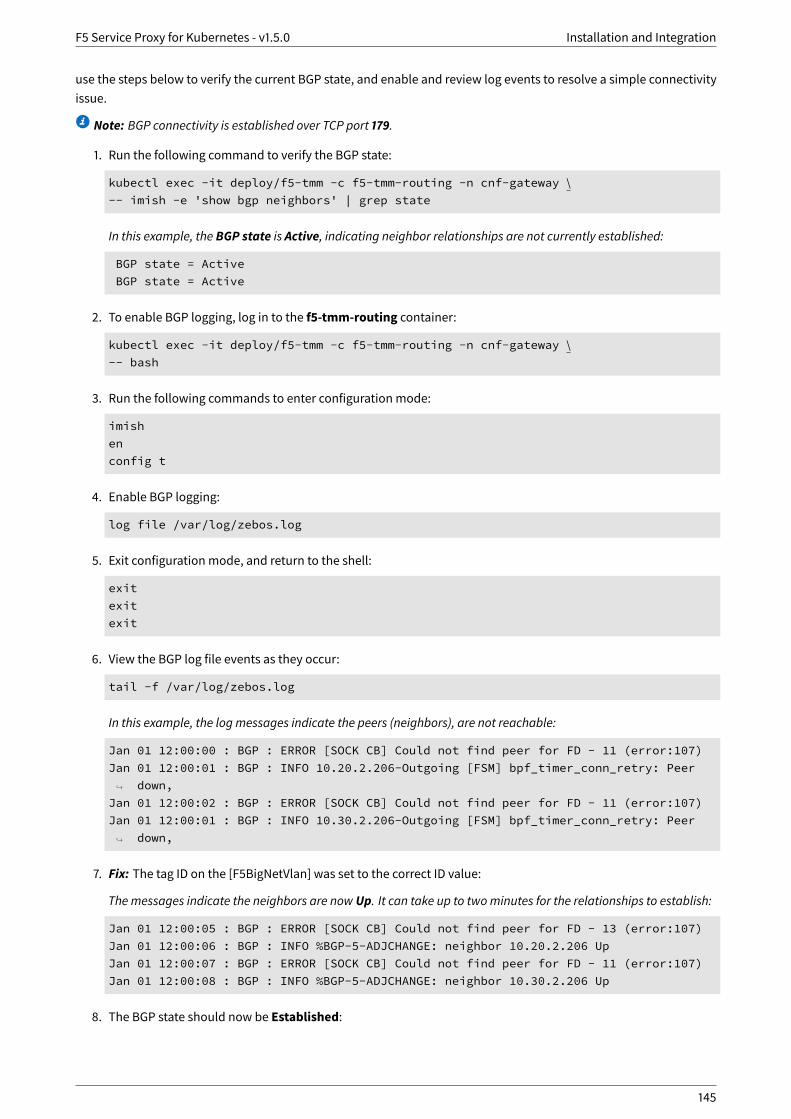
F5 Service Proxy for Kubernetes - v1.5.0 Installation and Integration
use the steps below to verify the current BGP state, and enable and review log events to resolve a simple connectivityissue.
Note: BGP connectivity is established over TCP port 179.
1. Run the following command to verify the BGP state:
kubectl exec -it deploy/f5-tmm -c f5-tmm-routing -n cnf-gateway \-- imish -e 'show bgp neighbors' | grep state
In this example, the BGP state is Active, indicating neighbor relationships are not currently established:
BGP state = ActiveBGP state = Active
2. To enable BGP logging, log in to the f5-tmm-routing container:
kubectl exec -it deploy/f5-tmm -c f5-tmm-routing -n cnf-gateway \-- bash
3. Run the following commands to enter configuration mode:
imishenconfig t
4. Enable BGP logging:
log file /var/log/zebos.log
5. Exit configuration mode, and return to the shell:
exitexitexit
6. View the BGP log file events as they occur:
tail -f /var/log/zebos.log
In this example, the logmessages indicate the peers (neighbors), are not reachable:
Jan 01 12:00:00 : BGP : ERROR [SOCK CB] Could not find peer for FD - 11 (error:107)Jan 01 12:00:01 : BGP : INFO 10.20.2.206-Outgoing [FSM] bpf_timer_conn_retry: Peer
down,↪
Jan 01 12:00:02 : BGP : ERROR [SOCK CB] Could not find peer for FD - 11 (error:107)Jan 01 12:00:01 : BGP : INFO 10.30.2.206-Outgoing [FSM] bpf_timer_conn_retry: Peer
down,↪
7. Fix: The tag ID on the [F5BigNetVlan] was set to the correct ID value:
Themessages indicate the neighbors are nowUp. It can take up to twominutes for the relationships to establish:
Jan 01 12:00:05 : BGP : ERROR [SOCK CB] Could not find peer for FD - 13 (error:107)Jan 01 12:00:06 : BGP : INFO %BGP-5-ADJCHANGE: neighbor 10.20.2.206 UpJan 01 12:00:07 : BGP : ERROR [SOCK CB] Could not find peer for FD - 11 (error:107)Jan 01 12:00:08 : BGP : INFO %BGP-5-ADJCHANGE: neighbor 10.30.2.206 Up
8. The BGP state should now be Established:
145
F5 Service Proxy for Kubernetes - v1.5.0 Installation and Integration
imish -e 'show bgp neighbors' | grep state
BGP state = Established, up for 00:00:36BGP state = Established, up for 00:00:19
9. If the BGP state is still not established, and there are issues other than connectivity, set BGP logging to debug,and continue reviewing the lower-level log events:
debug bgp all
10. Once the BGP troubleshooting is complete, remove the BGP log and debug configurations:
no log file
no debug bgp
Feedback
Provide feedback to improve this document by emailing [email protected].
Supplemental
• The BGP section of the Networking Overview.
146
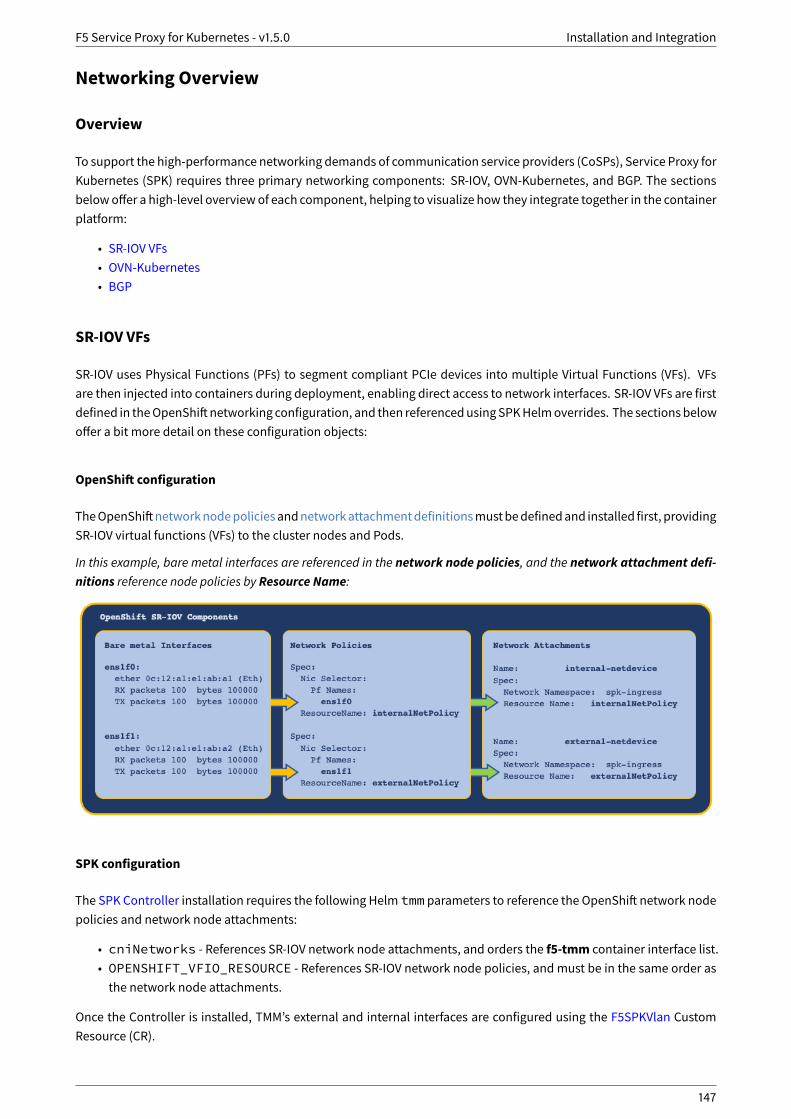
F5 Service Proxy for Kubernetes - v1.5.0 Installation and Integration
Networking Overview
Overview
To support the high-performance networking demands of communication service providers (CoSPs), Service Proxy forKubernetes (SPK) requires three primary networking components: SR-IOV, OVN-Kubernetes, and BGP. The sectionsbelowoffer a high-level overviewof each component, helping to visualize how they integrate together in the containerplatform:
• SR-IOV VFs• OVN-Kubernetes• BGP
SR-IOV VFs
SR-IOV uses Physical Functions (PFs) to segment compliant PCIe devices into multiple Virtual Functions (VFs). VFsare then injected into containers during deployment, enabling direct access to network interfaces. SR-IOV VFs are firstdefined in theOpenShiftnetworking configuration, and then referencedusingSPKHelmoverrides. The sectionsbelowoffer a bit more detail on these configuration objects:
OpenShift configuration
TheOpenShiftnetworknodepoliciesandnetworkattachmentdefinitionsmustbedefinedand installed first, providingSR-IOV virtual functions (VFs) to the cluster nodes and Pods.
In this example, bare metal interfaces are referenced in the network node policies, and the network attachment defi-nitions reference node policies by Resource Name:
SPK configuration
The SPK Controller installation requires the following Helm tmm parameters to reference the OpenShift network nodepolicies and network node attachments:
• cniNetworks - References SR-IOV network node attachments, and orders the f5-tmm container interface list.• OPENSHIFT_VFIO_RESOURCE - References SR-IOV network node policies, and must be in the same order asthe network node attachments.
Once the Controller is installed, TMM’s external and internal interfaces are configured using the F5SPKVlan CustomResource (CR).
147
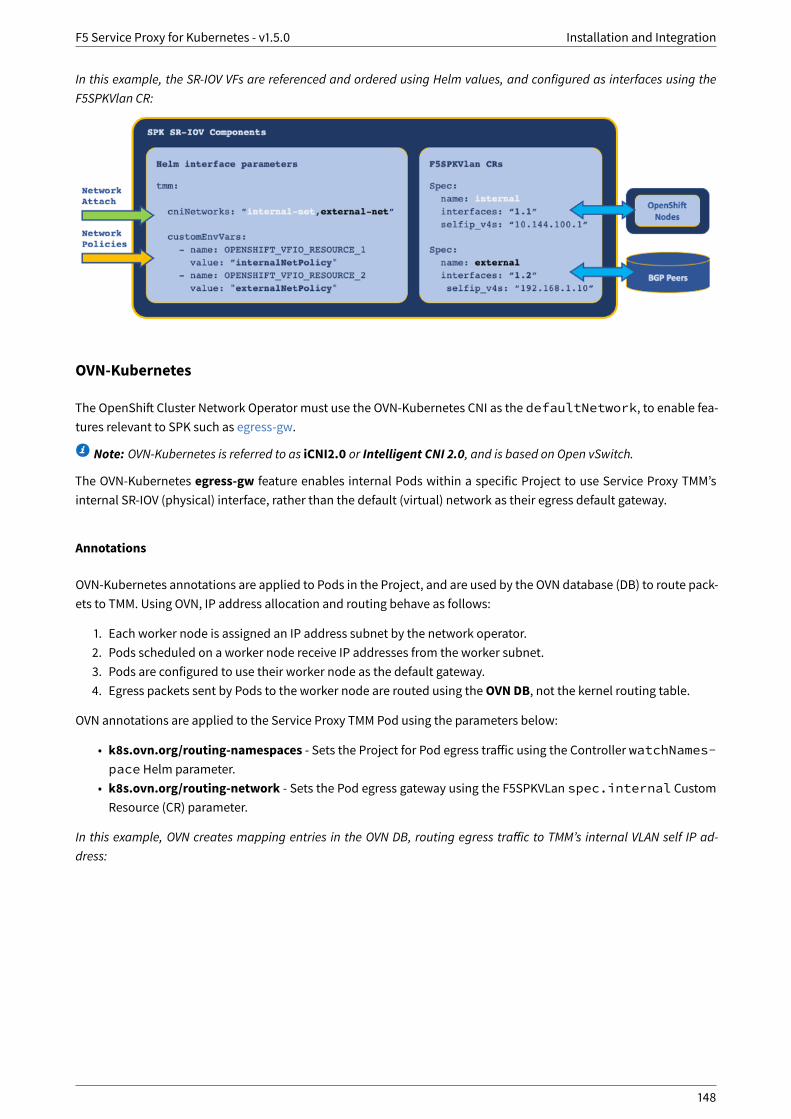
F5 Service Proxy for Kubernetes - v1.5.0 Installation and Integration
In this example, the SR-IOV VFs are referenced and ordered using Helm values, and configured as interfaces using theF5SPKVlan CR:
OVN-Kubernetes
The OpenShift Cluster Network Operator must use the OVN-Kubernetes CNI as the defaultNetwork, to enable fea-tures relevant to SPK such as egress-gw.
Note: OVN-Kubernetes is referred to as iCNI2.0 or Intelligent CNI 2.0, and is based on Open vSwitch.
The OVN-Kubernetes egress-gw feature enables internal Pods within a specific Project to use Service Proxy TMM’sinternal SR-IOV (physical) interface, rather than the default (virtual) network as their egress default gateway.
Annotations
OVN-Kubernetes annotations are applied to Pods in the Project, and are used by the OVN database (DB) to route pack-ets to TMM. Using OVN, IP address allocation and routing behave as follows:
1. Each worker node is assigned an IP address subnet by the network operator.2. Pods scheduled on a worker node receive IP addresses from the worker subnet.3. Pods are configured to use their worker node as the default gateway.4. Egress packets sent by Pods to the worker node are routed using theOVN DB, not the kernel routing table.
OVN annotations are applied to the Service Proxy TMM Pod using the parameters below:
• k8s.ovn.org/routing-namespaces - Sets the Project for Pod egress traffic using the Controller watchNames-pace Helm parameter.
• k8s.ovn.org/routing-network - Sets the Pod egress gateway using the F5SPKVLan spec.internal CustomResource (CR) parameter.
In this example, OVN creates mapping entries in the OVN DB, routing egress traffic to TMM’s internal VLAN self IP ad-dress:
148
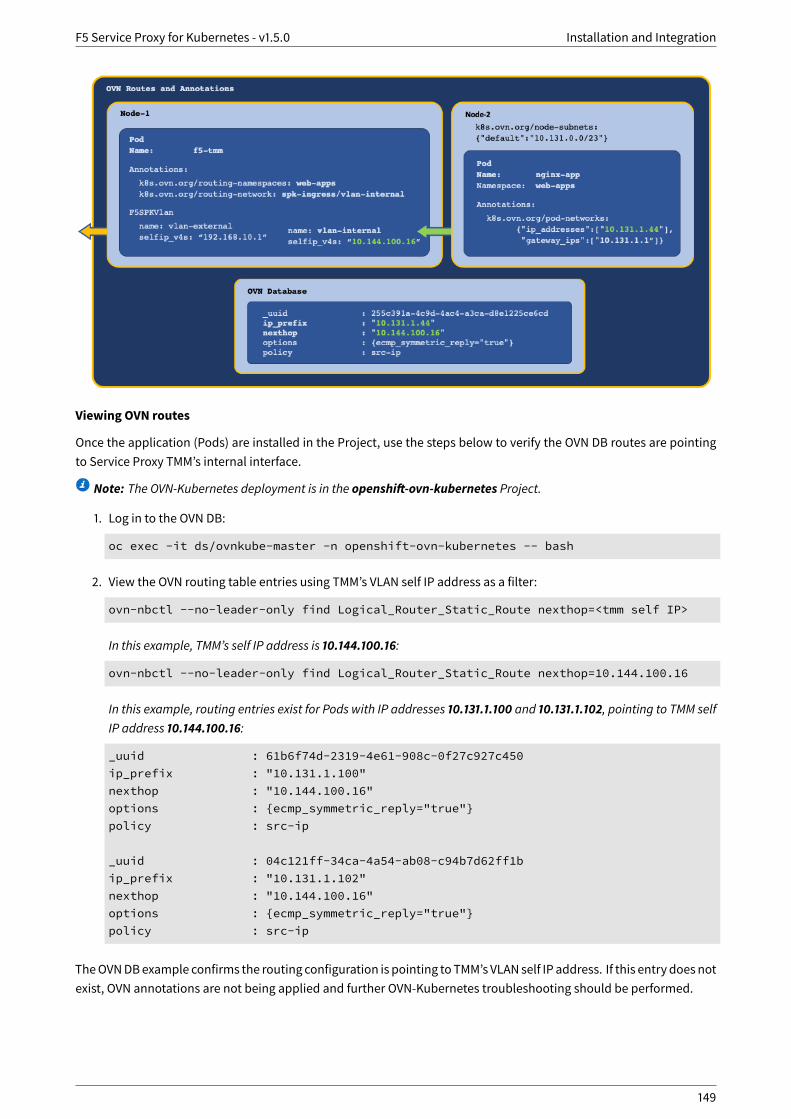
F5 Service Proxy for Kubernetes - v1.5.0 Installation and Integration
Viewing OVN routes
Once the application (Pods) are installed in the Project, use the steps below to verify the OVN DB routes are pointingto Service Proxy TMM’s internal interface.
Note: The OVN-Kubernetes deployment is in the openshift-ovn-kubernetes Project.
1. Log in to the OVN DB:
oc exec -it ds/ovnkube-master -n openshift-ovn-kubernetes -- bash
2. View the OVN routing table entries using TMM’s VLAN self IP address as a filter:
ovn-nbctl --no-leader-only find Logical_Router_Static_Route nexthop=<tmm self IP>
In this example, TMM’s self IP address is 10.144.100.16:
ovn-nbctl --no-leader-only find Logical_Router_Static_Route nexthop=10.144.100.16
In this example, routing entries exist for Pods with IP addresses 10.131.1.100 and 10.131.1.102, pointing to TMM selfIP address 10.144.100.16:
_uuid : 61b6f74d-2319-4e61-908c-0f27c927c450ip_prefix : "10.131.1.100"nexthop : "10.144.100.16"options : {ecmp_symmetric_reply="true"}policy : src-ip
_uuid : 04c121ff-34ca-4a54-ab08-c94b7d62ff1bip_prefix : "10.131.1.102"nexthop : "10.144.100.16"options : {ecmp_symmetric_reply="true"}policy : src-ip
TheOVNDBexample confirms the routing configuration is pointing toTMM’s VLAN self IP address. If this entry doesnotexist, OVN annotations are not being applied and further OVN-Kubernetes troubleshooting should be performed.
149
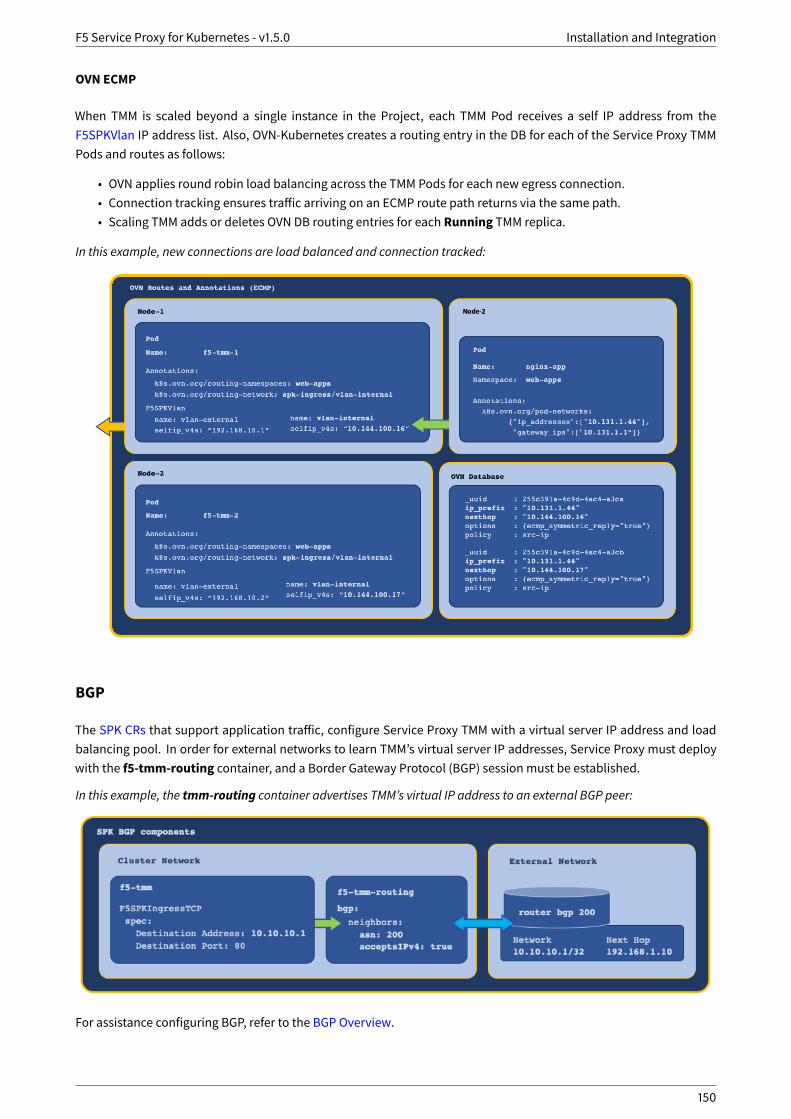
F5 Service Proxy for Kubernetes - v1.5.0 Installation and Integration
OVN ECMP
When TMM is scaled beyond a single instance in the Project, each TMM Pod receives a self IP address from theF5SPKVlan IP address list. Also, OVN-Kubernetes creates a routing entry in the DB for each of the Service Proxy TMMPods and routes as follows:
• OVN applies round robin load balancing across the TMM Pods for each new egress connection.• Connection tracking ensures traffic arriving on an ECMP route path returns via the same path.• Scaling TMM adds or deletes OVN DB routing entries for each Running TMM replica.
In this example, new connections are load balanced and connection tracked:
BGP
The SPK CRs that support application traffic, configure Service Proxy TMM with a virtual server IP address and loadbalancing pool. In order for external networks to learn TMM’s virtual server IP addresses, Service Proxy must deploywith the f5-tmm-routing container, and a Border Gateway Protocol (BGP) session must be established.
In this example, the tmm-routing container advertises TMM’s virtual IP address to an external BGP peer:
For assistance configuring BGP, refer to the BGP Overview.
150
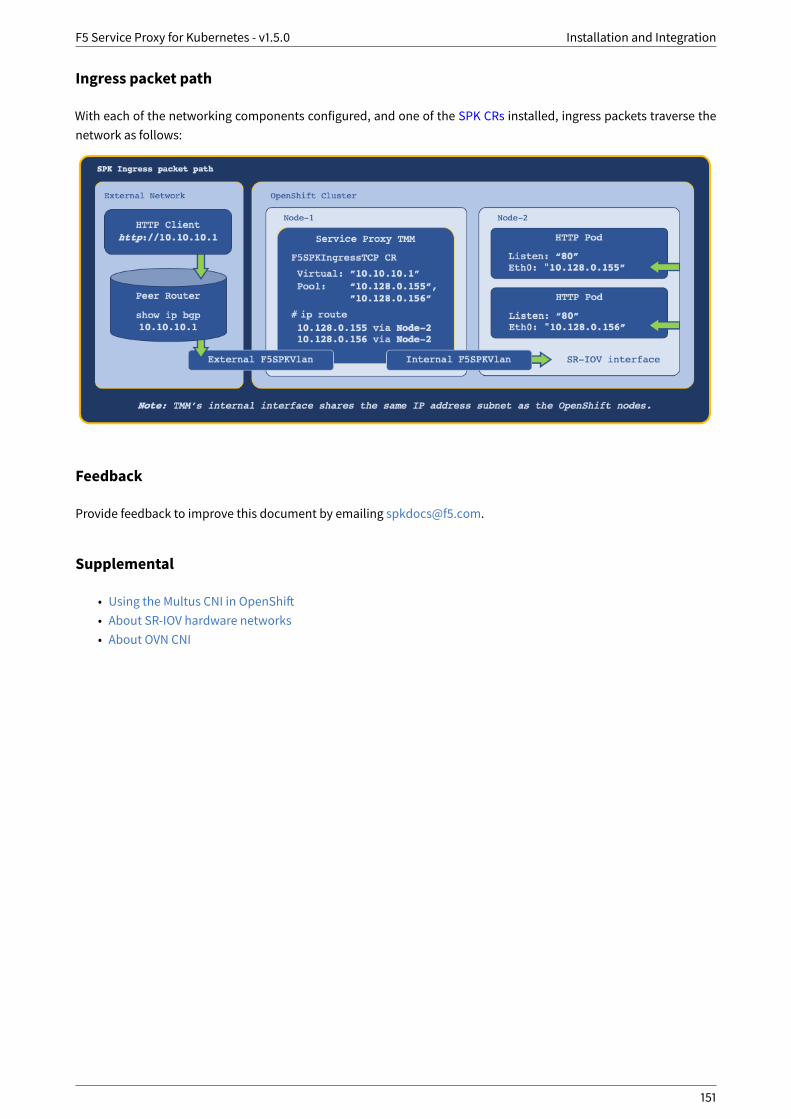
F5 Service Proxy for Kubernetes - v1.5.0 Installation and Integration
Ingress packet path
With each of the networking components configured, and one of the SPK CRs installed, ingress packets traverse thenetwork as follows:
Feedback
Provide feedback to improve this document by emailing [email protected].
Supplemental
• Using the Multus CNI in OpenShift• About SR-IOV hardware networks• About OVN CNI
151
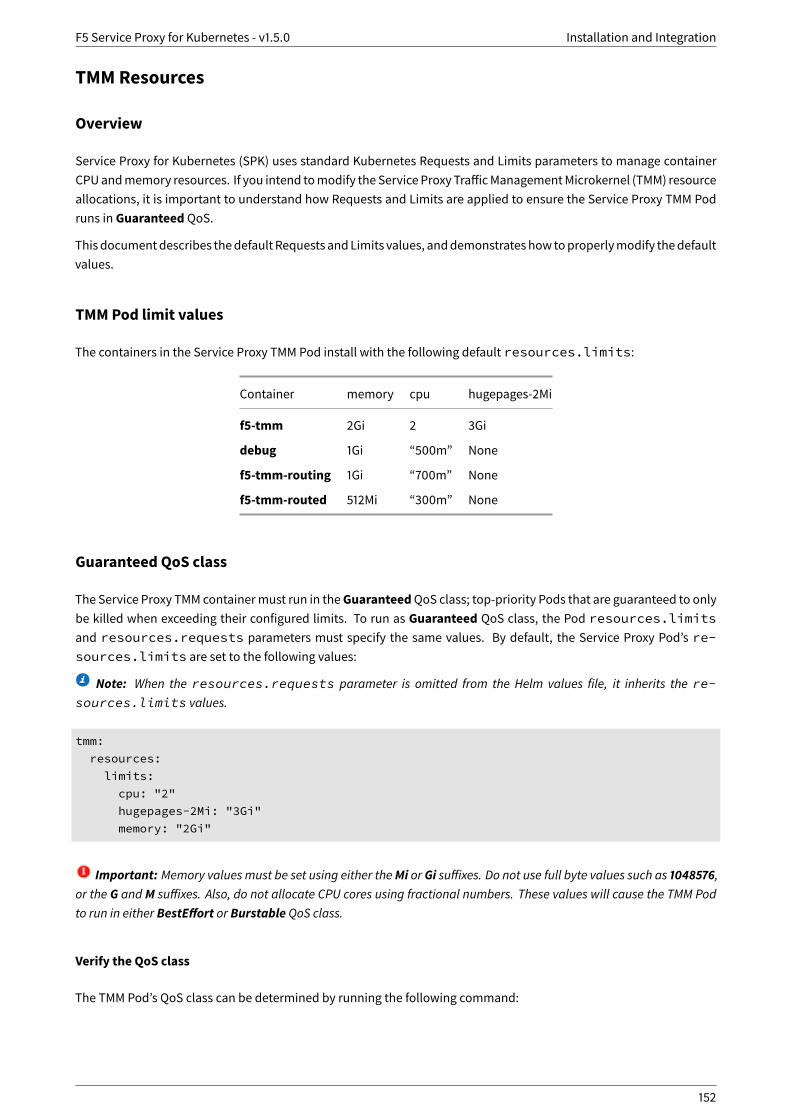
F5 Service Proxy for Kubernetes - v1.5.0 Installation and Integration
TMM Resources
Overview
Service Proxy for Kubernetes (SPK) uses standard Kubernetes Requests and Limits parameters to manage containerCPUandmemory resources. If you intend tomodify the Service Proxy TrafficManagementMicrokernel (TMM) resourceallocations, it is important to understand how Requests and Limits are applied to ensure the Service Proxy TMM Podruns in GuaranteedQoS.
Thisdocumentdescribes thedefault Requests andLimits values, anddemonstrateshowtoproperlymodify thedefaultvalues.
TMM Pod limit values
The containers in the Service Proxy TMM Pod install with the following default resources.limits:
Container memory cpu hugepages-2Mi
f5-tmm 2Gi 2 3Gi
debug 1Gi “500m” None
f5-tmm-routing 1Gi “700m” None
f5-tmm-routed 512Mi “300m” None
Guaranteed QoS class
The Service Proxy TMM containermust run in theGuaranteedQoS class; top-priority Pods that are guaranteed to onlybe killed when exceeding their configured limits. To run as Guaranteed QoS class, the Pod resources.limitsand resources.requests parameters must specify the same values. By default, the Service Proxy Pod’s re-sources.limits are set to the following values:
Note: When the resources.requests parameter is omitted from the Helm values file, it inherits the re-sources.limits values.
tmm:resources:limits:
cpu: "2"hugepages-2Mi: "3Gi"memory: "2Gi"
Important: Memory values must be set using either theMi or Gi suffixes. Do not use full byte values such as 1048576,or the G andM suffixes. Also, do not allocate CPU cores using fractional numbers. These values will cause the TMM Podto run in either BestEffort or Burstable QoS class.
Verify the QoS class
The TMM Pod’s QoS class can be determined by running the following command:
152
F5 Service Proxy for Kubernetes - v1.5.0 Installation and Integration
oc get pod -l app=f5-tmm -o jsonpath='{..qosClass}{"\n"}' -n <project>
In this example, the TMM Pod is in the spk-ingress Project:
oc get pod -l app=f5-tmm -o jsonpath='{..qosClass}{"\n"}' -n spk-ingress
Guaranteed
Modifying defaults
Service Proxy TMM requires hugepages to enable direct memory access (DMS). When allocating additional TMM CPUcores, hugepages must be pre-allocated using the hugepages-2Mi parameter. To calculate the minimum amountof hugepages, use the following formula: 1.5GB x TMMCPU count. For example, allocating 4 TMM CPUs requires 6GBof hugepages memory. To allocate 4 TMM CPU cores to the f5-tmm container, add the following limits to the SPKController Helm values file:
tmm:resources:limits:
cpu: "4"hugepages-2Mi: "6Gi"memory: "2Gi"
Supplemental
• Kubernetes Managing Resources for Containers• Kubernetes Quality of Service for Pods
153

F5 Service Proxy for Kubernetes - v1.5.0 Installation and Integration
Debug Sidecar
Overview
The Service Proxy Pod’s debug sidecar provides a set of command line tools for obtaining low-level, diagnostic dataand statistics about the Service Proxy Traffic Management Microkernel (TMM). The debug sidecar deploys by defaultwith the SPK Controller.
Command line tools
The table below lists and describes the available command line tools:
Tool Description
tmctl Displays various TMM traffic processing statistics, such as pool and virtualserver connections.
core-tmm Creates a diagnostic core file of the TMM process.
bdt_cli Displays TMM networking information such as ARP and route entries. See thebdt_cli section below.
tmm_cli Sets the TMM logging level. See the tmm_cli section below.
mrfdb Enables reading and writing dSSM database records. Se
qkview Creates a diagnostic data TAR file for F5 support. See theQkview sectionbelow.
configviewer Displays a log of the configuration objects created and deleted using SPKCustom Resources (CRs). See the configviewer section below.
tcpdump Displays packets sent and received on the specified network interface.
ping Send ICMP ECHO_REQUEST packets to remote hosts.
traceroute Displays the packet route in hops to a remote host.
Note: Typeman f5-tools in the debug container to get a full list of TMM specific commands.
Connecting to the sidecar
To connect to the debug sidecar and begin gathering diagnostic information, use the commands below.
1. Connect to the debug sidecar:
In this example, the debug sidecar is in the spk-ingress Project:
oc exec -it deploy/f5-tmm -c debug -n spk-ingress -- bash
2. Execute one of the available diagnostic commands:
In this example, ping is used to test connectivity to a remote host with IP address 192.168.10.100:
ping 192.168.10.100
PING 192.168.10.100 (192.168.10.100): 56 data bytes64 bytes from 192.168.10.100: icmp_seq=0 ttl=64 time=0.067 ms
154
F5 Service Proxy for Kubernetes - v1.5.0 Installation and Integration
64 bytes from 192.168.10.100: icmp_seq=1 ttl=64 time=0.067 ms64 bytes from 192.168.10.100: icmp_seq=2 ttl=64 time=0.067 ms64 bytes from 192.168.10.100: icmp_seq=3 ttl=64 time=0.067 ms
3. Type Exit to leave the debug sidecar.
Command examples
tmctl
Use the tmctl tool to query Service Proxy TMM for application traffic processing statistics.
1. Connect to the debug sidecar:
oc exec -it deploy/f5-tmm -c debug -n <project> -- bash
In this example, the debug sidecar is in the spk-ingress Project:
oc exec -it deploy/f5-tmm -c debug -n spk-ingress -- bash
2. To view virtual server connection statistics run the following command:
tmctl -d blade virtual_server_stat -s name,clientside.tot_conns
3. To view pool member connection statistics run the following command:
tmctl -d blade pool_member_stat -s pool_name,serverside.tot_conns
bdt_cli
Use the bdt_cli tool to query the Service Proxy TMM for networking data.
1. Connect to the debug sidecar:
oc exec -it deploy/f5-tmm -c debug -n <project> -- bash
In this example, the debug sidecar is in the spk-ingress Project:
oc exec -it deploy/f5-tmm -c debug -n spk-ingress -- bash
2. Connect to TMM referencing the gRPC channel SSL/TL certificates and key:
bdt_cli -tls=true -use_fqdn=true -server_addr=tmm0:8850 \-ca_file=/etc/ssl/certs/ca_root.crt \-client_crt=/etc/ssl/certs/f5-ing-demo-f5ingress.crt \-client_key=/etc/ssl/private/f5-ing-demo-f5ingress.key
3. Once connected, enter a number representing the network data of interest:
Enter the request type(number or string):1. check2. arp3. connection4. route5. exit
The output will resemble the following:
155
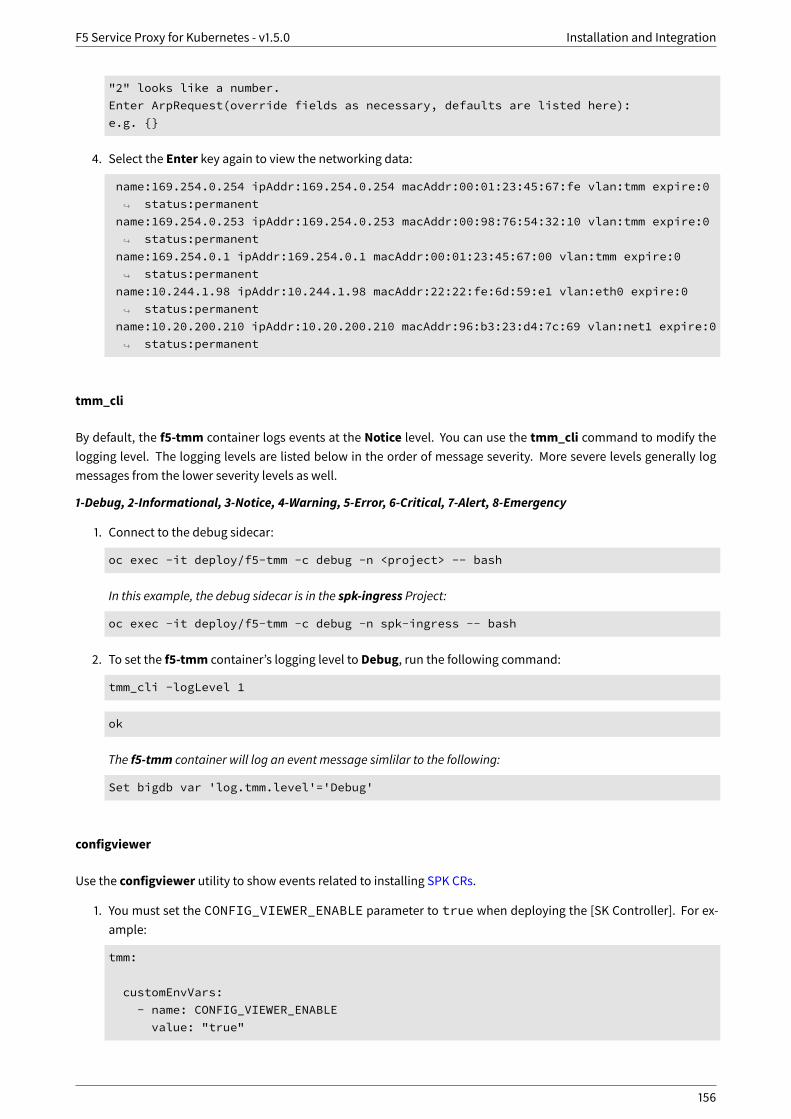
F5 Service Proxy for Kubernetes - v1.5.0 Installation and Integration
"2" looks like a number.Enter ArpRequest(override fields as necessary, defaults are listed here):e.g. {}
4. Select the Enter key again to view the networking data:
name:169.254.0.254 ipAddr:169.254.0.254 macAddr:00:01:23:45:67:fe vlan:tmm expire:0status:permanent↪
name:169.254.0.253 ipAddr:169.254.0.253 macAddr:00:98:76:54:32:10 vlan:tmm expire:0status:permanent↪
name:169.254.0.1 ipAddr:169.254.0.1 macAddr:00:01:23:45:67:00 vlan:tmm expire:0status:permanent↪
name:10.244.1.98 ipAddr:10.244.1.98 macAddr:22:22:fe:6d:59:e1 vlan:eth0 expire:0status:permanent↪
name:10.20.200.210 ipAddr:10.20.200.210 macAddr:96:b3:23:d4:7c:69 vlan:net1 expire:0status:permanent↪
tmm_cli
By default, the f5-tmm container logs events at the Notice level. You can use the tmm_cli command to modify thelogging level. The logging levels are listed below in the order of message severity. More severe levels generally logmessages from the lower severity levels as well.
1-Debug, 2-Informational, 3-Notice, 4-Warning, 5-Error, 6-Critical, 7-Alert, 8-Emergency
1. Connect to the debug sidecar:
oc exec -it deploy/f5-tmm -c debug -n <project> -- bash
In this example, the debug sidecar is in the spk-ingress Project:
oc exec -it deploy/f5-tmm -c debug -n spk-ingress -- bash
2. To set the f5-tmm container’s logging level to Debug, run the following command:
tmm_cli -logLevel 1
ok
The f5-tmm container will log an event message simlilar to the following:
Set bigdb var 'log.tmm.level'='Debug'
configviewer
Use the configviewer utility to show events related to installing SPK CRs.
1. You must set the CONFIG_VIEWER_ENABLE parameter to true when deploying the [SK Controller]. For ex-ample:
tmm:
customEnvVars:- name: CONFIG_VIEWER_ENABLEvalue: "true"
156
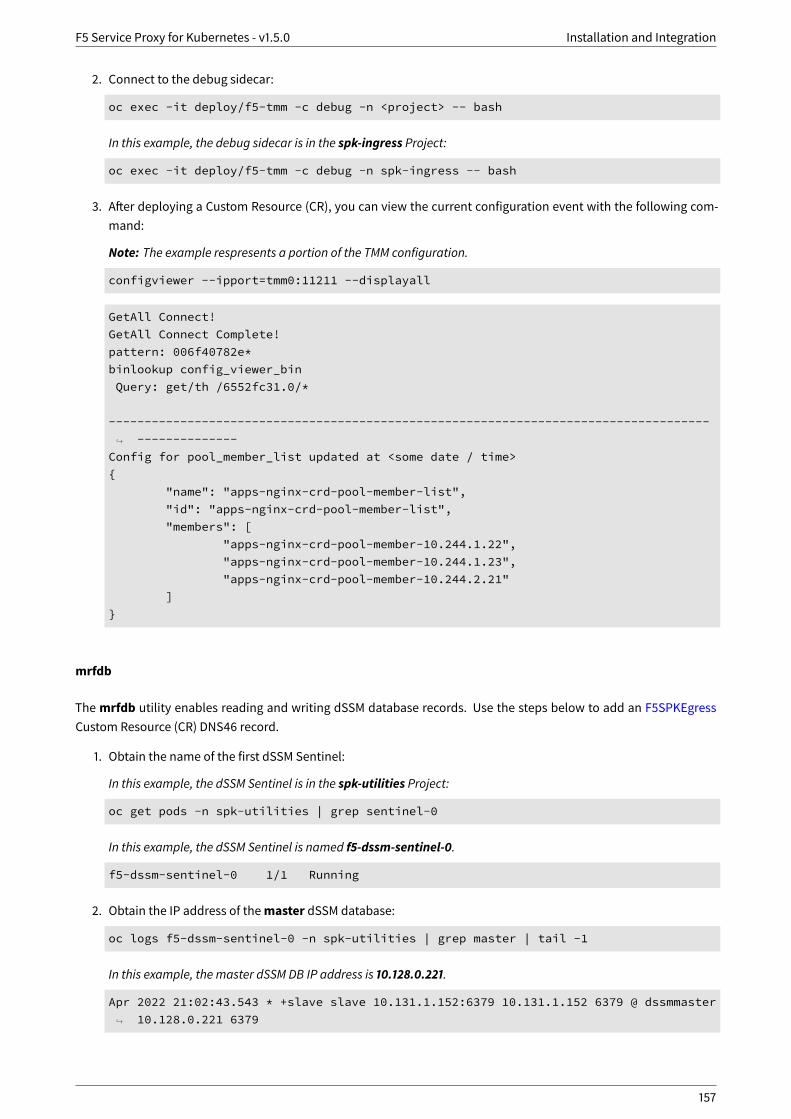
F5 Service Proxy for Kubernetes - v1.5.0 Installation and Integration
2. Connect to the debug sidecar:
oc exec -it deploy/f5-tmm -c debug -n <project> -- bash
In this example, the debug sidecar is in the spk-ingress Project:
oc exec -it deploy/f5-tmm -c debug -n spk-ingress -- bash
3. After deploying a Custom Resource (CR), you can view the current configuration event with the following com-mand:
Note: The example respresents a portion of the TMM configuration.
configviewer --ipport=tmm0:11211 --displayall
GetAll Connect!GetAll Connect Complete!pattern: 006f40782e*binlookup config_viewer_binQuery: get/th /6552fc31.0/*
--------------------------------------------------------------------------------------------------↪
Config for pool_member_list updated at <some date / time>{
"name": "apps-nginx-crd-pool-member-list","id": "apps-nginx-crd-pool-member-list","members": [
"apps-nginx-crd-pool-member-10.244.1.22","apps-nginx-crd-pool-member-10.244.1.23","apps-nginx-crd-pool-member-10.244.2.21"
]}
mrfdb
The mrfdb utility enables reading and writing dSSM database records. Use the steps below to add an F5SPKEgressCustom Resource (CR) DNS46 record.
1. Obtain the name of the first dSSM Sentinel:
In this example, the dSSM Sentinel is in the spk-utilities Project:
oc get pods -n spk-utilities | grep sentinel-0
In this example, the dSSM Sentinel is named f5-dssm-sentinel-0.
f5-dssm-sentinel-0 1/1 Running
2. Obtain the IP address of themaster dSSM database:
oc logs f5-dssm-sentinel-0 -n spk-utilities | grep master | tail -1
In this example, the master dSSM DB IP address is 10.128.0.221.
Apr 2022 21:02:43.543 * +slave slave 10.131.1.152:6379 10.131.1.152 6379 @ dssmmaster10.128.0.221 6379↪
157
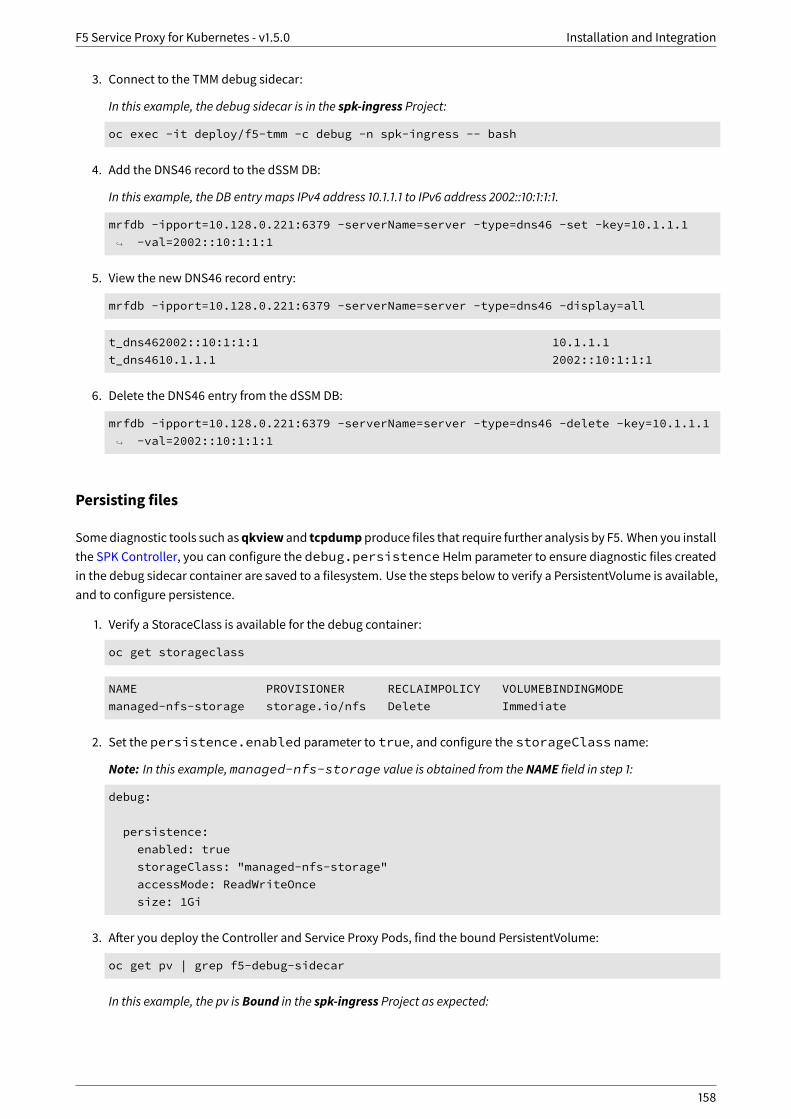
F5 Service Proxy for Kubernetes - v1.5.0 Installation and Integration
3. Connect to the TMM debug sidecar:
In this example, the debug sidecar is in the spk-ingress Project:
oc exec -it deploy/f5-tmm -c debug -n spk-ingress -- bash
4. Add the DNS46 record to the dSSM DB:
In this example, the DB entry maps IPv4 address 10.1.1.1 to IPv6 address 2002::10:1:1:1.
mrfdb -ipport=10.128.0.221:6379 -serverName=server -type=dns46 -set -key=10.1.1.1-val=2002::10:1:1:1↪
5. View the new DNS46 record entry:
mrfdb -ipport=10.128.0.221:6379 -serverName=server -type=dns46 -display=all
t_dns462002::10:1:1:1 10.1.1.1t_dns4610.1.1.1 2002::10:1:1:1
6. Delete the DNS46 entry from the dSSM DB:
mrfdb -ipport=10.128.0.221:6379 -serverName=server -type=dns46 -delete -key=10.1.1.1-val=2002::10:1:1:1↪
Persisting files
Somediagnostic tools such asqkview and tcpdumpproduce files that require further analysis by F5. When you installthe SPK Controller, you can configure the debug.persistence Helm parameter to ensure diagnostic files createdin the debug sidecar container are saved to a filesystem. Use the steps below to verify a PersistentVolume is available,and to configure persistence.
1. Verify a StoraceClass is available for the debug container:
oc get storageclass
NAME PROVISIONER RECLAIMPOLICY VOLUMEBINDINGMODEmanaged-nfs-storage storage.io/nfs Delete Immediate
2. Set the persistence.enabled parameter to true, and configure the storageClass name:
Note: In this example, managed-nfs-storage value is obtained from the NAME field in step 1:
debug:
persistence:enabled: truestorageClass: "managed-nfs-storage"accessMode: ReadWriteOncesize: 1Gi
3. After you deploy the Controller and Service Proxy Pods, find the bound PersistentVolume:
oc get pv | grep f5-debug-sidecar
In this example, the pv is Bound in the spk-ingress Project as expected:
158

F5 Service Proxy for Kubernetes - v1.5.0 Installation and Integration
pvc-42a5ef7-5c5f-4518-930f-851abf32c67 1Gi Bound spk-ingress/f5-debug-sidecarmanaged-nfs-storage↪
4. Use the PersistentVolume ID to find the Server name and the Path, or location on the cluster node where diag-nostic files are storeed.
Important: Files must be placed in the the debug sidecar’s /shared directory to be persisted.
oc describe pv <pv_id> | grep -iE 'path|server'
In this example, the PersistentVolume ID is pvc-42a5ef7-5c5f-4518-930f-851abf32c67:
oc describe pv pvc-42a5ef7-5c5f-4518-930f-851abf32c67 | grep -iE 'path|server'
The Server and Path information will resemble the following:
Server: provisioner.ocp.f5.comPath: /opt/local-path-provisioner/pvc-42a5ef7-5c5f-4518-930f-
851abf32c67_ingress_f5-debug-sidecar↪
Qkview
The qkview utility collects diagnostic and logging information from the f5-tmm container, and stores the data in aLinux TAR file. If you enabled the Fluentd Logging collector, run the qkview utility on f5-fluentd container to gatherlog files from all of the SPK Pods. Qkview files are typically generated and sent to F5 for further analysis. Use the stepsbelow to run the qkview utility, and copy the file to your local workstation.
1. Switch to the Service Proxy TMM Pod Project:
In this example, the spk-ingress Project is selected.
oc project spk-ingress
2. Obtain the name of the Service Proxy TMM Pod:
oc get pods --selector app=f5-tmm
In this example, the Service Proxy TMM Pod name is f5-tmm-79df567d45-ssjv9.
NAME READY STATUSf5-tmm-79df567d45-ssjv9 5/5 Running
3. Set the Service Proxy TMM Pod name as an environment variable:
In this example, the environment variable is named TMM_POD.
TMM_POD=f5-tmm-79df567d45-ssjv9
4. Open a remote shell to the TMM Pod’s debug container:
oc rsh -c debug $TMM_POD bash
The shell will display the name of the Service Proxy TMM Pod.
[root@f5-tmm-79df567d45-ssjv9 /]#
5. Change into the /shared directory mapped to the persistent volume:
159
F5 Service Proxy for Kubernetes - v1.5.0 Installation and Integration
cd /shared
6. Run the qkview utility:
qkview
7. The qkview file appears similar to the following:
qkview.20210219-223559.tar.gz
8. Type Exit to exit the debug container.
9. Copy the Qkview file to your local workstation:
oc rsync -c debug $TMM_POD:/shared/<file> .
In this example, the /shared/qkview.20210219-223559.tar.gz Qkview file is copied to the local workstation.
oc rsync -c debug $TMM_POD:/shared/qkview.20210219-223559.tar.gz .
10. Switch to the Fluentd logging Pod project:
In this example, the spk-utilities Project is selected.
oc project spk-utilities
11. Obtain the name of the Fluentd logging Pod:
oc get pods --selector run=f5-fluentd
In this example, the Fluentd logging Pod is named f5-toda-fluentd-768b475dc-pk6bp.
NAME READY STATUSf5-toda-fluentd-768b475dc-pk6bp 1/1 Running
12. Set the Fluentd logging Pod name as an environment variable:
FLUENTD_POD=f5-toda-fluentd-768b475dc-pk6bp
13. Connect to the f5-fluentd container:
oc rsh deploy/f5-toda-fluentd bash
14. Change into the /var/log/f5 directory mapped to the persistent volume:
cd /var/log/f5
15. Run the qkview utility:
qkview
16. The Qkview file appears similar to the following, on the worker node’s mapped filesystem:
qkview.20210219-273529.tar.gz
17. Type Exit to exit the f5-fluent container.
18. Copy the Qkview file to the local filesystem:
In this example, the file /shared/qkview.20210730-231942.tar.gz is copied to the local workstation.
160
F5 Service Proxy for Kubernetes - v1.5.0 Installation and Integration
oc rsync $FLUENTD_POD:/shared/qkview.20210730-231942.tar.gz .
Disabling the sidecar
The TMM debug sidecar installs by default with the Controller. You can disable the debug sidecar by setting the de-bug.enabled parameter to false in the Controller Helm values file:
debug:enabled: false
Feedback
Provide feedback to improve this document by emailing [email protected].
Supplemental
• Persistence Volumes
161
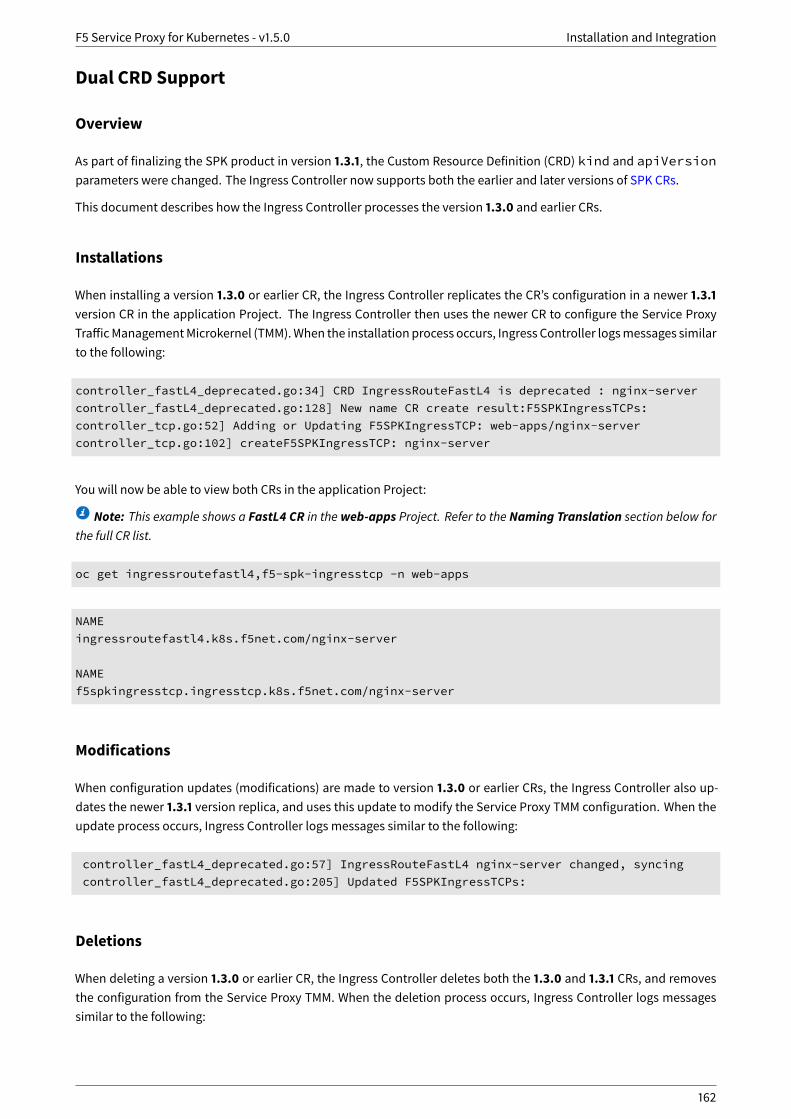
F5 Service Proxy for Kubernetes - v1.5.0 Installation and Integration
Dual CRD Support
Overview
As part of finalizing the SPK product in version 1.3.1, the Custom Resource Definition (CRD) kind and apiVersionparameters were changed. The Ingress Controller now supports both the earlier and later versions of SPK CRs.
This document describes how the Ingress Controller processes the version 1.3.0 and earlier CRs.
Installations
When installing a version 1.3.0 or earlier CR, the Ingress Controller replicates the CR’s configuration in a newer 1.3.1version CR in the application Project. The Ingress Controller then uses the newer CR to configure the Service ProxyTrafficManagementMicrokernel (TMM).When the installation process occurs, Ingress Controller logsmessages similarto the following:
controller_fastL4_deprecated.go:34] CRD IngressRouteFastL4 is deprecated : nginx-servercontroller_fastL4_deprecated.go:128] New name CR create result:F5SPKIngressTCPs:controller_tcp.go:52] Adding or Updating F5SPKIngressTCP: web-apps/nginx-servercontroller_tcp.go:102] createF5SPKIngressTCP: nginx-server
You will now be able to view both CRs in the application Project:
Note: This example shows a FastL4 CR in theweb-apps Project. Refer to the Naming Translation section below forthe full CR list.
oc get ingressroutefastl4,f5-spk-ingresstcp -n web-apps
NAMEingressroutefastl4.k8s.f5net.com/nginx-server
NAMEf5spkingresstcp.ingresstcp.k8s.f5net.com/nginx-server
Modifications
When configuration updates (modifications) are made to version 1.3.0 or earlier CRs, the Ingress Controller also up-dates the newer 1.3.1 version replica, and uses this update to modify the Service Proxy TMM configuration. When theupdate process occurs, Ingress Controller logs messages similar to the following:
controller_fastL4_deprecated.go:57] IngressRouteFastL4 nginx-server changed, syncingcontroller_fastL4_deprecated.go:205] Updated F5SPKIngressTCPs:
Deletions
When deleting a version 1.3.0 or earlier CR, the Ingress Controller deletes both the 1.3.0 and 1.3.1 CRs, and removesthe configuration from the Service Proxy TMM. When the deletion process occurs, Ingress Controller logs messagessimilar to the following:
162
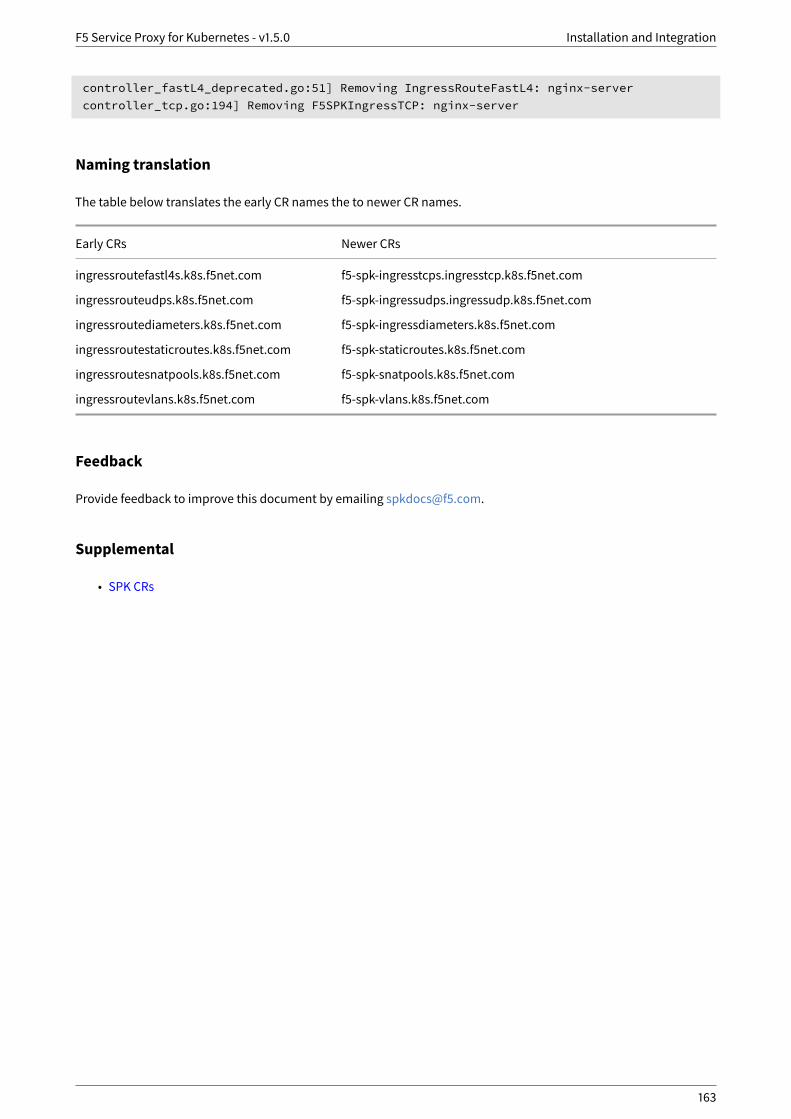
F5 Service Proxy for Kubernetes - v1.5.0 Installation and Integration
controller_fastL4_deprecated.go:51] Removing IngressRouteFastL4: nginx-servercontroller_tcp.go:194] Removing F5SPKIngressTCP: nginx-server
Naming translation
The table below translates the early CR names the to newer CR names.
Early CRs Newer CRs
ingressroutefastl4s.k8s.f5net.com f5-spk-ingresstcps.ingresstcp.k8s.f5net.com
ingressrouteudps.k8s.f5net.com f5-spk-ingressudps.ingressudp.k8s.f5net.com
ingressroutediameters.k8s.f5net.com f5-spk-ingressdiameters.k8s.f5net.com
ingressroutestaticroutes.k8s.f5net.com f5-spk-staticroutes.k8s.f5net.com
ingressroutesnatpools.k8s.f5net.com f5-spk-snatpools.k8s.f5net.com
ingressroutevlans.k8s.f5net.com f5-spk-vlans.k8s.f5net.com
Feedback
Provide feedback to improve this document by emailing [email protected].
Supplemental
• SPK CRs
163

F5 Service Proxy for Kubernetes - v1.5.0 Installation and Integration
Troubleshooting DNS/NAT46
Overview
The Service Proxy for Kubernetes (SPK) DNS/NAT46 feature is part of the F5SPKEgress Custom Resource (CR), and en-ables connectivity between internal IPv4 Pods and external IPv6 hosts. The DNS/NAT46 feature relies on a numberof basic networking configurations to successfully translate IPv4 and IPv6 connections. If you have configured theDNS/NAT46 feature, and are unable to successfully translate between hosts, use this document to determine themiss-ing or improperly configured networking components.
Configuration review
Review the points below to ensure the essential DNS/NAT46 configuration components are in place:
• Youmust enable Intelligent CNI 2 (iCNI2) when installing the [Ingress Controller].• Youmust have an associated F5SPKDnscache CR.• The IP address defined in the dnsNat46PoolIps parametermust not be reachable by internal Pods.• The dSSM Database Pods must be installed.
Requirements
Prior to getting started, ensure you have the Debug Sidecar enabled (default behavior).
Procedure
Use the steps below to verify the required networking components are present and correctly configured.
1. Switch to the Ingress Controller and Service Proxy TMM Project:
oc project <project>
In this example, the Ingress Controller is installed in the spk-ingress Project:
oc project spk-ingress
2. Obtain Service Proxy TMM’s IPv4 and IPv6 routing tables:
A. Obtain the IPv4 routing table:
oc exec -it deploy/f5-tmm -- ip r
The command output should resemble the following:
default via 169.254.0.254 dev tmm10.20.2.0/24 dev external-1 proto kernel scope link src 10.20.2.20710.130.0.0/23 dev eth0 proto kernel scope link src 10.130.0.910.144.175.0/24 dev internal proto kernel scope link src 10.144.175.231
B. Obtain the IPv6 routing table:
oc exec -it deploy/f5-tmm -- ip -6 r
The command output should resemble the following:
164
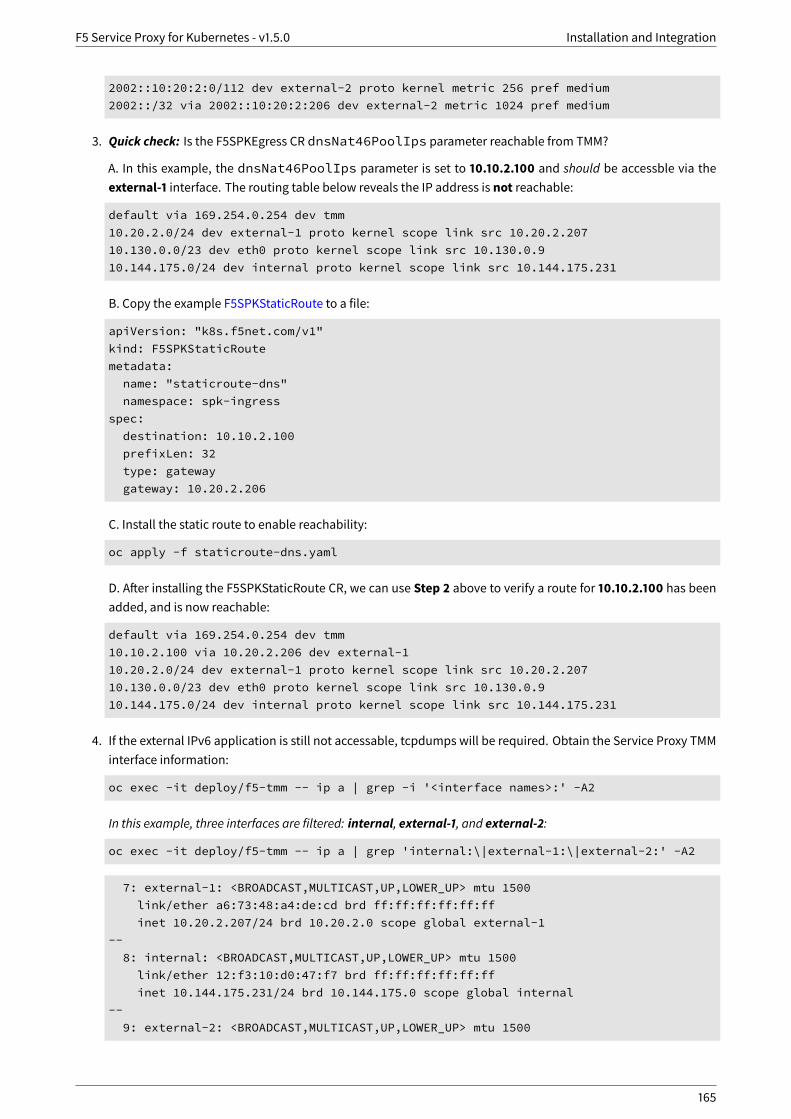
F5 Service Proxy for Kubernetes - v1.5.0 Installation and Integration
2002::10:20:2:0/112 dev external-2 proto kernel metric 256 pref medium2002::/32 via 2002::10:20:2:206 dev external-2 metric 1024 pref medium
3. Quick check: Is the F5SPKEgress CR dnsNat46PoolIps parameter reachable from TMM?
A. In this example, the dnsNat46PoolIps parameter is set to 10.10.2.100 and should be accessble via theexternal-1 interface. The routing table below reveals the IP address is not reachable:
default via 169.254.0.254 dev tmm10.20.2.0/24 dev external-1 proto kernel scope link src 10.20.2.20710.130.0.0/23 dev eth0 proto kernel scope link src 10.130.0.910.144.175.0/24 dev internal proto kernel scope link src 10.144.175.231
B. Copy the example F5SPKStaticRoute to a file:
apiVersion: "k8s.f5net.com/v1"kind: F5SPKStaticRoutemetadata:name: "staticroute-dns"namespace: spk-ingress
spec:destination: 10.10.2.100prefixLen: 32type: gatewaygateway: 10.20.2.206
C. Install the static route to enable reachability:
oc apply -f staticroute-dns.yaml
D. After installing the F5SPKStaticRoute CR, we can use Step 2 above to verify a route for 10.10.2.100 has beenadded, and is now reachable:
default via 169.254.0.254 dev tmm10.10.2.100 via 10.20.2.206 dev external-110.20.2.0/24 dev external-1 proto kernel scope link src 10.20.2.20710.130.0.0/23 dev eth0 proto kernel scope link src 10.130.0.910.144.175.0/24 dev internal proto kernel scope link src 10.144.175.231
4. If the external IPv6 application is still not accessable, tcpdumps will be required. Obtain the Service Proxy TMMinterface information:
oc exec -it deploy/f5-tmm -- ip a | grep -i '<interface names>:' -A2
In this example, three interfaces are filtered: internal, external-1, and external-2:
oc exec -it deploy/f5-tmm -- ip a | grep 'internal:\|external-1:\|external-2:' -A2
7: external-1: <BROADCAST,MULTICAST,UP,LOWER_UP> mtu 1500link/ether a6:73:48:a4:de:cd brd ff:ff:ff:ff:ff:ffinet 10.20.2.207/24 brd 10.20.2.0 scope global external-1
--8: internal: <BROADCAST,MULTICAST,UP,LOWER_UP> mtu 1500
link/ether 12:f3:10:d0:47:f7 brd ff:ff:ff:ff:ff:ffinet 10.144.175.231/24 brd 10.144.175.0 scope global internal
--9: external-2: <BROADCAST,MULTICAST,UP,LOWER_UP> mtu 1500
165
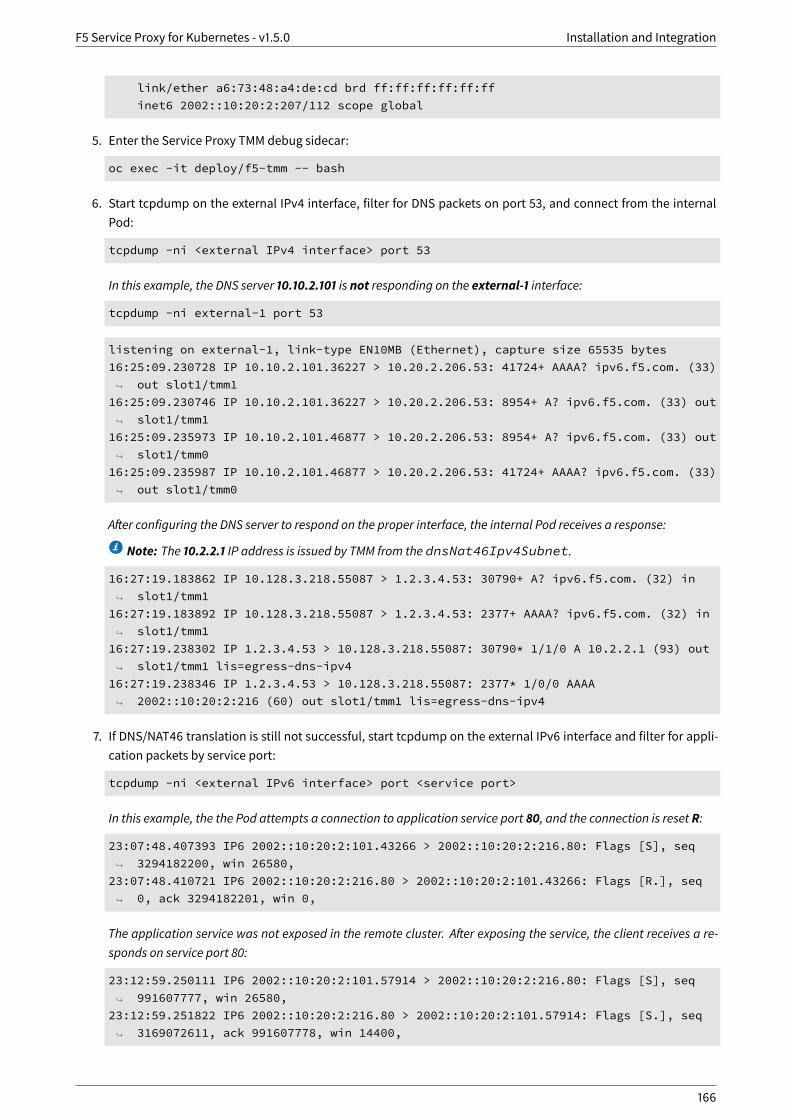
F5 Service Proxy for Kubernetes - v1.5.0 Installation and Integration
link/ether a6:73:48:a4:de:cd brd ff:ff:ff:ff:ff:ffinet6 2002::10:20:2:207/112 scope global
5. Enter the Service Proxy TMM debug sidecar:
oc exec -it deploy/f5-tmm -- bash
6. Start tcpdump on the external IPv4 interface, filter for DNS packets on port 53, and connect from the internalPod:
tcpdump -ni <external IPv4 interface> port 53
In this example, the DNS server 10.10.2.101 is not responding on the external-1 interface:
tcpdump -ni external-1 port 53
listening on external-1, link-type EN10MB (Ethernet), capture size 65535 bytes16:25:09.230728 IP 10.10.2.101.36227 > 10.20.2.206.53: 41724+ AAAA? ipv6.f5.com. (33)
out slot1/tmm1↪
16:25:09.230746 IP 10.10.2.101.36227 > 10.20.2.206.53: 8954+ A? ipv6.f5.com. (33) outslot1/tmm1↪
16:25:09.235973 IP 10.10.2.101.46877 > 10.20.2.206.53: 8954+ A? ipv6.f5.com. (33) outslot1/tmm0↪
16:25:09.235987 IP 10.10.2.101.46877 > 10.20.2.206.53: 41724+ AAAA? ipv6.f5.com. (33)out slot1/tmm0↪
After configuring the DNS server to respond on the proper interface, the internal Pod receives a response:
Note: The 10.2.2.1 IP address is issued by TMM from the dnsNat46Ipv4Subnet.
16:27:19.183862 IP 10.128.3.218.55087 > 1.2.3.4.53: 30790+ A? ipv6.f5.com. (32) inslot1/tmm1↪
16:27:19.183892 IP 10.128.3.218.55087 > 1.2.3.4.53: 2377+ AAAA? ipv6.f5.com. (32) inslot1/tmm1↪
16:27:19.238302 IP 1.2.3.4.53 > 10.128.3.218.55087: 30790* 1/1/0 A 10.2.2.1 (93) outslot1/tmm1 lis=egress-dns-ipv4↪
16:27:19.238346 IP 1.2.3.4.53 > 10.128.3.218.55087: 2377* 1/0/0 AAAA2002::10:20:2:216 (60) out slot1/tmm1 lis=egress-dns-ipv4↪
7. If DNS/NAT46 translation is still not successful, start tcpdump on the external IPv6 interface and filter for appli-cation packets by service port:
tcpdump -ni <external IPv6 interface> port <service port>
In this example, the the Pod attempts a connection to application service port 80, and the connection is reset R:
23:07:48.407393 IP6 2002::10:20:2:101.43266 > 2002::10:20:2:216.80: Flags [S], seq3294182200, win 26580,↪
23:07:48.410721 IP6 2002::10:20:2:216.80 > 2002::10:20:2:101.43266: Flags [R.], seq0, ack 3294182201, win 0,↪
The application service was not exposed in the remote cluster. After exposing the service, the client receives a re-sponds on service port 80:
23:12:59.250111 IP6 2002::10:20:2:101.57914 > 2002::10:20:2:216.80: Flags [S], seq991607777, win 26580,↪
23:12:59.251822 IP6 2002::10:20:2:216.80 > 2002::10:20:2:101.57914: Flags [S.], seq3169072611, ack 991607778, win 14400,↪
166
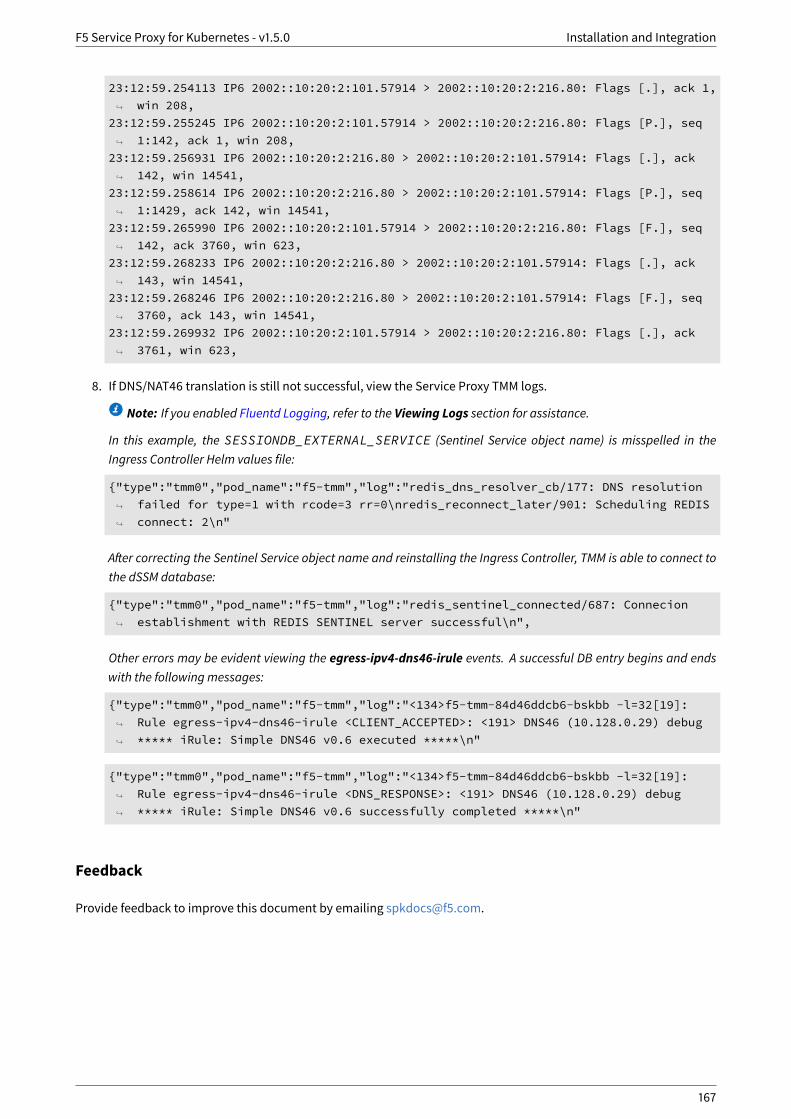
F5 Service Proxy for Kubernetes - v1.5.0 Installation and Integration
23:12:59.254113 IP6 2002::10:20:2:101.57914 > 2002::10:20:2:216.80: Flags [.], ack 1,win 208,↪
23:12:59.255245 IP6 2002::10:20:2:101.57914 > 2002::10:20:2:216.80: Flags [P.], seq1:142, ack 1, win 208,↪
23:12:59.256931 IP6 2002::10:20:2:216.80 > 2002::10:20:2:101.57914: Flags [.], ack142, win 14541,↪
23:12:59.258614 IP6 2002::10:20:2:216.80 > 2002::10:20:2:101.57914: Flags [P.], seq1:1429, ack 142, win 14541,↪
23:12:59.265990 IP6 2002::10:20:2:101.57914 > 2002::10:20:2:216.80: Flags [F.], seq142, ack 3760, win 623,↪
23:12:59.268233 IP6 2002::10:20:2:216.80 > 2002::10:20:2:101.57914: Flags [.], ack143, win 14541,↪
23:12:59.268246 IP6 2002::10:20:2:216.80 > 2002::10:20:2:101.57914: Flags [F.], seq3760, ack 143, win 14541,↪
23:12:59.269932 IP6 2002::10:20:2:101.57914 > 2002::10:20:2:216.80: Flags [.], ack3761, win 623,↪
8. If DNS/NAT46 translation is still not successful, view the Service Proxy TMM logs.
Note: If you enabled Fluentd Logging, refer to the Viewing Logs section for assistance.
In this example, the SESSIONDB_EXTERNAL_SERVICE (Sentinel Service object name) is misspelled in theIngress Controller Helm values file:
{"type":"tmm0","pod_name":"f5-tmm","log":"redis_dns_resolver_cb/177: DNS resolutionfailed for type=1 with rcode=3 rr=0\nredis_reconnect_later/901: Scheduling REDISconnect: 2\n"
↪
↪
After correcting the Sentinel Service object name and reinstalling the Ingress Controller, TMM is able to connect tothe dSSM database:
{"type":"tmm0","pod_name":"f5-tmm","log":"redis_sentinel_connected/687: Connecionestablishment with REDIS SENTINEL server successful\n",↪
Other errors may be evident viewing the egress-ipv4-dns46-irule events. A successful DB entry begins and endswith the followingmessages:
{"type":"tmm0","pod_name":"f5-tmm","log":"<134>f5-tmm-84d46ddcb6-bskbb -l=32[19]:Rule egress-ipv4-dns46-irule <CLIENT_ACCEPTED>: <191> DNS46 (10.128.0.29) debug***** iRule: Simple DNS46 v0.6 executed *****\n"
↪
↪
{"type":"tmm0","pod_name":"f5-tmm","log":"<134>f5-tmm-84d46ddcb6-bskbb -l=32[19]:Rule egress-ipv4-dns46-irule <DNS_RESPONSE>: <191> DNS46 (10.128.0.29) debug***** iRule: Simple DNS46 v0.6 successfully completed *****\n"
↪
↪
Feedback
Provide feedback to improve this document by emailing [email protected].
167

F5 Service Proxy for Kubernetes - v1.5.0 Installation and Integration
Config File Reference
This document provides a list of the files used to configure SR-IOV networking and the Service Proxy for Kubernetes(SPK) software components.
SR-IOV interfaces
• Network node policies• Network attachment definitions
Helm values
• Fluentd Logging• dSSM Database• Ingress Controller
Secret commands
• gRPC Secrets• dSSM Secrets
Custom Resources
• F5SPKVlan CR• F5SPKSnatpool CR• F5SPKEgress DNS46 CR
Supplemental
A tape archive (TAR) of configuration files can be downloaded here.
168
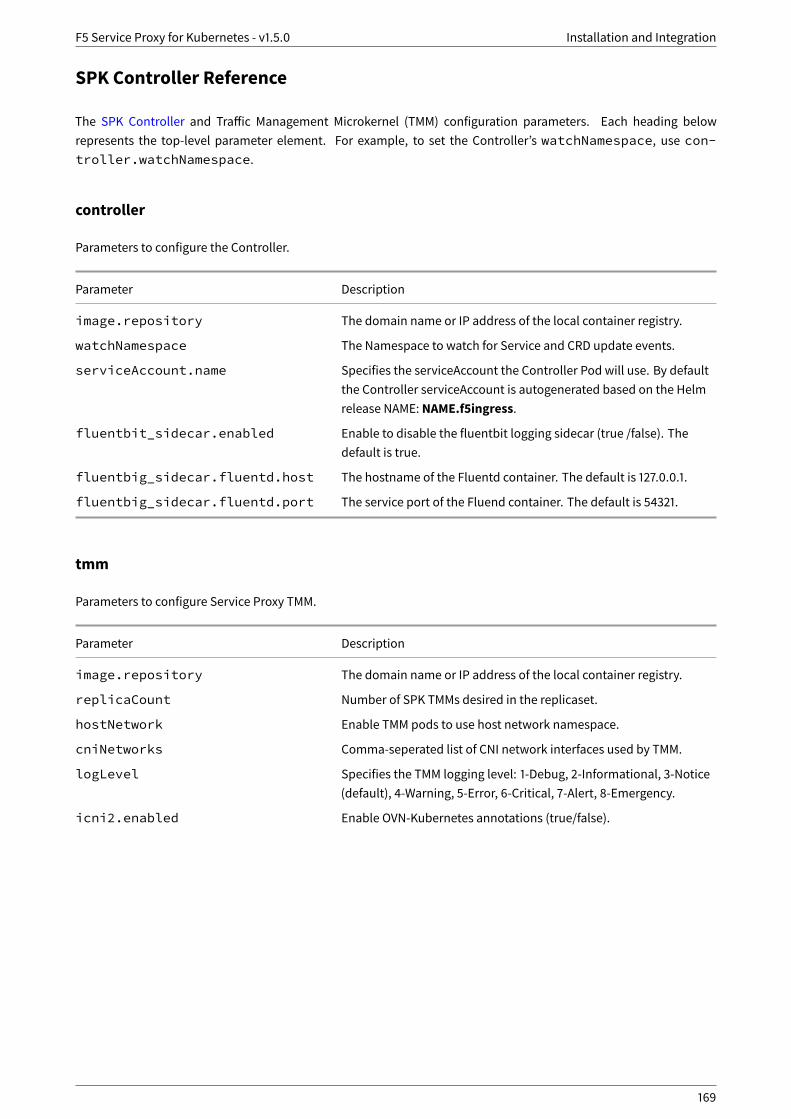
F5 Service Proxy for Kubernetes - v1.5.0 Installation and Integration
SPK Controller Reference
The SPK Controller and Traffic Management Microkernel (TMM) configuration parameters. Each heading belowrepresents the top-level parameter element. For example, to set the Controller’s watchNamespace, use con-troller.watchNamespace.
controller
Parameters to configure the Controller.
Parameter Description
image.repository The domain name or IP address of the local container registry.
watchNamespace The Namespace to watch for Service and CRD update events.
serviceAccount.name Specifies the serviceAccount the Controller Pod will use. By defaultthe Controller serviceAccount is autogenerated based on the Helmrelease NAME: NAME.f5ingress.
fluentbit_sidecar.enabled Enable to disable the fluentbit logging sidecar (true /false). Thedefault is true.
fluentbig_sidecar.fluentd.host The hostname of the Fluentd container. The default is 127.0.0.1.
fluentbig_sidecar.fluentd.port The service port of the Fluend container. The default is 54321.
tmm
Parameters to configure Service Proxy TMM.
Parameter Description
image.repository The domain name or IP address of the local container registry.
replicaCount Number of SPK TMMs desired in the replicaset.
hostNetwork Enable TMM pods to use host network namespace.
cniNetworks Comma-seperated list of CNI network interfaces used by TMM.
logLevel Specifies the TMM logging level: 1-Debug, 2-Informational, 3-Notice(default), 4-Warning, 5-Error, 6-Critical, 7-Alert, 8-Emergency.
icni2.enabled Enable OVN-Kubernetes annotations (true/false).
169
F5 Service Proxy for Kubernetes - v1.5.0 Installation and Integration
Parameter Description
bfdToOvn.enabled | Enabled whenSPK is used as an egressgateway and OVN Kubernetes usesBFD to monitor gateway nodes. ||serviceAccount.name| Specifies theserviceAccount the TMM Pod willuse. By default TMM uses the**default** serviceAccount. ||resources.limits.cpu| The number ofTMM threads to allocate. ||resources.limits.hugepages-2Mi| Theamount of hugepages toallocate: (1.5GB X TMM threads)+ 512MB. | |resources.limits.memory|The amount of memory toallocate: (1.5GB X TMM threads)+ 512MB. | |vxlan.enabled| EnableVXLAN configuration for thisTMM deployment (true/false). ||vxlan.name| VXLAN tunnel name. ||vxlan.localIp| VXLAN local IPaddress. | |vxlan.selfIp| VXLANself IP address. | |vxlan.port|VXLAN port. | |vxlan.key| VXLANkey. | |vxlan.staticRouteNodeNetmask|Netmask for static routes tonodes. ||vxlan.staticRoutePoolMemberNetmask‘
Netmask for static routes to pool members.
tmm.dynamicRouting
Thetmm.dynamicRoutingparameters to configure BGP. For configuration assistance, refer to theBGPOverview.
Parameter Description
enabled Enable the TMM dynamic routing container.
tmmRouting.image.repository The domain name or IP address of the local container registry.
tmm.dynamicRouting.tmmRouting.config
The tmm.dynamicRouting.tmRouting.config parameters.
Parameter Description
image.repository The domain name or IP address of the local container registry.Important: Omit the config prefix from this parameter.
bgp.hostname Sets the BGP Hostname.
170
F5 Service Proxy for Kubernetes - v1.5.0 Installation and Integration
Parameter Description
bgp.logFile Sets the name and location for the BGP log file.
bgp.debugs BGP array of debug.
bgp.asn TMM’s BGP Autonomous System Number.
bgp.maxPathsEbgp BGPmaximum number of paths for External BGP (2-64). Disablewith ‘null’ value.
bgp.maxPathsIbgp BGPmaximum number of paths for Internal BGP (2-64). Disablewith ‘null’ value.
bgp.neighbors BGP router array of neighbors.
bgp.neighbors.ip BGP router neighbors IP.
bgp.neighbors.acceptsIPv4 Advertise IPv4 virtual server addresses neighbors. true enables -empty string disables.
bgp.neighbors.acceptsIPv6 Advertise IPv6 virtual server addresses to neighbors. true enables -empty string disables.
bgp.neighbors.ebgpMultihop Sets the BGP TTL (range: 1-255).
bgp.neighbors.password BGP router neighbors Password.
bgp.gracefulRestartTime BGP graceful restart time.
bgp.routeMap The name of the routeMaps use to filter neighbor routes.
prefixList.name The name of the prefixList entry.
prefixList.seq The order of the prefixList entry.
prefixList.deny Allow or deny the prefixList entry.
prefixList.prefix The IP address subnet to filter.
routeMaps.name The name of the routeMaps object applied to the neighbor
routeMaps.seq The order of the routeMaps entry.
routeMaps.deny Allow or deny the routeMaps entry.
routeMaps.match The name of the referenced prefixList.bgp.neighbors.fallover Enable BFD fallover between peers: true / false.
bfd.interface Sets the BFD peering interface.
bfd.interval Configures the BFD transmission interval (50-999).
bfd.minrx Configures BFDminimum receive interval (50-999).
bfd.multiplier Configures the BFDmultiplier (3-50).
f5-toda-logging
Parameters to send TMM logging data to the Fluentd Logging container.
Note: f5-toda-logging is a subchart of the Ingress Helm chart.
Parameter Description
enabled Enable or disable TMM logging: true (default) or false.
171
F5 Service Proxy for Kubernetes - v1.5.0 Installation and Integration
Parameter Description
fluentD.host Sets the fluentd service name used as a target to send logginginformation.
sidecar.image.repository Sidecar regitry name.
tmstats.config.image.repository The path of f5-toda-tmstatsd image.
debug
Parameters for the Debug Sidecar.
Parameter Description
image.repository Debug registry name.
172
F5 Service Proxy for Kubernetes - v1.5.0 Installation and Integration
F5SPKIngressTCP Reference
The F5SPKIngressTCP Custom Resource (CR) configuration parameters. Each heading below represents the top-levelparameter element. For example, to set the Kubernetes Service name, use service.name.
service
Parameter Description
name Name of the Kubernetes Service providing access to the Pods.
port The exposed port for the service.
spec
Parameter Description
destinationAddress The advertised IPv4 address of the application.
ipv6destinationAddress The advertised IPv6 address of the application.
destinationPort The external service port of the application.
snat Translate the source IP address of ingress packets to TMM’s self IPaddresses. Use SRC_TRANS_AUTOMAP to enable, andSRC_TRANS_NONE to disable (default).
idleTimeout The number of seconds a connection can remain idle beforedeletion. The default is 300. You can also set immediate orindefinite.
category The F5SPKVlan category to associate with the virtual server.
clientTimeout The seconds allowed for clients to transmit enough data to select aserver pool. The default timeout is 30 seconds.
ipFragReass Reassemble IP fragments (true / false). The default is true.
ipTosToClient The ToS level assigned to IP packets sent to clients. The default is65535, not modified.
ipTosToServer The ToS level assigned to IP packets sent to servers. The default is65535, not modified.
ipV4TTL The outgoing packet IP TTL value for IPv4 traffic. The default is 255.
ipV6TTL The outgoing packet TTL value for IPv6 traffic. The default is 64.
linkQosToClient The QoS level assigned to packets sent to clients. The default is65535, not modified.
linkQosToServer The QoS level assigned to packets sent to servers. The default is65535, not modified.
loadBalancingMethod The traffic load balancing algorithm used.
looseClose Close loosely-initiated connections when receiving the first FINpacket (true/false). The default is false.
looseInitiation Initialize a connection when receiving a TCP packet, rather thanrequiring a SYN packet (true/false). The default is false.
173
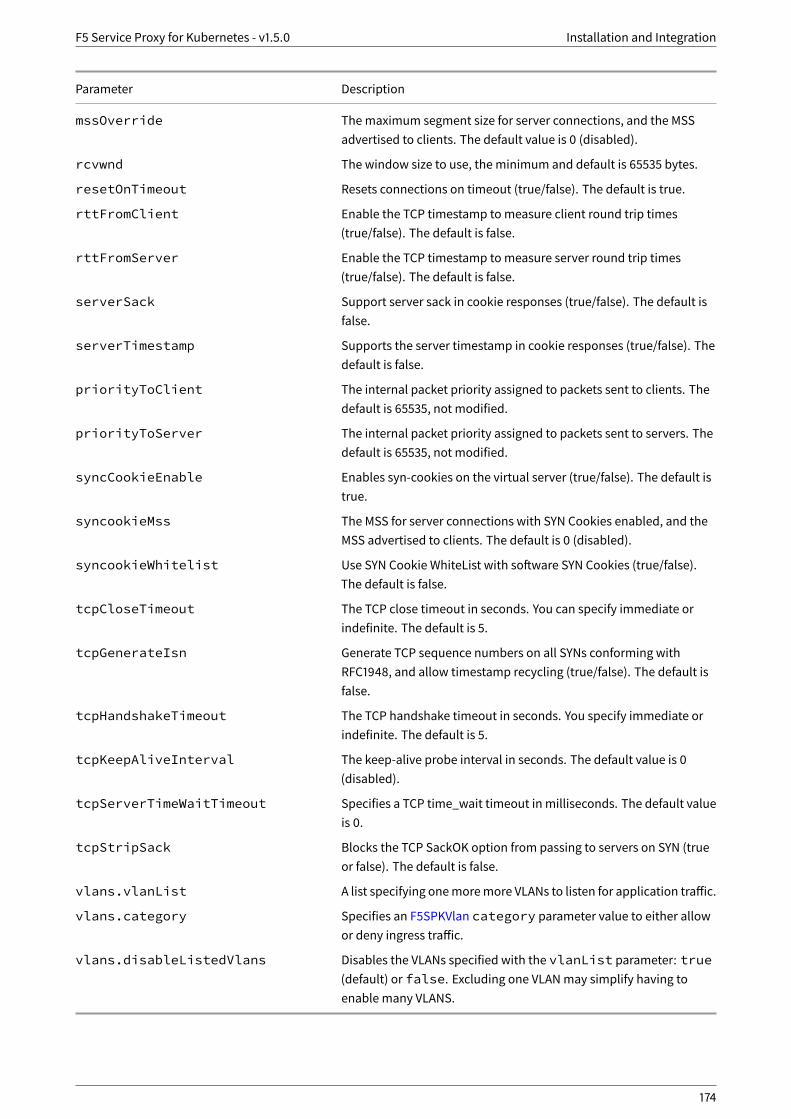
F5 Service Proxy for Kubernetes - v1.5.0 Installation and Integration
Parameter Description
mssOverride Themaximum segment size for server connections, and the MSSadvertised to clients. The default value is 0 (disabled).
rcvwnd The window size to use, the minimum and default is 65535 bytes.
resetOnTimeout Resets connections on timeout (true/false). The default is true.
rttFromClient Enable the TCP timestamp tomeasure client round trip times(true/false). The default is false.
rttFromServer Enable the TCP timestamp tomeasure server round trip times(true/false). The default is false.
serverSack Support server sack in cookie responses (true/false). The default isfalse.
serverTimestamp Supports the server timestamp in cookie responses (true/false). Thedefault is false.
priorityToClient The internal packet priority assigned to packets sent to clients. Thedefault is 65535, not modified.
priorityToServer The internal packet priority assigned to packets sent to servers. Thedefault is 65535, not modified.
syncCookieEnable Enables syn-cookies on the virtual server (true/false). The default istrue.
syncookieMss The MSS for server connections with SYN Cookies enabled, and theMSS advertised to clients. The default is 0 (disabled).
syncookieWhitelist Use SYN Cookie WhiteList with software SYN Cookies (true/false).The default is false.
tcpCloseTimeout The TCP close timeout in seconds. You can specify immediate orindefinite. The default is 5.
tcpGenerateIsn Generate TCP sequence numbers on all SYNs conforming withRFC1948, and allow timestamp recycling (true/false). The default isfalse.
tcpHandshakeTimeout The TCP handshake timeout in seconds. You specify immediate orindefinite. The default is 5.
tcpKeepAliveInterval The keep-alive probe interval in seconds. The default value is 0(disabled).
tcpServerTimeWaitTimeout Specifies a TCP time_wait timeout in milliseconds. The default valueis 0.
tcpStripSack Blocks the TCP SackOK option from passing to servers on SYN (trueor false). The default is false.
vlans.vlanList A list specifying onemoremore VLANs to listen for application traffic.
vlans.category Specifies an F5SPKVlan category parameter value to either allowor deny ingress traffic.
vlans.disableListedVlans Disables the VLANs specified with the vlanList parameter: true(default) or false. Excluding one VLANmay simplify having toenable many VLANS.
174
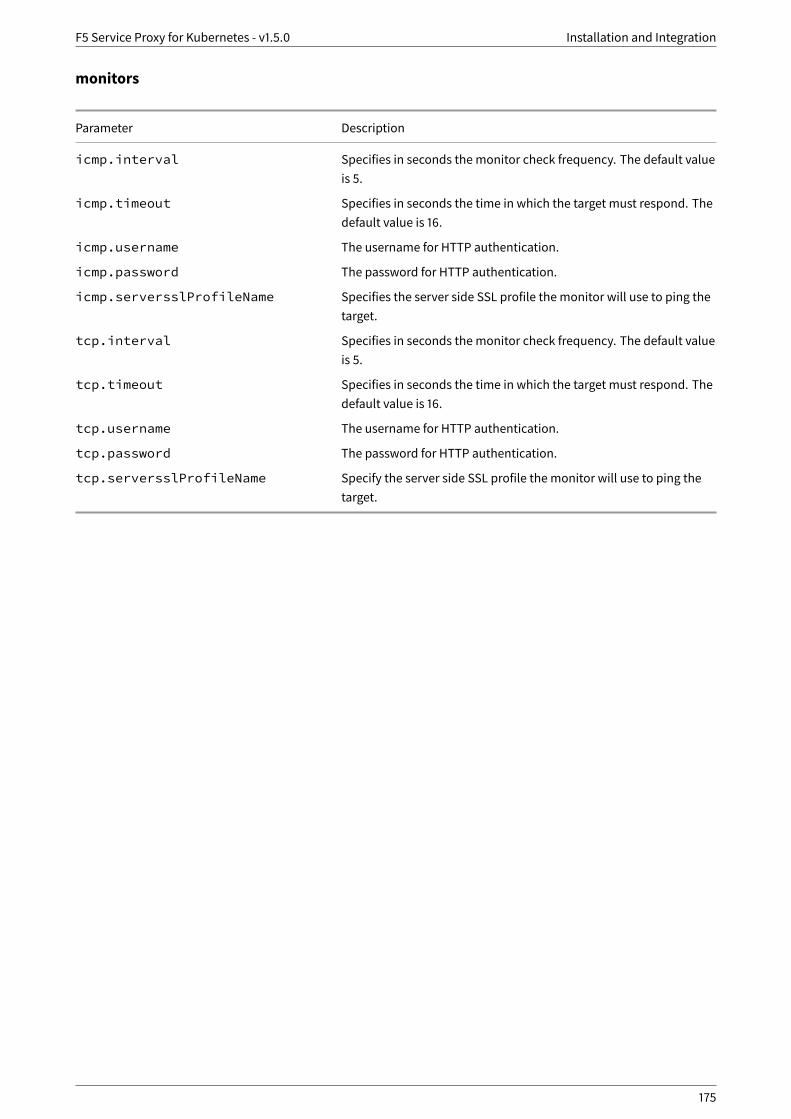
F5 Service Proxy for Kubernetes - v1.5.0 Installation and Integration
monitors
Parameter Description
icmp.interval Specifies in seconds the monitor check frequency. The default valueis 5.
icmp.timeout Specifies in seconds the time in which the target must respond. Thedefault value is 16.
icmp.username The username for HTTP authentication.
icmp.password The password for HTTP authentication.
icmp.serversslProfileName Specifies the server side SSL profile the monitor will use to ping thetarget.
tcp.interval Specifies in seconds the monitor check frequency. The default valueis 5.
tcp.timeout Specifies in seconds the time in which the target must respond. Thedefault value is 16.
tcp.username The username for HTTP authentication.
tcp.password The password for HTTP authentication.
tcp.serversslProfileName Specify the server side SSL profile the monitor will use to ping thetarget.
175
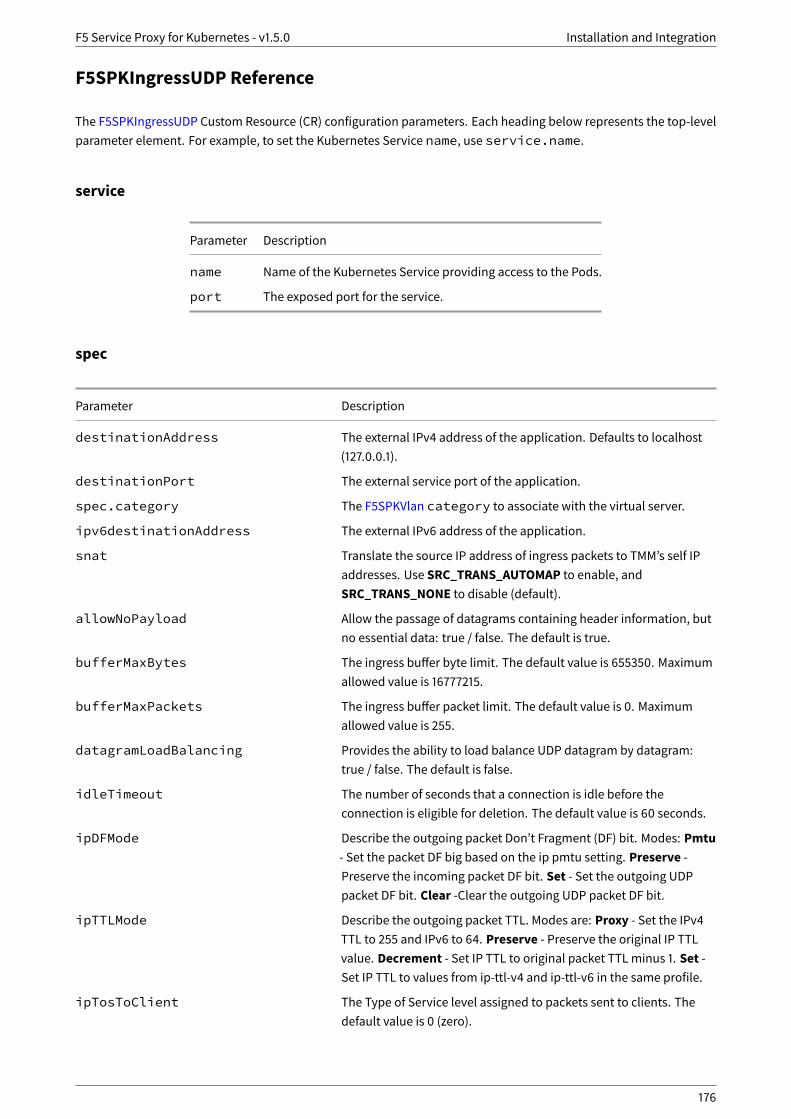
F5 Service Proxy for Kubernetes - v1.5.0 Installation and Integration
F5SPKIngressUDP Reference
The F5SPKIngressUDP Custom Resource (CR) configuration parameters. Each heading below represents the top-levelparameter element. For example, to set the Kubernetes Service name, use service.name.
service
Parameter Description
name Name of the Kubernetes Service providing access to the Pods.
port The exposed port for the service.
spec
Parameter Description
destinationAddress The external IPv4 address of the application. Defaults to localhost(127.0.0.1).
destinationPort The external service port of the application.
spec.category The F5SPKVlan category to associate with the virtual server.
ipv6destinationAddress The external IPv6 address of the application.
snat Translate the source IP address of ingress packets to TMM’s self IPaddresses. Use SRC_TRANS_AUTOMAP to enable, andSRC_TRANS_NONE to disable (default).
allowNoPayload Allow the passage of datagrams containing header information, butno essential data: true / false. The default is true.
bufferMaxBytes The ingress buffer byte limit. The default value is 655350. Maximumallowed value is 16777215.
bufferMaxPackets The ingress buffer packet limit. The default value is 0. Maximumallowed value is 255.
datagramLoadBalancing Provides the ability to load balance UDP datagram by datagram:true / false. The default is false.
idleTimeout The number of seconds that a connection is idle before theconnection is eligible for deletion. The default value is 60 seconds.
ipDFMode Describe the outgoing packet Don’t Fragment (DF) bit. Modes: Pmtu- Set the packet DF big based on the ip pmtu setting. Preserve -Preserve the incoming packet DF bit. Set - Set the outgoing UDPpacket DF bit. Clear -Clear the outgoing UDP packet DF bit.
ipTTLMode Describe the outgoing packet TTL. Modes are: Proxy - Set the IPv4TTL to 255 and IPv6 to 64. Preserve - Preserve the original IP TTLvalue. Decrement - Set IP TTL to original packet TTL minus 1. Set -Set IP TTL to values from ip-ttl-v4 and ip-ttl-v6 in the same profile.
ipTosToClient The Type of Service level assigned to packets sent to clients. Thedefault value is 0 (zero).
176
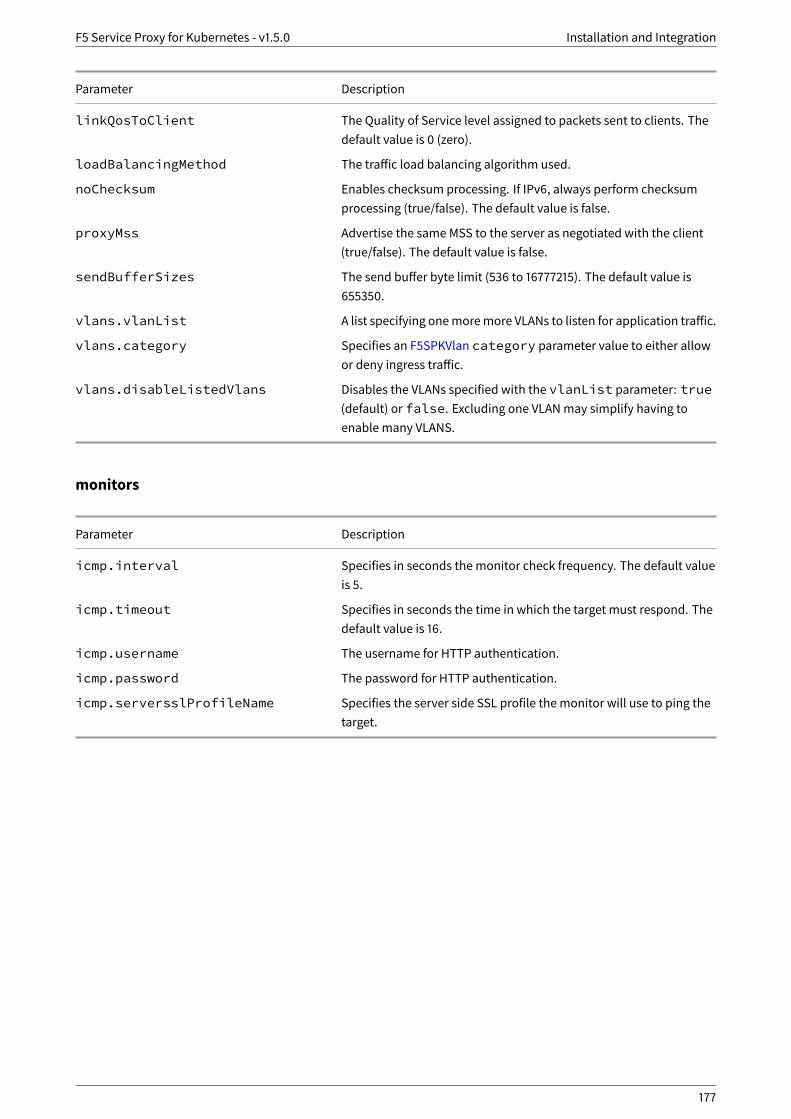
F5 Service Proxy for Kubernetes - v1.5.0 Installation and Integration
Parameter Description
linkQosToClient The Quality of Service level assigned to packets sent to clients. Thedefault value is 0 (zero).
loadBalancingMethod The traffic load balancing algorithm used.
noChecksum Enables checksum processing. If IPv6, always perform checksumprocessing (true/false). The default value is false.
proxyMss Advertise the same MSS to the server as negotiated with the client(true/false). The default value is false.
sendBufferSizes The send buffer byte limit (536 to 16777215). The default value is655350.
vlans.vlanList A list specifying onemoremore VLANs to listen for application traffic.
vlans.category Specifies an F5SPKVlan category parameter value to either allowor deny ingress traffic.
vlans.disableListedVlans Disables the VLANs specified with the vlanList parameter: true(default) or false. Excluding one VLANmay simplify having toenable many VLANS.
monitors
Parameter Description
icmp.interval Specifies in seconds the monitor check frequency. The default valueis 5.
icmp.timeout Specifies in seconds the time in which the target must respond. Thedefault value is 16.
icmp.username The username for HTTP authentication.
icmp.password The password for HTTP authentication.
icmp.serversslProfileName Specifies the server side SSL profile the monitor will use to ping thetarget.
177
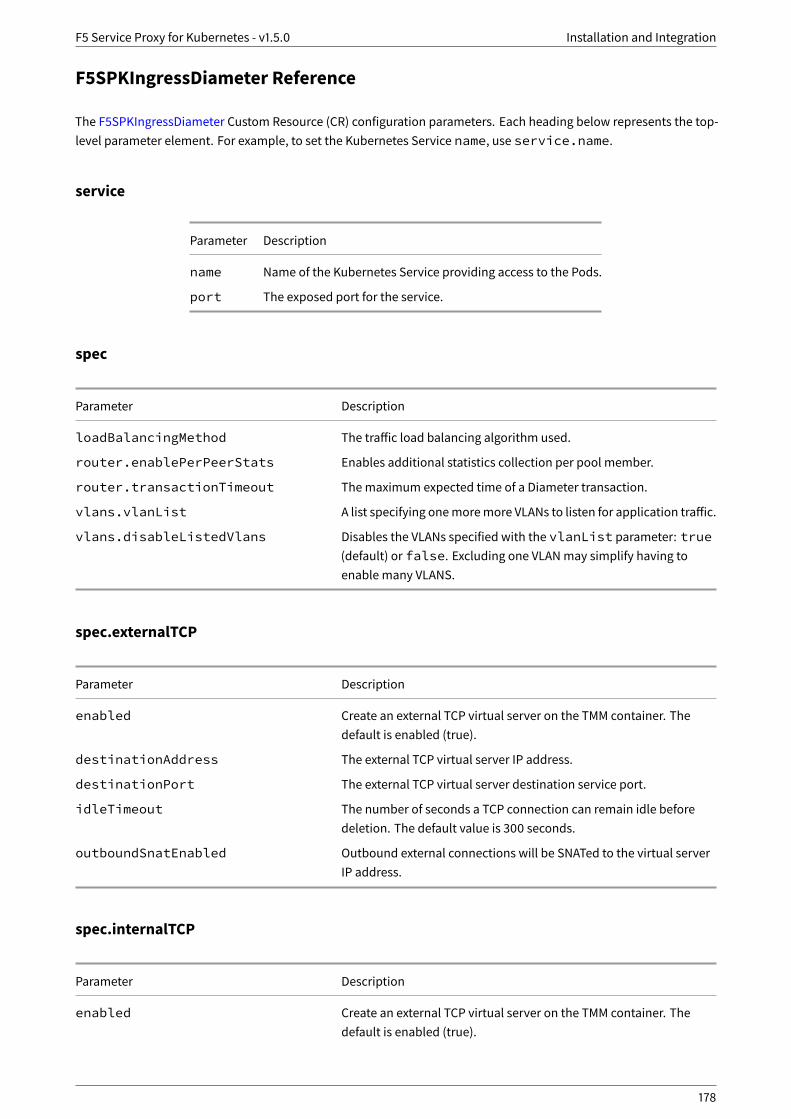
F5 Service Proxy for Kubernetes - v1.5.0 Installation and Integration
F5SPKIngressDiameter Reference
The F5SPKIngressDiameter Custom Resource (CR) configuration parameters. Each heading below represents the top-level parameter element. For example, to set the Kubernetes Service name, use service.name.
service
Parameter Description
name Name of the Kubernetes Service providing access to the Pods.
port The exposed port for the service.
spec
Parameter Description
loadBalancingMethod The traffic load balancing algorithm used.
router.enablePerPeerStats Enables additional statistics collection per pool member.
router.transactionTimeout Themaximum expected time of a Diameter transaction.
vlans.vlanList A list specifying onemoremore VLANs to listen for application traffic.
vlans.disableListedVlans Disables the VLANs specified with the vlanList parameter: true(default) or false. Excluding one VLANmay simplify having toenable many VLANS.
spec.externalTCP
Parameter Description
enabled Create an external TCP virtual server on the TMM container. Thedefault is enabled (true).
destinationAddress The external TCP virtual server IP address.
destinationPort The external TCP virtual server destination service port.
idleTimeout The number of seconds a TCP connection can remain idle beforedeletion. The default value is 300 seconds.
outboundSnatEnabled Outbound external connections will be SNATed to the virtual serverIP address.
spec.internalTCP
Parameter Description
enabled Create an external TCP virtual server on the TMM container. Thedefault is enabled (true).
178
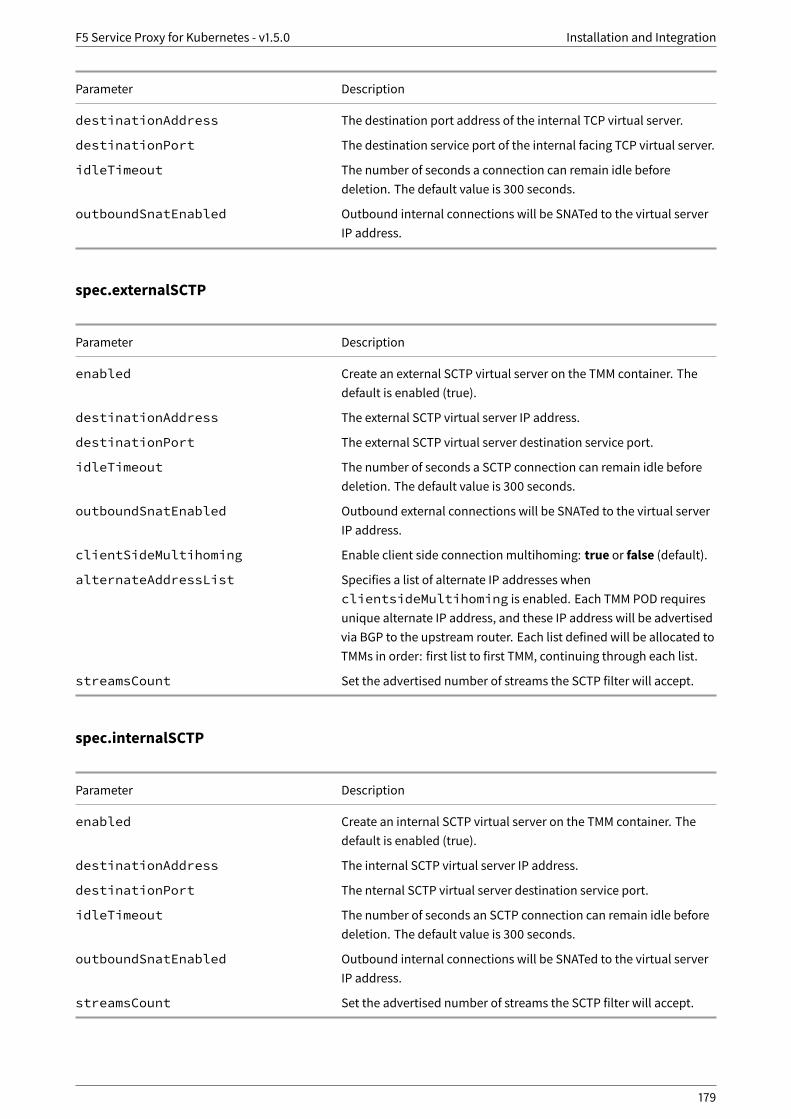
F5 Service Proxy for Kubernetes - v1.5.0 Installation and Integration
Parameter Description
destinationAddress The destination port address of the internal TCP virtual server.
destinationPort The destination service port of the internal facing TCP virtual server.
idleTimeout The number of seconds a connection can remain idle beforedeletion. The default value is 300 seconds.
outboundSnatEnabled Outbound internal connections will be SNATed to the virtual serverIP address.
spec.externalSCTP
Parameter Description
enabled Create an external SCTP virtual server on the TMM container. Thedefault is enabled (true).
destinationAddress The external SCTP virtual server IP address.
destinationPort The external SCTP virtual server destination service port.
idleTimeout The number of seconds a SCTP connection can remain idle beforedeletion. The default value is 300 seconds.
outboundSnatEnabled Outbound external connections will be SNATed to the virtual serverIP address.
clientSideMultihoming Enable client side connection multihoming: true or false (default).
alternateAddressList Specifies a list of alternate IP addresses whenclientsideMultihoming is enabled. Each TMM POD requiresunique alternate IP address, and these IP address will be advertisedvia BGP to the upstream router. Each list defined will be allocated toTMMs in order: first list to first TMM, continuing through each list.
streamsCount Set the advertised number of streams the SCTP filter will accept.
spec.internalSCTP
Parameter Description
enabled Create an internal SCTP virtual server on the TMM container. Thedefault is enabled (true).
destinationAddress The internal SCTP virtual server IP address.
destinationPort The nternal SCTP virtual server destination service port.
idleTimeout The number of seconds an SCTP connection can remain idle beforedeletion. The default value is 300 seconds.
outboundSnatEnabled Outbound internal connections will be SNATed to the virtual serverIP address.
streamsCount Set the advertised number of streams the SCTP filter will accept.
179
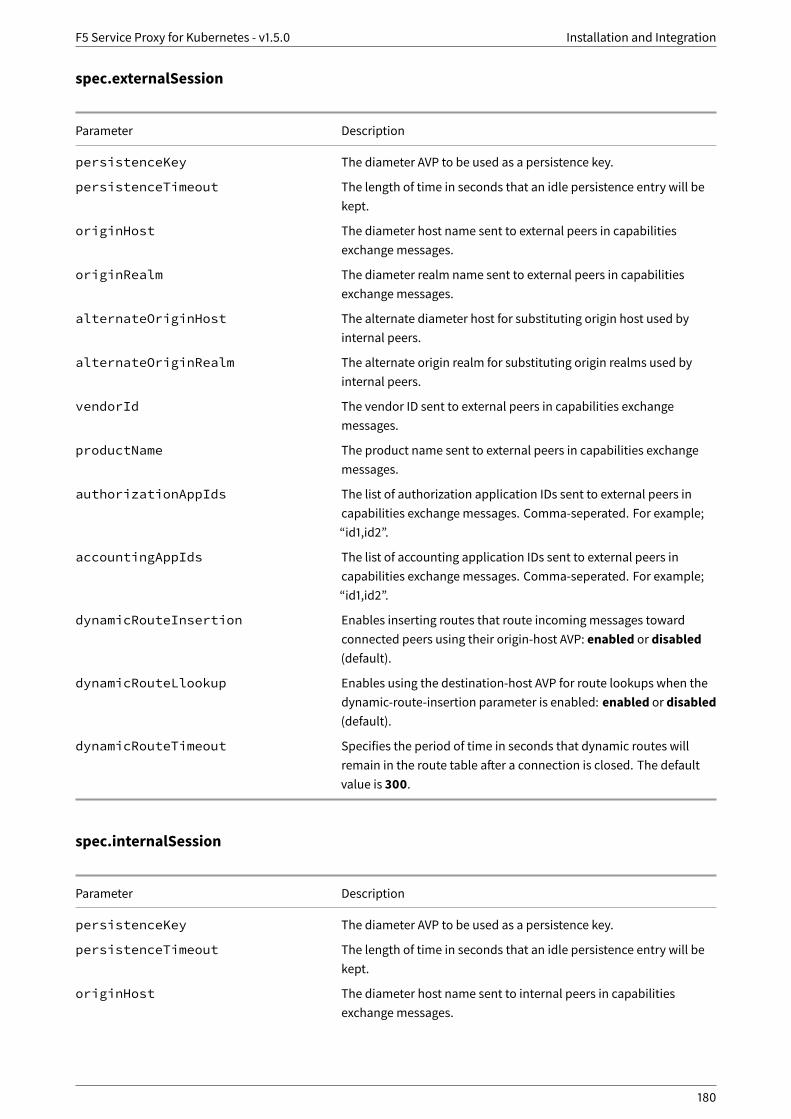
F5 Service Proxy for Kubernetes - v1.5.0 Installation and Integration
spec.externalSession
Parameter Description
persistenceKey The diameter AVP to be used as a persistence key.
persistenceTimeout The length of time in seconds that an idle persistence entry will bekept.
originHost The diameter host name sent to external peers in capabilitiesexchangemessages.
originRealm The diameter realm name sent to external peers in capabilitiesexchangemessages.
alternateOriginHost The alternate diameter host for substituting origin host used byinternal peers.
alternateOriginRealm The alternate origin realm for substituting origin realms used byinternal peers.
vendorId The vendor ID sent to external peers in capabilities exchangemessages.
productName The product name sent to external peers in capabilities exchangemessages.
authorizationAppIds The list of authorization application IDs sent to external peers incapabilities exchangemessages. Comma-seperated. For example;“id1,id2”.
accountingAppIds The list of accounting application IDs sent to external peers incapabilities exchangemessages. Comma-seperated. For example;“id1,id2”.
dynamicRouteInsertion Enables inserting routes that route incomingmessages towardconnected peers using their origin-host AVP: enabled or disabled(default).
dynamicRouteLlookup Enables using the destination-host AVP for route lookups when thedynamic-route-insertion parameter is enabled: enabled or disabled(default).
dynamicRouteTimeout Specifies the period of time in seconds that dynamic routes willremain in the route table after a connection is closed. The defaultvalue is 300.
spec.internalSession
Parameter Description
persistenceKey The diameter AVP to be used as a persistence key.
persistenceTimeout The length of time in seconds that an idle persistence entry will bekept.
originHost The diameter host name sent to internal peers in capabilitiesexchangemessages.
180
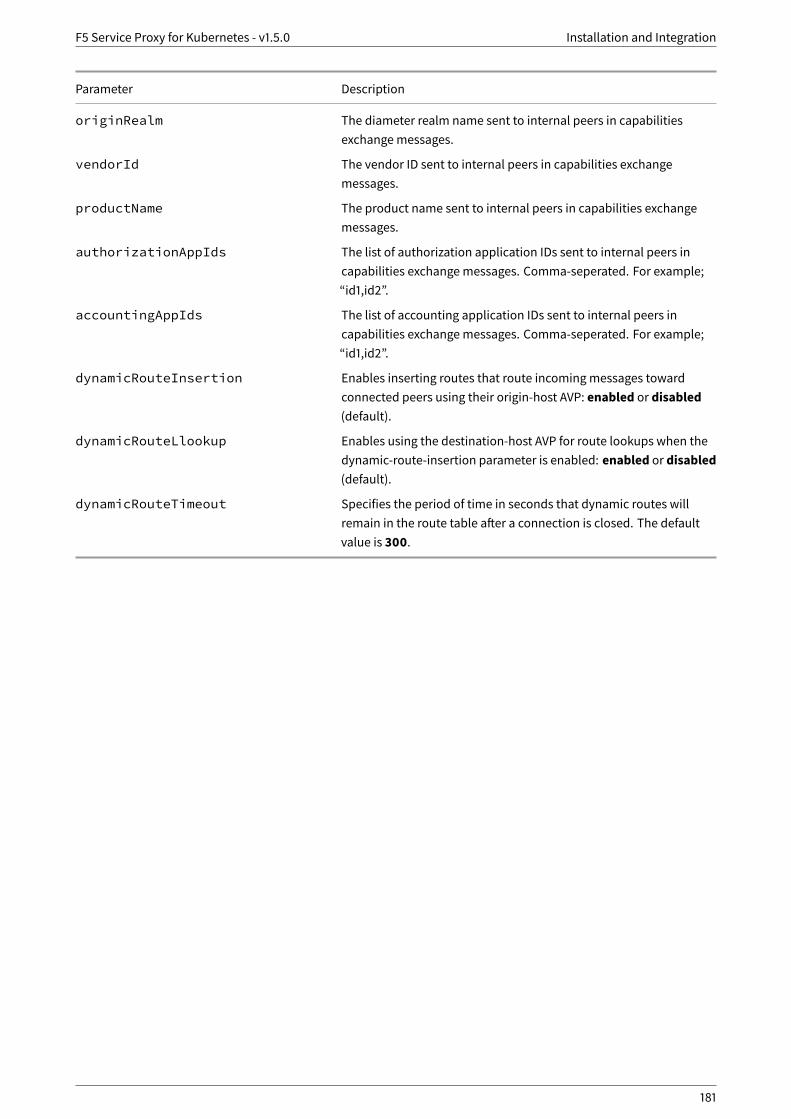
F5 Service Proxy for Kubernetes - v1.5.0 Installation and Integration
Parameter Description
originRealm The diameter realm name sent to internal peers in capabilitiesexchangemessages.
vendorId The vendor ID sent to internal peers in capabilities exchangemessages.
productName The product name sent to internal peers in capabilities exchangemessages.
authorizationAppIds The list of authorization application IDs sent to internal peers incapabilities exchangemessages. Comma-seperated. For example;“id1,id2”.
accountingAppIds The list of accounting application IDs sent to internal peers incapabilities exchangemessages. Comma-seperated. For example;“id1,id2”.
dynamicRouteInsertion Enables inserting routes that route incomingmessages towardconnected peers using their origin-host AVP: enabled or disabled(default).
dynamicRouteLlookup Enables using the destination-host AVP for route lookups when thedynamic-route-insertion parameter is enabled: enabled or disabled(default).
dynamicRouteTimeout Specifies the period of time in seconds that dynamic routes willremain in the route table after a connection is closed. The defaultvalue is 300.
181
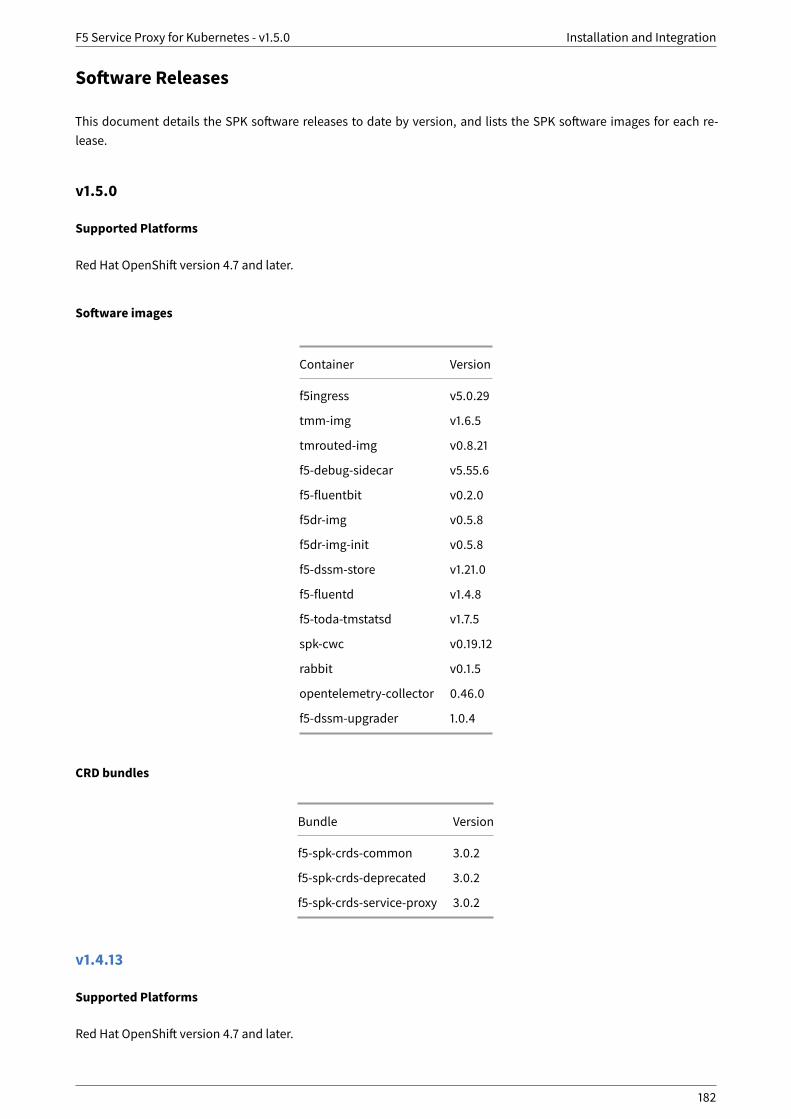
F5 Service Proxy for Kubernetes - v1.5.0 Installation and Integration
Software Releases
This document details the SPK software releases to date by version, and lists the SPK software images for each re-lease.
v1.5.0
Supported Platforms
Red Hat OpenShift version 4.7 and later.
Software images
Container Version
f5ingress v5.0.29
tmm-img v1.6.5
tmrouted-img v0.8.21
f5-debug-sidecar v5.55.6
f5-fluentbit v0.2.0
f5dr-img v0.5.8
f5dr-img-init v0.5.8
f5-dssm-store v1.21.0
f5-fluentd v1.4.8
f5-toda-tmstatsd v1.7.5
spk-cwc v0.19.12
rabbit v0.1.5
opentelemetry-collector 0.46.0
f5-dssm-upgrader 1.0.4
CRD bundles
Bundle Version
f5-spk-crds-common 3.0.2
f5-spk-crds-deprecated 3.0.2
f5-spk-crds-service-proxy 3.0.2
v1.4.13
Supported Platforms
Red Hat OpenShift version 4.7 and later.
182
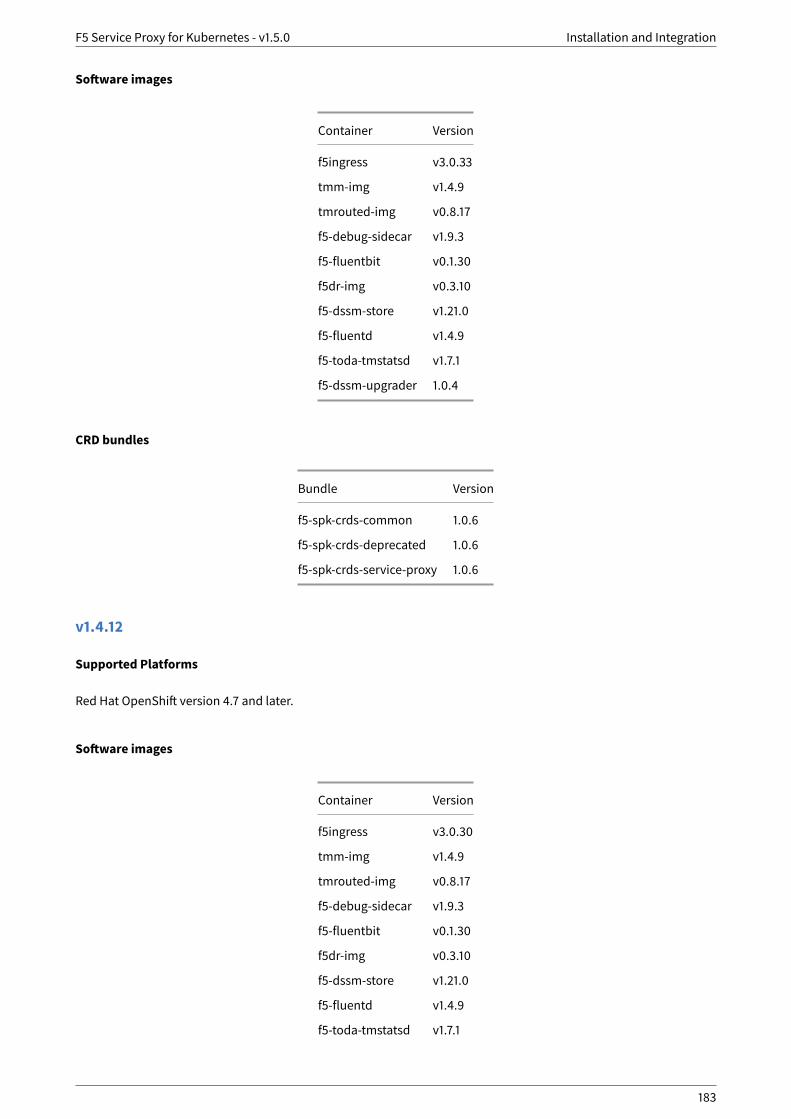
F5 Service Proxy for Kubernetes - v1.5.0 Installation and Integration
Software images
Container Version
f5ingress v3.0.33
tmm-img v1.4.9
tmrouted-img v0.8.17
f5-debug-sidecar v1.9.3
f5-fluentbit v0.1.30
f5dr-img v0.3.10
f5-dssm-store v1.21.0
f5-fluentd v1.4.9
f5-toda-tmstatsd v1.7.1
f5-dssm-upgrader 1.0.4
CRD bundles
Bundle Version
f5-spk-crds-common 1.0.6
f5-spk-crds-deprecated 1.0.6
f5-spk-crds-service-proxy 1.0.6
v1.4.12
Supported Platforms
Red Hat OpenShift version 4.7 and later.
Software images
Container Version
f5ingress v3.0.30
tmm-img v1.4.9
tmrouted-img v0.8.17
f5-debug-sidecar v1.9.3
f5-fluentbit v0.1.30
f5dr-img v0.3.10
f5-dssm-store v1.21.0
f5-fluentd v1.4.9
f5-toda-tmstatsd v1.7.1
183
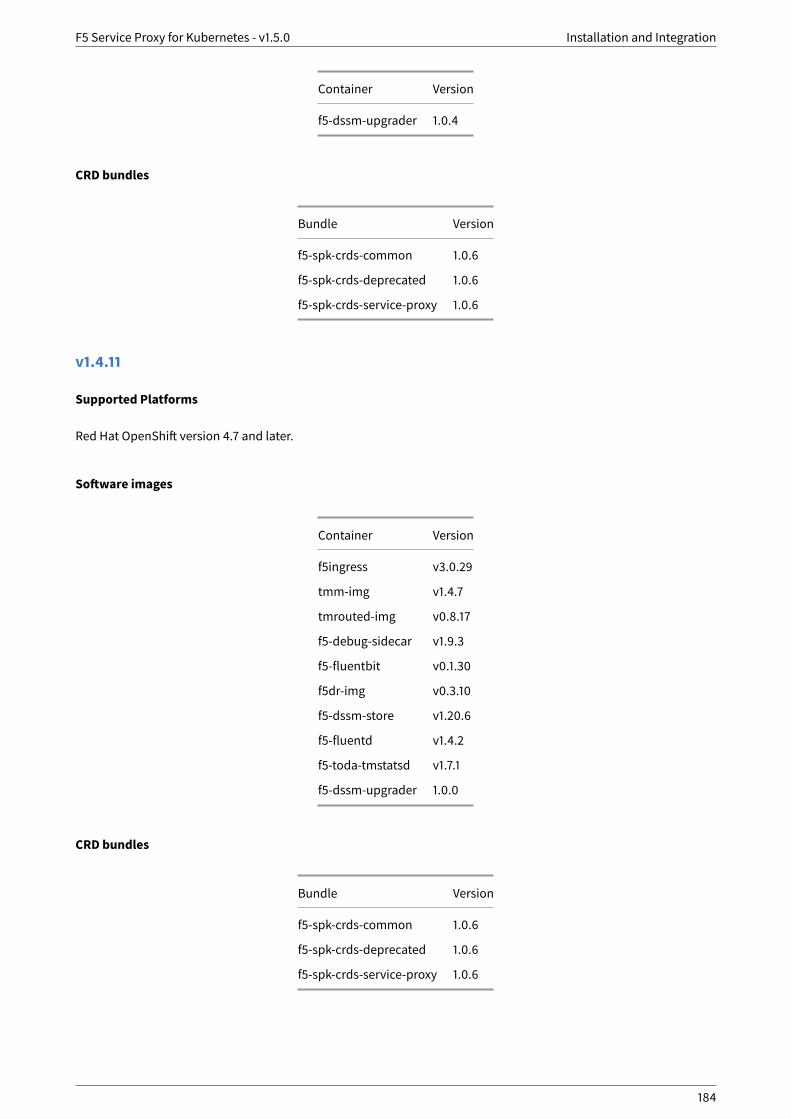
F5 Service Proxy for Kubernetes - v1.5.0 Installation and Integration
Container Version
f5-dssm-upgrader 1.0.4
CRD bundles
Bundle Version
f5-spk-crds-common 1.0.6
f5-spk-crds-deprecated 1.0.6
f5-spk-crds-service-proxy 1.0.6
v1.4.11
Supported Platforms
Red Hat OpenShift version 4.7 and later.
Software images
Container Version
f5ingress v3.0.29
tmm-img v1.4.7
tmrouted-img v0.8.17
f5-debug-sidecar v1.9.3
f5-fluentbit v0.1.30
f5dr-img v0.3.10
f5-dssm-store v1.20.6
f5-fluentd v1.4.2
f5-toda-tmstatsd v1.7.1
f5-dssm-upgrader 1.0.0
CRD bundles
Bundle Version
f5-spk-crds-common 1.0.6
f5-spk-crds-deprecated 1.0.6
f5-spk-crds-service-proxy 1.0.6
184

F5 Service Proxy for Kubernetes - v1.5.0 Installation and Integration
v1.4.10
Supported Platforms
Red Hat OpenShift version 4.7 and later.
Software images
Container Version
f5ingress v3.0.24
tmm-img v1.4.6
tmrouted-img v0.8.17
f5-debug-sidecar v1.9.3
f5-fluentbit v0.1.30
f5dr-img v0.3.10
f5-dssm-store v1.20.6
f5-fluentd v1.4.2
f5-toda-tmstatsd v1.7.1
f5-dssm-upgrader 1.0.0
CRD bundles
Bundle Version
f5-spk-crds-common 1.0.6
f5-spk-crds-deprecated 1.0.6
f5-spk-crds-service-proxy 1.0.6
v1.4.9
Supported Platforms
Red Hat OpenShift version 4.7 and later.
Software images
Container Version
f5ingress v3.0.20
tmm-img v1.4.3
tmrouted-img v0.8.17
f5-debug-sidecar v1.8.8
185

F5 Service Proxy for Kubernetes - v1.5.0 Installation and Integration
Container Version
f5-fluentbit v0.1.30
f5dr-img v0.3.10
f5-dssm-store v1.18.4
f5-fluentd v1.4.2
f5-toda-tmstatsd v1.7.1
CRD bundles
Bundle Version
f5-spk-crds-common 1.0.5
f5-spk-crds-deprecated 1.0.5
f5-spk-crds-service-proxy 1.0.5
v1.4.8
Supported Platforms
Red Hat OpenShift version 4.7 and later.
Software images
Container Version
f5ingress v3.0.18
tmm-img v1.4.2
tmrouted-img v0.8.17
f5-debug-sidecar v1.8.8
f5-fluentbit v0.1.30
f5dr-img v0.3.10
f5-dssm-store v1.18.4
f5-fluentd v1.4.2
f5-toda-tmstatsd v1.7.1
CRD bundles
Bundle Version
f5-spk-crds-common 1.0.5
f5-spk-crds-deprecated 1.0.5
186

F5 Service Proxy for Kubernetes - v1.5.0 Installation and Integration
Bundle Version
f5-spk-crds-service-proxy 1.0.5
v1.4.7
Supported Platforms
Red Hat OpenShift version 4.7 and later.
Software images
Container Version
f5ingress v3.0.17
tmm-img v1.4.2
tmrouted-img v0.8.17
f5-debug-sidecar v1.8.8
f5-fluentbit v0.1.30
f5dr-img v0.3.10
f5-dssm-store v1.18.4
f5-fluentd v1.4.2
f5-toda-tmstatsd v1.7.1
CRD bundles
Bundle Version
f5-spk-crds-common 1.0.5
f5-spk-crds-deprecated 1.0.5
f5-spk-crds-service-proxy 1.0.5
v1.4.5
Supported Platforms
Red Hat OpenShift version 4.7 and later.
Software images
Container Version
f5ingress v3.0.14
187
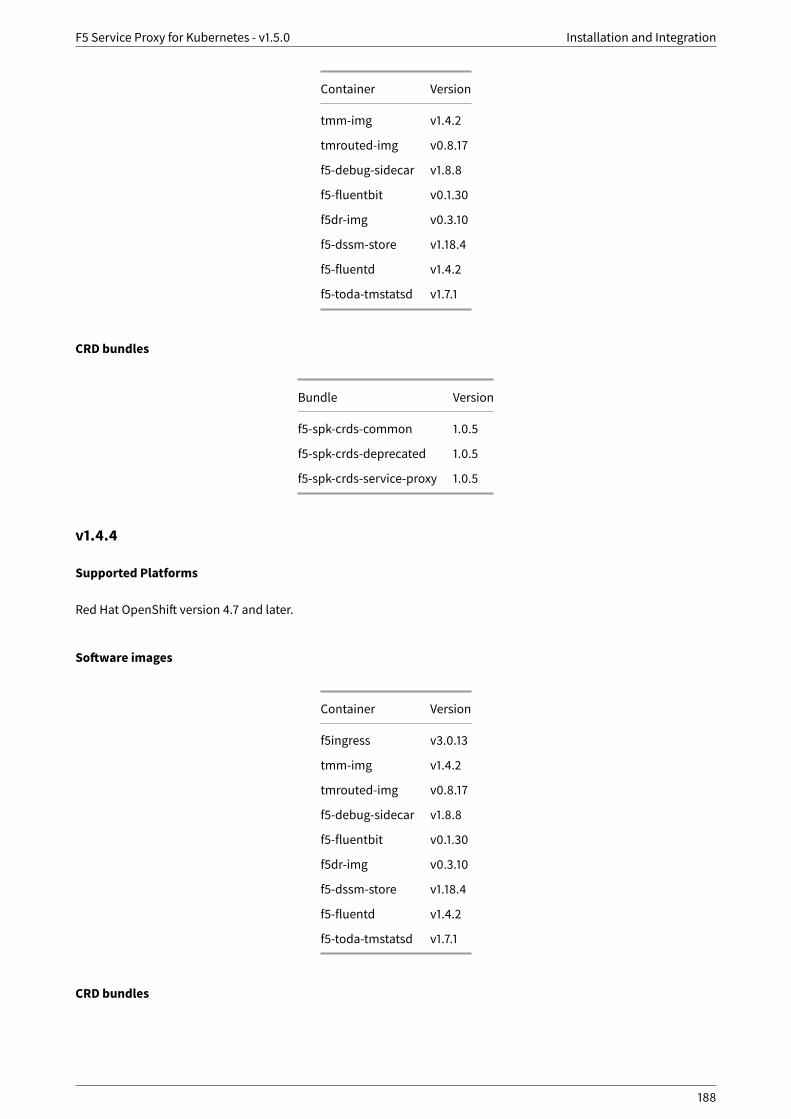
F5 Service Proxy for Kubernetes - v1.5.0 Installation and Integration
Container Version
tmm-img v1.4.2
tmrouted-img v0.8.17
f5-debug-sidecar v1.8.8
f5-fluentbit v0.1.30
f5dr-img v0.3.10
f5-dssm-store v1.18.4
f5-fluentd v1.4.2
f5-toda-tmstatsd v1.7.1
CRD bundles
Bundle Version
f5-spk-crds-common 1.0.5
f5-spk-crds-deprecated 1.0.5
f5-spk-crds-service-proxy 1.0.5
v1.4.4
Supported Platforms
Red Hat OpenShift version 4.7 and later.
Software images
Container Version
f5ingress v3.0.13
tmm-img v1.4.2
tmrouted-img v0.8.17
f5-debug-sidecar v1.8.8
f5-fluentbit v0.1.30
f5dr-img v0.3.10
f5-dssm-store v1.18.4
f5-fluentd v1.4.2
f5-toda-tmstatsd v1.7.1
CRD bundles
188

F5 Service Proxy for Kubernetes - v1.5.0 Installation and Integration
Bundle Version
f5-spk-crds-common 1.0.4
f5-spk-crds-deprecated 1.0.4
f5-spk-crds-service-proxy 1.0.4
v1.4.3
Supported Platforms
Red Hat OpenShift version 4.7 and later.
Software images
Container Version
f5ingress v3.0.8
tmm-img v1.4.2
tmrouted-img v0.8.17
f5-debug-sidecar v1.8.8
f5-fluentbit v0.1.30
f5dr-img v0.3.10
f5-dssm-store v1.18.4
f5-fluentd v1.4.2
f5-toda-tmstatsd v1.7.1
CRD bundles
Bundle Version
f5-spk-crds-common 1.0.4
f5-spk-crds-deprecated 1.0.4
f5-spk-crds-service-proxy 1.0.4
v1.4.2
Supported Platforms
Red Hat OpenShift version 4.7 and later.
Software images
189

F5 Service Proxy for Kubernetes - v1.5.0 Installation and Integration
Container Version
f5ingress v3.0.7
tmm-img v1.4.1
tmrouted-img v0.8.17
f5-debug-sidecar v1.8.8
f5-fluentbit v0.1.30
f5dr-img v0.3.10
f5-dssm-store v1.18.4
f5-fluentd v1.4.2
f5-toda-tmstatsd v1.7.1
CRD bundles
Bundle Version
f5-spk-crds-common 1.0.4
f5-spk-crds-deprecated 1.0.4
f5-spk-crds-service-proxy 1.0.4
v1.4.0
Supported Platforms
Red Hat OpenShift version 4.7 and later.
Software images
Container Version
f5ingress v0.186.8
tmm-img v0.589.0
tmrouted-img v0.8.17
f5-debug-sidecar v1.8.8
f5-fluentbit v0.1.30
f5dr-img v0.3.10
f5-dssm-store v1.18.4
f5-fluentd v1.4.2
f5-toda-tmstatsd v1.7.1
190
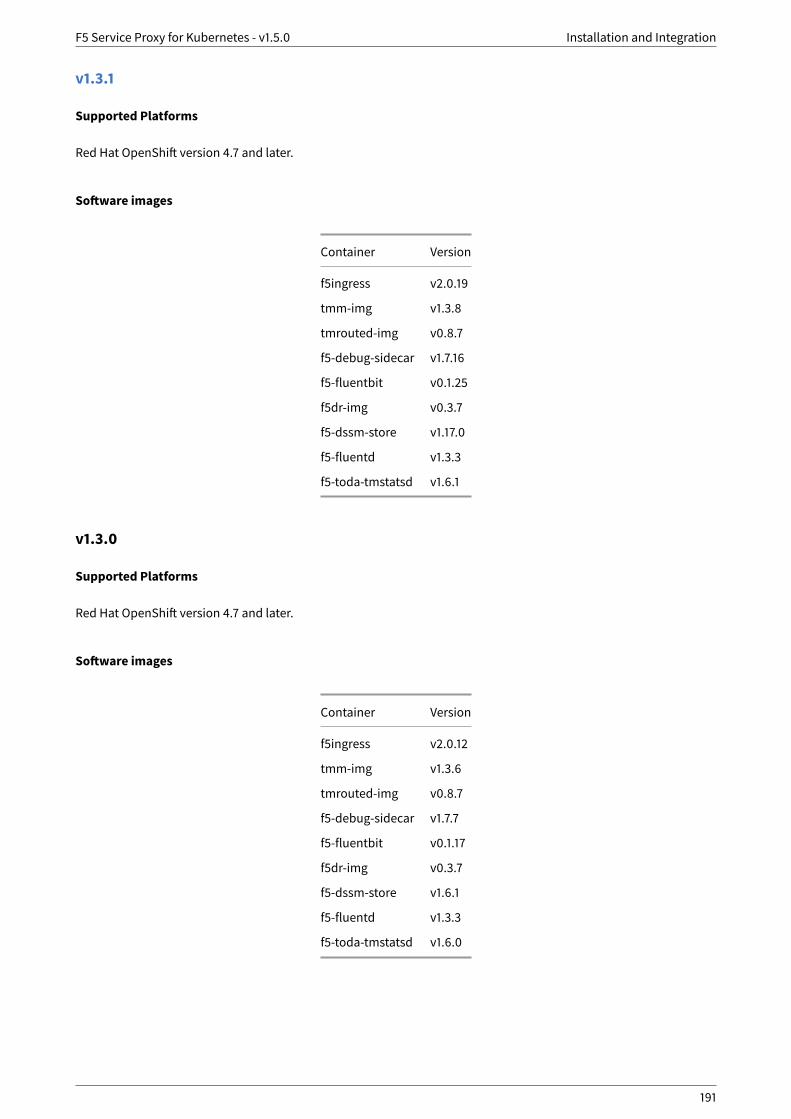
F5 Service Proxy for Kubernetes - v1.5.0 Installation and Integration
v1.3.1
Supported Platforms
Red Hat OpenShift version 4.7 and later.
Software images
Container Version
f5ingress v2.0.19
tmm-img v1.3.8
tmrouted-img v0.8.7
f5-debug-sidecar v1.7.16
f5-fluentbit v0.1.25
f5dr-img v0.3.7
f5-dssm-store v1.17.0
f5-fluentd v1.3.3
f5-toda-tmstatsd v1.6.1
v1.3.0
Supported Platforms
Red Hat OpenShift version 4.7 and later.
Software images
Container Version
f5ingress v2.0.12
tmm-img v1.3.6
tmrouted-img v0.8.7
f5-debug-sidecar v1.7.7
f5-fluentbit v0.1.17
f5dr-img v0.3.7
f5-dssm-store v1.6.1
f5-fluentd v1.3.3
f5-toda-tmstatsd v1.6.0
191
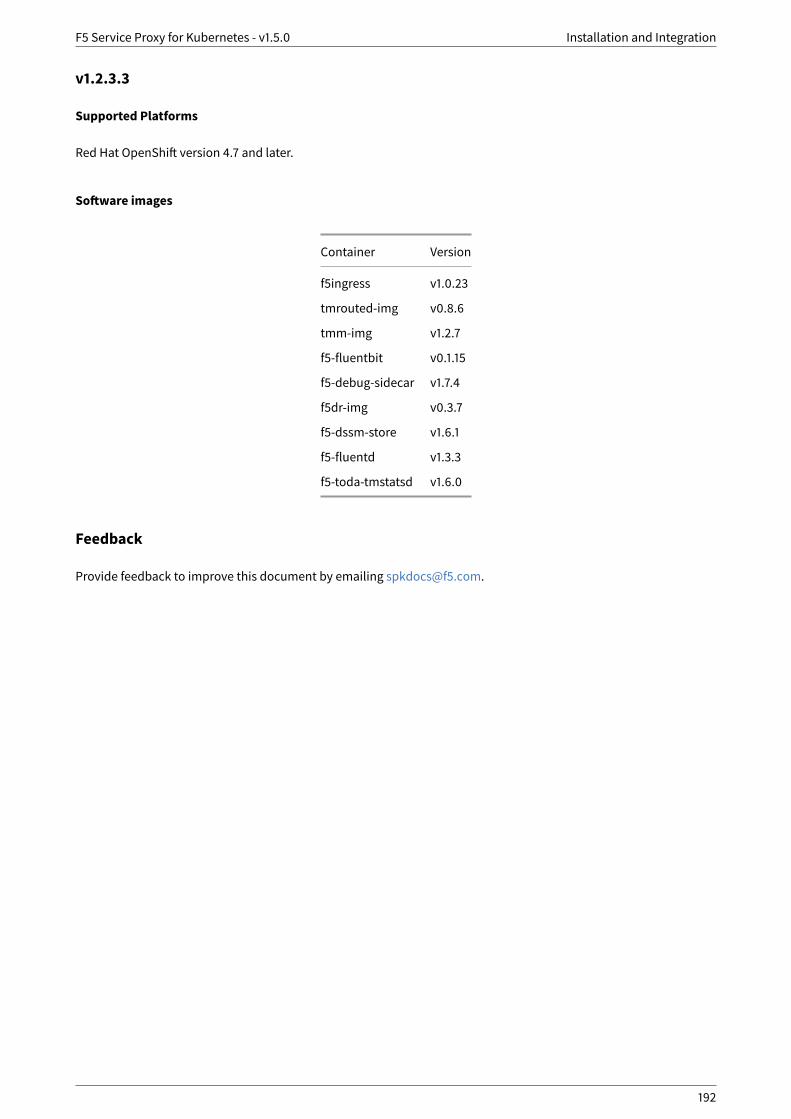
F5 Service Proxy for Kubernetes - v1.5.0 Installation and Integration
v1.2.3.3
Supported Platforms
Red Hat OpenShift version 4.7 and later.
Software images
Container Version
f5ingress v1.0.23
tmrouted-img v0.8.6
tmm-img v1.2.7
f5-fluentbit v0.1.15
f5-debug-sidecar v1.7.4
f5dr-img v0.3.7
f5-dssm-store v1.6.1
f5-fluentd v1.3.3
f5-toda-tmstatsd v1.6.0
Feedback
Provide feedback to improve this document by emailing [email protected].
192
Related Documents