F5 OpenStack Documentation Documentation Release F5 Networks, Inc Jul 05, 2017

Welcome message from author
This document is posted to help you gain knowledge. Please leave a comment to let me know what you think about it! Share it to your friends and learn new things together.
Transcript
F5 OpenStack DocumentationDocumentation
Release
F5 Networks, Inc
Jul 05, 2017


Contents
1 Guides and Resources 3
i

ii

F5 OpenStack Documentation Documentation, Release
Attention: The F5 OpenStack Integrations documentation is moving to clouddocs.f5.com. Thank you foryour patience during construction.
This documentation set provides users of F5® technologies with an interest in OpenStack a jumping-off point forgetting started with F5 in OpenStack. We have guides for simple OpenStack deployment and configuration and fordeploying BIG-IP® VE from within an OpenStack cloud.
If you would like to request a new user guide or notify us of an issue with an existing one, please file an issue inGitHub.
Contents 1

F5 OpenStack Documentation Documentation, Release
2 Contents
CHAPTER 1
Guides and Resources
Attention: The F5 OpenStack Integrations documentation is moving to clouddocs.f5.com. Thank you foryour patience during construction.
Project Index
F5 Networks® currently has a presence in the OpenStack projects listed below.
Neutron
Neutron is the OpenStack Networking component. The Load-Balancer-as-a-Service (LBaaS) plugin adds load balanc-ing functionality to Neutron. There are two versions – LBaaSv1 and LBaaSv2.
LBaaSv1
Important: End of Software Development for F5 OpenStack LBaaS version 1
F5 announces the End of Software Development (EoSD) for the F5 OpenStack LBaaS version 1 integration, effectiveOctober 1, 2016. This announcement is in compliance with the OpenStack community deprecation of the OpenStackNeutron LBaaS version 1 plugin. Customers are encouraged to move to OpenStack LBaaS version 2.
F5 will continue to repair defects and perform maintenance on the F5 OpenStack LBaaS version 1 integration until theOpenstack Ocata release in April 2017.
For additional information, please refer to the F5 OpenStack Releases and Support Matrix.
See also:
• f5-openstack-lbaasv1 on GitHub
3

F5 OpenStack Documentation Documentation, Release
• F5 LBaaSv1 Plugin Docs Home
LBaaSv2
F5’s LBaaSv2 solution is supported for use with OpenStack Liberty forward.1 F5’s LBaaSv2 solution comprises twoseparate projects: the F5 service provider driver and F5 agent.
All documentation relevant to LBaaSv2 is sourced from the f5-openstack-lbaasv2-driver project in GitHub.
f5-openstack-lbaasv2-driver
The F5 OpenStack service provider driver – also referred to as the F5 LBaaSv2 driver – directs Neutron load balancingcalls from the RPC messaging queue to the F5 agent. The two work in conjunction to retrieve LBaaS messaging callsfrom the OpenStack RPC queue and translate them into iControl® REST calls that are understood by BIG-IP devices.
See also:
• F5 LBaaSv2 Docs Home
• F5 LBaaSv2 User Guide
• f5-openstack-lbaasv2-driver on GitHub
f5-openstack-agent
The F5 agent provides OpenStack users with access to the robust set of BIG-IP® LTM® services, by means of thef5-sdk. The agent receives tasks from the F5 service provider driver and configures the requested LBaaS objects onthe BIG-IP.
In the future, the agent may also provide the means for using OpenStack services other than LBaaS in conjunctionwith BIG-IP devices.
See also:
• F5 Agent Docs Home
• F5 Agent Quick Start
• f5-openstack-agent on GitHub
Heat
Heat is OpenStack’s orchestration service. F5 has developed a set of Heat plugins and templates that make it easy toorchestrate cloud applications in OpenStack using F5 technologies.
Plugins
The F5 Heat plugins enable BIG-IP objects for use in OpenStack. Like F5 LBaaSv2, the Heat plugins use the f5-sdkto communicate with BIG-IP via the REST API.
See also:
• f5-openstack-heat-plugins on GitHub
• F5 Heat Plugins Docs Home
1 See the Releases and Support Matrix
4 Chapter 1. Guides and Resources
F5 OpenStack Documentation Documentation, Release
Templates
The F5 Heat templates can be used to provision resources and BIG-IP services in OpenStack clouds. F5’s templatesuse the OpenStack HOT template format; they can be used in conjunction with F5 iApps®, a user-customizableframework for deploying applications.
The F5 Heat templates come in two flavors: supported and unsupported. All F5 Heat templates can be downloadedfrom the F5 Heat docs site or GitHub repo.
Warning: F5 provides limited support for supported templates, while unsupported templates are considered to be‘use-at-your-own-risk’.
See also:
• f5-openstack-heat on GitHub
• F5 Heat Docs Home
• F5 Heat User Guide
Attention: The F5 OpenStack Integrations documentation is moving to clouddocs.f5.com. Thank you foryour patience during construction.
OpenStack Partnerships
F5 has tested and certified its integration with OpenStack distribution platform vendors such as Red Hat, Mirantis, andHPE, as well as SDN partners Cisco, PLUMgrid, and Nuage. That means you can count on fully supported, validatedOpenStack implementations.
Each of F5’s OpenStack distribution partners provides comprehensive documentation for installing and configuringOpenStack.
Table 1.1: F5 Distribution Platform Certifications
Platform F5 OpenStack Solution OpenStack versionHPE Helion OpenStack v4.0 F5 LBaaSv2 MitakaHPE Helion OpenStack v3.0 F5 LBaaSv2 LibertyMirantis OpenStack v9.0 F5 LBaaSv2, Heat plugin MitakaMirantis OpenStack v7.0 F5 LBaaSv1 KiloRedHat OpenStack Platform v9 F5 LBaaSv2 MitakaRedHat OpenStack Platform v8 F5 LBaaSv2 LibertyRedHat OpenStack Platform v7 F5 LBaaSv1 KiloRedHat OpenStack Platform v6 F5 LBaaSv1 Juno
Attention: The F5 OpenStack Integrations documentation is moving to clouddocs.f5.com. Thank you foryour patience during construction.
1.2. OpenStack Partnerships 5
F5 OpenStack Documentation Documentation, Release
Developer Area
The information presented in this area is for those wishing to contribute to any of F5®’s OpenStack projects. Be sureto consult the README and Contributing guide for the specific project that interests you, to ensure you’re inline withcurrent practices and policies.
Attention: The F5 OpenStack Integrations documentation is moving to clouddocs.f5.com. Thank you foryour patience during construction.
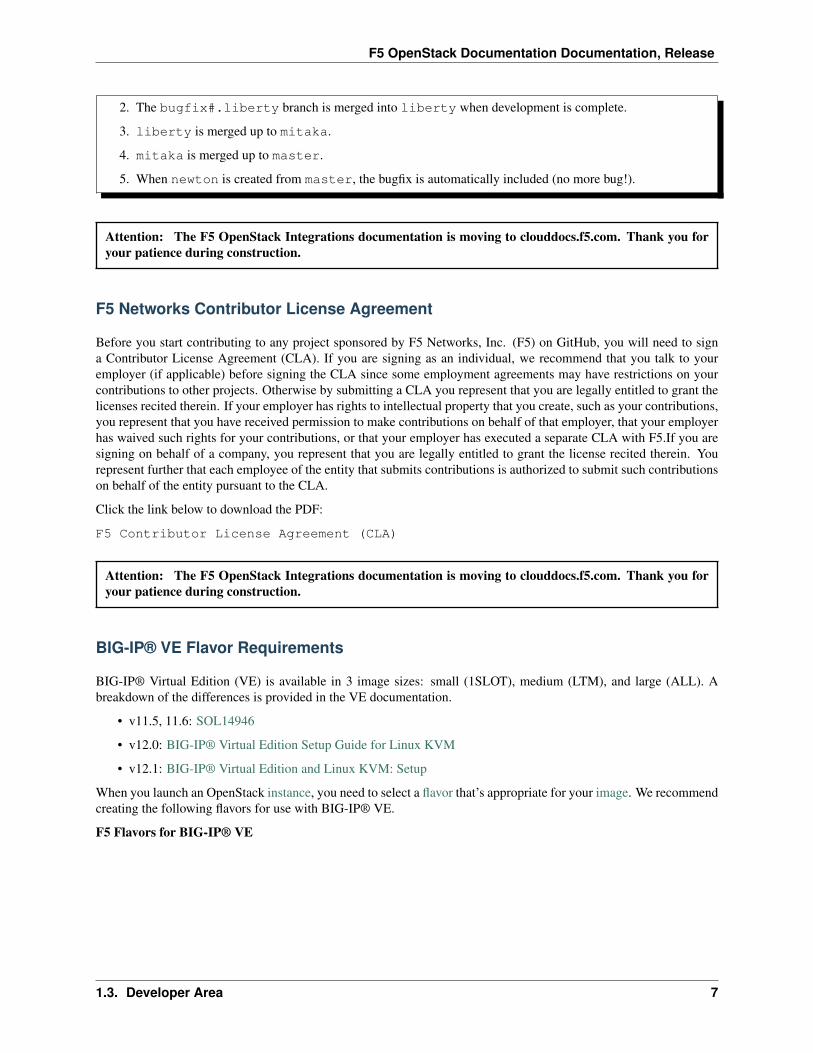
F5 Development Branching Strategy
Important: Development for all F5® OpenStack projects in GitHub follows this branching strategy.
Key Points
• Development takes place on feature branches, which tend to follow the naming convention fea-ture.<featurename>. These branches are either created from master or from the branch that corresponds tothe earliest OpenStack version in which the bugfix/change needs to be made (e.g., liberty).
• Feature branches are periodically merged into their ‘parent’ branches, most often in preparation for a release.
• Branches which correspond to specific OpenStack versions (e.g., kilo, liberty, ‘’mitaka‘‘) are periodicallymerged up the chain to ensure commits which apply to multiple versions are included in each version’s branch.
• master is the branch from which all development for new OpenStack versions is made.
Development Example
1. feature.liberty is created from master
2. Development to support the liberty release is made on the feature.liberty branch.
3. The feature.liberty branch is merged into master when all development for the liberty release iscomplete.
4. The liberty branch is created from master.
• All liberty version releases (e.g., 8.0.1, 8.0.2, etc.) are created from the liberty branch.
• All bugfixes for liberty + (e.g., fixes that need to be made for liberty releases and may also affect subse-quent versions) are made on feature branches created from, and then merged back into, the libertybranch.
5. master then moves ‘ahead’ of liberty in the branching structure; it is now the basis for all developmentfor the mitaka release.
Bugfix Example
1. A bugfix feature branch is created from liberty – for example, bugfix#.liberty – because that’s theearliest OpenStack version in which the bug was identified.
6 Chapter 1. Guides and Resources
F5 OpenStack Documentation Documentation, Release
2. The bugfix#.liberty branch is merged into liberty when development is complete.
3. liberty is merged up to mitaka.
4. mitaka is merged up to master.
5. When newton is created from master, the bugfix is automatically included (no more bug!).
Attention: The F5 OpenStack Integrations documentation is moving to clouddocs.f5.com. Thank you foryour patience during construction.
F5 Networks Contributor License Agreement
Before you start contributing to any project sponsored by F5 Networks, Inc. (F5) on GitHub, you will need to signa Contributor License Agreement (CLA). If you are signing as an individual, we recommend that you talk to youremployer (if applicable) before signing the CLA since some employment agreements may have restrictions on yourcontributions to other projects. Otherwise by submitting a CLA you represent that you are legally entitled to grant thelicenses recited therein. If your employer has rights to intellectual property that you create, such as your contributions,you represent that you have received permission to make contributions on behalf of that employer, that your employerhas waived such rights for your contributions, or that your employer has executed a separate CLA with F5.If you aresigning on behalf of a company, you represent that you are legally entitled to grant the license recited therein. Yourepresent further that each employee of the entity that submits contributions is authorized to submit such contributionson behalf of the entity pursuant to the CLA.
Click the link below to download the PDF:
F5 Contributor License Agreement (CLA)
Attention: The F5 OpenStack Integrations documentation is moving to clouddocs.f5.com. Thank you foryour patience during construction.
BIG-IP® VE Flavor Requirements
BIG-IP® Virtual Edition (VE) is available in 3 image sizes: small (1SLOT), medium (LTM), and large (ALL). Abreakdown of the differences is provided in the VE documentation.
• v11.5, 11.6: SOL14946
• v12.0: BIG-IP® Virtual Edition Setup Guide for Linux KVM
• v12.1: BIG-IP® Virtual Edition and Linux KVM: Setup
When you launch an OpenStack instance, you need to select a flavor that’s appropriate for your image. We recommendcreating the following flavors for use with BIG-IP® VE.
F5 Flavors for BIG-IP® VE
1.3. Developer Area 7

F5 OpenStack Documentation Documentation, Release
Fig. 1.1: Branching Strategy
8 Chapter 1. Guides and Resources
F5 OpenStack Documentation Documentation, Release
BIG-IP®version
BIG-IP® Image FlavorName
Flavor Elements
11.5, 11.6Small - 1SLOT F5-Small 2vCPUs, 4096M RAM, 20GB diskMedium -LTM/GTM
F5-Med 2vCPUs, 4096M RAM, 40GB disk
Large - ALL F5-Large 4vCPUs, 8192M RAM, 120GB disk
12.0, 12.1Small - 1SLOT F5-Small 2vCPUs, 4096M RAM, 20GB diskMedium -LTM/GTM
F5-Med 2vCPUs, 4096M RAM, 50GB disk
Large - ALL F5-Large 4vCPUs, 8192M RAM, 140GB disk*; 4vCPUs, 8192MRAM, 160GB disk**
* OS only; ** with Datastore
Reference Materials
• Coming soon!
Attention: The F5 OpenStack Integrations documentation is moving to clouddocs.f5.com. Thank you foryour patience during construction.
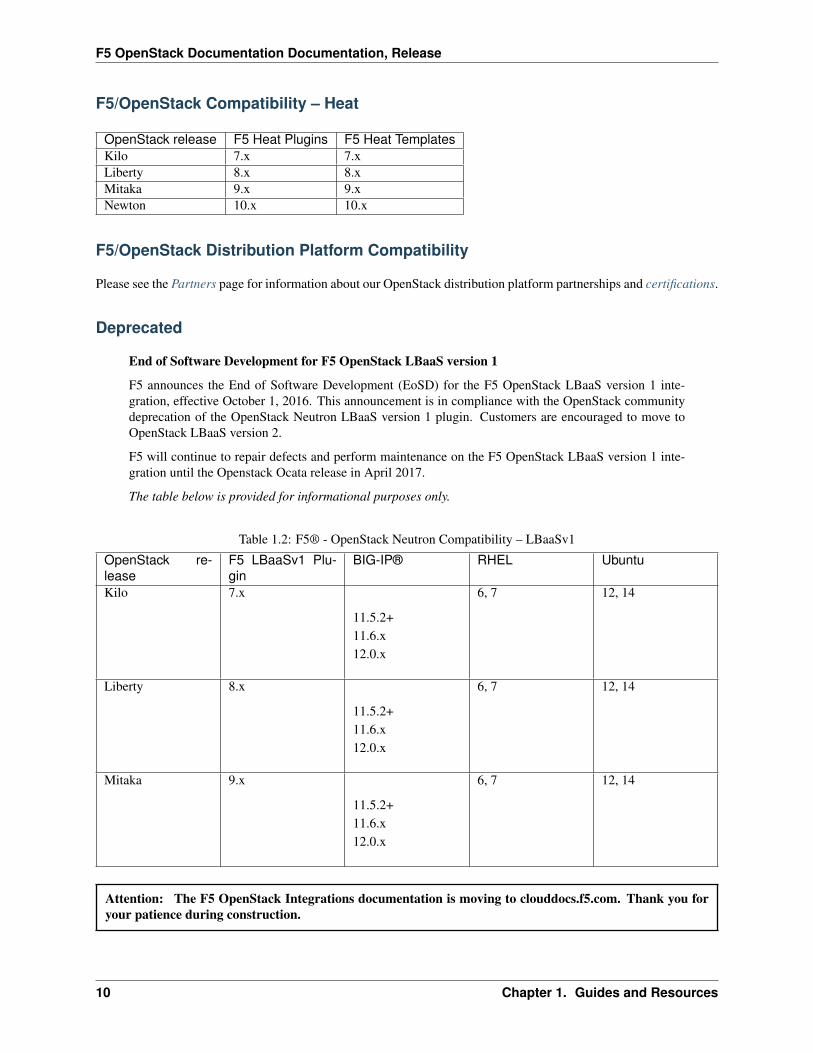
F5 OpenStack Releases and Support Matrix
F5/OpenStack Compatibility – LBaaSv2
OpenStack re-lease
F5 LBaaSv2 Plu-gin
BIG-IP® RHEL Ubuntu
Liberty 8.x
11.5.2+11.6.x12.1.x13.0.x
6, 7 12, 14
Mitaka 9.x
11.5.2+11.6.x12.1.x13.0.x
6, 7 12, 14
Newton N/A
11.5.2+11.6.x12.1.x13.0.x
6, 7 12, 14
1.4. F5 OpenStack Releases and Support Matrix 9
F5 OpenStack Documentation Documentation, Release
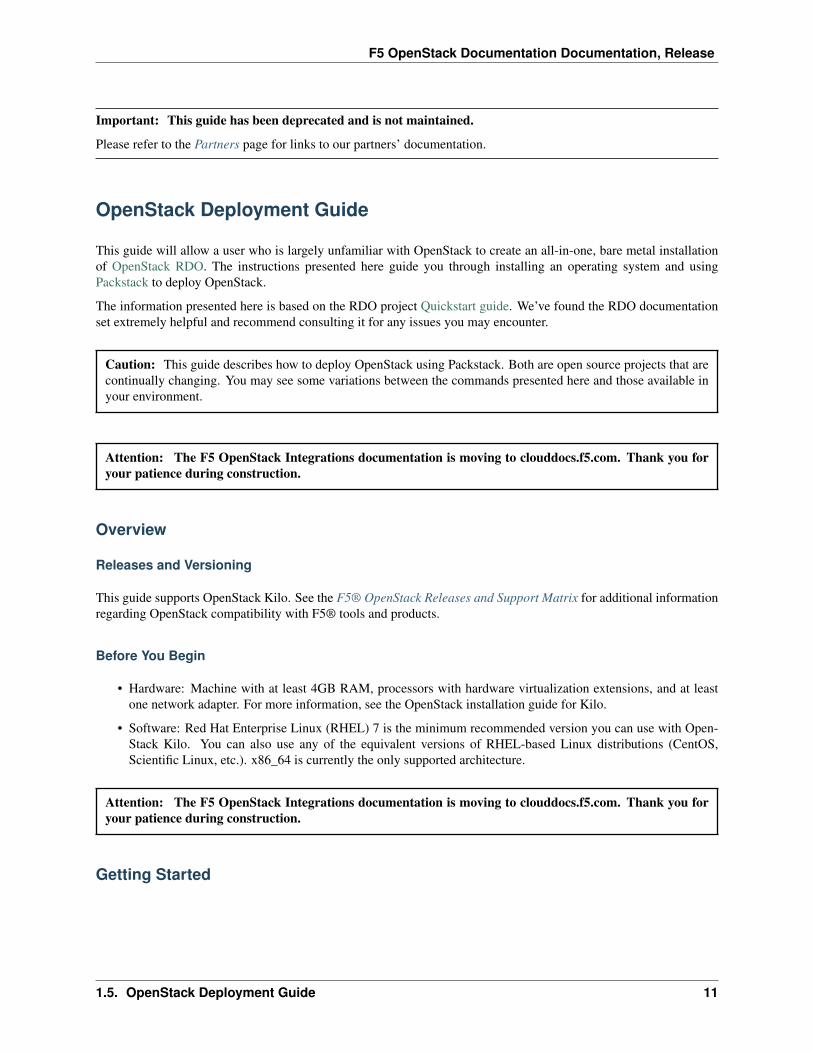
F5/OpenStack Compatibility – Heat
OpenStack release F5 Heat Plugins F5 Heat TemplatesKilo 7.x 7.xLiberty 8.x 8.xMitaka 9.x 9.xNewton 10.x 10.x
F5/OpenStack Distribution Platform Compatibility
Please see the Partners page for information about our OpenStack distribution platform partnerships and certifications.
Deprecated
End of Software Development for F5 OpenStack LBaaS version 1
F5 announces the End of Software Development (EoSD) for the F5 OpenStack LBaaS version 1 inte-gration, effective October 1, 2016. This announcement is in compliance with the OpenStack communitydeprecation of the OpenStack Neutron LBaaS version 1 plugin. Customers are encouraged to move toOpenStack LBaaS version 2.
F5 will continue to repair defects and perform maintenance on the F5 OpenStack LBaaS version 1 inte-gration until the Openstack Ocata release in April 2017.
The table below is provided for informational purposes only.
Table 1.2: F5® - OpenStack Neutron Compatibility – LBaaSv1
OpenStack re-lease
F5 LBaaSv1 Plu-gin
BIG-IP® RHEL Ubuntu
Kilo 7.x
11.5.2+11.6.x12.0.x
6, 7 12, 14
Liberty 8.x
11.5.2+11.6.x12.0.x
6, 7 12, 14
Mitaka 9.x
11.5.2+11.6.x12.0.x
6, 7 12, 14
Attention: The F5 OpenStack Integrations documentation is moving to clouddocs.f5.com. Thank you foryour patience during construction.
10 Chapter 1. Guides and Resources
F5 OpenStack Documentation Documentation, Release
Important: This guide has been deprecated and is not maintained.
Please refer to the Partners page for links to our partners’ documentation.
OpenStack Deployment Guide
This guide will allow a user who is largely unfamiliar with OpenStack to create an all-in-one, bare metal installationof OpenStack RDO. The instructions presented here guide you through installing an operating system and usingPackstack to deploy OpenStack.
The information presented here is based on the RDO project Quickstart guide. We’ve found the RDO documentationset extremely helpful and recommend consulting it for any issues you may encounter.
Caution: This guide describes how to deploy OpenStack using Packstack. Both are open source projects that arecontinually changing. You may see some variations between the commands presented here and those available inyour environment.
Attention: The F5 OpenStack Integrations documentation is moving to clouddocs.f5.com. Thank you foryour patience during construction.
Overview
Releases and Versioning
This guide supports OpenStack Kilo. See the F5® OpenStack Releases and Support Matrix for additional informationregarding OpenStack compatibility with F5® tools and products.
Before You Begin
• Hardware: Machine with at least 4GB RAM, processors with hardware virtualization extensions, and at leastone network adapter. For more information, see the OpenStack installation guide for Kilo.
• Software: Red Hat Enterprise Linux (RHEL) 7 is the minimum recommended version you can use with Open-Stack Kilo. You can also use any of the equivalent versions of RHEL-based Linux distributions (CentOS,Scientific Linux, etc.). x86_64 is currently the only supported architecture.
Attention: The F5 OpenStack Integrations documentation is moving to clouddocs.f5.com. Thank you foryour patience during construction.
Getting Started
1.5. OpenStack Deployment Guide 11
F5 OpenStack Documentation Documentation, Release
Install CentOS
First, you need to install an operating system on your hardware. We installed CentOS 7 on one machine which willserve as the controller, compute, and network nodes (referred to in this document as an ‘all-in-one’ configuration).
Note: Our lab uses DHCP, which means our machine acquired an IP address automatically. You may need to manuallyassign a static IP address, which can be easily done as part of the CentOS installation.
Disable Network Manager
Once the operating system is installed, you’ll need to disable Network Manager. It will be replaced by the standardnetwork service for all interfaces that will be used by OpenStack Networking (Neutron).
To verify if Network Manager is enabled:
$ sudo systemctl status NetworkManager
The system displays an error if the Network Manager service is not currently installed:
error reading information on service NetworkManager: No such file or directory
If you see this error, jump ahead to Install Software Repositories.
If Network Manager is running, run the following commands to disable it.
$ sudo systemctl stop NetworkManager$ sudo systemctl disable NetworkManager$ sudo systemctl enable network
Install Software Repositories
Note: You can run these commands as root or manager. If you’re logged in as an admin user, you may need to usesudo.
1. Update your current software packages:
$ sudo yum install update -y
2. Install the software package for the OpenStack Kilo release.
$ sudo install -y https://repos.fedorapeople.org/repos/openstack/→˓openstack-kilo/rdo-release-kilo-2.noarch.rpm
3. Install the software package for Packstack.
$ sudo install -y openstack-packstack
Attention: The F5 OpenStack Integrations documentation is moving to clouddocs.f5.com. Thank you foryour patience during construction.
12 Chapter 1. Guides and Resources
F5 OpenStack Documentation Documentation, Release
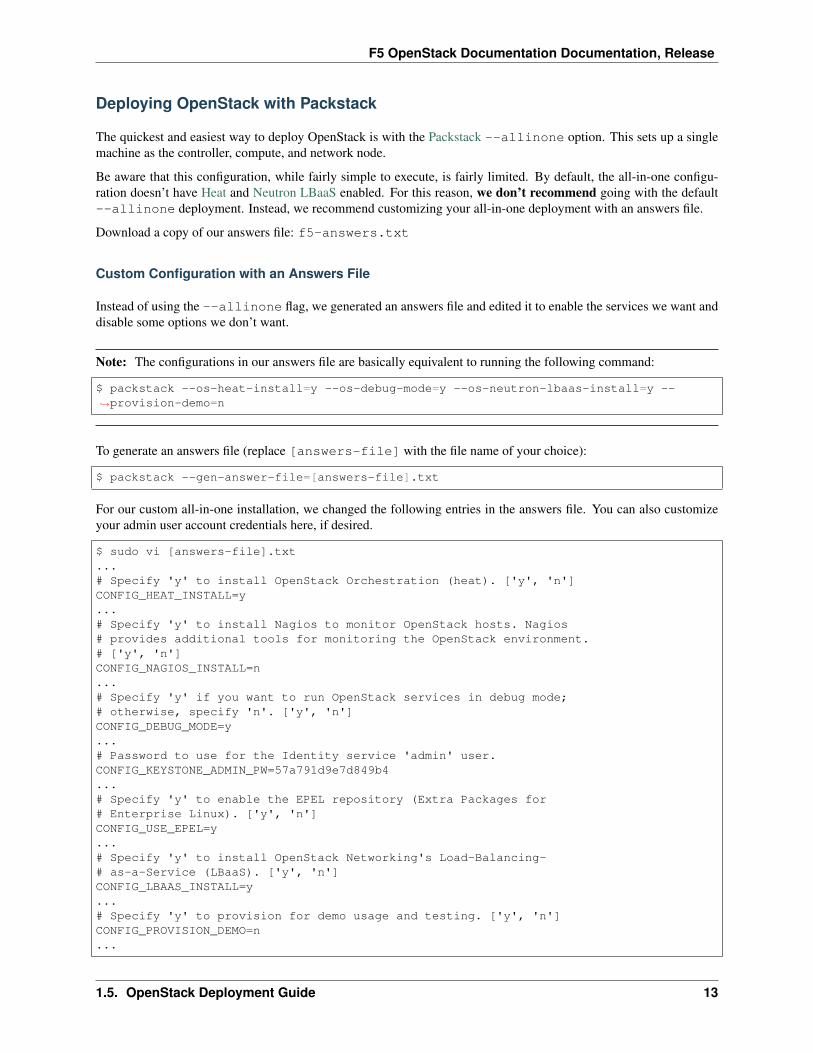
Deploying OpenStack with Packstack
The quickest and easiest way to deploy OpenStack is with the Packstack --allinone option. This sets up a singlemachine as the controller, compute, and network node.
Be aware that this configuration, while fairly simple to execute, is fairly limited. By default, the all-in-one configu-ration doesn’t have Heat and Neutron LBaaS enabled. For this reason, we don’t recommend going with the default--allinone deployment. Instead, we recommend customizing your all-in-one deployment with an answers file.
Download a copy of our answers file: f5-answers.txt
Custom Configuration with an Answers File
Instead of using the --allinone flag, we generated an answers file and edited it to enable the services we want anddisable some options we don’t want.
Note: The configurations in our answers file are basically equivalent to running the following command:
$ packstack --os-heat-install=y --os-debug-mode=y --os-neutron-lbaas-install=y --→˓provision-demo=n
To generate an answers file (replace [answers-file] with the file name of your choice):
$ packstack --gen-answer-file=[answers-file].txt
For our custom all-in-one installation, we changed the following entries in the answers file. You can also customizeyour admin user account credentials here, if desired.
$ sudo vi [answers-file].txt...# Specify 'y' to install OpenStack Orchestration (heat). ['y', 'n']CONFIG_HEAT_INSTALL=y...# Specify 'y' to install Nagios to monitor OpenStack hosts. Nagios# provides additional tools for monitoring the OpenStack environment.# ['y', 'n']CONFIG_NAGIOS_INSTALL=n...# Specify 'y' if you want to run OpenStack services in debug mode;# otherwise, specify 'n'. ['y', 'n']CONFIG_DEBUG_MODE=y...# Password to use for the Identity service 'admin' user.CONFIG_KEYSTONE_ADMIN_PW=57a791d9e7d849b4...# Specify 'y' to enable the EPEL repository (Extra Packages for# Enterprise Linux). ['y', 'n']CONFIG_USE_EPEL=y...# Specify 'y' to install OpenStack Networking's Load-Balancing-# as-a-Service (LBaaS). ['y', 'n']CONFIG_LBAAS_INSTALL=y...# Specify 'y' to provision for demo usage and testing. ['y', 'n']CONFIG_PROVISION_DEMO=n...
1.5. OpenStack Deployment Guide 13
F5 OpenStack Documentation Documentation, Release
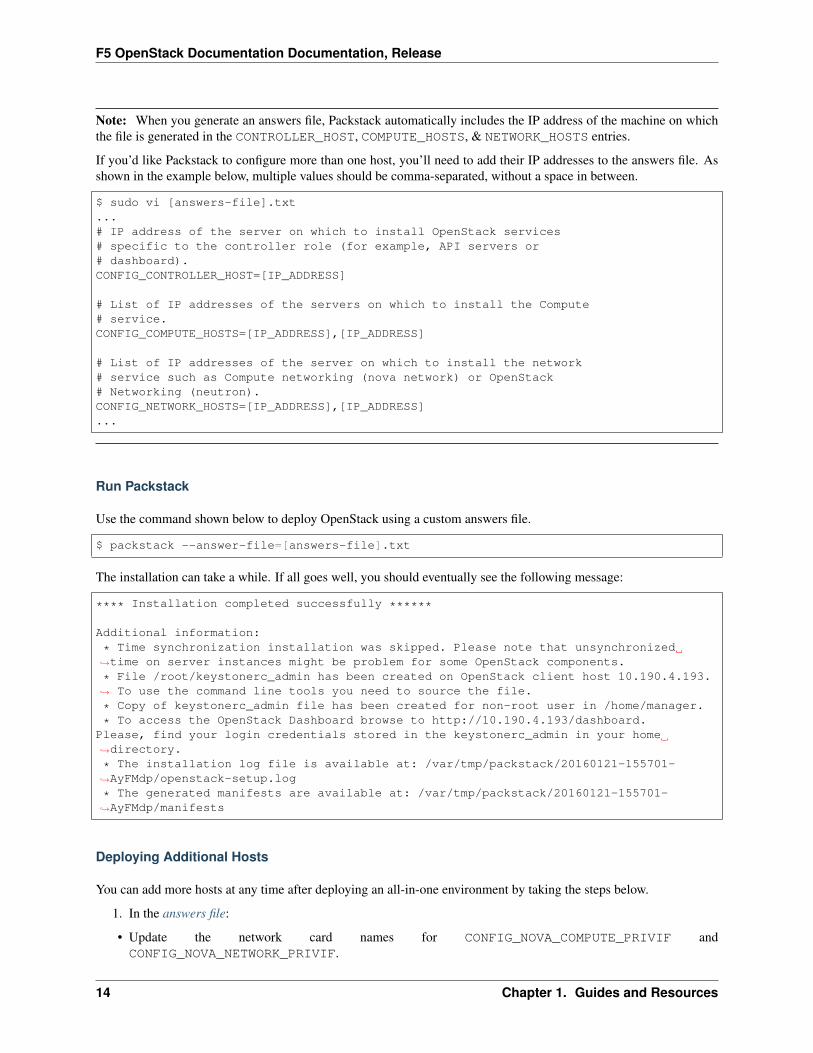
Note: When you generate an answers file, Packstack automatically includes the IP address of the machine on whichthe file is generated in the CONTROLLER_HOST, COMPUTE_HOSTS, & NETWORK_HOSTS entries.
If you’d like Packstack to configure more than one host, you’ll need to add their IP addresses to the answers file. Asshown in the example below, multiple values should be comma-separated, without a space in between.
$ sudo vi [answers-file].txt...# IP address of the server on which to install OpenStack services# specific to the controller role (for example, API servers or# dashboard).CONFIG_CONTROLLER_HOST=[IP_ADDRESS]
# List of IP addresses of the servers on which to install the Compute# service.CONFIG_COMPUTE_HOSTS=[IP_ADDRESS],[IP_ADDRESS]
# List of IP addresses of the server on which to install the network# service such as Compute networking (nova network) or OpenStack# Networking (neutron).CONFIG_NETWORK_HOSTS=[IP_ADDRESS],[IP_ADDRESS]...
Run Packstack
Use the command shown below to deploy OpenStack using a custom answers file.
$ packstack --answer-file=[answers-file].txt
The installation can take a while. If all goes well, you should eventually see the following message:
**** Installation completed successfully ******
Additional information:
* Time synchronization installation was skipped. Please note that unsynchronized→˓time on server instances might be problem for some OpenStack components.
* File /root/keystonerc_admin has been created on OpenStack client host 10.190.4.193.→˓ To use the command line tools you need to source the file.
* Copy of keystonerc_admin file has been created for non-root user in /home/manager.
* To access the OpenStack Dashboard browse to http://10.190.4.193/dashboard.Please, find your login credentials stored in the keystonerc_admin in your home→˓directory.
* The installation log file is available at: /var/tmp/packstack/20160121-155701-→˓AyFMdp/openstack-setup.log
* The generated manifests are available at: /var/tmp/packstack/20160121-155701-→˓AyFMdp/manifests
Deploying Additional Hosts
You can add more hosts at any time after deploying an all-in-one environment by taking the steps below.
1. In the answers file:
• Update the network card names for CONFIG_NOVA_COMPUTE_PRIVIF andCONFIG_NOVA_NETWORK_PRIVIF.
14 Chapter 1. Guides and Resources
F5 OpenStack Documentation Documentation, Release
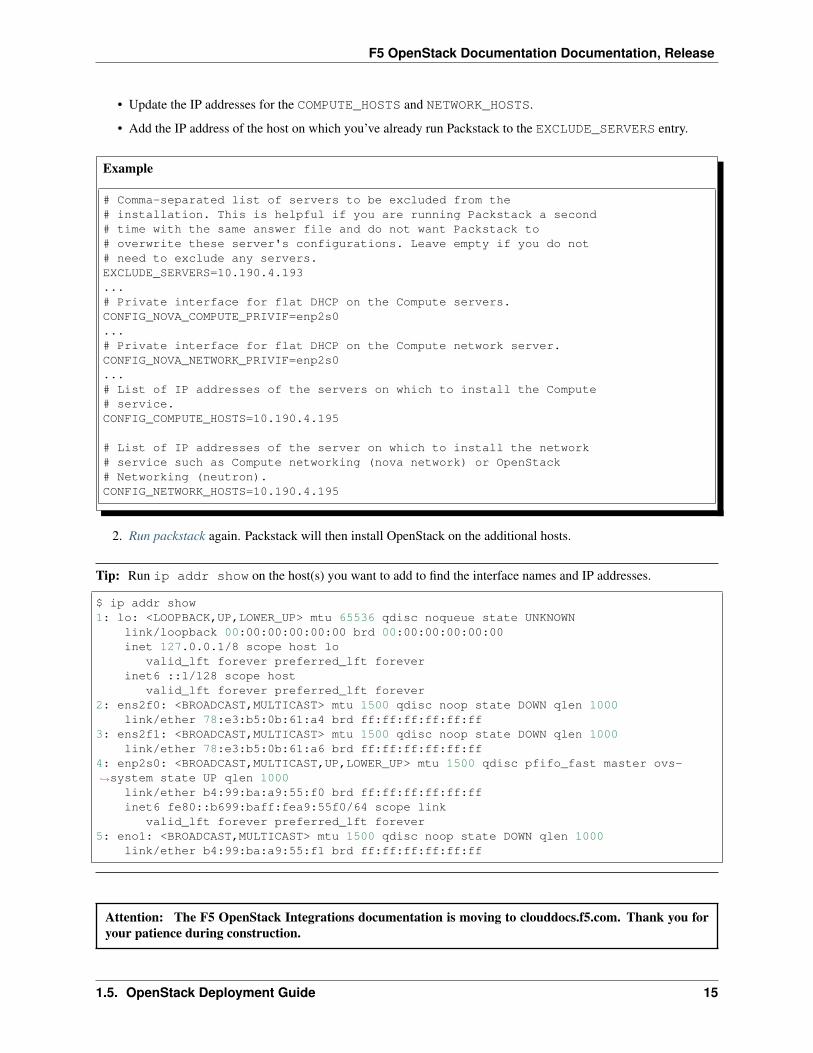
• Update the IP addresses for the COMPUTE_HOSTS and NETWORK_HOSTS.
• Add the IP address of the host on which you’ve already run Packstack to the EXCLUDE_SERVERS entry.
Example
# Comma-separated list of servers to be excluded from the# installation. This is helpful if you are running Packstack a second# time with the same answer file and do not want Packstack to# overwrite these server's configurations. Leave empty if you do not# need to exclude any servers.EXCLUDE_SERVERS=10.190.4.193...# Private interface for flat DHCP on the Compute servers.CONFIG_NOVA_COMPUTE_PRIVIF=enp2s0...# Private interface for flat DHCP on the Compute network server.CONFIG_NOVA_NETWORK_PRIVIF=enp2s0...# List of IP addresses of the servers on which to install the Compute# service.CONFIG_COMPUTE_HOSTS=10.190.4.195
# List of IP addresses of the server on which to install the network# service such as Compute networking (nova network) or OpenStack# Networking (neutron).CONFIG_NETWORK_HOSTS=10.190.4.195
2. Run packstack again. Packstack will then install OpenStack on the additional hosts.
Tip: Run ip addr show on the host(s) you want to add to find the interface names and IP addresses.
$ ip addr show1: lo: <LOOPBACK,UP,LOWER_UP> mtu 65536 qdisc noqueue state UNKNOWN
link/loopback 00:00:00:00:00:00 brd 00:00:00:00:00:00inet 127.0.0.1/8 scope host lo
valid_lft forever preferred_lft foreverinet6 ::1/128 scope host
valid_lft forever preferred_lft forever2: ens2f0: <BROADCAST,MULTICAST> mtu 1500 qdisc noop state DOWN qlen 1000
link/ether 78:e3:b5:0b:61:a4 brd ff:ff:ff:ff:ff:ff3: ens2f1: <BROADCAST,MULTICAST> mtu 1500 qdisc noop state DOWN qlen 1000
link/ether 78:e3:b5:0b:61:a6 brd ff:ff:ff:ff:ff:ff4: enp2s0: <BROADCAST,MULTICAST,UP,LOWER_UP> mtu 1500 qdisc pfifo_fast master ovs-→˓system state UP qlen 1000
link/ether b4:99:ba:a9:55:f0 brd ff:ff:ff:ff:ff:ffinet6 fe80::b699:baff:fea9:55f0/64 scope link
valid_lft forever preferred_lft forever5: eno1: <BROADCAST,MULTICAST> mtu 1500 qdisc noop state DOWN qlen 1000
link/ether b4:99:ba:a9:55:f1 brd ff:ff:ff:ff:ff:ff
Attention: The F5 OpenStack Integrations documentation is moving to clouddocs.f5.com. Thank you foryour patience during construction.
1.5. OpenStack Deployment Guide 15
F5 OpenStack Documentation Documentation, Release
Next Steps
See the F5® OpenStack configuration guide for instructions on the following basic OpenStack configurations:
• Neutron Network Configuration
• Adding projects and users
• Deploying resources
Note: You can either use the command line or the OpenStack dashboard (the GUI) to configure OpenStack. Thedashboard is accessible at the URL provided in the ‘successful installation’ message; the username and password arefound in the file keystonerc_admin (created as part of the Packstack deployment).
If you change your password in the dashboard, be sure to update it in keystonerc_admin as well.
Important: You need to source a credentials file with admin permissions (e.g., source keystonerc_admin)to use the openstack, nova, and neutron commands.
You can also make configurations via the OpenStack dashboard. See the OpenStack dashboard user guide for moreinformation.
Warning: You may receive an authentication error when trying to log in to the dashboard after a session timeout.If this happens, clear your browser’s cache and delete all cookies, then try logging in again.
Attention: The F5 OpenStack Integrations documentation is moving to clouddocs.f5.com. Thank you foryour patience during construction.
Important: This guide has been deprecated and is not maintained.
Please refer to the Partners page for links to our partners’ documentation.
OpenStack Configuration Guide
This guide will help you make the most basic configurations necessary to start using OpenStack Neutron.
Warning: Do not copy and paste the IP addresses shown in this guide; use the valid IP address(es) for yourmachine(s).
Attention: The F5 OpenStack Integrations documentation is moving to clouddocs.f5.com. Thank you foryour patience during construction.
16 Chapter 1. Guides and Resources
F5 OpenStack Documentation Documentation, Release
Overview
Releases and Versioning
This guide supports OpenStack Kilo. See the F5® OpenStack Releases and Support Matrix for additional informationregarding OpenStack compatibility with F5® tools and products.
Before You Begin
• OpenStack: All-in-one deployment on OpenStack Kilo. See our OpenStack deployment guide for setup instruc-tions.
• Software: Red Hat Enterprise Linux (RHEL) 7 is the minimum recommended version you can use with Open-Stack Kilo. You can also use any of the equivalent versions of RHEL-based Linux distributions (CentOS,Scientific Linux, etc.). x86_64 is currently the only supported architecture.
• Hardware: Machine with at least 4GB RAM, processors with hardware virtualization extensions, and at least onenetwork adapter. For more information, see the OpenStack Install guide for Kilo at http://docs.openstack.org.
Getting Started
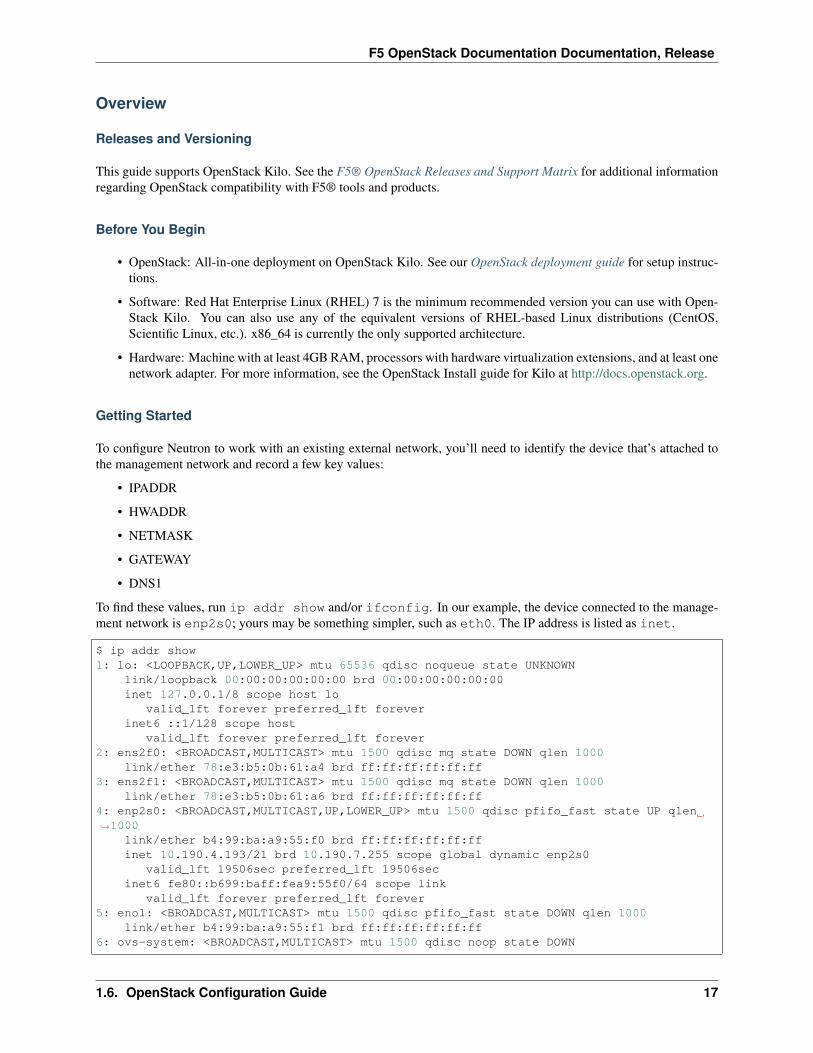
To configure Neutron to work with an existing external network, you’ll need to identify the device that’s attached tothe management network and record a few key values:
• IPADDR
• HWADDR
• NETMASK
• GATEWAY
• DNS1
To find these values, run ip addr show and/or ifconfig. In our example, the device connected to the manage-ment network is enp2s0; yours may be something simpler, such as eth0. The IP address is listed as inet.
$ ip addr show1: lo: <LOOPBACK,UP,LOWER_UP> mtu 65536 qdisc noqueue state UNKNOWN
link/loopback 00:00:00:00:00:00 brd 00:00:00:00:00:00inet 127.0.0.1/8 scope host lo
valid_lft forever preferred_lft foreverinet6 ::1/128 scope host
valid_lft forever preferred_lft forever2: ens2f0: <BROADCAST,MULTICAST> mtu 1500 qdisc mq state DOWN qlen 1000
link/ether 78:e3:b5:0b:61:a4 brd ff:ff:ff:ff:ff:ff3: ens2f1: <BROADCAST,MULTICAST> mtu 1500 qdisc mq state DOWN qlen 1000
link/ether 78:e3:b5:0b:61:a6 brd ff:ff:ff:ff:ff:ff4: enp2s0: <BROADCAST,MULTICAST,UP,LOWER_UP> mtu 1500 qdisc pfifo_fast state UP qlen→˓1000
link/ether b4:99:ba:a9:55:f0 brd ff:ff:ff:ff:ff:ffinet 10.190.4.193/21 brd 10.190.7.255 scope global dynamic enp2s0
valid_lft 19506sec preferred_lft 19506secinet6 fe80::b699:baff:fea9:55f0/64 scope link
valid_lft forever preferred_lft forever5: eno1: <BROADCAST,MULTICAST> mtu 1500 qdisc pfifo_fast state DOWN qlen 1000
link/ether b4:99:ba:a9:55:f1 brd ff:ff:ff:ff:ff:ff6: ovs-system: <BROADCAST,MULTICAST> mtu 1500 qdisc noop state DOWN
1.6. OpenStack Configuration Guide 17
F5 OpenStack Documentation Documentation, Release
link/ether 5e:31:76:30:05:cb brd ff:ff:ff:ff:ff:ff7: br-ex: <BROADCAST,MULTICAST,UP,LOWER_UP> mtu 1500 qdisc noqueue state UNKNOWN
link/ether 3a:c1:b2:f4:30:48 brd ff:ff:ff:ff:ff:ffinet6 fe80::38c1:b2ff:fef4:3048/64 scope link
valid_lft forever preferred_lft forever8: br-int: <BROADCAST,MULTICAST> mtu 1500 qdisc noop state DOWN
link/ether 2e:99:9e:a2:cc:43 brd ff:ff:ff:ff:ff:ff9: br-tun: <BROADCAST,MULTICAST> mtu 1500 qdisc noop state DOWN
link/ether b2:91:a4:55:a0:4a brd ff:ff:ff:ff:ff:ff
$ ifconfigbr-ex: flags=4163<UP,BROADCAST,RUNNING,MULTICAST> mtu 1500
inet6 fe80::38c1:b2ff:fef4:3048 prefixlen 64 scopeid 0x20<link>ether 3a:c1:b2:f4:30:48 txqueuelen 0 (Ethernet)RX packets 0 bytes 0 (0.0 B)RX errors 0 dropped 0 overruns 0 frame 0TX packets 8 bytes 648 (648.0 B)TX errors 0 dropped 0 overruns 0 carrier 0 collisions 0
enp2s0: flags=4163<UP,BROADCAST,RUNNING,MULTICAST> mtu 1500inet 10.190.4.193 netmask 255.255.248.0 broadcast 10.190.7.255inet6 fe80::b699:baff:fea9:55f0 prefixlen 64 scopeid 0x20<link>ether b4:99:ba:a9:55:f0 txqueuelen 1000 (Ethernet)RX packets 1183741 bytes 541128626 (516.0 MiB)RX errors 0 dropped 0 overruns 0 frame 0TX packets 130388 bytes 13634811 (13.0 MiB)TX errors 0 dropped 0 overruns 0 carrier 0 collisions 0device interrupt 16 memory 0xf7ee0000-f7f00000
lo: flags=73<UP,LOOPBACK,RUNNING> mtu 65536inet 127.0.0.1 netmask 255.0.0.0inet6 ::1 prefixlen 128 scopeid 0x10<host>loop txqueuelen 0 (Local Loopback)RX packets 4013798 bytes 371688922 (354.4 MiB)RX errors 0 dropped 0 overruns 0 frame 0TX packets 4013798 bytes 371688922 (354.4 MiB)TX errors 0 dropped 0 overruns 0 carrier 0 collisions 0
Attention: The F5 OpenStack Integrations documentation is moving to clouddocs.f5.com. Thank you foryour patience during construction.
Neutron - Initial Setup
Introduction
This guide will help you make the most basic configurations necessary to start using OpenStack Neutron.
Warning: Do not copy and paste the IP addresses shown in this guide; use the valid IP address(es) for yourmachine(s).
18 Chapter 1. Guides and Resources
F5 OpenStack Documentation Documentation, Release
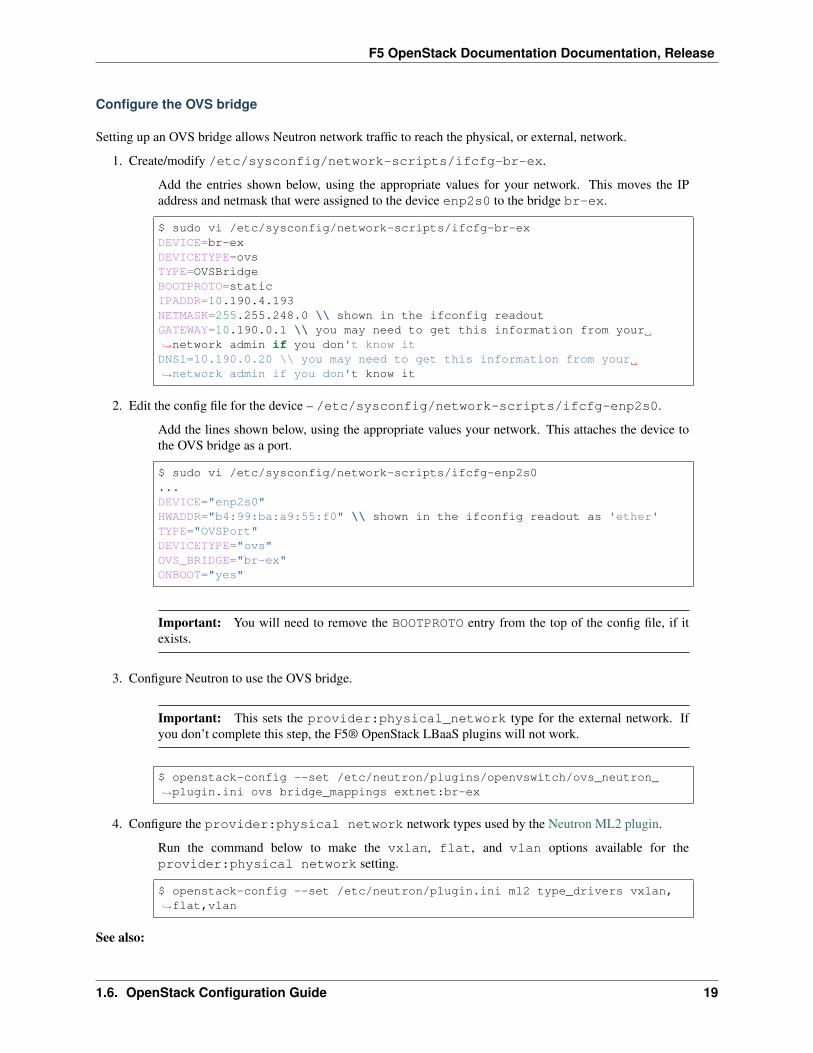
Configure the OVS bridge
Setting up an OVS bridge allows Neutron network traffic to reach the physical, or external, network.
1. Create/modify /etc/sysconfig/network-scripts/ifcfg-br-ex.
Add the entries shown below, using the appropriate values for your network. This moves the IPaddress and netmask that were assigned to the device enp2s0 to the bridge br-ex.
$ sudo vi /etc/sysconfig/network-scripts/ifcfg-br-exDEVICE=br-exDEVICETYPE=ovsTYPE=OVSBridgeBOOTPROTO=staticIPADDR=10.190.4.193NETMASK=255.255.248.0 \\ shown in the ifconfig readoutGATEWAY=10.190.0.1 \\ you may need to get this information from your→˓network admin if you don't know itDNS1=10.190.0.20 \\ you may need to get this information from your→˓network admin if you don't know it
2. Edit the config file for the device – /etc/sysconfig/network-scripts/ifcfg-enp2s0.
Add the lines shown below, using the appropriate values your network. This attaches the device tothe OVS bridge as a port.
$ sudo vi /etc/sysconfig/network-scripts/ifcfg-enp2s0...DEVICE="enp2s0"HWADDR="b4:99:ba:a9:55:f0" \\ shown in the ifconfig readout as 'ether'TYPE="OVSPort"DEVICETYPE="ovs"OVS_BRIDGE="br-ex"ONBOOT="yes"
Important: You will need to remove the BOOTPROTO entry from the top of the config file, if itexists.
3. Configure Neutron to use the OVS bridge.
Important: This sets the provider:physical_network type for the external network. Ifyou don’t complete this step, the F5® OpenStack LBaaS plugins will not work.
$ openstack-config --set /etc/neutron/plugins/openvswitch/ovs_neutron_→˓plugin.ini ovs bridge_mappings extnet:br-ex
4. Configure the provider:physical network network types used by the Neutron ML2 plugin.
Run the command below to make the vxlan, flat, and vlan options available for theprovider:physical network setting.
$ openstack-config --set /etc/neutron/plugin.ini ml2 type_drivers vxlan,→˓flat,vlan
See also:
1.6. OpenStack Configuration Guide 19
F5 OpenStack Documentation Documentation, Release
• RHEL OpenStack Networking Guide: Configure Bridge Mappings
• OpenStack Networking Guide: Provider networks with Open vSwitch
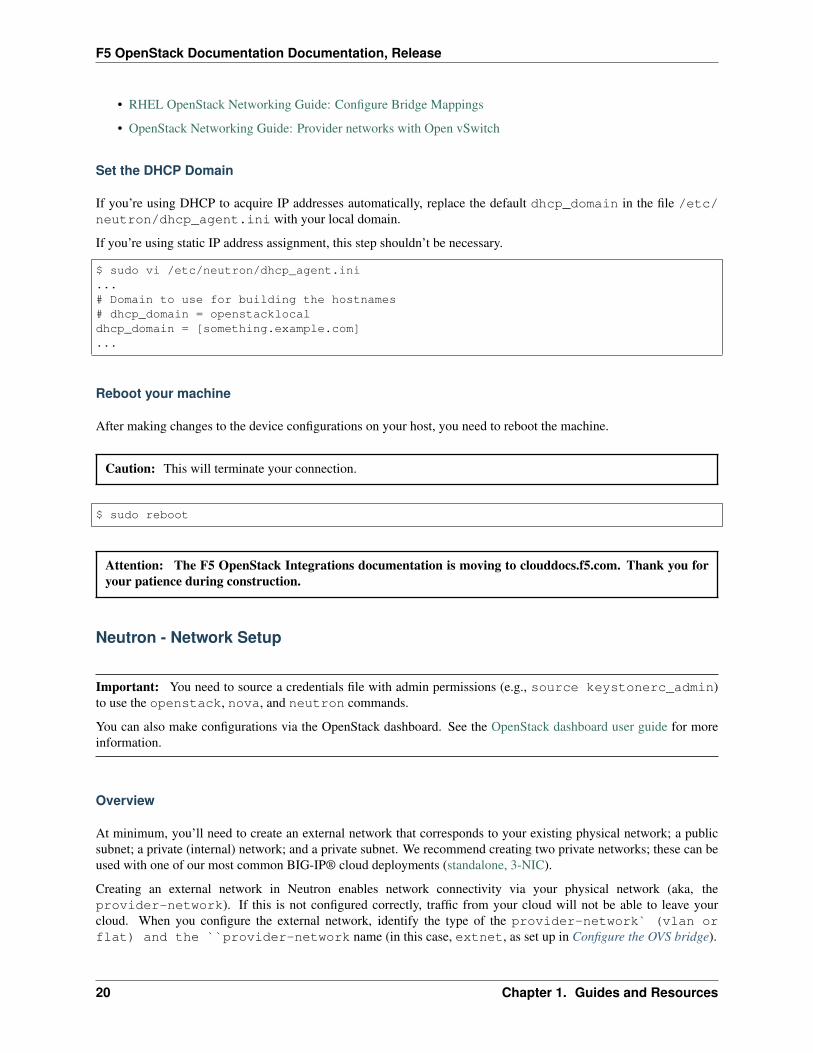
Set the DHCP Domain
If you’re using DHCP to acquire IP addresses automatically, replace the default dhcp_domain in the file /etc/neutron/dhcp_agent.ini with your local domain.
If you’re using static IP address assignment, this step shouldn’t be necessary.
$ sudo vi /etc/neutron/dhcp_agent.ini...# Domain to use for building the hostnames# dhcp_domain = openstacklocaldhcp_domain = [something.example.com]...
Reboot your machine
After making changes to the device configurations on your host, you need to reboot the machine.
Caution: This will terminate your connection.
$ sudo reboot
Attention: The F5 OpenStack Integrations documentation is moving to clouddocs.f5.com. Thank you foryour patience during construction.
Neutron - Network Setup
Important: You need to source a credentials file with admin permissions (e.g., source keystonerc_admin)to use the openstack, nova, and neutron commands.
You can also make configurations via the OpenStack dashboard. See the OpenStack dashboard user guide for moreinformation.
Overview
At minimum, you’ll need to create an external network that corresponds to your existing physical network; a publicsubnet; a private (internal) network; and a private subnet. We recommend creating two private networks; these can beused with one of our most common BIG-IP® cloud deployments (standalone, 3-NIC).
Creating an external network in Neutron enables network connectivity via your physical network (aka, theprovider-network). If this is not configured correctly, traffic from your cloud will not be able to leave yourcloud. When you configure the external network, identify the type of the provider-network` (vlan orflat) and the ``provider-network name (in this case, extnet, as set up in Configure the OVS bridge).
20 Chapter 1. Guides and Resources
F5 OpenStack Documentation Documentation, Release
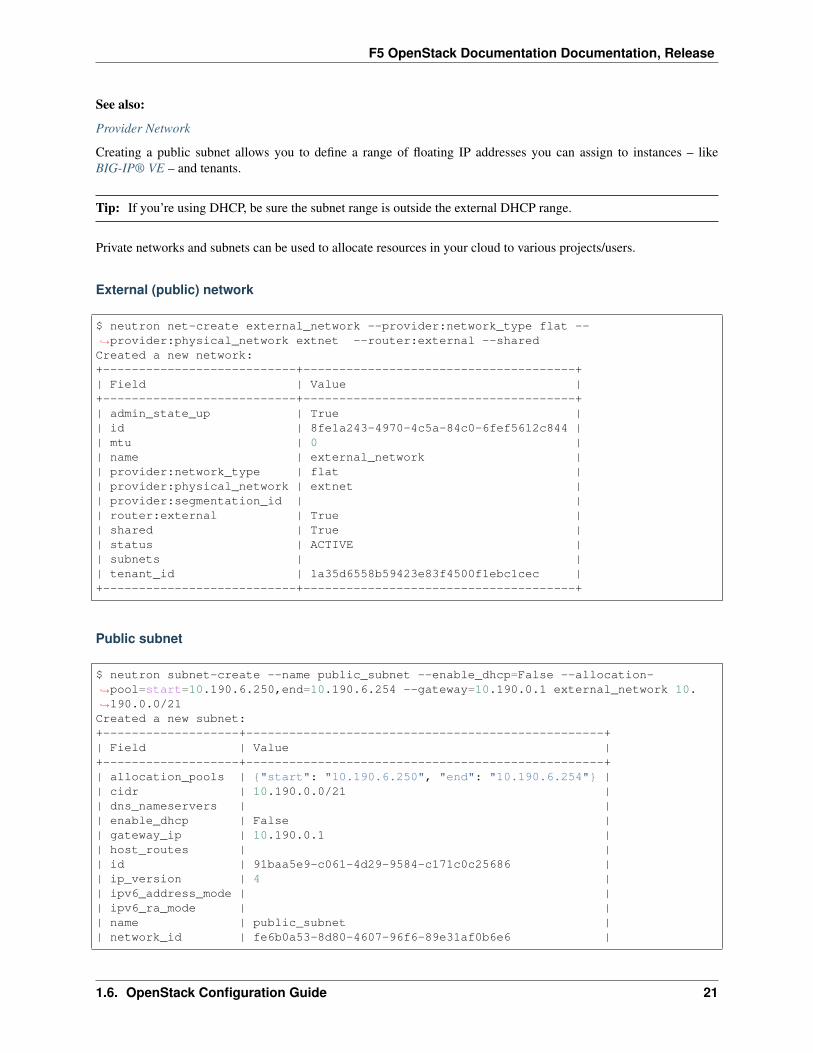
See also:
Provider Network
Creating a public subnet allows you to define a range of floating IP addresses you can assign to instances – likeBIG-IP® VE – and tenants.
Tip: If you’re using DHCP, be sure the subnet range is outside the external DHCP range.
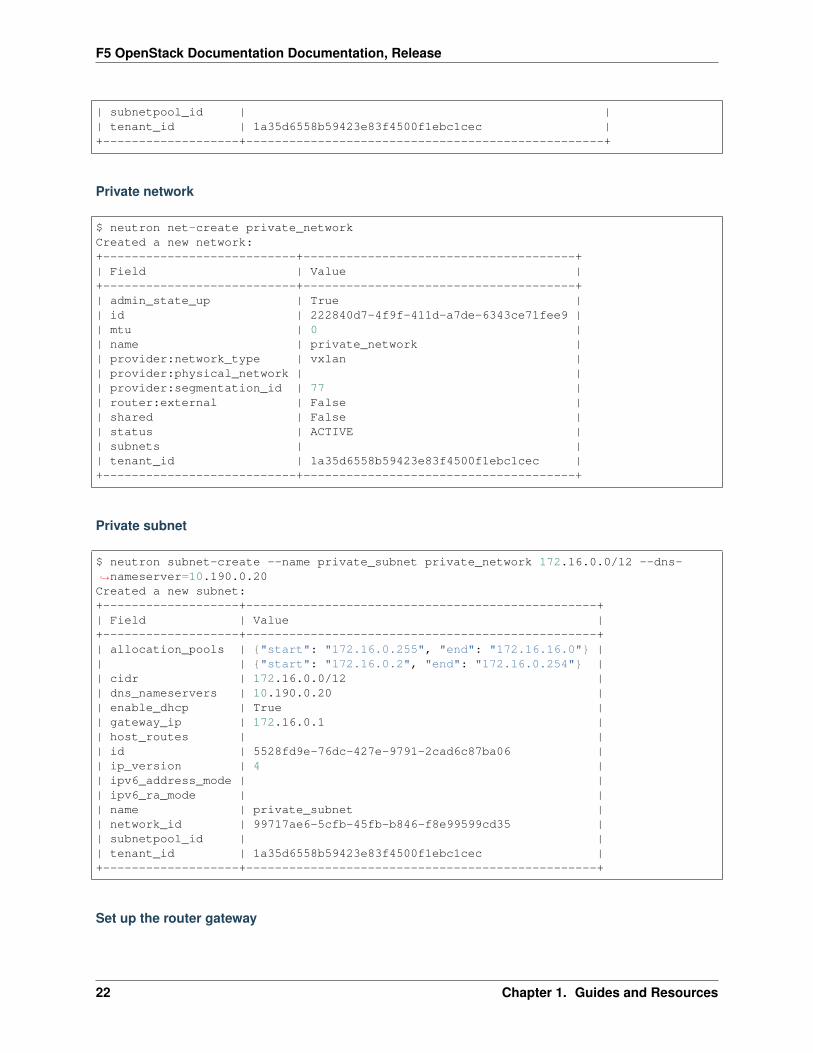
Private networks and subnets can be used to allocate resources in your cloud to various projects/users.
External (public) network
$ neutron net-create external_network --provider:network_type flat --→˓provider:physical_network extnet --router:external --sharedCreated a new network:+---------------------------+--------------------------------------+| Field | Value |+---------------------------+--------------------------------------+| admin_state_up | True || id | 8fe1a243-4970-4c5a-84c0-6fef5612c844 || mtu | 0 || name | external_network || provider:network_type | flat || provider:physical_network | extnet || provider:segmentation_id | || router:external | True || shared | True || status | ACTIVE || subnets | || tenant_id | 1a35d6558b59423e83f4500f1ebc1cec |+---------------------------+--------------------------------------+
Public subnet
$ neutron subnet-create --name public_subnet --enable_dhcp=False --allocation-→˓pool=start=10.190.6.250,end=10.190.6.254 --gateway=10.190.0.1 external_network 10.→˓190.0.0/21Created a new subnet:+-------------------+--------------------------------------------------+| Field | Value |+-------------------+--------------------------------------------------+| allocation_pools | {"start": "10.190.6.250", "end": "10.190.6.254"} || cidr | 10.190.0.0/21 || dns_nameservers | || enable_dhcp | False || gateway_ip | 10.190.0.1 || host_routes | || id | 91baa5e9-c061-4d29-9584-c171c0c25686 || ip_version | 4 || ipv6_address_mode | || ipv6_ra_mode | || name | public_subnet || network_id | fe6b0a53-8d80-4607-96f6-89e31af0b6e6 |
1.6. OpenStack Configuration Guide 21
F5 OpenStack Documentation Documentation, Release
| subnetpool_id | || tenant_id | 1a35d6558b59423e83f4500f1ebc1cec |+-------------------+--------------------------------------------------+
Private network
$ neutron net-create private_networkCreated a new network:+---------------------------+--------------------------------------+| Field | Value |+---------------------------+--------------------------------------+| admin_state_up | True || id | 222840d7-4f9f-411d-a7de-6343ce71fee9 || mtu | 0 || name | private_network || provider:network_type | vxlan || provider:physical_network | || provider:segmentation_id | 77 || router:external | False || shared | False || status | ACTIVE || subnets | || tenant_id | 1a35d6558b59423e83f4500f1ebc1cec |+---------------------------+--------------------------------------+
Private subnet
$ neutron subnet-create --name private_subnet private_network 172.16.0.0/12 --dns-→˓nameserver=10.190.0.20Created a new subnet:+-------------------+-------------------------------------------------+| Field | Value |+-------------------+-------------------------------------------------+| allocation_pools | {"start": "172.16.0.255", "end": "172.16.16.0"} || | {"start": "172.16.0.2", "end": "172.16.0.254"} || cidr | 172.16.0.0/12 || dns_nameservers | 10.190.0.20 || enable_dhcp | True || gateway_ip | 172.16.0.1 || host_routes | || id | 5528fd9e-76dc-427e-9791-2cad6c87ba06 || ip_version | 4 || ipv6_address_mode | || ipv6_ra_mode | || name | private_subnet || network_id | 99717ae6-5cfb-45fb-b846-f8e99599cd35 || subnetpool_id | || tenant_id | 1a35d6558b59423e83f4500f1ebc1cec |+-------------------+-------------------------------------------------+
Set up the router gateway
22 Chapter 1. Guides and Resources
F5 OpenStack Documentation Documentation, Release
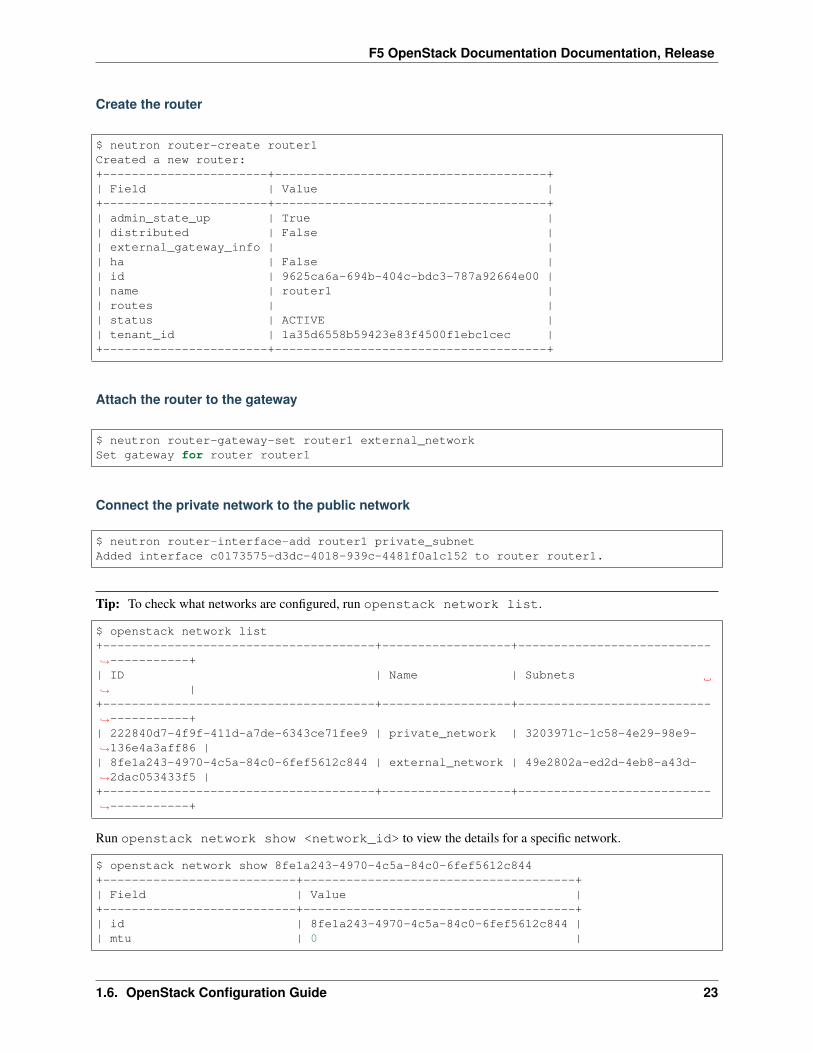
Create the router
$ neutron router-create router1Created a new router:+-----------------------+--------------------------------------+| Field | Value |+-----------------------+--------------------------------------+| admin_state_up | True || distributed | False || external_gateway_info | || ha | False || id | 9625ca6a-694b-404c-bdc3-787a92664e00 || name | router1 || routes | || status | ACTIVE || tenant_id | 1a35d6558b59423e83f4500f1ebc1cec |+-----------------------+--------------------------------------+
Attach the router to the gateway
$ neutron router-gateway-set router1 external_networkSet gateway for router router1
Connect the private network to the public network
$ neutron router-interface-add router1 private_subnetAdded interface c0173575-d3dc-4018-939c-4481f0a1c152 to router router1.
Tip: To check what networks are configured, run openstack network list.
$ openstack network list+--------------------------------------+------------------+---------------------------→˓-----------+| ID | Name | Subnets→˓ |+--------------------------------------+------------------+---------------------------→˓-----------+| 222840d7-4f9f-411d-a7de-6343ce71fee9 | private_network | 3203971c-1c58-4e29-98e9-→˓136e4a3aff86 || 8fe1a243-4970-4c5a-84c0-6fef5612c844 | external_network | 49e2802a-ed2d-4eb8-a43d-→˓2dac053433f5 |+--------------------------------------+------------------+---------------------------→˓-----------+
Run openstack network show <network_id> to view the details for a specific network.
$ openstack network show 8fe1a243-4970-4c5a-84c0-6fef5612c844+---------------------------+--------------------------------------+| Field | Value |+---------------------------+--------------------------------------+| id | 8fe1a243-4970-4c5a-84c0-6fef5612c844 || mtu | 0 |
1.6. OpenStack Configuration Guide 23
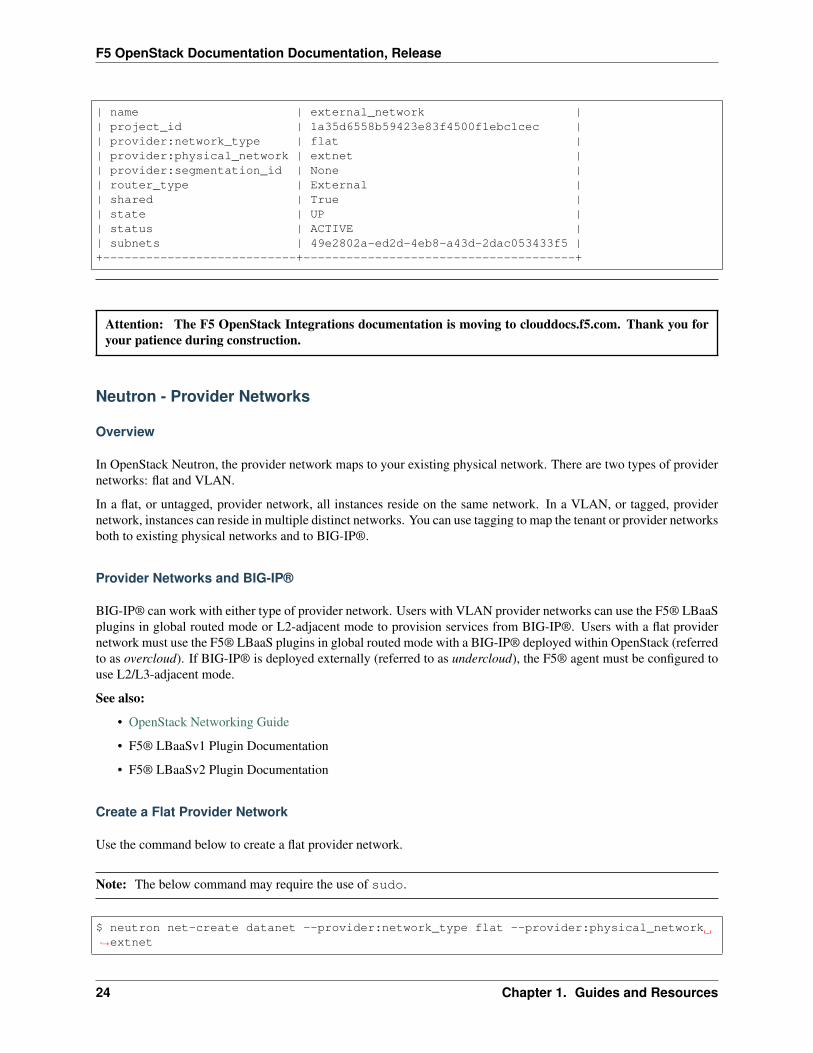
F5 OpenStack Documentation Documentation, Release
| name | external_network || project_id | 1a35d6558b59423e83f4500f1ebc1cec || provider:network_type | flat || provider:physical_network | extnet || provider:segmentation_id | None || router_type | External || shared | True || state | UP || status | ACTIVE || subnets | 49e2802a-ed2d-4eb8-a43d-2dac053433f5 |+---------------------------+--------------------------------------+
Attention: The F5 OpenStack Integrations documentation is moving to clouddocs.f5.com. Thank you foryour patience during construction.
Neutron - Provider Networks
Overview
In OpenStack Neutron, the provider network maps to your existing physical network. There are two types of providernetworks: flat and VLAN.
In a flat, or untagged, provider network, all instances reside on the same network. In a VLAN, or tagged, providernetwork, instances can reside in multiple distinct networks. You can use tagging to map the tenant or provider networksboth to existing physical networks and to BIG-IP®.
Provider Networks and BIG-IP®
BIG-IP® can work with either type of provider network. Users with VLAN provider networks can use the F5® LBaaSplugins in global routed mode or L2-adjacent mode to provision services from BIG-IP®. Users with a flat providernetwork must use the F5® LBaaS plugins in global routed mode with a BIG-IP® deployed within OpenStack (referredto as overcloud). If BIG-IP® is deployed externally (referred to as undercloud), the F5® agent must be configured touse L2/L3-adjacent mode.
See also:
• OpenStack Networking Guide
• F5® LBaaSv1 Plugin Documentation
• F5® LBaaSv2 Plugin Documentation
Create a Flat Provider Network
Use the command below to create a flat provider network.
Note: The below command may require the use of sudo.
$ neutron net-create datanet --provider:network_type flat --provider:physical_network→˓extnet
24 Chapter 1. Guides and Resources
F5 OpenStack Documentation Documentation, Release
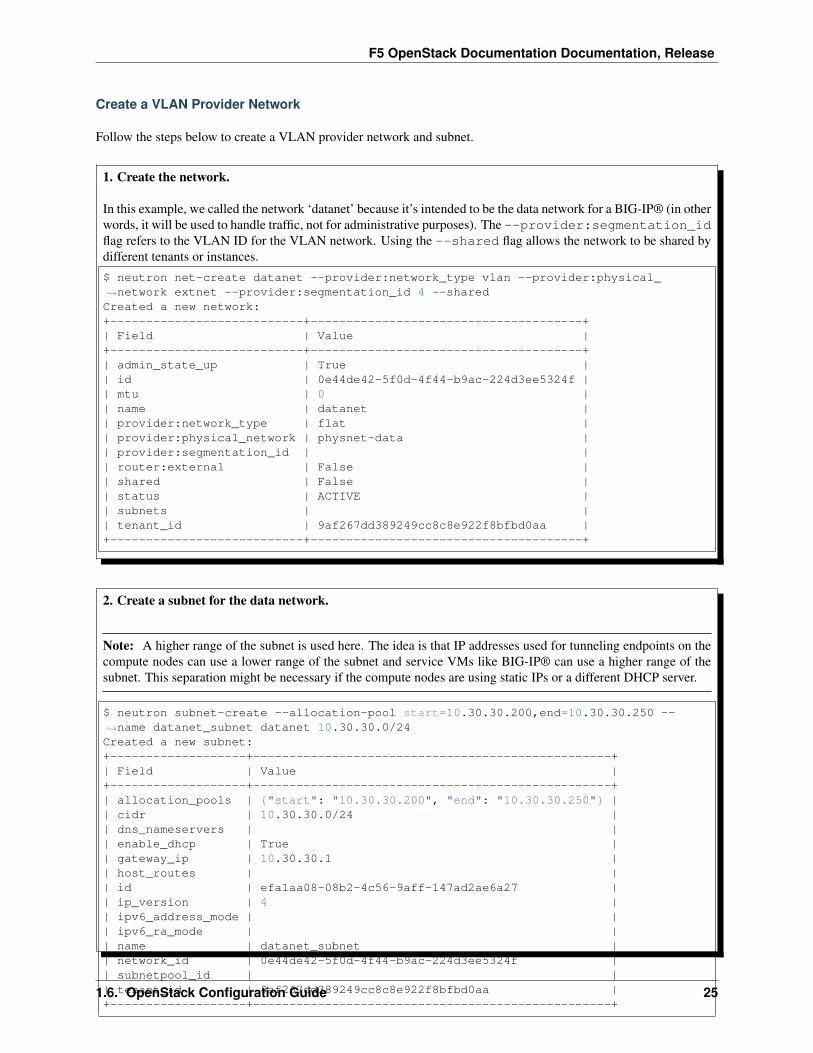
Create a VLAN Provider Network
Follow the steps below to create a VLAN provider network and subnet.
1. Create the network.
In this example, we called the network ‘datanet’ because it’s intended to be the data network for a BIG-IP® (in otherwords, it will be used to handle traffic, not for administrative purposes). The --provider:segmentation_idflag refers to the VLAN ID for the VLAN network. Using the --shared flag allows the network to be shared bydifferent tenants or instances.
$ neutron net-create datanet --provider:network_type vlan --provider:physical_→˓network extnet --provider:segmentation_id 4 --sharedCreated a new network:+---------------------------+--------------------------------------+| Field | Value |+---------------------------+--------------------------------------+| admin_state_up | True || id | 0e44de42-5f0d-4f44-b9ac-224d3ee5324f || mtu | 0 || name | datanet || provider:network_type | flat || provider:physical_network | physnet-data || provider:segmentation_id | || router:external | False || shared | False || status | ACTIVE || subnets | || tenant_id | 9af267dd389249cc8c8e922f8bfbd0aa |+---------------------------+--------------------------------------+
2. Create a subnet for the data network.
Note: A higher range of the subnet is used here. The idea is that IP addresses used for tunneling endpoints on thecompute nodes can use a lower range of the subnet and service VMs like BIG-IP® can use a higher range of thesubnet. This separation might be necessary if the compute nodes are using static IPs or a different DHCP server.
$ neutron subnet-create --allocation-pool start=10.30.30.200,end=10.30.30.250 --→˓name datanet_subnet datanet 10.30.30.0/24Created a new subnet:+-------------------+--------------------------------------------------+| Field | Value |+-------------------+--------------------------------------------------+| allocation_pools | {"start": "10.30.30.200", "end": "10.30.30.250"} || cidr | 10.30.30.0/24 || dns_nameservers | || enable_dhcp | True || gateway_ip | 10.30.30.1 || host_routes | || id | efa1aa08-08b2-4c56-9aff-147ad2ae6a27 || ip_version | 4 || ipv6_address_mode | || ipv6_ra_mode | || name | datanet_subnet || network_id | 0e44de42-5f0d-4f44-b9ac-224d3ee5324f || subnetpool_id | || tenant_id | 9af267dd389249cc8c8e922f8bfbd0aa |+-------------------+--------------------------------------------------+
1.6. OpenStack Configuration Guide 25
F5 OpenStack Documentation Documentation, Release
Attention: The F5 OpenStack Integrations documentation is moving to clouddocs.f5.com. Thank you foryour patience during construction.
Next Steps
We highly recommend using OpenStack dashboard to add images to Glance, launch instances, and/or use Heat stacksto deploy and configure resources. See the OpenStack dashboard user guide for instructions.
Tip: Here are a few helpful tips:
• If your private network doesn’t show up in the network list when launching an instance, the network may bemisconfigured.
• If you want to be able to use SSH to authenticate to tenants in your cloud, you’ll need to create or add SSH keypairs. We recommend generating your own key pair and adding it to OpenStack.
• Adding images to Glance in advance makes it easy to deploy resources using Heat.
Further Reading
Once you’ve completed these initial configurations for your OpenStack cloud, you may find the following helpful.
• How To: Deploy BIG-IP® VE in OpenStack
• F5® Heat User Guide
• F5 OpenStack LBaaSv1 Plugin Documentation
• F5 OpenStack LBaaSv2 Plugin documentation
• F5 BIG-IP® LTM knowledge base
• OpenStack Admin User Guide
• OpenStack Operations Guide
Attention: The F5 OpenStack Integrations documentation is moving to clouddocs.f5.com. Thank you foryour patience during construction.
How To Deploy BIG-IP VE in OpenStack
This document describes how to deploy BIG-IP® Virtual Edition (VE) in OpenStack Kilo. See the F5® OpenStackReleases and Support Matrix for versioning and compatibility information.
Important: This guide outlines the basic commands you’ll use in the OpenStack CLI, or the steps you’ll take in theOpenStack dashboard, to configure OpenStack for use with a BIG-IP® VE. The actual configurations you’ll need tomake may vary depending on your network’s architecture and your data center’s requirements.
26 Chapter 1. Guides and Resources
F5 OpenStack Documentation Documentation, Release
Attention: The F5 OpenStack Integrations documentation is moving to clouddocs.f5.com. Thank you foryour patience during construction.
Before you begin
You must have the following before deploying a BIG-IP® VE in OpenStack:
• A functional OpenStack environment with at least one controller node, one compute node, and one networknode.
See also:
– OpenStack End User Guide
– F5® OpenStack Deployment Guide
• An OpenStack-ready BIG-IP® VE image.
See also:
– F5® Heat User Guide: Onboarding a VE Image in OpenStack
• Basic understanding of OpenStack networking concepts.
See also:
– OpenStack User Guide: Create and manage networks
Important: You need to source a credentials file with admin permissions (e.g., source keystonerc_admin)to use the openstack, nova, and neutron commands.
You can also make configurations via the OpenStack dashboard. See the OpenStack dashboard user guide for moreinformation.
Attention: The F5 OpenStack Integrations documentation is moving to clouddocs.f5.com. Thank you foryour patience during construction.
Network Architecture
Single-tenancy
In a single-tenant architecture, the BIG-IP® provides services for only one tenant (interchangeably referred to as a‘project’ in OpenStack lingo).
Multi-tenancy
In a multi-tenant architecture, the BIG-IP® provides services for multiple tenants. The BIG-IP® instance can bepartitioned, with tenants allowed access to only their specific partition(s).
1.7. How To Deploy BIG-IP VE in OpenStack 27
F5 OpenStack Documentation Documentation, Release
VLANs
VLANs represent a logical collection of hosts that can share network resources. At minimum, BIG-IP® needs accessto two VLANs: the external network and the internal network.
For a commonly-used, basic load balancing set-up, you’ll need three VLANS: the external network, the internal datasubnet, and the internal management subnet.
Device Service Clustering requires additional VLANs.
High Availability
BIG-IP® high availability (HA) features, such as connection mirroring, configuration synchronization, and networkfailover, allow core system services to remain available in the event that a BIG-IP® device becomes unavailable.
Mirroring
BIG-IP® mirroring features allow you to duplicate the connection and persistence information from the active BIG-IP® device to a peer.
Clustering
BIG-IP® Device Service Clustering (DSC) provides synchronization and failover of configuration data across multipleBIG-IP® devices on a network.
BIG-IP® high availability (HA) features, such as connection mirroring, configuration synchronization, and networkfailover, allow core system services to remain available in the event that a BIG-IP® becomes unavailable.
For more information, see:
• BIG-IP® Device Service Clustering Administration
• F5’s SOL14135 Defining network resources for BIG-IP® high availability features
SR-IOV
BIG-IP® VE instances can provide improved throughput using Single root I/O virtualization (SR-IOV) to interactdirectly with underlying 10 gigabit Network Interface Card (NIC) adapters. See F5® Support SOL17204 for moreinformation.
If you’re using SR-IOV, use the command shown below to create a Neutron port and make note of the port ID. Youwill need to provide this information when launching the BIG-IP®.
$ neutron port-create [network-id] --binding:vnic-type direct
Attention: The F5 OpenStack Integrations documentation is moving to clouddocs.f5.com. Thank you foryour patience during construction.
28 Chapter 1. Guides and Resources
F5 OpenStack Documentation Documentation, Release
Initial Setup
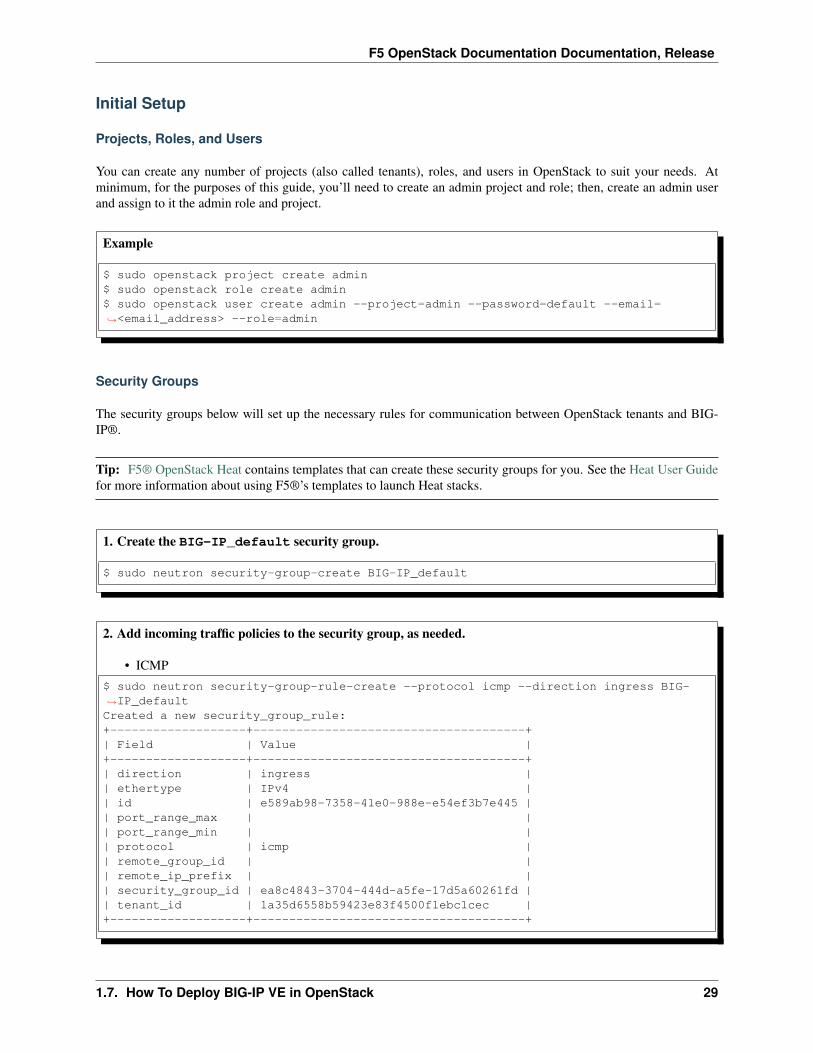
Projects, Roles, and Users
You can create any number of projects (also called tenants), roles, and users in OpenStack to suit your needs. Atminimum, for the purposes of this guide, you’ll need to create an admin project and role; then, create an admin userand assign to it the admin role and project.
Example
$ sudo openstack project create admin$ sudo openstack role create admin$ sudo openstack user create admin --project=admin --password=default --email=→˓<email_address> --role=admin
Security Groups
The security groups below will set up the necessary rules for communication between OpenStack tenants and BIG-IP®.
Tip: F5® OpenStack Heat contains templates that can create these security groups for you. See the Heat User Guidefor more information about using F5®’s templates to launch Heat stacks.
1. Create the BIG-IP_default security group.
$ sudo neutron security-group-create BIG-IP_default
2. Add incoming traffic policies to the security group, as needed.
• ICMP
$ sudo neutron security-group-rule-create --protocol icmp --direction ingress BIG-→˓IP_defaultCreated a new security_group_rule:+-------------------+--------------------------------------+| Field | Value |+-------------------+--------------------------------------+| direction | ingress || ethertype | IPv4 || id | e589ab98-7358-41e0-988e-e54ef3b7e445 || port_range_max | || port_range_min | || protocol | icmp || remote_group_id | || remote_ip_prefix | || security_group_id | ea8c4843-3704-444d-a5fe-17d5a60261fd || tenant_id | 1a35d6558b59423e83f4500f1ebc1cec |+-------------------+--------------------------------------+
1.7. How To Deploy BIG-IP VE in OpenStack 29
F5 OpenStack Documentation Documentation, Release
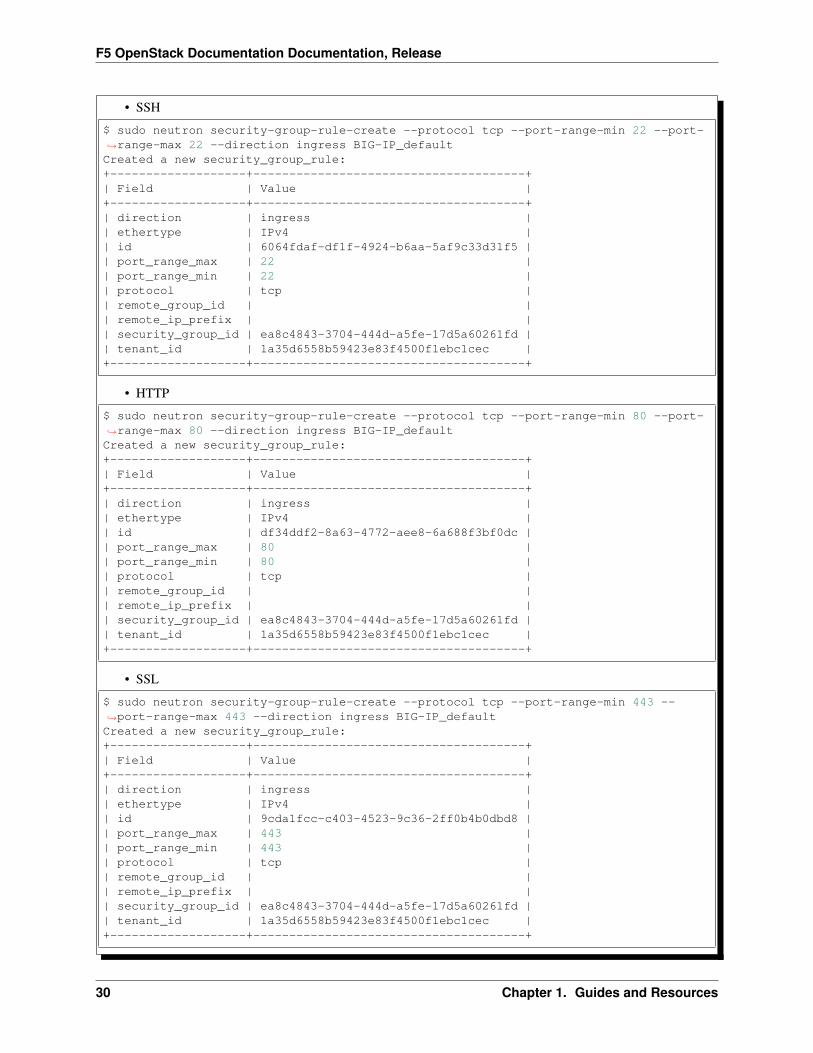
• SSH
$ sudo neutron security-group-rule-create --protocol tcp --port-range-min 22 --port-→˓range-max 22 --direction ingress BIG-IP_defaultCreated a new security_group_rule:+-------------------+--------------------------------------+| Field | Value |+-------------------+--------------------------------------+| direction | ingress || ethertype | IPv4 || id | 6064fdaf-df1f-4924-b6aa-5af9c33d31f5 || port_range_max | 22 || port_range_min | 22 || protocol | tcp || remote_group_id | || remote_ip_prefix | || security_group_id | ea8c4843-3704-444d-a5fe-17d5a60261fd || tenant_id | 1a35d6558b59423e83f4500f1ebc1cec |+-------------------+--------------------------------------+
• HTTP
$ sudo neutron security-group-rule-create --protocol tcp --port-range-min 80 --port-→˓range-max 80 --direction ingress BIG-IP_defaultCreated a new security_group_rule:+-------------------+--------------------------------------+| Field | Value |+-------------------+--------------------------------------+| direction | ingress || ethertype | IPv4 || id | df34ddf2-8a63-4772-aee8-6a688f3bf0dc || port_range_max | 80 || port_range_min | 80 || protocol | tcp || remote_group_id | || remote_ip_prefix | || security_group_id | ea8c4843-3704-444d-a5fe-17d5a60261fd || tenant_id | 1a35d6558b59423e83f4500f1ebc1cec |+-------------------+--------------------------------------+
• SSL
$ sudo neutron security-group-rule-create --protocol tcp --port-range-min 443 --→˓port-range-max 443 --direction ingress BIG-IP_defaultCreated a new security_group_rule:+-------------------+--------------------------------------+| Field | Value |+-------------------+--------------------------------------+| direction | ingress || ethertype | IPv4 || id | 9cda1fcc-c403-4523-9c36-2ff0b4b0dbd8 || port_range_max | 443 || port_range_min | 443 || protocol | tcp || remote_group_id | || remote_ip_prefix | || security_group_id | ea8c4843-3704-444d-a5fe-17d5a60261fd || tenant_id | 1a35d6558b59423e83f4500f1ebc1cec |+-------------------+--------------------------------------+
30 Chapter 1. Guides and Resources
F5 OpenStack Documentation Documentation, Release
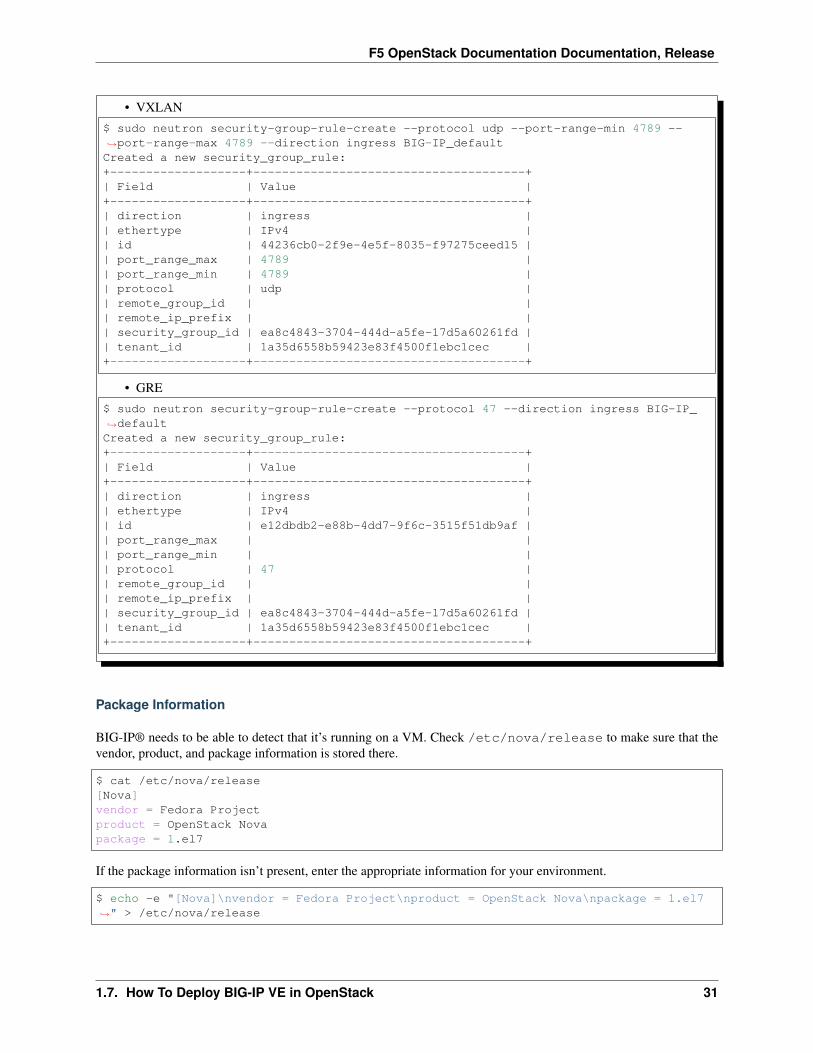
• VXLAN
$ sudo neutron security-group-rule-create --protocol udp --port-range-min 4789 --→˓port-range-max 4789 --direction ingress BIG-IP_defaultCreated a new security_group_rule:+-------------------+--------------------------------------+| Field | Value |+-------------------+--------------------------------------+| direction | ingress || ethertype | IPv4 || id | 44236cb0-2f9e-4e5f-8035-f97275ceed15 || port_range_max | 4789 || port_range_min | 4789 || protocol | udp || remote_group_id | || remote_ip_prefix | || security_group_id | ea8c4843-3704-444d-a5fe-17d5a60261fd || tenant_id | 1a35d6558b59423e83f4500f1ebc1cec |+-------------------+--------------------------------------+
• GRE
$ sudo neutron security-group-rule-create --protocol 47 --direction ingress BIG-IP_→˓defaultCreated a new security_group_rule:+-------------------+--------------------------------------+| Field | Value |+-------------------+--------------------------------------+| direction | ingress || ethertype | IPv4 || id | e12dbdb2-e88b-4dd7-9f6c-3515f51db9af || port_range_max | || port_range_min | || protocol | 47 || remote_group_id | || remote_ip_prefix | || security_group_id | ea8c4843-3704-444d-a5fe-17d5a60261fd || tenant_id | 1a35d6558b59423e83f4500f1ebc1cec |+-------------------+--------------------------------------+
Package Information
BIG-IP® needs to be able to detect that it’s running on a VM. Check /etc/nova/release to make sure that thevendor, product, and package information is stored there.
$ cat /etc/nova/release[Nova]vendor = Fedora Projectproduct = OpenStack Novapackage = 1.el7
If the package information isn’t present, enter the appropriate information for your environment.
$ echo -e "[Nova]\nvendor = Fedora Project\nproduct = OpenStack Nova\npackage = 1.el7→˓" > /etc/nova/release
1.7. How To Deploy BIG-IP VE in OpenStack 31
F5 OpenStack Documentation Documentation, Release
Custom Flavors
While the built-in Nova Flavors can be used with BIG-IP® VE, you can also create your own custom flavors.
Tip: For information regarding BIG-IP® VE image sizes and minimum requirements, see the BIG-IP® VE FlavorRequirements.
To define a custom flavor via the command line:
flavor_id=$(cat /proc/sys/kernel/random/uuid) nova flavor-create f5small $flavor_id→˓4096 20 2
You can also create new custom flavors via the OpenStack dashboard. To do so, go to System → Flavors and clickCreate Flavor.
Restart
Once your setup is complete, restart the Nova-Compute service:
$ sudo service nova-compute restart // Debian/Ubuntu$ sudo systemctl restart nova-compute // Redhat/CentOS
Attention: The F5 OpenStack Integrations documentation is moving to clouddocs.f5.com. Thank you foryour patience during construction.
Launch BIG-IP® VE in OpenStack
Overview
We recommend using the F5® Openstack Heat templates to deploy BIG-IP® in OpenStack. The F5-supported tem-plates can be used to set up a number of commonly-used scenarios.
The instructions provided here can help you create a minimal OpenStack deployment, which can be built upon manu-ally, or using Heat, depending on your needs.
Import OpenStack-Ready VE Image
To import an OpenStack-ready BIG-IP® VE image file using the command line:
$ glance image-create --name <name> --container-format <format> --disk-format <format>→˓ --file <your.image.filename>
Example:
$ glance image-create --name bigip11.6.0 --container-format bare --disk-format→˓qcow2 --file BIGIP-11.6.0.6.146.442.LTM.Small.qcow2
32 Chapter 1. Guides and Resources
F5 OpenStack Documentation Documentation, Release
Caution: The standard BIG-IP® VE image – the image you download from f5.com – must be patched to beOpenStack-ready. You can use the OpenStack Heat orchestration service to import a standard VE image and makeit OpenStack-ready. See the F5® Heat User Guide for instructions.
Launch an Instance
To launch a BIG-IP® instance using the OpenStack dashboard:
1. Go to http://<ip_address>/dashboard and log in with your admin credentials.
2. Go to Project → Compute → Instances, then click Launch Instance.
• On the Project & User tab:
– select admin for each.
• On the Details tab:
– enter a descriptive instance name;
– choose your custom flavor;
– select boot from image as the boot source;
– select your BIG-IP® image.
• On the Access & Security tab:
– select the BIG-IP_default security group.
• On the Network tab:
– select networks as appropriate (at least two).
• Click Launch.
Warning: Do not select the physical external network when launching an instance. Choose the VLANs you set upfor use with your BIG-IP®.
Assign a Floating IP Address
Use the OpenStack dashboard to assign a floating IP address to the instance.
1. Go to Project → Compute → Instances, then choose Associate Floating IP from the drop-down menu in theActions column.
2. Select a Floating IP from the IP Address drop-down menu.
3. In the port drop-down, select the port for your BIG-IP® image that corresponds to the external VLAN you setup for your BIG-IP®.
4. Click Associate.
Tip: If no floating IP addresses are available, click + to generate one, then click Allocate.
1.7. How To Deploy BIG-IP VE in OpenStack 33
F5 OpenStack Documentation Documentation, Release
Attention: The F5 OpenStack Integrations documentation is moving to clouddocs.f5.com. Thank you foryour patience during construction.
Next Steps
Now that your BIG-IP® VE is running, you will need to configure it. See Further Reading for more information.
Tip:
• You can access the BIG-IP® from the OpenStack dashboard via System → Instances → Console.
Tip: To log in to the BIG-IP® GUI, copy its floating IP from the Instance screen in the dashboard, then paste it intoyour browser’s address bar. You must use https to connect.
Use either the system default username and password, or credentials defined during onboarding, to log in.
Further Reading
The BIG-IP® literature on AskF5 and DevCentral provides comprehensive configuration instructions and trou-bleshooting information. The initial configuration guide walks you through the essential first steps:
• BIG-IP® System Initial Configuration Guide (v12.0)
• BIG-IP® System Initial Configuration Guide (v11.6)
Once your BIG-IP® is configured, you can deploy the F5® OpenStack LBaaS plugin appropriate for your environ-ment.
• LBaaSv1
• LBaaSv2
Releases and Support
The user guides provided here support OpenStack Kilo. See the F5 Releases and Support Matrix for more information.
For Developers
Interested in contributing to an F5 OpenStack project? Check out the Developer Area.
34 Chapter 1. Guides and Resources
Related Documents


