ODI11g: Creating an ODI Project and Interface: Exporting a Flat File to a Flat File Purpose This tutorial walks you through the steps that are needed to create a project and an interface in Oracle Data Integrator (ODI) to export a flat file to another flat file. Time to Complete Approximately 40 minutes Overview A common task that is performed using ODI is to export data from a flat file and load this data into another flat file. This tutorial walks you through the steps that are needed to create a project and an interface that will import a file to a staging area, perform some minor transformations, and then write the data to a file. You also execute the interface and verify the execution using ODI Operator. Scenario Linda works as a database administrator for Global Enterprise. In Global Enterprise, Linda is responsible for performing database management and integration tasks on various resources within the organization. In particular, Linda is responsible for data loading, transformation, and validation. To begin working on her projects, Linda created the new Master repository and Work repository. Now Linda needs to create a project and an interface to export data from a flat file, perform transformations, and load this data into another flat file.

Exporting a Flat File to a Flat File
Jan 18, 2016
How to load data from flat file to flat file.
Welcome message from author
This document is posted to help you gain knowledge. Please leave a comment to let me know what you think about it! Share it to your friends and learn new things together.
Transcript
ODI11g: Creating an ODI Project and Interface: Exporting a Flat File to a Flat File
Purpose
This tutorial walks you through the steps that are needed to create a project and an interface in Oracle Data Integrator (ODI) to export a flat file to another flat file.
Time to Complete
Approximately 40 minutes
Overview
A common task that is performed using ODI is to export data from a flat file and load this data into another flat file. This tutorial walks you through the steps that are needed to create a project and an interface that will import a file to a staging area, perform some minor transformations, and then write the data to a file. You also execute the interface and verify the execution using ODI Operator.
Scenario
Linda works as a database administrator for Global Enterprise. In Global Enterprise, Linda is responsible for performing database management and integration tasks on various resources within the organization. In particular, Linda is responsible for data loading, transformation, and validation. To begin working on her projects, Linda created the new Master repository and Work repository. Now Linda needs to create a project and an interface to export data from a flat file, perform transformations, and load this data into another flat file.
Creating a New Project with Oracle Data Integrator
To create a new project within Oracle Data Integrator, perform the following steps:
1. Start ODI Designer: Start > Programs > Oracle > Oracle Data Integrator > ODI Studio . Select WORKREP1 from the Login Name drop-down list if not already selected. Enter SUPERVISOR in the User field and SUNOPSIS in the Password field. Click OK to login.
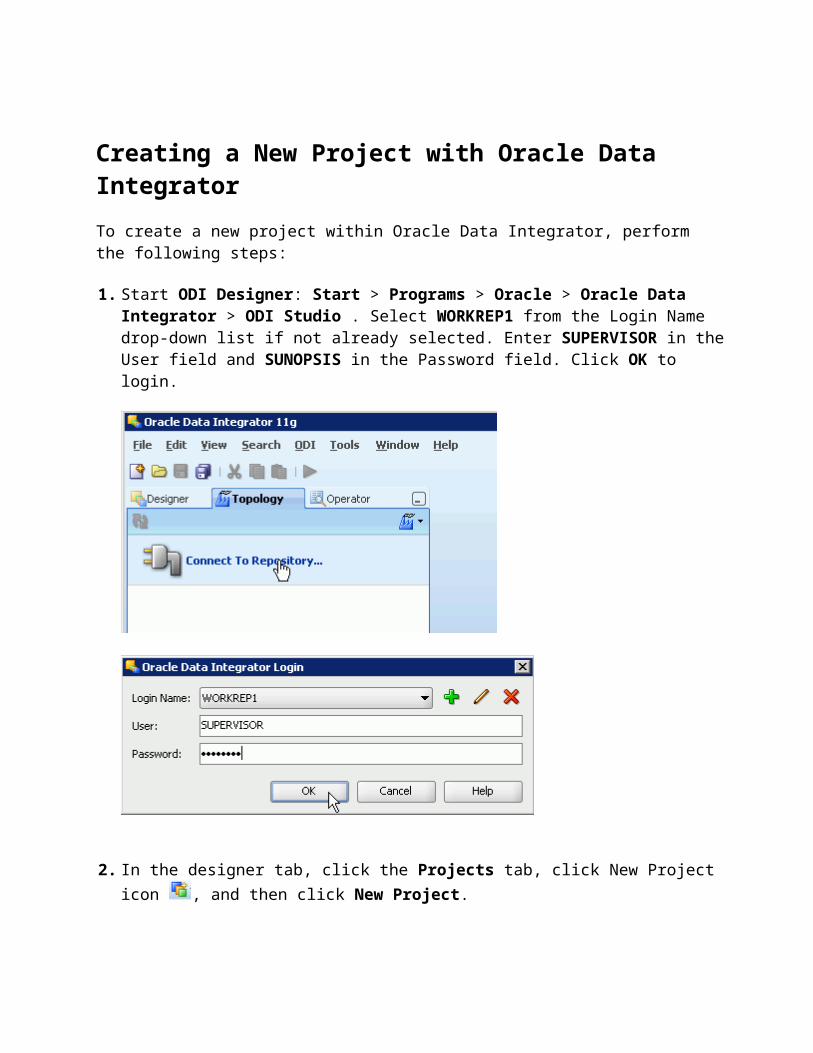
2. In the designer tab, click the Projects tab, click New Project icon , and then click New Project.
3. On the screen that appears, set the Name of the project to ODI_exp_FT_FT in the Name field.
The Code field is filled automatically. Click Save icon . The newly created ODI_exp_FT_FT project now appears in the Projects tree view. You have now successfully
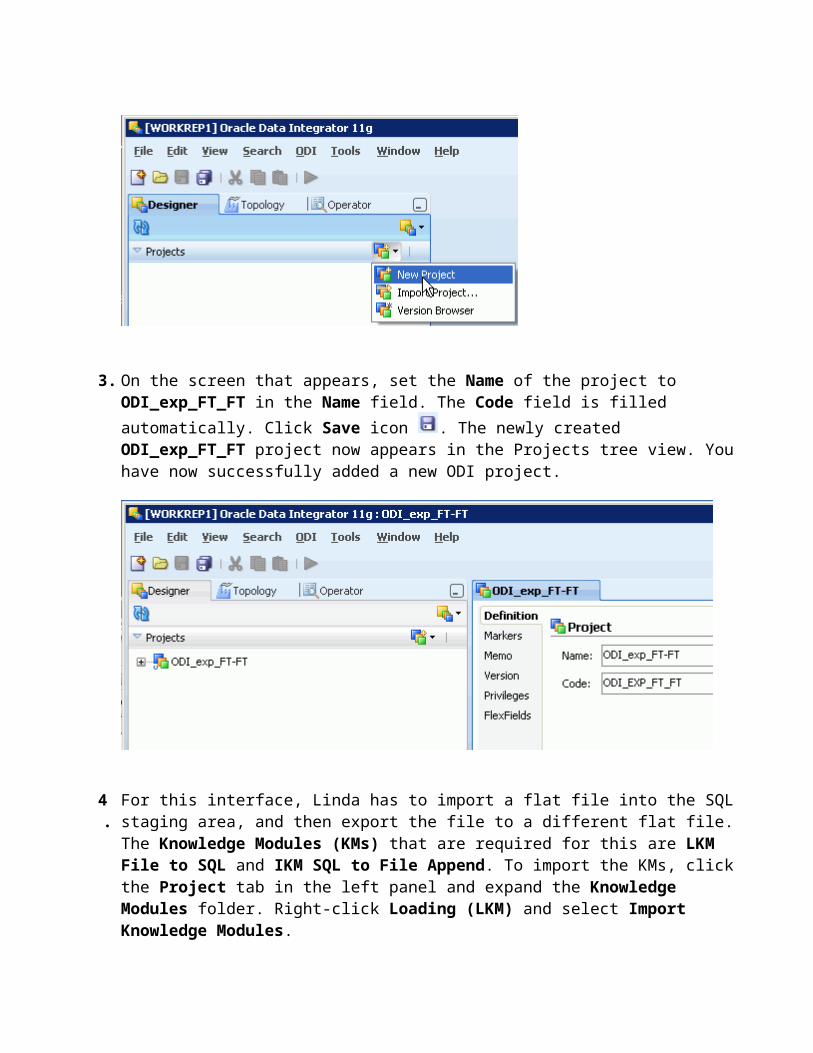
added a new ODI project.
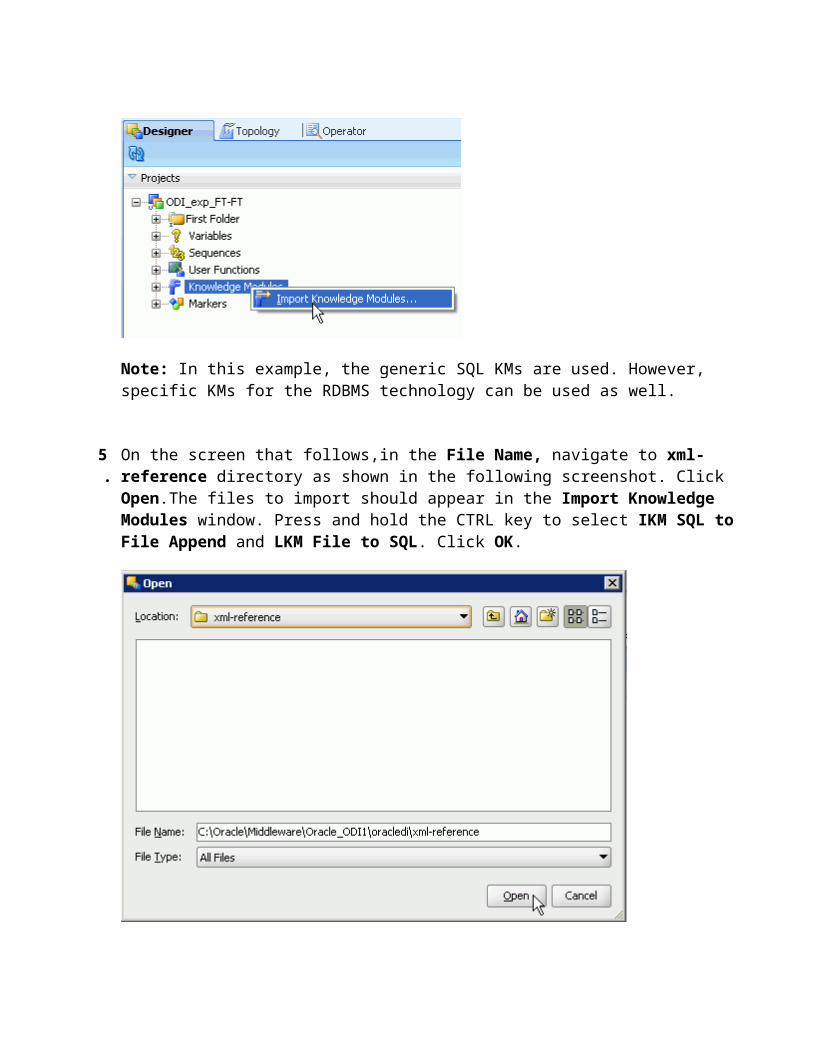
4 . For this interface, Linda has to import a flat file into the SQL staging area, and then export the file to a different flat file. The Knowledge Modules (KMs) that are required for this are LKM File to SQL and IKM SQL to File Append. To import the KMs, click the Project tab in the left panel and expand the Knowledge Modules folder. Right-click Loading (LKM) and select Import Knowledge Modules.
Note: In this example, the generic SQL KMs are used. However, specific KMs for the RDBMS technology can be used as well.
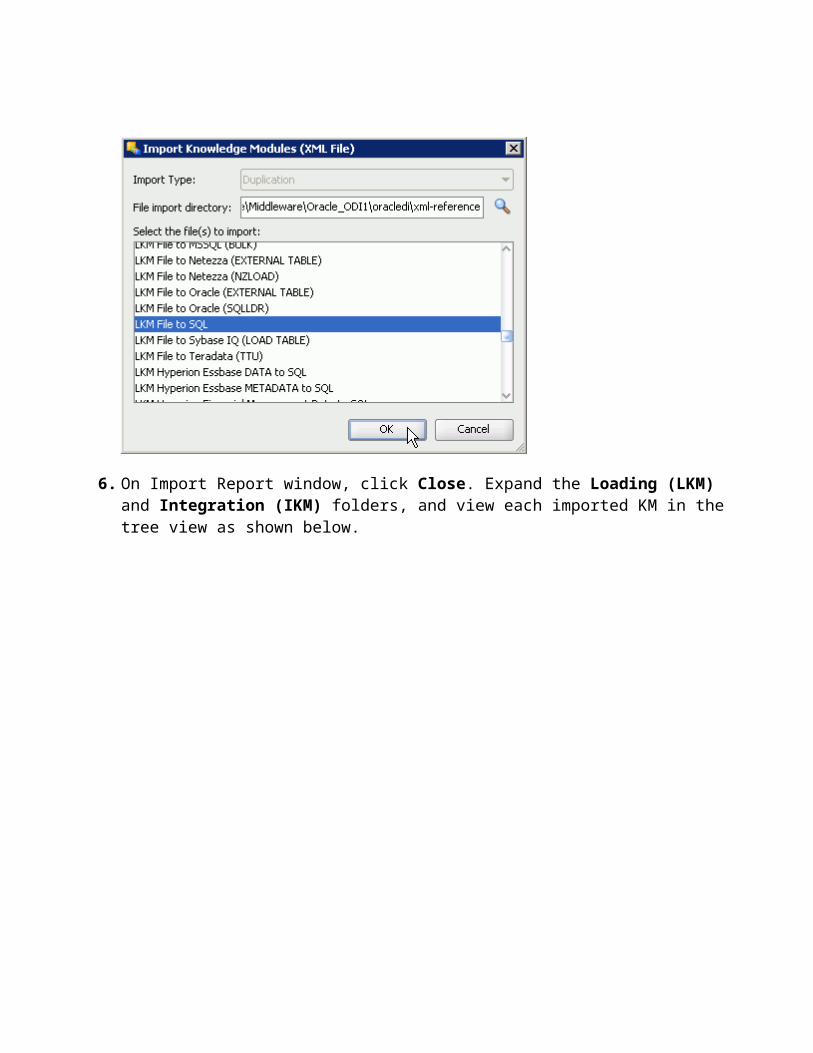
5 . On the screen that follows,in the File Name, navigate to xml-reference directory as shown in the following screenshot. Click Open.The files to import should appear in the Import Knowledge Modules window. Press and hold the CTRL key to select IKM SQL to File Append and LKM File to SQL. Click OK.
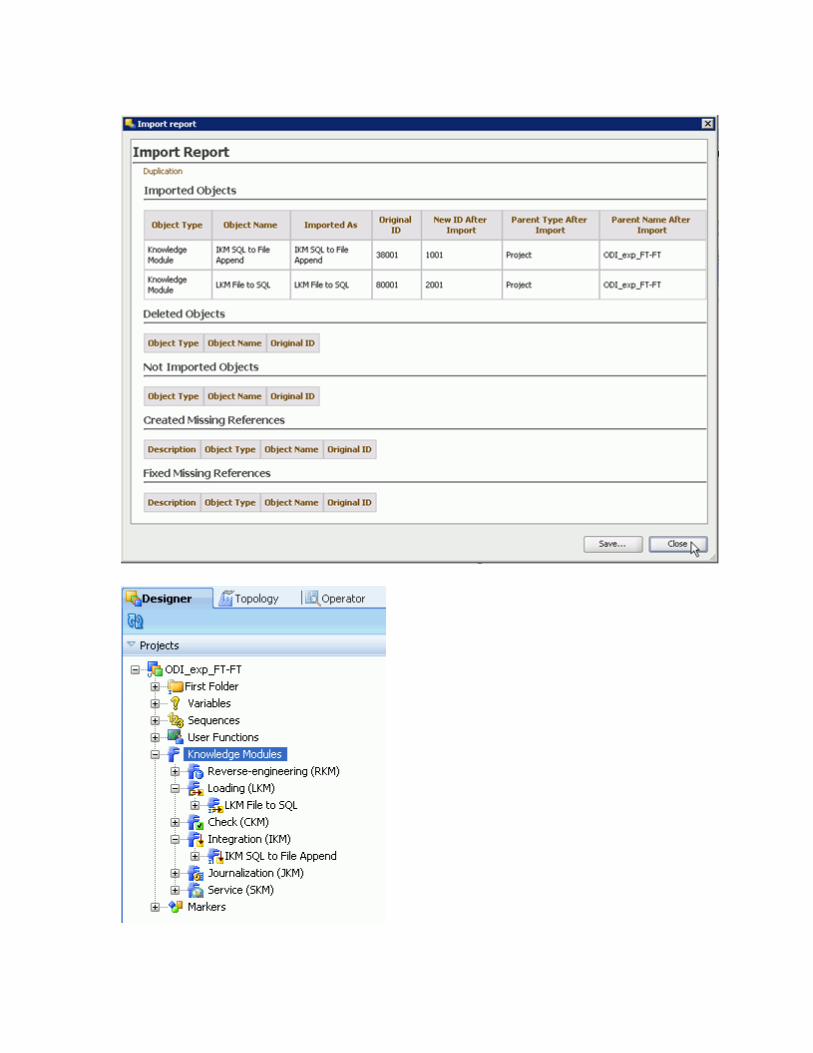
6. On Import Report window, click Close. Expand the Loading (LKM) and Integration (IKM) folders, and view each imported KM in the tree view as shown below.
Creating a New Physical Schema for the Flat File Model
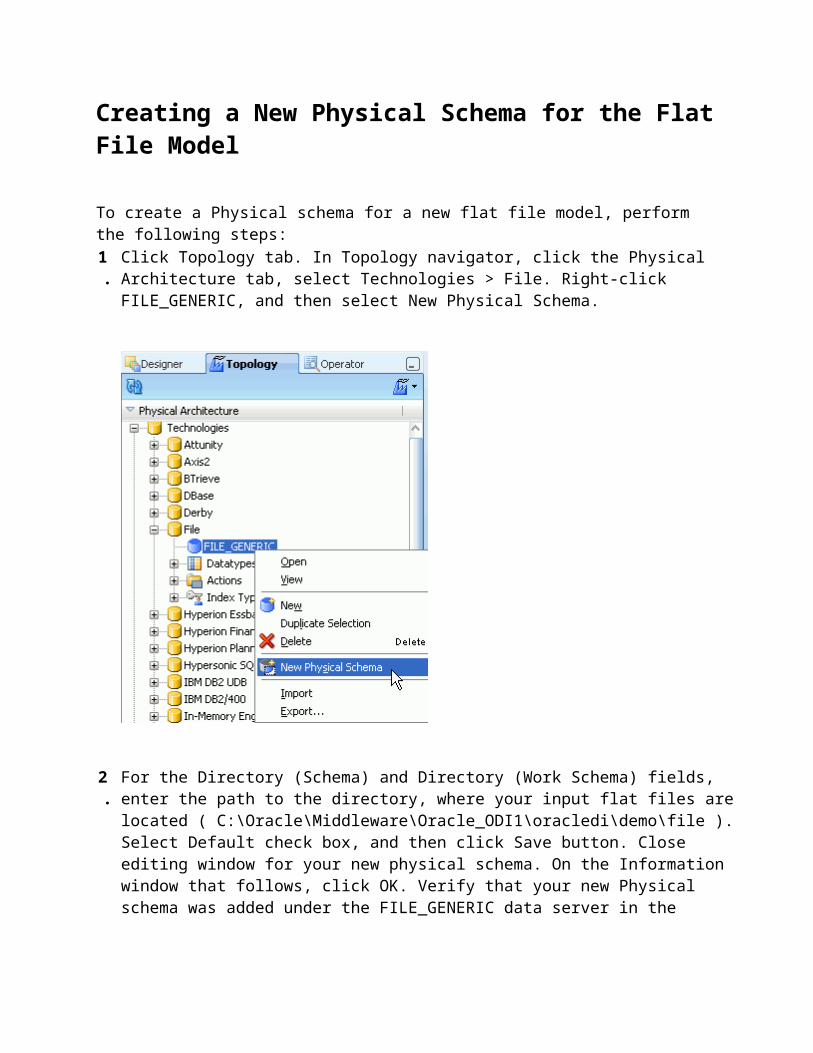
To create a Physical schema for a new flat file model, perform the following steps:1 . Click Topology tab. In Topology navigator, click the Physical Architecture tab, select
Technologies > File. Right-click FILE_GENERIC, and then select New Physical Schema.
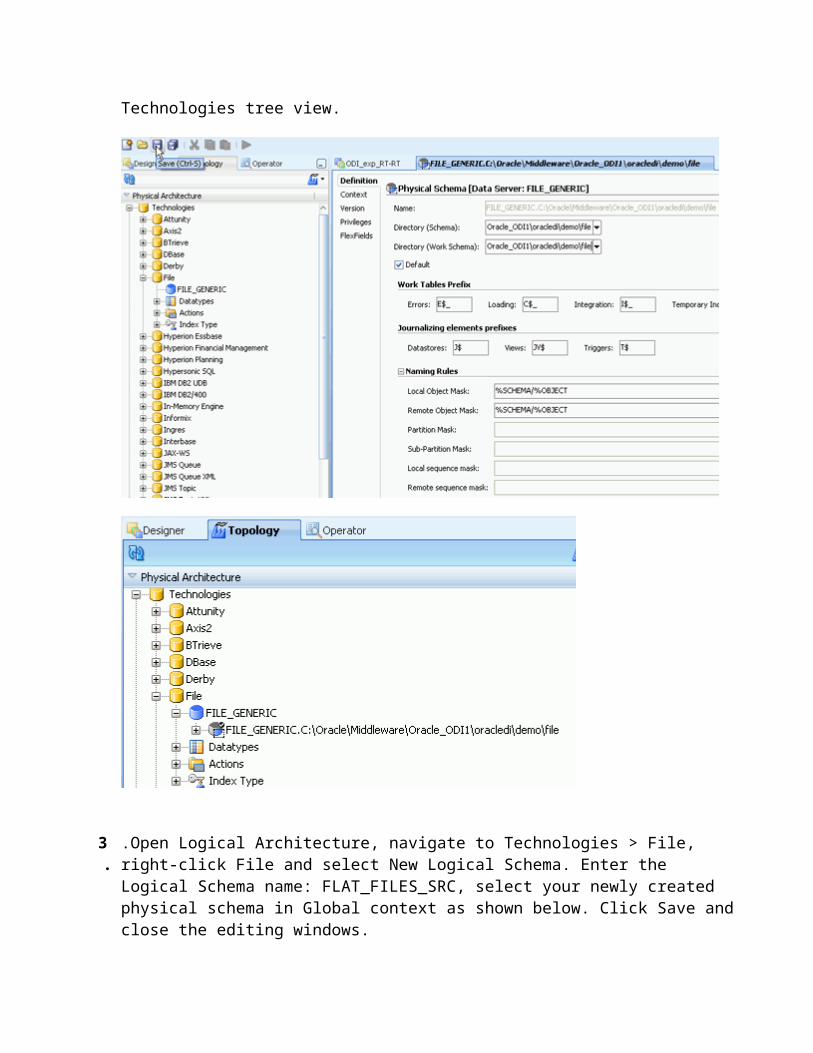
2 . For the Directory (Schema) and Directory (Work Schema) fields, enter the path to the directory, where your input flat files are located ( C:\Oracle\Middleware\Oracle_ODI1\oracledi\demo\file ). Select Default check box, and then click Save button. Close editing window for your new physical schema. On the Information window that follows, click OK. Verify that your new Physical schema was added under the FILE_GENERIC data server in the Technologies tree view.
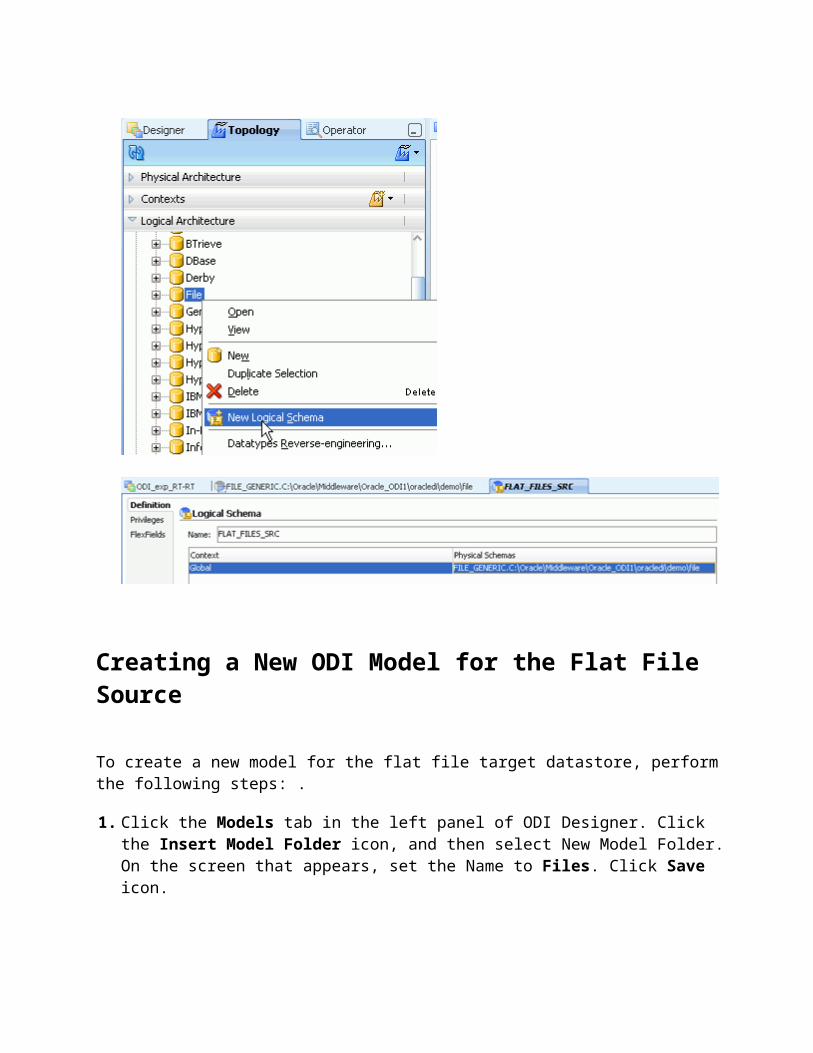
3 . .Open Logical Architecture, navigate to Technologies > File, right-click File and select New Logical Schema. Enter the Logical Schema name: FLAT_FILES_SRC, select your newly created physical schema in Global context as shown below. Click Save and close the editing windows.
Creating a New ODI Model for the Flat File Source
To create a new model for the flat file target datastore, perform the following steps: .
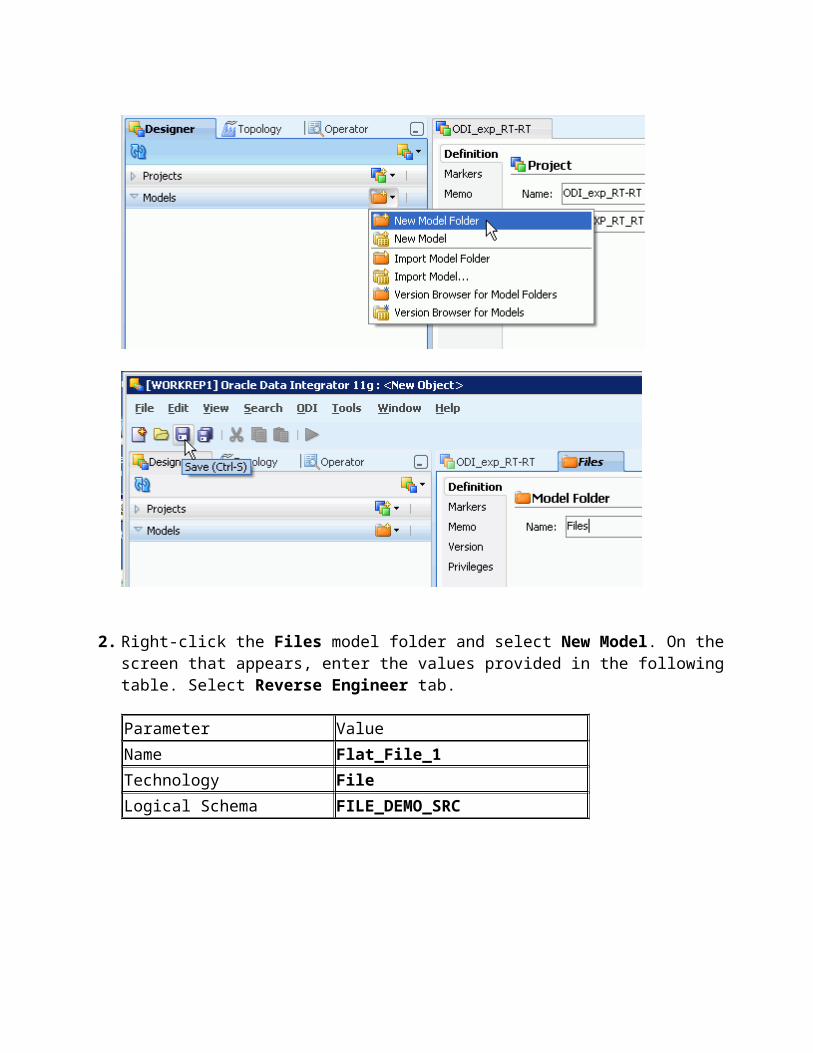
1. Click the Models tab in the left panel of ODI Designer. Click the Insert Model Folder icon, and then select New Model Folder. On the screen that appears, set the Name to Files. Click Save icon.
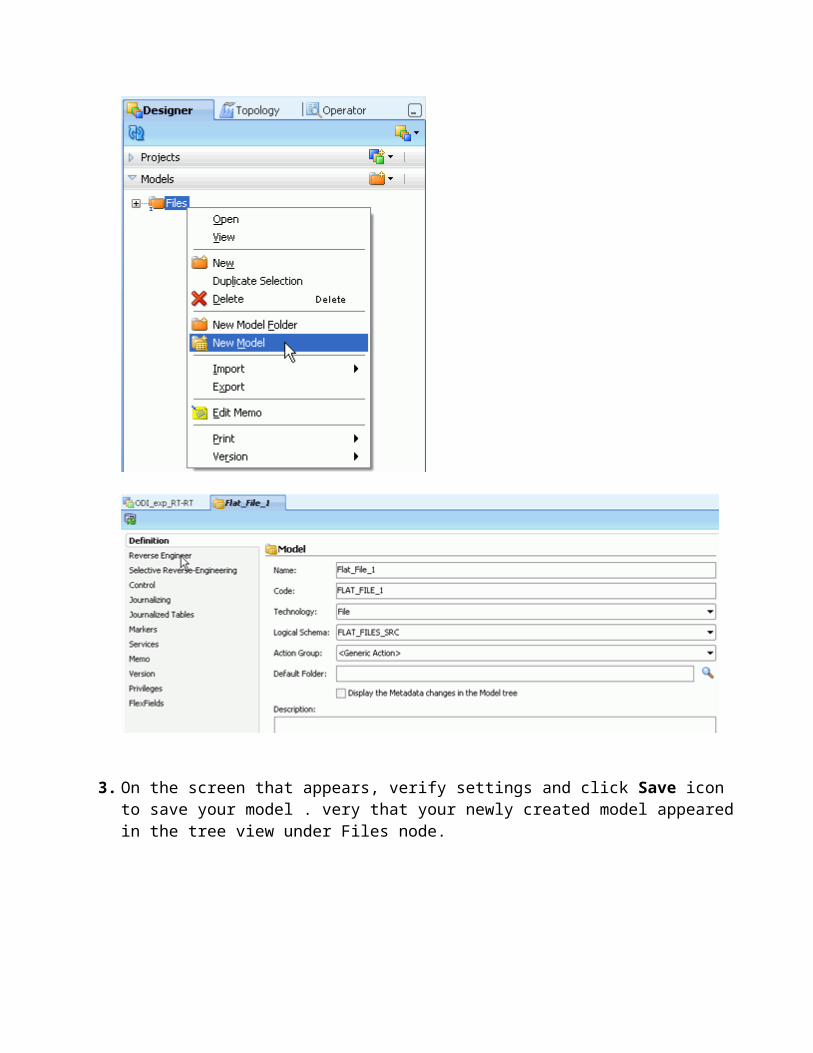
2. Right-click the Files model folder and select New Model. On the screen that appears, enter the values provided in the following table. Select Reverse Engineer tab.
Parameter Value
Name Flat_File_1
Technology File
Logical Schema FILE_DEMO_SRC
3. On the screen that appears, verify settings and click Save icon to save your model . very that your newly created model appeared in the tree view under Files node.
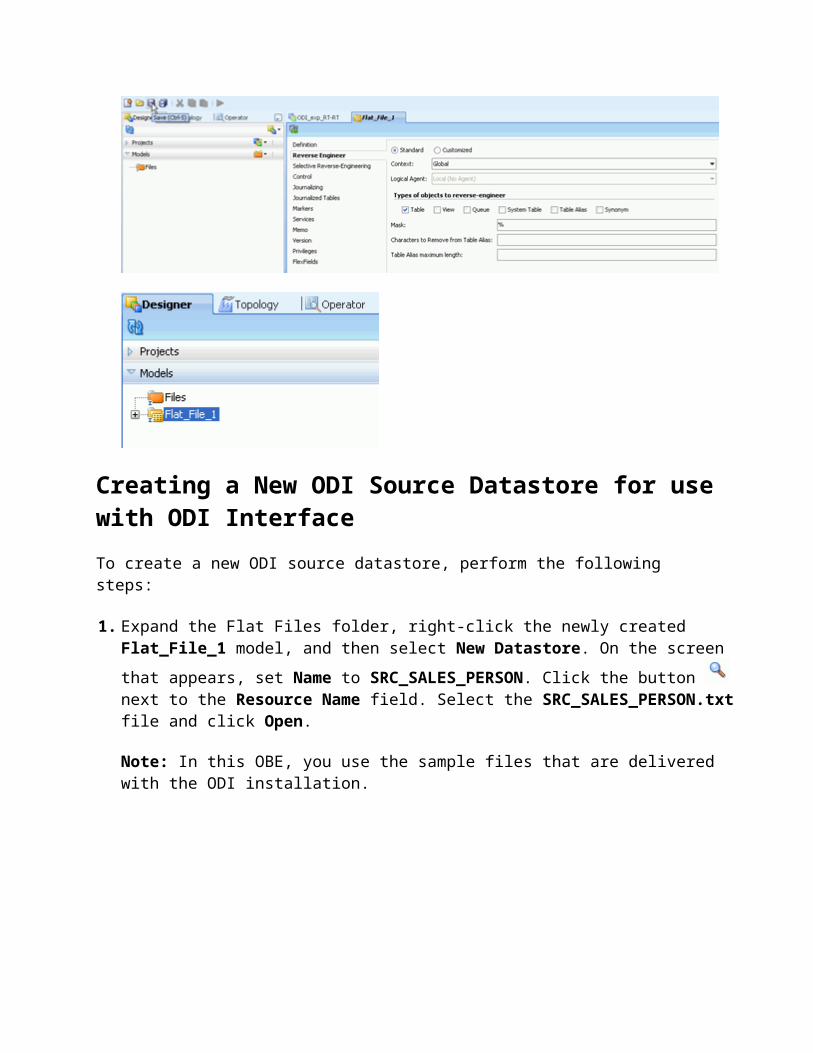
Creating a New ODI Source Datastore for use with ODI Interface
To create a new ODI source datastore, perform the following steps:
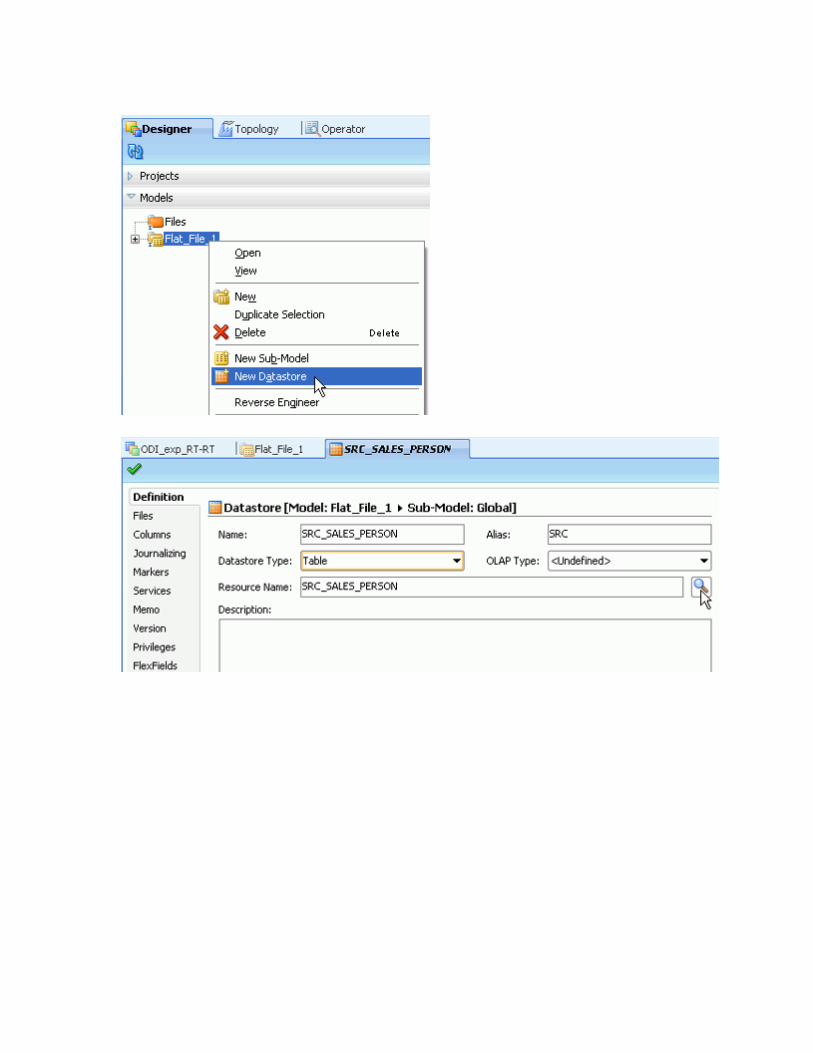
1. Expand the Flat Files folder, right-click the newly created Flat_File_1 model, and then select New Datastore. On the screen that appears, set Name to SRC_SALES_PERSON. Click the
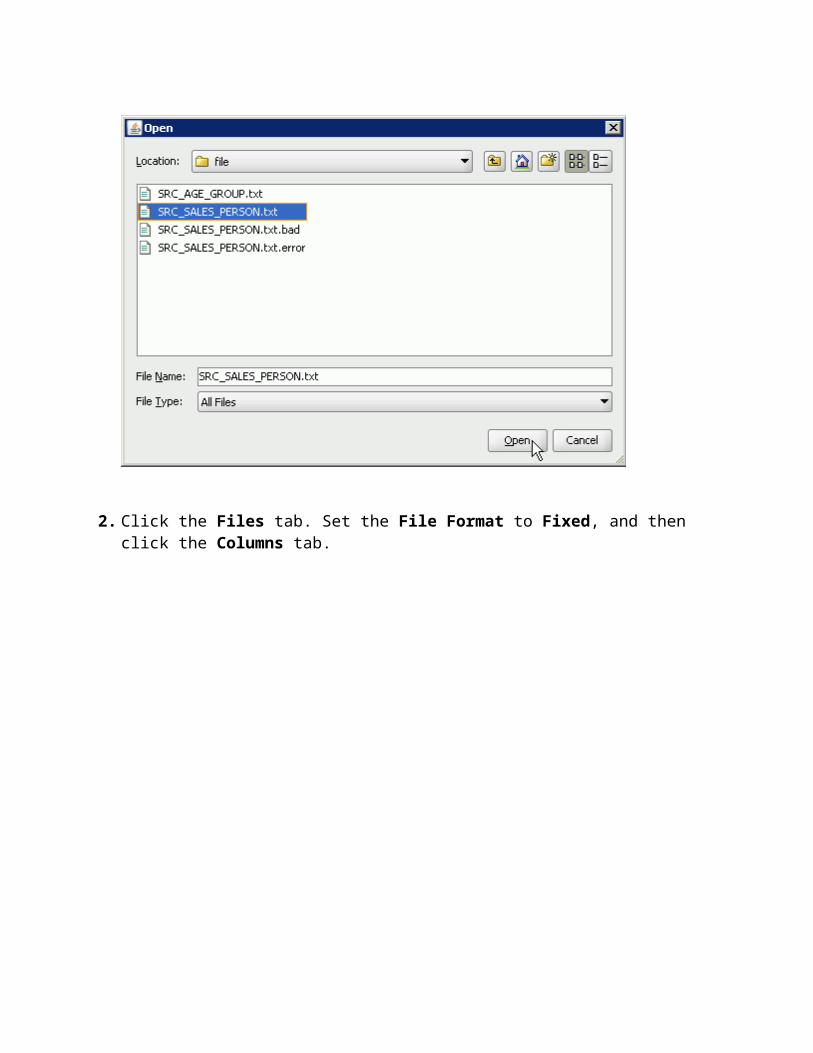
button next to the Resource Name field. Select the SRC_SALES_PERSON.txt file and click Open.
Note: In this OBE, you use the sample files that are delivered with the ODI installation.
2. Click the Files tab. Set the File Format to Fixed, and then click the Columns tab.
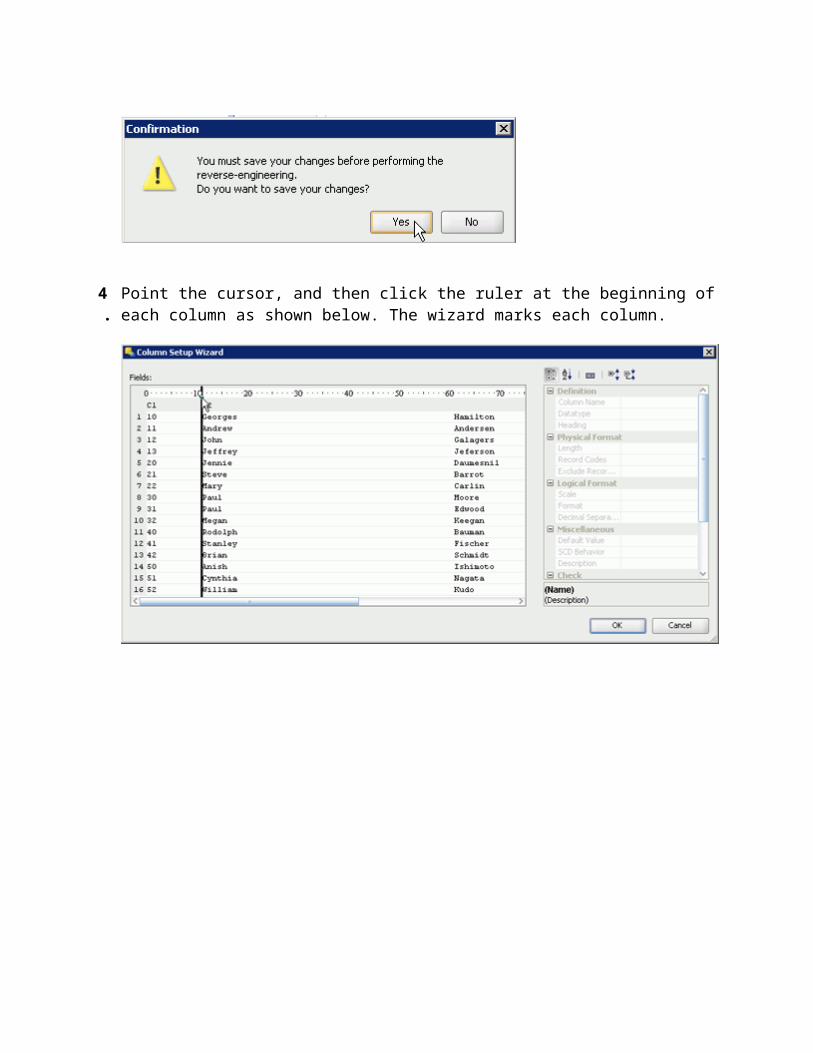
3 . On the Columns tab, click the Reverse Engineer button. The following screen appears. Click Yes.. The Column Setup Wizard appears.
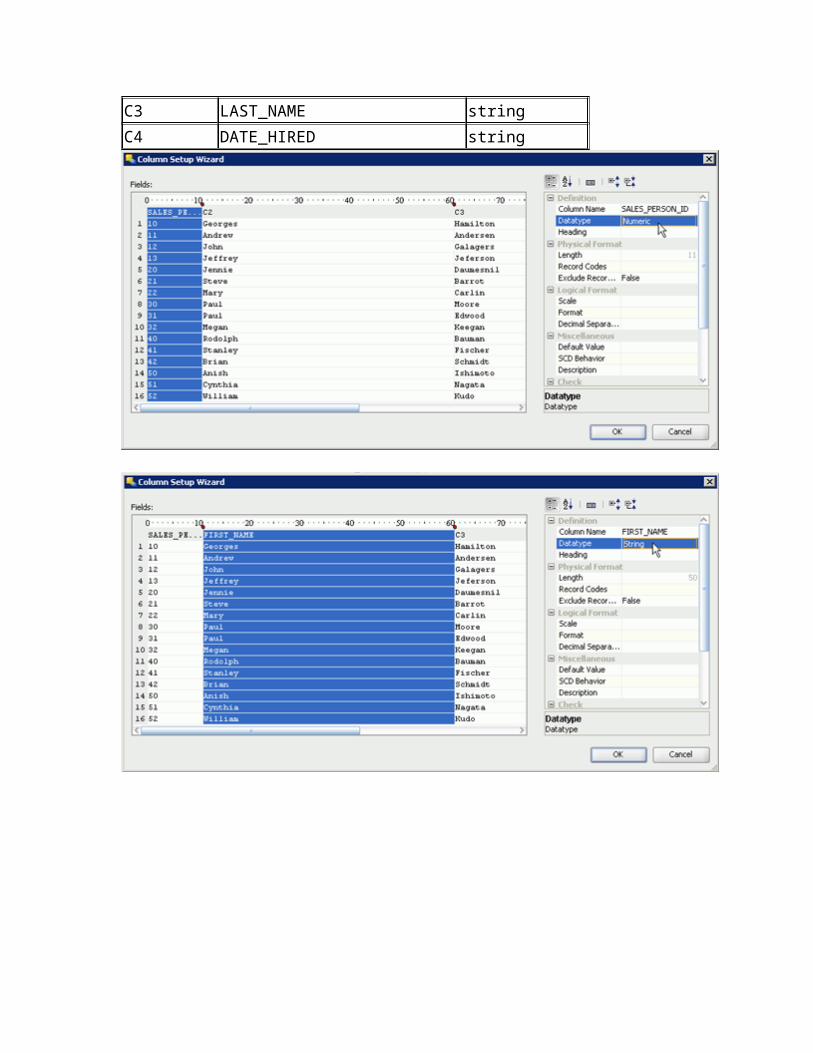
4 . Point the cursor, and then click the ruler at the beginning of each column as shown below. The wizard marks each column.

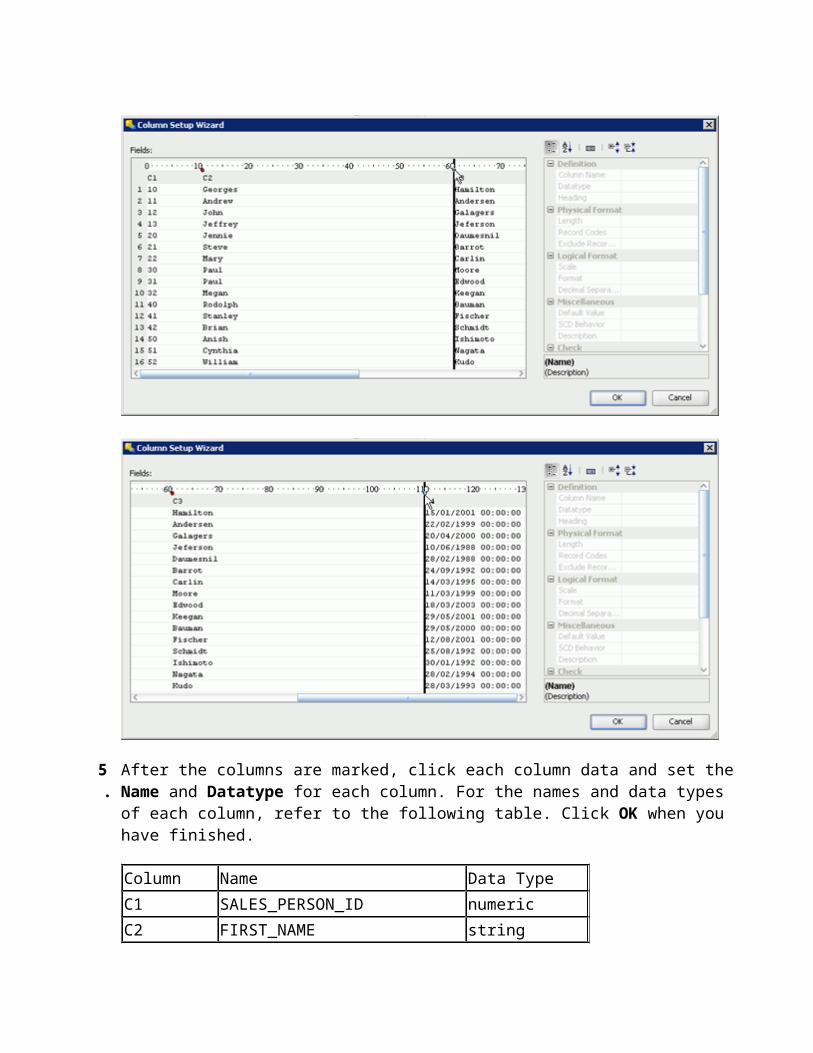
5 . After the columns are marked, click each column data and set the Name and Datatype for each column. For the names and data types of each column, refer to the following table. Click OK when you have finished.
Column Name Data Type
C1 SALES_PERSON_ID numeric
C2 FIRST_NAME string
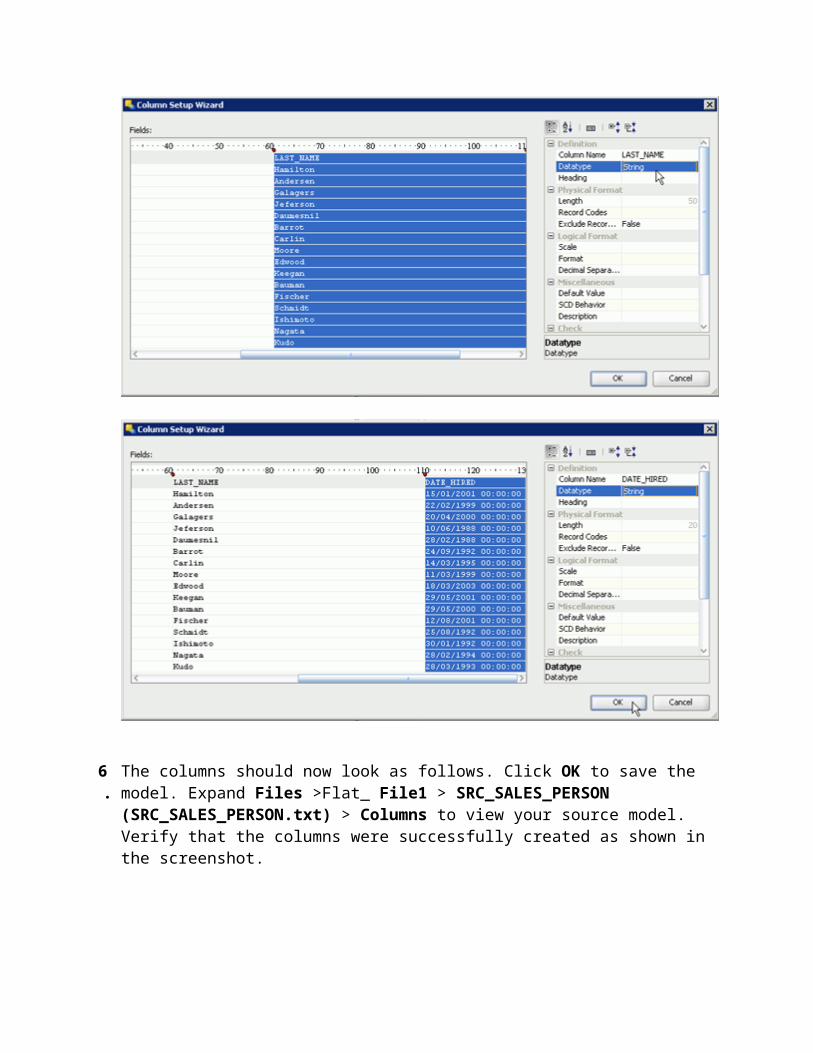
C3 LAST_NAME string
C4 DATE_HIRED string
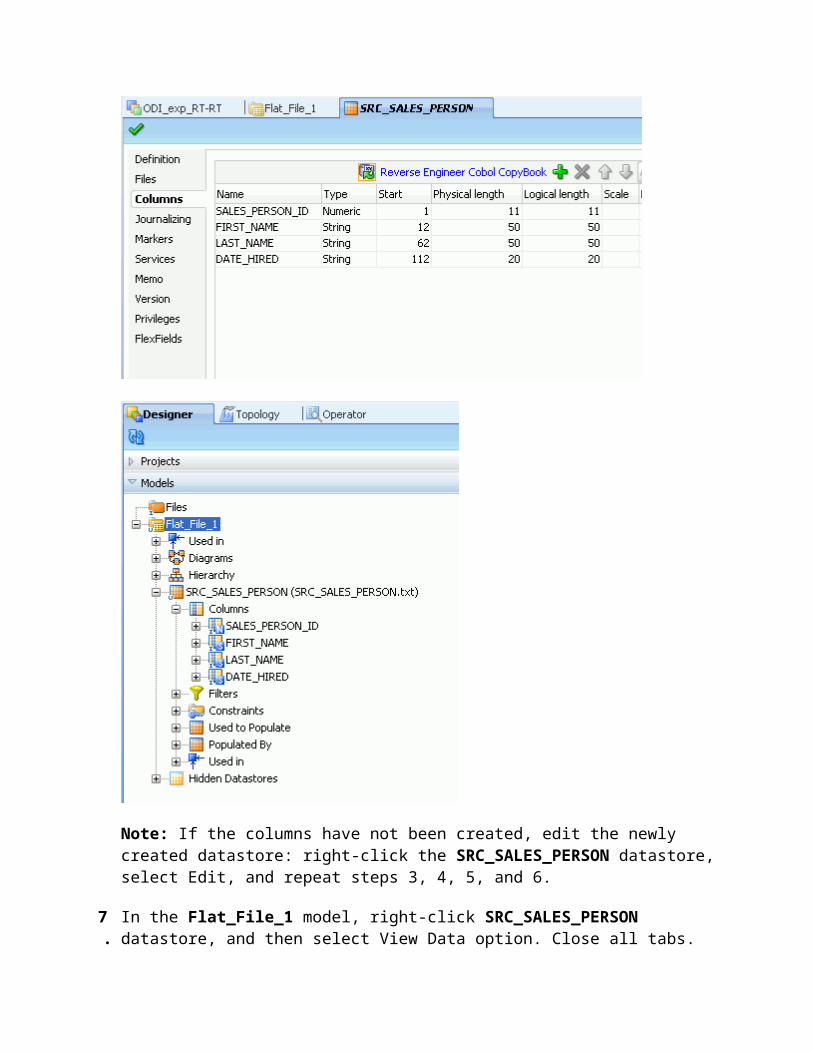
6 . The columns should now look as follows. Click OK to save the model. Expand Files >Flat_ File1 > SRC_SALES_PERSON (SRC_SALES_PERSON.txt) > Columns to view your source model. Verify that the columns were successfully created as shown in the screenshot.
Note: If the columns have not been created, edit the newly created datastore: right-click the SRC_SALES_PERSON datastore, select Edit, and repeat steps 3, 4, 5, and 6.
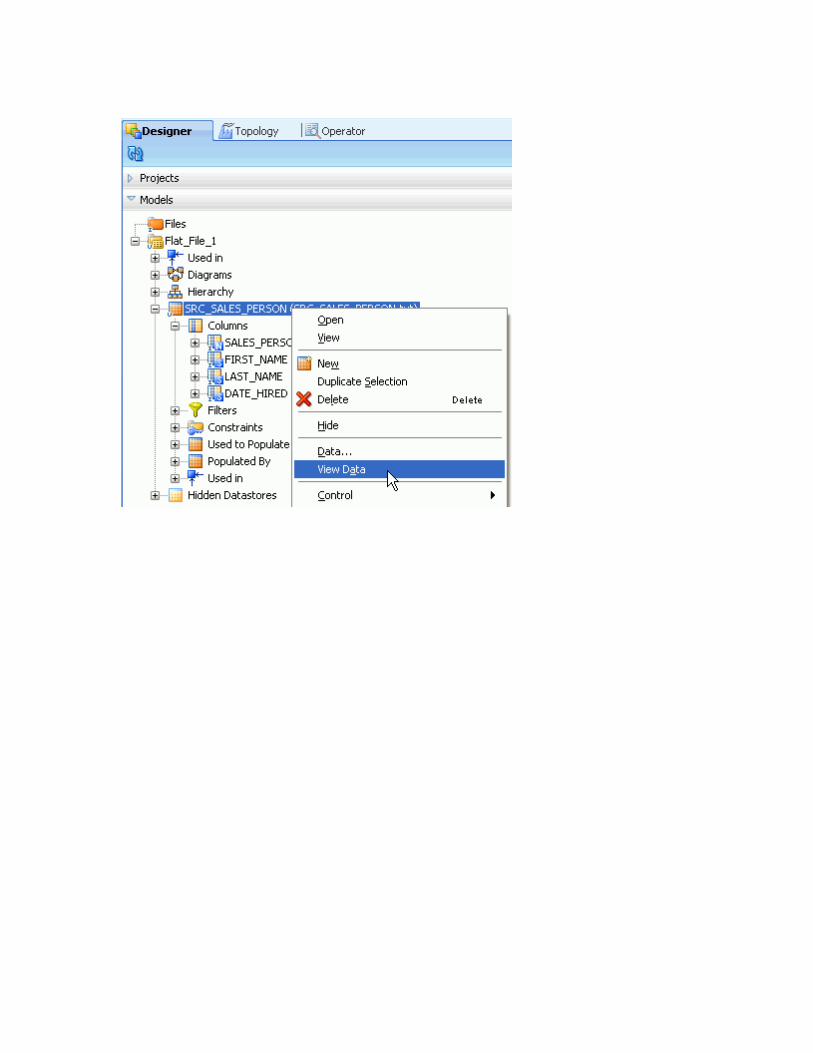
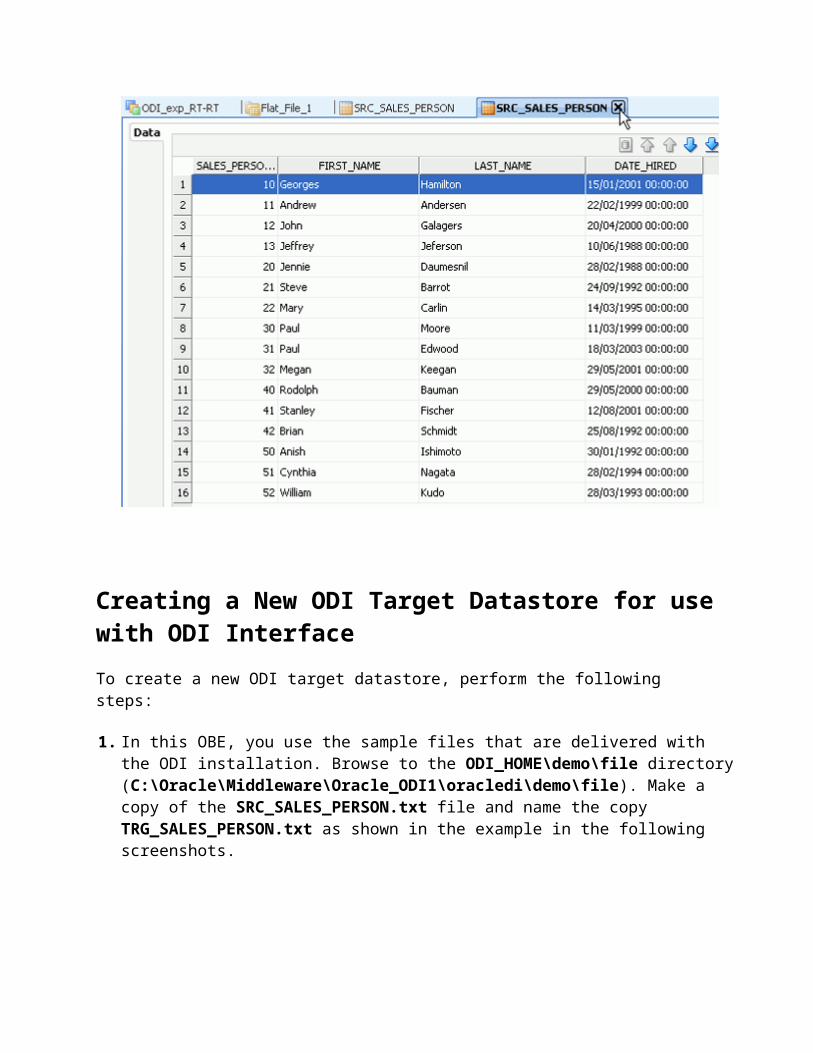
7 . In the Flat_File_1 model, right-click SRC_SALES_PERSON datastore, and then select View Data option. Close all tabs.
Creating a New ODI Target Datastore for use with ODI Interface
To create a new ODI target datastore, perform the following steps:
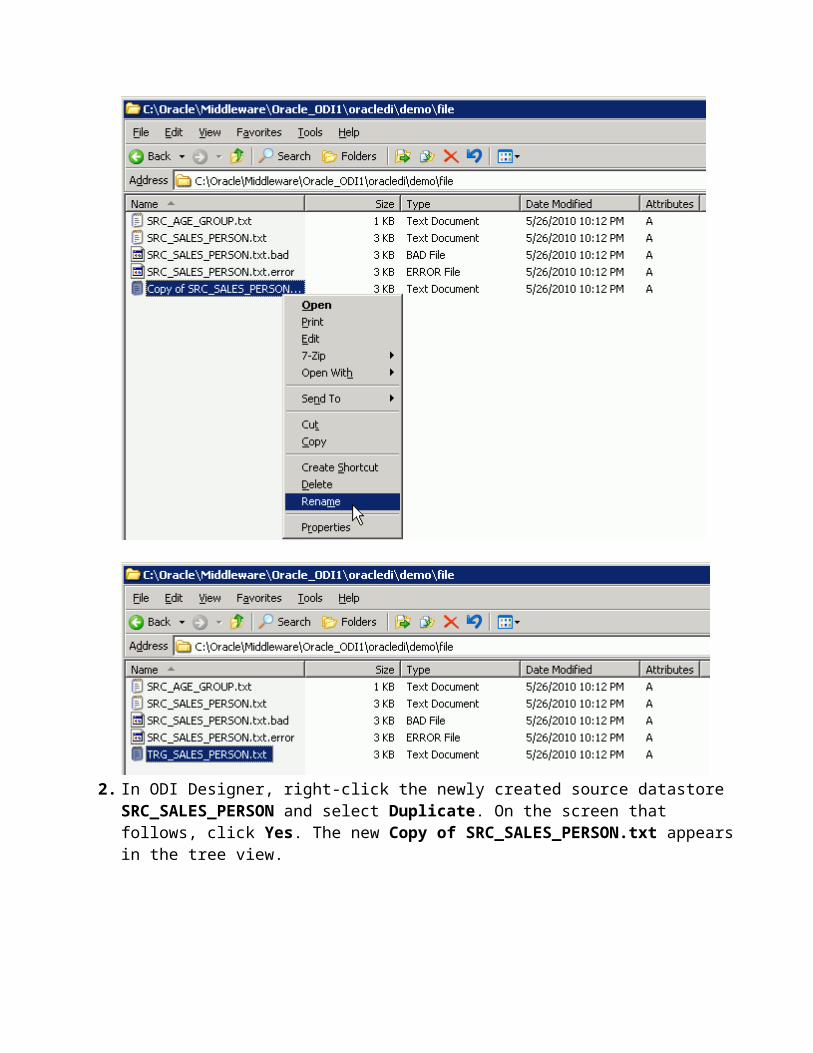
1. In this OBE, you use the sample files that are delivered with the ODI installation. Browse to the ODI_HOME\demo\file directory (C:\Oracle\Middleware\Oracle_ODI1\oracledi\demo\file). Make a copy of the SRC_SALES_PERSON.txt file and name the copy TRG_SALES_PERSON.txt as shown in the example in the following screenshots.
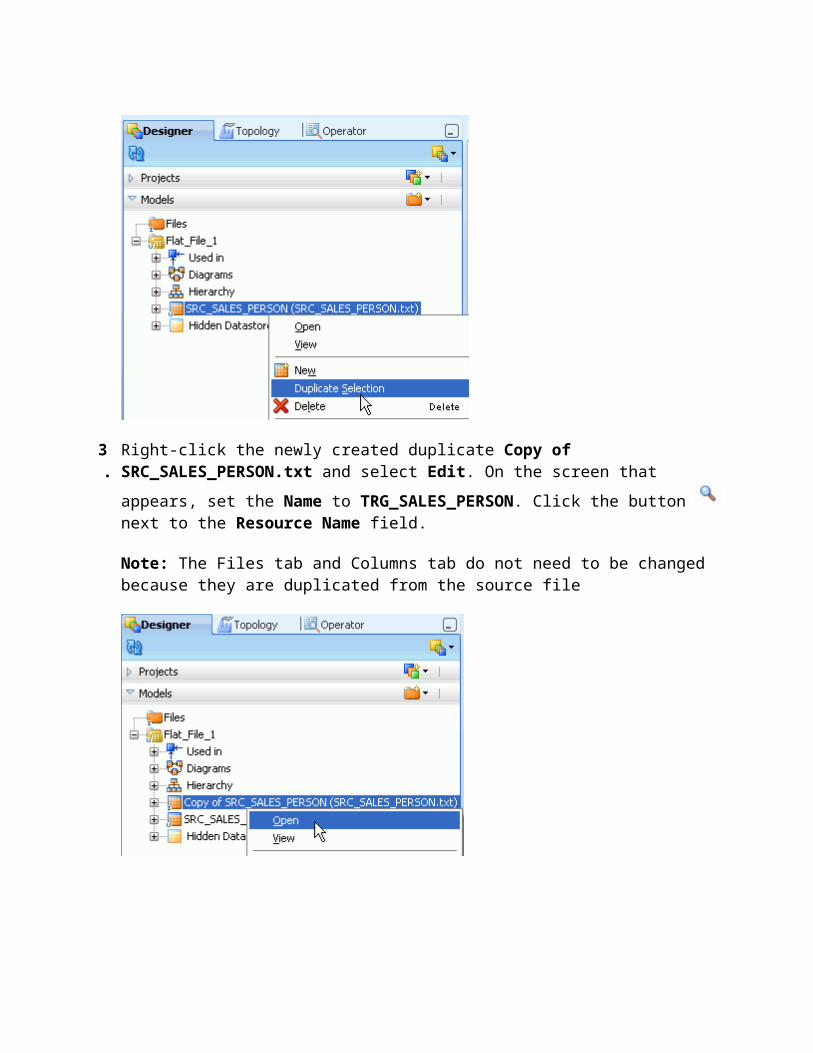
2. In ODI Designer, right-click the newly created source datastore SRC_SALES_PERSON and select Duplicate. On the screen that follows, click Yes. The new Copy of SRC_SALES_PERSON.txt appears in the tree view.
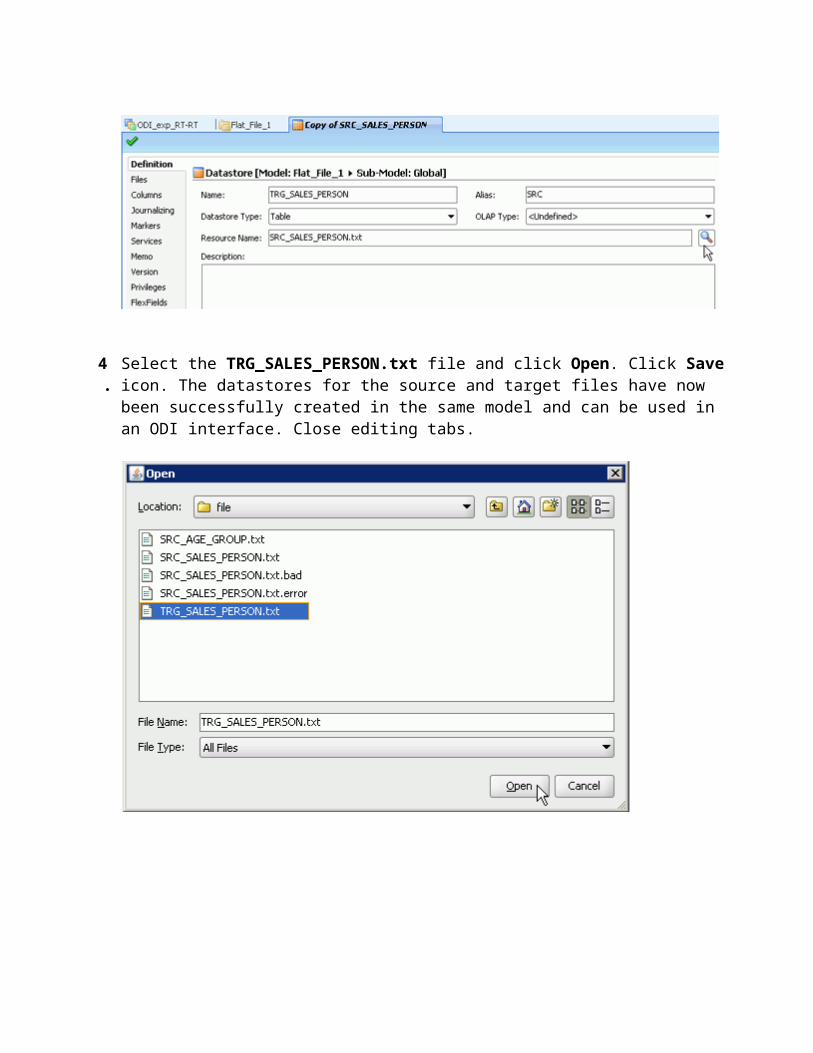
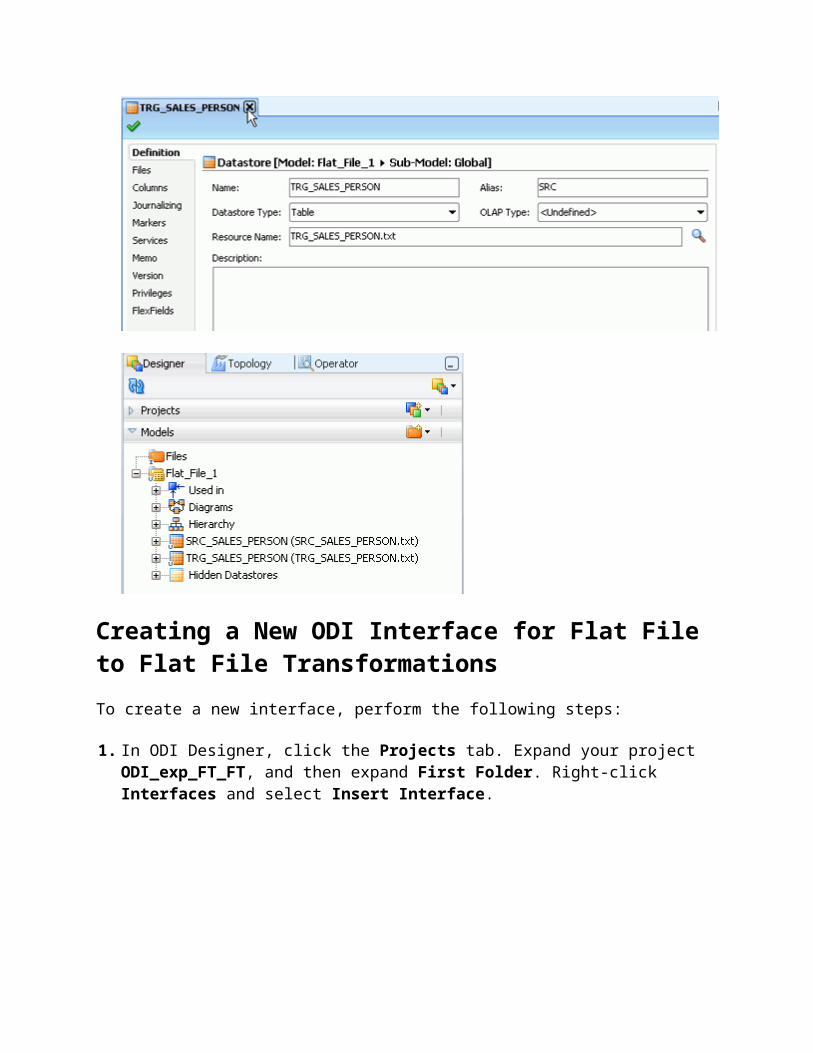
3 . Right-click the newly created duplicate Copy of SRC_SALES_PERSON.txt and select Edit.
On the screen that appears, set the Name to TRG_SALES_PERSON. Click the button next to the Resource Name field.
Note: The Files tab and Columns tab do not need to be changed because they are duplicated from the source file
4 . Select the TRG_SALES_PERSON.txt file and click Open. Click Save icon. The datastores for the source and target files have now been successfully created in the same model and can be used in an ODI interface. Close editing tabs.
Creating a New ODI Interface for Flat File to Flat File Transformations
To create a new interface, perform the following steps:
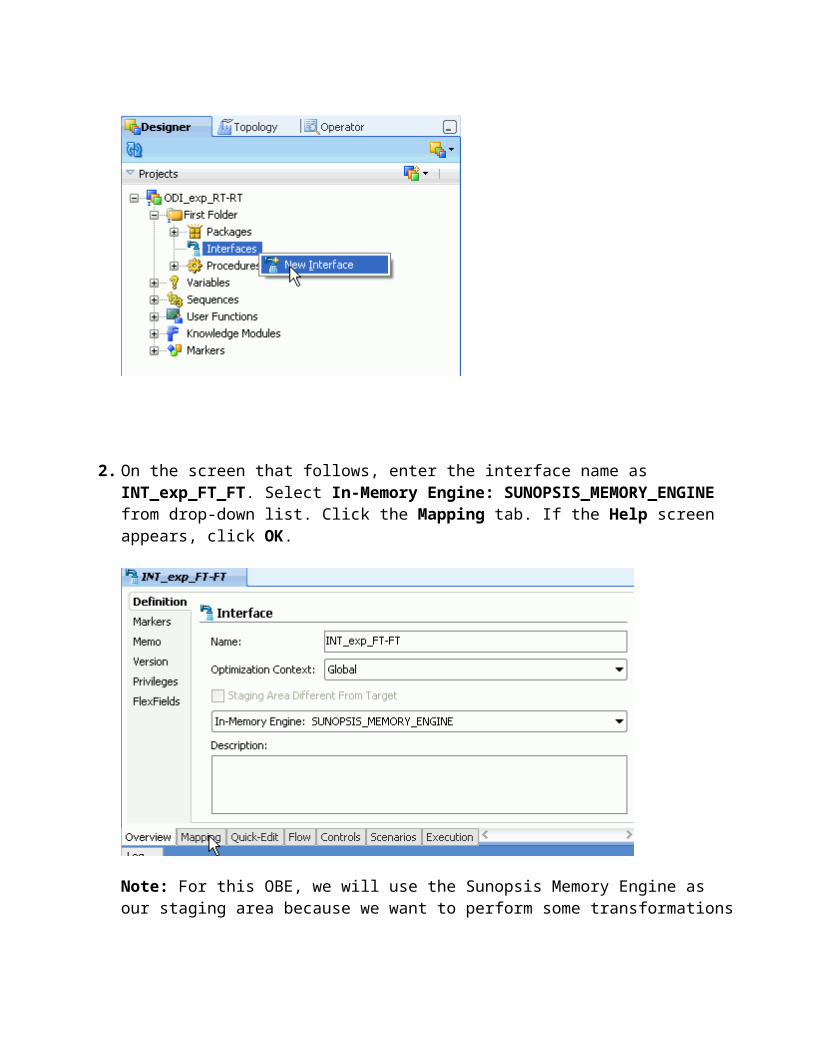
1. In ODI Designer, click the Projects tab. Expand your project ODI_exp_FT_FT, and then expand First Folder. Right-click Interfaces and select Insert Interface.
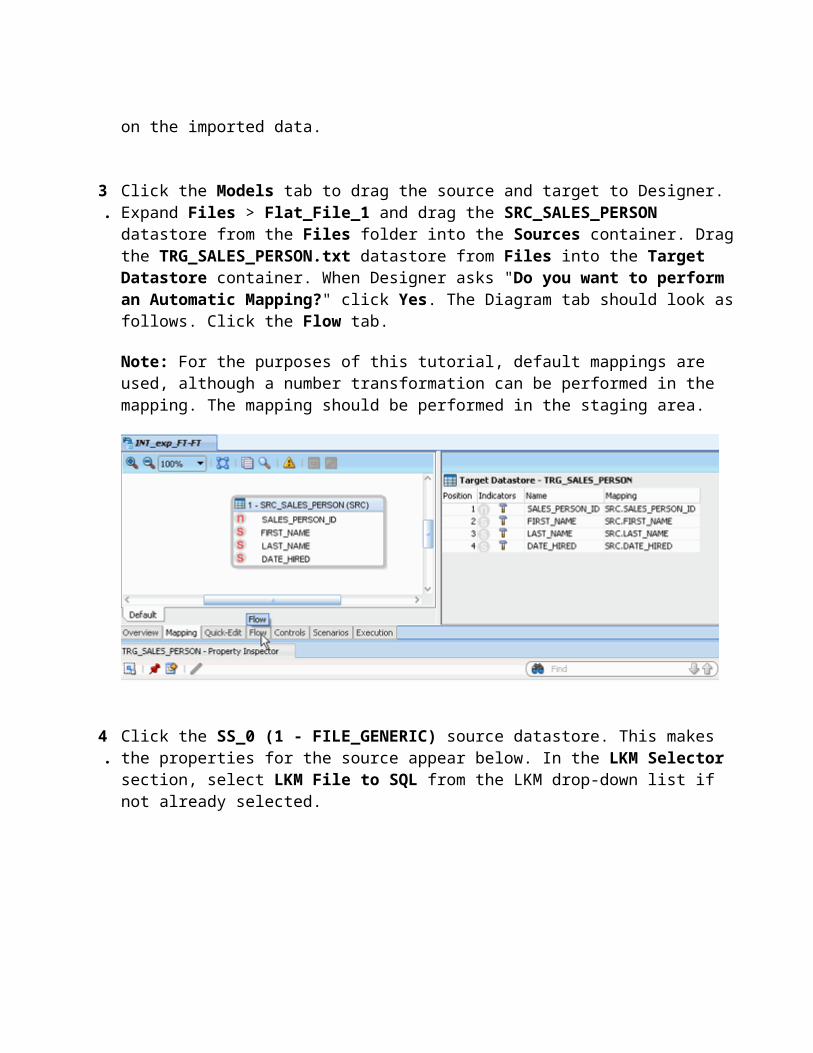
2. On the screen that follows, enter the interface name as INT_exp_FT_FT. Select In-Memory Engine: SUNOPSIS_MEMORY_ENGINE from drop-down list. Click the Mapping tab. If the Help screen appears, click OK.
Note: For this OBE, we will use the Sunopsis Memory Engine as our staging area because we want to perform some transformations on the imported data.
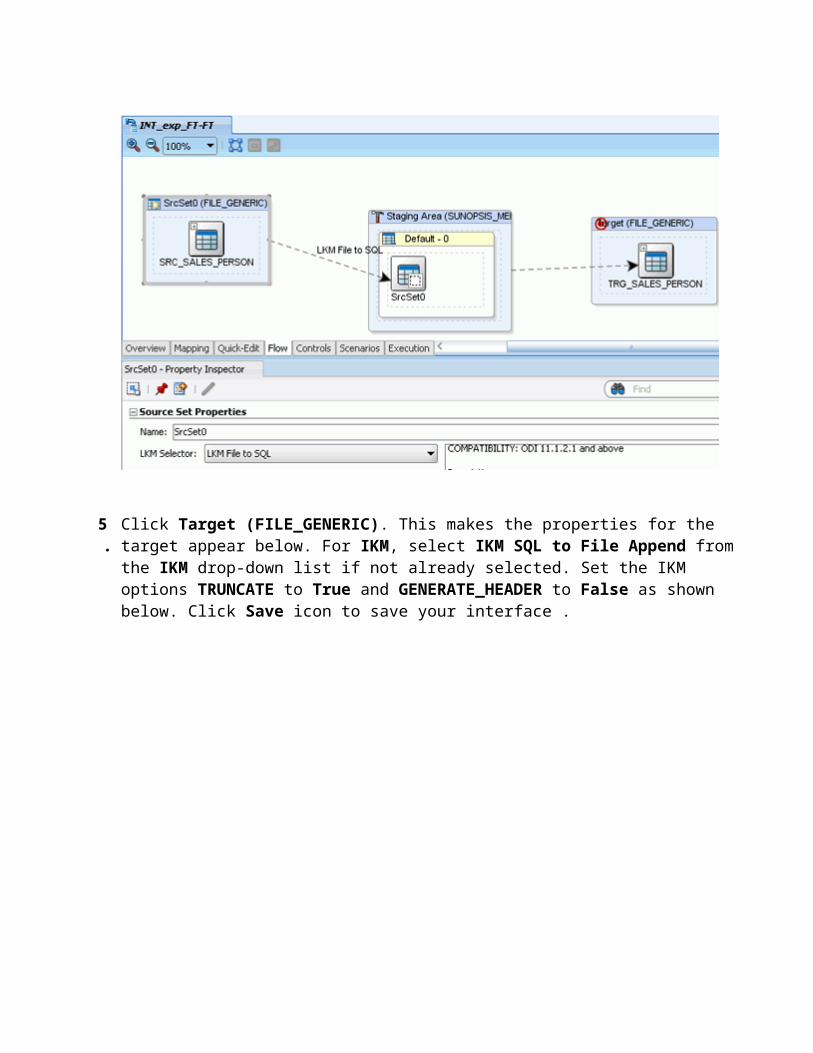
3 . Click the Models tab to drag the source and target to Designer. Expand Files > Flat_File_1 and drag the SRC_SALES_PERSON datastore from the Files folder into the Sources container. Drag the TRG_SALES_PERSON.txt datastore from Files into the Target Datastore container. When Designer asks "Do you want to perform an Automatic Mapping?" click Yes. The Diagram tab should look as follows. Click the Flow tab.
Note: For the purposes of this tutorial, default mappings are used, although a number transformation can be performed in the mapping. The mapping should be performed in the staging area.
4 . Click the SS_0 (1 - FILE_GENERIC) source datastore. This makes the properties for the source appear below. In the LKM Selector section, select LKM File to SQL from the LKM drop-down list if not already selected.
5 . Click Target (FILE_GENERIC). This makes the properties for the target appear below. For IKM, select IKM SQL to File Append from the IKM drop-down list if not already selected. Set the IKM options TRUNCATE to True and GENERATE_HEADER to False as shown below. Click Save icon to save your interface .
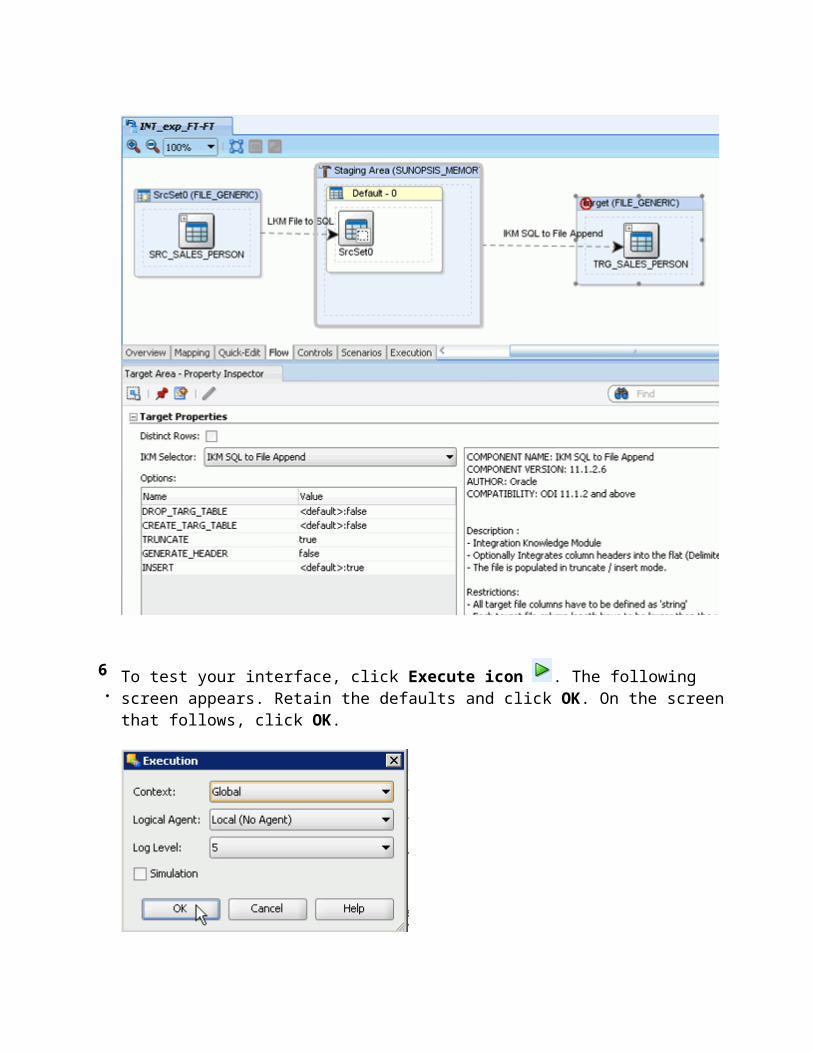
6 .To test your interface, click Execute icon . The following screen appears. Retain the defaults and click OK. On the screen that follows, click OK.
7 . To verify that your interface was executed successfully, you need to open ODI Operator. Click the ODI Operator tab. In ODI Operator, click Hierarchial Sessions. Expand Date > Today > INT_exp_FF_FF > Steps > INT_exp_FF_FF, and view the execution results for each step. Double-click any step and click the Description and Execution tabs to see the execution results. Double-click step 6. View the number of rows that are inserted into the target flat file. Click OK. Close the tabs.
Related Documents