ExamView Assessment Suite User Guide 9.0

Exam viewassessmentsuiteuserguide version 9
Aug 11, 2015
Welcome message from author
This document is posted to help you gain knowledge. Please leave a comment to let me know what you think about it! Share it to your friends and learn new things together.
Transcript

ExamView Assessment SuiteUser Guide9.0
ExamView Assessment Suite 2
© 2015 Turning Technologies, LLC. All rights reserved.
Portions Responsive Innovations, LLC, Microsoft Corporation
No part of this document may be reproduced or transmitted in any form or by any means, electronic or mechanical, for any purpose,without the express written permission of Turning Technologies, LLC. All rights reserved.
Turning Technologies, LLC, 255West Federal Street, Youngstown, OH 44503 USA.
TurningPoint® is a registered trademark of Turning Technologies, LLC. Other trademarked product names mentioned in this manualare owned by their respective companies.
The following regulatory statements apply to radio frequency and infrared transmitters and receivers mentioned in this manual,including the ResponseCard RF, ResponseCard RF LCD, ResponseCard IR, ResponseCard XR, ResponseCard NXT, QT Device,CPS IR, CPS Pulse, CPS Spark, Gen 2, PRS RF, PRS IR, DualBoard, Touch Board, Touch Board Plus, MeetingBoard, SchoolBoard,iPannel, Mobi, MobiView, MobiKWIK, Mobi Learner, Mobi 360 and their respective receivers.
FCC Statement
This device complies with part 15 of the FCC Rules. Operation is subject to the following two conditions: (1) This device may notcause harmful interference, and (2) this device must accept any interference received, including interference that may causeundesired operation.
Changes or modifications not expressly approved by the party responsible for compliance could void the user’s authority to operatethe equipment.
IC Statement
This device complies with Industry Canada licence-exempt RSS standard(s). Operation is subject to the following two conditions: (1)this device may not cause interference, and (2) this device must accept any interference, including interference that may causeundesired operation of the device.
Le présent appareil est conforme aux CNR d'Industrie Canada applicables aux appareils radio exempts de licence. L'exploitation estautorisée aux deux conditions suivantes : (1) l'appareil ne doit pas produire de brouillage, et (2) l'utilisateur de l'appareil doit acceptertout brouillage radioélectrique subi, même si le brouillage est susceptible d'en compromettre le fonctionnement.
turningtechnologies.com/user-guides
ExamView Assessment Suite 3
Table of ContentsTABLE OF CONTENTS 3
INTRODUCTION 5Technical Requirements 6Downloading the ExamView Assessment Suite Trial Software (PC Only) 6Installing the ExamView Assessment Suite Software 7
Welcome Screen 8
CREATE A TEST 9Creating a Test with the QuickTest Wizard 9
Building a New Test 9Customizing the Appearance of a Test 11Printing a Test 13Printing a Bubble Form (PC Only) 13
Publish or Export an Online Test 14Working with LearningManagement Systems 14Publishing a Test or Question Bank 14Exporting a Test or Question Bank 14
ENTER YOUR OWN QUESTIONS 15Question Bank Basics 15
A HANDS-ON TUTORIAL 18Copying and Pasting Questions 22Importing Questions from CPS Lessons (PC Only) 23Importing Questions from aWord Processor (PC Only) 23
WORKING WITH CLASSES AND ASSIGNMENTS 24Creating a New Class 24Manually Entering Student Names and IDs 24Importing a Class Roster Through theWizard (PC Only) 25Performing Advanced Import Mapping (PC Only) 27Importing a Class Roster from aCPS Database/Package 27Exporting a Class Roster as a Text File 28Exporting a Class Roster as a CPS Database/Package 28Creating a New Assignment 29Importing Assignments from aCPS Database 29Publishing Assignment Results 30Exporting Assignment Results 31Exporting Detailed Assignment Results 31Results from Scanners 31Getting Results from aDedicated OMR Scanner 32Getting Results from a Plain-Paper Scanner (PC Only) 33
turningtechnologies.com/user-guides
ExamView Assessment Suite 4
ONLINE TESTS ON YOUR LOCAL AREA NETWORK 35Preparing for Online Testing 35Creating anOnline (LAN) Test without a Roster 35Create anOnline (LAN) Test with a Roster 36
TAKE A TEST WITH THE TEST PLAYER 37Getting Started with the ExamView Test Player 37Taking a Test with the Test Player 37Getting Results from LAN Test 38
REPORTS 39Class Reports 39Student Reports 45Printing a Report 48Exporting Assignment Results 49
INTERNET (HTML) TESTS 50Publishing an Internet (HTML) Test 50Taking an Internet Test 51
CONTACT US 52
turningtechnologies.com/user-guides

ExamView Assessment Suite 5
IntroductionThe ExamView Assessment Suite (including the Test Generator, Test Manager and Test Player) is a comprehensive solutionfor creating, administering and scoring tests. The software includes many features to save you time and generate informationto assess and improve student performance.
Use the ExamView Test Generator to:
l Create a paper test in less than fiveminutes.l Print multiple versions of the same test.l Enter your own questions.l Prepare an online test, study guide or worksheet.l Upload question banks and tests to LearningManagement Systems (LMS) suchas ANGEL, Blackboard andWebCT.
Use the ExamView Test Manager to:
l Create or import a class roster.l Automatically score a paper test using a scanner.l Automatically score an assignment using CPS clickers.l Administer and score an online test.l Prepare a variety of useful class and student reports.
Your students use the ExamView Test Player to:
l Take study guides, quizzes and tests using a local area network.
turningtechnologies.com/user-guides
ExamView Assessment Suite 6
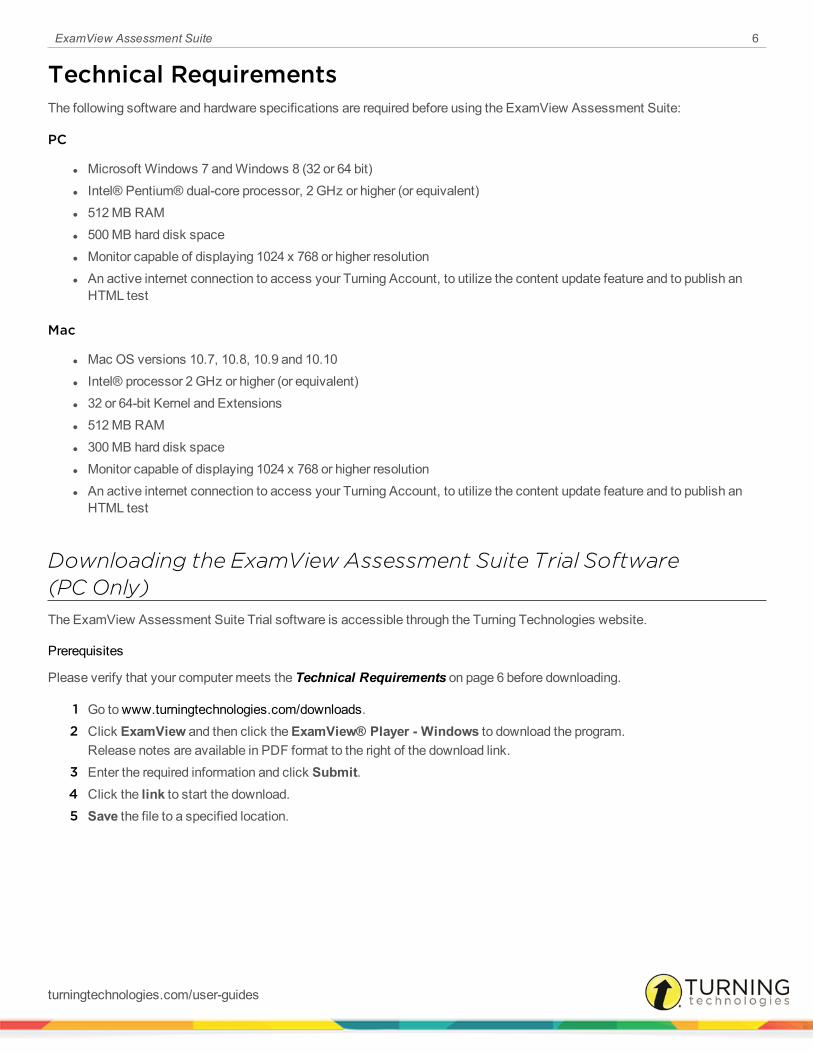
Technical RequirementsThe following software and hardware specifications are required before using the ExamView Assessment Suite:
PC
l Microsoft Windows 7 andWindows 8 (32 or 64 bit)l Intel® Pentium® dual-core processor, 2 GHz or higher (or equivalent)l 512MB RAMl 500MB hard disk spacel Monitor capable of displaying 1024 x 768 or higher resolutionl An active internet connection to access your Turning Account, to utilize the content update feature and to publish anHTML test
Mac
l Mac OS versions 10.7, 10.8, 10.9 and 10.10l Intel® processor 2 GHz or higher (or equivalent)l 32 or 64-bit Kernel and Extensionsl 512MB RAMl 300MB hard disk spacel Monitor capable of displaying 1024 x 768 or higher resolutionl An active internet connection to access your Turning Account, to utilize the content update feature and to publish anHTML test
Downloading the ExamView Assessment Suite Trial Software(PC Only)The ExamView Assessment Suite Trial software is accessible through the Turning Technologies website.
Prerequisites
Please verify that your computer meets the Technical Requirements on page 6 before downloading.
1 Go to www.turningtechnologies.com/downloads.2 Click ExamView and then click theExamView® Player - Windows to download the program.
Release notes are available in PDF format to the right of the download link.3 Enter the required information and click Submit.4 Click the link to start the download.5 Save the file to a specified location.
turningtechnologies.com/user-guides
ExamView Assessment Suite 7
Installing the ExamView Assessment Suite SoftwareThe ExamView Assessment Suite software includes the Test Generator, Test Manager and Test Player.
NOTEIf you received the ExamView Assessment Suite software from a publisher, the installerautomatically copies the publisher-supplied question banks to a new folder within the Banks folder.It may install an additional Publish folder for storing files that are needed for publishing questions tothe publisher-hosted server.
1 To install the program, follow the on-screen prompts.
NOTEThe program installs the program to these paths:PC - C:\Program Files\eInstruction\ExamView ORC:\Program Files (x86)\eInstruction\ExamViewMac - HD:\Applications\eInstruction\ExamView
Next Steps
The first time you open the software, you are prompted to enter your name, school/organization name, city and state. Thisinformation is used to help identify the files you create. Enter as much information as possible.Each time you open the ExamView Test Generator software, theWelcome screen is displayed.
turningtechnologies.com/user-guides
ExamView Assessment Suite 8
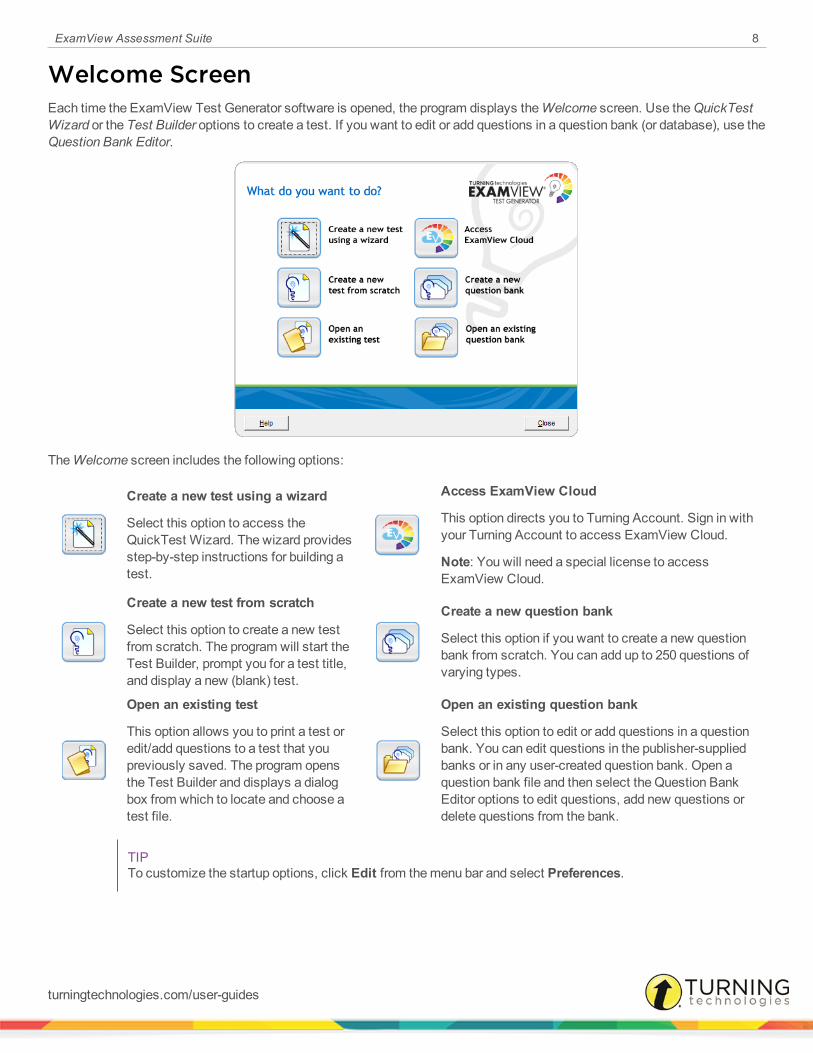
Welcome ScreenEach time the ExamView Test Generator software is opened, the program displays theWelcome screen. Use theQuickTestWizard or the Test Builder options to create a test. If you want to edit or add questions in a question bank (or database), use theQuestion Bank Editor.
TheWelcome screen includes the following options:
Create a new test using a wizard
Select this option to access theQuickTest Wizard. The wizard providesstep-by-step instructions for building atest.
Access ExamView Cloud
This option directs you to Turning Account. Sign in withyour Turning Account to access ExamView Cloud.
Note: You will need a special license to accessExamView Cloud.
Create a new test from scratch
Select this option to create a new testfrom scratch. The program will start theTest Builder, prompt you for a test title,and display a new (blank) test.
Create a new question bank
Select this option if you want to create a new questionbank from scratch. You can add up to 250 questions ofvarying types.
Open an existing test
This option allows you to print a test oredit/add questions to a test that youpreviously saved. The program opensthe Test Builder and displays a dialogbox from which to locate and choose atest file.
Open an existing question bank
Select this option to edit or add questions in a questionbank. You can edit questions in the publisher-suppliedbanks or in any user-created question bank. Open aquestion bank file and then select the Question BankEditor options to edit questions, add new questions ordelete questions from the bank.
TIPTo customize the startup options, click Edit from themenu bar and select Preferences.
turningtechnologies.com/user-guides
ExamView Assessment Suite 9
Create a TestThe ExamView Test Generator program provides all the tools you need to create a paper test or an online test from your ownquestions or from those provided by a publisher. You can use theQuickTest Wizard to select the questions for a test, or youcan use one or more of the other question selection options.
After you create or build a test, you can change the instructions, reorder the questions, change the layout, print the test, orpublish an online test.
Creating a Test with the QuickTest WizardTheQuickTest Wizard is the quickest and easiest way to create an ExamView test.
1 Click or select QuickTest Wizard from themenu bar.
If you just opened the program, select from theWelcome screen.2 Enter the Test title and click Next.3 Double-click a folder (if necessary) to display a list of question banks.4 Select the question banks from which you want to select questions and click Next.
Click the Folder icon to identify the location of the files if no question banks appear in the list. If you assigned apassword to the question bank, you will be prompted to enter the password before you can continue.
5 Identify how many questions of each type you want on the test and click Next.6 If prompted, enter the number of matching groups you want the wizard to use when it selects thematching questions
you requested.7 Review the test summary and then click Finish to complete the process.
When you click Finish, ExamView selects the questions based on your responses and displays them in the testdocument window.
Next Steps
After the program displays the test, you can edit/create questions, select additional questions, customize the appearance ofthe test, save your work, or print the test.
Building a New TestThe ExamView Test Generator offers several question selection options to create a new test. You can use theQuickTestWizard or one of the other six options. The option you choose depends on your particular needs. For example, you can selectquestions by viewing the actual questions and deciding which to include on your test. Or, you can select questions by learningobjective or standard.
1 Open ExamView Test Generator.A welcome screen with several options is displayed.
2 Select .You can also click from the Test Builder toolbar.
3 Name your test.
turningtechnologies.com/user-guides
ExamView Assessment Suite 10
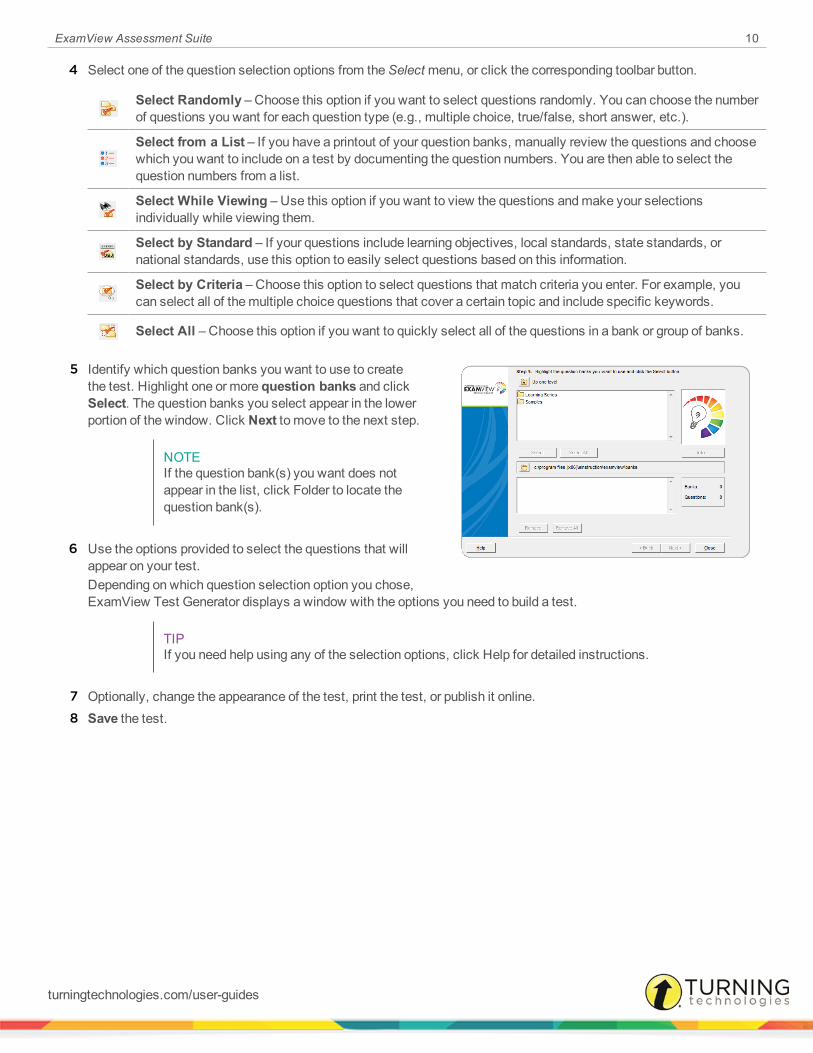
4 Select one of the question selection options from theSelectmenu, or click the corresponding toolbar button.
Select Randomly – Choose this option if you want to select questions randomly. You can choose the numberof questions you want for each question type (e.g., multiple choice, true/false, short answer, etc.).
Select from a List – If you have a printout of your question banks, manually review the questions and choosewhich you want to include on a test by documenting the question numbers. You are then able to select thequestion numbers from a list.
Select While Viewing – Use this option if you want to view the questions andmake your selectionsindividually while viewing them.
Select by Standard – If your questions include learning objectives, local standards, state standards, ornational standards, use this option to easily select questions based on this information.
Select by Criteria – Choose this option to select questions that match criteria you enter. For example, youcan select all of themultiple choice questions that cover a certain topic and include specific keywords.
Select All – Choose this option if you want to quickly select all of the questions in a bank or group of banks.
5 Identify which question banks you want to use to createthe test. Highlight one or more question banks and clickSelect. The question banks you select appear in the lowerportion of the window. Click Next to move to the next step.
NOTEIf the question bank(s) you want does notappear in the list, click Folder to locate thequestion bank(s).
6 Use the options provided to select the questions that willappear on your test.Depending on which question selection option you chose,ExamView Test Generator displays a window with the options you need to build a test.
TIPIf you need help using any of the selection options, click Help for detailed instructions.
7 Optionally, change the appearance of the test, print the test, or publish it online.8 Save the test.
turningtechnologies.com/user-guides

ExamView Assessment Suite 11
Customizing the Appearance of a TestThis section covers the following topics:
Printing a TestPrinting a Bubble Form (PC Only)
ExamView Test Generator includes numerous features that allow you to customize the appearance of a test to your exactspecifications. A few of themore popular options are listed here, but you can refer to the help topic Customizing theAppearance of a Test for a complete list.
Answer Space
Depending on how your students will complete the test, you can turn on or off space for answers. For example, if you want yourstudents to write the answers on the test next to each question, you can provide space to do so. If your students will be using abubble sheet or a separate piece of paper, you can show only the questions. Click Test from themenu bar and select Layout.Click theAnswers tab and set the corresponding options in theAnswer Space area.
NOTESome answer space options are disabled when tests are set to display in two-column format.
Mix Question Types
You can group questions on a test by question type (e.g., multiple choice, true/ false, etc.) or mix the question types. Whenquestions are grouped by question type, an instruction line describing how to answer questions of this type is displayed.
Often state tests do not group questions by question type. If you want to create a test that more closely resembles a state test,you canmix the question types. Click Test from themenu bar and select Layout. Click theQuestion Types tab and selectAllow question types to be mixed. Reorder the questions tomix the question types (see the Reordering Questions sectionthat appears below).
Two-Column Formatting;
You can display tests in one- or two-column format. Click Test from themenu bar and select Layout. Click thePage tab andselect Two Columns. Choose whether you would like vertical and horizontal lines included on your test.
Reordering Questions
Click Question from themenu bar and select Reorder; the questions to your liking. If your test is set to group questions byquestion type, your questions must remain grouped by question type when reordering. You cannot move a single true/falsequestion to a position after themultiple choice questions. Instead, youmust move the entire group of true/false questions.
NOTEYou canmanually reorder or scramble questions. Also, when you print a test, you can scramble thequestions.
If your test is set to allow for mixed question types, you can click Sort in the Reorder Questions dialog box to sort questionsby question criteria.
If you want to scramble the questions, click Question from themenu bar and select Scramble. From there, you can choose toscramble sections, questions, and the answer choices in multiple choice andmultiple response questions.
turningtechnologies.com/user-guides
ExamView Assessment Suite 12
Replace Font
If you want to change the font of your entire test, click Edit from themenu bar and select Replace Font. Select the fonts andsizes you want to use, and click Replace All. All questions in your test will instantly update with the newly selected fontchoices.
TIPIf you use the Replace Font option to replace a font, it is best to replace one font (e.g., Times NewRoman) with another (e.g., Arial). Do not choose to replace all fonts with another font. This couldcause unintended results such as replacing symbols or other special characters (e.g., Symbol).
Adjust Multiple Choice
You can instantly reduce the number of choices in all of your multiple choice questions. Click Question from themenu bar andselect Adjust Choices/Columns.
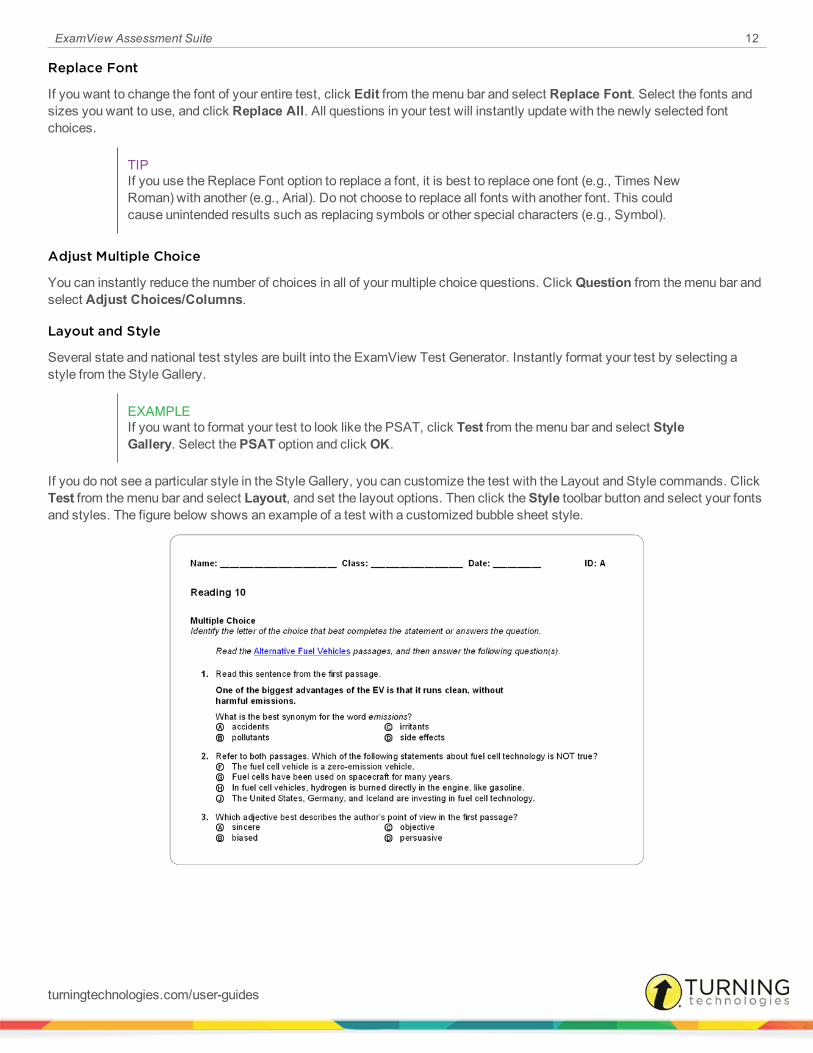
Layout and Style
Several state and national test styles are built into the ExamView Test Generator. Instantly format your test by selecting astyle from the Style Gallery.
EXAMPLEIf you want to format your test to look like the PSAT, click Test from themenu bar and select StyleGallery. Select thePSAT option and click OK.
If you do not see a particular style in the Style Gallery, you can customize the test with the Layout and Style commands. ClickTest from themenu bar and select Layout, and set the layout options. Then click theStyle toolbar button and select your fontsand styles. The figure below shows an example of a test with a customized bubble sheet style.
turningtechnologies.com/user-guides

ExamView Assessment Suite 13
Printing a TestWhen printing a test youmust select the number of versions to print as well as several scramble options. There are alsooptions for printing an answer strip and/or a versionmap (if applicable).
1 Click or click File and select Print Test.2 Specify the number of test versions to print (1-26).3 Select one or more of the scramble options: sections, questions,multiple choice/multiple response answer
choices or calculate new algorithm values.If you opt to scramble sections or questions, you can also choose to print a versionmap—a correlation chart to showyou how the test was scrambled.The calculate new algorithm values is only available for tests that contain dynamic questions.
4 Optionally, print an answer strip.5 Optionally, print a version map.6 Click OK to confirm your responses.7 In thePrint Test window, select entire test or selected pages and then click OK to print the test.
NOTEYou cannot print selected pages if you chose to print an answer strip or multiple versions of atest.
Printing a Bubble Form (PC Only)Bubble forms are available for printing from either the Test Generator or Test Manager application. These bubble forms arecompatible with the plain-paper scanning feature of the Test Manager. Refer to the Test Manager Help for details about thiscapability.
When printing the bubble form from ExamView Test Manager, you have the additional option of printing student andassignment information directly onto the form.
1 Click File and select Print Bubble Form.2 Select a form from the Form Name list.
A description of the selected bubble form is displayed in the area on the right.3 Click OK to print the selected bubble form.
turningtechnologies.com/user-guides
ExamView Assessment Suite 14
Publish or Export an Online TestExamView Test Generator enables you publish a test in a variety of online formats. Regardless of the online testing option youselect, the steps to build a test are the same as those you use to create a paper test.
Online testing options:
l Publish a test for use on your local area network (LAN).l Publish a test to a publisher’s website.l Export a test as an HTML document that you can post to your ownwebsite.l Publish a test directly to ANGEL orWebCT.l Export a test for use with ANGEL, Blackboard orWebCT.
The online testing format that you select depends on your specific needs. Refer to the other sections in this user guide for acomplete description of the various options. Detailed instructions are available to guide you through the process of publishingan online test.
Working with Learning Management SystemsExamView Assessment Suite works with LearningManagement Systems (LMSs) including ANGEL, Blackboard andWebCT.Tests and question banks can either be published directly or exported to a file format that can be uploaded to these LMSs.
Publishing a Test or Question Bank
1 Open ExamView Test Generator and create or open a test or question bank.2 Click File, mouse overPublish To and select the LMS.3 Select the LMS server profile and click OK.4 Complete the options in the dialog and click OK.5 Log in to your LMS to view the ExamView content.
Exporting a Test or Question Bank
1 Open ExamView Test Generator and create or open a test or question bank.2 Click File, mouse overExport and select the LMS.3 Name the file and click Save.4 Complete the options in the dialog and click OK.5 Log in to your LMS and upload the exported test/question bank.
turningtechnologies.com/user-guides

ExamView Assessment Suite 15
Enter Your Own QuestionsWhen you build a test using ExamView Test Generator, you select questions from question banks. A question bank (or bank)is a collection of questions and all of the related items (images, equations, learning objectives, standards, etc.) stored in onefile. Each question bank may contain up to 250 questions, but you can have an unlimited number of banks. Typically, questionsare organized into banks by chapter or lesson.
Using the ExamView Test Generator, you can:
l Enter new questions or edit existing questions.l Copy and paste questions from another source.l Using the ExamView Import Utility, import questions from anRTF file.
IMPORTANTYou can create a new question or edit a question while building a test. However, editing a questionafter it is included on a test does not change the original question in the question bank. Youmustedit or add new questions in a question bank tomake them available as you build tests.
Question Bank BasicsIf you have not used ExamView Test Generator to create your own questions, consider the information in this section beforeyou get started. For example, you can includemore information than just the question (e.g., answer, learning objective orstandard, student feedback, etc.).
Question Types
When you create your own questions, you can include one or more of the following question types:
True/False Yes/No Problem
Modified True/False Numeric Response Essay
Multiple Choice Completion Case
Multiple Response Matching Other
Bimodal Short Answer
NOTEA bimodal question can be displayed as a short answer or amultiple choice question on a test.
Question Information
Questions can include optional information that is useful when creating a test. For example, you can include learning objectives(or standards) and then select questions based on those objectives. You can also use this information to generate class andstudent reports. You can enter any or all of the following information with each question.
Difficulty State Standard Topic
Reference Local Standard Keywords
Learning Objective Miscellaneous Notes
National Standard
turningtechnologies.com/user-guides
ExamView Assessment Suite 16
NOTEUse the pipe ( | ) character to enter more than one data element in a given field such as a statestandard e.g., MA3-1.2 | MA4-1.
You can enter questionmetadata directly into the appropriate information field or add it using a list. To view the list, place thecursor in the information field of interest and then click . The default pick list is composed of question information alreadypresent in other questions in the currently open bank or test.
You can change the pick list so that the default list is merged with contents from an external list source. List files must conformto a specific formatting convention and be stored in the Extras folder of the ExamView directory.
NOTEYou can save commonmetadata information in a list file and then share or distribute the file tostandardize the entries by multiple authors.
To change the pick list source (PC Only)
1 Click to reveal amenu with available lists.2 Select a list file name orRestore Default.
The name of the List Source is displayed above the list. This source displays eitherDefault or the name of the list file.The default list contains only unique entries already recorded for questions in the active file.Selecting an external list file merges the entries of that file with the default list, it does not replace it. Entries for theexternal list file and the default list are combined and sorted together alphabetically.Only one file will be added to the default list at a time.If the external list file does not contain any entries for a particular category, the list will not appear to have changed.However, other categories that are contained in the external file will be updated.
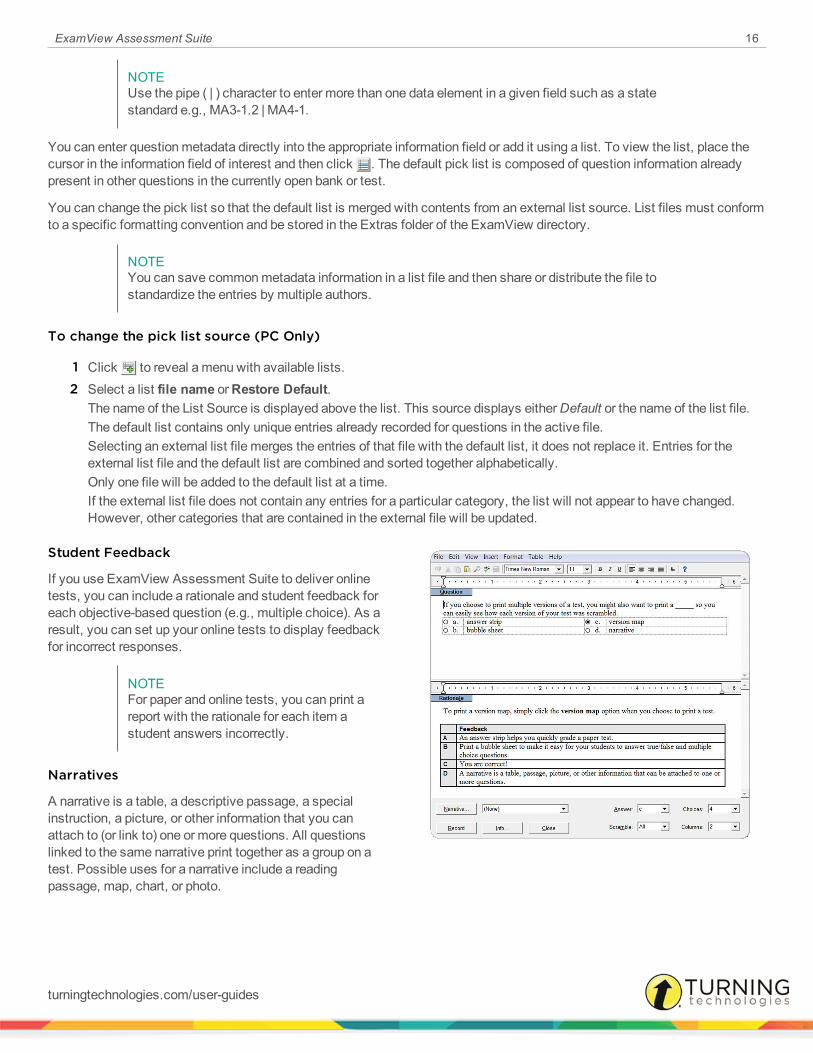
Student Feedback
If you use ExamView Assessment Suite to deliver onlinetests, you can include a rationale and student feedback foreach objective-based question (e.g., multiple choice). As aresult, you can set up your online tests to display feedbackfor incorrect responses.
NOTEFor paper and online tests, you can print areport with the rationale for each item astudent answers incorrectly.
Narratives
A narrative is a table, a descriptive passage, a specialinstruction, a picture, or other information that you canattach to (or link to) one or more questions. All questionslinked to the same narrative print together as a group on atest. Possible uses for a narrative include a readingpassage, map, chart, or photo.
turningtechnologies.com/user-guides

ExamView Assessment Suite 17
Images
You can easily insert an image (e.g., graph, map, photo, etc.) into a question or an answer. Or, you can copy and paste animage from another program. Whichever option you use, consider the size and readability of the image.
Color images and photos can use a lot of memory that, in turn, increase the size of the test or question bank file. For example,a single color photo can be 1-2MB. For paper tests, the size of an image is not that critical. However, the image size doesaffect online tests. Imagine students downloading a test via the internet that includes three or four photos. If you use colorimages, use the lowest possible resolution.
If you plan to include an image in a question, you should check the image for readability. Can you read the information on yourscreen and on paper? If you create your own art, use a larger font for text that appears as part of an image. For best results andsmaller file sizes, use black and white or 256-color images.
Other Issues
If you create your own questions or edit existing questions, consider these additional guidelines.
When you create your own questions
l Do not create questions that refer to another question or depend on a particular question order. Remember that you canscramble questions on a test. And if you randomly select questions, youmay not get the totality of the questionsneeded.
l Use tables, not tabs, if you need to create tabular material. Tables retain alignment, especially for online tests.l For PC, use standard fonts such as Times New Roman, Arial, Courier, Courier New, Wingdings and Symbol. For MAC,use standard fonts such as Times New Roman, Arial, Courier, Courier New, Geneva, Wingdings and Symbol.
l Formultiple choice andmultiple response questions, be sure to set the scramble options for questions that includechoices such as All of the above or None of the above. You would not want one of these choices to appear as choice aor b.
l ExamView Test Generator automatically includes instructions for each question type.
NOTEQuestion type instructions are not displayed when tests are set to allow for mixed questiontypes.
l For questions that require specific instructions, add the instruction line to the question stem or within a narrative.l Questions that contain wide images, tables, or equations will not display in two-column format. If you plan to formatyour test with two columns, try to keep your images to roughly three inches or smaller in width.
turningtechnologies.com/user-guides
ExamView Assessment Suite 18
A Hands-on TutorialThis section provides a tutorial that will guide you step-by-step through the entire process to create a question bank using theExamView Test Generator. This tutorial explains how to create a variety of question types, save the bank, use a narrative,insert art, enter question information and print a question bank.
Create a New Question Bank
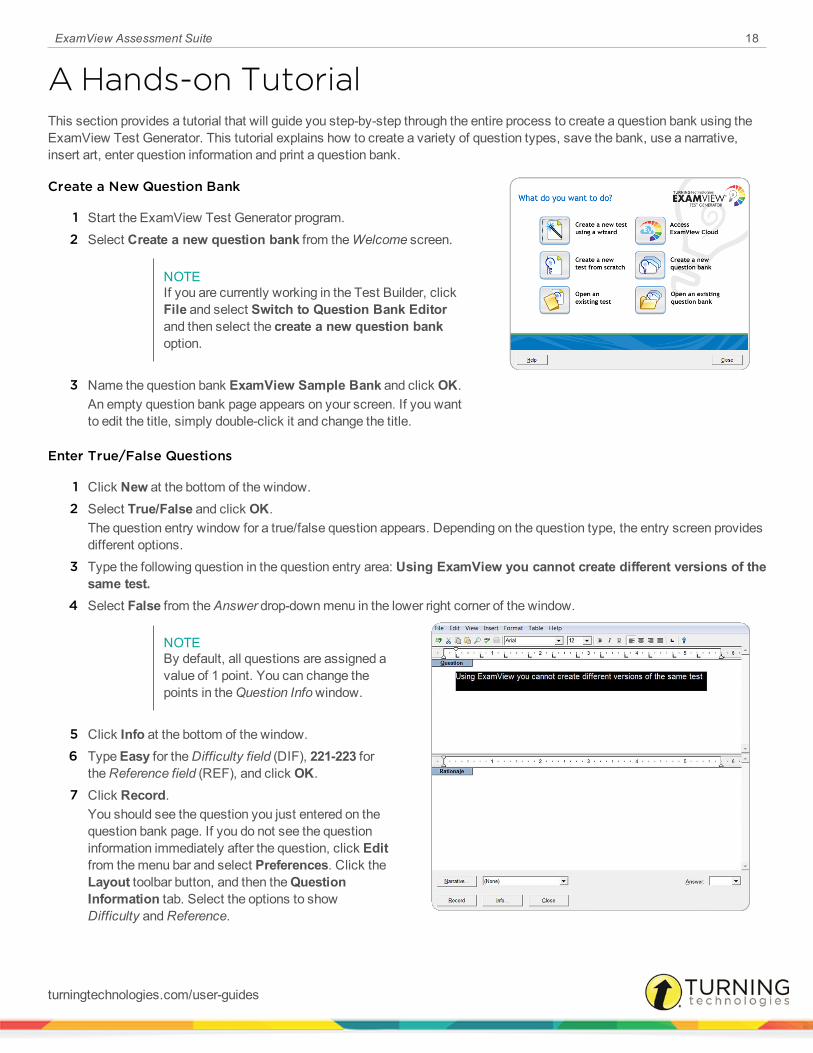
1 Start the ExamView Test Generator program.2 Select Create a new question bank from theWelcome screen.
NOTEIf you are currently working in the Test Builder, clickFile and select Switch to Question Bank Editorand then select the create a new question bankoption.
3 Name the question bank ExamView Sample Bank and click OK.An empty question bank page appears on your screen. If you wantto edit the title, simply double-click it and change the title.
Enter True/False Questions
1 Click New at the bottom of the window.2 Select True/False and click OK.
The question entry window for a true/false question appears. Depending on the question type, the entry screen providesdifferent options.
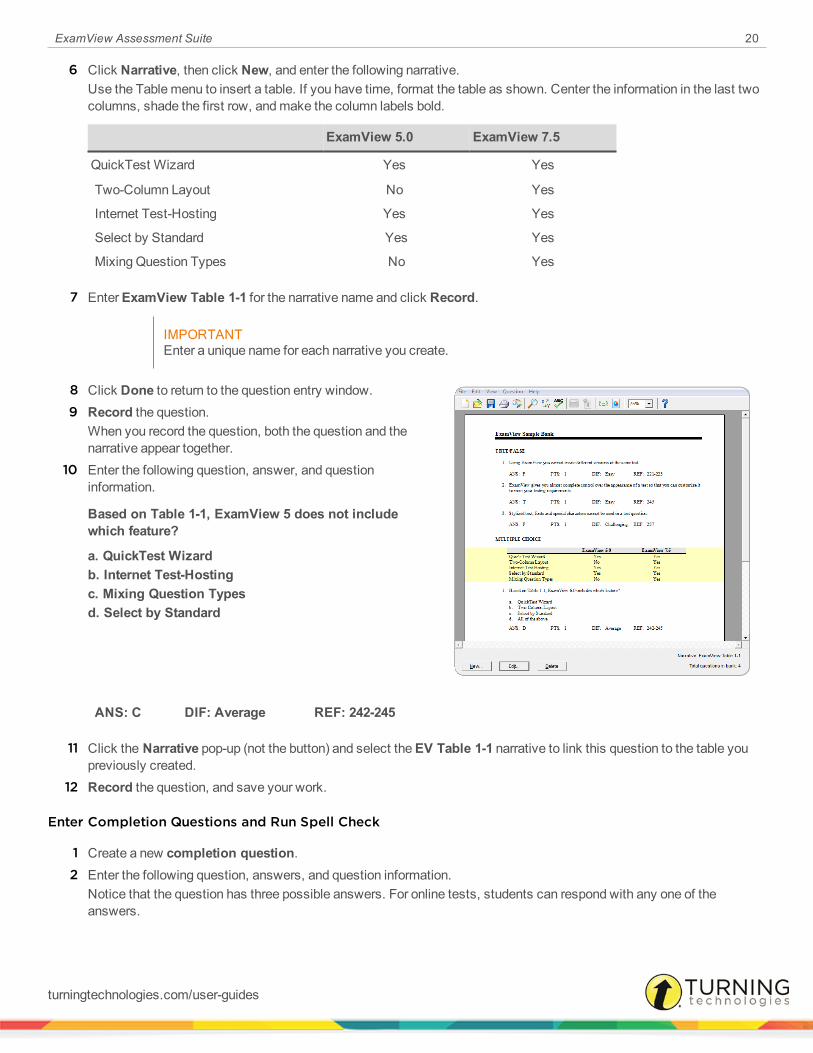
3 Type the following question in the question entry area: Using ExamView you cannot create different versions of thesame test.
4 Select False from theAnswer drop-downmenu in the lower right corner of the window.
NOTEBy default, all questions are assigned avalue of 1 point. You can change thepoints in theQuestion Infowindow.
5 Click Info at the bottom of the window.6 TypeEasy for theDifficulty field (DIF), 221-223 for
theReference field (REF), and click OK.7 Click Record.
You should see the question you just entered on thequestion bank page. If you do not see the questioninformation immediately after the question, click Editfrom themenu bar and select Preferences. Click theLayout toolbar button, and then theQuestionInformation tab. Select the options to showDifficulty andReference.
turningtechnologies.com/user-guides

ExamView Assessment Suite 19
8 Proofread the question. If you need tomake any changes, double-click the question. Or, highlight it and click Edit at thebottom of the window.
9 Create twomore true/false questions using the following information.
ExamView gives you almost complete control over the appearance of a test so that you can customize it tomeet your testing requirements.
ANS: T DIF: Easy REF: 245
Stylized text, fonts, and special characters cannot be used in a test question.
ANS: F DIF: Challenging REF: 237
Save the Question Bank
1 Proofread your work andmake any changes as needed.2 Click File from themenu bar and select Save.
TIPBe sure to save your question bank on a regular basis. From time to time, make a backup ofyour files.
3 Enter a question bank file name, select a locationwhere you want to save the file and click Save.4 Close the program, or continue with the next part of this tutorial.
Create Multiple Choice Questions with a Narrative
1 If necessary, start the program and open the question bank you just created for this tutorial.2 Click New and select amultiple choice question.
TIPYou can also press Ctrl+N (Windows) or Cmd+N (Mac) to create a new question. Or, clickQuestion and select New.
3 Enter the following question, answer, and question information.
Based on Table 1-1, ExamView 6.0 includes which feature?
a. QuickTest Wizardb. Two-Column Layoutc. Select by Standardd. All of the above
ANS: D DIF: Average REF: 242-245
4 Set the answer to d.5 Select a-c in theScramble box to scramble choices a-c only when you create a test, and set 1 for the columns.
turningtechnologies.com/user-guides
ExamView Assessment Suite 20
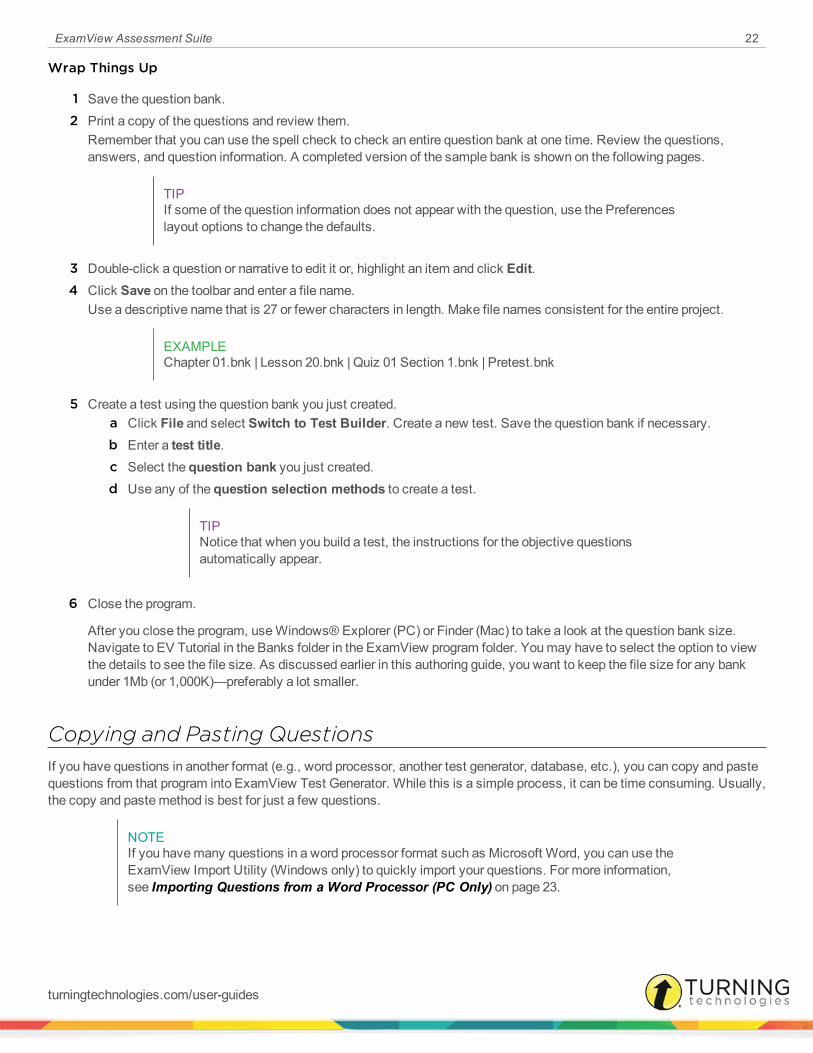
6 Click Narrative, then click New, and enter the following narrative.Use the Tablemenu to insert a table. If you have time, format the table as shown. Center the information in the last twocolumns, shade the first row, andmake the column labels bold.
ExamView 5.0 ExamView 7.5
QuickTest Wizard Yes Yes
Two-Column Layout No Yes
Internet Test-Hosting Yes Yes
Select by Standard Yes Yes
Mixing Question Types No Yes
7 EnterExamView Table 1-1 for the narrative name and click Record.
IMPORTANTEnter a unique name for each narrative you create.
8 Click Done to return to the question entry window.9 Record the question.
When you record the question, both the question and thenarrative appear together.
10 Enter the following question, answer, and questioninformation.
Based on Table 1-1, ExamView 5 does not includewhich feature?
a. QuickTest Wizardb. Internet Test-Hostingc. Mixing Question Typesd. Select by Standard
ANS: C DIF: Average REF: 242-245
11 Click the Narrative pop-up (not the button) and select theEV Table 1-1 narrative to link this question to the table youpreviously created.
12 Record the question, and save your work.
Enter Completion Questions and Run Spell Check
1 Create a new completion question.2 Enter the following question, answers, and question information.
Notice that the question has three possible answers. For online tests, students can respond with any one of theanswers.
turningtechnologies.com/user-guides
ExamView Assessment Suite 21
TIPUse the Shift key and hyphen to create the space to write an answer.
ExamView is a computer ____________________ that allows you to build paper and online tests.
ANS:programapplicationtool
DIF: Average REF: 247
3 Enter the next question, answer, and question information.
Use the online ____________________ whenever you need additional instructions to use ExamView.
ANS: help DIF: Easy REF: 251
4 After you record the question, click Edit from themenu bar and select Spell Check.5 Save your work.
Create a Short Answer Question with a Picture
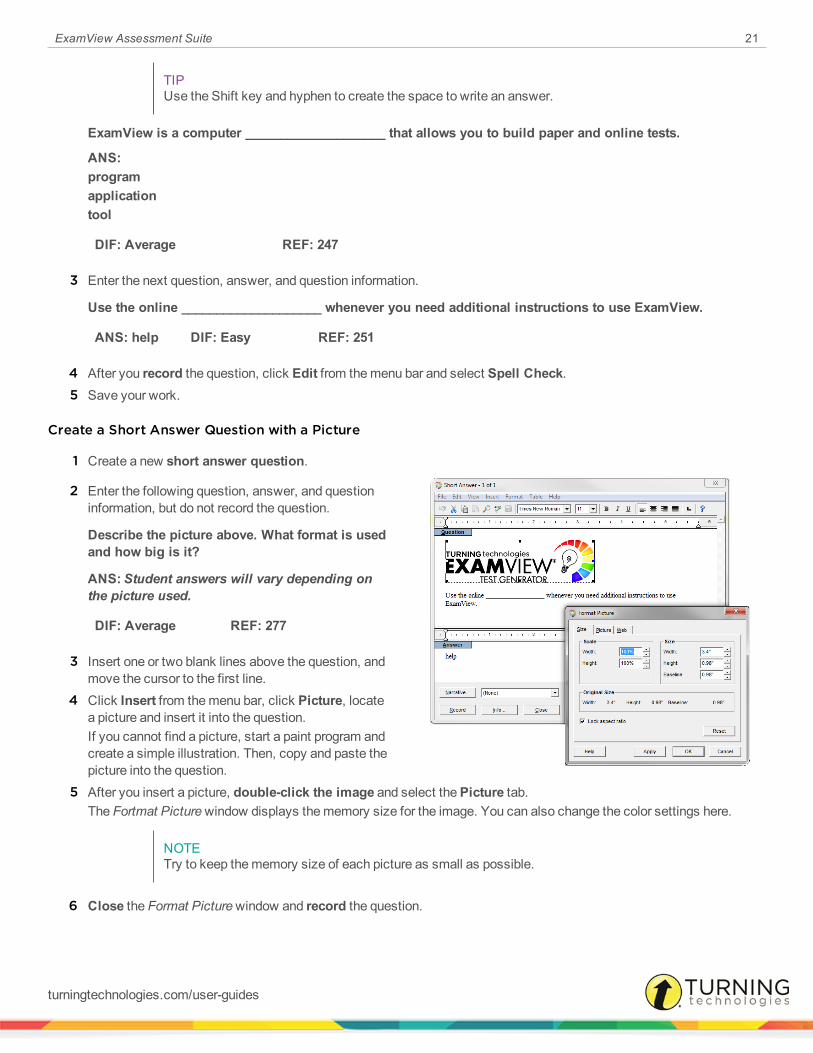
1 Create a new short answer question.
2 Enter the following question, answer, and questioninformation, but do not record the question.
Describe the picture above. What format is usedand how big is it?
ANS:Student answers will vary depending onthe picture used.
DIF: Average REF: 277
3 Insert one or two blank lines above the question, andmove the cursor to the first line.
4 Click Insert from themenu bar, click Picture, locatea picture and insert it into the question.If you cannot find a picture, start a paint program andcreate a simple illustration. Then, copy and paste thepicture into the question.
5 After you insert a picture, double-click the image and select thePicture tab.The Fortmat Picturewindow displays thememory size for the image. You can also change the color settings here.
NOTETry to keep thememory size of each picture as small as possible.
6 Close the Format Picturewindow and record the question.
turningtechnologies.com/user-guides
ExamView Assessment Suite 22
Wrap Things Up
1 Save the question bank.2 Print a copy of the questions and review them.
Remember that you can use the spell check to check an entire question bank at one time. Review the questions,answers, and question information. A completed version of the sample bank is shown on the following pages.
TIPIf some of the question information does not appear with the question, use the Preferenceslayout options to change the defaults.
3 Double-click a question or narrative to edit it or, highlight an item and click Edit.4 Click Save on the toolbar and enter a file name.
Use a descriptive name that is 27 or fewer characters in length. Make file names consistent for the entire project.
EXAMPLEChapter 01.bnk | Lesson 20.bnk | Quiz 01 Section 1.bnk | Pretest.bnk
5 Create a test using the question bank you just created.a Click File and select Switch to Test Builder. Create a new test. Save the question bank if necessary.b Enter a test title.c Select the question bank you just created.d Use any of the question selection methods to create a test.
TIPNotice that when you build a test, the instructions for the objective questionsautomatically appear.
6 Close the program.
After you close the program, useWindows® Explorer (PC) or Finder (Mac) to take a look at the question bank size.Navigate to EV Tutorial in the Banks folder in the ExamView program folder. Youmay have to select the option to viewthe details to see the file size. As discussed earlier in this authoring guide, you want to keep the file size for any bankunder 1Mb (or 1,000K)—preferably a lot smaller.
Copying and Pasting QuestionsIf you have questions in another format (e.g., word processor, another test generator, database, etc.), you can copy and pastequestions from that program into ExamView Test Generator. While this is a simple process, it can be time consuming. Usually,the copy and pastemethod is best for just a few questions.
NOTEIf you havemany questions in a word processor format such as Microsoft Word, you can use theExamView Import Utility (Windows only) to quickly import your questions. For more information,see Importing Questions from a Word Processor (PC Only) on page 23.
turningtechnologies.com/user-guides
ExamView Assessment Suite 23
1 Create a new question in a question bank or a test.2 Highlight and copy the text (e.g., from your word processor) that you want to paste into a question.3 Switch to the ExamView Test Generator question entry window.4 Paste the text into the question.
TIPDepending on the question type, youmay have to copy and paste the question separatelyfrom the answer. However, you can quickly copy/pastemultiple choice andmultipleresponse questions. Using the SmartPaste option, you can automatically copy the choicesinto the appropriate places within the question entry window.To use SmartPaste, highlight an entire multiple choice or multiple response questionincluding the choices (a. b. c. d. e.) in your word processor and select Copy. Switch to thequestion entry window and press F7 (not Ctrl/Cmd+V or Paste).
Importing Questions fromCPS Lessons (PC Only)If you have all or most of your questions in a Classroom Performance System (CPS) database, you can easily import yourCPS lessons into ExamView Test Generator. The program includes step-by-step instructions that explain how to import yourquestions.
NOTEYou can only import a single lesson at a time.
1 Open ExamView Test Generator in either the Test Builder or Question Bank Editor mode.2 Click File from themenu bar, mouse over Import and select CPS Lesson.
A file selection window appears.3 Select theCPS file that contains the lesson to import and click Open.
The Import CPS Lessonwindow appears. The window displays the lesson file tree structure from the CPS file.4 Select the lesson and click OK to complete the import.
Importing Questions from aWord Processor (PC Only)If you have all or most of your questions in a word processor format such as Microsoft Word, you can use ExamView ImportUtility (installed with the other ExamView Assessment Suite programs, forWindows only) to import your questions intoExamView Test Generator format very quickly. The program includes step-by-step instructions that explain how to import yourquestions.
turningtechnologies.com/user-guides

ExamView Assessment Suite 24
Working with Classes and AssignmentsExamView Test Manager provides the features you need to track results for paper and online tests. To begin, create a newclass. Then, manually enter the student information or import a roster from another format such as your gradebook. Follow thesteps in the appropriate section to create a new class and enter your roster.
IMPORTANTYou do not have to create a new class if you do not plan to track student results or give onlinetests.
Creating a New ClassBefore you enter student information, youmust create a new class. Enter information about your class (e.g., class name, classID, period, and section) and yourself (name, ID, school name, school ID, city, and state). Only a few fields are required, whilefields such as Password and School ID are optional.
1 Open ExamView Test Manager and select .If you are already working in the ExamView Test Manager, save the current class, click File from themenu bar andselect New Class or click .
2 Enter the class name.3 Optionally, enter other class information, such as aClass ID, Period, Section, andPassword.
NOTEYou can change your class information at any time by selecting the Class Information optionfrom the Edit menu or by double clicking on your class information.
4 To edit the class preferences, click Preferences .5 Enter your name, the school name, city, and state.6 Optionally, enter your Instructor ID andSchool ID.7 Click OK to record the class information.
Manually Entering Student Names and IDsAfter you create a new class, the next step is to enter student information. At aminimum, youmust enter each student’s nameand assign an ID. Youmay also enter an alias, password and device ID. ExamView Test Manager provides an option to showthe alias instead of the name and ID on reports. You can assign a unique password to each student to use when taking anonline (LAN) test and a device ID to collect assessment data using clickers.
ExamView Test Manager allows you to generate reports using optional demographic information such as gender, socio-economic factors, race and custom fields (e.g., instructor, location, etc.). Click More in the New Student window to display thedata entry fields to record this information.
NOTEA single class may contain up to 1000 students.
turningtechnologies.com/user-guides

ExamView Assessment Suite 25
1 Before creating students, youmust create or open a class in which to create the students.
2 Click Student from themenu bar and select Add New Student or click .3 Enter the student's first name, last name and student ID.
The program allows you to enter duplicate student names in a class roster. However, theStudent ID field must beunique for each student.If you plan to use a scanner to collect results, use digits (0-9) only for the student ID. Most scanner forms only providefor numeric IDs. ExamView's plain-paper scanning forms support a maximum of 10 digits for the ID.
NOTEThe Student Alias, Password, and Device ID fields are optional. Click More to viewadditional student fields.
4 If you wish to add additional students, click Next. If you are finished adding students, click OK.
Importing a Class Roster Through theWizard (PC Only)The Import Class RosterWizard is a three-step process that allows advanced import mapping of a text file to the TestManager's Student Information.
1 Step 1:a Set the row number to start importing student roster
records.l Use the Preview window to view the first 10rows of the text file. The row numbers areincluded in the preview.
l Many text rosters contain headerinformation, a row of labels for each datacolumn. Do not import the header row.
l If the desired import starting point is morethan 10 rows into file, it is recommended thatyou delete the unnecessary rows from thefile prior to import.
b Indicate how the student names are formatted inthe text file by selecting the appropriate radiobutton.
c Click Next.
turningtechnologies.com/user-guides

ExamView Assessment Suite 26
2 Step 2:a Drag the names of field that you want to import from
the text file to the target boxes next to thecorresponding Test Manager field name. Fieldnames not dragged into a target box will not beimported.
l Student name and Student ID fields arerequired for import, all other fields areoptional.
l Student IDs must be unique for the record tosuccessfully import. If a duplicate ID isfound in the existing class or within the textfile, that record will not be imported. A statusmessage at the end of the import processwill report if any records were skipped andhow many were skipped.
l Field names can be dragged tomore than one target box. For example, the student's last name can bemapped to both Last Name and Password.
b Use the arrow buttons to advance or reverse the contents being previewed.The preview is updated in both the Source Text Fields list and in the import target boxes. This is a useful tool forverifying that the desired import data is mapped to the proper Test Manager category.
c Click Next.
3 Step 3:a Value restricted fields correspond to check boxes in
the Student Information dialog and requireadditional text mapping to indicate which check boxshould be selected. Value restricted fields flaggedfor import will display either a check mark orwarning icon next to their name. To ensuresuccessful import of all the desired data, advancedfield mapping should be performed until no warningicons are displayed. Click Edit Mapping to performthis step.
l Value restricted fields not flagged for importwill have the Edit Mapping button disabled.
l Youmay continue with the import processand ignore the warnings, but values that arenot mapped to a check box will be ignoredwhen imported.
b If flagged for import, select the format for the date of birth data using the drop-down list.l Only digits can be used to indicatemonth (M), day (D), and year (Y) values. So dates cannot use stringssuch as "August" or "Aug." for themonth.
l Digits can be contiguous (e.g. MMDDYYYY) or separated by slashes (e.g. MM/DD/YYYY), dashes (e.g.MM-DD-YYYY) or spaces (e.g. MM DD YYYY).
l Year values can be specified using four digits or just the last two digits.
c Click Finish. A message appears asking if you want to save the import definition profile.
turningtechnologies.com/user-guides
ExamView Assessment Suite 27
d Click Yes to save the import definition profile, click No to continue to import without saving the profile, or clickCancel to return to the wizard.
l After the import process is complete, amessage appears displaying the number of student recordssuccessfully added and the number of records that were skipped.
l Much of the student demographic information is presented as a series of check boxes. These valuerestricted fields include: Gender, Grade Level, Sociological/Economic, Race/Ethnicity, andOther. If anyof these categories are flagged for import, additional mapping will need to be performed to associate textterms with each check box.
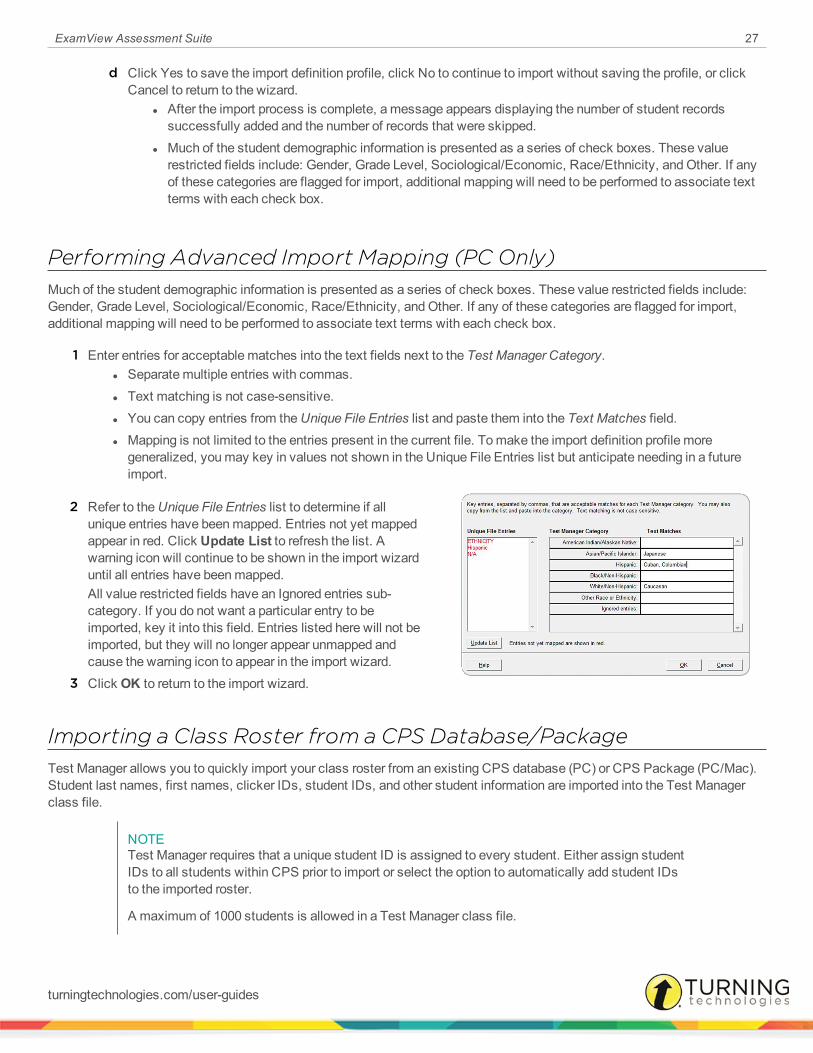
Performing Advanced Import Mapping (PC Only)Much of the student demographic information is presented as a series of check boxes. These value restricted fields include:Gender, Grade Level, Sociological/Economic, Race/Ethnicity, andOther. If any of these categories are flagged for import,additional mapping will need to be performed to associate text terms with each check box.
1 Enter entries for acceptable matches into the text fields next to the Test Manager Category.l Separatemultiple entries with commas.l Text matching is not case-sensitive.l You can copy entries from theUnique File Entries list and paste them into the Text Matches field.l Mapping is not limited to the entries present in the current file. Tomake the import definition profile moregeneralized, youmay key in values not shown in the Unique File Entries list but anticipate needing in a futureimport.
2 Refer to theUnique File Entries list to determine if allunique entries have beenmapped. Entries not yet mappedappear in red. Click Update List to refresh the list. Awarning icon will continue to be shown in the import wizarduntil all entries have beenmapped.All value restricted fields have an Ignored entries sub-category. If you do not want a particular entry to beimported, key it into this field. Entries listed here will not beimported, but they will no longer appear unmapped andcause the warning icon to appear in the import wizard.
3 Click OK to return to the import wizard.
Importing a Class Roster from a CPS Database/PackageTest Manager allows you to quickly import your class roster from an existing CPS database (PC) or CPS Package (PC/Mac).Student last names, first names, clicker IDs, student IDs, and other student information are imported into the Test Managerclass file.
NOTETest Manager requires that a unique student ID is assigned to every student. Either assign studentIDs to all students within CPS prior to import or select the option to automatically add student IDsto the imported roster.
A maximum of 1000 students is allowed in a Test Manager class file.
turningtechnologies.com/user-guides
ExamView Assessment Suite 28
1 Open or create a class in Test Manager.2 PC: Click File from themenu bar, mouse over Import and select Class Roster from CPS Database.
Mac: Click File from themenu bar, mouse over Import and select Class Roster from CPS Package.
3 Select theCPS database (CPS file) and click Open.4 If more than one roster is detected in the database file, a list will open showing the roster names and number of students
in each roster. Select the roster to import and click OK.5 The roster is imported and a summary of the number of imported student records is displayed. Click OK.
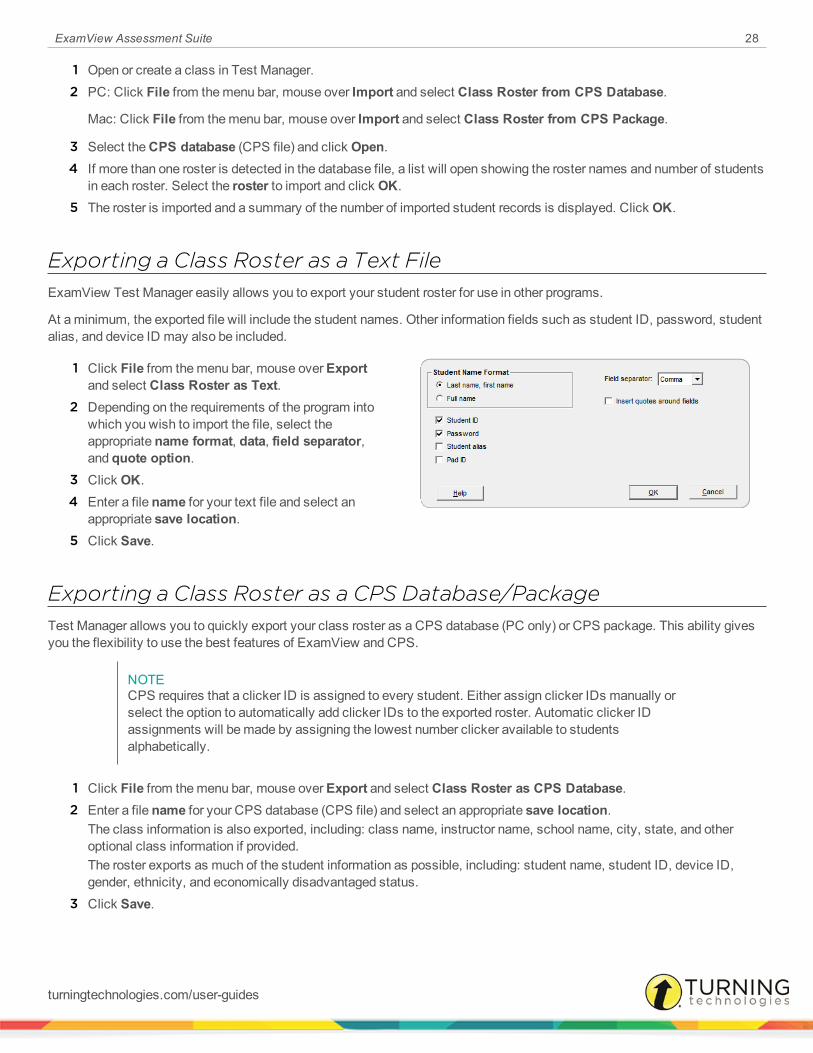
Exporting a Class Roster as a Text FileExamView Test Manager easily allows you to export your student roster for use in other programs.
At aminimum, the exported file will include the student names. Other information fields such as student ID, password, studentalias, and device ID may also be included.
1 Click File from themenu bar, mouse overExportand select Class Roster as Text.
2 Depending on the requirements of the program intowhich you wish to import the file, select theappropriate name format, data, field separator,and quote option.
3 Click OK.4 Enter a file name for your text file and select an
appropriate save location.5 Click Save.
Exporting a Class Roster as a CPS Database/PackageTest Manager allows you to quickly export your class roster as a CPS database (PC only) or CPS package. This ability givesyou the flexibility to use the best features of ExamView and CPS.
NOTECPS requires that a clicker ID is assigned to every student. Either assign clicker IDs manually orselect the option to automatically add clicker IDs to the exported roster. Automatic clicker IDassignments will bemade by assigning the lowest number clicker available to studentsalphabetically.
1 Click File from themenu bar, mouse overExport and select Class Roster as CPS Database.2 Enter a file name for your CPS database (CPS file) and select an appropriate save location.
The class information is also exported, including: class name, instructor name, school name, city, state, and otheroptional class information if provided.The roster exports as much of the student information as possible, including: student name, student ID, device ID,gender, ethnicity, and economically disadvantaged status.
3 Click Save.
turningtechnologies.com/user-guides
ExamView Assessment Suite 29
Creating a New AssignmentBefore you can score a test, youmust first build it using ExamView Test Generator and then create an assignment inExamView Test Manager. When you create the assignment, ExamView Test Manager automatically opens the test file andreads the following information for each question (if available): answer, reference, learning objective, local standard, statestandard, national standard, and points.
1 Use ExamView Test Generator to build a test.
Automated scoringmethods such as scanning or response device transmission only work with objective questionssuch as multiple choice and true/false. If your test includes open-ended questions such as short answer or essay, youmust manually score those questions and record the points.
NOTEIf you plan to administer multiple (scrambled) versions of a test, create one version, print it,and then save the file. Scramble the test to create the next version, print it, and save the test.For each unique test, youmust create a separate assignment.
2 Open ExamView Test Manager and open your class.
NOTEA single class may contain up to 200 assignments.
3 Click Assignment from themenu bar and select Create New Assignment or click .4 Enter the assignment name, category, term and date.5 Select thePaper test scored manually, with a scanner, or with clickers option and click Next.6 Select the test file (with a TST extension) that you created in step 1 above.
This allows ExamView Test Manager to read in the answer key, point values, etc. If necessary, navigate to theappropriate folder to access the test file. You can click Preview Test to make sure that you are selecting the correcttest.
7 Review the summary information and click Back if you need tomake any changes.
After you create the assignment, it appears in the ExamView Test Manager work area.
8 Click Finishwhen all of the options are set as desired.
Importing Assignments from a CPS DatabaseImporting assignments from CPS brings in data that includes student responses, points earned, correct answers, difficultylevel, and standards associated with the questions in the CPS session data. Even if the CPS session data is collected from anExamView source, imported questions cannot be viewed from within Test Manager. Aside from this limitation, importedassignments appear identical to ExamView-created assignments and can be analyzed using Test Manager's reporting tools.
NOTEStudent records arematched to the Test Manager roster based on student ID alone. First name,last name, and device IDs are not compared.
turningtechnologies.com/user-guides
ExamView Assessment Suite 30
1 UseCPS to collect session data to be used as an ExamView assignment. Save the database as a CPS file (PC) orexport it as a CXM file (Mac).
2 Open ExamView Test Manager and open the class containing the roster that matches the CPS database roster.3 Click File from the Test Manager menu bar, mouse over Import and select Assignments from CPS Database. The
Select CPS Databasewindow is displayed.
NOTEEach assignment can contain amaximum of 250 questions. CPS session data that exceedthis limit will only import the first 250 questions.
4 Navigate to the CPS database file and click Open. The Import Assignments from CPS Databasewindow appears.5 Select the session data to be imported, and click Next.
a First select the CPS class roster that corresponds to the Test Manager class roster. The session dataassociated with this class roster is listed below.
b Once the roster is verified, select some or all of the session data listed. Each session data listing that is selectedis imported into Test Manager as a separate assignment.
6 Assign point values, then click Next.CPS assigns equal point values for all questions within a session. By default, this value is 1 point per question. Adifferent per question point valuemay be entered for each assignment.Individual question point values can be changed after the assignment is imported by editing the assignment information.
7 Review the summary information. Click Finish to accept the imported assignments into Test Manager.
Things to keep in mind:
l CPS assigns equal point values for all questions within a session. By default, this value is 1 point per question. Adifferent point valuemay be entered for each assignment.
l Individual question point values can be changed after the assignment is imported by editing the assignment information.l Student records arematched to the ExamView Test Manager roster based on Student ID alone. First name, last name,and device IDs are not compared.
l Each assignment can contain amaximum of 250 questions. CPS session data that exceed this limit will only import thefirst 250 questions.
Publishing Assignment ResultsExamView Test Manager allows you to share assignment results with LearningManagement Systems (LMS) by eitherpublishing directly or exporting to a file format that can be uploaded. These features give you the flexibility to collect andanalyze assignment results in ExamView Test Manager and then post them online to your LMS.
1 Open ExamView Test Manager and open or create a class file with at least one assignment.2 Click File from themenu bar, mouse overPublish To and select the target LMS.3 Select the LMS server profile and click OK.4 Complete the options in the dialog and click OK.5 Log in to your LMS grade book to view the ExamView assignment results.
turningtechnologies.com/user-guides

ExamView Assessment Suite 31
Exporting Assignment Results
1 Open ExamView Test Manager and open or create a class file with at least one assignment.2 Click File from themenu bar, mouse overExport and select the target LMS.3 Complete the export dialog options and click OK to export the assignment results.4 Select the locationwhere you want to save the exported file, enter a file name, and click Save.
The results are saved as a CSV file.5 Log in to your LMS and upload the exported assignment results.
Exporting Detailed Assignment ResultsIn addition to supporting formats for uploading into various LMS platforms, a Detailed Results as Text option allows anassignment to be exported with information about individual questions (not simply overall scores) as well as exporting studentdemographic information (not just name and ID). This export feature is useful for bringing assignments into other grade book ordata analysis solutions.
Prerequisites
At least one assignment must already exist in the class file
1 Open ExamView Test Manager and open or create a classfile with at least one assignment.
2 Click File from themenu bar, mouse overExport andselect Detailed Results as Text.The export dialog opens.
3 Complete the export dialog options and click OK to exportthe detailed assignment results.
4 Select the save location, enter a file name, and clickSave.The results are saved as a CSV file.
5 Login to your LMS and upload the exported assignment results.
Results from ScannersExamView Test Manager currently supports a variety of scanner models and forms that allow you to collect studentassignment results. Visit the eInstruction by Turning Technologies website (www.turningtechnologies.com) to get themost up-to-date list of ExamView supported scanners and form options.
This section covers the following topics:
Getting Results from a Dedicated OMR ScannerGetting Results from a Plain-Paper Scanner (PC Only)
turningtechnologies.com/user-guides
ExamView Assessment Suite 32
Getting Results from a Dedicated OMR ScannerThe following OMR scanners and forms are currently supported and appear as options in the Get Results from Scanner dialogeven if the hardware is not available.
AppersonScanner: Advantage 1200Forms: 2850, 2851, 2854Website: www.appersonedu.com
Pearson/NCSScanner: EZDataForms: 258936, 258937, 259402, 259404, 259405Website: www.scantron.com
1 From theGet Results from Scanner dialog, select theOMR scanner from the drop-down list box. The option toPrintcorrect answers on scanner sheet is only enabled if it is a feature supported by the selected scanner model.
2 Select the connection port to which the scanner is connected, or click Detect Scanner to automatically set the port.3 Select the form used from the drop-down list box. The list of available forms will change depending upon the selected
scanner model.4 Set the beginning question number and click Next.
TIPYou can use the same forms for several assignments. For example, you can administer andscan a quiz with 10 questions. For the next quiz, set the beginning question number to 11 andhave your students fill in the bubbles for questions 11-20.
5 Click Start Scanning to activate the scanning session.
NOTEVerify that the scanner is connected properly before you try to scan the forms. If you havetrouble with the scanner, view the Troubleshooting section of this help file. If you are stillhaving problems, contact the scanner manufacturer for support.
6 Scan the forms.If the student ID on the form does not match an ID in your class roster, the program allows you to select the studentfrom your roster.
7 Click Finish to accept the scores and return to the gradebook.l Youmay include up to 100 objective questions on a test. If you havemore that 100 questions, divide the test intotwo parts and create separate assignments.
l Place the objective questions at the beginning of the test and number the questions consecutively (e.g., multiplechoice 1-25, true/false 26-40, etc.).
l If you have problem with a form, you canmake corrections and then re-scan it. If necessary, you canmanuallyenter the points earned.
l You can includematching questions on a scanned test, but you are limited to the number of choices available onthe selected bubble form. Check the form that you intend to use to be sure that the number of answer choicesmatches your test questions. Or, you can includematching questions with more choices and score themmanually.
l The software allows you to get results for an assignment frommultiple sources. For example, you couldadminister a paper test to part of the class and an online test to homebound students.
l You can scan forms inmultiple sessions.
turningtechnologies.com/user-guides

ExamView Assessment Suite 33
l If there are problems with a student’s form—such as missing responses, multiple responses, answer out ofrange (e.g., entering an E if only A-D valid)—an asterisk ( * ) appears next to that student’s name. Click StopScanning, highlight the student name, and click Edit. You can change the response for any item. Click StartScanning to continue.
Apperson Advantage 1200 Notes:
l If the scanner becomes unresponsive, click Stop Scanning, press Reset Options (located on the scanner), and thenclick Start Scanning. If that does not solve the problem, cancel the scanning process. Turn the scanner off; turn thescanner on; and attempt to scan the forms again.
l The Apperson scanner prints the percentage score on the scanner form. For tests with only objective questions all set to1 point, the score will be correct. If your test includes open-ended questions, the score printed on the form will not reflectthe open-ended questions. Unfortunately, there is no way to disable printing. However, you can remove the printcartridges.
Scantron EZData Notes:
l If the status light turns an orange color, contact themanufacturer for assistance. A problemmay occur if there is aconflict between the scanner and another hardware device.
l If you notice that the information is regularly misreading student responses, follow themanufacturer’s guidelines forcleaning the scanner.
Getting Results from a Plain-Paper Scanner (PC Only)Plain-paper scanning allows you to print bubble forms using an ordinary laser printer, pre-print assignment and studentinformation on the forms, and scan the results using a TWAIN-compliant image scanner. Because forms can be printed on-demand on standard sheets of paper, plain-paper scanning provides great flexibility, convenience, and cost savings overdedicated OMR scanning. Additionally, the hardware required for plain-paper scanning can be used for other purposes.
Plain-paper scanning reads the students’ responses for each question, stores this information for each student, andautomatically calculates their score based on the point values assigned to the questions.
Properly installed image scanners that are TWAIN compliant will automatically populate the list of available scanners in theGet Results from Scanner dialog. Some scanners will appear in the list because their TWAIN drivers have been installed onthe computer, even if the hardware is no longer connected.
1 Start ExamView Test Manager and open the class.2 Select (highlight) the assignment to be scored.
3 Click , or click Assignment from themenu bar and select Get Results from Scanner.4 Select the desired scanner from the drop-down list.
A separate entry will appear for every imaging device with TWAIN drivers installed on the computer. Some scannermanufacturers will install multiple drivers for a scanner, somultiple entries will appear in the list for a single scanner. Tryto select the entry for the scanner that is most appropriate for themodel and connection of your scanner. Refer to theTroubleshooting section for additional details.
turningtechnologies.com/user-guides
ExamView Assessment Suite 34
TIPWith plain-paper scanning, there is no need to specify a form and an assignment does nothave to be answered using the same form for all students. For example, you can administer a50 questionmultiple choice test with most of the class using form ei50AE, but give studentswith special needs form ei50AE Jr. There is no need to sort the forms or specify which formsare being used. The form information is automatically read in from each sheet as it isscanned.
5 Set the beginning question number and click Next.
TIPTo save paper, you can use the same forms for several assignments. For example, you canadminister and scan a quiz with 10 questions. For the next quiz, set the beginning questionnumber to 11 and have your students fill in the bubbles for questions 11-20.
6 Load the forms into the scanner ADF tray or flatbed.Forms may be rotated 180° from each other but must be placed with the image sides properly facing the scanningsurface. Verify that the orientation of the image face of the forms matches the direction specified by the scannermanufacturer.
7 Click Start Scanning to initiate scanning.8 Scan the forms.
If the student ID on the form does not match an ID in your class roster, the program gives you the option to select thestudent from your roster.
9 Click Finish to accept the scores and return to the gradebook.
Things to keep in mind:
l Verify that the scanner is connected properly before you try to scan the forms. If you have trouble with the scanner, viewthe Troubleshooting section of this help file. If you are still having problems, contact the scanner manufacturer forsupport.
l If you havemore questions than can be accommodated on a form, divide the test into two parts and create separateassignments.
l Place the objective questions at the beginning of the test and number the questions consecutively (e.g., multiple choice1-25, true/false 26-40, etc.).
l If you have problem with a form, you canmake corrections and then re-scan it. If necessary, you canmanually enter thepoints earned.
l You can includematching questions on a scanned test, but you are limited to the number of choices available on theselected bubble form. Check the form that you intend to use to be sure that the number of answer choices matches yourtest questions. Or, you can includematching questions with more choices and score themmanually.
l The software allows you to get results for an assignment frommultiple sources. For example, you could administer apaper test to part of the class and an online test to homebound students.
l You can scan forms inmultiple sessions.l If there are problems with a student’s form—such as missing responses, multiple responses, answer out of range (e.g.,entering an E if only A-D valid)—an asterisk ( * ) will appear next to that student’s name. Click Stop Scanning, highlightthe student name, and click Edit. You can change the response for any item. Click Start Scanning to continue.
turningtechnologies.com/user-guides
ExamView Assessment Suite 35
Online Tests on Your Local Area NetworkThe ExamView Assessment Suite includes all of the tools you need to create and administer online tests on your local areanetwork (LAN). Use the online testing features to save time grading tests and generate the information to improve studentperformance.
You can create online tests that anyone can take using your local area network (LAN), or you can assign a roster to an onlinetest.
EXAMPLEYou can use ExamView Test Generator to create self-grading practice tests (or study guides) thatprovide feedback for incorrect responses. You can also use this testing option to administerchapter tests, quizzes, benchmark tests, homework, and worksheets. Then, use ExamView TestManager to get results from an online test and produce reports.
Preparing for Online Testing
Prerequisites
Before students can take tests using your local area network (LAN), youmust prepare for online testing.
1 Talk to your network administrator to secure space on your local area network to put the online tests.
You and your students both need read/write (full) access to the network folder.
2 Ask your network administrator to install ExamView Test Player on your network and to place a shortcut on eachworkstation to access the program. Or, you can install the player program on each computer.
(PC only) Advanced: As a best practice, you can create a shortcut for the program and set the target properties toinclude the following options. For example, set the target to c:\examview\evpro.exe /nobrowse.
/nobrowse turns off the option for students to change the path (or location) of the tests.
/noprefs directs the program not to write the preferences to the local computer.
/testpath= allows you to set the default path for the tests.
3 Start ExamView Test Generator, click Edit from themenu bar and select Preferences and click the Files toolbarbutton. Set the default online (LAN) path to the location on the network.
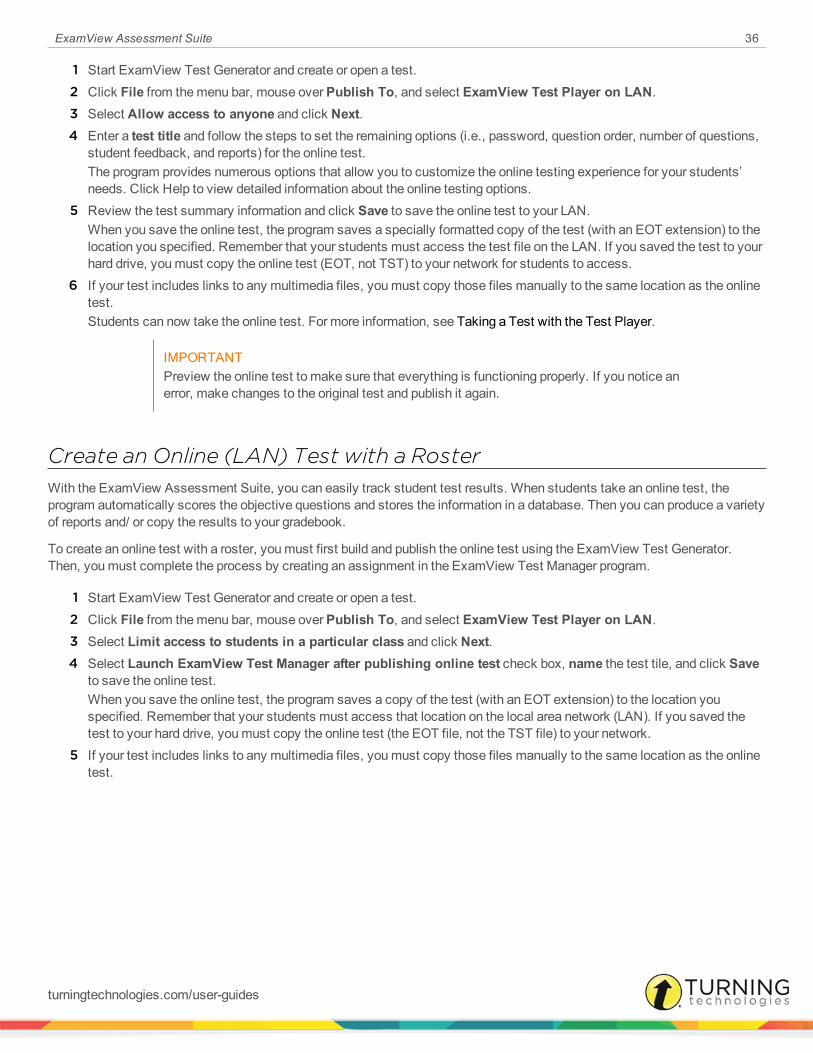
Creating an Online (LAN) Test without a RosterYou can publish an online test with or without a roster for your students to take on your local area network (LAN). If you publisha test without a roster, the program automatically scores the test. Anyonemay take the test; however, the results are onlyavailable immediately after a student completes a test.
IMPORTANTNo results are stored in ExamView Test Manager, and you will not be able to prepare anystudent/class reports.
turningtechnologies.com/user-guides
ExamView Assessment Suite 36
1 Start ExamView Test Generator and create or open a test.2 Click File from themenu bar, mouse overPublish To, and select ExamView Test Player on LAN.3 Select Allow access to anyone and click Next.4 Enter a test title and follow the steps to set the remaining options (i.e., password, question order, number of questions,
student feedback, and reports) for the online test.The program provides numerous options that allow you to customize the online testing experience for your students’needs. Click Help to view detailed information about the online testing options.
5 Review the test summary information and click Save to save the online test to your LAN.When you save the online test, the program saves a specially formatted copy of the test (with an EOT extension) to thelocation you specified. Remember that your students must access the test file on the LAN. If you saved the test to yourhard drive, youmust copy the online test (EOT, not TST) to your network for students to access.
6 If your test includes links to any multimedia files, youmust copy those files manually to the same location as the onlinetest.Students can now take the online test. For more information, see Taking a Test with the Test Player.
IMPORTANTPreview the online test to make sure that everything is functioning properly. If you notice anerror, make changes to the original test and publish it again.
Create an Online (LAN) Test with a RosterWith the ExamView Assessment Suite, you can easily track student test results. When students take an online test, theprogram automatically scores the objective questions and stores the information in a database. Then you can produce a varietyof reports and/ or copy the results to your gradebook.
To create an online test with a roster, youmust first build and publish the online test using the ExamView Test Generator.Then, youmust complete the process by creating an assignment in the ExamView Test Manager program.
1 Start ExamView Test Generator and create or open a test.2 Click File from themenu bar, mouse overPublish To, and select ExamView Test Player on LAN.3 Select Limit access to students in a particular class and click Next.4 Select Launch ExamView Test Manager after publishing online test check box, name the test tile, and click Save
to save the online test.When you save the online test, the program saves a copy of the test (with an EOT extension) to the location youspecified. Remember that your students must access that location on the local area network (LAN). If you saved thetest to your hard drive, youmust copy the online test (the EOT file, not the TST file) to your network.
5 If your test includes links to any multimedia files, youmust copy those files manually to the same location as the onlinetest.
turningtechnologies.com/user-guides

ExamView Assessment Suite 37
Take a Test with the Test PlayerFor tests that you administer on your local area network (LAN), students must use the ExamView Test Player to take the test.Before your students can take the test, make sure that the program is installed on your network and that students haveread/write (full) access to the folder where the test is located.
You can include any question type (multiple choice, true/false, numeric response, completion, essay, etc.) on an online test.The program automatically scores any objective (e.g., multiple choice, completion, or numeric response questions.) Youmustmanually score any open-ended (e.g., essay) questions.
Getting Started with the ExamView Test Player
1 Enter your name and ID, and click Next.Verify that you entered the information correctly or the test you wish to takemay not appear in the list of available tests.If you do not know your ID number, consult your instructor.
2 Select a test and click Next.If no tests appear in the list, click the Folder button and identify where the tests are located. Ask your instructor if youneed assistance with this step.
3 If prompted, enter a password.If you do not know your password, consult your instructor.
4 Review the summary information and click Startwhen you are ready to begin.
NOTEIf you are resuming a test you had started in a previous session, you will automaticallycontinue where you left off. Answers and timer settings are automatically loaded with thetest.
Taking a Test with the Test Player
1 Answer the first question.Themethod for answering questions will vary depending on the question type.
2 Move to the next question and answer it.Repeat this step to answer all of the remaining questions. You can skip a question and come back to it later ifnecessary. Use theGo ToQuestion button to see which questions you have not answered.
NOTEYoumay be able to check your work depending on how your instructor configured the test. Ifa question has amultimedia link, you can play amovie, watch an animation, or listen to anaudio segment.
3 When you are finished with the test, click Test from themenu bar and select End Test, or click End.Depending on how your instructor configured the test, youmay be given the option to save your answers and completethe test at a later time. Select the appropriate option and click OK.
4 Depending on how your instructor configured the test, youmay be shown an end-of-test report. To print the report, clickFile from themenu bar and select Print, click Print, or use the keyboard shortcut Ctrl+P (PC) orCmd+P (Mac).
turningtechnologies.com/user-guides

ExamView Assessment Suite 38
ExamView Test Player prints the complete report or selected pages. The information on the report varies based on theinstructor’s configurations. Also, your instructor may choose to disable the print option.
5 To take another test, click File from themenu bar and select New or click New.Once you complete a test, you can choose to take another test or you can close the program. If you choose to takeanother test, youmust register again.
6 To close the program, click File from themenu bar and select Exit (PC) or click theExamView Test Playermenu andselect Quit ExamView Test Player (Mac) or click Exit.
Getting Results from LAN TestAfter your students take an online test using ExamView Test Player, the next step is to get the results into ExamView TestManager. When you perform this step, the program reads the results and stores the data in the class record. If your testincludes open-ended questions, you need tomanually score those questions and assign the point values using the Edit Scoresoption.
1 Select (highlight) theassignment for which youwant to get results.
2 Click Assignment from themenu bar and select GetResults from LAN Test orclick the toolbar icon.The program automaticallylocates the online test file(EOT) and reads the resultsfrom it. If youmoved the file,youmust locate it.
3 If your test included open-ended questions or you needto change a student’s score,select the assignment, clickAssignment from themenubar and select Edit Scores.The window displays how your students answered each question and the points earned. For open-ended questions,select a question. The student’s response appears for your review. Read the response and enter the points earned.Click Next to move to the open-ended question for the next student. You can change the points earned for any otherquestion too.
NOTEStudent results are stored only for online tests that you assigned to a class. If you create atest with the ExamView Test Generator and choose the Allow access to anyone option,results will not be read by the ExamView Test Manager software.
turningtechnologies.com/user-guides

ExamView Assessment Suite 39
Reports
ExamView Test Manager enables you to prepare numerous reports based on your students’ assignment results data. You canprint a report for a single assignment, a group or all assignments. You can also customize a report to include selected studentsfiltered by various criteria. Many of the reports include useful graphs and charts.
Use ExamView Test Manager to generate the following class and reports:
Class Reports Student Reports
Assignment Results Assignment Results
Class Assignment Summary Assignment Review
Open-Ended Responses Worksheet Student Progress Report
Item Analysis Summary Learning Focus
Item Remediation Summary Performance Summary
Class Roster
Learning Focus
Performance Summary
Class Performance Progress Chart
For each report, you can control what information is displayed by selecting the various reporting options. Using the filter option,you can generate reports for selected students or groups that match the criteria you set.
Class ReportsExamView Test Manager provides numerous reports to help you understand and evaluate your students’ performance.Depending on your needs, youmay prepare one or more of the class reports to provide useful performance data that allows youto assess your class as a whole and then determine appropriate strategies to achieve the learning objectives/standards. Witheach report, you can control numerous reporting options to customize the report as desired. This section includes a briefoverview and a sample of each class report.
turningtechnologies.com/user-guides
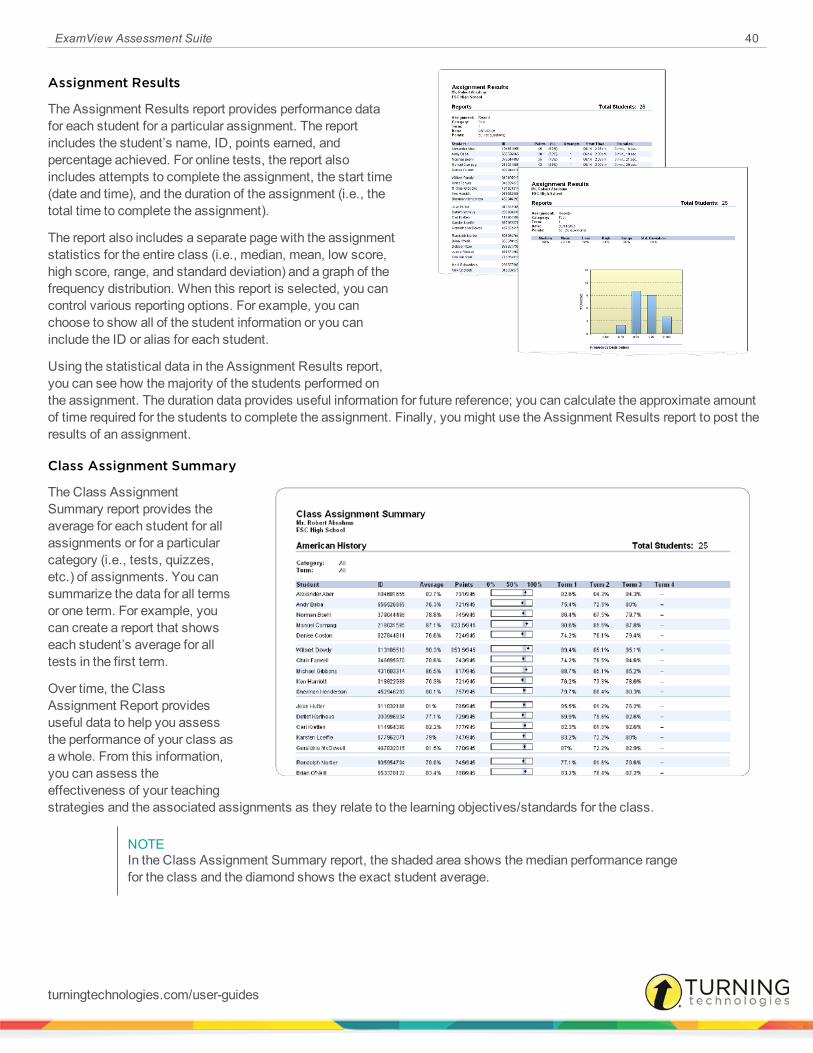
ExamView Assessment Suite 40
Assignment Results
The Assignment Results report provides performance datafor each student for a particular assignment. The reportincludes the student’s name, ID, points earned, andpercentage achieved. For online tests, the report alsoincludes attempts to complete the assignment, the start time(date and time), and the duration of the assignment (i.e., thetotal time to complete the assignment).
The report also includes a separate page with the assignmentstatistics for the entire class (i.e., median, mean, low score,high score, range, and standard deviation) and a graph of thefrequency distribution. When this report is selected, you cancontrol various reporting options. For example, you canchoose to show all of the student information or you caninclude the ID or alias for each student.
Using the statistical data in the Assignment Results report,you can see how themajority of the students performed onthe assignment. The duration data provides useful information for future reference; you can calculate the approximate amountof time required for the students to complete the assignment. Finally, youmight use the Assignment Results report to post theresults of an assignment.
Class Assignment Summary
The Class AssignmentSummary report provides theaverage for each student for allassignments or for a particularcategory (i.e., tests, quizzes,etc.) of assignments. You cansummarize the data for all termsor one term. For example, youcan create a report that showseach student’s average for alltests in the first term.
Over time, the ClassAssignment Report providesuseful data to help you assessthe performance of your class asa whole. From this information,you can assess theeffectiveness of your teachingstrategies and the associated assignments as they relate to the learning objectives/standards for the class.
NOTEIn the Class Assignment Summary report, the shaded area shows themedian performance rangefor the class and the diamond shows the exact student average.
turningtechnologies.com/user-guides

ExamView Assessment Suite 41
Open-Ended Responses Worksheet
TheOpen-Ended Responses Worksheet report allows you to score the open-ended questions that your students complete aspart of an online test.
How to score and record results for open-ended questions...
1 After all of your students finish an online test,you should get the results into the ExamViewTest Manager. This process reads all of thestudent responses for the assignment includingthe open-ended questions (essay, short answer,etc.).
2 Print the Open-Ended Responses Worksheet.The report includes the open-ended responsesfor each student and space for you to write thepoints earned for each question.
3 After you complete the worksheet, use theEditScores option to enter the results into theprogram.You can use theOpen-Ended ResponsesWorksheet report to work away from yourcomputer. You can score open-ended questionsanywhere and then enter the scores into the ExamView Test Manager at a convenient time.
How to view the open-ended responses worksheet...
1 Click Report from themenu bar and select Open-Ended Responses Worksheet.2 Select the assignment for which you wish to view open-ended responses. You can limit the number of assignments that
appear in the list by choosing aCategory and/or Term.3 Optionally, select a report filter to view open ended responses for selected students. Click Filters to create, edit, or
delete an existing filter.4 Click OK to view the report.5 To view the report for a different assignment, click Previous orNext or choose an assignment from the drop-down list.6 Select a percentage from the Zoom drop-down list to change the zoom setting.7 Click Print to print your report. You can print the report for the current assignment or for all assignments.8 Click Close to exit the report.9 Repeat steps 2 to 8 above to view another report, or click Cancel to exit.
turningtechnologies.com/user-guides
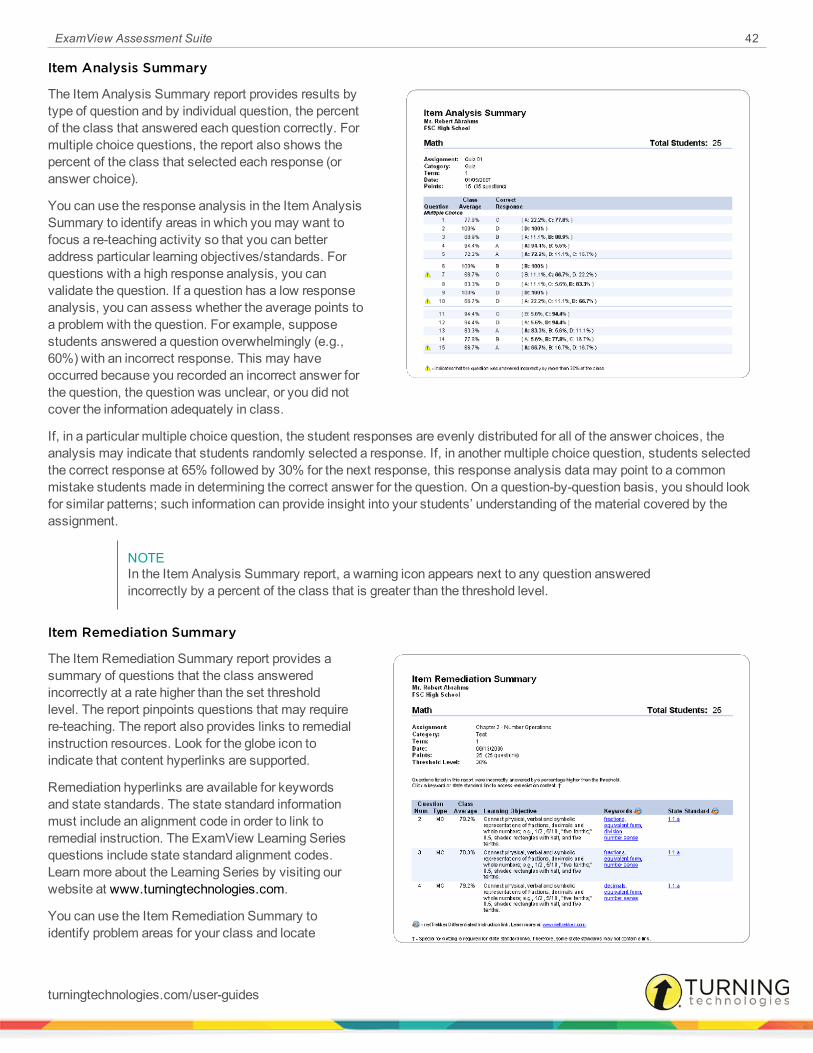
ExamView Assessment Suite 42
Item Analysis Summary
The Item Analysis Summary report provides results bytype of question and by individual question, the percentof the class that answered each question correctly. Formultiple choice questions, the report also shows thepercent of the class that selected each response (oranswer choice).
You can use the response analysis in the Item AnalysisSummary to identify areas in which youmay want tofocus a re-teaching activity so that you can betteraddress particular learning objectives/standards. Forquestions with a high response analysis, you canvalidate the question. If a question has a low responseanalysis, you can assess whether the average points toa problem with the question. For example, supposestudents answered a question overwhelmingly (e.g.,60%) with an incorrect response. This may haveoccurred because you recorded an incorrect answer forthe question, the question was unclear, or you did notcover the information adequately in class.
If, in a particular multiple choice question, the student responses are evenly distributed for all of the answer choices, theanalysis may indicate that students randomly selected a response. If, in another multiple choice question, students selectedthe correct response at 65% followed by 30% for the next response, this response analysis datamay point to a commonmistake students made in determining the correct answer for the question. On a question-by-question basis, you should lookfor similar patterns; such information can provide insight into your students’ understanding of thematerial covered by theassignment.
NOTEIn the Item Analysis Summary report, a warning icon appears next to any question answeredincorrectly by a percent of the class that is greater than the threshold level.
Item Remediation Summary
The Item Remediation Summary report provides asummary of questions that the class answeredincorrectly at a rate higher than the set thresholdlevel. The report pinpoints questions that may requirere-teaching. The report also provides links to remedialinstruction resources. Look for the globe icon toindicate that content hyperlinks are supported.
Remediation hyperlinks are available for keywordsand state standards. The state standard informationmust include an alignment code in order to link toremedial instruction. The ExamView Learning Seriesquestions include state standard alignment codes.Learnmore about the Learning Series by visiting ourwebsite at www.turningtechnologies.com.
You can use the Item Remediation Summary toidentify problem areas for your class and locate
turningtechnologies.com/user-guides
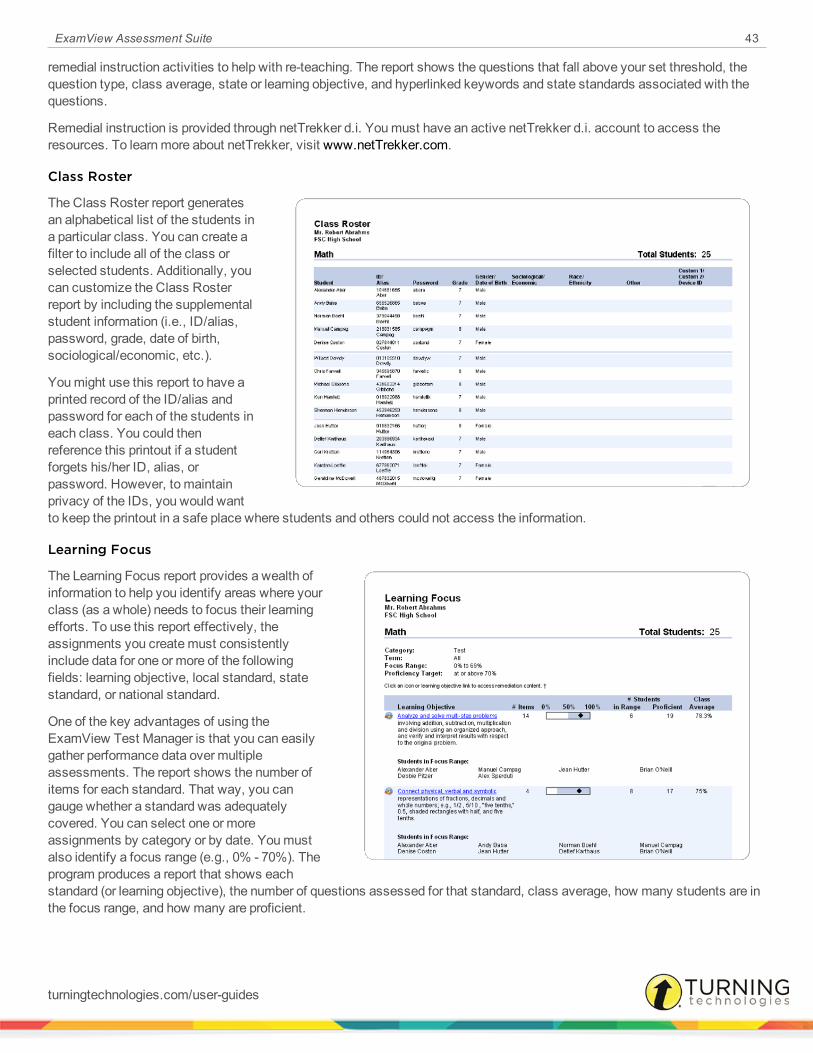
ExamView Assessment Suite 43
remedial instruction activities to help with re-teaching. The report shows the questions that fall above your set threshold, thequestion type, class average, state or learning objective, and hyperlinked keywords and state standards associated with thequestions.
Remedial instruction is provided through netTrekker d.i. Youmust have an active netTrekker d.i. account to access theresources. To learnmore about netTrekker, visit www.netTrekker.com.
Class Roster
The Class Roster report generatesan alphabetical list of the students ina particular class. You can create afilter to include all of the class orselected students. Additionally, youcan customize the Class Rosterreport by including the supplementalstudent information (i.e., ID/alias,password, grade, date of birth,sociological/economic, etc.).
Youmight use this report to have aprinted record of the ID/alias andpassword for each of the students ineach class. You could thenreference this printout if a studentforgets his/her ID, alias, orpassword. However, to maintainprivacy of the IDs, you would wantto keep the printout in a safe place where students and others could not access the information.
Learning Focus
The Learning Focus report provides a wealth ofinformation to help you identify areas where yourclass (as a whole) needs to focus their learningefforts. To use this report effectively, theassignments you createmust consistentlyinclude data for one or more of the followingfields: learning objective, local standard, statestandard, or national standard.
One of the key advantages of using theExamView Test Manager is that you can easilygather performance data over multipleassessments. The report shows the number ofitems for each standard. That way, you cangauge whether a standard was adequatelycovered. You can select one or moreassignments by category or by date. Youmustalso identify a focus range (e.g., 0% - 70%). Theprogram produces a report that shows eachstandard (or learning objective), the number of questions assessed for that standard, class average, how many students are inthe focus range, and how many are proficient.
turningtechnologies.com/user-guides

ExamView Assessment Suite 44
In addition, this report provides links to remedial instruction resources. Look for the globe icon to indicate that contenthyperlinks are supported.
Remedial instruction is provided through netTrekker d.i. Youmust have an active netTrekker d.i. account to access theresources. To learnmore about netTrekker, visit www.netTrekker.com.
NOTEThe shaded area shows the performance for themedian 70% of the students in your class. Forexample, if there are 20 students in your class, the top 3 scores (15%) and lowest 3 scores (15%)would not be included. The range of scores represents 14 students or 70% of the class. Thediamond shows the actual class average. Use the graphs to see how themajority of studentsperformed. If the area is relatively short, students’ scores were similar.
Performance Summary
The Performance Summary report provides asummary of your class’ performance for all classassignments in a category over a specified daterange. The Performance Summary report lists alearning objective/standard, the number of items(i.e., questions) that assess thatobjective/standard, and the proficiency level thatthe class as a whole has attained.
To use the Performance Summary reporteffectively, youmust consistently includequestion information for one or more of thefollowing fields in each of the items you create:learning objective, local standard, state standard,or national standard. (Many publishers includethis information for the questions they provide.)
You can customize the Performance Summaryreport to generate the performance data that bestmeet your needs. You can select the date rangefor the class assignments, and you can set an appropriate proficiency target (e.g., 70% and above) for the class assignmentsat a particular time in the term. As an example, youmight set the proficiency target at 70% with the first class assignment thatcovers a particular learning objective/standard. Then, on a subsequent class assignment on the same learningobjectives/standards, youmight set the proficiency target at 80%.
turningtechnologies.com/user-guides

ExamView Assessment Suite 45
Class Performance Progress Chart
The Class Performance Progress Chartreport shows at a glance how eachstudent is performing on each of thelearning objectives/standards for allassignments in a category over aspecified date range. The report lists alearning objective/standard, the number ofitems (i.e., questions) that assess thatlearning objective/standard, and aproficiency indicator for each of thestudents.
To use the Class Performance ProgressChart report effectively, youmustconsistently include question informationfor one or more of the following fields ineach of the items you create: learning objective, local standard, state standard, or national standard. (Many publishers includethis information for the questions they provide.)
To customize the Class Performance Progress Chart, you can set the category of assignments, the date range of the classassignments, the number of proficiency levels, and the proficiency level value ranges based on your performance criteria. Thereport shows a circle icon to indicate each student’s performance on each of the learning objectives/standards.
Student ReportsExamView Test Manager provides five reports that highlight each student’s individual performance for one or moreassignments. This section includes a brief overview and a sample of each student report.
Assignment Results
The Assignment Results report reflects astudent’s performance for one assignment.The report includes the following information:assignment average, points earned for eachquestion, and the student’s response for eachquestion. AnX appears next to each questionthat the student answered incorrectly. Ahyphen appears next to each question forwhich the student earned partial credit.
If you select the option for performance resultsfor learning objectives/standards, theAssignment Results report also includes eachlearning objective and the followingperformance data for that learningobjective/standard: the average, pointsearned, the proficiency level, and the specificquestions in the class assignment. To use theAssignment Results report effectively, youmust consistently include question information for one or more of the following fields in each of the items you create: learning
turningtechnologies.com/user-guides

ExamView Assessment Suite 46
objective, local standard, state standard, or national standard. (Many publishers include this information for the questions theyprovide.)
You can use this report to identify each student’s proficiency level for each of the learning objectives/standards for eachassignment. This informationmay also help you to identify areas in which a student may need remedial work.
Assignment Review
The Assignment Review report provides a tool to helpyour students understand themistakes they made onan assignment. For each question answeredincorrectly, the report shows the following: pointsearned, student’s response, correct answer, rationale,reference, and focus area (depending on theinformation available).
To use the Assignment Review report effectively, youmust consistently include extra question informationfor each of the items you create. (Many publishersinclude this information for the questions they provide.)For example, a study tip such as Refer to pp. 23-25 isthe information in the Reference field for a question.Students, in this example, could use the report to referto the specified pages in their textbook as they reviewthe questions that they answered incorrectly.
Students can use the Assignment Review report toreview the completed assignments and to learn fromtheir mistakes.
Student Progress Report
The Student Progress Reportshows a student’s progress forone or more terms. The reportorganizes the results by term andprovides the following informationfor each assignment: assignmentdescription, date assigned,category, points earned, percentachieved, and class average. Asummary shows the term averageby listing the total points earnedout of the total possible points, theequivalent percent, and the classaverage.
You can use the Student ProgressReport to depict the student’sprogress over time.
turningtechnologies.com/user-guides

ExamView Assessment Suite 47
Learning Focus
The Learning Focus reportidentifies areas where a studentneeds to focus his/her learningefforts. Based on a proficiencylevel you set, the report lists thelearning objective/standards that astudent has not mastered. Foreach of the learningobjectives/standards the studenthas not yet mastered, the LearningFocus report lists the learningobjective/standard, the associatednumber of items, the points earnedon items, and the proficiency levelthat the student has attained.
You can customize the LearningFocus report to generate theperformance data that best meet your needs. You can select one or more class assignments by category and the date range forthe assignments. You can set an appropriate focus range (e.g., 0% - 70%) for the class assignments at a particular time in theterm. As an example, youmight set the focus range at 0% to 70% with the first class assignment that covers a particularlearning objective/standard. Then, on a subsequent class assignment on the same learning objectives/standards, youmightset the focus range to 0% to 80%.
You can use the Learning Focus report to help a student know exactly what to study in order to attain mastery level on theidentified learning objectives/standards.
NOTEThe shaded area shows the performance for themedian 70% of the students in a class. Forexample, if there are 20 students in a class, the top 3 scores (15%) and lowest 3 scores (15%)would not be included. The range of scores for 14 students (70%) would be represented. Thediamond shows your student’s actual performance. Use the graphs to see how a studentperformed in relation to his/her class. For example, if the diamond appears near or past the rightedge of the shaded area, the student’s performance is in the upper range for the class. If theshaded area is relatively short, students’ scores were similar.
turningtechnologies.com/user-guides
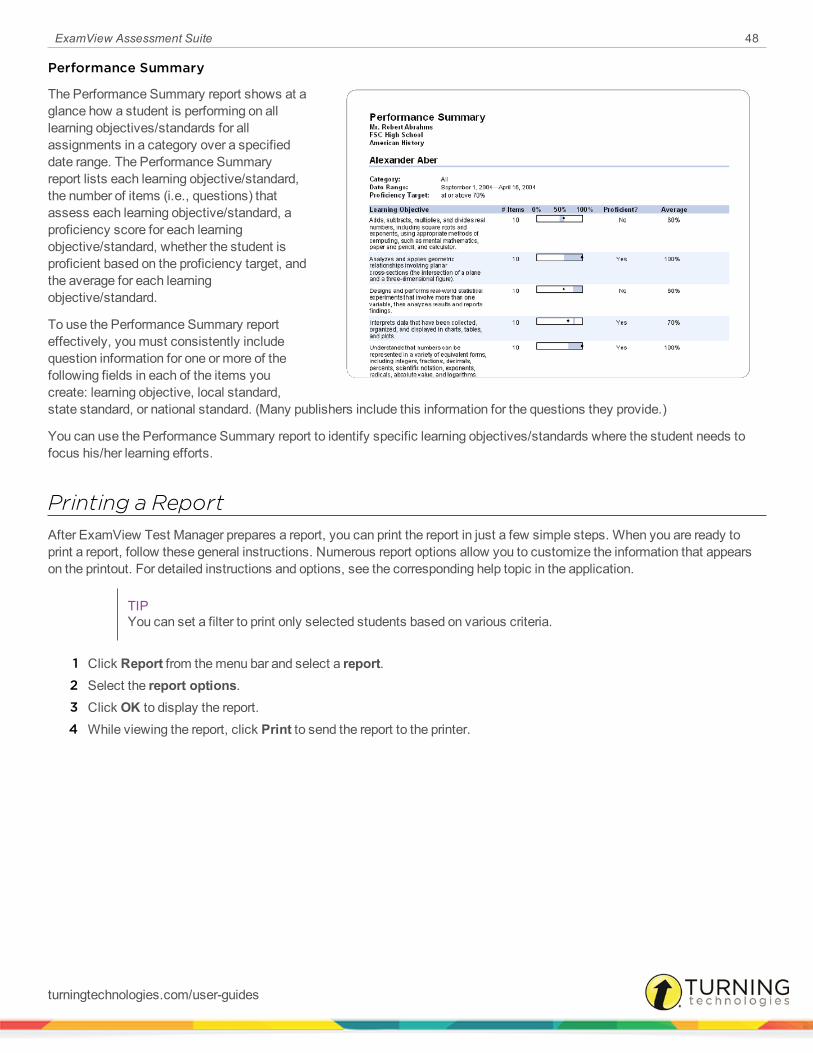
ExamView Assessment Suite 48
Performance Summary
The Performance Summary report shows at aglance how a student is performing on alllearning objectives/standards for allassignments in a category over a specifieddate range. The Performance Summaryreport lists each learning objective/standard,the number of items (i.e., questions) thatassess each learning objective/standard, aproficiency score for each learningobjective/standard, whether the student isproficient based on the proficiency target, andthe average for each learningobjective/standard.
To use the Performance Summary reporteffectively, youmust consistently includequestion information for one or more of thefollowing fields in each of the items youcreate: learning objective, local standard,state standard, or national standard. (Many publishers include this information for the questions they provide.)
You can use the Performance Summary report to identify specific learning objectives/standards where the student needs tofocus his/her learning efforts.
Printing a ReportAfter ExamView Test Manager prepares a report, you can print the report in just a few simple steps. When you are ready toprint a report, follow these general instructions. Numerous report options allow you to customize the information that appearson the printout. For detailed instructions and options, see the corresponding help topic in the application.
TIPYou can set a filter to print only selected students based on various criteria.
1 Click Report from themenu bar and select a report.2 Select the report options.3 Click OK to display the report.4 While viewing the report, click Print to send the report to the printer.
turningtechnologies.com/user-guides
ExamView Assessment Suite 49
Exporting Assignment ResultsExamView Test Manager enables you export the students’ results data for an assignment. You can export summary data (e.g.,student name, ID, and percentage) or detailed data (e.g., student information, all responses, answer key, etc.). With the exportoption you can export student results in order to import them into your gradebook or a spreadsheet. For more advanced users,you can export the results for use with a student information system.
1 Select an assignment.2 Click File from themenu bar, mouse overExport, and then click theAssignment Results as Text orAssignment
Results as XML option.Use the as Text option to export results for use with a gradebook or a spreadsheet program. Use the as XML option toexport results to a student information system.
3 Set the options (if necessary) and then enter a file name.
NOTEYou can also use the Copy All Class Records option in the Edit menu to copy all of theinformation in the work area. Then, you can paste that information into a spreadsheetdocument.
turningtechnologies.com/user-guides
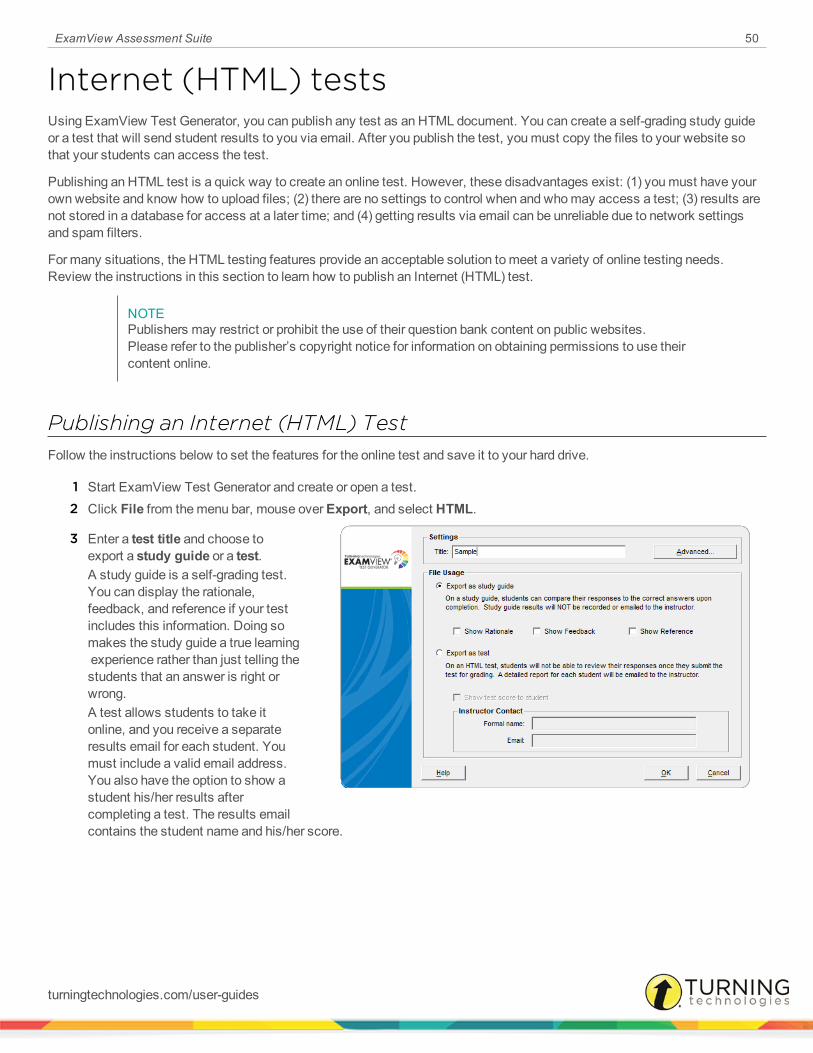
ExamView Assessment Suite 50
Internet (HTML) testsUsing ExamView Test Generator, you can publish any test as an HTML document. You can create a self-grading study guideor a test that will send student results to you via email. After you publish the test, youmust copy the files to your website sothat your students can access the test.
Publishing an HTML test is a quick way to create an online test. However, these disadvantages exist: (1) youmust have yourownwebsite and know how to upload files; (2) there are no settings to control when and whomay access a test; (3) results arenot stored in a database for access at a later time; and (4) getting results via email can be unreliable due to network settingsand spam filters.
For many situations, the HTML testing features provide an acceptable solution tomeet a variety of online testing needs.Review the instructions in this section to learn how to publish an Internet (HTML) test.
NOTEPublishers may restrict or prohibit the use of their question bank content on public websites.Please refer to the publisher’s copyright notice for information on obtaining permissions to use theircontent online.
Publishing an Internet (HTML) TestFollow the instructions below to set the features for the online test and save it to your hard drive.
1 Start ExamView Test Generator and create or open a test.2 Click File from themenu bar, mouse overExport, and select HTML.
3 Enter a test title and choose toexport a study guide or a test.A study guide is a self-grading test.You can display the rationale,feedback, and reference if your testincludes this information. Doing somakes the study guide a true learningexperience rather than just telling thestudents that an answer is right orwrong.A test allows students to take itonline, and you receive a separateresults email for each student. Youmust include a valid email address.You also have the option to show astudent his/her results aftercompleting a test. The results emailcontains the student name and his/her score.
turningtechnologies.com/user-guides
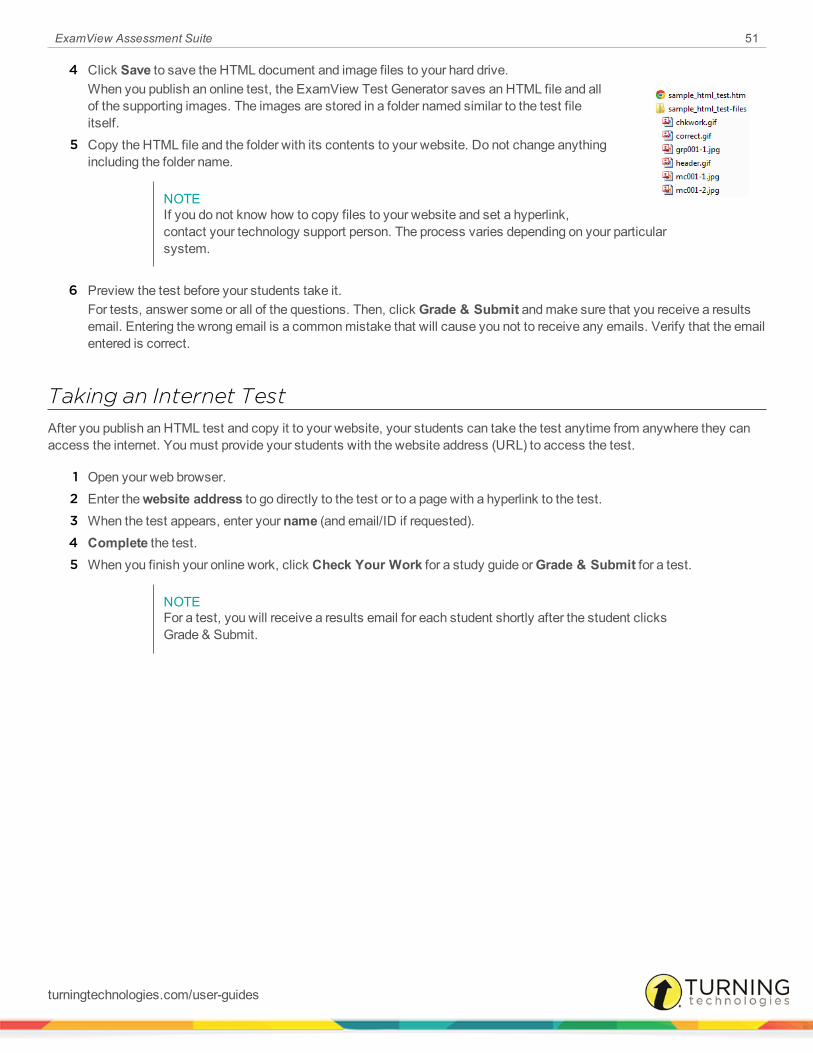
ExamView Assessment Suite 51
4 Click Save to save the HTML document and image files to your hard drive.When you publish an online test, the ExamView Test Generator saves an HTML file and allof the supporting images. The images are stored in a folder named similar to the test fileitself.
5 Copy the HTML file and the folder with its contents to your website. Do not change anythingincluding the folder name.
NOTEIf you do not know how to copy files to your website and set a hyperlink,contact your technology support person. The process varies depending on your particularsystem.
6 Preview the test before your students take it.For tests, answer some or all of the questions. Then, click Grade & Submit andmake sure that you receive a resultsemail. Entering the wrong email is a commonmistake that will cause you not to receive any emails. Verify that the emailentered is correct.
Taking an Internet TestAfter you publish an HTML test and copy it to your website, your students can take the test anytime from anywhere they canaccess the internet. Youmust provide your students with the website address (URL) to access the test.
1 Open your web browser.2 Enter thewebsite address to go directly to the test or to a page with a hyperlink to the test.3 When the test appears, enter your name (and email/ID if requested).4 Complete the test.5 When you finish your online work, click Check Your Work for a study guide orGrade & Submit for a test.
NOTEFor a test, you will receive a results email for each student shortly after the student clicksGrade & Submit.
turningtechnologies.com/user-guides

ExamView Assessment Suite 52
Contact Us
For additional help, contact Turning Technologies Technical Support.
Technical Support is available from 7 a.m. - 9 p.m. EST.
From within the contiguous United States, you can reach Technical Support toll-free by calling 866.746.3015. If you are callingfrom outside of the United States, please call +1 330.746.3015.
Technical Support may also be reached via e-mail at [email protected] or [email protected], a brandof Turning Technologies.
Wewant to hear from you! To submit a product enhancement request, visit us athttp://www.turningtechnologies.com/product-enhancement-request-form.
Office Locations
Ohio
255West Federal StreetYoungstown, Ohio 44503Toll-Free: 866.746.3015Direct: 330.746.3015International: +1 330.746.3015
Belfast
19 Colvin HouseInspire Business ParkCarrowreagh RoadBelfast BT16 1QTUnited KingdomDirect: +44 (0)28 9048 7898
Paris
26/36 rue Alfred Nobel93600 Aulnay-sous-BoisFranceDirect/Support: +33 (0)1 58 31 10 60
Amsterdam
Keizersgracht 75, Garden1015 CE, AmsterdamTheNetherlandsDirect: +31 (0)85 4011 040
turningtechnologies.com/user-guides
Related Documents