Evergreen Documentation Documentation Interest Group

Welcome message from author
This document is posted to help you gain knowledge. Please leave a comment to let me know what you think about it! Share it to your friends and learn new things together.
Transcript

Evergreen DocumentationDocumentation Interest Group

Report errors in this documentation using Launchpad.
Evergreen DocumentationDocumentation Interest Group
Evergreen Documentation 3
Table of ContentsI. Introduction .............................................................................................................................................. 15
1. About This Documentation ................................................................................................................. 172. About Evergreen ............................................................................................................................... 18
II. Evergreen 2.9 Release Notes ...................................................................................................................... 193. Evergreen 2.9.8 ................................................................................................................................. 22
Acknowledgements ....................................................................................................................... 224. Evergreen 2.9.7 ................................................................................................................................. 23
Acknowledgements ....................................................................................................................... 235. Evergreen 2.9.6 ................................................................................................................................. 25
Acknowledgements ....................................................................................................................... 256. Evergreen 2.9.5 ................................................................................................................................. 26
Acknowledgements ....................................................................................................................... 267. Evergreen 2.9.4 ................................................................................................................................. 27
Acknowledgements ....................................................................................................................... 278. Evergreen 2.9.3 ................................................................................................................................. 28
Acquisitions ................................................................................................................................. 28Cataloging ................................................................................................................................... 28Circulation ................................................................................................................................... 28OPAC ......................................................................................................................................... 28Miscelleneous ............................................................................................................................... 28Acknowledgements ....................................................................................................................... 29
9. Evergreen 2.9.2 ................................................................................................................................. 30Acquisitions / Cataloging ............................................................................................................... 30Circulation ................................................................................................................................... 30OPAC ......................................................................................................................................... 30Administration .............................................................................................................................. 30Acknowledgements ....................................................................................................................... 30
10. Evergreen 2.9.1 ............................................................................................................................... 32Acquisitions ................................................................................................................................. 32Administration .............................................................................................................................. 32Cataloging ................................................................................................................................... 32Circulation ................................................................................................................................... 32Public Catalog .............................................................................................................................. 32Reports ....................................................................................................................................... 33Acknowledgements ....................................................................................................................... 33
11. 2.9.0 Upgrade notes ......................................................................................................................... 35Remove Script-Based Circulation Configuration ................................................................................. 35Remove open-ils.penalty service ...................................................................................................... 35Removal of deprecated "JSPAC" interface ........................................................................................ 35Removal of legacy selfcheck interface .............................................................................................. 36
12. 2.9.0 New Features .......................................................................................................................... 37Acquisitions ................................................................................................................................. 37Administration .............................................................................................................................. 38Cataloging ................................................................................................................................... 38Circulation ................................................................................................................................... 41Client .......................................................................................................................................... 42OPAC ......................................................................................................................................... 42Acknowledgments ......................................................................................................................... 44
III. Software Installation ................................................................................................................................ 4713. Introduction .................................................................................................................................... 4914. System Requirements ....................................................................................................................... 50
Server Minimum Requirements ....................................................................................................... 50Staff Client Requirements .............................................................................................................. 50
Evergreen Documentation 4Report errors in this documentation using Launchpad.
15. Installing the Evergreen server ........................................................................................................... 51Preamble: referenced user accounts .................................................................................................. 51Preamble: developer instructions ..................................................................................................... 51Installing prerequisites ................................................................................................................... 51Configuration and compilation instructions ........................................................................................ 53Installation instructions .................................................................................................................. 53Change ownership of the Evergreen files .......................................................................................... 53Additional Instructions for Developers .............................................................................................. 53Configure the Apache Web server ................................................................................................... 54Configure OpenSRF for the Evergreen application .............................................................................. 55Creating the Evergreen database ...................................................................................................... 56Starting Evergreen ........................................................................................................................ 58Testing connections to Evergreen .................................................................................................... 58Getting help ................................................................................................................................. 59License ....................................................................................................................................... 59
16. Installing the Staff Client .................................................................................................................. 60Installing on Windows ................................................................................................................... 60Installing on Linux ........................................................................................................................ 62Registering a Workstation .............................................................................................................. 62Removing Staff Client Preferences ................................................................................................... 63
17. Upgrading the Evergreen Server ......................................................................................................... 65Software Prerequisites ................................................................................................................... 65Upgrade the Evergreen code ........................................................................................................... 65Upgrade the Evergreen database schema ........................................................................................... 67Restart Evergreen and Test ............................................................................................................. 69Review Release Notes ................................................................................................................... 70
18. Setting Up EDI Acquisitions ............................................................................................................. 71Introduction ................................................................................................................................. 71Installation ................................................................................................................................... 71Configuration ............................................................................................................................... 72Troubleshooting ............................................................................................................................ 73
IV. System Configuration and Customization .................................................................................................... 7519. Introduction .................................................................................................................................... 8020. Describing your organization ............................................................................................................. 81
Organization Unit Types ................................................................................................................ 81Organizational Units ...................................................................................................................... 81
21. Describing your people ..................................................................................................................... 83Setting the staff user’s working location ........................................................................................... 83Comparing approaches for managing permissions ............................................................................... 84Managing permissions in the staff client ........................................................................................... 84Managing role-based permission groups in the staff client .................................................................... 86Managing role-based permission groups in the database ....................................................................... 88
22. Migrating Patron Data ...................................................................................................................... 91Creating an sql Script for Importing Patrons ...................................................................................... 92Batch Updating Patron Data ........................................................................................................... 93
23. Migrating from a legacy system ......................................................................................................... 95Making electronic resources visible in the catalog .............................................................................. 95Migrating your bibliographic records ................................................................................................ 96Migrating your call numbers, copies, and parts .................................................................................. 97
24. Importing materials in the staff client ................................................................................................ 100Staff client batch record imports .................................................................................................... 100
25. Ordering materials ......................................................................................................................... 105When should libraries use acquisitions? .......................................................................................... 105Managing Funds ......................................................................................................................... 105Ordering .................................................................................................................................... 107
Evergreen Documentation 5Report errors in this documentation using Launchpad.
26. Designing your catalog ................................................................................................................... 110Configuring and customizing the public interface .............................................................................. 110Setting the default physical location for your library environment ........................................................ 113Setting a default language and adding optional languages ................................................................... 113Editing the formats select box options in the search interface. ............................................................. 114Adding and removing search fields in advanced search ...................................................................... 114Changing the display of facets and facet groups ............................................................................... 115Including External Content in Your Public Interface .......................................................................... 115Including Locally Hosted Content in Your Public Interface ................................................................. 118Sitemap generator ....................................................................................................................... 120Troubleshooting TPAC errors ........................................................................................................ 120
27. Borrowing items: who, what, for how long ......................................................................................... 122Data elements that affect your circulation policies ............................................................................. 122Circulation Rules ........................................................................................................................ 123Creating Circulation Policies ......................................................................................................... 126
28. Hard due dates .............................................................................................................................. 129Creating a hard due date .............................................................................................................. 129
29. TPac Configuration and Customization .............................................................................................. 130Template toolkit documentation ..................................................................................................... 130TPAC URL ................................................................................................................................ 130Perl modules used directly by TPAC .............................................................................................. 130Default templates ........................................................................................................................ 130Apache configuration files ............................................................................................................ 130TPAC CSS and media files ........................................................................................................... 131Mapping templates to URLs ......................................................................................................... 131How to override templates ............................................................................................................ 131Changing some text in the TPAC ................................................................................................... 133Troubleshooting .......................................................................................................................... 134
30. Creating a New Skin: the Bare Minimum ........................................................................................... 135Apache directives ........................................................................................................................ 135Customizing templates ................................................................................................................. 135
31. Auto Suggest in Catalog Search ....................................................................................................... 137Enabling this Feature ................................................................................................................... 137Using this Feature ....................................................................................................................... 137
32. Authentication Proxy ...................................................................................................................... 13933. Kid’s OPAC Configuration .............................................................................................................. 141
Configuration ............................................................................................................................. 141Considerations for Community Adoption ......................................................................................... 142Outstanding Development (Unsponsored) ........................................................................................ 142
34. Customizable Toolbar ..................................................................................................................... 143Configure Toolbar ....................................................................................................................... 143
35. Patron Address City/State/County Pre-Populate by ZIP Code ................................................................. 146Scoping and Permissions .............................................................................................................. 146Setup Steps ................................................................................................................................ 146ZIP Code Data ........................................................................................................................... 148Development .............................................................................................................................. 149
36. Phonelist.pm Module ...................................................................................................................... 150Adding Parameters ...................................................................................................................... 151Output ....................................................................................................................................... 151Holds ........................................................................................................................................ 152Overdues ................................................................................................................................... 152Skipping patrons with email notification of holds .............................................................................. 152Using the ws_ou parameter ........................................................................................................... 153Automating the download ............................................................................................................. 153
37. SIP Server .................................................................................................................................... 154
Evergreen Documentation 6Report errors in this documentation using Launchpad.
Installing the SIP Server ............................................................................................................... 154SIP Communication ..................................................................................................................... 157
38. Apache Rewrite Tricks ................................................................................................................... 165Short URLs ................................................................................................................................ 165Domain Based Content with RewriteMaps ....................................................................................... 165
39. Apache Access Handler Perl Module ................................................................................................. 167Use Cases .................................................................................................................................. 168Proxying Websites ....................................................................................................................... 168
V. Using the Staff Client .............................................................................................................................. 17040. Introduction .................................................................................................................................. 17241. Logging in to Evergreen ................................................................................................................. 173
Standalone Interface .................................................................................................................... 173Preset Tabs in Evergreen Client ..................................................................................................... 173Auto Login ................................................................................................................................ 176Logging Out ............................................................................................................................... 178
42. Button Bar/Toolbar ........................................................................................................................ 18043. Check-boxes ................................................................................................................................. 18244. Tab Buttons .................................................................................................................................. 18345. New Options for Double Clicking ..................................................................................................... 184
Double Click to Retrieve a Patron’s Record ..................................................................................... 184Double Click to Retrieve Item Attributes ......................................................................................... 184
46. Patron Border Color Enhancement .................................................................................................... 18647. Sorting Columns ............................................................................................................................ 187
Sorting the On Shelf Pull List ....................................................................................................... 187Sorting Circulation Policies ........................................................................................................... 188
48. Column Picker .............................................................................................................................. 19049. Recent Staff Searches ..................................................................................................................... 192
Administrative Settings ................................................................................................................ 192Recent Staff Searches .................................................................................................................. 193
50. Return to Search Results from MARC Record .................................................................................... 19451. Workstation Administration ............................................................................................................. 195
Copy Editor: Copy Location Name First ......................................................................................... 195Font and Sound Settings ............................................................................................................... 195Select Hotkeys ............................................................................................................................ 196Configure Printers ....................................................................................................................... 197Receipt Template Editor ............................................................................................................... 199Customizable Toolbar .................................................................................................................. 216
VI. System Administration From the Staff Client .............................................................................................. 21952. Introduction .................................................................................................................................. 22353. Acquisitions Administration ............................................................................................................. 224
Acquisitions Settings ................................................................................................................... 224Cancel/Delay reasons ................................................................................................................... 224Claiming .................................................................................................................................... 225Currency Types .......................................................................................................................... 227Distribution Formulas .................................................................................................................. 227Electronic Data Interchange .......................................................................................................... 229Exchange Rates .......................................................................................................................... 233MARC Federated Search .............................................................................................................. 233Fund Tags .................................................................................................................................. 234Funding Sources ......................................................................................................................... 235Funds ........................................................................................................................................ 236Invoice menus ............................................................................................................................ 240Line Item Features ...................................................................................................................... 241Providers ................................................................................................................................... 242
54. Age hold protection ........................................................................................................................ 244

Evergreen Documentation 7Report errors in this documentation using Launchpad.
Active date display in OPAC ........................................................................................................ 24455. Authorities .................................................................................................................................... 245
Authority Control Sets ................................................................................................................. 245Thesauri .................................................................................................................................... 245Authority Fields .......................................................................................................................... 246Browse Axes .............................................................................................................................. 248
56. Best-Hold Selection Sort Order ........................................................................................................ 250Preconfigured Best-Hold Orders .................................................................................................... 250Create a New Best-Hold Selection Sort Order .................................................................................. 250Edit an Existing Best-Hold Selection Sort Order ............................................................................... 251Choosing the Best-Hold Selection Sort Order ................................................................................... 251Permissions to use this Feature ...................................................................................................... 252
57. Booking Module Administration ....................................................................................................... 253Creating Bookable Non-Bibliographic Resources .............................................................................. 253Editing Non-Bibliographic Resources ............................................................................................. 260Deleting Non-bibliographic Resources ............................................................................................ 260
58. Call Number Prefixes and Suffixes ................................................................................................... 261Configure call number prefixes ...................................................................................................... 261Configure call number suffixes ...................................................................................................... 261Apply Call Number Prefixes and Suffixes ....................................................................................... 262
59. Circulation Limit Sets ..................................................................................................................... 263Maximum Checkout by Copy Location ........................................................................................... 263
60. Copy Status .................................................................................................................................. 266Adding Copy Statuses .................................................................................................................. 267Deleting Copy Statuses ................................................................................................................ 267Editing Copy Statuses .................................................................................................................. 267
61. Floating Groups ............................................................................................................................. 268Floating Groups .......................................................................................................................... 268Floating Group Members .............................................................................................................. 268Examples ................................................................................................................................... 268
62. MARC Import Remove Fields ......................................................................................................... 272Create a MARC Import Remove Fields profile ................................................................................. 272Import Options ........................................................................................................................... 273Permissions to use this Feature ...................................................................................................... 276
63. MARC Record Attributes ................................................................................................................ 277Multi Valued Fields and Composite Record Attributes ....................................................................... 277
64. Org Unit Proximity Adjustments ...................................................................................................... 286Org Unit Proximity Adjustments .................................................................................................... 286Absolute and Relative Adjustments ................................................................................................ 286Create an Org Unit Proximity Adjustment ....................................................................................... 287Permissions to use this Feature ...................................................................................................... 288
65. User and Group Permissions ............................................................................................................ 289Staff Accounts ............................................................................................................................ 289
66. SMS Text Messaging ..................................................................................................................... 292Administrative Setup ................................................................................................................... 292Receiving Holds Notices via Text Message ..................................................................................... 296Sending Copy Details via Text Message ......................................................................................... 297
67. User Activity Types ....................................................................................................................... 300Enabling this Feature ................................................................................................................... 300Using this Feature ....................................................................................................................... 301
68. Z39.50 Servers .............................................................................................................................. 302Restrict Z39.50 Sources by Permission Group .................................................................................. 302Storing Z39.50 Server Credentials .................................................................................................. 303
VII. Local Administration ............................................................................................................................. 30569. Introduction .................................................................................................................................. 307
Evergreen Documentation 8Report errors in this documentation using Launchpad.
70. Library Settings Editor .................................................................................................................... 308Editing Library Settings ............................................................................................................... 308Exporting/Importing Library Settings .............................................................................................. 309Settings Overview ....................................................................................................................... 310
71. Address Alert ................................................................................................................................ 346General Usage Examples .............................................................................................................. 346Access Control and Scoping ......................................................................................................... 346Adding a new Address Alert ......................................................................................................... 346Editing an Address Alert .............................................................................................................. 347Deleting an Address Alert ............................................................................................................ 347Staff View of Address Alerts ........................................................................................................ 348Regular Expressions / Wildcards .................................................................................................... 348Examples ................................................................................................................................... 348Development .............................................................................................................................. 349
72. Barcode Completion ....................................................................................................................... 350Scoping and Permissions .............................................................................................................. 350Access Points ............................................................................................................................. 350Multiple Matches ........................................................................................................................ 351Barcode Completion Data Fields .................................................................................................... 352Create, Update, Filter, Delete/Disable Rules ..................................................................................... 353Examples ................................................................................................................................... 354Testing ...................................................................................................................................... 356
73. Hold-driven recalls ......................................................................................................................... 357Enabling hold-driven recalls .......................................................................................................... 357Editing the item recall notification email template ............................................................................. 357
74. Notifications / Action Triggers ......................................................................................................... 358Event Definitions ........................................................................................................................ 358Creating Action Triggers .............................................................................................................. 359Processing Action Triggers ........................................................................................................... 362
75. Recent Staff Searches ..................................................................................................................... 36476. Standing Penalties .......................................................................................................................... 36677. Statistical Categories Editor ............................................................................................................. 36778. Work Log ..................................................................................................................................... 371
Expanding the Work Log ............................................................................................................. 371VIII. Acquisitions ........................................................................................................................................ 372
79. Acquisitions .................................................................................................................................. 374Acquisitions Workflow ................................................................................................................ 374
80. Selection Lists and Purchase Orders .................................................................................................. 376Selection Lists ............................................................................................................................ 376Purchase Orders .......................................................................................................................... 378Brief Records ............................................................................................................................. 382MARC Federated Search .............................................................................................................. 384Line Items ................................................................................................................................. 385
81. Invoices ....................................................................................................................................... 388Creating invoices and adding line items .......................................................................................... 388Electronic Invoicing ..................................................................................................................... 395View an invoice .......................................................................................................................... 395Receive Items From an Invoice ..................................................................................................... 396
82. Load MARC Order Records ............................................................................................................ 400Basic Upload Options .................................................................................................................. 400Record Matching Options ............................................................................................................. 400Default Upload Settings ............................................................................................................... 401Sticky Settings ............................................................................................................................ 402Use Cases for MARC Order Upload form ....................................................................................... 402
83. Placing purchase requests from a patron record ................................................................................... 407
Evergreen Documentation 9Report errors in this documentation using Launchpad.
84. Managing patron purchase requests ................................................................................................... 408Adding a request ......................................................................................................................... 408Adding requests to selection lists ................................................................................................... 408
IX. Cataloging ............................................................................................................................................ 41085. Introduction .................................................................................................................................. 41286. MARC Fixed Field Editor Right-Click Context Menu Options ............................................................... 41387. MARC 007 Field Physical Characteristics Wizard ............................................................................... 41588. Batch Importing MARC Records ...................................................................................................... 419
Permissions ................................................................................................................................ 419Record Display Attributes ............................................................................................................. 419Record Match Sets ...................................................................................................................... 419Import Item Attributes ................................................................................................................. 424Import Records ........................................................................................................................... 426Default Values for Item Import ..................................................................................................... 432Importing Authority Records from the Staff Client ............................................................................ 432
89. Overlay Existing Catalog Record via Z39.50 Import ............................................................................ 43490. Z39.50 Search Enhancements ........................................................................................................... 43791. Monograph Parts ........................................................................................................................... 441
Add a Monograph Part to an Existing Record .................................................................................. 441Monograph Part Merging .............................................................................................................. 443
92. Conjoined Items ............................................................................................................................ 444Using the Conjoined Items Feature ................................................................................................. 444
93. Cataloging Electronic Resources — Finding Them in Catalog Searches .................................................... 448Adding a Located URI to the Record ............................................................................................. 448Using Transcendent Bib Sources for Electronic Resources .................................................................. 450
94. TPAC Copy Edit Links ................................................................................................................... 45195. MARC Batch Edit ......................................................................................................................... 452
Action (Rule Type) ..................................................................................................................... 452Other Template Fields .................................................................................................................. 452
96. Manage Authorities ........................................................................................................................ 454Searching for authorities ............................................................................................................... 454
97. Link Checker ................................................................................................................................ 456Search for URLs ......................................................................................................................... 456View Your Results ...................................................................................................................... 457Manage Your Sessions ................................................................................................................. 458
X. Serials ................................................................................................................................................... 46098. Serials .......................................................................................................................................... 462
Serial Control View vs. Alternate Serial Control View ....................................................................... 462MFHD Records .......................................................................................................................... 463
99. Copy Template for Serials ............................................................................................................... 464Create a copy template ................................................................................................................. 464Edit a copy template .................................................................................................................... 465
100. Serials Control View .................................................................................................................... 466Create a Subscription ................................................................................................................... 466Create a Distribution .................................................................................................................... 467Create Captions and Patterns ......................................................................................................... 471Creating an Issuance .................................................................................................................... 476Generate Prediction ..................................................................................................................... 479
101. Alternate Serial Control View ........................................................................................................ 481Creating a Subscription ................................................................................................................ 481Creating a Distribution ................................................................................................................. 482Creating a Stream ....................................................................................................................... 483Creating a Caption and Pattern ...................................................................................................... 485Creating an Issuance .................................................................................................................... 490Generate Item Predictions ............................................................................................................. 492
Evergreen Documentation 10Report errors in this documentation using Launchpad.
102. Edit Subscriptions ........................................................................................................................ 493Serials Control View ................................................................................................................... 493Alternate Serials Control View ...................................................................................................... 493
103. Receiving .................................................................................................................................... 494Serials Control View Receiving ..................................................................................................... 494Batch Receiving .......................................................................................................................... 497
104. Special Issues .............................................................................................................................. 500105. Holdings ..................................................................................................................................... 501
System Generated Holdings Statement ............................................................................................ 501MARC Format for Holdings Display (MFHD) ................................................................................. 501
106. Group Serials Issues in the Template Toolkit OPAC ........................................................................... 502Administration ............................................................................................................................ 502Displaying Issues in the OPAC ..................................................................................................... 502
XI. Circulation ............................................................................................................................................ 506107. Introduction ................................................................................................................................. 510108. Circulating Items .......................................................................................................................... 511
Check Out (F1) .......................................................................................................................... 511Check In (F2) ............................................................................................................................. 513Renewal and Editing the Item’s Due Date ....................................................................................... 515Marking Items Lost and Claimed Returned ...................................................................................... 517Mark an Item Long Overdue ......................................................................................................... 521In-house Use (F6) ....................................................................................................................... 524Item Status (F5) .......................................................................................................................... 525
109. Holds Management ....................................................................................................................... 530Placing Holds ............................................................................................................................. 530Holds Levels .............................................................................................................................. 530Title Level Hold ......................................................................................................................... 530Parts Level Hold ......................................................................................................................... 532Placing Holds in Patron Records .................................................................................................... 533Managing Holds ......................................................................................................................... 534Alternate Hold Pick up Location .................................................................................................... 552Display Hold Types on Pull Lists .................................................................................................. 555
110. Booking Module .......................................................................................................................... 557Creating a Booking Reservation ..................................................................................................... 557Reservation Pull List ................................................................................................................... 564Capturing Items for Reservations ................................................................................................... 565Picking Up Reservations .............................................................................................................. 566Returning Reservations ................................................................................................................ 568Cancelling a Reservation .............................................................................................................. 569
111. Circulation - Patron Record ........................................................................................................... 572Searching Patrons ........................................................................................................................ 572Registering New Patrons .............................................................................................................. 573Patron Self-Registration ................................................................................................................ 575Updating Patron Information ......................................................................................................... 577Renewing Library Cards ............................................................................................................... 578Lost Library Cards ...................................................................................................................... 580Resetting Patron’s Password ......................................................................................................... 580Barring a Patron ......................................................................................................................... 581Barred vs. Blocked ...................................................................................................................... 582Staff-Generated Messages ............................................................................................................. 582Patron Alerts .............................................................................................................................. 583Patron Notes .............................................................................................................................. 584Staff-Generated Penalties/Messages ................................................................................................ 586Patron Message Center ................................................................................................................. 590Merging Patron Records ............................................................................................................... 596
Evergreen Documentation 11Report errors in this documentation using Launchpad.
Bills and Payments ...................................................................................................................... 598112. Triggered Events and Notices ......................................................................................................... 611
Access and View ........................................................................................................................ 611Filter ......................................................................................................................................... 611Sort .......................................................................................................................................... 612Print .......................................................................................................................................... 612Reset ......................................................................................................................................... 612
113. Offline Transactions ..................................................................................................................... 613Patron Registration ...................................................................................................................... 613Checking Out Items ..................................................................................................................... 613Renew ....................................................................................................................................... 614In-house Use .............................................................................................................................. 614Check In .................................................................................................................................... 615Uploading Offline Transactions ..................................................................................................... 615
114. Self checkout ............................................................................................................................... 619Initializing the self check ............................................................................................................. 619Checking out or renewing items in the self check ............................................................................. 620
115. RFID Product Integration .............................................................................................................. 621Evergreen Integration with PV Supa GoodStuff RFID Reader ............................................................. 621
XII. Reports ............................................................................................................................................... 623116. Introduction ................................................................................................................................. 625117. Starting and Stopping the Reporter Daemon ...................................................................................... 626
Starting the Reporter Daemon ....................................................................................................... 626Stopping the Reporter Daemon ...................................................................................................... 626
118. Folders ....................................................................................................................................... 627Creating Folders ......................................................................................................................... 627Managing Folders ....................................................................................................................... 628
119. Creating Templates ....................................................................................................................... 629Choosing Report Fields ................................................................................................................ 629Applying Filters .......................................................................................................................... 639
120. Generating Reports from Templates ................................................................................................. 643Viewing and Editing Report Parameters .......................................................................................... 646
121. Viewing Report Output ................................................................................................................. 649122. Cloning Shared Templates ............................................................................................................. 651123. Adding Data Sources to Reporter .................................................................................................... 652
Create a PostgreSQL query, view, or table for your data source ........................................................... 652Add a new class to fm_IDL.xml for your data source ........................................................................ 653Restart the affected services to see the new data source in the reporter .................................................. 655
124. Running Recurring Reports ............................................................................................................ 657125. Template Terminology .................................................................................................................. 658
Data Types ................................................................................................................................ 658Field Transforms ......................................................................................................................... 659
126. Template Enhancements ................................................................................................................ 661Documentation URL .................................................................................................................... 661Field Hints ................................................................................................................................. 662
127. Exporting Report Templates Using phpPgAdmin ............................................................................... 664Dump the Entire Reports Template Table ........................................................................................ 664Dump Data with an SQL Statement ............................................................................................... 664
XIII. Web Client Preview ............................................................................................................................. 666128. Introduction ................................................................................................................................. 668129. Using the Web Client ................................................................................................................... 669
Introduction ................................................................................................................................ 669Logging into Evergreen ................................................................................................................ 669Tab Browser-Based Tab Buttons and Keyboard Shortcuts .................................................................. 670
130. Circulation .................................................................................................................................. 671
Evergreen Documentation 12Report errors in this documentation using Launchpad.
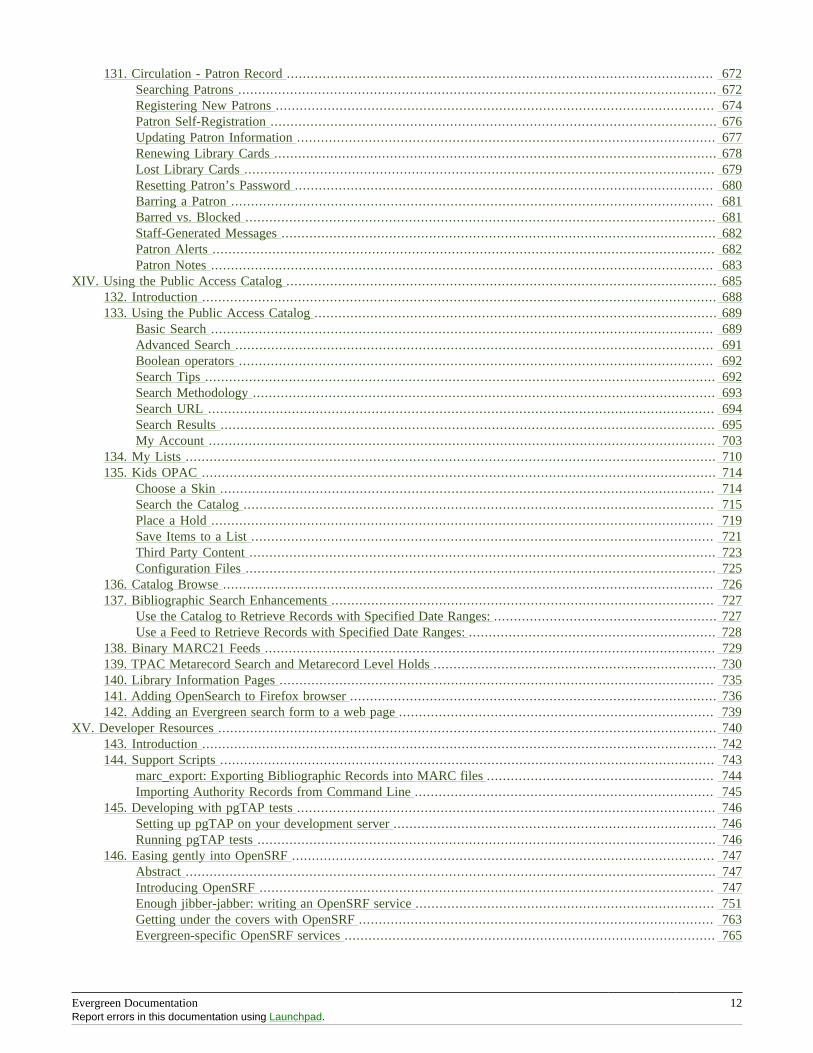
131. Circulation - Patron Record ........................................................................................................... 672Searching Patrons ........................................................................................................................ 672Registering New Patrons .............................................................................................................. 674Patron Self-Registration ................................................................................................................ 676Updating Patron Information ......................................................................................................... 677Renewing Library Cards ............................................................................................................... 678Lost Library Cards ...................................................................................................................... 679Resetting Patron’s Password ......................................................................................................... 680Barring a Patron ......................................................................................................................... 681Barred vs. Blocked ...................................................................................................................... 681Staff-Generated Messages ............................................................................................................. 682Patron Alerts .............................................................................................................................. 682Patron Notes .............................................................................................................................. 683
XIV. Using the Public Access Catalog ............................................................................................................ 685132. Introduction ................................................................................................................................. 688133. Using the Public Access Catalog ..................................................................................................... 689
Basic Search .............................................................................................................................. 689Advanced Search ........................................................................................................................ 691Boolean operators ....................................................................................................................... 692Search Tips ................................................................................................................................ 692Search Methodology .................................................................................................................... 693Search URL ............................................................................................................................... 694Search Results ............................................................................................................................ 695My Account ............................................................................................................................... 703
134. My Lists ..................................................................................................................................... 710135. Kids OPAC ................................................................................................................................. 714
Choose a Skin ............................................................................................................................ 714Search the Catalog ...................................................................................................................... 715Place a Hold .............................................................................................................................. 719Save Items to a List .................................................................................................................... 721Third Party Content ..................................................................................................................... 723Configuration Files ...................................................................................................................... 725
136. Catalog Browse ........................................................................................................................... 726137. Bibliographic Search Enhancements ................................................................................................ 727
Use the Catalog to Retrieve Records with Specified Date Ranges: ........................................................ 727Use a Feed to Retrieve Records with Specified Date Ranges: .............................................................. 728
138. Binary MARC21 Feeds ................................................................................................................. 729139. TPAC Metarecord Search and Metarecord Level Holds ....................................................................... 730140. Library Information Pages ............................................................................................................. 735141. Adding OpenSearch to Firefox browser ............................................................................................ 736142. Adding an Evergreen search form to a web page ............................................................................... 739
XV. Developer Resources ............................................................................................................................. 740143. Introduction ................................................................................................................................. 742144. Support Scripts ............................................................................................................................ 743
marc_export: Exporting Bibliographic Records into MARC files ......................................................... 744Importing Authority Records from Command Line ........................................................................... 745
145. Developing with pgTAP tests ......................................................................................................... 746Setting up pgTAP on your development server ................................................................................. 746Running pgTAP tests ................................................................................................................... 746
146. Easing gently into OpenSRF .......................................................................................................... 747Abstract ..................................................................................................................................... 747Introducing OpenSRF .................................................................................................................. 747Enough jibber-jabber: writing an OpenSRF service ........................................................................... 751Getting under the covers with OpenSRF ......................................................................................... 763Evergreen-specific OpenSRF services ............................................................................................. 765
Evergreen Documentation 13Report errors in this documentation using Launchpad.
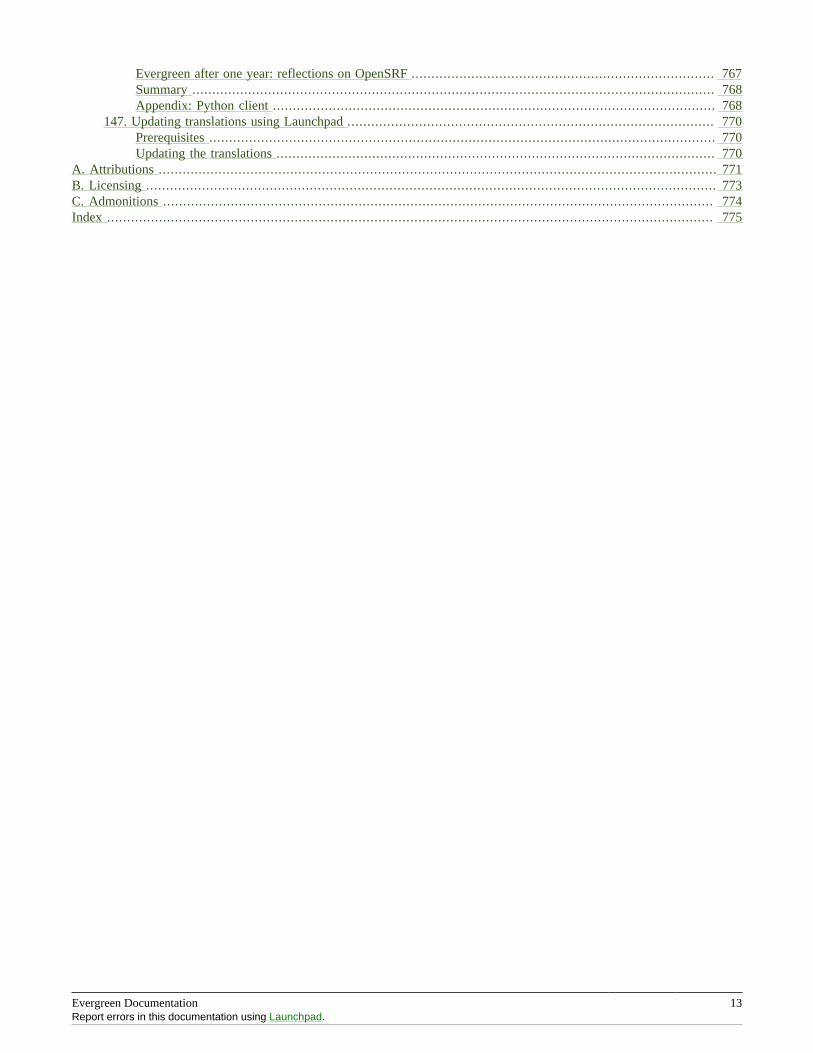
Evergreen after one year: reflections on OpenSRF ............................................................................ 767Summary ................................................................................................................................... 768Appendix: Python client ............................................................................................................... 768
147. Updating translations using Launchpad ............................................................................................ 770Prerequisites ............................................................................................................................... 770Updating the translations .............................................................................................................. 770
A. Attributions ............................................................................................................................................ 771B. Licensing ............................................................................................................................................... 773C. Admonitions .......................................................................................................................................... 774Index ........................................................................................................................................................ 775
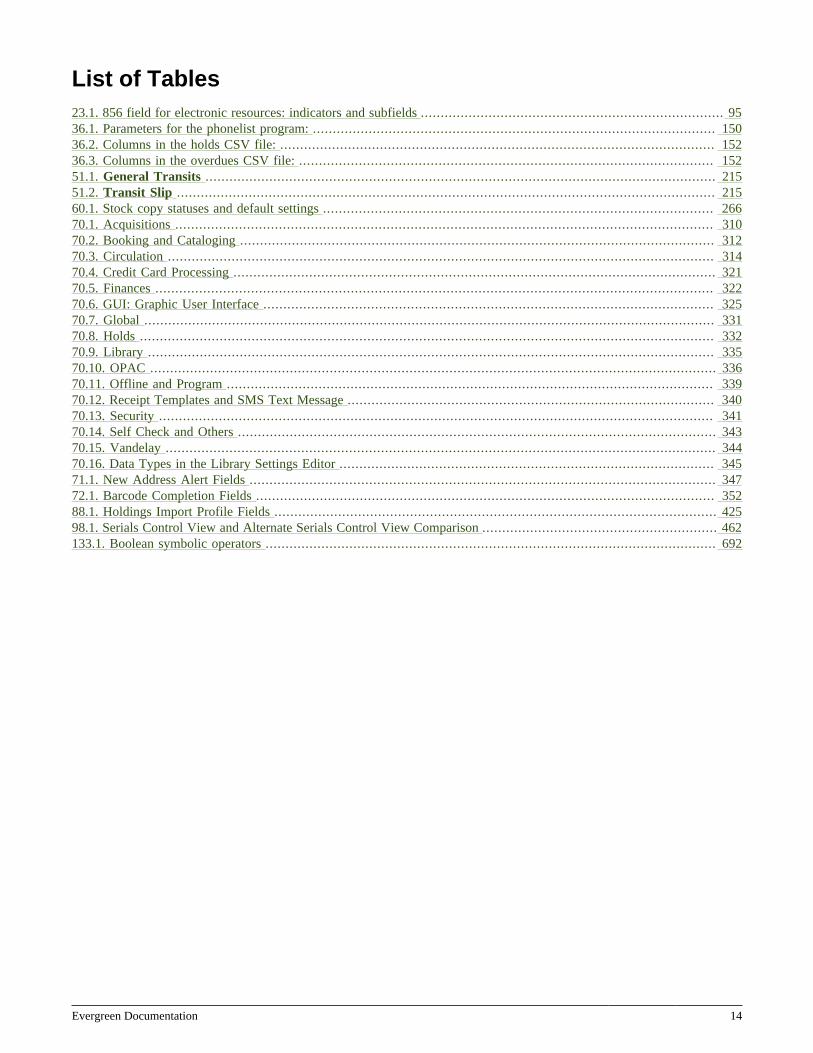
Evergreen Documentation 14
List of Tables23.1. 856 field for electronic resources: indicators and subfields ............................................................................ 9536.1. Parameters for the phonelist program: ..................................................................................................... 15036.2. Columns in the holds CSV file: ............................................................................................................. 15236.3. Columns in the overdues CSV file: ........................................................................................................ 15251.1. General Transits ................................................................................................................................ 21551.2. Transit Slip ....................................................................................................................................... 21560.1. Stock copy statuses and default settings .................................................................................................. 26670.1. Acquisitions ....................................................................................................................................... 31070.2. Booking and Cataloging ....................................................................................................................... 31270.3. Circulation ......................................................................................................................................... 31470.4. Credit Card Processing ......................................................................................................................... 32170.5. Finances ............................................................................................................................................ 32270.6. GUI: Graphic User Interface ................................................................................................................. 32570.7. Global ............................................................................................................................................... 33170.8. Holds ................................................................................................................................................ 33270.9. Library .............................................................................................................................................. 33570.10. OPAC .............................................................................................................................................. 33670.11. Offline and Program .......................................................................................................................... 33970.12. Receipt Templates and SMS Text Message ............................................................................................ 34070.13. Security ........................................................................................................................................... 34170.14. Self Check and Others ........................................................................................................................ 34370.15. Vandelay .......................................................................................................................................... 34470.16. Data Types in the Library Settings Editor .............................................................................................. 34571.1. New Address Alert Fields ..................................................................................................................... 34772.1. Barcode Completion Fields ................................................................................................................... 35288.1. Holdings Import Profile Fields ............................................................................................................... 42598.1. Serials Control View and Alternate Serials Control View Comparison ........................................................... 462133.1. Boolean symbolic operators ................................................................................................................. 692

Part I. Introduction

Part I. Introduction 16
Table of Contents1. About This Documentation ......................................................................................................................... 172. About Evergreen ....................................................................................................................................... 18

Chapter 1. About This Documentation 17
Chapter 1. About This DocumentationThis guide was produced by the Evergreen Documentation Interest Group (DIG), consisting of numerousvolunteers from many different organizations. The DIG has drawn together, edited, and supplemented pre-existingdocumentation contributed by libraries and consortia running Evergreen that were kind enough to release theirdocumentation into the creative commons. Please see the Attributions section for a full list of authors andcontributing organizations. Just like the software it describes, this guide is a work in progress, continually revised tomeet the needs of its users, so if you find errors or omissions, please let us know, by contacting the DIG facilitatorsat [email protected].
This guide to Evergreen is intended to meet the needs of front-line library staff, catalogers, library administrators,system administrators, and software developers. It is organized into Parts, Chapters, and Sections addressing keyaspects of the software, beginning with the topics of broadest interest to the largest groups of users and progressingto some of the more specialized and technical topics of interest to smaller numbers of users.
Copies of this guide can be accessed in PDF and HTML formats from http://docs.evergreen-ils.org/.

Chapter 2. About Evergreen 18
Chapter 2. About EvergreenEvergreen is an open source library automation software designed to meet the needs of the very smallest to the verylargest libraries and consortia. Through its staff interface, it facilitates the management, cataloging, and circulationof library materials, and through its online public access interface it helps patrons find those materials.
The Evergreen software is freely licensed under the GNU General Public License, meaning that it is free todownload, use, view, modify, and share. It has an active development and user community, as well as severalcompanies offering migration, support, hosting, and development services.
The community’s development requirements state that Evergreen must be:
• Stable, even under extreme load.
• Robust, and capable of handling a high volume of transactions and simultaneous users.
• Flexible, to accommodate the varied needs of libraries.
• Secure, to protect our patrons’ privacy and data.
• User-friendly, to facilitate patron and staff use of the system.
Evergreen, which first launched in 2006 now powers over 544 libraries of every type – public, academic, special,school, and even tribal and home libraries – in over a dozen countries worldwide.

Part II. Evergreen 2.9 Release Notes
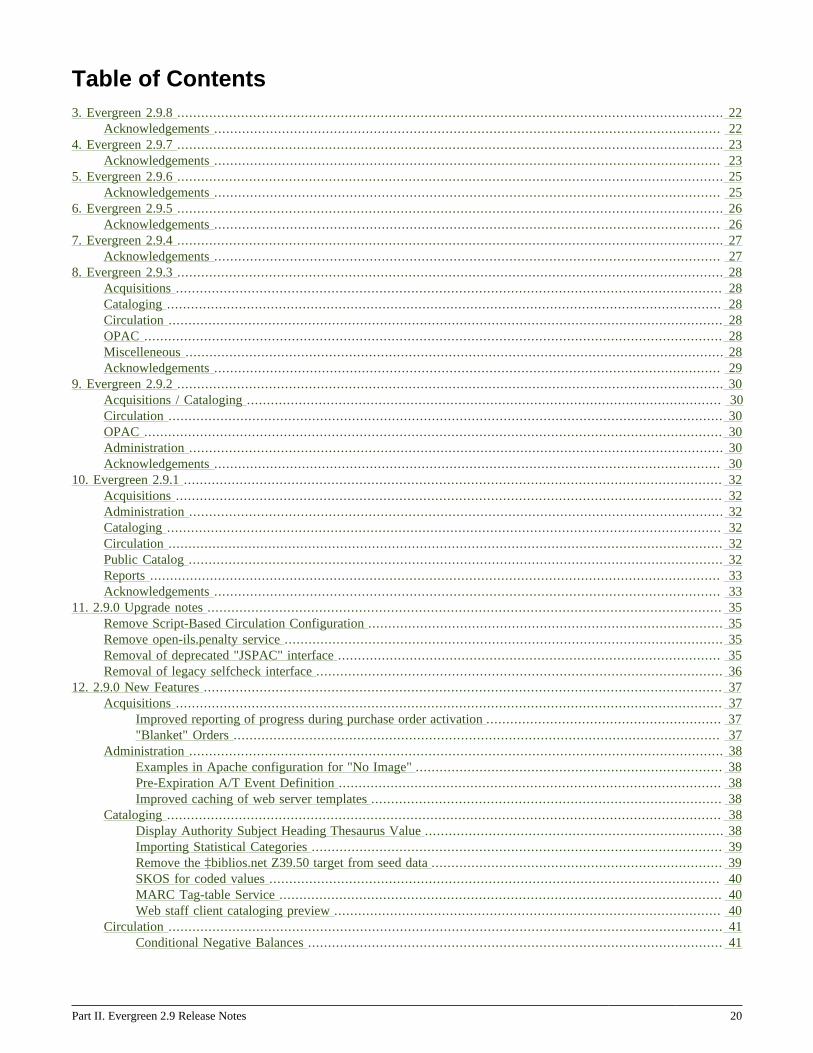
Part II. Evergreen 2.9 Release Notes 20
Table of Contents3. Evergreen 2.9.8 ......................................................................................................................................... 22
Acknowledgements ............................................................................................................................... 224. Evergreen 2.9.7 ......................................................................................................................................... 23
Acknowledgements ............................................................................................................................... 235. Evergreen 2.9.6 ......................................................................................................................................... 25
Acknowledgements ............................................................................................................................... 256. Evergreen 2.9.5 ......................................................................................................................................... 26
Acknowledgements ............................................................................................................................... 267. Evergreen 2.9.4 ......................................................................................................................................... 27
Acknowledgements ............................................................................................................................... 278. Evergreen 2.9.3 ......................................................................................................................................... 28
Acquisitions ......................................................................................................................................... 28Cataloging ........................................................................................................................................... 28Circulation ........................................................................................................................................... 28OPAC ................................................................................................................................................. 28Miscelleneous ....................................................................................................................................... 28Acknowledgements ............................................................................................................................... 29
9. Evergreen 2.9.2 ......................................................................................................................................... 30Acquisitions / Cataloging ....................................................................................................................... 30Circulation ........................................................................................................................................... 30OPAC ................................................................................................................................................. 30Administration ...................................................................................................................................... 30Acknowledgements ............................................................................................................................... 30
10. Evergreen 2.9.1 ....................................................................................................................................... 32Acquisitions ......................................................................................................................................... 32Administration ...................................................................................................................................... 32Cataloging ........................................................................................................................................... 32Circulation ........................................................................................................................................... 32Public Catalog ...................................................................................................................................... 32Reports ............................................................................................................................................... 33Acknowledgements ............................................................................................................................... 33
11. 2.9.0 Upgrade notes ................................................................................................................................. 35Remove Script-Based Circulation Configuration ......................................................................................... 35Remove open-ils.penalty service .............................................................................................................. 35Removal of deprecated "JSPAC" interface ................................................................................................ 35Removal of legacy selfcheck interface ...................................................................................................... 36
12. 2.9.0 New Features .................................................................................................................................. 37Acquisitions ......................................................................................................................................... 37
Improved reporting of progress during purchase order activation ........................................................... 37"Blanket" Orders .......................................................................................................................... 37
Administration ...................................................................................................................................... 38Examples in Apache configuration for "No Image" ............................................................................. 38Pre-Expiration A/T Event Definition ................................................................................................ 38Improved caching of web server templates ........................................................................................ 38
Cataloging ........................................................................................................................................... 38Display Authority Subject Heading Thesaurus Value ........................................................................... 38Importing Statistical Categories ....................................................................................................... 39Remove the ‡biblios.net Z39.50 target from seed data ......................................................................... 39SKOS for coded values ................................................................................................................. 40MARC Tag-table Service ............................................................................................................... 40Web staff client cataloging preview ................................................................................................. 40
Circulation ........................................................................................................................................... 41Conditional Negative Balances ........................................................................................................ 41
Part II. Evergreen 2.9 Release Notes 21Report errors in this documentation using Launchpad.
Selfcheck Inactivity Warning .......................................................................................................... 41User Registration Includes Inactive Accounts in Dupe Search ............................................................... 42
Client .................................................................................................................................................. 42Link in catalog to clear Added Content cache .................................................................................... 42Disable Google Analytics in Staff Client ........................................................................................... 42Move Acquisitions Admin Menu ..................................................................................................... 42
OPAC ................................................................................................................................................. 42Account Expiration Date in My Account .......................................................................................... 42Change to Available Copies Display ................................................................................................ 42Column sorting in circulation screens ............................................................................................... 42New bib source variable for catalog customization .............................................................................. 43New class attribute for e-resource links ............................................................................................ 43Removal of deprecated "JSPAC" interface ........................................................................................ 43Removal of legacy selfcheck interface .............................................................................................. 44
Acknowledgments ................................................................................................................................. 44

Chapter 3. Evergreen 2.9.8 22
Chapter 3. Evergreen 2.9.8This release contains several bugfixes improving on Evergreen 2.9.7
• When adding a price to the Acquisitions Brief Record price field, it will now propogate to the lineitem estimatedprice field.
• Declares UTF-8 encoding when printing from the catalog to resolve issues where non_ASCII characters printedincorrectly in some browsers.
• Fixes an issue where the circ module sometimes skipped over booking logic even when booking was runningon a system.
AcknowledgementsWe would like to thank the following individuals who contributed code, testing and documentation patches to the2.9.8 point release of Evergreen:
• Bill Erickson
• Mike Rylander
• Dan Scott

Chapter 4. Evergreen 2.9.7 23
Chapter 4. Evergreen 2.9.7This release contains several bugfixes improving on Evergreen 2.9.6
• The claims never checked out counter on the patron record is now incremented correctly when marking a lostloan as claims-never-checked-out.
• When a transit is canceled, the copy’s status is changed only if its status was previously "In Transit".
• Retrieving records with embedded holdings via SRU and Z39.50 is now faster.
• The hold status message in the public catalog now uses better grammar.
• The error message displayed when a patron attempts to place a hold but is prevented from doing so due to policyreasons is now more likely to be useful
• The public catalog now draws the edition statement only from the 250 field; it no longer tries to check the 534and 775 fields.
• Embedded schema.org microdata now uses "offeredBy" rather than "seller".
• The ContentCafe added content plugin now handles the "fake" ISBNs that Baker and Taylor assigns to mediaitems.
• Attempting to renew a rental or deposit item in the public catalog no longer causes an internal server errorr.
• Various format icons now have transparent backgrounds (as opposed to white).
• The staff client will no longer wait indefinitely for Novelist to supply added content, improving its responsiveness.
• A few additional strings are now marked as translatable.
AcknowledgementsWe would like to thank the following individuals who contributed code, testing and documentation patches to the2.9.6 point release of Evergreen:
• Thomas Berezansky
• Jason Boyer
• Galen Charlton
• Jeff Davis
• Blake Graham-Henderson
• Jim Keenan
• Kathy Lussier
• Mike Rylander
Chapter 4. Evergreen 2.9.7 24Report errors in this documentation using Launchpad.
• Dan Scott
• Ben Shum
• Remington Steed
• Jason Stephenson
• Josh Stompro
• Yamil Suarez
Chapter 5. Evergreen 2.9.6 25
Chapter 5. Evergreen 2.9.6This release contains several bugfixes improving on Evergreen 2.9.5
• Fixes a bug where Action Triggers could select an inactive event definition when running.
• Fixes an issue where previously-checked-out items did not display in metarecord searches when the TagCirculated Items Library Setting is enabled.
• Fixes an error that occurred when the system attempted to display a translated string for the "Has Local Copy"hold placement error message.
• Fixes an issue where the Show More/Show Fewer Details button didn’t work in catalogs that default to showingmore details.
• Removes Social Security Number as a stock patron identification type for new installations. This fix does notchange patron identification types for existing Evergreen systems.
• Adds two missing link fields (patron profile and patron home library) to the fm_idl.xml for the Combined Activeand Aged Circulations (combcirc) reporter source.
• Adds a performance improvement for the "Clear Holds Shelf" checkin modifier.
AcknowledgementsWe would like to thank the following individuals who contributed code, testing and documentation patches to the2.9.6 point release of Evergreen:
• Galen Charlton
• Codey Kolasinski
• Jeanette Lundgren
• Kathy Lussier
• Terran McCanna
• Michele Morgan
• Jason Stephenson
• Josh Stompro
Chapter 6. Evergreen 2.9.5 26
Chapter 6. Evergreen 2.9.5This release contains several bugixes improving on Evergreen 2.9.4
• Emails sent using the Action Trigger SendEmail reactor now always MIME-encode the From, To, Subject, Bcc,Cc, Reply-To, and Sender headers. As a consequence, non-ASCII character in those fields are more likely to bedisplayed correctly in email clients.
• Fixes the responsive view of the My Account Items Out screen so that Title and Author are now in separatecolumns.
• Fixes an incorrect link for the MVF field definition and adds a new link to BRE in fm_IDL.xml.
AcknowledgementsWe would like to thank the following individuals who contributed code and documentation patches to the 2.9.5point release of Evergreen:
• Blake Henderson
• Pasi Kallinen
• Dan Scott
• Dan Wells
We also thank the following organizations whose employees contributed patches:
• Calvin College
• Laurentian University
• MOBIUS
• Pohjois-Karjalan Tietotekniikkakeskus Oy
Chapter 7. Evergreen 2.9.4 27
Chapter 7. Evergreen 2.9.4This release contains several bugfixes improving on Evergreen 2.9.3
• Fixes a bug where phrase searching in the catalog failed when the phrase started or ended with punctuation.
• Fixes a bug where changing the sort order in the public catalog to "relevance" could fail.
• Fixes a bug that prevented users from recreating a monograph part that had previously been deleted.
• Silences unnecessary warnings emitted for libraries using extending grace periods.
• Removes support for Debian Squeeze now that its long-term support period has ended.
AcknowledgementsWe would like to thank the following individuals who contributed code and documentation patches to the 2.9.4point release of Evergreen:
• Jason Boyer
• Steve Callender
• Galen Charlton
• Mike Rylander
• Yamil Suarez
We also thank the following organizations whose employees contributed patches:
• Berklee College of Music
• Equinox Software, Inc.
• Evergreen Indiana
Chapter 8. Evergreen 2.9.3 28
Chapter 8. Evergreen 2.9.3This release contains several bugfixes improving on Evergreen 2.9.2.
Acquisitions• Adds EDI Cancel Code 85 to the acquisitions cancel reason table.
• Fixes an issue where the "Expand All" button in selection lists was not working.
• Fixes an issue where deletable reasons from the acquisitions Cancel Reasons table could not be deleted.
Cataloging• Improves sorting in holdings maintenance so that copies sort first by parts then by barcode.
Circulation• Fixes an issue where the wrong last billing type and last billing note were displaying for some transactions.
• Now calculates credit payments as integers to avoid rounding errors with large sets of small billings.
• Fixes an issue in the patron record where staff was unable to retrieve the Message Center interface after visitingthe Triggered Events page and vice versa.
• Now displays the short version of a title on the Place Holds screen when placing metabib holds to reduce instanceswhere the wrong title/format displayed.
OPAC• Fixes an issue where detailed search results showed parts for items that didn’t have parts.
• Changes the e-mail address check on password reset requests so that it is no longer case sensitive.
• Fixes a problem where users were unable to navigate through multiple pages of their holds history.
• Removes undefined values from ISBN and ISSN arrays to prevent empty requests from being sent to addedcontent providers.
• Fixes an issue where the kids catalog was not displaying title information after hold placement or after addinga title to a list.
• Corrects the kids catalog holds notification default preferences to allow for SMS text messaging options.
Miscelleneous• Modifies the way SIP2 clients parse dates so that a patron’s date of birth is returned correctly.
Chapter 8. Evergreen 2.9.3 29Report errors in this documentation using Launchpad.
• Fixes an issue where the Selfcheck fines receipt templated printed all open billable transactions, regardless ofwhether it had bills associated with it.
• Fixes an issue that prevented Selfcheck’s "Print List" for holds view from working.
AcknowledgementsWe would like to thank the following individuals who contributed code and documentation patches to the 2.9.3point release of Evergreen:
• Thomas Berezansky
• Jason Boyer
• Galen Charlton
• Bill Erickson
• Blake Henderson
• Terran McCanna
• Chris Sharp
• Remington Steed
• Jason Stephenson
• Josh Stompro
• Dan Wells
We also thank the following organizations whose employees contributed patches:
• Calvin College
• Equinox Software, Inc.
• Evergreen Indiana
• Georgia Public Library Service
• King County Library System
• Lake Agassiz Regional Library
• Merrimack Valley Library Consortium
• MOBIUS
• Northwest Regional Library System
Chapter 9. Evergreen 2.9.2 30
Chapter 9. Evergreen 2.9.2This release contains several bugfixes improving on Evergreen 2.9.1.
Acquisitions / Cataloging• Allows the Z39.50 itnerface and the acquisitions MARC Federated Search interface to search the UPC index of
the local catalog if Z39.50 is configured to search that field.
• Fixes an issue where spaces in a PO name cause the system to improperly process EDI response messages.
Circulation• Fixes a problem where the balance owed was miscalculated when a row was deleted from money.billing.
• Fixes an issue where credit card payments made via PayflowPro failed because Evergreen does not install thePayflowPro module by default.
• Changes credit card payment behavior so that the patron’s billing address will be read when the patron has nomailing address. If all address fields are properly set by the API caller except the country and the patron has noaddresses, the system will attempt to determine the country from library settings. If insufficient address data isprovided, the system will return an invalid params Event.
• Modifies the reasons for various void/adjust events to more accurately reflect the reason why a fine/fee wasremoved from a patron’s record.
OPAC• Fixes an issue where the reset password link was displaying even on systems that had disabled the ability to reset
passwords.
• Fixes an issue where the journal type search did not work when entering it as the second or third input on theadvanced search screen.
• Fixes an issue where catalog translations were broken by creating separate directories for the catalog and webstaff client translations.
Administration• Changes marc_export to only print "waiting for input" when running interactively.
AcknowledgementsWe would like to thank the following individuals who contributed code and documentation patches to the 2.9.2point release of Evergreen:
• Galen Charlton

Chapter 9. Evergreen 2.9.2 31Report errors in this documentation using Launchpad.
• Bill Erickson
• Blake Henderson
• Mike Rylander
• Ben Shum
• Jason Stephenson
• Dan Wells
We also thank the following organizations whose employees contributed patches:
• Calvin College
• Equinox Software, Inc.
• King County Library System
• Merrimack Valley Library Consortium
• MOBIUS

Chapter 10. Evergreen 2.9.1 32
Chapter 10. Evergreen 2.9.1This release contains several bugfixes improving on Evergreen 2.9.0.
Acquisitions• Protects the stock acquisitions cancel reasons from deletion since they are required to properly handle EDI order
responses.
• Changes the copy location dropdown so that users can view and select copy locations owned outside theworkstation branch if they have permission to do so. This fix also adds the copy location’s owning org unit tothe display.
Administration• Allows use of more special characters, including - and +, when entering a library’s main email address in the
Organizational Units editor.
• Fixes an issue where marc_export attempts to call a non-existent field on MARC::Record if an error occurs whileexporting authority records.
Cataloging• Fixes the mapping between copies and the target part when using "Merge Selected" in the Monographic Parts
interface.
• Fixes an issue with the horizontal scrollbar bar in the MARC import queue inspector so the focus no longer jumpsto the top of the screen when attempting to use the scrollbar.
• Hides the staff-client saved searches header from screen readers when using the public catalog in non-staff mode.
Circulation• When placing a hold via the staff client and clicking Advanced Hold Options, fixes an issue where the barcode
field populated with the staff member’s barcode.
• Fixes an issue where some holds with a higher proximity were preferred over holds with a lower proximity becausethe list of proximities of elgible copies was sorting ASCIIbetically instead of numerically.
• Adds a delete flag for monographic parts, fixes staff client errors that were previously caused by deleted parts,and cancels any holds attached to those deleted parts.
• Fixes an internal error that appeared when trying to renew an item on the booking resource list through the publiccatalog. Users will now get a message saying they do not have permission to renew the item.
Public Catalog• Fixes an issue where unclosed phrase searches returned zero results and tied up the open-ils.storage process.
Chapter 10. Evergreen 2.9.1 33Report errors in this documentation using Launchpad.
• Fixes an issue where phrase searches were ignoring modifiers used in relevance ranking, leading to poorly-rankedresults.
• Fixes an issue where parameters weren’t properly maintained when searching by copy location group.
Reports• Adds support for UTF-8 in the Reports interface.
AcknowledgementsWe would like to thank the following individuals who contributed code and documentation patches to the 2.9.1point release of Evergreen:
• Adam Bowling
• Kate Butler
• Steven Chan
• Galen Charlton
• Blake Henderson
• Pasi Kallinen
• Jake Litrell
• Kathy Lussier
• Mike Rylander
• Dan Scott
• Chris Sharp
• Ben Shum
• Remington Steed
• Jason Stephenson
• Josh Stompro
• Yamil Suarez
We also thank the following organizations whose employees contributed patches:
• Berklee College of Music
• Bibliomation
• British Columbia Libraries Cooperative

Chapter 10. Evergreen 2.9.1 34Report errors in this documentation using Launchpad.
• Calvin College
• Emerald Data Networks, Inc.
• Equinox Software, Inc.
• Georgia Public Library Service
• Lake Agassiz Regional Library
• Laurentian University
• Massachusetts Library Network Cooperative
• Merrimack Valley Library Consortium
• MOBIUS
• Northwest Regional Library System
• Pohjois-Karjalan Tietotekniikkakeskus Oy
• Rodgers Memorial Library
We regret any omissions. If a contributor has been inadvertantly missed, please open a bug at http://bugs.launchpad.net/evergreen/ with a correction.
Chapter 11. 2.9.0 Upgrade notes 35
Chapter 11. 2.9.0 Upgrade notes
Remove Script-Based CirculationConfigurationEvergreen no longer supports script-based circulation policies. All policies must now be managed within the LocalAdministration # Circulation Policies, Hold Policies, and related interfaces.
Remove open-ils.penalty serviceEvergreen no longer uses the open-ils.penalty service. It is safe (though not required) to remove the following XMLchunks from /openils/conf/opensrf.xml after stopping services.
<!-- first element -->
<open-ils.penalty> <keepalive>3</keepalive> <stateless>1</stateless> <language>perl</language> <implementation>OpenILS::Application::Penalty</implementation> <max_requests>99</max_requests> <unix_config> <max_requests>1000</max_requests> <unix_log>open-ils.penalty_unix.log</unix_log> <unix_sock>open-ils.penalty_unix.sock</unix_sock> <unix_pid>open-ils.penalty_unix.pid</unix_pid> <min_children>1</min_children> <max_children>15</max_children> <min_spare_children>1</min_spare_children> <max_spare_children>5</max_spare_children> </unix_config> <app_settings> <patron_penalty>penalty/patron_penalty.js</patron_penalty> <script_path>LIBDIR/javascript</script_path> <script_path>LOCALSTATEDIR</script_path> <script_path>LOCALSTATEDIR/catalog</script_path> </app_settings></open-ils.penalty>
<!-- second element -->
<appname>open-ils.penalty</appname>
Removal of deprecated "JSPAC" interfaceThe deprecated Javascript OPAC interface known as "JSPAC" is no longer included in Evergreen as of this release.
With the understanding that local sites may have made use of existing parts of the old JSPAC interface — especiallyimages and CSS — no attempt is made at upgrade time to automatically remove the existing files from disk.
When upgrading, you may wish to remove "index.xml" from your Apache DirectoryIndex directives.
The following directories, xml, js, and css files were formerly part of JSPAC, and you may be able to safely removethem from your system after verifying that they and their contents are no longer required:
• web/opac/common/css/
Chapter 11. 2.9.0 Upgrade notes 36Report errors in this documentation using Launchpad.
• web/opac/common/js/dtree.js
• web/opac/common/xml/
• web/opac/extras/bbags.js
• web/opac/extras/bbags.xml
• web/opac/skin/default/js/
• web/opac/skin/default/xml/
• web/opac/theme/
The list of images removed in this change is lengthy, and not included here.
Removal of legacy selfcheck interfaceThe legacy selfcheck interface is no longer included in Evergreen as of this release.
This interface was formerly located at a URL ending in extras/selfcheck/selfcheck.xml
No attempt is made at upgrade time to automatically remove this interface.
It is recommended that you remove this interface and its associated configuration after performing an upgrade:
(paths relative to Evergreen web root)
• opac/extras/selfcheck/selfcheck.css
• opac/extras/selfcheck/selfcheck.js
• opac/extras/selfcheck/selfcheck.xml
• opac/extras/selfcheck/selfcheck_print.css
You can also remove the related Apache configuration block starting with:
<LocationMatch .*/selfcheck.xml>
Chapter 12. 2.9.0 New Features 37
Chapter 12. 2.9.0 New Features
Acquisitions
Improved reporting of progress during purchase orderactivationThe progress dialog that is displayed when activating a purchase order now displays more information, particularlyduring the asset creation phase. It is now also updated in a more linear fashion; making it less likely for it to appearthat the activation has stalled.
"Blanket" Orders"Blanket" orders allow staff to invoice an encumbered amount multiple times, paying off the charge over a periodof time. The work flow supported by this development assumes staff does not need to track the individual contentsof the order, only the amounts encumbered and invoiced in bulk.
Example
1. Staff creates PO with a Direct Charge of "Popular Fiction 2015" and a charge type of "Blanket Order".
2. The amount entered for the charge equals the total amount expected to be charged over the duration of the order.
3. When a shipment of "Popular Fiction" items arrive, staff creates an invoice from the "Popular Fiction 2015"PO page and enters the amount billed/paid for the received shipment under the "Popular Fiction 2015" chargein the invoice.
4. When the final shipment arrives, staff select the Final invoice for Blanket Order option on the invoice screen tomark the PO as received and drop any remaining encumbrances to $0.
a. Alternatively, if the PO needs to be finalized without creating a final invoice, staff can use the new FinalizeBlanket Order option on the PO page.
New Components/Terminology/Concepts
• Invoice Item Types have a new flag called blanket, available under Admin # Server Administration # Acq #Invoice Item Types in the staff client.
• Any direct charge using a blanket item type will create a long-lived charge that can be invoiced multiple times.
• Such a charge is considered open until its purchase order is "finalized" (received).
• "Finalizing" a PO changes the PO’s state to received (assuming there are no pending lineitems on the PO) and fullydis-encumbers all blanket charges on the PO by setting the fund_debit amount to $0 on the original fund_debitfor the charge.
• Invoicing a blanket charge does the following under the covers:
a. Create an invoice_item to track the payment
Chapter 12. 2.9.0 New Features 38Report errors in this documentation using Launchpad.
b. Create a new fund_debit to implement the payment whose amount matches the invoiced amount.
c. Subtract the invoiced amount from the fund_debit linked to the original blanket po_item, thus reducing theamount encumbered on the charge as a whole by the invoiced amount.
• A PO can have multiple blanket charges. E.g. you could have a blanket order for "Popular Fiction 2015" and asecond charge for "Pop Fiction 2015 Taxes" to track / pay taxes over time on a blanket charge.
• A PO can have a mix of lineitems, non-blanket charges, and blanket charges.
• A blanket Invoice Item Type cannot also be a prorate type, since it’s nonsensical. Blanket items are encumbered,whereas prorated items are only paid at invoice time and never encumbered.
AdministrationExamples in Apache configuration for "No Image"There are now commented out examples for custom images to be used when "no image" is present in the catalogfor cover art. The included examples are for small/medium/large jacket image art in the event they are not foundby the configured Added Content module.
Pre-Expiration A/T Event DefinitionA new Action Trigger event definition ("30 Day Account Expiration Courtesy Notice") for sending alerts to usersbefore their accounts are expired has been added. This is intended to give users time to renew their account beforethey lose access to library services.
Improved caching of web server templatesTemplate Toolkit processors used by Apache are now cached for better performance (by virtue of thereby beingable to take advantage of Template Toolkit’s internal caching mechanism). In addition, the compiled versions ofthe templates themselves can be cached to provide an additional performance boost.
Two Apache virtualhost configuration variables are added to control caching of compiled templates:
• OILSWebCompiledTemplateCache - specifies location on the web server filesystem to store compiledtemplates.
• OILSWebTemplateStatTTL - specifies number of seconds before checking to see if a newer version of acached template is available.
As a result of the caching changes, it is now necessary for Evergreen administrators to reload Apache to ensure thata change to (say) TPAC templates becomes visible.
CatalogingDisplay Authority Subject Heading Thesaurus ValueThere is now a new column in the Manage Authorities search results. Each result row now displays each authority’sthesaurus value with a "Thes: " prefix. In the authority MARC editor interface the thesaurus value corresponds to

Chapter 12. 2.9.0 New Features 39Report errors in this documentation using Launchpad.
the "Subject Heading Thesaurus" fixed field (http://www.loc.gov/marc/authority/ad008.html) labeled “Subj”. Forexample, a value of "Thes: a" means that the authority is a Library of Congress Subject Heading, and a value of"Thes: k" means the authority is a Canadian Subject Heading.
A Library of Congress list of thesaurus values:
• '' = Alternate no attempt to code
• a = Library of Congress Subject Headings
• b = LC subject headings for children’s literature
• c = Medical Subject Headings
• d = National Agricultural Library subject authority file
• k = Canadian Subject Headings
• n = Not applicable
• r = Art and Architecture Thesaurus
• s = Sears List of Subject Headings
• v = Repertoire de vedettes-matiere
• z = Other
• | = No attempt to code
Importing Statistical CategoriesYou can now retrieve statistical categories (stat cats) from the MARC record and apply them to the items inEvergreen. When importing or overlaying items through the Vandelay MARC batch import process, edit yourHoldings Import Profile to tell Evergreen which subfield contains your stat cat data. That subfield in your MARCrecords should be formatted like the following:
CATEGORY 1|VALUE 1||CATEGORY 2|VALUE 2
Notice that the pipe character | is used to separate each category from its value, and two pipes separate each pairof category values.
If you are overlaying existing copies which already have stat cats attached to them, the overlay process will keepthose values unless the incoming copies contain updated values for matching categories.
Remove the ‡biblios.net Z39.50 target from seed dataThe Z39.50 target at z3950.biblios.net/bibliographic has not worked for years, so its service definition is no longerprovided in the seed data for new installations of Evergreen.
Users of existing Evergreen systems should consider removing the Z39.50 definition for ‡biblios.net. This can bedone from Admin | Server Administration | Z39.50 Servers in the staff client.
Chapter 12. 2.9.0 New Features 40Report errors in this documentation using Launchpad.
SKOS for coded valuesSome vocabularies used (or which could be used) for stock record attributes and coded value maps in Evergreen arepublished on the web using SKOS. The record attributes system can now associate Linked Data URIs with specificattribute values. In particular, seed data supplying URIs for the RDA Content Type, Media Type, and Carrier Typein this release.
This is an experimental, "under-the-hood" feature that will be built upon in subsuquent releases.
MARC Tag-table ServiceThe tag tables for the web staff client MARC editor are now stored in the database rather than a separate XMLtooltips file as used by the XUL MARC editor. The tag-table service, which is part of the web staff client sprint 2preview in this release, has the following features:
• specifies whether (sub)fields are optional or mandatory
• specifies whether (sub)fields are repeatable or not
• a coded value map can be associated with a subfield to establish a controlled vocabulary for that subfield
• MARC field and subfield definitions can be overridden by institutions further down in the organizational unithierarchy. This allows, for example, a library to specify definitions for local MARC tags.
• values supplied by the tag-table service are used to populate values in context menus in the web staff client MARCeditor.
The initial seed data for the in-database tag table is derived from the current tooltips XML file.
Web staff client cataloging previewThe web staff client now includes additional functionality to support cataloging and item maintenance, including:
• a new MARC editor
• the service backing the authority headings chooser now has the ability to filter the browse by subject thesaurus
• Z39.50 search and record import
• improvements to copy and record bucket functionality
• embedding the link checker interface
• embedding the MARC batch import/export interface
• the web staff volume/copy editor
Nearly all of the cataloging functionality available in the XUL staff client is now present in the web staff client withthe exception of printing spine labels. Nonetheless, the web staff client remains a preview and is not recommendedfor production use.
Chapter 12. 2.9.0 New Features 41Report errors in this documentation using Launchpad.
CirculationConditional Negative BalancesEvergreen sites will now have more control over whether a negative balance can be applied to a user’s billing recordand when that negative balance can be applied. Through a series of Library Settings, a site can prohibit negativebalances on bills or can allow those negative balances to be applied for a specific period of time after a lost oroverdue bill is charged to the user. Sites can set a default for all types of bills or can apply distinct settings for lostbills and for overdue fines. The more specific settings will override the default.
Sites that opt to allow negative balances for a specific period of time must 1) enable the relevant "prohibit negativebalances" setting(s) and 2) specify the time period in the relevant Negative Balance Interval setting(s).
In addition to the new library settings, the system now has a new account adjustment payment type. This paymenttype will be utilized for libraries prohibiting negative balances to replace the previous voiding behavior that causedthe negative balances to occur. The account adjustment payment type will also be used for all libraries, regardless ofthe state of negative balance settings, in cases where overdue fines are adjusted when an overdue item is marked lost.
An Adjust to Zero option has been added to the bills interface of the patron record. This option will always adjustthe selected bill to a zero balance. It can also be used to easily clear a negative balance from the patron’s record. Auser must have the new ADJUST_BILLS permission to see and use this option.
This new feature also changes the behavior for the client option to void a bill from the patron record. If a user doesnot have the VOID_BILLING permission, the option to void bills will be hidden in the bills interface and in theFull Details view of a specific bill.
To truly remove the ability to produce negative balances on a transaction, administrators need to 1) enable therelevant setting in the Library Settings Editor and 2) remove the VOID_BILLING permission from staff accountssince manual voiding will continue to produce negative balances.
New Library Settings
• Negative Balance Interval (Default) (bill.negative_balance_interval_default)
• Negative Balance Interval for Lost (bill.negative_balance_interval_on_lost) -
• Negative Balance Interval for Overdues (bill.negative_balance_interval_on_overdues
• Prohibit negative balance on bills (Default) (bill.prohibit_negative_balance_default)
• Prohibit negative balance on bills for lost materials (bill.prohibit_negative_balance_on_lost)
• Prohibit negative balance on bills for overdue materials (bill.prohibit_negative_balance_on_overdues)
New Permissions
• ADJUST_BILLS
Selfcheck Inactivity WarningThe Selfcheck interface now warns patrons when they are about to be logged out due to inactivity 20 seconds priorto logging them out.

Chapter 12. 2.9.0 New Features 42Report errors in this documentation using Launchpad.
The inactivity timeout is also reset with each checkout to avoid timeouts while checking out lots of items.
User Registration Includes Inactive Accounts in DupeSearchWhen registering a user, the system checks to see if there are already exiting users with the same name, address,email, etc. Now this duplicate user search includes inactive users so that matches can be re-activated if desired,rather than creating duplicate accounts.
Client
Link in catalog to clear Added Content cacheOn the catalog’s record summary page, there is now a link for staff that allow them to forcibly clear the cache for theAdded Content for that record. This is helpful if the Added Content retrieved the wrong cover jacket art, summary,etc. and caches the wrong result.
Disable Google Analytics in Staff ClientIn the staff client interface, Google Analytics for the web catalog is now disabled by default. This was a preventivemeasure to reduce the potential risks for leaking patron information.
Move Acquisitions Admin MenuIn the staff client interface, the Acquisitions Administration menu is now directly accessible from the main "Admin"menu instead of living under "Server Administration". It has also been renamed as "Acquisitions Administration".
OPAC
Account Expiration Date in My AccountThe Account Expiration Date has been added to the catalog’s My Account display on the main Account Summarypage and the Account Preferences page. This should help patrons with figuring out when their accounts are due toexpire before they actually expire.
Change to Available Copies DisplayThe Show link in the available copies area of the record summary will now display for any org unit that owns a copyof a particular title, even if all those copies are unavailable. The Show link will not display if a) the copy display isalready scoped to that org unit or b) the org unit does not own copies of the title.
The language has also been changed to read "x of y copies available at z library."
Column sorting in circulation screensSorting of selected columns is now available in the Items Checked Out, Check Out History, and Holds screens.
Chapter 12. 2.9.0 New Features 43Report errors in this documentation using Launchpad.
• Clicking on the appropriate column heads now sorts the contents from “ascending” to “descending” to “no sort”.(The “no sort” restores the original list as presented in the screen.)
• The sort indicator (an up or down arrow) is placed to the right of the column head, as appropriate.
• The combined Title/Author column in the Items Checked Out screen is now separated into two independentlysortable columns (Title and Author).
• Title sorting is done with the non-filing characters (leading “the”, “a”, “an”, and other langugage equivalents)removed. The leading articles are rendered in a smaller font, so as to keep the main entry prominent. In additionto the non-filing characters removed for the sort, leading non-alphanumeric characters are ignored in the sort.
New bib source variable for catalog customizationFor bibliographic records, there is a "bib source" that can be associated with every record. This source is nowavailable as a variable that can be used behind the scenes when customizing the online catalog. The new bib sourcevariables do not present themselves in the catalog display by default.
New class attribute for e-resource linksIn the catalog, links to electronic resources now have a link class attribute of "uri_link" to make them easier tocustomize or build additional services upon.
Removal of deprecated "JSPAC" interfaceThe deprecated Javascript OPAC interface known as "JSPAC" is no longer included in Evergreen as of this release.
With the understanding that local sites may have made use of existing parts of the old JSPAC interface — especiallyimages and CSS — no attempt is made at upgrade time to automatically remove the existing files from disk.
When upgrading, you may wish to remove "index.xml" from your Apache DirectoryIndex directives.
The following directories, xml, js, and css files were formerly part of JSPAC, and you may be able to safely removethem from your system after verifying that they and their contents are no longer required:
• web/opac/common/css/
• web/opac/common/js/dtree.js
• web/opac/common/xml/
• web/opac/extras/bbags.js
• web/opac/extras/bbags.xml
• web/opac/skin/default/js/
• web/opac/skin/default/xml/
• web/opac/theme/
The list of images removed in this change is lengthy, and not included here.
Chapter 12. 2.9.0 New Features 44Report errors in this documentation using Launchpad.
Removal of legacy selfcheck interfaceThe legacy selfcheck interface is no longer included in Evergreen as of this release.
This interface was formerly located at a URL ending in extras/selfcheck/selfcheck.xml
No attempt is made at upgrade time to automatically remove this interface.
It is recommended that you remove this interface and its associated configuration after performing an upgrade:
(paths relative to Evergreen web root)
• opac/extras/selfcheck/selfcheck.css
• opac/extras/selfcheck/selfcheck.js
• opac/extras/selfcheck/selfcheck.xml
• opac/extras/selfcheck/selfcheck_print.css
You can also remove the related Apache configuration block starting with:
<LocationMatch .*/selfcheck.xml>
AcknowledgmentsThe Evergreen project would like to acknowledge the following organizations who commissioned developmentsin this release of Evergreen:
• Georgia Public Library Service
• Grand Rapids Public Library
• Kenton County Public Library
• King County Library System
• Massachusetts Library Network Cooperative
• NC Cardinal
• OhioNet
• Pennsylvania Integrated Library System
We would also like to thank the following individuals who contributed code, documentation patches and tests tothis release of Evergreen:
• Thomas Berezansky
• Matt Berowski
• Adam Bowling

Chapter 12. 2.9.0 New Features 45Report errors in this documentation using Launchpad.
• Jason Boyer
• Christine Burns
• Galen Charlton
• Bill Erickson
• Jason Etheridge
• Jeff Davis
• Lynn Floyd
• Jeff Godin
• Angela Kilsdonk
• Doug Kyle
• Debbie Luchenbill
• Kathy Lussier
• Terran McCanna
• Stephen Moss
• Dan Pearl
• Michael Peters
• Mike Rylander
• Jane Sandberg
• Dan Scott
• Ben Shum
• Josh Stompro
• Remington Steed
• Jason Stephenson
• Yamil Suarez
• Dan Wells
• Liam Whalen
We also thank the following organizations whose employees contributed patches:
• Anderson County Library

Chapter 12. 2.9.0 New Features 46Report errors in this documentation using Launchpad.
• Berklee College of Music
• Bibliomation
• British Columbia Libraries Cooperative
• Calvin College
• Catalyst Dev Works
• Central/Western Massachusetts Automated Resource Sharing
• Emerald Data Networks, Inc.
• Equinox Software, Inc.
• Georgia Public Library Service
• Grand Rapids Public Library
• Indiana State Library
• King County Library System
• Lake Agassiz Regional Library
• Laurentian University
• Linn-Benton Community College
• Massachusetts Library Network Cooperative
• Merrimack Valley Library Consortium
• MOBIUS
• Northwest Regional Library System
• Sigio
• Traverse Area District Library
We regret any omissions. If a contributor has been inadvertantly missed, please open a bug at http://bugs.launchpad.net/evergreen/ with a correction.

Part III. Software Installation
Part III. Software Installation 48
Table of Contents13. Introduction ............................................................................................................................................ 4914. System Requirements ............................................................................................................................... 50
Server Minimum Requirements ............................................................................................................... 50Staff Client Requirements ...................................................................................................................... 50
15. Installing the Evergreen server ................................................................................................................... 51Preamble: referenced user accounts .......................................................................................................... 51Preamble: developer instructions ............................................................................................................. 51Installing prerequisites ........................................................................................................................... 51Configuration and compilation instructions ................................................................................................ 53Installation instructions .......................................................................................................................... 53Change ownership of the Evergreen files .................................................................................................. 53Additional Instructions for Developers ...................................................................................................... 53Configure the Apache Web server ........................................................................................................... 54Configure OpenSRF for the Evergreen application ...................................................................................... 55Creating the Evergreen database .............................................................................................................. 56
Setting up the PostgreSQL server .................................................................................................... 56Creating the Evergreen database and schema ..................................................................................... 57Loading sample data ..................................................................................................................... 57Creating the database on a remote server .......................................................................................... 57
Starting Evergreen ................................................................................................................................ 58Testing connections to Evergreen ............................................................................................................ 58Getting help ......................................................................................................................................... 59License ............................................................................................................................................... 59
16. Installing the Staff Client .......................................................................................................................... 60Installing on Windows ........................................................................................................................... 60Installing on Linux ................................................................................................................................ 62Registering a Workstation ...................................................................................................................... 62Removing Staff Client Preferences .......................................................................................................... 63
Windows ..................................................................................................................................... 63Linux .......................................................................................................................................... 64
17. Upgrading the Evergreen Server ................................................................................................................. 65Software Prerequisites ........................................................................................................................... 65Upgrade the Evergreen code ................................................................................................................... 65Upgrade the Evergreen database schema ................................................................................................... 67Restart Evergreen and Test ..................................................................................................................... 69Review Release Notes ........................................................................................................................... 70
18. Setting Up EDI Acquisitions ..................................................................................................................... 71Introduction ......................................................................................................................................... 71Installation ........................................................................................................................................... 71
Install EDI Translator .................................................................................................................... 71Install EDI Scripts ........................................................................................................................ 72
Configuration ....................................................................................................................................... 72Configuring Providers .................................................................................................................... 72Configuring EDI Accounts ............................................................................................................. 73Configuring Organizational Unit SAN code ....................................................................................... 73
Troubleshooting .................................................................................................................................... 73PO JEDI Template Issues ............................................................................................................... 73

Chapter 13. Introduction 49
Chapter 13. IntroductionThis part will guide you through the installation steps installation or upgrading your Evergreen system. It is intendedfor system administrators.
Chapter 14. System Requirements 50
Chapter 14. System Requirements
Server Minimum RequirementsThe following are the base requirements setting Evergreen up on a test server:
• An available desktop, server or virtual image
• 1GB RAM, or more if your server also runs a graphical desktop
• Linux Operating System
• Ports 80 and 443 should be opened in your firewall for TCP connections to allow OPAC and staff clientconnections to the Evergreen server.
Staff Client RequirementsStaff terminals connect to the central database using the Evergreen staff client, available for download from TheEvergreen download page. The staff client must be installed on each staff workstation and requires at minimum:
• Windows (XP, Vista, or 7), Mac OS X, or Linux operating system
• a reliable high speed Internet connection
• 512Mb of RAM
• The staff client uses the TCP protocol on ports 80 and 443 to communicate with the Evergreen server.
Barcode Scanners
Evergreen will work with virtually any barcode scanner – if it worked with your legacy system it should work onEvergreen.
Printers
Evergreen can use any printer configured for your terminal to print receipts, check-out slips, holds lists, etc. Thesingle exception is spine label printing, which is still under development. Evergreen currently formats spine labelsfor output to a label roll printer. If you do not have a roll printer manual formatting may be required.
Chapter 15. Installing the Evergreen server 51
Chapter 15. Installing the Evergreenserver
Preamble: referenced user accountsIn subsequent sections, we will refer to a number of different accounts, as follows:
• Linux user accounts:
• The user Linux account is the account that you use to log onto the Linux system as a regular user.
• The root Linux account is an account that has system administrator privileges. On Debian and Fedora you canswitch to this account from your user account by issuing the su - command and entering the password forthe root account when prompted. On Ubuntu you can switch to this account from your user account using thesudo su - command and entering the password for your user account when prompted.
• The opensrf Linux account is an account that you create when installing OpenSRF. You can switch to thisaccount from the root account by issuing the su - opensrf command.
• The postgres Linux account is created automatically when you install the PostgreSQL database server. Youcan switch to this account from the root account by issuing the su - postgres command.
• PostgreSQL user accounts:
• The evergreen PostgreSQL account is a superuser account that you will create to connect to the PostgreSQLdatabase server.
• Evergreen administrator account:
• The egadmin Evergreen account is an administrator account for Evergreen that you will use to test connectivityand configure your Evergreen instance.
Preamble: developer instructions
Skip this section if you are using an official release tarball downloaded from http://evergreen-ils.org/egdownloads
Developers working directly with the source code from the Git repository, rather than an official release tarball,must perform one step before they can proceed with the ./configure step.
As the user Linux account, issue the following command in the Evergreen source directory to generate the configurescript and Makefiles:
autoreconf -i
Installing prerequisites• PostgreSQL: Version 9.3 is recommended. The minimum supported version is 9.1.
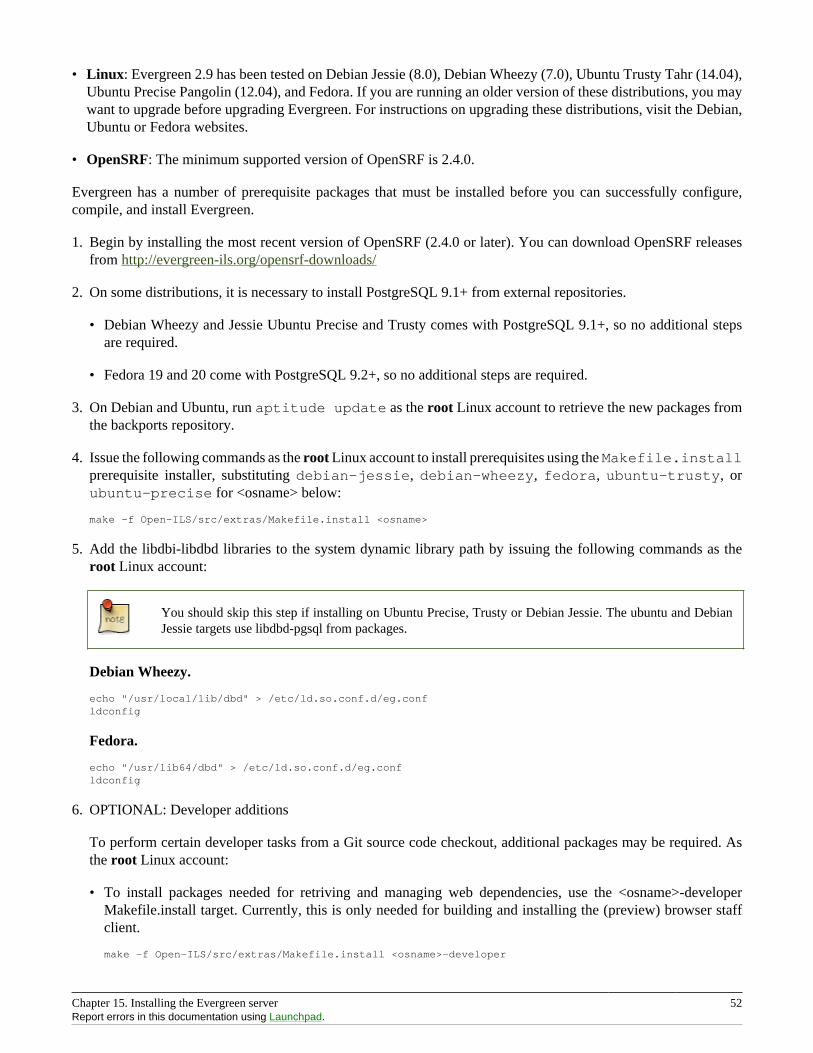
Chapter 15. Installing the Evergreen server 52Report errors in this documentation using Launchpad.
• Linux: Evergreen 2.9 has been tested on Debian Jessie (8.0), Debian Wheezy (7.0), Ubuntu Trusty Tahr (14.04),Ubuntu Precise Pangolin (12.04), and Fedora. If you are running an older version of these distributions, you maywant to upgrade before upgrading Evergreen. For instructions on upgrading these distributions, visit the Debian,Ubuntu or Fedora websites.
• OpenSRF: The minimum supported version of OpenSRF is 2.4.0.
Evergreen has a number of prerequisite packages that must be installed before you can successfully configure,compile, and install Evergreen.
1. Begin by installing the most recent version of OpenSRF (2.4.0 or later). You can download OpenSRF releasesfrom http://evergreen-ils.org/opensrf-downloads/
2. On some distributions, it is necessary to install PostgreSQL 9.1+ from external repositories.
• Debian Wheezy and Jessie Ubuntu Precise and Trusty comes with PostgreSQL 9.1+, so no additional stepsare required.
• Fedora 19 and 20 come with PostgreSQL 9.2+, so no additional steps are required.
3. On Debian and Ubuntu, run aptitude update as the root Linux account to retrieve the new packages fromthe backports repository.
4. Issue the following commands as the root Linux account to install prerequisites using the Makefile.installprerequisite installer, substituting debian-jessie, debian-wheezy, fedora, ubuntu-trusty, orubuntu-precise for <osname> below:
make -f Open-ILS/src/extras/Makefile.install <osname>
5. Add the libdbi-libdbd libraries to the system dynamic library path by issuing the following commands as theroot Linux account:
You should skip this step if installing on Ubuntu Precise, Trusty or Debian Jessie. The ubuntu and DebianJessie targets use libdbd-pgsql from packages.
Debian Wheezy.
echo "/usr/local/lib/dbd" > /etc/ld.so.conf.d/eg.confldconfig
Fedora.
echo "/usr/lib64/dbd" > /etc/ld.so.conf.d/eg.confldconfig
6. OPTIONAL: Developer additions
To perform certain developer tasks from a Git source code checkout, additional packages may be required. Asthe root Linux account:
• To install packages needed for retriving and managing web dependencies, use the <osname>-developerMakefile.install target. Currently, this is only needed for building and installing the (preview) browser staffclient.
make -f Open-ILS/src/extras/Makefile.install <osname>-developer
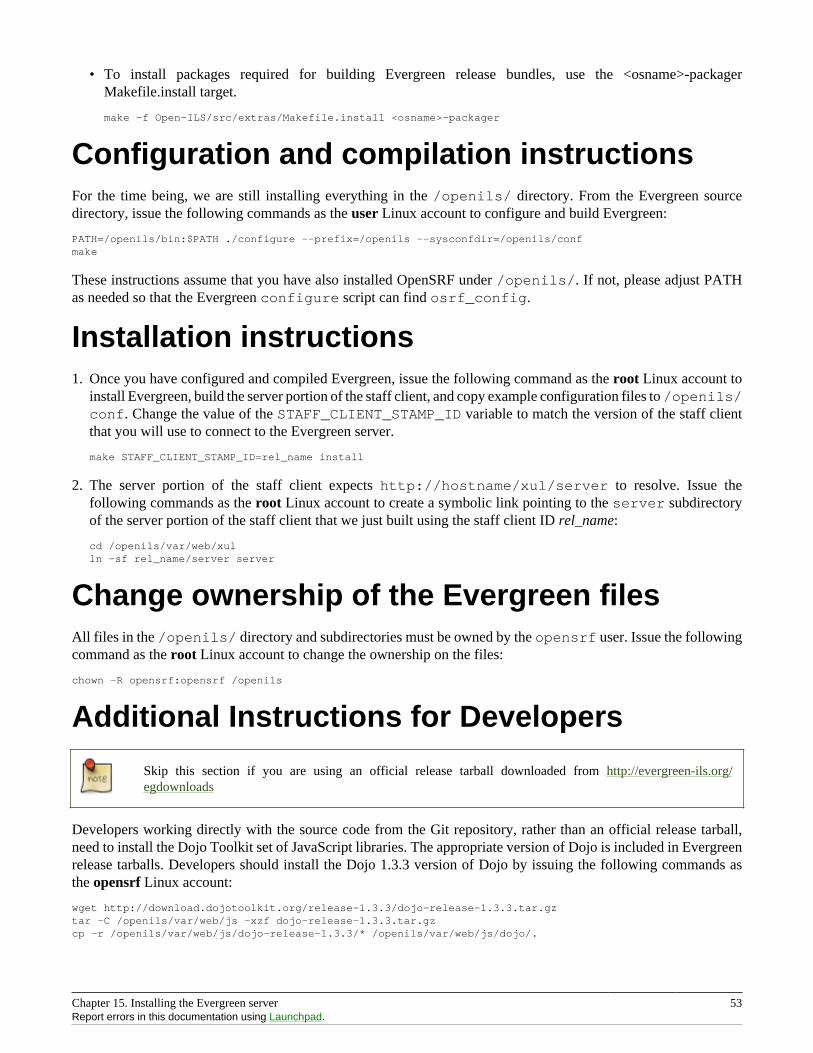
Chapter 15. Installing the Evergreen server 53Report errors in this documentation using Launchpad.
• To install packages required for building Evergreen release bundles, use the <osname>-packagerMakefile.install target.
make -f Open-ILS/src/extras/Makefile.install <osname>-packager
Configuration and compilation instructionsFor the time being, we are still installing everything in the /openils/ directory. From the Evergreen sourcedirectory, issue the following commands as the user Linux account to configure and build Evergreen:
PATH=/openils/bin:$PATH ./configure --prefix=/openils --sysconfdir=/openils/confmake
These instructions assume that you have also installed OpenSRF under /openils/. If not, please adjust PATHas needed so that the Evergreen configure script can find osrf_config.
Installation instructions1. Once you have configured and compiled Evergreen, issue the following command as the root Linux account to
install Evergreen, build the server portion of the staff client, and copy example configuration files to /openils/conf. Change the value of the STAFF_CLIENT_STAMP_ID variable to match the version of the staff clientthat you will use to connect to the Evergreen server.
make STAFF_CLIENT_STAMP_ID=rel_name install
2. The server portion of the staff client expects http://hostname/xul/server to resolve. Issue thefollowing commands as the root Linux account to create a symbolic link pointing to the server subdirectoryof the server portion of the staff client that we just built using the staff client ID rel_name:
cd /openils/var/web/xulln -sf rel_name/server server
Change ownership of the Evergreen filesAll files in the /openils/ directory and subdirectories must be owned by the opensrf user. Issue the followingcommand as the root Linux account to change the ownership on the files:
chown -R opensrf:opensrf /openils
Additional Instructions for Developers
Skip this section if you are using an official release tarball downloaded from http://evergreen-ils.org/egdownloads
Developers working directly with the source code from the Git repository, rather than an official release tarball,need to install the Dojo Toolkit set of JavaScript libraries. The appropriate version of Dojo is included in Evergreenrelease tarballs. Developers should install the Dojo 1.3.3 version of Dojo by issuing the following commands asthe opensrf Linux account:
wget http://download.dojotoolkit.org/release-1.3.3/dojo-release-1.3.3.tar.gztar -C /openils/var/web/js -xzf dojo-release-1.3.3.tar.gzcp -r /openils/var/web/js/dojo-release-1.3.3/* /openils/var/web/js/dojo/.
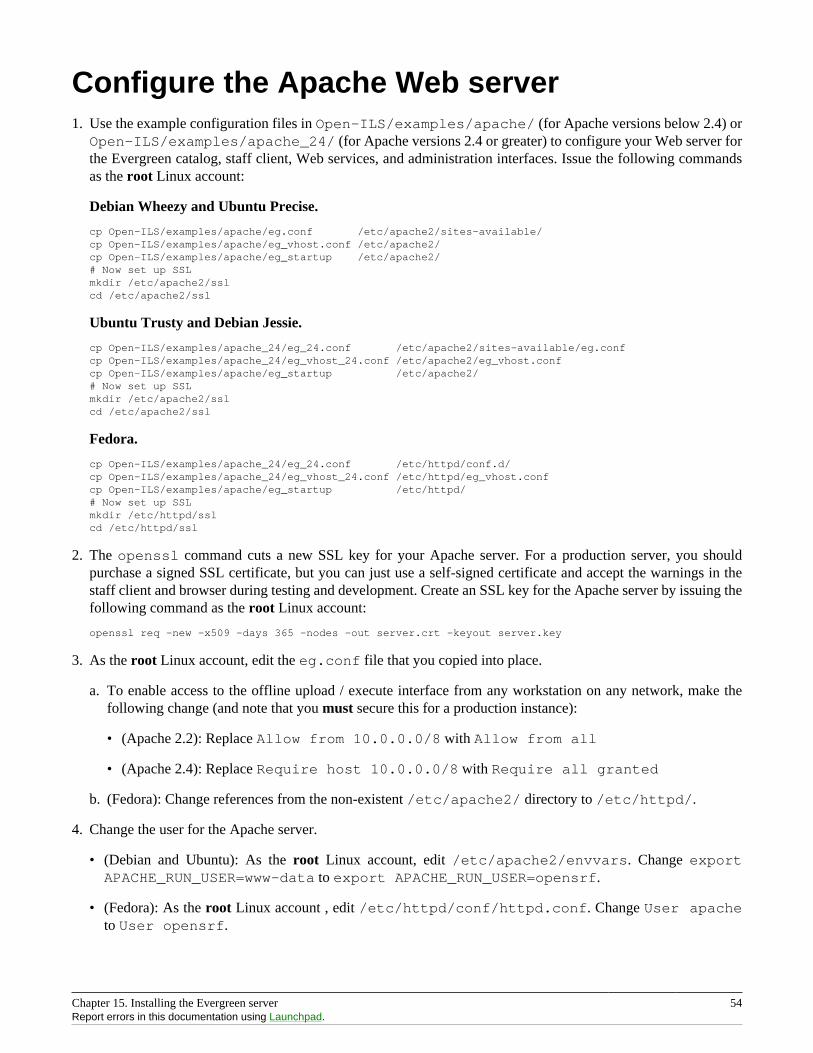
Chapter 15. Installing the Evergreen server 54Report errors in this documentation using Launchpad.
Configure the Apache Web server1. Use the example configuration files in Open-ILS/examples/apache/ (for Apache versions below 2.4) orOpen-ILS/examples/apache_24/ (for Apache versions 2.4 or greater) to configure your Web server forthe Evergreen catalog, staff client, Web services, and administration interfaces. Issue the following commandsas the root Linux account:
Debian Wheezy and Ubuntu Precise.
cp Open-ILS/examples/apache/eg.conf /etc/apache2/sites-available/cp Open-ILS/examples/apache/eg_vhost.conf /etc/apache2/cp Open-ILS/examples/apache/eg_startup /etc/apache2/# Now set up SSLmkdir /etc/apache2/sslcd /etc/apache2/ssl
Ubuntu Trusty and Debian Jessie.
cp Open-ILS/examples/apache_24/eg_24.conf /etc/apache2/sites-available/eg.confcp Open-ILS/examples/apache_24/eg_vhost_24.conf /etc/apache2/eg_vhost.confcp Open-ILS/examples/apache/eg_startup /etc/apache2/# Now set up SSLmkdir /etc/apache2/sslcd /etc/apache2/ssl
Fedora.
cp Open-ILS/examples/apache_24/eg_24.conf /etc/httpd/conf.d/cp Open-ILS/examples/apache_24/eg_vhost_24.conf /etc/httpd/eg_vhost.confcp Open-ILS/examples/apache/eg_startup /etc/httpd/# Now set up SSLmkdir /etc/httpd/sslcd /etc/httpd/ssl
2. The openssl command cuts a new SSL key for your Apache server. For a production server, you shouldpurchase a signed SSL certificate, but you can just use a self-signed certificate and accept the warnings in thestaff client and browser during testing and development. Create an SSL key for the Apache server by issuing thefollowing command as the root Linux account:
openssl req -new -x509 -days 365 -nodes -out server.crt -keyout server.key
3. As the root Linux account, edit the eg.conf file that you copied into place.
a. To enable access to the offline upload / execute interface from any workstation on any network, make thefollowing change (and note that you must secure this for a production instance):
• (Apache 2.2): Replace Allow from 10.0.0.0/8 with Allow from all
• (Apache 2.4): Replace Require host 10.0.0.0/8 with Require all granted
b. (Fedora): Change references from the non-existent /etc/apache2/ directory to /etc/httpd/.
4. Change the user for the Apache server.
• (Debian and Ubuntu): As the root Linux account, edit /etc/apache2/envvars. Change exportAPACHE_RUN_USER=www-data to export APACHE_RUN_USER=opensrf.
• (Fedora): As the root Linux account , edit /etc/httpd/conf/httpd.conf. Change User apacheto User opensrf.
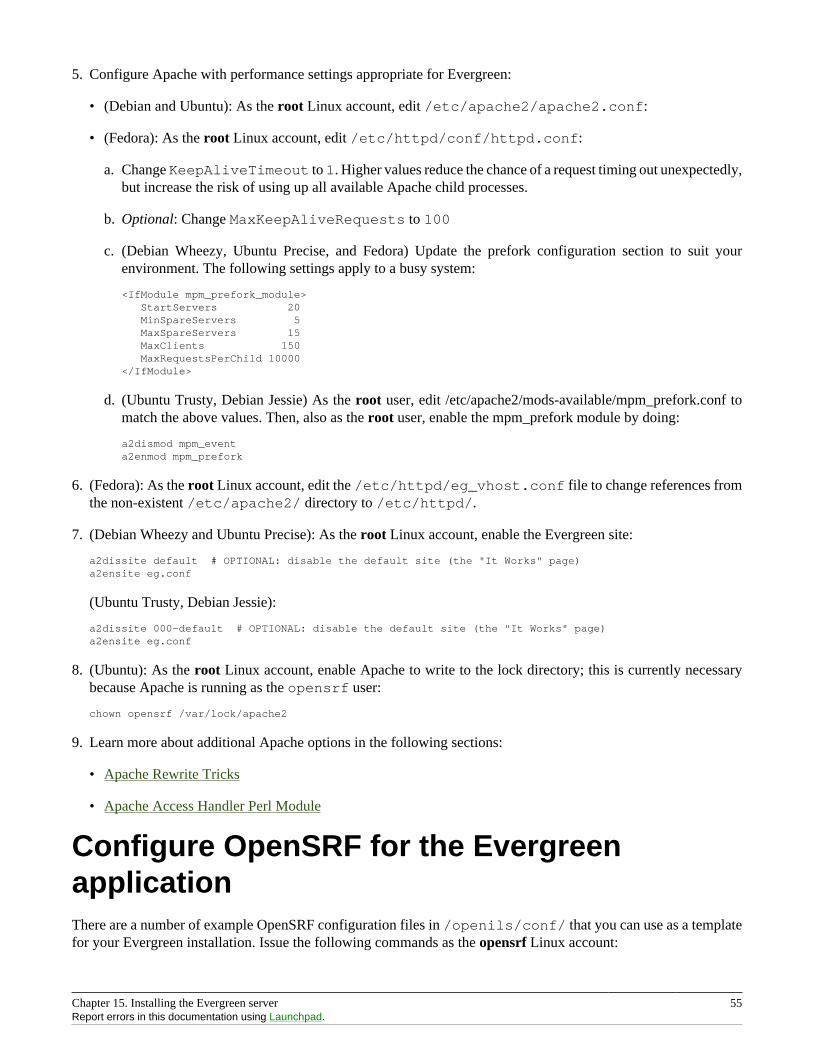
Chapter 15. Installing the Evergreen server 55Report errors in this documentation using Launchpad.
5. Configure Apache with performance settings appropriate for Evergreen:
• (Debian and Ubuntu): As the root Linux account, edit /etc/apache2/apache2.conf:
• (Fedora): As the root Linux account, edit /etc/httpd/conf/httpd.conf:
a. Change KeepAliveTimeout to 1. Higher values reduce the chance of a request timing out unexpectedly,but increase the risk of using up all available Apache child processes.
b. Optional: Change MaxKeepAliveRequests to 100
c. (Debian Wheezy, Ubuntu Precise, and Fedora) Update the prefork configuration section to suit yourenvironment. The following settings apply to a busy system:
<IfModule mpm_prefork_module> StartServers 20 MinSpareServers 5 MaxSpareServers 15 MaxClients 150 MaxRequestsPerChild 10000</IfModule>
d. (Ubuntu Trusty, Debian Jessie) As the root user, edit /etc/apache2/mods-available/mpm_prefork.conf tomatch the above values. Then, also as the root user, enable the mpm_prefork module by doing:
a2dismod mpm_eventa2enmod mpm_prefork
6. (Fedora): As the root Linux account, edit the /etc/httpd/eg_vhost.conf file to change references fromthe non-existent /etc/apache2/ directory to /etc/httpd/.
7. (Debian Wheezy and Ubuntu Precise): As the root Linux account, enable the Evergreen site:
a2dissite default # OPTIONAL: disable the default site (the "It Works" page)a2ensite eg.conf
(Ubuntu Trusty, Debian Jessie):
a2dissite 000-default # OPTIONAL: disable the default site (the "It Works" page)a2ensite eg.conf
8. (Ubuntu): As the root Linux account, enable Apache to write to the lock directory; this is currently necessarybecause Apache is running as the opensrf user:
chown opensrf /var/lock/apache2
9. Learn more about additional Apache options in the following sections:
• Apache Rewrite Tricks
• Apache Access Handler Perl Module
Configure OpenSRF for the EvergreenapplicationThere are a number of example OpenSRF configuration files in /openils/conf/ that you can use as a templatefor your Evergreen installation. Issue the following commands as the opensrf Linux account:
Chapter 15. Installing the Evergreen server 56Report errors in this documentation using Launchpad.
cp -b /openils/conf/opensrf_core.xml.example /openils/conf/opensrf_core.xmlcp -b /openils/conf/opensrf.xml.example /openils/conf/opensrf.xml
When you installed OpenSRF, you created four Jabber users on two separate domains and edited theopensrf_core.xml file accordingly. Please refer back to the OpenSRF README and, as the opensrf Linuxaccount, edit the Evergreen version of the opensrf_core.xml file using the same Jabber users and domains asyou used while installing and testing OpenSRF.
The -b flag tells the cp command to create a backup version of the destination file. The backup version of thedestination file has a tilde (~) appended to the file name, so if you have forgotten the Jabber users and domains,you can retrieve the settings from the backup version of the files.
eg_db_config, described in the following section, sets the database connection information in opensrf.xmlfor you.
Creating the Evergreen databaseSetting up the PostgreSQL serverFor production use, most libraries install the PostgreSQL database server on a dedicated machine. Therefore, bydefault, the Makefile.install prerequisite installer does not install the PostgreSQL 9 database server that isrequired by every Evergreen system. You can install the packages required by Debian or Ubuntu on the machine ofyour choice using the following commands as the root Linux account:
(Debian / Ubuntu / Fedora) Installing PostgreSQL server packages. Each OS build target provides the postgresserver installation packages required for each operating system. To install Postgres server packages, use the maketarget postgres-server-<OSTYPE>. Choose the most appropriate command below based on your operating system.
make -f Open-ILS/src/extras/Makefile.install postgres-server-debian-jessiemake -f Open-ILS/src/extras/Makefile.install postgres-server-debian-wheezymake -f Open-ILS/src/extras/Makefile.install postgres-server-ubuntu-precisemake -f Open-ILS/src/extras/Makefile.install postgres-server-ubuntu-trustymake -f Open-ILS/src/extras/Makefile.install postgres-server-fedora
(Fedora) Postgres initialization. Installing Postgres on Fedora also requires you to initialize the PostgreSQLcluster and start the service. Issue the following commands as the root user:
postgresql-setup initdbsystemctl start postgresql
For a standalone PostgreSQL server, install the following Perl modules for your distribution as the root Linuxaccount:
(Ubuntu Precise).
cpan Rose::URI
(Debian "wheezy" and Ubuntu Trusty). No extra modules required for these distributions.
(Fedora).
cpan Rose::URI
You need to create a PostgreSQL superuser to create and access the database. Issue the following command as thepostgres Linux account to create a new PostgreSQL superuser named evergreen. When prompted, enter the newuser’s password:
Chapter 15. Installing the Evergreen server 57Report errors in this documentation using Launchpad.
createuser -s -P evergreen
Enabling connections to the PostgreSQL database. Your PostgreSQL database may be configured by defaultto prevent connections, for example, it might reject attempts to connect via TCP/IP or from other servers. To enableTCP/IP connections from localhost, check your pg_hba.conf file, found in the /etc/postgresql/ directoryon Debian and Ubuntu, and in the /var/lib/pgsql/data/ directory on Fedora. A simple way to enable TCP/IP connections from localhost to all databases with password authentication, which would be suitable for a test installof Evergreen on a single server, is to ensure the file contains the following entries before any "host … ident" entries:
host all all ::1/128 md5host all all 127.0.0.1/32 md5
When you change the pg_hba.conf file, you will need to reload PostgreSQL to make the changes take effect.For more information on configuring connectivity to PostgreSQL, see http://www.postgresql.org/docs/devel/static/auth-pg-hba-conf.html
Creating the Evergreen database and schemaOnce you have created the evergreen PostgreSQL account, you also need to create the database and schema,and configure your configuration files to point at the database server. Issue the following command as the rootLinux account from inside the Evergreen source directory, replacing <user>, <password>, <hostname>, <port>, and<dbname> with the appropriate values for your PostgreSQL database (where <user> and <password> are for theevergreen PostgreSQL account you just created), and replace <admin-user> and <admin-pass> with the values youwant for the egadmin Evergreen administrator account:
perl Open-ILS/src/support-scripts/eg_db_config --update-config \ --service all --create-database --create-schema --create-offline \ --user <user> --password <password> --hostname <hostname> --port <port> \ --database <dbname> --admin-user <admin-user> --admin-pass <admin-pass>
This creates the database and schema and configures all of the services in your /openils/conf/opensrf.xmlconfiguration file to point to that database. It also creates the configuration files required by the Evergreen cgi-bin administration scripts, and sets the user name and password for the egadmin Evergreen administrator accountto your requested values.
You can get a complete set of options for eg_db_config by passing the --help parameter.
Loading sample dataIf you add the --load-all-sample parameter to the eg_db_config command, a set of authority andbibliographic records, call numbers, copies, staff and regular users, and transactions will be loaded into your targetdatabase. This sample dataset is commonly referred to as the concerto sample data, and can be useful for testing outEvergreen functionality and for creating problem reports that developers can easily recreate with their own copyof the concerto sample data.
Creating the database on a remote serverIn a production instance of Evergreen, your PostgreSQL server should be installed on a dedicated server.
PostgreSQL 9.1 and later
To create the database instance on a remote database server running PostgreSQL 9.1 or later, simply use the --create-database flag on eg_db_config.
Chapter 15. Installing the Evergreen server 58Report errors in this documentation using Launchpad.
Starting Evergreen1. As the root Linux account, start the memcached and ejabberd services (if they aren’t already running):
/etc/init.d/ejabberd start/etc/init.d/memcached start
2. As the opensrf Linux account, start Evergreen. The -l flag in the following command is onlynecessary if you want to force Evergreen to treat the hostname as localhost; if you configuredopensrf.xml using the real hostname of your machine as returned by perl -ENet::Domain 'printNet::Domain::hostfqdn() . "\n";', you should not use the -l flag.
osrf_control -l --start-all
• If you receive the error message bash: osrf_control: command not found, then your environmentvariable PATH does not include the /openils/bin directory; this should have been set in the opensrfLinux account’s .bashrc configuration file. To manually set the PATH variable, edit the configuration file~/.bashrc as the opensrf Linux account and add the following line:
export PATH=$PATH:/openils/bin
3. As the opensrf Linux account, generate the Web files needed by the staff client and catalogue and update theorganization unit proximity (you need to do this the first time you start Evergreen, and after that each time youchange the library org unit configuration. ):
autogen.sh
4. As the root Linux account, restart the Apache Web server:
/etc/init.d/apache2 restart
If the Apache Web server was running when you started the OpenSRF services, you might not be able tosuccessfully log in to the OPAC or staff client until the Apache Web server is restarted.
Testing connections to EvergreenOnce you have installed and started Evergreen, test your connection to Evergreen via srfsh. As the opensrf Linuxaccount, issue the following commands to start srfsh and try to log onto the Evergreen server using the egadminEvergreen administrator user name and password that you set using the eg_db_config command:
/openils/bin/srfshsrfsh% login <admin-user> <admin-pass>
You should see a result like:
Received Data: "250bf1518c7527a03249858687714376"------------------------------------Request Completed SuccessfullyRequest Time in seconds: 0.045286------------------------------------
Received Data: { "ilsevent":0, "textcode":"SUCCESS", "desc":" ", "pid":21616, "stacktrace":"oils_auth.c:304", "payload":{ "authtoken":"e5f9827cc0f93b503a1cc66bee6bdd1a", "authtime":420 }
Chapter 15. Installing the Evergreen server 59Report errors in this documentation using Launchpad.
}
------------------------------------Request Completed SuccessfullyRequest Time in seconds: 1.336568------------------------------------
If this does not work, it’s time to do some troubleshooting.
• As the opensrf Linux account, run the settings-tester.pl script to see if it finds any system configurationproblems. The script is found at Open-ILS/src/support-scripts/settings-tester.pl in theEvergreen source tree.
• Follow the steps in the troubleshooting guide.
• If you have faithfully followed the entire set of installation steps listed here, you are probably extremely close toa working system. Gather your configuration files and log files and contact the Evergreen development mailinglist for assistance before making any drastic changes to your system configuration.
Getting helpNeed help installing or using Evergreen? Join the mailing lists at http://evergreen-ils.org/communicate/mailing-lists/or contact us on the Freenode IRC network on the #evergreen channel.
LicenseThis work is licensed under the Creative Commons Attribution-ShareAlike 3.0 Unported License. To view a copy ofthis license, visit http://creativecommons.org/licenses/by-sa/3.0/ or send a letter to Creative Commons, 444 CastroStreet, Suite 900, Mountain View, California, 94041, USA.

Chapter 16. Installing the Staff Client 60
Chapter 16. Installing the Staff Client
Installing on Windows
Official Evergreen releases have corresponding Windows based staff clients ready to use.
1. Download the staff client from http://www.open-ils.org/downloads.php.
The version of your staff client will need to match the version of your Evergreen server. If you are unsureabout the version of your Evergreen server, contact your system administrator.
2. Click on the downloaded Evergreen setup file.
3. Click Next to begin installation:
4. Click Next to accept destination folder.
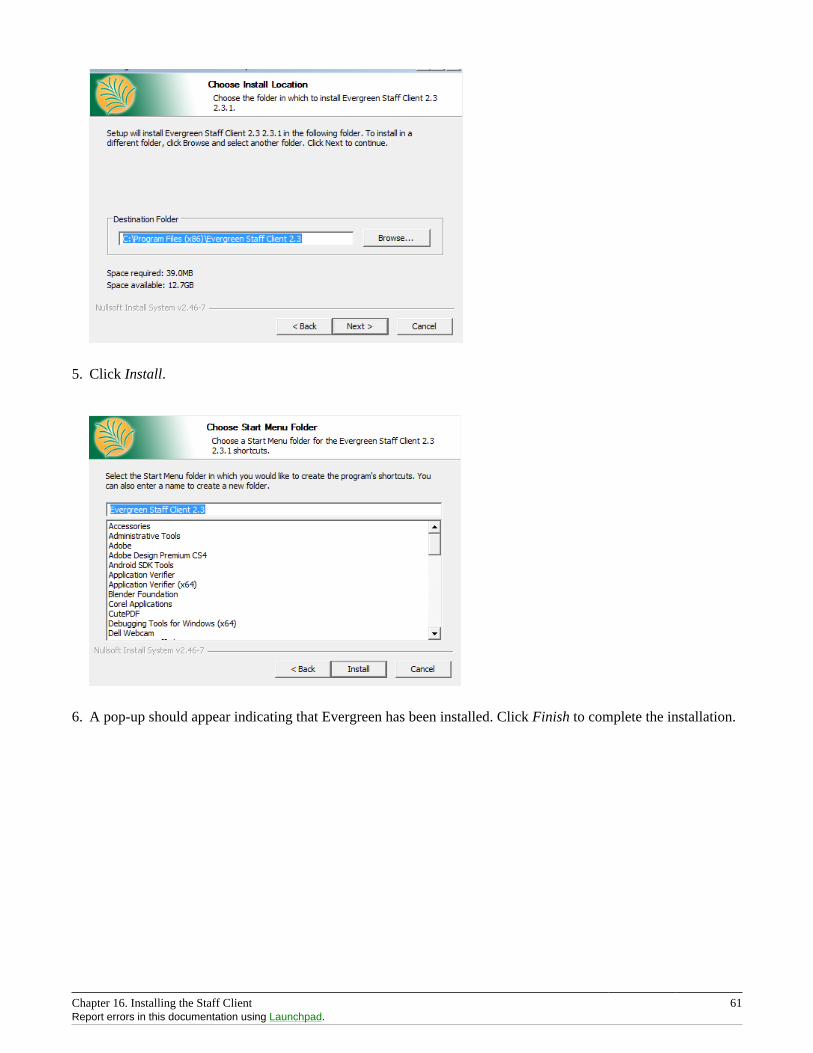
Chapter 16. Installing the Staff Client 61Report errors in this documentation using Launchpad.
5. Click Install.
6. A pop-up should appear indicating that Evergreen has been installed. Click Finish to complete the installation.
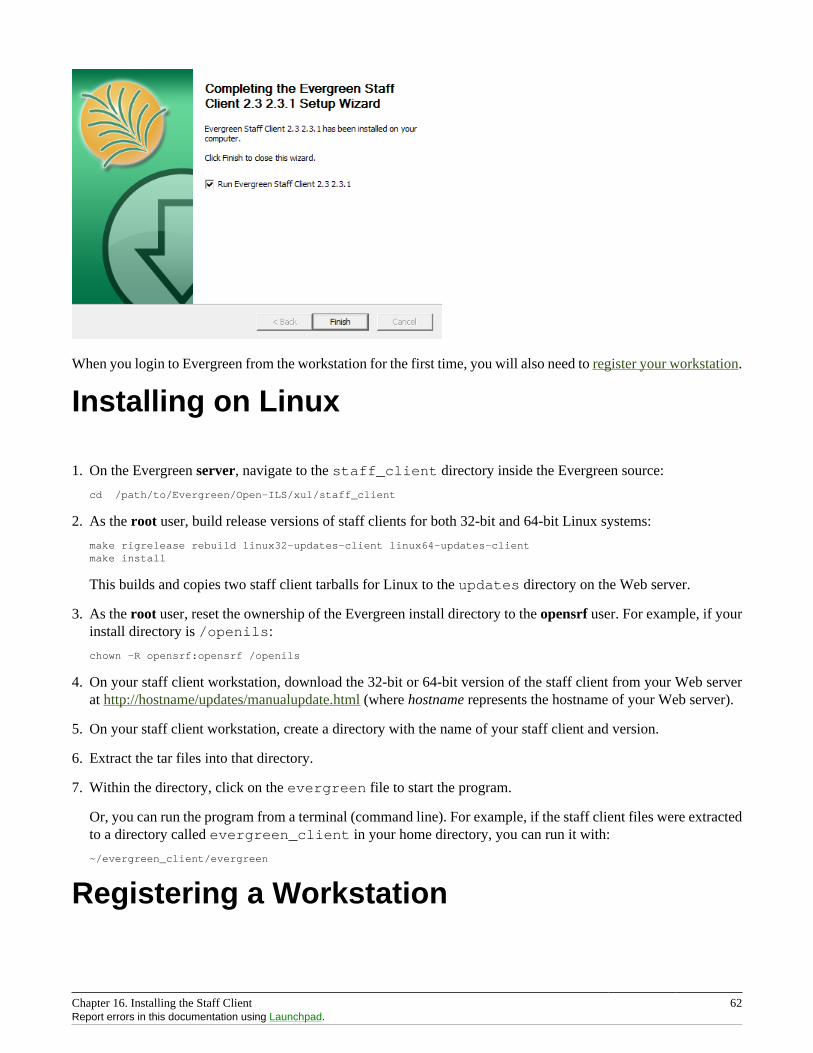
Chapter 16. Installing the Staff Client 62Report errors in this documentation using Launchpad.
When you login to Evergreen from the workstation for the first time, you will also need to register your workstation.
Installing on Linux
1. On the Evergreen server, navigate to the staff_client directory inside the Evergreen source:
cd /path/to/Evergreen/Open-ILS/xul/staff_client
2. As the root user, build release versions of staff clients for both 32-bit and 64-bit Linux systems:
make rigrelease rebuild linux32-updates-client linux64-updates-clientmake install
This builds and copies two staff client tarballs for Linux to the updates directory on the Web server.
3. As the root user, reset the ownership of the Evergreen install directory to the opensrf user. For example, if yourinstall directory is /openils:
chown -R opensrf:opensrf /openils
4. On your staff client workstation, download the 32-bit or 64-bit version of the staff client from your Web serverat http://hostname/updates/manualupdate.html (where hostname represents the hostname of your Web server).
5. On your staff client workstation, create a directory with the name of your staff client and version.
6. Extract the tar files into that directory.
7. Within the directory, click on the evergreen file to start the program.
Or, you can run the program from a terminal (command line). For example, if the staff client files were extractedto a directory called evergreen_client in your home directory, you can run it with:
~/evergreen_client/evergreen
Registering a Workstation
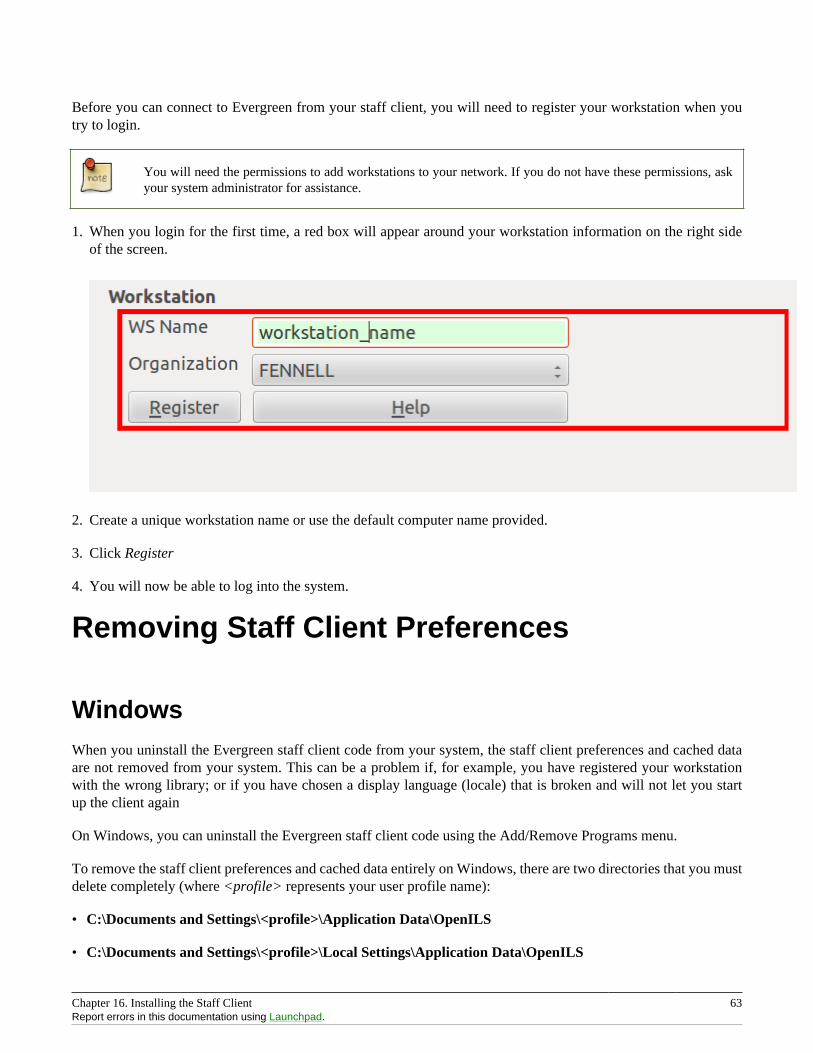
Chapter 16. Installing the Staff Client 63Report errors in this documentation using Launchpad.
Before you can connect to Evergreen from your staff client, you will need to register your workstation when youtry to login.
You will need the permissions to add workstations to your network. If you do not have these permissions, askyour system administrator for assistance.
1. When you login for the first time, a red box will appear around your workstation information on the right sideof the screen.
2. Create a unique workstation name or use the default computer name provided.
3. Click Register
4. You will now be able to log into the system.
Removing Staff Client Preferences
WindowsWhen you uninstall the Evergreen staff client code from your system, the staff client preferences and cached dataare not removed from your system. This can be a problem if, for example, you have registered your workstationwith the wrong library; or if you have chosen a display language (locale) that is broken and will not let you startup the client again
On Windows, you can uninstall the Evergreen staff client code using the Add/Remove Programs menu.
To remove the staff client preferences and cached data entirely on Windows, there are two directories that you mustdelete completely (where <profile> represents your user profile name):
• C:\Documents and Settings\<profile>\Application Data\OpenILS
• C:\Documents and Settings\<profile>\Local Settings\Application Data\OpenILS
Chapter 16. Installing the Staff Client 64Report errors in this documentation using Launchpad.
You might need to change the preferences in Windows Explorer to display hidden files (Tools # Folder Options…# View).
LinuxTo remove the staff client preferences and cached data from your user account on Linux, there is one directory thatyou must delete completely:
rm -fr ~/.openils
Chapter 17. Upgrading the Evergreen Server 65
Chapter 17. Upgrading the EvergreenServerBefore upgrading, it is important to carefully plan an upgrade strategy to minimize system downtime and serviceinterruptions. All of the steps in this chapter are to be completed from the command line.
Software Prerequisites• PostgreSQL: Version 9.3 is recommended. The minimum supported version is 9.1.
• Linux: Evergreen 2.9 has been tested on Debian Jessie (8.0), Debian Wheezy (7.0), Ubuntu Trusty Tahr (14.04),Ubuntu Precise Pangolin (12.04), and Fedora. If you are running an older version of these distributions, you maywant to upgrade before upgrading Evergreen. For instructions on upgrading these distributions, visit the Debian,Ubuntu or Fedora websites.
• OpenSRF: The minimum supported version of OpenSRF is 2.4.0.
In the following instructions, you are asked to perform certain steps as either the root or opensrf user.
• Debian: To become the root user, issue the su command and enter the password of the root user.
• Ubuntu: To become the root user, issue the sudo su command and enter the password of your current user.
To switch from the root user to a different user, issue the su - [user] command; for example, su - opensrf.Once you have become a non-root user, to become the root user again simply issue the exit command.
Upgrade the Evergreen codeThe following steps guide you through a simplistic upgrade of a production server. You must adjust these steps toaccommodate your customizations such as catalogue skins.
1. Stop Evergreen and back up your data:
a. As root, stop the Apache web server.
b. As the opensrf user, stop all Evergreen and OpenSRF services:
osrf_control --localhost --stop-all
c. Back up the /openils directory.
2. Upgrade OpenSRF. Download and install the latest version of OpenSRF from the OpenSRF download page.
3. As the opensrf user, download and extract Evergreen 2.9:
wget http://evergreen-ils.org/downloads/Evergreen-ILS-2.9.8.tar.gztar xzf Evergreen-ILS-2.9.8.tar.gz
For the latest edition of Evergreen, check the Evergreen download page and adjust upgrading instructionsaccordingly.
Chapter 17. Upgrading the Evergreen Server 66Report errors in this documentation using Launchpad.
4. As the root user, install the prerequisites:
cd /home/opensrf/Evergreen-ILS-2.9.8
On the next command, replace [distribution] with one of these values for your distribution of Debianor Ubuntu:
• debian-jessie for Debian Jessie (8.0) (See Bug 134222 if you want to use EDI)
• debian-wheezy for Debian Wheezy (7.0)
• ubuntu-trusty for Ubuntu Trusty Tahr (14.04) (See Bug 134222 if you want to use EDI)
• ubuntu-precise for Ubuntu Precise Pangolin (12.04)
• fedora for Fedora
make -f Open-ILS/src/extras/Makefile.install [distribution]
5. As the opensrf user, configure and compile Evergreen:
cd /home/opensrf/Evergreen-ILS-2.9.8PATH=/openils/bin:$PATH ./configure --prefix=/openils --sysconfdir=/openils/confmake
These instructions assume that you have also installed OpenSRF under /openils/. If not, please adjust PATH asneeded so that the Evergreen configure script can find osrf_config.
6. As the root user, install Evergreen:
cd /home/opensrf/Evergreen-ILS-2.9.8make STAFF_CLIENT_STAMP_ID=rel_2_9_8 install
7. As the root user, change all files to be owned by the opensrf user and group:
chown -R opensrf:opensrf /openils
8. As the opensrf user, update the server symlink in /openils/var/web/xul/:
cd /openils/var/web/xul/rm serverln -sf rel_2_9_8/server server
9. As the opensrf user, update opensrf_core.xml and opensrf.xml by copying the new example files (/openils/conf/opensrf_core.xml.example and /openils/conf/opensrf.xml). The -b option creates a backup copy of the old file.
cp -b /openils/conf/opensrf_core.xml.example /openils/conf/opensrf_core.xmlcp -b /openils/conf/opensrf.xml.example /openils/conf/opensrf.xml
Copying these configuration files will remove any customizations you have made to them. Remember toredo your customizations after copying them.
10.As the opensrf user, update the configuration files:
cd /home/opensrf/Evergreen-ILS-2.9.8perl Open-ILS/src/support-scripts/eg_db_config --update-config --service all \--create-offline --database evergreen --host localhost --user evergreen --password evergreen
Chapter 17. Upgrading the Evergreen Server 67Report errors in this documentation using Launchpad.
11.As the root user, update the Apache files:
Use the example configuration files in Open-ILS/examples/apache/ (for Apache versions below 2.4) orOpen-ILS/examples/apache_24/ (for Apache versions 2.4 or greater) to configure your Web server forthe Evergreen catalog, staff client, Web services, and administration interfaces. Issue the following commandsas the root Linux account:
Copying these Apache configuration files will remove any customizations you have made to them.Remember to redo your customizations after copying them. For example, if you purchased an SSL certificate,you will need to edit eg.conf to point to the appropriate SSL certificate files. The diff command can be used toshow the differences between the distribution version and your customized version. diff <customizedfile> <dist file>
a. Update /etc/apache2/eg_startup by copying the example from Open-ILS/examples/apache/eg_startup.
cp /home/opensrf/Evergreen-ILS-2.9.8/Open-ILS/examples/apache/eg_startup /etc/apache2/eg_startup
b. Update /etc/apache2/eg_vhost.conf by copying the example from Open-ILS/examples/apache/eg_vhost.conf.
cp /home/opensrf/Evergreen-ILS-2.9.8/Open-ILS/examples/apache/eg_vhost.conf /etc/apache2/eg_vhost.conf
c. Update /etc/apache2/sites-available/eg.conf by copying the example from Open-ILS/examples/apache/eg.conf.
cp /home/opensrf/Evergreen-ILS-2.9.8/Open-ILS/examples/apache/eg.conf /etc/apache2/sites-available/eg.conf
Upgrade the Evergreen database schema
The upgrade of the Evergreen database schema is the lengthiest part of the upgrade process for sites with a significantamount of production data.
Before running the upgrade script against your production Evergreen database, back up your database, restore it toa test server, and run the upgrade script against the test server. This enables you to determine how long the upgradewill take and whether any local customizations present problems for the stock upgrade script that require furthertailoring of the upgrade script. The backup also enables you to cleanly restore your production data if anything goeswrong during the upgrade.
Evergreen provides incremental upgrade scripts that allow you to upgrade from one minor version to the nextuntil you have the current version of the schema. For example, if you want to upgrade from 2.5.1 to 2.9.8, youwould run the following upgrade scripts:
• 2.5.1-2.5.2-upgrade-db.sql
• 2.5.2-2.5.3-upgrade-db.sql
• 2.5.3-2.6.0-upgrade-db.sql (this is a major version upgrade)
• 2.6.2-2.6.3-upgrade-db.sql
• 2.6.3-2.7.0-upgrade-db.sql (this is a major version upgrade)
Chapter 17. Upgrading the Evergreen Server 68Report errors in this documentation using Launchpad.
• 2.7.0-2.7.1-upgrade-db.sql
• 2.7.1-2.7.2-upgrade-db.sql
• 2.7.2-2.7.3-upgrade-db.sql
• 2.7.3-2.7.4-upgrade-db.sql
• 2.7.4-2.8.0-upgrade-db.sql (this is a major version upgrade)
• 2.8.0-2.8.1-upgrade-db.sql
• 2.8.1-2.8.2-upgrade-db.sql
• 2.8.2-2.8.3-upgrade-db.sql
• 2.8.3-2.8.4-upgrade-db.sql
• 2.8.4-2.9.0-upgrade-db.sql (this is a major version upgrade)
• 2.9.0-2.9.1-upgrade-db.sql
• 2.9.1-2.9.2-upgrade-db.sql
• 2.9.2-2.9.3-upgrade-db.sql
• 2.9.3-2.9.4-upgrade-db.sql
• 2.9.4-2.9.5-upgrade-db.sql
• 2.9.5-2.9.6-upgrade-db.sql
• 2.9.6-2.9.7-upgrade-db.sql
• 2.9.7-2.9.8-upgrade-db.sql
Note that you do not want to run additional 2.5 scripts to upgrade to the newest version of 2.5, since currentlythere is no automated way to upgrade from 2.5.4+ to 2.6. Only upgrade as far as necessary to reach the majorversion upgrade script (in this example, as far as 2.5.3).
To upgrade across multiple major versions (e.g. from 2.3.0 to 2.9.8), use the same logic to utilize the providedmajor version upgrade scripts. For example:
• 2.3-2.4.0-upgrade-db.sql
• 2.3-2.4-supplemental.sh
• (run all incremental scripts from 2.4.0 to 2.4.3)
• 2.4.3-2.5.0-upgrade-db.sql
• (run all incremental scripts from 2.5.0 to 2.5.3)
• 2.5.3-2.6.0-upgrade-db.sql
• (run all incremental scripts from 2.6.0 to 2.6.3)
• 2.6.3-2.7.0-upgrade-db.sql
Chapter 17. Upgrading the Evergreen Server 69Report errors in this documentation using Launchpad.
• (run all incremental scripts from 2.7.0 to 2.7.4)
• 2.7.4-2.8.0-upgrade-db.sql
• (run all incremental scripts from 2.8.0 to 2.8.4)
• 2.8.4-2.9.0-upgrade-db.sql
• (run all incremental scripts from 2.9.0 to 2.9.8)
Pay attention to error output as you run the upgrade scripts. If you encounter errors that you cannot resolveyourself through additional troubleshooting, please report the errors to the Evergreen Technical Discussion List.
Run the following steps (including other upgrade scripts, as noted above) as a user with the ability to connect tothe database server.
cd /home/opensrf/Evergreen-ILS-2.9.8/Open-ILS/src/sql/Pgpsql -U evergreen -h localhost -f version-upgrade/2.9.7-2.9.8-upgrade-db.sql evergreen
After the some database upgrade scripts finish, you may see a note on how to reingest your bib records. Youmay run this after you have completed the entire upgrade and tested your system. Reingesting records may takea long time depending on the number of bib records in your system.
Restart Evergreen and Test1. As the root user, restart memcached to clear out all old user sessions.
service memcached restart
2. As the opensrf user, start all Evergreen and OpenSRF services:
osrf_control --localhost --start-all
3. As the opensrf user, run autogen to refresh the static organizational data files:
cd /openils/bin./autogen.sh
4. Start srfsh and try logging in using your Evergreen username and password:
/openils/bin/srfshsrfsh% login username password
You should see a result like:
Chapter 17. Upgrading the Evergreen Server 70Report errors in this documentation using Launchpad.
Received Data: "250bf1518c7527a03249858687714376" ------------------------------------ Request Completed Successfully Request Time in seconds: 0.045286 ------------------------------------
Received Data: { "ilsevent":0, "textcode":"SUCCESS", "desc":" ", "pid":21616, "stacktrace":"oils_auth.c:304", "payload":{ "authtoken":"e5f9827cc0f93b503a1cc66bee6bdd1a", "authtime":420 }
}
------------------------------------ Request Completed Successfully Request Time in seconds: 1.336568 ------------------------------------
If this does not work, it’s time to do some troubleshooting.
5. As the root user, start the Apache web server.
If you encounter errors, refer to the troubleshooting section of this documentation for tips on finding solutionsand seeking further assistance from the Evergreen community.
Review Release NotesReview the 2.9 release notes for other tasks that need to be done after upgrading. If you have upgraded over severalmajor versions, you will need to review the release notes for each version also.
Chapter 18. Setting Up EDI Acquisitions 71
Chapter 18. Setting Up EDI Acquisitions
IntroductionElectronic Data Interchange (EDI) is used to exchange information between participating vendors and Evergreen.This chapter contains technical information for installation and configuration of the components necessary to runEDI Acquisitions for Evergreen.
Installation
Install EDI TranslatorThe EDI Translator is used to convert data into EDI format. It runs on localhost and listens on port 9191 by default.This is controlled via the edi_webrick.cnf file located in the edi_translator directory. It should not be necessary toedit this configuration if you install EDI Translator on the same server used for running Action/Triggers events.
If you are running Evergreen with a multi-server configuration, make sure to install EDI Translator on the sameserver used for Action/Trigger event generation.
Steps for Installing
1. As the opensrf user, copy the EDI Translator code found in Open-ILS/src/edi_translator to somewhere accessible(for example, /openils/var/edi):
cp -r Open-ILS/src/edi_translator /openils/var/edi
2. Navigate to where you have saved the code to begin next step:
cd /openils/var/edi
3. Next, as the root user (or a user with sudo rights), install the dependencies, via "install.sh". This will performsome apt-get routines to install the code needed for the EDI translator to function. (Note: subversion must beinstalled first)
./install.sh
4. Now, we’re ready to start "edi_webrick.bash" which is the script that calls the "Ruby" code to translate EDI. Thisscript needs to be started in order for EDI to function so please take appropriate measures to ensure this startsfollowing reboots/upgrades/etc. As the opensrf user:
./edi_webrick.bash
5. You can check to see if EDI translator is running.
• Using the command "ps aux | grep edi" should show you something similar if the script is running properly:
root 30349 0.8 0.1 52620 10824 pts/0 S 13:04 0:00 ruby ./edi_webrick.rb
• To shutdown EDI Translator you can use something like pkill (assuming no other ruby processes are runningon that server):
kill -INT $(pgrep ruby)
Chapter 18. Setting Up EDI Acquisitions 72Report errors in this documentation using Launchpad.
Install EDI ScriptsThe EDI scripts are "edi_pusher.pl" and "edi_fetcher.pl" and are used to "push" and "fetch" EDI messages forconfigured EDI accounts.
1. As the opensrf user, copy edi_pusher.pl and edi_fetcher.pl from Open-ILS/src/support-scripts into /openils/bin:
cp Open-ILS/src/support-scripts/edi_pusher.pl /openils/bincp Open-ILS/src/support-scripts/edi_fetcher.pl /openils/bin
2. Setup the edi_pusher.pl and edi_fetcher.pl scripts to run as cron jobs in order to regularly push and receive EDImessages.
• Add to the opensrf user’s crontab the following entries:
10 * * * * cd /openils/bin && /usr/bin/perl ./edi_pusher.pl > /dev/null0 1 * * * cd /openils/bin && /usr/bin/perl ./edi_fetcher.pl > /dev/null
• The example for edi_pusher.pl sets the script to run at 10 minutes past the hour, every hour.
• The example for edi_fetcher.pl sets the script to run at 1 AM every night.
You may choose to run the EDI scripts more or less frequently based on the necessary response times fromyour vendors.
Configuration
Configuring ProvidersLook in Admin > Server Administration > Acquisitions > Providers
Column Description/Notes
Provider Name A unique name to identify the provider
Code A unique code to identify the provider
Owner The org unit who will "own" the provider.
Currency The currency format the provider accepts
Active Whether or not the Provider is "active" for use
Default Claim Policy ??
EDI Default The default "EDI Account" to use (see EDI AccountsConfiguration)
Email The email address for the provider
Fax Phone A fax number for the provider
Holdings Tag The holdings tag to be utilized (usually 852, for Evergreen)
Phone A phone number for the provider
Prepayment Required Whether or not prepayment is required
SAN The vendor provided, org unit specific SAN code
URL The vendor website
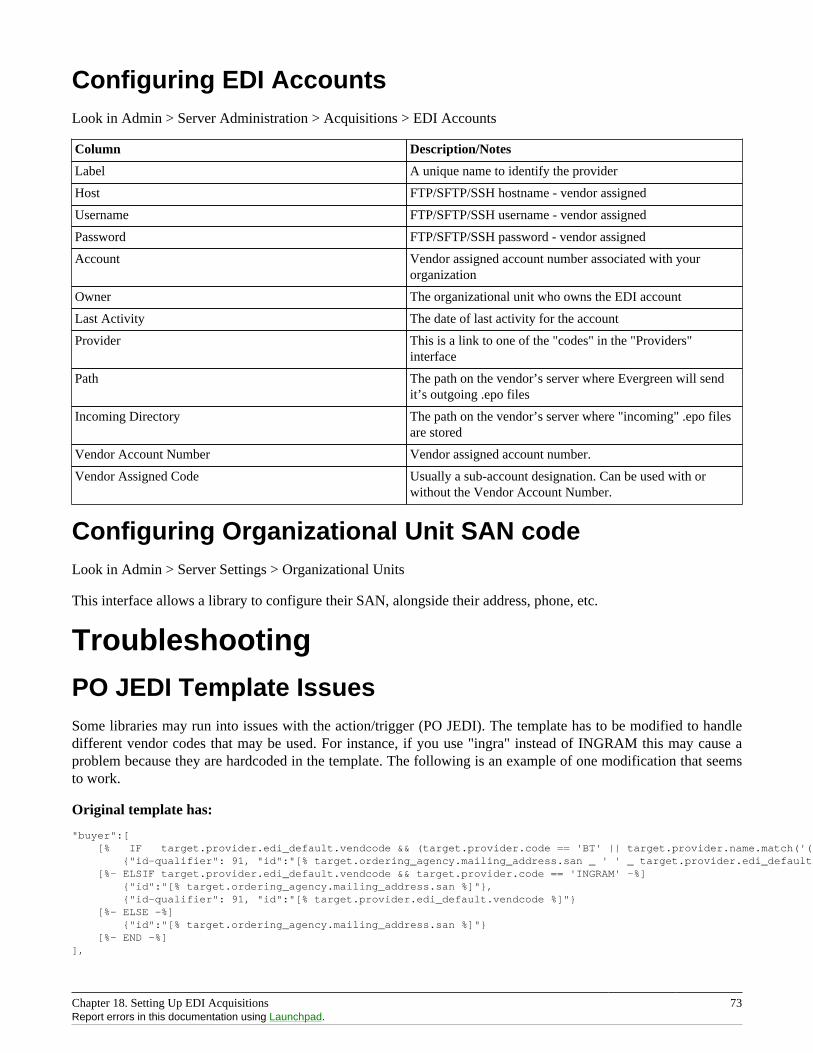
Chapter 18. Setting Up EDI Acquisitions 73Report errors in this documentation using Launchpad.
Configuring EDI AccountsLook in Admin > Server Administration > Acquisitions > EDI Accounts
Column Description/Notes
Label A unique name to identify the provider
Host FTP/SFTP/SSH hostname - vendor assigned
Username FTP/SFTP/SSH username - vendor assigned
Password FTP/SFTP/SSH password - vendor assigned
Account Vendor assigned account number associated with yourorganization
Owner The organizational unit who owns the EDI account
Last Activity The date of last activity for the account
Provider This is a link to one of the "codes" in the "Providers"interface
Path The path on the vendor’s server where Evergreen will sendit’s outgoing .epo files
Incoming Directory The path on the vendor’s server where "incoming" .epo filesare stored
Vendor Account Number Vendor assigned account number.
Vendor Assigned Code Usually a sub-account designation. Can be used with orwithout the Vendor Account Number.
Configuring Organizational Unit SAN codeLook in Admin > Server Settings > Organizational Units
This interface allows a library to configure their SAN, alongside their address, phone, etc.
Troubleshooting
PO JEDI Template IssuesSome libraries may run into issues with the action/trigger (PO JEDI). The template has to be modified to handledifferent vendor codes that may be used. For instance, if you use "ingra" instead of INGRAM this may cause aproblem because they are hardcoded in the template. The following is an example of one modification that seemsto work.
Original template has:
"buyer":[ [% IF target.provider.edi_default.vendcode && (target.provider.code == 'BT' || target.provider.name.match('(?i)^BAKER & TAYLOR')) -%] {"id-qualifier": 91, "id":"[% target.ordering_agency.mailing_address.san _ ' ' _ target.provider.edi_default.vendcode %]"} [%- ELSIF target.provider.edi_default.vendcode && target.provider.code == 'INGRAM' -%] {"id":"[% target.ordering_agency.mailing_address.san %]"}, {"id-qualifier": 91, "id":"[% target.provider.edi_default.vendcode %]"} [%- ELSE -%] {"id":"[% target.ordering_agency.mailing_address.san %]"} [%- END -%]],
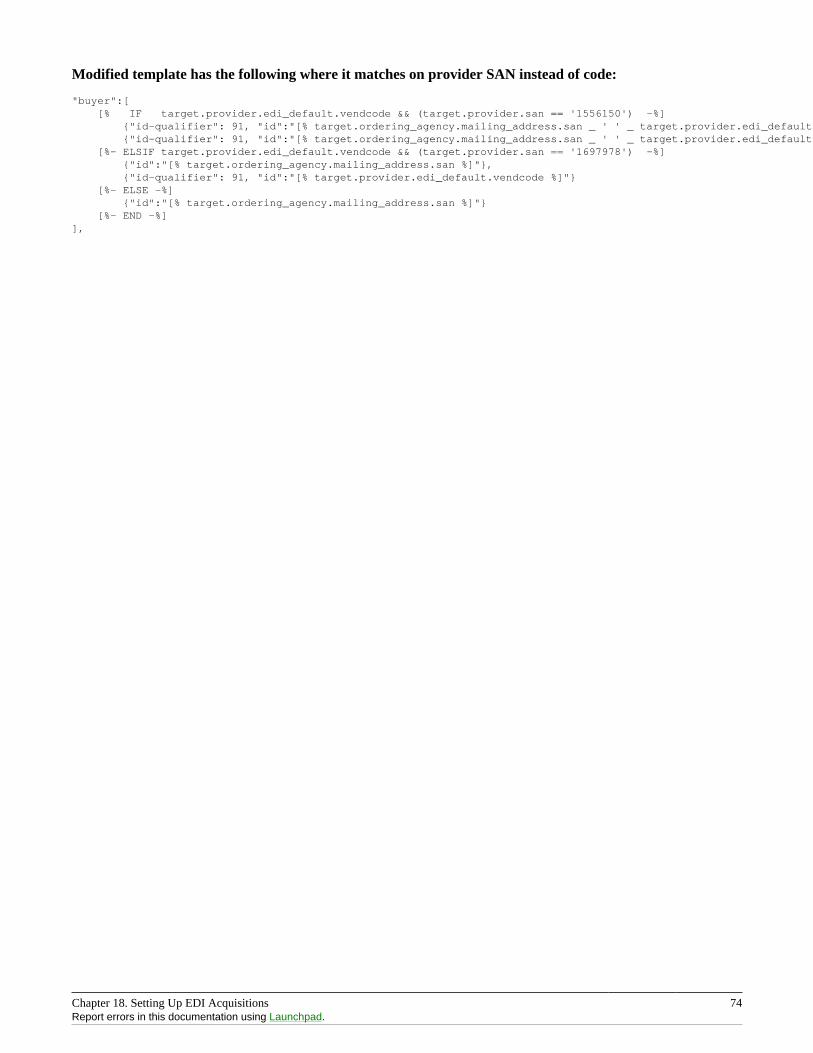
Chapter 18. Setting Up EDI Acquisitions 74Report errors in this documentation using Launchpad.
Modified template has the following where it matches on provider SAN instead of code:
"buyer":[ [% IF target.provider.edi_default.vendcode && (target.provider.san == '1556150') -%] {"id-qualifier": 91, "id":"[% target.ordering_agency.mailing_address.san _ ' ' _ target.provider.edi_default.vendcode %]"} {"id-qualifier": 91, "id":"[% target.ordering_agency.mailing_address.san _ ' ' _ target.provider.edi_default.vendcode %]"} [%- ELSIF target.provider.edi_default.vendcode && (target.provider.san == '1697978') -%] {"id":"[% target.ordering_agency.mailing_address.san %]"}, {"id-qualifier": 91, "id":"[% target.provider.edi_default.vendcode %]"} [%- ELSE -%] {"id":"[% target.ordering_agency.mailing_address.san %]"} [%- END -%]],

Part IV. System Configurationand Customization
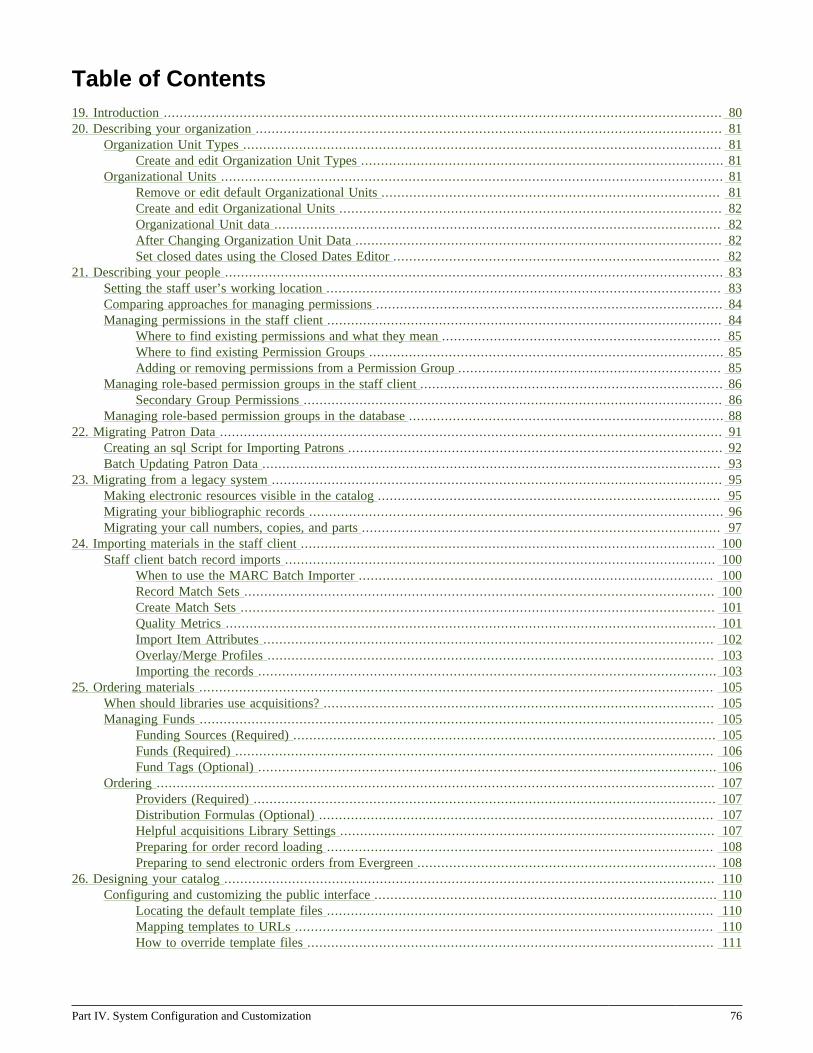
Part IV. System Configuration and Customization 76
Table of Contents19. Introduction ............................................................................................................................................ 8020. Describing your organization ..................................................................................................................... 81
Organization Unit Types ........................................................................................................................ 81Create and edit Organization Unit Types ........................................................................................... 81
Organizational Units .............................................................................................................................. 81Remove or edit default Organizational Units ..................................................................................... 81Create and edit Organizational Units ................................................................................................ 82Organizational Unit data ................................................................................................................ 82After Changing Organization Unit Data ............................................................................................ 82Set closed dates using the Closed Dates Editor .................................................................................. 82
21. Describing your people ............................................................................................................................. 83Setting the staff user’s working location ................................................................................................... 83Comparing approaches for managing permissions ....................................................................................... 84Managing permissions in the staff client ................................................................................................... 84
Where to find existing permissions and what they mean ...................................................................... 85Where to find existing Permission Groups ......................................................................................... 85Adding or removing permissions from a Permission Group .................................................................. 85
Managing role-based permission groups in the staff client ............................................................................ 86Secondary Group Permissions ......................................................................................................... 86
Managing role-based permission groups in the database ............................................................................... 8822. Migrating Patron Data .............................................................................................................................. 91
Creating an sql Script for Importing Patrons .............................................................................................. 92Batch Updating Patron Data ................................................................................................................... 93
23. Migrating from a legacy system ................................................................................................................. 95Making electronic resources visible in the catalog ...................................................................................... 95Migrating your bibliographic records ........................................................................................................ 96Migrating your call numbers, copies, and parts .......................................................................................... 97
24. Importing materials in the staff client ........................................................................................................ 100Staff client batch record imports ............................................................................................................ 100
When to use the MARC Batch Importer ......................................................................................... 100Record Match Sets ...................................................................................................................... 100Create Match Sets ....................................................................................................................... 101Quality Metrics ........................................................................................................................... 101Import Item Attributes ................................................................................................................. 102Overlay/Merge Profiles ................................................................................................................ 103Importing the records ................................................................................................................... 103
25. Ordering materials ................................................................................................................................. 105When should libraries use acquisitions? .................................................................................................. 105Managing Funds ................................................................................................................................. 105
Funding Sources (Required) .......................................................................................................... 105Funds (Required) ........................................................................................................................ 106Fund Tags (Optional) ................................................................................................................... 106
Ordering ............................................................................................................................................ 107Providers (Required) .................................................................................................................... 107Distribution Formulas (Optional) ................................................................................................... 107Helpful acquisitions Library Settings .............................................................................................. 107Preparing for order record loading ................................................................................................. 108Preparing to send electronic orders from Evergreen ........................................................................... 108
26. Designing your catalog ........................................................................................................................... 110Configuring and customizing the public interface ...................................................................................... 110
Locating the default template files ................................................................................................. 110Mapping templates to URLs ......................................................................................................... 110How to override template files ...................................................................................................... 111
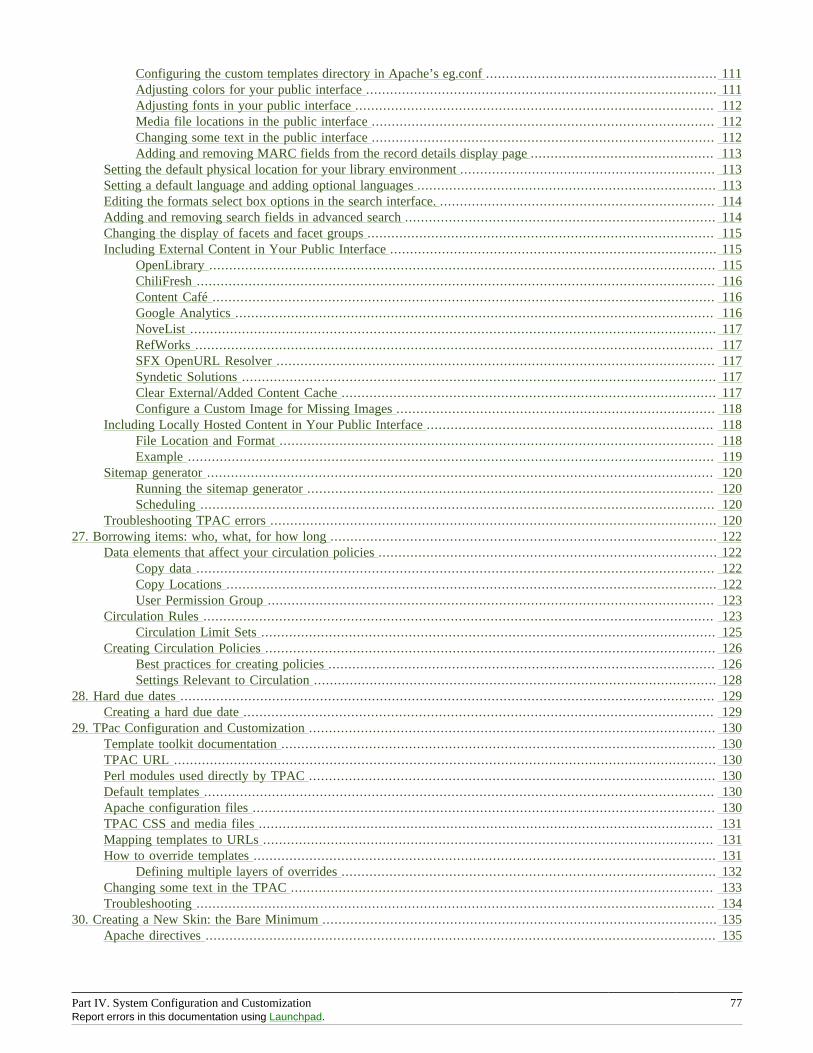
Part IV. System Configuration and Customization 77Report errors in this documentation using Launchpad.
Configuring the custom templates directory in Apache’s eg.conf .......................................................... 111Adjusting colors for your public interface ........................................................................................ 111Adjusting fonts in your public interface .......................................................................................... 112Media file locations in the public interface ...................................................................................... 112Changing some text in the public interface ...................................................................................... 112Adding and removing MARC fields from the record details display page .............................................. 113
Setting the default physical location for your library environment ................................................................ 113Setting a default language and adding optional languages ........................................................................... 113Editing the formats select box options in the search interface. ..................................................................... 114Adding and removing search fields in advanced search .............................................................................. 114Changing the display of facets and facet groups ....................................................................................... 115Including External Content in Your Public Interface .................................................................................. 115
OpenLibrary ............................................................................................................................... 115ChiliFresh .................................................................................................................................. 116Content Café .............................................................................................................................. 116Google Analytics ........................................................................................................................ 116NoveList .................................................................................................................................... 117RefWorks .................................................................................................................................. 117SFX OpenURL Resolver .............................................................................................................. 117Syndetic Solutions ....................................................................................................................... 117Clear External/Added Content Cache .............................................................................................. 117Configure a Custom Image for Missing Images ................................................................................ 118
Including Locally Hosted Content in Your Public Interface ........................................................................ 118File Location and Format ............................................................................................................. 118Example .................................................................................................................................... 119
Sitemap generator ............................................................................................................................... 120Running the sitemap generator ...................................................................................................... 120Scheduling ................................................................................................................................. 120
Troubleshooting TPAC errors ................................................................................................................ 12027. Borrowing items: who, what, for how long ................................................................................................. 122
Data elements that affect your circulation policies ..................................................................................... 122Copy data .................................................................................................................................. 122Copy Locations ........................................................................................................................... 122User Permission Group ................................................................................................................ 123
Circulation Rules ................................................................................................................................ 123Circulation Limit Sets .................................................................................................................. 125
Creating Circulation Policies ................................................................................................................. 126Best practices for creating policies ................................................................................................. 126Settings Relevant to Circulation ..................................................................................................... 128
28. Hard due dates ...................................................................................................................................... 129Creating a hard due date ...................................................................................................................... 129
29. TPac Configuration and Customization ...................................................................................................... 130Template toolkit documentation ............................................................................................................. 130TPAC URL ........................................................................................................................................ 130Perl modules used directly by TPAC ...................................................................................................... 130Default templates ................................................................................................................................ 130Apache configuration files .................................................................................................................... 130TPAC CSS and media files .................................................................................................................. 131Mapping templates to URLs ................................................................................................................. 131How to override templates .................................................................................................................... 131
Defining multiple layers of overrides .............................................................................................. 132Changing some text in the TPAC .......................................................................................................... 133Troubleshooting .................................................................................................................................. 134
30. Creating a New Skin: the Bare Minimum ................................................................................................... 135Apache directives ................................................................................................................................ 135
Part IV. System Configuration and Customization 78Report errors in this documentation using Launchpad.
Customizing templates ......................................................................................................................... 13531. Auto Suggest in Catalog Search ............................................................................................................... 137
Enabling this Feature ........................................................................................................................... 137Using this Feature ............................................................................................................................... 137
32. Authentication Proxy .............................................................................................................................. 13933. Kid’s OPAC Configuration ...................................................................................................................... 141
Configuration ..................................................................................................................................... 141Apache ...................................................................................................................................... 141XML Configuration File ............................................................................................................... 141Skin Configuration ...................................................................................................................... 142
Considerations for Community Adoption ................................................................................................. 142Outstanding Development (Unsponsored) ................................................................................................ 142
34. Customizable Toolbar ............................................................................................................................. 143Configure Toolbar ............................................................................................................................... 143
35. Patron Address City/State/County Pre-Populate by ZIP Code ......................................................................... 146Scoping and Permissions ...................................................................................................................... 146Setup Steps ........................................................................................................................................ 146
Step 1 - Setup Data File ............................................................................................................... 146Step 2 - Enable Feature ................................................................................................................ 147Step 3 - Test .............................................................................................................................. 148
ZIP Code Data ................................................................................................................................... 148Manual Entry ............................................................................................................................. 148Geonames.org Data ..................................................................................................................... 148Commercial Data ........................................................................................................................ 148Existing Patron Database .............................................................................................................. 148
Development ...................................................................................................................................... 14936. Phonelist.pm Module .............................................................................................................................. 150
Adding Parameters .............................................................................................................................. 151Output ............................................................................................................................................... 151Holds ................................................................................................................................................ 152Overdues ........................................................................................................................................... 152Skipping patrons with email notification of holds ..................................................................................... 152Using the ws_ou parameter ................................................................................................................... 153Automating the download ..................................................................................................................... 153
37. SIP Server ............................................................................................................................................ 154Installing the SIP Server ....................................................................................................................... 154
Getting the code ......................................................................................................................... 154Configuring the Server ................................................................................................................. 154Adding SIP Users ....................................................................................................................... 154Running the server ...................................................................................................................... 156Logging-SIP ............................................................................................................................... 156Testing Your SIP Connection ........................................................................................................ 157More Testing .............................................................................................................................. 157
SIP Communication ............................................................................................................................. 15701 Block Patron .......................................................................................................................... 15909/10 Checkin ............................................................................................................................ 15911/12 Checkout ........................................................................................................................... 16015/16 Hold ................................................................................................................................. 16117/18 Item Information ................................................................................................................ 16119/20 Item Status Update ............................................................................................................. 16123/24 Patron Status ..................................................................................................................... 16125/26 Patron Enable .................................................................................................................... 16229/30 Renew .............................................................................................................................. 16235/36 End Session ....................................................................................................................... 16237/38 Fee Paid ........................................................................................................................... 162

Part IV. System Configuration and Customization 79Report errors in this documentation using Launchpad.
63/64 Patron Information .............................................................................................................. 16265/66 Renew All ......................................................................................................................... 16393/94 Login ............................................................................................................................... 16397/96 Resend .............................................................................................................................. 16399/98 SC and ACS Status ............................................................................................................. 163Fields ........................................................................................................................................ 164
38. Apache Rewrite Tricks ........................................................................................................................... 165Short URLs ........................................................................................................................................ 165Domain Based Content with RewriteMaps ............................................................................................... 165
39. Apache Access Handler Perl Module ......................................................................................................... 167Use Cases .......................................................................................................................................... 168Proxying Websites ............................................................................................................................... 168

Chapter 19. Introduction 80
Chapter 19. IntroductionThe Evergreen system allows a free range of customizations to every aspect of the system. Use this part of thedocumentation to become familiar with the tools for configuring the system as well as customizing the catalog andstaff client.
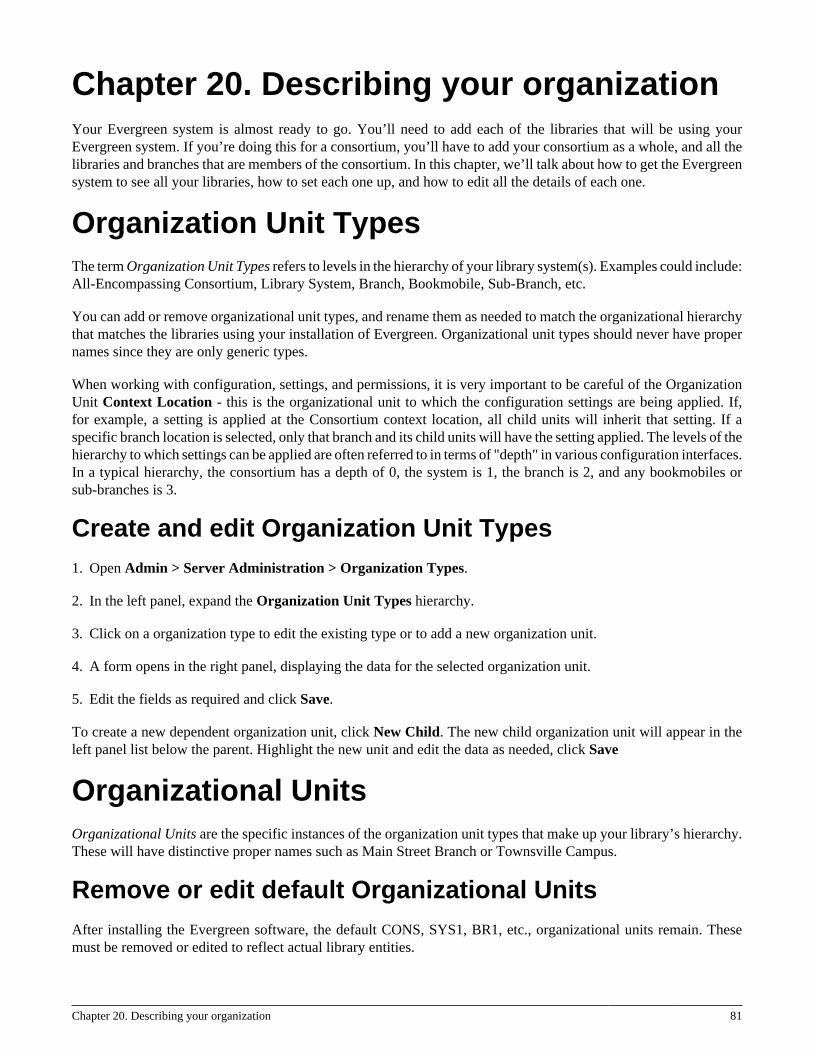
Chapter 20. Describing your organization 81
Chapter 20. Describing your organizationYour Evergreen system is almost ready to go. You’ll need to add each of the libraries that will be using yourEvergreen system. If you’re doing this for a consortium, you’ll have to add your consortium as a whole, and all thelibraries and branches that are members of the consortium. In this chapter, we’ll talk about how to get the Evergreensystem to see all your libraries, how to set each one up, and how to edit all the details of each one.
Organization Unit TypesThe term Organization Unit Types refers to levels in the hierarchy of your library system(s). Examples could include:All-Encompassing Consortium, Library System, Branch, Bookmobile, Sub-Branch, etc.
You can add or remove organizational unit types, and rename them as needed to match the organizational hierarchythat matches the libraries using your installation of Evergreen. Organizational unit types should never have propernames since they are only generic types.
When working with configuration, settings, and permissions, it is very important to be careful of the OrganizationUnit Context Location - this is the organizational unit to which the configuration settings are being applied. If,for example, a setting is applied at the Consortium context location, all child units will inherit that setting. If aspecific branch location is selected, only that branch and its child units will have the setting applied. The levels of thehierarchy to which settings can be applied are often referred to in terms of "depth" in various configuration interfaces.In a typical hierarchy, the consortium has a depth of 0, the system is 1, the branch is 2, and any bookmobiles orsub-branches is 3.
Create and edit Organization Unit Types1. Open Admin > Server Administration > Organization Types.
2. In the left panel, expand the Organization Unit Types hierarchy.
3. Click on a organization type to edit the existing type or to add a new organization unit.
4. A form opens in the right panel, displaying the data for the selected organization unit.
5. Edit the fields as required and click Save.
To create a new dependent organization unit, click New Child. The new child organization unit will appear in theleft panel list below the parent. Highlight the new unit and edit the data as needed, click Save
Organizational UnitsOrganizational Units are the specific instances of the organization unit types that make up your library’s hierarchy.These will have distinctive proper names such as Main Street Branch or Townsville Campus.
Remove or edit default Organizational UnitsAfter installing the Evergreen software, the default CONS, SYS1, BR1, etc., organizational units remain. Thesemust be removed or edited to reflect actual library entities.
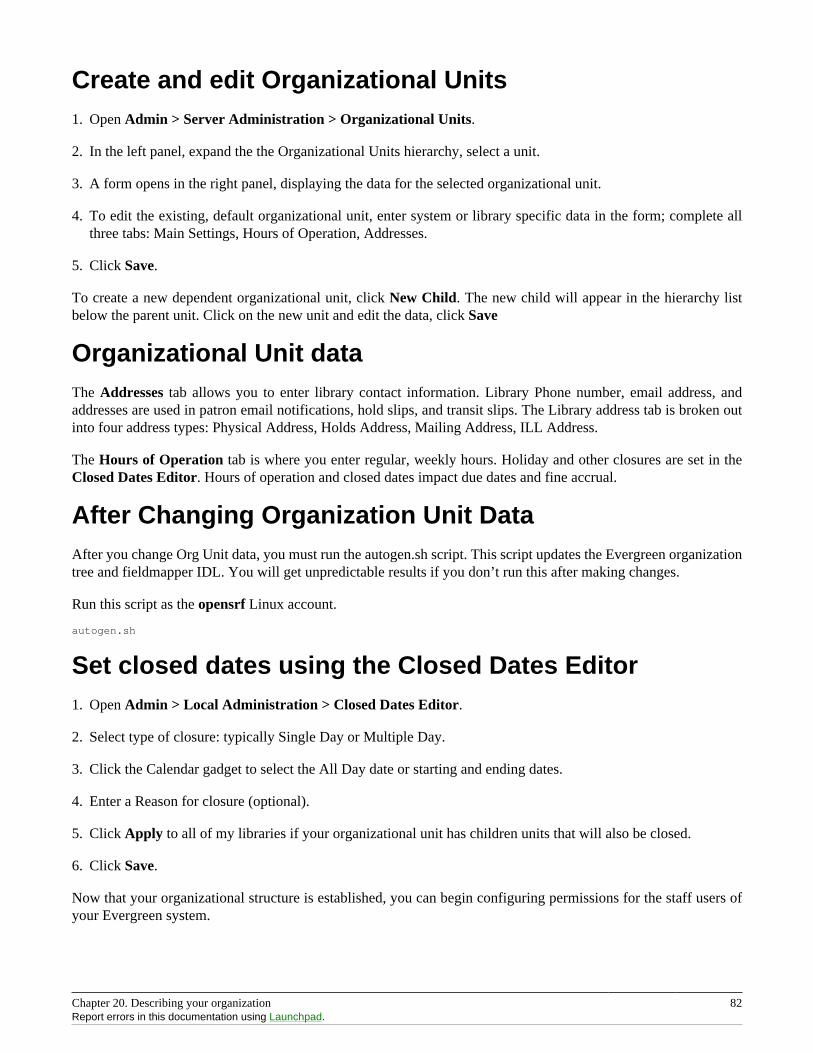
Chapter 20. Describing your organization 82Report errors in this documentation using Launchpad.
Create and edit Organizational Units1. Open Admin > Server Administration > Organizational Units.
2. In the left panel, expand the the Organizational Units hierarchy, select a unit.
3. A form opens in the right panel, displaying the data for the selected organizational unit.
4. To edit the existing, default organizational unit, enter system or library specific data in the form; complete allthree tabs: Main Settings, Hours of Operation, Addresses.
5. Click Save.
To create a new dependent organizational unit, click New Child. The new child will appear in the hierarchy listbelow the parent unit. Click on the new unit and edit the data, click Save
Organizational Unit dataThe Addresses tab allows you to enter library contact information. Library Phone number, email address, andaddresses are used in patron email notifications, hold slips, and transit slips. The Library address tab is broken outinto four address types: Physical Address, Holds Address, Mailing Address, ILL Address.
The Hours of Operation tab is where you enter regular, weekly hours. Holiday and other closures are set in theClosed Dates Editor. Hours of operation and closed dates impact due dates and fine accrual.
After Changing Organization Unit DataAfter you change Org Unit data, you must run the autogen.sh script. This script updates the Evergreen organizationtree and fieldmapper IDL. You will get unpredictable results if you don’t run this after making changes.
Run this script as the opensrf Linux account.
autogen.sh
Set closed dates using the Closed Dates Editor1. Open Admin > Local Administration > Closed Dates Editor.
2. Select type of closure: typically Single Day or Multiple Day.
3. Click the Calendar gadget to select the All Day date or starting and ending dates.
4. Enter a Reason for closure (optional).
5. Click Apply to all of my libraries if your organizational unit has children units that will also be closed.
6. Click Save.
Now that your organizational structure is established, you can begin configuring permissions for the staff users ofyour Evergreen system.
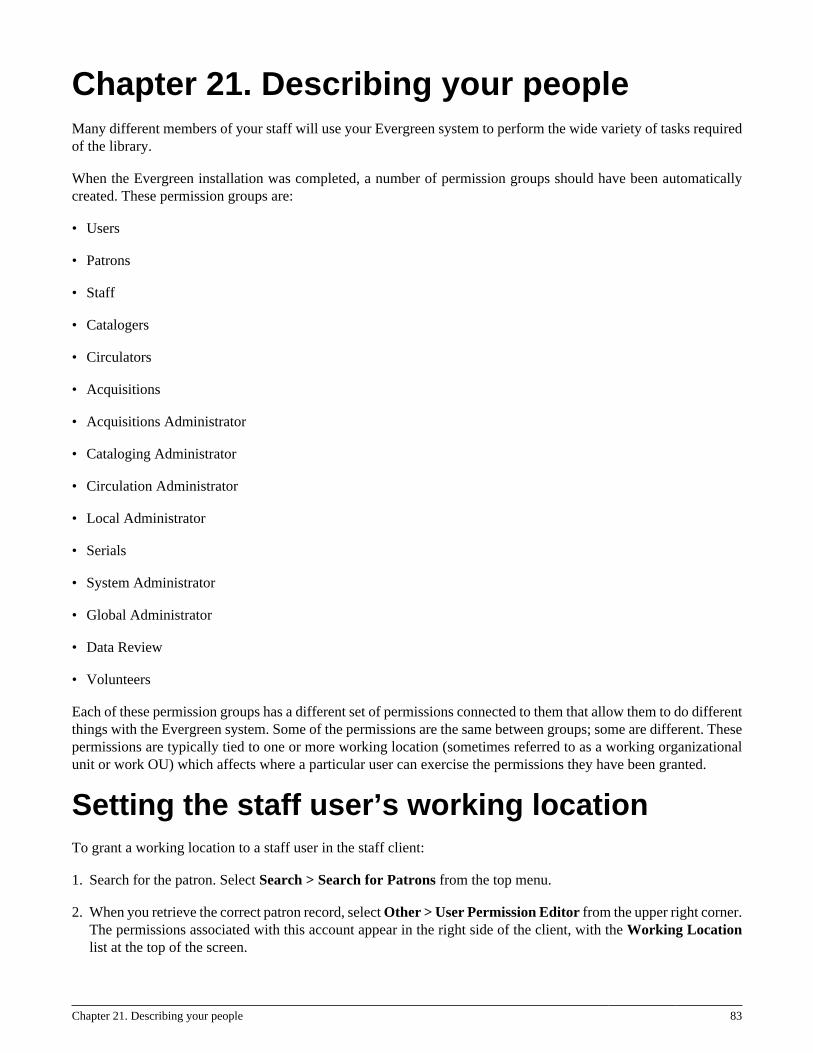
Chapter 21. Describing your people 83
Chapter 21. Describing your peopleMany different members of your staff will use your Evergreen system to perform the wide variety of tasks requiredof the library.
When the Evergreen installation was completed, a number of permission groups should have been automaticallycreated. These permission groups are:
• Users
• Patrons
• Staff
• Catalogers
• Circulators
• Acquisitions
• Acquisitions Administrator
• Cataloging Administrator
• Circulation Administrator
• Local Administrator
• Serials
• System Administrator
• Global Administrator
• Data Review
• Volunteers
Each of these permission groups has a different set of permissions connected to them that allow them to do differentthings with the Evergreen system. Some of the permissions are the same between groups; some are different. Thesepermissions are typically tied to one or more working location (sometimes referred to as a working organizationalunit or work OU) which affects where a particular user can exercise the permissions they have been granted.
Setting the staff user’s working locationTo grant a working location to a staff user in the staff client:
1. Search for the patron. Select Search > Search for Patrons from the top menu.
2. When you retrieve the correct patron record, select Other > User Permission Editor from the upper right corner.The permissions associated with this account appear in the right side of the client, with the Working Locationlist at the top of the screen.
Chapter 21. Describing your people 84Report errors in this documentation using Launchpad.
3. The Working Location list displays the Organizational Units in your consortium. Select the check box for eachOrganization Unit where this user needs working permissions. Clear any other check boxes for OrganizationUnits where the user no longer requires working permissions.
4. Scroll all the way to the bottom of the page and click Save. This user account is now ready to be used at yourlibrary.
As you scroll down the page you will come to the Permissions list. These are the permissions that are given throughthe Permission Group that you assigned to this user. Depending on your own permissions, you may also have theability to grant individual permissions directly to this user.
Comparing approaches for managingpermissionsThe Evergreen community uses two different approaches to deal with managing permissions for users:
• Staff Client
Evergreen libraries that are most comfortable using the staff client tend to manage permissions by creatingdifferent profiles for each type of user. When you create a new user, the profile you assign to the user determinestheir basic set of permissions. This approach requires many permission groups that contain overlapping sets ofpermissions: for example, you might need to create a Student Circulator group and a Student Cataloger group.Then if a new employee needs to perform both of these roles, you need to create a third Student Cataloger /Circulator group representing the set of all of the permissions of the first two groups.
The advantage to this approach is that you can maintain the permissions entirely within the staff client; a drawbackto this approach is that it can be challenging to remember to add a new permission to all of the groups. Anotherdrawback of this approach is that the user profile is also used to determine circulation and hold rules, so thecomplexity of your circulation and hold rules might increase significantly.
• Database Access
Evergreen libraries that are comfortable manipulating the database directly tend to manage permissions bycreating permission groups that reflect discrete roles within a library. At the database level, you can make auser belong to many different permission groups, and that can simplify your permission management efforts. Forexample, if you create a Student Circulator group and a Student Cataloger group, and a new employee needsto perform both of these roles, you can simply assign them to both of the groups; you do not need to create anentirely new permission group in this case. An advantage of this approach is that the user profile can representonly the user’s borrowing category and requires only the basic Patrons permissions, which can simplify yourcirculation and hold rules.
Permissions and profiles are not carved in stone. As the system administrator, you can change them as needed.You may set and alter the permissions for each permission group in line with what your library, or possibly yourconsortium, defines as the appropriate needs for each function in the library.
Managing permissions in the staff clientIn this section, we’ll show you in the staff client:
• where to find the available permissions
Chapter 21. Describing your people 85Report errors in this documentation using Launchpad.
• where to find the existing permission groups
• how to see the permissions associated with each group
• how to add or remove permissions from a group
We also provide an appendix with a listing of suggested minimum permissions for some essential groups. You cancompare the existing permissions with these suggested permissions and, if any are missing, you will know how toadd them.
Where to find existing permissions and what they mean
In the staff client, in the upper right corner of the screen, click on Admin > Server Administration > Permissions.
The list of available permissions will appear on screen and you can scroll down through them to see permissionsthat are already available in your default installation of Evergreen.
There are over 500 permissions in the permission list. They appear in two columns: Code and Description. Code isthe name of the permission as it appear in the Evergreen database. Description is a brief note on what the permissionallows. All of the most common permissions have easily understandable descriptions.
Where to find existing Permission Groups
In the staff client, in the upper right corner of the screen, navigate to Admin > Server Administration > PermissionGroups.
Two panes will open on your screen. The left pane provides a tree view of existing Permission Groups. The rightpane contains two tabs: Group Configuration and Group Permissions.
In the left pane, you will find a listing of the existing Permission Groups which were installed by default. Click on the+ sign next to any folder to expand the tree and see the groups underneath it. You should see the Permission Groupsthat were listed at the beginning of this chapter. If you do not and you need them, you will have to create them.
Adding or removing permissions from a PermissionGroup
First, we will remove a permission from the Staff group.
1. From the list of Permission Groups, click on Staff.
2. In the right pane, click on the Group Permissions tab. You will now see a list of permissions that this group has.
3. From the list, choose CREATE_CONTAINER. This will now be highlighted.
4. Click the Delete Selected button. CREATE_CONTAINER will be deleted from the list. The system will not askfor a confirmation. If you delete something by accident, you will have to add it back.
5. Click the Save Changes button.
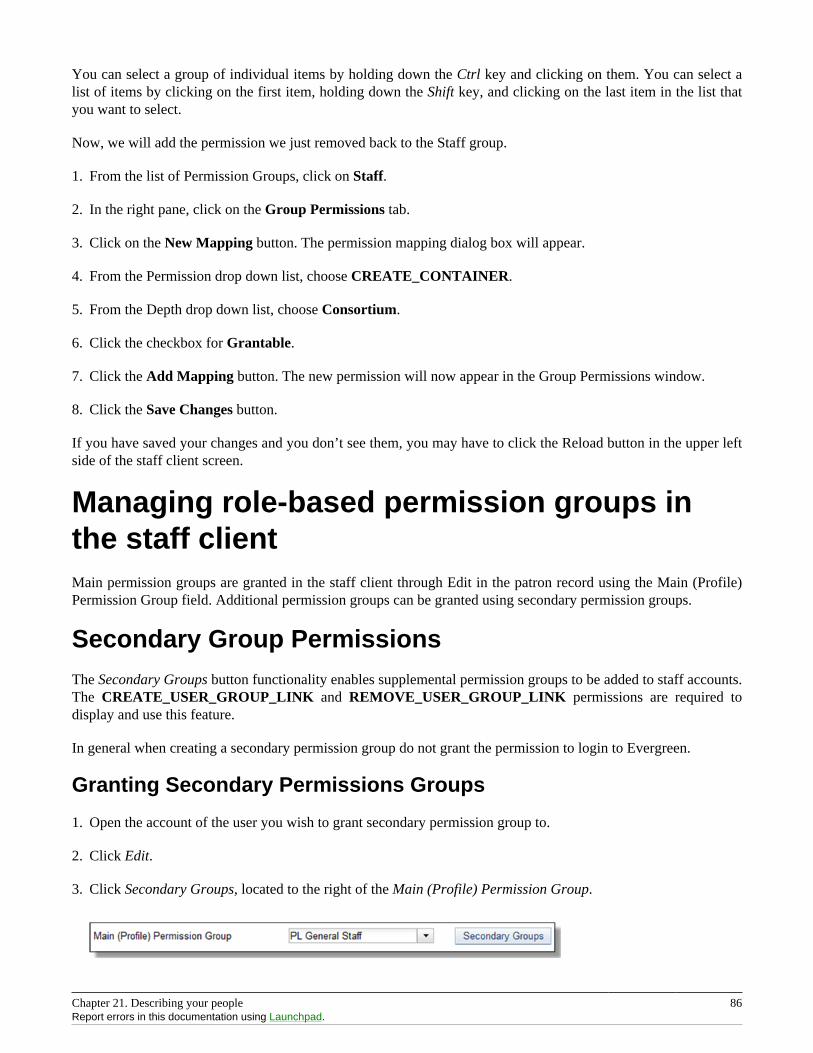
Chapter 21. Describing your people 86Report errors in this documentation using Launchpad.
You can select a group of individual items by holding down the Ctrl key and clicking on them. You can select alist of items by clicking on the first item, holding down the Shift key, and clicking on the last item in the list thatyou want to select.
Now, we will add the permission we just removed back to the Staff group.
1. From the list of Permission Groups, click on Staff.
2. In the right pane, click on the Group Permissions tab.
3. Click on the New Mapping button. The permission mapping dialog box will appear.
4. From the Permission drop down list, choose CREATE_CONTAINER.
5. From the Depth drop down list, choose Consortium.
6. Click the checkbox for Grantable.
7. Click the Add Mapping button. The new permission will now appear in the Group Permissions window.
8. Click the Save Changes button.
If you have saved your changes and you don’t see them, you may have to click the Reload button in the upper leftside of the staff client screen.
Managing role-based permission groups inthe staff clientMain permission groups are granted in the staff client through Edit in the patron record using the Main (Profile)Permission Group field. Additional permission groups can be granted using secondary permission groups.
Secondary Group PermissionsThe Secondary Groups button functionality enables supplemental permission groups to be added to staff accounts.The CREATE_USER_GROUP_LINK and REMOVE_USER_GROUP_LINK permissions are required todisplay and use this feature.
In general when creating a secondary permission group do not grant the permission to login to Evergreen.
Granting Secondary Permissions Groups
1. Open the account of the user you wish to grant secondary permission group to.
2. Click Edit.
3. Click Secondary Groups, located to the right of the Main (Profile) Permission Group.
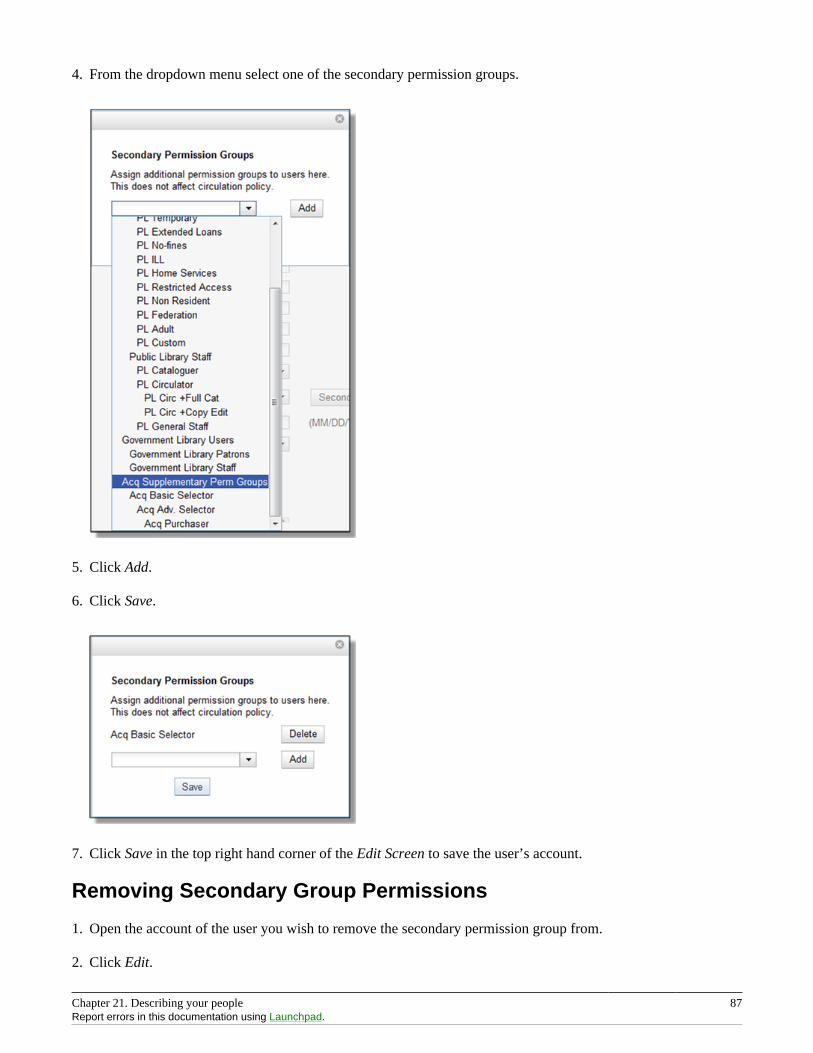
Chapter 21. Describing your people 87Report errors in this documentation using Launchpad.
4. From the dropdown menu select one of the secondary permission groups.
5. Click Add.
6. Click Save.
7. Click Save in the top right hand corner of the Edit Screen to save the user’s account.
Removing Secondary Group Permissions
1. Open the account of the user you wish to remove the secondary permission group from.
2. Click Edit.
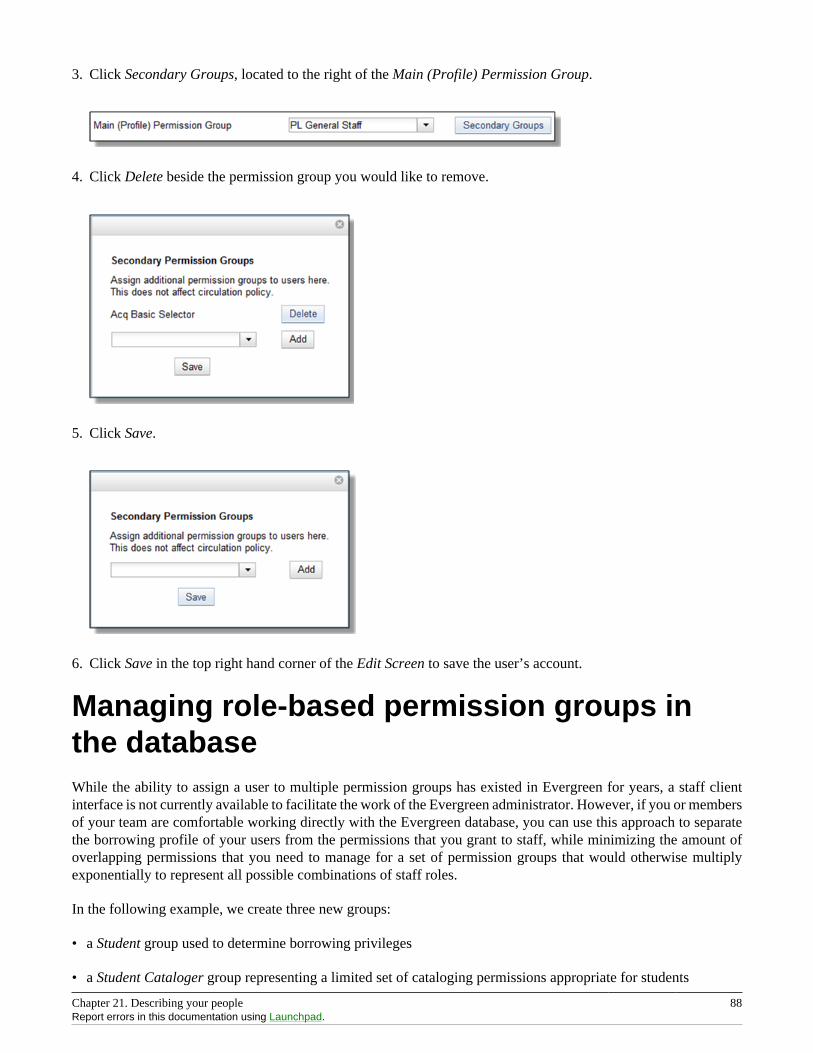
Chapter 21. Describing your people 88Report errors in this documentation using Launchpad.
3. Click Secondary Groups, located to the right of the Main (Profile) Permission Group.
4. Click Delete beside the permission group you would like to remove.
5. Click Save.
6. Click Save in the top right hand corner of the Edit Screen to save the user’s account.
Managing role-based permission groups inthe databaseWhile the ability to assign a user to multiple permission groups has existed in Evergreen for years, a staff clientinterface is not currently available to facilitate the work of the Evergreen administrator. However, if you or membersof your team are comfortable working directly with the Evergreen database, you can use this approach to separatethe borrowing profile of your users from the permissions that you grant to staff, while minimizing the amount ofoverlapping permissions that you need to manage for a set of permission groups that would otherwise multiplyexponentially to represent all possible combinations of staff roles.
In the following example, we create three new groups:
• a Student group used to determine borrowing privileges
• a Student Cataloger group representing a limited set of cataloging permissions appropriate for students
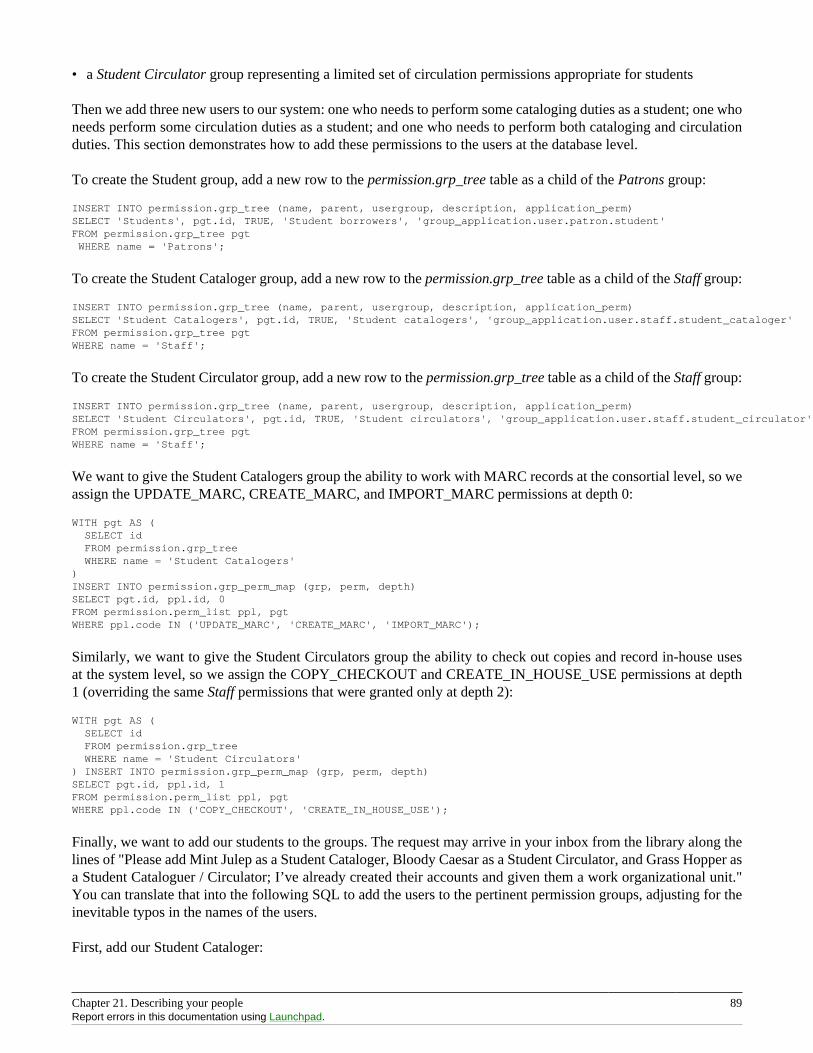
Chapter 21. Describing your people 89Report errors in this documentation using Launchpad.
• a Student Circulator group representing a limited set of circulation permissions appropriate for students
Then we add three new users to our system: one who needs to perform some cataloging duties as a student; one whoneeds perform some circulation duties as a student; and one who needs to perform both cataloging and circulationduties. This section demonstrates how to add these permissions to the users at the database level.
To create the Student group, add a new row to the permission.grp_tree table as a child of the Patrons group:
INSERT INTO permission.grp_tree (name, parent, usergroup, description, application_perm)SELECT 'Students', pgt.id, TRUE, 'Student borrowers', 'group_application.user.patron.student'FROM permission.grp_tree pgt WHERE name = 'Patrons';
To create the Student Cataloger group, add a new row to the permission.grp_tree table as a child of the Staff group:
INSERT INTO permission.grp_tree (name, parent, usergroup, description, application_perm)SELECT 'Student Catalogers', pgt.id, TRUE, 'Student catalogers', 'group_application.user.staff.student_cataloger'FROM permission.grp_tree pgtWHERE name = 'Staff';
To create the Student Circulator group, add a new row to the permission.grp_tree table as a child of the Staff group:
INSERT INTO permission.grp_tree (name, parent, usergroup, description, application_perm)SELECT 'Student Circulators', pgt.id, TRUE, 'Student circulators', 'group_application.user.staff.student_circulator'FROM permission.grp_tree pgtWHERE name = 'Staff';
We want to give the Student Catalogers group the ability to work with MARC records at the consortial level, so weassign the UPDATE_MARC, CREATE_MARC, and IMPORT_MARC permissions at depth 0:
WITH pgt AS ( SELECT id FROM permission.grp_tree WHERE name = 'Student Catalogers')INSERT INTO permission.grp_perm_map (grp, perm, depth)SELECT pgt.id, ppl.id, 0FROM permission.perm_list ppl, pgtWHERE ppl.code IN ('UPDATE_MARC', 'CREATE_MARC', 'IMPORT_MARC');
Similarly, we want to give the Student Circulators group the ability to check out copies and record in-house usesat the system level, so we assign the COPY_CHECKOUT and CREATE_IN_HOUSE_USE permissions at depth1 (overriding the same Staff permissions that were granted only at depth 2):
WITH pgt AS ( SELECT id FROM permission.grp_tree WHERE name = 'Student Circulators') INSERT INTO permission.grp_perm_map (grp, perm, depth)SELECT pgt.id, ppl.id, 1FROM permission.perm_list ppl, pgtWHERE ppl.code IN ('COPY_CHECKOUT', 'CREATE_IN_HOUSE_USE');
Finally, we want to add our students to the groups. The request may arrive in your inbox from the library along thelines of "Please add Mint Julep as a Student Cataloger, Bloody Caesar as a Student Circulator, and Grass Hopper asa Student Cataloguer / Circulator; I’ve already created their accounts and given them a work organizational unit."You can translate that into the following SQL to add the users to the pertinent permission groups, adjusting for theinevitable typos in the names of the users.
First, add our Student Cataloger:
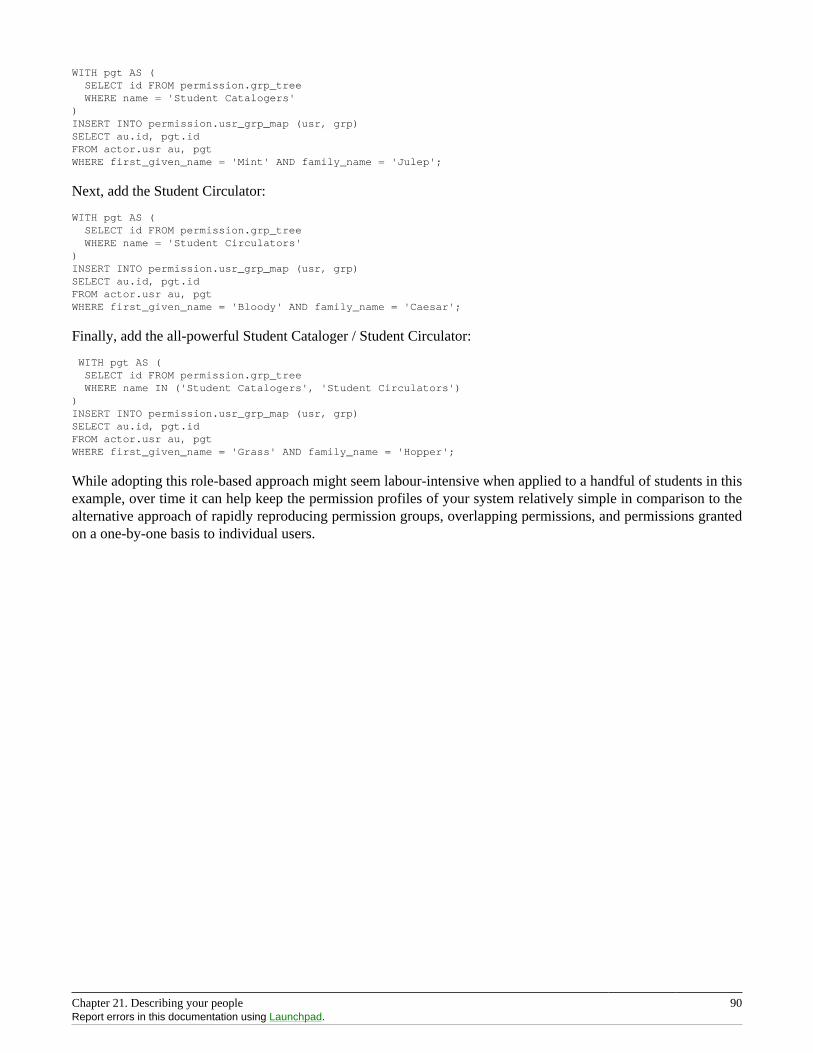
Chapter 21. Describing your people 90Report errors in this documentation using Launchpad.
WITH pgt AS ( SELECT id FROM permission.grp_tree WHERE name = 'Student Catalogers')INSERT INTO permission.usr_grp_map (usr, grp)SELECT au.id, pgt.idFROM actor.usr au, pgtWHERE first_given_name = 'Mint' AND family_name = 'Julep';
Next, add the Student Circulator:
WITH pgt AS ( SELECT id FROM permission.grp_tree WHERE name = 'Student Circulators')INSERT INTO permission.usr_grp_map (usr, grp)SELECT au.id, pgt.idFROM actor.usr au, pgtWHERE first_given_name = 'Bloody' AND family_name = 'Caesar';
Finally, add the all-powerful Student Cataloger / Student Circulator:
WITH pgt AS ( SELECT id FROM permission.grp_tree WHERE name IN ('Student Catalogers', 'Student Circulators'))INSERT INTO permission.usr_grp_map (usr, grp)SELECT au.id, pgt.idFROM actor.usr au, pgtWHERE first_given_name = 'Grass' AND family_name = 'Hopper';
While adopting this role-based approach might seem labour-intensive when applied to a handful of students in thisexample, over time it can help keep the permission profiles of your system relatively simple in comparison to thealternative approach of rapidly reproducing permission groups, overlapping permissions, and permissions grantedon a one-by-one basis to individual users.
Chapter 22. Migrating Patron Data 91
Chapter 22. Migrating Patron DataThis section will explain the task of migrating your patron data from comma delimited files into Evergreen. It doesnot deal with the process of exporting from the non-Evergreen system since this process may vary depending onwhere you are extracting your patron records. Patron could come from an ILS or it could come from a studentdatabase in the case of academic records.
When importing records into Evergreen you will need to populate 3 tables in your Evergreen database:
• actor.usr - The main table for user data
• actor.card - Stores the barcode for users; Users can have more than 1 card but only 1 can be active at a given time;
• actor.usr_address - Used for storing address information; A user can have more than one address.
Before following the procedures below to import patron data into Evergreen, it is a good idea to examine the fieldsin these tables in order to decide on a strategy for data to include in your import. It is important to understand thedata types and constraints on each field.
1. Export the patron data from your existing ILS or from another source into a comma delimited file. The commadelimited file used for importing the records should use Unicode (UTF8) character encoding.
2. Create a staging table. A staging table will allow you to tweak the data before importing. Here is an examplesql statement:
CREATE TABLE students ( student_id int, barcode text, last_name text, first_name text, email text, address_type text, street1 text, street2 text, city text, province text, country text, postal_code text, phone text, profile int DEFAULT 2, ident_type int, home_ou int, claims_returned_count int DEFAULT 0, usrname text, net_access_level int DEFAULT 2, password text );
The default variables allow you to set default for your library or to populate required fields in Evergreen ifyour data includes NULL values.
The data field profile in the above SQL script refers to the user group and should be an integer referencingthe id field in permission.grp_tree. Setting this value will affect the permissions for the user. See the values inpermission.grp_tree for possibilities.
ident_type is the identification type used for identifying users. This is a integer value referencingconfig.identification_type and should match the id values of that table. The default values are 1 for DriversLicense, 2 for SSN or 3 for other.
home_ou is the home organizational unit for the user. This value needs to match the corresponding id in theactor.org_unit table.
3. Copy records into staging table from a comma delimited file.
COPY students (student_id, last_name, first_name, email, address_type, street1, street2, city, province, country, postal_code, phone) FROM '/home/opensrf/patrons.csv' WITH CSV HEADER;
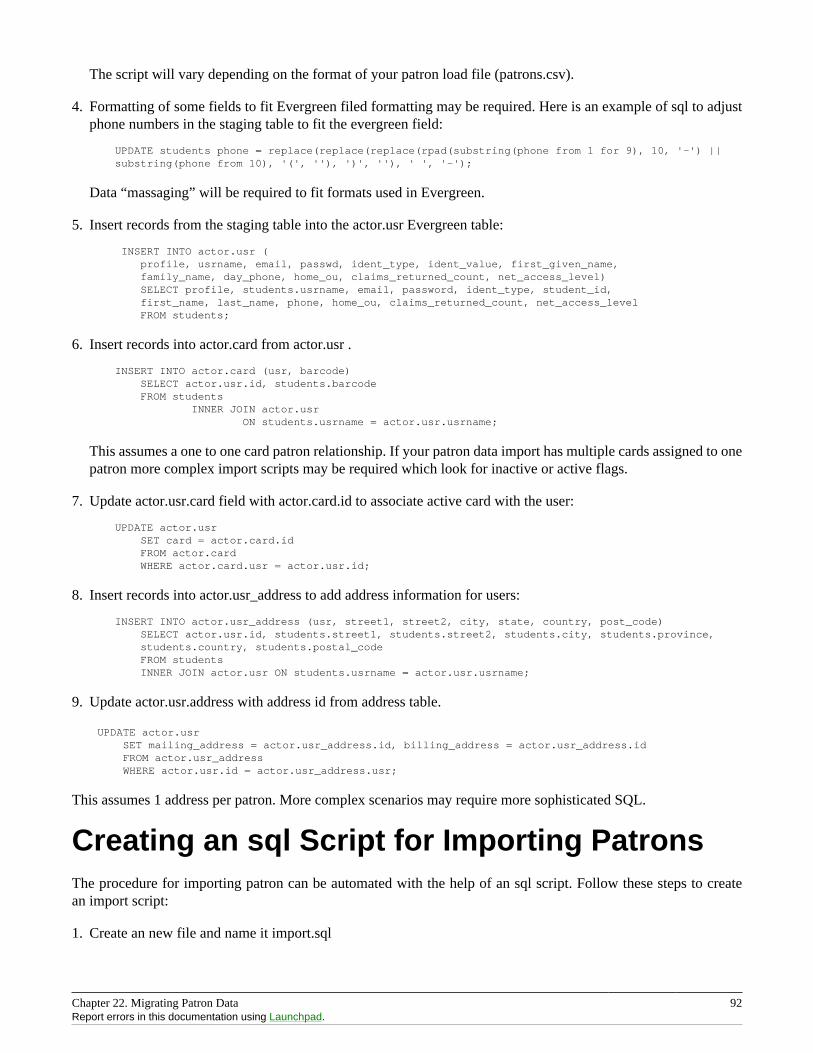
Chapter 22. Migrating Patron Data 92Report errors in this documentation using Launchpad.
The script will vary depending on the format of your patron load file (patrons.csv).
4. Formatting of some fields to fit Evergreen filed formatting may be required. Here is an example of sql to adjustphone numbers in the staging table to fit the evergreen field:
UPDATE students phone = replace(replace(replace(rpad(substring(phone from 1 for 9), 10, '-') || substring(phone from 10), '(', ''), ')', ''), ' ', '-');
Data “massaging” will be required to fit formats used in Evergreen.
5. Insert records from the staging table into the actor.usr Evergreen table:
INSERT INTO actor.usr ( profile, usrname, email, passwd, ident_type, ident_value, first_given_name, family_name, day_phone, home_ou, claims_returned_count, net_access_level) SELECT profile, students.usrname, email, password, ident_type, student_id, first_name, last_name, phone, home_ou, claims_returned_count, net_access_level FROM students;
6. Insert records into actor.card from actor.usr .
INSERT INTO actor.card (usr, barcode) SELECT actor.usr.id, students.barcode FROM students INNER JOIN actor.usr ON students.usrname = actor.usr.usrname;
This assumes a one to one card patron relationship. If your patron data import has multiple cards assigned to onepatron more complex import scripts may be required which look for inactive or active flags.
7. Update actor.usr.card field with actor.card.id to associate active card with the user:
UPDATE actor.usr SET card = actor.card.id FROM actor.card WHERE actor.card.usr = actor.usr.id;
8. Insert records into actor.usr_address to add address information for users:
INSERT INTO actor.usr_address (usr, street1, street2, city, state, country, post_code) SELECT actor.usr.id, students.street1, students.street2, students.city, students.province, students.country, students.postal_code FROM students INNER JOIN actor.usr ON students.usrname = actor.usr.usrname;
9. Update actor.usr.address with address id from address table.
UPDATE actor.usr SET mailing_address = actor.usr_address.id, billing_address = actor.usr_address.id FROM actor.usr_address WHERE actor.usr.id = actor.usr_address.usr;
This assumes 1 address per patron. More complex scenarios may require more sophisticated SQL.
Creating an sql Script for Importing PatronsThe procedure for importing patron can be automated with the help of an sql script. Follow these steps to createan import script:
1. Create an new file and name it import.sql
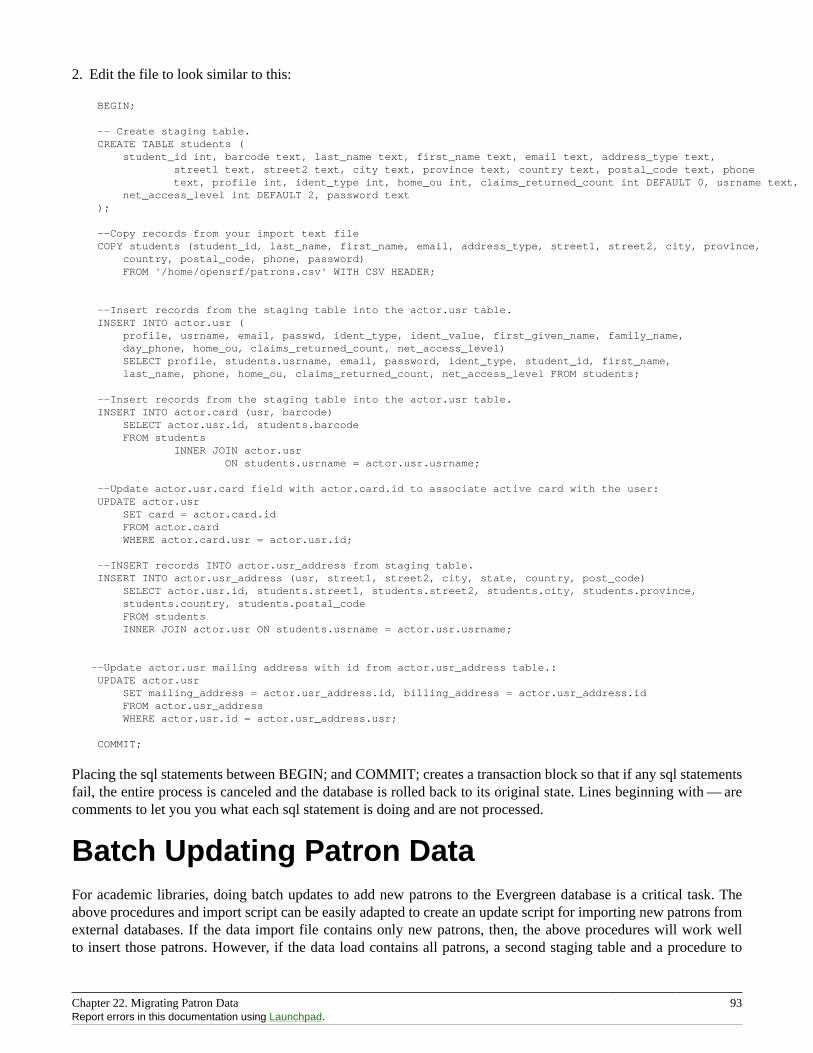
Chapter 22. Migrating Patron Data 93Report errors in this documentation using Launchpad.
2. Edit the file to look similar to this:
BEGIN;
-- Create staging table. CREATE TABLE students ( student_id int, barcode text, last_name text, first_name text, email text, address_type text, street1 text, street2 text, city text, province text, country text, postal_code text, phone text, profile int, ident_type int, home_ou int, claims_returned_count int DEFAULT 0, usrname text, net_access_level int DEFAULT 2, password text );
--Copy records from your import text file COPY students (student_id, last_name, first_name, email, address_type, street1, street2, city, province, country, postal_code, phone, password) FROM '/home/opensrf/patrons.csv' WITH CSV HEADER;
--Insert records from the staging table into the actor.usr table. INSERT INTO actor.usr ( profile, usrname, email, passwd, ident_type, ident_value, first_given_name, family_name, day_phone, home_ou, claims_returned_count, net_access_level) SELECT profile, students.usrname, email, password, ident_type, student_id, first_name, last_name, phone, home_ou, claims_returned_count, net_access_level FROM students;
--Insert records from the staging table into the actor.usr table. INSERT INTO actor.card (usr, barcode) SELECT actor.usr.id, students.barcode FROM students INNER JOIN actor.usr ON students.usrname = actor.usr.usrname;
--Update actor.usr.card field with actor.card.id to associate active card with the user: UPDATE actor.usr SET card = actor.card.id FROM actor.card WHERE actor.card.usr = actor.usr.id;
--INSERT records INTO actor.usr_address from staging table. INSERT INTO actor.usr_address (usr, street1, street2, city, state, country, post_code) SELECT actor.usr.id, students.street1, students.street2, students.city, students.province, students.country, students.postal_code FROM students INNER JOIN actor.usr ON students.usrname = actor.usr.usrname;
--Update actor.usr mailing address with id from actor.usr_address table.: UPDATE actor.usr SET mailing_address = actor.usr_address.id, billing_address = actor.usr_address.id FROM actor.usr_address WHERE actor.usr.id = actor.usr_address.usr;
COMMIT;
Placing the sql statements between BEGIN; and COMMIT; creates a transaction block so that if any sql statementsfail, the entire process is canceled and the database is rolled back to its original state. Lines beginning with — arecomments to let you you what each sql statement is doing and are not processed.
Batch Updating Patron DataFor academic libraries, doing batch updates to add new patrons to the Evergreen database is a critical task. Theabove procedures and import script can be easily adapted to create an update script for importing new patrons fromexternal databases. If the data import file contains only new patrons, then, the above procedures will work wellto insert those patrons. However, if the data load contains all patrons, a second staging table and a procedure to

Chapter 22. Migrating Patron Data 94Report errors in this documentation using Launchpad.
remove existing patrons from that second staging table may be required before importing the new patrons. Moreover,additional steps to update address information and perhaps delete inactive patrons may also be desired dependingon the requirements of the institution.
After developing the scripts to import and update patrons have been created, another important task for library staffis to develop an import strategy and schedule which suits the needs of the library. This could be determined byregistration dates of your institution in the case of academic libraries. It is important to balance the convenience ofpatron loads and the cost of processing these loads vs staff adding patrons manually.

Chapter 23. Migrating from a legacy system 95
Chapter 23. Migrating from a legacysystemWhen you migrate to Evergreen, you generally want to migrate the bibliographic records and copy information thatexisted in your previous library system. For anything more than a few thousand records, you should import the datadirectly into the database rather than use the tools in the staff client. While the data that you can extract from yourlegacy system varies widely, this section assumes that you or members of your team have the ability to write scriptsand are comfortable working with SQL to manipulate data within PostgreSQL. If so, then the following sectionwill guide you towards a method of generating common data formats so that you can then load the data into thedatabase in bulk.
Making electronic resources visible in thecatalogElectronic resources generally do not have any call number or copy information associated with them, and Evergreenenables you to easily make bibliographic records visible in the public catalog within sections of the organizationalunit hierarchy. For example, you can make a set of bibliographic records visible only to specific branches thathave purchased licenses for the corresponding resources, or you can make records representing publicly availableelectronic resources visible to the entire consortium.
Therefore, to make a record visible in the public catalog, modify the records using your preferred MARC editingapproach to ensure the 856 field contains the following information before loading records for electronic resourcesinto Evergreen:
Table 23.1. 856 field for electronic resources: indicators and subfields
Attribute Value Note
Indicator 1 4
Indicator 2 0 or 1
Subfield u URL for the electronic resource
Subfield y Text content of the link
Subfield z Public note Normally displayed after the link
Subfield 9 Organizational unit short name The record will be visible whena search is performed specifyingthis organizational unit or one ofits children. You can repeat thissubfield as many times as you need.
Once your electronic resource bibliographic records have the required indicators and subfields for each 856 field inthe record, you can proceed to load the records using either the command-line bulk import method or the MARCBatch Importer in the staff client.
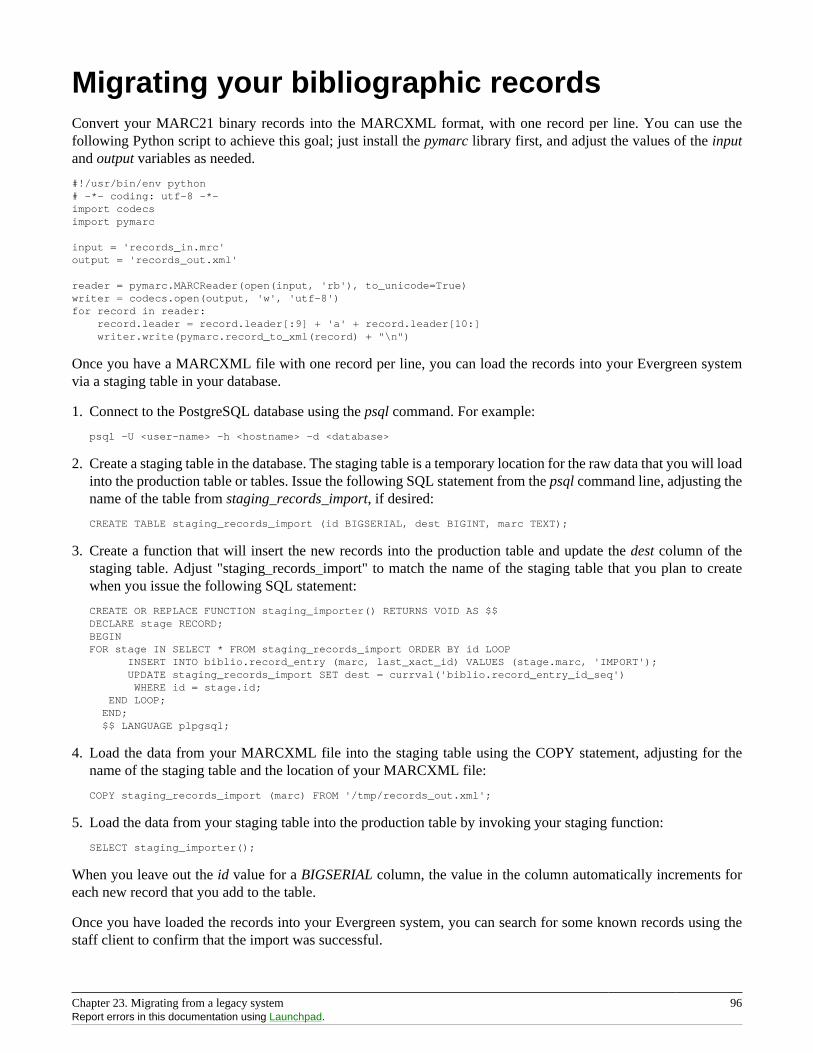
Chapter 23. Migrating from a legacy system 96Report errors in this documentation using Launchpad.
Migrating your bibliographic recordsConvert your MARC21 binary records into the MARCXML format, with one record per line. You can use thefollowing Python script to achieve this goal; just install the pymarc library first, and adjust the values of the inputand output variables as needed.
#!/usr/bin/env python# -*- coding: utf-8 -*-import codecsimport pymarc
input = 'records_in.mrc'output = 'records_out.xml'
reader = pymarc.MARCReader(open(input, 'rb'), to_unicode=True)writer = codecs.open(output, 'w', 'utf-8')for record in reader: record.leader = record.leader[:9] + 'a' + record.leader[10:] writer.write(pymarc.record_to_xml(record) + "\n")
Once you have a MARCXML file with one record per line, you can load the records into your Evergreen systemvia a staging table in your database.
1. Connect to the PostgreSQL database using the psql command. For example:
psql -U <user-name> -h <hostname> -d <database>
2. Create a staging table in the database. The staging table is a temporary location for the raw data that you will loadinto the production table or tables. Issue the following SQL statement from the psql command line, adjusting thename of the table from staging_records_import, if desired:
CREATE TABLE staging_records_import (id BIGSERIAL, dest BIGINT, marc TEXT);
3. Create a function that will insert the new records into the production table and update the dest column of thestaging table. Adjust "staging_records_import" to match the name of the staging table that you plan to createwhen you issue the following SQL statement:
CREATE OR REPLACE FUNCTION staging_importer() RETURNS VOID AS $$DECLARE stage RECORD;BEGINFOR stage IN SELECT * FROM staging_records_import ORDER BY id LOOP INSERT INTO biblio.record_entry (marc, last_xact_id) VALUES (stage.marc, 'IMPORT'); UPDATE staging_records_import SET dest = currval('biblio.record_entry_id_seq') WHERE id = stage.id; END LOOP; END; $$ LANGUAGE plpgsql;
4. Load the data from your MARCXML file into the staging table using the COPY statement, adjusting for thename of the staging table and the location of your MARCXML file:
COPY staging_records_import (marc) FROM '/tmp/records_out.xml';
5. Load the data from your staging table into the production table by invoking your staging function:
SELECT staging_importer();
When you leave out the id value for a BIGSERIAL column, the value in the column automatically increments foreach new record that you add to the table.
Once you have loaded the records into your Evergreen system, you can search for some known records using thestaff client to confirm that the import was successful.
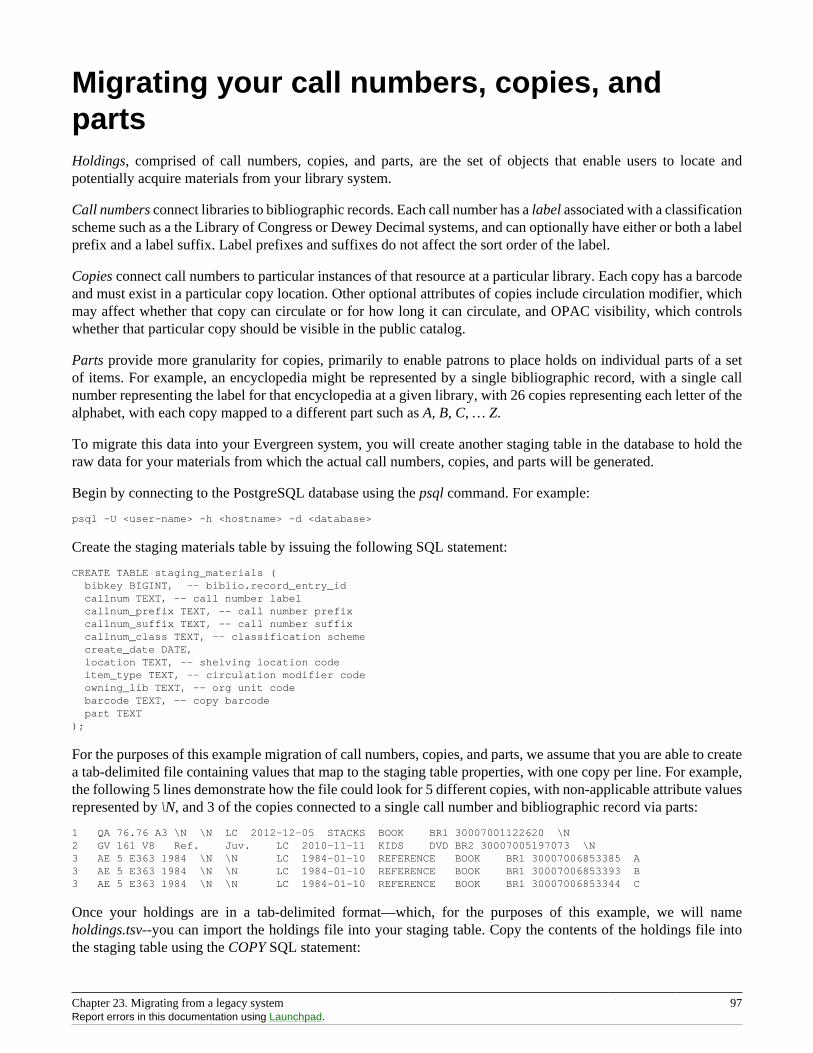
Chapter 23. Migrating from a legacy system 97Report errors in this documentation using Launchpad.
Migrating your call numbers, copies, andpartsHoldings, comprised of call numbers, copies, and parts, are the set of objects that enable users to locate andpotentially acquire materials from your library system.
Call numbers connect libraries to bibliographic records. Each call number has a label associated with a classificationscheme such as a the Library of Congress or Dewey Decimal systems, and can optionally have either or both a labelprefix and a label suffix. Label prefixes and suffixes do not affect the sort order of the label.
Copies connect call numbers to particular instances of that resource at a particular library. Each copy has a barcodeand must exist in a particular copy location. Other optional attributes of copies include circulation modifier, whichmay affect whether that copy can circulate or for how long it can circulate, and OPAC visibility, which controlswhether that particular copy should be visible in the public catalog.
Parts provide more granularity for copies, primarily to enable patrons to place holds on individual parts of a setof items. For example, an encyclopedia might be represented by a single bibliographic record, with a single callnumber representing the label for that encyclopedia at a given library, with 26 copies representing each letter of thealphabet, with each copy mapped to a different part such as A, B, C, … Z.
To migrate this data into your Evergreen system, you will create another staging table in the database to hold theraw data for your materials from which the actual call numbers, copies, and parts will be generated.
Begin by connecting to the PostgreSQL database using the psql command. For example:
psql -U <user-name> -h <hostname> -d <database>
Create the staging materials table by issuing the following SQL statement:
CREATE TABLE staging_materials ( bibkey BIGINT, -- biblio.record_entry_id callnum TEXT, -- call number label callnum_prefix TEXT, -- call number prefix callnum_suffix TEXT, -- call number suffix callnum_class TEXT, -- classification scheme create_date DATE, location TEXT, -- shelving location code item_type TEXT, -- circulation modifier code owning_lib TEXT, -- org unit code barcode TEXT, -- copy barcode part TEXT);
For the purposes of this example migration of call numbers, copies, and parts, we assume that you are able to createa tab-delimited file containing values that map to the staging table properties, with one copy per line. For example,the following 5 lines demonstrate how the file could look for 5 different copies, with non-applicable attribute valuesrepresented by \N, and 3 of the copies connected to a single call number and bibliographic record via parts:
1 QA 76.76 A3 \N \N LC 2012-12-05 STACKS BOOK BR1 30007001122620 \N2 GV 161 V8 Ref. Juv. LC 2010-11-11 KIDS DVD BR2 30007005197073 \N3 AE 5 E363 1984 \N \N LC 1984-01-10 REFERENCE BOOK BR1 30007006853385 A3 AE 5 E363 1984 \N \N LC 1984-01-10 REFERENCE BOOK BR1 30007006853393 B3 AE 5 E363 1984 \N \N LC 1984-01-10 REFERENCE BOOK BR1 30007006853344 C
Once your holdings are in a tab-delimited format—which, for the purposes of this example, we will nameholdings.tsv--you can import the holdings file into your staging table. Copy the contents of the holdings file intothe staging table using the COPY SQL statement:
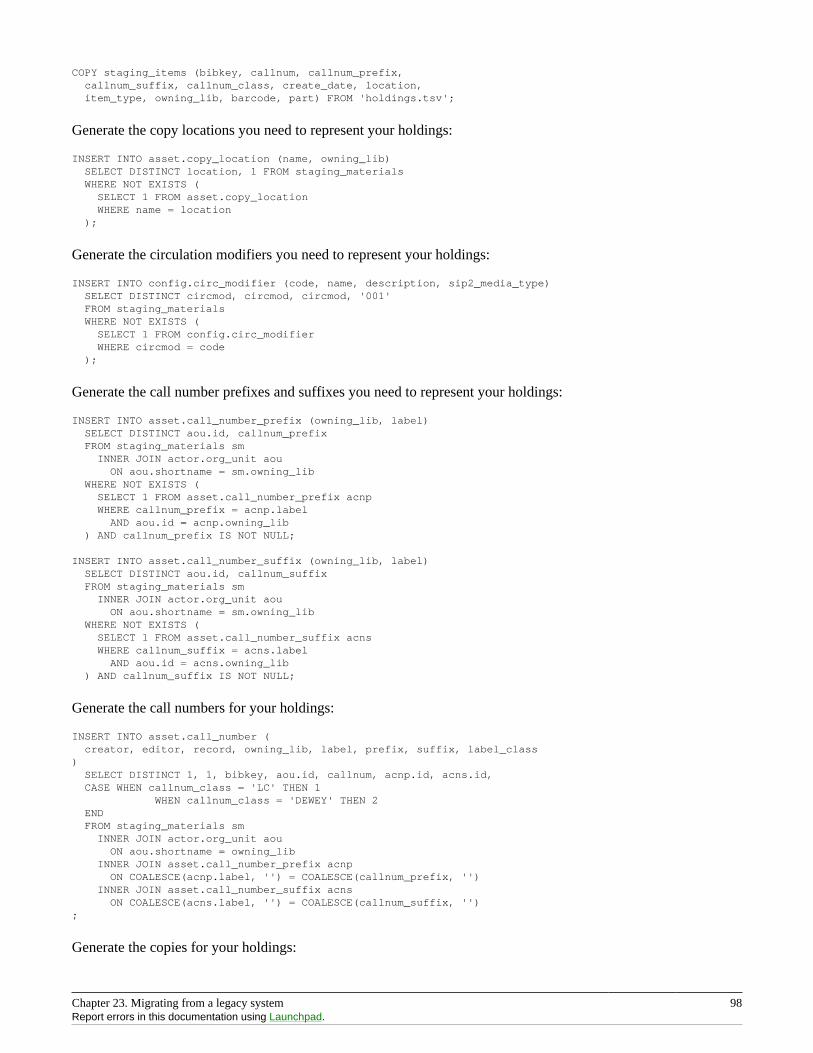
Chapter 23. Migrating from a legacy system 98Report errors in this documentation using Launchpad.
COPY staging_items (bibkey, callnum, callnum_prefix, callnum_suffix, callnum_class, create_date, location, item_type, owning_lib, barcode, part) FROM 'holdings.tsv';
Generate the copy locations you need to represent your holdings:
INSERT INTO asset.copy_location (name, owning_lib) SELECT DISTINCT location, 1 FROM staging_materials WHERE NOT EXISTS ( SELECT 1 FROM asset.copy_location WHERE name = location );
Generate the circulation modifiers you need to represent your holdings:
INSERT INTO config.circ_modifier (code, name, description, sip2_media_type) SELECT DISTINCT circmod, circmod, circmod, '001' FROM staging_materials WHERE NOT EXISTS ( SELECT 1 FROM config.circ_modifier WHERE circmod = code );
Generate the call number prefixes and suffixes you need to represent your holdings:
INSERT INTO asset.call_number_prefix (owning_lib, label) SELECT DISTINCT aou.id, callnum_prefix FROM staging_materials sm INNER JOIN actor.org_unit aou ON aou.shortname = sm.owning_lib WHERE NOT EXISTS ( SELECT 1 FROM asset.call_number_prefix acnp WHERE callnum_prefix = acnp.label AND aou.id = acnp.owning_lib ) AND callnum_prefix IS NOT NULL;
INSERT INTO asset.call_number_suffix (owning_lib, label) SELECT DISTINCT aou.id, callnum_suffix FROM staging_materials sm INNER JOIN actor.org_unit aou ON aou.shortname = sm.owning_lib WHERE NOT EXISTS ( SELECT 1 FROM asset.call_number_suffix acns WHERE callnum_suffix = acns.label AND aou.id = acns.owning_lib ) AND callnum_suffix IS NOT NULL;
Generate the call numbers for your holdings:
INSERT INTO asset.call_number ( creator, editor, record, owning_lib, label, prefix, suffix, label_class) SELECT DISTINCT 1, 1, bibkey, aou.id, callnum, acnp.id, acns.id, CASE WHEN callnum_class = 'LC' THEN 1 WHEN callnum_class = 'DEWEY' THEN 2 END FROM staging_materials sm INNER JOIN actor.org_unit aou ON aou.shortname = owning_lib INNER JOIN asset.call_number_prefix acnp ON COALESCE(acnp.label, '') = COALESCE(callnum_prefix, '') INNER JOIN asset.call_number_suffix acns ON COALESCE(acns.label, '') = COALESCE(callnum_suffix, '');
Generate the copies for your holdings:
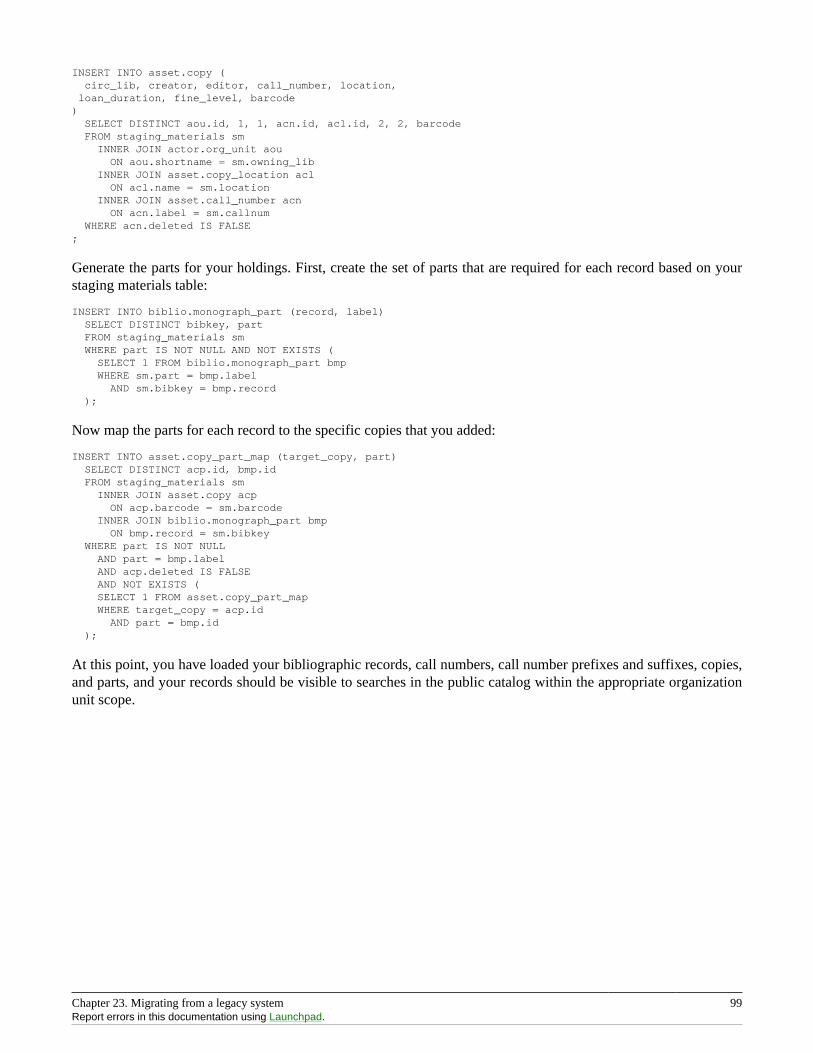
Chapter 23. Migrating from a legacy system 99Report errors in this documentation using Launchpad.
INSERT INTO asset.copy ( circ_lib, creator, editor, call_number, location, loan_duration, fine_level, barcode) SELECT DISTINCT aou.id, 1, 1, acn.id, acl.id, 2, 2, barcode FROM staging_materials sm INNER JOIN actor.org_unit aou ON aou.shortname = sm.owning_lib INNER JOIN asset.copy_location acl ON acl.name = sm.location INNER JOIN asset.call_number acn ON acn.label = sm.callnum WHERE acn.deleted IS FALSE;
Generate the parts for your holdings. First, create the set of parts that are required for each record based on yourstaging materials table:
INSERT INTO biblio.monograph_part (record, label) SELECT DISTINCT bibkey, part FROM staging_materials sm WHERE part IS NOT NULL AND NOT EXISTS ( SELECT 1 FROM biblio.monograph_part bmp WHERE sm.part = bmp.label AND sm.bibkey = bmp.record );
Now map the parts for each record to the specific copies that you added:
INSERT INTO asset.copy_part_map (target_copy, part) SELECT DISTINCT acp.id, bmp.id FROM staging_materials sm INNER JOIN asset.copy acp ON acp.barcode = sm.barcode INNER JOIN biblio.monograph_part bmp ON bmp.record = sm.bibkey WHERE part IS NOT NULL AND part = bmp.label AND acp.deleted IS FALSE AND NOT EXISTS ( SELECT 1 FROM asset.copy_part_map WHERE target_copy = acp.id AND part = bmp.id );
At this point, you have loaded your bibliographic records, call numbers, call number prefixes and suffixes, copies,and parts, and your records should be visible to searches in the public catalog within the appropriate organizationunit scope.
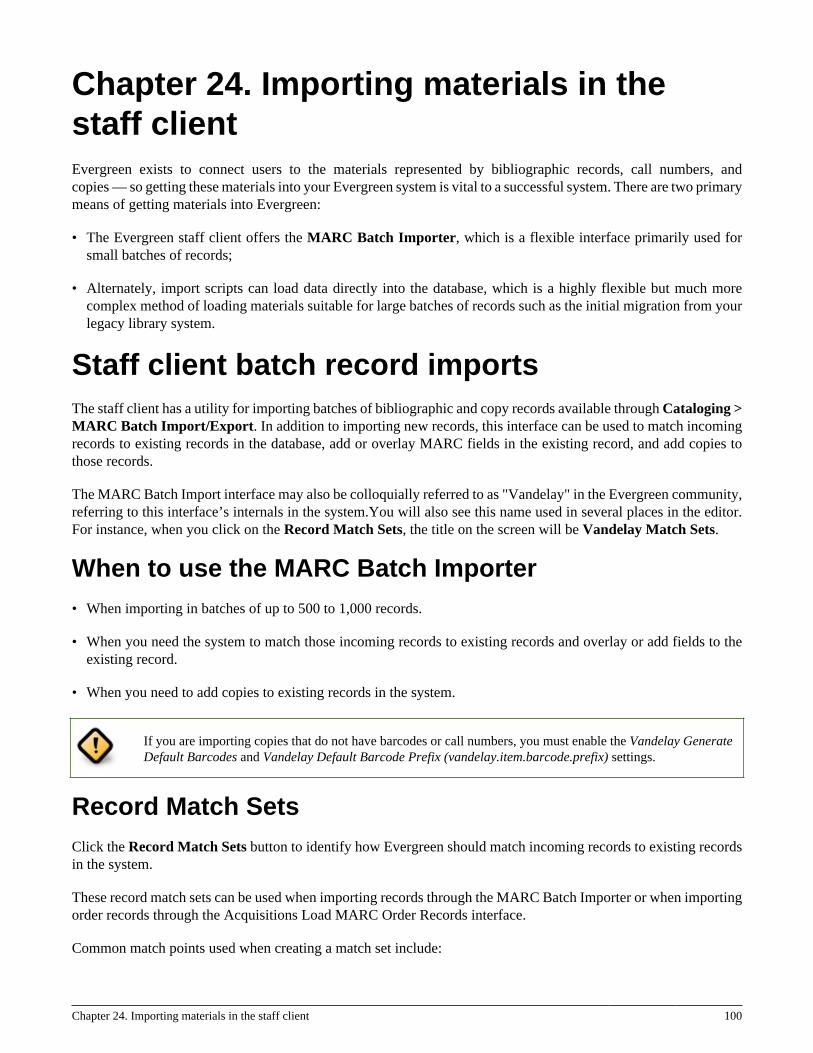
Chapter 24. Importing materials in the staff client 100
Chapter 24. Importing materials in thestaff clientEvergreen exists to connect users to the materials represented by bibliographic records, call numbers, andcopies — so getting these materials into your Evergreen system is vital to a successful system. There are two primarymeans of getting materials into Evergreen:
• The Evergreen staff client offers the MARC Batch Importer, which is a flexible interface primarily used forsmall batches of records;
• Alternately, import scripts can load data directly into the database, which is a highly flexible but much morecomplex method of loading materials suitable for large batches of records such as the initial migration from yourlegacy library system.
Staff client batch record importsThe staff client has a utility for importing batches of bibliographic and copy records available through Cataloging >MARC Batch Import/Export. In addition to importing new records, this interface can be used to match incomingrecords to existing records in the database, add or overlay MARC fields in the existing record, and add copies tothose records.
The MARC Batch Import interface may also be colloquially referred to as "Vandelay" in the Evergreen community,referring to this interface’s internals in the system.You will also see this name used in several places in the editor.For instance, when you click on the Record Match Sets, the title on the screen will be Vandelay Match Sets.
When to use the MARC Batch Importer• When importing in batches of up to 500 to 1,000 records.
• When you need the system to match those incoming records to existing records and overlay or add fields to theexisting record.
• When you need to add copies to existing records in the system.
If you are importing copies that do not have barcodes or call numbers, you must enable the Vandelay GenerateDefault Barcodes and Vandelay Default Barcode Prefix (vandelay.item.barcode.prefix) settings.
Record Match SetsClick the Record Match Sets button to identify how Evergreen should match incoming records to existing recordsin the system.
These record match sets can be used when importing records through the MARC Batch Importer or when importingorder records through the Acquisitions Load MARC Order Records interface.
Common match points used when creating a match set include:
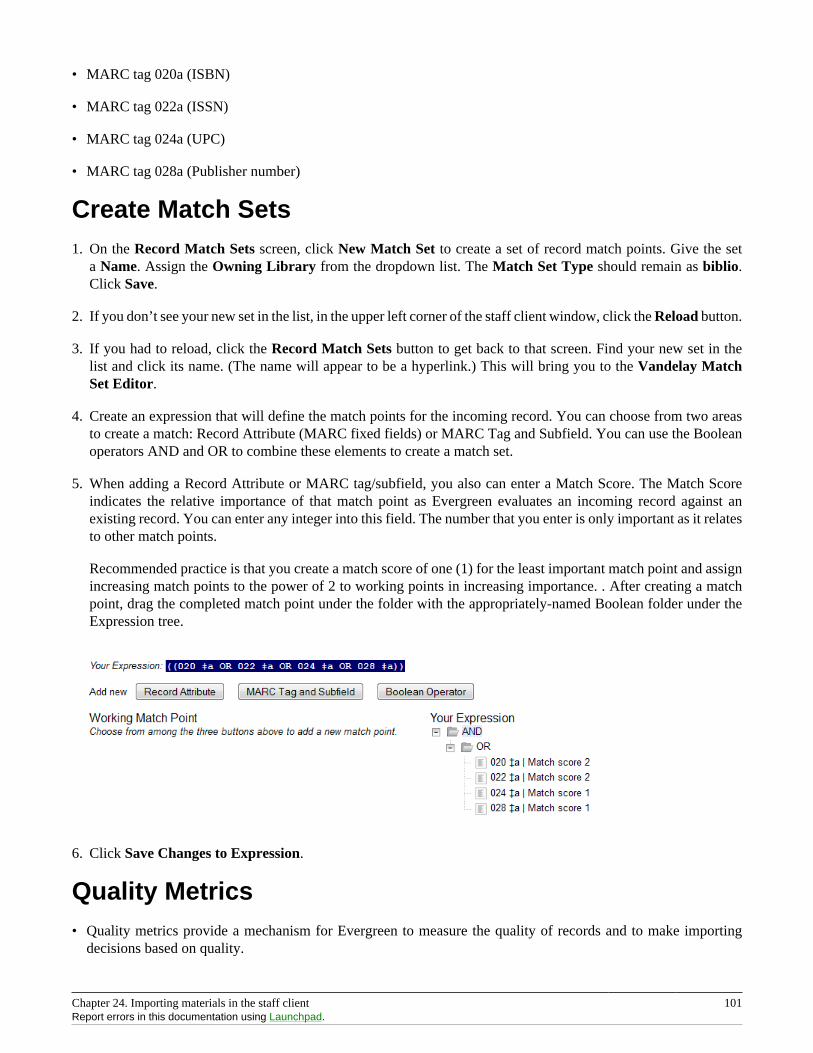
Chapter 24. Importing materials in the staff client 101Report errors in this documentation using Launchpad.
• MARC tag 020a (ISBN)
• MARC tag 022a (ISSN)
• MARC tag 024a (UPC)
• MARC tag 028a (Publisher number)
Create Match Sets1. On the Record Match Sets screen, click New Match Set to create a set of record match points. Give the set
a Name. Assign the Owning Library from the dropdown list. The Match Set Type should remain as biblio.Click Save.
2. If you don’t see your new set in the list, in the upper left corner of the staff client window, click the Reload button.
3. If you had to reload, click the Record Match Sets button to get back to that screen. Find your new set in thelist and click its name. (The name will appear to be a hyperlink.) This will bring you to the Vandelay MatchSet Editor.
4. Create an expression that will define the match points for the incoming record. You can choose from two areasto create a match: Record Attribute (MARC fixed fields) or MARC Tag and Subfield. You can use the Booleanoperators AND and OR to combine these elements to create a match set.
5. When adding a Record Attribute or MARC tag/subfield, you also can enter a Match Score. The Match Scoreindicates the relative importance of that match point as Evergreen evaluates an incoming record against anexisting record. You can enter any integer into this field. The number that you enter is only important as it relatesto other match points.
Recommended practice is that you create a match score of one (1) for the least important match point and assignincreasing match points to the power of 2 to working points in increasing importance. . After creating a matchpoint, drag the completed match point under the folder with the appropriately-named Boolean folder under theExpression tree.
6. Click Save Changes to Expression.
Quality Metrics• Quality metrics provide a mechanism for Evergreen to measure the quality of records and to make importing
decisions based on quality.
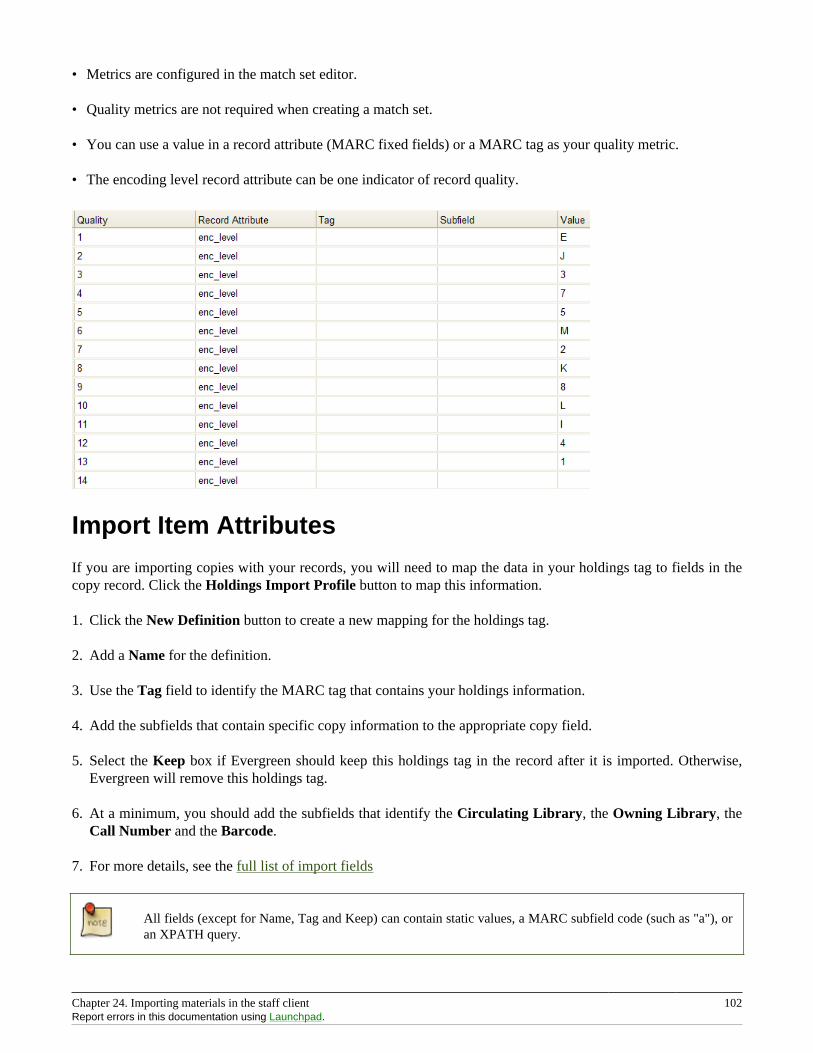
Chapter 24. Importing materials in the staff client 102Report errors in this documentation using Launchpad.
• Metrics are configured in the match set editor.
• Quality metrics are not required when creating a match set.
• You can use a value in a record attribute (MARC fixed fields) or a MARC tag as your quality metric.
• The encoding level record attribute can be one indicator of record quality.
Import Item Attributes
If you are importing copies with your records, you will need to map the data in your holdings tag to fields in thecopy record. Click the Holdings Import Profile button to map this information.
1. Click the New Definition button to create a new mapping for the holdings tag.
2. Add a Name for the definition.
3. Use the Tag field to identify the MARC tag that contains your holdings information.
4. Add the subfields that contain specific copy information to the appropriate copy field.
5. Select the Keep box if Evergreen should keep this holdings tag in the record after it is imported. Otherwise,Evergreen will remove this holdings tag.
6. At a minimum, you should add the subfields that identify the Circulating Library, the Owning Library, theCall Number and the Barcode.
7. For more details, see the full list of import fields
All fields (except for Name, Tag and Keep) can contain static values, a MARC subfield code (such as "a"), oran XPATH query.
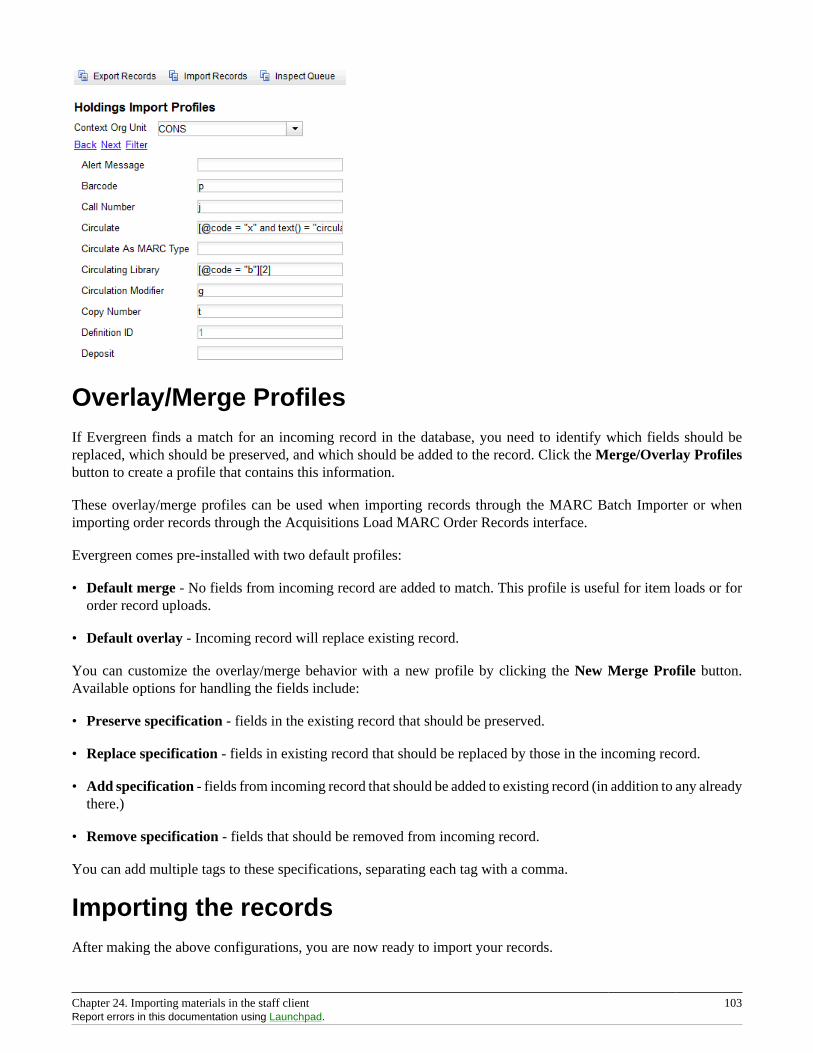
Chapter 24. Importing materials in the staff client 103Report errors in this documentation using Launchpad.
Overlay/Merge ProfilesIf Evergreen finds a match for an incoming record in the database, you need to identify which fields should bereplaced, which should be preserved, and which should be added to the record. Click the Merge/Overlay Profilesbutton to create a profile that contains this information.
These overlay/merge profiles can be used when importing records through the MARC Batch Importer or whenimporting order records through the Acquisitions Load MARC Order Records interface.
Evergreen comes pre-installed with two default profiles:
• Default merge - No fields from incoming record are added to match. This profile is useful for item loads or fororder record uploads.
• Default overlay - Incoming record will replace existing record.
You can customize the overlay/merge behavior with a new profile by clicking the New Merge Profile button.Available options for handling the fields include:
• Preserve specification - fields in the existing record that should be preserved.
• Replace specification - fields in existing record that should be replaced by those in the incoming record.
• Add specification - fields from incoming record that should be added to existing record (in addition to any alreadythere.)
• Remove specification - fields that should be removed from incoming record.
You can add multiple tags to these specifications, separating each tag with a comma.
Importing the recordsAfter making the above configurations, you are now ready to import your records.
Chapter 24. Importing materials in the staff client 104Report errors in this documentation using Launchpad.
1. Click the Import Records button
2. Provide a unique name for the queue where the records will be loaded
3. Identify the match set that should be used for matching
4. If you are importing copies, identify the Import Item Attributes definition in the Holdings Import Profile
5. Select a record source
6. Select the overlay/merge profile that defines which fields should be replaced, added or preserved
7. Identify which records should be imported, the options are:
• Import Non-Matching Records will automatically import records that have no match in the system
• Merge on Exact Match will automatically import records that match on the 901c (record ID)
• Merge on Single Match will automatically import records when there is only one match in the system
• Merge on Best Match will automatically import records for the best match in the system; the best match willbe determined by the combined total of the records match point scores
You do not need to select any of these import options at this step. You may also opt to review the records first inthe import queue and then import them.
• Best Single Match Minimum Quality Ratio should only be changed if quality metrics were used in the match set
• Set to 0.0 to import a record regardless of record quality
• Set to 1.0 if the incoming record must be of equal or higher quality than the existing record to be imported
• Set to 1.1 if the incoming record must be of higher quality than the existing record to be imported
• Insufficient Quality Fall-Through Profile can also be used with quality metrics. If an incoming record doesnot meet the standards of the minimum quality ratio, you can identify a back-up merge profile to be used forthose records. For example, you may want to use the default overlay profile for high-quality records but usethe default merge profile for lower quality records.
Chapter 25. Ordering materials 105
Chapter 25. Ordering materialsAcquisitions allows you to order materials, track the expenditure of your collections funds, track invoices and set uppolicies for manual claiming. In this chapter, we’re going to be describing how to use the most essential functionsof acquisitions in the Evergreen system.
When should libraries use acquisitions?• When you want to track spending of your collections budget.
• When you want to use Evergreen to place orders electronically with your vendors.
• When you want to import large batches of records to quickly get your on-order titles into the system.
If your library simply wants to add on-order copies to the catalog so that patrons can view and place holds on titlesthat have not yet arrived, acquisitions may be more than you need. Adding those on-order records via catalogingis a simpler option that works well for this use case.
Below are the basic administrative settings to be configured to get started with acquisitions. At a minimum, a librarymust configure Funding Sources, Funds, and Providers to use acquisitions.
Managing Funds
Funding Sources (Required)Funding sources allow you to specify the sources that contribute monies to your fund(s). You can create as few oras many funding sources as you need. These can be used to track exact amounts for accounts in your general ledger.
Example funding sources might be:
• A municipal allocation for your materials budget;
• A trust fund used for collections;
• A revolving account that is used to replace lost materials;
• Grant funds to be used for collections.
Funding sources are not tied to fiscal or calendar years, so you can continue to add money to the same fundingsource over multiple years, e.g. County Funding. Alternatively, you can name funding sources by year, e.g. CountyFunding 2010 and County Funding 2011, and apply credits each year to the matching source.
1. To create a funding source, select Admin > Server Administration > Acquisitions > Funding Source. Clickthe New Funding Source button. Give the funding source a name, an owning library, and code. You should alsoidentify the type of currency that is used for the fund.
2. You must add money to the funding source before you can use it. Click the hyperlinked name of the fundingsource and then click the Apply Credit button. Add the amount of funds you need to add. The Note field isoptional.
Chapter 25. Ordering materials 106Report errors in this documentation using Launchpad.
Funds (Required)Funds allow you to allocate credits toward specific purchases. They typically are used to track spending andpurchases for specific collections. Some libraries may choose to define very broad funds for their collections (e.g.children’s materials, adult materials) while others may choose to define more specific funds (e.g. adult non-fictionDVDs for BR1).
If your library does not wish to track fund accounting, you can create one large generic fund and use that fund forall of your purchases.
1. To create a fund, select Admin > Server Administration > Acquisitions > Funds. Click the New Fund button.Give the fund a name and code.
2. The Year can either be the fiscal or calendar year for the fund.
3. If you are a multi-branch library that will be ordering titles for multiple branches, you should select the systemas the owning Org Unit, even if this fund will only be used for collections at a specific branch. If you are a one-branch library or if your branches do their own ordering, you can select the branch as the owning Org Unit.
4. Select the Currency Type that will be used for this fund.
5. You must select the Active checkbox to use the fund.
6. Enter a Balance Stop Percent. The balance stop percent prevents you from making purchases when only aspecified amount of the fund remains. For example, if you want to spend 95 percent of your funds, leaving a fivepercent balance in the fund, then you would enter 95 in the field. When the fund reaches its balance stop percent,it will appear in red when you apply funds to copies.
7. Enter a Balance Warning Percent. The balance warning percent gives you a warning that the fund is low. Youcan specify any percent. For example, if you want to spend 90 percent of your funds and be warned when thefund has only 10 percent of its balance remaining, then enter 90 in the field. When the fund reaches its balancewarning percent, it will appear in yellow when you apply funds to copies.
8. Check the Propagate box to propagate funds. When you propagate a fund, the system will create a new fund forthe following fiscal year with the same parameters as your current fund. All of the settings transfer except for theyear and the amount of money in the fund. Propagation occurs during the fiscal year close-out operation.
9. Check the Rollover box if you want to roll over remaining encumbrances and funds into the same fund nextyear. If you need the ability to roll over encumbrances without rolling over funds, go to the Library SettingsEditor (Admin > Local Administration > Library Settings Editor) and set Allow funds to be rolled overwithout bringing the money along to True.
10.You must add money to the fund before you can begin using it. Click the hyperlinked name of the fund. Clickthe Create Allocation button. Select a Funding Source from which the allocation will be drawn and then enteran amount for the allocation. The Note field is optional.
Fund Tags (Optional)You can apply tags to funds so that you can group funds for easy reporting. For example, you have three funds forchildren’s materials: Children’s Board Books, Children’s DVDs, and Children’s CDs. Assign a fund tag of children’sto each fund. When you need to report on the amount that has been spent on all children’s materials, you can run areport on the fund tag to find total expenditures on children’s materials rather than reporting on each individual fund.

Chapter 25. Ordering materials 107Report errors in this documentation using Launchpad.
1. To create a fund tag, select Admin > Server Administration > Acquisitions > Fund Tags. Click the New FundTag button. Select a owning library and add the name for the fund tag.
2. To apply a fund tag to a fund, select Admin > Server Administration > Acquisitions > Funds. Click on thehyperlinked name for the fund. Click the Tags tab and then click the Add Tag button. Select the tag from thedropdown menu.
Ordering
Providers (Required)Providers are the vendors from whom you order titles.
1. To add a provider record, select Admin > Server Administration > Acquisitions > Providers.
2. Enter information about the provider. At a minimum, you need to add a Provider Name, Code, Owner, andCurrency. You also need to select the Active checkbox to use the provider.
Distribution Formulas (Optional)If you are ordering for a multi-branch library system, distribution formulas are a useful way to specify the numberof copies that should be distributed to specific branches and copy locations.
1. To create a distribution formula, select Admin > Server Administration > Acquisitions > DistributionFormulas. Click the New Formula button. Enter the formula name and select the owning library. Ignore theSkip Count field.
2. Click New Entry. Select an Owning Library from the drop down menu. This indicates the branch that will receivethe items.
3. Select a Shelving Location from the drop down menu.
4. In the Item Count field, enter the number of items that should be distributed to that branch and copy location.You can enter the number or use the arrows on the right side of the field.
5. Keep adding entries until the distribution formula is complete.
Helpful acquisitions Library SettingsThere are several acquisitions Library Settings available that will help with acquisitions workflow. These settingscan be found at Admin > Local Administration > Library Settings Editor.
• Default circulation modifier - Automatically applies a default circulation modifier to all of your acquisitionscopies. Useful if you use a specific circulation modifier for on-order copies.
• Default copy location - Automatically applies a default copy location (e.g. On Order) to acquisitions copies.
• Temporary barcode prefix - Applies a unique prefix to the barcode that is automatically generated during theacquisitions process.
• Temporary call number prefix - Applies a unique prefix to the start of the call number that is automaticallygenerated during the acquisitions process.
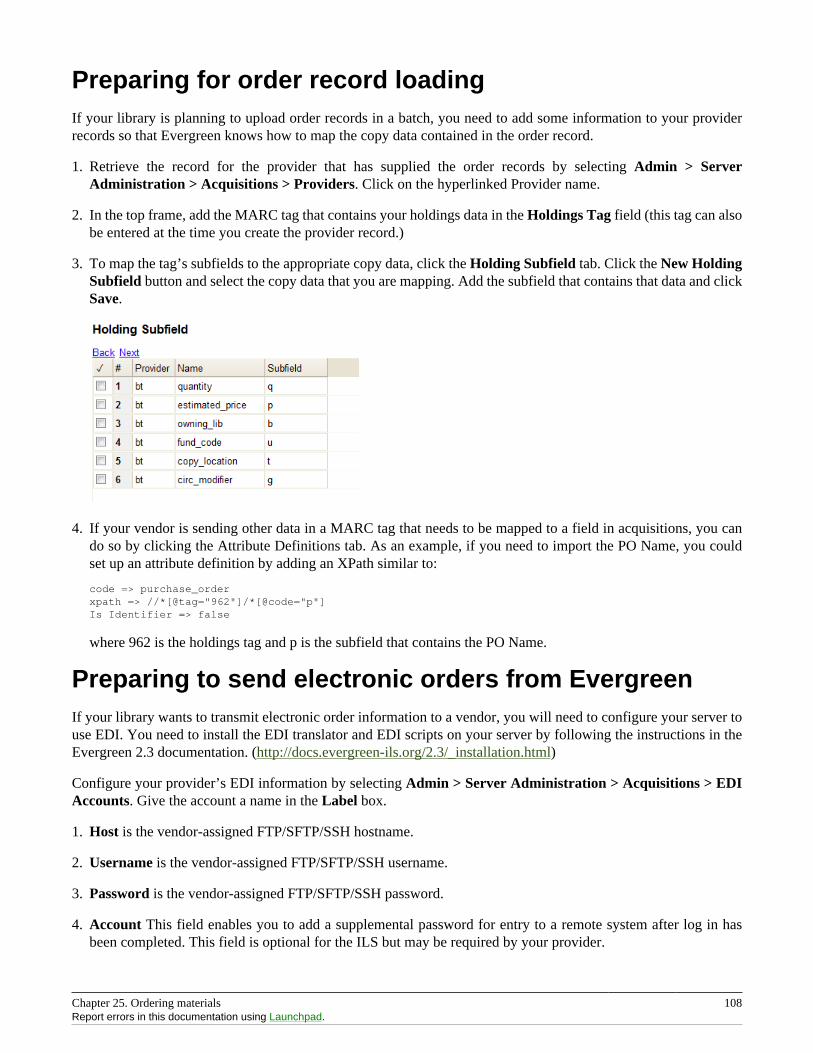
Chapter 25. Ordering materials 108Report errors in this documentation using Launchpad.
Preparing for order record loadingIf your library is planning to upload order records in a batch, you need to add some information to your providerrecords so that Evergreen knows how to map the copy data contained in the order record.
1. Retrieve the record for the provider that has supplied the order records by selecting Admin > ServerAdministration > Acquisitions > Providers. Click on the hyperlinked Provider name.
2. In the top frame, add the MARC tag that contains your holdings data in the Holdings Tag field (this tag can alsobe entered at the time you create the provider record.)
3. To map the tag’s subfields to the appropriate copy data, click the Holding Subfield tab. Click the New HoldingSubfield button and select the copy data that you are mapping. Add the subfield that contains that data and clickSave.
4. If your vendor is sending other data in a MARC tag that needs to be mapped to a field in acquisitions, you cando so by clicking the Attribute Definitions tab. As an example, if you need to import the PO Name, you couldset up an attribute definition by adding an XPath similar to:
code => purchase_orderxpath => //*[@tag="962"]/*[@code="p"]Is Identifier => false
where 962 is the holdings tag and p is the subfield that contains the PO Name.
Preparing to send electronic orders from EvergreenIf your library wants to transmit electronic order information to a vendor, you will need to configure your server touse EDI. You need to install the EDI translator and EDI scripts on your server by following the instructions in theEvergreen 2.3 documentation. (http://docs.evergreen-ils.org/2.3/_installation.html)
Configure your provider’s EDI information by selecting Admin > Server Administration > Acquisitions > EDIAccounts. Give the account a name in the Label box.
1. Host is the vendor-assigned FTP/SFTP/SSH hostname.
2. Username is the vendor-assigned FTP/SFTP/SSH username.
3. Password is the vendor-assigned FTP/SFTP/SSH password.
4. Account This field enables you to add a supplemental password for entry to a remote system after log in hasbeen completed. This field is optional for the ILS but may be required by your provider.
Chapter 25. Ordering materials 109Report errors in this documentation using Launchpad.
5. Owner is the organizational unit who owns the EDI account
6. Last Activity is the date of last activity for the account
7. Provider is a link to the codes for the Provider record.
8. Path is the path on the vendor’s server where Evergreen will deposit its outgoing order files.
9. Incoming Directory is the path on the vendor’s server where Evergreen will retrieve incoming order responsesand invoices.
10.Vendor Account Number is the Vendor assigned account number.
11.Vendor Assigned Code is usually a sub-account designation. It can be used with or without the Vendor AccountNumber.
You now need to add this EDI Account and the SAN code to the provider’s record.
1. Select Admin > Server Administration > Acquisitions > Providers.
2. Click the hyperlinked Provider name.
3. Select the account you just created in the EDI Default field.
4. Add the vendor-provided SAN code to the SAN field.
The last step is to add your library’s SAN code to Evergreen.
1. Select Admin > Server Administration > Organizational Units.
2. Select your library from the organizational hierarchy in the left pane.
3. Click the Addresses tab and add your library’s SAN code to the SAN field.
Chapter 26. Designing your catalog 110
Chapter 26. Designing your catalogWhen people want to find things in your Evergreen system, they will check the catalog. In Evergreen, the catalog ismade available through a web interface, called the OPAC (Online Public Access Catalog). In the latest versions ofthe Evergreen system, the OPAC is built on a set of programming modules called the Template Toolkit. You willsee the OPAC sometimes referred to as the TPAC.
In this chapter, we’ll show you how to customize the OPAC, change it from its default configuration, and makeit your own.
Configuring and customizing the publicinterfaceThe public interface is referred to as the TPAC or Template Toolkit (TT) within the Evergreen community. Thetemplate toolkit system allows you to customize the look and feel of your OPAC by editing the template pages (.tt2)files as well as the associated style sheets.
Locating the default template files
The default URL for the TPAC on a default Evergreen system is http://localhost/eg/opac/home (adjust localhost tomatch your hostname or IP address).
The default template file is installed in /openils/var/templates/opac.
You should generally avoid touching the installed default template files, unless you are contributing changes forEvergreen to adopt as a new default. Even then, while you are developing your changes, consider using templateoverrides rather than touching the installed templates until you are ready to commit the changes to a branch. Seebelow for information on template overrides.
Mapping templates to URLs
The mapping for templates to URLs is straightforward. Following are a few examples, where <templates> is aplaceholder for one or more directories that will be searched for a match:
• http://localhost/eg/opac/home # /openils/var/<templates>/opac/home.tt2
• http://localhost/eg/opac/advanced # /openils/var/<templates>/opac/advanced.tt2
• http://localhost/eg/opac/results # /openils/var/<templates>/opac/results.tt2
The template files themselves can process, be wrapped by, or include other template files. For example, the home.tt2template currently involves a number of other template files to generate a single HTML file.
Example Template Toolkit file: opac/home.tt2.
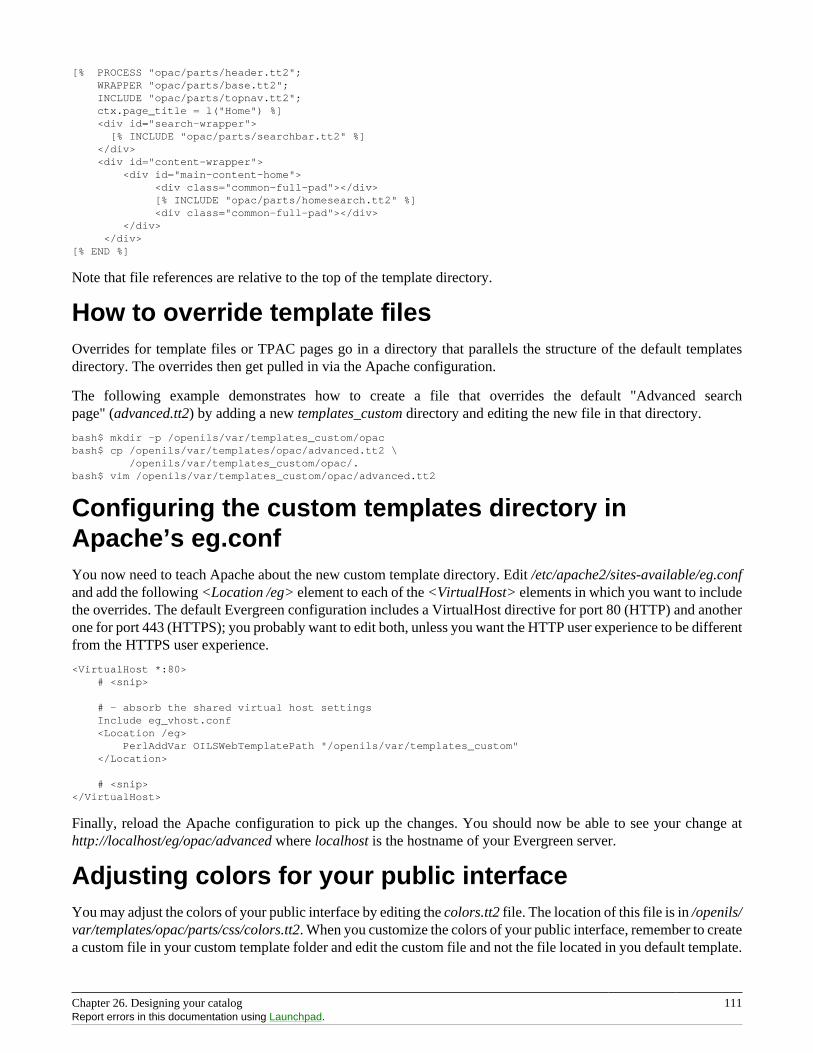
Chapter 26. Designing your catalog 111Report errors in this documentation using Launchpad.
[% PROCESS "opac/parts/header.tt2"; WRAPPER "opac/parts/base.tt2"; INCLUDE "opac/parts/topnav.tt2"; ctx.page_title = l("Home") %] <div id="search-wrapper"> [% INCLUDE "opac/parts/searchbar.tt2" %] </div> <div id="content-wrapper"> <div id="main-content-home"> <div class="common-full-pad"></div> [% INCLUDE "opac/parts/homesearch.tt2" %] <div class="common-full-pad"></div> </div> </div>[% END %]
Note that file references are relative to the top of the template directory.
How to override template filesOverrides for template files or TPAC pages go in a directory that parallels the structure of the default templatesdirectory. The overrides then get pulled in via the Apache configuration.
The following example demonstrates how to create a file that overrides the default "Advanced searchpage" (advanced.tt2) by adding a new templates_custom directory and editing the new file in that directory.
bash$ mkdir -p /openils/var/templates_custom/opacbash$ cp /openils/var/templates/opac/advanced.tt2 \ /openils/var/templates_custom/opac/.bash$ vim /openils/var/templates_custom/opac/advanced.tt2
Configuring the custom templates directory inApache’s eg.confYou now need to teach Apache about the new custom template directory. Edit /etc/apache2/sites-available/eg.confand add the following <Location /eg> element to each of the <VirtualHost> elements in which you want to includethe overrides. The default Evergreen configuration includes a VirtualHost directive for port 80 (HTTP) and anotherone for port 443 (HTTPS); you probably want to edit both, unless you want the HTTP user experience to be differentfrom the HTTPS user experience.
<VirtualHost *:80> # <snip>
# - absorb the shared virtual host settings Include eg_vhost.conf <Location /eg> PerlAddVar OILSWebTemplatePath "/openils/var/templates_custom" </Location>
# <snip></VirtualHost>
Finally, reload the Apache configuration to pick up the changes. You should now be able to see your change athttp://localhost/eg/opac/advanced where localhost is the hostname of your Evergreen server.
Adjusting colors for your public interfaceYou may adjust the colors of your public interface by editing the colors.tt2 file. The location of this file is in /openils/var/templates/opac/parts/css/colors.tt2. When you customize the colors of your public interface, remember to createa custom file in your custom template folder and edit the custom file and not the file located in you default template.
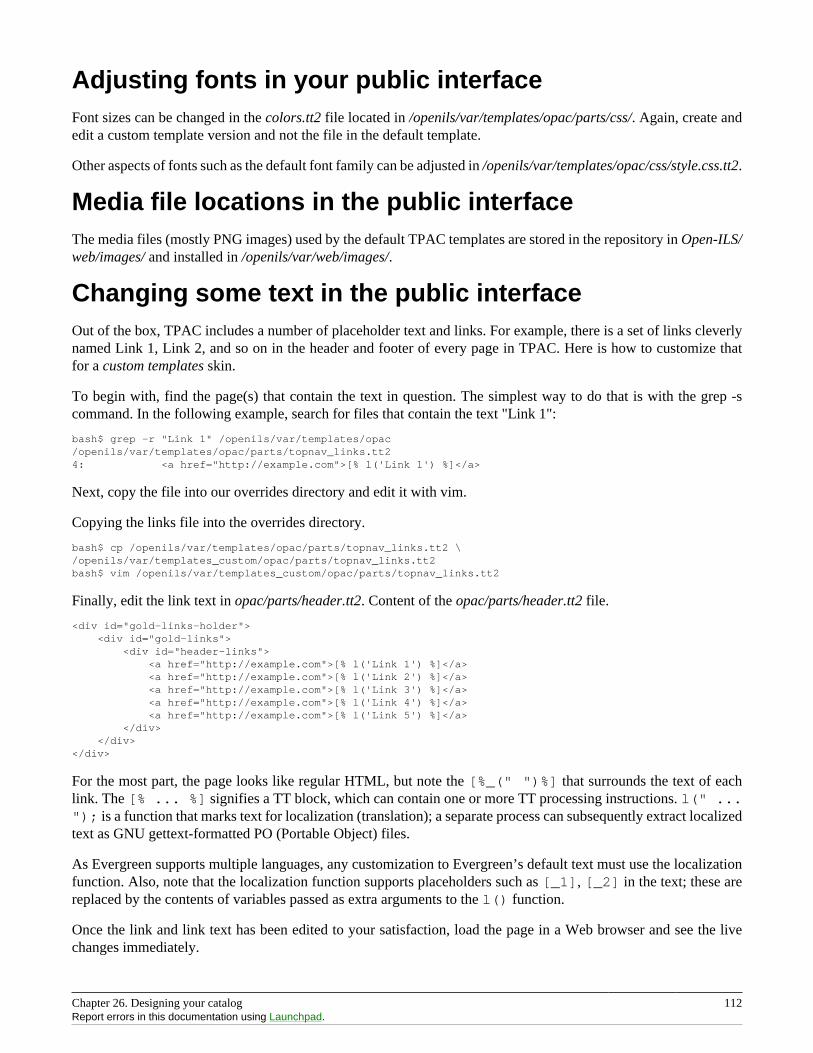
Chapter 26. Designing your catalog 112Report errors in this documentation using Launchpad.
Adjusting fonts in your public interfaceFont sizes can be changed in the colors.tt2 file located in /openils/var/templates/opac/parts/css/. Again, create andedit a custom template version and not the file in the default template.
Other aspects of fonts such as the default font family can be adjusted in /openils/var/templates/opac/css/style.css.tt2.
Media file locations in the public interfaceThe media files (mostly PNG images) used by the default TPAC templates are stored in the repository in Open-ILS/web/images/ and installed in /openils/var/web/images/.
Changing some text in the public interfaceOut of the box, TPAC includes a number of placeholder text and links. For example, there is a set of links cleverlynamed Link 1, Link 2, and so on in the header and footer of every page in TPAC. Here is how to customize thatfor a custom templates skin.
To begin with, find the page(s) that contain the text in question. The simplest way to do that is with the grep -scommand. In the following example, search for files that contain the text "Link 1":
bash$ grep -r "Link 1" /openils/var/templates/opac/openils/var/templates/opac/parts/topnav_links.tt24: <a href="http://example.com">[% l('Link 1') %]</a>
Next, copy the file into our overrides directory and edit it with vim.
Copying the links file into the overrides directory.
bash$ cp /openils/var/templates/opac/parts/topnav_links.tt2 \/openils/var/templates_custom/opac/parts/topnav_links.tt2bash$ vim /openils/var/templates_custom/opac/parts/topnav_links.tt2
Finally, edit the link text in opac/parts/header.tt2. Content of the opac/parts/header.tt2 file.
<div id="gold-links-holder"> <div id="gold-links"> <div id="header-links"> <a href="http://example.com">[% l('Link 1') %]</a> <a href="http://example.com">[% l('Link 2') %]</a> <a href="http://example.com">[% l('Link 3') %]</a> <a href="http://example.com">[% l('Link 4') %]</a> <a href="http://example.com">[% l('Link 5') %]</a> </div> </div></div>
For the most part, the page looks like regular HTML, but note the [%_(" ")%] that surrounds the text of eachlink. The [% ... %] signifies a TT block, which can contain one or more TT processing instructions. l(" ..."); is a function that marks text for localization (translation); a separate process can subsequently extract localizedtext as GNU gettext-formatted PO (Portable Object) files.
As Evergreen supports multiple languages, any customization to Evergreen’s default text must use the localizationfunction. Also, note that the localization function supports placeholders such as [_1], [_2] in the text; these arereplaced by the contents of variables passed as extra arguments to the l() function.
Once the link and link text has been edited to your satisfaction, load the page in a Web browser and see the livechanges immediately.
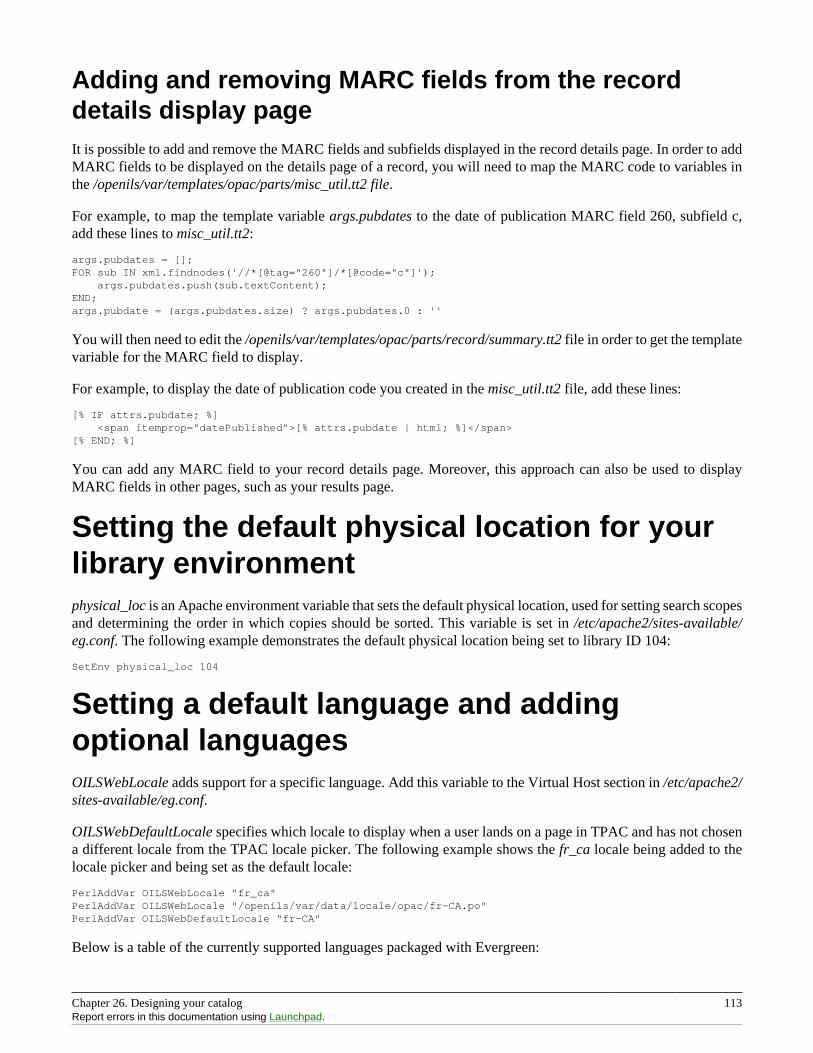
Chapter 26. Designing your catalog 113Report errors in this documentation using Launchpad.
Adding and removing MARC fields from the recorddetails display pageIt is possible to add and remove the MARC fields and subfields displayed in the record details page. In order to addMARC fields to be displayed on the details page of a record, you will need to map the MARC code to variables inthe /openils/var/templates/opac/parts/misc_util.tt2 file.
For example, to map the template variable args.pubdates to the date of publication MARC field 260, subfield c,add these lines to misc_util.tt2:
args.pubdates = [];FOR sub IN xml.findnodes('//*[@tag="260"]/*[@code="c"]'); args.pubdates.push(sub.textContent);END;args.pubdate = (args.pubdates.size) ? args.pubdates.0 : ''
You will then need to edit the /openils/var/templates/opac/parts/record/summary.tt2 file in order to get the templatevariable for the MARC field to display.
For example, to display the date of publication code you created in the misc_util.tt2 file, add these lines:
[% IF attrs.pubdate; %] <span itemprop="datePublished">[% attrs.pubdate | html; %]</span>[% END; %]
You can add any MARC field to your record details page. Moreover, this approach can also be used to displayMARC fields in other pages, such as your results page.
Setting the default physical location for yourlibrary environmentphysical_loc is an Apache environment variable that sets the default physical location, used for setting search scopesand determining the order in which copies should be sorted. This variable is set in /etc/apache2/sites-available/eg.conf. The following example demonstrates the default physical location being set to library ID 104:
SetEnv physical_loc 104
Setting a default language and addingoptional languagesOILSWebLocale adds support for a specific language. Add this variable to the Virtual Host section in /etc/apache2/sites-available/eg.conf.
OILSWebDefaultLocale specifies which locale to display when a user lands on a page in TPAC and has not chosena different locale from the TPAC locale picker. The following example shows the fr_ca locale being added to thelocale picker and being set as the default locale:
PerlAddVar OILSWebLocale "fr_ca"PerlAddVar OILSWebLocale "/openils/var/data/locale/opac/fr-CA.po"PerlAddVar OILSWebDefaultLocale "fr-CA"
Below is a table of the currently supported languages packaged with Evergreen:
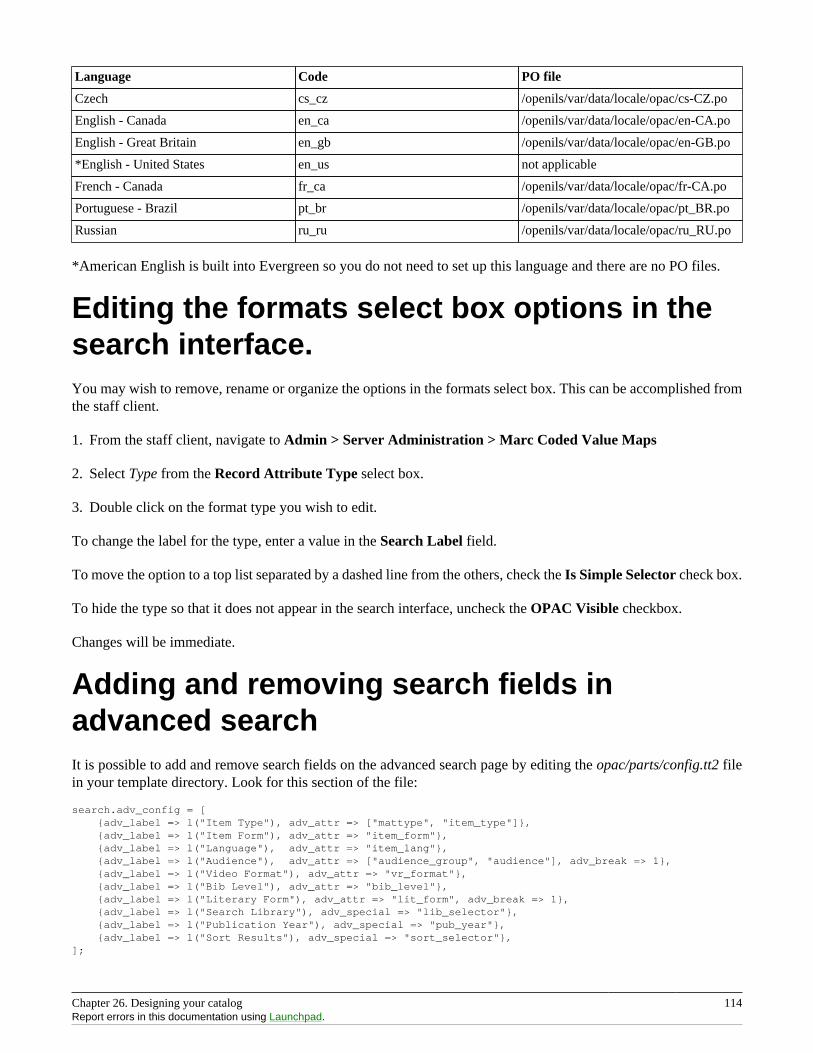
Chapter 26. Designing your catalog 114Report errors in this documentation using Launchpad.
Language Code PO file
Czech cs_cz /openils/var/data/locale/opac/cs-CZ.po
English - Canada en_ca /openils/var/data/locale/opac/en-CA.po
English - Great Britain en_gb /openils/var/data/locale/opac/en-GB.po
*English - United States en_us not applicable
French - Canada fr_ca /openils/var/data/locale/opac/fr-CA.po
Portuguese - Brazil pt_br /openils/var/data/locale/opac/pt_BR.po
Russian ru_ru /openils/var/data/locale/opac/ru_RU.po
*American English is built into Evergreen so you do not need to set up this language and there are no PO files.
Editing the formats select box options in thesearch interface.You may wish to remove, rename or organize the options in the formats select box. This can be accomplished fromthe staff client.
1. From the staff client, navigate to Admin > Server Administration > Marc Coded Value Maps
2. Select Type from the Record Attribute Type select box.
3. Double click on the format type you wish to edit.
To change the label for the type, enter a value in the Search Label field.
To move the option to a top list separated by a dashed line from the others, check the Is Simple Selector check box.
To hide the type so that it does not appear in the search interface, uncheck the OPAC Visible checkbox.
Changes will be immediate.
Adding and removing search fields inadvanced searchIt is possible to add and remove search fields on the advanced search page by editing the opac/parts/config.tt2 filein your template directory. Look for this section of the file:
search.adv_config = [ {adv_label => l("Item Type"), adv_attr => ["mattype", "item_type"]}, {adv_label => l("Item Form"), adv_attr => "item_form"}, {adv_label => l("Language"), adv_attr => "item_lang"}, {adv_label => l("Audience"), adv_attr => ["audience_group", "audience"], adv_break => 1}, {adv_label => l("Video Format"), adv_attr => "vr_format"}, {adv_label => l("Bib Level"), adv_attr => "bib_level"}, {adv_label => l("Literary Form"), adv_attr => "lit_form", adv_break => 1}, {adv_label => l("Search Library"), adv_special => "lib_selector"}, {adv_label => l("Publication Year"), adv_special => "pub_year"}, {adv_label => l("Sort Results"), adv_special => "sort_selector"},];
Chapter 26. Designing your catalog 115Report errors in this documentation using Launchpad.
For example, if you delete the line:
{adv_label => l("Language"), adv_attr => "item_lang"},
the language field will no longer appear on your advanced search page. Changes will appear immediately after yousave your changes.
Changing the display of facets and facetgroupsFacets can be reordered on the search results page by editing the opac/parts/config.tt2 file in your template directory.
Edit the following section of config.tt2, changing the order of the facet categories according to your needs:
facet.display = [ {facet_class => 'author', facet_order => ['personal', 'corporate']}, {facet_class => 'subject', facet_order => ['topic']}, {facet_class => 'series', facet_order => ['seriestitle']}, {facet_class => 'subject', facet_order => ['name', 'geographic']}];
You may also change the default number of facets appearing under each category by editing thefacet.default_display_count value in config.tt2. The default value is 5.
Including External Content in Your PublicInterfaceThe public interface allows you to include external services and content in your public interface. These can includebook cover images, user reviews, table of contents, summaries, author notes, annotations, user suggestions, seriesinformation among other services. Some of these services are free while others require a subscription.
The following are some of the external content services which you can configure in Evergreen.
OpenLibraryThe default install of Evergreen includes OpenLibrary book covers. The settings for this are controlled by the<added_content> section of /openils/conf/opensrf.xml. Here are the key elements of this configuration:
<module>OpenILS::WWW::AddedContent::OpenLibrary</module>
This section calls the OpenLibrary perl module. If you wish to link to a different book cover service other thanOpenLibrary, you must refer to the location of the corresponding Perl module. You will also need to change othersettings accordingly.
<timeout>1</timeout>
Max number of seconds to wait for an added content request to return data. Data not returned within the timeoutis considered a failure.
<retry_timeout>600</retry_timeout>
This setting is the amount of time to wait before we try again.
Chapter 26. Designing your catalog 116Report errors in this documentation using Launchpad.
<max_errors>15</max_errors>
Maximum number of consecutive lookup errors a given process can have before added content lookups are disabledfor everyone. To adjust the site of the cover image on the record details page edit the config.tt2 file and changethe value of the record.summary.jacket_size. The default value is "medium" and the available options are "small","medium" and "large."
ChiliFreshChiliFresh is a subscription-based service which allows book covers, reviews and social interaction of patrons toappear in your catalog. To activate ChiliFresh, you will need to open the Apache configuration file /etc/apache2/eg_vhost.conf and edit several lines:
1. Uncomment (remove the "#" at the beginning of the line) and add your ChiliFresh account number:
#SetEnv OILS_CHILIFRESH_ACCOUNT
1. Uncomment this line and add your ChiliFresh Profile:
#SetEnv OILS_CHILIFRESH_PROFILE
Uncomment the line indicating the location of the Evergreen JavaScript for ChiliFresh:
#SetEnv OILS_CHILIFRESH_URL http://chilifresh.com/on-site /js/evergreen.js
1. Uncomment the line indicating the secure URL for the Evergreen JavaScript :
#SetEnv OILS_CHILIFRESH_HTTPS_URL https://secure.chilifresh.com/on-site/js/evergreen.js
Content CaféContent Café is a subscription-based service that can add jacket images, reviews, summaries, tables of contents andbook details to your records.
In order to activate Content Café, edit the /openils/conf/opensrf.xml file and change the <module> element to pointto the ContentCafe Perl Module:
<module>OpenILS::WWW::AddedContent::ContentCafe</module>
To adjust settings for Content Café, edit a couple of fields with the <ContentCafe> Section of /openils/conf/opensrf.xml.
Edit the userid and password elements to match the user id and password for your Content Café account.
Change the return_behavior_on_no_jacket_image to set the behavior of your service when an image is not availablefor an item. By default this value is set to T which will result in a small image with the text "No Image Available"in place of a book cover. If you set this value to 1 a 1X1 blank image will be in place of a book cover.
Google AnalyticsGoogle Analytics is a free service to collect statistics for your Evergreen site. Statistic tracking is disabled by defaultthrough the Evergreen client software when library staff use your site within the client, but active when anyone usesthe site without the client. This was a preventive measure to reduce the potential risks for leaking patron information.
Chapter 26. Designing your catalog 117Report errors in this documentation using Launchpad.
In order to use Google Analytics you will first need to set up the service from the Google Analytics website at http://www.google.com/analytics/. To activate Google Analytics you will need to edit config.tt2 in your template. Toenable the service set the value of google_analytics.enabled to true and change the value of google_analytics.codeto be the code in your Google Analytics account.
NoveListNovelist is a subscription-based service providing reviews and recommendation for books in you catalog. To activateyour Novelist service in Evergreen, open the Apache configuration file /etc/apache2/eg_vhost.conf and edit the line:
#SetEnv OILS_NOVELIST_URL
You should use the URL provided by NoveList.
RefWorksRefWorks is a subscription-based online bibliographic management tool. If you have a RefWorks subscription, youcan activate RefWorks in Evergreen by editing the config.tt2 file located in your template directory. You will needto set the ctx.refworks.enabled value to true. You may also set the RefWorks URL by changing the ctx.refworks.urlsetting on the same file.
SFX OpenURL ResolverAn OpenURL resolver allows you to find electronic resources and pull them into your catalog based on the ISBNor ISSN of the item. In order to use the SFX OpenURL resolver, you will need to subscribe to the Ex Libris SFXservice. To activate the service in Evergreen edit the config.tt2 file in your template. Enable the resolver by changingthe value of openurl.enabled to true and change the openurl.baseurl setting to point to the URL of your OpenURLresolver.
Syndetic SolutionsSyndetic Solutions is a subscription service providing book covers and other data for items in your catalog. Inorder to activate Syndetic, edit the /openils/conf/opensrf.xml file and change the <module> element to point to theSyndetic Perl Module:
<module>OpenILS::WWW::AddedContent::Syndetic</module>
You will also need to edit the <userid> element to be the user id provided to you by Syndetic.
Then, you will need to uncomment and edit the <base_url> element so that it points to the Syndetic service:
<base_url>http://syndetics.com/index.aspx</base_url>
For changes to be activated for your public interface you will need to restart Evergreen and Apache.
Clear External/Added Content CacheOn the catalog’s record summary page, there is a link for staff that will forcibly clear the cache of the Added Contentfor that record. This is helpful for when the Added Content retrieved the wrong cover jacket art, summary, etc. andcaches the wrong result.
Chapter 26. Designing your catalog 118Report errors in this documentation using Launchpad.
Once clicked, there is a pop up that will display what was cleared from the cache.
You will need to reload the record in the staff client to obtain the new images from your Added Content Supplier.
Configure a Custom Image for Missing ImagesYou can configure a "no image" image other than the standard 1-pixel blank image. The example eg_vhost.conf fileprovides examples in the comments. Note: Evergreen does not provide default images for these.
Including Locally Hosted Content in YourPublic InterfaceIt is also possible to show added content that has been generated locally by placing the content in a specific spot onthe web server. It is possible to have local book jackets, reviews, TOC, excerpts or annotations.
File Location and FormatBy default the files will need to be placed in directories under /openils/var/web/opac/extras/ac/ on the server(s)that run Apache.
The files need to be in specific folders depending on the format of the added content. Local Content can only belooked up based on the record ID at this time.
Chapter 26. Designing your catalog 119Report errors in this documentation using Launchpad.
URL Format: http://catalog/opac/extras/ac/{type}/{format}/r/{recordid}
• type is one of jacket, reviews, toc, excerpt or anotes.
• format is type dependent:
• for jacket, one of small, medium or large
• others, one of html, xml or json … html is the default for non-image added content
• recordid is the bibliographic record id (bre.id).
ExampleIf you have some equipment that you are circulating such as a laptop or eBook reader and you want to add an imageof the equipment that will show up in the catalog.
If you are adding jacket art for a traditional type of media (book, CD, DVD) consider adding the jacket art tothe http://openlibrary.org project instead of hosting it locally. This would allow other libraries to benefit fromyour work.
Make note of the Record ID of the bib record. You can find this by looking at the URL of the bib in the catalog.http://catalog/eg/opac/record/123, 123 is the record ID. These images will only show up for one specific record.
Create 3 different sized versions of the image in png or jpg format.
• Small - 80px x 80px - named 123-s.jpg or 123-s.png - This is displayed in the browse display.
• Medium - 240px x 240px - named 123-m.jpg or 123-m.png - This is displayed on the summary page.
• Large - 400px x 399px - named 123-l.jpg or 123-l.png - This is displayed if the summary page image is clicked on.
The image dimensions are up to you, use what looks good in your catalog.
Next, upload the images to the evergreen server(s) that run apache, and move/rename the files to the followinglocations/name. You will need to create directories that are missing.
• Small - Move the file 123-s.jpg to /openils/var/web/opac/extras/ac/jacket/small/r/123
• Medium - Move the file 123-m.jpg to /openils/var/web/opac/extras/ac/jacket/medum/r/123.
• Large - Move the file 123-l.jpg to /openils/var/web/opac/extras/ac/jacket/large/r/123.
The system doesn’t need the file extension to know what kind of file it is.
Reload the bib record summary in the web catalog and your new image will display.

Chapter 26. Designing your catalog 120Report errors in this documentation using Launchpad.
Sitemap generatorA sitemap directs search engines to the pages of interest in a web site so that the search engines can intelligentlycrawl your site. In the case of Evergreen, the primary pages of interest are the bibliographic record detail pages.
The sitemap generator script creates sitemaps that adhere to the http://sitemaps.org specification, including:
• limiting the number of URLs per sitemap file to no more than 50,000 URLs;
• providing the date that the bibliographic record was last edited, so that once a search engine has crawled all ofyour sites' record detail pages, it only has to reindex those pages that are new or have changed since the last crawl;
• generating a sitemap index file that points to each of the sitemap files.
Running the sitemap generatorThe sitemap_generator script must be invoked with the following argument:
• --lib-hostname: specifies the hostname for the catalog (for example, --lib-hostname https://catalog.example.com); all URLs will be generated appended to this hostname
Therefore, the following arguments are useful for generating multiple sitemaps per Evergreen instance:
• --lib-shortname: limit the list of record URLs to those which have copies owned by the designated libraryor any of its children;
• --prefix: provides a prefix for the sitemap index file names
Other options enable you to override the OpenSRF configuration file and the database connection credentials, butthe default settings are generally fine.
Note that on very large Evergreen instances, sitemaps can consume hundreds of megabytes of disk space, so ensurethat your Evergreen instance has enough room before running the script.
SchedulingTo enable search engines to maintain a fresh index of your bibliographic records, you may want to include the scriptin your cron jobs on a nightly or weekly basis.
Sitemap files are generated in the same directory from which the script is invoked, so a cron entry will look somethinglike:
12 2 * * * cd /openils/var/web && /openils/bin/sitemap_generator
Troubleshooting TPAC errorsIf there is a problem such as a TT syntax error, it generally shows up as an ugly server failure page. If you checkthe Apache error logs, you will probably find some solid clues about the reason for the failure. For example, inthe following example, the error message identifies the file in which the problem occurred as well as the relevantline numbers.
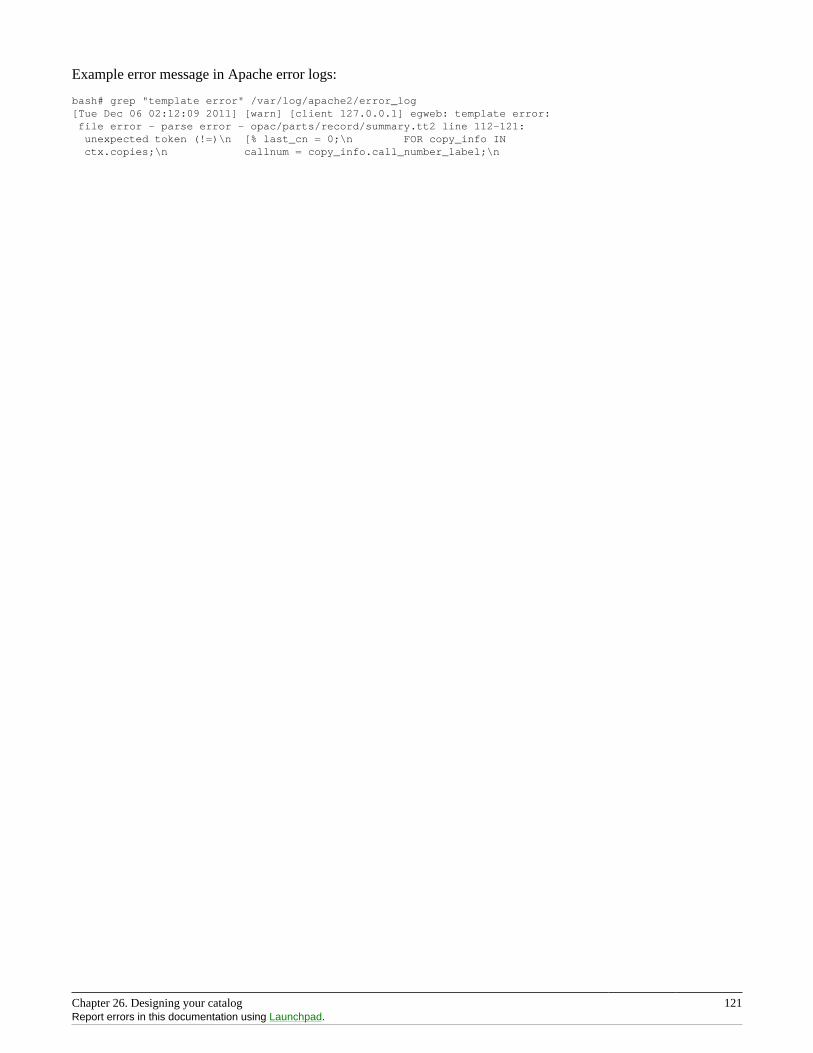
Chapter 26. Designing your catalog 121Report errors in this documentation using Launchpad.
Example error message in Apache error logs:
bash# grep "template error" /var/log/apache2/error_log[Tue Dec 06 02:12:09 2011] [warn] [client 127.0.0.1] egweb: template error: file error - parse error - opac/parts/record/summary.tt2 line 112-121: unexpected token (!=)\n [% last_cn = 0;\n FOR copy_info IN ctx.copies;\n callnum = copy_info.call_number_label;\n
Chapter 27. Borrowing items: who, what, for how long 122
Chapter 27. Borrowing items: who, what,for how longCirculation policies pull together user, library, and item data to determine how library materials circulate, such as:which patrons, from what libraries can borrow what types of materials, for how long, and with what overdue fines.
Individual elements of the circulation policies are configured using specific interfaces, and should be configuredprior to setting up the circulation policies.
Data elements that affect your circulationpoliciesThere are a few data elements which must be considered when setting up your circulation policies.
Copy data
Several fields set via the copy editor are commonly used to affect the circulation of an item.
• Circulation modifier - Circulation modifiers are fields used to control circulation policies on specific groups ofitems. They can be added to copies during the cataloging process. New circulation modifiers can be created inthe staff client by navigating to Admin > Server Administration > Circulation Modifiers.
• Circulate? flag - The circulate? flag in the copy editor can be set to False to disallow an item from circulating.
• Reference? flag - The reference? flag in the copy editor can also be used as a data element in circulation policies.
Copy Locations
• To get to the Copy Locations Editor, navigate to Admin > Local Administration > Copy Locations Editor.
• Set OPAC Visible to "No" to hide all copies in a copy location from the public catalog. (You can also hideindividual copies using the Copy Editor.)
• Set Hold Verify to "Yes" if when a copy checks in you want to always ask for staff confirmation before capturinga hold.
• Set Checkin Alert to "Yes" to allow routing alerts to display when copies are checked in.
• Set Holdable to "No" to prevent copies in an entire copy location from being placed on hold.
• Set Circulate to "No" to disallow circulating copies in an entire copy location.
• If you delete a copy location, it will be removed from display in the staff client and the catalog, but it will remainin the database. This allows you to treat a copy location as deleted without losing statistical information forcirculations related to that copy location.
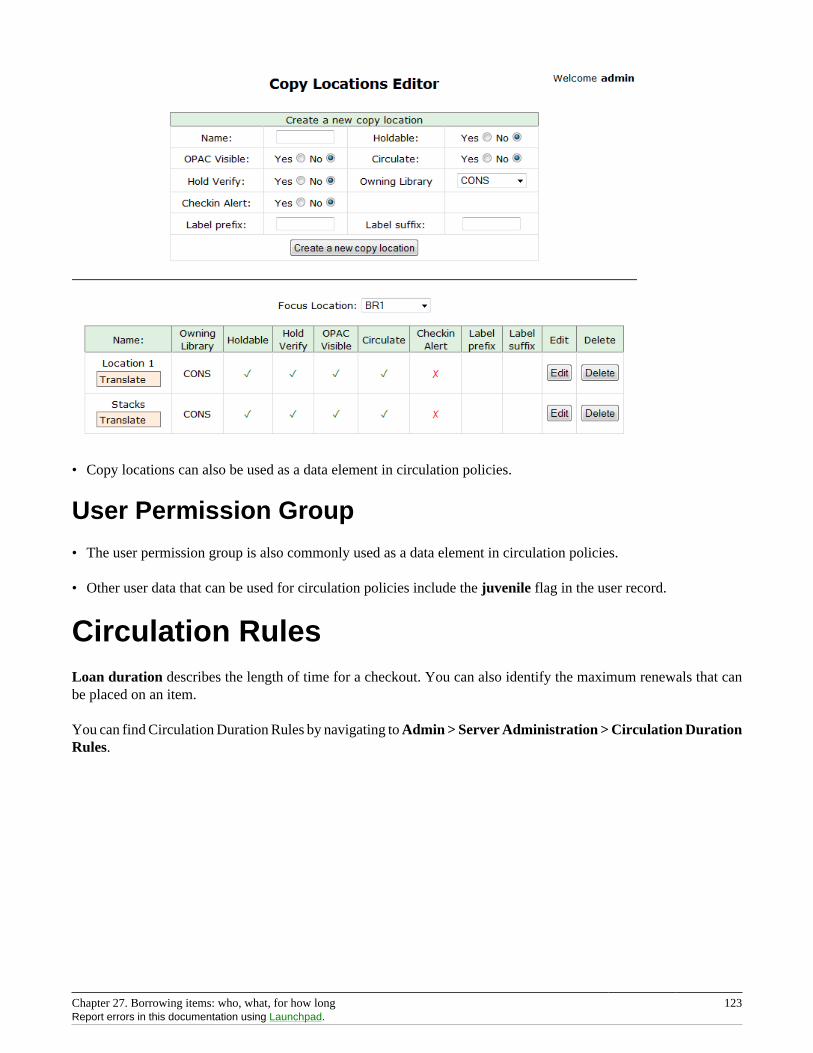
Chapter 27. Borrowing items: who, what, for how long 123Report errors in this documentation using Launchpad.
• Copy locations can also be used as a data element in circulation policies.
User Permission Group
• The user permission group is also commonly used as a data element in circulation policies.
• Other user data that can be used for circulation policies include the juvenile flag in the user record.
Circulation RulesLoan duration describes the length of time for a checkout. You can also identify the maximum renewals that canbe placed on an item.
You can find Circulation Duration Rules by navigating to Admin > Server Administration > Circulation DurationRules.
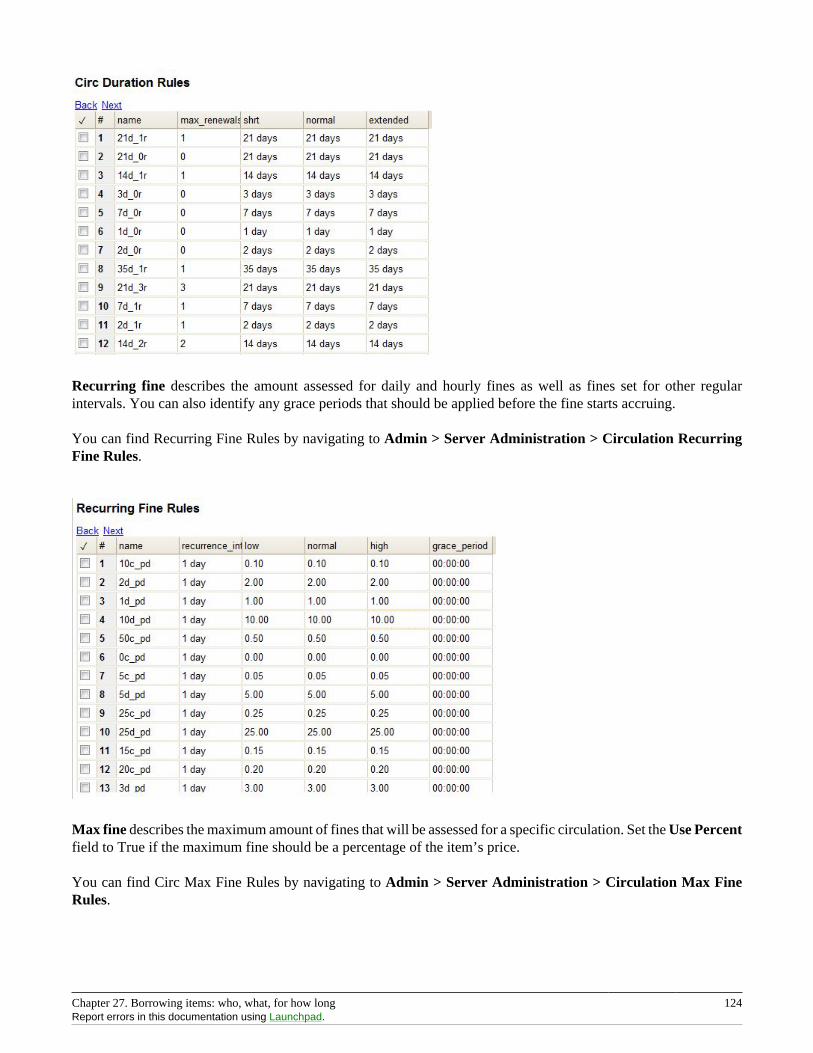
Chapter 27. Borrowing items: who, what, for how long 124Report errors in this documentation using Launchpad.
Recurring fine describes the amount assessed for daily and hourly fines as well as fines set for other regularintervals. You can also identify any grace periods that should be applied before the fine starts accruing.
You can find Recurring Fine Rules by navigating to Admin > Server Administration > Circulation RecurringFine Rules.
Max fine describes the maximum amount of fines that will be assessed for a specific circulation. Set the Use Percentfield to True if the maximum fine should be a percentage of the item’s price.
You can find Circ Max Fine Rules by navigating to Admin > Server Administration > Circulation Max FineRules.
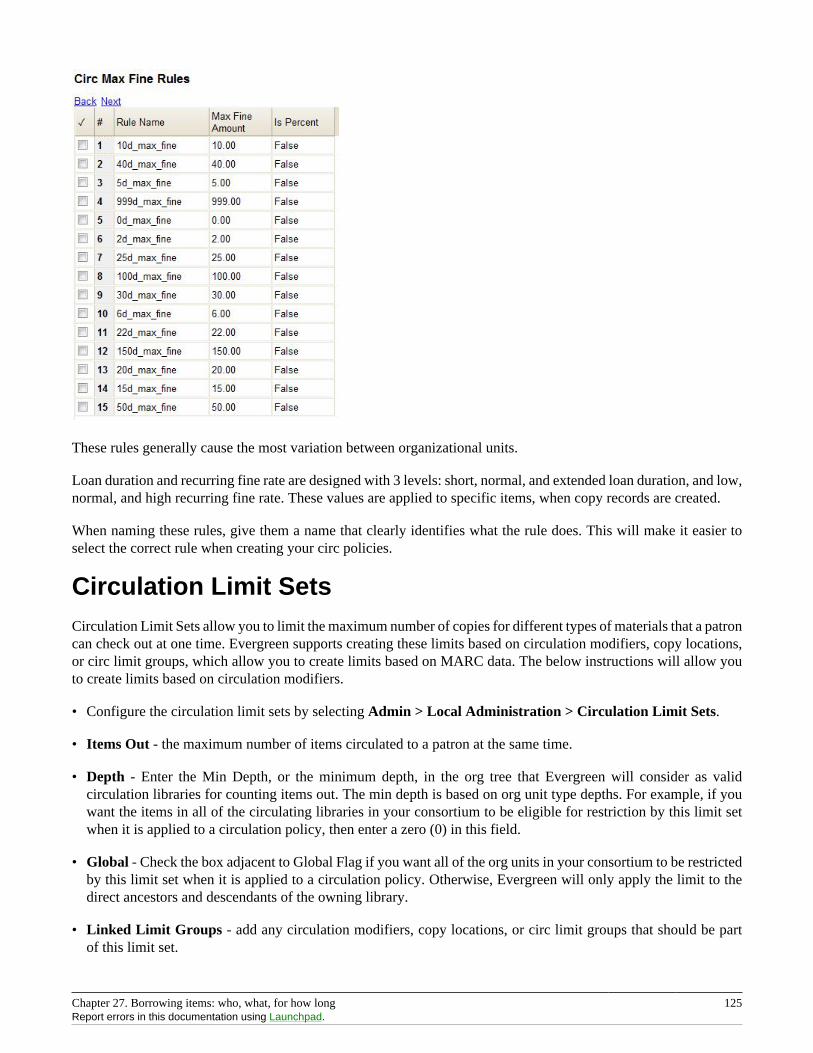
Chapter 27. Borrowing items: who, what, for how long 125Report errors in this documentation using Launchpad.
These rules generally cause the most variation between organizational units.
Loan duration and recurring fine rate are designed with 3 levels: short, normal, and extended loan duration, and low,normal, and high recurring fine rate. These values are applied to specific items, when copy records are created.
When naming these rules, give them a name that clearly identifies what the rule does. This will make it easier toselect the correct rule when creating your circ policies.
Circulation Limit SetsCirculation Limit Sets allow you to limit the maximum number of copies for different types of materials that a patroncan check out at one time. Evergreen supports creating these limits based on circulation modifiers, copy locations,or circ limit groups, which allow you to create limits based on MARC data. The below instructions will allow youto create limits based on circulation modifiers.
• Configure the circulation limit sets by selecting Admin > Local Administration > Circulation Limit Sets.
• Items Out - the maximum number of items circulated to a patron at the same time.
• Depth - Enter the Min Depth, or the minimum depth, in the org tree that Evergreen will consider as validcirculation libraries for counting items out. The min depth is based on org unit type depths. For example, if youwant the items in all of the circulating libraries in your consortium to be eligible for restriction by this limit setwhen it is applied to a circulation policy, then enter a zero (0) in this field.
• Global - Check the box adjacent to Global Flag if you want all of the org units in your consortium to be restrictedby this limit set when it is applied to a circulation policy. Otherwise, Evergreen will only apply the limit to thedirect ancestors and descendants of the owning library.
• Linked Limit Groups - add any circulation modifiers, copy locations, or circ limit groups that should be partof this limit set.
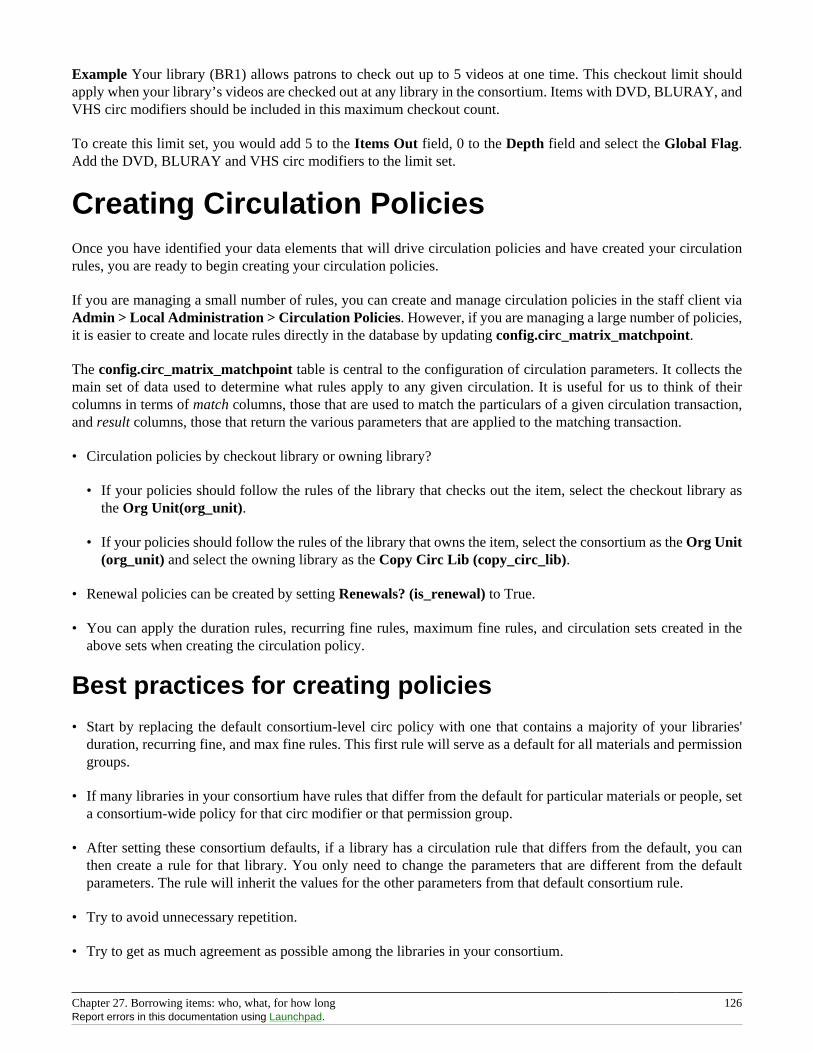
Chapter 27. Borrowing items: who, what, for how long 126Report errors in this documentation using Launchpad.
Example Your library (BR1) allows patrons to check out up to 5 videos at one time. This checkout limit shouldapply when your library’s videos are checked out at any library in the consortium. Items with DVD, BLURAY, andVHS circ modifiers should be included in this maximum checkout count.
To create this limit set, you would add 5 to the Items Out field, 0 to the Depth field and select the Global Flag.Add the DVD, BLURAY and VHS circ modifiers to the limit set.
Creating Circulation PoliciesOnce you have identified your data elements that will drive circulation policies and have created your circulationrules, you are ready to begin creating your circulation policies.
If you are managing a small number of rules, you can create and manage circulation policies in the staff client viaAdmin > Local Administration > Circulation Policies. However, if you are managing a large number of policies,it is easier to create and locate rules directly in the database by updating config.circ_matrix_matchpoint.
The config.circ_matrix_matchpoint table is central to the configuration of circulation parameters. It collects themain set of data used to determine what rules apply to any given circulation. It is useful for us to think of theircolumns in terms of match columns, those that are used to match the particulars of a given circulation transaction,and result columns, those that return the various parameters that are applied to the matching transaction.
• Circulation policies by checkout library or owning library?
• If your policies should follow the rules of the library that checks out the item, select the checkout library asthe Org Unit(org_unit).
• If your policies should follow the rules of the library that owns the item, select the consortium as the Org Unit(org_unit) and select the owning library as the Copy Circ Lib (copy_circ_lib).
• Renewal policies can be created by setting Renewals? (is_renewal) to True.
• You can apply the duration rules, recurring fine rules, maximum fine rules, and circulation sets created in theabove sets when creating the circulation policy.
Best practices for creating policies• Start by replacing the default consortium-level circ policy with one that contains a majority of your libraries'
duration, recurring fine, and max fine rules. This first rule will serve as a default for all materials and permissiongroups.
• If many libraries in your consortium have rules that differ from the default for particular materials or people, seta consortium-wide policy for that circ modifier or that permission group.
• After setting these consortium defaults, if a library has a circulation rule that differs from the default, you canthen create a rule for that library. You only need to change the parameters that are different from the defaultparameters. The rule will inherit the values for the other parameters from that default consortium rule.
• Try to avoid unnecessary repetition.
• Try to get as much agreement as possible among the libraries in your consortium.
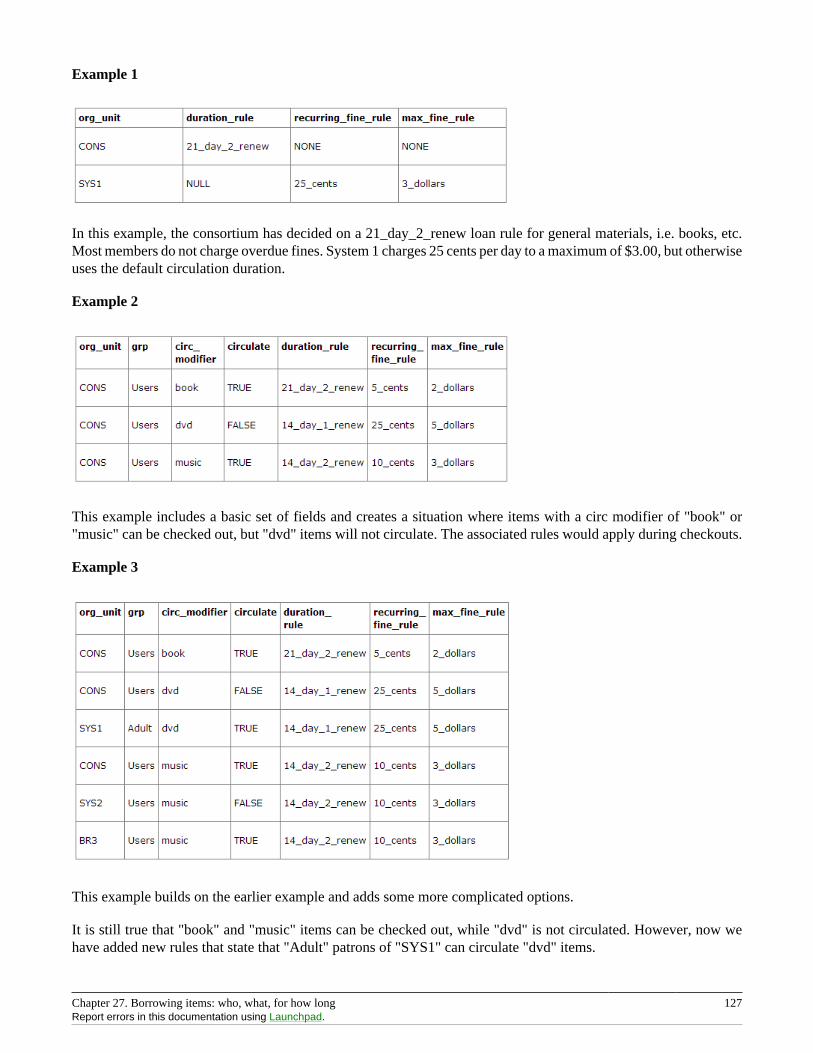
Chapter 27. Borrowing items: who, what, for how long 127Report errors in this documentation using Launchpad.
Example 1
In this example, the consortium has decided on a 21_day_2_renew loan rule for general materials, i.e. books, etc.Most members do not charge overdue fines. System 1 charges 25 cents per day to a maximum of $3.00, but otherwiseuses the default circulation duration.
Example 2
This example includes a basic set of fields and creates a situation where items with a circ modifier of "book" or"music" can be checked out, but "dvd" items will not circulate. The associated rules would apply during checkouts.
Example 3
This example builds on the earlier example and adds some more complicated options.
It is still true that "book" and "music" items can be checked out, while "dvd" is not circulated. However, now wehave added new rules that state that "Adult" patrons of "SYS1" can circulate "dvd" items.
Chapter 27. Borrowing items: who, what, for how long 128Report errors in this documentation using Launchpad.
Settings Relevant to CirculationThe following circulation settings, available via Admin > Local Administration > Library Settings Editor, canalso affect your circulation duration, renewals and fine policy.
• Auto-Extend Grace Periods - When enabled, grace periods will auto-extend. By default this will be only whenthey are a full day or more and end on a closed date, though other options can alter this.
• Auto-Extending Grace Periods extend for all closed dates - If enabled and Grace Periods auto-extending isturned on, grace periods will extend past all closed dates they intersect, within hard-coded limits.
• Auto-Extending Grace Periods include trailing closed dates - If enabled and Grace Periods auto-extending isturned on, grace periods will include closed dates that directly follow the last day of the grace period.
• Checkout auto renew age - When an item has been checked out for at least this amount of time, an attempt tocheck out the item to the patron that it is already checked out to will simply renew the circulation.
• Cap Max Fine at Item Price - This prevents the system from charging more than the item price in overdue fines.
• Lost Item Billing: New Min/Max Price Settings - Patrons will be billed at least the Min Price and at most theMax price, even if the item’s price is outside that range. To set a fixed price for all lost items, set min and maxto the same amount.
• Charge fines on overdue circulations when closed - Normally, fines are not charged when a library is closed.When set to True, fines will be charged during scheduled closings and normal weekly closed days.
Chapter 28. Hard due dates 129
Chapter 28. Hard due datesThis feature allows you to specify a specific due date within your circulation policies. This is particularly useful foracademic and school libraries, who may wish to make certain items due at the end of a semester or term.
To work with hard due dates, you will need the CREATE_CIRC_DURATION, UPDATE_CIRC_DURATION,and DELETE_CIRC_DURATION permissions at the consortium level.
Creating a hard due dateSetting up hard due dates is a two-step process. You must first create a hard due date, and then populate it withspecific values.
To create a hard due date:
1. Click Admin # Server Administration # Hard Due Date Changes.
2. Click New Hard Due Date.
3. In the Name field, enter a name for your hard due date. Note that each hard due date can have multiple values,so it’s best to use a generic name here, such as "End of semester."
4. In the Owner field, select the appropriate org unit for your new hard due date.
5. In the Current Ceiling Date field, select any value. This field is required, but its value will be overwritten insubsequent steps, so you may enter an arbitrary date here.
6. Check the Always Use? checkbox if you want items to only receive the due dates you specify, regardless of whenthey would ordinarily be due. If you leave this box unchecked, your specified due dates will serve as "ceiling"values that limit, rather than override, other circulation rules. In other words, with this box checked, items maybe due only on the specified dates. With the box unchecked, items may be due on or before the specified dates,simply not after.
7. Click Save.
To add date values to your hard due date:
1. Click the hyperlinked name of the due date you just created.
2. Click on New Hard Due Date Value
3. In the Ceiling Date field, enter the specific date you would like items to be due.
4. In the Active Date field, enter the date you want this specific due date value to take effect.
5. Click Save.
6. Each Hard Due Date can include multiple values. For example, you can repeat these steps to enter specific duedates for several semesters using this same screen.
After creating a hard due date and assigning it values, you can apply it by adding it to a circulation policy.
Chapter 29. TPac Configuration and Customization 130
Chapter 29. TPac Configuration andCustomization
Template toolkit documentationFor more general information about template toolkit see: official documentation.
The purpose of this chapter is to focus on the Evergreen-specific uses of Template Toolkit (TT) in the OPAC.
TPAC URLThe URL for the TPAC on a default Evergreen system is http://localhost/eg/opac/home (adjust localhost tomatch your hostname or IP address, naturally!)
Perl modules used directly by TPAC• Open-ILS/src/perlmods/lib/OpenILS/WWW/EGCatLoader.pm
• Open-ILS/src/perlmods/lib/OpenILS/WWW/EGCatLoader/Account.pm
• Open-ILS/src/perlmods/lib/OpenILS/WWW/EGCatLoader/Container.pm
• Open-ILS/src/perlmods/lib/OpenILS/WWW/EGCatLoader/Record.pm
• Open-ILS/src/perlmods/lib/OpenILS/WWW/EGCatLoader/Search.pm
• Open-ILS/src/perlmods/lib/OpenILS/WWW/EGCatLoader/Util.pm
Default templatesThe source template files are found in Open-ILS/src/templates/opac.
These template files are installed in /openils/var/templates/opac.
NOTE. You should generally avoid touching the installed default template files, unless you are contributingchanges that you want Evergreen to adopt as a new default. Even then, while you are developing your changes,consider using template overrides rather than touching the installed templates until you are ready to commit thechanges to a branch. See below for information on template overrides.
Apache configuration filesThe base Evergreen configuration file on Debian-based systems can be found in /etc/apache2/sites-enabled/eg.conf. This file defines the basic virtual host configuration for Evergreen (hostnames and
Chapter 29. TPac Configuration and Customization 131Report errors in this documentation using Launchpad.
ports), then single-sources the bulk of the configuration for each virtual host by including /etc/apache2/eg_vhost.conf.
TPAC CSS and media filesThe CSS files used by the default TPAC templates are stored in the repo in Open-ILS/web/css/skin/default/opac/ and installed in /openils/var/web/css/skin/default/opac/.
The media files—mostly PNG images—used by the default TPAC templates are stored in the repo in Open-ILS/web/images/ and installed in /openils/var/web/images/.
Mapping templates to URLsThe mapping for templates to URLs is straightforward. Following are a few examples, where <templates> is aplaceholder for one or more directories that will be searched for a match:
• http://localhost/eg/opac/home # /openils/var/<templates>/opac/home.tt2
• http://localhost/eg/opac/advanced # /openils/var/<templates>/opac/advanced.tt2
• http://localhost/eg/opac/results # /openils/var/<templates>/opac/results.tt2
The template files themselves can process, be wrapped by, or include other template files. For example, thehome.tt2 template currently involves a number of other template files to generate a single HTML file:
Example Template Toolkit file: opac/home.tt2.
[% PROCESS "opac/parts/header.tt2"; WRAPPER "opac/parts/base.tt2"; INCLUDE "opac/parts/topnav.tt2"; ctx.page_title = l("Home") %] <div id="search-wrapper"> [% INCLUDE "opac/parts/searchbar.tt2" %] </div> <div id="content-wrapper"> <div id="main-content-home"> <div class="common-full-pad"></div> [% INCLUDE "opac/parts/homesearch.tt2" %] <div class="common-full-pad"></div> </div> </div>[% END %]
We will dissect this example in some more detail later, but the important thing to note is that the file references arerelative to the top of the template directory.
How to override templatesOverrides for templates go in a directory that parallels the structure of the default templates directory. The overridesthen get pulled in via the Apache configuration.
In the following example, we demonstrate how to create a file that overrides the default "Advanced searchpage" (advanced.tt2) by adding a new templates directory and editing the new file in that directory.
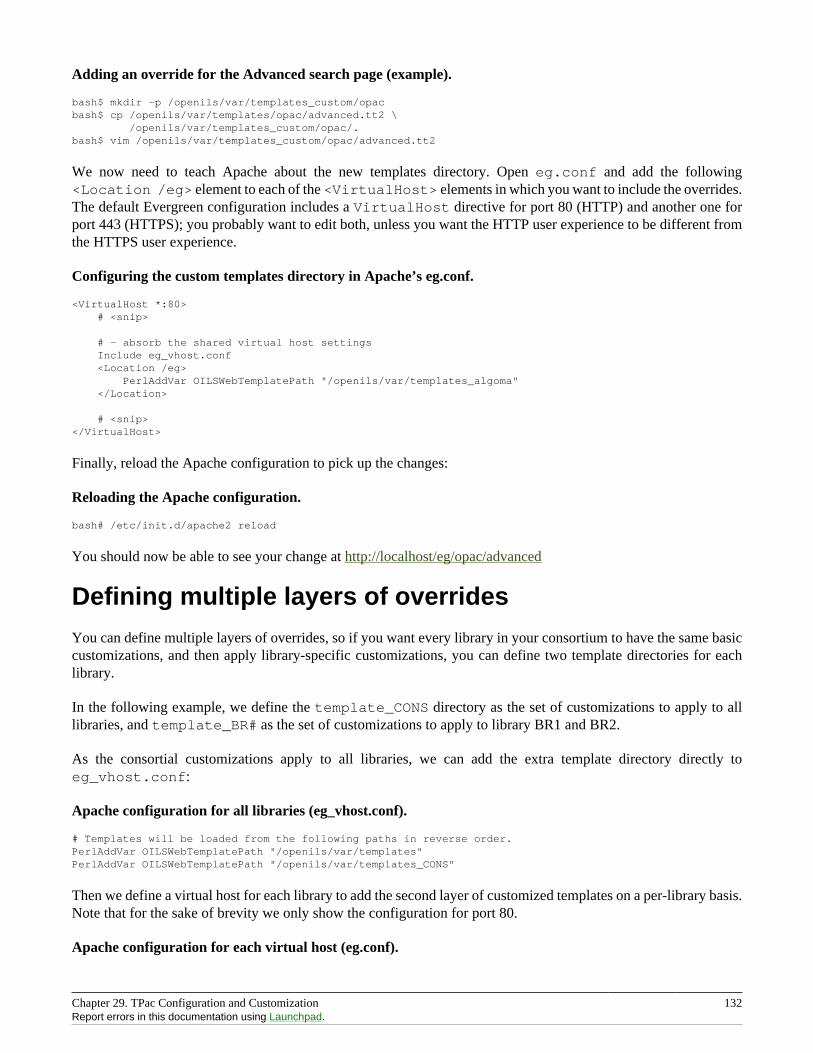
Chapter 29. TPac Configuration and Customization 132Report errors in this documentation using Launchpad.
Adding an override for the Advanced search page (example).
bash$ mkdir -p /openils/var/templates_custom/opacbash$ cp /openils/var/templates/opac/advanced.tt2 \ /openils/var/templates_custom/opac/.bash$ vim /openils/var/templates_custom/opac/advanced.tt2
We now need to teach Apache about the new templates directory. Open eg.conf and add the following<Location /eg> element to each of the <VirtualHost> elements in which you want to include the overrides.The default Evergreen configuration includes a VirtualHost directive for port 80 (HTTP) and another one forport 443 (HTTPS); you probably want to edit both, unless you want the HTTP user experience to be different fromthe HTTPS user experience.
Configuring the custom templates directory in Apache’s eg.conf.
<VirtualHost *:80> # <snip>
# - absorb the shared virtual host settings Include eg_vhost.conf <Location /eg> PerlAddVar OILSWebTemplatePath "/openils/var/templates_algoma" </Location>
# <snip></VirtualHost>
Finally, reload the Apache configuration to pick up the changes:
Reloading the Apache configuration.
bash# /etc/init.d/apache2 reload
You should now be able to see your change at http://localhost/eg/opac/advanced
Defining multiple layers of overridesYou can define multiple layers of overrides, so if you want every library in your consortium to have the same basiccustomizations, and then apply library-specific customizations, you can define two template directories for eachlibrary.
In the following example, we define the template_CONS directory as the set of customizations to apply to alllibraries, and template_BR# as the set of customizations to apply to library BR1 and BR2.
As the consortial customizations apply to all libraries, we can add the extra template directory directly toeg_vhost.conf:
Apache configuration for all libraries (eg_vhost.conf).
# Templates will be loaded from the following paths in reverse order.PerlAddVar OILSWebTemplatePath "/openils/var/templates"PerlAddVar OILSWebTemplatePath "/openils/var/templates_CONS"
Then we define a virtual host for each library to add the second layer of customized templates on a per-library basis.Note that for the sake of brevity we only show the configuration for port 80.
Apache configuration for each virtual host (eg.conf).
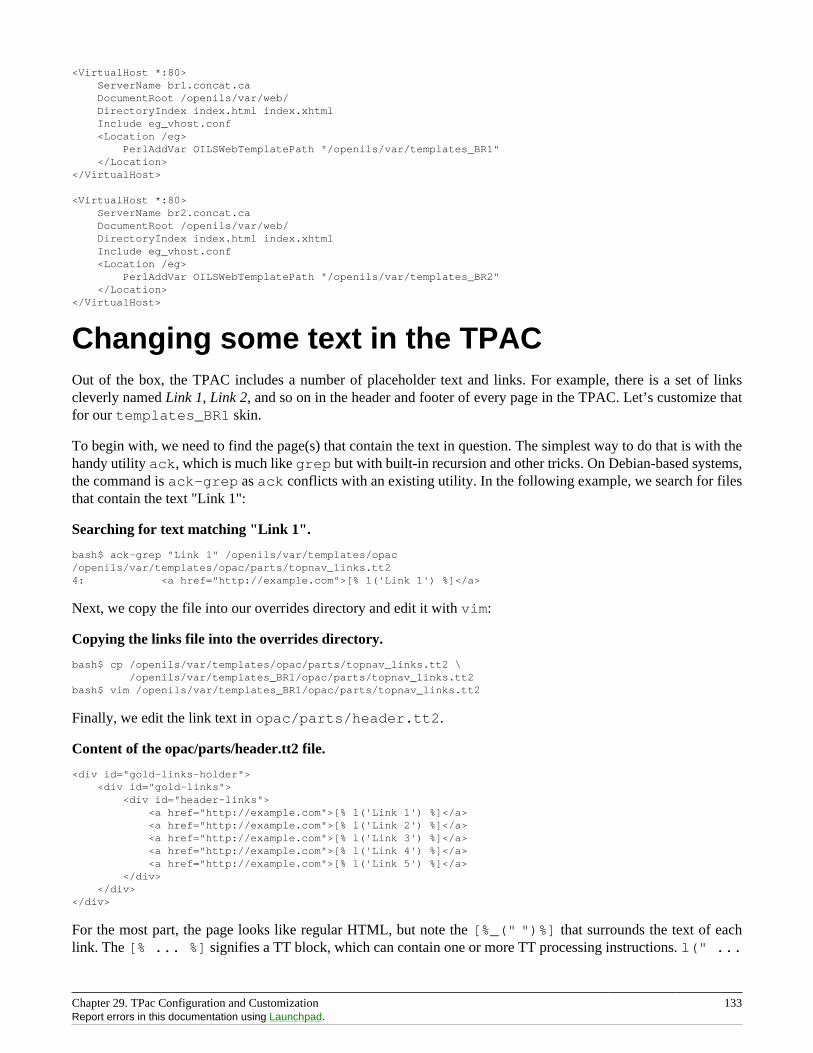
Chapter 29. TPac Configuration and Customization 133Report errors in this documentation using Launchpad.
<VirtualHost *:80> ServerName br1.concat.ca DocumentRoot /openils/var/web/ DirectoryIndex index.html index.xhtml Include eg_vhost.conf <Location /eg> PerlAddVar OILSWebTemplatePath "/openils/var/templates_BR1" </Location></VirtualHost>
<VirtualHost *:80> ServerName br2.concat.ca DocumentRoot /openils/var/web/ DirectoryIndex index.html index.xhtml Include eg_vhost.conf <Location /eg> PerlAddVar OILSWebTemplatePath "/openils/var/templates_BR2" </Location></VirtualHost>
Changing some text in the TPACOut of the box, the TPAC includes a number of placeholder text and links. For example, there is a set of linkscleverly named Link 1, Link 2, and so on in the header and footer of every page in the TPAC. Let’s customize thatfor our templates_BR1 skin.
To begin with, we need to find the page(s) that contain the text in question. The simplest way to do that is with thehandy utility ack, which is much like grep but with built-in recursion and other tricks. On Debian-based systems,the command is ack-grep as ack conflicts with an existing utility. In the following example, we search for filesthat contain the text "Link 1":
Searching for text matching "Link 1".
bash$ ack-grep "Link 1" /openils/var/templates/opac/openils/var/templates/opac/parts/topnav_links.tt24: <a href="http://example.com">[% l('Link 1') %]</a>
Next, we copy the file into our overrides directory and edit it with vim:
Copying the links file into the overrides directory.
bash$ cp /openils/var/templates/opac/parts/topnav_links.tt2 \ /openils/var/templates_BR1/opac/parts/topnav_links.tt2bash$ vim /openils/var/templates_BR1/opac/parts/topnav_links.tt2
Finally, we edit the link text in opac/parts/header.tt2.
Content of the opac/parts/header.tt2 file.
<div id="gold-links-holder"> <div id="gold-links"> <div id="header-links"> <a href="http://example.com">[% l('Link 1') %]</a> <a href="http://example.com">[% l('Link 2') %]</a> <a href="http://example.com">[% l('Link 3') %]</a> <a href="http://example.com">[% l('Link 4') %]</a> <a href="http://example.com">[% l('Link 5') %]</a> </div> </div></div>
For the most part, the page looks like regular HTML, but note the [%_(" ")%] that surrounds the text of eachlink. The [% ... %] signifies a TT block, which can contain one or more TT processing instructions. l(" ...
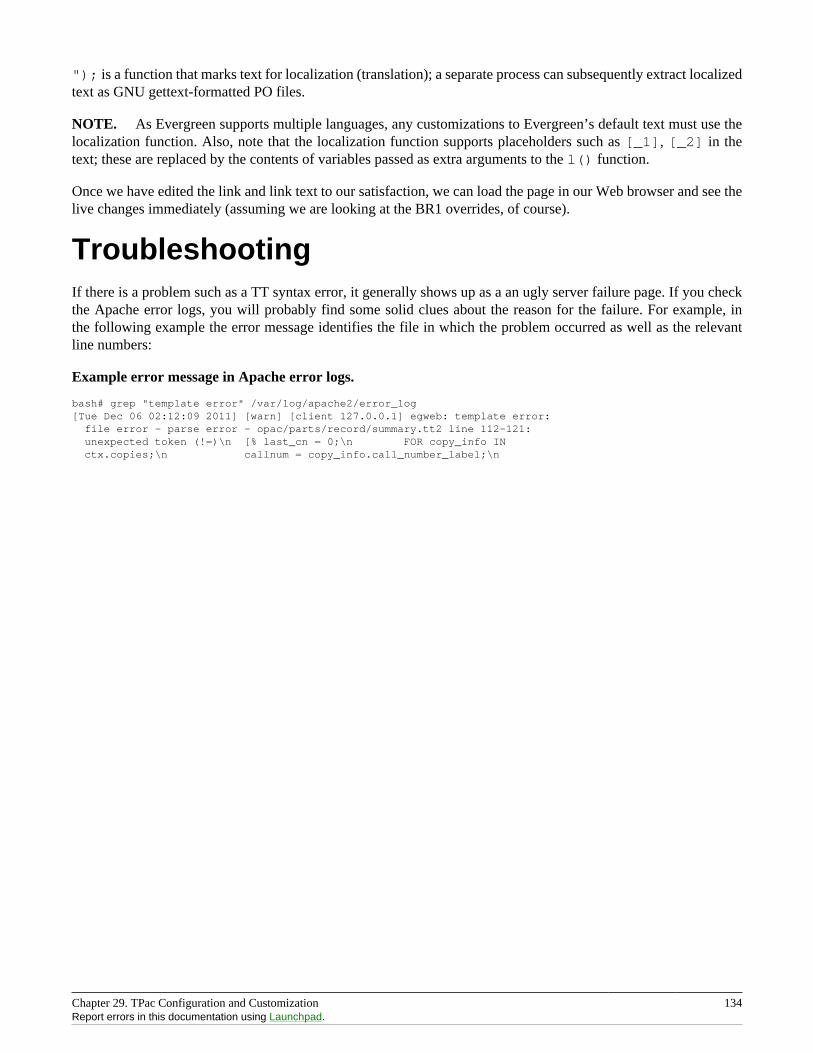
Chapter 29. TPac Configuration and Customization 134Report errors in this documentation using Launchpad.
"); is a function that marks text for localization (translation); a separate process can subsequently extract localizedtext as GNU gettext-formatted PO files.
NOTE. As Evergreen supports multiple languages, any customizations to Evergreen’s default text must use thelocalization function. Also, note that the localization function supports placeholders such as [_1], [_2] in thetext; these are replaced by the contents of variables passed as extra arguments to the l() function.
Once we have edited the link and link text to our satisfaction, we can load the page in our Web browser and see thelive changes immediately (assuming we are looking at the BR1 overrides, of course).
TroubleshootingIf there is a problem such as a TT syntax error, it generally shows up as a an ugly server failure page. If you checkthe Apache error logs, you will probably find some solid clues about the reason for the failure. For example, inthe following example the error message identifies the file in which the problem occurred as well as the relevantline numbers:
Example error message in Apache error logs.
bash# grep "template error" /var/log/apache2/error_log[Tue Dec 06 02:12:09 2011] [warn] [client 127.0.0.1] egweb: template error: file error - parse error - opac/parts/record/summary.tt2 line 112-121: unexpected token (!=)\n [% last_cn = 0;\n FOR copy_info IN ctx.copies;\n callnum = copy_info.call_number_label;\n

Chapter 30. Creating a New Skin: the Bare Minimum 135
Chapter 30. Creating a New Skin: the BareMinimumWhen you adopt the TPAC as your catalog, you must create a new skin. This involves a combination of overridingtemplate files and setting Apache directives to control the look and feel of your customized TPAC.
Apache directivesThere are a few Apache directives and environment variables of note for customizing TPAC behavior. Thesedirectives should generally live within a <vhost> section of your Apache configuration.
• OILSWebDefaultLocale specifies which locale to display when a user lands on a page in the TPAC andhas not chosen a different locale from the TPAC locale picker. The following example shows the fr_ca localebeing added to the locale picker and being set as the default locale:
PerlAddVar OILSWebLocale "fr_ca"PerlAddVar OILSWebLocale "/openils/var/data/locale/opac/fr-CA.po"PerlAddVar OILSWebDefaultLocale "fr-CA"
• physical_loc is an Apache environment variable that sets the default physical location, used for setting searchscopes and determining the order in which copies should be sorted. The following example demonstrates thedefault physical location being set to library ID 104:
SetEnv physical_loc 104
Customizing templatesWhen you install Evergreen, the TPAC templates include many placeholder images, text, and links. You shouldoverride most of these to provide your users with a custom experience that matches your library. Following is a listof templates that include placeholder images, text, or links that you should override.
All paths are relative to /openils/var/templates/opac
• parts/config.tt2: contains many configuration settings that affect the behavior of the TPAC, including:
• hiding the Place Hold button for available items
• enabling RefWorks support for citation management
• adding OpenURL resolution for electronic resources
• enabling Google Analytics tracking for your TPAC
• displaying the "Forgot your password?" prompt
• controlling the size of cover art on the record details page
• defining which facets to display, and in which order
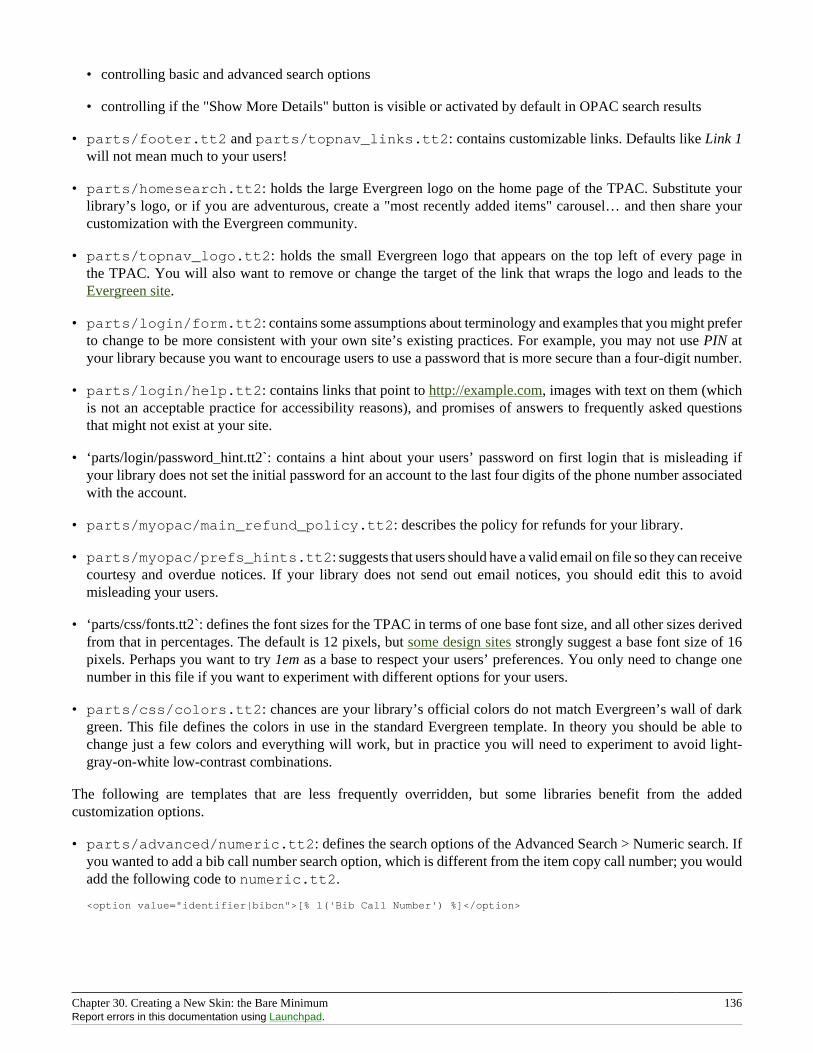
Chapter 30. Creating a New Skin: the Bare Minimum 136Report errors in this documentation using Launchpad.
• controlling basic and advanced search options
• controlling if the "Show More Details" button is visible or activated by default in OPAC search results
• parts/footer.tt2 and parts/topnav_links.tt2: contains customizable links. Defaults like Link 1will not mean much to your users!
• parts/homesearch.tt2: holds the large Evergreen logo on the home page of the TPAC. Substitute yourlibrary’s logo, or if you are adventurous, create a "most recently added items" carousel… and then share yourcustomization with the Evergreen community.
• parts/topnav_logo.tt2: holds the small Evergreen logo that appears on the top left of every page inthe TPAC. You will also want to remove or change the target of the link that wraps the logo and leads to theEvergreen site.
• parts/login/form.tt2: contains some assumptions about terminology and examples that you might preferto change to be more consistent with your own site’s existing practices. For example, you may not use PIN atyour library because you want to encourage users to use a password that is more secure than a four-digit number.
• parts/login/help.tt2: contains links that point to http://example.com, images with text on them (whichis not an acceptable practice for accessibility reasons), and promises of answers to frequently asked questionsthat might not exist at your site.
• ‘parts/login/password_hint.tt2`: contains a hint about your users’ password on first login that is misleading ifyour library does not set the initial password for an account to the last four digits of the phone number associatedwith the account.
• parts/myopac/main_refund_policy.tt2: describes the policy for refunds for your library.
• parts/myopac/prefs_hints.tt2: suggests that users should have a valid email on file so they can receivecourtesy and overdue notices. If your library does not send out email notices, you should edit this to avoidmisleading your users.
• ‘parts/css/fonts.tt2`: defines the font sizes for the TPAC in terms of one base font size, and all other sizes derivedfrom that in percentages. The default is 12 pixels, but some design sites strongly suggest a base font size of 16pixels. Perhaps you want to try 1em as a base to respect your users’ preferences. You only need to change onenumber in this file if you want to experiment with different options for your users.
• parts/css/colors.tt2: chances are your library’s official colors do not match Evergreen’s wall of darkgreen. This file defines the colors in use in the standard Evergreen template. In theory you should be able tochange just a few colors and everything will work, but in practice you will need to experiment to avoid light-gray-on-white low-contrast combinations.
The following are templates that are less frequently overridden, but some libraries benefit from the addedcustomization options.
• parts/advanced/numeric.tt2: defines the search options of the Advanced Search > Numeric search. Ifyou wanted to add a bib call number search option, which is different from the item copy call number; you wouldadd the following code to numeric.tt2.
<option value="identifier|bibcn">[% l('Bib Call Number') %]</option>
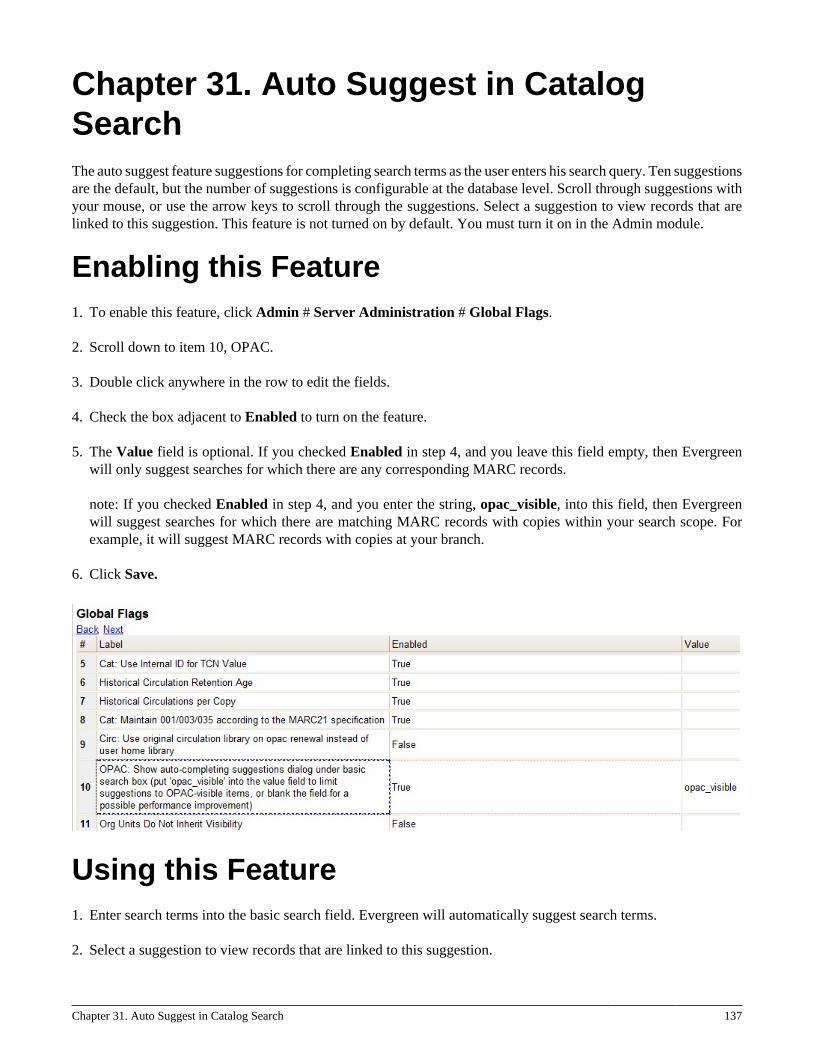
Chapter 31. Auto Suggest in Catalog Search 137
Chapter 31. Auto Suggest in CatalogSearchThe auto suggest feature suggestions for completing search terms as the user enters his search query. Ten suggestionsare the default, but the number of suggestions is configurable at the database level. Scroll through suggestions withyour mouse, or use the arrow keys to scroll through the suggestions. Select a suggestion to view records that arelinked to this suggestion. This feature is not turned on by default. You must turn it on in the Admin module.
Enabling this Feature1. To enable this feature, click Admin # Server Administration # Global Flags.
2. Scroll down to item 10, OPAC.
3. Double click anywhere in the row to edit the fields.
4. Check the box adjacent to Enabled to turn on the feature.
5. The Value field is optional. If you checked Enabled in step 4, and you leave this field empty, then Evergreenwill only suggest searches for which there are any corresponding MARC records.
note: If you checked Enabled in step 4, and you enter the string, opac_visible, into this field, then Evergreenwill suggest searches for which there are matching MARC records with copies within your search scope. Forexample, it will suggest MARC records with copies at your branch.
6. Click Save.
Using this Feature1. Enter search terms into the basic search field. Evergreen will automatically suggest search terms.
2. Select a suggestion to view records that are linked to this suggestion.
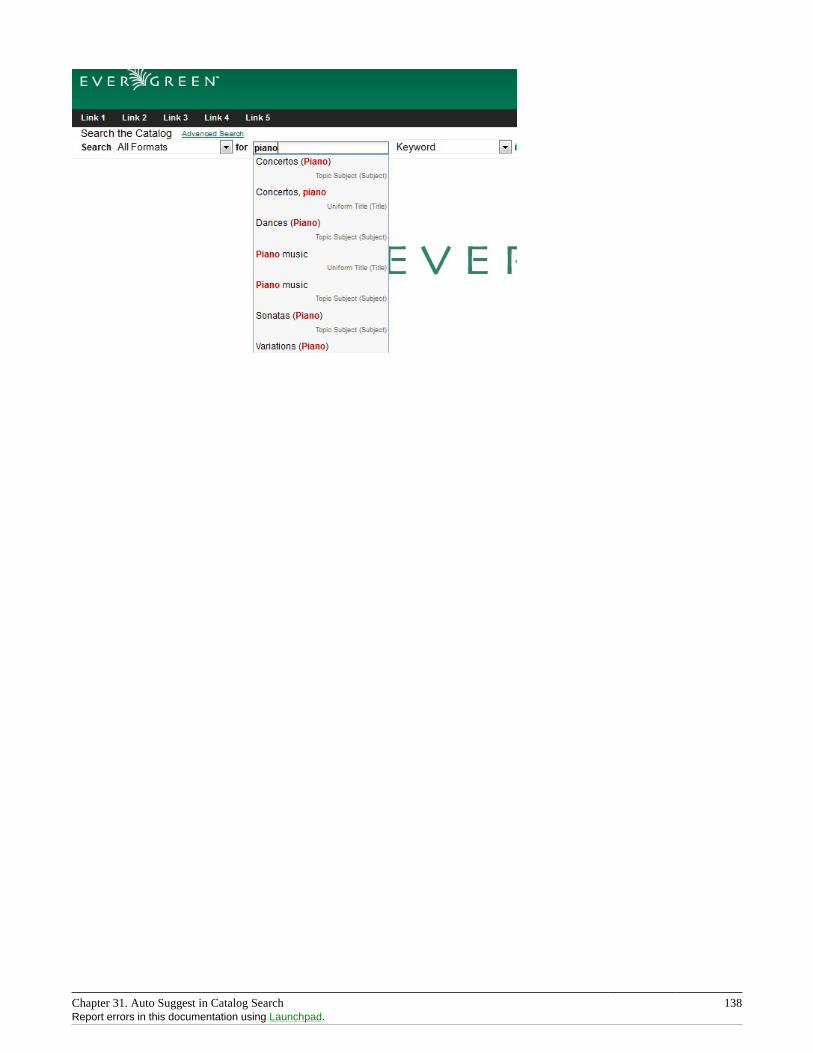
Chapter 31. Auto Suggest in Catalog Search 138Report errors in this documentation using Launchpad.
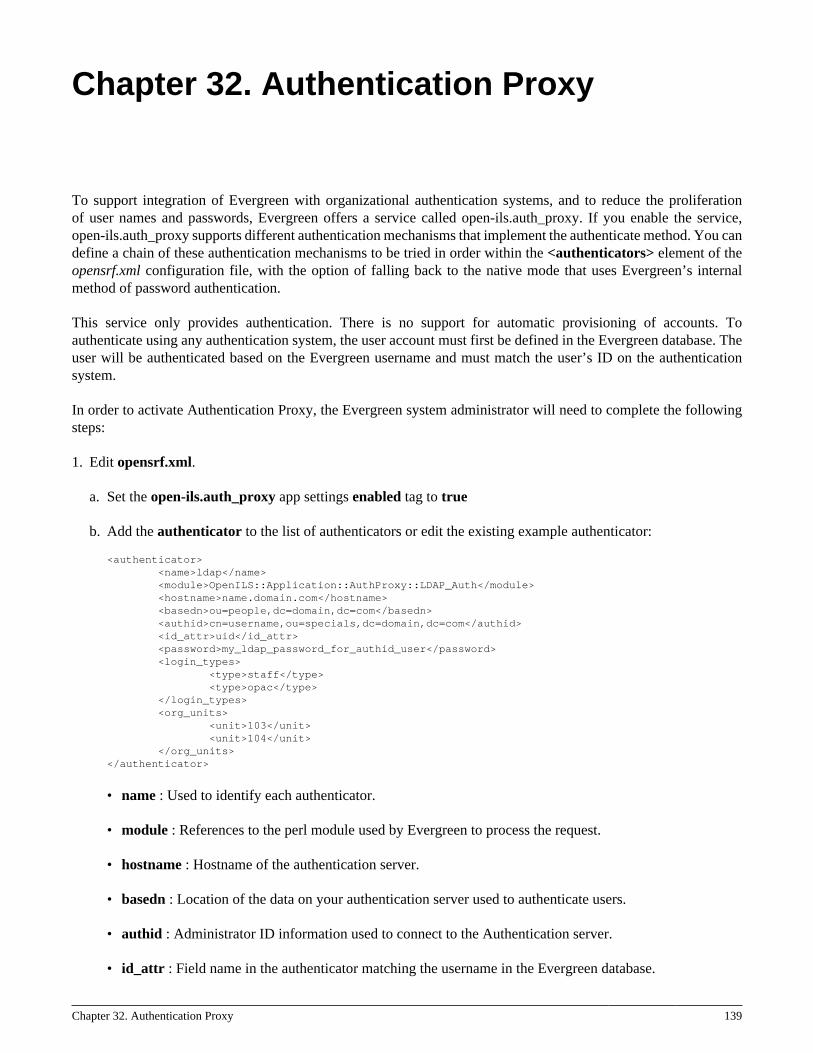
Chapter 32. Authentication Proxy 139
Chapter 32. Authentication Proxy
To support integration of Evergreen with organizational authentication systems, and to reduce the proliferationof user names and passwords, Evergreen offers a service called open-ils.auth_proxy. If you enable the service,open-ils.auth_proxy supports different authentication mechanisms that implement the authenticate method. You candefine a chain of these authentication mechanisms to be tried in order within the <authenticators> element of theopensrf.xml configuration file, with the option of falling back to the native mode that uses Evergreen’s internalmethod of password authentication.
This service only provides authentication. There is no support for automatic provisioning of accounts. Toauthenticate using any authentication system, the user account must first be defined in the Evergreen database. Theuser will be authenticated based on the Evergreen username and must match the user’s ID on the authenticationsystem.
In order to activate Authentication Proxy, the Evergreen system administrator will need to complete the followingsteps:
1. Edit opensrf.xml.
a. Set the open-ils.auth_proxy app settings enabled tag to true
b. Add the authenticator to the list of authenticators or edit the existing example authenticator:
<authenticator> <name>ldap</name> <module>OpenILS::Application::AuthProxy::LDAP_Auth</module> <hostname>name.domain.com</hostname> <basedn>ou=people,dc=domain,dc=com</basedn> <authid>cn=username,ou=specials,dc=domain,dc=com</authid> <id_attr>uid</id_attr> <password>my_ldap_password_for_authid_user</password> <login_types> <type>staff</type> <type>opac</type> </login_types> <org_units> <unit>103</unit> <unit>104</unit> </org_units></authenticator>
• name : Used to identify each authenticator.
• module : References to the perl module used by Evergreen to process the request.
• hostname : Hostname of the authentication server.
• basedn : Location of the data on your authentication server used to authenticate users.
• authid : Administrator ID information used to connect to the Authentication server.
• id_attr : Field name in the authenticator matching the username in the Evergreen database.
Chapter 32. Authentication Proxy 140Report errors in this documentation using Launchpad.
• password : Administrator password used to connect to the authentication server. Password for the authid.
• login_types : Specifies which types of logins will use this authenticator. This might be useful if staff usea different LDAP directory than general users.
• org_units : Specifies which org units will use the authenticator. This is useful in a consortium environmentwhere libraries will use separate authentication systems.
2. Restart Evergreen and Apache to activate configuration changes.
If using proxy authentication with library employees that will use the Admin > Change Operator: New featurein the client software, then add "temp" as a login_types.
Chapter 33. Kid’s OPAC Configuration 141
Chapter 33. Kid’s OPAC Configuration
Configuration
ApacheThe KPAC is already included and ready to be used with new Evergreen installs. So you only need to change theapache config if you need to change template locations or if you want to use a different kpac.xml config file. Thedefaults for the KPAC are set in /etc/apache2/eg_vhosts.conf.
<Location /eg/kpac> PerlSetVar OILSWebContextLoader "OpenILS::WWW::EGKPacLoader" PerlSetVar KPacConfigFile "/openils/conf/kpac.xml.example"</Location>
XML Configuration File• The XML configuration file defines the layout of the kid’s OPAC.
• It is read with each restart/reload of the Apache web server.
• The file lives by default at /openils/conf/kpac.xml.example
• There are two top-level elements: <pages> and <layout>.
• The layout defines the owning org unit and the start page, both by ID.
• At runtime, the layout is determined by the context org unit. If no configuration is defined for the context orgunit, the layout for the closest ancestor is used.
<layout owner="1" page="1"/>
• The pages section is a container for <page> elements.
• Each page defines an ID, the number of columns to display for the page, the page name, and an icon.
<page id="1" columns="5" name="Home" img="/images/home.jpg">
• Each page is a container of cells
• Each cell defines
• type (topic, search, link)
• name
• icon
• content
• The content for type="topic" cells is the ID of the page this topic jumps to. The name and img for the referencedpage is used as the display content.
Chapter 33. Kid’s OPAC Configuration 142Report errors in this documentation using Launchpad.
<cell type="topic">12</cell>
• The content for type="search" cells is the search query. The name and img are used for the display content.
<cell name="Piano" img="category.png" type="search">su:piano</cell>
• The content for type="link" cells is the URL. The name and img are used for the display content.
<cell name="Clarinet" img="category.png" type="link">http://en.wikipedia.org/wiki/Clarinet</cell>
Skin ConfigurationThe following example enables you to configure the alternate skin (Monster Skin, kpac2) for the Kids Catalog.
You should be familiar with how the Evergreen TPAC handles template folders before you make these changes.
If you already have a custom template directory setup you can copy the Open-ILS/examples/web/templates/kpacfiles to that directory instead, and then skip any Apache config changes.
% cp -r Open-ILS/examples/web/css/skin/kpac2 /openils/var/web/css/skin/% cp -r Open-ILS/examples/web/images/kpac/* /openils/var/web/images/kpac/ #does not clobber% mkdir /openils/var/templates_kpac2% cp -r Open-ILS/examples/web/templates/kpac /openils/var/templates_kpac2/% cp -r /openils/var/web/css/skin/default/kpac/fonts /openils/var/web/css/skin/kpac2/kpac
Then set up 443/80 vhosts for serving the alternate skin in eg.conf, something along the lines of:
<VirtualHost *:80> ServerName xyz.dev198.esilibrary.com:80 DocumentRoot /openils/var/web/ DirectoryIndex index.html index.xhtml Include eg_vhost.conf <Location /eg/kpac> #Point to a different kpac.xml config file if needed #PerlSetVar KPacConfigFile "/openils/conf/kpac.xml.example" PerlAddVar OILSWebTemplatePath "/openils/var/templates_kpac2" </Location></VirtualHost>
Considerations for Community AdoptionThe templates for the Kid’s OPAC were developed long before the TPAC was integrated into Evergreen and it hasmany of the same limitations that were part of the TPAC.
• Fixed width elements (divs, images, etc.), which complicates the addition of new features and localcustomizations.
• Images with text, which prevents l10n/i18n.
• While the KPAC does not attempt to match the color scheme of any one institution, it’s inconsistent with thestandard Evergreen color palette. Creating an additional skin to act as the Evergreen default my be necessary.
Outstanding Development (Unsponsored)• Port the XML configuration file to a DB structure, complete with UI for managing the various components and
upgrade path.
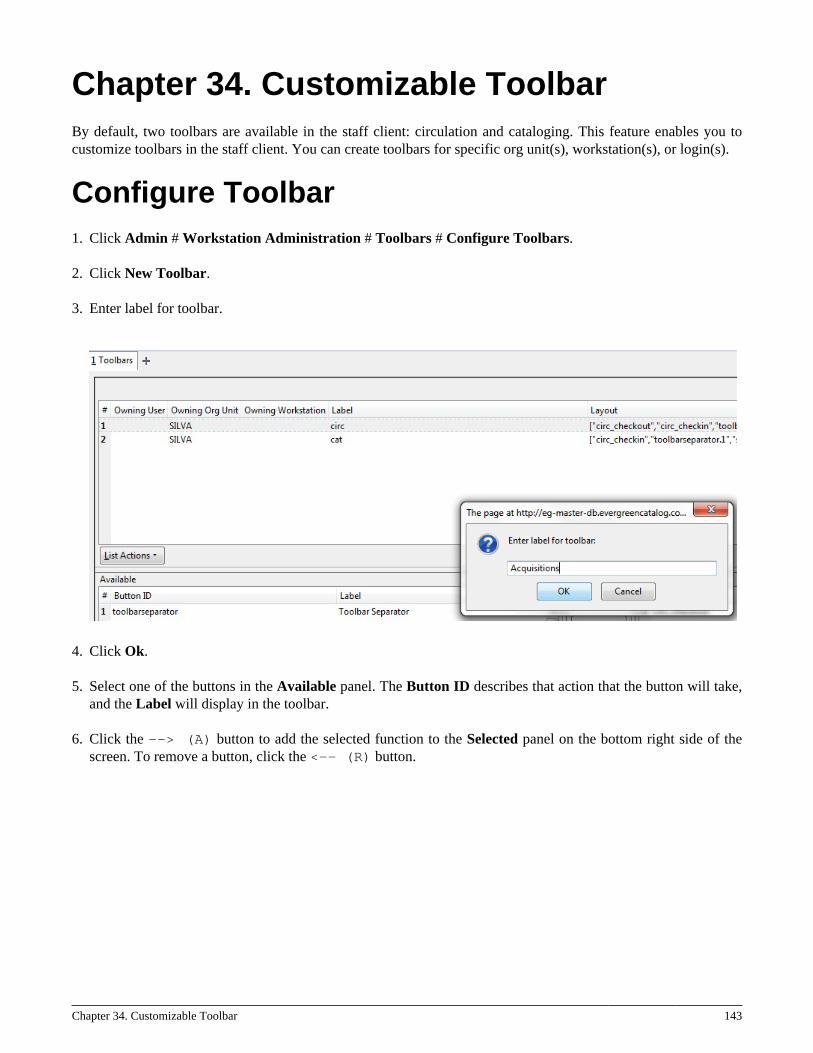
Chapter 34. Customizable Toolbar 143
Chapter 34. Customizable ToolbarBy default, two toolbars are available in the staff client: circulation and cataloging. This feature enables you tocustomize toolbars in the staff client. You can create toolbars for specific org unit(s), workstation(s), or login(s).
Configure Toolbar1. Click Admin # Workstation Administration # Toolbars # Configure Toolbars.
2. Click New Toolbar.
3. Enter label for toolbar.
4. Click Ok.
5. Select one of the buttons in the Available panel. The Button ID describes that action that the button will take,and the Label will display in the toolbar.
6. Click the --> (A) button to add the selected function to the Selected panel on the bottom right side of thescreen. To remove a button, click the <-- (R) button.

Chapter 34. Customizable Toolbar 144Report errors in this documentation using Launchpad.
7. Continue adding buttons if desired. The buttons will display in the order that you add them. If you want to reorderthe buttons, click the Up or Down buttons.
8. To separate buttons onto left and right sides of the screen on the same toolbar, select toolbarspacer, and click--> (A).
9. To add a dividing line between buttons that appear on the same side of the screen, select toolbarseparator, andclick --> (A).
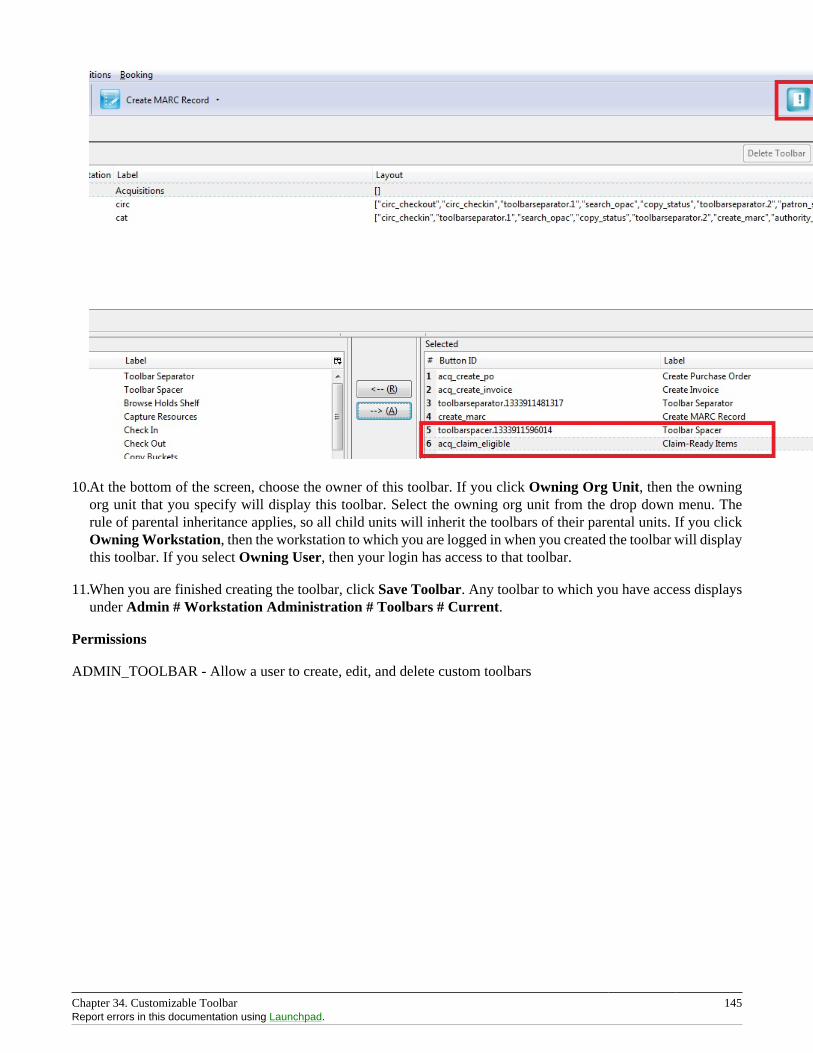
Chapter 34. Customizable Toolbar 145Report errors in this documentation using Launchpad.
10.At the bottom of the screen, choose the owner of this toolbar. If you click Owning Org Unit, then the owningorg unit that you specify will display this toolbar. Select the owning org unit from the drop down menu. Therule of parental inheritance applies, so all child units will inherit the toolbars of their parental units. If you clickOwning Workstation, then the workstation to which you are logged in when you created the toolbar will displaythis toolbar. If you select Owning User, then your login has access to that toolbar.
11.When you are finished creating the toolbar, click Save Toolbar. Any toolbar to which you have access displaysunder Admin # Workstation Administration # Toolbars # Current.
Permissions
ADMIN_TOOLBAR - Allow a user to create, edit, and delete custom toolbars
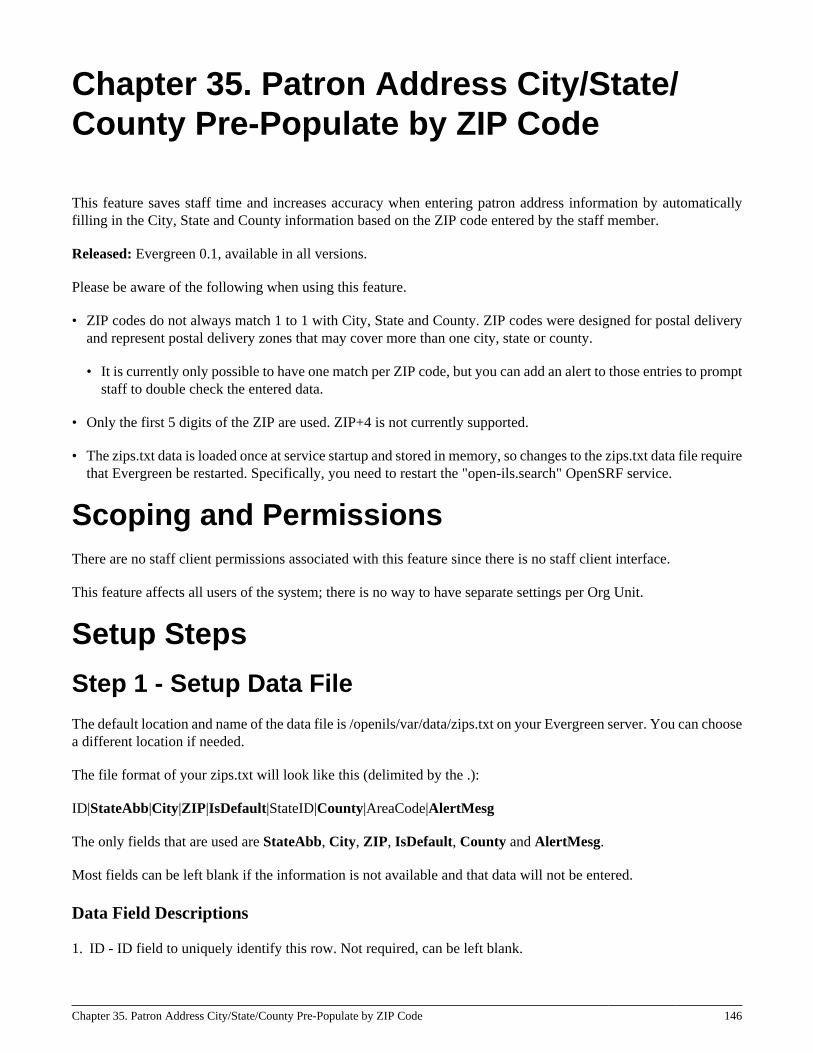
Chapter 35. Patron Address City/State/County Pre-Populate by ZIP Code 146
Chapter 35. Patron Address City/State/County Pre-Populate by ZIP Code
This feature saves staff time and increases accuracy when entering patron address information by automaticallyfilling in the City, State and County information based on the ZIP code entered by the staff member.
Released: Evergreen 0.1, available in all versions.
Please be aware of the following when using this feature.
• ZIP codes do not always match 1 to 1 with City, State and County. ZIP codes were designed for postal deliveryand represent postal delivery zones that may cover more than one city, state or county.
• It is currently only possible to have one match per ZIP code, but you can add an alert to those entries to promptstaff to double check the entered data.
• Only the first 5 digits of the ZIP are used. ZIP+4 is not currently supported.
• The zips.txt data is loaded once at service startup and stored in memory, so changes to the zips.txt data file requirethat Evergreen be restarted. Specifically, you need to restart the "open-ils.search" OpenSRF service.
Scoping and PermissionsThere are no staff client permissions associated with this feature since there is no staff client interface.
This feature affects all users of the system; there is no way to have separate settings per Org Unit.
Setup Steps
Step 1 - Setup Data FileThe default location and name of the data file is /openils/var/data/zips.txt on your Evergreen server. You can choosea different location if needed.
The file format of your zips.txt will look like this (delimited by the .):
ID|StateAbb|City|ZIP|IsDefault|StateID|County|AreaCode|AlertMesg
The only fields that are used are StateAbb, City, ZIP, IsDefault, County and AlertMesg.
Most fields can be left blank if the information is not available and that data will not be entered.
Data Field Descriptions
1. ID - ID field to uniquely identify this row. Not required, can be left blank.
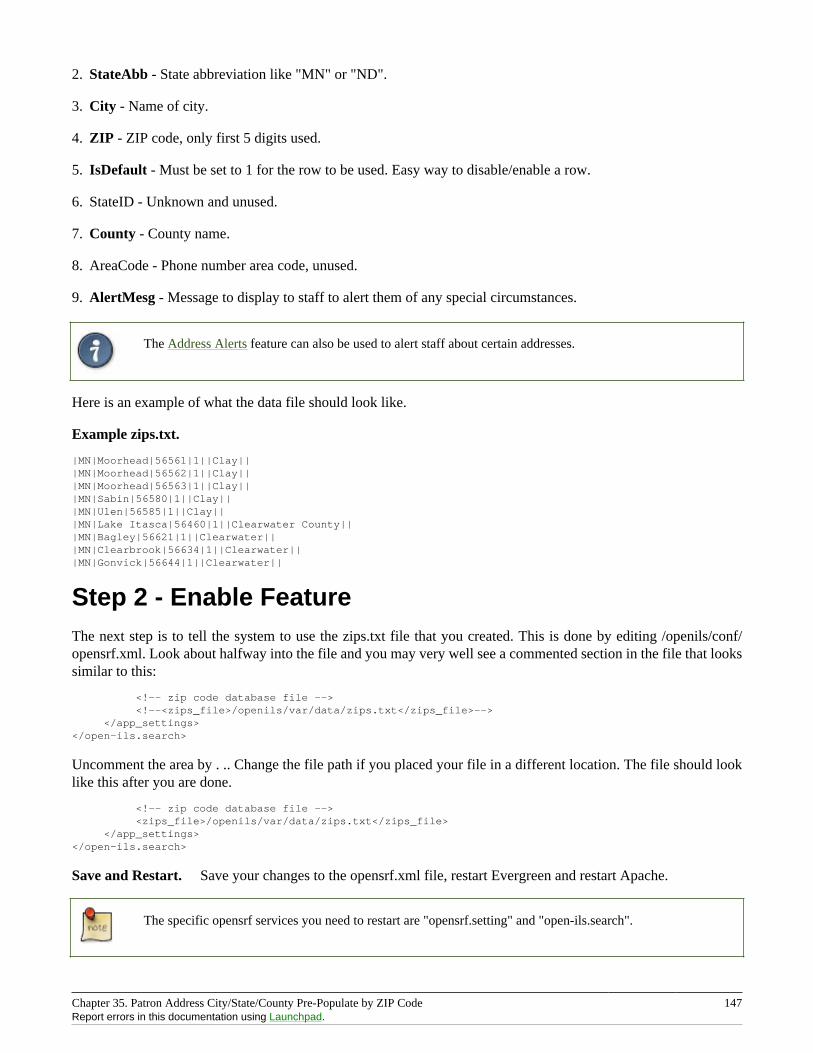
Chapter 35. Patron Address City/State/County Pre-Populate by ZIP Code 147Report errors in this documentation using Launchpad.
2. StateAbb - State abbreviation like "MN" or "ND".
3. City - Name of city.
4. ZIP - ZIP code, only first 5 digits used.
5. IsDefault - Must be set to 1 for the row to be used. Easy way to disable/enable a row.
6. StateID - Unknown and unused.
7. County - County name.
8. AreaCode - Phone number area code, unused.
9. AlertMesg - Message to display to staff to alert them of any special circumstances.
The Address Alerts feature can also be used to alert staff about certain addresses.
Here is an example of what the data file should look like.
Example zips.txt.
|MN|Moorhead|56561|1||Clay|||MN|Moorhead|56562|1||Clay|||MN|Moorhead|56563|1||Clay|||MN|Sabin|56580|1||Clay|||MN|Ulen|56585|1||Clay|||MN|Lake Itasca|56460|1||Clearwater County|||MN|Bagley|56621|1||Clearwater|||MN|Clearbrook|56634|1||Clearwater|||MN|Gonvick|56644|1||Clearwater||
Step 2 - Enable FeatureThe next step is to tell the system to use the zips.txt file that you created. This is done by editing /openils/conf/opensrf.xml. Look about halfway into the file and you may very well see a commented section in the file that lookssimilar to this:
<!-- zip code database file --> <!--<zips_file>/openils/var/data/zips.txt</zips_file>--> </app_settings></open-ils.search>
Uncomment the area by . .. Change the file path if you placed your file in a different location. The file should looklike this after you are done.
<!-- zip code database file --> <zips_file>/openils/var/data/zips.txt</zips_file> </app_settings></open-ils.search>
Save and Restart. Save your changes to the opensrf.xml file, restart Evergreen and restart Apache.
The specific opensrf services you need to restart are "opensrf.setting" and "open-ils.search".
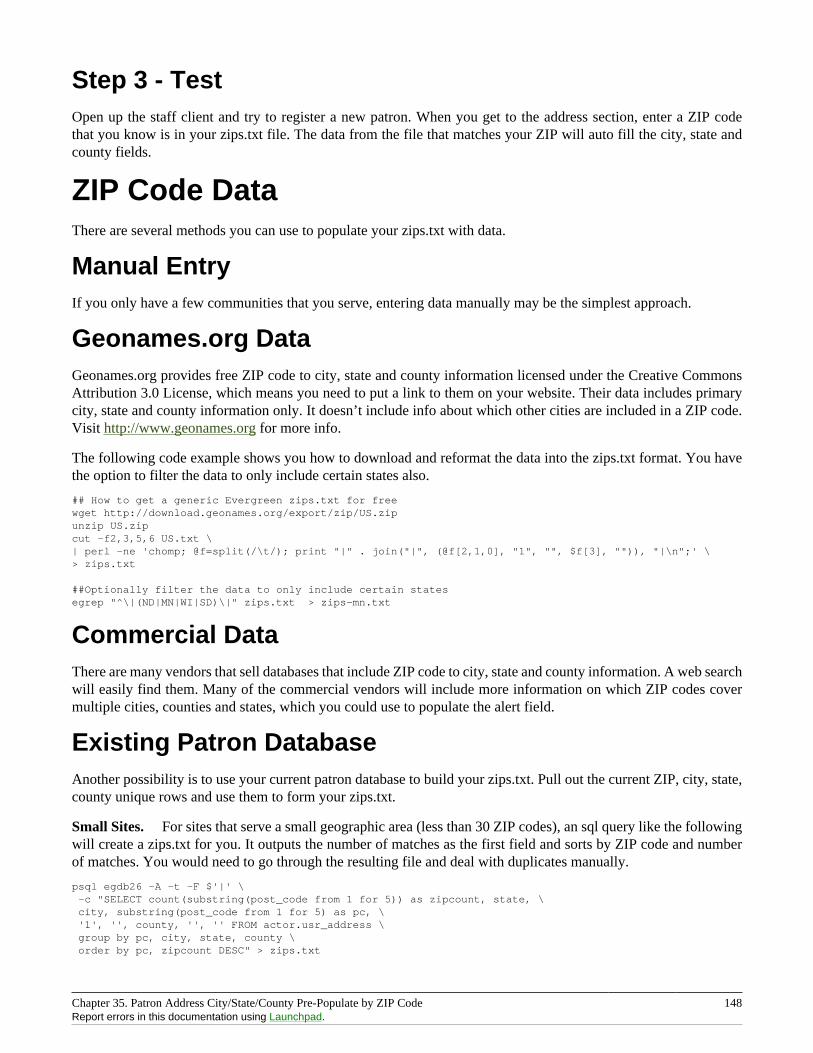
Chapter 35. Patron Address City/State/County Pre-Populate by ZIP Code 148Report errors in this documentation using Launchpad.
Step 3 - TestOpen up the staff client and try to register a new patron. When you get to the address section, enter a ZIP codethat you know is in your zips.txt file. The data from the file that matches your ZIP will auto fill the city, state andcounty fields.
ZIP Code DataThere are several methods you can use to populate your zips.txt with data.
Manual EntryIf you only have a few communities that you serve, entering data manually may be the simplest approach.
Geonames.org DataGeonames.org provides free ZIP code to city, state and county information licensed under the Creative CommonsAttribution 3.0 License, which means you need to put a link to them on your website. Their data includes primarycity, state and county information only. It doesn’t include info about which other cities are included in a ZIP code.Visit http://www.geonames.org for more info.
The following code example shows you how to download and reformat the data into the zips.txt format. You havethe option to filter the data to only include certain states also.
## How to get a generic Evergreen zips.txt for freewget http://download.geonames.org/export/zip/US.zipunzip US.zipcut -f2,3,5,6 US.txt \| perl -ne 'chomp; @f=split(/\t/); print "|" . join("|", (@f[2,1,0], "1", "", $f[3], "")), "|\n";' \> zips.txt
##Optionally filter the data to only include certain statesegrep "^\|(ND|MN|WI|SD)\|" zips.txt > zips-mn.txt
Commercial DataThere are many vendors that sell databases that include ZIP code to city, state and county information. A web searchwill easily find them. Many of the commercial vendors will include more information on which ZIP codes covermultiple cities, counties and states, which you could use to populate the alert field.
Existing Patron DatabaseAnother possibility is to use your current patron database to build your zips.txt. Pull out the current ZIP, city, state,county unique rows and use them to form your zips.txt.
Small Sites. For sites that serve a small geographic area (less than 30 ZIP codes), an sql query like the followingwill create a zips.txt for you. It outputs the number of matches as the first field and sorts by ZIP code and numberof matches. You would need to go through the resulting file and deal with duplicates manually.
psql egdb26 -A -t -F $'|' \ -c "SELECT count(substring(post_code from 1 for 5)) as zipcount, state, \ city, substring(post_code from 1 for 5) as pc, \ '1', '', county, '', '' FROM actor.usr_address \ group by pc, city, state, county \ order by pc, zipcount DESC" > zips.txt

Chapter 35. Patron Address City/State/County Pre-Populate by ZIP Code 149Report errors in this documentation using Launchpad.
Larger Sites. For larger sites Ben Ostrowsky at ESI created a pair of scripts that handles deduping the resultsand adding in county information. Instructions for use are included in the files.
• http://git.esilibrary.com/?p=migration-tools.git;a=blob;f=elect_ZIPs
• http://git.esilibrary.com/?p=migration-tools.git;a=blob;f=enrich_ZIPs
DevelopmentIf you need to make changes to how this feature works, such as to add support for other postal code formats, hereis a list of the files that you need to look at.
1. Zips.pm - contains code for loading the zips.txt file into memory and replying to search queries. Open-ILS / src /perlmods / lib / OpenILS / Application / Search / Zips.pm
2. register.js - This is where patron registration logic is located. The code that queries the ZIP search service andfills the address is located here. Open-ILS / web / js / ui / default / actor / user / register.js
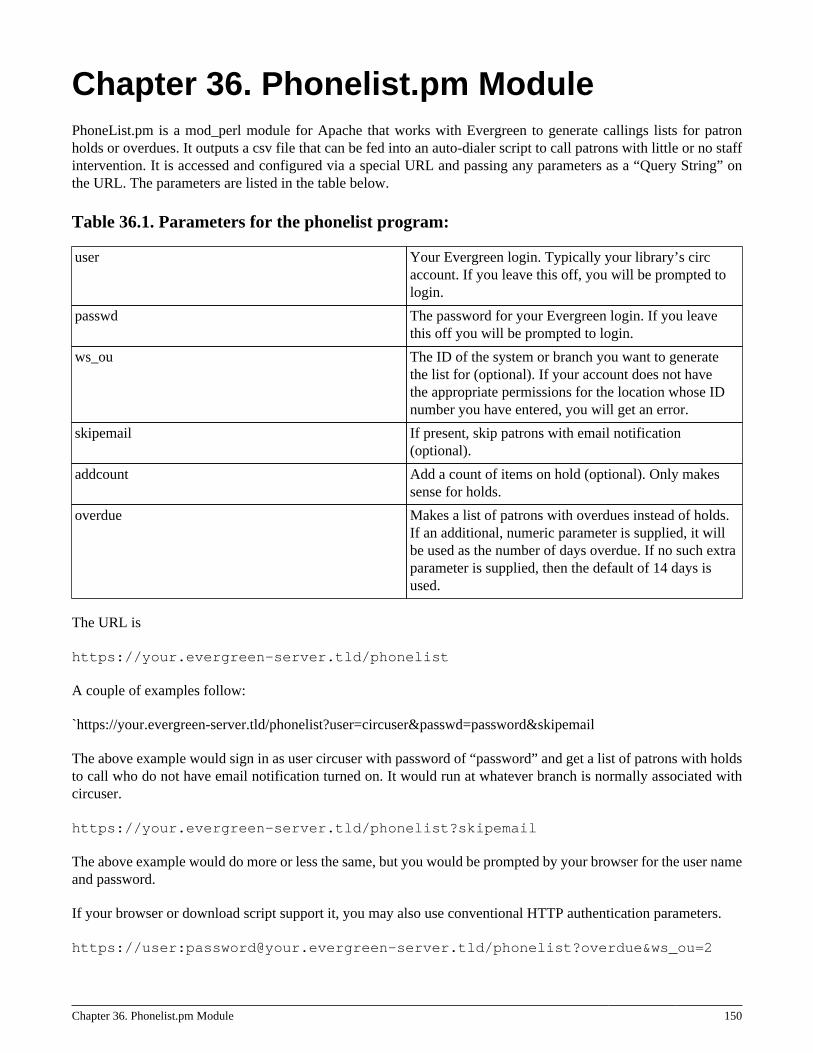
Chapter 36. Phonelist.pm Module 150
Chapter 36. Phonelist.pm ModulePhoneList.pm is a mod_perl module for Apache that works with Evergreen to generate callings lists for patronholds or overdues. It outputs a csv file that can be fed into an auto-dialer script to call patrons with little or no staffintervention. It is accessed and configured via a special URL and passing any parameters as a “Query String” onthe URL. The parameters are listed in the table below.
Table 36.1. Parameters for the phonelist program:
user Your Evergreen login. Typically your library’s circaccount. If you leave this off, you will be prompted tologin.
passwd The password for your Evergreen login. If you leavethis off you will be prompted to login.
ws_ou The ID of the system or branch you want to generatethe list for (optional). If your account does not havethe appropriate permissions for the location whose IDnumber you have entered, you will get an error.
skipemail If present, skip patrons with email notification(optional).
addcount Add a count of items on hold (optional). Only makessense for holds.
overdue Makes a list of patrons with overdues instead of holds.If an additional, numeric parameter is supplied, it willbe used as the number of days overdue. If no such extraparameter is supplied, then the default of 14 days isused.
The URL is
https://your.evergreen-server.tld/phonelist
A couple of examples follow:
`https://your.evergreen-server.tld/phonelist?user=circuser&passwd=password&skipemail
The above example would sign in as user circuser with password of “password” and get a list of patrons with holdsto call who do not have email notification turned on. It would run at whatever branch is normally associated withcircuser.
https://your.evergreen-server.tld/phonelist?skipemail
The above example would do more or less the same, but you would be prompted by your browser for the user nameand password.
If your browser or download script support it, you may also use conventional HTTP authentication parameters.
https://user:[email protected]/phonelist?overdue&ws_ou=2
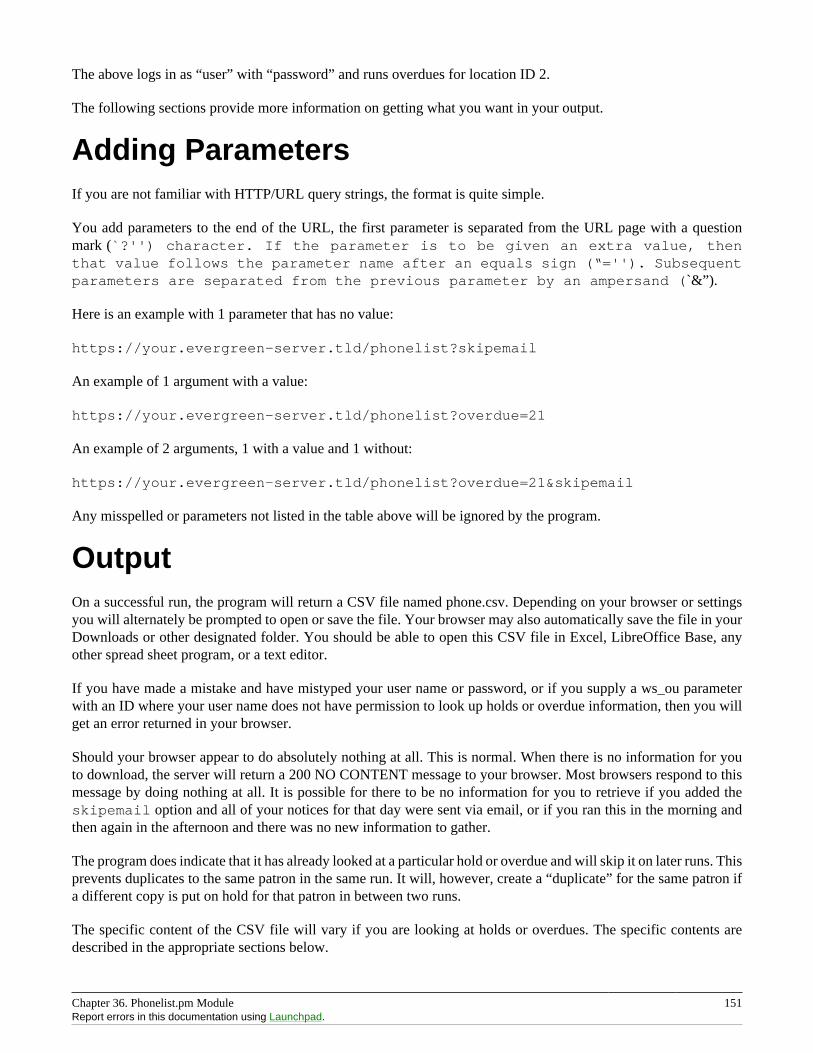
Chapter 36. Phonelist.pm Module 151Report errors in this documentation using Launchpad.
The above logs in as “user” with “password” and runs overdues for location ID 2.
The following sections provide more information on getting what you want in your output.
Adding ParametersIf you are not familiar with HTTP/URL query strings, the format is quite simple.
You add parameters to the end of the URL, the first parameter is separated from the URL page with a questionmark (`?'') character. If the parameter is to be given an extra value, thenthat value follows the parameter name after an equals sign (“=''). Subsequentparameters are separated from the previous parameter by an ampersand (`&”).
Here is an example with 1 parameter that has no value:
https://your.evergreen-server.tld/phonelist?skipemail
An example of 1 argument with a value:
https://your.evergreen-server.tld/phonelist?overdue=21
An example of 2 arguments, 1 with a value and 1 without:
https://your.evergreen-server.tld/phonelist?overdue=21&skipemail
Any misspelled or parameters not listed in the table above will be ignored by the program.
OutputOn a successful run, the program will return a CSV file named phone.csv. Depending on your browser or settingsyou will alternately be prompted to open or save the file. Your browser may also automatically save the file in yourDownloads or other designated folder. You should be able to open this CSV file in Excel, LibreOffice Base, anyother spread sheet program, or a text editor.
If you have made a mistake and have mistyped your user name or password, or if you supply a ws_ou parameterwith an ID where your user name does not have permission to look up holds or overdue information, then you willget an error returned in your browser.
Should your browser appear to do absolutely nothing at all. This is normal. When there is no information for youto download, the server will return a 200 NO CONTENT message to your browser. Most browsers respond to thismessage by doing nothing at all. It is possible for there to be no information for you to retrieve if you added theskipemail option and all of your notices for that day were sent via email, or if you ran this in the morning andthen again in the afternoon and there was no new information to gather.
The program does indicate that it has already looked at a particular hold or overdue and will skip it on later runs. Thisprevents duplicates to the same patron in the same run. It will, however, create a “duplicate” for the same patron ifa different copy is put on hold for that patron in between two runs.
The specific content of the CSV file will vary if you are looking at holds or overdues. The specific contents aredescribed in the appropriate sections below.
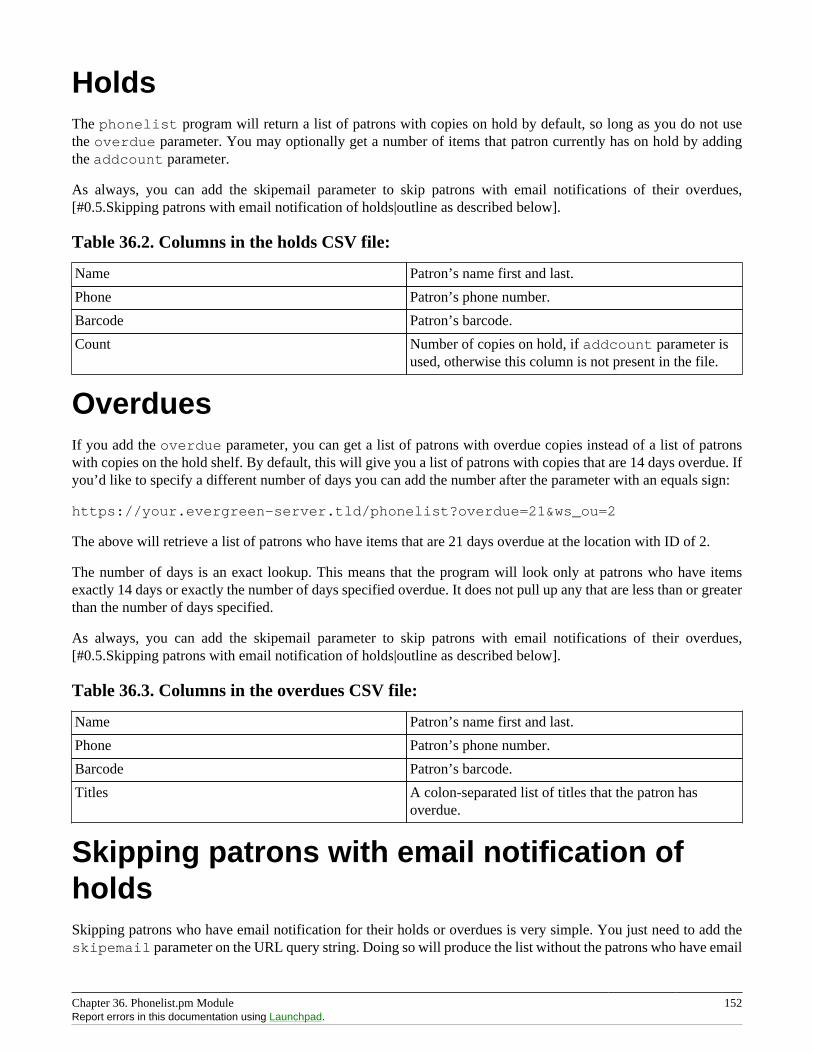
Chapter 36. Phonelist.pm Module 152Report errors in this documentation using Launchpad.
HoldsThe phonelist program will return a list of patrons with copies on hold by default, so long as you do not usethe overdue parameter. You may optionally get a number of items that patron currently has on hold by addingthe addcount parameter.
As always, you can add the skipemail parameter to skip patrons with email notifications of their overdues,[#0.5.Skipping patrons with email notification of holds|outline as described below].
Table 36.2. Columns in the holds CSV file:
Name Patron’s name first and last.
Phone Patron’s phone number.
Barcode Patron’s barcode.
Count Number of copies on hold, if addcount parameter isused, otherwise this column is not present in the file.
OverduesIf you add the overdue parameter, you can get a list of patrons with overdue copies instead of a list of patronswith copies on the hold shelf. By default, this will give you a list of patrons with copies that are 14 days overdue. Ifyou’d like to specify a different number of days you can add the number after the parameter with an equals sign:
https://your.evergreen-server.tld/phonelist?overdue=21&ws_ou=2
The above will retrieve a list of patrons who have items that are 21 days overdue at the location with ID of 2.
The number of days is an exact lookup. This means that the program will look only at patrons who have itemsexactly 14 days or exactly the number of days specified overdue. It does not pull up any that are less than or greaterthan the number of days specified.
As always, you can add the skipemail parameter to skip patrons with email notifications of their overdues,[#0.5.Skipping patrons with email notification of holds|outline as described below].
Table 36.3. Columns in the overdues CSV file:
Name Patron’s name first and last.
Phone Patron’s phone number.
Barcode Patron’s barcode.
Titles A colon-separated list of titles that the patron hasoverdue.
Skipping patrons with email notification ofholdsSkipping patrons who have email notification for their holds or overdues is very simple. You just need to add theskipemail parameter on the URL query string. Doing so will produce the list without the patrons who have email
Chapter 36. Phonelist.pm Module 153Report errors in this documentation using Launchpad.
notification for overdues, or for all of their holds. Please note that if a patron has multiple holds available, and evenone of these holds requests a phone-only notification, then that patron will still show on the list. For this optionto exclude a patron from the holds list, the patron must request email notification on all of their current holds. Inpractice, we find that this is usually the case.
Using the ws_ou parameterGenerally, you will not need to use the ws_ou parameter when using the phonelist program. The phonelist will lookup the branch where your login account works and use that location when generating the list. However, if you arepart of a multi-branch systems in a consortium, then the ws_ou parameter will be of interest to you. You can use itto specify which branch, or the whole system, you wish to search when running the program.
Automating the downloadIf you’d like to automate the download of these files, you should be able to do so using any HTTP programmingtoolkit. Your client must accept cookies and follow any redirects in order to function.
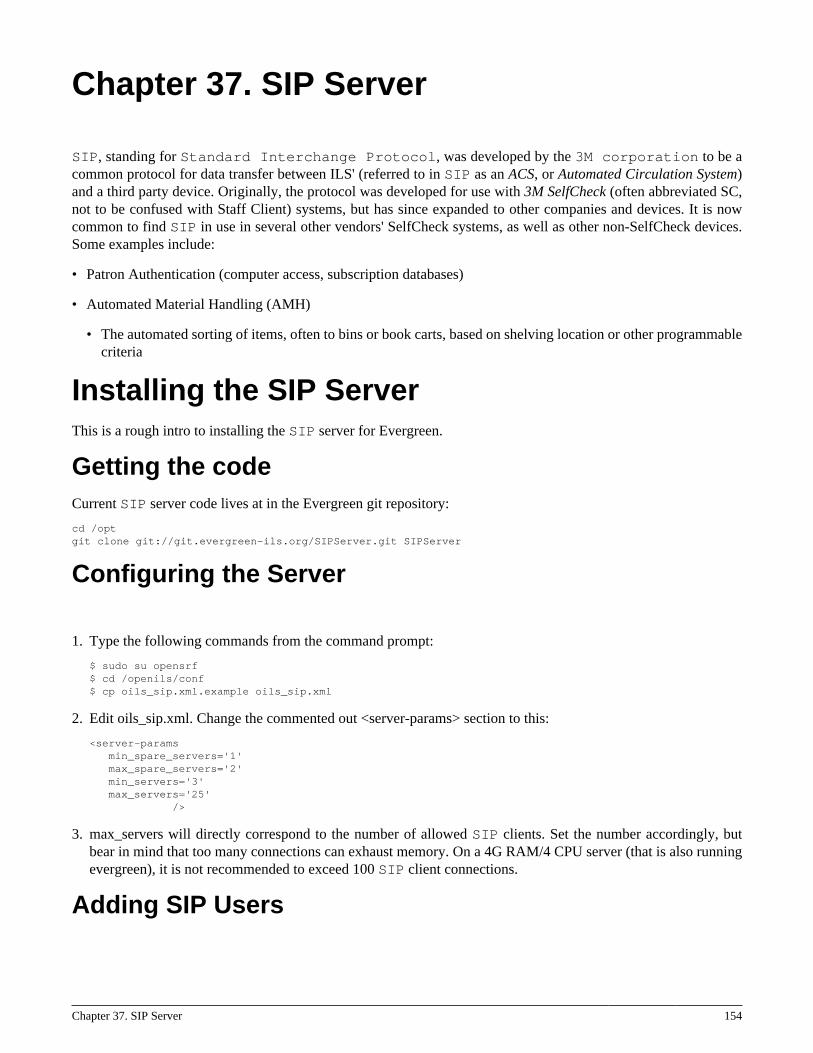
Chapter 37. SIP Server 154
Chapter 37. SIP Server
SIP, standing for Standard Interchange Protocol, was developed by the 3M corporation to be acommon protocol for data transfer between ILS' (referred to in SIP as an ACS, or Automated Circulation System)and a third party device. Originally, the protocol was developed for use with 3M SelfCheck (often abbreviated SC,not to be confused with Staff Client) systems, but has since expanded to other companies and devices. It is nowcommon to find SIP in use in several other vendors' SelfCheck systems, as well as other non-SelfCheck devices.Some examples include:
• Patron Authentication (computer access, subscription databases)
• Automated Material Handling (AMH)
• The automated sorting of items, often to bins or book carts, based on shelving location or other programmablecriteria
Installing the SIP ServerThis is a rough intro to installing the SIP server for Evergreen.
Getting the codeCurrent SIP server code lives at in the Evergreen git repository:
cd /optgit clone git://git.evergreen-ils.org/SIPServer.git SIPServer
Configuring the Server
1. Type the following commands from the command prompt:
$ sudo su opensrf$ cd /openils/conf$ cp oils_sip.xml.example oils_sip.xml
2. Edit oils_sip.xml. Change the commented out <server-params> section to this:
<server-params min_spare_servers='1' max_spare_servers='2' min_servers='3' max_servers='25' />
3. max_servers will directly correspond to the number of allowed SIP clients. Set the number accordingly, butbear in mind that too many connections can exhaust memory. On a 4G RAM/4 CPU server (that is also runningevergreen), it is not recommended to exceed 100 SIP client connections.
Adding SIP Users
Chapter 37. SIP Server 155Report errors in this documentation using Launchpad.
1. Type the following commands from the command prompt:
$ sudo su opensrf$ cd /openils/conf
2. In the <accounts> section, add SIP client login information. Make sure that all <logins> use the sameinstitution attribute, and make sure the institution is listed in <institutions>. All attributes in the <login>section will be used by the SIP client.
3. In Evergreen, create a new profile group called SIP. This group should be a sub-group of Users (not Staffor Patrons). Set Editing Permission as group_application.user.sip_client and give the group the followingpermissions:
COPY_CHECKINCOPY_CHECKOUTCREATE_PAYMENTRENEW_CIRCVIEW_CIRCULATIONSVIEW_COPY_CHECKOUT_HISTORYVIEW_PERMIT_CHECKOUTVIEW_USERVIEW_USER_FINES_SUMMARYVIEW_USER_TRANSACTIONS
OR use SQL like:
INSERT INTO permission.grp_tree (name,parent,description,application_perm)VALUES ('SIP', 1, 'SIP2 Client Systems', 'group_application.user.sip_client');
INSERT INTO permission.grp_perm_map (grp, perm, depth, grantable)SELECT g.id, p.id, 0, FALSEFROM permission.grp_tree g, permission.perm_list pWHERE g.name = 'SIP' AND p.code IN ( 'COPY_CHECKIN', 'COPY_CHECKOUT', 'RENEW_CIRC', 'VIEW_CIRCULATIONS', 'VIEW_COPY_CHECKOUT_HISTORY', 'VIEW_PERMIT_CHECKOUT', 'VIEW_USER', 'VIEW_USER_FINES_SUMMARY', 'VIEW_USER_TRANSACTIONS' );
Verify:
SELECT *FROM permission.grp_perm_map pgpm INNER JOIN permission.perm_list ppl ON pgpm.perm = ppl.id INNER JOIN permission.grp_tree pgt ON pgt.id = pgpm.grpWHERE pgt.name = 'SIP';
4. For each account created in the <login> section of oils_sip.xml, create a user (via the staff client user editor)that has the same username and password and put that user into the SIP group.
The expiration date will affect the SIP users' connection so you might want to make a note of this somewhere.
Chapter 37. SIP Server 156Report errors in this documentation using Launchpad.
Running the serverTo start the SIP server type the following commands from the command prompt:
$ sudo su opensrf
$ oils_ctl.sh -a [start|stop|restart]_sip
Logging-SIP
Syslog
It is useful to log SIP requests to a separate file especially during initial setup by modifying your syslog config file.
1. Edit syslog.conf.
$ sudo vi /etc/syslog.conf # maybe /etc/rsyslog.conf
2. Add this:
local6.* -/var/log/SIP_evergreen.log
3. Syslog expects the logfile to exist so create the file.
$ sudo touch /var/log/SIP_evergreen.log
4. Restart sysklogd.
$ sudo /etc/init.d/sysklogd restart
Syslog-NG
1. Edit logging config.
sudo vi /etc/syslog-ng/syslog-ng.conf
2. Add:
# +SIP2+ for Evergreenfilter f_eg_sip { level(warn, err, crit) and facility(local6); };destination eg_sip { file("var/log/SIP_evergreen.log"); };log { source(s_all); filter(f_eg_sip); destination(eg_sip); };
3. Syslog-ng expects the logfile to exist so create the file.
$ sudo touch /var/log/SIP_evergreen.log
4. Restart syslog-ng
$ sudo /etc/init.d/syslog-ng restart
Chapter 37. SIP Server 157Report errors in this documentation using Launchpad.
Testing Your SIP Connection• In the root directory of the SIPServer code:
$ cd SIPServer/t
• Edit SIPtest.pm, change the $instid, $server, $username, and $password variables. This will be enough to testconnectivity. To run all tests, you’ll need to change all the variables in the Configuration section.
$ PERL5LIB=../ perl 00sc_status.t
This should produce something like:
1..4ok 1 - Invalid usernameok 2 - Invalid usernameok 3 - loginok 4 - SC status
• Don’t be dismayed at Invalid Username. That’s just one of the many tests that are run.
More Testing1. Once you have opened up either the SIP OR SIP2 ports to be accessible from outside you can do some testing
via telnet. You can try this with localhost if you so wish, but we want to prove that SIP2 works fromnon-localhost. Replace $instid, $server, $barcode, $username, and $password variables below asnecessary.
We are using 6001 here which is associated with SIP2 as per our configuration.
$ telnet $server 6001Connected to $server.Escape character is '^]'.9300CN**$username**|CO**$password**|CP**$instid**
You should get back.
941
2. Now just copy in the following line (with variables replaced) you don’t need to hit enter, just paste!
2300120080623 172148AO**$instid**|AA**$barcode**|AC$password|AD**$password**
You will get back the patron information for $barcode (something similar to the what’s below).
24 Y 00120100113 170738AEFirstName MiddleName LastName|AA**$barcode**|BLY|CQY|BHUSD|BV0.00|AFOK|AO**$instid**|
The response declares it is a valid patron BLY with a valid password CQY and shows the user’s $name.
SIP Communication
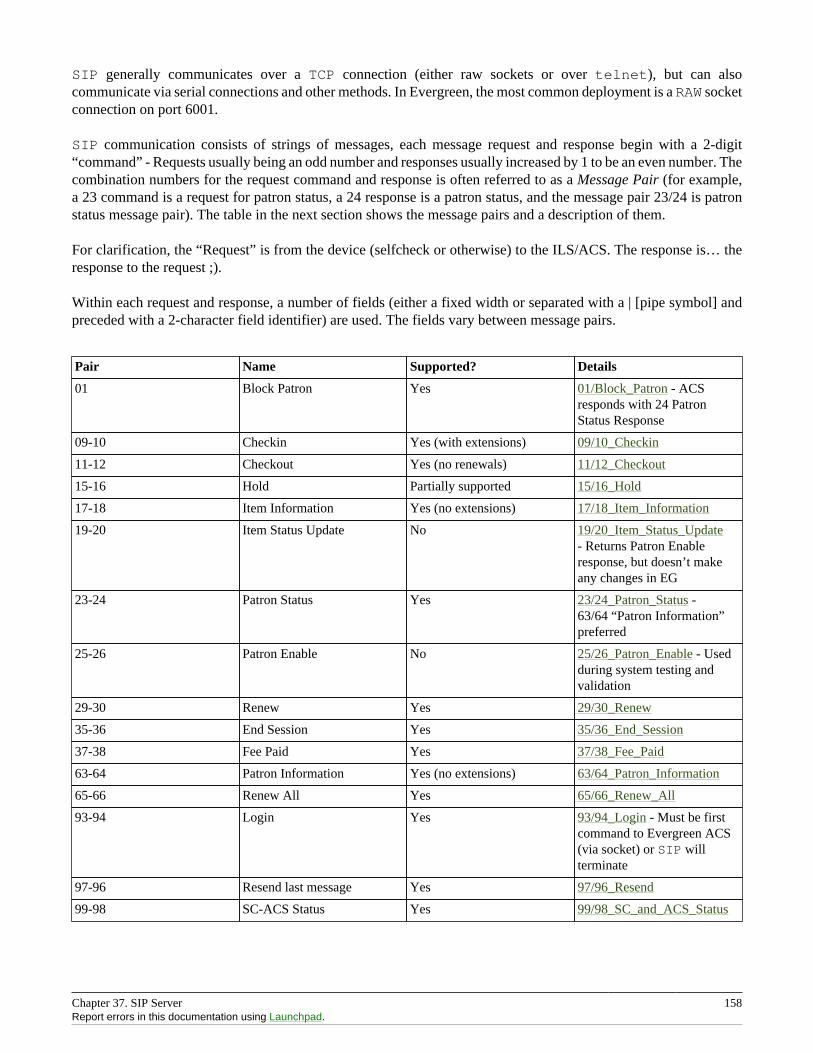
Chapter 37. SIP Server 158Report errors in this documentation using Launchpad.
SIP generally communicates over a TCP connection (either raw sockets or over telnet), but can alsocommunicate via serial connections and other methods. In Evergreen, the most common deployment is a RAW socketconnection on port 6001.
SIP communication consists of strings of messages, each message request and response begin with a 2-digit“command” - Requests usually being an odd number and responses usually increased by 1 to be an even number. Thecombination numbers for the request command and response is often referred to as a Message Pair (for example,a 23 command is a request for patron status, a 24 response is a patron status, and the message pair 23/24 is patronstatus message pair). The table in the next section shows the message pairs and a description of them.
For clarification, the “Request” is from the device (selfcheck or otherwise) to the ILS/ACS. The response is… theresponse to the request ;).
Within each request and response, a number of fields (either a fixed width or separated with a | [pipe symbol] andpreceded with a 2-character field identifier) are used. The fields vary between message pairs.
Pair Name Supported? Details
01 Block Patron Yes 01/Block_Patron - ACSresponds with 24 PatronStatus Response
09-10 Checkin Yes (with extensions) 09/10_Checkin
11-12 Checkout Yes (no renewals) 11/12_Checkout
15-16 Hold Partially supported 15/16_Hold
17-18 Item Information Yes (no extensions) 17/18_Item_Information
19-20 Item Status Update No 19/20_Item_Status_Update- Returns Patron Enableresponse, but doesn’t makeany changes in EG
23-24 Patron Status Yes 23/24_Patron_Status -63/64 “Patron Information”preferred
25-26 Patron Enable No 25/26_Patron_Enable - Usedduring system testing andvalidation
29-30 Renew Yes 29/30_Renew
35-36 End Session Yes 35/36_End_Session
37-38 Fee Paid Yes 37/38_Fee_Paid
63-64 Patron Information Yes (no extensions) 63/64_Patron_Information
65-66 Renew All Yes 65/66_Renew_All
93-94 Login Yes 93/94_Login - Must be firstcommand to Evergreen ACS(via socket) or SIP willterminate
97-96 Resend last message Yes 97/96_Resend
99-98 SC-ACS Status Yes 99/98_SC_and_ACS_Status
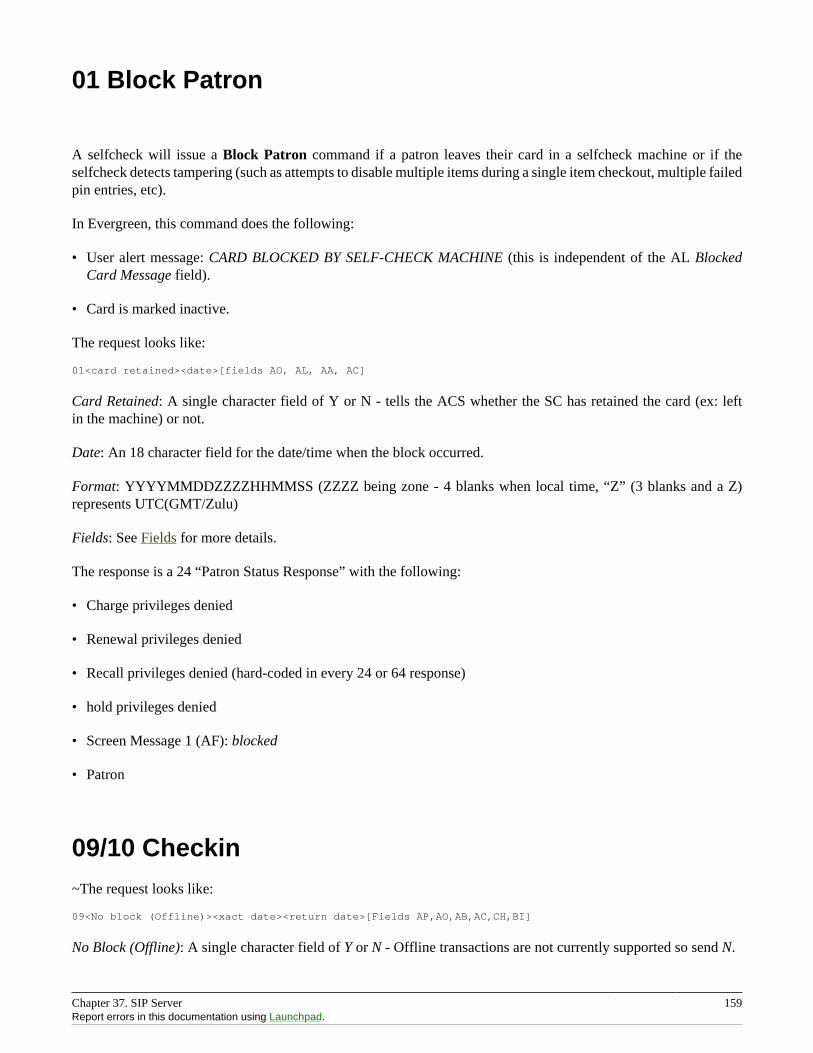
Chapter 37. SIP Server 159Report errors in this documentation using Launchpad.
01 Block Patron
A selfcheck will issue a Block Patron command if a patron leaves their card in a selfcheck machine or if theselfcheck detects tampering (such as attempts to disable multiple items during a single item checkout, multiple failedpin entries, etc).
In Evergreen, this command does the following:
• User alert message: CARD BLOCKED BY SELF-CHECK MACHINE (this is independent of the AL BlockedCard Message field).
• Card is marked inactive.
The request looks like:
01<card retained><date>[fields AO, AL, AA, AC]
Card Retained: A single character field of Y or N - tells the ACS whether the SC has retained the card (ex: leftin the machine) or not.
Date: An 18 character field for the date/time when the block occurred.
Format: YYYYMMDDZZZZHHMMSS (ZZZZ being zone - 4 blanks when local time, “Z” (3 blanks and a Z)represents UTC(GMT/Zulu)
Fields: See Fields for more details.
The response is a 24 “Patron Status Response” with the following:
• Charge privileges denied
• Renewal privileges denied
• Recall privileges denied (hard-coded in every 24 or 64 response)
• hold privileges denied
• Screen Message 1 (AF): blocked
• Patron
09/10 Checkin~The request looks like:
09<No block (Offline)><xact date><return date>[Fields AP,AO,AB,AC,CH,BI]
No Block (Offline): A single character field of Y or N - Offline transactions are not currently supported so send N.
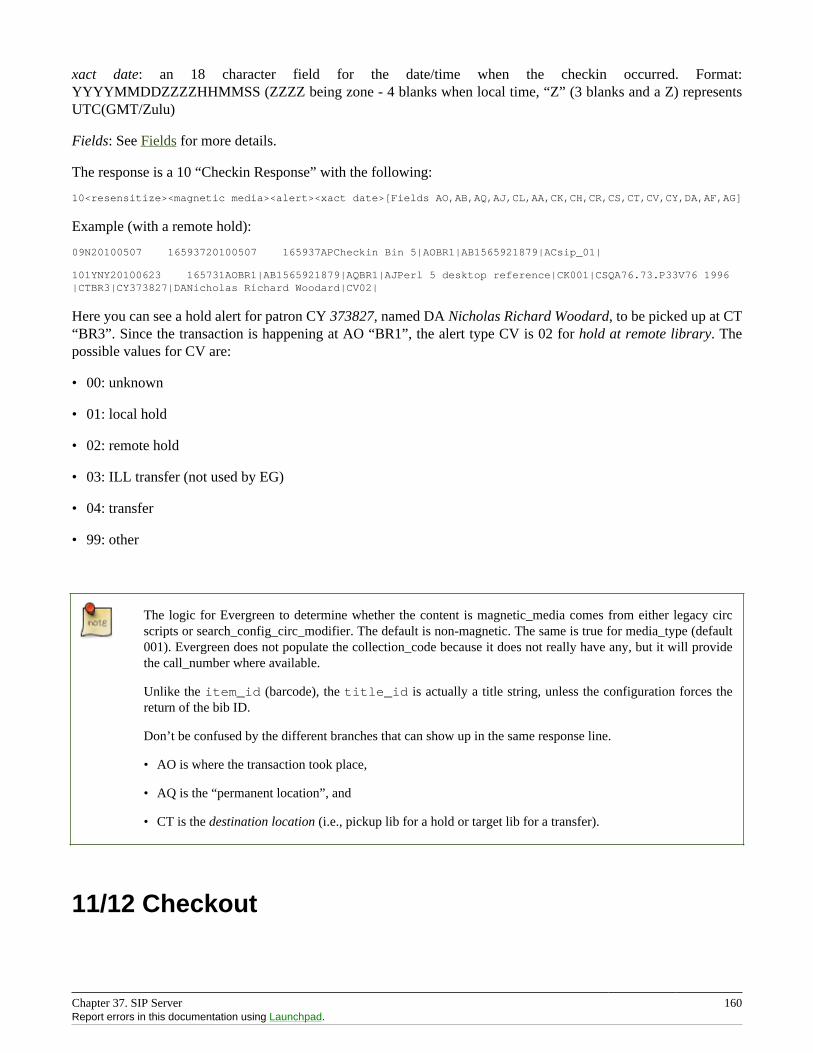
Chapter 37. SIP Server 160Report errors in this documentation using Launchpad.
xact date: an 18 character field for the date/time when the checkin occurred. Format:YYYYMMDDZZZZHHMMSS (ZZZZ being zone - 4 blanks when local time, “Z” (3 blanks and a Z) representsUTC(GMT/Zulu)
Fields: See Fields for more details.
The response is a 10 “Checkin Response” with the following:
10<resensitize><magnetic media><alert><xact date>[Fields AO,AB,AQ,AJ,CL,AA,CK,CH,CR,CS,CT,CV,CY,DA,AF,AG]
Example (with a remote hold):
09N20100507 16593720100507 165937APCheckin Bin 5|AOBR1|AB1565921879|ACsip_01|
101YNY20100623 165731AOBR1|AB1565921879|AQBR1|AJPerl 5 desktop reference|CK001|CSQA76.73.P33V76 1996|CTBR3|CY373827|DANicholas Richard Woodard|CV02|
Here you can see a hold alert for patron CY 373827, named DA Nicholas Richard Woodard, to be picked up at CT“BR3”. Since the transaction is happening at AO “BR1”, the alert type CV is 02 for hold at remote library. Thepossible values for CV are:
• 00: unknown
• 01: local hold
• 02: remote hold
• 03: ILL transfer (not used by EG)
• 04: transfer
• 99: other
The logic for Evergreen to determine whether the content is magnetic_media comes from either legacy circscripts or search_config_circ_modifier. The default is non-magnetic. The same is true for media_type (default001). Evergreen does not populate the collection_code because it does not really have any, but it will providethe call_number where available.
Unlike the item_id (barcode), the title_id is actually a title string, unless the configuration forces thereturn of the bib ID.
Don’t be confused by the different branches that can show up in the same response line.
• AO is where the transaction took place,
• AQ is the “permanent location”, and
• CT is the destination location (i.e., pickup lib for a hold or target lib for a transfer).
11/12 Checkout
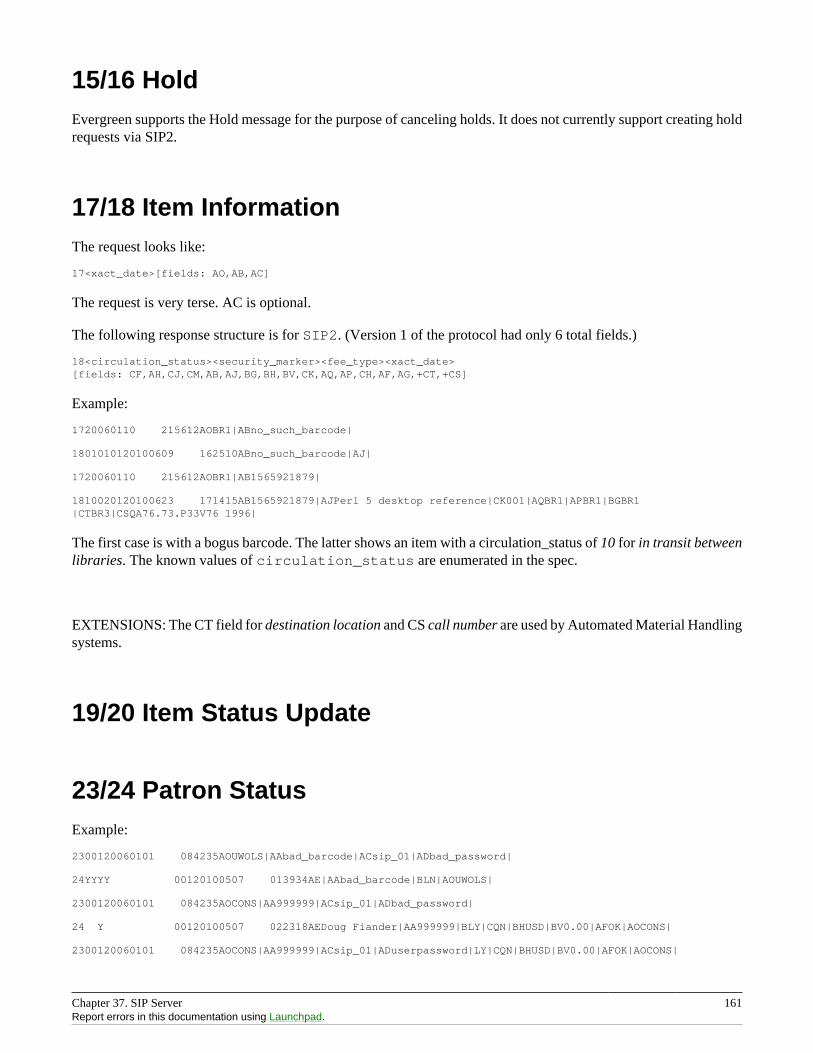
Chapter 37. SIP Server 161Report errors in this documentation using Launchpad.
15/16 HoldEvergreen supports the Hold message for the purpose of canceling holds. It does not currently support creating holdrequests via SIP2.
17/18 Item InformationThe request looks like:
17<xact_date>[fields: AO,AB,AC]
The request is very terse. AC is optional.
The following response structure is for SIP2. (Version 1 of the protocol had only 6 total fields.)
18<circulation_status><security_marker><fee_type><xact_date>[fields: CF,AH,CJ,CM,AB,AJ,BG,BH,BV,CK,AQ,AP,CH,AF,AG,+CT,+CS]
Example:
1720060110 215612AOBR1|ABno_such_barcode|
1801010120100609 162510ABno_such_barcode|AJ|
1720060110 215612AOBR1|AB1565921879|
1810020120100623 171415AB1565921879|AJPerl 5 desktop reference|CK001|AQBR1|APBR1|BGBR1|CTBR3|CSQA76.73.P33V76 1996|
The first case is with a bogus barcode. The latter shows an item with a circulation_status of 10 for in transit betweenlibraries. The known values of circulation_status are enumerated in the spec.
EXTENSIONS: The CT field for destination location and CS call number are used by Automated Material Handlingsystems.
19/20 Item Status Update
23/24 Patron StatusExample:
2300120060101 084235AOUWOLS|AAbad_barcode|ACsip_01|ADbad_password|
24YYYY 00120100507 013934AE|AAbad_barcode|BLN|AOUWOLS|
2300120060101 084235AOCONS|AA999999|ACsip_01|ADbad_password|
24 Y 00120100507 022318AEDoug Fiander|AA999999|BLY|CQN|BHUSD|BV0.00|AFOK|AOCONS|
2300120060101 084235AOCONS|AA999999|ACsip_01|ADuserpassword|LY|CQN|BHUSD|BV0.00|AFOK|AOCONS|
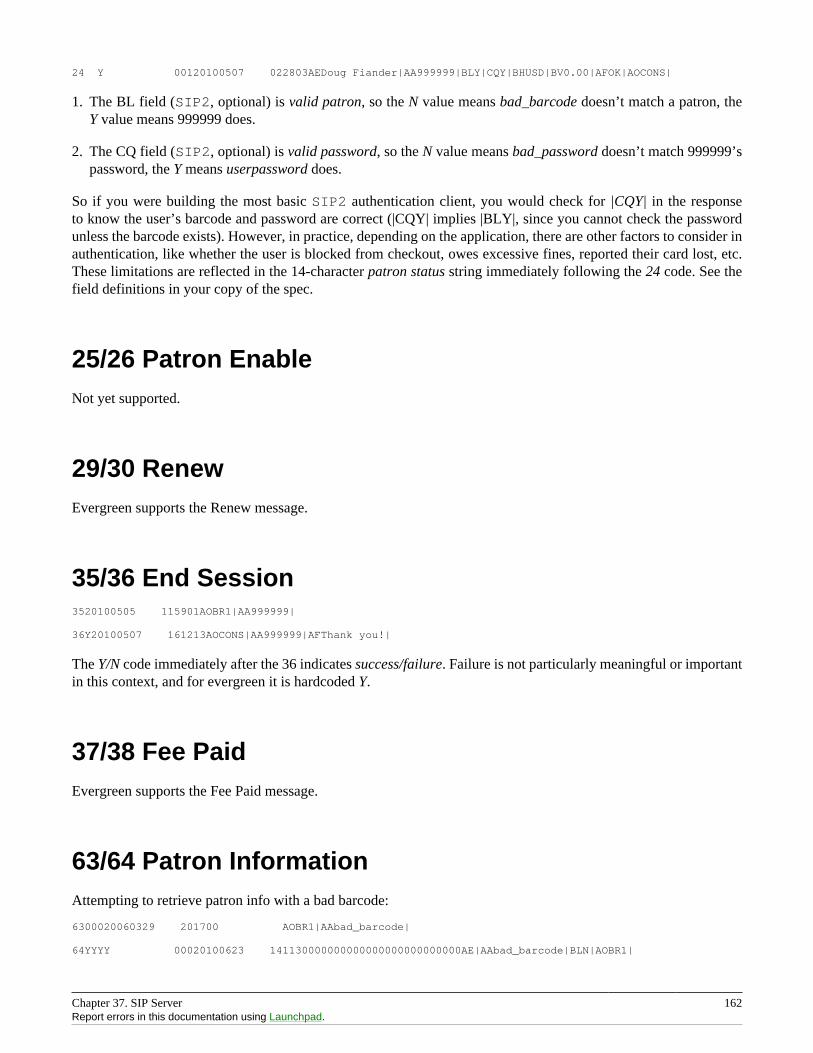
Chapter 37. SIP Server 162Report errors in this documentation using Launchpad.
24 Y 00120100507 022803AEDoug Fiander|AA999999|BLY|CQY|BHUSD|BV0.00|AFOK|AOCONS|
1. The BL field (SIP2, optional) is valid patron, so the N value means bad_barcode doesn’t match a patron, theY value means 999999 does.
2. The CQ field (SIP2, optional) is valid password, so the N value means bad_password doesn’t match 999999’spassword, the Y means userpassword does.
So if you were building the most basic SIP2 authentication client, you would check for |CQY| in the responseto know the user’s barcode and password are correct (|CQY| implies |BLY|, since you cannot check the passwordunless the barcode exists). However, in practice, depending on the application, there are other factors to consider inauthentication, like whether the user is blocked from checkout, owes excessive fines, reported their card lost, etc.These limitations are reflected in the 14-character patron status string immediately following the 24 code. See thefield definitions in your copy of the spec.
25/26 Patron EnableNot yet supported.
29/30 RenewEvergreen supports the Renew message.
35/36 End Session3520100505 115901AOBR1|AA999999|
36Y20100507 161213AOCONS|AA999999|AFThank you!|
The Y/N code immediately after the 36 indicates success/failure. Failure is not particularly meaningful or importantin this context, and for evergreen it is hardcoded Y.
37/38 Fee PaidEvergreen supports the Fee Paid message.
63/64 Patron InformationAttempting to retrieve patron info with a bad barcode:
6300020060329 201700 AOBR1|AAbad_barcode|
64YYYY 00020100623 141130000000000000000000000000AE|AAbad_barcode|BLN|AOBR1|
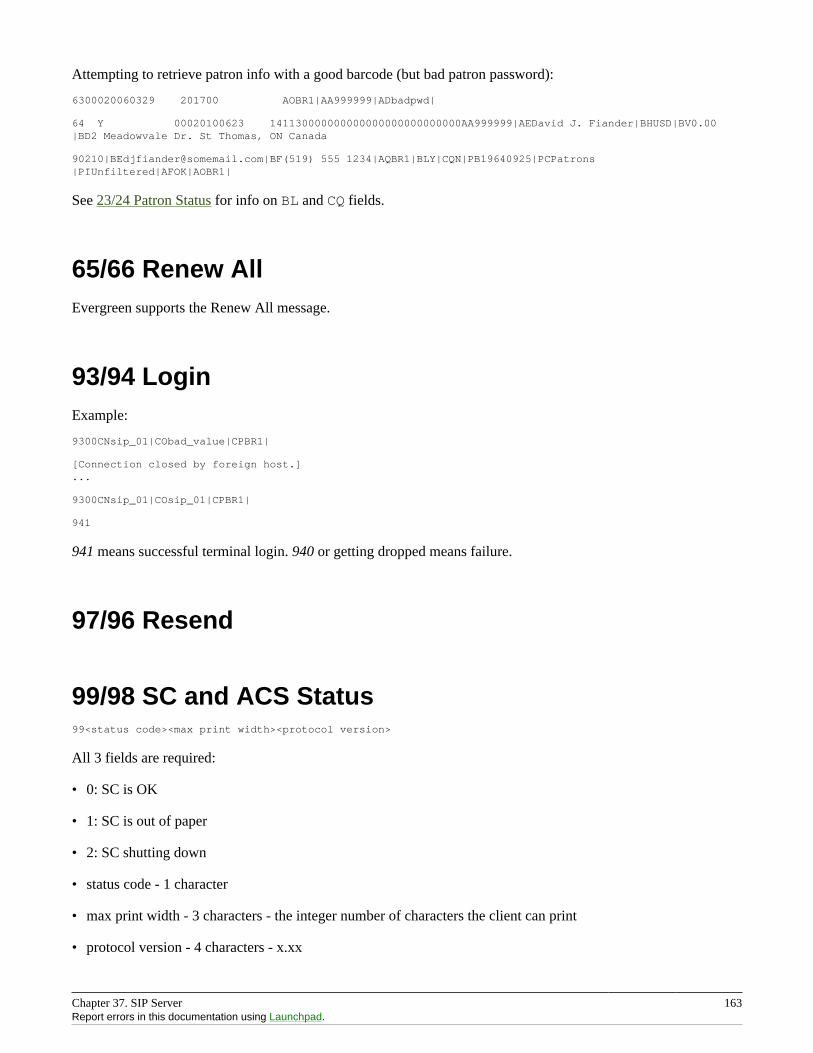
Chapter 37. SIP Server 163Report errors in this documentation using Launchpad.
Attempting to retrieve patron info with a good barcode (but bad patron password):
6300020060329 201700 AOBR1|AA999999|ADbadpwd|
64 Y 00020100623 141130000000000000000000000000AA999999|AEDavid J. Fiander|BHUSD|BV0.00|BD2 Meadowvale Dr. St Thomas, ON Canada
90210|[email protected]|BF(519) 555 1234|AQBR1|BLY|CQN|PB19640925|PCPatrons|PIUnfiltered|AFOK|AOBR1|
See 23/24 Patron Status for info on BL and CQ fields.
65/66 Renew AllEvergreen supports the Renew All message.
93/94 LoginExample:
9300CNsip_01|CObad_value|CPBR1|
[Connection closed by foreign host.]...
9300CNsip_01|COsip_01|CPBR1|
941
941 means successful terminal login. 940 or getting dropped means failure.
97/96 Resend
99/98 SC and ACS Status99<status code><max print width><protocol version>
All 3 fields are required:
• 0: SC is OK
• 1: SC is out of paper
• 2: SC shutting down
• status code - 1 character
• max print width - 3 characters - the integer number of characters the client can print
• protocol version - 4 characters - x.xx
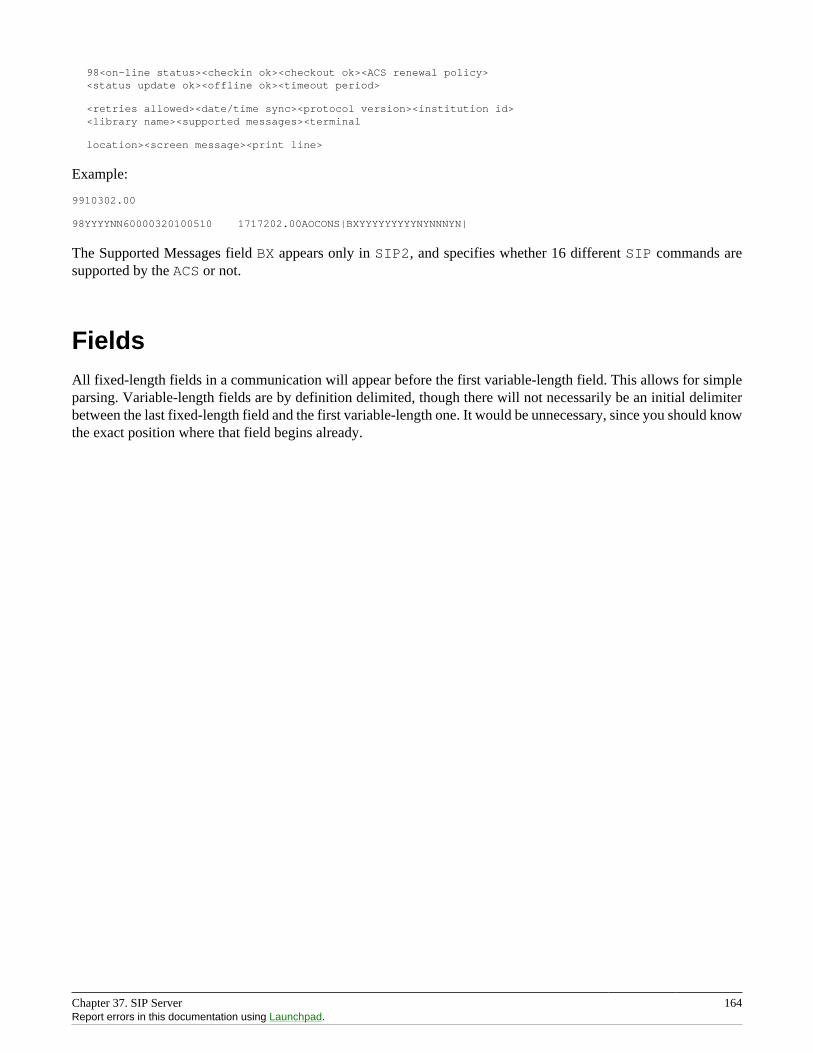
Chapter 37. SIP Server 164Report errors in this documentation using Launchpad.
98<on-line status><checkin ok><checkout ok><ACS renewal policy><status update ok><offline ok><timeout period>
<retries allowed><date/time sync><protocol version><institution id><library name><supported messages><terminal
location><screen message><print line>
Example:
9910302.00
98YYYYNN60000320100510 1717202.00AOCONS|BXYYYYYYYYYNYNNNYN|
The Supported Messages field BX appears only in SIP2, and specifies whether 16 different SIP commands aresupported by the ACS or not.
FieldsAll fixed-length fields in a communication will appear before the first variable-length field. This allows for simpleparsing. Variable-length fields are by definition delimited, though there will not necessarily be an initial delimiterbetween the last fixed-length field and the first variable-length one. It would be unnecessary, since you should knowthe exact position where that field begins already.
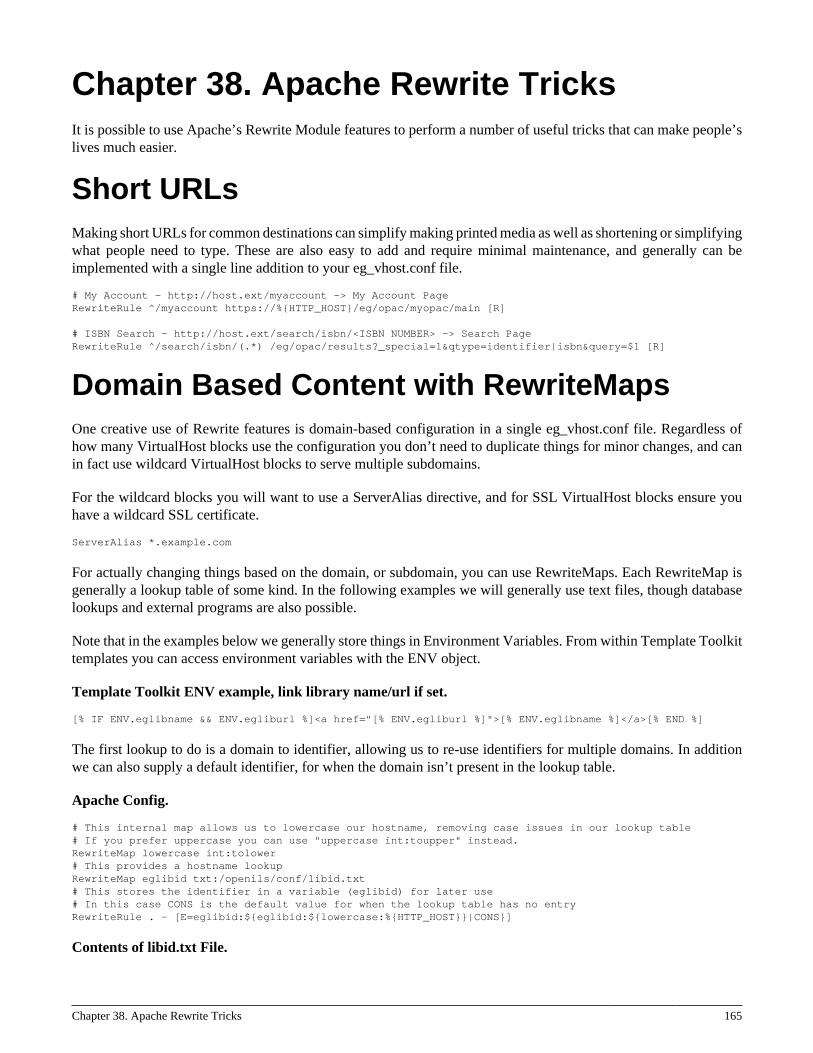
Chapter 38. Apache Rewrite Tricks 165
Chapter 38. Apache Rewrite TricksIt is possible to use Apache’s Rewrite Module features to perform a number of useful tricks that can make people’slives much easier.
Short URLsMaking short URLs for common destinations can simplify making printed media as well as shortening or simplifyingwhat people need to type. These are also easy to add and require minimal maintenance, and generally can beimplemented with a single line addition to your eg_vhost.conf file.
# My Account - http://host.ext/myaccount -> My Account PageRewriteRule ^/myaccount https://%{HTTP_HOST}/eg/opac/myopac/main [R]
# ISBN Search - http://host.ext/search/isbn/<ISBN NUMBER> -> Search PageRewriteRule ^/search/isbn/(.*) /eg/opac/results?_special=1&qtype=identifier|isbn&query=$1 [R]
Domain Based Content with RewriteMapsOne creative use of Rewrite features is domain-based configuration in a single eg_vhost.conf file. Regardless ofhow many VirtualHost blocks use the configuration you don’t need to duplicate things for minor changes, and canin fact use wildcard VirtualHost blocks to serve multiple subdomains.
For the wildcard blocks you will want to use a ServerAlias directive, and for SSL VirtualHost blocks ensure youhave a wildcard SSL certificate.
ServerAlias *.example.com
For actually changing things based on the domain, or subdomain, you can use RewriteMaps. Each RewriteMap isgenerally a lookup table of some kind. In the following examples we will generally use text files, though databaselookups and external programs are also possible.
Note that in the examples below we generally store things in Environment Variables. From within Template Toolkittemplates you can access environment variables with the ENV object.
Template Toolkit ENV example, link library name/url if set.
[% IF ENV.eglibname && ENV.egliburl %]<a href="[% ENV.egliburl %]">[% ENV.eglibname %]</a>[% END %]
The first lookup to do is a domain to identifier, allowing us to re-use identifiers for multiple domains. In additionwe can also supply a default identifier, for when the domain isn’t present in the lookup table.
Apache Config.
# This internal map allows us to lowercase our hostname, removing case issues in our lookup table# If you prefer uppercase you can use "uppercase int:toupper" instead.RewriteMap lowercase int:tolower# This provides a hostname lookupRewriteMap eglibid txt:/openils/conf/libid.txt# This stores the identifier in a variable (eglibid) for later use# In this case CONS is the default value for when the lookup table has no entryRewriteRule . - [E=eglibid:${eglibid:${lowercase:%{HTTP_HOST}}|CONS}]
Contents of libid.txt File.
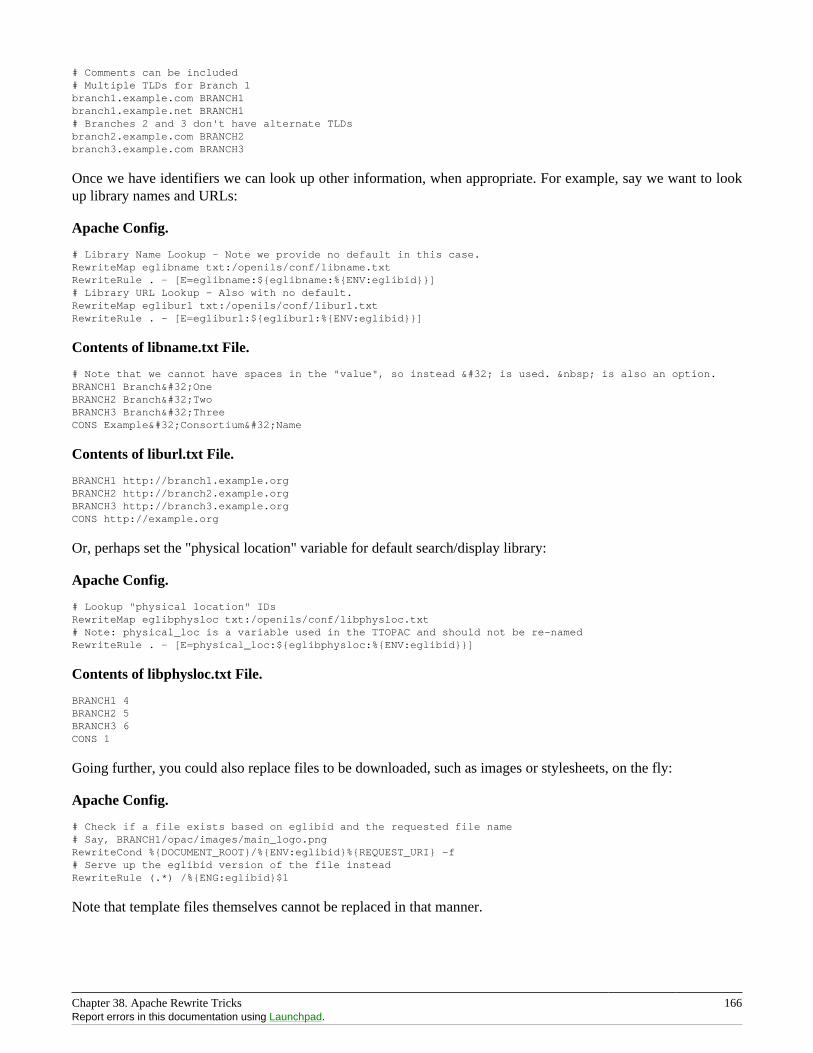
Chapter 38. Apache Rewrite Tricks 166Report errors in this documentation using Launchpad.
# Comments can be included# Multiple TLDs for Branch 1branch1.example.com BRANCH1branch1.example.net BRANCH1# Branches 2 and 3 don't have alternate TLDsbranch2.example.com BRANCH2branch3.example.com BRANCH3
Once we have identifiers we can look up other information, when appropriate. For example, say we want to lookup library names and URLs:
Apache Config.
# Library Name Lookup - Note we provide no default in this case.RewriteMap eglibname txt:/openils/conf/libname.txtRewriteRule . - [E=eglibname:${eglibname:%{ENV:eglibid}}]# Library URL Lookup - Also with no default.RewriteMap egliburl txt:/openils/conf/liburl.txtRewriteRule . - [E=egliburl:${egliburl:%{ENV:eglibid}}]
Contents of libname.txt File.
# Note that we cannot have spaces in the "value", so instead   is used. is also an option.BRANCH1 Branch OneBRANCH2 Branch TwoBRANCH3 Branch ThreeCONS Example Consortium Name
Contents of liburl.txt File.
BRANCH1 http://branch1.example.orgBRANCH2 http://branch2.example.orgBRANCH3 http://branch3.example.orgCONS http://example.org
Or, perhaps set the "physical location" variable for default search/display library:
Apache Config.
# Lookup "physical location" IDsRewriteMap eglibphysloc txt:/openils/conf/libphysloc.txt# Note: physical_loc is a variable used in the TTOPAC and should not be re-namedRewriteRule . - [E=physical_loc:${eglibphysloc:%{ENV:eglibid}}]
Contents of libphysloc.txt File.
BRANCH1 4BRANCH2 5BRANCH3 6CONS 1
Going further, you could also replace files to be downloaded, such as images or stylesheets, on the fly:
Apache Config.
# Check if a file exists based on eglibid and the requested file name# Say, BRANCH1/opac/images/main_logo.pngRewriteCond %{DOCUMENT_ROOT}/%{ENV:eglibid}%{REQUEST_URI} -f# Serve up the eglibid version of the file insteadRewriteRule (.*) /%{ENG:eglibid}$1
Note that template files themselves cannot be replaced in that manner.
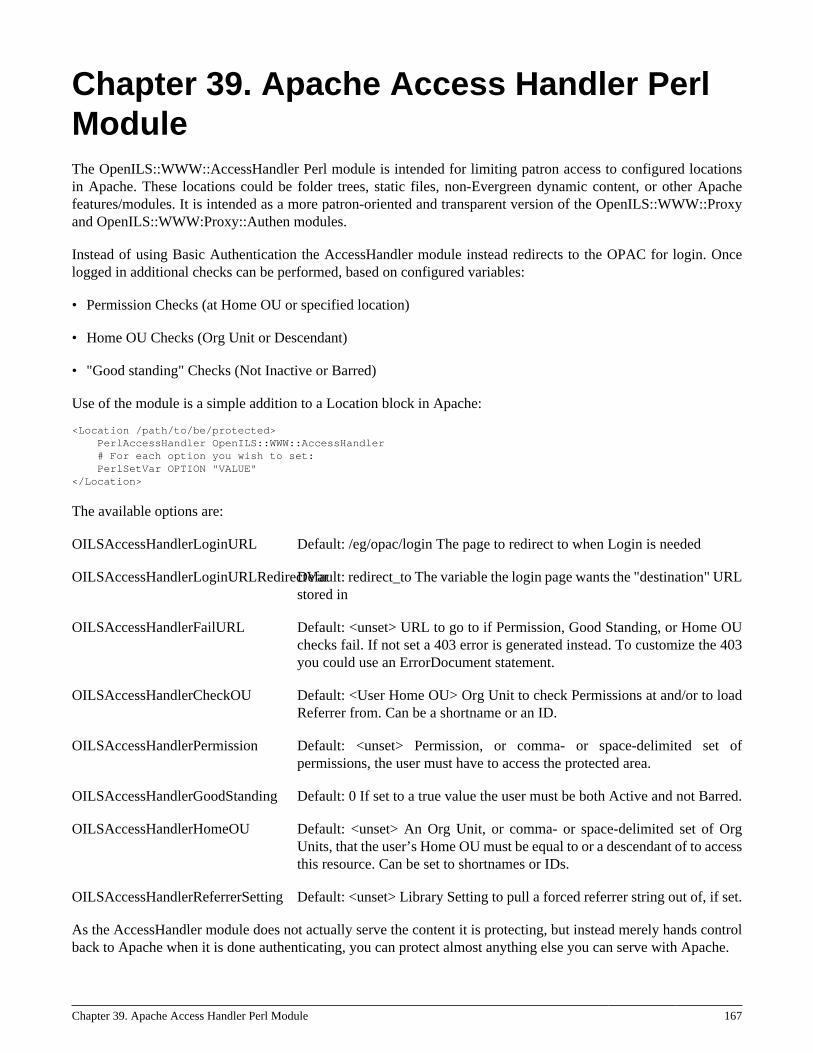
Chapter 39. Apache Access Handler Perl Module 167
Chapter 39. Apache Access Handler PerlModuleThe OpenILS::WWW::AccessHandler Perl module is intended for limiting patron access to configured locationsin Apache. These locations could be folder trees, static files, non-Evergreen dynamic content, or other Apachefeatures/modules. It is intended as a more patron-oriented and transparent version of the OpenILS::WWW::Proxyand OpenILS::WWW:Proxy::Authen modules.
Instead of using Basic Authentication the AccessHandler module instead redirects to the OPAC for login. Oncelogged in additional checks can be performed, based on configured variables:
• Permission Checks (at Home OU or specified location)
• Home OU Checks (Org Unit or Descendant)
• "Good standing" Checks (Not Inactive or Barred)
Use of the module is a simple addition to a Location block in Apache:
<Location /path/to/be/protected> PerlAccessHandler OpenILS::WWW::AccessHandler # For each option you wish to set: PerlSetVar OPTION "VALUE"</Location>
The available options are:
OILSAccessHandlerLoginURL Default: /eg/opac/login The page to redirect to when Login is needed
OILSAccessHandlerLoginURLRedirectVarDefault: redirect_to The variable the login page wants the "destination" URLstored in
OILSAccessHandlerFailURL Default: <unset> URL to go to if Permission, Good Standing, or Home OUchecks fail. If not set a 403 error is generated instead. To customize the 403you could use an ErrorDocument statement.
OILSAccessHandlerCheckOU Default: <User Home OU> Org Unit to check Permissions at and/or to loadReferrer from. Can be a shortname or an ID.
OILSAccessHandlerPermission Default: <unset> Permission, or comma- or space-delimited set ofpermissions, the user must have to access the protected area.
OILSAccessHandlerGoodStanding Default: 0 If set to a true value the user must be both Active and not Barred.
OILSAccessHandlerHomeOU Default: <unset> An Org Unit, or comma- or space-delimited set of OrgUnits, that the user’s Home OU must be equal to or a descendant of to accessthis resource. Can be set to shortnames or IDs.
OILSAccessHandlerReferrerSetting Default: <unset> Library Setting to pull a forced referrer string out of, if set.
As the AccessHandler module does not actually serve the content it is protecting, but instead merely hands controlback to Apache when it is done authenticating, you can protect almost anything else you can serve with Apache.
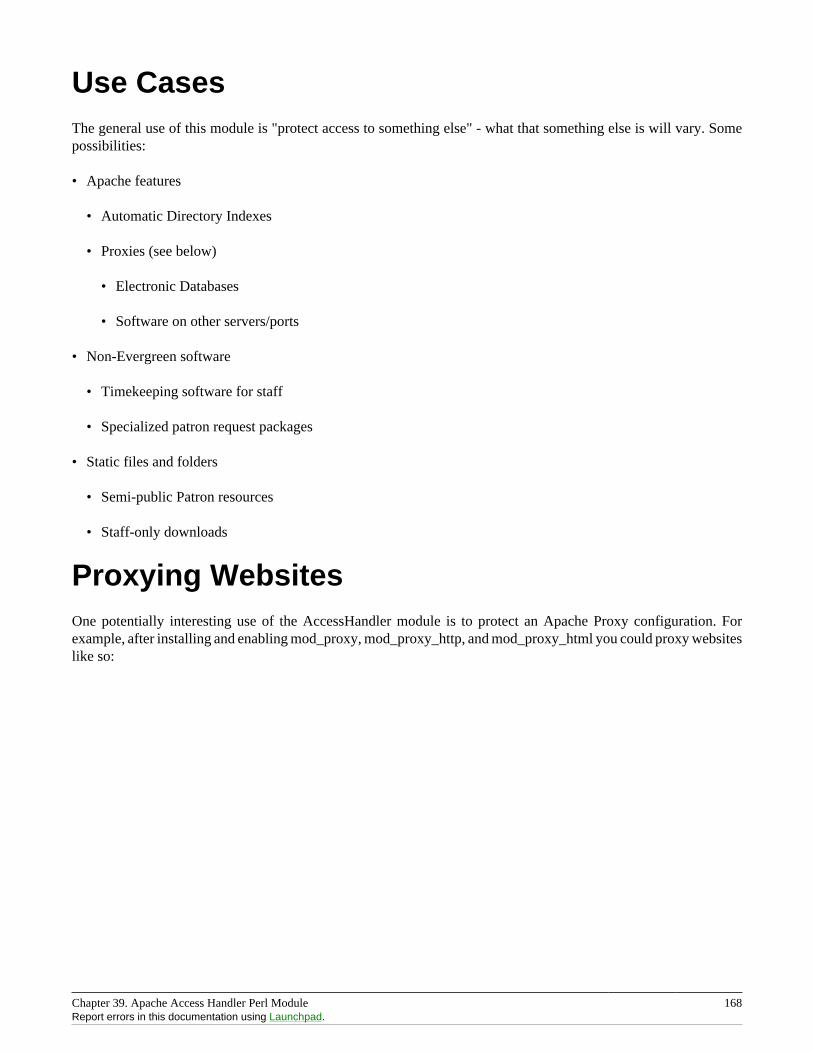
Chapter 39. Apache Access Handler Perl Module 168Report errors in this documentation using Launchpad.
Use CasesThe general use of this module is "protect access to something else" - what that something else is will vary. Somepossibilities:
• Apache features
• Automatic Directory Indexes
• Proxies (see below)
• Electronic Databases
• Software on other servers/ports
• Non-Evergreen software
• Timekeeping software for staff
• Specialized patron request packages
• Static files and folders
• Semi-public Patron resources
• Staff-only downloads
Proxying WebsitesOne potentially interesting use of the AccessHandler module is to protect an Apache Proxy configuration. Forexample, after installing and enabling mod_proxy, mod_proxy_http, and mod_proxy_html you could proxy websiteslike so:
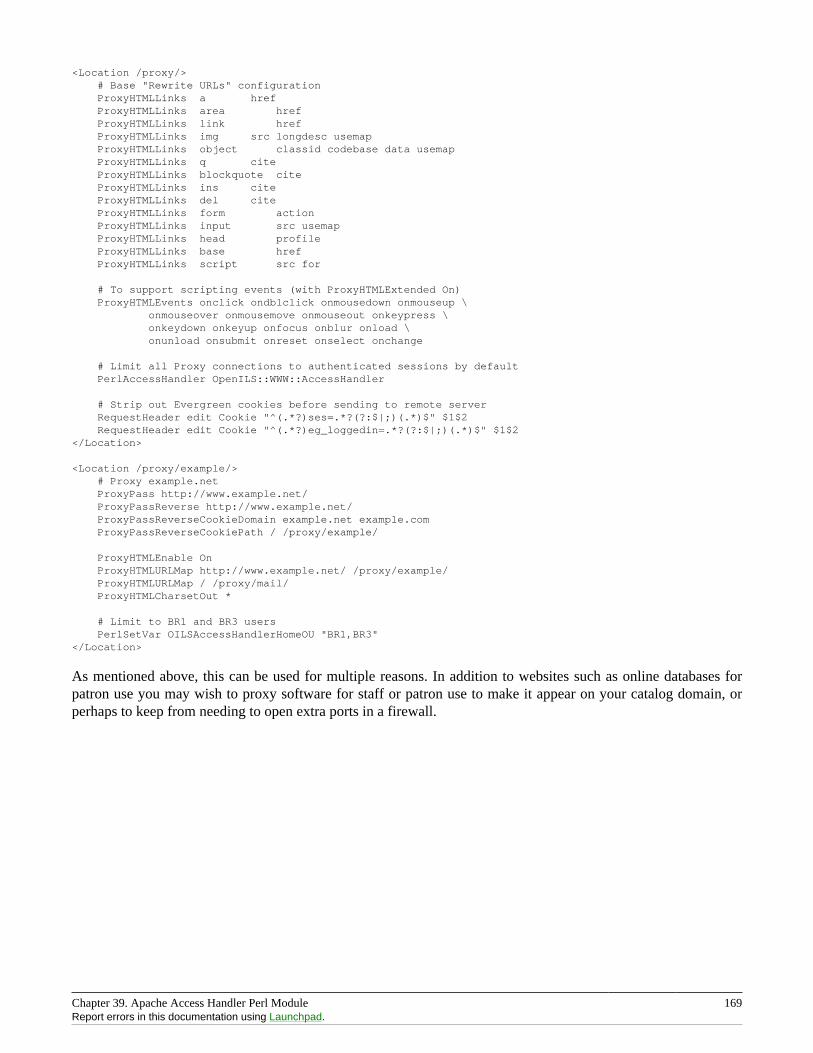
Chapter 39. Apache Access Handler Perl Module 169Report errors in this documentation using Launchpad.
<Location /proxy/> # Base "Rewrite URLs" configuration ProxyHTMLLinks a href ProxyHTMLLinks area href ProxyHTMLLinks link href ProxyHTMLLinks img src longdesc usemap ProxyHTMLLinks object classid codebase data usemap ProxyHTMLLinks q cite ProxyHTMLLinks blockquote cite ProxyHTMLLinks ins cite ProxyHTMLLinks del cite ProxyHTMLLinks form action ProxyHTMLLinks input src usemap ProxyHTMLLinks head profile ProxyHTMLLinks base href ProxyHTMLLinks script src for
# To support scripting events (with ProxyHTMLExtended On) ProxyHTMLEvents onclick ondblclick onmousedown onmouseup \ onmouseover onmousemove onmouseout onkeypress \ onkeydown onkeyup onfocus onblur onload \ onunload onsubmit onreset onselect onchange
# Limit all Proxy connections to authenticated sessions by default PerlAccessHandler OpenILS::WWW::AccessHandler
# Strip out Evergreen cookies before sending to remote server RequestHeader edit Cookie "^(.*?)ses=.*?(?:$|;)(.*)$" $1$2 RequestHeader edit Cookie "^(.*?)eg_loggedin=.*?(?:$|;)(.*)$" $1$2</Location>
<Location /proxy/example/> # Proxy example.net ProxyPass http://www.example.net/ ProxyPassReverse http://www.example.net/ ProxyPassReverseCookieDomain example.net example.com ProxyPassReverseCookiePath / /proxy/example/
ProxyHTMLEnable On ProxyHTMLURLMap http://www.example.net/ /proxy/example/ ProxyHTMLURLMap / /proxy/mail/ ProxyHTMLCharsetOut *
# Limit to BR1 and BR3 users PerlSetVar OILSAccessHandlerHomeOU "BR1,BR3"</Location>
As mentioned above, this can be used for multiple reasons. In addition to websites such as online databases forpatron use you may wish to proxy software for staff or patron use to make it appear on your catalog domain, orperhaps to keep from needing to open extra ports in a firewall.

Part V. Using the Staff Client
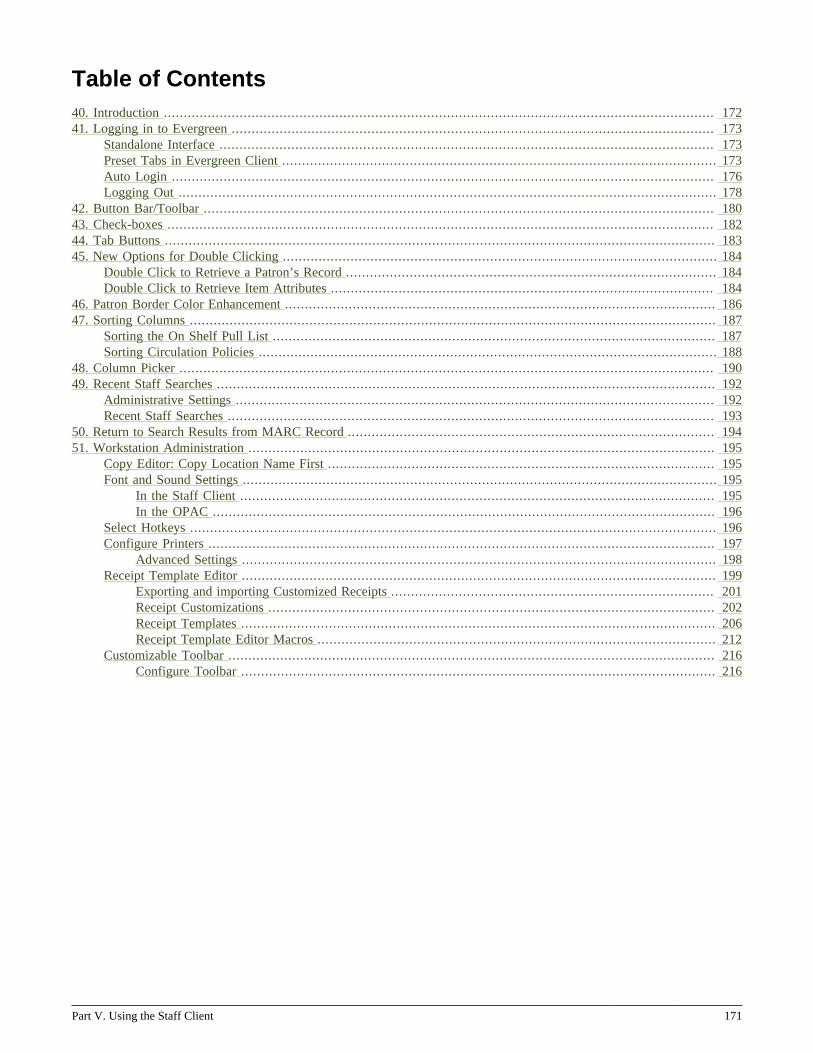
Part V. Using the Staff Client 171
Table of Contents40. Introduction .......................................................................................................................................... 17241. Logging in to Evergreen ......................................................................................................................... 173
Standalone Interface ............................................................................................................................ 173Preset Tabs in Evergreen Client ............................................................................................................. 173Auto Login ........................................................................................................................................ 176Logging Out ....................................................................................................................................... 178
42. Button Bar/Toolbar ................................................................................................................................ 18043. Check-boxes ......................................................................................................................................... 18244. Tab Buttons .......................................................................................................................................... 18345. New Options for Double Clicking ............................................................................................................. 184
Double Click to Retrieve a Patron’s Record ............................................................................................. 184Double Click to Retrieve Item Attributes ................................................................................................ 184
46. Patron Border Color Enhancement ............................................................................................................ 18647. Sorting Columns .................................................................................................................................... 187
Sorting the On Shelf Pull List ............................................................................................................... 187Sorting Circulation Policies ................................................................................................................... 188
48. Column Picker ...................................................................................................................................... 19049. Recent Staff Searches ............................................................................................................................. 192
Administrative Settings ........................................................................................................................ 192Recent Staff Searches .......................................................................................................................... 193
50. Return to Search Results from MARC Record ............................................................................................ 19451. Workstation Administration ..................................................................................................................... 195
Copy Editor: Copy Location Name First ................................................................................................. 195Font and Sound Settings ....................................................................................................................... 195
In the Staff Client ....................................................................................................................... 195In the OPAC .............................................................................................................................. 196
Select Hotkeys .................................................................................................................................... 196Configure Printers ............................................................................................................................... 197
Advanced Settings ....................................................................................................................... 198Receipt Template Editor ....................................................................................................................... 199
Exporting and importing Customized Receipts ................................................................................. 201Receipt Customizations ................................................................................................................ 202Receipt Templates ....................................................................................................................... 206Receipt Template Editor Macros .................................................................................................... 212
Customizable Toolbar .......................................................................................................................... 216Configure Toolbar ....................................................................................................................... 216

Chapter 40. Introduction 172
Chapter 40. IntroductionThis part of the documentation deals with general Staff Client usage including logging in, navigation and shortcuts.
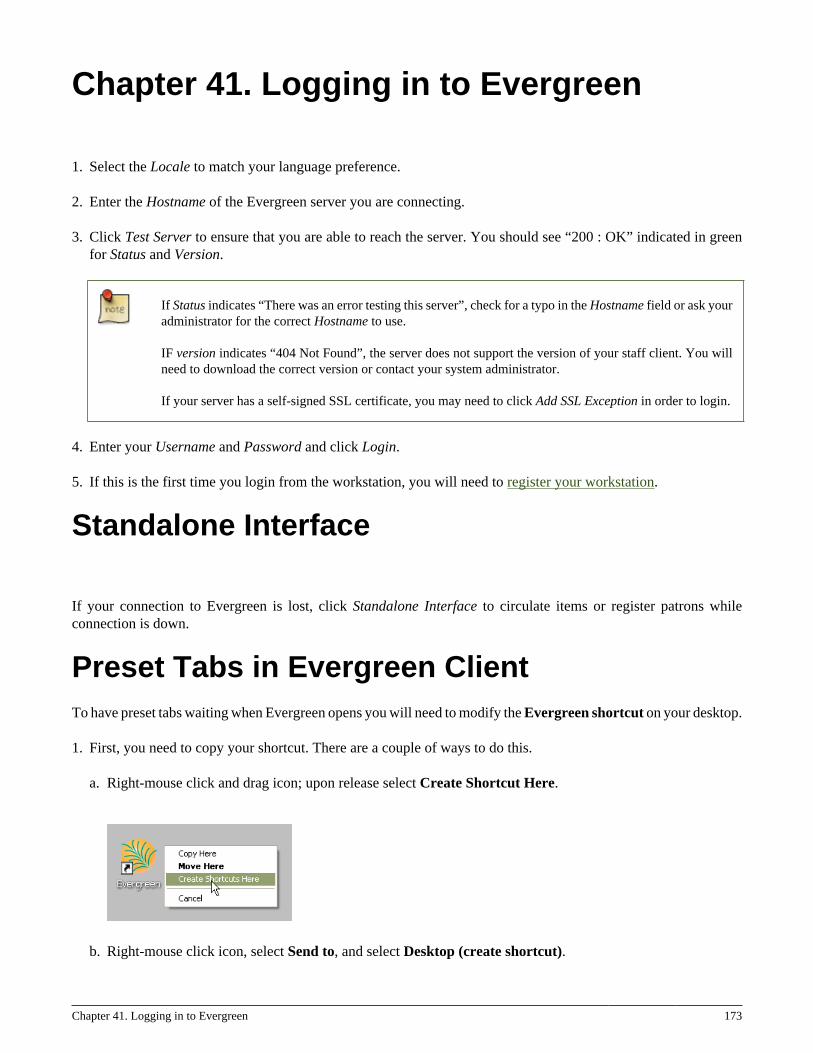
Chapter 41. Logging in to Evergreen 173
Chapter 41. Logging in to Evergreen
1. Select the Locale to match your language preference.
2. Enter the Hostname of the Evergreen server you are connecting.
3. Click Test Server to ensure that you are able to reach the server. You should see “200 : OK” indicated in greenfor Status and Version.
If Status indicates “There was an error testing this server”, check for a typo in the Hostname field or ask youradministrator for the correct Hostname to use.
IF version indicates “404 Not Found”, the server does not support the version of your staff client. You willneed to download the correct version or contact your system administrator.
If your server has a self-signed SSL certificate, you may need to click Add SSL Exception in order to login.
4. Enter your Username and Password and click Login.
5. If this is the first time you login from the workstation, you will need to register your workstation.
Standalone Interface
If your connection to Evergreen is lost, click Standalone Interface to circulate items or register patrons whileconnection is down.
Preset Tabs in Evergreen ClientTo have preset tabs waiting when Evergreen opens you will need to modify the Evergreen shortcut on your desktop.
1. First, you need to copy your shortcut. There are a couple of ways to do this.
a. Right-mouse click and drag icon; upon release select Create Shortcut Here.
b. Right-mouse click icon, select Send to, and select Desktop (create shortcut).
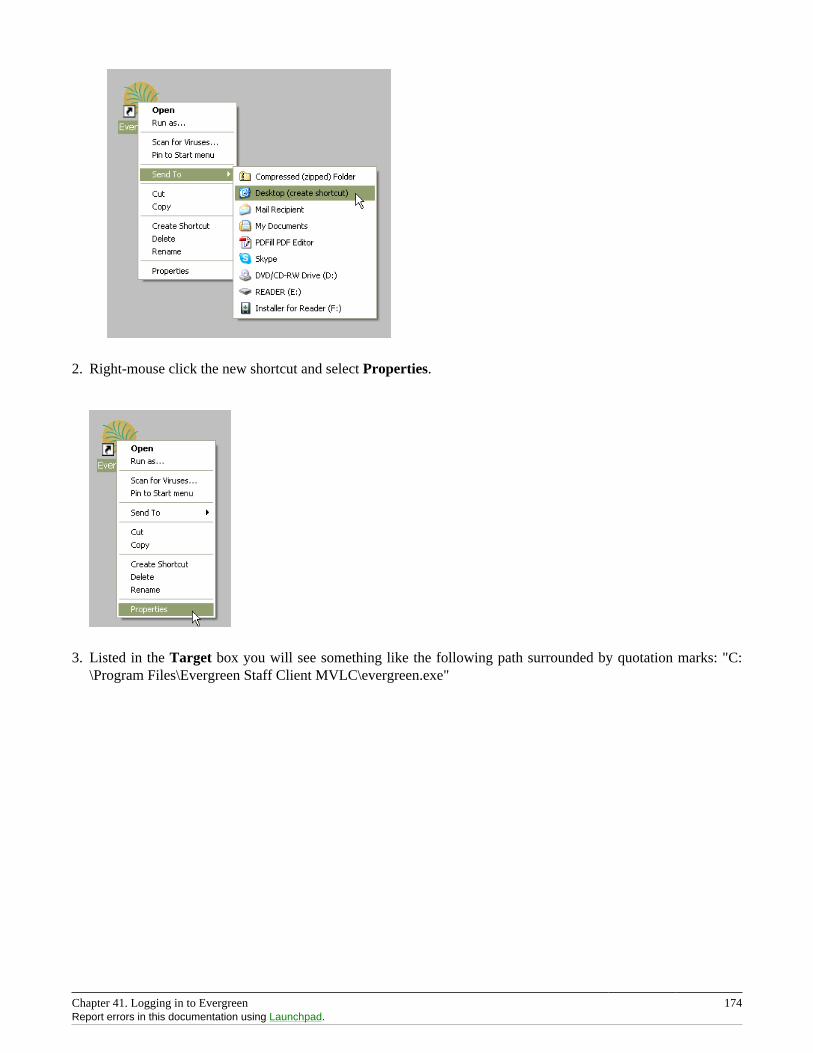
Chapter 41. Logging in to Evergreen 174Report errors in this documentation using Launchpad.
2. Right-mouse click the new shortcut and select Properties.
3. Listed in the Target box you will see something like the following path surrounded by quotation marks: "C:\Program Files\Evergreen Staff Client MVLC\evergreen.exe"
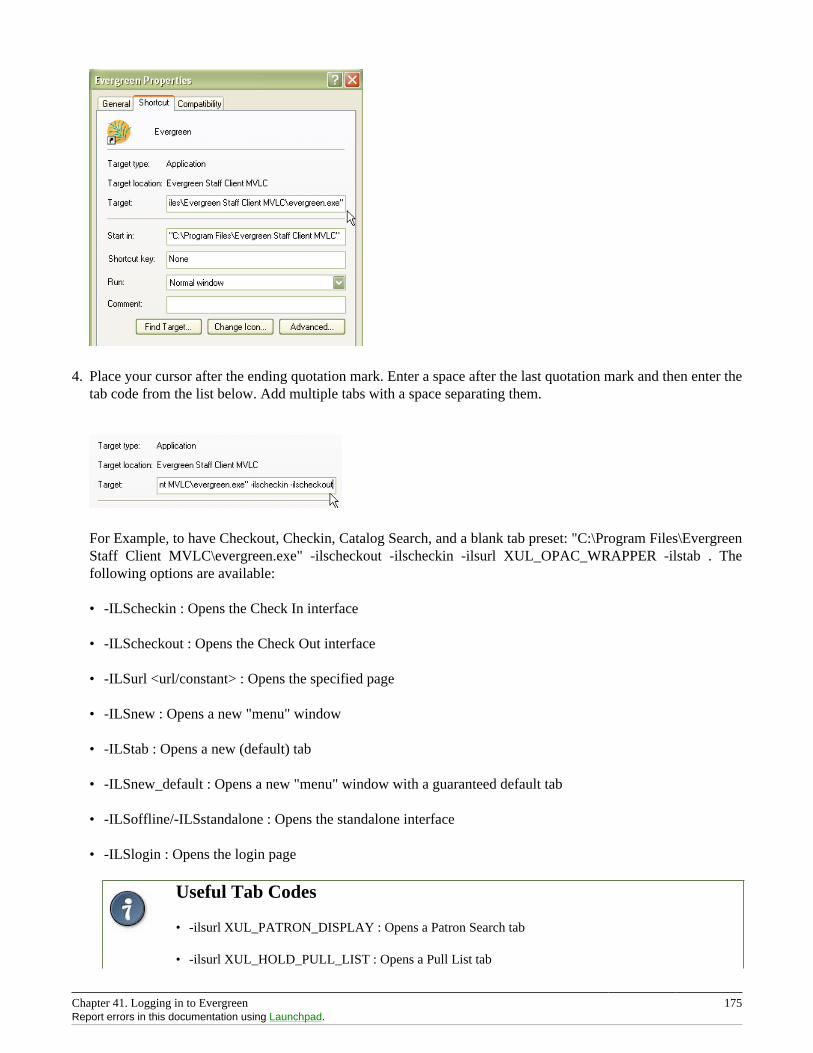
Chapter 41. Logging in to Evergreen 175Report errors in this documentation using Launchpad.
4. Place your cursor after the ending quotation mark. Enter a space after the last quotation mark and then enter thetab code from the list below. Add multiple tabs with a space separating them.
For Example, to have Checkout, Checkin, Catalog Search, and a blank tab preset: "C:\Program Files\EvergreenStaff Client MVLC\evergreen.exe" -ilscheckout -ilscheckin -ilsurl XUL_OPAC_WRAPPER -ilstab . Thefollowing options are available:
• -ILScheckin : Opens the Check In interface
• -ILScheckout : Opens the Check Out interface
• -ILSurl <url/constant> : Opens the specified page
• -ILSnew : Opens a new "menu" window
• -ILStab : Opens a new (default) tab
• -ILSnew_default : Opens a new "menu" window with a guaranteed default tab
• -ILSoffline/-ILSstandalone : Opens the standalone interface
• -ILSlogin : Opens the login page
Useful Tab Codes
• -ilsurl XUL_PATRON_DISPLAY : Opens a Patron Search tab
• -ilsurl XUL_HOLD_PULL_LIST : Opens a Pull List tab

Chapter 41. Logging in to Evergreen 176Report errors in this documentation using Launchpad.
• -ilsurl XUL_HOLDS_BROWSER : Opens a Browse Holds Shelf tab
• -ilsurl XUL_OPAC_WRAPPER : Opens an Advanced Catalog search tab
• -ilsurl XUL_COPY_STATUS : Opens an Item status by barcode tab
• -ilsurl XUL_RECORD_BUCKETS : Opens a Manage Record Buckets tab
• -ilsurl XUL_COPY_BUCKETS : Opens a Manage Copy Buckets tab
• -ilsurl XUL_MARC_NEW : Opens a Create new MARC record tab
• -ilsurl XUL_Z3950_IMPORT : Opens an Import record from Z39.50 tab
• To open two windows, one with checkin and checkout, one with Marc and Z39.50, use: -ilscheckin -ilscheckout -ilsnew -ilsurl XUL_MARC_NEW -ilsurl XUL_Z3950_IMPORT
5. You may want to rename your shortcut to reflect its purpose. For example, you could have one icon set to opencirculation-related tabs and one icon to open cataloging-related tabs. Right-mouse click and select Rename todo this.
Auto LoginTo use auto login, you will need to modify the Evergreen shortcut on your desktop. There are three new commandswhich are necessary for automatic login:
• -ilsuser
• -ilspassword
• -ilshost
You will need all three to have your client successfully login. To enable automatic login we need to modify theEvergreen shortcut on your desktop. If your shortcut already has preset tab commands, then place the automaticlogin commands after those commands.
1. First, if your workstation will have multiple logins (circ, cat, admin) you need to copy a shortcut for each. Thereare a couple of ways to do this.
a. Right-mouse click and drag icon; upon release select Create Shortcut Here.
b. Right-mouse click icon, select Send to, and select Desktop (create shortcut).

Chapter 41. Logging in to Evergreen 177Report errors in this documentation using Launchpad.
2. Right-mouse click the new shortcut and select Properties.
Listed in the Target box you will see something like the following path surrounded by quotation marks: "C:\Program Files\Evergreen Staff Client MVLC\evergreen.exe"
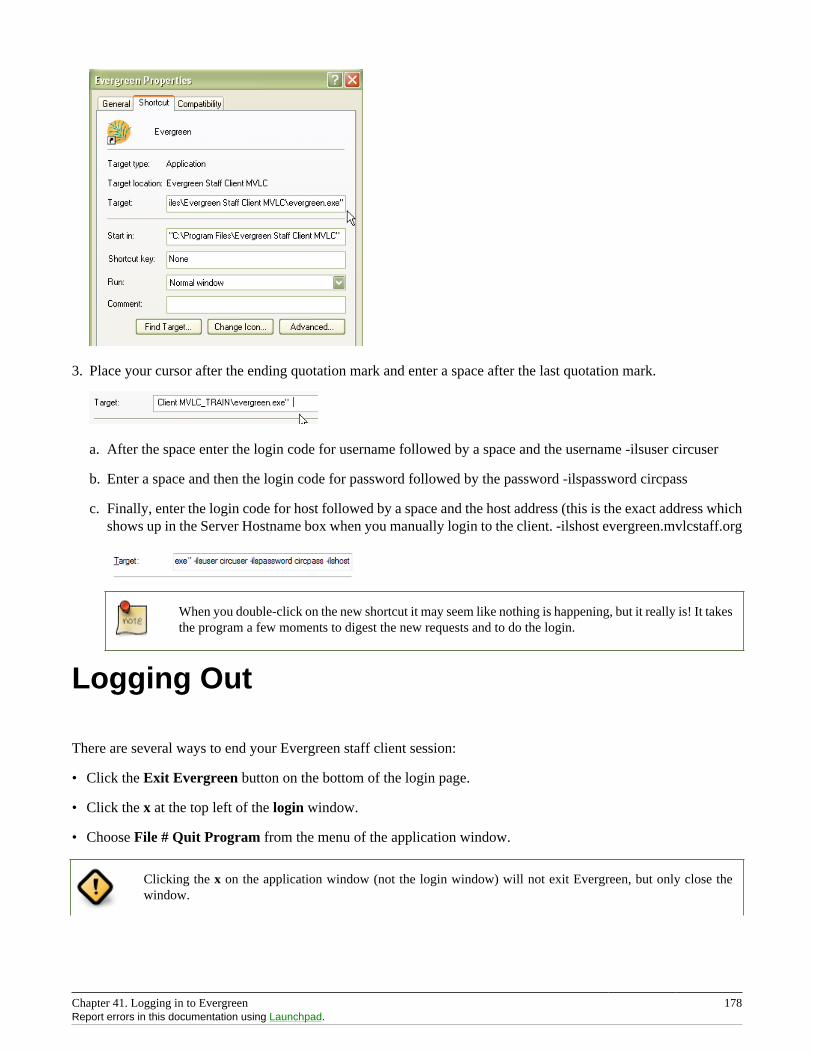
Chapter 41. Logging in to Evergreen 178Report errors in this documentation using Launchpad.
3. Place your cursor after the ending quotation mark and enter a space after the last quotation mark.
a. After the space enter the login code for username followed by a space and the username -ilsuser circuser
b. Enter a space and then the login code for password followed by the password -ilspassword circpass
c. Finally, enter the login code for host followed by a space and the host address (this is the exact address whichshows up in the Server Hostname box when you manually login to the client. -ilshost evergreen.mvlcstaff.org
When you double-click on the new shortcut it may seem like nothing is happening, but it really is! It takesthe program a few moments to digest the new requests and to do the login.
Logging Out
There are several ways to end your Evergreen staff client session:
• Click the Exit Evergreen button on the bottom of the login page.
• Click the x at the top left of the login window.
• Choose File # Quit Program from the menu of the application window.
Clicking the x on the application window (not the login window) will not exit Evergreen, but only close thewindow.

Chapter 41. Logging in to Evergreen 179Report errors in this documentation using Launchpad.
A new application window can be opened by clicking Open New Window from the login window.
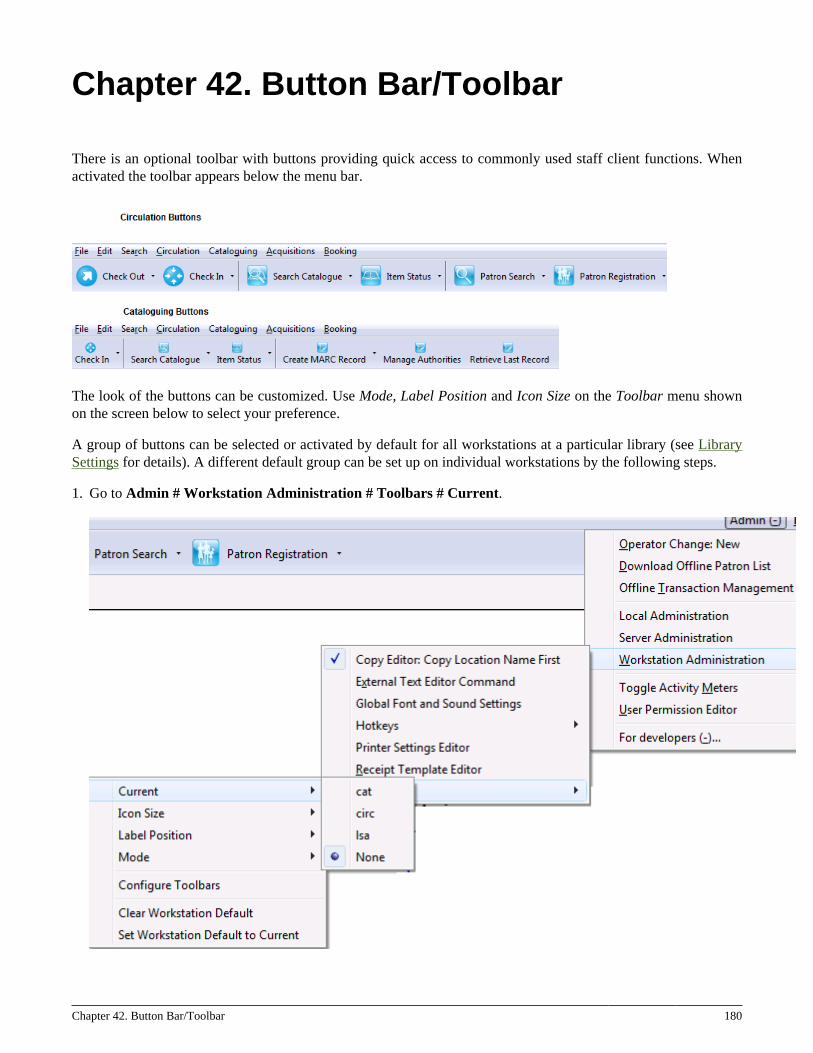
Chapter 42. Button Bar/Toolbar 180
Chapter 42. Button Bar/Toolbar
There is an optional toolbar with buttons providing quick access to commonly used staff client functions. Whenactivated the toolbar appears below the menu bar.
The look of the buttons can be customized. Use Mode, Label Position and Icon Size on the Toolbar menu shownon the screen below to select your preference.
A group of buttons can be selected or activated by default for all workstations at a particular library (see LibrarySettings for details). A different default group can be set up on individual workstations by the following steps.
1. Go to Admin # Workstation Administration # Toolbars # Current.
Chapter 42. Button Bar/Toolbar 181Report errors in this documentation using Launchpad.
2. Choose a group from the list.
3. Go back to the above menu. Select Set Workstation Default to Current. The above selected toolbar group isset as default for this workstation.
To clear an existing setting click Clear Workstation Default.
Circulation and Cataloguing are the default toolbar groups. Local system administrators can create new groups forindividual accounts, workstations or all in a particular library.
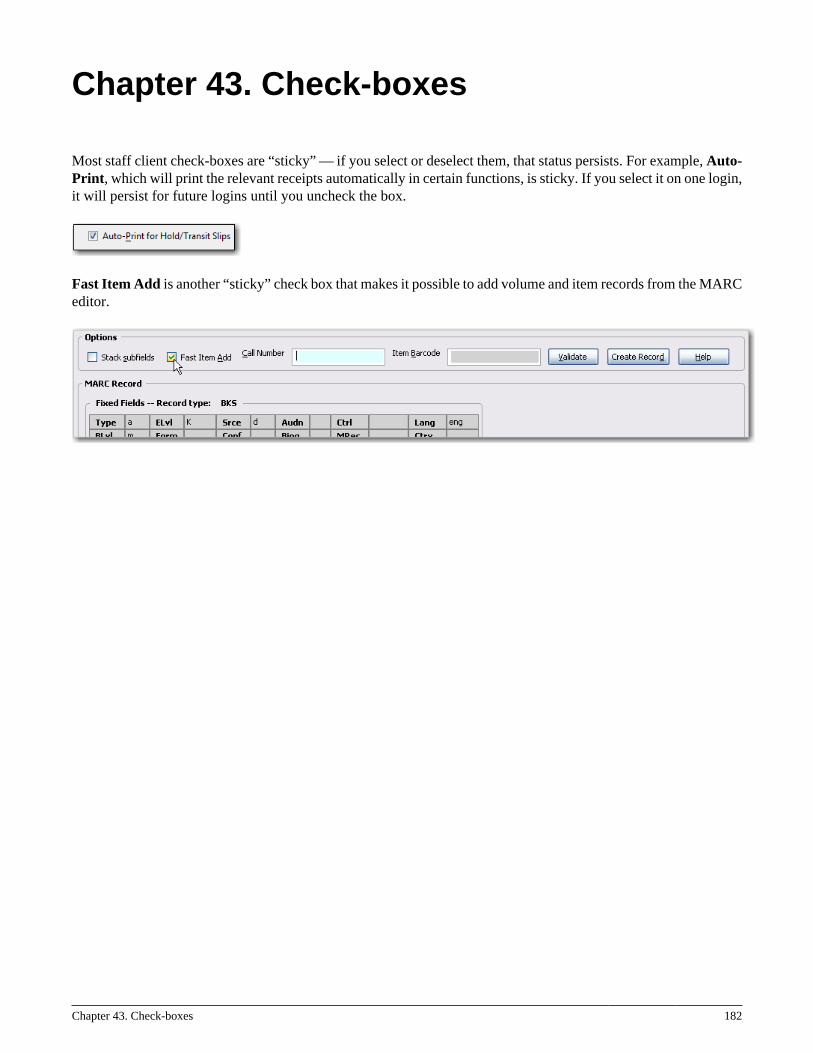
Chapter 43. Check-boxes 182
Chapter 43. Check-boxes
Most staff client check-boxes are “sticky” — if you select or deselect them, that status persists. For example, Auto-Print, which will print the relevant receipts automatically in certain functions, is sticky. If you select it on one login,it will persist for future logins until you uncheck the box.
Fast Item Add is another “sticky” check box that makes it possible to add volume and item records from the MARCeditor.
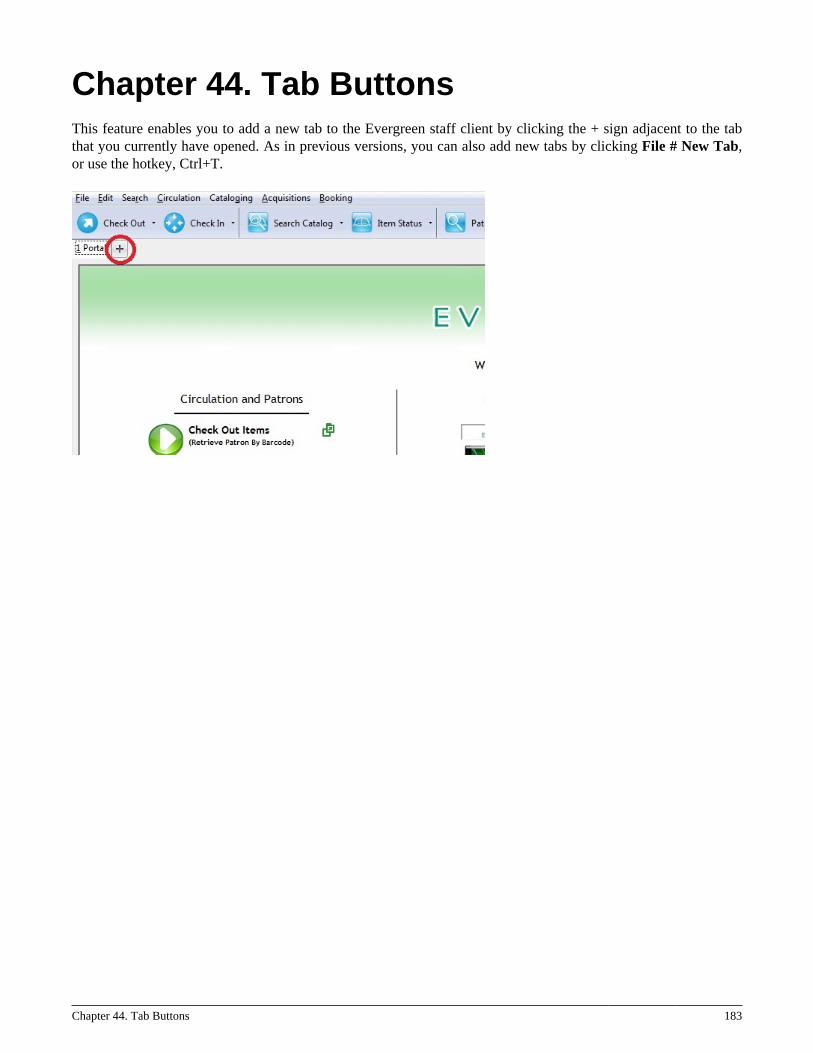
Chapter 44. Tab Buttons 183
Chapter 44. Tab ButtonsThis feature enables you to add a new tab to the Evergreen staff client by clicking the + sign adjacent to the tabthat you currently have opened. As in previous versions, you can also add new tabs by clicking File # New Tab,or use the hotkey, Ctrl+T.
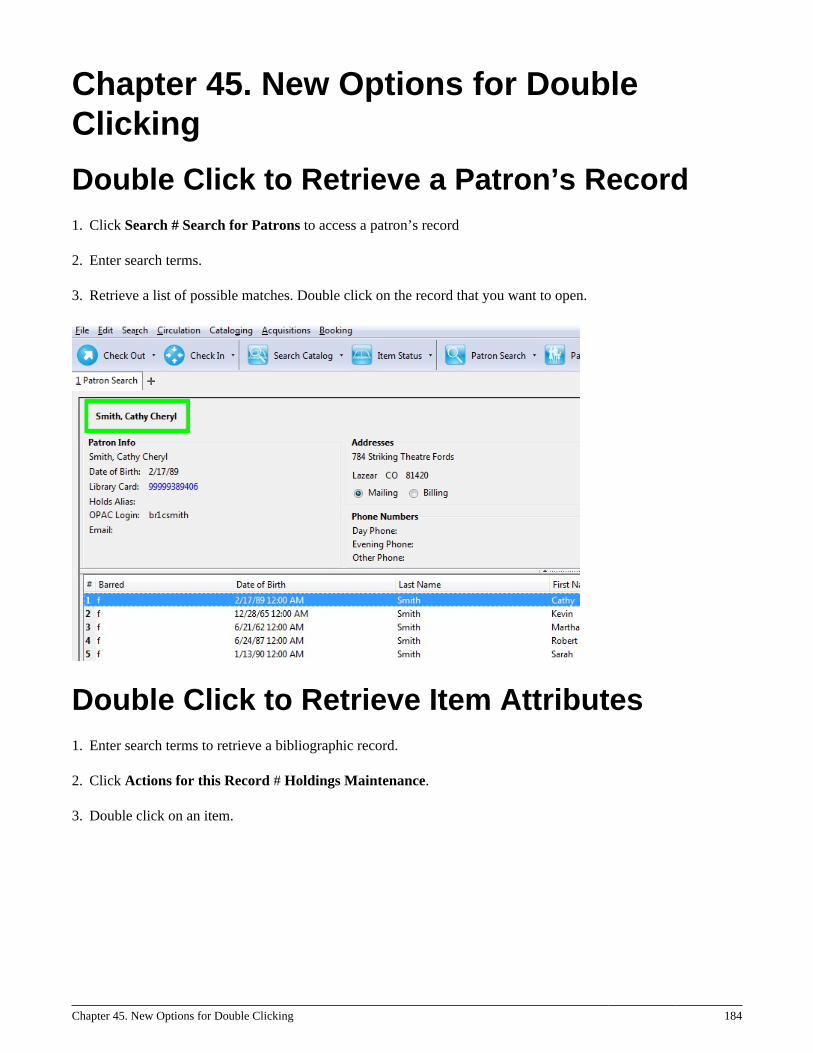
Chapter 45. New Options for Double Clicking 184
Chapter 45. New Options for DoubleClicking
Double Click to Retrieve a Patron’s Record1. Click Search # Search for Patrons to access a patron’s record
2. Enter search terms.
3. Retrieve a list of possible matches. Double click on the record that you want to open.
Double Click to Retrieve Item Attributes1. Enter search terms to retrieve a bibliographic record.
2. Click Actions for this Record # Holdings Maintenance.
3. Double click on an item.
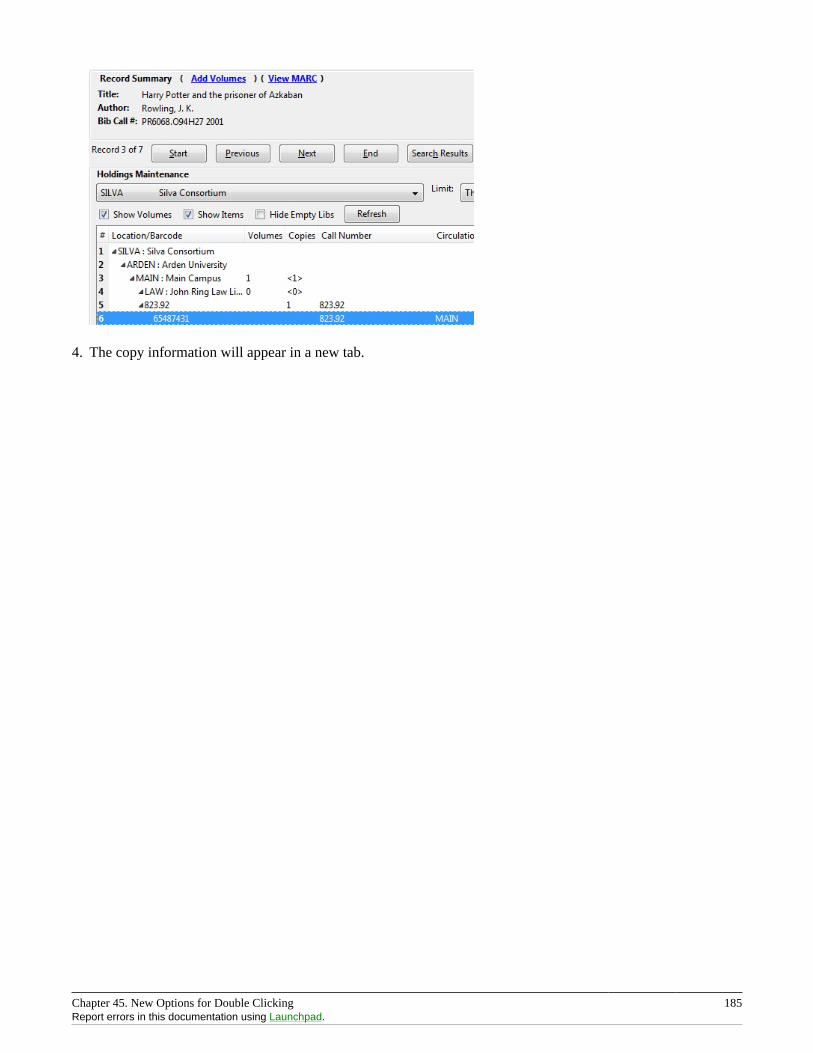
Chapter 45. New Options for Double Clicking 185Report errors in this documentation using Launchpad.
4. The copy information will appear in a new tab.
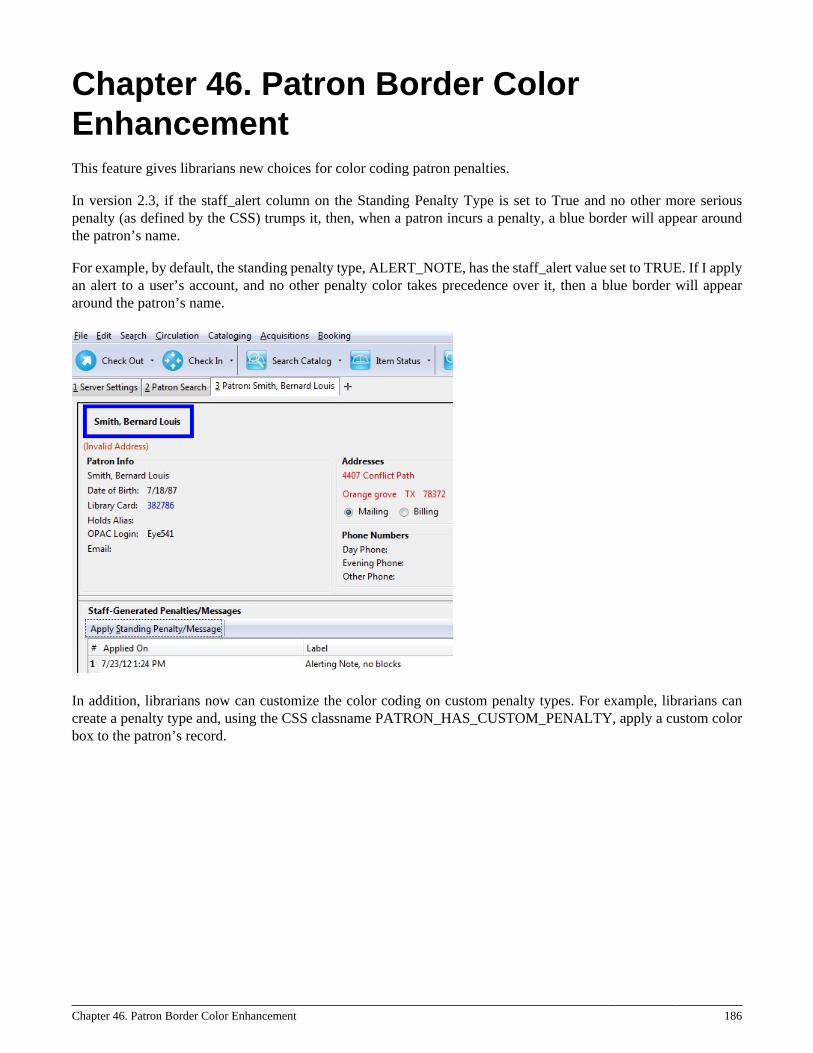
Chapter 46. Patron Border Color Enhancement 186
Chapter 46. Patron Border ColorEnhancementThis feature gives librarians new choices for color coding patron penalties.
In version 2.3, if the staff_alert column on the Standing Penalty Type is set to True and no other more seriouspenalty (as defined by the CSS) trumps it, then, when a patron incurs a penalty, a blue border will appear aroundthe patron’s name.
For example, by default, the standing penalty type, ALERT_NOTE, has the staff_alert value set to TRUE. If I applyan alert to a user’s account, and no other penalty color takes precedence over it, then a blue border will appeararound the patron’s name.
In addition, librarians now can customize the color coding on custom penalty types. For example, librarians cancreate a penalty type and, using the CSS classname PATRON_HAS_CUSTOM_PENALTY, apply a custom colorbox to the patron’s record.
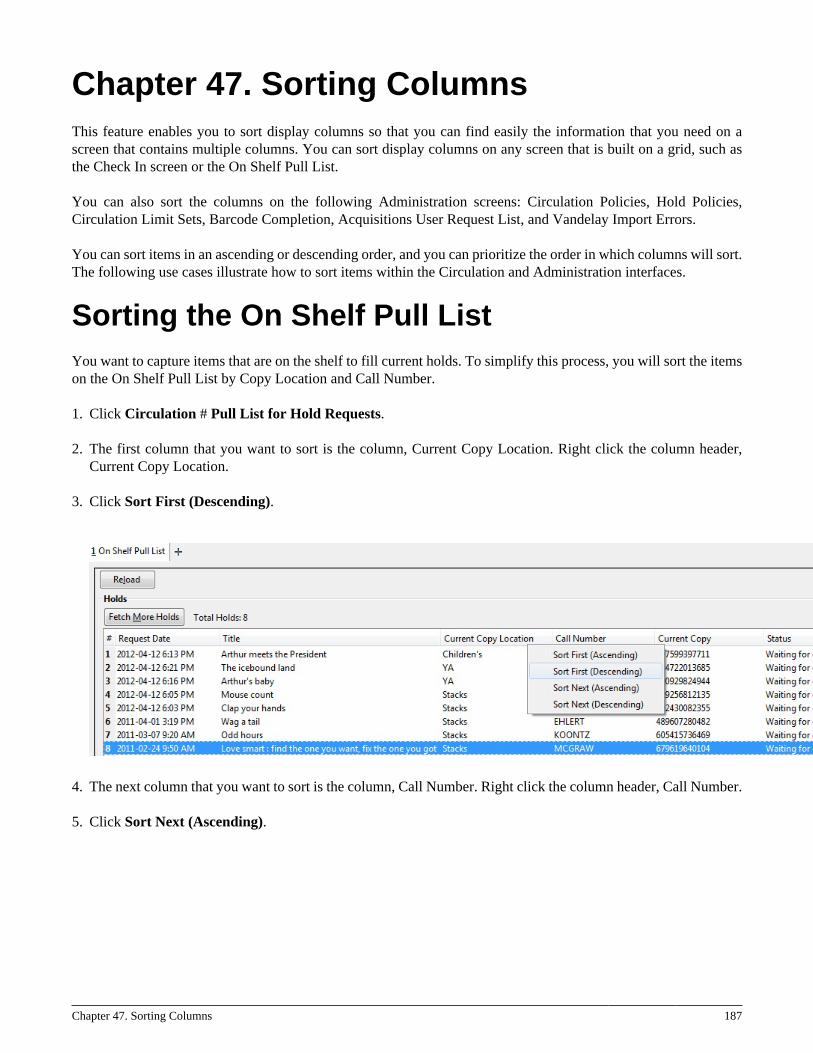
Chapter 47. Sorting Columns 187
Chapter 47. Sorting ColumnsThis feature enables you to sort display columns so that you can find easily the information that you need on ascreen that contains multiple columns. You can sort display columns on any screen that is built on a grid, such asthe Check In screen or the On Shelf Pull List.
You can also sort the columns on the following Administration screens: Circulation Policies, Hold Policies,Circulation Limit Sets, Barcode Completion, Acquisitions User Request List, and Vandelay Import Errors.
You can sort items in an ascending or descending order, and you can prioritize the order in which columns will sort.The following use cases illustrate how to sort items within the Circulation and Administration interfaces.
Sorting the On Shelf Pull ListYou want to capture items that are on the shelf to fill current holds. To simplify this process, you will sort the itemson the On Shelf Pull List by Copy Location and Call Number.
1. Click Circulation # Pull List for Hold Requests.
2. The first column that you want to sort is the column, Current Copy Location. Right click the column header,Current Copy Location.
3. Click Sort First (Descending).
4. The next column that you want to sort is the column, Call Number. Right click the column header, Call Number.
5. Click Sort Next (Ascending).
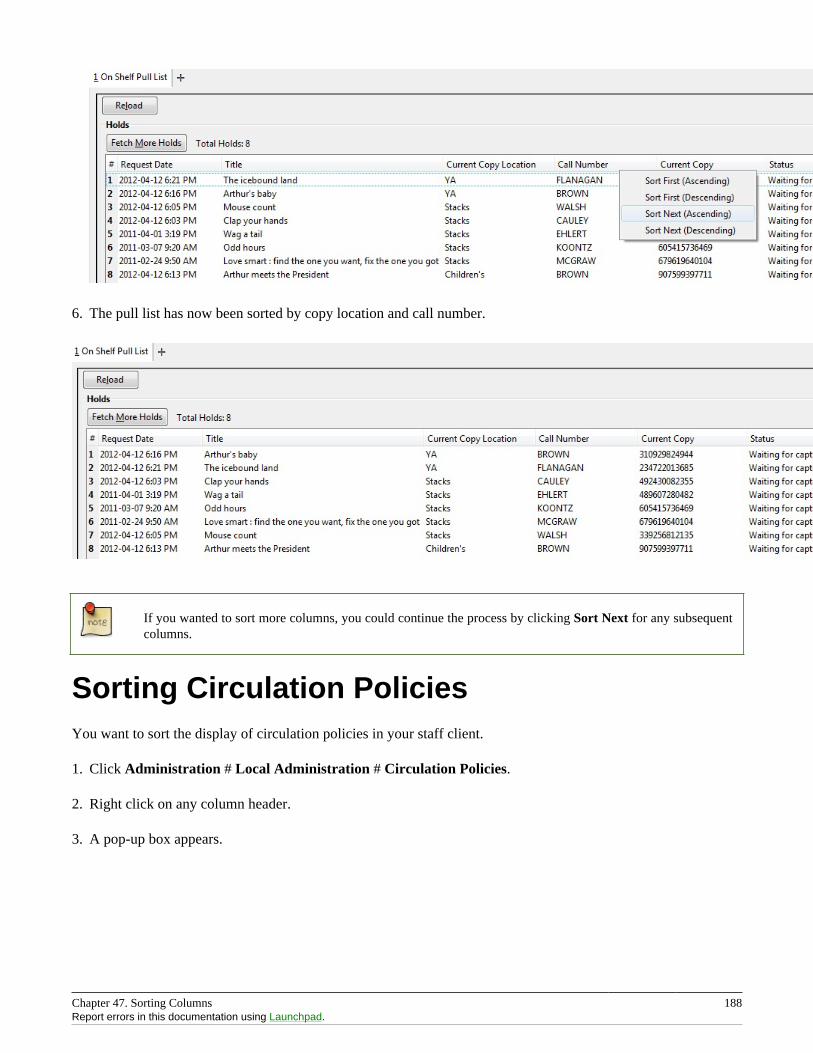
Chapter 47. Sorting Columns 188Report errors in this documentation using Launchpad.
6. The pull list has now been sorted by copy location and call number.
If you wanted to sort more columns, you could continue the process by clicking Sort Next for any subsequentcolumns.
Sorting Circulation PoliciesYou want to sort the display of circulation policies in your staff client.
1. Click Administration # Local Administration # Circulation Policies.
2. Right click on any column header.
3. A pop-up box appears.
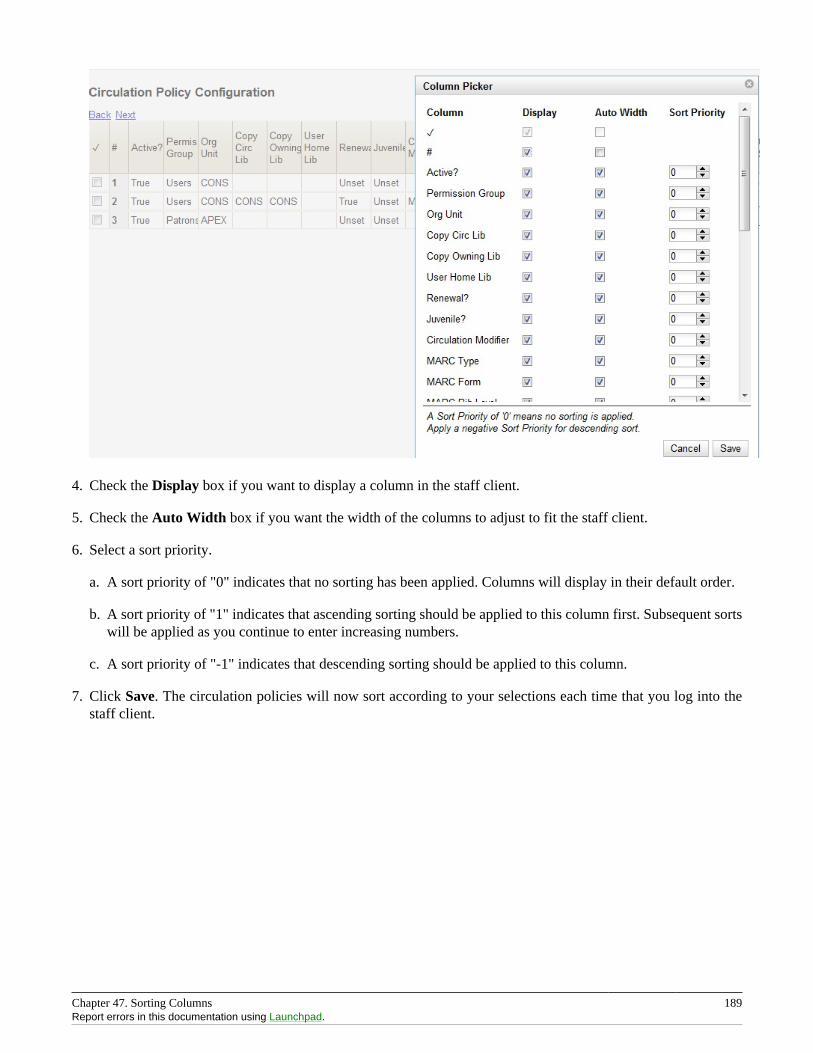
Chapter 47. Sorting Columns 189Report errors in this documentation using Launchpad.
4. Check the Display box if you want to display a column in the staff client.
5. Check the Auto Width box if you want the width of the columns to adjust to fit the staff client.
6. Select a sort priority.
a. A sort priority of "0" indicates that no sorting has been applied. Columns will display in their default order.
b. A sort priority of "1" indicates that ascending sorting should be applied to this column first. Subsequent sortswill be applied as you continue to enter increasing numbers.
c. A sort priority of "-1" indicates that descending sorting should be applied to this column.
7. Click Save. The circulation policies will now sort according to your selections each time that you log into thestaff client.
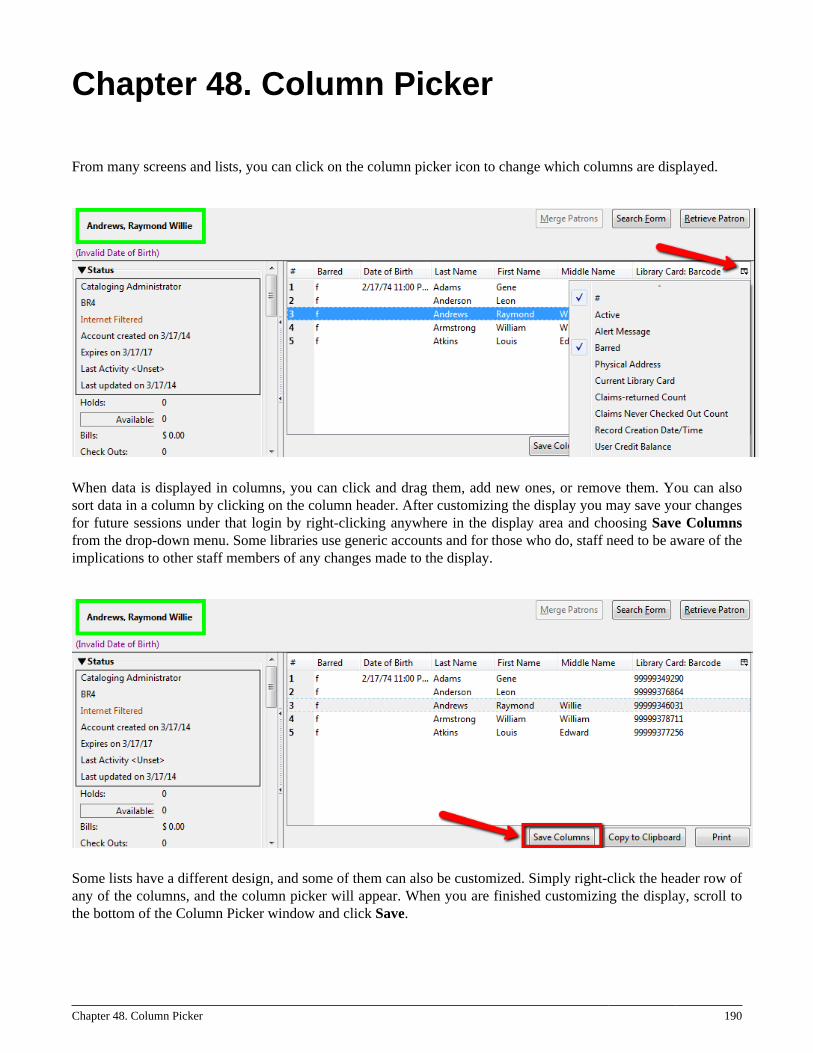
Chapter 48. Column Picker 190
Chapter 48. Column Picker
From many screens and lists, you can click on the column picker icon to change which columns are displayed.
When data is displayed in columns, you can click and drag them, add new ones, or remove them. You can alsosort data in a column by clicking on the column header. After customizing the display you may save your changesfor future sessions under that login by right-clicking anywhere in the display area and choosing Save Columnsfrom the drop-down menu. Some libraries use generic accounts and for those who do, staff need to be aware of theimplications to other staff members of any changes made to the display.
Some lists have a different design, and some of them can also be customized. Simply right-click the header row ofany of the columns, and the column picker will appear. When you are finished customizing the display, scroll tothe bottom of the Column Picker window and click Save.
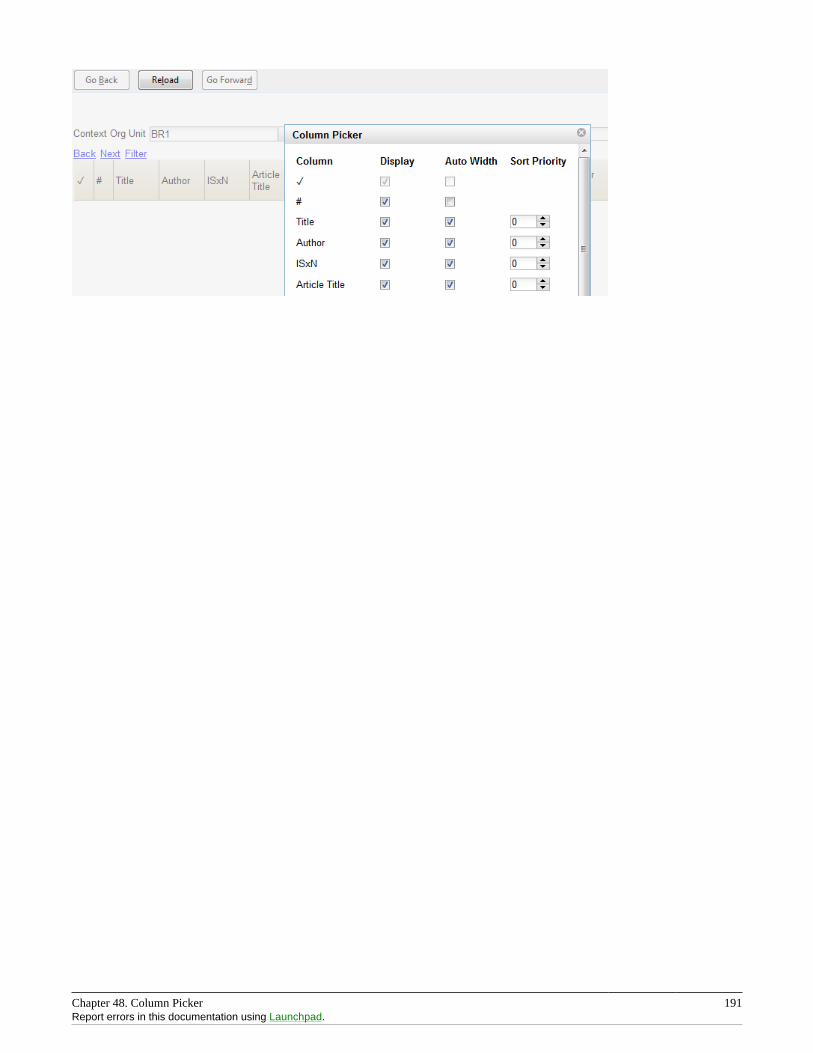
Chapter 48. Column Picker 191Report errors in this documentation using Launchpad.
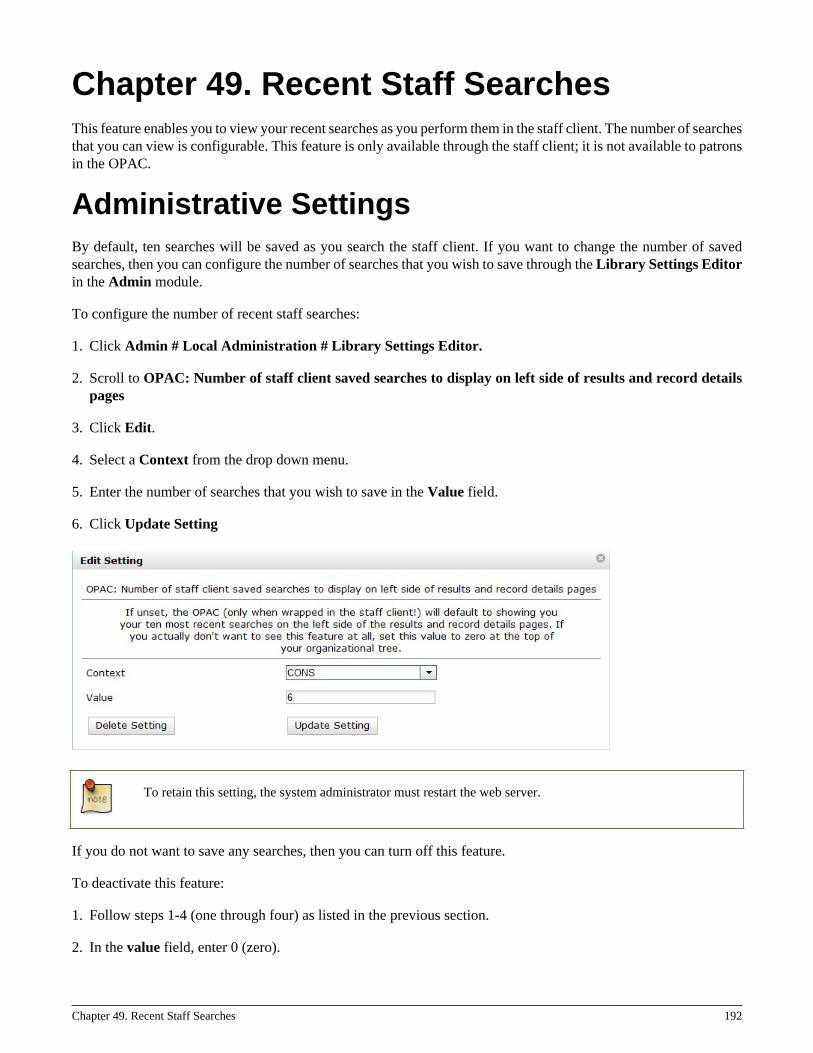
Chapter 49. Recent Staff Searches 192
Chapter 49. Recent Staff SearchesThis feature enables you to view your recent searches as you perform them in the staff client. The number of searchesthat you can view is configurable. This feature is only available through the staff client; it is not available to patronsin the OPAC.
Administrative SettingsBy default, ten searches will be saved as you search the staff client. If you want to change the number of savedsearches, then you can configure the number of searches that you wish to save through the Library Settings Editorin the Admin module.
To configure the number of recent staff searches:
1. Click Admin # Local Administration # Library Settings Editor.
2. Scroll to OPAC: Number of staff client saved searches to display on left side of results and record detailspages
3. Click Edit.
4. Select a Context from the drop down menu.
5. Enter the number of searches that you wish to save in the Value field.
6. Click Update Setting
To retain this setting, the system administrator must restart the web server.
If you do not want to save any searches, then you can turn off this feature.
To deactivate this feature:
1. Follow steps 1-4 (one through four) as listed in the previous section.
2. In the value field, enter 0 (zero).
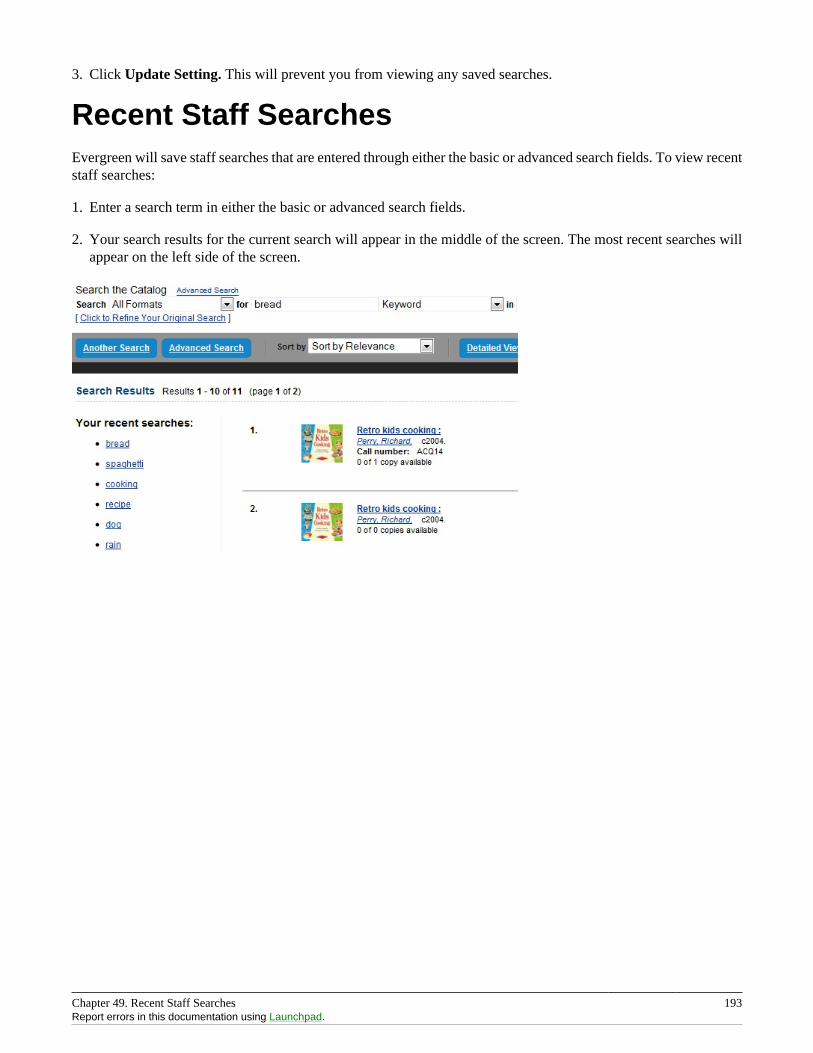
Chapter 49. Recent Staff Searches 193Report errors in this documentation using Launchpad.
3. Click Update Setting. This will prevent you from viewing any saved searches.
Recent Staff SearchesEvergreen will save staff searches that are entered through either the basic or advanced search fields. To view recentstaff searches:
1. Enter a search term in either the basic or advanced search fields.
2. Your search results for the current search will appear in the middle of the screen. The most recent searches willappear on the left side of the screen.
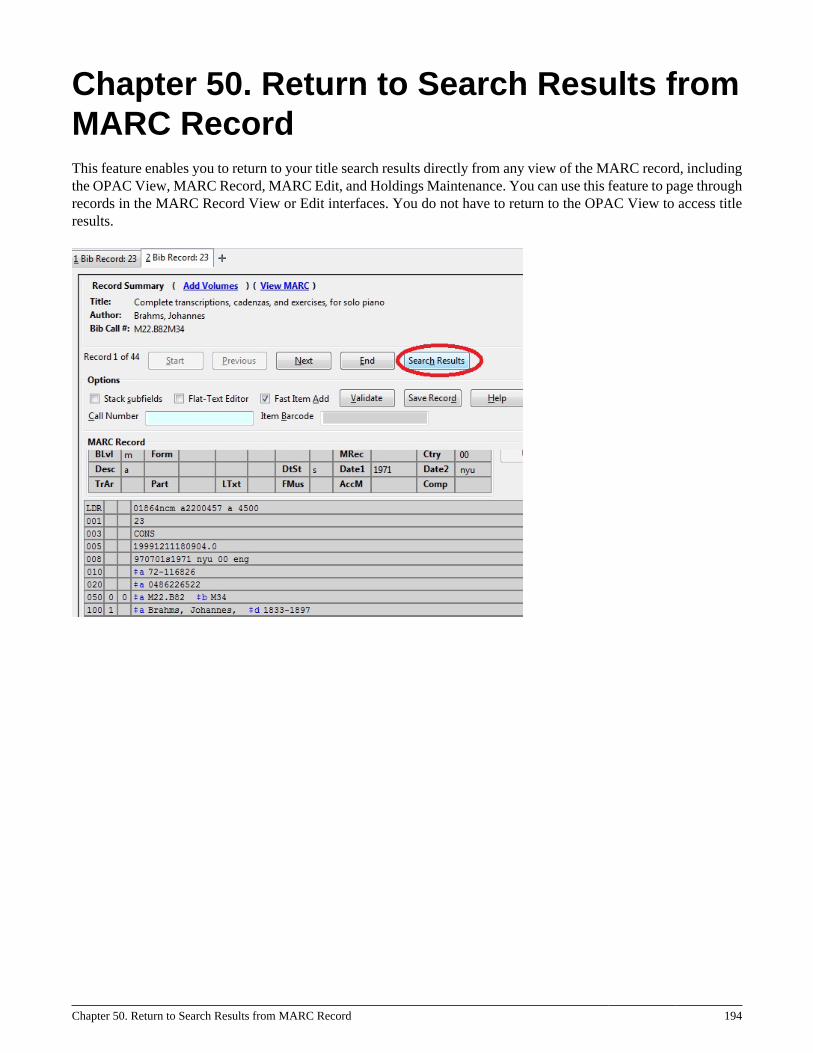
Chapter 50. Return to Search Results from MARC Record 194
Chapter 50. Return to Search Results fromMARC RecordThis feature enables you to return to your title search results directly from any view of the MARC record, includingthe OPAC View, MARC Record, MARC Edit, and Holdings Maintenance. You can use this feature to page throughrecords in the MARC Record View or Edit interfaces. You do not have to return to the OPAC View to access titleresults.
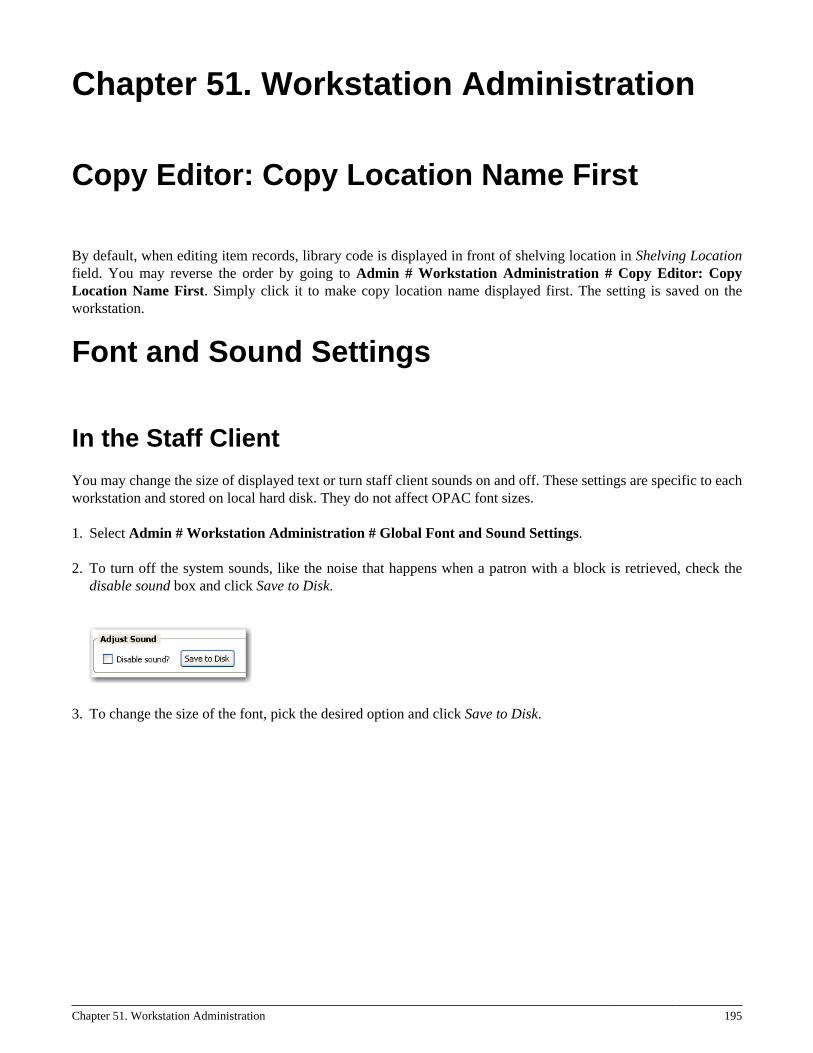
Chapter 51. Workstation Administration 195
Chapter 51. Workstation Administration
Copy Editor: Copy Location Name First
By default, when editing item records, library code is displayed in front of shelving location in Shelving Locationfield. You may reverse the order by going to Admin # Workstation Administration # Copy Editor: CopyLocation Name First. Simply click it to make copy location name displayed first. The setting is saved on theworkstation.
Font and Sound Settings
In the Staff Client
You may change the size of displayed text or turn staff client sounds on and off. These settings are specific to eachworkstation and stored on local hard disk. They do not affect OPAC font sizes.
1. Select Admin # Workstation Administration # Global Font and Sound Settings.
2. To turn off the system sounds, like the noise that happens when a patron with a block is retrieved, check thedisable sound box and click Save to Disk.
3. To change the size of the font, pick the desired option and click Save to Disk.
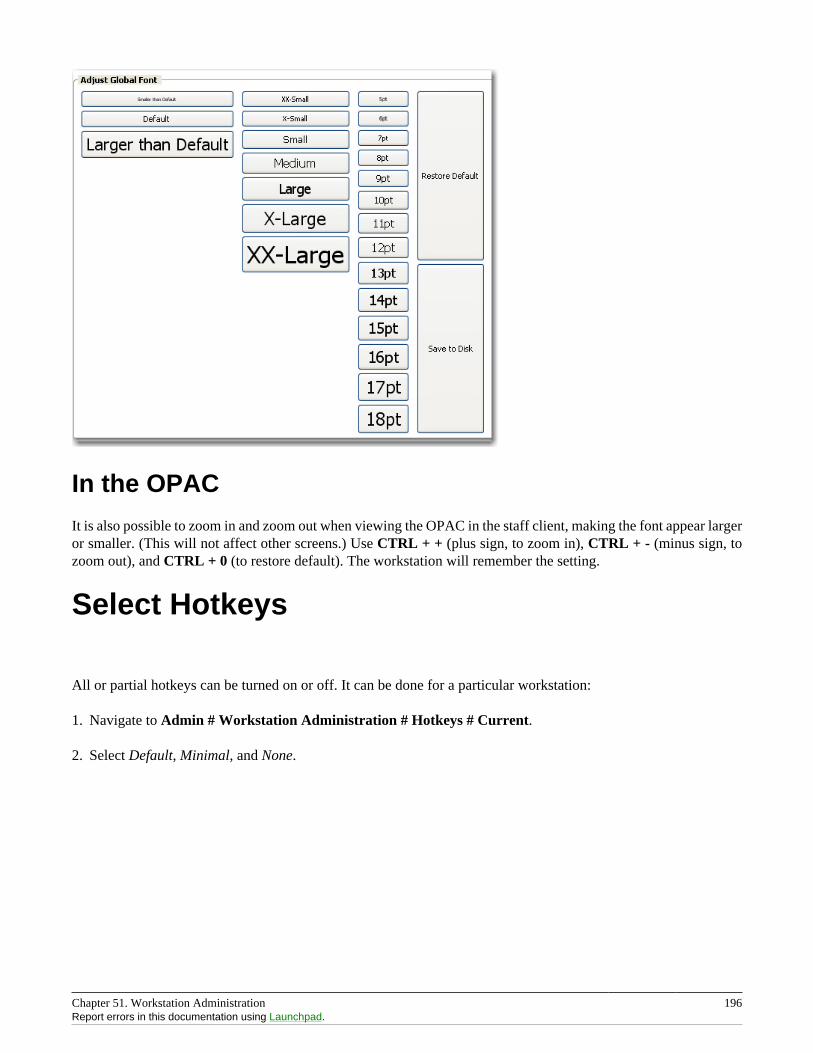
Chapter 51. Workstation Administration 196Report errors in this documentation using Launchpad.
In the OPAC
It is also possible to zoom in and zoom out when viewing the OPAC in the staff client, making the font appear largeror smaller. (This will not affect other screens.) Use CTRL + + (plus sign, to zoom in), CTRL + - (minus sign, tozoom out), and CTRL + 0 (to restore default). The workstation will remember the setting.
Select Hotkeys
All or partial hotkeys can be turned on or off. It can be done for a particular workstation:
1. Navigate to Admin # Workstation Administration # Hotkeys # Current.
2. Select Default, Minimal, and None.
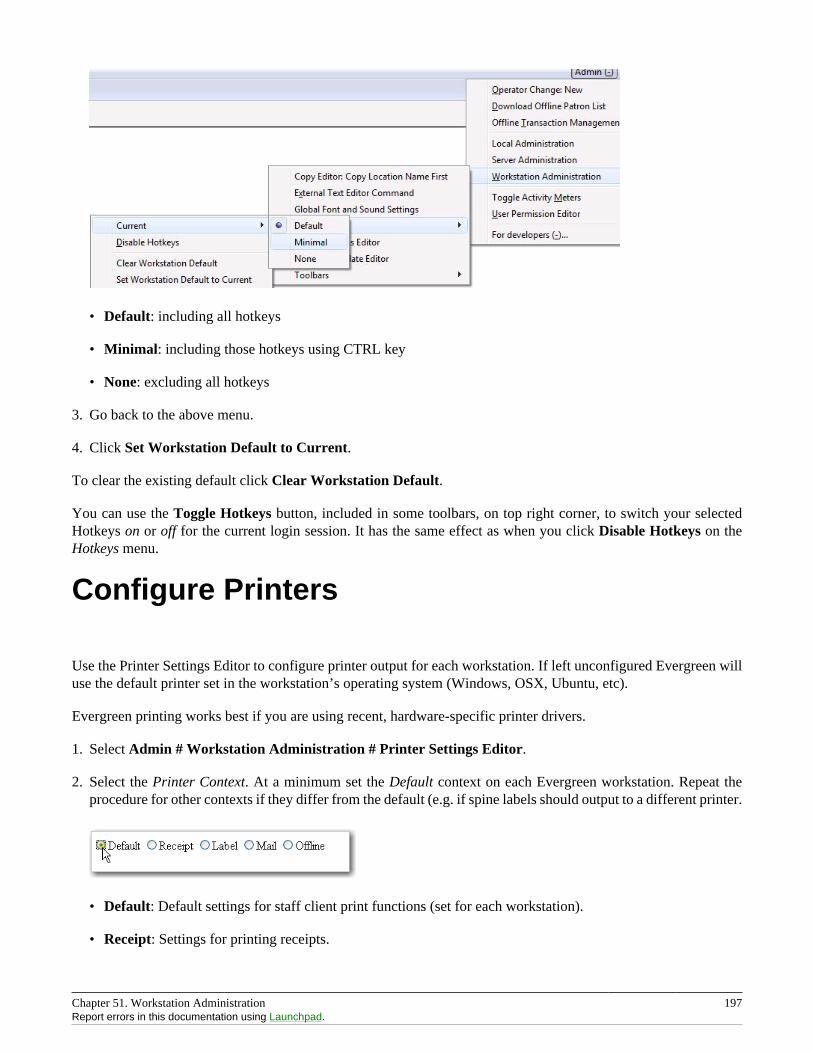
Chapter 51. Workstation Administration 197Report errors in this documentation using Launchpad.
• Default: including all hotkeys
• Minimal: including those hotkeys using CTRL key
• None: excluding all hotkeys
3. Go back to the above menu.
4. Click Set Workstation Default to Current.
To clear the existing default click Clear Workstation Default.
You can use the Toggle Hotkeys button, included in some toolbars, on top right corner, to switch your selectedHotkeys on or off for the current login session. It has the same effect as when you click Disable Hotkeys on theHotkeys menu.
Configure Printers
Use the Printer Settings Editor to configure printer output for each workstation. If left unconfigured Evergreen willuse the default printer set in the workstation’s operating system (Windows, OSX, Ubuntu, etc).
Evergreen printing works best if you are using recent, hardware-specific printer drivers.
1. Select Admin # Workstation Administration # Printer Settings Editor.
2. Select the Printer Context. At a minimum set the Default context on each Evergreen workstation. Repeat theprocedure for other contexts if they differ from the default (e.g. if spine labels should output to a different printer.
• Default: Default settings for staff client print functions (set for each workstation).
• Receipt: Settings for printing receipts.
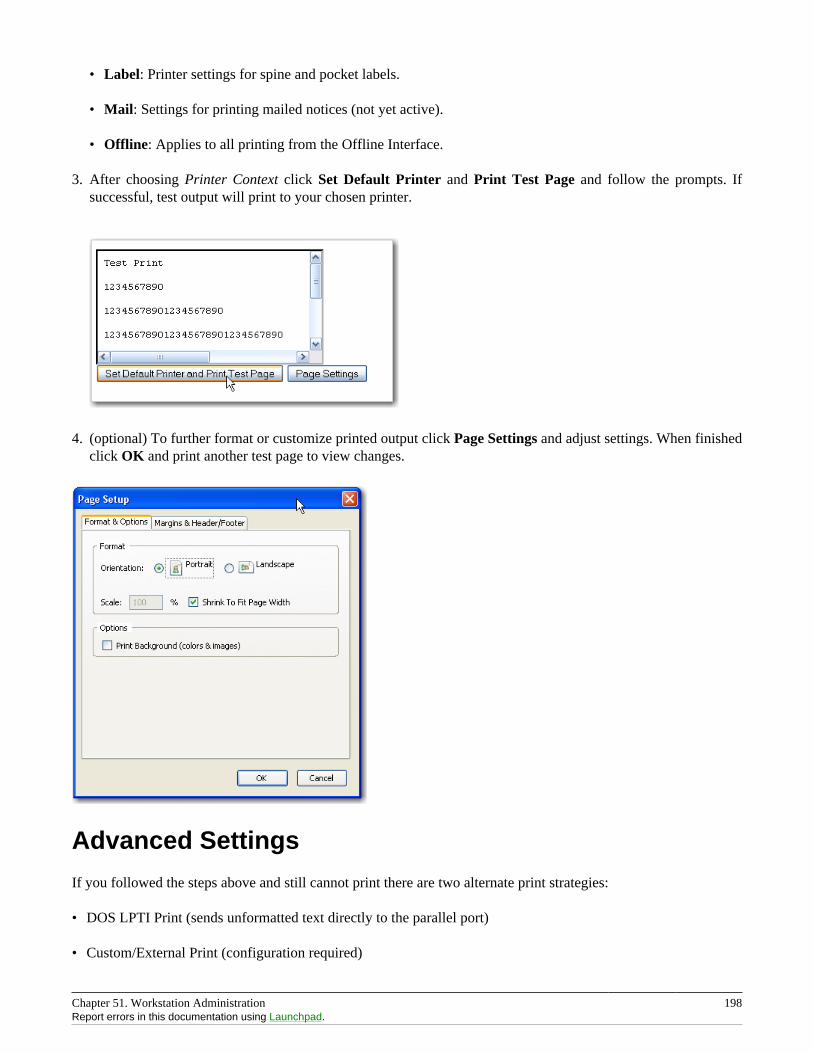
Chapter 51. Workstation Administration 198Report errors in this documentation using Launchpad.
• Label: Printer settings for spine and pocket labels.
• Mail: Settings for printing mailed notices (not yet active).
• Offline: Applies to all printing from the Offline Interface.
3. After choosing Printer Context click Set Default Printer and Print Test Page and follow the prompts. Ifsuccessful, test output will print to your chosen printer.
4. (optional) To further format or customize printed output click Page Settings and adjust settings. When finishedclick OK and print another test page to view changes.
Advanced Settings
If you followed the steps above and still cannot print there are two alternate print strategies:
• DOS LPTI Print (sends unformatted text directly to the parallel port)
• Custom/External Print (configuration required)
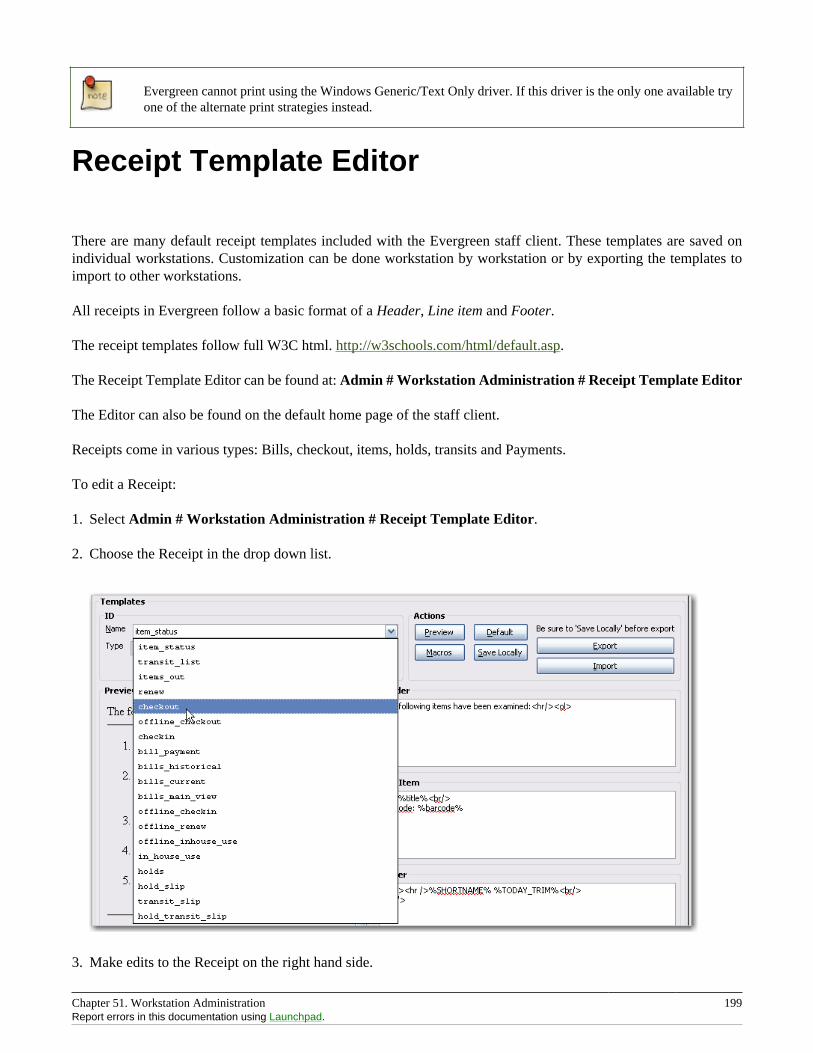
Chapter 51. Workstation Administration 199Report errors in this documentation using Launchpad.
Evergreen cannot print using the Windows Generic/Text Only driver. If this driver is the only one available tryone of the alternate print strategies instead.
Receipt Template Editor
There are many default receipt templates included with the Evergreen staff client. These templates are saved onindividual workstations. Customization can be done workstation by workstation or by exporting the templates toimport to other workstations.
All receipts in Evergreen follow a basic format of a Header, Line item and Footer.
The receipt templates follow full W3C html. http://w3schools.com/html/default.asp.
The Receipt Template Editor can be found at: Admin # Workstation Administration # Receipt Template Editor
The Editor can also be found on the default home page of the staff client.
Receipts come in various types: Bills, checkout, items, holds, transits and Payments.
To edit a Receipt:
1. Select Admin # Workstation Administration # Receipt Template Editor.
2. Choose the Receipt in the drop down list.
3. Make edits to the Receipt on the right hand side.
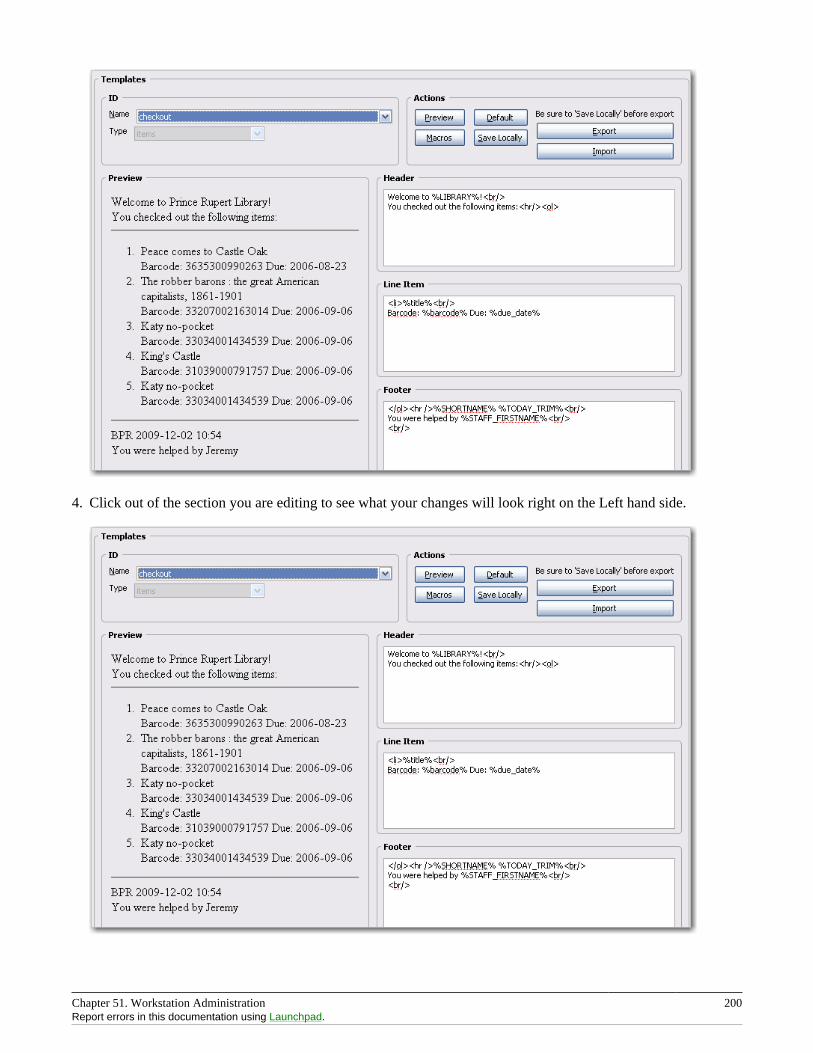
Chapter 51. Workstation Administration 200Report errors in this documentation using Launchpad.
4. Click out of the section you are editing to see what your changes will look right on the Left hand side.
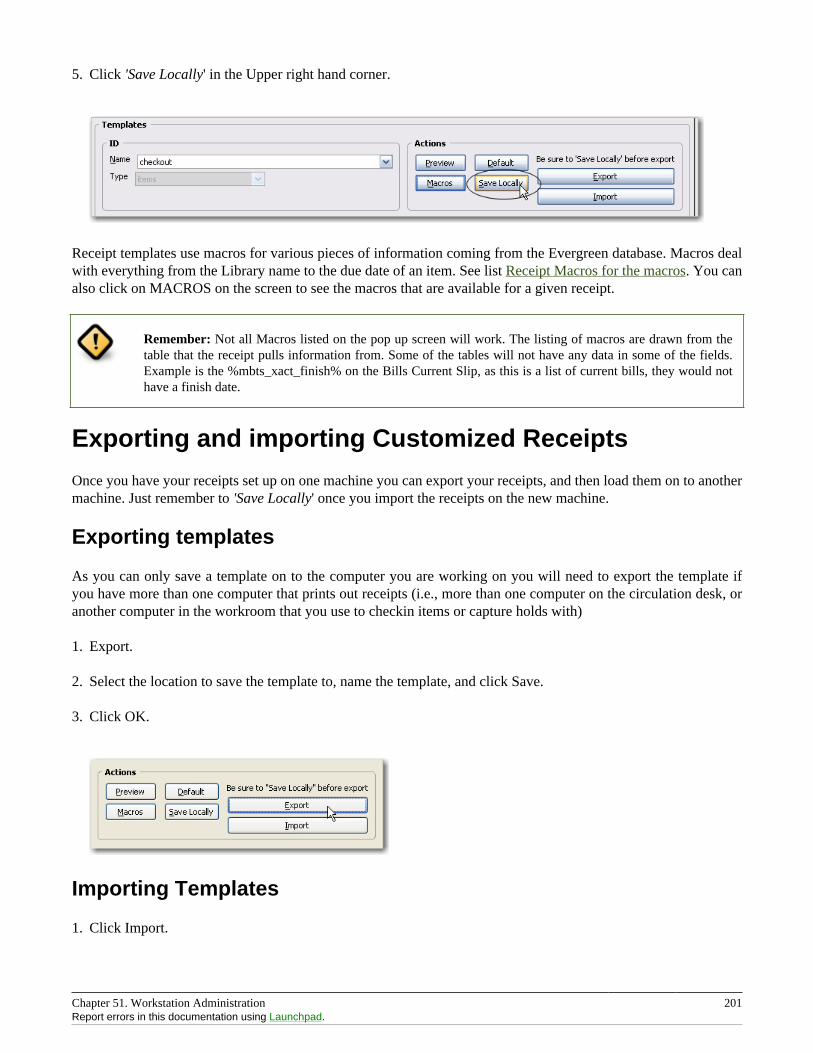
Chapter 51. Workstation Administration 201Report errors in this documentation using Launchpad.
5. Click 'Save Locally' in the Upper right hand corner.
Receipt templates use macros for various pieces of information coming from the Evergreen database. Macros dealwith everything from the Library name to the due date of an item. See list Receipt Macros for the macros. You canalso click on MACROS on the screen to see the macros that are available for a given receipt.
Remember: Not all Macros listed on the pop up screen will work. The listing of macros are drawn from thetable that the receipt pulls information from. Some of the tables will not have any data in some of the fields.Example is the %mbts_xact_finish% on the Bills Current Slip, as this is a list of current bills, they would nothave a finish date.
Exporting and importing Customized Receipts
Once you have your receipts set up on one machine you can export your receipts, and then load them on to anothermachine. Just remember to 'Save Locally' once you import the receipts on the new machine.
Exporting templates
As you can only save a template on to the computer you are working on you will need to export the template ifyou have more than one computer that prints out receipts (i.e., more than one computer on the circulation desk, oranother computer in the workroom that you use to checkin items or capture holds with)
1. Export.
2. Select the location to save the template to, name the template, and click Save.
3. Click OK.
Importing Templates
1. Click Import.
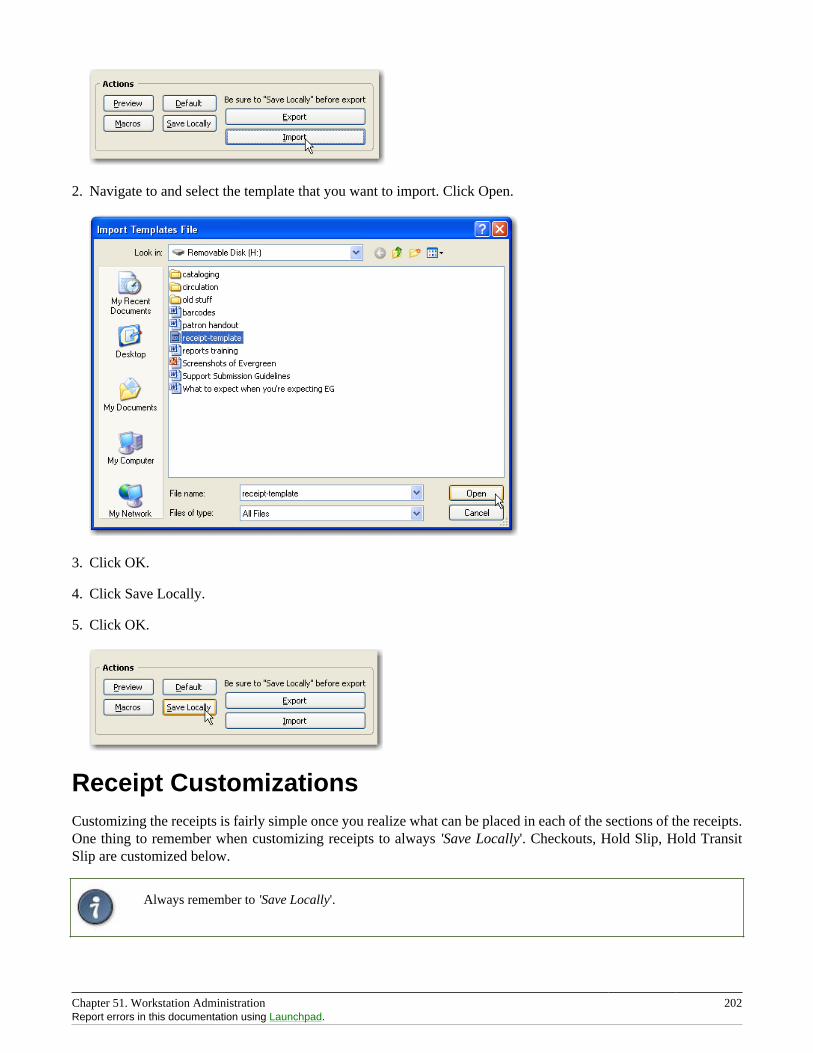
Chapter 51. Workstation Administration 202Report errors in this documentation using Launchpad.
2. Navigate to and select the template that you want to import. Click Open.
3. Click OK.
4. Click Save Locally.
5. Click OK.
Receipt CustomizationsCustomizing the receipts is fairly simple once you realize what can be placed in each of the sections of the receipts.One thing to remember when customizing receipts to always 'Save Locally'. Checkouts, Hold Slip, Hold TransitSlip are customized below.
Always remember to 'Save Locally'.
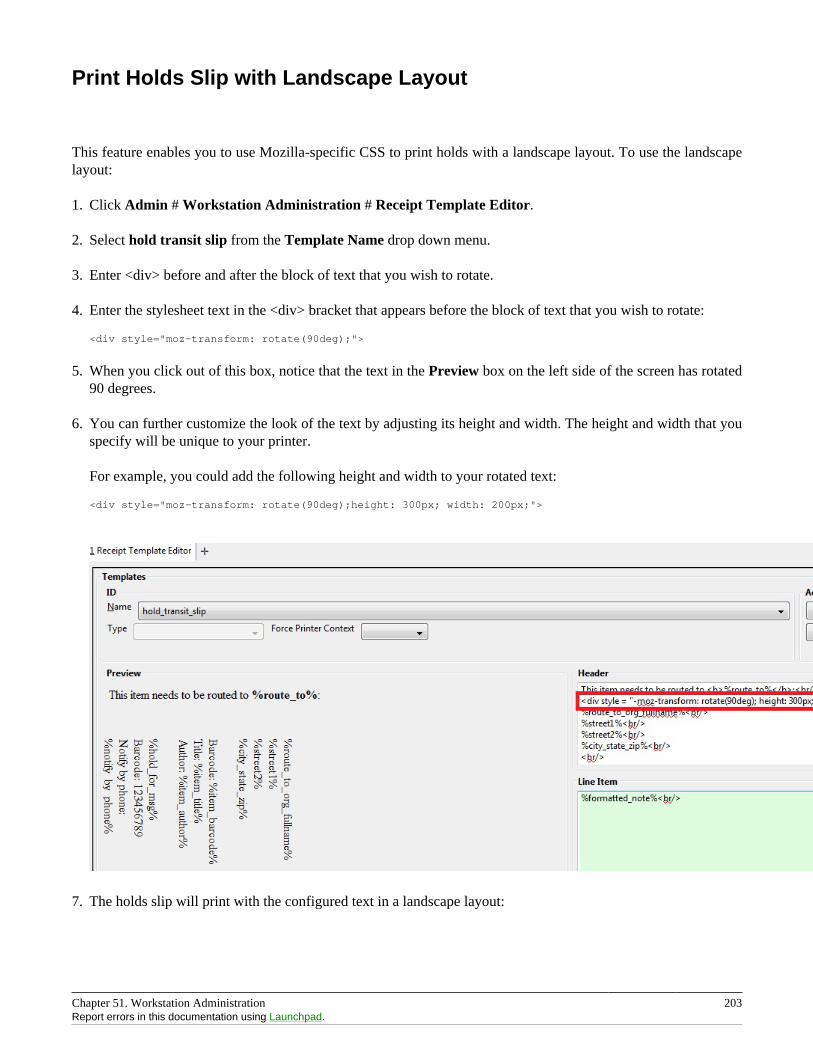
Chapter 51. Workstation Administration 203Report errors in this documentation using Launchpad.
Print Holds Slip with Landscape Layout
This feature enables you to use Mozilla-specific CSS to print holds with a landscape layout. To use the landscapelayout:
1. Click Admin # Workstation Administration # Receipt Template Editor.
2. Select hold transit slip from the Template Name drop down menu.
3. Enter <div> before and after the block of text that you wish to rotate.
4. Enter the stylesheet text in the <div> bracket that appears before the block of text that you wish to rotate:
<div style="moz-transform: rotate(90deg);">
5. When you click out of this box, notice that the text in the Preview box on the left side of the screen has rotated90 degrees.
6. You can further customize the look of the text by adjusting its height and width. The height and width that youspecify will be unique to your printer.
For example, you could add the following height and width to your rotated text:
<div style="moz-transform: rotate(90deg);height: 300px; width: 200px;">
7. The holds slip will print with the configured text in a landscape layout:
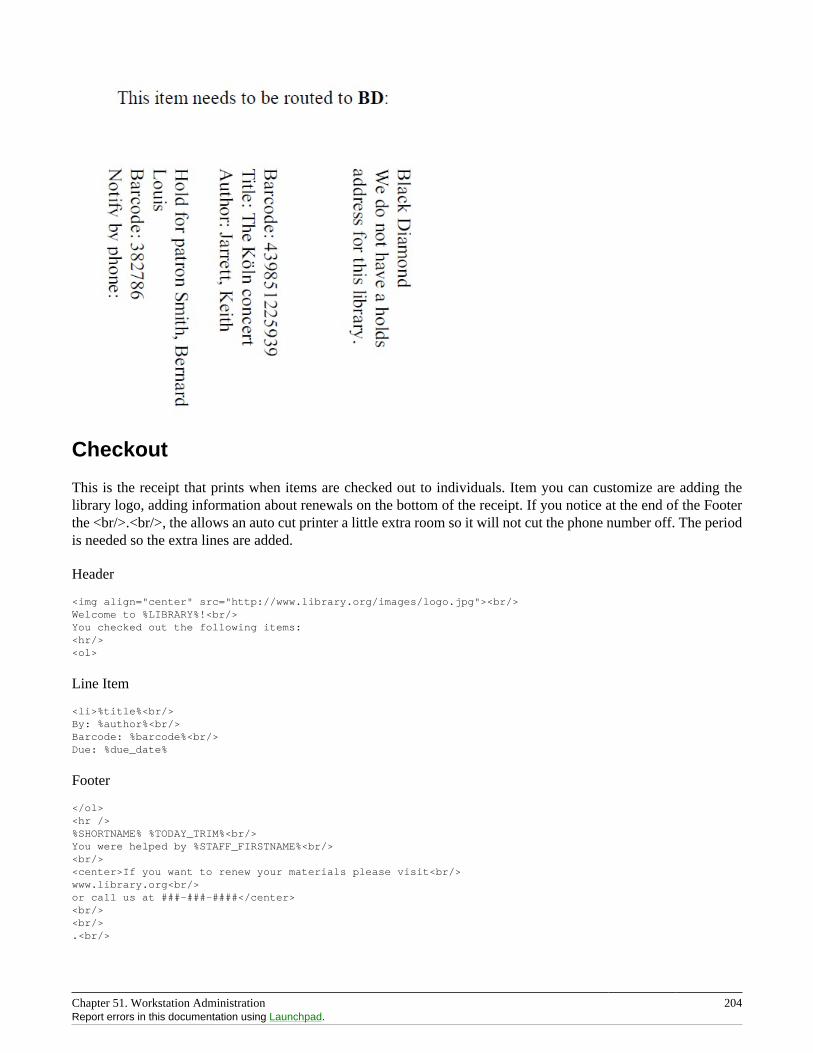
Chapter 51. Workstation Administration 204Report errors in this documentation using Launchpad.
Checkout
This is the receipt that prints when items are checked out to individuals. Item you can customize are adding thelibrary logo, adding information about renewals on the bottom of the receipt. If you notice at the end of the Footerthe <br/>.<br/>, the allows an auto cut printer a little extra room so it will not cut the phone number off. The periodis needed so the extra lines are added.
Header
<img align="center" src="http://www.library.org/images/logo.jpg"><br/>Welcome to %LIBRARY%!<br/>You checked out the following items:<hr/><ol>
Line Item
<li>%title%<br/>By: %author%<br/>Barcode: %barcode%<br/>Due: %due_date%
Footer
</ol><hr />%SHORTNAME% %TODAY_TRIM%<br/>You were helped by %STAFF_FIRSTNAME%<br/><br/><center>If you want to renew your materials please visit<br/>www.library.org<br/>or call us at ###-###-####</center><br/><br/>.<br/>
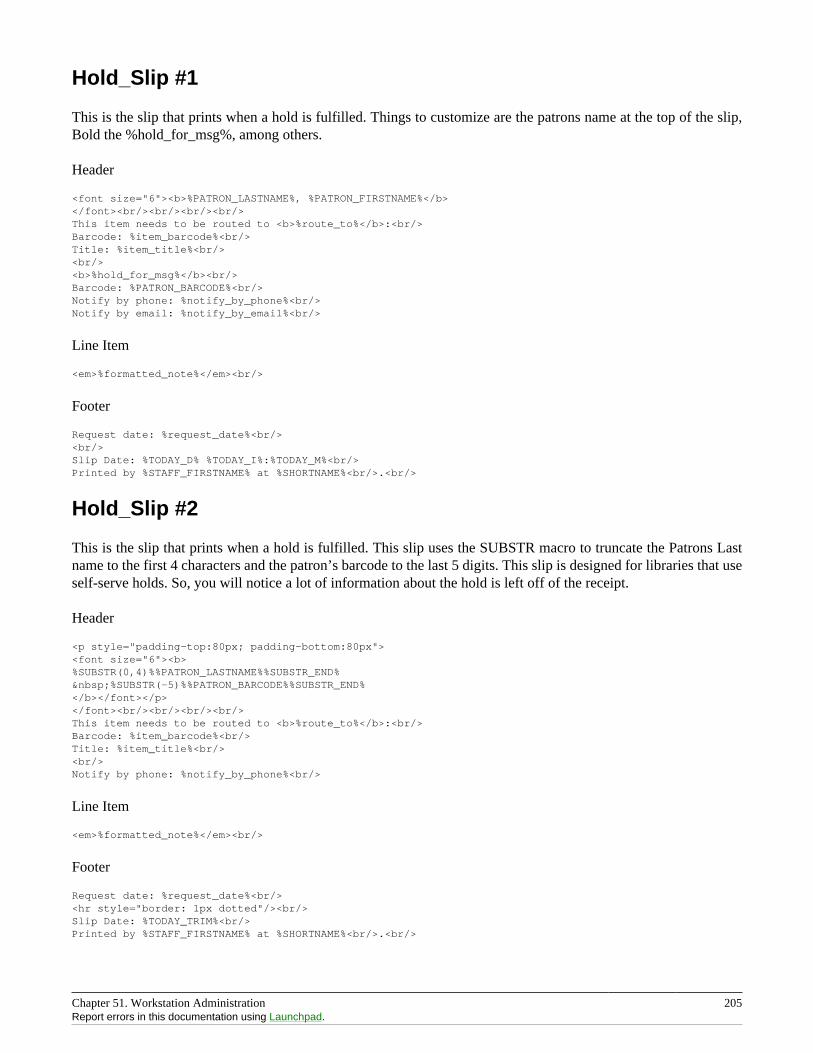
Chapter 51. Workstation Administration 205Report errors in this documentation using Launchpad.
Hold_Slip #1
This is the slip that prints when a hold is fulfilled. Things to customize are the patrons name at the top of the slip,Bold the %hold_for_msg%, among others.
Header
<font size="6"><b>%PATRON_LASTNAME%, %PATRON_FIRSTNAME%</b></font><br/><br/><br/><br/>This item needs to be routed to <b>%route_to%</b>:<br/>Barcode: %item_barcode%<br/>Title: %item_title%<br/><br/><b>%hold_for_msg%</b><br/>Barcode: %PATRON_BARCODE%<br/>Notify by phone: %notify_by_phone%<br/>Notify by email: %notify_by_email%<br/>
Line Item
<em>%formatted_note%</em><br/>
Footer
Request date: %request_date%<br/><br/>Slip Date: %TODAY_D% %TODAY_I%:%TODAY_M%<br/>Printed by %STAFF_FIRSTNAME% at %SHORTNAME%<br/>.<br/>
Hold_Slip #2
This is the slip that prints when a hold is fulfilled. This slip uses the SUBSTR macro to truncate the Patrons Lastname to the first 4 characters and the patron’s barcode to the last 5 digits. This slip is designed for libraries that useself-serve holds. So, you will notice a lot of information about the hold is left off of the receipt.
Header
<p style="padding-top:80px; padding-bottom:80px"><font size="6"><b>%SUBSTR(0,4)%%PATRON_LASTNAME%%SUBSTR_END% %SUBSTR(-5)%%PATRON_BARCODE%%SUBSTR_END%</b></font></p></font><br/><br/><br/><br/>This item needs to be routed to <b>%route_to%</b>:<br/>Barcode: %item_barcode%<br/>Title: %item_title%<br/><br/>Notify by phone: %notify_by_phone%<br/>
Line Item
<em>%formatted_note%</em><br/>
Footer
Request date: %request_date%<br/><hr style="border: 1px dotted"/><br/>Slip Date: %TODAY_TRIM%<br/>Printed by %STAFF_FIRSTNAME% at %SHORTNAME%<br/>.<br/>
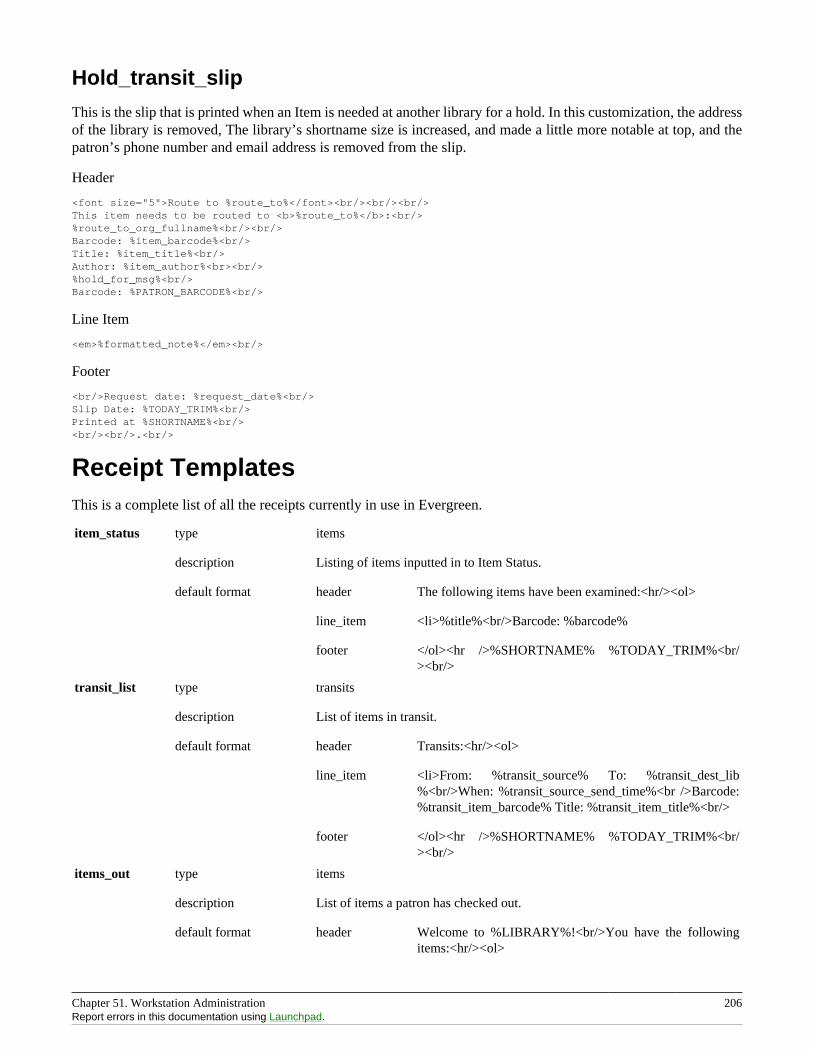
Chapter 51. Workstation Administration 206Report errors in this documentation using Launchpad.
Hold_transit_slip
This is the slip that is printed when an Item is needed at another library for a hold. In this customization, the addressof the library is removed, The library’s shortname size is increased, and made a little more notable at top, and thepatron’s phone number and email address is removed from the slip.
Header
<font size="5">Route to %route_to%</font><br/><br/><br/>This item needs to be routed to <b>%route_to%</b>:<br/>%route_to_org_fullname%<br/><br/>Barcode: %item_barcode%<br/>Title: %item_title%<br/>Author: %item_author%<br><br/>%hold_for_msg%<br/>Barcode: %PATRON_BARCODE%<br/>
Line Item
<em>%formatted_note%</em><br/>
Footer
<br/>Request date: %request_date%<br/>Slip Date: %TODAY_TRIM%<br/>Printed at %SHORTNAME%<br/><br/><br/>.<br/>
Receipt TemplatesThis is a complete list of all the receipts currently in use in Evergreen.
item_status type items
description Listing of items inputted in to Item Status.
default format header The following items have been examined:<hr/><ol>
line_item <li>%title%<br/>Barcode: %barcode%
footer </ol><hr />%SHORTNAME% %TODAY_TRIM%<br/><br/>
transit_list type transits
description List of items in transit.
default format header Transits:<hr/><ol>
line_item <li>From: %transit_source% To: %transit_dest_lib%<br/>When: %transit_source_send_time%<br />Barcode:%transit_item_barcode% Title: %transit_item_title%<br/>
footer </ol><hr />%SHORTNAME% %TODAY_TRIM%<br/><br/>
items_out type items
description List of items a patron has checked out.
default format header Welcome to %LIBRARY%!<br/>You have the followingitems:<hr/><ol>

Chapter 51. Workstation Administration 207Report errors in this documentation using Launchpad.
line_item <li>%title%<br/>Barcode: %barcode% Due: %due_date%
footer </ol><hr />%SHORTNAME% %TODAY_TRIM%<br/>You were helped by %STAFF_FIRSTNAME%<br/><br/>
renew type items
description List of items that have been renewed using the renew item screen
default format header Welcome to %LIBRARY%!<br/>You have renewed thefollowing items::<hr/><ol>
line_item <li>%title%<br/>Barcode: %barcode% Due: %due_date%
footer </ol><hr />%SHORTNAME% %TODAY_TRIM%<br/>You were helped by %STAFF_FIRSTNAME%<br/><br/>
checkout type items
description List of items currently checked out to the patron during this transaction.
default format header Welcome to %LIBRARY%!<br/>You checked out thefollowing items::<hr/><ol>
line_item <li>%title%<br/>Barcode: %barcode% Due: %due_date%
footer </ol><hr />%SHORTNAME% %TODAY_TRIM%<br/>You were helped by %STAFF_FIRSTNAME%<br/><br/>
offline_checkout type offline_checkout
description List of items checked out via the Standalone interface. Remember thatStandalone interface does not have access to the database.
default format header Patron %patron_barcode%<br/>You checked out thefollowing items::<hr/><ol>
line_item <li>Barcode: %barcode%<br/>Due: %due_date%
footer </ol><hr />%TODAY_TRIM%<br/><br/>
checkin type items
description List of items that have just been entered in to the check-in screens.
default format header You checked in the following items:<hr/><ol>
line_item <li>%title%<br/>Barcode: %barcode% Call Number:%call_number%
footer </ol><hr />%SHORTNAME% %TODAY_TRIM%<br/><br/>
bill_payment type payment
description Patron payment receipt
default format header Welcome to %LIBRARY%!<br/> A receipt of yourtransaction: <hr/> <table width="100%"> <tr> <td>OriginalBalance:</td> <td align="right">$%original_balance%</td></tr> <tr> <td>Payment Method:</td> <td align="right">
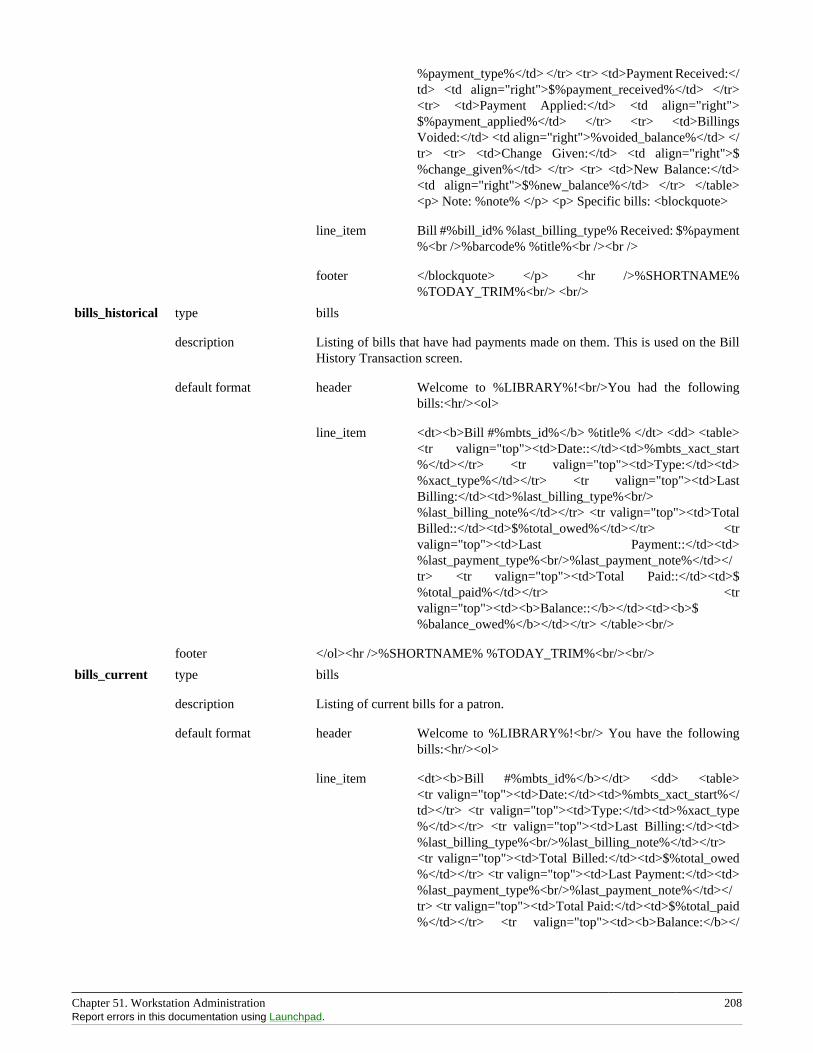
Chapter 51. Workstation Administration 208Report errors in this documentation using Launchpad.
%payment_type%</td> </tr> <tr> <td>Payment Received:</td> <td align="right">$%payment_received%</td> </tr><tr> <td>Payment Applied:</td> <td align="right">$%payment_applied%</td> </tr> <tr> <td>BillingsVoided:</td> <td align="right">%voided_balance%</td> </tr> <tr> <td>Change Given:</td> <td align="right">$%change_given%</td> </tr> <tr> <td>New Balance:</td><td align="right">$%new_balance%</td> </tr> </table><p> Note: %note% </p> <p> Specific bills: <blockquote>
line_item Bill #%bill_id% %last_billing_type% Received: $%payment%<br />%barcode% %title%<br /><br />
footer </blockquote> </p> <hr />%SHORTNAME%%TODAY_TRIM%<br/> <br/>
bills_historical type bills
description Listing of bills that have had payments made on them. This is used on the BillHistory Transaction screen.
default format header Welcome to %LIBRARY%!<br/>You had the followingbills:<hr/><ol>
line_item <dt><b>Bill #%mbts_id%</b> %title% </dt> <dd> <table><tr valign="top"><td>Date::</td><td>%mbts_xact_start%</td></tr> <tr valign="top"><td>Type:</td><td>%xact_type%</td></tr> <tr valign="top"><td>LastBilling:</td><td>%last_billing_type%<br/>%last_billing_note%</td></tr> <tr valign="top"><td>TotalBilled::</td><td>$%total_owed%</td></tr> <trvalign="top"><td>Last Payment::</td><td>%last_payment_type%<br/>%last_payment_note%</td></tr> <tr valign="top"><td>Total Paid::</td><td>$%total_paid%</td></tr> <trvalign="top"><td><b>Balance::</b></td><td><b>$%balance_owed%</b></td></tr> </table><br/>
footer </ol><hr />%SHORTNAME% %TODAY_TRIM%<br/><br/>
bills_current type bills
description Listing of current bills for a patron.
default format header Welcome to %LIBRARY%!<br/> You have the followingbills:<hr/><ol>
line_item <dt><b>Bill #%mbts_id%</b></dt> <dd> <table><tr valign="top"><td>Date:</td><td>%mbts_xact_start%</td></tr> <tr valign="top"><td>Type:</td><td>%xact_type%</td></tr> <tr valign="top"><td>Last Billing:</td><td>%last_billing_type%<br/>%last_billing_note%</td></tr><tr valign="top"><td>Total Billed:</td><td>$%total_owed%</td></tr> <tr valign="top"><td>Last Payment:</td><td>%last_payment_type%<br/>%last_payment_note%</td></tr> <tr valign="top"><td>Total Paid:</td><td>$%total_paid%</td></tr> <tr valign="top"><td><b>Balance:</b></
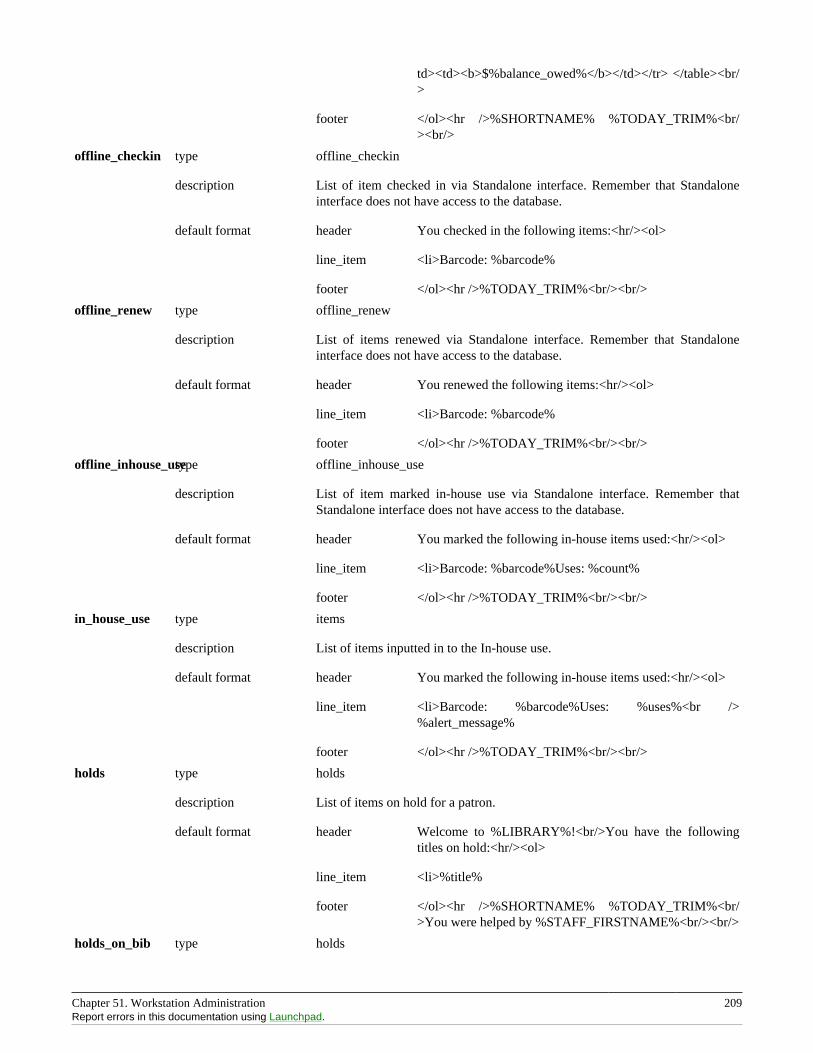
Chapter 51. Workstation Administration 209Report errors in this documentation using Launchpad.
td><td><b>$%balance_owed%</b></td></tr> </table><br/>
footer </ol><hr />%SHORTNAME% %TODAY_TRIM%<br/><br/>
offline_checkin type offline_checkin
description List of item checked in via Standalone interface. Remember that Standaloneinterface does not have access to the database.
default format header You checked in the following items:<hr/><ol>
line_item <li>Barcode: %barcode%
footer </ol><hr />%TODAY_TRIM%<br/><br/>
offline_renew type offline_renew
description List of items renewed via Standalone interface. Remember that Standaloneinterface does not have access to the database.
default format header You renewed the following items:<hr/><ol>
line_item <li>Barcode: %barcode%
footer </ol><hr />%TODAY_TRIM%<br/><br/>
offline_inhouse_usetype offline_inhouse_use
description List of item marked in-house use via Standalone interface. Remember thatStandalone interface does not have access to the database.
default format header You marked the following in-house items used:<hr/><ol>
line_item <li>Barcode: %barcode%Uses: %count%
footer </ol><hr />%TODAY_TRIM%<br/><br/>
in_house_use type items
description List of items inputted in to the In-house use.
default format header You marked the following in-house items used:<hr/><ol>
line_item <li>Barcode: %barcode%Uses: %uses%<br />%alert_message%
footer </ol><hr />%TODAY_TRIM%<br/><br/>
holds type holds
description List of items on hold for a patron.
default format header Welcome to %LIBRARY%!<br/>You have the followingtitles on hold:<hr/><ol>
line_item <li>%title%
footer </ol><hr />%SHORTNAME% %TODAY_TRIM%<br/>You were helped by %STAFF_FIRSTNAME%<br/><br/>
holds_on_bib type holds

Chapter 51. Workstation Administration 210Report errors in this documentation using Launchpad.
description This list is used to print the holds on a title record.
default format header Welcome to %LIBRARY%!<br/>You have the followingtitles on hold:<hr/><ol>
line_item <li>%title%
footer </ol><hr />%SHORTNAME% %TODAY_TRIM%<br/>You were helped by %STAFF_FIRSTNAME%<br/><br/>
holds_for_patrondescription This list is used to print the holds on a patron record.
type holds
default format header Welcome to %LIBRARY%!<br/>You have the followingtitles on hold:<hr/><ol>
line_item <li>%title%
footer </ol><hr />%SHORTNAME% %TODAY_TRIM%<br/>You were helped by %STAFF_FIRSTNAME%<br/><br/>
holds_shelf type holds
description This list is used to print the holds on the holds shelf.
default format header Welcome to %LIBRARY%!<br/>You have the followingtitles on hold:<hr/><ol>
line_item <li>%title%
footer </ol><hr />%SHORTNAME% %TODAY_TRIM%<br/>You were helped by %STAFF_FIRSTNAME%<br/><br/>
holds_pull_list type holds
description This list is used to print the holds on the holds pull list.
default format header Welcome to %LIBRARY%!<br/>You have the followingtitles on hold:<hr/><ol>
line_item <li>%title%
footer </ol><hr />%SHORTNAME% %TODAY_TRIM%<br/>You were helped by %STAFF_FIRSTNAME%<br/><br/>
hold_slip type holds
description This is printed when a hold is fulfilled.
default format header This item needs to be routed to<b>%route_to%</b>:<br/>Barcode: %item_barcode%<br/>Title: %item_title%<br/><br/>%hold_for_msg%<br/>Barcode: %PATRON_BARCODE%<br/>Notify by phone:%notify_by_phone%<br/>Notified by text: %notify_by_text%<br/>Notified by email: %notify_by_email%<br/>
line_item %formatted_note%<br/>
footer <br/>Request date: %request_date%<br/>Slip Date:%TODAY_TRIM%<br/>Printed by
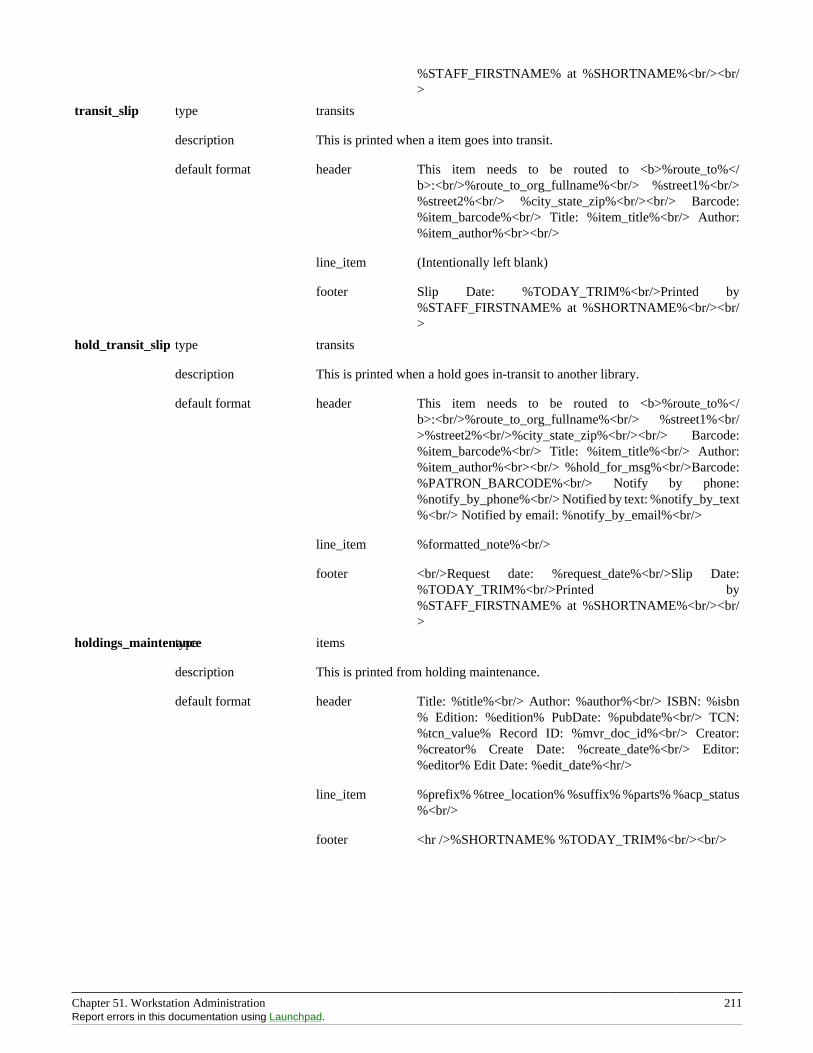
Chapter 51. Workstation Administration 211Report errors in this documentation using Launchpad.
%STAFF_FIRSTNAME% at %SHORTNAME%<br/><br/>
transit_slip type transits
description This is printed when a item goes into transit.
default format header This item needs to be routed to <b>%route_to%</b>:<br/>%route_to_org_fullname%<br/> %street1%<br/>%street2%<br/> %city_state_zip%<br/><br/> Barcode:%item_barcode%<br/> Title: %item_title%<br/> Author:%item_author%<br><br/>
line_item (Intentionally left blank)
footer Slip Date: %TODAY_TRIM%<br/>Printed by%STAFF_FIRSTNAME% at %SHORTNAME%<br/><br/>
hold_transit_slip type transits
description This is printed when a hold goes in-transit to another library.
default format header This item needs to be routed to <b>%route_to%</b>:<br/>%route_to_org_fullname%<br/> %street1%<br/>%street2%<br/>%city_state_zip%<br/><br/> Barcode:%item_barcode%<br/> Title: %item_title%<br/> Author:%item_author%<br><br/> %hold_for_msg%<br/>Barcode:%PATRON_BARCODE%<br/> Notify by phone:%notify_by_phone%<br/> Notified by text: %notify_by_text%<br/> Notified by email: %notify_by_email%<br/>
line_item %formatted_note%<br/>
footer <br/>Request date: %request_date%<br/>Slip Date:%TODAY_TRIM%<br/>Printed by%STAFF_FIRSTNAME% at %SHORTNAME%<br/><br/>
holdings_maintenancetype items
description This is printed from holding maintenance.
default format header Title: %title%<br/> Author: %author%<br/> ISBN: %isbn% Edition: %edition% PubDate: %pubdate%<br/> TCN:%tcn_value% Record ID: %mvr_doc_id%<br/> Creator:%creator% Create Date: %create_date%<br/> Editor:%editor% Edit Date: %edit_date%<hr/>
line_item %prefix% %tree_location% %suffix% %parts% %acp_status%<br/>
footer <hr />%SHORTNAME% %TODAY_TRIM%<br/><br/>
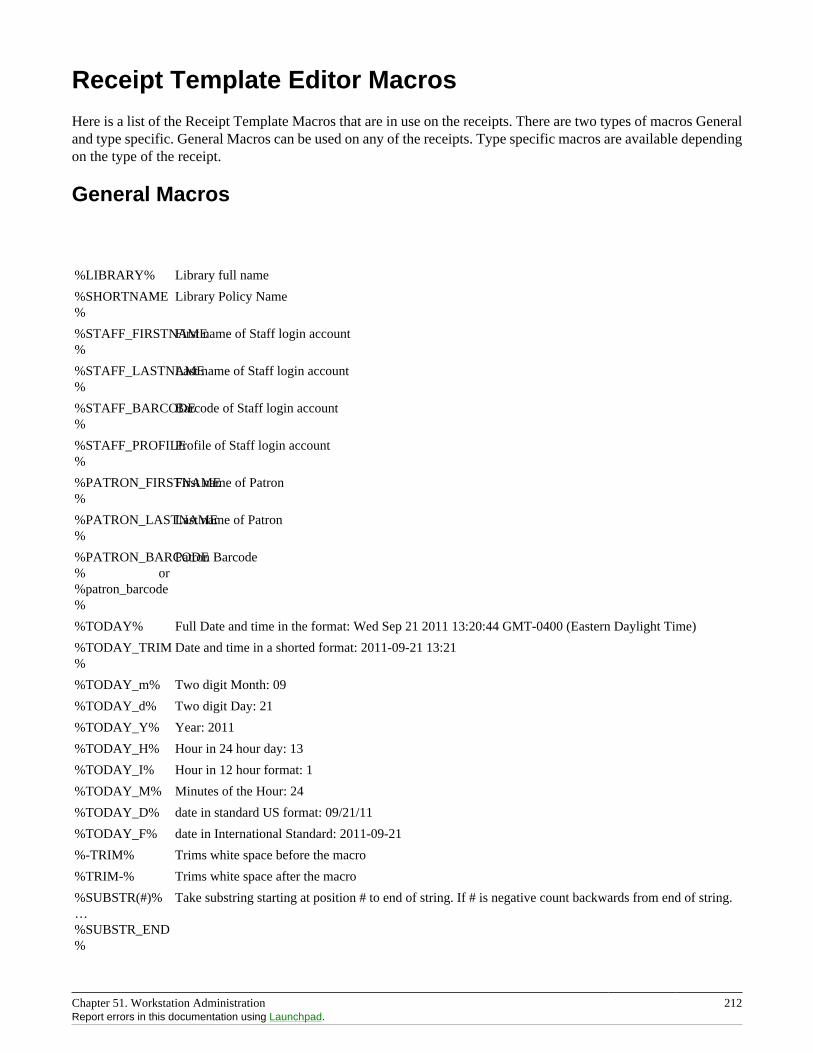
Chapter 51. Workstation Administration 212Report errors in this documentation using Launchpad.
Receipt Template Editor Macros
Here is a list of the Receipt Template Macros that are in use on the receipts. There are two types of macros Generaland type specific. General Macros can be used on any of the receipts. Type specific macros are available dependingon the type of the receipt.
General Macros
%LIBRARY% Library full name
%SHORTNAME%
Library Policy Name
%STAFF_FIRSTNAME%
First name of Staff login account
%STAFF_LASTNAME%
Last name of Staff login account
%STAFF_BARCODE%
Barcode of Staff login account
%STAFF_PROFILE%
Profile of Staff login account
%PATRON_FIRSTNAME%
First name of Patron
%PATRON_LASTNAME%
Last name of Patron
%PATRON_BARCODE% or%patron_barcode%
Patron Barcode
%TODAY% Full Date and time in the format: Wed Sep 21 2011 13:20:44 GMT-0400 (Eastern Daylight Time)
%TODAY_TRIM%
Date and time in a shorted format: 2011-09-21 13:21
%TODAY_m% Two digit Month: 09
%TODAY_d% Two digit Day: 21
%TODAY_Y% Year: 2011
%TODAY_H% Hour in 24 hour day: 13
%TODAY_I% Hour in 12 hour format: 1
%TODAY_M% Minutes of the Hour: 24
%TODAY_D% date in standard US format: 09/21/11
%TODAY_F% date in International Standard: 2011-09-21
%-TRIM% Trims white space before the macro
%TRIM-% Trims white space after the macro
%SUBSTR(#)%…%SUBSTR_END%
Take substring starting at position # to end of string. If # is negative count backwards from end of string.
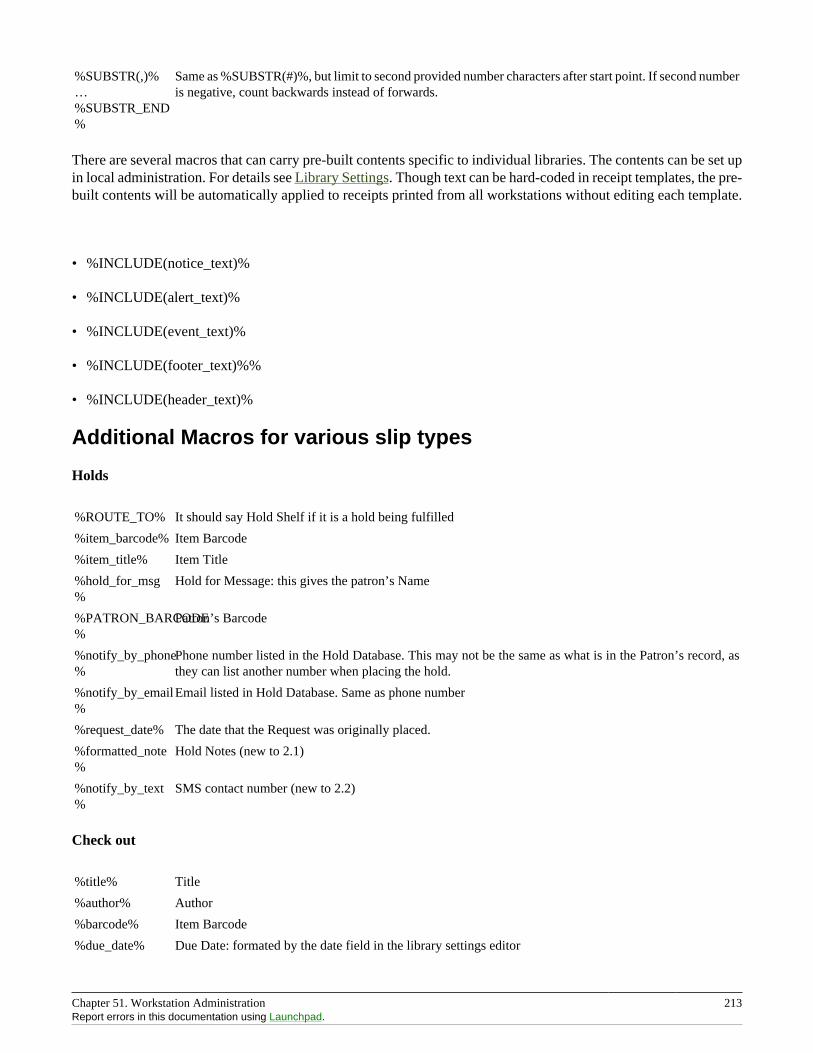
Chapter 51. Workstation Administration 213Report errors in this documentation using Launchpad.
%SUBSTR(,)%…%SUBSTR_END%
Same as %SUBSTR(#)%, but limit to second provided number characters after start point. If second numberis negative, count backwards instead of forwards.
There are several macros that can carry pre-built contents specific to individual libraries. The contents can be set upin local administration. For details see Library Settings. Though text can be hard-coded in receipt templates, the pre-built contents will be automatically applied to receipts printed from all workstations without editing each template.
• %INCLUDE(notice_text)%
• %INCLUDE(alert_text)%
• %INCLUDE(event_text)%
• %INCLUDE(footer_text)%%
• %INCLUDE(header_text)%
Additional Macros for various slip types
Holds
%ROUTE_TO% It should say Hold Shelf if it is a hold being fulfilled
%item_barcode% Item Barcode
%item_title% Item Title
%hold_for_msg%
Hold for Message: this gives the patron’s Name
%PATRON_BARCODE%
Patron’s Barcode
%notify_by_phone%
Phone number listed in the Hold Database. This may not be the same as what is in the Patron’s record, asthey can list another number when placing the hold.
%notify_by_email%
Email listed in Hold Database. Same as phone number
%request_date% The date that the Request was originally placed.
%formatted_note%
Hold Notes (new to 2.1)
%notify_by_text%
SMS contact number (new to 2.2)
Check out
%title% Title
%author% Author
%barcode% Item Barcode
%due_date% Due Date: formated by the date field in the library settings editor
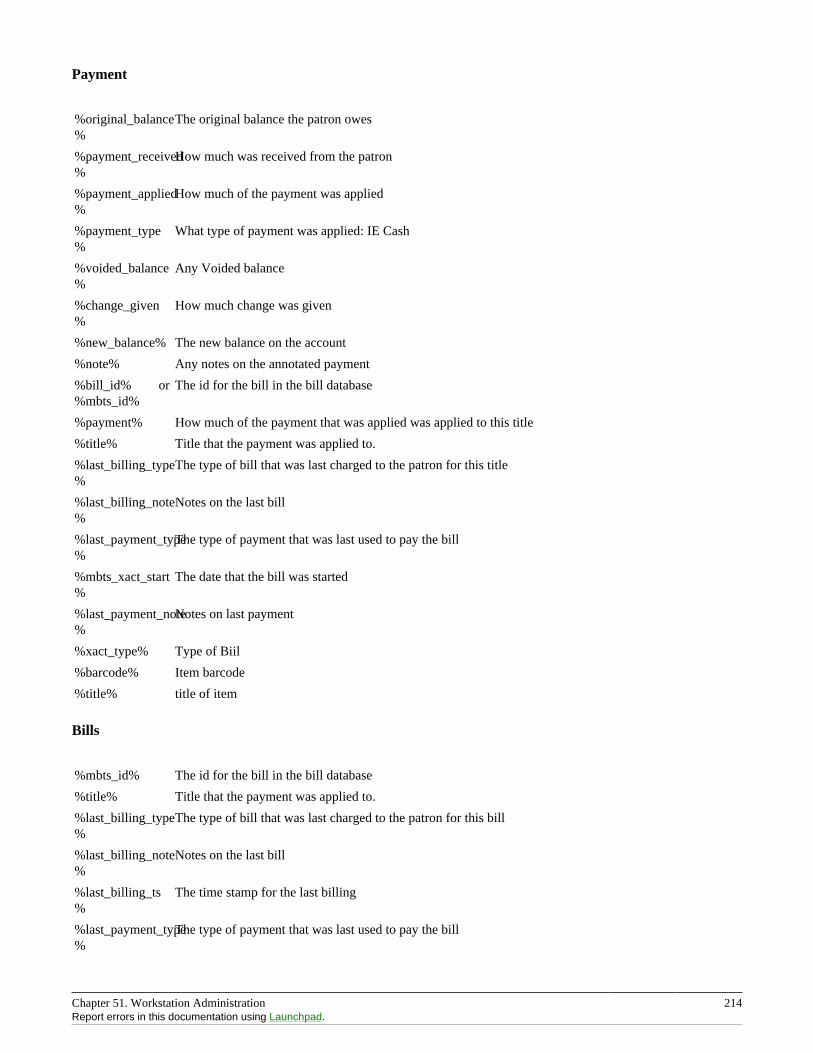
Chapter 51. Workstation Administration 214Report errors in this documentation using Launchpad.
Payment
%original_balance%
The original balance the patron owes
%payment_received%
How much was received from the patron
%payment_applied%
How much of the payment was applied
%payment_type%
What type of payment was applied: IE Cash
%voided_balance%
Any Voided balance
%change_given%
How much change was given
%new_balance% The new balance on the account
%note% Any notes on the annotated payment
%bill_id% or%mbts_id%
The id for the bill in the bill database
%payment% How much of the payment that was applied was applied to this title
%title% Title that the payment was applied to.
%last_billing_type%
The type of bill that was last charged to the patron for this title
%last_billing_note%
Notes on the last bill
%last_payment_type%
The type of payment that was last used to pay the bill
%mbts_xact_start%
The date that the bill was started
%last_payment_note%
Notes on last payment
%xact_type% Type of Biil
%barcode% Item barcode
%title% title of item
Bills
%mbts_id% The id for the bill in the bill database
%title% Title that the payment was applied to.
%last_billing_type%
The type of bill that was last charged to the patron for this bill
%last_billing_note%
Notes on the last bill
%last_billing_ts%
The time stamp for the last billing
%last_payment_type%
The type of payment that was last used to pay the bill
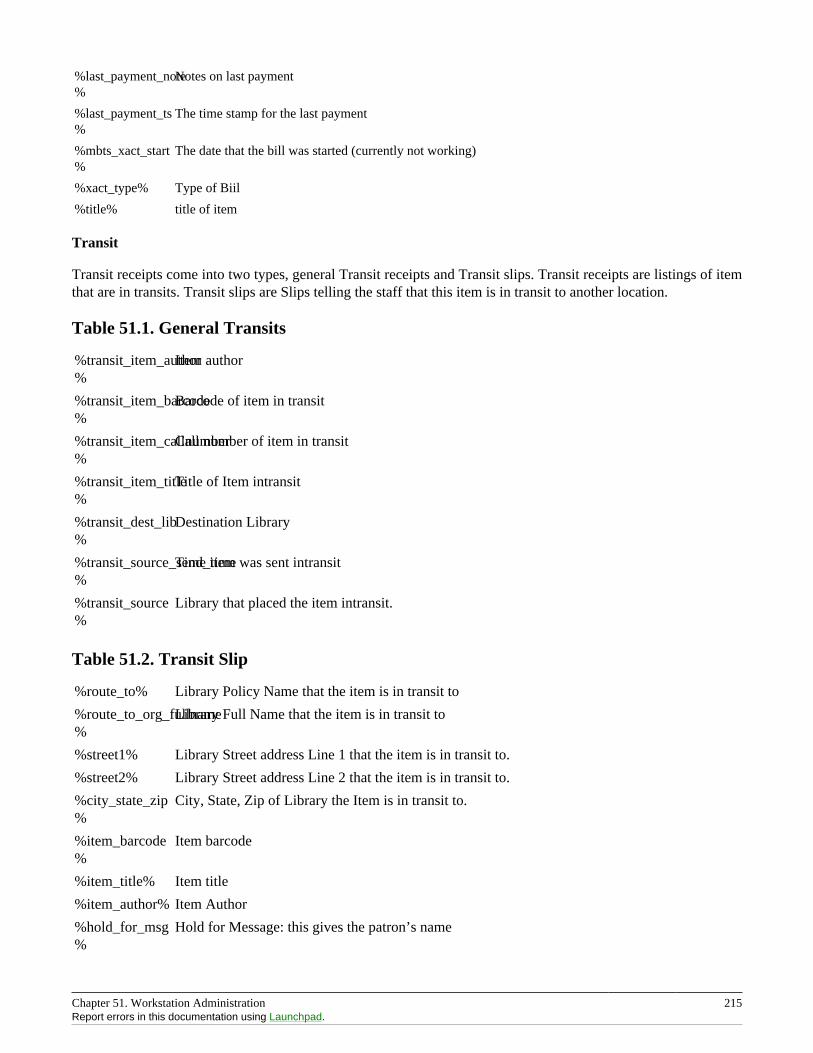
Chapter 51. Workstation Administration 215Report errors in this documentation using Launchpad.
%last_payment_note%
Notes on last payment
%last_payment_ts%
The time stamp for the last payment
%mbts_xact_start%
The date that the bill was started (currently not working)
%xact_type% Type of Biil
%title% title of item
Transit
Transit receipts come into two types, general Transit receipts and Transit slips. Transit receipts are listings of itemthat are in transits. Transit slips are Slips telling the staff that this item is in transit to another location.
Table 51.1. General Transits
%transit_item_author%
Item author
%transit_item_barcode%
Barcode of item in transit
%transit_item_callnumber%
Call number of item in transit
%transit_item_title%
Title of Item intransit
%transit_dest_lib%
Destination Library
%transit_source_send_time%
Time item was sent intransit
%transit_source%
Library that placed the item intransit.
Table 51.2. Transit Slip
%route_to% Library Policy Name that the item is in transit to
%route_to_org_fullname%
Library Full Name that the item is in transit to
%street1% Library Street address Line 1 that the item is in transit to.
%street2% Library Street address Line 2 that the item is in transit to.
%city_state_zip%
City, State, Zip of Library the Item is in transit to.
%item_barcode%
Item barcode
%item_title% Item title
%item_author% Item Author
%hold_for_msg%
Hold for Message: this gives the patron’s name
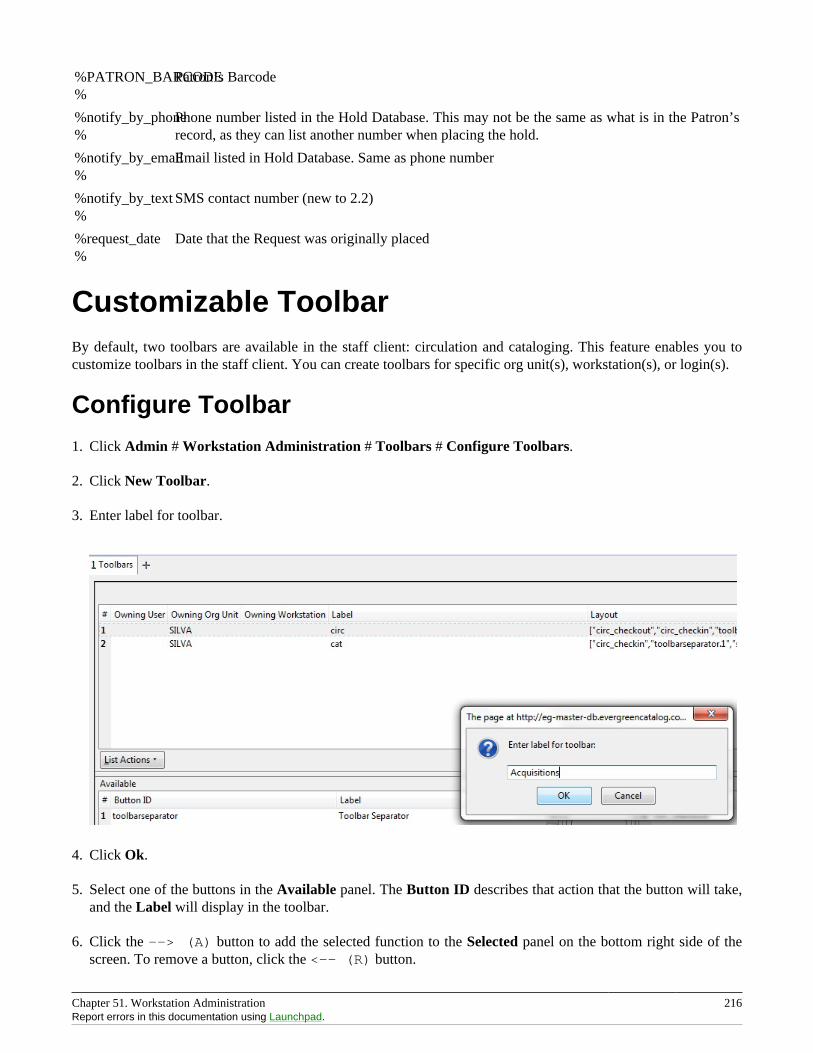
Chapter 51. Workstation Administration 216Report errors in this documentation using Launchpad.
%PATRON_BARCODE%
Patron’s Barcode
%notify_by_phone%
Phone number listed in the Hold Database. This may not be the same as what is in the Patron’srecord, as they can list another number when placing the hold.
%notify_by_email%
Email listed in Hold Database. Same as phone number
%notify_by_text%
SMS contact number (new to 2.2)
%request_date%
Date that the Request was originally placed
Customizable ToolbarBy default, two toolbars are available in the staff client: circulation and cataloging. This feature enables you tocustomize toolbars in the staff client. You can create toolbars for specific org unit(s), workstation(s), or login(s).
Configure Toolbar
1. Click Admin # Workstation Administration # Toolbars # Configure Toolbars.
2. Click New Toolbar.
3. Enter label for toolbar.
4. Click Ok.
5. Select one of the buttons in the Available panel. The Button ID describes that action that the button will take,and the Label will display in the toolbar.
6. Click the --> (A) button to add the selected function to the Selected panel on the bottom right side of thescreen. To remove a button, click the <-- (R) button.
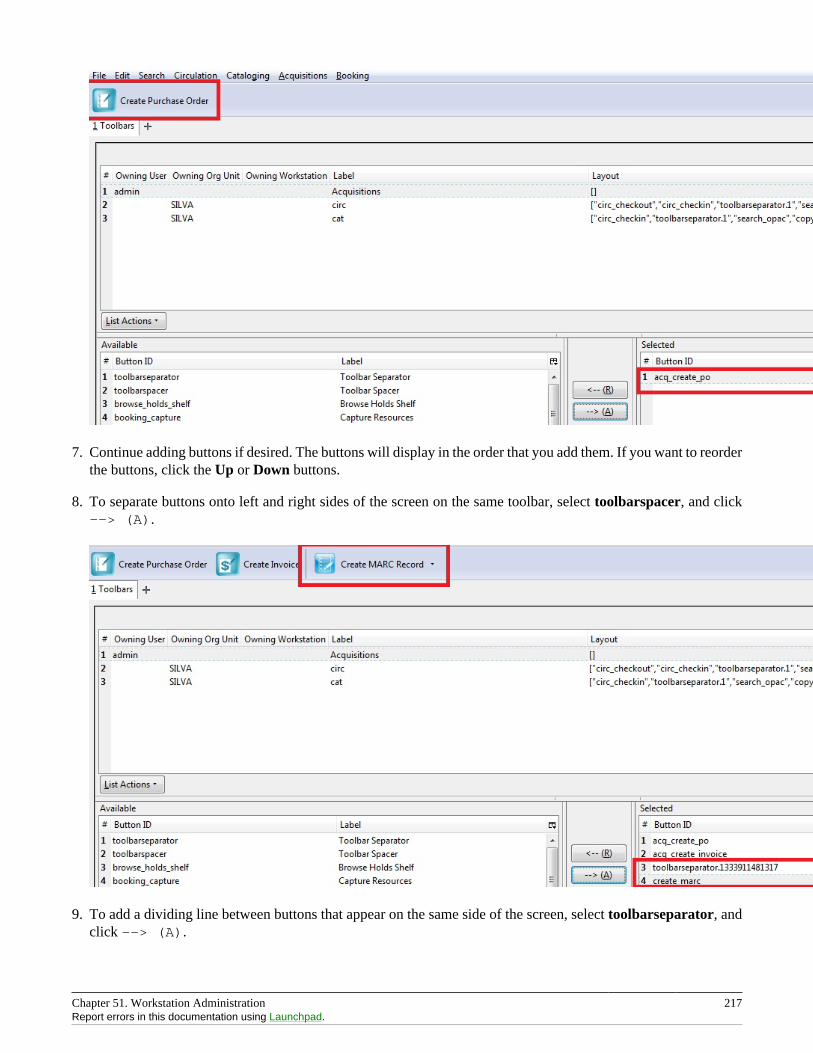
Chapter 51. Workstation Administration 217Report errors in this documentation using Launchpad.
7. Continue adding buttons if desired. The buttons will display in the order that you add them. If you want to reorderthe buttons, click the Up or Down buttons.
8. To separate buttons onto left and right sides of the screen on the same toolbar, select toolbarspacer, and click--> (A).
9. To add a dividing line between buttons that appear on the same side of the screen, select toolbarseparator, andclick --> (A).

Chapter 51. Workstation Administration 218Report errors in this documentation using Launchpad.
10.At the bottom of the screen, choose the owner of this toolbar. If you click Owning Org Unit, then the owningorg unit that you specify will display this toolbar. Select the owning org unit from the drop down menu. Therule of parental inheritance applies, so all child units will inherit the toolbars of their parental units. If you clickOwning Workstation, then the workstation to which you are logged in when you created the toolbar will displaythis toolbar. If you select Owning User, then your login has access to that toolbar.
11.When you are finished creating the toolbar, click Save Toolbar. Any toolbar to which you have access displaysunder Admin # Workstation Administration # Toolbars # Current.
Permissions
ADMIN_TOOLBAR - Allow a user to create, edit, and delete custom toolbars

Part VI. System AdministrationFrom the Staff Client
Part VI. System Administration From the Staff Client 220
Table of Contents52. Introduction .......................................................................................................................................... 22353. Acquisitions Administration ..................................................................................................................... 224
Acquisitions Settings ........................................................................................................................... 224Cancel/Delay reasons ........................................................................................................................... 224
Create a cancel/delay reason ......................................................................................................... 225Delete a custom cancel/delay reason ............................................................................................... 225
Claiming ............................................................................................................................................ 225Create a claim policy ................................................................................................................... 225Create a claim type ..................................................................................................................... 226Create a claim event type ............................................................................................................. 226Create a claim policy action .......................................................................................................... 227
Currency Types .................................................................................................................................. 227Create a currency type ................................................................................................................. 227Edit a currency type .................................................................................................................... 227
Distribution Formulas .......................................................................................................................... 227Create a distribution formula ......................................................................................................... 228Edit a distribution formula ............................................................................................................ 229
Electronic Data Interchange .................................................................................................................. 229Entering SANs (Standard Address Numbers) ................................................................................... 229Create an EDI Account ................................................................................................................ 230EDI Messages ............................................................................................................................ 232
Exchange Rates .................................................................................................................................. 233Create an exchange rate ............................................................................................................... 233Edit an exchange rate .................................................................................................................. 233
MARC Federated Search ...................................................................................................................... 233Fund Tags .......................................................................................................................................... 234Funding Sources ................................................................................................................................. 235
Create a funding source ............................................................................................................... 235Allocate credits to funding sources ................................................................................................. 235Allocate credits to funds ............................................................................................................... 236Track debits and credits ............................................................................................................... 236
Funds ................................................................................................................................................ 236Create a fund ............................................................................................................................. 236Allocate credits from funding sources to funds ................................................................................. 237Transfer credits between funds ...................................................................................................... 238Track balances and expenditures .................................................................................................... 238Fund reporting ............................................................................................................................ 238Edit a fund ................................................................................................................................. 239Perform fiscal year close-out operation ........................................................................................... 239
Invoice menus .................................................................................................................................... 240Invoice item type ........................................................................................................................ 240Invoice payment method .............................................................................................................. 241
Line Item Features .............................................................................................................................. 241Create a line item alert ................................................................................................................. 241Line item MARC attribute definitions ............................................................................................. 242
Providers ........................................................................................................................................... 242Create a provider ........................................................................................................................ 242Add contact and holdings information to providers ............................................................................ 243Edit a provider ........................................................................................................................... 243
54. Age hold protection ................................................................................................................................ 244Active date display in OPAC ................................................................................................................ 244
55. Authorities ............................................................................................................................................ 245Authority Control Sets ......................................................................................................................... 245

Part VI. System Administration From the Staff Client 221Report errors in this documentation using Launchpad.
Add a Control Set ....................................................................................................................... 245Thesauri ............................................................................................................................................ 245
Add a Thesaurus ......................................................................................................................... 246Authority Fields .................................................................................................................................. 246
Create an Authority Field ............................................................................................................. 246Browse Axes ...................................................................................................................................... 248
Create a new Browse Axis ........................................................................................................... 24856. Best-Hold Selection Sort Order ................................................................................................................ 250
Preconfigured Best-Hold Orders ............................................................................................................ 250Create a New Best-Hold Selection Sort Order .......................................................................................... 250Edit an Existing Best-Hold Selection Sort Order ....................................................................................... 251Choosing the Best-Hold Selection Sort Order ........................................................................................... 251Permissions to use this Feature .............................................................................................................. 252
57. Booking Module Administration ............................................................................................................... 253Creating Bookable Non-Bibliographic Resources ...................................................................................... 253
Create New Resource Type ........................................................................................................... 253Create New Resource Attribute ..................................................................................................... 256Create New Resource Attribute Value ............................................................................................. 257Create New Resource .................................................................................................................. 258Map Resource Attributes and Values to Resources ............................................................................ 259
Editing Non-Bibliographic Resources ..................................................................................................... 260Editing Resource Types ................................................................................................................ 260
Deleting Non-bibliographic Resources .................................................................................................... 26058. Call Number Prefixes and Suffixes ........................................................................................................... 261
Configure call number prefixes .............................................................................................................. 261Configure call number suffixes .............................................................................................................. 261Apply Call Number Prefixes and Suffixes ............................................................................................... 262
59. Circulation Limit Sets ............................................................................................................................. 263Maximum Checkout by Copy Location ................................................................................................... 263
60. Copy Status .......................................................................................................................................... 266Adding Copy Statuses .......................................................................................................................... 267Deleting Copy Statuses ........................................................................................................................ 267Editing Copy Statuses .......................................................................................................................... 267
61. Floating Groups ..................................................................................................................................... 268Floating Groups .................................................................................................................................. 268Floating Group Members ...................................................................................................................... 268
Org Unit .................................................................................................................................... 268Stop Depth ................................................................................................................................. 268Max Depth ................................................................................................................................. 268Exclude ..................................................................................................................................... 268
Examples ........................................................................................................................................... 268Float Everywhere ........................................................................................................................ 268Float Within System .................................................................................................................... 269Float To All Branches ................................................................................................................. 269Float To All Branches Within System ............................................................................................. 269Float Between BR1 and BR3 ........................................................................................................ 270Float Everywhere Except BM1 ...................................................................................................... 270Float into, but not out of, BR2 ...................................................................................................... 270
62. MARC Import Remove Fields ................................................................................................................. 272Create a MARC Import Remove Fields profile ......................................................................................... 272Import Options ................................................................................................................................... 273Permissions to use this Feature .............................................................................................................. 276
63. MARC Record Attributes ........................................................................................................................ 277Multi Valued Fields and Composite Record Attributes ............................................................................... 277
Multi Valued Fields ..................................................................................................................... 277
Part VI. System Administration From the Staff Client 222Report errors in this documentation using Launchpad.
Composite Record Attributes ......................................................................................................... 278Coded Value Maps ...................................................................................................................... 279Composite Attribute Entry Definitions ............................................................................................ 280Search and Icon Formats .............................................................................................................. 282
64. Org Unit Proximity Adjustments .............................................................................................................. 286Org Unit Proximity Adjustments ............................................................................................................ 286Absolute and Relative Adjustments ........................................................................................................ 286Create an Org Unit Proximity Adjustment ............................................................................................... 287Permissions to use this Feature .............................................................................................................. 288
65. User and Group Permissions .................................................................................................................... 289Staff Accounts .................................................................................................................................... 289
Staff Account Permissions ............................................................................................................ 289Granting Additional Permissions .................................................................................................... 289
66. SMS Text Messaging ............................................................................................................................. 292Administrative Setup ........................................................................................................................... 292
Enable Text Messages .................................................................................................................. 292Authenticate Patrons .................................................................................................................... 293Configure SMS Carriers ............................................................................................................... 293Configure Text Message Templates ................................................................................................ 294
Receiving Holds Notices via Text Message ............................................................................................. 296Sending Copy Details via Text Message ................................................................................................. 297
67. User Activity Types ............................................................................................................................... 300Enabling this Feature ........................................................................................................................... 300Using this Feature ............................................................................................................................... 301
68. Z39.50 Servers ...................................................................................................................................... 302Restrict Z39.50 Sources by Permission Group .......................................................................................... 302
Administrative Settings ................................................................................................................ 302Restrict Z39.50 Sources by Permission Group .................................................................................. 303
Storing Z39.50 Server Credentials .......................................................................................................... 303

Chapter 52. Introduction 223
Chapter 52. IntroductionThis part deals with the options in the Server Administration menu found in the staff client.
Chapter 53. Acquisitions Administration 224
Chapter 53. Acquisitions Administration
Acquisitions Settings
Several setting in the Library Settings area of the Admin module pertain to functions in the Acquisitions module.You can access these settings by clicking Admin # Local Administration # Library Settings Editor.
• CAT: Delete bib if all copies are deleted via Acquisitions lineitem cancellation - If you cancel a line item, thenall of the on order copies in the catalog are deleted. If, when you cancel a line item, you also want to delete thebib record, then set this setting to TRUE.
• Allow funds to be rolled over without bringing the money along - enables you to move a fund’s encumbrancesfrom one year to the next without moving unspent money. Unused money is not added to the next year’s fundand is not available for use.
• Allows patrons to create automatic holds from purchase requests.
• Default circulation modifier - This modifier would be applied to items that are created in the acquisitions module
• Default copy location - This copy location would be applied to items that are created in the acquisitions module
• Fund Spending Limit for Block - When the amount remaining in the fund, including spent money andencumbrances, goes below this percentage, attempts to spend from the fund will be blocked.
• Fund Spending Limit for Warning - When the amount remaining in the fund, including spent money andencumbrances, goes below this percentage, attempts to spend from the fund will result in a warning to the staff.
• Rollover Distribution Formulae Funds - When set to true, during fiscal rollover, all distribution formulae willupdate to use new funds.
• Set copy creator as receiver - When receiving a copy in acquisitions, set the copy "creator" to be the staff thatreceived the copy
• Temporary barcode prefix - Temporary barcode prefix for items that are created in the acquisitions module
• Temporary call number prefix - Temporary call number prefix for items that are created in the acquisitions module
Cancel/Delay reasons
The Cancel reasons link enables you to predefine the reasons for which a line item or a PO can be cancelled. Adefault list of reasons appears, but you can add custom reasons to this list. Applying the cancel reason will preventthe item from appearing in a claims list and will allow you to cancel debits associated with the purchase. Cancelreasons also enable you to delay a purchase. For example, you could create a cancel reason of back ordered, andyou could choose to keep the debits associated with the purchase.
Chapter 53. Acquisitions Administration 225Report errors in this documentation using Launchpad.
Create a cancel/delay reason1. To add a new cancel reason, click Administration # Server Administration # Acquisitions # Cancel reasons.
2. Click New Cancel Reason.
3. Select a using library from the drop-down menu. The using library indicates the organizational units whose staffcan use this cancel reason. This menu is populated with the shortnames that you created for your libraries in theorganizational units tree (See Admin # Server Administration # Organizational Units.)
4. Create a label for the cancel reason. This label will appear when you select a cancel reason on an item or a PO.
5. Create a description of the cancel reason. This is a free text field and can comprise any text of your choosing.
6. If you want to retain the debits associated with the cancelled purchase, click the box adjacent to Keep Debits#
7. Click Save.
Delete a custom cancel/delay reasonYou can delete custom cancel reason.
1. Select the checkbox for the custom cancel reason that should be deleted.
2. Click the Delete Selected button.
You cannot select the checkbox for any of the default cancel reasons because the system expects those reasonsto be available to handle EDI order responses.
Claiming
Currently, all claiming is manual, but the admin module enables you to build claim policies and specify the action(s)that users should take to claim items.
Create a claim policyThe claim policy link enables you to name the claim policy and specify the organization that owns it.
1. To create a claim policy, click Admin # Server Administration # Acquisitions # Claim Policies.
2. Create a claim policy name. No limits exist on the number of characters that can be entered in this field.
3. Select an org unit from the drop-down menu. The org unit indicates the organizational units whose staff canuse this claim policy. This menu is populated with the shortnames that you created for your libraries in theorganizational units tree (See Admin # Server Administration # Organizational Units).
The rule of parental inheritance applies to this list.
Chapter 53. Acquisitions Administration 226Report errors in this documentation using Launchpad.
4. Enter a description. No limits exist on the number of characters that can be entered in this field.
5. Click Save.
Create a claim typeThe claim type link enables you to specify the reason for a type of claim.
1. To create a claim type, click Admin # Server Administration # Acquisitions # Claim types.
2. Create a claim type. No limits exist on the number of characters that can be entered in this field.
3. Select an org unit from the drop-down menu. The org unit indicates the organizational units whose staff canuse this claim type. This menu is populated with the shortnames that you created for your libraries in theorganizational units tree (See Admin # Server Administration # Organizational Units).
The rule of parental inheritance applies to this list.
4. Enter a description. No limits exist on the number of characters that can be entered in this field.
5. Click Save.
Create a claim event typeThe claim event type describes the physical action that should occur when an item needs to be claimed. For example,the user should notify the vendor via email that the library is claiming an item.
1. To access the claim event types, click Admin # Server Administration # Acquisitions # Claim event type.
2. Enter a code for the claim event type. No limits exist on the number of characters that can be entered in this field.
3. Select an org unit from the drop-down menu. The org unit indicates the organizational units whose staff canuse this event type. This menu is populated with the shortnames that you created for your libraries in theorganizational units tree (See Admin # Server Administration # Organizational Units).
The rule of parental inheritance applies to this list.
4. Enter a description. No limits exist on the number of characters that can be entered in this field.
5. If this claim is initiated by the user, then check the box adjacent to Library Initiated.
Currently, all claims are initiated by a user. The ILS cannot automatically claim an issue.
6. Click Save.
Chapter 53. Acquisitions Administration 227Report errors in this documentation using Launchpad.
Create a claim policy actionThe claim policy action enables you to specify how long a user should wait before claiming the item.
1. To access claim policy actions, click Admin # Server Administration # Acquisitions #Claim Policy Actions.
2. Select an Action (Event Type) from the drop-down menu.
3. Enter an action interval. This field indicates how long a user should wait before claiming the item.
4. In the Claim Policy ID field, select a claim policy from the drop-down menu.
5. Click Save.
You can create claim cycles by adding multiple claim policy actions to a claim policy.
Currency Types
Currency types can be created and applied to funds in the administrative module. When a fund is applied to a copyor line item for purchase, the item will be purchased in the currency associated with that fund.
Create a currency type1. To create a new currency type, click Admin # Server Administration # Acquisitions # Currency types.
2. Enter the currency code. No limits exist on the number of characters that can be entered in this field.
3. Enter the name of the currency type in Currency Label field. No limits exist on the number of characters thatcan be entered in this field.
4. Click Save.
Edit a currency type1. To edit a currency type, click your cursor in the row that you want to edit. The row will turn blue.
2. Double click. The pop-up box will appear, and you can edit the fields.
3. After making changes, click Save.
From the currency types interface, you can delete currencies that have never been applied to funds or used tomake purchases.
Distribution Formulas
Chapter 53. Acquisitions Administration 228Report errors in this documentation using Launchpad.
Distribution formulas allow you to specify the number of copies that should be distributed to specific branches. Theycan also serve as templates allowing you to predefine settings for your copies. You can create and reuse formulasas needed.
Create a distribution formula1. Click Admin # Server Administration # Acquisitions #Distribution Formulas.
2. Click New Formula.
3. Enter a Formula Name. No limits exist on the number of characters that can be entered in this field.
4. Choose a Formula Owner from the drop-down menu. The Formula Owner indicates the organizational unitswhose staff can use this formula. This menu is populated with the shortnames that you created for your librariesin the organizational units tree (See Admin # Server Administration # Organizational Units).
The rule of parental inheritance applies to this list.
5. Ignore the Skip Count field which is currently not used.
6. Click Save.
7. Click New Entry.
8. Select an Owning Library from the drop-down menu. This indicates the branch that will receive the items. Thismenu is populated with the shortnames that you created for your libraries in the organizational units tree (SeeAdmin # Server Administration # Organizational Units).
9. Select/enter any of the following copy details you want to predefine in the distribution formula.
• Copy Location
• Fund
• Circ Modifier
• Collection Code
10.In the Item Count field, enter the number of items that should be distributed to the branch. You can enter thenumber or use the arrows on the right side of the field.
11.Click Apply Changes. The screen will reload.
12.To view the changes to your formula, click Admin # Server Administration # Acquisitions # DistributionFormulas. The item_count will reflect the entries to your distribution formula.
To edit the Formula Name, click the hyperlinked name of the formula in the top left corner. A pop-up box willenable you to enter a new formula name.
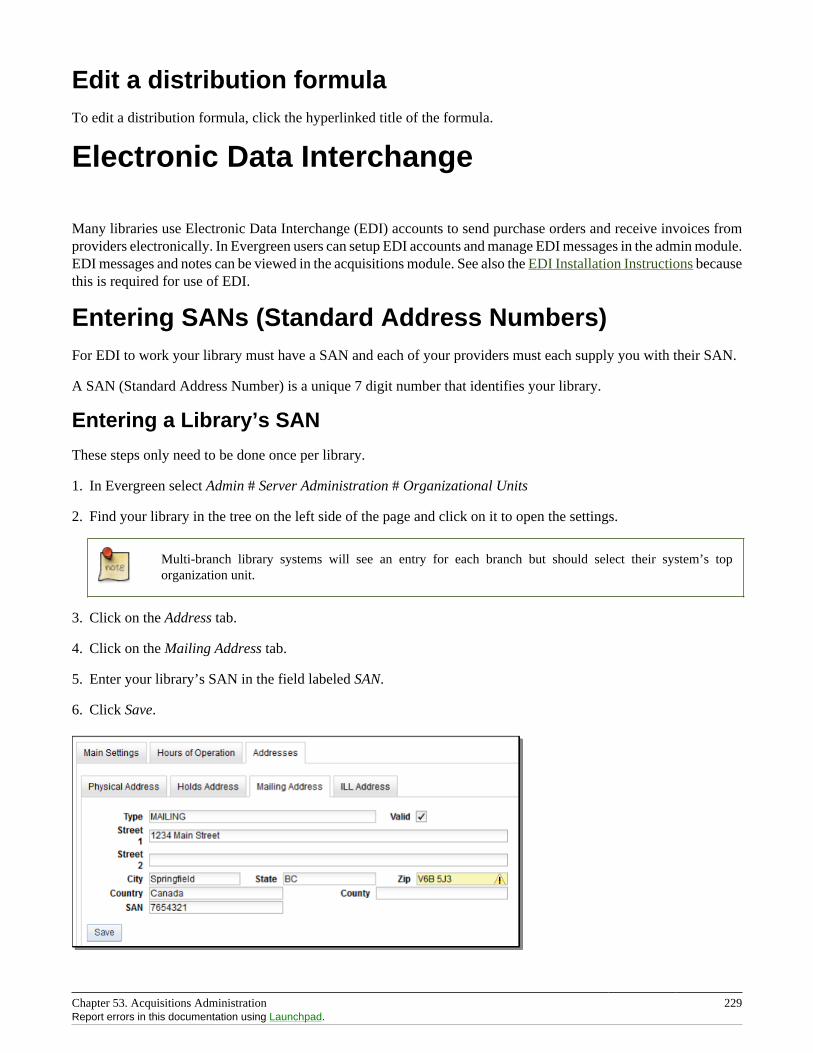
Chapter 53. Acquisitions Administration 229Report errors in this documentation using Launchpad.
Edit a distribution formulaTo edit a distribution formula, click the hyperlinked title of the formula.
Electronic Data Interchange
Many libraries use Electronic Data Interchange (EDI) accounts to send purchase orders and receive invoices fromproviders electronically. In Evergreen users can setup EDI accounts and manage EDI messages in the admin module.EDI messages and notes can be viewed in the acquisitions module. See also the EDI Installation Instructions becausethis is required for use of EDI.
Entering SANs (Standard Address Numbers)For EDI to work your library must have a SAN and each of your providers must each supply you with their SAN.
A SAN (Standard Address Number) is a unique 7 digit number that identifies your library.
Entering a Library’s SAN
These steps only need to be done once per library.
1. In Evergreen select Admin # Server Administration # Organizational Units
2. Find your library in the tree on the left side of the page and click on it to open the settings.
Multi-branch library systems will see an entry for each branch but should select their system’s toporganization unit.
3. Click on the Address tab.
4. Click on the Mailing Address tab.
5. Enter your library’s SAN in the field labeled SAN.
6. Click Save.
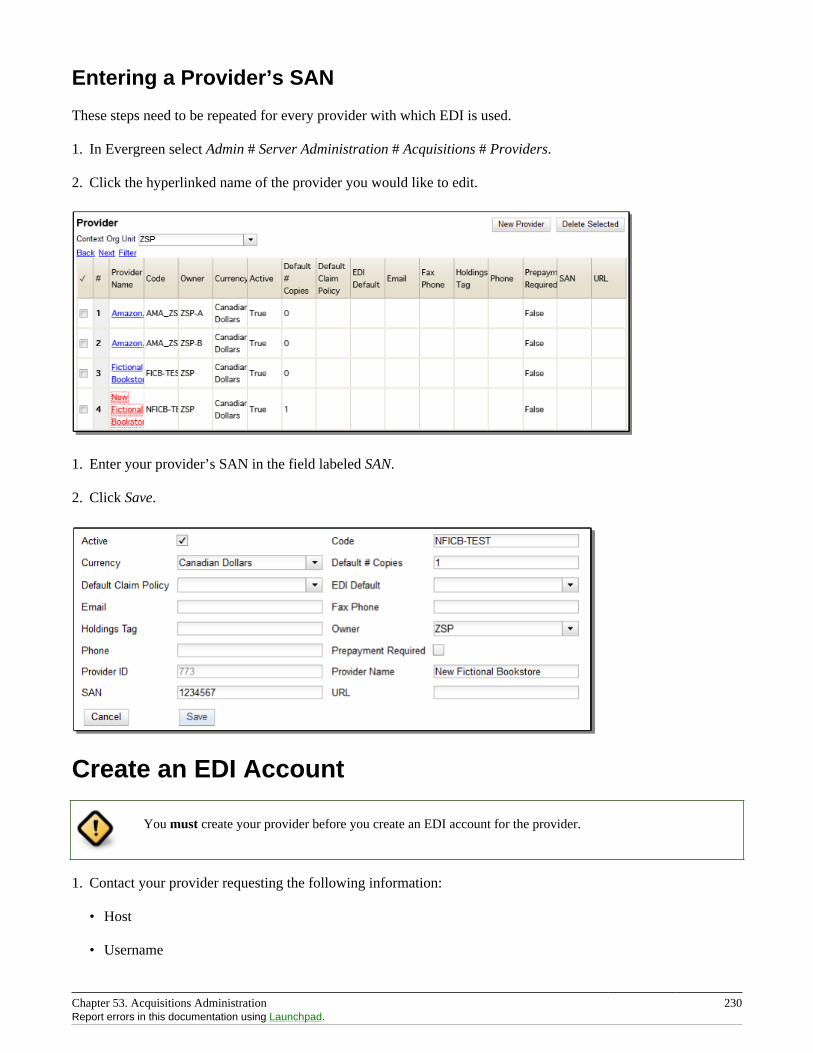
Chapter 53. Acquisitions Administration 230Report errors in this documentation using Launchpad.
Entering a Provider’s SAN
These steps need to be repeated for every provider with which EDI is used.
1. In Evergreen select Admin # Server Administration # Acquisitions # Providers.
2. Click the hyperlinked name of the provider you would like to edit.
1. Enter your provider’s SAN in the field labeled SAN.
2. Click Save.
Create an EDI Account
You must create your provider before you create an EDI account for the provider.
1. Contact your provider requesting the following information:
• Host
• Username
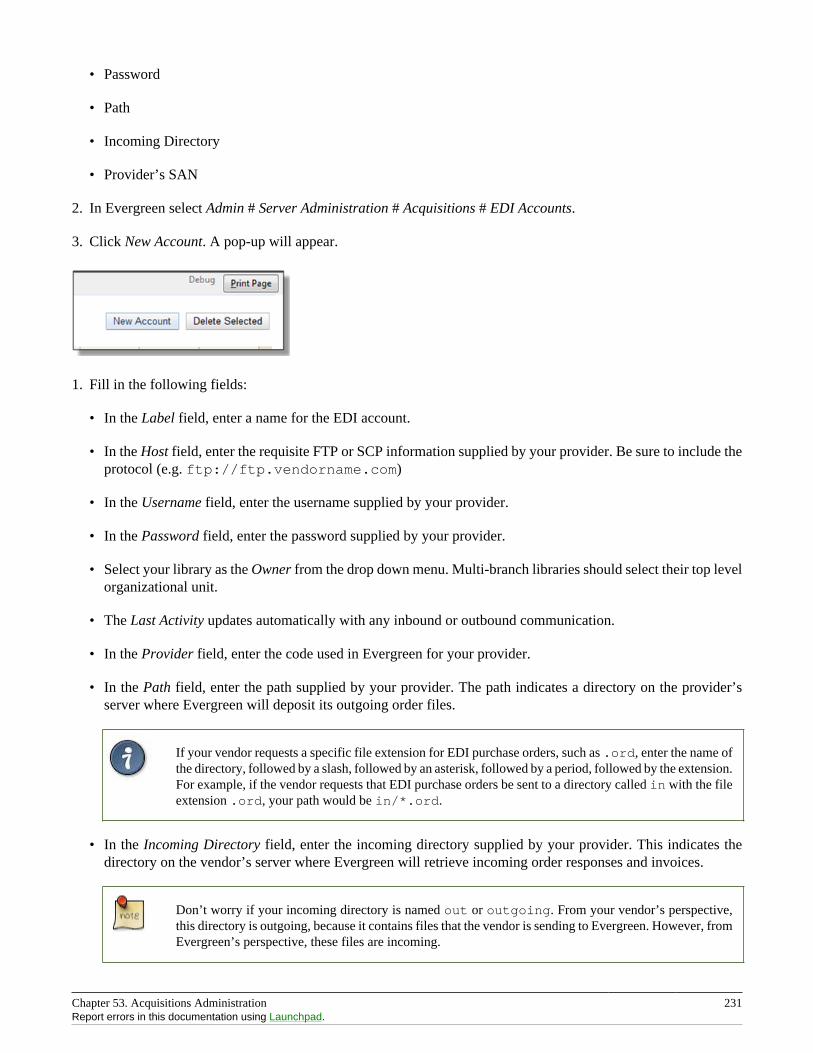
Chapter 53. Acquisitions Administration 231Report errors in this documentation using Launchpad.
• Password
• Path
• Incoming Directory
• Provider’s SAN
2. In Evergreen select Admin # Server Administration # Acquisitions # EDI Accounts.
3. Click New Account. A pop-up will appear.
1. Fill in the following fields:
• In the Label field, enter a name for the EDI account.
• In the Host field, enter the requisite FTP or SCP information supplied by your provider. Be sure to include theprotocol (e.g. ftp://ftp.vendorname.com)
• In the Username field, enter the username supplied by your provider.
• In the Password field, enter the password supplied by your provider.
• Select your library as the Owner from the drop down menu. Multi-branch libraries should select their top levelorganizational unit.
• The Last Activity updates automatically with any inbound or outbound communication.
• In the Provider field, enter the code used in Evergreen for your provider.
• In the Path field, enter the path supplied by your provider. The path indicates a directory on the provider’sserver where Evergreen will deposit its outgoing order files.
If your vendor requests a specific file extension for EDI purchase orders, such as .ord, enter the name ofthe directory, followed by a slash, followed by an asterisk, followed by a period, followed by the extension.For example, if the vendor requests that EDI purchase orders be sent to a directory called in with the fileextension .ord, your path would be in/*.ord.
• In the Incoming Directory field, enter the incoming directory supplied by your provider. This indicates thedirectory on the vendor’s server where Evergreen will retrieve incoming order responses and invoices.
Don’t worry if your incoming directory is named out or outgoing. From your vendor’s perspective,this directory is outgoing, because it contains files that the vendor is sending to Evergreen. However, fromEvergreen’s perspective, these files are incoming.
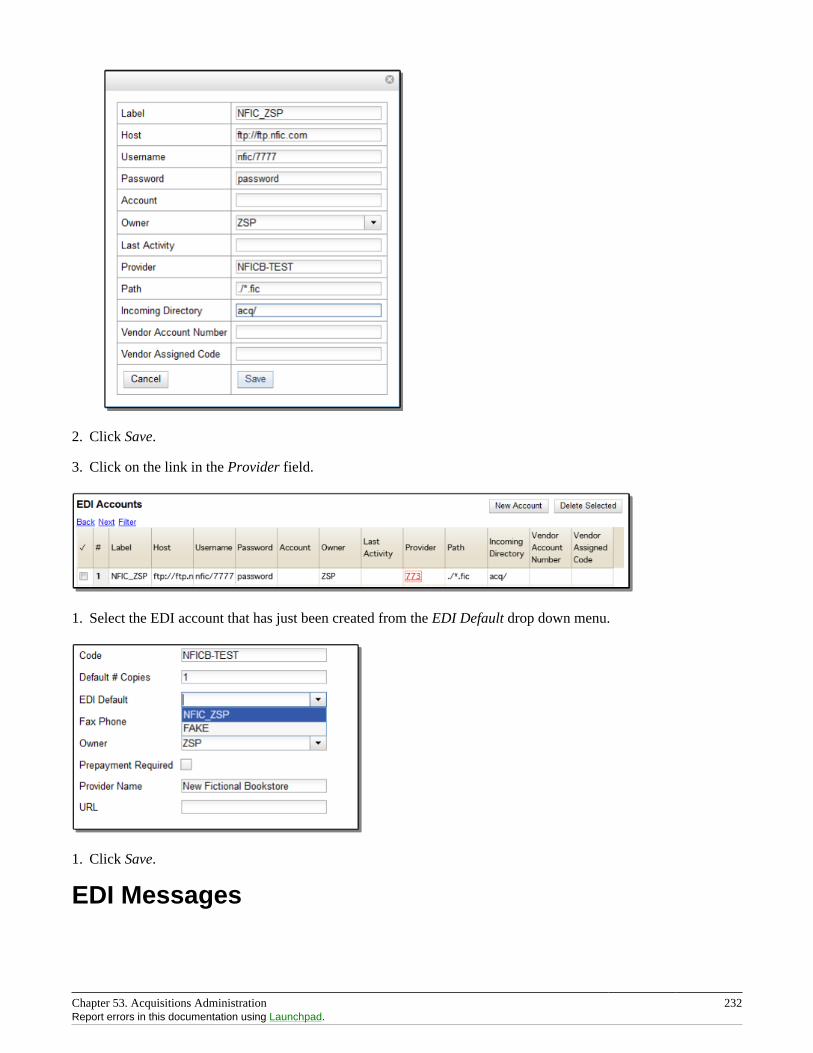
Chapter 53. Acquisitions Administration 232Report errors in this documentation using Launchpad.
2. Click Save.
3. Click on the link in the Provider field.
1. Select the EDI account that has just been created from the EDI Default drop down menu.
1. Click Save.
EDI Messages
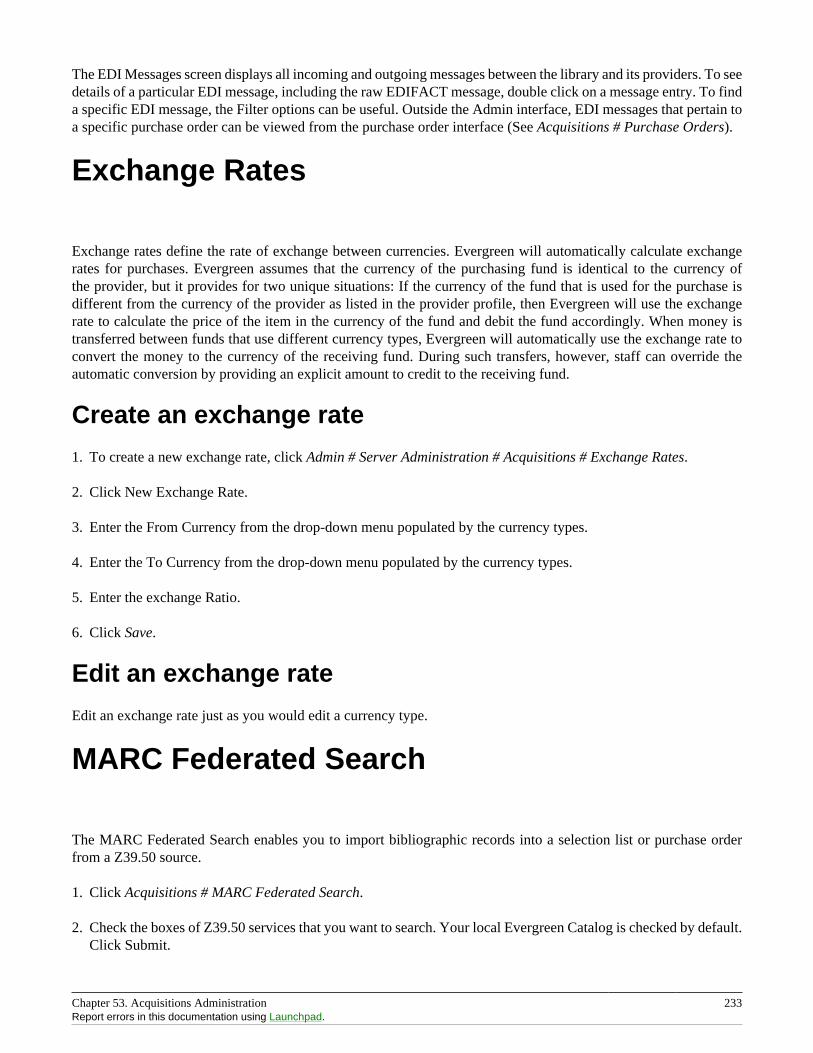
Chapter 53. Acquisitions Administration 233Report errors in this documentation using Launchpad.
The EDI Messages screen displays all incoming and outgoing messages between the library and its providers. To seedetails of a particular EDI message, including the raw EDIFACT message, double click on a message entry. To finda specific EDI message, the Filter options can be useful. Outside the Admin interface, EDI messages that pertain toa specific purchase order can be viewed from the purchase order interface (See Acquisitions # Purchase Orders).
Exchange Rates
Exchange rates define the rate of exchange between currencies. Evergreen will automatically calculate exchangerates for purchases. Evergreen assumes that the currency of the purchasing fund is identical to the currency ofthe provider, but it provides for two unique situations: If the currency of the fund that is used for the purchase isdifferent from the currency of the provider as listed in the provider profile, then Evergreen will use the exchangerate to calculate the price of the item in the currency of the fund and debit the fund accordingly. When money istransferred between funds that use different currency types, Evergreen will automatically use the exchange rate toconvert the money to the currency of the receiving fund. During such transfers, however, staff can override theautomatic conversion by providing an explicit amount to credit to the receiving fund.
Create an exchange rate
1. To create a new exchange rate, click Admin # Server Administration # Acquisitions # Exchange Rates.
2. Click New Exchange Rate.
3. Enter the From Currency from the drop-down menu populated by the currency types.
4. Enter the To Currency from the drop-down menu populated by the currency types.
5. Enter the exchange Ratio.
6. Click Save.
Edit an exchange rate
Edit an exchange rate just as you would edit a currency type.
MARC Federated Search
The MARC Federated Search enables you to import bibliographic records into a selection list or purchase orderfrom a Z39.50 source.
1. Click Acquisitions # MARC Federated Search.
2. Check the boxes of Z39.50 services that you want to search. Your local Evergreen Catalog is checked by default.Click Submit.
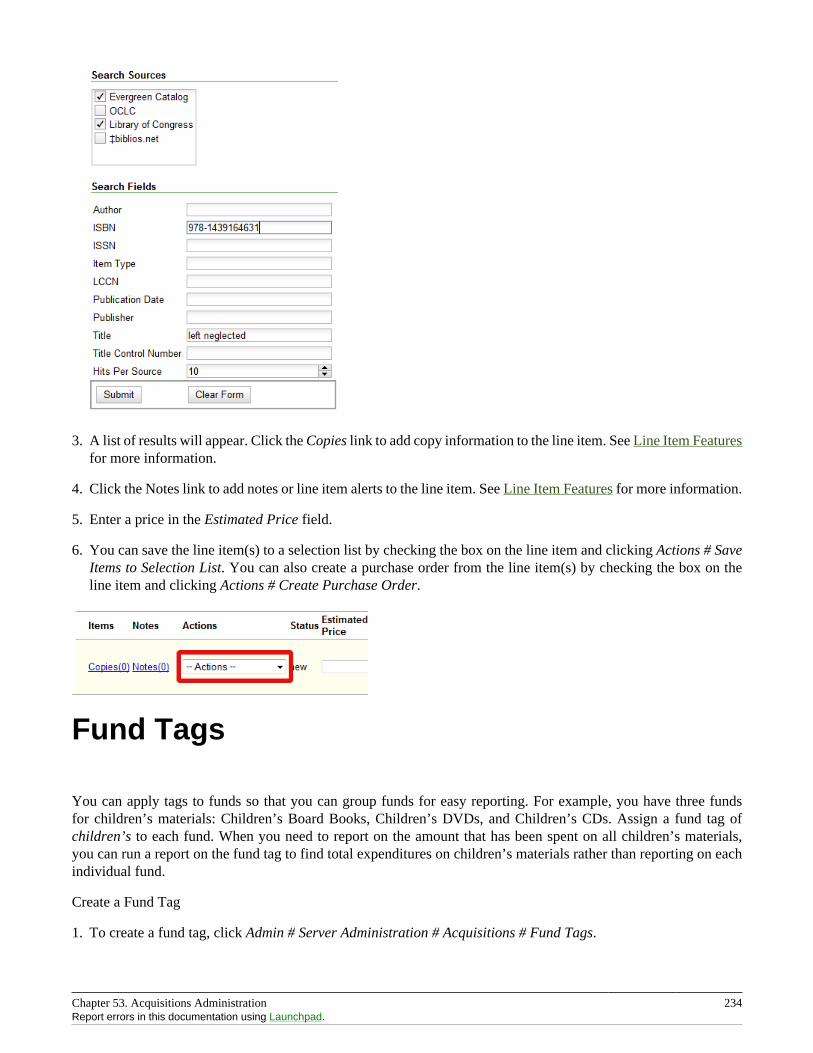
Chapter 53. Acquisitions Administration 234Report errors in this documentation using Launchpad.
3. A list of results will appear. Click the Copies link to add copy information to the line item. See Line Item Featuresfor more information.
4. Click the Notes link to add notes or line item alerts to the line item. See Line Item Features for more information.
5. Enter a price in the Estimated Price field.
6. You can save the line item(s) to a selection list by checking the box on the line item and clicking Actions # SaveItems to Selection List. You can also create a purchase order from the line item(s) by checking the box on theline item and clicking Actions # Create Purchase Order.
Fund Tags
You can apply tags to funds so that you can group funds for easy reporting. For example, you have three fundsfor children’s materials: Children’s Board Books, Children’s DVDs, and Children’s CDs. Assign a fund tag ofchildren’s to each fund. When you need to report on the amount that has been spent on all children’s materials,you can run a report on the fund tag to find total expenditures on children’s materials rather than reporting on eachindividual fund.
Create a Fund Tag
1. To create a fund tag, click Admin # Server Administration # Acquisitions # Fund Tags.
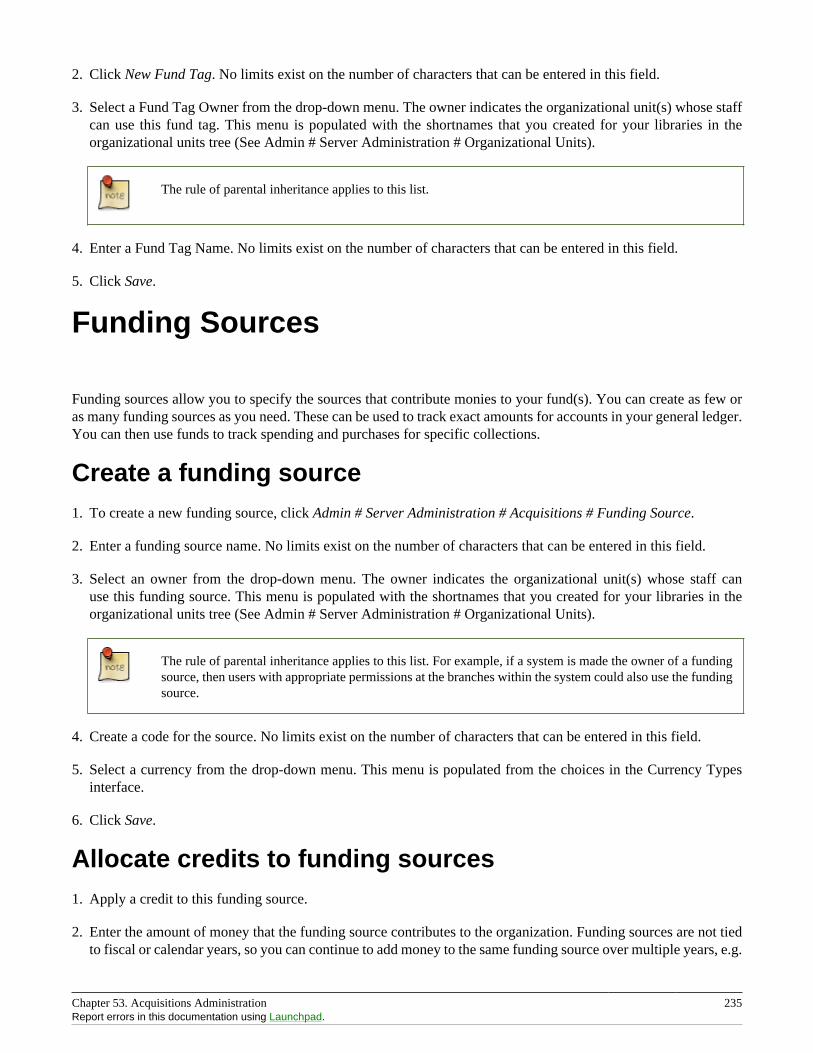
Chapter 53. Acquisitions Administration 235Report errors in this documentation using Launchpad.
2. Click New Fund Tag. No limits exist on the number of characters that can be entered in this field.
3. Select a Fund Tag Owner from the drop-down menu. The owner indicates the organizational unit(s) whose staffcan use this fund tag. This menu is populated with the shortnames that you created for your libraries in theorganizational units tree (See Admin # Server Administration # Organizational Units).
The rule of parental inheritance applies to this list.
4. Enter a Fund Tag Name. No limits exist on the number of characters that can be entered in this field.
5. Click Save.
Funding Sources
Funding sources allow you to specify the sources that contribute monies to your fund(s). You can create as few oras many funding sources as you need. These can be used to track exact amounts for accounts in your general ledger.You can then use funds to track spending and purchases for specific collections.
Create a funding source1. To create a new funding source, click Admin # Server Administration # Acquisitions # Funding Source.
2. Enter a funding source name. No limits exist on the number of characters that can be entered in this field.
3. Select an owner from the drop-down menu. The owner indicates the organizational unit(s) whose staff canuse this funding source. This menu is populated with the shortnames that you created for your libraries in theorganizational units tree (See Admin # Server Administration # Organizational Units).
The rule of parental inheritance applies to this list. For example, if a system is made the owner of a fundingsource, then users with appropriate permissions at the branches within the system could also use the fundingsource.
4. Create a code for the source. No limits exist on the number of characters that can be entered in this field.
5. Select a currency from the drop-down menu. This menu is populated from the choices in the Currency Typesinterface.
6. Click Save.
Allocate credits to funding sources1. Apply a credit to this funding source.
2. Enter the amount of money that the funding source contributes to the organization. Funding sources are not tiedto fiscal or calendar years, so you can continue to add money to the same funding source over multiple years, e.g.
Chapter 53. Acquisitions Administration 236Report errors in this documentation using Launchpad.
County Funding. Alternatively, you can name funding sources by year, e.g. County Funding 2010 and CountyFunding 2011, and apply credits each year to the matching source.
3. To apply a credit, click on the hyperlinked name of the funding source. The Funding Source Details will appear.
4. Click Apply Credit.
5. Enter an amount to apply to this funding source.
6. Enter a note. This field is optional.
7. Click Apply.
Allocate credits to fundsIf you have already set up your funds, then you can then click the Allocate to Fund button to apply credits from thefunding sources to the funds. If you have not yet set up your funds, or you need to add a new one, you can allocatecredits to funds from the funds interface. See section 1.2 for more information.
1. To allocate credits to funds, click Allocate to Fund.
2. Enter the amount that you want to allocate.
3. Enter a note. This field is optional.
4. Click Apply.
Track debits and creditsYou can track credits to and allocations from each funding source. These amounts are updated when creditsand allocations are made in the Funding Source Details. Access the Funding Source Details by clicking on thehyperlinked name of the Funding Source.
Funds
Funds allow you to allocate credits toward specific purchases. In the funds interface, you can create funds; allocatecredits from funding sources to funds; transfer money between funds; and apply fund tags to funds. Funds are createdfor a specific year, either fiscal or calendar. These funds are owned by org units. At the top of the funds interface,you can set a contextual org unit and year. The drop-down menu at the top of the screen enables you to focus onfunds that are owned by specific organizational units during specific years.
Create a fund1. To create a new fund, click Admin # Server Administration # Acquisitions # Funds.
2. Enter a name for the fund. No limits exist on the number of characters that can be entered in this field.
3. Create a code for the fund. No limits exist on the number of characters that can be entered in this field.
Chapter 53. Acquisitions Administration 237Report errors in this documentation using Launchpad.
4. Enter a year for the fund. This can be a fiscal year or a calendar year. The format of the year is YYYY.
5. Select an org unit from the drop-down menu. The org unit indicates the organizational units whose staff can usethis fund. This menu is populated with the shortnames that you created for your libraries in the organizationalunits tree (See Admin # Server Administration # Organizational Units).
The rule of parental inheritance applies to this list. See section
6. Select a currency type from the drop-down menu. This menu is comprised of entries in the currency types menu.When a fund is applied to a line item or copy, the price of the item will be encumbered in the currency associatedwith the fund.
7. Click the Active box to activate this fund. You cannot make purchases from this fund if it is not active.
8. Enter a Balance Stop Percent. The balance stop percent prevents you from making purchases when only aspecified amount of the fund remains. For example, if you want to spend 95 percent of your funds, leaving a fivepercent balance in the fund, then you would enter 95 in the field. When the fund reaches its balance stop percent,it will appear in red when you apply funds to copies.
9. Enter a Balance Warning Percent. The balance warning percent gives you a warning that the fund is low. Youcan specify any percent. For example, if you want to spend 90 percent of your funds and be warned when thefund has only 10 percent of its balance remaining, then enter 90 in the field. When the fund reaches its balancewarning percent, it will appear in yellow when you apply funds to copies.
10.Check the Propagate box to propagate funds. When you propagate a fund, the ILS will create a new fund for thefollowing fiscal year with the same parameters as your current fund. All of the settings transfer except for theyear and the amount of money in the fund. Propagation occurs during the fiscal year close-out operation.
11.Check the Rollover box if you want to roll over remaining funds into the same fund next year. You should alsocheck this box if you only want to roll over encumbrances into next year’s fund.
12.Click Save.
Allocate credits from funding sources to fundsCredits can be applied to funds from funding sources using the fund interface. The credits that you apply to the fundcan be applied later to purchases.
1. To access funds, click Admin # Server Administration # Acquisitions # Funds.
2. Click the hyperlinked name of the fund.
3. To add a credit to the fund, click the Create Allocation tab.
4. Choose a Funding Source from the drop-down menu.
5. Enter an amount that you want to apply to the fund from the funding source.
6. Enter a note. This field is optional.
7. Click Apply.
Chapter 53. Acquisitions Administration 238Report errors in this documentation using Launchpad.
Transfer credits between fundsThe credits that you allocate to funds can be transferred between funds if desired. In the following example, youcan transfer $500.00 from the Young Adult Fiction fund to the Children’s DVD fund.
1. To access funds, click Admin # Server Administration # Acquisitions # Funds.
2. Click the hyperlinked name of the originating fund.
3. The Fund Details screen appears. Click Transfer Money.
4. Enter the amount that you would like to transfer.
5. From the drop-down menu, select the destination fund.
6. Add a note. This field is optional.
7. Click Transfer.
Track balances and expendituresThe Fund Details allows you to track the fund’s balance, encumbrances, and amount spent. It also allows you totrack allocations from the funding source(s), debits, and fund tags.
1. To access the fund details, click on the hyperlinked name of the fund that you created.
2. The Summary allows you to track the following:
3. Balance - The balance is calculated by subtracting both items that have been invoiced and encumbrances fromthe total allocated to the fund.
4. Total Allocated - This amount is the total amount allocated from the Funding Source.
5. Spent Balance - This balance is calculated by subtracting only the items that have been invoiced from the totalallocated to the fund. It does not include encumbrances.
6. Total Debits - The total debits are calculated by adding the cost of items that have been invoiced andencumbrances.
7. Total Spent - The total spent is calculated by adding the cost of items that have been invoiced. It does not includeencumbrances.
8. Total Encumbered - The total encumbered is calculated by adding all encumbrances.
Fund reporting
A core source, Fund Summary, is available in the reports interface. This core source enables librarians to easily runa report on fund activity. Fields that are accessible in this interface include Remaining Balance, Total Allocated,Total Encumbered, and Total Spent.
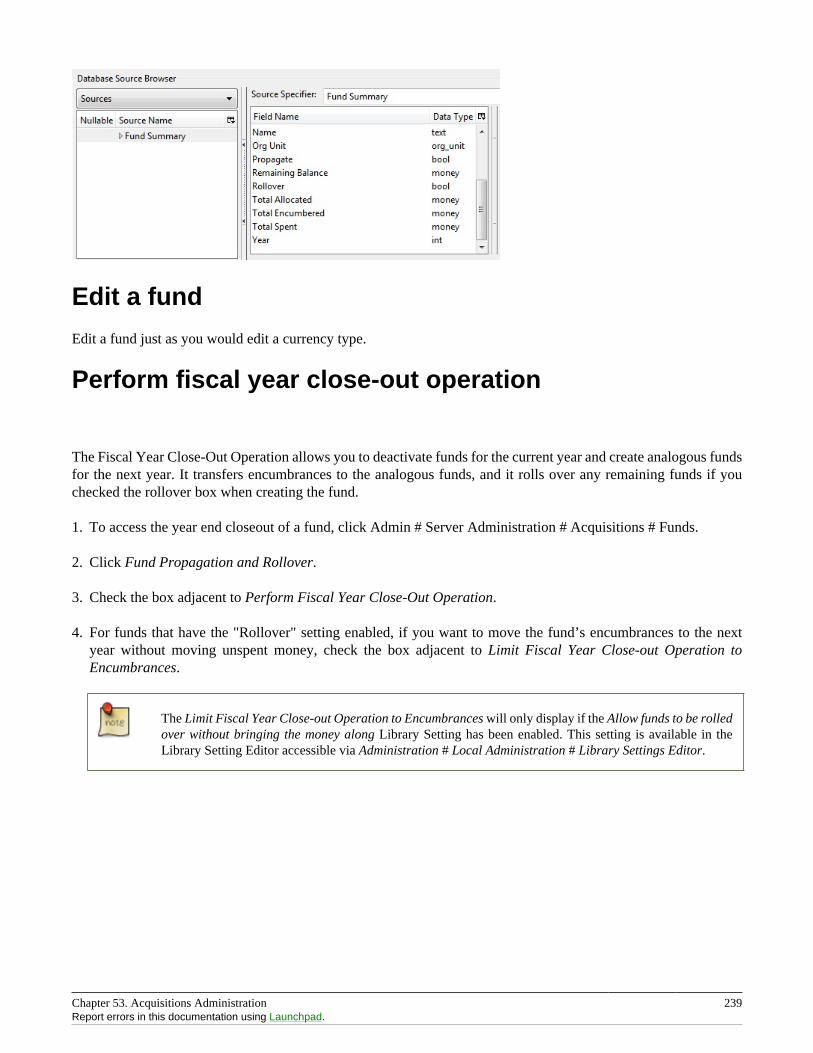
Chapter 53. Acquisitions Administration 239Report errors in this documentation using Launchpad.
Edit a fund
Edit a fund just as you would edit a currency type.
Perform fiscal year close-out operation
The Fiscal Year Close-Out Operation allows you to deactivate funds for the current year and create analogous fundsfor the next year. It transfers encumbrances to the analogous funds, and it rolls over any remaining funds if youchecked the rollover box when creating the fund.
1. To access the year end closeout of a fund, click Admin # Server Administration # Acquisitions # Funds.
2. Click Fund Propagation and Rollover.
3. Check the box adjacent to Perform Fiscal Year Close-Out Operation.
4. For funds that have the "Rollover" setting enabled, if you want to move the fund’s encumbrances to the nextyear without moving unspent money, check the box adjacent to Limit Fiscal Year Close-out Operation toEncumbrances.
The Limit Fiscal Year Close-out Operation to Encumbrances will only display if the Allow funds to be rolledover without bringing the money along Library Setting has been enabled. This setting is available in theLibrary Setting Editor accessible via Administration # Local Administration # Library Settings Editor.

Chapter 53. Acquisitions Administration 240Report errors in this documentation using Launchpad.
5. Notice that the context org unit reflects the context org unit that you selected at the top of the Funds screen.
6. If you want to perform the close-out operation on the context org unit and its child units, then check the boxadjacent to Include Funds for Descendant Org Units.
7. Check the box adjacent to dry run if you want to test changes to the funds before they are enacted. Evergreen willgenerate a summary of the changes that would occur during the selected operations. No data will be changed.
8. Click Process.
9. Evergreen will begin the propagation process. Evergreen will make a clone of each fund, but it will incrementthe year by 1.
Invoice menus
Invoice menus allow you to create drop-down menus that appear on invoices. You can create an invoice item typeor invoice payment method.
Invoice item typeThe invoice item type allows you to enter the types of additional charges that you can add to an invoice. Examples ofadditional charge types might include taxes or processing fees. Charges for bibliographic items are listed separatelyfrom these additional charges. A default list of charge types displays, but you can add custom charge types to thislist. Invoice item types can also be used when adding non-bibliographic items to a purchase order. When invoiced,the invoice item type will copy from the purchase order to the invoice.
1. To create a new charge type, click Admin # Server Administration # Acquisitions # Invoice Item Type.
2. Click New Invoice Item Type.
3. Create a code for the charge type. No limits exist on the number of characters that can be entered in this field.
Chapter 53. Acquisitions Administration 241Report errors in this documentation using Launchpad.
4. Create a label. No limits exist on the number of characters that can be entered in this field. The text in this fieldappears in the drop-down menu on the invoice.
5. If items on the invoice were purchased with the monies in multiple funds, then you can divide the additionalcharge across funds. Check the box adjacent to Prorate# if you want to prorate the charge across funds.
6. Click Save.
Invoice payment methodThe invoice payment method allows you to predefine the type(s) of invoices and payment method(s) that you accept.The text that you enter in the admin module will appear as a drop-down menu in the invoice type and paymentmethod fields on the invoice.
1. To create a new invoice payment method, click Admin # Server Administration # Acquisitions # Invoice PaymentMethod.
2. Click New Invoice Payment Method.
3. Create a code for the invoice payment method. No limits exist on the number of characters that can be enteredin this field.
4. Create a name for the invoice payment method. No limits exist on the number of characters that can be enteredin this field. The text in this field appears in the drop-down menu on the invoice.
5. Click Save.
Payment methods can be deleted from this screen.
Line Item Features
Line item alerts are predefined text that can be added to line items that are on selection lists or purchase orders. Youcan define the alerts from which staff can choose. Line item alerts appear in a pop-up box when the line item, orany of its copies, are marked as received.
Create a line item alert1. To create a line item alert, click Administration # Server Administration # Acquisitions # Line Item Alerts.
2. Click New Line Item Alert Text.
3. Create a code for the text. No limits exist on the number of characters that can be entered in this field.
4. Create a description for the text. No limits exist on the number of characters that can be entered in this field.
5. Select an owning library from the drop-down menu. The owning library indicates the organizational units whosestaff can use this alert. This menu is populated with the shortnames that you created for your libraries in theorganizational units tree (See Admin # Server Administration # Organizational Units).
6. Click Save.
Chapter 53. Acquisitions Administration 242Report errors in this documentation using Launchpad.
Line item MARC attribute definitionsLine item attributes define the fields that Evergreen needs to extract from the bibliographic records that are in theacquisitions database to display in the catalog. Also, these attributes will appear as fields in the New Brief Recordinterface. You will be able to enter information for the brief record in the fields where attributes have been defined.
ProvidersProviders are vendors. You can create a provider profile that includes contact information for the provider, holdingsinformation, invoices, and other information.
Create a provider1. To create a new provider, click Admin # Server Administration # Acquisitions # Providers.
2. Enter the provider name.
3. Create a code for the provider. No limits exist on the number of characters that can be entered in this field.
4. Select an owner from the drop-down menu. The owner indicates the organizational units whose staff can use thisprovider. This menu is populated with the shortnames that you created for your libraries in the organizationalunits tree (See Admin # Server Administration # Organizational Units).
The rule of parental inheritance applies to this list.
5. Select a currency from the drop-down menu. This drop-down list is populated by the list of currencies availablein the currency types.
6. A provider must be active in order for purchases to be made from that provider. To activate the provider, checkthe box adjacent to Active. To deactivate a vendor, uncheck the box.
7. Add the default # of copies that are typically ordered through the provider. This number will automaticallypopulate the line item’s Copies box on any PO’s associated with this provider. If another quantity is enteredduring the selection or ordering process, it will override this default. If no number is specified, the default numberof copies will be zero.
8. Select a default claim policy from the drop-down box. This list is derived from the claim policies that can becreated
9. Select an EDI default. This list is derived from the EDI accounts that can be created.
10.Enter the provider’s email address.
11.In the Fax Phone field, enter the provider’s fax number.
12.In the holdings tag field, enter the tag in which the provider places holdings data.
13.In the phone field, enter the provider’s phone number.
14.If prepayment is required to purchase from this provider, then check the box adjacent to prepayment required.
Chapter 53. Acquisitions Administration 243Report errors in this documentation using Launchpad.
15.Enter the Standard Address Number (SAN) for your provider.
16.Enter the web address for the provider’s website in the URL field.
17.Click Save.
Add contact and holdings information to providersAfter you save the provider profile, the screen reloads so that you can save additional information about the provider.You can also access this screen by clicking the hyperlinked name of the provider on the Providers screen. The tabsallow you to add a provider address and contact, attribute definitions, and holding subfields. You can also viewinvoices associated with the provider.
1. Enter a Provider Address, and click Save.
Required fields for the provider address are: Street 1, city, state, country, post code. You may have multiplevalid addresses.
2. Enter the Provider Contact, and click Save.
3. Your vendor may include information that is specific to your organization in MARC tags. You can specify thetypes of information that should be entered in each MARC tag. Enter attribute definitions to correlate MARCtags with the information that they should contain in incoming vendor records. Some technical knowledge isrequired to enter XPath information. As an example, if you need to import the PO Name, you could set up anattribute definition by adding an XPath similar to:
code => purchase_orderxpath => //*[@tag="962"]/*[@code="p"]Is Identifier => false
where 962 is the holdings tag and p is the subfield that contains the PO Name.
4. You may have entered a holdings tag when you created the provider profile. You can also enter holdings subfields.Holdings subfields allow you to specify subfields within the holdings tag to which your vendor adds holdingsinformation, such as quantity ordered, fund, and estimated price.
5. Click invoices to access invoices associated with a provider.
Edit a providerEdit a provider just as you would edit a currency type.
You can delete providers only if no purchase orders have been assigned to them.
Chapter 54. Age hold protection 244
Chapter 54. Age hold protection
Age hold protection prevents new items from filling holds requested for pickup at a library other than the owninglibrary for a specified period of time.
You can define the protection period in Admin # Server Administration # Age Hold Protect Rules.
The protection period when applied to a copy record can start with the copy record create date (default) or activedate. You can change this setting in Admin # Local Administration # Library Settings Editor: Use Active Datefor Age Protection.
In addition to time period, you can set the proximity value to define which organizational units are allowed to actas pickup libraries. The proximity values affect holds as follows:
• "0" allows only holds where pickup library = owning library
• "1" allows holds where pickup library = owning library, parent, and child organizational units
• "2" allows holds where pickup library = owning library, parent, child, and/or sibling organizational units
Age protection only applies to individual copy records. You cannot configure age protection rules in hold policies.
Active date display in OPACIf a library uses the copy’s active date to calculate holds age protection, the active date will display with the copydetails instead of the create date in the staff client view of the catalog. Libraries that do not enable the Use ActiveDate for Age Protection library setting will continue to display the create date.
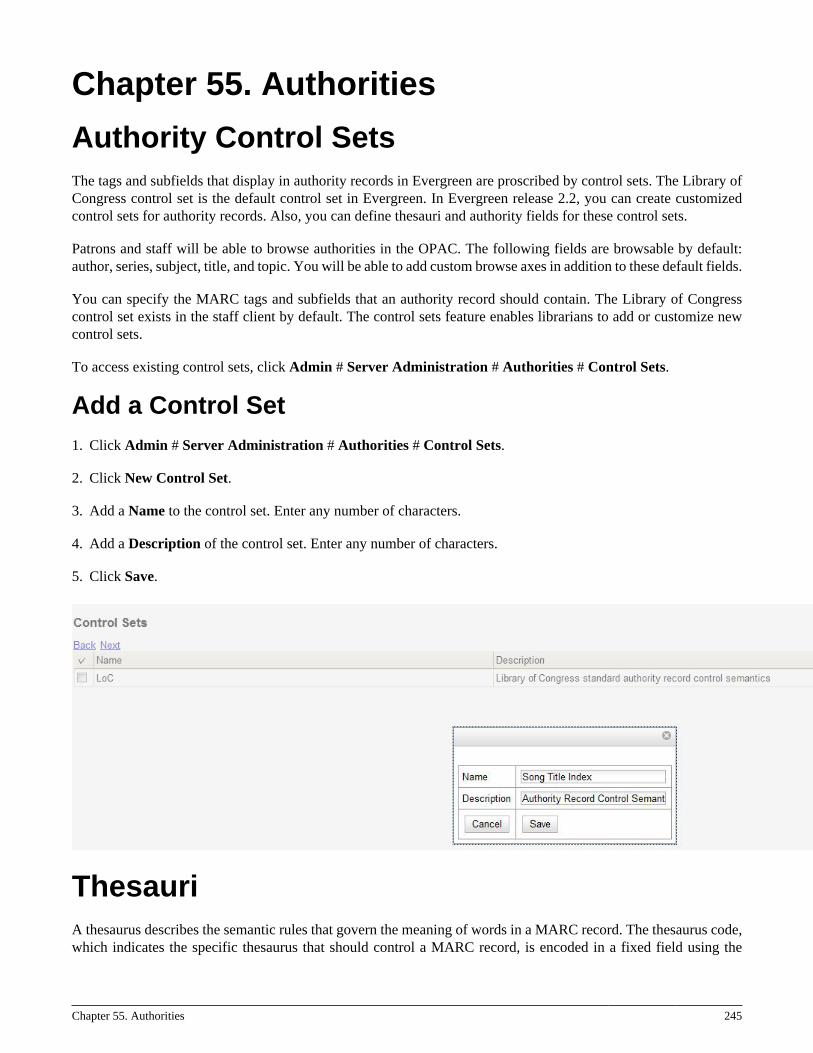
Chapter 55. Authorities 245
Chapter 55. Authorities
Authority Control SetsThe tags and subfields that display in authority records in Evergreen are proscribed by control sets. The Library ofCongress control set is the default control set in Evergreen. In Evergreen release 2.2, you can create customizedcontrol sets for authority records. Also, you can define thesauri and authority fields for these control sets.
Patrons and staff will be able to browse authorities in the OPAC. The following fields are browsable by default:author, series, subject, title, and topic. You will be able to add custom browse axes in addition to these default fields.
You can specify the MARC tags and subfields that an authority record should contain. The Library of Congresscontrol set exists in the staff client by default. The control sets feature enables librarians to add or customize newcontrol sets.
To access existing control sets, click Admin # Server Administration # Authorities # Control Sets.
Add a Control Set1. Click Admin # Server Administration # Authorities # Control Sets.
2. Click New Control Set.
3. Add a Name to the control set. Enter any number of characters.
4. Add a Description of the control set. Enter any number of characters.
5. Click Save.
ThesauriA thesaurus describes the semantic rules that govern the meaning of words in a MARC record. The thesaurus code,which indicates the specific thesaurus that should control a MARC record, is encoded in a fixed field using the
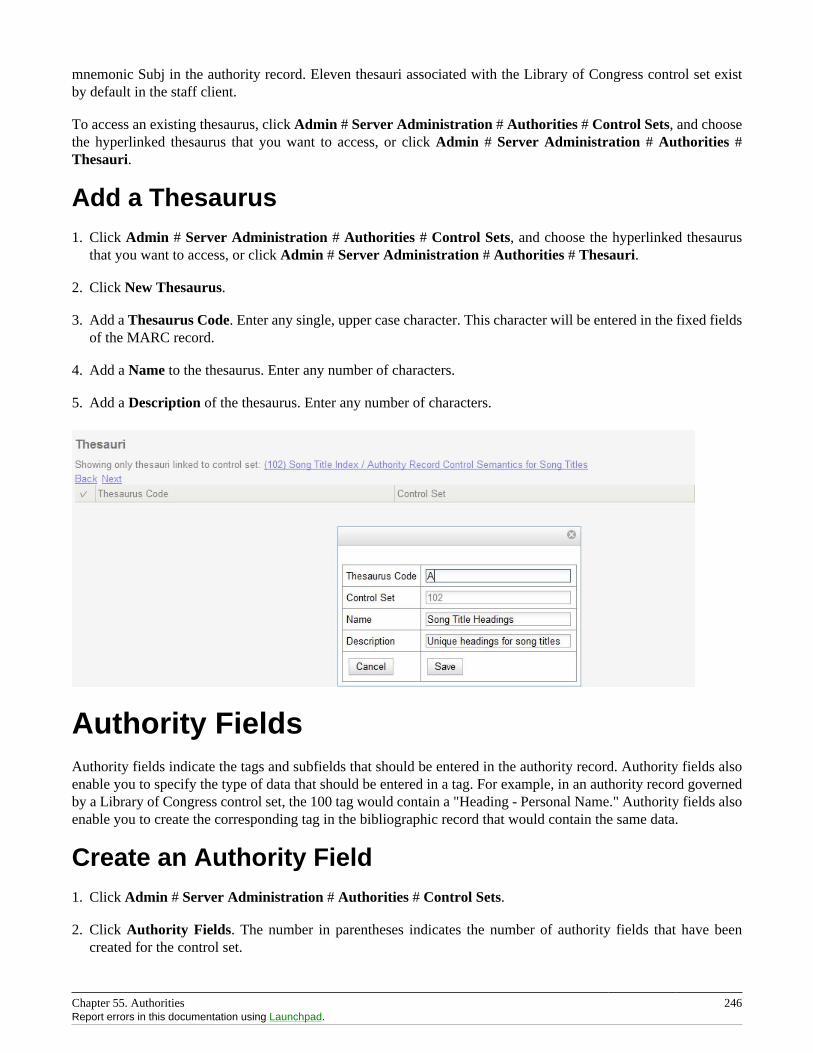
Chapter 55. Authorities 246Report errors in this documentation using Launchpad.
mnemonic Subj in the authority record. Eleven thesauri associated with the Library of Congress control set existby default in the staff client.
To access an existing thesaurus, click Admin # Server Administration # Authorities # Control Sets, and choosethe hyperlinked thesaurus that you want to access, or click Admin # Server Administration # Authorities #Thesauri.
Add a Thesaurus1. Click Admin # Server Administration # Authorities # Control Sets, and choose the hyperlinked thesaurus
that you want to access, or click Admin # Server Administration # Authorities # Thesauri.
2. Click New Thesaurus.
3. Add a Thesaurus Code. Enter any single, upper case character. This character will be entered in the fixed fieldsof the MARC record.
4. Add a Name to the thesaurus. Enter any number of characters.
5. Add a Description of the thesaurus. Enter any number of characters.
Authority FieldsAuthority fields indicate the tags and subfields that should be entered in the authority record. Authority fields alsoenable you to specify the type of data that should be entered in a tag. For example, in an authority record governedby a Library of Congress control set, the 100 tag would contain a "Heading - Personal Name." Authority fields alsoenable you to create the corresponding tag in the bibliographic record that would contain the same data.
Create an Authority Field1. Click Admin # Server Administration # Authorities # Control Sets.
2. Click Authority Fields. The number in parentheses indicates the number of authority fields that have beencreated for the control set.
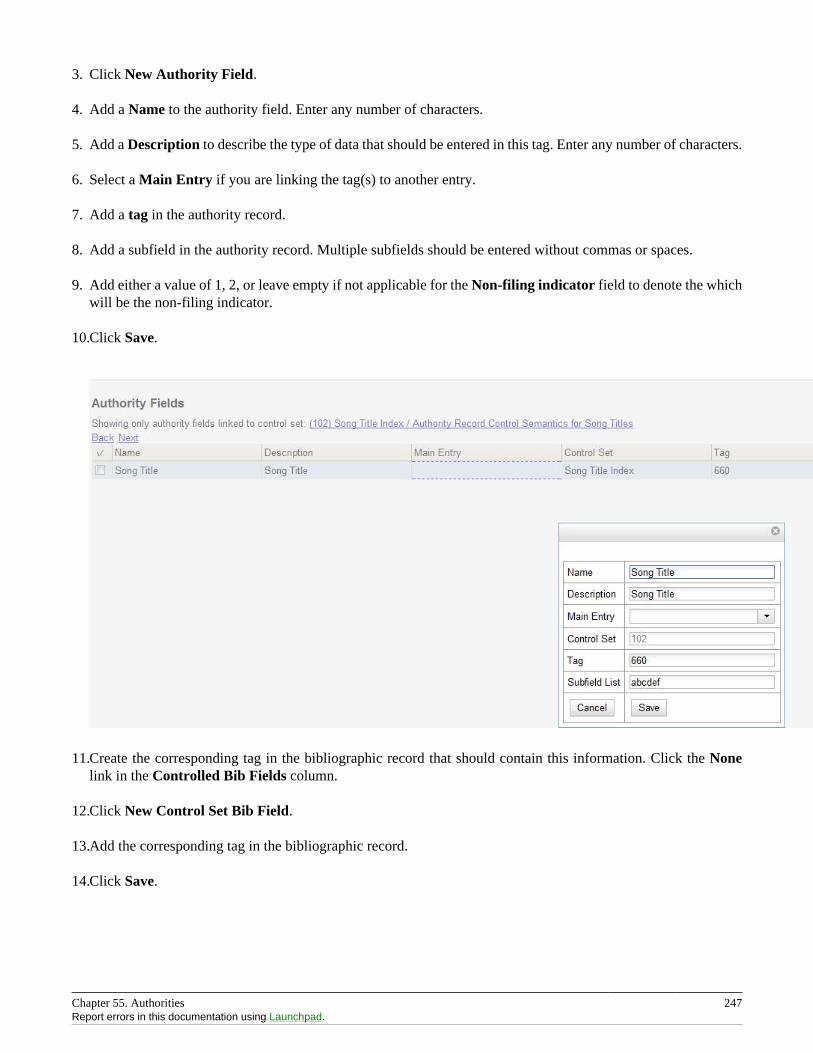
Chapter 55. Authorities 247Report errors in this documentation using Launchpad.
3. Click New Authority Field.
4. Add a Name to the authority field. Enter any number of characters.
5. Add a Description to describe the type of data that should be entered in this tag. Enter any number of characters.
6. Select a Main Entry if you are linking the tag(s) to another entry.
7. Add a tag in the authority record.
8. Add a subfield in the authority record. Multiple subfields should be entered without commas or spaces.
9. Add either a value of 1, 2, or leave empty if not applicable for the Non-filing indicator field to denote the whichwill be the non-filing indicator.
10.Click Save.
11.Create the corresponding tag in the bibliographic record that should contain this information. Click the Nonelink in the Controlled Bib Fields column.
12.Click New Control Set Bib Field.
13.Add the corresponding tag in the bibliographic record.
14.Click Save.
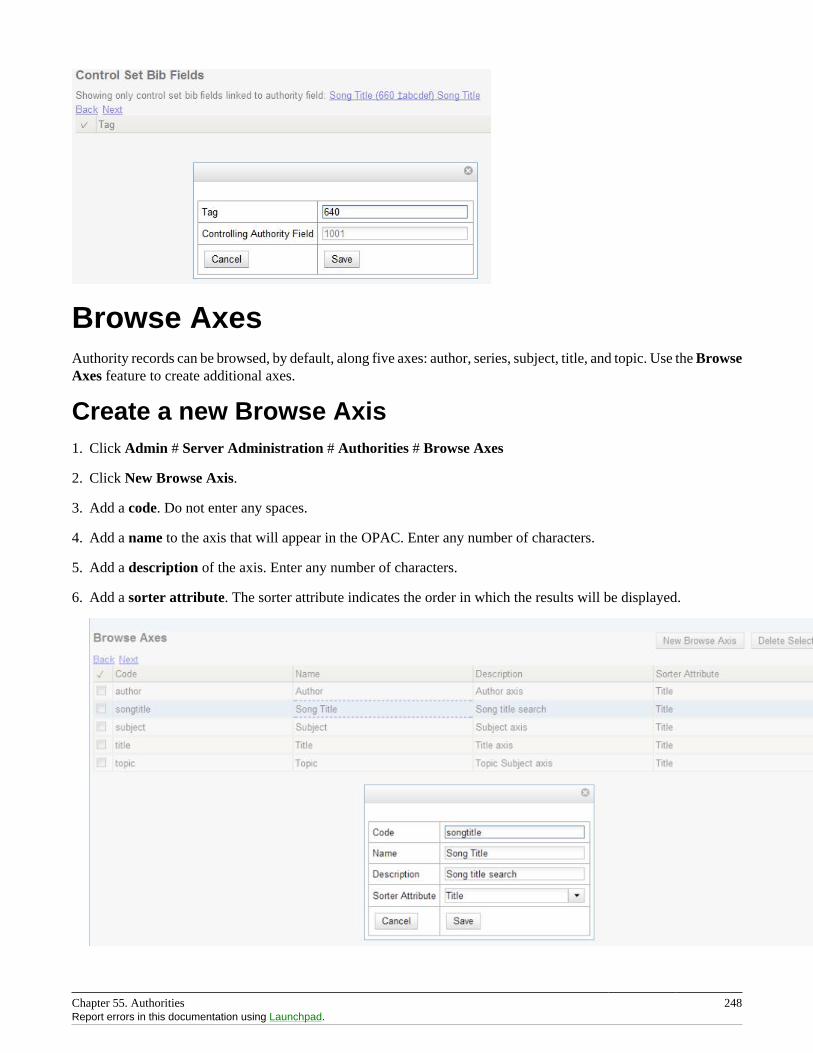
Chapter 55. Authorities 248Report errors in this documentation using Launchpad.
Browse AxesAuthority records can be browsed, by default, along five axes: author, series, subject, title, and topic. Use the BrowseAxes feature to create additional axes.
Create a new Browse Axis1. Click Admin # Server Administration # Authorities # Browse Axes
2. Click New Browse Axis.
3. Add a code. Do not enter any spaces.
4. Add a name to the axis that will appear in the OPAC. Enter any number of characters.
5. Add a description of the axis. Enter any number of characters.
6. Add a sorter attribute. The sorter attribute indicates the order in which the results will be displayed.
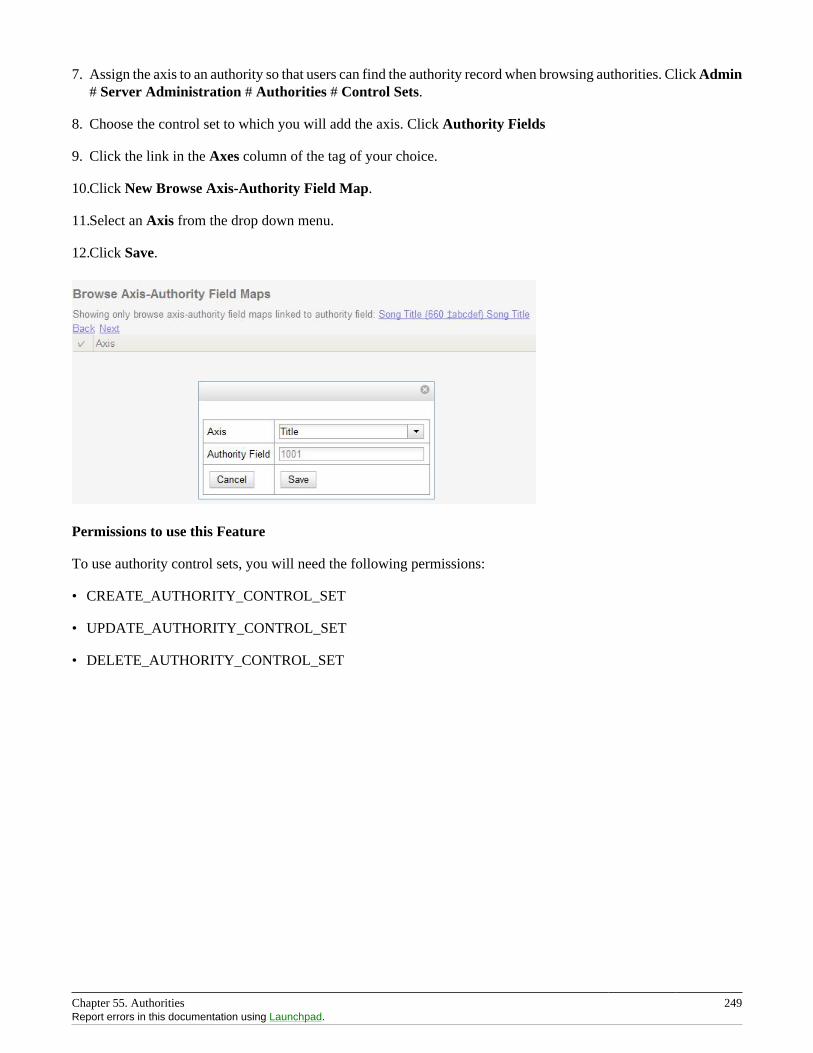
Chapter 55. Authorities 249Report errors in this documentation using Launchpad.
7. Assign the axis to an authority so that users can find the authority record when browsing authorities. Click Admin# Server Administration # Authorities # Control Sets.
8. Choose the control set to which you will add the axis. Click Authority Fields
9. Click the link in the Axes column of the tag of your choice.
10.Click New Browse Axis-Authority Field Map.
11.Select an Axis from the drop down menu.
12.Click Save.
Permissions to use this Feature
To use authority control sets, you will need the following permissions:
• CREATE_AUTHORITY_CONTROL_SET
• UPDATE_AUTHORITY_CONTROL_SET
• DELETE_AUTHORITY_CONTROL_SET
Chapter 56. Best-Hold Selection Sort Order 250
Chapter 56. Best-Hold Selection SortOrderBest-Hold Selection Sort Order allows libraries to configure customized rules for Evergreen to use to select the besthold to fill at opportunistic capture. When a copy is captured for a hold upon check-in, Evergreen evaluates the holdsin the system that the item could fill. Evergreen uses a set of rules, or a Best-Hold Selection Sort Order, to determinethe best hold to fill with the item. In previous version of Evergreen, there were two sets of rules for Evergreen to useto determine the best hold to fulfill: Traditional and FIFO (First In, First Out). Traditional uses Org Unit Proximity toidentify the nearest hold to fill. FIFO follows a strict order of first-in, first-out rules. This feature allows new, customBest-Hold Selection Sort Orders to be created. Existing Best-Hold Selection Sort Orders can also be modified.
Preconfigured Best-Hold OrdersEvergreen comes with six preconfigured Best-Hold Selection Sort Orders to choose from:
• Traditional
• Traditional with Holds-go-home
• Traditional with Holds-always-go-home
• FIFO
• FIFO with Holds-go-home
• FIFO with Holds-always-go-home
The Holds-go-home and Holds-always-go-home options allow libraries to determine how long they want to allowitems to transit outside of the item’s home library, before it must return to its home library to fulfill any holds thatare to be picked up there. Libraries can set this time limit in the library setting Holds: Max foreign-circulationtime. The Library Settings Editor can be found under Admin # Local Administration # Library Settings Editor.
Create a New Best-Hold Selection Sort OrderTo create a new Best-Hold Selection Sort Order, go to Admin # Server Administration # Best-Hold SelectionSort Order.
1. Click Create New.
2. Assign your Best-Hold Selection Sort Order a Name.
3. Next, use the Move Up and Move Down buttons to arrange the fields in the order that you would like Evergreento check when looking for the best hold to fill with a copy at opportunistic capture.
4. Click Save Changes to create your custom Best-Hold Selection Sort Order.
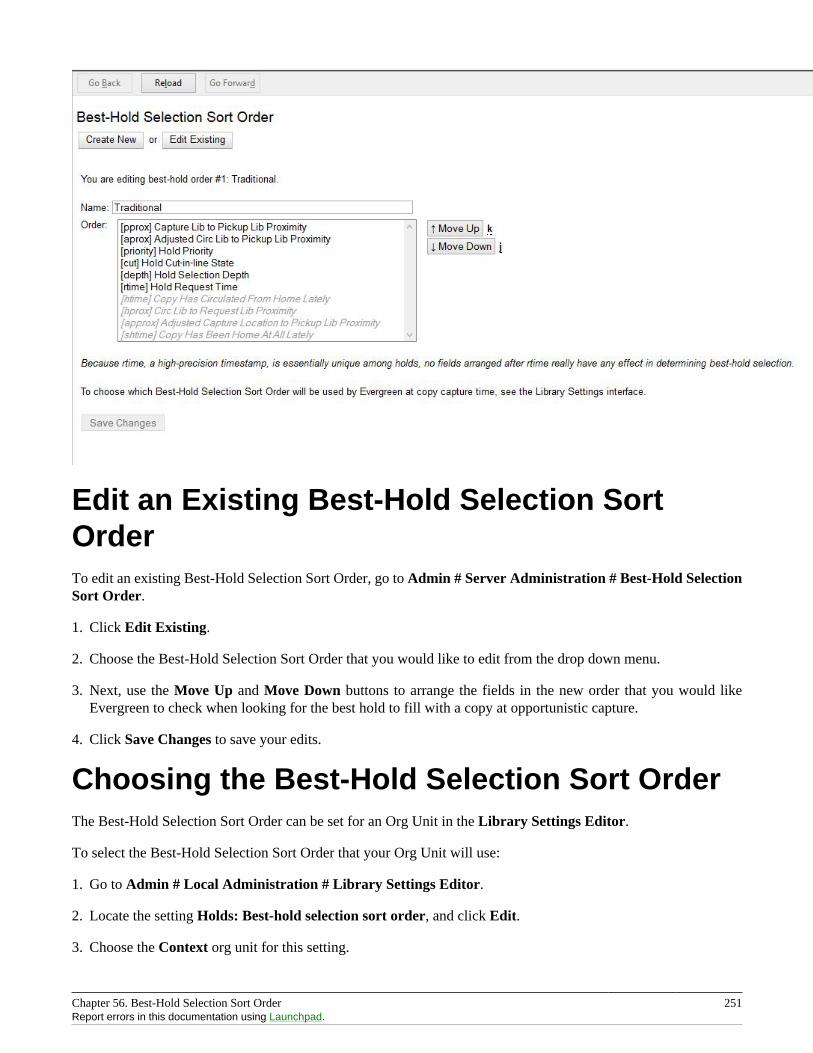
Chapter 56. Best-Hold Selection Sort Order 251Report errors in this documentation using Launchpad.
Edit an Existing Best-Hold Selection SortOrderTo edit an existing Best-Hold Selection Sort Order, go to Admin # Server Administration # Best-Hold SelectionSort Order.
1. Click Edit Existing.
2. Choose the Best-Hold Selection Sort Order that you would like to edit from the drop down menu.
3. Next, use the Move Up and Move Down buttons to arrange the fields in the new order that you would likeEvergreen to check when looking for the best hold to fill with a copy at opportunistic capture.
4. Click Save Changes to save your edits.
Choosing the Best-Hold Selection Sort OrderThe Best-Hold Selection Sort Order can be set for an Org Unit in the Library Settings Editor.
To select the Best-Hold Selection Sort Order that your Org Unit will use:
1. Go to Admin # Local Administration # Library Settings Editor.
2. Locate the setting Holds: Best-hold selection sort order, and click Edit.
3. Choose the Context org unit for this setting.
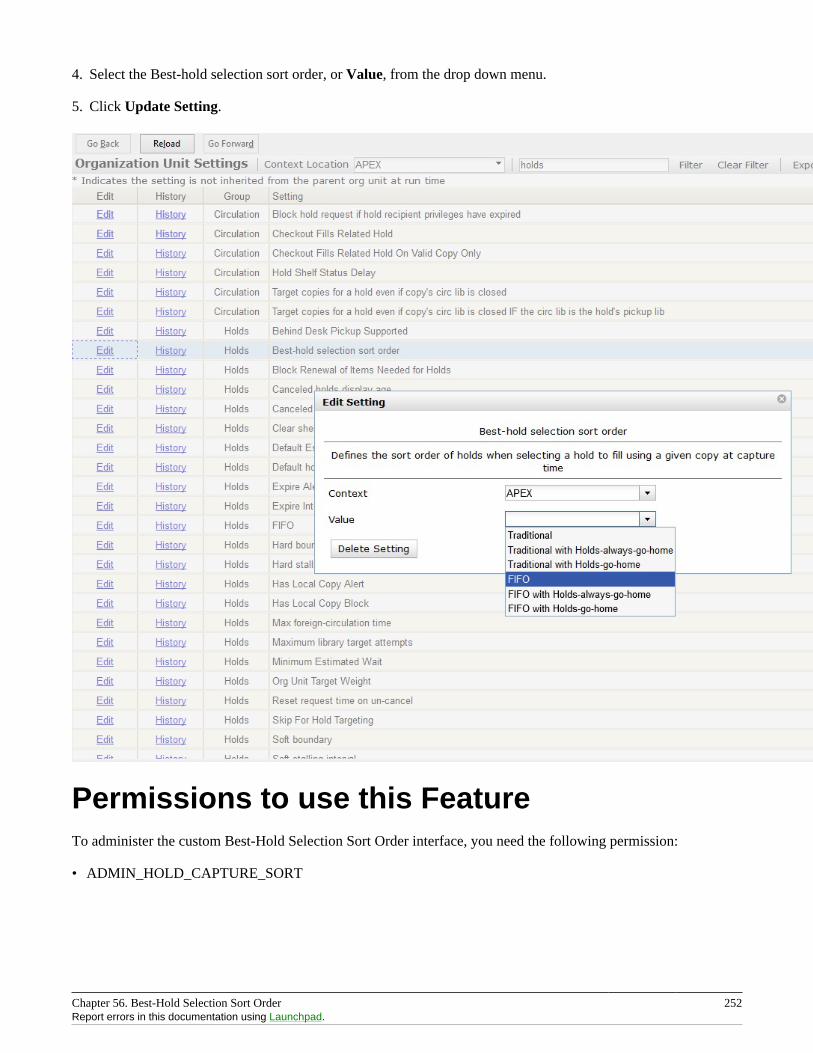
Chapter 56. Best-Hold Selection Sort Order 252Report errors in this documentation using Launchpad.
4. Select the Best-hold selection sort order, or Value, from the drop down menu.
5. Click Update Setting.
Permissions to use this FeatureTo administer the custom Best-Hold Selection Sort Order interface, you need the following permission:
• ADMIN_HOLD_CAPTURE_SORT
Chapter 57. Booking Module Administration 253
Chapter 57. Booking ModuleAdministration
Creating Bookable Non-BibliographicResourcesStaff with the required permissions (Circulator and above) can create bookable non-bibliographic resources suchas laptops, projectors, and meeting rooms.
The following pieces make up a non-bibliographic resource:
• Resource Type
• Resource Attribute
• Resource Attribute Values
• Resource
• Resource Attribute Map
You need to create resource types and resource attributes (features of the resource types), and add booking items(resources) to individual resource type. Each resource attribute may have multiple values. You need to link theapplicable features (resource attributes and values) to individual item (resource) through the Resource AttributeMap. Before you create resources (booking items) you need to have a resource type and associated resource attributesand values, if any, for them.
Create New Resource Type
1) Select Admin -# Server Administration -# Booking -# Resource Types.
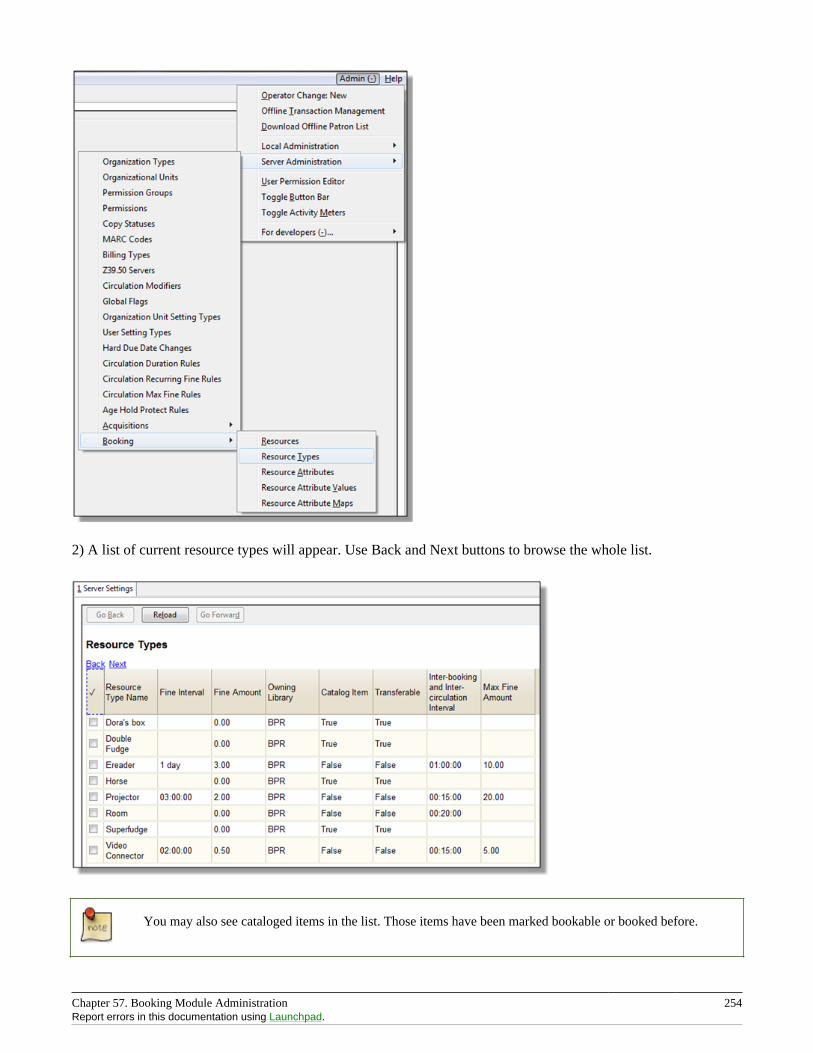
Chapter 57. Booking Module Administration 254Report errors in this documentation using Launchpad.
2) A list of current resource types will appear. Use Back and Next buttons to browse the whole list.
You may also see cataloged items in the list. Those items have been marked bookable or booked before.
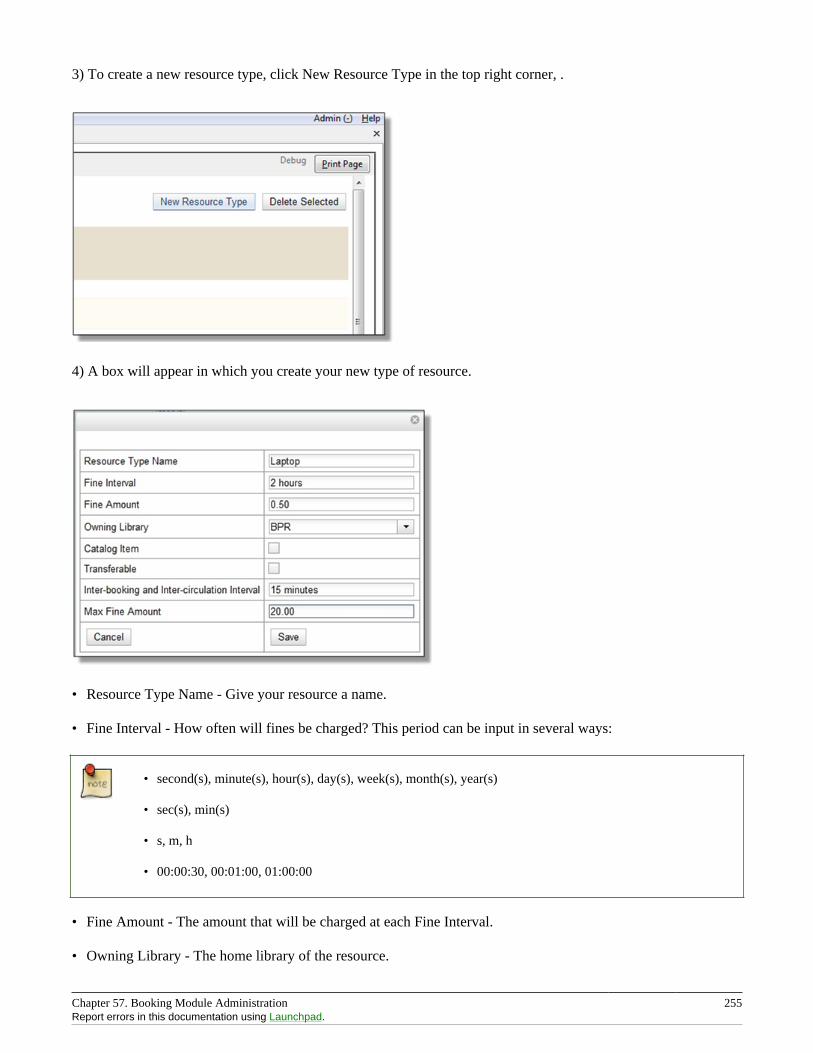
Chapter 57. Booking Module Administration 255Report errors in this documentation using Launchpad.
3) To create a new resource type, click New Resource Type in the top right corner, .
4) A box will appear in which you create your new type of resource.
• Resource Type Name - Give your resource a name.
• Fine Interval - How often will fines be charged? This period can be input in several ways:
• second(s), minute(s), hour(s), day(s), week(s), month(s), year(s)
• sec(s), min(s)
• s, m, h
• 00:00:30, 00:01:00, 01:00:00
• Fine Amount - The amount that will be charged at each Fine Interval.
• Owning Library - The home library of the resource.
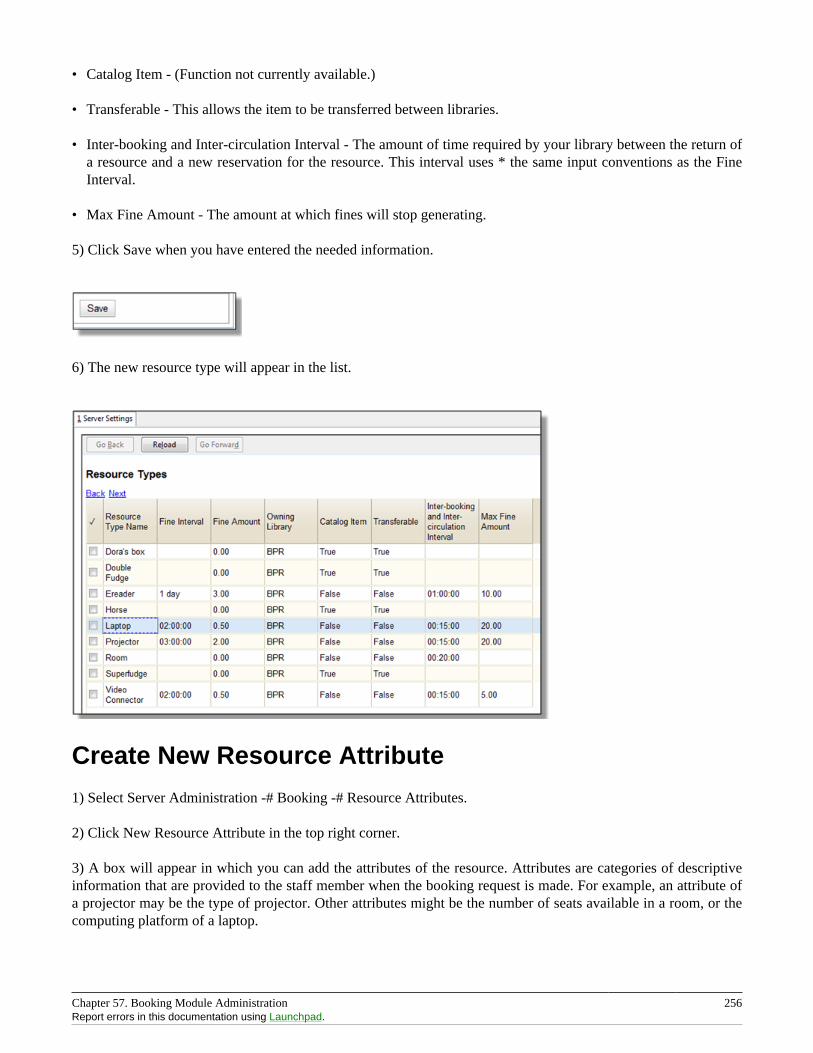
Chapter 57. Booking Module Administration 256Report errors in this documentation using Launchpad.
• Catalog Item - (Function not currently available.)
• Transferable - This allows the item to be transferred between libraries.
• Inter-booking and Inter-circulation Interval - The amount of time required by your library between the return ofa resource and a new reservation for the resource. This interval uses * the same input conventions as the FineInterval.
• Max Fine Amount - The amount at which fines will stop generating.
5) Click Save when you have entered the needed information.
6) The new resource type will appear in the list.
Create New Resource Attribute
1) Select Server Administration -# Booking -# Resource Attributes.
2) Click New Resource Attribute in the top right corner.
3) A box will appear in which you can add the attributes of the resource. Attributes are categories of descriptiveinformation that are provided to the staff member when the booking request is made. For example, an attribute ofa projector may be the type of projector. Other attributes might be the number of seats available in a room, or thecomputing platform of a laptop.

Chapter 57. Booking Module Administration 257Report errors in this documentation using Launchpad.
• Resource Attribute Name - Give your attribute a name.
• Owning Library - The home library of the resource.
• Resource Type - Type in the first letter to list then choose the Resource Type to which the Attribute is applicable.
• Is Required - (Function not currently available.)
4) Click Save when the necessary information has been entered.
5) The added attribute will appear in the list.
One resource type may have multiple attributes. You may repeat the above procedure to add more.
Create New Resource Attribute Value1) One resource attribute may have multiple values. To add new attribute value, select Server Administration #Booking # Resource Attribute Values.
2) Click New Resource Attribute Value in the top right corner.
3) A box will appear in which you assign a value to a particular attribute. Values can be numbers, words, or acombination of them, that describe the particular aspects of the resource that have been defined as Attributes. Asall values appear on the same list for selection, values should be as unique as possible. For example, a laptop mayhave a computing platform that is either PC or Mac.
• Owning Library - The home library of the resource.
• Resource Attribute - The attribute you wish to assign the value to.
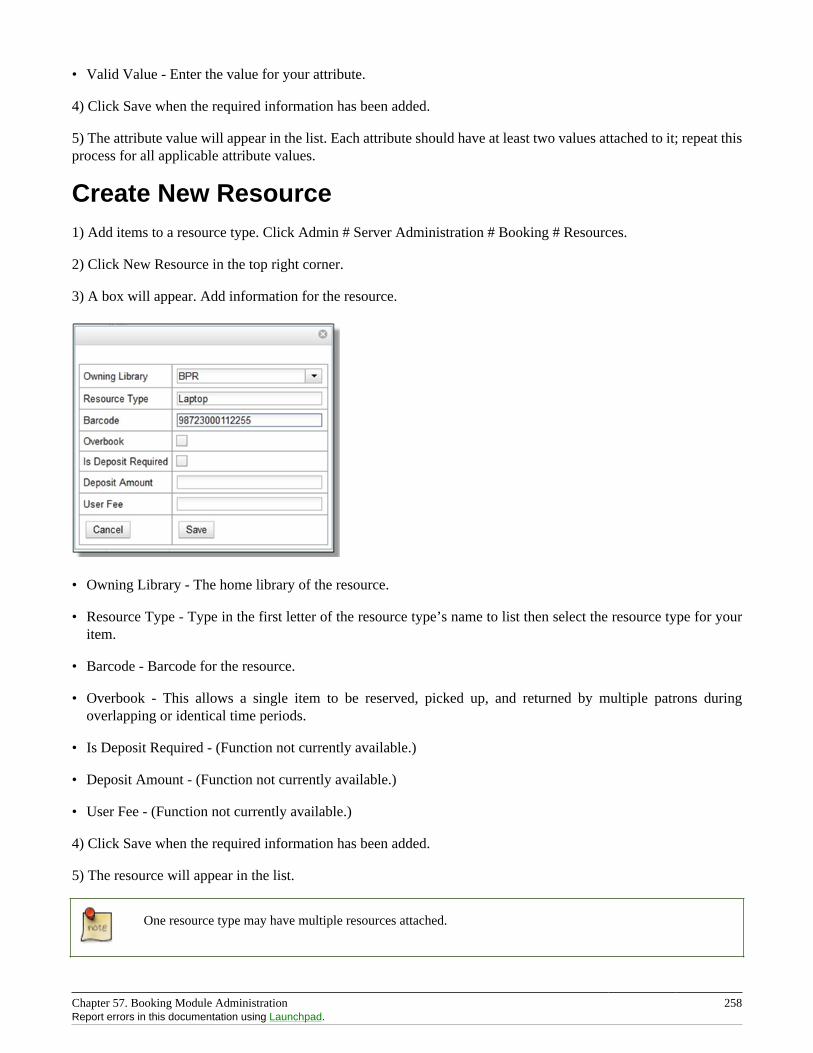
Chapter 57. Booking Module Administration 258Report errors in this documentation using Launchpad.
• Valid Value - Enter the value for your attribute.
4) Click Save when the required information has been added.
5) The attribute value will appear in the list. Each attribute should have at least two values attached to it; repeat thisprocess for all applicable attribute values.
Create New Resource1) Add items to a resource type. Click Admin # Server Administration # Booking # Resources.
2) Click New Resource in the top right corner.
3) A box will appear. Add information for the resource.
• Owning Library - The home library of the resource.
• Resource Type - Type in the first letter of the resource type’s name to list then select the resource type for youritem.
• Barcode - Barcode for the resource.
• Overbook - This allows a single item to be reserved, picked up, and returned by multiple patrons duringoverlapping or identical time periods.
• Is Deposit Required - (Function not currently available.)
• Deposit Amount - (Function not currently available.)
• User Fee - (Function not currently available.)
4) Click Save when the required information has been added.
5) The resource will appear in the list.
One resource type may have multiple resources attached.
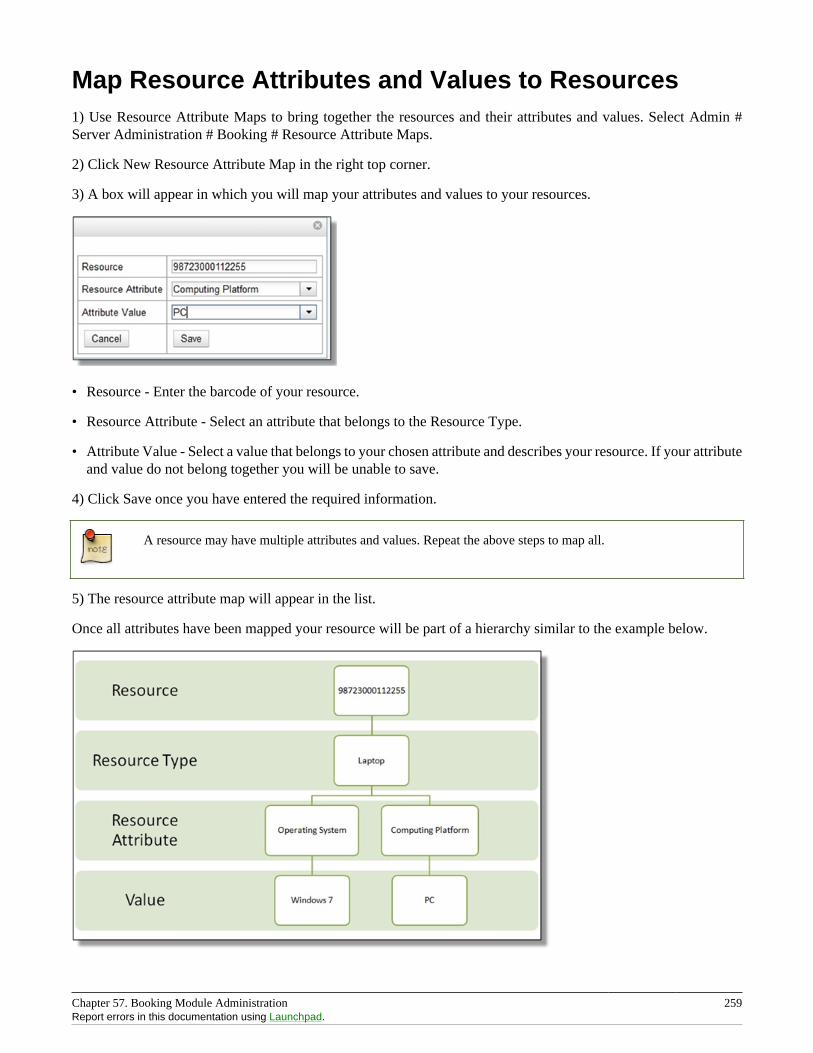
Chapter 57. Booking Module Administration 259Report errors in this documentation using Launchpad.
Map Resource Attributes and Values to Resources1) Use Resource Attribute Maps to bring together the resources and their attributes and values. Select Admin #Server Administration # Booking # Resource Attribute Maps.
2) Click New Resource Attribute Map in the right top corner.
3) A box will appear in which you will map your attributes and values to your resources.
• Resource - Enter the barcode of your resource.
• Resource Attribute - Select an attribute that belongs to the Resource Type.
• Attribute Value - Select a value that belongs to your chosen attribute and describes your resource. If your attributeand value do not belong together you will be unable to save.
4) Click Save once you have entered the required information.
A resource may have multiple attributes and values. Repeat the above steps to map all.
5) The resource attribute map will appear in the list.
Once all attributes have been mapped your resource will be part of a hierarchy similar to the example below.
Chapter 57. Booking Module Administration 260Report errors in this documentation using Launchpad.
Editing Non-Bibliographic ResourcesStaff with the required permissions can edit aspects of existing non-bibliographic resources. For example, resourcetype can be edited in the event that the fine amount for a laptop changes from $2.00 to $5.00.
Editing Resource Types1) Bring up your list of resource types. Select Admin -# Server Administration -# Booking -# Resource Types.
2) A list of current resource types will appear.
3) Double click anywhere on the line of the resource type you would like to edit.
4) The resource type box will appear. Make your changes and click Save.
5) Following the same procedure you may edit Resource Attributes, Attributes Values, Resources and AttributeMap by selecting them on Admin -# Server Administration -# Booking menu.
Deleting Non-bibliographic Resources1) To delete a booking resource, go to Admin # Server Administration # Booking # Resources.
2) Select the checkbox in front the resource you want to delete. Click Delete Selected. The resource will disappearfrom the list.
Following the same procedure you may delete Resource Attributes Maps.
You may also delete Resource Attribute Values, Resource Attributes and Resource Types. But you have to deletethem in the reverse order when you create them to make sure the entry is not in use when you try to delete it.
This is the deletion order: Resource Attribute Map/Resources -# Resource Attribute Values -# Resource Attributes-# Resource Types.
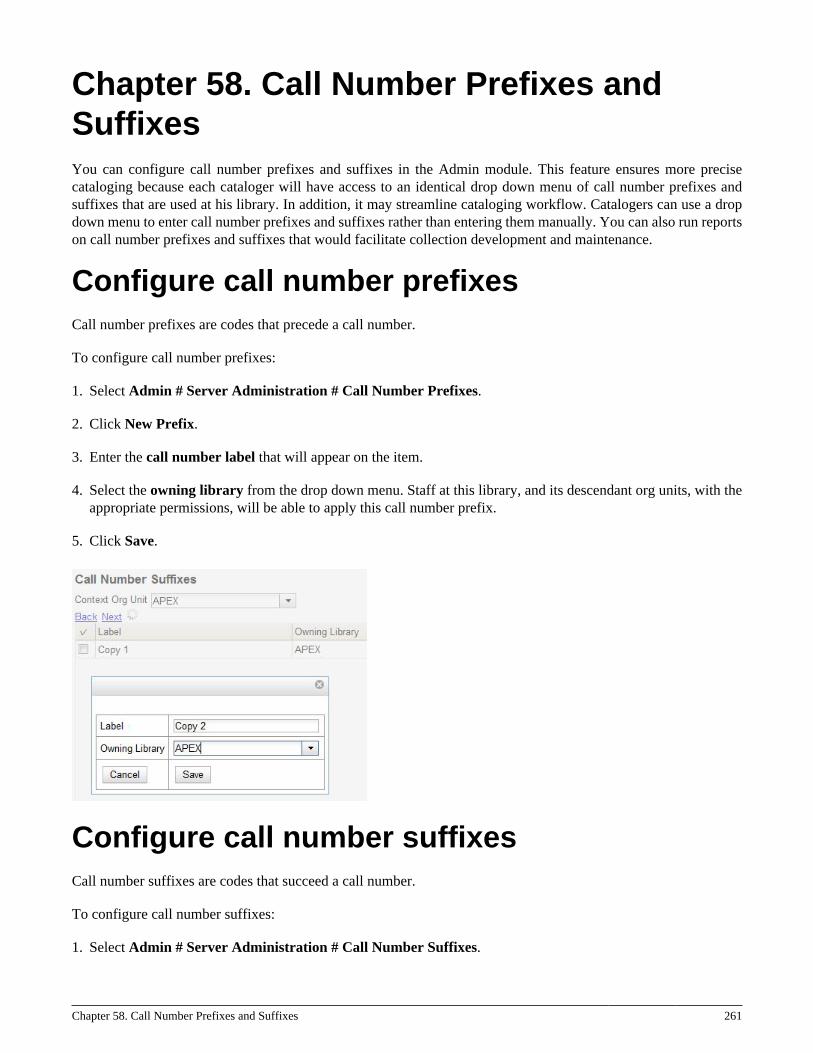
Chapter 58. Call Number Prefixes and Suffixes 261
Chapter 58. Call Number Prefixes andSuffixesYou can configure call number prefixes and suffixes in the Admin module. This feature ensures more precisecataloging because each cataloger will have access to an identical drop down menu of call number prefixes andsuffixes that are used at his library. In addition, it may streamline cataloging workflow. Catalogers can use a dropdown menu to enter call number prefixes and suffixes rather than entering them manually. You can also run reportson call number prefixes and suffixes that would facilitate collection development and maintenance.
Configure call number prefixesCall number prefixes are codes that precede a call number.
To configure call number prefixes:
1. Select Admin # Server Administration # Call Number Prefixes.
2. Click New Prefix.
3. Enter the call number label that will appear on the item.
4. Select the owning library from the drop down menu. Staff at this library, and its descendant org units, with theappropriate permissions, will be able to apply this call number prefix.
5. Click Save.
Configure call number suffixesCall number suffixes are codes that succeed a call number.
To configure call number suffixes:
1. Select Admin # Server Administration # Call Number Suffixes.
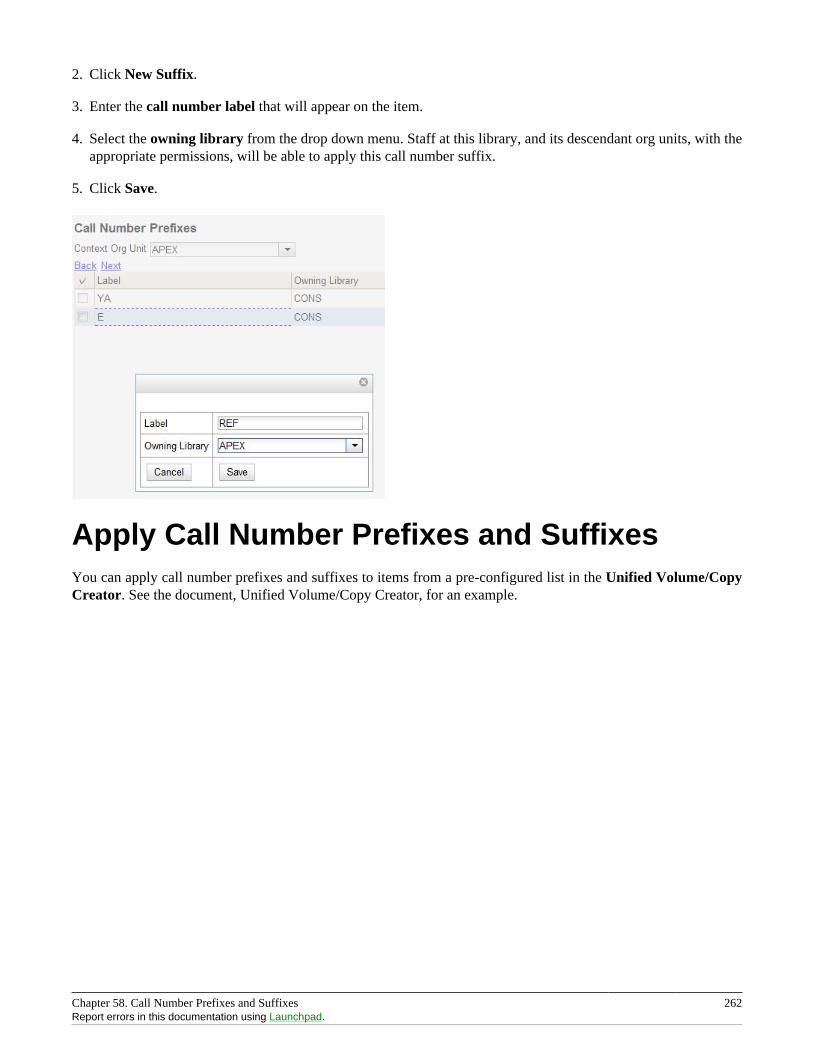
Chapter 58. Call Number Prefixes and Suffixes 262Report errors in this documentation using Launchpad.
2. Click New Suffix.
3. Enter the call number label that will appear on the item.
4. Select the owning library from the drop down menu. Staff at this library, and its descendant org units, with theappropriate permissions, will be able to apply this call number suffix.
5. Click Save.
Apply Call Number Prefixes and SuffixesYou can apply call number prefixes and suffixes to items from a pre-configured list in the Unified Volume/CopyCreator. See the document, Unified Volume/Copy Creator, for an example.
Chapter 59. Circulation Limit Sets 263
Chapter 59. Circulation Limit Sets
Maximum Checkout by Copy LocationThis feature enables you to specify the maximum number of checkouts of items by copy location and is an additionto the circulation limit sets. Circulation limit sets refine circulation policies by limiting the number of items thatusers can check out. Circulation limit sets are linked by name to circulation policies.
To limit checkouts by copy location:
1. Click Admin # Local Administration # Circulation Limit Sets.
2. Click New to create a new circulation limit set.
3. In the Owning Library field, select the library that can create and edit this limit set.
4. Enter a Name for the circulation set. You will select the Name to link the circulation limit set to a circulationpolicy.
5. Enter the number of Items Out that a user can take from this copy location.
6. Enter the Min Depth, or the minimum depth in the org tree that Evergreen will consider as valid circulationlibraries for counting items out. The min depth is based on org unit type depths. For example, if you want theitems in all of the circulating libraries in your consortium to be eligible for restriction by this limit set when it isapplied to a circulation policy, then enter a zero (0) in this field.
7. Check the box adjacent to Global Flag if you want all of the org units in your consortium to be restricted by thislimit set when it is applied to a circulation policy. Otherwise, Evergreen will only apply the limit to the directancestors and descendants of the owning library.
8. Enter a brief Description of the circulation limit set.
9. Click Save.
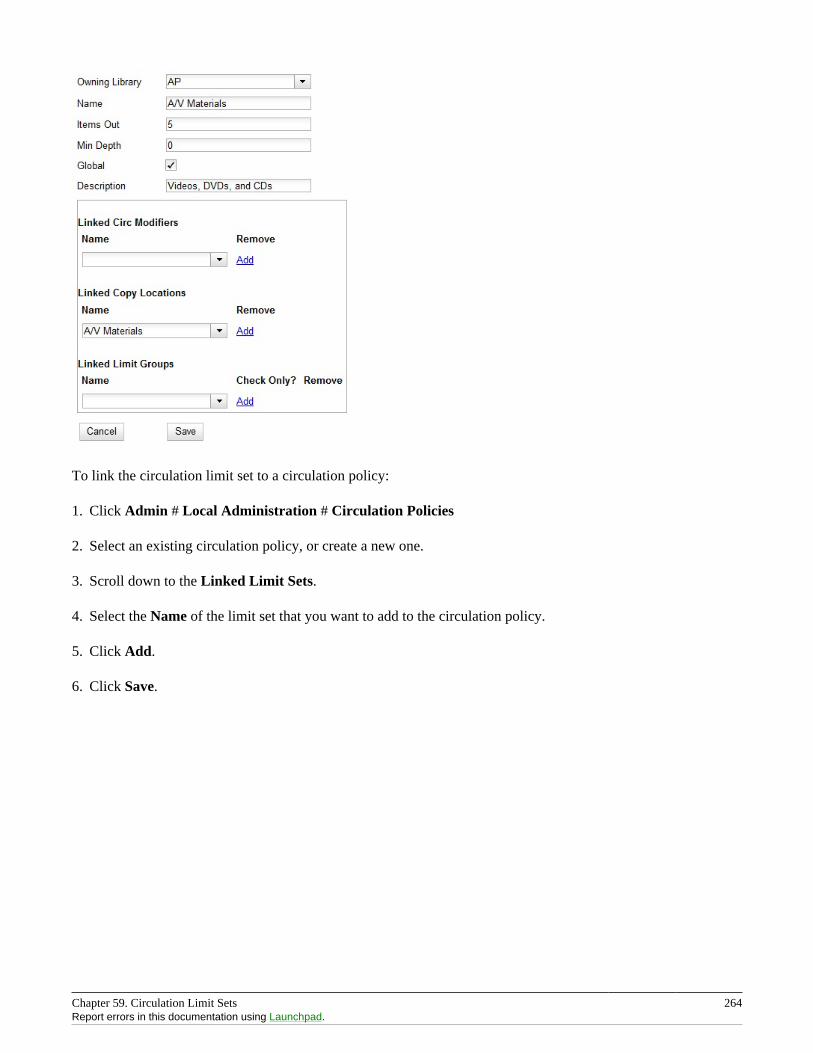
Chapter 59. Circulation Limit Sets 264Report errors in this documentation using Launchpad.
To link the circulation limit set to a circulation policy:
1. Click Admin # Local Administration # Circulation Policies
2. Select an existing circulation policy, or create a new one.
3. Scroll down to the Linked Limit Sets.
4. Select the Name of the limit set that you want to add to the circulation policy.
5. Click Add.
6. Click Save.
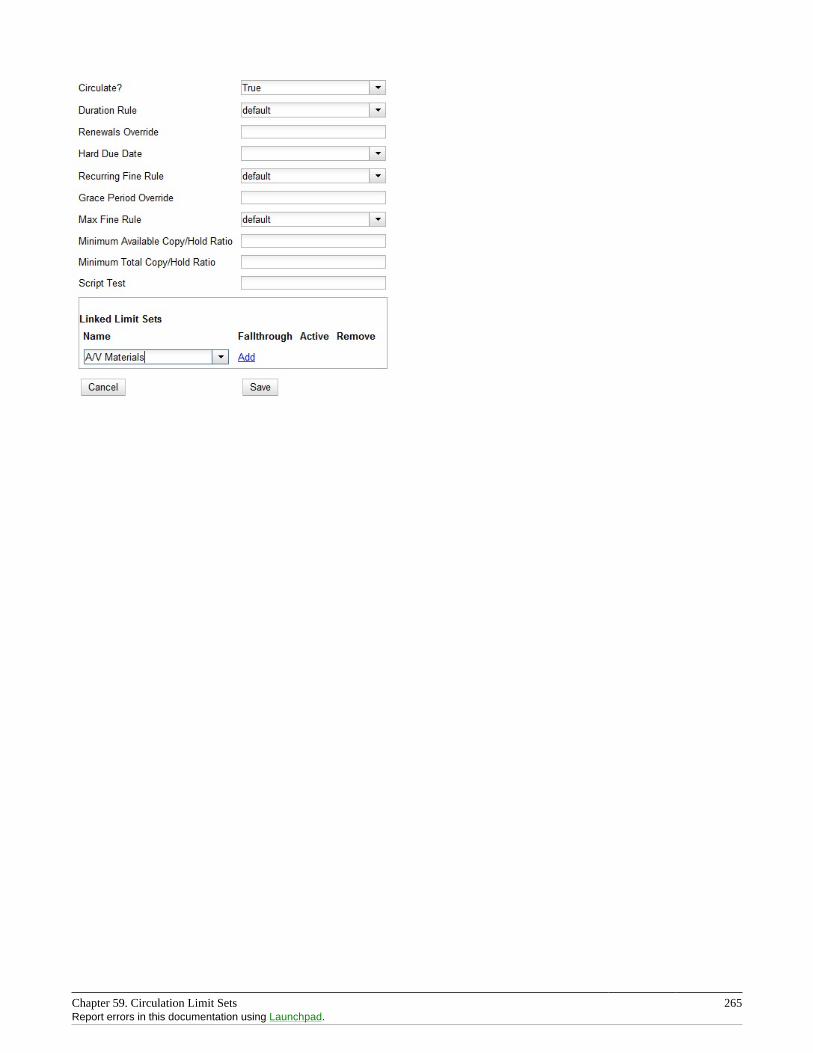
Chapter 59. Circulation Limit Sets 265Report errors in this documentation using Launchpad.
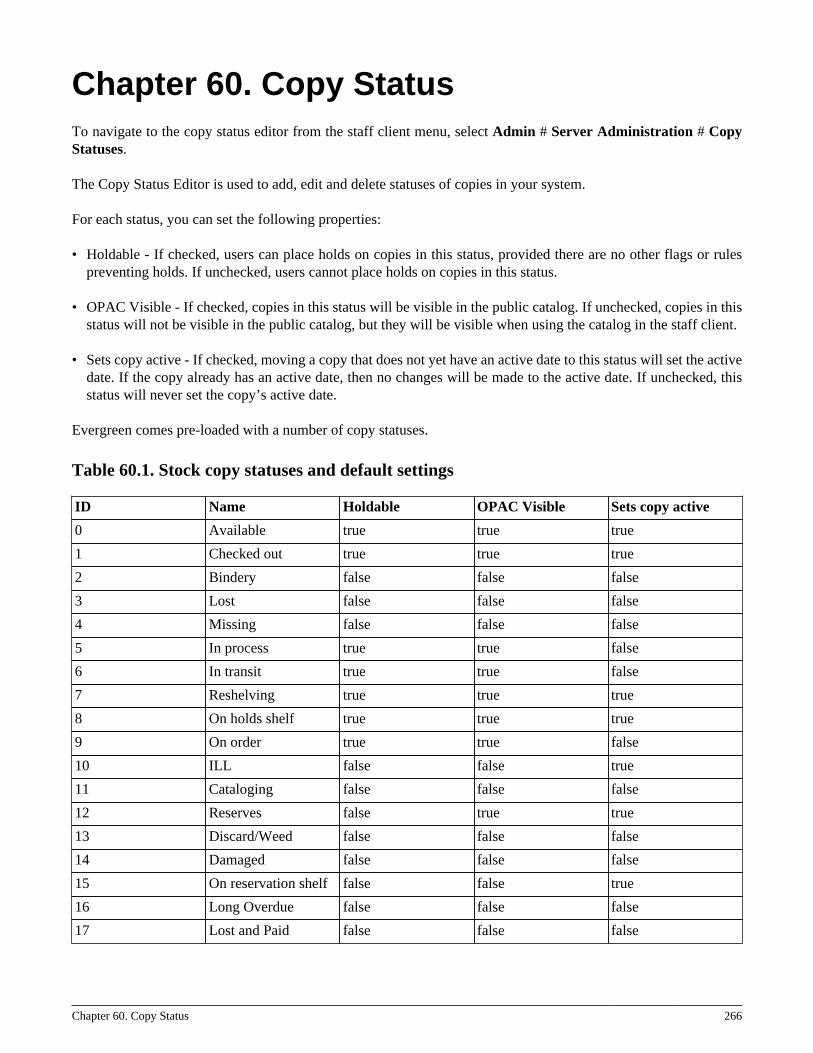
Chapter 60. Copy Status 266
Chapter 60. Copy StatusTo navigate to the copy status editor from the staff client menu, select Admin # Server Administration # CopyStatuses.
The Copy Status Editor is used to add, edit and delete statuses of copies in your system.
For each status, you can set the following properties:
• Holdable - If checked, users can place holds on copies in this status, provided there are no other flags or rulespreventing holds. If unchecked, users cannot place holds on copies in this status.
• OPAC Visible - If checked, copies in this status will be visible in the public catalog. If unchecked, copies in thisstatus will not be visible in the public catalog, but they will be visible when using the catalog in the staff client.
• Sets copy active - If checked, moving a copy that does not yet have an active date to this status will set the activedate. If the copy already has an active date, then no changes will be made to the active date. If unchecked, thisstatus will never set the copy’s active date.
Evergreen comes pre-loaded with a number of copy statuses.
Table 60.1. Stock copy statuses and default settings
ID Name Holdable OPAC Visible Sets copy active
0 Available true true true
1 Checked out true true true
2 Bindery false false false
3 Lost false false false
4 Missing false false false
5 In process true true false
6 In transit true true false
7 Reshelving true true true
8 On holds shelf true true true
9 On order true true false
10 ILL false false true
11 Cataloging false false false
12 Reserves false true true
13 Discard/Weed false false false
14 Damaged false false false
15 On reservation shelf false false true
16 Long Overdue false false false
17 Lost and Paid false false false
Chapter 60. Copy Status 267Report errors in this documentation using Launchpad.
Adding Copy Statuses1. In the New Status field, enter the name of the new status you wish to add.
2. Click Add.
3. Locate your new status and check the Holdable check box if you wish to allow users to place holds on items inthis status. Check OPAC Visible if you wish for this status to appear in the public catalog. Check Sets copy activeif you wish for this status to set the active date for new items.
4. Click Save Changes at the bottom of the screen to save changes to the new status.
Deleting Copy Statuses1. Highlight the statuses you wish to delete. Ctrl-click to select more than one status.
2. Click Delete Selected.
3. Click OK to verify.
You will not be able to delete statuses if copies currently exist with that status.
Editing Copy Statuses1. Double click on a status name to change its name. Enter the new name.
2. To change whether a status is holdable, visible in the OPAC, or sets the copy’s active date, check or uncheckthe relevant checkbox.
3. Once you have finished editing the statuses, remember to click Save Changes.
Chapter 61. Floating Groups 268
Chapter 61. Floating GroupsBefore floating groups copies could float or not. If they floated then they floated everywhere, with no restrictions.
After floating groups where a copy will float is defined by what group it has been assigned to.
Floating GroupsEach floating group comes with a name and a manual flag, plus zero or more group members. The name is usedsolely for selection and display purposes.
The manual flag dictates whether or not the "Manual Floating Active" checkin modifier needs to be active for acopy to float. This allows for greater control over when items float. It also prevents automated checkins via SIP2from triggering floats.
Floating Group MembersEach member of a floating group references an org unit and has a stop depth, an optional max depth, and an excludeflag.
Org UnitThe org unit and all descendants are included, unless max depth is set, in which case the tree is cut off at the maxdepth.
Stop DepthThe stop depth is the highest point from the current copy circ library to the checkin library for the item that will betraversed. If the item has to go higher than the stop depth on the tree the member rule in question is ignored.
Max DepthAs mentioned with the org unit, the max depth is the furthest down on the tree from the org unit that gets included.This is based on the entire tree, not just off of the org unit. So in the default tree a max depth of 1 will stop at thesystem level no matter if org unit is set to CONS or SYS1.
ExcludeExclude, if set, causes floating to not happen for the member. Excludes always take priority, so you can remove anorg unit from floating without having to worry about other rules overriding it.
Examples
Float EverywhereThis is a default floating rule to emulate the previous floating behavior for new installs and upgrades.
Chapter 61. Floating Groups 269Report errors in this documentation using Launchpad.
One member:
• Org Unit: CONS
• Stop Depth: 0
• Max Depth: Unset
• Exclude: Off
Float Within SystemThis would permit a copy to float anywhere within a system, but would return to the system if it was returnedelsewhere.
One member:
• Org Unit: CONS
• Stop Depth: 1
• Max Depth: Unset
• Exclude: Off
Float To All BranchesThis would permit a copy to float to any branch, but not to sublibraries or bookmobiles.
One member:
• Org Unit: CONS
• Stop Depth: 0
• Max Depth: 2
• Exclude: Off
Float To All Branches Within SystemThis would permit a copy to float to any branch in a system, but not to sublibraries or bookmobiles, and returningto the system if returned elsewhere.
One member:
• Org Unit: CONS
• Stop Depth: 1
• Max Depth: 2
• Exclude: Off
Chapter 61. Floating Groups 270Report errors in this documentation using Launchpad.
Float Between BR1 and BR3This would permit a copy to float between BR1 and BR3 specifically, excluding sublibraries and bookmobiles.
It would consist of two members, identical other than the org unit:
• Org Unit: BR1 / BR3
• Stop Depth: 0
• Max Depth: 2
• Exclude: Off
Float Everywhere Except BM1This would allow an item to float anywhere except for BM1. It accomplishes this with two members.
The first includes all org units, just like Float Everywhere:
• Org Unit: CONS
• Stop Depth: 0
• Max Depth: Unset
• Exclude: Off
The second excludes BM1:
• Org Unit: BM1
• Stop Depth: 0
• Max Depth: Unset
• Exclude: On
That works because excludes are applied first.
Float into, but not out of, BR2This would allow an item to float into BR2, but once there it would never leave. Why you would want to allowitems to float to but not from a single library I dunno, but here it is. This takes advantage of the fact that the rulessay where we can float to, but outside of stop depth don’t care where we are floating from.
One member:
• Org Unit: BR2
• Stop Depth: 0
• Max Depth: Unset

Chapter 61. Floating Groups 271Report errors in this documentation using Launchpad.
• Exclude: Off
Chapter 62. MARC Import Remove Fields 272
Chapter 62. MARC Import Remove FieldsMARC Import Remove Fields allows staff to configure MARC tags to be automatically removed from bibliographicrecords when they are imported into Evergreen. This feature allows specific MARC tags to be removed from recordsthat are imported through three different interfaces:
• Cataloging # Import Record from Z39.50
• Cataloging # MARC Batch Import/Export
• Acquisitions # Load MARC Order Records
Create a MARC Import Remove Fields profileTo create a MARC Import Remove Fields profile, go to Admin # Server Administration # MARC ImportRemove Fields.
1. Click New Field Group.
2. Assign the Field Group a Label. This label will appear in the import interfaces.
3. Assign an Org Unit Owner.
4. Check the box next to Always Apply if you want Evergreen to apply this Remove Fields profile to all MARCrecords that are imported through the three affected interfaces. If you do not select Always Apply, staff will havethe option to choose which Remove Fields profile to use when importing records.
5. Click Save.
6. The profile that you created will now appear in the list of MARC Import Remove Fields.
7. Click on the hyperlinked ID number. This will bring you into the Remove Fields profile to configure the MARCtags to be removed.
8. Click New Field.
9. In the Field, enter the MARC tag to be removed.
10.Click Save.
11.Add New Fields until you have configured all the tags needed for this profile.
12.Click Return to Groups to go back to the list of Remove Field profiles.
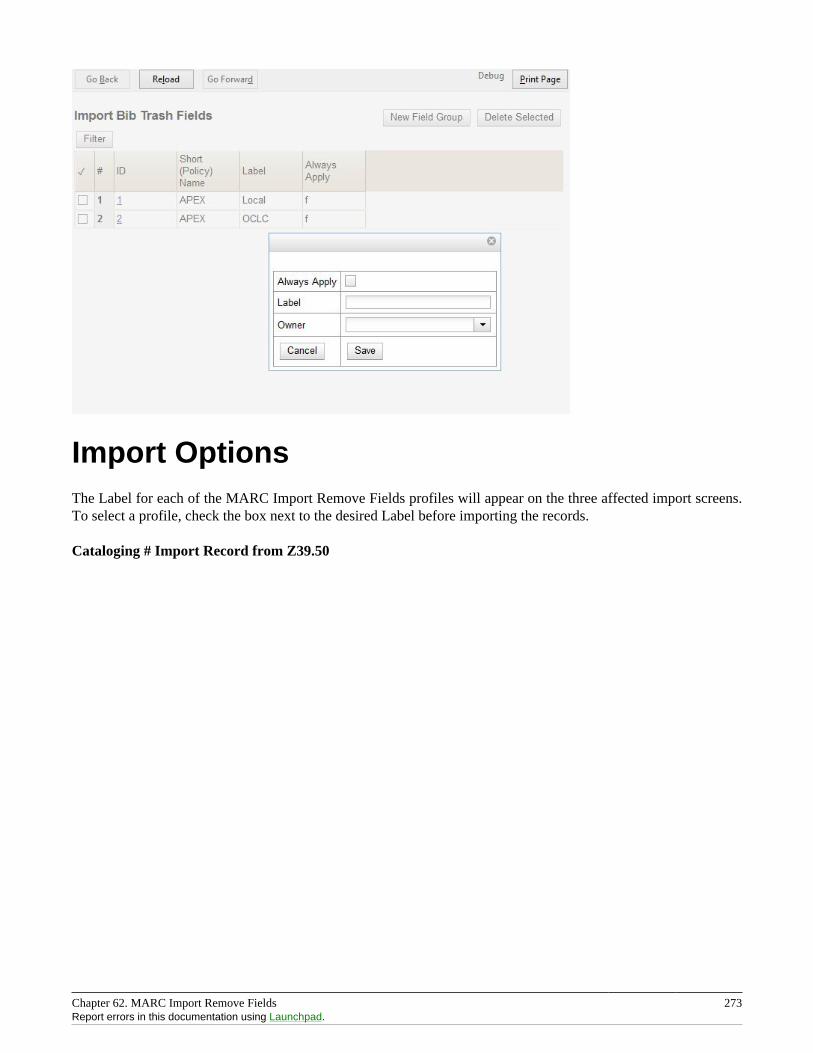
Chapter 62. MARC Import Remove Fields 273Report errors in this documentation using Launchpad.
Import OptionsThe Label for each of the MARC Import Remove Fields profiles will appear on the three affected import screens.To select a profile, check the box next to the desired Label before importing the records.
Cataloging # Import Record from Z39.50
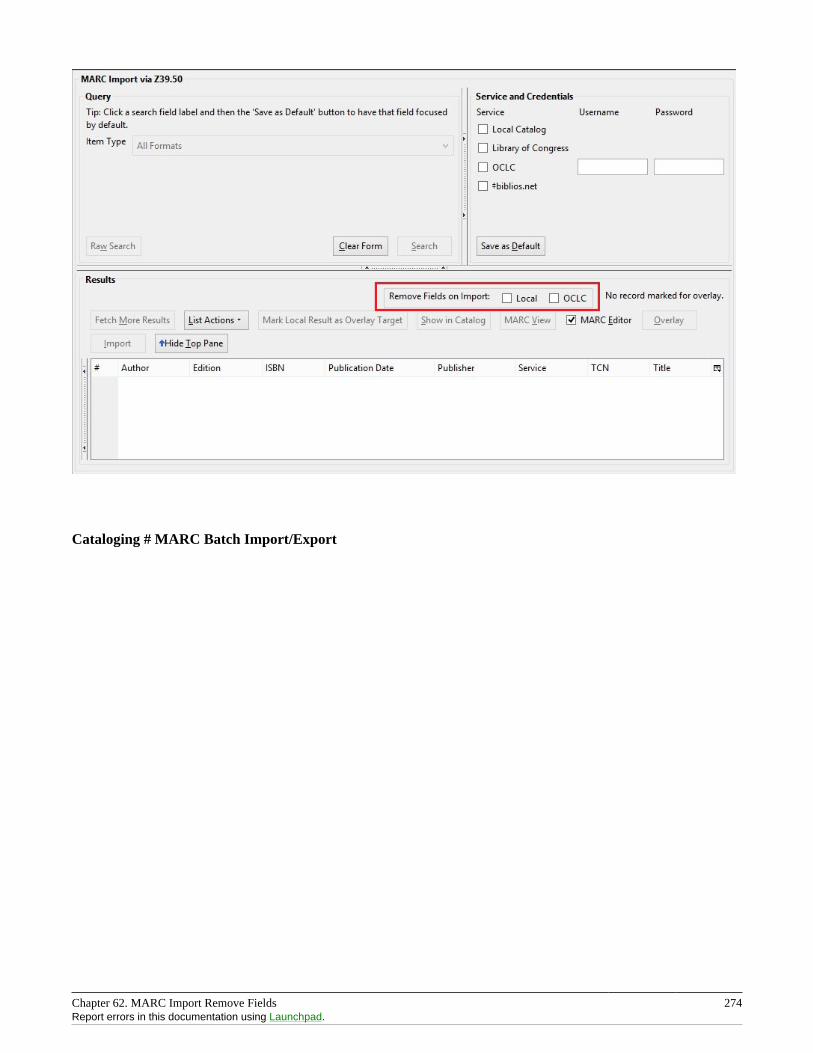
Chapter 62. MARC Import Remove Fields 274Report errors in this documentation using Launchpad.
Cataloging # MARC Batch Import/Export
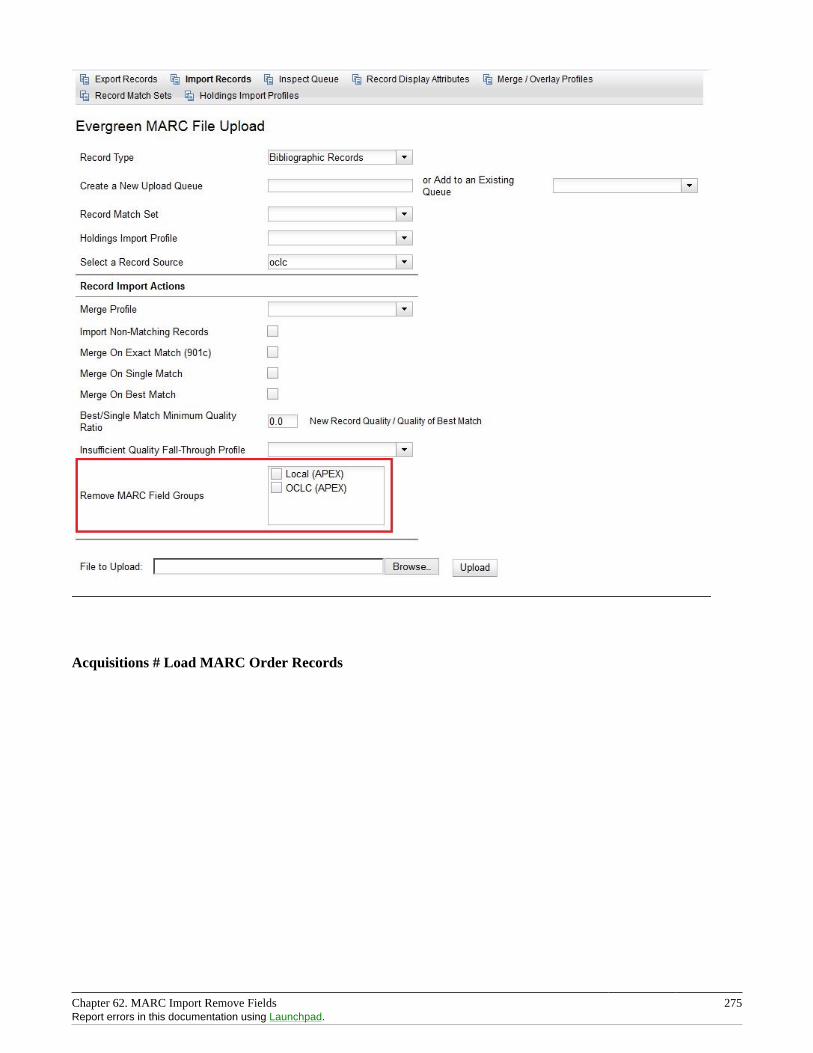
Chapter 62. MARC Import Remove Fields 275Report errors in this documentation using Launchpad.
Acquisitions # Load MARC Order Records
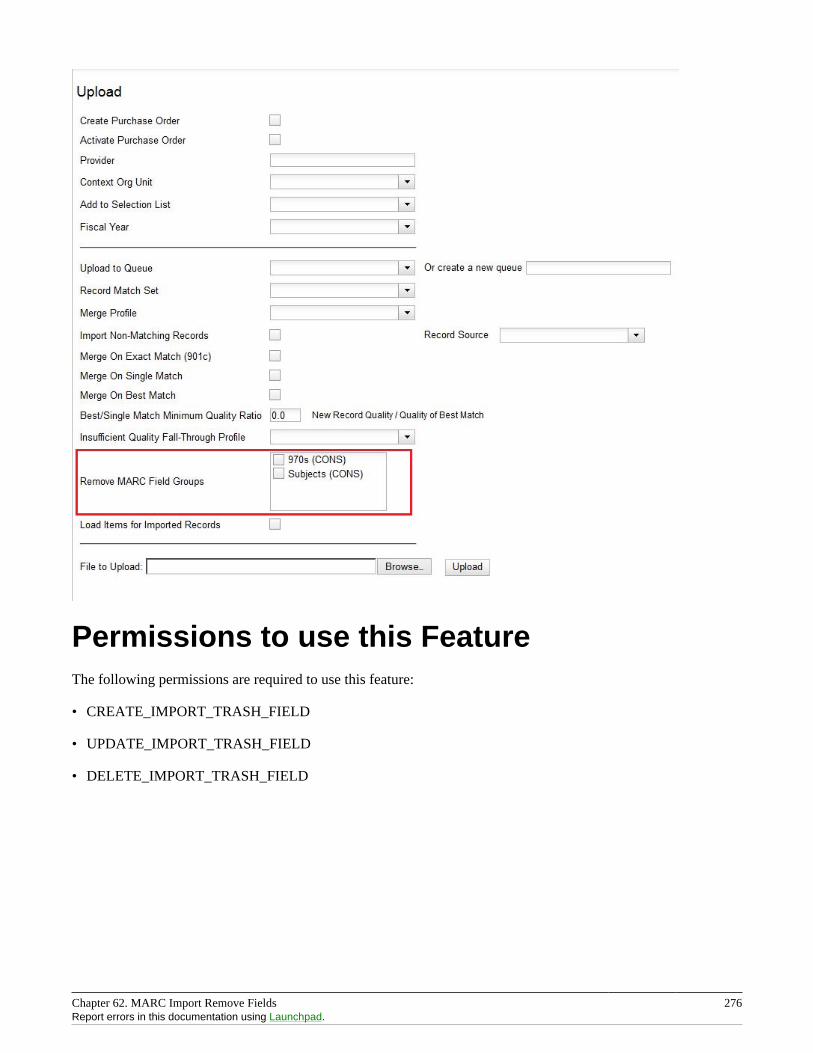
Chapter 62. MARC Import Remove Fields 276Report errors in this documentation using Launchpad.
Permissions to use this FeatureThe following permissions are required to use this feature:
• CREATE_IMPORT_TRASH_FIELD
• UPDATE_IMPORT_TRASH_FIELD
• DELETE_IMPORT_TRASH_FIELD
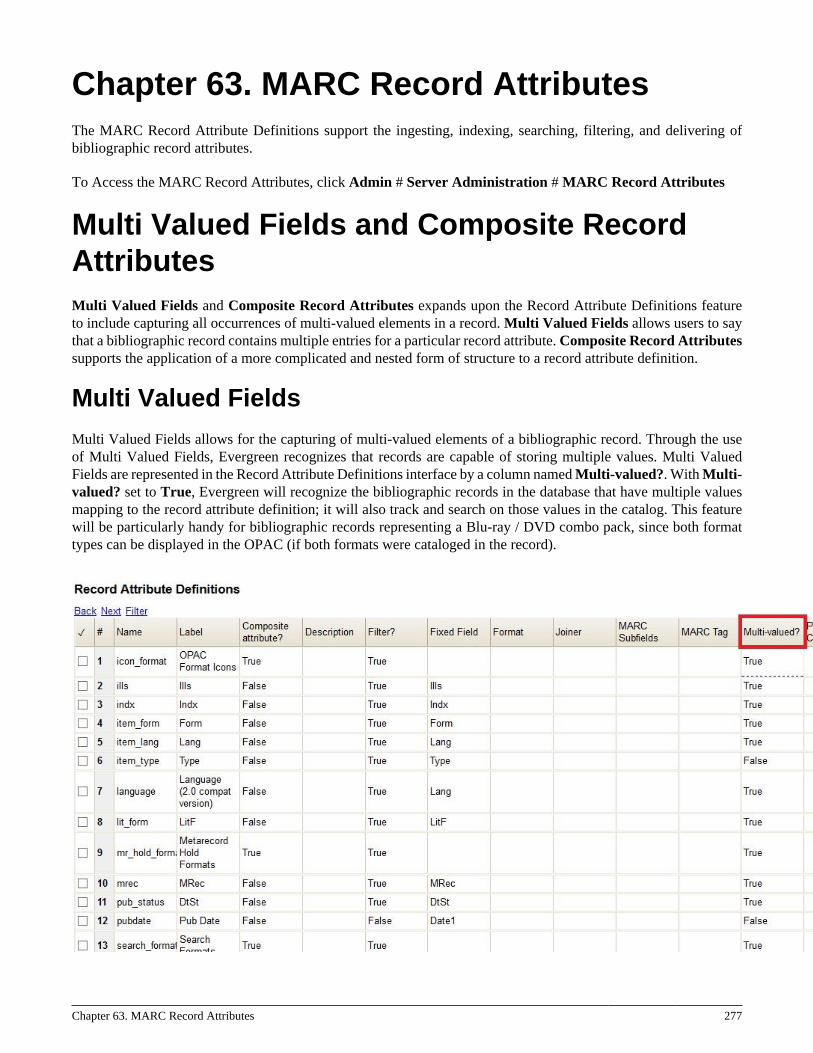
Chapter 63. MARC Record Attributes 277
Chapter 63. MARC Record AttributesThe MARC Record Attribute Definitions support the ingesting, indexing, searching, filtering, and delivering ofbibliographic record attributes.
To Access the MARC Record Attributes, click Admin # Server Administration # MARC Record Attributes
Multi Valued Fields and Composite RecordAttributesMulti Valued Fields and Composite Record Attributes expands upon the Record Attribute Definitions featureto include capturing all occurrences of multi-valued elements in a record. Multi Valued Fields allows users to saythat a bibliographic record contains multiple entries for a particular record attribute. Composite Record Attributessupports the application of a more complicated and nested form of structure to a record attribute definition.
Multi Valued FieldsMulti Valued Fields allows for the capturing of multi-valued elements of a bibliographic record. Through the useof Multi Valued Fields, Evergreen recognizes that records are capable of storing multiple values. Multi ValuedFields are represented in the Record Attribute Definitions interface by a column named Multi-valued?. With Multi-valued? set to True, Evergreen will recognize the bibliographic records in the database that have multiple valuesmapping to the record attribute definition; it will also track and search on those values in the catalog. This featurewill be particularly handy for bibliographic records representing a Blu-ray / DVD combo pack, since both formattypes can be displayed in the OPAC (if both formats were cataloged in the record).
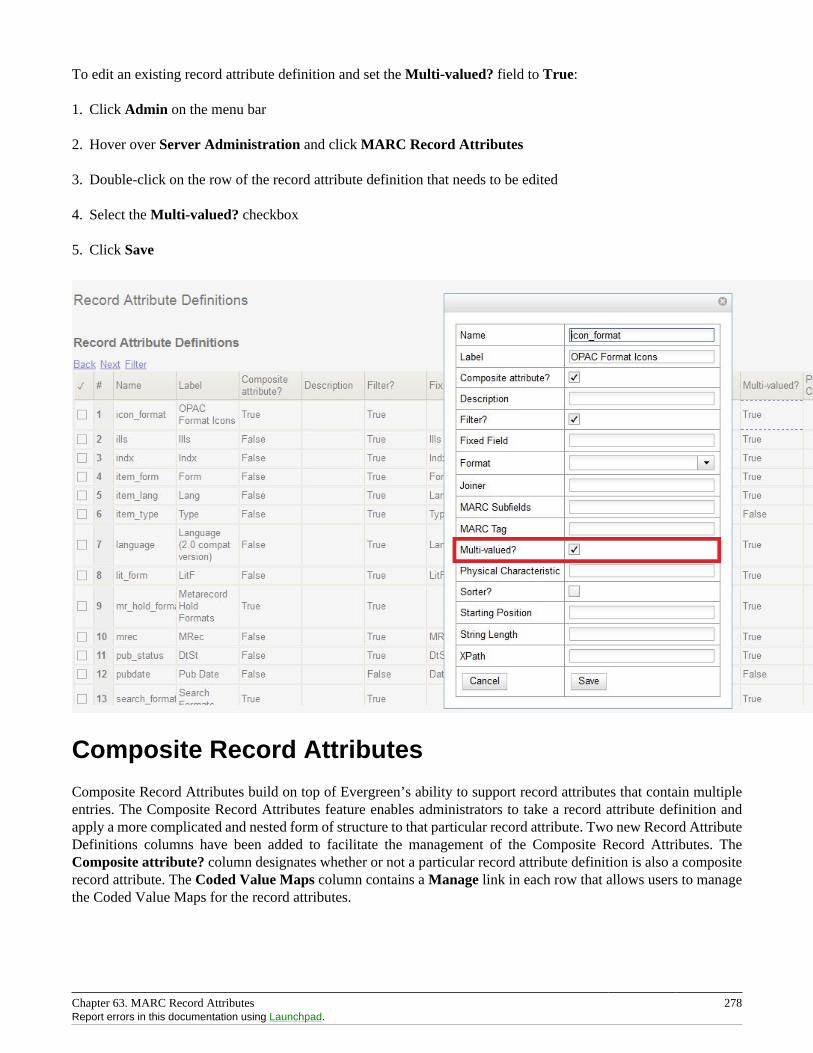
Chapter 63. MARC Record Attributes 278Report errors in this documentation using Launchpad.
To edit an existing record attribute definition and set the Multi-valued? field to True:
1. Click Admin on the menu bar
2. Hover over Server Administration and click MARC Record Attributes
3. Double-click on the row of the record attribute definition that needs to be edited
4. Select the Multi-valued? checkbox
5. Click Save
Composite Record Attributes
Composite Record Attributes build on top of Evergreen’s ability to support record attributes that contain multipleentries. The Composite Record Attributes feature enables administrators to take a record attribute definition andapply a more complicated and nested form of structure to that particular record attribute. Two new Record AttributeDefinitions columns have been added to facilitate the management of the Composite Record Attributes. TheComposite attribute? column designates whether or not a particular record attribute definition is also a compositerecord attribute. The Coded Value Maps column contains a Manage link in each row that allows users to managethe Coded Value Maps for the record attributes.
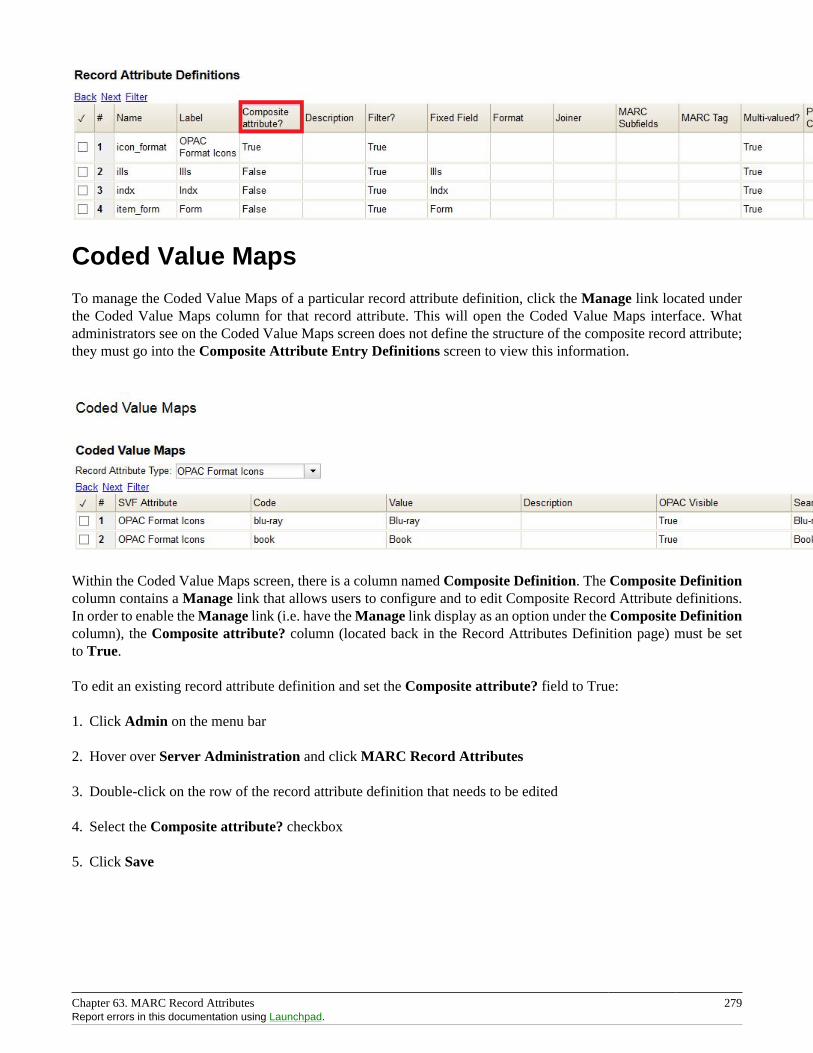
Chapter 63. MARC Record Attributes 279Report errors in this documentation using Launchpad.
Coded Value Maps
To manage the Coded Value Maps of a particular record attribute definition, click the Manage link located underthe Coded Value Maps column for that record attribute. This will open the Coded Value Maps interface. Whatadministrators see on the Coded Value Maps screen does not define the structure of the composite record attribute;they must go into the Composite Attribute Entry Definitions screen to view this information.
Within the Coded Value Maps screen, there is a column named Composite Definition. The Composite Definitioncolumn contains a Manage link that allows users to configure and to edit Composite Record Attribute definitions.In order to enable the Manage link (i.e. have the Manage link display as an option under the Composite Definitioncolumn), the Composite attribute? column (located back in the Record Attributes Definition page) must be setto True.
To edit an existing record attribute definition and set the Composite attribute? field to True:
1. Click Admin on the menu bar
2. Hover over Server Administration and click MARC Record Attributes
3. Double-click on the row of the record attribute definition that needs to be edited
4. Select the Composite attribute? checkbox
5. Click Save
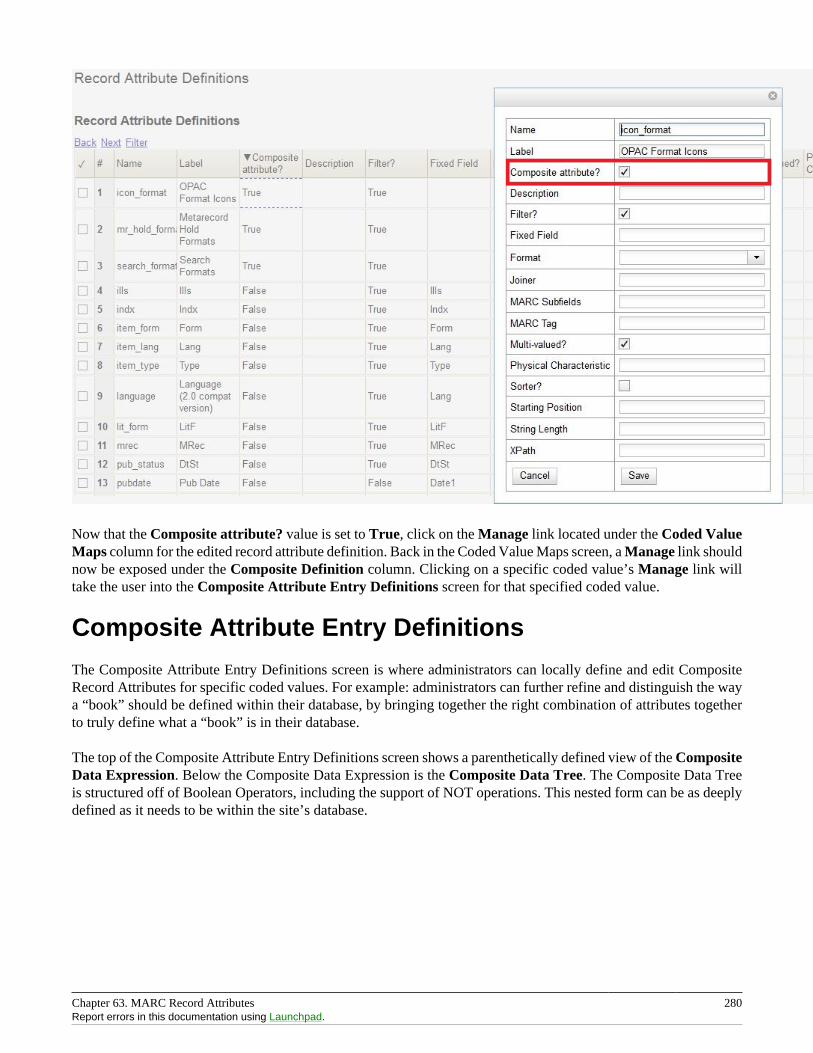
Chapter 63. MARC Record Attributes 280Report errors in this documentation using Launchpad.
Now that the Composite attribute? value is set to True, click on the Manage link located under the Coded ValueMaps column for the edited record attribute definition. Back in the Coded Value Maps screen, a Manage link shouldnow be exposed under the Composite Definition column. Clicking on a specific coded value’s Manage link willtake the user into the Composite Attribute Entry Definitions screen for that specified coded value.
Composite Attribute Entry Definitions
The Composite Attribute Entry Definitions screen is where administrators can locally define and edit CompositeRecord Attributes for specific coded values. For example: administrators can further refine and distinguish the waya “book” should be defined within their database, by bringing together the right combination of attributes togetherto truly define what a “book” is in their database.
The top of the Composite Attribute Entry Definitions screen shows a parenthetically defined view of the CompositeData Expression. Below the Composite Data Expression is the Composite Data Tree. The Composite Data Treeis structured off of Boolean Operators, including the support of NOT operations. This nested form can be as deeplydefined as it needs to be within the site’s database.
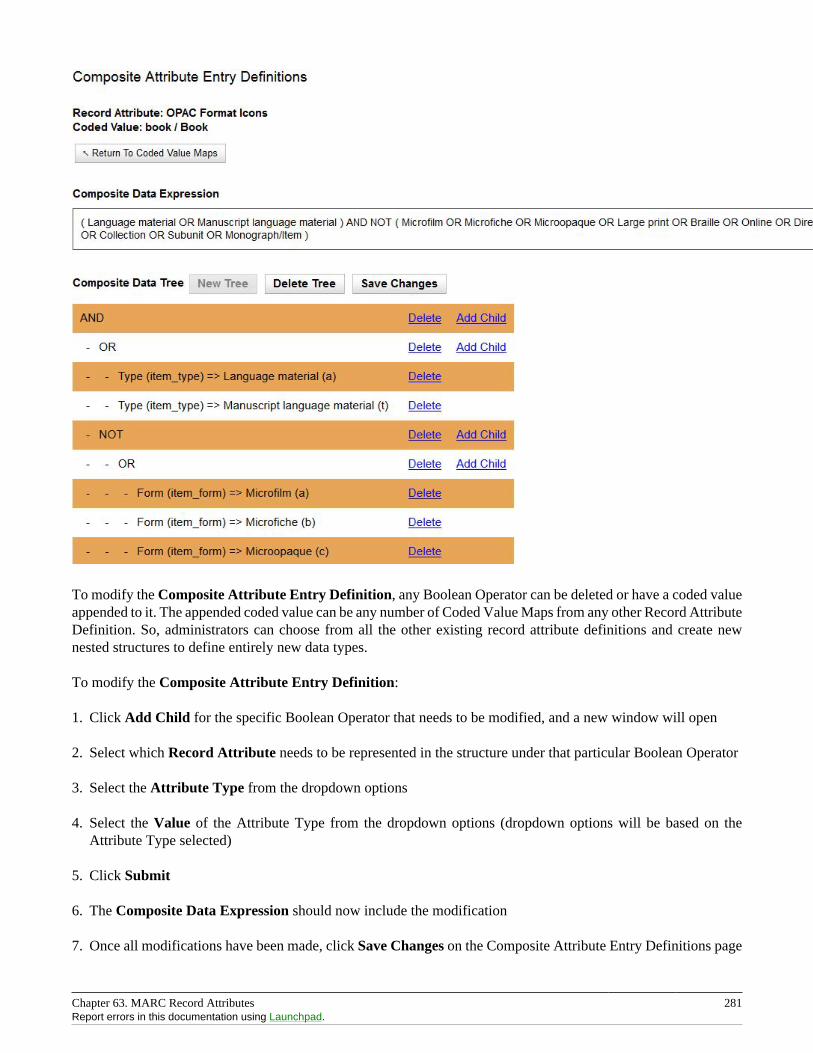
Chapter 63. MARC Record Attributes 281Report errors in this documentation using Launchpad.
To modify the Composite Attribute Entry Definition, any Boolean Operator can be deleted or have a coded valueappended to it. The appended coded value can be any number of Coded Value Maps from any other Record AttributeDefinition. So, administrators can choose from all the other existing record attribute definitions and create newnested structures to define entirely new data types.
To modify the Composite Attribute Entry Definition:
1. Click Add Child for the specific Boolean Operator that needs to be modified, and a new window will open
2. Select which Record Attribute needs to be represented in the structure under that particular Boolean Operator
3. Select the Attribute Type from the dropdown options
4. Select the Value of the Attribute Type from the dropdown options (dropdown options will be based on theAttribute Type selected)
5. Click Submit
6. The Composite Data Expression should now include the modification
7. Once all modifications have been made, click Save Changes on the Composite Attribute Entry Definitions page
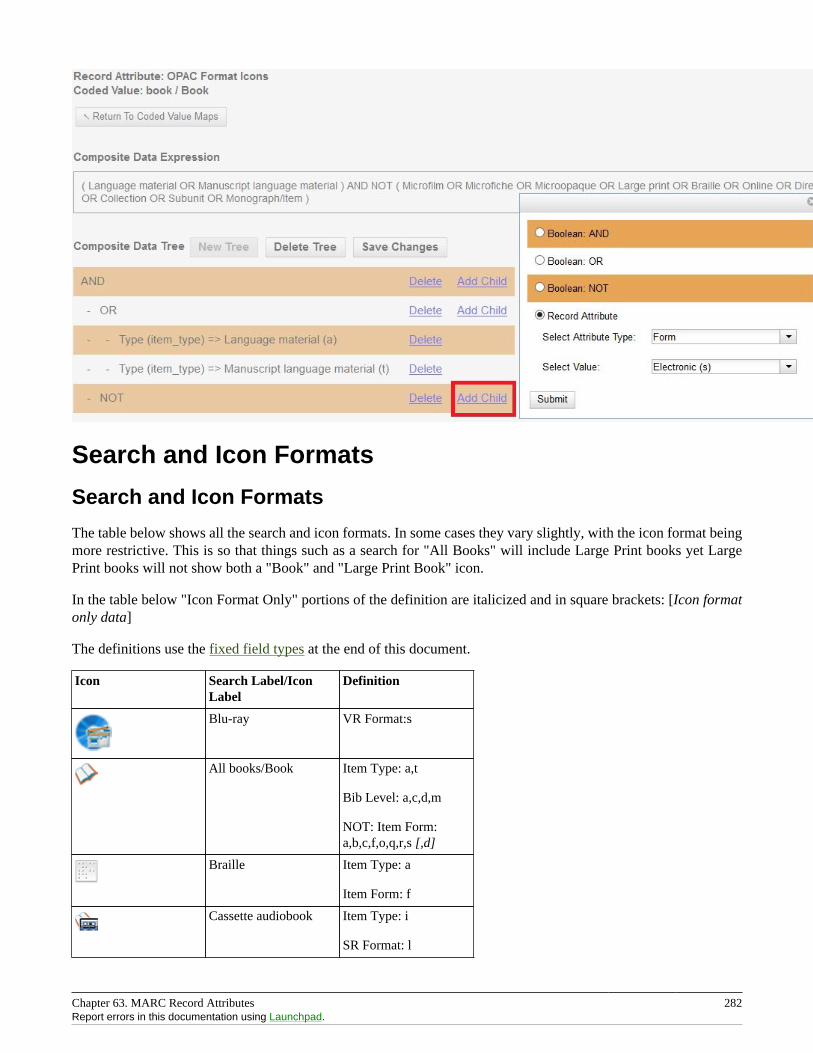
Chapter 63. MARC Record Attributes 282Report errors in this documentation using Launchpad.
Search and Icon Formats
Search and Icon Formats
The table below shows all the search and icon formats. In some cases they vary slightly, with the icon format beingmore restrictive. This is so that things such as a search for "All Books" will include Large Print books yet LargePrint books will not show both a "Book" and "Large Print Book" icon.
In the table below "Icon Format Only" portions of the definition are italicized and in square brackets: [Icon formatonly data]
The definitions use the fixed field types at the end of this document.
Icon Search Label/IconLabel
Definition
Blu-ray VR Format:s
All books/Book Item Type: a,t
Bib Level: a,c,d,m
NOT: Item Form:a,b,c,f,o,q,r,s [,d]
Braille Item Type: a
Item Form: f
Cassette audiobook Item Type: i
SR Format: l
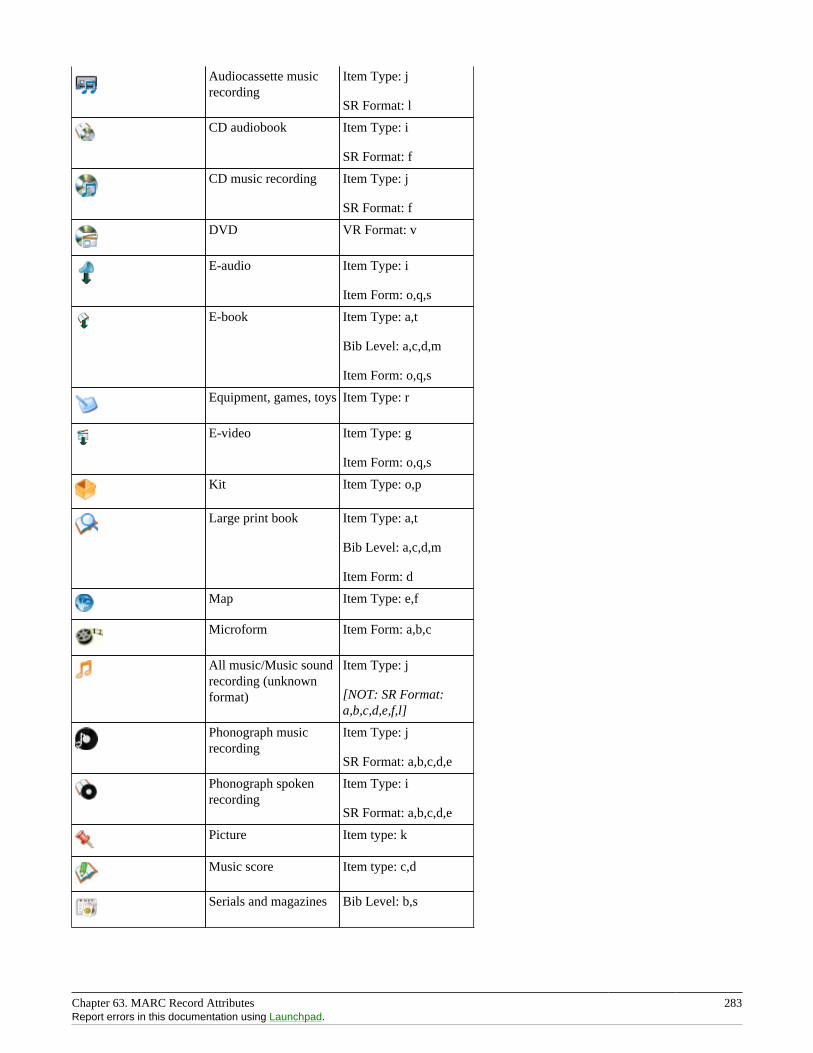
Chapter 63. MARC Record Attributes 283Report errors in this documentation using Launchpad.
Audiocassette musicrecording
Item Type: j
SR Format: l
CD audiobook Item Type: i
SR Format: f
CD music recording Item Type: j
SR Format: f
DVD VR Format: v
E-audio Item Type: i
Item Form: o,q,s
E-book Item Type: a,t
Bib Level: a,c,d,m
Item Form: o,q,s
Equipment, games, toys Item Type: r
E-video Item Type: g
Item Form: o,q,s
Kit Item Type: o,p
Large print book Item Type: a,t
Bib Level: a,c,d,m
Item Form: d
Map Item Type: e,f
Microform Item Form: a,b,c
All music/Music soundrecording (unknownformat)
Item Type: j
[NOT: SR Format:a,b,c,d,e,f,l]
Phonograph musicrecording
Item Type: j
SR Format: a,b,c,d,e
Phonograph spokenrecording
Item Type: i
SR Format: a,b,c,d,e
Picture Item type: k
Music score Item type: c,d
Serials and magazines Bib Level: b,s
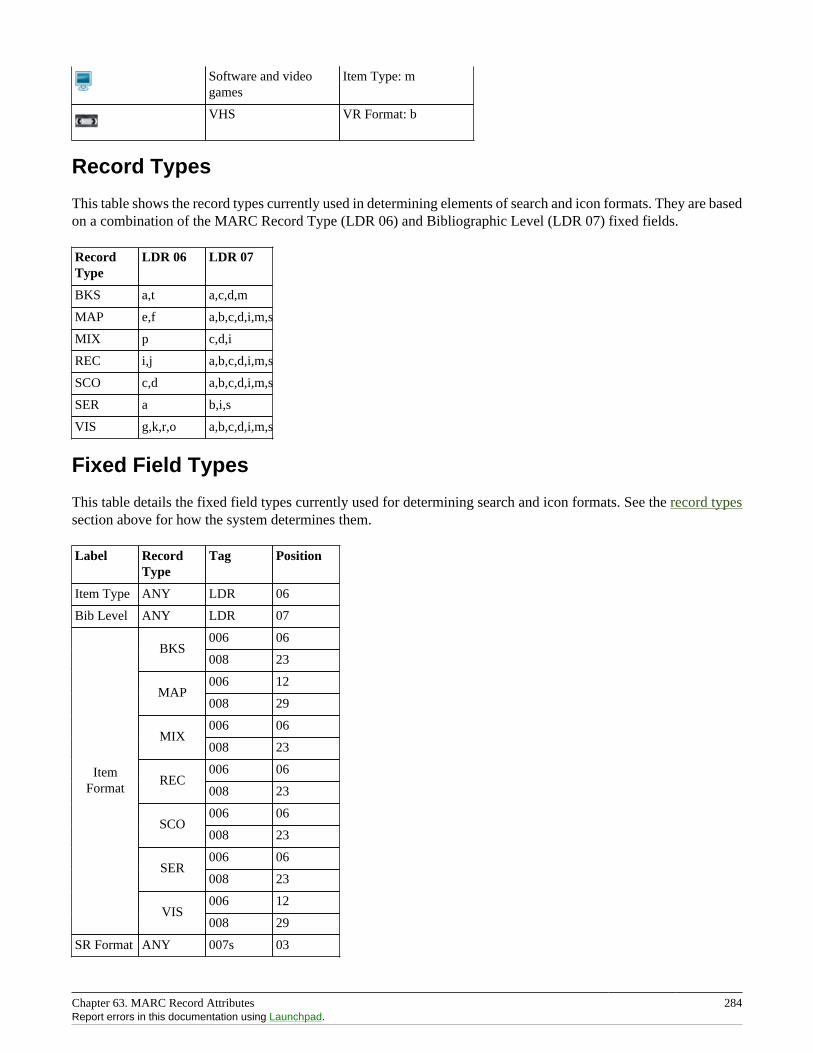
Chapter 63. MARC Record Attributes 284Report errors in this documentation using Launchpad.
Software and videogames
Item Type: m
VHS VR Format: b
Record Types
This table shows the record types currently used in determining elements of search and icon formats. They are basedon a combination of the MARC Record Type (LDR 06) and Bibliographic Level (LDR 07) fixed fields.
RecordType
LDR 06 LDR 07
BKS a,t a,c,d,m
MAP e,f a,b,c,d,i,m,s
MIX p c,d,i
REC i,j a,b,c,d,i,m,s
SCO c,d a,b,c,d,i,m,s
SER a b,i,s
VIS g,k,r,o a,b,c,d,i,m,s
Fixed Field Types
This table details the fixed field types currently used for determining search and icon formats. See the record typessection above for how the system determines them.
Label RecordType
Tag Position
Item Type ANY LDR 06
Bib Level ANY LDR 07
006 06BKS
008 23
006 12MAP
008 29
006 06MIX
008 23
006 06REC
008 23
006 06SCO
008 23
006 06SER
008 23
006 12
ItemFormat
VIS008 29
SR Format ANY 007s 03
Chapter 63. MARC Record Attributes 285Report errors in this documentation using Launchpad.
VR Format ANY 007v 04
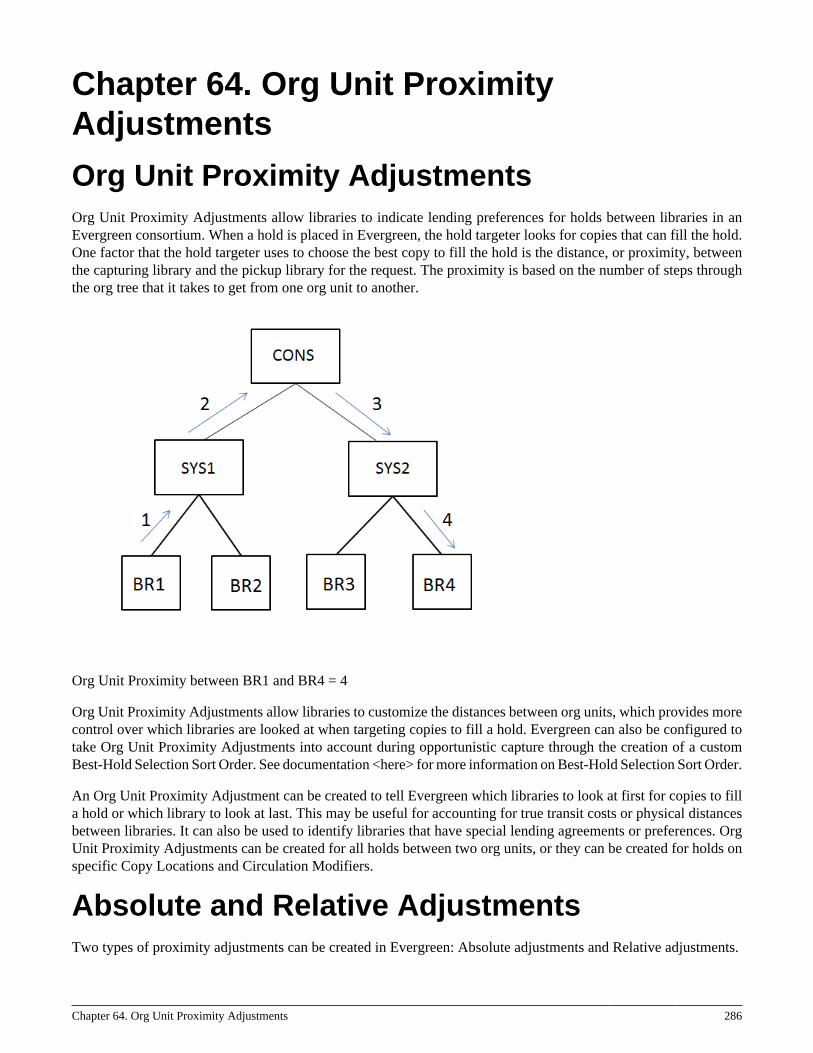
Chapter 64. Org Unit Proximity Adjustments 286
Chapter 64. Org Unit ProximityAdjustments
Org Unit Proximity AdjustmentsOrg Unit Proximity Adjustments allow libraries to indicate lending preferences for holds between libraries in anEvergreen consortium. When a hold is placed in Evergreen, the hold targeter looks for copies that can fill the hold.One factor that the hold targeter uses to choose the best copy to fill the hold is the distance, or proximity, betweenthe capturing library and the pickup library for the request. The proximity is based on the number of steps throughthe org tree that it takes to get from one org unit to another.
Org Unit Proximity between BR1 and BR4 = 4
Org Unit Proximity Adjustments allow libraries to customize the distances between org units, which provides morecontrol over which libraries are looked at when targeting copies to fill a hold. Evergreen can also be configured totake Org Unit Proximity Adjustments into account during opportunistic capture through the creation of a customBest-Hold Selection Sort Order. See documentation <here> for more information on Best-Hold Selection Sort Order.
An Org Unit Proximity Adjustment can be created to tell Evergreen which libraries to look at first for copies to filla hold or which library to look at last. This may be useful for accounting for true transit costs or physical distancesbetween libraries. It can also be used to identify libraries that have special lending agreements or preferences. OrgUnit Proximity Adjustments can be created for all holds between two org units, or they can be created for holds onspecific Copy Locations and Circulation Modifiers.
Absolute and Relative AdjustmentsTwo types of proximity adjustments can be created in Evergreen: Absolute adjustments and Relative adjustments.
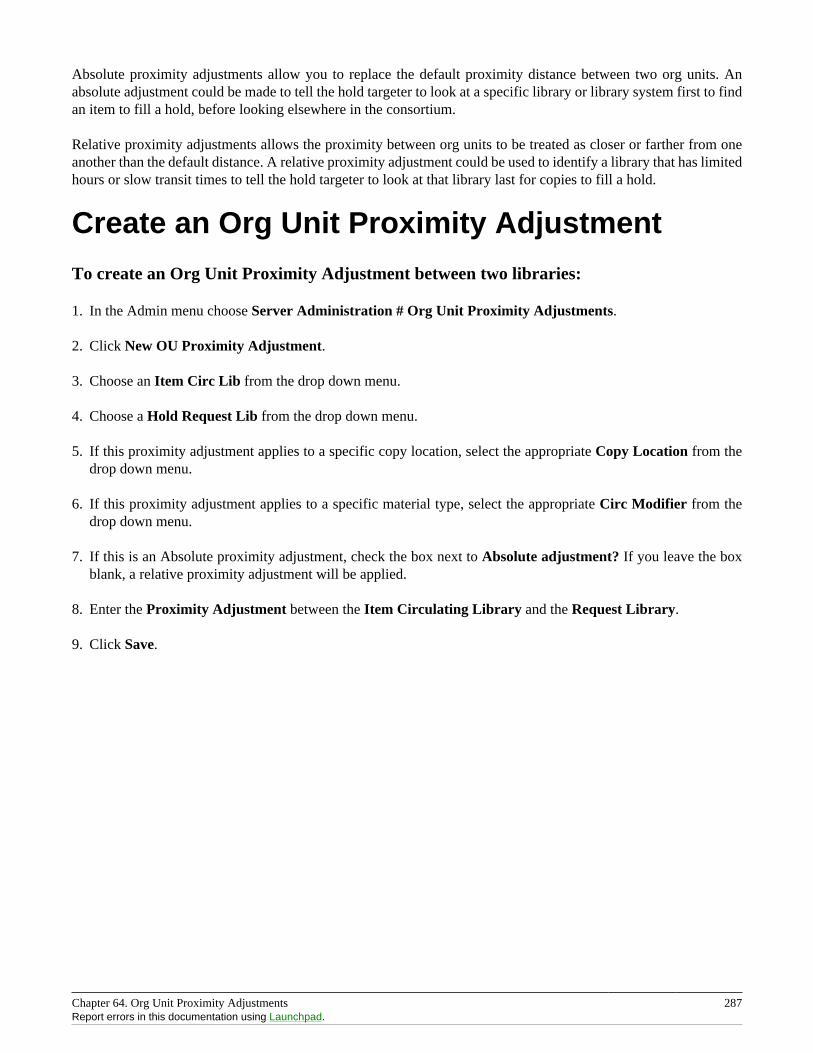
Chapter 64. Org Unit Proximity Adjustments 287Report errors in this documentation using Launchpad.
Absolute proximity adjustments allow you to replace the default proximity distance between two org units. Anabsolute adjustment could be made to tell the hold targeter to look at a specific library or library system first to findan item to fill a hold, before looking elsewhere in the consortium.
Relative proximity adjustments allows the proximity between org units to be treated as closer or farther from oneanother than the default distance. A relative proximity adjustment could be used to identify a library that has limitedhours or slow transit times to tell the hold targeter to look at that library last for copies to fill a hold.
Create an Org Unit Proximity Adjustment
To create an Org Unit Proximity Adjustment between two libraries:
1. In the Admin menu choose Server Administration # Org Unit Proximity Adjustments.
2. Click New OU Proximity Adjustment.
3. Choose an Item Circ Lib from the drop down menu.
4. Choose a Hold Request Lib from the drop down menu.
5. If this proximity adjustment applies to a specific copy location, select the appropriate Copy Location from thedrop down menu.
6. If this proximity adjustment applies to a specific material type, select the appropriate Circ Modifier from thedrop down menu.
7. If this is an Absolute proximity adjustment, check the box next to Absolute adjustment? If you leave the boxblank, a relative proximity adjustment will be applied.
8. Enter the Proximity Adjustment between the Item Circulating Library and the Request Library.
9. Click Save.
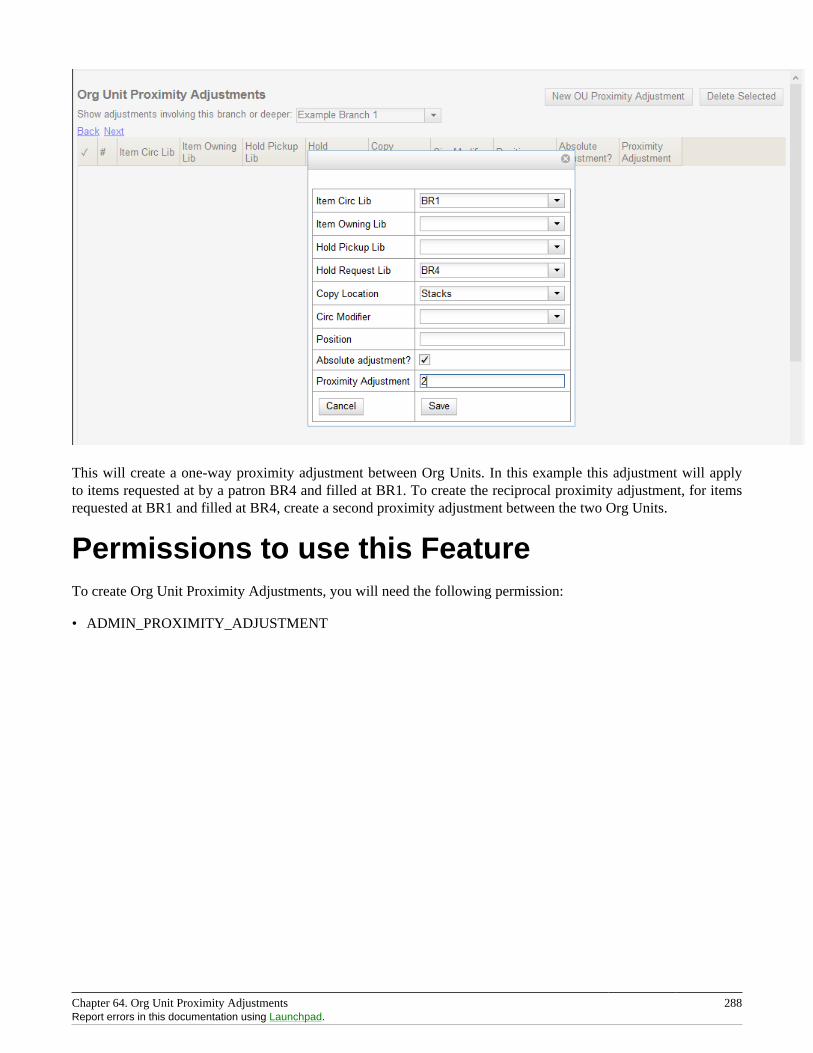
Chapter 64. Org Unit Proximity Adjustments 288Report errors in this documentation using Launchpad.
This will create a one-way proximity adjustment between Org Units. In this example this adjustment will applyto items requested at by a patron BR4 and filled at BR1. To create the reciprocal proximity adjustment, for itemsrequested at BR1 and filled at BR4, create a second proximity adjustment between the two Org Units.
Permissions to use this FeatureTo create Org Unit Proximity Adjustments, you will need the following permission:
• ADMIN_PROXIMITY_ADJUSTMENT
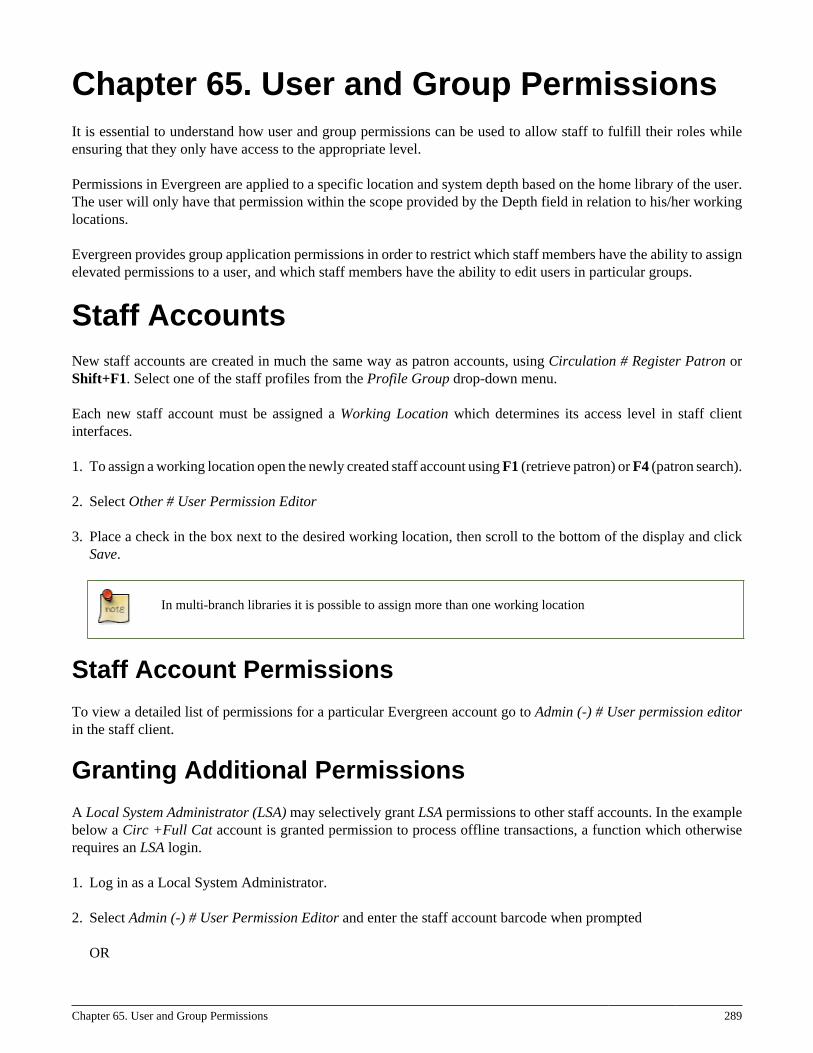
Chapter 65. User and Group Permissions 289
Chapter 65. User and Group PermissionsIt is essential to understand how user and group permissions can be used to allow staff to fulfill their roles whileensuring that they only have access to the appropriate level.
Permissions in Evergreen are applied to a specific location and system depth based on the home library of the user.The user will only have that permission within the scope provided by the Depth field in relation to his/her workinglocations.
Evergreen provides group application permissions in order to restrict which staff members have the ability to assignelevated permissions to a user, and which staff members have the ability to edit users in particular groups.
Staff AccountsNew staff accounts are created in much the same way as patron accounts, using Circulation # Register Patron orShift+F1. Select one of the staff profiles from the Profile Group drop-down menu.
Each new staff account must be assigned a Working Location which determines its access level in staff clientinterfaces.
1. To assign a working location open the newly created staff account using F1 (retrieve patron) or F4 (patron search).
2. Select Other # User Permission Editor
3. Place a check in the box next to the desired working location, then scroll to the bottom of the display and clickSave.
In multi-branch libraries it is possible to assign more than one working location
Staff Account Permissions
To view a detailed list of permissions for a particular Evergreen account go to Admin (-) # User permission editorin the staff client.
Granting Additional Permissions
A Local System Administrator (LSA) may selectively grant LSA permissions to other staff accounts. In the examplebelow a Circ +Full Cat account is granted permission to process offline transactions, a function which otherwiserequires an LSA login.
1. Log in as a Local System Administrator.
2. Select Admin (-) # User Permission Editor and enter the staff account barcode when prompted
OR
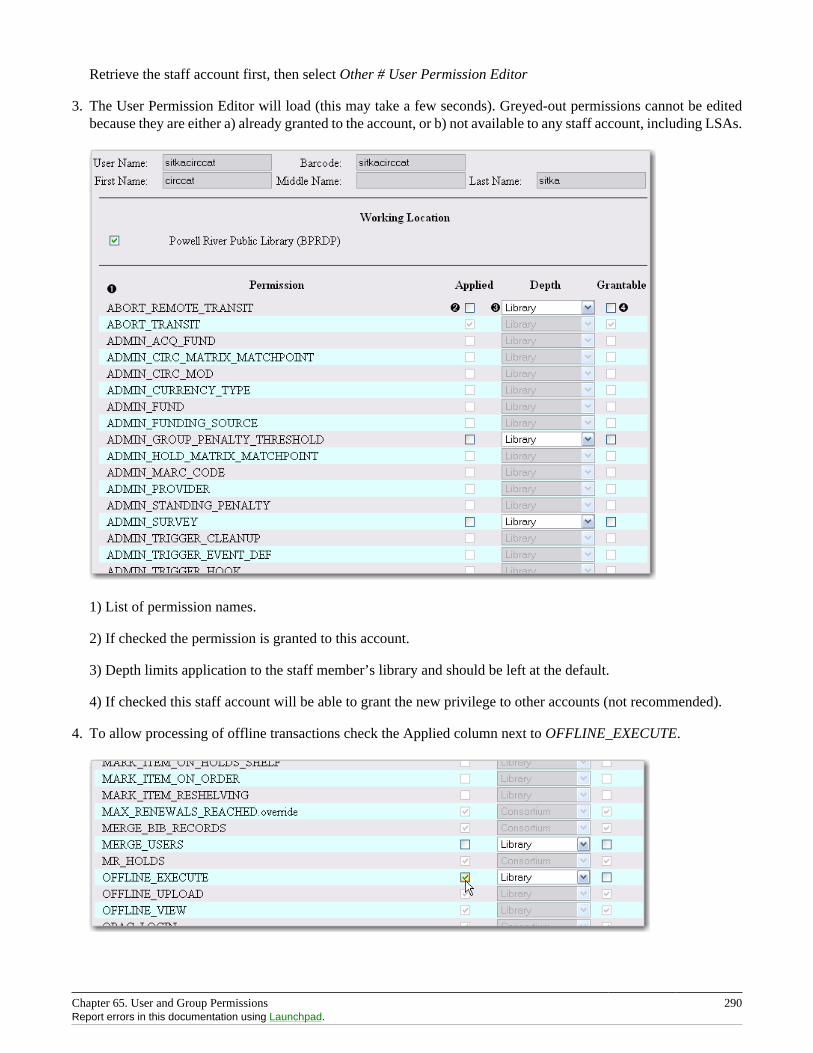
Chapter 65. User and Group Permissions 290Report errors in this documentation using Launchpad.
Retrieve the staff account first, then select Other # User Permission Editor
3. The User Permission Editor will load (this may take a few seconds). Greyed-out permissions cannot be editedbecause they are either a) already granted to the account, or b) not available to any staff account, including LSAs.
1) List of permission names.
2) If checked the permission is granted to this account.
3) Depth limits application to the staff member’s library and should be left at the default.
4) If checked this staff account will be able to grant the new privilege to other accounts (not recommended).
4. To allow processing of offline transactions check the Applied column next to OFFLINE_EXECUTE.
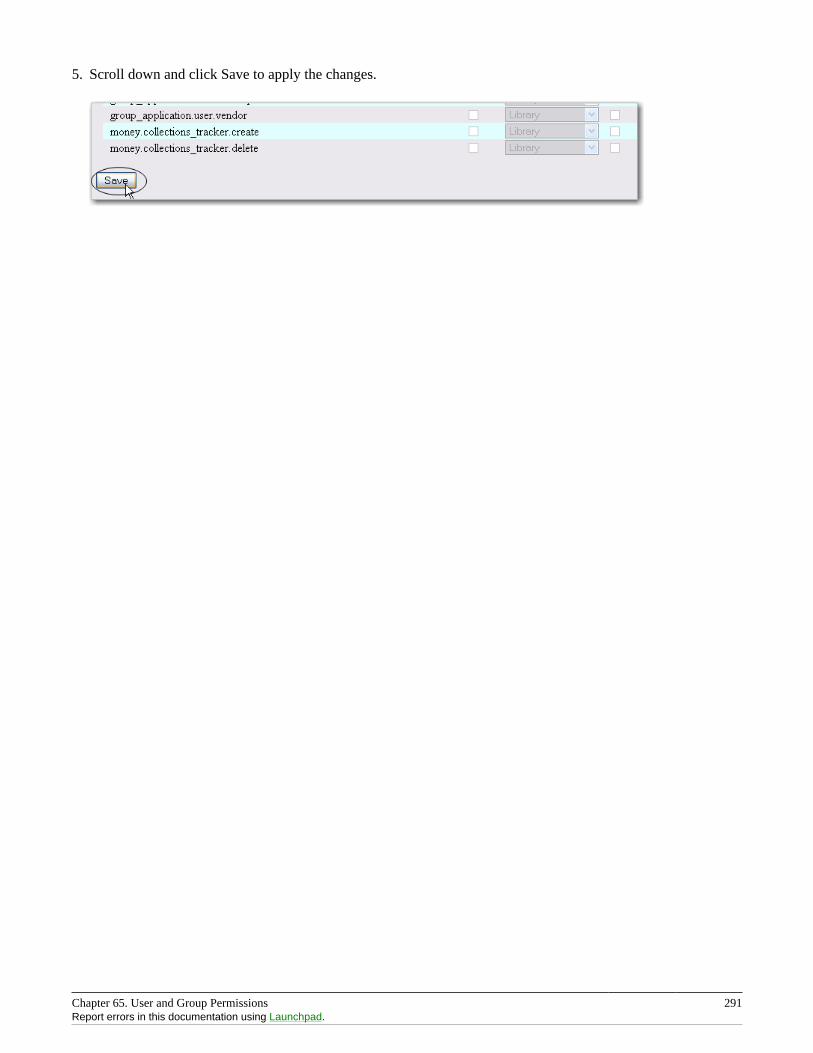
Chapter 65. User and Group Permissions 291Report errors in this documentation using Launchpad.
5. Scroll down and click Save to apply the changes.
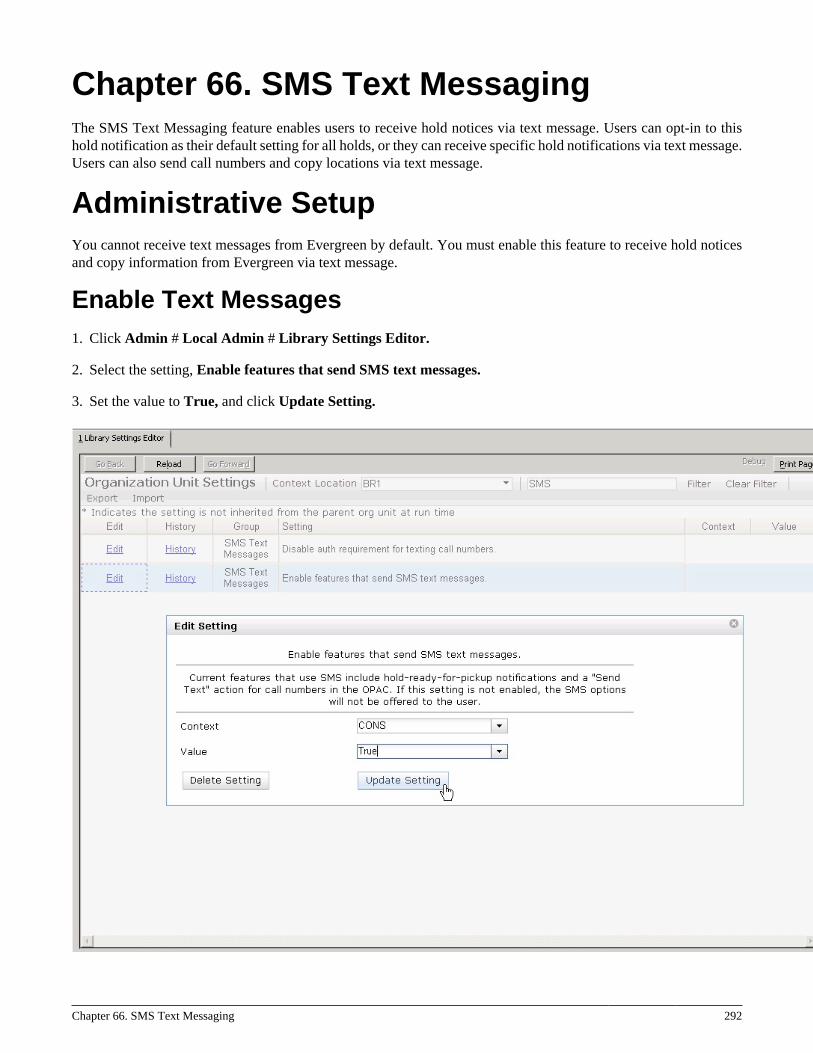
Chapter 66. SMS Text Messaging 292
Chapter 66. SMS Text MessagingThe SMS Text Messaging feature enables users to receive hold notices via text message. Users can opt-in to thishold notification as their default setting for all holds, or they can receive specific hold notifications via text message.Users can also send call numbers and copy locations via text message.
Administrative SetupYou cannot receive text messages from Evergreen by default. You must enable this feature to receive hold noticesand copy information from Evergreen via text message.
Enable Text Messages1. Click Admin # Local Admin # Library Settings Editor.
2. Select the setting, Enable features that send SMS text messages.
3. Set the value to True, and click Update Setting.
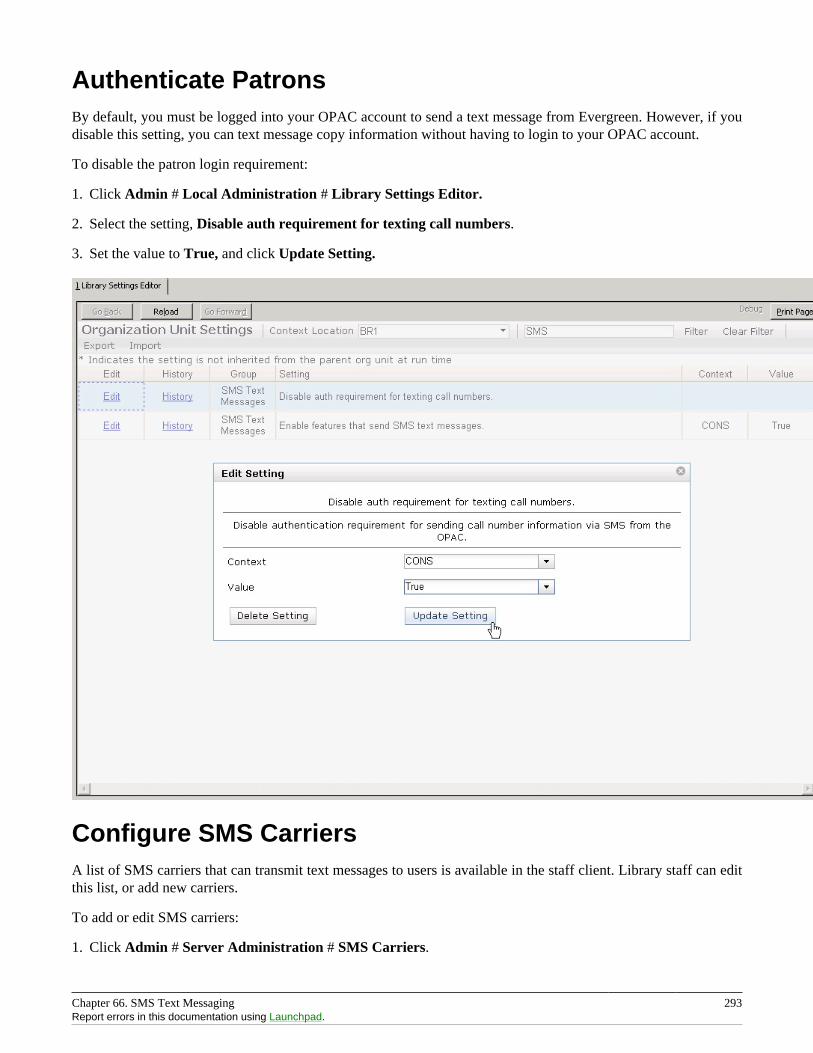
Chapter 66. SMS Text Messaging 293Report errors in this documentation using Launchpad.
Authenticate PatronsBy default, you must be logged into your OPAC account to send a text message from Evergreen. However, if youdisable this setting, you can text message copy information without having to login to your OPAC account.
To disable the patron login requirement:
1. Click Admin # Local Administration # Library Settings Editor.
2. Select the setting, Disable auth requirement for texting call numbers.
3. Set the value to True, and click Update Setting.
Configure SMS CarriersA list of SMS carriers that can transmit text messages to users is available in the staff client. Library staff can editthis list, or add new carriers.
To add or edit SMS carriers:
1. Click Admin # Server Administration # SMS Carriers.
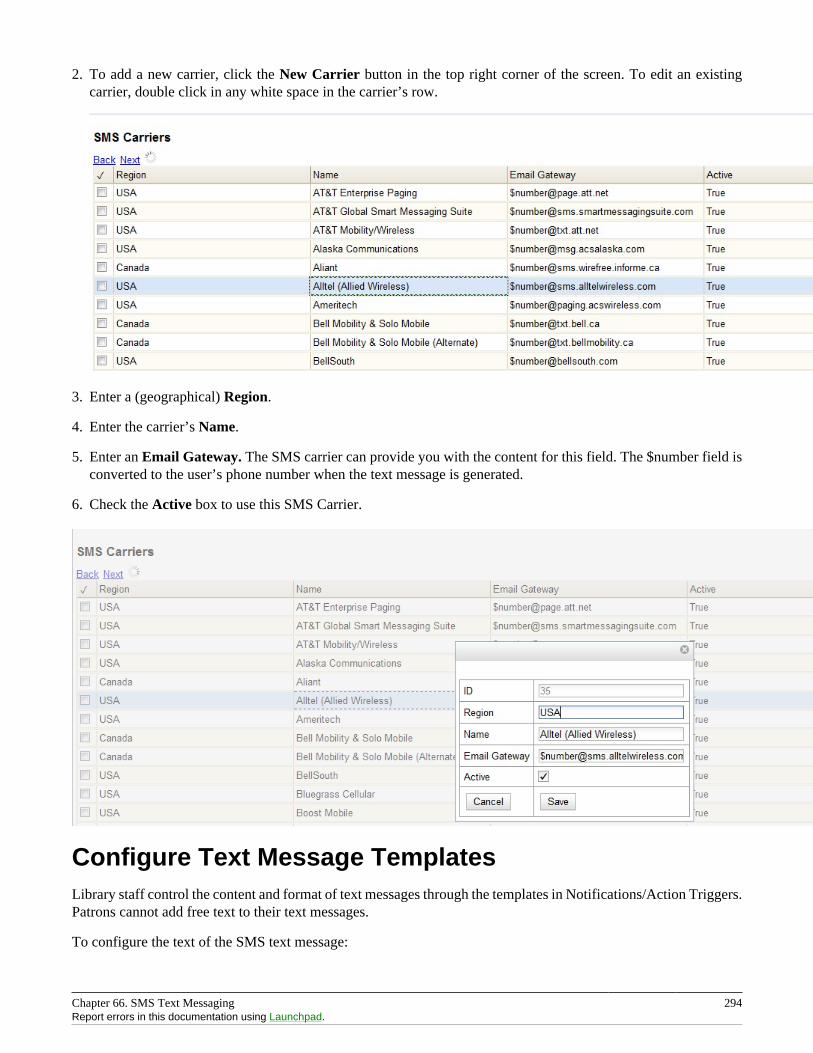
Chapter 66. SMS Text Messaging 294Report errors in this documentation using Launchpad.
2. To add a new carrier, click the New Carrier button in the top right corner of the screen. To edit an existingcarrier, double click in any white space in the carrier’s row.
3. Enter a (geographical) Region.
4. Enter the carrier’s Name.
5. Enter an Email Gateway. The SMS carrier can provide you with the content for this field. The $number field isconverted to the user’s phone number when the text message is generated.
6. Check the Active box to use this SMS Carrier.
Configure Text Message TemplatesLibrary staff control the content and format of text messages through the templates in Notifications/Action Triggers.Patrons cannot add free text to their text messages.
To configure the text of the SMS text message:
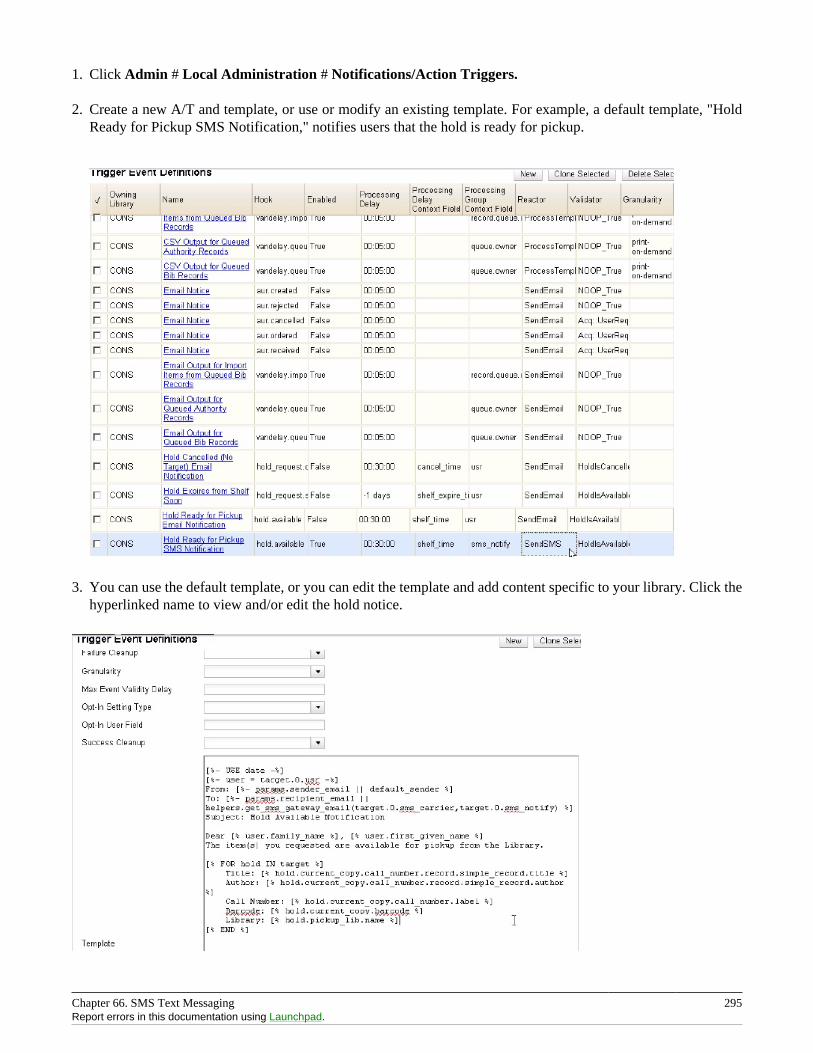
Chapter 66. SMS Text Messaging 295Report errors in this documentation using Launchpad.
1. Click Admin # Local Administration # Notifications/Action Triggers.
2. Create a new A/T and template, or use or modify an existing template. For example, a default template, "HoldReady for Pickup SMS Notification," notifies users that the hold is ready for pickup.
3. You can use the default template, or you can edit the template and add content specific to your library. Click thehyperlinked name to view and/or edit the hold notice.
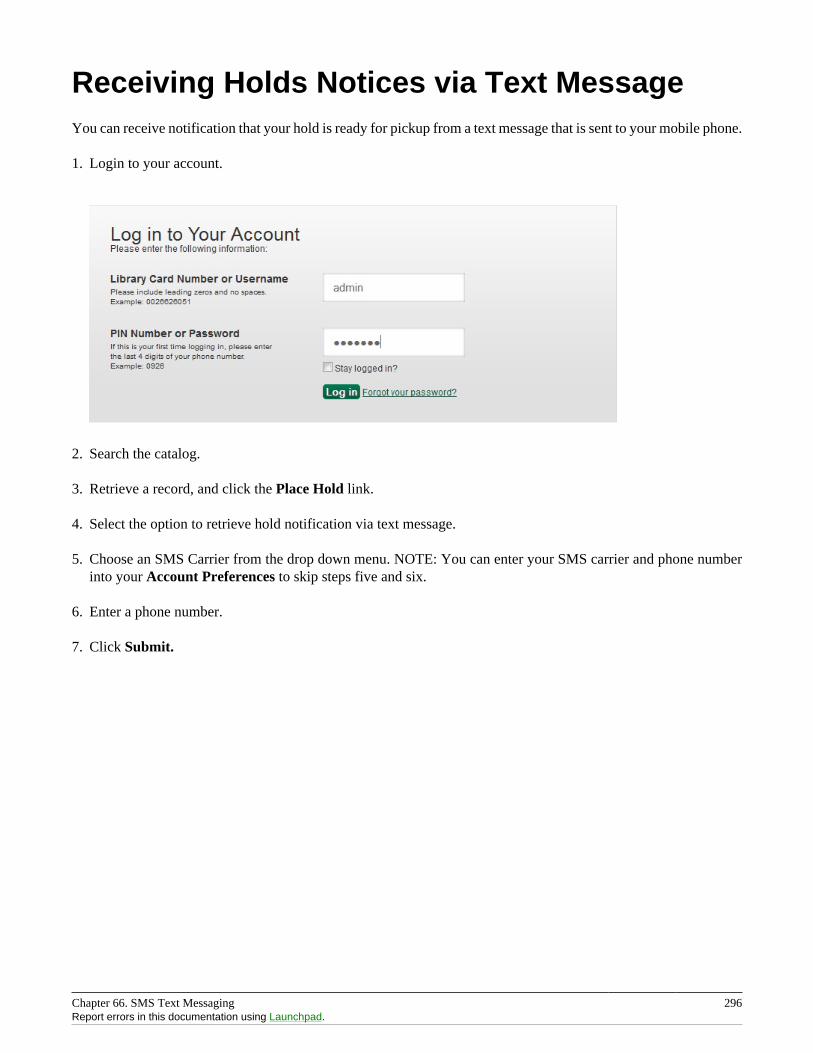
Chapter 66. SMS Text Messaging 296Report errors in this documentation using Launchpad.
Receiving Holds Notices via Text MessageYou can receive notification that your hold is ready for pickup from a text message that is sent to your mobile phone.
1. Login to your account.
2. Search the catalog.
3. Retrieve a record, and click the Place Hold link.
4. Select the option to retrieve hold notification via text message.
5. Choose an SMS Carrier from the drop down menu. NOTE: You can enter your SMS carrier and phone numberinto your Account Preferences to skip steps five and six.
6. Enter a phone number.
7. Click Submit.
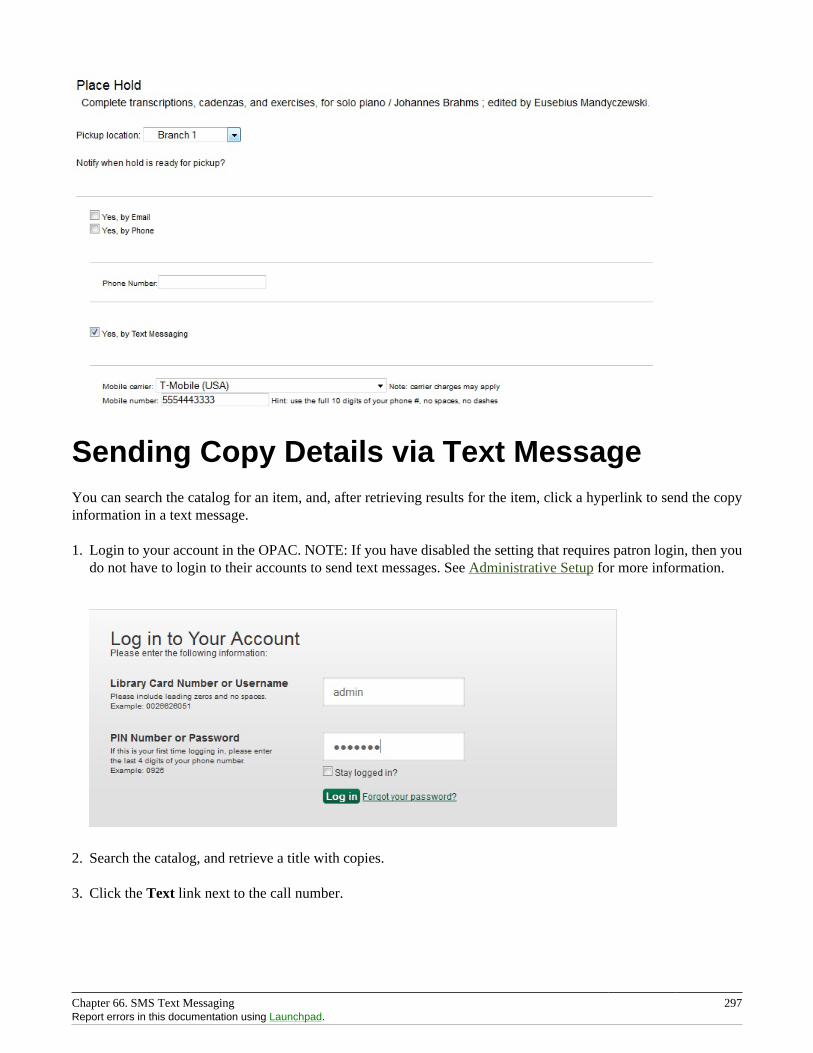
Chapter 66. SMS Text Messaging 297Report errors in this documentation using Launchpad.
Sending Copy Details via Text MessageYou can search the catalog for an item, and, after retrieving results for the item, click a hyperlink to send the copyinformation in a text message.
1. Login to your account in the OPAC. NOTE: If you have disabled the setting that requires patron login, then youdo not have to login to their accounts to send text messages. See Administrative Setup for more information.
2. Search the catalog, and retrieve a title with copies.
3. Click the Text link next to the call number.
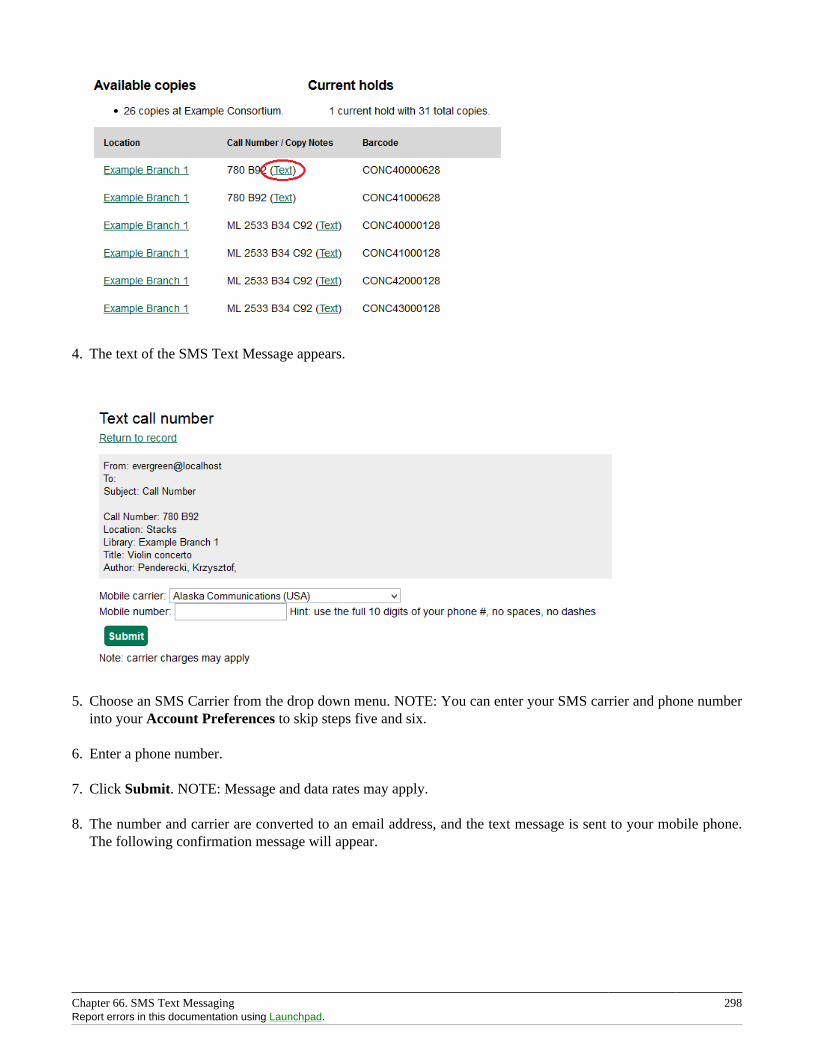
Chapter 66. SMS Text Messaging 298Report errors in this documentation using Launchpad.
4. The text of the SMS Text Message appears.
5. Choose an SMS Carrier from the drop down menu. NOTE: You can enter your SMS carrier and phone numberinto your Account Preferences to skip steps five and six.
6. Enter a phone number.
7. Click Submit. NOTE: Message and data rates may apply.
8. The number and carrier are converted to an email address, and the text message is sent to your mobile phone.The following confirmation message will appear.
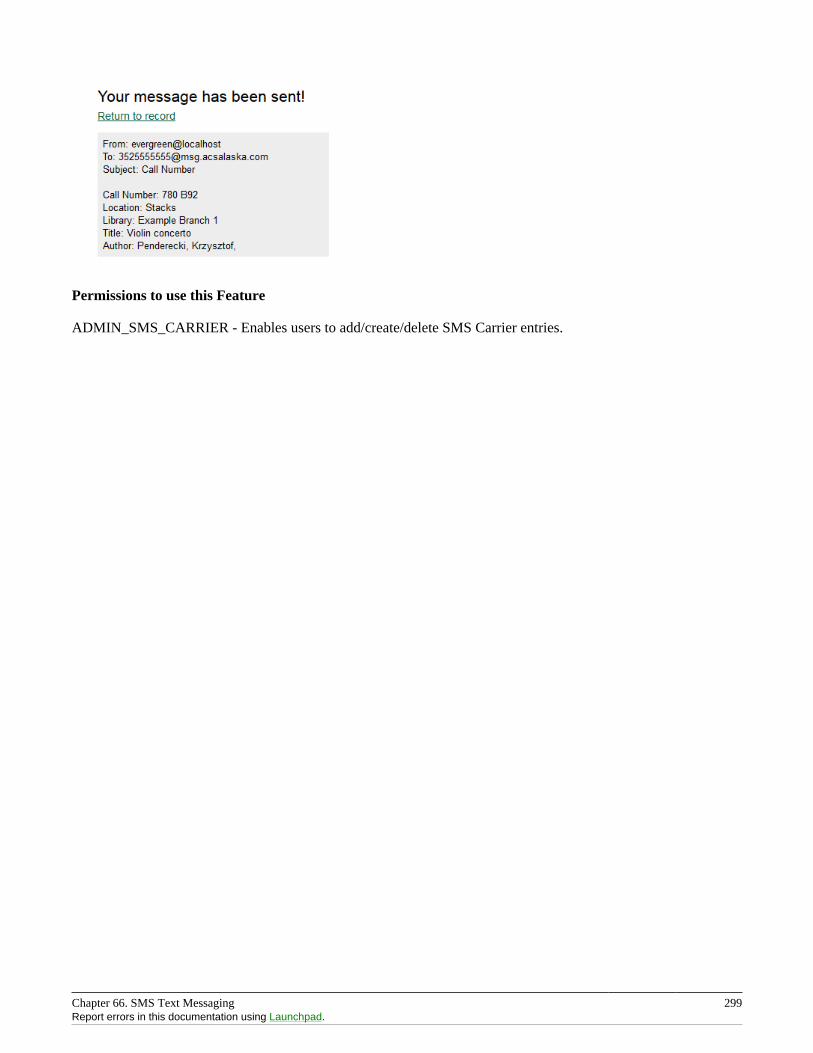
Chapter 66. SMS Text Messaging 299Report errors in this documentation using Launchpad.
Permissions to use this Feature
ADMIN_SMS_CARRIER - Enables users to add/create/delete SMS Carrier entries.
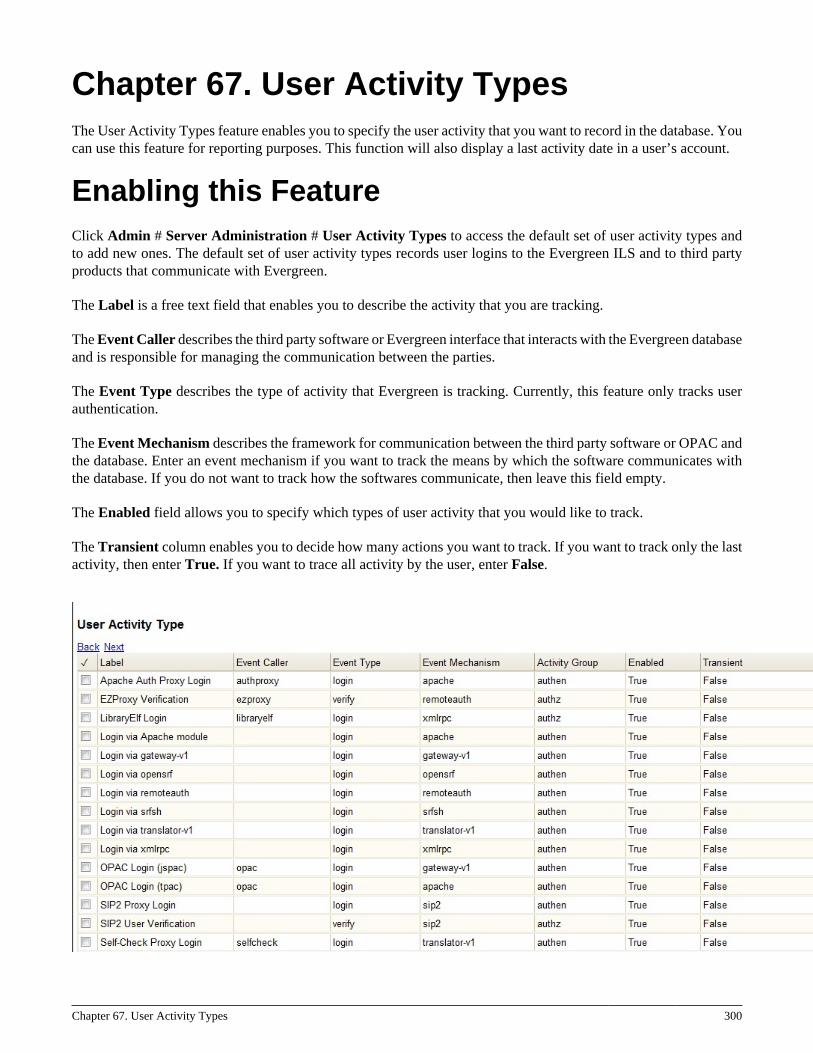
Chapter 67. User Activity Types 300
Chapter 67. User Activity TypesThe User Activity Types feature enables you to specify the user activity that you want to record in the database. Youcan use this feature for reporting purposes. This function will also display a last activity date in a user’s account.
Enabling this FeatureClick Admin # Server Administration # User Activity Types to access the default set of user activity types andto add new ones. The default set of user activity types records user logins to the Evergreen ILS and to third partyproducts that communicate with Evergreen.
The Label is a free text field that enables you to describe the activity that you are tracking.
The Event Caller describes the third party software or Evergreen interface that interacts with the Evergreen databaseand is responsible for managing the communication between the parties.
The Event Type describes the type of activity that Evergreen is tracking. Currently, this feature only tracks userauthentication.
The Event Mechanism describes the framework for communication between the third party software or OPAC andthe database. Enter an event mechanism if you want to track the means by which the software communicates withthe database. If you do not want to track how the softwares communicate, then leave this field empty.
The Enabled field allows you to specify which types of user activity that you would like to track.
The Transient column enables you to decide how many actions you want to track. If you want to track only the lastactivity, then enter True. If you want to trace all activity by the user, enter False.
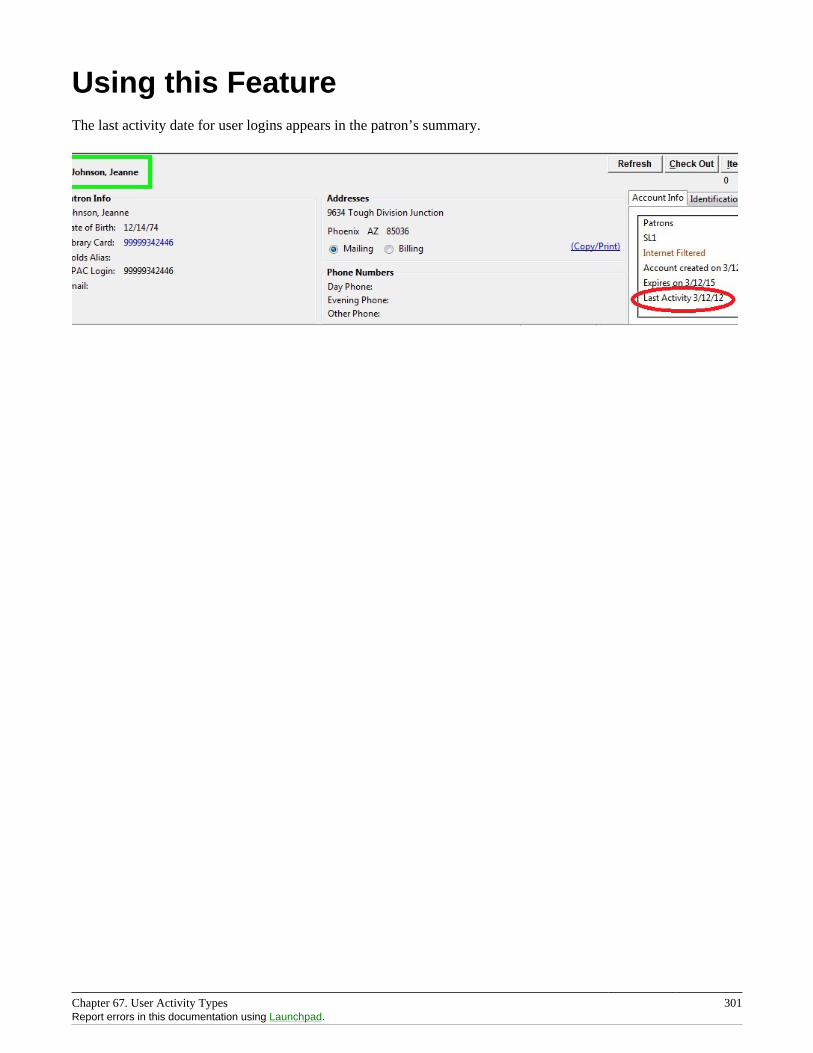
Chapter 67. User Activity Types 301Report errors in this documentation using Launchpad.
Using this FeatureThe last activity date for user logins appears in the patron’s summary.
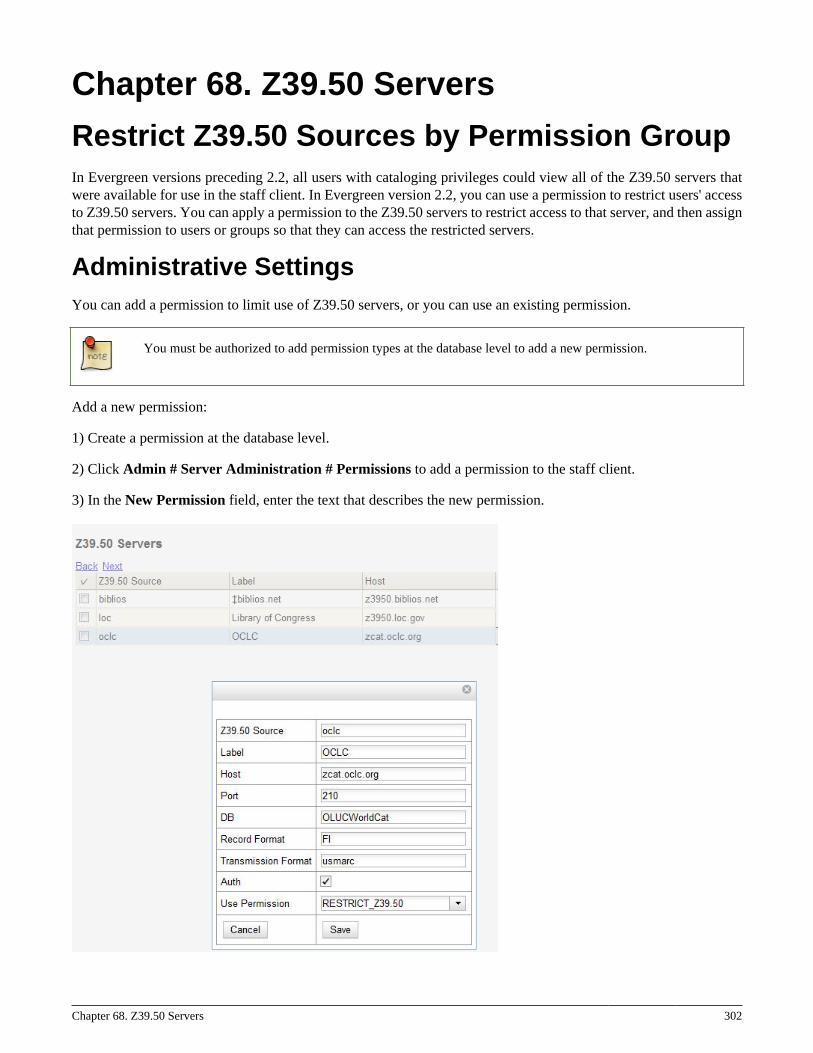
Chapter 68. Z39.50 Servers 302
Chapter 68. Z39.50 Servers
Restrict Z39.50 Sources by Permission GroupIn Evergreen versions preceding 2.2, all users with cataloging privileges could view all of the Z39.50 servers thatwere available for use in the staff client. In Evergreen version 2.2, you can use a permission to restrict users' accessto Z39.50 servers. You can apply a permission to the Z39.50 servers to restrict access to that server, and then assignthat permission to users or groups so that they can access the restricted servers.
Administrative SettingsYou can add a permission to limit use of Z39.50 servers, or you can use an existing permission.
You must be authorized to add permission types at the database level to add a new permission.
Add a new permission:
1) Create a permission at the database level.
2) Click Admin # Server Administration # Permissions to add a permission to the staff client.
3) In the New Permission field, enter the text that describes the new permission.
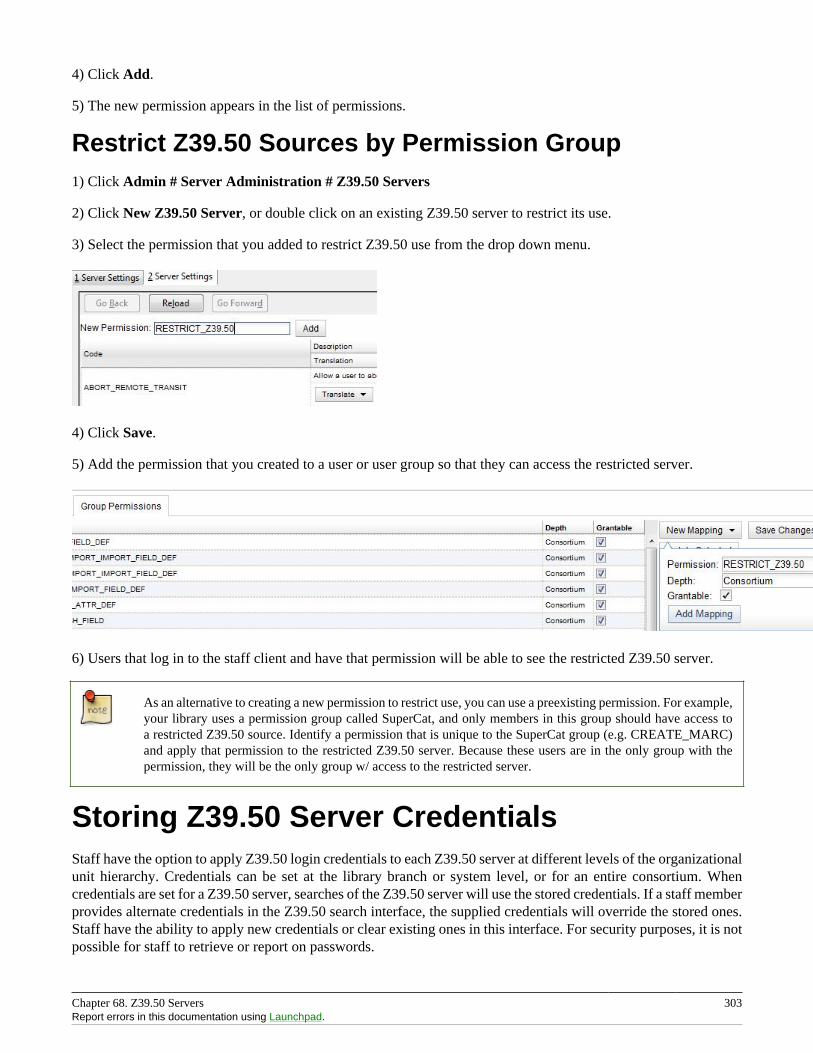
Chapter 68. Z39.50 Servers 303Report errors in this documentation using Launchpad.
4) Click Add.
5) The new permission appears in the list of permissions.
Restrict Z39.50 Sources by Permission Group1) Click Admin # Server Administration # Z39.50 Servers
2) Click New Z39.50 Server, or double click on an existing Z39.50 server to restrict its use.
3) Select the permission that you added to restrict Z39.50 use from the drop down menu.
4) Click Save.
5) Add the permission that you created to a user or user group so that they can access the restricted server.
6) Users that log in to the staff client and have that permission will be able to see the restricted Z39.50 server.
As an alternative to creating a new permission to restrict use, you can use a preexisting permission. For example,your library uses a permission group called SuperCat, and only members in this group should have access toa restricted Z39.50 source. Identify a permission that is unique to the SuperCat group (e.g. CREATE_MARC)and apply that permission to the restricted Z39.50 server. Because these users are in the only group with thepermission, they will be the only group w/ access to the restricted server.
Storing Z39.50 Server CredentialsStaff have the option to apply Z39.50 login credentials to each Z39.50 server at different levels of the organizationalunit hierarchy. Credentials can be set at the library branch or system level, or for an entire consortium. Whencredentials are set for a Z39.50 server, searches of the Z39.50 server will use the stored credentials. If a staff memberprovides alternate credentials in the Z39.50 search interface, the supplied credentials will override the stored ones.Staff have the ability to apply new credentials or clear existing ones in this interface. For security purposes, it is notpossible for staff to retrieve or report on passwords.
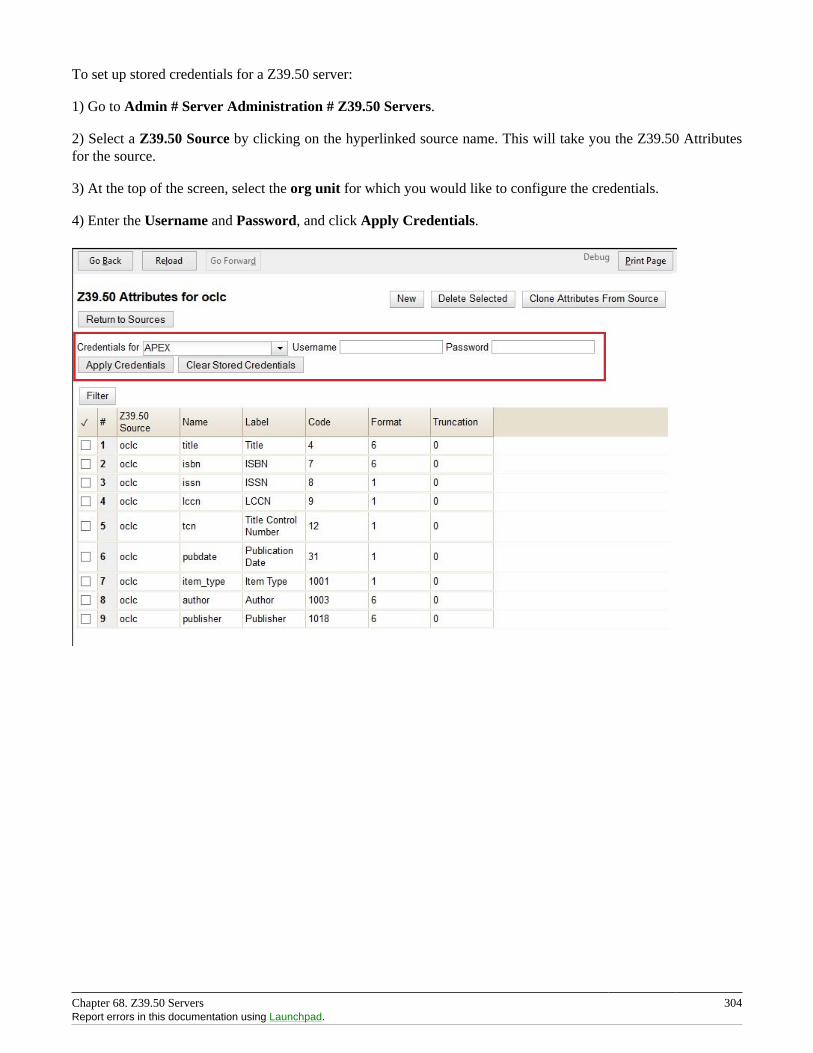
Chapter 68. Z39.50 Servers 304Report errors in this documentation using Launchpad.
To set up stored credentials for a Z39.50 server:
1) Go to Admin # Server Administration # Z39.50 Servers.
2) Select a Z39.50 Source by clicking on the hyperlinked source name. This will take you the Z39.50 Attributesfor the source.
3) At the top of the screen, select the org unit for which you would like to configure the credentials.
4) Enter the Username and Password, and click Apply Credentials.

Part VII. Local Administration
Part VII. Local Administration 306
Table of Contents69. Introduction .......................................................................................................................................... 30770. Library Settings Editor ........................................................................................................................... 308
Editing Library Settings ....................................................................................................................... 308Exporting/Importing Library Settings ...................................................................................................... 309Settings Overview ............................................................................................................................... 310
Data Types ................................................................................................................................ 34571. Address Alert ........................................................................................................................................ 346
General Usage Examples ...................................................................................................................... 346Access Control and Scoping ................................................................................................................. 346Adding a new Address Alert ................................................................................................................. 346Editing an Address Alert ...................................................................................................................... 347Deleting an Address Alert .................................................................................................................... 347Staff View of Address Alerts ................................................................................................................ 348Regular Expressions / Wildcards ............................................................................................................ 348Examples ........................................................................................................................................... 348Development ...................................................................................................................................... 349
72. Barcode Completion ............................................................................................................................... 350Scoping and Permissions ...................................................................................................................... 350Access Points ..................................................................................................................................... 350Multiple Matches ................................................................................................................................ 351Barcode Completion Data Fields ............................................................................................................ 352Create, Update, Filter, Delete/Disable Rules ............................................................................................. 353
Create Rules ............................................................................................................................... 353Update Rules .............................................................................................................................. 353Filter Rules ................................................................................................................................ 354Delete/Disable Rules .................................................................................................................... 354
Examples ........................................................................................................................................... 354Barcode With Prefix and Padding .................................................................................................. 354Barcode With Suffix .................................................................................................................... 354Barcode With Left Padding ........................................................................................................... 355Barcode With Right Padding ......................................................................................................... 355Barcode of any Length with Prefix and Suffix .................................................................................. 355
Testing .............................................................................................................................................. 35673. Hold-driven recalls ................................................................................................................................. 357
Enabling hold-driven recalls .................................................................................................................. 357Editing the item recall notification email template ..................................................................................... 357
74. Notifications / Action Triggers ................................................................................................................. 358Event Definitions ................................................................................................................................ 358
Table 1: Action Trigger Event Definitions ....................................................................................... 358Creating Action Triggers ...................................................................................................................... 359
Cloning Existing Action Triggers ................................................................................................... 360Editing Action Triggers ................................................................................................................ 360Deleting Action Triggers .............................................................................................................. 361Hooks ....................................................................................................................................... 361Reactors .................................................................................................................................... 361Validators .................................................................................................................................. 361
Processing Action Triggers ................................................................................................................... 36275. Recent Staff Searches ............................................................................................................................. 36476. Standing Penalties .................................................................................................................................. 36677. Statistical Categories Editor ..................................................................................................................... 36778. Work Log ............................................................................................................................................. 371
Expanding the Work Log ..................................................................................................................... 371

Chapter 69. Introduction 307
Chapter 69. IntroductionThis part covers the options in the Local Administration menu found in the staff client.
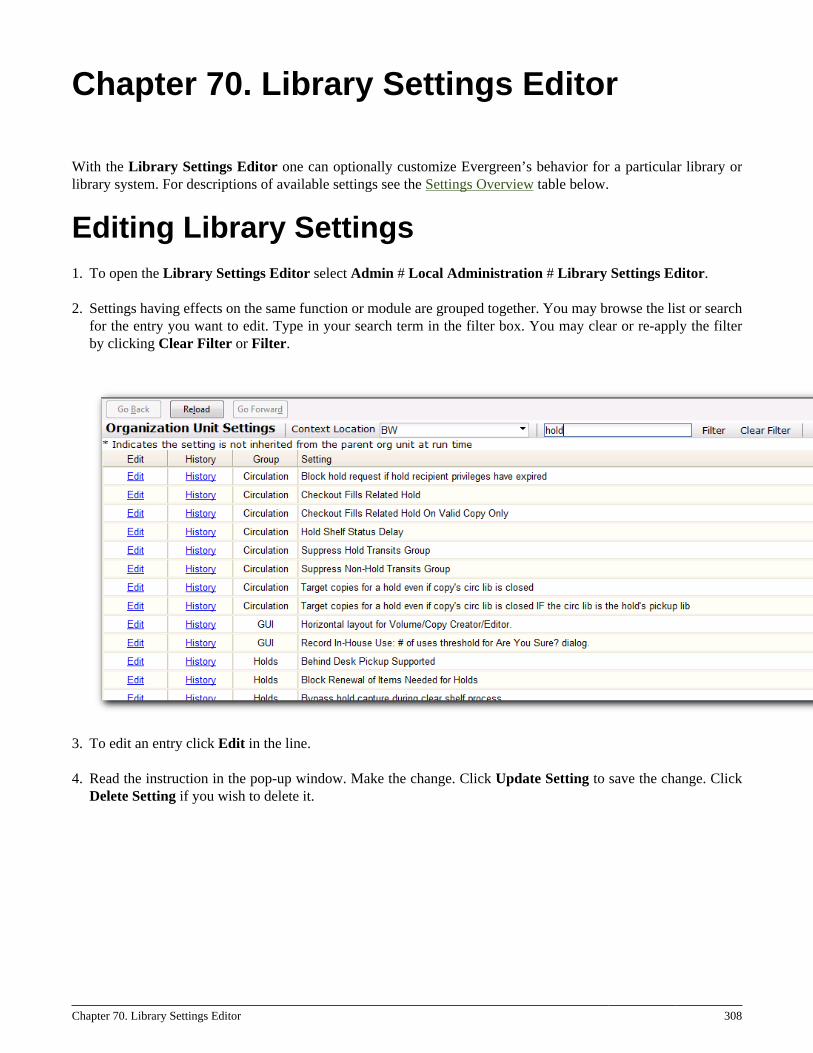
Chapter 70. Library Settings Editor 308
Chapter 70. Library Settings Editor
With the Library Settings Editor one can optionally customize Evergreen’s behavior for a particular library orlibrary system. For descriptions of available settings see the Settings Overview table below.
Editing Library Settings1. To open the Library Settings Editor select Admin # Local Administration # Library Settings Editor.
2. Settings having effects on the same function or module are grouped together. You may browse the list or searchfor the entry you want to edit. Type in your search term in the filter box. You may clear or re-apply the filterby clicking Clear Filter or Filter.
3. To edit an entry click Edit in the line.
4. Read the instruction in the pop-up window. Make the change. Click Update Setting to save the change. ClickDelete Setting if you wish to delete it.
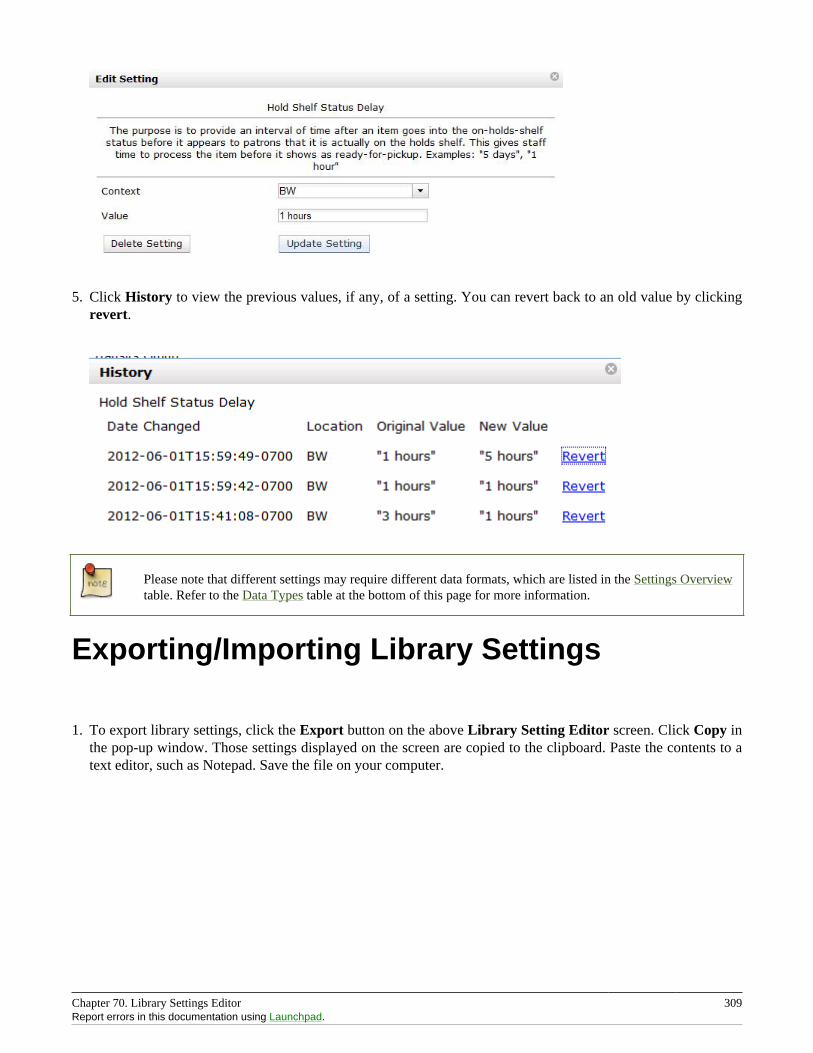
Chapter 70. Library Settings Editor 309Report errors in this documentation using Launchpad.
5. Click History to view the previous values, if any, of a setting. You can revert back to an old value by clickingrevert.
Please note that different settings may require different data formats, which are listed in the Settings Overviewtable. Refer to the Data Types table at the bottom of this page for more information.
Exporting/Importing Library Settings
1. To export library settings, click the Export button on the above Library Setting Editor screen. Click Copy inthe pop-up window. Those settings displayed on the screen are copied to the clipboard. Paste the contents to atext editor, such as Notepad. Save the file on your computer.
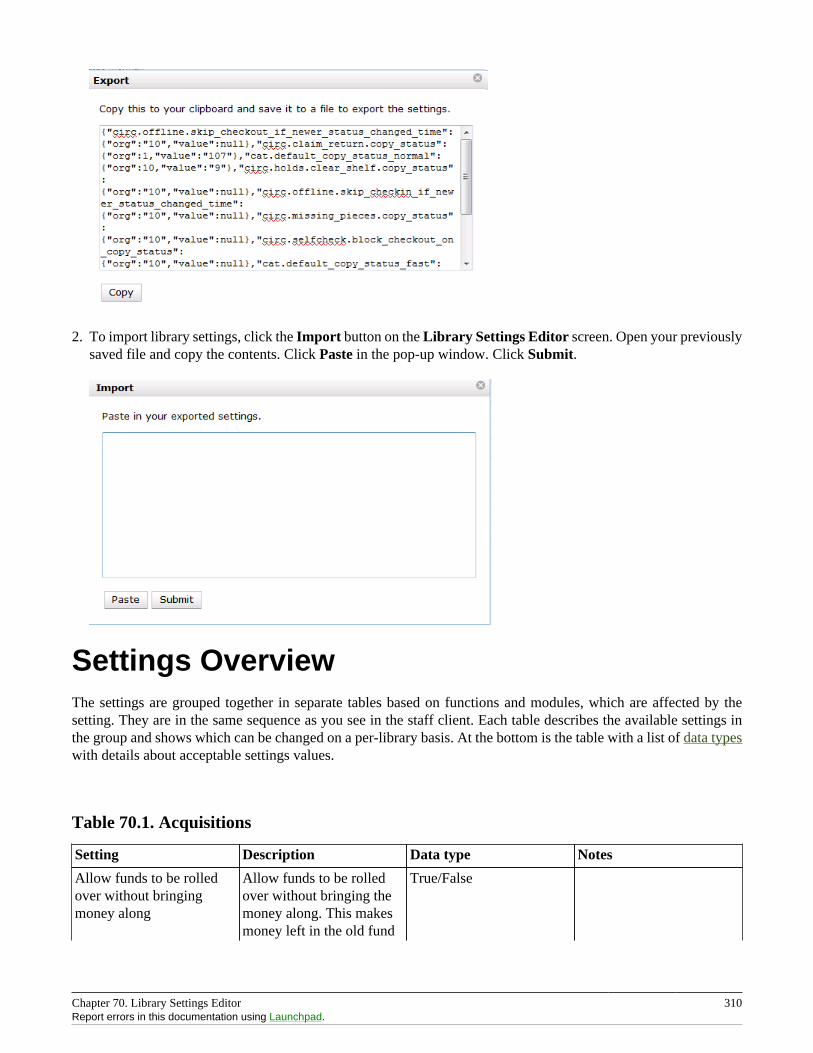
Chapter 70. Library Settings Editor 310Report errors in this documentation using Launchpad.
2. To import library settings, click the Import button on the Library Settings Editor screen. Open your previouslysaved file and copy the contents. Click Paste in the pop-up window. Click Submit.
Settings OverviewThe settings are grouped together in separate tables based on functions and modules, which are affected by thesetting. They are in the same sequence as you see in the staff client. Each table describes the available settings inthe group and shows which can be changed on a per-library basis. At the bottom is the table with a list of data typeswith details about acceptable settings values.
Table 70.1. Acquisitions
Setting Description Data type Notes
Allow funds to be rolledover without bringingmoney along
Allow funds to be rolledover without bringing themoney along. This makesmoney left in the old fund
True/False
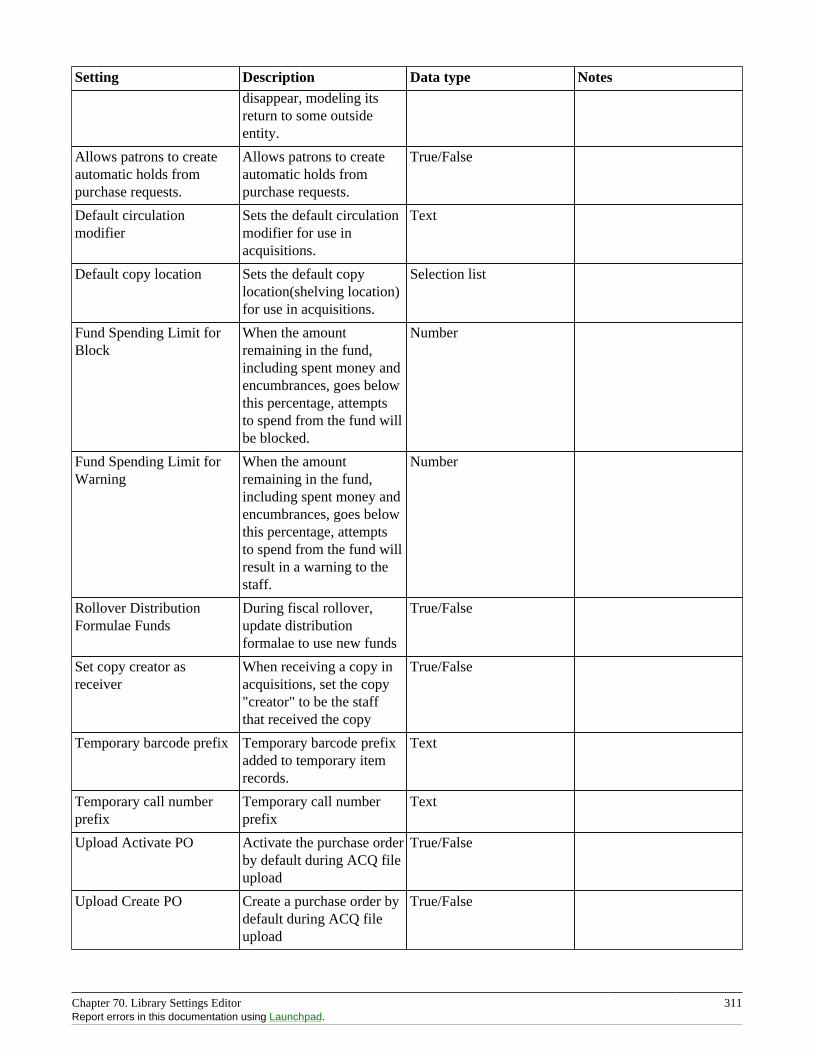
Chapter 70. Library Settings Editor 311Report errors in this documentation using Launchpad.
Setting Description Data type Notesdisappear, modeling itsreturn to some outsideentity.
Allows patrons to createautomatic holds frompurchase requests.
Allows patrons to createautomatic holds frompurchase requests.
True/False
Default circulationmodifier
Sets the default circulationmodifier for use inacquisitions.
Text
Default copy location Sets the default copylocation(shelving location)for use in acquisitions.
Selection list
Fund Spending Limit forBlock
When the amountremaining in the fund,including spent money andencumbrances, goes belowthis percentage, attemptsto spend from the fund willbe blocked.
Number
Fund Spending Limit forWarning
When the amountremaining in the fund,including spent money andencumbrances, goes belowthis percentage, attemptsto spend from the fund willresult in a warning to thestaff.
Number
Rollover DistributionFormulae Funds
During fiscal rollover,update distributionformalae to use new funds
True/False
Set copy creator asreceiver
When receiving a copy inacquisitions, set the copy"creator" to be the staffthat received the copy
True/False
Temporary barcode prefix Temporary barcode prefixadded to temporary itemrecords.
Text
Temporary call numberprefix
Temporary call numberprefix
Text
Upload Activate PO Activate the purchase orderby default during ACQ fileupload
True/False
Upload Create PO Create a purchase order bydefault during ACQ fileupload
True/False
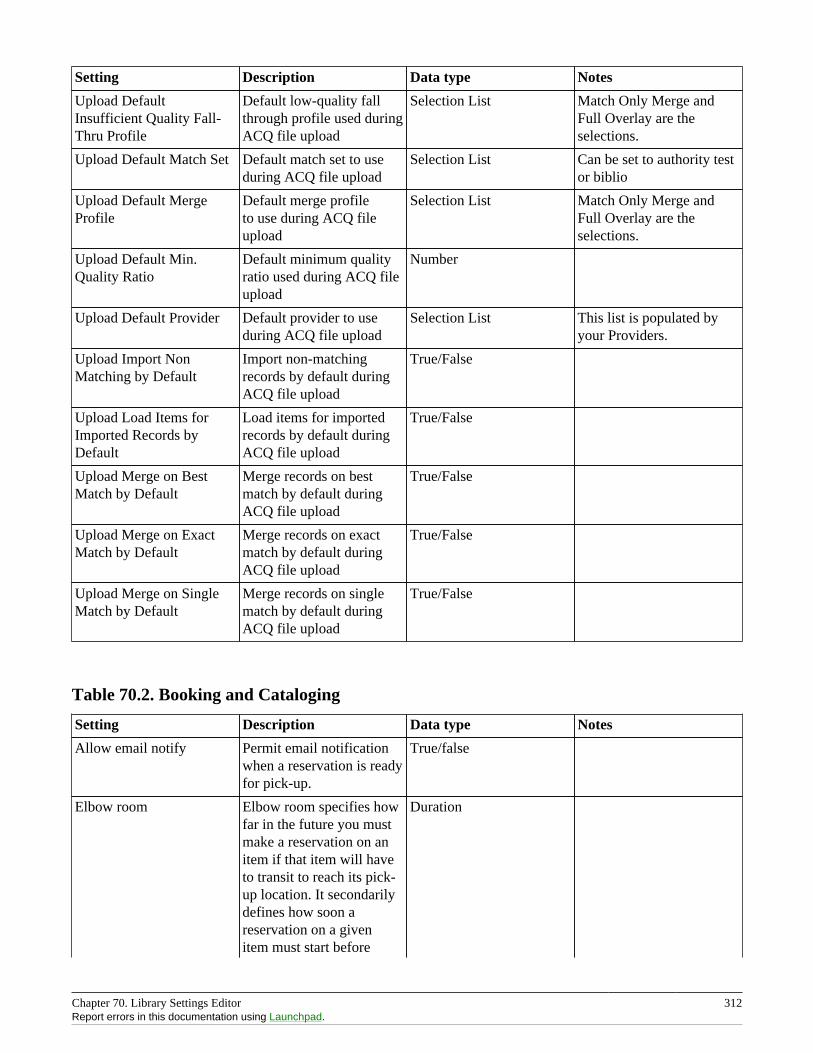
Chapter 70. Library Settings Editor 312Report errors in this documentation using Launchpad.
Setting Description Data type Notes
Upload DefaultInsufficient Quality Fall-Thru Profile
Default low-quality fallthrough profile used duringACQ file upload
Selection List Match Only Merge andFull Overlay are theselections.
Upload Default Match Set Default match set to useduring ACQ file upload
Selection List Can be set to authority testor biblio
Upload Default MergeProfile
Default merge profileto use during ACQ fileupload
Selection List Match Only Merge andFull Overlay are theselections.
Upload Default Min.Quality Ratio
Default minimum qualityratio used during ACQ fileupload
Number
Upload Default Provider Default provider to useduring ACQ file upload
Selection List This list is populated byyour Providers.
Upload Import NonMatching by Default
Import non-matchingrecords by default duringACQ file upload
True/False
Upload Load Items forImported Records byDefault
Load items for importedrecords by default duringACQ file upload
True/False
Upload Merge on BestMatch by Default
Merge records on bestmatch by default duringACQ file upload
True/False
Upload Merge on ExactMatch by Default
Merge records on exactmatch by default duringACQ file upload
True/False
Upload Merge on SingleMatch by Default
Merge records on singlematch by default duringACQ file upload
True/False
Table 70.2. Booking and Cataloging
Setting Description Data type Notes
Allow email notify Permit email notificationwhen a reservation is readyfor pick-up.
True/false
Elbow room Elbow room specifies howfar in the future you mustmake a reservation on anitem if that item will haveto transit to reach its pick-up location. It secondarilydefines how soon areservation on a givenitem must start before
Duration
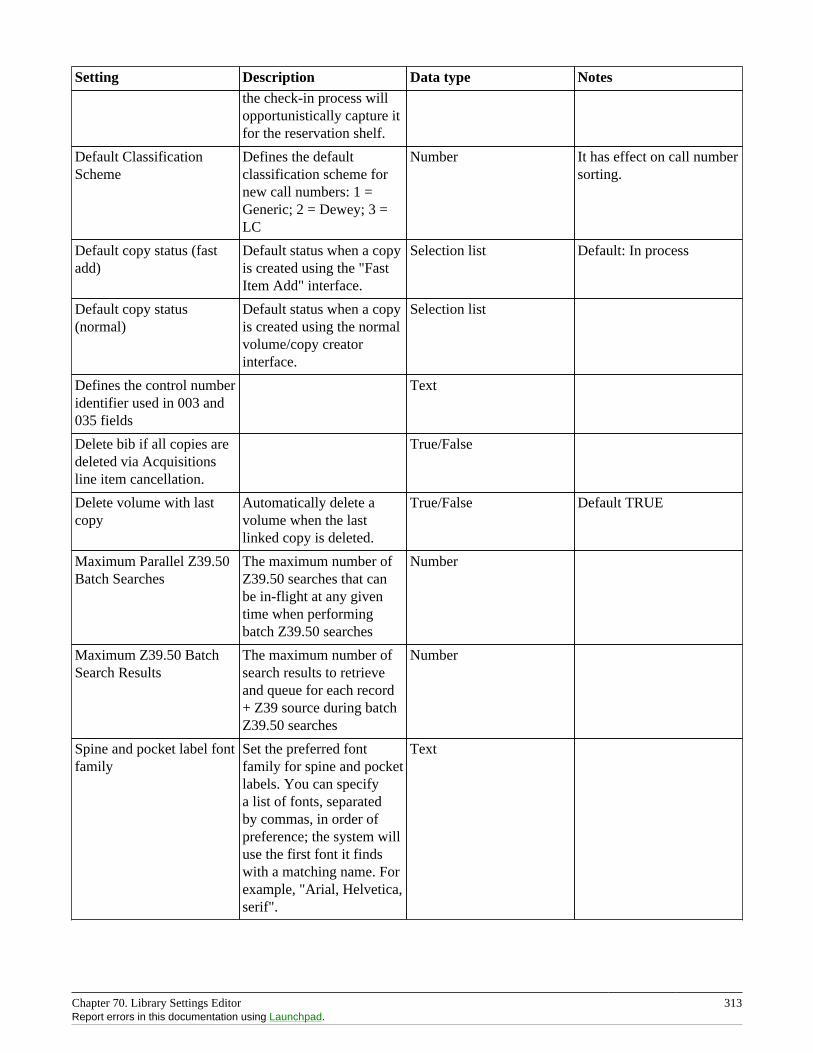
Chapter 70. Library Settings Editor 313Report errors in this documentation using Launchpad.
Setting Description Data type Notesthe check-in process willopportunistically capture itfor the reservation shelf.
Default ClassificationScheme
Defines the defaultclassification scheme fornew call numbers: 1 =Generic; 2 = Dewey; 3 =LC
Number It has effect on call numbersorting.
Default copy status (fastadd)
Default status when a copyis created using the "FastItem Add" interface.
Selection list Default: In process
Default copy status(normal)
Default status when a copyis created using the normalvolume/copy creatorinterface.
Selection list
Defines the control numberidentifier used in 003 and035 fields
Text
Delete bib if all copies aredeleted via Acquisitionsline item cancellation.
True/False
Delete volume with lastcopy
Automatically delete avolume when the lastlinked copy is deleted.
True/False Default TRUE
Maximum Parallel Z39.50Batch Searches
The maximum number ofZ39.50 searches that canbe in-flight at any giventime when performingbatch Z39.50 searches
Number
Maximum Z39.50 BatchSearch Results
The maximum number ofsearch results to retrieveand queue for each record+ Z39 source during batchZ39.50 searches
Number
Spine and pocket label fontfamily
Set the preferred fontfamily for spine and pocketlabels. You can specifya list of fonts, separatedby commas, in order ofpreference; the system willuse the first font it findswith a matching name. Forexample, "Arial, Helvetica,serif".
Text
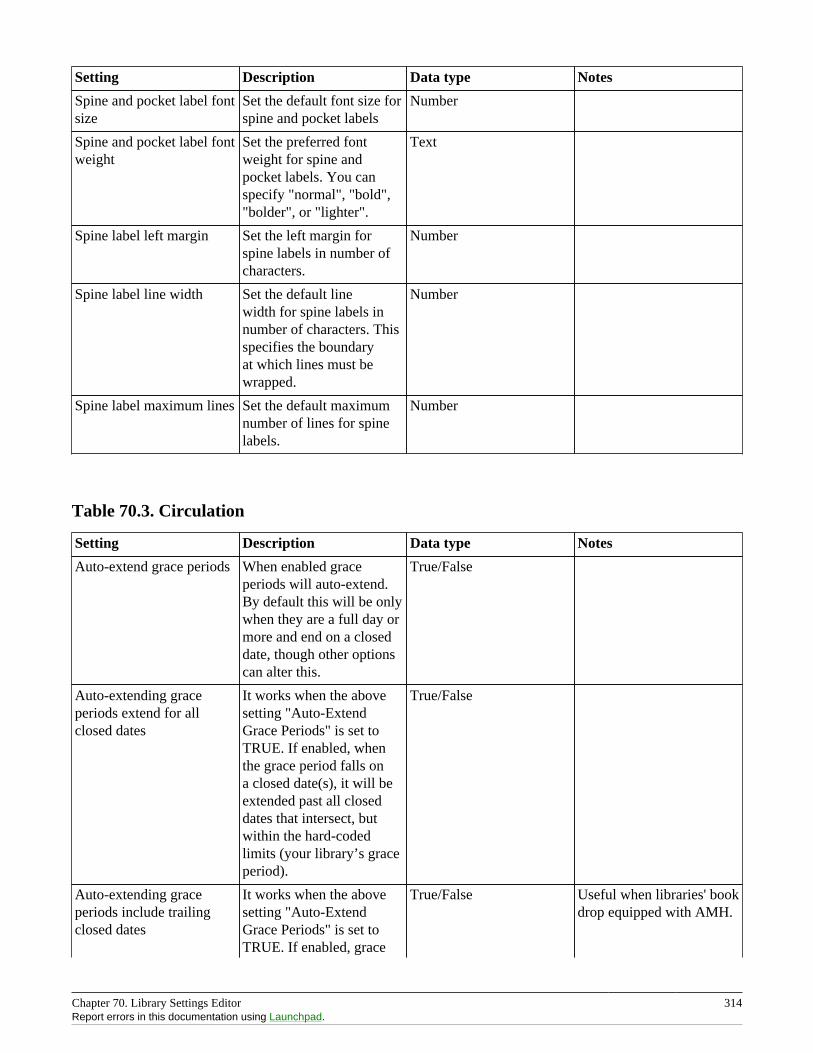
Chapter 70. Library Settings Editor 314Report errors in this documentation using Launchpad.
Setting Description Data type Notes
Spine and pocket label fontsize
Set the default font size forspine and pocket labels
Number
Spine and pocket label fontweight
Set the preferred fontweight for spine andpocket labels. You canspecify "normal", "bold","bolder", or "lighter".
Text
Spine label left margin Set the left margin forspine labels in number ofcharacters.
Number
Spine label line width Set the default linewidth for spine labels innumber of characters. Thisspecifies the boundaryat which lines must bewrapped.
Number
Spine label maximum lines Set the default maximumnumber of lines for spinelabels.
Number
Table 70.3. Circulation
Setting Description Data type Notes
Auto-extend grace periods When enabled graceperiods will auto-extend.By default this will be onlywhen they are a full day ormore and end on a closeddate, though other optionscan alter this.
True/False
Auto-extending graceperiods extend for allclosed dates
It works when the abovesetting "Auto-ExtendGrace Periods" is set toTRUE. If enabled, whenthe grace period falls ona closed date(s), it will beextended past all closeddates that intersect, butwithin the hard-codedlimits (your library’s graceperiod).
True/False
Auto-extending graceperiods include trailingclosed dates
It works when the abovesetting "Auto-ExtendGrace Periods" is set toTRUE. If enabled, grace
True/False Useful when libraries' bookdrop equipped with AMH.
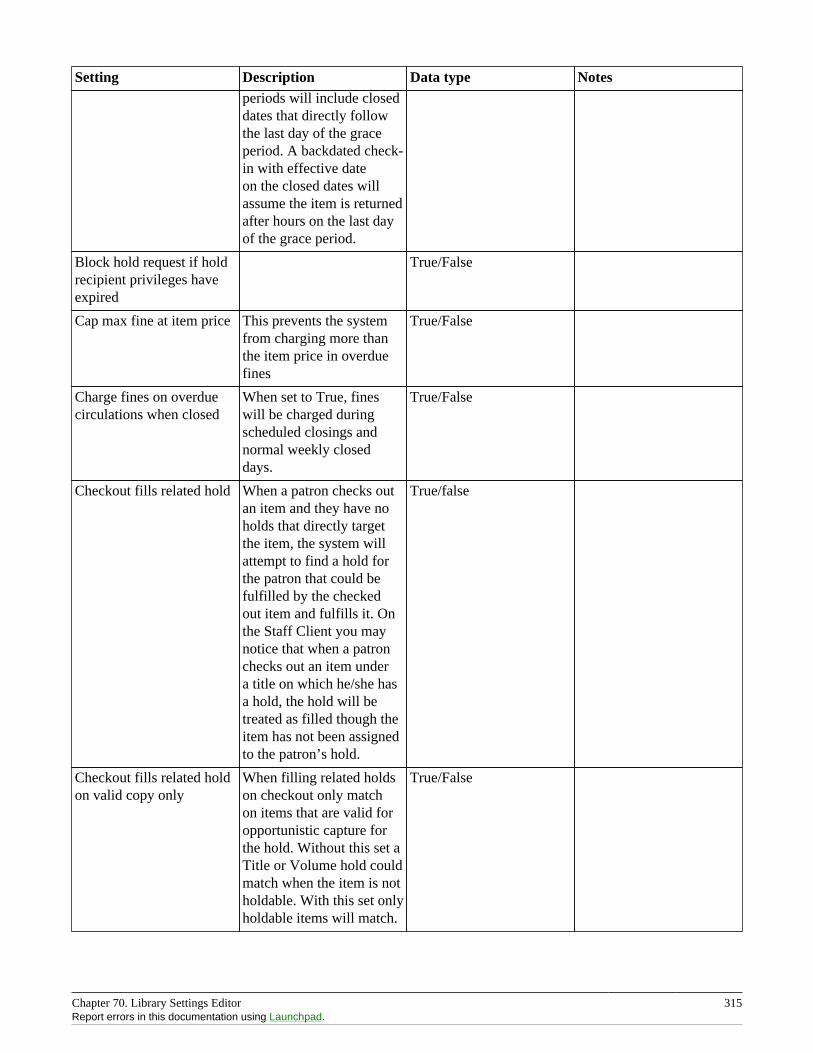
Chapter 70. Library Settings Editor 315Report errors in this documentation using Launchpad.
Setting Description Data type Notesperiods will include closeddates that directly followthe last day of the graceperiod. A backdated check-in with effective dateon the closed dates willassume the item is returnedafter hours on the last dayof the grace period.
Block hold request if holdrecipient privileges haveexpired
True/False
Cap max fine at item price This prevents the systemfrom charging more thanthe item price in overduefines
True/False
Charge fines on overduecirculations when closed
When set to True, fineswill be charged duringscheduled closings andnormal weekly closeddays.
True/False
Checkout fills related hold When a patron checks outan item and they have noholds that directly targetthe item, the system willattempt to find a hold forthe patron that could befulfilled by the checkedout item and fulfills it. Onthe Staff Client you maynotice that when a patronchecks out an item undera title on which he/she hasa hold, the hold will betreated as filled though theitem has not been assignedto the patron’s hold.
True/false
Checkout fills related holdon valid copy only
When filling related holdson checkout only matchon items that are valid foropportunistic capture forthe hold. Without this set aTitle or Volume hold couldmatch when the item is notholdable. With this set onlyholdable items will match.
True/False
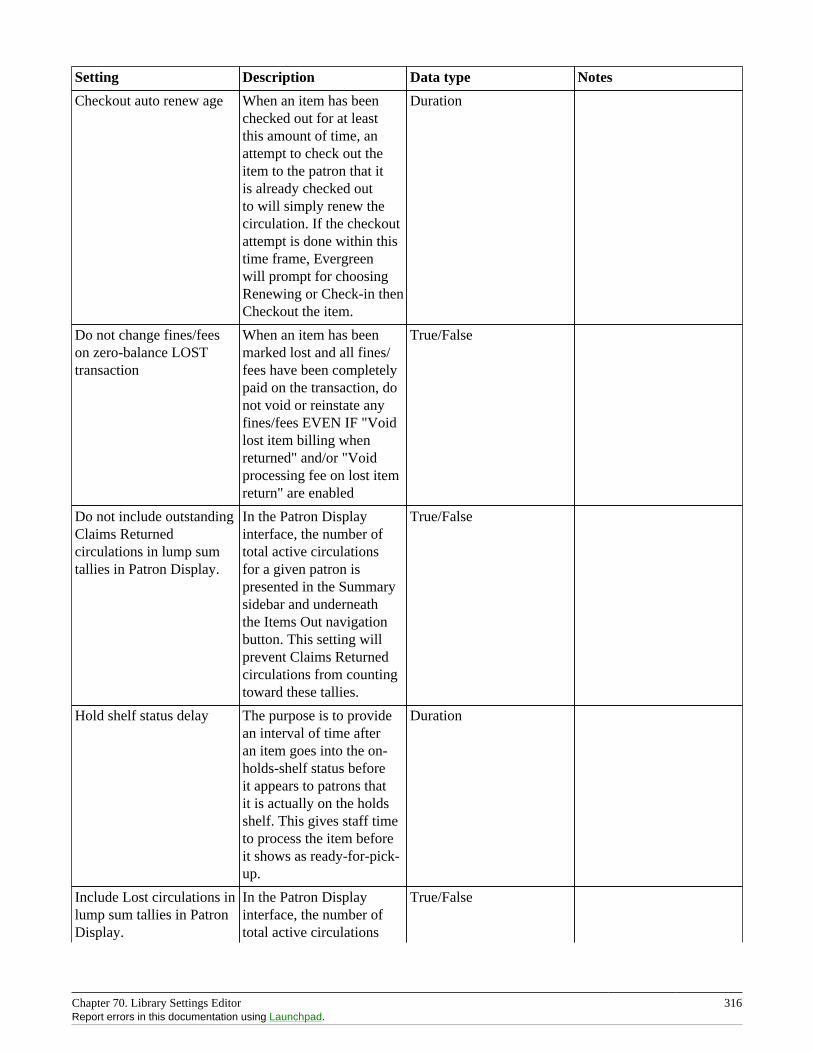
Chapter 70. Library Settings Editor 316Report errors in this documentation using Launchpad.
Setting Description Data type Notes
Checkout auto renew age When an item has beenchecked out for at leastthis amount of time, anattempt to check out theitem to the patron that itis already checked outto will simply renew thecirculation. If the checkoutattempt is done within thistime frame, Evergreenwill prompt for choosingRenewing or Check-in thenCheckout the item.
Duration
Do not change fines/feeson zero-balance LOSTtransaction
When an item has beenmarked lost and all fines/fees have been completelypaid on the transaction, donot void or reinstate anyfines/fees EVEN IF "Voidlost item billing whenreturned" and/or "Voidprocessing fee on lost itemreturn" are enabled
True/False
Do not include outstandingClaims Returnedcirculations in lump sumtallies in Patron Display.
In the Patron Displayinterface, the number oftotal active circulationsfor a given patron ispresented in the Summarysidebar and underneaththe Items Out navigationbutton. This setting willprevent Claims Returnedcirculations from countingtoward these tallies.
True/False
Hold shelf status delay The purpose is to providean interval of time afteran item goes into the on-holds-shelf status beforeit appears to patrons thatit is actually on the holdsshelf. This gives staff timeto process the item beforeit shows as ready-for-pick-up.
Duration
Include Lost circulations inlump sum tallies in PatronDisplay.
In the Patron Displayinterface, the number oftotal active circulations
True/False

Chapter 70. Library Settings Editor 317Report errors in this documentation using Launchpad.
Setting Description Data type Notesfor a given patron ispresented in the Summarysidebar and underneaththe Items Out navigationbutton. This setting willinclude Lost circulationsas counting toward thesetallies.
Invalid patron addresspenalty
When set, if a patronaddress is set to invalid, apenalty is applied.
True/False
Item status for missingpieces
This is the Item Status touse for items that havebeen marked or scanned ashaving Missing Pieces. Inthe absence of this setting,the Damaged status isused.
Selection list
Load patron fromCheckout
When scanning barcodesinto Checkout auto-detectif a new patron barcode isscanned and auto-load thenew patron.
True/False
Long-Overdue Check-InInterval Uses Last ActivityDate
Use the long-overdue last-activity date instead ofthe due_date to determinewhether the item has beenchecked out too long toperform long-overduecheck-in processing. If set,the system will first checkthe last payment time,followed by the last billingtime, followed by the duedate. See also "Long-Overdue Max ReturnInterval"
True/False
Long-Overdue ItemsUsable on Checkin
Long-overdue items areusable on checkin insteadof going "home" first
True/False
Long-Overdue Max ReturnInterval
Long-overdue check-inprocessing (voiding fees,re-instating overdues,etc.) will not take placefor items that have beenoverdue for (or have last
Duration
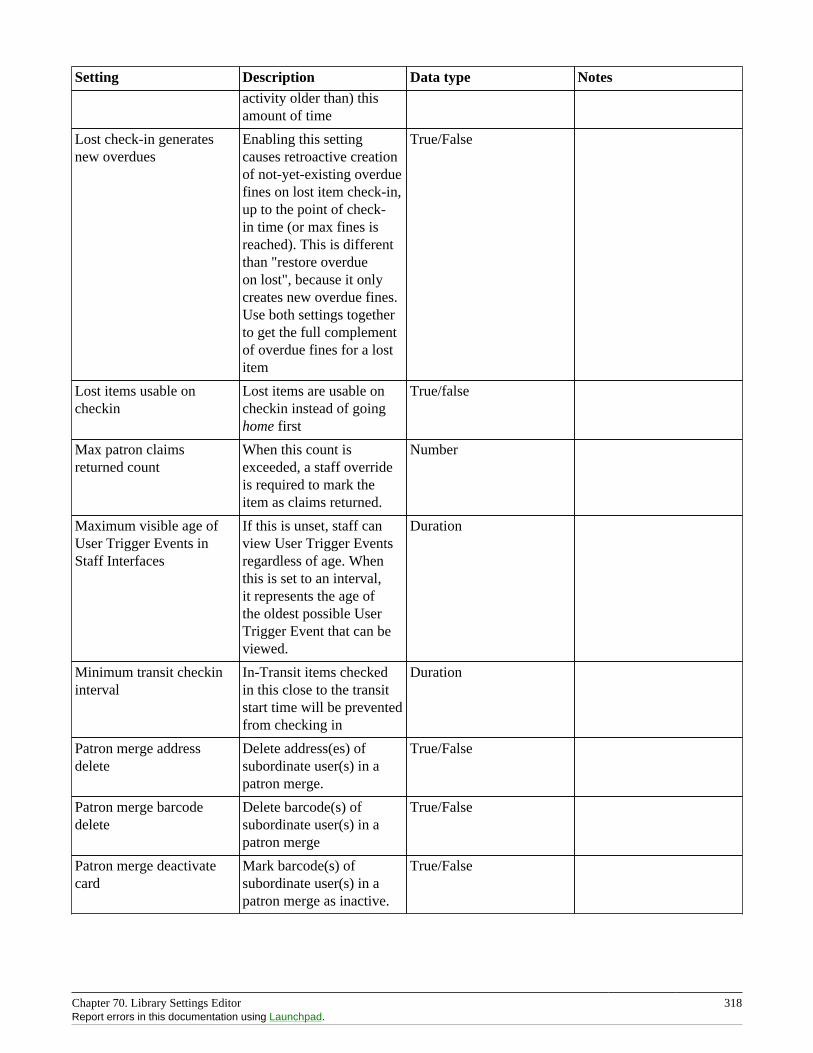
Chapter 70. Library Settings Editor 318Report errors in this documentation using Launchpad.
Setting Description Data type Notesactivity older than) thisamount of time
Lost check-in generatesnew overdues
Enabling this settingcauses retroactive creationof not-yet-existing overduefines on lost item check-in,up to the point of check-in time (or max fines isreached). This is differentthan "restore overdueon lost", because it onlycreates new overdue fines.Use both settings togetherto get the full complementof overdue fines for a lostitem
True/False
Lost items usable oncheckin
Lost items are usable oncheckin instead of goinghome first
True/false
Max patron claimsreturned count
When this count isexceeded, a staff overrideis required to mark theitem as claims returned.
Number
Maximum visible age ofUser Trigger Events inStaff Interfaces
If this is unset, staff canview User Trigger Eventsregardless of age. Whenthis is set to an interval,it represents the age ofthe oldest possible UserTrigger Event that can beviewed.
Duration
Minimum transit checkininterval
In-Transit items checkedin this close to the transitstart time will be preventedfrom checking in
Duration
Patron merge addressdelete
Delete address(es) ofsubordinate user(s) in apatron merge.
True/False
Patron merge barcodedelete
Delete barcode(s) ofsubordinate user(s) in apatron merge
True/False
Patron merge deactivatecard
Mark barcode(s) ofsubordinate user(s) in apatron merge as inactive.
True/False
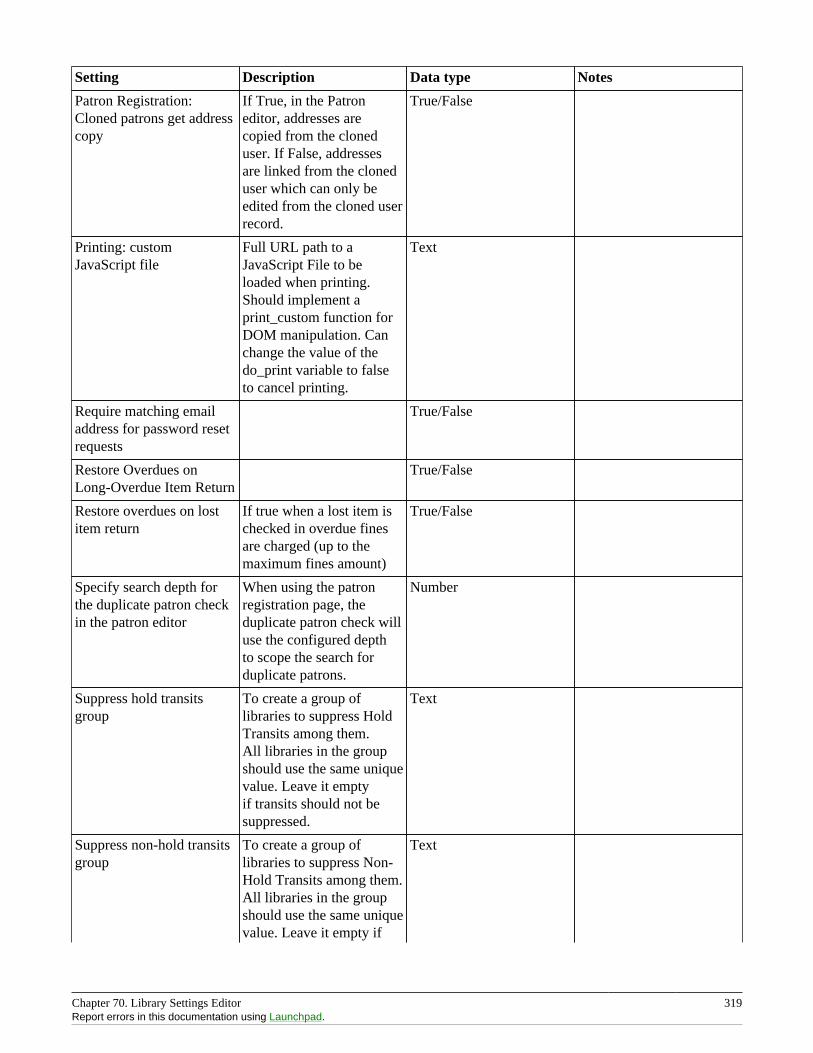
Chapter 70. Library Settings Editor 319Report errors in this documentation using Launchpad.
Setting Description Data type Notes
Patron Registration:Cloned patrons get addresscopy
If True, in the Patroneditor, addresses arecopied from the cloneduser. If False, addressesare linked from the cloneduser which can only beedited from the cloned userrecord.
True/False
Printing: customJavaScript file
Full URL path to aJavaScript File to beloaded when printing.Should implement aprint_custom function forDOM manipulation. Canchange the value of thedo_print variable to falseto cancel printing.
Text
Require matching emailaddress for password resetrequests
True/False
Restore Overdues onLong-Overdue Item Return
True/False
Restore overdues on lostitem return
If true when a lost item ischecked in overdue finesare charged (up to themaximum fines amount)
True/False
Specify search depth forthe duplicate patron checkin the patron editor
When using the patronregistration page, theduplicate patron check willuse the configured depthto scope the search forduplicate patrons.
Number
Suppress hold transitsgroup
To create a group oflibraries to suppress HoldTransits among them.All libraries in the groupshould use the same uniquevalue. Leave it emptyif transits should not besuppressed.
Text
Suppress non-hold transitsgroup
To create a group oflibraries to suppress Non-Hold Transits among them.All libraries in the groupshould use the same uniquevalue. Leave it empty if
Text
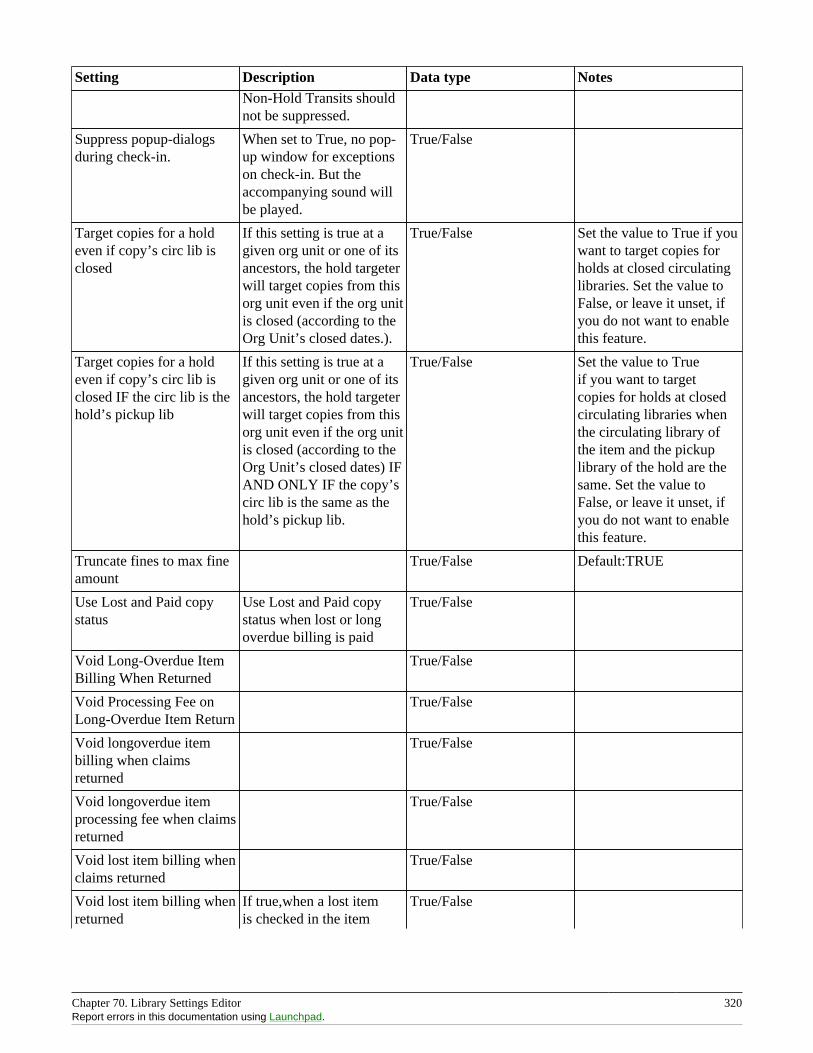
Chapter 70. Library Settings Editor 320Report errors in this documentation using Launchpad.
Setting Description Data type NotesNon-Hold Transits shouldnot be suppressed.
Suppress popup-dialogsduring check-in.
When set to True, no pop-up window for exceptionson check-in. But theaccompanying sound willbe played.
True/False
Target copies for a holdeven if copy’s circ lib isclosed
If this setting is true at agiven org unit or one of itsancestors, the hold targeterwill target copies from thisorg unit even if the org unitis closed (according to theOrg Unit’s closed dates.).
True/False Set the value to True if youwant to target copies forholds at closed circulatinglibraries. Set the value toFalse, or leave it unset, ifyou do not want to enablethis feature.
Target copies for a holdeven if copy’s circ lib isclosed IF the circ lib is thehold’s pickup lib
If this setting is true at agiven org unit or one of itsancestors, the hold targeterwill target copies from thisorg unit even if the org unitis closed (according to theOrg Unit’s closed dates) IFAND ONLY IF the copy’scirc lib is the same as thehold’s pickup lib.
True/False Set the value to Trueif you want to targetcopies for holds at closedcirculating libraries whenthe circulating library ofthe item and the pickuplibrary of the hold are thesame. Set the value toFalse, or leave it unset, ifyou do not want to enablethis feature.
Truncate fines to max fineamount
True/False Default:TRUE
Use Lost and Paid copystatus
Use Lost and Paid copystatus when lost or longoverdue billing is paid
True/False
Void Long-Overdue ItemBilling When Returned
True/False
Void Processing Fee onLong-Overdue Item Return
True/False
Void longoverdue itembilling when claimsreturned
True/False
Void longoverdue itemprocessing fee when claimsreturned
True/False
Void lost item billing whenclaims returned
True/False
Void lost item billing whenreturned
If true,when a lost itemis checked in the item
True/False
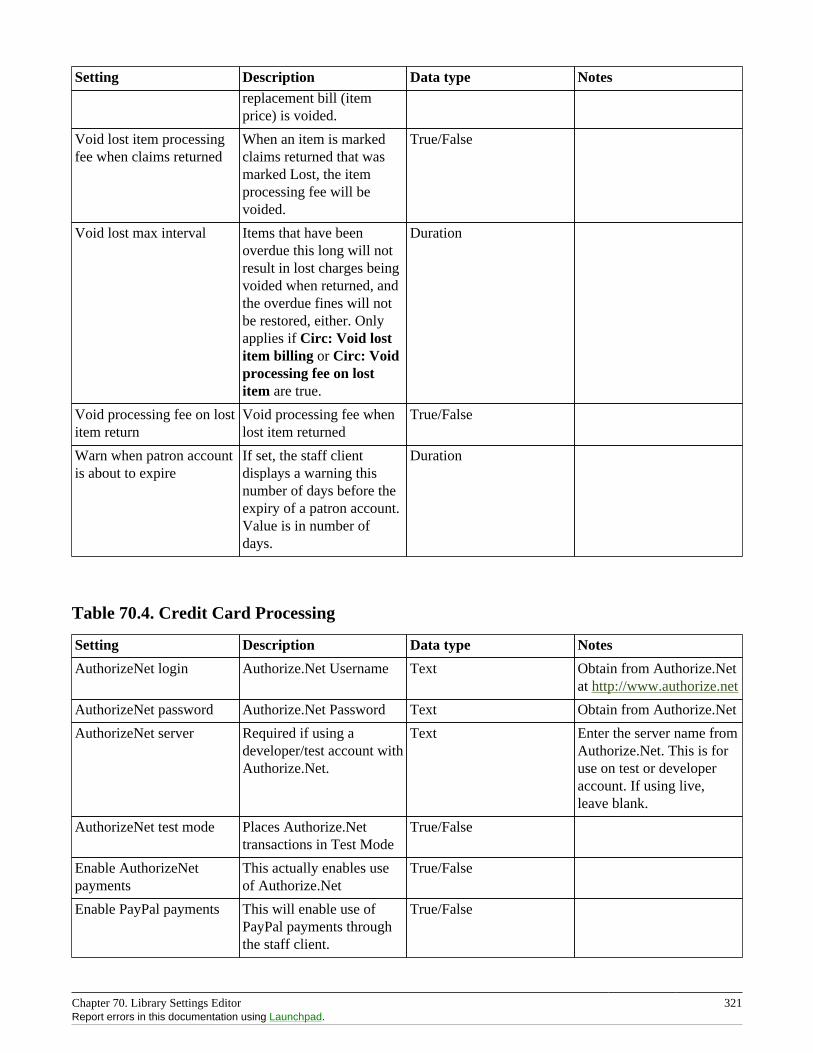
Chapter 70. Library Settings Editor 321Report errors in this documentation using Launchpad.
Setting Description Data type Notesreplacement bill (itemprice) is voided.
Void lost item processingfee when claims returned
When an item is markedclaims returned that wasmarked Lost, the itemprocessing fee will bevoided.
True/False
Void lost max interval Items that have beenoverdue this long will notresult in lost charges beingvoided when returned, andthe overdue fines will notbe restored, either. Onlyapplies if Circ: Void lostitem billing or Circ: Voidprocessing fee on lostitem are true.
Duration
Void processing fee on lostitem return
Void processing fee whenlost item returned
True/False
Warn when patron accountis about to expire
If set, the staff clientdisplays a warning thisnumber of days before theexpiry of a patron account.Value is in number ofdays.
Duration
Table 70.4. Credit Card Processing
Setting Description Data type Notes
AuthorizeNet login Authorize.Net Username Text Obtain from Authorize.Netat http://www.authorize.net
AuthorizeNet password Authorize.Net Password Text Obtain from Authorize.Net
AuthorizeNet server Required if using adeveloper/test account withAuthorize.Net.
Text Enter the server name fromAuthorize.Net. This is foruse on test or developeraccount. If using live,leave blank.
AuthorizeNet test mode Places Authorize.Nettransactions in Test Mode
True/False
Enable AuthorizeNetpayments
This actually enables useof Authorize.Net
True/False
Enable PayPal payments This will enable use ofPayPal payments throughthe staff client.
True/False
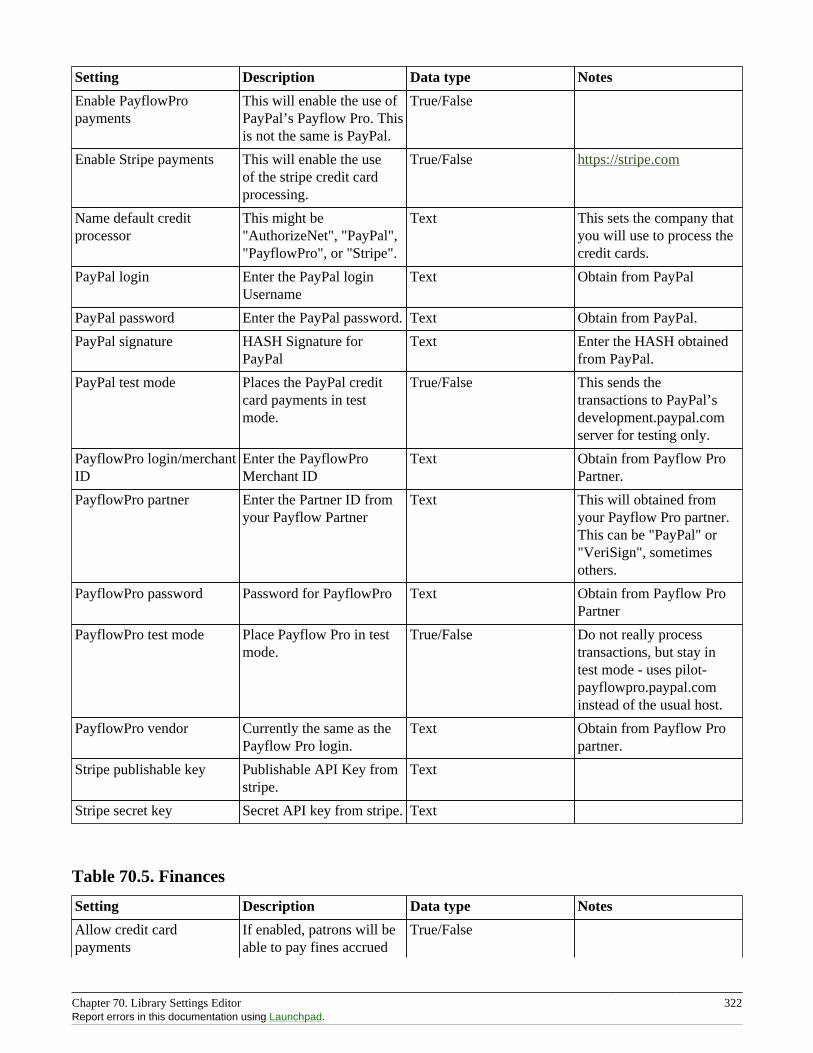
Chapter 70. Library Settings Editor 322Report errors in this documentation using Launchpad.
Setting Description Data type Notes
Enable PayflowPropayments
This will enable the use ofPayPal’s Payflow Pro. Thisis not the same is PayPal.
True/False
Enable Stripe payments This will enable the useof the stripe credit cardprocessing.
True/False https://stripe.com
Name default creditprocessor
This might be"AuthorizeNet", "PayPal","PayflowPro", or "Stripe".
Text This sets the company thatyou will use to process thecredit cards.
PayPal login Enter the PayPal loginUsername
Text Obtain from PayPal
PayPal password Enter the PayPal password. Text Obtain from PayPal.
PayPal signature HASH Signature forPayPal
Text Enter the HASH obtainedfrom PayPal.
PayPal test mode Places the PayPal creditcard payments in testmode.
True/False This sends thetransactions to PayPal’sdevelopment.paypal.comserver for testing only.
PayflowPro login/merchantID
Enter the PayflowProMerchant ID
Text Obtain from Payflow ProPartner.
PayflowPro partner Enter the Partner ID fromyour Payflow Partner
Text This will obtained fromyour Payflow Pro partner.This can be "PayPal" or"VeriSign", sometimesothers.
PayflowPro password Password for PayflowPro Text Obtain from Payflow ProPartner
PayflowPro test mode Place Payflow Pro in testmode.
True/False Do not really processtransactions, but stay intest mode - uses pilot-payflowpro.paypal.cominstead of the usual host.
PayflowPro vendor Currently the same as thePayflow Pro login.
Text Obtain from Payflow Propartner.
Stripe publishable key Publishable API Key fromstripe.
Text
Stripe secret key Secret API key from stripe. Text
Table 70.5. Finances
Setting Description Data type Notes
Allow credit cardpayments
If enabled, patrons will beable to pay fines accrued
True/False
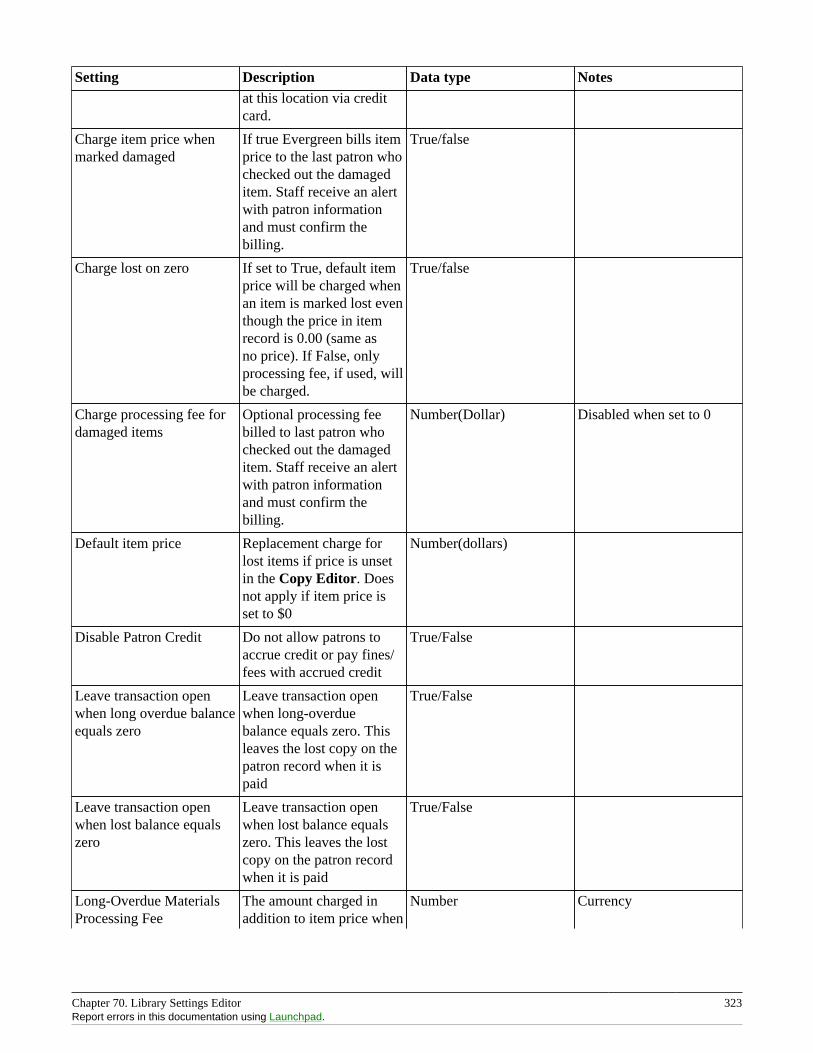
Chapter 70. Library Settings Editor 323Report errors in this documentation using Launchpad.
Setting Description Data type Notesat this location via creditcard.
Charge item price whenmarked damaged
If true Evergreen bills itemprice to the last patron whochecked out the damageditem. Staff receive an alertwith patron informationand must confirm thebilling.
True/false
Charge lost on zero If set to True, default itemprice will be charged whenan item is marked lost eventhough the price in itemrecord is 0.00 (same asno price). If False, onlyprocessing fee, if used, willbe charged.
True/false
Charge processing fee fordamaged items
Optional processing feebilled to last patron whochecked out the damageditem. Staff receive an alertwith patron informationand must confirm thebilling.
Number(Dollar) Disabled when set to 0
Default item price Replacement charge forlost items if price is unsetin the Copy Editor. Doesnot apply if item price isset to $0
Number(dollars)
Disable Patron Credit Do not allow patrons toaccrue credit or pay fines/fees with accrued credit
True/False
Leave transaction openwhen long overdue balanceequals zero
Leave transaction openwhen long-overduebalance equals zero. Thisleaves the lost copy on thepatron record when it ispaid
True/False
Leave transaction openwhen lost balance equalszero
Leave transaction openwhen lost balance equalszero. This leaves the lostcopy on the patron recordwhen it is paid
True/False
Long-Overdue MaterialsProcessing Fee
The amount charged inaddition to item price when
Number Currency
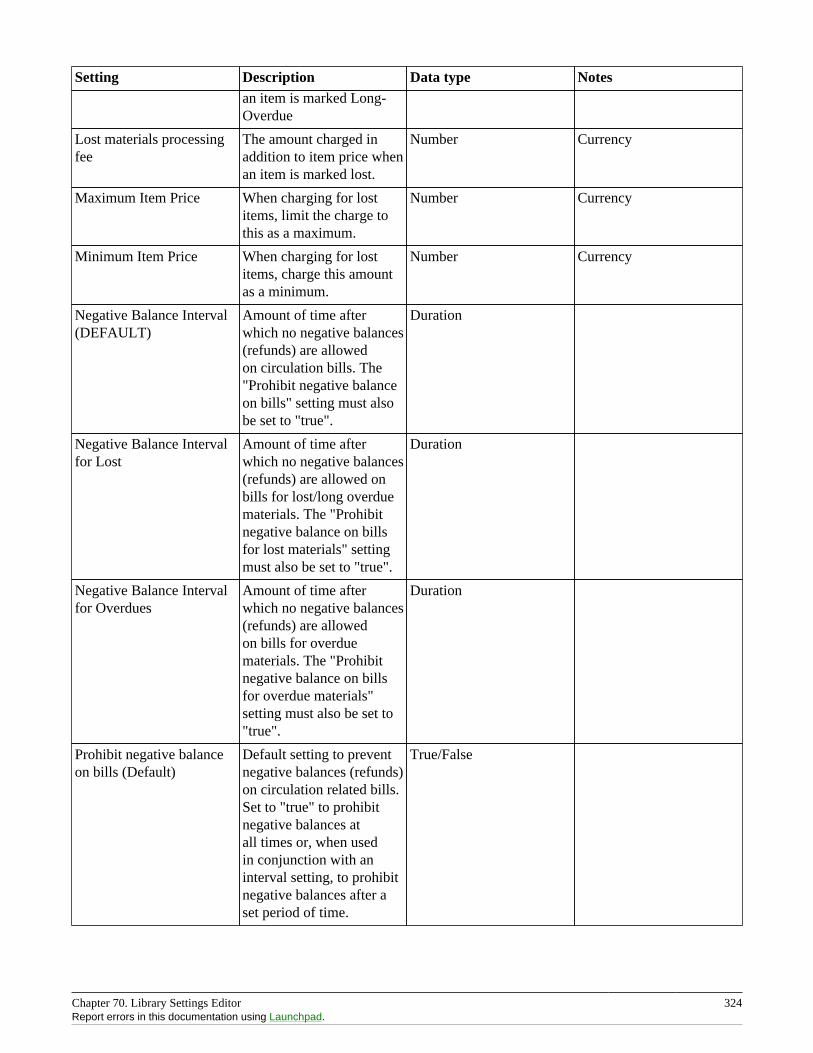
Chapter 70. Library Settings Editor 324Report errors in this documentation using Launchpad.
Setting Description Data type Notesan item is marked Long-Overdue
Lost materials processingfee
The amount charged inaddition to item price whenan item is marked lost.
Number Currency
Maximum Item Price When charging for lostitems, limit the charge tothis as a maximum.
Number Currency
Minimum Item Price When charging for lostitems, charge this amountas a minimum.
Number Currency
Negative Balance Interval(DEFAULT)
Amount of time afterwhich no negative balances(refunds) are allowedon circulation bills. The"Prohibit negative balanceon bills" setting must alsobe set to "true".
Duration
Negative Balance Intervalfor Lost
Amount of time afterwhich no negative balances(refunds) are allowed onbills for lost/long overduematerials. The "Prohibitnegative balance on billsfor lost materials" settingmust also be set to "true".
Duration
Negative Balance Intervalfor Overdues
Amount of time afterwhich no negative balances(refunds) are allowedon bills for overduematerials. The "Prohibitnegative balance on billsfor overdue materials"setting must also be set to"true".
Duration
Prohibit negative balanceon bills (Default)
Default setting to preventnegative balances (refunds)on circulation related bills.Set to "true" to prohibitnegative balances atall times or, when usedin conjunction with aninterval setting, to prohibitnegative balances after aset period of time.
True/False
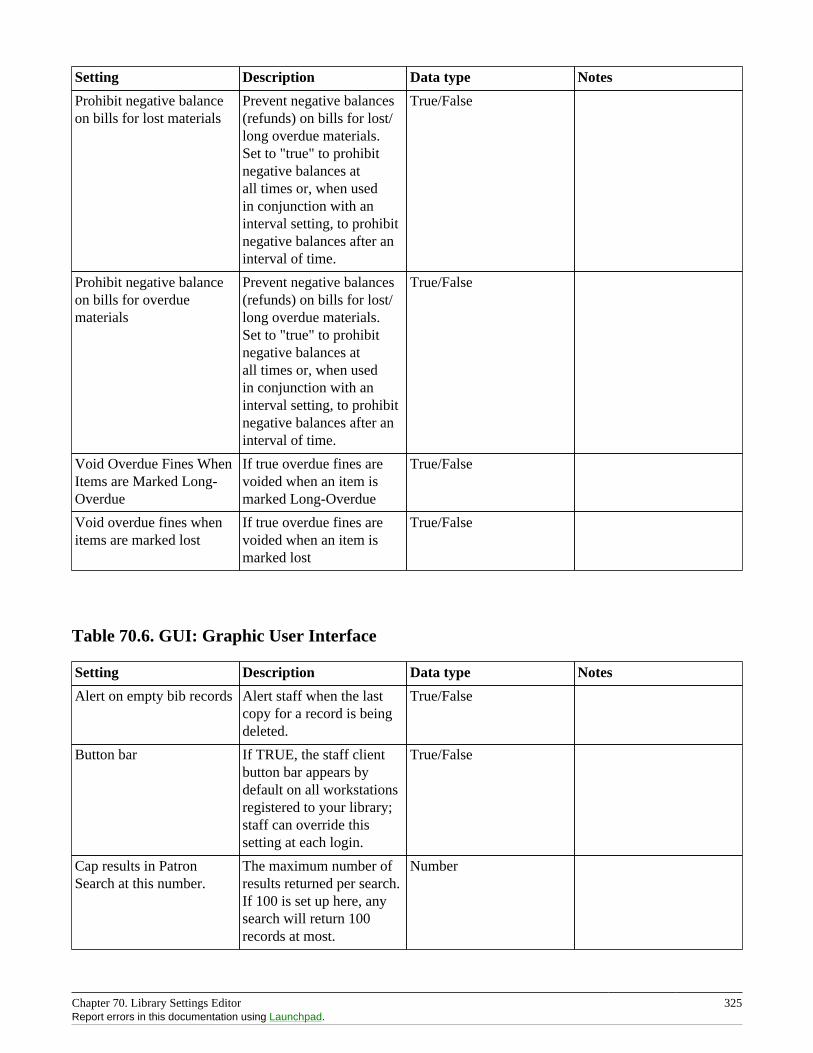
Chapter 70. Library Settings Editor 325Report errors in this documentation using Launchpad.
Setting Description Data type Notes
Prohibit negative balanceon bills for lost materials
Prevent negative balances(refunds) on bills for lost/long overdue materials.Set to "true" to prohibitnegative balances atall times or, when usedin conjunction with aninterval setting, to prohibitnegative balances after aninterval of time.
True/False
Prohibit negative balanceon bills for overduematerials
Prevent negative balances(refunds) on bills for lost/long overdue materials.Set to "true" to prohibitnegative balances atall times or, when usedin conjunction with aninterval setting, to prohibitnegative balances after aninterval of time.
True/False
Void Overdue Fines WhenItems are Marked Long-Overdue
If true overdue fines arevoided when an item ismarked Long-Overdue
True/False
Void overdue fines whenitems are marked lost
If true overdue fines arevoided when an item ismarked lost
True/False
Table 70.6. GUI: Graphic User Interface
Setting Description Data type Notes
Alert on empty bib records Alert staff when the lastcopy for a record is beingdeleted.
True/False
Button bar If TRUE, the staff clientbutton bar appears bydefault on all workstationsregistered to your library;staff can override thissetting at each login.
True/False
Cap results in PatronSearch at this number.
The maximum number ofresults returned per search.If 100 is set up here, anysearch will return 100records at most.
Number
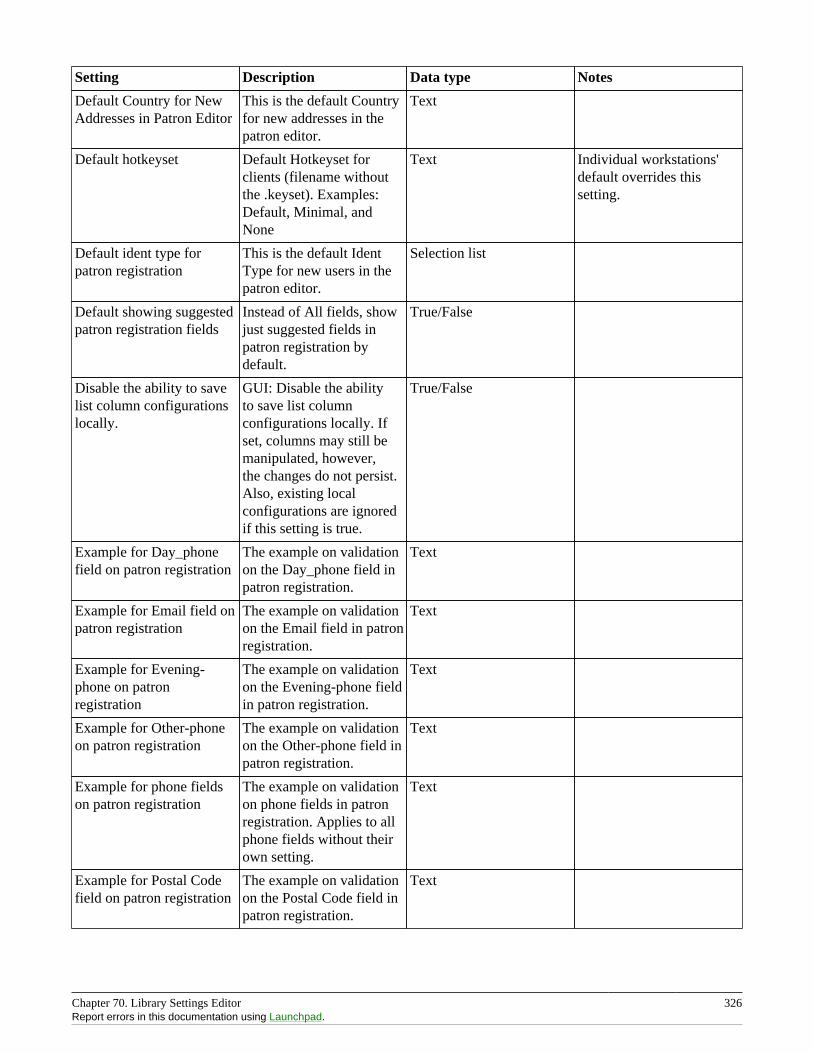
Chapter 70. Library Settings Editor 326Report errors in this documentation using Launchpad.
Setting Description Data type Notes
Default Country for NewAddresses in Patron Editor
This is the default Countryfor new addresses in thepatron editor.
Text
Default hotkeyset Default Hotkeyset forclients (filename withoutthe .keyset). Examples:Default, Minimal, andNone
Text Individual workstations'default overrides thissetting.
Default ident type forpatron registration
This is the default IdentType for new users in thepatron editor.
Selection list
Default showing suggestedpatron registration fields
Instead of All fields, showjust suggested fields inpatron registration bydefault.
True/False
Disable the ability to savelist column configurationslocally.
GUI: Disable the abilityto save list columnconfigurations locally. Ifset, columns may still bemanipulated, however,the changes do not persist.Also, existing localconfigurations are ignoredif this setting is true.
True/False
Example for Day_phonefield on patron registration
The example on validationon the Day_phone field inpatron registration.
Text
Example for Email field onpatron registration
The example on validationon the Email field in patronregistration.
Text
Example for Evening-phone on patronregistration
The example on validationon the Evening-phone fieldin patron registration.
Text
Example for Other-phoneon patron registration
The example on validationon the Other-phone field inpatron registration.
Text
Example for phone fieldson patron registration
The example on validationon phone fields in patronregistration. Applies to allphone fields without theirown setting.
Text
Example for Postal Codefield on patron registration
The example on validationon the Postal Code field inpatron registration.
Text
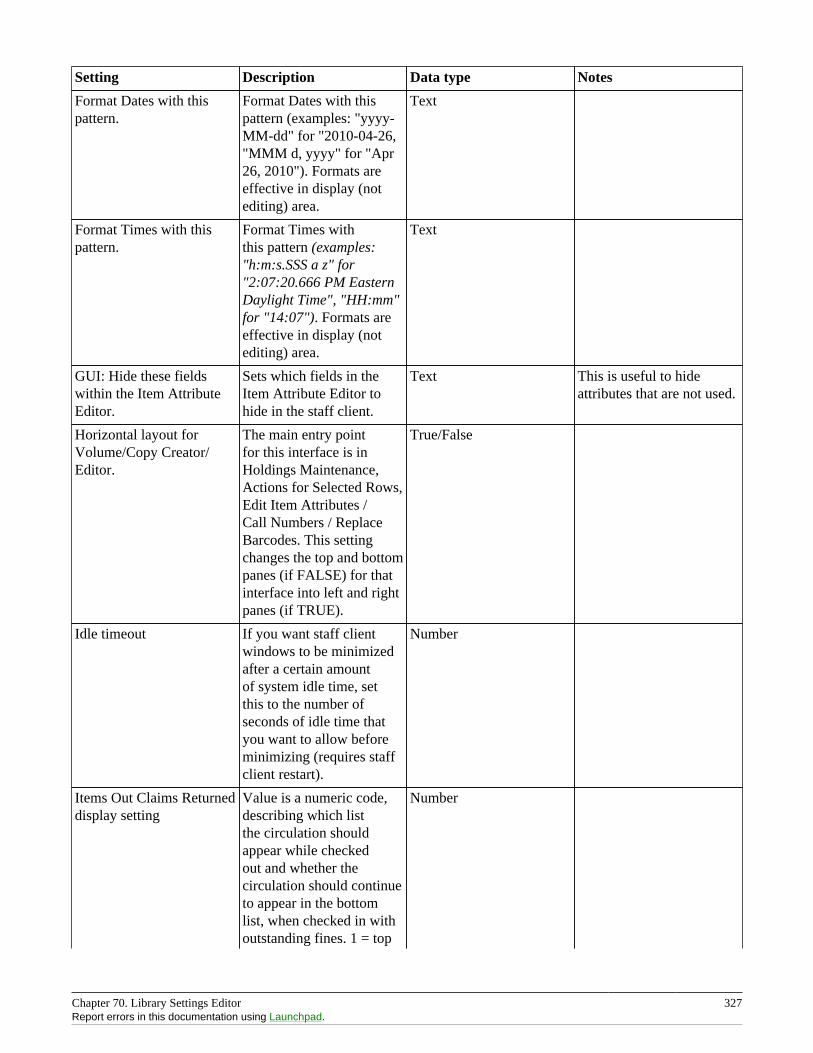
Chapter 70. Library Settings Editor 327Report errors in this documentation using Launchpad.
Setting Description Data type Notes
Format Dates with thispattern.
Format Dates with thispattern (examples: "yyyy-MM-dd" for "2010-04-26,"MMM d, yyyy" for "Apr26, 2010"). Formats areeffective in display (notediting) area.
Text
Format Times with thispattern.
Format Times withthis pattern (examples:"h:m:s.SSS a z" for"2:07:20.666 PM EasternDaylight Time", "HH:mm"for "14:07"). Formats areeffective in display (notediting) area.
Text
GUI: Hide these fieldswithin the Item AttributeEditor.
Sets which fields in theItem Attribute Editor tohide in the staff client.
Text This is useful to hideattributes that are not used.
Horizontal layout forVolume/Copy Creator/Editor.
The main entry pointfor this interface is inHoldings Maintenance,Actions for Selected Rows,Edit Item Attributes /Call Numbers / ReplaceBarcodes. This settingchanges the top and bottompanes (if FALSE) for thatinterface into left and rightpanes (if TRUE).
True/False
Idle timeout If you want staff clientwindows to be minimizedafter a certain amountof system idle time, setthis to the number ofseconds of idle time thatyou want to allow beforeminimizing (requires staffclient restart).
Number
Items Out Claims Returneddisplay setting
Value is a numeric code,describing which listthe circulation shouldappear while checkedout and whether thecirculation should continueto appear in the bottomlist, when checked in withoutstanding fines. 1 = top
Number
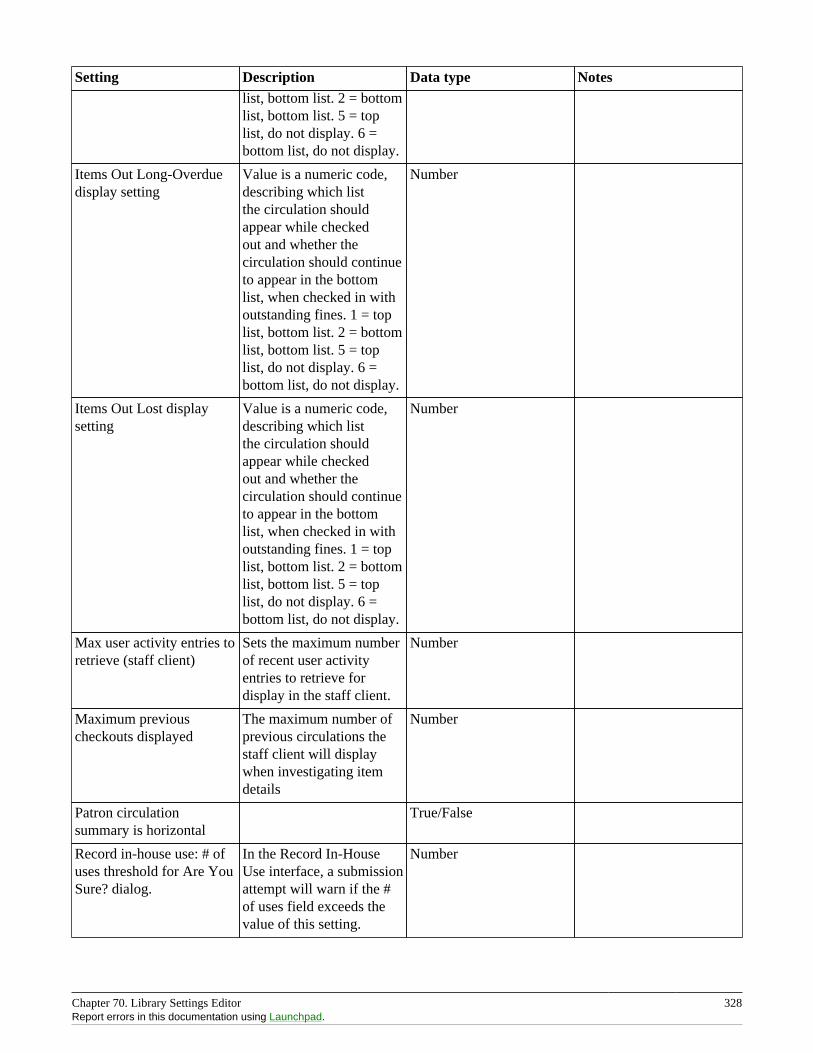
Chapter 70. Library Settings Editor 328Report errors in this documentation using Launchpad.
Setting Description Data type Noteslist, bottom list. 2 = bottomlist, bottom list. 5 = toplist, do not display. 6 =bottom list, do not display.
Items Out Long-Overduedisplay setting
Value is a numeric code,describing which listthe circulation shouldappear while checkedout and whether thecirculation should continueto appear in the bottomlist, when checked in withoutstanding fines. 1 = toplist, bottom list. 2 = bottomlist, bottom list. 5 = toplist, do not display. 6 =bottom list, do not display.
Number
Items Out Lost displaysetting
Value is a numeric code,describing which listthe circulation shouldappear while checkedout and whether thecirculation should continueto appear in the bottomlist, when checked in withoutstanding fines. 1 = toplist, bottom list. 2 = bottomlist, bottom list. 5 = toplist, do not display. 6 =bottom list, do not display.
Number
Max user activity entries toretrieve (staff client)
Sets the maximum numberof recent user activityentries to retrieve fordisplay in the staff client.
Number
Maximum previouscheckouts displayed
The maximum number ofprevious circulations thestaff client will displaywhen investigating itemdetails
Number
Patron circulationsummary is horizontal
True/False
Record in-house use: # ofuses threshold for Are YouSure? dialog.
In the Record In-HouseUse interface, a submissionattempt will warn if the #of uses field exceeds thevalue of this setting.
Number
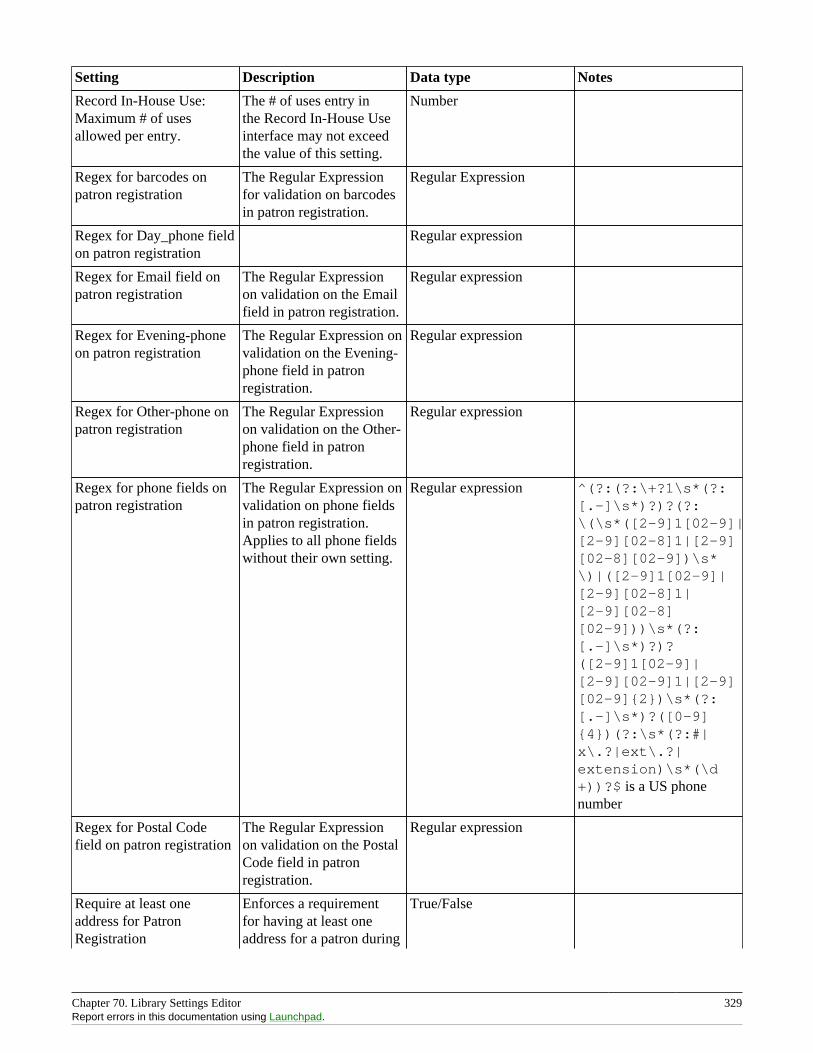
Chapter 70. Library Settings Editor 329Report errors in this documentation using Launchpad.
Setting Description Data type Notes
Record In-House Use:Maximum # of usesallowed per entry.
The # of uses entry inthe Record In-House Useinterface may not exceedthe value of this setting.
Number
Regex for barcodes onpatron registration
The Regular Expressionfor validation on barcodesin patron registration.
Regular Expression
Regex for Day_phone fieldon patron registration
Regular expression
Regex for Email field onpatron registration
The Regular Expressionon validation on the Emailfield in patron registration.
Regular expression
Regex for Evening-phoneon patron registration
The Regular Expression onvalidation on the Evening-phone field in patronregistration.
Regular expression
Regex for Other-phone onpatron registration
The Regular Expressionon validation on the Other-phone field in patronregistration.
Regular expression
Regex for phone fields onpatron registration
The Regular Expression onvalidation on phone fieldsin patron registration.Applies to all phone fieldswithout their own setting.
Regular expression ^(?:(?:\+?1\s*(?:[.-]\s*)?)?(?:\(\s*([2-9]1[02-9]|[2-9][02-8]1|[2-9][02-8][02-9])\s*\)|([2-9]1[02-9]|[2-9][02-8]1|[2-9][02-8][02-9]))\s*(?:[.-]\s*)?)?([2-9]1[02-9]|[2-9][02-9]1|[2-9][02-9]{2})\s*(?:[.-]\s*)?([0-9]{4})(?:\s*(?:#|x\.?|ext\.?|extension)\s*(\d+))?$ is a US phonenumber
Regex for Postal Codefield on patron registration
The Regular Expressionon validation on the PostalCode field in patronregistration.
Regular expression
Require at least oneaddress for PatronRegistration
Enforces a requirementfor having at least oneaddress for a patron during
True/False
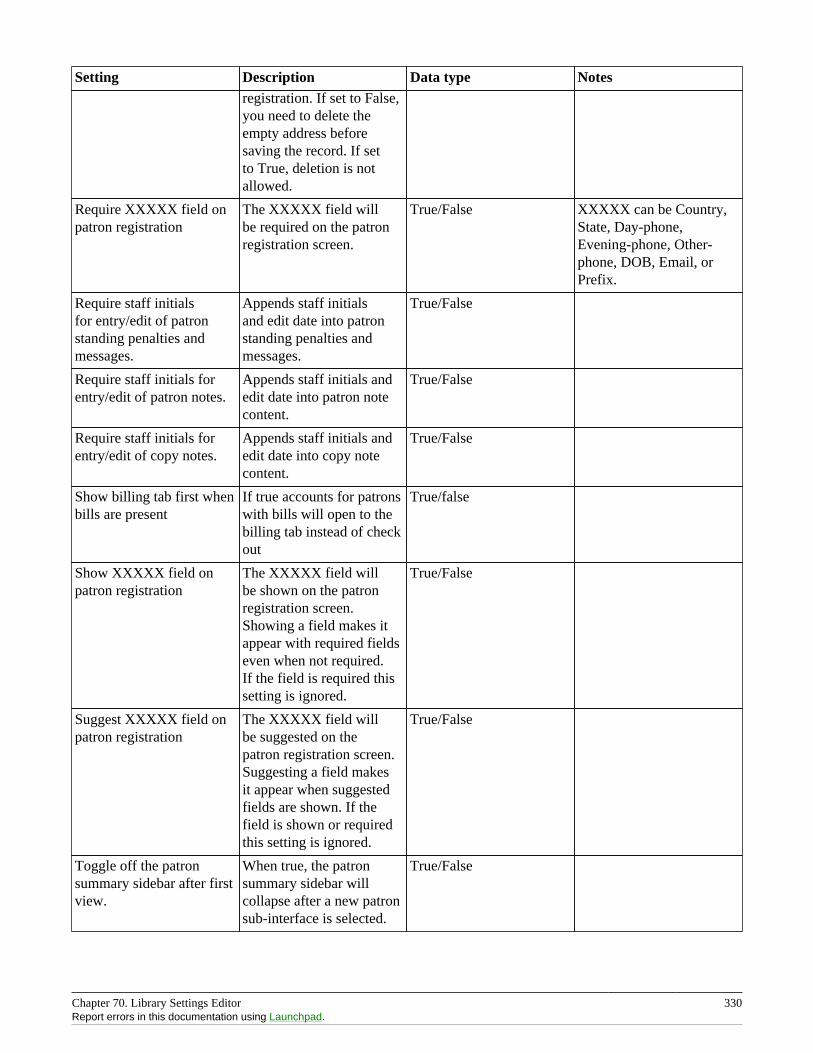
Chapter 70. Library Settings Editor 330Report errors in this documentation using Launchpad.
Setting Description Data type Notesregistration. If set to False,you need to delete theempty address beforesaving the record. If setto True, deletion is notallowed.
Require XXXXX field onpatron registration
The XXXXX field willbe required on the patronregistration screen.
True/False XXXXX can be Country,State, Day-phone,Evening-phone, Other-phone, DOB, Email, orPrefix.
Require staff initialsfor entry/edit of patronstanding penalties andmessages.
Appends staff initialsand edit date into patronstanding penalties andmessages.
True/False
Require staff initials forentry/edit of patron notes.
Appends staff initials andedit date into patron notecontent.
True/False
Require staff initials forentry/edit of copy notes.
Appends staff initials andedit date into copy notecontent.
True/False
Show billing tab first whenbills are present
If true accounts for patronswith bills will open to thebilling tab instead of checkout
True/false
Show XXXXX field onpatron registration
The XXXXX field willbe shown on the patronregistration screen.Showing a field makes itappear with required fieldseven when not required.If the field is required thissetting is ignored.
True/False
Suggest XXXXX field onpatron registration
The XXXXX field willbe suggested on thepatron registration screen.Suggesting a field makesit appear when suggestedfields are shown. If thefield is shown or requiredthis setting is ignored.
True/False
Toggle off the patronsummary sidebar after firstview.
When true, the patronsummary sidebar willcollapse after a new patronsub-interface is selected.
True/False
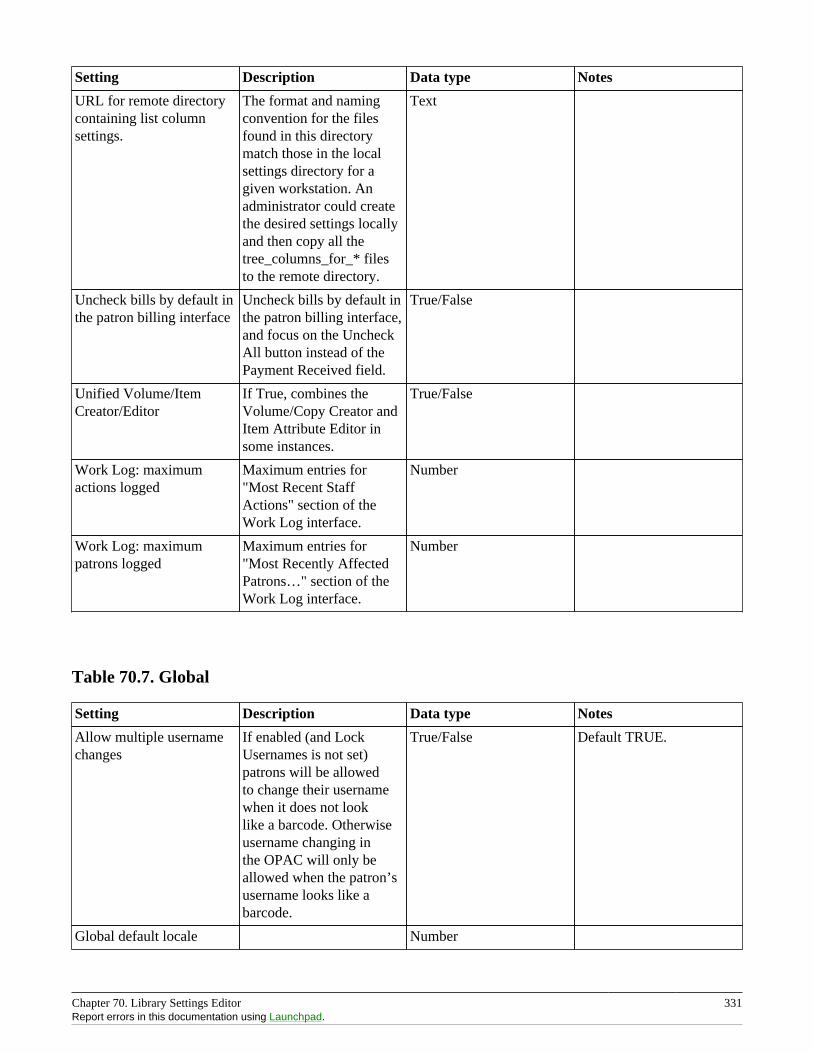
Chapter 70. Library Settings Editor 331Report errors in this documentation using Launchpad.
Setting Description Data type Notes
URL for remote directorycontaining list columnsettings.
The format and namingconvention for the filesfound in this directorymatch those in the localsettings directory for agiven workstation. Anadministrator could createthe desired settings locallyand then copy all thetree_columns_for_* filesto the remote directory.
Text
Uncheck bills by default inthe patron billing interface
Uncheck bills by default inthe patron billing interface,and focus on the UncheckAll button instead of thePayment Received field.
True/False
Unified Volume/ItemCreator/Editor
If True, combines theVolume/Copy Creator andItem Attribute Editor insome instances.
True/False
Work Log: maximumactions logged
Maximum entries for"Most Recent StaffActions" section of theWork Log interface.
Number
Work Log: maximumpatrons logged
Maximum entries for"Most Recently AffectedPatrons…" section of theWork Log interface.
Number
Table 70.7. Global
Setting Description Data type Notes
Allow multiple usernamechanges
If enabled (and LockUsernames is not set)patrons will be allowedto change their usernamewhen it does not looklike a barcode. Otherwiseusername changing inthe OPAC will only beallowed when the patron’susername looks like abarcode.
True/False Default TRUE.
Global default locale Number
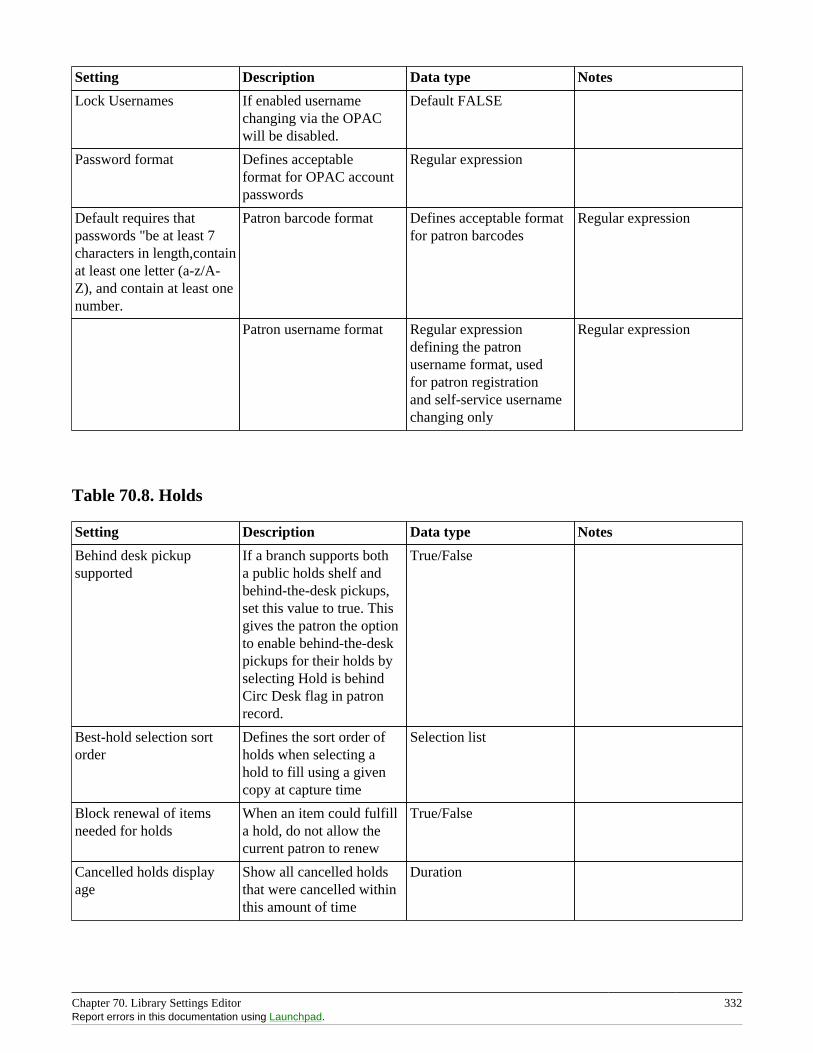
Chapter 70. Library Settings Editor 332Report errors in this documentation using Launchpad.
Setting Description Data type Notes
Lock Usernames If enabled usernamechanging via the OPACwill be disabled.
Default FALSE
Password format Defines acceptableformat for OPAC accountpasswords
Regular expression
Default requires thatpasswords "be at least 7characters in length,containat least one letter (a-z/A-Z), and contain at least onenumber.
Patron barcode format Defines acceptable formatfor patron barcodes
Regular expression
Patron username format Regular expressiondefining the patronusername format, usedfor patron registrationand self-service usernamechanging only
Regular expression
Table 70.8. Holds
Setting Description Data type Notes
Behind desk pickupsupported
If a branch supports botha public holds shelf andbehind-the-desk pickups,set this value to true. Thisgives the patron the optionto enable behind-the-deskpickups for their holds byselecting Hold is behindCirc Desk flag in patronrecord.
True/False
Best-hold selection sortorder
Defines the sort order ofholds when selecting ahold to fill using a givencopy at capture time
Selection list
Block renewal of itemsneeded for holds
When an item could fulfilla hold, do not allow thecurrent patron to renew
True/False
Cancelled holds displayage
Show all cancelled holdsthat were cancelled withinthis amount of time
Duration
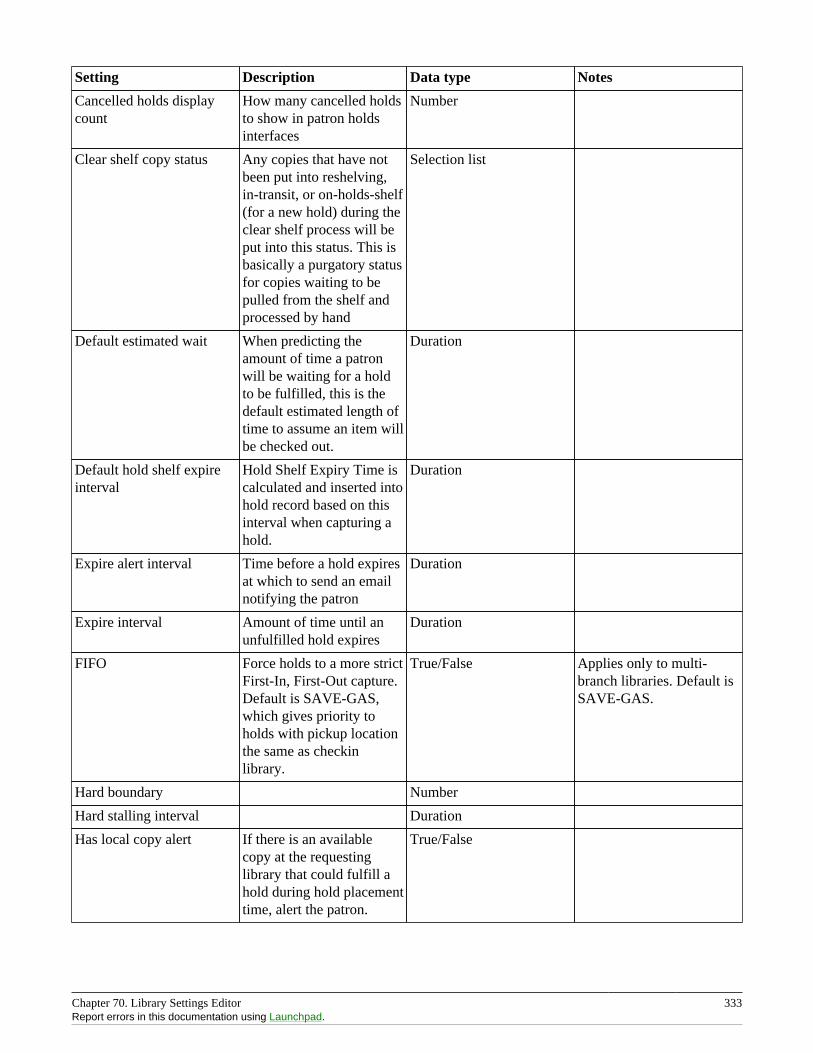
Chapter 70. Library Settings Editor 333Report errors in this documentation using Launchpad.
Setting Description Data type Notes
Cancelled holds displaycount
How many cancelled holdsto show in patron holdsinterfaces
Number
Clear shelf copy status Any copies that have notbeen put into reshelving,in-transit, or on-holds-shelf(for a new hold) during theclear shelf process will beput into this status. This isbasically a purgatory statusfor copies waiting to bepulled from the shelf andprocessed by hand
Selection list
Default estimated wait When predicting theamount of time a patronwill be waiting for a holdto be fulfilled, this is thedefault estimated length oftime to assume an item willbe checked out.
Duration
Default hold shelf expireinterval
Hold Shelf Expiry Time iscalculated and inserted intohold record based on thisinterval when capturing ahold.
Duration
Expire alert interval Time before a hold expiresat which to send an emailnotifying the patron
Duration
Expire interval Amount of time until anunfulfilled hold expires
Duration
FIFO Force holds to a more strictFirst-In, First-Out capture.Default is SAVE-GAS,which gives priority toholds with pickup locationthe same as checkinlibrary.
True/False Applies only to multi-branch libraries. Default isSAVE-GAS.
Hard boundary Number
Hard stalling interval Duration
Has local copy alert If there is an availablecopy at the requestinglibrary that could fulfill ahold during hold placementtime, alert the patron.
True/False
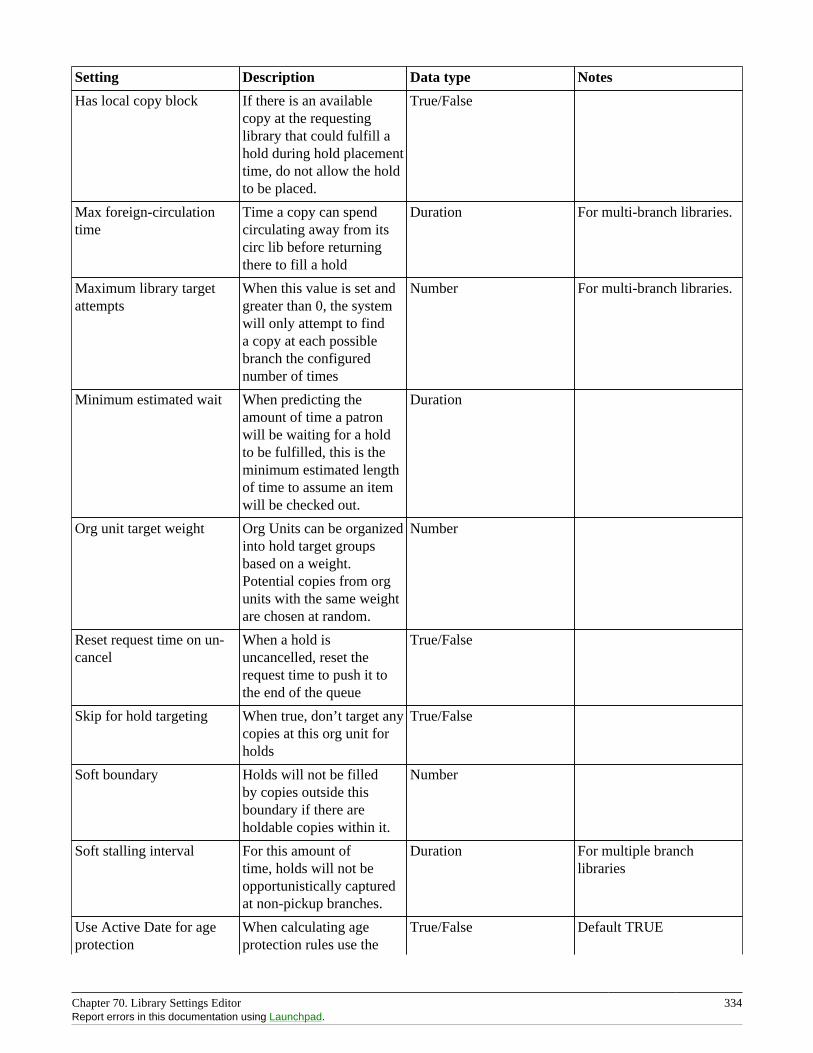
Chapter 70. Library Settings Editor 334Report errors in this documentation using Launchpad.
Setting Description Data type Notes
Has local copy block If there is an availablecopy at the requestinglibrary that could fulfill ahold during hold placementtime, do not allow the holdto be placed.
True/False
Max foreign-circulationtime
Time a copy can spendcirculating away from itscirc lib before returningthere to fill a hold
Duration For multi-branch libraries.
Maximum library targetattempts
When this value is set andgreater than 0, the systemwill only attempt to finda copy at each possiblebranch the configurednumber of times
Number For multi-branch libraries.
Minimum estimated wait When predicting theamount of time a patronwill be waiting for a holdto be fulfilled, this is theminimum estimated lengthof time to assume an itemwill be checked out.
Duration
Org unit target weight Org Units can be organizedinto hold target groupsbased on a weight.Potential copies from orgunits with the same weightare chosen at random.
Number
Reset request time on un-cancel
When a hold isuncancelled, reset therequest time to push it tothe end of the queue
True/False
Skip for hold targeting When true, don’t target anycopies at this org unit forholds
True/False
Soft boundary Holds will not be filledby copies outside thisboundary if there areholdable copies within it.
Number
Soft stalling interval For this amount oftime, holds will not beopportunistically capturedat non-pickup branches.
Duration For multiple branchlibraries
Use Active Date for ageprotection
When calculating ageprotection rules use the
True/False Default TRUE
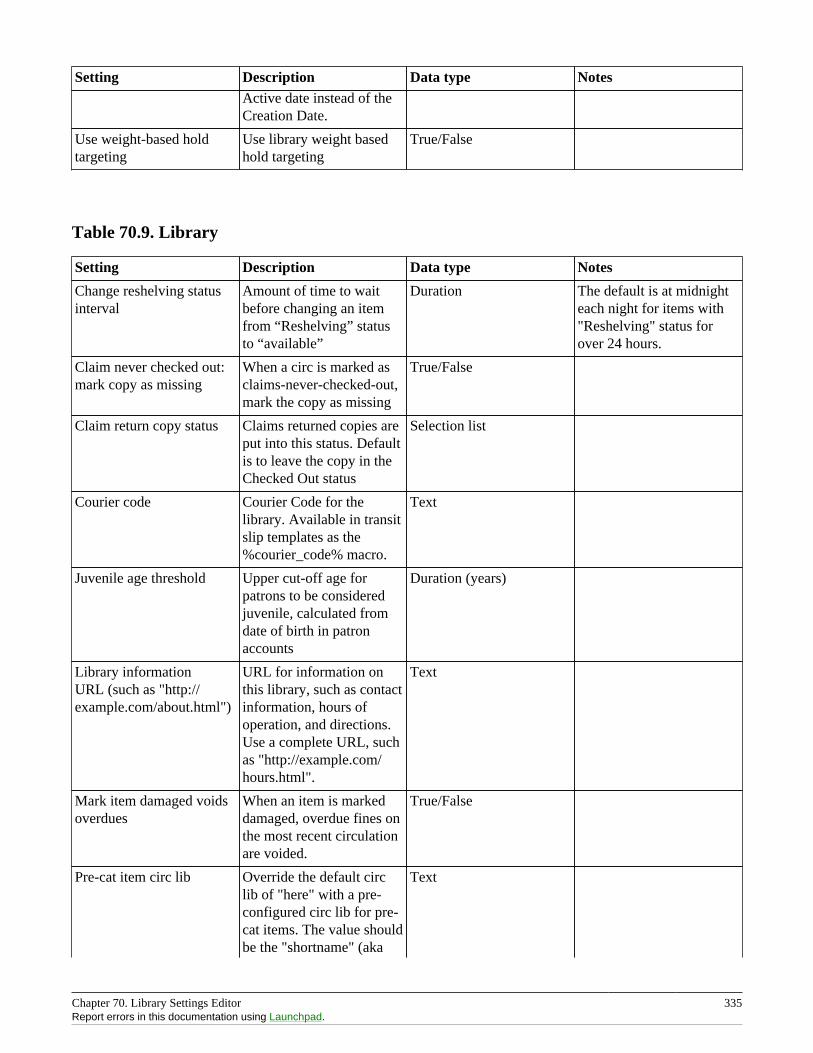
Chapter 70. Library Settings Editor 335Report errors in this documentation using Launchpad.
Setting Description Data type NotesActive date instead of theCreation Date.
Use weight-based holdtargeting
Use library weight basedhold targeting
True/False
Table 70.9. Library
Setting Description Data type Notes
Change reshelving statusinterval
Amount of time to waitbefore changing an itemfrom “Reshelving” statusto “available”
Duration The default is at midnighteach night for items with"Reshelving" status forover 24 hours.
Claim never checked out:mark copy as missing
When a circ is marked asclaims-never-checked-out,mark the copy as missing
True/False
Claim return copy status Claims returned copies areput into this status. Defaultis to leave the copy in theChecked Out status
Selection list
Courier code Courier Code for thelibrary. Available in transitslip templates as the%courier_code% macro.
Text
Juvenile age threshold Upper cut-off age forpatrons to be consideredjuvenile, calculated fromdate of birth in patronaccounts
Duration (years)
Library informationURL (such as "http://example.com/about.html")
URL for information onthis library, such as contactinformation, hours ofoperation, and directions.Use a complete URL, suchas "http://example.com/hours.html".
Text
Mark item damaged voidsoverdues
When an item is markeddamaged, overdue fines onthe most recent circulationare voided.
True/False
Pre-cat item circ lib Override the default circlib of "here" with a pre-configured circ lib for pre-cat items. The value shouldbe the "shortname" (aka
Text
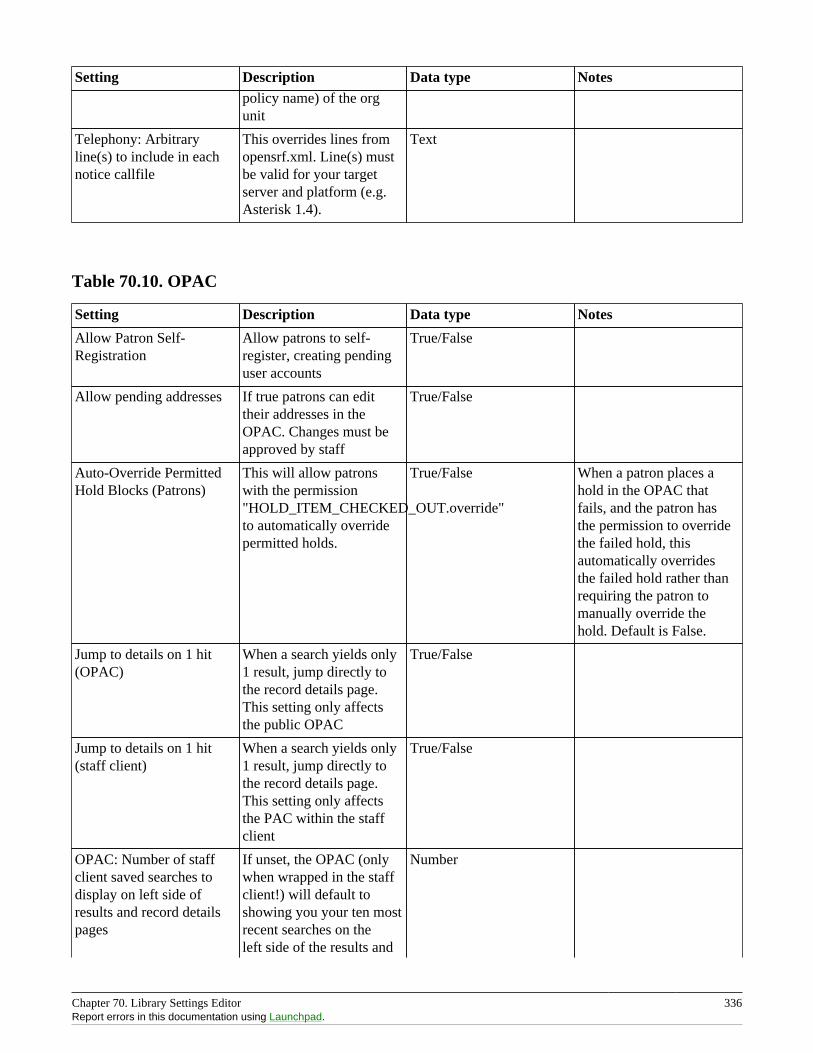
Chapter 70. Library Settings Editor 336Report errors in this documentation using Launchpad.
Setting Description Data type Notespolicy name) of the orgunit
Telephony: Arbitraryline(s) to include in eachnotice callfile
This overrides lines fromopensrf.xml. Line(s) mustbe valid for your targetserver and platform (e.g.Asterisk 1.4).
Text
Table 70.10. OPAC
Setting Description Data type Notes
Allow Patron Self-Registration
Allow patrons to self-register, creating pendinguser accounts
True/False
Allow pending addresses If true patrons can edittheir addresses in theOPAC. Changes must beapproved by staff
True/False
Auto-Override PermittedHold Blocks (Patrons)
This will allow patronswith the permission"HOLD_ITEM_CHECKED_OUT.override"to automatically overridepermitted holds.
True/False When a patron places ahold in the OPAC thatfails, and the patron hasthe permission to overridethe failed hold, thisautomatically overridesthe failed hold rather thanrequiring the patron tomanually override thehold. Default is False.
Jump to details on 1 hit(OPAC)
When a search yields only1 result, jump directly tothe record details page.This setting only affectsthe public OPAC
True/False
Jump to details on 1 hit(staff client)
When a search yields only1 result, jump directly tothe record details page.This setting only affectsthe PAC within the staffclient
True/False
OPAC: Number of staffclient saved searches todisplay on left side ofresults and record detailspages
If unset, the OPAC (onlywhen wrapped in the staffclient!) will default toshowing you your ten mostrecent searches on theleft side of the results and
Number
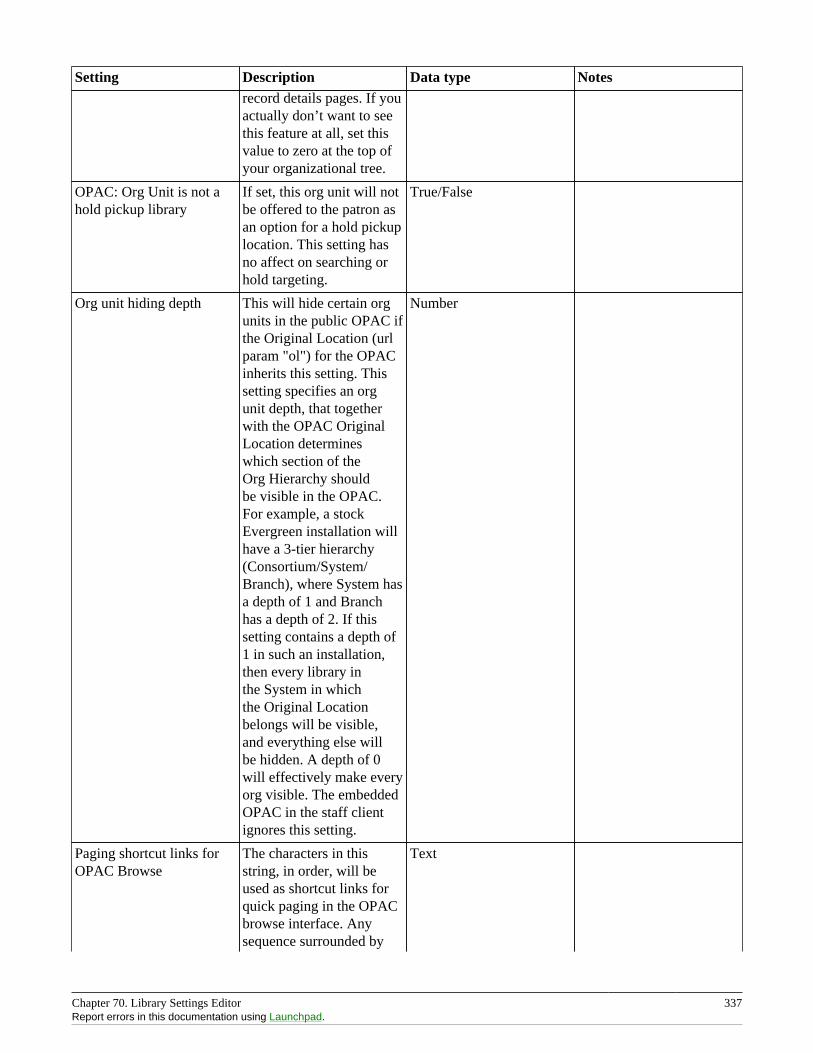
Chapter 70. Library Settings Editor 337Report errors in this documentation using Launchpad.
Setting Description Data type Notesrecord details pages. If youactually don’t want to seethis feature at all, set thisvalue to zero at the top ofyour organizational tree.
OPAC: Org Unit is not ahold pickup library
If set, this org unit will notbe offered to the patron asan option for a hold pickuplocation. This setting hasno affect on searching orhold targeting.
True/False
Org unit hiding depth This will hide certain orgunits in the public OPAC ifthe Original Location (urlparam "ol") for the OPACinherits this setting. Thissetting specifies an orgunit depth, that togetherwith the OPAC OriginalLocation determineswhich section of theOrg Hierarchy shouldbe visible in the OPAC.For example, a stockEvergreen installation willhave a 3-tier hierarchy(Consortium/System/Branch), where System hasa depth of 1 and Branchhas a depth of 2. If thissetting contains a depth of1 in such an installation,then every library inthe System in whichthe Original Locationbelongs will be visible,and everything else willbe hidden. A depth of 0will effectively make everyorg visible. The embeddedOPAC in the staff clientignores this setting.
Number
Paging shortcut links forOPAC Browse
The characters in thisstring, in order, will beused as shortcut links forquick paging in the OPACbrowse interface. Anysequence surrounded by
Text
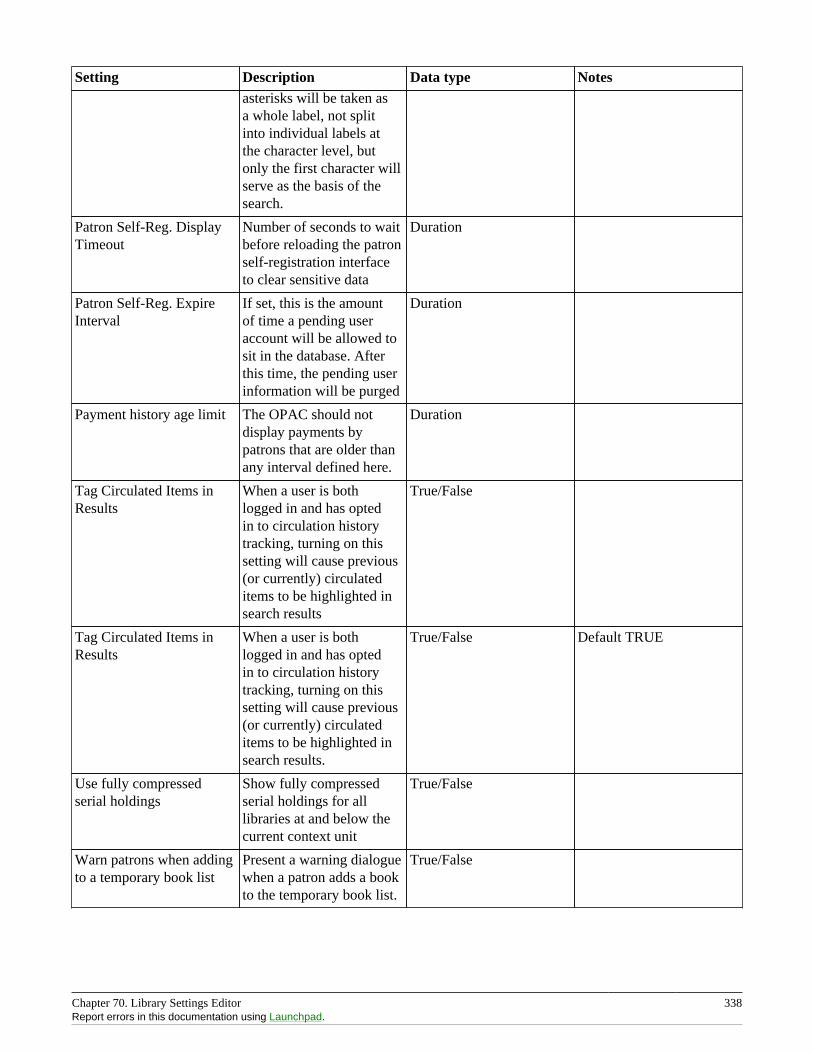
Chapter 70. Library Settings Editor 338Report errors in this documentation using Launchpad.
Setting Description Data type Notesasterisks will be taken asa whole label, not splitinto individual labels atthe character level, butonly the first character willserve as the basis of thesearch.
Patron Self-Reg. DisplayTimeout
Number of seconds to waitbefore reloading the patronself-registration interfaceto clear sensitive data
Duration
Patron Self-Reg. ExpireInterval
If set, this is the amountof time a pending useraccount will be allowed tosit in the database. Afterthis time, the pending userinformation will be purged
Duration
Payment history age limit The OPAC should notdisplay payments bypatrons that are older thanany interval defined here.
Duration
Tag Circulated Items inResults
When a user is bothlogged in and has optedin to circulation historytracking, turning on thissetting will cause previous(or currently) circulateditems to be highlighted insearch results
True/False
Tag Circulated Items inResults
When a user is bothlogged in and has optedin to circulation historytracking, turning on thissetting will cause previous(or currently) circulateditems to be highlighted insearch results.
True/False Default TRUE
Use fully compressedserial holdings
Show fully compressedserial holdings for alllibraries at and below thecurrent context unit
True/False
Warn patrons when addingto a temporary book list
Present a warning dialoguewhen a patron adds a bookto the temporary book list.
True/False
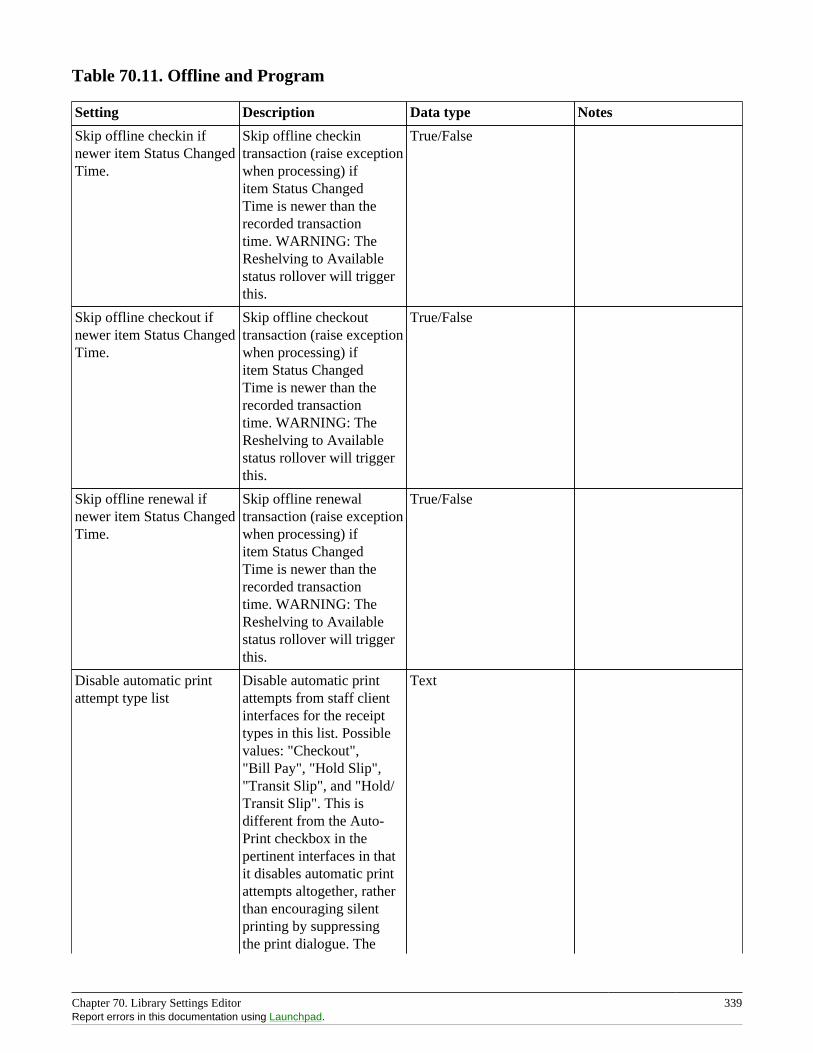
Chapter 70. Library Settings Editor 339Report errors in this documentation using Launchpad.
Table 70.11. Offline and Program
Setting Description Data type Notes
Skip offline checkin ifnewer item Status ChangedTime.
Skip offline checkintransaction (raise exceptionwhen processing) ifitem Status ChangedTime is newer than therecorded transactiontime. WARNING: TheReshelving to Availablestatus rollover will triggerthis.
True/False
Skip offline checkout ifnewer item Status ChangedTime.
Skip offline checkouttransaction (raise exceptionwhen processing) ifitem Status ChangedTime is newer than therecorded transactiontime. WARNING: TheReshelving to Availablestatus rollover will triggerthis.
True/False
Skip offline renewal ifnewer item Status ChangedTime.
Skip offline renewaltransaction (raise exceptionwhen processing) ifitem Status ChangedTime is newer than therecorded transactiontime. WARNING: TheReshelving to Availablestatus rollover will triggerthis.
True/False
Disable automatic printattempt type list
Disable automatic printattempts from staff clientinterfaces for the receipttypes in this list. Possiblevalues: "Checkout","Bill Pay", "Hold Slip","Transit Slip", and "Hold/Transit Slip". This isdifferent from the Auto-Print checkbox in thepertinent interfaces in thatit disables automatic printattempts altogether, ratherthan encouraging silentprinting by suppressingthe print dialogue. The
Text
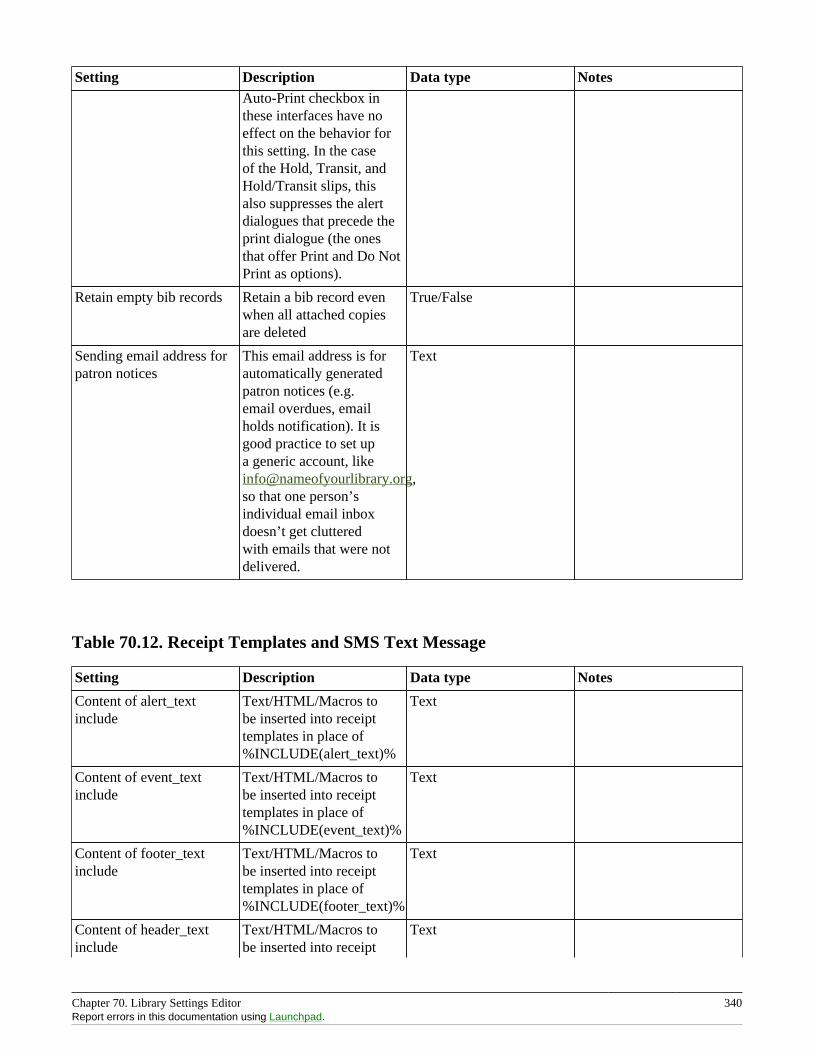
Chapter 70. Library Settings Editor 340Report errors in this documentation using Launchpad.
Setting Description Data type NotesAuto-Print checkbox inthese interfaces have noeffect on the behavior forthis setting. In the caseof the Hold, Transit, andHold/Transit slips, thisalso suppresses the alertdialogues that precede theprint dialogue (the onesthat offer Print and Do NotPrint as options).
Retain empty bib records Retain a bib record evenwhen all attached copiesare deleted
True/False
Sending email address forpatron notices
This email address is forautomatically generatedpatron notices (e.g.email overdues, emailholds notification). It isgood practice to set upa generic account, [email protected],so that one person’sindividual email inboxdoesn’t get clutteredwith emails that were notdelivered.
Text
Table 70.12. Receipt Templates and SMS Text Message
Setting Description Data type Notes
Content of alert_textinclude
Text/HTML/Macros tobe inserted into receipttemplates in place of%INCLUDE(alert_text)%
Text
Content of event_textinclude
Text/HTML/Macros tobe inserted into receipttemplates in place of%INCLUDE(event_text)%
Text
Content of footer_textinclude
Text/HTML/Macros tobe inserted into receipttemplates in place of%INCLUDE(footer_text)%
Text
Content of header_textinclude
Text/HTML/Macros tobe inserted into receipt
Text
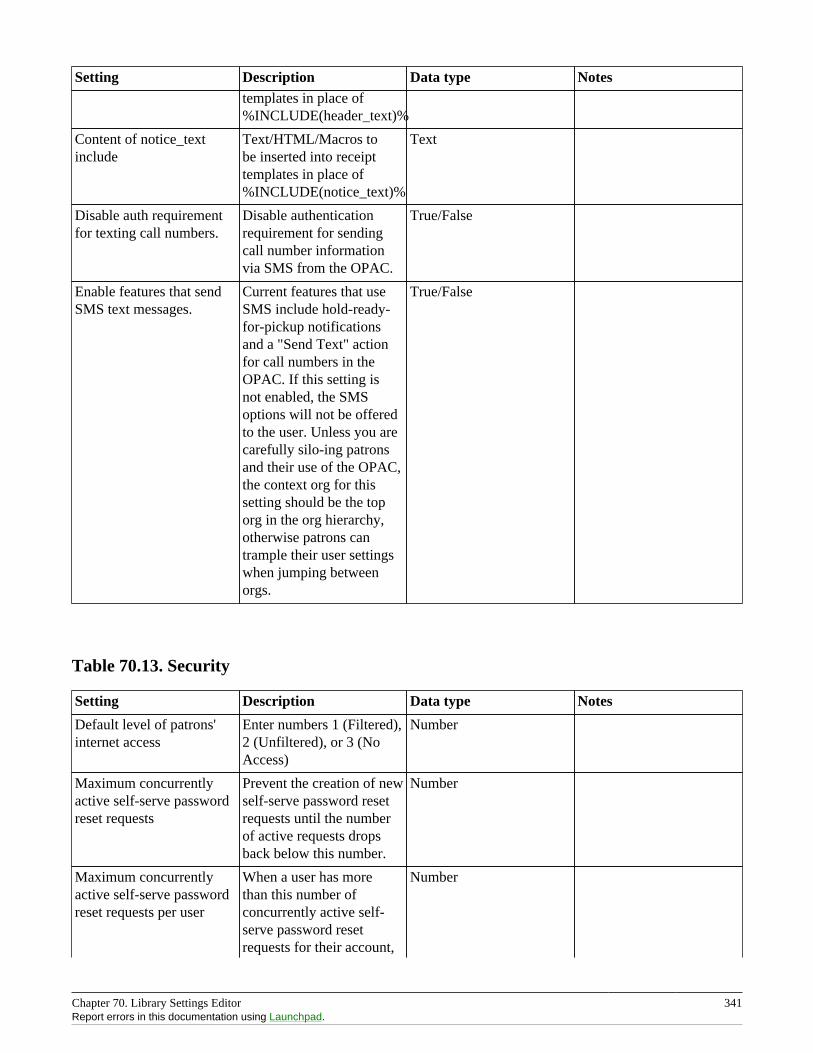
Chapter 70. Library Settings Editor 341Report errors in this documentation using Launchpad.
Setting Description Data type Notestemplates in place of%INCLUDE(header_text)%
Content of notice_textinclude
Text/HTML/Macros tobe inserted into receipttemplates in place of%INCLUDE(notice_text)%
Text
Disable auth requirementfor texting call numbers.
Disable authenticationrequirement for sendingcall number informationvia SMS from the OPAC.
True/False
Enable features that sendSMS text messages.
Current features that useSMS include hold-ready-for-pickup notificationsand a "Send Text" actionfor call numbers in theOPAC. If this setting isnot enabled, the SMSoptions will not be offeredto the user. Unless you arecarefully silo-ing patronsand their use of the OPAC,the context org for thissetting should be the toporg in the org hierarchy,otherwise patrons cantrample their user settingswhen jumping betweenorgs.
True/False
Table 70.13. Security
Setting Description Data type Notes
Default level of patrons'internet access
Enter numbers 1 (Filtered),2 (Unfiltered), or 3 (NoAccess)
Number
Maximum concurrentlyactive self-serve passwordreset requests
Prevent the creation of newself-serve password resetrequests until the numberof active requests dropsback below this number.
Number
Maximum concurrentlyactive self-serve passwordreset requests per user
When a user has morethan this number ofconcurrently active self-serve password resetrequests for their account,
Number
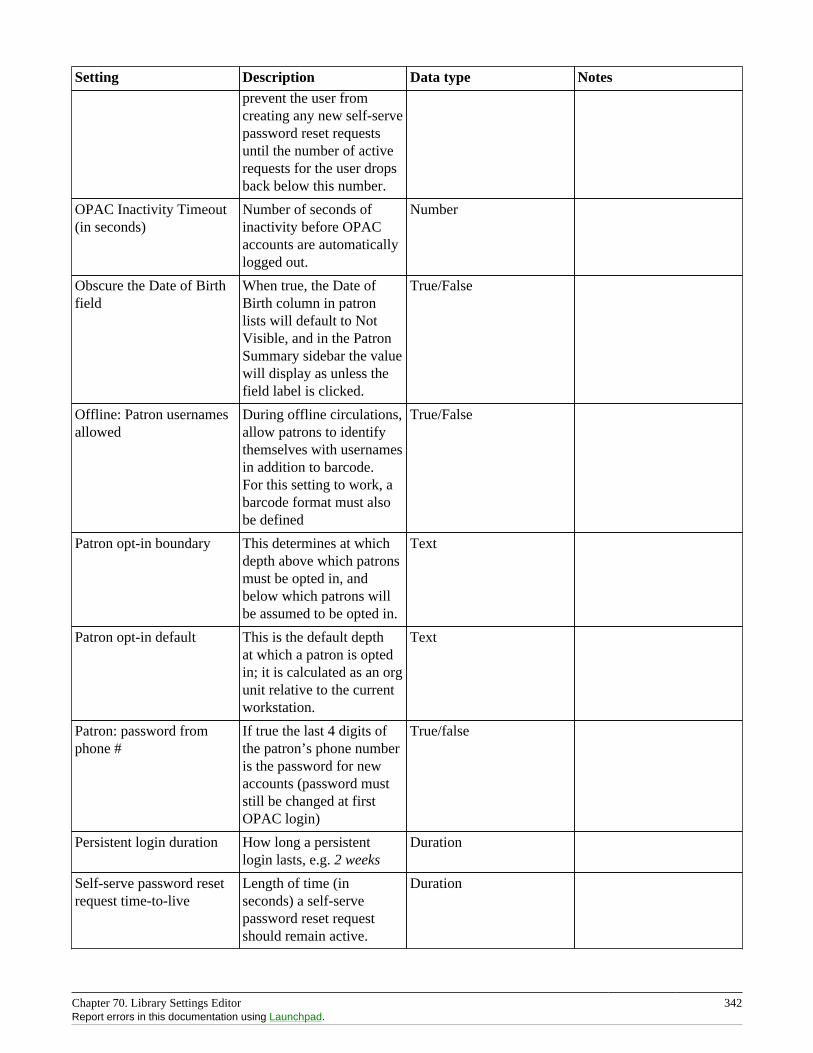
Chapter 70. Library Settings Editor 342Report errors in this documentation using Launchpad.
Setting Description Data type Notesprevent the user fromcreating any new self-servepassword reset requestsuntil the number of activerequests for the user dropsback below this number.
OPAC Inactivity Timeout(in seconds)
Number of seconds ofinactivity before OPACaccounts are automaticallylogged out.
Number
Obscure the Date of Birthfield
When true, the Date ofBirth column in patronlists will default to NotVisible, and in the PatronSummary sidebar the valuewill display as unless thefield label is clicked.
True/False
Offline: Patron usernamesallowed
During offline circulations,allow patrons to identifythemselves with usernamesin addition to barcode.For this setting to work, abarcode format must alsobe defined
True/False
Patron opt-in boundary This determines at whichdepth above which patronsmust be opted in, andbelow which patrons willbe assumed to be opted in.
Text
Patron opt-in default This is the default depthat which a patron is optedin; it is calculated as an orgunit relative to the currentworkstation.
Text
Patron: password fromphone #
If true the last 4 digits ofthe patron’s phone numberis the password for newaccounts (password muststill be changed at firstOPAC login)
True/false
Persistent login duration How long a persistentlogin lasts, e.g. 2 weeks
Duration
Self-serve password resetrequest time-to-live
Length of time (inseconds) a self-servepassword reset requestshould remain active.
Duration
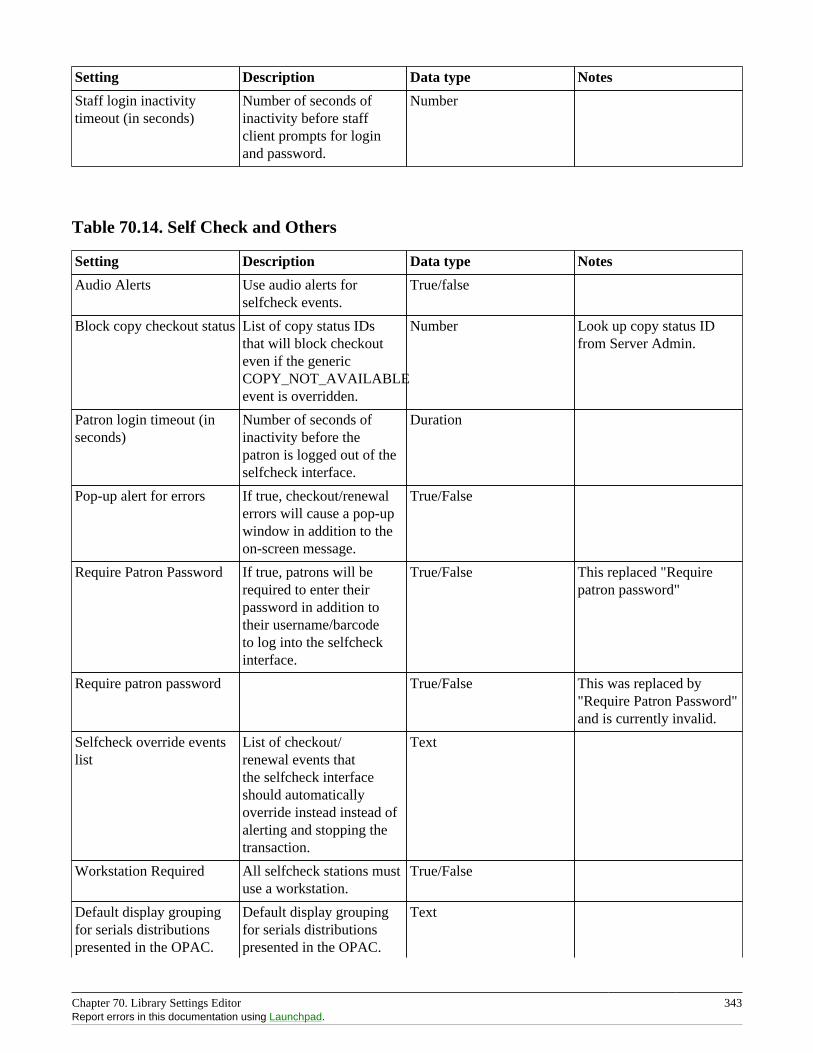
Chapter 70. Library Settings Editor 343Report errors in this documentation using Launchpad.
Setting Description Data type Notes
Staff login inactivitytimeout (in seconds)
Number of seconds ofinactivity before staffclient prompts for loginand password.
Number
Table 70.14. Self Check and Others
Setting Description Data type Notes
Audio Alerts Use audio alerts forselfcheck events.
True/false
Block copy checkout status List of copy status IDsthat will block checkouteven if the genericCOPY_NOT_AVAILABLEevent is overridden.
Number Look up copy status IDfrom Server Admin.
Patron login timeout (inseconds)
Number of seconds ofinactivity before thepatron is logged out of theselfcheck interface.
Duration
Pop-up alert for errors If true, checkout/renewalerrors will cause a pop-upwindow in addition to theon-screen message.
True/False
Require Patron Password If true, patrons will berequired to enter theirpassword in addition totheir username/barcodeto log into the selfcheckinterface.
True/False This replaced "Requirepatron password"
Require patron password True/False This was replaced by"Require Patron Password"and is currently invalid.
Selfcheck override eventslist
List of checkout/renewal events thatthe selfcheck interfaceshould automaticallyoverride instead instead ofalerting and stopping thetransaction.
Text
Workstation Required All selfcheck stations mustuse a workstation.
True/False
Default display groupingfor serials distributionspresented in the OPAC.
Default display groupingfor serials distributionspresented in the OPAC.
Text
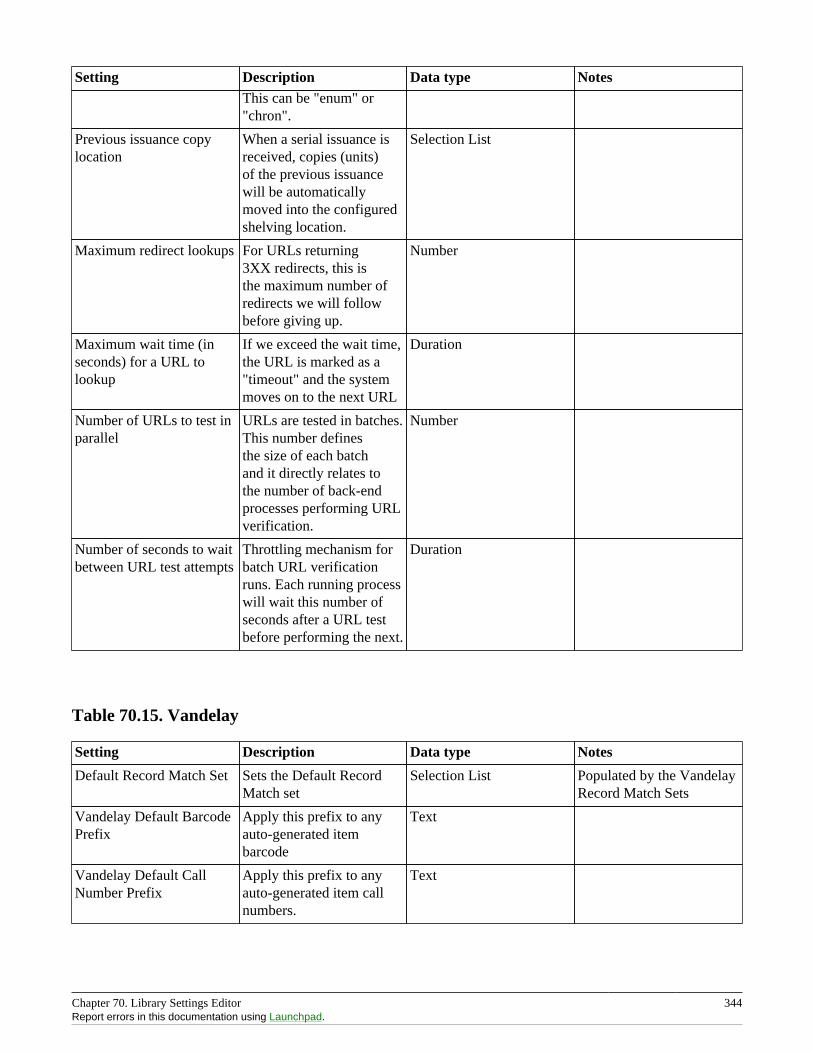
Chapter 70. Library Settings Editor 344Report errors in this documentation using Launchpad.
Setting Description Data type NotesThis can be "enum" or"chron".
Previous issuance copylocation
When a serial issuance isreceived, copies (units)of the previous issuancewill be automaticallymoved into the configuredshelving location.
Selection List
Maximum redirect lookups For URLs returning3XX redirects, this isthe maximum number ofredirects we will followbefore giving up.
Number
Maximum wait time (inseconds) for a URL tolookup
If we exceed the wait time,the URL is marked as a"timeout" and the systemmoves on to the next URL
Duration
Number of URLs to test inparallel
URLs are tested in batches.This number definesthe size of each batchand it directly relates tothe number of back-endprocesses performing URLverification.
Number
Number of seconds to waitbetween URL test attempts
Throttling mechanism forbatch URL verificationruns. Each running processwill wait this number ofseconds after a URL testbefore performing the next.
Duration
Table 70.15. Vandelay
Setting Description Data type Notes
Default Record Match Set Sets the Default RecordMatch set
Selection List Populated by the VandelayRecord Match Sets
Vandelay Default BarcodePrefix
Apply this prefix to anyauto-generated itembarcode
Text
Vandelay Default CallNumber Prefix
Apply this prefix to anyauto-generated item callnumbers.
Text
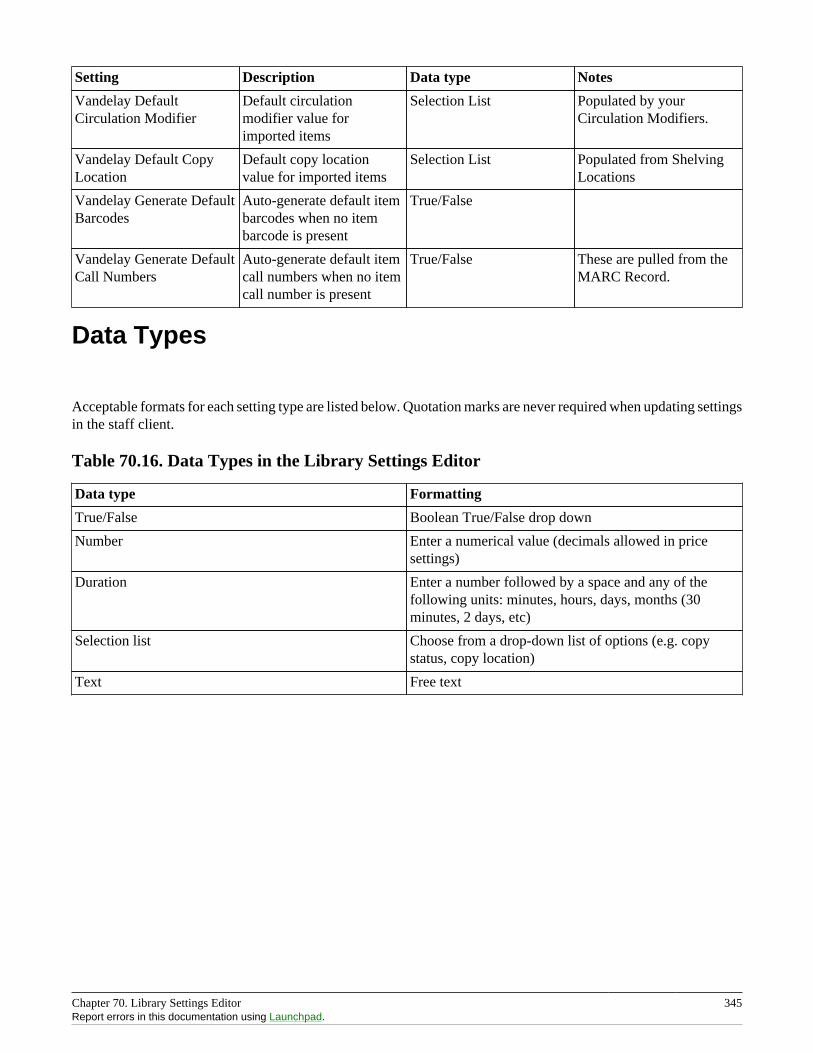
Chapter 70. Library Settings Editor 345Report errors in this documentation using Launchpad.
Setting Description Data type Notes
Vandelay DefaultCirculation Modifier
Default circulationmodifier value forimported items
Selection List Populated by yourCirculation Modifiers.
Vandelay Default CopyLocation
Default copy locationvalue for imported items
Selection List Populated from ShelvingLocations
Vandelay Generate DefaultBarcodes
Auto-generate default itembarcodes when no itembarcode is present
True/False
Vandelay Generate DefaultCall Numbers
Auto-generate default itemcall numbers when no itemcall number is present
True/False These are pulled from theMARC Record.
Data Types
Acceptable formats for each setting type are listed below. Quotation marks are never required when updating settingsin the staff client.
Table 70.16. Data Types in the Library Settings Editor
Data type Formatting
True/False Boolean True/False drop down
Number Enter a numerical value (decimals allowed in pricesettings)
Duration Enter a number followed by a space and any of thefollowing units: minutes, hours, days, months (30minutes, 2 days, etc)
Selection list Choose from a drop-down list of options (e.g. copystatus, copy location)
Text Free text
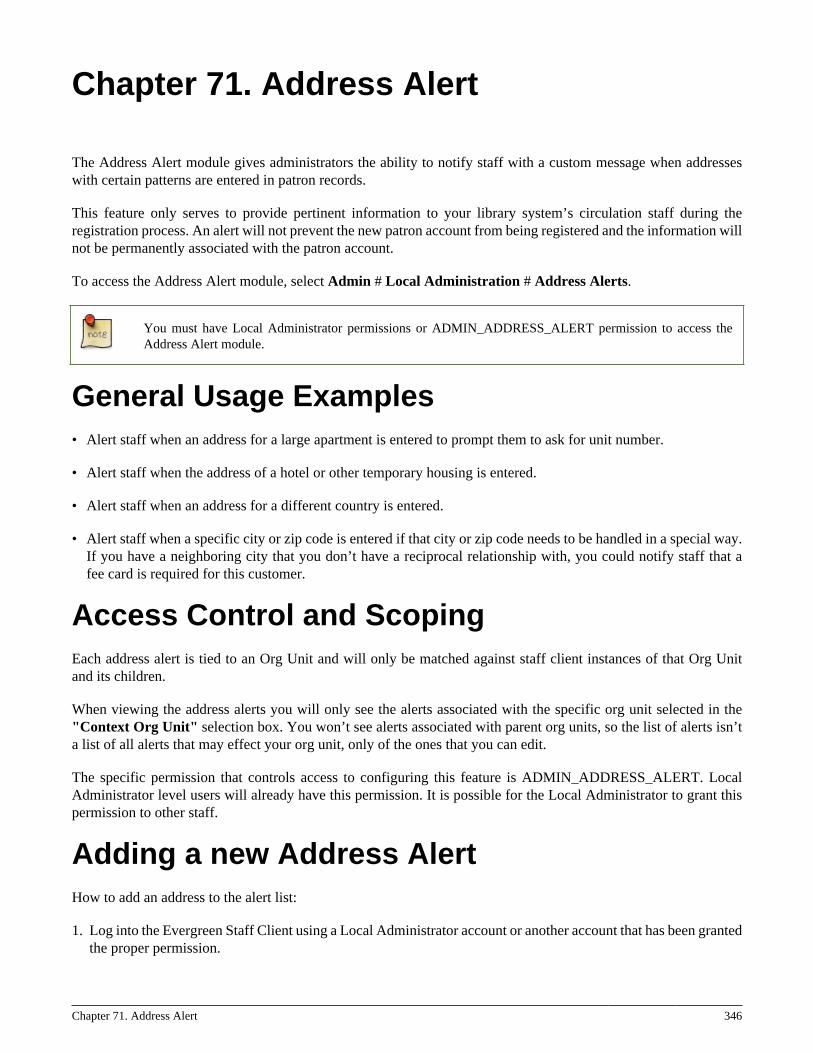
Chapter 71. Address Alert 346
Chapter 71. Address Alert
The Address Alert module gives administrators the ability to notify staff with a custom message when addresseswith certain patterns are entered in patron records.
This feature only serves to provide pertinent information to your library system’s circulation staff during theregistration process. An alert will not prevent the new patron account from being registered and the information willnot be permanently associated with the patron account.
To access the Address Alert module, select Admin # Local Administration # Address Alerts.
You must have Local Administrator permissions or ADMIN_ADDRESS_ALERT permission to access theAddress Alert module.
General Usage Examples• Alert staff when an address for a large apartment is entered to prompt them to ask for unit number.
• Alert staff when the address of a hotel or other temporary housing is entered.
• Alert staff when an address for a different country is entered.
• Alert staff when a specific city or zip code is entered if that city or zip code needs to be handled in a special way.If you have a neighboring city that you don’t have a reciprocal relationship with, you could notify staff that afee card is required for this customer.
Access Control and ScopingEach address alert is tied to an Org Unit and will only be matched against staff client instances of that Org Unitand its children.
When viewing the address alerts you will only see the alerts associated with the specific org unit selected in the"Context Org Unit" selection box. You won’t see alerts associated with parent org units, so the list of alerts isn’ta list of all alerts that may effect your org unit, only of the ones that you can edit.
The specific permission that controls access to configuring this feature is ADMIN_ADDRESS_ALERT. LocalAdministrator level users will already have this permission. It is possible for the Local Administrator to grant thispermission to other staff.
Adding a new Address AlertHow to add an address to the alert list:
1. Log into the Evergreen Staff Client using a Local Administrator account or another account that has been grantedthe proper permission.
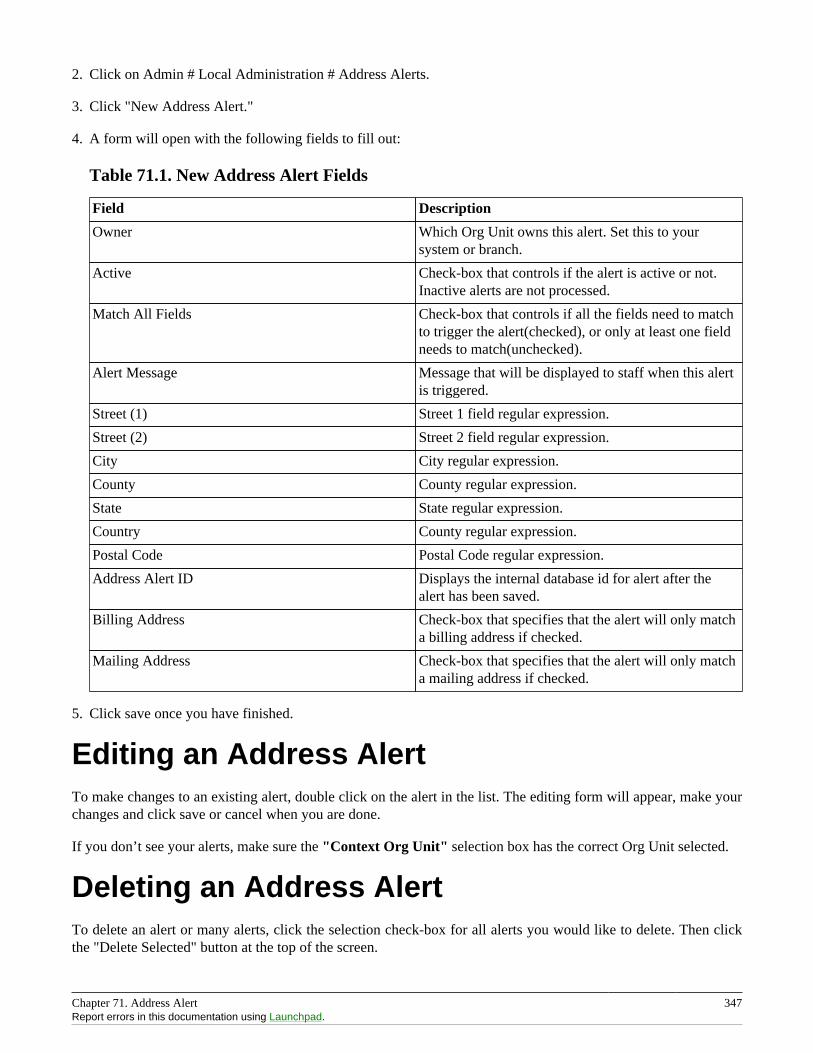
Chapter 71. Address Alert 347Report errors in this documentation using Launchpad.
2. Click on Admin # Local Administration # Address Alerts.
3. Click "New Address Alert."
4. A form will open with the following fields to fill out:
Table 71.1. New Address Alert Fields
Field Description
Owner Which Org Unit owns this alert. Set this to yoursystem or branch.
Active Check-box that controls if the alert is active or not.Inactive alerts are not processed.
Match All Fields Check-box that controls if all the fields need to matchto trigger the alert(checked), or only at least one fieldneeds to match(unchecked).
Alert Message Message that will be displayed to staff when this alertis triggered.
Street (1) Street 1 field regular expression.
Street (2) Street 2 field regular expression.
City City regular expression.
County County regular expression.
State State regular expression.
Country County regular expression.
Postal Code Postal Code regular expression.
Address Alert ID Displays the internal database id for alert after thealert has been saved.
Billing Address Check-box that specifies that the alert will only matcha billing address if checked.
Mailing Address Check-box that specifies that the alert will only matcha mailing address if checked.
5. Click save once you have finished.
Editing an Address AlertTo make changes to an existing alert, double click on the alert in the list. The editing form will appear, make yourchanges and click save or cancel when you are done.
If you don’t see your alerts, make sure the "Context Org Unit" selection box has the correct Org Unit selected.
Deleting an Address AlertTo delete an alert or many alerts, click the selection check-box for all alerts you would like to delete. Then clickthe "Delete Selected" button at the top of the screen.
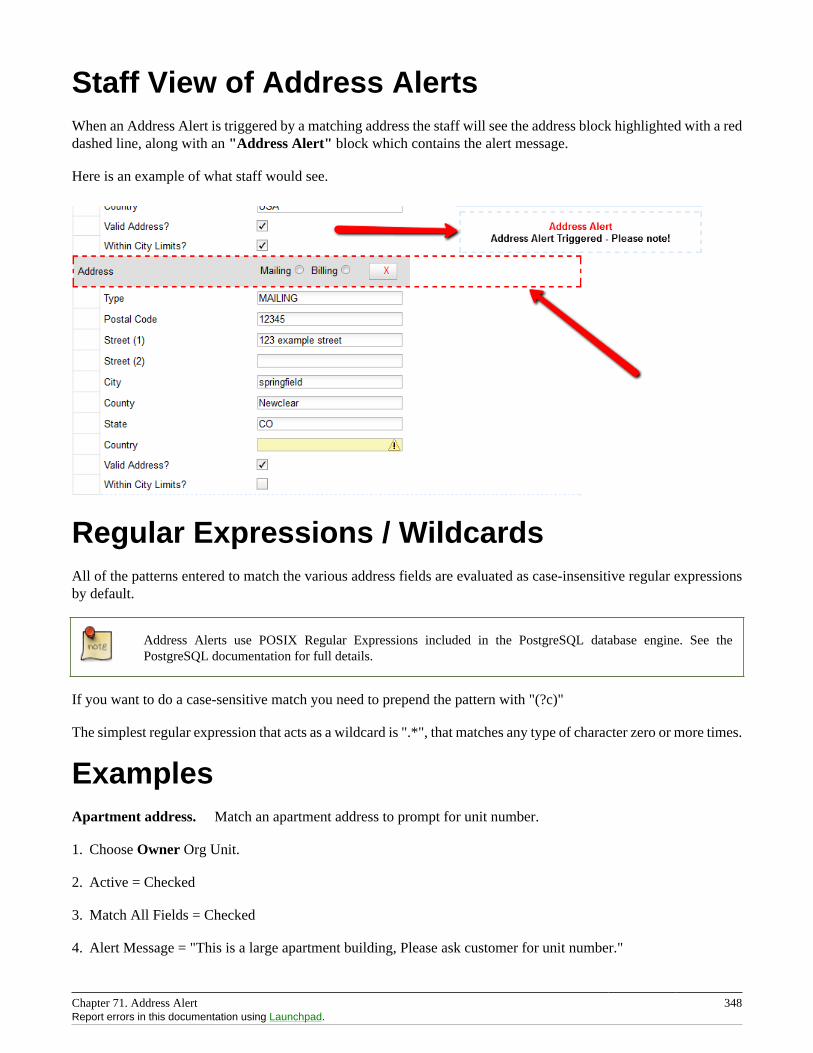
Chapter 71. Address Alert 348Report errors in this documentation using Launchpad.
Staff View of Address AlertsWhen an Address Alert is triggered by a matching address the staff will see the address block highlighted with a reddashed line, along with an "Address Alert" block which contains the alert message.
Here is an example of what staff would see.
Regular Expressions / WildcardsAll of the patterns entered to match the various address fields are evaluated as case-insensitive regular expressionsby default.
Address Alerts use POSIX Regular Expressions included in the PostgreSQL database engine. See thePostgreSQL documentation for full details.
If you want to do a case-sensitive match you need to prepend the pattern with "(?c)"
The simplest regular expression that acts as a wildcard is ".*", that matches any type of character zero or more times.
ExamplesApartment address. Match an apartment address to prompt for unit number.
1. Choose Owner Org Unit.
2. Active = Checked
3. Match All Fields = Checked
4. Alert Message = "This is a large apartment building, Please ask customer for unit number."
Chapter 71. Address Alert 349Report errors in this documentation using Launchpad.
5. Street (1) = "1212 Evergreen Lane.*"
6. City = "mytown"
All addresses on street. Match all addresses on a certain street. Matches ave and avenue because of endingwildcard.
1. Choose Owner Org Unit.
2. Active = Checked
3. Match All Fields = Checked
4. Alert Message = "This street is in a different county, please setup reciprocal card."
5. Street (1) = ".* Evergreen Ave.*"
6. City = "mytown"
Match list of cities. Match several different cities with one alert. Could be used if certain cities don’t havereciprocal agreements. Note the use of parentheses and the | character to separate the different options.
1. Choose Owner Org Unit.
2. Active = Checked
3. Match All Fields = Checked
4. Alert Message = "Customer must purchase a Fee card."
5. City = "(Emeryville|San Jose|San Francisco)"
DevelopmentLinks to resources with more information on how and why this feature was developed and where the various sourcefiles are located.
• Launchpad ticket for the feature request and development of address alerts - https://bugs.launchpad.net/evergreen/+bug/898248
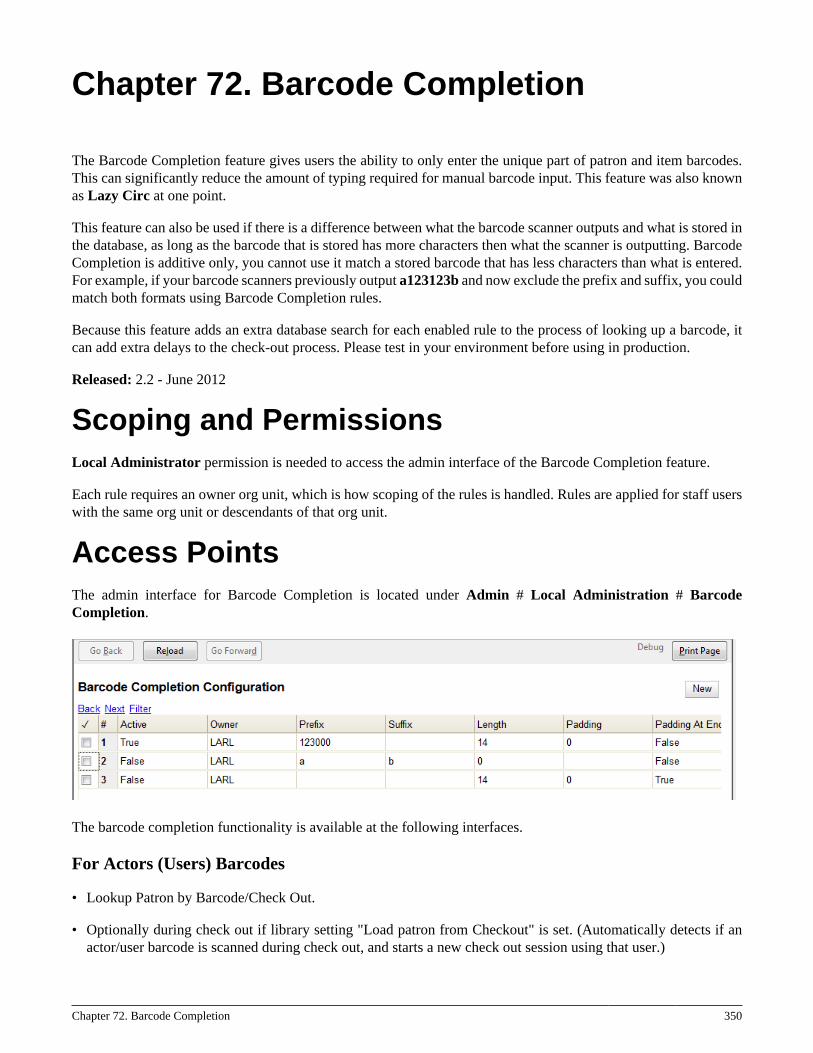
Chapter 72. Barcode Completion 350
Chapter 72. Barcode Completion
The Barcode Completion feature gives users the ability to only enter the unique part of patron and item barcodes.This can significantly reduce the amount of typing required for manual barcode input. This feature was also knownas Lazy Circ at one point.
This feature can also be used if there is a difference between what the barcode scanner outputs and what is stored inthe database, as long as the barcode that is stored has more characters then what the scanner is outputting. BarcodeCompletion is additive only, you cannot use it match a stored barcode that has less characters than what is entered.For example, if your barcode scanners previously output a123123b and now exclude the prefix and suffix, you couldmatch both formats using Barcode Completion rules.
Because this feature adds an extra database search for each enabled rule to the process of looking up a barcode, itcan add extra delays to the check-out process. Please test in your environment before using in production.
Released: 2.2 - June 2012
Scoping and PermissionsLocal Administrator permission is needed to access the admin interface of the Barcode Completion feature.
Each rule requires an owner org unit, which is how scoping of the rules is handled. Rules are applied for staff userswith the same org unit or descendants of that org unit.
Access PointsThe admin interface for Barcode Completion is located under Admin # Local Administration # BarcodeCompletion.
The barcode completion functionality is available at the following interfaces.
For Actors (Users) Barcodes
• Lookup Patron by Barcode/Check Out.
• Optionally during check out if library setting "Load patron from Checkout" is set. (Automatically detects if anactor/user barcode is scanned during check out, and starts a new check out session using that user.)
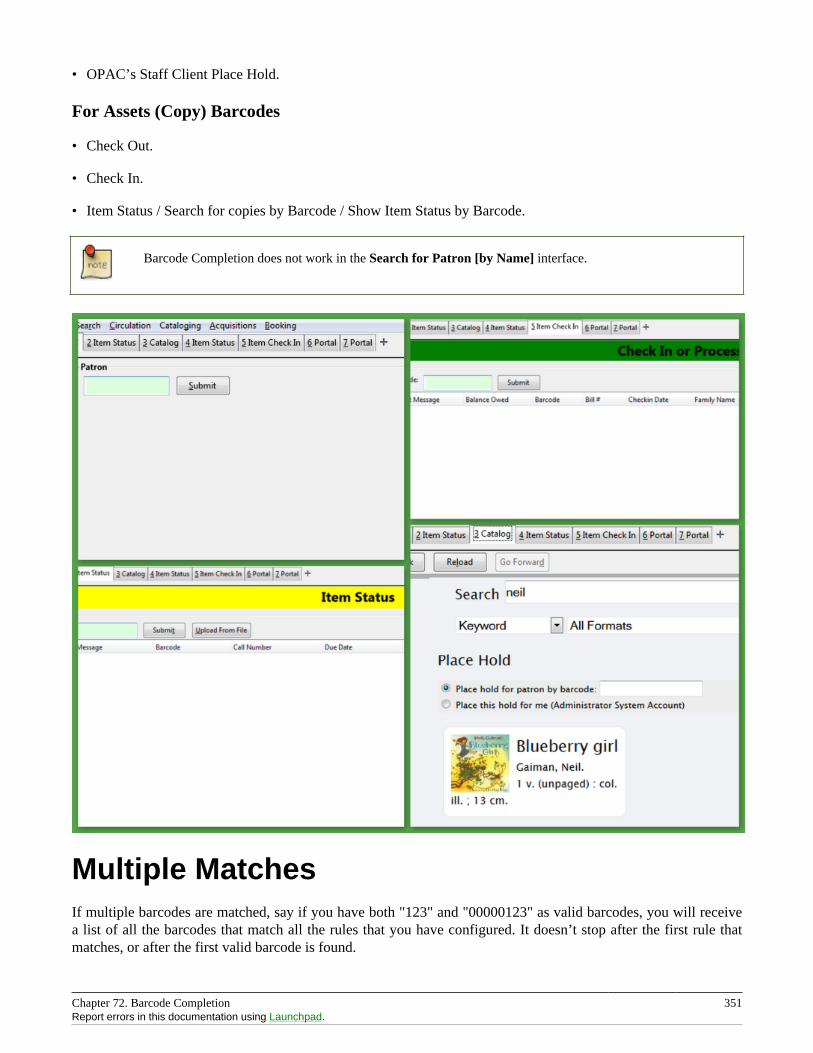
Chapter 72. Barcode Completion 351Report errors in this documentation using Launchpad.
• OPAC’s Staff Client Place Hold.
For Assets (Copy) Barcodes
• Check Out.
• Check In.
• Item Status / Search for copies by Barcode / Show Item Status by Barcode.
Barcode Completion does not work in the Search for Patron [by Name] interface.
Multiple MatchesIf multiple barcodes are matched, say if you have both "123" and "00000123" as valid barcodes, you will receivea list of all the barcodes that match all the rules that you have configured. It doesn’t stop after the first rule thatmatches, or after the first valid barcode is found.
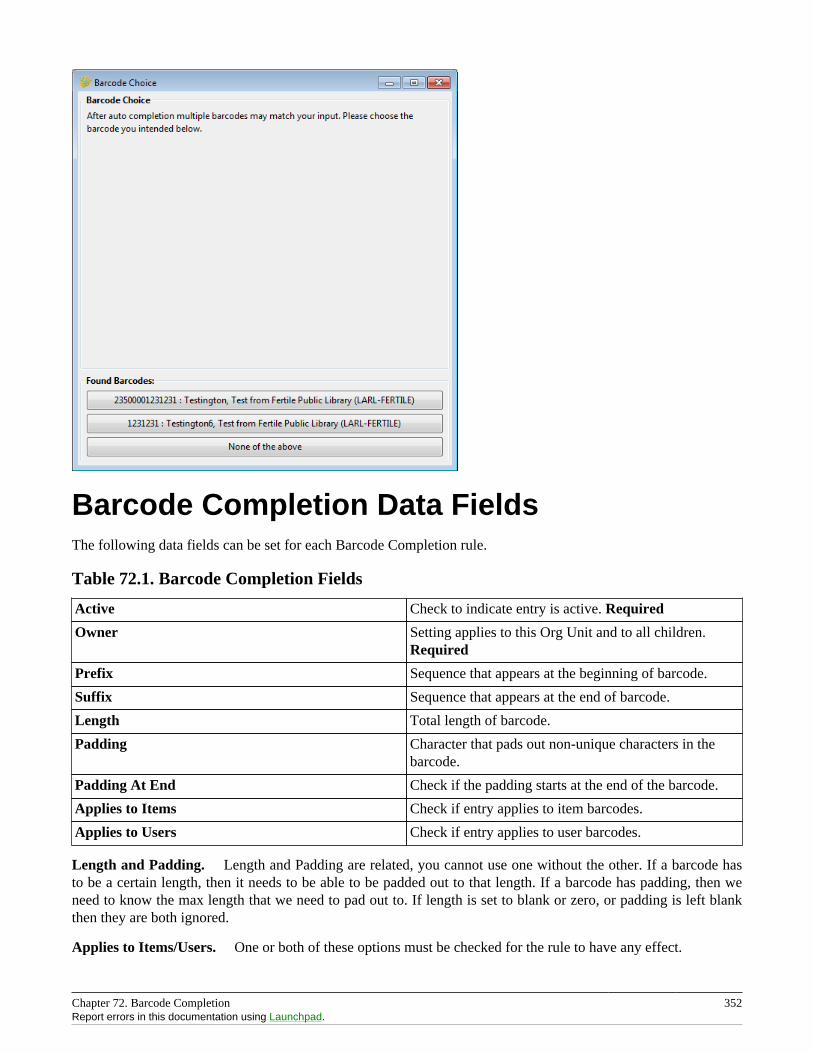
Chapter 72. Barcode Completion 352Report errors in this documentation using Launchpad.
Barcode Completion Data FieldsThe following data fields can be set for each Barcode Completion rule.
Table 72.1. Barcode Completion Fields
Active Check to indicate entry is active. Required
Owner Setting applies to this Org Unit and to all children.Required
Prefix Sequence that appears at the beginning of barcode.
Suffix Sequence that appears at the end of barcode.
Length Total length of barcode.
Padding Character that pads out non-unique characters in thebarcode.
Padding At End Check if the padding starts at the end of the barcode.
Applies to Items Check if entry applies to item barcodes.
Applies to Users Check if entry applies to user barcodes.
Length and Padding. Length and Padding are related, you cannot use one without the other. If a barcode hasto be a certain length, then it needs to be able to be padded out to that length. If a barcode has padding, then weneed to know the max length that we need to pad out to. If length is set to blank or zero, or padding is left blankthen they are both ignored.
Applies to Items/Users. One or both of these options must be checked for the rule to have any effect.

Chapter 72. Barcode Completion 353Report errors in this documentation using Launchpad.
Create, Update, Filter, Delete/Disable Rules
In the Barcode Completion admin interface at Admin # Local Administration # Barcode Completion you cancreate, update and disable rules.
Create Rules
To create a new rule click on the New button in the upper right corner. When you are are done with editing the newrule click the Save button. If you want to cancel the new rule creation click the Cancel button.
Update Rules
To edit a rule double click on the rule in the main list.
Chapter 72. Barcode Completion 354Report errors in this documentation using Launchpad.
Filter RulesIt may be useful to filter the rules list if there are a large number of rules. Click on the filter link to bring up theFilter Results dialog box. You can filter on any of the data fields and you can setup multiple filter rules. ClickApply to enable the filter rules, only the rows that match will now be displayed.
To clear out the filter rules, delete all of the filter rules by clicking the X next to each rule, and then click Apply.
Delete/Disable RulesIt isn’t possible to delete a rule from the database from the admin interface. If a rule is no longer needed set Activeto "False" to disable it. To keep the number of rules down, reuse inactive rules when creating new rules.
ExamplesIn all these examples, the unique part of the barcode is 123. So that is all that users will need to type to match thefull barcode.
Barcode With Prefix and PaddingBarcode: 4545000123
To match this 10 character barcode by only typing in 123 we need the following settings.
• Active - Checked
• Owner - Set to your org unit.
• Prefix - 4545 - This is the prefix that the barcode starts with.
• Length - 10 - Total length of the barcode.
• Padding - 0 - Zeros will be used to pad out non significant parts of the barcode.
• Applies to Items and/or Applies to Users - Checked
The system takes the 123 that you entered and adds the prefix to the beginning of it. Then adds zeros between theprefix and your number to pad it out to 10 characters. Then it searches the database for that barcode.
Barcode With SuffixBarcode: 123000book
To match this 10 character barcode by only typing in 123 we need the following settings.
• Active - Checked
• Owner - Set to your org unit.
• Suffix - book - This is the suffix that the barcode ends with.
Chapter 72. Barcode Completion 355Report errors in this documentation using Launchpad.
• Length - 10 - Total length of the barcode.
• Padding - 0 - Zeros will be used to pad out non significant parts of the barcode.
• Padding at End - Checked
• Applies to Items and/or Applies to Users - Checked
The system takes the 123 that you entered and adds the suffix to the end of it. Then adds zeros between your numberand the suffix to pad it out to 10 characters. Then it searches the database for that barcode.
Barcode With Left PaddingBarcode: 0000000123
To match this 10 character barcode by only typing in 123 we need the following settings.
• Active - Checked
• Owner - Set to your org unit.
• Length - 10 - Total length of the barcode.
• Padding - 0 - Zeros will be used to pad out non significant parts of the barcode.
• Applies to Items and/or Applies to Users - Checked
The system takes the 123 that you entered, then adds zeros between your number and the left to pad it out to 10characters. Then it searches the database for that barcode.
Barcode With Right PaddingBarcode: 1230000000
To match this 10 character barcode by only typing in 123 we need the following settings.
• Active - Checked
• Owner - Set to your org unit.
• Length - 10 - Total length of the barcode.
• Padding - 0 - Zeros will be used to pad out non significant parts of the barcode.
• Padding at End - Checked
• Applies to Items and/or Applies to Users - Checked
The system takes the 123 that you entered, then adds zeros between your number and the right to pad it out to 10characters. Then it searches the database for that barcode.
Barcode of any Length with Prefix and SuffixBarcode: a123b
Chapter 72. Barcode Completion 356Report errors in this documentation using Launchpad.
To match this 5 character barcode by only typing in 123 we need the following settings. This use of BarcodeCompletion doesn’t save many keystrokes, but it does allow you to handle the case where your barcode scannersat one point were set to output a prefix and suffix which was stored in the database. Now your barcode scannersno longer include the prefix and suffix. These settings will simply add the prefix and suffix to any barcode enteredand search for that.
• Active - Checked
• Owner - Set to your org unit.
• Length/Padding - 0/null - Set the length to 0 and/or leave the padding blank.
• Prefix - a - This is the prefix that the barcode starts with.
• Suffix - b - This is the suffix that the barcode starts with.
• Applies to Items and/or Applies to Users - Checked
The system takes the 123 that you entered, then adds the prefix and suffix specified. Then it searches the databasefor that barcode. Because no length or padding was entered, this rule will add the prefix and suffix to any barcodethat is entered and then search for that valid barcode.
TestingTo test this feature, setup the rules that you want, then setup items/users with barcodes that should match. Then tryscanning the short version of those barcodes in the various supported access points.
Chapter 73. Hold-driven recalls 357
Chapter 73. Hold-driven recalls
Added in Evergreen 2.1
In academic libraries, it is common for groups like faculty and graduate students to have extended loan periods (forexample, 120 days), while others have more common loan periods such as 3 weeks. In these environments, it isdesirable to have a hold placed on an item that has been loaned out for an extended period to trigger a recall, which:
1. Truncates the loan period
2. Sets the remaining available renewals to 0
3. Optionally: Changes the fines associated with overdues for the new due date
4. Optionally: Notifies the current patron of the recall, including the new due date and fine level
Enabling hold-driven recallsBy default, holds do not trigger recalls. To enable hold-driven recalls of circulating items, library settings must bechanged as follows:
1. Click Admin # Local Administration # Library Settings Editor.
2. Set the Recalls: Circulation duration that triggers a recall (recall threshold) setting. The recall threshold isspecified as an interval (for example, "21 days"); any items with a loan duration of less that this interval are notconsidered for a recall.
3. Set the Recalls: Truncated loan period (return interval) setting. The return interval is specified as an interval(for example, "7 days"). The due date on the recalled item is changed to be the greater of either the recall thresholdor the return interval.
4. Optionally: Set the Recalls: An array of fine amount, fine interval, and maximum fine setting. If set, thisapplies the specified fine rules to the current circulation period for the recalled item.
When a hold is placed and no available copies are found by the hold targeter, the recall logic checks to see if therecall threshold and return interval settings are set; if so, then the hold targeter checks the currently checked-outcopies to determine if any of the currently circulating items at the designated pickup library have a loan durationlonger than the recall threshold. If so, then the eligible item with the due date nearest to the current date is recalled.
Editing the item recall notification emailtemplateThe template for the item recall notification email is contained in the Item Recall Email Notice template, foundunder Admin # Local Administration # Notifications / Action Triggers.
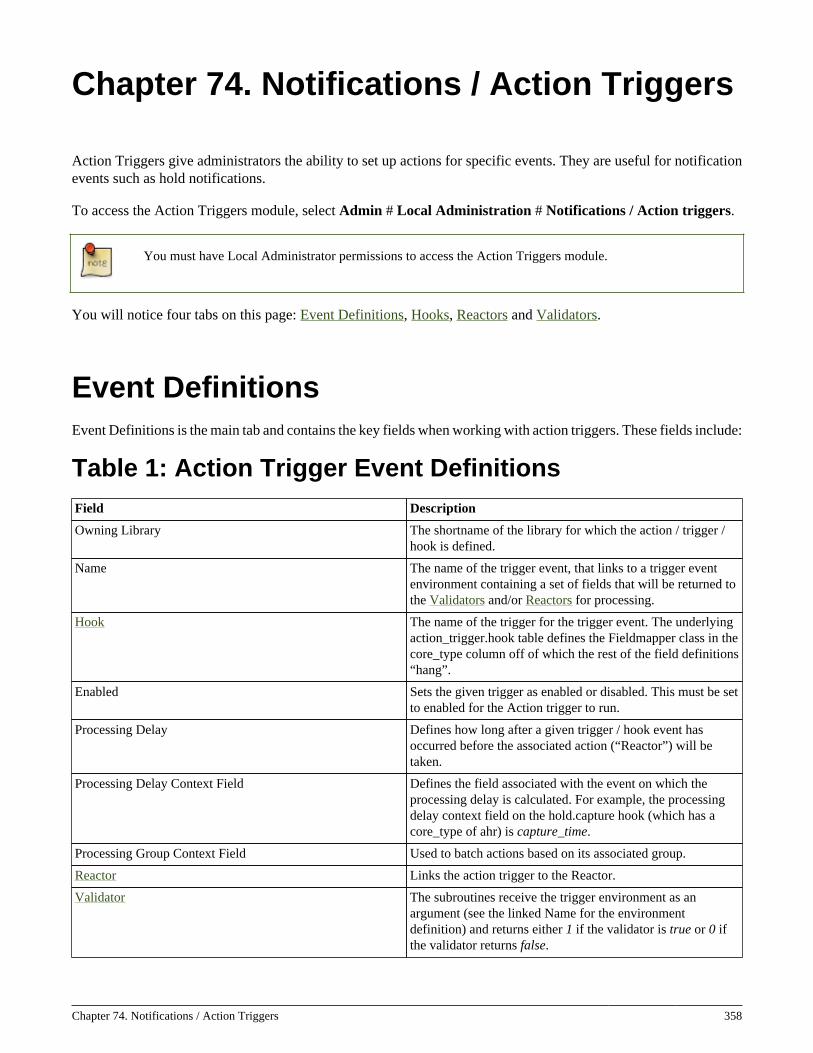
Chapter 74. Notifications / Action Triggers 358
Chapter 74. Notifications / Action Triggers
Action Triggers give administrators the ability to set up actions for specific events. They are useful for notificationevents such as hold notifications.
To access the Action Triggers module, select Admin # Local Administration # Notifications / Action triggers.
You must have Local Administrator permissions to access the Action Triggers module.
You will notice four tabs on this page: Event Definitions, Hooks, Reactors and Validators.
Event DefinitionsEvent Definitions is the main tab and contains the key fields when working with action triggers. These fields include:
Table 1: Action Trigger Event DefinitionsField Description
Owning Library The shortname of the library for which the action / trigger /hook is defined.
Name The name of the trigger event, that links to a trigger eventenvironment containing a set of fields that will be returned tothe Validators and/or Reactors for processing.
Hook The name of the trigger for the trigger event. The underlyingaction_trigger.hook table defines the Fieldmapper class in thecore_type column off of which the rest of the field definitions“hang”.
Enabled Sets the given trigger as enabled or disabled. This must be setto enabled for the Action trigger to run.
Processing Delay Defines how long after a given trigger / hook event hasoccurred before the associated action (“Reactor”) will betaken.
Processing Delay Context Field Defines the field associated with the event on which theprocessing delay is calculated. For example, the processingdelay context field on the hold.capture hook (which has acore_type of ahr) is capture_time.
Processing Group Context Field Used to batch actions based on its associated group.
Reactor Links the action trigger to the Reactor.
Validator The subroutines receive the trigger environment as anargument (see the linked Name for the environmentdefinition) and returns either 1 if the validator is true or 0 ifthe validator returns false.
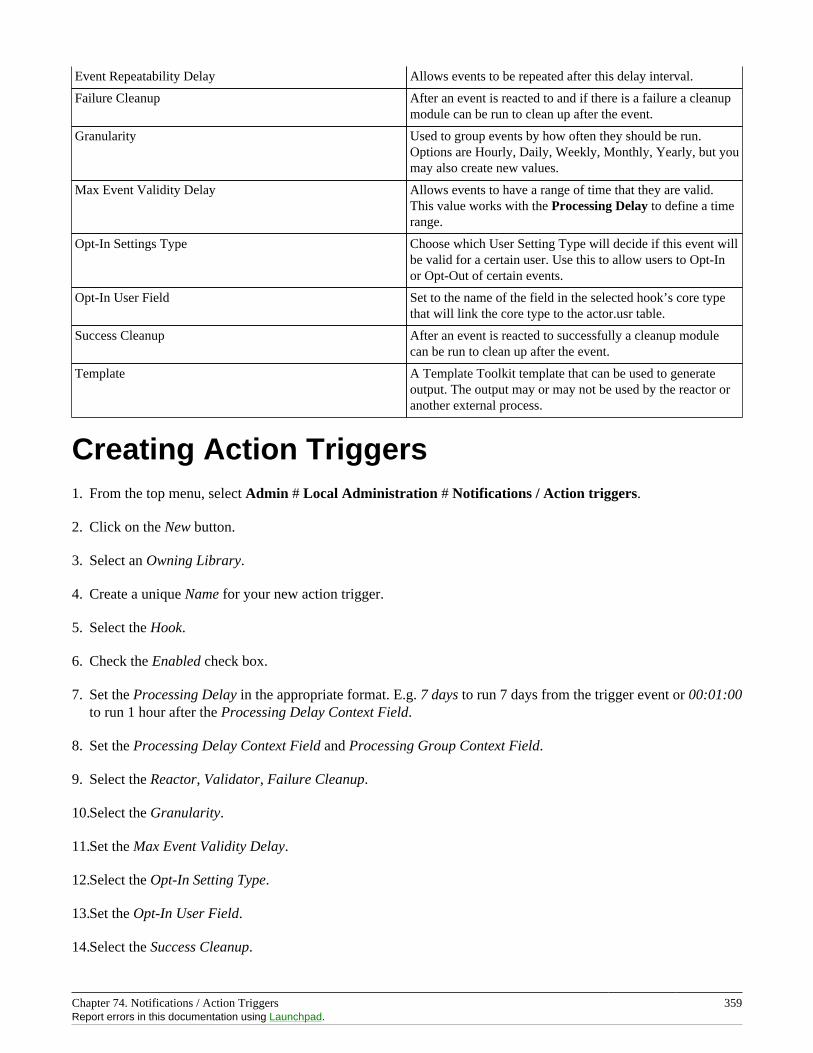
Chapter 74. Notifications / Action Triggers 359Report errors in this documentation using Launchpad.
Event Repeatability Delay Allows events to be repeated after this delay interval.
Failure Cleanup After an event is reacted to and if there is a failure a cleanupmodule can be run to clean up after the event.
Granularity Used to group events by how often they should be run.Options are Hourly, Daily, Weekly, Monthly, Yearly, but youmay also create new values.
Max Event Validity Delay Allows events to have a range of time that they are valid.This value works with the Processing Delay to define a timerange.
Opt-In Settings Type Choose which User Setting Type will decide if this event willbe valid for a certain user. Use this to allow users to Opt-Inor Opt-Out of certain events.
Opt-In User Field Set to the name of the field in the selected hook’s core typethat will link the core type to the actor.usr table.
Success Cleanup After an event is reacted to successfully a cleanup modulecan be run to clean up after the event.
Template A Template Toolkit template that can be used to generateoutput. The output may or may not be used by the reactor oranother external process.
Creating Action Triggers1. From the top menu, select Admin # Local Administration # Notifications / Action triggers.
2. Click on the New button.
3. Select an Owning Library.
4. Create a unique Name for your new action trigger.
5. Select the Hook.
6. Check the Enabled check box.
7. Set the Processing Delay in the appropriate format. E.g. 7 days to run 7 days from the trigger event or 00:01:00to run 1 hour after the Processing Delay Context Field.
8. Set the Processing Delay Context Field and Processing Group Context Field.
9. Select the Reactor, Validator, Failure Cleanup.
10.Select the Granularity.
11.Set the Max Event Validity Delay.
12.Select the Opt-In Setting Type.
13.Set the Opt-In User Field.
14.Select the Success Cleanup.
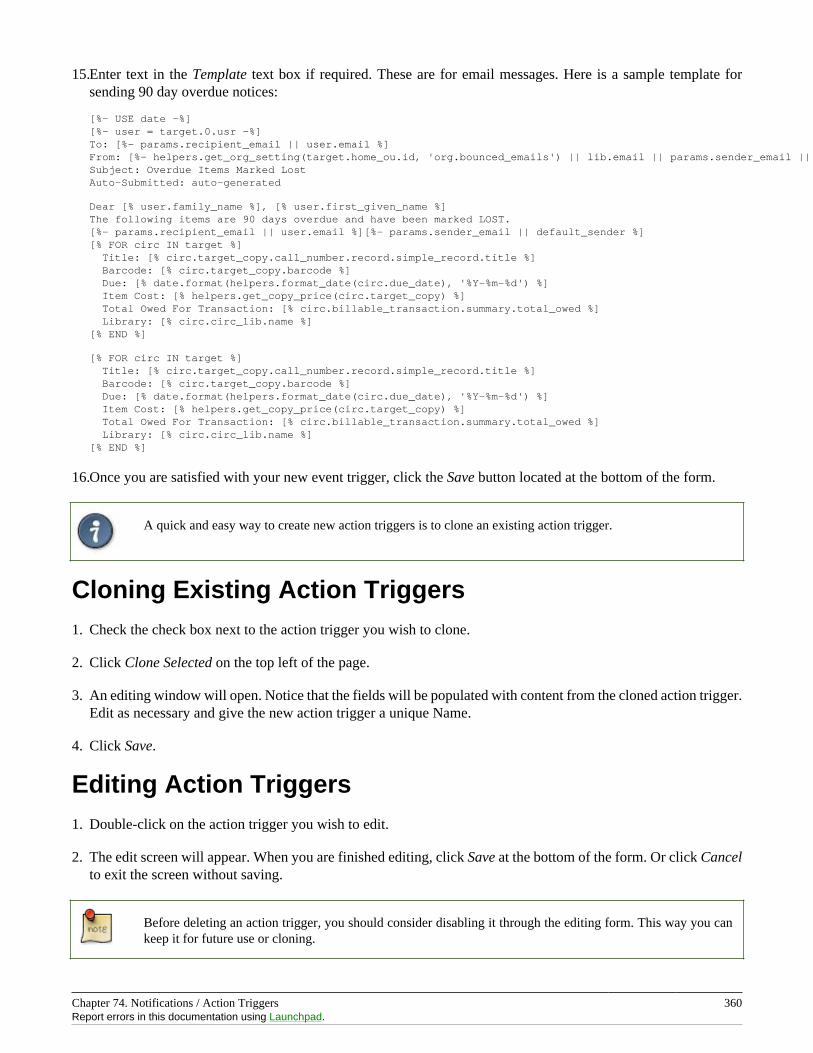
Chapter 74. Notifications / Action Triggers 360Report errors in this documentation using Launchpad.
15.Enter text in the Template text box if required. These are for email messages. Here is a sample template forsending 90 day overdue notices:
[%- USE date -%][%- user = target.0.usr -%]To: [%- params.recipient_email || user.email %]From: [%- helpers.get_org_setting(target.home_ou.id, 'org.bounced_emails') || lib.email || params.sender_email || default_sender %]Subject: Overdue Items Marked LostAuto-Submitted: auto-generated
Dear [% user.family_name %], [% user.first_given_name %]The following items are 90 days overdue and have been marked LOST.[%- params.recipient_email || user.email %][%- params.sender_email || default_sender %][% FOR circ IN target %] Title: [% circ.target_copy.call_number.record.simple_record.title %] Barcode: [% circ.target_copy.barcode %] Due: [% date.format(helpers.format_date(circ.due_date), '%Y-%m-%d') %] Item Cost: [% helpers.get_copy_price(circ.target_copy) %] Total Owed For Transaction: [% circ.billable_transaction.summary.total_owed %] Library: [% circ.circ_lib.name %][% END %]
[% FOR circ IN target %] Title: [% circ.target_copy.call_number.record.simple_record.title %] Barcode: [% circ.target_copy.barcode %] Due: [% date.format(helpers.format_date(circ.due_date), '%Y-%m-%d') %] Item Cost: [% helpers.get_copy_price(circ.target_copy) %] Total Owed For Transaction: [% circ.billable_transaction.summary.total_owed %] Library: [% circ.circ_lib.name %][% END %]
16.Once you are satisfied with your new event trigger, click the Save button located at the bottom of the form.
A quick and easy way to create new action triggers is to clone an existing action trigger.
Cloning Existing Action Triggers1. Check the check box next to the action trigger you wish to clone.
2. Click Clone Selected on the top left of the page.
3. An editing window will open. Notice that the fields will be populated with content from the cloned action trigger.Edit as necessary and give the new action trigger a unique Name.
4. Click Save.
Editing Action Triggers1. Double-click on the action trigger you wish to edit.
2. The edit screen will appear. When you are finished editing, click Save at the bottom of the form. Or click Cancelto exit the screen without saving.
Before deleting an action trigger, you should consider disabling it through the editing form. This way you cankeep it for future use or cloning.
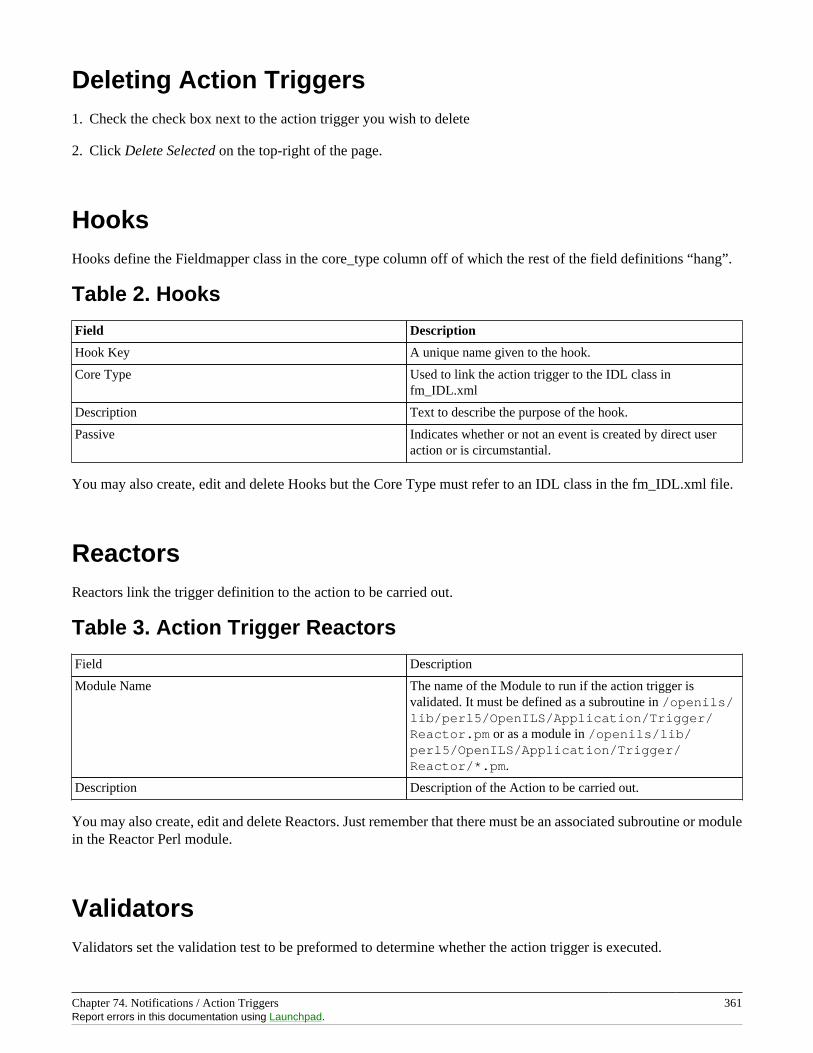
Chapter 74. Notifications / Action Triggers 361Report errors in this documentation using Launchpad.
Deleting Action Triggers1. Check the check box next to the action trigger you wish to delete
2. Click Delete Selected on the top-right of the page.
HooksHooks define the Fieldmapper class in the core_type column off of which the rest of the field definitions “hang”.
Table 2. Hooks
Field Description
Hook Key A unique name given to the hook.
Core Type Used to link the action trigger to the IDL class infm_IDL.xml
Description Text to describe the purpose of the hook.
Passive Indicates whether or not an event is created by direct useraction or is circumstantial.
You may also create, edit and delete Hooks but the Core Type must refer to an IDL class in the fm_IDL.xml file.
ReactorsReactors link the trigger definition to the action to be carried out.
Table 3. Action Trigger Reactors
Field Description
Module Name The name of the Module to run if the action trigger isvalidated. It must be defined as a subroutine in /openils/lib/perl5/OpenILS/Application/Trigger/Reactor.pm or as a module in /openils/lib/perl5/OpenILS/Application/Trigger/Reactor/*.pm.
Description Description of the Action to be carried out.
You may also create, edit and delete Reactors. Just remember that there must be an associated subroutine or modulein the Reactor Perl module.
ValidatorsValidators set the validation test to be preformed to determine whether the action trigger is executed.
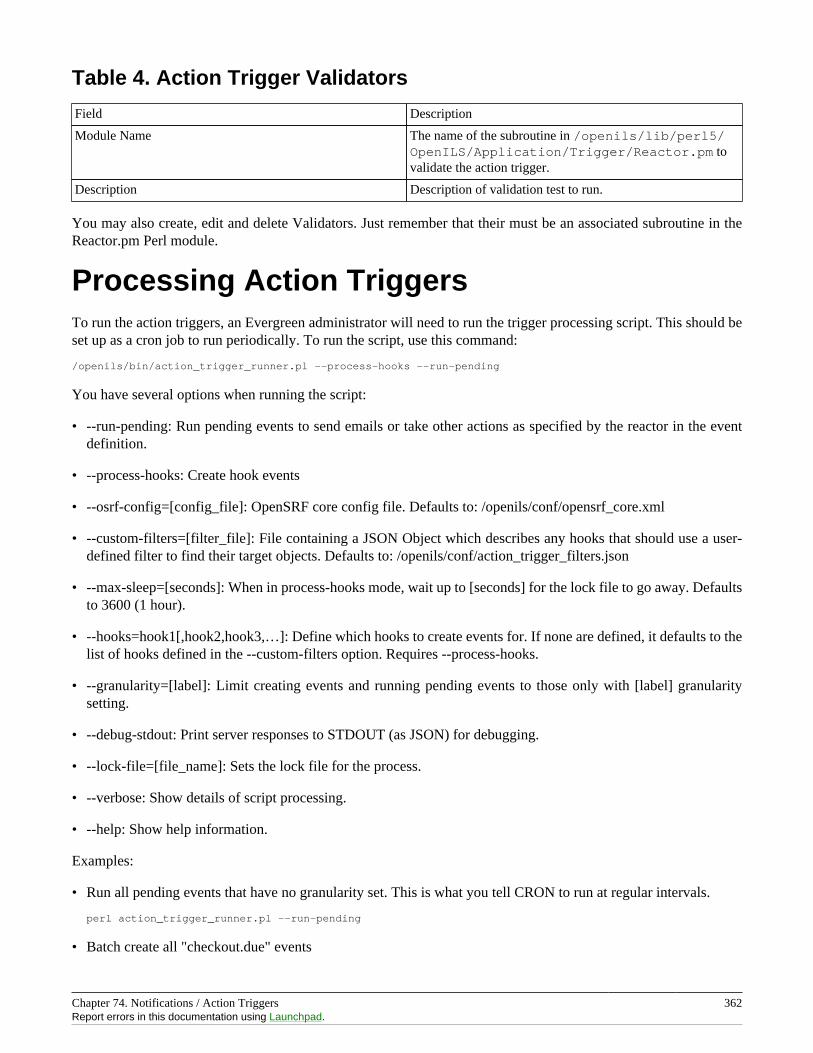
Chapter 74. Notifications / Action Triggers 362Report errors in this documentation using Launchpad.
Table 4. Action Trigger Validators
Field Description
Module Name The name of the subroutine in /openils/lib/perl5/OpenILS/Application/Trigger/Reactor.pm tovalidate the action trigger.
Description Description of validation test to run.
You may also create, edit and delete Validators. Just remember that their must be an associated subroutine in theReactor.pm Perl module.
Processing Action TriggersTo run the action triggers, an Evergreen administrator will need to run the trigger processing script. This should beset up as a cron job to run periodically. To run the script, use this command:
/openils/bin/action_trigger_runner.pl --process-hooks --run-pending
You have several options when running the script:
• --run-pending: Run pending events to send emails or take other actions as specified by the reactor in the eventdefinition.
• --process-hooks: Create hook events
• --osrf-config=[config_file]: OpenSRF core config file. Defaults to: /openils/conf/opensrf_core.xml
• --custom-filters=[filter_file]: File containing a JSON Object which describes any hooks that should use a user-defined filter to find their target objects. Defaults to: /openils/conf/action_trigger_filters.json
• --max-sleep=[seconds]: When in process-hooks mode, wait up to [seconds] for the lock file to go away. Defaultsto 3600 (1 hour).
• --hooks=hook1[,hook2,hook3,…]: Define which hooks to create events for. If none are defined, it defaults to thelist of hooks defined in the --custom-filters option. Requires --process-hooks.
• --granularity=[label]: Limit creating events and running pending events to those only with [label] granularitysetting.
• --debug-stdout: Print server responses to STDOUT (as JSON) for debugging.
• --lock-file=[file_name]: Sets the lock file for the process.
• --verbose: Show details of script processing.
• --help: Show help information.
Examples:
• Run all pending events that have no granularity set. This is what you tell CRON to run at regular intervals.
perl action_trigger_runner.pl --run-pending
• Batch create all "checkout.due" events
Chapter 74. Notifications / Action Triggers 363Report errors in this documentation using Launchpad.
perl action_trigger_runner.pl --hooks=checkout.due --process-hooks
• Batch create all events for a specific granularity and to send notices for all pending events with that samegranularity.
perl action_trigger_runner.pl --run-pending --granularity=Hourly --process-hooks
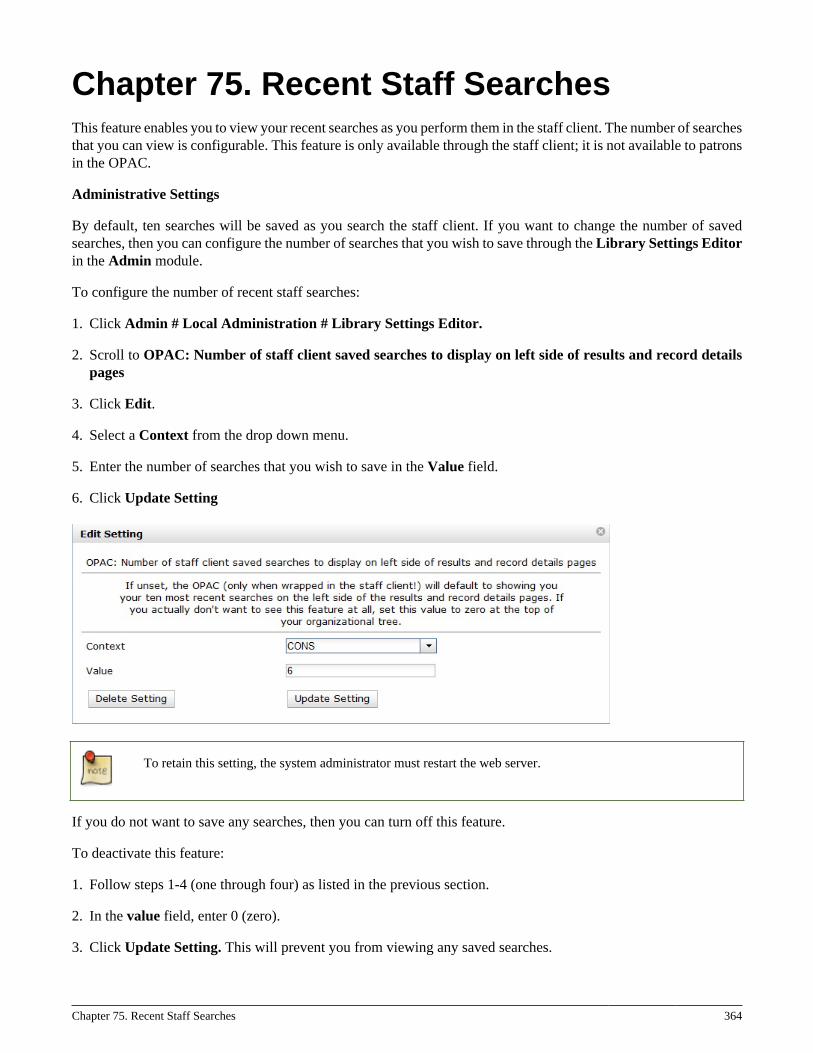
Chapter 75. Recent Staff Searches 364
Chapter 75. Recent Staff SearchesThis feature enables you to view your recent searches as you perform them in the staff client. The number of searchesthat you can view is configurable. This feature is only available through the staff client; it is not available to patronsin the OPAC.
Administrative Settings
By default, ten searches will be saved as you search the staff client. If you want to change the number of savedsearches, then you can configure the number of searches that you wish to save through the Library Settings Editorin the Admin module.
To configure the number of recent staff searches:
1. Click Admin # Local Administration # Library Settings Editor.
2. Scroll to OPAC: Number of staff client saved searches to display on left side of results and record detailspages
3. Click Edit.
4. Select a Context from the drop down menu.
5. Enter the number of searches that you wish to save in the Value field.
6. Click Update Setting
To retain this setting, the system administrator must restart the web server.
If you do not want to save any searches, then you can turn off this feature.
To deactivate this feature:
1. Follow steps 1-4 (one through four) as listed in the previous section.
2. In the value field, enter 0 (zero).
3. Click Update Setting. This will prevent you from viewing any saved searches.
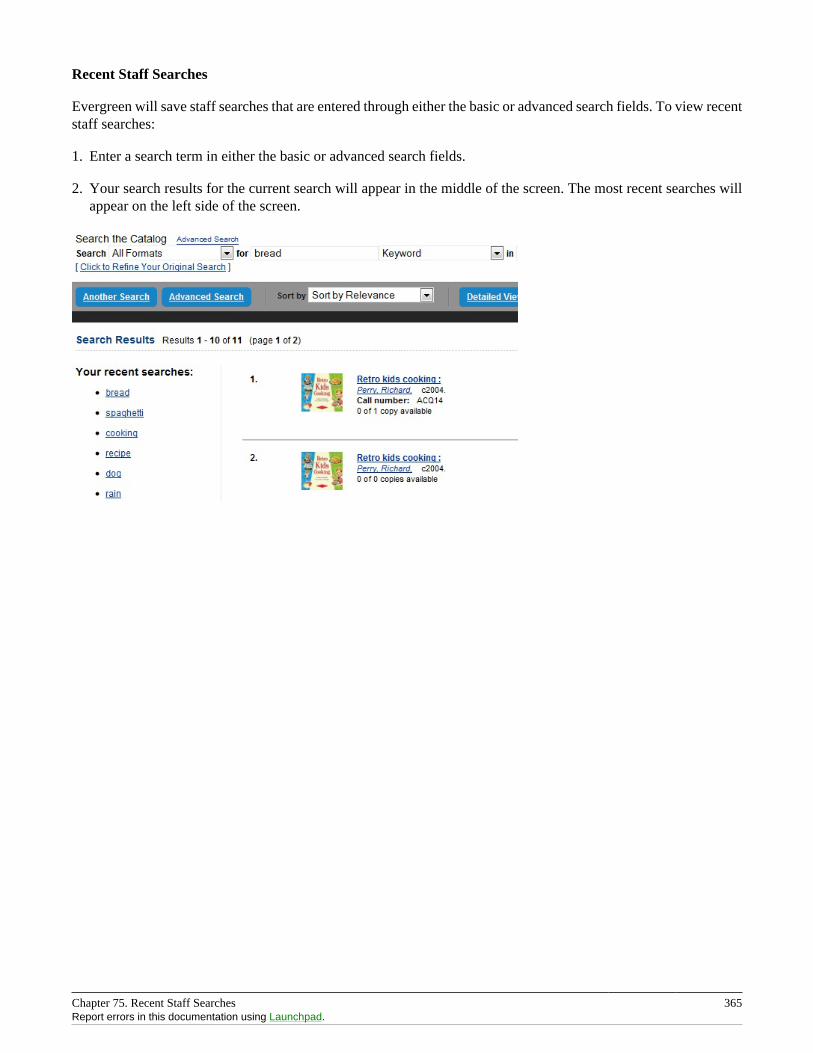
Chapter 75. Recent Staff Searches 365Report errors in this documentation using Launchpad.
Recent Staff Searches
Evergreen will save staff searches that are entered through either the basic or advanced search fields. To view recentstaff searches:
1. Enter a search term in either the basic or advanced search fields.
2. Your search results for the current search will appear in the middle of the screen. The most recent searches willappear on the left side of the screen.
Chapter 76. Standing Penalties 366
Chapter 76. Standing PenaltiesIn versions of Evergreen prior to 2.3, the following penalty types were available by default. When applied to useraccounts, these penalties prevented users from completing the following actions:
• CIRC - Users cannot check out items
• HOLD - Users cannot place holds on items
• RENEW - Users cannot renew items
In version 2.3, two new penalty types are available in Evergreen:
• CAPTURE - This penalty prevents a user’s holds from being captured. If the HOLD penalty has not been appliedto a user’s account, then the patron can place a hold, but the targeted item will not appear on a pull list and willnot be captured for a hold if it is checked in.
• FULFILL - This penalty prevents a user from checking out an item that is on hold. If the HOLD and CAPTUREpenalties have not been applied to a user’s account, then the user can place a hold on an item, and the item can becaptured for a hold. However, when he tries to check out the item, the circulator will see a pop up box with thename of the penalty type, FULFILL. The circulator must correct the problem with the account or must overridethe penalty to check out the item.
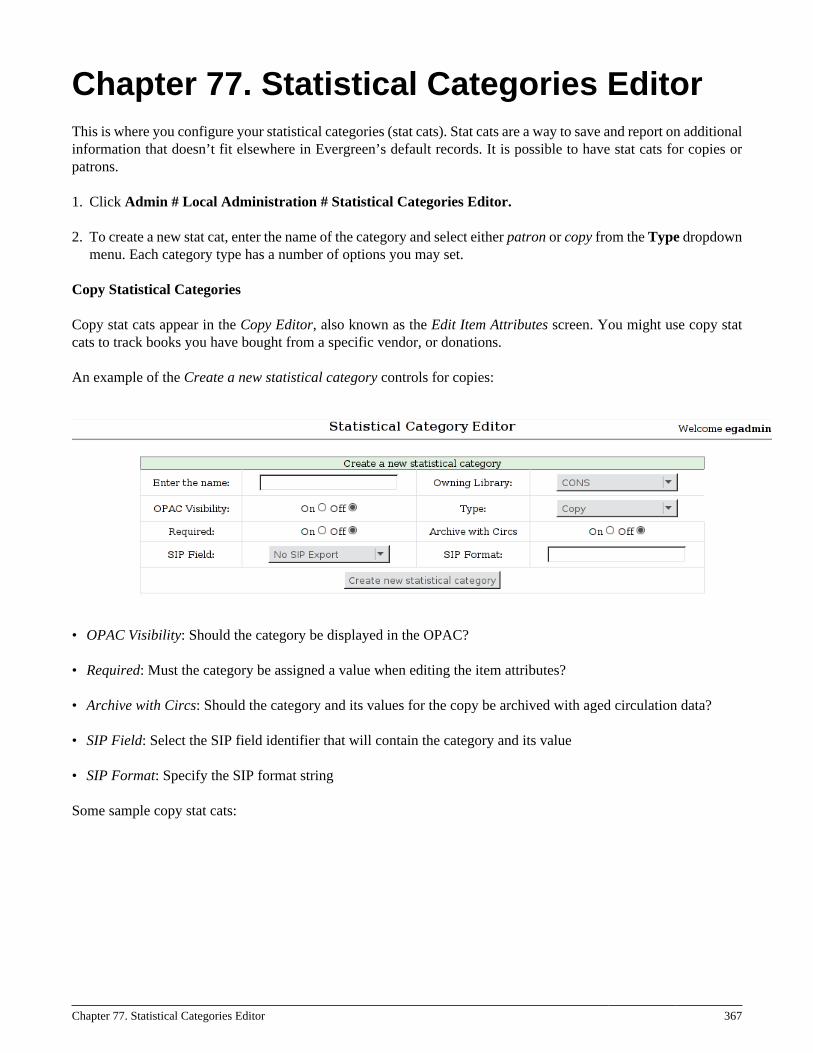
Chapter 77. Statistical Categories Editor 367
Chapter 77. Statistical Categories EditorThis is where you configure your statistical categories (stat cats). Stat cats are a way to save and report on additionalinformation that doesn’t fit elsewhere in Evergreen’s default records. It is possible to have stat cats for copies orpatrons.
1. Click Admin # Local Administration # Statistical Categories Editor.
2. To create a new stat cat, enter the name of the category and select either patron or copy from the Type dropdownmenu. Each category type has a number of options you may set.
Copy Statistical Categories
Copy stat cats appear in the Copy Editor, also known as the Edit Item Attributes screen. You might use copy statcats to track books you have bought from a specific vendor, or donations.
An example of the Create a new statistical category controls for copies:
• OPAC Visibility: Should the category be displayed in the OPAC?
• Required: Must the category be assigned a value when editing the item attributes?
• Archive with Circs: Should the category and its values for the copy be archived with aged circulation data?
• SIP Field: Select the SIP field identifier that will contain the category and its value
• SIP Format: Specify the SIP format string
Some sample copy stat cats:
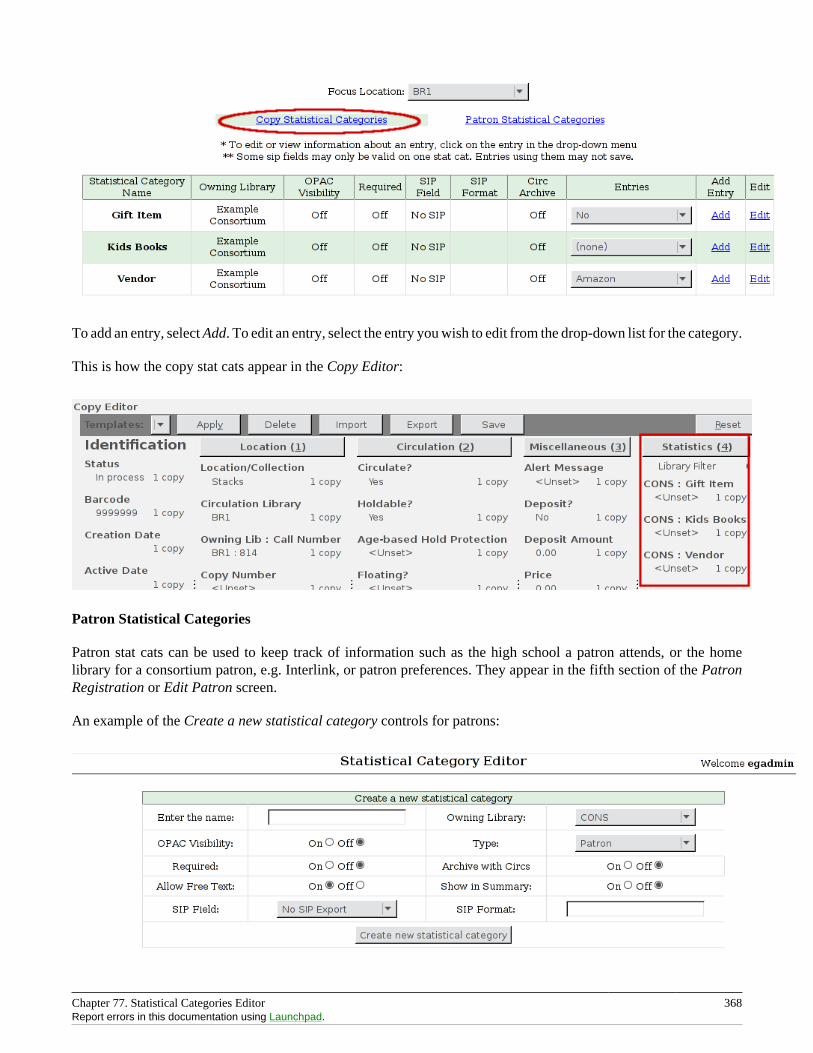
Chapter 77. Statistical Categories Editor 368Report errors in this documentation using Launchpad.
To add an entry, select Add. To edit an entry, select the entry you wish to edit from the drop-down list for the category.
This is how the copy stat cats appear in the Copy Editor:
Patron Statistical Categories
Patron stat cats can be used to keep track of information such as the high school a patron attends, or the homelibrary for a consortium patron, e.g. Interlink, or patron preferences. They appear in the fifth section of the PatronRegistration or Edit Patron screen.
An example of the Create a new statistical category controls for patrons:
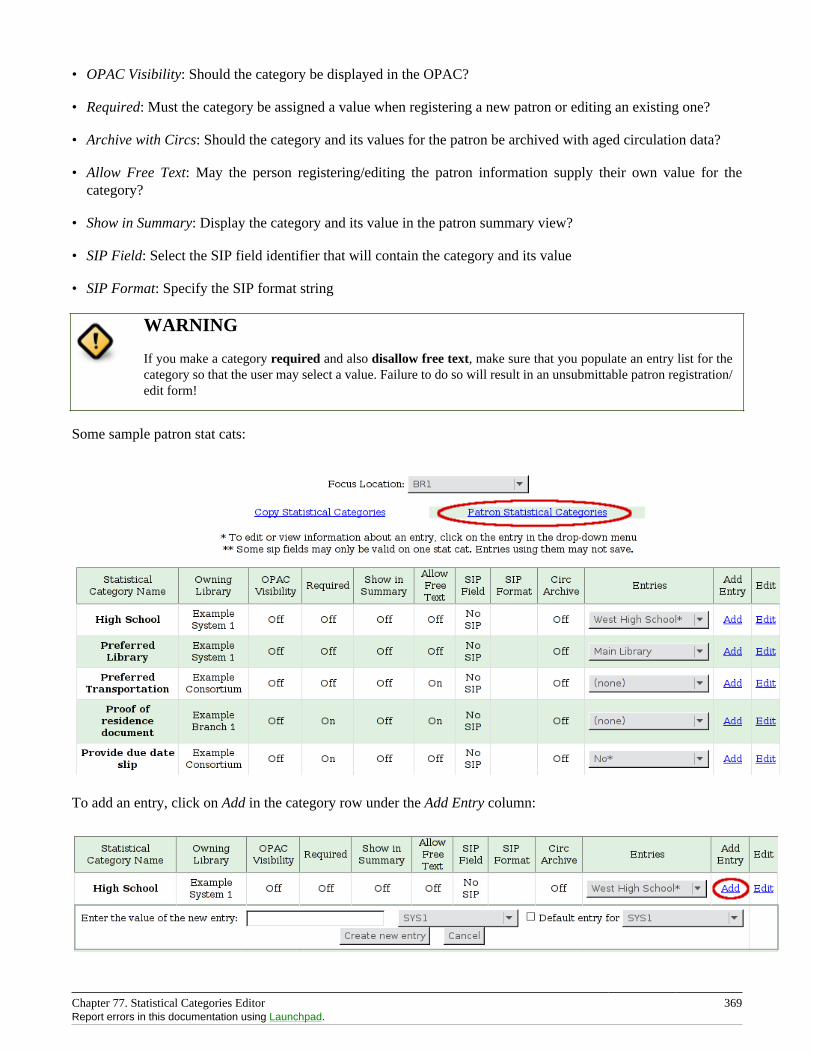
Chapter 77. Statistical Categories Editor 369Report errors in this documentation using Launchpad.
• OPAC Visibility: Should the category be displayed in the OPAC?
• Required: Must the category be assigned a value when registering a new patron or editing an existing one?
• Archive with Circs: Should the category and its values for the patron be archived with aged circulation data?
• Allow Free Text: May the person registering/editing the patron information supply their own value for thecategory?
• Show in Summary: Display the category and its value in the patron summary view?
• SIP Field: Select the SIP field identifier that will contain the category and its value
• SIP Format: Specify the SIP format string
WARNING
If you make a category required and also disallow free text, make sure that you populate an entry list for thecategory so that the user may select a value. Failure to do so will result in an unsubmittable patron registration/edit form!
Some sample patron stat cats:
To add an entry, click on Add in the category row under the Add Entry column:
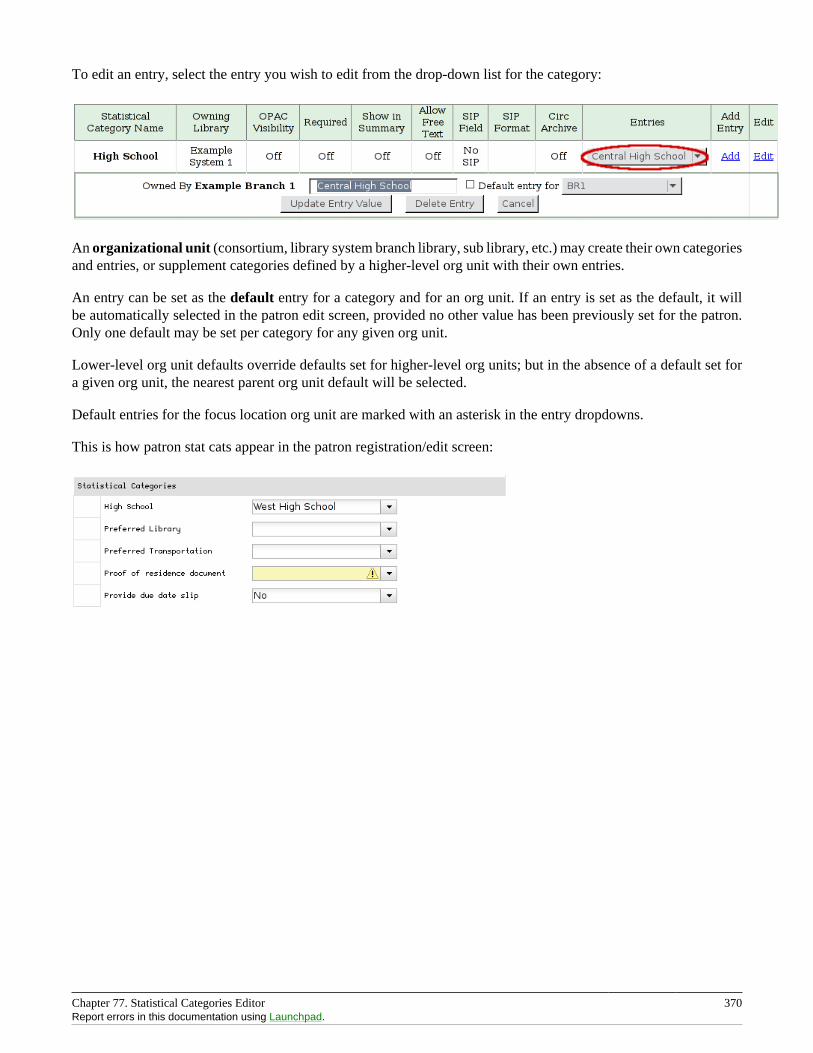
Chapter 77. Statistical Categories Editor 370Report errors in this documentation using Launchpad.
To edit an entry, select the entry you wish to edit from the drop-down list for the category:
An organizational unit (consortium, library system branch library, sub library, etc.) may create their own categoriesand entries, or supplement categories defined by a higher-level org unit with their own entries.
An entry can be set as the default entry for a category and for an org unit. If an entry is set as the default, it willbe automatically selected in the patron edit screen, provided no other value has been previously set for the patron.Only one default may be set per category for any given org unit.
Lower-level org unit defaults override defaults set for higher-level org units; but in the absence of a default set fora given org unit, the nearest parent org unit default will be selected.
Default entries for the focus location org unit are marked with an asterisk in the entry dropdowns.
This is how patron stat cats appear in the patron registration/edit screen:
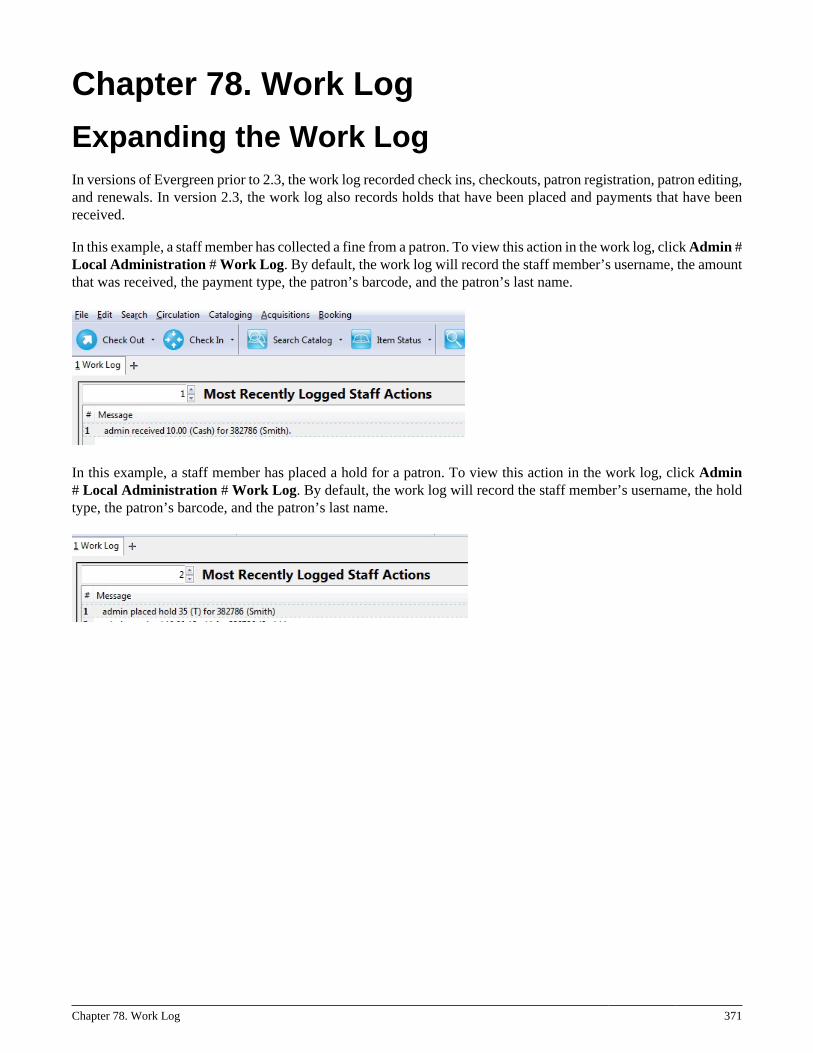
Chapter 78. Work Log 371
Chapter 78. Work Log
Expanding the Work LogIn versions of Evergreen prior to 2.3, the work log recorded check ins, checkouts, patron registration, patron editing,and renewals. In version 2.3, the work log also records holds that have been placed and payments that have beenreceived.
In this example, a staff member has collected a fine from a patron. To view this action in the work log, click Admin #Local Administration # Work Log. By default, the work log will record the staff member’s username, the amountthat was received, the payment type, the patron’s barcode, and the patron’s last name.
In this example, a staff member has placed a hold for a patron. To view this action in the work log, click Admin# Local Administration # Work Log. By default, the work log will record the staff member’s username, the holdtype, the patron’s barcode, and the patron’s last name.

Part VIII. Acquisitions
Part VIII. Acquisitions 373
Table of Contents79. Acquisitions .......................................................................................................................................... 374
Acquisitions Workflow ........................................................................................................................ 37480. Selection Lists and Purchase Orders .......................................................................................................... 376
Selection Lists .................................................................................................................................... 376Create a selection list ................................................................................................................... 376Add items to a selection list .......................................................................................................... 376Clone selection lists ..................................................................................................................... 376Merge selection lists .................................................................................................................... 377Delete selection lists .................................................................................................................... 377Mark Ready for Selector .............................................................................................................. 377Convert selection list to purchase order ........................................................................................... 378
Purchase Orders .................................................................................................................................. 378Duplicate Purchase Order Name Warning Dialog .............................................................................. 378Purchase Order Activation Progress Bar .......................................................................................... 379Activate Purchase Order with Zero Copies ...................................................................................... 380Enhancements to Canceled and Delayed Items ................................................................................. 380
Brief Records ..................................................................................................................................... 382Add brief records to a selection list ................................................................................................ 382Add brief records to purchase orders .............................................................................................. 383
MARC Federated Search ...................................................................................................................... 384Line Items ......................................................................................................................................... 385
Return to Line Item ..................................................................................................................... 385Display a Count of Existing Copies on Selection List and Purchase Order Lineitems ................................ 386
81. Invoices ............................................................................................................................................... 388Creating invoices and adding line items .................................................................................................. 388
Creating a blanket invoice ............................................................................................................ 388Adding line items from a Purchase Order or search results screen to an invoice ...................................... 389Search for line items from an invoice ............................................................................................. 390Create an invoice for a purchase order ............................................................................................ 393Link an existing invoice to a purchase order .................................................................................... 394
Electronic Invoicing ............................................................................................................................. 395View an invoice .................................................................................................................................. 395Receive Items From an Invoice ............................................................................................................. 396
Receive Items in Batch (List Mode) ............................................................................................... 396Receive Specific Copies (Numeric Mode) ....................................................................................... 398
82. Load MARC Order Records .................................................................................................................... 400Basic Upload Options .......................................................................................................................... 400Record Matching Options ..................................................................................................................... 400Default Upload Settings ....................................................................................................................... 401Sticky Settings .................................................................................................................................... 402Use Cases for MARC Order Upload form ............................................................................................... 402
83. Placing purchase requests from a patron record ........................................................................................... 40784. Managing patron purchase requests ........................................................................................................... 408
Adding a request ................................................................................................................................. 408Adding requests to selection lists ........................................................................................................... 408
Chapter 79. Acquisitions 374
Chapter 79. AcquisitionsThis section is intended for those who are responsible for managing and processing acquisitions.
Before beginning to use Acquisitions, the following must be configured by an administrator:
• Cancel/Suspend Reasons (optional)
• Claiming (optional)
• Currency Types (defaults exist)
• Distribution Formulas (optional)
• EDI Accounts (optional) (see Setting Up EDI Acquisitions under Software Installation)
• Exchange Rates (defaults exist)
• Funds and Fund Sources
• Invoice Types (defaults exist) and Invoice Payment Methods
• Line Item Features (optional)
• Merge Overlay Profiles and Record Match Sets (see Batch Importing MARC Records in Cataloging)
• Providers
Acquisitions WorkflowThe following diagram shows how the workflow functions in Evergreen. One of the differences in this process youshould notice is that when creating a selection list on the vendor site, libraries will be downloading and importingthe vendor bibs and item records.
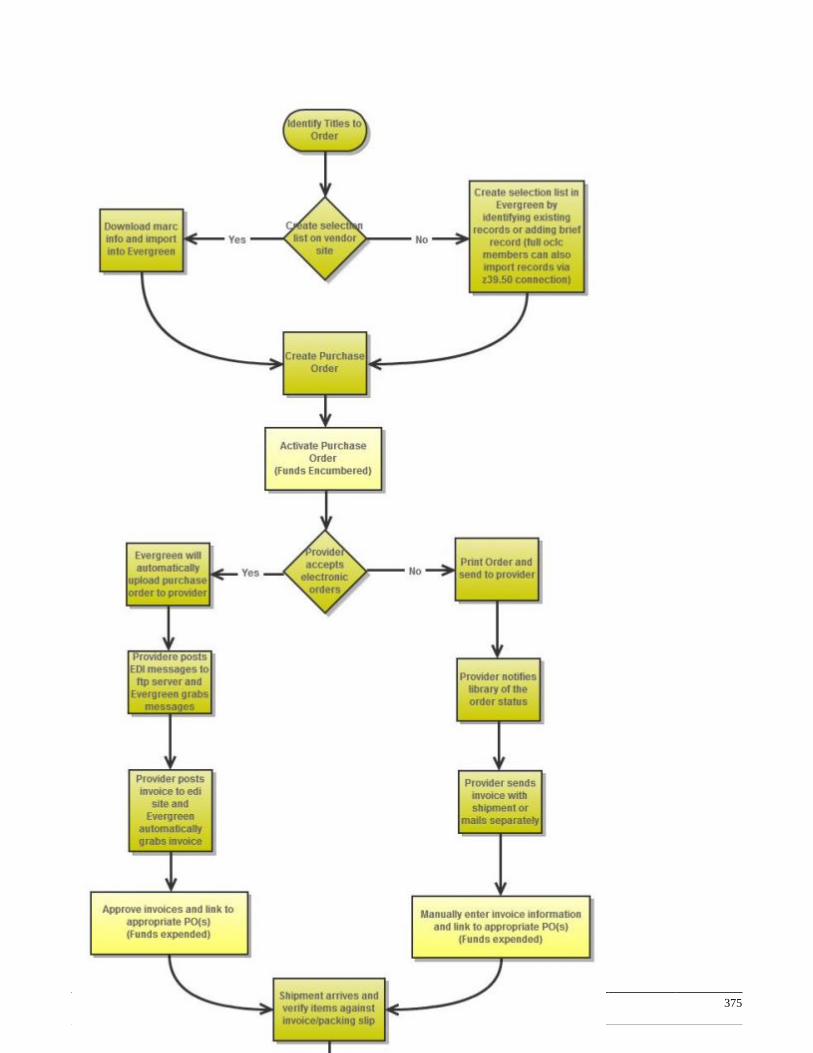
Chapter 79. Acquisitions 375Report errors in this documentation using Launchpad.
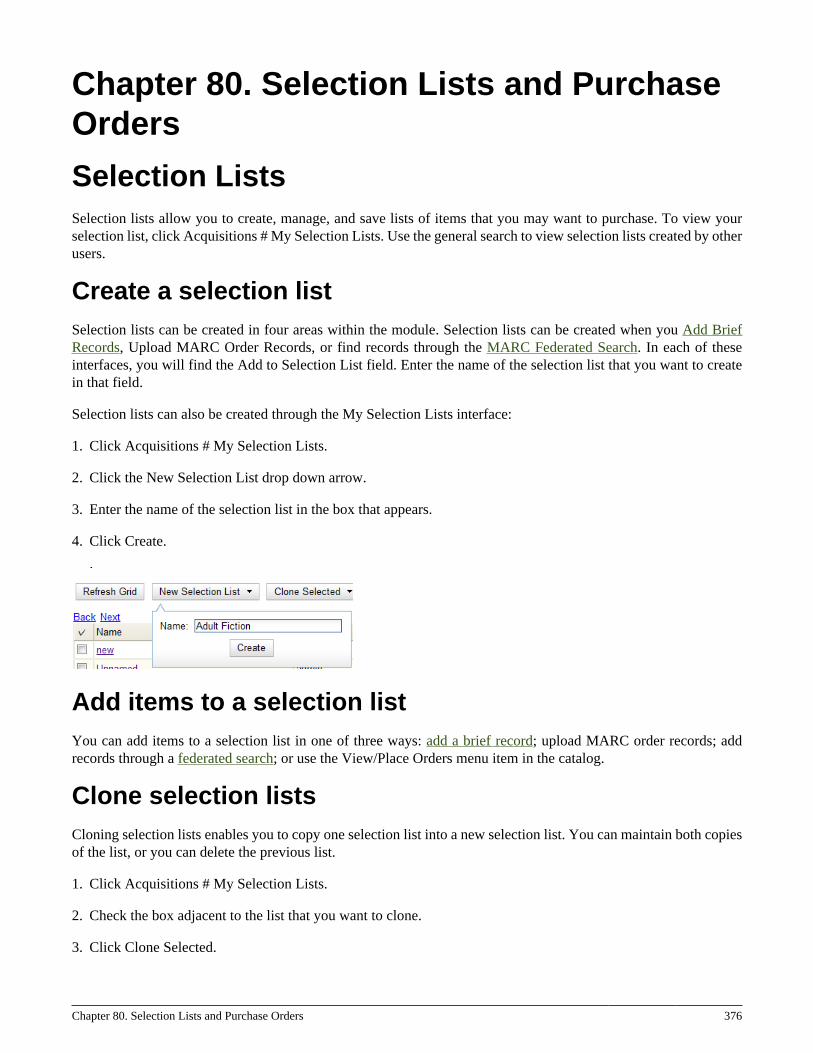
Chapter 80. Selection Lists and Purchase Orders 376
Chapter 80. Selection Lists and PurchaseOrders
Selection ListsSelection lists allow you to create, manage, and save lists of items that you may want to purchase. To view yourselection list, click Acquisitions # My Selection Lists. Use the general search to view selection lists created by otherusers.
Create a selection listSelection lists can be created in four areas within the module. Selection lists can be created when you Add BriefRecords, Upload MARC Order Records, or find records through the MARC Federated Search. In each of theseinterfaces, you will find the Add to Selection List field. Enter the name of the selection list that you want to createin that field.
Selection lists can also be created through the My Selection Lists interface:
1. Click Acquisitions # My Selection Lists.
2. Click the New Selection List drop down arrow.
3. Enter the name of the selection list in the box that appears.
4. Click Create.
Add items to a selection listYou can add items to a selection list in one of three ways: add a brief record; upload MARC order records; addrecords through a federated search; or use the View/Place Orders menu item in the catalog.
Clone selection listsCloning selection lists enables you to copy one selection list into a new selection list. You can maintain both copiesof the list, or you can delete the previous list.
1. Click Acquisitions # My Selection Lists.
2. Check the box adjacent to the list that you want to clone.
3. Click Clone Selected.
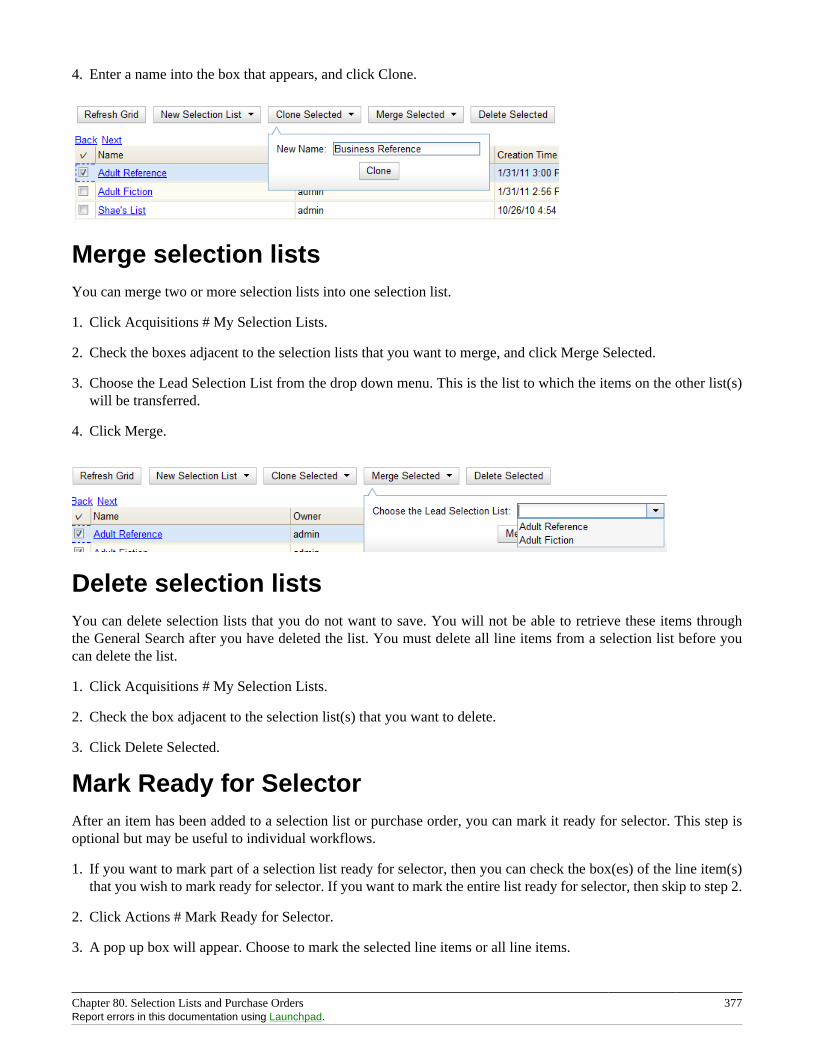
Chapter 80. Selection Lists and Purchase Orders 377Report errors in this documentation using Launchpad.
4. Enter a name into the box that appears, and click Clone.
Merge selection listsYou can merge two or more selection lists into one selection list.
1. Click Acquisitions # My Selection Lists.
2. Check the boxes adjacent to the selection lists that you want to merge, and click Merge Selected.
3. Choose the Lead Selection List from the drop down menu. This is the list to which the items on the other list(s)will be transferred.
4. Click Merge.
Delete selection listsYou can delete selection lists that you do not want to save. You will not be able to retrieve these items throughthe General Search after you have deleted the list. You must delete all line items from a selection list before youcan delete the list.
1. Click Acquisitions # My Selection Lists.
2. Check the box adjacent to the selection list(s) that you want to delete.
3. Click Delete Selected.
Mark Ready for SelectorAfter an item has been added to a selection list or purchase order, you can mark it ready for selector. This step isoptional but may be useful to individual workflows.
1. If you want to mark part of a selection list ready for selector, then you can check the box(es) of the line item(s)that you wish to mark ready for selector. If you want to mark the entire list ready for selector, then skip to step 2.
2. Click Actions # Mark Ready for Selector.
3. A pop up box will appear. Choose to mark the selected line items or all line items.
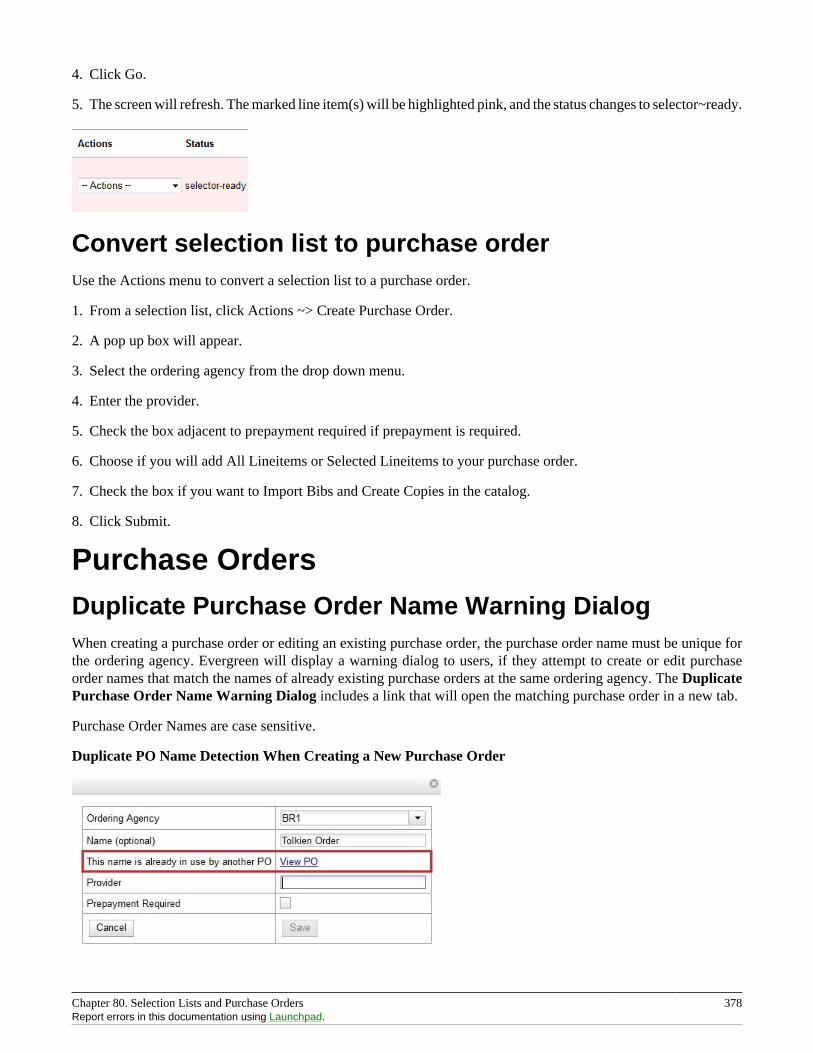
Chapter 80. Selection Lists and Purchase Orders 378Report errors in this documentation using Launchpad.
4. Click Go.
5. The screen will refresh. The marked line item(s) will be highlighted pink, and the status changes to selector~ready.
Convert selection list to purchase orderUse the Actions menu to convert a selection list to a purchase order.
1. From a selection list, click Actions ~> Create Purchase Order.
2. A pop up box will appear.
3. Select the ordering agency from the drop down menu.
4. Enter the provider.
5. Check the box adjacent to prepayment required if prepayment is required.
6. Choose if you will add All Lineitems or Selected Lineitems to your purchase order.
7. Check the box if you want to Import Bibs and Create Copies in the catalog.
8. Click Submit.
Purchase OrdersDuplicate Purchase Order Name Warning DialogWhen creating a purchase order or editing an existing purchase order, the purchase order name must be unique forthe ordering agency. Evergreen will display a warning dialog to users, if they attempt to create or edit purchaseorder names that match the names of already existing purchase orders at the same ordering agency. The DuplicatePurchase Order Name Warning Dialog includes a link that will open the matching purchase order in a new tab.
Purchase Order Names are case sensitive.
Duplicate PO Name Detection When Creating a New Purchase Order
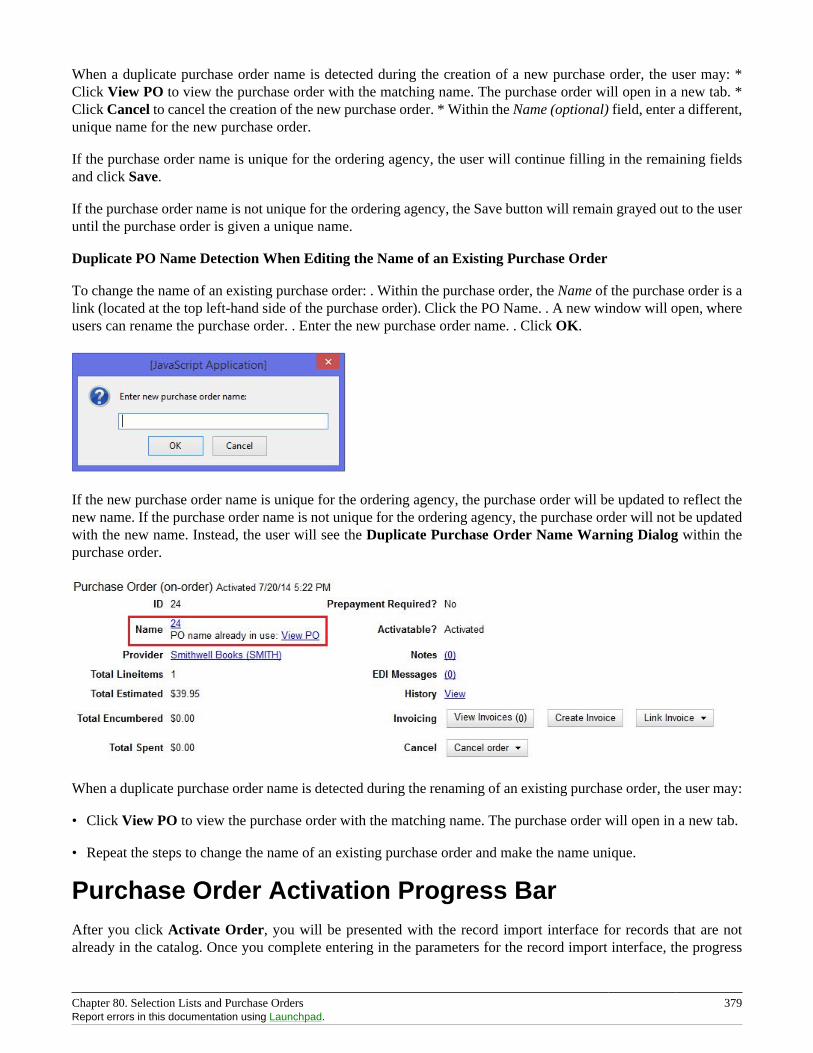
Chapter 80. Selection Lists and Purchase Orders 379Report errors in this documentation using Launchpad.
When a duplicate purchase order name is detected during the creation of a new purchase order, the user may: *Click View PO to view the purchase order with the matching name. The purchase order will open in a new tab. *Click Cancel to cancel the creation of the new purchase order. * Within the Name (optional) field, enter a different,unique name for the new purchase order.
If the purchase order name is unique for the ordering agency, the user will continue filling in the remaining fieldsand click Save.
If the purchase order name is not unique for the ordering agency, the Save button will remain grayed out to the useruntil the purchase order is given a unique name.
Duplicate PO Name Detection When Editing the Name of an Existing Purchase Order
To change the name of an existing purchase order: . Within the purchase order, the Name of the purchase order is alink (located at the top left-hand side of the purchase order). Click the PO Name. . A new window will open, whereusers can rename the purchase order. . Enter the new purchase order name. . Click OK.
If the new purchase order name is unique for the ordering agency, the purchase order will be updated to reflect thenew name. If the purchase order name is not unique for the ordering agency, the purchase order will not be updatedwith the new name. Instead, the user will see the Duplicate Purchase Order Name Warning Dialog within thepurchase order.
When a duplicate purchase order name is detected during the renaming of an existing purchase order, the user may:
• Click View PO to view the purchase order with the matching name. The purchase order will open in a new tab.
• Repeat the steps to change the name of an existing purchase order and make the name unique.
Purchase Order Activation Progress BarAfter you click Activate Order, you will be presented with the record import interface for records that are notalready in the catalog. Once you complete entering in the parameters for the record import interface, the progress
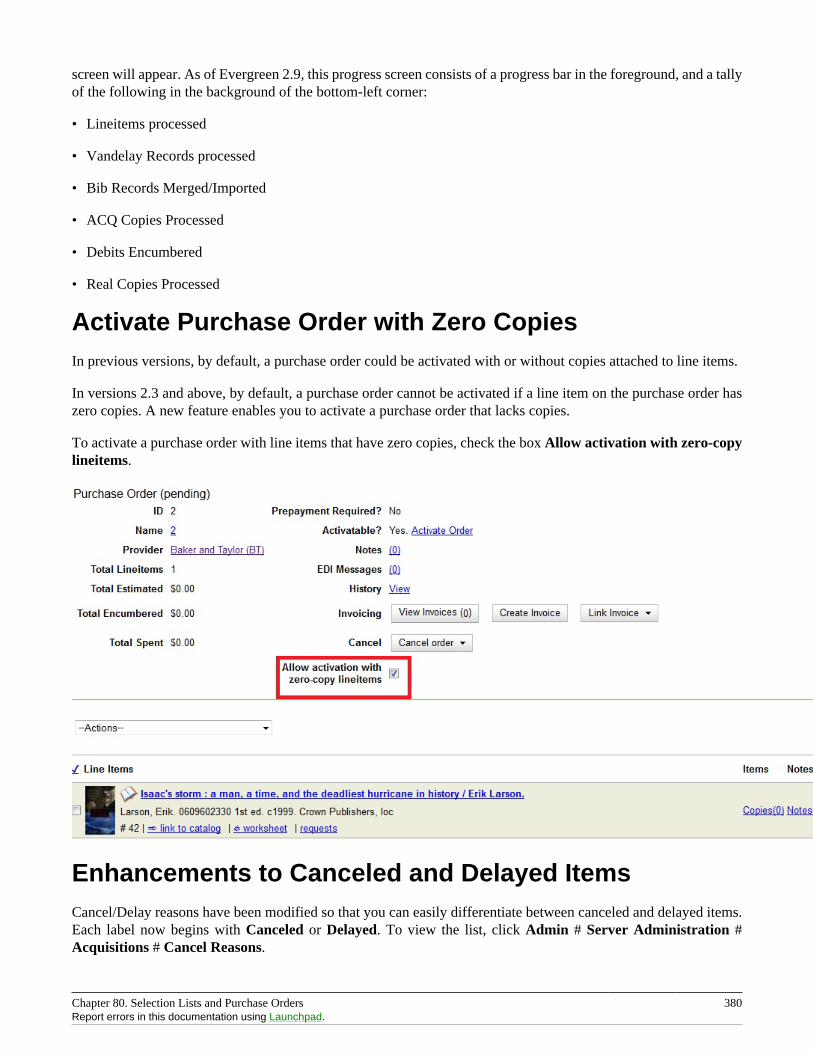
Chapter 80. Selection Lists and Purchase Orders 380Report errors in this documentation using Launchpad.
screen will appear. As of Evergreen 2.9, this progress screen consists of a progress bar in the foreground, and a tallyof the following in the background of the bottom-left corner:
• Lineitems processed
• Vandelay Records processed
• Bib Records Merged/Imported
• ACQ Copies Processed
• Debits Encumbered
• Real Copies Processed
Activate Purchase Order with Zero CopiesIn previous versions, by default, a purchase order could be activated with or without copies attached to line items.
In versions 2.3 and above, by default, a purchase order cannot be activated if a line item on the purchase order haszero copies. A new feature enables you to activate a purchase order that lacks copies.
To activate a purchase order with line items that have zero copies, check the box Allow activation with zero-copylineitems.
Enhancements to Canceled and Delayed ItemsCancel/Delay reasons have been modified so that you can easily differentiate between canceled and delayed items.Each label now begins with Canceled or Delayed. To view the list, click Admin # Server Administration #Acquisitions # Cancel Reasons.
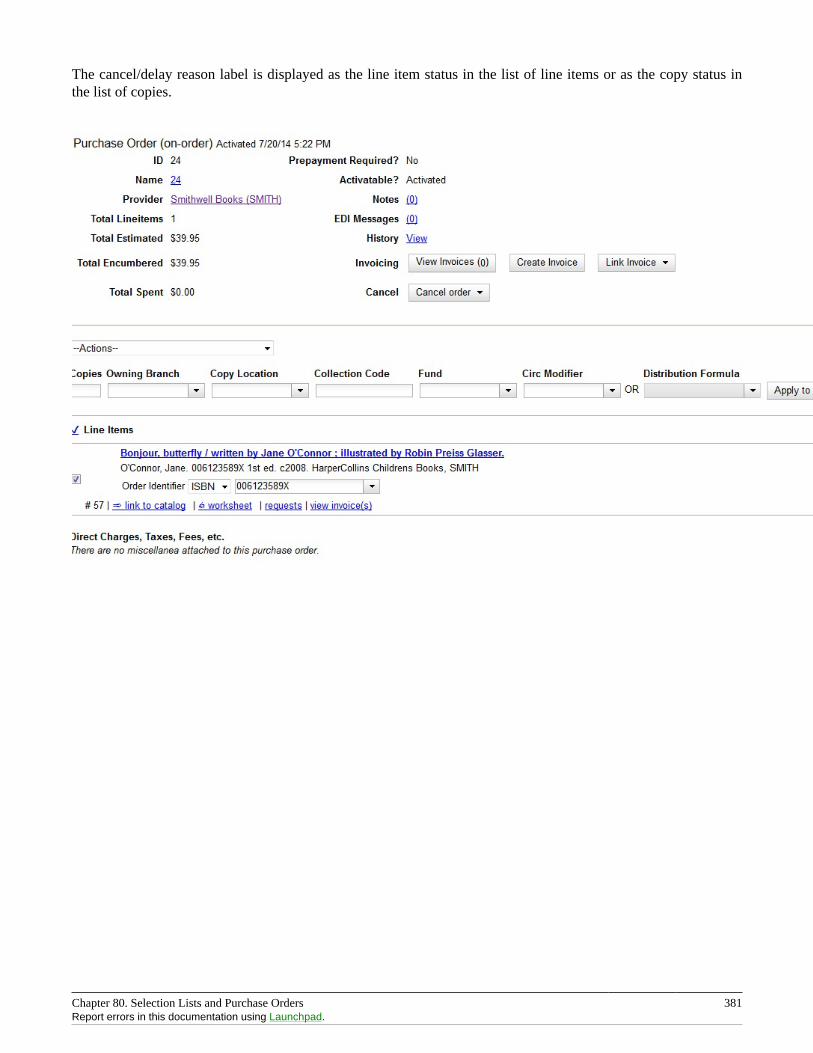
Chapter 80. Selection Lists and Purchase Orders 381Report errors in this documentation using Launchpad.
The cancel/delay reason label is displayed as the line item status in the list of line items or as the copy status inthe list of copies.
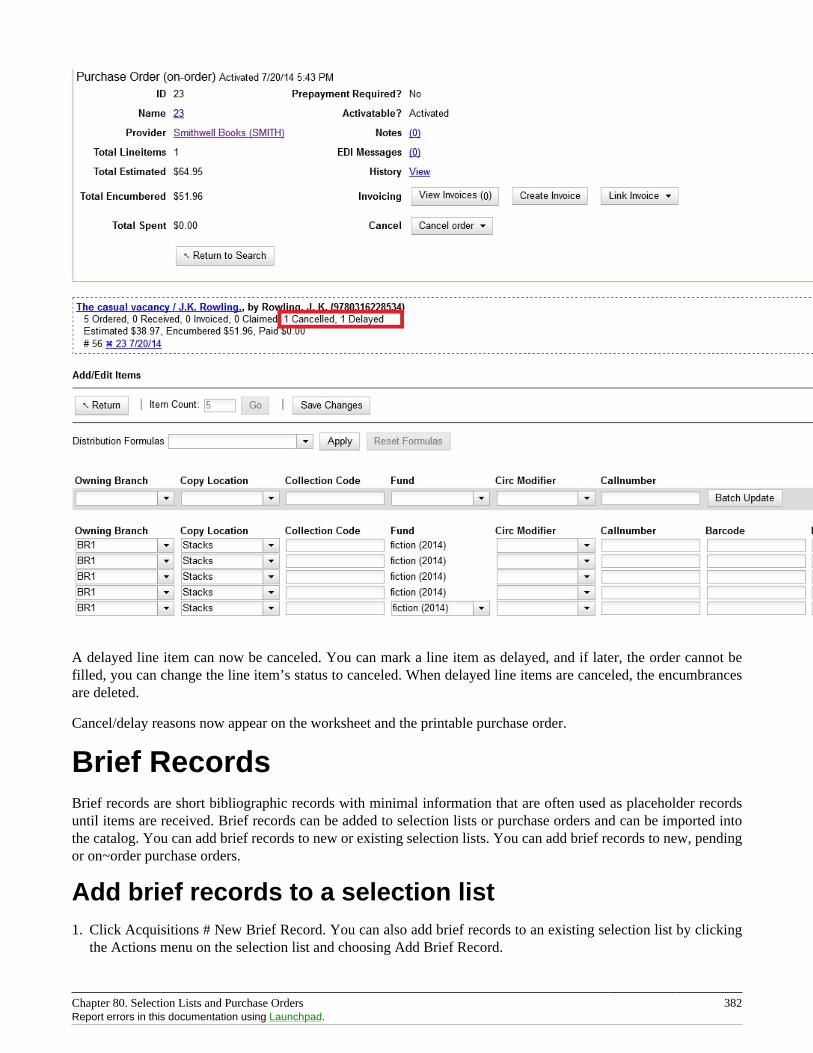
Chapter 80. Selection Lists and Purchase Orders 382Report errors in this documentation using Launchpad.
A delayed line item can now be canceled. You can mark a line item as delayed, and if later, the order cannot befilled, you can change the line item’s status to canceled. When delayed line items are canceled, the encumbrancesare deleted.
Cancel/delay reasons now appear on the worksheet and the printable purchase order.
Brief RecordsBrief records are short bibliographic records with minimal information that are often used as placeholder recordsuntil items are received. Brief records can be added to selection lists or purchase orders and can be imported intothe catalog. You can add brief records to new or existing selection lists. You can add brief records to new, pendingor on~order purchase orders.
Add brief records to a selection list1. Click Acquisitions # New Brief Record. You can also add brief records to an existing selection list by clicking
the Actions menu on the selection list and choosing Add Brief Record.
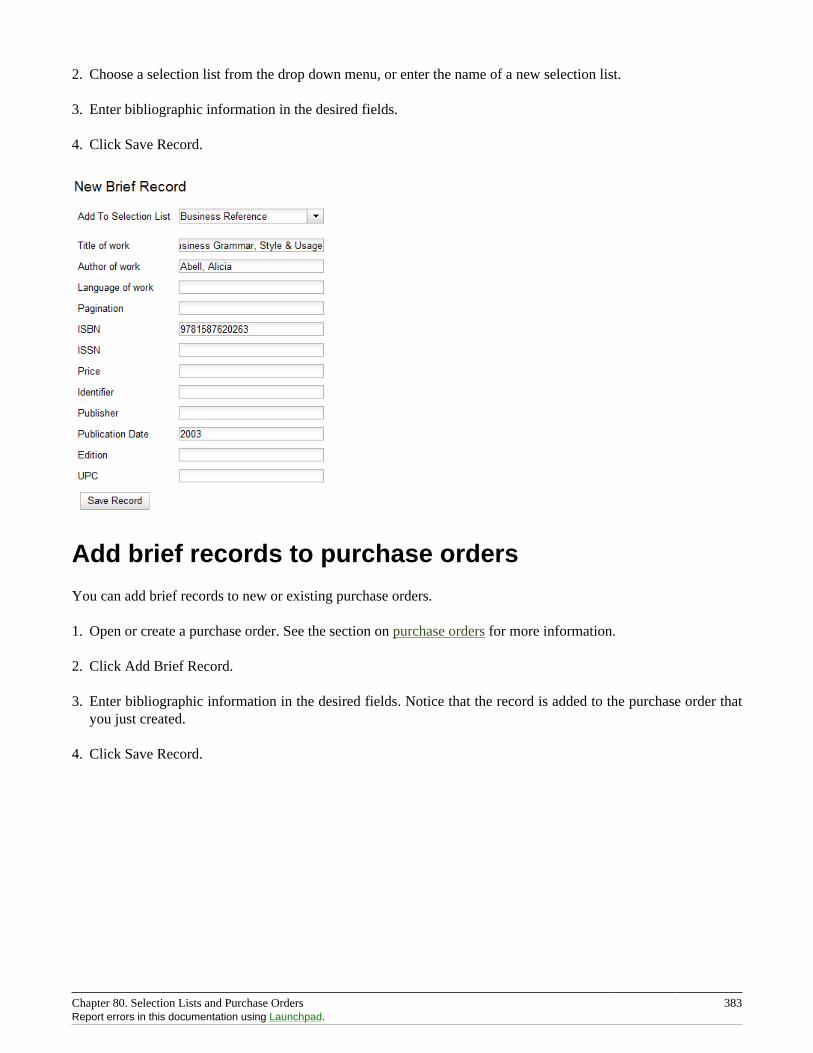
Chapter 80. Selection Lists and Purchase Orders 383Report errors in this documentation using Launchpad.
2. Choose a selection list from the drop down menu, or enter the name of a new selection list.
3. Enter bibliographic information in the desired fields.
4. Click Save Record.
Add brief records to purchase orders
You can add brief records to new or existing purchase orders.
1. Open or create a purchase order. See the section on purchase orders for more information.
2. Click Add Brief Record.
3. Enter bibliographic information in the desired fields. Notice that the record is added to the purchase order thatyou just created.
4. Click Save Record.
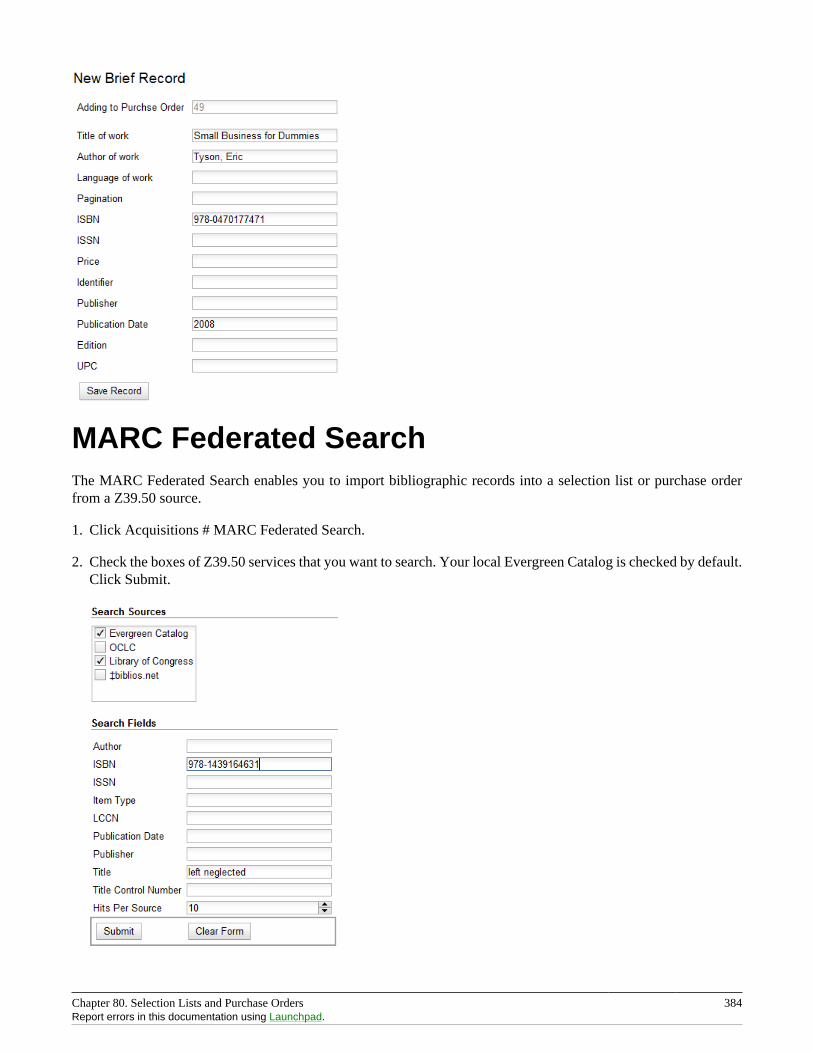
Chapter 80. Selection Lists and Purchase Orders 384Report errors in this documentation using Launchpad.
MARC Federated SearchThe MARC Federated Search enables you to import bibliographic records into a selection list or purchase orderfrom a Z39.50 source.
1. Click Acquisitions # MARC Federated Search.
2. Check the boxes of Z39.50 services that you want to search. Your local Evergreen Catalog is checked by default.Click Submit.
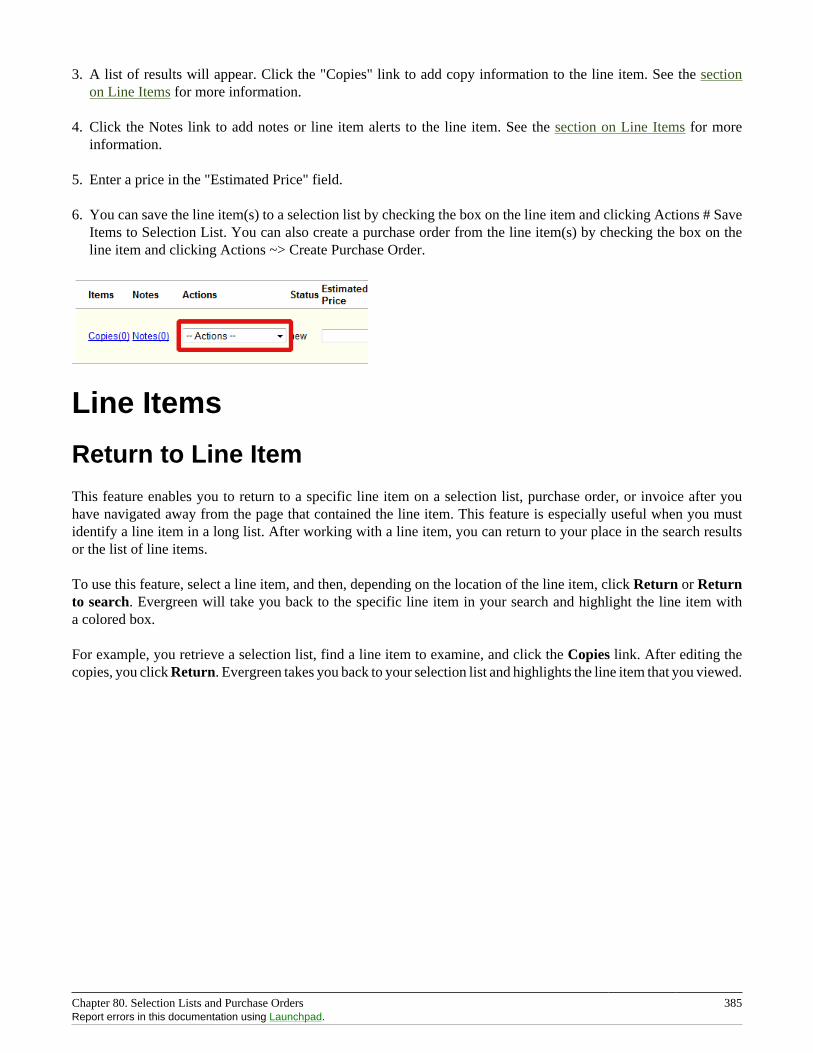
Chapter 80. Selection Lists and Purchase Orders 385Report errors in this documentation using Launchpad.
3. A list of results will appear. Click the "Copies" link to add copy information to the line item. See the sectionon Line Items for more information.
4. Click the Notes link to add notes or line item alerts to the line item. See the section on Line Items for moreinformation.
5. Enter a price in the "Estimated Price" field.
6. You can save the line item(s) to a selection list by checking the box on the line item and clicking Actions # SaveItems to Selection List. You can also create a purchase order from the line item(s) by checking the box on theline item and clicking Actions ~> Create Purchase Order.
Line Items
Return to Line Item
This feature enables you to return to a specific line item on a selection list, purchase order, or invoice after youhave navigated away from the page that contained the line item. This feature is especially useful when you mustidentify a line item in a long list. After working with a line item, you can return to your place in the search resultsor the list of line items.
To use this feature, select a line item, and then, depending on the location of the line item, click Return or Returnto search. Evergreen will take you back to the specific line item in your search and highlight the line item witha colored box.
For example, you retrieve a selection list, find a line item to examine, and click the Copies link. After editing thecopies, you click Return. Evergreen takes you back to your selection list and highlights the line item that you viewed.

Chapter 80. Selection Lists and Purchase Orders 386Report errors in this documentation using Launchpad.
This feature is available in General Search Results, Purchase Orders, and Selection Lists, whenever any of thefollowing links are available:
• Selection List
• Purchase Order
• Copies
• Notes
• Worksheet
This feature is available in Invoices whenever any of the following links are available:
• Title
• Selection List
• Purchase Order
Display a Count of Existing Copies on Selection Listand Purchase Order LineitemsWhen displaying Acquisitions lineitems within the Selection List and Purchase Order interfaces, Evergreen displaysa count of existing catalog copies on the lineitem. The count of existing catalog copies refers to the number of copiesowned at the ordering agency and / or the ordering agency’s child organization units.
The counts display for lineitems that have a direct link to a catalog record. Generally, this includes lineitems createdas "on order" based on an existing catalog record and lineitems where "Load Bibs and Items" has been applied.
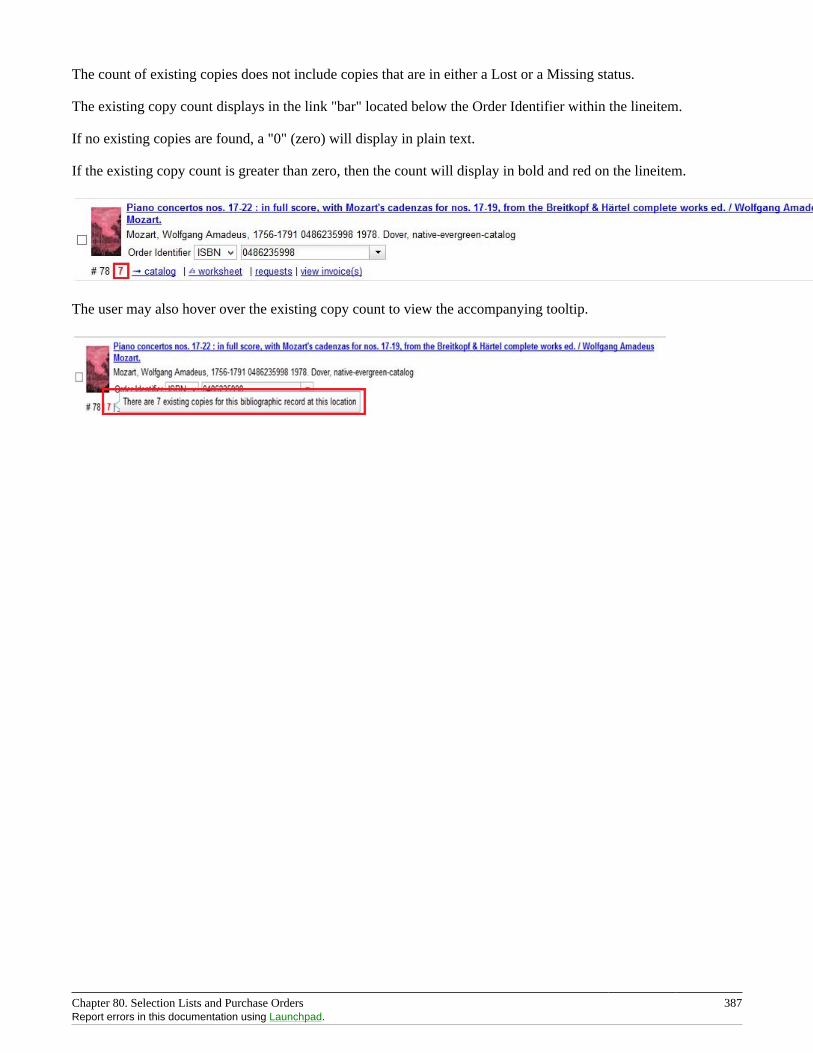
Chapter 80. Selection Lists and Purchase Orders 387Report errors in this documentation using Launchpad.
The count of existing copies does not include copies that are in either a Lost or a Missing status.
The existing copy count displays in the link "bar" located below the Order Identifier within the lineitem.
If no existing copies are found, a "0" (zero) will display in plain text.
If the existing copy count is greater than zero, then the count will display in bold and red on the lineitem.
The user may also hover over the existing copy count to view the accompanying tooltip.
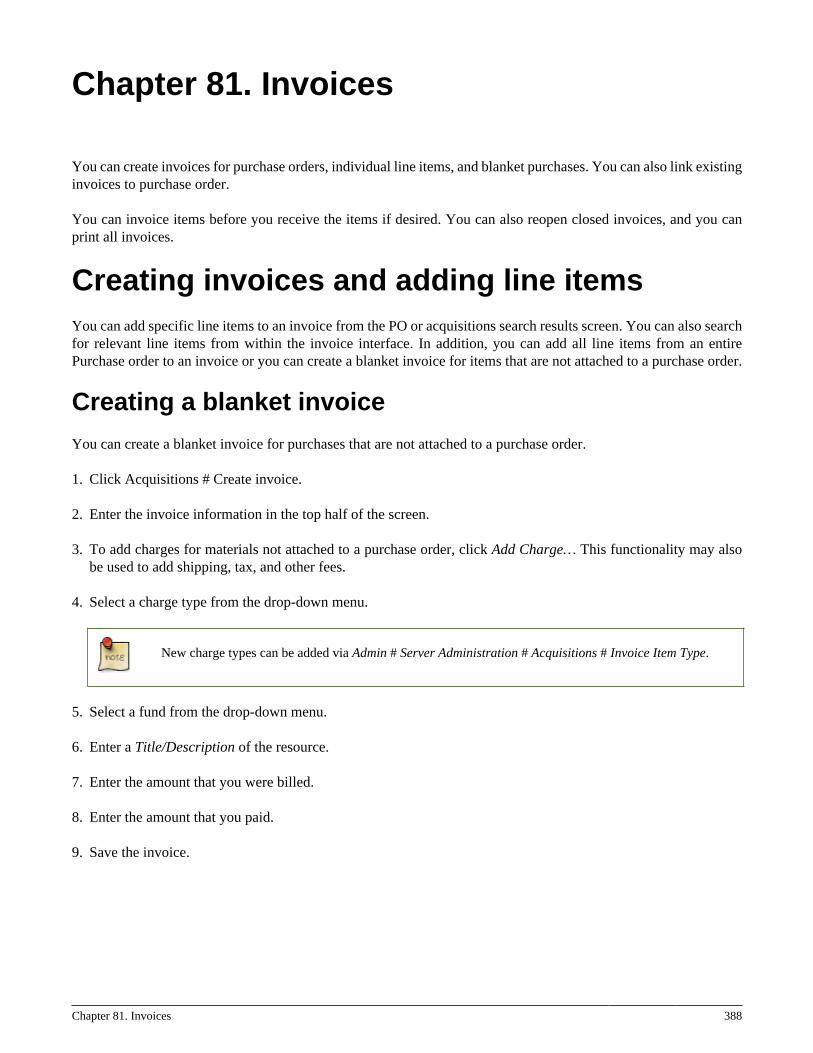
Chapter 81. Invoices 388
Chapter 81. Invoices
You can create invoices for purchase orders, individual line items, and blanket purchases. You can also link existinginvoices to purchase order.
You can invoice items before you receive the items if desired. You can also reopen closed invoices, and you canprint all invoices.
Creating invoices and adding line itemsYou can add specific line items to an invoice from the PO or acquisitions search results screen. You can also searchfor relevant line items from within the invoice interface. In addition, you can add all line items from an entirePurchase order to an invoice or you can create a blanket invoice for items that are not attached to a purchase order.
Creating a blanket invoice
You can create a blanket invoice for purchases that are not attached to a purchase order.
1. Click Acquisitions # Create invoice.
2. Enter the invoice information in the top half of the screen.
3. To add charges for materials not attached to a purchase order, click Add Charge… This functionality may alsobe used to add shipping, tax, and other fees.
4. Select a charge type from the drop-down menu.
New charge types can be added via Admin # Server Administration # Acquisitions # Invoice Item Type.
5. Select a fund from the drop-down menu.
6. Enter a Title/Description of the resource.
7. Enter the amount that you were billed.
8. Enter the amount that you paid.
9. Save the invoice.
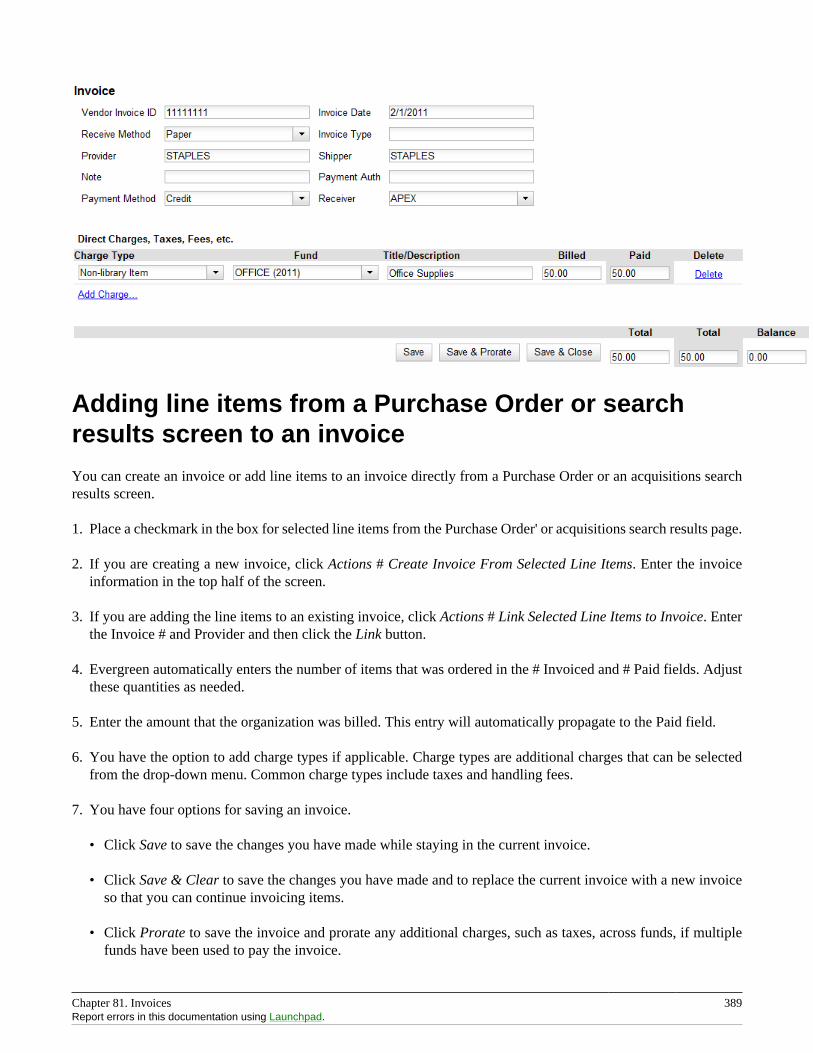
Chapter 81. Invoices 389Report errors in this documentation using Launchpad.
Adding line items from a Purchase Order or searchresults screen to an invoice
You can create an invoice or add line items to an invoice directly from a Purchase Order or an acquisitions searchresults screen.
1. Place a checkmark in the box for selected line items from the Purchase Order' or acquisitions search results page.
2. If you are creating a new invoice, click Actions # Create Invoice From Selected Line Items. Enter the invoiceinformation in the top half of the screen.
3. If you are adding the line items to an existing invoice, click Actions # Link Selected Line Items to Invoice. Enterthe Invoice # and Provider and then click the Link button.
4. Evergreen automatically enters the number of items that was ordered in the # Invoiced and # Paid fields. Adjustthese quantities as needed.
5. Enter the amount that the organization was billed. This entry will automatically propagate to the Paid field.
6. You have the option to add charge types if applicable. Charge types are additional charges that can be selectedfrom the drop-down menu. Common charge types include taxes and handling fees.
7. You have four options for saving an invoice.
• Click Save to save the changes you have made while staying in the current invoice.
• Click Save & Clear to save the changes you have made and to replace the current invoice with a new invoiceso that you can continue invoicing items.
• Click Prorate to save the invoice and prorate any additional charges, such as taxes, across funds, if multiplefunds have been used to pay the invoice.
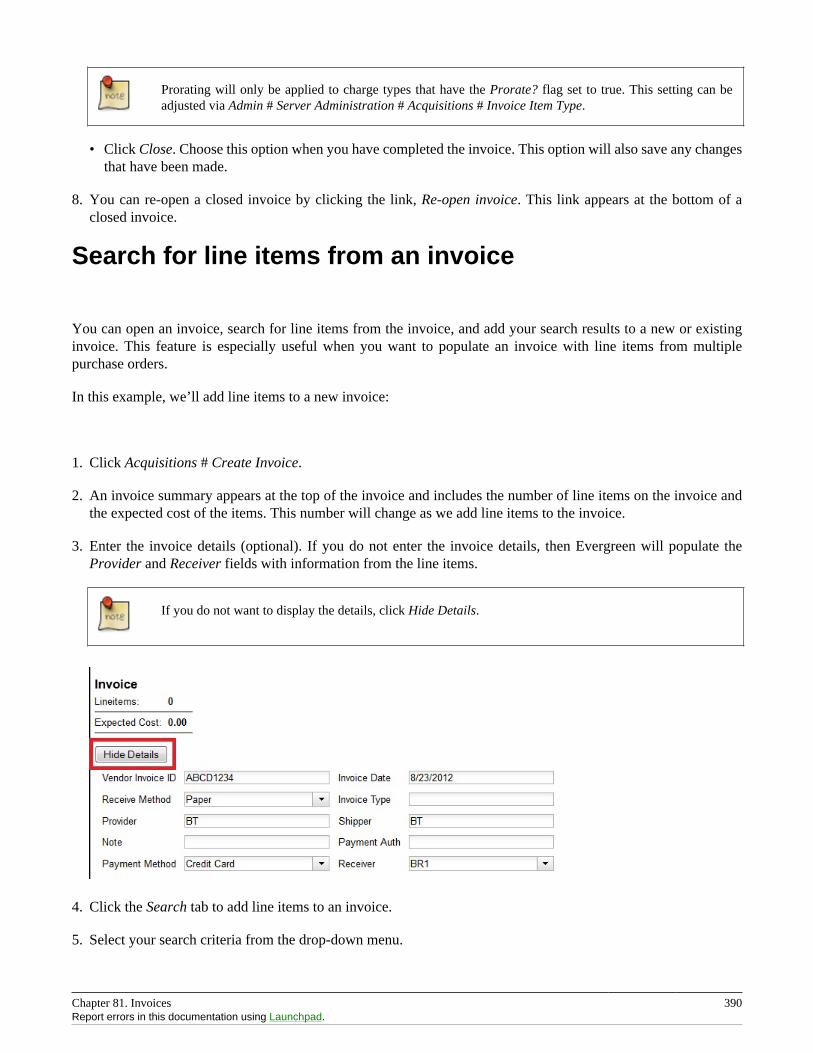
Chapter 81. Invoices 390Report errors in this documentation using Launchpad.
Prorating will only be applied to charge types that have the Prorate? flag set to true. This setting can beadjusted via Admin # Server Administration # Acquisitions # Invoice Item Type.
• Click Close. Choose this option when you have completed the invoice. This option will also save any changesthat have been made.
8. You can re-open a closed invoice by clicking the link, Re-open invoice. This link appears at the bottom of aclosed invoice.
Search for line items from an invoice
You can open an invoice, search for line items from the invoice, and add your search results to a new or existinginvoice. This feature is especially useful when you want to populate an invoice with line items from multiplepurchase orders.
In this example, we’ll add line items to a new invoice:
1. Click Acquisitions # Create Invoice.
2. An invoice summary appears at the top of the invoice and includes the number of line items on the invoice andthe expected cost of the items. This number will change as we add line items to the invoice.
3. Enter the invoice details (optional). If you do not enter the invoice details, then Evergreen will populate theProvider and Receiver fields with information from the line items.
If you do not want to display the details, click Hide Details.
4. Click the Search tab to add line items to an invoice.
5. Select your search criteria from the drop-down menu.
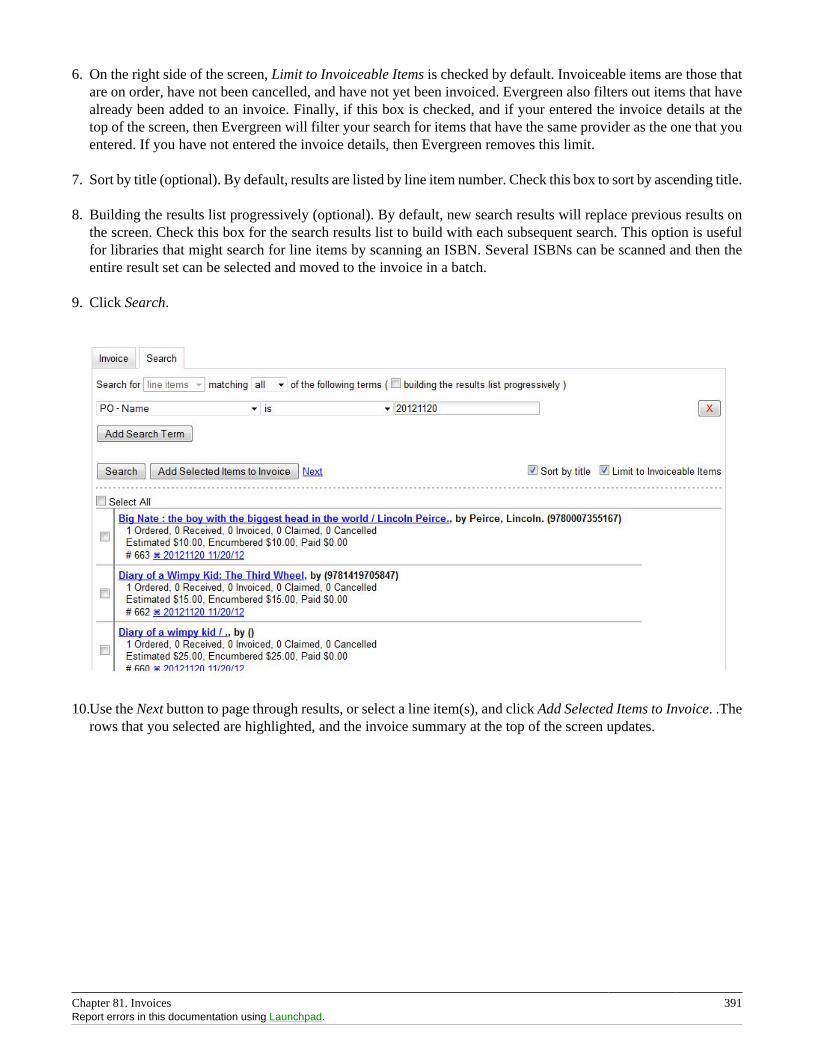
Chapter 81. Invoices 391Report errors in this documentation using Launchpad.
6. On the right side of the screen, Limit to Invoiceable Items is checked by default. Invoiceable items are those thatare on order, have not been cancelled, and have not yet been invoiced. Evergreen also filters out items that havealready been added to an invoice. Finally, if this box is checked, and if your entered the invoice details at thetop of the screen, then Evergreen will filter your search for items that have the same provider as the one that youentered. If you have not entered the invoice details, then Evergreen removes this limit.
7. Sort by title (optional). By default, results are listed by line item number. Check this box to sort by ascending title.
8. Building the results list progressively (optional). By default, new search results will replace previous results onthe screen. Check this box for the search results list to build with each subsequent search. This option is usefulfor libraries that might search for line items by scanning an ISBN. Several ISBNs can be scanned and then theentire result set can be selected and moved to the invoice in a batch.
9. Click Search.
10.Use the Next button to page through results, or select a line item(s), and click Add Selected Items to Invoice. .Therows that you selected are highlighted, and the invoice summary at the top of the screen updates.
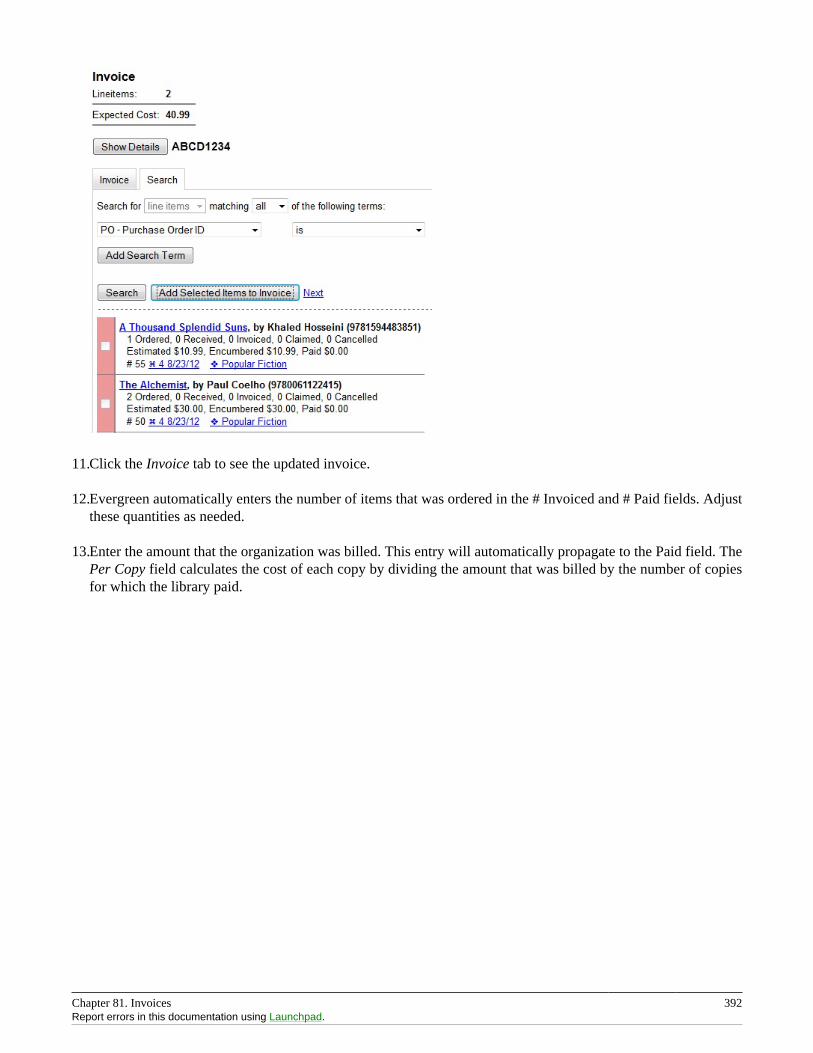
Chapter 81. Invoices 392Report errors in this documentation using Launchpad.
11.Click the Invoice tab to see the updated invoice.
12.Evergreen automatically enters the number of items that was ordered in the # Invoiced and # Paid fields. Adjustthese quantities as needed.
13.Enter the amount that the organization was billed. This entry will automatically propagate to the Paid field. ThePer Copy field calculates the cost of each copy by dividing the amount that was billed by the number of copiesfor which the library paid.
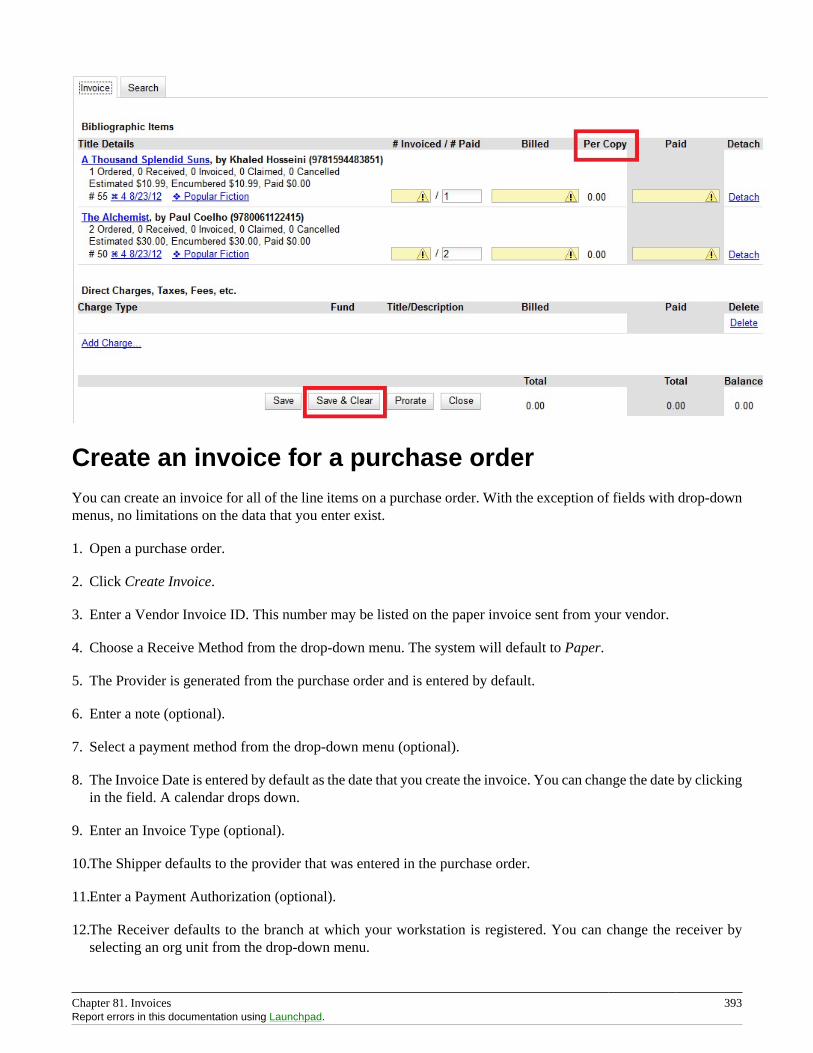
Chapter 81. Invoices 393Report errors in this documentation using Launchpad.
Create an invoice for a purchase orderYou can create an invoice for all of the line items on a purchase order. With the exception of fields with drop-downmenus, no limitations on the data that you enter exist.
1. Open a purchase order.
2. Click Create Invoice.
3. Enter a Vendor Invoice ID. This number may be listed on the paper invoice sent from your vendor.
4. Choose a Receive Method from the drop-down menu. The system will default to Paper.
5. The Provider is generated from the purchase order and is entered by default.
6. Enter a note (optional).
7. Select a payment method from the drop-down menu (optional).
8. The Invoice Date is entered by default as the date that you create the invoice. You can change the date by clickingin the field. A calendar drops down.
9. Enter an Invoice Type (optional).
10.The Shipper defaults to the provider that was entered in the purchase order.
11.Enter a Payment Authorization (optional).
12.The Receiver defaults to the branch at which your workstation is registered. You can change the receiver byselecting an org unit from the drop-down menu.
Chapter 81. Invoices 394Report errors in this documentation using Launchpad.
The bibliographic line items are listed in the next section of the invoice. Along with the title and author ofthe line items is a summary of copies ordered, received, invoiced, claimed, and cancelled. You can also viewthe amounts estimated, encumbered, and paid for each line item. Finally, each line item has a line item IDand links to the selection list (if used) and the purchase order.
13.Evergreen automatically enters the number of items that was ordered in the # Invoiced and # Paid fields. Adjustthese quantities as needed.
14.Enter the amount that the organization was billed. This entry will automatically propagate to the Paid field. ThePer Copy field calculates the cost of each copy by dividing the amount that was billed by the number of copiesfor which the library paid.
15.You have the option to add charge types if applicable. Charge types are additional charges that can be selectedfrom the drop-down menu. Common charge types include taxes and handling fees.
16.You have four options for saving an invoice.
• Click Save to save the changes you have made while staying in the current invoice.
• Click Save & Clear to save the changes you have made and to replace the current invoice with a new invoiceso that you can continue invoicing items.
• Click Prorate to save the invoice and prorate any additional charges, such as taxes, across funds, if multiplefunds have been used to pay the invoice.
Prorating will only be applied to charge types that have the Prorate? flag set to true. This setting can beadjusted via Admin # Server Administration # Acquisitions # Invoice Item Type.
• Click Close. Choose this option when you have completed the invoice. This option will also save any changesthat have been made.
17.You can re-open a closed invoice by clicking the link, Re-open invoice. This link appears at the bottom of aclosed invoice.
Link an existing invoice to a purchase order
You can use the link invoice feature to link an existing invoice to a purchase order. For example, an invoice isreceived for a shipment with items on purchase order #1 and purchase order #2. When the invoice arrives, purchaseorder #1 is retrieved, and the invoice is created. To receive the items on purchase order #2, simply link the invoiceto the purchase order. You do not need to recreate it.
1. Open a purchase order.
2. Click Link Invoice.
3. Enter the Invoice # and the Provider of the invoice to which you wish to link.
4. Click Link.
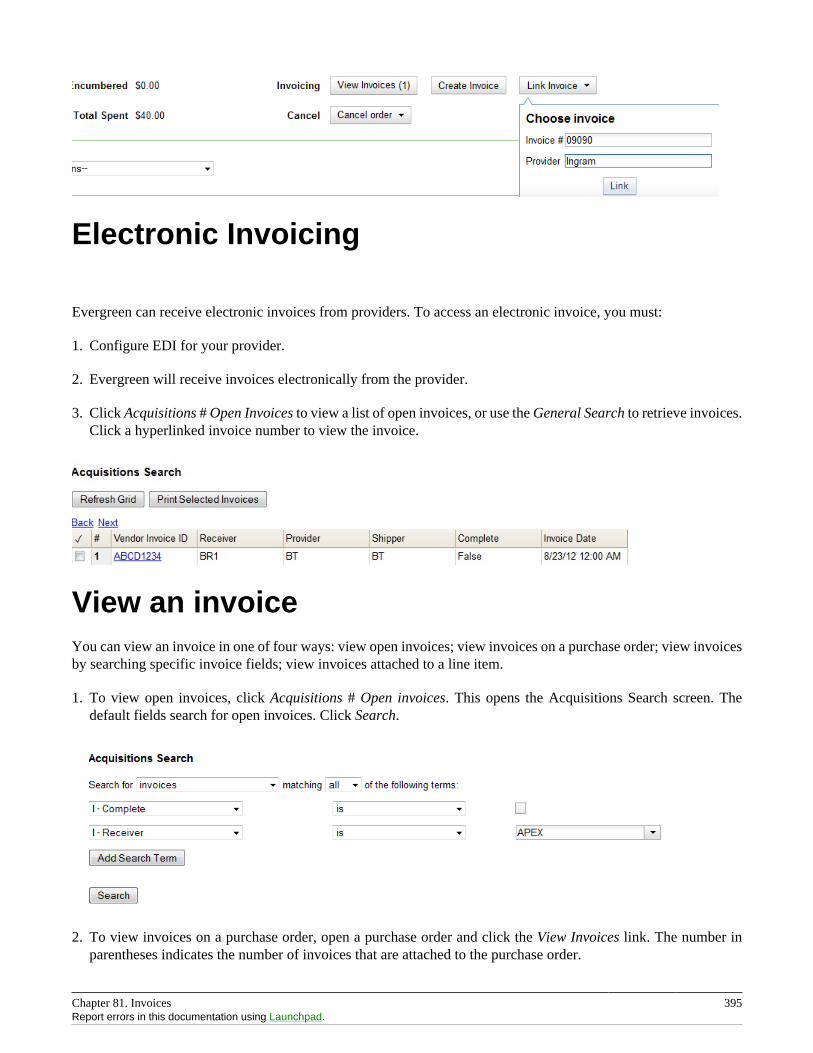
Chapter 81. Invoices 395Report errors in this documentation using Launchpad.
Electronic Invoicing
Evergreen can receive electronic invoices from providers. To access an electronic invoice, you must:
1. Configure EDI for your provider.
2. Evergreen will receive invoices electronically from the provider.
3. Click Acquisitions # Open Invoices to view a list of open invoices, or use the General Search to retrieve invoices.Click a hyperlinked invoice number to view the invoice.
View an invoiceYou can view an invoice in one of four ways: view open invoices; view invoices on a purchase order; view invoicesby searching specific invoice fields; view invoices attached to a line item.
1. To view open invoices, click Acquisitions # Open invoices. This opens the Acquisitions Search screen. Thedefault fields search for open invoices. Click Search.
2. To view invoices on a purchase order, open a purchase order and click the View Invoices link. The number inparentheses indicates the number of invoices that are attached to the purchase order.
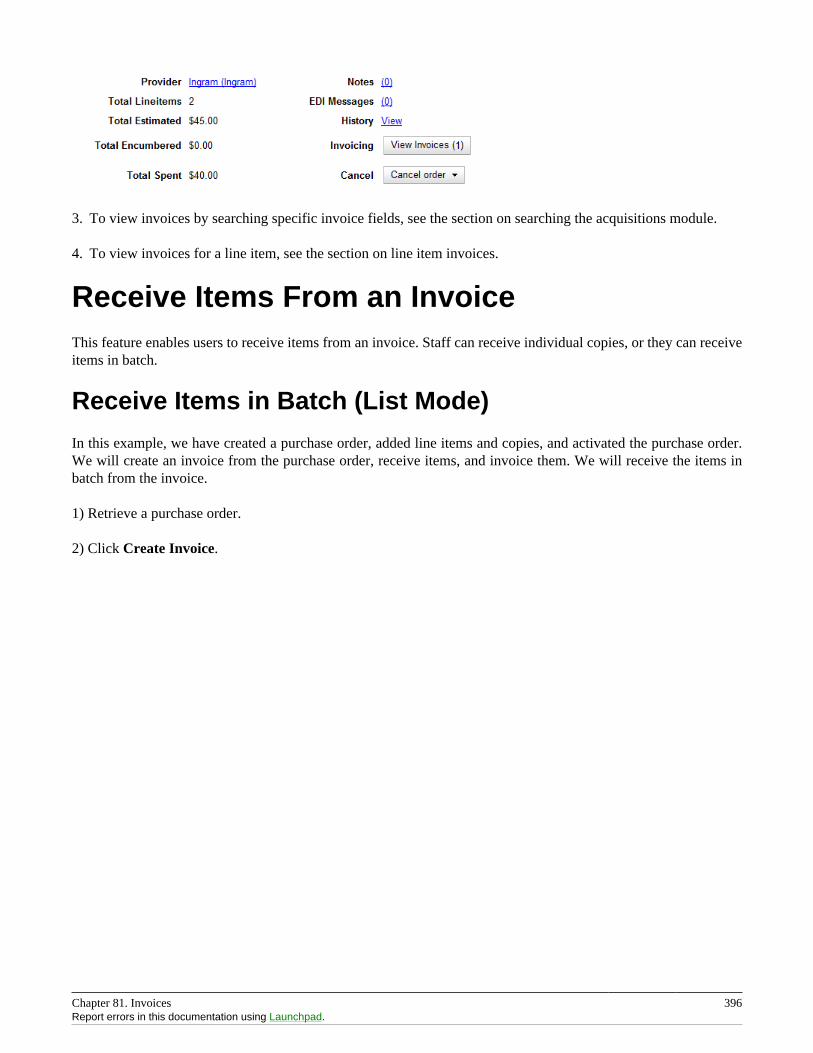
Chapter 81. Invoices 396Report errors in this documentation using Launchpad.
3. To view invoices by searching specific invoice fields, see the section on searching the acquisitions module.
4. To view invoices for a line item, see the section on line item invoices.
Receive Items From an InvoiceThis feature enables users to receive items from an invoice. Staff can receive individual copies, or they can receiveitems in batch.
Receive Items in Batch (List Mode)
In this example, we have created a purchase order, added line items and copies, and activated the purchase order.We will create an invoice from the purchase order, receive items, and invoice them. We will receive the items inbatch from the invoice.
1) Retrieve a purchase order.
2) Click Create Invoice.
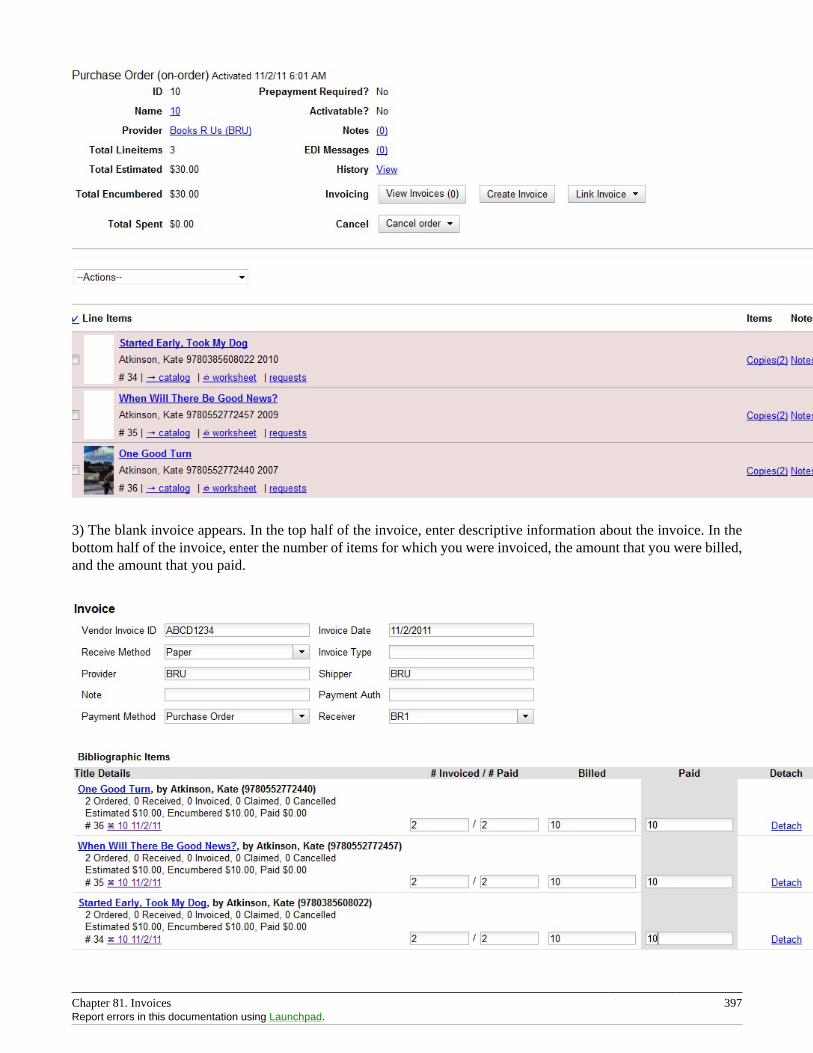
Chapter 81. Invoices 397Report errors in this documentation using Launchpad.
3) The blank invoice appears. In the top half of the invoice, enter descriptive information about the invoice. In thebottom half of the invoice, enter the number of items for which you were invoiced, the amount that you were billed,and the amount that you paid.
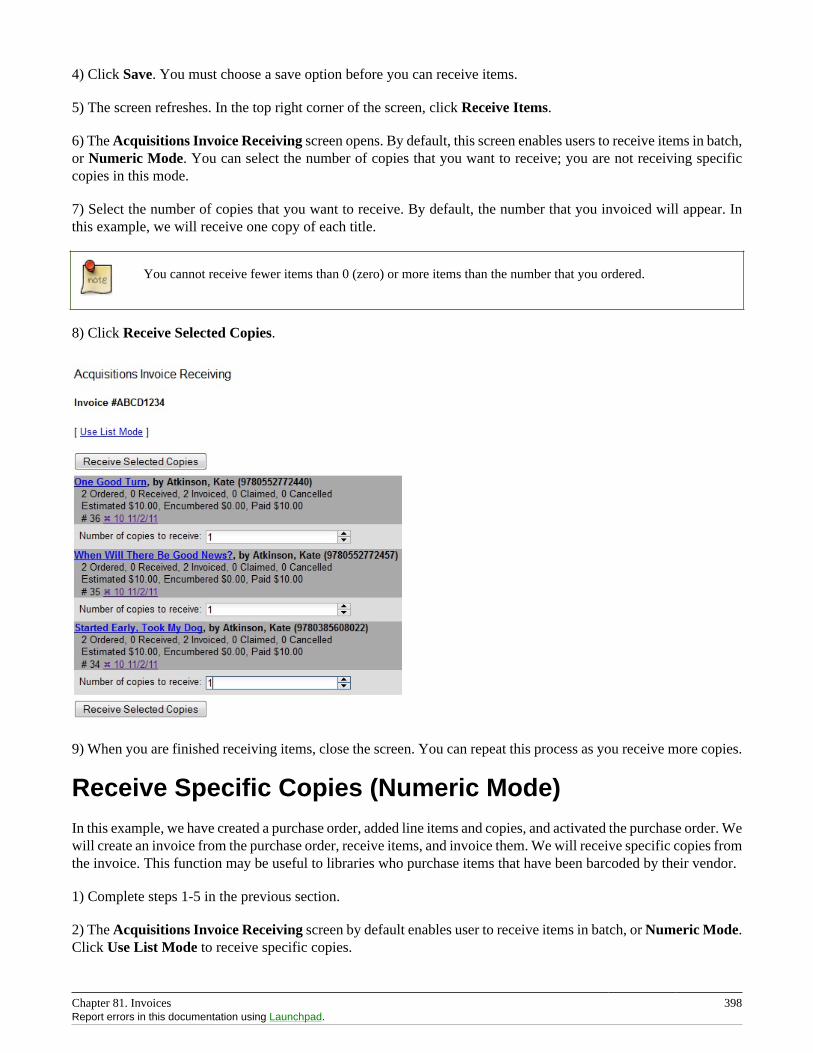
Chapter 81. Invoices 398Report errors in this documentation using Launchpad.
4) Click Save. You must choose a save option before you can receive items.
5) The screen refreshes. In the top right corner of the screen, click Receive Items.
6) The Acquisitions Invoice Receiving screen opens. By default, this screen enables users to receive items in batch,or Numeric Mode. You can select the number of copies that you want to receive; you are not receiving specificcopies in this mode.
7) Select the number of copies that you want to receive. By default, the number that you invoiced will appear. Inthis example, we will receive one copy of each title.
You cannot receive fewer items than 0 (zero) or more items than the number that you ordered.
8) Click Receive Selected Copies.
9) When you are finished receiving items, close the screen. You can repeat this process as you receive more copies.
Receive Specific Copies (Numeric Mode)In this example, we have created a purchase order, added line items and copies, and activated the purchase order. Wewill create an invoice from the purchase order, receive items, and invoice them. We will receive specific copies fromthe invoice. This function may be useful to libraries who purchase items that have been barcoded by their vendor.
1) Complete steps 1-5 in the previous section.
2) The Acquisitions Invoice Receiving screen by default enables user to receive items in batch, or Numeric Mode.Click Use List Mode to receive specific copies.
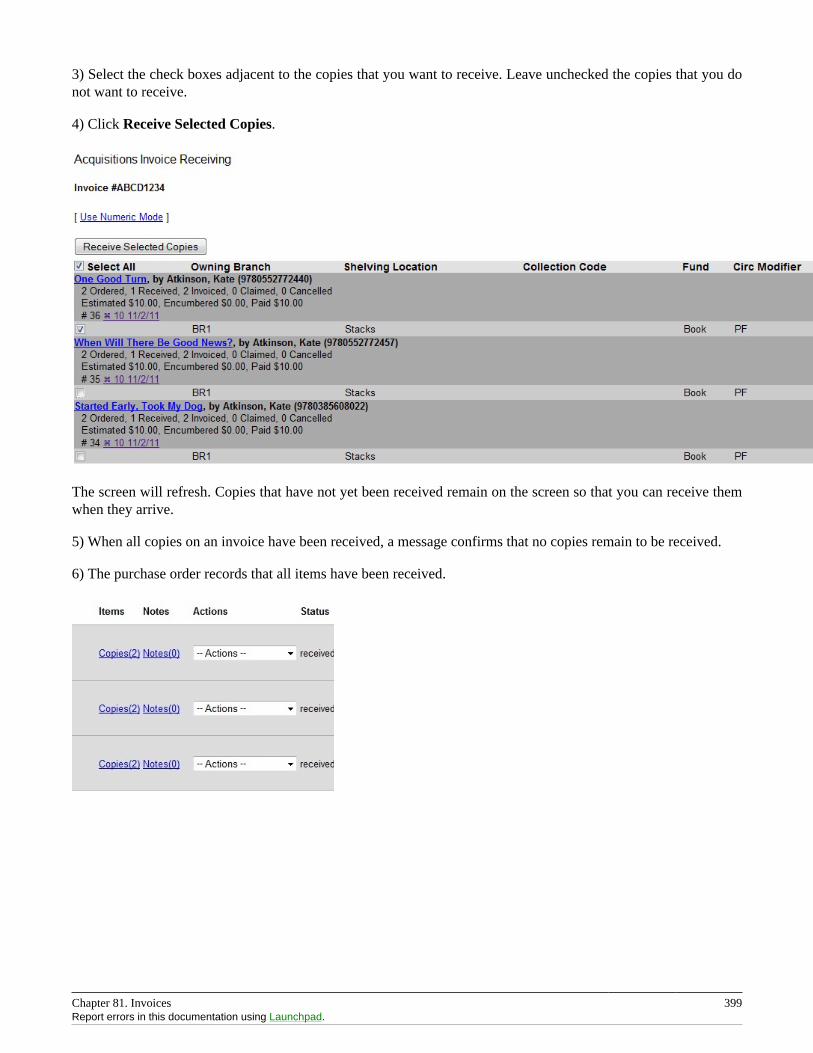
Chapter 81. Invoices 399Report errors in this documentation using Launchpad.
3) Select the check boxes adjacent to the copies that you want to receive. Leave unchecked the copies that you donot want to receive.
4) Click Receive Selected Copies.
The screen will refresh. Copies that have not yet been received remain on the screen so that you can receive themwhen they arrive.
5) When all copies on an invoice have been received, a message confirms that no copies remain to be received.
6) The purchase order records that all items have been received.
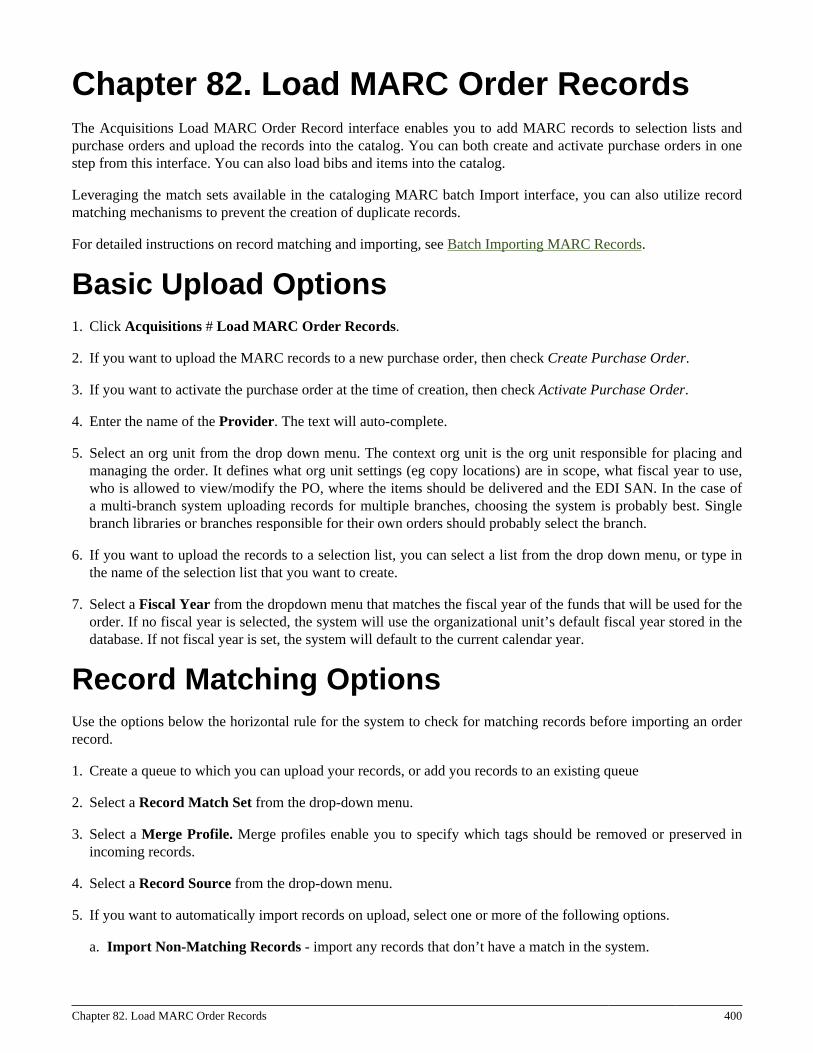
Chapter 82. Load MARC Order Records 400
Chapter 82. Load MARC Order RecordsThe Acquisitions Load MARC Order Record interface enables you to add MARC records to selection lists andpurchase orders and upload the records into the catalog. You can both create and activate purchase orders in onestep from this interface. You can also load bibs and items into the catalog.
Leveraging the match sets available in the cataloging MARC batch Import interface, you can also utilize recordmatching mechanisms to prevent the creation of duplicate records.
For detailed instructions on record matching and importing, see Batch Importing MARC Records.
Basic Upload Options1. Click Acquisitions # Load MARC Order Records.
2. If you want to upload the MARC records to a new purchase order, then check Create Purchase Order.
3. If you want to activate the purchase order at the time of creation, then check Activate Purchase Order.
4. Enter the name of the Provider. The text will auto-complete.
5. Select an org unit from the drop down menu. The context org unit is the org unit responsible for placing andmanaging the order. It defines what org unit settings (eg copy locations) are in scope, what fiscal year to use,who is allowed to view/modify the PO, where the items should be delivered and the EDI SAN. In the case ofa multi-branch system uploading records for multiple branches, choosing the system is probably best. Singlebranch libraries or branches responsible for their own orders should probably select the branch.
6. If you want to upload the records to a selection list, you can select a list from the drop down menu, or type inthe name of the selection list that you want to create.
7. Select a Fiscal Year from the dropdown menu that matches the fiscal year of the funds that will be used for theorder. If no fiscal year is selected, the system will use the organizational unit’s default fiscal year stored in thedatabase. If not fiscal year is set, the system will default to the current calendar year.
Record Matching OptionsUse the options below the horizontal rule for the system to check for matching records before importing an orderrecord.
1. Create a queue to which you can upload your records, or add you records to an existing queue
2. Select a Record Match Set from the drop-down menu.
3. Select a Merge Profile. Merge profiles enable you to specify which tags should be removed or preserved inincoming records.
4. Select a Record Source from the drop-down menu.
5. If you want to automatically import records on upload, select one or more of the following options.
a. Import Non-Matching Records - import any records that don’t have a match in the system.

Chapter 82. Load MARC Order Records 401Report errors in this documentation using Launchpad.
b. Merge on Exact Match (901c) - use only for records that will match on the 901c field.
c. Merge on Single Match - import records that only have one match in the system.
d. Merge on Best Match - If more than one match is found in the catalog for a given record, Evergreen willattempt to perform the best match as defined by the match score.
6. To only import records that have a quality equal to or greater than the existing record, enter a Best/Single MatchMinimum Quality Ratio. Divide the incoming record quality score, as determined by the match set’s qualitymetrics, by the record quality score of the best match that exists in the catalog. If you want to ensure that theinbound record is only imported when it has a higher quality than the best match, then you must enter a ratio thatis higher than 1, such as 1.1. If you want to bypass all quality restraints, enter a 0 (zero) in this field.
7. Select an Insufficient Quality Fall-Through Profile if desired. This field enables you to indicate that if theinbound record does not meet the configured quality standards, then you may still import the record using analternate merge profile. This field is typically used for selecting a merge profile that allows the user to importholdings attached to a lower quality record without replacing the existing (target) record with the incoming record.This field is optional.
8. If your order records contain holdings information, by default, Evergreen will load them as acquisitions copies.(Note: These can be overlayed with real copies during the MARC batch importing process.) Or you can selectLoad Items for Imported Records to load them as live copies that display in the catalog.
Default Upload SettingsYou can set default upload values by modifying the following settings in Admin # Local Administration # LibrarySettings Editor:
• Upload Activate PO
• Upload Create PO
• Upload Default Insufficient Quality Fall-Thru Profile
• Upload Default Match Set
• Upload Default Merge Profile
• Upload Upload Default Min. Quality Ratio
• Upload Default Provider
• Upload Import Non Matching by Default
• Upload Load Items for Imported Records by Default
• Upload Merge on Best Match by Default
• Upload Merge on Exact Match by Default
• Upload Merge on Single Match by Default
Chapter 82. Load MARC Order Records 402Report errors in this documentation using Launchpad.
Sticky SettingsIf the above default settings are not implemented, the selections/values used in the following fields will be stickyand will automatically populate the fields the next time the Load MARC Order Records screen is pulled up:
• Create Purchase Order
• Activate Purchase Order
• Context Org Unit
• Record Match Set
• Merge Profile
• Import Non-Matching Records
• Merge on Exact Match (901c)
• Merge on Single Match
• Merge on Best Match
• Best/Single Match Minimum Quality Ratio
• Insufficient Quality Fall-Through Profile
• Load Items for Imported Records
Use Cases for MARC Order Upload formYou can add items to a selection list or purchase order and ignore the record matching options, or you can use bothacquisitions and cataloging functions. In these examples, you will use both functions.
Example 1 Using the Acquisitions MARC Batch Load interface, upload MARC records to a selection list and importqueue, and match queued records with existing catalog records.
In this example, an acquisitions librarian has received a batch of MARC records from a vendor. She will add therecords to a selection list and a Vandelay record queue.
A cataloger will later view the queue, edit the records, and import them into the catalog.
1. Click Acquisitions # Load MARC Order Records
2. Add MARC order records to a Selection list and/or a Purchase Order. Check the box to create a purchase orderif desired.
3. Select a Provider from the drop-down menu, or begin typing the code for the provider, and the field will auto-fill.
4. Select a Context Org Unit from the drop down-menu, or begin typing the code for the context org unit, andthe field will auto-fill.
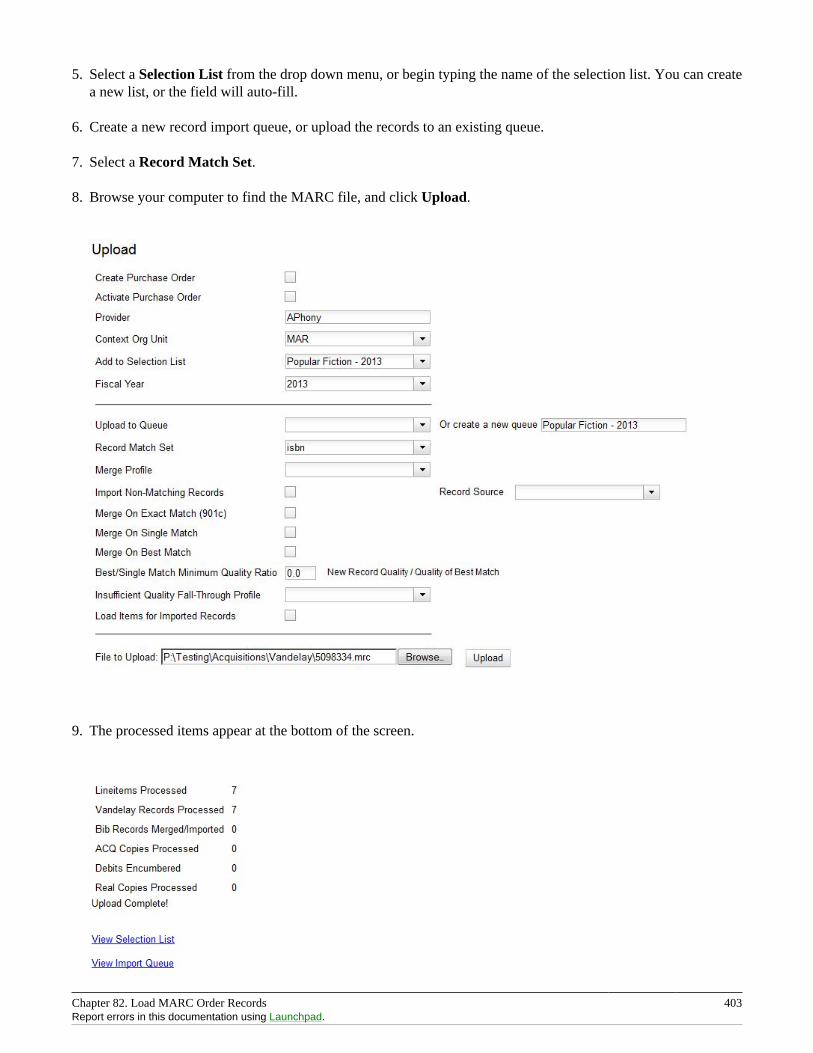
Chapter 82. Load MARC Order Records 403Report errors in this documentation using Launchpad.
5. Select a Selection List from the drop down menu, or begin typing the name of the selection list. You can createa new list, or the field will auto-fill.
6. Create a new record import queue, or upload the records to an existing queue.
7. Select a Record Match Set.
8. Browse your computer to find the MARC file, and click Upload.
9. The processed items appear at the bottom of the screen.
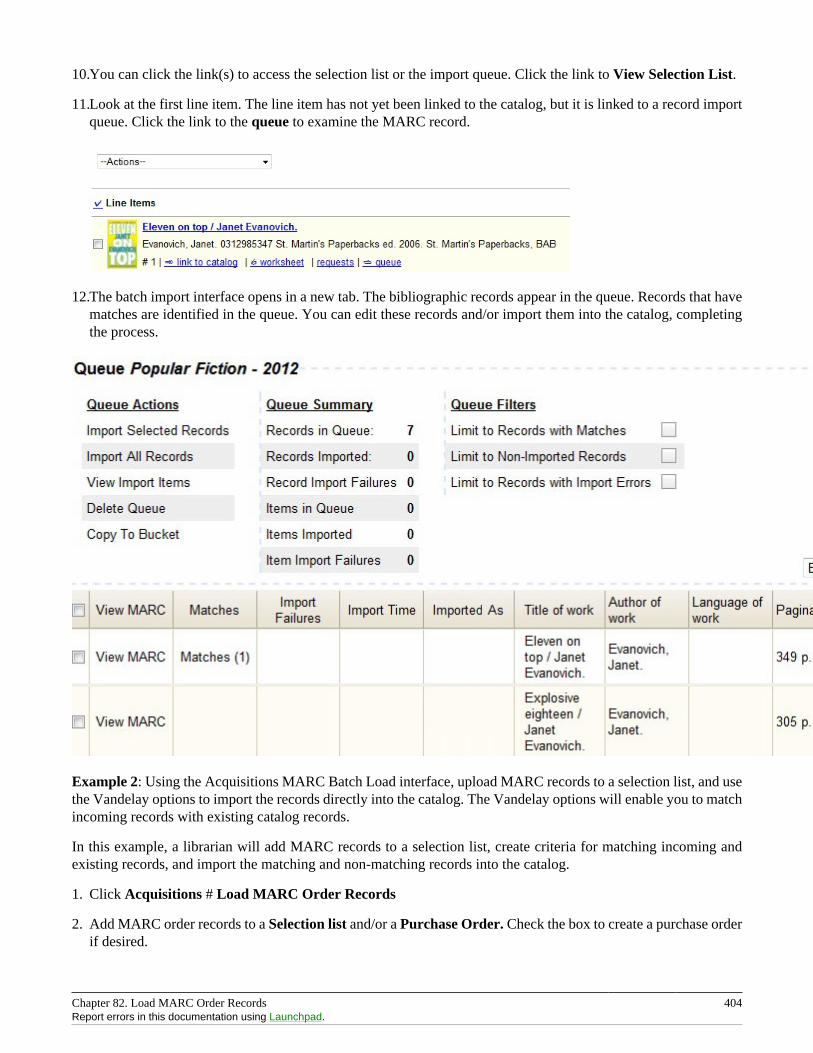
Chapter 82. Load MARC Order Records 404Report errors in this documentation using Launchpad.
10.You can click the link(s) to access the selection list or the import queue. Click the link to View Selection List.
11.Look at the first line item. The line item has not yet been linked to the catalog, but it is linked to a record importqueue. Click the link to the queue to examine the MARC record.
12.The batch import interface opens in a new tab. The bibliographic records appear in the queue. Records that havematches are identified in the queue. You can edit these records and/or import them into the catalog, completingthe process.
Example 2: Using the Acquisitions MARC Batch Load interface, upload MARC records to a selection list, and usethe Vandelay options to import the records directly into the catalog. The Vandelay options will enable you to matchincoming records with existing catalog records.
In this example, a librarian will add MARC records to a selection list, create criteria for matching incoming andexisting records, and import the matching and non-matching records into the catalog.
1. Click Acquisitions # Load MARC Order Records
2. Add MARC order records to a Selection list and/or a Purchase Order. Check the box to create a purchase orderif desired.
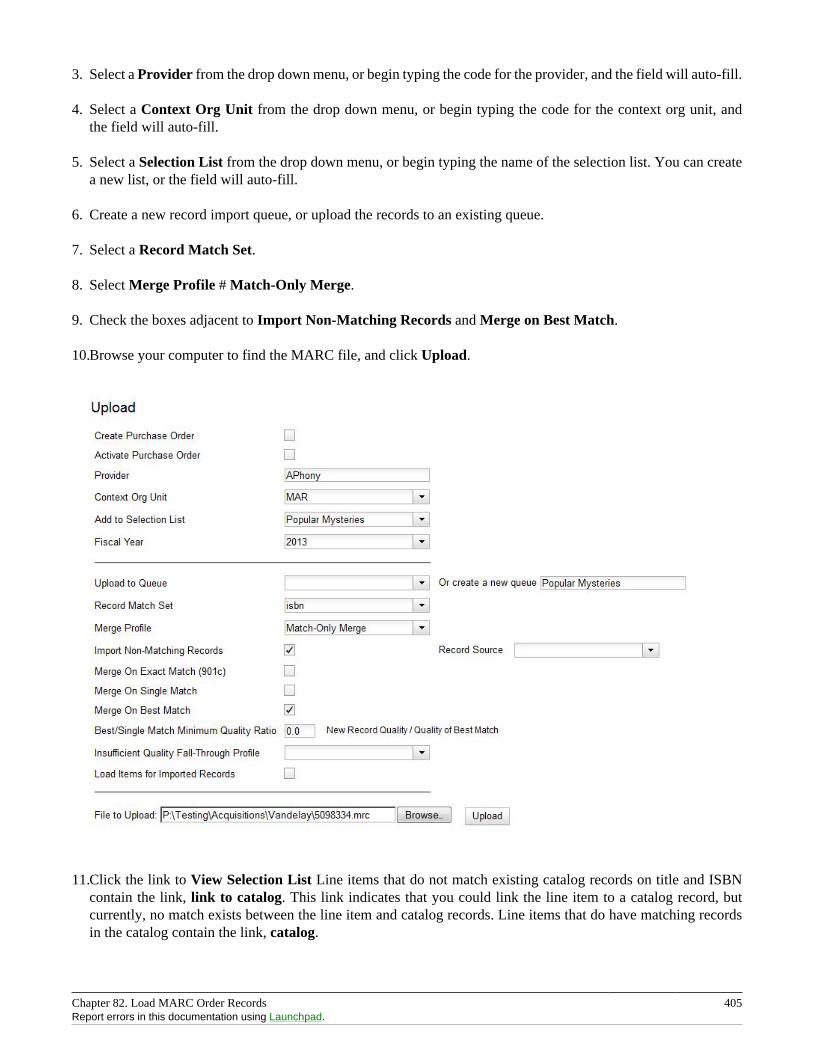
Chapter 82. Load MARC Order Records 405Report errors in this documentation using Launchpad.
3. Select a Provider from the drop down menu, or begin typing the code for the provider, and the field will auto-fill.
4. Select a Context Org Unit from the drop down menu, or begin typing the code for the context org unit, andthe field will auto-fill.
5. Select a Selection List from the drop down menu, or begin typing the name of the selection list. You can createa new list, or the field will auto-fill.
6. Create a new record import queue, or upload the records to an existing queue.
7. Select a Record Match Set.
8. Select Merge Profile # Match-Only Merge.
9. Check the boxes adjacent to Import Non-Matching Records and Merge on Best Match.
10.Browse your computer to find the MARC file, and click Upload.
11.Click the link to View Selection List Line items that do not match existing catalog records on title and ISBNcontain the link, link to catalog. This link indicates that you could link the line item to a catalog record, butcurrently, no match exists between the line item and catalog records. Line items that do have matching recordsin the catalog contain the link, catalog.

Chapter 82. Load MARC Order Records 406Report errors in this documentation using Launchpad.
12.Click the catalog link to view the line item in the catalog.
Permissions to use this Feature
IMPORT_MARC - Using batch importer to create new bib records requires the IMPORT_MARC permission (sameas open-ils.cat.biblio.record.xml.import). If the permission fails, the queued record will fail import and be stampedwith a new "import.record.perm_failure" import error
IMPORT_ACQ_LINEITEM_BIB_RECORD_UPLOAD - This allows interfaces leveraging the batch importer,such as Acquisitions, to create a higher barrier to entry. This permission prevents users from creating new bib recordsdirectly from the ACQ vendor MARC file upload interface.
Chapter 83. Placing purchase requests from a patron record 407
Chapter 83. Placing purchase requestsfrom a patron record
Patrons may wish to suggest titles for your Library to purchase. You can track these requests within Evergreen,whether or not you are using the acquisitions module for other purposes. This section describes how you can recordthese requests within a patron’s record.
1. Retrieve the patron’s record.
2. Select Other -# Acquisition Requests. This takes you to the Requests Screen.
3. The Requests Screen will show any other requests that this patron has made. You may sort the requests by clickingon the column headers.
4. To add the request, click the Create Request button.
You will need the CREATE_PURCHASE_REQUEST permission to add a request.
5. The request type field is required. Every other field is optional, although it is recommended that you enter asmuch information about the request as possible.
6. The Pickup Library, User, and Request Date/Time field will be filled in automatically.
7. You have the option to automatically place a hold for the patron if your library decides to purchase the item. Ifyou’d like Evergreen to generate this hold, check the Place Hold box.
8. When you have finished entering information about the request, click the Save button.
Chapter 84. Managing patron purchase requests 408
Chapter 84. Managing patron purchaserequests
Patrons may wish to suggest titles for your Library to purchase. You can track these requests within Evergreen,whether or not you are using the acquisitions module for other purposes. This section describes how you can managethese requests.
1. Go to Acquisitions # Patron Requests.
2. The Requests Screen will show any other requests that patrons have made. You may sort the requests by clickingon the column headers.
3. You can filter this screen by organizational unit or patron’s barcode. There are additional filter options availableif you click on Filter.
4. To remove a user filter, click on User and leave the barcode field blank.
Adding a requestYou may add a patron purchase request using this screen.
1. To add the request, click the Create Request button.
You will need the CREATE_PURCHASE_REQUEST permission to add a request.
2. If you have not already filtered the search using a patron’s barcode, you will be prompted to enter it beforestarting the request.
3. The request type field is required. Every other field is optional, although it is recommended that you enter asmuch information about the request as possible.
4. The Pickup Library, User, and Request Date/Time field will be filled in automatically.
5. You have the option to automatically place a hold for the patron if your library decides to purchase the item. Ifyou’d like Evergreen to generate this hold, check the Place Hold box.
6. When you have finished entering information about the request, click the Save button.
Adding requests to selection listsIf you’d like to purchase a patron’s request, follow these steps:
1. Click on the blue hyperlinked title of the patron’s request.
2. Click the Add to Selection List button.
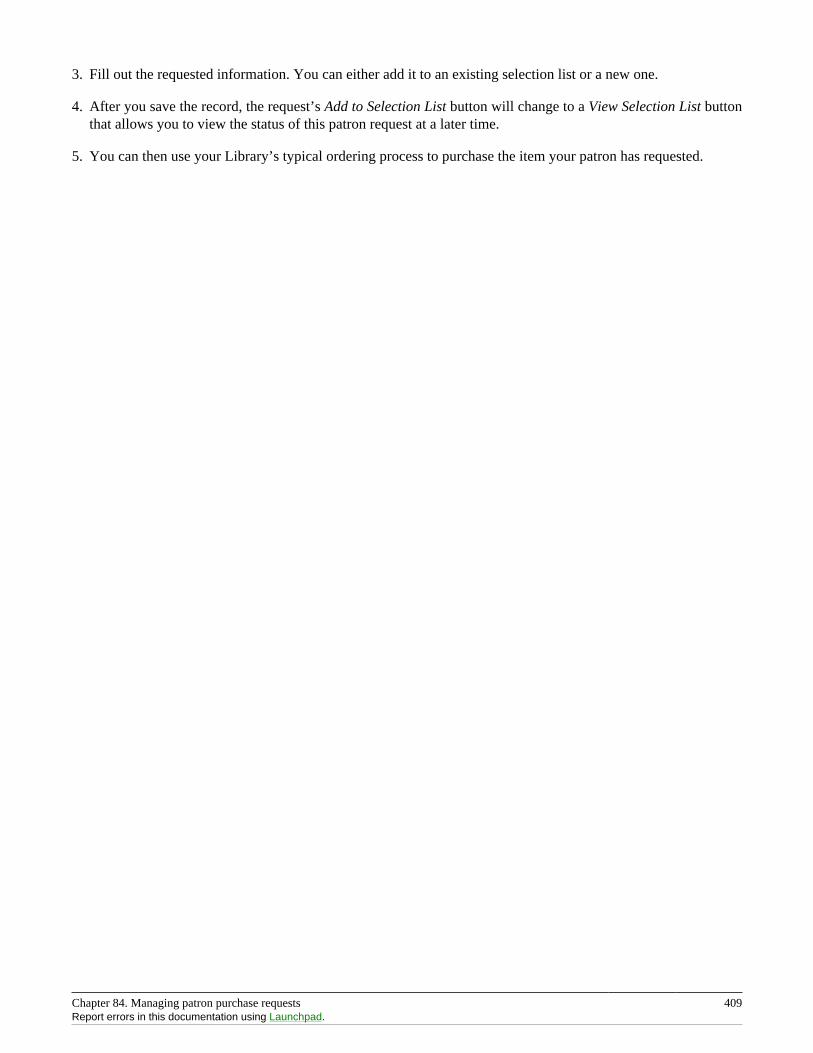
Chapter 84. Managing patron purchase requests 409Report errors in this documentation using Launchpad.
3. Fill out the requested information. You can either add it to an existing selection list or a new one.
4. After you save the record, the request’s Add to Selection List button will change to a View Selection List buttonthat allows you to view the status of this patron request at a later time.
5. You can then use your Library’s typical ordering process to purchase the item your patron has requested.

Part IX. Cataloging
Part IX. Cataloging 411
Table of Contents85. Introduction .......................................................................................................................................... 41286. MARC Fixed Field Editor Right-Click Context Menu Options ....................................................................... 41387. MARC 007 Field Physical Characteristics Wizard ....................................................................................... 41588. Batch Importing MARC Records .............................................................................................................. 419
Permissions ........................................................................................................................................ 419Record Display Attributes ..................................................................................................................... 419Record Match Sets .............................................................................................................................. 419
Creating a Match Set ................................................................................................................... 419Replace Mode ............................................................................................................................ 423Quality Metrics ........................................................................................................................... 424
Import Item Attributes ......................................................................................................................... 424Import Records ................................................................................................................................... 426Default Values for Item Import ............................................................................................................. 432Importing Authority Records from the Staff Client .................................................................................... 432
89. Overlay Existing Catalog Record via Z39.50 Import .................................................................................... 43490. Z39.50 Search Enhancements ................................................................................................................... 43791. Monograph Parts ................................................................................................................................... 441
Add a Monograph Part to an Existing Record .......................................................................................... 441Monograph Part Merging ..................................................................................................................... 443
92. Conjoined Items .................................................................................................................................... 444Using the Conjoined Items Feature ........................................................................................................ 444
93. Cataloging Electronic Resources — Finding Them in Catalog Searches ............................................................ 448Adding a Located URI to the Record ..................................................................................................... 448
Located URI Example 1 ............................................................................................................... 449Located URI Example 2 ............................................................................................................... 449
Using Transcendent Bib Sources for Electronic Resources .......................................................................... 45094. TPAC Copy Edit Links ........................................................................................................................... 45195. MARC Batch Edit ................................................................................................................................. 452
Action (Rule Type) ............................................................................................................................. 452Other Template Fields .......................................................................................................................... 452
Advanced Matching Restrictions (Optional) ..................................................................................... 45296. Manage Authorities ................................................................................................................................ 454
Searching for authorities ....................................................................................................................... 45497. Link Checker ........................................................................................................................................ 456
Search for URLs ................................................................................................................................. 456View Your Results .............................................................................................................................. 457Manage Your Sessions ......................................................................................................................... 458
Edit Columns ............................................................................................................................. 458Clone Sessions ........................................................................................................................... 458View Verification Attempts .......................................................................................................... 458

Chapter 85. Introduction 412
Chapter 85. IntroductionCataloguers should use this part for understanding the cataloguing procedures used in Evergreen.
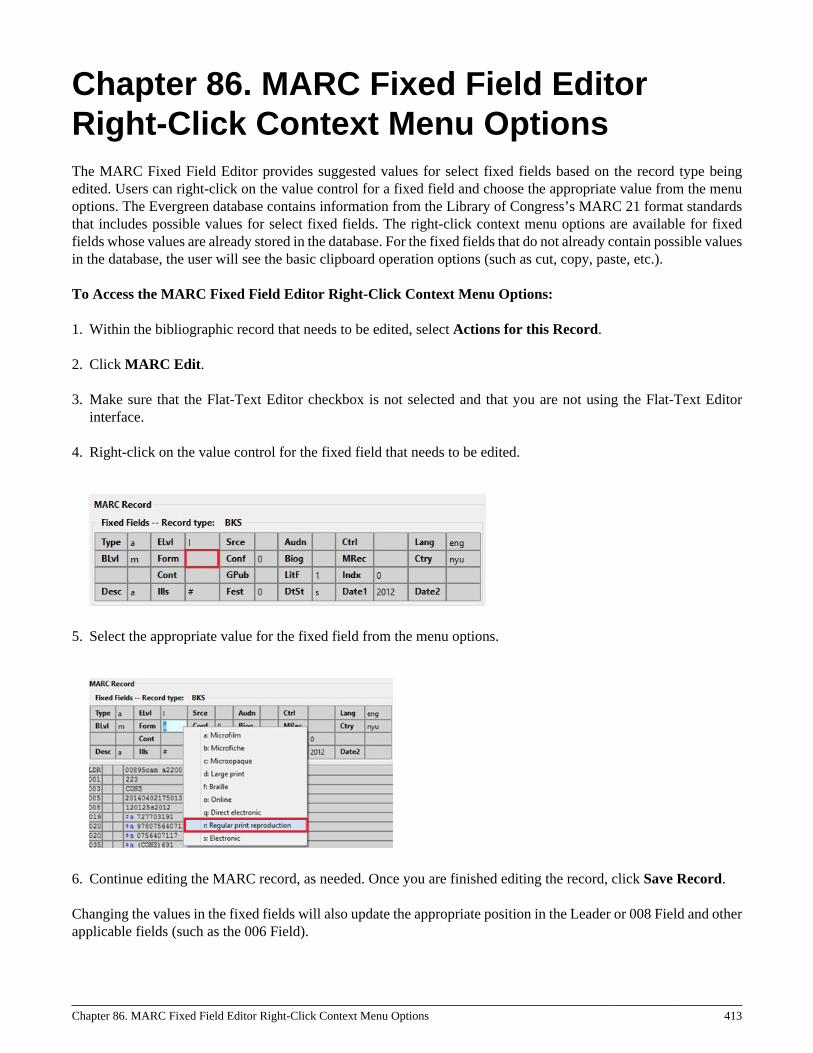
Chapter 86. MARC Fixed Field Editor Right-Click Context Menu Options 413
Chapter 86. MARC Fixed Field EditorRight-Click Context Menu OptionsThe MARC Fixed Field Editor provides suggested values for select fixed fields based on the record type beingedited. Users can right-click on the value control for a fixed field and choose the appropriate value from the menuoptions. The Evergreen database contains information from the Library of Congress’s MARC 21 format standardsthat includes possible values for select fixed fields. The right-click context menu options are available for fixedfields whose values are already stored in the database. For the fixed fields that do not already contain possible valuesin the database, the user will see the basic clipboard operation options (such as cut, copy, paste, etc.).
To Access the MARC Fixed Field Editor Right-Click Context Menu Options:
1. Within the bibliographic record that needs to be edited, select Actions for this Record.
2. Click MARC Edit.
3. Make sure that the Flat-Text Editor checkbox is not selected and that you are not using the Flat-Text Editorinterface.
4. Right-click on the value control for the fixed field that needs to be edited.
5. Select the appropriate value for the fixed field from the menu options.
6. Continue editing the MARC record, as needed. Once you are finished editing the record, click Save Record.
Changing the values in the fixed fields will also update the appropriate position in the Leader or 008 Field and otherapplicable fields (such as the 006 Field).
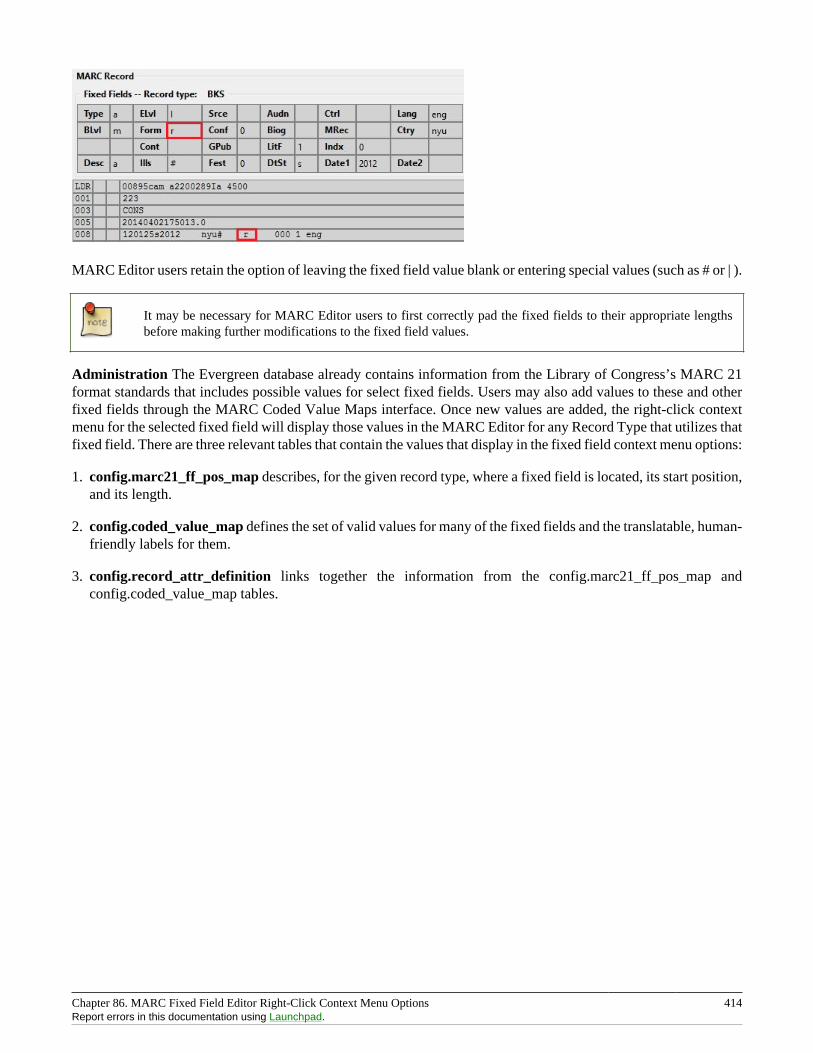
Chapter 86. MARC Fixed Field Editor Right-Click Context Menu Options 414Report errors in this documentation using Launchpad.
MARC Editor users retain the option of leaving the fixed field value blank or entering special values (such as # or | ).
It may be necessary for MARC Editor users to first correctly pad the fixed fields to their appropriate lengthsbefore making further modifications to the fixed field values.
Administration The Evergreen database already contains information from the Library of Congress’s MARC 21format standards that includes possible values for select fixed fields. Users may also add values to these and otherfixed fields through the MARC Coded Value Maps interface. Once new values are added, the right-click contextmenu for the selected fixed field will display those values in the MARC Editor for any Record Type that utilizes thatfixed field. There are three relevant tables that contain the values that display in the fixed field context menu options:
1. config.marc21_ff_pos_map describes, for the given record type, where a fixed field is located, its start position,and its length.
2. config.coded_value_map defines the set of valid values for many of the fixed fields and the translatable, human-friendly labels for them.
3. config.record_attr_definition links together the information from the config.marc21_ff_pos_map andconfig.coded_value_map tables.
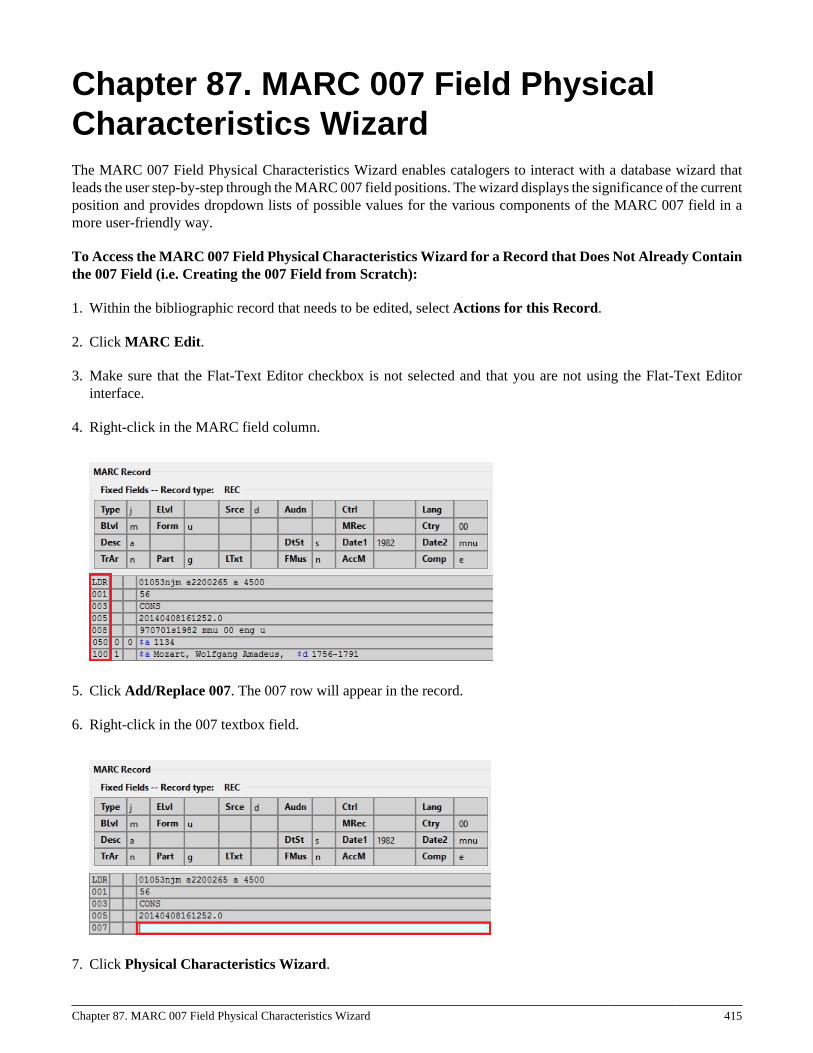
Chapter 87. MARC 007 Field Physical Characteristics Wizard 415
Chapter 87. MARC 007 Field PhysicalCharacteristics WizardThe MARC 007 Field Physical Characteristics Wizard enables catalogers to interact with a database wizard thatleads the user step-by-step through the MARC 007 field positions. The wizard displays the significance of the currentposition and provides dropdown lists of possible values for the various components of the MARC 007 field in amore user-friendly way.
To Access the MARC 007 Field Physical Characteristics Wizard for a Record that Does Not Already Containthe 007 Field (i.e. Creating the 007 Field from Scratch):
1. Within the bibliographic record that needs to be edited, select Actions for this Record.
2. Click MARC Edit.
3. Make sure that the Flat-Text Editor checkbox is not selected and that you are not using the Flat-Text Editorinterface.
4. Right-click in the MARC field column.
5. Click Add/Replace 007. The 007 row will appear in the record.
6. Right-click in the 007 textbox field.
7. Click Physical Characteristics Wizard.
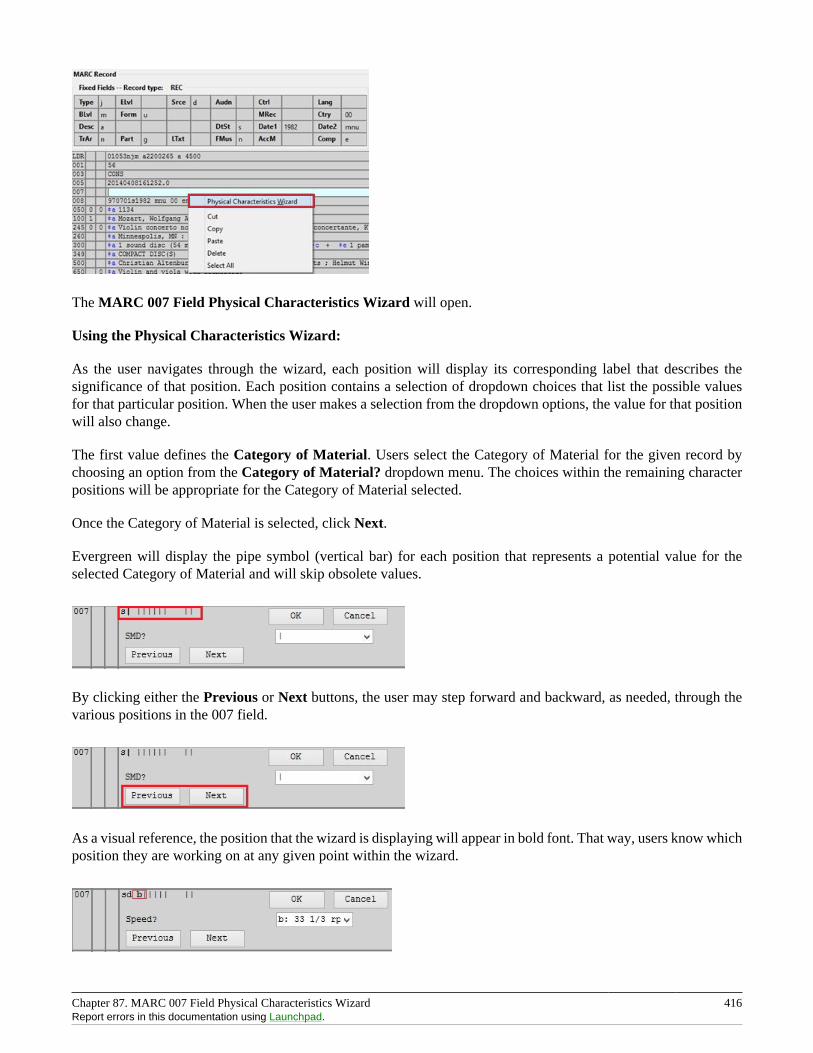
Chapter 87. MARC 007 Field Physical Characteristics Wizard 416Report errors in this documentation using Launchpad.
The MARC 007 Field Physical Characteristics Wizard will open.
Using the Physical Characteristics Wizard:
As the user navigates through the wizard, each position will display its corresponding label that describes thesignificance of that position. Each position contains a selection of dropdown choices that list the possible valuesfor that particular position. When the user makes a selection from the dropdown options, the value for that positionwill also change.
The first value defines the Category of Material. Users select the Category of Material for the given record bychoosing an option from the Category of Material? dropdown menu. The choices within the remaining characterpositions will be appropriate for the Category of Material selected.
Once the Category of Material is selected, click Next.
Evergreen will display the pipe symbol (vertical bar) for each position that represents a potential value for theselected Category of Material and will skip obsolete values.
By clicking either the Previous or Next buttons, the user may step forward and backward, as needed, through thevarious positions in the 007 field.
As a visual reference, the position that the wizard is displaying will appear in bold font. That way, users know whichposition they are working on at any given point within the wizard.
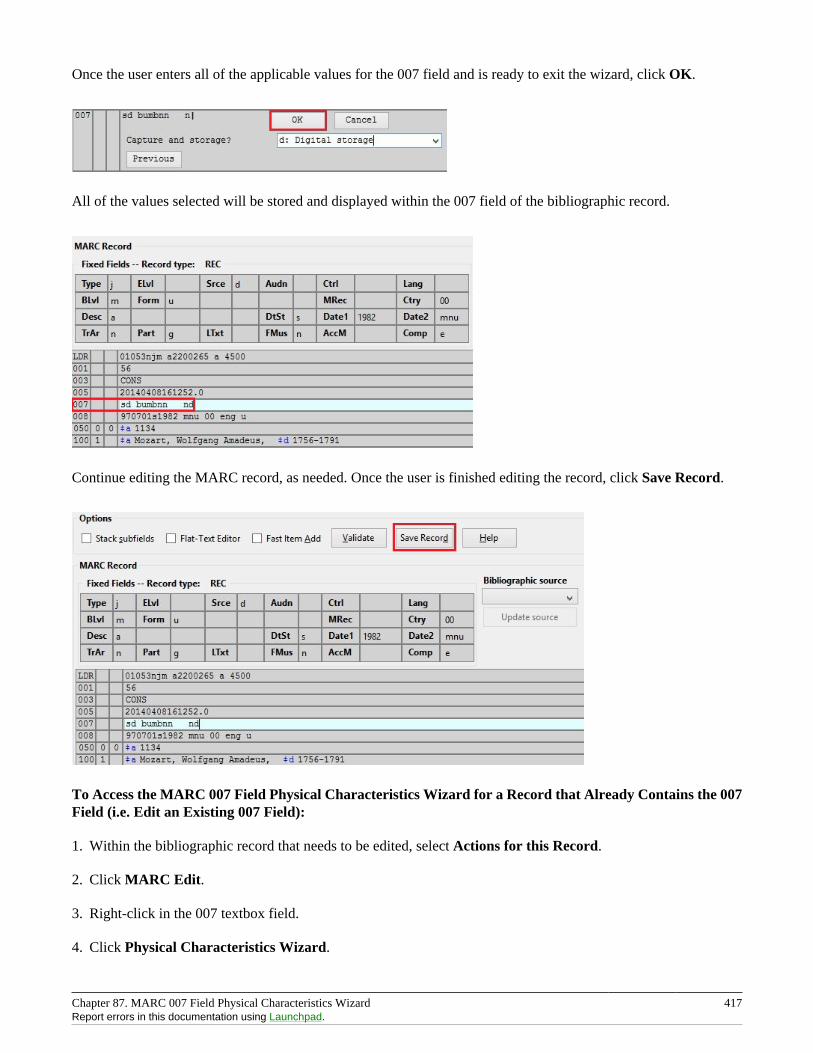
Chapter 87. MARC 007 Field Physical Characteristics Wizard 417Report errors in this documentation using Launchpad.
Once the user enters all of the applicable values for the 007 field and is ready to exit the wizard, click OK.
All of the values selected will be stored and displayed within the 007 field of the bibliographic record.
Continue editing the MARC record, as needed. Once the user is finished editing the record, click Save Record.
To Access the MARC 007 Field Physical Characteristics Wizard for a Record that Already Contains the 007Field (i.e. Edit an Existing 007 Field):
1. Within the bibliographic record that needs to be edited, select Actions for this Record.
2. Click MARC Edit.
3. Right-click in the 007 textbox field.
4. Click Physical Characteristics Wizard.
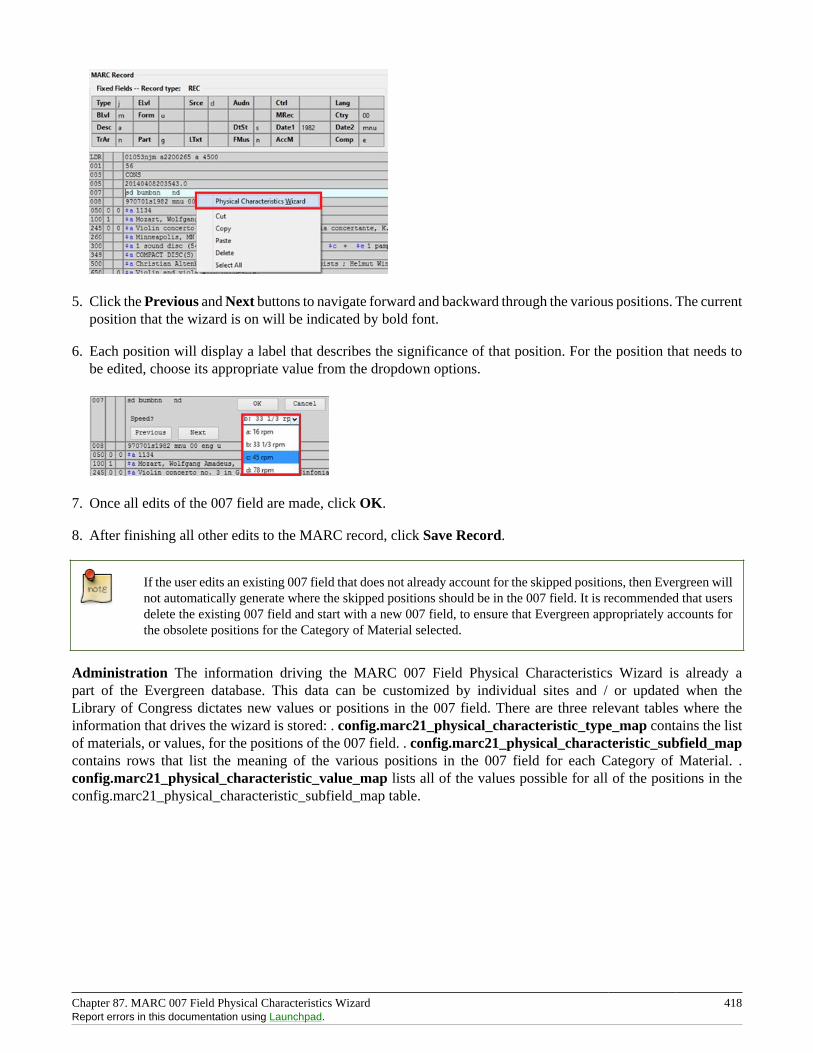
Chapter 87. MARC 007 Field Physical Characteristics Wizard 418Report errors in this documentation using Launchpad.
5. Click the Previous and Next buttons to navigate forward and backward through the various positions. The currentposition that the wizard is on will be indicated by bold font.
6. Each position will display a label that describes the significance of that position. For the position that needs tobe edited, choose its appropriate value from the dropdown options.
7. Once all edits of the 007 field are made, click OK.
8. After finishing all other edits to the MARC record, click Save Record.
If the user edits an existing 007 field that does not already account for the skipped positions, then Evergreen willnot automatically generate where the skipped positions should be in the 007 field. It is recommended that usersdelete the existing 007 field and start with a new 007 field, to ensure that Evergreen appropriately accounts forthe obsolete positions for the Category of Material selected.
Administration The information driving the MARC 007 Field Physical Characteristics Wizard is already apart of the Evergreen database. This data can be customized by individual sites and / or updated when theLibrary of Congress dictates new values or positions in the 007 field. There are three relevant tables where theinformation that drives the wizard is stored: . config.marc21_physical_characteristic_type_map contains the listof materials, or values, for the positions of the 007 field. . config.marc21_physical_characteristic_subfield_mapcontains rows that list the meaning of the various positions in the 007 field for each Category of Material. .config.marc21_physical_characteristic_value_map lists all of the values possible for all of the positions in theconfig.marc21_physical_characteristic_subfield_map table.
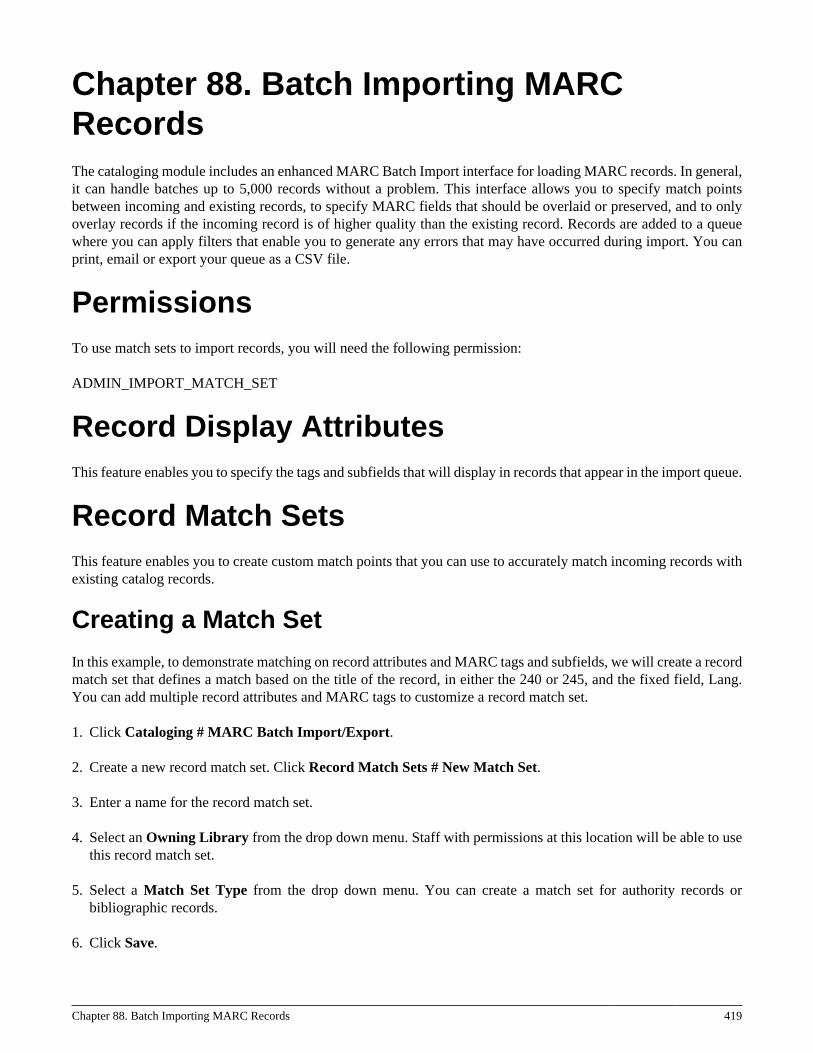
Chapter 88. Batch Importing MARC Records 419
Chapter 88. Batch Importing MARCRecordsThe cataloging module includes an enhanced MARC Batch Import interface for loading MARC records. In general,it can handle batches up to 5,000 records without a problem. This interface allows you to specify match pointsbetween incoming and existing records, to specify MARC fields that should be overlaid or preserved, and to onlyoverlay records if the incoming record is of higher quality than the existing record. Records are added to a queuewhere you can apply filters that enable you to generate any errors that may have occurred during import. You canprint, email or export your queue as a CSV file.
PermissionsTo use match sets to import records, you will need the following permission:
ADMIN_IMPORT_MATCH_SET
Record Display AttributesThis feature enables you to specify the tags and subfields that will display in records that appear in the import queue.
Record Match SetsThis feature enables you to create custom match points that you can use to accurately match incoming records withexisting catalog records.
Creating a Match Set
In this example, to demonstrate matching on record attributes and MARC tags and subfields, we will create a recordmatch set that defines a match based on the title of the record, in either the 240 or 245, and the fixed field, Lang.You can add multiple record attributes and MARC tags to customize a record match set.
1. Click Cataloging # MARC Batch Import/Export.
2. Create a new record match set. Click Record Match Sets # New Match Set.
3. Enter a name for the record match set.
4. Select an Owning Library from the drop down menu. Staff with permissions at this location will be able to usethis record match set.
5. Select a Match Set Type from the drop down menu. You can create a match set for authority records orbibliographic records.
6. Click Save.
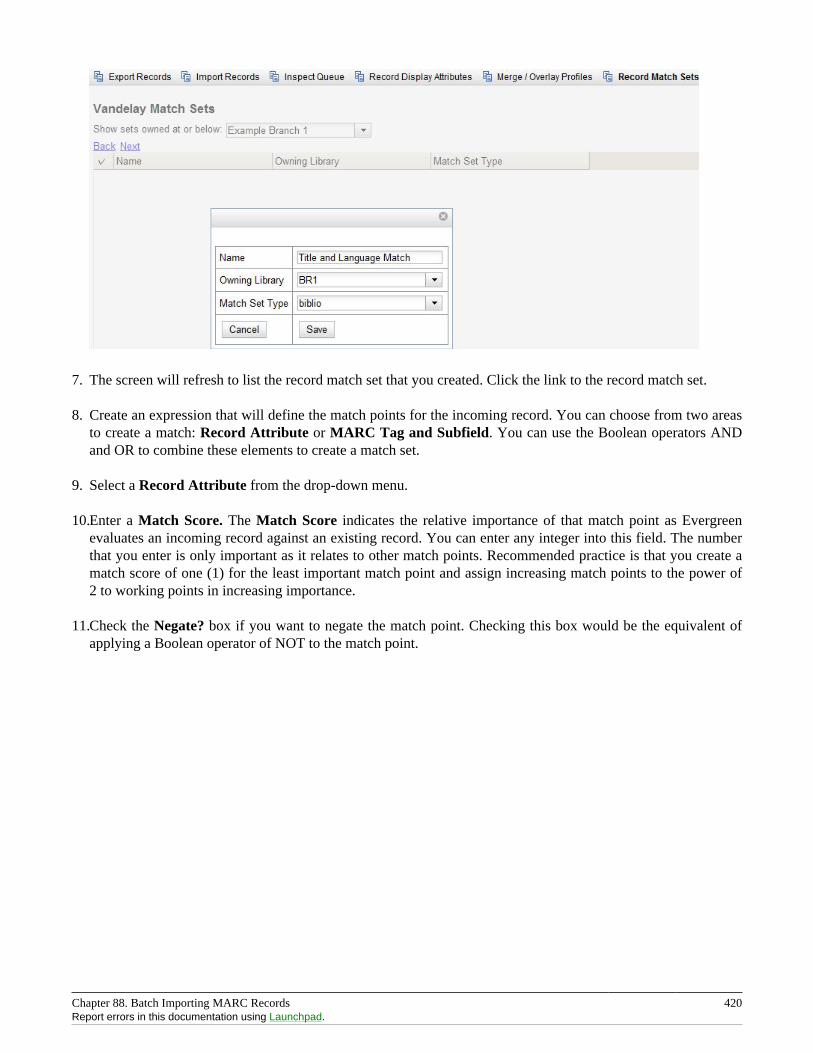
Chapter 88. Batch Importing MARC Records 420Report errors in this documentation using Launchpad.
7. The screen will refresh to list the record match set that you created. Click the link to the record match set.
8. Create an expression that will define the match points for the incoming record. You can choose from two areasto create a match: Record Attribute or MARC Tag and Subfield. You can use the Boolean operators ANDand OR to combine these elements to create a match set.
9. Select a Record Attribute from the drop-down menu.
10.Enter a Match Score. The Match Score indicates the relative importance of that match point as Evergreenevaluates an incoming record against an existing record. You can enter any integer into this field. The numberthat you enter is only important as it relates to other match points. Recommended practice is that you create amatch score of one (1) for the least important match point and assign increasing match points to the power of2 to working points in increasing importance.
11.Check the Negate? box if you want to negate the match point. Checking this box would be the equivalent ofapplying a Boolean operator of NOT to the match point.
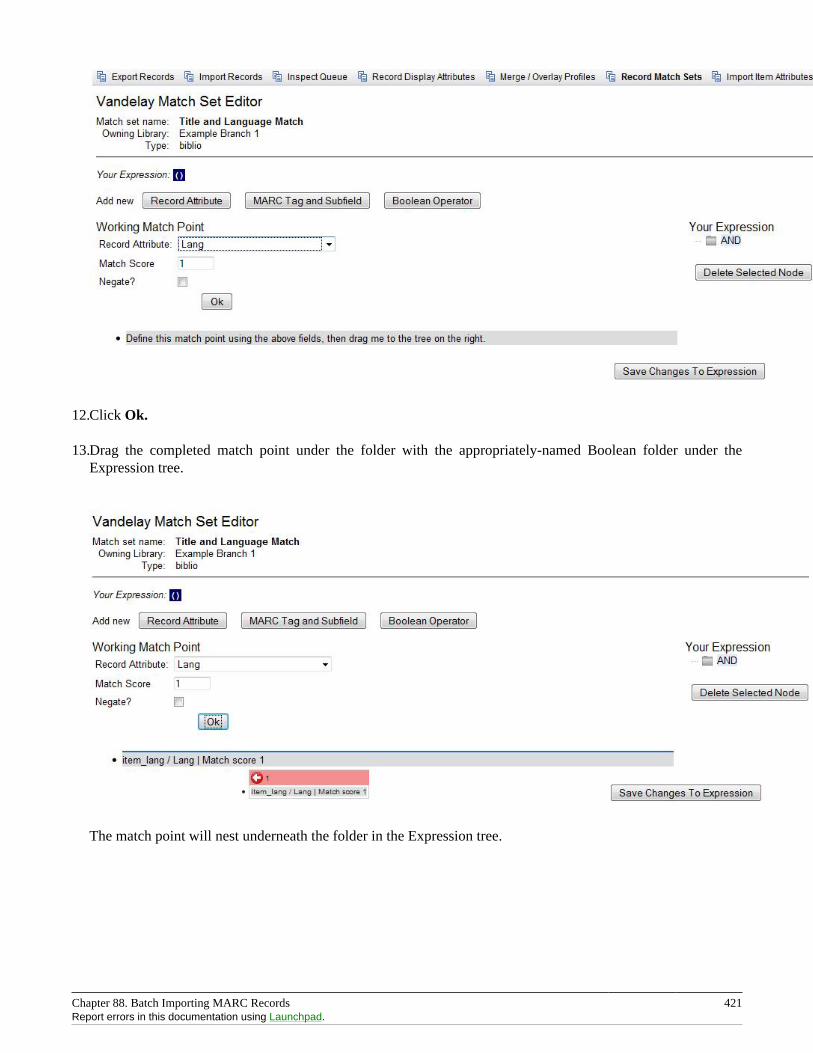
Chapter 88. Batch Importing MARC Records 421Report errors in this documentation using Launchpad.
12.Click Ok.
13.Drag the completed match point under the folder with the appropriately-named Boolean folder under theExpression tree.
The match point will nest underneath the folder in the Expression tree.
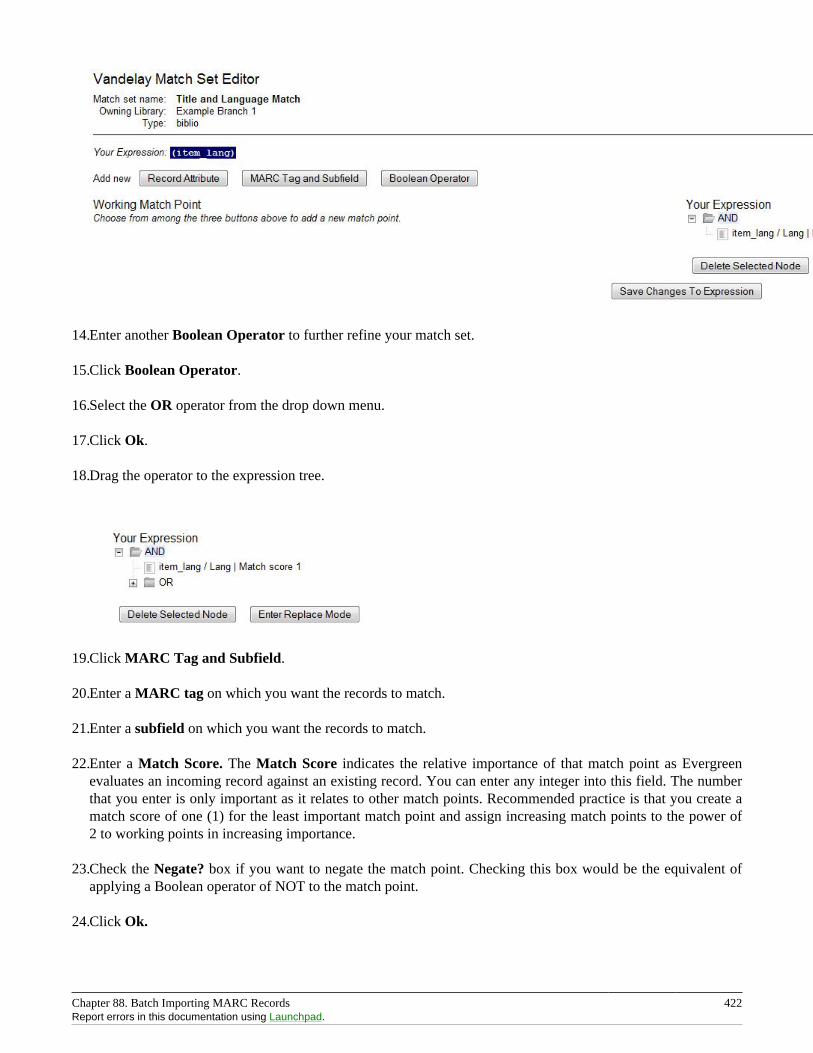
Chapter 88. Batch Importing MARC Records 422Report errors in this documentation using Launchpad.
14.Enter another Boolean Operator to further refine your match set.
15.Click Boolean Operator.
16.Select the OR operator from the drop down menu.
17.Click Ok.
18.Drag the operator to the expression tree.
19.Click MARC Tag and Subfield.
20.Enter a MARC tag on which you want the records to match.
21.Enter a subfield on which you want the records to match.
22.Enter a Match Score. The Match Score indicates the relative importance of that match point as Evergreenevaluates an incoming record against an existing record. You can enter any integer into this field. The numberthat you enter is only important as it relates to other match points. Recommended practice is that you create amatch score of one (1) for the least important match point and assign increasing match points to the power of2 to working points in increasing importance.
23.Check the Negate? box if you want to negate the match point. Checking this box would be the equivalent ofapplying a Boolean operator of NOT to the match point.
24.Click Ok.
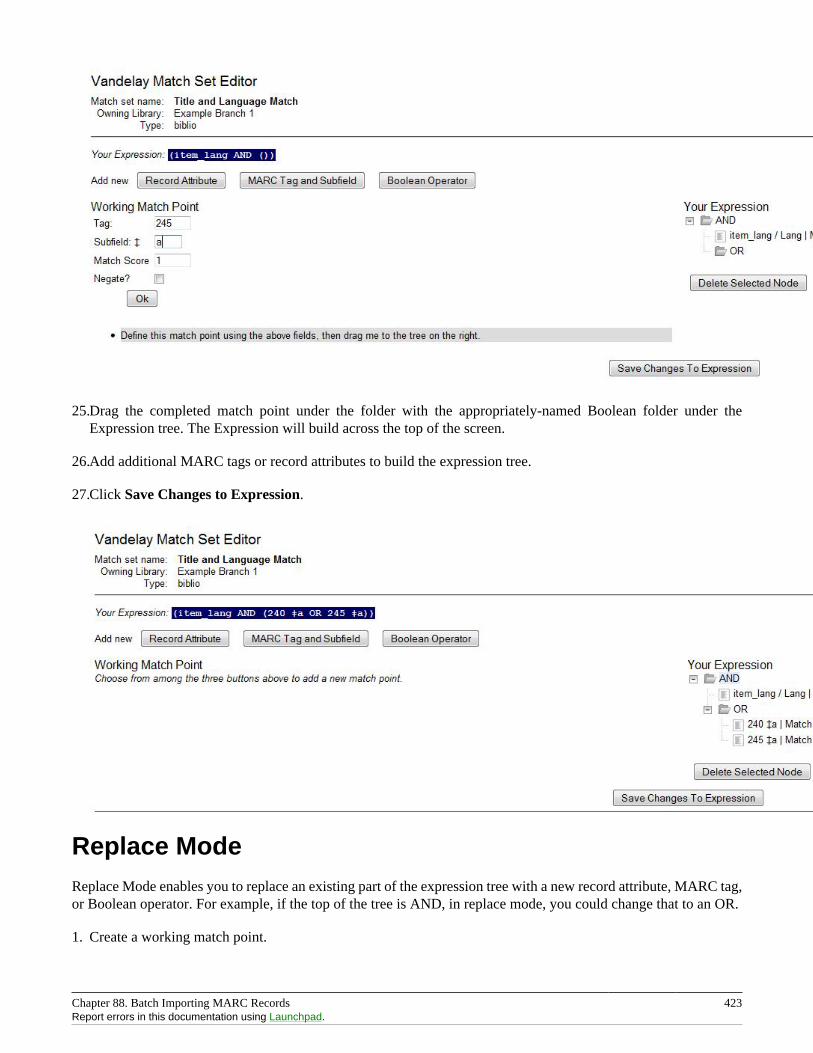
Chapter 88. Batch Importing MARC Records 423Report errors in this documentation using Launchpad.
25.Drag the completed match point under the folder with the appropriately-named Boolean folder under theExpression tree. The Expression will build across the top of the screen.
26.Add additional MARC tags or record attributes to build the expression tree.
27.Click Save Changes to Expression.
Replace ModeReplace Mode enables you to replace an existing part of the expression tree with a new record attribute, MARC tag,or Boolean operator. For example, if the top of the tree is AND, in replace mode, you could change that to an OR.
1. Create a working match point.
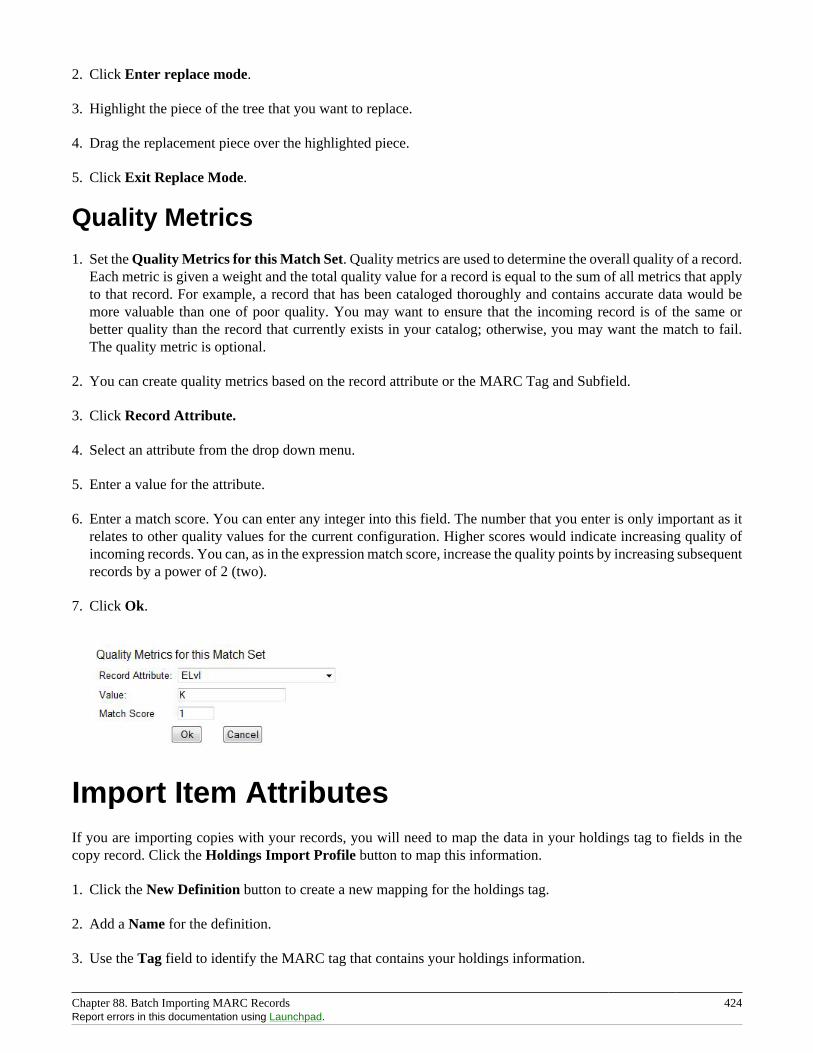
Chapter 88. Batch Importing MARC Records 424Report errors in this documentation using Launchpad.
2. Click Enter replace mode.
3. Highlight the piece of the tree that you want to replace.
4. Drag the replacement piece over the highlighted piece.
5. Click Exit Replace Mode.
Quality Metrics
1. Set the Quality Metrics for this Match Set. Quality metrics are used to determine the overall quality of a record.Each metric is given a weight and the total quality value for a record is equal to the sum of all metrics that applyto that record. For example, a record that has been cataloged thoroughly and contains accurate data would bemore valuable than one of poor quality. You may want to ensure that the incoming record is of the same orbetter quality than the record that currently exists in your catalog; otherwise, you may want the match to fail.The quality metric is optional.
2. You can create quality metrics based on the record attribute or the MARC Tag and Subfield.
3. Click Record Attribute.
4. Select an attribute from the drop down menu.
5. Enter a value for the attribute.
6. Enter a match score. You can enter any integer into this field. The number that you enter is only important as itrelates to other quality values for the current configuration. Higher scores would indicate increasing quality ofincoming records. You can, as in the expression match score, increase the quality points by increasing subsequentrecords by a power of 2 (two).
7. Click Ok.
Import Item AttributesIf you are importing copies with your records, you will need to map the data in your holdings tag to fields in thecopy record. Click the Holdings Import Profile button to map this information.
1. Click the New Definition button to create a new mapping for the holdings tag.
2. Add a Name for the definition.
3. Use the Tag field to identify the MARC tag that contains your holdings information.
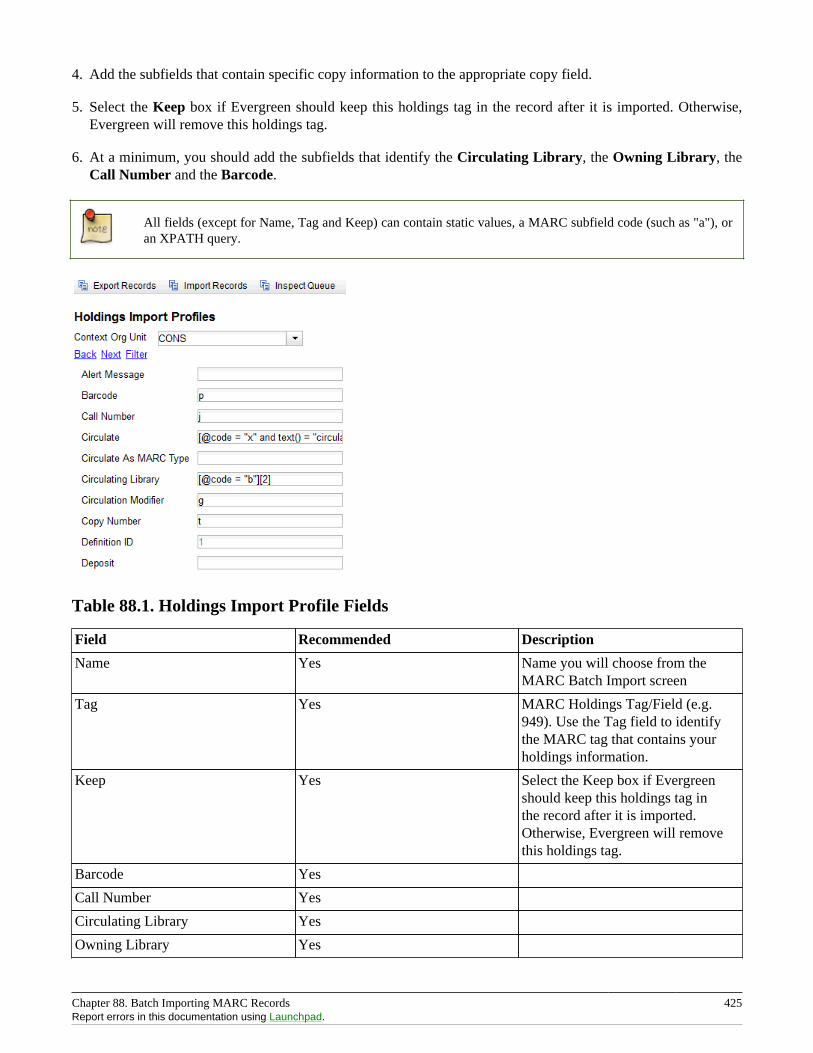
Chapter 88. Batch Importing MARC Records 425Report errors in this documentation using Launchpad.
4. Add the subfields that contain specific copy information to the appropriate copy field.
5. Select the Keep box if Evergreen should keep this holdings tag in the record after it is imported. Otherwise,Evergreen will remove this holdings tag.
6. At a minimum, you should add the subfields that identify the Circulating Library, the Owning Library, theCall Number and the Barcode.
All fields (except for Name, Tag and Keep) can contain static values, a MARC subfield code (such as "a"), oran XPATH query.
Table 88.1. Holdings Import Profile Fields
Field Recommended Description
Name Yes Name you will choose from theMARC Batch Import screen
Tag Yes MARC Holdings Tag/Field (e.g.949). Use the Tag field to identifythe MARC tag that contains yourholdings information.
Keep Yes Select the Keep box if Evergreenshould keep this holdings tag inthe record after it is imported.Otherwise, Evergreen will removethis holdings tag.
Barcode Yes
Call Number Yes
Circulating Library Yes
Owning Library Yes
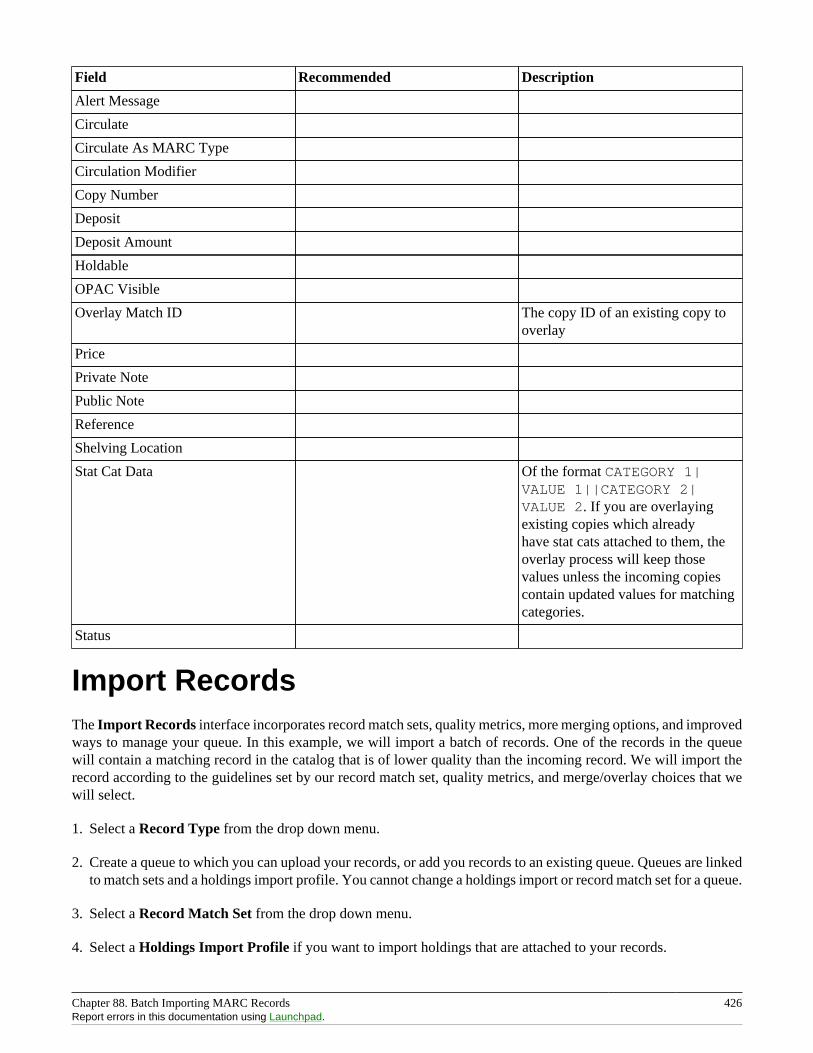
Chapter 88. Batch Importing MARC Records 426Report errors in this documentation using Launchpad.
Field Recommended Description
Alert Message
Circulate
Circulate As MARC Type
Circulation Modifier
Copy Number
Deposit
Deposit Amount
Holdable
OPAC Visible
Overlay Match ID The copy ID of an existing copy tooverlay
Price
Private Note
Public Note
Reference
Shelving Location
Stat Cat Data Of the format CATEGORY 1|VALUE 1||CATEGORY 2|VALUE 2. If you are overlayingexisting copies which alreadyhave stat cats attached to them, theoverlay process will keep thosevalues unless the incoming copiescontain updated values for matchingcategories.
Status
Import RecordsThe Import Records interface incorporates record match sets, quality metrics, more merging options, and improvedways to manage your queue. In this example, we will import a batch of records. One of the records in the queuewill contain a matching record in the catalog that is of lower quality than the incoming record. We will import therecord according to the guidelines set by our record match set, quality metrics, and merge/overlay choices that wewill select.
1. Select a Record Type from the drop down menu.
2. Create a queue to which you can upload your records, or add you records to an existing queue. Queues are linkedto match sets and a holdings import profile. You cannot change a holdings import or record match set for a queue.
3. Select a Record Match Set from the drop down menu.
4. Select a Holdings Import Profile if you want to import holdings that are attached to your records.
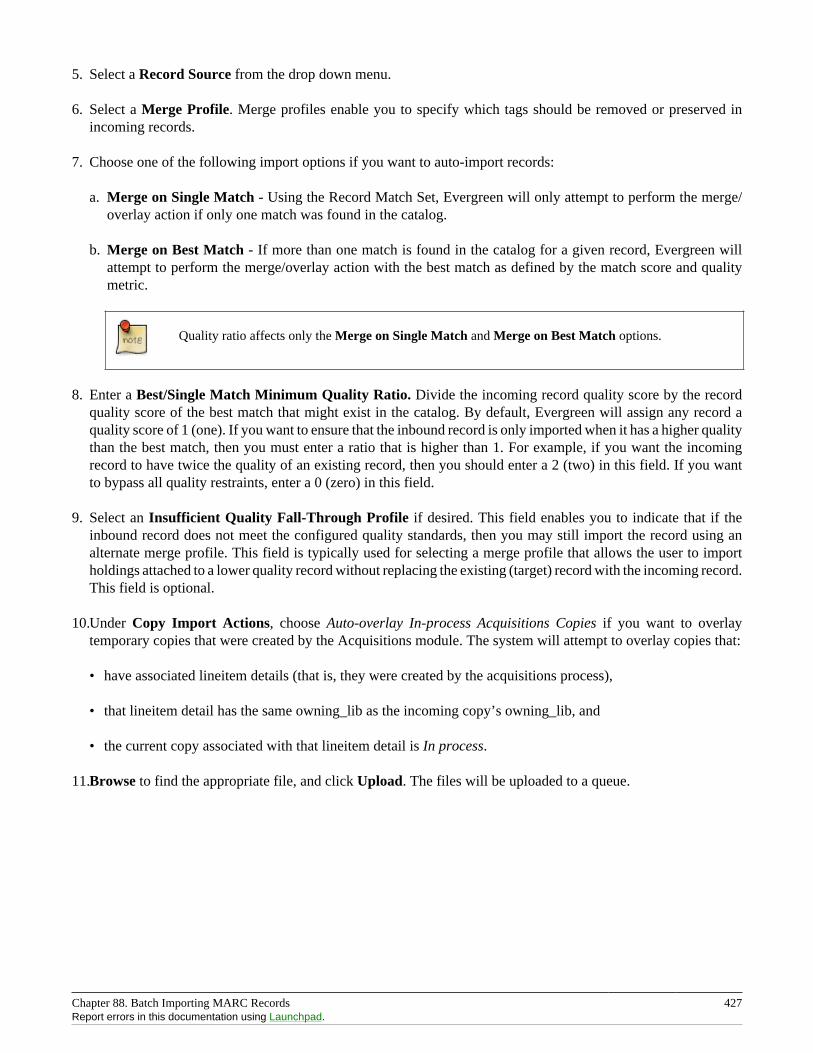
Chapter 88. Batch Importing MARC Records 427Report errors in this documentation using Launchpad.
5. Select a Record Source from the drop down menu.
6. Select a Merge Profile. Merge profiles enable you to specify which tags should be removed or preserved inincoming records.
7. Choose one of the following import options if you want to auto-import records:
a. Merge on Single Match - Using the Record Match Set, Evergreen will only attempt to perform the merge/overlay action if only one match was found in the catalog.
b. Merge on Best Match - If more than one match is found in the catalog for a given record, Evergreen willattempt to perform the merge/overlay action with the best match as defined by the match score and qualitymetric.
Quality ratio affects only the Merge on Single Match and Merge on Best Match options.
8. Enter a Best/Single Match Minimum Quality Ratio. Divide the incoming record quality score by the recordquality score of the best match that might exist in the catalog. By default, Evergreen will assign any record aquality score of 1 (one). If you want to ensure that the inbound record is only imported when it has a higher qualitythan the best match, then you must enter a ratio that is higher than 1. For example, if you want the incomingrecord to have twice the quality of an existing record, then you should enter a 2 (two) in this field. If you wantto bypass all quality restraints, enter a 0 (zero) in this field.
9. Select an Insufficient Quality Fall-Through Profile if desired. This field enables you to indicate that if theinbound record does not meet the configured quality standards, then you may still import the record using analternate merge profile. This field is typically used for selecting a merge profile that allows the user to importholdings attached to a lower quality record without replacing the existing (target) record with the incoming record.This field is optional.
10.Under Copy Import Actions, choose Auto-overlay In-process Acquisitions Copies if you want to overlaytemporary copies that were created by the Acquisitions module. The system will attempt to overlay copies that:
• have associated lineitem details (that is, they were created by the acquisitions process),
• that lineitem detail has the same owning_lib as the incoming copy’s owning_lib, and
• the current copy associated with that lineitem detail is In process.
11.Browse to find the appropriate file, and click Upload. The files will be uploaded to a queue.
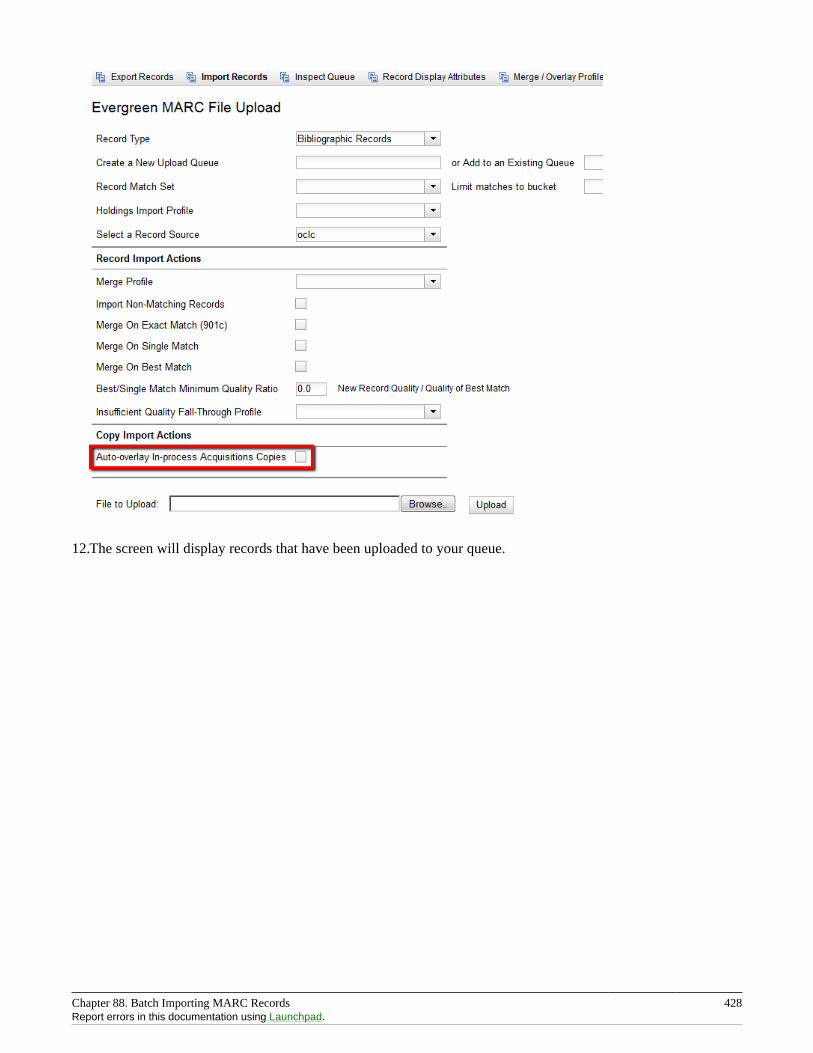
Chapter 88. Batch Importing MARC Records 428Report errors in this documentation using Launchpad.
12.The screen will display records that have been uploaded to your queue.
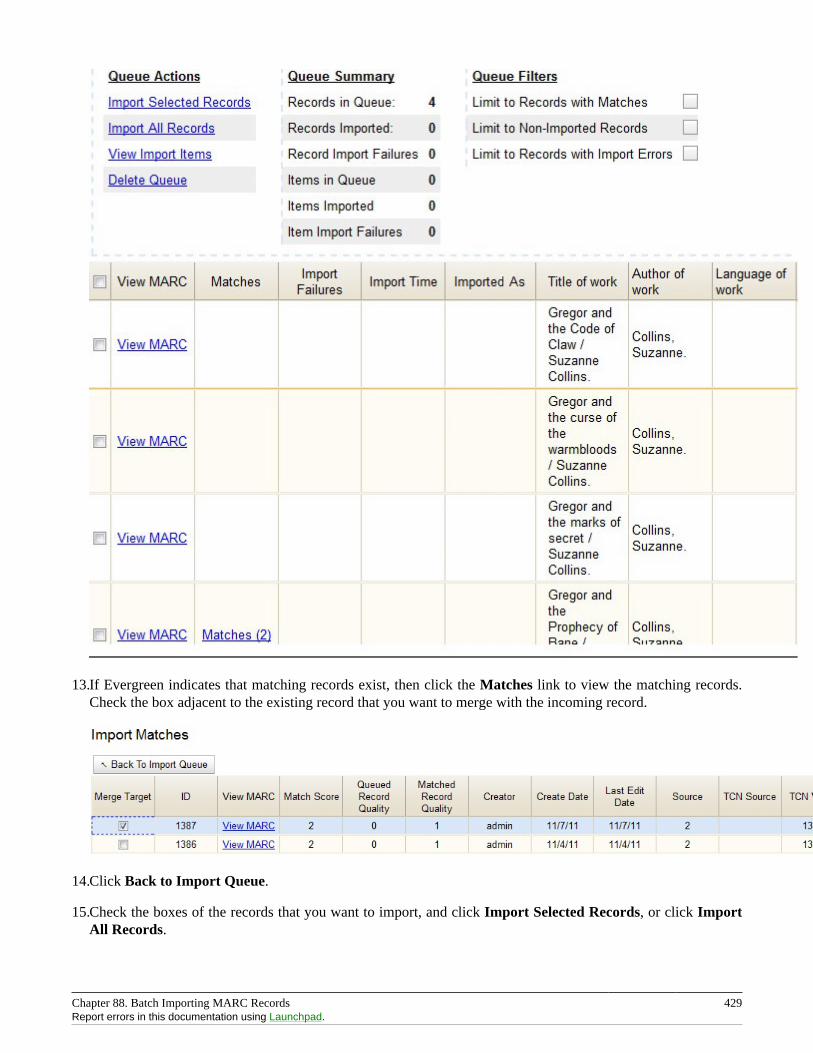
Chapter 88. Batch Importing MARC Records 429Report errors in this documentation using Launchpad.
13.If Evergreen indicates that matching records exist, then click the Matches link to view the matching records.Check the box adjacent to the existing record that you want to merge with the incoming record.
14.Click Back to Import Queue.
15.Check the boxes of the records that you want to import, and click Import Selected Records, or click ImportAll Records.
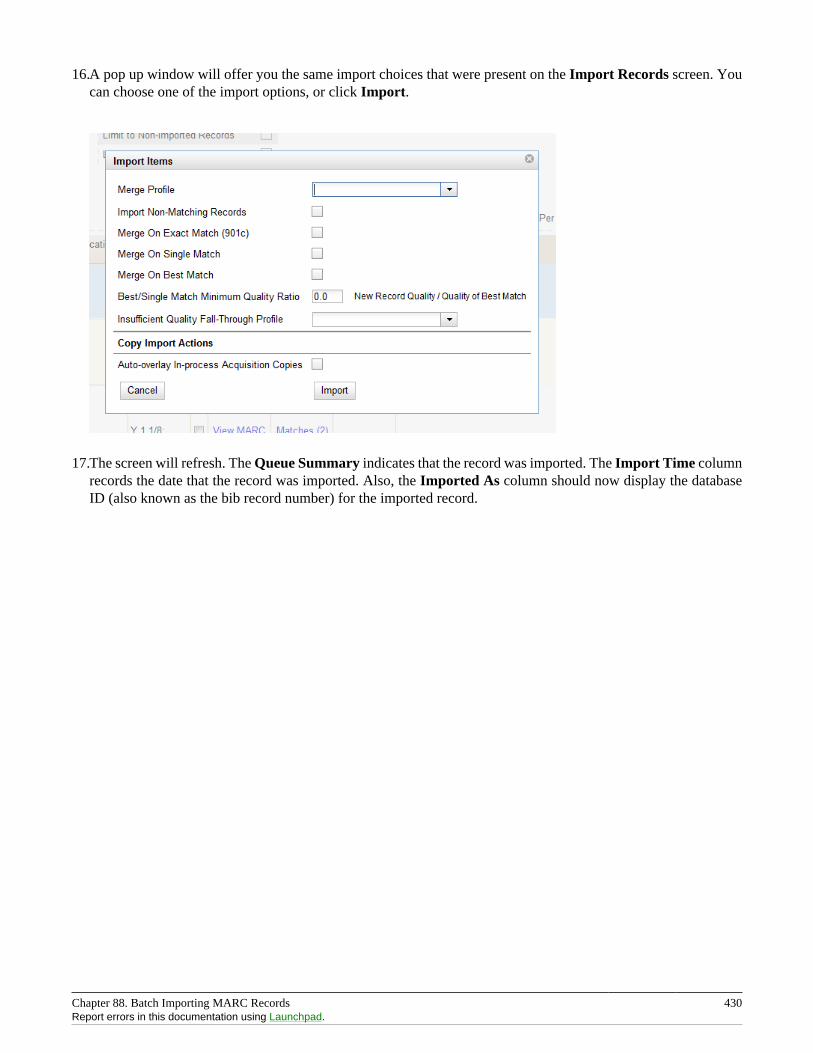
Chapter 88. Batch Importing MARC Records 430Report errors in this documentation using Launchpad.
16.A pop up window will offer you the same import choices that were present on the Import Records screen. Youcan choose one of the import options, or click Import.
17.The screen will refresh. The Queue Summary indicates that the record was imported. The Import Time columnrecords the date that the record was imported. Also, the Imported As column should now display the databaseID (also known as the bib record number) for the imported record.
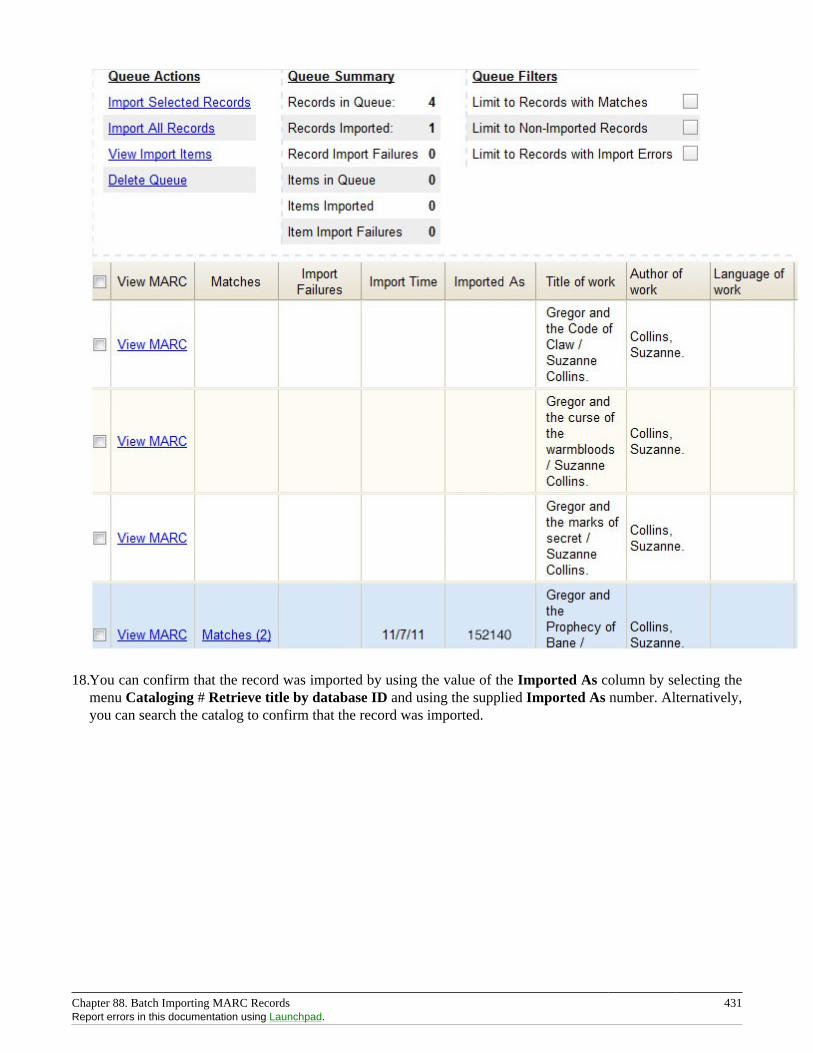
Chapter 88. Batch Importing MARC Records 431Report errors in this documentation using Launchpad.
18.You can confirm that the record was imported by using the value of the Imported As column by selecting themenu Cataloging # Retrieve title by database ID and using the supplied Imported As number. Alternatively,you can search the catalog to confirm that the record was imported.
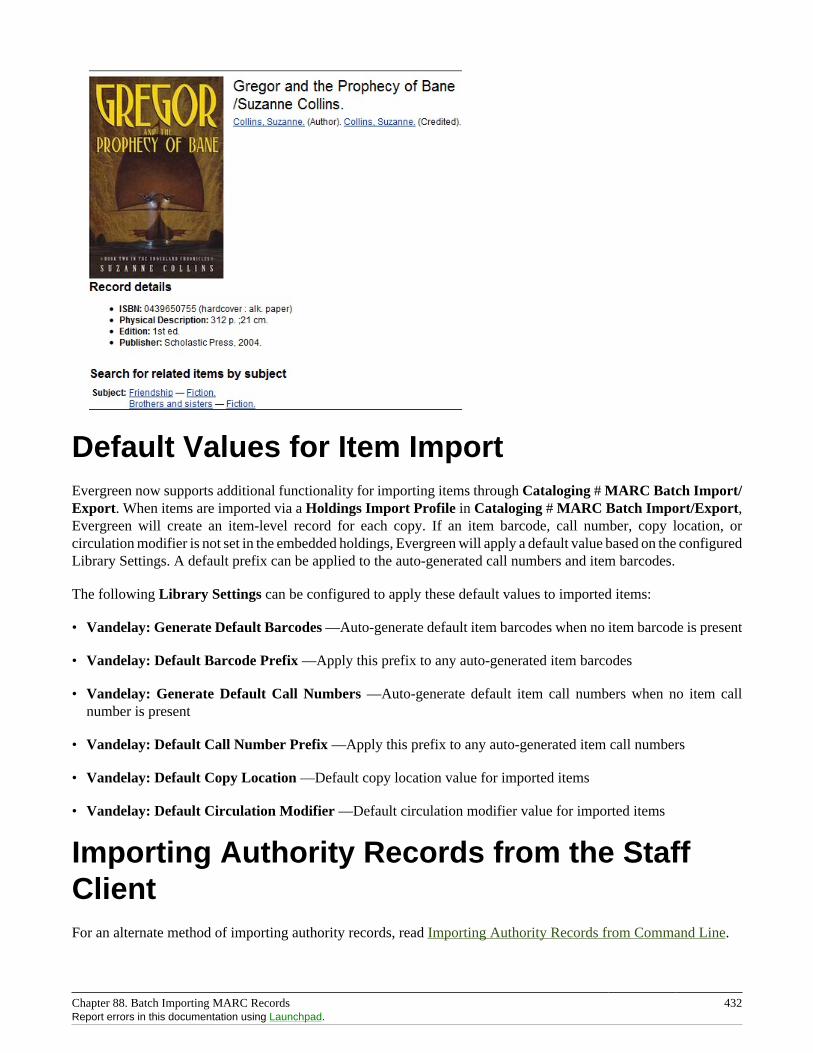
Chapter 88. Batch Importing MARC Records 432Report errors in this documentation using Launchpad.
Default Values for Item ImportEvergreen now supports additional functionality for importing items through Cataloging # MARC Batch Import/Export. When items are imported via a Holdings Import Profile in Cataloging # MARC Batch Import/Export,Evergreen will create an item-level record for each copy. If an item barcode, call number, copy location, orcirculation modifier is not set in the embedded holdings, Evergreen will apply a default value based on the configuredLibrary Settings. A default prefix can be applied to the auto-generated call numbers and item barcodes.
The following Library Settings can be configured to apply these default values to imported items:
• Vandelay: Generate Default Barcodes —Auto-generate default item barcodes when no item barcode is present
• Vandelay: Default Barcode Prefix —Apply this prefix to any auto-generated item barcodes
• Vandelay: Generate Default Call Numbers —Auto-generate default item call numbers when no item callnumber is present
• Vandelay: Default Call Number Prefix —Apply this prefix to any auto-generated item call numbers
• Vandelay: Default Copy Location —Default copy location value for imported items
• Vandelay: Default Circulation Modifier —Default circulation modifier value for imported items
Importing Authority Records from the StaffClientFor an alternate method of importing authority records, read Importing Authority Records from Command Line.
Chapter 88. Batch Importing MARC Records 433Report errors in this documentation using Launchpad.
To import a set of MARC authority records from the MARC Batch Import/Export interface:
1. From the Evergreen staff client, select Cataloging # MARC Batch Import/Export. The Evergreen MARC FileUpload screen opens, with Import Records as the highlighted tab.
2. From the Record Type drop-down menu, select Authority Records.
3. Enter a name for the queue (batch import job) in the Create a New Upload Queue field.
4. Select the Import Non-Matching Records checkbox.
5. Click the Browse button to select the file of MARC authorities to import.
6. Click the Upload button to begin importing the records.
The screen displays "Uploading… Processing…" to show that the records are being transferred to the server,then displays a progress bar to show the actual import progress. When the staff client displays the progress bar,you can disconnect your staff client safely. Very large batches of records might time out at this stage.
7. Once the import is finished, the staff client displays the results of the import process. You can manually displaythe import progress by selecting the Inspect Queue tab of the MARC Batch Import/Export interface and selectingthe queue name. By default, the staff client does not display records that were imported successfully; it onlyshows records that conflicted with existing entries in the database. The screen shows the overall status of theimport process in the top right-hand corner, with the Total and Imported number of records for the queue.
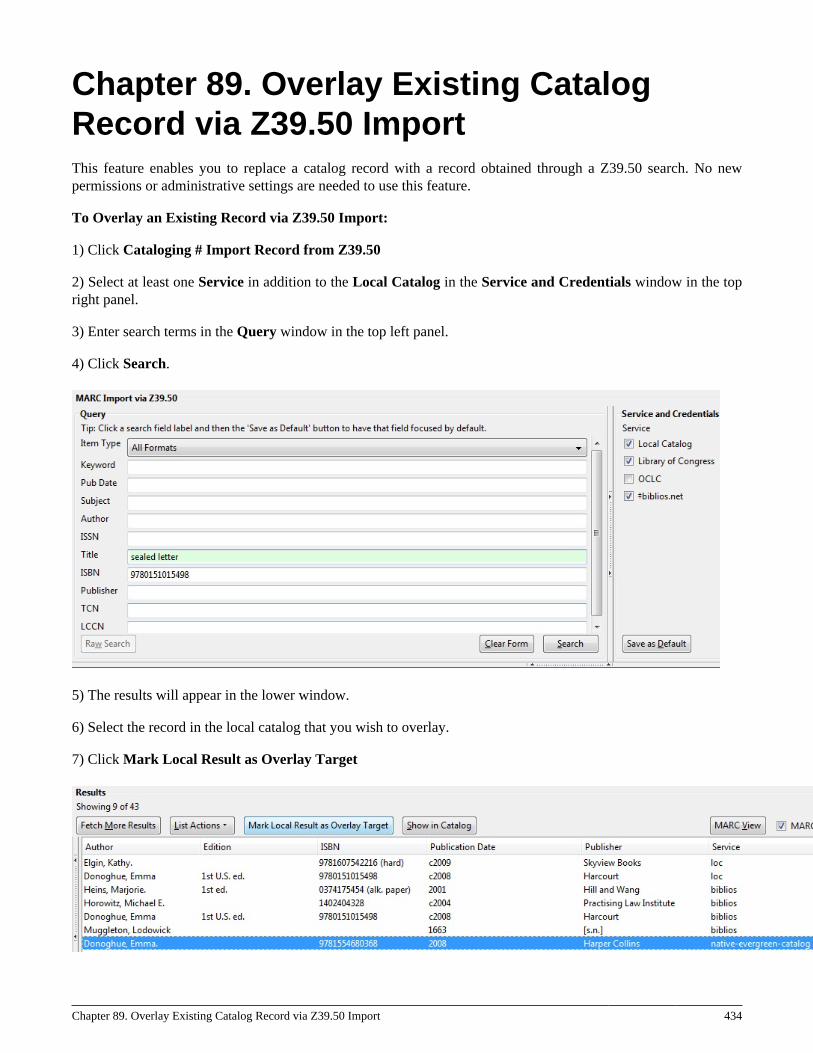
Chapter 89. Overlay Existing Catalog Record via Z39.50 Import 434
Chapter 89. Overlay Existing CatalogRecord via Z39.50 ImportThis feature enables you to replace a catalog record with a record obtained through a Z39.50 search. No newpermissions or administrative settings are needed to use this feature.
To Overlay an Existing Record via Z39.50 Import:
1) Click Cataloging # Import Record from Z39.50
2) Select at least one Service in addition to the Local Catalog in the Service and Credentials window in the topright panel.
3) Enter search terms in the Query window in the top left panel.
4) Click Search.
5) The results will appear in the lower window.
6) Select the record in the local catalog that you wish to overlay.
7) Click Mark Local Result as Overlay Target
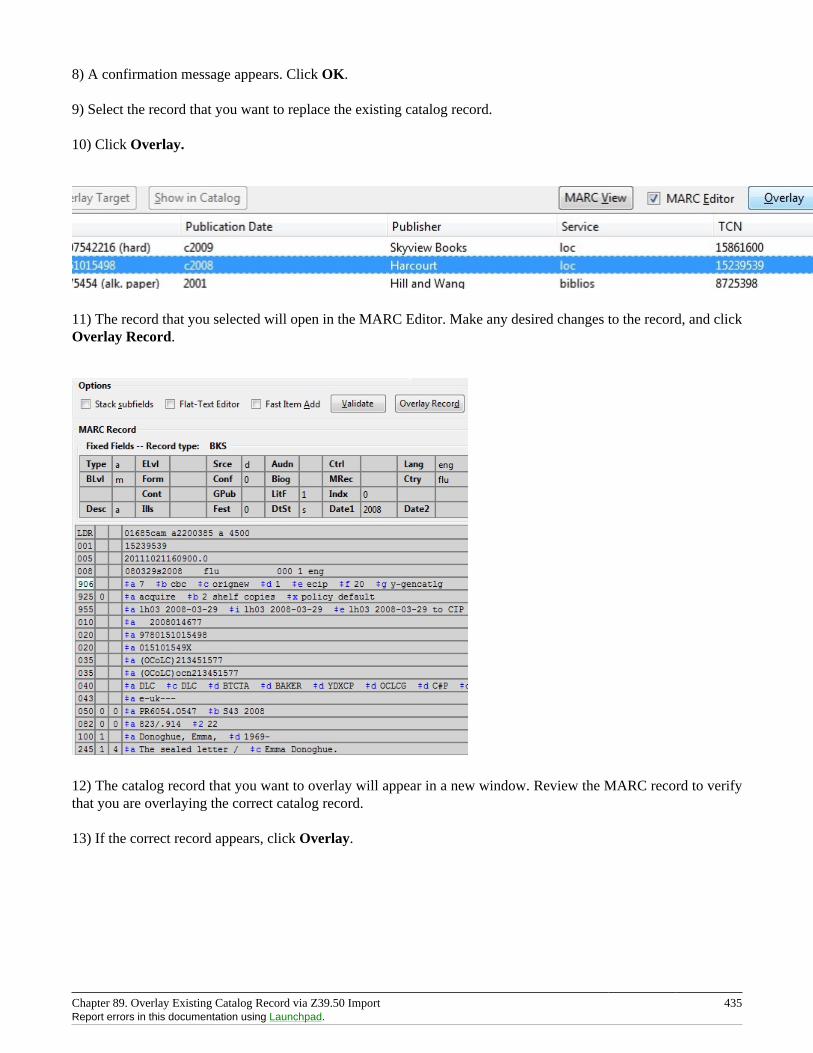
Chapter 89. Overlay Existing Catalog Record via Z39.50 Import 435Report errors in this documentation using Launchpad.
8) A confirmation message appears. Click OK.
9) Select the record that you want to replace the existing catalog record.
10) Click Overlay.
11) The record that you selected will open in the MARC Editor. Make any desired changes to the record, and clickOverlay Record.
12) The catalog record that you want to overlay will appear in a new window. Review the MARC record to verifythat you are overlaying the correct catalog record.
13) If the correct record appears, click Overlay.
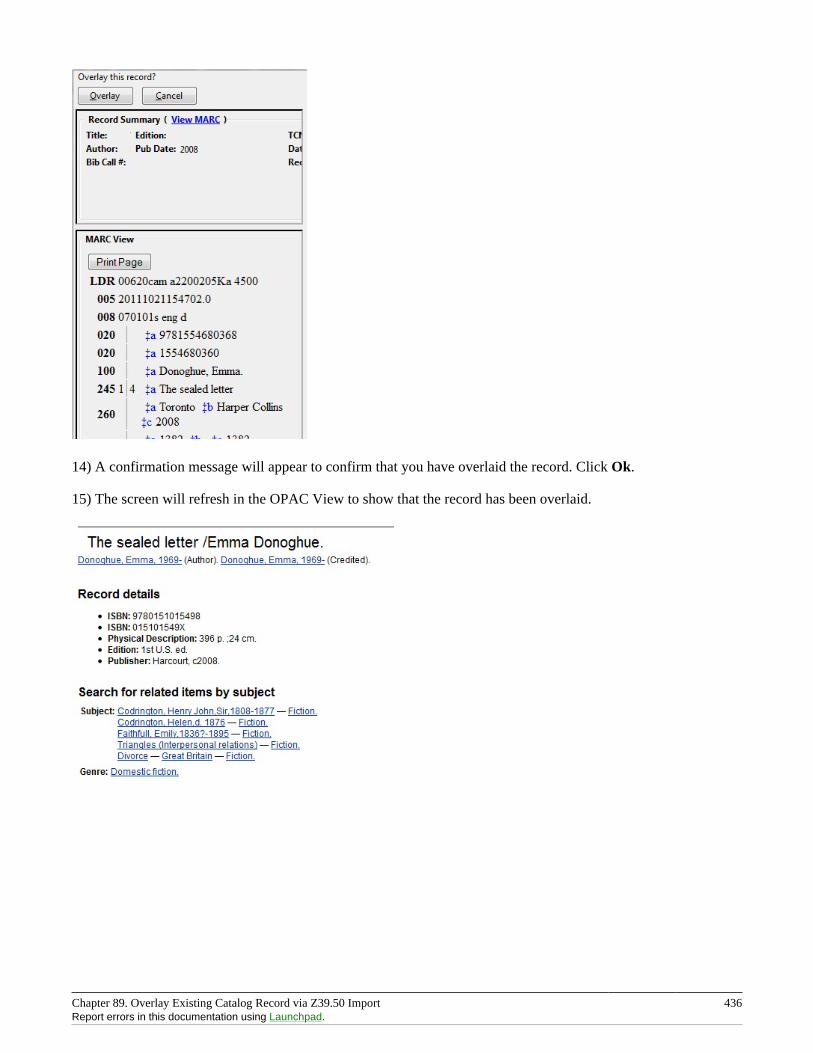
Chapter 89. Overlay Existing Catalog Record via Z39.50 Import 436Report errors in this documentation using Launchpad.
14) A confirmation message will appear to confirm that you have overlaid the record. Click Ok.
15) The screen will refresh in the OPAC View to show that the record has been overlaid.
Chapter 90. Z39.50 Search Enhancements 437
Chapter 90. Z39.50 Search EnhancementsAbstract
In Evergreen version 2.5, you will be able to search multiple Z39.50 sources simultaneously from record buckets.Using this feature, you can match records from Z39.50 sources to catalog records in your bucket and import theZ39.50 records via Vandelay.
Administration
The following administrative interfaces will enable you to configure Z39.50 search parameters.
Z39.50 Index Field Maps
Click Admin # Server Administration # Z39.50 Index Field Maps to map bib record indexes (metabib fields andrecord attributes) in your catalog records to Z39.50 search attributes. Metabib fields are typically free form fieldsfound in the body of a catalog record while record attributes typically have only one value and are often found inthe leader.
You can map a metabib field or a record attribute to a Z39.50 attribute or a Z39.50 attribute type. To map a specificfield in your catalog record to a specific field in a chosen Z39.50 source, you should map to a Z39.50 attribute.For example, if you want the Personal Author in your catalog record to map to the Author field when searching theLibrary of Congress, then you should do the following:
1. Click New or double-click to edit an existing map.
2. Select the Metabib Field from the drop down menu.
3. Select the appropriate source and field from the Z39.50 Attribute drop down menu.
4. Click Save.
Alternatively, if you want the Personal Author in your catalog record to map to the generic author field of anyZ39.50 source, then you should do the following:
1. Click New or double-click to edit an existing map.
2. Select the Metabib Field from the drop down menu.
3. Select the appropriate heading from the Z39.50 Attribute Type drop down menu.
4. Click Save.
Z39.50 servers
Click Admin # Server Admin # Z39.50 Servers to input your Z39.50 server. Click the hyperlinked name of anyserver to view the Z39.50 search attribute types and settings. These settings describe how the search values (froma metabib field or record attribute) are translated into Z39.50 searches.
Apply Quality Sets to Z30.50 Sources
From this interface, you can rank the quality of incoming search results according to the match set that you haveestablished and their Z39.50 point of origin. By applying a quality score, you tell Evergreen to merge the highestquality records into the catalog.
1. Click Cataloging # MARC Batch Import/Export.
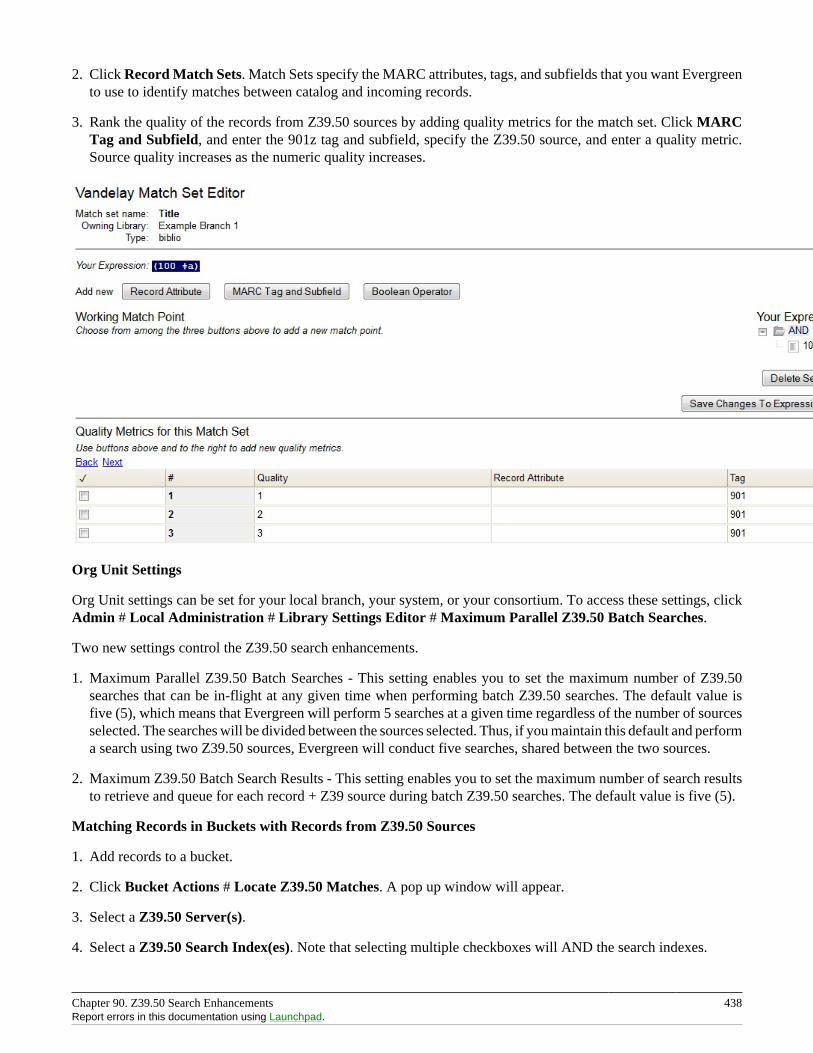
Chapter 90. Z39.50 Search Enhancements 438Report errors in this documentation using Launchpad.
2. Click Record Match Sets. Match Sets specify the MARC attributes, tags, and subfields that you want Evergreento use to identify matches between catalog and incoming records.
3. Rank the quality of the records from Z39.50 sources by adding quality metrics for the match set. Click MARCTag and Subfield, and enter the 901z tag and subfield, specify the Z39.50 source, and enter a quality metric.Source quality increases as the numeric quality increases.
Org Unit Settings
Org Unit settings can be set for your local branch, your system, or your consortium. To access these settings, clickAdmin # Local Administration # Library Settings Editor # Maximum Parallel Z39.50 Batch Searches.
Two new settings control the Z39.50 search enhancements.
1. Maximum Parallel Z39.50 Batch Searches - This setting enables you to set the maximum number of Z39.50searches that can be in-flight at any given time when performing batch Z39.50 searches. The default value isfive (5), which means that Evergreen will perform 5 searches at a given time regardless of the number of sourcesselected. The searches will be divided between the sources selected. Thus, if you maintain this default and performa search using two Z39.50 sources, Evergreen will conduct five searches, shared between the two sources.
2. Maximum Z39.50 Batch Search Results - This setting enables you to set the maximum number of search resultsto retrieve and queue for each record + Z39 source during batch Z39.50 searches. The default value is five (5).
Matching Records in Buckets with Records from Z39.50 Sources
1. Add records to a bucket.
2. Click Bucket Actions # Locate Z39.50 Matches. A pop up window will appear.
3. Select a Z39.50 Server(s).
4. Select a Z39.50 Search Index(es). Note that selecting multiple checkboxes will AND the search indexes.
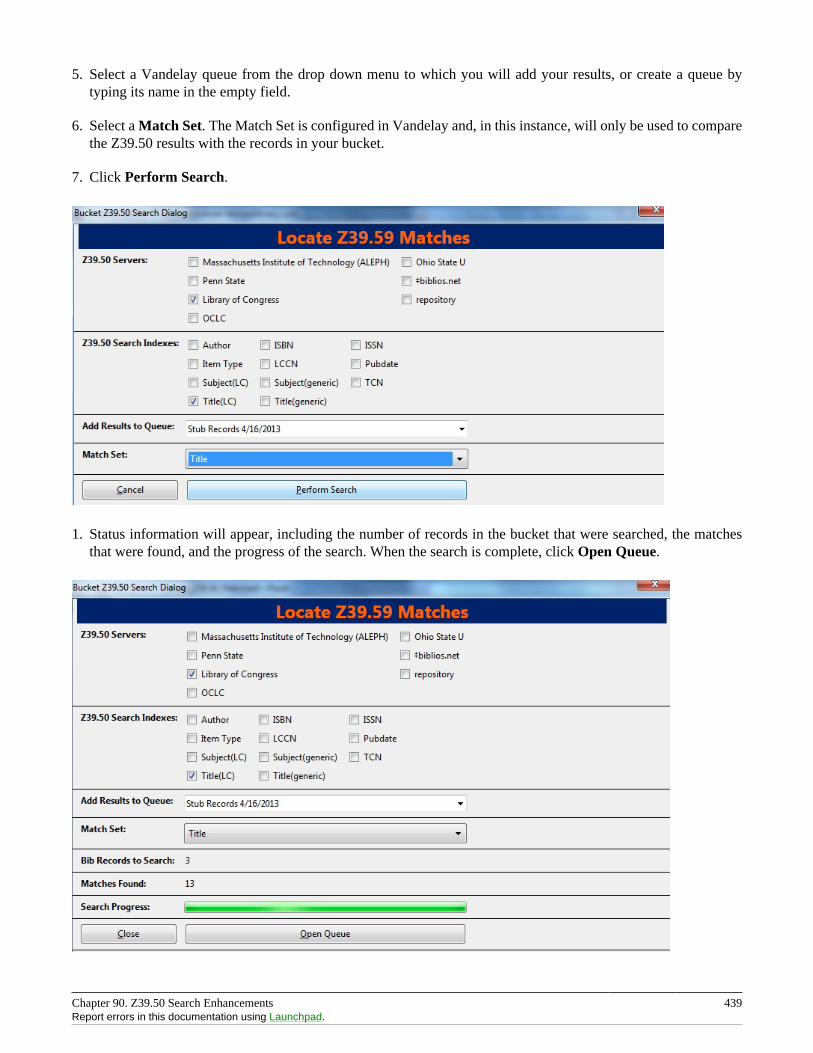
Chapter 90. Z39.50 Search Enhancements 439Report errors in this documentation using Launchpad.
5. Select a Vandelay queue from the drop down menu to which you will add your results, or create a queue bytyping its name in the empty field.
6. Select a Match Set. The Match Set is configured in Vandelay and, in this instance, will only be used to comparethe Z39.50 results with the records in your bucket.
7. Click Perform Search.
1. Status information will appear, including the number of records in the bucket that were searched, the matchesthat were found, and the progress of the search. When the search is complete, click Open Queue.
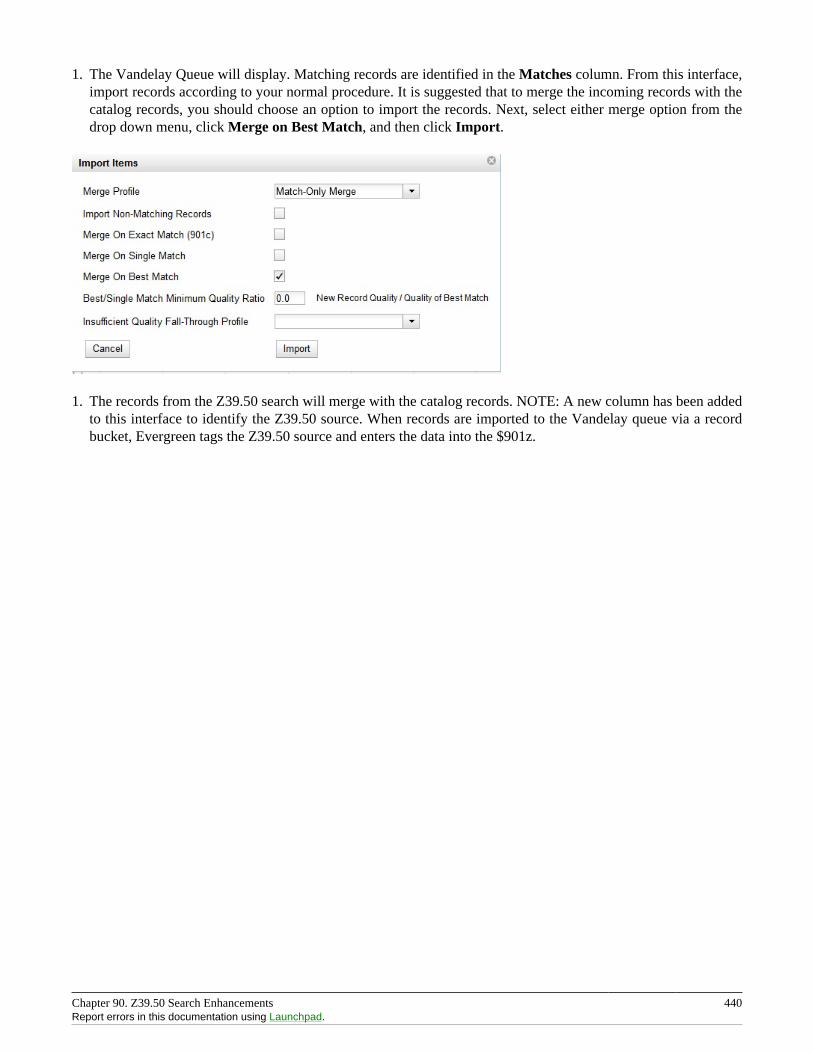
Chapter 90. Z39.50 Search Enhancements 440Report errors in this documentation using Launchpad.
1. The Vandelay Queue will display. Matching records are identified in the Matches column. From this interface,import records according to your normal procedure. It is suggested that to merge the incoming records with thecatalog records, you should choose an option to import the records. Next, select either merge option from thedrop down menu, click Merge on Best Match, and then click Import.
1. The records from the Z39.50 search will merge with the catalog records. NOTE: A new column has been addedto this interface to identify the Z39.50 source. When records are imported to the Vandelay queue via a recordbucket, Evergreen tags the Z39.50 source and enters the data into the $901z.
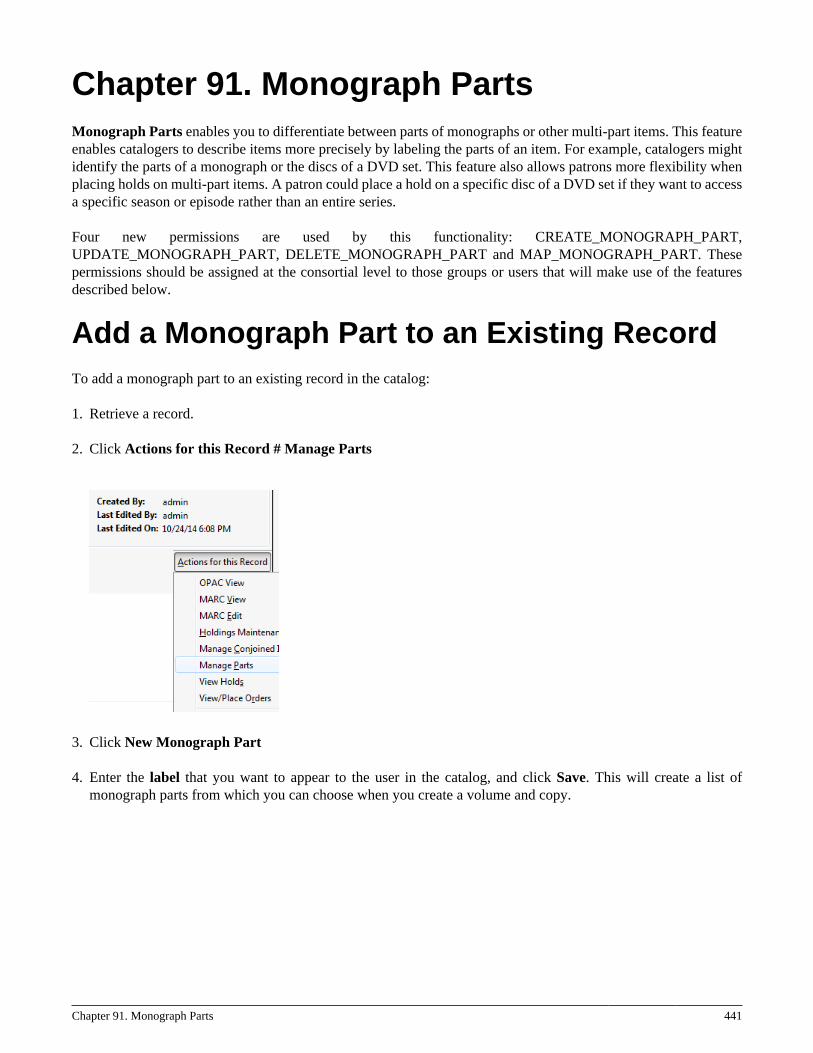
Chapter 91. Monograph Parts 441
Chapter 91. Monograph PartsMonograph Parts enables you to differentiate between parts of monographs or other multi-part items. This featureenables catalogers to describe items more precisely by labeling the parts of an item. For example, catalogers mightidentify the parts of a monograph or the discs of a DVD set. This feature also allows patrons more flexibility whenplacing holds on multi-part items. A patron could place a hold on a specific disc of a DVD set if they want to accessa specific season or episode rather than an entire series.
Four new permissions are used by this functionality: CREATE_MONOGRAPH_PART,UPDATE_MONOGRAPH_PART, DELETE_MONOGRAPH_PART and MAP_MONOGRAPH_PART. Thesepermissions should be assigned at the consortial level to those groups or users that will make use of the featuresdescribed below.
Add a Monograph Part to an Existing RecordTo add a monograph part to an existing record in the catalog:
1. Retrieve a record.
2. Click Actions for this Record # Manage Parts
3. Click New Monograph Part
4. Enter the label that you want to appear to the user in the catalog, and click Save. This will create a list ofmonograph parts from which you can choose when you create a volume and copy.
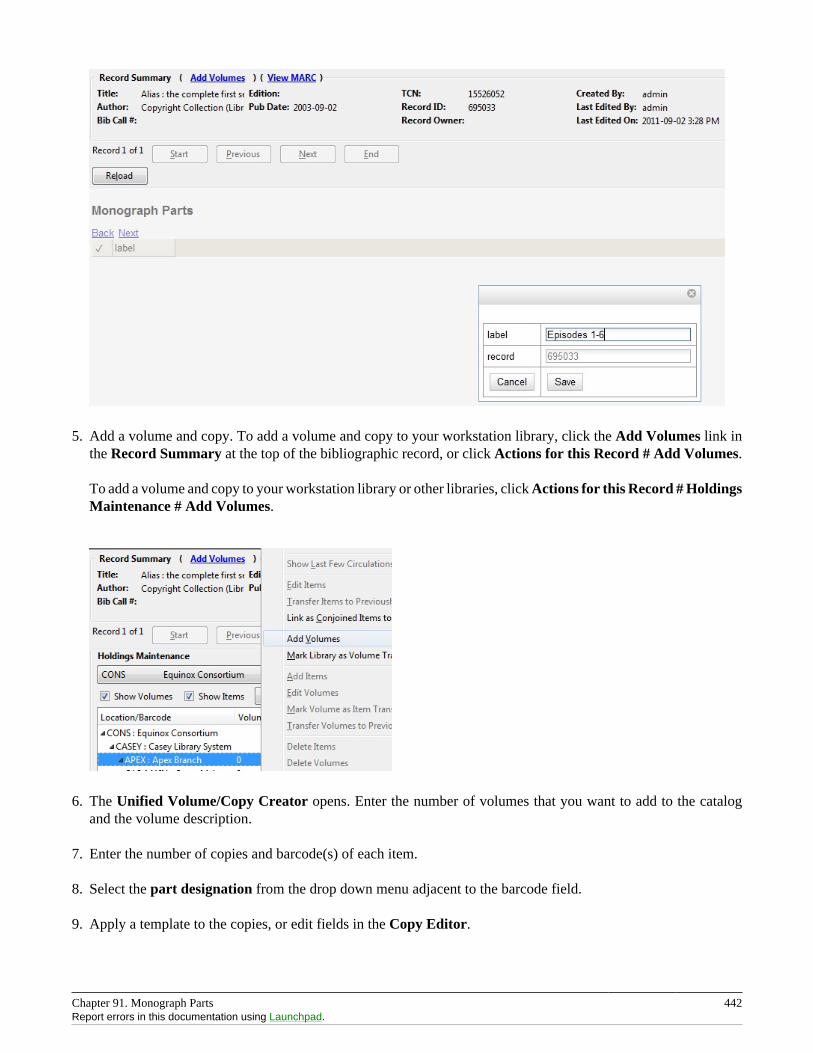
Chapter 91. Monograph Parts 442Report errors in this documentation using Launchpad.
5. Add a volume and copy. To add a volume and copy to your workstation library, click the Add Volumes link inthe Record Summary at the top of the bibliographic record, or click Actions for this Record # Add Volumes.
To add a volume and copy to your workstation library or other libraries, click Actions for this Record # HoldingsMaintenance # Add Volumes.
6. The Unified Volume/Copy Creator opens. Enter the number of volumes that you want to add to the catalogand the volume description.
7. Enter the number of copies and barcode(s) of each item.
8. Select the part designation from the drop down menu adjacent to the barcode field.
9. Apply a template to the copies, or edit fields in the Copy Editor.
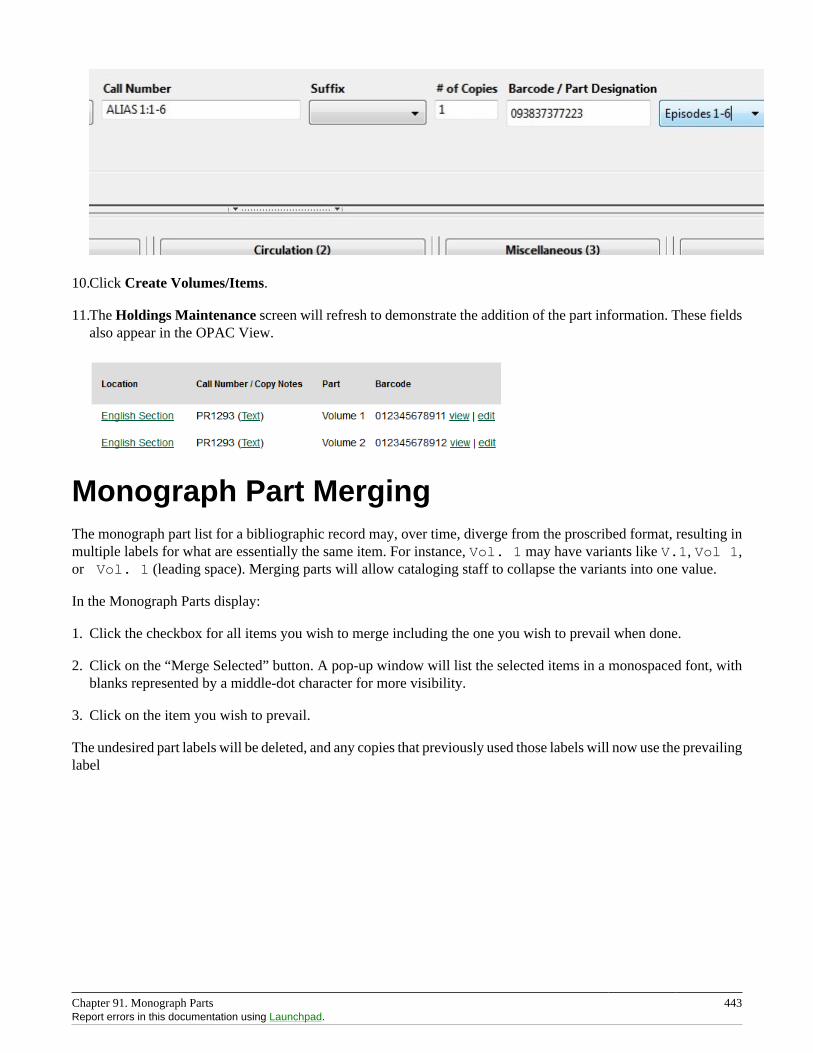
Chapter 91. Monograph Parts 443Report errors in this documentation using Launchpad.
10.Click Create Volumes/Items.
11.The Holdings Maintenance screen will refresh to demonstrate the addition of the part information. These fieldsalso appear in the OPAC View.
Monograph Part MergingThe monograph part list for a bibliographic record may, over time, diverge from the proscribed format, resulting inmultiple labels for what are essentially the same item. For instance, Vol. 1 may have variants like V.1, Vol 1,or Vol. 1 (leading space). Merging parts will allow cataloging staff to collapse the variants into one value.
In the Monograph Parts display:
1. Click the checkbox for all items you wish to merge including the one you wish to prevail when done.
2. Click on the “Merge Selected” button. A pop-up window will list the selected items in a monospaced font, withblanks represented by a middle-dot character for more visibility.
3. Click on the item you wish to prevail.
The undesired part labels will be deleted, and any copies that previously used those labels will now use the prevailinglabel
Chapter 92. Conjoined Items 444
Chapter 92. Conjoined ItemsPrior to Evergreen version 2.1, items could be attached to only one bibliographic record. The Conjoined Itemsfeature in Evergreen 2.1 enables catalogers to link items to multiple bibliographic records. This feature will enablemore precise cataloging. For example, catalogers will be able to indicate items that are printed back to back, arebilingual, are part of a bound volume, are part of a set, or are available as an e-reader pre-load. This feature will alsohelp the user retrieve more relevant search results. For example, a librarian catalogs a multi-volume festschrift. Shecan create a bibliographic record for the festschrift and a record for each volume. She can link the items on eachvolume to the festschrift record so that a patron could search for a volume or the festschrift and retrieve informationabout both works.
In the example below, a librarian has created a bibliographic record for two bestselling items. These books areavailable as physical copies in the library, and they are available as e-reader downloads. The librarian will link thecopy of the Kindle to the bibliographic records that are available on the e-reader.
Using the Conjoined Items FeatureThe Conjoined Items feature was designed so that you can link items between bibliographic records when you havethe item in hand, or when the item is not physically present. Both processes are described here. The steps are fewerif you have the item in hand, but both processes accomplish the same task. This document also demonstrates theprocess to edit or delete links between items and bibliographic records. Finally, the permission a cataloger needsto use this feature is listed.
Scenario 1: I want to link an item to another bibliographic record, but I do not have theitem in hand
1. Retrieve the bibliographic record to which you would like to link an item.
2. Click Actions for this Record # Mark as Target for Conjoined Items.
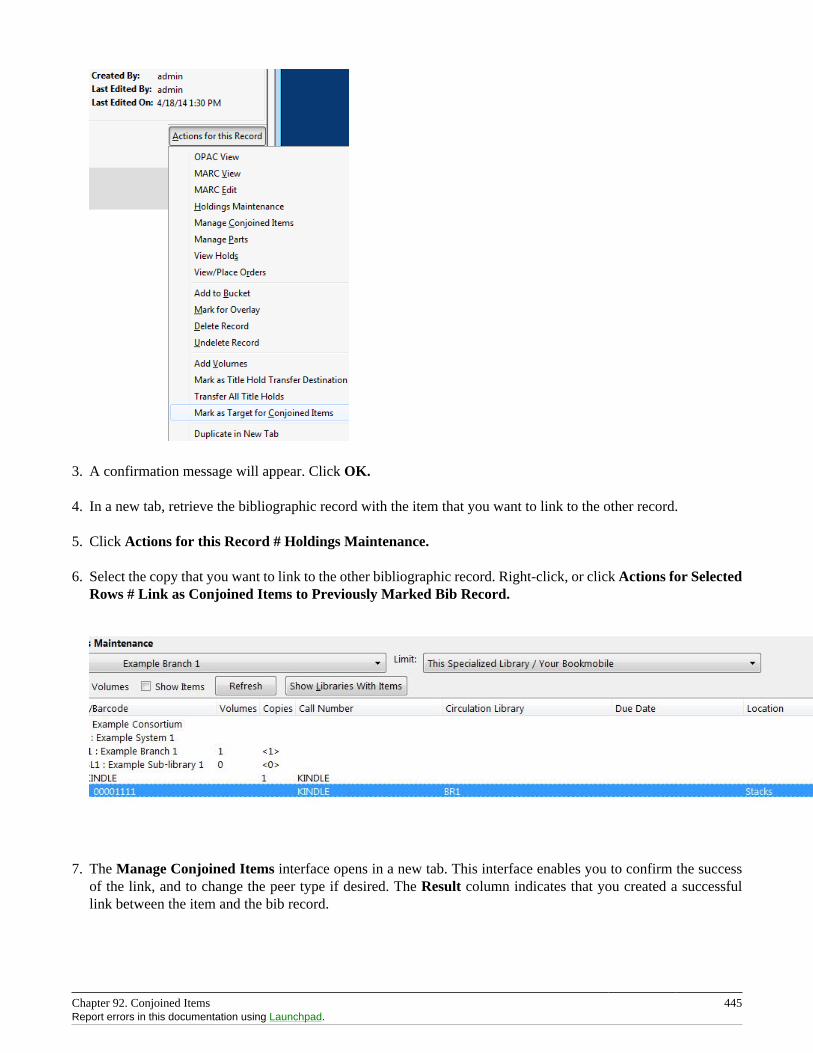
Chapter 92. Conjoined Items 445Report errors in this documentation using Launchpad.
3. A confirmation message will appear. Click OK.
4. In a new tab, retrieve the bibliographic record with the item that you want to link to the other record.
5. Click Actions for this Record # Holdings Maintenance.
6. Select the copy that you want to link to the other bibliographic record. Right-click, or click Actions for SelectedRows # Link as Conjoined Items to Previously Marked Bib Record.
7. The Manage Conjoined Items interface opens in a new tab. This interface enables you to confirm the successof the link, and to change the peer type if desired. The Result column indicates that you created a successfullink between the item and the bib record.
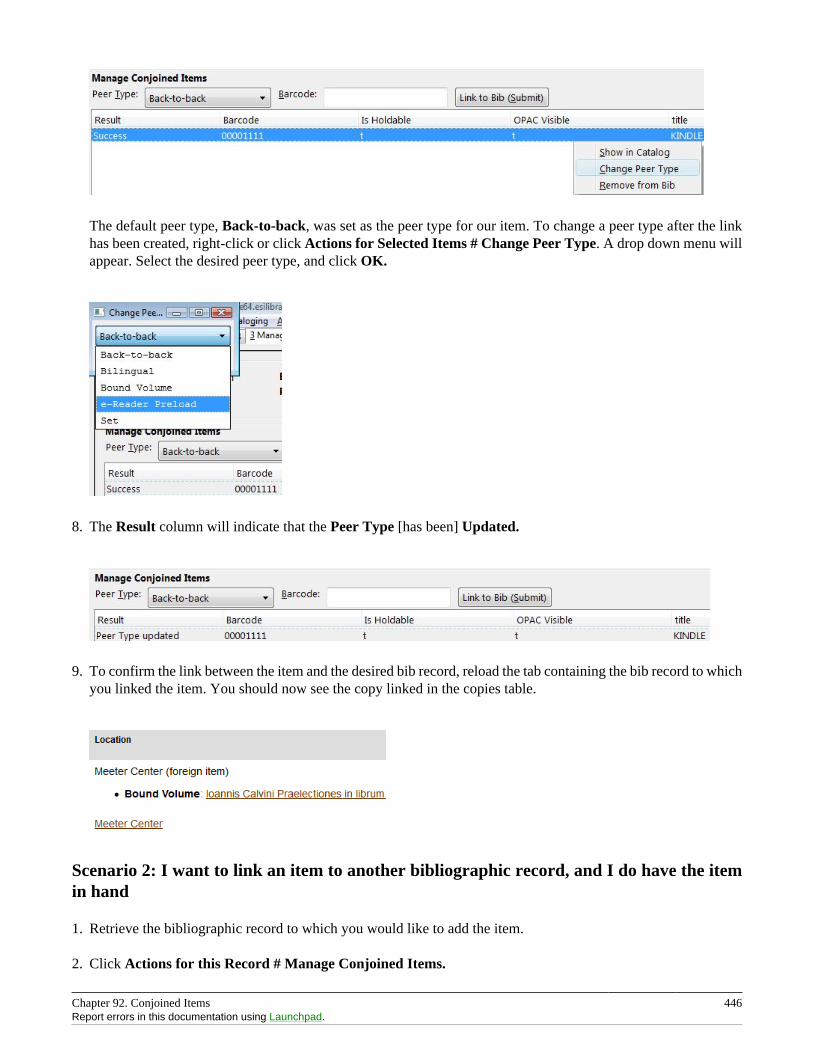
Chapter 92. Conjoined Items 446Report errors in this documentation using Launchpad.
The default peer type, Back-to-back, was set as the peer type for our item. To change a peer type after the linkhas been created, right-click or click Actions for Selected Items # Change Peer Type. A drop down menu willappear. Select the desired peer type, and click OK.
8. The Result column will indicate that the Peer Type [has been] Updated.
9. To confirm the link between the item and the desired bib record, reload the tab containing the bib record to whichyou linked the item. You should now see the copy linked in the copies table.
Scenario 2: I want to link an item to another bibliographic record, and I do have the itemin hand
1. Retrieve the bibliographic record to which you would like to add the item.
2. Click Actions for this Record # Manage Conjoined Items.
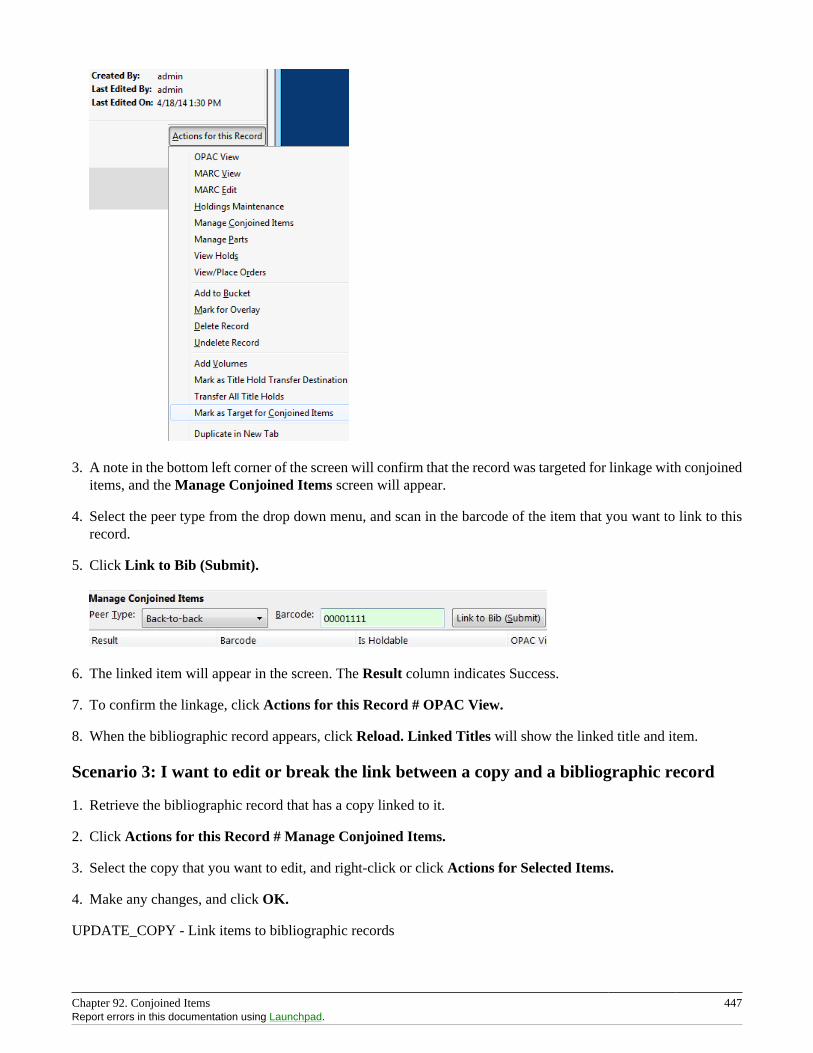
Chapter 92. Conjoined Items 447Report errors in this documentation using Launchpad.
3. A note in the bottom left corner of the screen will confirm that the record was targeted for linkage with conjoineditems, and the Manage Conjoined Items screen will appear.
4. Select the peer type from the drop down menu, and scan in the barcode of the item that you want to link to thisrecord.
5. Click Link to Bib (Submit).
6. The linked item will appear in the screen. The Result column indicates Success.
7. To confirm the linkage, click Actions for this Record # OPAC View.
8. When the bibliographic record appears, click Reload. Linked Titles will show the linked title and item.
Scenario 3: I want to edit or break the link between a copy and a bibliographic record
1. Retrieve the bibliographic record that has a copy linked to it.
2. Click Actions for this Record # Manage Conjoined Items.
3. Select the copy that you want to edit, and right-click or click Actions for Selected Items.
4. Make any changes, and click OK.
UPDATE_COPY - Link items to bibliographic records
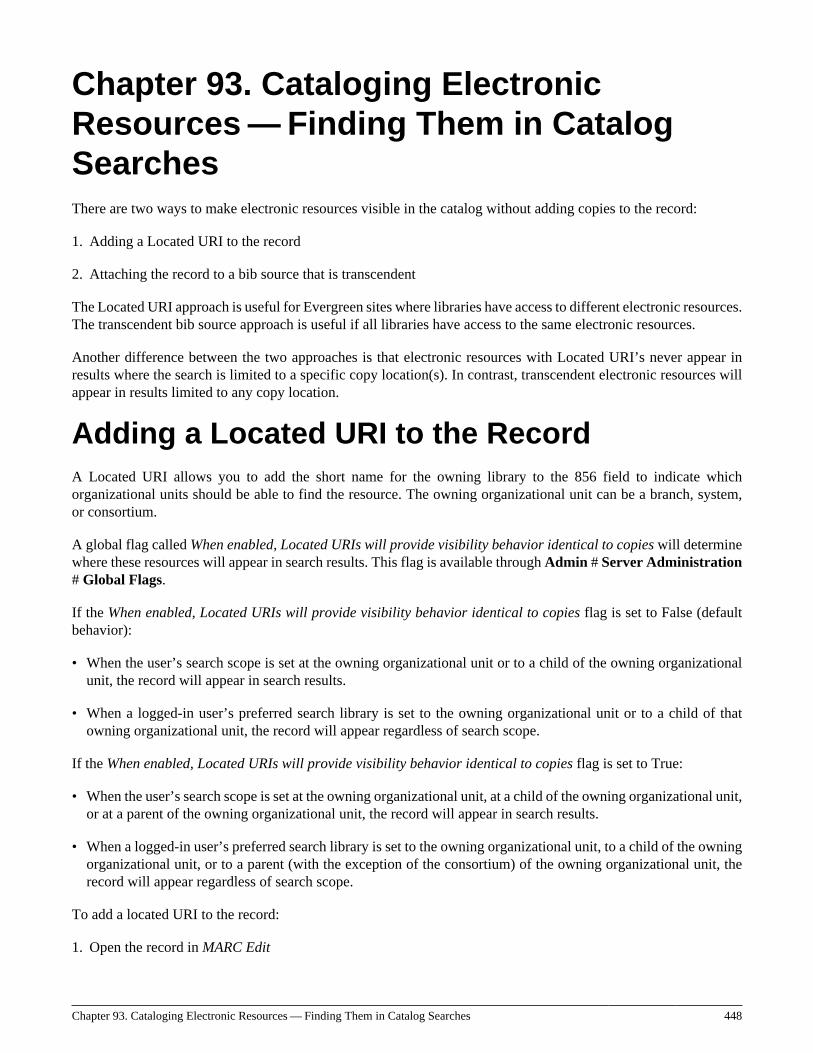
Chapter 93. Cataloging Electronic Resources — Finding Them in Catalog Searches 448
Chapter 93. Cataloging ElectronicResources — Finding Them in CatalogSearchesThere are two ways to make electronic resources visible in the catalog without adding copies to the record:
1. Adding a Located URI to the record
2. Attaching the record to a bib source that is transcendent
The Located URI approach is useful for Evergreen sites where libraries have access to different electronic resources.The transcendent bib source approach is useful if all libraries have access to the same electronic resources.
Another difference between the two approaches is that electronic resources with Located URI’s never appear inresults where the search is limited to a specific copy location(s). In contrast, transcendent electronic resources willappear in results limited to any copy location.
Adding a Located URI to the RecordA Located URI allows you to add the short name for the owning library to the 856 field to indicate whichorganizational units should be able to find the resource. The owning organizational unit can be a branch, system,or consortium.
A global flag called When enabled, Located URIs will provide visibility behavior identical to copies will determinewhere these resources will appear in search results. This flag is available through Admin # Server Administration# Global Flags.
If the When enabled, Located URIs will provide visibility behavior identical to copies flag is set to False (defaultbehavior):
• When the user’s search scope is set at the owning organizational unit or to a child of the owning organizationalunit, the record will appear in search results.
• When a logged-in user’s preferred search library is set to the owning organizational unit or to a child of thatowning organizational unit, the record will appear regardless of search scope.
If the When enabled, Located URIs will provide visibility behavior identical to copies flag is set to True:
• When the user’s search scope is set at the owning organizational unit, at a child of the owning organizational unit,or at a parent of the owning organizational unit, the record will appear in search results.
• When a logged-in user’s preferred search library is set to the owning organizational unit, to a child of the owningorganizational unit, or to a parent (with the exception of the consortium) of the owning organizational unit, therecord will appear regardless of search scope.
To add a located URI to the record:
1. Open the record in MARC Edit
Chapter 93. Cataloging Electronic Resources — Finding Them in Catalog Searches 449Report errors in this documentation using Launchpad.
2. Add a subfield 9 to the 856 field of the record and enter the short name of the organizational unit for the value.Make sure there is a 4 entered as the first indicator and a 0 entered as the second indicator. For example:
856 40 $u http://lwn.net $y Linux Weekly News $9 BR1
would make this item visible to people searching in a library scope of BR1 or to logged-in users who have setBR1 as their preferred search library.
If multiple organizational units own the resource, you can enter more than one subfield 9 to the 856 field oryou can enter multiple 856 fields with a subfield 9 to the record
3. Save the record
Located URI Example 1
The When enabled, Located URIs will provide visibility behavior identical to copies flag is set to False (defaultbehavior)
The Record has two 856 fields: one with SYS1 in subfield 9 and the other with BR4 in subfield 9
• Any user searching SYS1 or any of its children (BR1, BR2, SL1) will find the record. These users will only seethe URL belonging to SYS1.
• Any user searching BR4 will find the record. These users will only see the URL belonging to BR4.
• A user searching SYS2 will NOT find the record because SYS2 is a parent of an owning org unit, not a child. Thesame thing happens if the user is searching the consortium. In this case, the system assumes the user is unlikelyto have access to this resource and therefore does not retrieve it.
• A logged-in user with a preferred search library of BR4 will find the record at any search scope. This user willsee the URL belonging to BR4. Because this user previously identified a preference for using this library, thesystem assumes the user is likely to have access to this resource.
• A logged-in user with a preferred search library of BR4 who is searching SYS1 or any of its children will alsoretrieve the record. In this case, the user will see both URLs, the one belonging to SYS1 because the search librarymatches or is a child of the owning organizational unit and the one belonging to BR4 because it matches or isa child of the preferred search library. The URL belonging to the search library (if it is an exact match, not achild) will sort to the top.
Located URI Example 2
The When enabled, Located URIs will provide visibility behavior identical to copies flag is set to True
The Record has two 856 fields: one with SYS1 in subfield 9 and the other with BR4 in subfield 9
• Any user searching SYS1 or any of its children (BR1, BR2, SL1) will find the record. These users will only seethe URL belonging to SYS1.
• Any user searching BR4 will find the record. These users will only see the URL belonging to BR4.
Chapter 93. Cataloging Electronic Resources — Finding Them in Catalog Searches 450Report errors in this documentation using Launchpad.
• Any user searching the consortium will find the record. These users will see both URLs in the record. In this case,the system sees this user as a potential user of SYS2 or BR4 and therefore offers them the option of accessingthe resource through either URL.
• A user searching SYS2 will find the record because SYS2 is a parent of an owning org unit. The user will seethe URL belonging to BR4. Once again, the system sees this user as a potential user of BR4 and therefore offersthem the option of accessing this resource.
• A user searching BR3 will NOT find the record because BR3 is neither a child nor a parent of an owningorganizational unit.
• A logged-in user with a preferred search library of BR4 who is searching BR3 will find the record. This user willsee the URL belonging to BR4. Because this user previously identified a preference for using this library, thesystem assumes the user is likely to have access to this resource.
• A logged-in user with a preferred search library of BR4 who is searching SYS1 or any of its children will alsoretrieve the record. In this case, the user will see both URLs, the one belonging to SYS1 because the search librarymatches or is a child of the owning organizational unit and the one belonging to BR4 because it matches or isa child of the preferred search library. The URL belonging to the search library (if it is an exact match, not achild) will sort to the top.
Using Transcendent Bib Sources forElectronic ResourcesConnecting a bib record to a transcendent bib source will make the record visible in search results regardless ofthe user’s search scope.
To start, you need to create a transcendent bib source by adding it to config.bib_source in the Evergreen databaseand setting the transcendant field to true. For example:
# INSERT INTO config.bib_source(quality, source, transcendant,can_have_copies) VALUES (50, ‘ebooks’, TRUE, FALSE);
If you want to allow libraries to add copies to these records, set the can_have_copies field to TRUE. If you wantto prevent libraries from adding copies to these records, set the can_have_copies field to FALSE.
When adding or uploading bib records for electronic resources, set the bibliographic source for the record to thenewly-created transcendent bibliographic source. Using the staff client, the bibliographic source can be selected inthe MARC Batch Import interface when importing new, non-matching records or in the MARC Edit interface whenediting existing records.
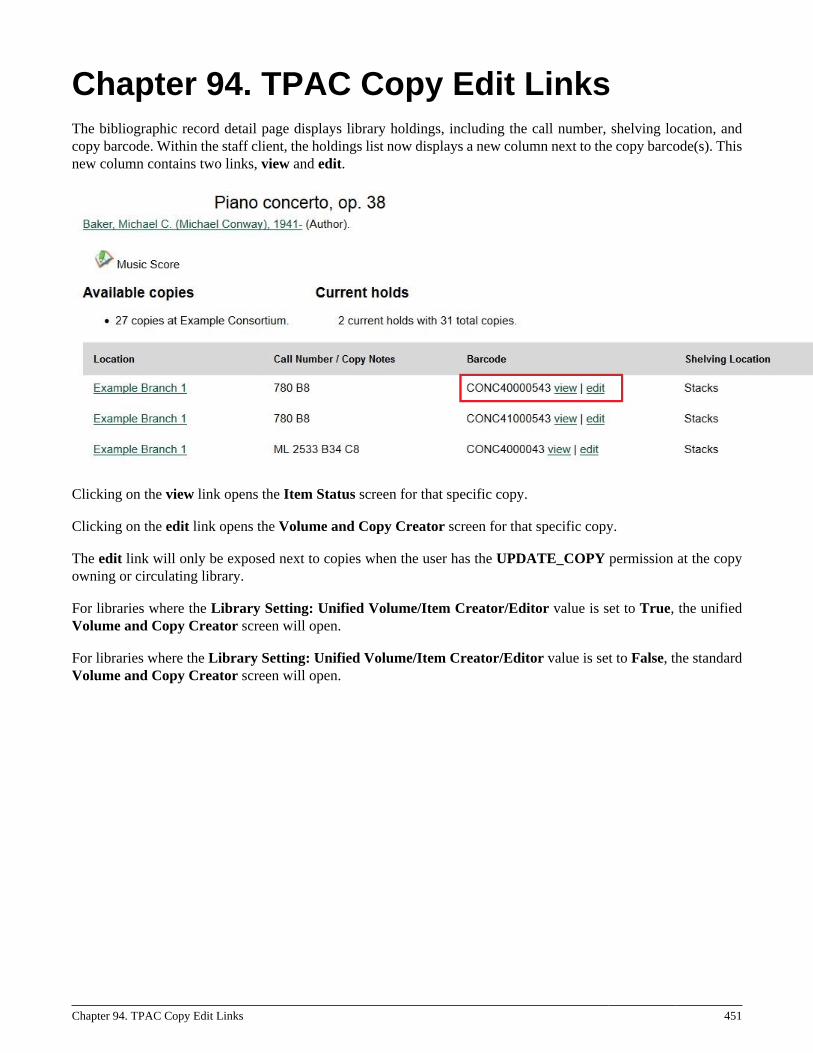
Chapter 94. TPAC Copy Edit Links 451
Chapter 94. TPAC Copy Edit LinksThe bibliographic record detail page displays library holdings, including the call number, shelving location, andcopy barcode. Within the staff client, the holdings list now displays a new column next to the copy barcode(s). Thisnew column contains two links, view and edit.
Clicking on the view link opens the Item Status screen for that specific copy.
Clicking on the edit link opens the Volume and Copy Creator screen for that specific copy.
The edit link will only be exposed next to copies when the user has the UPDATE_COPY permission at the copyowning or circulating library.
For libraries where the Library Setting: Unified Volume/Item Creator/Editor value is set to True, the unifiedVolume and Copy Creator screen will open.
For libraries where the Library Setting: Unified Volume/Item Creator/Editor value is set to False, the standardVolume and Copy Creator screen will open.
Chapter 95. MARC Batch Edit 452
Chapter 95. MARC Batch EditThis function is used to batch edit MARC records either adding a field, removing a field or changing the contentsof a field.
Record Source This includes options to batch edit identifying MARC records in a record bucket, CSV fileor by record id.
Go! (button) This button runs the action defined by the rule template(s).
Action (Rule Type)Replace Replaces the value in a MARC field for a batch of records.
Delete Removes a MARC field and its contents from the batch of records.
Add Use this to add a field and its contents to a batch of records.
Other Template FieldsMARC Tag This is used to identify the field for adding, replacing, or deleting.
Subfield (optional) Indicates which subfield is being edited.
MARC Data Use this to indicate the data to add or used in replacing the existing data.
Advanced Matching Restrictions (Optional)Subfield Regular Expression:: Using PERL syntax for a regular expression to identify the data to be removed orreplaced.
Running a Template to Add, Delete, or Replace MARC data
1. Click Cataloging#MARC Batch Edit
2. Select Record source
3. Select the appropriate bucket, load the CSV file or enter record id depending on Record source selected
4. Select the Action Rule
5. Enter the MARC Tag with no indicators (eg. 245)
6. Enter the subfields with no spaces. Subfields are optional. Multiple subfield can be entered such as auz.
7. Enter the MARC Data which is the value in the fields
8. Enter optional Advanced Matching Restrictions
a. Subfield

Chapter 95. MARC Batch Edit 453Report errors in this documentation using Launchpad.
b. Regular Expression (using PERL syntax)
9. Click Go!
10.Results page will display indicating the number of records successfully edited

Chapter 96. Manage Authorities 454
Chapter 96. Manage AuthoritiesIn Evergreen to view, edit, merge, and delete authority records you would use the Manage Authorities interfacethrough the Cataloging menu.
Currently in Evergreen to create a new authority record, as opposed to importing an authority record, you needto have a bib record open in the bib MARC editor.
• For example, if you want to create a new author authority you need to have a bib record that has a bib 1xxor 7xx tag with the main entry filled out.
• Then you need to right click on that 1xx or 7xx tag. In the context menu that shows up, select Create NewAuthority from this field, then select either Create Immediately or Create and Edit….
• If you choose Create and Edit…, after the authority MARC editor opens you need to click on the Save buttonto finally add the new authority record to your system.
Searching for authoritiesTo search for authorities in your system, first select the Cataloging menu and then select Manage Authorities.Then proceed to fill out the search form.
1. Type in your Search Term
2. Select an Authority type, types currently include: Author, Subject, Title, Topic
3. Click on the Submit button
The authority search results will include the following elements from left to right:
• Actions menu, which can be used to select actions that affect the corresponding authority record. Actions include:Edit, Mark for Merge, Delete
• Count of how many bibs are linked to the corresponding authority
• Main entry of the authority, i.e the authority tag 1xx value
• Control set value, with LoC being the default, but others can be added
• Authority Subject heading system/thesaurus, for example a value of "a" means authority originated from theLibrary of Congress (http://www.loc.gov/marc/authority/ad008.html)
Library of Congress list of thesaurus values:
• '' = Alternate no attempt to code
• a = Library of Congress Subject Headings
• b = LC subject headings for children’s literature
• c = Medical Subject Headings
Chapter 96. Manage Authorities 455Report errors in this documentation using Launchpad.
• d = National Agricultural Library subject authority file
• k = Canadian Subject Headings
• n = Not applicable
• r = Art and Architecture Thesaurus
• s = Sears List of Subject Headings
• v = Repertoire de vedettes-matiere
• z = Other
• | = No attempt to code
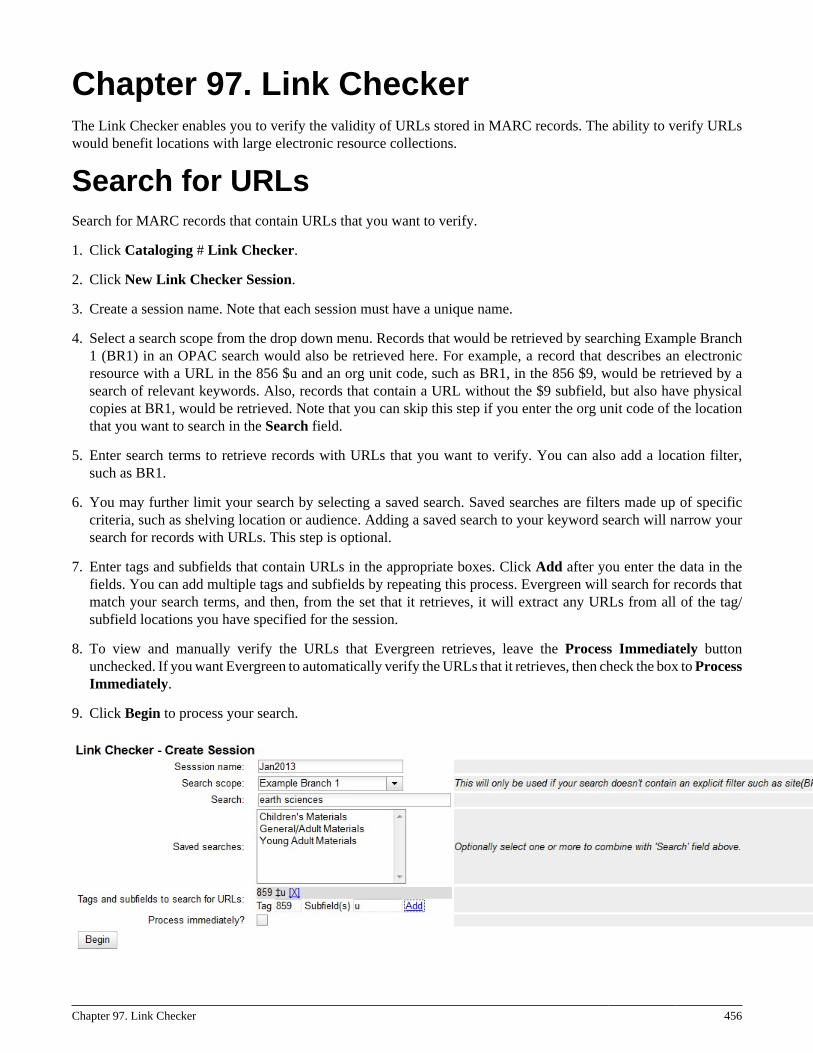
Chapter 97. Link Checker 456
Chapter 97. Link CheckerThe Link Checker enables you to verify the validity of URLs stored in MARC records. The ability to verify URLswould benefit locations with large electronic resource collections.
Search for URLsSearch for MARC records that contain URLs that you want to verify.
1. Click Cataloging # Link Checker.
2. Click New Link Checker Session.
3. Create a session name. Note that each session must have a unique name.
4. Select a search scope from the drop down menu. Records that would be retrieved by searching Example Branch1 (BR1) in an OPAC search would also be retrieved here. For example, a record that describes an electronicresource with a URL in the 856 $u and an org unit code, such as BR1, in the 856 $9, would be retrieved by asearch of relevant keywords. Also, records that contain a URL without the $9 subfield, but also have physicalcopies at BR1, would be retrieved. Note that you can skip this step if you enter the org unit code of the locationthat you want to search in the Search field.
5. Enter search terms to retrieve records with URLs that you want to verify. You can also add a location filter,such as BR1.
6. You may further limit your search by selecting a saved search. Saved searches are filters made up of specificcriteria, such as shelving location or audience. Adding a saved search to your keyword search will narrow yoursearch for records with URLs. This step is optional.
7. Enter tags and subfields that contain URLs in the appropriate boxes. Click Add after you enter the data in thefields. You can add multiple tags and subfields by repeating this process. Evergreen will search for records thatmatch your search terms, and then, from the set that it retrieves, it will extract any URLs from all of the tag/subfield locations you have specified for the session.
8. To view and manually verify the URLs that Evergreen retrieves, leave the Process Immediately buttonunchecked. If you want Evergreen to automatically verify the URLs that it retrieves, then check the box to ProcessImmediately.
9. Click Begin to process your search.
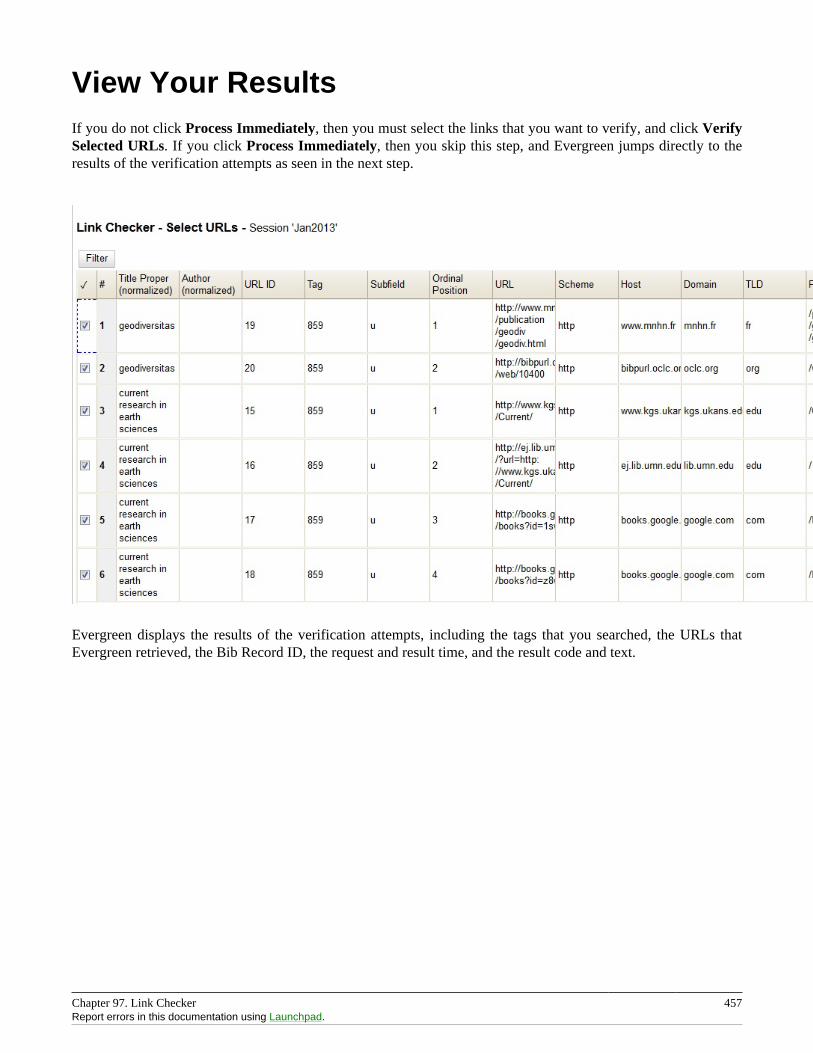
Chapter 97. Link Checker 457Report errors in this documentation using Launchpad.
View Your ResultsIf you do not click Process Immediately, then you must select the links that you want to verify, and click VerifySelected URLs. If you click Process Immediately, then you skip this step, and Evergreen jumps directly to theresults of the verification attempts as seen in the next step.
Evergreen displays the results of the verification attempts, including the tags that you searched, the URLs thatEvergreen retrieved, the Bib Record ID, the request and result time, and the result code and text.
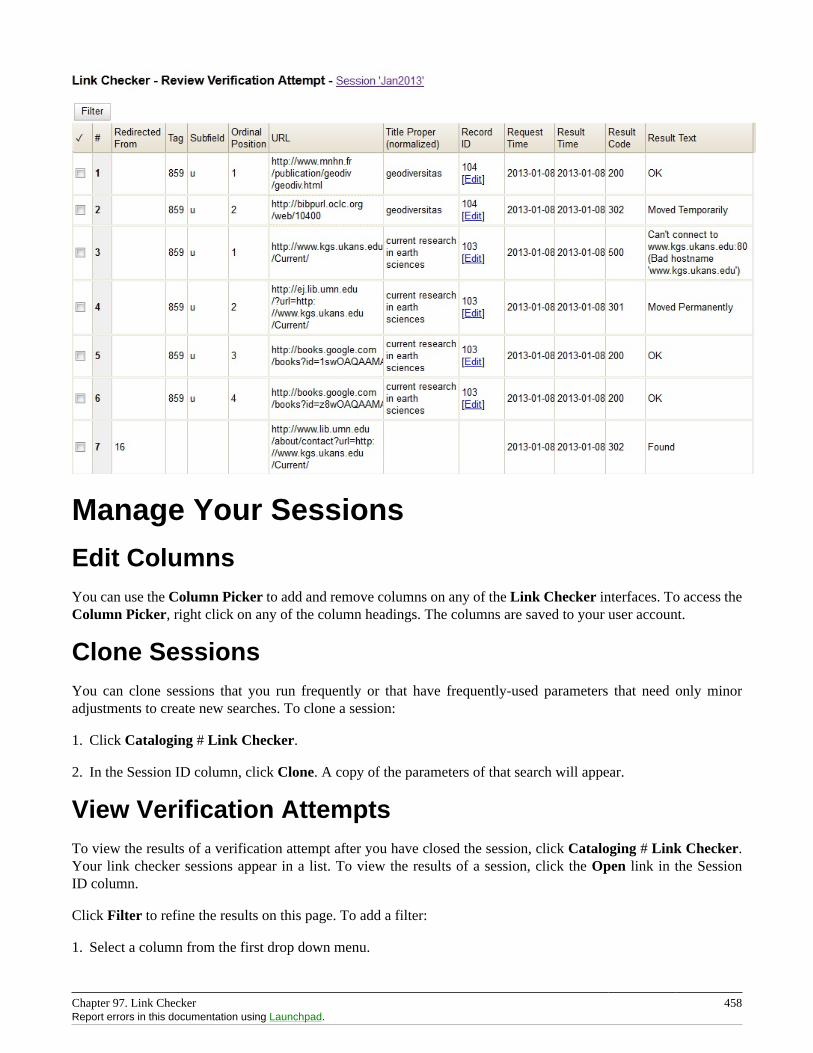
Chapter 97. Link Checker 458Report errors in this documentation using Launchpad.
Manage Your Sessions
Edit ColumnsYou can use the Column Picker to add and remove columns on any of the Link Checker interfaces. To access theColumn Picker, right click on any of the column headings. The columns are saved to your user account.
Clone SessionsYou can clone sessions that you run frequently or that have frequently-used parameters that need only minoradjustments to create new searches. To clone a session:
1. Click Cataloging # Link Checker.
2. In the Session ID column, click Clone. A copy of the parameters of that search will appear.
View Verification AttemptsTo view the results of a verification attempt after you have closed the session, click Cataloging # Link Checker.Your link checker sessions appear in a list. To view the results of a session, click the Open link in the SessionID column.
Click Filter to refine the results on this page. To add a filter:
1. Select a column from the first drop down menu.
Chapter 97. Link Checker 459Report errors in this documentation using Launchpad.
2. Select an operator from the second drop down menu.
3. A third field will appear. Enter the appropriate text.
4. Click Apply to apply the filter to your current results. Click Save Filters to save the filter to your user accountfor later use.

Part X. Serials
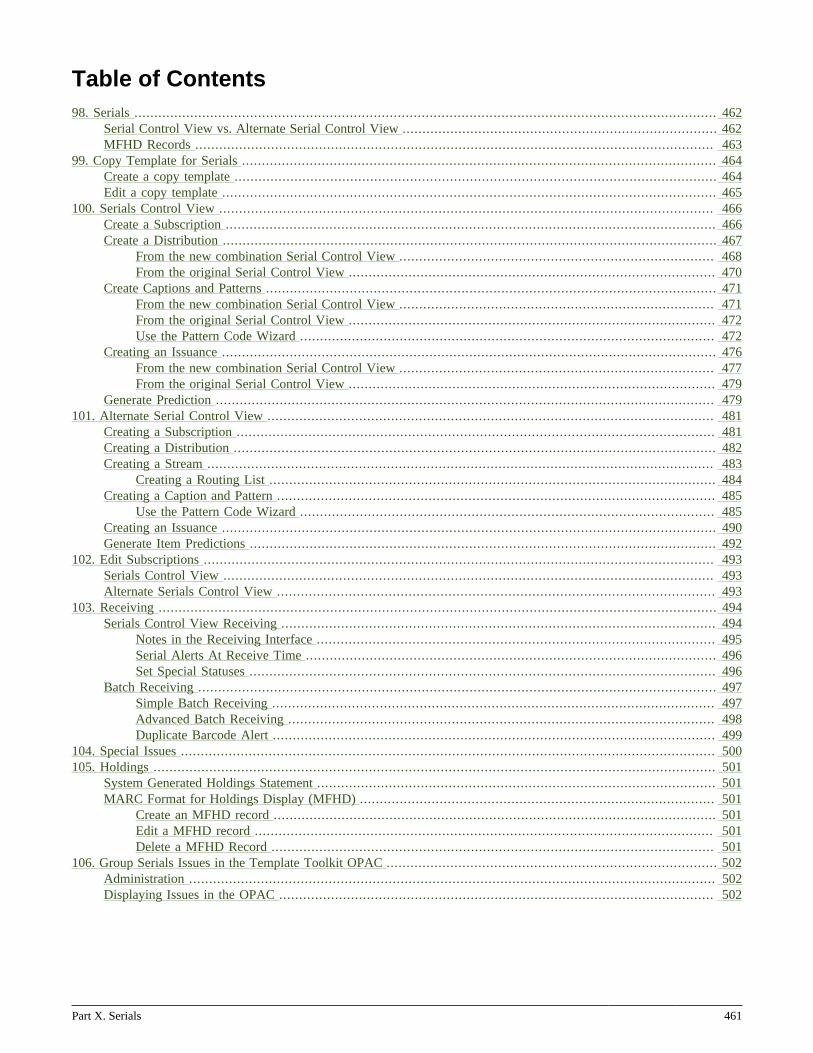
Part X. Serials 461
Table of Contents98. Serials .................................................................................................................................................. 462
Serial Control View vs. Alternate Serial Control View ............................................................................... 462MFHD Records .................................................................................................................................. 463
99. Copy Template for Serials ....................................................................................................................... 464Create a copy template ......................................................................................................................... 464Edit a copy template ............................................................................................................................ 465
100. Serials Control View ............................................................................................................................ 466Create a Subscription ........................................................................................................................... 466Create a Distribution ............................................................................................................................ 467
From the new combination Serial Control View ............................................................................... 468From the original Serial Control View ............................................................................................ 470
Create Captions and Patterns ................................................................................................................. 471From the new combination Serial Control View ............................................................................... 471From the original Serial Control View ............................................................................................ 472Use the Pattern Code Wizard ........................................................................................................ 472
Creating an Issuance ............................................................................................................................ 476From the new combination Serial Control View ............................................................................... 477From the original Serial Control View ............................................................................................ 479
Generate Prediction ............................................................................................................................. 479101. Alternate Serial Control View ................................................................................................................ 481
Creating a Subscription ........................................................................................................................ 481Creating a Distribution ......................................................................................................................... 482Creating a Stream ............................................................................................................................... 483
Creating a Routing List ................................................................................................................ 484Creating a Caption and Pattern .............................................................................................................. 485
Use the Pattern Code Wizard ........................................................................................................ 485Creating an Issuance ............................................................................................................................ 490Generate Item Predictions ..................................................................................................................... 492
102. Edit Subscriptions ................................................................................................................................ 493Serials Control View ........................................................................................................................... 493Alternate Serials Control View .............................................................................................................. 493
103. Receiving ............................................................................................................................................ 494Serials Control View Receiving ............................................................................................................. 494
Notes in the Receiving Interface .................................................................................................... 495Serial Alerts At Receive Time ....................................................................................................... 496Set Special Statuses ..................................................................................................................... 496
Batch Receiving .................................................................................................................................. 497Simple Batch Receiving ............................................................................................................... 497Advanced Batch Receiving ........................................................................................................... 498Duplicate Barcode Alert ............................................................................................................... 499
104. Special Issues ...................................................................................................................................... 500105. Holdings ............................................................................................................................................. 501
System Generated Holdings Statement .................................................................................................... 501MARC Format for Holdings Display (MFHD) ......................................................................................... 501
Create an MFHD record ............................................................................................................... 501Edit a MFHD record ................................................................................................................... 501Delete a MFHD Record ............................................................................................................... 501
106. Group Serials Issues in the Template Toolkit OPAC ................................................................................... 502Administration .................................................................................................................................... 502Displaying Issues in the OPAC ............................................................................................................. 502
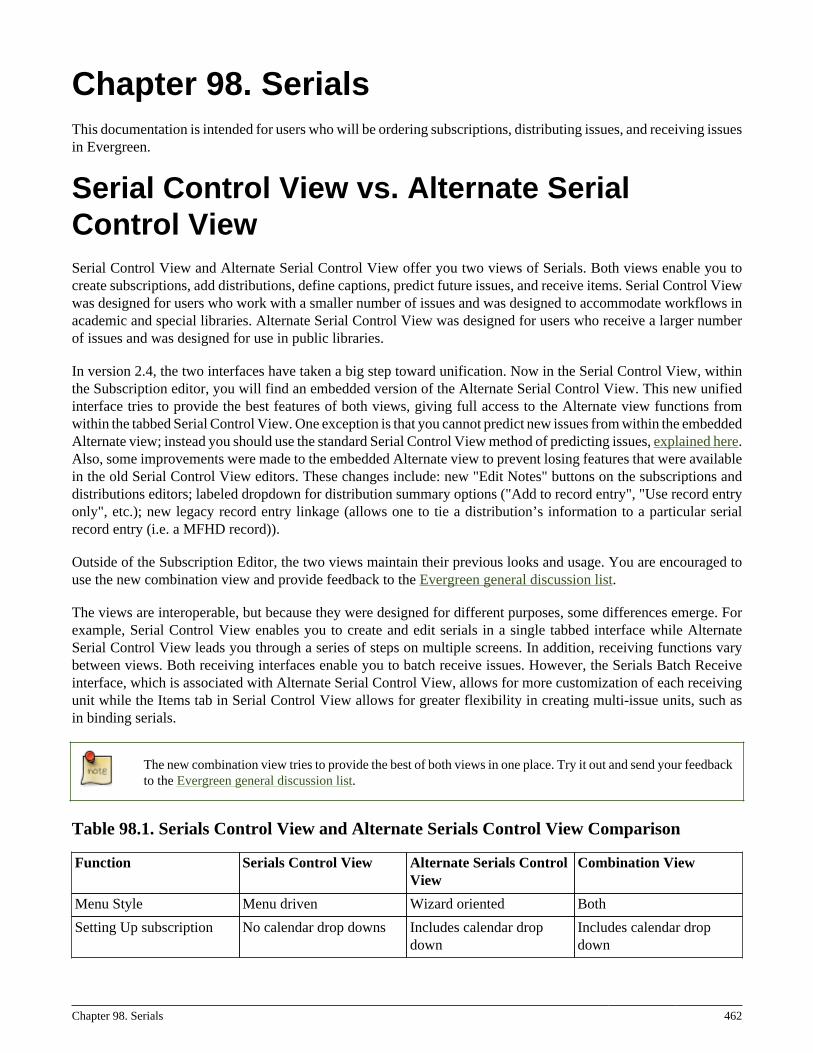
Chapter 98. Serials 462
Chapter 98. SerialsThis documentation is intended for users who will be ordering subscriptions, distributing issues, and receiving issuesin Evergreen.
Serial Control View vs. Alternate SerialControl ViewSerial Control View and Alternate Serial Control View offer you two views of Serials. Both views enable you tocreate subscriptions, add distributions, define captions, predict future issues, and receive items. Serial Control Viewwas designed for users who work with a smaller number of issues and was designed to accommodate workflows inacademic and special libraries. Alternate Serial Control View was designed for users who receive a larger numberof issues and was designed for use in public libraries.
In version 2.4, the two interfaces have taken a big step toward unification. Now in the Serial Control View, withinthe Subscription editor, you will find an embedded version of the Alternate Serial Control View. This new unifiedinterface tries to provide the best features of both views, giving full access to the Alternate view functions fromwithin the tabbed Serial Control View. One exception is that you cannot predict new issues from within the embeddedAlternate view; instead you should use the standard Serial Control View method of predicting issues, explained here.Also, some improvements were made to the embedded Alternate view to prevent losing features that were availablein the old Serial Control View editors. These changes include: new "Edit Notes" buttons on the subscriptions anddistributions editors; labeled dropdown for distribution summary options ("Add to record entry", "Use record entryonly", etc.); new legacy record entry linkage (allows one to tie a distribution’s information to a particular serialrecord entry (i.e. a MFHD record)).
Outside of the Subscription Editor, the two views maintain their previous looks and usage. You are encouraged touse the new combination view and provide feedback to the Evergreen general discussion list.
The views are interoperable, but because they were designed for different purposes, some differences emerge. Forexample, Serial Control View enables you to create and edit serials in a single tabbed interface while AlternateSerial Control View leads you through a series of steps on multiple screens. In addition, receiving functions varybetween views. Both receiving interfaces enable you to batch receive issues. However, the Serials Batch Receiveinterface, which is associated with Alternate Serial Control View, allows for more customization of each receivingunit while the Items tab in Serial Control View allows for greater flexibility in creating multi-issue units, such asin binding serials.
The new combination view tries to provide the best of both views in one place. Try it out and send your feedbackto the Evergreen general discussion list.
Table 98.1. Serials Control View and Alternate Serials Control View Comparison
Function Serials Control View Alternate Serials ControlView
Combination View
Menu Style Menu driven Wizard oriented Both
Setting Up subscription No calendar drop downs Includes calendar dropdown
Includes calendar dropdown
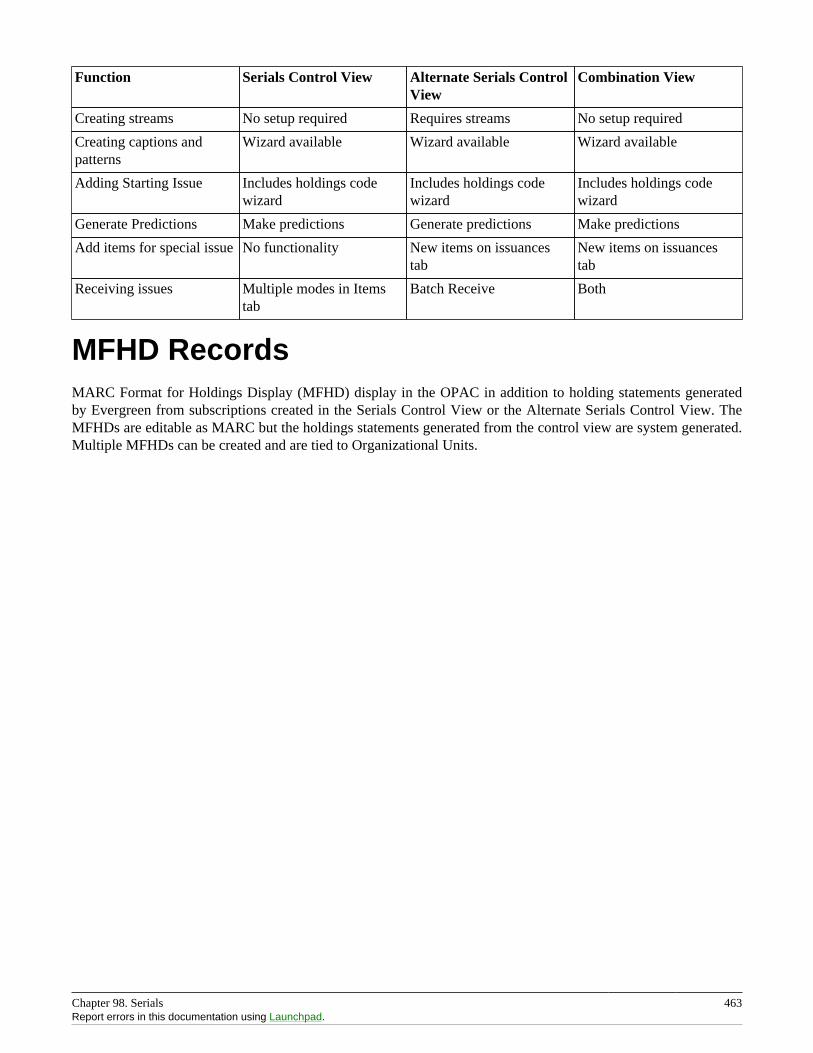
Chapter 98. Serials 463Report errors in this documentation using Launchpad.
Function Serials Control View Alternate Serials ControlView
Combination View
Creating streams No setup required Requires streams No setup required
Creating captions andpatterns
Wizard available Wizard available Wizard available
Adding Starting Issue Includes holdings codewizard
Includes holdings codewizard
Includes holdings codewizard
Generate Predictions Make predictions Generate predictions Make predictions
Add items for special issue No functionality New items on issuancestab
New items on issuancestab
Receiving issues Multiple modes in Itemstab
Batch Receive Both
MFHD RecordsMARC Format for Holdings Display (MFHD) display in the OPAC in addition to holding statements generatedby Evergreen from subscriptions created in the Serials Control View or the Alternate Serials Control View. TheMFHDs are editable as MARC but the holdings statements generated from the control view are system generated.Multiple MFHDs can be created and are tied to Organizational Units.
Chapter 99. Copy Template for Serials 464
Chapter 99. Copy Template for SerialsA copy template enables you to specify item attributes that should be applied by default to copies of serials. You cancreate one copy template and apply it to multiple serials. You can also create multiple copy templates. Templateswill be used in the Alternate Serial Control View or the Serial Control View.
Create a copy templateTo create a copy template, click Admin # Local Administration # Copy Template Editor.
1. Enter a Name for the template.
2. Select an owning library from the Owning Lib drop down menu. This organization owns the copy template. Astaff member with permissions at that organization can modify the copy template. The menu is populated fromthe organizations that you created in Admin # Server Administration # Organizational Units.
3. Check Circulate? if you want the item to circulate.
4. Check Holdable? if patrons can place holds on the item.
5. Check OPAC Visible? if you want patrons to be able to see the item in the OPAC after you receive it.
6. Select a Loan Duration rule from the drop down menu. This field is required.
7. Select a Fine Level for the item from the drop down menu. This field is required.
8. Select a copy location from the Location drop down menu. The menu is populated from the copy locations thatyou created in Admin # Local Administration # Copy Locations.
9. Select a Circ Modifier from the drop down menu. The menu is populated from the modifiers that you created inAdmin # Server Administration # Circulation Modifiers.
10.Select a Floating Group if the item is part of a floating collection. For more information, see the chapter onFloating Groups.
11.Check Deposit? if patrons must place a deposit on the copy before they can use it.
12.Check Reference? if the item is a reference item.
13.Check Mint Condition? if the item is in mint condition.
14.Enter age protection rules in the Age Protect field. Age protection allows you to control the extent to which anitem can circulate after it has been received. For example, you may want to protect new copies of a serial so thatonly patrons who check out the item at your branch can use it.
15.Enter a message in the Alert Message field. This message will appear every time the item is checked out to apatron.
16.Enter a code from the MARC fixed fields into the Circ as Type field if you want to control the circulation basedon the item type.
17.Enter a Deposit Amount if patrons must place a deposit on the copy before they can use it.

Chapter 99. Copy Template for Serials 465Report errors in this documentation using Launchpad.
18.Enter the Price of the item.
19.Select a copy status from the Status drop down menu. The copy statuses can be managed in Admin # ServerAdministration # Copy Statuses.
20.Click Save.
Edit a copy templateYou can make changes to an existing copy template. Changes that you make to a copy template will apply to anyitems that you receive after you edited the template.
1. Double-click the row you want to edit. The copy template will appear, and you can edit the fields.
2. After making changes, click Save.
From the copy template interface, you can delete copy templates that have never been used. First check the boxfor the template you wish to delete, then click Delete Selected.
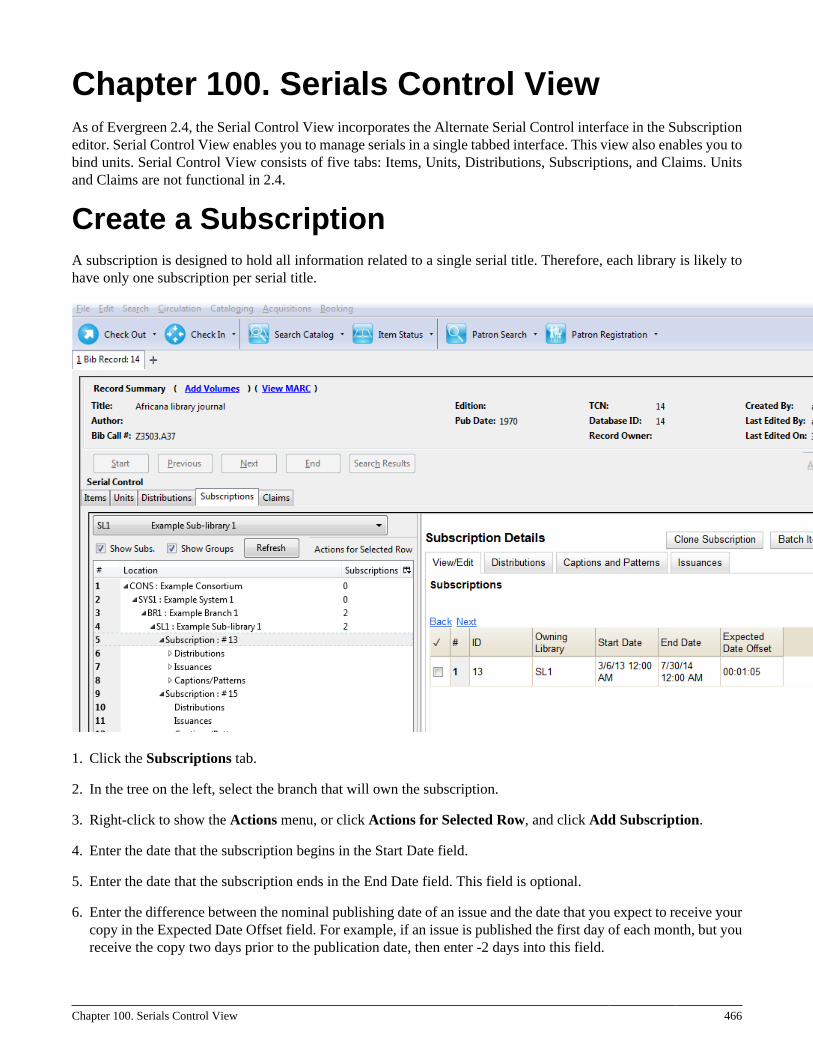
Chapter 100. Serials Control View 466
Chapter 100. Serials Control ViewAs of Evergreen 2.4, the Serial Control View incorporates the Alternate Serial Control interface in the Subscriptioneditor. Serial Control View enables you to manage serials in a single tabbed interface. This view also enables you tobind units. Serial Control View consists of five tabs: Items, Units, Distributions, Subscriptions, and Claims. Unitsand Claims are not functional in 2.4.
Create a SubscriptionA subscription is designed to hold all information related to a single serial title. Therefore, each library is likely tohave only one subscription per serial title.
1. Click the Subscriptions tab.
2. In the tree on the left, select the branch that will own the subscription.
3. Right-click to show the Actions menu, or click Actions for Selected Row, and click Add Subscription.
4. Enter the date that the subscription begins in the Start Date field.
5. Enter the date that the subscription ends in the End Date field. This field is optional.
6. Enter the difference between the nominal publishing date of an issue and the date that you expect to receive yourcopy in the Expected Date Offset field. For example, if an issue is published the first day of each month, but youreceive the copy two days prior to the publication date, then enter -2 days into this field.
Chapter 100. Serials Control View 467Report errors in this documentation using Launchpad.
7. When finished, click Save. Or to exit the editor without saving, click Cancel.
You can add notes to the subscription by clicking View/Edit Notes. These notes can also be accessed from theItems tab by right-clicking on an item and choosing View Sub. Notes. Also, the Notes column in the Items tabdisplays the total notes of each kind (Item notes, then Distribution notes, then Subscription notes).
Create a DistributionDistributions indicate the branches that should receive copies of a serial. Distributions work together with streamsto indicate the number of copies that should be sent to each branch.
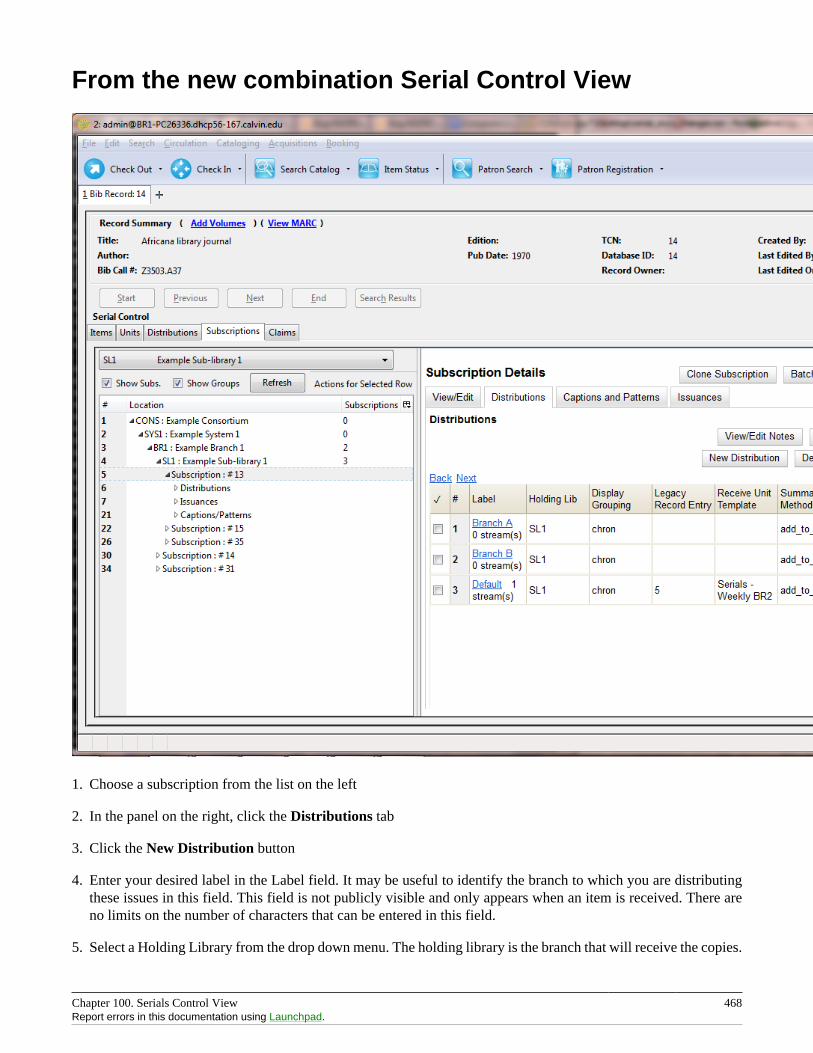
Chapter 100. Serials Control View 468Report errors in this documentation using Launchpad.
From the new combination Serial Control View
1. Choose a subscription from the list on the left
2. In the panel on the right, click the Distributions tab
3. Click the New Distribution button
4. Enter your desired label in the Label field. It may be useful to identify the branch to which you are distributingthese issues in this field. This field is not publicly visible and only appears when an item is received. There areno limits on the number of characters that can be entered in this field.
5. Select a Holding Library from the drop down menu. The holding library is the branch that will receive the copies.
Chapter 100. Serials Control View 469Report errors in this documentation using Launchpad.
6. Select a Display Grouping
7. Choose a Legacy Record Entry to attach to this serial record. The Legacy Record Entry contains the MFHDrecords that are attached to the bib record if the owning library is identical to the distribution’s holding library.A distribution can thus be an extension of an MFHD record.
8. Select a copy template from the Receive Unit Template drop down menu. This menu is populated with the copytemplates that you created in Copy Template Editor.
9. Select a Summary method. This determines how the Holdings Summary will treat the Legacy Record Entry (i.e.MFHD record) in relation to the Serial Control holdings data.
• Add to record entry - Displays the MFHD holdings summary first, followed by the summary generated fromthe Serial Control received issues
• Use record entry only - Displays only the MFHD holdings summary
• Do not use record entry - Displays only the holdings summary generated from Serial Control received issues
• Merge with record entry - Merges the two holdings summaries into a single statement
10.Enter a Unit label prefix. This information will display in Serial Control View when the items are received, butit does not print in the Spine Label printing interface.
11.Enter a Unit label suffix. This information will display in Serial Control View when the items are received, butit does not print in the Spine Label printing interface.
12.Click the Save button to finish.
Label, Holding Library, and Receive Unit Template are required fields when creating a distribution.
Streams are created automatically in the Serial Control View. For information on using Streams in thecombination Serial Control View, see Creating a Stream.
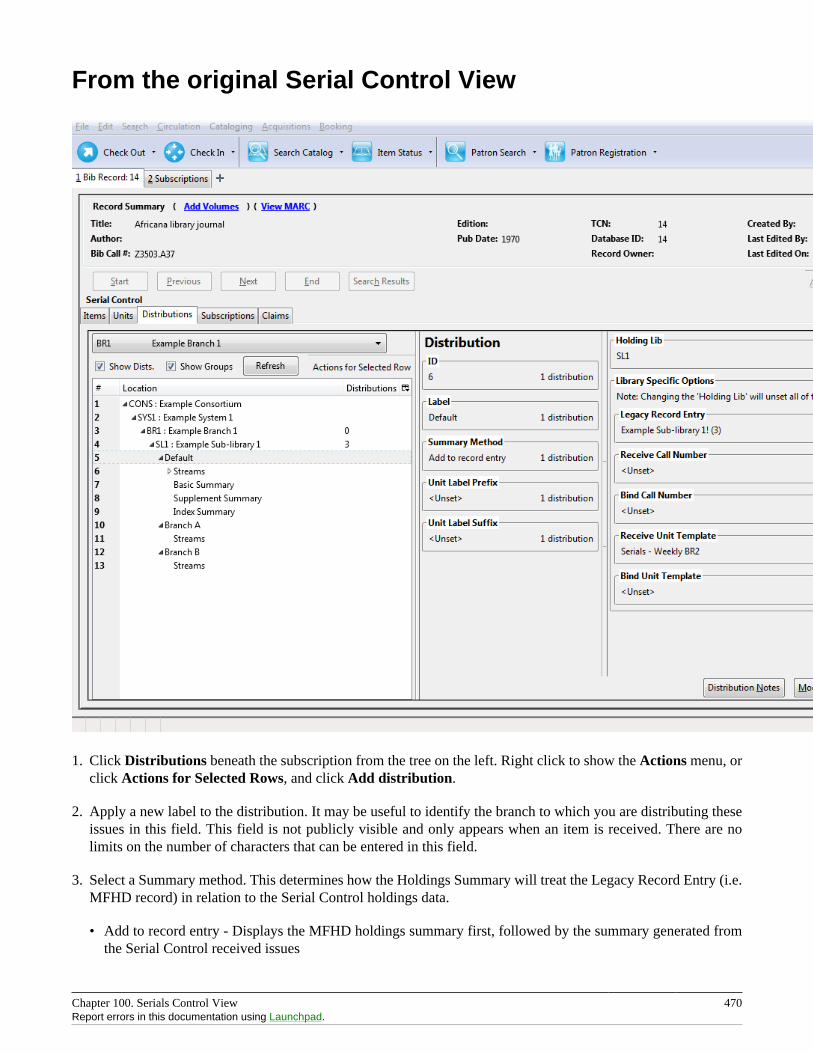
Chapter 100. Serials Control View 470Report errors in this documentation using Launchpad.
From the original Serial Control View
1. Click Distributions beneath the subscription from the tree on the left. Right click to show the Actions menu, orclick Actions for Selected Rows, and click Add distribution.
2. Apply a new label to the distribution. It may be useful to identify the branch to which you are distributing theseissues in this field. This field is not publicly visible and only appears when an item is received. There are nolimits on the number of characters that can be entered in this field.
3. Select a Summary method. This determines how the Holdings Summary will treat the Legacy Record Entry (i.e.MFHD record) in relation to the Serial Control holdings data.
• Add to record entry - Displays the MFHD holdings summary first, followed by the summary generated fromthe Serial Control received issues
Chapter 100. Serials Control View 471Report errors in this documentation using Launchpad.
• Use record entry only - Displays only the MFHD holdings summary
• Do not use record entry - Displays only the holdings summary generated from Serial Control received issues
• Merge with record entry - Merges the two holdings summaries into a single statement
4. Apply a prefix to the spine label if desired. This information will display in Serial Control View when the itemsare received, but it does not print in the Spine Label printing interface.
5. Apply a suffix to the spine label if desired. This information will display in Serial Control View when the itemsare received, but it does not print in the Spine Label printing interface.
6. The holding library is filled in by default and is the library to which you attached the subscription.
7. The Legacy Record Entry contains the MFHD records that are attached to the bib record if the owning library isidentical to the distribution’s holding library. A distribution can thus be an extension of an MFHD record. Selectthe MFHD record from the drop down menu.
8. The Receive Call Number field is empty until you receive the first item. When you receive the first item, you areprompted to enter a call number. That call number will populate this drop down menu.
9. The Bind Call Number field is empty until you bind the first item. When you receive the first item, you areprompted to enter a call number. That call number will populate this drop down menu.
10.Receive Unit Template - The template that should be applied to copies when they are received. Select a templatefrom the drop down menu.
11.Bind Unit Template - The template that should be applied to copies when they are bound. Select a template fromthe drop down menu.
12.When finished, click Create Distribution(s) in the bottom right corner of the screen.
13.A confirmation message appears. Click OK.
You can add notes to the distribution by clicking Distribution Notes. These notes can also be accessed fromthe Items tab by right-clicking on an item and choosing View Dist. Notes. Also, the Notes column in the Itemstab displays the total notes of each kind (Item notes, then Distribution notes, then Subscription notes).
Create Captions and Patterns
From the new combination Serial Control ViewThe Captions and Patterns wizard allows you to enter caption and pattern data as it is described by the 853, 854, and855 MARC tags. These tags allow you to define how issues will be captioned, and how often the library receivesissues of the serial.
1. In the panel on the right, click the Captions and Patterns tab.
2. Click Add New.
3. In the Type drop down menu, select the MARC tag to which you would like to add data.
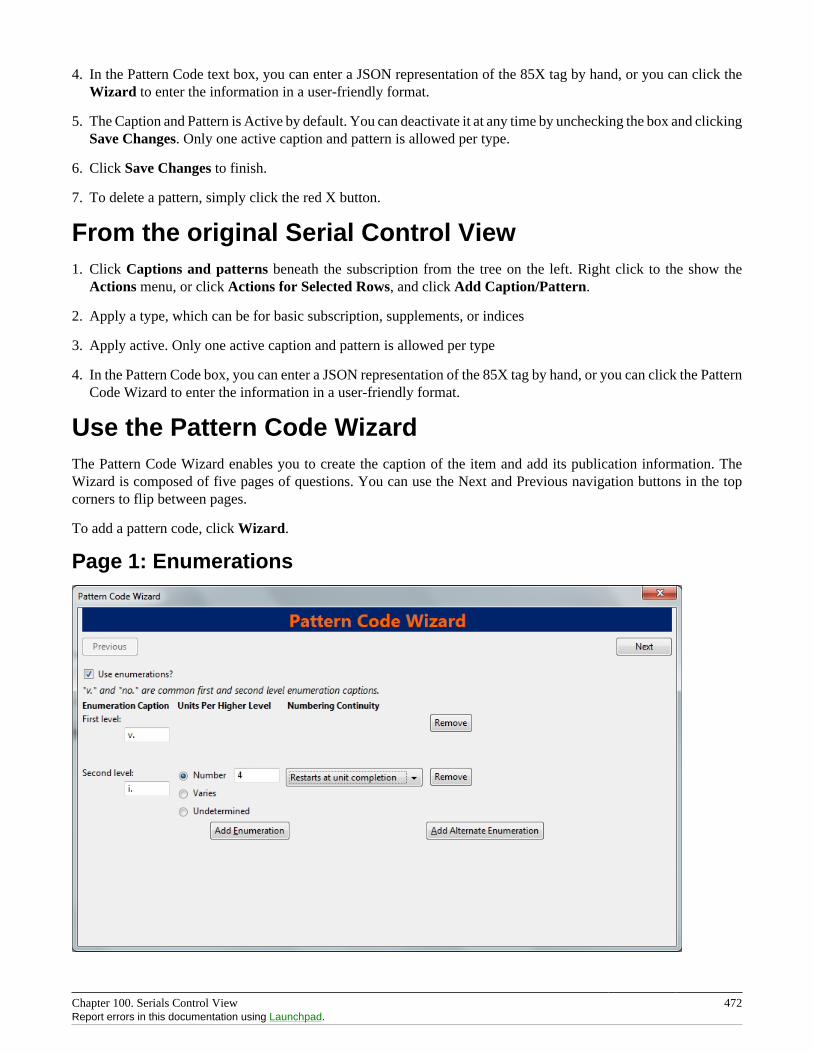
Chapter 100. Serials Control View 472Report errors in this documentation using Launchpad.
4. In the Pattern Code text box, you can enter a JSON representation of the 85X tag by hand, or you can click theWizard to enter the information in a user-friendly format.
5. The Caption and Pattern is Active by default. You can deactivate it at any time by unchecking the box and clickingSave Changes. Only one active caption and pattern is allowed per type.
6. Click Save Changes to finish.
7. To delete a pattern, simply click the red X button.
From the original Serial Control View1. Click Captions and patterns beneath the subscription from the tree on the left. Right click to the show the
Actions menu, or click Actions for Selected Rows, and click Add Caption/Pattern.
2. Apply a type, which can be for basic subscription, supplements, or indices
3. Apply active. Only one active caption and pattern is allowed per type
4. In the Pattern Code box, you can enter a JSON representation of the 85X tag by hand, or you can click the PatternCode Wizard to enter the information in a user-friendly format.
Use the Pattern Code WizardThe Pattern Code Wizard enables you to create the caption of the item and add its publication information. TheWizard is composed of five pages of questions. You can use the Next and Previous navigation buttons in the topcorners to flip between pages.
To add a pattern code, click Wizard.
Page 1: Enumerations
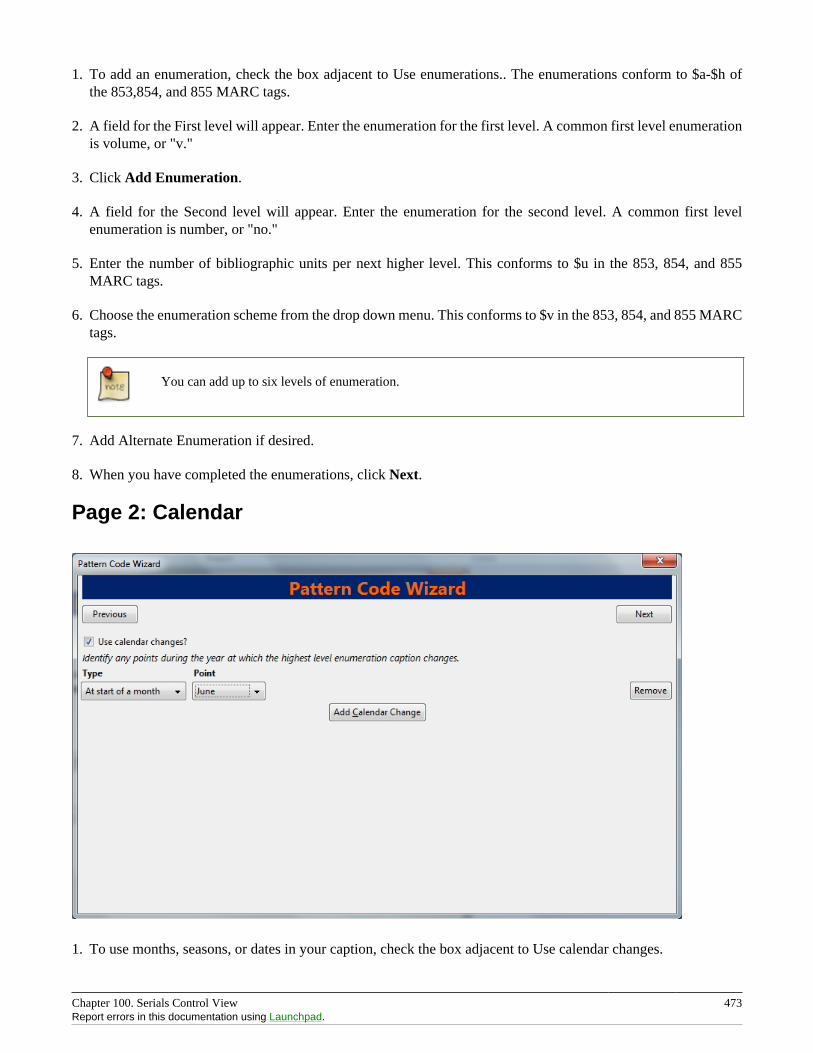
Chapter 100. Serials Control View 473Report errors in this documentation using Launchpad.
1. To add an enumeration, check the box adjacent to Use enumerations.. The enumerations conform to $a-$h ofthe 853,854, and 855 MARC tags.
2. A field for the First level will appear. Enter the enumeration for the first level. A common first level enumerationis volume, or "v."
3. Click Add Enumeration.
4. A field for the Second level will appear. Enter the enumeration for the second level. A common first levelenumeration is number, or "no."
5. Enter the number of bibliographic units per next higher level. This conforms to $u in the 853, 854, and 855MARC tags.
6. Choose the enumeration scheme from the drop down menu. This conforms to $v in the 853, 854, and 855 MARCtags.
You can add up to six levels of enumeration.
7. Add Alternate Enumeration if desired.
8. When you have completed the enumerations, click Next.
Page 2: Calendar
1. To use months, seasons, or dates in your caption, check the box adjacent to Use calendar changes.
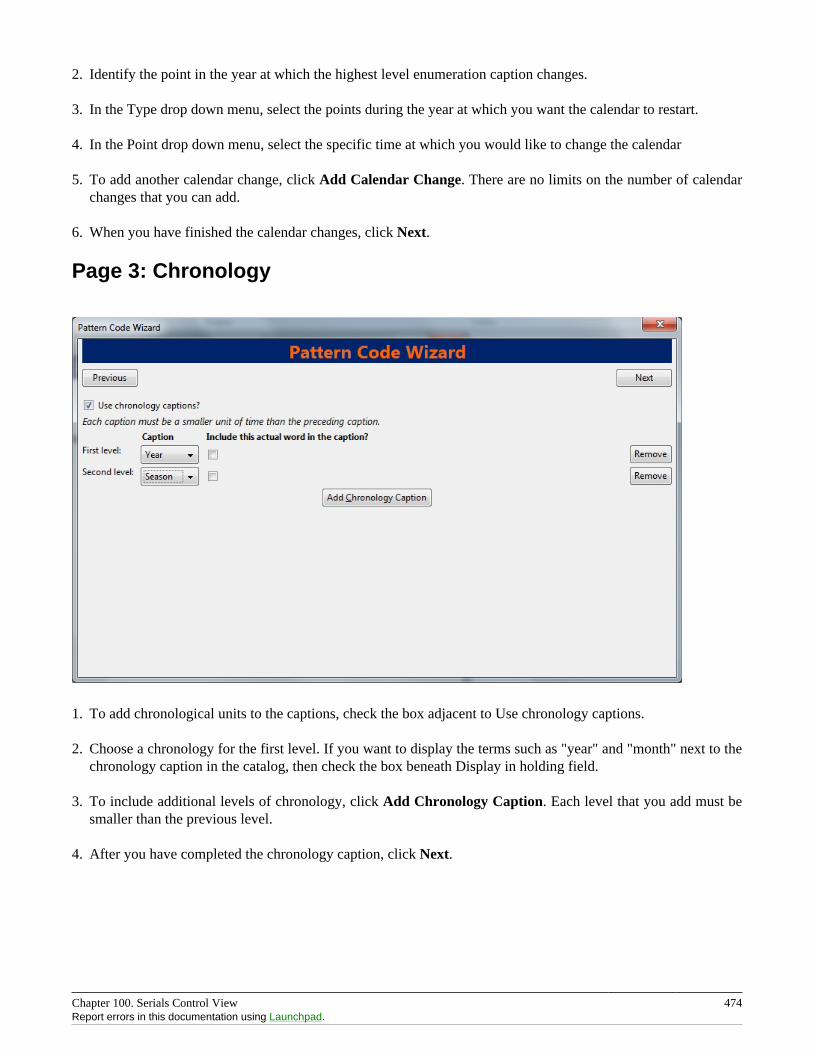
Chapter 100. Serials Control View 474Report errors in this documentation using Launchpad.
2. Identify the point in the year at which the highest level enumeration caption changes.
3. In the Type drop down menu, select the points during the year at which you want the calendar to restart.
4. In the Point drop down menu, select the specific time at which you would like to change the calendar
5. To add another calendar change, click Add Calendar Change. There are no limits on the number of calendarchanges that you can add.
6. When you have finished the calendar changes, click Next.
Page 3: Chronology
1. To add chronological units to the captions, check the box adjacent to Use chronology captions.
2. Choose a chronology for the first level. If you want to display the terms such as "year" and "month" next to thechronology caption in the catalog, then check the box beneath Display in holding field.
3. To include additional levels of chronology, click Add Chronology Caption. Each level that you add must besmaller than the previous level.
4. After you have completed the chronology caption, click Next.
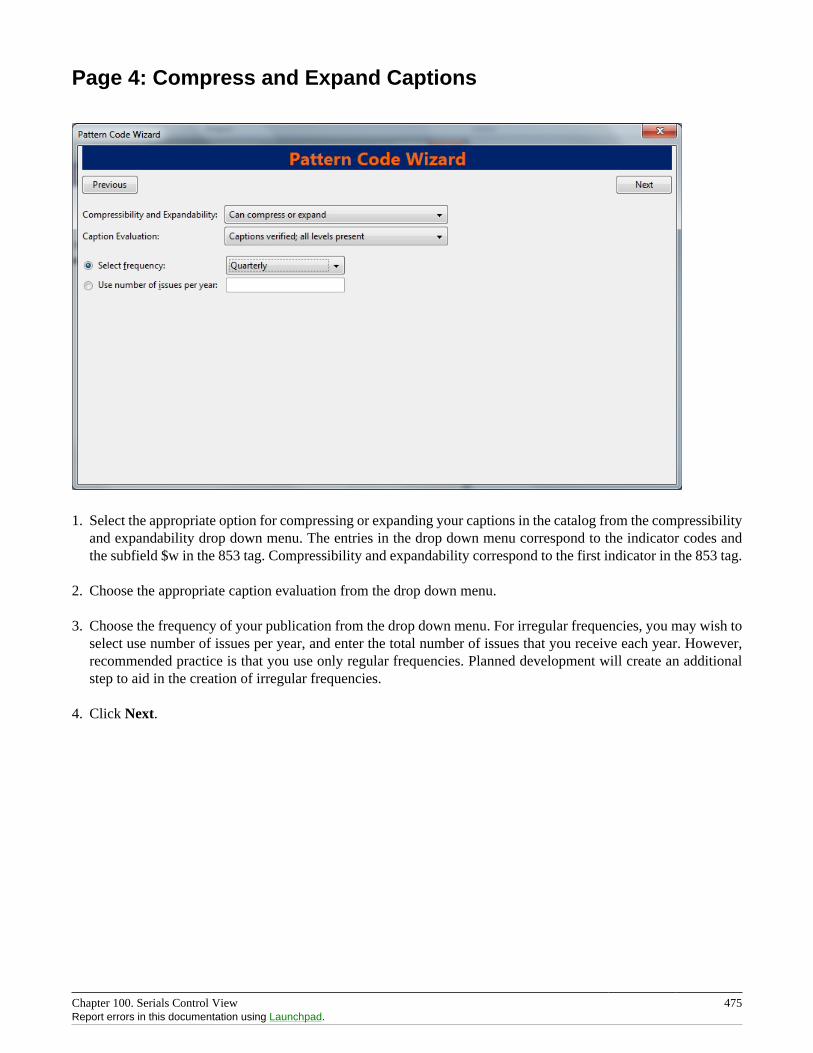
Chapter 100. Serials Control View 475Report errors in this documentation using Launchpad.
Page 4: Compress and Expand Captions
1. Select the appropriate option for compressing or expanding your captions in the catalog from the compressibilityand expandability drop down menu. The entries in the drop down menu correspond to the indicator codes andthe subfield $w in the 853 tag. Compressibility and expandability correspond to the first indicator in the 853 tag.
2. Choose the appropriate caption evaluation from the drop down menu.
3. Choose the frequency of your publication from the drop down menu. For irregular frequencies, you may wish toselect use number of issues per year, and enter the total number of issues that you receive each year. However,recommended practice is that you use only regular frequencies. Planned development will create an additionalstep to aid in the creation of irregular frequencies.
4. Click Next.
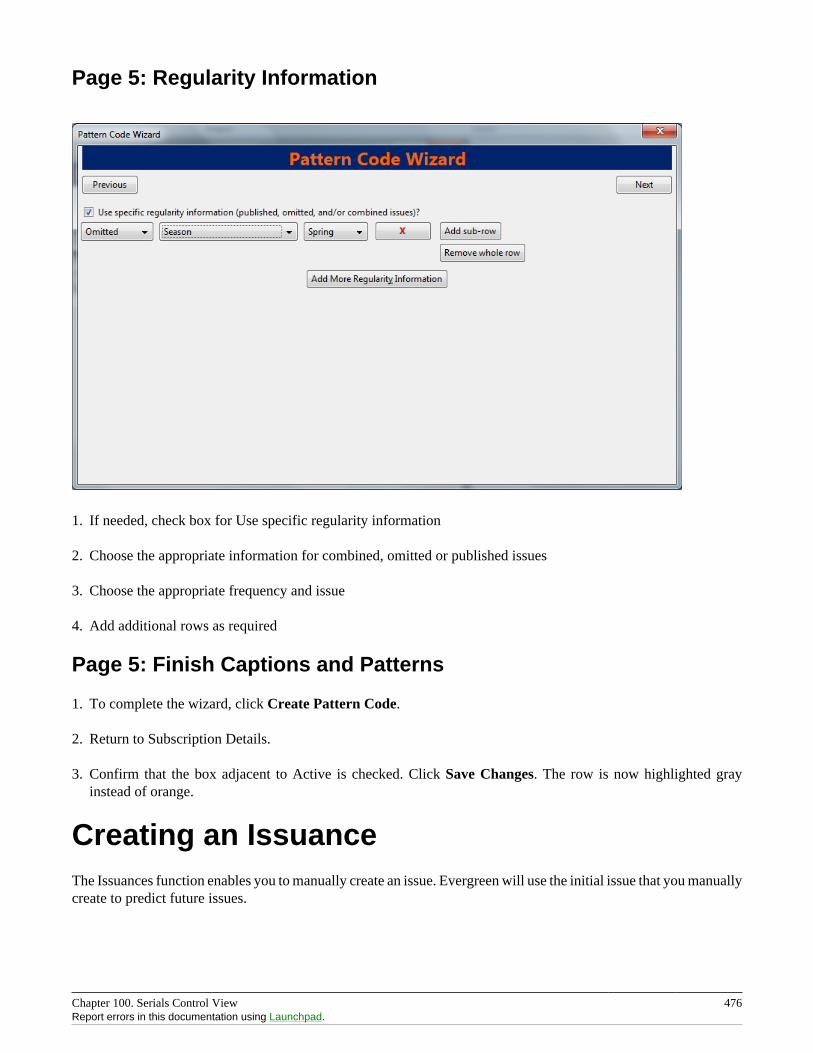
Chapter 100. Serials Control View 476Report errors in this documentation using Launchpad.
Page 5: Regularity Information
1. If needed, check box for Use specific regularity information
2. Choose the appropriate information for combined, omitted or published issues
3. Choose the appropriate frequency and issue
4. Add additional rows as required
Page 5: Finish Captions and Patterns
1. To complete the wizard, click Create Pattern Code.
2. Return to Subscription Details.
3. Confirm that the box adjacent to Active is checked. Click Save Changes. The row is now highlighted grayinstead of orange.
Creating an IssuanceThe Issuances function enables you to manually create an issue. Evergreen will use the initial issue that you manuallycreate to predict future issues.
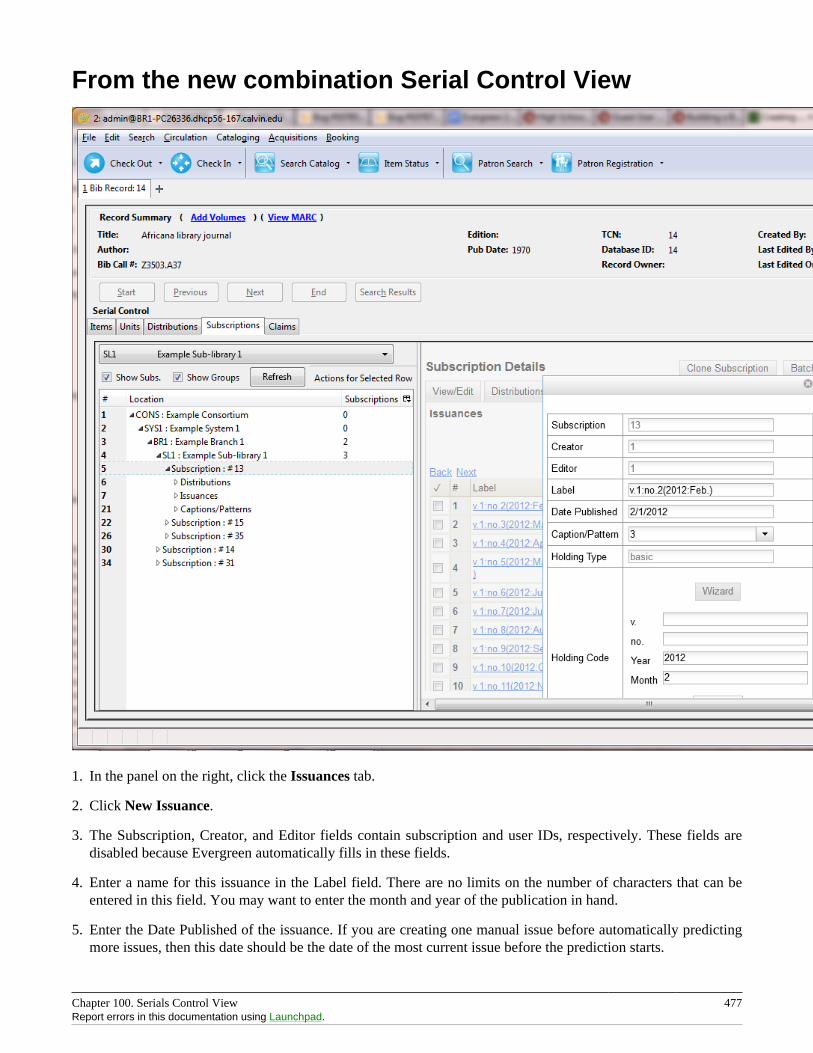
Chapter 100. Serials Control View 477Report errors in this documentation using Launchpad.
From the new combination Serial Control View
1. In the panel on the right, click the Issuances tab.
2. Click New Issuance.
3. The Subscription, Creator, and Editor fields contain subscription and user IDs, respectively. These fields aredisabled because Evergreen automatically fills in these fields.
4. Enter a name for this issuance in the Label field. There are no limits on the number of characters that can beentered in this field. You may want to enter the month and year of the publication in hand.
5. Enter the Date Published of the issuance. If you are creating one manual issue before automatically predictingmore issues, then this date should be the date of the most current issue before the prediction starts.
Chapter 100. Serials Control View 478Report errors in this documentation using Launchpad.
6. Select a Caption/Pattern from the drop down menu. The numbers in the drop down menu correspond to the IDsof the caption/patterns that you created.
7. The Holding Type appears by default and corresponds to the Type that you selected when you created the Caption/Pattern.
8. In the holding code area of the New Issuance dialog, click Wizard. The Wizard enables you to add holdingsinformation.
9. Enter the volume of the item in hand in the v. field.
10.Enter the number of the item in hand in the no. field.
11.Enter the year of publication in the Year field.
12.Enter the month of publication in the Month field if applicable. You must enter the calendar number of the monthrather than the name of the month. For example, enter 12 if the item in hand was published in December.
13.Enter the day of publication in the day field if applicable.
14.Click Compile to generate the holdings code.
15.Click Save to finish.
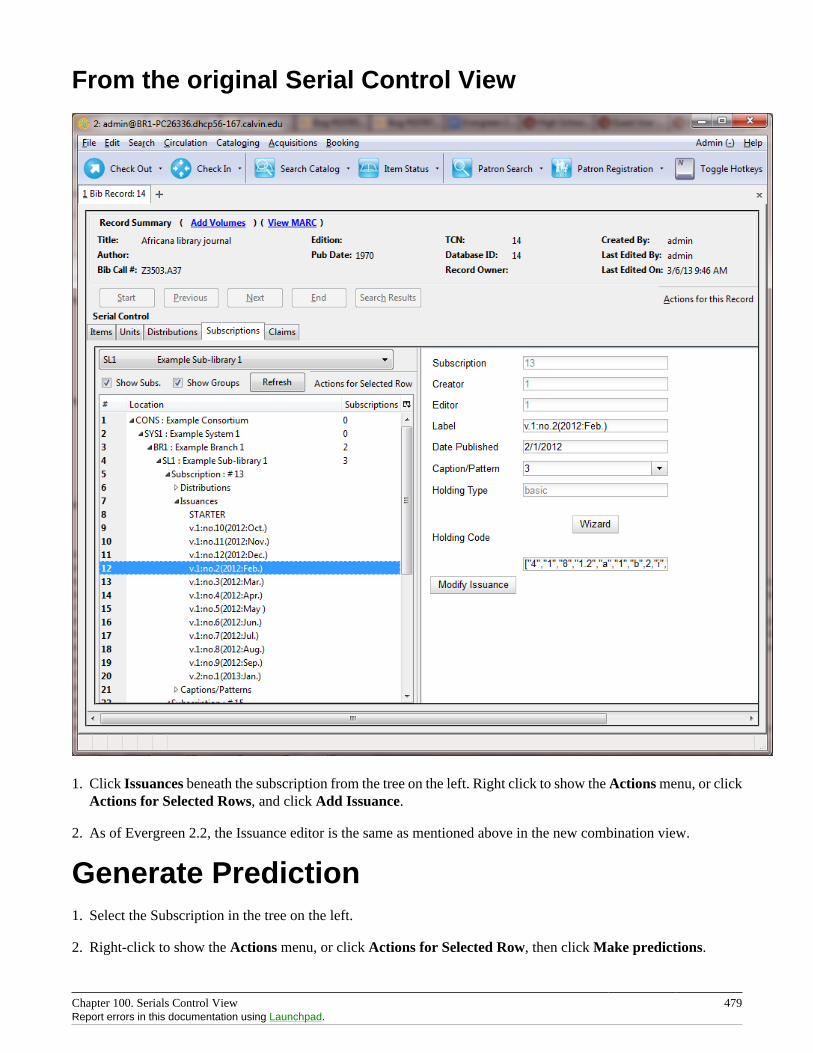
Chapter 100. Serials Control View 479Report errors in this documentation using Launchpad.
From the original Serial Control View
1. Click Issuances beneath the subscription from the tree on the left. Right click to show the Actions menu, or clickActions for Selected Rows, and click Add Issuance.
2. As of Evergreen 2.2, the Issuance editor is the same as mentioned above in the new combination view.
Generate Prediction1. Select the Subscription in the tree on the left.
2. Right-click to show the Actions menu, or click Actions for Selected Row, then click Make predictions.
Chapter 100. Serials Control View 480Report errors in this documentation using Launchpad.
3. A pop up box will ask you how many items you want to predict. Enter the number, and click OK.
4. A confirmation message will appear. Click OK.
5. To view the predicted issues, select a Subscription from the tree on the left, then click the Issuances tab in thepanel on the right.
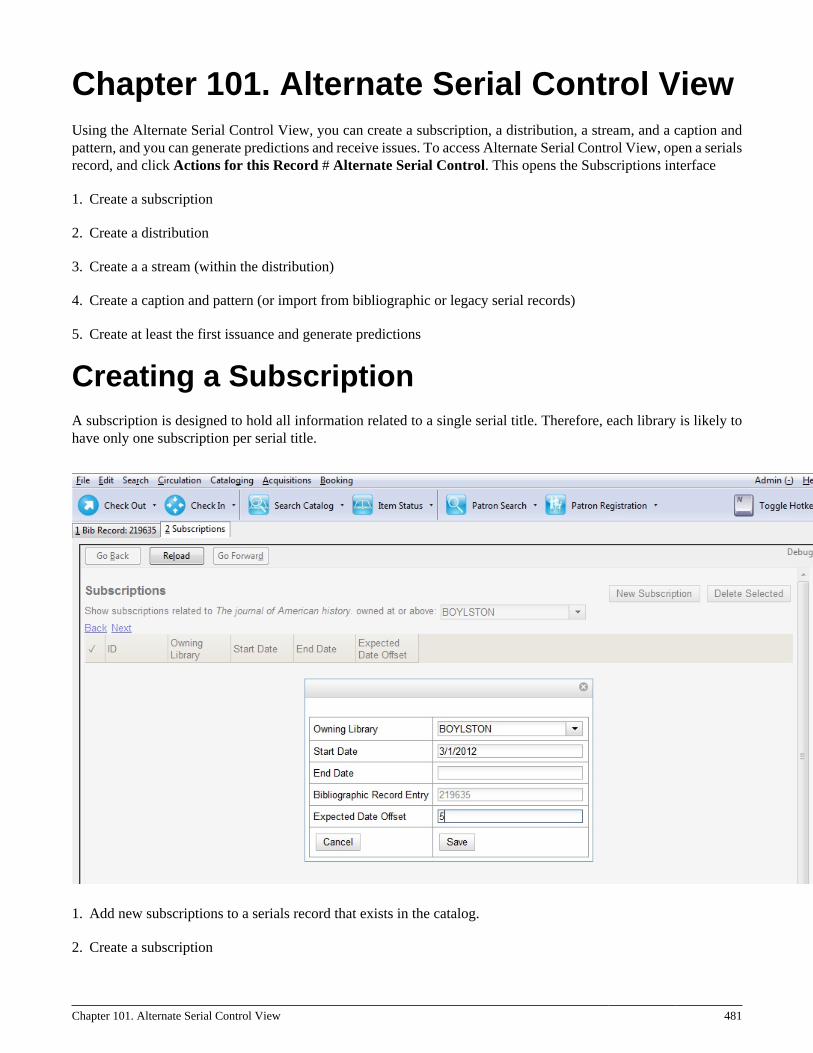
Chapter 101. Alternate Serial Control View 481
Chapter 101. Alternate Serial Control ViewUsing the Alternate Serial Control View, you can create a subscription, a distribution, a stream, and a caption andpattern, and you can generate predictions and receive issues. To access Alternate Serial Control View, open a serialsrecord, and click Actions for this Record # Alternate Serial Control. This opens the Subscriptions interface
1. Create a subscription
2. Create a distribution
3. Create a a stream (within the distribution)
4. Create a caption and pattern (or import from bibliographic or legacy serial records)
5. Create at least the first issuance and generate predictions
Creating a SubscriptionA subscription is designed to hold all information related to a single serial title. Therefore, each library is likely tohave only one subscription per serial title.
1. Add new subscriptions to a serials record that exists in the catalog.
2. Create a subscription
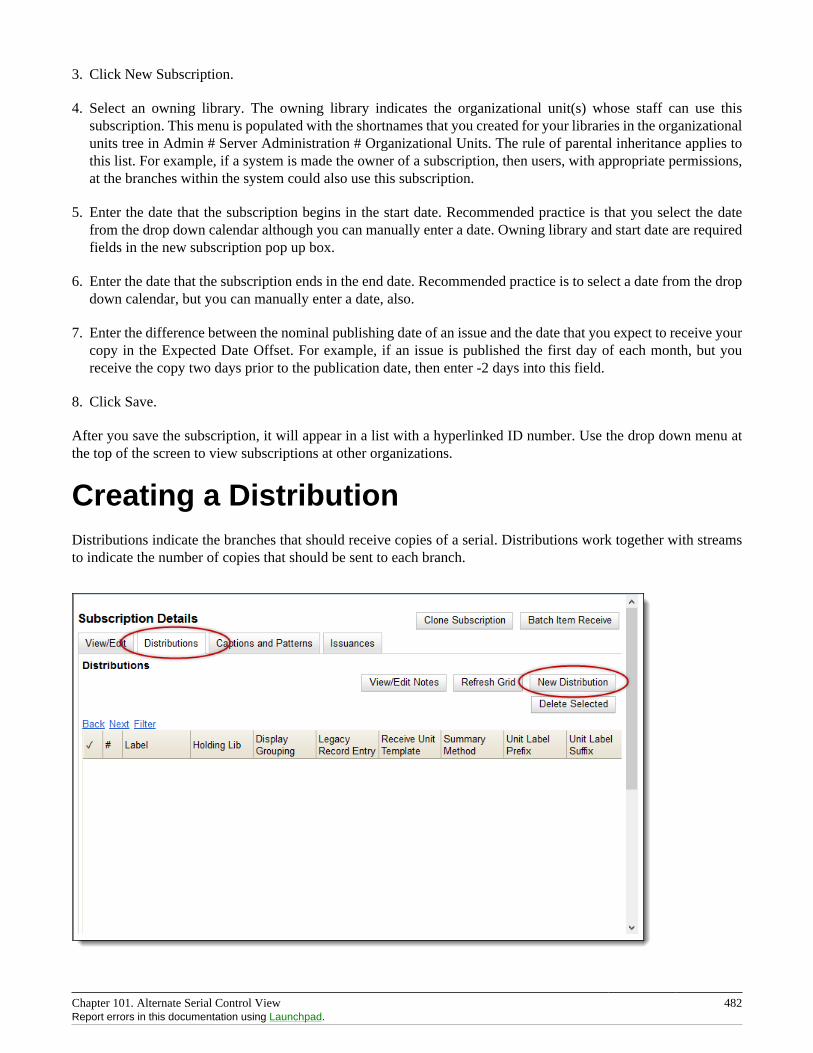
Chapter 101. Alternate Serial Control View 482Report errors in this documentation using Launchpad.
3. Click New Subscription.
4. Select an owning library. The owning library indicates the organizational unit(s) whose staff can use thissubscription. This menu is populated with the shortnames that you created for your libraries in the organizationalunits tree in Admin # Server Administration # Organizational Units. The rule of parental inheritance applies tothis list. For example, if a system is made the owner of a subscription, then users, with appropriate permissions,at the branches within the system could also use this subscription.
5. Enter the date that the subscription begins in the start date. Recommended practice is that you select the datefrom the drop down calendar although you can manually enter a date. Owning library and start date are requiredfields in the new subscription pop up box.
6. Enter the date that the subscription ends in the end date. Recommended practice is to select a date from the dropdown calendar, but you can manually enter a date, also.
7. Enter the difference between the nominal publishing date of an issue and the date that you expect to receive yourcopy in the Expected Date Offset. For example, if an issue is published the first day of each month, but youreceive the copy two days prior to the publication date, then enter -2 days into this field.
8. Click Save.
After you save the subscription, it will appear in a list with a hyperlinked ID number. Use the drop down menu atthe top of the screen to view subscriptions at other organizations.
Creating a DistributionDistributions indicate the branches that should receive copies of a serial. Distributions work together with streamsto indicate the number of copies that should be sent to each branch.
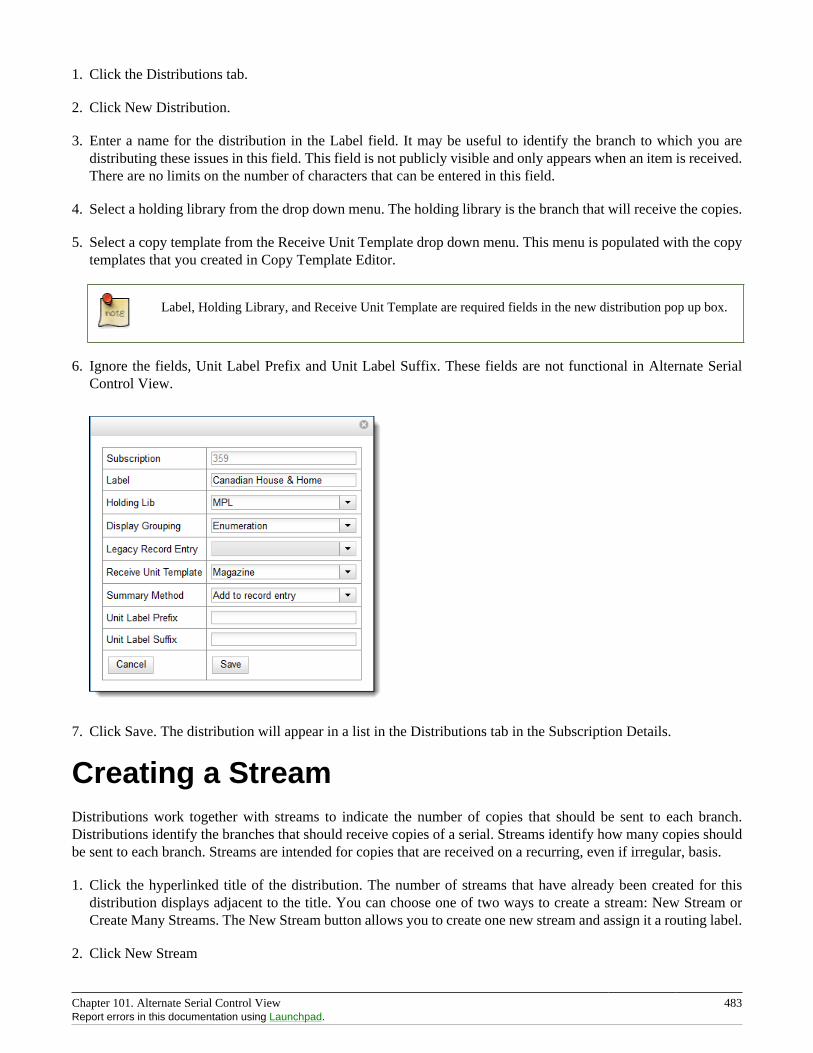
Chapter 101. Alternate Serial Control View 483Report errors in this documentation using Launchpad.
1. Click the Distributions tab.
2. Click New Distribution.
3. Enter a name for the distribution in the Label field. It may be useful to identify the branch to which you aredistributing these issues in this field. This field is not publicly visible and only appears when an item is received.There are no limits on the number of characters that can be entered in this field.
4. Select a holding library from the drop down menu. The holding library is the branch that will receive the copies.
5. Select a copy template from the Receive Unit Template drop down menu. This menu is populated with the copytemplates that you created in Copy Template Editor.
Label, Holding Library, and Receive Unit Template are required fields in the new distribution pop up box.
6. Ignore the fields, Unit Label Prefix and Unit Label Suffix. These fields are not functional in Alternate SerialControl View.
7. Click Save. The distribution will appear in a list in the Distributions tab in the Subscription Details.
Creating a StreamDistributions work together with streams to indicate the number of copies that should be sent to each branch.Distributions identify the branches that should receive copies of a serial. Streams identify how many copies shouldbe sent to each branch. Streams are intended for copies that are received on a recurring, even if irregular, basis.
1. Click the hyperlinked title of the distribution. The number of streams that have already been created for thisdistribution displays adjacent to the title. You can choose one of two ways to create a stream: New Stream orCreate Many Streams. The New Stream button allows you to create one new stream and assign it a routing label.
2. Click New Stream
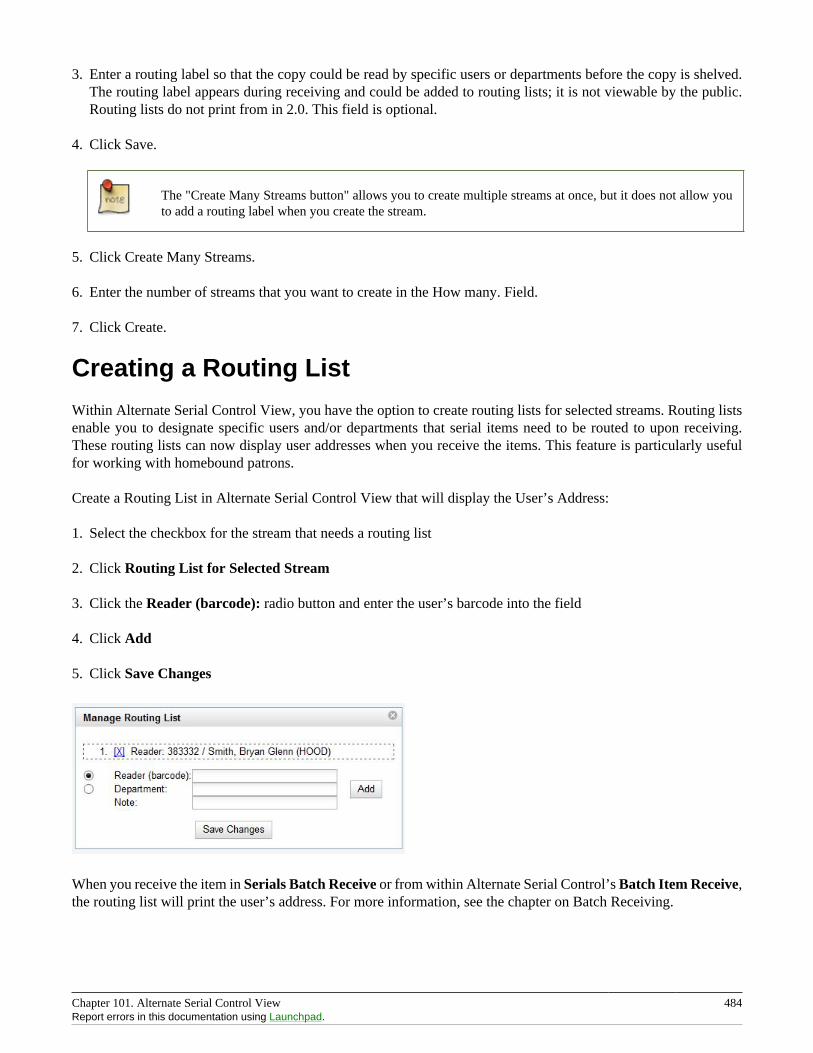
Chapter 101. Alternate Serial Control View 484Report errors in this documentation using Launchpad.
3. Enter a routing label so that the copy could be read by specific users or departments before the copy is shelved.The routing label appears during receiving and could be added to routing lists; it is not viewable by the public.Routing lists do not print from in 2.0. This field is optional.
4. Click Save.
The "Create Many Streams button" allows you to create multiple streams at once, but it does not allow youto add a routing label when you create the stream.
5. Click Create Many Streams.
6. Enter the number of streams that you want to create in the How many. Field.
7. Click Create.
Creating a Routing List
Within Alternate Serial Control View, you have the option to create routing lists for selected streams. Routing listsenable you to designate specific users and/or departments that serial items need to be routed to upon receiving.These routing lists can now display user addresses when you receive the items. This feature is particularly usefulfor working with homebound patrons.
Create a Routing List in Alternate Serial Control View that will display the User’s Address:
1. Select the checkbox for the stream that needs a routing list
2. Click Routing List for Selected Stream
3. Click the Reader (barcode): radio button and enter the user’s barcode into the field
4. Click Add
5. Click Save Changes
When you receive the item in Serials Batch Receive or from within Alternate Serial Control’s Batch Item Receive,the routing list will print the user’s address. For more information, see the chapter on Batch Receiving.
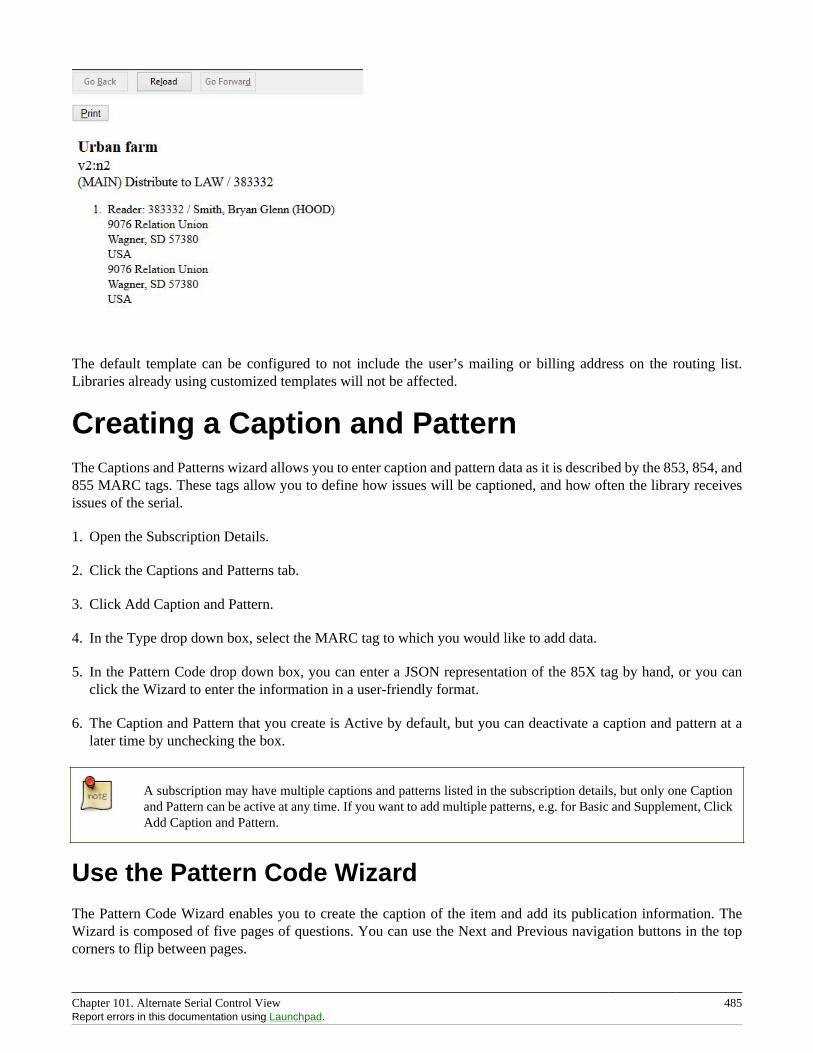
Chapter 101. Alternate Serial Control View 485Report errors in this documentation using Launchpad.
The default template can be configured to not include the user’s mailing or billing address on the routing list.Libraries already using customized templates will not be affected.
Creating a Caption and PatternThe Captions and Patterns wizard allows you to enter caption and pattern data as it is described by the 853, 854, and855 MARC tags. These tags allow you to define how issues will be captioned, and how often the library receivesissues of the serial.
1. Open the Subscription Details.
2. Click the Captions and Patterns tab.
3. Click Add Caption and Pattern.
4. In the Type drop down box, select the MARC tag to which you would like to add data.
5. In the Pattern Code drop down box, you can enter a JSON representation of the 85X tag by hand, or you canclick the Wizard to enter the information in a user-friendly format.
6. The Caption and Pattern that you create is Active by default, but you can deactivate a caption and pattern at alater time by unchecking the box.
A subscription may have multiple captions and patterns listed in the subscription details, but only one Captionand Pattern can be active at any time. If you want to add multiple patterns, e.g. for Basic and Supplement, ClickAdd Caption and Pattern.
Use the Pattern Code WizardThe Pattern Code Wizard enables you to create the caption of the item and add its publication information. TheWizard is composed of five pages of questions. You can use the Next and Previous navigation buttons in the topcorners to flip between pages.
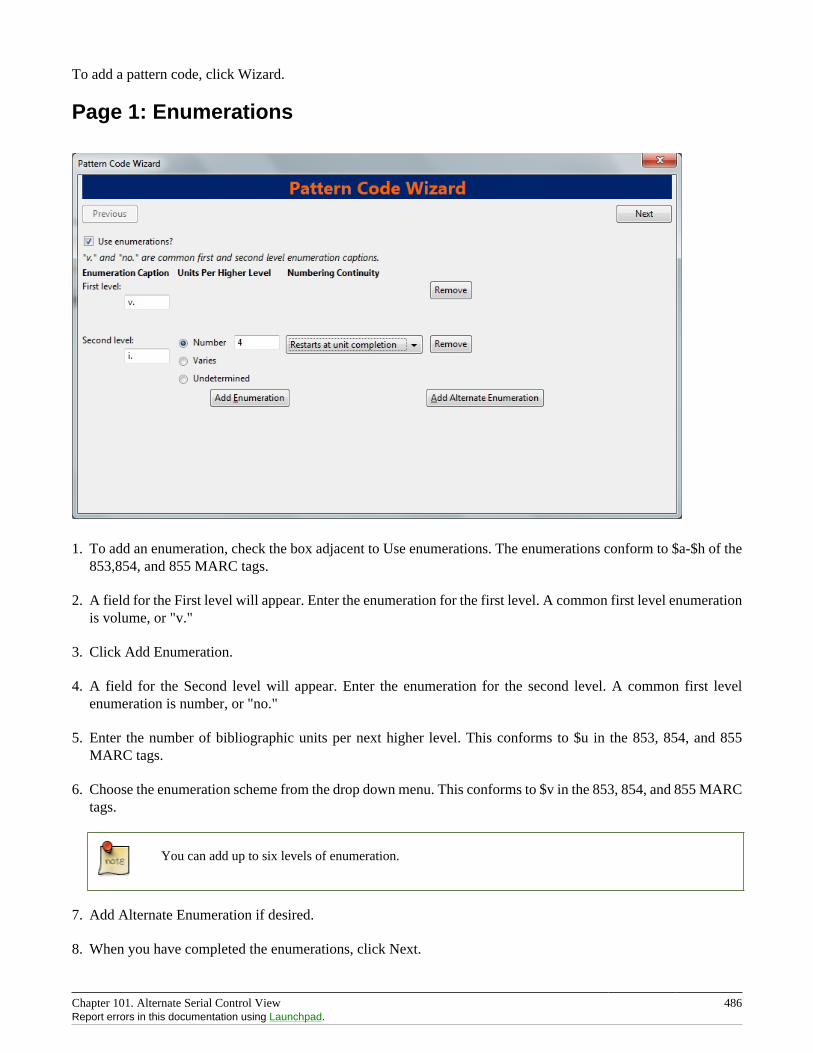
Chapter 101. Alternate Serial Control View 486Report errors in this documentation using Launchpad.
To add a pattern code, click Wizard.
Page 1: Enumerations
1. To add an enumeration, check the box adjacent to Use enumerations. The enumerations conform to $a-$h of the853,854, and 855 MARC tags.
2. A field for the First level will appear. Enter the enumeration for the first level. A common first level enumerationis volume, or "v."
3. Click Add Enumeration.
4. A field for the Second level will appear. Enter the enumeration for the second level. A common first levelenumeration is number, or "no."
5. Enter the number of bibliographic units per next higher level. This conforms to $u in the 853, 854, and 855MARC tags.
6. Choose the enumeration scheme from the drop down menu. This conforms to $v in the 853, 854, and 855 MARCtags.
You can add up to six levels of enumeration.
7. Add Alternate Enumeration if desired.
8. When you have completed the enumerations, click Next.
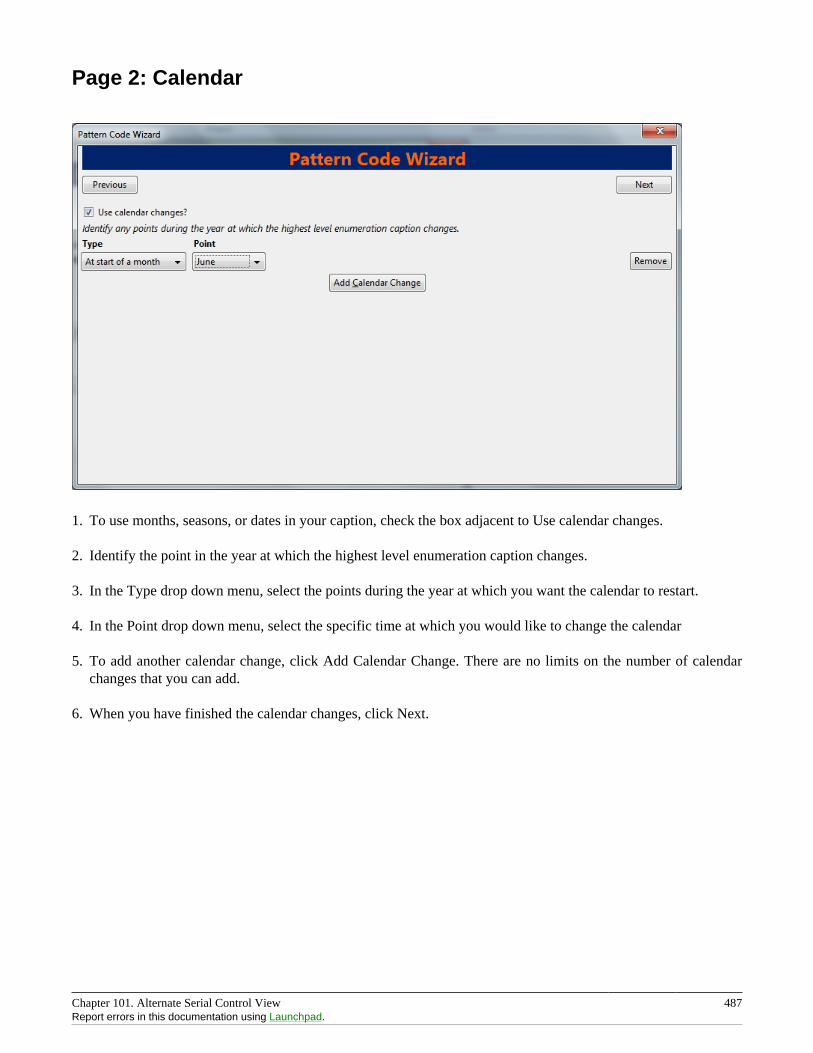
Chapter 101. Alternate Serial Control View 487Report errors in this documentation using Launchpad.
Page 2: Calendar
1. To use months, seasons, or dates in your caption, check the box adjacent to Use calendar changes.
2. Identify the point in the year at which the highest level enumeration caption changes.
3. In the Type drop down menu, select the points during the year at which you want the calendar to restart.
4. In the Point drop down menu, select the specific time at which you would like to change the calendar
5. To add another calendar change, click Add Calendar Change. There are no limits on the number of calendarchanges that you can add.
6. When you have finished the calendar changes, click Next.
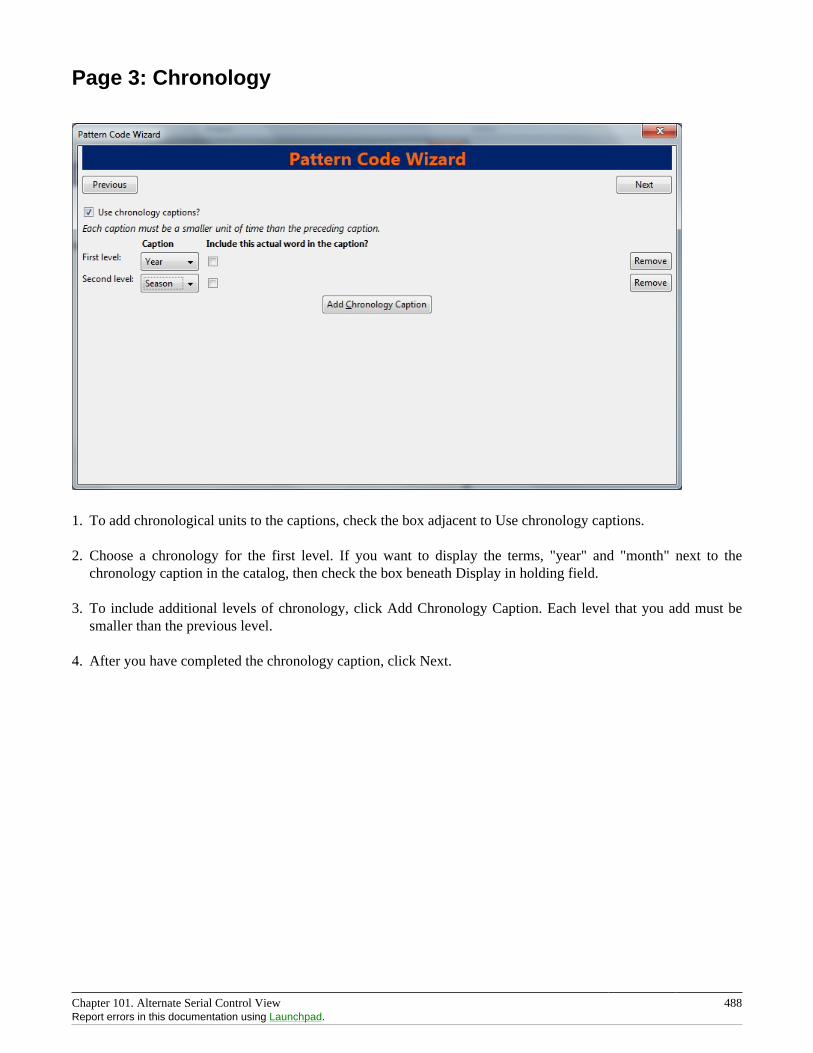
Chapter 101. Alternate Serial Control View 488Report errors in this documentation using Launchpad.
Page 3: Chronology
1. To add chronological units to the captions, check the box adjacent to Use chronology captions.
2. Choose a chronology for the first level. If you want to display the terms, "year" and "month" next to thechronology caption in the catalog, then check the box beneath Display in holding field.
3. To include additional levels of chronology, click Add Chronology Caption. Each level that you add must besmaller than the previous level.
4. After you have completed the chronology caption, click Next.
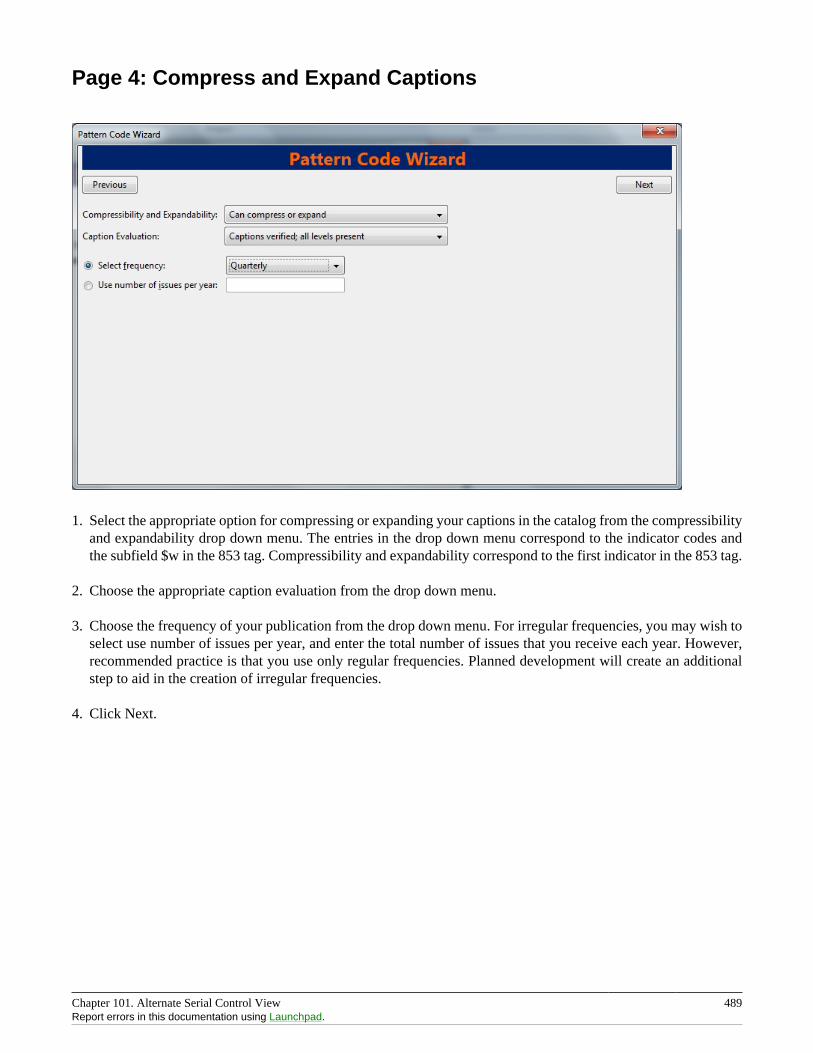
Chapter 101. Alternate Serial Control View 489Report errors in this documentation using Launchpad.
Page 4: Compress and Expand Captions
1. Select the appropriate option for compressing or expanding your captions in the catalog from the compressibilityand expandability drop down menu. The entries in the drop down menu correspond to the indicator codes andthe subfield $w in the 853 tag. Compressibility and expandability correspond to the first indicator in the 853 tag.
2. Choose the appropriate caption evaluation from the drop down menu.
3. Choose the frequency of your publication from the drop down menu. For irregular frequencies, you may wish toselect use number of issues per year, and enter the total number of issues that you receive each year. However,recommended practice is that you use only regular frequencies. Planned development will create an additionalstep to aid in the creation of irregular frequencies.
4. Click Next.
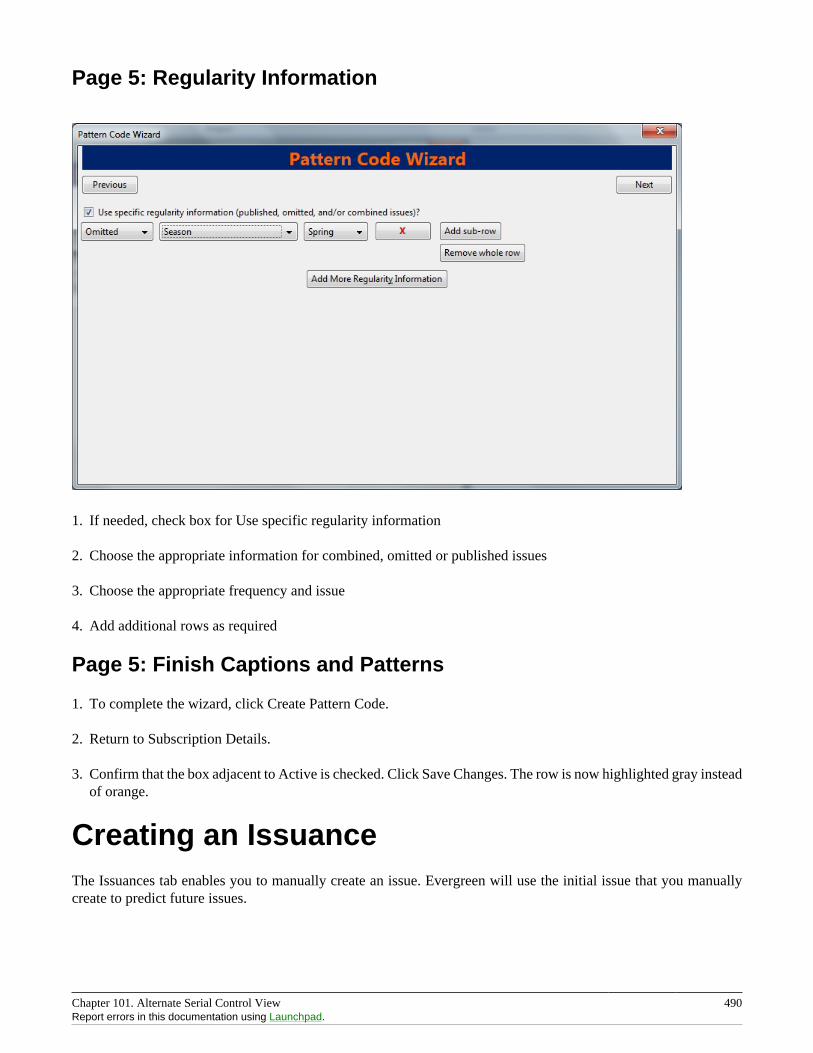
Chapter 101. Alternate Serial Control View 490Report errors in this documentation using Launchpad.
Page 5: Regularity Information
1. If needed, check box for Use specific regularity information
2. Choose the appropriate information for combined, omitted or published issues
3. Choose the appropriate frequency and issue
4. Add additional rows as required
Page 5: Finish Captions and Patterns
1. To complete the wizard, click Create Pattern Code.
2. Return to Subscription Details.
3. Confirm that the box adjacent to Active is checked. Click Save Changes. The row is now highlighted gray insteadof orange.
Creating an IssuanceThe Issuances tab enables you to manually create an issue. Evergreen will use the initial issue that you manuallycreate to predict future issues.
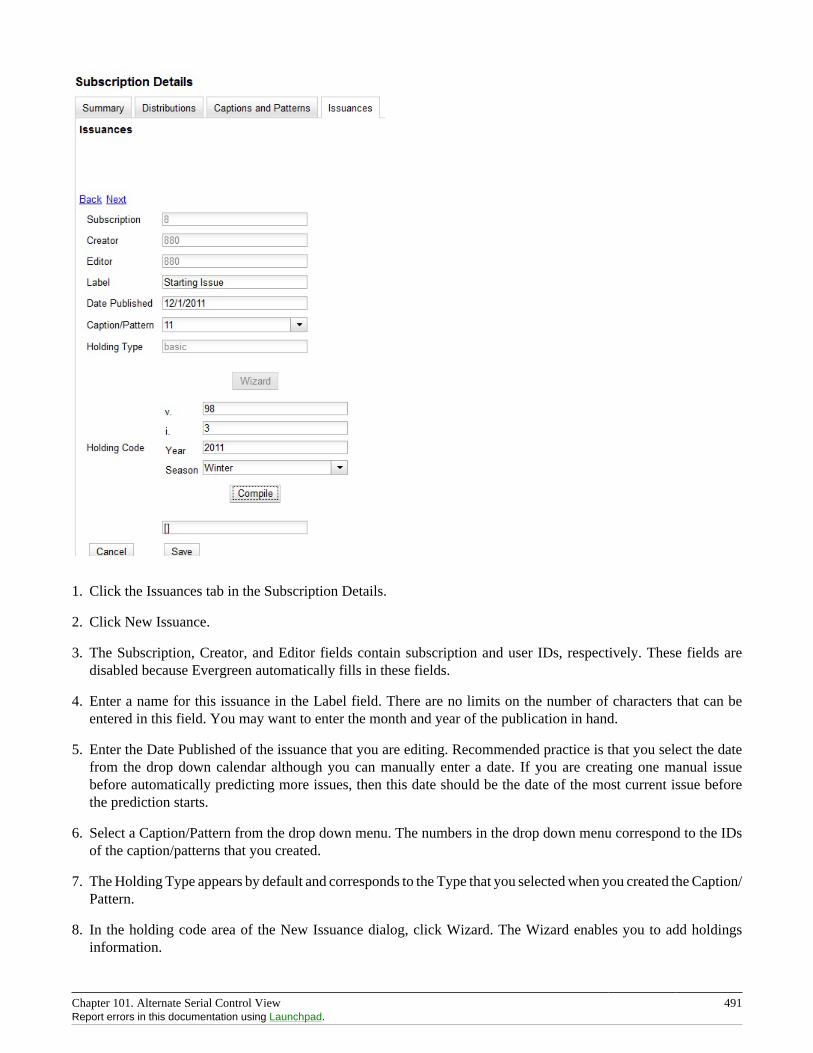
Chapter 101. Alternate Serial Control View 491Report errors in this documentation using Launchpad.
1. Click the Issuances tab in the Subscription Details.
2. Click New Issuance.
3. The Subscription, Creator, and Editor fields contain subscription and user IDs, respectively. These fields aredisabled because Evergreen automatically fills in these fields.
4. Enter a name for this issuance in the Label field. There are no limits on the number of characters that can beentered in this field. You may want to enter the month and year of the publication in hand.
5. Enter the Date Published of the issuance that you are editing. Recommended practice is that you select the datefrom the drop down calendar although you can manually enter a date. If you are creating one manual issuebefore automatically predicting more issues, then this date should be the date of the most current issue beforethe prediction starts.
6. Select a Caption/Pattern from the drop down menu. The numbers in the drop down menu correspond to the IDsof the caption/patterns that you created.
7. The Holding Type appears by default and corresponds to the Type that you selected when you created the Caption/Pattern.
8. In the holding code area of the New Issuance dialog, click Wizard. The Wizard enables you to add holdingsinformation.
Chapter 101. Alternate Serial Control View 492Report errors in this documentation using Launchpad.
9. Enter the volume of the item in hand in the v. field.
10.Enter the number of the item in hand in the no. field.
11.Enter the year of publication in the Year field.
12.Enter the month of publication in the Month field if applicable. You must enter the calendar number of the monthrather than the name of the month. For example, enter 12 if the item in hand was published in December.
13.Enter the day of publication in the day field if applicable.
14.Click Compile to generate the holdings code.
Generate Item PredictionsAfter you manually create the first issue, Evergreen will predict future issuances. Use the Generate Predictionsfunctionality to predict future issues.
1. Click Subscription Details # Issuances # Generate Predictions.
2. Choose the length of time for which you want to predict issues. If you select the radio button to predict untilend of subscription, then Evergreen will predict issues until the end date that you created when you created thesubscription. See creating a subscription for more information. If you do not have an end date, select the radiobutton to predict a certain number of issuances, and enter a number in the field.
3. Click Generate.
4. Evergreen will predict a run of issuances and copies. The prediction will appear in a list.
5. You can delete the first, manual issuance by clicking the check box adjacent to the issuance and clicking DeleteSelected.
Chapter 102. Edit Subscriptions 493
Chapter 102. Edit SubscriptionsSubscriptions can be edited to change the caption and pattern and other information.
Serials Control View1. To access Serial Control View, open a serials record, and click Actions for this Record # Serial Control. This
opens the Subscriptions interface
2. Click the subscriptions tab
3. Click on the appropriate link to edit
Alternate Serials Control View1. To access Alternate Serial Control View, open a serials record, and click Actions for this Record # Alternate
Serial Control. This opens the Subscriptions interface
2. Click the hyperlinked ID number to edit the subscription.
3. Click on the appropriate tab to edit the information
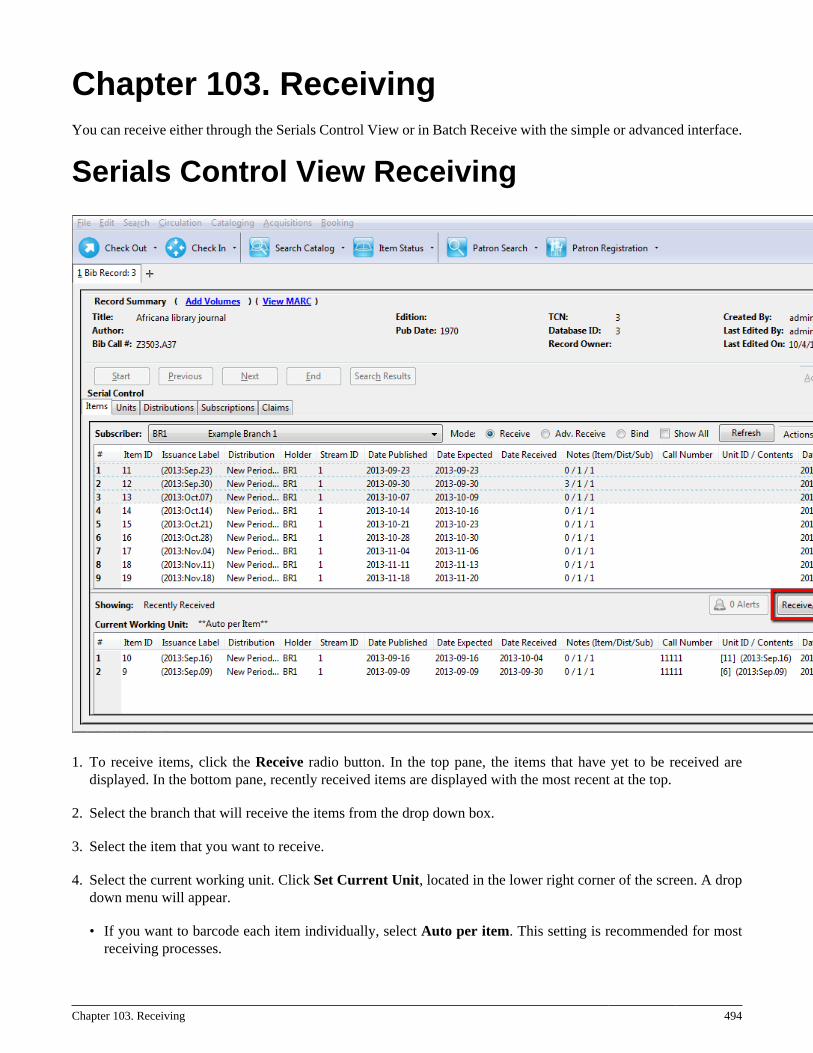
Chapter 103. Receiving 494
Chapter 103. ReceivingYou can receive either through the Serials Control View or in Batch Receive with the simple or advanced interface.
Serials Control View Receiving
1. To receive items, click the Receive radio button. In the top pane, the items that have yet to be received aredisplayed. In the bottom pane, recently received items are displayed with the most recent at the top.
2. Select the branch that will receive the items from the drop down box.
3. Select the item that you want to receive.
4. Select the current working unit. Click Set Current Unit, located in the lower right corner of the screen. A dropdown menu will appear.
• If you want to barcode each item individually, select Auto per item. This setting is recommended for mostreceiving processes.
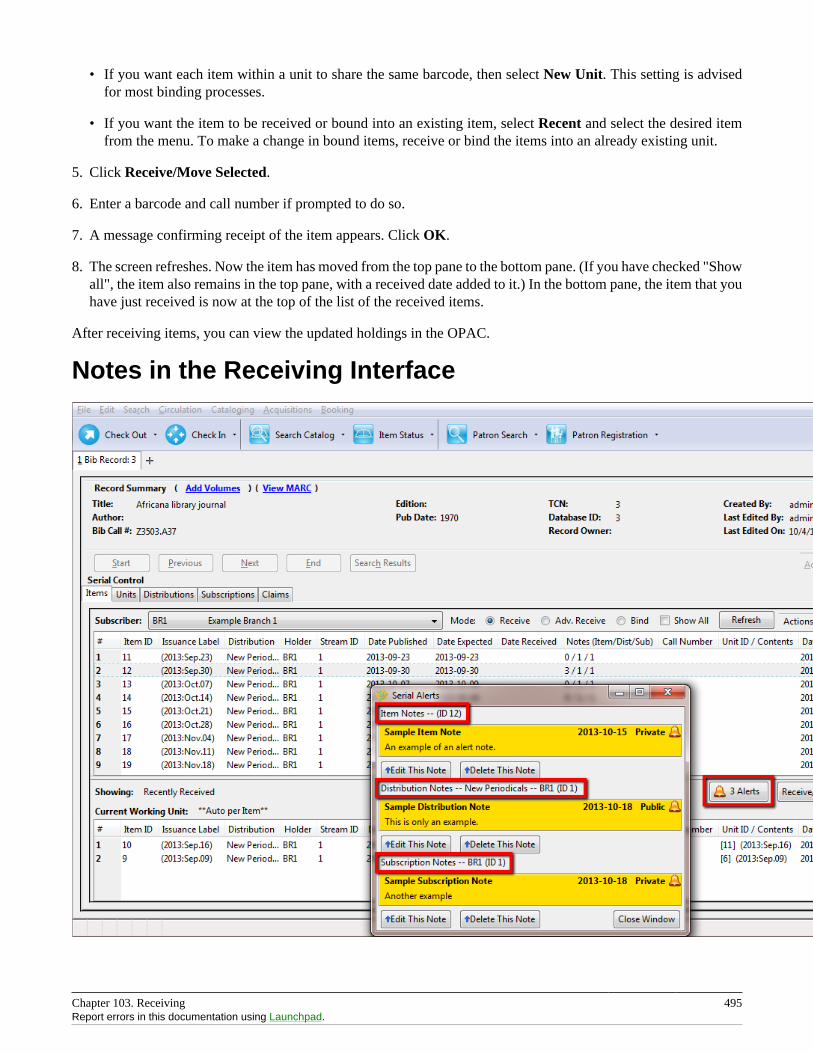
Chapter 103. Receiving 495Report errors in this documentation using Launchpad.
• If you want each item within a unit to share the same barcode, then select New Unit. This setting is advisedfor most binding processes.
• If you want the item to be received or bound into an existing item, select Recent and select the desired itemfrom the menu. To make a change in bound items, receive or bind the items into an already existing unit.
5. Click Receive/Move Selected.
6. Enter a barcode and call number if prompted to do so.
7. A message confirming receipt of the item appears. Click OK.
8. The screen refreshes. Now the item has moved from the top pane to the bottom pane. (If you have checked "Showall", the item also remains in the top pane, with a received date added to it.) In the bottom pane, the item that youhave just received is now at the top of the list of the received items.
After receiving items, you can view the updated holdings in the OPAC.
Notes in the Receiving Interface
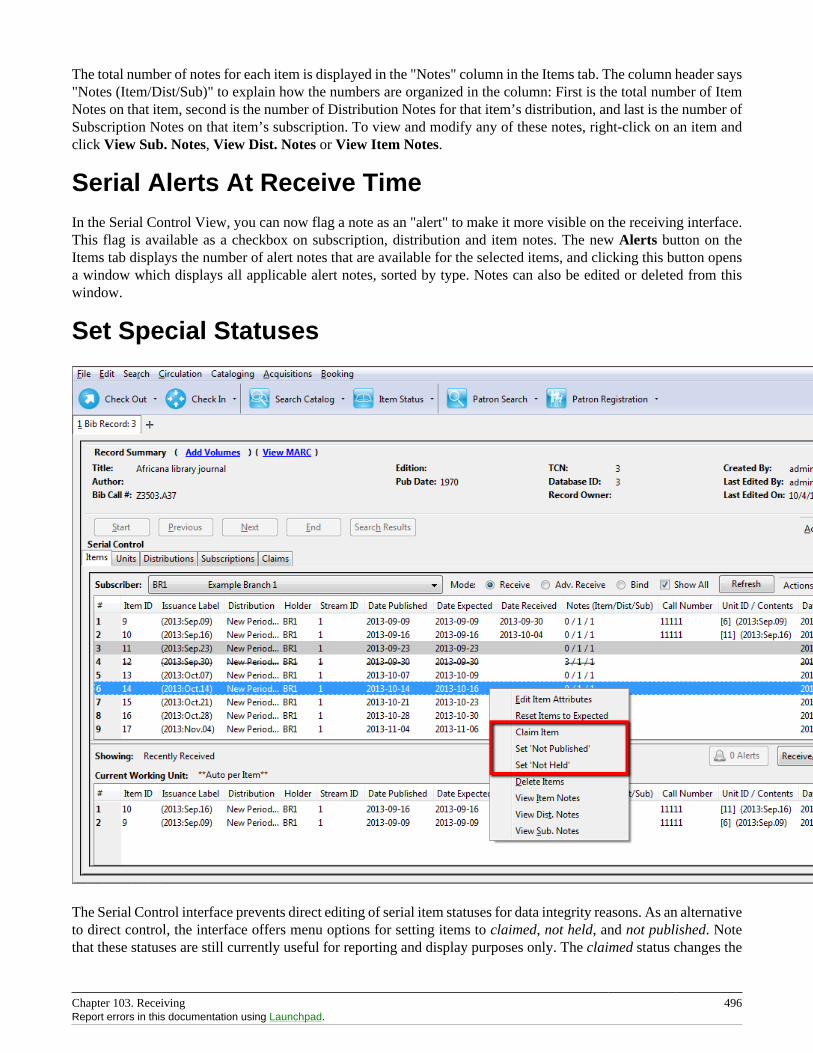
Chapter 103. Receiving 496Report errors in this documentation using Launchpad.
The total number of notes for each item is displayed in the "Notes" column in the Items tab. The column header says"Notes (Item/Dist/Sub)" to explain how the numbers are organized in the column: First is the total number of ItemNotes on that item, second is the number of Distribution Notes for that item’s distribution, and last is the number ofSubscription Notes on that item’s subscription. To view and modify any of these notes, right-click on an item andclick View Sub. Notes, View Dist. Notes or View Item Notes.
Serial Alerts At Receive TimeIn the Serial Control View, you can now flag a note as an "alert" to make it more visible on the receiving interface.This flag is available as a checkbox on subscription, distribution and item notes. The new Alerts button on theItems tab displays the number of alert notes that are available for the selected items, and clicking this button opensa window which displays all applicable alert notes, sorted by type. Notes can also be edited or deleted from thiswindow.
Set Special Statuses
The Serial Control interface prevents direct editing of serial item statuses for data integrity reasons. As an alternativeto direct control, the interface offers menu options for setting items to claimed, not held, and not published. Notethat these statuses are still currently useful for reporting and display purposes only. The claimed status changes the
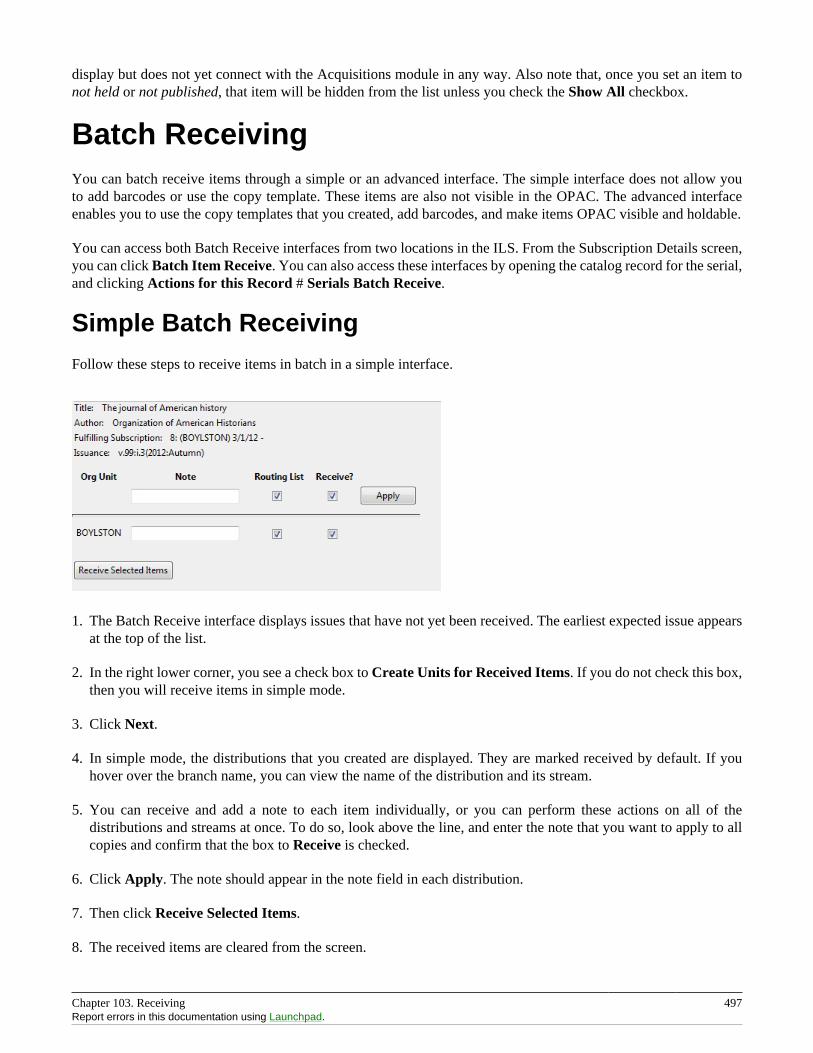
Chapter 103. Receiving 497Report errors in this documentation using Launchpad.
display but does not yet connect with the Acquisitions module in any way. Also note that, once you set an item tonot held or not published, that item will be hidden from the list unless you check the Show All checkbox.
Batch ReceivingYou can batch receive items through a simple or an advanced interface. The simple interface does not allow youto add barcodes or use the copy template. These items are also not visible in the OPAC. The advanced interfaceenables you to use the copy templates that you created, add barcodes, and make items OPAC visible and holdable.
You can access both Batch Receive interfaces from two locations in the ILS. From the Subscription Details screen,you can click Batch Item Receive. You can also access these interfaces by opening the catalog record for the serial,and clicking Actions for this Record # Serials Batch Receive.
Simple Batch ReceivingFollow these steps to receive items in batch in a simple interface.
1. The Batch Receive interface displays issues that have not yet been received. The earliest expected issue appearsat the top of the list.
2. In the right lower corner, you see a check box to Create Units for Received Items. If you do not check this box,then you will receive items in simple mode.
3. Click Next.
4. In simple mode, the distributions that you created are displayed. They are marked received by default. If youhover over the branch name, you can view the name of the distribution and its stream.
5. You can receive and add a note to each item individually, or you can perform these actions on all of thedistributions and streams at once. To do so, look above the line, and enter the note that you want to apply to allcopies and confirm that the box to Receive is checked.
6. Click Apply. The note should appear in the note field in each distribution.
7. Then click Receive Selected Items.
8. The received items are cleared from the screen.
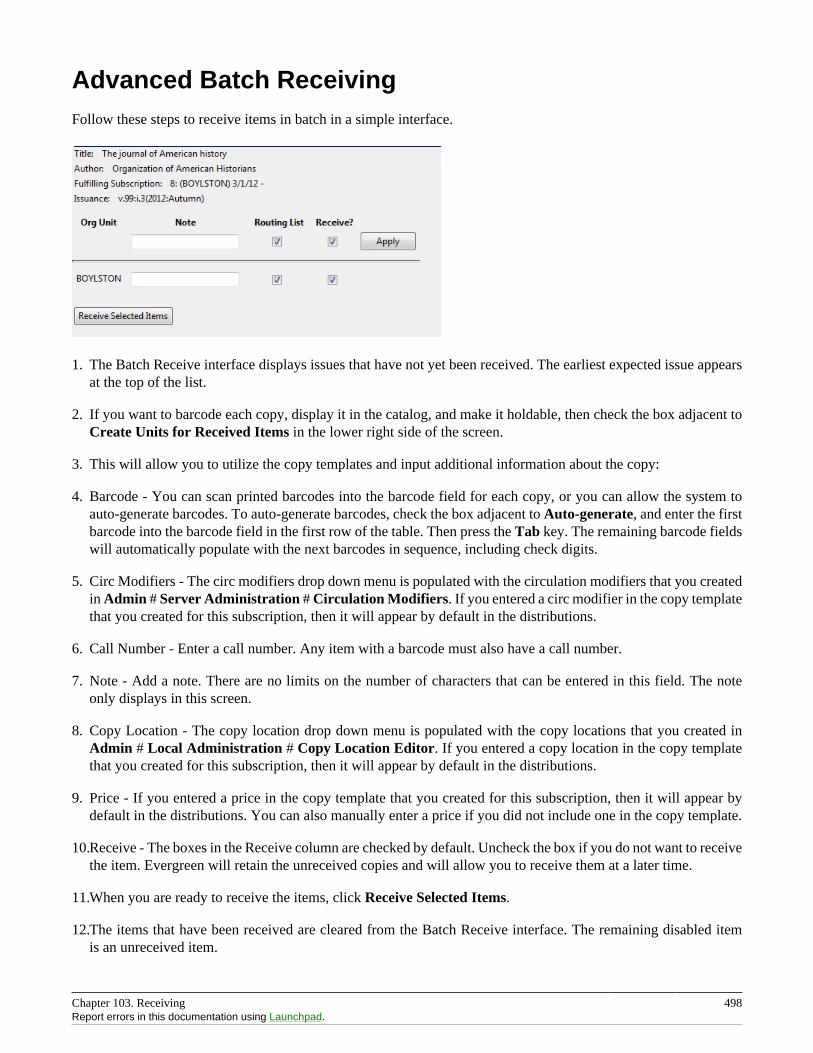
Chapter 103. Receiving 498Report errors in this documentation using Launchpad.
Advanced Batch ReceivingFollow these steps to receive items in batch in a simple interface.
1. The Batch Receive interface displays issues that have not yet been received. The earliest expected issue appearsat the top of the list.
2. If you want to barcode each copy, display it in the catalog, and make it holdable, then check the box adjacent toCreate Units for Received Items in the lower right side of the screen.
3. This will allow you to utilize the copy templates and input additional information about the copy:
4. Barcode - You can scan printed barcodes into the barcode field for each copy, or you can allow the system toauto-generate barcodes. To auto-generate barcodes, check the box adjacent to Auto-generate, and enter the firstbarcode into the barcode field in the first row of the table. Then press the Tab key. The remaining barcode fieldswill automatically populate with the next barcodes in sequence, including check digits.
5. Circ Modifiers - The circ modifiers drop down menu is populated with the circulation modifiers that you createdin Admin # Server Administration # Circulation Modifiers. If you entered a circ modifier in the copy templatethat you created for this subscription, then it will appear by default in the distributions.
6. Call Number - Enter a call number. Any item with a barcode must also have a call number.
7. Note - Add a note. There are no limits on the number of characters that can be entered in this field. The noteonly displays in this screen.
8. Copy Location - The copy location drop down menu is populated with the copy locations that you created inAdmin # Local Administration # Copy Location Editor. If you entered a copy location in the copy templatethat you created for this subscription, then it will appear by default in the distributions.
9. Price - If you entered a price in the copy template that you created for this subscription, then it will appear bydefault in the distributions. You can also manually enter a price if you did not include one in the copy template.
10.Receive - The boxes in the Receive column are checked by default. Uncheck the box if you do not want to receivethe item. Evergreen will retain the unreceived copies and will allow you to receive them at a later time.
11.When you are ready to receive the items, click Receive Selected Items.
12.The items that have been received are cleared from the Batch Receive interface. The remaining disabled itemis an unreceived item.
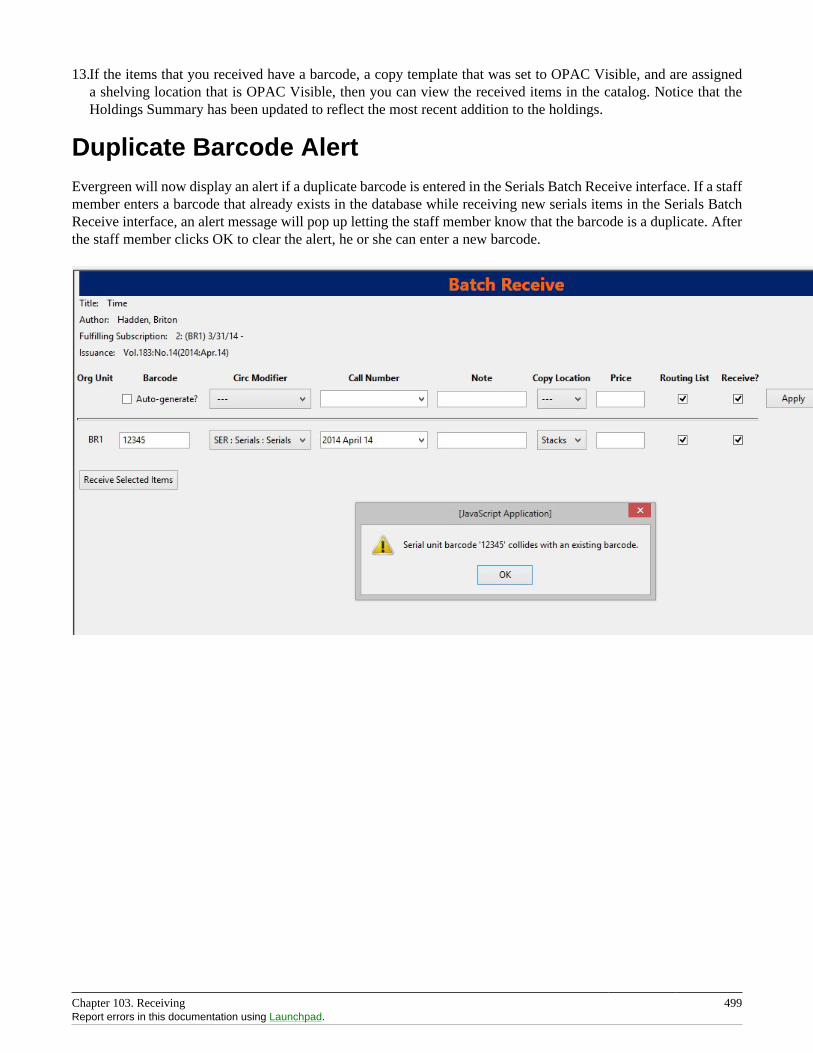
Chapter 103. Receiving 499Report errors in this documentation using Launchpad.
13.If the items that you received have a barcode, a copy template that was set to OPAC Visible, and are assigneda shelving location that is OPAC Visible, then you can view the received items in the catalog. Notice that theHoldings Summary has been updated to reflect the most recent addition to the holdings.
Duplicate Barcode AlertEvergreen will now display an alert if a duplicate barcode is entered in the Serials Batch Receive interface. If a staffmember enters a barcode that already exists in the database while receiving new serials items in the Serials BatchReceive interface, an alert message will pop up letting the staff member know that the barcode is a duplicate. Afterthe staff member clicks OK to clear the alert, he or she can enter a new barcode.
Chapter 104. Special Issues 500
Chapter 104. Special IssuesCurrently, creating a special issue can only be done through the Alternate Serials Control View.
1. Create an issuance in the Serials Control View or the Alternate Serials Control View
2. In the Alternate Serials Control View, click on the name of your special issue in the list of issuances.
3. Click the New Items button
4. Enter the appropriate information
5. The item is now ready to receive. If you complete the Date Received field and change the status to received thenit will receive the issue but it won’t create the associated copy record whereas if you leave it blank and receivethe item through the Serials Control View or Batch Receive function you can create the Copy Record at that time.
Chapter 105. Holdings 501
Chapter 105. Holdings
System Generated Holdings StatementAs issues are received, Evergreen creates a holding statement in the OPAC based on what is set up in the Captionand Patterns of the subscription. The systems generated holdings can only be edited by changing caption and patterninformation and there is no ability to edit the statement as free text.
MARC Format for Holdings Display (MFHD)Evergreen users can create, edit and delete their own MFHD.
Create an MFHD record1. Open a serial record, and in the bottom right corner above the copy information, click Add MFHD Record. You
can also add the MFHD statement by clicking Actions for this Record # MFHD Holdings # Add MFHDRecord.
2. A message will confirm that you have created the MFHD Record. Click OK.
3. Click Reload in the top left corner of the record.
4. The Holdings Summary will appear. Click Edit Holdings in the right corner.
5. Click Edit Record.
6. The MFHD window will pop up. Enter holdings information. Click Save MFHD.
7. Close the MFHD window.
8. Click Reload in the top left corner of the record. The Holdings Summary will reflect the changes to the MFHDstatement.
Edit a MFHD record1. Open a serial record, click Actions for this Record # MFHD Record # Edit MFHD Record and select the
appropriate MFHD.
2. Edit the MFHD
3. Click Save MFHD
Delete a MFHD Record1. Open a serial record, click Actions for this Record # MFHD Record # Delete MFHD Record and select the
appropriate MFHD.
2. Click to confirm the deletion of the MFHD
Chapter 106. Group Serials Issues in the Template Toolkit OPAC 502
Chapter 106. Group Serials Issues in theTemplate Toolkit OPACIn previous versions of Evergreen, issues of serials displayed in a list ordered by publication date. The list couldbe lengthy if the library had extensive holdings of a serial. Using the Template Toolkit OPAC that is available inversion 2.2, you can group issues of serials in the OPAC by chronology or enumeration. For example, you mightgroup issues by date published or by volume. Users can expand these hyperlinked groups to view holdings of specificissues. The result is a clean, easy-to-navigate interface for viewing holdings of serials with a large quantity of issues.
This feature is only available in the Template Toolkit OPAC.
AdministrationEnable the following organizational unit settings to use this feature:
1. Click Admin # Local Administration # Library Settings Editor.
2. Search or scroll to find Serials: Default display grouping for serials distributions presented in the OPAC.
3. Click Edit.
4. Enter enum to display issues by enumeration, or enter chron to display issues in chronological order. This valuewill become your default setting for display issues in the OPAC.
5. Click Update Setting.
6. Search or scroll to find OPAC: Use fully compressed serials holdings.
7. Select the value, True, to view a compressed holdings statement.
8. Click Update Setting.
Displaying Issues in the OPACYour library system has a subscription to the periodical, Bon Appetit. The serials librarian has determined that theissues at the Forest Falls branch should display in the OPAC by month and year. The issues at the McKinley branchshould display by volume and number. The serials librarian will create two distributions for the serial that willinclude these groupings.
1. Retrieve the bibliographic record for the serial, and click Actions for this Record # Alternate Serial Control.
2. Create a New Subscription or click on the hyperlinked ID of an existing subscription.
3. Click New Distribution.
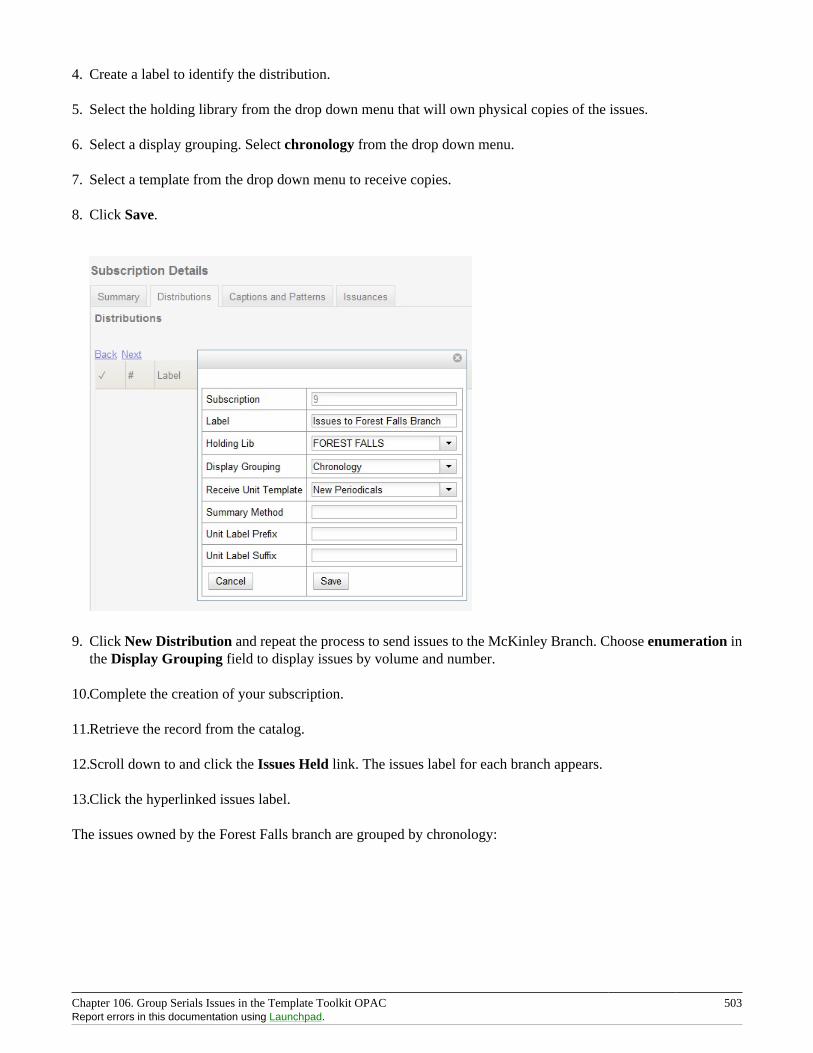
Chapter 106. Group Serials Issues in the Template Toolkit OPAC 503Report errors in this documentation using Launchpad.
4. Create a label to identify the distribution.
5. Select the holding library from the drop down menu that will own physical copies of the issues.
6. Select a display grouping. Select chronology from the drop down menu.
7. Select a template from the drop down menu to receive copies.
8. Click Save.
9. Click New Distribution and repeat the process to send issues to the McKinley Branch. Choose enumeration inthe Display Grouping field to display issues by volume and number.
10.Complete the creation of your subscription.
11.Retrieve the record from the catalog.
12.Scroll down to and click the Issues Held link. The issues label for each branch appears.
13.Click the hyperlinked issues label.
The issues owned by the Forest Falls branch are grouped by chronology:
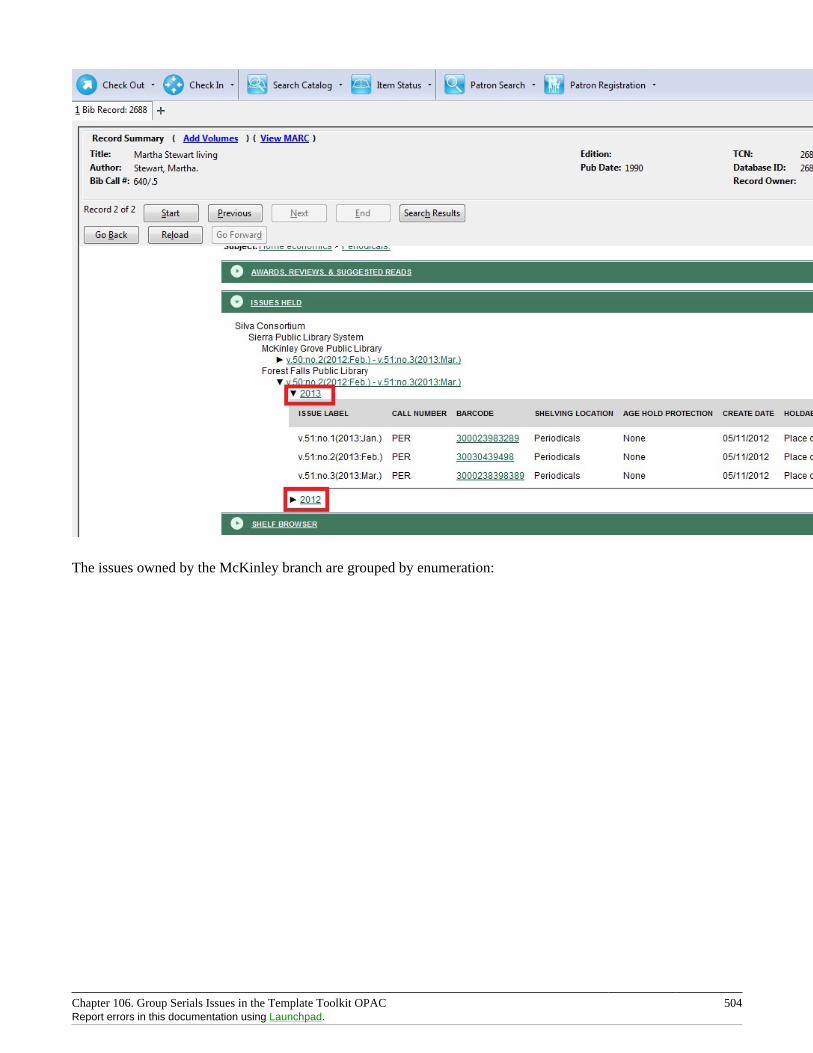
Chapter 106. Group Serials Issues in the Template Toolkit OPAC 504Report errors in this documentation using Launchpad.
The issues owned by the McKinley branch are grouped by enumeration:
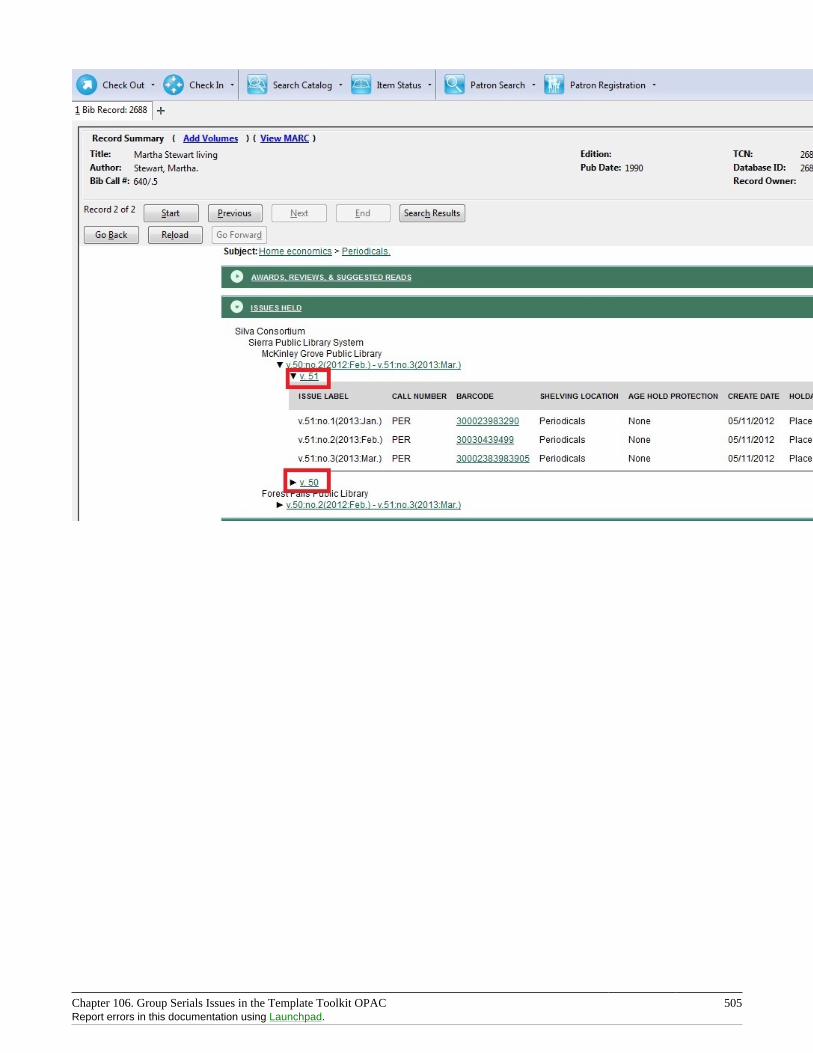
Chapter 106. Group Serials Issues in the Template Toolkit OPAC 505Report errors in this documentation using Launchpad.

Part XI. Circulation
Part XI. Circulation 507
Table of Contents107. Introduction ......................................................................................................................................... 510108. Circulating Items .................................................................................................................................. 511
Check Out (F1) .................................................................................................................................. 511Regular Items ............................................................................................................................. 511Pre-cataloged Items ..................................................................................................................... 511Due Dates .................................................................................................................................. 512
Check In (F2) ..................................................................................................................................... 513Regular check in ......................................................................................................................... 513Backdated check in ..................................................................................................................... 513Backdate Post-Checkin ................................................................................................................. 514Checkin Modifiers ....................................................................................................................... 514
Renewal and Editing the Item’s Due Date ............................................................................................... 515Renewing via a Patron’s Account .................................................................................................. 515Renewing by Item Barcode ........................................................................................................... 516Editing Due Date ........................................................................................................................ 516
Marking Items Lost and Claimed Returned .............................................................................................. 517Lost Items .................................................................................................................................. 517Refunding and Clearing Negative Balances ...................................................................................... 518Claimed Returned Items ............................................................................................................... 519Enhancements to Items Out .......................................................................................................... 520
Mark an Item Long Overdue ................................................................................................................. 521In-house Use (F6) ............................................................................................................................... 524Item Status (F5) .................................................................................................................................. 525
Checking item status .................................................................................................................... 525Viewing past circulations .............................................................................................................. 526Marking items damaged or missing and other functions ..................................................................... 528Item alerts .................................................................................................................................. 528
109. Holds Management ............................................................................................................................... 530Placing Holds ..................................................................................................................................... 530Holds Levels ...................................................................................................................................... 530Title Level Hold ................................................................................................................................. 530Parts Level Hold ................................................................................................................................. 532Placing Holds in Patron Records ............................................................................................................ 533
Placing Multiple Holds on Same Title ............................................................................................ 533Managing Holds ................................................................................................................................. 534
Actions for Selected Holds ........................................................................................................... 534Transferring Holds ...................................................................................................................... 537Cancelled Holds .......................................................................................................................... 538Viewing Details & Adding Notes to Holds ...................................................................................... 539Displaying Queue Position ............................................................................................................ 540Managing Holds in Title Records ................................................................................................... 541Retargeting Holds ....................................................................................................................... 542Pulling & Capturing Holds ........................................................................................................... 543Handling Missing and Damaged Item ............................................................................................. 547Holds Notification Methods .......................................................................................................... 548Clearing Shelf-Expired Holds ........................................................................................................ 550
Alternate Hold Pick up Location ............................................................................................................ 552Display Hold Types on Pull Lists .......................................................................................................... 555
110. Booking Module .................................................................................................................................. 557Creating a Booking Reservation ............................................................................................................ 557
To create a reservation from a patron record .................................................................................... 557To create a reservation from a booking resource ............................................................................... 560Search the catalogue to create a reservation ..................................................................................... 563

Part XI. Circulation 508Report errors in this documentation using Launchpad.
Reservation Pull List ........................................................................................................................... 564Capturing Items for Reservations ........................................................................................................... 565Picking Up Reservations ...................................................................................................................... 566Returning Reservations ........................................................................................................................ 568Cancelling a Reservation ...................................................................................................................... 569
Cancel a reservation from the patron record ..................................................................................... 569Cancel a reservation on reservation creation screen ........................................................................... 571
111. Circulation - Patron Record ................................................................................................................... 572Searching Patrons ................................................................................................................................ 572Registering New Patrons ...................................................................................................................... 573Patron Self-Registration ........................................................................................................................ 575Updating Patron Information ................................................................................................................. 577Renewing Library Cards ....................................................................................................................... 578Lost Library Cards .............................................................................................................................. 580Resetting Patron’s Password ................................................................................................................. 580Barring a Patron ................................................................................................................................. 581Barred vs. Blocked .............................................................................................................................. 582Staff-Generated Messages ..................................................................................................................... 582Patron Alerts ...................................................................................................................................... 583Patron Notes ...................................................................................................................................... 584Staff-Generated Penalties/Messages ........................................................................................................ 586
Add a Message ........................................................................................................................... 586Modify a Message ....................................................................................................................... 587Archive a Message ...................................................................................................................... 588Remove a Message ...................................................................................................................... 589
Patron Message Center ......................................................................................................................... 590Creating a Patron Message in the Patron Account ............................................................................. 590Creating a Patron Message using Action Triggers ............................................................................. 591Managing Patron Messages in the Staff Client ................................................................................. 592Viewing Patron Messages in the OPAC .......................................................................................... 593
Merging Patron Records ....................................................................................................................... 596Bills and Payments .............................................................................................................................. 598
The Bills Interface ...................................................................................................................... 599Making Payments ........................................................................................................................ 601Patron Credits ............................................................................................................................. 603Void vs. Forgive vs. Adjustment .................................................................................................... 605Forgiving Bills ........................................................................................................................... 605Voiding Bills .............................................................................................................................. 605Adjusting Bills to Zero ................................................................................................................ 606Adding New “Grocery” Bills ........................................................................................................ 607Negative Balances on Patron Accounts ........................................................................................... 608Bill History ................................................................................................................................ 609
112. Triggered Events and Notices ................................................................................................................. 611Access and View ................................................................................................................................ 611Filter ................................................................................................................................................. 611Sort .................................................................................................................................................. 612Print .................................................................................................................................................. 612Reset ................................................................................................................................................. 612
113. Offline Transactions ............................................................................................................................. 613Patron Registration .............................................................................................................................. 613Checking Out Items ............................................................................................................................. 613Renew ............................................................................................................................................... 614In-house Use ...................................................................................................................................... 614Check In ............................................................................................................................................ 615Uploading Offline Transactions ............................................................................................................. 615
Part XI. Circulation 509Report errors in this documentation using Launchpad.
Creating an Offline Session .......................................................................................................... 616Uploading Workstation Transactions to a Session ............................................................................. 616Processing the Transactions .......................................................................................................... 616Exceptions ................................................................................................................................. 617
114. Self checkout ....................................................................................................................................... 619Initializing the self check ..................................................................................................................... 619
Setting library hours of operation ................................................................................................... 619Configuring self check behavior .................................................................................................... 619
Checking out or renewing items in the self check ..................................................................................... 620115. RFID Product Integration ...................................................................................................................... 621
Evergreen Integration with PV Supa GoodStuff RFID Reader ..................................................................... 621

Chapter 107. Introduction 510
Chapter 107. IntroductionUse this section for understanding the circulation procedures in the Evergreen system.
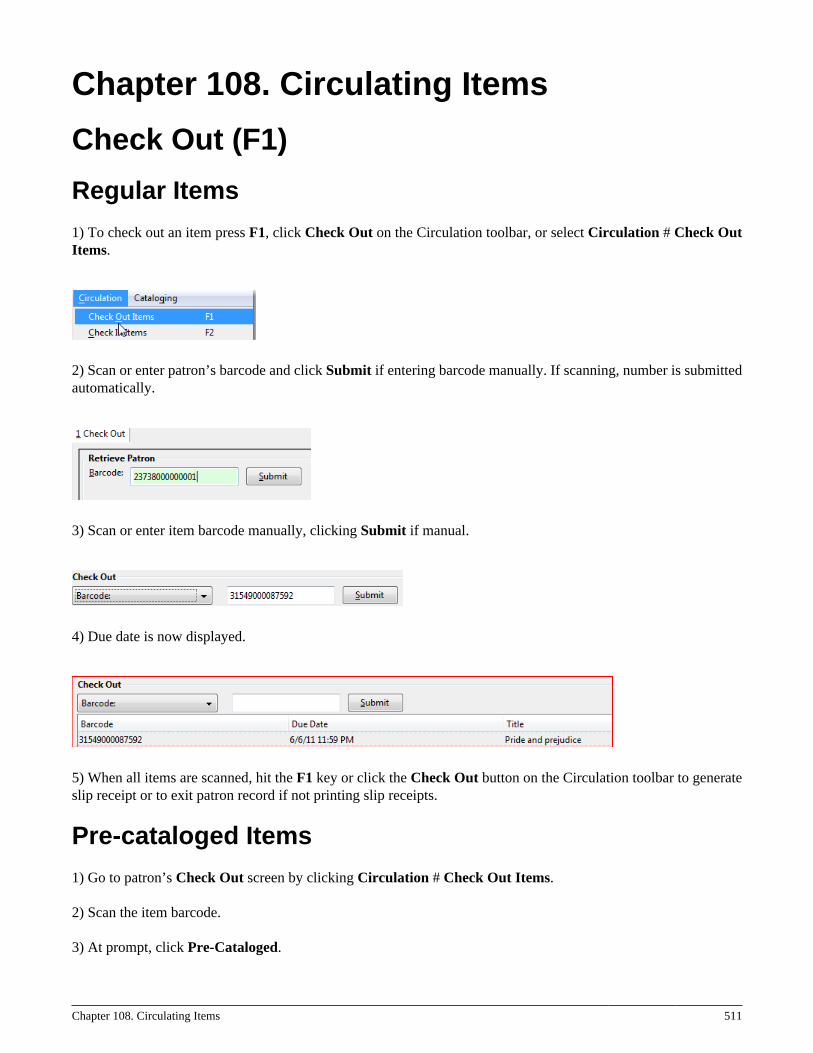
Chapter 108. Circulating Items 511
Chapter 108. Circulating Items
Check Out (F1)
Regular Items
1) To check out an item press F1, click Check Out on the Circulation toolbar, or select Circulation # Check OutItems.
2) Scan or enter patron’s barcode and click Submit if entering barcode manually. If scanning, number is submittedautomatically.
3) Scan or enter item barcode manually, clicking Submit if manual.
4) Due date is now displayed.
5) When all items are scanned, hit the F1 key or click the Check Out button on the Circulation toolbar to generateslip receipt or to exit patron record if not printing slip receipts.
Pre-cataloged Items
1) Go to patron’s Check Out screen by clicking Circulation # Check Out Items.
2) Scan the item barcode.
3) At prompt, click Pre-Cataloged.
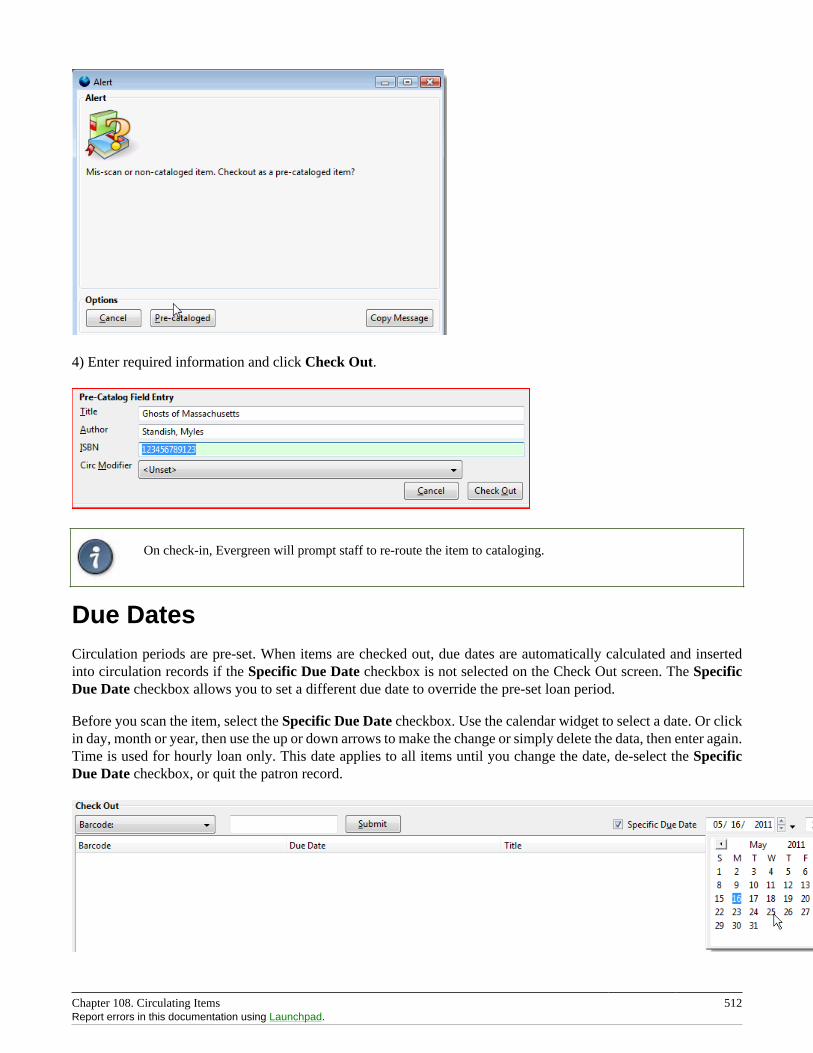
Chapter 108. Circulating Items 512Report errors in this documentation using Launchpad.
4) Enter required information and click Check Out.
On check-in, Evergreen will prompt staff to re-route the item to cataloging.
Due DatesCirculation periods are pre-set. When items are checked out, due dates are automatically calculated and insertedinto circulation records if the Specific Due Date checkbox is not selected on the Check Out screen. The SpecificDue Date checkbox allows you to set a different due date to override the pre-set loan period.
Before you scan the item, select the Specific Due Date checkbox. Use the calendar widget to select a date. Or clickin day, month or year, then use the up or down arrows to make the change or simply delete the data, then enter again.Time is used for hourly loan only. This date applies to all items until you change the date, de-select the SpecificDue Date checkbox, or quit the patron record.
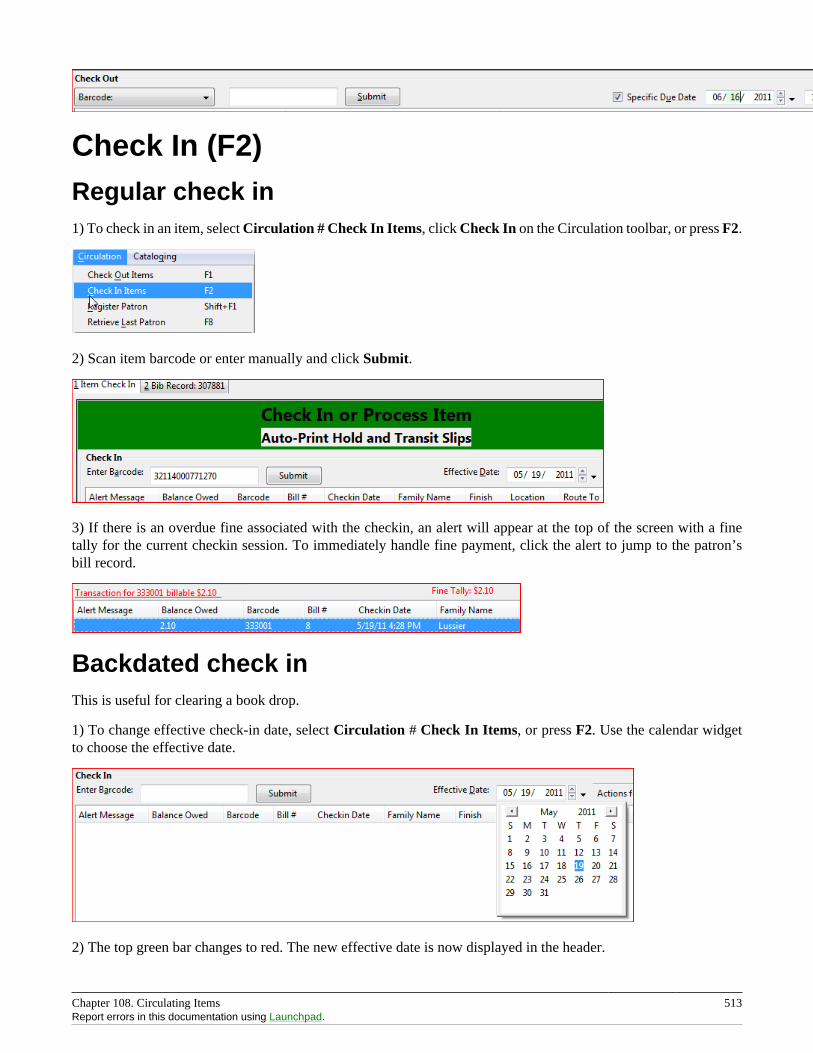
Chapter 108. Circulating Items 513Report errors in this documentation using Launchpad.
Check In (F2)Regular check in1) To check in an item, select Circulation # Check In Items, click Check In on the Circulation toolbar, or press F2.
2) Scan item barcode or enter manually and click Submit.
3) If there is an overdue fine associated with the checkin, an alert will appear at the top of the screen with a finetally for the current checkin session. To immediately handle fine payment, click the alert to jump to the patron’sbill record.
Backdated check inThis is useful for clearing a book drop.
1) To change effective check-in date, select Circulation # Check In Items, or press F2. Use the calendar widgetto choose the effective date.
2) The top green bar changes to red. The new effective date is now displayed in the header.
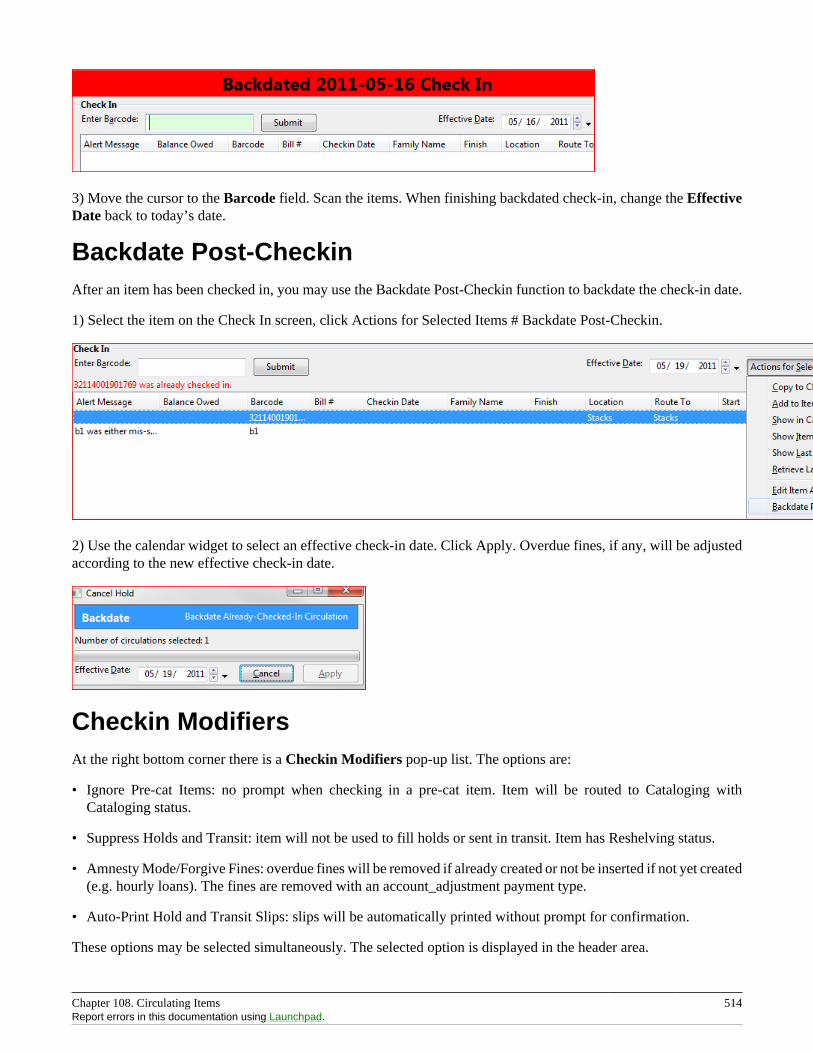
Chapter 108. Circulating Items 514Report errors in this documentation using Launchpad.
3) Move the cursor to the Barcode field. Scan the items. When finishing backdated check-in, change the EffectiveDate back to today’s date.
Backdate Post-CheckinAfter an item has been checked in, you may use the Backdate Post-Checkin function to backdate the check-in date.
1) Select the item on the Check In screen, click Actions for Selected Items # Backdate Post-Checkin.
2) Use the calendar widget to select an effective check-in date. Click Apply. Overdue fines, if any, will be adjustedaccording to the new effective check-in date.
Checkin ModifiersAt the right bottom corner there is a Checkin Modifiers pop-up list. The options are:
• Ignore Pre-cat Items: no prompt when checking in a pre-cat item. Item will be routed to Cataloging withCataloging status.
• Suppress Holds and Transit: item will not be used to fill holds or sent in transit. Item has Reshelving status.
• Amnesty Mode/Forgive Fines: overdue fines will be removed if already created or not be inserted if not yet created(e.g. hourly loans). The fines are removed with an account_adjustment payment type.
• Auto-Print Hold and Transit Slips: slips will be automatically printed without prompt for confirmation.
These options may be selected simultaneously. The selected option is displayed in the header area.
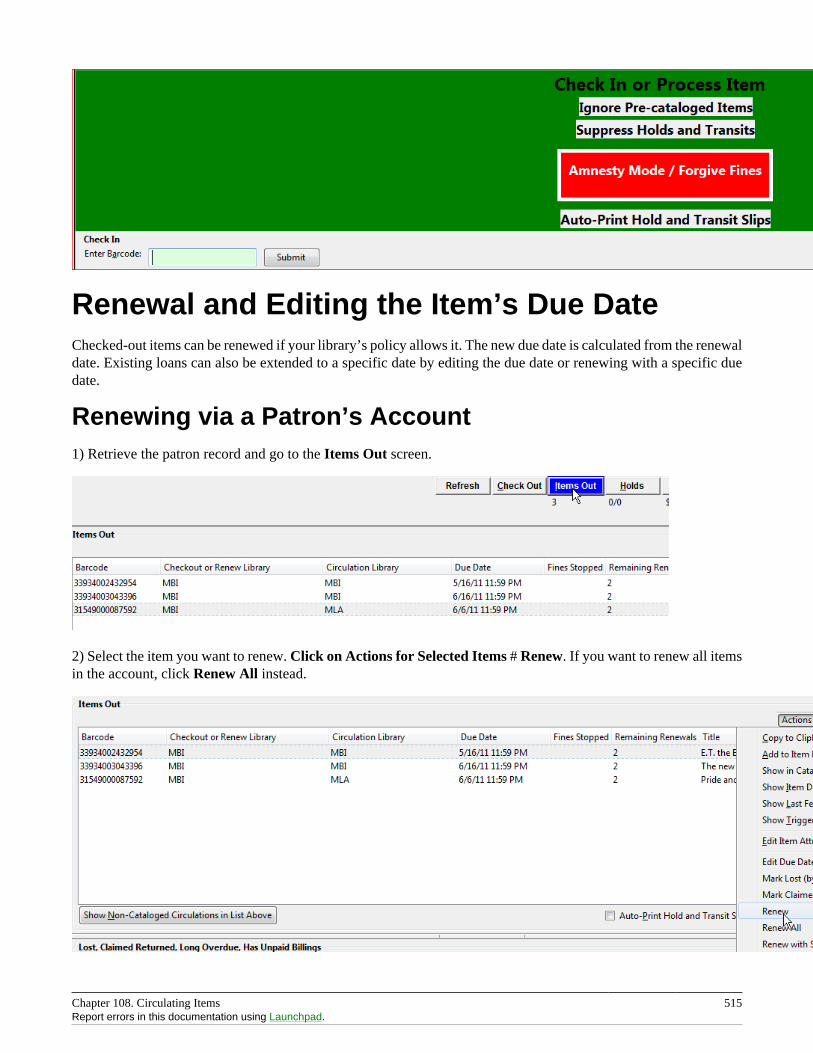
Chapter 108. Circulating Items 515Report errors in this documentation using Launchpad.
Renewal and Editing the Item’s Due DateChecked-out items can be renewed if your library’s policy allows it. The new due date is calculated from the renewaldate. Existing loans can also be extended to a specific date by editing the due date or renewing with a specific duedate.
Renewing via a Patron’s Account1) Retrieve the patron record and go to the Items Out screen.
2) Select the item you want to renew. Click on Actions for Selected Items # Renew. If you want to renew all itemsin the account, click Renew All instead.
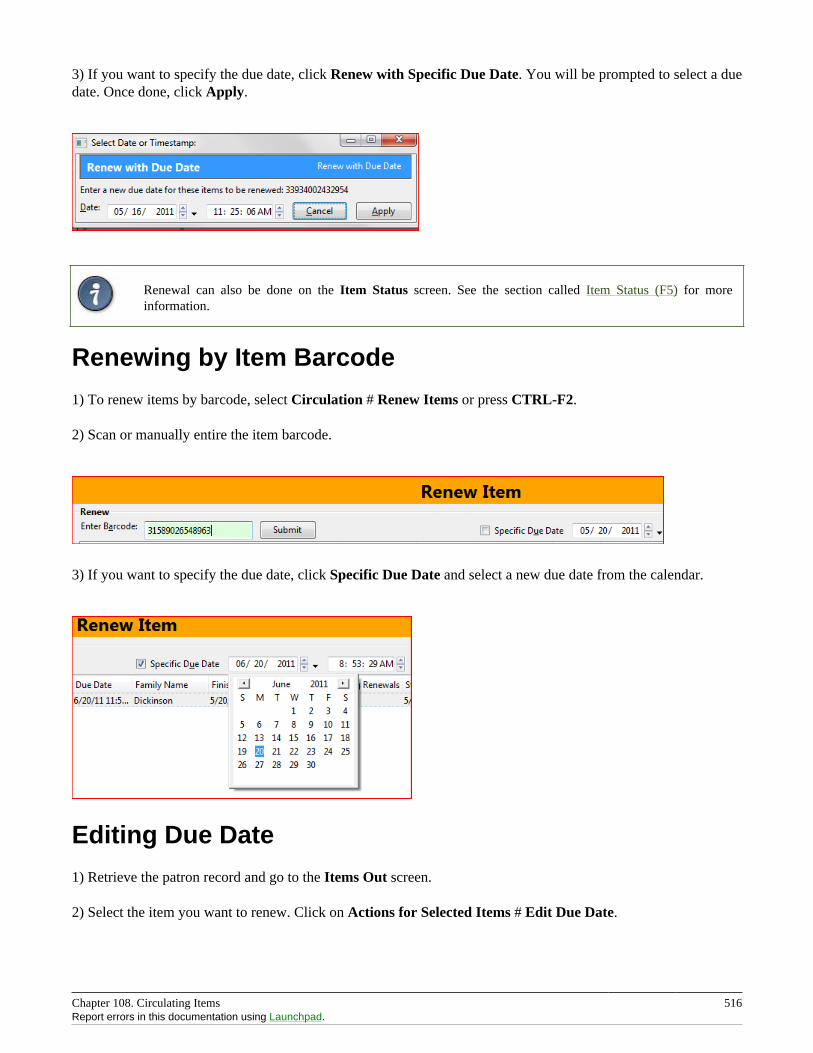
Chapter 108. Circulating Items 516Report errors in this documentation using Launchpad.
3) If you want to specify the due date, click Renew with Specific Due Date. You will be prompted to select a duedate. Once done, click Apply.
Renewal can also be done on the Item Status screen. See the section called Item Status (F5) for moreinformation.
Renewing by Item Barcode
1) To renew items by barcode, select Circulation # Renew Items or press CTRL-F2.
2) Scan or manually entire the item barcode.
3) If you want to specify the due date, click Specific Due Date and select a new due date from the calendar.
Editing Due Date
1) Retrieve the patron record and go to the Items Out screen.
2) Select the item you want to renew. Click on Actions for Selected Items # Edit Due Date.
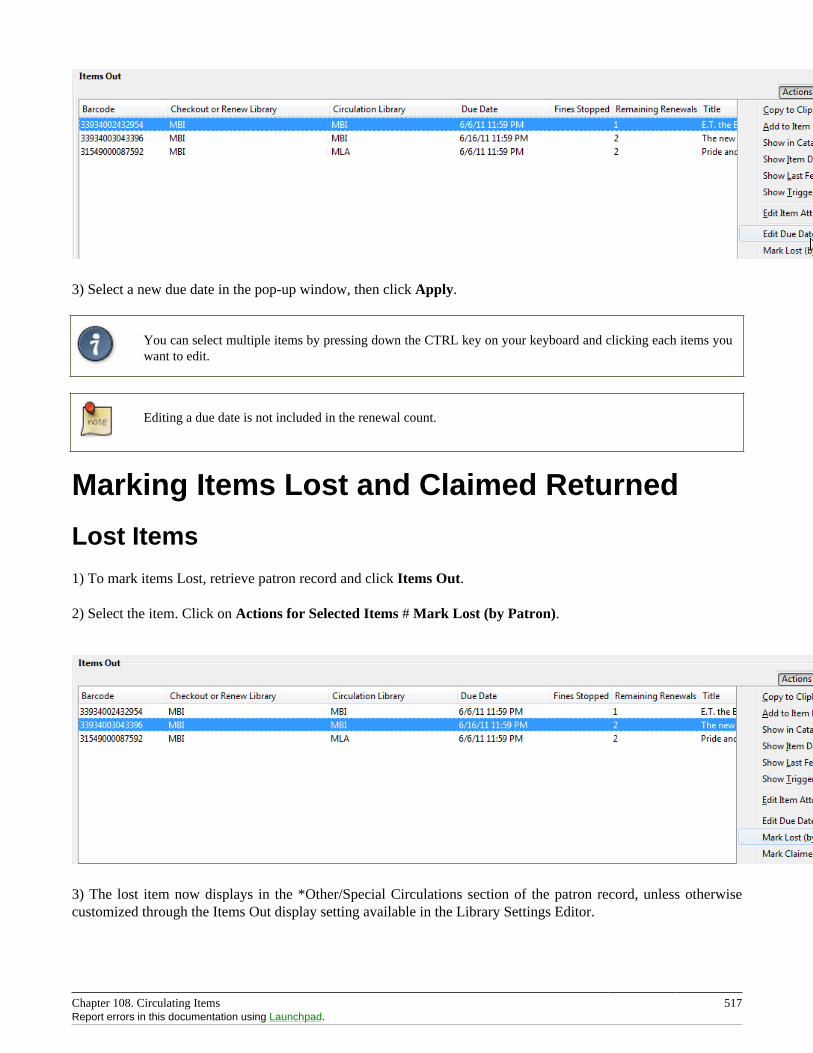
Chapter 108. Circulating Items 517Report errors in this documentation using Launchpad.
3) Select a new due date in the pop-up window, then click Apply.
You can select multiple items by pressing down the CTRL key on your keyboard and clicking each items youwant to edit.
Editing a due date is not included in the renewal count.
Marking Items Lost and Claimed Returned
Lost Items
1) To mark items Lost, retrieve patron record and click Items Out.
2) Select the item. Click on Actions for Selected Items # Mark Lost (by Patron).
3) The lost item now displays in the *Other/Special Circulations section of the patron record, unless otherwisecustomized through the Items Out display setting available in the Library Settings Editor.
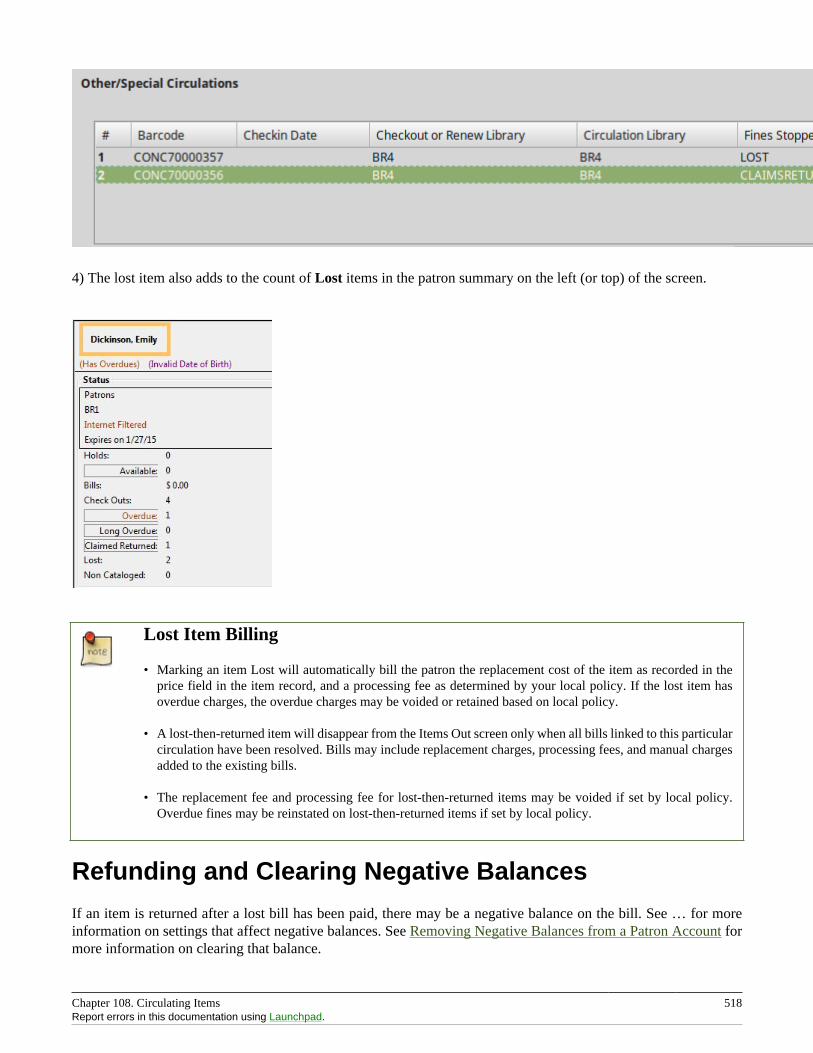
Chapter 108. Circulating Items 518Report errors in this documentation using Launchpad.
4) The lost item also adds to the count of Lost items in the patron summary on the left (or top) of the screen.
Lost Item Billing
• Marking an item Lost will automatically bill the patron the replacement cost of the item as recorded in theprice field in the item record, and a processing fee as determined by your local policy. If the lost item hasoverdue charges, the overdue charges may be voided or retained based on local policy.
• A lost-then-returned item will disappear from the Items Out screen only when all bills linked to this particularcirculation have been resolved. Bills may include replacement charges, processing fees, and manual chargesadded to the existing bills.
• The replacement fee and processing fee for lost-then-returned items may be voided if set by local policy.Overdue fines may be reinstated on lost-then-returned items if set by local policy.
Refunding and Clearing Negative Balances
If an item is returned after a lost bill has been paid, there may be a negative balance on the bill. See … for moreinformation on settings that affect negative balances. See Removing Negative Balances from a Patron Account formore information on clearing that balance.
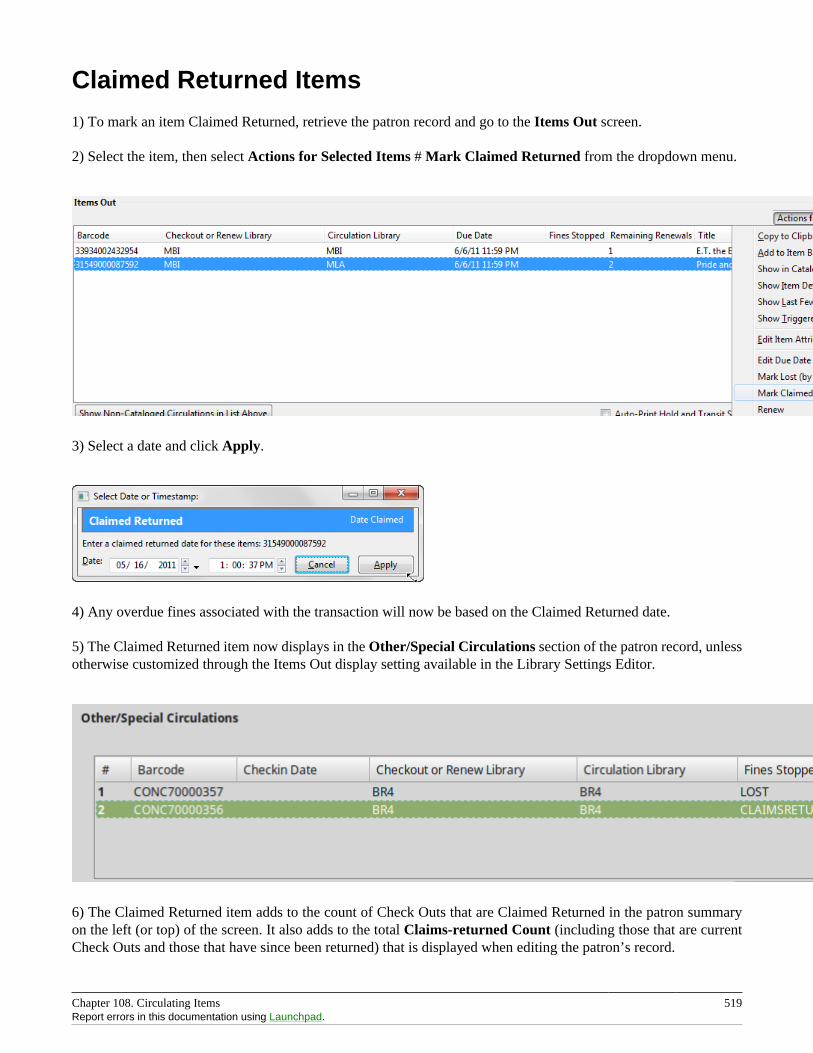
Chapter 108. Circulating Items 519Report errors in this documentation using Launchpad.
Claimed Returned Items
1) To mark an item Claimed Returned, retrieve the patron record and go to the Items Out screen.
2) Select the item, then select Actions for Selected Items # Mark Claimed Returned from the dropdown menu.
3) Select a date and click Apply.
4) Any overdue fines associated with the transaction will now be based on the Claimed Returned date.
5) The Claimed Returned item now displays in the Other/Special Circulations section of the patron record, unlessotherwise customized through the Items Out display setting available in the Library Settings Editor.
6) The Claimed Returned item adds to the count of Check Outs that are Claimed Returned in the patron summaryon the left (or top) of the screen. It also adds to the total Claims-returned Count (including those that are currentCheck Outs and those that have since been returned) that is displayed when editing the patron’s record.
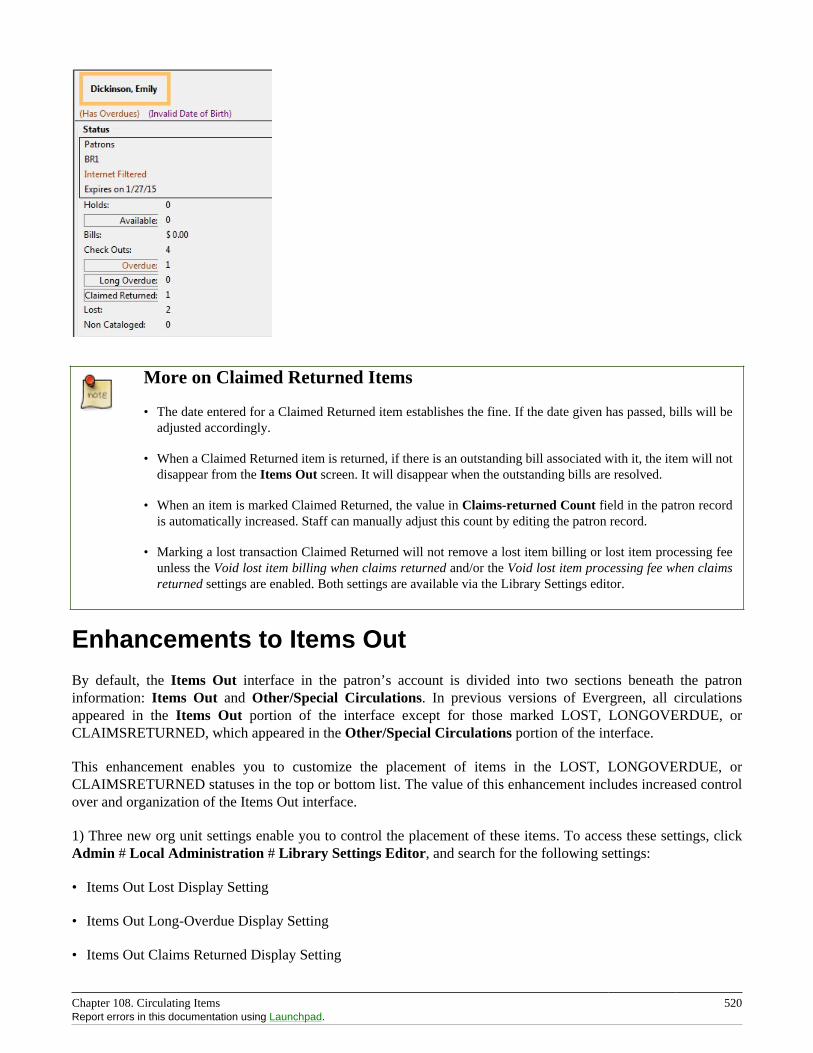
Chapter 108. Circulating Items 520Report errors in this documentation using Launchpad.
More on Claimed Returned Items
• The date entered for a Claimed Returned item establishes the fine. If the date given has passed, bills will beadjusted accordingly.
• When a Claimed Returned item is returned, if there is an outstanding bill associated with it, the item will notdisappear from the Items Out screen. It will disappear when the outstanding bills are resolved.
• When an item is marked Claimed Returned, the value in Claims-returned Count field in the patron recordis automatically increased. Staff can manually adjust this count by editing the patron record.
• Marking a lost transaction Claimed Returned will not remove a lost item billing or lost item processing feeunless the Void lost item billing when claims returned and/or the Void lost item processing fee when claimsreturned settings are enabled. Both settings are available via the Library Settings editor.
Enhancements to Items OutBy default, the Items Out interface in the patron’s account is divided into two sections beneath the patroninformation: Items Out and Other/Special Circulations. In previous versions of Evergreen, all circulationsappeared in the Items Out portion of the interface except for those marked LOST, LONGOVERDUE, orCLAIMSRETURNED, which appeared in the Other/Special Circulations portion of the interface.
This enhancement enables you to customize the placement of items in the LOST, LONGOVERDUE, orCLAIMSRETURNED statuses in the top or bottom list. The value of this enhancement includes increased controlover and organization of the Items Out interface.
1) Three new org unit settings enable you to control the placement of these items. To access these settings, clickAdmin # Local Administration # Library Settings Editor, and search for the following settings:
• Items Out Lost Display Setting
• Items Out Long-Overdue Display Setting
• Items Out Claims Returned Display Setting
Chapter 108. Circulating Items 521Report errors in this documentation using Launchpad.
The value for each setting is a numeric code describing the list in which the circulation should be placed when theitem is checked out, and whether the circulation should appear in the bottom list when checked in, regardless ofthe state of the transaction. For example, an item may be checked in but the circulation may remain open becausefees or fines are owed by the patron.
2) Enter the appropriate value, and click Update setting.
1 = Top list, then bottom list 2 = Bottom list, then bottom list 5 = Top list, then do not display 6 = Bottom list,then do not display
To Hide the bottom list entirely, set the value for all special statuses to "5".
Note that if all of the special statuses are hidden, then the interface more accurately represents a patron’s items outinstead of a combination of items out and items with special circumstances. Alternatively, if all items out and itemswith special statuses display in the top list, then the bottom list is hidden, and more screen space exists to displaya patron’s items out.
Mark an Item Long OverdueMarking an item Long Overdue
Once an item has been overdue for a configurable amount of time, Evergreen can mark the item long overdue inthe borrowing patron’s account. This will be done automatically through a Notification/Action Trigger. When theitem is marked long overdue, several actions will take place:
1. The item will go into the status of “Long Overdue”
2. The item will be moved to the “Lost, Claimed Returned, Long Overdue, Has Unpaid Billings” section of theItems Out screen in the patron’s account
3. The accrual of overdue fines will be stopped
Optionally the patron can be billed for the item price, a long overdue processing fee, and any overdue fines can bevoided from the account. Patrons can also be sent a notification that the item was marked long overdue.
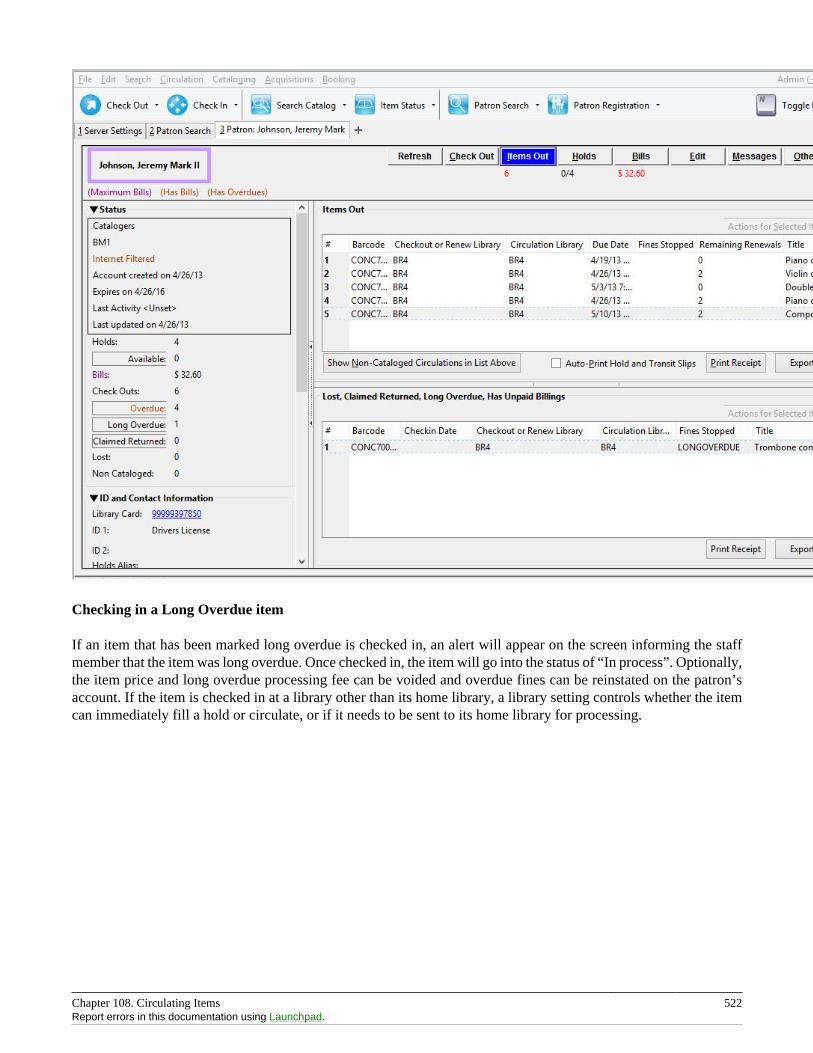
Chapter 108. Circulating Items 522Report errors in this documentation using Launchpad.
Checking in a Long Overdue item
If an item that has been marked long overdue is checked in, an alert will appear on the screen informing the staffmember that the item was long overdue. Once checked in, the item will go into the status of “In process”. Optionally,the item price and long overdue processing fee can be voided and overdue fines can be reinstated on the patron’saccount. If the item is checked in at a library other than its home library, a library setting controls whether the itemcan immediately fill a hold or circulate, or if it needs to be sent to its home library for processing.
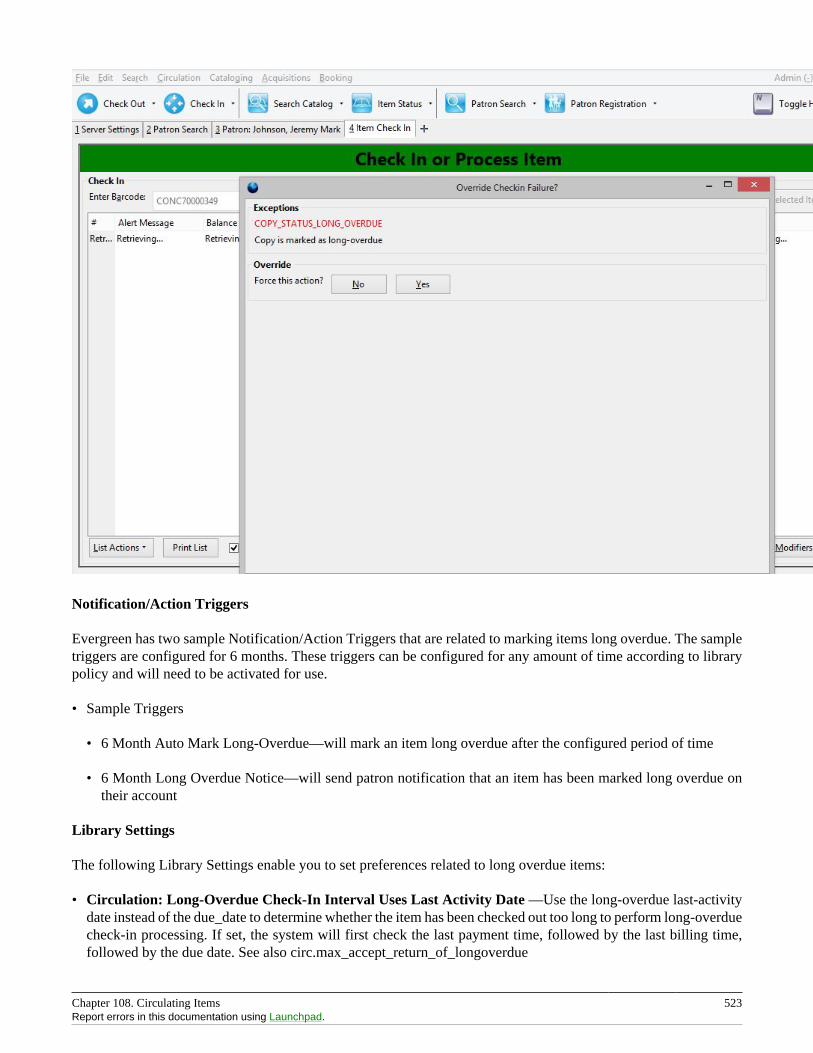
Chapter 108. Circulating Items 523Report errors in this documentation using Launchpad.
Notification/Action Triggers
Evergreen has two sample Notification/Action Triggers that are related to marking items long overdue. The sampletriggers are configured for 6 months. These triggers can be configured for any amount of time according to librarypolicy and will need to be activated for use.
• Sample Triggers
• 6 Month Auto Mark Long-Overdue—will mark an item long overdue after the configured period of time
• 6 Month Long Overdue Notice—will send patron notification that an item has been marked long overdue ontheir account
Library Settings
The following Library Settings enable you to set preferences related to long overdue items:
• Circulation: Long-Overdue Check-In Interval Uses Last Activity Date —Use the long-overdue last-activitydate instead of the due_date to determine whether the item has been checked out too long to perform long-overduecheck-in processing. If set, the system will first check the last payment time, followed by the last billing time,followed by the due date. See also circ.max_accept_return_of_longoverdue
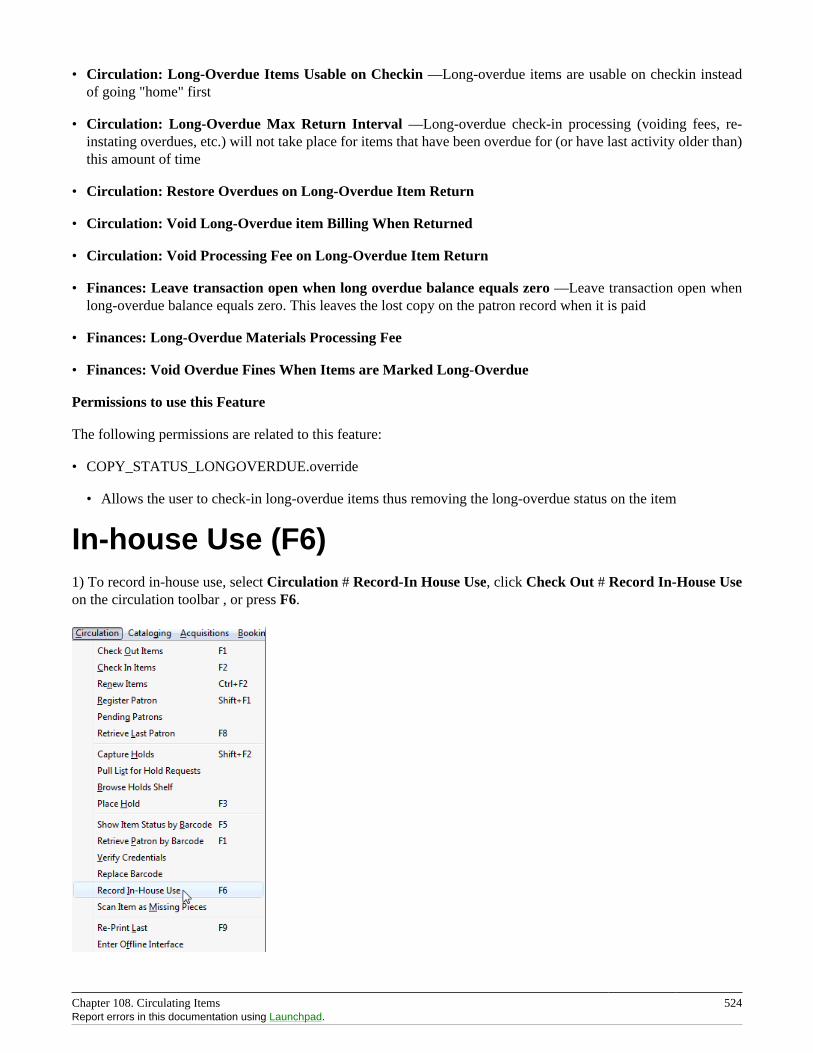
Chapter 108. Circulating Items 524Report errors in this documentation using Launchpad.
• Circulation: Long-Overdue Items Usable on Checkin —Long-overdue items are usable on checkin insteadof going "home" first
• Circulation: Long-Overdue Max Return Interval —Long-overdue check-in processing (voiding fees, re-instating overdues, etc.) will not take place for items that have been overdue for (or have last activity older than)this amount of time
• Circulation: Restore Overdues on Long-Overdue Item Return
• Circulation: Void Long-Overdue item Billing When Returned
• Circulation: Void Processing Fee on Long-Overdue Item Return
• Finances: Leave transaction open when long overdue balance equals zero —Leave transaction open whenlong-overdue balance equals zero. This leaves the lost copy on the patron record when it is paid
• Finances: Long-Overdue Materials Processing Fee
• Finances: Void Overdue Fines When Items are Marked Long-Overdue
Permissions to use this Feature
The following permissions are related to this feature:
• COPY_STATUS_LONGOVERDUE.override
• Allows the user to check-in long-overdue items thus removing the long-overdue status on the item
In-house Use (F6)1) To record in-house use, select Circulation # Record-In House Use, click Check Out # Record In-House Useon the circulation toolbar , or press F6.
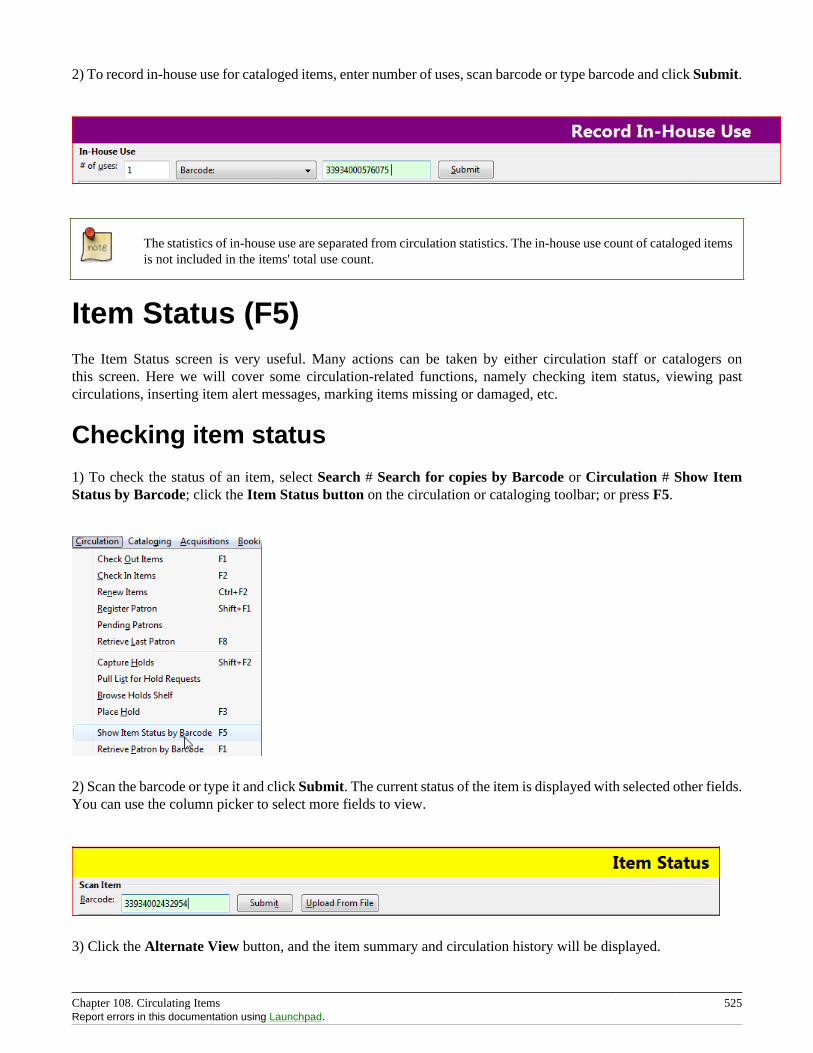
Chapter 108. Circulating Items 525Report errors in this documentation using Launchpad.
2) To record in-house use for cataloged items, enter number of uses, scan barcode or type barcode and click Submit.
The statistics of in-house use are separated from circulation statistics. The in-house use count of cataloged itemsis not included in the items' total use count.
Item Status (F5)The Item Status screen is very useful. Many actions can be taken by either circulation staff or catalogers onthis screen. Here we will cover some circulation-related functions, namely checking item status, viewing pastcirculations, inserting item alert messages, marking items missing or damaged, etc.
Checking item status
1) To check the status of an item, select Search # Search for copies by Barcode or Circulation # Show ItemStatus by Barcode; click the Item Status button on the circulation or cataloging toolbar; or press F5.
2) Scan the barcode or type it and click Submit. The current status of the item is displayed with selected other fields.You can use the column picker to select more fields to view.
3) Click the Alternate View button, and the item summary and circulation history will be displayed.
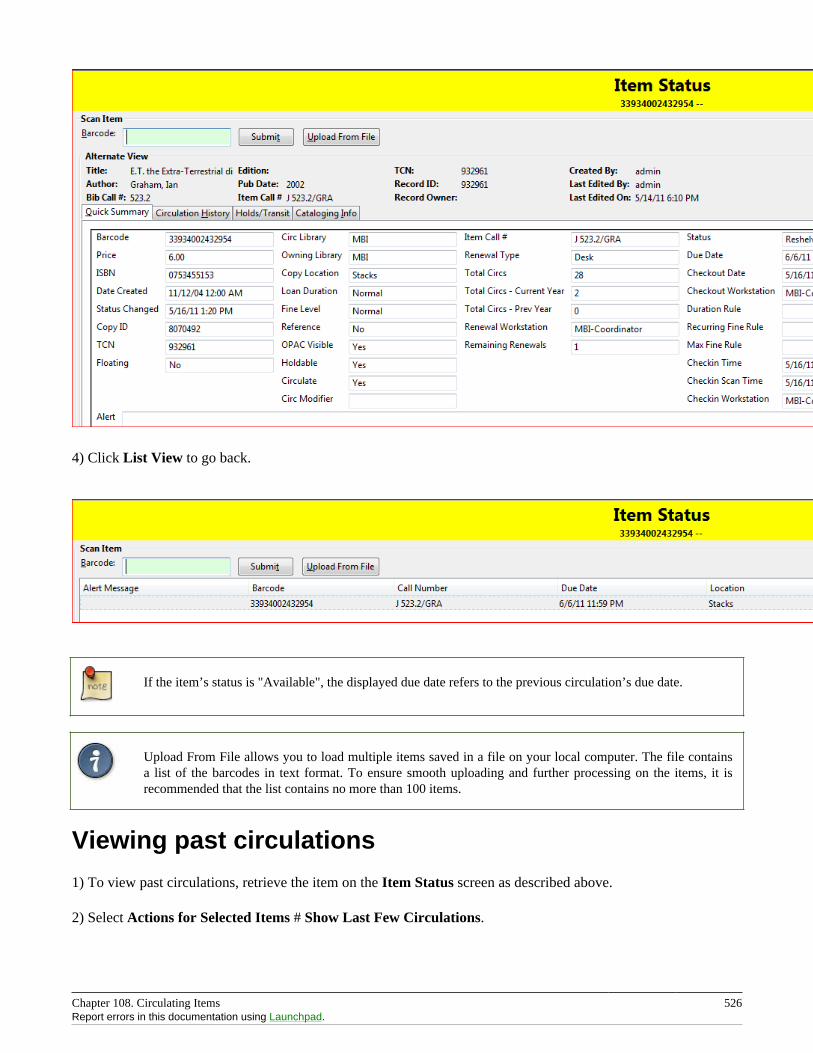
Chapter 108. Circulating Items 526Report errors in this documentation using Launchpad.
4) Click List View to go back.
If the item’s status is "Available", the displayed due date refers to the previous circulation’s due date.
Upload From File allows you to load multiple items saved in a file on your local computer. The file containsa list of the barcodes in text format. To ensure smooth uploading and further processing on the items, it isrecommended that the list contains no more than 100 items.
Viewing past circulations
1) To view past circulations, retrieve the item on the Item Status screen as described above.
2) Select Actions for Selected Items # Show Last Few Circulations.
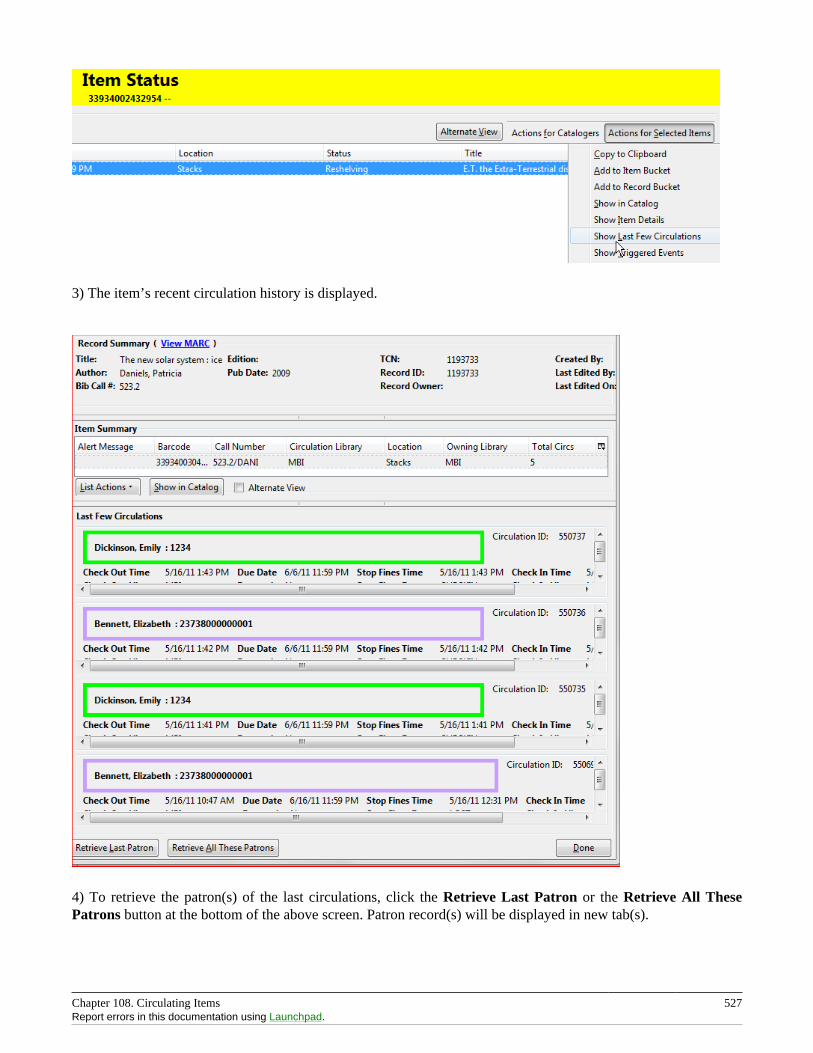
Chapter 108. Circulating Items 527Report errors in this documentation using Launchpad.
3) The item’s recent circulation history is displayed.
4) To retrieve the patron(s) of the last circulations, click the Retrieve Last Patron or the Retrieve All ThesePatrons button at the bottom of the above screen. Patron record(s) will be displayed in new tab(s).
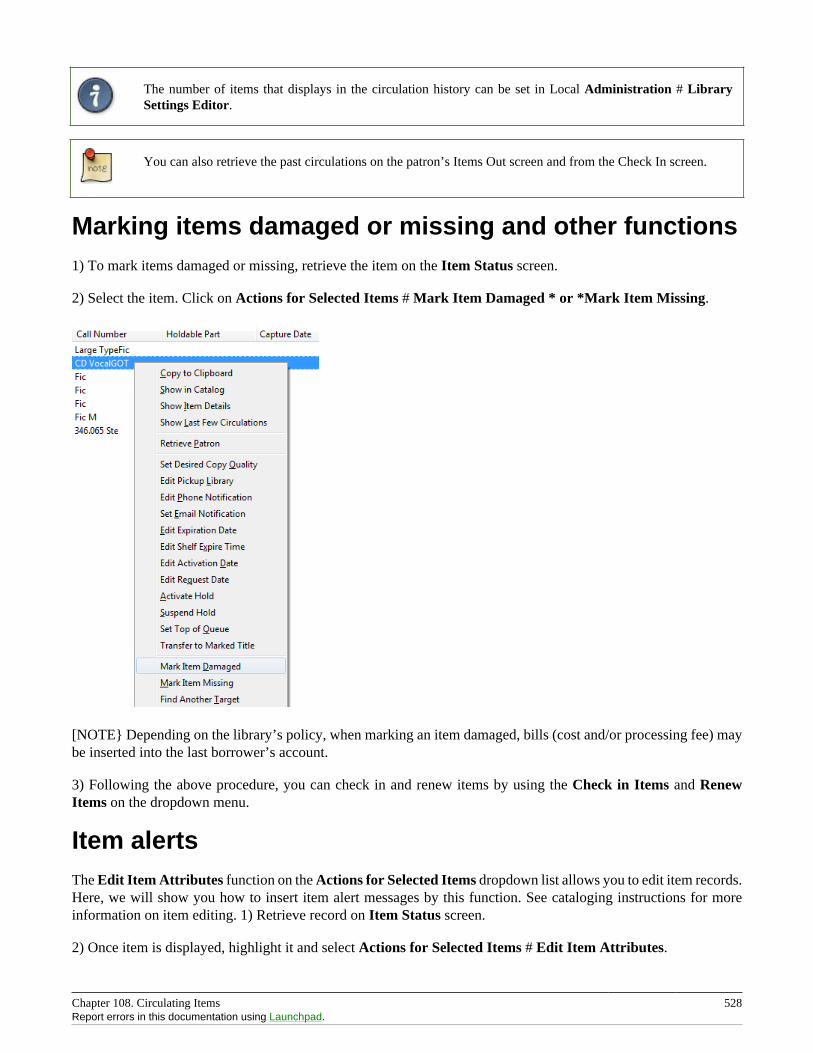
Chapter 108. Circulating Items 528Report errors in this documentation using Launchpad.
The number of items that displays in the circulation history can be set in Local Administration # LibrarySettings Editor.
You can also retrieve the past circulations on the patron’s Items Out screen and from the Check In screen.
Marking items damaged or missing and other functions1) To mark items damaged or missing, retrieve the item on the Item Status screen.
2) Select the item. Click on Actions for Selected Items # Mark Item Damaged * or *Mark Item Missing.
[NOTE} Depending on the library’s policy, when marking an item damaged, bills (cost and/or processing fee) maybe inserted into the last borrower’s account.
3) Following the above procedure, you can check in and renew items by using the Check in Items and RenewItems on the dropdown menu.
Item alertsThe Edit Item Attributes function on the Actions for Selected Items dropdown list allows you to edit item records.Here, we will show you how to insert item alert messages by this function. See cataloging instructions for moreinformation on item editing. 1) Retrieve record on Item Status screen.
2) Once item is displayed, highlight it and select Actions for Selected Items # Edit Item Attributes.
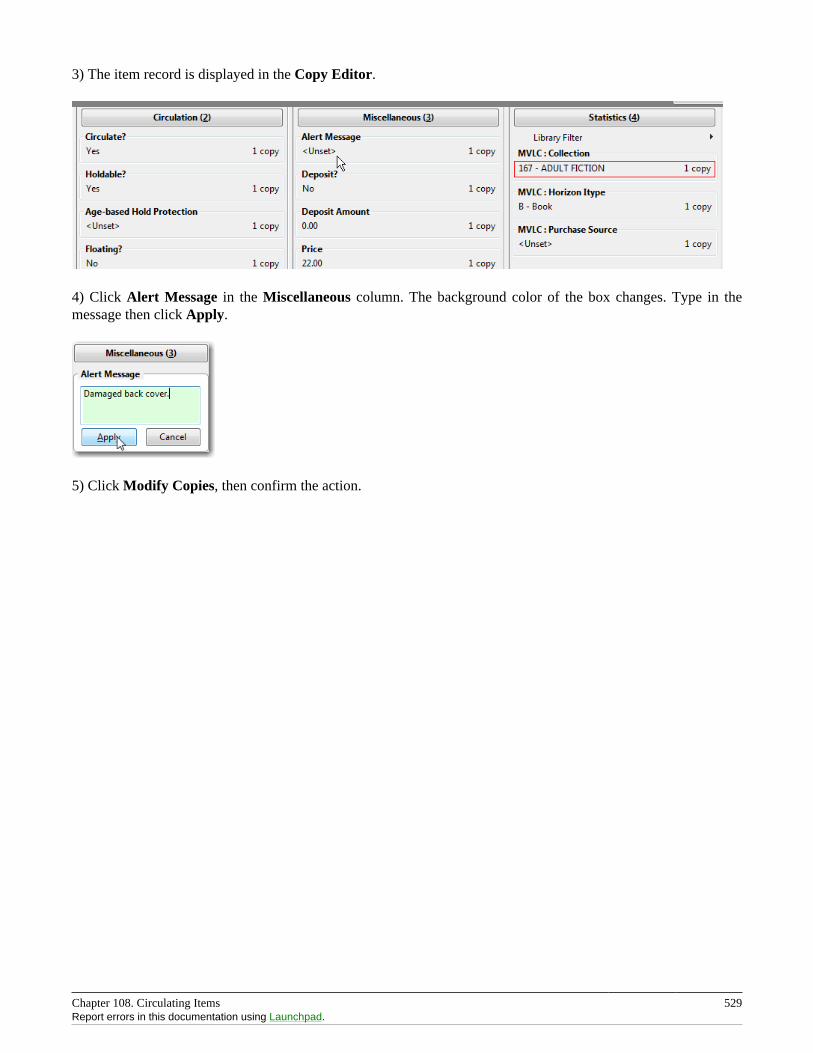
Chapter 108. Circulating Items 529Report errors in this documentation using Launchpad.
3) The item record is displayed in the Copy Editor.
4) Click Alert Message in the Miscellaneous column. The background color of the box changes. Type in themessage then click Apply.
5) Click Modify Copies, then confirm the action.
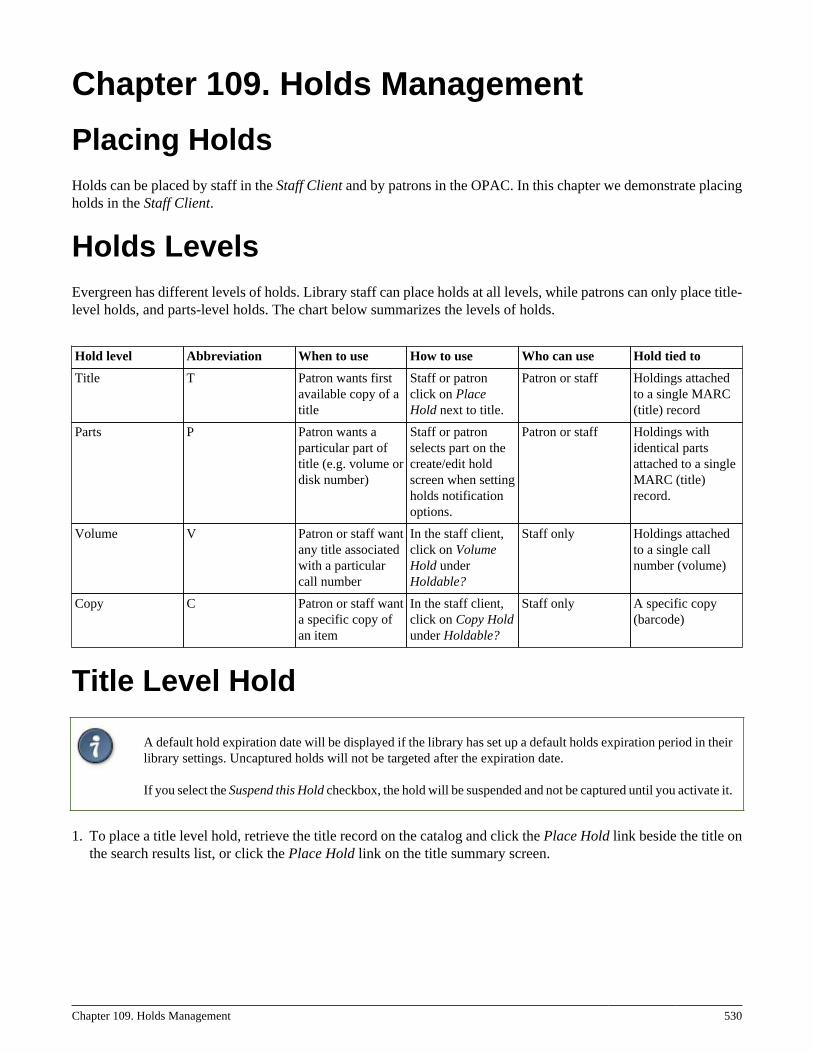
Chapter 109. Holds Management 530
Chapter 109. Holds Management
Placing HoldsHolds can be placed by staff in the Staff Client and by patrons in the OPAC. In this chapter we demonstrate placingholds in the Staff Client.
Holds LevelsEvergreen has different levels of holds. Library staff can place holds at all levels, while patrons can only place title-level holds, and parts-level holds. The chart below summarizes the levels of holds.
Hold level Abbreviation When to use How to use Who can use Hold tied to
Title T Patron wants firstavailable copy of atitle
Staff or patronclick on PlaceHold next to title.
Patron or staff Holdings attachedto a single MARC(title) record
Parts P Patron wants aparticular part oftitle (e.g. volume ordisk number)
Staff or patronselects part on thecreate/edit holdscreen when settingholds notificationoptions.
Patron or staff Holdings withidentical partsattached to a singleMARC (title)record.
Volume V Patron or staff wantany title associatedwith a particularcall number
In the staff client,click on VolumeHold underHoldable?
Staff only Holdings attachedto a single callnumber (volume)
Copy C Patron or staff wanta specific copy ofan item
In the staff client,click on Copy Holdunder Holdable?
Staff only A specific copy(barcode)
Title Level Hold
A default hold expiration date will be displayed if the library has set up a default holds expiration period in theirlibrary settings. Uncaptured holds will not be targeted after the expiration date.
If you select the Suspend this Hold checkbox, the hold will be suspended and not be captured until you activate it.
1. To place a title level hold, retrieve the title record on the catalog and click the Place Hold link beside the title onthe search results list, or click the Place Hold link on the title summary screen.
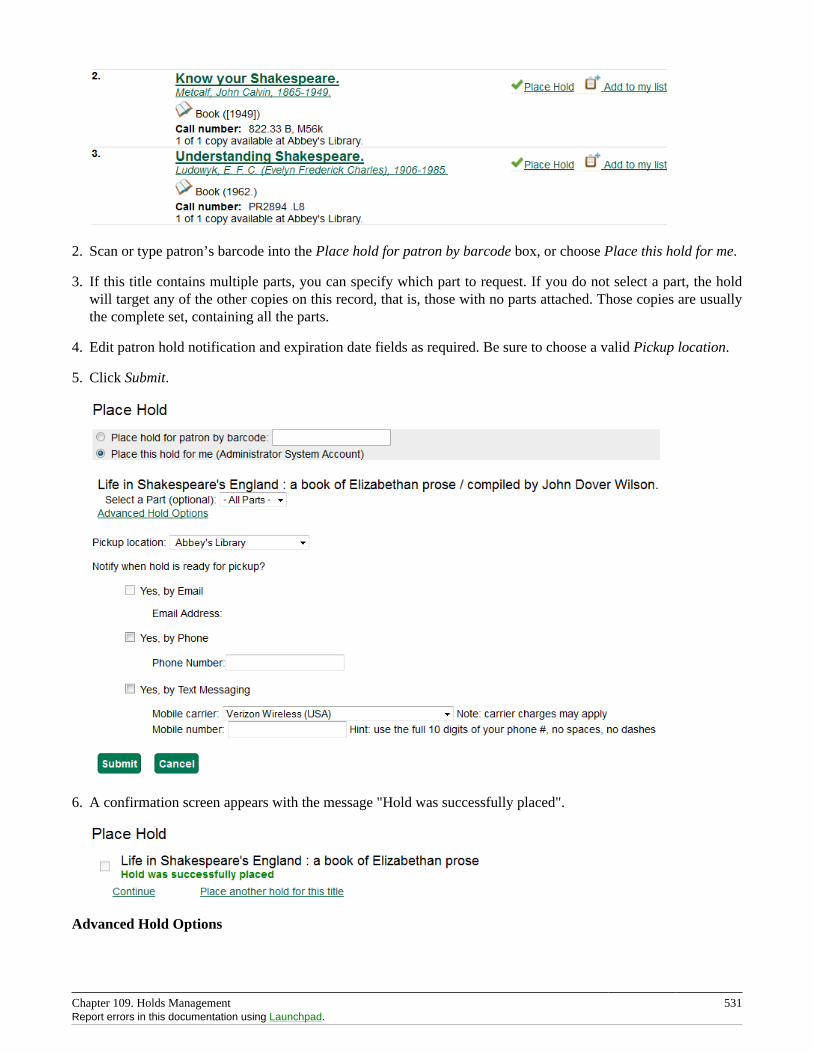
Chapter 109. Holds Management 531Report errors in this documentation using Launchpad.
2. Scan or type patron’s barcode into the Place hold for patron by barcode box, or choose Place this hold for me.
3. If this title contains multiple parts, you can specify which part to request. If you do not select a part, the holdwill target any of the other copies on this record, that is, those with no parts attached. Those copies are usuallythe complete set, containing all the parts.
4. Edit patron hold notification and expiration date fields as required. Be sure to choose a valid Pickup location.
5. Click Submit.
6. A confirmation screen appears with the message "Hold was successfully placed".
Advanced Hold Options
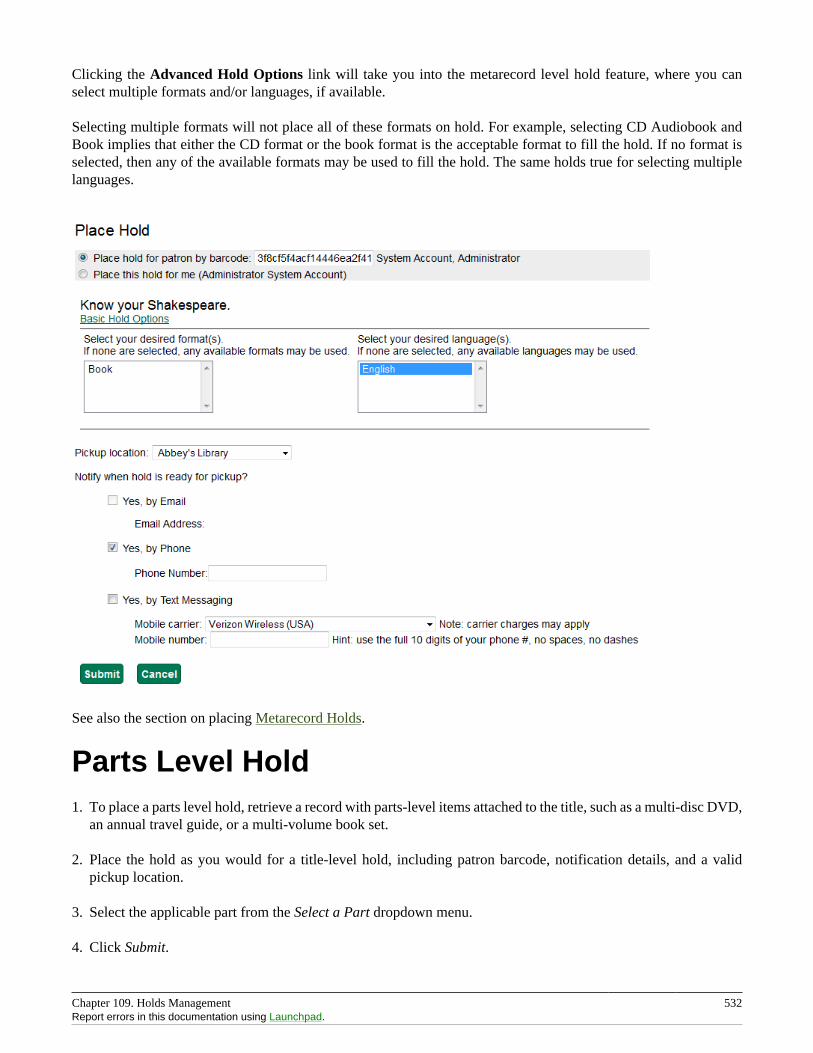
Chapter 109. Holds Management 532Report errors in this documentation using Launchpad.
Clicking the Advanced Hold Options link will take you into the metarecord level hold feature, where you canselect multiple formats and/or languages, if available.
Selecting multiple formats will not place all of these formats on hold. For example, selecting CD Audiobook andBook implies that either the CD format or the book format is the acceptable format to fill the hold. If no format isselected, then any of the available formats may be used to fill the hold. The same holds true for selecting multiplelanguages.
See also the section on placing Metarecord Holds.
Parts Level Hold1. To place a parts level hold, retrieve a record with parts-level items attached to the title, such as a multi-disc DVD,
an annual travel guide, or a multi-volume book set.
2. Place the hold as you would for a title-level hold, including patron barcode, notification details, and a validpickup location.
3. Select the applicable part from the Select a Part dropdown menu.
4. Click Submit.
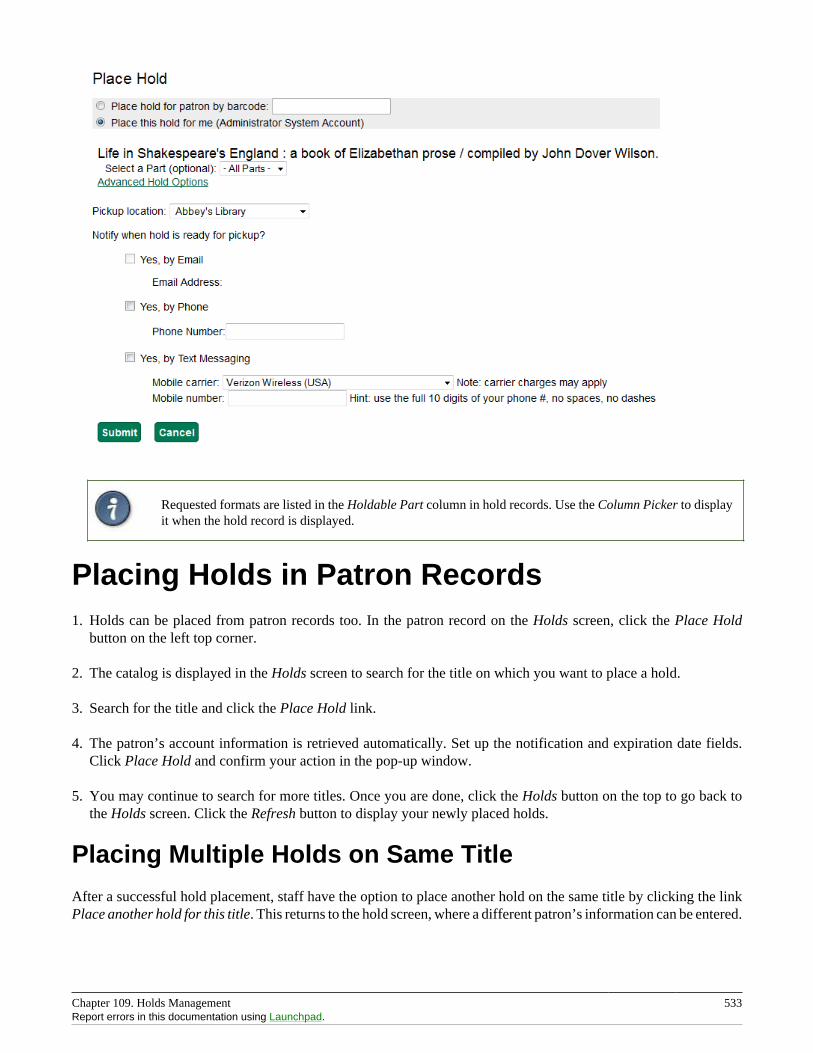
Chapter 109. Holds Management 533Report errors in this documentation using Launchpad.
Requested formats are listed in the Holdable Part column in hold records. Use the Column Picker to displayit when the hold record is displayed.
Placing Holds in Patron Records1. Holds can be placed from patron records too. In the patron record on the Holds screen, click the Place Hold
button on the left top corner.
2. The catalog is displayed in the Holds screen to search for the title on which you want to place a hold.
3. Search for the title and click the Place Hold link.
4. The patron’s account information is retrieved automatically. Set up the notification and expiration date fields.Click Place Hold and confirm your action in the pop-up window.
5. You may continue to search for more titles. Once you are done, click the Holds button on the top to go back tothe Holds screen. Click the Refresh button to display your newly placed holds.
Placing Multiple Holds on Same Title
After a successful hold placement, staff have the option to place another hold on the same title by clicking the linkPlace another hold for this title. This returns to the hold screen, where a different patron’s information can be entered.
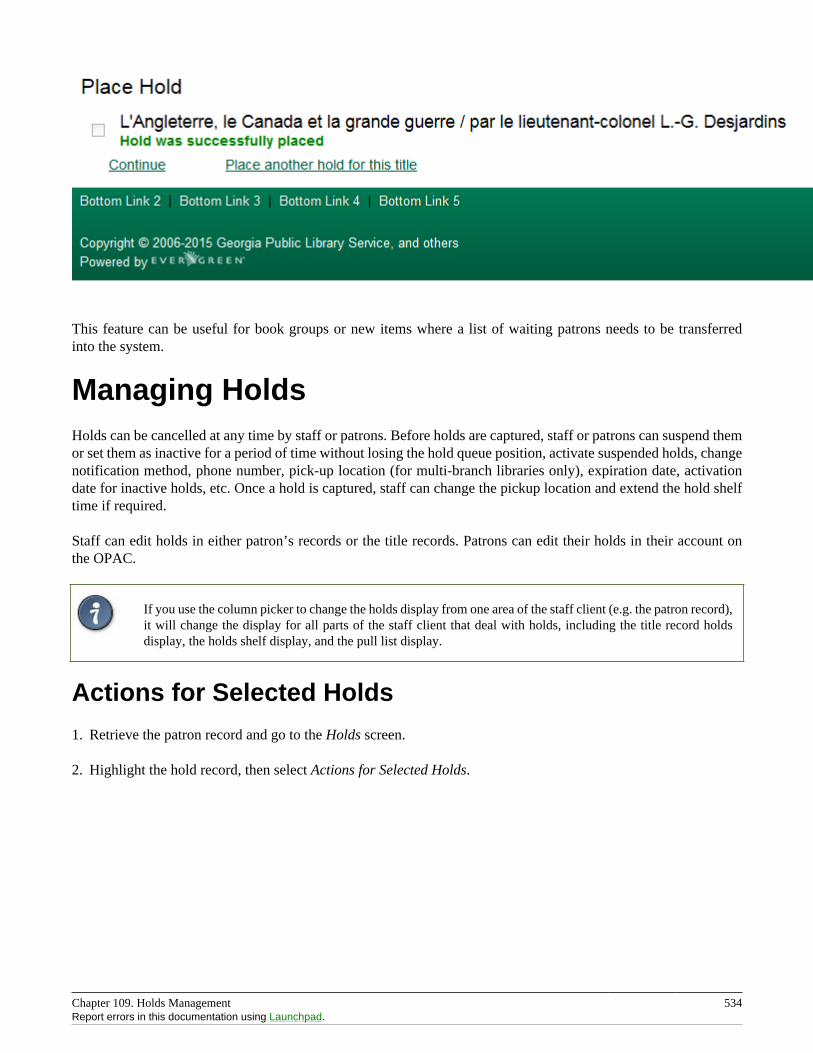
Chapter 109. Holds Management 534Report errors in this documentation using Launchpad.
This feature can be useful for book groups or new items where a list of waiting patrons needs to be transferredinto the system.
Managing HoldsHolds can be cancelled at any time by staff or patrons. Before holds are captured, staff or patrons can suspend themor set them as inactive for a period of time without losing the hold queue position, activate suspended holds, changenotification method, phone number, pick-up location (for multi-branch libraries only), expiration date, activationdate for inactive holds, etc. Once a hold is captured, staff can change the pickup location and extend the hold shelftime if required.
Staff can edit holds in either patron’s records or the title records. Patrons can edit their holds in their account onthe OPAC.
If you use the column picker to change the holds display from one area of the staff client (e.g. the patron record),it will change the display for all parts of the staff client that deal with holds, including the title record holdsdisplay, the holds shelf display, and the pull list display.
Actions for Selected Holds
1. Retrieve the patron record and go to the Holds screen.
2. Highlight the hold record, then select Actions for Selected Holds.
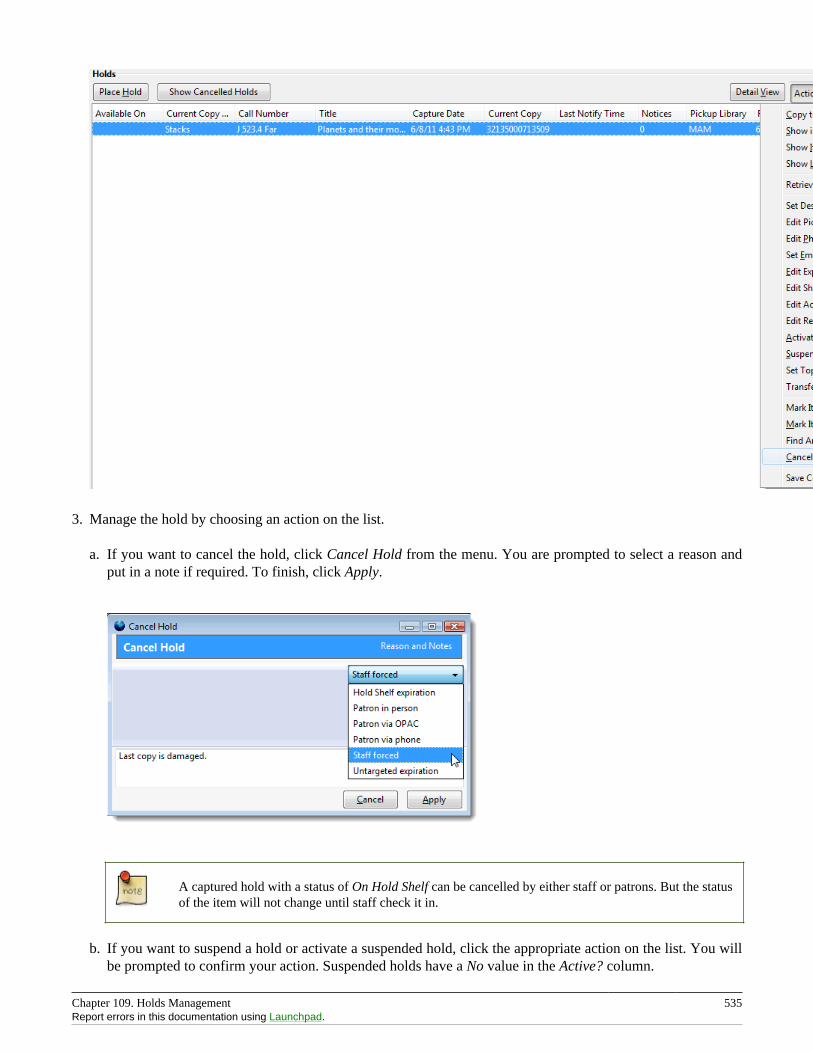
Chapter 109. Holds Management 535Report errors in this documentation using Launchpad.
3. Manage the hold by choosing an action on the list.
a. If you want to cancel the hold, click Cancel Hold from the menu. You are prompted to select a reason andput in a note if required. To finish, click Apply.
A captured hold with a status of On Hold Shelf can be cancelled by either staff or patrons. But the statusof the item will not change until staff check it in.
b. If you want to suspend a hold or activate a suspended hold, click the appropriate action on the list. You willbe prompted to confirm your action. Suspended holds have a No value in the Active? column.
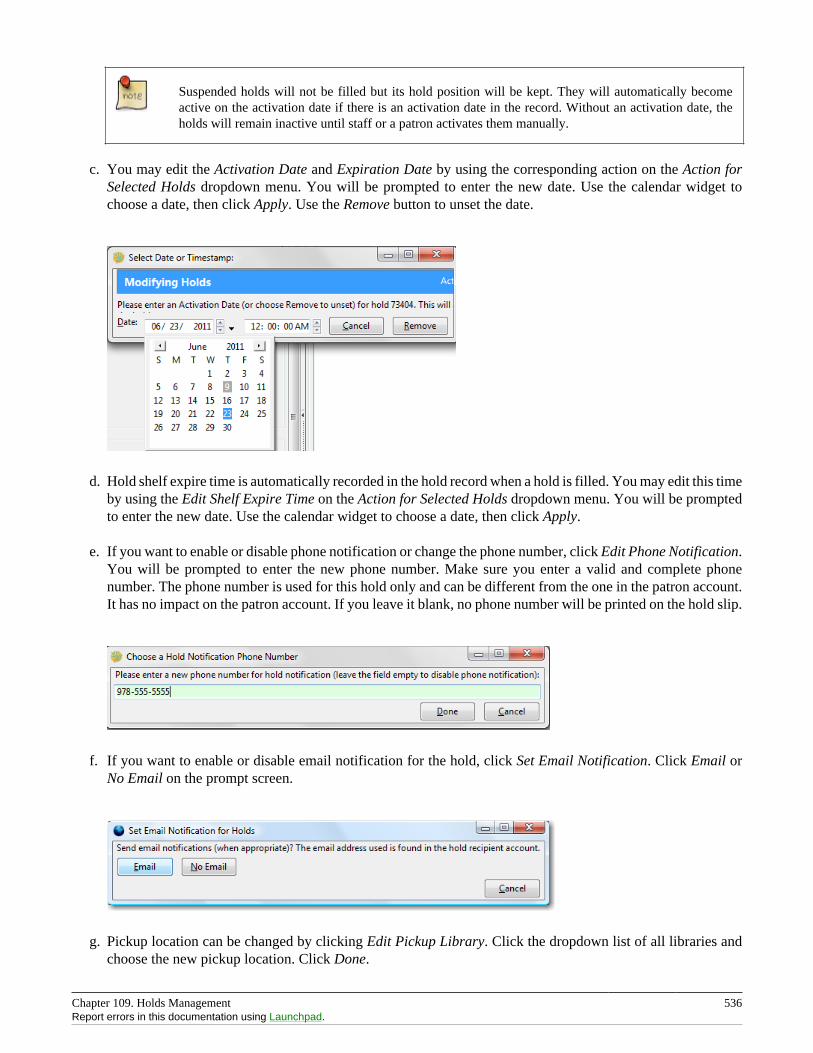
Chapter 109. Holds Management 536Report errors in this documentation using Launchpad.
Suspended holds will not be filled but its hold position will be kept. They will automatically becomeactive on the activation date if there is an activation date in the record. Without an activation date, theholds will remain inactive until staff or a patron activates them manually.
c. You may edit the Activation Date and Expiration Date by using the corresponding action on the Action forSelected Holds dropdown menu. You will be prompted to enter the new date. Use the calendar widget tochoose a date, then click Apply. Use the Remove button to unset the date.
d. Hold shelf expire time is automatically recorded in the hold record when a hold is filled. You may edit this timeby using the Edit Shelf Expire Time on the Action for Selected Holds dropdown menu. You will be promptedto enter the new date. Use the calendar widget to choose a date, then click Apply.
e. If you want to enable or disable phone notification or change the phone number, click Edit Phone Notification.You will be prompted to enter the new phone number. Make sure you enter a valid and complete phonenumber. The phone number is used for this hold only and can be different from the one in the patron account.It has no impact on the patron account. If you leave it blank, no phone number will be printed on the hold slip.
f. If you want to enable or disable email notification for the hold, click Set Email Notification. Click Email orNo Email on the prompt screen.
g. Pickup location can be changed by clicking Edit Pickup Library. Click the dropdown list of all libraries andchoose the new pickup location. Click Done.
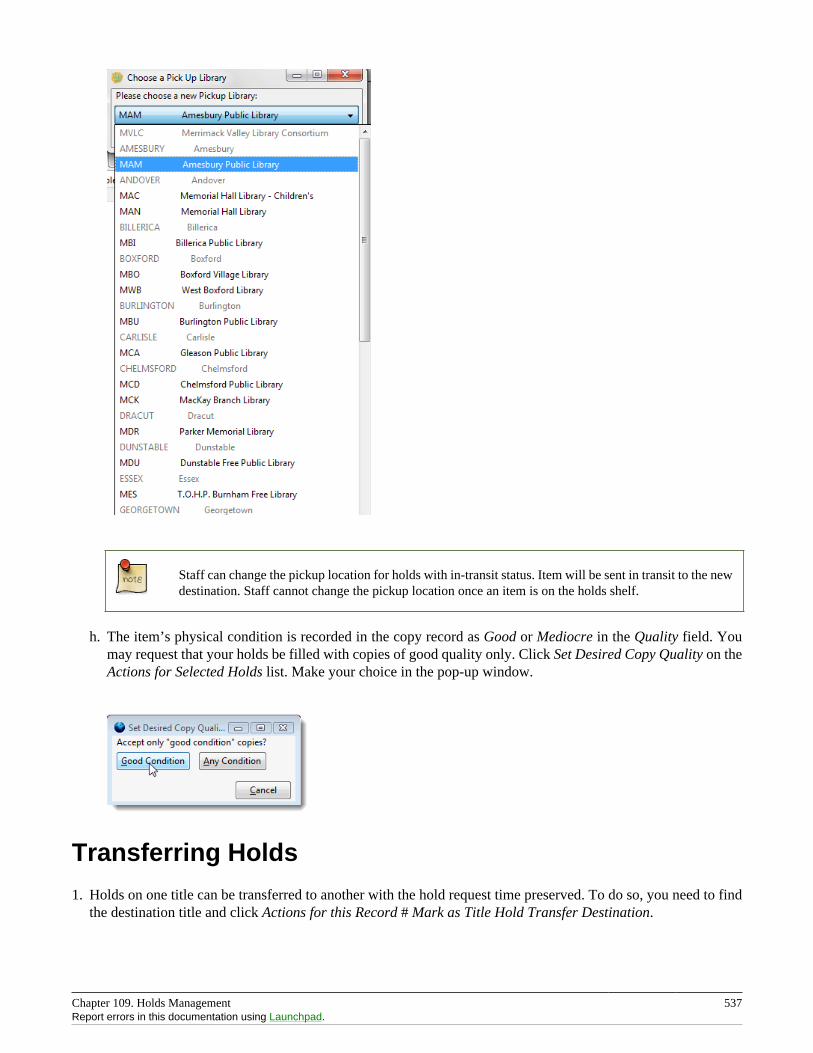
Chapter 109. Holds Management 537Report errors in this documentation using Launchpad.
Staff can change the pickup location for holds with in-transit status. Item will be sent in transit to the newdestination. Staff cannot change the pickup location once an item is on the holds shelf.
h. The item’s physical condition is recorded in the copy record as Good or Mediocre in the Quality field. Youmay request that your holds be filled with copies of good quality only. Click Set Desired Copy Quality on theActions for Selected Holds list. Make your choice in the pop-up window.
Transferring Holds
1. Holds on one title can be transferred to another with the hold request time preserved. To do so, you need to findthe destination title and click Actions for this Record # Mark as Title Hold Transfer Destination.
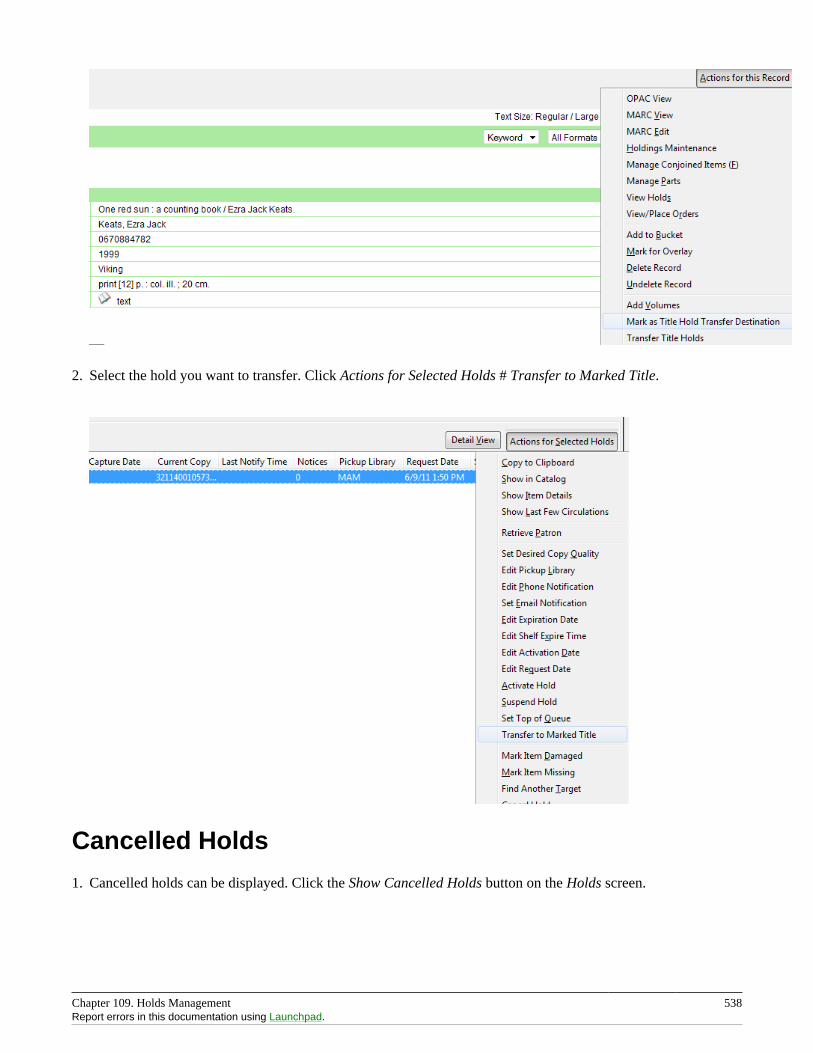
Chapter 109. Holds Management 538Report errors in this documentation using Launchpad.
2. Select the hold you want to transfer. Click Actions for Selected Holds # Transfer to Marked Title.
Cancelled Holds
1. Cancelled holds can be displayed. Click the Show Cancelled Holds button on the Holds screen.
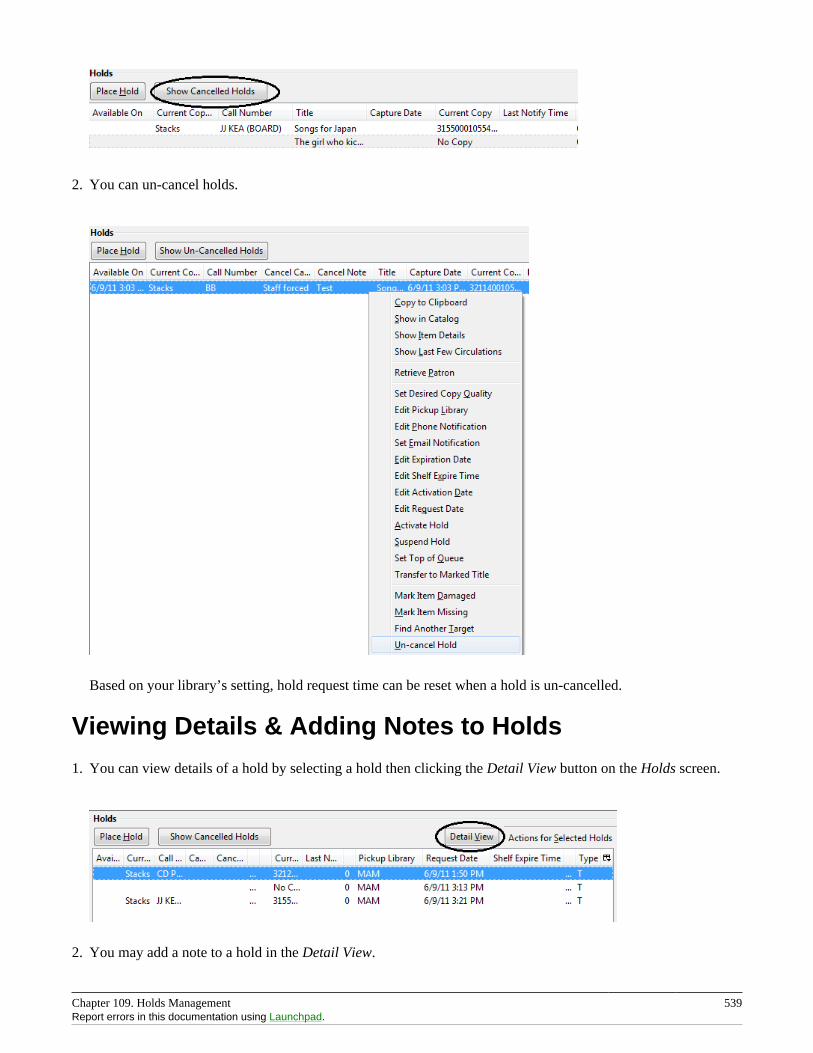
Chapter 109. Holds Management 539Report errors in this documentation using Launchpad.
2. You can un-cancel holds.
Based on your library’s setting, hold request time can be reset when a hold is un-cancelled.
Viewing Details & Adding Notes to Holds
1. You can view details of a hold by selecting a hold then clicking the Detail View button on the Holds screen.
2. You may add a note to a hold in the Detail View.
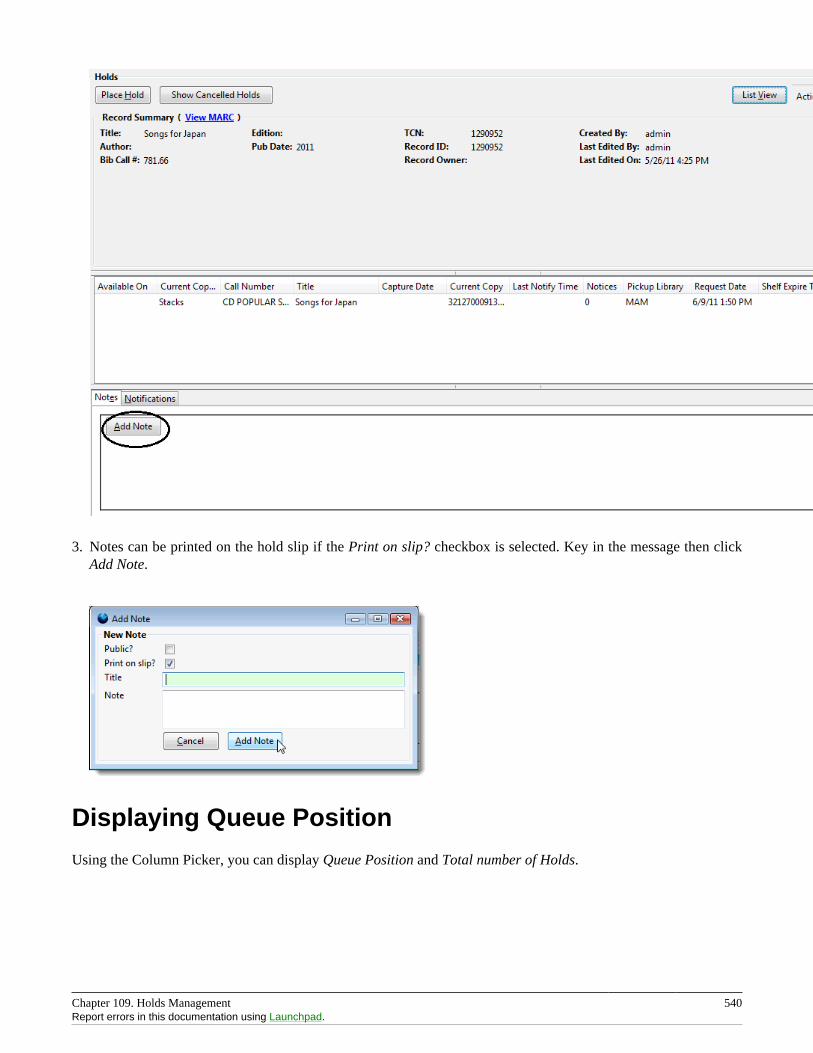
Chapter 109. Holds Management 540Report errors in this documentation using Launchpad.
3. Notes can be printed on the hold slip if the Print on slip? checkbox is selected. Key in the message then clickAdd Note.
Displaying Queue Position
Using the Column Picker, you can display Queue Position and Total number of Holds.
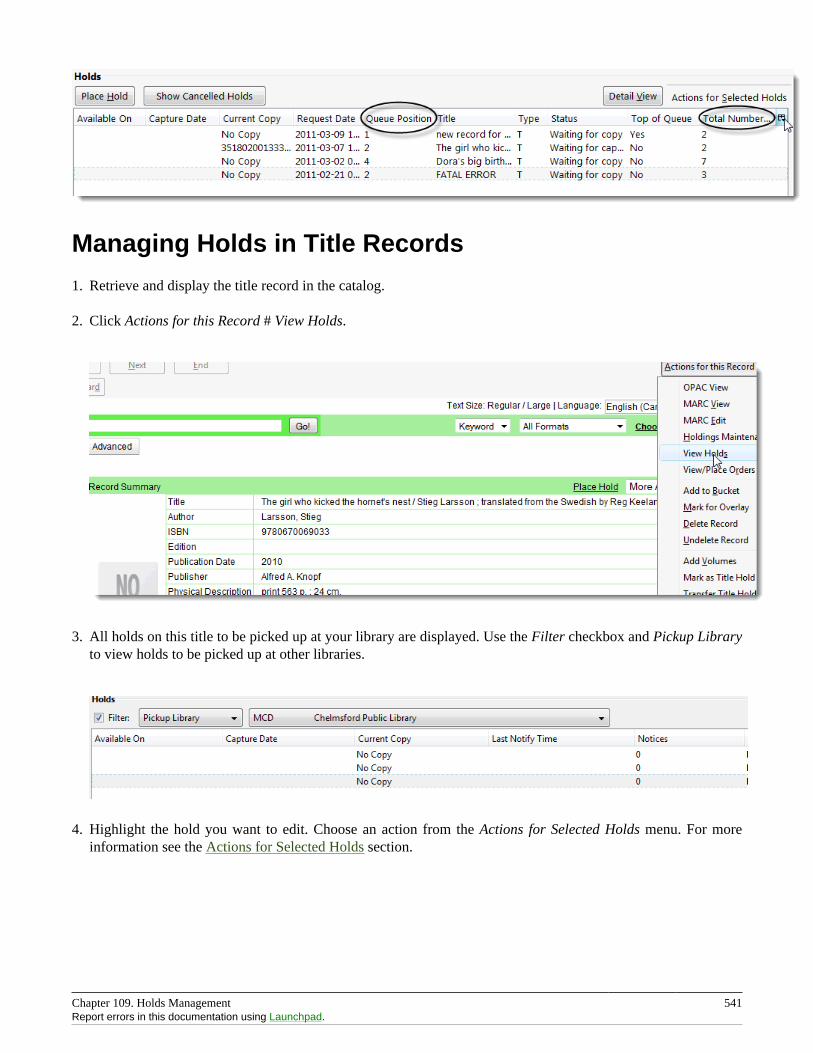
Chapter 109. Holds Management 541Report errors in this documentation using Launchpad.
Managing Holds in Title Records
1. Retrieve and display the title record in the catalog.
2. Click Actions for this Record # View Holds.
3. All holds on this title to be picked up at your library are displayed. Use the Filter checkbox and Pickup Libraryto view holds to be picked up at other libraries.
4. Highlight the hold you want to edit. Choose an action from the Actions for Selected Holds menu. For moreinformation see the Actions for Selected Holds section.
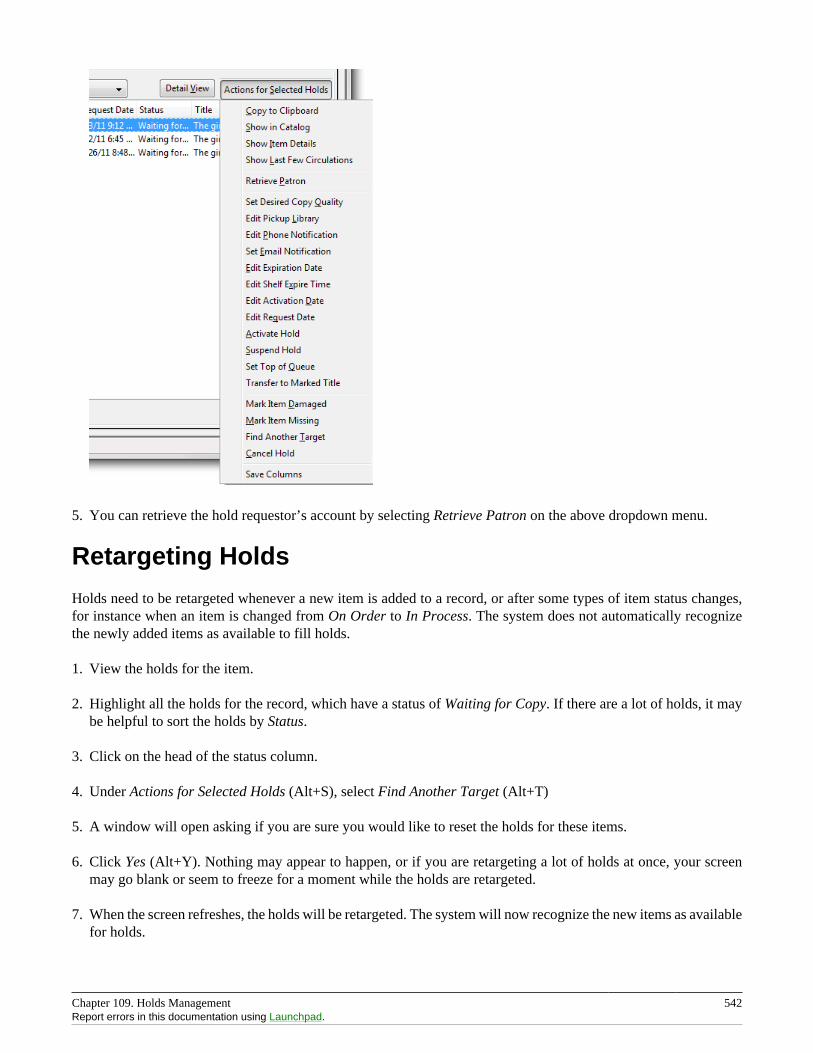
Chapter 109. Holds Management 542Report errors in this documentation using Launchpad.
5. You can retrieve the hold requestor’s account by selecting Retrieve Patron on the above dropdown menu.
Retargeting Holds
Holds need to be retargeted whenever a new item is added to a record, or after some types of item status changes,for instance when an item is changed from On Order to In Process. The system does not automatically recognizethe newly added items as available to fill holds.
1. View the holds for the item.
2. Highlight all the holds for the record, which have a status of Waiting for Copy. If there are a lot of holds, it maybe helpful to sort the holds by Status.
3. Click on the head of the status column.
4. Under Actions for Selected Holds (Alt+S), select Find Another Target (Alt+T)
5. A window will open asking if you are sure you would like to reset the holds for these items.
6. Click Yes (Alt+Y). Nothing may appear to happen, or if you are retargeting a lot of holds at once, your screenmay go blank or seem to freeze for a moment while the holds are retargeted.
7. When the screen refreshes, the holds will be retargeted. The system will now recognize the new items as availablefor holds.
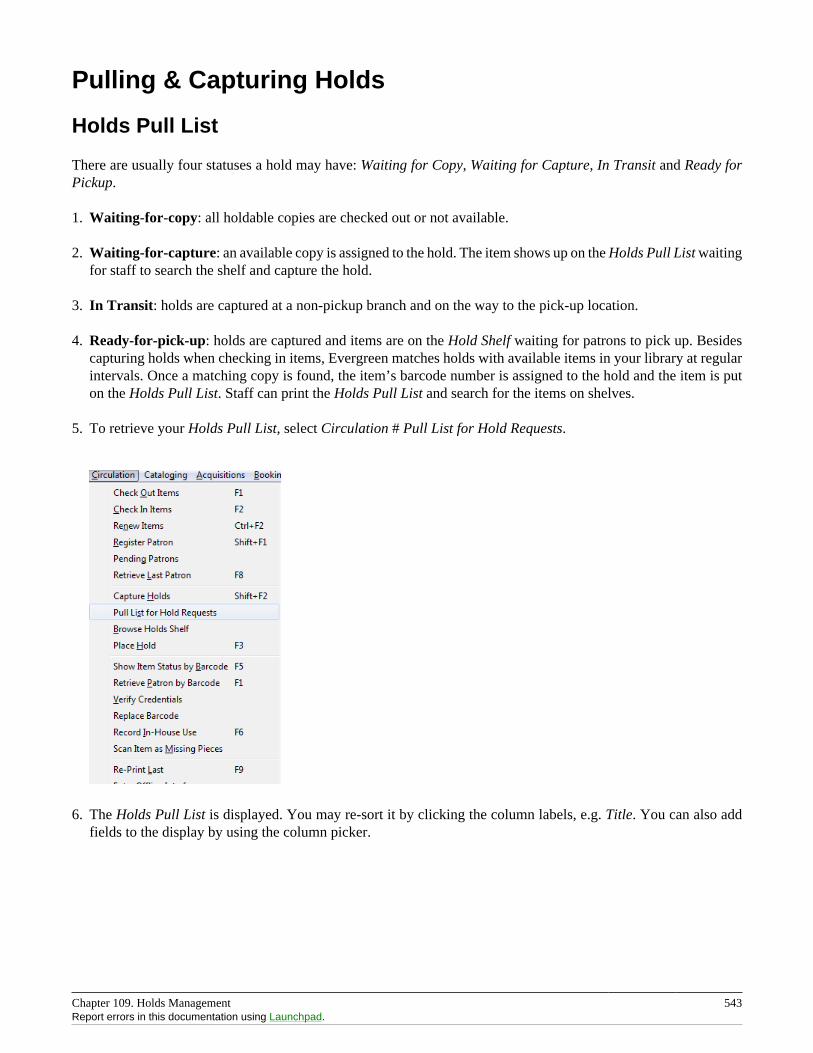
Chapter 109. Holds Management 543Report errors in this documentation using Launchpad.
Pulling & Capturing Holds
Holds Pull List
There are usually four statuses a hold may have: Waiting for Copy, Waiting for Capture, In Transit and Ready forPickup.
1. Waiting-for-copy: all holdable copies are checked out or not available.
2. Waiting-for-capture: an available copy is assigned to the hold. The item shows up on the Holds Pull List waitingfor staff to search the shelf and capture the hold.
3. In Transit: holds are captured at a non-pickup branch and on the way to the pick-up location.
4. Ready-for-pick-up: holds are captured and items are on the Hold Shelf waiting for patrons to pick up. Besidescapturing holds when checking in items, Evergreen matches holds with available items in your library at regularintervals. Once a matching copy is found, the item’s barcode number is assigned to the hold and the item is puton the Holds Pull List. Staff can print the Holds Pull List and search for the items on shelves.
5. To retrieve your Holds Pull List, select Circulation # Pull List for Hold Requests.
6. The Holds Pull List is displayed. You may re-sort it by clicking the column labels, e.g. Title. You can also addfields to the display by using the column picker.
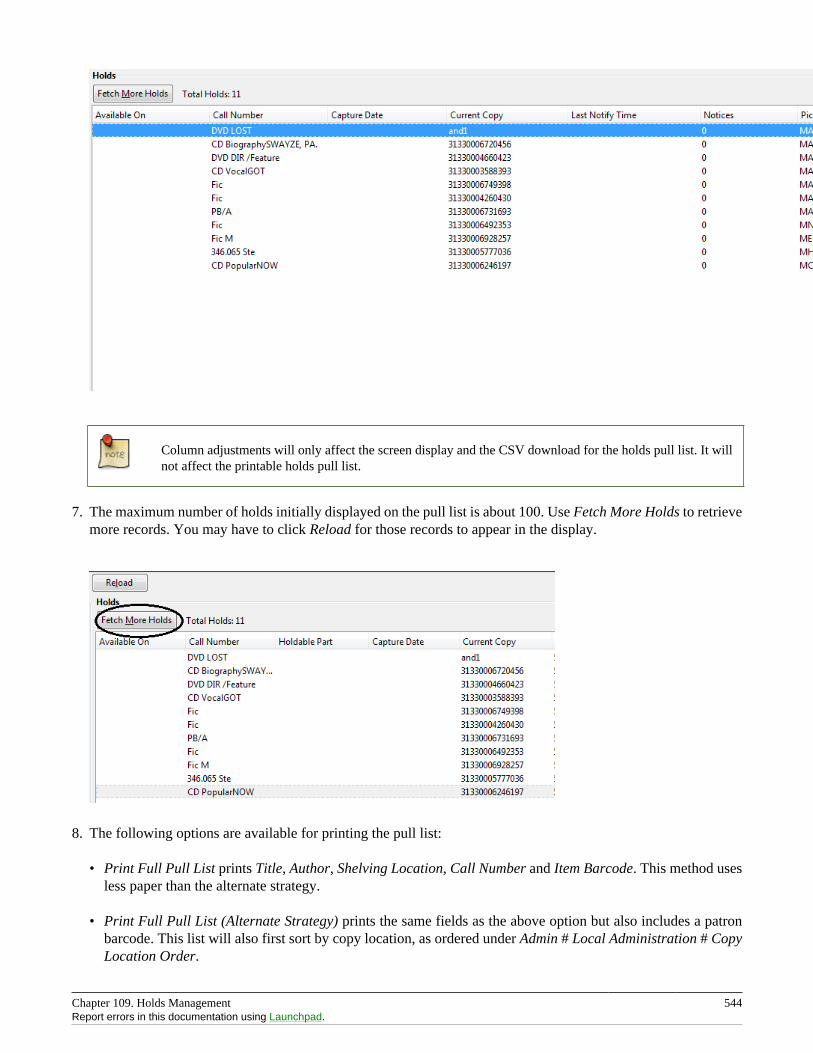
Chapter 109. Holds Management 544Report errors in this documentation using Launchpad.
Column adjustments will only affect the screen display and the CSV download for the holds pull list. It willnot affect the printable holds pull list.
7. The maximum number of holds initially displayed on the pull list is about 100. Use Fetch More Holds to retrievemore records. You may have to click Reload for those records to appear in the display.
8. The following options are available for printing the pull list:
• Print Full Pull List prints Title, Author, Shelving Location, Call Number and Item Barcode. This method usesless paper than the alternate strategy.
• Print Full Pull List (Alternate Strategy) prints the same fields as the above option but also includes a patronbarcode. This list will also first sort by copy location, as ordered under Admin # Local Administration # CopyLocation Order.

Chapter 109. Holds Management 545Report errors in this documentation using Launchpad.
• Save List CSV to File – This option is available from the List Actions button and saves all fields in the screendisplay to a CSV file. This file can then be opened in Excel or another spreadsheet program. This optionprovides more flexibility in identifying fields that should be printed.
With the CSV option, if you are including barcodes in the holds pull list, you will need to take the followingsteps to make the barcode display properly: in Excel, select the entire barcode column, right-click and selectFormat Cells, click Number as the category and then reduce the number of decimal places to 0.
9. You may perform hold management tasks by using the Actions for Selected Holds dropdown list.
The Holds Pull List is updated constantly. Once an item on the list is no longer available or a hold on the list iscaptured, the items will disappear from the list. The Holds Pull List should be printed at least once a day.
Capturing Holds
Holds can be captured when a checked-out item is returned (checked in) or an item on the Holds Pull List is retrievedand captured. When a hold is captured, the hold slip will be printed and if the patron has chosen to be notified byemail, the email notification will be sent out. The item should be put on the hold shelf.
1. To capture a hold, select Circulation # Capture Holds; click Check In # Capture Holds on the circulation toolbar;or hit Shift-F2.
2. Scan or type barcode and click Submit.
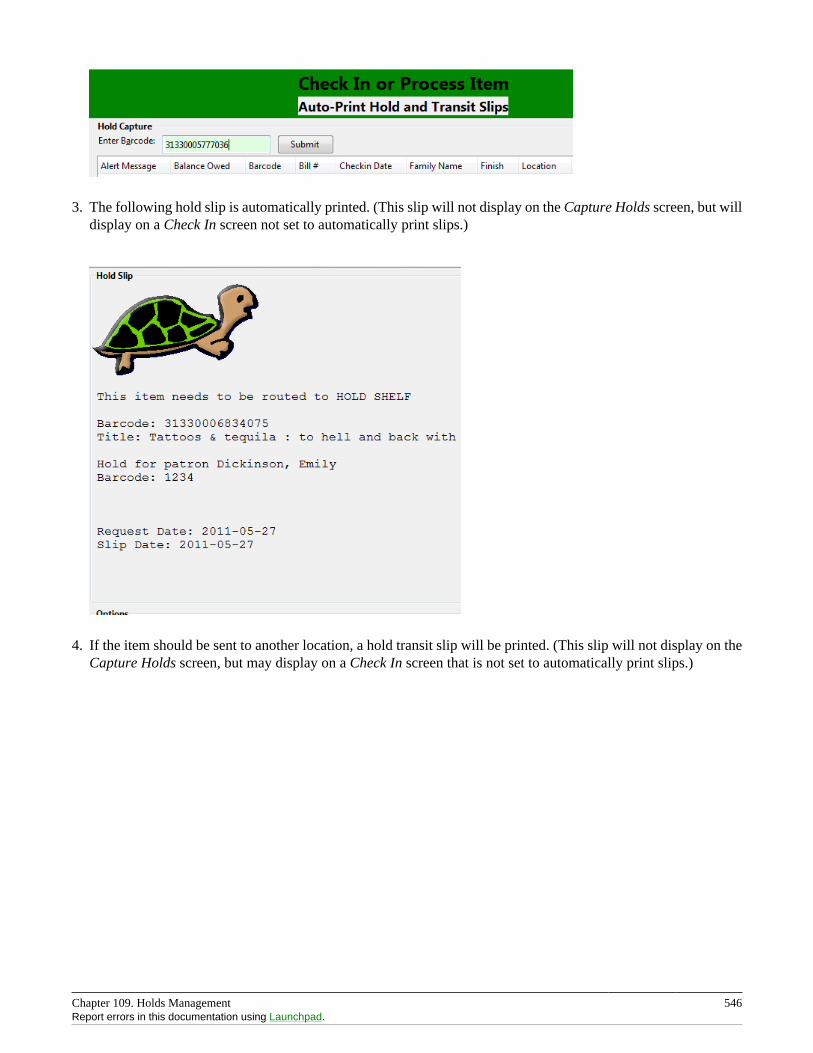
Chapter 109. Holds Management 546Report errors in this documentation using Launchpad.
3. The following hold slip is automatically printed. (This slip will not display on the Capture Holds screen, but willdisplay on a Check In screen not set to automatically print slips.)
4. If the item should be sent to another location, a hold transit slip will be printed. (This slip will not display on theCapture Holds screen, but may display on a Check In screen that is not set to automatically print slips.)
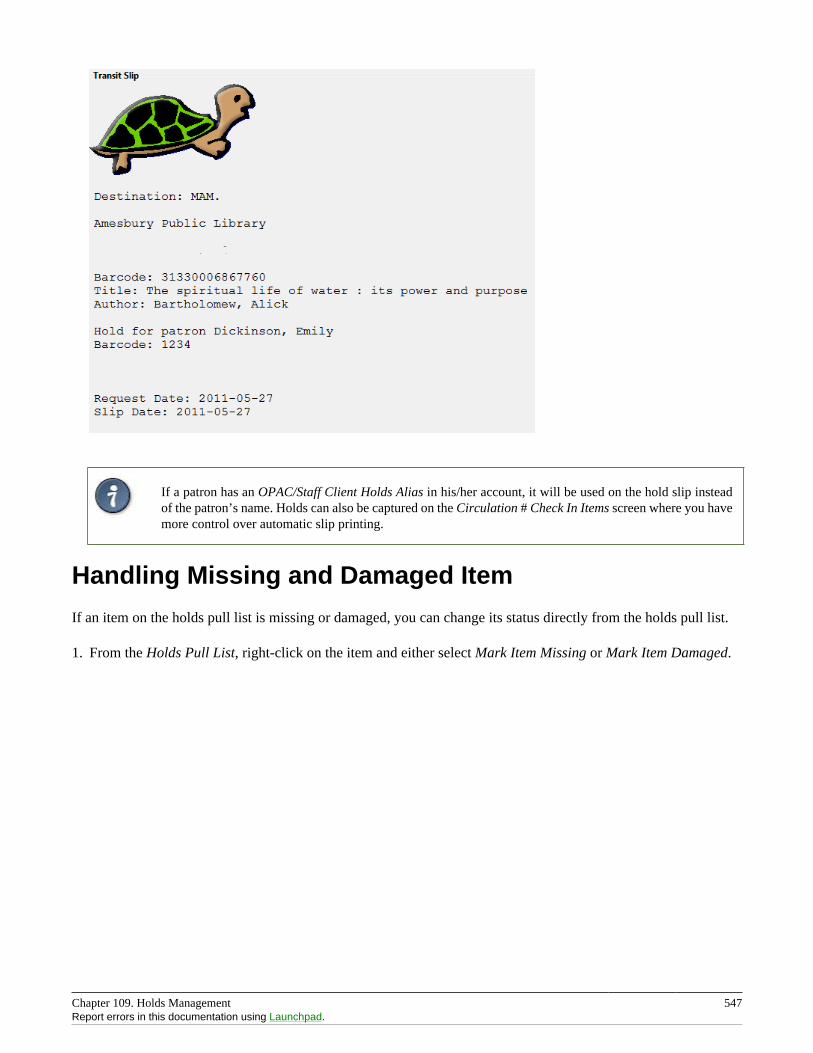
Chapter 109. Holds Management 547Report errors in this documentation using Launchpad.
If a patron has an OPAC/Staff Client Holds Alias in his/her account, it will be used on the hold slip insteadof the patron’s name. Holds can also be captured on the Circulation # Check In Items screen where you havemore control over automatic slip printing.
Handling Missing and Damaged Item
If an item on the holds pull list is missing or damaged, you can change its status directly from the holds pull list.
1. From the Holds Pull List, right-click on the item and either select Mark Item Missing or Mark Item Damaged.
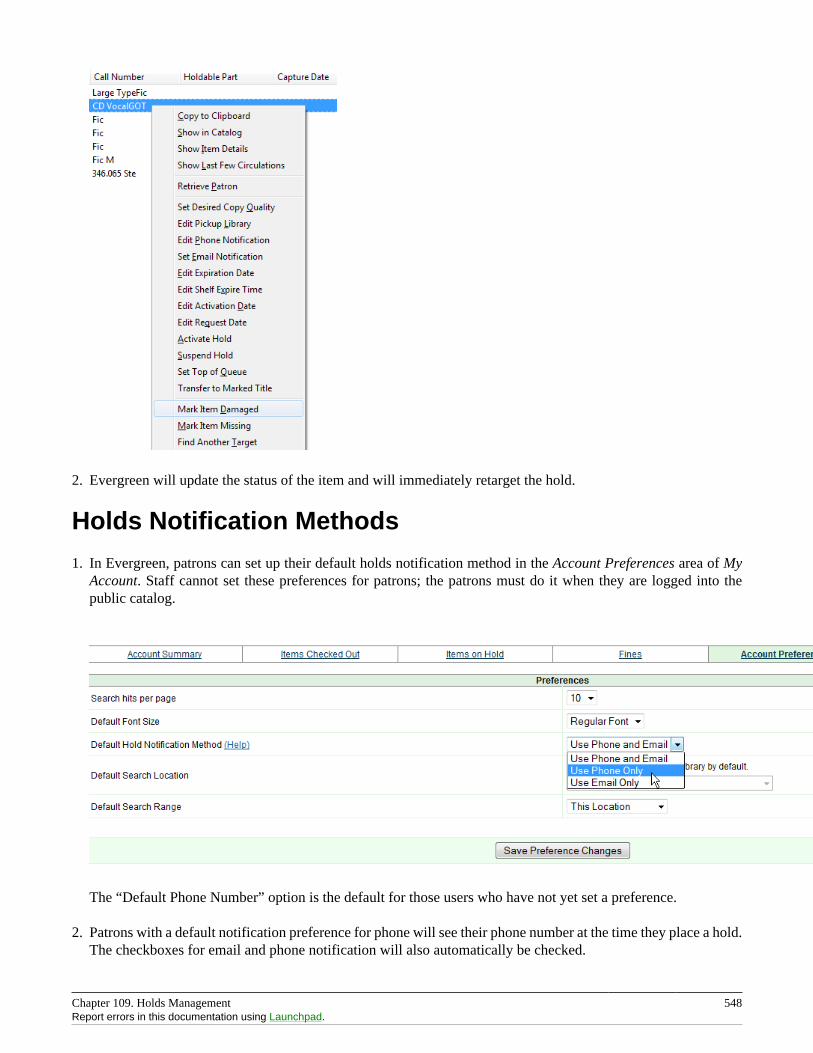
Chapter 109. Holds Management 548Report errors in this documentation using Launchpad.
2. Evergreen will update the status of the item and will immediately retarget the hold.
Holds Notification Methods
1. In Evergreen, patrons can set up their default holds notification method in the Account Preferences area of MyAccount. Staff cannot set these preferences for patrons; the patrons must do it when they are logged into thepublic catalog.
The “Default Phone Number” option is the default for those users who have not yet set a preference.
2. Patrons with a default notification preference for phone will see their phone number at the time they place a hold.The checkboxes for email and phone notification will also automatically be checked.
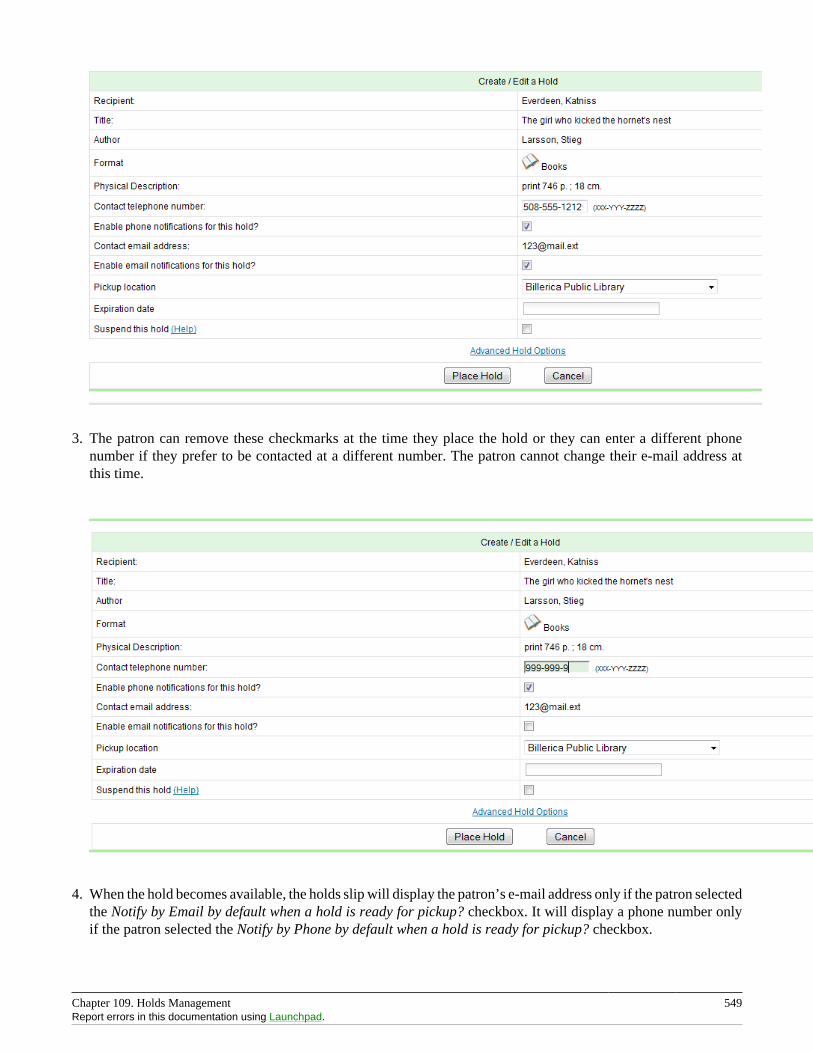
Chapter 109. Holds Management 549Report errors in this documentation using Launchpad.
3. The patron can remove these checkmarks at the time they place the hold or they can enter a different phonenumber if they prefer to be contacted at a different number. The patron cannot change their e-mail address atthis time.
4. When the hold becomes available, the holds slip will display the patron’s e-mail address only if the patron selectedthe Notify by Email by default when a hold is ready for pickup? checkbox. It will display a phone number onlyif the patron selected the Notify by Phone by default when a hold is ready for pickup? checkbox.
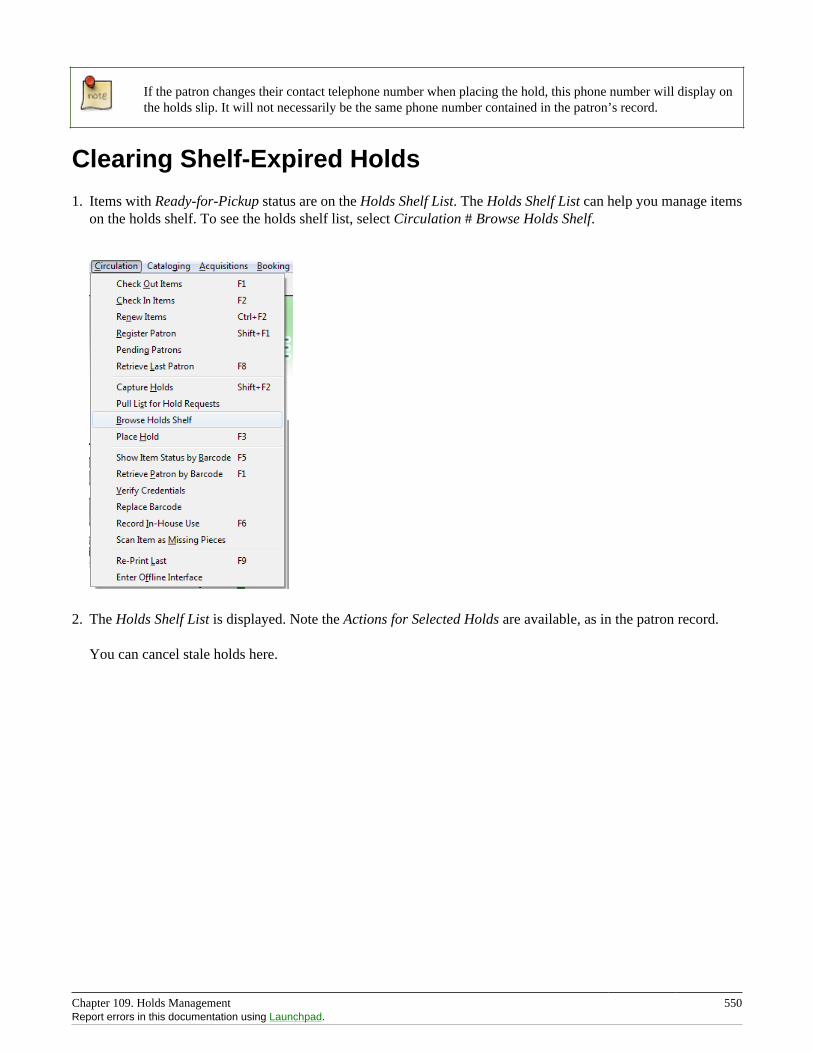
Chapter 109. Holds Management 550Report errors in this documentation using Launchpad.
If the patron changes their contact telephone number when placing the hold, this phone number will display onthe holds slip. It will not necessarily be the same phone number contained in the patron’s record.
Clearing Shelf-Expired Holds
1. Items with Ready-for-Pickup status are on the Holds Shelf List. The Holds Shelf List can help you manage itemson the holds shelf. To see the holds shelf list, select Circulation # Browse Holds Shelf.
2. The Holds Shelf List is displayed. Note the Actions for Selected Holds are available, as in the patron record.
You can cancel stale holds here.
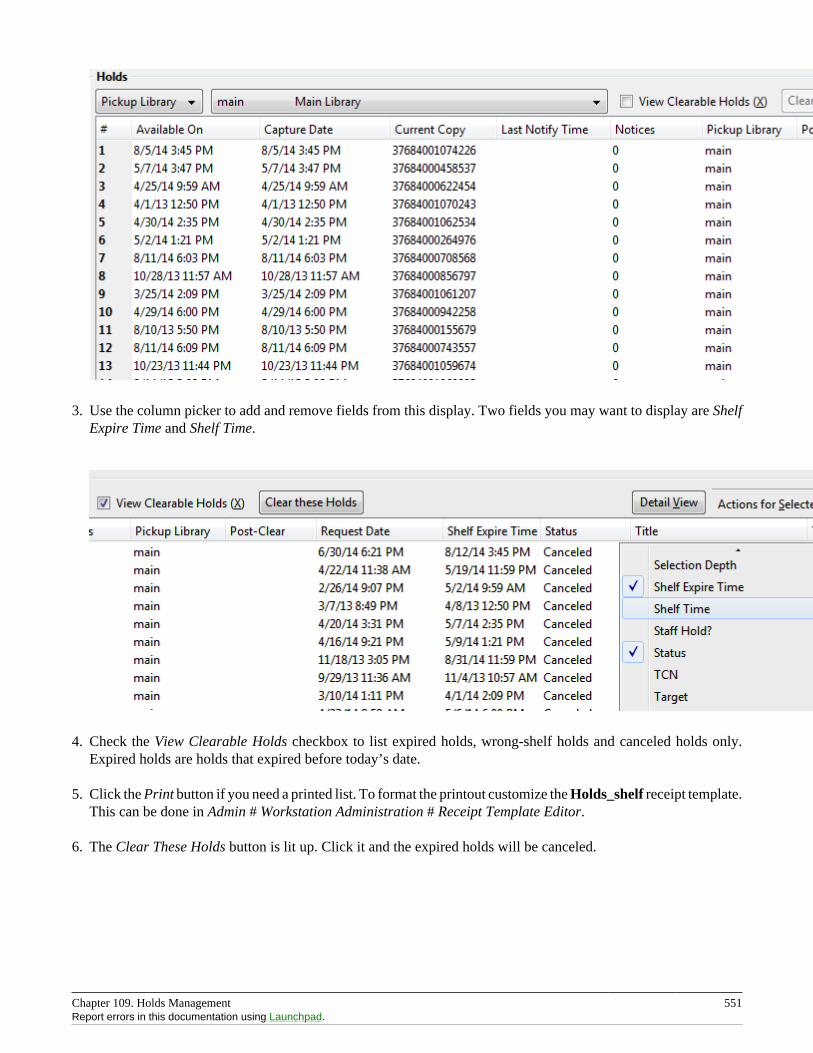
Chapter 109. Holds Management 551Report errors in this documentation using Launchpad.
3. Use the column picker to add and remove fields from this display. Two fields you may want to display are ShelfExpire Time and Shelf Time.
4. Check the View Clearable Holds checkbox to list expired holds, wrong-shelf holds and canceled holds only.Expired holds are holds that expired before today’s date.
5. Click the Print button if you need a printed list. To format the printout customize the Holds_shelf receipt template.This can be done in Admin # Workstation Administration # Receipt Template Editor.
6. The Clear These Holds button is lit up. Click it and the expired holds will be canceled.
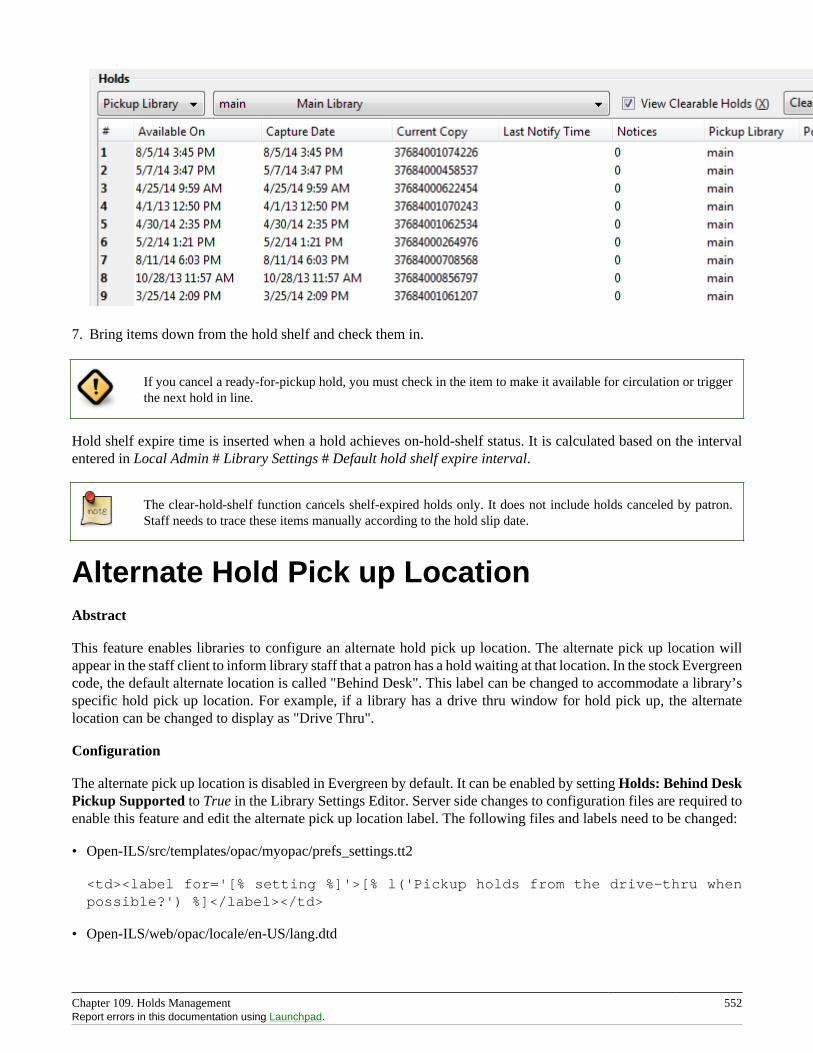
Chapter 109. Holds Management 552Report errors in this documentation using Launchpad.
7. Bring items down from the hold shelf and check them in.
If you cancel a ready-for-pickup hold, you must check in the item to make it available for circulation or triggerthe next hold in line.
Hold shelf expire time is inserted when a hold achieves on-hold-shelf status. It is calculated based on the intervalentered in Local Admin # Library Settings # Default hold shelf expire interval.
The clear-hold-shelf function cancels shelf-expired holds only. It does not include holds canceled by patron.Staff needs to trace these items manually according to the hold slip date.
Alternate Hold Pick up LocationAbstract
This feature enables libraries to configure an alternate hold pick up location. The alternate pick up location willappear in the staff client to inform library staff that a patron has a hold waiting at that location. In the stock Evergreencode, the default alternate location is called "Behind Desk". This label can be changed to accommodate a library’sspecific hold pick up location. For example, if a library has a drive thru window for hold pick up, the alternatelocation can be changed to display as "Drive Thru".
Configuration
The alternate pick up location is disabled in Evergreen by default. It can be enabled by setting Holds: Behind DeskPickup Supported to True in the Library Settings Editor. Server side changes to configuration files are required toenable this feature and edit the alternate pick up location label. The following files and labels need to be changed:
• Open-ILS/src/templates/opac/myopac/prefs_settings.tt2
<td><label for='[% setting %]'>[% l('Pickup holds from the drive-thru whenpossible?') %]</label></td>
• Open-ILS/web/opac/locale/en-US/lang.dtd
Chapter 109. Holds Management 553Report errors in this documentation using Launchpad.
<!ENTITY staff.patron_display.holds_available_behind_desk.label 'Drive-Thru:'>
• Open-ILS/xul/staff_client/server/locale/en-US/circ.properties
staff.circ.utils.hold.behind_desk=Drive-Thru
• Open-ILS/xul/staff_client/server/locale/en-US/patron.properties
staff.patron.summary.hold_counts_behind_desk=Available / Total (Drive-Thru)
Libraries can also choose to give patrons the ability to opt-in to pick up holds at the alternate location through theirOPAC account. To add this option, set the OPAC/Patron Visible field in the User Setting Type Hold is behind CircDesk to True. The User Setting Types can be found under Admin # Server Administration # User Setting Types.
Display
When enabled, the alternate pick up location will appear in several places in the staff client. The alternate pick uplocation and the number of items that are ready for pick up at that location will be displayed in the Patron AccountSummary and under the Holds button in the patron account. Staff will also see the general number of holds availableand holds placed by the patron.
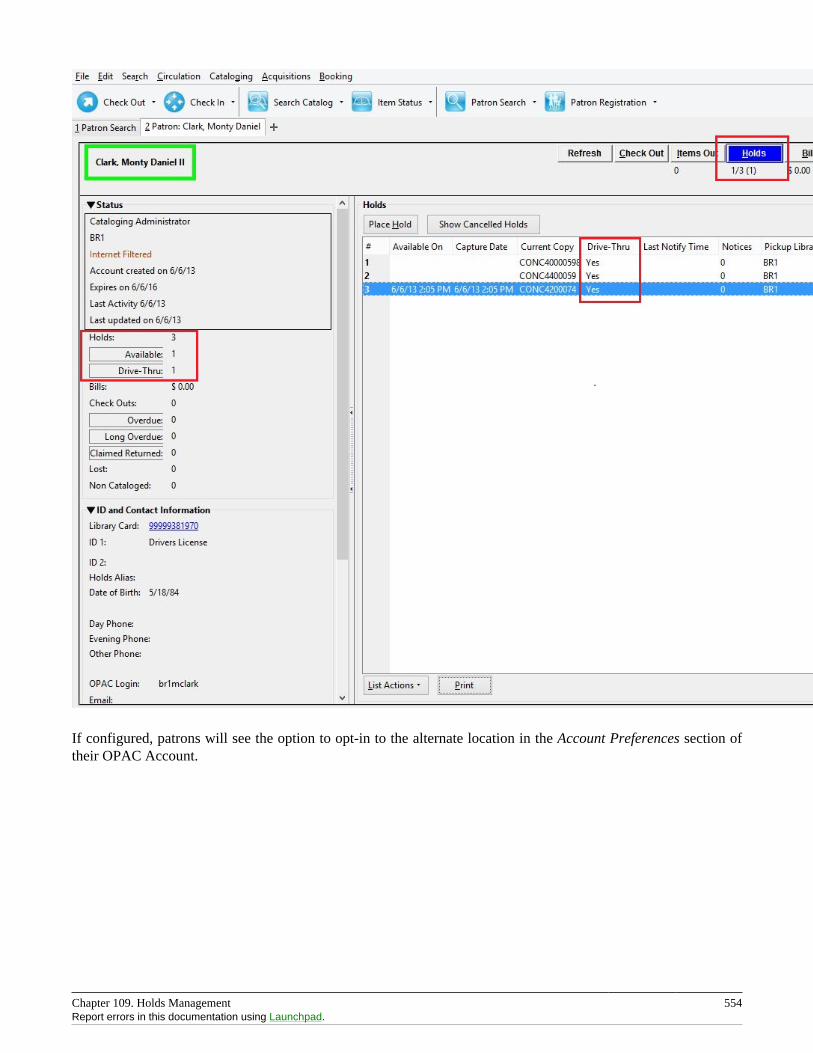
Chapter 109. Holds Management 554Report errors in this documentation using Launchpad.
If configured, patrons will see the option to opt-in to the alternate location in the Account Preferences section oftheir OPAC Account.
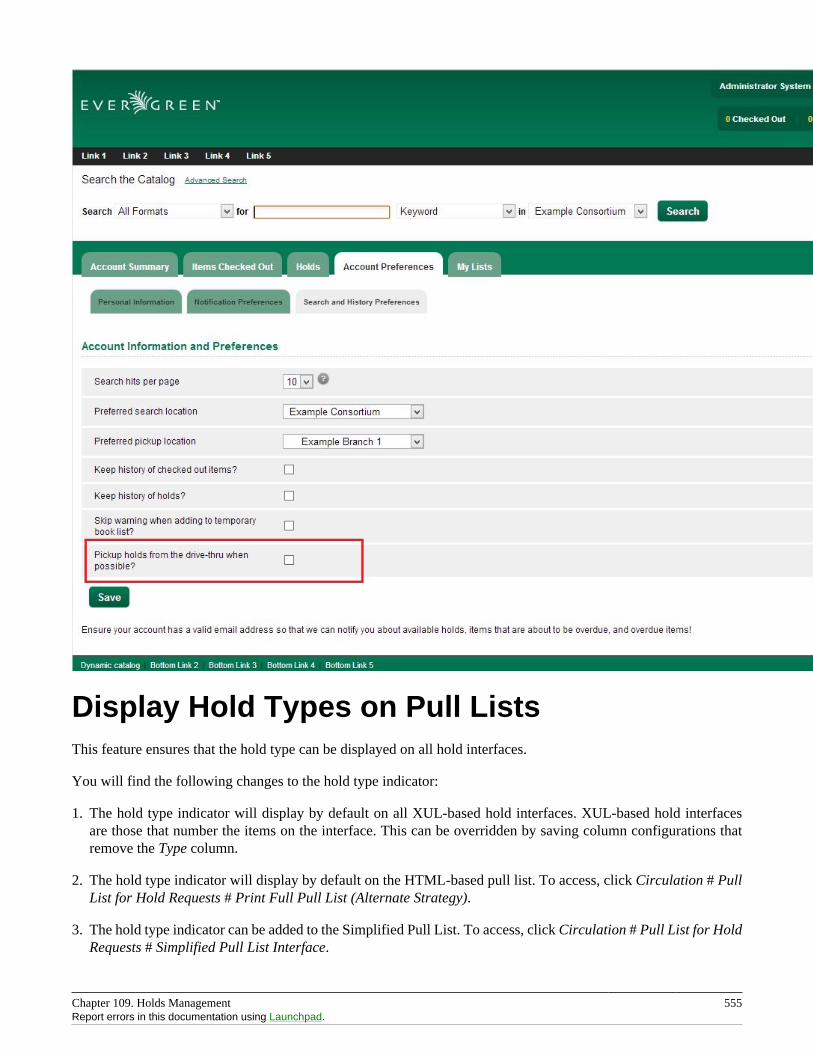
Chapter 109. Holds Management 555Report errors in this documentation using Launchpad.
Display Hold Types on Pull ListsThis feature ensures that the hold type can be displayed on all hold interfaces.
You will find the following changes to the hold type indicator:
1. The hold type indicator will display by default on all XUL-based hold interfaces. XUL-based hold interfacesare those that number the items on the interface. This can be overridden by saving column configurations thatremove the Type column.
2. The hold type indicator will display by default on the HTML-based pull list. To access, click Circulation # PullList for Hold Requests # Print Full Pull List (Alternate Strategy).
3. The hold type indicator can be added to the Simplified Pull List. To access, click Circulation # Pull List for HoldRequests # Simplified Pull List Interface.
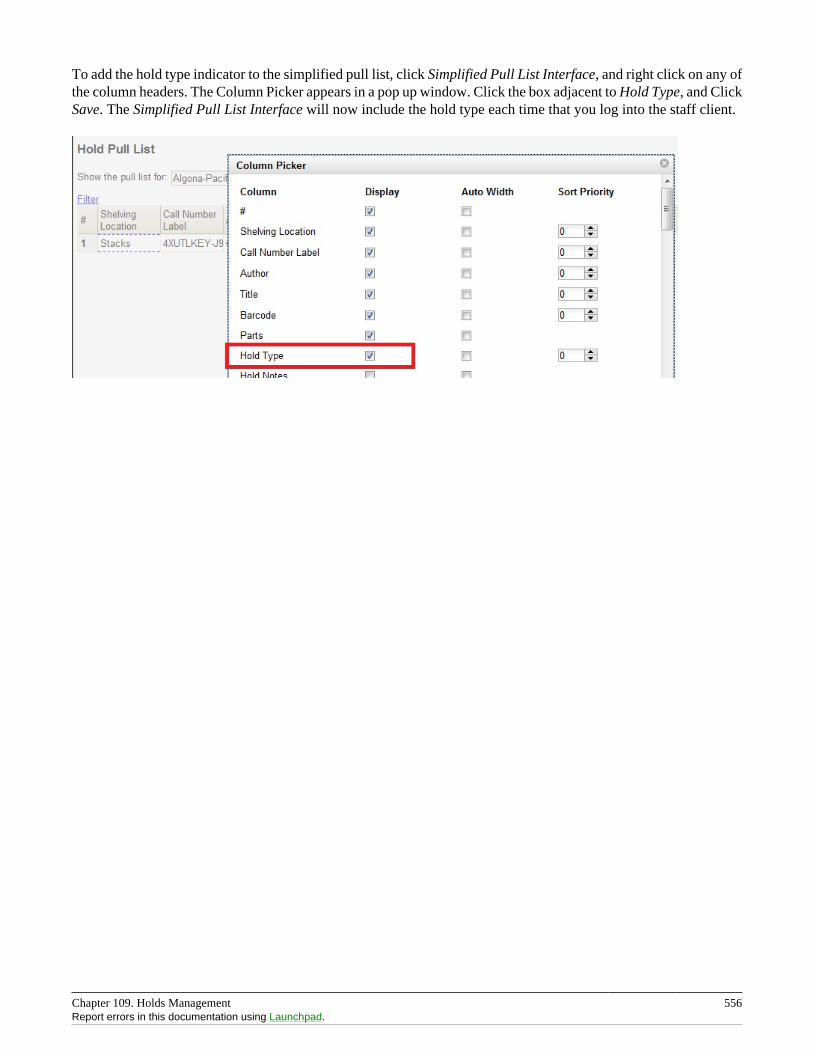
Chapter 109. Holds Management 556Report errors in this documentation using Launchpad.
To add the hold type indicator to the simplified pull list, click Simplified Pull List Interface, and right click on any ofthe column headers. The Column Picker appears in a pop up window. Click the box adjacent to Hold Type, and ClickSave. The Simplified Pull List Interface will now include the hold type each time that you log into the staff client.
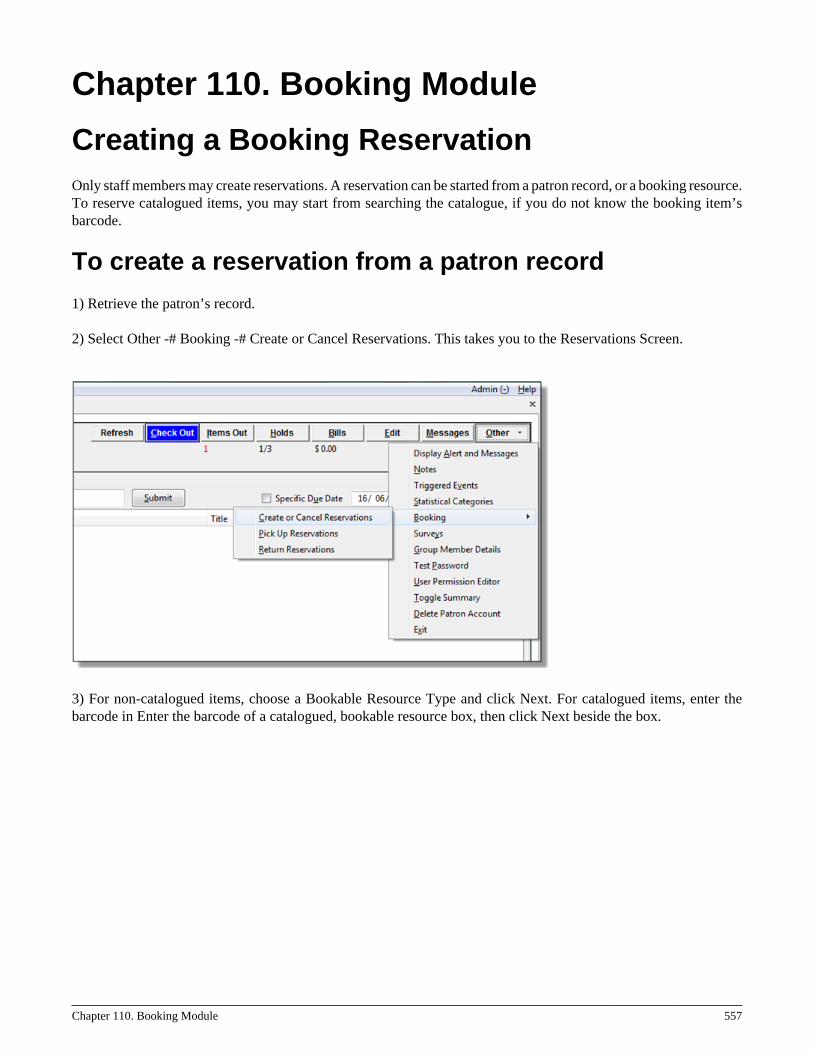
Chapter 110. Booking Module 557
Chapter 110. Booking Module
Creating a Booking ReservationOnly staff members may create reservations. A reservation can be started from a patron record, or a booking resource.To reserve catalogued items, you may start from searching the catalogue, if you do not know the booking item’sbarcode.
To create a reservation from a patron record
1) Retrieve the patron’s record.
2) Select Other -# Booking -# Create or Cancel Reservations. This takes you to the Reservations Screen.
3) For non-catalogued items, choose a Bookable Resource Type and click Next. For catalogued items, enter thebarcode in Enter the barcode of a catalogued, bookable resource box, then click Next beside the box.
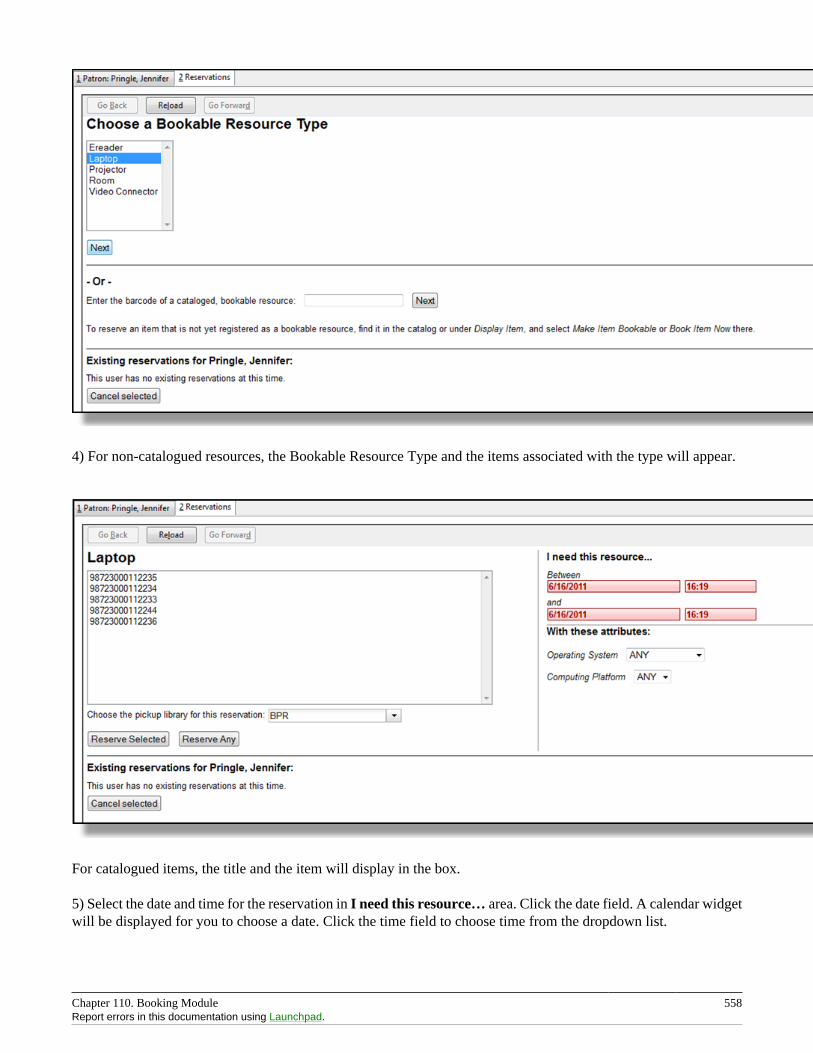
Chapter 110. Booking Module 558Report errors in this documentation using Launchpad.
4) For non-catalogued resources, the Bookable Resource Type and the items associated with the type will appear.
For catalogued items, the title and the item will display in the box.
5) Select the date and time for the reservation in I need this resource… area. Click the date field. A calendar widgetwill be displayed for you to choose a date. Click the time field to choose time from the dropdown list.
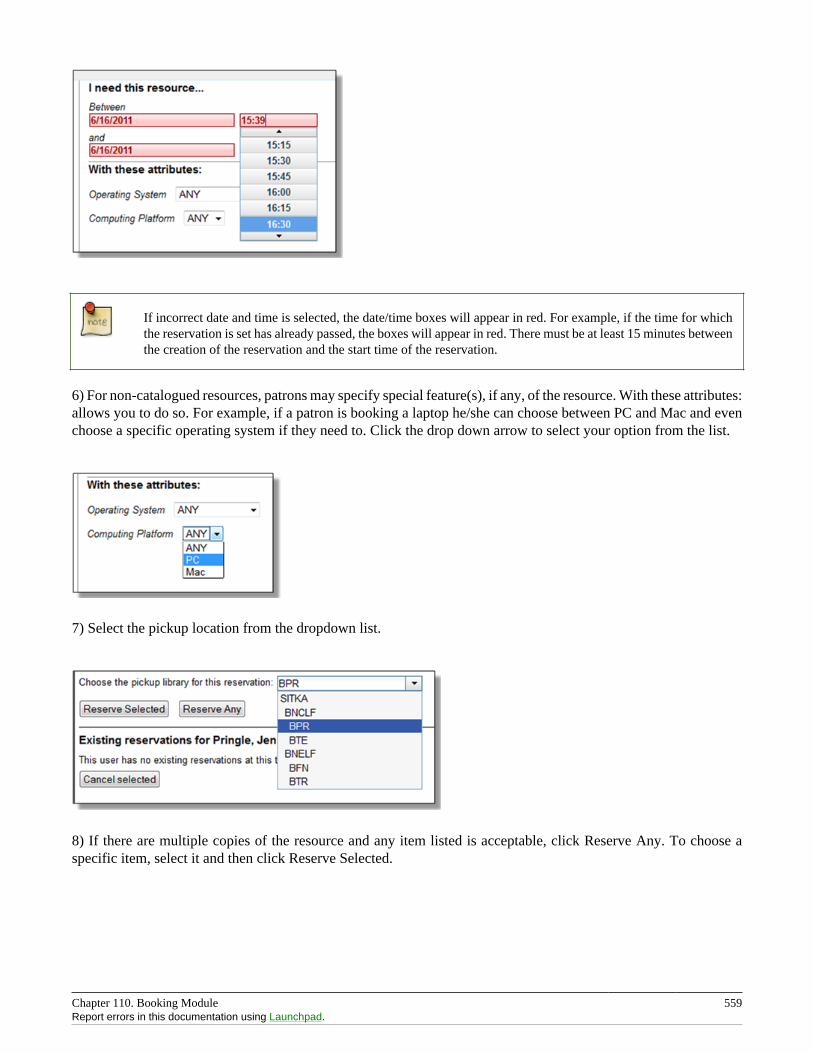
Chapter 110. Booking Module 559Report errors in this documentation using Launchpad.
If incorrect date and time is selected, the date/time boxes will appear in red. For example, if the time for whichthe reservation is set has already passed, the boxes will appear in red. There must be at least 15 minutes betweenthe creation of the reservation and the start time of the reservation.
6) For non-catalogued resources, patrons may specify special feature(s), if any, of the resource. With these attributes:allows you to do so. For example, if a patron is booking a laptop he/she can choose between PC and Mac and evenchoose a specific operating system if they need to. Click the drop down arrow to select your option from the list.
7) Select the pickup location from the dropdown list.
8) If there are multiple copies of the resource and any item listed is acceptable, click Reserve Any. To choose aspecific item, select it and then click Reserve Selected.
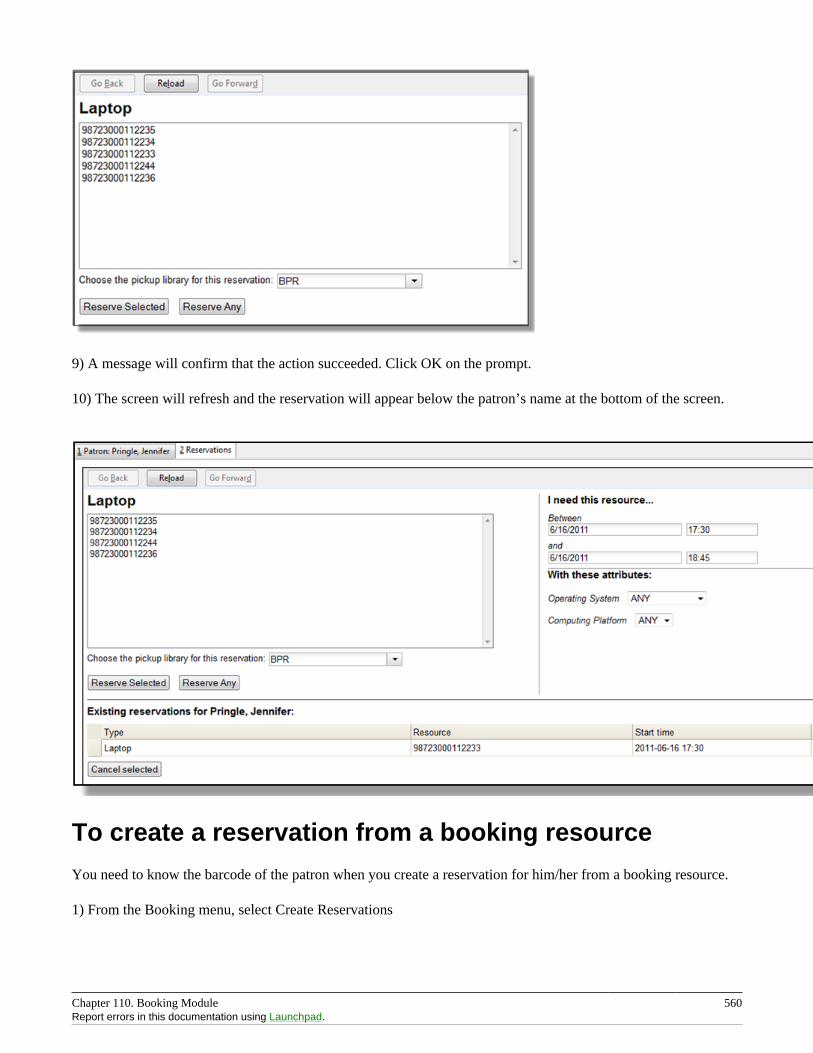
Chapter 110. Booking Module 560Report errors in this documentation using Launchpad.
9) A message will confirm that the action succeeded. Click OK on the prompt.
10) The screen will refresh and the reservation will appear below the patron’s name at the bottom of the screen.
To create a reservation from a booking resource
You need to know the barcode of the patron when you create a reservation for him/her from a booking resource.
1) From the Booking menu, select Create Reservations
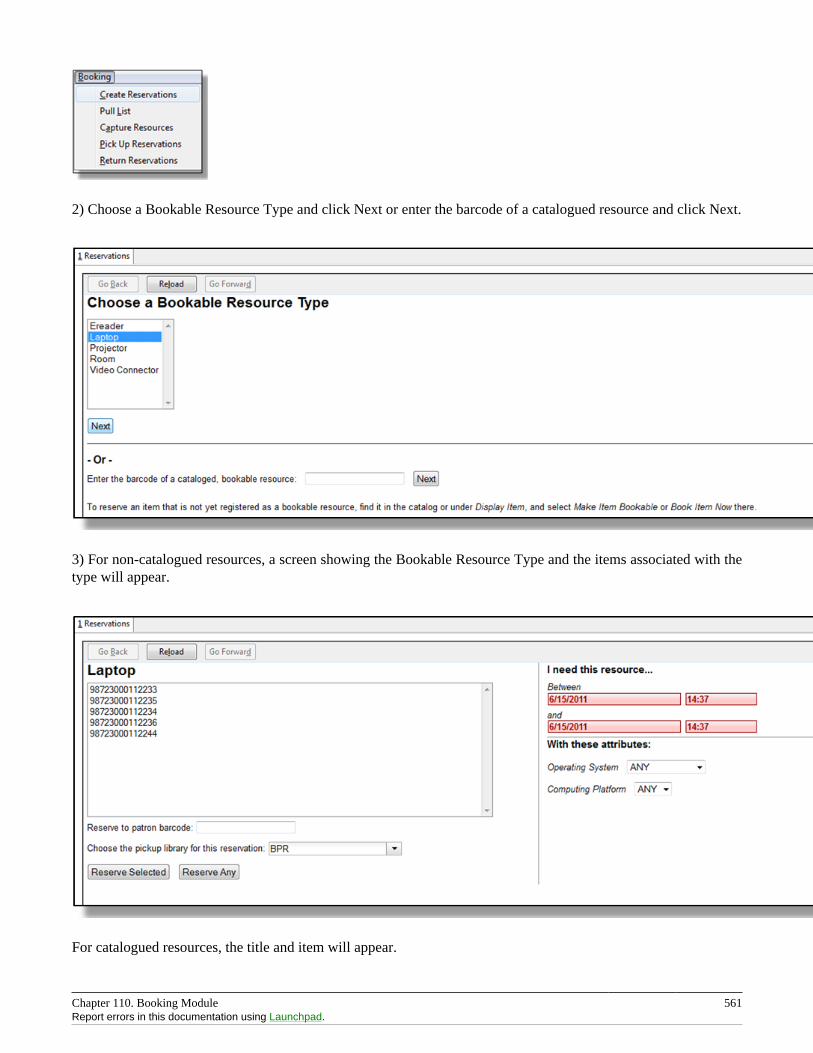
Chapter 110. Booking Module 561Report errors in this documentation using Launchpad.
2) Choose a Bookable Resource Type and click Next or enter the barcode of a catalogued resource and click Next.
3) For non-catalogued resources, a screen showing the Bookable Resource Type and the items associated with thetype will appear.
For catalogued resources, the title and item will appear.
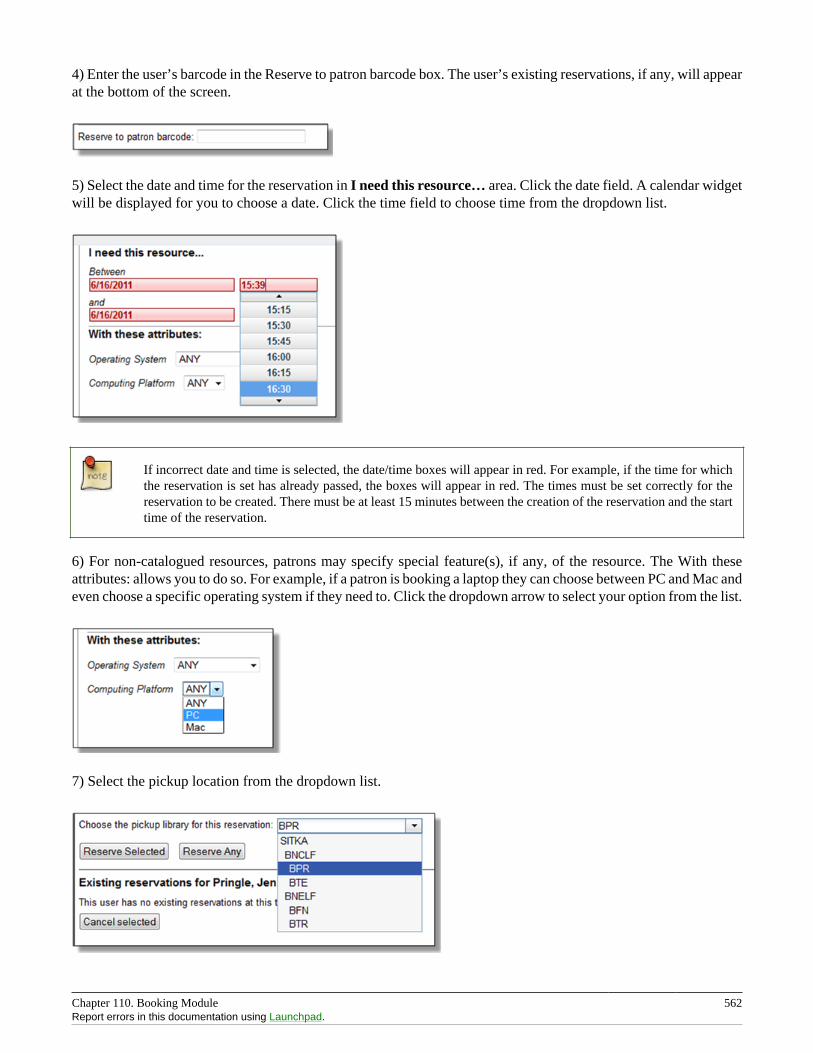
Chapter 110. Booking Module 562Report errors in this documentation using Launchpad.
4) Enter the user’s barcode in the Reserve to patron barcode box. The user’s existing reservations, if any, will appearat the bottom of the screen.
5) Select the date and time for the reservation in I need this resource… area. Click the date field. A calendar widgetwill be displayed for you to choose a date. Click the time field to choose time from the dropdown list.
If incorrect date and time is selected, the date/time boxes will appear in red. For example, if the time for whichthe reservation is set has already passed, the boxes will appear in red. The times must be set correctly for thereservation to be created. There must be at least 15 minutes between the creation of the reservation and the starttime of the reservation.
6) For non-catalogued resources, patrons may specify special feature(s), if any, of the resource. The With theseattributes: allows you to do so. For example, if a patron is booking a laptop they can choose between PC and Mac andeven choose a specific operating system if they need to. Click the dropdown arrow to select your option from the list.
7) Select the pickup location from the dropdown list.

Chapter 110. Booking Module 563Report errors in this documentation using Launchpad.
8) If there are multiple copies of the resource and any item listed is acceptable, click Reserve Any. To choose aspecific item, select it and then click Reserve Selected.
9) A message will confirm that the action succeeded. Click OK on the prompt.
10) The screen will refresh and the reservation will appear below the patron’s name at the bottom of the screen.
Search the catalogue to create a reservationIf you would like to reserve a catalogued item but do not know the item barcode, you may start with a cataloguesearch.
1) In the staff client, select Cataloguing -# Search the Catalogue or keyboard shortcut F3 to search for the item youwish to reserve. You may search by any bibliographic information.
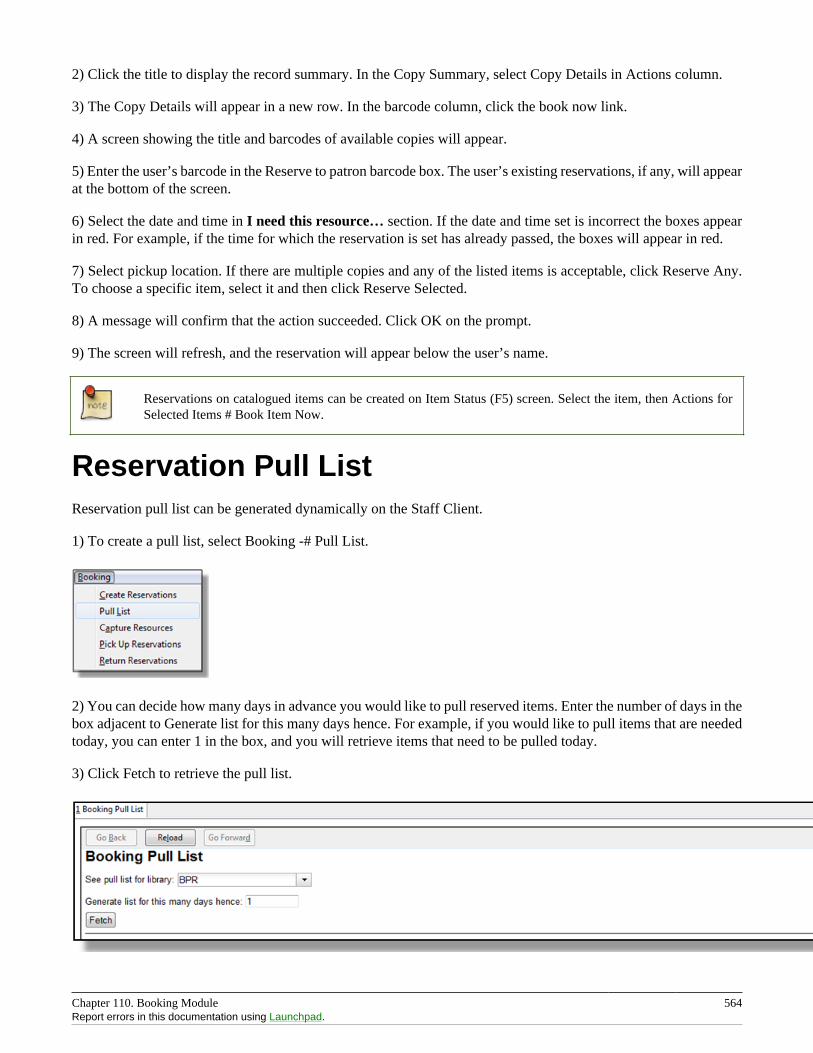
Chapter 110. Booking Module 564Report errors in this documentation using Launchpad.
2) Click the title to display the record summary. In the Copy Summary, select Copy Details in Actions column.
3) The Copy Details will appear in a new row. In the barcode column, click the book now link.
4) A screen showing the title and barcodes of available copies will appear.
5) Enter the user’s barcode in the Reserve to patron barcode box. The user’s existing reservations, if any, will appearat the bottom of the screen.
6) Select the date and time in I need this resource… section. If the date and time set is incorrect the boxes appearin red. For example, if the time for which the reservation is set has already passed, the boxes will appear in red.
7) Select pickup location. If there are multiple copies and any of the listed items is acceptable, click Reserve Any.To choose a specific item, select it and then click Reserve Selected.
8) A message will confirm that the action succeeded. Click OK on the prompt.
9) The screen will refresh, and the reservation will appear below the user’s name.
Reservations on catalogued items can be created on Item Status (F5) screen. Select the item, then Actions forSelected Items # Book Item Now.
Reservation Pull ListReservation pull list can be generated dynamically on the Staff Client.
1) To create a pull list, select Booking -# Pull List.
2) You can decide how many days in advance you would like to pull reserved items. Enter the number of days in thebox adjacent to Generate list for this many days hence. For example, if you would like to pull items that are neededtoday, you can enter 1 in the box, and you will retrieve items that need to be pulled today.
3) Click Fetch to retrieve the pull list.
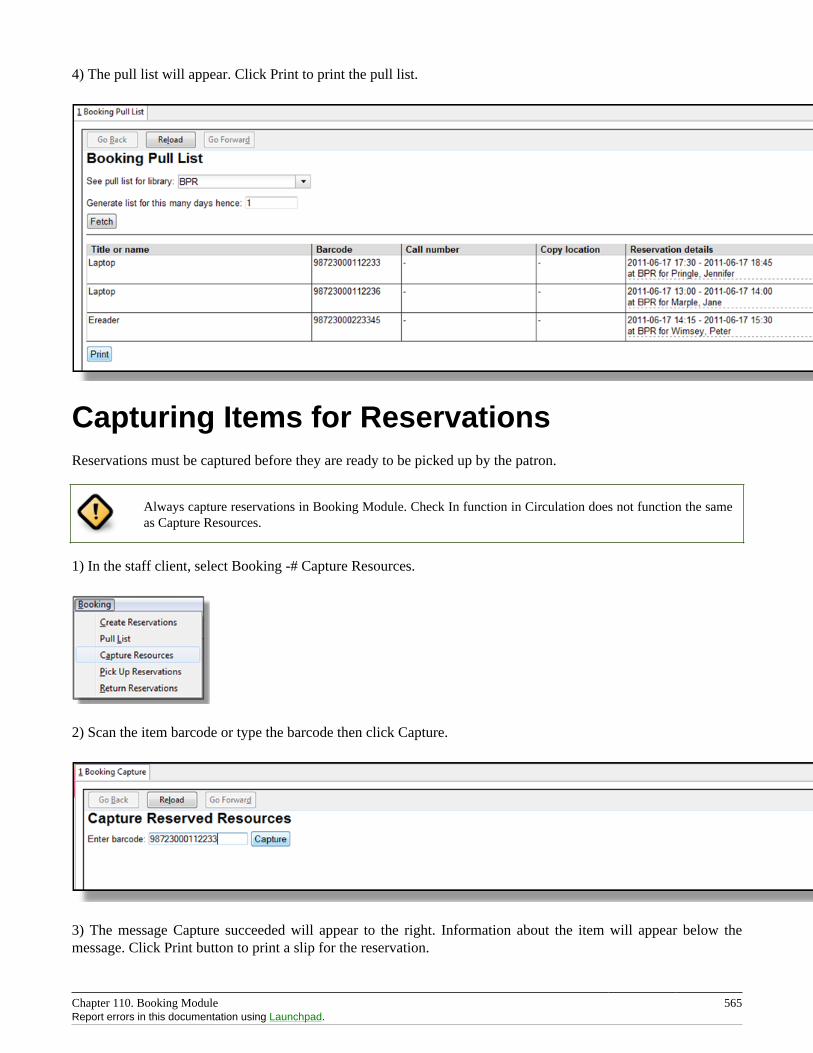
Chapter 110. Booking Module 565Report errors in this documentation using Launchpad.
4) The pull list will appear. Click Print to print the pull list.
Capturing Items for ReservationsReservations must be captured before they are ready to be picked up by the patron.
Always capture reservations in Booking Module. Check In function in Circulation does not function the sameas Capture Resources.
1) In the staff client, select Booking -# Capture Resources.
2) Scan the item barcode or type the barcode then click Capture.
3) The message Capture succeeded will appear to the right. Information about the item will appear below themessage. Click Print button to print a slip for the reservation.
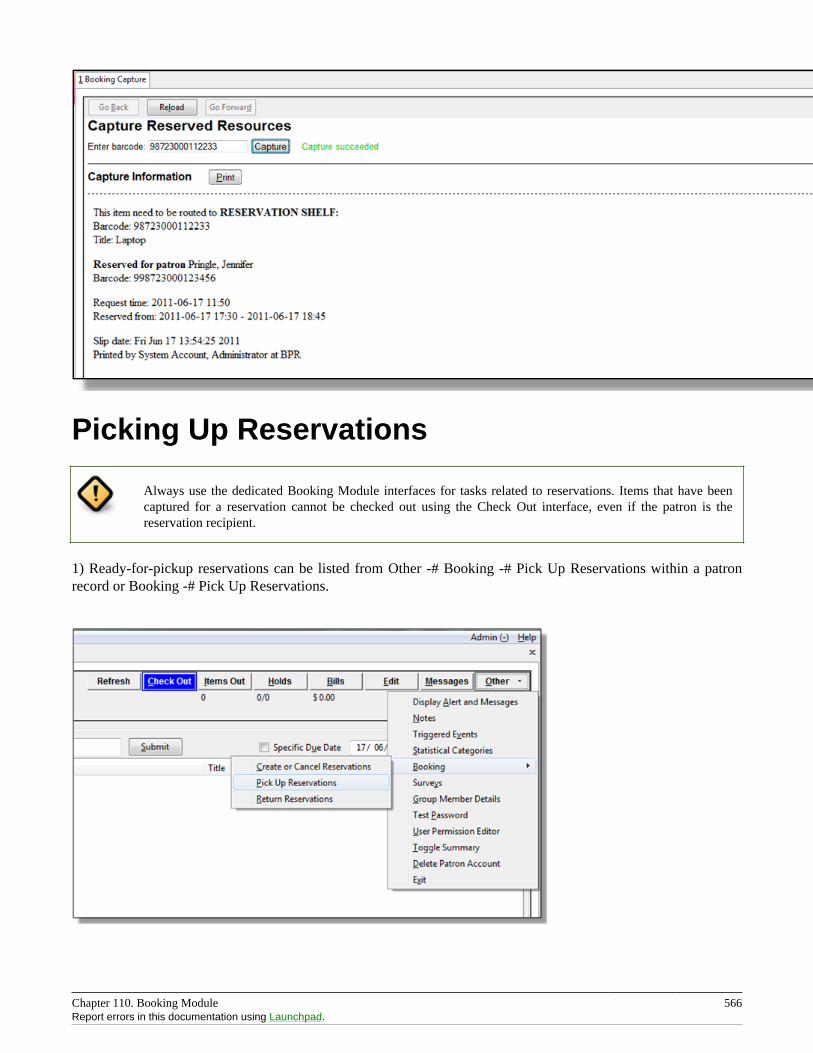
Chapter 110. Booking Module 566Report errors in this documentation using Launchpad.
Picking Up Reservations
Always use the dedicated Booking Module interfaces for tasks related to reservations. Items that have beencaptured for a reservation cannot be checked out using the Check Out interface, even if the patron is thereservation recipient.
1) Ready-for-pickup reservations can be listed from Other -# Booking -# Pick Up Reservations within a patronrecord or Booking -# Pick Up Reservations.

Chapter 110. Booking Module 567Report errors in this documentation using Launchpad.
2) Scan the patron barcode if using Booking -# Pick Up Reservations.
3) The reservation(s) available for pickup will display. Select those you want to pick up and click Pick Up.
4) The screen will refresh to show that the patron has picked up the reservation(s).
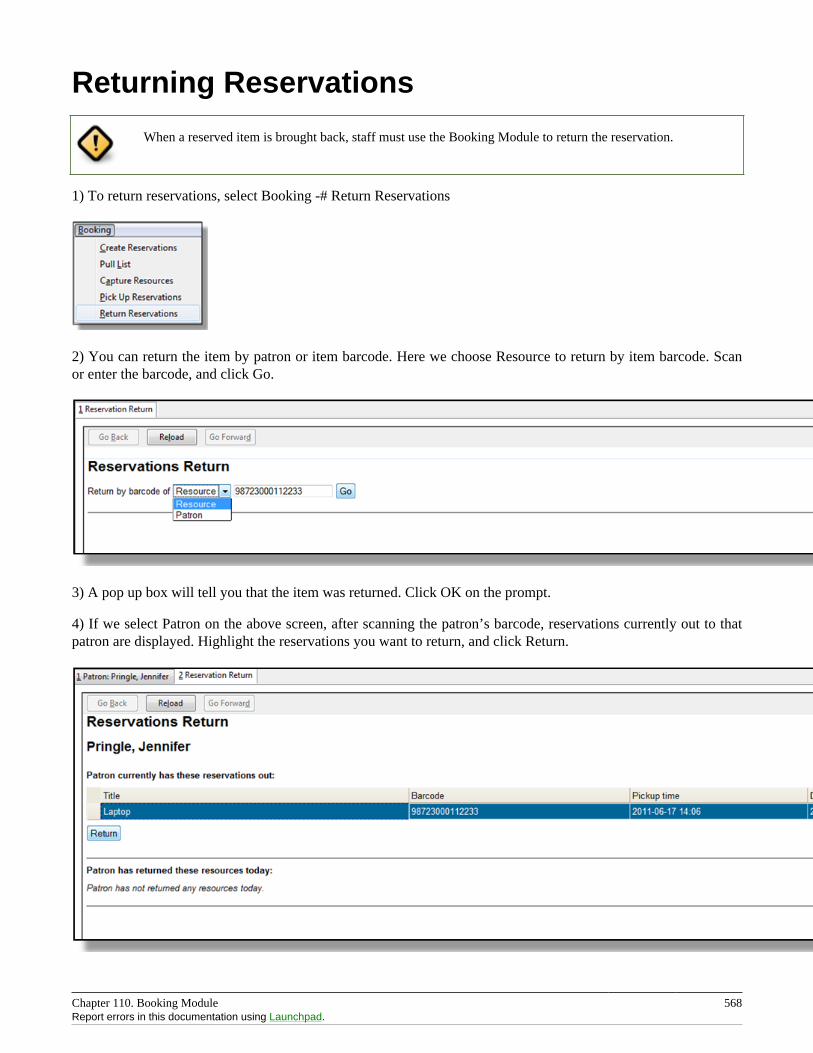
Chapter 110. Booking Module 568Report errors in this documentation using Launchpad.
Returning Reservations
When a reserved item is brought back, staff must use the Booking Module to return the reservation.
1) To return reservations, select Booking -# Return Reservations
2) You can return the item by patron or item barcode. Here we choose Resource to return by item barcode. Scanor enter the barcode, and click Go.
3) A pop up box will tell you that the item was returned. Click OK on the prompt.
4) If we select Patron on the above screen, after scanning the patron’s barcode, reservations currently out to thatpatron are displayed. Highlight the reservations you want to return, and click Return.
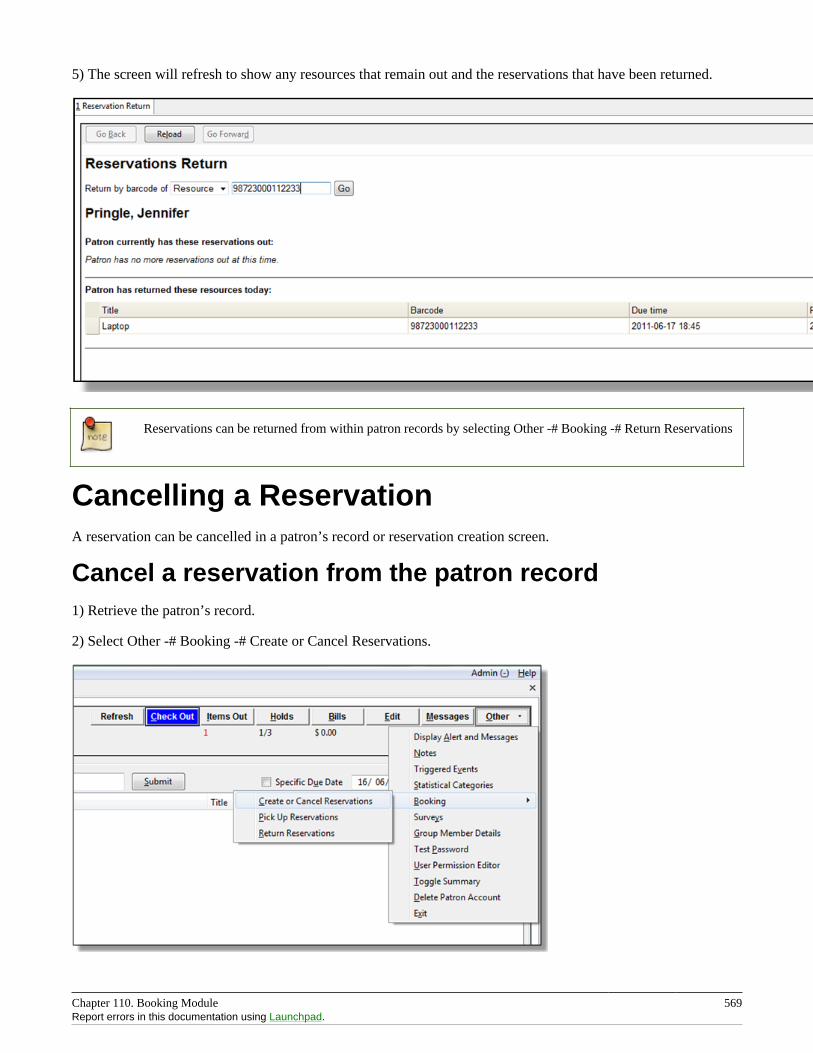
Chapter 110. Booking Module 569Report errors in this documentation using Launchpad.
5) The screen will refresh to show any resources that remain out and the reservations that have been returned.
Reservations can be returned from within patron records by selecting Other -# Booking -# Return Reservations
Cancelling a ReservationA reservation can be cancelled in a patron’s record or reservation creation screen.
Cancel a reservation from the patron record1) Retrieve the patron’s record.
2) Select Other -# Booking -# Create or Cancel Reservations.
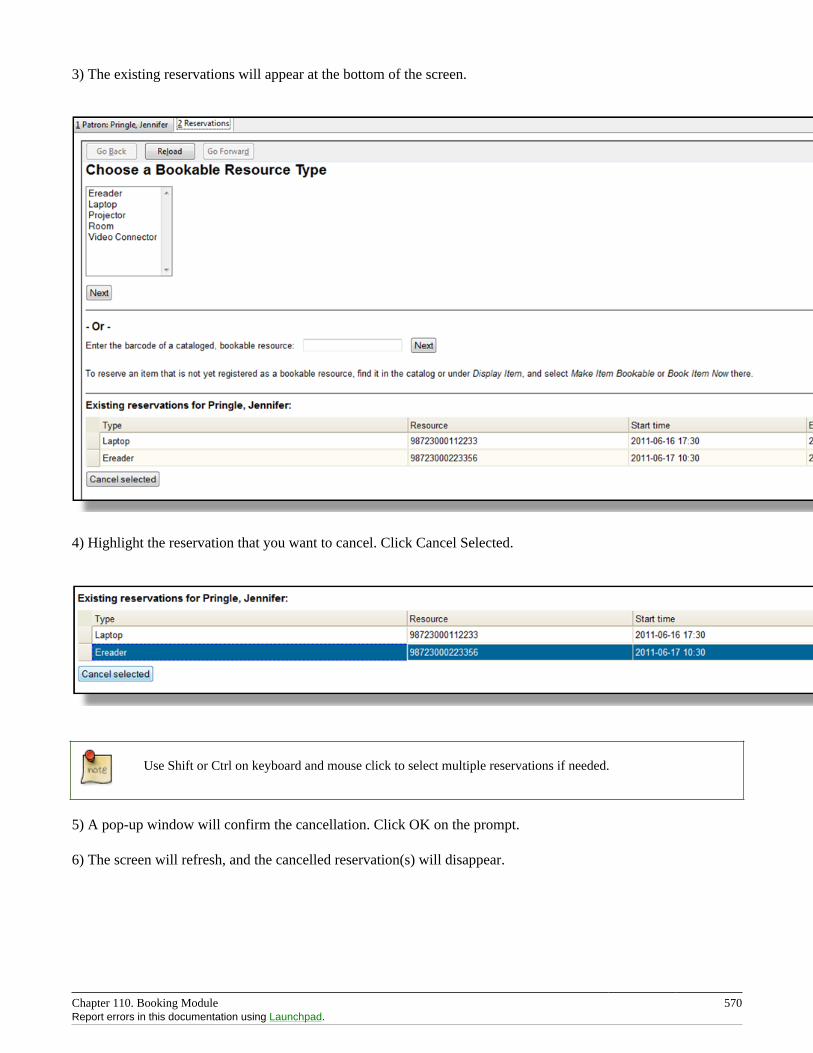
Chapter 110. Booking Module 570Report errors in this documentation using Launchpad.
3) The existing reservations will appear at the bottom of the screen.
4) Highlight the reservation that you want to cancel. Click Cancel Selected.
Use Shift or Ctrl on keyboard and mouse click to select multiple reservations if needed.
5) A pop-up window will confirm the cancellation. Click OK on the prompt.
6) The screen will refresh, and the cancelled reservation(s) will disappear.
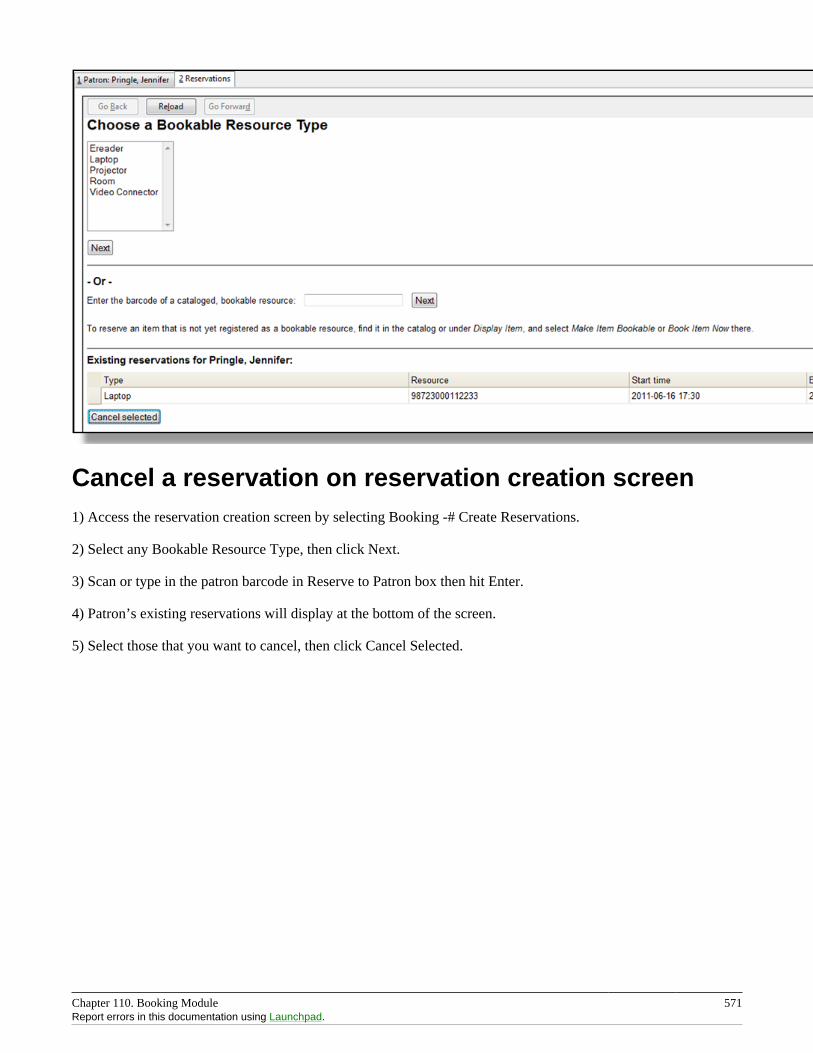
Chapter 110. Booking Module 571Report errors in this documentation using Launchpad.
Cancel a reservation on reservation creation screen1) Access the reservation creation screen by selecting Booking -# Create Reservations.
2) Select any Bookable Resource Type, then click Next.
3) Scan or type in the patron barcode in Reserve to Patron box then hit Enter.
4) Patron’s existing reservations will display at the bottom of the screen.
5) Select those that you want to cancel, then click Cancel Selected.
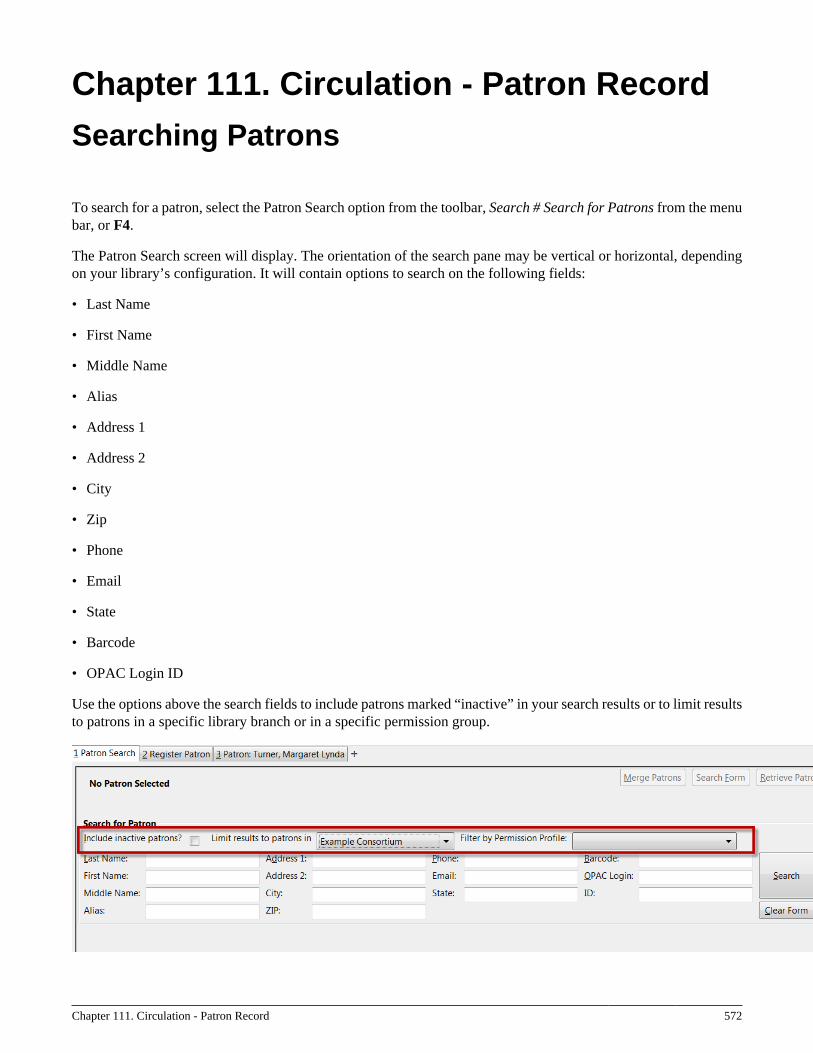
Chapter 111. Circulation - Patron Record 572
Chapter 111. Circulation - Patron Record
Searching Patrons
To search for a patron, select the Patron Search option from the toolbar, Search # Search for Patrons from the menubar, or F4.
The Patron Search screen will display. The orientation of the search pane may be vertical or horizontal, dependingon your library’s configuration. It will contain options to search on the following fields:
• Last Name
• First Name
• Middle Name
• Alias
• Address 1
• Address 2
• City
• Zip
• Phone
• State
• Barcode
• OPAC Login ID
Use the options above the search fields to include patrons marked “inactive” in your search results or to limit resultsto patrons in a specific library branch or in a specific permission group.
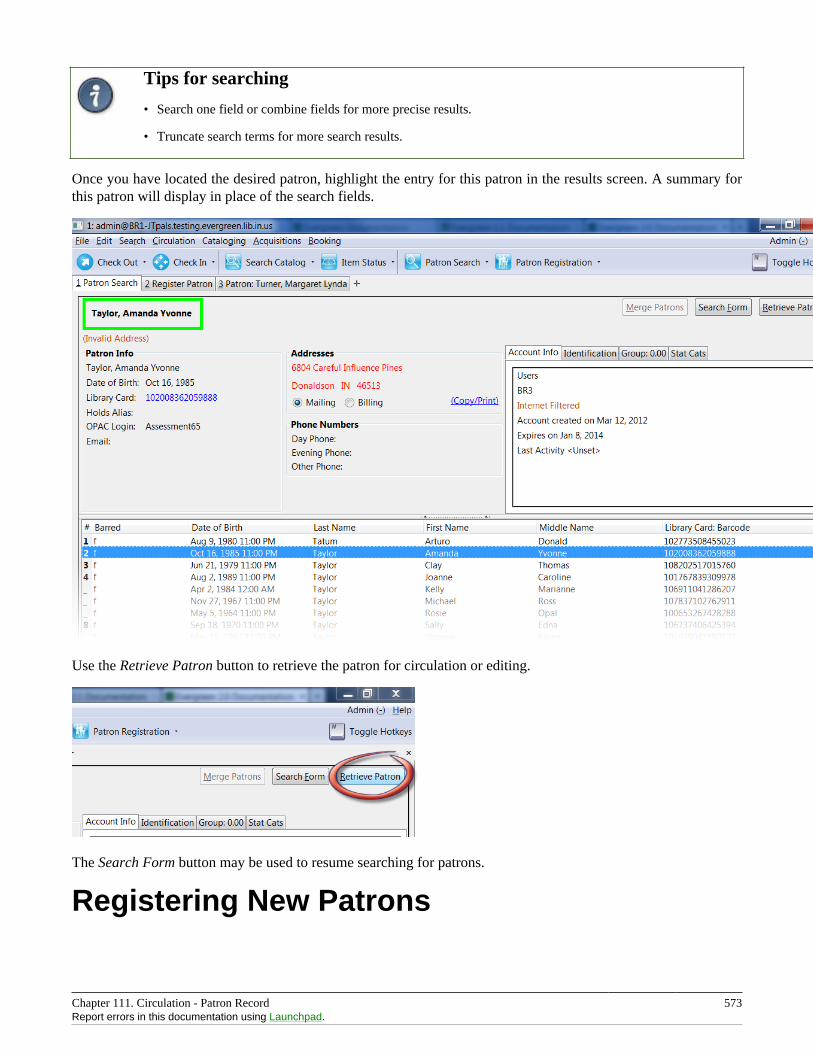
Chapter 111. Circulation - Patron Record 573Report errors in this documentation using Launchpad.
Tips for searching
• Search one field or combine fields for more precise results.
• Truncate search terms for more search results.
Once you have located the desired patron, highlight the entry for this patron in the results screen. A summary forthis patron will display in place of the search fields.
Use the Retrieve Patron button to retrieve the patron for circulation or editing.
The Search Form button may be used to resume searching for patrons.
Registering New Patrons
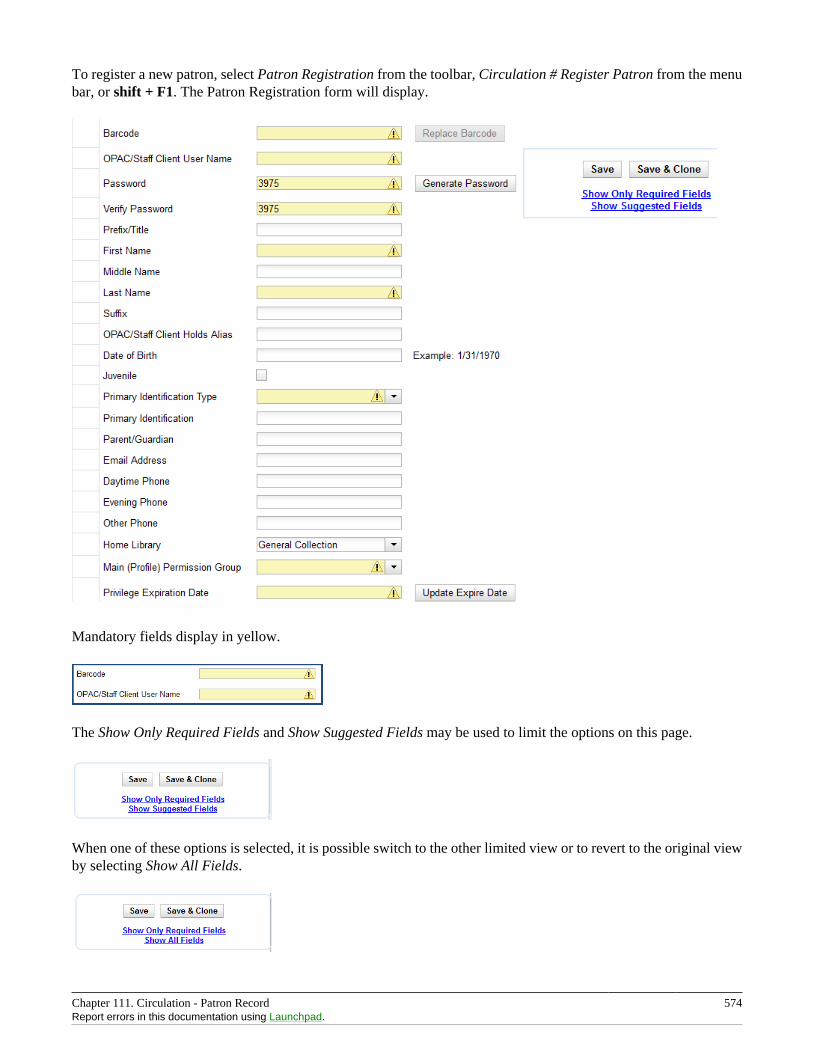
Chapter 111. Circulation - Patron Record 574Report errors in this documentation using Launchpad.
To register a new patron, select Patron Registration from the toolbar, Circulation # Register Patron from the menubar, or shift + F1. The Patron Registration form will display.
Mandatory fields display in yellow.
The Show Only Required Fields and Show Suggested Fields may be used to limit the options on this page.
When one of these options is selected, it is possible switch to the other limited view or to revert to the original viewby selecting Show All Fields.

Chapter 111. Circulation - Patron Record 575Report errors in this documentation using Launchpad.
When finished entering the necessary information, select Save to save the new patron record or Save & Clone toregister a patron with the same address. When Save & Clone is selected, the address information is copied intothe resulting patron registration screen. It is linked to the original patron. Address information may only be editedthrough the original record.
• Requested fields may be configured in the Library Settings Editor (Admin # Local Admin # Library SettingsEditor).
• Statistical categories may be created for information tracked by your library that is not in the default patronrecord.
• These may be configured in the Statistical Categories Editor (Admin # Local Admin # Statistical CategoriesEditor).
• Staff accounts may also function as patron accounts.
• You must select a Main (Profile) Permission Group before the Update Expire Date button will work, sincethe permission group determines the expiration date.
Patron Self-RegistrationAbstract
Patron Self-Registration allows patrons to initiate registration for a library account through the OPAC. Patrons canfill out a web-based form with basic information that will be stored as a “pending patron” in Evergreen. Librarystaff can review pending patrons in the staff-client and use the pre-loaded account information to create a full patronaccount. Pending patron accounts that are not approved within a configurable amount of time will be automaticallydeleted.
Patron Self-Registration
1. In the OPAC, click on the link to Request Library Card
2. Fill out the self-registration form to request a library card, and click Submit Registration.
3. Patrons will see a confirmation message: “Registration successful! Please see library staff to complete yourregistration.”
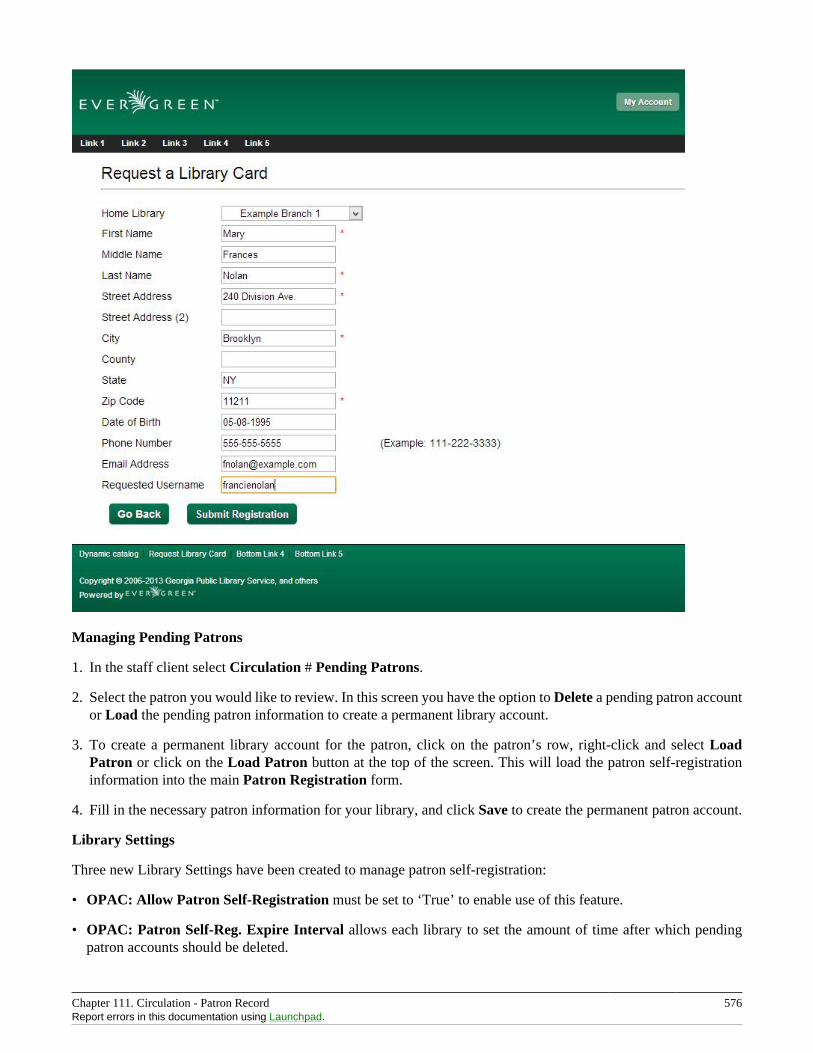
Chapter 111. Circulation - Patron Record 576Report errors in this documentation using Launchpad.
Managing Pending Patrons
1. In the staff client select Circulation # Pending Patrons.
2. Select the patron you would like to review. In this screen you have the option to Delete a pending patron accountor Load the pending patron information to create a permanent library account.
3. To create a permanent library account for the patron, click on the patron’s row, right-click and select LoadPatron or click on the Load Patron button at the top of the screen. This will load the patron self-registrationinformation into the main Patron Registration form.
4. Fill in the necessary patron information for your library, and click Save to create the permanent patron account.
Library Settings
Three new Library Settings have been created to manage patron self-registration:
• OPAC: Allow Patron Self-Registration must be set to ‘True’ to enable use of this feature.
• OPAC: Patron Self-Reg. Expire Interval allows each library to set the amount of time after which pendingpatron accounts should be deleted.
Chapter 111. Circulation - Patron Record 577Report errors in this documentation using Launchpad.
• OPAC: Patron Self-Reg. Display Timeout allows each library to set the amount of time after which the patronself-registration screen will timeout in the OPAC. The default is 5 minutes.
Several existing Library Settings can be used to determine if a field should be required or hidden in the self-registration form:
• GUI: Require day_phone field on patron registration
• GUI: Show day_phone on patron registration
• GUI: Require dob (date of birth) field on patron registration
• GUI: Show dob field on patron registration
• GUI: Require email field on patron registration
• GUI: Show email field on patron registration
• GUI: Require State field on patron registration
• GUI: Show State field on patron registration
• GUI: Require county field on patron registration
• GUI: Show county field on patron registration [New Setting]
Several existing Library Settings can be used to verify values in certain fields and provide examples for data formaton the registration form:
• Global: Patron username format
• GUI: Regex for phone fields on patron registration OR GUI: Regex for day_phone field on patronregistration
• GUI: Regex for email field on patron registration
• GUI: Regex for post_code field on patron registration
• GUI: Example for email field on patron registration
• GUI: Example for post_code field on patron registration
• GUI: Example for day_phone field on patron registration OR GUI: Example for phone fields on patronregistration
Updating Patron Information
Retrieve the patron record as described in the section Searching Patrons.
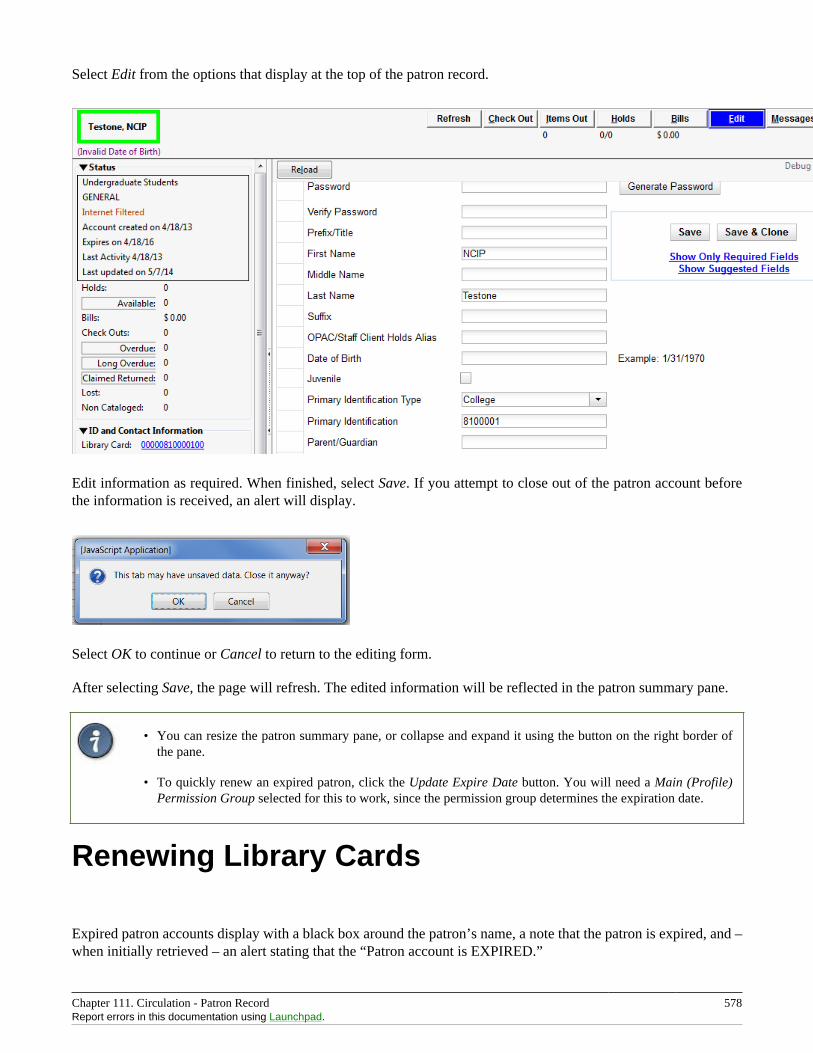
Chapter 111. Circulation - Patron Record 578Report errors in this documentation using Launchpad.
Select Edit from the options that display at the top of the patron record.
Edit information as required. When finished, select Save. If you attempt to close out of the patron account beforethe information is received, an alert will display.
Select OK to continue or Cancel to return to the editing form.
After selecting Save, the page will refresh. The edited information will be reflected in the patron summary pane.
• You can resize the patron summary pane, or collapse and expand it using the button on the right border ofthe pane.
• To quickly renew an expired patron, click the Update Expire Date button. You will need a Main (Profile)Permission Group selected for this to work, since the permission group determines the expiration date.
Renewing Library Cards
Expired patron accounts display with a black box around the patron’s name, a note that the patron is expired, and –when initially retrieved – an alert stating that the “Patron account is EXPIRED.”
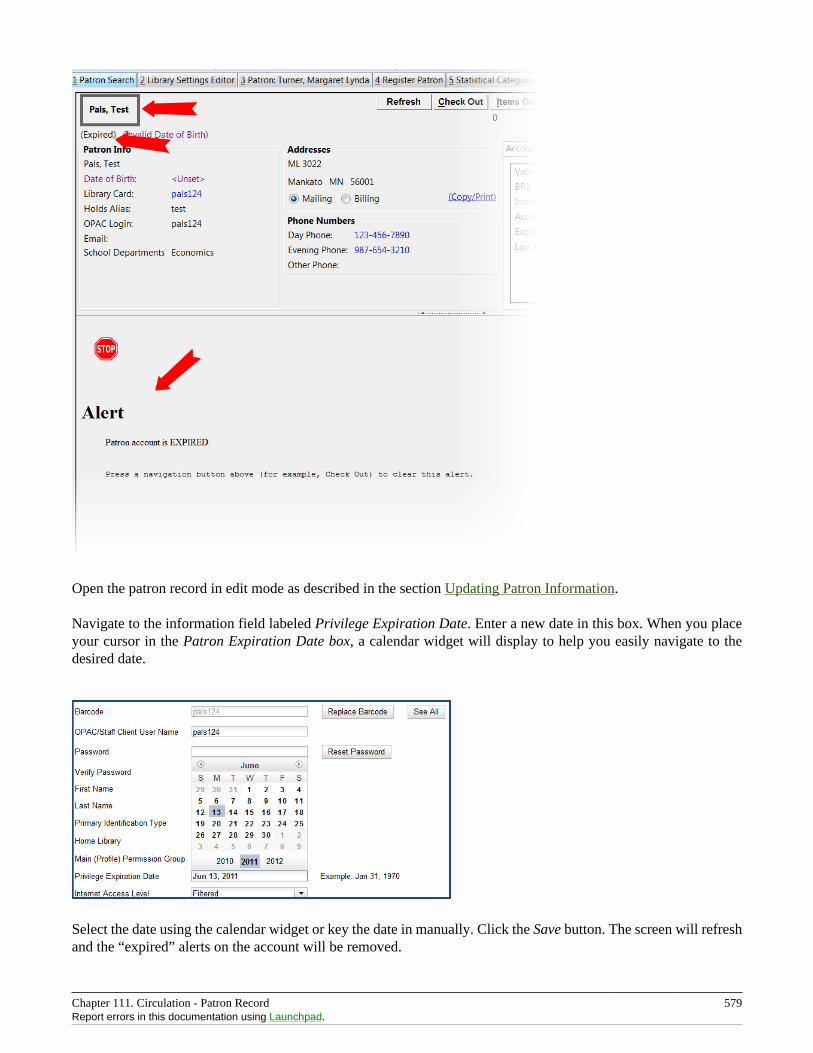
Chapter 111. Circulation - Patron Record 579Report errors in this documentation using Launchpad.
Open the patron record in edit mode as described in the section Updating Patron Information.
Navigate to the information field labeled Privilege Expiration Date. Enter a new date in this box. When you placeyour cursor in the Patron Expiration Date box, a calendar widget will display to help you easily navigate to thedesired date.
Select the date using the calendar widget or key the date in manually. Click the Save button. The screen will refreshand the “expired” alerts on the account will be removed.
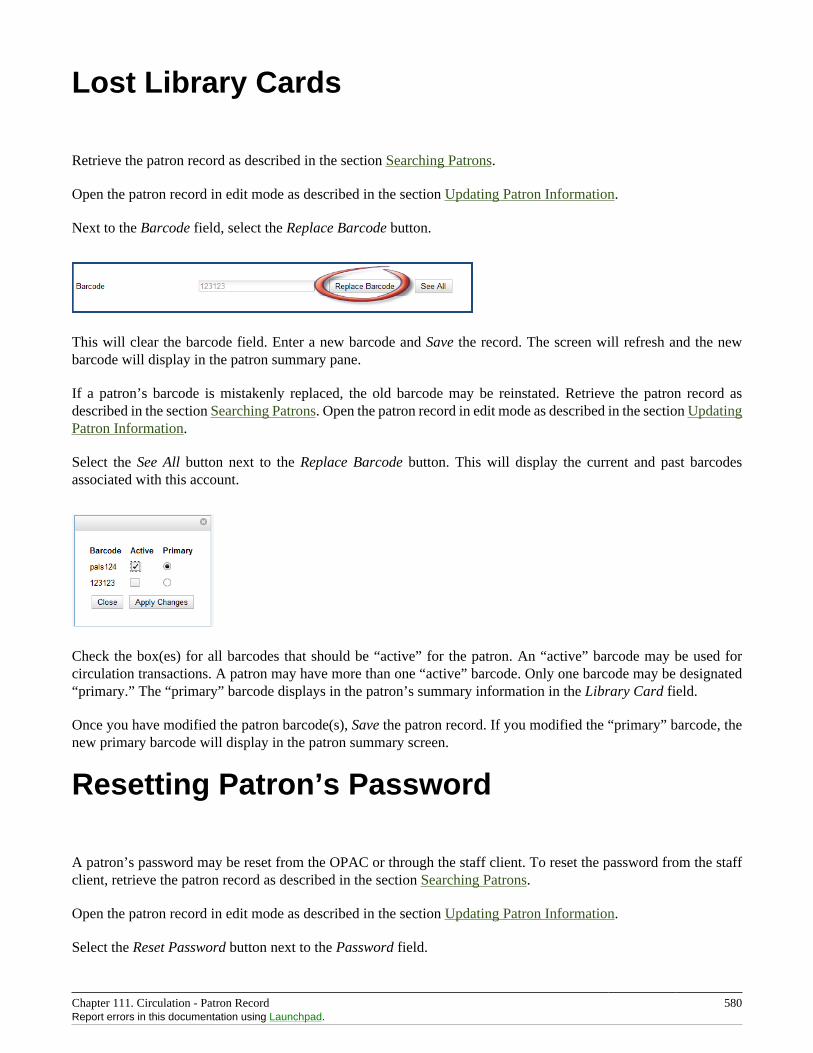
Chapter 111. Circulation - Patron Record 580Report errors in this documentation using Launchpad.
Lost Library Cards
Retrieve the patron record as described in the section Searching Patrons.
Open the patron record in edit mode as described in the section Updating Patron Information.
Next to the Barcode field, select the Replace Barcode button.
This will clear the barcode field. Enter a new barcode and Save the record. The screen will refresh and the newbarcode will display in the patron summary pane.
If a patron’s barcode is mistakenly replaced, the old barcode may be reinstated. Retrieve the patron record asdescribed in the section Searching Patrons. Open the patron record in edit mode as described in the section UpdatingPatron Information.
Select the See All button next to the Replace Barcode button. This will display the current and past barcodesassociated with this account.
Check the box(es) for all barcodes that should be “active” for the patron. An “active” barcode may be used forcirculation transactions. A patron may have more than one “active” barcode. Only one barcode may be designated“primary.” The “primary” barcode displays in the patron’s summary information in the Library Card field.
Once you have modified the patron barcode(s), Save the patron record. If you modified the “primary” barcode, thenew primary barcode will display in the patron summary screen.
Resetting Patron’s Password
A patron’s password may be reset from the OPAC or through the staff client. To reset the password from the staffclient, retrieve the patron record as described in the section Searching Patrons.
Open the patron record in edit mode as described in the section Updating Patron Information.
Select the Reset Password button next to the Password field.

Chapter 111. Circulation - Patron Record 581Report errors in this documentation using Launchpad.
The existing password is not displayed in patron records for security reasons.
A new number will populate the Password and Verify Password text boxes. Make note of the new password andSave the patron record. The screen will refresh and the new password will be suppressed from view.
If you need to change a patron or staff account password without using the staff client, here is how you canreset it with SQL.
Connect to your Evergreen database using psql or similar tool, and retreive and verify your admin username:
psql -U <user-name> -h <hostname> -d <database>
SELECT id, usrname, passwd from actor.usr where usrname = 'admin';
If you do not remember the username that you set, search for it in the actor.usr table, and then reset the password.
UPDATE actor.usr SET passwd = <password> WHERE id=<id of row to be updated>;
The new password will automatically be hashed.
Barring a Patron
A patron may be barred from circulation activities. To bar a patron, retrieve the patron record as described in thesection Searching Patrons.
Open the patron record in edit mode as described in the section Updating Patron Information.
Check the box for Barred in the patron account.
Save the user. The screen will refresh.
The patron account will now display an alert stating that the patron account is BARRED.
Additionally a red box and note will indicate the patron’s barred status.
Chapter 111. Circulation - Patron Record 582Report errors in this documentation using Launchpad.
Barring a patron from one library bars that patron from all consortium member libraries.
To unbar a patron, uncheck the Barred checkbox.
Barred vs. Blocked
Barred: Stops patrons from using their library cards; alerts the staff that the patron is banned/barred from thelibrary. The “check-out” functionality is disabled for barred patrons (NO option to override – the checkout windowis unusable and the bar must be removed from the account before the patron is able to checkout items). Thesepatrons may still log in to the OPAC to view their accounts.
Blocked: Often, these are system-generated blocks on patron accounts.
Some examples:
• Patron exceeds fine threshold
• Patron exceeds max checked out item threshold
A notice appears when a staff person tries to checkout an item to blocked patrons, but staff may be given permissionsto override blocks.
Staff-Generated Messages
There are several types of messages available for staff to leave notes on patron records.
Patron Notes: These notes are added via Other # Notes in the patron record, and create a clickable (See Notes)message beneath the patron name on the patron record screen. These notes can be viewable by staff only or sharedwith the patron. Staff initials can be required. (See the section Patron Notes for more.)
Patron Alerts: This type of alert is added via Edit button in the patron record. It creates a non-blocking alert messagewhich displays when the patron is retrieved. It also creates a clickable (Alert) message beneath the patron name onthe patron record screen. There is currently no way to require staff initials for this type of alert. (See the sectionPatron Alerts for more.)
Staff-Generated Penalties/Messages: These messages are added via the Messages button in the patron record.They can be a note, alert or block. Staff initials can be required. (See the section Staff-Generated Penalties/Messagesfor more.)
Patron Message Center: The Patron Message Center provides a way for libraries to communicate with patronsthrough messages that can be accessed through the patron’s OPAC account. Library staff can create messagesmanually by adding an OPAC visible Patron Note to an account. Messages can also be automatically generatedthrough an Action Trigger event. Patrons can access and manage messages within their OPAC account. (See thesection the section called “Creating a Patron Message in the Patron Account” for more.)

Chapter 111. Circulation - Patron Record 583Report errors in this documentation using Launchpad.
Patron Alerts
When an account has an alert on it, a Stop sign is displayed when the record is retrieved.
Navigating to an area of the patron record using the navigation buttons at the top of the record (for example, Editor Bills) will clear the message from view.
If you wish to view these alerts after they are cleared from view, they may be retrieved. Use the Other menu toselect Display Alert and Messages.
There are two types of Patron Alerts:
System-generated alerts: Once the cause is resolved (e.g. patron’s account has been renewed), the message willdisappear automatically.
Staff-generated alerts: Must be added and removed manually.
To add an alert to a patron account, retrieve the patron record as described in the section Searching Patrons.
Open the patron record in edit mode as described in the section Updating Patron Information.
Enter the alert text in the Alert Message field.
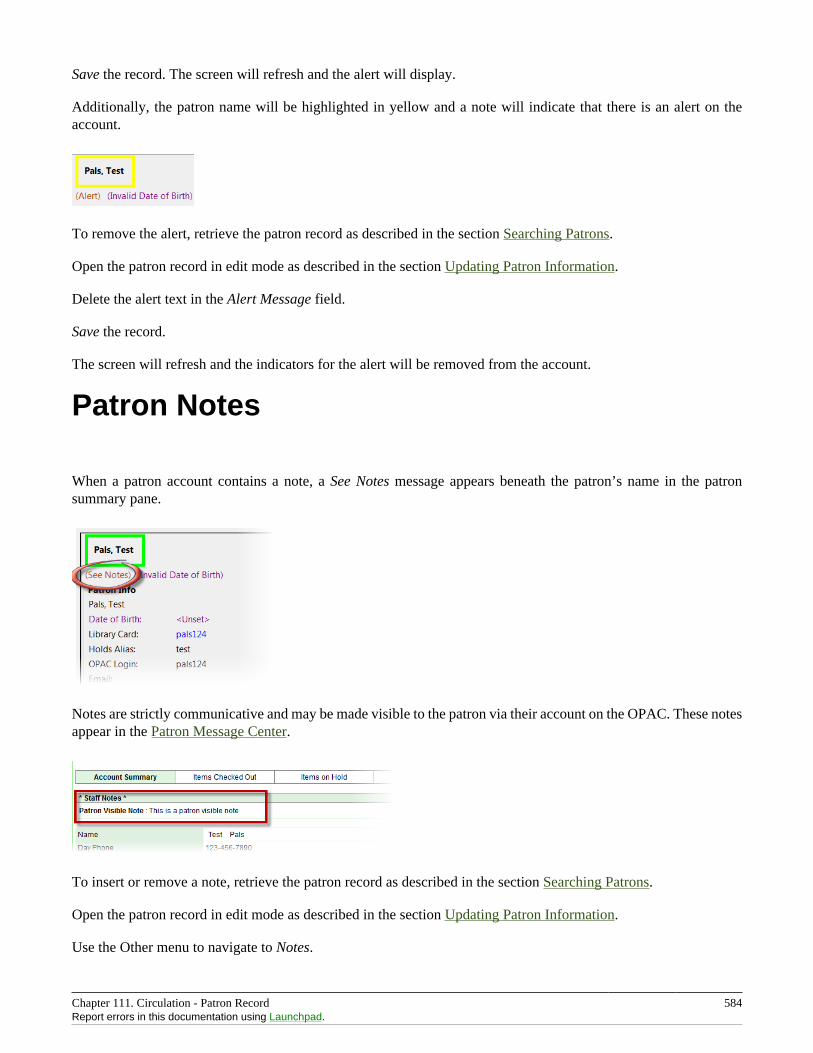
Chapter 111. Circulation - Patron Record 584Report errors in this documentation using Launchpad.
Save the record. The screen will refresh and the alert will display.
Additionally, the patron name will be highlighted in yellow and a note will indicate that there is an alert on theaccount.
To remove the alert, retrieve the patron record as described in the section Searching Patrons.
Open the patron record in edit mode as described in the section Updating Patron Information.
Delete the alert text in the Alert Message field.
Save the record.
The screen will refresh and the indicators for the alert will be removed from the account.
Patron Notes
When a patron account contains a note, a See Notes message appears beneath the patron’s name in the patronsummary pane.
Notes are strictly communicative and may be made visible to the patron via their account on the OPAC. These notesappear in the Patron Message Center.
To insert or remove a note, retrieve the patron record as described in the section Searching Patrons.
Open the patron record in edit mode as described in the section Updating Patron Information.
Use the Other menu to navigate to Notes.
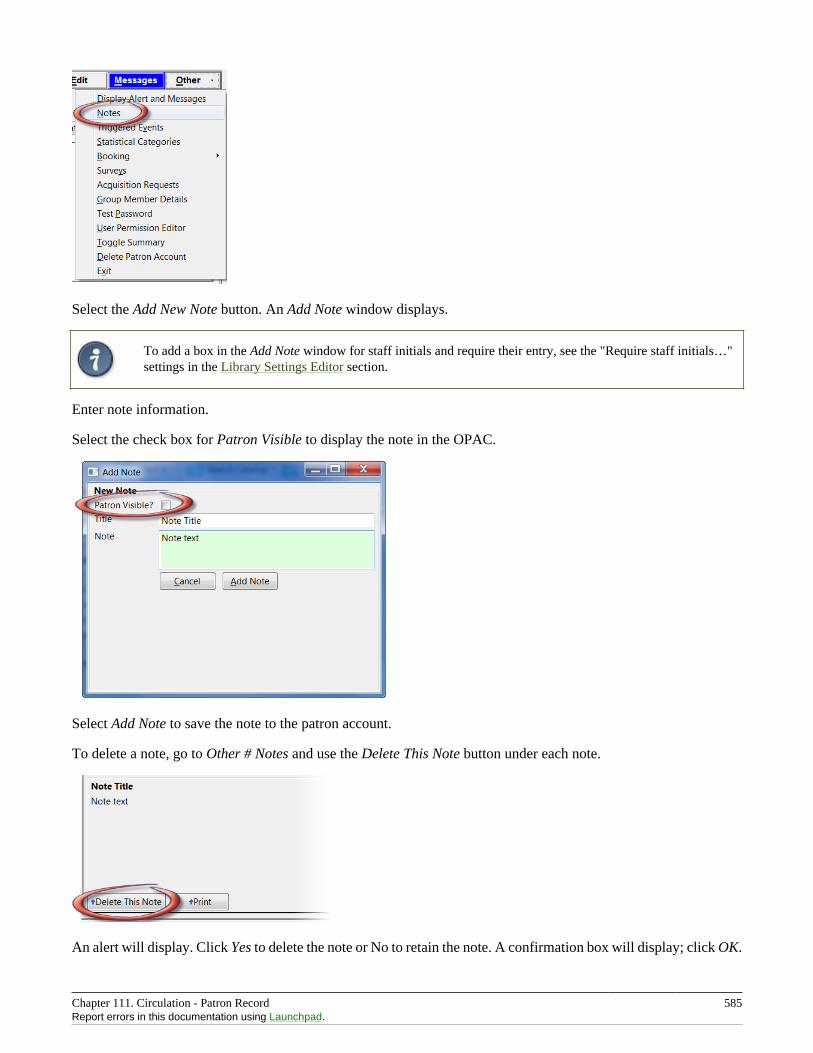
Chapter 111. Circulation - Patron Record 585Report errors in this documentation using Launchpad.
Select the Add New Note button. An Add Note window displays.
To add a box in the Add Note window for staff initials and require their entry, see the "Require staff initials…"settings in the Library Settings Editor section.
Enter note information.
Select the check box for Patron Visible to display the note in the OPAC.
Select Add Note to save the note to the patron account.
To delete a note, go to Other # Notes and use the Delete This Note button under each note.
An alert will display. Click Yes to delete the note or No to retain the note. A confirmation box will display; click OK.
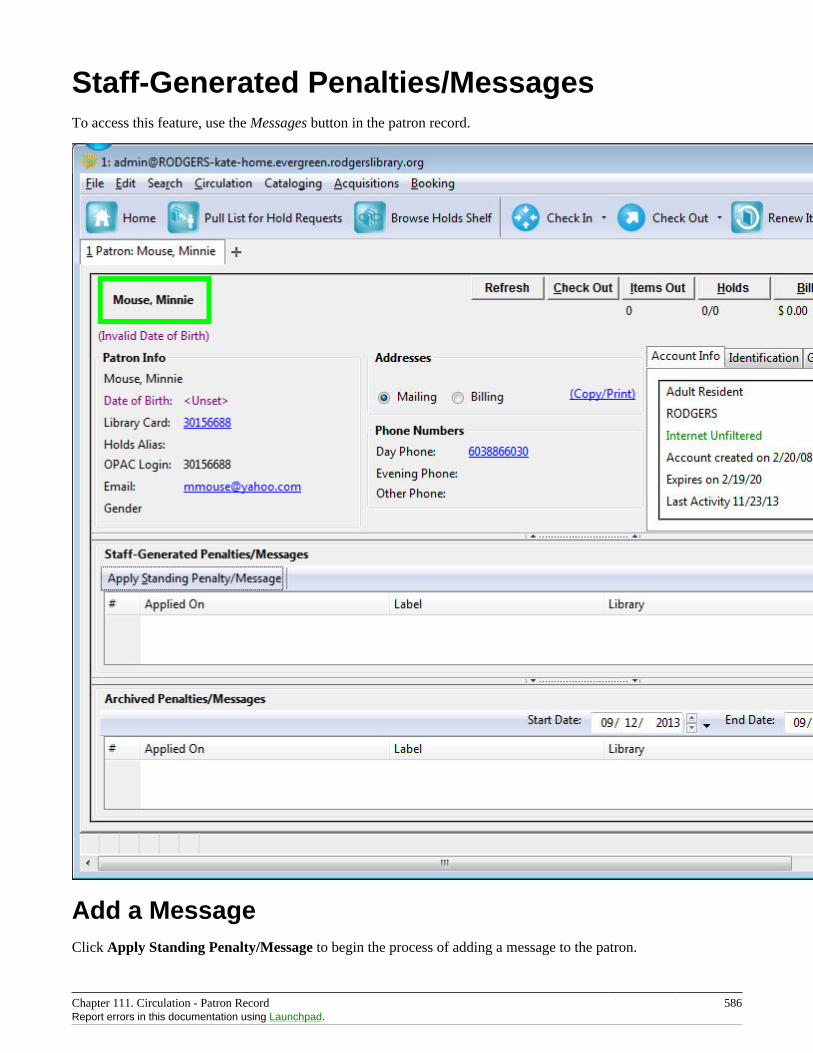
Chapter 111. Circulation - Patron Record 586Report errors in this documentation using Launchpad.
Staff-Generated Penalties/MessagesTo access this feature, use the Messages button in the patron record.
Add a MessageClick Apply Standing Penalty/Message to begin the process of adding a message to the patron.
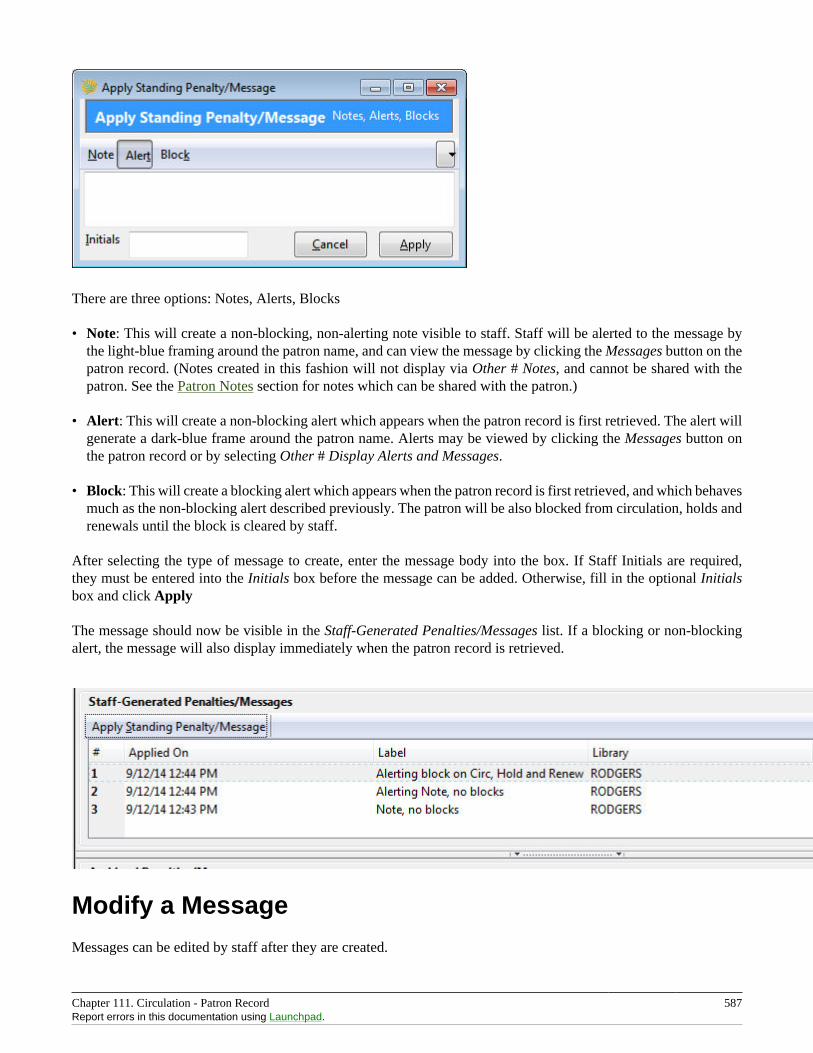
Chapter 111. Circulation - Patron Record 587Report errors in this documentation using Launchpad.
There are three options: Notes, Alerts, Blocks
• Note: This will create a non-blocking, non-alerting note visible to staff. Staff will be alerted to the message bythe light-blue framing around the patron name, and can view the message by clicking the Messages button on thepatron record. (Notes created in this fashion will not display via Other # Notes, and cannot be shared with thepatron. See the Patron Notes section for notes which can be shared with the patron.)
• Alert: This will create a non-blocking alert which appears when the patron record is first retrieved. The alert willgenerate a dark-blue frame around the patron name. Alerts may be viewed by clicking the Messages button onthe patron record or by selecting Other # Display Alerts and Messages.
• Block: This will create a blocking alert which appears when the patron record is first retrieved, and which behavesmuch as the non-blocking alert described previously. The patron will be also blocked from circulation, holds andrenewals until the block is cleared by staff.
After selecting the type of message to create, enter the message body into the box. If Staff Initials are required,they must be entered into the Initials box before the message can be added. Otherwise, fill in the optional Initialsbox and click Apply
The message should now be visible in the Staff-Generated Penalties/Messages list. If a blocking or non-blockingalert, the message will also display immediately when the patron record is retrieved.
Modify a Message
Messages can be edited by staff after they are created.
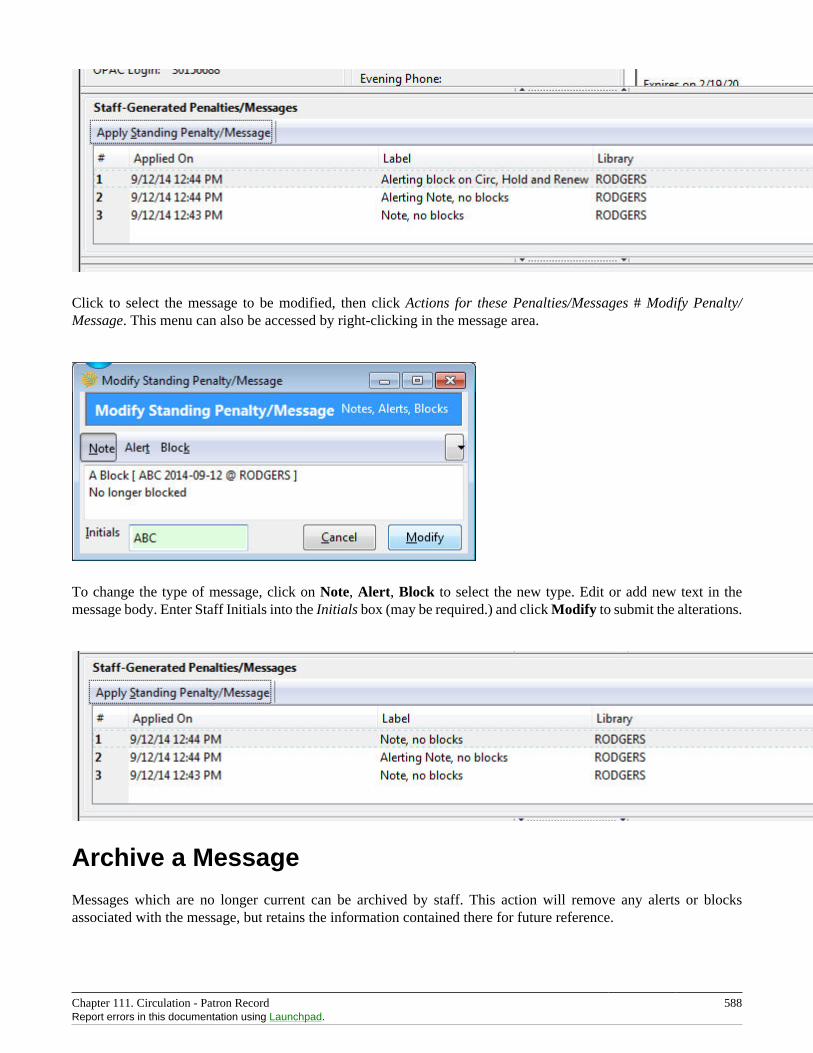
Chapter 111. Circulation - Patron Record 588Report errors in this documentation using Launchpad.
Click to select the message to be modified, then click Actions for these Penalties/Messages # Modify Penalty/Message. This menu can also be accessed by right-clicking in the message area.
To change the type of message, click on Note, Alert, Block to select the new type. Edit or add new text in themessage body. Enter Staff Initials into the Initials box (may be required.) and click Modify to submit the alterations.
Archive a Message
Messages which are no longer current can be archived by staff. This action will remove any alerts or blocksassociated with the message, but retains the information contained there for future reference.
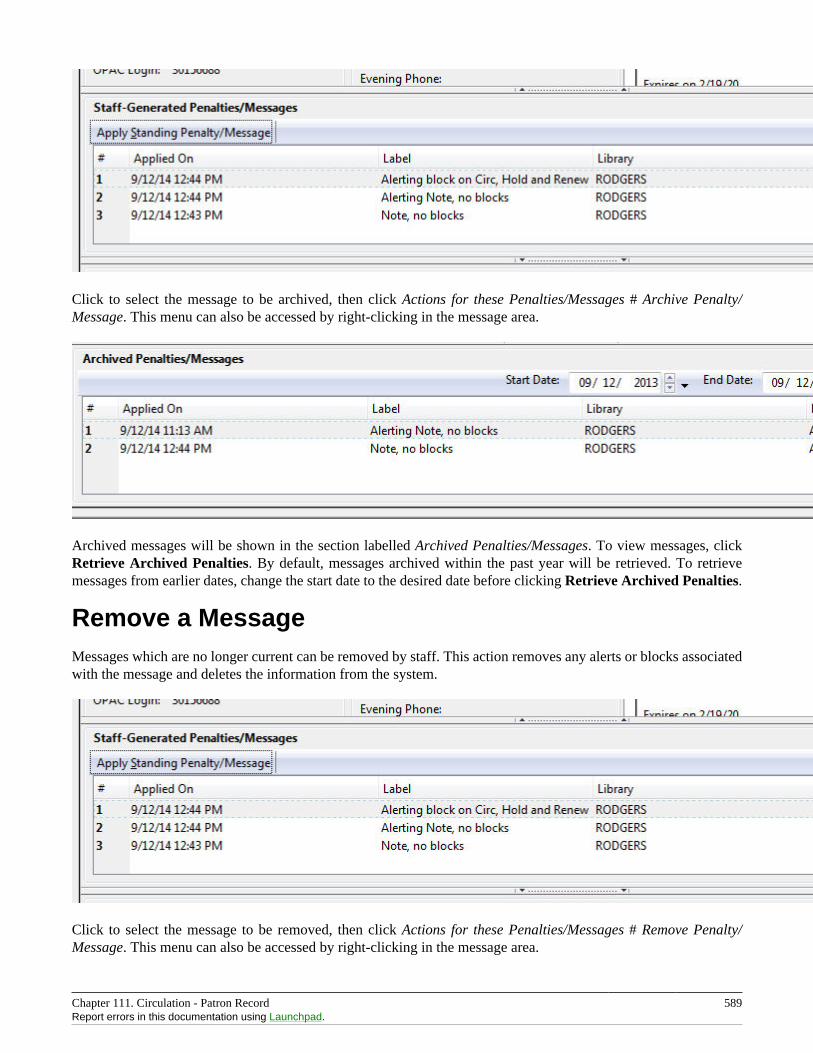
Chapter 111. Circulation - Patron Record 589Report errors in this documentation using Launchpad.
Click to select the message to be archived, then click Actions for these Penalties/Messages # Archive Penalty/Message. This menu can also be accessed by right-clicking in the message area.
Archived messages will be shown in the section labelled Archived Penalties/Messages. To view messages, clickRetrieve Archived Penalties. By default, messages archived within the past year will be retrieved. To retrievemessages from earlier dates, change the start date to the desired date before clicking Retrieve Archived Penalties.
Remove a MessageMessages which are no longer current can be removed by staff. This action removes any alerts or blocks associatedwith the message and deletes the information from the system.
Click to select the message to be removed, then click Actions for these Penalties/Messages # Remove Penalty/Message. This menu can also be accessed by right-clicking in the message area.
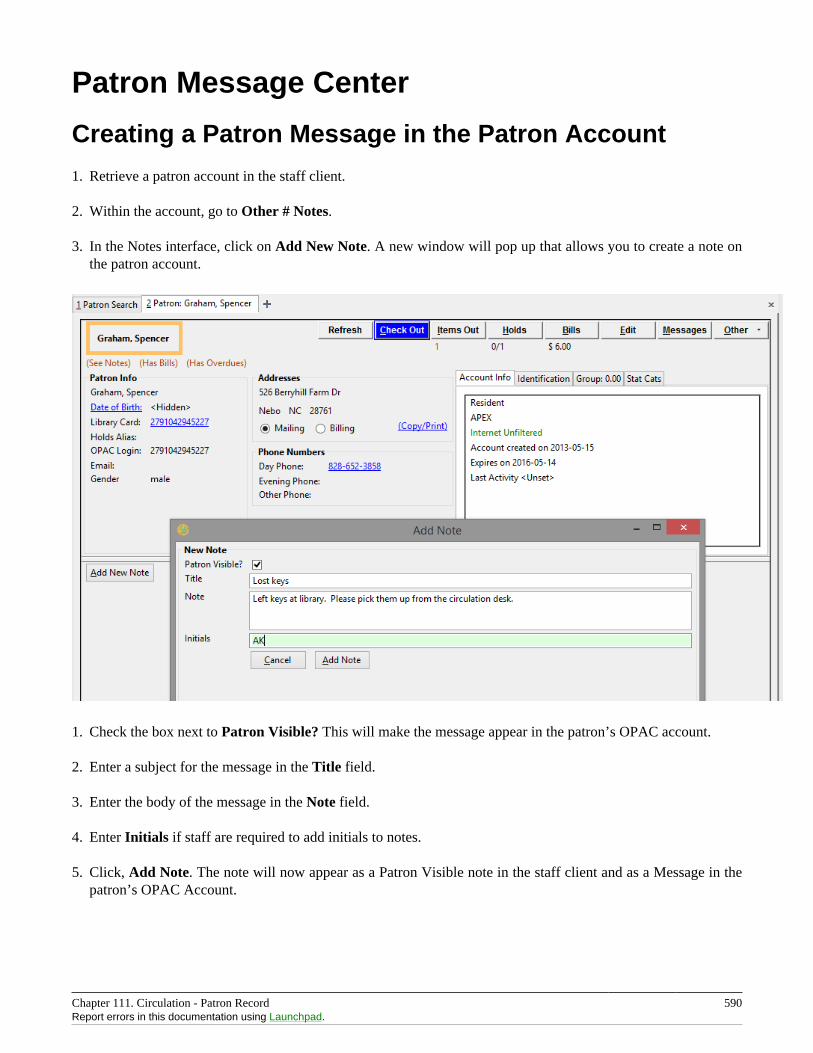
Chapter 111. Circulation - Patron Record 590Report errors in this documentation using Launchpad.
Patron Message Center
Creating a Patron Message in the Patron Account
1. Retrieve a patron account in the staff client.
2. Within the account, go to Other # Notes.
3. In the Notes interface, click on Add New Note. A new window will pop up that allows you to create a note onthe patron account.
1. Check the box next to Patron Visible? This will make the message appear in the patron’s OPAC account.
2. Enter a subject for the message in the Title field.
3. Enter the body of the message in the Note field.
4. Enter Initials if staff are required to add initials to notes.
5. Click, Add Note. The note will now appear as a Patron Visible note in the staff client and as a Message in thepatron’s OPAC Account.
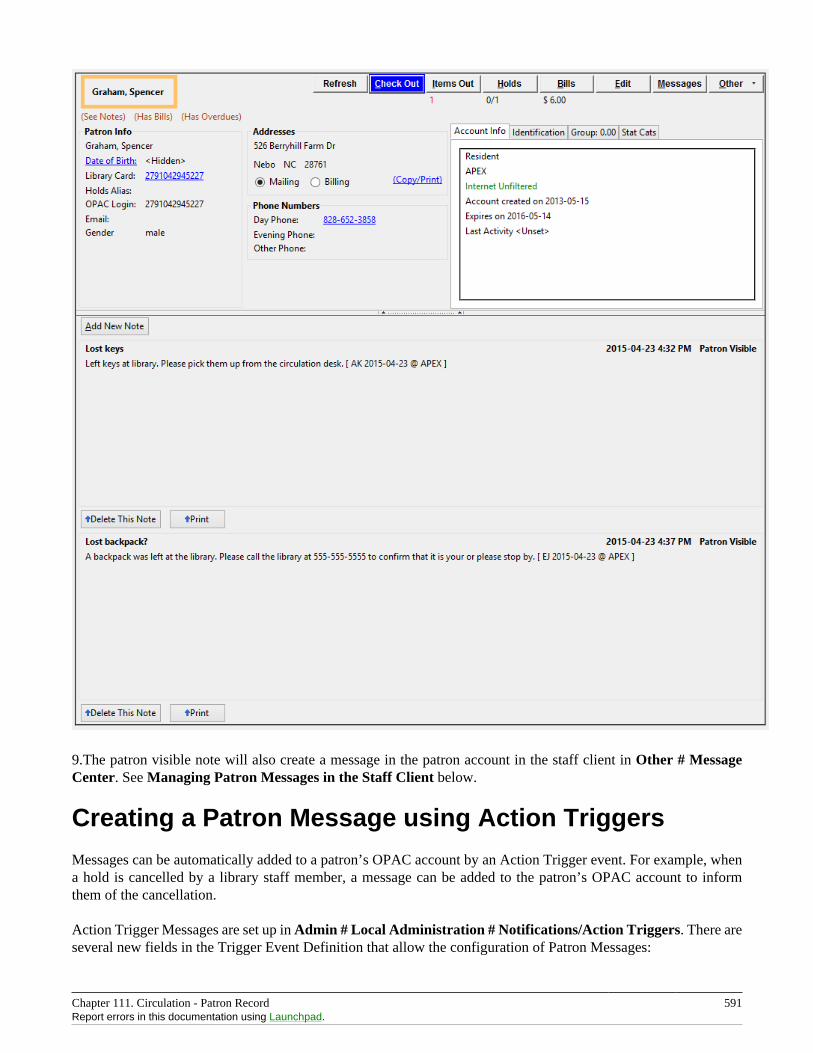
Chapter 111. Circulation - Patron Record 591Report errors in this documentation using Launchpad.
9.The patron visible note will also create a message in the patron account in the staff client in Other # MessageCenter. See Managing Patron Messages in the Staff Client below.
Creating a Patron Message using Action Triggers
Messages can be automatically added to a patron’s OPAC account by an Action Trigger event. For example, whena hold is cancelled by a library staff member, a message can be added to the patron’s OPAC account to informthem of the cancellation.
Action Trigger Messages are set up in Admin # Local Administration # Notifications/Action Triggers. There areseveral new fields in the Trigger Event Definition that allow the configuration of Patron Messages:

Chapter 111. Circulation - Patron Record 592Report errors in this documentation using Launchpad.
• Message Library Path: identifies the sending library for the message. This is the patron’s home library(usr.home_ou) in the stock Hold Cancellation message.
• Message Template: contains the content of the message.
• Message Title: appears as the subject line in the OPAC message.
• Message User Path: determines how to identify the user the message is sent to.
If you want to send patrons a notification email and an OPAC message when their hold is cancelled, use twoseparate Action Triggers: one for the email notification and one for the message.
Managing Patron Messages in the Staff Client
Patron messages can be viewed and managed in the staff client within the patron account.
1. Retrieve a patron account in the staff client.
2. Within the account, go to Other # Message Center.
3. Double click on a message to view the full title and content as well as the date and time the message was createdand the date and time that the message was read. Staff can also see if a patron has deleted the message from theirOPAC account (Deleted?) and can manually delete a message by marking it as Deleted.
When a message is marked deleted, the message will remain in Other # Message Center as a record that thepatron received it.
Deleting a patron visible note in Other # Notes will not delete the patron message from the Other # MessageCenter.
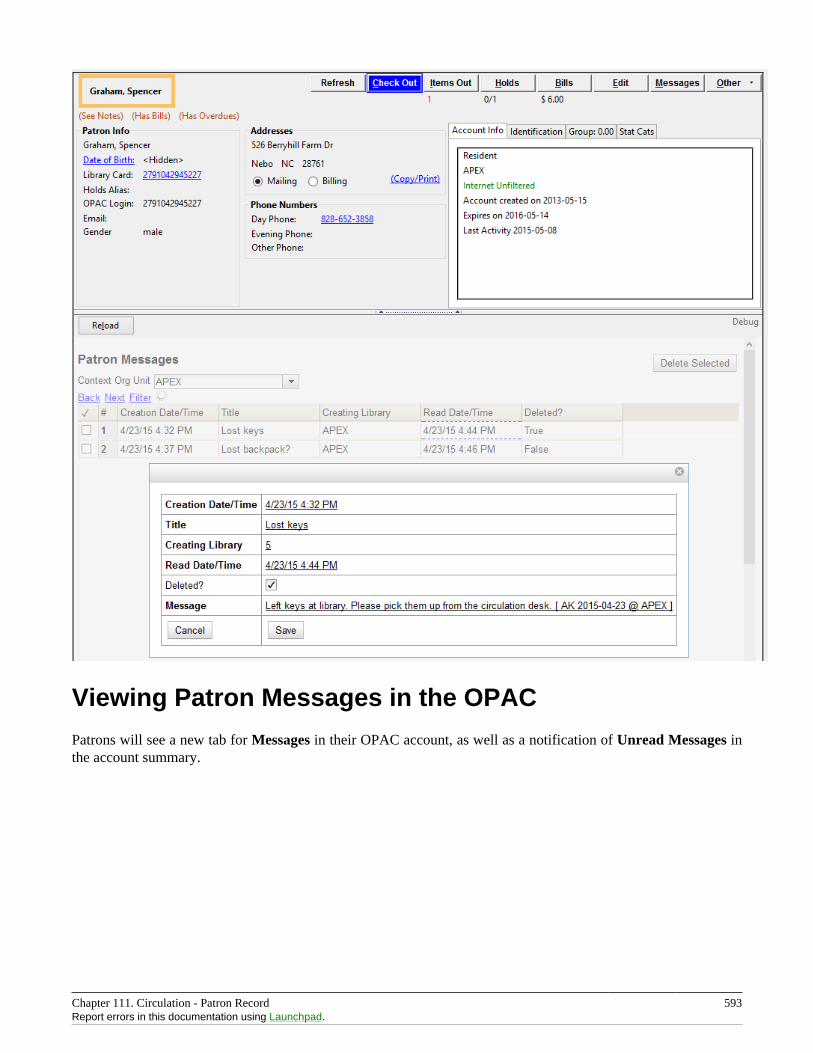
Chapter 111. Circulation - Patron Record 593Report errors in this documentation using Launchpad.
Viewing Patron Messages in the OPAC
Patrons will see a new tab for Messages in their OPAC account, as well as a notification of Unread Messages inthe account summary.

Chapter 111. Circulation - Patron Record 594Report errors in this documentation using Launchpad.
Patrons will see a list of the messages from the library by clicking on the Messages tab.
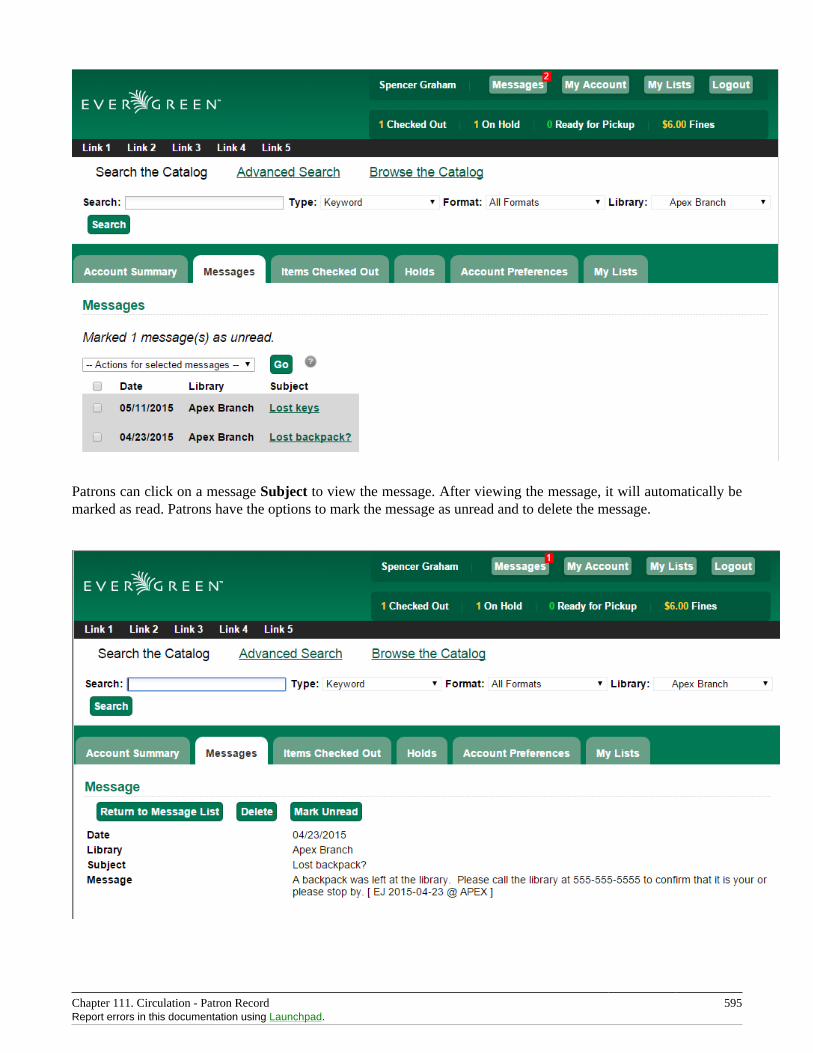
Chapter 111. Circulation - Patron Record 595Report errors in this documentation using Launchpad.
Patrons can click on a message Subject to view the message. After viewing the message, it will automatically bemarked as read. Patrons have the options to mark the message as unread and to delete the message.
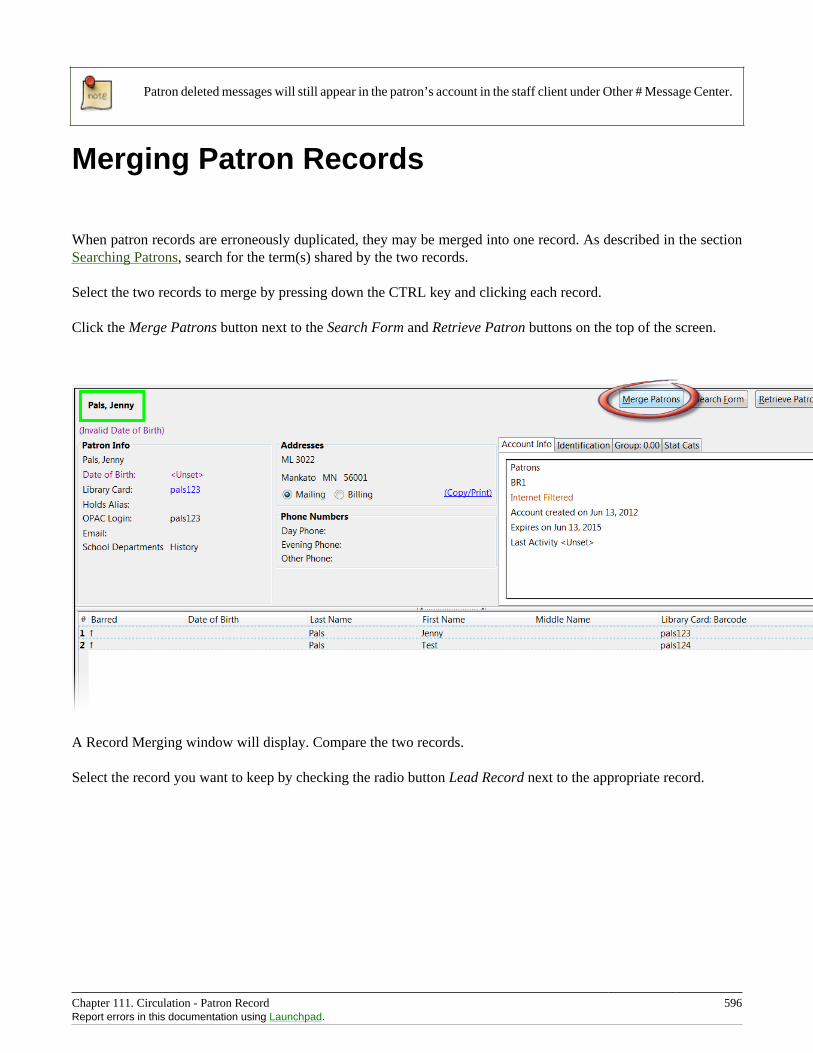
Chapter 111. Circulation - Patron Record 596Report errors in this documentation using Launchpad.
Patron deleted messages will still appear in the patron’s account in the staff client under Other # Message Center.
Merging Patron Records
When patron records are erroneously duplicated, they may be merged into one record. As described in the sectionSearching Patrons, search for the term(s) shared by the two records.
Select the two records to merge by pressing down the CTRL key and clicking each record.
Click the Merge Patrons button next to the Search Form and Retrieve Patron buttons on the top of the screen.
A Record Merging window will display. Compare the two records.
Select the record you want to keep by checking the radio button Lead Record next to the appropriate record.
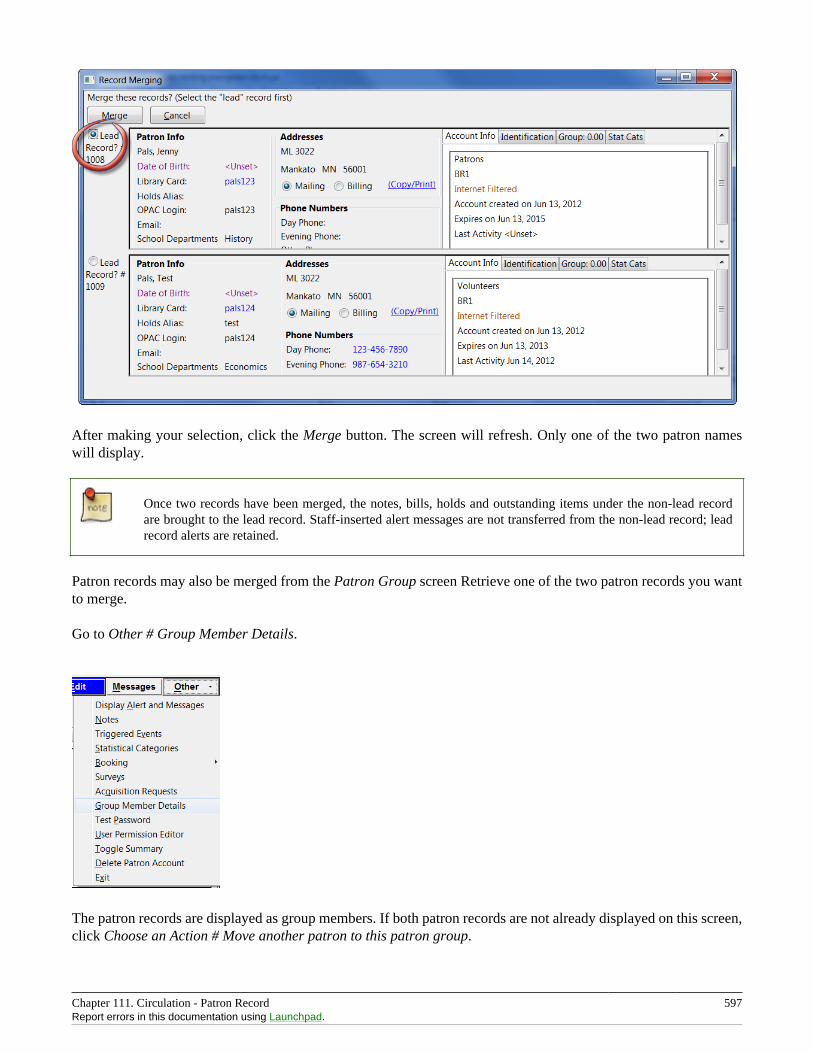
Chapter 111. Circulation - Patron Record 597Report errors in this documentation using Launchpad.
After making your selection, click the Merge button. The screen will refresh. Only one of the two patron nameswill display.
Once two records have been merged, the notes, bills, holds and outstanding items under the non-lead recordare brought to the lead record. Staff-inserted alert messages are not transferred from the non-lead record; leadrecord alerts are retained.
Patron records may also be merged from the Patron Group screen Retrieve one of the two patron records you wantto merge.
Go to Other # Group Member Details.
The patron records are displayed as group members. If both patron records are not already displayed on this screen,click Choose an Action # Move another patron to this patron group.
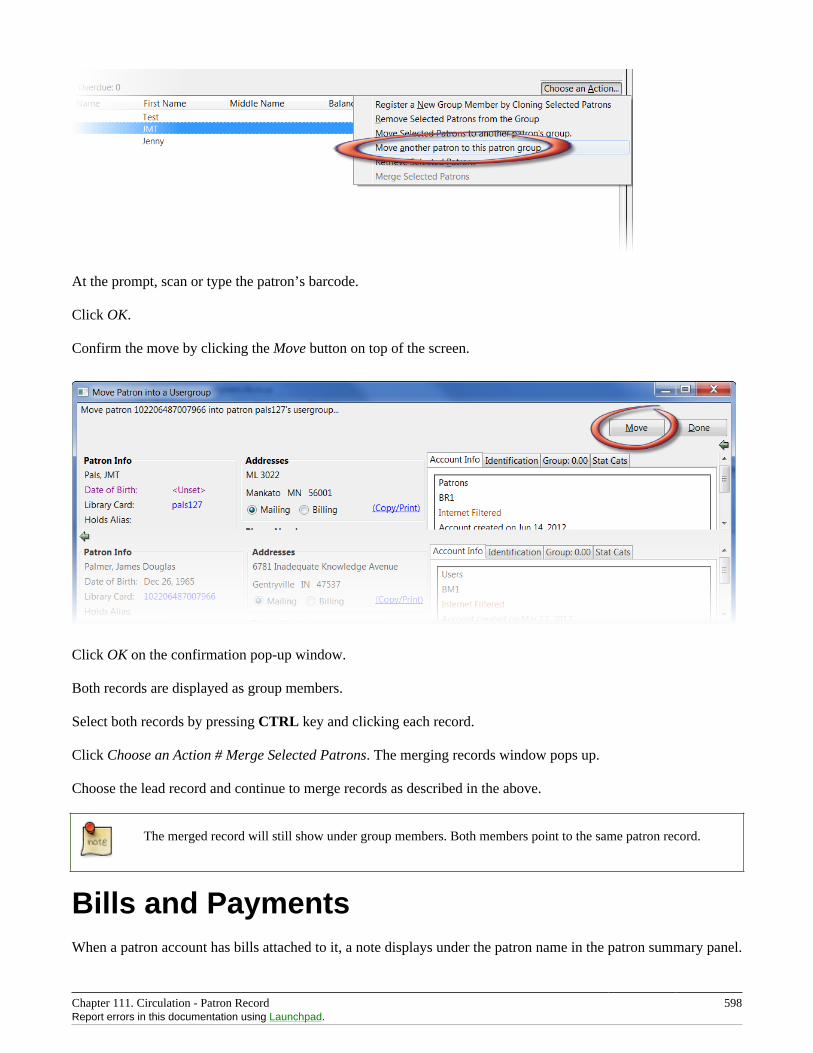
Chapter 111. Circulation - Patron Record 598Report errors in this documentation using Launchpad.
At the prompt, scan or type the patron’s barcode.
Click OK.
Confirm the move by clicking the Move button on top of the screen.
Click OK on the confirmation pop-up window.
Both records are displayed as group members.
Select both records by pressing CTRL key and clicking each record.
Click Choose an Action # Merge Selected Patrons. The merging records window pops up.
Choose the lead record and continue to merge records as described in the above.
The merged record will still show under group members. Both members point to the same patron record.
Bills and PaymentsWhen a patron account has bills attached to it, a note displays under the patron name in the patron summary panel.
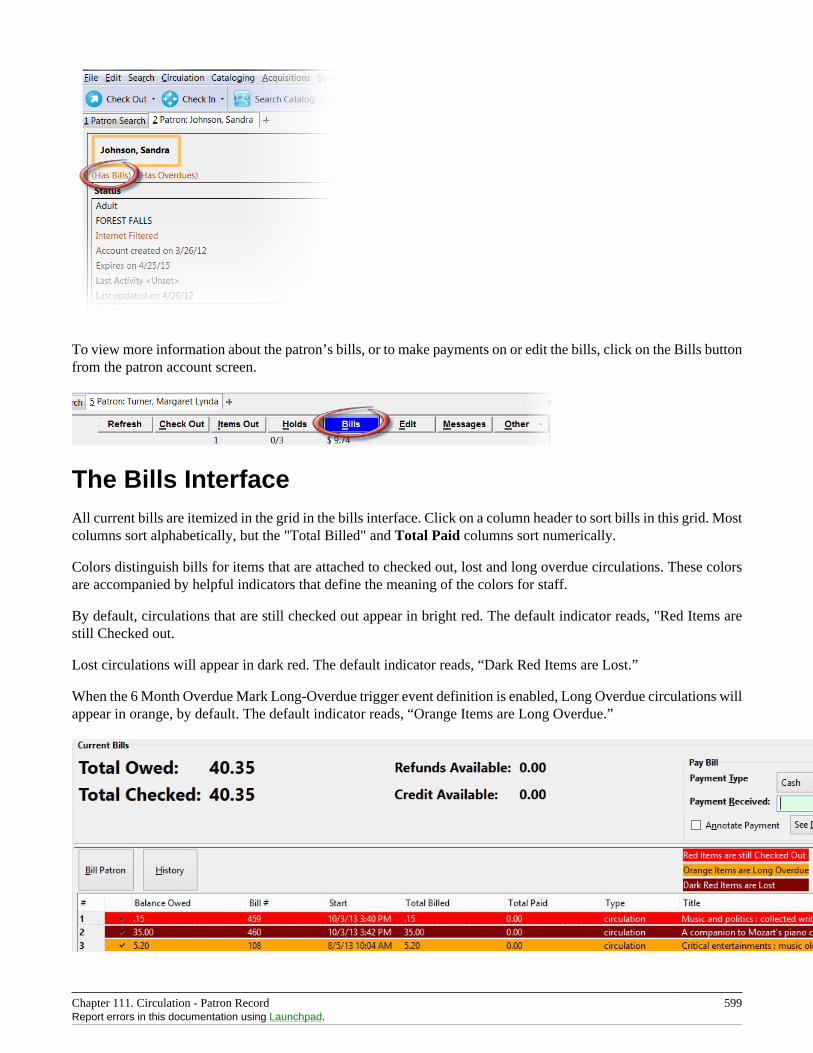
Chapter 111. Circulation - Patron Record 599Report errors in this documentation using Launchpad.
To view more information about the patron’s bills, or to make payments on or edit the bills, click on the Bills buttonfrom the patron account screen.
The Bills InterfaceAll current bills are itemized in the grid in the bills interface. Click on a column header to sort bills in this grid. Mostcolumns sort alphabetically, but the "Total Billed" and Total Paid columns sort numerically.
Colors distinguish bills for items that are attached to checked out, lost and long overdue circulations. These colorsare accompanied by helpful indicators that define the meaning of the colors for staff.
By default, circulations that are still checked out appear in bright red. The default indicator reads, "Red Items arestill Checked out.
Lost circulations will appear in dark red. The default indicator reads, “Dark Red Items are Lost.”
When the 6 Month Overdue Mark Long-Overdue trigger event definition is enabled, Long Overdue circulations willappear in orange, by default. The default indicator reads, “Orange Items are Long Overdue.”
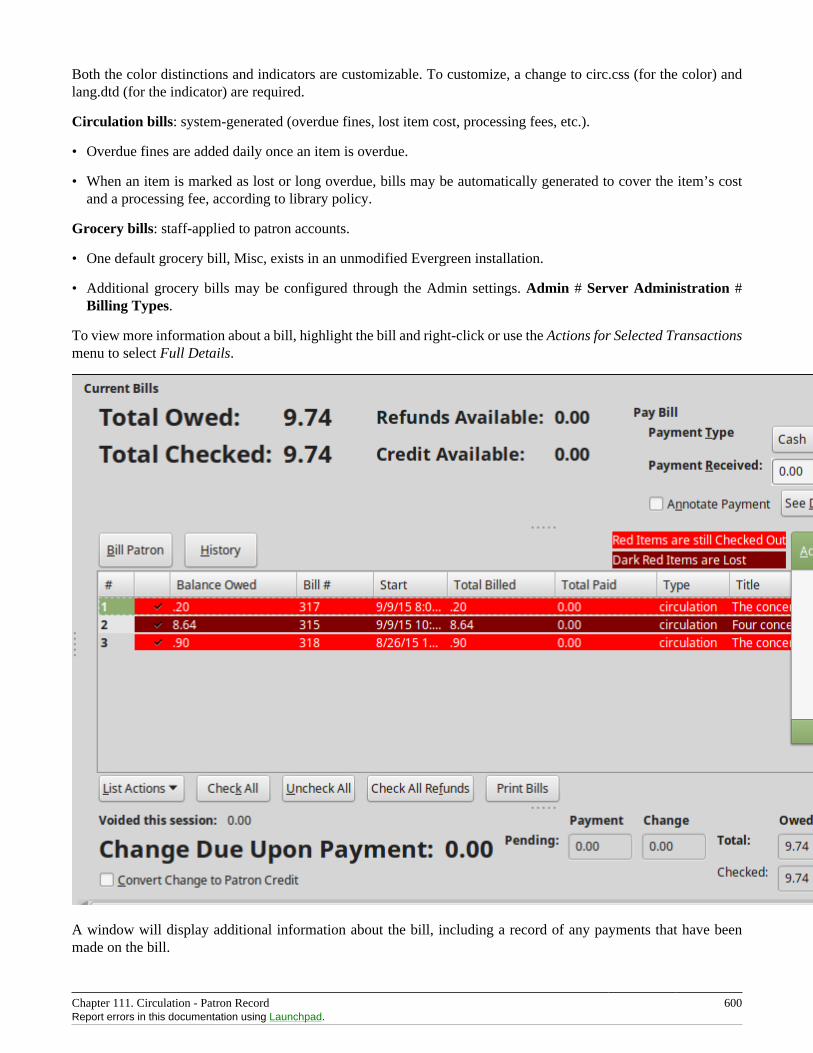
Chapter 111. Circulation - Patron Record 600Report errors in this documentation using Launchpad.
Both the color distinctions and indicators are customizable. To customize, a change to circ.css (for the color) andlang.dtd (for the indicator) are required.
Circulation bills: system-generated (overdue fines, lost item cost, processing fees, etc.).
• Overdue fines are added daily once an item is overdue.
• When an item is marked as lost or long overdue, bills may be automatically generated to cover the item’s costand a processing fee, according to library policy.
Grocery bills: staff-applied to patron accounts.
• One default grocery bill, Misc, exists in an unmodified Evergreen installation.
• Additional grocery bills may be configured through the Admin settings. Admin # Server Administration #Billing Types.
To view more information about a bill, highlight the bill and right-click or use the Actions for Selected Transactionsmenu to select Full Details.
A window will display additional information about the bill, including a record of any payments that have beenmade on the bill.
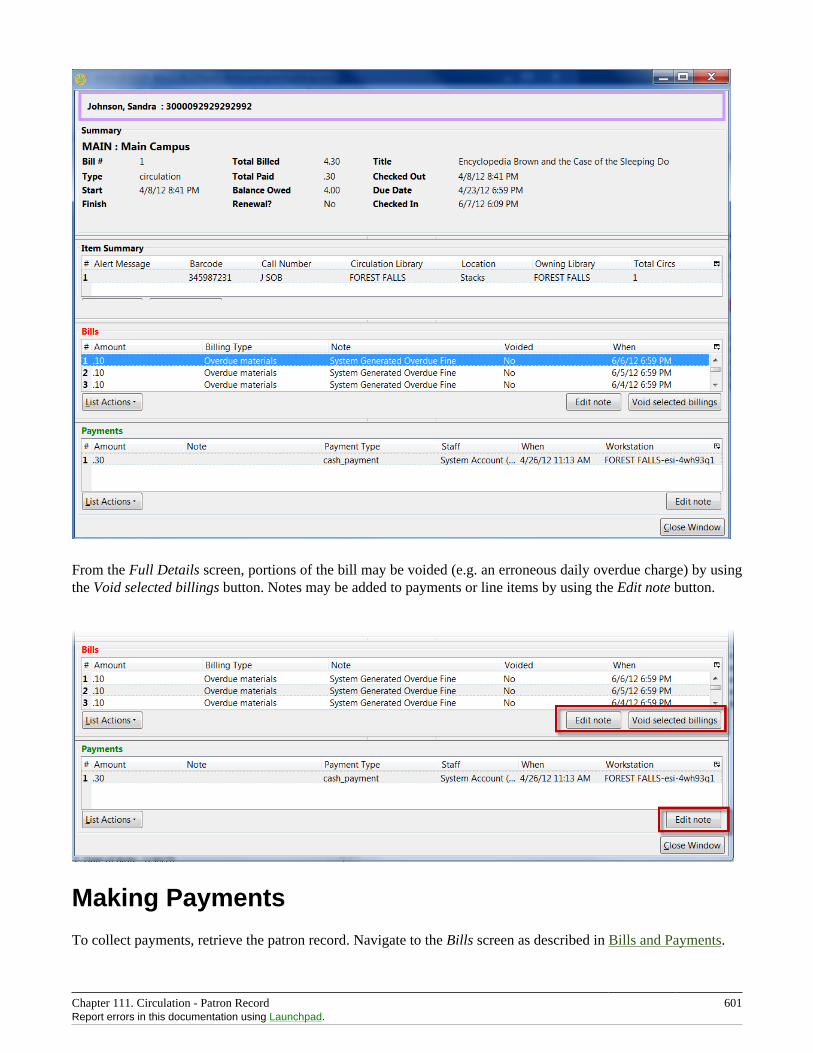
Chapter 111. Circulation - Patron Record 601Report errors in this documentation using Launchpad.
From the Full Details screen, portions of the bill may be voided (e.g. an erroneous daily overdue charge) by usingthe Void selected billings button. Notes may be added to payments or line items by using the Edit note button.
Making Payments
To collect payments, retrieve the patron record. Navigate to the Bills screen as described in Bills and Payments.
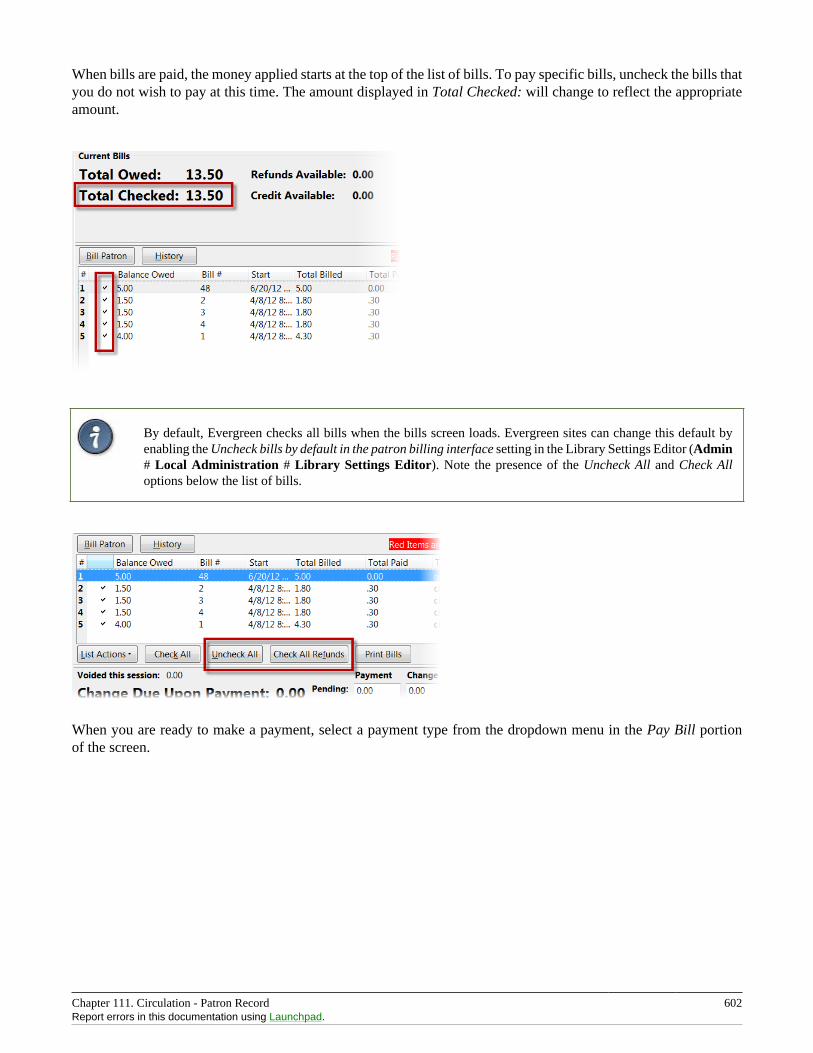
Chapter 111. Circulation - Patron Record 602Report errors in this documentation using Launchpad.
When bills are paid, the money applied starts at the top of the list of bills. To pay specific bills, uncheck the bills thatyou do not wish to pay at this time. The amount displayed in Total Checked: will change to reflect the appropriateamount.
By default, Evergreen checks all bills when the bills screen loads. Evergreen sites can change this default byenabling the Uncheck bills by default in the patron billing interface setting in the Library Settings Editor (Admin# Local Administration # Library Settings Editor). Note the presence of the Uncheck All and Check Alloptions below the list of bills.
When you are ready to make a payment, select a payment type from the dropdown menu in the Pay Bill portionof the screen.
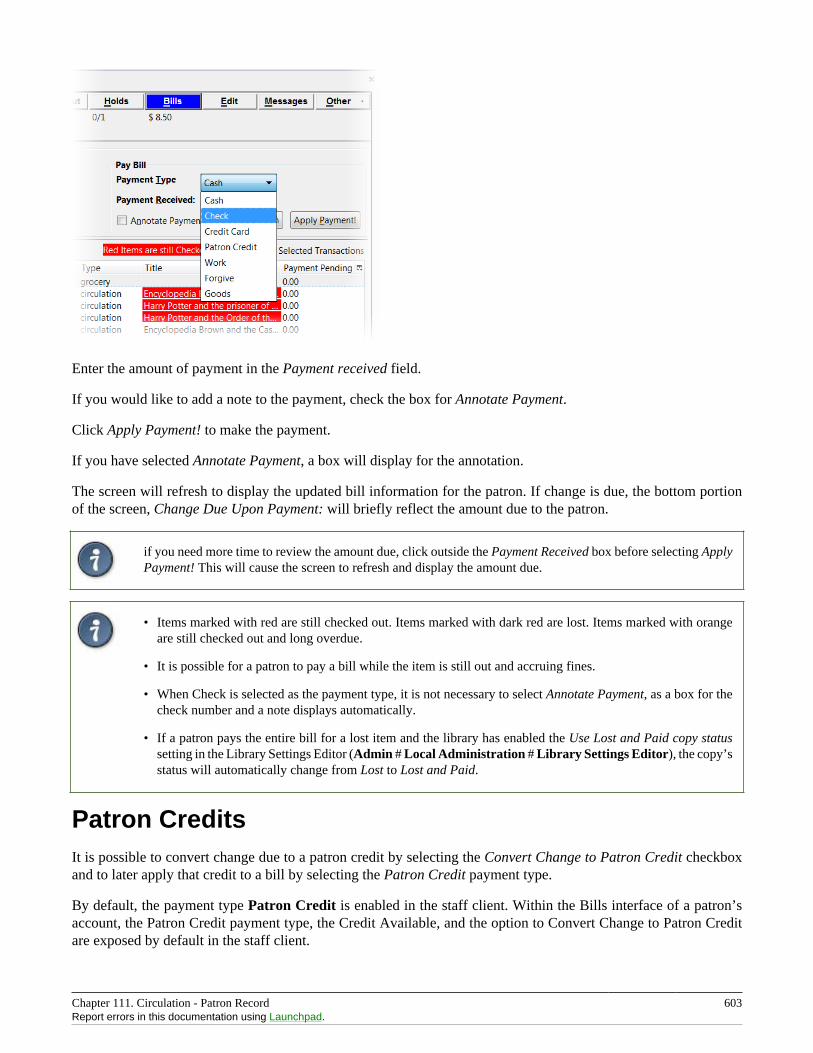
Chapter 111. Circulation - Patron Record 603Report errors in this documentation using Launchpad.
Enter the amount of payment in the Payment received field.
If you would like to add a note to the payment, check the box for Annotate Payment.
Click Apply Payment! to make the payment.
If you have selected Annotate Payment, a box will display for the annotation.
The screen will refresh to display the updated bill information for the patron. If change is due, the bottom portionof the screen, Change Due Upon Payment: will briefly reflect the amount due to the patron.
if you need more time to review the amount due, click outside the Payment Received box before selecting ApplyPayment! This will cause the screen to refresh and display the amount due.
• Items marked with red are still checked out. Items marked with dark red are lost. Items marked with orangeare still checked out and long overdue.
• It is possible for a patron to pay a bill while the item is still out and accruing fines.
• When Check is selected as the payment type, it is not necessary to select Annotate Payment, as a box for thecheck number and a note displays automatically.
• If a patron pays the entire bill for a lost item and the library has enabled the Use Lost and Paid copy statussetting in the Library Settings Editor (Admin # Local Administration # Library Settings Editor), the copy’sstatus will automatically change from Lost to Lost and Paid.
Patron CreditsIt is possible to convert change due to a patron credit by selecting the Convert Change to Patron Credit checkboxand to later apply that credit to a bill by selecting the Patron Credit payment type.
By default, the payment type Patron Credit is enabled in the staff client. Within the Bills interface of a patron’saccount, the Patron Credit payment type, the Credit Available, and the option to Convert Change to Patron Creditare exposed by default in the staff client.
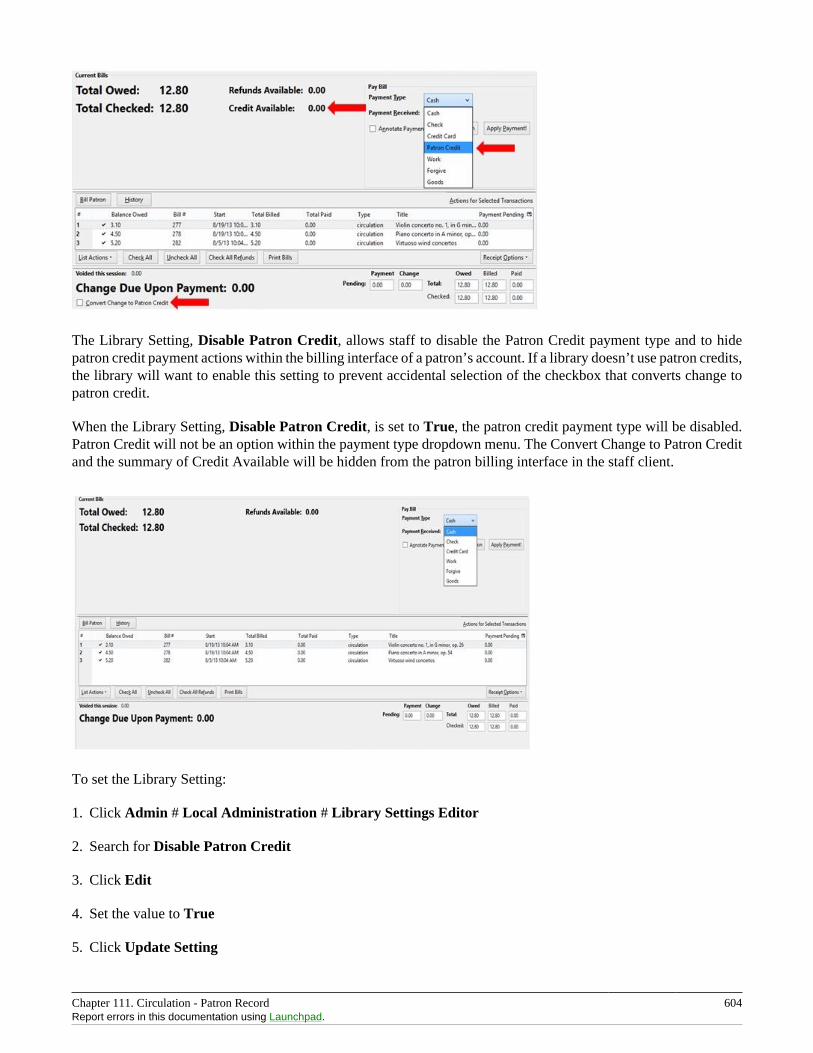
Chapter 111. Circulation - Patron Record 604Report errors in this documentation using Launchpad.
The Library Setting, Disable Patron Credit, allows staff to disable the Patron Credit payment type and to hidepatron credit payment actions within the billing interface of a patron’s account. If a library doesn’t use patron credits,the library will want to enable this setting to prevent accidental selection of the checkbox that converts change topatron credit.
When the Library Setting, Disable Patron Credit, is set to True, the patron credit payment type will be disabled.Patron Credit will not be an option within the payment type dropdown menu. The Convert Change to Patron Creditand the summary of Credit Available will be hidden from the patron billing interface in the staff client.
To set the Library Setting:
1. Click Admin # Local Administration # Library Settings Editor
2. Search for Disable Patron Credit
3. Click Edit
4. Set the value to True
5. Click Update Setting
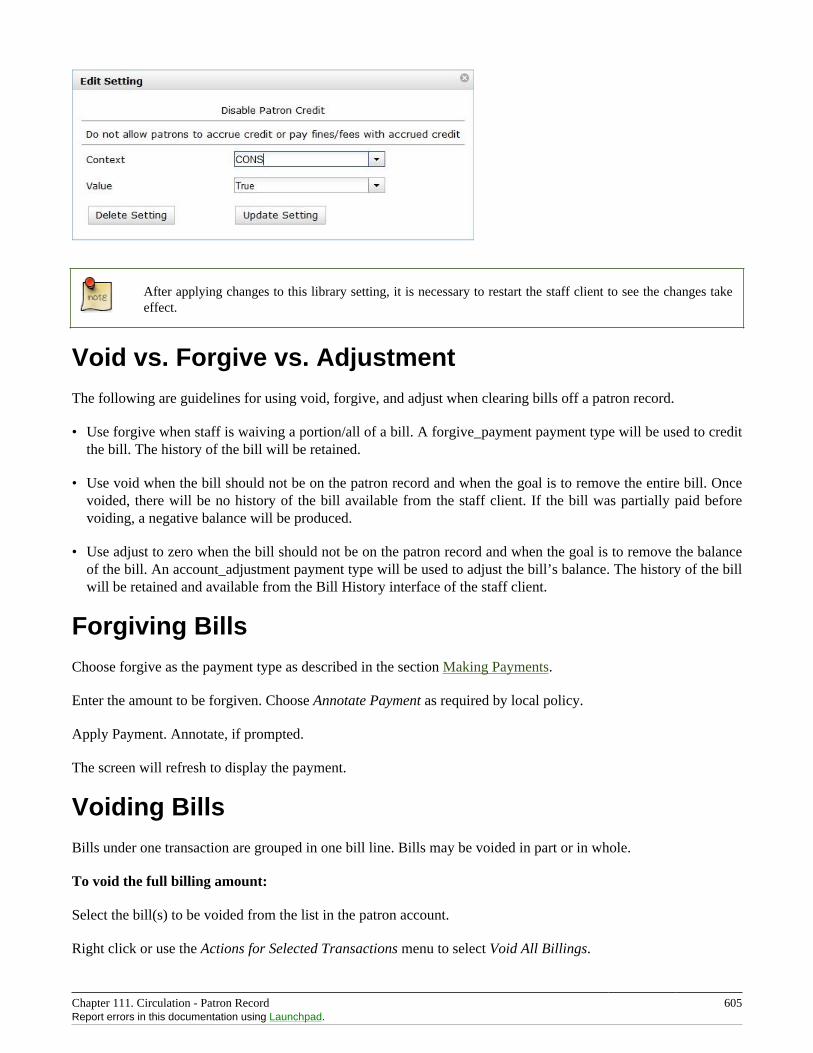
Chapter 111. Circulation - Patron Record 605Report errors in this documentation using Launchpad.
After applying changes to this library setting, it is necessary to restart the staff client to see the changes takeeffect.
Void vs. Forgive vs. AdjustmentThe following are guidelines for using void, forgive, and adjust when clearing bills off a patron record.
• Use forgive when staff is waiving a portion/all of a bill. A forgive_payment payment type will be used to creditthe bill. The history of the bill will be retained.
• Use void when the bill should not be on the patron record and when the goal is to remove the entire bill. Oncevoided, there will be no history of the bill available from the staff client. If the bill was partially paid beforevoiding, a negative balance will be produced.
• Use adjust to zero when the bill should not be on the patron record and when the goal is to remove the balanceof the bill. An account_adjustment payment type will be used to adjust the bill’s balance. The history of the billwill be retained and available from the Bill History interface of the staff client.
Forgiving BillsChoose forgive as the payment type as described in the section Making Payments.
Enter the amount to be forgiven. Choose Annotate Payment as required by local policy.
Apply Payment. Annotate, if prompted.
The screen will refresh to display the payment.
Voiding BillsBills under one transaction are grouped in one bill line. Bills may be voided in part or in whole.
To void the full billing amount:
Select the bill(s) to be voided from the list in the patron account.
Right click or use the Actions for Selected Transactions menu to select Void All Billings.

Chapter 111. Circulation - Patron Record 606Report errors in this documentation using Launchpad.
Confirm the action.
To void a partial amount:
Select a billing and choose Full Details for the transaction, as described in the section <circ_vs_grocery,Circulationvs. Grocery Bills>>
The bill details screen displays.
Select the specific bill to void.
Void Selected Billings and confirm the action.
Adjusting Bills to Zero
In the Bills interface, select the bill to adjust.
Right click or use the Actions for Selected Transactions menu to select Adjust to Zero.
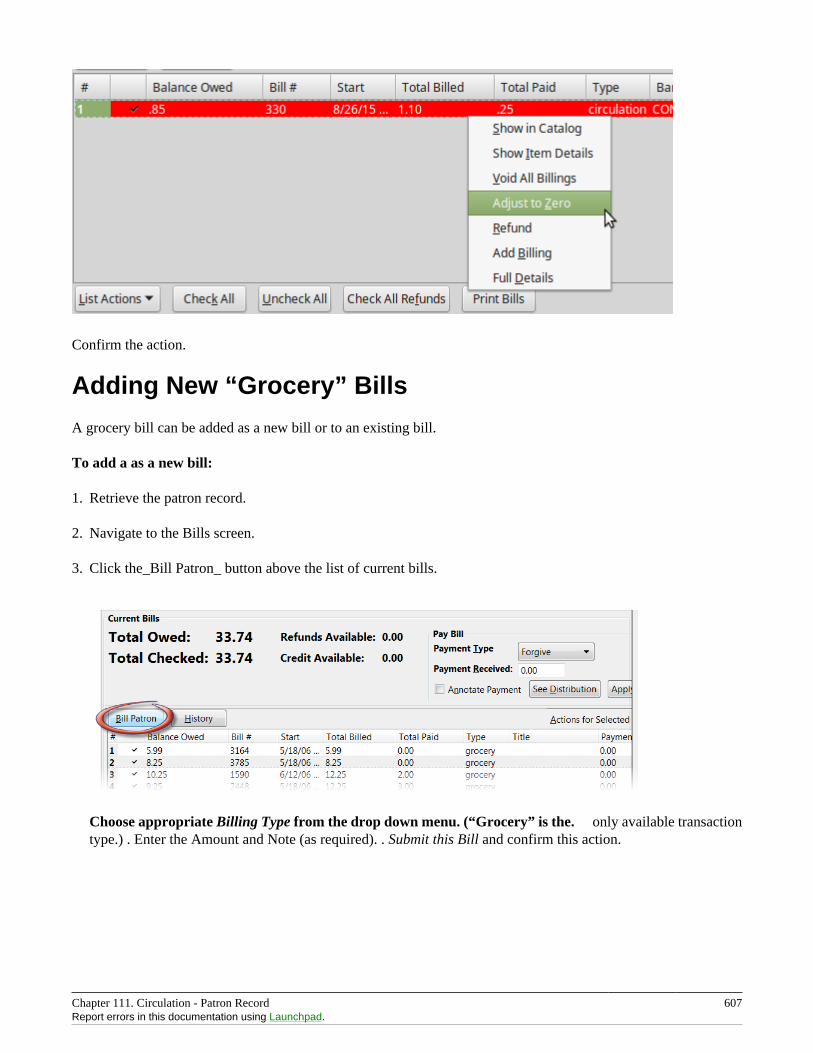
Chapter 111. Circulation - Patron Record 607Report errors in this documentation using Launchpad.
Confirm the action.
Adding New “Grocery” Bills
A grocery bill can be added as a new bill or to an existing bill.
To add a as a new bill:
1. Retrieve the patron record.
2. Navigate to the Bills screen.
3. Click the_Bill Patron_ button above the list of current bills.
Choose appropriate Billing Type from the drop down menu. (“Grocery” is the. only available transactiontype.) . Enter the Amount and Note (as required). . Submit this Bill and confirm this action.
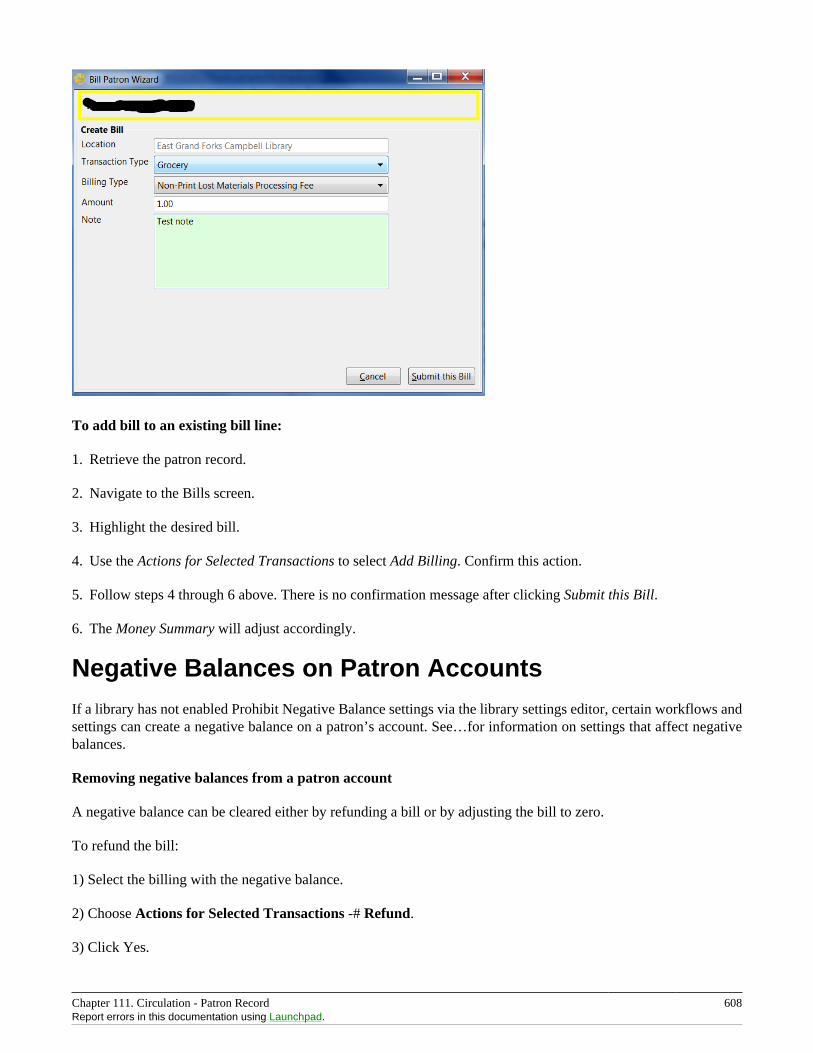
Chapter 111. Circulation - Patron Record 608Report errors in this documentation using Launchpad.
To add bill to an existing bill line:
1. Retrieve the patron record.
2. Navigate to the Bills screen.
3. Highlight the desired bill.
4. Use the Actions for Selected Transactions to select Add Billing. Confirm this action.
5. Follow steps 4 through 6 above. There is no confirmation message after clicking Submit this Bill.
6. The Money Summary will adjust accordingly.
Negative Balances on Patron AccountsIf a library has not enabled Prohibit Negative Balance settings via the library settings editor, certain workflows andsettings can create a negative balance on a patron’s account. See…for information on settings that affect negativebalances.
Removing negative balances from a patron account
A negative balance can be cleared either by refunding a bill or by adjusting the bill to zero.
To refund the bill:
1) Select the billing with the negative balance.
2) Choose Actions for Selected Transactions -# Refund.
3) Click Yes.
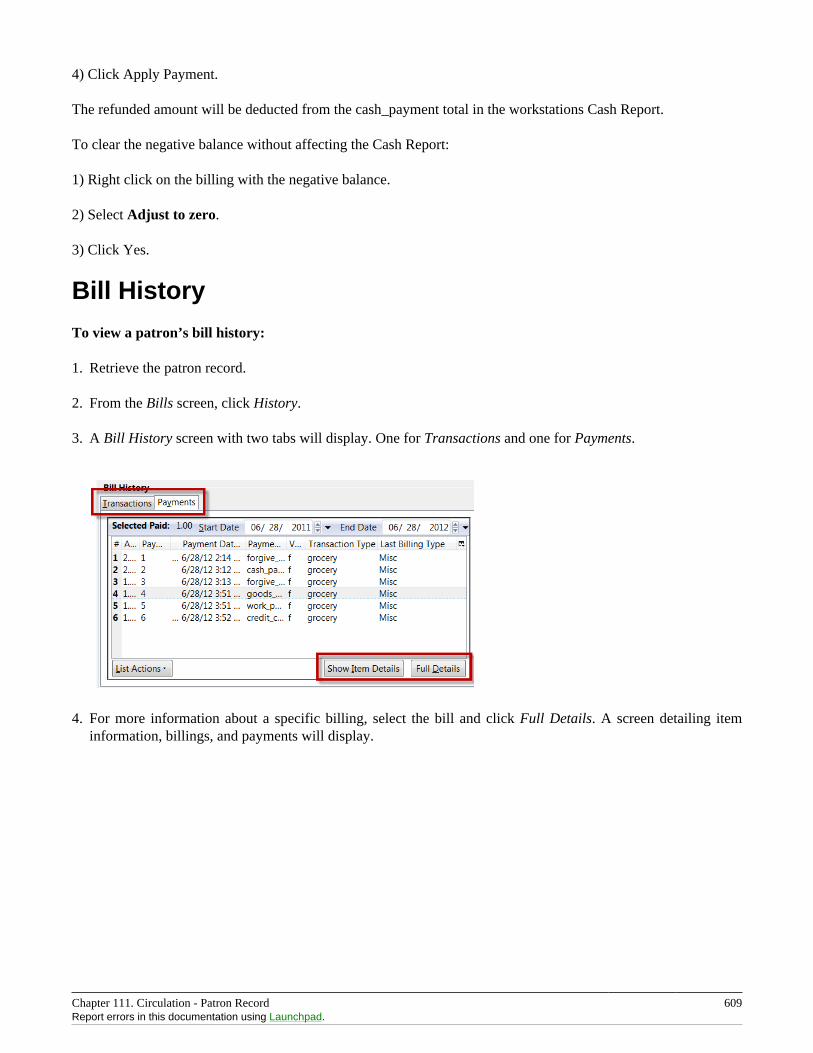
Chapter 111. Circulation - Patron Record 609Report errors in this documentation using Launchpad.
4) Click Apply Payment.
The refunded amount will be deducted from the cash_payment total in the workstations Cash Report.
To clear the negative balance without affecting the Cash Report:
1) Right click on the billing with the negative balance.
2) Select Adjust to zero.
3) Click Yes.
Bill History
To view a patron’s bill history:
1. Retrieve the patron record.
2. From the Bills screen, click History.
3. A Bill History screen with two tabs will display. One for Transactions and one for Payments.
4. For more information about a specific billing, select the bill and click Full Details. A screen detailing iteminformation, billings, and payments will display.
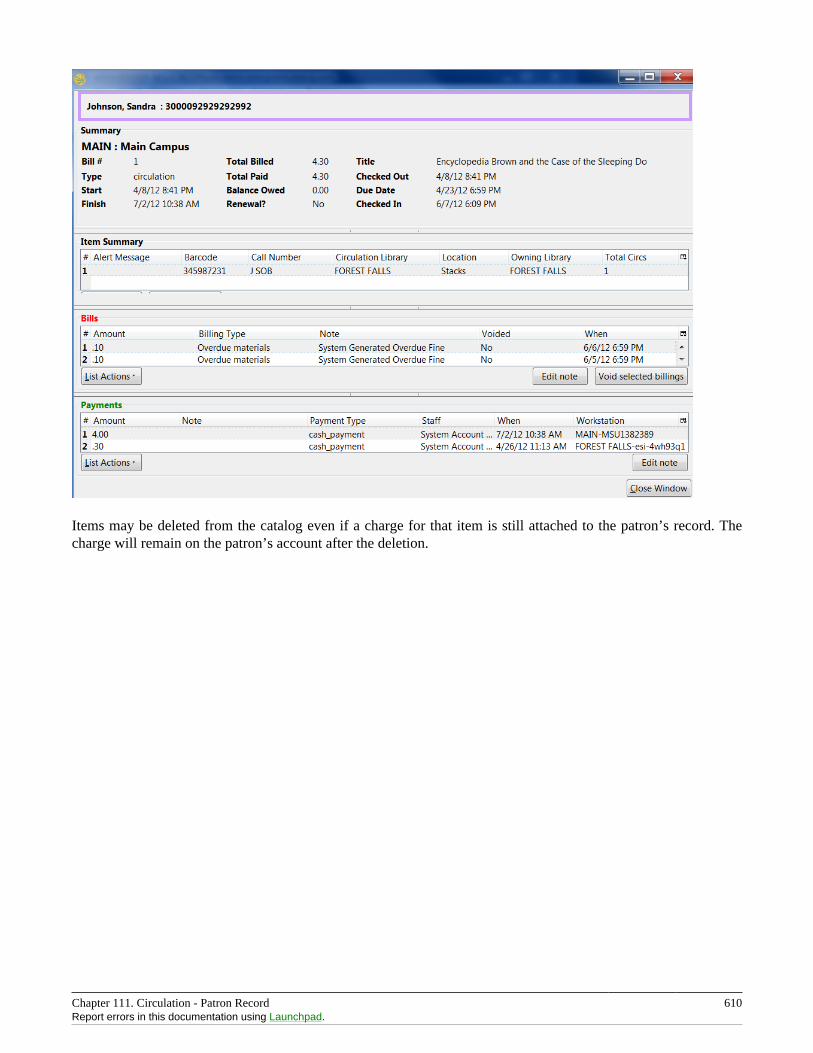
Chapter 111. Circulation - Patron Record 610Report errors in this documentation using Launchpad.
Items may be deleted from the catalog even if a charge for that item is still attached to the patron’s record. Thecharge will remain on the patron’s account after the deletion.
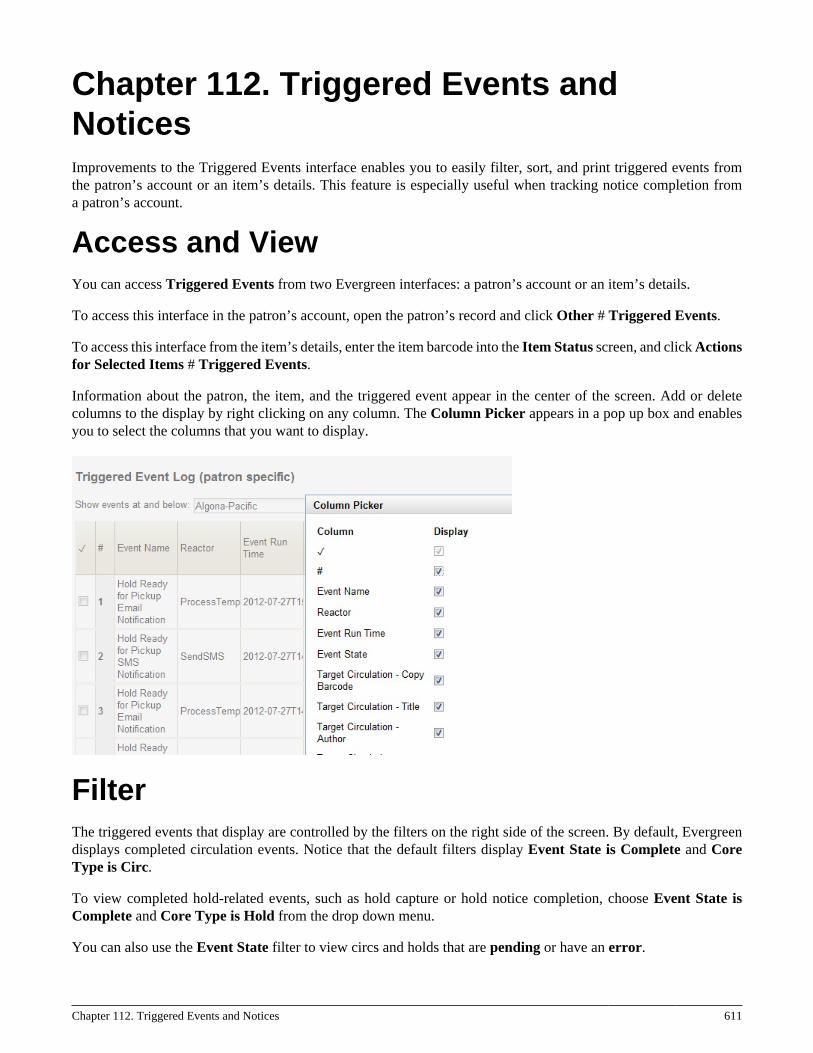
Chapter 112. Triggered Events and Notices 611
Chapter 112. Triggered Events andNoticesImprovements to the Triggered Events interface enables you to easily filter, sort, and print triggered events fromthe patron’s account or an item’s details. This feature is especially useful when tracking notice completion froma patron’s account.
Access and ViewYou can access Triggered Events from two Evergreen interfaces: a patron’s account or an item’s details.
To access this interface in the patron’s account, open the patron’s record and click Other # Triggered Events.
To access this interface from the item’s details, enter the item barcode into the Item Status screen, and click Actionsfor Selected Items # Triggered Events.
Information about the patron, the item, and the triggered event appear in the center of the screen. Add or deletecolumns to the display by right clicking on any column. The Column Picker appears in a pop up box and enablesyou to select the columns that you want to display.
FilterThe triggered events that display are controlled by the filters on the right side of the screen. By default, Evergreendisplays completed circulation events. Notice that the default filters display Event State is Complete and CoreType is Circ.
To view completed hold-related events, such as hold capture or hold notice completion, choose Event State isComplete and Core Type is Hold from the drop down menu.
You can also use the Event State filter to view circs and holds that are pending or have an error.
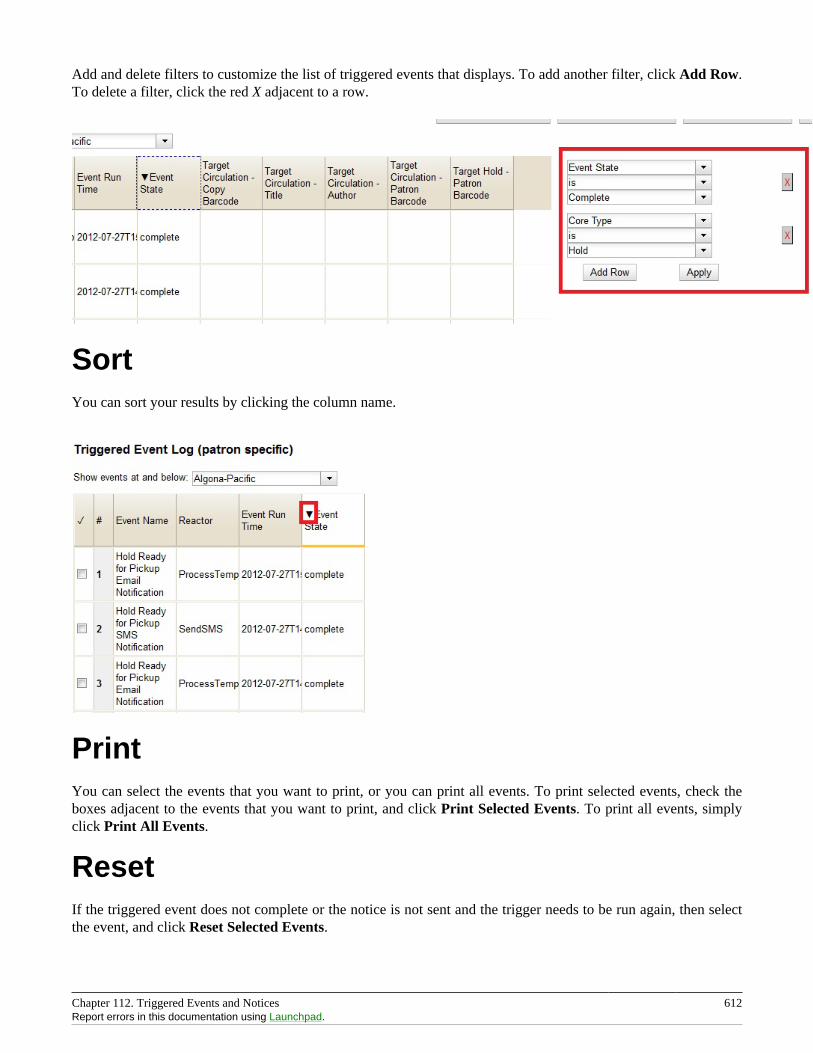
Chapter 112. Triggered Events and Notices 612Report errors in this documentation using Launchpad.
Add and delete filters to customize the list of triggered events that displays. To add another filter, click Add Row.To delete a filter, click the red X adjacent to a row.
SortYou can sort your results by clicking the column name.
PrintYou can select the events that you want to print, or you can print all events. To print selected events, check theboxes adjacent to the events that you want to print, and click Print Selected Events. To print all events, simplyclick Print All Events.
ResetIf the triggered event does not complete or the notice is not sent and the trigger needs to be run again, then selectthe event, and click Reset Selected Events.
Chapter 113. Offline Transactions 613
Chapter 113. Offline TransactionsEvergreen’s Standalone Interface / Offline Interface is designed to log transactions during network outage, whichcan be uploaded and processed once network operations are restored.
The terms Offline Interface and Standalone Interface mean the same thing: a separate program to handle simplecirculation tasks while the network is down.
To access the Offline Interface, navigate to the Staff Client login screen and click Standalone Interface. TheEvergreen Standalone Interface window opens.
Patron RegistrationPatron registration on the Evergreen Offline Interface records the minimum patron information necessary to registera new patron.
All of the fields, except for Line 2 of Billing Address, on the Patron Registration screen are required. If yourlibrary does not record information for any field, you need to work out a standard fake value for it, for example,1900-01-01 for Date of Birth.
The account password is automatically generated. Patrons can access their account with the password after theoffline transactions are uploaded and processed.
To register a patron:
1. Click Register Patron on the top menu bar. The Patron Registration window opens.
2. Fill in the form with patron information, using the drop down list if available.
3. Click Save patron registration. A confirmation dialog opens.
4. Click OK to finish registering the patron.
Checking Out Items
To circulate items from the Evergreen standalone interface:
1. Click Check Out on the top menu bar. The Standalone Check Out screen opens.
2. Ensure that the date on the left-hand side of the menu bar is correct.
3. Enter the patron’s library card barcode in the Enter the patron’s barcode field by scanning or typing the barcode.
4. Ensure that the due date is correct in the Enter the item due date field. You may enter a different due datemanually, or select a different duration from the dropdown list to select a relative due date based on the loanperiod.
5. Check out items:
• For cataloged items, scan each item’s barcode in Enter the item barcode field. The barcode appears on theright side of the screen.
Chapter 113. Offline Transactions 614Report errors in this documentation using Launchpad.
• For non-cataloged items:
i. Click Choose a non-barcode option to select a non-catalogued category from the drop-down list.
ii. Enter the number of items you want to check out, then click OK on the prompt window.
6. Scan all items, changing the due date if necessary.
7. To print a receipt, select the Print receipt? checkbox.
8. Click Save these transactions.
The default dates are based on your computer settings.
Pre-catalogued item circulation is not available on Offline Interface. If an existing pre-cat barcode happens to beused, it is checked out with the previous author and title. If a new pre-cat barcode is attempted, an error of ASSETNOT FOUND (item not found) is returned upon processing offline transactions.
RenewTo renew an item, you must know the item’s barcode number. The patron’s barcode is optional.
To renew items from the Evergreen standalone interface:
1. Click Renew on the top menu bar.
The Renew window is very similar to the Check Out window. The differences are that a patron’s barcodeis optional on the Renew window, and the non-barcoded option is not available on the Renew window, asnon-barcoded items can not be renewed.
2. Ensure that the date on the left-hand side of the menu bar is correct.
3. (Optional): Enter the patron’s library card barcode in the Enter the patron’s barcode field by scanning or typingthe barcode.
4. Ensure that the due date is correct in the Enter the item due date field. You may enter a different due datemanually, or select a different duration from the dropdown list to select a relative due date based on the loanperiod.
5. For each item to be renewed, enter the item’s barcode in the Enter the item barcode field. The barcode appearson the right side of the screen.
6. To print a receipt, select the Print receipt? checkbox.
7. Click Save these transactions.
In-house UseTo record in-house use transactions from the Evergreen standalone interface:
1. Click In House Use on the top menu bar.
Chapter 113. Offline Transactions 615Report errors in this documentation using Launchpad.
2. Ensure the date is correct.
3. Enter the number of uses to record for the item in the Enter the number of uses of the item field.
4. Enter the item barcode number in the Enter the item barcode field.
5. Repeat the previous 2 steps until all items have been scanned.
6. To print a receipt, select the Print receipt? checkbox.
7. Click Save these transactions.
Check InTo check in items from the Evergreen standalone interface:
1. Click Check In on the top menu bar. The Check In screen opens.
2. Ensure the date is correct.
3. For each item you want to check in, enter the item’s barcode in the Enter item barcode field. The number isdisplayed on the right side of the screen.
4. To print a receipt, select the Print receipt? checkbox.
5. Click Save these transactions.
Without access to Evergreen database, items on holds or with special status will not be captured in offline mode.
Uploading Offline TransactionsOnce you are able to connect to the server, you need to upload the offline transactions. To avoid confusion forpatrons and in the system, you should upload the offline transactions as soon as possible.
Once you can connect to the server, there are 3 steps to uploading offline transactions:
1. Create a session: to be done by local system administrators at an administration workstation.
2. Upload transactions to a session: to be done by circulation staff at circulation workstations.
3. Process the uploaded transactions: to be done by local system administrators at an administration workstation.
Once network connectivity has been restored, a local system administrator must create an offline transaction session.Then, staff can upload transactions from each of the workstations used in offline circulation mode to that session.Once all of the branch workstations have uploaded their transactions to the session, the manager processes all thetransactions from all the workstations at once.
Uploading transactions to the session does not put the transactions into the Evergreen database. The transactionswill not be sent to the Evergreen database until the manager processes the session.
Chapter 113. Offline Transactions 616Report errors in this documentation using Launchpad.
Creating an Offline SessionIn the Evergreen staff client:
1. Log into Evergreen using an account with local system administrator privileges.
2. Select Admin (-) # Offline Transaction Management from the menu. The Offline Transactions screen opens.Previously created sessions are listed in the Offline Sessions section.
3. In the upper Offline Sessions section, click Create to create a new session.
4. Enter a name for the session, like Internet Down 2012-12-02. Click OK.
5. In the Offline Sessions section, highlight the session you created. An Uploaded Transactions section appearsin the bottom of the screen. Initially, this section is empty.
6. Inform library staff that the session has been created and tell them the name of the session.
Uploading Workstation Transactions to a SessionWait until the local system administrator has created a session and told you that it’s ready for your upload. Theremay be several sessions shown on the Offline Transaction Management screen, so you will need the name of thecorrect session from your local system administrator.
Each workstation used to perform offline circulation during the outage must upload its transactions to the offlinetransaction session.
To upload offline transaction from a workstation to a session, perform the following steps in the Evergreen staffclient:
1. Log into Evergreen with your regular username and password.
2. Select Admin (-) # Offline Transaction Management from the menu. The Offline Transactions screen opens.You should see at least one session in the Offline Sessions section. You may also see older sessions.
3. In the upper Offline Sessions section, highlight the correct session, then click Upload. The transactions aretransferred to the Evergreen server.
4. When the transactions have been uploaded, select the session in the Offline Sessions section. The value in theUpload Count column has increased by 1 and your workstation is now listed in the Uploaded Transactionssection.
5. Inform your local system administrator that your transaction has been uploaded to the session.
Processing the TransactionsWhen all of the participating staff workstations have uploaded their transactions to the offline session, theworkstation names are listed in the Uploaded Transactions section. To process the offline transactions and makethem live on the Evergreen server:
1. Log into Evergreen using an account with local system administrator privileges.
Chapter 113. Offline Transactions 617Report errors in this documentation using Launchpad.
2. Select Admin (-) # Offline Transaction Management from the menu. The Offline Transactions screen opens.Previously created sessions are listed in the Offline Sessions section.
3. Highlight the correct session and, if necessary, click Refresh to verify all the participating workstations haveuploaded their transactions to your session.
4. Click Process. The processing may take some time to complete, depending on how many transactions you havedone. Click Refresh to see the updated status of the processing step. Processing is complete when the Processing?column shows Completed.
The number in the Transactions Processed column is equal to the number of items checked out or checked in. Forexample, 5 transactions processed could mean that:
• 5 items were checked out, or
• 3 items were checked in and 2 items were checked out, or
• 5 items were checked in.
ExceptionsExceptions are problems that were encountered during processing. For example, a mis-scanned patron barcode, anopen circulation, or an item that was not checked in before it was checked out to another patron would be listedas an exception. Those transactions causing exceptions may not be loaded into Evergreen database. Staff shouldexamine the exceptions and take necessary action.
These are a few notes about possible exceptions. It is not an all-inclusive list.
• Checking out a DVD with the wrong date (leaving due date set at +2 weeks instead of +1 week) does not causean exception.
• Overdue books are not flagged as exceptions.
• Checking out a reference book does not cause an exception.
• Checking out an item belonging to another library does not cause an exception.
• The Standalone Interface does not recognize books on hold, so no exceptions will be generated when matchingitems are checked in or checked out.
• The Standalone Interface can recognize blocked, barred, and expired patrons, as well as lost cards, if you haverecently run an Admin (-) # Download Offline Patron List action on the workstation on which you are usingthe Standalone Interface. You will get an error message indicating the patron status from within the StandaloneInterface at check-out time.
Common error messages
• ROUTE-ITEM - Indicates the book should be routed to another branch or library system. You’ll need to find thebook and re-check it in (online) to get the Transit Slip to print.
• COPY_STATUS_LOST - Indicates a book previously marked as lost was found and checked in.
• CIRC_CLAIMS_RETURNED - Indicates a book previously marked as claimed-returned was found and checkedin.
Chapter 113. Offline Transactions 618Report errors in this documentation using Launchpad.
• ASSET_COPY_NOT_FOUND - Indicates the item barcode was mis-scanned/mis-typed.
• ACTOR_CARD_NOT_FOUND - Indicates the patron’s library barcode was mis-scanned/ mis-typed.
• OPEN_CIRCULATION_EXISTS - Indicates a book was checked out that had never been checked in.
• MAX_RENEWALS_REACHED - Indicates the item has already been renewed the maximum times allowed (or it’sa video/DVD).
Chapter 114. Self checkout 619
Chapter 114. Self checkoutEvergreen includes a self check interface designed for libraries that simply want to record item circulation withoutworrying about security mechanisms like magnetic strips or RFID tags.
Initializing the self checkThe self check interface runs in a web browser. Before patrons can use the self check station, a staff member mustinitialize the interface by logging in.
1. Open your self check interface page in a web browser. By default, the URL is https://[hostname]/eg/circ/selfcheck/main, where [hostname] represents the host name of your Evergreen web server.
2. Log in with a staff account with circulation permissions.
Setting library hours of operation
When the self check prints a receipt, the default template includes the library’s hours of operation in the receipt. Ifthe library has no configured hours of operation, the attempt to print a receipt fails and the browser hangs.
Configuring self check behavior
Several library settings control the behavior of the self check:
• Audio Alerts: Plays sounds when events occur in the self check. These events are defined in the templates/circ/selfcheck/audio_config.tt2 template. To use the default sounds, you could run the followingcommand from your Evergreen server as the root user (assuming that /openils/ is your install prefix):
cp -r /openils/var/web/xul/server/skin/media/audio /openils/var/web/.
• Block copy checkout status: Prevent the staff user’s permission override from enabling patrons to check outitems that they would not normally be able to check out, such as the "On reservation shelf" status. The status IDsare found in the config.copy_status database table.
• Patron Login Timeout: Automatically logs the patron out of the self check after a certain period of inactivity.NOT CURRENTLY SUPPORTED
• Pop-up alert for errors: In addition to displaying an alert message on the screen, this setting raises patronawareness of possible problems by raising an alert box that the patron must dismiss before they can check outanother item.
• Require Patron Password: By default, users can enter either their user name or barcode, without having to entertheir password, to access their account. This setting requires patrons to enter their password for additional security.
• Workstation Required: If set, the URL must either include a ?ws=[workstation] parameter, where[workstation] is the name of a registered Evergreen workstation, or the staff member must register a newworkstation when they login. The workstation parameter ensures that check outs are recorded as occurring at thecorrect library.
Chapter 114. Self checkout 620Report errors in this documentation using Launchpad.
Checking out or renewing items in the selfcheckAfter a staff user has logged into the self check interface, the interface is ready for patrons to log in and check outor renew items.
1. The patron logs in by entering either their patron barcode or their user name.
2. The patron enters the barcode for each item. If the patron types the barcode, they need to press the <Enter>key to check out the item. The item details, including due date, appear below the barcode field.
3. When the patron is finished, they can click Logout if they want a receipt for their items, or Logout (no receipt)if they prefer no receipt.
Chapter 115. RFID Product Integration 621
Chapter 115. RFID Product Integration
Evergreen Integration with PV SupaGoodStuff RFID ReaderThis feature enables the Evergreen staff client to "talk" to the PV Supa Goodstuff RFID reader so that libraries canutilize PV Supa Goodstuff’s RFID technology when checking items in and out.
Administration
To use PV Supa Goodstuff, you must add code to the Admin module that Evergreen can use to identify the reader.
1. Click Admin # Workstation Admin # Server Add-ons.
2. Enter the code, pv_supa_goodstuff, to identify PV Supa Goodstuff in the Active Server Add-Ons field.
3. Click Update Active Add-Ons.
4. Look at the next field, Add-on Preferences. Enter information in the GoodStuff tab.
5. Check the Enabled check box to enable this add-on.
6. Enter the IP/Hostname of the hardware.
7. Enter the port.
8. Click Update.
Using RFID at the Circulation Desk
RFID functionality is available in the Circulation module via the check-out interface, the check-out function in thepatron account, and the check-in interface.
From the Check-Out interface (F1):
1. Check the RFID checkbox if your library cards have embedded RFID chips that Evergreen can use to retrieve thepatron barcode. RFID check boxes appear only if appropriate code words have been added in the Server Add-Ons.
2. Place the patron’s library card and/or item(s) on the PV Supa Goodstuff Reader. Evergreen will take you to thepatron’s account. If item(s) with RFID chips have also been placed on the reader, and the corresponding checkboxis checked, then Evergreen will scan the item(s) into the patron’s account.
RFID check boxes are sticky, so if you have checked an RFID box once, then it will continue to be checkedwhen you re-open the interface.
If you do not use RFID chips to retrieve patrons' accounts, then leave the RFID box unchecked. You can scana patron barcode with a barcode scanner, and Evergreen will retrieve the patron data without using the RFIDfeature. From the patron’s account, Evergreen can check out items using the RFID reader. See the next sectionfor details.
Chapter 115. RFID Product Integration 622Report errors in this documentation using Launchpad.
1. Click Done to complete the transaction, or close the window.
From the Check-Out tab in a patron’s record:
1. Open a patron’s record, and stack the item(s) to be checked out on the RFID reader. To retrieve item data usingthe RFID chips embedded in the item barcodes, click the RFID check box at the bottom of the patron account.When this box is checked, Evergreen will read the item(s) that are stacked on the RFID reader, check out theitem(s), and disable the security bits.
2. Click Done to complete the transaction, or close the window.
Evergreen pop-up messages, such as an Alert Message or Item Already Circulating may appear duringtransactions. Two new dialogs specific to PV Supa Goodstuff may also appear. One dialog, Incomplete Sets,allows you to continue checking out an incomplete set, such as a CD collection, or you can ask the hardwareto rescan the RFID tags to look again for a full set. The second dialog allows you to manually attempt to set orunset the security bit on an item if the automatic attempt failed.
From the Check In interface:
1. Click the RFID check box.
2. Place the items on the PV Supa Goodstuff Reader.
3. Evergreen will tell the reader to check in the item(s) and enable the security bits. The item(s) appear in a liston the screen.

Part XII. Reports
Part XII. Reports 624
Table of Contents116. Introduction ......................................................................................................................................... 625117. Starting and Stopping the Reporter Daemon .............................................................................................. 626
Starting the Reporter Daemon ............................................................................................................... 626Stopping the Reporter Daemon .............................................................................................................. 626
118. Folders ............................................................................................................................................... 627Creating Folders ................................................................................................................................. 627Managing Folders ............................................................................................................................... 628
119. Creating Templates ............................................................................................................................... 629Choosing Report Fields ........................................................................................................................ 629Applying Filters .................................................................................................................................. 639
Using Base Filters ....................................................................................................................... 639120. Generating Reports from Templates ......................................................................................................... 643
Viewing and Editing Report Parameters .................................................................................................. 646121. Viewing Report Output ......................................................................................................................... 649122. Cloning Shared Templates ..................................................................................................................... 651123. Adding Data Sources to Reporter ............................................................................................................ 652
Create a PostgreSQL query, view, or table for your data source ................................................................... 652Add a new class to fm_IDL.xml for your data source ................................................................................ 653Restart the affected services to see the new data source in the reporter .......................................................... 655
124. Running Recurring Reports .................................................................................................................... 657125. Template Terminology .......................................................................................................................... 658
Data Types ........................................................................................................................................ 658Field Transforms ................................................................................................................................. 659
126. Template Enhancements ........................................................................................................................ 661Documentation URL ............................................................................................................................ 661Field Hints ......................................................................................................................................... 662
127. Exporting Report Templates Using phpPgAdmin ....................................................................................... 664Dump the Entire Reports Template Table ................................................................................................ 664Dump Data with an SQL Statement ....................................................................................................... 664

Chapter 116. Introduction 625
Chapter 116. IntroductionLearn how to create and use reports in Evergreen.
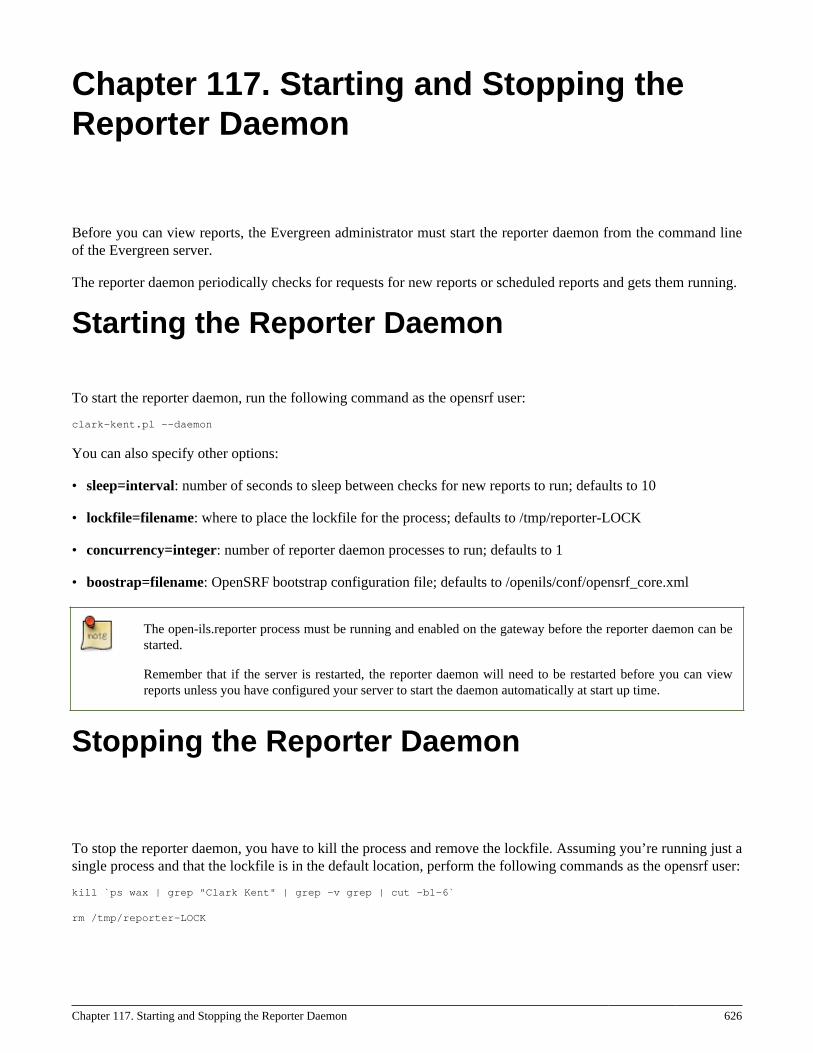
Chapter 117. Starting and Stopping the Reporter Daemon 626
Chapter 117. Starting and Stopping theReporter Daemon
Before you can view reports, the Evergreen administrator must start the reporter daemon from the command lineof the Evergreen server.
The reporter daemon periodically checks for requests for new reports or scheduled reports and gets them running.
Starting the Reporter Daemon
To start the reporter daemon, run the following command as the opensrf user:
clark-kent.pl --daemon
You can also specify other options:
• sleep=interval: number of seconds to sleep between checks for new reports to run; defaults to 10
• lockfile=filename: where to place the lockfile for the process; defaults to /tmp/reporter-LOCK
• concurrency=integer: number of reporter daemon processes to run; defaults to 1
• boostrap=filename: OpenSRF bootstrap configuration file; defaults to /openils/conf/opensrf_core.xml
The open-ils.reporter process must be running and enabled on the gateway before the reporter daemon can bestarted.
Remember that if the server is restarted, the reporter daemon will need to be restarted before you can viewreports unless you have configured your server to start the daemon automatically at start up time.
Stopping the Reporter Daemon
To stop the reporter daemon, you have to kill the process and remove the lockfile. Assuming you’re running just asingle process and that the lockfile is in the default location, perform the following commands as the opensrf user:
kill `ps wax | grep "Clark Kent" | grep -v grep | cut -b1-6`
rm /tmp/reporter-LOCK

Chapter 118. Folders 627
Chapter 118. Folders
There are three main components to reports: Templates, Reports, and Output. Each of these components must bestored in a folder. Folders can be private (accessible to your login only) or shared with other staff at your library, otherlibraries in your system or consortium. It is also possible to selectively share only certain folders and/or subfolders.
There are two parts to the folders pane. The My Folders section contains folders created with your Evergreen account.Folders that other users have shared with you appear in the Shared Folders section under the username of the sharingaccount.
Creating Folders
Whether you are creating a report from scratch or working from a shared template you must first create at leastone folder.
The steps for creating folders are similar for each reporting function. It is easier to create folders for templates,reports, and output all at once at the beginning, though it is possible to do it before each step. This exampledemonstrates creating a folder for a template.
1. Click on Templates in the My Folders section.
2. Name the folder. Select Share or Do not share from the dropdown menu.
3. If you want to share your folder, select who you want to share this folder with from the dropdown menu.
4. Click Create Sub Folder.
5. Click OK.
6. Next, create a folder for the report definition to be saved to. Click on Reports.
7. Repeat steps 2-5 to create a Reports folder also called Circulation.
Chapter 118. Folders 628Report errors in this documentation using Launchpad.
8. Finally, you need to create a folder for the report’s output to be saved in. Click on Output.
9. Repeat steps 2-5 to create an Output folder named Circulation.
Using a parallel naming scheme for folders in Templates, Reports, and Output helps keep your reports organizedand easier to find
The folders you just created will now be visible by clicking the arrows in My Folders. Bracketed after the foldername is whom the folder is shared with. For example, Circulation (BNCLF) is shared with the North Coast LibraryFederation. If it is not a shared folder there will be nothing after the folder name. You may create as many foldersand sub-folders as you like.
Managing Folders
Once a folder has been created you can change the name, delete it, create a new subfolder, or change the sharingsettings. This example demonstrates changing a folder name; the other choices follow similar steps
1. Click on the folder that you wish to rename.
2. Click Manage Folder.
3. Select Change folder name from the dropdown menu and click Go.
4. Enter the new name and click Submit.
5. Click OK.
6. You will get a confirmation box that the Action Succeeded. Click OK.
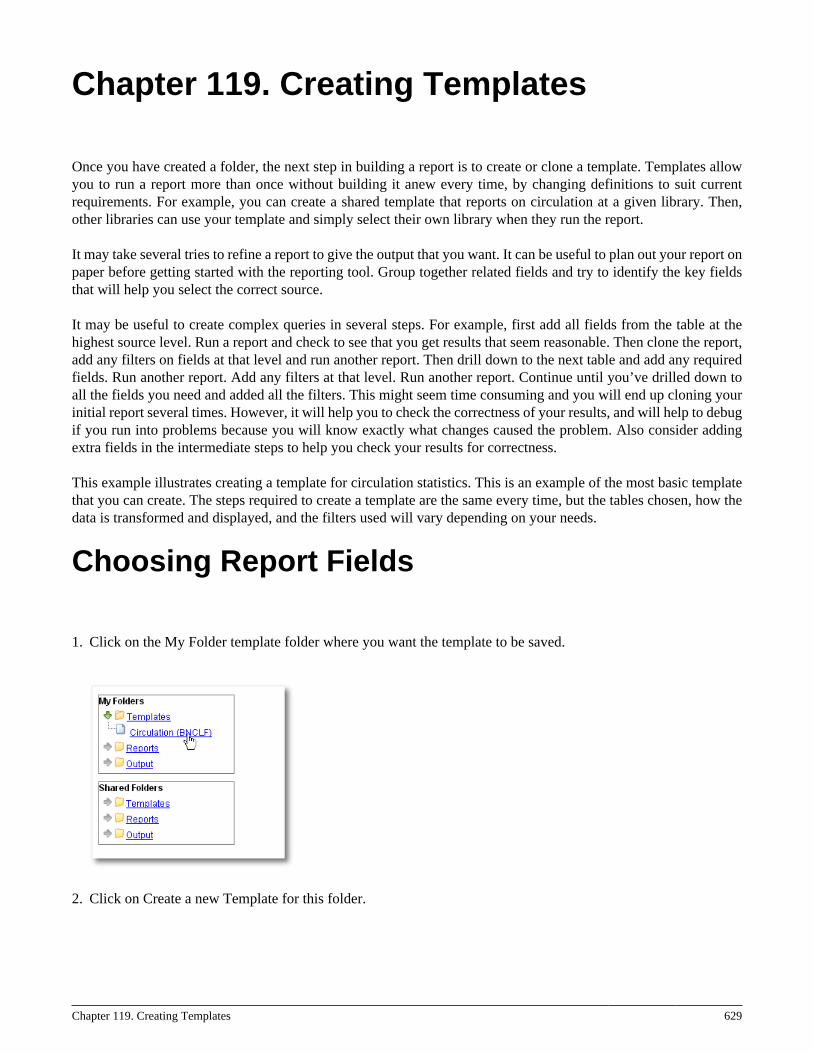
Chapter 119. Creating Templates 629
Chapter 119. Creating Templates
Once you have created a folder, the next step in building a report is to create or clone a template. Templates allowyou to run a report more than once without building it anew every time, by changing definitions to suit currentrequirements. For example, you can create a shared template that reports on circulation at a given library. Then,other libraries can use your template and simply select their own library when they run the report.
It may take several tries to refine a report to give the output that you want. It can be useful to plan out your report onpaper before getting started with the reporting tool. Group together related fields and try to identify the key fieldsthat will help you select the correct source.
It may be useful to create complex queries in several steps. For example, first add all fields from the table at thehighest source level. Run a report and check to see that you get results that seem reasonable. Then clone the report,add any filters on fields at that level and run another report. Then drill down to the next table and add any requiredfields. Run another report. Add any filters at that level. Run another report. Continue until you’ve drilled down toall the fields you need and added all the filters. This might seem time consuming and you will end up cloning yourinitial report several times. However, it will help you to check the correctness of your results, and will help to debugif you run into problems because you will know exactly what changes caused the problem. Also consider addingextra fields in the intermediate steps to help you check your results for correctness.
This example illustrates creating a template for circulation statistics. This is an example of the most basic templatethat you can create. The steps required to create a template are the same every time, but the tables chosen, how thedata is transformed and displayed, and the filters used will vary depending on your needs.
Choosing Report Fields
1. Click on the My Folder template folder where you want the template to be saved.
2. Click on Create a new Template for this folder.
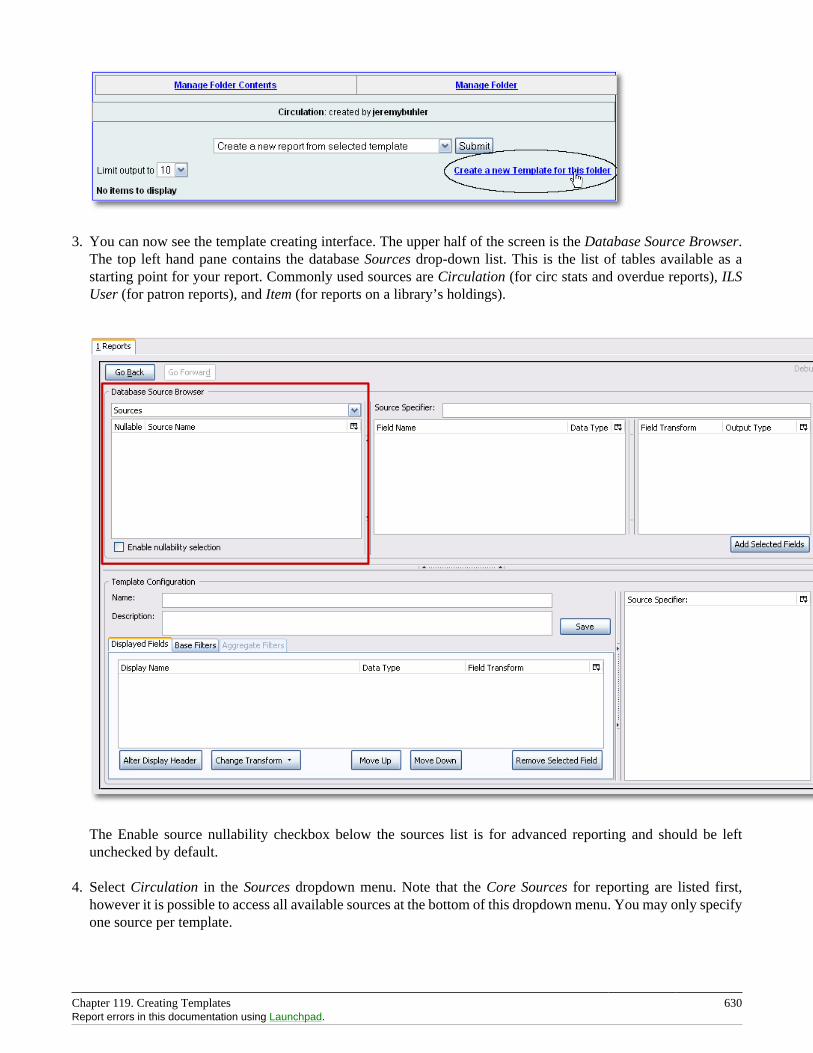
Chapter 119. Creating Templates 630Report errors in this documentation using Launchpad.
3. You can now see the template creating interface. The upper half of the screen is the Database Source Browser.The top left hand pane contains the database Sources drop-down list. This is the list of tables available as astarting point for your report. Commonly used sources are Circulation (for circ stats and overdue reports), ILSUser (for patron reports), and Item (for reports on a library’s holdings).
The Enable source nullability checkbox below the sources list is for advanced reporting and should be leftunchecked by default.
4. Select Circulation in the Sources dropdown menu. Note that the Core Sources for reporting are listed first,however it is possible to access all available sources at the bottom of this dropdown menu. You may only specifyone source per template.
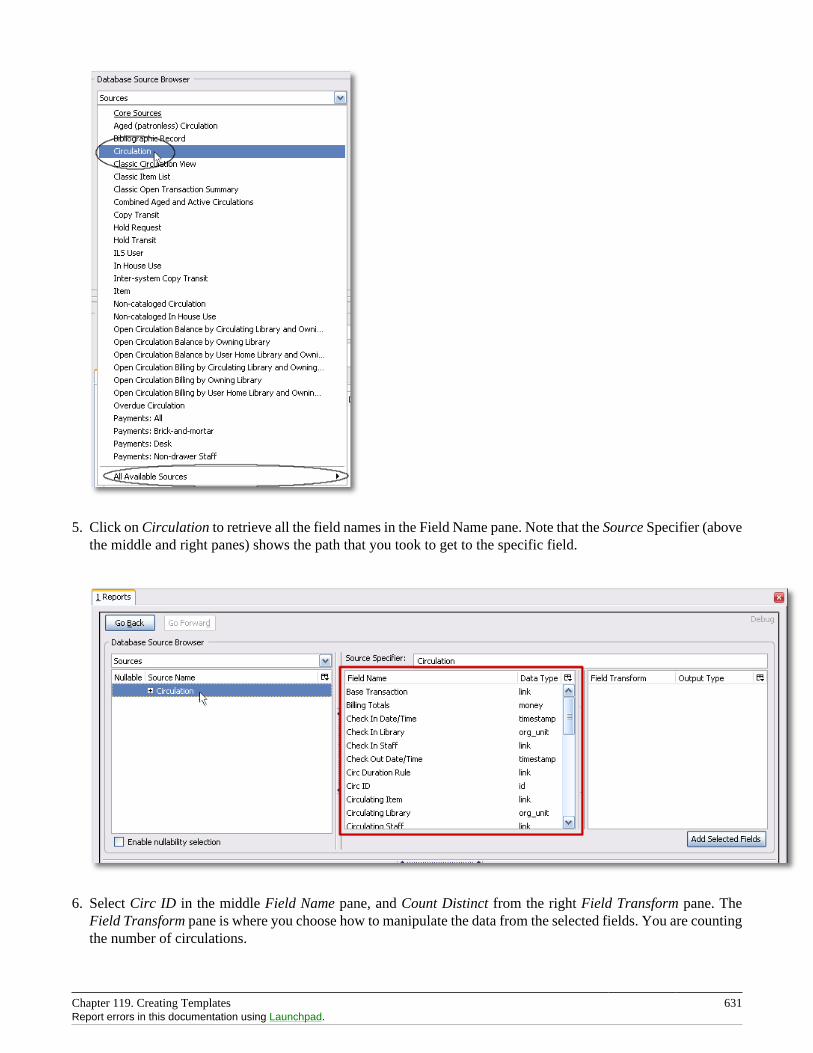
Chapter 119. Creating Templates 631Report errors in this documentation using Launchpad.
5. Click on Circulation to retrieve all the field names in the Field Name pane. Note that the Source Specifier (abovethe middle and right panes) shows the path that you took to get to the specific field.
6. Select Circ ID in the middle Field Name pane, and Count Distinct from the right Field Transform pane. TheField Transform pane is where you choose how to manipulate the data from the selected fields. You are countingthe number of circulations.
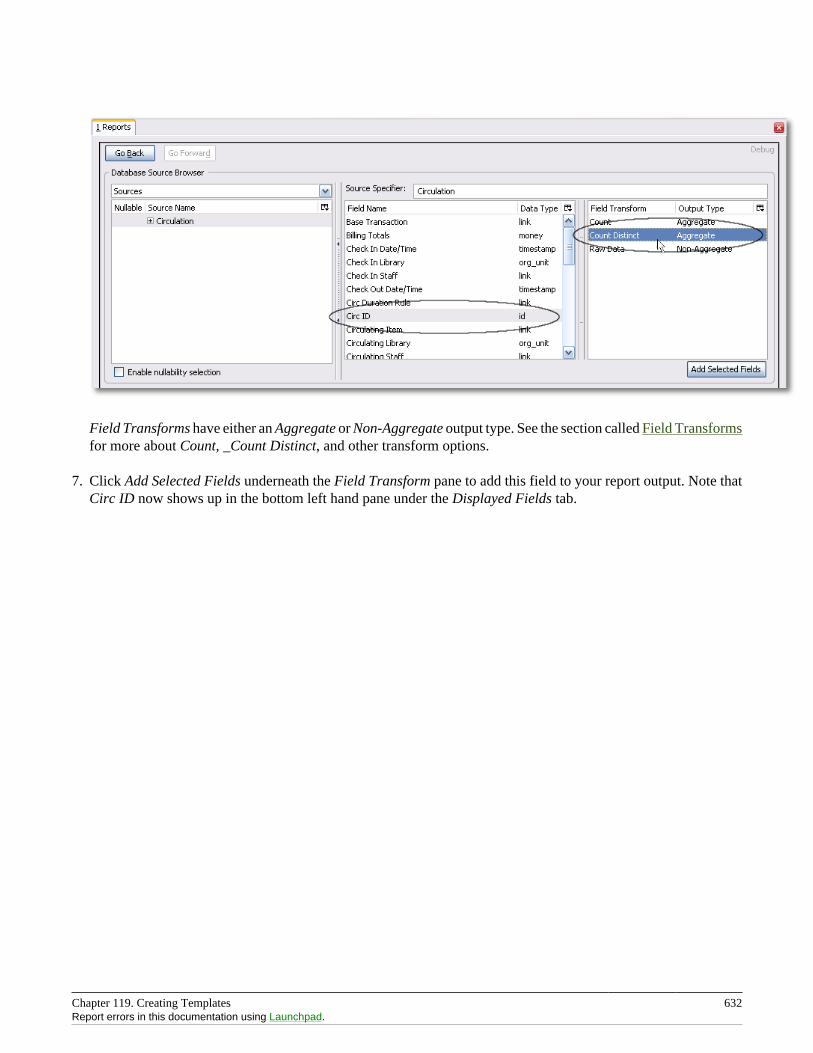
Chapter 119. Creating Templates 632Report errors in this documentation using Launchpad.
Field Transforms have either an Aggregate or Non-Aggregate output type. See the section called Field Transformsfor more about Count, _Count Distinct, and other transform options.
7. Click Add Selected Fields underneath the Field Transform pane to add this field to your report output. Note thatCirc ID now shows up in the bottom left hand pane under the Displayed Fields tab.
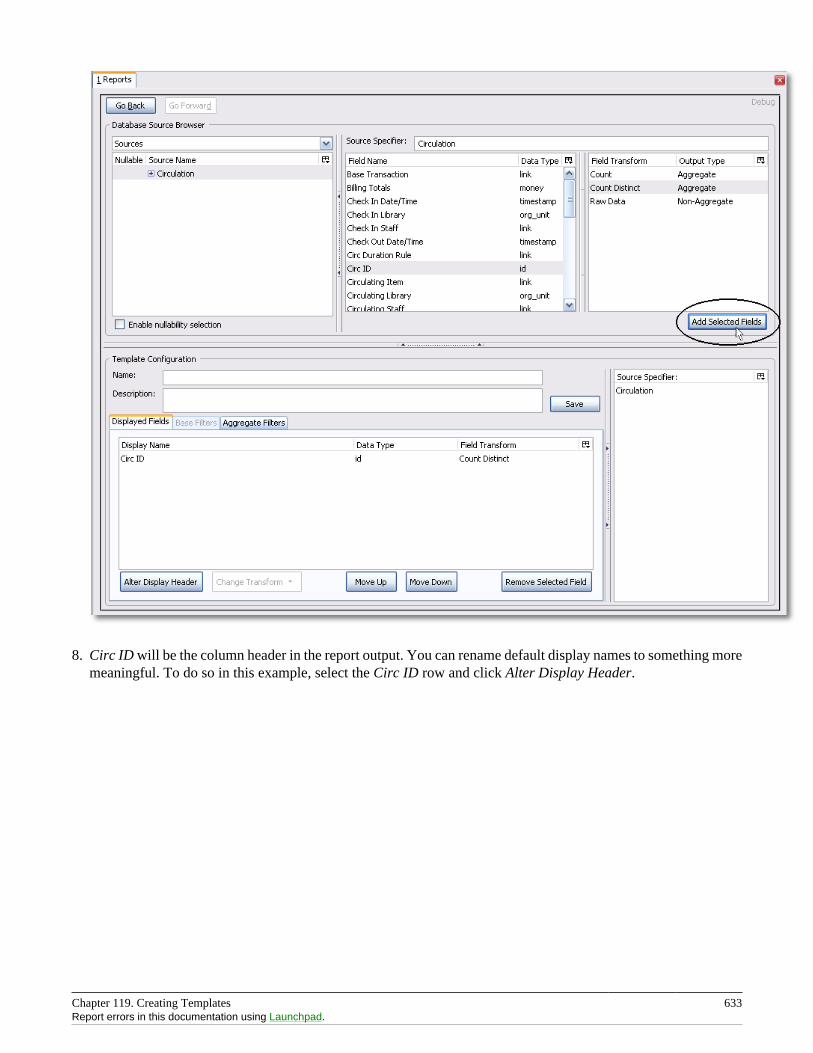
Chapter 119. Creating Templates 633Report errors in this documentation using Launchpad.
8. Circ ID will be the column header in the report output. You can rename default display names to something moremeaningful. To do so in this example, select the Circ ID row and click Alter Display Header.
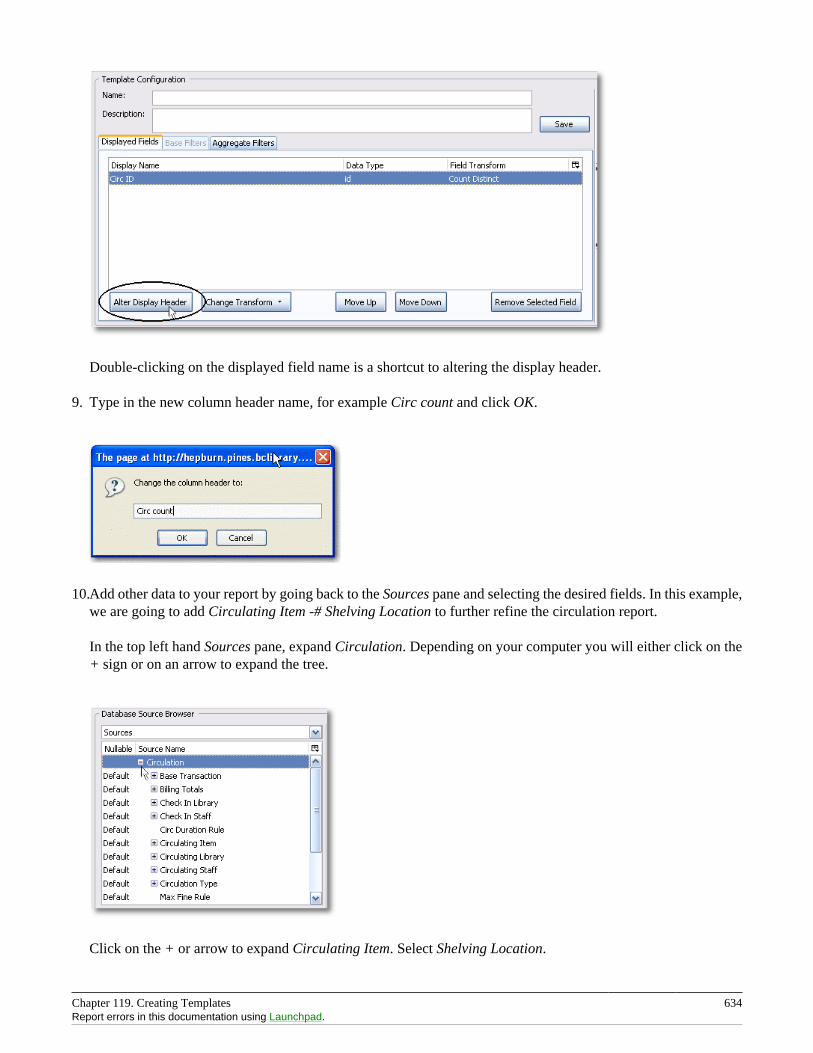
Chapter 119. Creating Templates 634Report errors in this documentation using Launchpad.
Double-clicking on the displayed field name is a shortcut to altering the display header.
9. Type in the new column header name, for example Circ count and click OK.
10.Add other data to your report by going back to the Sources pane and selecting the desired fields. In this example,we are going to add Circulating Item -# Shelving Location to further refine the circulation report.
In the top left hand Sources pane, expand Circulation. Depending on your computer you will either click on the+ sign or on an arrow to expand the tree.
Click on the + or arrow to expand Circulating Item. Select Shelving Location.
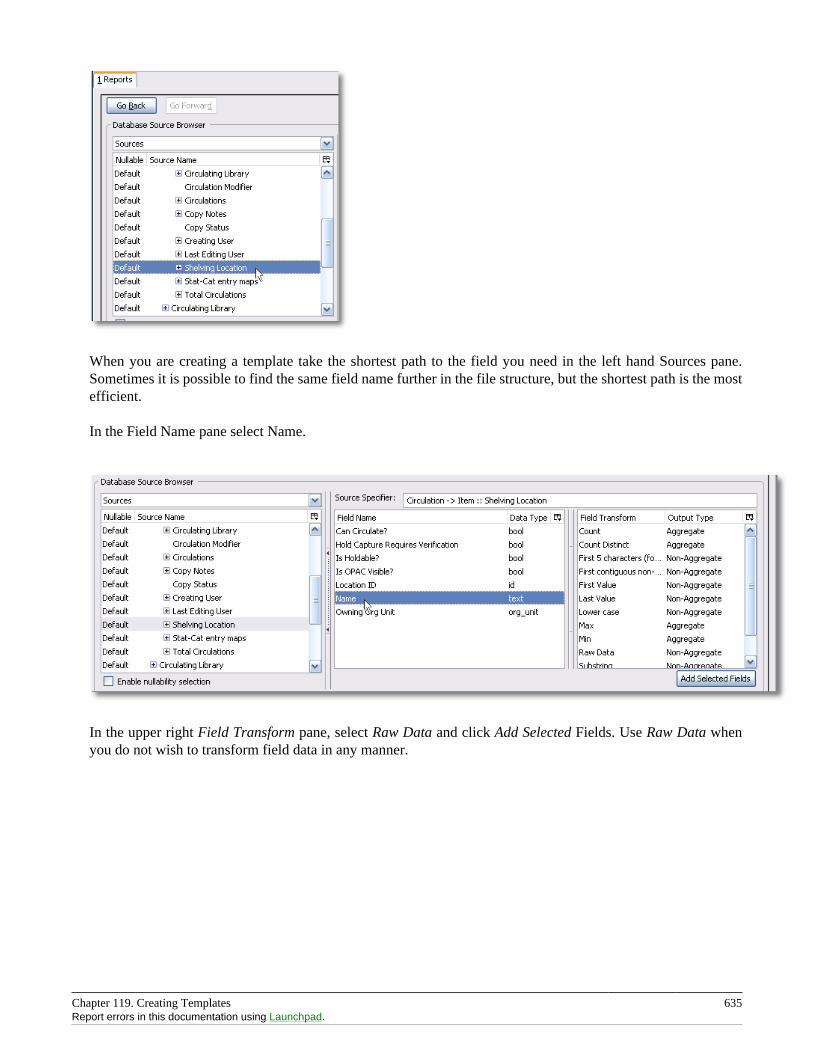
Chapter 119. Creating Templates 635Report errors in this documentation using Launchpad.
When you are creating a template take the shortest path to the field you need in the left hand Sources pane.Sometimes it is possible to find the same field name further in the file structure, but the shortest path is the mostefficient.
In the Field Name pane select Name.
In the upper right Field Transform pane, select Raw Data and click Add Selected Fields. Use Raw Data whenyou do not wish to transform field data in any manner.
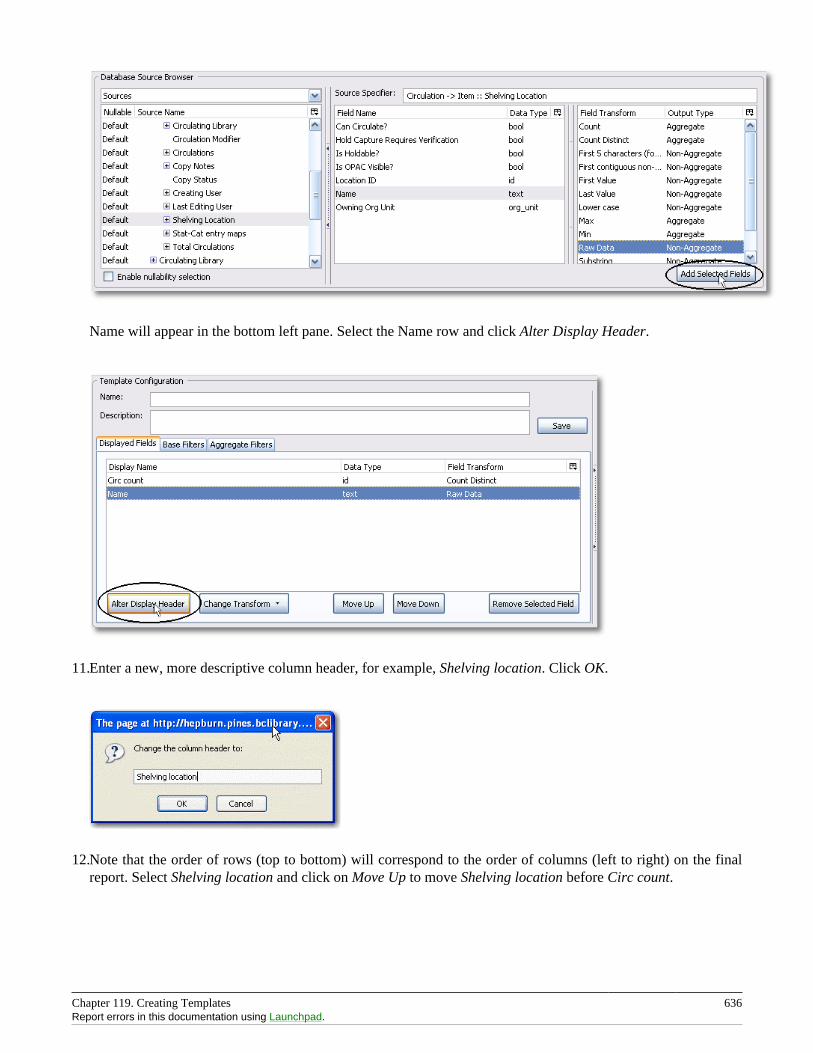
Chapter 119. Creating Templates 636Report errors in this documentation using Launchpad.
Name will appear in the bottom left pane. Select the Name row and click Alter Display Header.
11.Enter a new, more descriptive column header, for example, Shelving location. Click OK.
12.Note that the order of rows (top to bottom) will correspond to the order of columns (left to right) on the finalreport. Select Shelving location and click on Move Up to move Shelving location before Circ count.
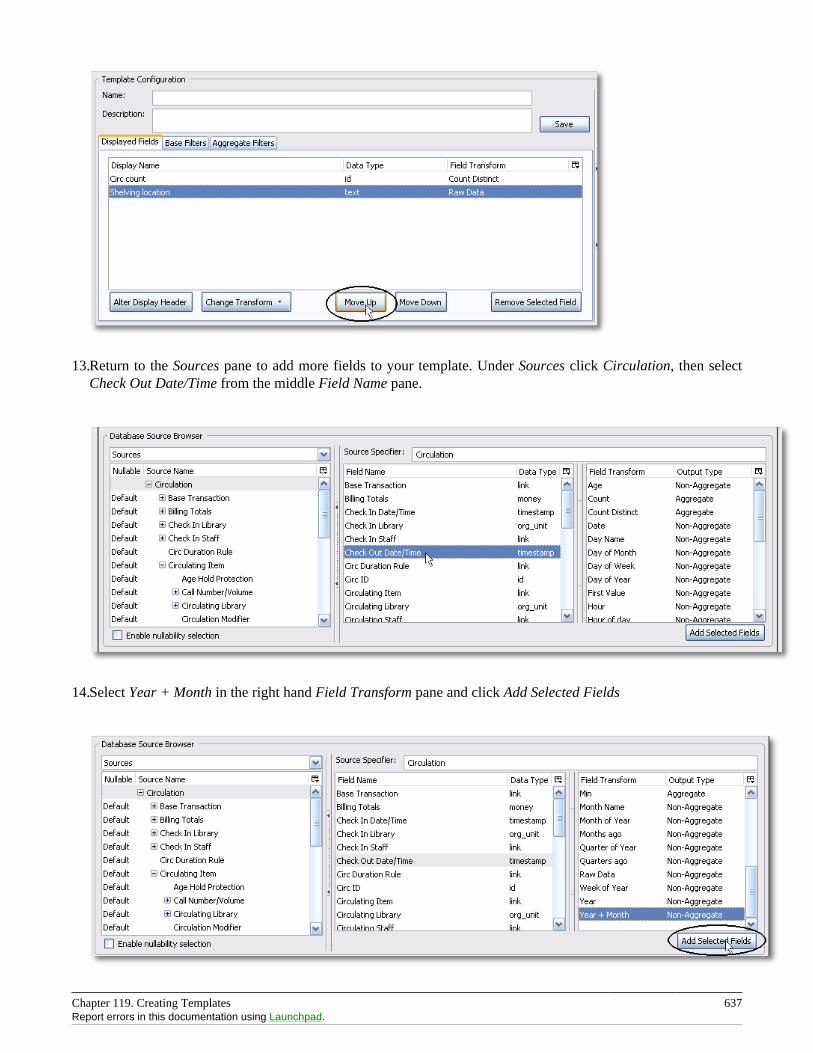
Chapter 119. Creating Templates 637Report errors in this documentation using Launchpad.
13.Return to the Sources pane to add more fields to your template. Under Sources click Circulation, then selectCheck Out Date/Time from the middle Field Name pane.
14.Select Year + Month in the right hand Field Transform pane and click Add Selected Fields
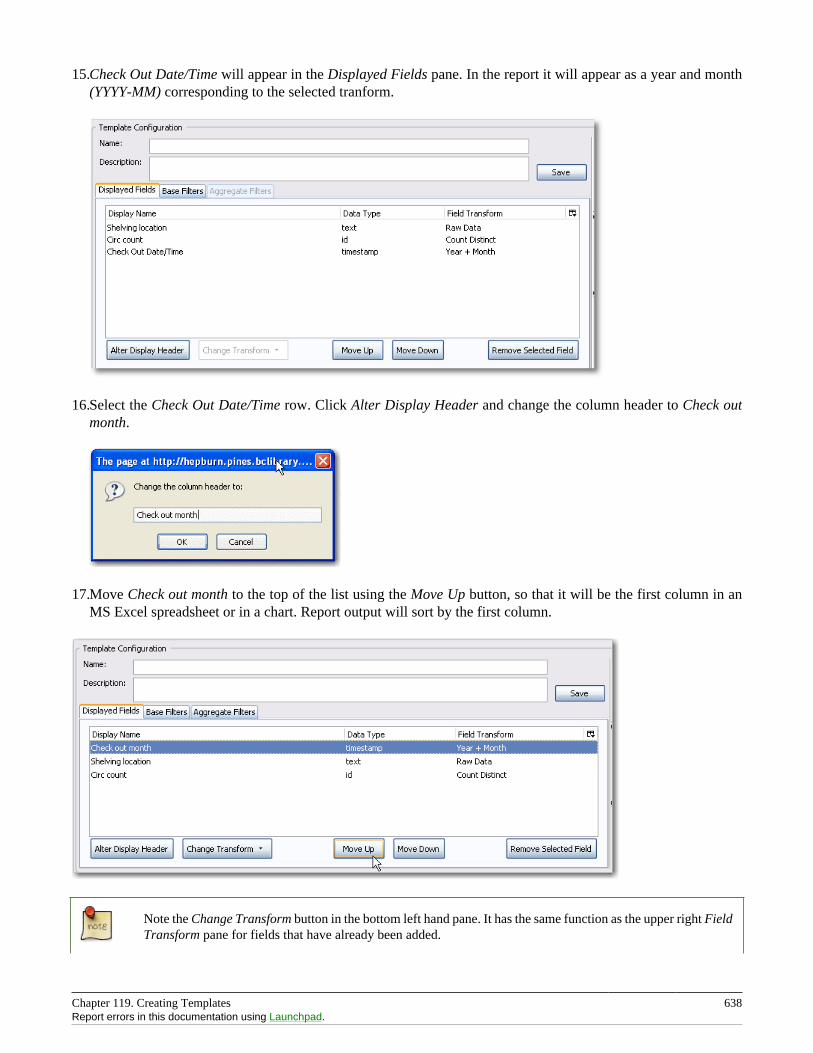
Chapter 119. Creating Templates 638Report errors in this documentation using Launchpad.
15.Check Out Date/Time will appear in the Displayed Fields pane. In the report it will appear as a year and month(YYYY-MM) corresponding to the selected tranform.
16.Select the Check Out Date/Time row. Click Alter Display Header and change the column header to Check outmonth.
17.Move Check out month to the top of the list using the Move Up button, so that it will be the first column in anMS Excel spreadsheet or in a chart. Report output will sort by the first column.
Note the Change Transform button in the bottom left hand pane. It has the same function as the upper right FieldTransform pane for fields that have already been added.
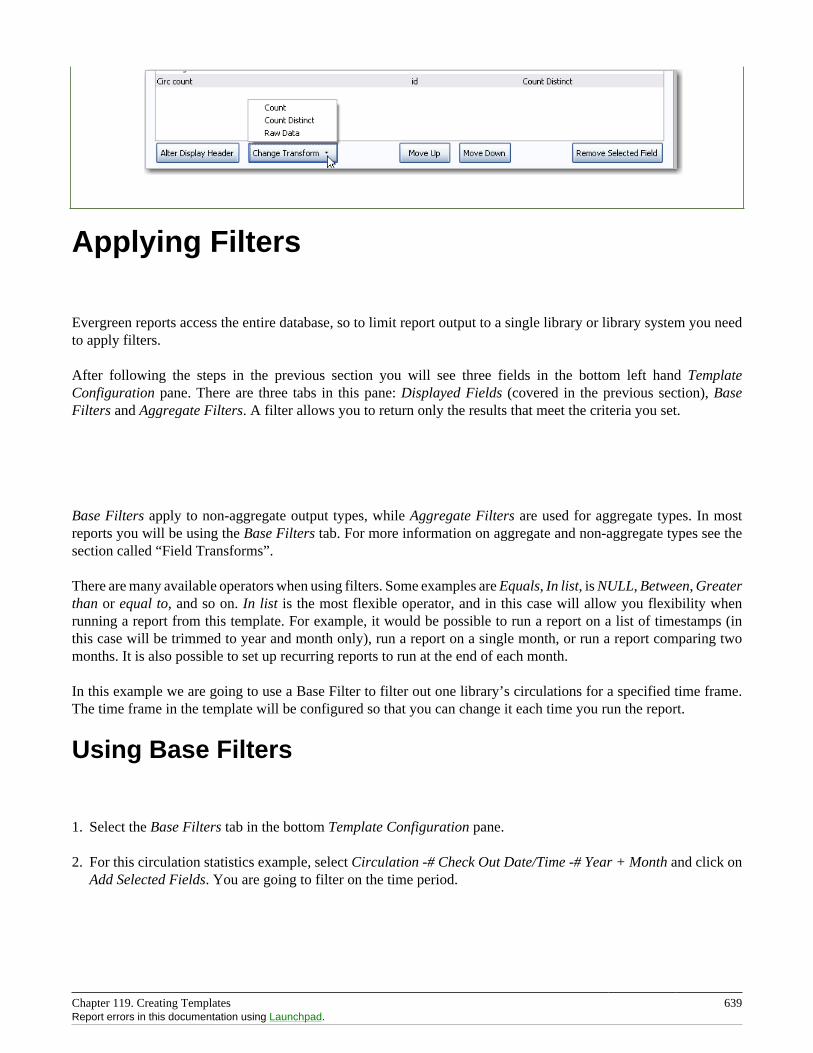
Chapter 119. Creating Templates 639Report errors in this documentation using Launchpad.
Applying Filters
Evergreen reports access the entire database, so to limit report output to a single library or library system you needto apply filters.
After following the steps in the previous section you will see three fields in the bottom left hand TemplateConfiguration pane. There are three tabs in this pane: Displayed Fields (covered in the previous section), BaseFilters and Aggregate Filters. A filter allows you to return only the results that meet the criteria you set.
Base Filters apply to non-aggregate output types, while Aggregate Filters are used for aggregate types. In mostreports you will be using the Base Filters tab. For more information on aggregate and non-aggregate types see thesection called “Field Transforms”.
There are many available operators when using filters. Some examples are Equals, In list, is NULL, Between, Greaterthan or equal to, and so on. In list is the most flexible operator, and in this case will allow you flexibility whenrunning a report from this template. For example, it would be possible to run a report on a list of timestamps (inthis case will be trimmed to year and month only), run a report on a single month, or run a report comparing twomonths. It is also possible to set up recurring reports to run at the end of each month.
In this example we are going to use a Base Filter to filter out one library’s circulations for a specified time frame.The time frame in the template will be configured so that you can change it each time you run the report.
Using Base Filters
1. Select the Base Filters tab in the bottom Template Configuration pane.
2. For this circulation statistics example, select Circulation -# Check Out Date/Time -# Year + Month and click onAdd Selected Fields. You are going to filter on the time period.
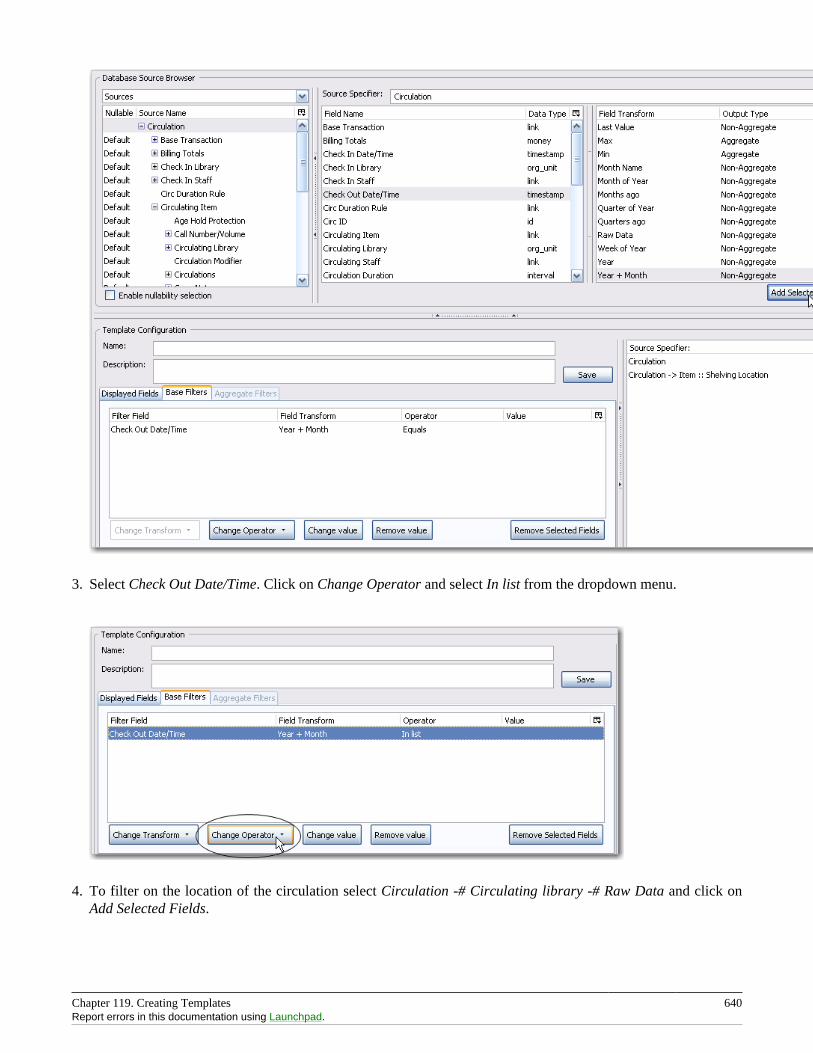
Chapter 119. Creating Templates 640Report errors in this documentation using Launchpad.
3. Select Check Out Date/Time. Click on Change Operator and select In list from the dropdown menu.
4. To filter on the location of the circulation select Circulation -# Circulating library -# Raw Data and click onAdd Selected Fields.
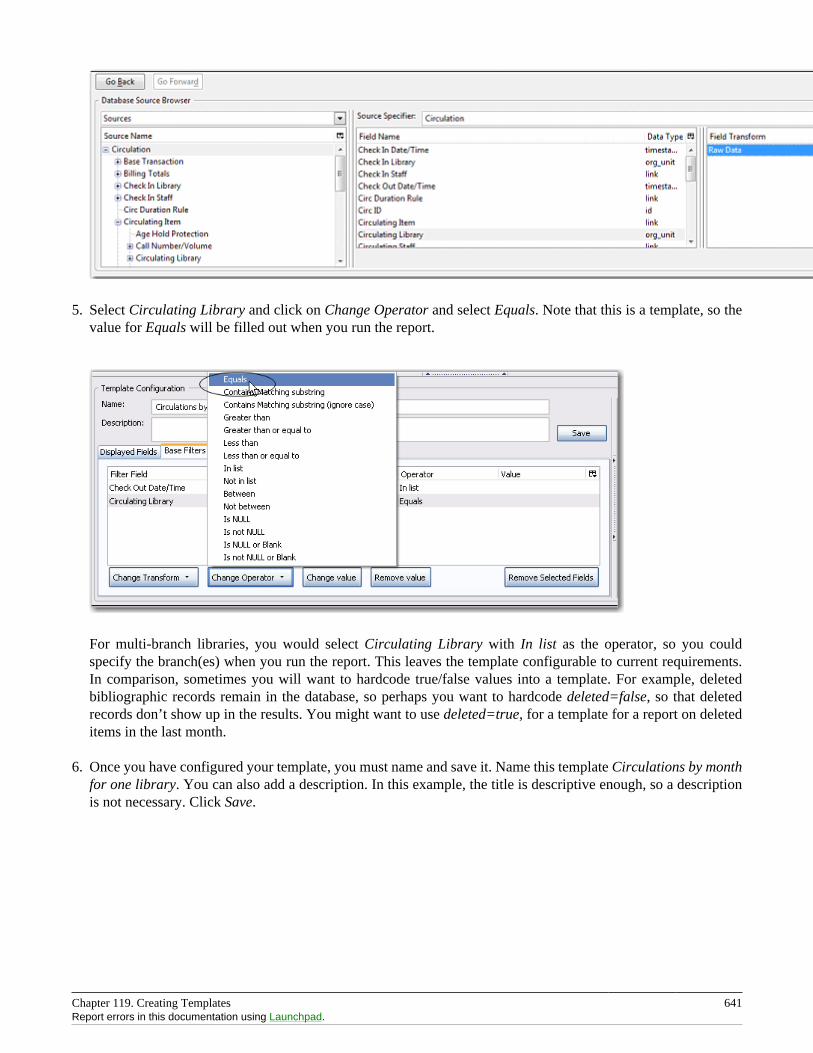
Chapter 119. Creating Templates 641Report errors in this documentation using Launchpad.
5. Select Circulating Library and click on Change Operator and select Equals. Note that this is a template, so thevalue for Equals will be filled out when you run the report.
For multi-branch libraries, you would select Circulating Library with In list as the operator, so you couldspecify the branch(es) when you run the report. This leaves the template configurable to current requirements.In comparison, sometimes you will want to hardcode true/false values into a template. For example, deletedbibliographic records remain in the database, so perhaps you want to hardcode deleted=false, so that deletedrecords don’t show up in the results. You might want to use deleted=true, for a template for a report on deleteditems in the last month.
6. Once you have configured your template, you must name and save it. Name this template Circulations by monthfor one library. You can also add a description. In this example, the title is descriptive enough, so a descriptionis not necessary. Click Save.
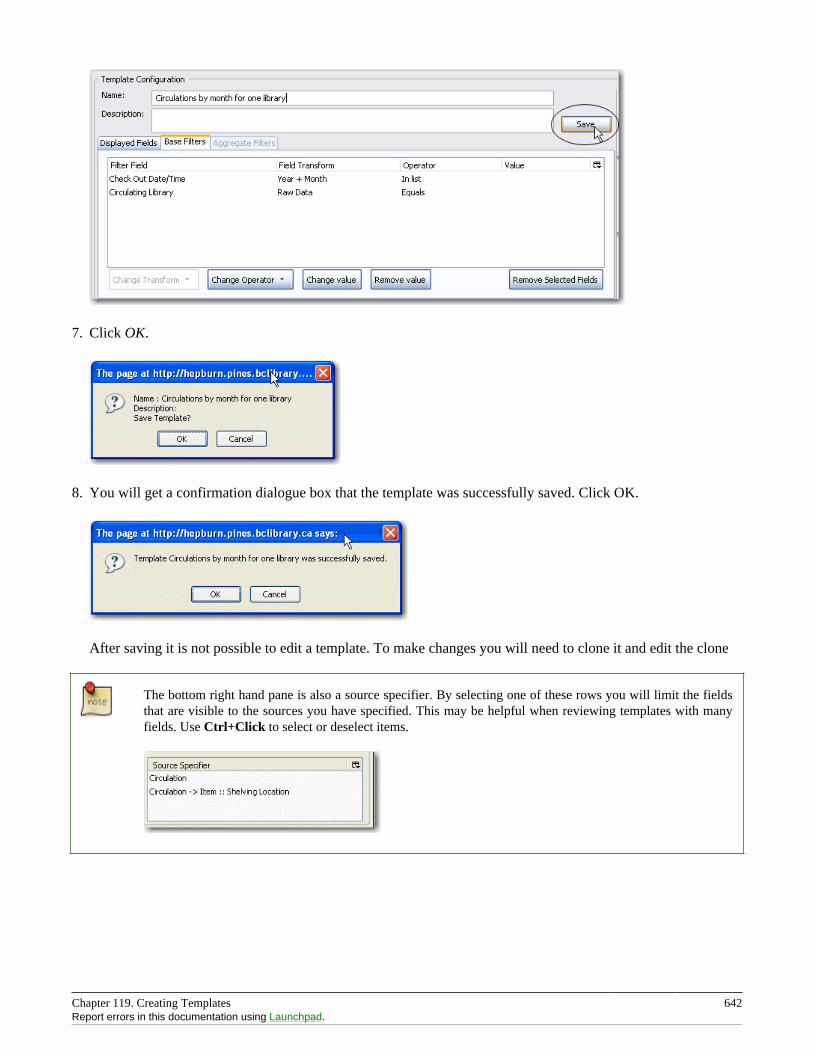
Chapter 119. Creating Templates 642Report errors in this documentation using Launchpad.
7. Click OK.
8. You will get a confirmation dialogue box that the template was successfully saved. Click OK.
After saving it is not possible to edit a template. To make changes you will need to clone it and edit the clone
The bottom right hand pane is also a source specifier. By selecting one of these rows you will limit the fieldsthat are visible to the sources you have specified. This may be helpful when reviewing templates with manyfields. Use Ctrl+Click to select or deselect items.
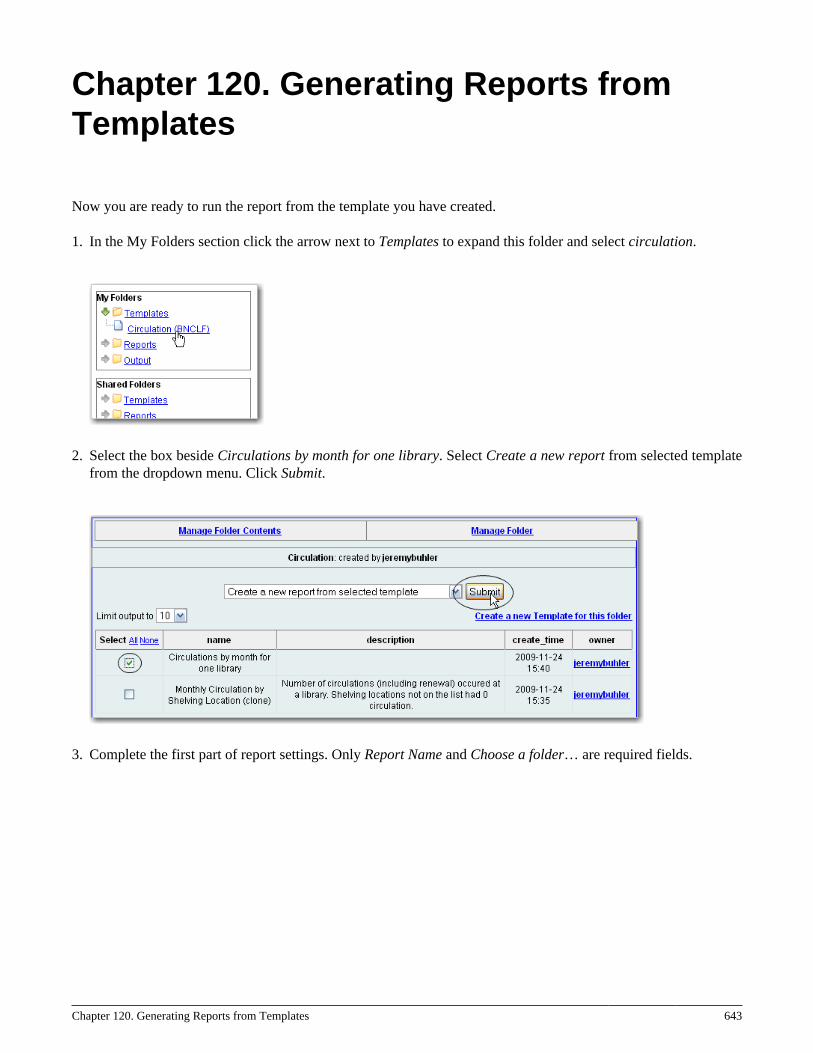
Chapter 120. Generating Reports from Templates 643
Chapter 120. Generating Reports fromTemplates
Now you are ready to run the report from the template you have created.
1. In the My Folders section click the arrow next to Templates to expand this folder and select circulation.
2. Select the box beside Circulations by month for one library. Select Create a new report from selected templatefrom the dropdown menu. Click Submit.
3. Complete the first part of report settings. Only Report Name and Choose a folder… are required fields.
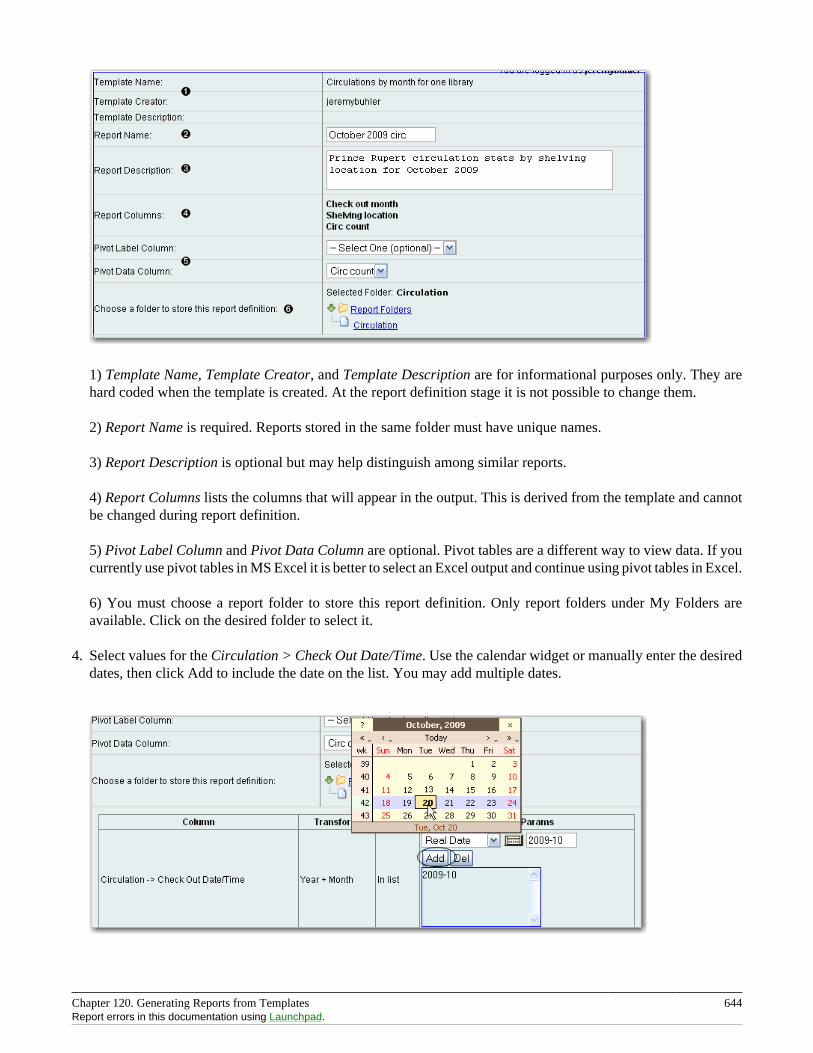
Chapter 120. Generating Reports from Templates 644Report errors in this documentation using Launchpad.
1) Template Name, Template Creator, and Template Description are for informational purposes only. They arehard coded when the template is created. At the report definition stage it is not possible to change them.
2) Report Name is required. Reports stored in the same folder must have unique names.
3) Report Description is optional but may help distinguish among similar reports.
4) Report Columns lists the columns that will appear in the output. This is derived from the template and cannotbe changed during report definition.
5) Pivot Label Column and Pivot Data Column are optional. Pivot tables are a different way to view data. If youcurrently use pivot tables in MS Excel it is better to select an Excel output and continue using pivot tables in Excel.
6) You must choose a report folder to store this report definition. Only report folders under My Folders areavailable. Click on the desired folder to select it.
4. Select values for the Circulation > Check Out Date/Time. Use the calendar widget or manually enter the desireddates, then click Add to include the date on the list. You may add multiple dates.
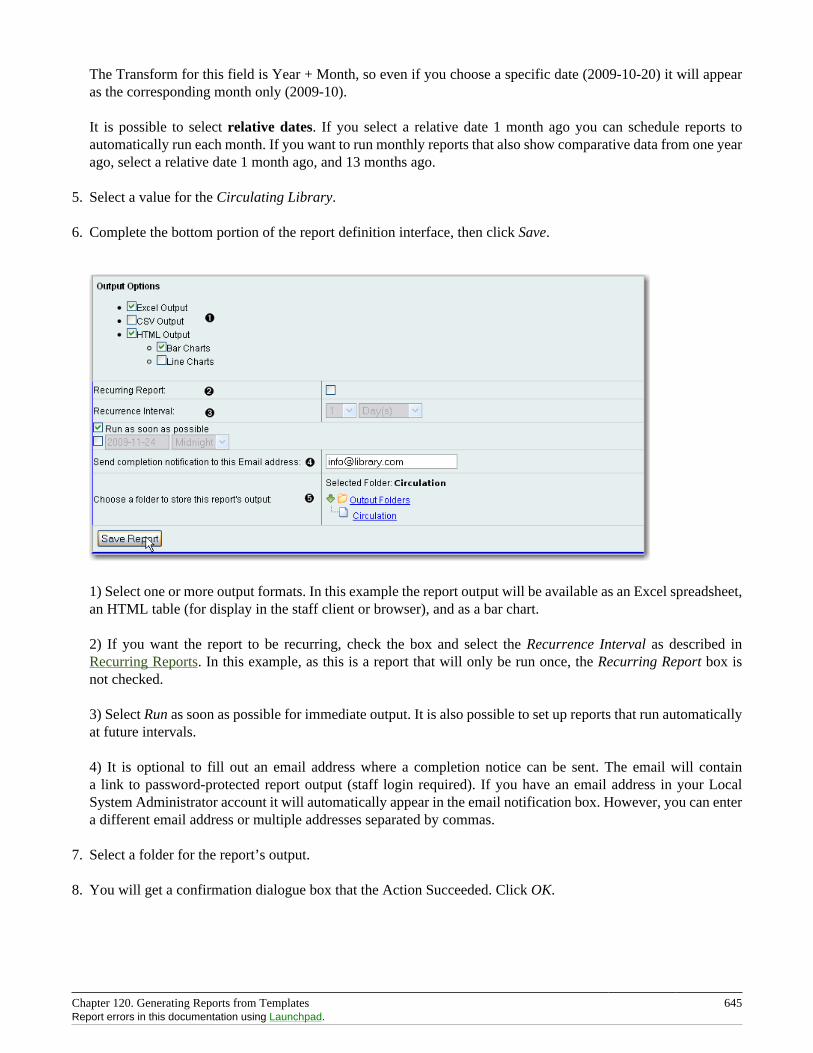
Chapter 120. Generating Reports from Templates 645Report errors in this documentation using Launchpad.
The Transform for this field is Year + Month, so even if you choose a specific date (2009-10-20) it will appearas the corresponding month only (2009-10).
It is possible to select relative dates. If you select a relative date 1 month ago you can schedule reports toautomatically run each month. If you want to run monthly reports that also show comparative data from one yearago, select a relative date 1 month ago, and 13 months ago.
5. Select a value for the Circulating Library.
6. Complete the bottom portion of the report definition interface, then click Save.
1) Select one or more output formats. In this example the report output will be available as an Excel spreadsheet,an HTML table (for display in the staff client or browser), and as a bar chart.
2) If you want the report to be recurring, check the box and select the Recurrence Interval as described inRecurring Reports. In this example, as this is a report that will only be run once, the Recurring Report box isnot checked.
3) Select Run as soon as possible for immediate output. It is also possible to set up reports that run automaticallyat future intervals.
4) It is optional to fill out an email address where a completion notice can be sent. The email will containa link to password-protected report output (staff login required). If you have an email address in your LocalSystem Administrator account it will automatically appear in the email notification box. However, you can entera different email address or multiple addresses separated by commas.
7. Select a folder for the report’s output.
8. You will get a confirmation dialogue box that the Action Succeeded. Click OK.
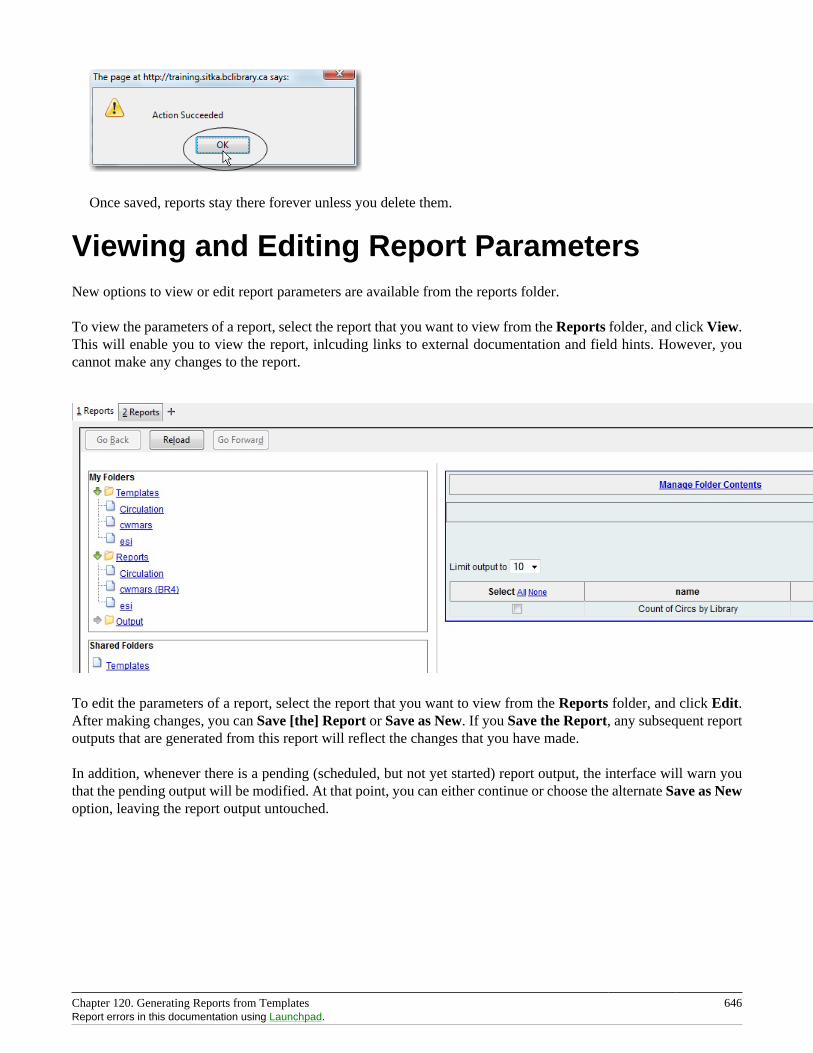
Chapter 120. Generating Reports from Templates 646Report errors in this documentation using Launchpad.
Once saved, reports stay there forever unless you delete them.
Viewing and Editing Report ParametersNew options to view or edit report parameters are available from the reports folder.
To view the parameters of a report, select the report that you want to view from the Reports folder, and click View.This will enable you to view the report, inlcuding links to external documentation and field hints. However, youcannot make any changes to the report.
To edit the parameters of a report, select the report that you want to view from the Reports folder, and click Edit.After making changes, you can Save [the] Report or Save as New. If you Save the Report, any subsequent reportoutputs that are generated from this report will reflect the changes that you have made.
In addition, whenever there is a pending (scheduled, but not yet started) report output, the interface will warn youthat the pending output will be modified. At that point, you can either continue or choose the alternate Save as Newoption, leaving the report output untouched.
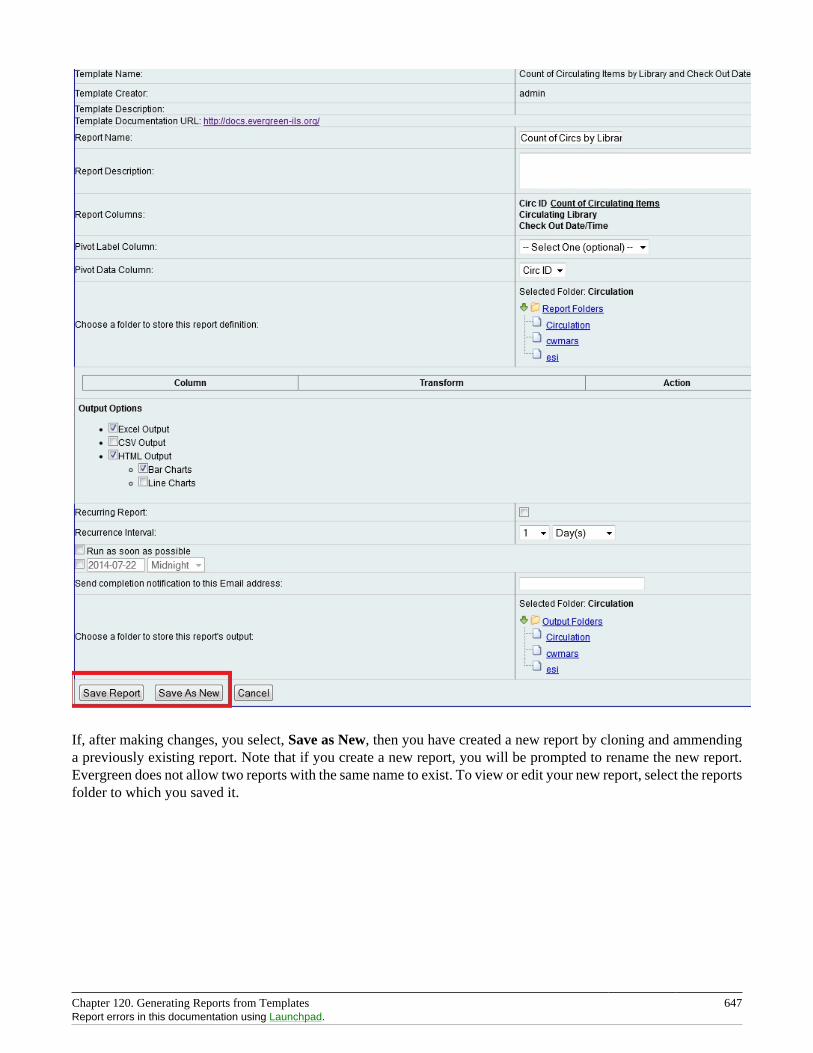
Chapter 120. Generating Reports from Templates 647Report errors in this documentation using Launchpad.
If, after making changes, you select, Save as New, then you have created a new report by cloning and ammendinga previously existing report. Note that if you create a new report, you will be prompted to rename the new report.Evergreen does not allow two reports with the same name to exist. To view or edit your new report, select the reportsfolder to which you saved it.
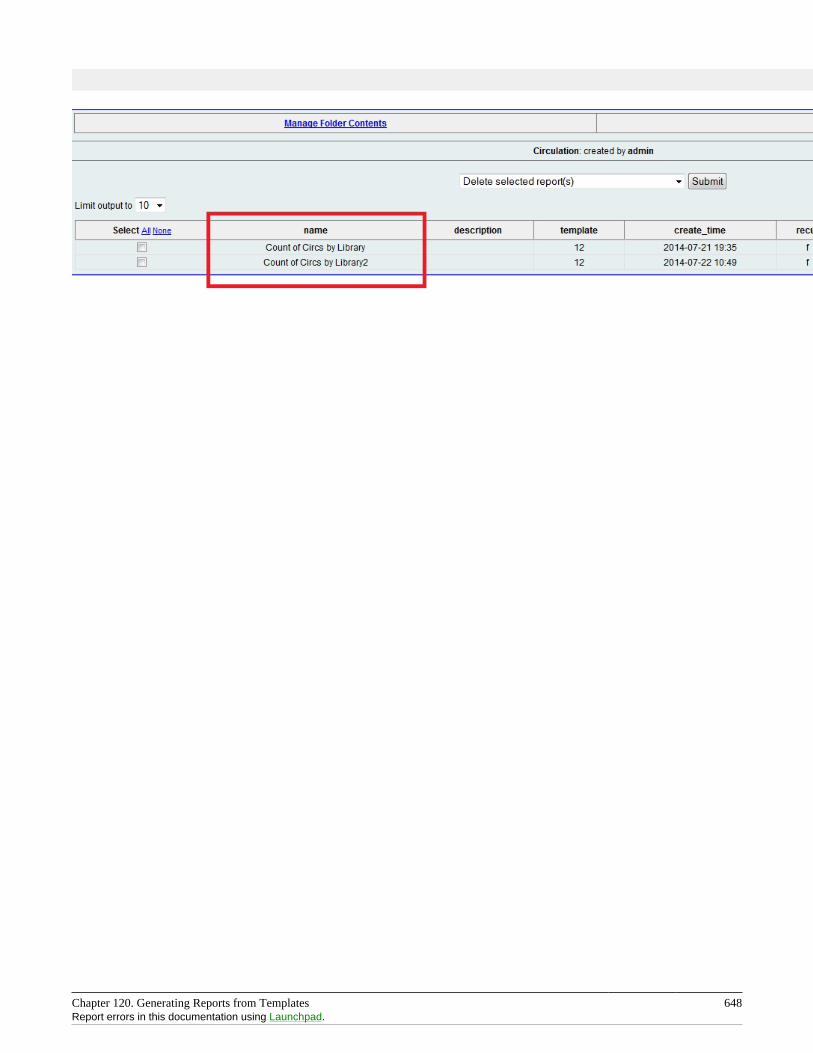
Chapter 120. Generating Reports from Templates 648Report errors in this documentation using Launchpad.
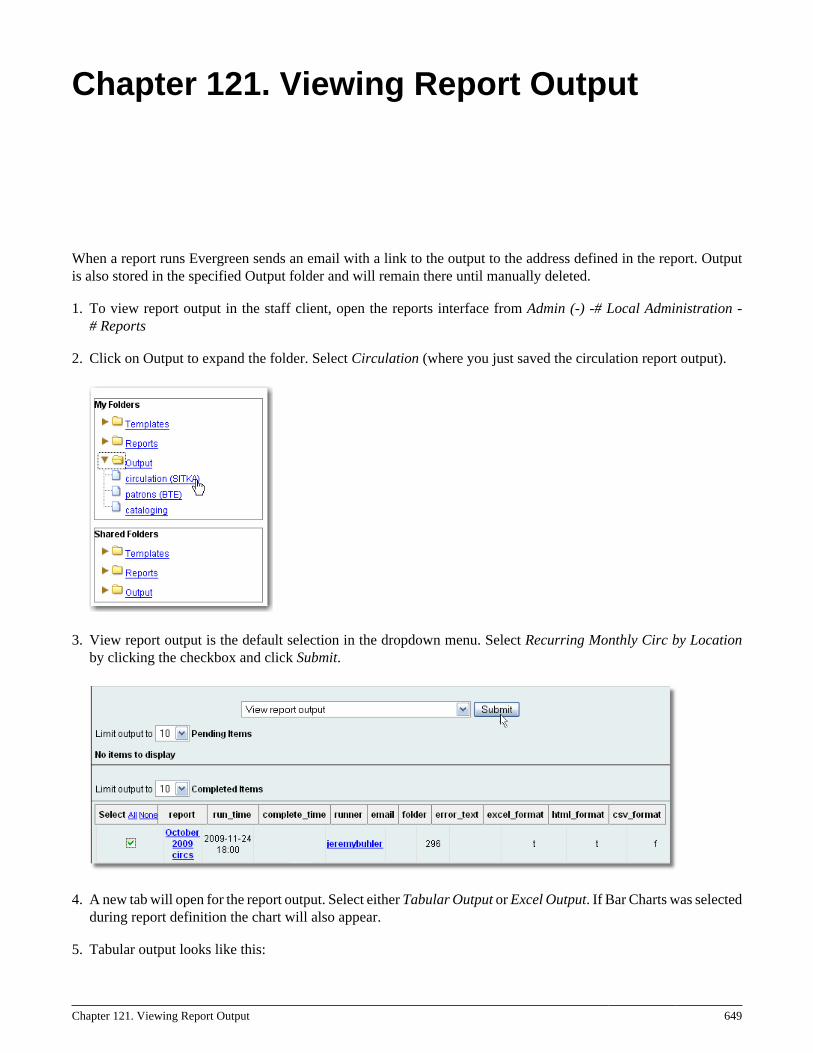
Chapter 121. Viewing Report Output 649
Chapter 121. Viewing Report Output
When a report runs Evergreen sends an email with a link to the output to the address defined in the report. Outputis also stored in the specified Output folder and will remain there until manually deleted.
1. To view report output in the staff client, open the reports interface from Admin (-) -# Local Administration -# Reports
2. Click on Output to expand the folder. Select Circulation (where you just saved the circulation report output).
3. View report output is the default selection in the dropdown menu. Select Recurring Monthly Circ by Locationby clicking the checkbox and click Submit.
4. A new tab will open for the report output. Select either Tabular Output or Excel Output. If Bar Charts was selectedduring report definition the chart will also appear.
5. Tabular output looks like this:
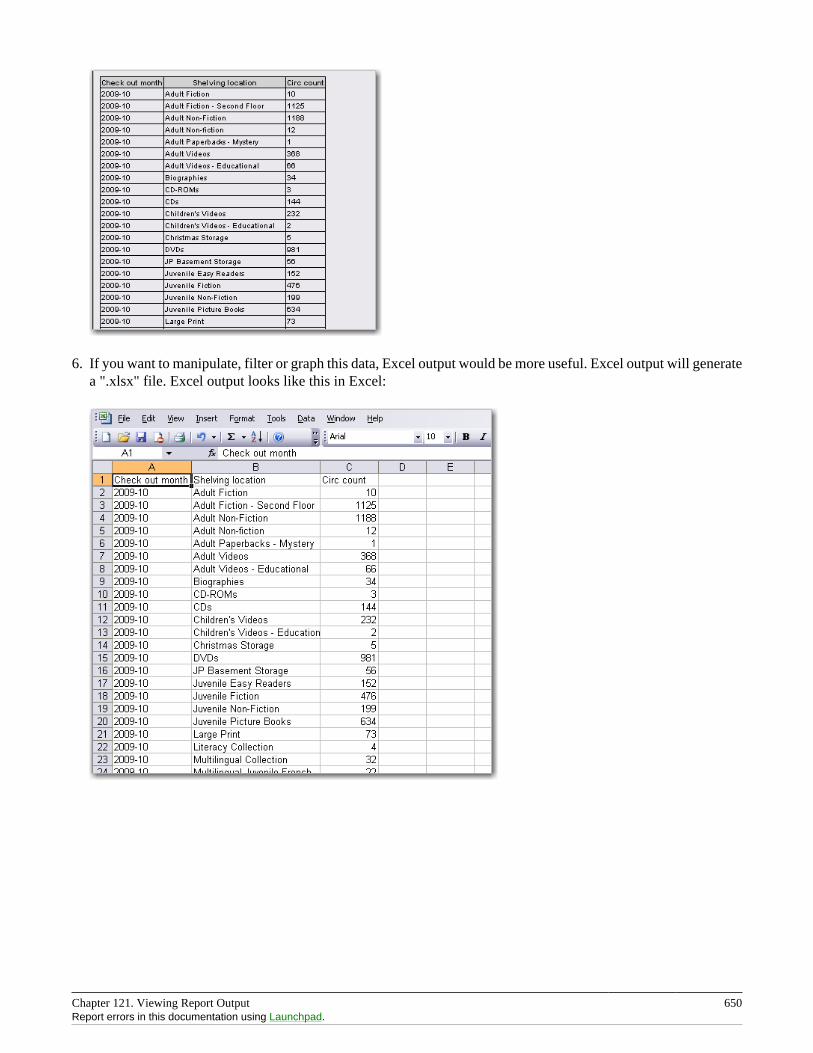
Chapter 121. Viewing Report Output 650Report errors in this documentation using Launchpad.
6. If you want to manipulate, filter or graph this data, Excel output would be more useful. Excel output will generatea ".xlsx" file. Excel output looks like this in Excel:
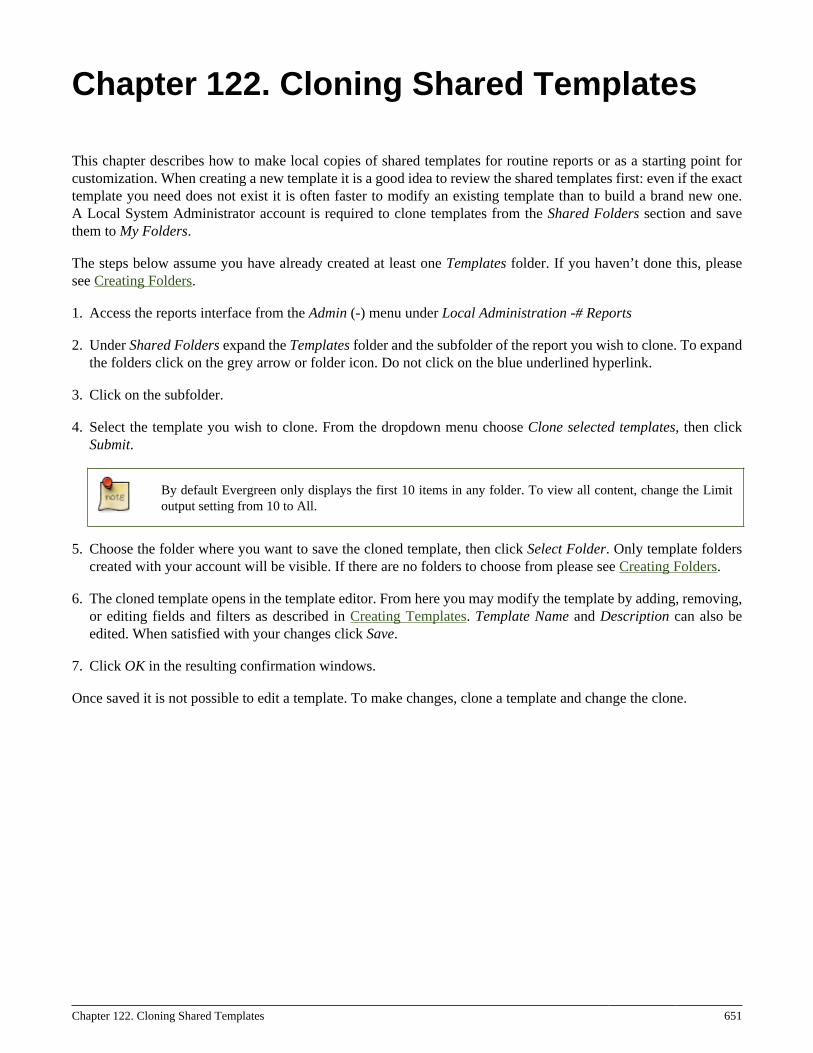
Chapter 122. Cloning Shared Templates 651
Chapter 122. Cloning Shared Templates
This chapter describes how to make local copies of shared templates for routine reports or as a starting point forcustomization. When creating a new template it is a good idea to review the shared templates first: even if the exacttemplate you need does not exist it is often faster to modify an existing template than to build a brand new one.A Local System Administrator account is required to clone templates from the Shared Folders section and savethem to My Folders.
The steps below assume you have already created at least one Templates folder. If you haven’t done this, pleasesee Creating Folders.
1. Access the reports interface from the Admin (-) menu under Local Administration -# Reports
2. Under Shared Folders expand the Templates folder and the subfolder of the report you wish to clone. To expandthe folders click on the grey arrow or folder icon. Do not click on the blue underlined hyperlink.
3. Click on the subfolder.
4. Select the template you wish to clone. From the dropdown menu choose Clone selected templates, then clickSubmit.
By default Evergreen only displays the first 10 items in any folder. To view all content, change the Limitoutput setting from 10 to All.
5. Choose the folder where you want to save the cloned template, then click Select Folder. Only template folderscreated with your account will be visible. If there are no folders to choose from please see Creating Folders.
6. The cloned template opens in the template editor. From here you may modify the template by adding, removing,or editing fields and filters as described in Creating Templates. Template Name and Description can also beedited. When satisfied with your changes click Save.
7. Click OK in the resulting confirmation windows.
Once saved it is not possible to edit a template. To make changes, clone a template and change the clone.
Chapter 123. Adding Data Sources to Reporter 652
Chapter 123. Adding Data Sources toReporter
You can further customize your Evergreen reporting environment by adding additional data sources.
The Evergreen reporter module does not build and execute SQL queries directly, but instead uses a data abstractionlayer called Fieldmapper to mediate queries on the Evergreen database.Fieldmapper is also used by other coreEvergreen DAO services, including cstore and permacrud. The configuration file fm_IDL.xml contains the mappingbetween Fieldmapper class definitions and the database. The fm_IDL.xml file is located in the /openils/confdirectory.
There are 3 basic steps to adding a new data source. Each step will be discussed in more detail in the
1. Create a PostgreSQL query, view, or table that will provide the data for your data source.
2. Add a new class to fm_IDL.xml for your data source.
3. Restart the affected services to see the new data source in Reporter.
There are two possbile sources for new data sources:
• An SQL query built directly into the class definition in fm_IDL.xml. You can use this method if you are onlygoing to access this data source through the Evergreen reporter and/or cstore code that you write.
• A new table or view in the Evergreen PostgresSQL database on which a class definition in fm_IDL.xml. You canuse this method if you want to be able to access this data source through directly through SQL or using otherreporting tool.
Create a PostgreSQL query, view, or table foryour data source
You need to decide whether you will create your data source as a query, a view, or a table.
1. Create a query if you are planning to access this data source only through the Evergreen reporter and/or cstorecode that you write. You will use this query to create an IDL only view.
2. Create a view if you are planning to access this data source through other methods in addition to the Evergreenreporter, or if you may need to do performance tuning to optimize your query.
3. You may also need to use an additional table as part of your data source if you have additional data that’s notincluded in the base Evergreen, or if you need to use a table to store the results of a query for performance reasons.
Chapter 123. Adding Data Sources to Reporter 653Report errors in this documentation using Launchpad.
To develop and test queries, views, and tables, you will need
• Access to the Evergree PostgreSQL database at the command line. This is normally the psql application. Youcan access the Postgres documentation at the Official Postgres documentation for more information aboutPostgreSQL.
• Knowledge of the Evergreen database structure for the data that you want to access. You can find this informationby looking at the Evergreen schema Evergreen schema
If the views that you are creating are purely local in usage and are not intended for contribution to the core Evergreencode, create the Views and Tables in the extend_reporter schema. This schema is intended to be used for localcustomizations and will not be modified during upgrades to the Evergreen system.
You should make that you have an appropriate version control pocess for the SQL used to create you data sources.
Here’s an example of a view created to incorporate some locally defined user statistical categories:
example view for reports.
create view extend_reporter.patronstats asselect u.id,grp.name as "ptype",rl.stat_cat_entry as "reg_lib",gr.stat_cat_entry as "gender",ag.stat_cat_entry as "age_group",EXTRACT(YEAR FROM age(u.dob)) as "age",hl.id as "home_lib",u.create_date,u.expire_date,ms_balance_owedfrom actor.usr ujoin permission.grp_tree grp on (u.profile = grp.id and (grp.parent = 2 or grp.name = 'patron'))join actor.org_unit hl on (u.home_ou = hl.id)left join money.open_usr_summary ms on (ms.usr = u.id)left join actor.stat_cat_entry_usr_map rl on (u.id = rl.target_usr and rl.stat_cat = 4)left join actor.stat_cat_entry_usr_map bt on (u.id = bt.target_usr and bt.stat_cat = 3)left join actor.stat_cat_entry_usr_map gr on (u.id = gr.target_usr and gr.stat_cat = 2)left join actor.stat_cat_entry_usr_map gr on (u.id = gr.target_usr and gr.stat_cat = 2)left join actor.stat_cat_entry_usr_map ag on (u.id = ag.target_usr and ag.stat_cat = 1)where u.active = 't' and u.deleted <> 't';
Add a new class to fm_IDL.xml for your datasourceOnce you have your data source, the next step is to add that data source as a new class in fm_IDL.xml.
You will need to add the following attributes for the class definition:
Chapter 123. Adding Data Sources to Reporter 654Report errors in this documentation using Launchpad.
• id. You should follow a consistent naming convention for your class names that won’t create conflicts in the futurewith any standard classes added in future upgrades. Evergreen normally names each class with the first letter ofeach word in the schema and table names. You may want to add a local prefix or suffix to your local class names.
• controller=”open-ils.cstore”
• oils_obj:fieldmapper=”extend_reporter::long_name_of_view”
• oils_persist.readonly=”true”
• reporter:core=”true” (if you want this to show up as a “core” reporting source)
• reporter:label. This is the name that will appear on the data source list in the Evergreen reporter.
• oils_persist:source_definition. If this is an IDL-only view, add the SQL query here. You don’t need this attributeif your class is based on a PostgreSQL view or table.
• oils_persist:tablename="schemaname.viewname or tablename" If this class is based on a PostgreSQL viewor table, add the table name here. You don’t need this attribute is your class is an IDL-only view.
For each column in the view or query output, add field element and set the following attributes. The fields shouldbe wrapped with <field> </field>:
• reporter:label. This is the name that appears in the Evergreen reporter.
• name. This should match the column name in the view or query output.
• reporter:datatype (which can be id, bool, money, org_unit, int, number, interval, float, text, timestamp, or link)
For each linking field, add a link element with the following attributes. The elements should be wrapped with <link></link>:
• field (should match field.name)
• reltype (“has_a”, “might_have”, or “has_many”)
• map (“”)
• key (name of the linking field in the foreign table)
• class (ID of the IDL class of the table that is to be linked to)
The following example is a class definition for the example view that was created in the previous section.
example class definition for reports.
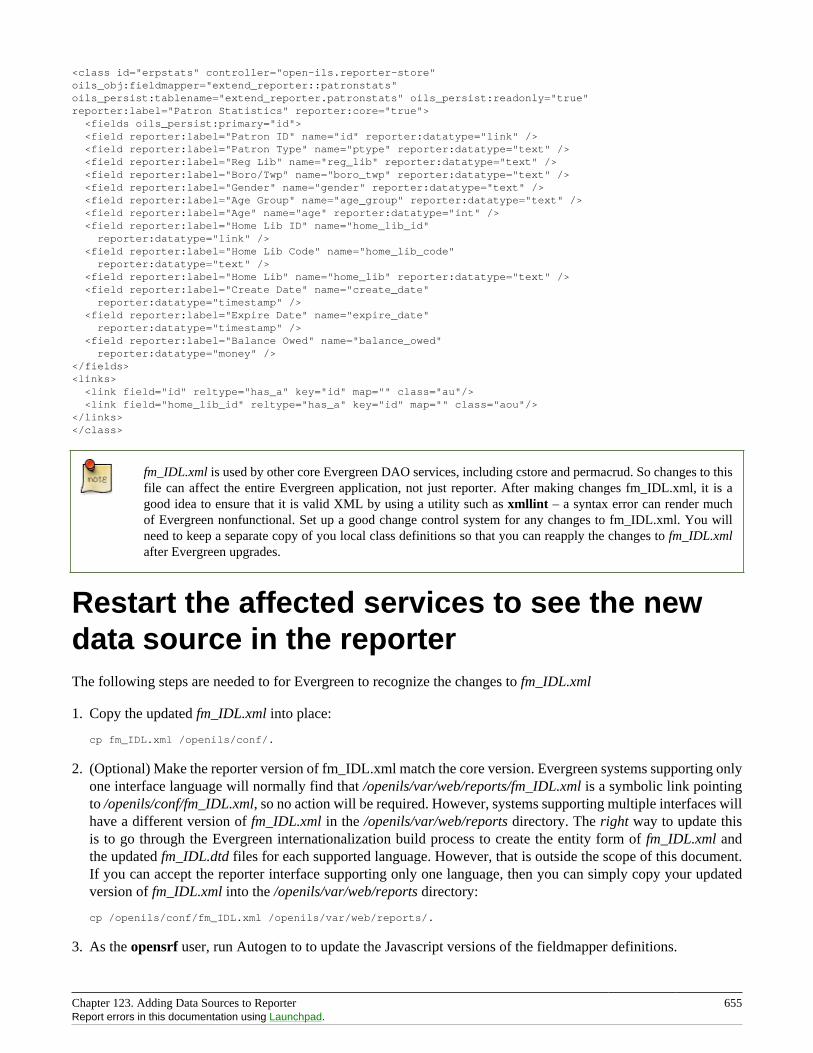
Chapter 123. Adding Data Sources to Reporter 655Report errors in this documentation using Launchpad.
<class id="erpstats" controller="open-ils.reporter-store"oils_obj:fieldmapper="extend_reporter::patronstats"oils_persist:tablename="extend_reporter.patronstats" oils_persist:readonly="true"reporter:label="Patron Statistics" reporter:core="true"> <fields oils_persist:primary="id"> <field reporter:label="Patron ID" name="id" reporter:datatype="link" /> <field reporter:label="Patron Type" name="ptype" reporter:datatype="text" /> <field reporter:label="Reg Lib" name="reg_lib" reporter:datatype="text" /> <field reporter:label="Boro/Twp" name="boro_twp" reporter:datatype="text" /> <field reporter:label="Gender" name="gender" reporter:datatype="text" /> <field reporter:label="Age Group" name="age_group" reporter:datatype="text" /> <field reporter:label="Age" name="age" reporter:datatype="int" /> <field reporter:label="Home Lib ID" name="home_lib_id" reporter:datatype="link" /> <field reporter:label="Home Lib Code" name="home_lib_code" reporter:datatype="text" /> <field reporter:label="Home Lib" name="home_lib" reporter:datatype="text" /> <field reporter:label="Create Date" name="create_date" reporter:datatype="timestamp" /> <field reporter:label="Expire Date" name="expire_date" reporter:datatype="timestamp" /> <field reporter:label="Balance Owed" name="balance_owed" reporter:datatype="money" /></fields><links> <link field="id" reltype="has_a" key="id" map="" class="au"/> <link field="home_lib_id" reltype="has_a" key="id" map="" class="aou"/></links></class>
fm_IDL.xml is used by other core Evergreen DAO services, including cstore and permacrud. So changes to thisfile can affect the entire Evergreen application, not just reporter. After making changes fm_IDL.xml, it is agood idea to ensure that it is valid XML by using a utility such as xmllint – a syntax error can render muchof Evergreen nonfunctional. Set up a good change control system for any changes to fm_IDL.xml. You willneed to keep a separate copy of you local class definitions so that you can reapply the changes to fm_IDL.xmlafter Evergreen upgrades.
Restart the affected services to see the newdata source in the reporterThe following steps are needed to for Evergreen to recognize the changes to fm_IDL.xml
1. Copy the updated fm_IDL.xml into place:
cp fm_IDL.xml /openils/conf/.
2. (Optional) Make the reporter version of fm_IDL.xml match the core version. Evergreen systems supporting onlyone interface language will normally find that /openils/var/web/reports/fm_IDL.xml is a symbolic link pointingto /openils/conf/fm_IDL.xml, so no action will be required. However, systems supporting multiple interfaces willhave a different version of fm_IDL.xml in the /openils/var/web/reports directory. The right way to update thisis to go through the Evergreen internationalization build process to create the entity form of fm_IDL.xml andthe updated fm_IDL.dtd files for each supported language. However, that is outside the scope of this document.If you can accept the reporter interface supporting only one language, then you can simply copy your updatedversion of fm_IDL.xml into the /openils/var/web/reports directory:
cp /openils/conf/fm_IDL.xml /openils/var/web/reports/.
3. As the opensrf user, run Autogen to to update the Javascript versions of the fieldmapper definitions.
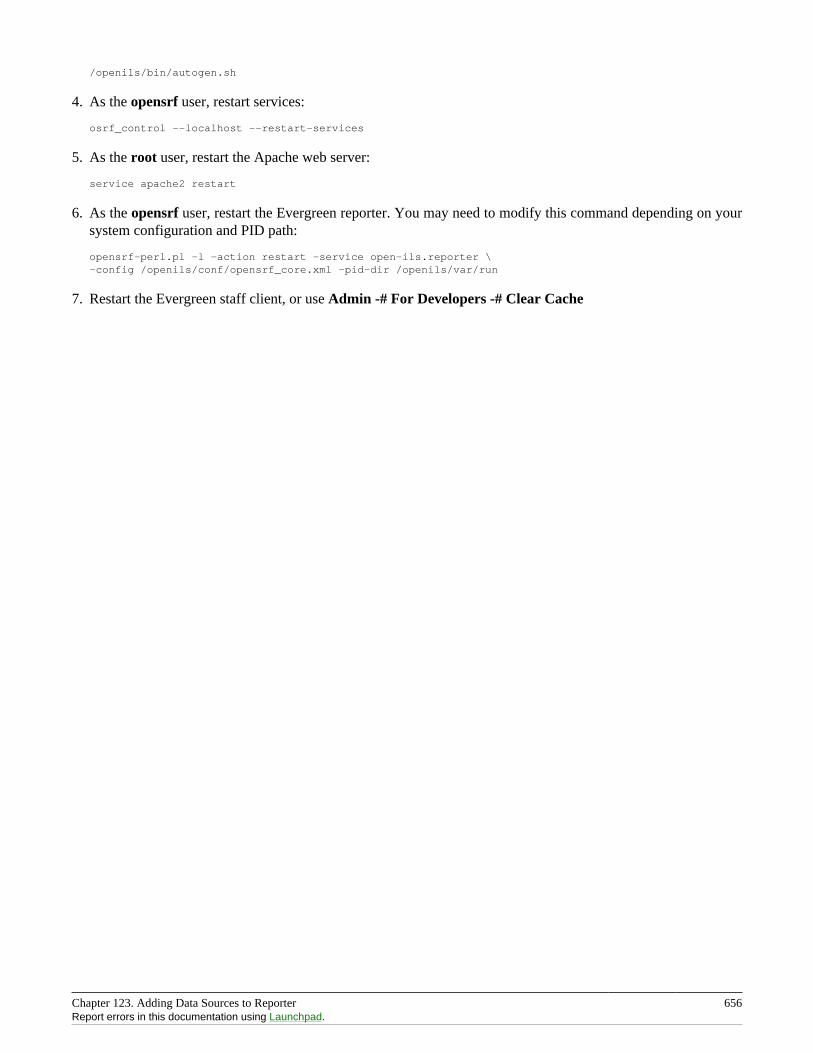
Chapter 123. Adding Data Sources to Reporter 656Report errors in this documentation using Launchpad.
/openils/bin/autogen.sh
4. As the opensrf user, restart services:
osrf_control --localhost --restart-services
5. As the root user, restart the Apache web server:
service apache2 restart
6. As the opensrf user, restart the Evergreen reporter. You may need to modify this command depending on yoursystem configuration and PID path:
opensrf-perl.pl -l -action restart -service open-ils.reporter \-config /openils/conf/opensrf_core.xml -pid-dir /openils/var/run
7. Restart the Evergreen staff client, or use Admin -# For Developers -# Clear Cache
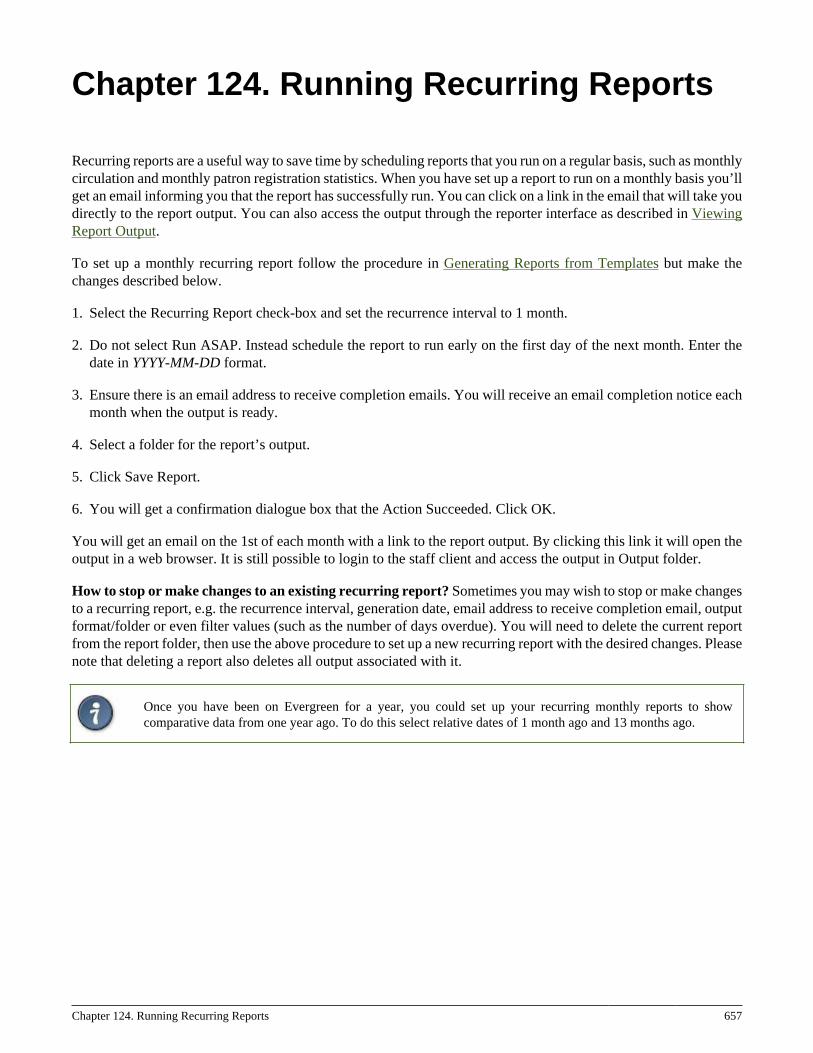
Chapter 124. Running Recurring Reports 657
Chapter 124. Running Recurring Reports
Recurring reports are a useful way to save time by scheduling reports that you run on a regular basis, such as monthlycirculation and monthly patron registration statistics. When you have set up a report to run on a monthly basis you’llget an email informing you that the report has successfully run. You can click on a link in the email that will take youdirectly to the report output. You can also access the output through the reporter interface as described in ViewingReport Output.
To set up a monthly recurring report follow the procedure in Generating Reports from Templates but make thechanges described below.
1. Select the Recurring Report check-box and set the recurrence interval to 1 month.
2. Do not select Run ASAP. Instead schedule the report to run early on the first day of the next month. Enter thedate in YYYY-MM-DD format.
3. Ensure there is an email address to receive completion emails. You will receive an email completion notice eachmonth when the output is ready.
4. Select a folder for the report’s output.
5. Click Save Report.
6. You will get a confirmation dialogue box that the Action Succeeded. Click OK.
You will get an email on the 1st of each month with a link to the report output. By clicking this link it will open theoutput in a web browser. It is still possible to login to the staff client and access the output in Output folder.
How to stop or make changes to an existing recurring report? Sometimes you may wish to stop or make changesto a recurring report, e.g. the recurrence interval, generation date, email address to receive completion email, outputformat/folder or even filter values (such as the number of days overdue). You will need to delete the current reportfrom the report folder, then use the above procedure to set up a new recurring report with the desired changes. Pleasenote that deleting a report also deletes all output associated with it.
Once you have been on Evergreen for a year, you could set up your recurring monthly reports to showcomparative data from one year ago. To do this select relative dates of 1 month ago and 13 months ago.
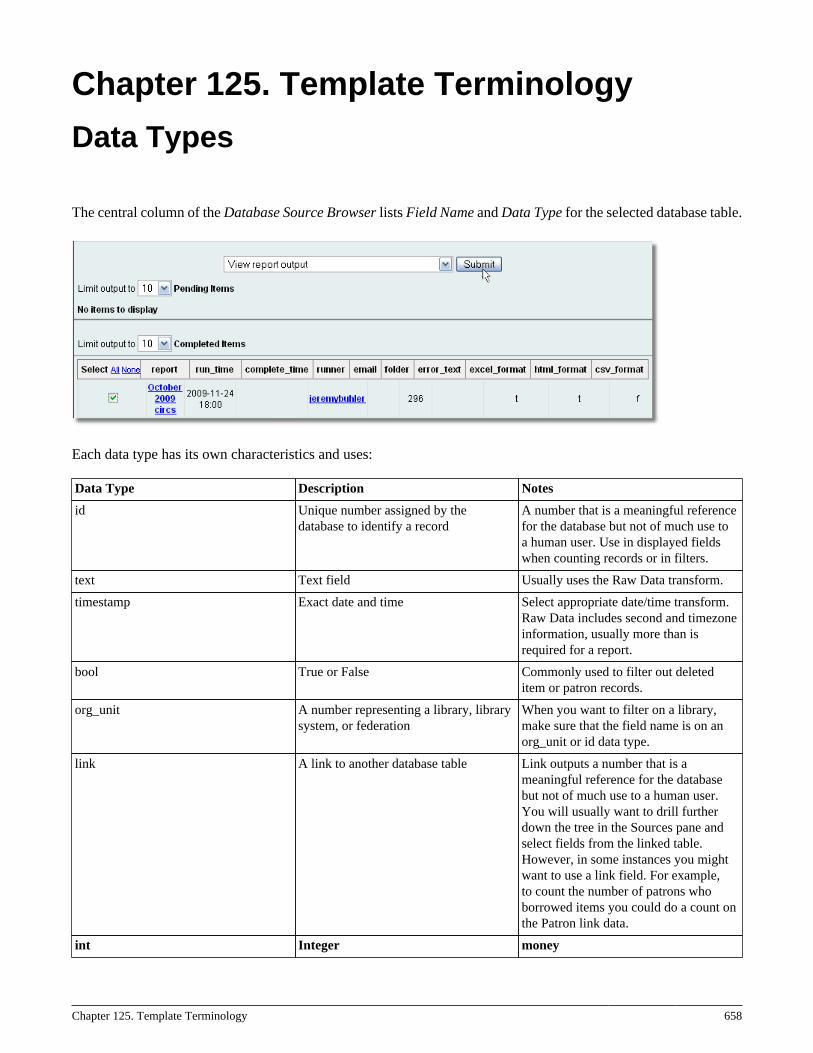
Chapter 125. Template Terminology 658
Chapter 125. Template Terminology
Data Types
The central column of the Database Source Browser lists Field Name and Data Type for the selected database table.
Each data type has its own characteristics and uses:
Data Type Description Notes
id Unique number assigned by thedatabase to identify a record
A number that is a meaningful referencefor the database but not of much use toa human user. Use in displayed fieldswhen counting records or in filters.
text Text field Usually uses the Raw Data transform.
timestamp Exact date and time Select appropriate date/time transform.Raw Data includes second and timezoneinformation, usually more than isrequired for a report.
bool True or False Commonly used to filter out deleteditem or patron records.
org_unit A number representing a library, librarysystem, or federation
When you want to filter on a library,make sure that the field name is on anorg_unit or id data type.
link A link to another database table Link outputs a number that is ameaningful reference for the databasebut not of much use to a human user.You will usually want to drill furtherdown the tree in the Sources pane andselect fields from the linked table.However, in some instances you mightwant to use a link field. For example,to count the number of patrons whoborrowed items you could do a count onthe Patron link data.
int Integer money
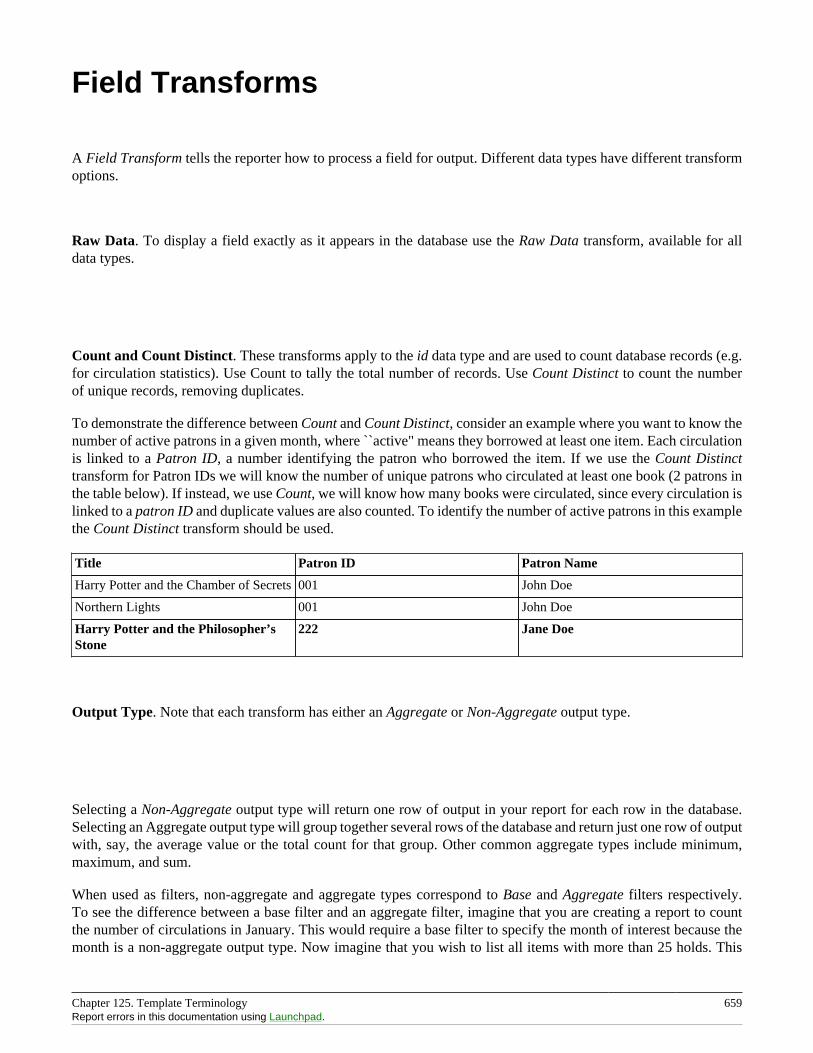
Chapter 125. Template Terminology 659Report errors in this documentation using Launchpad.
Field Transforms
A Field Transform tells the reporter how to process a field for output. Different data types have different transformoptions.
Raw Data. To display a field exactly as it appears in the database use the Raw Data transform, available for alldata types.
Count and Count Distinct. These transforms apply to the id data type and are used to count database records (e.g.for circulation statistics). Use Count to tally the total number of records. Use Count Distinct to count the numberof unique records, removing duplicates.
To demonstrate the difference between Count and Count Distinct, consider an example where you want to know thenumber of active patrons in a given month, where ``active" means they borrowed at least one item. Each circulationis linked to a Patron ID, a number identifying the patron who borrowed the item. If we use the Count Distincttransform for Patron IDs we will know the number of unique patrons who circulated at least one book (2 patrons inthe table below). If instead, we use Count, we will know how many books were circulated, since every circulation islinked to a patron ID and duplicate values are also counted. To identify the number of active patrons in this examplethe Count Distinct transform should be used.
Title Patron ID Patron Name
Harry Potter and the Chamber of Secrets 001 John Doe
Northern Lights 001 John Doe
Harry Potter and the Philosopher’sStone
222 Jane Doe
Output Type. Note that each transform has either an Aggregate or Non-Aggregate output type.
Selecting a Non-Aggregate output type will return one row of output in your report for each row in the database.Selecting an Aggregate output type will group together several rows of the database and return just one row of outputwith, say, the average value or the total count for that group. Other common aggregate types include minimum,maximum, and sum.
When used as filters, non-aggregate and aggregate types correspond to Base and Aggregate filters respectively.To see the difference between a base filter and an aggregate filter, imagine that you are creating a report to countthe number of circulations in January. This would require a base filter to specify the month of interest because themonth is a non-aggregate output type. Now imagine that you wish to list all items with more than 25 holds. This

Chapter 125. Template Terminology 660Report errors in this documentation using Launchpad.
would require an aggregate filter on the number of holds per item because you must use an aggregate output typeto count the holds.
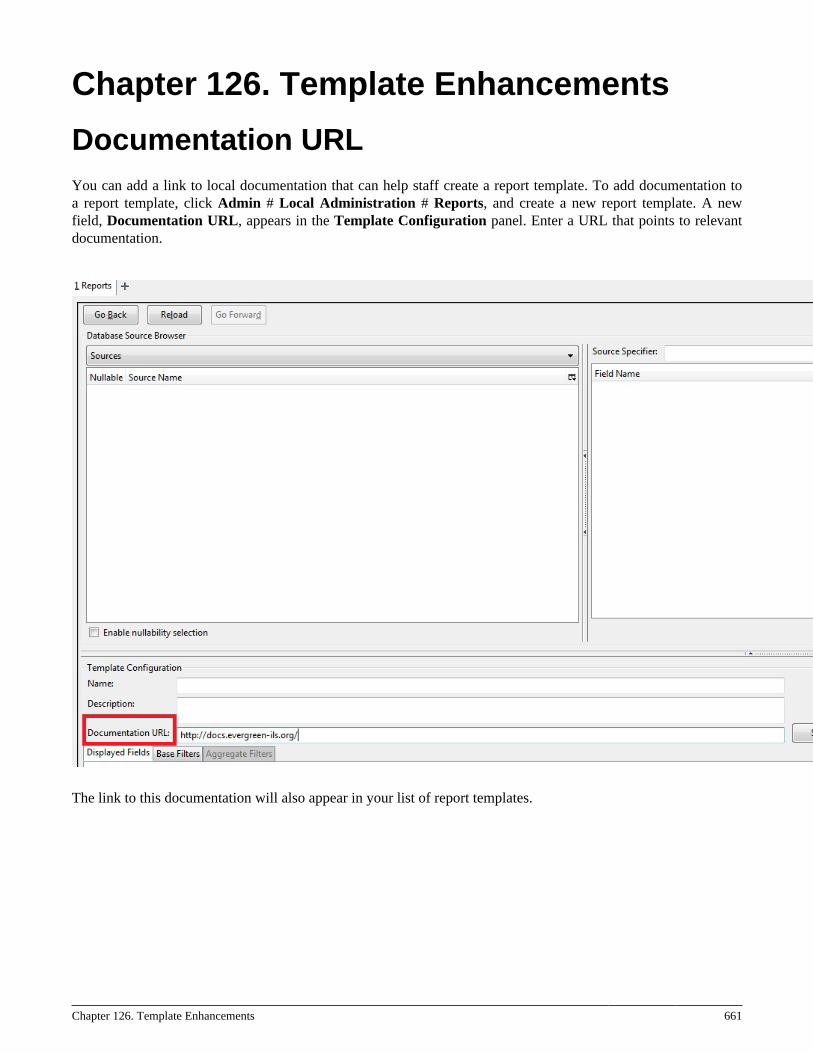
Chapter 126. Template Enhancements 661
Chapter 126. Template Enhancements
Documentation URLYou can add a link to local documentation that can help staff create a report template. To add documentation toa report template, click Admin # Local Administration # Reports, and create a new report template. A newfield, Documentation URL, appears in the Template Configuration panel. Enter a URL that points to relevantdocumentation.
The link to this documentation will also appear in your list of report templates.
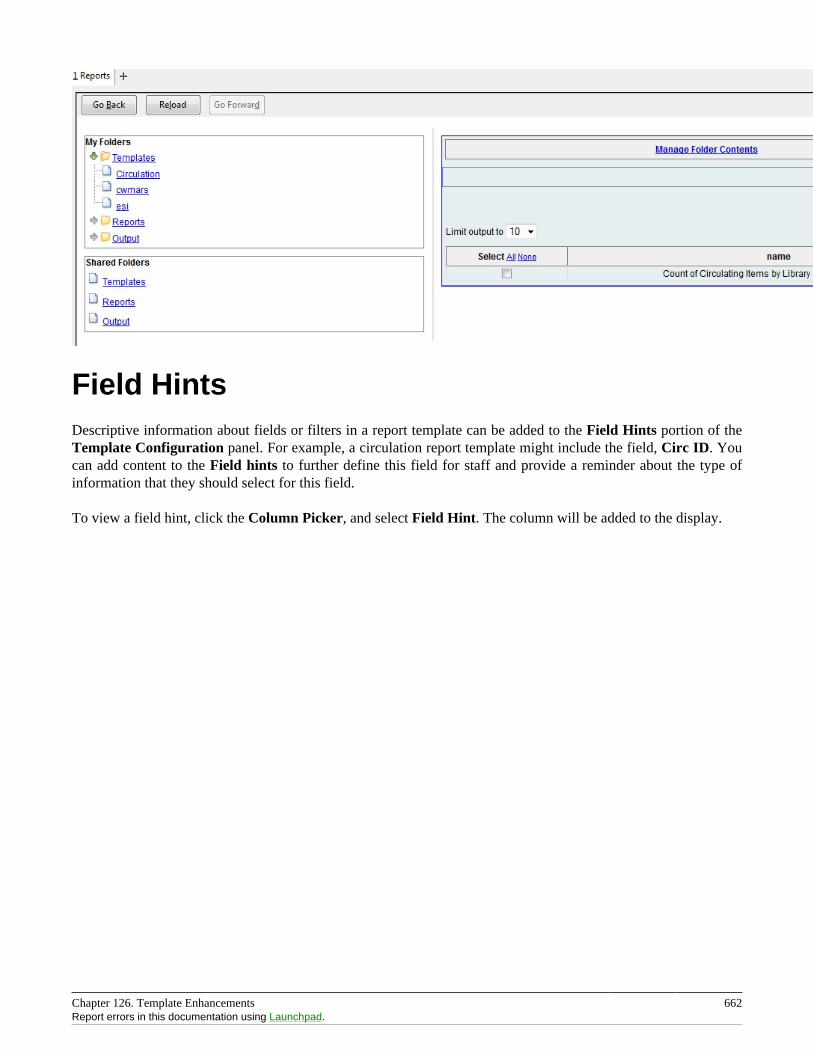
Chapter 126. Template Enhancements 662Report errors in this documentation using Launchpad.
Field HintsDescriptive information about fields or filters in a report template can be added to the Field Hints portion of theTemplate Configuration panel. For example, a circulation report template might include the field, Circ ID. Youcan add content to the Field hints to further define this field for staff and provide a reminder about the type ofinformation that they should select for this field.
To view a field hint, click the Column Picker, and select Field Hint. The column will be added to the display.
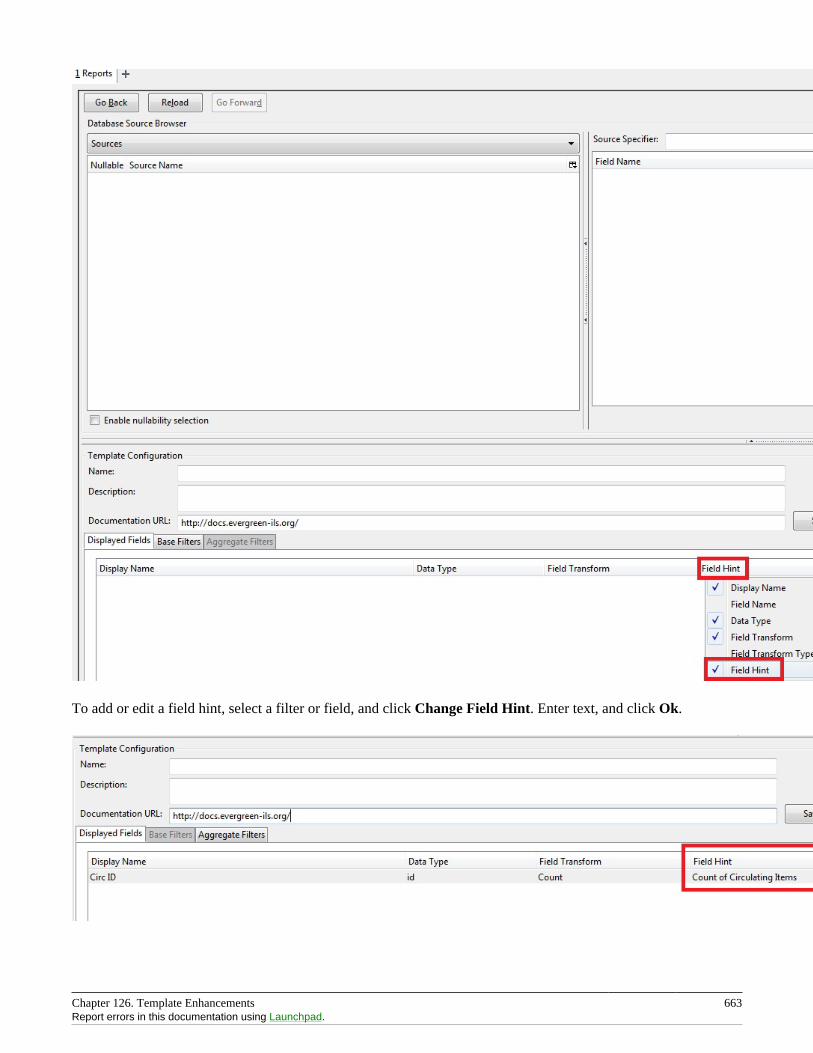
Chapter 126. Template Enhancements 663Report errors in this documentation using Launchpad.
To add or edit a field hint, select a filter or field, and click Change Field Hint. Enter text, and click Ok.
Chapter 127. Exporting Report Templates Using phpPgAdmin 664
Chapter 127. Exporting Report TemplatesUsing phpPgAdmin
Once the data is exported. Database Administrators/Systems Administrators can easily import this data into thetemplates folder to make it available in the client.
Dump the Entire Reports Template TableThe data exported in this method can create issues importing into a different system if you do not have a matchingfolder and owner. This is going to export report templates created in your system. The most important fields forimporting into the new system are name, description, and data. Data defines the actual structure of the report. Theowner and folder fields will unique to the system they were exported from and will have to be altered to ensure theymatch the appropriate owner and folder information for the new system.
1. Go to the Reporter schema. Report templates are located in the Template table
2. Click on the link to the Template table
3. Click the export button at the top right of the phpPgAdmin screen
4. Make sure the following is selected
a. Data Only (checked)
b. Format: Select CSV or Tabbed did get the data in a text format
c. Download checked
5. Click export button at the bottom
6. A text file will download to your local system
Dump Data with an SQL StatementThe following statement could be used to grab the data in the folder and dump it with admin account as the ownerand the first folder in your system.
SELECT 1 as owner, name, description, data, 1 as folder FROM reporter.template
or use the following to capture your folder names for export
SELECT 1 as owner, t.name, t.description, t.data, f.name as folder FROM reporter.template t JOIN reporter.template_folder f ON t.folder=f.id
1. Run the above query
2. Click the download link at the bottom of the page
3. Select the file format (CSV or Tabbed)
Chapter 127. Exporting Report Templates Using phpPgAdmin 665Report errors in this documentation using Launchpad.
4. Check download
5. A text file with the report template data will be downloaded.

Part XIII. Web Client Preview
Part XIII. Web Client Preview 667
Table of Contents128. Introduction ......................................................................................................................................... 668129. Using the Web Client ........................................................................................................................... 669
Introduction ........................................................................................................................................ 669Logging into Evergreen ........................................................................................................................ 669
Setting Browser Defaults for Web Client ......................................................................................... 669Logging Out ............................................................................................................................... 670
Tab Browser-Based Tab Buttons and Keyboard Shortcuts .......................................................................... 670Setting New Tab Behavior ............................................................................................................ 670
130. Circulation .......................................................................................................................................... 671131. Circulation - Patron Record ................................................................................................................... 672
Searching Patrons ................................................................................................................................ 672Registering New Patrons ...................................................................................................................... 674Patron Self-Registration ........................................................................................................................ 676Updating Patron Information ................................................................................................................. 677Renewing Library Cards ....................................................................................................................... 678Lost Library Cards .............................................................................................................................. 679Resetting Patron’s Password ................................................................................................................. 680Barring a Patron ................................................................................................................................. 681Barred vs. Blocked .............................................................................................................................. 681Staff-Generated Messages ..................................................................................................................... 682Patron Alerts ...................................................................................................................................... 682Patron Notes ...................................................................................................................................... 683
Chapter 128. Introduction 668
Chapter 128. IntroductionThe Evergreen Web Staff Client is in the early stages of development and is being provided as a "preview" versionbeginning in Evergreen version 2.7. If you are an early adopter, thank you! Please keep in mind:
1. We want your feedback! Please report any errors, bugs, strange behavior, etc. using Launchpad. And pleasesend requested features or design improvements to the Evergreen Developers email list.
2. It is changing rapidly. Features are being added in "sprints" grouped by workflow. Read the development wikipage and watch the general email list for updates. (However, these changes will only appear on your client whenyour version of Evergreen is upgraded. Ask your server administrator for details.)
3. The design may change significantly. Initially, it will follow the design of the current XUL-based staff client.But the browser framework provides more flexibility for design choices. Also, Evergreen hired an intern fromDecember 2014 through March 2015 to create a User Interface Style Guide. Watch IRC and the general emaillist to follow the progress.
The following rationale was published in the Release Notes for Evergreen 2.7:
The 2.7 release will contain a preview of web client circulation features. Circulation is the first step in moving allstaff functions from the existing XULRunner-based client to a web application that will be based on AngularJS.
Evergreen is moving away from the existing client because XULRunner no longer supports features critical to theEvergreen software, including remote XUL, multi-part streaming, and XML JavaScript. The new web client isexpected to show some speed improvements, to provide comprehensive support for internationalization/localization,to provide good support for assistive technologies, to be easier to customize locally, and to be more mobile friendly.
The intent of the preview is to make it easier for end users at Evergreen sites to try the new client, becomefamiliar with its features, and to discover/report bugs that are found. Instructions to implement the web client canbe found in the code in Open-ILS/web/js/ui/default/staff/README.install. These will be revised and moved to thefull README for 2.7.1.
Evergreen 2.9 includes the following improvements to the web client preview:
The web staff client now includes additional functionality to support cataloging and item maintenance, including:
• a new MARC editor
• the service backing the authority headings chooser now has the ability to filter the browse by subject thesaurus
• Z39.50 search and record import
• improvements to copy and record bucket functionality
• embedding the link checker interface
• embedding the MARC batch import/export interface
• the web staff volume/copy editor
Nearly all of the cataloging functionality available in the XUL staff client is now present in the web staff client withthe exception of printing spine labels. Nonetheless, the web staff client remains a preview and is not recommendedfor production use.
Chapter 129. Using the Web Client 669
Chapter 129. Using the Web Client
IntroductionThis part of the documentation deals with general client usage including logging in, navigation and shortcuts.
Logging into Evergreen
1. The default URL to log into the client is https://localhost/eg/staff/login
2. Enter your Username and Password.
3. Verify that the correct workstation is selected and click Sign In.
Although workstation registration is not required in the web client, it is highly recommended that you registerthe workstation for all web client features to work correctly. If you have not yet registered a workstation, youneed to log in with the workstation field unset and then follow instructions to register your workstation.
Setting Browser Defaults for Web ClientTo ensure that staff can easily get to the web client portal page on login without additional steps, you can set thebrowser’s home page to default to the web client.
Setting the Web Client as the Home Page in Chrome
1. In the top-right corner of your browser, click the Chrome menu.
2. Select Settings.
3. In the On startup section, select Open a specific page or set of pages.
4. Click the Set Pages link.
5. Add https://localhost/eg/staff/ to the Enter URL box and click OK.
Setting the Web Client as the Home Page in Firefox
1. In the top-right corner of your browser, click the menu button.
2. Click Options.
3. In the When Firefox starts: dropdown menu, select Show my home page.
4. In the Home Page box, add https://localhost/eg/staff/ and click OK.
Chapter 129. Using the Web Client 670Report errors in this documentation using Launchpad.
Logging Out
To log out of the client:
1. Click the menu button to the right of your user name in the top-right corner of the window.
2. Select Log Out
Exiting the browser will not log you out of the web client.
Tab Browser-Based Tab Buttons andKeyboard ShortcutsNow that the client will be loaded in a web browser, users can use browser-based tab controls and keyboard shortcutsto help with navigation. Below are some tips for browser navigation that can be used in Chrome and Firefox onWindows PCs.
• Use CTRL-T or click the browser’s new tab button to open a new tab.
• Use CTRL-W or click the x in the tab to close the tab.
• Undo closing a tab by hitting CTRL-Shift-Tab.
• To open a link from the web client in a new tab, CTRL-click the link or right-click the link and select Open Linkin New Tab. Using this method, you can also open options from the web client’s dropdown menus in a new tab
• Navigate from one tab to another using CTRL-Tab on the keyboard.
Setting New Tab BehaviorSome users may want to automatically open the web client’s portal page in a new tab. Neither Chrome nor Firefoxwill open your home page by default when you open a new tab. However, both browsers have optional add-ons thatwill allow you to set the browsers to automatically open the home page whenever open opening a new tab. Theseadd-ons may be useful for those libraries that want the new tab to open to the web client portal page.

Chapter 130. Circulation 671
Chapter 130. CirculationUse this section for understanding the circulation procedures in the Evergreen system.
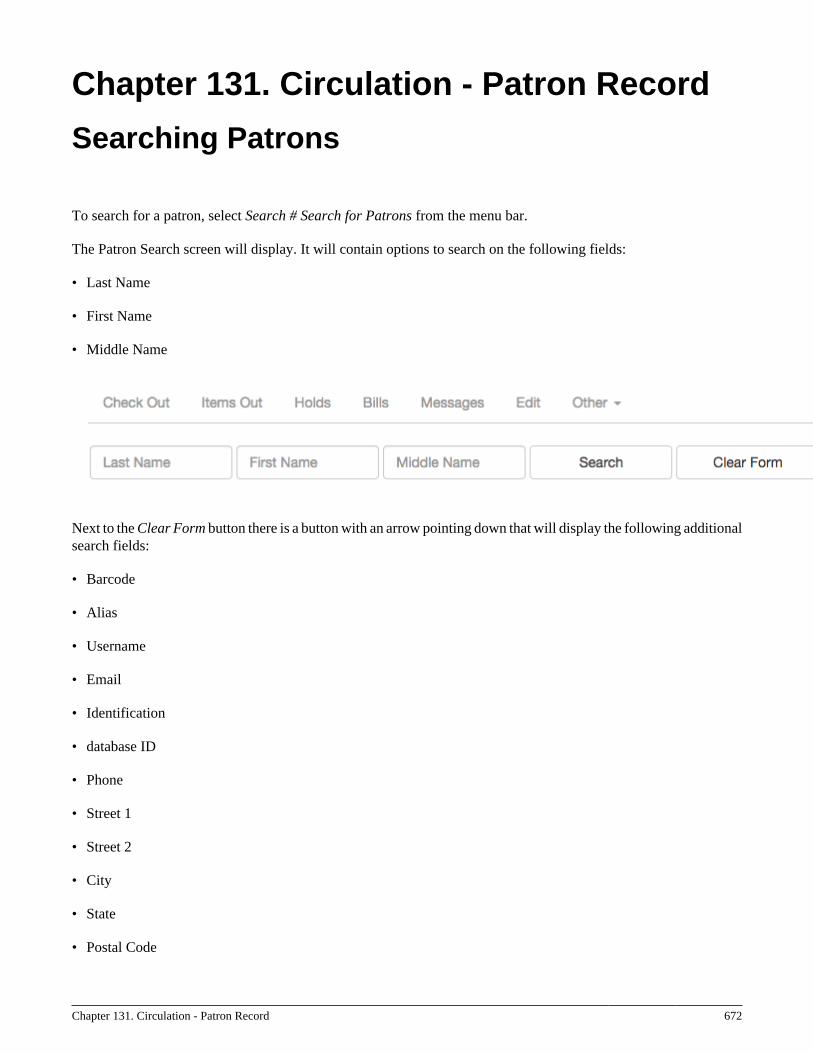
Chapter 131. Circulation - Patron Record 672
Chapter 131. Circulation - Patron Record
Searching Patrons
To search for a patron, select Search # Search for Patrons from the menu bar.
The Patron Search screen will display. It will contain options to search on the following fields:
• Last Name
• First Name
• Middle Name
Next to the Clear Form button there is a button with an arrow pointing down that will display the following additionalsearch fields:
• Barcode
• Alias
• Username
• Identification
• database ID
• Phone
• Street 1
• Street 2
• City
• State
• Postal Code
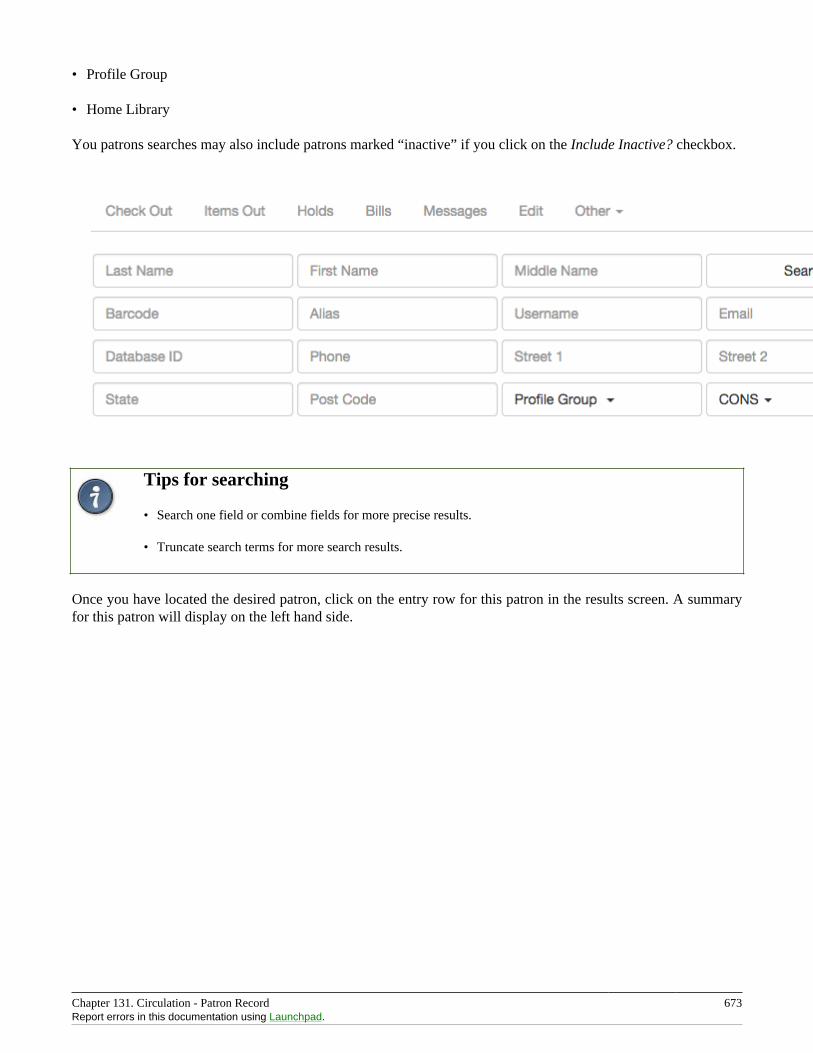
Chapter 131. Circulation - Patron Record 673Report errors in this documentation using Launchpad.
• Profile Group
• Home Library
You patrons searches may also include patrons marked “inactive” if you click on the Include Inactive? checkbox.
Tips for searching
• Search one field or combine fields for more precise results.
• Truncate search terms for more search results.
Once you have located the desired patron, click on the entry row for this patron in the results screen. A summaryfor this patron will display on the left hand side.
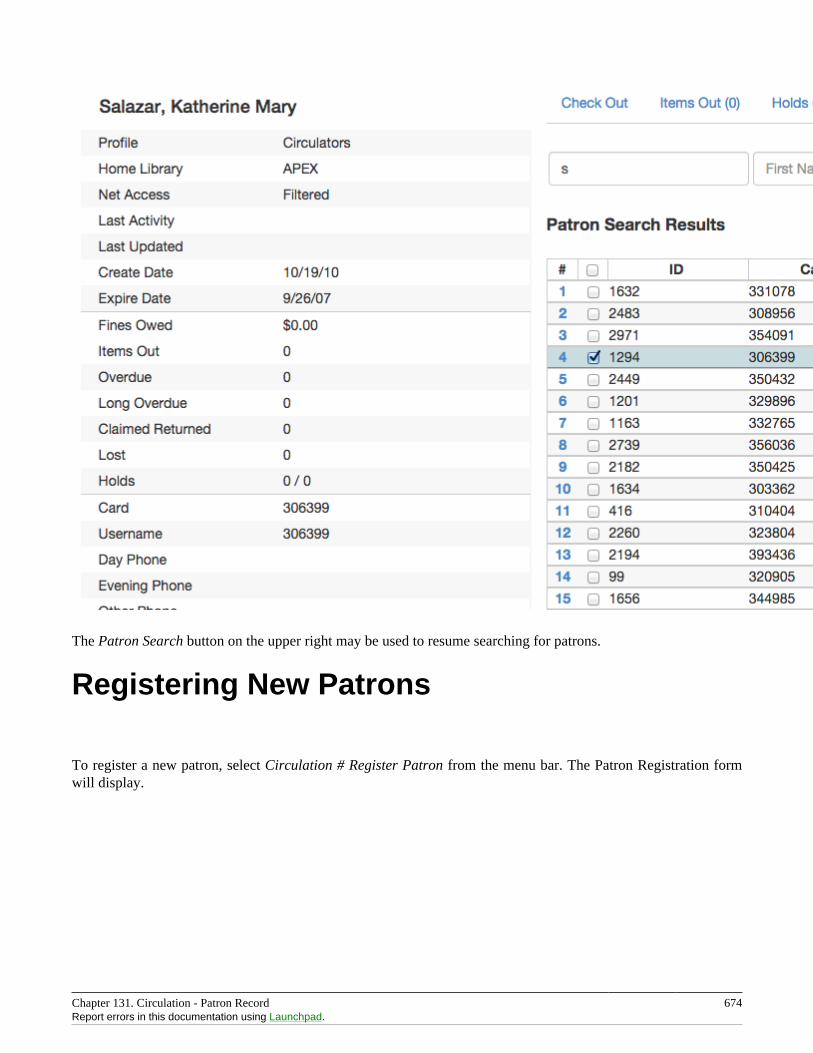
Chapter 131. Circulation - Patron Record 674Report errors in this documentation using Launchpad.
The Patron Search button on the upper right may be used to resume searching for patrons.
Registering New Patrons
To register a new patron, select Circulation # Register Patron from the menu bar. The Patron Registration formwill display.
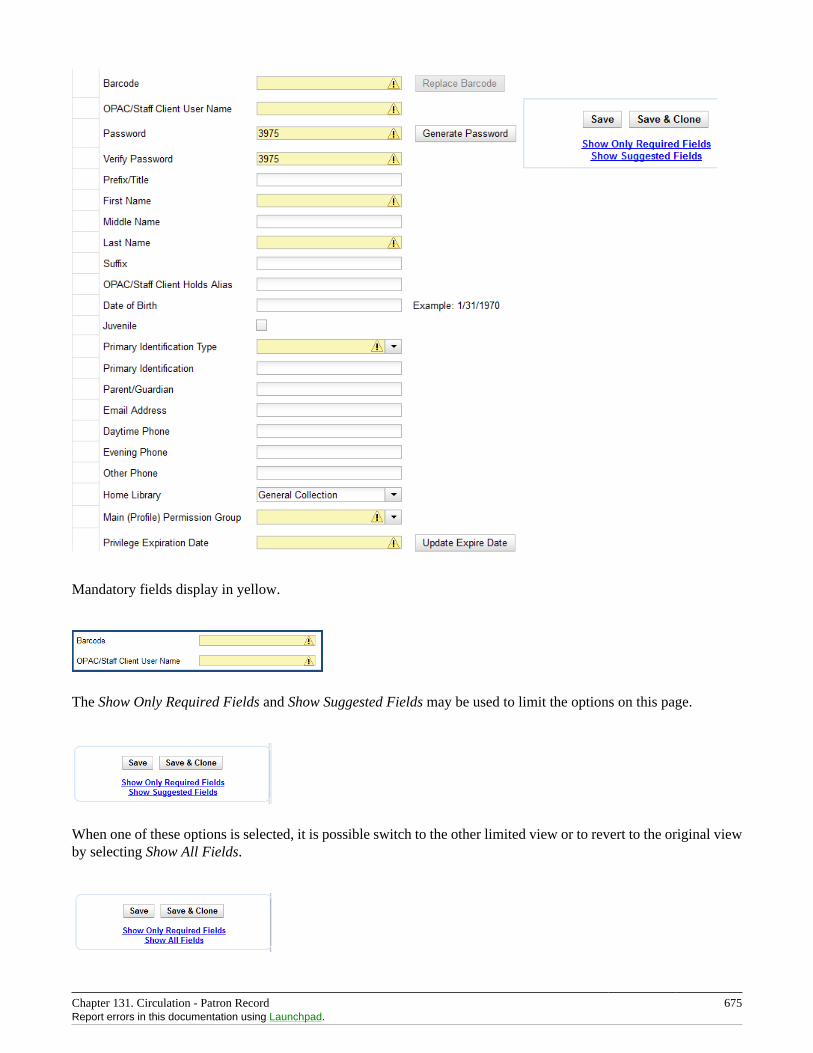
Chapter 131. Circulation - Patron Record 675Report errors in this documentation using Launchpad.
Mandatory fields display in yellow.
The Show Only Required Fields and Show Suggested Fields may be used to limit the options on this page.
When one of these options is selected, it is possible switch to the other limited view or to revert to the original viewby selecting Show All Fields.
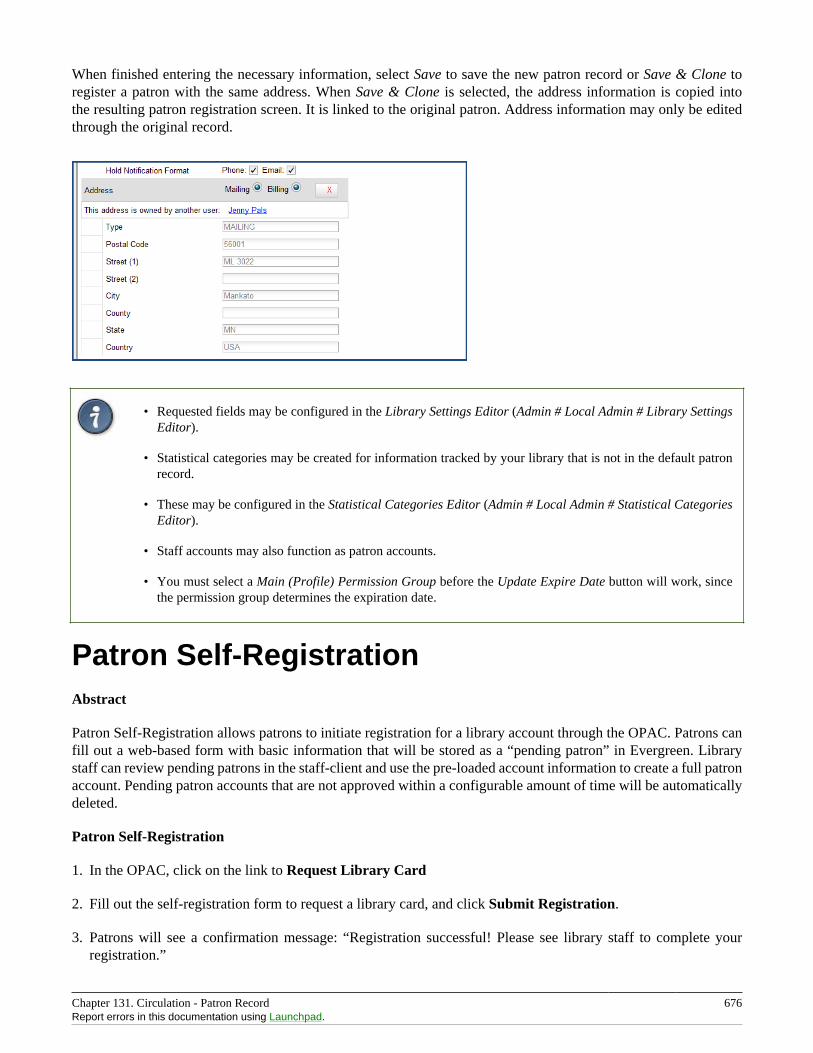
Chapter 131. Circulation - Patron Record 676Report errors in this documentation using Launchpad.
When finished entering the necessary information, select Save to save the new patron record or Save & Clone toregister a patron with the same address. When Save & Clone is selected, the address information is copied intothe resulting patron registration screen. It is linked to the original patron. Address information may only be editedthrough the original record.
• Requested fields may be configured in the Library Settings Editor (Admin # Local Admin # Library SettingsEditor).
• Statistical categories may be created for information tracked by your library that is not in the default patronrecord.
• These may be configured in the Statistical Categories Editor (Admin # Local Admin # Statistical CategoriesEditor).
• Staff accounts may also function as patron accounts.
• You must select a Main (Profile) Permission Group before the Update Expire Date button will work, sincethe permission group determines the expiration date.
Patron Self-RegistrationAbstract
Patron Self-Registration allows patrons to initiate registration for a library account through the OPAC. Patrons canfill out a web-based form with basic information that will be stored as a “pending patron” in Evergreen. Librarystaff can review pending patrons in the staff-client and use the pre-loaded account information to create a full patronaccount. Pending patron accounts that are not approved within a configurable amount of time will be automaticallydeleted.
Patron Self-Registration
1. In the OPAC, click on the link to Request Library Card
2. Fill out the self-registration form to request a library card, and click Submit Registration.
3. Patrons will see a confirmation message: “Registration successful! Please see library staff to complete yourregistration.”
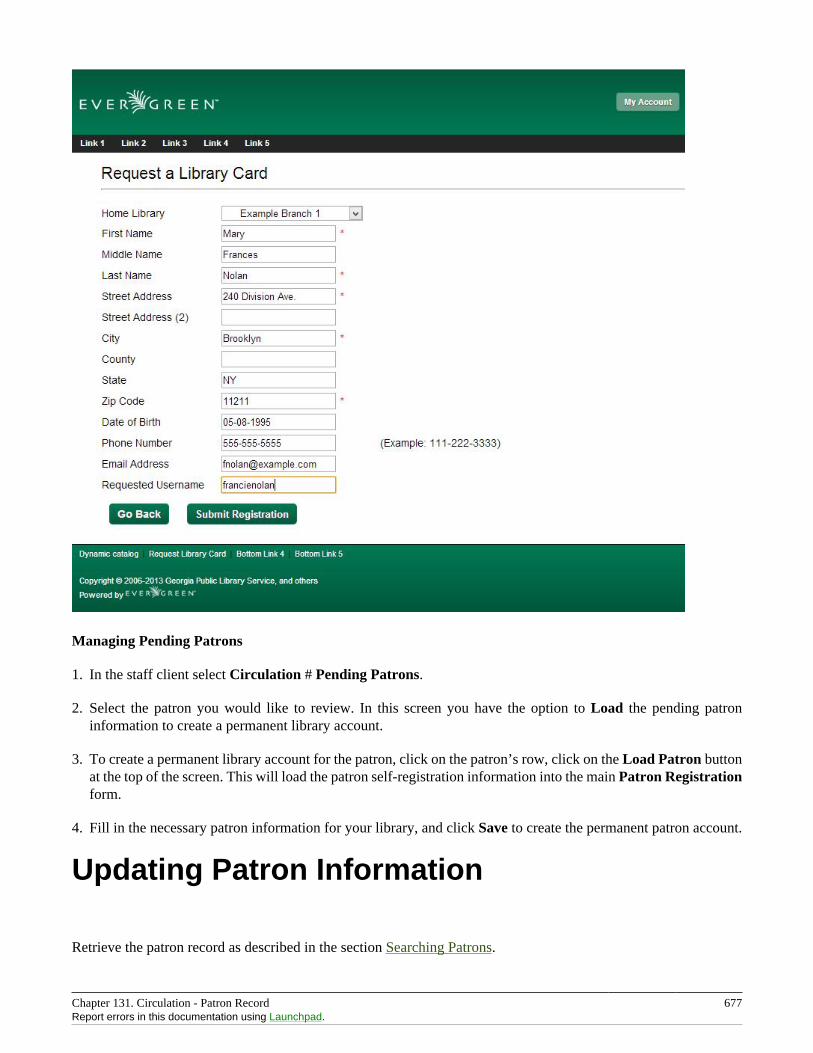
Chapter 131. Circulation - Patron Record 677Report errors in this documentation using Launchpad.
Managing Pending Patrons
1. In the staff client select Circulation # Pending Patrons.
2. Select the patron you would like to review. In this screen you have the option to Load the pending patroninformation to create a permanent library account.
3. To create a permanent library account for the patron, click on the patron’s row, click on the Load Patron buttonat the top of the screen. This will load the patron self-registration information into the main Patron Registrationform.
4. Fill in the necessary patron information for your library, and click Save to create the permanent patron account.
Updating Patron Information
Retrieve the patron record as described in the section Searching Patrons.
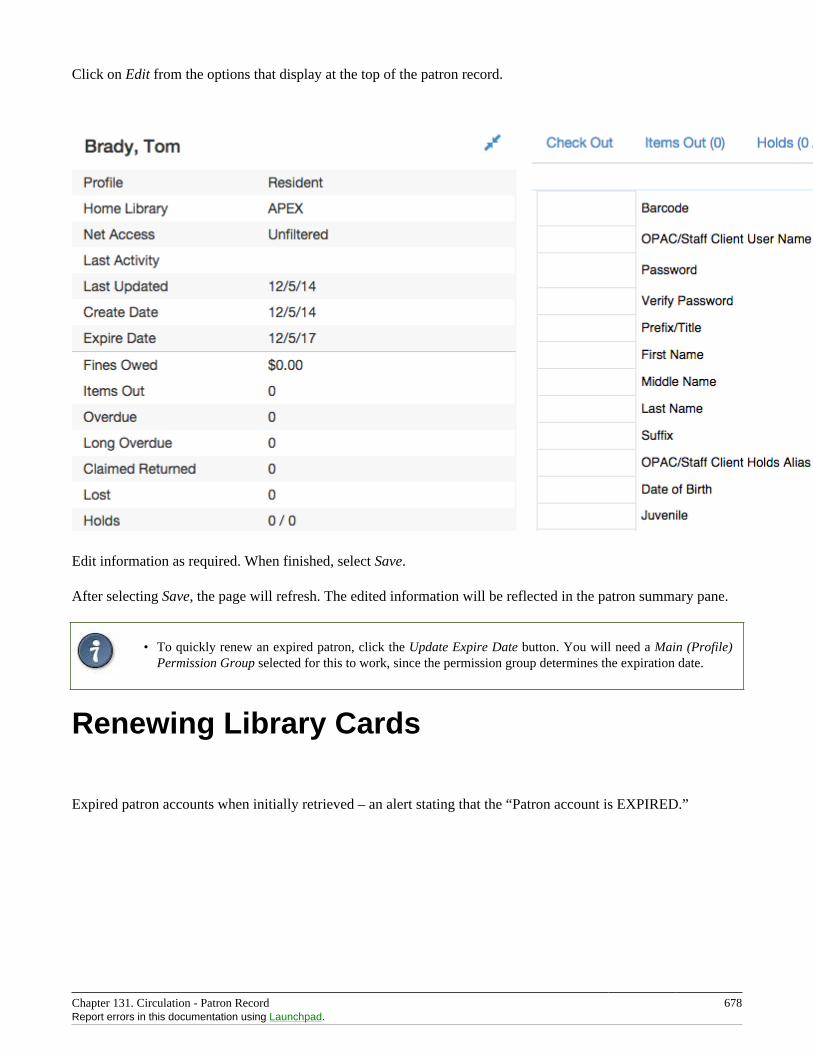
Chapter 131. Circulation - Patron Record 678Report errors in this documentation using Launchpad.
Click on Edit from the options that display at the top of the patron record.
Edit information as required. When finished, select Save.
After selecting Save, the page will refresh. The edited information will be reflected in the patron summary pane.
• To quickly renew an expired patron, click the Update Expire Date button. You will need a Main (Profile)Permission Group selected for this to work, since the permission group determines the expiration date.
Renewing Library Cards
Expired patron accounts when initially retrieved – an alert stating that the “Patron account is EXPIRED.”
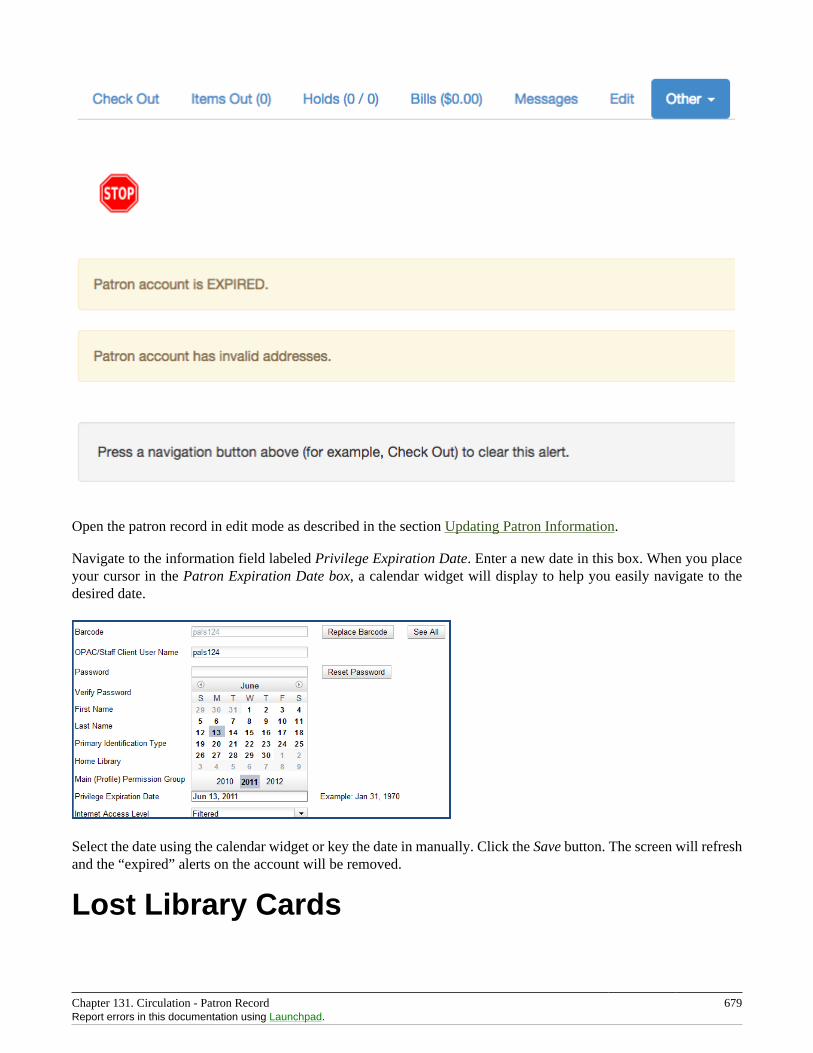
Chapter 131. Circulation - Patron Record 679Report errors in this documentation using Launchpad.
Open the patron record in edit mode as described in the section Updating Patron Information.
Navigate to the information field labeled Privilege Expiration Date. Enter a new date in this box. When you placeyour cursor in the Patron Expiration Date box, a calendar widget will display to help you easily navigate to thedesired date.
Select the date using the calendar widget or key the date in manually. Click the Save button. The screen will refreshand the “expired” alerts on the account will be removed.
Lost Library Cards

Chapter 131. Circulation - Patron Record 680Report errors in this documentation using Launchpad.
Retrieve the patron record as described in the section Searching Patrons.
Open the patron record in edit mode as described in the section Updating Patron Information.
Next to the Barcode field, select the Replace Barcode button.
This will clear the barcode field. Enter a new barcode and Save the record. The screen will refresh and the newbarcode will display in the patron summary pane.
If a patron’s barcode is mistakenly replaced, the old barcode may be reinstated. Retrieve the patron record asdescribed in the section Searching Patrons. Open the patron record in edit mode as described in the section UpdatingPatron Information.
Select the See All button next to the Replace Barcode button. This will display the current and past barcodesassociated with this account.
Check the box(es) for all barcodes that should be “active” for the patron. An “active” barcode may be used forcirculation transactions. A patron may have more than one “active” barcode. Only one barcode may be designated“primary.” The “primary” barcode displays in the patron’s summary information in the Library Card field.
Once you have modified the patron barcode(s), Save the patron record. If you modified the “primary” barcode, thenew primary barcode will display in the patron summary screen.
Resetting Patron’s Password
A patron’s password may be reset from the OPAC or through the staff client. To reset the password from the staffclient, retrieve the patron record as described in the section Searching Patrons.
Open the patron record in edit mode as described in the section Updating Patron Information.
Select the Reset Password button next to the Password field.
The existing password is not displayed in patron records for security reasons.
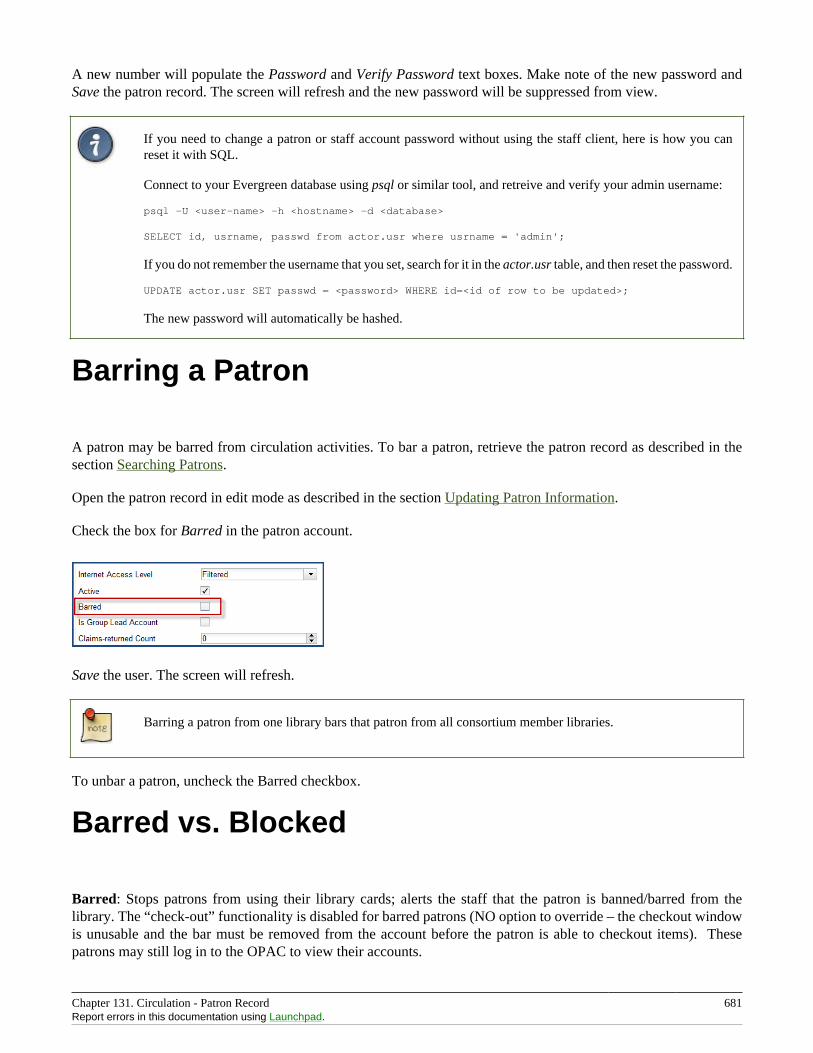
Chapter 131. Circulation - Patron Record 681Report errors in this documentation using Launchpad.
A new number will populate the Password and Verify Password text boxes. Make note of the new password andSave the patron record. The screen will refresh and the new password will be suppressed from view.
If you need to change a patron or staff account password without using the staff client, here is how you canreset it with SQL.
Connect to your Evergreen database using psql or similar tool, and retreive and verify your admin username:
psql -U <user-name> -h <hostname> -d <database>
SELECT id, usrname, passwd from actor.usr where usrname = 'admin';
If you do not remember the username that you set, search for it in the actor.usr table, and then reset the password.
UPDATE actor.usr SET passwd = <password> WHERE id=<id of row to be updated>;
The new password will automatically be hashed.
Barring a Patron
A patron may be barred from circulation activities. To bar a patron, retrieve the patron record as described in thesection Searching Patrons.
Open the patron record in edit mode as described in the section Updating Patron Information.
Check the box for Barred in the patron account.
Save the user. The screen will refresh.
Barring a patron from one library bars that patron from all consortium member libraries.
To unbar a patron, uncheck the Barred checkbox.
Barred vs. Blocked
Barred: Stops patrons from using their library cards; alerts the staff that the patron is banned/barred from thelibrary. The “check-out” functionality is disabled for barred patrons (NO option to override – the checkout windowis unusable and the bar must be removed from the account before the patron is able to checkout items). Thesepatrons may still log in to the OPAC to view their accounts.
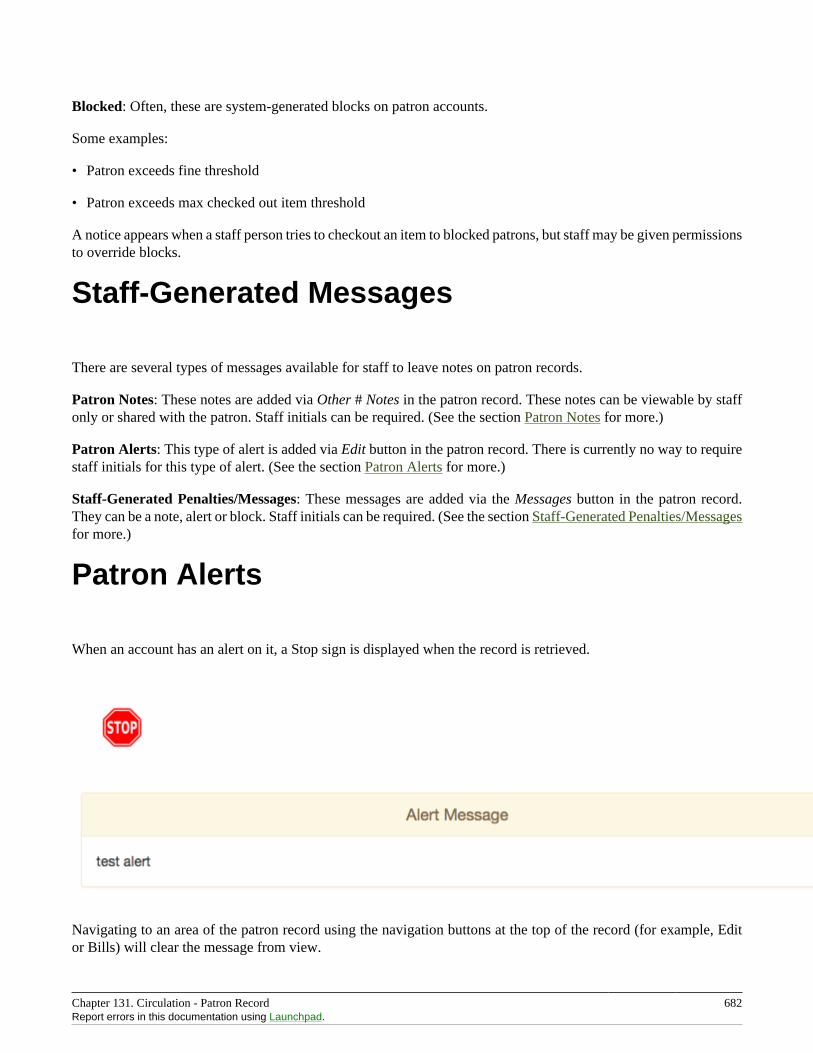
Chapter 131. Circulation - Patron Record 682Report errors in this documentation using Launchpad.
Blocked: Often, these are system-generated blocks on patron accounts.
Some examples:
• Patron exceeds fine threshold
• Patron exceeds max checked out item threshold
A notice appears when a staff person tries to checkout an item to blocked patrons, but staff may be given permissionsto override blocks.
Staff-Generated Messages
There are several types of messages available for staff to leave notes on patron records.
Patron Notes: These notes are added via Other # Notes in the patron record. These notes can be viewable by staffonly or shared with the patron. Staff initials can be required. (See the section Patron Notes for more.)
Patron Alerts: This type of alert is added via Edit button in the patron record. There is currently no way to requirestaff initials for this type of alert. (See the section Patron Alerts for more.)
Staff-Generated Penalties/Messages: These messages are added via the Messages button in the patron record.They can be a note, alert or block. Staff initials can be required. (See the section Staff-Generated Penalties/Messagesfor more.)
Patron Alerts
When an account has an alert on it, a Stop sign is displayed when the record is retrieved.
Navigating to an area of the patron record using the navigation buttons at the top of the record (for example, Editor Bills) will clear the message from view.
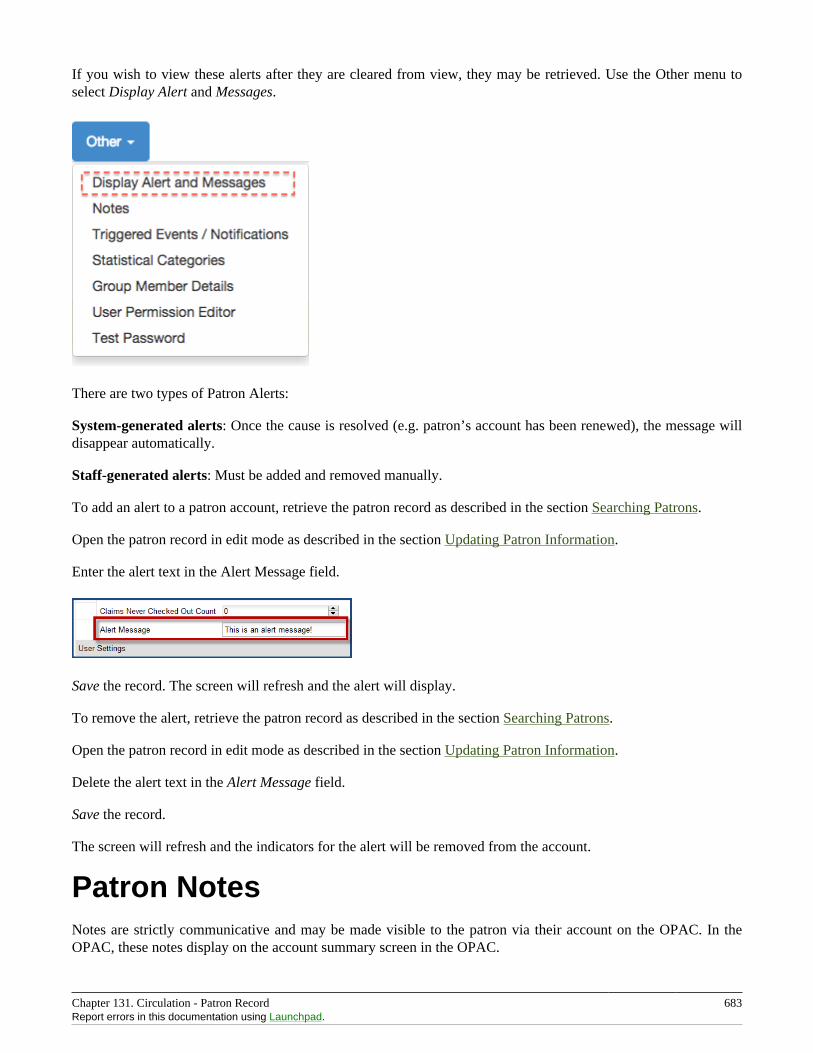
Chapter 131. Circulation - Patron Record 683Report errors in this documentation using Launchpad.
If you wish to view these alerts after they are cleared from view, they may be retrieved. Use the Other menu toselect Display Alert and Messages.
There are two types of Patron Alerts:
System-generated alerts: Once the cause is resolved (e.g. patron’s account has been renewed), the message willdisappear automatically.
Staff-generated alerts: Must be added and removed manually.
To add an alert to a patron account, retrieve the patron record as described in the section Searching Patrons.
Open the patron record in edit mode as described in the section Updating Patron Information.
Enter the alert text in the Alert Message field.
Save the record. The screen will refresh and the alert will display.
To remove the alert, retrieve the patron record as described in the section Searching Patrons.
Open the patron record in edit mode as described in the section Updating Patron Information.
Delete the alert text in the Alert Message field.
Save the record.
The screen will refresh and the indicators for the alert will be removed from the account.
Patron NotesNotes are strictly communicative and may be made visible to the patron via their account on the OPAC. In theOPAC, these notes display on the account summary screen in the OPAC.
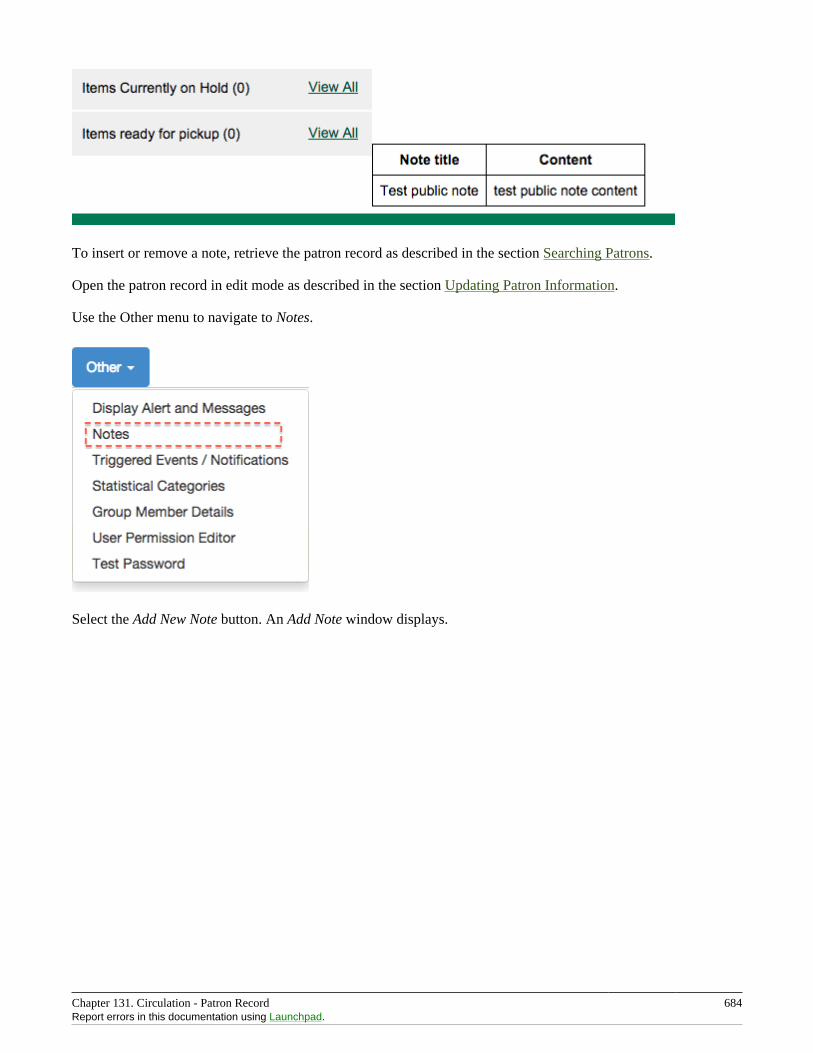
Chapter 131. Circulation - Patron Record 684Report errors in this documentation using Launchpad.
To insert or remove a note, retrieve the patron record as described in the section Searching Patrons.
Open the patron record in edit mode as described in the section Updating Patron Information.
Use the Other menu to navigate to Notes.
Select the Add New Note button. An Add Note window displays.

Part XIV. Using the Public Access Catalog
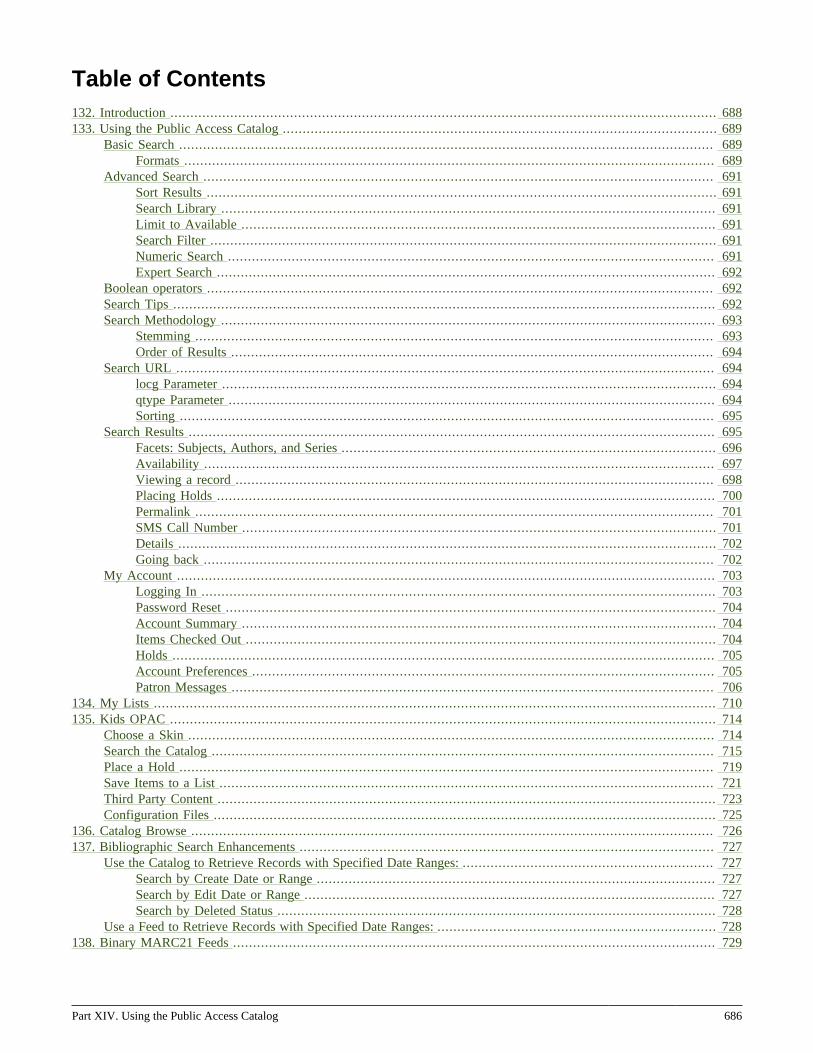
Part XIV. Using the Public Access Catalog 686
Table of Contents132. Introduction ......................................................................................................................................... 688133. Using the Public Access Catalog ............................................................................................................. 689
Basic Search ...................................................................................................................................... 689Formats ..................................................................................................................................... 689
Advanced Search ................................................................................................................................ 691Sort Results ................................................................................................................................ 691Search Library ............................................................................................................................ 691Limit to Available ....................................................................................................................... 691Search Filter ............................................................................................................................... 691Numeric Search .......................................................................................................................... 691Expert Search ............................................................................................................................. 692
Boolean operators ............................................................................................................................... 692Search Tips ........................................................................................................................................ 692Search Methodology ............................................................................................................................ 693
Stemming .................................................................................................................................. 693Order of Results ......................................................................................................................... 694
Search URL ....................................................................................................................................... 694locg Parameter ............................................................................................................................ 694qtype Parameter .......................................................................................................................... 694Sorting ...................................................................................................................................... 695
Search Results .................................................................................................................................... 695Facets: Subjects, Authors, and Series .............................................................................................. 696Availability ................................................................................................................................ 697Viewing a record ........................................................................................................................ 698Placing Holds ............................................................................................................................. 700Permalink .................................................................................................................................. 701SMS Call Number ....................................................................................................................... 701Details ....................................................................................................................................... 702Going back ................................................................................................................................ 702
My Account ....................................................................................................................................... 703Logging In ................................................................................................................................. 703Password Reset ........................................................................................................................... 704Account Summary ....................................................................................................................... 704Items Checked Out ...................................................................................................................... 704Holds ........................................................................................................................................ 705Account Preferences .................................................................................................................... 705Patron Messages ......................................................................................................................... 706
134. My Lists ............................................................................................................................................. 710135. Kids OPAC ......................................................................................................................................... 714
Choose a Skin .................................................................................................................................... 714Search the Catalog .............................................................................................................................. 715Place a Hold ...................................................................................................................................... 719Save Items to a List ............................................................................................................................ 721Third Party Content ............................................................................................................................. 723Configuration Files .............................................................................................................................. 725
136. Catalog Browse ................................................................................................................................... 726137. Bibliographic Search Enhancements ........................................................................................................ 727
Use the Catalog to Retrieve Records with Specified Date Ranges: ............................................................... 727Search by Create Date or Range .................................................................................................... 727Search by Edit Date or Range ....................................................................................................... 727Search by Deleted Status .............................................................................................................. 728
Use a Feed to Retrieve Records with Specified Date Ranges: ...................................................................... 728138. Binary MARC21 Feeds ......................................................................................................................... 729
Part XIV. Using the Public Access Catalog 687Report errors in this documentation using Launchpad.
139. TPAC Metarecord Search and Metarecord Level Holds ............................................................................... 730140. Library Information Pages ..................................................................................................................... 735141. Adding OpenSearch to Firefox browser .................................................................................................... 736142. Adding an Evergreen search form to a web page ....................................................................................... 739

Chapter 132. Introduction 688
Chapter 132. IntroductionEvergreen has a public OPAC that meets WCAG guidelines (http://www.w3.org/WAI/intro/wcag), which helpsmake the OPAC accessible to users with a range of disabilities. This part of the documentation explains how to usethe Evergreen public OPAC. It covers the basic catalog and more advanced search topics. It also describes the “MyAccount” tools users have to find information and manage their personal library accounts through the OPAC. Thissection could be used by staff and patrons but would be more useful for staff as a generic reference when developingcustom guides and tutorials for their users.
Chapter 133. Using the Public Access Catalog 689
Chapter 133. Using the Public AccessCatalog
Basic Search
From the OPAC home, you can conduct a basic search of all materials owned by all libraries in your Evergreensystem.
This search can be as simple as typing keywords into the search box and clicking the Search button. Or you canmake your search more precise by limiting your search by fields to search, material type or library location.
The Homepage contains a single search box for you to enter search terms. You can get to the Homepage at any timeby clicking the Another Search link from the leftmost link on the bar above your search results in the catalogue, oryou can enter a search anywhere you see a search box.
You can select to search by:
• Keyword: finds the terms you enter anywhere in the entire record for an item, including title, author, subject,and other information.
• Title: finds the terms you enter in the title of an item.
• Journal Title: finds the terms you enter in the title of a serial bib record.
• Author: finds the terms you enter in the author of an item.
• Subject: finds the terms you enter in the subject of an item. Subjects are categories assigned to items accordingto a system such as the Library of Congress Subject Headings.
• Series: finds the terms you enter in the title of a multi-part series.
To search an item copy call number, use Advanced Search: Numeric
FormatsYou can limit your search by formats based on MARC fixed field type:
• All Books

Chapter 133. Using the Public Access Catalog 690Report errors in this documentation using Launchpad.
• All Music
• Audiocassette music recording
• Blu-ray
• Braille
• Cassette audiobook
• CD Audiobook
• CD Music recording
• DVD
• E-audio
• E-book
• E-video
• Equipment, games, toys
• Kit
• Large Print Book
• Map
• Microform
• Music Score
• Phonograph music recording
• Phonograph spoken recording
• Picture
• Serials and magazines
• Software and video games
• VHS
Libraries
If you are using a catalogue in a library or accessing a library’s online catalogue from its homepage, the search willreturn items for your local library. If your library has multiple branches, the result will display items available atyour branch and all branches of your library system separately.
Chapter 133. Using the Public Access Catalog 691Report errors in this documentation using Launchpad.
Advanced SearchAdvanced searches allow users to perform more complex searches by providing more options. Many kinds ofsearches can be performed from the Advanced Search screen. You can access by clicking Advanced Search on thecatalogue Homepage or search results screen.
The available search options are the same as on the basic search. But you may use one or many of themsimultaneously. If you want to combine more than three search options, use Add Search Row button to add moresearch input rows. Clicking the X button will close the search input row.
Sort Results
By default, the search results are in order of greatest to least relevance, see Order of Results. In the sort results menuyou may select to order the search results by relevance, title, author, or publication date.
Search Library
The current search library is displayed under Search Library drop down menu. By default it is your library. Thesearch returns results for your local library only. If your library system has multiple branches, use the Search Librarybox to select different branches or the whole library system.
Limit to Available
This checkbox is at the bottom line of Search Library. Select Limit to Available to limit results to those titles thathave items with a circulation status of "available" (by default, either Available or Reshelving).
Search Filter
You can filter your search by Item Type, Item Form, Language, Audience, Video Format, Bib Level, Literary Form,Search Library, and Publication Year. Publication year is inclusive. For example, if you set Publication YearBetween 2005 and 2007, your results can include items published in 2005, 2006 and 2007.
For each filter type, you may select multiple criteria by holding down the CTRL key as you click on the options. Ifnothing is selected for a filter, the search will return results as though all options are selected.
Numeric SearchIf you have details on the exact item you wish to search for, use the Numeric Search tab on the advanced searchpage. Use the drop-down menu to select your search by ISBN, ISSN, Bib Call Number, Call Number (Shelf Browse),LCCN, TCN, or Item Barcode. Enter the information and then click the Search button.
Chapter 133. Using the Public Access Catalog 692Report errors in this documentation using Launchpad.
Expert Search
If you are familiar with MARC cataloging, you may search by MARC tag in the Expert Search option on the left ofthe screen. Enter the three-digit tag number, the subfield if relevant, and the value or text that corresponds to the tag.For example, to search by publisher name, enter 260 b Random House. To search several tags simultaneously,use the Add Row option. Click Submit to run the search.
Use the MARC Expert Search only as a last resort, as it can take much longer to retrieve results than by usingindexed fields. For example, rather than running an expert search for "245 a Gone with the wind", simply doa regular title search for "Gone with the wind".
Boolean operators
Classic search interfaces (that is, those used primarily by librarians) forced users to learn the art of crafting searchphrases with Boolean operators. To a large extent this was due to the inability of those systems to provide relevancyranking beyond a "last in, first out" approach. Thankfully, Evergreen, like most modern search systems, supports arather sophisticated relevancy ranking system that removes the need for Boolean operators in most cases.
By default, all terms that have been entered in a search query are joined with an implicit AND operator. Those termsare required to appear in the designated fields to produce a matching record: a search for golden compass will searchfor entries that contain both golden and compass.
Words that are often considered Boolean operators, such as AND, OR, and NOT, are not special in Evergreen: theyare treated as just another search term. For example, a title search for golden and compass will not returnthe title Golden Compass.
However, Evergreen does support Boolean searching for those rare cases where you might require it, using symbolicoperators as follows:
Table 133.1. Boolean symbolic operators
Operator Symbol Example
AND && a && b
OR || a || b
NOT -term a -b
Search Tips
Evergreen tries to approach search from the perspective of a major search engine: the user should simply be ableto enter the terms they are looking for as a general keyword search, and Evergreen should return results that aremost relevant given those terms. For example, you do not need to enter author’s last name first, nor do you need
Chapter 133. Using the Public Access Catalog 693Report errors in this documentation using Launchpad.
to enter an exact title or subject heading. Evergreen is also forgiving about plurals and alternate verb endings, so ifyou enter dogs, Evergreen will also find items with dog.
The search engine has no stop words (terms are ignored by the search engine): a title search for to be or notto be (in any order) yields a list of titles with those words.
• Don’t worry about white space, exact punctuation, or capitalization.
1. White spaces before or after a word are ignored. So, a search for [ golden compass ] gives the sameresults as a search for [golden compass].
2. A double dash or a colon between words is reduced to a blank space. So, a title search for golden:compass orgolden — compass is equivalent to golden compass.
3. Punctuation marks occurring within a word are removed; the exception is _. So, a title search for gol_dencom_pass gives no result.
4. Diacritical marks and solitary & or | characters located anywhere in the search term are removed. Words orletters linked together by . (dot) are joined together without the dot. So, a search for go|l|den & comp.ass isequivalent to golden compass.
5. Upper and lower case letters are equivalent. So, Golden Compass is the same as golden compass.
• Enter your search words in any order. So, a search for compass golden gives the same results as a search forgolden compass. Adding more search words gives fewer but more specific results.
• This is also true for author searches. Both David Suzuki and Suzuki, David will return results for the same author.
• Use specific search terms. Evergreen will search for the words you specify, not the meanings, so choose searchterms that are likely to appear in an item description. For example, the search luxury hotels will produce morerelevant results than nice places to stay.
• Search for an exact phrase using double-quotes. For example “golden compass”.
• The order of words is important for an exact phrase search. golden compass is different than compass golden.
• White space, punctuation and capitalization are removed from exact phrases as described above. So a phraseretains its search terms and its relative order, but not special characters and not case.
• Two phrases are joined by and, so a search for "golden compass" "dark materials" is equivalent to goldencompass and dark materials.
• Truncation Words may be right-hand truncated using an asterisk. Use a single asterisk * to truncate any numberof characters. (example: environment* agency)
Search Methodology
Stemming
Chapter 133. Using the Public Access Catalog 694Report errors in this documentation using Launchpad.
A search for dogs will also return hits with the word dog and a search for parenting will return results with the wordsparent and parental. This is because the search uses stemming to help return the most relevant results. That is, wordsare reduced to their stem (or root word) before the search is performed.
The stemming algorithm relies on common English language patterns - like verbs ending in ing - to find the stems.This is more efficient than looking up each search term in a dictionary and usually produces desirable results.However, it also means the search will sometimes reduce a word to an incorrect stem and cause unexpected results.To prevent a word or phrase from stemming, put it in double-quotes to force an exact search. For example, a searchfor parenting will also return results for parental, but a search for "parenting" will not.
Understanding how stemming works can help you to create more relevant searches, but it is usually best not toanticipate how a search term will be stemmed. For example, searching for gold compass does not return thesame results as golden compass, because -en is not a regular suffix in English, and therefore the stemmingalgorithm does not recognize gold as a stem of golden.
Order of Results
By default, the results are listed in order of relevance, similar to a search engine like Google. The relevance isdetermined using a number of factors, including how often and where the search terms appear in the item description,and whether the search terms are part of the title, subject, author, or series. The results which best match your searchare returned first rather than results appearing in alphabetical or chronological order.
In the Advanced Search screen, you may select to order the search results by relevance, title, author, or publicationdate before you start the search. You can also re-order your search results using the Sort Results dropdown list onthe search result screen.
Search URL
When performing a search or clicking on the details links, Evergreen constructs a GET request url with theparameters of the search. The url for searches and details in Evergreen are persistent links in that they can be saved,shared and used later.
Here is a basic search URL structure:
[hostname]/eg/opac/results?query=[search term]&qtype=keyword&fi%3Aitem_type=&locg=[location id]
locg ParameterThis is the id of the search location. It is an integer and maches the id of the location the user selected in the locationdrop down menu.
qtype ParameterThe qtype parameter in the URL represents the search type values and represent one of the following search orrequest types:
Chapter 133. Using the Public Access Catalog 695Report errors in this documentation using Launchpad.
• Keyword
• Title
• Journal Title
• Author
• Subject
• Series
• Bib Call Number
These match the options in the search type drop-down box.
Sorting
The sort parameter sorts the results on one of these criteria.
• sort=pubdate (publication date) - chronological order
• sort=titlesort - Alphabetical order
• sort=authorsort - Alphabetical order on family name first
To change the sort direction of the results, the sort parameter value has the ".descending" suffix added to it.
• sort=titlesort.descending
• sort=authorsort.descending
• sort=pubdate.descending
In the absence of the sort parameter, the search results default to sorting by relevance.
Search Results
The search results are a list of relevant works from the catalogue. If there are many results, they are divided intoseveral pages. At the top of the list, you can see the total number of results and go back and forth between the pagesby clicking the links that say Previous or Next on top or bottom of the list. You can also click on the adjacent resultspage number listed. These page number links allow you to skip to that results page, if your search results neededmultiple pages to display. Here is an example:
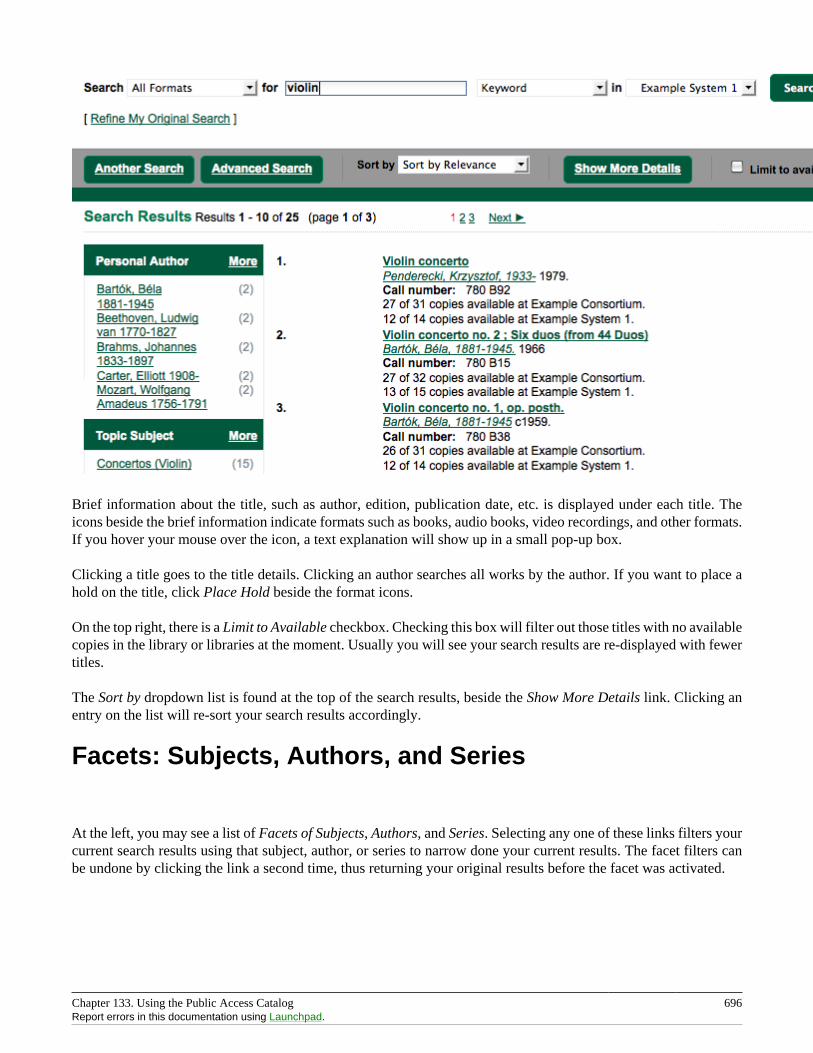
Chapter 133. Using the Public Access Catalog 696Report errors in this documentation using Launchpad.
Brief information about the title, such as author, edition, publication date, etc. is displayed under each title. Theicons beside the brief information indicate formats such as books, audio books, video recordings, and other formats.If you hover your mouse over the icon, a text explanation will show up in a small pop-up box.
Clicking a title goes to the title details. Clicking an author searches all works by the author. If you want to place ahold on the title, click Place Hold beside the format icons.
On the top right, there is a Limit to Available checkbox. Checking this box will filter out those titles with no availablecopies in the library or libraries at the moment. Usually you will see your search results are re-displayed with fewertitles.
The Sort by dropdown list is found at the top of the search results, beside the Show More Details link. Clicking anentry on the list will re-sort your search results accordingly.
Facets: Subjects, Authors, and Series
At the left, you may see a list of Facets of Subjects, Authors, and Series. Selecting any one of these links filters yourcurrent search results using that subject, author, or series to narrow done your current results. The facet filters canbe undone by clicking the link a second time, thus returning your original results before the facet was activated.
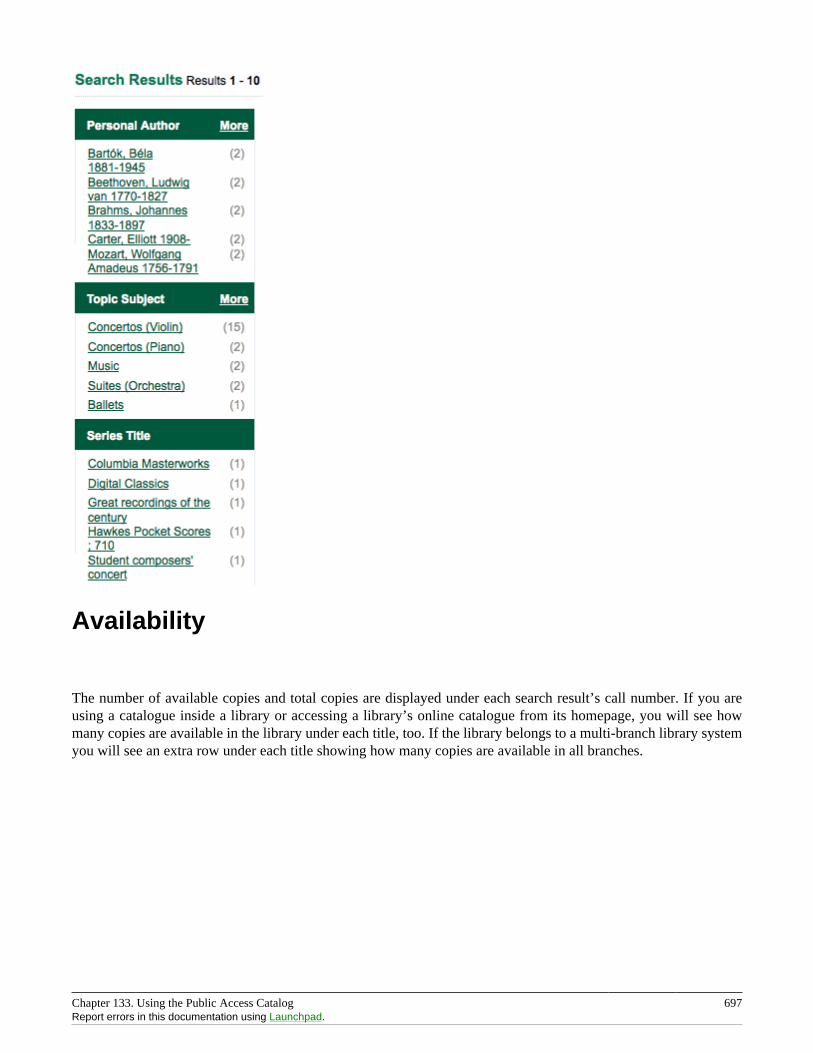
Chapter 133. Using the Public Access Catalog 697Report errors in this documentation using Launchpad.
Availability
The number of available copies and total copies are displayed under each search result’s call number. If you areusing a catalogue inside a library or accessing a library’s online catalogue from its homepage, you will see howmany copies are available in the library under each title, too. If the library belongs to a multi-branch library systemyou will see an extra row under each title showing how many copies are available in all branches.

Chapter 133. Using the Public Access Catalog 698Report errors in this documentation using Launchpad.
You may also click the Show More Details link at the top of the results page, next to the Limit to available itemscheck box, to view each search result’s copies' individual call number, status, and shelving location.
Viewing a record
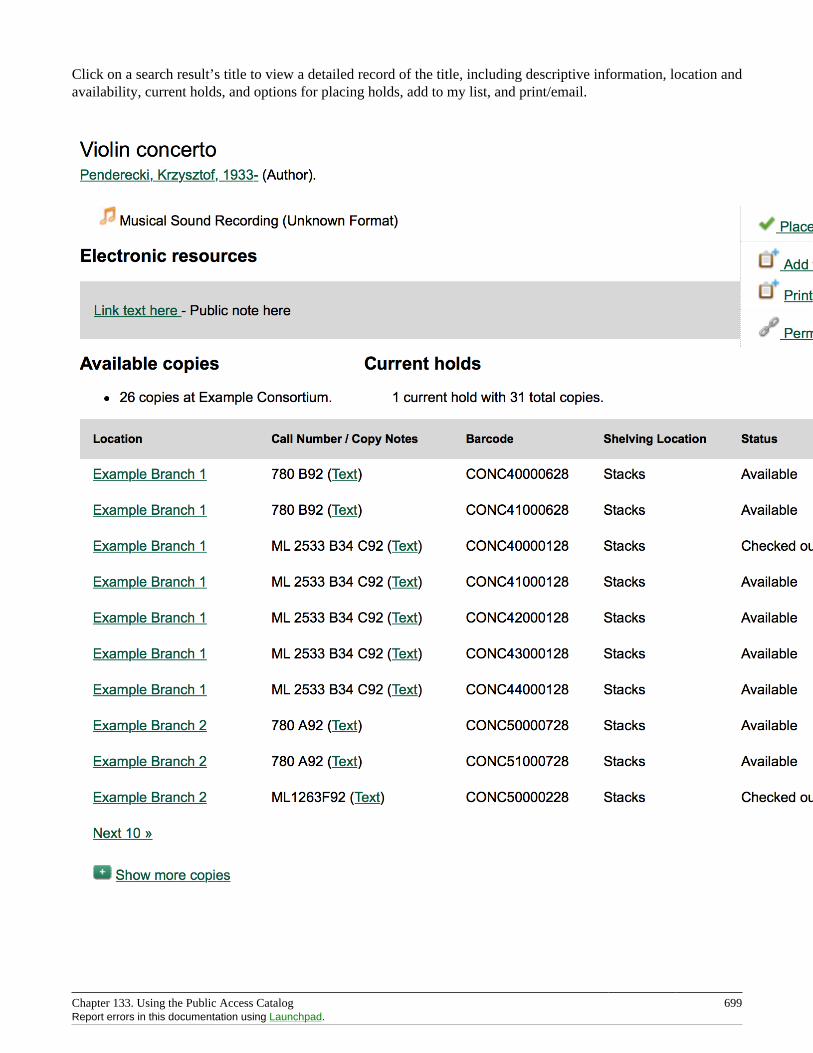
Chapter 133. Using the Public Access Catalog 699Report errors in this documentation using Launchpad.
Click on a search result’s title to view a detailed record of the title, including descriptive information, location andavailability, current holds, and options for placing holds, add to my list, and print/email.
Chapter 133. Using the Public Access Catalog 700Report errors in this documentation using Launchpad.
Placing Holds
Holds can be placed on either title results or search results page. If the item is available, it will be pulled from theshelf and held for you. If all copies at your local library are checked out, you will be placed on a waiting list andyou will be notified when items become available.
On title details page, you can select the Place Hold link in the upper right corner of the record to reserve the item.You will need your library account user name and password. You may choose to be notified by phone or email.
In the example below, the phone number in your account will automatically show up. Once you select the Enablephone notifications for this hold checkbox, you can supply a different phone number for this hold only. Thenotification method will be selected automatically if you have set it up in your account references. But you stillhave a chance to re-select on this screen. You may also suspend the hold temporarily by checking the Suspend box.Click the Help beside it for details.
You can view and cancel a hold at anytime. Before your hold is captured, which means an item has been held waitingfor you to pick up, you can edit, suspend or activate it. You need log into your patron My Account to do it. Fromyour account you can also set up an Cancel if not filled by date for your hold. Cancel if not filled by date means afterthis date, even though your hold has not been fulfilled you do not need the item anymore.
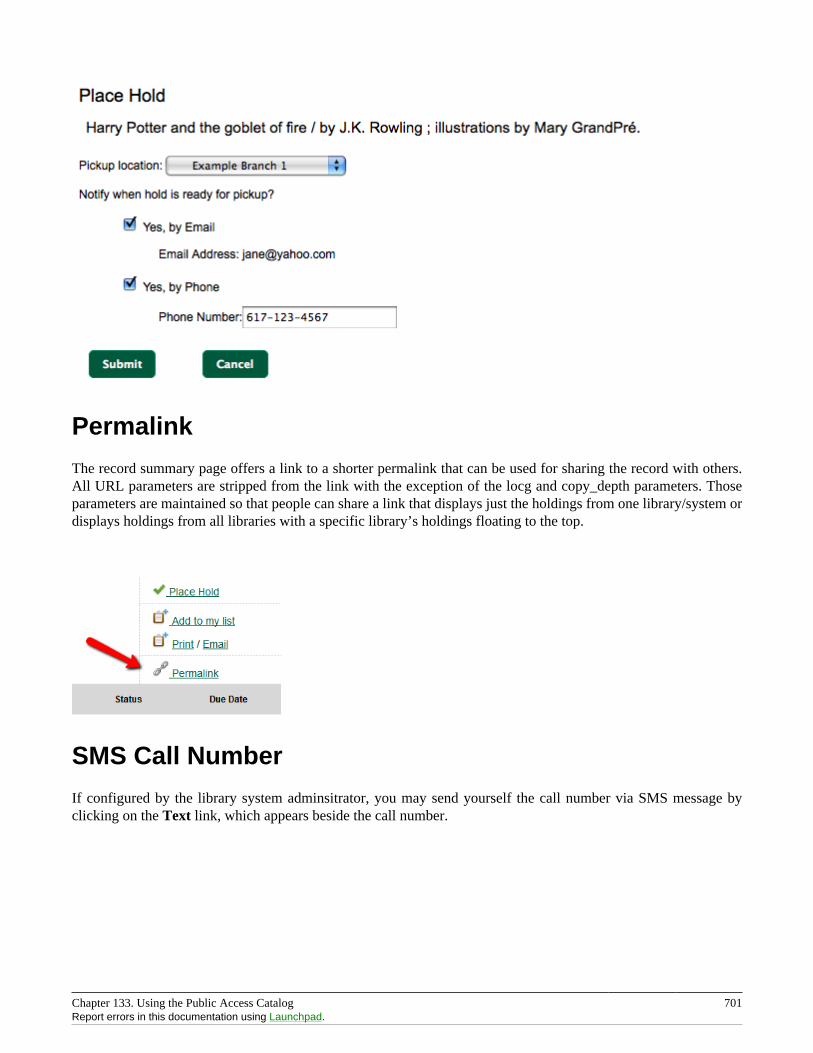
Chapter 133. Using the Public Access Catalog 701Report errors in this documentation using Launchpad.
Permalink
The record summary page offers a link to a shorter permalink that can be used for sharing the record with others.All URL parameters are stripped from the link with the exception of the locg and copy_depth parameters. Thoseparameters are maintained so that people can share a link that displays just the holdings from one library/system ordisplays holdings from all libraries with a specific library’s holdings floating to the top.
SMS Call Number
If configured by the library system adminsitrator, you may send yourself the call number via SMS message byclicking on the Text link, which appears beside the call number.
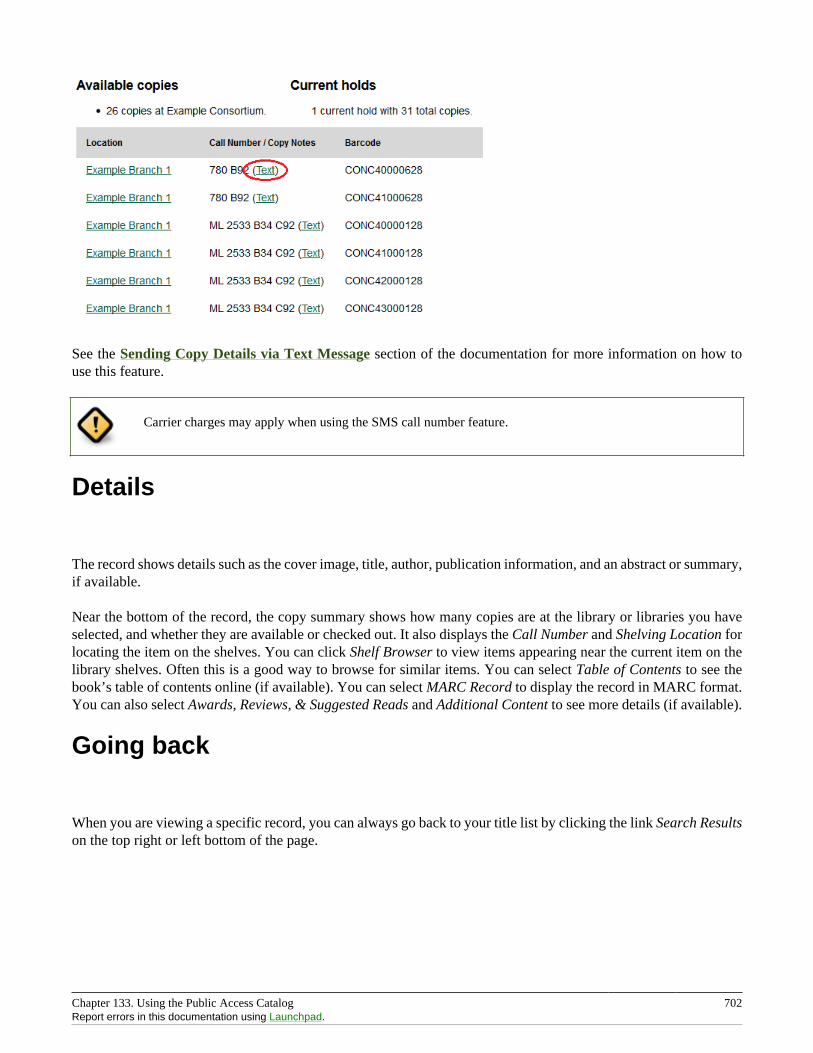
Chapter 133. Using the Public Access Catalog 702Report errors in this documentation using Launchpad.
See the Sending Copy Details via Text Message section of the documentation for more information on how touse this feature.
Carrier charges may apply when using the SMS call number feature.
Details
The record shows details such as the cover image, title, author, publication information, and an abstract or summary,if available.
Near the bottom of the record, the copy summary shows how many copies are at the library or libraries you haveselected, and whether they are available or checked out. It also displays the Call Number and Shelving Location forlocating the item on the shelves. You can click Shelf Browser to view items appearing near the current item on thelibrary shelves. Often this is a good way to browse for similar items. You can select Table of Contents to see thebook’s table of contents online (if available). You can select MARC Record to display the record in MARC format.You can also select Awards, Reviews, & Suggested Reads and Additional Content to see more details (if available).
Going back
When you are viewing a specific record, you can always go back to your title list by clicking the link Search Resultson the top right or left bottom of the page.
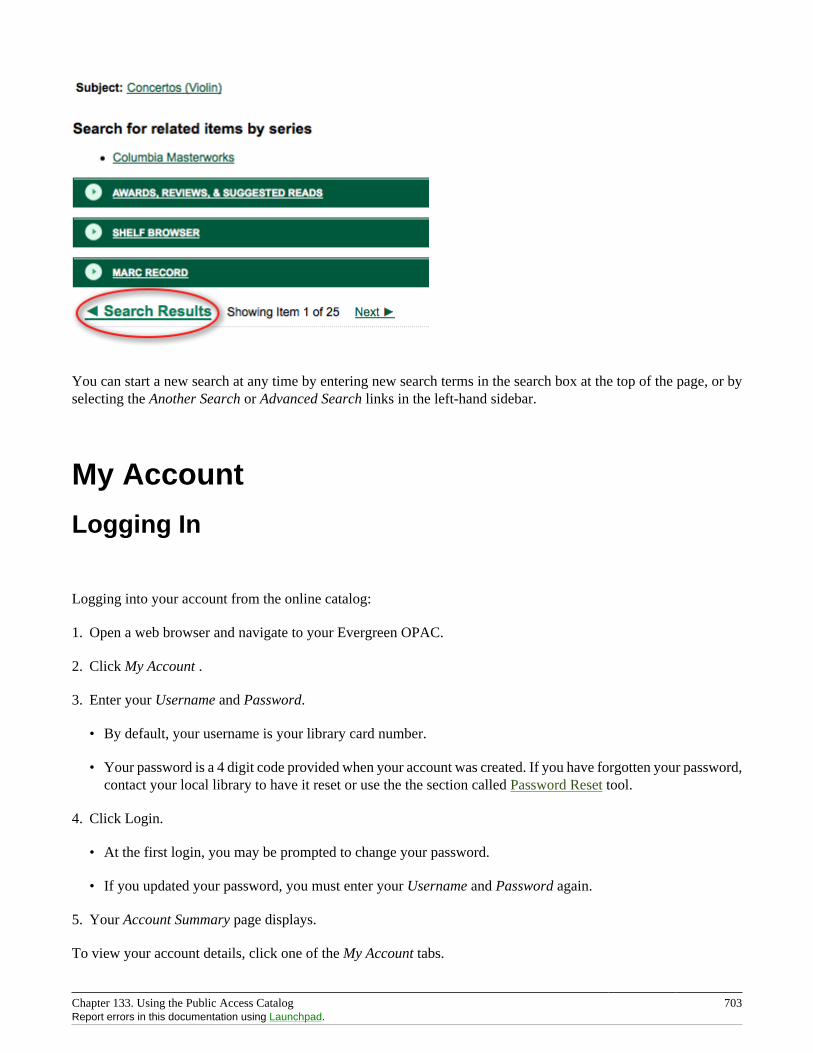
Chapter 133. Using the Public Access Catalog 703Report errors in this documentation using Launchpad.
You can start a new search at any time by entering new search terms in the search box at the top of the page, or byselecting the Another Search or Advanced Search links in the left-hand sidebar.
My Account
Logging In
Logging into your account from the online catalog:
1. Open a web browser and navigate to your Evergreen OPAC.
2. Click My Account .
3. Enter your Username and Password.
• By default, your username is your library card number.
• Your password is a 4 digit code provided when your account was created. If you have forgotten your password,contact your local library to have it reset or use the the section called Password Reset tool.
4. Click Login.
• At the first login, you may be prompted to change your password.
• If you updated your password, you must enter your Username and Password again.
5. Your Account Summary page displays.
To view your account details, click one of the My Account tabs.
Chapter 133. Using the Public Access Catalog 704Report errors in this documentation using Launchpad.
To start a search, enter a term in the search box at the top of the page and click Search!
If using a public computer be sure to log out!
Password Reset
To reset your password:
1. click on the Forgot your password? link located beside the login button.
2. Fill in the Barcode and User name text boxes.
3. A message should appear indicating that your request has been processed and that you will receive an email withfurther instructions.
4. An email will be sent to the email addressed you have registered with your Evergreen library. You should clickon the link included in the email to open the password reset page. Processing time may vary.
You will need to have a valid email account set up in Evergreen for you to reset your password. Otherwise,you will need to contact your library to have your password reset by library staff.
5. At the reset email page you should enter the new password in the New password field and re-enter it in the Re-enter new password field.
6. Click Submit.
7. A message should appear on the page indicating that your password has been reset.
8. Login to your account with your new password.
Account Summary
In the My Account # Account Summary page, you can see when your account expires and your total number ofitems checked out, items on hold, and items ready for pickup. In addition, the Account Summary page lists yourcurrent fines and payment history.
Items Checked Out
Users can manage items currently checked out, like renew specific items. Users can also view overdue items andsee how many renewals they have remaining for specific item.
Chapter 133. Using the Public Access Catalog 705Report errors in this documentation using Launchpad.
As of Evergreen version 2.9, sorting of selected columns is available in the Items Checked Out and Check OutHistory pages. Clicking on the appropriate column heads sorts the contents from "ascending" to "descending" to "nosort". (The "no sort" restores the original list as presented in the screen.) The sort indicator (an up or down arrow)is placed to the right of the column head, as appropriate.
Within Items Checked Out # Current Items Checked Out, the following column headers can be sorted: Title,Author, Renewals Left, Due Date, Barcode, and Call Number.
Within Items Checked Out # Check Out History, the following column headers can be sorted: Title, Author,Checkout Date, Due Date, Date Returned, Barcode, and Call Number
Holds
From My Account, patrons can see Items on Hold and Holds History and manage items currently being requested.In Holds # Items on Hold, the content shown can be sorted by clicking on the following column headers: Title,Author, and Format (based on format name represented by the icon).
Actions include:
• Suspend - set a period of time during which the hold will not become active, such as during a vacation
• Activate - manually remove the suspension
• Cancel - remove the hold request
Edit options include:
• Change pick up library
• Change the Cancel unless filled by date, also known as the hold expiration date
• Change the status of the hold to either active or suspended.
• Change the If suspended, activate on date, which reactivates a suspended hold at the specified date
To edit items on hold:
1. Login to My Account, click the Holds tab.
2. Select the hold to modify.
3. Click Edit for selected holds.
4. Select the change to make and follow the instructions.
Account Preferences
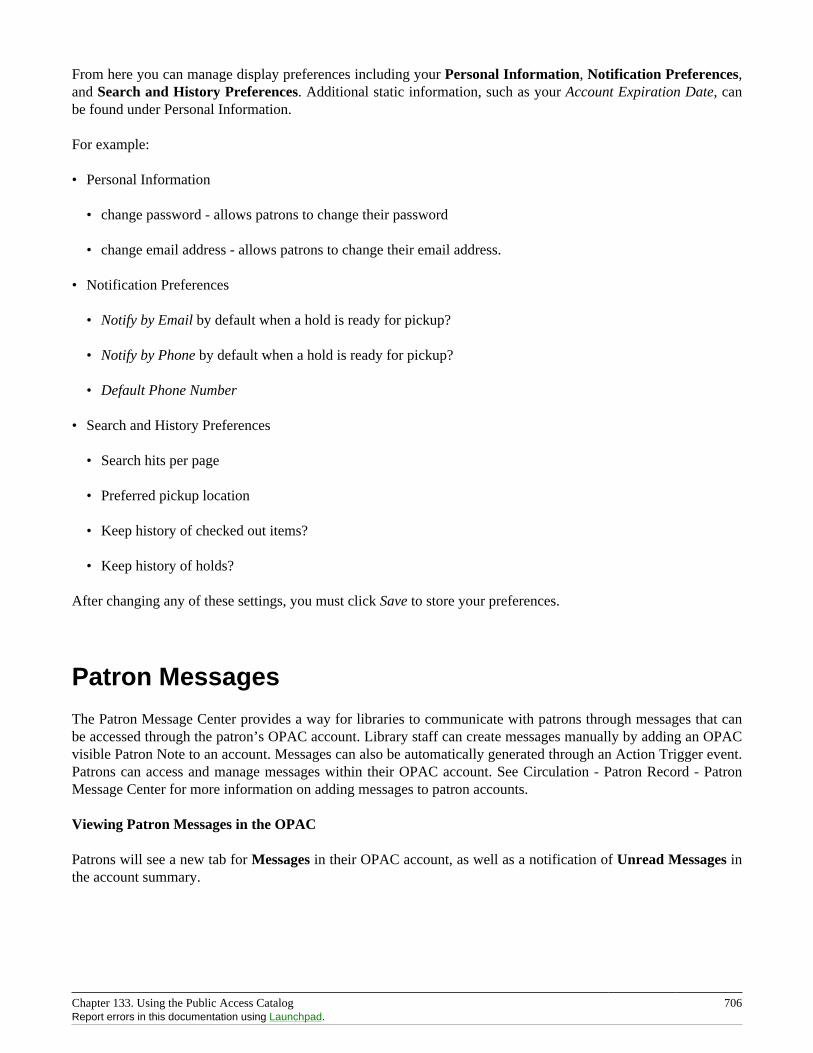
Chapter 133. Using the Public Access Catalog 706Report errors in this documentation using Launchpad.
From here you can manage display preferences including your Personal Information, Notification Preferences,and Search and History Preferences. Additional static information, such as your Account Expiration Date, canbe found under Personal Information.
For example:
• Personal Information
• change password - allows patrons to change their password
• change email address - allows patrons to change their email address.
• Notification Preferences
• Notify by Email by default when a hold is ready for pickup?
• Notify by Phone by default when a hold is ready for pickup?
• Default Phone Number
• Search and History Preferences
• Search hits per page
• Preferred pickup location
• Keep history of checked out items?
• Keep history of holds?
After changing any of these settings, you must click Save to store your preferences.
Patron Messages
The Patron Message Center provides a way for libraries to communicate with patrons through messages that canbe accessed through the patron’s OPAC account. Library staff can create messages manually by adding an OPACvisible Patron Note to an account. Messages can also be automatically generated through an Action Trigger event.Patrons can access and manage messages within their OPAC account. See Circulation - Patron Record - PatronMessage Center for more information on adding messages to patron accounts.
Viewing Patron Messages in the OPAC
Patrons will see a new tab for Messages in their OPAC account, as well as a notification of Unread Messages inthe account summary.
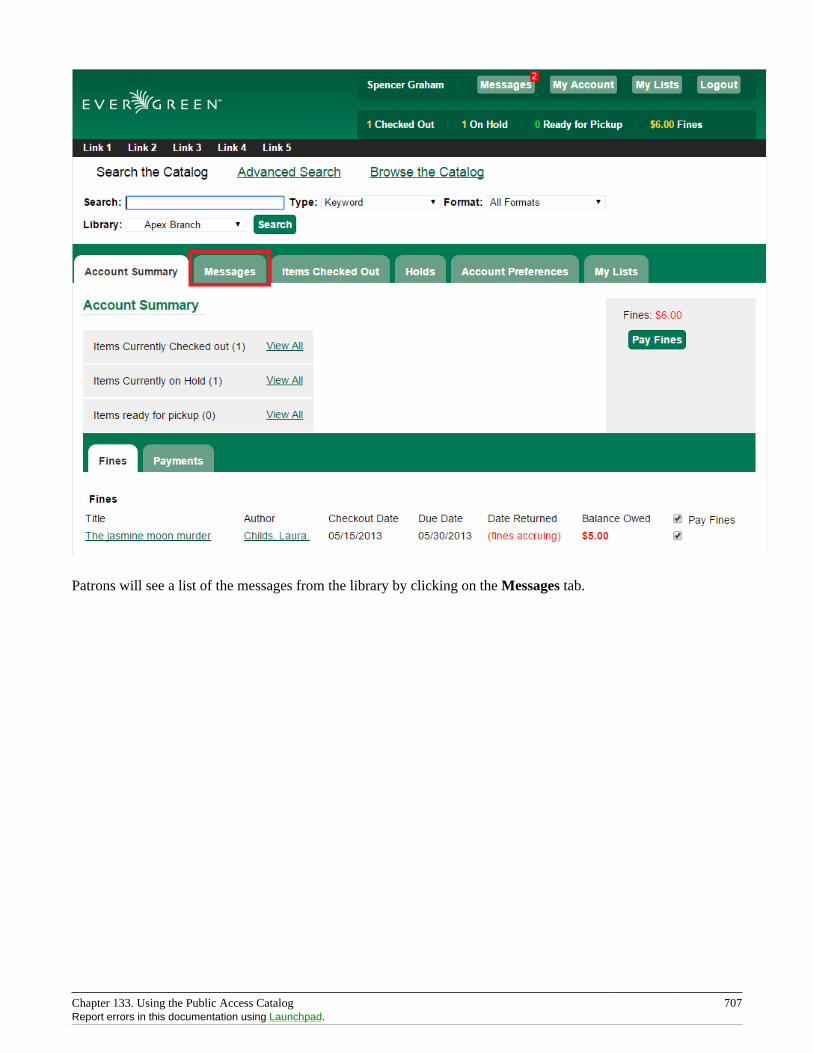
Chapter 133. Using the Public Access Catalog 707Report errors in this documentation using Launchpad.
Patrons will see a list of the messages from the library by clicking on the Messages tab.

Chapter 133. Using the Public Access Catalog 708Report errors in this documentation using Launchpad.
Patrons can click on a message Subject to view the message. After viewing the message, it will automatically bemarked as read. Patrons have the options to mark the message as unread and to delete the message.

Chapter 133. Using the Public Access Catalog 709Report errors in this documentation using Launchpad.
Patron deleted messages will still appear in the patron’s account in the staff client under Other # Message Center.
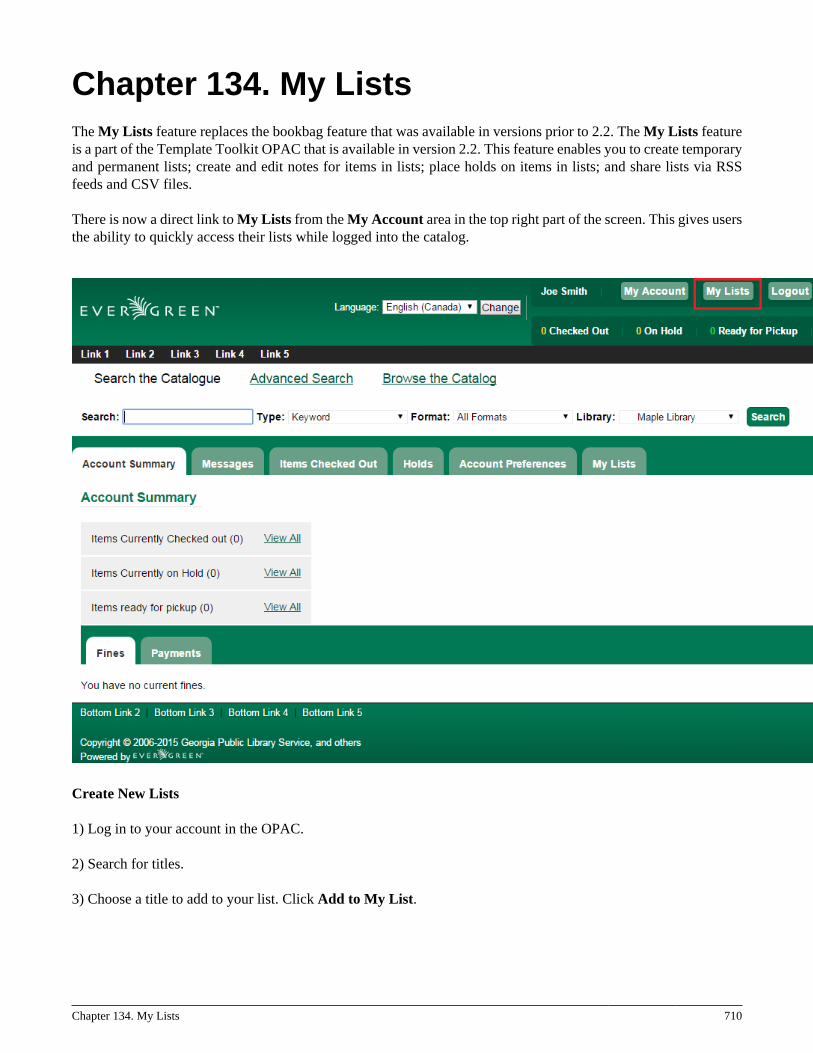
Chapter 134. My Lists 710
Chapter 134. My ListsThe My Lists feature replaces the bookbag feature that was available in versions prior to 2.2. The My Lists featureis a part of the Template Toolkit OPAC that is available in version 2.2. This feature enables you to create temporaryand permanent lists; create and edit notes for items in lists; place holds on items in lists; and share lists via RSSfeeds and CSV files.
There is now a direct link to My Lists from the My Account area in the top right part of the screen. This gives usersthe ability to quickly access their lists while logged into the catalog.
Create New Lists
1) Log in to your account in the OPAC.
2) Search for titles.
3) Choose a title to add to your list. Click Add to My List.
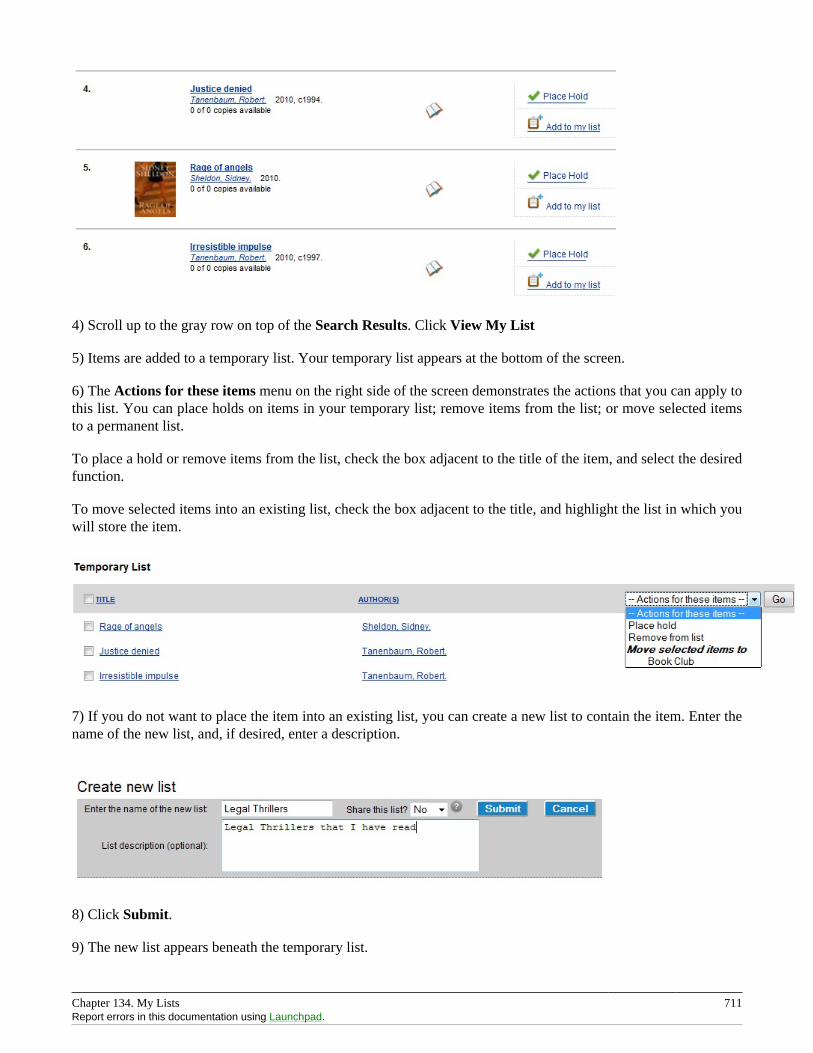
Chapter 134. My Lists 711Report errors in this documentation using Launchpad.
4) Scroll up to the gray row on top of the Search Results. Click View My List
5) Items are added to a temporary list. Your temporary list appears at the bottom of the screen.
6) The Actions for these items menu on the right side of the screen demonstrates the actions that you can apply tothis list. You can place holds on items in your temporary list; remove items from the list; or move selected itemsto a permanent list.
To place a hold or remove items from the list, check the box adjacent to the title of the item, and select the desiredfunction.
To move selected items into an existing list, check the box adjacent to the title, and highlight the list in which youwill store the item.
7) If you do not want to place the item into an existing list, you can create a new list to contain the item. Enter thename of the new list, and, if desired, enter a description.
8) Click Submit.
9) The new list appears beneath the temporary list.
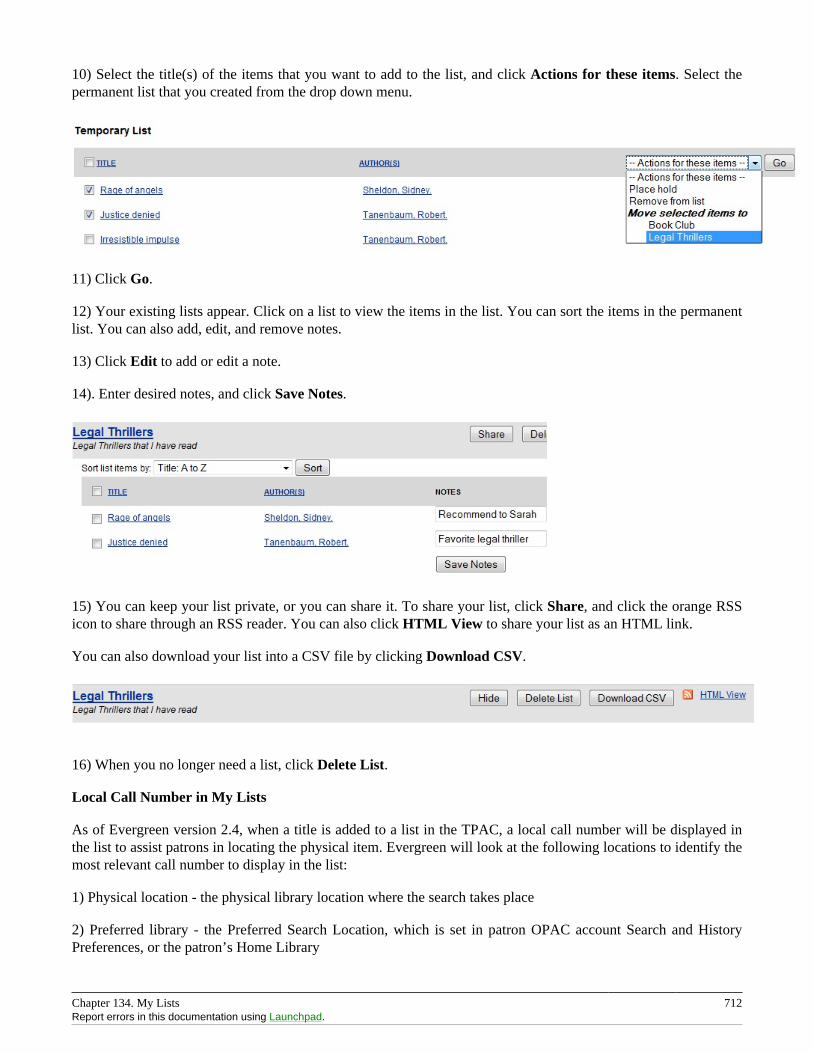
Chapter 134. My Lists 712Report errors in this documentation using Launchpad.
10) Select the title(s) of the items that you want to add to the list, and click Actions for these items. Select thepermanent list that you created from the drop down menu.
11) Click Go.
12) Your existing lists appear. Click on a list to view the items in the list. You can sort the items in the permanentlist. You can also add, edit, and remove notes.
13) Click Edit to add or edit a note.
14). Enter desired notes, and click Save Notes.
15) You can keep your list private, or you can share it. To share your list, click Share, and click the orange RSSicon to share through an RSS reader. You can also click HTML View to share your list as an HTML link.
You can also download your list into a CSV file by clicking Download CSV.
16) When you no longer need a list, click Delete List.
Local Call Number in My Lists
As of Evergreen version 2.4, when a title is added to a list in the TPAC, a local call number will be displayed inthe list to assist patrons in locating the physical item. Evergreen will look at the following locations to identify themost relevant call number to display in the list:
1) Physical location - the physical library location where the search takes place
2) Preferred library - the Preferred Search Location, which is set in patron OPAC account Search and HistoryPreferences, or the patron’s Home Library
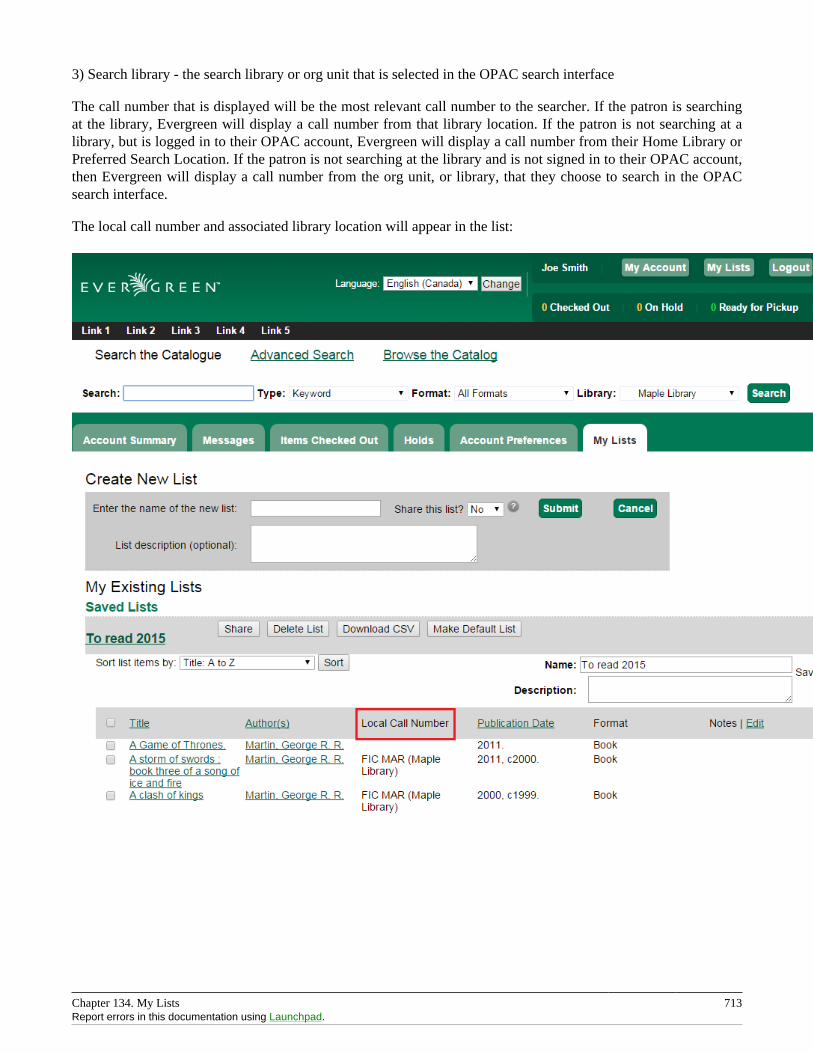
Chapter 134. My Lists 713Report errors in this documentation using Launchpad.
3) Search library - the search library or org unit that is selected in the OPAC search interface
The call number that is displayed will be the most relevant call number to the searcher. If the patron is searchingat the library, Evergreen will display a call number from that library location. If the patron is not searching at alibrary, but is logged in to their OPAC account, Evergreen will display a call number from their Home Library orPreferred Search Location. If the patron is not searching at the library and is not signed in to their OPAC account,then Evergreen will display a call number from the org unit, or library, that they choose to search in the OPACsearch interface.
The local call number and associated library location will appear in the list:
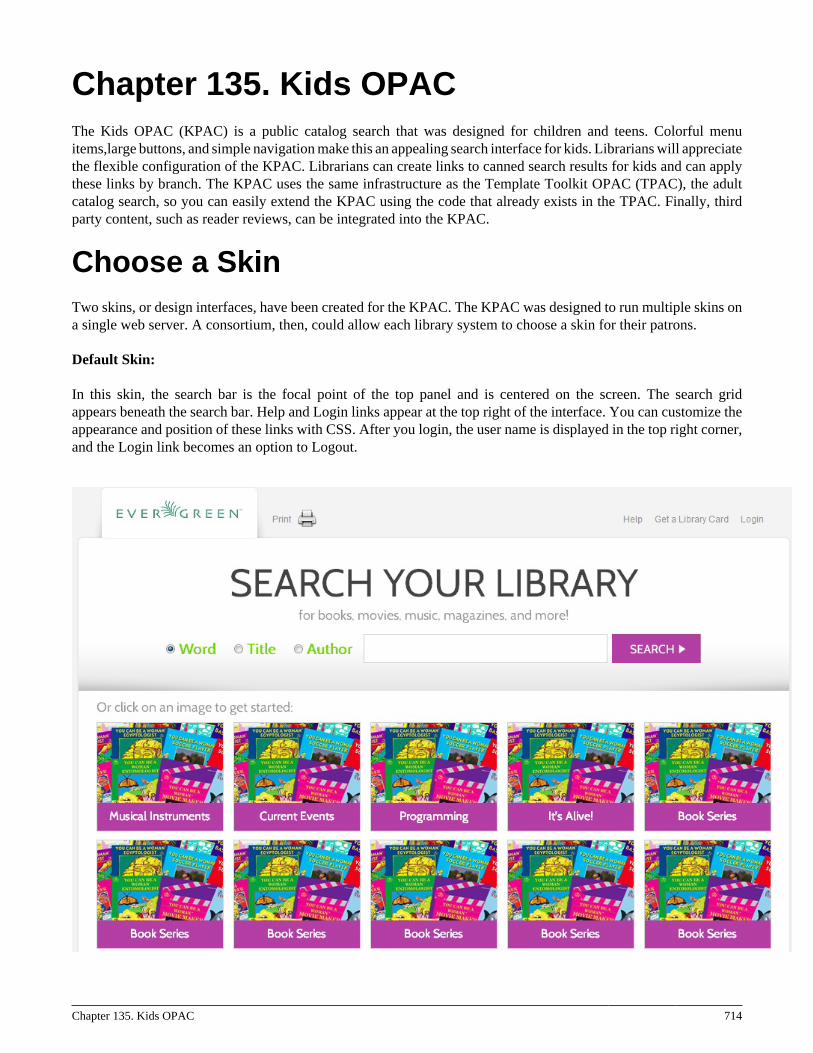
Chapter 135. Kids OPAC 714
Chapter 135. Kids OPACThe Kids OPAC (KPAC) is a public catalog search that was designed for children and teens. Colorful menuitems,large buttons, and simple navigation make this an appealing search interface for kids. Librarians will appreciatethe flexible configuration of the KPAC. Librarians can create links to canned search results for kids and can applythese links by branch. The KPAC uses the same infrastructure as the Template Toolkit OPAC (TPAC), the adultcatalog search, so you can easily extend the KPAC using the code that already exists in the TPAC. Finally, thirdparty content, such as reader reviews, can be integrated into the KPAC.
Choose a SkinTwo skins, or design interfaces, have been created for the KPAC. The KPAC was designed to run multiple skins ona single web server. A consortium, then, could allow each library system to choose a skin for their patrons.
Default Skin:
In this skin, the search bar is the focal point of the top panel and is centered on the screen. The search gridappears beneath the search bar. Help and Login links appear at the top right of the interface. You can customize theappearance and position of these links with CSS. After you login, the user name is displayed in the top right corner,and the Login link becomes an option to Logout.
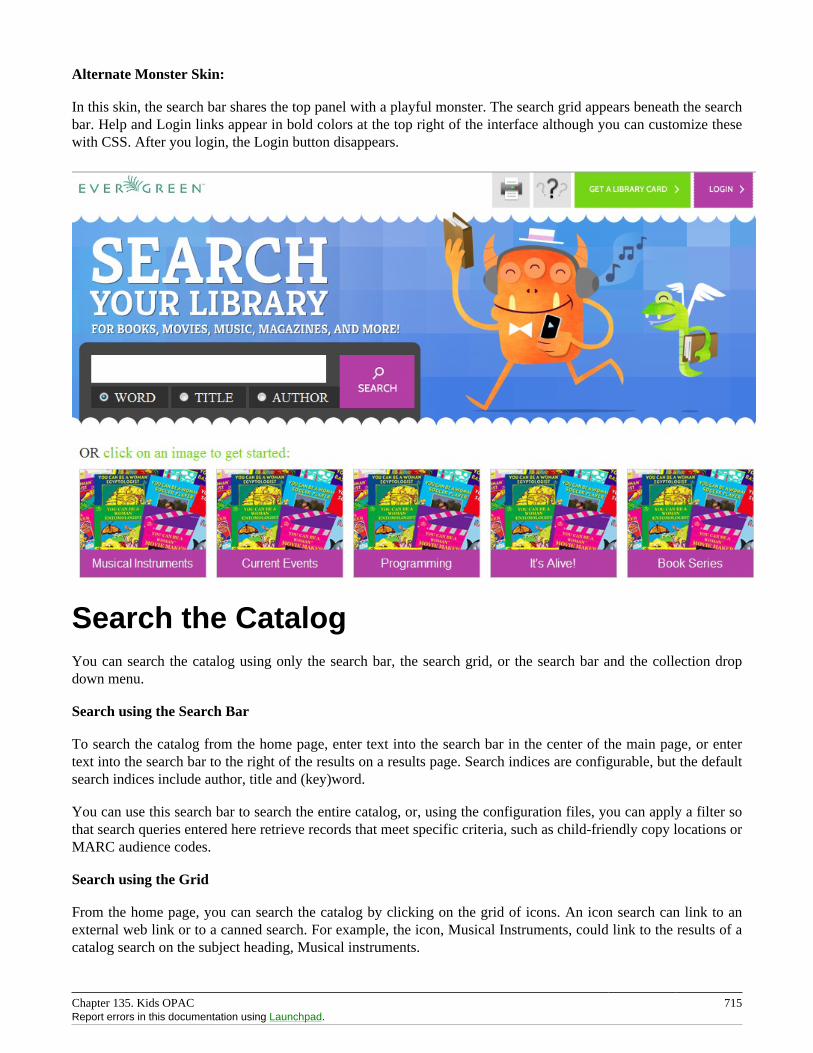
Chapter 135. Kids OPAC 715Report errors in this documentation using Launchpad.
Alternate Monster Skin:
In this skin, the search bar shares the top panel with a playful monster. The search grid appears beneath the searchbar. Help and Login links appear in bold colors at the top right of the interface although you can customize thesewith CSS. After you login, the Login button disappears.
Search the CatalogYou can search the catalog using only the search bar, the search grid, or the search bar and the collection dropdown menu.
Search using the Search Bar
To search the catalog from the home page, enter text into the search bar in the center of the main page, or entertext into the search bar to the right of the results on a results page. Search indices are configurable, but the defaultsearch indices include author, title and (key)word.
You can use this search bar to search the entire catalog, or, using the configuration files, you can apply a filter sothat search queries entered here retrieve records that meet specific criteria, such as child-friendly copy locations orMARC audience codes.
Search using the Grid
From the home page, you can search the catalog by clicking on the grid of icons. An icon search can link to anexternal web link or to a canned search. For example, the icon, Musical Instruments, could link to the results of acatalog search on the subject heading, Musical instruments.
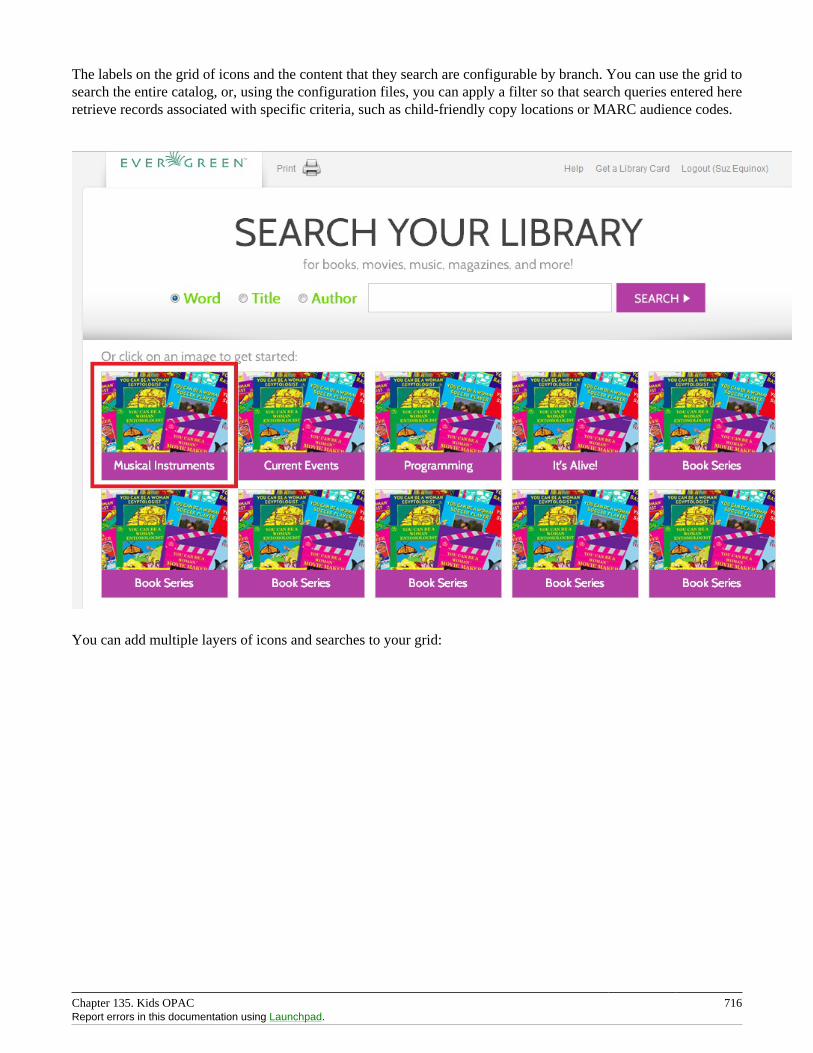
Chapter 135. Kids OPAC 716Report errors in this documentation using Launchpad.
The labels on the grid of icons and the content that they search are configurable by branch. You can use the grid tosearch the entire catalog, or, using the configuration files, you can apply a filter so that search queries entered hereretrieve records associated with specific criteria, such as child-friendly copy locations or MARC audience codes.
You can add multiple layers of icons and searches to your grid:
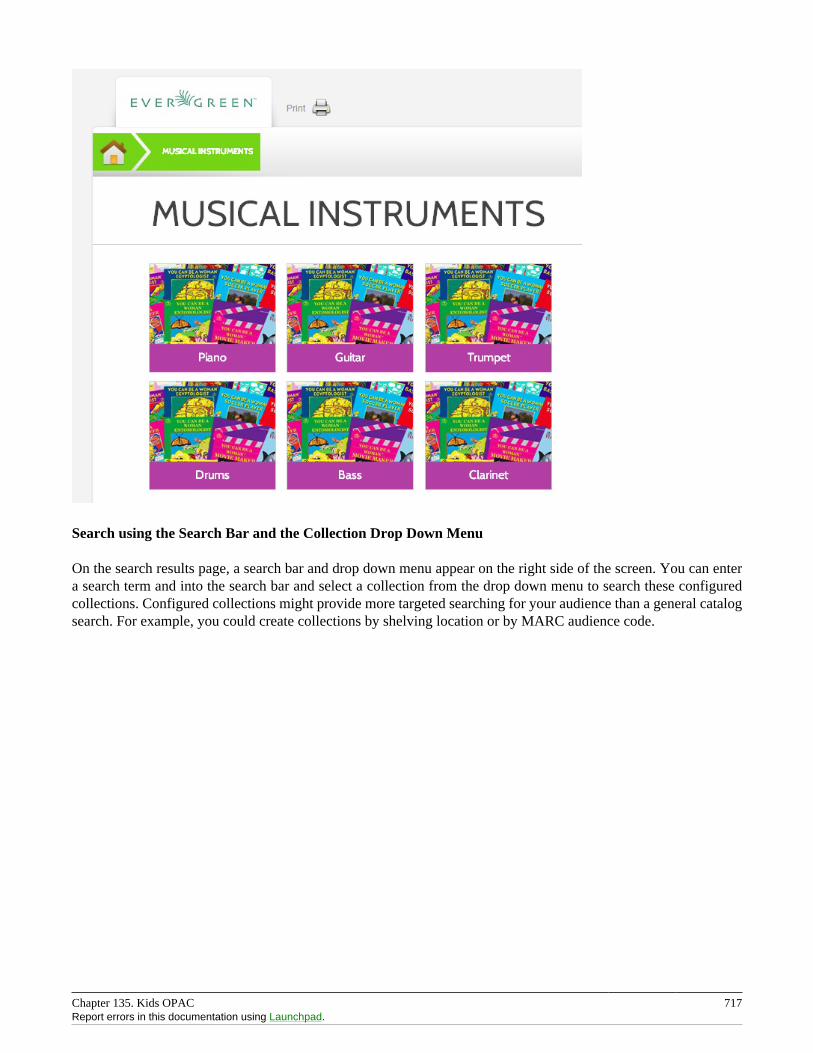
Chapter 135. Kids OPAC 717Report errors in this documentation using Launchpad.
Search using the Search Bar and the Collection Drop Down Menu
On the search results page, a search bar and drop down menu appear on the right side of the screen. You can entera search term and into the search bar and select a collection from the drop down menu to search these configuredcollections. Configured collections might provide more targeted searching for your audience than a general catalogsearch. For example, you could create collections by shelving location or by MARC audience code.
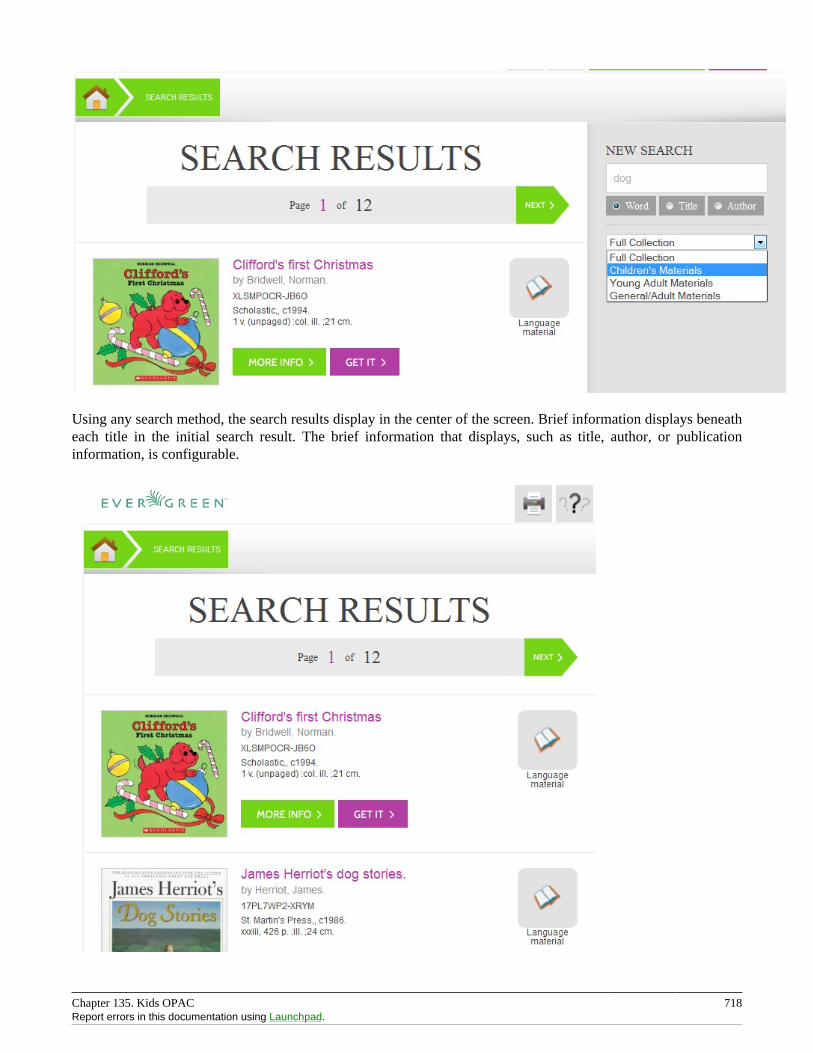
Chapter 135. Kids OPAC 718Report errors in this documentation using Launchpad.
Using any search method, the search results display in the center of the screen. Brief information displays beneatheach title in the initial search result. The brief information that displays, such as title, author, or publicationinformation, is configurable.
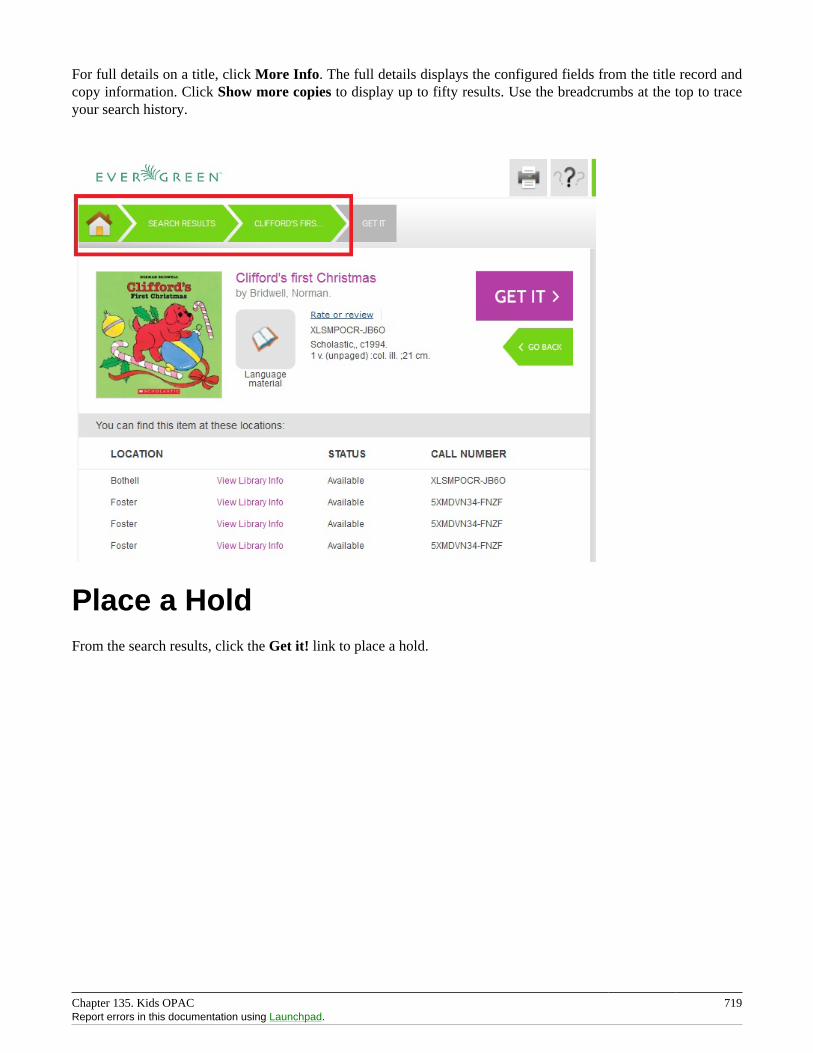
Chapter 135. Kids OPAC 719Report errors in this documentation using Launchpad.
For full details on a title, click More Info. The full details displays the configured fields from the title record andcopy information. Click Show more copies to display up to fifty results. Use the breadcrumbs at the top to traceyour search history.
Place a HoldFrom the search results, click the Get it! link to place a hold.
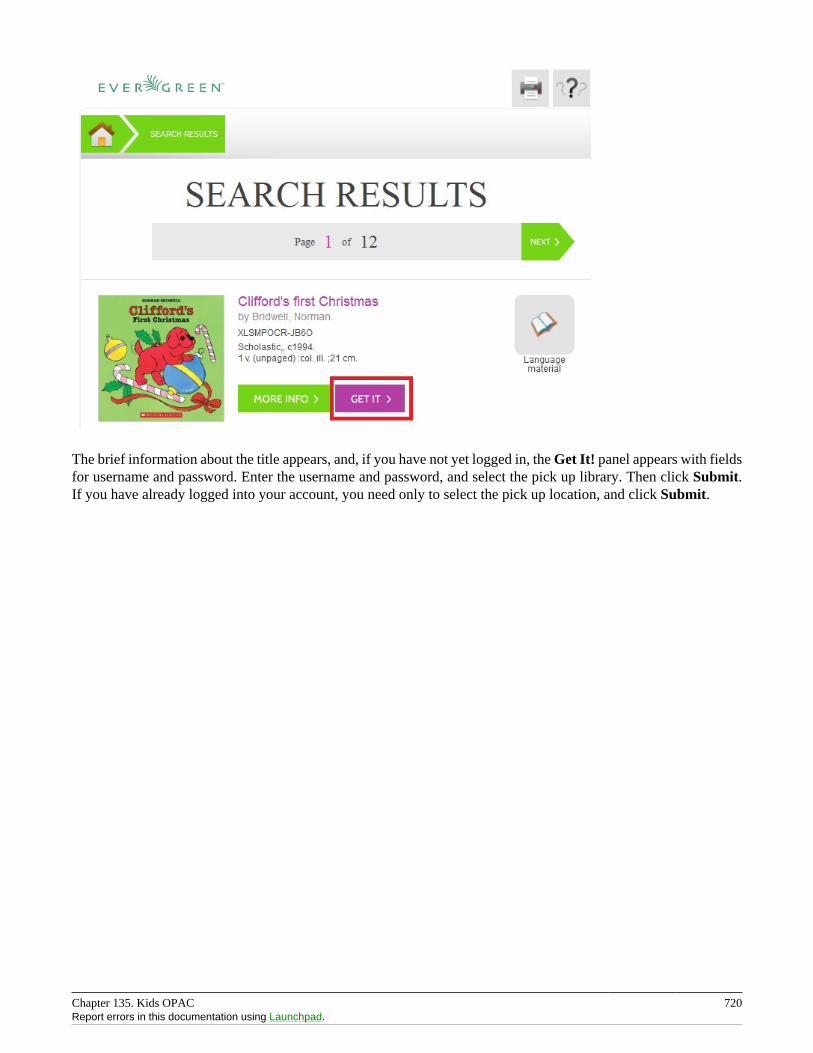
Chapter 135. Kids OPAC 720Report errors in this documentation using Launchpad.
The brief information about the title appears, and, if you have not yet logged in, the Get It! panel appears with fieldsfor username and password. Enter the username and password, and select the pick up library. Then click Submit.If you have already logged into your account, you need only to select the pick up location, and click Submit.
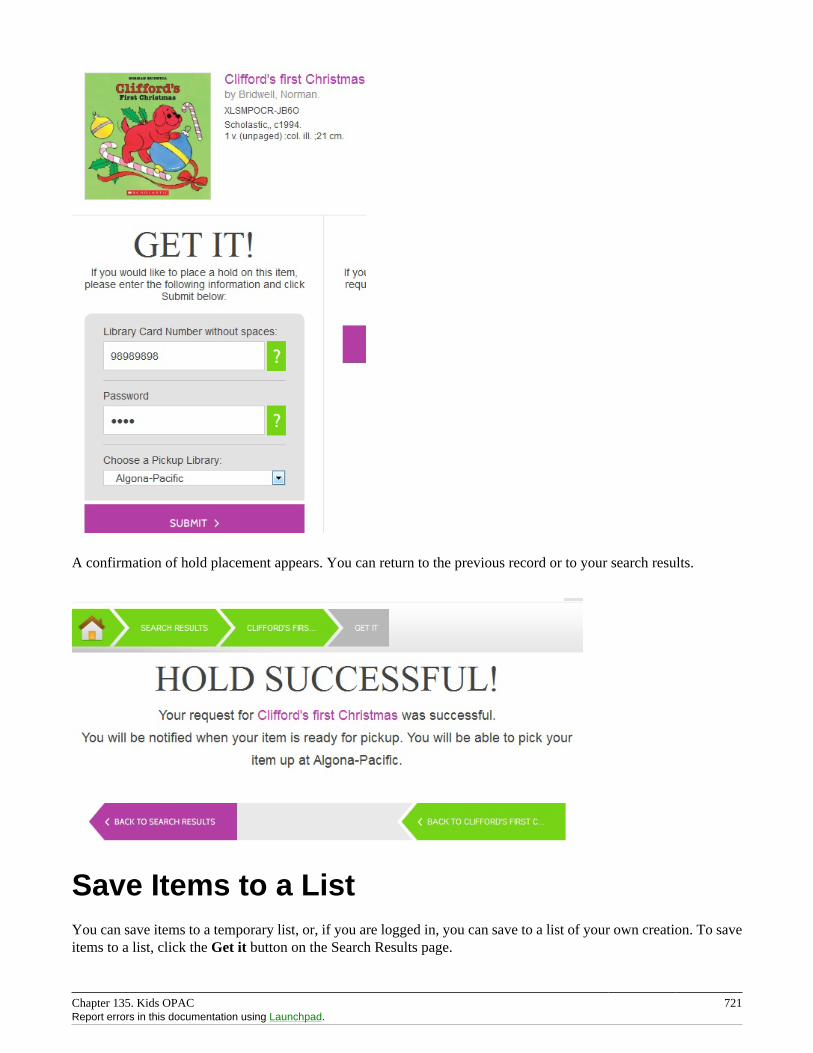
Chapter 135. Kids OPAC 721Report errors in this documentation using Launchpad.
A confirmation of hold placement appears. You can return to the previous record or to your search results.
Save Items to a ListYou can save items to a temporary list, or, if you are logged in, you can save to a list of your own creation. To saveitems to a list, click the Get it button on the Search Results page.
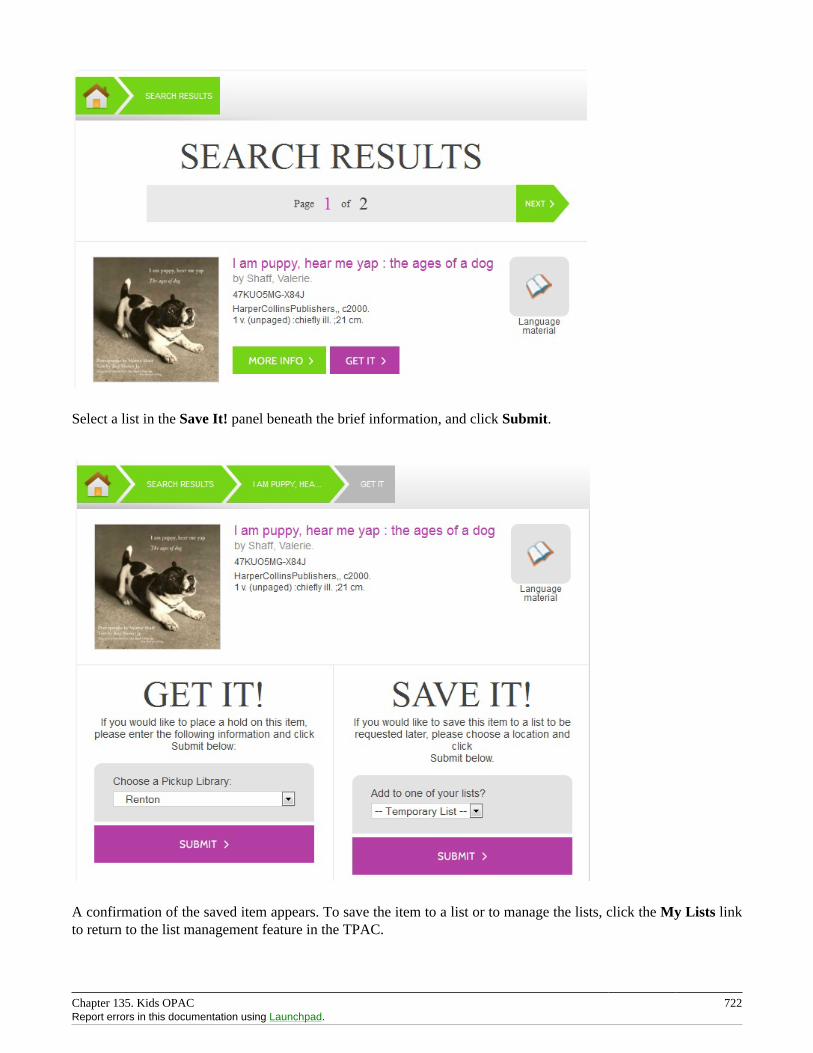
Chapter 135. Kids OPAC 722Report errors in this documentation using Launchpad.
Select a list in the Save It! panel beneath the brief information, and click Submit.
A confirmation of the saved item appears. To save the item to a list or to manage the lists, click the My Lists linkto return to the list management feature in the TPAC.
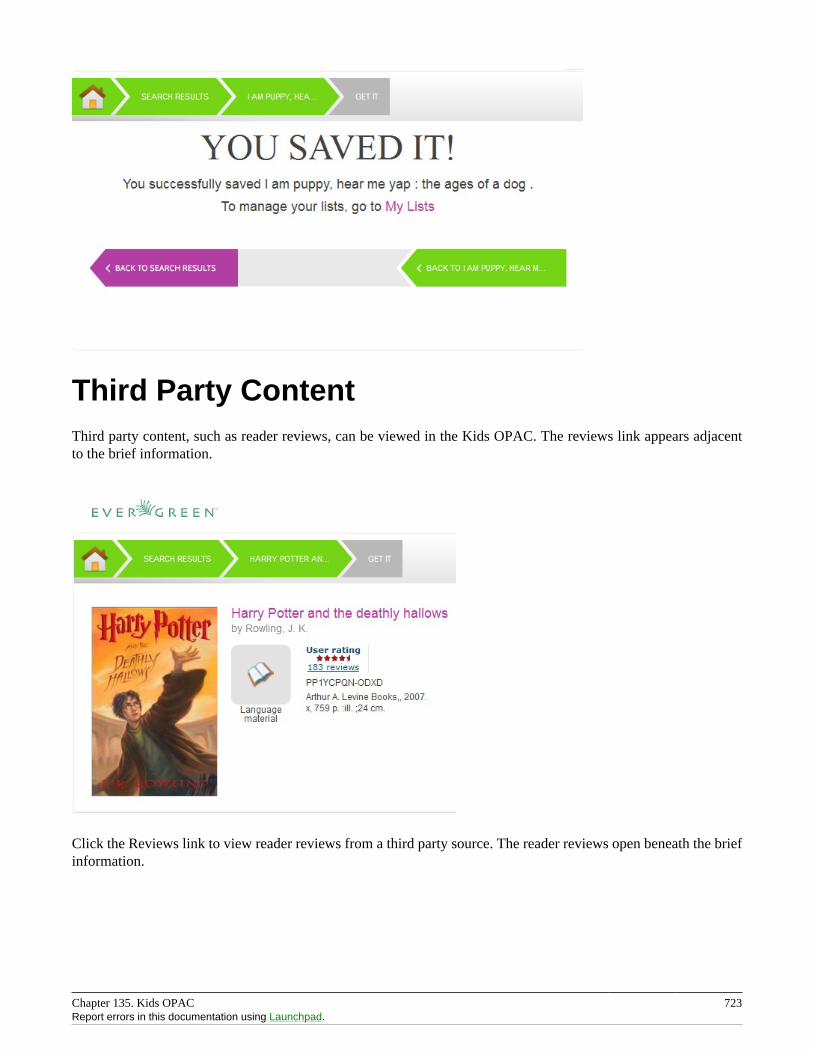
Chapter 135. Kids OPAC 723Report errors in this documentation using Launchpad.
Third Party ContentThird party content, such as reader reviews, can be viewed in the Kids OPAC. The reviews link appears adjacentto the brief information.
Click the Reviews link to view reader reviews from a third party source. The reader reviews open beneath the briefinformation.
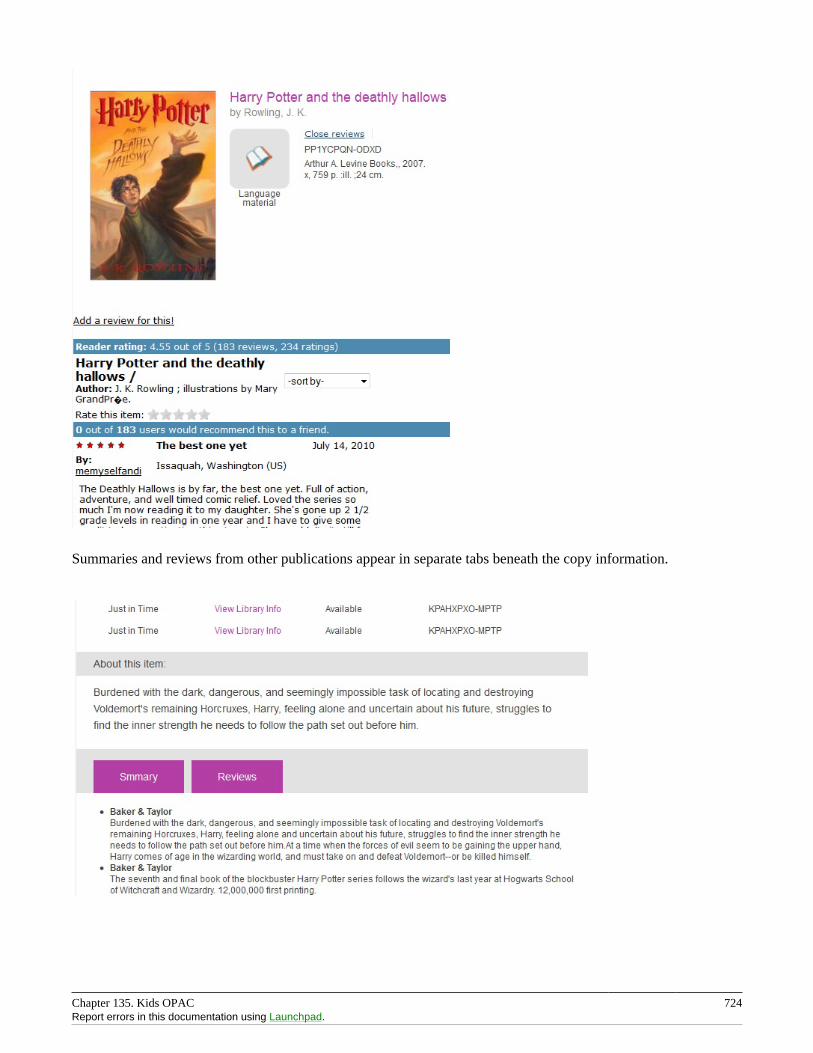
Chapter 135. Kids OPAC 724Report errors in this documentation using Launchpad.
Summaries and reviews from other publications appear in separate tabs beneath the copy information.

Chapter 135. Kids OPAC 725Report errors in this documentation using Launchpad.
Configuration FilesConfiguration files allow you to define labels for canned searches in the icon grid, determine how icons lead usersto new pages, and define whether those icons are canned searches or links to external resources. Documentationdescribing how to use the configuration files is available in the Evergreen repository.
Chapter 136. Catalog Browse 726
Chapter 136. Catalog BrowseAbstract
Catalog Browse enables you to browse bibliographic headings available in your catalog. You can click thehyperlinked bibliographic headings to retrieve catalog records that contain these headings. Also, if a givenbibliographic heading is linked to an authority record, and if that authority is linked to another one via the firstauthority’s See and See Also tags, the additional variants of (e.g.) an author’s name will appear in your search results.
Use Catalog Browse
1. To access this feature, navigate to the catalog search page, and click the link, Browse the Catalog. By default,you can browse by title, author, subject, or series. System administrators can revise this list by editing the fileat the location opac/parts/qtype_selector.tt2, and they can even make use of custom indices based on defintionsin the database’s config.metabib_field table.
2. Enter a term or part of a term to browse. Evergreen will retrieve a list of bibliographic headings that match yourquery. Click the Back and Forward buttons to page through you results. To limit your browse results to a specificbranch or copy location group, select the appropriate unit from the drop down menu, and click Go.
3. Select a link from the search results. Each linked heading displays the number of bibliographic records associatedwith the heading. Appropriate information from linked authority records, if any, appears below the main entryheading.
4. To return to your list of results, click the browser’s back button or Browse the Catalog. Evergreen will returnyou to your previous position in your list of results.
Administration
A new global flag warns users when they are entering a browse term that begins with an article. Systemsadministrators can create a regular expression to configure articles matched with specific indices that would prompta warning for the user. By default, this setting is not enabled.
1. To enable this feature, click Admin # Server Administration # Global Flags.
2. Double click Map of search classes to regular expressions to warn user about leading articles.
3. Make changes, and click Save.
Chapter 137. Bibliographic Search Enhancements 727
Chapter 137. Bibliographic SearchEnhancementsEnhancements to the bibliographic search function enable you to search for records that were created, edited, ordeleted within a date range. You can use the catalog interface or the record feed to search for records with specificdate ranges.
Note that all dates should be formatted as YYYY-MM-DD and should be included in parentheses.
Use the Catalog to Retrieve Records withSpecified Date Ranges:
Search by Create Date or Range
To find records that were created on or after a specific date, enter the term, create_date, and the date in the catalogsearch field. For example, to find records that were created on or after April 1, 2013, enter the following into thecatalog search field:
create_date(2013-04-01)
To find records that were created within a specific date range, enter the term, create_date, followed by comma-separated dates in parentheses. For example, to find records that were created between April 1, 2013 and April 8,2013, enter the following into the catalog search field:
create_date(2013-04-01,2013-04-08)
Search by Edit Date or Range
To find records that were edited on or before a specific date, enter the term, edit-date, and the date in the catalogsearch field. The date should be preceded by a comma. For example, to find records that were edited on or beforeApril 1, 2013, enter the following into the catalog search field:
edit_date(,2013-04-01)
To find records that were edited on or after a specific date, enter the term, edit_date, and the date in the catalogsearch field. For example, to find records that were edited on or after April 1, 2013, enter the following into thecatalog search field:
edit_date(2013-04-01)
To find records that were edited within a specific range, enter the term, edit_date, followed by comma-separateddates in parentheses. For example, to find records that were edited between April 1, 2013 and April 8, 2013, enterthe following into the catalog search field:
edit_date(2013-04-01,2013-04-08)
Chapter 137. Bibliographic Search Enhancements 728Report errors in this documentation using Launchpad.
Search by Deleted StatusTo search for deleted records, enter in your catalog search field the term, edit_date, the date that you want to search,and the term, #deleted. For example, to find records that were deleted on or after April 1, 2013, enter the followinginto the catalog search field:
edit_date(2013-04-01)#deleted
To find records that were deleted within a specific range, enter the term, edit_date, followed by comma-separateddates in parentheses. For example, to find records that were deleted between April 1, 2013 and April 8, 2013, enterthe following into the catalog search field:
edit_date(2013-04-01,2013-04-08)#deleted
Use a Feed to Retrieve Records with SpecifiedDate Ranges:You can use a feed to retrieve records that were created, edited, or deleted within specific date ranges by adding thedates to the catalog’s URL. You can do this manually, or you can write a script that would automatically retrievethis information.
To manually retrieve records that were created, edited, or deleted within a specific date, enter the terms and datesas specified above within the search terms in the URL. For example, to retrieve records created on or after April1, 2013, enter the following in your URL:
http://test.esilibrary.com/opac/extras/opensearch/1.1/-/html-full?searchTerms=create_date(2013-04-01)&searchClass=keyword
To retrieve deleted records, replace the # with %23 in your URL.

Chapter 138. Binary MARC21 Feeds 729
Chapter 138. Binary MARC21 FeedsEvergreen’s OpenSearch service can return search results in many formats, including HTML, MARCXML, andMODS. As of version 2.4, it can also return results in binary MARC21 format.
When making an HTTP request to an Evergreen system using the OpenSearch API, you must include the term"marc21" in the appropriate location within the URL to retrieve a feed of MARC21 records in a binary format. Thefollowing example demonstrates the appropriate form of the URL:
http://test.esilibrary.com/opac/extras/opensearch/1.1/-/marc21?searchTerms=create_date%282013-04-01%29&searchClass=keyword
You can add this term manually to the URL produced by a catalog search, or you can create a script that wouldretrieve this information automatically.
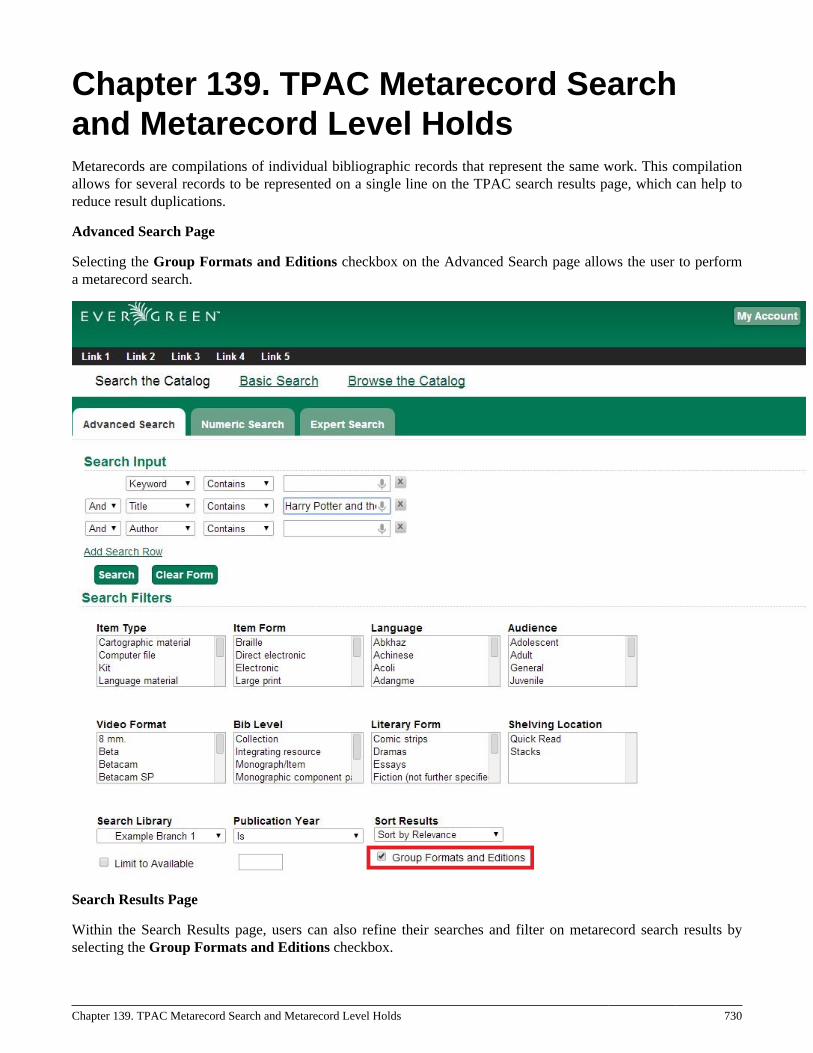
Chapter 139. TPAC Metarecord Search and Metarecord Level Holds 730
Chapter 139. TPAC Metarecord Searchand Metarecord Level HoldsMetarecords are compilations of individual bibliographic records that represent the same work. This compilationallows for several records to be represented on a single line on the TPAC search results page, which can help toreduce result duplications.
Advanced Search Page
Selecting the Group Formats and Editions checkbox on the Advanced Search page allows the user to performa metarecord search.
Search Results Page
Within the Search Results page, users can also refine their searches and filter on metarecord search results byselecting the Group Formats and Editions checkbox.
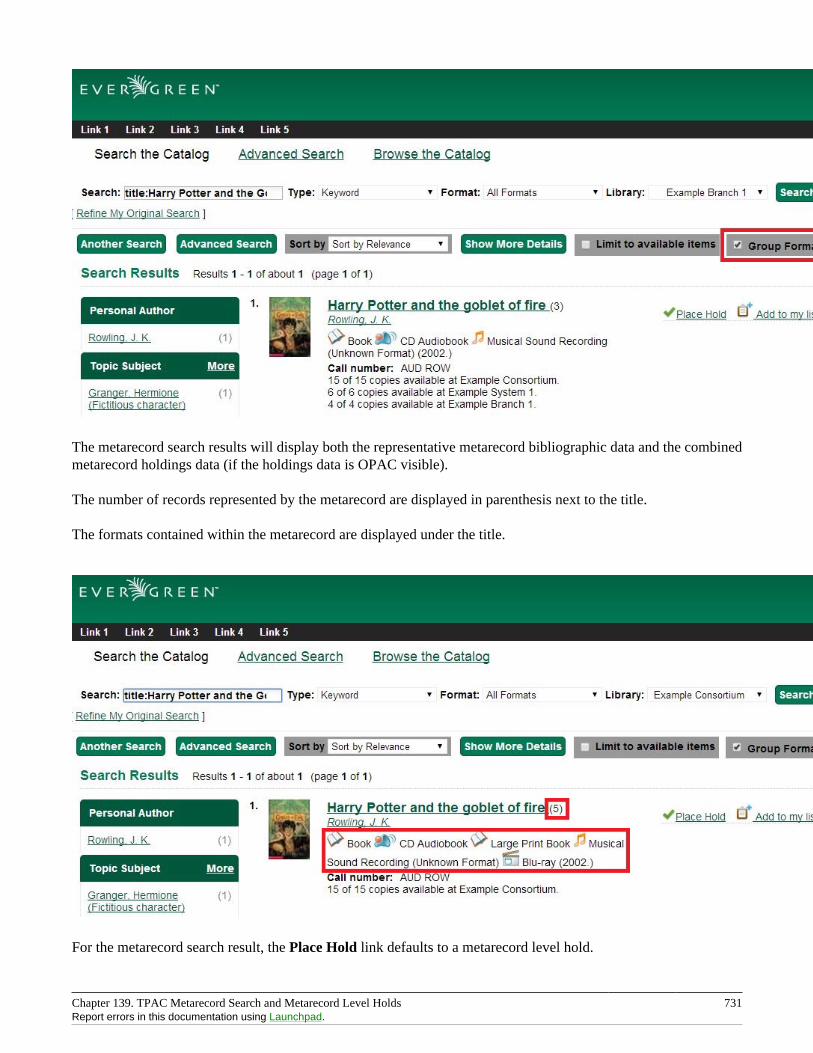
Chapter 139. TPAC Metarecord Search and Metarecord Level Holds 731Report errors in this documentation using Launchpad.
The metarecord search results will display both the representative metarecord bibliographic data and the combinedmetarecord holdings data (if the holdings data is OPAC visible).
The number of records represented by the metarecord are displayed in parenthesis next to the title.
The formats contained within the metarecord are displayed under the title.
For the metarecord search result, the Place Hold link defaults to a metarecord level hold.
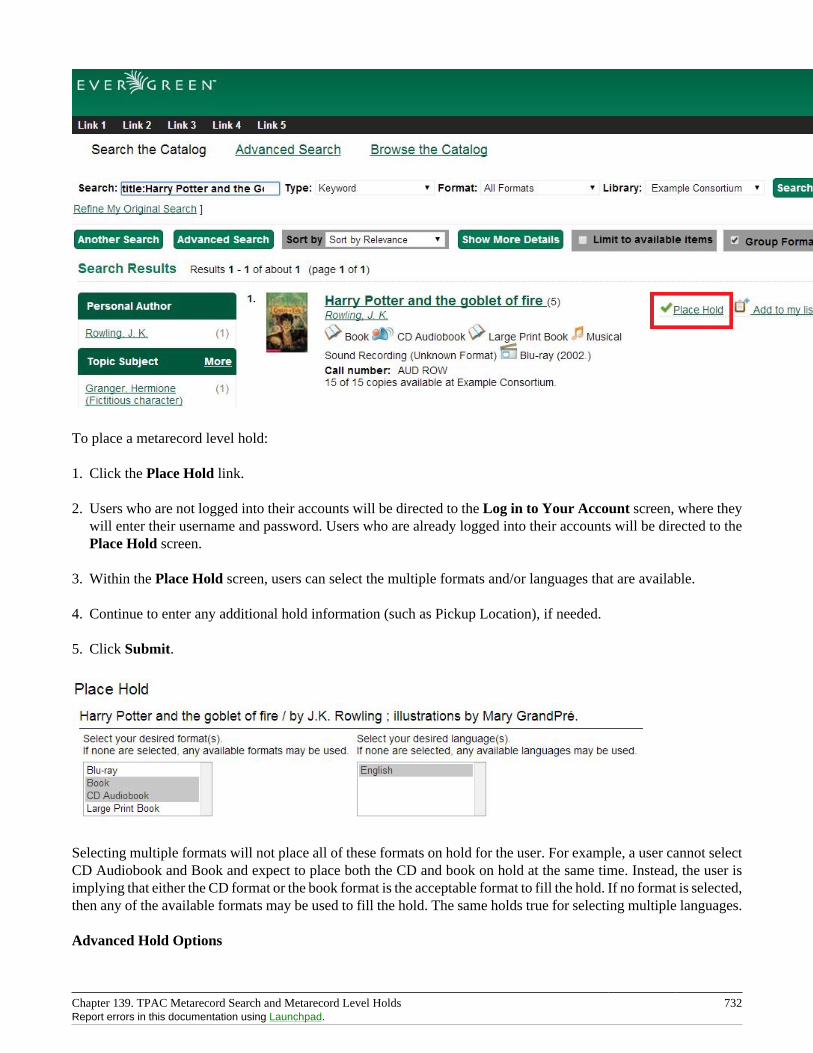
Chapter 139. TPAC Metarecord Search and Metarecord Level Holds 732Report errors in this documentation using Launchpad.
To place a metarecord level hold:
1. Click the Place Hold link.
2. Users who are not logged into their accounts will be directed to the Log in to Your Account screen, where theywill enter their username and password. Users who are already logged into their accounts will be directed to thePlace Hold screen.
3. Within the Place Hold screen, users can select the multiple formats and/or languages that are available.
4. Continue to enter any additional hold information (such as Pickup Location), if needed.
5. Click Submit.
Selecting multiple formats will not place all of these formats on hold for the user. For example, a user cannot selectCD Audiobook and Book and expect to place both the CD and book on hold at the same time. Instead, the user isimplying that either the CD format or the book format is the acceptable format to fill the hold. If no format is selected,then any of the available formats may be used to fill the hold. The same holds true for selecting multiple languages.
Advanced Hold Options
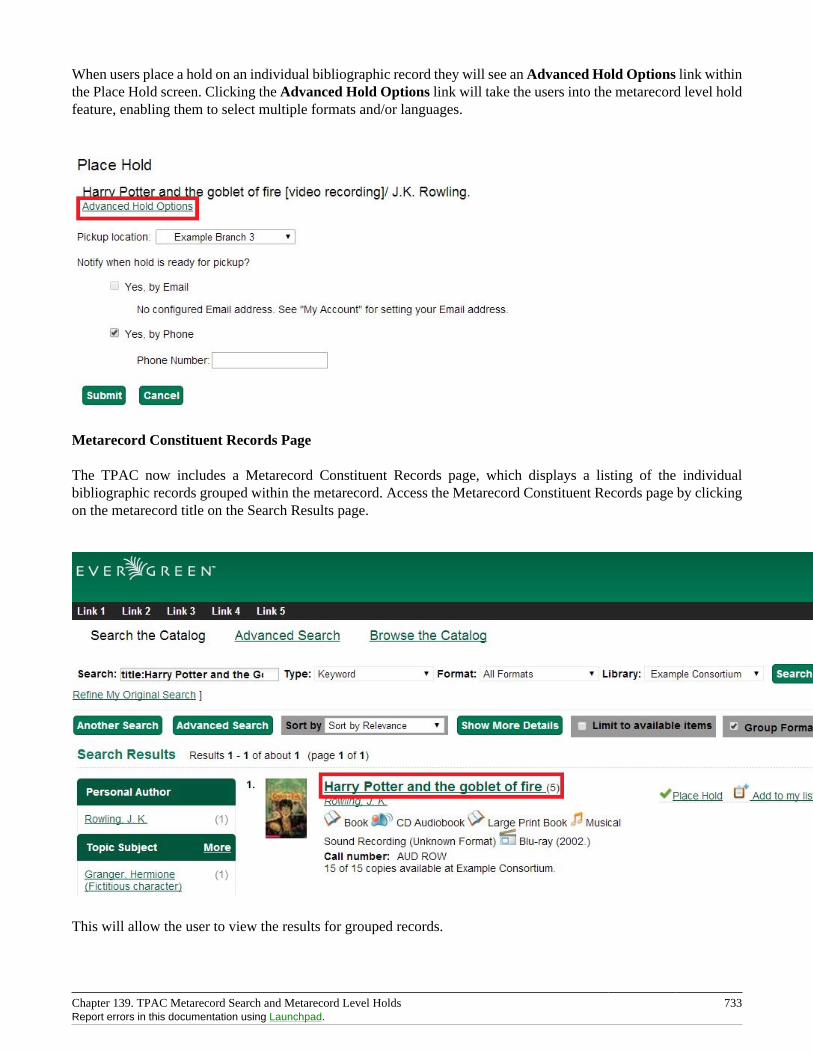
Chapter 139. TPAC Metarecord Search and Metarecord Level Holds 733Report errors in this documentation using Launchpad.
When users place a hold on an individual bibliographic record they will see an Advanced Hold Options link withinthe Place Hold screen. Clicking the Advanced Hold Options link will take the users into the metarecord level holdfeature, enabling them to select multiple formats and/or languages.
Metarecord Constituent Records Page
The TPAC now includes a Metarecord Constituent Records page, which displays a listing of the individualbibliographic records grouped within the metarecord. Access the Metarecord Constituent Records page by clickingon the metarecord title on the Search Results page.
This will allow the user to view the results for grouped records.
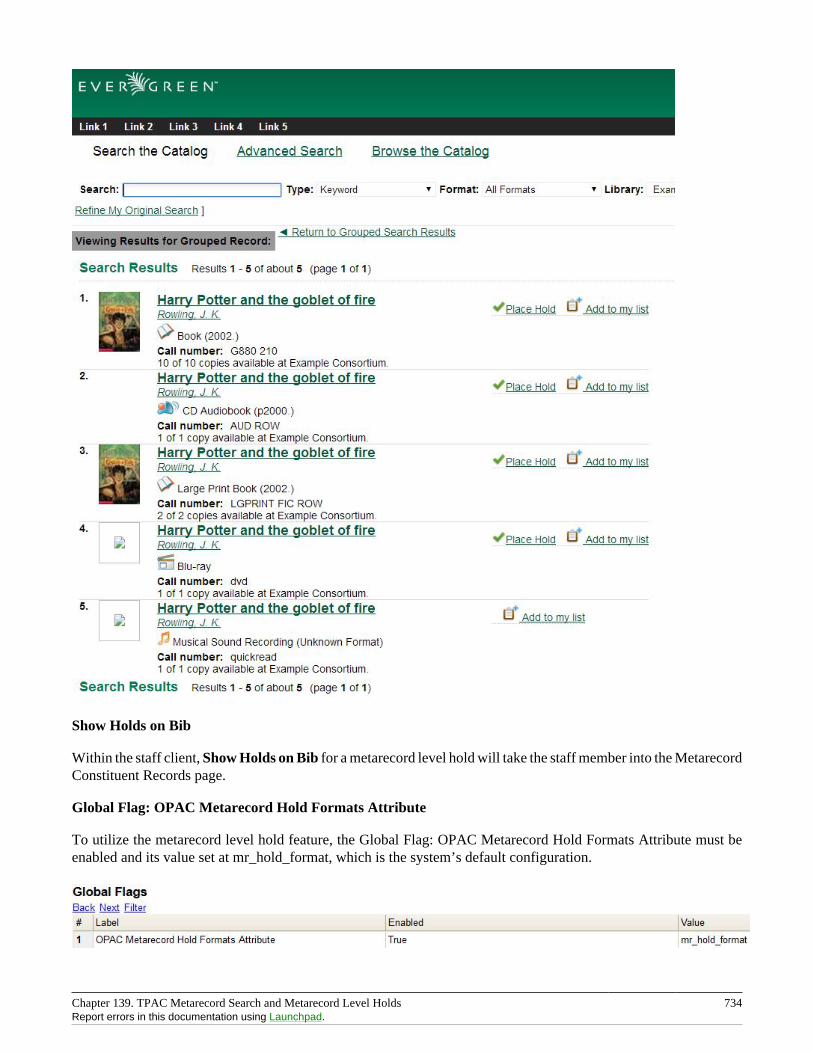
Chapter 139. TPAC Metarecord Search and Metarecord Level Holds 734Report errors in this documentation using Launchpad.
Show Holds on Bib
Within the staff client, Show Holds on Bib for a metarecord level hold will take the staff member into the MetarecordConstituent Records page.
Global Flag: OPAC Metarecord Hold Formats Attribute
To utilize the metarecord level hold feature, the Global Flag: OPAC Metarecord Hold Formats Attribute must beenabled and its value set at mr_hold_format, which is the system’s default configuration.
Chapter 140. Library Information Pages 735
Chapter 140. Library Information PagesThe branch name displayed in the copy details section of the search results page, the record summarypage, and the kids catalog record summary page will link to a library information page. This page islocated at http://hostname/eg/opac/library/<SHORTNAME> and at http://hostname/eg/opac/library/<ID>.
Evergreen automatically generates this page based on information entered in Admin # Server Administration #Organizational Units (actor.org_unit).
The library information page displays:
• The name of the library
• Opening hours
• E-mail address
• Phone number
• Mailing address
• The branch’s parent library system
An Evergreen site can also display a link to the library’s web site on the information page.
To display a link:
1. Go to Admin # Local Administration # Library Settings Editor.
2. Edit the Library Information URL setting for the branch.
If you set the URL at the system level, that URL will be used as the link for the system and for all child branchesthat do not have its own URL set. . Enter the URL in the following format: http://example.com/about.html.
An Evergreen site may also opt to link directly from the copy details section of the catalog to the library web site,bypassing the automatically-generated library information page. To do so:
1. Add the library’s URL to the Library Information URL setting as described above.
2. Go to Admin # Local Administration # Library Settings Editor.
3. Set the Use external "library information URL" in copy table, if available setting to true.
The library information pages publish schema.org structured data, as do parts of the OPAC bibliographic recordviews, which can enable search engines and other systems to better understand your libraries and their resources.

Chapter 141. Adding OpenSearch to Firefox browser 736
Chapter 141. Adding OpenSearch toFirefox browserOpenSearch is a collection of simple formats for the sharing of search results. More information about OpenSearchcan be found on their website.
The following example illustrates how to add an OpenSearch source to the list of search sources in a Firefox browser:
1. Navigate to any catalog page in your Firefox browser and click on the top right box’s dropdown and select theoption for Add "Example Consortium OpenSearch". The label will match the current scope.
2. At this point, it will add a new search option for the location the catalog is currently using. In this example, thatis CONS (searching the whole consortium).
3. Enter search terms to begin a keyword search using this source. The next image illustrates an example searchfor "mozart" using the sample bib record set.
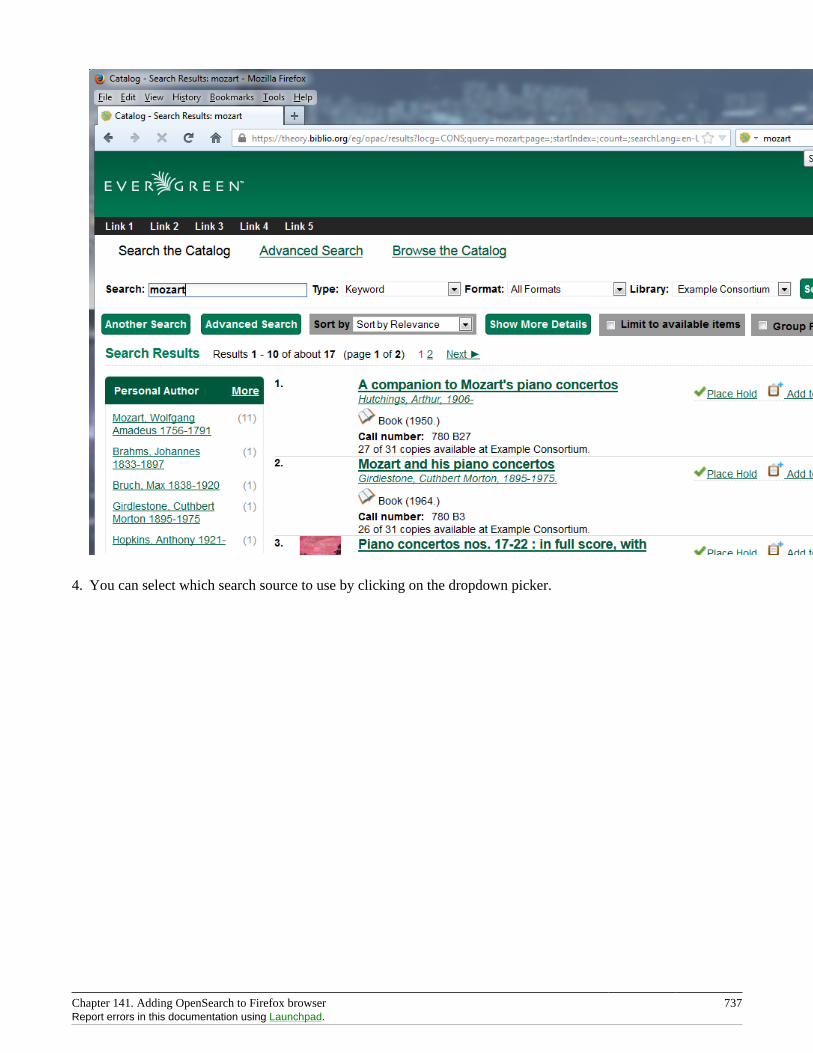
Chapter 141. Adding OpenSearch to Firefox browser 737Report errors in this documentation using Launchpad.
4. You can select which search source to use by clicking on the dropdown picker.
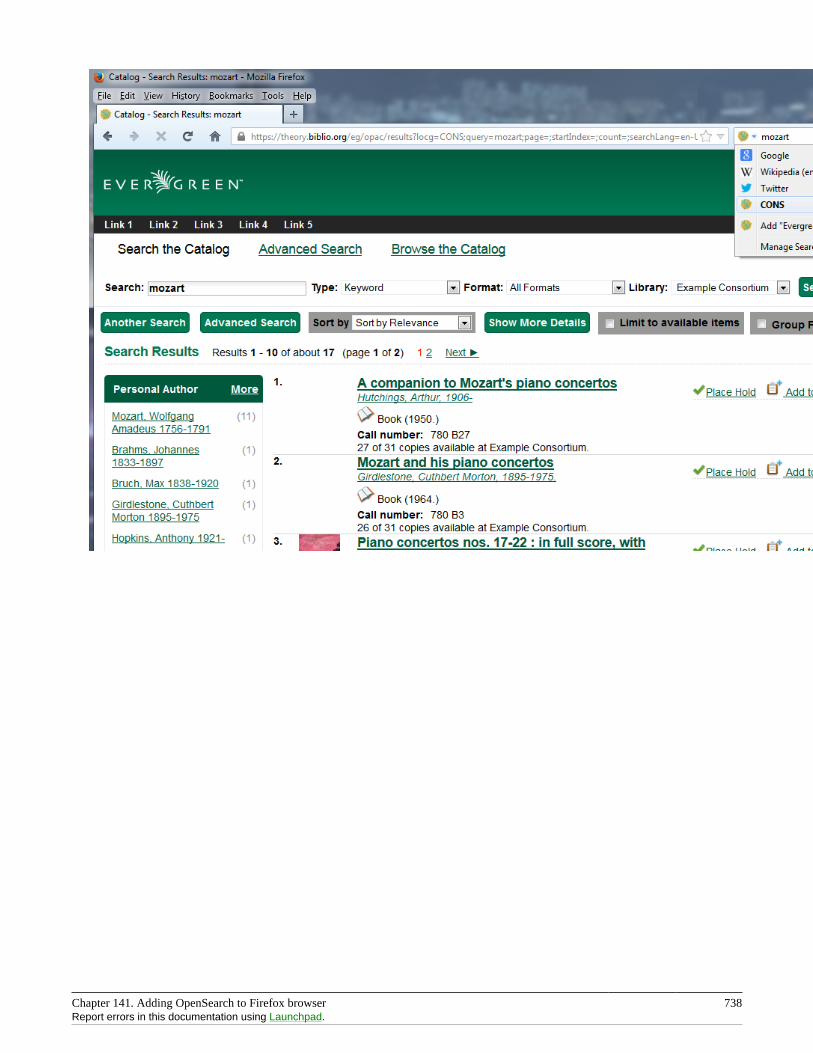
Chapter 141. Adding OpenSearch to Firefox browser 738Report errors in this documentation using Launchpad.
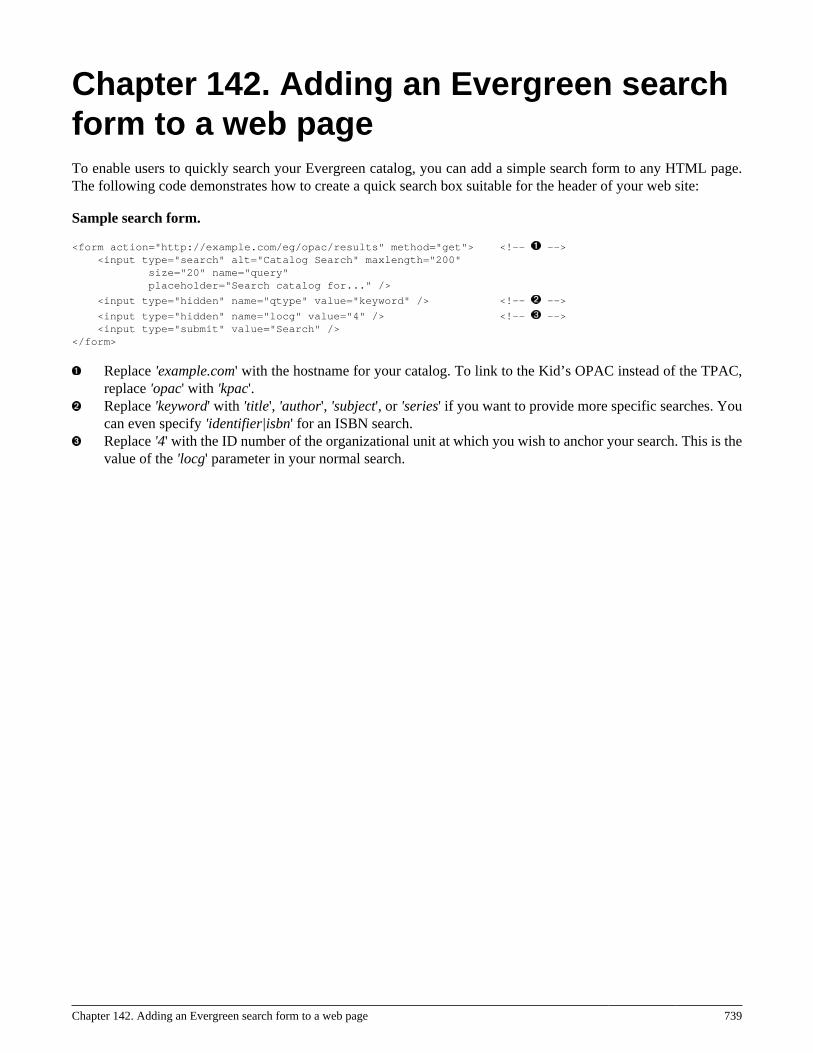
Chapter 142. Adding an Evergreen search form to a web page 739
Chapter 142. Adding an Evergreen searchform to a web pageTo enable users to quickly search your Evergreen catalog, you can add a simple search form to any HTML page.The following code demonstrates how to create a quick search box suitable for the header of your web site:
Sample search form.
<form action="http://example.com/eg/opac/results" method="get"> <!-- --> <input type="search" alt="Catalog Search" maxlength="200" size="20" name="query" placeholder="Search catalog for..." />
<input type="hidden" name="qtype" value="keyword" /> <!-- -->
<input type="hidden" name="locg" value="4" /> <!-- --> <input type="submit" value="Search" /></form>
Replace 'example.com' with the hostname for your catalog. To link to the Kid’s OPAC instead of the TPAC,replace 'opac' with 'kpac'.Replace 'keyword' with 'title', 'author', 'subject', or 'series' if you want to provide more specific searches. Youcan even specify 'identifier|isbn' for an ISBN search.Replace '4' with the ID number of the organizational unit at which you wish to anchor your search. This is thevalue of the 'locg' parameter in your normal search.

Part XV. Developer Resources
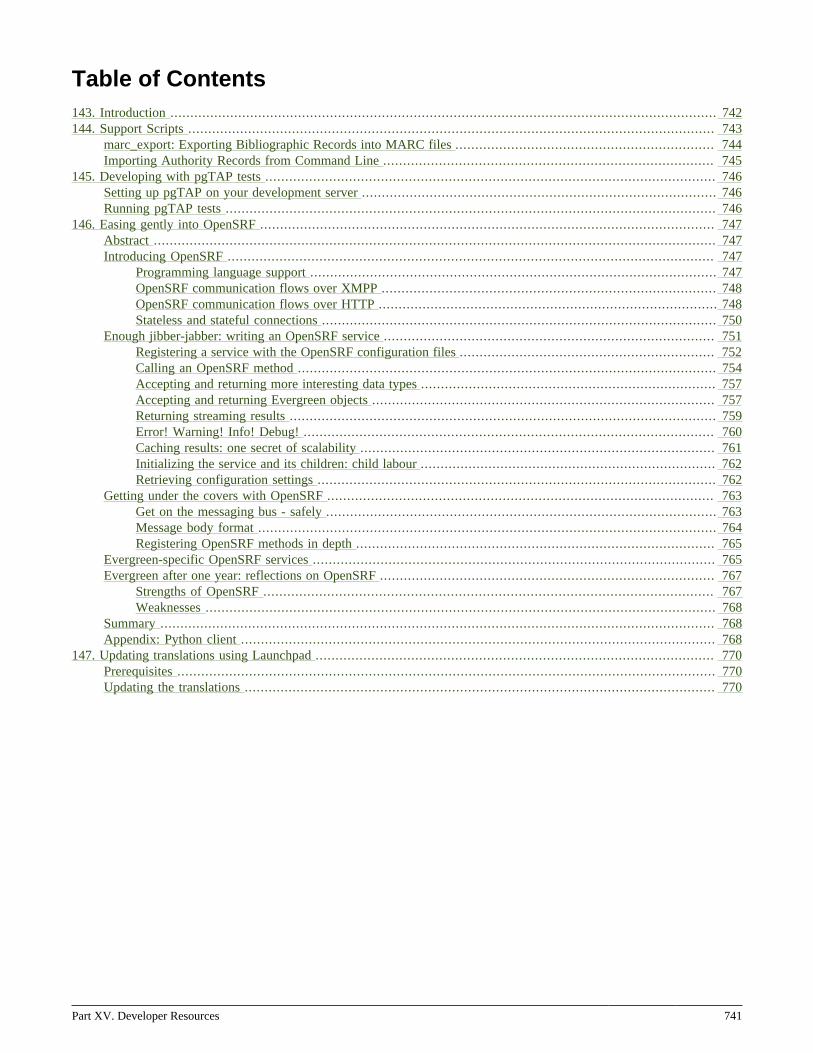
Part XV. Developer Resources 741
Table of Contents143. Introduction ......................................................................................................................................... 742144. Support Scripts .................................................................................................................................... 743
marc_export: Exporting Bibliographic Records into MARC files ................................................................. 744Importing Authority Records from Command Line ................................................................................... 745
145. Developing with pgTAP tests ................................................................................................................. 746Setting up pgTAP on your development server ......................................................................................... 746Running pgTAP tests ........................................................................................................................... 746
146. Easing gently into OpenSRF .................................................................................................................. 747Abstract ............................................................................................................................................. 747Introducing OpenSRF .......................................................................................................................... 747
Programming language support ...................................................................................................... 747OpenSRF communication flows over XMPP .................................................................................... 748OpenSRF communication flows over HTTP ..................................................................................... 748Stateless and stateful connections ................................................................................................... 750
Enough jibber-jabber: writing an OpenSRF service ................................................................................... 751Registering a service with the OpenSRF configuration files ................................................................ 752Calling an OpenSRF method ......................................................................................................... 754Accepting and returning more interesting data types .......................................................................... 757Accepting and returning Evergreen objects ...................................................................................... 757Returning streaming results ........................................................................................................... 759Error! Warning! Info! Debug! ....................................................................................................... 760Caching results: one secret of scalability ......................................................................................... 761Initializing the service and its children: child labour .......................................................................... 762Retrieving configuration settings .................................................................................................... 762
Getting under the covers with OpenSRF ................................................................................................. 763Get on the messaging bus - safely .................................................................................................. 763Message body format ................................................................................................................... 764Registering OpenSRF methods in depth .......................................................................................... 765
Evergreen-specific OpenSRF services ..................................................................................................... 765Evergreen after one year: reflections on OpenSRF .................................................................................... 767
Strengths of OpenSRF ................................................................................................................. 767Weaknesses ................................................................................................................................ 768
Summary ........................................................................................................................................... 768Appendix: Python client ....................................................................................................................... 768
147. Updating translations using Launchpad .................................................................................................... 770Prerequisites ....................................................................................................................................... 770Updating the translations ...................................................................................................................... 770

Chapter 143. Introduction 742
Chapter 143. IntroductionDevelopers can use this part to learn more about the programming languages, communication protocols andstandards used in Evergreen.
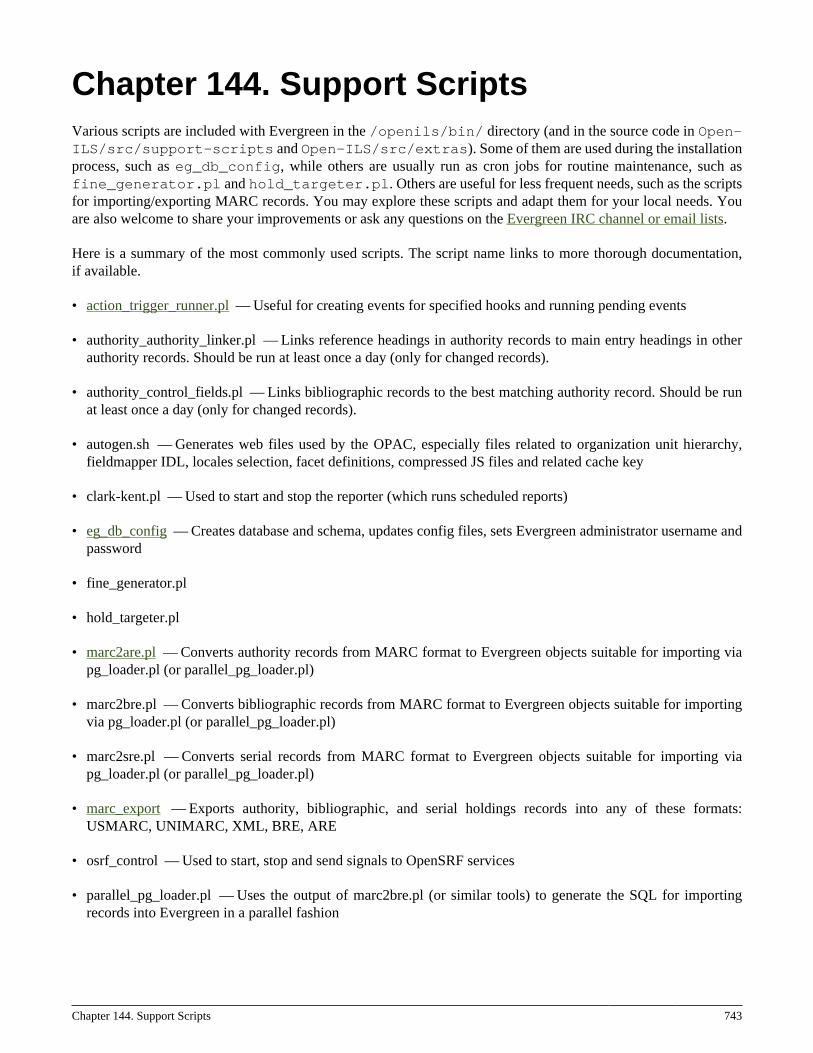
Chapter 144. Support Scripts 743
Chapter 144. Support ScriptsVarious scripts are included with Evergreen in the /openils/bin/ directory (and in the source code in Open-ILS/src/support-scripts and Open-ILS/src/extras). Some of them are used during the installationprocess, such as eg_db_config, while others are usually run as cron jobs for routine maintenance, such asfine_generator.pl and hold_targeter.pl. Others are useful for less frequent needs, such as the scriptsfor importing/exporting MARC records. You may explore these scripts and adapt them for your local needs. Youare also welcome to share your improvements or ask any questions on the Evergreen IRC channel or email lists.
Here is a summary of the most commonly used scripts. The script name links to more thorough documentation,if available.
• action_trigger_runner.pl — Useful for creating events for specified hooks and running pending events
• authority_authority_linker.pl — Links reference headings in authority records to main entry headings in otherauthority records. Should be run at least once a day (only for changed records).
• authority_control_fields.pl — Links bibliographic records to the best matching authority record. Should be runat least once a day (only for changed records).
• autogen.sh — Generates web files used by the OPAC, especially files related to organization unit hierarchy,fieldmapper IDL, locales selection, facet definitions, compressed JS files and related cache key
• clark-kent.pl — Used to start and stop the reporter (which runs scheduled reports)
• eg_db_config — Creates database and schema, updates config files, sets Evergreen administrator username andpassword
• fine_generator.pl
• hold_targeter.pl
• marc2are.pl — Converts authority records from MARC format to Evergreen objects suitable for importing viapg_loader.pl (or parallel_pg_loader.pl)
• marc2bre.pl — Converts bibliographic records from MARC format to Evergreen objects suitable for importingvia pg_loader.pl (or parallel_pg_loader.pl)
• marc2sre.pl — Converts serial records from MARC format to Evergreen objects suitable for importing viapg_loader.pl (or parallel_pg_loader.pl)
• marc_export — Exports authority, bibliographic, and serial holdings records into any of these formats:USMARC, UNIMARC, XML, BRE, ARE
• osrf_control — Used to start, stop and send signals to OpenSRF services
• parallel_pg_loader.pl — Uses the output of marc2bre.pl (or similar tools) to generate the SQL for importingrecords into Evergreen in a parallel fashion
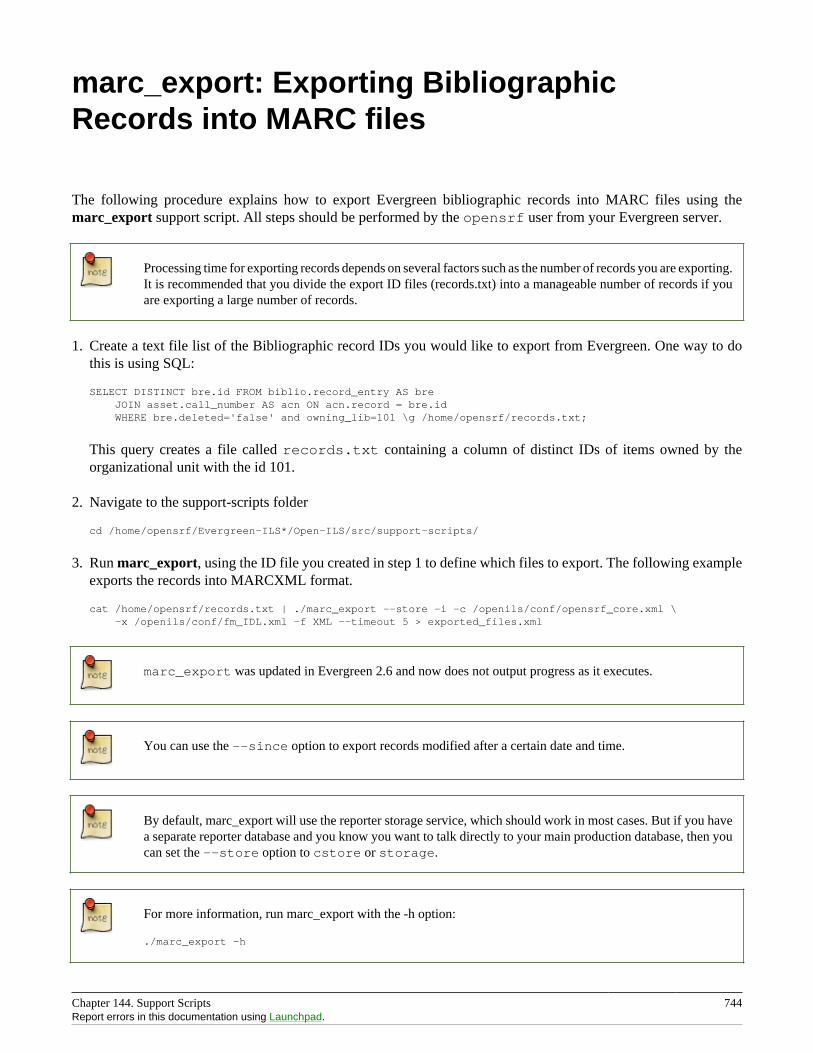
Chapter 144. Support Scripts 744Report errors in this documentation using Launchpad.
marc_export: Exporting BibliographicRecords into MARC files
The following procedure explains how to export Evergreen bibliographic records into MARC files using themarc_export support script. All steps should be performed by the opensrf user from your Evergreen server.
Processing time for exporting records depends on several factors such as the number of records you are exporting.It is recommended that you divide the export ID files (records.txt) into a manageable number of records if youare exporting a large number of records.
1. Create a text file list of the Bibliographic record IDs you would like to export from Evergreen. One way to dothis is using SQL:
SELECT DISTINCT bre.id FROM biblio.record_entry AS bre JOIN asset.call_number AS acn ON acn.record = bre.id WHERE bre.deleted='false' and owning_lib=101 \g /home/opensrf/records.txt;
This query creates a file called records.txt containing a column of distinct IDs of items owned by theorganizational unit with the id 101.
2. Navigate to the support-scripts folder
cd /home/opensrf/Evergreen-ILS*/Open-ILS/src/support-scripts/
3. Run marc_export, using the ID file you created in step 1 to define which files to export. The following exampleexports the records into MARCXML format.
cat /home/opensrf/records.txt | ./marc_export --store -i -c /openils/conf/opensrf_core.xml \ -x /openils/conf/fm_IDL.xml -f XML --timeout 5 > exported_files.xml
marc_export was updated in Evergreen 2.6 and now does not output progress as it executes.
You can use the --since option to export records modified after a certain date and time.
By default, marc_export will use the reporter storage service, which should work in most cases. But if you havea separate reporter database and you know you want to talk directly to your main production database, then youcan set the --store option to cstore or storage.
For more information, run marc_export with the -h option:
./marc_export -h
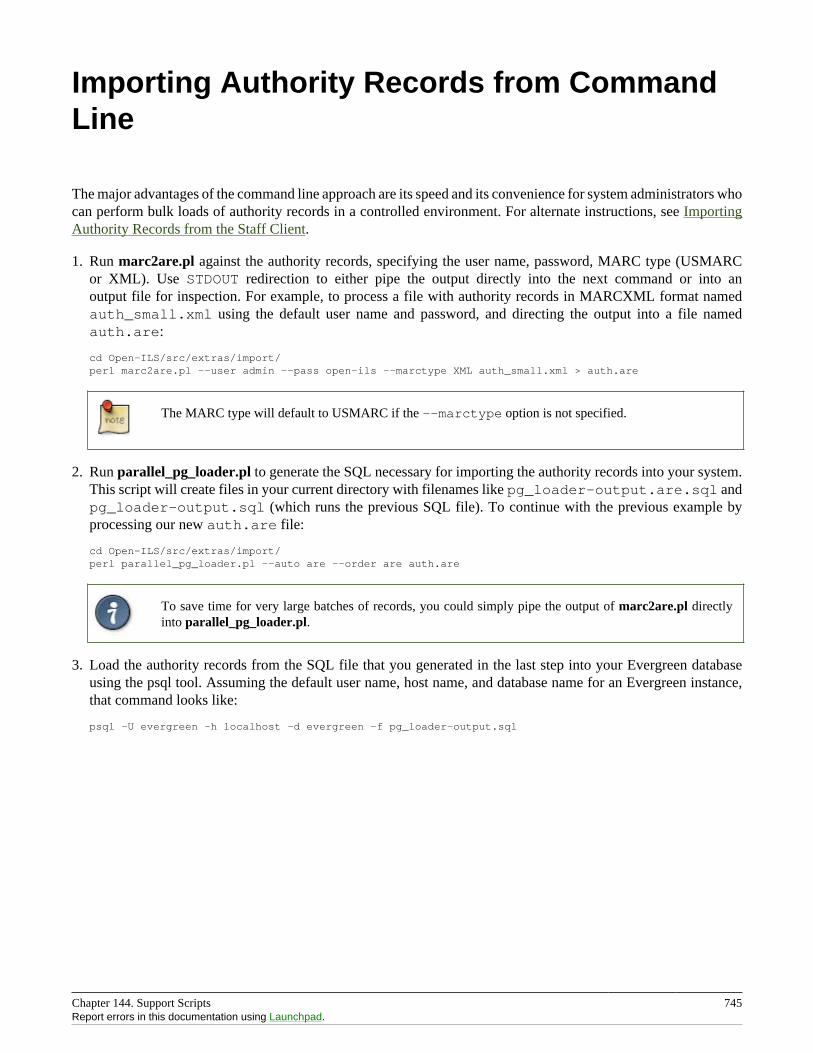
Chapter 144. Support Scripts 745Report errors in this documentation using Launchpad.
Importing Authority Records from CommandLine
The major advantages of the command line approach are its speed and its convenience for system administrators whocan perform bulk loads of authority records in a controlled environment. For alternate instructions, see ImportingAuthority Records from the Staff Client.
1. Run marc2are.pl against the authority records, specifying the user name, password, MARC type (USMARCor XML). Use STDOUT redirection to either pipe the output directly into the next command or into anoutput file for inspection. For example, to process a file with authority records in MARCXML format namedauth_small.xml using the default user name and password, and directing the output into a file namedauth.are:
cd Open-ILS/src/extras/import/perl marc2are.pl --user admin --pass open-ils --marctype XML auth_small.xml > auth.are
The MARC type will default to USMARC if the --marctype option is not specified.
2. Run parallel_pg_loader.pl to generate the SQL necessary for importing the authority records into your system.This script will create files in your current directory with filenames like pg_loader-output.are.sql andpg_loader-output.sql (which runs the previous SQL file). To continue with the previous example byprocessing our new auth.are file:
cd Open-ILS/src/extras/import/perl parallel_pg_loader.pl --auto are --order are auth.are
To save time for very large batches of records, you could simply pipe the output of marc2are.pl directlyinto parallel_pg_loader.pl.
3. Load the authority records from the SQL file that you generated in the last step into your Evergreen databaseusing the psql tool. Assuming the default user name, host name, and database name for an Evergreen instance,that command looks like:
psql -U evergreen -h localhost -d evergreen -f pg_loader-output.sql

Chapter 145. Developing with pgTAP tests 746
Chapter 145. Developing with pgTAP tests
Setting up pgTAP on your development serverCurrently, Evergreen pgTAP tests expect a version of pgTAP (0.93) that is not yet available in the packages formost Linux distributions. Therefore, you will have to install pgTAP from source as follows:
1. Download, make, and install pgTAP on your database server. pgTAP can be downloaded from http://pgxn.org/dist/pgtap/ and the instructions for building and installing the extension are available from http://pgtap.org/documentation.html
2. Create the pgTAP extension in your Evergreen database. Using psql, connect to your Evergreen database andthen issue the command:
CREATE EXTENSION pgtap;
Running pgTAP testsThe pgTAP tests can be found in subdirectories of Open-ILS/src/sql/Pg/ as follows:
• t: contains pgTAP unit tests that can be run on a freshly installed Evergreen database
• live_t: contains pgTAP unit tests meant to be run on an Evergreen database that also has had the "concerto"sample data loaded on it
To run the pgTAP unit and regression tests, use the pg_prove command. For example, from the Evergreen sourcedirectory, you can issue the command: pg_prove -U evergreen Open-ILS/src/sql/Pg/t Open-ILS/src/sql/Pg/t/regress
Chapter 146. Easing gently into OpenSRF 747
Chapter 146. Easing gently into OpenSRF
AbstractThe Evergreen open-source library system serves library consortia composed of hundreds of branches with millionsof patrons - for example, the Georgia Public Library Service PINES system. One of the claimed advantagesof Evergreen over alternative integrated library systems is the underlying Open Service Request Framework(OpenSRF, pronounced "open surf") architecture. This article introduces OpenSRF, demonstrates how to buildOpenSRF services through simple code examples, and explains the technical foundations on which OpenSRF isbuilt.
Introducing OpenSRFOpenSRF is a message routing network that offers scalability and failover support for individual services and entireservers with minimal development and deployment overhead. You can use OpenSRF to build loosely-coupledapplications that can be deployed on a single server or on clusters of geographically distributed servers using thesame code and minimal configuration changes. Although copyright statements on some of the OpenSRF code dateback to Mike Rylander’s original explorations in 2000, Evergreen was the first major application to be developedwith, and to take full advantage of, the OpenSRF architecture starting in 2004. The first official release of OpenSRFwas 0.1 in February 2005 (http://evergreen-ils.org/blog/?p=21), but OpenSRF’s development continues a steadypace of enhancement and refinement, with the release of 1.0.0 in October 2008 and the most recent release of 1.2.2in February 2010.
OpenSRF is a distinct break from the architectural approach used by previous library systems and has more incommon with modern Web applications. The traditional "scale-up" approach to serve more transactions is topurchase a server with more CPUs and more RAM, possibly splitting the load between a Web server, a databaseserver, and a business logic server. Evergreen, however, is built on the Open Service Request Framework (OpenSRF)architecture, which firmly embraces the "scale-out" approach of spreading transaction load over cheap commodityservers. The initial GPLS PINES hardware cluster, while certainly impressive, may have offered the misleadingimpression that Evergreen is complex and requires a lot of hardware to run.
This article hopes to correct any such lingering impression by demonstrating that OpenSRF itself is an extremelysimple architecture on which one can easily build applications of many kinds – not just library applications – andthat you can use a number of different languages to call and implement OpenSRF methods with a minimal learningcurve. With an application built on OpenSRF, when you identify a bottleneck in your application’s business logiclayer, you can adjust the number of the processes serving that particular bottleneck on each of your servers; or if theproblem is that your service is resource-hungry, you could add an inexpensive server to your cluster and dedicateit to running that resource-hungry service.
Programming language supportIf you need to develop an entirely new OpenSRF service, you can choose from a number of different languages inwhich to implement that service. OpenSRF client language bindings have been written for C, Java, JavaScript, Perl,and Python, and server language bindings have been written for C, Perl, and Python. This article uses Perl examplesas a lowest common denominator programming language. Writing an OpenSRF binding for another language is arelatively small task if that language offers libraries that support the core technologies on which OpenSRF depends:
• Extensible Messaging and Presence Protocol (XMPP, sometimes referred to as Jabber) - provides the basemessaging infrastructure between OpenSRF clients and servers
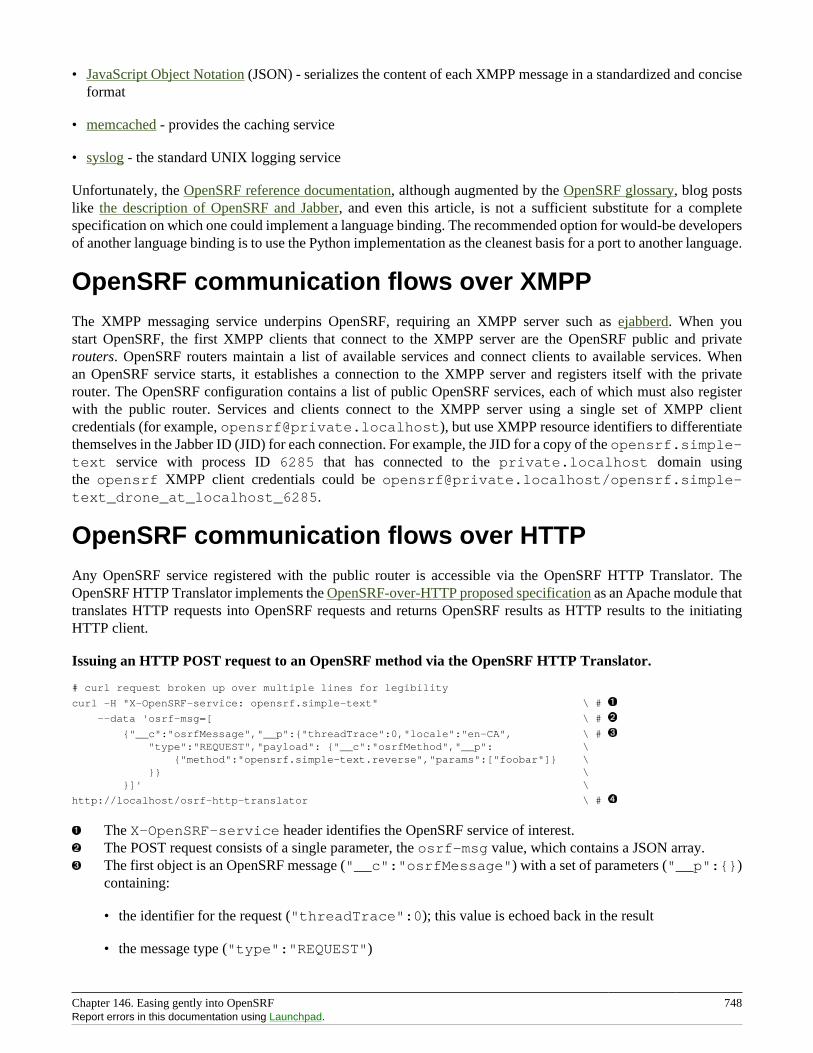
Chapter 146. Easing gently into OpenSRF 748Report errors in this documentation using Launchpad.
• JavaScript Object Notation (JSON) - serializes the content of each XMPP message in a standardized and conciseformat
• memcached - provides the caching service
• syslog - the standard UNIX logging service
Unfortunately, the OpenSRF reference documentation, although augmented by the OpenSRF glossary, blog postslike the description of OpenSRF and Jabber, and even this article, is not a sufficient substitute for a completespecification on which one could implement a language binding. The recommended option for would-be developersof another language binding is to use the Python implementation as the cleanest basis for a port to another language.
OpenSRF communication flows over XMPPThe XMPP messaging service underpins OpenSRF, requiring an XMPP server such as ejabberd. When youstart OpenSRF, the first XMPP clients that connect to the XMPP server are the OpenSRF public and privaterouters. OpenSRF routers maintain a list of available services and connect clients to available services. Whenan OpenSRF service starts, it establishes a connection to the XMPP server and registers itself with the privaterouter. The OpenSRF configuration contains a list of public OpenSRF services, each of which must also registerwith the public router. Services and clients connect to the XMPP server using a single set of XMPP clientcredentials (for example, [email protected]), but use XMPP resource identifiers to differentiatethemselves in the Jabber ID (JID) for each connection. For example, the JID for a copy of the opensrf.simple-text service with process ID 6285 that has connected to the private.localhost domain usingthe opensrf XMPP client credentials could be [email protected]/opensrf.simple-text_drone_at_localhost_6285.
OpenSRF communication flows over HTTPAny OpenSRF service registered with the public router is accessible via the OpenSRF HTTP Translator. TheOpenSRF HTTP Translator implements the OpenSRF-over-HTTP proposed specification as an Apache module thattranslates HTTP requests into OpenSRF requests and returns OpenSRF results as HTTP results to the initiatingHTTP client.
Issuing an HTTP POST request to an OpenSRF method via the OpenSRF HTTP Translator.
# curl request broken up over multiple lines for legibility
curl -H "X-OpenSRF-service: opensrf.simple-text" \ #
--data 'osrf-msg=[ \ #
{"__c":"osrfMessage","__p":{"threadTrace":0,"locale":"en-CA", \ # "type":"REQUEST","payload": {"__c":"osrfMethod","__p": \ {"method":"opensrf.simple-text.reverse","params":["foobar"]} \ }} \ }]' \
http://localhost/osrf-http-translator \ #
The X-OpenSRF-service header identifies the OpenSRF service of interest.The POST request consists of a single parameter, the osrf-msg value, which contains a JSON array.The first object is an OpenSRF message ("__c":"osrfMessage") with a set of parameters ("__p":{})containing:
• the identifier for the request ("threadTrace":0); this value is echoed back in the result
• the message type ("type":"REQUEST")
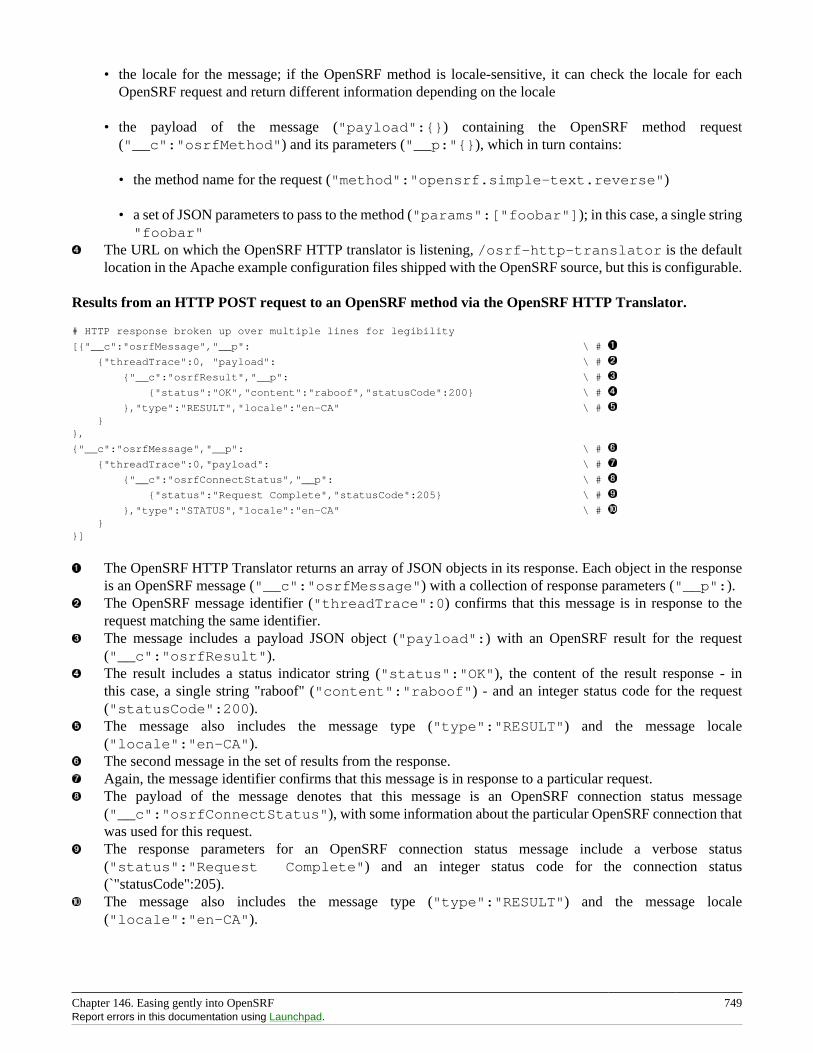
Chapter 146. Easing gently into OpenSRF 749Report errors in this documentation using Launchpad.
• the locale for the message; if the OpenSRF method is locale-sensitive, it can check the locale for eachOpenSRF request and return different information depending on the locale
• the payload of the message ("payload":{}) containing the OpenSRF method request("__c":"osrfMethod") and its parameters ("__p:"{}), which in turn contains:
• the method name for the request ("method":"opensrf.simple-text.reverse")
• a set of JSON parameters to pass to the method ("params":["foobar"]); in this case, a single string"foobar"
The URL on which the OpenSRF HTTP translator is listening, /osrf-http-translator is the defaultlocation in the Apache example configuration files shipped with the OpenSRF source, but this is configurable.
Results from an HTTP POST request to an OpenSRF method via the OpenSRF HTTP Translator.
# HTTP response broken up over multiple lines for legibility
[{"__c":"osrfMessage","__p": \ #
{"threadTrace":0, "payload": \ #
{"__c":"osrfResult","__p": \ #
{"status":"OK","content":"raboof","statusCode":200} \ #
},"type":"RESULT","locale":"en-CA" \ # }},
{"__c":"osrfMessage","__p": \ #
{"threadTrace":0,"payload": \ #
{"__c":"osrfConnectStatus","__p": \ #
{"status":"Request Complete","statusCode":205} \ #
},"type":"STATUS","locale":"en-CA" \ # }}]
The OpenSRF HTTP Translator returns an array of JSON objects in its response. Each object in the responseis an OpenSRF message ("__c":"osrfMessage") with a collection of response parameters ("__p":).The OpenSRF message identifier ("threadTrace":0) confirms that this message is in response to therequest matching the same identifier.The message includes a payload JSON object ("payload":) with an OpenSRF result for the request("__c":"osrfResult").The result includes a status indicator string ("status":"OK"), the content of the result response - inthis case, a single string "raboof" ("content":"raboof") - and an integer status code for the request("statusCode":200).The message also includes the message type ("type":"RESULT") and the message locale("locale":"en-CA").The second message in the set of results from the response.Again, the message identifier confirms that this message is in response to a particular request.The payload of the message denotes that this message is an OpenSRF connection status message("__c":"osrfConnectStatus"), with some information about the particular OpenSRF connection thatwas used for this request.The response parameters for an OpenSRF connection status message include a verbose status("status":"Request Complete") and an integer status code for the connection status(`"statusCode":205).The message also includes the message type ("type":"RESULT") and the message locale("locale":"en-CA").
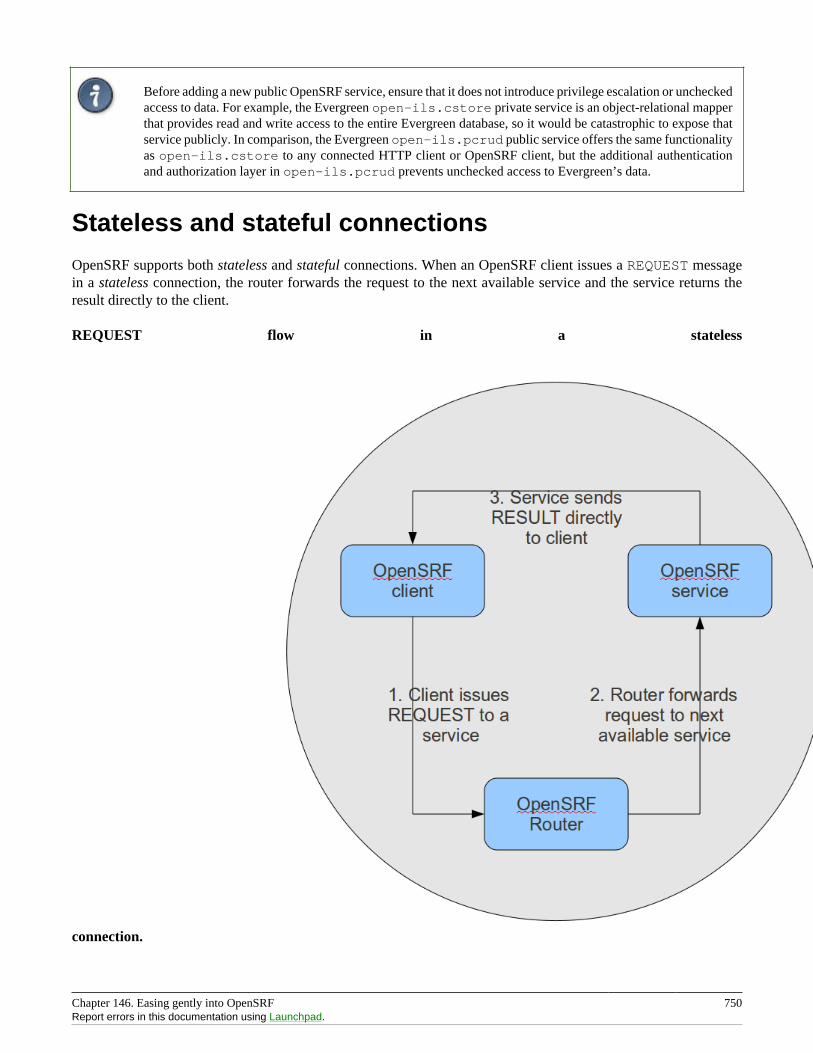
Chapter 146. Easing gently into OpenSRF 750Report errors in this documentation using Launchpad.
Before adding a new public OpenSRF service, ensure that it does not introduce privilege escalation or uncheckedaccess to data. For example, the Evergreen open-ils.cstore private service is an object-relational mapperthat provides read and write access to the entire Evergreen database, so it would be catastrophic to expose thatservice publicly. In comparison, the Evergreen open-ils.pcrud public service offers the same functionalityas open-ils.cstore to any connected HTTP client or OpenSRF client, but the additional authenticationand authorization layer in open-ils.pcrud prevents unchecked access to Evergreen’s data.
Stateless and stateful connections
OpenSRF supports both stateless and stateful connections. When an OpenSRF client issues a REQUEST messagein a stateless connection, the router forwards the request to the next available service and the service returns theresult directly to the client.
REQUEST flow in a stateless
connection.
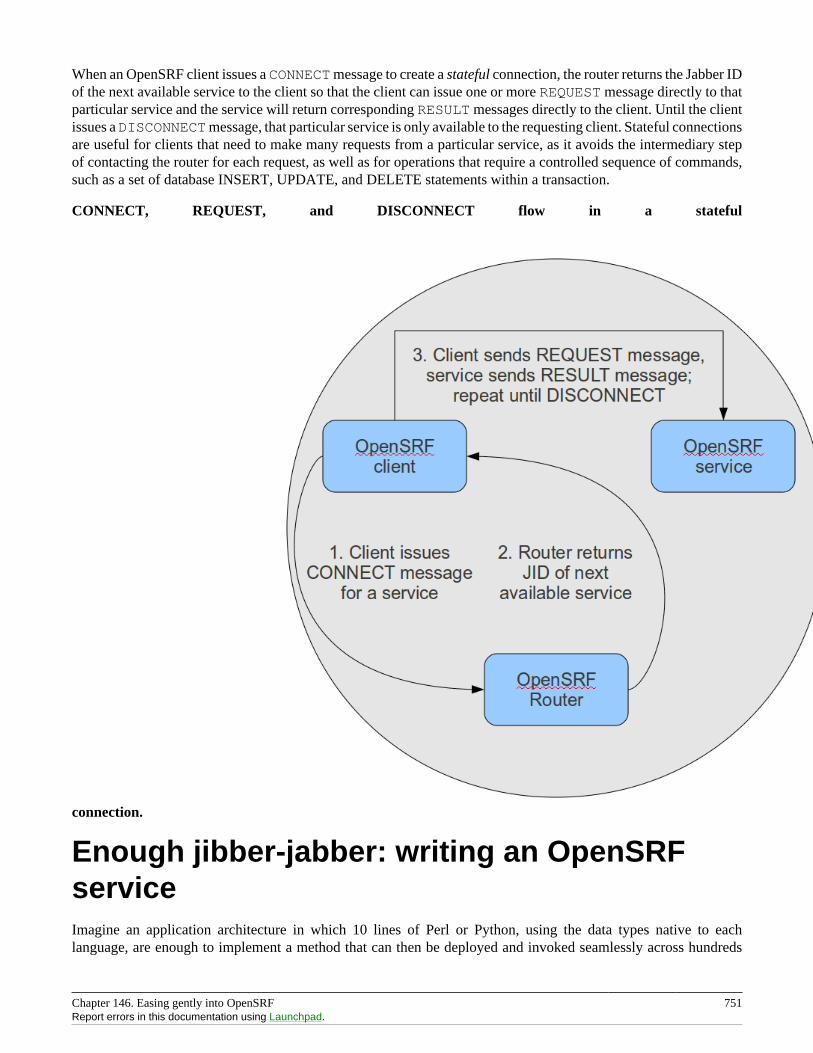
Chapter 146. Easing gently into OpenSRF 751Report errors in this documentation using Launchpad.
When an OpenSRF client issues a CONNECT message to create a stateful connection, the router returns the Jabber IDof the next available service to the client so that the client can issue one or more REQUEST message directly to thatparticular service and the service will return corresponding RESULT messages directly to the client. Until the clientissues a DISCONNECT message, that particular service is only available to the requesting client. Stateful connectionsare useful for clients that need to make many requests from a particular service, as it avoids the intermediary stepof contacting the router for each request, as well as for operations that require a controlled sequence of commands,such as a set of database INSERT, UPDATE, and DELETE statements within a transaction.
CONNECT, REQUEST, and DISCONNECT flow in a stateful
connection.
Enough jibber-jabber: writing an OpenSRFserviceImagine an application architecture in which 10 lines of Perl or Python, using the data types native to eachlanguage, are enough to implement a method that can then be deployed and invoked seamlessly across hundreds
Chapter 146. Easing gently into OpenSRF 752Report errors in this documentation using Launchpad.
of servers. You have just imagined developing with OpenSRF – it is truly that simple. Under the covers, ofcourse, the OpenSRF language bindings do an incredible amount of work on behalf of the developer. An OpenSRFapplication consists of one or more OpenSRF services that expose methods: for example, the opensrf.simple-text demonstration service exposes the opensrf.simple-text.split() and opensrf.simple-text.reverse() methods. Each method accepts zero or more arguments and returns zero or one results. Thedata types supported by OpenSRF arguments and results are typical core language data types: strings, numbers,booleans, arrays, and hashes.
To implement a new OpenSRF service, perform the following steps:
1. Include the base OpenSRF support libraries
2. Write the code for each of your OpenSRF methods as separate procedures
3. Register each method
4. Add the service definition to the OpenSRF configuration files
For example, the following code implements an OpenSRF service. The service includes one method namedopensrf.simple-text.reverse() that accepts one string as input and returns the reversed version of thatstring:
#!/usr/bin/perl
package OpenSRF::Application::Demo::SimpleText;
use strict;
use OpenSRF::Application;use parent qw/OpenSRF::Application/;
sub text_reverse { my ($self , $conn, $text) = @_; my $reversed_text = scalar reverse($text); return $reversed_text;}
__PACKAGE__->register_method( method => 'text_reverse', api_name => 'opensrf.simple-text.reverse');
Ten lines of code, and we have a complete OpenSRF service that exposes a single method and could be deployedquickly on a cluster of servers to meet your application’s ravenous demand for reversed strings! If you’re unfamiliarwith Perl, the use OpenSRF::Application; use parent qw/OpenSRF::Application/; lines tellthis package to inherit methods and properties from the OpenSRF::Application module. For example, the callto __PACKAGE__->register_method() is defined in OpenSRF::Application but due to inheritanceis available in this package (named by the special Perl symbol __PACKAGE__ that contains the current packagename). The register_method() procedure is how we introduce a method to the rest of the OpenSRF world.
Registering a service with the OpenSRF configurationfilesTwo files control most of the configuration for OpenSRF:
• opensrf.xml contains the configuration for the service itself as well as a list of which application servers inyour OpenSRF cluster should start the service
Chapter 146. Easing gently into OpenSRF 753Report errors in this documentation using Launchpad.
• opensrf_core.xml (often referred to as the "bootstrap configuration" file) contains the OpenSRF networkinginformation, including the XMPP server connection credentials for the public and private routers; you only needto touch this for a new service if the new service needs to be accessible via the public router
Begin by defining the service itself in opensrf.xml. To register the opensrf.simple-text service, add thefollowing section to the <apps> element (corresponding to the XPath /opensrf/default/apps/):
<apps>
<opensrf.simple-text> <!-- -->
<keepalive>3</keepalive> <!-- -->
<stateless>1</stateless> <!-- -->
<language>perl</language> <!-- -->
<implementation>OpenSRF::Application::Demo::SimpleText</implementation> <!-- -->
<max_requests>100</max_requests> <!-- --> <unix_config>
<max_requests>1000</max_requests> <!-- -->
<unix_log>opensrf.simple-text_unix.log</unix_log> <!-- -->
<unix_sock>opensrf.simple-text_unix.sock</unix_sock> <!-- -->
<unix_pid>opensrf.simple-text_unix.pid</unix_pid> <!-- -->
<min_children>5</min_children> <!-- -->
<max_children>15</max_children> <!-- -->
<min_spare_children>2</min_spare_children> <!-- -->
<max_spare_children>5</max_spare_children> <!-- --> </unix_config> </opensrf.simple-text>
<!-- other OpenSRF services registered here... --></apps>
The element name is the name that the OpenSRF control scripts use to refer to the service.Specifies the interval (in seconds) between checks to determine if the service is still running.Specifies whether OpenSRF clients can call methods from this service without first having to create aconnection to a specific service backend process for that service. If the value is 1, then the client can simplyissue a request and the router will forward the request to an available service and the result will be returneddirectly to the client.Specifies the programming language in which the service is implementedSpecifies the name of the library or module in which the service is implemented(C implementations): Specifies the maximum number of requests a process serves before it is killed andreplaced by a new process.(Perl implementations): Specifies the maximum number of requests a process serves before it is killed andreplaced by a new process.The name of the log file for language-specific log messages such as syntax warnings.The name of the UNIX socket used for inter-process communications.The name of the PID file for the master process for the service.The minimum number of child processes that should be running at any given time.The maximum number of child processes that should be running at any given time.The minimum number of child processes that should be available to handle incoming requests. If there arefewer than this number of spare child processes, new processes will be spawned.The minimum number of child processes that should be available to handle incoming requests. If there aremore than this number of spare child processes, the extra processes will be killed.
To make the service accessible via the public router, you must also edit the opensrf_core.xml configurationfile to add the service to the list of publicly accessible services:
Making a service publicly accessible in opensrf_core.xml.
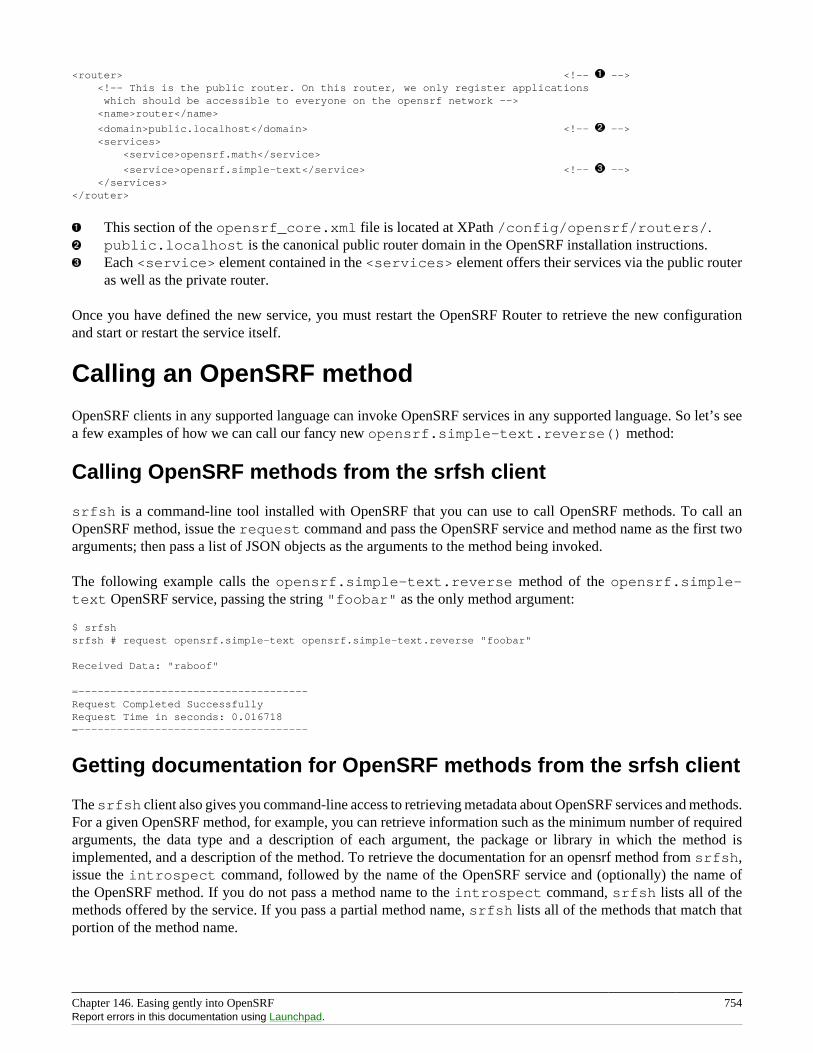
Chapter 146. Easing gently into OpenSRF 754Report errors in this documentation using Launchpad.
<router> <!-- --> <!-- This is the public router. On this router, we only register applications which should be accessible to everyone on the opensrf network --> <name>router</name>
<domain>public.localhost</domain> <!-- --> <services> <service>opensrf.math</service>
<service>opensrf.simple-text</service> <!-- --> </services></router>
This section of the opensrf_core.xml file is located at XPath /config/opensrf/routers/.public.localhost is the canonical public router domain in the OpenSRF installation instructions.Each <service> element contained in the <services> element offers their services via the public routeras well as the private router.
Once you have defined the new service, you must restart the OpenSRF Router to retrieve the new configurationand start or restart the service itself.
Calling an OpenSRF method
OpenSRF clients in any supported language can invoke OpenSRF services in any supported language. So let’s seea few examples of how we can call our fancy new opensrf.simple-text.reverse() method:
Calling OpenSRF methods from the srfsh client
srfsh is a command-line tool installed with OpenSRF that you can use to call OpenSRF methods. To call anOpenSRF method, issue the request command and pass the OpenSRF service and method name as the first twoarguments; then pass a list of JSON objects as the arguments to the method being invoked.
The following example calls the opensrf.simple-text.reverse method of the opensrf.simple-text OpenSRF service, passing the string "foobar" as the only method argument:
$ srfshsrfsh # request opensrf.simple-text opensrf.simple-text.reverse "foobar"
Received Data: "raboof"
=------------------------------------Request Completed SuccessfullyRequest Time in seconds: 0.016718=------------------------------------
Getting documentation for OpenSRF methods from the srfsh client
The srfsh client also gives you command-line access to retrieving metadata about OpenSRF services and methods.For a given OpenSRF method, for example, you can retrieve information such as the minimum number of requiredarguments, the data type and a description of each argument, the package or library in which the method isimplemented, and a description of the method. To retrieve the documentation for an opensrf method from srfsh,issue the introspect command, followed by the name of the OpenSRF service and (optionally) the name ofthe OpenSRF method. If you do not pass a method name to the introspect command, srfsh lists all of themethods offered by the service. If you pass a partial method name, srfsh lists all of the methods that match thatportion of the method name.
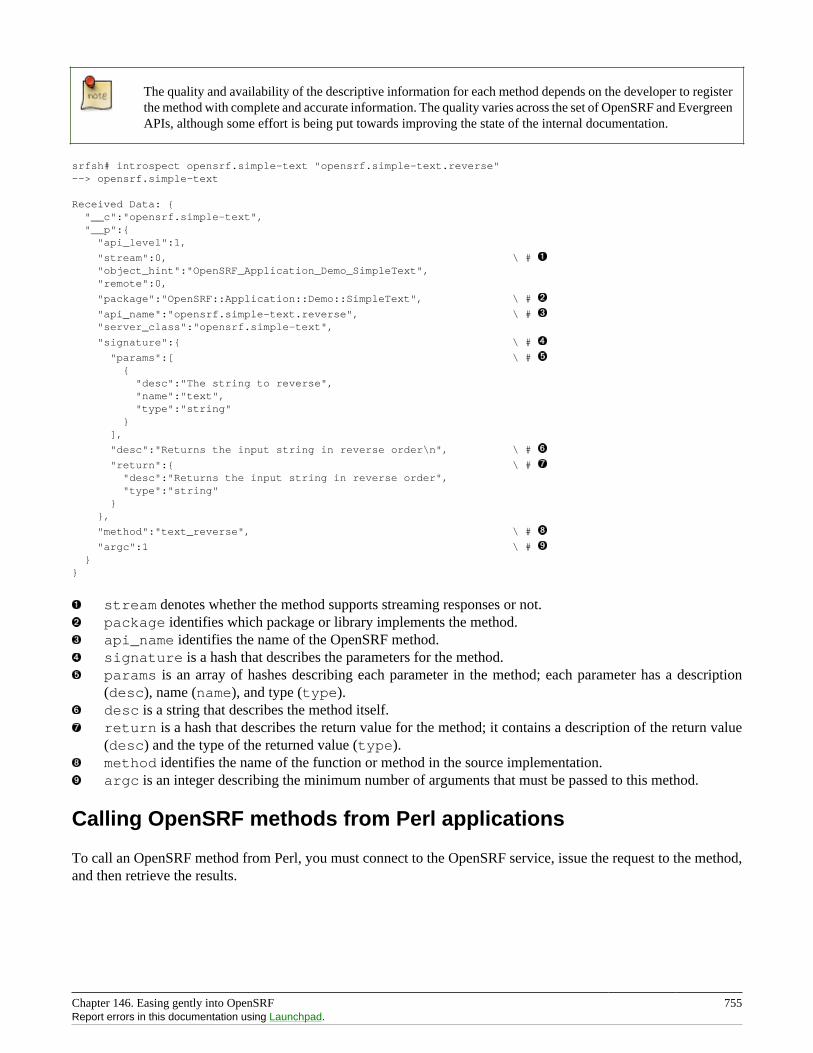
Chapter 146. Easing gently into OpenSRF 755Report errors in this documentation using Launchpad.
The quality and availability of the descriptive information for each method depends on the developer to registerthe method with complete and accurate information. The quality varies across the set of OpenSRF and EvergreenAPIs, although some effort is being put towards improving the state of the internal documentation.
srfsh# introspect opensrf.simple-text "opensrf.simple-text.reverse"--> opensrf.simple-text
Received Data: { "__c":"opensrf.simple-text", "__p":{ "api_level":1,
"stream":0, \ # "object_hint":"OpenSRF_Application_Demo_SimpleText", "remote":0,
"package":"OpenSRF::Application::Demo::SimpleText", \ #
"api_name":"opensrf.simple-text.reverse", \ # "server_class":"opensrf.simple-text",
"signature":{ \ #
"params":[ \ # { "desc":"The string to reverse", "name":"text", "type":"string" } ],
"desc":"Returns the input string in reverse order\n", \ #
"return":{ \ # "desc":"Returns the input string in reverse order", "type":"string" } },
"method":"text_reverse", \ #
"argc":1 \ # }}
stream denotes whether the method supports streaming responses or not.package identifies which package or library implements the method.api_name identifies the name of the OpenSRF method.signature is a hash that describes the parameters for the method.params is an array of hashes describing each parameter in the method; each parameter has a description(desc), name (name), and type (type).desc is a string that describes the method itself.return is a hash that describes the return value for the method; it contains a description of the return value(desc) and the type of the returned value (type).method identifies the name of the function or method in the source implementation.argc is an integer describing the minimum number of arguments that must be passed to this method.
Calling OpenSRF methods from Perl applications
To call an OpenSRF method from Perl, you must connect to the OpenSRF service, issue the request to the method,and then retrieve the results.
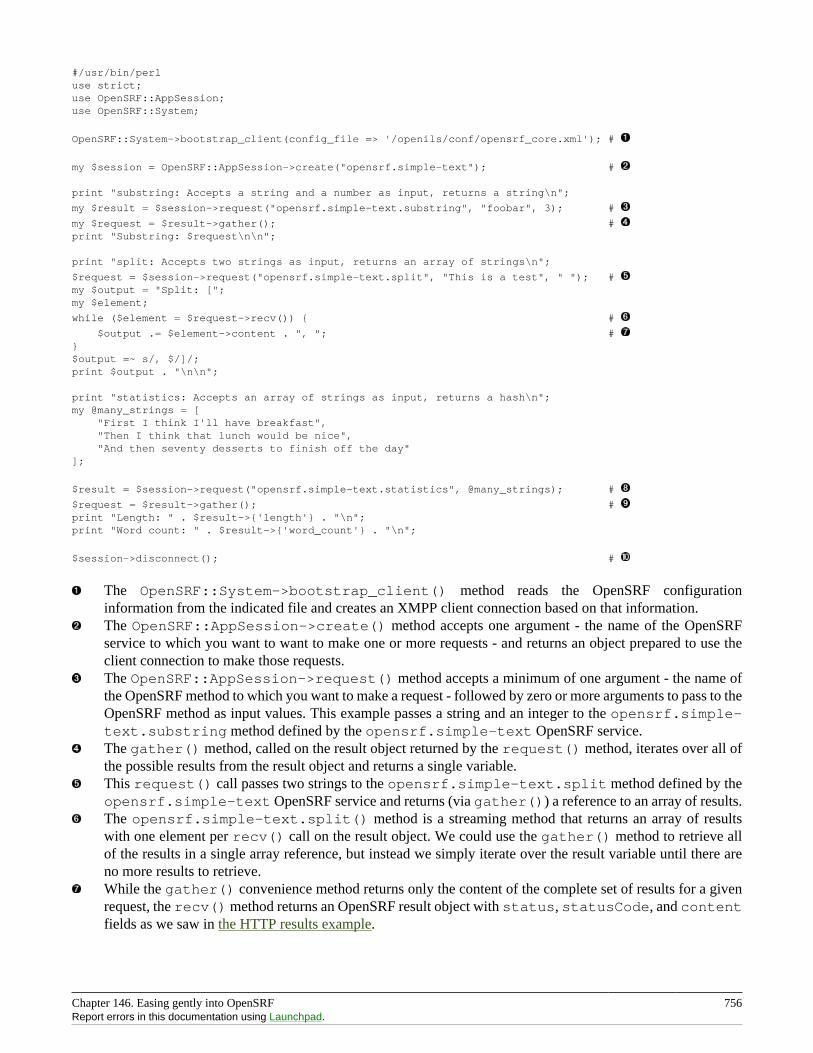
Chapter 146. Easing gently into OpenSRF 756Report errors in this documentation using Launchpad.
#/usr/bin/perluse strict;use OpenSRF::AppSession;use OpenSRF::System;
OpenSRF::System->bootstrap_client(config_file => '/openils/conf/opensrf_core.xml'); #
my $session = OpenSRF::AppSession->create("opensrf.simple-text"); #
print "substring: Accepts a string and a number as input, returns a string\n";
my $result = $session->request("opensrf.simple-text.substring", "foobar", 3); #
my $request = $result->gather(); # print "Substring: $request\n\n";
print "split: Accepts two strings as input, returns an array of strings\n";
$request = $session->request("opensrf.simple-text.split", "This is a test", " "); # my $output = "Split: [";my $element;
while ($element = $request->recv()) { #
$output .= $element->content . ", "; # }$output =~ s/, $/]/;print $output . "\n\n";
print "statistics: Accepts an array of strings as input, returns a hash\n";my @many_strings = [ "First I think I'll have breakfast", "Then I think that lunch would be nice", "And then seventy desserts to finish off the day"];
$result = $session->request("opensrf.simple-text.statistics", @many_strings); #
$request = $result->gather(); # print "Length: " . $result->{'length'} . "\n";print "Word count: " . $result->{'word_count'} . "\n";
$session->disconnect(); #
The OpenSRF::System->bootstrap_client() method reads the OpenSRF configurationinformation from the indicated file and creates an XMPP client connection based on that information.The OpenSRF::AppSession->create() method accepts one argument - the name of the OpenSRFservice to which you want to want to make one or more requests - and returns an object prepared to use theclient connection to make those requests.The OpenSRF::AppSession->request() method accepts a minimum of one argument - the name ofthe OpenSRF method to which you want to make a request - followed by zero or more arguments to pass to theOpenSRF method as input values. This example passes a string and an integer to the opensrf.simple-text.substring method defined by the opensrf.simple-text OpenSRF service.The gather() method, called on the result object returned by the request() method, iterates over all ofthe possible results from the result object and returns a single variable.This request() call passes two strings to the opensrf.simple-text.split method defined by theopensrf.simple-text OpenSRF service and returns (via gather()) a reference to an array of results.The opensrf.simple-text.split() method is a streaming method that returns an array of resultswith one element per recv() call on the result object. We could use the gather() method to retrieve allof the results in a single array reference, but instead we simply iterate over the result variable until there areno more results to retrieve.While the gather() convenience method returns only the content of the complete set of results for a givenrequest, the recv() method returns an OpenSRF result object with status, statusCode, and contentfields as we saw in the HTTP results example.
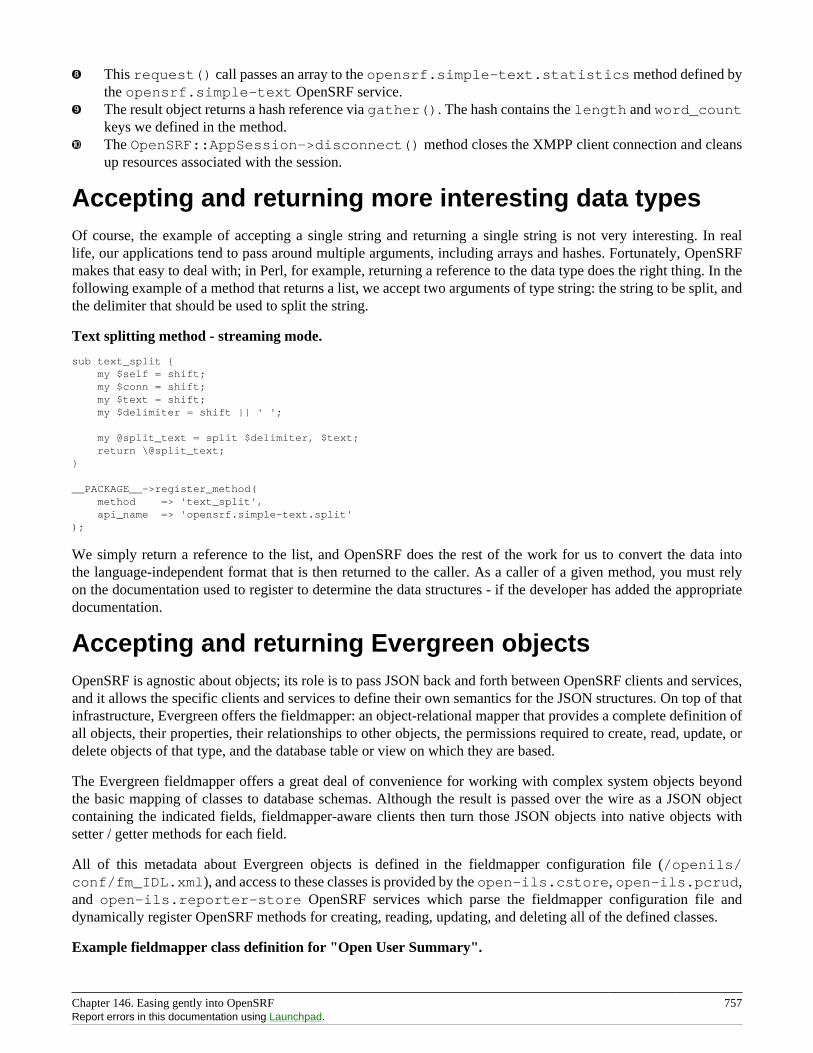
Chapter 146. Easing gently into OpenSRF 757Report errors in this documentation using Launchpad.
This request() call passes an array to the opensrf.simple-text.statistics method defined bythe opensrf.simple-text OpenSRF service.The result object returns a hash reference via gather(). The hash contains the length and word_countkeys we defined in the method.The OpenSRF::AppSession->disconnect() method closes the XMPP client connection and cleansup resources associated with the session.
Accepting and returning more interesting data typesOf course, the example of accepting a single string and returning a single string is not very interesting. In reallife, our applications tend to pass around multiple arguments, including arrays and hashes. Fortunately, OpenSRFmakes that easy to deal with; in Perl, for example, returning a reference to the data type does the right thing. In thefollowing example of a method that returns a list, we accept two arguments of type string: the string to be split, andthe delimiter that should be used to split the string.
Text splitting method - streaming mode.
sub text_split { my $self = shift; my $conn = shift; my $text = shift; my $delimiter = shift || ' ';
my @split_text = split $delimiter, $text; return \@split_text;}
__PACKAGE__->register_method( method => 'text_split', api_name => 'opensrf.simple-text.split');
We simply return a reference to the list, and OpenSRF does the rest of the work for us to convert the data intothe language-independent format that is then returned to the caller. As a caller of a given method, you must relyon the documentation used to register to determine the data structures - if the developer has added the appropriatedocumentation.
Accepting and returning Evergreen objectsOpenSRF is agnostic about objects; its role is to pass JSON back and forth between OpenSRF clients and services,and it allows the specific clients and services to define their own semantics for the JSON structures. On top of thatinfrastructure, Evergreen offers the fieldmapper: an object-relational mapper that provides a complete definition ofall objects, their properties, their relationships to other objects, the permissions required to create, read, update, ordelete objects of that type, and the database table or view on which they are based.
The Evergreen fieldmapper offers a great deal of convenience for working with complex system objects beyondthe basic mapping of classes to database schemas. Although the result is passed over the wire as a JSON objectcontaining the indicated fields, fieldmapper-aware clients then turn those JSON objects into native objects withsetter / getter methods for each field.
All of this metadata about Evergreen objects is defined in the fieldmapper configuration file (/openils/conf/fm_IDL.xml), and access to these classes is provided by the open-ils.cstore, open-ils.pcrud,and open-ils.reporter-store OpenSRF services which parse the fieldmapper configuration file anddynamically register OpenSRF methods for creating, reading, updating, and deleting all of the defined classes.
Example fieldmapper class definition for "Open User Summary".
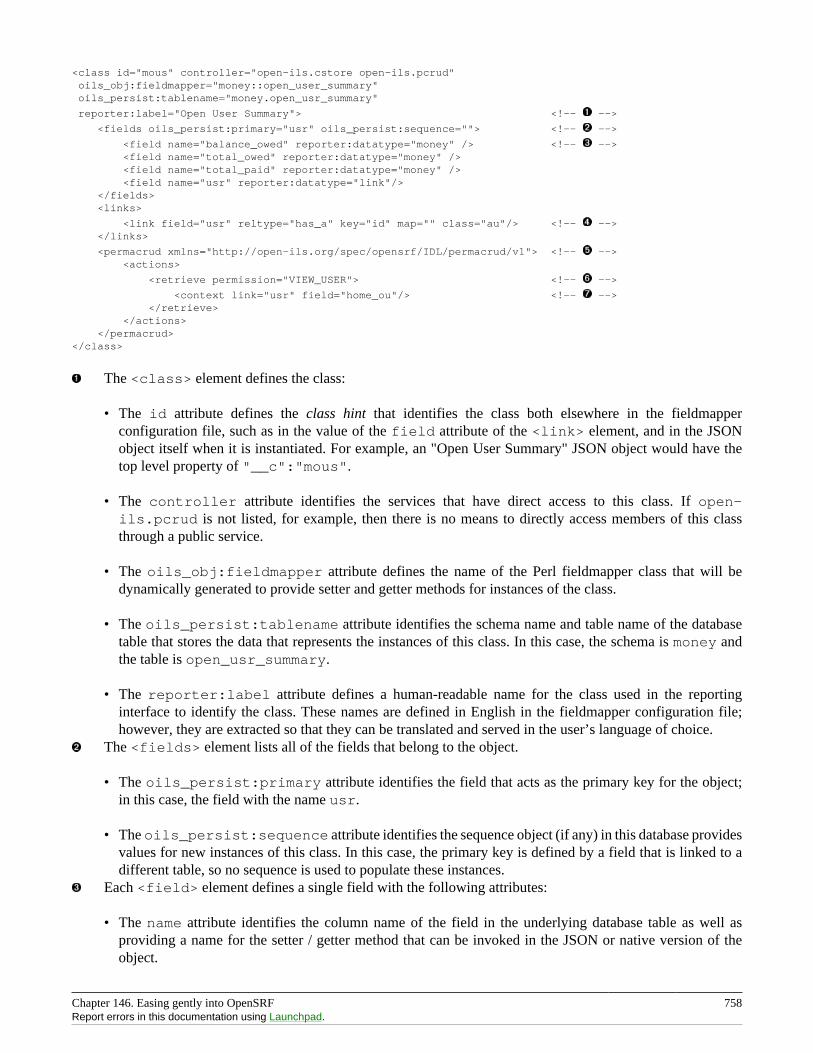
Chapter 146. Easing gently into OpenSRF 758Report errors in this documentation using Launchpad.
<class id="mous" controller="open-ils.cstore open-ils.pcrud" oils_obj:fieldmapper="money::open_user_summary" oils_persist:tablename="money.open_usr_summary"
reporter:label="Open User Summary"> <!-- -->
<fields oils_persist:primary="usr" oils_persist:sequence=""> <!-- -->
<field name="balance_owed" reporter:datatype="money" /> <!-- --> <field name="total_owed" reporter:datatype="money" /> <field name="total_paid" reporter:datatype="money" /> <field name="usr" reporter:datatype="link"/> </fields> <links>
<link field="usr" reltype="has_a" key="id" map="" class="au"/> <!-- --> </links>
<permacrud xmlns="http://open-ils.org/spec/opensrf/IDL/permacrud/v1"> <!-- --> <actions>
<retrieve permission="VIEW_USER"> <!-- -->
<context link="usr" field="home_ou"/> <!-- --> </retrieve> </actions> </permacrud></class>
The <class> element defines the class:
• The id attribute defines the class hint that identifies the class both elsewhere in the fieldmapperconfiguration file, such as in the value of the field attribute of the <link> element, and in the JSONobject itself when it is instantiated. For example, an "Open User Summary" JSON object would have thetop level property of "__c":"mous".
• The controller attribute identifies the services that have direct access to this class. If open-ils.pcrud is not listed, for example, then there is no means to directly access members of this classthrough a public service.
• The oils_obj:fieldmapper attribute defines the name of the Perl fieldmapper class that will bedynamically generated to provide setter and getter methods for instances of the class.
• The oils_persist:tablename attribute identifies the schema name and table name of the databasetable that stores the data that represents the instances of this class. In this case, the schema is money andthe table is open_usr_summary.
• The reporter:label attribute defines a human-readable name for the class used in the reportinginterface to identify the class. These names are defined in English in the fieldmapper configuration file;however, they are extracted so that they can be translated and served in the user’s language of choice.
The <fields> element lists all of the fields that belong to the object.
• The oils_persist:primary attribute identifies the field that acts as the primary key for the object;in this case, the field with the name usr.
• The oils_persist:sequence attribute identifies the sequence object (if any) in this database providesvalues for new instances of this class. In this case, the primary key is defined by a field that is linked to adifferent table, so no sequence is used to populate these instances.
Each <field> element defines a single field with the following attributes:
• The name attribute identifies the column name of the field in the underlying database table as well asproviding a name for the setter / getter method that can be invoked in the JSON or native version of theobject.
Chapter 146. Easing gently into OpenSRF 759Report errors in this documentation using Launchpad.
• The reporter:datatype attribute defines how the reporter should treat the contents of the field for thepurposes of querying and display.
• The reporter:label attribute can be used to provide a human-readable name for each field; withoutit, the reporter falls back to the value of the name attribute.
The <links> element contains a set of zero or more <link> elements, each of which defines a relationshipbetween the class being described and another class.
• The field attribute identifies the field named in this class that links to the external class.
• The reltype attribute identifies the kind of relationship between the classes; in the case of has_a, eachvalue in the usr field is guaranteed to have a corresponding value in the external class.
• The key attribute identifies the name of the field in the external class to which this field links.
• The rarely-used map attribute identifies a second class to which the external class links; it enables this fieldto define a direct relationship to an external class with one degree of separation, to avoid having to retrieveall of the linked members of an intermediate class just to retrieve the instances from the actual desired targetclass.
• The class attribute identifies the external class to which this field links.The <permacrud> element defines the permissions that must have been granted to a user to operate oninstances of this class.The <retrieve> element is one of four possible children of the <actions> element that define thepermissions required for each action: create, retrieve, update, and delete.
• The permission attribute identifies the name of the permission that must have been granted to the userto perform the action.
• The contextfield attribute, if it exists, defines the field in this class that identifies the library withinthe system for which the user must have privileges to work. If a user has been granted a given permission,but has not been granted privileges to work at a given library, they can not perform the action at that library.
The rarely-used <context> element identifies a linked field (link attribute) in this class which links to anexternal class that holds the field (field attribute) that identifies the library within the system for which theuser must have privileges to work.
When you retrieve an instance of a class, you can ask for the result to flesh some or all of the linked fields of thatclass, so that the linked instances are returned embedded directly in your requested instance. In that same requestyou can ask for the fleshed instances to in turn have their linked fields fleshed. By bundling all of this into a singlerequest and result sequence, you can avoid the network overhead of requiring the client to request the base object,then request each linked object in turn.
You can also iterate over a collection of instances and set the automatically generated isdeleted, isupdated,or isnew properties to indicate that the given instance has been deleted, updated, or created respectively. Evergreencan then act in batch mode over the collection to perform the requested actions on any of the instances that havebeen flagged for action.
Returning streaming resultsIn the previous implementation of the opensrf.simple-text.split method, we returned a reference to thecomplete array of results. For small values being delivered over the network, this is perfectly acceptable, but for
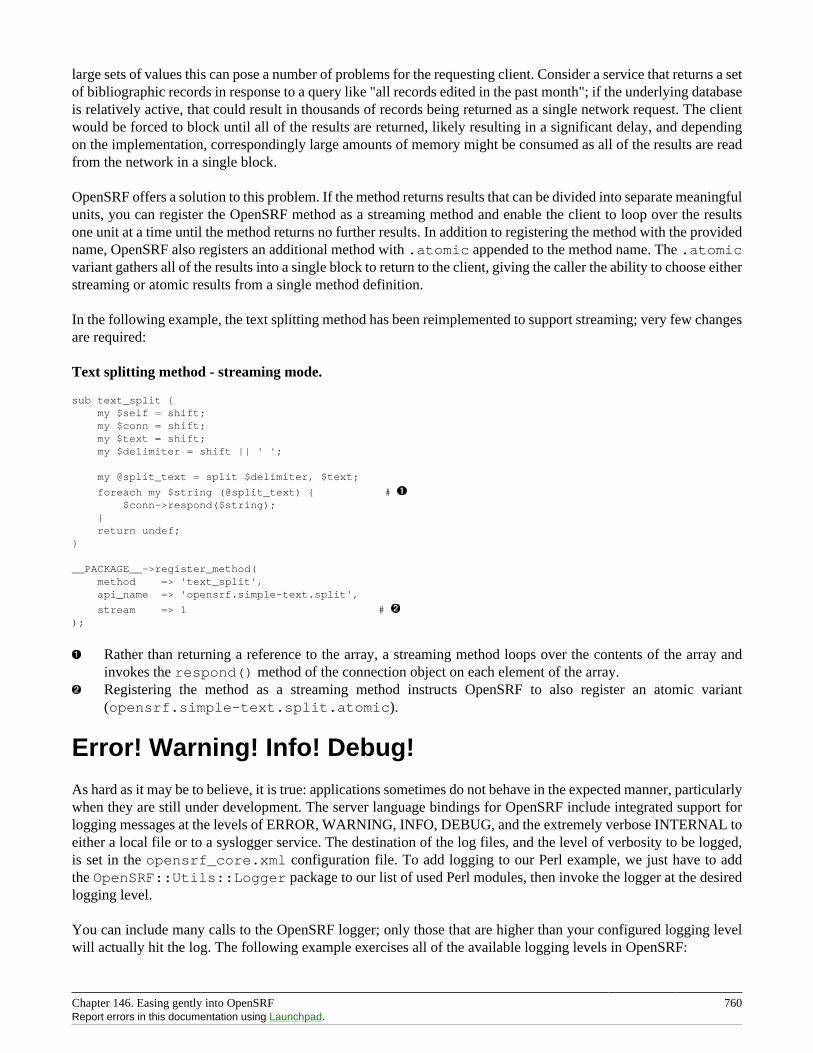
Chapter 146. Easing gently into OpenSRF 760Report errors in this documentation using Launchpad.
large sets of values this can pose a number of problems for the requesting client. Consider a service that returns a setof bibliographic records in response to a query like "all records edited in the past month"; if the underlying databaseis relatively active, that could result in thousands of records being returned as a single network request. The clientwould be forced to block until all of the results are returned, likely resulting in a significant delay, and dependingon the implementation, correspondingly large amounts of memory might be consumed as all of the results are readfrom the network in a single block.
OpenSRF offers a solution to this problem. If the method returns results that can be divided into separate meaningfulunits, you can register the OpenSRF method as a streaming method and enable the client to loop over the resultsone unit at a time until the method returns no further results. In addition to registering the method with the providedname, OpenSRF also registers an additional method with .atomic appended to the method name. The .atomicvariant gathers all of the results into a single block to return to the client, giving the caller the ability to choose eitherstreaming or atomic results from a single method definition.
In the following example, the text splitting method has been reimplemented to support streaming; very few changesare required:
Text splitting method - streaming mode.
sub text_split { my $self = shift; my $conn = shift; my $text = shift; my $delimiter = shift || ' ';
my @split_text = split $delimiter, $text;
foreach my $string (@split_text) { # $conn->respond($string); } return undef;}
__PACKAGE__->register_method( method => 'text_split', api_name => 'opensrf.simple-text.split',
stream => 1 # );
Rather than returning a reference to the array, a streaming method loops over the contents of the array andinvokes the respond() method of the connection object on each element of the array.Registering the method as a streaming method instructs OpenSRF to also register an atomic variant(opensrf.simple-text.split.atomic).
Error! Warning! Info! Debug!
As hard as it may be to believe, it is true: applications sometimes do not behave in the expected manner, particularlywhen they are still under development. The server language bindings for OpenSRF include integrated support forlogging messages at the levels of ERROR, WARNING, INFO, DEBUG, and the extremely verbose INTERNAL toeither a local file or to a syslogger service. The destination of the log files, and the level of verbosity to be logged,is set in the opensrf_core.xml configuration file. To add logging to our Perl example, we just have to addthe OpenSRF::Utils::Logger package to our list of used Perl modules, then invoke the logger at the desiredlogging level.
You can include many calls to the OpenSRF logger; only those that are higher than your configured logging levelwill actually hit the log. The following example exercises all of the available logging levels in OpenSRF:
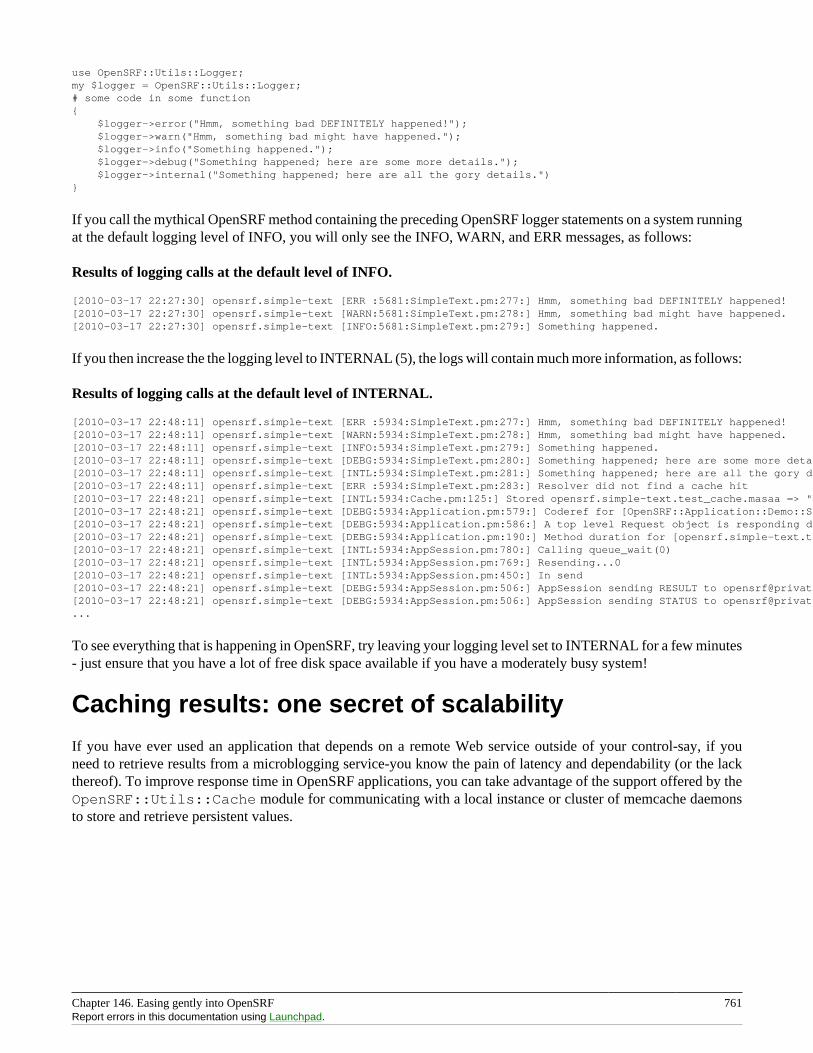
Chapter 146. Easing gently into OpenSRF 761Report errors in this documentation using Launchpad.
use OpenSRF::Utils::Logger;my $logger = OpenSRF::Utils::Logger;# some code in some function{ $logger->error("Hmm, something bad DEFINITELY happened!"); $logger->warn("Hmm, something bad might have happened."); $logger->info("Something happened."); $logger->debug("Something happened; here are some more details."); $logger->internal("Something happened; here are all the gory details.")}
If you call the mythical OpenSRF method containing the preceding OpenSRF logger statements on a system runningat the default logging level of INFO, you will only see the INFO, WARN, and ERR messages, as follows:
Results of logging calls at the default level of INFO.
[2010-03-17 22:27:30] opensrf.simple-text [ERR :5681:SimpleText.pm:277:] Hmm, something bad DEFINITELY happened![2010-03-17 22:27:30] opensrf.simple-text [WARN:5681:SimpleText.pm:278:] Hmm, something bad might have happened.[2010-03-17 22:27:30] opensrf.simple-text [INFO:5681:SimpleText.pm:279:] Something happened.
If you then increase the the logging level to INTERNAL (5), the logs will contain much more information, as follows:
Results of logging calls at the default level of INTERNAL.
[2010-03-17 22:48:11] opensrf.simple-text [ERR :5934:SimpleText.pm:277:] Hmm, something bad DEFINITELY happened![2010-03-17 22:48:11] opensrf.simple-text [WARN:5934:SimpleText.pm:278:] Hmm, something bad might have happened.[2010-03-17 22:48:11] opensrf.simple-text [INFO:5934:SimpleText.pm:279:] Something happened.[2010-03-17 22:48:11] opensrf.simple-text [DEBG:5934:SimpleText.pm:280:] Something happened; here are some more details.[2010-03-17 22:48:11] opensrf.simple-text [INTL:5934:SimpleText.pm:281:] Something happened; here are all the gory details.[2010-03-17 22:48:11] opensrf.simple-text [ERR :5934:SimpleText.pm:283:] Resolver did not find a cache hit[2010-03-17 22:48:21] opensrf.simple-text [INTL:5934:Cache.pm:125:] Stored opensrf.simple-text.test_cache.masaa => "here" in memcached server[2010-03-17 22:48:21] opensrf.simple-text [DEBG:5934:Application.pm:579:] Coderef for [OpenSRF::Application::Demo::SimpleText::test_cache] has been run[2010-03-17 22:48:21] opensrf.simple-text [DEBG:5934:Application.pm:586:] A top level Request object is responding de nada[2010-03-17 22:48:21] opensrf.simple-text [DEBG:5934:Application.pm:190:] Method duration for [opensrf.simple-text.test_cache]: 10.005[2010-03-17 22:48:21] opensrf.simple-text [INTL:5934:AppSession.pm:780:] Calling queue_wait(0)[2010-03-17 22:48:21] opensrf.simple-text [INTL:5934:AppSession.pm:769:] Resending...0[2010-03-17 22:48:21] opensrf.simple-text [INTL:5934:AppSession.pm:450:] In send[2010-03-17 22:48:21] opensrf.simple-text [DEBG:5934:AppSession.pm:506:] AppSession sending RESULT to [email protected]/_dan-karmic-liblap_1268880489.752154_5943 with threadTrace [1][2010-03-17 22:48:21] opensrf.simple-text [DEBG:5934:AppSession.pm:506:] AppSession sending STATUS to [email protected]/_dan-karmic-liblap_1268880489.752154_5943 with threadTrace [1]...
To see everything that is happening in OpenSRF, try leaving your logging level set to INTERNAL for a few minutes- just ensure that you have a lot of free disk space available if you have a moderately busy system!
Caching results: one secret of scalability
If you have ever used an application that depends on a remote Web service outside of your control-say, if youneed to retrieve results from a microblogging service-you know the pain of latency and dependability (or the lackthereof). To improve response time in OpenSRF applications, you can take advantage of the support offered by theOpenSRF::Utils::Cache module for communicating with a local instance or cluster of memcache daemonsto store and retrieve persistent values.
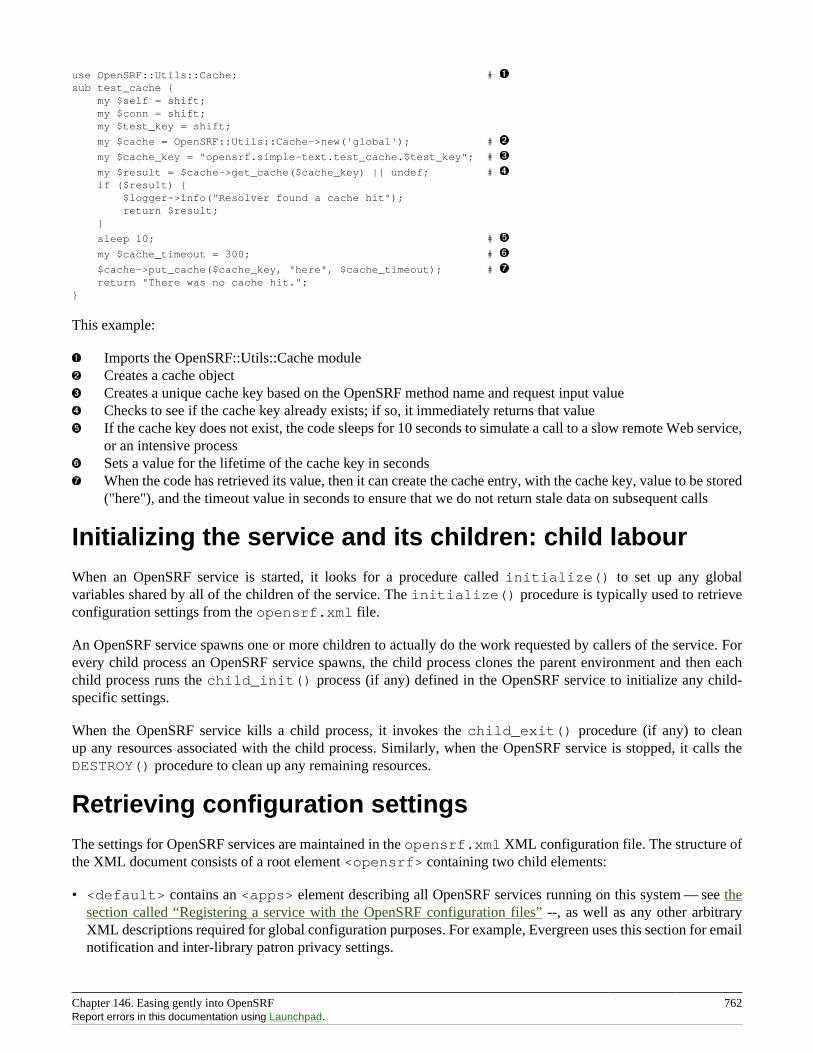
Chapter 146. Easing gently into OpenSRF 762Report errors in this documentation using Launchpad.
use OpenSRF::Utils::Cache; # sub test_cache { my $self = shift; my $conn = shift; my $test_key = shift;
my $cache = OpenSRF::Utils::Cache->new('global'); #
my $cache_key = "opensrf.simple-text.test_cache.$test_key"; #
my $result = $cache->get_cache($cache_key) || undef; # if ($result) { $logger->info("Resolver found a cache hit"); return $result; }
sleep 10; #
my $cache_timeout = 300; #
$cache->put_cache($cache_key, "here", $cache_timeout); # return "There was no cache hit.";}
This example:
Imports the OpenSRF::Utils::Cache moduleCreates a cache objectCreates a unique cache key based on the OpenSRF method name and request input valueChecks to see if the cache key already exists; if so, it immediately returns that valueIf the cache key does not exist, the code sleeps for 10 seconds to simulate a call to a slow remote Web service,or an intensive processSets a value for the lifetime of the cache key in secondsWhen the code has retrieved its value, then it can create the cache entry, with the cache key, value to be stored("here"), and the timeout value in seconds to ensure that we do not return stale data on subsequent calls
Initializing the service and its children: child labourWhen an OpenSRF service is started, it looks for a procedure called initialize() to set up any globalvariables shared by all of the children of the service. The initialize() procedure is typically used to retrieveconfiguration settings from the opensrf.xml file.
An OpenSRF service spawns one or more children to actually do the work requested by callers of the service. Forevery child process an OpenSRF service spawns, the child process clones the parent environment and then eachchild process runs the child_init() process (if any) defined in the OpenSRF service to initialize any child-specific settings.
When the OpenSRF service kills a child process, it invokes the child_exit() procedure (if any) to cleanup any resources associated with the child process. Similarly, when the OpenSRF service is stopped, it calls theDESTROY() procedure to clean up any remaining resources.
Retrieving configuration settingsThe settings for OpenSRF services are maintained in the opensrf.xml XML configuration file. The structure ofthe XML document consists of a root element <opensrf> containing two child elements:
• <default> contains an <apps> element describing all OpenSRF services running on this system — see thesection called “Registering a service with the OpenSRF configuration files” --, as well as any other arbitraryXML descriptions required for global configuration purposes. For example, Evergreen uses this section for emailnotification and inter-library patron privacy settings.
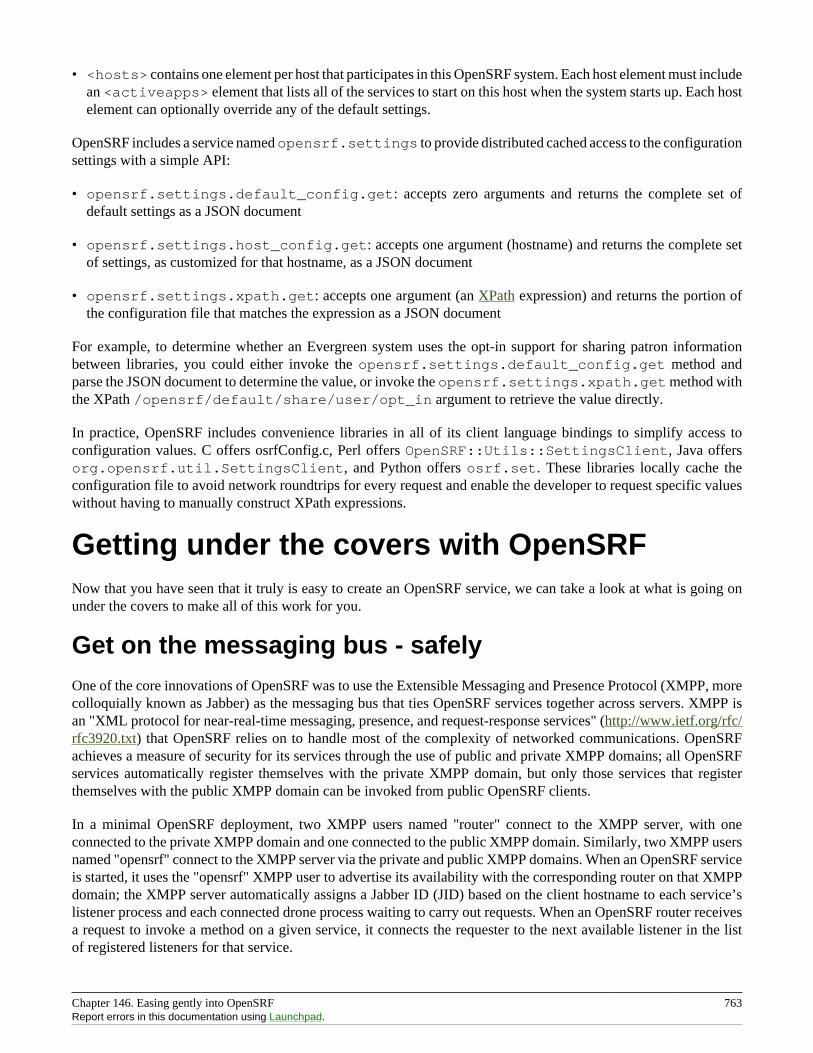
Chapter 146. Easing gently into OpenSRF 763Report errors in this documentation using Launchpad.
• <hosts> contains one element per host that participates in this OpenSRF system. Each host element must includean <activeapps> element that lists all of the services to start on this host when the system starts up. Each hostelement can optionally override any of the default settings.
OpenSRF includes a service named opensrf.settings to provide distributed cached access to the configurationsettings with a simple API:
• opensrf.settings.default_config.get: accepts zero arguments and returns the complete set ofdefault settings as a JSON document
• opensrf.settings.host_config.get: accepts one argument (hostname) and returns the complete setof settings, as customized for that hostname, as a JSON document
• opensrf.settings.xpath.get: accepts one argument (an XPath expression) and returns the portion ofthe configuration file that matches the expression as a JSON document
For example, to determine whether an Evergreen system uses the opt-in support for sharing patron informationbetween libraries, you could either invoke the opensrf.settings.default_config.get method andparse the JSON document to determine the value, or invoke the opensrf.settings.xpath.get method withthe XPath /opensrf/default/share/user/opt_in argument to retrieve the value directly.
In practice, OpenSRF includes convenience libraries in all of its client language bindings to simplify access toconfiguration values. C offers osrfConfig.c, Perl offers OpenSRF::Utils::SettingsClient, Java offersorg.opensrf.util.SettingsClient, and Python offers osrf.set. These libraries locally cache theconfiguration file to avoid network roundtrips for every request and enable the developer to request specific valueswithout having to manually construct XPath expressions.
Getting under the covers with OpenSRFNow that you have seen that it truly is easy to create an OpenSRF service, we can take a look at what is going onunder the covers to make all of this work for you.
Get on the messaging bus - safelyOne of the core innovations of OpenSRF was to use the Extensible Messaging and Presence Protocol (XMPP, morecolloquially known as Jabber) as the messaging bus that ties OpenSRF services together across servers. XMPP isan "XML protocol for near-real-time messaging, presence, and request-response services" (http://www.ietf.org/rfc/rfc3920.txt) that OpenSRF relies on to handle most of the complexity of networked communications. OpenSRFachieves a measure of security for its services through the use of public and private XMPP domains; all OpenSRFservices automatically register themselves with the private XMPP domain, but only those services that registerthemselves with the public XMPP domain can be invoked from public OpenSRF clients.
In a minimal OpenSRF deployment, two XMPP users named "router" connect to the XMPP server, with oneconnected to the private XMPP domain and one connected to the public XMPP domain. Similarly, two XMPP usersnamed "opensrf" connect to the XMPP server via the private and public XMPP domains. When an OpenSRF serviceis started, it uses the "opensrf" XMPP user to advertise its availability with the corresponding router on that XMPPdomain; the XMPP server automatically assigns a Jabber ID (JID) based on the client hostname to each service’slistener process and each connected drone process waiting to carry out requests. When an OpenSRF router receivesa request to invoke a method on a given service, it connects the requester to the next available listener in the listof registered listeners for that service.
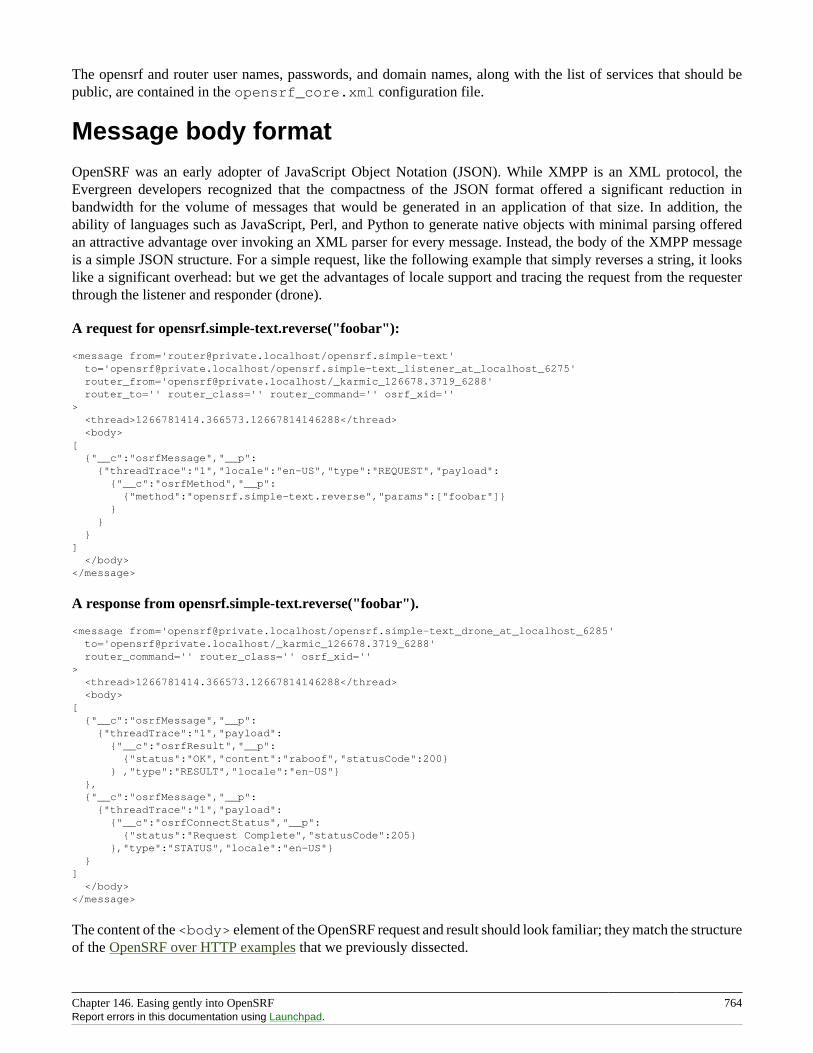
Chapter 146. Easing gently into OpenSRF 764Report errors in this documentation using Launchpad.
The opensrf and router user names, passwords, and domain names, along with the list of services that should bepublic, are contained in the opensrf_core.xml configuration file.
Message body formatOpenSRF was an early adopter of JavaScript Object Notation (JSON). While XMPP is an XML protocol, theEvergreen developers recognized that the compactness of the JSON format offered a significant reduction inbandwidth for the volume of messages that would be generated in an application of that size. In addition, theability of languages such as JavaScript, Perl, and Python to generate native objects with minimal parsing offeredan attractive advantage over invoking an XML parser for every message. Instead, the body of the XMPP messageis a simple JSON structure. For a simple request, like the following example that simply reverses a string, it lookslike a significant overhead: but we get the advantages of locale support and tracing the request from the requesterthrough the listener and responder (drone).
A request for opensrf.simple-text.reverse("foobar"):
<message from='[email protected]/opensrf.simple-text' to='[email protected]/opensrf.simple-text_listener_at_localhost_6275' router_from='[email protected]/_karmic_126678.3719_6288' router_to='' router_class='' router_command='' osrf_xid=''> <thread>1266781414.366573.12667814146288</thread> <body>[ {"__c":"osrfMessage","__p": {"threadTrace":"1","locale":"en-US","type":"REQUEST","payload": {"__c":"osrfMethod","__p": {"method":"opensrf.simple-text.reverse","params":["foobar"]} } } }] </body></message>
A response from opensrf.simple-text.reverse("foobar").
<message from='[email protected]/opensrf.simple-text_drone_at_localhost_6285' to='[email protected]/_karmic_126678.3719_6288' router_command='' router_class='' osrf_xid=''> <thread>1266781414.366573.12667814146288</thread> <body>[ {"__c":"osrfMessage","__p": {"threadTrace":"1","payload": {"__c":"osrfResult","__p": {"status":"OK","content":"raboof","statusCode":200} } ,"type":"RESULT","locale":"en-US"} }, {"__c":"osrfMessage","__p": {"threadTrace":"1","payload": {"__c":"osrfConnectStatus","__p": {"status":"Request Complete","statusCode":205} },"type":"STATUS","locale":"en-US"} }] </body></message>
The content of the <body> element of the OpenSRF request and result should look familiar; they match the structureof the OpenSRF over HTTP examples that we previously dissected.
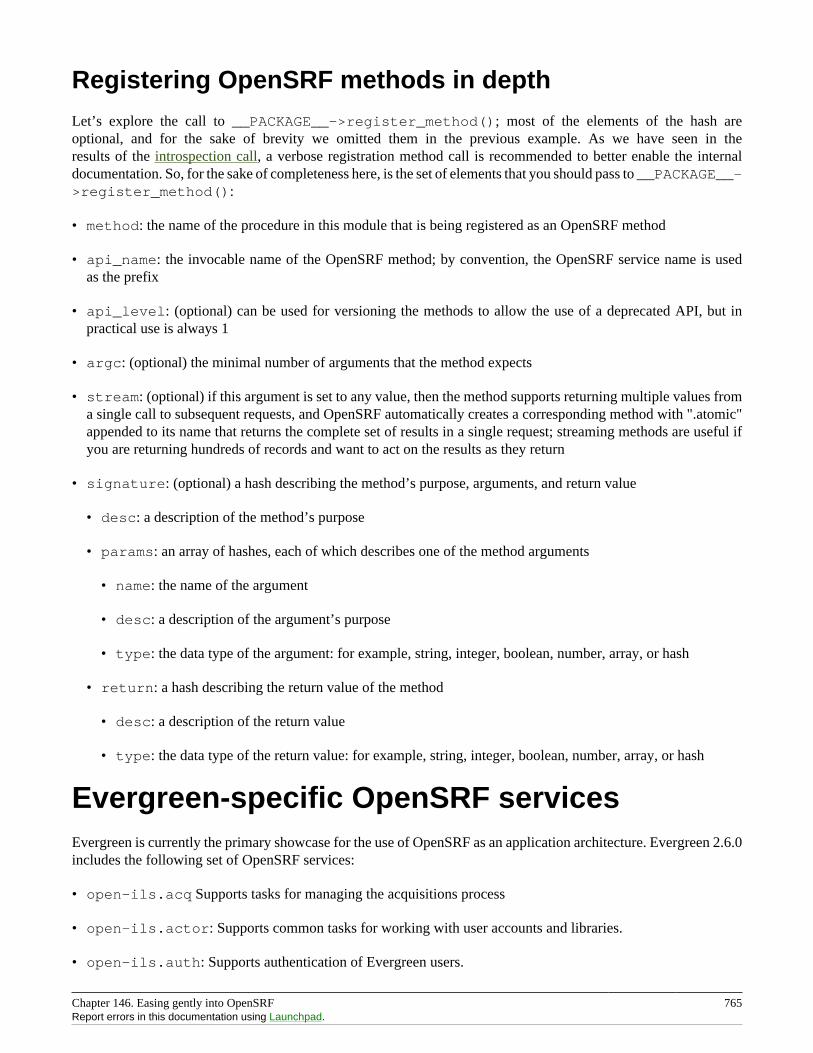
Chapter 146. Easing gently into OpenSRF 765Report errors in this documentation using Launchpad.
Registering OpenSRF methods in depthLet’s explore the call to __PACKAGE__->register_method(); most of the elements of the hash areoptional, and for the sake of brevity we omitted them in the previous example. As we have seen in theresults of the introspection call, a verbose registration method call is recommended to better enable the internaldocumentation. So, for the sake of completeness here, is the set of elements that you should pass to __PACKAGE__->register_method():
• method: the name of the procedure in this module that is being registered as an OpenSRF method
• api_name: the invocable name of the OpenSRF method; by convention, the OpenSRF service name is usedas the prefix
• api_level: (optional) can be used for versioning the methods to allow the use of a deprecated API, but inpractical use is always 1
• argc: (optional) the minimal number of arguments that the method expects
• stream: (optional) if this argument is set to any value, then the method supports returning multiple values froma single call to subsequent requests, and OpenSRF automatically creates a corresponding method with ".atomic"appended to its name that returns the complete set of results in a single request; streaming methods are useful ifyou are returning hundreds of records and want to act on the results as they return
• signature: (optional) a hash describing the method’s purpose, arguments, and return value
• desc: a description of the method’s purpose
• params: an array of hashes, each of which describes one of the method arguments
• name: the name of the argument
• desc: a description of the argument’s purpose
• type: the data type of the argument: for example, string, integer, boolean, number, array, or hash
• return: a hash describing the return value of the method
• desc: a description of the return value
• type: the data type of the return value: for example, string, integer, boolean, number, array, or hash
Evergreen-specific OpenSRF servicesEvergreen is currently the primary showcase for the use of OpenSRF as an application architecture. Evergreen 2.6.0includes the following set of OpenSRF services:
• open-ils.acq Supports tasks for managing the acquisitions process
• open-ils.actor: Supports common tasks for working with user accounts and libraries.
• open-ils.auth: Supports authentication of Evergreen users.
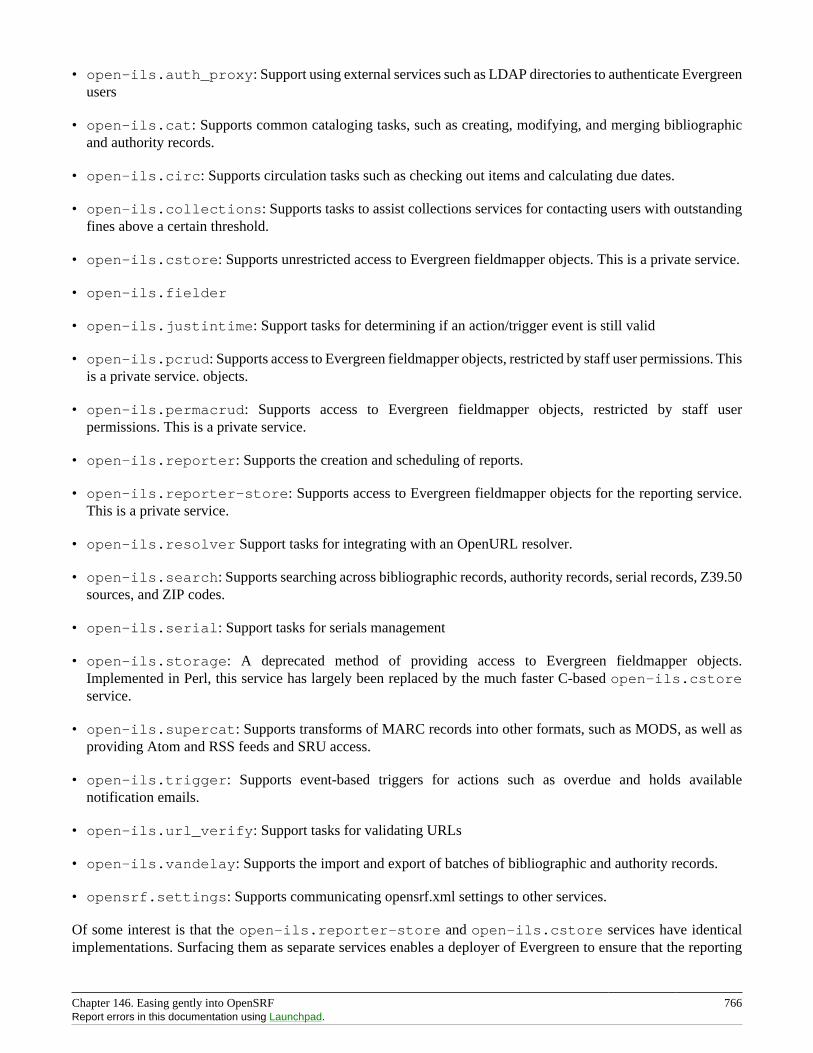
Chapter 146. Easing gently into OpenSRF 766Report errors in this documentation using Launchpad.
• open-ils.auth_proxy: Support using external services such as LDAP directories to authenticate Evergreenusers
• open-ils.cat: Supports common cataloging tasks, such as creating, modifying, and merging bibliographicand authority records.
• open-ils.circ: Supports circulation tasks such as checking out items and calculating due dates.
• open-ils.collections: Supports tasks to assist collections services for contacting users with outstandingfines above a certain threshold.
• open-ils.cstore: Supports unrestricted access to Evergreen fieldmapper objects. This is a private service.
• open-ils.fielder
• open-ils.justintime: Support tasks for determining if an action/trigger event is still valid
• open-ils.pcrud: Supports access to Evergreen fieldmapper objects, restricted by staff user permissions. Thisis a private service. objects.
• open-ils.permacrud: Supports access to Evergreen fieldmapper objects, restricted by staff userpermissions. This is a private service.
• open-ils.reporter: Supports the creation and scheduling of reports.
• open-ils.reporter-store: Supports access to Evergreen fieldmapper objects for the reporting service.This is a private service.
• open-ils.resolver Support tasks for integrating with an OpenURL resolver.
• open-ils.search: Supports searching across bibliographic records, authority records, serial records, Z39.50sources, and ZIP codes.
• open-ils.serial: Support tasks for serials management
• open-ils.storage: A deprecated method of providing access to Evergreen fieldmapper objects.Implemented in Perl, this service has largely been replaced by the much faster C-based open-ils.cstoreservice.
• open-ils.supercat: Supports transforms of MARC records into other formats, such as MODS, as well asproviding Atom and RSS feeds and SRU access.
• open-ils.trigger: Supports event-based triggers for actions such as overdue and holds availablenotification emails.
• open-ils.url_verify: Support tasks for validating URLs
• open-ils.vandelay: Supports the import and export of batches of bibliographic and authority records.
• opensrf.settings: Supports communicating opensrf.xml settings to other services.
Of some interest is that the open-ils.reporter-store and open-ils.cstore services have identicalimplementations. Surfacing them as separate services enables a deployer of Evergreen to ensure that the reporting
Chapter 146. Easing gently into OpenSRF 767Report errors in this documentation using Launchpad.
service does not interfere with the performance-critical open-ils.cstore service. One can also direct thereporting service to a read-only database replica to, again, avoid interference with open-ils.cstore whichmust write to the master database.
There are only a few significant services that are not built on OpenSRF, such as the SIP and Z39.50 servers. Theseservices implement different protocols and build on existing daemon architectures (Simple2ZOOM for Z39.50), butstill rely on the other OpenSRF services to provide access to the Evergreen data. The non-OpenSRF services arereasonably self-contained and can be deployed on different servers to deliver the same sort of deployment flexibilityas OpenSRF services, but have the disadvantage of not being integrated into the same configuration and controlinfrastructure as the OpenSRF services.
Evergreen after one year: reflections onOpenSRFProject Conifer has been live on Evergreen for just over a year now, and as one of the primary technologists I havehad to work closely with the OpenSRF infrastructure during that time. As such, I am in a position to identify someof the strengths and weaknesses of OpenSRF based on our experiences.
Strengths of OpenSRFAs a service infrastructure, OpenSRF has been remarkably reliable. We initially deployed Evergreen on anunreleased version of both OpenSRF and Evergreen due to our requirements for some functionality that had notbeen delivered in a stable release at that point in time, and despite this risky move we suffered very little unplanneddowntime in the opening months. On July 27, 2009 we moved to a newer (but still unreleased) version of theOpenSRF and Evergreen code, and began formally tracking our downtime. Since then, we have achieved morethan 99.9% availability - including scheduled downtime for maintenance. This compares quite favourably to themaximum of 75% availability that we were capable of achieving on our previous library system due to the nightlydowntime that was required for our backup process. The OpenSRF "maximum request" configuration parameter foreach service that kills off drone processes after they have served a given number of requests provides a nice failsafefor processes that might otherwise suffer from a memory leak or hung process. It also helps that when we need toapply an update to a Perl service that is running on multiple servers, we can apply the updated code, then restart theservice on one server at a time to avoid any downtime.
As promised by the OpenSRF infrastructure, we have also been able to tune our cluster of servers to provide betterperformance. For example, we were able to change the number of maximum concurrent processes for our databaseservices when we noticed that we seeing a performance bottleneck with database access. Making a configurationchange go live simply requires you to restart the opensrf.setting service to pick up the configuration change,then restart the affected service on each of your servers. We were also able to turn off some of the less-used OpenSRFservices, such as open-ils.collections, on one of our servers to devote more resources on that server to themore frequently used services and other performance-critical processes such as Apache.
The support for logging and caching that is built into OpenSRF has been particularly helpful with the developmentof a custom service for SFX holdings integration into our catalogue. Once I understood how OpenSRF works, mostof the effort required to build that SFX integration service was spent on figuring out how to properly invoke theSFX API to display human-readable holdings. Adding a new OpenSRF service and registering several new methodsfor the service was relatively easy. The support for directing log messages to syslog in OpenSRF has also been aboon for both development and debugging when problems arise in a cluster of five servers; we direct all of our logmessages to a single server where we can inspect the complete set of messages for the entire cluster in context,rather than trying to piece them together across servers.
Chapter 146. Easing gently into OpenSRF 768Report errors in this documentation using Launchpad.
Weaknesses
The primary weakness of OpenSRF is the lack of either formal or informal documentation for OpenSRF. Thereare many frequently asked questions on the Evergreen mailing lists and IRC channel that indicate that some ofthe people running Evergreen or trying to run Evergreen have not been able to find documentation to help themunderstand, even at a high level, how the OpenSRF Router and services work with XMPP and the Apache Webserver to provide a working Evergreen system. Also, over the past few years several developers have indicated aninterest in developing Ruby and PHP bindings for OpenSRF, but the efforts so far have resulted in no working code.Without a formal specification, clearly annotated examples, and unit tests for the major OpenSRF communicationuse cases that could be ported to the new language as a base set of expectations for a working binding, the hurdlesfor a developer new to OpenSRF are significant. As a result, Evergreen integration efforts with popular frameworkslike Drupal, Blacklight, and VuFind result in the best practical option for a developer with limited time — database-level integration — which has the unfortunate side effect of being much more likely to break after an upgrade.
In conjunction with the lack of documentation that makes it hard to get started with the framework, a disincentivefor new developers to contribute to OpenSRF itself is the lack of integrated unit tests. For a developer to contributea significant, non-obvious patch to OpenSRF, they need to manually run through various (undocumented, again)use cases to try and ensure that the patch introduced no unanticipated side effects. The same problems hold forEvergreen itself, although the Constrictor stress-testing framework offers a way of performing some automatedsystem testing and performance testing.
These weaknesses could be relatively easily overcome with the effort through contributions from people with theright skill sets. This article arguably offers a small set of clear examples at both the networking and applicationlayer of OpenSRF. A technical writer who understands OpenSRF could contribute a formal specification to theproject. With a formal specification at their disposal, a quality assurance expert could create an automated testharness and a basic set of unit tests that could be incrementally extended to provide more coverage over time. Ifone or more continual integration environments are set up to track the various OpenSRF branches of interest, thenthe OpenSRF community would have immediate feedback on build quality. Once a unit testing framework is inplace, more developers might be willing to develop and contribute patches as they could sanity check their owncode without an intense effort before exposing it to their peers.
SummaryIn this article, I attempted to provide both a high-level and detailed overview of how OpenSRF works, how tobuild and deploy new OpenSRF services, how to make requests to OpenSRF method from OpenSRF clients or overHTTP, and why you should consider it a possible infrastructure for building your next high-performance system thatrequires the capability to scale out. In addition, I surveyed the Evergreen services built on OpenSRF and reflected onthe strengths and weaknesses of the platform based on the experiences of Project Conifer after a year in production,with some thoughts about areas where the right application of skills could make a significant difference to theEvergreen and OpenSRF projects.
Appendix: Python clientFollowing is a Python client that makes the same OpenSRF calls as the Perl client:
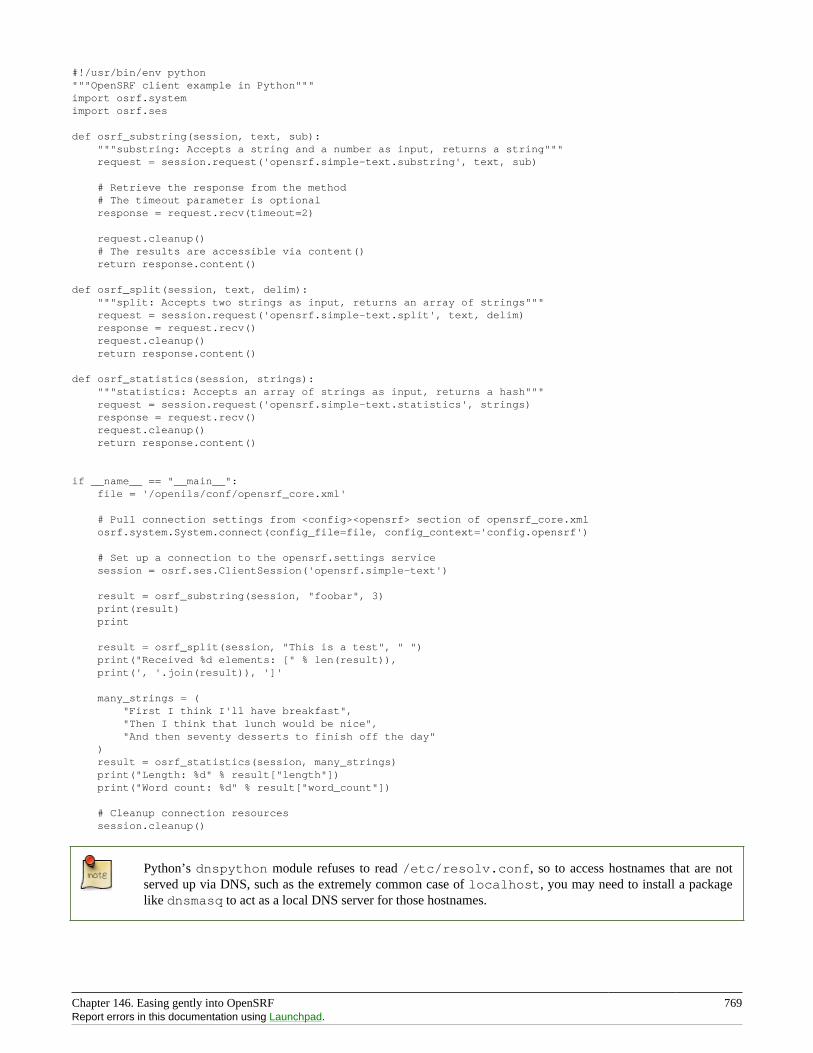
Chapter 146. Easing gently into OpenSRF 769Report errors in this documentation using Launchpad.
#!/usr/bin/env python"""OpenSRF client example in Python"""import osrf.systemimport osrf.ses
def osrf_substring(session, text, sub): """substring: Accepts a string and a number as input, returns a string""" request = session.request('opensrf.simple-text.substring', text, sub)
# Retrieve the response from the method # The timeout parameter is optional response = request.recv(timeout=2)
request.cleanup() # The results are accessible via content() return response.content()
def osrf_split(session, text, delim): """split: Accepts two strings as input, returns an array of strings""" request = session.request('opensrf.simple-text.split', text, delim) response = request.recv() request.cleanup() return response.content()
def osrf_statistics(session, strings): """statistics: Accepts an array of strings as input, returns a hash""" request = session.request('opensrf.simple-text.statistics', strings) response = request.recv() request.cleanup() return response.content()
if __name__ == "__main__": file = '/openils/conf/opensrf_core.xml'
# Pull connection settings from <config><opensrf> section of opensrf_core.xml osrf.system.System.connect(config_file=file, config_context='config.opensrf')
# Set up a connection to the opensrf.settings service session = osrf.ses.ClientSession('opensrf.simple-text')
result = osrf_substring(session, "foobar", 3) print(result) print
result = osrf_split(session, "This is a test", " ") print("Received %d elements: [" % len(result)), print(', '.join(result)), ']'
many_strings = ( "First I think I'll have breakfast", "Then I think that lunch would be nice", "And then seventy desserts to finish off the day" ) result = osrf_statistics(session, many_strings) print("Length: %d" % result["length"]) print("Word count: %d" % result["word_count"])
# Cleanup connection resources session.cleanup()
Python’s dnspython module refuses to read /etc/resolv.conf, so to access hostnames that are notserved up via DNS, such as the extremely common case of localhost, you may need to install a packagelike dnsmasq to act as a local DNS server for those hostnames.
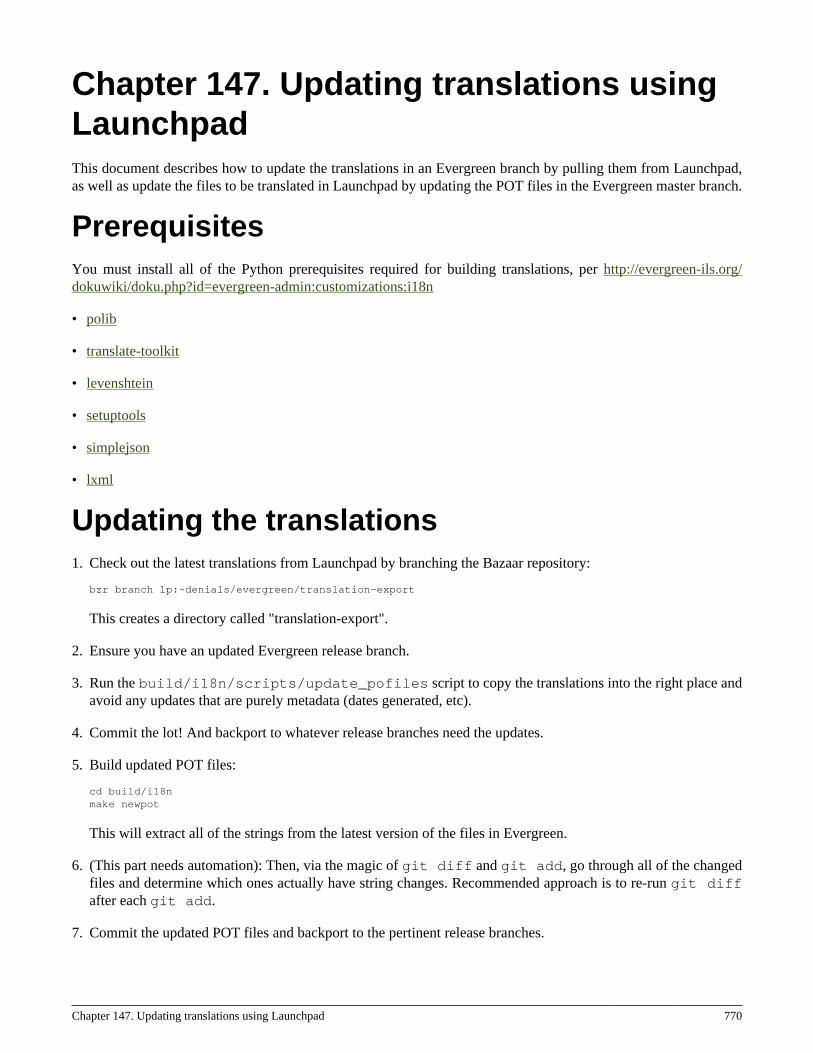
Chapter 147. Updating translations using Launchpad 770
Chapter 147. Updating translations usingLaunchpadThis document describes how to update the translations in an Evergreen branch by pulling them from Launchpad,as well as update the files to be translated in Launchpad by updating the POT files in the Evergreen master branch.
PrerequisitesYou must install all of the Python prerequisites required for building translations, per http://evergreen-ils.org/dokuwiki/doku.php?id=evergreen-admin:customizations:i18n
• polib
• translate-toolkit
• levenshtein
• setuptools
• simplejson
• lxml
Updating the translations1. Check out the latest translations from Launchpad by branching the Bazaar repository:
bzr branch lp:~denials/evergreen/translation-export
This creates a directory called "translation-export".
2. Ensure you have an updated Evergreen release branch.
3. Run the build/i18n/scripts/update_pofiles script to copy the translations into the right place andavoid any updates that are purely metadata (dates generated, etc).
4. Commit the lot! And backport to whatever release branches need the updates.
5. Build updated POT files:
cd build/i18nmake newpot
This will extract all of the strings from the latest version of the files in Evergreen.
6. (This part needs automation): Then, via the magic of git diff and git add, go through all of the changedfiles and determine which ones actually have string changes. Recommended approach is to re-run git diffafter each git add.
7. Commit the updated POT files and backport to the pertinent release branches.
Appendix A. Attributions 771
Appendix A. AttributionsCopyright © 2009-2012 Evergreen DIG
Copyright © 2007-2012 Equinox
Copyright © 2007-2012 Dan Scott
Copyright © 2009-2012 BC Libraries Cooperative (SITKA)
Copyright © 2008-2012 King County Library System
Copyright © 2009-2012 Pioneer Library System
Copyright © 2009-2012 PALS
Copyright © 2009-2012 Georgia Public Library Service
Copyright © 2008-2012 Project Conifer
Copyright © 2009-2012 Bibliomation
Copyright © 2008-2012 Evergreen Indiana
Copyright © 2008-2012 SC LENDS
Current DIG Members
• Hilary Caws-Elwitt, Susquehanna County Library
• Karen Collier, Kent County Public Library
• George Duimovich, NRCan Library
• Sally Fortin, Equinox Software
• Wolf Halton, Lyrasis
• June Rayner, eiNetwork
• Steve Sheppard
• Ben Shum, Bibliomation
• Roni Shwaish, eiNetwork
• Robert Soulliere, Mohawk College
• Tim Spindler, C/W MARS
• Lindsay Stratton, Pioneer Library System
• Yamil Suarez, Berklee College of Music

Appendix A. Attributions 772Report errors in this documentation using Launchpad.
• Jenny Turner, PALS

Appendix B. Licensing 773
Appendix B. Licensing
This work is licensed under a Creative Commons Attribution-ShareAlike 3.0 Unported License.

Appendix C. Admonitions 774
Appendix C. Admonitions• Note
• warning
• caution
• tip
Index 775
IndexAaccount preferences, 705account summary, 704accounts, 229, 229acquisitions
claiming, 225currency types, 227distribution formulas
templates, 227EDI
accounts, 229messages, 232
exchange rates, 233funding sources, 235funds, 236
fiscal rollover, 239reports, 238tags, 234
invoices, 240, 388electronic, 395searching for lineitems, 390
line itemcancellation, 224
line items, 241lineitems
adding, 390searching for, 390
MARC federated search, 233permissions, 224purchase order
cancellation, 224Acquisitions
Library Settings Editor, 310action triggers
event definitionsnotifications, 358
adding, 390adding data sources, 652address alerts, 346advanced search
expert search, 692limit to available, 691numeric search, 691search filters, 691search library, 691sort results, 691
Age Protection, 244
aggregate filters, 639Alerts, 583, 682AND operator, 692Apache, 67applying filters, 639
aggregate filters, 639base filter, 639, 639
audiobooks, 689authentication
LDAP, 139proxy, 139
author, 689authors, 696Automated Circulation System, 154Automated Material Handling, 154Automated Material Handling (AMH), 161availability, 697
BBarcode Completion
Lazy Circ, 350barring, 581, 582, 681, 681base filter, 639, 639bib call number, 689blocking, 582, 682Booking
Library Settings Editor, 312books, 689boolean, 692button bar, 180
Ccancellation, 224, 224Cataloging
Library Settings Editor, 312Check-boxes
sticky settings, 182checkout, 199choosing reports fields, 629Circulation
Library Settings Editor, 314circulation
recallshold-driven, 357
claiming, 225cloning, 651Column Picker, 190configuration, 195, 195, 195configuration files
oils_sip.xml, 154, 154
Index 776Report errors in this documentation using Launchpad.
copy editorshelving location, 195
count, 659creating, 627creating templates, 629
choosing reports fields, 629Credit Card Processing
Library Settings Editor, 321currency types, 227
DData Types
Library Settings Editor, 345data types, 658database schema, 67, 653Debian, 66details, 702distribution formulas
templates, 227
EEDI
accounts, 229, 229messages, 232, 232
electronic, 395event definitions
notifications, 358Excel, 649exchange rates, 233expert search, 692Exporting
Library Settings Editor, 309exporting templates, 664
Ffacets: subjects
authors, 696field transform, 632field transforms, 659
count, 659output type, 659, 659, 659raw data, 659raw distinct, 659
fieldmapper, 653Finances
Library Settings Editor, 322fiscal rollover, 239fm_IDL.xml, 652, 653folders, 627
creating, 627
managing, 628fonts
zooming, 195formats
audiobooks, 689books, 689music, 689video, 689
funding sources, 235funds, 236, 238
fiscal rollover, 239reports, 238tags, 234
Ggenerating, 643Global
Library Settings Editor, 331going back, 702Graphic User Interface
Library Settings Editor, 325GUI
Library Settings Editor, 325
Hhold-driven, 357hold-driven recalls, 357Holds, 244
Age Protection, 244Library Settings Editor, 332
holds, 705preferred pickup location, 706
holds receiptlayout, 203
hotkeys, 196
IImporting
Library Settings Editor, 309includes, 213installation
Linux, 62Windows, 60
invoices, 240, 388electronic, 395searching for lineitems, 390
items checked out, 704
Jjournal title, 689
Index 777Report errors in this documentation using Launchpad.
Kkeyword, 689
Llayout, 203Lazy Circ, 350LDAP, 139Library
Library Settings Editor, 335library cards
renewing, 578, 678replacing, 580, 679
Library Settings Editor, 308, 309, 309, 310, 312, 312,314, 321, 322, 325, 325, 325, 331, 332, 335, 336, 338,338, 340, 340, 340, 341, 343, 344, 345limit to available, 691line item
cancellation, 224line items, 241lineitems
adding, 390searching for, 390
Linux, 62Debian, 66Ubuntu, 66
logging in, 173, 669, 703logging out, 178, 670
Mmacros, 199, 212magnetic media, 160managing, 628MARC federated search, 233marc2are.pl, 745marc_export, 744merging, 596messages, 232, 232, 582, 682music, 689my account
account preferences, 705account summary, 704holds, 705items checked out, 704logging in, 703password reset, 704
NNOT operator, 692notes, 584notifications, 358
numeric search, 691
OOffline
Library Settings Editor, 338oils_sip.xml, 154, 154OPAC, 689
Library Settings Editor, 336OR operator, 692order of results, 694output, 649
Excel, 649spreadsheet, 649tabular, 649
output type, 659, 659, 659
Ppassword reset, 704passwords, 580, 680Patron Registration Settings
Library Settings Editor, 325patrons
Alerts, 583, 682barring, 581, 582, 681, 681blocking, 582, 682merging, 596messages, 582, 682notes, 584passwords, 580, 680purchase requests, 407registering, 573, 674searching for, 572, 672updating, 577, 677
permissions, 224pg_loader.pl, 745placing holds, 700Populate Address by ZIP Code
ZIP code, 146PostgreSQL, 652, 652preferred pickup location, 706printers, 197Program
Library Settings Editor, 338proxy, 139purchase order
cancellation, 224purchase requests, 407, 408
Rraw data, 659
Index 778Report errors in this documentation using Launchpad.
raw distinct, 659recalls
hold-driven, 357receipt template editor, 199
checkout, 199holds receipt
layout, 203includes, 213macros, 199, 212
Receipt TemplatesLibrary Settings Editor, 340
recurring, 657registering, 573, 674registering a workstation, 63removing user preferences, 63removing user settings, 63renewing, 578, 678replacing, 580, 679report sources, 653reporter
starting, 626starting daemon, 626stopping daemon, 626
reports, 238adding data sources, 652applying filters, 639
aggregate filters, 639base filter, 639, 639
cloning, 651creating templates, 629
choosing reports fields, 629data types, 658exporting templates, 664field transform, 632field transforms, 659
count, 659output type, 659, 659, 659raw data, 659raw distinct, 659
folders, 627creating, 627managing, 628
funds, 238generating, 643output, 649
Excel, 649spreadsheet, 649tabular, 649
recurring, 657starting server application, 626
stopping server application, 626
Ssearch
AND operator, 692author, 689bib call number, 689boolean, 692journal title, 689keyword, 689NOT operator, 692OR operator, 692order of results, 694series, 689stemming, 693stop words, 692subject, 689title, 689truncation, 692URL, 694
search box, 689search filters, 691search library, 691search results, 695
availability, 697details, 702facets: subjects
authors, 696going back, 702placing holds, 700viewing a record, 698
searching for, 390, 572, 672searching for lineitems, 390Security
Library Settings Editor, 341Self Check
Library Settings Editor, 343SelfCheck, 154, 159series, 689shelving location, 195SIP, 156, 156, 157SIP Communication, 157SIP Server
SIP Communication, 157SMS Settings
Library Settings Editor, 340sort results, 691sounds, 195spreadsheet, 649SQL, 652
Index 779Report errors in this documentation using Launchpad.
SSL certificate, 173, 669staff client
button bar, 180configuration, 195fonts
zooming, 195hotkeys, 196installation
Linux, 62Windows, 60
logging in, 173, 669logging out, 178, 670printers, 197registering a workstation, 63removing user preferences, 63removing user settings, 63sounds, 195standalone interface, 173toolbar, 180
standalone interface, 173starting, 626starting daemon, 626starting server application, 626stemming, 693sticky settings, 182stop words, 692stopping daemon, 626stopping server application, 626subject, 689syslog, 156syslog-NG, 156
Ttabular, 649tags, 234templates, 227Text Messaging
Library Settings Editor, 340title, 689toolbar, 180truncation, 692
UUbuntu, 66updating, 577, 677URL, 694
VVandelay
Library Settings Editor, 344
video, 689viewing a record, 698
WWindows, 60workstation
configuration, 195
ZZIP code, 146zips.txt
Populate Address by ZIP CodeZIP code, 146
zooming, 195
Related Documents