Welcome to Thank you for purchasing the Einstein Remote Education Collar from E-Collar Technologies, Inc. We have made every attempt to provide you with the most technologically advanced product using the most stringent quality and manufacturing standards. We are confident you will be pleased with the results you will attain with the ET-702. Please remember you will get better results with the use of lower stimulation combined with consistent training techniques. The use of high levels of stimulation should only be used as a last resort and in life-threatening situations. Good luck with your training and please feel free to contact us should you have any questions. 1-855-326-5527 or 1-855-ecollar

Welcome message from author
This document is posted to help you gain knowledge. Please leave a comment to let me know what you think about it! Share it to your friends and learn new things together.
Transcript
8/3/2019 ET-702 Manual
http://slidepdf.com/reader/full/et-702-manual 1/25
Welcome to
Thank you for purchasing the Einstein RemoteEducation Collar from E-Collar Technologies, Inc.
We have made every attempt to provide you with the
most technologically advanced product using the
most stringent quality and manufacturing standards.
We are confident you will be pleased with the results
you will attain with the ET-702.
Please remember you will get better results with theuse of lower stimulation combined with consistent
training techniques. The use of high levels of
stimulation should only be used as a last resort and
in life-threatening situations.
Good luck with your training and please feel free to
contact us should you have any questions.
1-855-326-5527 or 1-855-ecollar
8/3/2019 ET-702 Manual
http://slidepdf.com/reader/full/et-702-manual 2/25
02
Einstein Owner's Manual ET-702
CHARACTERISTICS
•
•
•
•
•
•
•
Range : Up to 800 yards
Momentary and Continuous Stimulation Supported
Education Tone
Employs Ni-MH Rechargeable Batteries
Convenient Intensity Dial for Quick Adjustment
Stimulation Levels Adjustable from 0 to 100
Lock and Set Stimulation Feature
Characteristics

8/3/2019 ET-702 Manual
http://slidepdf.com/reader/full/et-702-manual 3/25
03
Einstein Owner's Manual ET-702
CONTENTS
• 2 Collar Receivers
• Lanyard
• Test Light
• Contact Point Tool• Contact Points 3/4"
Contents
Battery Charger
(For ET-500 Only)
• Transmitter
• Owner’s Manual
Battery Charger and
Splitter Cable
•
8/3/2019 ET-702 Manual
http://slidepdf.com/reader/full/et-702-manual 4/25
04
Einstein Owner's Manual ET-702
TABLE OF CONTENTS
•
•
•
•
•
•
•
•
•
•
•
•
•
•
Safety and General Information
Getting Started
Charging the Batteries
Turning Your Einstein On/Off
The LCD Display Features
Button Functions
Changing the Intensity Level of Stimulation
Lock/Unlock the Stimulation Intensity Level
Indicator Light
Testing Your Einstein
Replacing the Contact Points
Correctly Fitting the Collar
Warranty
Contact Information
05
06
08
10
11
12
15
18
19
20
21
22
23
24
Table of Contents
8/3/2019 ET-702 Manual
http://slidepdf.com/reader/full/et-702-manual 5/25
05
Einstein Owner's Manual ET-702
SAFETY AND GENERAL INFORMATION
•
•
•
•
The Einstein Education Collar complies with all National and
International Standards and Guidelines for human exposure to
radio frequency electromagnetic energy.
Nearly all electronic devices are susceptible to electromagnetic
interference (EMI) if inadequately shielded or designed without
precautions to EMI.
Einstein E-Collar transmitters manufactured by E-Collar
Technologies, Inc. comply with Article 15 of the FCC rules and
operate under Part 95 of FCC regulations.
IMPORTANT NOTICE
Safety and General Information
1.
2.
To avoid Electromagnetic Interference and/or compatibility conflicts,
please turn off your transmitter and collar receiver in any facility where
posted notices instruct you to do so. Never use your equipment in
close proximity of a Hospital or Health Care Facility or enter the facility
without turning off both units.
An FCC license is not needed to operate Einstein E-Collar transmitters.
However, any change or modification made to the transmitter,
including the supplied antenna, without the expressed written approval
of E-Collar Technologies, Inc. could void your authority to operate.

8/3/2019 ET-702 Manual
http://slidepdf.com/reader/full/et-702-manual 6/25
06
Einstein Owner's Manual ET-702
TRANSMITTER PARTS
Antenna
Stimulation Level Dial
Stimulation Button (1D, Black)
Stimulation Button (2D, Red)
Indicator Light
(LED Window)
LCD Display
Getting Started
Mode Button
On/Off Magnetic
Red Dot
On/Off Button
Battery Charging Receptacle
and Rubber Cover
Momentary / Continuous
Toggle Switch
8/3/2019 ET-702 Manual
http://slidepdf.com/reader/full/et-702-manual 7/25
07
Einstein Owner's Manual ET-702
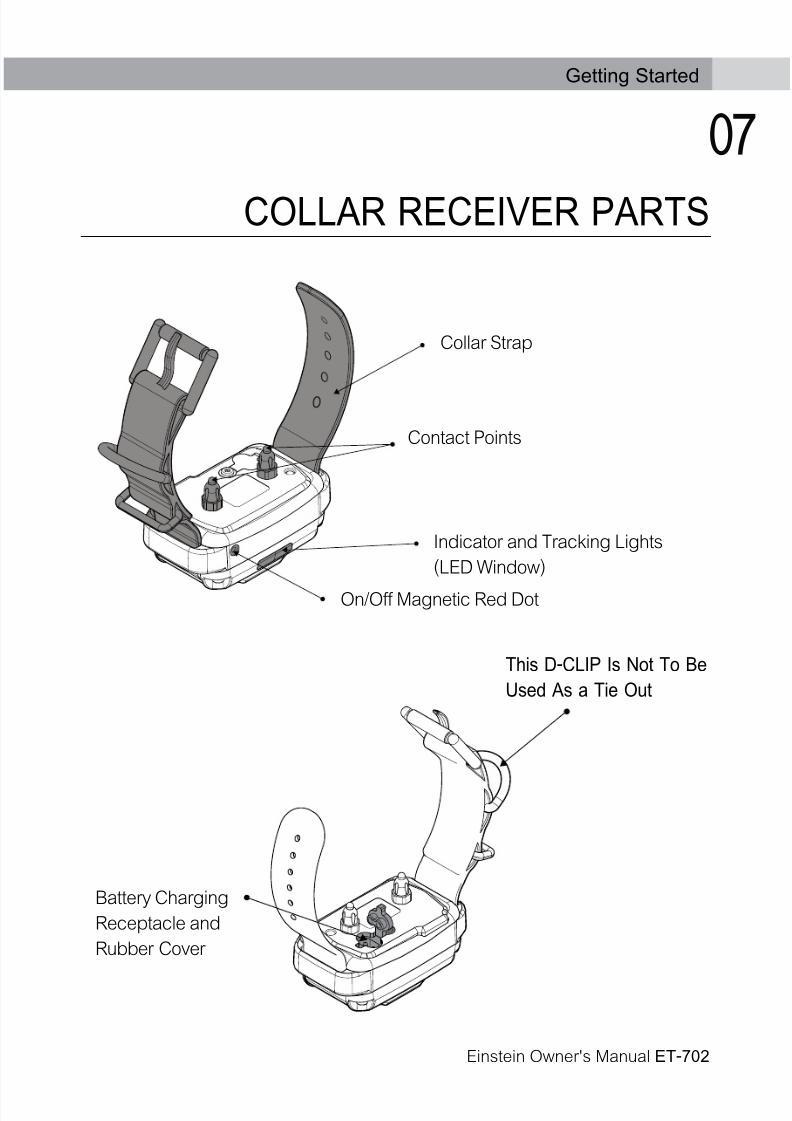
COLLAR RECEIVER PARTS
Battery Charging
Receptacle and
Rubber Cover
Collar Strap
Contact Points
Indicator and Tracking Lights
(LED Window)
On/Off Magnetic Red Dot
Getting Started
This D-CLIP Is Not To Be
Used As a Tie Out
8/3/2019 ET-702 Manual
http://slidepdf.com/reader/full/et-702-manual 8/25
08
Einstein Owner's Manual ET-702
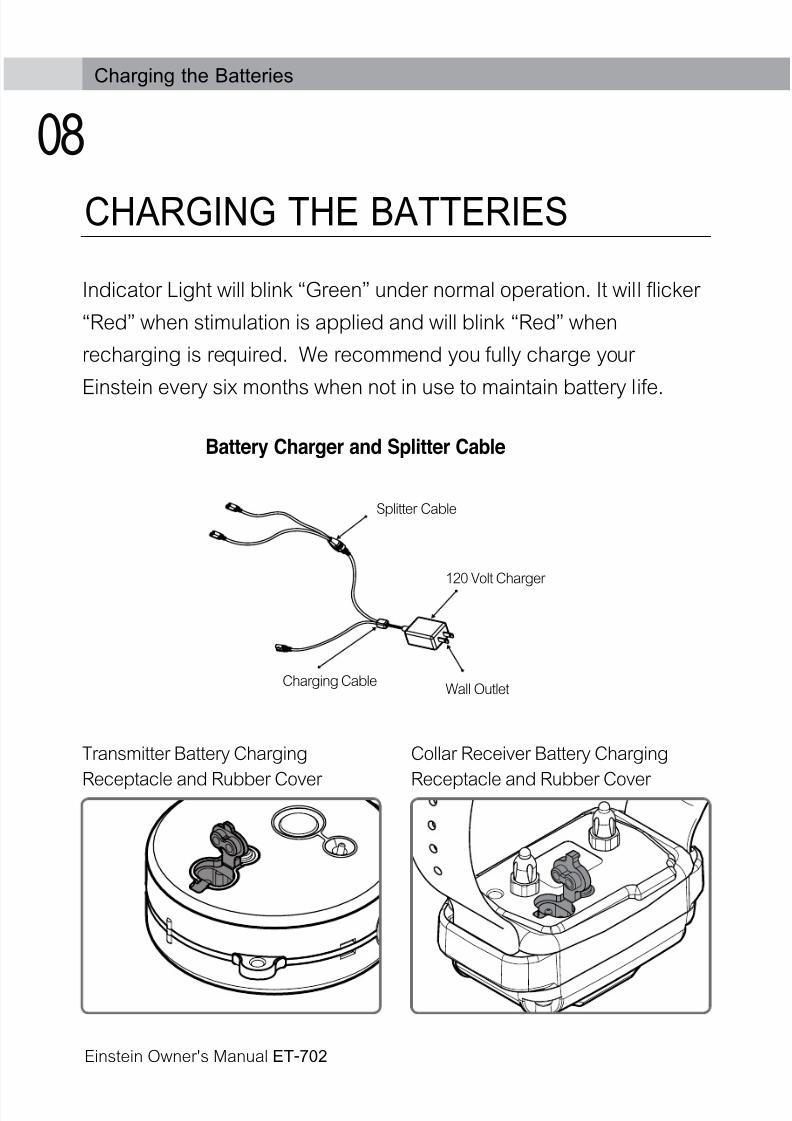
CHARGING THE BATTERIES
Indicator Light will blink “Green” under normal operation. It will flicker
“Red” when stimulation is applied and will blink “Red” when
recharging is required. We recommend you fully charge your
Einstein every six months when not in use to maintain battery life.
Transmitter Battery Charging
Receptacle and Rubber Cover
Collar Receiver Battery Charging
Receptacle and Rubber Cover
Charging the Batteries
Battery Charger and Splitter Cable
Splitter Cable
120 Volt Charger
Wall OutletCharging Cable
8/3/2019 ET-702 Manual
http://slidepdf.com/reader/full/et-702-manual 9/25
09
Einstein Owner's Manual ET-702
Charging the Batteries
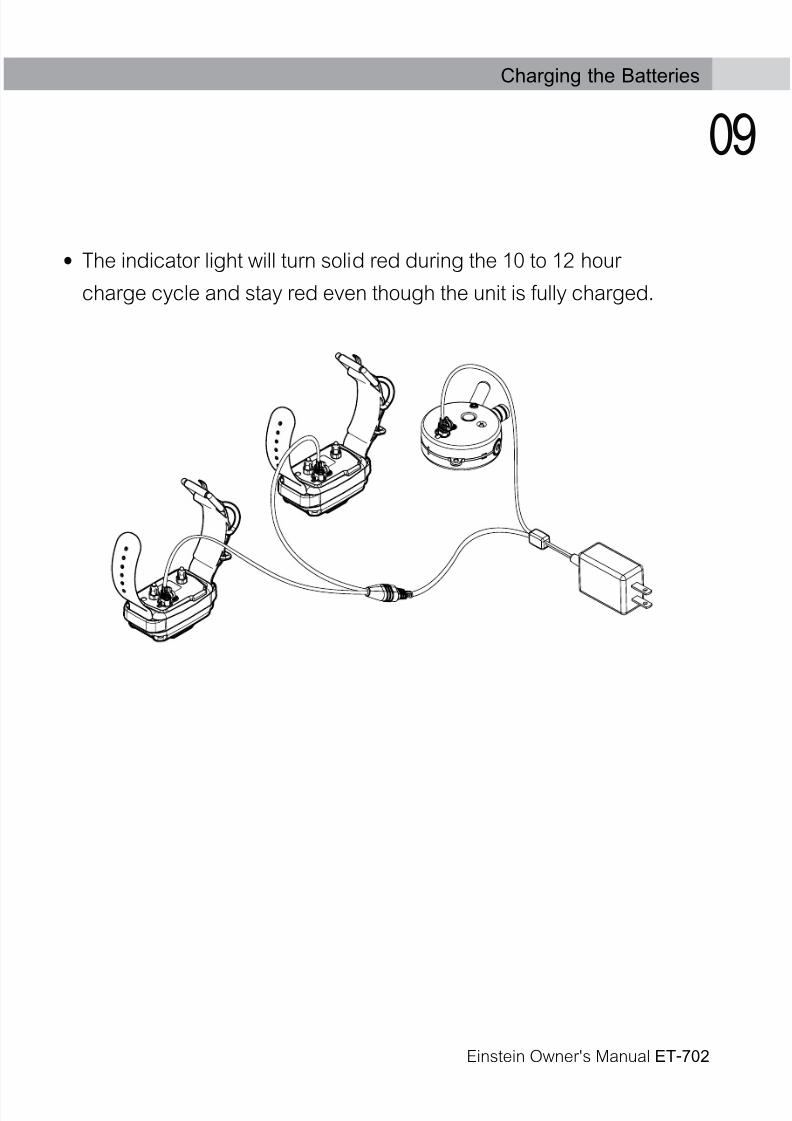
The indicator light will turn solid red during the 10 to 12 hour
charge cycle and stay red even though the unit is fully charged.
•
8/3/2019 ET-702 Manual
http://slidepdf.com/reader/full/et-702-manual 10/25
10
Einstein Owner's Manual ET-702
TURNING YOUR Einstein ON/OFF
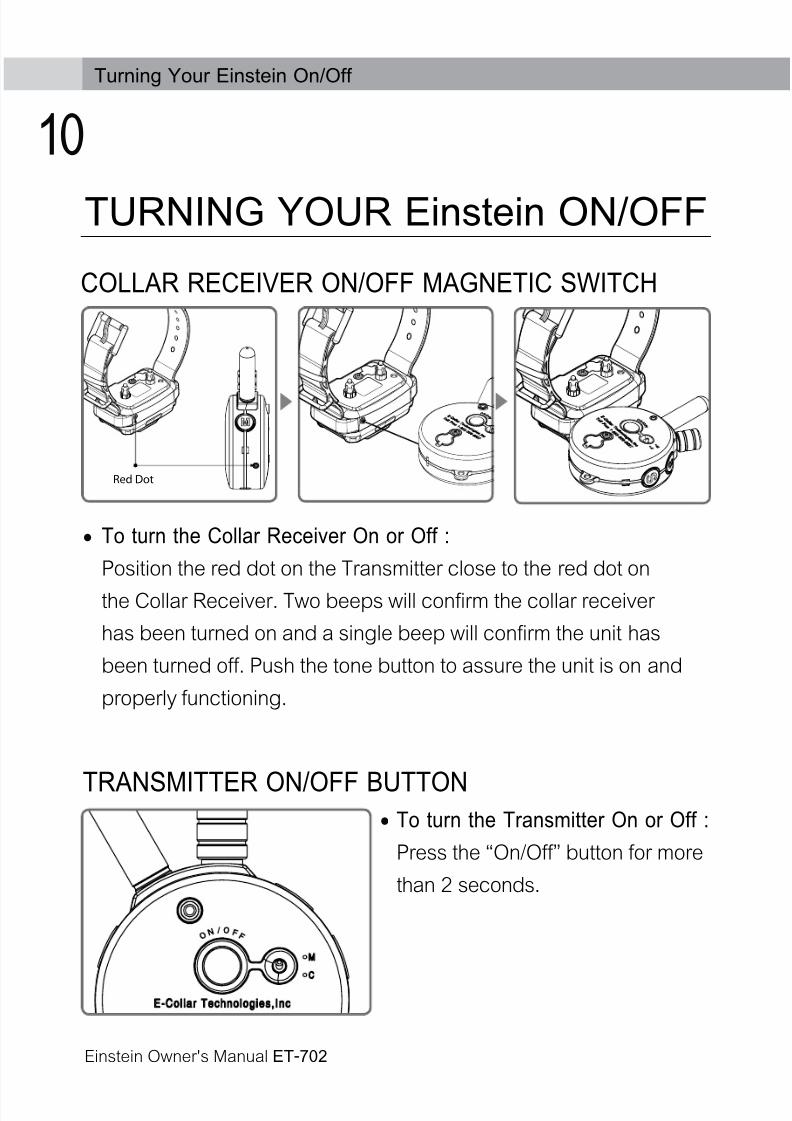
• To turn the Collar Receiver On or Off :
Position the red dot on the Transmitter close to the red dot on
the Collar Receiver. Two beeps will confirm the collar receiver
has been turned on and a single beep will confirm the unit has
been turned off. Push the tone button to assure the unit is on and
properly functioning.
TRANSMITTER ON/OFF BUTTON
Turning Your Einstein On/Off
Red Dot
COLLAR RECEIVER ON/OFF MAGNETIC SWITCH
• To turn the Transmitter On or Off :
Press the “On/Off” button for more
than 2 seconds.
8/3/2019 ET-702 Manual
http://slidepdf.com/reader/full/et-702-manual 11/25
11
Einstein Owner's Manual ET-702
THE LCD DISPLAY FEATURES
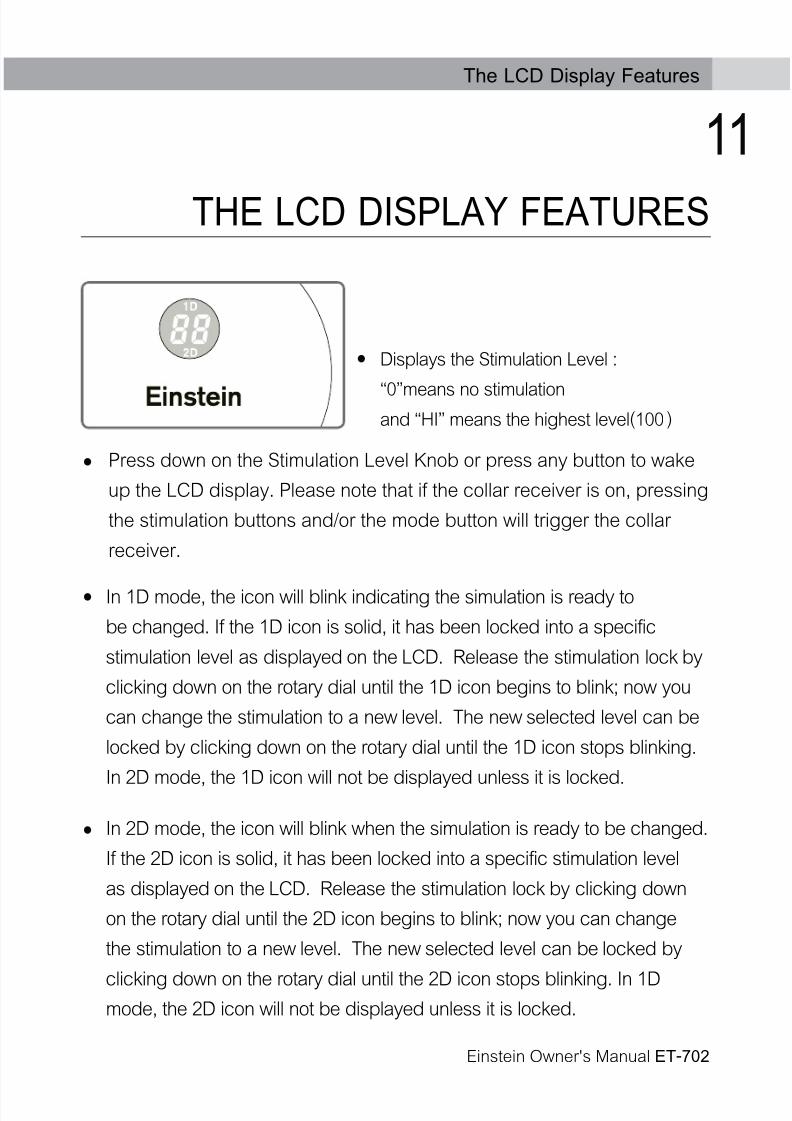
In 1D mode, the icon will blink indicating the simulation is ready to
be changed. If the 1D icon is solid, it has been locked into a specific
stimulation level as displayed on the LCD. Release the stimulation lock by
clicking down on the rotary dial until the 1D icon begins to blink; now you
can change the stimulation to a new level. The new selected level can be
locked by clicking down on the rotary dial until the 1D icon stops blinking.
In 2D mode, the 1D icon will not be displayed unless it is locked.
In 2D mode, the icon will blink when the simulation is ready to be changed.
If the 2D icon is solid, it has been locked into a specific stimulation level
as displayed on the LCD. Release the stimulation lock by clicking down
on the rotary dial until the 2D icon begins to blink; now you can change
the stimulation to a new level. The new selected level can be locked by
clicking down on the rotary dial until the 2D icon stops blinking. In 1Dmode, the 2D icon will not be displayed unless it is locked.
Displays the Stimulation Level :
“0”means no stimulationand “HI” means the highest level(100 )
The LCD Display Features
•
•
•
Press down on the Stimulation Level Knob or press any button to wake
up the LCD display. Please note that if the collar receiver is on, pressing
the stimulation buttons and/or the mode button will trigger the collar
receiver.
•

8/3/2019 ET-702 Manual
http://slidepdf.com/reader/full/et-702-manual 12/25
12
Einstein Owner's Manual ET-702
BUTTON FUNCTIONS
Button Functions
Stimulation Button (1D, Black)
Stimulation Button (2D, Red)
LCD Display
Mode Button
On/Off Button
Momentary / ContinuousToggle Switch
Stimulation Level Dial
TRANSMITTER
The ET-702 transmitter is equipped with four control buttons, one toggle switch,
LCD display, and an adjustable dial. For long range use hold the transmitter up
like the Statue of Liberty and never allow the antenna to touch anything as it will
decrease the range. Power lines and foliage will also reduce the range.

8/3/2019 ET-702 Manual
http://slidepdf.com/reader/full/et-702-manual 13/25
13
Einstein Owner's Manual ET-702
Mode Button “M”
- Mode Button allows the user to change modes, cycling between 1D
Mode to 2D Mode, 2D Mode to Buzzer Mode, and Buzzer Mode to 1D
Mode as shown in the diagram.
- In 1D Mode, you can change the intensity level of 1D by rotating
the dial and locking it. (See "LOCK/UNLOCK THE STIMULATION
INTENSITY LEVEL" for details) The intensity level of 2D will be sameas that of 1D unless it is locked.
- In 2D Mode, you can change the intensity level of 2D by rotating the
dial and locking it. The intensity level of 1D will be same as that of 2D
unless it is locked.
- In Buzzer Mode, you can send only an education tone to each collar
receiver.
Stimulation Button (1D, Black Color)
- In 1D/2D Mode, Sends momentary or continuous stimulation to the
Dog 1 collar receiver(black belt) based on the selection of toggle
switch.
- In Buzzer Mode, Sends an education tone to the Dog 1 collar
receiver(black belt).
Button Functions
1 Dog Mode 2 Dog Mode Buzzer Mode

8/3/2019 ET-702 Manual
http://slidepdf.com/reader/full/et-702-manual 14/25
14
Einstein Owner's Manual ET-702
Button Functions
Stimulation Button (2D, Red Color)
- In 1D/2D Mode, Sends momentary and continuous stimulation to
the Dog 2 collar receiver(red belt) based on the selection of toggle
switch.
- In Buzzer Mode, Sends an education tone to the Dog 2 collar
receiver(red belt).
On/Off Button
- When pressed for more than 2 seconds, it will turn On or Off the
transmitter.
Momentary/Continuous Toggle Switch
- Toggle switch on the backside of the transmitter allows the user to
switch between Momentary Stimulation and Continuous Stimulation.
- If Continuous Stimulation is selected, pressing stimulation buttons
(1D or 2D) will send stimulation to the collar receiver for the duration
of the button being pressed. After 10 seconds the Over-Stimulationfeature will stop the stimulation until the button is released and
pressed again.

8/3/2019 ET-702 Manual
http://slidepdf.com/reader/full/et-702-manual 15/25
15
Einstein Owner's Manual ET-702
CHANGING THE INTENSITY LEVEL OF STIMULATION
Rotating clockwise increases the
stimulation level and conversely,
rotating counter-clockwise lowers
the stimulation level.
It is highly recommended that the user practices changing levels and
modes before putting the collar receiver on the dog.
Setting the correct stimulation level for your dog is very important. Toset your “conditioning” stimulation level, put the collar receiver (see
page 22 for proper fitting technique) on your dog. Let him/her get
used to the collar receiver for a couple of hours. While watching your
dog, turn the level to “0” and press the stimulation button (1D/2D)
Slowly turn the stimulation up at a rate of approximately 2-3 levels
per second. When your dog first perceives the stimulation, usuallybetween 15 and 40, release the button. This is your “conditioning”
stimulation level. You may need to add a few levels later as your dog
becomes more conditioned to the stimulation. The “conditioning”
stimulation is used when the trainer wants to use the stimulation in
continuous mode.
Changing the Intensity Level of Stimulation
8/3/2019 ET-702 Manual
http://slidepdf.com/reader/full/et-702-manual 16/25
16
Einstein Owner's Manual ET-702
CHANGING THE INTENSITY LEVEL OF STIMULATION
For example, if you want your dog to come to you and heel, you can
hold the button down until your dog comes and heels or if jumping is
an issue, you can hold the button down anytime their front paws are
off the ground.
Setting the “Corrective” stimulation level is a little more difficult due
to the wide differences in temperaments and stimulation tolerance
among the many breeds of dogs. On average, it is normally 20 to 40
levels higher than the “Conditioning” level. This higher level will only
be used in “Momentary” mode as not to over-stimulate your dog.This mode is used for stopping unwanted behaviors such as chewing,
digging, street-running, excessive barking, and aggressiveness, etc.
It is important to apply the “Momentary” stimulus at the exact time of
the unwanted behavior. Additional pulses may be used to reinforce
the command if compliance is not immediate.
Changing the Intensity Level of Stimulation

8/3/2019 ET-702 Manual
http://slidepdf.com/reader/full/et-702-manual 17/25
17
Einstein Owner's Manual ET-702
CHANGING THE INTENSITY LEVEL OF STIMULATION
IMPORTANT TRAINING TIP
E-Collars should be used to reinforce commands your dog already
knows. It is not a replacement for basic leash obedience training, buta tool to allow you to better communicate to your dog.
For best results, use the least amount of stimulation required to get
compliance from your dog. A calm and consistent approach to
training will always produce better long term results. It is highly
recommended that aggressive dogs be taken to a professional trainer
for evaluation before e-collar use.
A variety of E-Collar training videos are available on YouTube by
searching “e-collar training” and “that’s my dog”.
Happy Training.
Changing the Intensity Level of Stimulation

8/3/2019 ET-702 Manual
http://slidepdf.com/reader/full/et-702-manual 18/25
18
Einstein Owner's Manual ET-702
LOCK/UNLOCK THE STIMULATION INTENSITY LEVEL
How to Lock/Unlock the Stimulation Level
This feature is useful when controlling two dogs simultaneously andyou want to have different stimulation levels for each dog.
In 1D Mode, you can see the 1D icon is blinking on the LCD display.Set the desired stimulation level and then push down on the top of thestimulation dial until you see “1D” icon stop flashing.If the stimulation level doesn’t change when you rotate the stimulation
knob, you have successfully locked the stimulation level of Dog 1.
Change the mode to 2D Mode by pressing the Mode Button andrepeat the previous step. The “2D” icon light on the bottom portion of the LCD display will stop flashing. when you have successfully lockedthe stimulation level of Dog 2.
To unlock the stimulation level simply press the stimulation knob
again and it will unlock the stimulation level of the dog selected bythe mode button.
Dog 1
Dog 2
Lock/Unlock the Stimulation Intensity Level
8/3/2019 ET-702 Manual
http://slidepdf.com/reader/full/et-702-manual 19/25
19
Einstein Owner's Manual ET-702
INDICATOR LIGHT
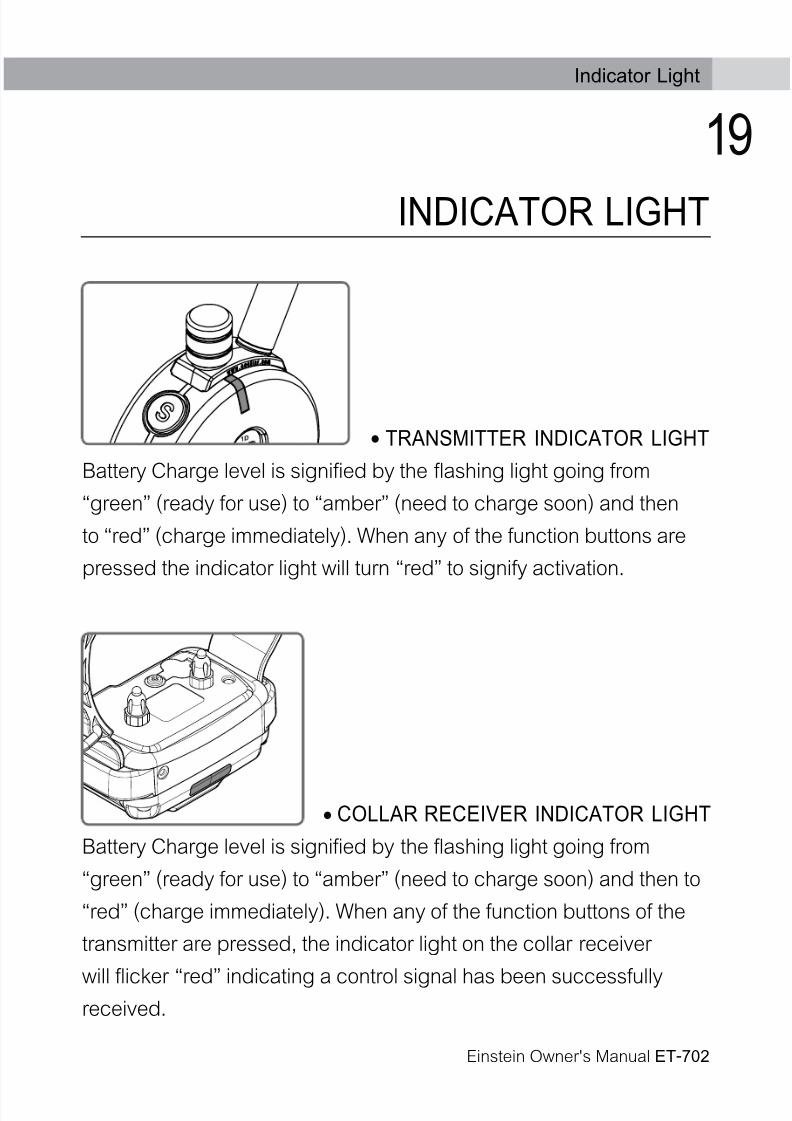
TRANSMITTER INDICATOR LIGHT
Battery Charge level is signified by the flashing light going from
“green” (ready for use) to “amber” (need to charge soon) and then
to “red” (charge immediately). When any of the function buttons are
pressed the indicator light will turn “red” to signify activation.
•
COLLAR RECEIVER INDICATOR LIGHT
Battery Charge level is signified by the flashing light going from
“green” (ready for use) to “amber” (need to charge soon) and then to
“red” (charge immediately). When any of the function buttons of the
transmitter are pressed, the indicator light on the collar receiver
will flicker “red” indicating a control signal has been successfullyreceived.
•
Indicator Light
8/3/2019 ET-702 Manual
http://slidepdf.com/reader/full/et-702-manual 20/25
20
Einstein Owner's Manual ET-702
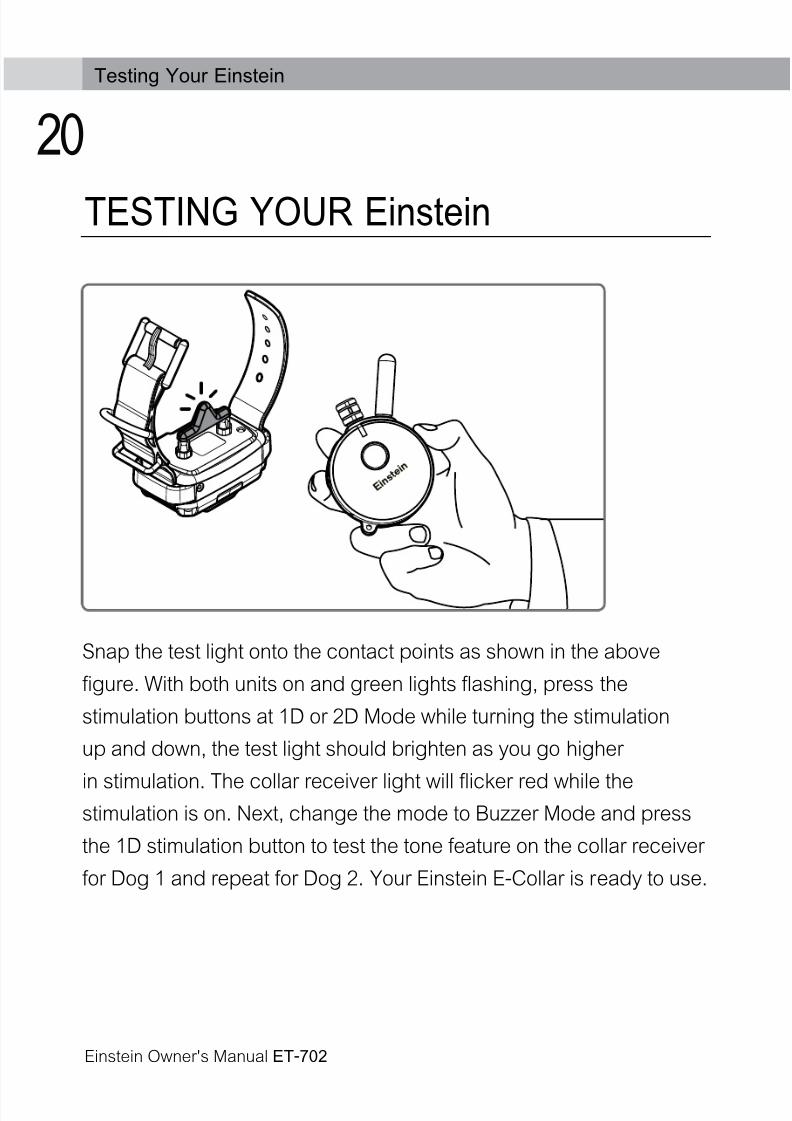
TESTING YOUR Einstein
Snap the test light onto the contact points as shown in the above
figure. With both units on and green lights flashing, press the
stimulation buttons at 1D or 2D Mode while turning the stimulation
up and down, the test light should brighten as you go higher
in stimulation. The collar receiver light will flicker red while thestimulation is on. Next, change the mode to Buzzer Mode and press
the 1D stimulation button to test the tone feature on the collar receiver
for Dog 1 and repeat for Dog 2. Your Einstein E-Collar is ready to use.
Testing Your Einstein
8/3/2019 ET-702 Manual
http://slidepdf.com/reader/full/et-702-manual 21/25
21
Einstein Owner's Manual ET-702
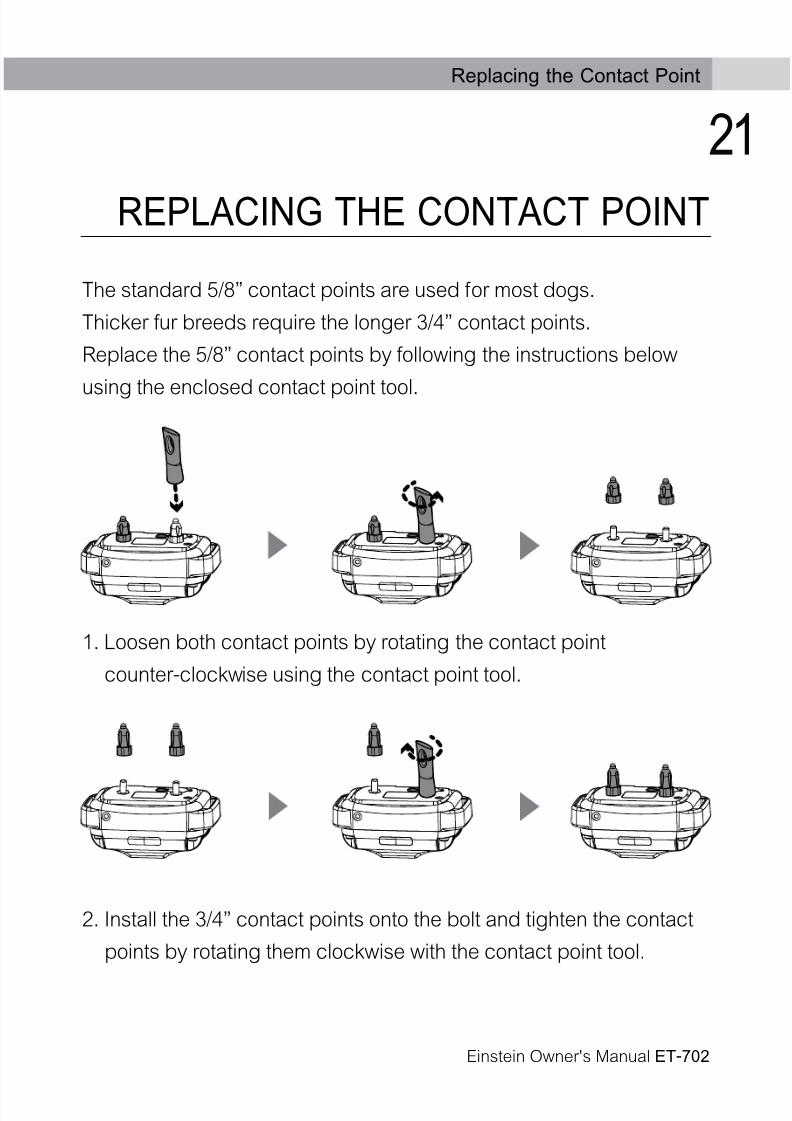
REPLACING THE CONTACT POINT
Replacing the Contact Point
The standard 5/8” contact points are used for most dogs.
Thicker fur breeds require the longer 3/4” contact points.
Replace the 5/8” contact points by following the instructions below
using the enclosed contact point tool.
1. Loosen both contact points by rotating the contact point
counter-clockwise using the contact point tool.
2. Install the 3/4” contact points onto the bolt and tighten the contact
points by rotating them clockwise with the contact point tool.

8/3/2019 ET-702 Manual
http://slidepdf.com/reader/full/et-702-manual 22/25
22
Einstein Owner's Manual ET-702
CORRECTLY FITTING THE COLLAR
Correctly Fitting the Collar
Too tight poses the risk of skin irritation and discomfort. Too loose
and the contact points will not be able to administer the stimulation
reliably.
The optimal position for the collar receiver is on either side of the
dog’s windpipe.
IMPORTANT NOTICE
To prevent the occurrence of skin irritations the Collar Receiver
should never be worn for more than 12 hours per day. Should your
dog experience skin irritations from over exposure to the contact
points remove the collar receiver unit immediately and stop using
your e-collar until all skin irritations are totally healed. Antibiotic
ointment will aid in the healing process. Some dog breeds have very
thick fur that requires special contact points, please contact our
customer service or visit www.ecollar.com for more information.
The collar should be adjusted to allow the
“contact points” to have direct contact
with the skin. You should be able to fit a
couple of fingers between the collar strapand your dog.

8/3/2019 ET-702 Manual
http://slidepdf.com/reader/full/et-702-manual 23/25
23
Einstein Owner's Manual ET-702
WARRANTY
To Register for the Limited Lifetime Warranty :
To register your Einstein product, please log onto our website at
www.ecollar.com, click on the warranty registration link and fill out
the required information. Please register your product within 30
days of your purchase. If you do not have access to a computer,
please call our toll free number of 1-855-326-5527 and one of our
customer service representatives will register your product for
you. In the event the product is not properly registered proof of
purchase will be needed to obtain warranty work. Product returns
without proper registration and proof of purchase will be subject to
a warranty start date estimated by your units serial number. Misuse,improper maintenance, lost units are not covered by this warranty.
Limited Lifetime Warranty :
Your Limited Lifetime Warranty begins the date of the original
purchase. For the first two years both parts and labor are covered
100%. The rechargeable batteries have a one year replacement
warranty. After the two year replacement warranty has expiredthe Limited Lifetime Warranty will cover the material to repair your
e-collar system not including the accessories and antennas. The
labor and shipping costs are not included and are the responsibility
of the customer. Labor fees will be calculated based on the extent
of the work performed. The Limited Lifetime Warranty will expire
5 years from the date the model is discontinued by E-Collar
Technologies, Inc. Any attempt by the user to repair or open thee-collar including battery replacement will void the warranty.
Warranty
8/3/2019 ET-702 Manual
http://slidepdf.com/reader/full/et-702-manual 24/25
24
Einstein Owner's Manual ET-702
CONTACT INFORMATION
E-Collar Technologies, Inc.
2120 Forrest Park Drive
Garrett, IN 46738
Toll-Free 1-855-326-5527
Toll-Free Fax 1-855-226-5527
www.ecollar.com
Contact Information

8/3/2019 ET-702 Manual
http://slidepdf.com/reader/full/et-702-manual 25/25
Related Documents