2014 Essentials of Aseptic Dispensing

Welcome message from author
This document is posted to help you gain knowledge. Please leave a comment to let me know what you think about it! Share it to your friends and learn new things together.
Transcript
2014
Essentials of Aseptic Dispensing
1 | P a g e
Essentials for Aseptic Dispensing
(Version 2 - 2014)
Contents A. HAND WASHING.............................................................................................................................. 2
B. GLOVING ......................................................................................................................................... 3
C. PARTS OF A SYRINGE ....................................................................................................................... 4
D. PARTS OF A NEEDLE ........................................................................................................................ 4
E. PARTS OF AN AMPOULE.................................................................................................................. 5
F. PARTS OF A VIAL ............................................................................................................................. 5
G. CRITICAL SITES ................................................................................................................................. 6
H. NEEDLE-SYRINGE ASSEMBLY ........................................................................................................... 6
I. MEASUREMENT OF SOLUTION IN A SYRINGE …………………………………………………………………………….7
J. OPENING AN AMPOULE .................................................................................................................. 8
K. DRAWING CONTENTS FROM AN AMPOULE ................................................................................. 10
L. RECONSTITUTING A POWDERED VIAL .......................................................................................... 11
M. WITHDRAWING FROM A VIAL ....................................................................................................... 13
N. MANAGEMENT OF CYTOTOXIC SPILL ............................................................................................ 15

2 | P a g e
A. HAND WASHING
This section looks at the requirements and technique of hand washing prior to carrying out
aseptic dispensing of cytotoxic drugs.
1. Remove all jewelry from fingers, hands and arms.
2. Wet hands and arms (half way to elbow).
3. Use sufficient povidone iodine for hands and arms and lather well.
4. Scrub for one minute taking care to wash carefully every finger, palm and fingertip. (Finger
nails should be trimmed short and nail polish should not be used).
5. Dry hands using automatic hand dryer or non-linting paper towels.

3 | P a g e
B. GLOVING
This section looks at the requirements and technique of gloving as well as the policy relating to
changing of gloves during the aseptic dispensing of cytotoxic drugs.
1. Sterile gloves should always be worn in the cleanroom when handling cytotoxic drugs.
2. Sterile, powder free latex, nitrile or neoprene gloves may be used if they are validated for
the use specifically in cytotoxic drug reconstitution.
3. Double gloving is recommended. The outer pair should be changed every 30 minutes or
whenever damage (such as tears in the glove) or any obvious contamination occurs.
4. Gloves should be disinfected with sterile alcohol each time the operator returns their hand
into the cytotoxic reconstitution cabinet.
5. Upon completion of work, hands should be thoroughly washed after removing both sets of
gloves.
Refer to the diagram below on how to wear gloves.

4 | P a g e
C. PARTS OF A SYRINGE
D. PARTS OF A NEEDLE

5 | P a g e
E. PARTS OF AN AMPOULE
F. PARTS OF A VIAL
Anatomy of a glass ampoule
Top of vial where needle is inserted Plastic cap
6 | P a g e
G. CRITICAL SITES
The critical sites of the various sterile equipment used in aseptic dispensing is provided
and these critical sites should not be handled during the aseptic dispensing process as they
can potentially result in contamination of the final product.
1. Critical sites of the sterile equipment are parts of the equipment (needle, syringe, ampoule,
and vial) that should not be touched. If the critical sites are touched, the equipment is
considered to be contaminated and should be discarded immediately and replaced by a new
equipment.
2. Critical sites for the following sterile equipment are:
a. Syringe: tip and plunger (if syringe is reused)
b. Needle: entire length of the needle from the hub to the bevel tip
c. Opened ampoule: neck of ampoule
d. Vial or iv bottle – rubber top
The critical sites for (c) & (d) should be swabbed with sterile alcohol wipes and air dried
before further manipulations are performed on it.
H. NEEDLE-SYRINGE ASSEMBLY
Luer-lock syringes should be used when reconstituting or preparing cytotoxic drugs. This
section looks at how the needle and syringe should be assembled before carrying out aseptic
dispensing of cytotoxic drugs.
1. Remove syringe from sterile packaging taking care not to touch the tip of the syringe onto
any surface or packaging during the removal. Place the syringe vertically on its end in the
upright position if there is no needle attached.
2. Hold the needle packaging with hand and peel back the wrapper taking care not to touch the
open end (critical site) of the needle.
3. While still holding the wrapper and the open end of the needle, pick up the syringe by
holding the barrel firmly between the thumb and the index finger of the other hand.
4. Connect the needle to the syringe and turn the syringe in a clockwise direction until it is tight.
This will ensure a tight fit between the syringe and needle.
5. Adjust the plunger to release the seal/air.
6. Immediately prior to use, remove the needle cap by pulling the cap whilst holding the barrel
of the syringe firmly between the thumb and the index finger.

7 | P a g e
I. MEASURE OF SOLUTION IN A SYRINGE
This section aims to provide the operator with the proper way to measure and read the volume of
the solution in the syringe.
The volume of solution that is drawn in a syringe has to be correctly drawn and the diagram
below shows how the volume is to be read on the barrel of the syringe.
The position to be read should be the marking on the barrel at the final edge of the plunger
piston. (See diagram below)
In the diagram below, the final edge of the plunger piston is aligned with the 1.5mL line on the
barrel of the syringe.
Correct measurement is 1.5mL

8 | P a g e
The next two sections (J & K) will enable the operator to handle the glass and plastic ampoule in a
safe way so as to be able to open the ampoule and withdraw the contents in an aseptic manner.
J. OPENING AN AMPOULE
GLASS AMPOULE
1. Prior to using the glass ampoule, check ampoule for any markings that indicate the
appropriate point of break of the ampoule.
2. If such markings exist, ampoule can be broken without filing at the neck.
3. If such markings do not exist, gently file the syringe neck with the ampoule file.
4. Prior to opening the ampoule, check name, contents and expiry date of ampoule.
5. Hold ampoule vertically between thumb and index finger and inspect bulb of ampoule for
solution. If solution is present in the bulb, remove by doing an inverted “J” movement. (See
Figure for the sequence of the movement). DO NOT TAP THE TIP OF THE AMPOULE WITH
YOUR FINGER AS THE HEAD OF THE AMPOULE CAN BREAK OFF AT THE NECK.
6. When breaking the ampoule, hold the tip of the ampoule between the thumb and index
finger of dominant hand and the base of the ampoule between the thumb and index finger
of the other. Ensure that the fingers are well away from the narrowest part (neck) of the
ampoule.
7. With the thumb pointing away, break open the ampoule without touching the neck.
8. If there is a dot on the tip (head) of the ampoule, ensure the dot is facing away from you and
the index finger is on it. Snap it while ensuring tips of fingers are well away from the
narrowest part (neck) of the ampoule.

9 | P a g e
Clearing liquid at head of ampoule using the inverted “J” movement
Position 1: Hold the tip (head) of the ampoule in an inverted position.
Position 2 to 5: Rotate the ampoule using the inverted “J” movement in one swift movement.
Position 6: Finally, the ampoule will be in an upright position and the liquid which had
collected in the tip (or head) of the ampoule will have drained into the body of the ampoule.
If there is still liquid in the head of the ampoule, repeat the sequence again.
PLASTIC AMPOULES For plastic ampoules the technique is dependent on the brand in stock. Open these ampoules according to manufacturer’s instructions.
Different types of plastic ampoules
10 | P a g e
K. DRAWING CONTENTS FROM AN AMPOULE
1. Assemble needle and syringe as given in Section F (Needle-Syringe Assembly) and remove
needle sheath.
2. Hold the opened ampoule in one hand and the syringe in the other and place the beveled
edge of the needle with the graduated markings of the syringe facing you.
3. Withdraw the fluid into the syringe by exerting upward pressure on the end of the plunger.
Ensure minimal handling of the barrel of the plunger.
4. Tip the ampoule at an angle to draw remaining solution into the shoulder of the ampoule.
5. Withdraw the residual solution by placing the beveled edge of the needle into the shoulder.
6. After the required solution has been drawn into the syringe place the ampoule down.
7. Hold the syringe vertically with the needle uppermost in one hand, pull plunger down so
that there is no solution in the hub of the needle. Tap the barrel with the other hand to
remove any bubbles in the barrel of the syringe. Be sure to pull the plunger down again
before expelling the air.
8. Adjust the plunger to obtain the required volume of the solution.
11 | P a g e
The next 2 sections (L & M) will enable the operator to handle the vial correctly and safely. The
two sections will focus on the reconstitution of a powdered vial as well as to withdraw fluid from
the vial minimizing the generation of aerosols in the process.
L. RECONSTITUTING A POWDERED VIAL
1. Check contents of vial and expiry date.
2. Remove vial cap or protective seal from vial.
3. Wipe exposed bung with a sterile alcohol wipe and allow it to dry.
4. Assemble needle and syringe.
5. Draw up the required amount of reconstituting solution into the syringe.
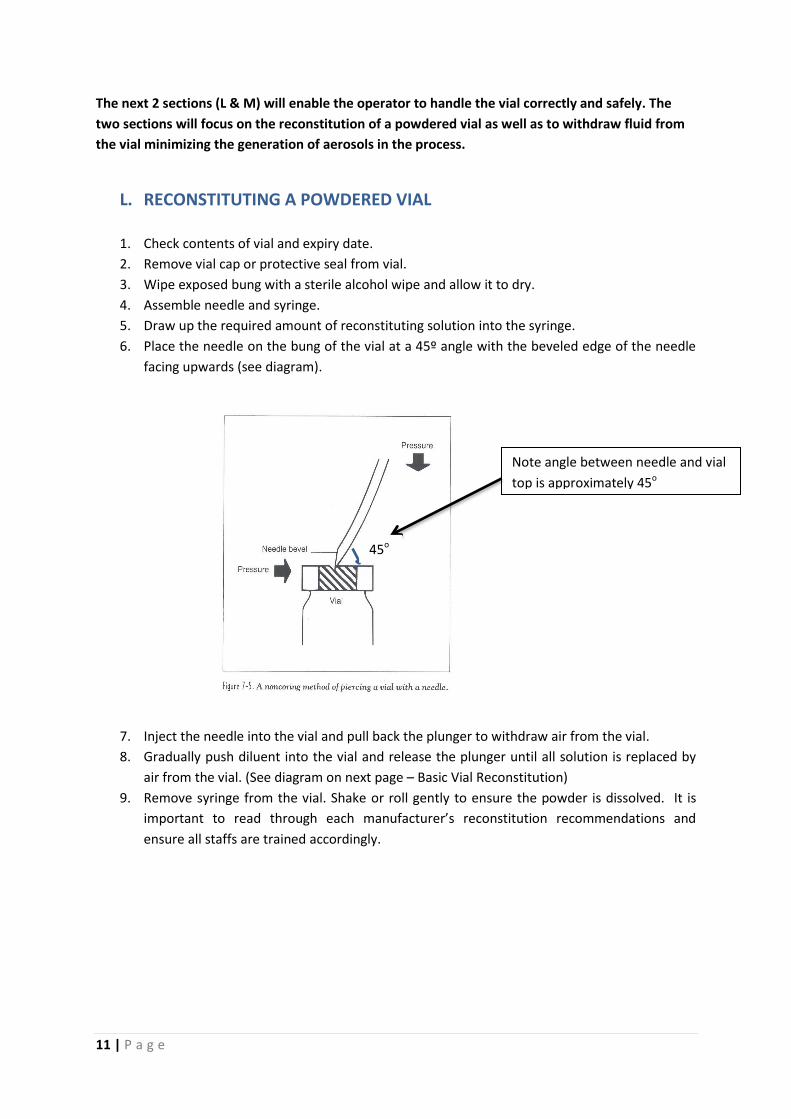
6. Place the needle on the bung of the vial at a 45º angle with the beveled edge of the needle
facing upwards (see diagram).
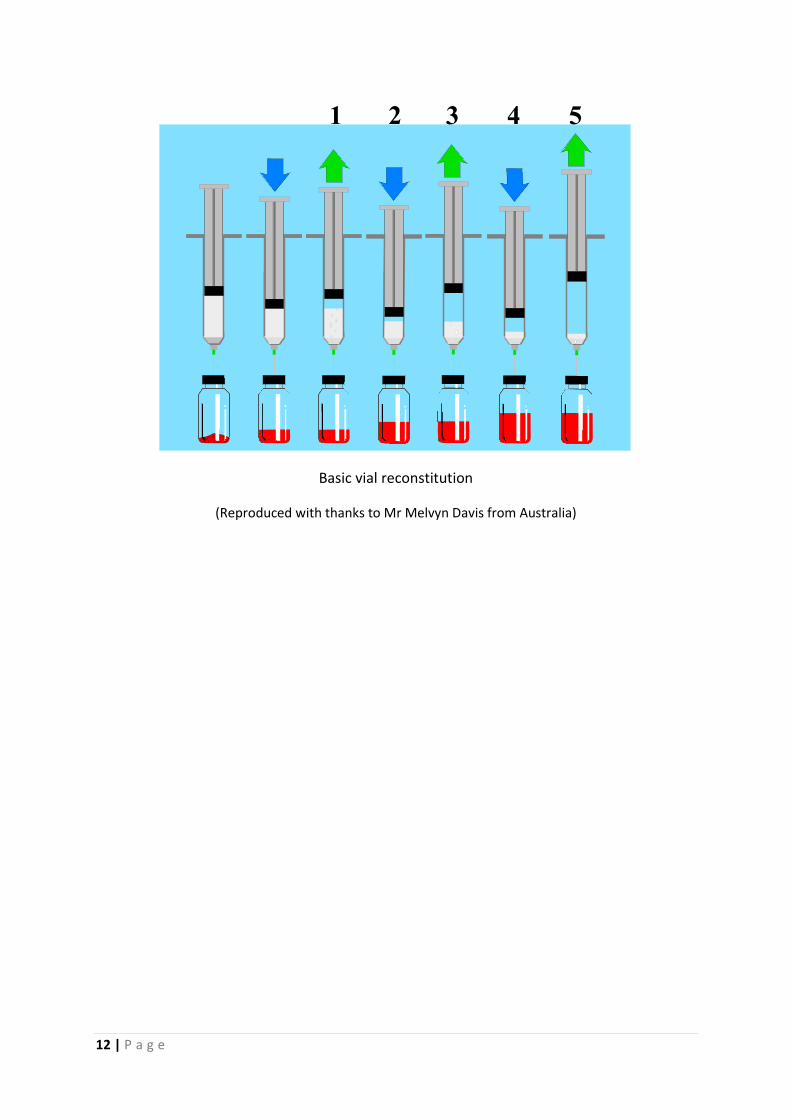
7. Inject the needle into the vial and pull back the plunger to withdraw air from the vial.
8. Gradually push diluent into the vial and release the plunger until all solution is replaced by
air from the vial. (See diagram on next page – Basic Vial Reconstitution)
9. Remove syringe from the vial. Shake or roll gently to ensure the powder is dissolved. It is
important to read through each manufacturer’s reconstitution recommendations and
ensure all staffs are trained accordingly.
Note angle between needle and vial
top is approximately 45o
45o
12 | P a g e
Basic vial reconstitution
(Reproduced with thanks to Mr Melvyn Davis from Australia)
1 2 3 4 5

13 | P a g e
M. WITHDRAWING FROM A VIAL
1. Check name, contents and expiry date of vial.
2. Remove vial cap or protective seal from vial.
3. Wipe exposed bung with a sterile alcohol wipe and allow to dry.
4. Assemble needle and syringe.
5. Draw up into the syringe a volume of air equal to the volume of solution to be drawn out of
an unused vial.
6. Place the needle on the bung of the vial at a 45° angle with the beveled edge of the needle
facing upwards.
7. Inject the needle into the vial, invert the vial and pull back the plunger to withdraw air from
the vial.
8. Position the tip of the needle into the solution and gradually push air into the vial until
pressure resistance increases. Minimise agitation of the solution as some products will foam
which can result in the solution being more difficult to withdraw from the vial.
9. Release plunger and allow the solution to flow back into the syringe.
10. Repeat steps 6 and 7 until the desired volume is in the syringe.
11. Hold the syringe vertically and tap the syringe so that the bubbles rise to the top of the
syringe.
12. Adjust syringe volume to the required amount.
13. Withdraw extra air into the syringe to create negative pressure.
14. Remove needle-syringe assembly from the vial.
15. Repeat steps 1 - 9 when withdrawing from multiple vials using the same syringe.

14 | P a g e
Basic vial withdrawal
Basic vial withdrawal continued
(Reproduced with thanks to Mr Melvyn Davis from Australia)
90%
1 2 3 4
-10%
5 6 7 8 9
15 | P a g e
N. MANAGEMENT OF CYTOTOXIC SPILL
This section will address the management of cytotoxic spills and the principles behind the handling
of the different types of spills.
GENERAL
1. Most cytotoxic drugs are irritating to the skin, mucous membranes and eyes and can cause
necrotic or inflammatory lesions in soft tissues.
2. Such contact or inhalation may result from spills.
3. When a spill or breakage occurs, it should be cleaned up immediately by the person
responsible for the spill.
4. The person responsible should be trained in the appropriate procedures.
5. A spill should be identified with a warning sign so the other persons in the area will not be
contaminated.
6. Appropriate protective equipment must be worn be worn during spill cleanup operations.
7. In the event of spill, any scheduled cleaning must be suspended until the area has been
properly cleaned up.
8. Spill kits should be readily available whenever there are cytotoxic drugs being used.
9. All items contaminated by cytotoxic materials must be treated as cytotoxic waste.
Suggested items in SPILL KIT
- “Caution Hazardous Drugs Spill” Signs
- Instructions for correct use of Spill Kit
- Chemo Gown and overshoes
- Safety glasses/goggles
- Respirator mask
- Chemosafe gloves
- Absorbent pads/mats
- Absorbent towels
- Purple cytotoxic bag printed with “Cytotoxic Waste”
- White waste bag
- Zip-lock plastic bags
- Plastic scoop & scraper
- Bottle of water
- Alkaline detergent
- Incident report form

16 | P a g e
( Picture of a typical spill kit courtesy of Dr Jung -Tae Kim from Korea)
Cytotoxic Spill
1. Alert other staff in the area to the potential hazard and limit access by placing the warning
sign in a prominent position.
2. Remove the contents of the spill kit and put on in this order: the mask, gown and shoe cover,
the goggles or face shield and the gloves (to double glove).
3. For a liquid spill, carefully place a sufficient quantity of absorbent paper/mat over the spilled
liquid.
If the spill involves a powder, carefully place sufficient absorbent paper/mat over the powder and then carefully wet the paper/mat with water so that the powder dissolves and is absorbed by the paper/mat. Alternatively wet towel/mat can be placed over spilled powder to contain/reduce powder aerosol.
4. Gather up the contaminated papers/mat and carefully gather any broken glass and discard
waste into zip-locked bag before discarding it into the cytotoxic waste container.
5. Repeat steps (3) and (4) until the spill has been completely cleared.
When cleaning a cytotoxic spill, all cleaning should begin from the outside of the spill area
and gradually work towards the centre.
When cleaning the spill area,
a. Use detergent and water to wash the area of the spill thoroughly, discarding all waste generated into the cytotoxic waste container.
b. Rinse the area well with clean water. c. Dry the area completely to prevent accidental slippage on wet floor. d. For spill in common areas, arrange for hospital cleaning staff to re-clean the area
immediately. e. For spill in cleanroom, the spill switch is to be activated.
When activated, this switch will increase the negative pressure within the cytotoxic suite to minimise any contamination of the external environment.)
f. For spill in drug cabinet, disinfect cabinet with alcohol 70% and re-set cabinet for drug preparation.

17 | P a g e
6. In the event that staff become contaminated with a cytotoxic agent, the following procedure
should be followed:
- All overtly contaminated protective clothing should be removed onsite and placed in the cytotoxic waste
- waste container. Clothing with minimal amount of contamination should be laundered container onsite.
- All contaminated clothing should be removed and if heavily contaminated, should be discarded into the cytotoxic separately and rinsed well.
- The contaminated area of skin should be washed with soap and rinsed with large amounts of water.
- Eyes that have become contaminated should be thoroughly irrigated with 0.9% sodium chloride or other suitable ophthalmic irrigation solutions. It is not recommended to irrigate the eye directly with running water from a tap (faucet) because of the potential for water pressure damage to the eye. In all cases where the eye is thought to be contaminated, ophthalmological advice should be sought.
- If the skin is broken, the affected area should be irrigated with water and bleeding controlled.
- Medical attention should be sought as soon as practical.
7. Staff to notify immediate supervisor and report/document the spill in an incident report form.
8. Supervisor is to investigate the cause of the incident and take appropriate measure(s) to prevent recurrence.

18 | P a g e
ACKNOWLEDGEMENT
Ms Lita Chew Mr Peter Yap
Head of Pharmacy, NCCS Director
Assistant Professor, Pharmacy Department, NUS Pharmacy Practice & Development
National Cancer Centre NTUC Unity Healthcare Co-operative
Singapore Singapore
Mrs. Harbans Kaur Dhillon Mr Puttarapong Kanpukdee
Senior Pharmacist Division Director, Pharmacy Division
Pharmacy Unit Bumrungrad International Hospital
University Malaya Medical Centre Thailand
Malaysia
Ms. Rizka Andalusia Dr. Suphat Subongkot
Clinical Pharmacist, Assistant Professor,
Dharmais Cancer Center, Pharmacy Practice Division
Indonesia. Khon Kaen University
Thailand
Ms Birinder Kaur Mr Miguel Bo Senior Pharmacist Development, Education & Transnational
Department of Pharmacy Research, Department of Pharmacy
Hospital Universiti Kebangsaan Fudan University Shanghai Cancer
Malaysia China
Ms. Ae-Ryoung Park Mr Melvyn Davis from Australia
Pharmacy Manager (BMT Part), BCOP for pictures on page 15
Department of Pharmacy
Catholic University Seoul St. Mary's Hospital
Korea
Dr Jung-Tae Kim
Invited Professor, Kyunghee University
Director of Pharmacy,
Kyunghee University Hospital at Gangdong,
Korea
Related Documents