SAP HANA Cloud Development (ESPM Scenarios Installation Guide) 1 SAP HANA Cloud End-to-End-Development Scenarios ESPM Scenarios Installation Guide Version 3.0

Welcome message from author
This document is posted to help you gain knowledge. Please leave a comment to let me know what you think about it! Share it to your friends and learn new things together.
Transcript

SAP HANA Cloud Development (ESPM Scenarios Installation Guide)
1
SAP HANA Cloud End-to-End-Development Scenarios
ESPM Scenarios Installation Guide
Version 3.0
SAP HANA Cloud Development (ESPM Scenarios Installation Guide)
2
© 2014 SAP SE or an SAP affiliate company. All rights reserved.
No part of this publication may be reproduced or transmitted in any form or for any purpose without the express permission of SAP SE or an SAP affiliate company.
SAP and other SAP products and services mentioned herein as well as their respective logos are trademarks or registered trademarks of SAP SE (or an SAP affiliate company) in Germany and other countries. Please see http://www.sap.com/corporate-en/legal/copyright/index.epx#trademark for additional trademark information and notices. Some software products marketed by SAP SE and its distributors contain proprietary software components of other software vendors.
National product specifications may vary.
These materials are provided by SAP SE or an SAP affiliate company for informational purposes only, without representation or warranty of any kind, and SAP SE or its affiliated companies shall not be liable for errors or omissions with respect to the materials. The only warranties for SAP SE or SAP affiliate company products and services are those that are set forth in the express warranty statements accompanying such products and services, if any. Nothing herein should be construed as constituting an additional warranty.
This tutorial intends to complement SAP product documentation. While specific product features and procedures typically are explained in a practical business context, it is not implied that those features and procedures are the only approach in solving a specific business problem using SAP HANA Cloud. Should you wish to receive additional information, clarification or support, please refer to SAP Consulting. Any software coding and/or code lines / strings (“Code”) included in this documentation are only examples and are not intended to be used in a productive system environment. The Code is only intended better explain and visualize the syntax and phrasing rules of certain coding. SAP does not warrant the correctness and completeness of the Code given herein, and SAP shall not be liable for errors or damages caused by the usage of the Code, except if such damages were caused by SAP intentionally or grossly negligent.
Disclaimer: Some components of this product are based on Java™. Any code change in these components may cause unpredictable and severe malfunctions and is therefore expressively prohibited, as is any decompilation of these components. Any Java™ Source Code delivered with this product is only to be used by SAP’s Support Services and may not be modified or altered in any way.

SAP HANA Cloud Development (ESPM Scenarios Installation Guide)
3
Table of Contents
Table of Contents ......................................................................................................................... 3
Introduction ................................................................................................................................. 4
1 Installation Guide – SAP HANA Cloud Development ........................................................... 5
1.1 Java 7 JDK .................................................................................................................................... 6
1.2 Register for SAP HANA Cloud Developer Account ...................................................................... 7
1.3 Eclipse IDE for SAP HANA Cloud Application Development ...................................................... 11
1.4 Eclipse SAP HANA Cloud Tools Installation ............................................................................... 13
1.5 Eclipse SAP HANA Cloud SDK Installation .................................................................................. 16
1.5.1 Set up SAP HANA Cloud Runtime Environment .................................................................... 17
1.6 Maven Integration for Eclipse Installation ................................................................................ 20
1.6.1 Maven Usage ......................................................................................................................... 20
1.6.2 Maven Integration for Eclipse Configuration Steps .............................................................. 21
1.7 EGit Verification ......................................................................................................................... 28
1.8 Web Browsers ........................................................................................................................... 30
2 ESPM Applications - Sources & Eclipse Projects ................................................................ 31
2.1 Download ready-to-run ESPM Applications sources ................................................................. 31
2.1.1 Contents of the downloaded cloud-esmp-scenarios Git Repository .................................... 34
2.1.2 Steps to check out the scenario-webshop ............................................................................ 36
2.2 Import ESPM Applications projects into your Eclipse ............................................................... 38
3 Run ESPM Scenario Applications on SAP HANA Cloud ....................................................... 41
3.1 Prerequisites before running ESPM Applications...................................................................... 41
3.2 Publish and Run ESPM applications on SAP HANA Cloud local server ...................................... 44
3.2.1 Prerequisites for running ESPM applications on SAP HANA Cloud local server .................... 44
3.2.2 ESPM WebShop Application .................................................................................................. 47
3.2.3 ESPM Mobile Shopping Application ...................................................................................... 49
3.2.4 ESPM WebShop Extension (Reviews) Application................................................................. 50
3.3 Publish and Run ESPM applications on SAP HANA Cloud ......................................................... 52
3.3.1 Prerequisites before running ESPM Applications on SAP HANA Cloud................................. 52
3.3.2 ESPM WebShop Application .................................................................................................. 56
3.3.3 ESPM Mobile Shopping Application ...................................................................................... 59
3.3.4 ESPM WebShop Extension (Reviews) Application................................................................. 60
4 What comes next? ........................................................................................................... 61
5 Tutorial Documentation History ....................................................................................... 62
SAP HANA Cloud Development (ESPM Scenarios Installation Guide)
4
Introduction
What do you get here?
The ESPM (Enterprise Sales & Procurement Model) Application Scenarios are reference applications
to describe how SAP HANA Cloud applications are developed by standard means. These reference
applications are running and always available on SAP HANA Cloud. They can be launched by anyone
ESPM Web Shop application
ESPM Reviews application (Extension of Web Shop Application)
ESPM Mobile Shopping application (works only properly with Chrome Web Browser)
The ESPM reference applications can also be downloaded as sources and deployed and run by any
developer in an own SAP HANA Cloud (Trial) account.
This ESPM Scenarios Installation Guide describes step-by-step
1. How you setup the HANA Cloud Development environment (chapter 1)
2. How you import the ESPM sources and projects into your Eclipse IDE (chapter 2)
3. How you deploy, run and test the ESPM Applications on SAP HANA Cloud (chapter 3)
Execute the step-by-step descriptions of the three chapters of this tutorial to get the ESPM
applications running on your SAP HANA Cloud (Trial) account.
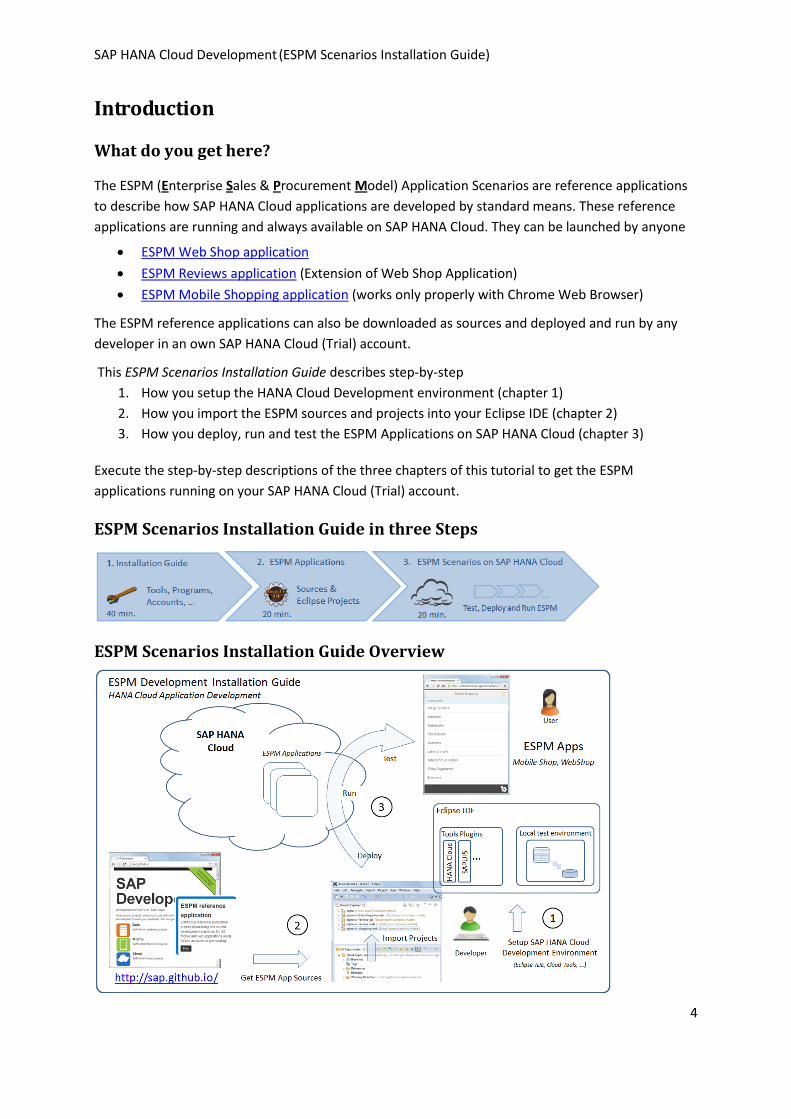
ESPM Scenarios Installation Guide in three Steps
ESPM Scenarios Installation Guide Overview
SAP HANA Cloud Development (ESPM Scenarios Installation Guide)
5
1 Installation Guide – SAP HANA Cloud Development
Overview
As explained in the above Introduction this first chapter describes how you setup your development
environment for SAP HANA Cloud Application Development. This development environment can be
used for all kind of SAP HANA Cloud Application development but we will use it in chapter 2 and 3 to
get the ESPM applications source projects and deploy, run and test them on SAP HANA Cloud.
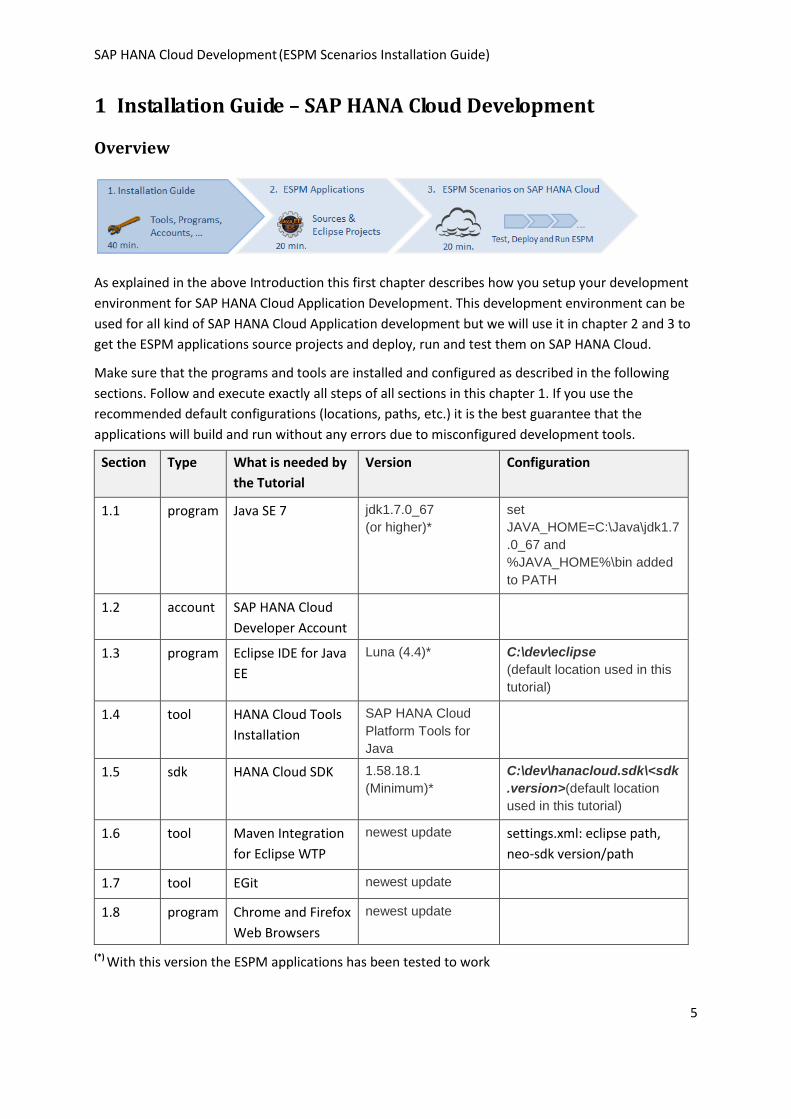
Make sure that the programs and tools are installed and configured as described in the following
sections. Follow and execute exactly all steps of all sections in this chapter 1. If you use the
recommended default configurations (locations, paths, etc.) it is the best guarantee that the
applications will build and run without any errors due to misconfigured development tools.
Section Type What is needed by
the Tutorial
Version Configuration
1.1 program Java SE 7 jdk1.7.0_67
(or higher)* set
JAVA_HOME=C:\Java\jdk1.7
.0_67 and
%JAVA_HOME%\bin added
to PATH
1.2 account SAP HANA Cloud
Developer Account
1.3 program Eclipse IDE for Java
EE
Luna (4.4)* C:\dev\eclipse
(default location used in this
tutorial)
1.4 tool HANA Cloud Tools
Installation
SAP HANA Cloud
Platform Tools for
Java
1.5 sdk HANA Cloud SDK 1.58.18.1
(Minimum)* C:\dev\hanacloud.sdk\<sdk
.version>(default location
used in this tutorial)
1.6 tool Maven Integration
for Eclipse WTP
newest update settings.xml: eclipse path,
neo-sdk version/path
1.7 tool EGit newest update
1.8 program Chrome and Firefox
Web Browsers
newest update
(*) With this version the ESPM applications has been tested to work
SAP HANA Cloud Development (ESPM Scenarios Installation Guide)
6
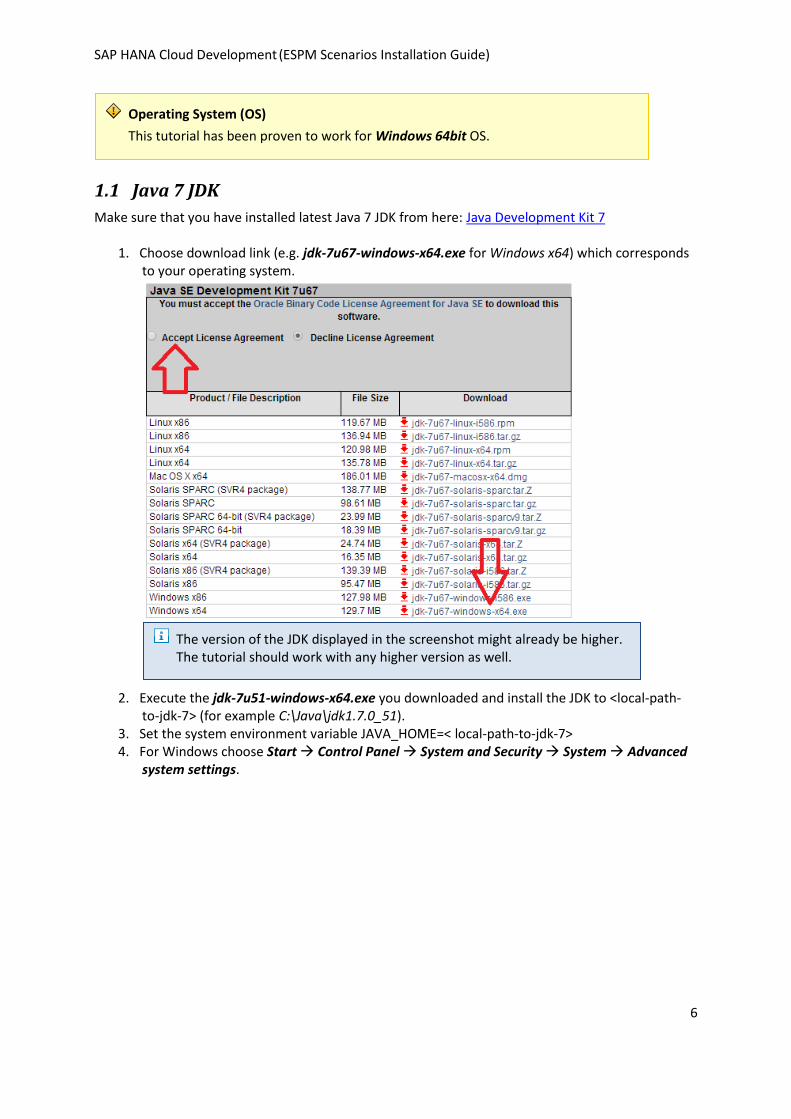
1.1 Java 7 JDK
Make sure that you have installed latest Java 7 JDK from here: Java Development Kit 7
1. Choose download link (e.g. jdk-7u67-windows-x64.exe for Windows x64) which corresponds to your operating system.
2. Execute the jdk-7u51-windows-x64.exe you downloaded and install the JDK to <local-path-to-jdk-7> (for example C:\Java\jdk1.7.0_51).
3. Set the system environment variable JAVA_HOME=< local-path-to-jdk-7> 4. For Windows choose Start Control Panel System and Security System Advanced
system settings.
Operating System (OS)
This tutorial has been proven to work for Windows 64bit OS.
The version of the JDK displayed in the screenshot might already be higher. The tutorial should work with any higher version as well.

SAP HANA Cloud Development (ESPM Scenarios Installation Guide)
7
5. Choose New to add the new JAVA_HOME system variable. 6. Select Path from the System variables list and choose Edit to add ";%JAVA_HOME%\bin" to
the end of your path variable. 7. Confirm with OK.
1.2 Register for SAP HANA Cloud Developer Account
For developing and running Web applications on SAP HANA Cloud you have to register once for a
Cloud Developer Account.
Execute the following steps to register for your own Cloud Developer Account.
1. Open https://account.hanatrial.ondemand.com

SAP HANA Cloud Development (ESPM Scenarios Installation Guide)
8
2. Choose Register to open a registration form.
3. On the registration form enter the corresponding fields, read the Terms of use and then
select the option that you have read and understand the Terms and Conditions of SAP HANA Cloud.
4. Choose Register

SAP HANA Cloud Development (ESPM Scenarios Installation Guide)
9
5. A registration confirmation message appears. An e-mail which contains the activation link of your cloud developer account will be sent to you.
6. Open this mail which was sent to your e-mail account
7. Choose the Click here to activate your account button and an Account Successfully Activated
message will appear.
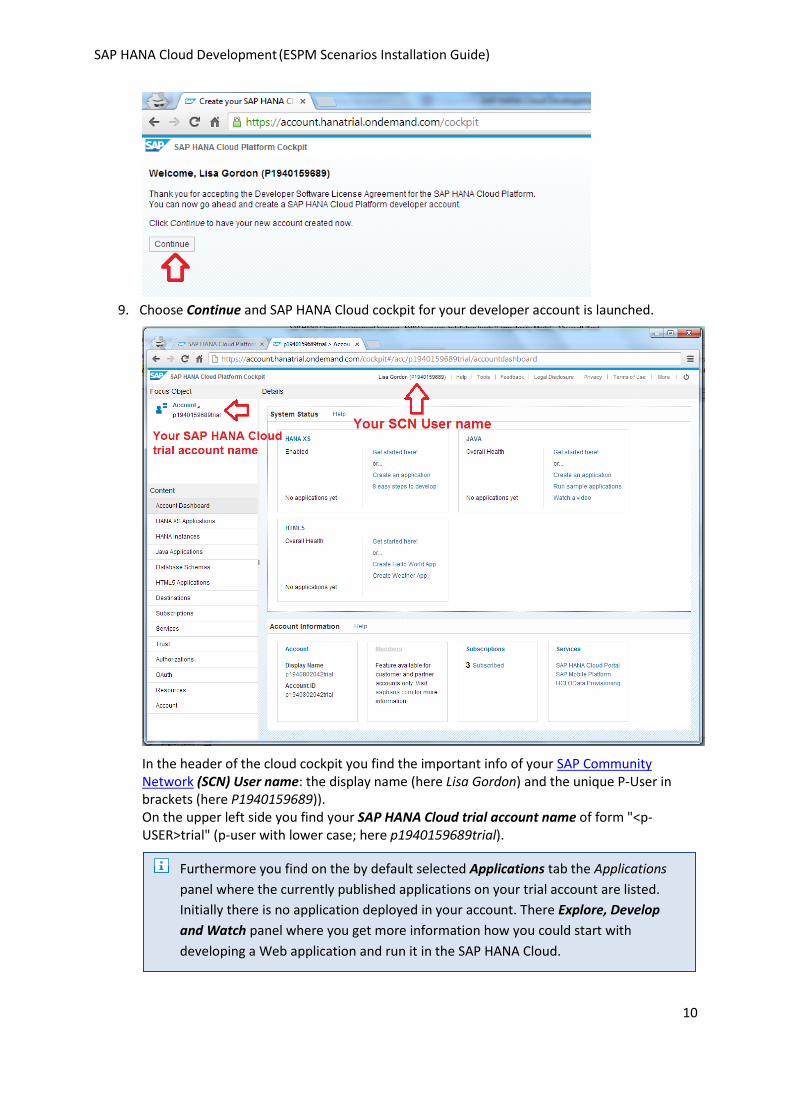
8. Choose Continue to launch the SAP HANA Cloud Cockpit of your newly created developer
account.
SAP HANA Cloud Development (ESPM Scenarios Installation Guide)
10
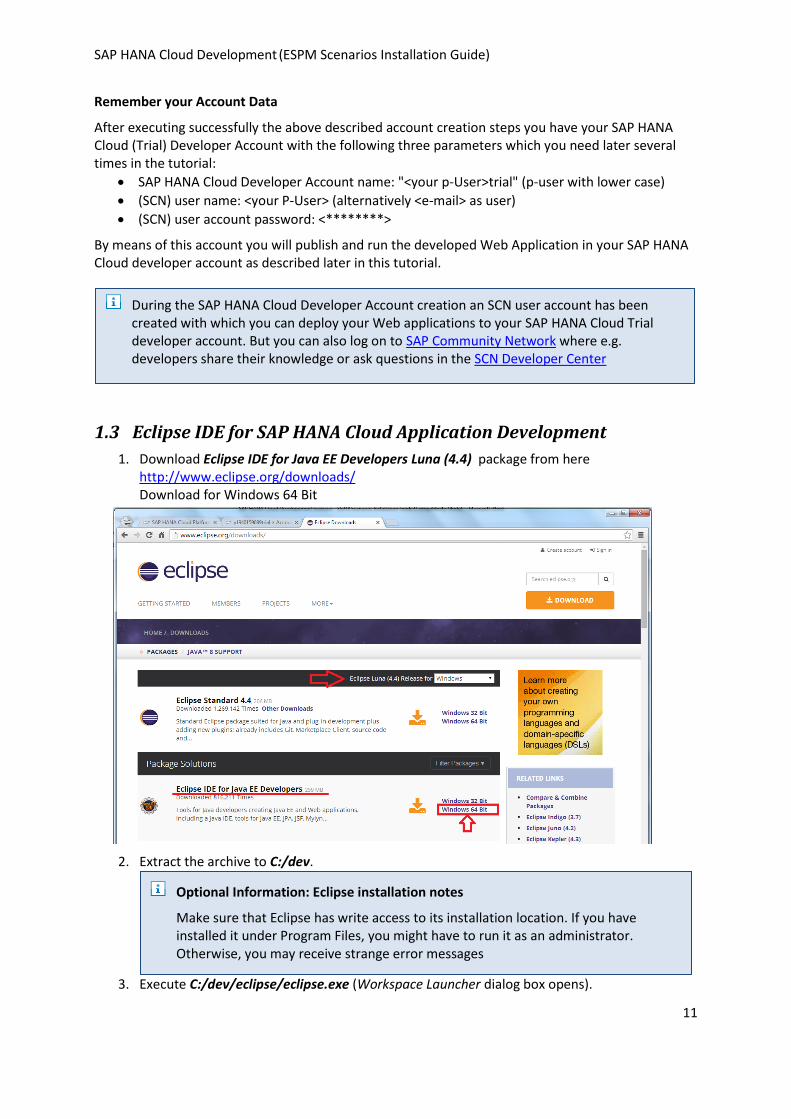
9. Choose Continue and SAP HANA Cloud cockpit for your developer account is launched.
In the header of the cloud cockpit you find the important info of your SAP Community Network (SCN) User name: the display name (here Lisa Gordon) and the unique P-User in brackets (here P1940159689)). On the upper left side you find your SAP HANA Cloud trial account name of form "<p-USER>trial" (p-user with lower case; here p1940159689trial).
Furthermore you find on the by default selected Applications tab the Applications
panel where the currently published applications on your trial account are listed.
Initially there is no application deployed in your account. There Explore, Develop
and Watch panel where you get more information how you could start with
developing a Web application and run it in the SAP HANA Cloud.
you might read the corresponding HANA Cloud documentation here
SAP HANA Cloud Development (ESPM Scenarios Installation Guide)
11
Remember your Account Data
After executing successfully the above described account creation steps you have your SAP HANA Cloud (Trial) Developer Account with the following three parameters which you need later several times in the tutorial:
SAP HANA Cloud Developer Account name: "<your p-User>trial" (p-user with lower case)
(SCN) user name: <your P-User> (alternatively <e-mail> as user)
(SCN) user account password: <********>
By means of this account you will publish and run the developed Web Application in your SAP HANA Cloud developer account as described later in this tutorial.
1.3 Eclipse IDE for SAP HANA Cloud Application Development
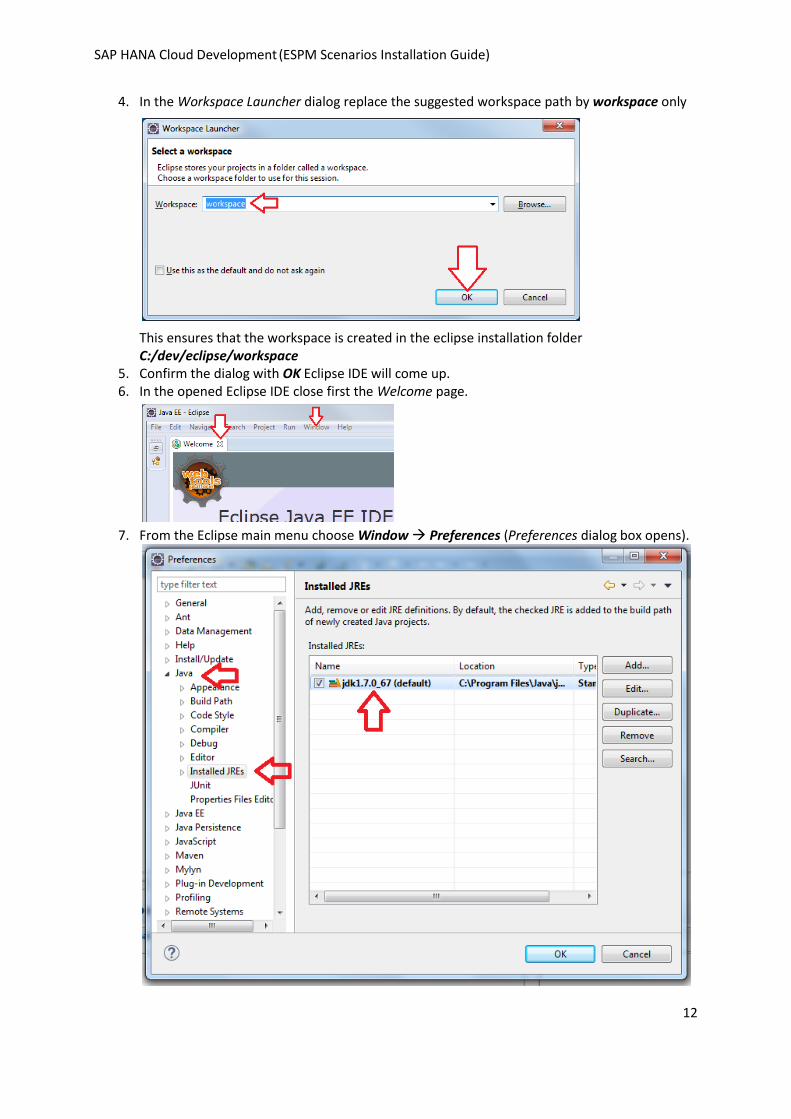
1. Download Eclipse IDE for Java EE Developers Luna (4.4) package from here http://www.eclipse.org/downloads/ Download for Windows 64 Bit
2. Extract the archive to C:/dev.
3. Execute C:/dev/eclipse/eclipse.exe (Workspace Launcher dialog box opens).
Optional Information: Eclipse installation notes
Make sure that Eclipse has write access to its installation location. If you have installed it under Program Files, you might have to run it as an administrator. Otherwise, you may receive strange error messages
During the SAP HANA Cloud Developer Account creation an SCN user account has been created with which you can deploy your Web applications to your SAP HANA Cloud Trial developer account. But you can also log on to SAP Community Network where e.g. developers share their knowledge or ask questions in the SCN Developer Center
SAP HANA Cloud Development (ESPM Scenarios Installation Guide)
12
4. In the Workspace Launcher dialog replace the suggested workspace path by workspace only
This ensures that the workspace is created in the eclipse installation folder C:/dev/eclipse/workspace
5. Confirm the dialog with OK Eclipse IDE will come up. 6. In the opened Eclipse IDE close first the Welcome page.
7. From the Eclipse main menu choose Window Preferences (Preferences dialog box opens).

SAP HANA Cloud Development (ESPM Scenarios Installation Guide)
13
8. Ensure you are using a JDK not a JRE (The reason is that the later used Maven in Eclipse tool need a Java SDK and will not work correctly with a Java JRE) Navigate to Java Installed JREs and ensure that the installed Java SDK 7 is selected as the Standard VM and NOT a JRE! If Java JDK is not yet selected, then proceed as follows:
a) Choose Add... b) Select Standard VM and choose Next c) In the JRE home field, choose Directory... d) Navigate to the location of your jdk7 (e.g. C:/Java/jdk1.7.0_67) and confirm with OK e) Select the checkbox of the jdk7 you just added (as shown in the screenshot above).
9. Then close the Preference dialog box with OK.
1.4 Eclipse SAP HANA Cloud Tools Installation
Make sure that Eclipse IDE is started and if a Welcome page is displayed, then close it. Configure Proxy Settings
1. From the Eclipse main menu, choose Window Preferences.
2. Choose General Network Connections to configure your proxy settings (either “non-proxy”
case 1 or “proxy” case 2). a) Case 1: Execute the following sub steps if you are not working in a network which uses a
proxy:
Select Direct as Active Provider
Choose OK.
In some operating systems, the path is Eclipse Preferences.
SAP HANA Cloud Development (ESPM Scenarios Installation Guide)
14
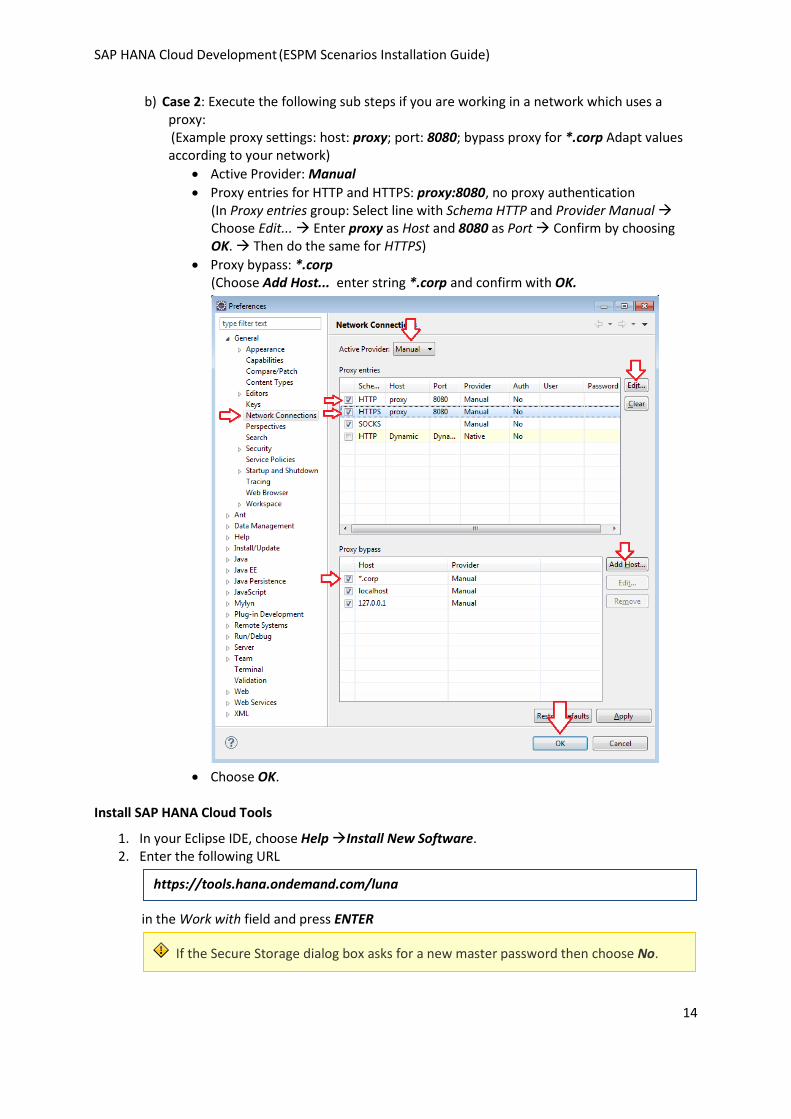
b) Case 2: Execute the following sub steps if you are working in a network which uses a proxy: (Example proxy settings: host: proxy; port: 8080; bypass proxy for *.corp Adapt values according to your network)
Active Provider: Manual
Proxy entries for HTTP and HTTPS: proxy:8080, no proxy authentication (In Proxy entries group: Select line with Schema HTTP and Provider Manual Choose Edit... Enter proxy as Host and 8080 as Port Confirm by choosing OK. Then do the same for HTTPS)
Proxy bypass: *.corp (Choose Add Host... enter string *.corp and confirm with OK.
Choose OK. Install SAP HANA Cloud Tools
1. In your Eclipse IDE, choose Help Install New Software. 2. Enter the following URL
in the Work with field and press ENTER
If the Secure Storage dialog box asks for a new master password then choose No.
https://tools.hana.ondemand.com/luna
SAP HANA Cloud Development (ESPM Scenarios Installation Guide)
15
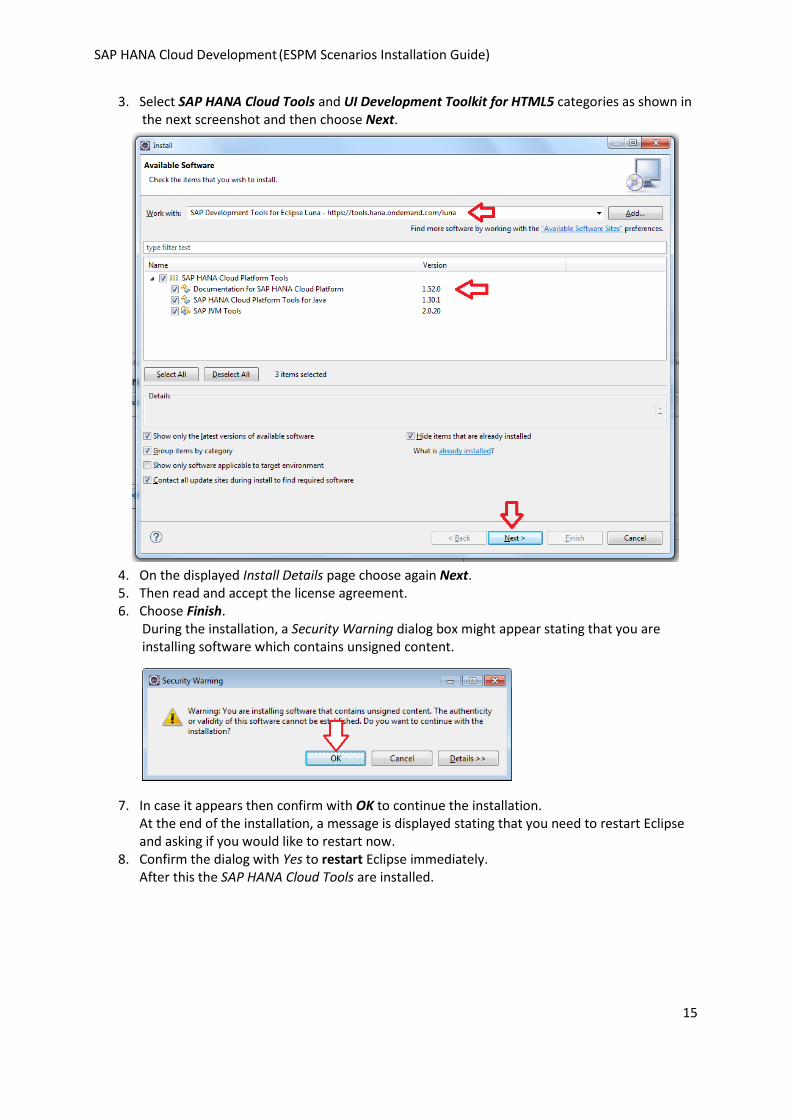
3. Select SAP HANA Cloud Tools and UI Development Toolkit for HTML5 categories as shown in the next screenshot and then choose Next.
4. On the displayed Install Details page choose again Next. 5. Then read and accept the license agreement. 6. Choose Finish.
During the installation, a Security Warning dialog box might appear stating that you are installing software which contains unsigned content.
7. In case it appears then confirm with OK to continue the installation.
At the end of the installation, a message is displayed stating that you need to restart Eclipse and asking if you would like to restart now.
8. Confirm the dialog with Yes to restart Eclipse immediately. After this the SAP HANA Cloud Tools are installed.

SAP HANA Cloud Development (ESPM Scenarios Installation Guide)
16
1.5 Eclipse SAP HANA Cloud SDK Installation
To install the newest SAP HANA Cloud SDK (1.x) on your system execute the following steps
1. Open https://tools.hana.ondemand.com
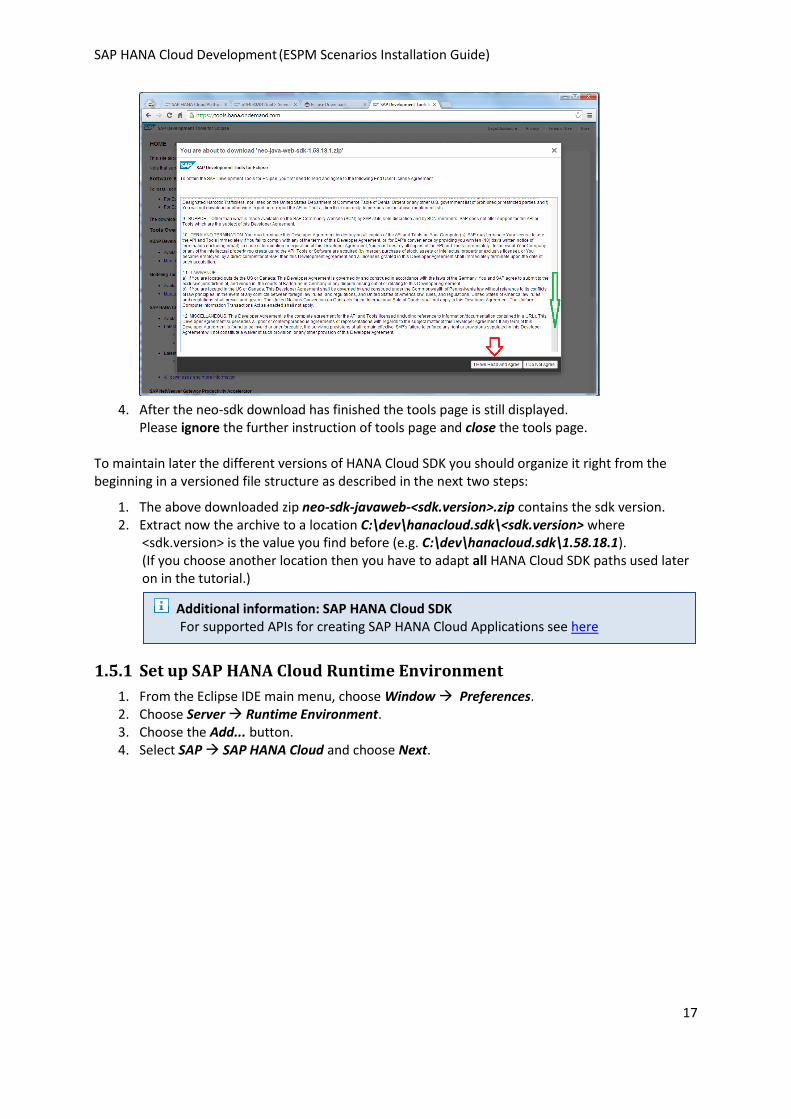
2. Click on neo-sdk-javaweb-<sdk.version>.zip link Before you are allowed to download the SDK you have to read and agree to the SAP Developer License agreement
3. Choose I Have Read And Agree to accept the SAP Developer License. After this the download of the SAP HANA Cloud SDK with zip name 'neo-sdk-<version>.zip' starts.
The version of neo-sdk-javaweb (technical short name for HANA Cloud SDK) displayed in the screenshot might already be higher. The tutorial should work with any higher version as well.
SAP HANA Cloud Development (ESPM Scenarios Installation Guide)
17
4. After the neo-sdk download has finished the tools page is still displayed.
Please ignore the further instruction of tools page and close the tools page. To maintain later the different versions of HANA Cloud SDK you should organize it right from the beginning in a versioned file structure as described in the next two steps:
1. The above downloaded zip neo-sdk-javaweb-<sdk.version>.zip contains the sdk version. 2. Extract now the archive to a location C:\dev\hanacloud.sdk\<sdk.version> where
<sdk.version> is the value you find before (e.g. C:\dev\hanacloud.sdk\1.58.18.1). (If you choose another location then you have to adapt all HANA Cloud SDK paths used later on in the tutorial.)
1.5.1 Set up SAP HANA Cloud Runtime Environment
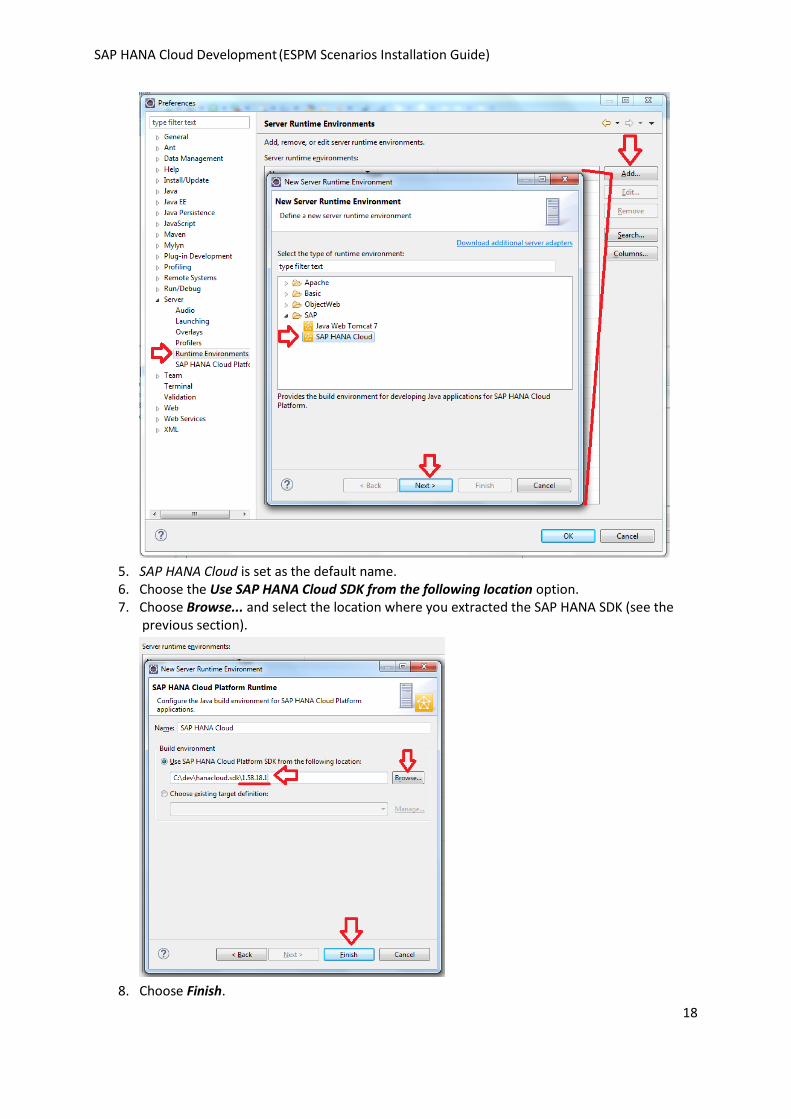
1. From the Eclipse IDE main menu, choose Window Preferences. 2. Choose Server Runtime Environment. 3. Choose the Add... button. 4. Select SAP SAP HANA Cloud and choose Next.
Additional information: SAP HANA Cloud SDK For supported APIs for creating SAP HANA Cloud Applications see here
SAP HANA Cloud Development (ESPM Scenarios Installation Guide)
18
5. SAP HANA Cloud is set as the default name. 6. Choose the Use SAP HANA Cloud SDK from the following location option. 7. Choose Browse... and select the location where you extracted the SAP HANA SDK (see the
previous section).
8. Choose Finish.
SAP HANA Cloud Development (ESPM Scenarios Installation Guide)
19
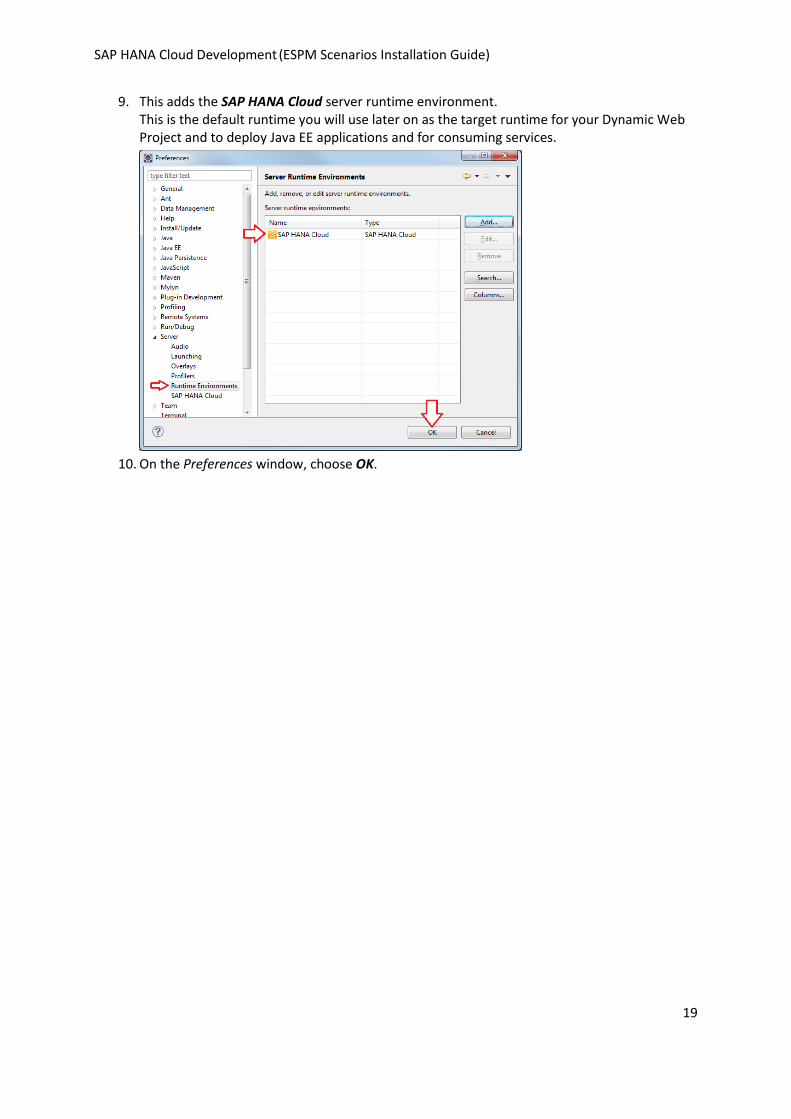
9. This adds the SAP HANA Cloud server runtime environment. This is the default runtime you will use later on as the target runtime for your Dynamic Web Project and to deploy Java EE applications and for consuming services.
10. On the Preferences window, choose OK.
SAP HANA Cloud Development (ESPM Scenarios Installation Guide)
20
1.6 Maven Integration for Eclipse Installation
1.6.1 Maven Usage
Is Apache Maven Mandatory for this End-to-End Scenario?
Java EE-based SAP HANA Cloud Application development is still possible without Maven build technology, even though this may result in many more manual steps to find the necessary libraries. This is not demonstrated in this tutorial but Maven is used instead.
You can execute the Maven-related build steps in the tutorial without knowing any details of Maven. If you want to learn more about Maven, see http://maven.apache.org
Optional Information: Why using Apache Maven here
Developers may have seen how easily the SAP HANA Cloud platform works for the simplest Java EE applications (for an example, see the Hello World or the Hello World extended with JPA Persistence tutorials). Create a dynamic Web project, add a few JAR files to the WEB-INF/lib, specify the SAP HANA Cloud runtime (Local Server or Cloud) as API, publish the application to the server manually via Eclipse Tools and see finally how the application works by manually starting and using it in a Web browser.
This gives an initial impression of how Java EE-based development and SAP HANA Cloud work smoothly together. But what if the Java EE application to be developed becomes more complex? In that case developers need the following:
1. Dependencies/versions management support for the libraries used. 2. Automatic builds to set up continuous integration 3. Automated integration tests to ensure high quality software.
This cannot be achieved with the large number of manual steps seen in the initial simple application tutorials.
This is where Apache Maven as a build technology comes in. (Note, that you are not restricted to using this build tool, however. Apache Maven was chosen as it has been widely adopted but the principles apply equally to other build systems.) Maven as introduced here in the end-to-end scenario will show:
1. How the required and specified library/jar dependencies in a pom.xml will resolve the dependent jar files automatically. These dependent jar files are copied during the Maven build in the WEB-INF/lib of the developed Java EE-based application.
2. How a headless build and test can be completely automated. Maven could not only help resolve the dependencies that are required and put them in the right location in your Java EE application, it can also automate the build and test it
SAP HANA Cloud Development (ESPM Scenarios Installation Guide)
21
1.6.2 Maven Integration for Eclipse Configuration Steps
To build Java EE application projects from Eclipse IDE using Apache Maven, you can use the Maven Integration tools for Eclipse, which are by default part of the before installed Eclipse IDE for Java EE Developers Kepler (4.3.1) SR1 package.
These consist of the Maven-Eclipse integration and the Maven-Eclipse-WTP (Web Tools Platform) integration, which provide a bridge between Maven, Eclipse and the WTP tooling.
To work with the Maven integration tool you need to configure it as follows
Configure Maven The following Maven configuration steps ensure that access to the public Central Maven Repository (where all most of the artifacts, i.e. jar files, libraries, etc. needed for build are stored) is enabled, and that the additional repositories which are defined in the pom.xml of subsequently created projects can be accessed.
Maven User Settings
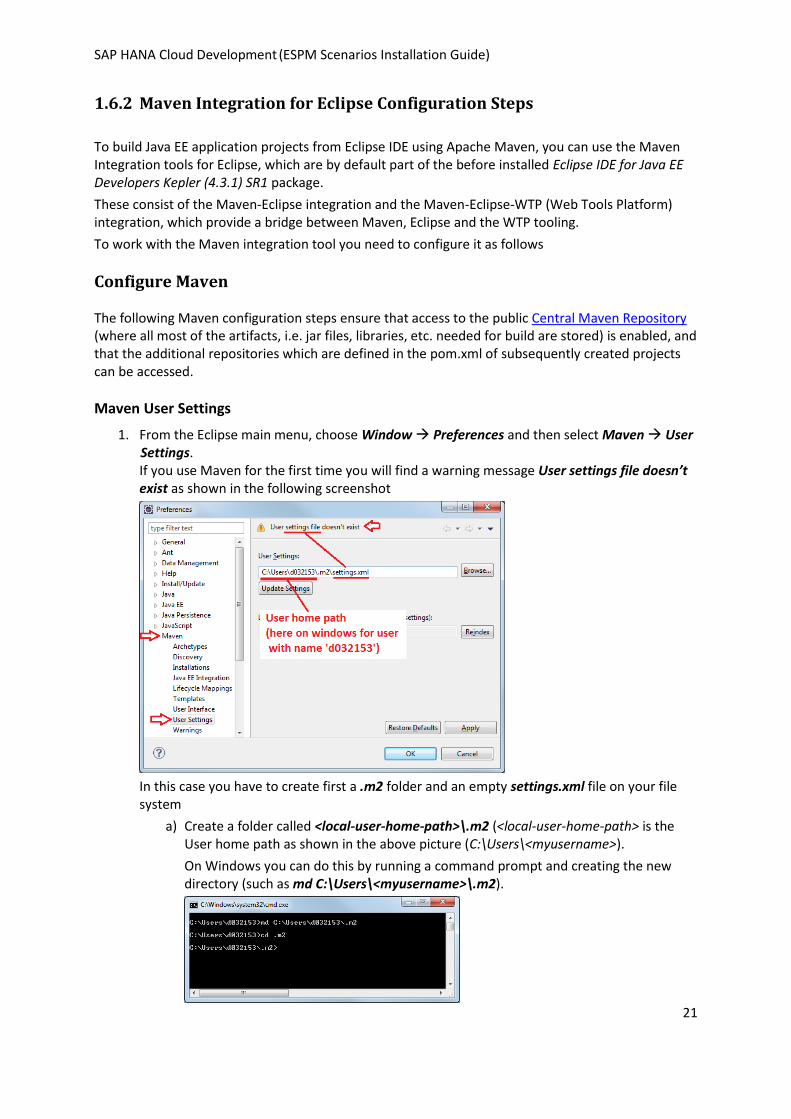
1. From the Eclipse main menu, choose Window Preferences and then select Maven User Settings. If you use Maven for the first time you will find a warning message User settings file doesn’t exist as shown in the following screenshot
In this case you have to create first a .m2 folder and an empty settings.xml file on your file system
a) Create a folder called <local-user-home-path>\.m2 (<local-user-home-path> is the User home path as shown in the above picture (C:\Users\<myusername>).
On Windows you can do this by running a command prompt and creating the new directory (such as md C:\Users\<myusername>\.m2).
SAP HANA Cloud Development (ESPM Scenarios Installation Guide)
22
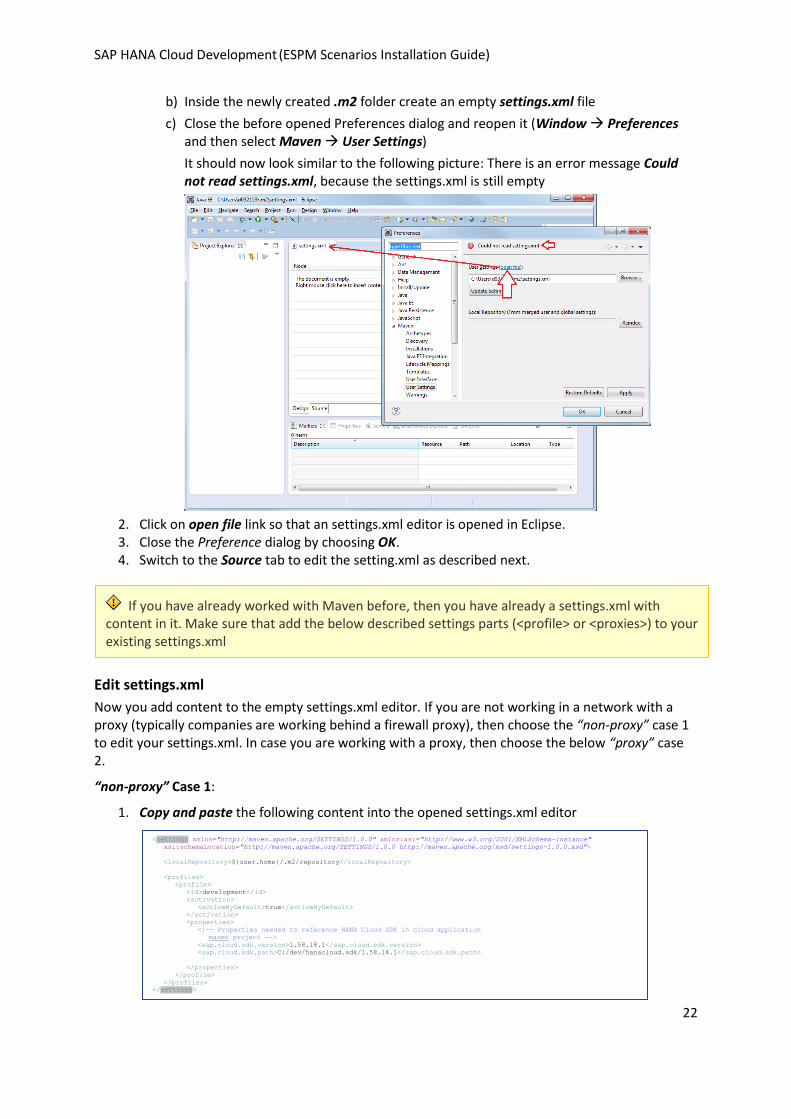
b) Inside the newly created .m2 folder create an empty settings.xml file
c) Close the before opened Preferences dialog and reopen it (Window Preferences and then select Maven User Settings)
It should now look similar to the following picture: There is an error message Could not read settings.xml, because the settings.xml is still empty
2. Click on open file link so that an settings.xml editor is opened in Eclipse. 3. Close the Preference dialog by choosing OK. 4. Switch to the Source tab to edit the setting.xml as described next.
Edit settings.xml
Now you add content to the empty settings.xml editor. If you are not working in a network with a proxy (typically companies are working behind a firewall proxy), then choose the “non-proxy” case 1 to edit your settings.xml. In case you are working with a proxy, then choose the below “proxy” case 2.
“non-proxy” Case 1:
1. Copy and paste the following content into the opened settings.xml editor
If you have already worked with Maven before, then you have already a settings.xml with content in it. Make sure that add the below described settings parts (<profile> or <proxies>) to your existing settings.xml
<settings xmlns="http://maven.apache.org/SETTINGS/1.0.0" xmlns:xsi="http://www.w3.org/2001/XMLSchema-instance"
xsi:schemaLocation="http://maven.apache.org/SETTINGS/1.0.0 http://maven.apache.org/xsd/settings-1.0.0.xsd">
<localRepository>${user.home}/.m2/repository</localRepository>
<profiles>
<profile>
<id>development</id>
<activation>
<activeByDefault>true</activeByDefault>
</activation>
<properties>
<!-- Properties needed to reference HANA Cloud SDK in cloud application
maven project -->
<sap.cloud.sdk.version>1.58.18.1</sap.cloud.sdk.version>
<sap.cloud.sdk.path>C:/dev/hanacloud.sdk/1.58.18.1</sap.cloud.sdk.path>
</properties>
</profile>
</profiles>
</settings>
SAP HANA Cloud Development (ESPM Scenarios Installation Guide)
23
2. Configure the copied content The property values defined in the properties section needs to be adapted to your development environment (location paths of artifacts like Eclipse, SDK, etc. and corresponding versions) Check all below properties step by step and if needed change the corresponding value in settings.xml.
1. sap.cloud.sdk.path and sap.cloud.sdk.version: In installation section 1.5 you already learned how to determine the version of the downloaded HANA Cloud SDK. Change value sap.cloud.sdk.version accordingly. Default path according to neo SDK installation section is C:/dev/hanacloud.sdk/<sdk.version>. Adapt if necessary.
3. Save settings.xml editor
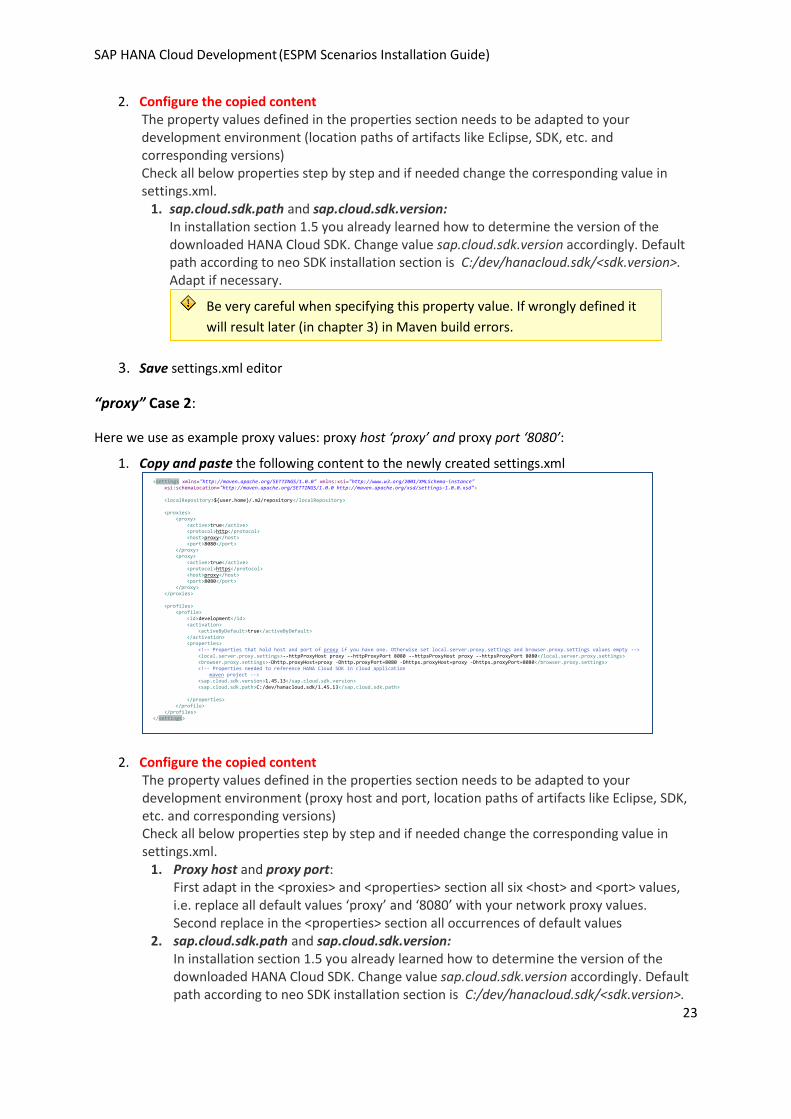
“proxy” Case 2:
Here we use as example proxy values: proxy host ‘proxy’ and proxy port ‘8080’:
1. Copy and paste the following content to the newly created settings.xml
2. Configure the copied content The property values defined in the properties section needs to be adapted to your development environment (proxy host and port, location paths of artifacts like Eclipse, SDK, etc. and corresponding versions) Check all below properties step by step and if needed change the corresponding value in settings.xml.
1. Proxy host and proxy port: First adapt in the <proxies> and <properties> section all six <host> and <port> values, i.e. replace all default values ‘proxy’ and ‘8080’ with your network proxy values. Second replace in the <properties> section all occurrences of default values
2. sap.cloud.sdk.path and sap.cloud.sdk.version: In installation section 1.5 you already learned how to determine the version of the downloaded HANA Cloud SDK. Change value sap.cloud.sdk.version accordingly. Default path according to neo SDK installation section is C:/dev/hanacloud.sdk/<sdk.version>.
Be very careful when specifying this property value. If wrongly defined it
will result later (in chapter 3) in Maven build errors.
<settings xmlns="http://maven.apache.org/SETTINGS/1.0.0" xmlns:xsi="http://www.w3.org/2001/XMLSchema-instance" xsi:schemaLocation="http://maven.apache.org/SETTINGS/1.0.0 http://maven.apache.org/xsd/settings-1.0.0.xsd"> <localRepository>${user.home}/.m2/repository</localRepository> <proxies> <proxy> <active>true</active> <protocol>http</protocol> <host>proxy</host> <port>8080</port> </proxy> <proxy> <active>true</active> <protocol>https</protocol> <host>proxy</host> <port>8080</port> </proxy> </proxies> <profiles> <profile> <id>development</id> <activation> <activeByDefault>true</activeByDefault> </activation> <properties> <!-- Properties that hold host and port of proxy if you have one. Otherwise set local.server.proxy.settings and browser.proxy.settings values empty --> <local.server.proxy.settings>--httpProxyHost proxy --httpProxyPort 8080 --httpsProxyHost proxy --httpsProxyPort 8080</local.server.proxy.settings> <browser.proxy.settings>-Dhttp.proxyHost=proxy -Dhttp.proxyPort=8080 -Dhttps.proxyHost=proxy -Dhttps.proxyPort=8080</browser.proxy.settings> <!-- Properties needed to reference HANA Cloud SDK in cloud application maven project --> <sap.cloud.sdk.version>1.45.13</sap.cloud.sdk.version> <sap.cloud.sdk.path>C:/dev/hanacloud.sdk/1.45.13</sap.cloud.sdk.path> </properties> </profile> </profiles> </settings>
SAP HANA Cloud Development (ESPM Scenarios Installation Guide)
24
Adapt if necessary.
3. Save settings.xml editor.
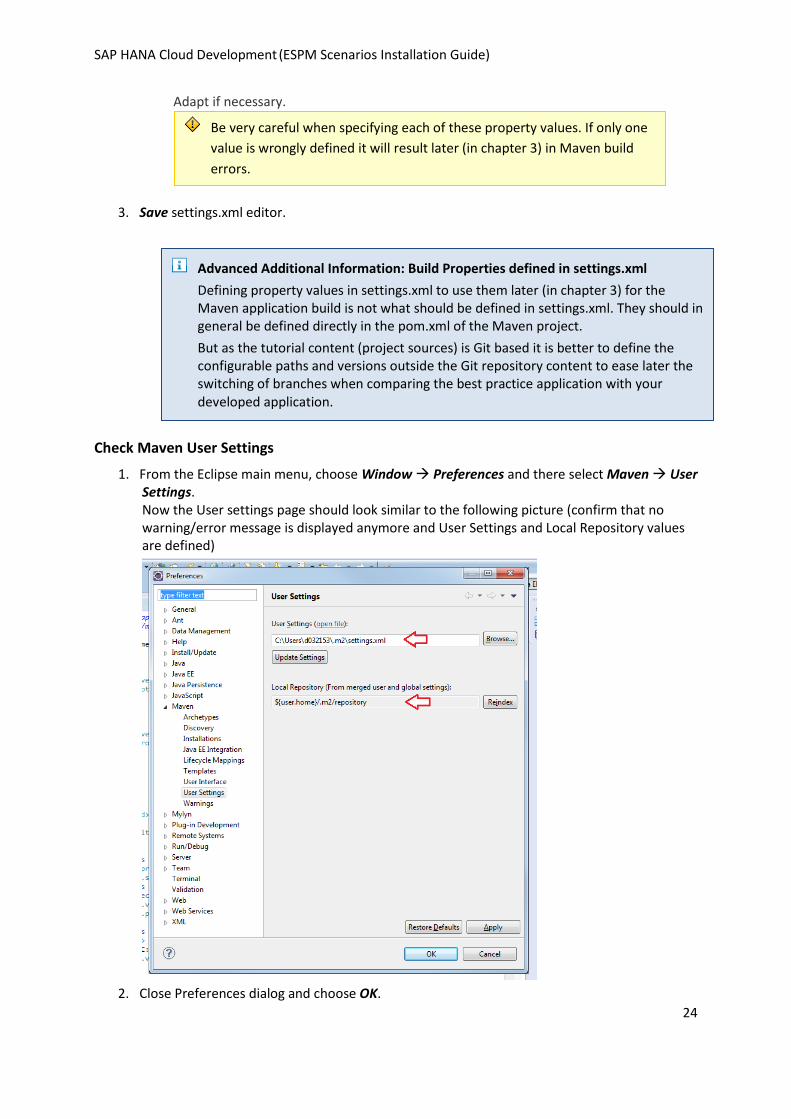
Check Maven User Settings
1. From the Eclipse main menu, choose Window Preferences and there select Maven User Settings. Now the User settings page should look similar to the following picture (confirm that no warning/error message is displayed anymore and User Settings and Local Repository values are defined)
2. Close Preferences dialog and choose OK.
Advanced Additional Information: Build Properties defined in settings.xml
Defining property values in settings.xml to use them later (in chapter 3) for the Maven application build is not what should be defined in settings.xml. They should in general be defined directly in the pom.xml of the Maven project.
But as the tutorial content (project sources) is Git based it is better to define the configurable paths and versions outside the Git repository content to ease later the switching of branches when comparing the best practice application with your developed application.
Be very careful when specifying each of these property values. If only one
value is wrongly defined it will result later (in chapter 3) in Maven build
errors.
SAP HANA Cloud Development (ESPM Scenarios Installation Guide)
25
Verify Maven settings by building a Maven Project Because it is crucial for working with the tutorial Example applications you will create a simple Maven project and verify that the Maven build with the specified settings.xml works.
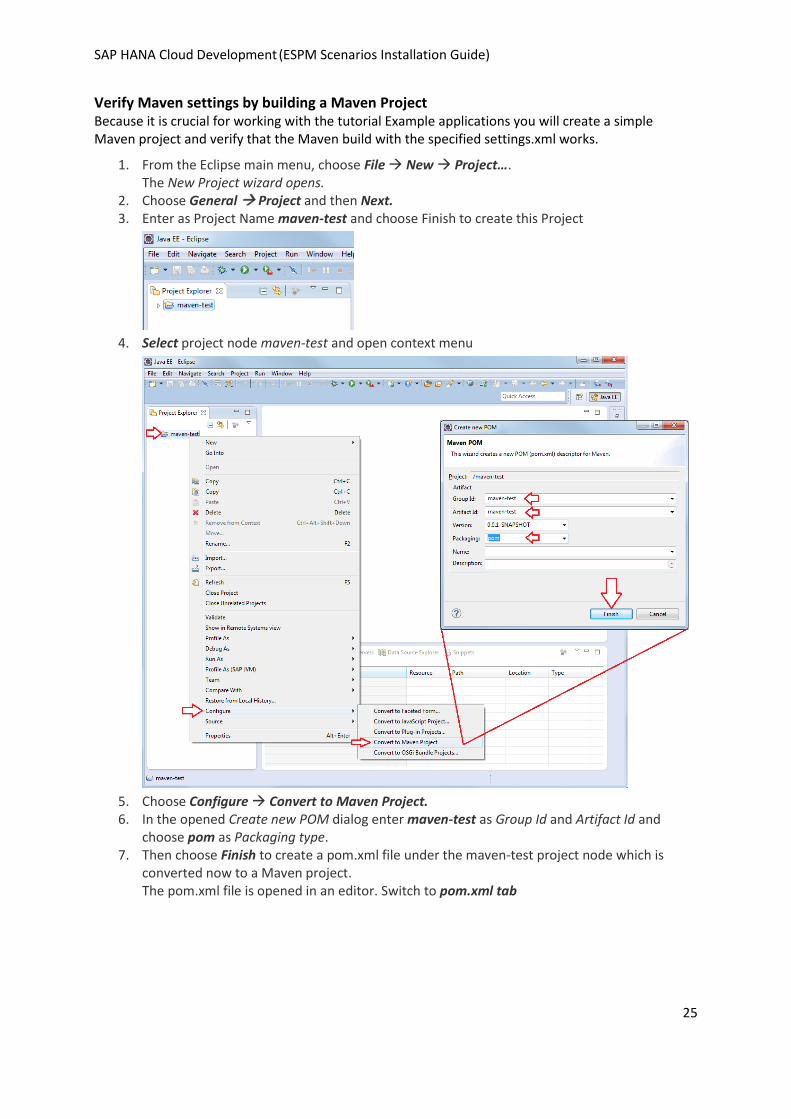
1. From the Eclipse main menu, choose File New Project…. The New Project wizard opens.
2. Choose General Project and then Next. 3. Enter as Project Name maven-test and choose Finish to create this Project
4. Select project node maven-test and open context menu
5. Choose Configure Convert to Maven Project. 6. In the opened Create new POM dialog enter maven-test as Group Id and Artifact Id and
choose pom as Packaging type. 7. Then choose Finish to create a pom.xml file under the maven-test project node which is
converted now to a Maven project. The pom.xml file is opened in an editor. Switch to pom.xml tab
SAP HANA Cloud Development (ESPM Scenarios Installation Guide)
26
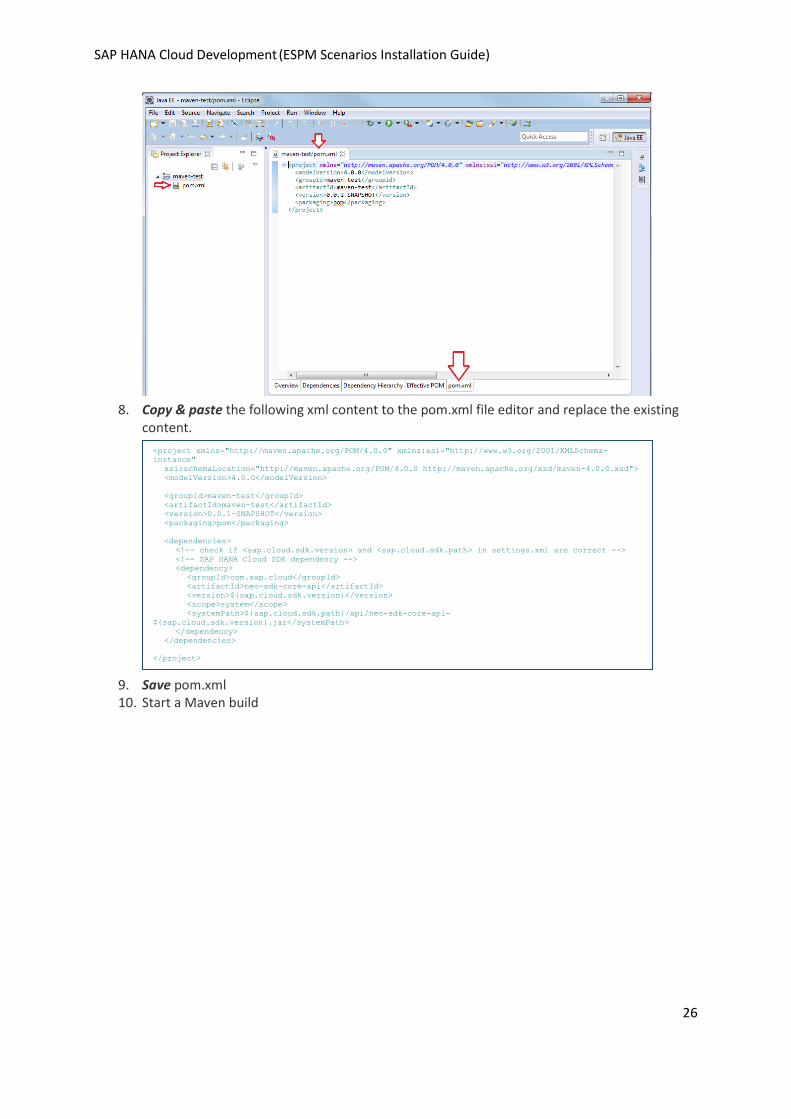
8. Copy & paste the following xml content to the pom.xml file editor and replace the existing
content.
9. Save pom.xml 10. Start a Maven build
<project xmlns="http://maven.apache.org/POM/4.0.0" xmlns:xsi="http://www.w3.org/2001/XMLSchema-
instance"
xsi:schemaLocation="http://maven.apache.org/POM/4.0.0 http://maven.apache.org/xsd/maven-4.0.0.xsd">
<modelVersion>4.0.0</modelVersion>
<groupId>maven-test</groupId>
<artifactId>maven-test</artifactId>
<version>0.0.1-SNAPSHOT</version>
<packaging>pom</packaging>
<dependencies>
<!-- check if <sap.cloud.sdk.version> and <sap.cloud.sdk.path> in settings.xml are correct -->
<!-- SAP HANA Cloud SDK dependency -->
<dependency>
<groupId>com.sap.cloud</groupId>
<artifactId>neo-sdk-core-api</artifactId>
<version>${sap.cloud.sdk.version}</version>
<scope>system</scope>
<systemPath>${sap.cloud.sdk.path}/api/neo-sdk-core-api-
${sap.cloud.sdk.version}.jar</systemPath>
</dependency>
</dependencies>
</project>
SAP HANA Cloud Development (ESPM Scenarios Installation Guide)
27
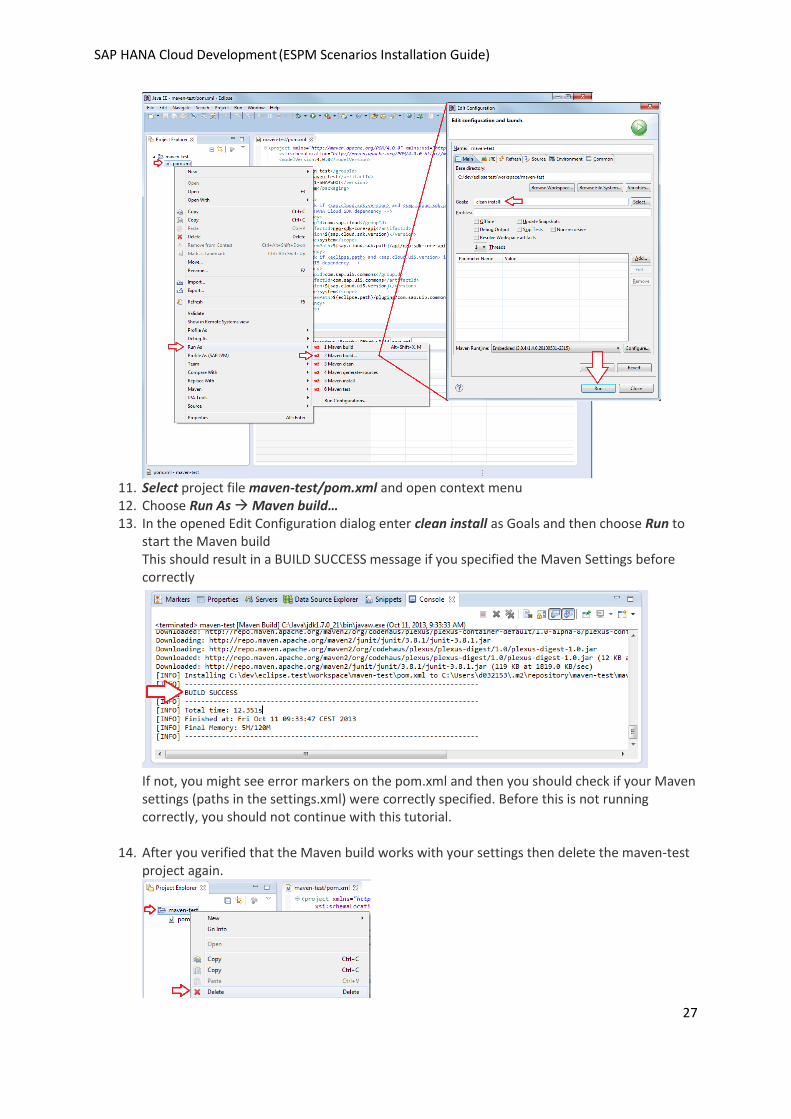
11. Select project file maven-test/pom.xml and open context menu 12. Choose Run As Maven build… 13. In the opened Edit Configuration dialog enter clean install as Goals and then choose Run to
start the Maven build This should result in a BUILD SUCCESS message if you specified the Maven Settings before correctly
If not, you might see error markers on the pom.xml and then you should check if your Maven settings (paths in the settings.xml) were correctly specified. Before this is not running correctly, you should not continue with this tutorial.
14. After you verified that the Maven build works with your settings then delete the maven-test
project again.

SAP HANA Cloud Development (ESPM Scenarios Installation Guide)
28
With these steps you have finished verifying that your Maven settings are correct so that you can build later the ESPM and other Maven based SAP HANA Cloud application projects.
Later in this installation guide it is described how to build the ESPM applications. In the more detailed ESPM application tutorials (see chapter 4) you use this build technology to run their integration tests with Maven Eclipse tools.
1.7 EGit Verification
EGit, the Eclipse tooling for working with Git repositories is required, in order to download and work with the ready-to-use sample application. EGit packages are by default part of the before installed Eclipse IDE for Java EE Developers Luna (4.4) package. If you are unsure click Help -> About Eclipse
EGit should be included by default.
In case you are not able to find EGit you can follow the below steps to install it in your Eclipse.
EGit Installation Steps
SAP HANA Cloud Development (ESPM Scenarios Installation Guide)
29
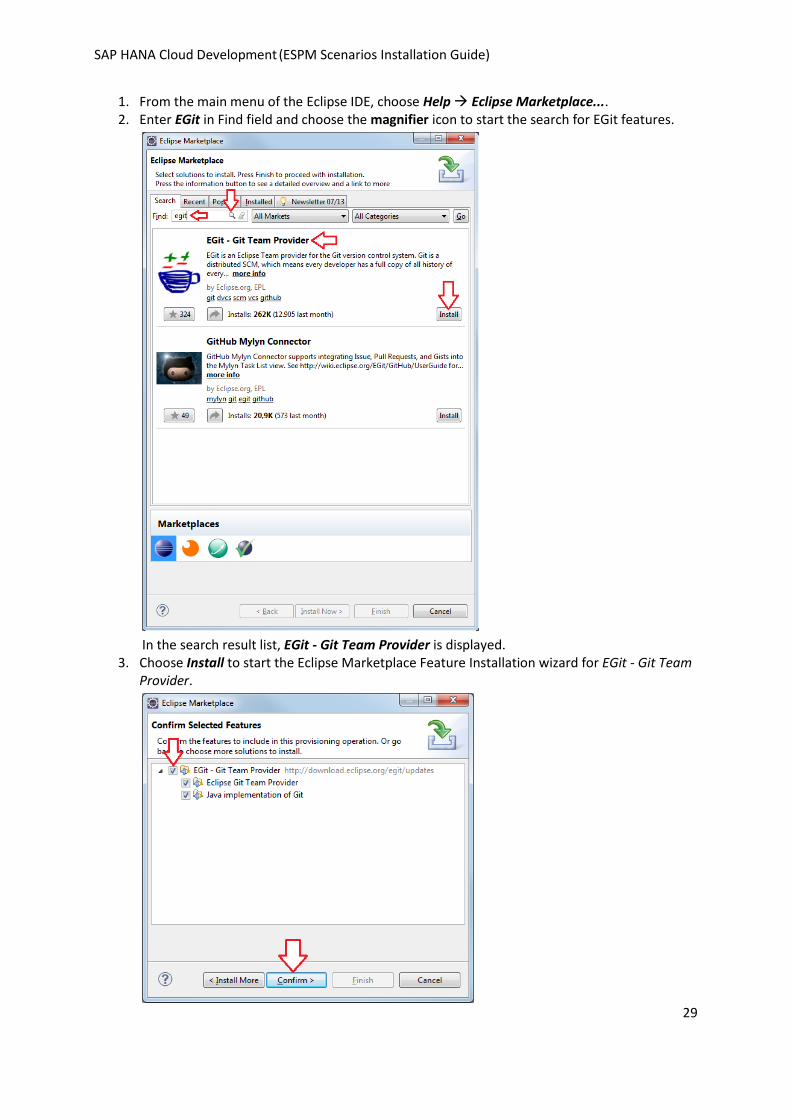
1. From the main menu of the Eclipse IDE, choose Help Eclipse Marketplace.... 2. Enter EGit in Find field and choose the magnifier icon to start the search for EGit features.
In the search result list, EGit - Git Team Provider is displayed.
3. Choose Install to start the Eclipse Marketplace Feature Installation wizard for EGit - Git Team Provider.
SAP HANA Cloud Development (ESPM Scenarios Installation Guide)
30
4. Choose Confirm > and on the next wizard page choose again Confirm >. 5. Read and accept the license agreement. 6. Choose Finish.
At the end of the installation there is a message stating that you need to restart Eclipse and asking if you would like to restart now.
7. Confirm the dialog with Yes to restart Eclipse. 8. Restart the Eclipse IDE.
The new EGit feature is installed.
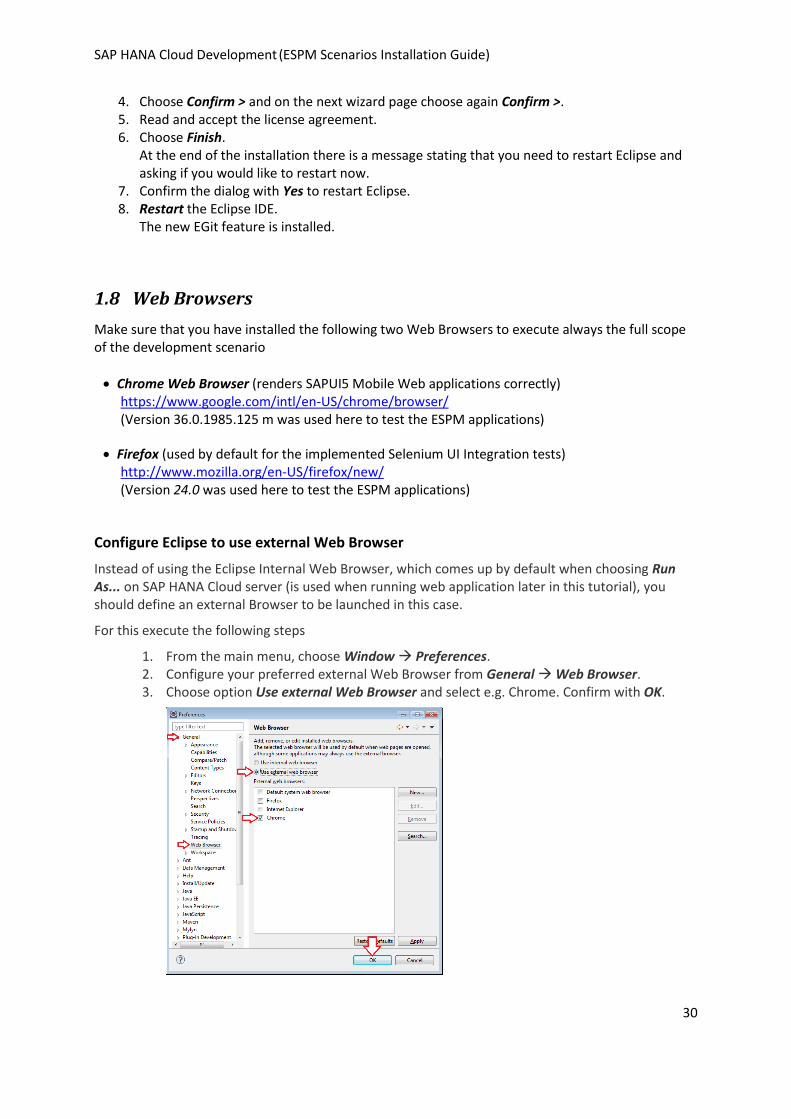
1.8 Web Browsers
Make sure that you have installed the following two Web Browsers to execute always the full scope of the development scenario
Chrome Web Browser (renders SAPUI5 Mobile Web applications correctly) https://www.google.com/intl/en-US/chrome/browser/ (Version 36.0.1985.125 m was used here to test the ESPM applications)
Firefox (used by default for the implemented Selenium UI Integration tests) http://www.mozilla.org/en-US/firefox/new/ (Version 24.0 was used here to test the ESPM applications)
Configure Eclipse to use external Web Browser
Instead of using the Eclipse Internal Web Browser, which comes up by default when choosing Run As... on SAP HANA Cloud server (is used when running web application later in this tutorial), you should define an external Browser to be launched in this case.
For this execute the following steps
1. From the main menu, choose Window Preferences. 2. Configure your preferred external Web Browser from General Web Browser. 3. Choose option Use external Web Browser and select e.g. Chrome. Confirm with OK.

SAP HANA Cloud Development (ESPM Scenarios Installation Guide)
31
2 ESPM Applications - Sources & Eclipse Projects
In this chapter you will download the ESPM Application sources into a local Git Repository and then you import the corresponding projects into your Eclipse workspace.
Download ready-to-run ESPM Application sources (section 2.1)
Import ready-to-run ESPM Application projects into your Eclipse (section 2.2)
After you executed the chapter 1 you have the necessary tools, programs, account installed and configured to execute this Getting Started tutorial, but check also the following note.
2.1 Download ready-to-run ESPM Applications sources
SAP Developers GitHub is the location where you can download many example sources for SAP HANA DB, SAP HANA Cloud and SAP Mobile related technologies. From there you will get also the ESPM Applications sources as described with the following steps:
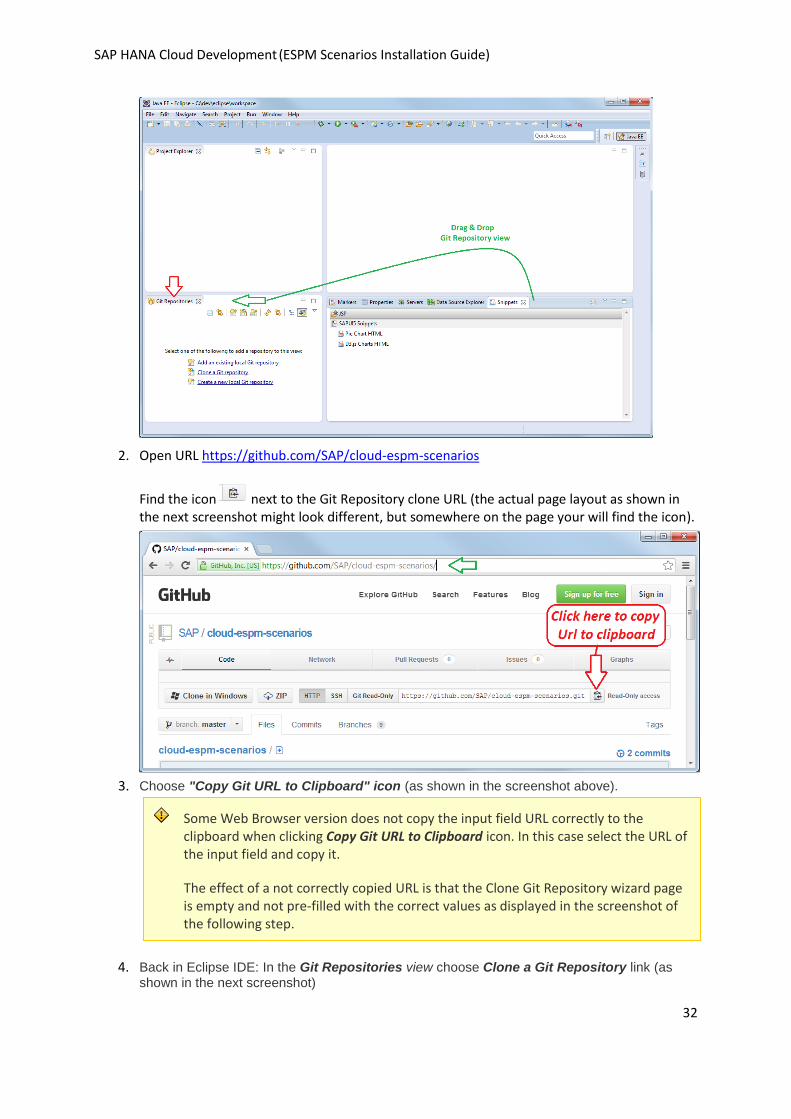
1. Open Git Repositories view. Eclipse main menu, choose Window Show View Other...; On the opened Show View select Git Git Repositories and confirm with OK to open the view. In the following screenshot Git Repositories View was dragged and dropped under the Project Explorer view.
Make sure that you have …
1. … at least neo-sdk version 1.58.18.1 downloaded
before running this tutorial.
To 1) Check your installed neo-sdk version by navigating to C:/hanacloud.sdk/<sdk.version> according to section 1.5. If you have to download a newer version then adjust the neo-sdk version values in your settings.xml file according to section 1.6.
SAP HANA Cloud Development (ESPM Scenarios Installation Guide)
32
2. Open URL https://github.com/SAP/cloud-espm-scenarios
Find the icon next to the Git Repository clone URL (the actual page layout as shown in the next screenshot might look different, but somewhere on the page your will find the icon).
3. Choose "Copy Git URL to Clipboard" icon (as shown in the screenshot above).
4. Back in Eclipse IDE: In the Git Repositories view choose Clone a Git Repository link (as shown in the next screenshot)
Some Web Browser version does not copy the input field URL correctly to the clipboard when clicking Copy Git URL to Clipboard icon. In this case select the URL of the input field and copy it.
The effect of a not correctly copied URL is that the Clone Git Repository wizard page is empty and not pre-filled with the correct values as displayed in the screenshot of the following step.

SAP HANA Cloud Development (ESPM Scenarios Installation Guide)
33
This opens the Clone Git Repository wizard where the three fields URI, Host and Repository path are already pre-filled with the correct values (due to the copy to clipboard action before).
5. Choose Next and make sure all branches (master, scenario-mobileshop, scenario-webshop, etc.) nodes are selected.
6. Choose Next

SAP HANA Cloud Development (ESPM Scenarios Installation Guide)
34
7. Specify a directory where you want to download the cloud-espm-scenarios Git repository
We suggest to use C:\dev\git\ (which is named in the following as <local-gitrepo-path>) 8. Keep the other default settings and choose Finish
This will create a node cloud-espm-scenarios[master] in your Eclipse Git Repositories view.
With these steps you have downloaded the ready-to-run ESPM sources as Git Repository to your local
computer and you can start working with it.
2.1.1 Contents of the downloaded cloud-esmp-scenarios Git Repository
In the Git Repositories view you see that the Local/master branch is checked out indicated by the
checked decorator.

SAP HANA Cloud Development (ESPM Scenarios Installation Guide)
35
The contents of this Local master branch correspond to the Remote Tracking branch origin/master of
the remote SAP Developers GitHub Repository.
The master branch contains the sources of all ESPM scenarios whereas other branches only contain a
certain ESPM scenario or certain step of a scenario; e.g. scenario-mobileshop branch only contains
the sources which are relevant for the ESPM mobile scenario.
ESPM Sources on file system:
At location <local-path-to-espm-scenarios-git>/cloud-espm-scenarios you find in your file system
explorer folders which contain the different kind of ESPM scenario sources:
espm-cloud-jpa and espm-cloud-web (WebShop sources)
espm-mobile-shopping (MobileShopping sources)
espm-ui-reviews-jpa and espm-ui-reviews-web (WebShop Extension sources))
Corresponding to the three main scenarios (MobileShopping, WebShop and WebShop Extension) you
find in Eclipse Git Repository view of the cloud-espm-scenario repository three main remote "scenario"
branches
origin/scenario-mobileshop
origin/scenario-webshop
origin/scenario-webshop-extension

SAP HANA Cloud Development (ESPM Scenarios Installation Guide)
36
A checked out branch corresponds to certain scenario project sources.
If you check out e.g. the branch scenario-webshop then you will get only the sources relevant for the
ESPM WebShop application scenario. In the next section you learn how to check out a branch by
means of the scenario-webshop branch.
2.1.2 Steps to check out the scenario-webshop
Execute the following steps to check out the scenario-webshop branch which contain the sources of
the ESPM WebShop scenario only.
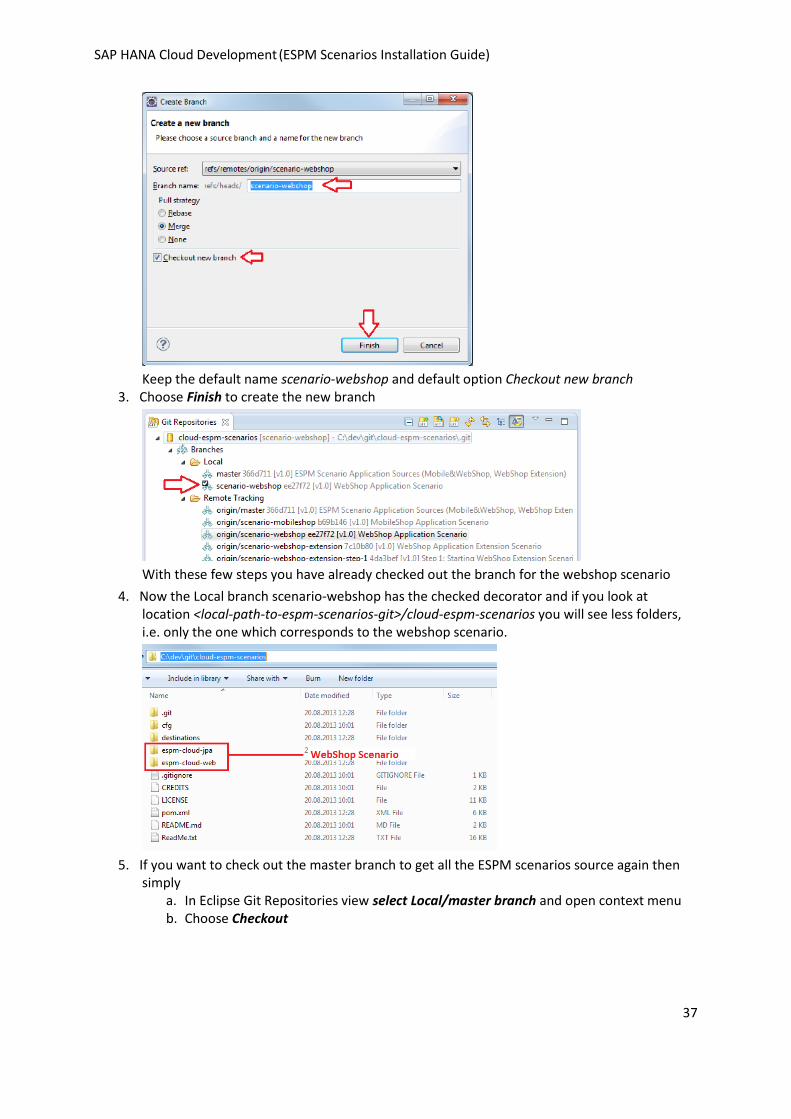
1. Select Remote Tracking branch origin/scenario-webshop and open context menu
2. Choose Create Branch...
SAP HANA Cloud Development (ESPM Scenarios Installation Guide)
37
Keep the default name scenario-webshop and default option Checkout new branch
3. Choose Finish to create the new branch
With these few steps you have already checked out the branch for the webshop scenario
4. Now the Local branch scenario-webshop has the checked decorator and if you look at location <local-path-to-espm-scenarios-git>/cloud-espm-scenarios you will see less folders, i.e. only the one which corresponds to the webshop scenario.
5. If you want to check out the master branch to get all the ESPM scenarios source again then
simply a. In Eclipse Git Repositories view select Local/master branch and open context menu b. Choose Checkout

SAP HANA Cloud Development (ESPM Scenarios Installation Guide)
38
In the same way as you checked out the scenarios-webshop branch above you can now check out
other scenario branches, e.g. the scenario-mobileshop branch, where you would get the ESPM
MobileShop application scenario sources.
The webshop-extension scenario has more branches with added suffix "step-1", "step-2", etc. These
"step" branches correspond to the sources of a certain step of the corresponding WebShop
Extension tutorial published on http://scn.sap.com/community/developer-center/cross-technology.
So far you’ve learned a bit about the downloaded cloud-espm-scenarios Git Repository source
structure and how to check out certain scenarios branches which corresponds to the source contents
of corresponding ESPM scenarios.
In the next section it is described how you import ESPM scenarios projects of a checked out branch.
2.2 Import ESPM Applications projects into your Eclipse
In your Eclipse Git Repositories view navigate to cloud-espm-scenarios/Branch/Local and make sure
that the master branch is checked out as explained in the before section 2.1
In short (if master branch has not checked out yet):
Check out master branch by double click on Local/master node
Import master branch ESPM Application Projects
All ESPM Applications are based on Maven so that you will import them as Maven Projects into your
Eclipse as described with the following steps.
SAP HANA Cloud Development (ESPM Scenarios Installation Guide)
39
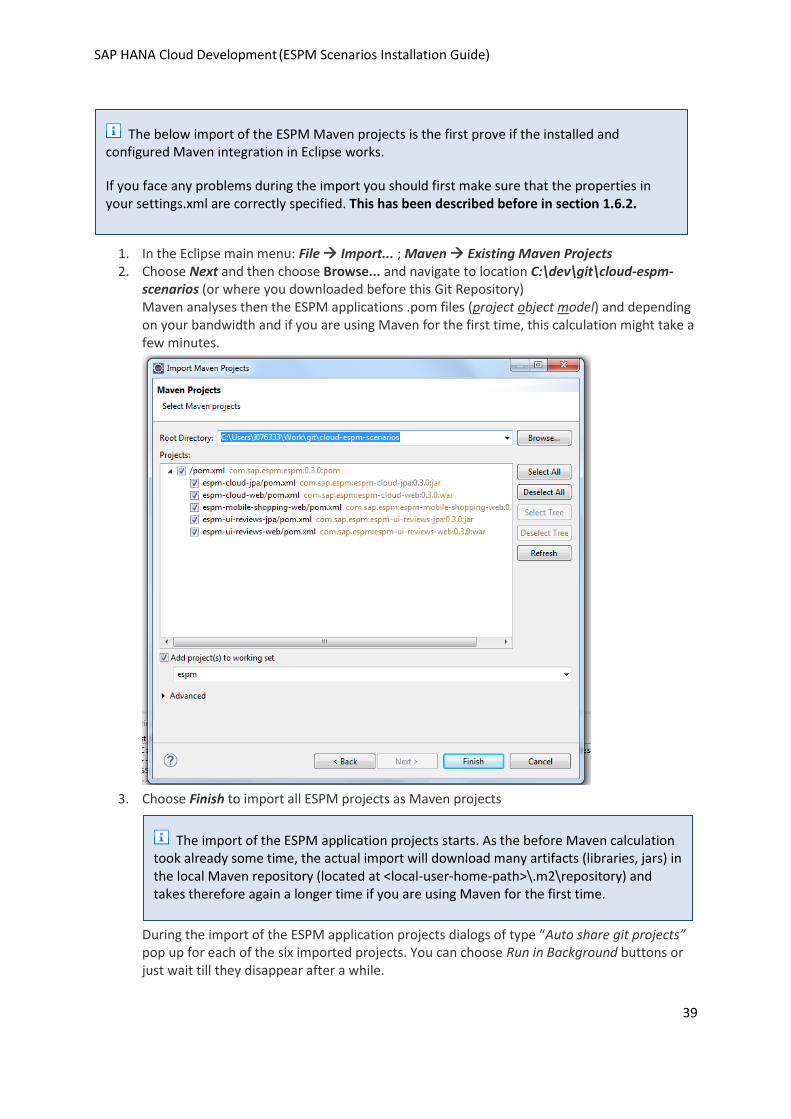
1. In the Eclipse main menu: File Import... ; Maven Existing Maven Projects 2. Choose Next and then choose Browse... and navigate to location C:\dev\git\cloud-espm-
scenarios (or where you downloaded before this Git Repository) Maven analyses then the ESPM applications .pom files (project object model) and depending on your bandwidth and if you are using Maven for the first time, this calculation might take a few minutes.
3. Choose Finish to import all ESPM projects as Maven projects
During the import of the ESPM application projects dialogs of type “Auto share git projects” pop up for each of the six imported projects. You can choose Run in Background buttons or just wait till they disappear after a while.
The import of the ESPM application projects starts. As the before Maven calculation took already some time, the actual import will download many artifacts (libraries, jars) in the local Maven repository (located at <local-user-home-path>\.m2\repository) and takes therefore again a longer time if you are using Maven for the first time.
The below import of the ESPM Maven projects is the first prove if the installed and configured Maven integration in Eclipse works.
If you face any problems during the import you should first make sure that the properties in your settings.xml are correctly specified. This has been described before in section 1.6.2.

SAP HANA Cloud Development (ESPM Scenarios Installation Guide)
40
Finally you will see the resulting six ESPM projects in the Project Explorer Finally six projects espm, espm-cloud-jpa/web, espm-mobile-shopping-web and espm-ui-reviews-jpa/web are imported and should not be decorated with error markers as shown in the following picture.
With this you have imported all ESPM projects into your Eclipse IDE.
In the following chapter 3 you will see how to run each of the three ESPM applications (WebShop, MobileShop and WebShop Extension/Reviews) either on local HANA Cloud server or on SAP HANA Cloud.

SAP HANA Cloud Development (ESPM Scenarios Installation Guide)
41
3 Run ESPM Scenario Applications on SAP HANA Cloud
Here we described how you deploy and run quickly all three main ESPM Scenario applications (Web Shop, Mobile Shopping and Web Shop extended by Web Reviews), first on local HANA Cloud server and then on SAP HANA Cloud.
Each of the main ESPM Scenarios (see chapter 4 for the links) has its own step-by-step tutorial where the technical details of the corresponding application (also the publishing to local Cloud server and SAP HANA Cloud) are described. Only their developers get the insights how the corresponding applications were developed (application structure, used technologies, etc.)
For that reason we keep the description of deploying and running the ESPM Applications here very short. You could even skip this chapter 3 and jump directly into one of the ESPM Scenario tutorials which are listed in chapter 4.
3.1 Prerequisites before running ESPM Applications
Check out master branch
1. In Make sure that the master branch is checked out and all projects of master branch are
imported as explained in the section 2.2
In short (if master branch has not checked out yet)
i. Check out master branch by double click on Local/master node
ii. Import all ESPM Maven Projects
Build of all ESPM Application Projects with Maven
1. In Eclipse Project Explorer view select espm/pom.xml and open context menu
We assume for this chapter that you have executed already all sections of chapter 1 and 2.
Especially Maven integration for Eclipse has been configured correctly according to your system configured (see section 1.6.2) and ESPM applications of the master branch have already been imported to your Eclipse workspace as Maven projects as described in section 2.2.
SAP HANA Cloud Development (ESPM Scenarios Installation Guide)
42
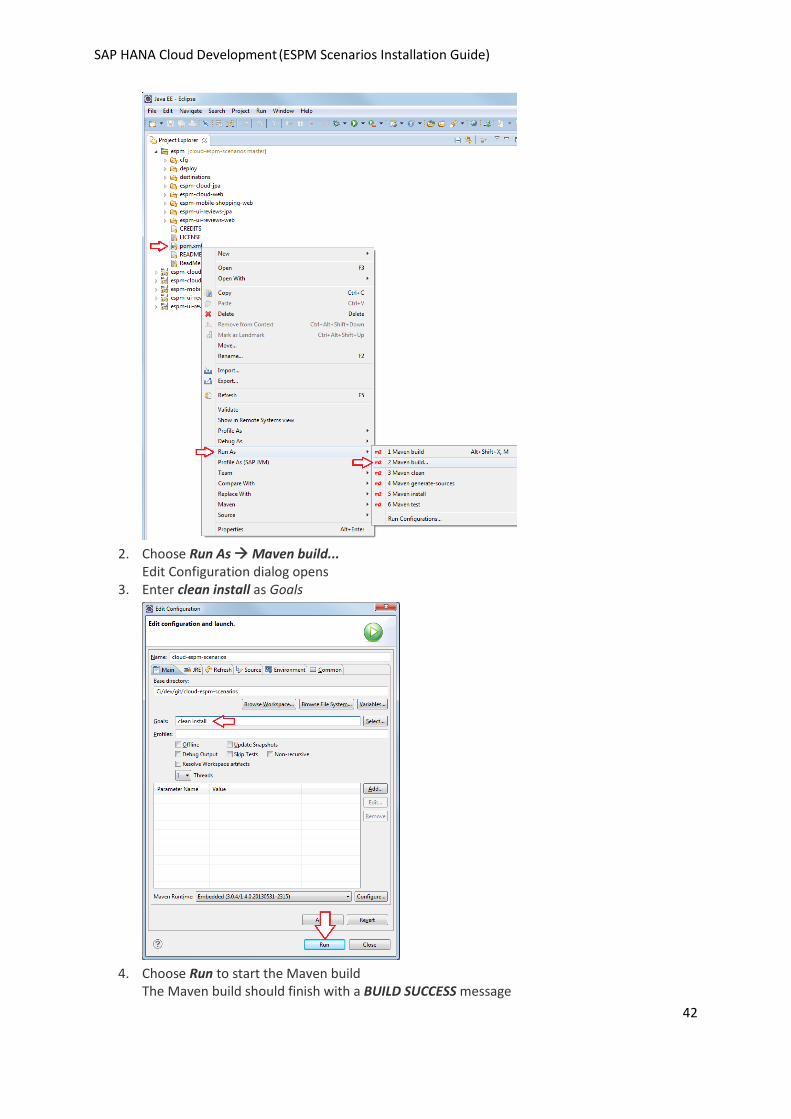
2. Choose Run As Maven build...
Edit Configuration dialog opens 3. Enter clean install as Goals
4. Choose Run to start the Maven build
The Maven build should finish with a BUILD SUCCESS message
SAP HANA Cloud Development (ESPM Scenarios Installation Guide)
43
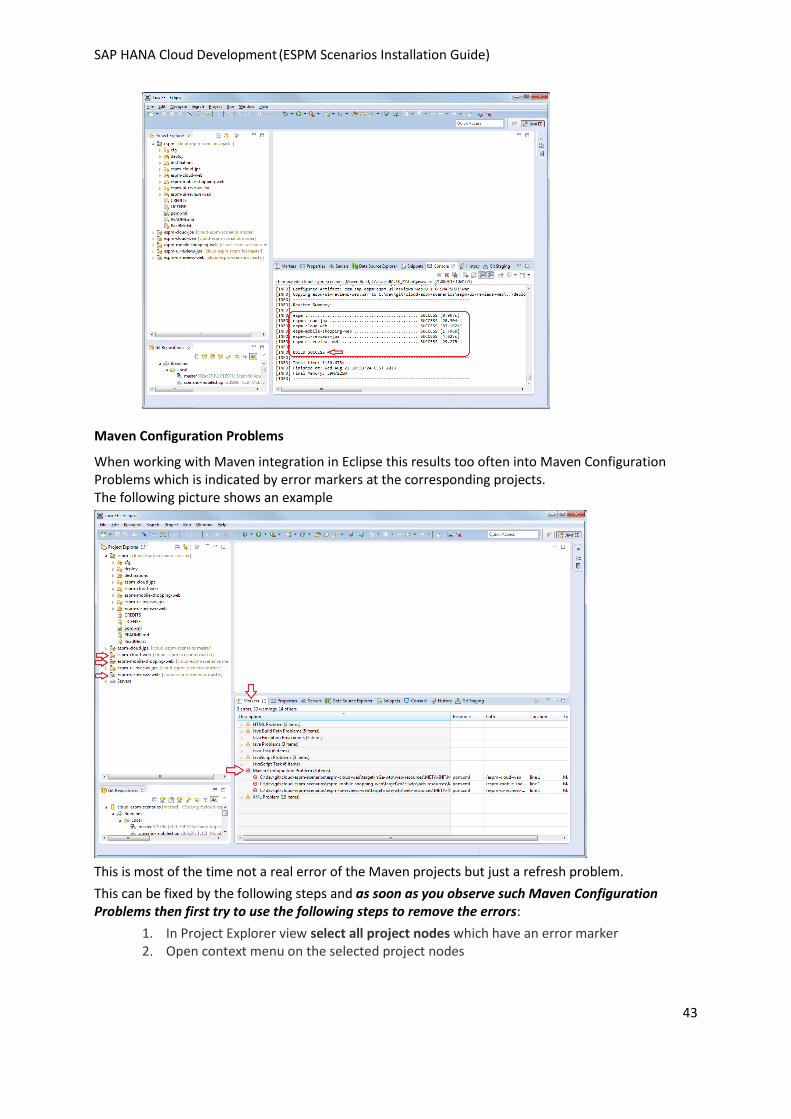
Maven Configuration Problems
When working with Maven integration in Eclipse this results too often into Maven Configuration Problems which is indicated by error markers at the corresponding projects. The following picture shows an example
This is most of the time not a real error of the Maven projects but just a refresh problem.
This can be fixed by the following steps and as soon as you observe such Maven Configuration Problems then first try to use the following steps to remove the errors:
1. In Project Explorer view select all project nodes which have an error marker 2. Open context menu on the selected project nodes

SAP HANA Cloud Development (ESPM Scenarios Installation Guide)
44
3. Choose Maven Update Project…. 4. In the opened Update Maven Project dialog make sure that the projects with errors are
selected 5. Choose OK to update the Maven Projects
This procedure works in most of the cases to remove the Maven Configuration Errors.
3.2 Publish and Run ESPM applications on SAP HANA Cloud local server
3.2.1 Prerequisites for running ESPM applications on SAP HANA Cloud local
server
Create SAP HANA Cloud local server
With the following steps you create a local SAP HANA Cloud server which is used to run all ESPM Applications as described in the following sections 3.2.2 First the server is created and then the connectivity destinations are imported so that the applications know from connectivity service which backend they have to use to read and write data.
1. In Eclipse select Servers view (If not already open: Eclipse menu Window Show View Others...)
2. On the Servers view open right mouse context menu and choose New Server (or if this is the first server you create in the view choose instead the No servers are available. Click this link to create a new server… link). New Server wizard opens
SAP HANA Cloud Development (ESPM Scenarios Installation Guide)
45
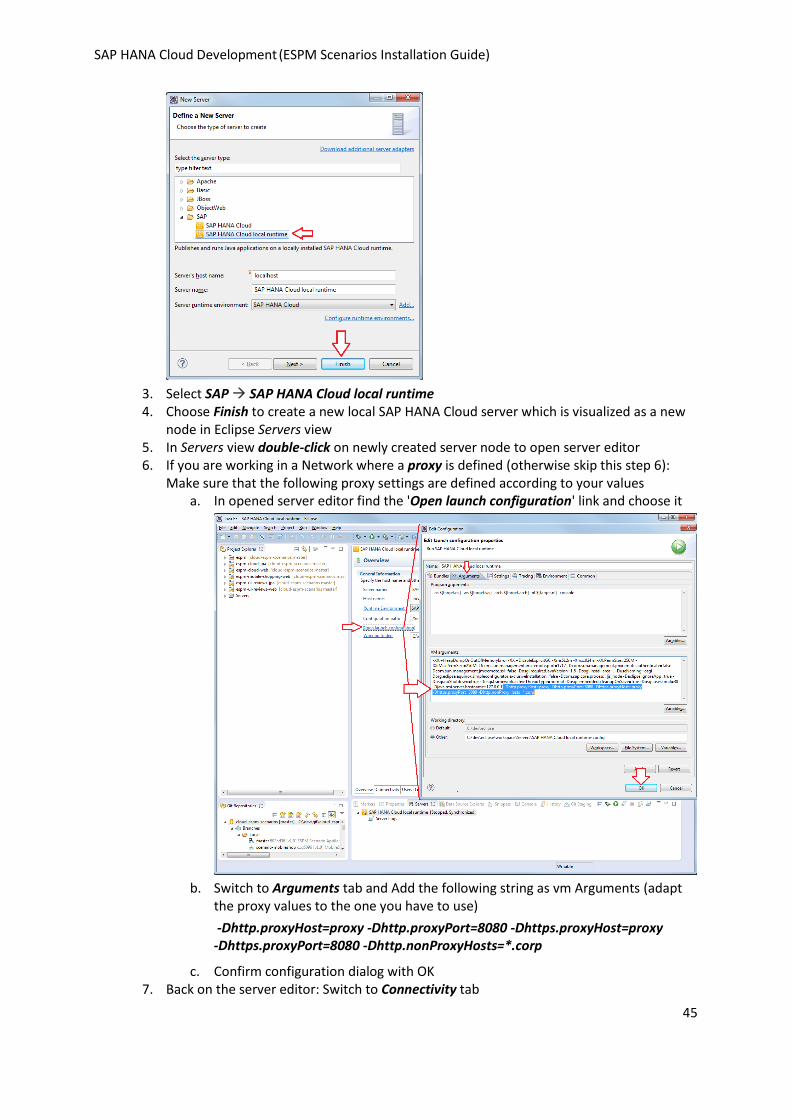
3. Select SAP SAP HANA Cloud local runtime 4. Choose Finish to create a new local SAP HANA Cloud server which is visualized as a new
node in Eclipse Servers view 5. In Servers view double-click on newly created server node to open server editor 6. If you are working in a Network where a proxy is defined (otherwise skip this step 6):
Make sure that the following proxy settings are defined according to your values a. In opened server editor find the 'Open launch configuration' link and choose it
b. Switch to Arguments tab and Add the following string as vm Arguments (adapt
the proxy values to the one you have to use)
-Dhttp.proxyHost=proxy -Dhttp.proxyPort=8080 -Dhttps.proxyHost=proxy -Dhttps.proxyPort=8080 -Dhttp.nonProxyHosts=*.corp
c. Confirm configuration dialog with OK 7. Back on the server editor: Switch to Connectivity tab
SAP HANA Cloud Development (ESPM Scenarios Installation Guide)
46
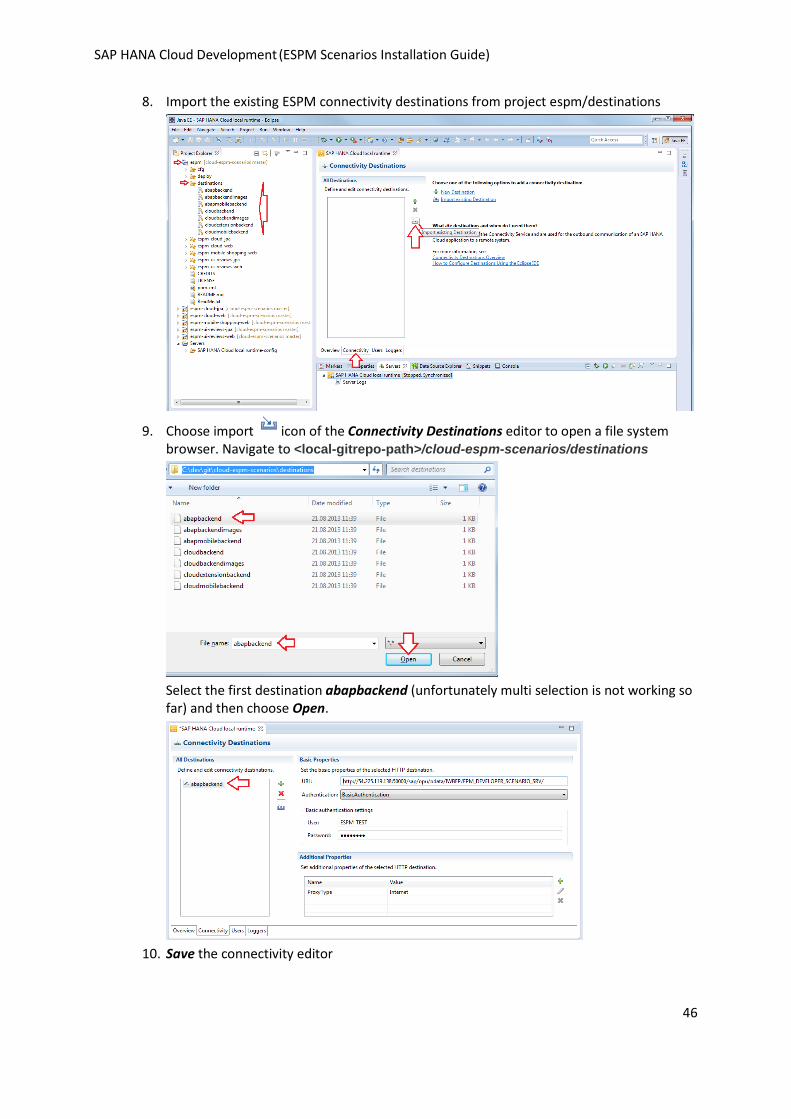
8. Import the existing ESPM connectivity destinations from project espm/destinations
9. Choose import icon of the Connectivity Destinations editor to open a file system browser. Navigate to <local-gitrepo-path>/cloud-espm-scenarios/destinations
Select the first destination abapbackend (unfortunately multi selection is not working so far) and then choose Open.
10. Save the connectivity editor
SAP HANA Cloud Development (ESPM Scenarios Installation Guide)
47
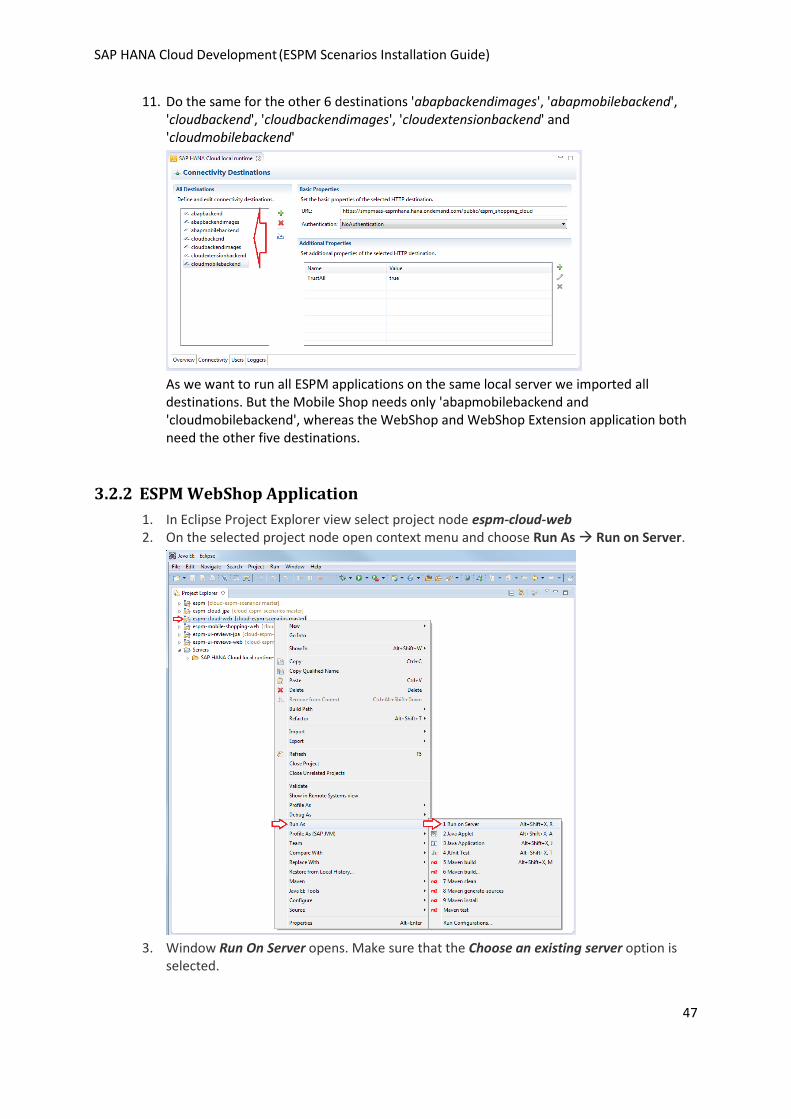
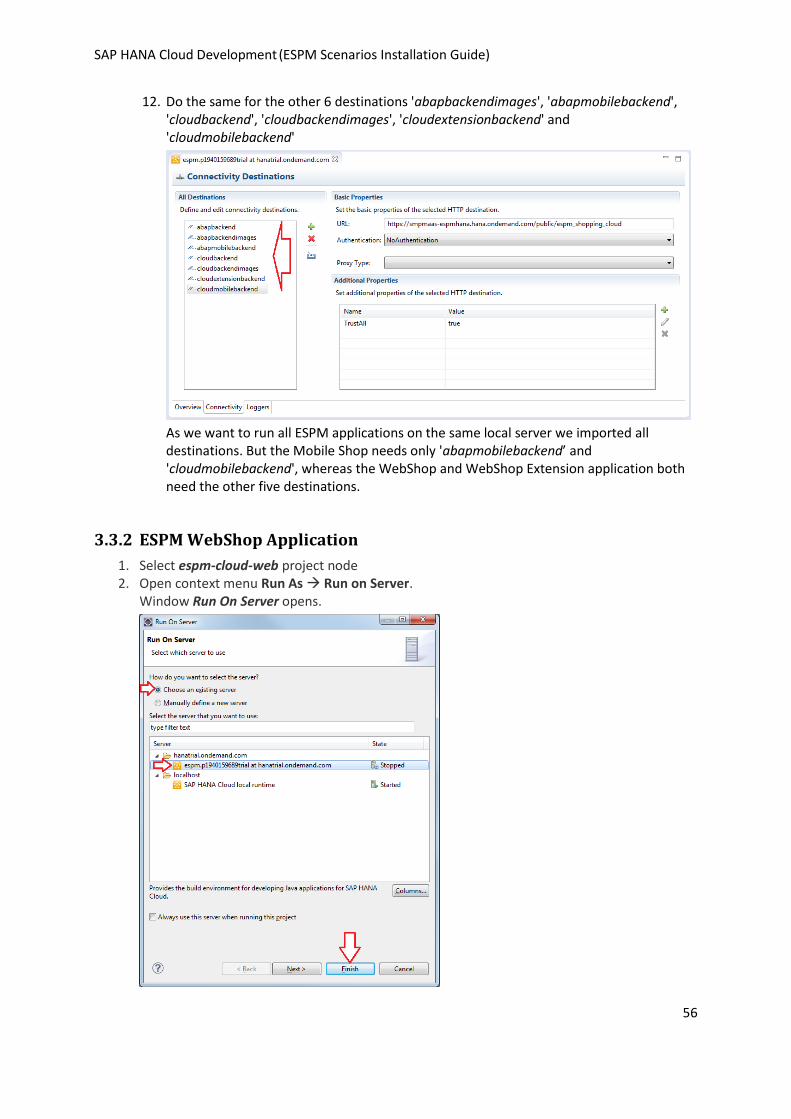
11. Do the same for the other 6 destinations 'abapbackendimages', 'abapmobilebackend', 'cloudbackend', 'cloudbackendimages', 'cloudextensionbackend' and 'cloudmobilebackend'
As we want to run all ESPM applications on the same local server we imported all destinations. But the Mobile Shop needs only 'abapmobilebackend and 'cloudmobilebackend', whereas the WebShop and WebShop Extension application both need the other five destinations.
3.2.2 ESPM WebShop Application
1. In Eclipse Project Explorer view select project node espm-cloud-web 2. On the selected project node open context menu and choose Run As Run on Server.
3. Window Run On Server opens. Make sure that the Choose an existing server option is
selected.
SAP HANA Cloud Development (ESPM Scenarios Installation Guide)
48
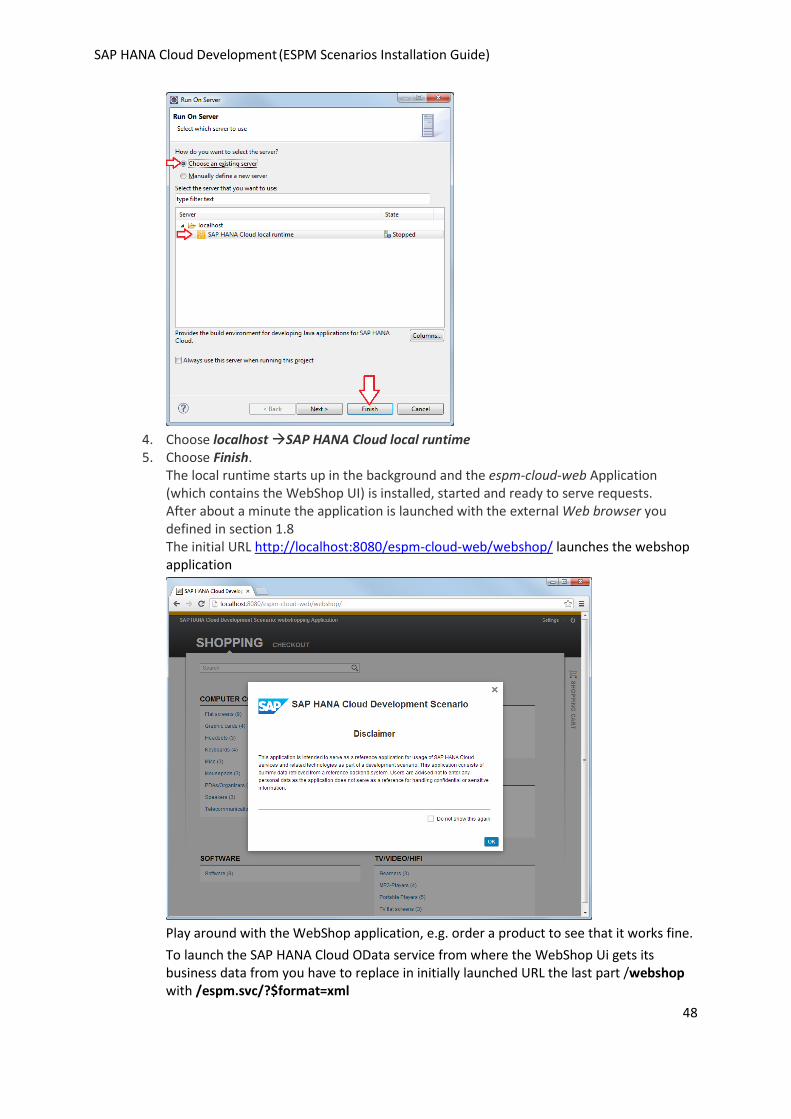
4. Choose localhost SAP HANA Cloud local runtime 5. Choose Finish.
The local runtime starts up in the background and the espm-cloud-web Application (which contains the WebShop UI) is installed, started and ready to serve requests. After about a minute the application is launched with the external Web browser you defined in section 1.8 The initial URL http://localhost:8080/espm-cloud-web/webshop/ launches the webshop application
Play around with the WebShop application, e.g. order a product to see that it works fine.
To launch the SAP HANA Cloud OData service from where the WebShop Ui gets its business data from you have to replace in initially launched URL the last part /webshop with /espm.svc/?$format=xml

SAP HANA Cloud Development (ESPM Scenarios Installation Guide)
49
The resulting URL http://localhost:8080/espm-cloud-web/espm.svc/?$format=xml requests the ESPM OData service
3.2.3 ESPM Mobile Shopping Application
Running ESPM Mobile Shopping application on local server works analogous to the before described
WebShop application but it is started from espm-mobile-shopping-web project is used.
1. In Eclipse Project Explorer view select project node espm-mobile-shopping-web 2. On the selected project node open context menu and choose Run As Run on Server. 3. Window Run On Server opens. Make sure that the Choose an existing server option is
selected. 4. Choose localhost SAP HANA Cloud local runtime 5. Choose Finish.
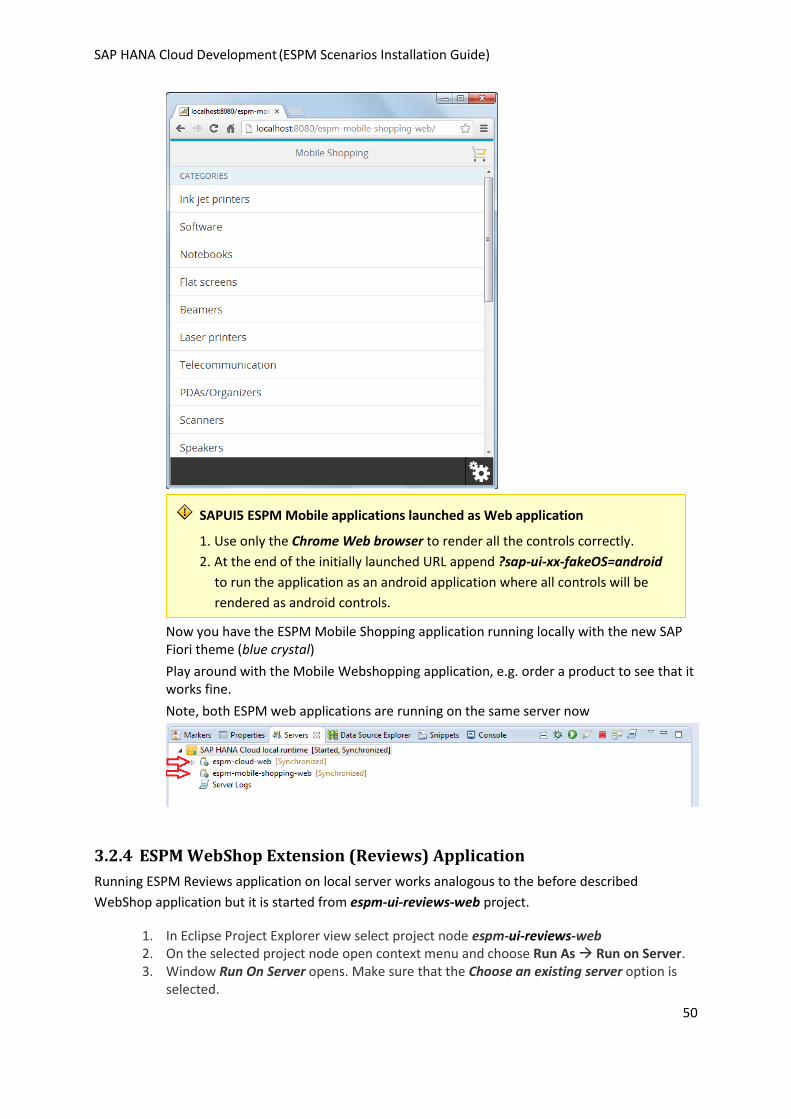
The local runtime starts up in the background and the espm-mobile-shopping-web Application (which contains the Mobile Shopping Ui) is installed, started and ready to serve requests. After about a minute the application is launched with the external Web browser The launched URL http://localhost:8080/espm-mobile-shopping-web/ shows the Mobile Shopping UI.
SAP HANA Cloud Development (ESPM Scenarios Installation Guide)
50
Now you have the ESPM Mobile Shopping application running locally with the new SAP Fiori theme (blue crystal)
Play around with the Mobile Webshopping application, e.g. order a product to see that it works fine.
Note, both ESPM web applications are running on the same server now
3.2.4 ESPM WebShop Extension (Reviews) Application
Running ESPM Reviews application on local server works analogous to the before described
WebShop application but it is started from espm-ui-reviews-web project.
1. In Eclipse Project Explorer view select project node espm-ui-reviews-web 2. On the selected project node open context menu and choose Run As Run on Server. 3. Window Run On Server opens. Make sure that the Choose an existing server option is
selected.
SAPUI5 ESPM Mobile applications launched as Web application
1. Use only the Chrome Web browser to render all the controls correctly.
2. At the end of the initially launched URL append ?sap-ui-xx-fakeOS=android
to run the application as an android application where all controls will be
rendered as android controls.
SAP HANA Cloud Development (ESPM Scenarios Installation Guide)
51
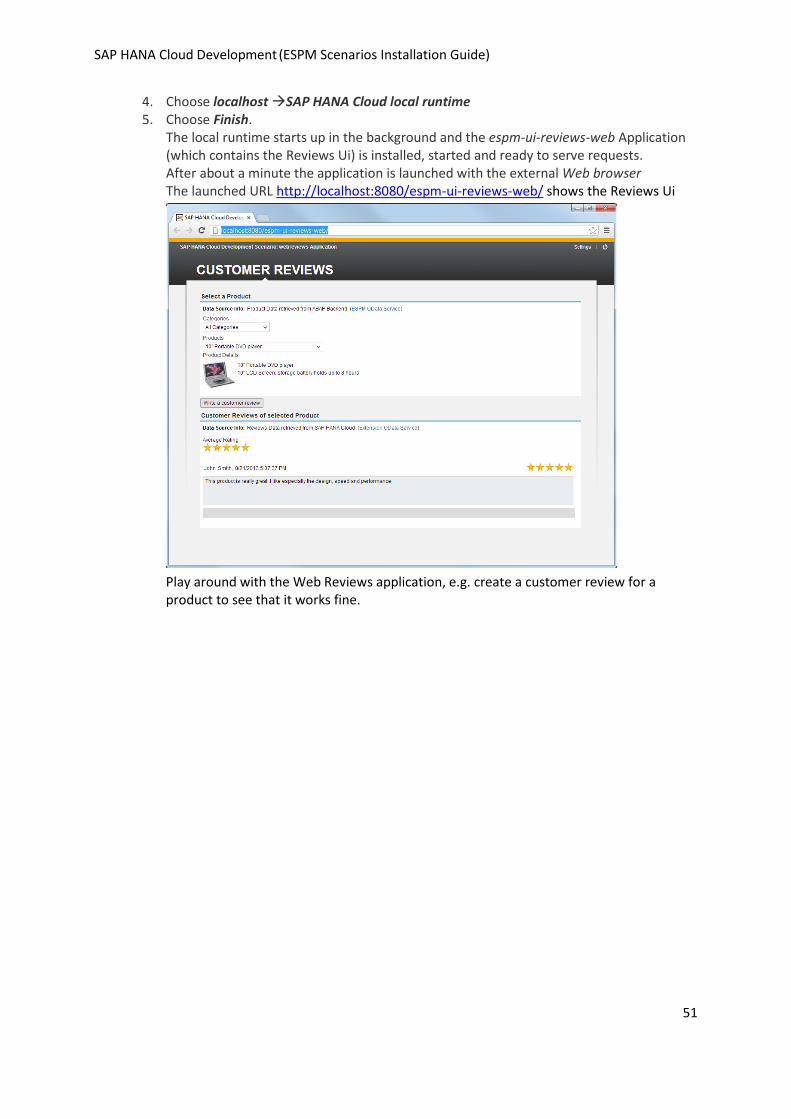
4. Choose localhost SAP HANA Cloud local runtime 5. Choose Finish.
The local runtime starts up in the background and the espm-ui-reviews-web Application (which contains the Reviews Ui) is installed, started and ready to serve requests. After about a minute the application is launched with the external Web browser The launched URL http://localhost:8080/espm-ui-reviews-web/ shows the Reviews Ui
Play around with the Web Reviews application, e.g. create a customer review for a product to see that it works fine.
SAP HANA Cloud Development (ESPM Scenarios Installation Guide)
52
3.3 Publish and Run ESPM applications on SAP HANA Cloud
Prerequisite is that you know your SAP HANA Cloud (Trial) Developer Account data
SAP HANA Cloud Developer Account name: "<your p-User>trial" (p-user with lower case)
(SCN) user name: <your p-User> (alternatively <e-mail> as user)
(SCN) user account password: <********>
You have created your account in section 1.2.
In the below picture we use the account data of Lisa Gordan: Account name: p1940159689trial and SCN user name p1940159689. Always replace the corresponding values with your account data.
3.3.1 Prerequisites before running ESPM Applications on SAP HANA Cloud
Configure Eclipse Server Preferences
In the Eclipse Server Preferences you can configure on which SAP HANA Cloud account you will by
default run your web applications. Later when you choose New Server then the wizard values are
prefilled with these settings.
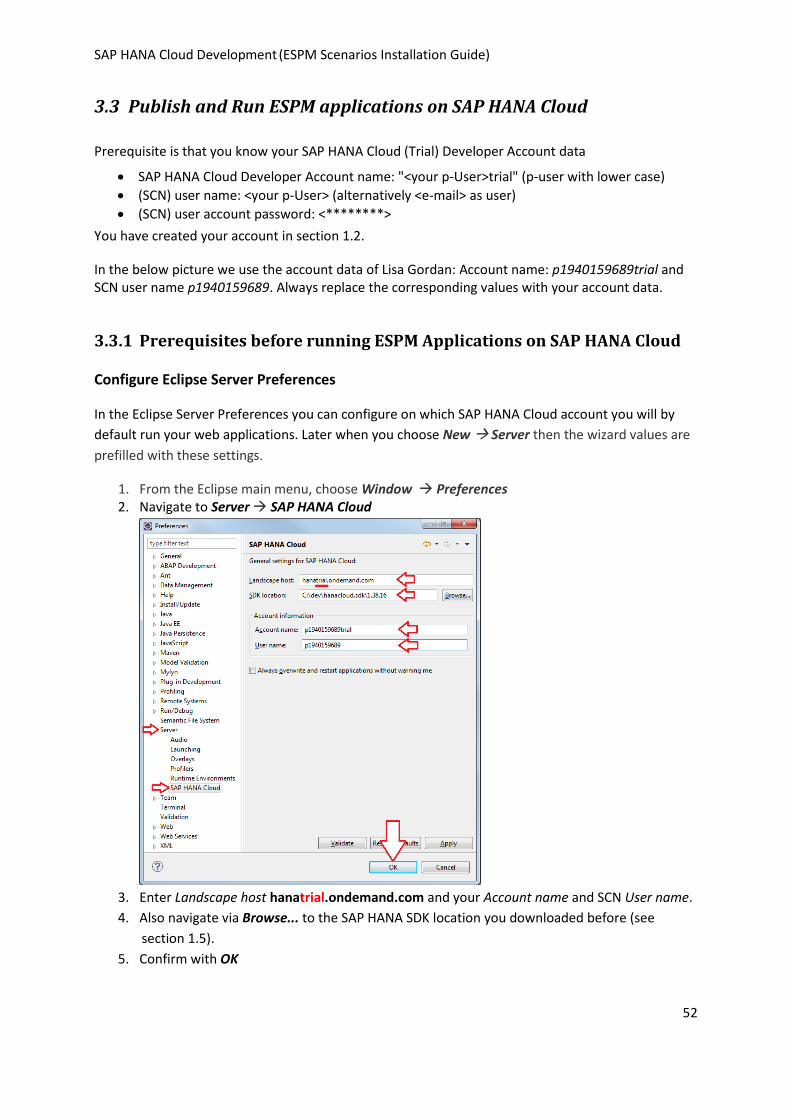
1. From the Eclipse main menu, choose Window Preferences 2. Navigate to Server SAP HANA Cloud
3. Enter Landscape host hanatrial.ondemand.com and your Account name and SCN User name.
4. Also navigate via Browse... to the SAP HANA SDK location you downloaded before (see
section 1.5).
5. Confirm with OK

SAP HANA Cloud Development (ESPM Scenarios Installation Guide)
53
Create SAP HANA Cloud server
With the following steps you create a SAP HANA Cloud server which is used to run all ESPM Applications as described in the following section 3.3.2 First the server is created and then the connectivity destinations are imported so that the applications know from connectivity service which backend they have to use to read and write data. This server creation and connectivity destinations setup works almost the same as described before for the local server in section 3.2.1
1. In Eclipse select Servers view (If not already open: Eclipse menu Window Show View Others...)
2. On the Servers view open right mouse context menu and choose New Server
New Server wizard opens
3. Select SAP SAP HANA Cloud
If you specified the Eclipse preferences correctly then the Server’s host name should be pre-filled with the value: handtrial.ondemand.com
4. Choose Next.
SAP HANA Cloud Development (ESPM Scenarios Installation Guide)
54
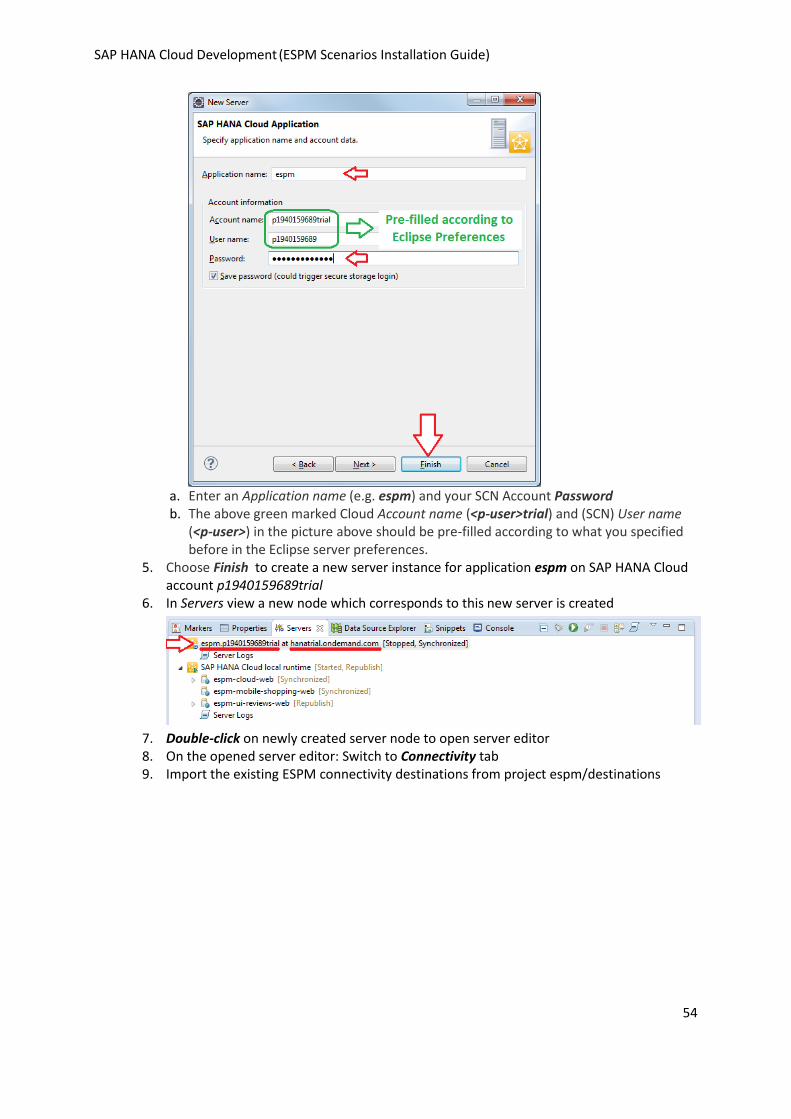
a. Enter an Application name (e.g. espm) and your SCN Account Password b. The above green marked Cloud Account name (<p-user>trial) and (SCN) User name
(<p-user>) in the picture above should be pre-filled according to what you specified before in the Eclipse server preferences.
5. Choose Finish to create a new server instance for application espm on SAP HANA Cloud account p1940159689trial
6. In Servers view a new node which corresponds to this new server is created
7. Double-click on newly created server node to open server editor 8. On the opened server editor: Switch to Connectivity tab 9. Import the existing ESPM connectivity destinations from project espm/destinations
SAP HANA Cloud Development (ESPM Scenarios Installation Guide)
55
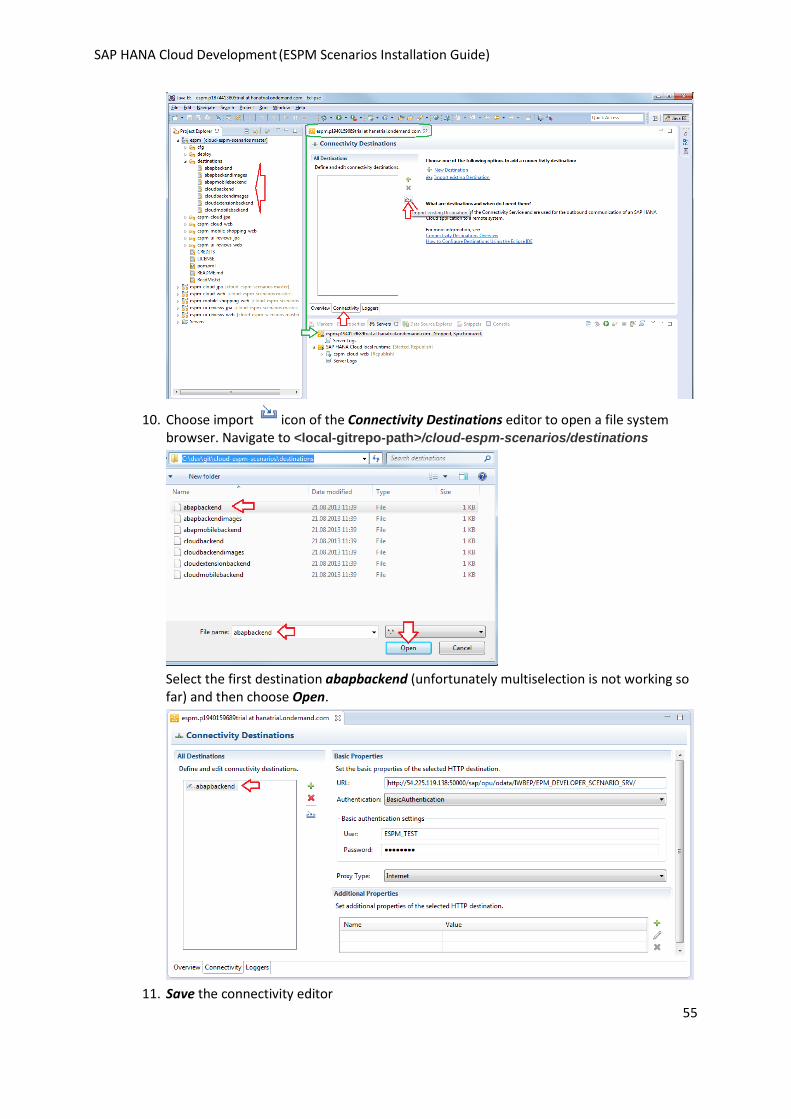
10. Choose import icon of the Connectivity Destinations editor to open a file system browser. Navigate to <local-gitrepo-path>/cloud-espm-scenarios/destinations
Select the first destination abapbackend (unfortunately multiselection is not working so far) and then choose Open.
11. Save the connectivity editor
SAP HANA Cloud Development (ESPM Scenarios Installation Guide)
56
12. Do the same for the other 6 destinations 'abapbackendimages', 'abapmobilebackend', 'cloudbackend', 'cloudbackendimages', 'cloudextensionbackend' and 'cloudmobilebackend'
As we want to run all ESPM applications on the same local server we imported all destinations. But the Mobile Shop needs only 'abapmobilebackend’ and 'cloudmobilebackend', whereas the WebShop and WebShop Extension application both need the other five destinations.
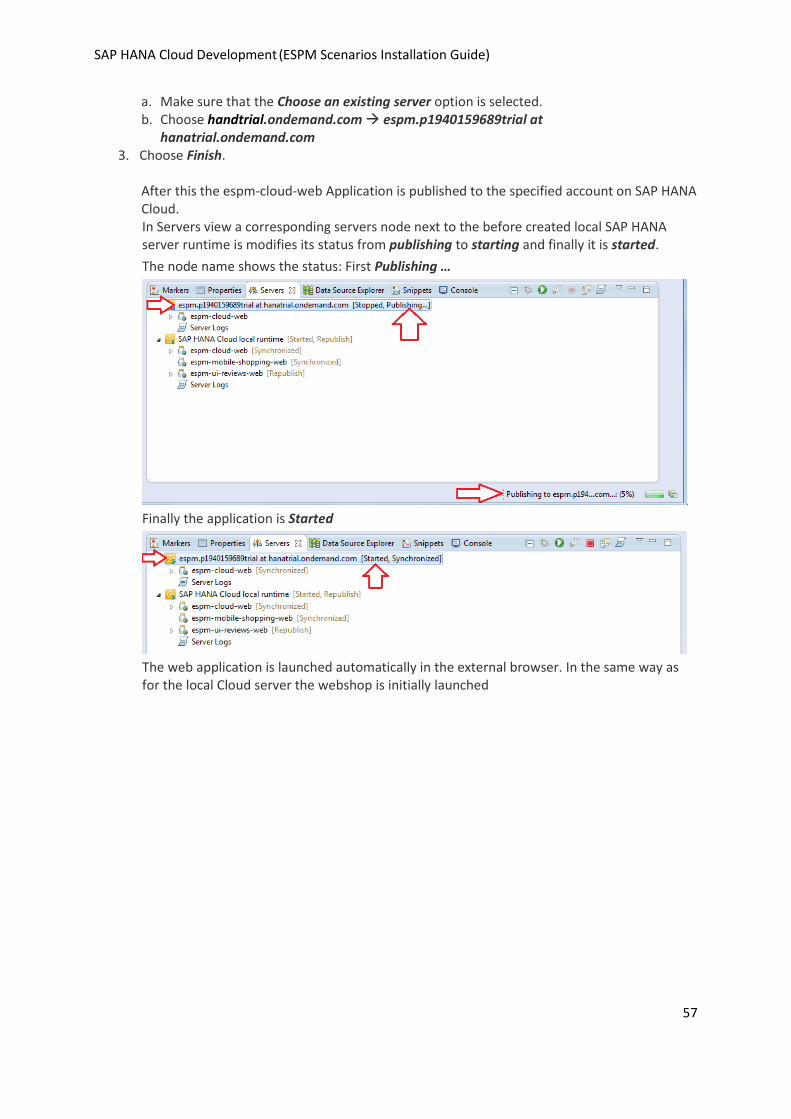
3.3.2 ESPM WebShop Application
1. Select espm-cloud-web project node 2. Open context menu Run As Run on Server.
Window Run On Server opens.
SAP HANA Cloud Development (ESPM Scenarios Installation Guide)
57
a. Make sure that the Choose an existing server option is selected. b. Choose handtrial.ondemand.com espm.p1940159689trial at
hanatrial.ondemand.com 3. Choose Finish.
After this the espm-cloud-web Application is published to the specified account on SAP HANA Cloud. In Servers view a corresponding servers node next to the before created local SAP HANA server runtime is modifies its status from publishing to starting and finally it is started.
The node name shows the status: First Publishing …
Finally the application is Started
The web application is launched automatically in the external browser. In the same way as for the local Cloud server the webshop is initially launched

SAP HANA Cloud Development (ESPM Scenarios Installation Guide)
58
Play around with the WebShop application, e.g. order a product to see that it works fine.
To launch the SAP HANA Cloud OData service from where the WebShop Ui gets its business data from you have to replace in the initially launched URL the last part /webshop with /espm.svc
SAP HANA Cloud Development (ESPM Scenarios Installation Guide)
59
3.3.3 ESPM Mobile Shopping Application
Running ESPM Mobile Shopping application on SAP HANA Cloud works analogous to the before
described WebShop application but it is started from espm-mobile-shopping-web project is used.
1. Select espm-mobile-shopping-web project node 2. Open context menu Run As Run on Server.
Window Run On Server opens. a. Make sure that the Choose an existing server option is selected. b. Choose handtrial.ondemand.com espm.p1940159689trial at
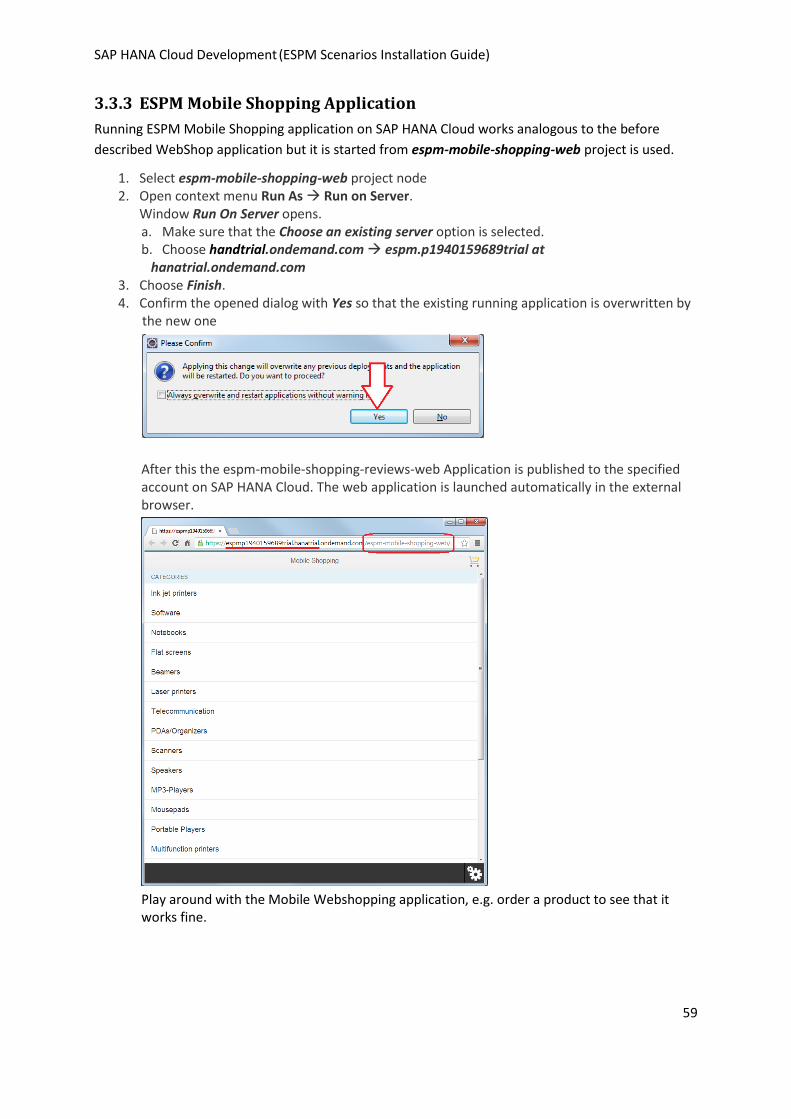
hanatrial.ondemand.com 3. Choose Finish. 4. Confirm the opened dialog with Yes so that the existing running application is overwritten by
the new one
After this the espm-mobile-shopping-reviews-web Application is published to the specified account on SAP HANA Cloud. The web application is launched automatically in the external browser.
Play around with the Mobile Webshopping application, e.g. order a product to see that it works fine.
SAP HANA Cloud Development (ESPM Scenarios Installation Guide)
60
3.3.4 ESPM WebShop Extension (Reviews) Application
Running ESPM Reviews application on SAP HANA Cloud works analogous to the before described
WebShop application but it is started from espm-ui-reviews-web project.
1. Select espm-ui-reviews-web project node 2. Open context menu Run As Run on Server.
Window Run On Server opens. a. Make sure that the Choose an existing server option is selected. b. Choose handtrial.ondemand.com espm.p1940159689trial at
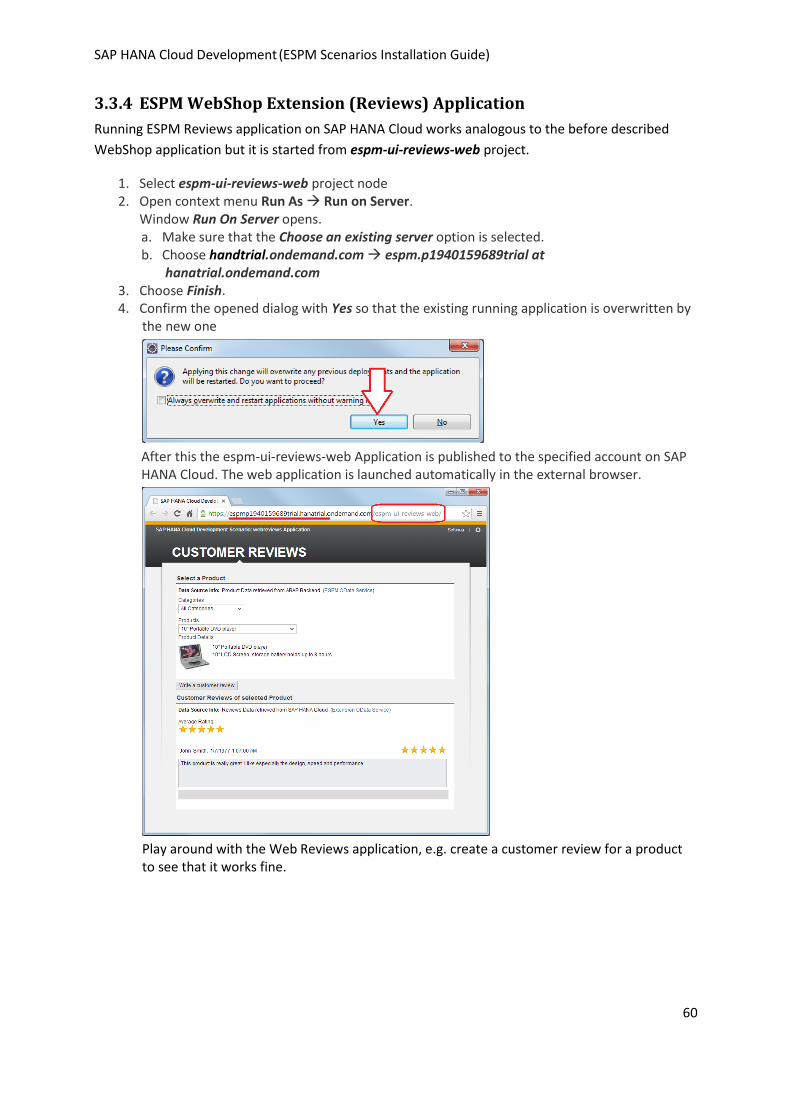
hanatrial.ondemand.com 3. Choose Finish. 4. Confirm the opened dialog with Yes so that the existing running application is overwritten by
the new one
After this the espm-ui-reviews-web Application is published to the specified account on SAP HANA Cloud. The web application is launched automatically in the external browser.
Play around with the Web Reviews application, e.g. create a customer review for a product to see that it works fine.
SAP HANA Cloud Development (ESPM Scenarios Installation Guide)
61
4 What comes next?
After you have gone through this ESPM Scenarios Guide and learned how to install and run the ESPM Scenario application projects you should dive into the development details of certain ESPM End-to-End Scenarios.
Each ESPM Scenario application has an own step-by-step tutorial describing the development details of the corresponding application. These tutorials are published on SCN.
We recommend doing the ESPM WebShop Extension Scenario tutorial before the WebShop (i.e. ESPM HANA Cloud - WebShop and Retailer Application) Scenario tutorial itself.
ESPM WebShop Extension Scenario http://scn.sap.com/docs/DOC-41491
ESPM HANA Cloud - WebShop and Retailer Application Scenario http://scn.sap.com/docs/DOC-46869
ESPM Mobile Shopping: http://scn.sap.com/docs/DOC-41430
SAP HANA Cloud Development (ESPM Scenarios Installation Guide)
62
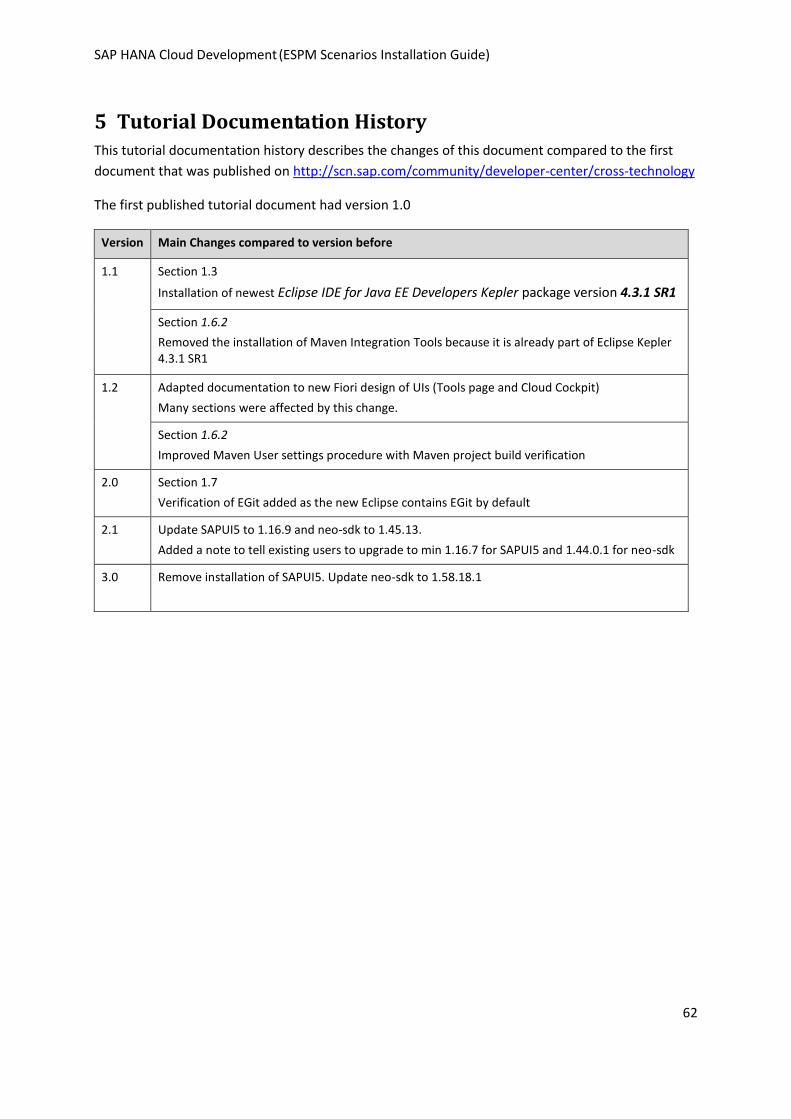
5 Tutorial Documentation History This tutorial documentation history describes the changes of this document compared to the first
document that was published on http://scn.sap.com/community/developer-center/cross-technology
The first published tutorial document had version 1.0
Version Main Changes compared to version before
1.1 Section 1.3
Installation of newest Eclipse IDE for Java EE Developers Kepler package version 4.3.1 SR1
Section 1.6.2
Removed the installation of Maven Integration Tools because it is already part of Eclipse Kepler 4.3.1 SR1
1.2 Adapted documentation to new Fiori design of UIs (Tools page and Cloud Cockpit)
Many sections were affected by this change.
Section 1.6.2
Improved Maven User settings procedure with Maven project build verification
2.0 Section 1.7
Verification of EGit added as the new Eclipse contains EGit by default
2.1 Update SAPUI5 to 1.16.9 and neo-sdk to 1.45.13.
Added a note to tell existing users to upgrade to min 1.16.7 for SAPUI5 and 1.44.0.1 for neo-sdk
3.0 Remove installation of SAPUI5. Update neo-sdk to 1.58.18.1
Related Documents