4041375-00 EK3

Welcome message from author
This document is posted to help you gain knowledge. Please leave a comment to let me know what you think about it! Share it to your friends and learn new things together.
Transcript
4041375-00EK3
02
CONTENTS
INSTRUCTION BOOK SYMBOLS ……………………………………………… 4IMPORTANT SAFETY INSTRUCTIONS ……………………………………… 5
WHEN USING THIS PRODUCT ̶̶̶̶̶̶̶̶̶̶̶̶̶̶̶̶̶̶̶̶̶̶̶ 5WHEN USING THE STRAP ̶̶̶̶̶̶̶̶̶̶̶̶̶̶̶̶̶̶̶̶̶̶̶̶̶ 5WHEN USING THE BATTERIES ̶̶̶̶̶̶̶̶̶̶̶̶̶̶̶̶̶̶̶̶̶̶̶ 6FOR USERS IN HONG KONG̶̶̶̶̶̶̶̶̶̶̶̶̶̶̶̶̶̶̶̶̶̶̶̶ 7WHEN CHOOSING A POWER SOURCE ̶̶̶̶̶̶̶̶̶̶̶̶̶̶̶̶̶̶̶ 8
EPSON FEATURES……………………………………………………………… 10
CAMERA SETUP 11
ITEMS……………………………………………………………………………… 12CHECKING THE PACKING CONTENTS ̶̶̶̶̶̶̶̶̶̶̶̶̶̶̶̶̶̶̶12
TOP VIEW ………………………………………………………………………… 14BATTERIES AND MEMORY CARD INSTALLATION……………………… 16
ACCESSING THE BATTERIES AND MEMORY CARD ̶̶̶̶̶̶̶̶̶̶̶̶̶16HOW TO INSERT AND REMOVE THE MEMORY CARD ̶̶̶̶̶̶̶̶̶̶̶̶16BATTERY SETUP ̶̶̶̶̶̶̶̶̶̶̶̶̶̶̶̶̶̶̶̶̶̶̶̶̶̶̶̶̶17BATTERY LIFE INDICATOR̶̶̶̶̶̶̶̶̶̶̶̶̶̶̶̶̶̶̶̶̶̶̶̶̶17
SETTING UP YOUR CAMERA………………………………………………… 18POWER ON/OFF ̶̶̶̶̶̶̶̶̶̶̶̶̶̶̶̶̶̶̶̶̶̶̶̶̶̶̶̶̶18INITIAL SETTINGS ̶̶̶̶̶̶̶̶̶̶̶̶̶̶̶̶̶̶̶̶̶̶̶̶̶̶̶̶̶18
STANDARD OPERATION 19
HOLDING THE CAMERA / RELEASING THE SHUTTER ……………… 20FULL & HALF SHUTTER BUTTON POSITONS ̶̶̶̶̶̶̶̶̶̶̶̶̶̶̶̶21CAMERA RANGE ̶̶̶̶̶̶̶̶̶̶̶̶̶̶̶̶̶̶̶̶̶̶̶̶̶̶̶̶̶21
THE IMAGE SYSTEM…………………………………………………………… 22TAKING PHOTOS USING THE LCD MONITOR ̶̶̶̶̶̶̶̶̶̶̶̶̶̶̶̶22TURNING THE QUICK VIEW ON/OFF ̶̶̶̶̶̶̶̶̶̶̶̶̶̶̶̶̶̶̶̶23USING THE VIEWFINDER-ONLY METHOD̶̶̶̶̶̶̶̶̶̶̶̶̶̶̶̶̶̶24IF THE CAPTURED IMAGE IS OUT OF FOCUS FRAME̶̶̶̶̶̶̶̶̶̶̶̶26OPTICAL ZOOM & DIGITAL ZOOM ̶̶̶̶̶̶̶̶̶̶̶̶̶̶̶̶̶̶̶̶̶27IMAGE CAPTURE SETTINGS ̶̶̶̶̶̶̶̶̶̶̶̶̶̶̶̶̶̶̶̶̶̶̶̶28CONFIRMING THE NUMBER OF PHOTOGRAPHS ̶̶̶̶̶̶̶̶̶̶̶̶̶̶29FLASH CONTROL ̶̶̶̶̶̶̶̶̶̶̶̶̶̶̶̶̶̶̶̶̶̶̶̶̶̶̶̶̶30USING THE SELF TIMER̶̶̶̶̶̶̶̶̶̶̶̶̶̶̶̶̶̶̶̶̶̶̶̶̶̶31
PLAYBACK SYSTEM …………………………………………………………… 32ONE BY ONE PLAYBACK̶̶̶̶̶̶̶̶̶̶̶̶̶̶̶̶̶̶̶̶̶̶̶̶̶̶32DISPLAYING MULTIPLE IMAGES ̶̶̶̶̶̶̶̶̶̶̶̶̶̶̶̶̶̶̶̶̶̶33
1
LCD MONITOR IMAGE ENLARGEMENT ̶̶̶̶̶̶̶̶̶̶̶̶̶̶̶̶̶̶ 33SLIDE SHOW ̶̶̶̶̶̶̶̶̶̶̶̶̶̶̶̶̶̶̶̶̶̶̶̶̶̶̶̶̶̶ 34QUICK PHOTO REVIEW ̶̶̶̶̶̶̶̶̶̶̶̶̶̶̶̶̶̶̶̶̶̶̶̶̶ 35
DELETING FILES ……………………………………………………………… 36DELETING A SINGLE PHOTO̶̶̶̶̶̶̶̶̶̶̶̶̶̶̶̶̶̶̶̶̶̶̶ 36DELETING ALL IMAGES ̶̶̶̶̶̶̶̶̶̶̶̶̶̶̶̶̶̶̶̶̶̶̶̶̶ 37
USING YOUR IMAGES ………………………………………………………… 38DISPLAYING ON A TV ̶̶̶̶̶̶̶̶̶̶̶̶̶̶̶̶̶̶̶̶̶̶̶̶̶̶ 38EXPORTING IMAGES TO A COMPUTER̶̶̶̶̶̶̶̶̶̶̶̶̶̶̶̶̶̶ 38WORKING WITH IMAGES ON A COMPUTER̶̶̶̶̶̶̶̶̶̶̶̶̶̶̶̶ 39DIRECT PRINTING FROM CAMERA TO PRINTER ̶̶̶̶̶̶̶̶̶̶̶̶̶ 39
USING THE AC ADAPTER …………………………………………………… 40HOW TO CONNECT THE AC ADAPTER ̶̶̶̶̶̶̶̶̶̶̶̶̶̶̶̶̶̶ 40
ADVANCED FUNCTIONS 41
DISPLAY & MENU BUTTON SETTINGS …………………………………… 42DISPLAY BUTTON FUNCTION ̶̶̶̶̶̶̶̶̶̶̶̶̶̶̶̶̶̶̶̶̶̶ 42MENU BUTTON FUNCTION ̶̶̶̶̶̶̶̶̶̶̶̶̶̶̶̶̶̶̶̶̶̶̶ 43
PRINT Image Framer (P.I.F) FUNCTION ………………………………… 44PRINT Image Framer (P.I.F) SHOOTING ………………………………… 45
TAKING PHOTOS WITHIN THE FRAME ̶̶̶̶̶̶̶̶̶̶̶̶̶̶̶̶̶̶ 45VIEWING A P.I.F. IMAGE̶̶̶̶̶̶̶̶̶̶̶̶̶̶̶̶̶̶̶̶̶̶̶̶̶ 46
REPLACING FRAMES ………………………………………………………… 47USING THE CD-ROM ̶̶̶̶̶̶̶̶̶̶̶̶̶̶̶̶̶̶̶̶̶̶̶̶̶̶ 47DOWNLOADING FROM THE WEB ̶̶̶̶̶̶̶̶̶̶̶̶̶̶̶̶̶̶̶̶ 47DELETING FRAMES ̶̶̶̶̶̶̶̶̶̶̶̶̶̶̶̶̶̶̶̶̶̶̶̶̶̶̶ 48INSTALLING FRAMES ̶̶̶̶̶̶̶̶̶̶̶̶̶̶̶̶̶̶̶̶̶̶̶̶̶̶ 49TAKING PHOTOS IN MACRO MODE ̶̶̶̶̶̶̶̶̶̶̶̶̶̶̶̶̶̶̶ 50
MACRO MODE…………………………………………………………………… 50CONTINUOUS SHOOTING …………………………………………………… 51
CONTINUOUS SHOOTING ̶̶̶̶̶̶̶̶̶̶̶̶̶̶̶̶̶̶̶̶̶̶̶̶ 51
SCENE MODES ………………………………………………………………… 52SELECTING A SCENE MODE̶̶̶̶̶̶̶̶̶̶̶̶̶̶̶̶̶̶̶̶̶̶̶ 52NORMAL MODE̶̶̶̶̶̶̶̶̶̶̶̶̶̶̶̶̶̶̶̶̶̶̶̶̶̶̶̶̶ 53LANDSCAPE MODE ̶̶̶̶̶̶̶̶̶̶̶̶̶̶̶̶̶̶̶̶̶̶̶̶̶̶̶ 53PORTRAIT MODE ̶̶̶̶̶̶̶̶̶̶̶̶̶̶̶̶̶̶̶̶̶̶̶̶̶̶̶̶ 53
WHITE BALANCE ……………………………………………………………… 54AUTOMATIC WHITE BALANCE ̶̶̶̶̶̶̶̶̶̶̶̶̶̶̶̶̶̶̶̶̶̶ 54SELECTING WHITE BALANCE MANUALLY̶̶̶̶̶̶̶̶̶̶̶̶̶̶̶̶̶ 55
2
LIGHT SENSITIVITY …………………………………………………………… 56CHANGING TO AUTOMATIC SENSITIVITY MODE ̶̶̶̶̶̶̶̶̶̶̶̶̶ 56SETTING LIGHT SENSITIVITY MANUALLY ̶̶̶̶̶̶̶̶̶̶̶̶̶̶̶̶̶ 57
MAKING EXPOSURE SETTINGS …………………………………………… 58ADJUSTMENTS ̶̶̶̶̶̶̶̶̶̶̶̶̶̶̶̶̶̶̶̶̶̶̶̶̶̶̶̶̶ 58
RESETTING TO DEFAULT MODE…………………………………………… 60RESETTING TO DEFAULT MODE̶̶̶̶̶̶̶̶̶̶̶̶̶̶̶̶̶̶̶̶̶ 60
VIEWING RECORDED IMAGE DATA ……………………………………… 61DISPLAYING RECORDED IMAGE DATA ̶̶̶̶̶̶̶̶̶̶̶̶̶̶̶̶̶̶ 61
VIDEO CLIPS …………………………………………………………………… 62RECORDING A VIDEO CLIP ̶̶̶̶̶̶̶̶̶̶̶̶̶̶̶̶̶̶̶̶̶̶̶ 62PLAYING BACK A CLIP̶̶̶̶̶̶̶̶̶̶̶̶̶̶̶̶̶̶̶̶̶̶̶̶̶̶ 63DELETING VIDEO CLIPS ̶̶̶̶̶̶̶̶̶̶̶̶̶̶̶̶̶̶̶̶̶̶̶̶̶ 64
DIRECT PRINTING 65
DIRECT PRINTING ……………………………………………………………… 66LIST OF COMPATIBLE PRINTERS ̶̶̶̶̶̶̶̶̶̶̶̶̶̶̶̶̶̶̶̶ 66
DIRECT PRINTING PROCESS ……………………………………………… 67PRINTING THE IMAGE SEEN ON THE LCD MONITOR ̶̶̶̶̶̶̶̶̶̶̶ 67PRINTING ALL THE IMAGES IN MEMORY ̶̶̶̶̶̶̶̶̶̶̶̶̶̶̶̶̶ 68PRINTING SELECTED IMAGES ̶̶̶̶̶̶̶̶̶̶̶̶̶̶̶̶̶̶̶̶̶̶ 69
PRINT Image Framer (P.I.F.) PRINTING…………………………………… 70PRINTING PRINT Image Framer (P.I.F.) IMAGES ……………………… 71
PRINTING THE P.I.F. IMAGE DISPLAYED ON THE LCD MONITOR ̶̶̶̶̶ 71OTHER P.I.F. PRINTING OPTIONS ̶̶̶̶̶̶̶̶̶̶̶̶̶̶̶̶̶̶̶̶ 72CHANGING THE FRAMES ̶̶̶̶̶̶̶̶̶̶̶̶̶̶̶̶̶̶̶̶̶̶̶̶ 73
PRINT SETTINGS ……………………………………………………………… 74HOW TO CHANGE PRINT SETTINGS ̶̶̶̶̶̶̶̶̶̶̶̶̶̶̶̶̶̶̶ 74SETTING PAPER SIZE ̶̶̶̶̶̶̶̶̶̶̶̶̶̶̶̶̶̶̶̶̶̶̶̶̶̶ 75SELECTING PRINT BORDERS ̶̶̶̶̶̶̶̶̶̶̶̶̶̶̶̶̶̶̶̶̶̶ 75PRINTING THE DATE ̶̶̶̶̶̶̶̶̶̶̶̶̶̶̶̶̶̶̶̶̶̶̶̶̶̶ 76HIGH SPEED PRINTING ̶̶̶̶̶̶̶̶̶̶̶̶̶̶̶̶̶̶̶̶̶̶̶̶̶ 76
PRINTER UTILITIES …………………………………………………………… 77PRINTER UTILITIES ̶̶̶̶̶̶̶̶̶̶̶̶̶̶̶̶̶̶̶̶̶̶̶̶̶̶̶ 77TEST PRINTING FOR NOZZLE CHECK ̶̶̶̶̶̶̶̶̶̶̶̶̶̶̶̶̶̶ 78HEAD CLEANING ̶̶̶̶̶̶̶̶̶̶̶̶̶̶̶̶̶̶̶̶̶̶̶̶̶̶̶̶ 78
ADDITIONAL SETTINGS 79DIGITAL PRINT ORDER FORMAT (DPOF) ̶̶̶̶̶̶̶̶̶̶̶̶̶̶̶̶̶ 80SAVING PHOTOS IN DPOF̶̶̶̶̶̶̶̶̶̶̶̶̶̶̶̶̶̶̶̶̶̶̶̶ 80
3
SOUND AND SHUTTER SETTINGS ̶̶̶̶̶̶̶̶̶̶̶̶̶̶̶̶̶̶̶̶ 81ADJUSTING LCD BRIGHTNESS̶̶̶̶̶̶̶̶̶̶̶̶̶̶̶̶̶̶̶̶̶̶ 82MEMORY CARD FORMATTING ̶̶̶̶̶̶̶̶̶̶̶̶̶̶̶̶̶̶̶̶̶̶ 83AUTO POWER SAVE̶̶̶̶̶̶̶̶̶̶̶̶̶̶̶̶̶̶̶̶̶̶̶̶̶̶̶ 84RESETTING THE AUTO POWER SAVE ̶̶̶̶̶̶̶̶̶̶̶̶̶̶̶̶̶̶ 84DATE & TIME AND DATE/TIME FORMATS ̶̶̶̶̶̶̶̶̶̶̶̶̶̶̶̶ 85RULES FOR NAMING FILES (Cumulative function) ̶̶̶̶̶̶̶̶̶̶̶̶̶ 86RESETTING FILE NUMBERS ̶̶̶̶̶̶̶̶̶̶̶̶̶̶̶̶̶̶̶̶̶̶̶ 86RESETTING VIDEO OUT ̶̶̶̶̶̶̶̶̶̶̶̶̶̶̶̶̶̶̶̶̶̶̶̶̶ 87SETTING THE MENU LANGUAGE̶̶̶̶̶̶̶̶̶̶̶̶̶̶̶̶̶̶̶̶̶ 87RESETTING CAMERA DEFAULTS̶̶̶̶̶̶̶̶̶̶̶̶̶̶̶̶̶̶̶̶̶ 88
ADDITIONAL INFORMATION 89
CLEANING THE CAMERA …………………………………………………… 90WHEN THE CAMERA NEEDS CLEANING ̶̶̶̶̶̶̶̶̶̶̶̶̶̶̶̶̶ 90STORING THE CAMERA ̶̶̶̶̶̶̶̶̶̶̶̶̶̶̶̶̶̶̶̶̶̶̶̶̶ 90
SPECIFICATIONS L-300 …………………………………………………… 91SPECIFICATIONS L-200 …………………………………………………… 92
TROUBLESHOOTING 93
TROUBLESHOOTING ………………………………………………………… 94IF YOU RUN INTO TROUBLE ̶̶̶̶̶̶̶̶̶̶̶̶̶̶̶̶̶̶̶̶̶̶̶ 94BEFORE YOU CALL CUSTOMER SUPPORT ̶̶̶̶̶̶̶̶̶̶̶̶̶̶̶̶ 94CAMERA BODY PROBLEMS ̶̶̶̶̶̶̶̶̶̶̶̶̶̶̶̶̶̶̶̶̶̶̶ 94IMAGE PROBLEMS ̶̶̶̶̶̶̶̶̶̶̶̶̶̶̶̶̶̶̶̶̶̶̶̶̶̶̶ 97PRINTING PROBLEMS̶̶̶̶̶̶̶̶̶̶̶̶̶̶̶̶̶̶̶̶̶̶̶̶̶̶ 98
LIST OF ERROR MESSAGES ………………………………………………… 99PHOTO MODE MESSAGES̶̶̶̶̶̶̶̶̶̶̶̶̶̶̶̶̶̶̶̶̶̶̶̶ 99PLAYBACK MODE MESSAGES ̶̶̶̶̶̶̶̶̶̶̶̶̶̶̶̶̶̶̶̶̶̶ 99SET UP MODE MESSAGES ̶̶̶̶̶̶̶̶̶̶̶̶̶̶̶̶̶̶̶̶̶̶̶ 100DIRECT PRINTING MESSAGES ̶̶̶̶̶̶̶̶̶̶̶̶̶̶̶̶̶̶̶̶̶̶ 100
EPSON INFORMATION 102
CONTACTING CUSTOMER SUPPORT………………………………………102
INDEX………………………………………………………………………………104
4
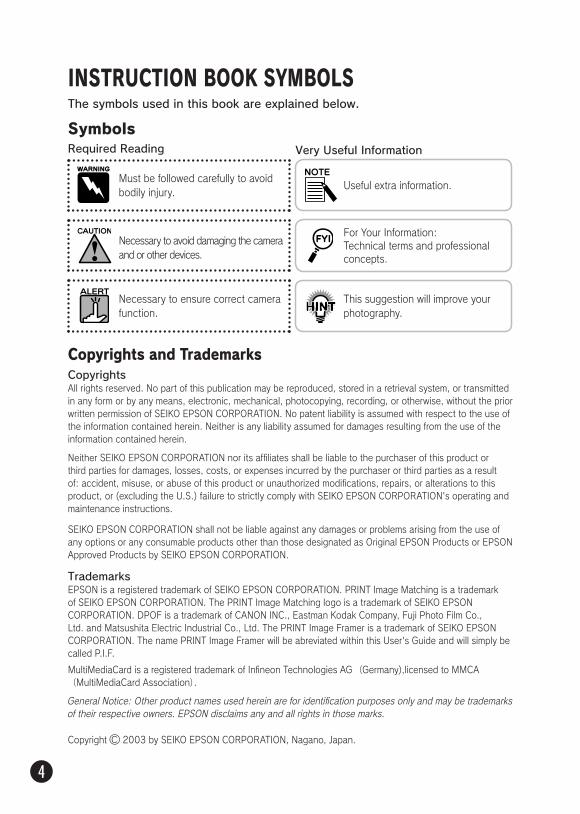
INSTRUCTION BOOK SYMBOLS
Symbols
The symbols used in this book are explained below.
Required Reading Very Useful Information
CopyrightsAll rights reserved. No part of this publication may be reproduced, stored in a retrieval system, or transmitted in any form or by any means, electronic, mechanical, photocopying, recording, or otherwise, without the prior written permission of SEIKO EPSON CORPORATION. No patent liability is assumed with respect to the use of the information contained herein. Neither is any liability assumed for damages resulting from the use of the information contained herein.
Necessary to avoid damaging the camera and or other devices.
For Your Information:Technical terms and professional concepts.
Necessary to ensure correct camera function.
Useful extra information.
This suggestion will improve your photography.
Copyrights and Trademarks
Must be followed carefully to avoid bodily injury.
Neither SEIKO EPSON CORPORATION nor its affiliates shall be liable to the purchaser of this product or third parties for damages, losses, costs, or expenses incurred by the purchaser or third parties as a result of: accident, misuse, or abuse of this product or unauthorized modifications, repairs, or alterations to this product, or (excluding the U.S.) failure to strictly comply with SEIKO EPSON CORPORATION's operating and maintenance instructions.
SEIKO EPSON CORPORATION shall not be liable against any damages or problems arising from the use of any options or any consumable products other than those designated as Original EPSON Products or EPSON Approved Products by SEIKO EPSON CORPORATION.
TrademarksEPSON is a registered trademark of SEIKO EPSON CORPORATION. PRINT Image Matching is a trademark of SEIKO EPSON CORPORATION. The PRINT Image Matching logo is a trademark of SEIKO EPSON CORPORATION. DPOF is a trademark of CANON INC., Eastman Kodak Company, Fuji Photo Film Co., Ltd. and Matsushita Electric Industrial Co., Ltd. The PRINT Image Framer is a trademark of SEIKO EPSON CORPORATION. The name PRINT Image Framer will be abreviated within this User's Guide and will simply be called P.I.F.
MultiMediaCard is a registered trademark of Infineon Technologies AG(Germany),licensed to MMCA(MultiMediaCard Association).
General Notice: Other product names used herein are for identification purposes only and may be trademarks of their respective owners. EPSON disclaims any and all rights in those marks.
Copyright 2003 by SEIKO EPSON CORPORATION, Nagano, Japan.

5
IMPORTANT SAFETY INSTRUCTIONS
Read all of these instructions before using this product, and keep this guide handy for later reference. Follow all warnings and instructions marked on this product and options.
Note the following when using this product.□ To reduce the risk of electric shock, do not remove the cover of this product or options.
Do not open any compartments except as instructed in this User's Guide.
□ Do not insert objects into any openings.
□ To prevent fire or electric shock, do not expose this product or options to rain or moisture.
□ To prevent fire or electric shock, do not cover this product with a blanket or other covering that may give off an electric charge.
□ To prevent fire or explosion, do not use this product where flammable or volatile gas is stored.
□ Do not use this product outdoors during a thunderstorm.
□ To prevent possible injury, do not take flash pictures in close proximity to anyone's eyes.
□ Remove the batteries from and/or unplug this product and refer servicing to qualified service personnel under the following conditions:
The power cord or plug is damaged; liquid has entered this product or its options; this product or its options have been dropped or the case damaged; this product or its options do not operate normally or exhibit a distinct change in performance; this product or its options emit unusual noises, odors, or smoke.
□ Never adjust controls that are not mentioned in the operating instructions.
□ If the liquid crystal solution contained in the LCD monitor leaks out and gets on your hands, wash them thoroughly with soap and water. If it gets into your eyes, flush them immediately with water.
□ Do not look at the sun through the viewfinder. Doing so could damage your eyes.
WHEN USING THIS PRODUCT
Note the following when using this product strap.□ Do not swing this product about. Doing so could damage this product or other objects,
or cause injury.
□ Do not pull or tighten the strap too much when wearing it. Doing so could cause serious injury.
□ Keep the strap away from children.
WHEN USING THE STRAP
6
WHEN USING THE BATTERIES
Note the following when using batteries.□ Only use the batteries in EPSON Digital Cameras as specified in this manual.
□ To guard against short-circuiting, do not remove the outside sleeves of the batteries.
□ Keep the batteries from making contact with metal objects such as coins or keys, which could short circuit the batteries.
□ Do not put the batteries near or into fire or water.
□ Read all relevant safety and operating instructions before using the batteries.
□ Do not use manganese batteries (IEC R6).
□ Do not charge primary (non-rechargeable) batteries.
□ To avoid fire or electric shock, do not use batteries that are leaking or damaged in any way.
□ Do not handle the batteries with wet hands or use them near water. Do not expose the batteries to water or high humidity.
□ Do not place the batteries near or into heat sources or fire.
□ Do not drop, puncture, disassemble, mutilate, or short-circuit batteries.
□ To protect against short-circuiting, do not remove the outside sleeves of the batteries.
□ Prevent the batteries from coming into contact with metal objects which could short-circuit the batteries, such as coins or keys.
□ Do not insert batteries into wall outlets or other power sources such as car cigarette lighter sockets.
□ Do not solder lead wires or terminals directly to a battery.
Replacing the batteriesYou can replace them with any of the following batteries.
□Do not apply heat or force to batteries, and do not disassemble, drop, short-circuit, or put batteries into fire or water.
□ Do not keep batteries loose in your pockets.
□ Do not mix different types of batteries; this can cause fire or explosion.
□ Always use batteries from the same package as a set. Do not mix old and new batteries.
Handling the batteriesKeep the battery ends clean by wiping them with a dry cloth.
・Battery life varies depending on the battery type and the manufacturer.・If you use rechargeable batteries in the L-300/200, replace them with four fully-charged batteries. If you find that your batteries run out soon after recharging them a number of times, make sure you discharge them completely before recharging.
Single-use AA alkaline batteriesRechargeable AA Ni-MH batteriesRechargeable AA nickel-manganese batteries
7
If battery acid gets into your eyes or on your skin, immediately rinse the affected area thoroughly with water and seek medical treatment. If a battery is swallowed, seek medical treatment immediately.
If damage occurs to the plug, replace the cord set or consult a qualified electrician.Replace fuses only with fuses of the correct size and rating.
FOR USERS IN HONG KONG
For German users:
Bij dit produkt zijn batterijen geleverd. Wanneer deze leeg zijn, moet u ze niet weggooien maar inleveren als KCA.
Do not dispose of batteries with ordinary refuse. Instead, dispose of them in a recycle box in accordance with local laws.
For the Netherlands users:Do not dispose of the batteries with ordinary refuse. Instead, dispose of them as small chemical waste in accordance with local laws, and the following Dutch Government Gazette 45, KCA Marking:
□ Be sure to securely cover the + end of each battery with tape to prevent combustion or explosion when disposing.
□ Dispose of used batteries according to the manufacturer’s instructions and in compliance with all applicable laws. Contact your local government agency for information about battery recycling and disposal.
Disposing of the batteriesBefore disposing of batteries, make sure you discharge them completely.
□Do not store batteries with metal objects, which could short-circuit the batteries.
□ Avoid storing batteries in extremely hot or humid locations.
□ Store batteries out of reach of children.
□ Always remove the batteries from the camera and charger before storing. Batteries left in your camera and charger for a long time may leak and cause damage.
Storing the batteriesIf you do not plan to use the camera for a long period of time, remove the batteries and store them at a low temperature in a dry location.
8
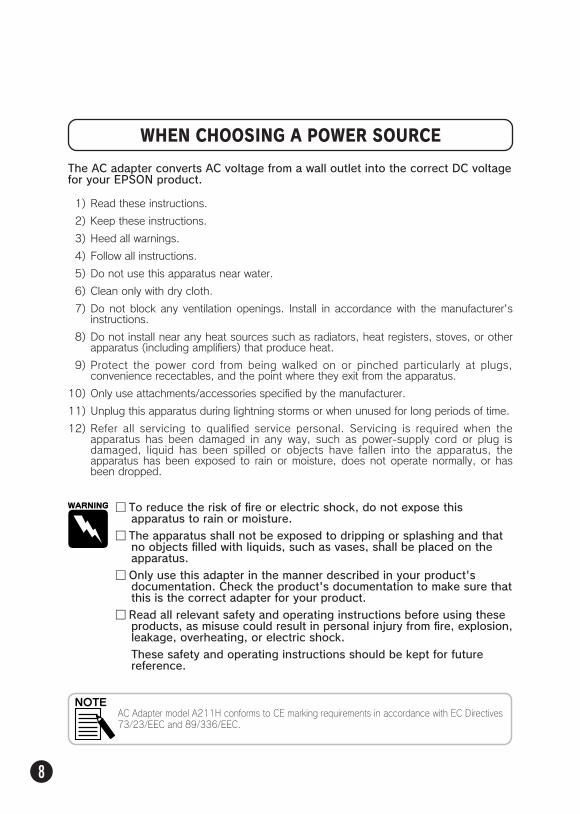
□ To reduce the risk of fire or electric shock, do not expose this apparatus to rain or moisture.
□ The apparatus shall not be exposed to dripping or splashing and that no objects filled with liquids, such as vases, shall be placed on the apparatus.
□ Only use this adapter in the manner described in your product's documentation. Check the product's documentation to make sure that this is the correct adapter for your product.
□ Read all relevant safety and operating instructions before using these products, as misuse could result in personal injury from fire, explosion, leakage, overheating, or electric shock.
These safety and operating instructions should be kept for future reference.
AC Adapter model A211H conforms to CE marking requirements in accordance with EC Directives 73/23/EEC and 89/336/EEC.
WHEN CHOOSING A POWER SOURCE
The AC adapter converts AC voltage from a wall outlet into the correct DC voltage for your EPSON product.
1) Read these instructions.
2) Keep these instructions.
3) Heed all warnings.
4) Follow all instructions.
5) Do not use this apparatus near water.
6) Clean only with dry cloth.
7) Do not block any ventilation openings. Install in accordance with the manufacturer's instructions.
8) Do not install near any heat sources such as radiators, heat registers, stoves, or other apparatus (including amplifiers) that produce heat.
9) Protect the power cord from being walked on or pinched particularly at plugs, convenience recectables, and the point where they exit from the apparatus.
10) Only use attachments/accessories specified by the manufacturer.
11) Unplug this apparatus during lightning storms or when unused for long periods of time.
12) Refer all servicing to qualified service personal. Servicing is required when the apparatus has been damaged in any way, such as power-supply cord or plug is damaged, liquid has been spilled or objects have fallen into the apparatus, the apparatus has been exposed to rain or moisture, does not operate normally, or has been dropped.

9
This product is designed for use with EPSON products ONLY. Do not attempt to use it with other electronic devices.
□Beware of electrical shock hazards.
□ Do not use this product near water or handle it with wet hands.
□ Keep away from heat sources. Do not use the charger outside the temperature range of 5°C to 35°C (41°F to 95°F).
□ Do not insert objects into any openings as they may touch dangerous voltage points or short out parts.
□ Never disassemble or modify this product.
□ Use only indoors, in a dry location.
□ Do not expose to water or excess humidity.
□ Use the type of power source indicated on the label, and always supply power directly from a standard domestic electrical outlet.
□ Do not place multiple loads on the electrical outlet.
□ Be sure your AC power cord meets the relevant local safety standards.
□ Never insert or disconnect the power plug with wet hands.
□ Power-supply cords should be protected from abrasion, cuts, crimping and kinking. Be sure to place your cords to avoid any damage. Do not place objects on top of the power cord or allow the power cord to be stepped on or run over. You should take special care to try to keep the power cord straight at the ends and the points where it enters and leaves the transformer.
□ Do not allow the AC power cord to become damaged or frayed.
□ Unplug your equipment from the wall outlet and refer servicing to qualified personnel under the following conditions:
If the power cord or plug is damaged; if liquid has entered your equipment; if your equipment has been exposed to rain or water; if your equipment has been dropped or damaged; if your equipment is operating abnormally or exhibits a distinct change in performance. Adjust only those controls described in your product documentation.
□ Never attempt to repair this product yourself. Improper repair work can be dangerous.
□ Unplug this product from the wall outlet before cleaning.
□ Clean only with a clean, soft dry cloth.
□ Do not use liquid or aerosol cleaners.
□ Keep out of reach of children.
□ For US and Canadian users: Use the included power cord or a 6-10 foot UL-approved type SPT-2 or heavier type, 2 x 18 AWG cord with a 125 V 10 A plug and 125V 7A connector.
□ If you plan to use the AC Adapter in Germany, observe the following: To provide adequate short-circuit protection and over-current protection for these products, the building installation must be protected by a 16 Amp circuit breaker.
10
EPSON FEATURES
Get beautiful results from many easy-to-use camera features!
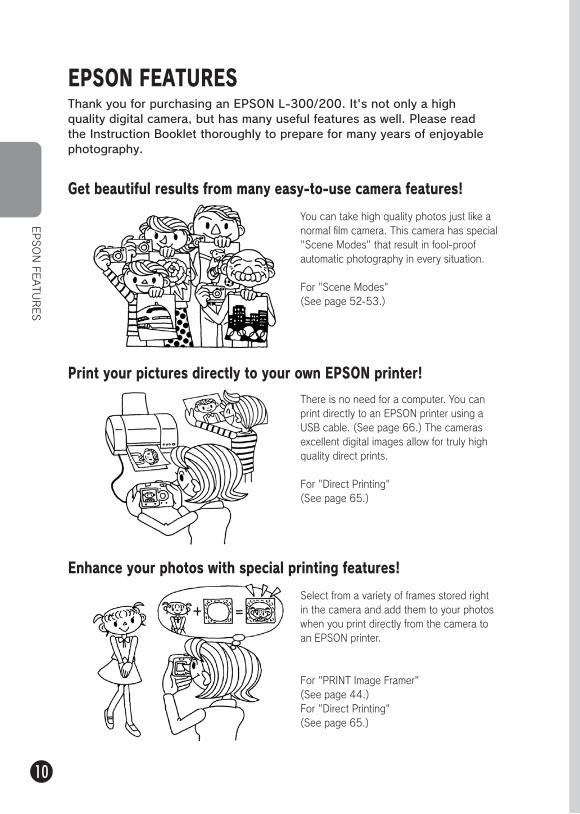
Thank you for purchasing an EPSON L-300/200. It's not only a high quality digital camera, but has many useful features as well. Please read the Instruction Booklet thoroughly to prepare for many years of enjoyable photography.
Print your pictures directly to your own EPSON printer!
You can take high quality photos just like a normal film camera. This camera has special "Scene Modes" that result in fool-proof automatic photography in every situation.
For "Scene Modes"(See page 52-53.)
There is no need for a computer. You can print directly to an EPSON printer using a USB cable. (See page 66.) The cameras excellent digital images allow for truly high quality direct prints.
For "Direct Printing"(See page 65.)
Enhance your photos with special printing features!
Select from a variety of frames stored right in the camera and add them to your photos when you print directly from the camera to an EPSON printer.
For "PRINT Image Framer" (See page 44.)For "Direct Printing"(See page 65.)
EPSON FEATURES
11
CAMERA SETUPHow to set up your camera for optimal performance.
P.12 ●P.14 ●P.16 ●P.18 ●
ITEMSTOP VIEWBATTERIES AND MEMORY CARD INSTALLATIONSETTING UP YOUR CAMERA
12
ITEMS
CHECKING THE PACKING CONTENTS
ITEMS
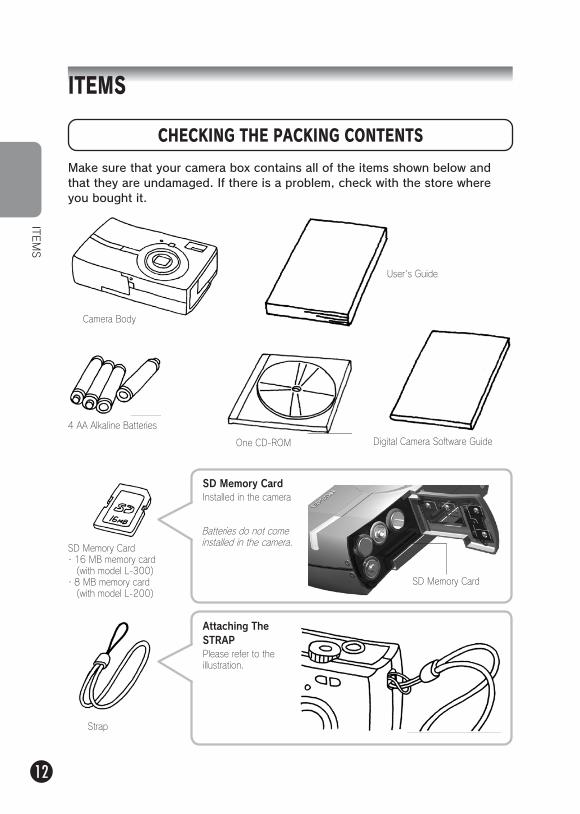
Make sure that your camera box contains all of the items shown below and that they are undamaged. If there is a problem, check with the store where you bought it.
SD Memory Card・16 MB memory card (with model L-300)・8 MB memory card (with model L-200)
Strap
4 AA Alkaline Batteries
One CD-ROM
Camera Body
User's Guide
Digital Camera Software Guide
Attaching The STRAPPlease refer to the illustration.
SD Memory CardInstalled in the camera
Batteries do not come installed in the camera.
SD Memory Card
13
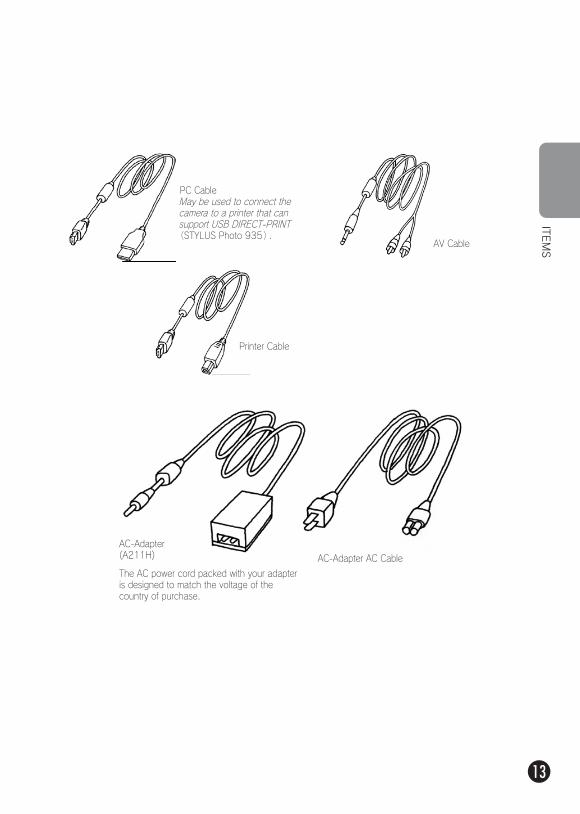
AC-Adapter (A211H) AC-Adapter AC Cable
PC CableMay be used to connect the camera to a printer that can support USB DIRECT-PRINT(STYLUS Photo 935).
ITEMS
Printer Cable
AV Cable
The AC power cord packed with your adapter is designed to match the voltage of the country of purchase.
14
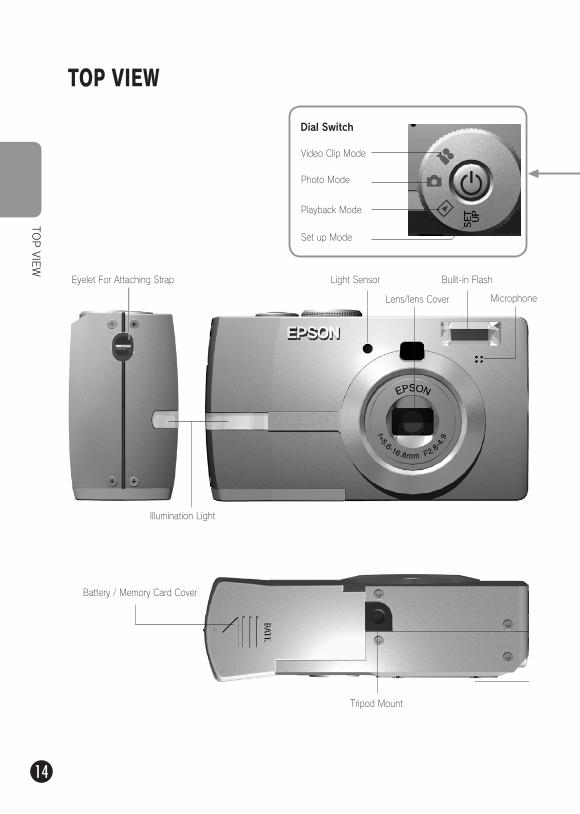
TOP VIEW
Video Clip Mode
Photo Mode
Microphone
Playback Mode
TOP VIEW
Lens/lens Cover
Built-in Flash
Illumination Light
Tripod Mount
Dial Switch
Set up Mode
Eyelet For Attaching Strap Light Sensor
Battery / Memory Card Cover
15
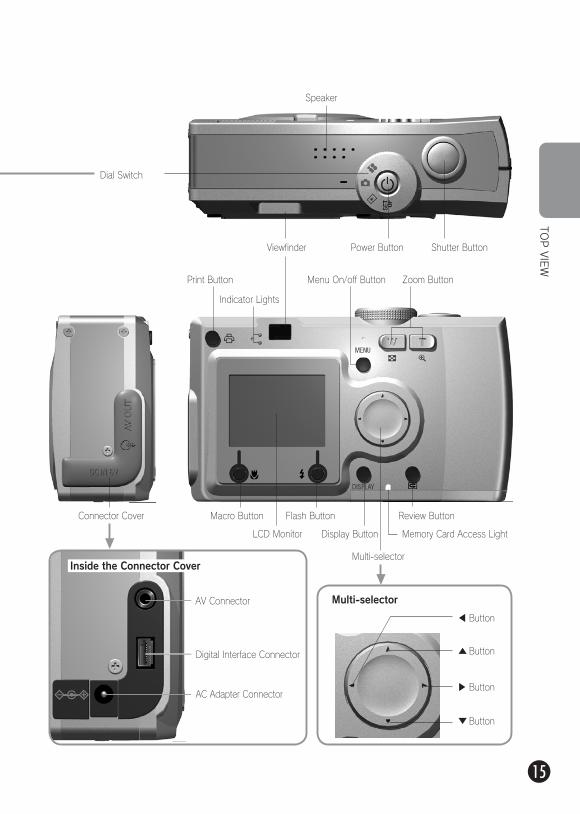
Connector Cover
Speaker
Inside the Connector Cover
TOP VIEW
Shutter ButtonPower Button
Dial Switch
Print Button
Viewfinder
Zoom Button
Review Button
Display Button
Flash Button
Multi-selector
Macro Button
Menu On/off Button
LCD Monitor
▼ Button
▲
Button
▲ Button
▲ Button
Multi-selector
Memory Card Access Light
AC Adapter Connector
AV Connector
Digital Interface Connector
Indicator Lights
16
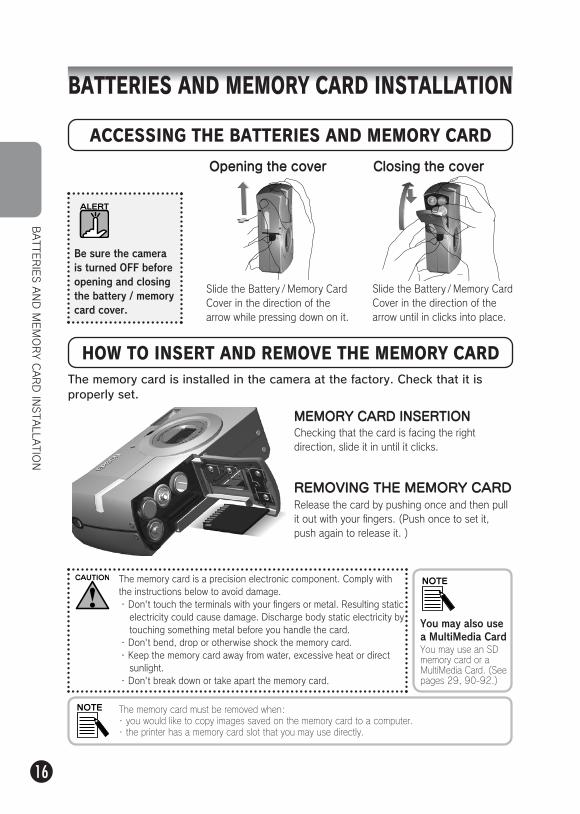
HOW TO INSERT AND REMOVE THE MEMORY CARD
Checking that the card is facing the right direction, slide it in until it clicks.
MEMORY CARD INSERTION
Release the card by pushing once and then pull it out with your fingers. (Push once to set it, push again to release it. )
REMOVING THE MEMORY CARD
BATTERIES AND MEMORY CARD INSTALLATION
The memory card is installed in the camera at the factory. Check that it is properly set.
The memory card is a precision electronic component. Comply with the instructions below to avoid damage.・Don't touch the terminals with your fingers or metal. Resulting static electricity could cause damage. Discharge body static electricity by touching something metal before you handle the card.
・Don't bend, drop or otherwise shock the memory card.・Keep the memory card away from water, excessive heat or direct sunlight.
・Don't break down or take apart the memory card.
The memory card must be removed when:・ you would like to copy images saved on the memory card to a computer.・ the printer has a memory card slot that you may use directly.
ACCESSING THE BATTERIES AND MEMORY CARD
Be sure the camera is turned OFF before opening and closing the battery / memory card cover.
Slide the Battery / Memory Card Cover in the direction of the arrow while pressing down on it.
Slide the Battery / Memory Card Cover in the direction of the arrow until in clicks into place.
Opening the cover Closing the cover
BATTE
RIES AND MEMORY C
ARD INSTALLA
TION
You may also use a MultiMedia Card You may use an SD memory card or a MultiMedia Card. (See pages 29, 90-92.)
17
BATTE
RIES AND MEMORY C
ARD INSTALLA
TION
・When changing the batteries, change all 4 at the same time and use the same brand.
・The life of a battery will vary depending on the brand and grade. The conditions and modes that are used will also affect the length of use.
・Non-rechargeable batteries cannot be recharged. Follow the instructions provided to discharge batteries.
If you insert the batteries incorrectly you may cause leaking, overheating or injury to yourself. You may also damage the camera.
BATTERY LIFE INDICATORAs the batteries lose power, the icon on the LCD monitor will change from
to .When the icon changes from
to
The power is low and you can no longer photograph.Then the indicator light will show red and the camera will automatically shut down.
BATTERY SETUP
Insert the batteries according to the pole indications on the cover.
Be sure the battery poles +- are aligned properly.
SETTING THE BATTERIES
When the is flashing
To find out what batteries may be used. See pages 91-92.
Power in the batteries is almost depleted. Please be ready to insert a spare.
・Rechargeable batteries should be recharged in their own charge until used up.・Do not dispose of batteries as ordinary refuse.・Instead, dispose of them in a collection or recycle box in accordance with local laws.
Batteries Icon
If the batteries run low, you can simply plug in the AC adapter to continue using the camera. (See page 40.)
18
SETTING UP YOUR CAMERA
The first time you use the camera, you must set the following three items. You will only need to do this once.
SETTIN
G UP YO
UR CAMERA
Turning on the Power
Turning off the Power
Turn on the camera by pressing the POWER button. The lens cover will open automatically, and the lens will extend.
Pressing the POWER button again will turn the power off. The lens will automatically retract and the lens cover will close.
When the camera is left on for a long period of time without being used, it will automatically shut down to save the batteries. (See page 82.)
INITIAL SETTINGS
2. Setting Date & Time
3. Setting the Video Out Signal
1. Selecting a LanguageThe first time you turn on the POWER, the "Language" screen appears. Use the ▲▼ buttons to select English, then press the
FLASH button.(See page 87.)
MACRO button FLASH button
buttonbuttonbuttonbutton
Next the screen "Date/Time" will appear with the year highlighted.Use the ▲▼ buttons to change the numbers.Use the ▲ ▼ buttons to highlight the next item.Press the FLASH button to save the settings.Press the MACRO button to return to previous settings.Hold down the ▲▼ buttons to scroll faster.You may change these settings at a later date. (See page 83.)
The last screen will say Video Out.Use the ▲▼ buttons to highlight PAL or NTSC. Then press theFLASH button to save.(See page 87.)
Initial settings are complete.
POWER ON/OFFPOWER button
19
STANDARD OPERATION How to use in the automatic mode.
P.20 ●P.22 ●P.32 ●P.36 ●P.38 ●P.40 ●
HOLDING THE CAMERA / RELEASING THE SHUTTERTHE IMAGE SYSTEMPLAYBACK SYSTEMDELETING SYSTEMUSING YOUR IMAGEUSING THE AC ADAPTER
20
HOLDING THE CAMERA / RELEASING THE SHUTTERThere is no special picture-taking stance for this particular camera, but it is useful to know these basic techniques for taking good pictures in general.
Poor Form
Make an L-shape platform with the left hand
Knees slightly bent to create a cushion
Left thumb next to your forehead
Both arms are close to your body
Right thumb controls the shutter button
Avoid arching your shutter button finger
Arms are extended
Both hands are clutching the camera
Knees slightly bent to create a cushion
Knees are locked
Forms a human tripod
Both arms are close to your body
In P.I.F. mode the image will sometimes appear upside down.
LCD Viewer Stance (Horizontal)Maintain the same L-shaped left hand grip and relax shoulders to bring arms forward.
LCD Viewer Stance (Vertical)Right thumb controls shutter button. Left hand shades the LCD screen for easier viewing.
Good Form For Taking Horizontal Shots
Good Form For Taking Vertical Shots
HOLDING THE CAMERA / RELEASING THE SHUTTER
21
CAMERA RANGE
50cm (19.6 inches)
Focal Point
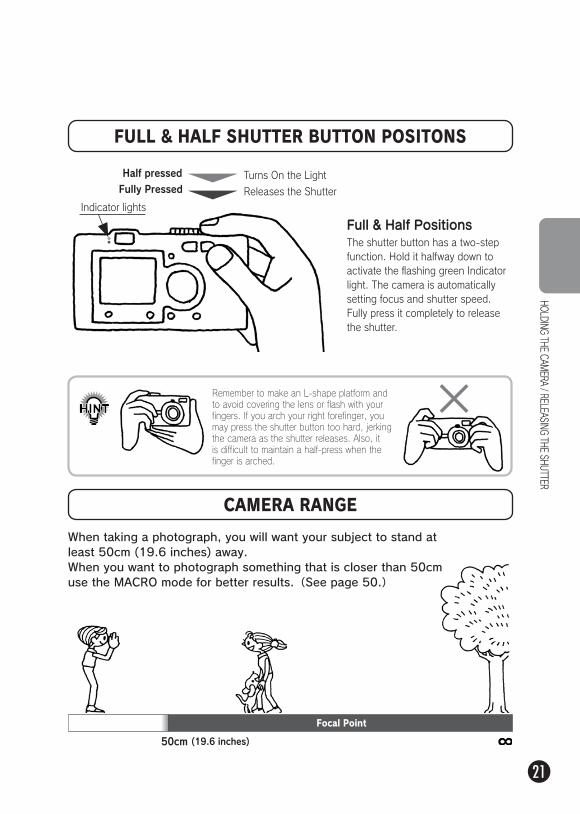
FULL & HALF SHUTTER BUTTON POSITONS
The shutter button has a two-step function. Hold it halfway down to activate the flashing green Indicator light. The camera is automatically setting focus and shutter speed.Fully press it completely to release the shutter.
Full & Half Positions
Fully Pressed Releases the Shutter
Half pressed Turns On the Light
Indicator lights
Remember to make an L-shape platform and to avoid covering the lens or flash with your fingers. If you arch your right forefinger, you may press the shutter button too hard, jerking the camera as the shutter releases. Also, it is difficult to maintain a half-press when the finger is arched.
HOLDING THE CAMERA / RELEASING THE SHUTTER
When taking a photograph, you will want your subject to stand at least 50cm (19.6 inches) away.When you want to photograph something that is closer than 50cm use the MACRO mode for better results.(See page 50.)
22
THE IM
AGE SYSTEM
Indicator light(green)
focus frame
THE IMAGE SYSTEMA brief description of how to take photos.
TAKING PHOTOS USING THE LCD MONITOR
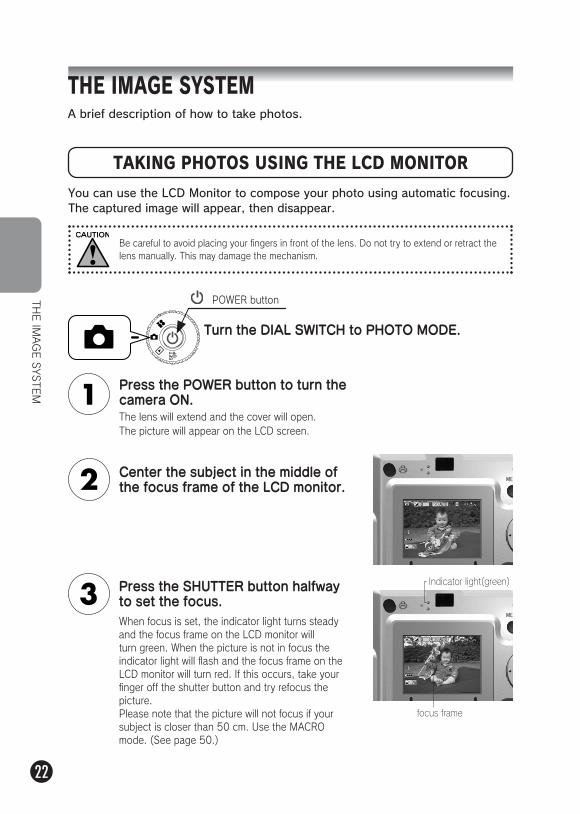
Press the POWER button to turn the camera ON.The lens will extend and the cover will open.The picture will appear on the LCD screen.
You can use the LCD Monitor to compose your photo using automatic focusing.The captured image will appear, then disappear.
Center the subject in the middle of the focus frame of the LCD monitor.
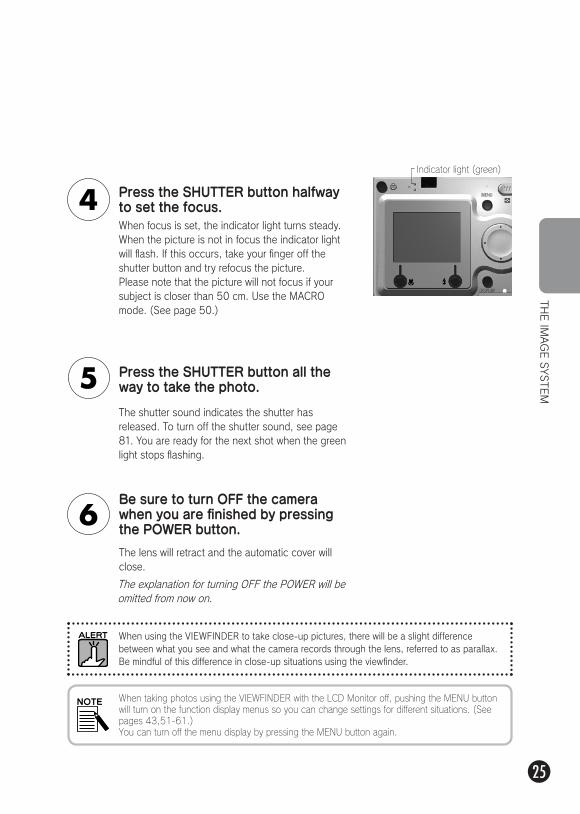
Press the SHUTTER button halfway to set the focus.When focus is set, the indicator light turns steady and the focus frame on the LCD monitor will turn green. When the picture is not in focus the indicator light will flash and the focus frame on the LCD monitor will turn red. If this occurs, take your finger off the shutter button and try refocus the picture. Please note that the picture will not focus if your subject is closer than 50 cm. Use the MACRO mode. (See page 50.)
Turn the DIAL SWITCH to PHOTO MODE.
POWER button
Be careful to avoid placing your fingers in front of the lens. Do not try to extend or retract the lens manually. This may damage the mechanism.
23
Press the SHUTTER button fully to take the photo.You will know the picture is recorded when you hear the shutter sound. This sound may be turned off. (See page 81.)
buttonbuttonbuttonbutton
Press the POWER button to turn the camera OFF when finished.The lens will retract and the lens cover will close.
TURNING THE QUICK VIEW ON/OFF
This system sends the recorded photo to the LCD monitor 3 seconds after the image is captured. This function may be turned ON or OFF.
The recorded picture is displayed. It will disappear after 3 seconds, or after the shutter button is pressed halfway, whichever is sooner.When using only the VIEWFINDER the QUICK VIEW function will not work.
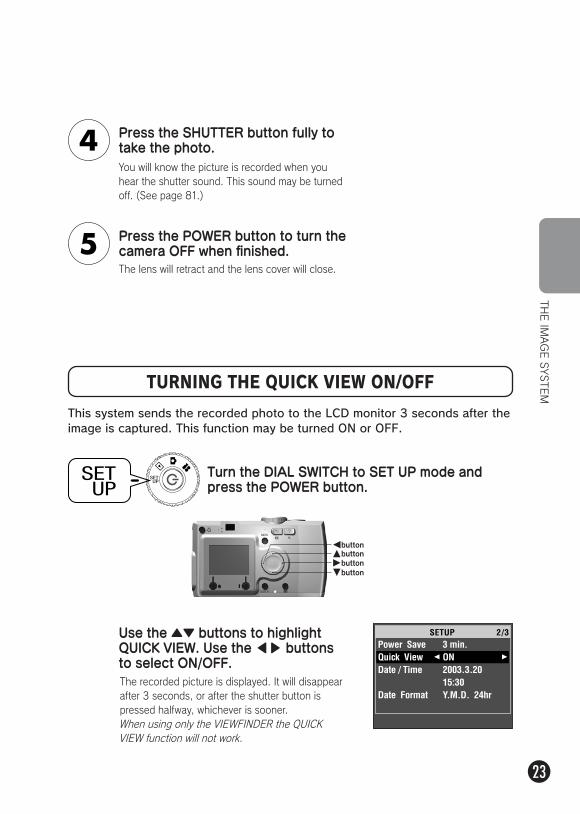
Use the ▲▼ buttons to highlight QUICK VIEW. Use the ▲ ▼ buttons to select ON/OFF.
Turn the DIAL SWITCH to SET UP mode and press the POWER button.
THE IM
AGE SYSTEM
24
The camera will set the focus on the image located in the exact center of the frame.
DISPLAY button
VIEWFINDER
USING THE VIEWFINDER-ONLY METHOD
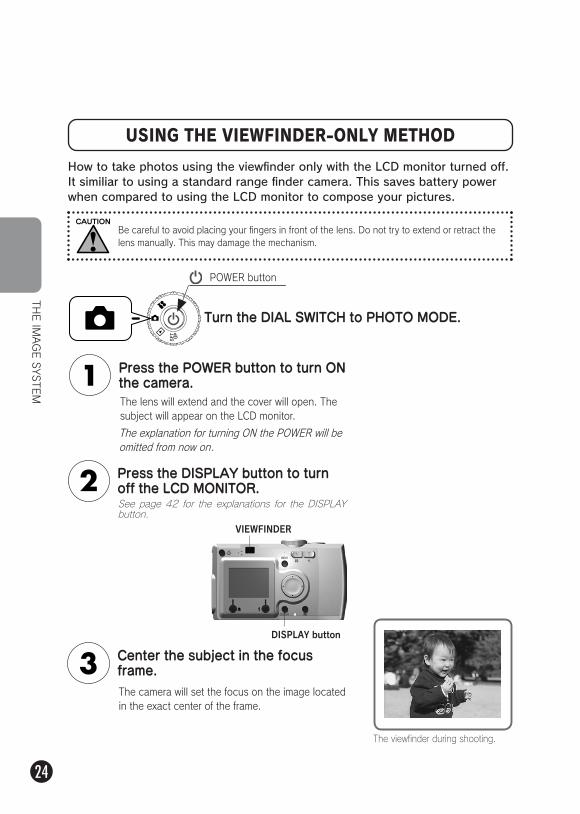
How to take photos using the viewfinder only with the LCD monitor turned off. It similiar to using a standard range finder camera. This saves battery power when compared to using the LCD monitor to compose your pictures.
Center the subject in the focus frame.
Be careful to avoid placing your fingers in front of the lens. Do not try to extend or retract the lens manually. This may damage the mechanism.
Press the POWER button to turn ON the camera.The lens will extend and the cover will open. The subject will appear on the LCD monitor.
Press the DISPLAY button to turn off the LCD MONITOR.
Turn the DIAL SWITCH to PHOTO MODE.
The viewfinder during shooting.
POWER button
The explanation for turning ON the POWER will be omitted from now on.
THE IM
AGE SYSTEM
See page 42 for the explanations for the DISPLAY button.
25
THE IM
AGE SYSTEM
Press the SHUTTER button all the way to take the photo.
When using the VIEWFINDER to take close-up pictures, there will be a slight difference between what you see and what the camera records through the lens, referred to as parallax. Be mindful of this difference in close-up situations using the viewfinder.
The shutter sound indicates the shutter has released. To turn off the shutter sound, see page 81. You are ready for the next shot when the green light stops flashing.
Be sure to turn OFF the camera when you are finished by pressing the POWER button.
The lens will retract and the automatic cover will close.
When taking photos using the VIEWFINDER with the LCD Monitor off, pushing the MENU button will turn on the function display menus so you can change settings for different situations. (See pages 43,51-61.)You can turn off the menu display by pressing the MENU button again.
Press the SHUTTER button halfway to set the focus.
The explanation for turning OFF the POWER will be omitted from now on.
Indicator light (green)
When focus is set, the indicator light turns steady. When the picture is not in focus the indicator light will flash. If this occurs, take your finger off the shutter button and try refocus the picture. Please note that the picture will not focus if your subject is closer than 50 cm. Use the MACRO mode. (See page 50.)
Indicator light (green)
26
THE IM
AGE SYSTEM
IF THE CAPTURED IMAGE IS OUT OF FOCUS FRAME
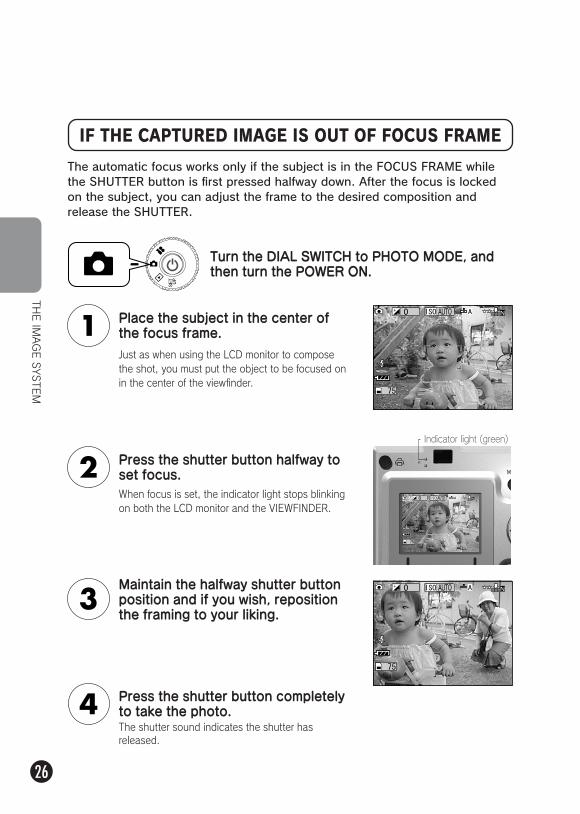
Place the subject in the center of the focus frame.
Press the shutter button halfway to set focus.When focus is set, the indicator light stops blinking on both the LCD monitor and the VIEWFINDER.
Maintain the halfway shutter button position and if you wish, reposition the framing to your liking.
The automatic focus works only if the subject is in the FOCUS FRAME while the SHUTTER button is first pressed halfway down. After the focus is locked on the subject, you can adjust the frame to the desired composition and release the SHUTTER.
Press the shutter button completely to take the photo.The shutter sound indicates the shutter has released.
Turn the DIAL SWITCH to PHOTO MODE, and then turn the POWER ON.
Just as when using the LCD monitor to compose the shot, you must put the object to be focused on in the center of the viewfinder.
27
THE IM
AGE SYSTEM
You can also use the Digital Zoom while shooting through the VIEWFINDER, although all digitally enhanced images are inferior in resolution.
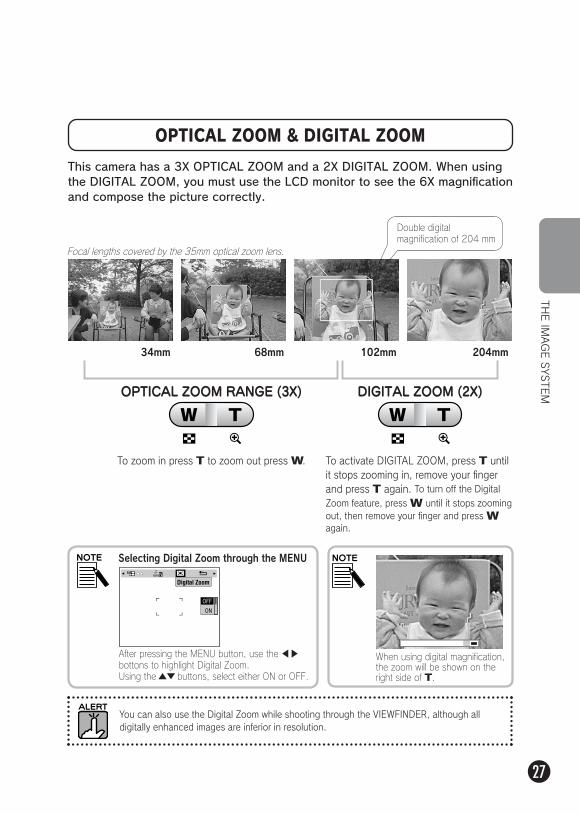
OPTICAL ZOOM & DIGITAL ZOOM
OPTICAL ZOOM RANGE (3X)
To zoom in press T to zoom out press W.
This camera has a 3X OPTICAL ZOOM and a 2X DIGITAL ZOOM. When using the DIGITAL ZOOM, you must use the LCD monitor to see the 6X magnification and compose the picture correctly.
DIGITAL ZOOM (2X)
To activate DIGITAL ZOOM, press T until it stops zooming in, remove your finger and press T again. To turn off the Digital Zoom feature, press W until it stops zooming out, then remove your finger and press W again.
When using digital magnification, the zoom will be shown on the right side of T.
34mm 102mm68mm 204mm
Focal lengths covered by the 35mm optical zoom lens.
Double digital magnification of 204 mm
After pressing the MENU button, use the ▲ ▼ bottons to highlight Digital Zoom.Using the ▲▼ buttons, select either ON or OFF.
Selecting Digital Zoom through the MENU
28
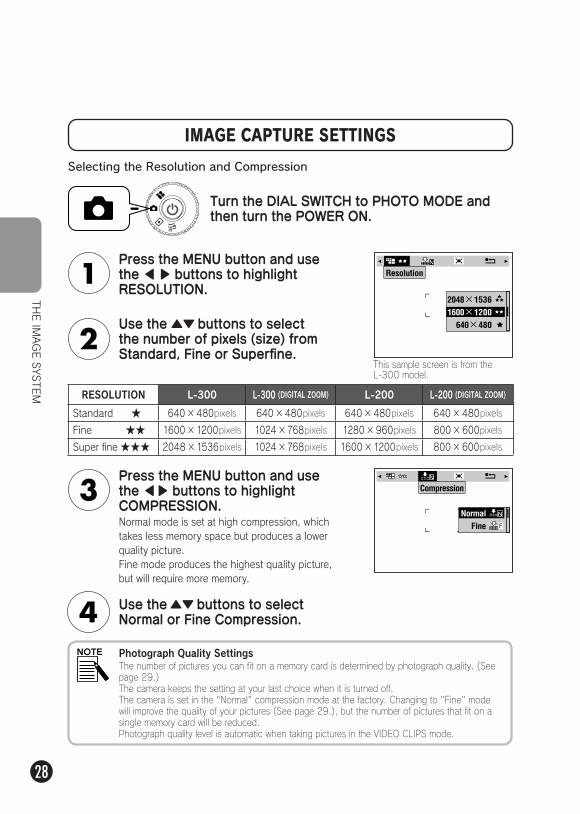
IMAGE CAPTURE SETTINGS
Photograph Quality SettingsThe number of pictures you can fit on a memory card is determined by photograph quality. (See page 29.)The camera keeps the setting at your last choice when it is turned off.The camera is set in the "Normal" compression mode at the factory. Changing to "Fine" mode will improve the quality of your pictures (See page 29.), but the number of pictures that fit on a single memory card will be reduced.Photograph quality level is automatic when taking pictures in the VIDEO CLIPS mode.
Normal mode is set at high compression, which takes less memory space but produces a lower quality picture.Fine mode produces the highest quality picture, but will require more memory.
Press the MENU button and use the ▲ ▼ buttons to highlight RESOLUTION.
Use the ▲▼ buttons to select the number of pixels (size) from Standard, Fine or Superfine.
Press the MENU button and use the ▲ ▼ buttons to highlight COMPRESSION.
Use the ▲▼ buttons to select Normal or Fine Compression.
Turn the DIAL SWITCH to PHOTO MODE and then turn the POWER ON.
RESOLUTION L-300 L-300 (DIGITAL ZOOM) L-200 L-200 (DIGITAL ZOOM)
Standard ★ 640×480pixels 640×480pixels 640×480pixels 640×480pixels
Fine ★★ 1600×1200pixels 1024×768pixels 1280×960pixels 800×600pixels
Super fine ★★★ 2048×1536pixels 1024×768pixels 1600×1200pixels 800×600pixels
Selecting the Resolution and Compression
This sample screen is from the L-300 model.
THE IM
AGE SYSTEM
29
THE IM
AGE SYSTEM
・ The numbers are the result of factory tests made by the manufacturer.・The numbers on the LCD monitor are only a guide. The actual numbers may vary.・The numbers on the LCD monitor may vary with image capture settings.・The number on the LCD monitor may change after each picture is taken. Each one will take up different amounts of memory. The number is calculated based on the factory average.
・When you take VIDEO CLIPS the amount of pictures you can take will change drastically. See page 62 for more detailed information on VIDEO CLIPS.
・The number of the sheets which can take pictures is a maximum of 9999.
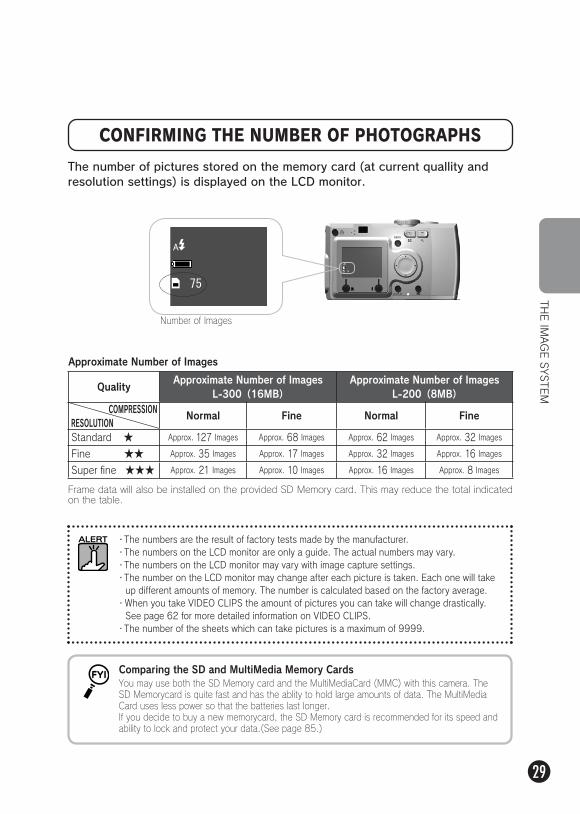
CONFIRMING THE NUMBER OF PHOTOGRAPHS
The number of pictures stored on the memory card (at current quallity and resolution settings) is displayed on the LCD monitor.
QualityApproximate Number of Images
L-300(16MB)Approximate Number of Images
L-200(8MB)
Normal Fine Normal Fine
Standard ★ Approx. 127 Images Approx. 68 Images Approx. 62 Images Approx. 32 Images
Fine ★★ Approx. 35 Images Approx. 17 Images Approx. 32 Images Approx. 16 Images
Super fine ★★★ Approx. 21 Images Approx. 10 Images Approx. 16 Images Approx. 8 Images
Approximate Number of Images
Number of Images
RESOLUTIONCOMPRESSION
Frame data will also be installed on the provided SD Memory card. This may reduce the total indicated on the table.
Comparing the SD and MultiMedia Memory CardsYou may use both the SD Memory card and the MultiMediaCard (MMC) with this camera. The SD Memorycard is quite fast and has the ablity to hold large amounts of data. The MultiMedia Card uses less power so that the batteries last longer.If you decide to buy a new memorycard, the SD Memory card is recommended for its speed and ability to lock and protect your data.(See page 85.)
30
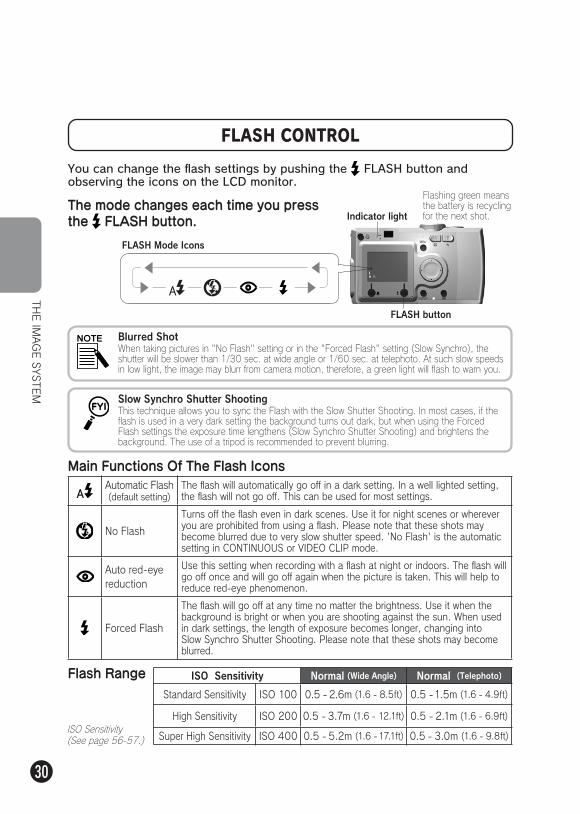
FLASH button
Indicator light
FLASH CONTROL
Flash Range
You can change the flash settings by pushing the FLASH button and observing the icons on the LCD monitor.
Flashing green means the battery is recycling for the next shot.
FLASH Mode Icons
Main Functions Of The Flash IconsAutomatic Flash(default setting)
The flash will automatically go off in a dark setting. In a well lighted setting, the flash will not go off. This can be used for most settings.
No Flash
Turns off the flash even in dark scenes. Use it for night scenes or wherever you are prohibited from using a flash. Please note that these shots may become blurred due to very slow shutter speed. 'No Flash' is the automatic setting in CONTINUOUS or VIDEO CLIP mode.
Auto red-eye reduction
Use this setting when recording with a flash at night or indoors. The flash will go off once and will go off again when the picture is taken. This will help to reduce red-eye phenomenon.
Forced Flash
The flash will go off at any time no matter the brightness. Use it when the background is bright or when you are shooting against the sun. When used in dark settings, the length of exposure becomes longer, changing into Slow Synchro Shutter Shooting. Please note that these shots may become blurred.
ISO Sensitivity Normal (Wide Angle) Normal (Telephoto)
Standard Sensitivity ISO 100 0.5 - 2.6m (1.6 - 8.5ft) 0.5 - 1.5m (1.6 - 4.9ft)
High Sensitivity ISO 200 0.5 - 3.7m (1.6 - 12.1ft) 0.5 - 2.1m (1.6 - 6.9ft)
Super High Sensitivity ISO 400 0.5 - 5.2m (1.6 - 17.1ft) 0.5 - 3.0m (1.6 - 9.8ft)
Blurred ShotWhen taking pictures in "No Flash" setting or in the "Forced Flash" setting (Slow Synchro), the shutter will be slower than 1/30 sec. at wide angle or 1/60 sec. at telephoto. At such slow speeds in low light, the image may blurr from camera motion, therefore, a green light will flash to warn you.
The mode changes each time you press the FLASH button.
Slow Synchro Shutter ShootingThis technique allows you to sync the Flash with the Slow Shutter Shooting. In most cases, if the flash is used in a very dark setting the background turns out dark, but when using the Forced Flash settings the exposure time lengthens (Slow Synchro Shutter Shooting) and brightens the background. The use of a tripod is recommended to prevent blurring.
THE IM
AGE SYSTEM
ISO Sensitivity(See page 56-57.)
31
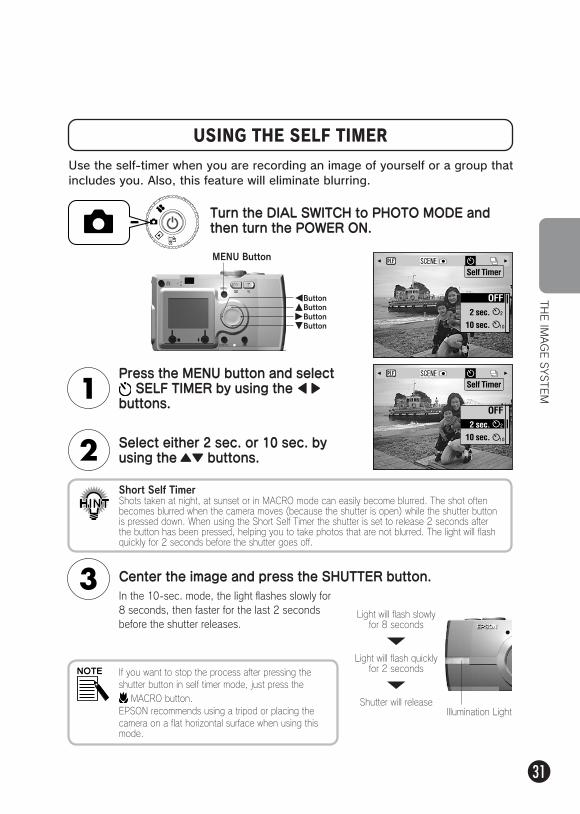
USING THE SELF TIMER
Press the MENU button and select SELF TIMER by using the ▲ ▼
buttons.
Center the image and press the SHUTTER button.
Use the self-timer when you are recording an image of yourself or a group that includes you. Also, this feature will eliminate blurring.
Select either 2 sec. or 10 sec. by using the ▲▼ buttons.
Turn the DIAL SWITCH to PHOTO MODE and then turn the POWER ON.
In the 10-sec. mode, the light flashes slowly for 8 seconds, then faster for the last 2 seconds before the shutter releases.
If you want to stop the process after pressing the shutter button in self timer mode, just press the MACRO button.
EPSON recommends using a tripod or placing the camera on a flat horizontal surface when using this mode.
Light will flash slowly for 8 seconds
Light will flash quickly for 2 seconds
Short Self TimerShots taken at night, at sunset or in MACRO mode can easily become blurred. The shot often becomes blurred when the camera moves (because the shutter is open) while the shutter button is pressed down. When using the Short Self Timer the shutter is set to release 2 seconds after the button has been pressed, helping you to take photos that are not blurred. The light will flash quickly for 2 seconds before the shutter goes off.
Shutter will release
MENU Button
ButtonButtonButtonButton
Illumination Light
THE IM
AGE SYSTEM
32
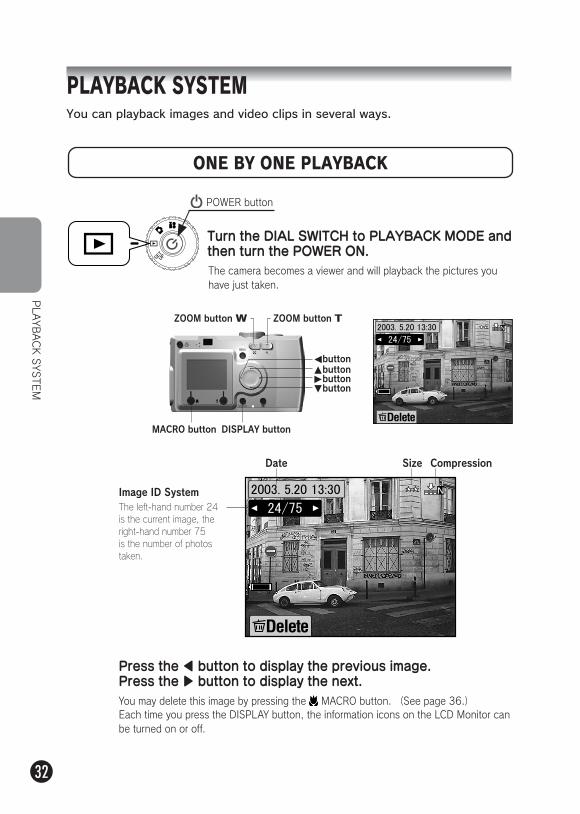
PLAYBACK SYSTEM
PLAYBACK SYSTEMYou can playback images and video clips in several ways.
ONE BY ONE PLAYBACK
Press the ▲ button to display the previous image. Press the ▼ button to display the next.
The left-hand number 24 is the current image, the right-hand number 75 is the number of photos taken.
Turn the DIAL SWITCH to PLAYBACK MODE and then turn the POWER ON.
Date Size Compression
POWER button
You may delete this image by pressing the MACRO button. (See page 36.)Each time you press the DISPLAY button, the information icons on the LCD Monitor can be turned on or off.
MACRO button DISPLAY button
buttonbuttonbuttonbutton
ZOOM button TZOOM button W
Image ID System
The camera becomes a viewer and will playback the pictures you have just taken.
33
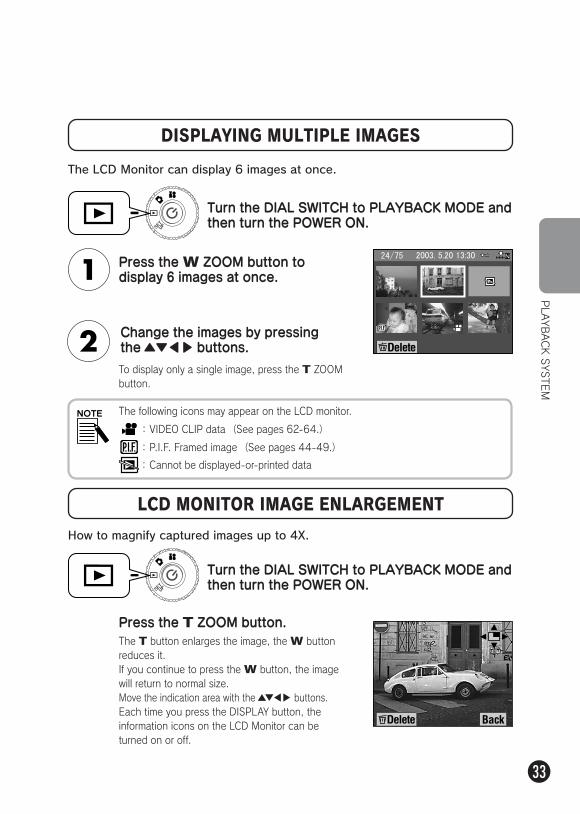
Press the W ZOOM button to display 6 images at once.
Change the images by pressing the ▲▼ ▲ ▼ buttons.
LCD MONITOR IMAGE ENLARGEMENT
How to magnify captured images up to 4X.
Press the T ZOOM button.The T button enlarges the image, the W button reduces it.If you continue to press the W button, the image will return to normal size.Move the indication area with the ▲▼ ▲ ▼ buttons.Each time you press the DISPLAY button, the information icons on the LCD Monitor can be turned on or off.
To display only a single image, press the T ZOOM button.
DISPLAYING MULTIPLE IMAGES
The LCD Monitor can display 6 images at once.
Turn the DIAL SWITCH to PLAYBACK MODE and then turn the POWER ON.
Turn the DIAL SWITCH to PLAYBACK MODE and then turn the POWER ON.
The following icons may appear on the LCD monitor.
:VIDEO CLIP data(See pages 62-64.)
:P.I.F. Framed image(See pages 44-49.)
:Cannot be displayed-or-printed data
PLAYBACK SYSTEM
34
PLAYBACK SYSTEM
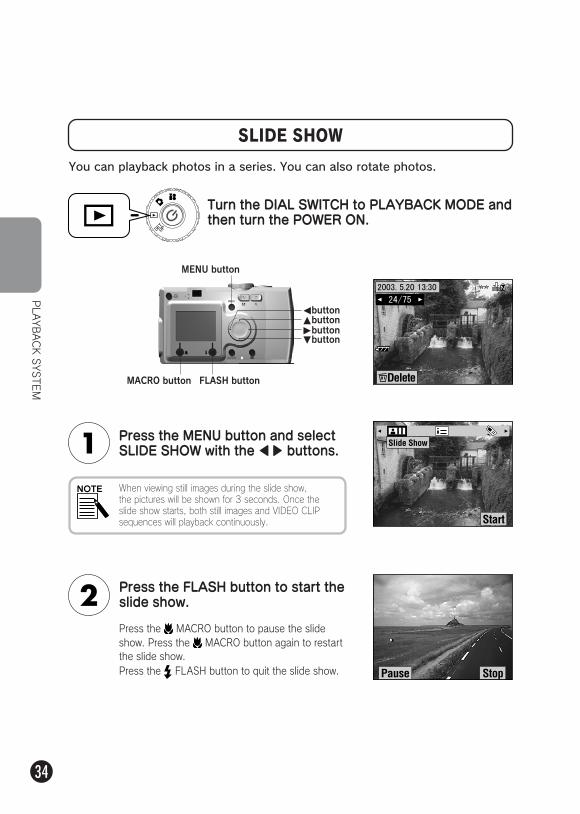
SLIDE SHOW
You can playback photos in a series. You can also rotate photos.
Press the MENU button and select SLIDE SHOW with the ▲ ▼ buttons.
Press the FLASH button to start the slide show.
Press the MACRO button to pause the slide show. Press the MACRO button again to restart the slide show.Press the FLASH button to quit the slide show.
Turn the DIAL SWITCH to PLAYBACK MODE and then turn the POWER ON.
MENU button
MACRO button FLASH button
buttonbuttonbuttonbutton
When viewing still images during the slide show, the pictures will be shown for 3 seconds. Once the slide show starts, both still images and VIDEO CLIP sequences will playback continuously.
35
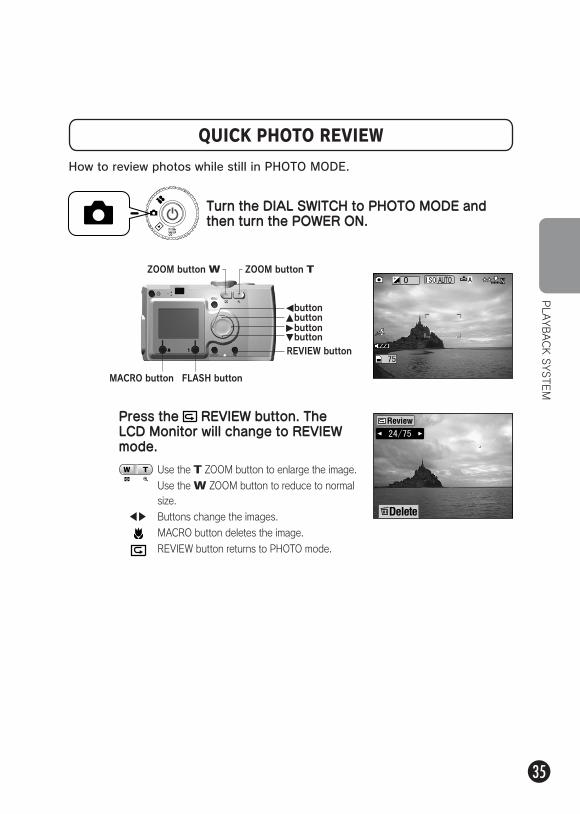
QUICK PHOTO REVIEW
How to review photos while still in PHOTO MODE.
Press the REVIEW button. The LCD Monitor will change to REVIEW mode.
Use the T ZOOM button to enlarge the image. Use the W ZOOM button to reduce to normal size.
Buttons change the images.
MACRO button deletes the image.
REVIEW button returns to PHOTO mode.
Turn the DIAL SWITCH to PHOTO MODE and then turn the POWER ON.
PLAYBACK SYSTEM
▲ ▼
MACRO button FLASH button
buttonbuttonbuttonbutton
REVIEW button
ZOOM button TZOOM button W
36
DELETIN
G FILE
S
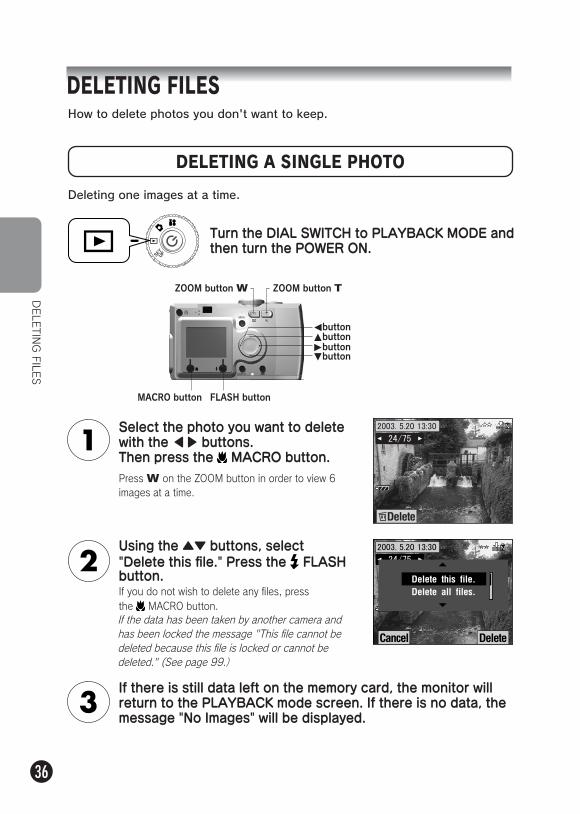
DELETING FILESHow to delete photos you don't want to keep.
DELETING A SINGLE PHOTO
Select the photo you want to delete with the ▲ ▼ buttons.Then press the MACRO button.Press W on the ZOOM button in order to view 6 images at a time.
Using the ▲▼ buttons, select "Delete this file." Press the FLASH button.
Deleting one images at a time.
If there is still data left on the memory card, the monitor will return to the PLAYBACK mode screen. If there is no data, the message "No Images" will be displayed.
If you do not wish to delete any files, press the MACRO button.If the data has been taken by another camera and has been locked the message "This file cannot be deleted because this file is locked or cannot be deleted." (See page 99.)
Turn the DIAL SWITCH to PLAYBACK MODE and then turn the POWER ON.
MACRO button FLASH button
buttonbuttonbuttonbutton
ZOOM button TZOOM button W
37
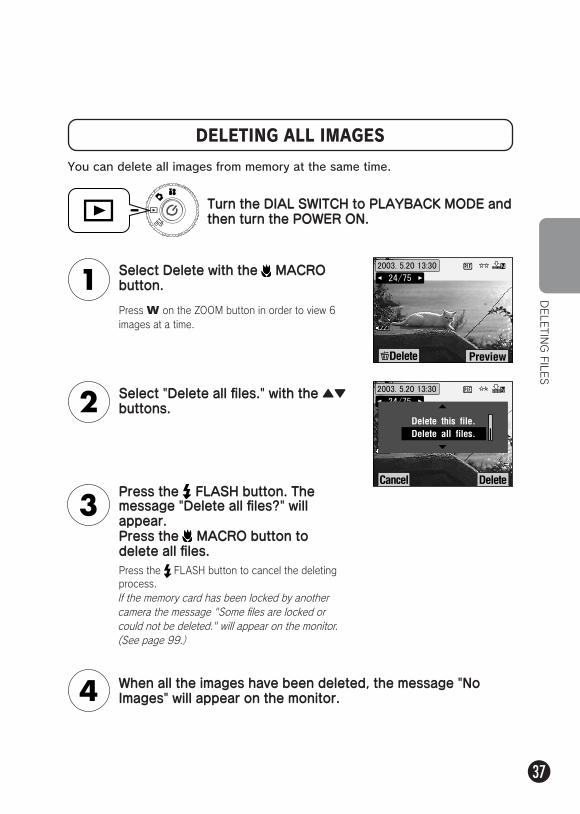
DELETING ALL IMAGES
You can delete all images from memory at the same time.
Select Delete with the MACRO button.
Select "Delete all files." with the ▲▼ buttons.
Press the FLASH button. The message "Delete all files?" will appear.Press the MACRO button to delete all files.Press the FLASH button to cancel the deleting process.If the memory card has been locked by another camera the message "Some files are locked or could not be deleted." will appear on the monitor. (See page 99.)
Turn the DIAL SWITCH to PLAYBACK MODE and then turn the POWER ON.
When all the images have been deleted, the message "No Images" will appear on the monitor.
DELETIN
G FILE
S
Press W on the ZOOM button in order to view 6 images at a time.
38
USING YOUR IMAGES
USING YO
UR IM
AGES
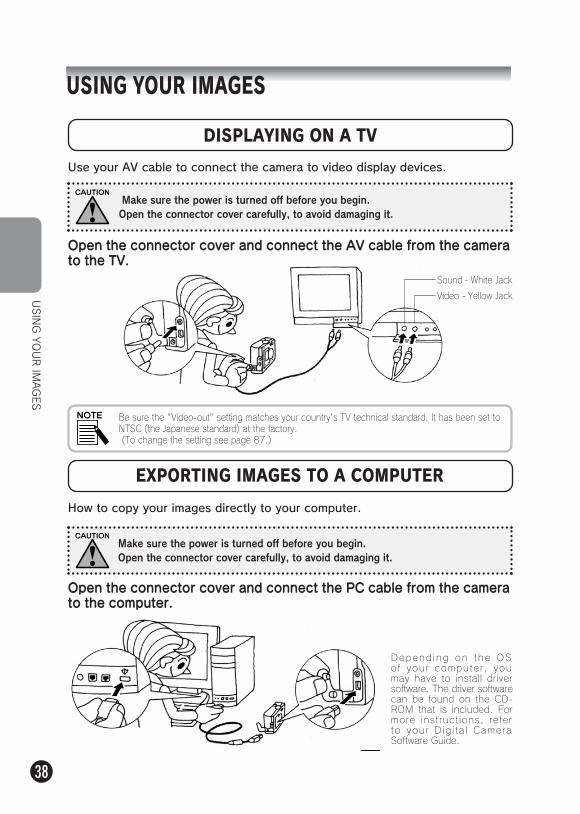
DISPLAYING ON A TV
Use your AV cable to connect the camera to video display devices.
Be sure the "Video-out" setting matches your country's TV technical standard. It has been set to NTSC (the Japanese standard) at the factory. (To change the setting see page 87.)
EXPORTING IMAGES TO A COMPUTER
How to copy your images directly to your computer.
Make sure the power is turned off before you begin.Open the connector cover carefully, to avoid damaging it.
Make sure the power is turned off before you begin.Open the connector cover carefully, to avoid damaging it.
Open the connector cover and connect the PC cable from the camera to the computer.
Open the connector cover and connect the AV cable from the camera to the TV.
Sound - White Jack
Video - Yellow Jack
Depend ing on the OS of your computer, you may have to install driver software. The driver software can be found on the CD-ROM that is included. For more instructions, refer to your Digi ta l Camera Software Guide.
39
When images that were taken using the P.I.F.mode are copied to your computer, the link between the image and the frames will be broken.
USING YO
UR IM
AGES
DIRECT PRINTING FROM CAMERA TO PRINTER
You can print a selected image easily by pressing the PRINT button on this model camera. Since it is a digital camera, you can print selected pictures as you watch and make a collection of printed pictures without using a computer at all. (See page 65.)
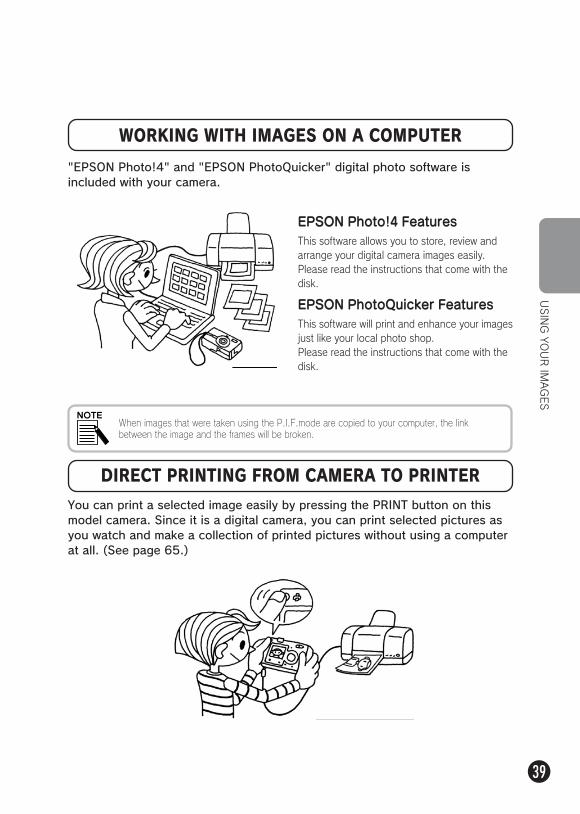
WORKING WITH IMAGES ON A COMPUTER
"EPSON Photo!4" and "EPSON PhotoQuicker" digital photo software is included with your camera.
EPSON Photo!4 Features
EPSON PhotoQuicker Features
This software allows you to store, review and arrange your digital camera images easily. Please read the instructions that come with the disk.
This software will print and enhance your images just like your local photo shop. Please read the instructions that come with the disk.
40
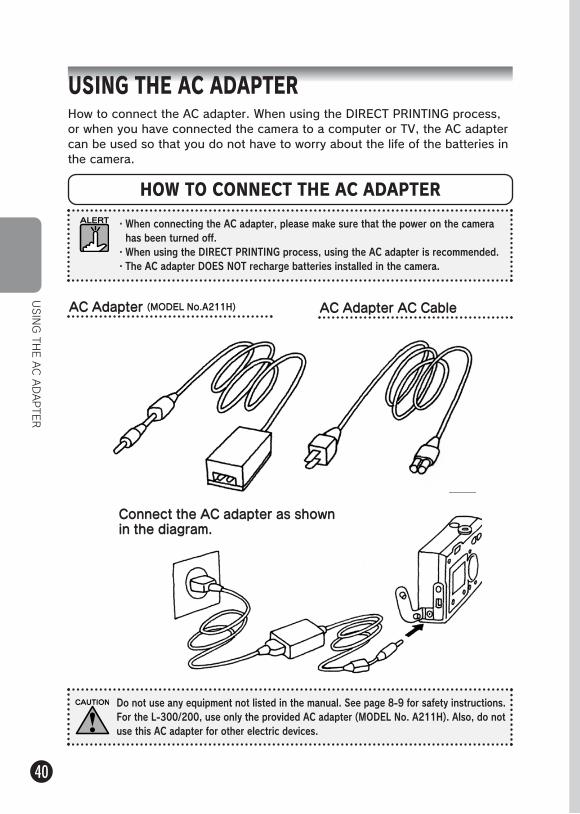
HOW TO CONNECT THE AC ADAPTER
AC Adapter (MODEL No.A211H) AC Adapter AC Cable
Do not use any equipment not listed in the manual. See page 8-9 for safety instructions.For the L-300/200, use only the provided AC adapter (MODEL No. A211H). Also, do not use this AC adapter for other electric devices.
USING THE AC ADAPTERHow to connect the AC adapter. When using the DIRECT PRINTING process, or when you have connected the camera to a computer or TV, the AC adapter can be used so that you do not have to worry about the life of the batteries in the camera.
Connect the AC adapter as shown in the diagram.
USING TH
E AC ADAPTER
・When connecting the AC adapter, please make sure that the power on the camera has been turned off.
・When using the DIRECT PRINTING process, using the AC adapter is recommended.・The AC adapter DOES NOT recharge batteries installed in the camera.

41
ADVANCED FUNCTIONS
P.42 ●P.44 ●P.45 ●P.47 ●P.50 ●P.51 ●P.52 ●P.54 ●P.56 ●P.58 ●P.60 ●P.61 ●P.62 ●
DISPLAY & MENU BUTTONS SETTINGSPRINT Image Framer (P.I.F.) FUNCTIONPRINT Image Framer (P.I.F.) SHOOTINGREPLACING FRAMESMACRO MODECONTINUOUS SHOOTINGSCENE MODESWHITE BALANCELIGHT SENSITIVITYMAKING EXPOSURE SETTINGSRESETTING TO DEFAULT MODE VIEWING RECORDED IMAGE DATAVIDEO CLIPS
42
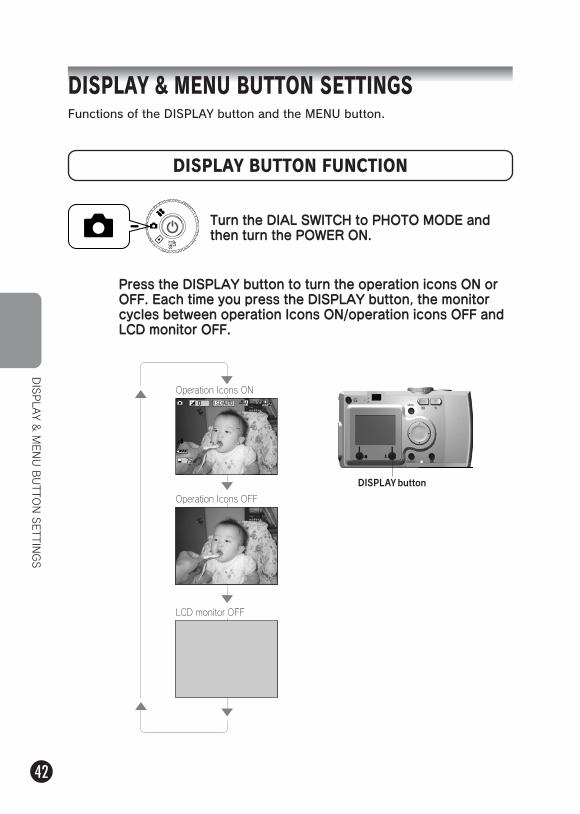
DISPLAY & MENU BUTTON SETTINGSFunctions of the DISPLAY button and the MENU button.
DISPLAY BUTTON FUNCTION
Press the DISPLAY button to turn the operation icons ON or OFF. Each time you press the DISPLAY button, the monitor cycles between operation Icons ON/operation icons OFF and LCD monitor OFF.
DISPLAY &
MENU BUTTO
N SETTIN
GS
Turn the DIAL SWITCH to PHOTO MODE and then turn the POWER ON.
DISPLAY button
LCD monitor OFF
Operation Icons OFF
Operation Icons ON

43
MENU BUTTON FUNCTION
Press the MENU button and the MENU shows up on the LCD monitor. Each time you press the MENU button you can turn the MENU ON or OFF.
Turn the DIAL SWITCH to PHOTO MODE and then turn the POWER ON.
DISPLAY &
MENU BUTTO
N SETTIN
GS
Operation Icons ON Operation Icons OFF LCD monitor OFF
In PHOTO mode, when you press the MENU button you may use the ▲ ▼ buttons to scroll through the menu.In PLAYBACK mode the Menu items will become active each time you press the ▲ ▼ buttons.
Menu for PHOTO mode Menu for PLAYBACK mode
MENU button
buttonbuttonbuttonbutton
Use the ▲ ▼ buttons to scroll through the menu (Shown below).
Use the ▲ ▼ buttons to move across the menu.
Menu List
44
P.I.F
. FUNCTIO
N
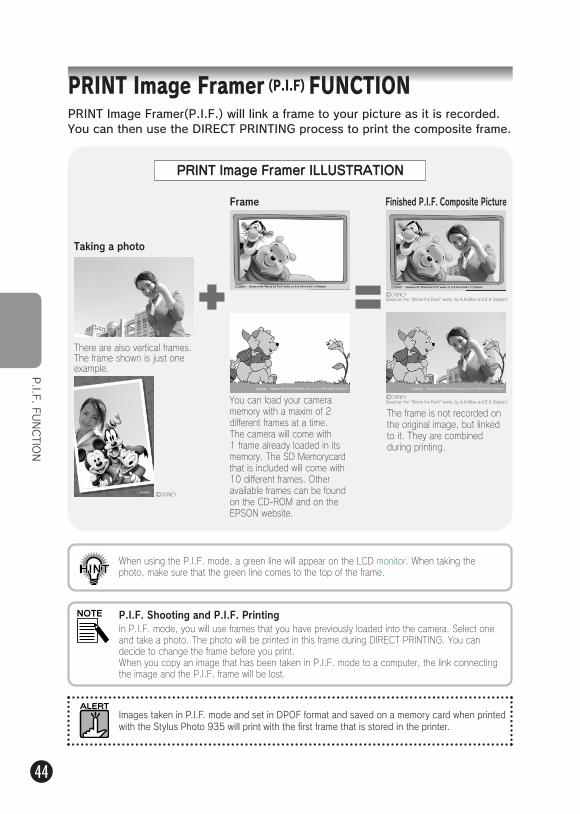
When using the P.I.F. mode, a green line will appear on the LCD monitor. When taking the photo, make sure that the green line comes to the top of the frame.
PRINT Image Framer (P.I.F) FUNCTIONPRINT Image Framer(P.I.F.) will link a frame to your picture as it is recorded. You can then use the DIRECT PRINTING process to print the composite frame.
There are also vertical frames. The frame shown is just one example.
Frame
Taking a photo
You can load your camera memory with a maxim of 2 different frames at a time. The camera will come with 1 frame already loaded in its memory. The SD Memorycard that is included will come with 10 different frames. Other available frames can be found on the CD-ROM and on the EPSON website.
The frame is not recorded on the original image, but linked to it. They are combined during printing.
P.I.F. Shooting and P.I.F. PrintingIn P.I.F. mode, you will use frames that you have previously loaded into the camera. Select one and take a photo. The photo will be printed in this frame during DIRECT PRINTING. You can decide to change the frame before you print.When you copy an image that has been taken in P.I.F. mode to a computer, the link connecting the image and the P.I.F. frame will be lost.
Finished P.I.F. Composite Picture
Images taken in P.I.F. mode and set in DPOF format and saved on a memory card when printed with the Stylus Photo 935 will print with the first frame that is stored in the printer.
DISNEY
DISNEY
Based on the "Winnie the Pooh" works, by A.A.Milne and E.H.Shepard.DISNEY
PRINT Image Framer ILLUSTRATION
Based on the "Winnie the Pooh" works, by A.A.Milne and E.H.Shepard.
45
P.I.F
. SHOOTIN
G
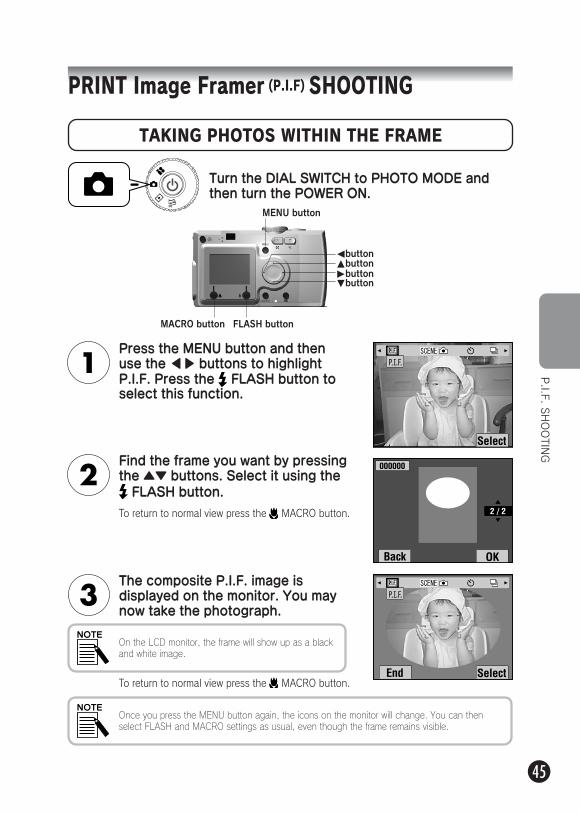
TAKING PHOTOS WITHIN THE FRAME
Press the MENU button and then use the ▲ ▼ buttons to highlight P.I.F. Press the FLASH button to select this function.
Turn the DIAL SWITCH to PHOTO MODE and then turn the POWER ON.
Find the frame you want by pressing the ▲▼ buttons. Select it using the FLASH button.
To return to normal view press the MACRO button.
The composite P.I.F. image is displayed on the monitor. You may now take the photograph.
Once you press the MENU button again, the icons on the monitor will change. You can then select FLASH and MACRO settings as usual, even though the frame remains visible.
PRINT Image Framer (P.I.F) SHOOTING
On the LCD monitor, the frame will show up as a black and white image.
MENU button
MACRO button FLASH button
buttonbuttonbuttonbutton
To return to normal view press the MACRO button.
46
P.I.F
. SHOOTIN
G
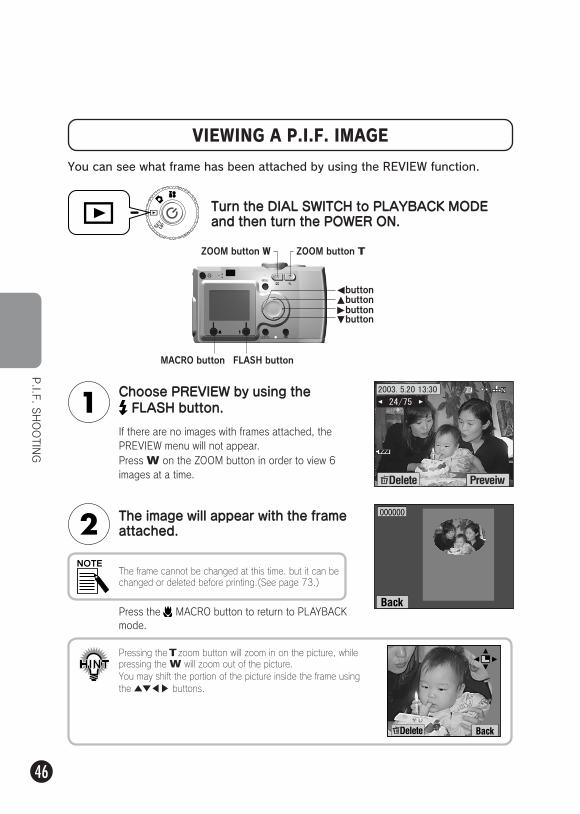
VIEWING A P.I.F. IMAGE
You can see what frame has been attached by using the REVIEW function.
Choose PREVIEW by using the FLASH button.
The image will appear with the frame attached.
Press the MACRO button to return to PLAYBACK mode.
Turn the DIAL SWITCH to PLAYBACK MODE and then turn the POWER ON.
Pressing theT zoom button will zoom in on the picture, while pressing the W will zoom out of the picture.You may shift the portion of the picture inside the frame using the ▲▼ ▲ ▼ buttons.
If there are no images with frames attached, the PREVIEW menu will not appear.
The frame cannot be changed at this time. but it can be changed or deleted before printing.(See page 73.)
Press W on the ZOOM button in order to view 6 images at a time.
MACRO button FLASH button
buttonbuttonbuttonbutton
ZOOM button TZOOM button W
47
REPLACING FRAMES
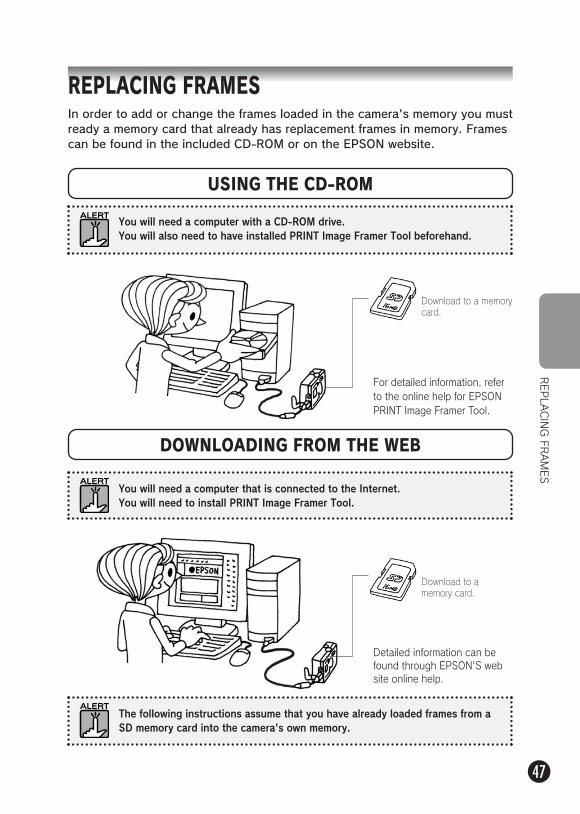
REPLACING FRAMESIn order to add or change the frames loaded in the camera's memory you must ready a memory card that already has replacement frames in memory. Frames can be found in the included CD-ROM or on the EPSON website.
USING THE CD-ROM
DOWNLOADING FROM THE WEB
You will need a computer with a CD-ROM drive.You will also need to have installed PRINT Image Framer Tool beforehand.
You will need a computer that is connected to the Internet.You will need to install PRINT Image Framer Tool.
The following instructions assume that you have already loaded frames from a SD memory card into the camera's own memory.
For detailed information, refer to the online help for EPSON PRINT Image Framer Tool.
Download to a memory card.
Download to a memory card.
Detailed information can be found through EPSON'S web site online help.
48
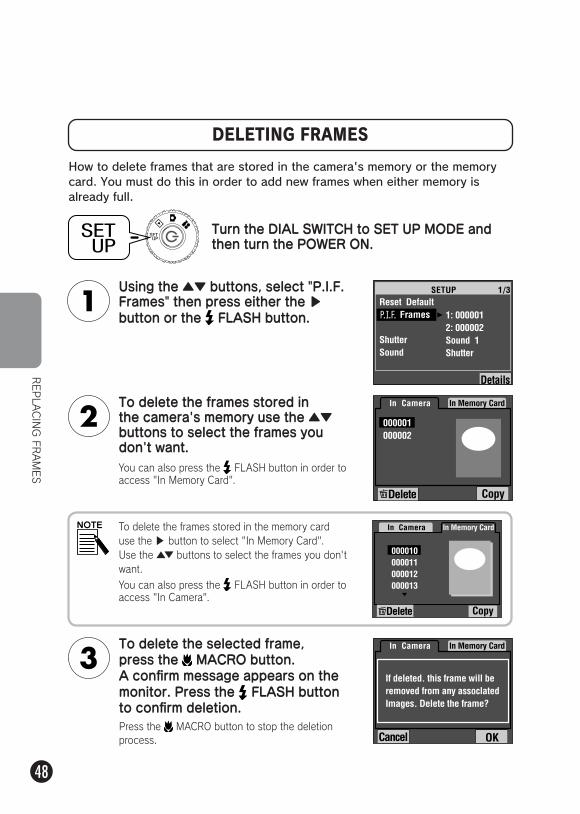
DELETING FRAMES
How to delete frames that are stored in the camera's memory or the memory card. You must do this in order to add new frames when either memory is already full.
Using the ▲▼ buttons, select "P.I.F. Frames" then press either the
▲
button or the FLASH button.
To delete the frames stored in the camera's memory use the ▲▼buttons to select the frames you don't want.
Turn the DIAL SWITCH to SET UP MODE and then turn the POWER ON.
To delete the selected frame, press the MACRO button.A confirm message appears on the monitor. Press the FLASH button to confirm deletion.
To delete the frames stored in the memory card use the ▼ button to select "In Memory Card". Use the ▲▼ buttons to select the frames you don't want.
You can also press the FLASH button in order to access "In Camera".
You can also press the FLASH button in order to access "In Memory Card".
Press the MACRO button to stop the deletion process.
REPLACING FRAMES
49
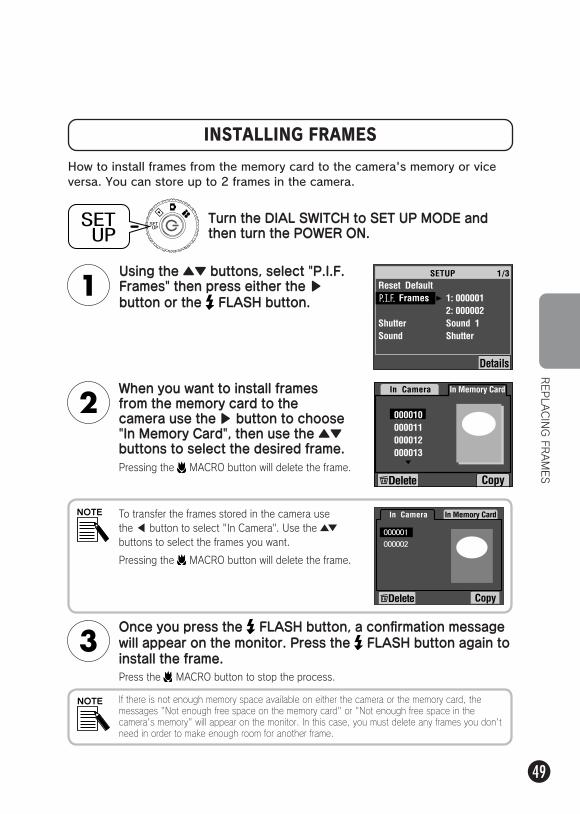
INSTALLING FRAMES
Using the ▲▼ buttons, select "P.I.F. Frames" then press either the
▲
button or the FLASH button.
When you want to install frames from the memory card to the camera use the ▼ button to choose "In Memory Card", then use the ▲▼ buttons to select the desired frame.
Once you press the FLASH button, a confirmation message will appear on the monitor. Press the FLASH button again to install the frame.
If there is not enough memory space available on either the camera or the memory card, the messages "Not enough free space on the memory card" or "Not enough free space in the camera's memory" will appear on the monitor. In this case, you must delete any frames you don't need in order to make enough room for another frame.
Turn the DIAL SWITCH to SET UP MODE and then turn the POWER ON.
Press the MACRO button to stop the process.
To transfer the frames stored in the camera use the
▼
button to select "In Camera". Use the ▲▼ buttons to select the frames you want.
How to install frames from the memory card to the camera's memory or vice versa. You can store up to 2 frames in the camera.
REPLACING FRAMES
Pressing the MACRO button will delete the frame.
Pressing the MACRO button will delete the frame.
50
MACRO MODE
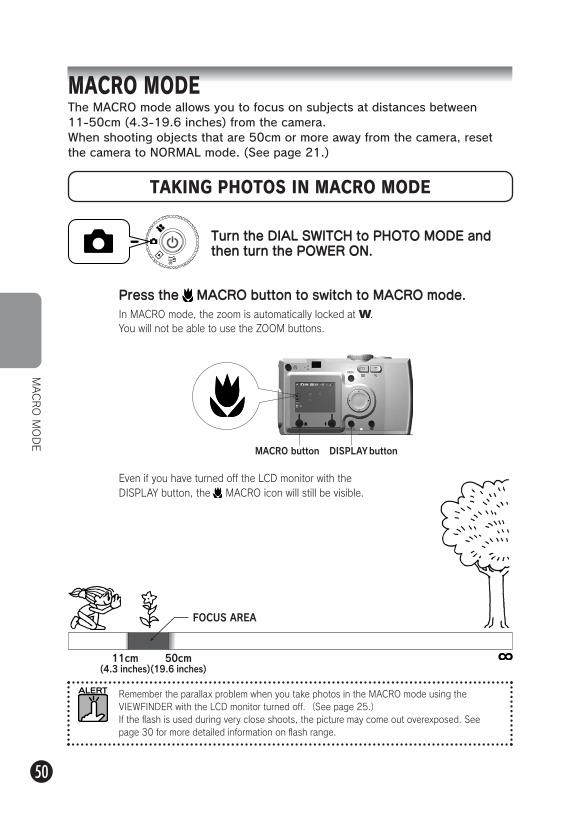
MACRO MODEThe MACRO mode allows you to focus on subjects at distances between 11-50cm (4.3-19.6 inches) from the camera.When shooting objects that are 50cm or more away from the camera, reset the camera to NORMAL mode. (See page 21.)
TAKING PHOTOS IN MACRO MODE
Press the MACRO button to switch to MACRO mode.
Remember the parallax problem when you take photos in the MACRO mode using the VIEWFINDER with the LCD monitor turned off.(See page 25.)If the flash is used during very close shoots, the picture may come out overexposed. See page 30 for more detailed information on flash range.
Even if you have turned off the LCD monitor with the DISPLAY button, the MACRO icon will still be visible.
Turn the DIAL SWITCH to PHOTO MODE and then turn the POWER ON.
In MACRO mode, the zoom is automatically locked at W. You will not be able to use the ZOOM buttons.
50cm (19.6 inches)
FOCUS AREA
11cm(4.3 inches)
MACRO button DISPLAY button
51
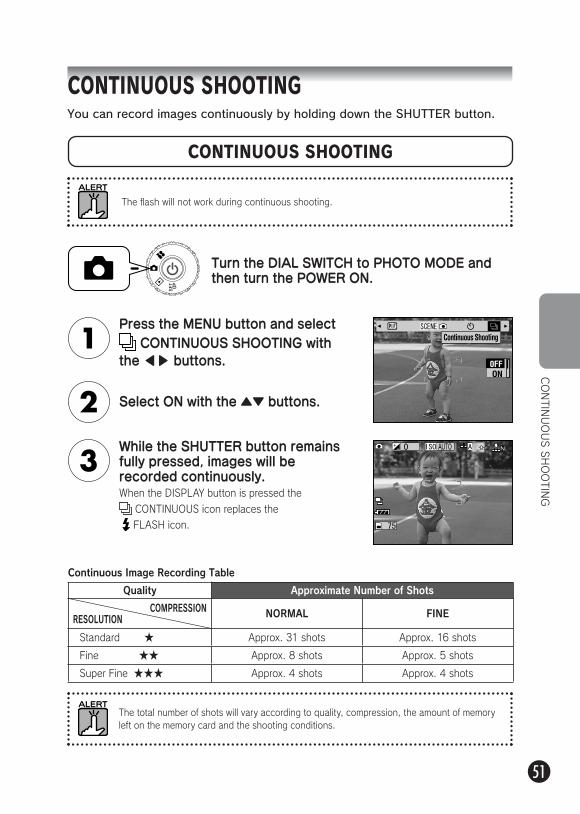
CONTINUOUS SHOOTINGYou can record images continuously by holding down the SHUTTER button.
CONTINUOUS SHOOTING
The flash will not work during continuous shooting.
CONTIN
UOUS SHOOTIN
G
Press the MENU button and select CONTINUOUS SHOOTING with
the ▲ ▼ buttons.
When the DISPLAY button is pressed the
CONTINUOUS icon replaces the
FLASH icon.
While the SHUTTER button remains fully pressed, images will be recorded continuously.
The total number of shots will vary according to quality, compression, the amount of memory left on the memory card and the shooting conditions.
Turn the DIAL SWITCH to PHOTO MODE and then turn the POWER ON.
Quality Approximate Number of Shots
NORMAL FINE
Standard ★ Approx. 31 shots Approx. 16 shots
Fine ★★ Approx. 8 shots Approx. 5 shots
Super Fine ★★★ Approx. 4 shots Approx. 4 shots
Select ON with the ▲▼ buttons.
Continuous Image Recording Table
RESOLUTIONCOMPRESSION
52
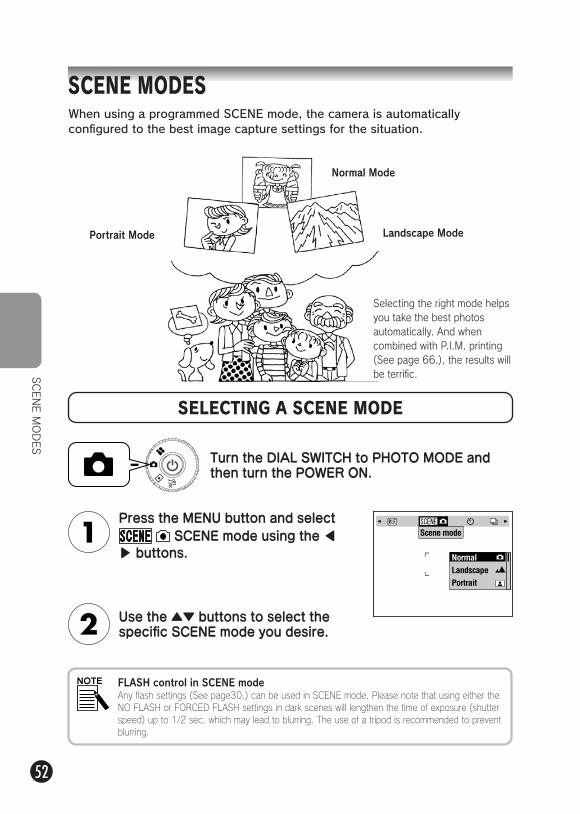
SCENE MODESWhen using a programmed SCENE mode, the camera is automatically configured to the best image capture settings for the situation.
Selecting the right mode helps you take the best photos automatically. And when combined with P.I.M. printing (See page 66.), the results will be terrific.
Normal Mode
SCENE MODES
Landscape ModePortrait Mode
SELECTING A SCENE MODE
Press the MENU button and select SCENE mode using the ▲
▼ buttons.
Use the ▲▼ buttons to select the specific SCENE mode you desire.
Turn the DIAL SWITCH to PHOTO MODE and then turn the POWER ON.
FLASH control in SCENE modeAny flash settings (See page30.) can be used in SCENE mode. Please note that using either the NO FLASH or FORCED FLASH settings in dark scenes will lengthen the time of exposure (shutter speed) up to 1/2 sec. which may lead to blurring. The use of a tripod is recommended to prevent blurring.
53
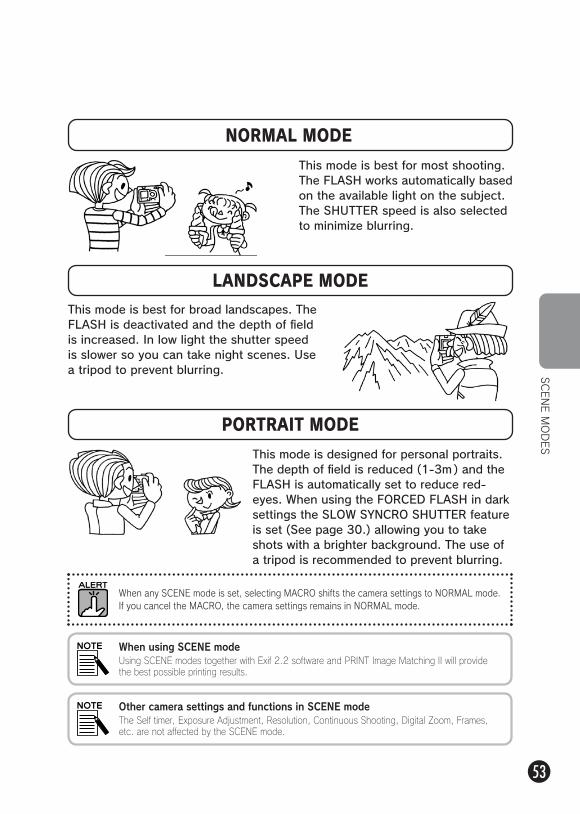
NORMAL MODE
SCENE MODES
This mode is best for most shooting. The FLASH works automatically based on the available light on the subject. The SHUTTER speed is also selected to minimize blurring.
When using SCENE mode Using SCENE modes together with Exif 2.2 software and PRINT Image Matching II will provide the best possible printing results.
When any SCENE mode is set, selecting MACRO shifts the camera settings to NORMAL mode. If you cancel the MACRO, the camera settings remains in NORMAL mode.
Other camera settings and functions in SCENE modeThe Self timer, Exposure Adjustment, Resolution, Continuous Shooting, Digital Zoom, Frames, etc. are not affected by the SCENE mode.
LANDSCAPE MODEThis mode is best for broad landscapes. The FLASH is deactivated and the depth of field is increased. In low light the shutter speed is slower so you can take night scenes. Use a tripod to prevent blurring.
PORTRAIT MODE
This mode is designed for personal portraits. The depth of field is reduced (1-3m) and the FLASH is automatically set to reduce red- eyes. When using the FORCED FLASH in dark settings the SLOW SYNCRO SHUTTER feature is set (See page 30.) allowing you to take shots with a brighter background. The use of a tripod is recommended to prevent blurring.
54
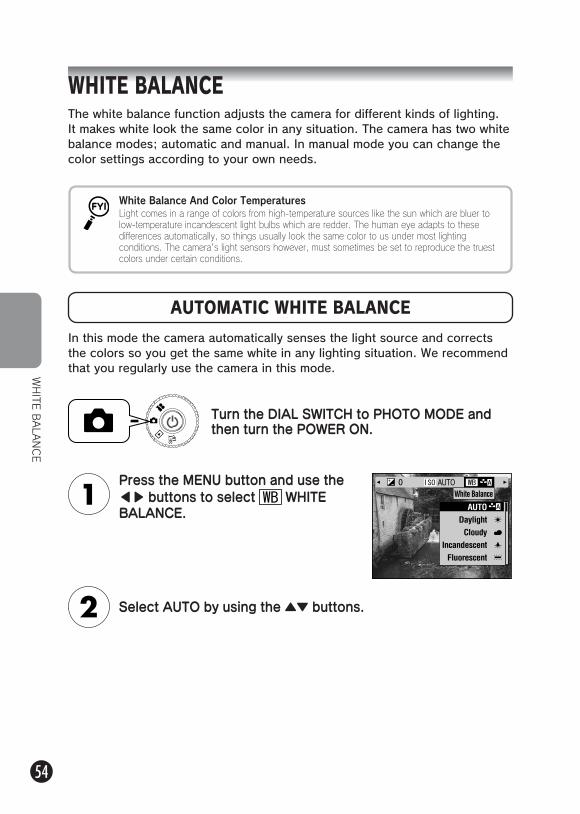
WHITE BALANCEThe white balance function adjusts the camera for different kinds of lighting. It makes white look the same color in any situation. The camera has two white balance modes; automatic and manual. In manual mode you can change the color settings according to your own needs.
AUTOMATIC WHITE BALANCE
WHITE
BALANCE
Press the MENU button and use the
▲ ▼ buttons to select WHITE BALANCE.
Select AUTO by using the ▲▼ buttons.
Turn the DIAL SWITCH to PHOTO MODE and then turn the POWER ON.
In this mode the camera automatically senses the light source and corrects the colors so you get the same white in any lighting situation. We recommend that you regularly use the camera in this mode.
Light comes in a range of colors from high-temperature sources like the sun which are bluer to low-temperature incandescent light bulbs which are redder. The human eye adapts to these differences automatically, so things usually look the same color to us under most lighting conditions. The camera's light sensors however, must sometimes be set to reproduce the truest colors under certain conditions.
White Balance And Color Temperatures
55
SELECTING WHITE BALANCE MANUALLY
WHITE
BALANCE
Press the MENU button and use the
▲ ▼ buttons to select WHITE BALANCE.
Using the ▲▼ buttons select the best choice among auto, daylight, cloudy, incandescent and fluorescent.
Turn the DIAL SWITCH to PHOTO MODE and then turn the POWER ON.
You can select specialized white balance settings to achieve truer colors in certain conditions; DAYLIGHT, CLOUDY, INCANDESCENT, and FLUORESCENT.
Effective use of manual WHITE BALANCE.・Pictures taken under fluorescent light tend to turn out greenish. Use the FLUORESCENT setting to correct for this.
・Incandescent light tends to make subjects appear reddish-yellow. Using the DAYLIGHT setting will allow reddish yellow colors of sunset to stay that way.
56
LIGHT SENSITIVITYA roll of film loaded in a camera has a fixed light sensitivity, but the digital camera is more flexible. You can change the light sensitivity for a specific purpose any time manually or let the camera select it automatically.
CHANGING TO AUTOMATIC SENSITIVITY MODE
LIGHT S
ENSITIV
ITY
Press the MENU button and use the ▲ ▼ buttons to select SENSITIVITY.
Select AUTO by using the ▲▼ buttons.
The camera is set in AUTO mode at the factory, so there is no need to change anything to use this mode when you first begin. This is the best setting for most picture taking. The status is confirmed on the LCD monitor display. You can set this function during shooting with the viewfinder.
Turn the DIAL SWITCH to PHOTO MODE and then turn the POWER ON.
Recording ConditionsSurer focusLess blurringImage Quality
Fine grainBeautiful color
In general, setting higher (ISO) light sensitivity allows for easier focusing and less chance of blurring. However your photos will appear grainier and you will lose color richness. Think about the shooting conditions and the results you want before you set the ISO.
57
SETTING LIGHT SENSITIVITY MANUALLY
LIGHT S
ENSITIV
ITY
Press the MENU button and use the ▲ ▼ buttons to select SENSITIVITY.
Using the ▲▼ buttons, you may select the desired sensitivity from [100] [200] or [400].
Turn the DIAL SWITCH to PHOTO MODE and then turn the POWER ON.
Situations for Manual Sensitivity Control・When the image is too dark ,but you can't use the flash. Or when the image is blurry, but you can't use the flash.・When you must be moving the camera in order to get a shot. OR when the object is blurry from moving at high speed.・When you are anticipating problems in MACRO mode or any close-up situation. When you get blurry results in MACRO or any close-up situation. ・When you want to record a distant object with the FLASH. You can extend the range of the FLASH by increasing the sensitivity.
You can change the sensitivity to manual control. Use this mode when you expect blurring problems from camera motion, when you need to control depth of field and when you want to control FLASH range.
58
MAKING EXPOSURE SETTINGSYou can adjust exposure to help control how much light falls on the CCD. It influences the brightness of the entire image. You usually don't need to make manual adjustments, but it is possible to increase + or decrease - the exposure to suit a particular purpose.It is recommended that these adjustments be used when shooting against the sun or when you have any very bright background where the automatic sensors may not work well.
MAKING EXPOSURE SETTIN
GS
ADJUSTMENTS
Press the MENU button and use the
▲ ▼ buttons to select EXPOSURE ADJUSTMENT.
Select the adjustment value using the ▲▼ buttons.
Turn the DIAL SWITCH to PHOTO MODE and then turn the POWER ON.
Effects of Exposure Adjustment
-2.0EV ± 0EV + 2.0EV
The exposure adjustment range is from - 2.0 EV to + 2.0 EV during programmed shooting. There are 9 steps of 0.5 EV each. You can confirm the setting on the Display Panel of the LCD monitor. (See page 22.42) You can also set the number while shooting through the VIEWFINDER.
59
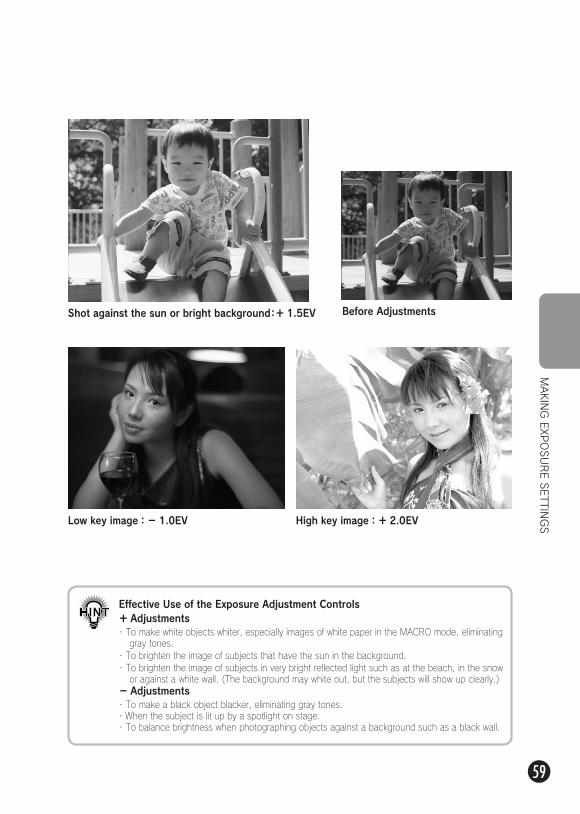
Effective Use of the Exposure Adjustment Controls+ Adjustments・ To make white objects whiter, especially images of white paper in the MACRO mode, eliminating gray tones.
・ To brighten the image of subjects that have the sun in the background.・ To brighten the image of subjects in very bright reflected light such as at the beach, in the snow or against a white wall. (The background may white out, but the subjects will show up clearly.)
-Adjustments・ To make a black object blacker, eliminating gray tones.・When the subject is lit up by a spotlight on stage.・ To balance brightness when photographing objects against a background such as a black wall.
Low key image:- 1.0EV High key image:+ 2.0EV
Shot against the sun or bright background:+ 1.5EV
MAKING EXPOSURE SETTIN
GS
Before Adjustments
60
RESETTIN
G TO
DEFAULT M
ODE
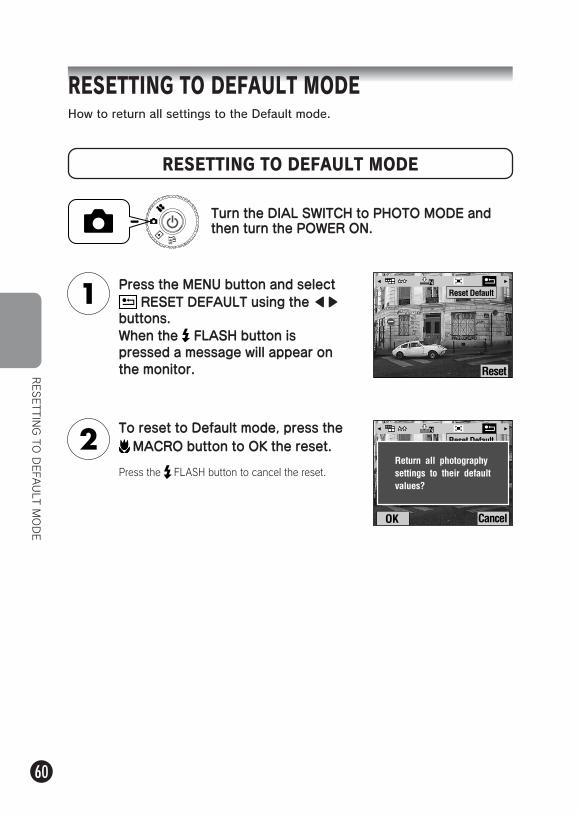
RESETTING TO DEFAULT MODEHow to return all settings to the Default mode.
RESETTING TO DEFAULT MODE
Press the MENU button and select RESET DEFAULT using the ▲ ▼
buttons.When the FLASH button is pressed a message will appear on the monitor.
To reset to Default mode, press the MACRO button to OK the reset.
Press the FLASH button to cancel the reset.
Turn the DIAL SWITCH to PHOTO MODE and then turn the POWER ON.
61
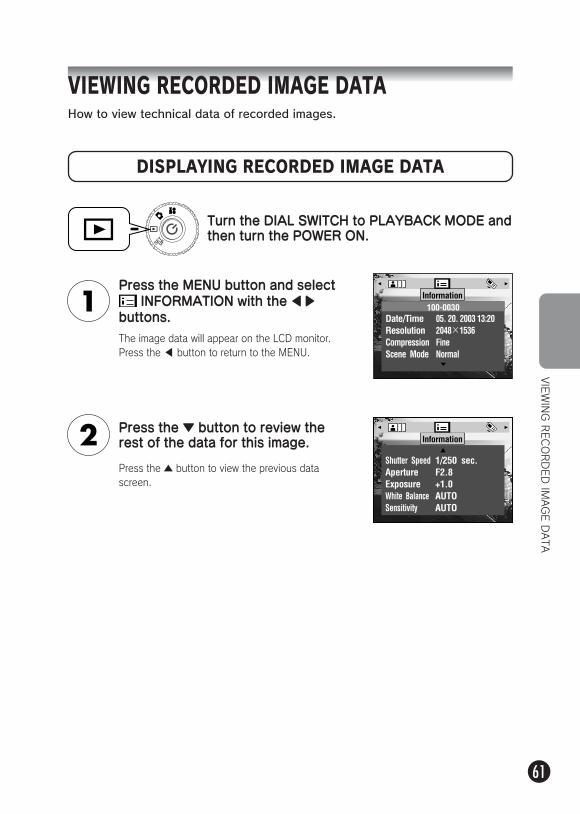
VIEWING RECORDED IMAGE DATAHow to view technical data of recorded images.
DISPLAYING RECORDED IMAGE DATA
VIEWING RECORDED IM
AGE DATA
Press the MENU button and select INFORMATION with the ▲ ▼
buttons.The image data will appear on the LCD monitor.Press the ▲ button to return to the MENU.
Press the ▼ button to review the rest of the data for this image.
Press the
▼
button to view the previous data screen.
Turn the DIAL SWITCH to PLAYBACK MODE and then turn the POWER ON.
62
VIDEO CLIP
S
VIDEO CLIPS
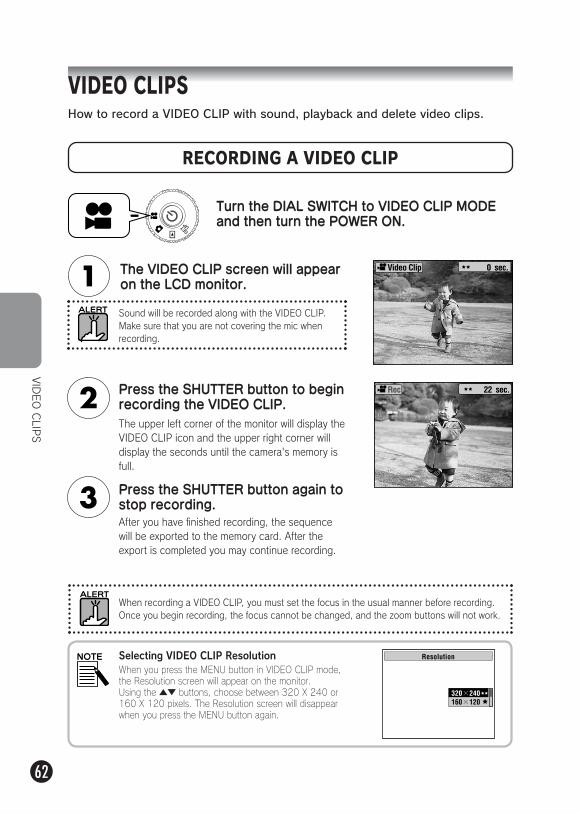
RECORDING A VIDEO CLIP
The VIDEO CLIP screen will appear on the LCD monitor.
When recording a VIDEO CLIP, you must set the focus in the usual manner before recording. Once you begin recording, the focus cannot be changed, and the zoom buttons will not work.
How to record a VIDEO CLIP with sound, playback and delete video clips.
Turn the DIAL SWITCH to VIDEO CLIP MODE and then turn the POWER ON.
Press the SHUTTER button to begin recording the VIDEO CLIP.The upper left corner of the monitor will display the VIDEO CLIP icon and the upper right corner will display the seconds until the camera's memory is full.
Press the SHUTTER button again to stop recording.After you have finished recording, the sequence will be exported to the memory card. After the export is completed you may continue recording.
Sound will be recorded along with the VIDEO CLIP. Make sure that you are not covering the mic when recording.
When you press the MENU button in VIDEO CLIP mode, the Resolution screen will appear on the monitor.Using the ▲▼ buttons, choose between 320 X 240 or 160 X 120 pixels. The Resolution screen will disappear when you press the MENU button again.
Selecting VIDEO CLIP Resolution
63
VIDEO CLIP files are very large. Be sure you have enough memory space before you begin.
Image size Recording Time (16MB) Recording Time (8MB) 320× 240 ★★ Approx. 60 seconds Approx. 30 seconds
160×120 ★ Approx. 150 seconds Approx. 70 seconds
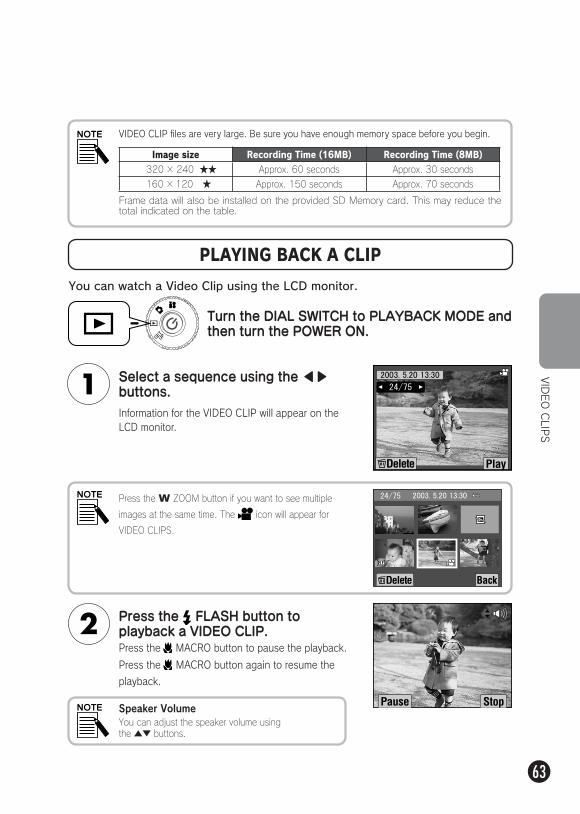
PLAYING BACK A CLIP
VIDEO CLIP
S
You can watch a Video Clip using the LCD monitor.
Select a sequence using the ▲ ▼ buttons.Information for the VIDEO CLIP will appear on the LCD monitor.
Press the FLASH button to playback a VIDEO CLIP.Press the MACRO button to pause the playback.
Press the MACRO button again to resume the
playback.
Speaker VolumeYou can adjust the speaker volume using the ▲▼ buttons.
Press the W ZOOM button if you want to see multiple
images at the same time. The icon will appear for
VIDEO CLIPS.
Turn the DIAL SWITCH to PLAYBACK MODE and then turn the POWER ON.
Frame data will also be installed on the provided SD Memory card. This may reduce the total indicated on the table.
64
VIDEO CLIP
S
DELETING VIDEO CLIPS
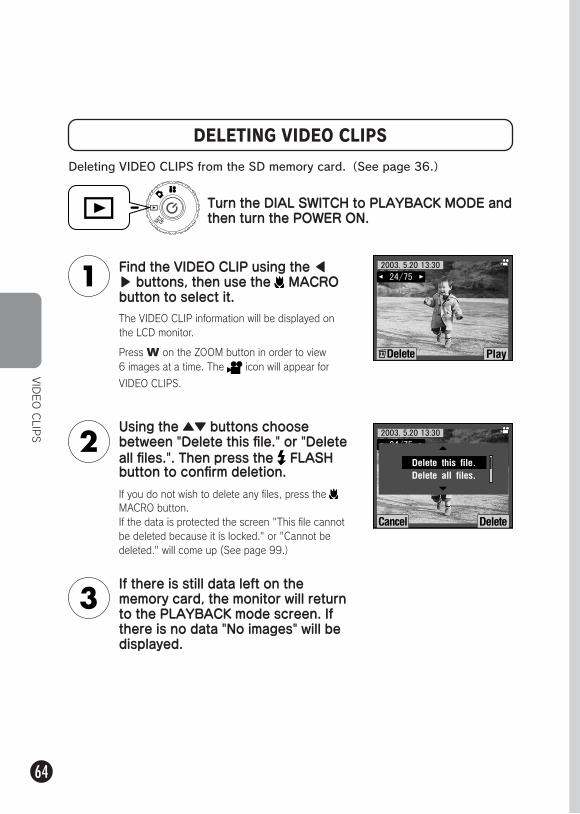
Deleting VIDEO CLIPS from the SD memory card.(See page 36.)
The VIDEO CLIP information will be displayed on the LCD monitor.
Turn the DIAL SWITCH to PLAYBACK MODE and then turn the POWER ON.
Press W on the ZOOM button in order to view 6 images at a time. The icon will appear for
VIDEO CLIPS.
Using the ▲▼ buttons choose between "Delete this file." or "Delete all files.". Then press the FLASH button to confirm deletion.
If there is still data left on the memory card, the monitor will return to the PLAYBACK mode screen. If there is no data "No images" will be displayed.
If you do not wish to delete any files, press the MACRO button.If the data is protected the screen "This file cannot be deleted because it is locked." or "Cannot be deleted." will come up (See page 99.)
Find the VIDEO CLIP using the ▲
▼ buttons, then use the MACRO button to select it.
65
DIRECT PRINTING
P.66 ●P.67 ●P.70 ●P.71 ●P.74 ●P.77 ●
DIRECT PRINTINGDIRECT PRINTING PROCESSPRINT Image Framer (P.I.F.) PRINTINGPRINTING PRINT Image Framer (P.I.F.) IMAGESPRINT SETTINGSPRINTER UTILITIES
66
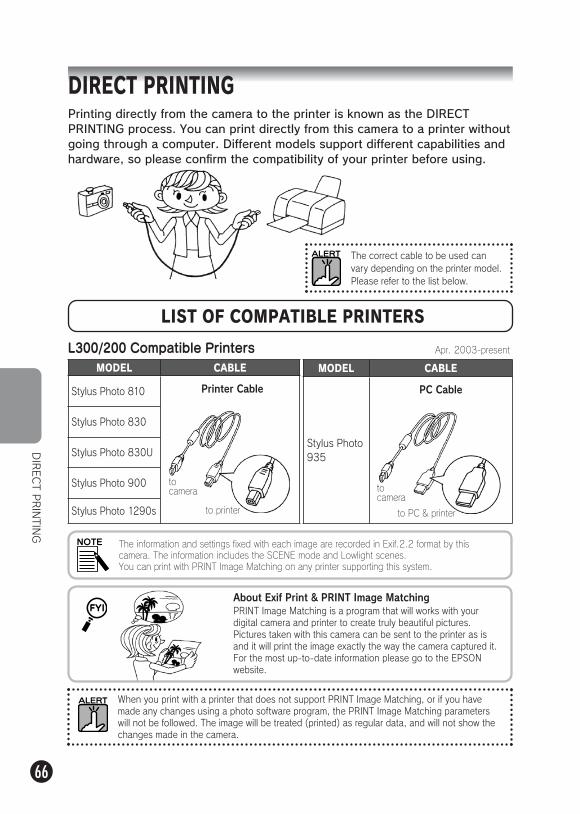
DIRECT P
RINTIN
G
DIRECT PRINTINGPrinting directly from the camera to the printer is known as the DIRECT PRINTING process. You can print directly from this camera to a printer without going through a computer. Different models support different capabilities and hardware, so please confirm the compatibility of your printer before using.
The information and settings fixed with each image are recorded in Exif.2.2 format by this camera. The information includes the SCENE mode and Lowlight scenes.You can print with PRINT Image Matching on any printer supporting this system.
The correct cable to be used can vary depending on the printer model. Please refer to the list below.
LIST OF COMPATIBLE PRINTERS
L300/200 Compatible Printers Apr. 2003-present
PRINT Image Matching is a program that will works with your digital camera and printer to create truly beautiful pictures. Pictures taken with this camera can be sent to the printer as is and it will print the image exactly the way the camera captured it.For the most up-to-date information please go to the EPSON website.
About Exif Print & PRINT Image Matching
MODEL CABLE
Stylus Photo 810 Printer Cable
Stylus Photo 830
Stylus Photo 830U
Stylus Photo 900
Stylus Photo 1290s
MODEL CABLE
Stylus Photo 935
PC Cable
to printer to PC & printer
to camera to
camera
When you print with a printer that does not support PRINT Image Matching, or if you have made any changes using a photo software program, the PRINT Image Matching parameters will not be followed. The image will be treated (printed) as regular data, and will not show the changes made in the camera.
67
DIRECT P
RINTIN
G PROCESS
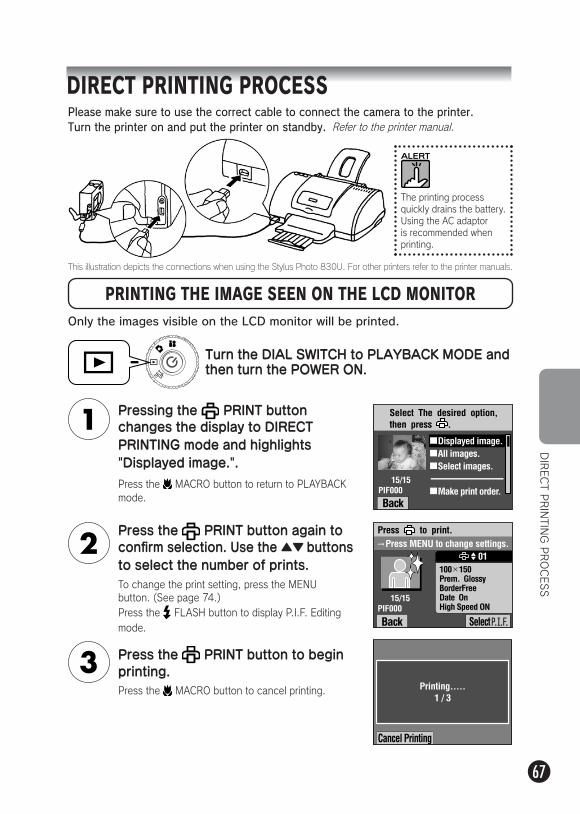
DIRECT PRINTING PROCESS
PRINTING THE IMAGE SEEN ON THE LCD MONITOR
Pressing the PRINT button changes the display to DIRECT PRINTING mode and highlights "Displayed image.".
To change the print setting, press the MENU button. (See page 74.)Press the FLASH button to display P.I.F. Editing mode.
Press the PRINT button again to confirm selection. Use the ▲▼ buttons to select the number of prints.
Press the PRINT button to begin printing.
Press the MACRO button to return to PLAYBACK mode.
Turn the DIAL SWITCH to PLAYBACK MODE and then turn the POWER ON.
The printing process quickly drains the battery. Using the AC adaptor is recommended when printing.
Press the MACRO button to cancel printing.
Only the images visible on the LCD monitor will be printed.
This illustration depicts the connections when using the Stylus Photo 830U. For other printers refer to the printer manuals.
Please make sure to use the correct cable to connect the camera to the printer.Turn the printer on and put the printer on standby. Refer to the printer manual.
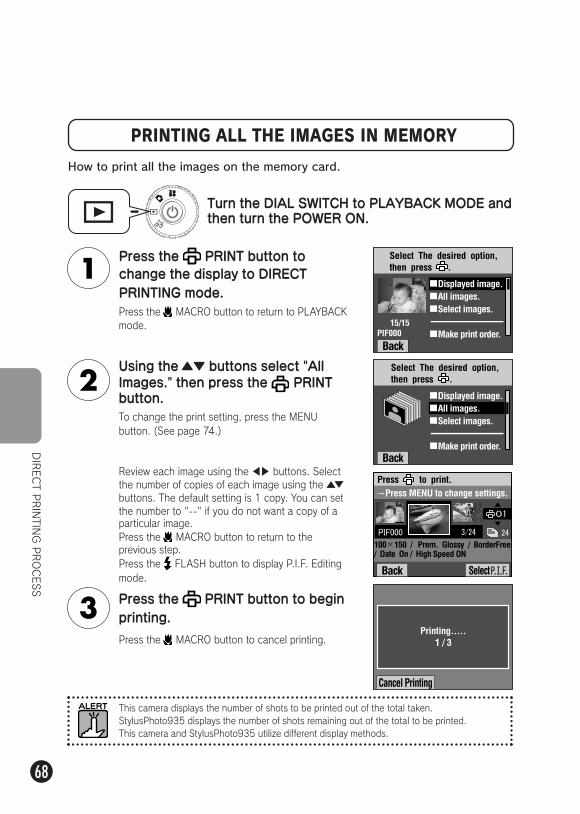
68
DIRECT P
RINTIN
G PROCESS
PRINTING ALL THE IMAGES IN MEMORY
How to print all the images on the memory card.
Press the PRINT button to change the display to DIRECT PRINTING mode.
Press the MACRO button to return to the previous step.Press the FLASH button to display P.I.F. Editing mode.
Review each image using the ▲ ▼ buttons. Select the number of copies of each image using the ▲▼ buttons. The default setting is 1 copy. You can set the number to "--" if you do not want a copy of a particular image.
Press the PRINT button to begin printing.
To change the print setting, press the MENU button. (See page 74.)
Using the ▲▼ buttons select "All Images." then press the PRINT button.
Press the MACRO button to return to PLAYBACK mode.
Turn the DIAL SWITCH to PLAYBACK MODE and then turn the POWER ON.
Press the MACRO button to cancel printing.
This camera displays the number of shots to be printed out of the total taken.StylusPhoto935 displays the number of shots remaining out of the total to be printed.This camera and StylusPhoto935 utilize different display methods.
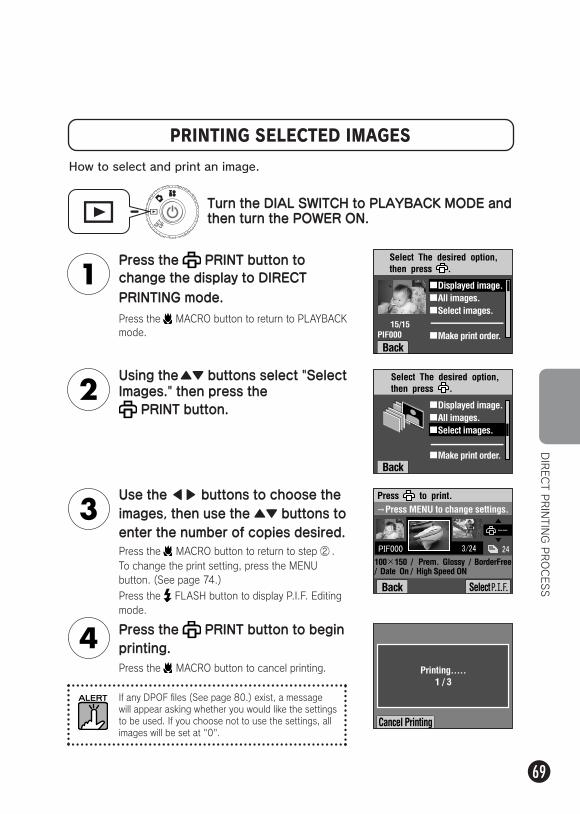
69
DIRECT P
RINTIN
G PROCESS
PRINTING SELECTED IMAGES
How to select and print an image.
Press the PRINT button to change the display to DIRECT PRINTING mode.
Press the MACRO button to return to step ② .
Use the ▲ ▼ buttons to choose the images, then use the ▲▼ buttons to enter the number of copies desired.
Press the PRINT button to begin printing.
To change the print setting, press the MENU button. (See page 74.)
Press the FLASH button to display P.I.F. Editing mode.
Using the▲▼ buttons select "Select Images." then press the
PRINT button.
Press the MACRO button to return to PLAYBACK mode.
If any DPOF files (See page 80.) exist, a message will appear asking whether you would like the settings to be used. If you choose not to use the settings, all images will be set at "0".
Turn the DIAL SWITCH to PLAYBACK MODE and then turn the POWER ON.
Press the MACRO button to cancel printing.
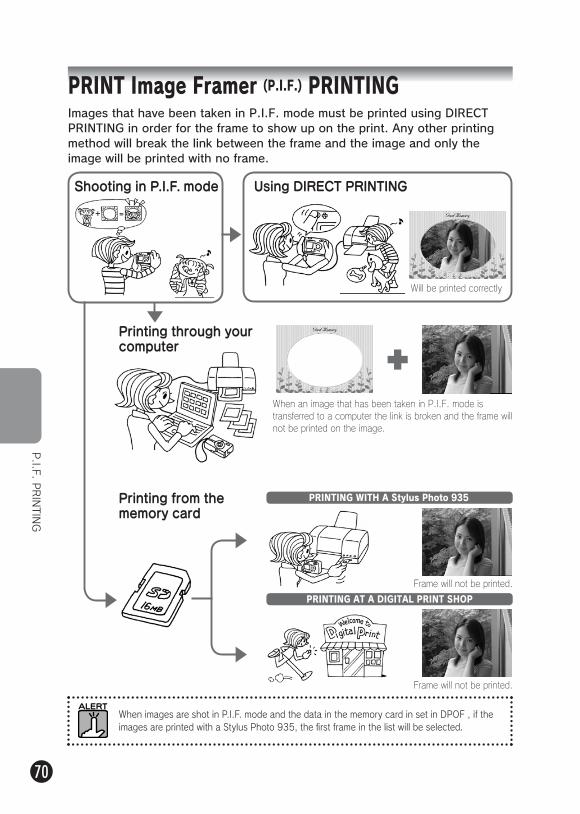
70
When an image that has been taken in P.I.F. mode is transferred to a computer the link is broken and the frame will not be printed on the image.
PRINT Image Framer (P.I.F.) PRINTINGImages that have been taken in P.I.F. mode must be printed using DIRECT PRINTING in order for the frame to show up on the print. Any other printing method will break the link between the frame and the image and only the image will be printed with no frame.
Using DIRECT PRINTING
Printing through your computer
Printing from the memory card
Frame will not be printed.
When images are shot in P.I.F. mode and the data in the memory card in set in DPOF , if the images are printed with a Stylus Photo 935, the first frame in the list will be selected.
Will be printed correctly
PRINTING AT A DIGITAL PRINT SHOP
PRINTING WITH A Stylus Photo 935
Shooting in P.I.F. mode
P.I.F
. PRINTIN
G
Frame will not be printed.
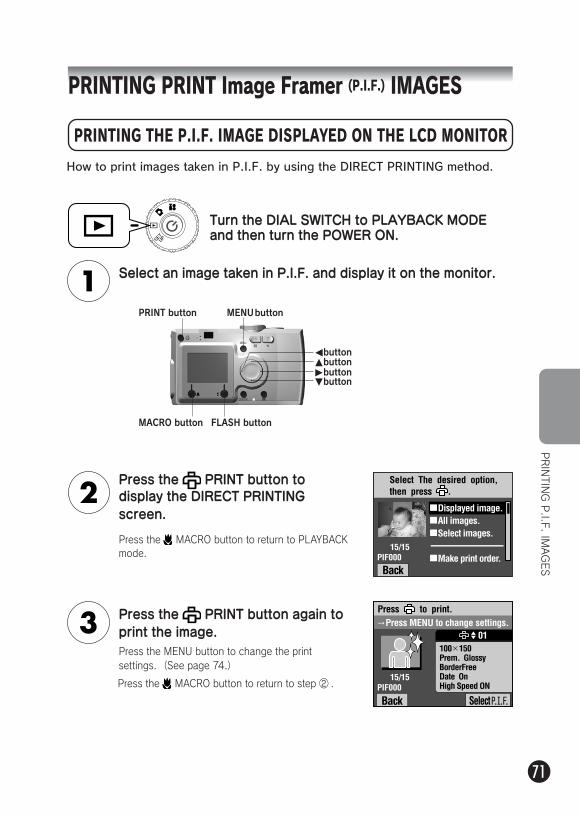
71
PRINTIN
G P.I.F
. IMAGES
PRINTING THE P.I.F. IMAGE DISPLAYED ON THE LCD MONITOR
How to print images taken in P.I.F. by using the DIRECT PRINTING method.
Select an image taken in P.I.F. and display it on the monitor.
Turn the DIAL SWITCH to PLAYBACK MODE and then turn the POWER ON.
Press the MENU button to change the print settings.(See page 74.)
Press the MACRO button to return to step ② .
PRINTING PRINT Image Framer (P.I.F.) IMAGES
Press the PRINT button to display the DIRECT PRINTING screen.
Press the MACRO button to return to PLAYBACK mode.
Press the PRINT button again to print the image.
MACRO button FLASH button
buttonbuttonbuttonbutton
PRINT button MENU button
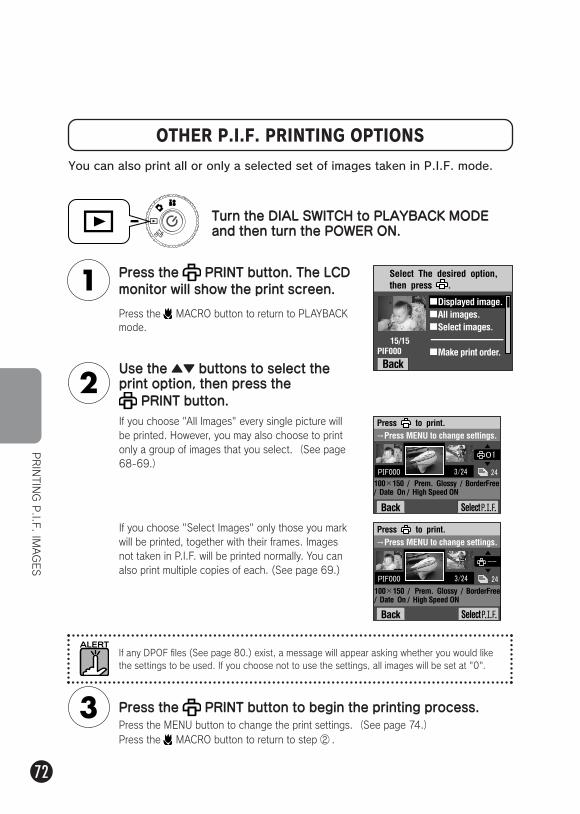
72
PRINTIN
G P.I.F
. IMAGES
OTHER P.I.F. PRINTING OPTIONS
You can also print all or only a selected set of images taken in P.I.F. mode.
Press the MENU button to change the print settings.(See page 74.)Press the MACRO button to return to step ② .
Turn the DIAL SWITCH to PLAYBACK MODE and then turn the POWER ON.
Press the MACRO button to return to PLAYBACK mode.
Press the PRINT button to begin the printing process.
Use the ▲▼ buttons to select the print option, then press the
PRINT button.If you choose "All Images" every single picture will be printed. However, you may also choose to print only a group of images that you select.(See page 68-69.)
If you choose "Select Images" only those you mark will be printed, together with their frames. Images not taken in P.I.F. will be printed normally. You can also print multiple copies of each. (See page 69.)
Press the PRINT button. The LCD monitor will show the print screen.
If any DPOF files (See page 80.) exist, a message will appear asking whether you would like the settings to be used. If you choose not to use the settings, all images will be set at "0".

73
CHANGING THE FRAMES
Frames may be changed when printing directly from the camera.
Press the FLASH button and frame choices will be displayed on the monitor.Press the MACRO button to return to step ② .
Use the ▲▼ buttons and display the frame that you would like to use.To remove a frame select the number "---".Press the MACRO button to return to step ② .
Turn the DIAL SWITCH to PLAYBACK MODE and then turn the POWER ON.
Press the FLASH button to link the displayed frame to your picture.
Press the MENU button to change the print settings.(See page 74.)
Use the ▲▼ buttons to select the desired option, then press the PRINT button.
PRINTIN
G P.I.F
. IMAGES
Screen for printing "Displayed image." Screen for printing "All images." Screen for printing "Selected images."
When viewing 1 image, use the ▲ ▼
buttons, when viewing 6 use the ▲▼
▲ ▼ buttons to choose the images you wish to print. Press the PRINT button to go to the printing screen.For PRINTING mode see pages 67-69.
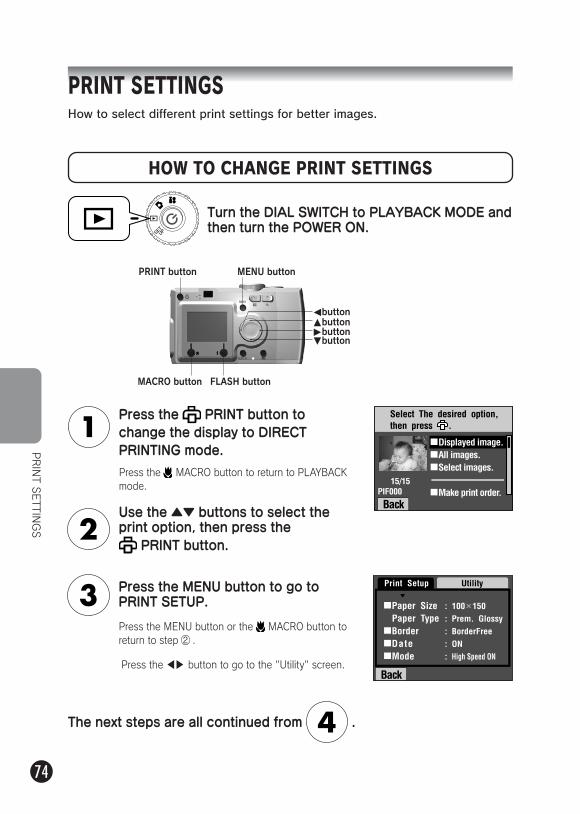
74
PRINT S
ETTIN
GS
Press the PRINT button to change the display to DIRECT PRINTING mode.
Press the MENU button or the MACRO button to return to step ② .
Press the MACRO button to return to PLAYBACK mode.
Turn the DIAL SWITCH to PLAYBACK MODE and then turn the POWER ON.
Press the MENU button to go to PRINT SETUP.
PRINT SETTINGS
HOW TO CHANGE PRINT SETTINGS
The next steps are all continued from .
How to select different print settings for better images.
Press the ▲ ▼ button to go to the "Utility" screen.
MACRO button FLASH button
buttonbuttonbuttonbutton
PRINT button MENU button
Use the ▲▼ buttons to select the print option, then press the
PRINT button.

75
SETTING PAPER SIZE
How to specify the size of the paper for your photo.
Use the ▲▼ buttons and select "Paper Size".
SELECTING PRINT BORDERS
PRINT S
ETTIN
GS
Use the ▲▼ buttons and select "Border".
You can print pictures with or without borders.Not to be confused with frames, borders refer to white spaces between the edges of the photo and the edges of the paper.
You can choose to print on any of two sizes of Premium Glossy paper: "4" X 6"/ PM Glossy", "100 X 150 mm/PM Glossy".
Use the ▲ ▼ buttons to change the settings.
Press the MENU button or the MACRO button to return to step ② .
Press the MENU button or the MACRO button to return to step ② .
Press the MENU button or the MACRO button to return to step ② .
Press the MENU button or the MACRO button to return to step ② .
4" X 6"
PM Glossy
100 X 150mm
PM Glossy
Continued from page 74
Continued from page 74
Use the ▲ ▼ buttons to change the settings.
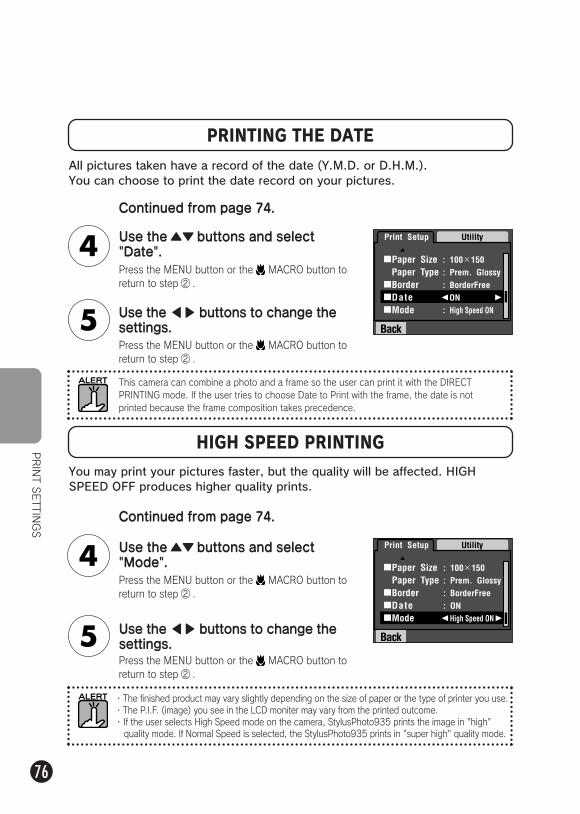
76
PRINTING THE DATE
PRINT S
ETTIN
GS
All pictures taken have a record of the date (Y.M.D. or D.H.M.).You can choose to print the date record on your pictures.
Use the ▲▼ buttons and select "Date".
HIGH SPEED PRINTING
Use the ▲▼ buttons and select "Mode".
You may print your pictures faster, but the quality will be affected. HIGH SPEED OFF produces higher quality prints.
Continued from page 74.
Use the ▲ ▼ buttons to change the settings.
Use the ▲ ▼ buttons to change the settings.
Press the MENU button or the MACRO button to return to step ② .
Press the MENU button or the MACRO button to return to step ② .
Press the MENU button or the MACRO button to return to step ② .
Press the MENU button or the MACRO button to return to step ② .
Continued from page 74.
This camera can combine a photo and a frame so the user can print it with the DIRECT PRINTING mode. If the user tries to choose Date to Print with the frame, the date is not printed because the frame composition takes precedence.
・The finished product may vary slightly depending on the size of paper or the type of printer you use.・The P.I.F. (image) you see in the LCD moniter may vary from the printed outcome.・If the user selects High Speed mode on the camera, StylusPhoto935 prints the image in "high" quality mode. If Normal Speed is selected, the StylusPhoto935 prints in "super high" quality mode.
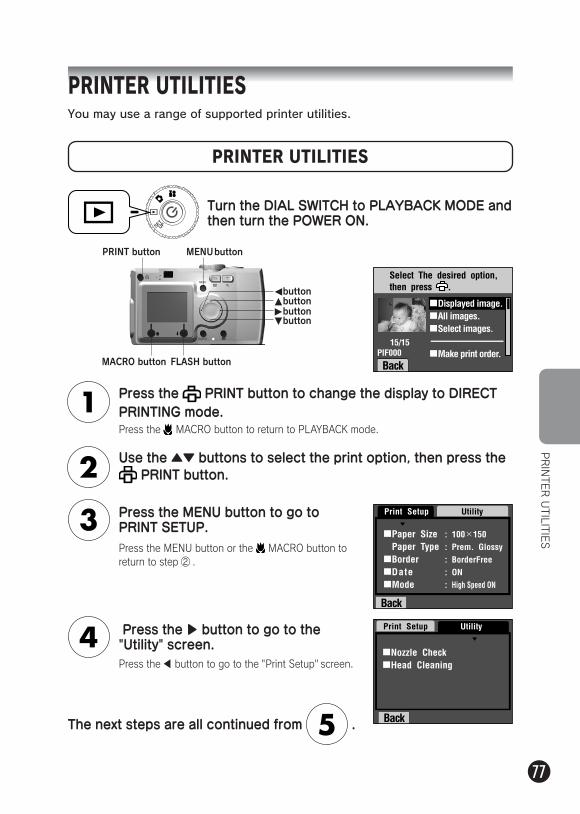
77
PRINTER UTILITIESYou may use a range of supported printer utilities.
PRINTER UTILITIES
PRINTER UTILITIE
S
Press the PRINT button to change the display to DIRECT PRINTING mode.Press the MACRO button to return to PLAYBACK mode.
Turn the DIAL SWITCH to PLAYBACK MODE and then turn the POWER ON.
Press the MENU button or the MACRO button to return to step ② .
Press the ▼ button to go to the "Utility" screen.Press the ▲ button to go to the "Print Setup" screen.
The next steps are all continued from .
MACRO button FLASH button
buttonbuttonbuttonbutton
PRINT button MENU button
Press the MENU button to go to PRINT SETUP.
Use the ▲▼ buttons to select the print option, then press the PRINT button.
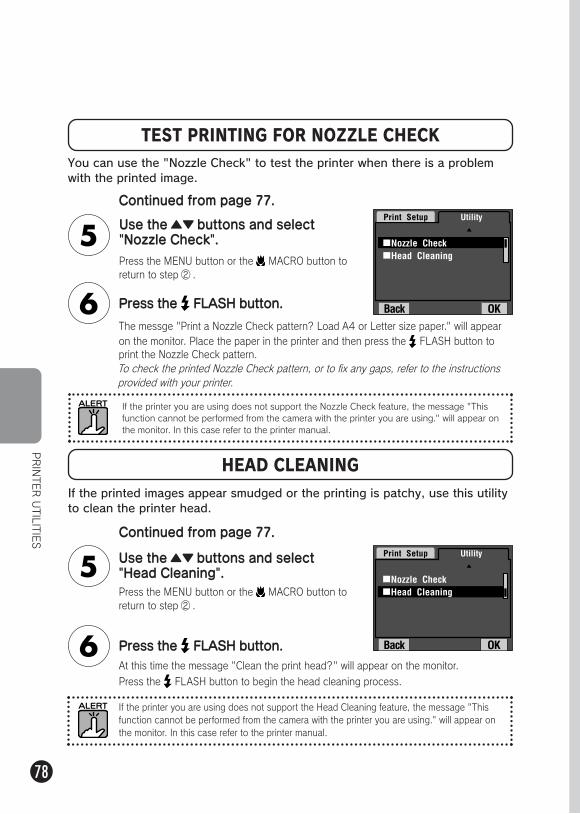
78
HEAD CLEANINGIf the printed images appear smudged or the printing is patchy, use this utility to clean the printer head.
PRINTER UTILITIE
S
Use the ▲▼ buttons and select "Head Cleaning".
If the printer you are using does not support the Head Cleaning feature, the message "This function cannot be performed from the camera with the printer you are using." will appear on the monitor. In this case refer to the printer manual.
Use the ▲▼ buttons and select "Nozzle Check".
If the printer you are using does not support the Nozzle Check feature, the message "This function cannot be performed from the camera with the printer you are using." will appear on the monitor. In this case refer to the printer manual.
TEST PRINTING FOR NOZZLE CHECKYou can use the "Nozzle Check" to test the printer when there is a problem with the printed image.
Continued from page 77.
Press the FLASH button.
Press the MENU button or the MACRO button to return to step ② .
Press the MENU button or the MACRO button to return to step ② .
The messge "Print a Nozzle Check pattern? Load A4 or Letter size paper." will appear on the monitor. Place the paper in the printer and then press the FLASH button to print the Nozzle Check pattern.To check the printed Nozzle Check pattern, or to fix any gaps, refer to the instructions provided with your printer.
At this time the message "Clean the print head?" will appear on the monitor.
Press the FLASH button to begin the head cleaning process.
Press the FLASH button.
Continued from page 77.
79
ADDITIONAL SETTINGS
P.80 ●P.80 ●P.81 ●P.82 ●P.82 ●P.83 ●P.84 ●P.85 ●P.86 ●P.86 ●P.87 ●P.87 ●P.88 ●
DIGITAL PRINT ORDER FORMAT(DPOF)SAVING PHOTOS IN DPOFSOUND AND SHUTTER SETTINGSAUTO POWER SAVE RESETTING THE AUTO POWER SAVEDATE & TIME AND DATE/TIME FORMATSADJUSTING LCD BRIGHTNESSMEMORY CARD FORMATTINGRULES FOR NAMING FILES (Cumulative function)RESETTING FILE NUMBERSRESETTING VIDEO OUTSETTING THE MENU LANGUAGERESETTING CAMERA DEFAULTS
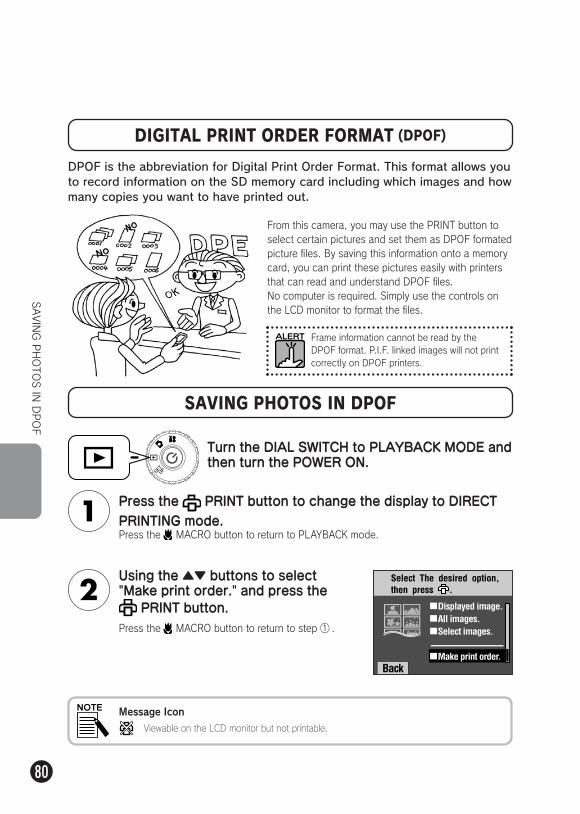
80
SAVING PHOTO
S IN DPOF
DPOF is the abbreviation for Digital Print Order Format. This format allows you to record information on the SD memory card including which images and how many copies you want to have printed out.
DIGITAL PRINT ORDER FORMAT (DPOF)
Press the PRINT button to change the display to DIRECT PRINTING mode.
Press the MACRO button to return to step ① .
Using the ▲▼ buttons to select "Make print order." and press the
PRINT button.
Press the MACRO button to return to PLAYBACK mode.
Turn the DIAL SWITCH to PLAYBACK MODE and then turn the POWER ON.
From this camera, you may use the PRINT button to select certain pictures and set them as DPOF formated picture files. By saving this information onto a memory card, you can print these pictures easily with printers that can read and understand DPOF files.No computer is required. Simply use the controls on the LCD monitor to format the files.
SAVING PHOTOS IN DPOF
Frame information cannot be read by the DPOF format. P.I.F. linked images will not print correctly on DPOF printers.
Viewable on the LCD monitor but not printable.
Message Icon
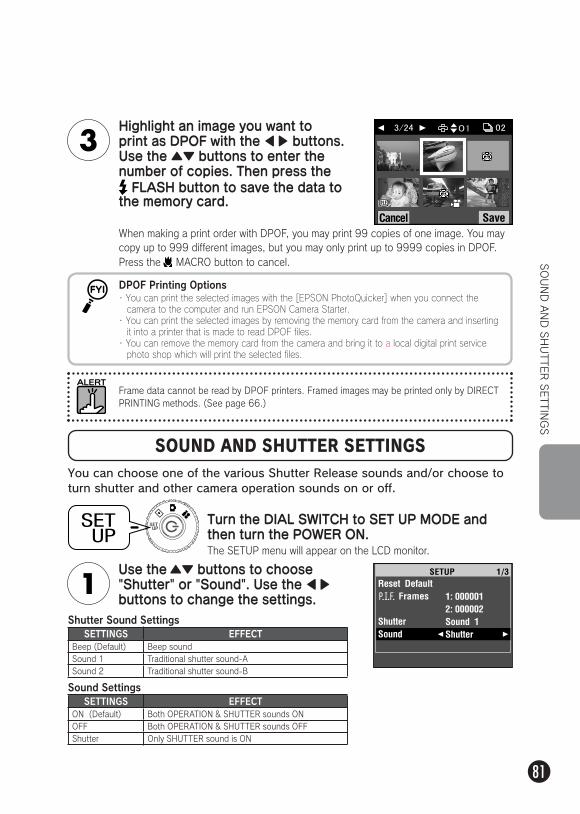
81
When making a print order with DPOF, you may print 99 copies of one image. You may copy up to 999 different images, but you may only print up to 9999 copies in DPOF.Press the MACRO button to cancel.
Highlight an image you want to print as DPOF with the ▲ ▼ buttons. Use the ▲▼ buttons to enter the number of copies. Then press the FLASH button to save the data to
the memory card.
DPOF Printing Options
SOUND AND SHUTTE
R SETTIN
GS
SOUND AND SHUTTER SETTINGSYou can choose one of the various Shutter Release sounds and/or choose to turn shutter and other camera operation sounds on or off.
Use the ▲▼ buttons to choose "Shutter" or "Sound". Use the ▲ ▼
buttons to change the settings.
Turn the DIAL SWITCH to SET UP MODE and then turn the POWER ON.
SETTINGS EFFECTON (Default) Both OPERATION & SHUTTER sounds ONOFF Both OPERATION & SHUTTER sounds OFFShutter Only SHUTTER sound is ON
Sound Settings
The SETUP menu will appear on the LCD monitor.
Frame data cannot be read by DPOF printers. Framed images may be printed only by DIRECT PRINTING methods. (See page 66.)
・ You can print the selected images with the [EPSON PhotoQuicker] when you connect the camera to the computer and run EPSON Camera Starter.・ You can print the selected images by removing the memory card from the camera and inserting it into a printer that is made to read DPOF files.・ You can remove the memory card from the camera and bring it to a local digital print service photo shop which will print the selected files.
SETTINGS EFFECTBeep (Default) Beep soundSound 1 Traditional shutter sound-ASound 2 Traditional shutter sound-B
Shutter Sound Settings
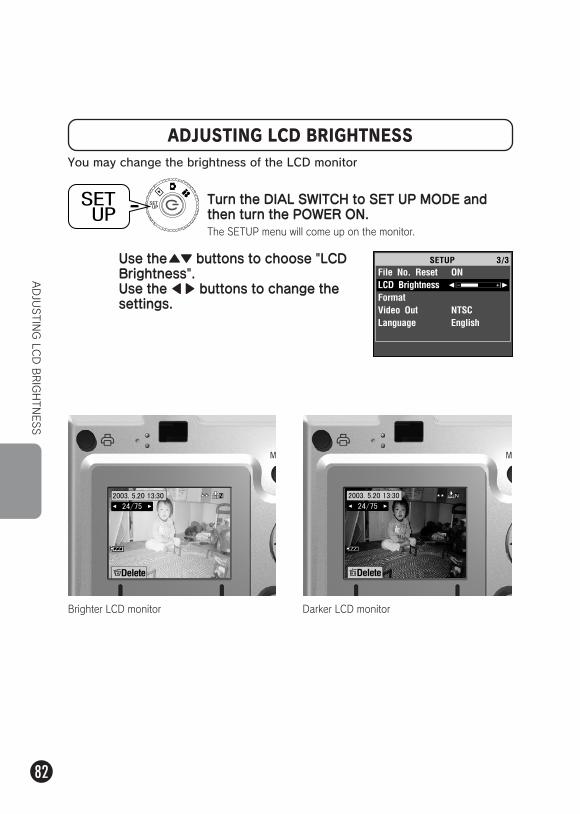
82
ADJUSTIN
G LC
D BRIGHTNESS
ADJUSTING LCD BRIGHTNESSYou may change the brightness of the LCD monitor
Use the▲▼ buttons to choose "LCD Brightness".Use the ▲ ▼ buttons to change the settings.
Turn the DIAL SWITCH to SET UP MODE and then turn the POWER ON.The SETUP menu will come up on the monitor.
Brighter LCD monitor Darker LCD monitor
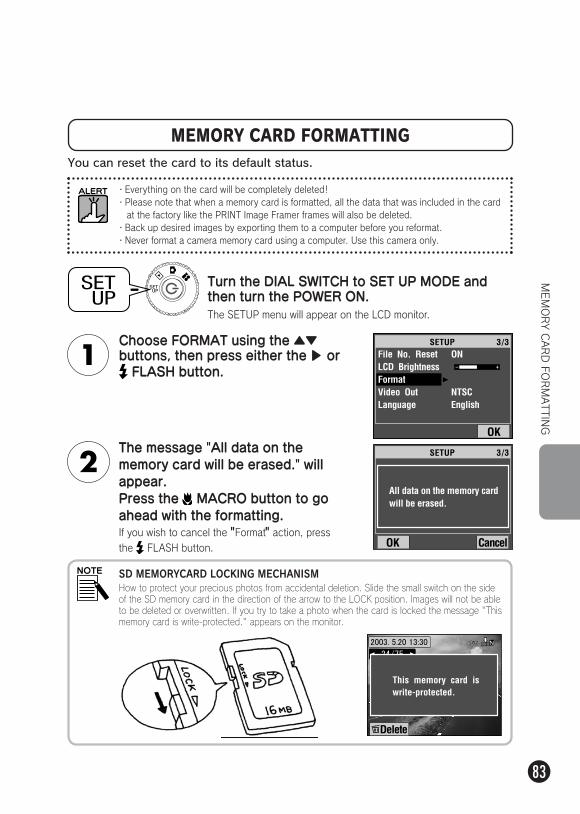
83
You can reset the card to its default status.
MEMORY CARD FORMATTING
・ Everything on the card will be completely deleted! ・ Please note that when a memory card is formatted, all the data that was included in the card at the factory like the PRINT Image Framer frames will also be deleted.
・ Back up desired images by exporting them to a computer before you reformat.・ Never format a camera memory card using a computer. Use this camera only.
Choose FORMAT using the ▲▼buttons, then press either the ▼ or FLASH button.
The message "All data on the memory card will be erased." will appear. Press the MACRO button to go ahead with the formatting.
MEMORY C
ARD FORMATTIN
G
If you wish to cancel the "Format" action, press the FLASH button.
Turn the DIAL SWITCH to SET UP MODE and then turn the POWER ON.The SETUP menu will appear on the LCD monitor.
SD MEMORYCARD LOCKING MECHANISMHow to protect your precious photos from accidental deletion. Slide the small switch on the side of the SD memory card in the direction of the arrow to the LOCK position. Images will not be able to be deleted or overwritten. If you try to take a photo when the card is locked the message "This memory card is write-protected." appears on the monitor.
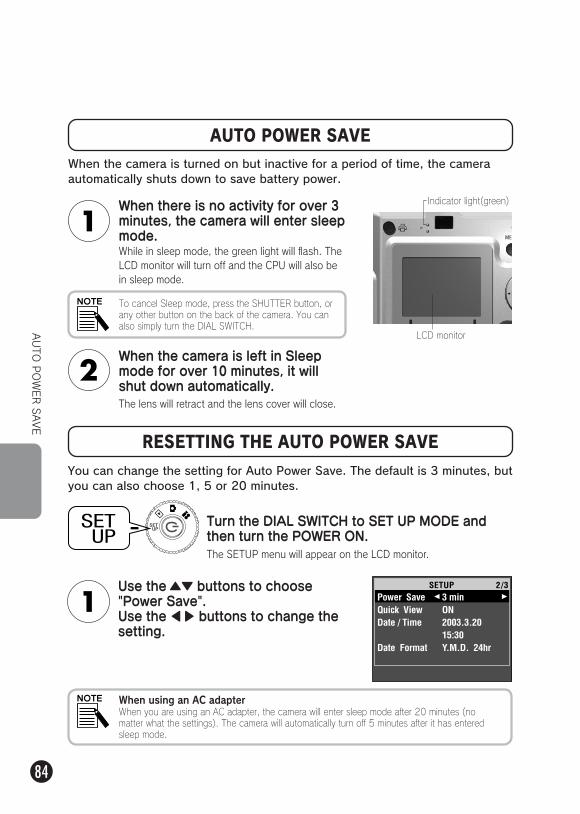
84
AUTO
POWER SAVE
When using an AC adapterWhen you are using an AC adapter, the camera will enter sleep mode after 20 minutes (no matter what the settings). The camera will automatically turn off 5 minutes after it has entered sleep mode.
Use the ▲▼ buttons to choose "Power Save".Use the ▲ ▼ buttons to change the setting.
Turn the DIAL SWITCH to SET UP MODE and then turn the POWER ON.The SETUP menu will appear on the LCD monitor.
RESETTING THE AUTO POWER SAVE
When the camera is turned on but inactive for a period of time, the camera automatically shuts down to save battery power.
AUTO POWER SAVE
While in sleep mode, the green light will flash. The LCD monitor will turn off and the CPU will also be in sleep mode.
You can change the setting for Auto Power Save. The default is 3 minutes, but you can also choose 1, 5 or 20 minutes.
To cancel Sleep mode, press the SHUTTER button, or any other button on the back of the camera. You can also simply turn the DIAL SWITCH.
When the camera is left in Sleep mode for over 10 minutes, it will shut down automatically.
When there is no activity for over 3 minutes, the camera will enter sleep mode.
Indicator light(green)
LCD monitor
The lens will retract and the lens cover will close.
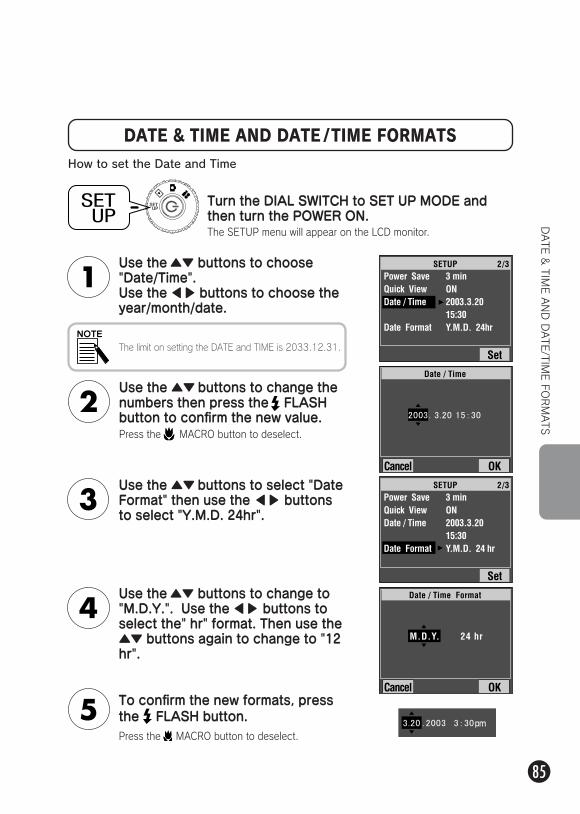
85
DATE & TIM
E AND DATE/TIM
E FORMATS
DATE & TIME AND DATE /TIME FORMATSHow to set the Date and Time
Use the ▲▼ buttons to choose "Date/Time".Use the ▲ ▼ buttons to choose the year/month/date.
Use the ▲▼ buttons to change to "M.D.Y.". Use the ▲ ▼ buttons to select the" hr" format. Then use the ▲▼ buttons again to change to "12 hr".
To confirm the new formats, press the FLASH button.Press the MACRO button to deselect.
Use the ▲▼ buttons to select "Date Format" then use the ▲ ▼ buttons to select "Y.M.D. 24hr".
Use the ▲▼ buttons to change the numbers then press the FLASH button to confirm the new value.Press the MACRO button to deselect.
Turn the DIAL SWITCH to SET UP MODE and then turn the POWER ON.The SETUP menu will appear on the LCD monitor.
The limit on setting the DATE and TIME is 2033.12.31.
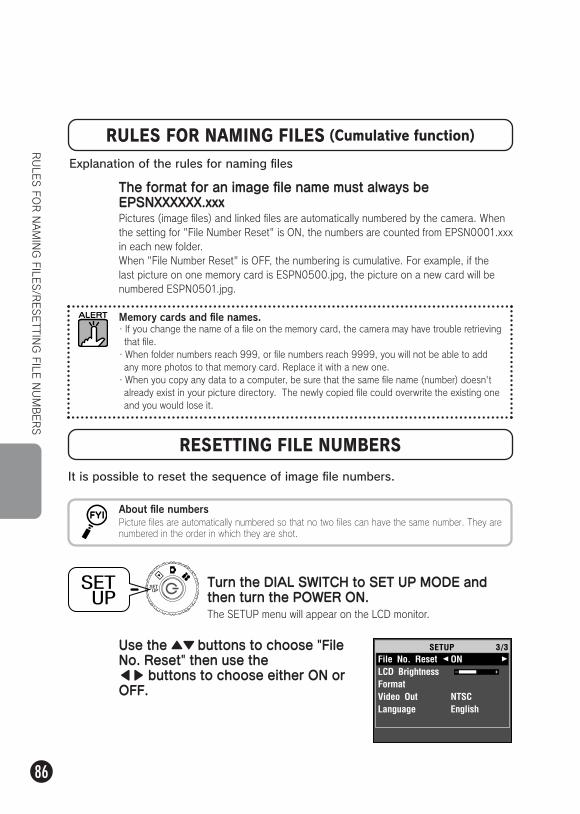
86
RULES FOR NAMING FILE
S/RESETTIN
G FILE
NUMBERS
RULES FOR NAMING FILES (Cumulative function)Explanation of the rules for naming files
The format for an image file name must always be EPSNXXXXXX.xxxPictures (image files) and linked files are automatically numbered by the camera. When the setting for "File Number Reset" is ON, the numbers are counted from EPSN0001.xxx in each new folder.When "File Number Reset" is OFF, the numbering is cumulative. For example, if the last picture on one memory card is ESPN0500.jpg, the picture on a new card will be numbered ESPN0501.jpg.
It is possible to reset the sequence of image file numbers.
RESETTING FILE NUMBERS
Use the ▲▼ buttons to choose "File No. Reset" then use the
▲ ▼ buttons to choose either ON or OFF.
Picture files are automatically numbered so that no two files can have the same number. They are numbered in the order in which they are shot.
About file numbers
Turn the DIAL SWITCH to SET UP MODE and then turn the POWER ON.The SETUP menu will appear on the LCD monitor.
Memory cards and file names.・ If you change the name of a file on the memory card, the camera may have trouble retrieving that file.・When folder numbers reach 999, or file numbers reach 9999, you will not be able to add any more photos to that memory card. Replace it with a new one. ・When you copy any data to a computer, be sure that the same file name (number) doesn't already exist in your picture directory. The newly copied file could overwrite the existing one and you would lose it.
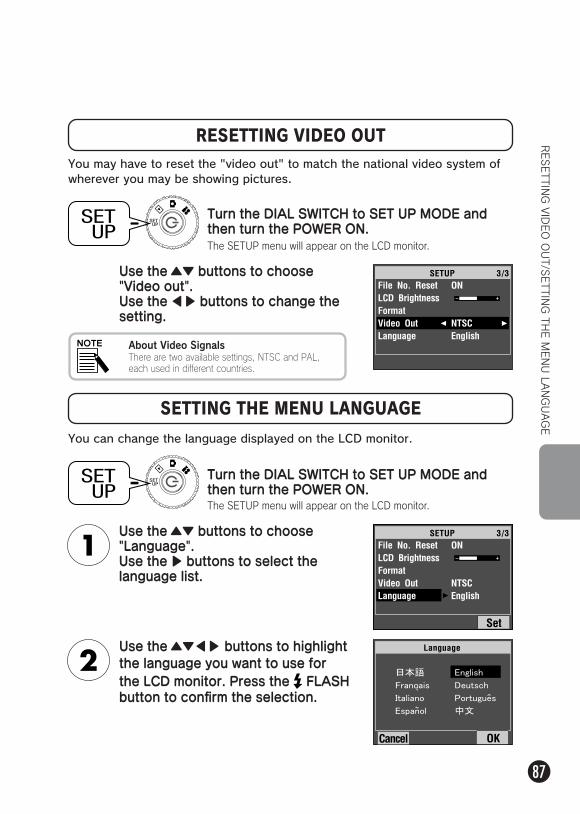
87
You may have to reset the "video out" to match the national video system of wherever you may be showing pictures.
SETTING THE MENU LANGUAGE
RESETTIN
G VIDEO OUT/S
ETTIN
G TH
E MENU LA
NGUAGE
You can change the language displayed on the LCD monitor.
Use the ▲▼ buttons to choose "Video out".Use the ▲ ▼ buttons to change the setting.
Use the ▲▼ buttons to choose "Language".Use the ▼ buttons to select the language list.
Use the ▲▼ ▲ ▼ buttons to highlight the language you want to use for the LCD monitor. Press the FLASH button to confirm the selection.
RESETTING VIDEO OUT
Turn the DIAL SWITCH to SET UP MODE and then turn the POWER ON.The SETUP menu will appear on the LCD monitor.
Turn the DIAL SWITCH to SET UP MODE and then turn the POWER ON.The SETUP menu will appear on the LCD monitor.
About Video SignalsThere are two available settings, NTSC and PAL, each used in different countries.
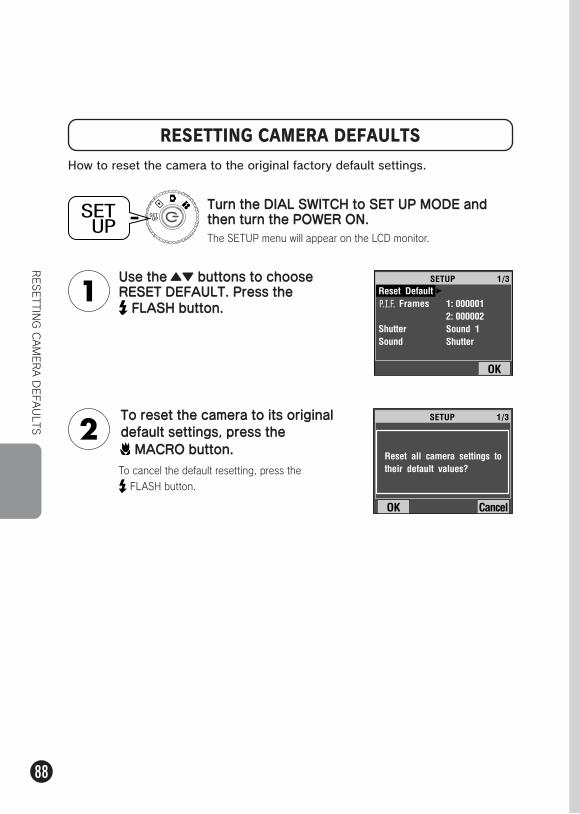
88
RESETTIN
G CAMERA DEFAULTS
How to reset the camera to the original factory default settings.
Use the ▲▼ buttons to choose RESET DEFAULT. Press the FLASH button.
To reset the camera to its original default settings, press the MACRO button.
To cancel the default resetting, press the
FLASH button.
RESETTING CAMERA DEFAULTS
Turn the DIAL SWITCH to SET UP MODE and then turn the POWER ON.The SETUP menu will appear on the LCD monitor.
89
ADDITIONAL INFORMATION
P.90 ●P.91 ●P.92 ●
CLEANING THE CAMERASPECIFICATIONS L-300SPECIFICATIONS L-200
90
CLEANING THE CAMERAIt is important to keep the camera clean so it will function well anytime you need it.
WHEN THE CAMERA NEEDS CLEANING
CLEANING THE CAMERA EXTERIORWipe the outside of the camera with a soft dry cloth. If there is heavy soil use a cloth dampened with a natural detergent. Wipe again with soft dry cloth. To clean the lens make sure the camera is turned off, then blow off any loose dust or dirt or use a lens and camera cleaning brush. Next, blow on the lens and wipe off all moisture with a soft dry cloth. Clean the LCD monitor also with a soft dry cloth.
When performing any camera maintenance, be sure to disconnect the AC adapter. Otherwise, you could recieve a shock.
CLEANING BATTERY TERMINALSWhen the battery terminals or contacts on the battery cover and compartment become dark (oxydized) you should wipe them with a clean dry cloth.If the battery terminal is dirty, it may shorten the life of the battery.
NEVER use volatile chemicals such as alcohol, paint thinner or benzine. They will damage the camera exterior. The same is true for the battery compartment.
STORING THE CAMERA
The camera is made of precision electronic components sensitive to strong magnetic fields.Be careful where you store it. Please refer to the SAFETY INSTRUCTIONS listed at the beginning of this User's Guide. For more information, see page 102 for the CUSTOMER SERVICE SUPPORT section.
CLEANING TH
E CAMERA
Store the camera in a cool and dry location and remove the batteries to prevent corrosion or leaks if you will not be using the camera for a long period of time.
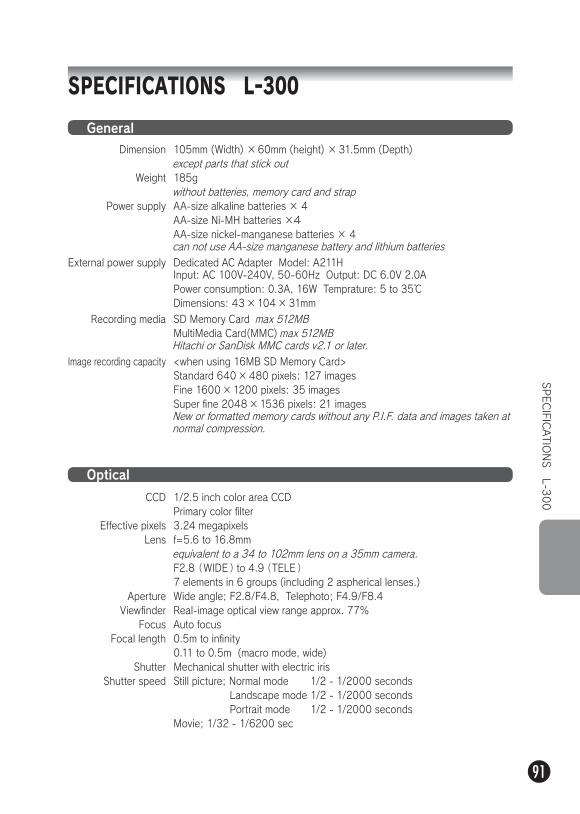
91
SPECIFICATIONS L-300
General105mm (Width) ×60mm (height) ×31.5mm (Depth) except parts that stick out185g without batteries, memory card and strap AA-size alkaline batteries × 4AA-size Ni-MH batteries ×4AA-size nickel-manganese batteries × 4can not use AA-size manganese battery and lithium batteriesDedicated AC Adapter Model: A211HInput: AC 100V-240V, 50-60Hz Output: DC 6.0V 2.0A Power consumption: 0.3A, 16W Temprature: 5 to 35℃ Dimensions: 43×104×31mm
SD Memory Card max 512MBMultiMedia Card(MMC) max 512MBHitachi or SanDisk MMC cards v2.1 or later.<when using 16MB SD Memory Card>Standard 640×480 pixels: 127 imagesFine 1600×1200 pixels: 35 imagesSuper fine 2048×1536 pixels: 21 imagesNew or formatted memory cards without any P.I.F. data and images taken at normal compression.
SPECIFICATIO
NS
L-300
Dimension
Weight
Power supply
External power supply
Recording media
Image recording capacity
Optical
1/2.5 inch color area CCD Primary color filter 3.24 megapixelsf=5.6 to 16.8mm equivalent to a 34 to 102mm lens on a 35mm camera.F2.8 (WIDE ) to 4.9 (TELE ) 7 elements in 6 groups (including 2 aspherical lenses.)Wide angle; F2.8/F4.8, Telephoto; F4.9/F8.4Real-image optical view range approx. 77%Auto focus0.5m to infinity0.11 to 0.5m (macro mode, wide)Mechanical shutter with electric irisStill picture; Normal mode 1/2 - 1/2000 seconds Landscape mode 1/2 - 1/2000 seconds Portrait mode 1/2 - 1/2000 secondsMovie; 1/32 - 1/6200 sec
CCD
Effective pixelsLens
ApertureViewfinder
FocusFocal length
ShutterShutter speed
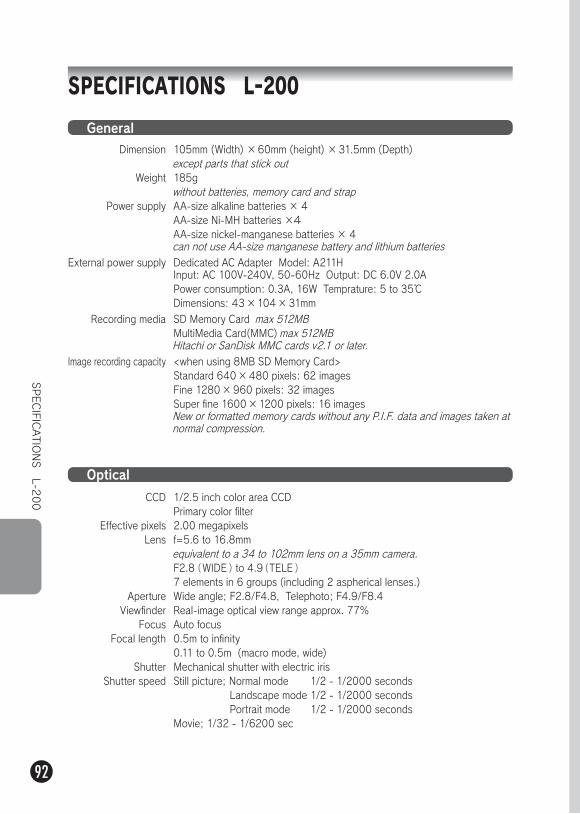
92
SPECIFICATIO
NS
L-200
SPECIFICATIONS L-200
General105mm (Width) ×60mm (height) ×31.5mm (Depth) except parts that stick out185g without batteries, memory card and strap AA-size alkaline batteries × 4AA-size Ni-MH batteries ×4AA-size nickel-manganese batteries × 4can not use AA-size manganese battery and lithium batteriesDedicated AC Adapter Model: A211HInput: AC 100V-240V, 50-60Hz Output: DC 6.0V 2.0A Power consumption: 0.3A, 16W Temprature: 5 to 35℃ Dimensions: 43×104×31mm
SD Memory Card max 512MBMultiMedia Card(MMC) max 512MBHitachi or SanDisk MMC cards v2.1 or later.<when using 8MB SD Memory Card>Standard 640×480 pixels: 62 imagesFine 1280×960 pixels: 32 imagesSuper fine 1600×1200 pixels: 16 imagesNew or formatted memory cards without any P.I.F. data and images taken at normal compression.
Dimension
Weight
Power supply
External power supply
Recording media
Image recording capacity
Optical
1/2.5 inch color area CCD Primary color filter 2.00 megapixelsf=5.6 to 16.8mm equivalent to a 34 to 102mm lens on a 35mm camera.F2.8(WIDE ) to 4.9(TELE ) 7 elements in 6 groups (including 2 aspherical lenses.)Wide angle; F2.8/F4.8, Telephoto; F4.9/F8.4Real-image optical view range approx. 77%Auto focus0.5m to infinity0.11 to 0.5m (macro mode, wide)Mechanical shutter with electric irisStill picture; Normal mode 1/2 - 1/2000 seconds Landscape mode 1/2 - 1/2000 seconds Portrait mode 1/2 - 1/2000 secondsMovie; 1/32 - 1/6200 sec
CCD
Effective pixelsLens
ApertureViewfinder
FocusFocal length
ShutterShutter speed
TROUBLESHOOTING
93
TROUBLESHOOTING
P.94 ●P.99 ●
TRUBLESHOOTINGLIST OF ERROR MESSAGES
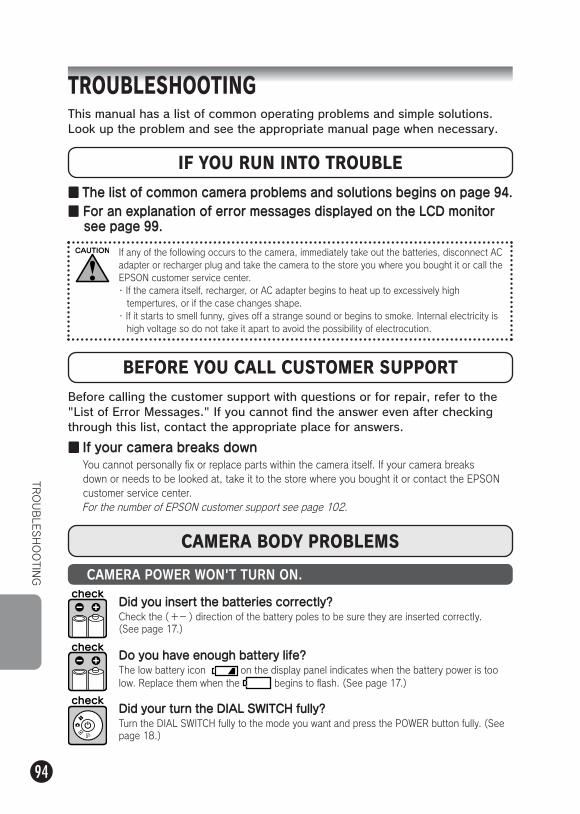
94
TROUBLESHOOTINGThis manual has a list of common operating problems and simple solutions. Look up the problem and see the appropriate manual page when necessary.
IF YOU RUN INTO TROUBLE
■ If your camera breaks downYou cannot personally fix or replace parts within the camera itself. If your camera breaks down or needs to be looked at, take it to the store where you bought it or contact the EPSON customer service center.For the number of EPSON customer support see page 102.
If any of the following occurs to the camera, immediately take out the batteries, disconnect AC adapter or recharger plug and take the camera to the store you where you bought it or call the EPSON customer service center.・ If the camera itself, recharger, or AC adapter begins to heat up to excessively high tempertures, or if the case changes shape.
・ If it starts to smell funny, gives off a strange sound or begins to smoke. Internal electricity is high voltage so do not take it apart to avoid the possibility of electrocution.
■ The list of common camera problems and solutions begins on page 94.■ For an explanation of error messages displayed on the LCD monitor
see page 99.
Before calling the customer support with questions or for repair, refer to the "List of Error Messages." If you cannot find the answer even after checking through this list, contact the appropriate place for answers.
BEFORE YOU CALL CUSTOMER SUPPORT
TROUBLESHOOTIN
GCAMERA BODY PROBLEMS
CAMERA POWER WON'T TURN ON.
Do you have enough battery life?The low battery icon on the display panel indicates when the battery power is too low. Replace them when the begins to flash. (See page 17.)
Did you insert the batteries correctly?Check the (+-) direction of the battery poles to be sure they are inserted correctly. (See page 17.)
Did your turn the DIAL SWITCH fully?Turn the DIAL SWITCH fully to the mode you want and press the POWER button fully. (See page 18.)
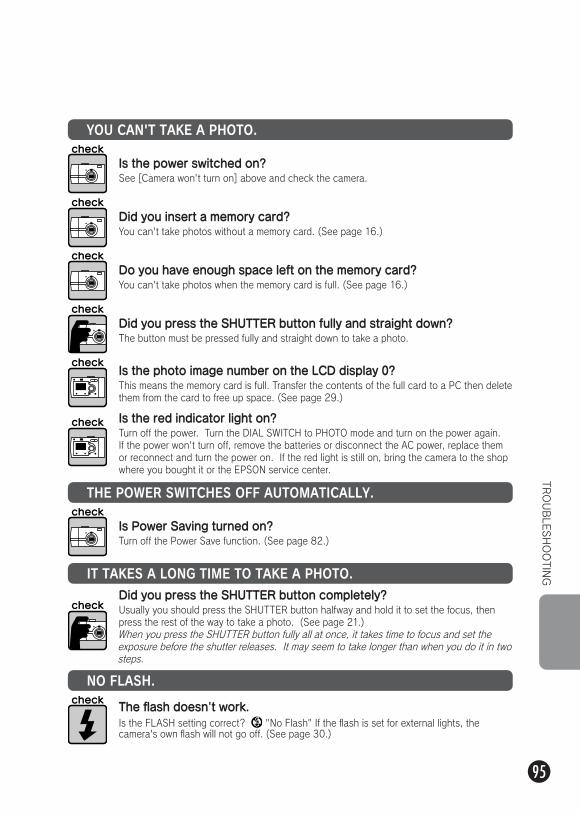
95
YOU CAN'T TAKE A PHOTO.
Is the photo image number on the LCD display 0?This means the memory card is full. Transfer the contents of the full card to a PC then delete them from the card to free up space. (See page 29.)
Did you press the SHUTTER button fully and straight down?The button must be pressed fully and straight down to take a photo.
Do you have enough space left on the memory card?You can't take photos when the memory card is full. (See page 16.)
Did you insert a memory card?You can't take photos without a memory card. (See page 16.)
Is the power switched on?See [Camera won't turn on] above and check the camera.
Is the red indicator light on?Turn off the power. Turn the DIAL SWITCH to PHOTO mode and turn on the power again. If the power won't turn off, remove the batteries or disconnect the AC power, replace them or reconnect and turn the power on. If the red light is still on, bring the camera to the shop where you bought it or the EPSON service center.
TROUBLESHOOTIN
G
THE POWER SWITCHES OFF AUTOMATICALLY.
IT TAKES A LONG TIME TO TAKE A PHOTO.
NO FLASH.
Did you press the SHUTTER button completely?Usually you should press the SHUTTER button halfway and hold it to set the focus, then press the rest of the way to take a photo. (See page 21.)When you press the SHUTTER button fully all at once, it takes time to focus and set the exposure before the shutter releases. It may seem to take longer than when you do it in two steps.
Is Power Saving turned on?Turn off the Power Save function. (See page 82.)
The flash doesn't work.Is the FLASH setting correct? "No Flash" If the flash is set for external lights, the camera's own flash will not go off. (See page 30.)
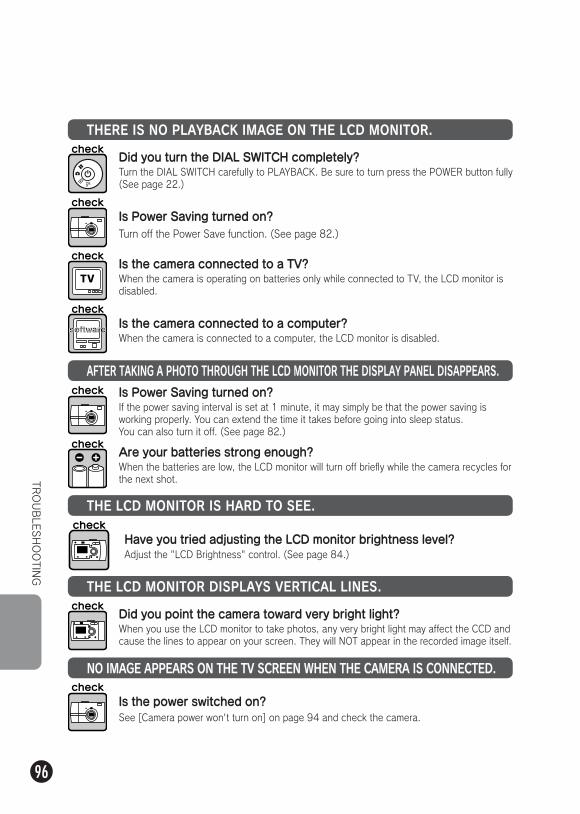
96
THERE IS NO PLAYBACK IMAGE ON THE LCD MONITOR.
Is the camera connected to a TV?When the camera is operating on batteries only while connected to TV, the LCD monitor is disabled.
Is Power Saving turned on?Turn off the Power Save function. (See page 82.)
Did you turn the DIAL SWITCH completely?Turn the DIAL SWITCH carefully to PLAYBACK. Be sure to turn press the POWER button fully (See page 22.)
Is the camera connected to a computer?When the camera is connected to a computer, the LCD monitor is disabled.
TROUBLESHOOTIN
G
AFTER TAKING A PHOTO THROUGH THE LCD MONITOR THE DISPLAY PANEL DISAPPEARS.
THE LCD MONITOR IS HARD TO SEE.
THE LCD MONITOR DISPLAYS VERTICAL LINES.
Did you point the camera toward very bright light?When you use the LCD monitor to take photos, any very bright light may affect the CCD and cause the lines to appear on your screen. They will NOT appear in the recorded image itself.
Is Power Saving turned on?If the power saving interval is set at 1 minute, it may simply be that the power saving is working properly. You can extend the time it takes before going into sleep status.You can also turn it off. (See page 82.)
Is the power switched on?See [Camera power won't turn on] on page 94 and check the camera.
Are your batteries strong enough?When the batteries are low, the LCD monitor will turn off briefly while the camera recycles for the next shot.
Have you tried adjusting the LCD monitor brightness level? Adjust the "LCD Brightness" control. (See page 84.)
NO IMAGE APPEARS ON THE TV SCREEN WHEN THE CAMERA IS CONNECTED.
97
Is the TV set up to recognize the camera as a picture source?Check that the TV/video selector on your TV is on [video]. See your TV instruction booklet for details.
The camera connected correctly to the TV?Check that the camera-AV cable is connected properly at both ends. (See page 38.)
Is the [video out] correctly selected on the camera?Check to see that the [video out] control (NTSC/PAL) is correctly set for the TV system of the country where you are showing your pictures. (See page 87.)
TROUBLESHOOTIN
G
Is the camera in the right distance mode setting?Be sure to take photos no closer than 50 cm from the camera in NORMAL mode. For distances from 11-50 cm, use the MACRO mode.(See page 50.)
Did you operate the auto-focus correctly?To use auto-focus, place the subject in the center of the viewfinder and press the SHUTTER button halfway.(See page 22.)
Is the lens dirty? Use an lens cleaning brush or gently blow on the lens to free it of dirt. Then blow on it and wipe it with a soft dry cloth. (See page 90.)
Did you touch the lens during shooting?If you touch the lens during shooting, the lens may become dirty and the picture may come out blurred. Holding the camera in the proper position will help you in not touching the lens. (See page 20.) If the lens becomes dirty in any way, use a soft dry cloth to wipe it. (See page 90.)
Is the captured image blurred?Hold the camera in the proper position when shooting, with your lower, support arm close to your body. (See page 22.) Use a tripod for night views and other low light situations.
IMAGES ARE OUT OF FOCUS.
IMAGE PROBLEMS
Adjust the exposure control in the + direction.You can brighten shots by adjusting the Ev control. (See page 58.)
Use the flash.See page 30 to learn about the range of the flash. If you use external flash sources, refer to the device's instruction booklet.
THE IMAGE IS TOO DARK.

98
TROUBLESHOOTIN
G
Avoid using the flash for close-ups.Set the control for NO FLASH. (See page 30.) If the image is too dark, increase the light sensitivity setting. (See page 57.)
THE IMAGE IS TOO BRIGHT.
Adjust the exposure control in the - direction.You can increase brightness by adjusting the Ev control. (See page 58.)
Select a higher light sensitivity setting.This is especially useful when it's impossible to use a flash. (See page 57.)
PART OF THE IMAGE IS MISSING.
THE IMAGE COLOR IS WRONG.
Is the subject of the picture very close to the camera?When the object is less than 1 meter from the lens, you may be experiencing parallax problems. (See page 25.) You may want to compose the shot using the LCD monitor. (See page 22.)
Are you looking straight through the viewfinder?You can misjudge the composition of the picture if you are looking through the viewfinder at an angle or holding the camera away from your face.
Was your finger covering the lens?When you take photos using the viewfinder, it is possible that fingers, straps or pieces of clothing may be partially covering the lens.
Is the white balance set correctly?・ If you use the AUTO setting under fluorescent lighting conditions, the image is balanced only for green light. Instead, use the FLUORESCENT setting and the camera will adjust to the specific florescent source in your scene.
・ Use the INCANDESCENT, when you want to keep the reddish orange hues that come from shooting at sunset.
Did you have to point the camera toward a strong bright light?Move your subject so the light is behind the camera.
See pages 77-78 or your printer instruction booklet for details.
PRINTING PROBLEMS
99
MESSAGE PROBLEM & SOLUTION
No images Problem:There are no images recorded on the memory card.Solution:Insert a memory card with images. Also check the image
after each shot to confirm.
This image cannot be displayed.
Problem:The image file exists but can't be displayed.Solution:Playback System (See page 32.)
This file cannot be deleted because this file is locked or cannot be deleted.
Problem:This image has been locked to prevent deletion.Solution:Delete the image with the machine that took the image or
locked it.
Some files are locked or could not be deleted.
Problem:Some images on this card have been write-protected.Solution:Delete the image with the device that took the image or
locked it.
The necessary Frame file does not exist or is unusable.
Problem:The picture can't be viewed because there is no file or the link has been broken.
Solution:The link has been broken or the frames itself has been deleted. Replace or add a frame linked to this file. (See pages 49.)
PLAYBACK MODE MESSAGES
LIST O
F ERROR MESSAGES
LIST OF ERROR MESSAGESFollow the appropriate instructions below when the error message appears.
MESSAGE PROBLEM & SOLUTION
This memory card is write-protected.
Problem:Memory card is locked.Solution:Unlock the memory card by hand. (See page 85.)
Memory card error. Check the memory card.
Problem:Unspecified memory card problem.Solution:Remove the card and replace it. (See page 16.) Contact
the card maker.
No memory card inserted. Problem:The camera has no memory card inserted.Solution:Insert a memory card. (See page 16).
The memory card is full. Problem:No more room for data on the memory card.Solution:Make room by deleting data (See pages 36-37.) or export
the data to your computer and then reformat the card. (See page 85.)
No Frames. Problem:No frames stored in the camera.Solution:Load up to 2 frames into the camera.(See pages 48-49.)
This Frame file cannot be used with this camera.
Problem:The camera doesn't support the frame. Solution:Reload with different frame that can be used with this
camera. (See pages 49.)
PHOTO MODE MESSAGES
100
MESSAGE PROBLEM & SOLUTION
Not enough free space on the memory card.
Problem:Not enough memory left on the card to record the picture.Solution:Either delete some pictures or reformat the card. (See
pages 36-37.)
Not enough free space in the camera's memory.
Problem:Not enough camera memory to transmit the frame.Solution:Delete one or more PIF frames from camera memory. (See page 48.)
A Frame with the same name already exists. Replace it with this Frame?
Problem:Another frame with this name exists either on the memory card or in the camera.
Solution:You may choose to replace it. Please note that the new file will overwrite the existing one.
SET UP MODE MESSAGES
LIST O
F ERROR MESSAGES
MESSAGE PROBLEM & SOLUTION
Battery power is low. Connect AC adapter.
Problem:Little battery power remaining.Solution:The camera won't continue to direct print when the power
is low. Connect to AC power.
Make sure that the printer is on and connected.
Problem:The DP cable is disconnected; the printer selected doesn't support the direct printing; is connected to another device (other than a computer), the printer power is turned off.
Solution:Reconnect the camera correctly to the printer and turn the printer power on. (See page 66.)
Black ink out. Replace the black ink cartridge.
Problem:The printer is out of black ink.Solution:Replace the black cartridge following the printer instruction
booklet.
Color ink out. Replace the color ink cartridge.
Problem:The printer is out of colored ink.Solution:Replace the colored cartridge(s) following the printer
instruction booklet.
Check the ink cartridges. Problem:An ink cartridge is missing or not set properly in the printer.Solution:Set or reset ink cartridge(s) following the printer instruction
booklet.
Paper out. Load paper. Problem:The paper isn't set properly in the printer.Solution:Set or reset the paper following the printer instruction
booklet
Paper jam. Problem:A sheet of paper has jammed during printing.Solution:Clear the jam following the printer instruction booklet.
This image cannot be printed.
Problem:You have selected an image that can't be printed.Solution:Select another image.
DIRECT PRINTING MESSAGES
101
LIST O
F ERROR MESSAGES
MESSAGE PROBLEM & SOLUTION
Printer error. Problem:There may be a problem with the printer.Solution:Turn the printer off for a few seconds then turn the power
back on. If the error message still appears, turn the power off and check to see if there is anything (packing materials, paper) stuck inside the printer. Then turn the power back on.
There is no response from the printer.
Problem:The printer has frozen and won't communicate with the camera.
Solution:Check the camera to printer connection. Check that the printer power is turned on. See the printer instruction booklet for further details.
Could not print.Try printing again?
Problem:If the printer is in the middle of printing something, it may not be able to accept the next request.
Solution:Restart the printer or wait until the current print run is finished and then try again.
Could not print. Problem:The printer has rejected the print request. Solution:If neither of the above works, see the printer instruction
booklet for further remedies.Restart the printer or resend the request from the camera. If none of these remedies work, contact your nearest Epson Customer Support.
A communication error has occurred.
Problem:Either the cable has been disconnected or the power has been turned off.
Solution:Recheck that the cable is connected, turn the power back on and try again.
xx images could not be printed.
Problem:If some of the images were taken with another camera or have been changed by software, only the images taken with this camera will be printed.
Solution:Use the actual camera or computer that was used to create the images in order to print them.
Cannot print because the necessary Frame file does not exist or is corrupted.
Problem:The picture can't be printed because there is no frame file or the link has been broken.
Solution:Replace or add a frame linked to this file. (See page 49.)
This function cannot be performed from the camera with the printer you are using.
Problem:The printer does not support this function.Solution:You can try to clean it in some other way, but the printer
doesn't support the camera's function.
This printer is not supported.
Problem:The printer isn't made for direct printing.Solution:Make sure the printer supports direct printing before you
buy it.
Parts inside your printer require maintenance.
Problem:The printer cannot print because the components within the printer needs adjusting.
Solution:Turn the printer off for a few seconds then turn the power back on. If the error message still appears, consult the shop you bought your printer from or the Epson Customer Support.
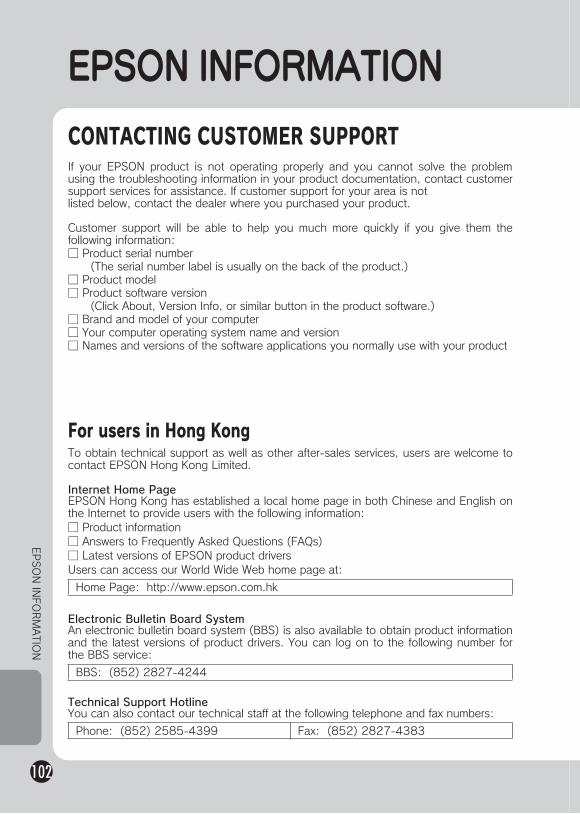
102
If your EPSON product is not operating properly and you cannot solve the problem using the troubleshooting information in your product documentation, contact customer support services for assistance. If customer support for your area is not listed below, contact the dealer where you purchased your product.
Customer support will be able to help you much more quickly if you give them the following information:□ Product serial number (The serial number label is usually on the back of the product.)□ Product model□ Product software version (Click About, Version Info, or similar button in the product software.)□ Brand and model of your computer□ Your computer operating system name and version□ Names and versions of the software applications you normally use with your product
CONTACTING CUSTOMER SUPPORT
EPSON INFORMATIO
N
For users in Hong KongTo obtain technical support as well as other after-sales services, users are welcome to contact EPSON Hong Kong Limited.
Internet Home PageEPSON Hong Kong has established a local home page in both Chinese and English on the Internet to provide users with the following information:□ Product information□ Answers to Frequently Asked Questions (FAQs)□ Latest versions of EPSON product driversUsers can access our World Wide Web home page at:
Home Page: http://www.epson.com.hk
Electronic Bulletin Board SystemAn electronic bulletin board system (BBS) is also available to obtain product information and the latest versions of product drivers. You can log on to the following number for the BBS service:
BBS: (852) 2827-4244
Technical Support HotlineYou can also contact our technical staff at the following telephone and fax numbers:
Phone: (852) 2585-4399 Fax: (852) 2827-4383
EPSON INFORMATION
103
EPSON OVERSEAS MARKETING LOCATIONS
2003 April
Epson America, Inc.3840 Kilroy Airport WayLong Beach, CA 90806Phone: (562) 981-3840Fax: (562) 290-5220
EPSON UK LTD.Campus 100, Maylands Avenue,Hemel Hempstead, Herts,HP2 7TJ, U.K.Phone: (+44) 01442 261144Fax: (+44) 01442 227227
EPSON FRANCE S.A.68 bis, rue Marjolin92300, Levallois-Perret, FrancePhone: 33.1.41.86.26.56Telex: 610657
EPSON DEUTSCHLAND GmbHZülpicher Straße 6,40549 Düsseldorf GermanyPhone: (0211) 56030Fax: (0211) 5047787
EPSON AUSTRALIA PTY. LTD.70 GIBBES STREET,CHATSWOOD 2067 NSW.Phone: 2-9903-9000Fax: 2-9903-9177
EPSON SINGAPORE PTE. LTD.No. 1 Temasek Avenue #36-00Millenia Tower, Singapore 039192Phone: (065) 633 77 911Fax: (065) 633 41 185
EPSON HONG KONG LTD.Rooms 4706-10, 47/F,China Resources Bldg.,26 Harbour Road, Wanchai, Hong KongPhone: 2585-4300Fax: 2827-7083
EPSON TAIWAN TECHNOLOGY &TRADING LTD.10F, No. 287 Nanking E. Road, Sec. 3,Taipei, Taiwan,Phone: (02) 2717-7360Fax: (02) 2712-9164
EPSON ITALIA S.p.A.V.le F.lli Casiraghi 42720099 Sesto S.GiovanniMI, ItalyPhone: +3902262331Fax: +39022440750
EPSON IBERICA S.A.Av. de Roma, 18-2608290 Cerdanyola del VallesBarcelona, SpainPhone: 582. 15.00Fax: 582. 15.55
SEIKO EPSON CORPORATION(Hirooka Office)80 Harashinden, HirookaShiojiri-shi, Nagano-ken399-0785 Japan
EPSON PORTUGAL, S.A.R. do Progresso, 471, 1° Perafita4460 Matosinhos, PortugalPhone: (02) 996 14 02Fax: (02) 996 14 11
EPSON INFORMATIO
N
104
INDEX
AAC adapter AC adapter (A211H) 13, 40, 91, 92AC adapter AC Cable 13, 40Adjusting LCD Brightness 84Auto Focus 50, 21-26AV 13, 38BBatteriesAccessing The Batteries 16Batteries Installation 16Battery / Memory Card Cover 16Battery Life Indicator 17Cleaning Battery Terminals 90Setting The Batteries 17Blurred Shot 30ButtonsDisplay Button 42Flash Button 30Macro Button 50Menu Button 31, 43, 62Power Button 18Print Button 67-69, 71-74, 77Review Button 35Shatter Button 21-26, 62Zoom Button 27, 33, 35, 46, 64 CCamera Range 21, 50CableAC Cable 13, 40AV Cable 13, 38PC Cable 13, 66Printer Cable 13, 38, 66Changing The Frames 73Color Temperatures 54Compatible Printers 66Compression 28, 29, 32, 51Fine Compression 28, 29. 51Normal Compression 28, 29, 51Confirming The Number Of Photographs 29Continuous Shooting 51DDate & Time 18, 83DeletingDeleting All Images 36Deleting A Single Photo 37Deleting Frames 48Deleting Video Clip 64Digital Zoom 27Dial SwichPhoto Mode 22-26, 28, 31, 35, 42-43, 45, 50-60
Playback Mode 32-34, 36-37, 46, 61, 63-64, 67-69, 71-78, 80
Setup Mode 23, 48-49, 81-88
Video Clip Mode 62Direct PrintingDirect Printing From Camera To Printer 39, 66Direct Printing Messages 100Head Cleaning 78High Speed Printing 76List Of Compatible Printers 66Printer Utilities 77, 78Print Images Framer (P.I.F.) Printing 70-73Printing All The Images In Memory 68Printing Selected Images 69Printing The Date 76Printing The Image Seen On The LCD Monitor 67Print Settings 74Selecting Print Borders 75Setting Paper Size 75Test Printing For Nozzle Check 78Displaying On A Tv 38Displaying Recorded Image Data 61DPOFDigital Print Order Format (DPOF) 80DPOF Printing Options 81Saving Photos In DPOF 80EEV 58, 59Exif 66Exposure Adjustment 58, 59FFine Compression 28, 29, 51Fine Resolution 28, 29, 51FlashFlash Control 30Flash Icons 30Flash Range 30Focus Area 21, 50Full Shutter 21HHalf Shutter 21Holding The Camera 20IIf The Captured Image Is Out Of Focus 26Illumination Light 31Initial Settings 18ISO 30, 56, 57LLANDSCAPE Mode 53Language 18, 87LCD MonitorLCD Monitor Off 42Printing The Image Seen On The LCD Monitor 67Taking Photos Using The LCD Monitor 22No Playback Image On The LCD Monitor 96Light SensitivityAutomatic Sensitivity Mode 56
105
Setting Light Sensitivity Manually 57List Of Compatible Printers 66MMacro Mode 50Memory CardMemory Card Formatting 85Multimedia Card 16, 29SD Memory card 12, 29, 63SD Memory Card Installation 16SD Memory Card Write-protection 85Message Icon 80NNormal Compression 28, 29, 51Normal Mode 52, 53, 91, 92NTSC 18, 38, 87OOptical Zoom 27PPRINT Image Framer(P.I.F.) Changing The Frames 73Deleting Frames 48PRINT Image Framer (P.I.F.) Printing 44, 70-73PRINT Image Framer (P.I.F) Shooting 45Viewing A P.I.F. Image 46PAL 18, 87Parallax 25, 50Photograph Quality Settings 28Playback SystemDisplaying Multiple Images 33Image Enlargement 33MENU For Playback Mode 43One By One Playback 32PLAYING BACK A CLIP 63Quick Photo Review 35Slide Show 34Power On/Off 18PRINT Image Matching 66QQuick Photo Review 35Quick View 23RResettingResetting Camera Defaults 88Resetting File Numbers 86Resetting The Auto Power Save 82Resetting To Default Mode 60Resetting Video Out 87Resolution Fine Resolution 28, 29, 51Standard Resolution 28, 29, 51Super Fine Resolution 28, 29, 51Rules For Naming Files 86SSCENE Modes
Landscape Mode 53, 91, 92Normal Mode 52, 53, 91, 92Portrait Mode 53, 91, 92Selecting A Scene Mode 52Self TimerSelf Timer 31Short Self Timer 31Slow Shutter Speeds 30Slow Syncro Shutter 30, 53Slide Show 34SoundShutter Sound Settings 81Sound Settings 81Speaker Volume 63Specifications 91, 92Shutter ButtonFull Shutter 21Half Shutter 21Standard Resolution 28, 29, 51Super Fine Resolution 28, 29, 51TTablesApproximate Number Of Images 29Compression 29Continuous Image Recording Table 51Flash Range 30Resolution 28, 29Shutter Sound Settings 81Sound Settings 81Video Clip Resolution 63Taking PhotosTaking Photos In MACRO Mode 50Taking Photos Using The Viewfinder 24Taking Photos Using The LCD Monitor 22Tv 38UUtilitiesHead Cleaning 78Printer Utilities 77Test Printing For Nozzle Check 78VVideo ClipDeleting Video Clip 64Playing Back A Clip 63Recording A Video Clip 62Selecting Video Clip Resolution 62Video icon 33Viewfinder 24, 25WWhite BalanceAutomatic White Balance 54Selecting White Balance Manually 55ZZoom 27

Printed in Malaysia 03.01-20
Related Documents