User Guide OASYS ePortal Account and Messaging Florida Department of Revenue Property Tax Oversight December 2021

Welcome message from author
This document is posted to help you gain knowledge. Please leave a comment to let me know what you think about it! Share it to your friends and learn new things together.
Transcript

User Guide
OASYS ePortal
Account and Messaging
Florida Department of Revenue
Property Tax Oversight
December 2021
i
User Guide OASYS ePortal Account and Messaging 2021
Contents 1. Introduction .............................................................................................................................. 1
2. Initial Account Setup ................................................................................................................. 2
3. Logon ........................................................................................................................................ 7
4. Forgot Username ...................................................................................................................... 8
5. Forgot Password ....................................................................................................................... 9
6. Dashboard (Home) .................................................................................................................. 12
7. Important Dates ...................................................................................................................... 13
8. User Profile ............................................................................................................................. 17
9. Manage Subscription Categories ............................................................................................. 18
10. Accessing OASYS ePortal Messages ...................................................................................... 19
11. Reporting Technical Problems ............................................................................................... 24
1
User Guide OASYS ePortal Account and Messaging 2021
1. Introduction The OASYS ePortal will be used by the Department of Revenue’s (Department) Property Tax Oversight (PTO) program as the primary method to send communications to county offices instead of emails previously sent by PTO. Communications will be sent to OASYS ePortal users based on message categories that the user selects. Communications that are sent will go to an inbox located within the OASYS ePortal, and users will receive a duplicate message in the email that is associated with their OASYS ePortal account. This user guide is intended for all OASYS ePortal users to understand how to subscribe to, view, and manage messages that they receive from the OASYS ePortal. The user guide will first cover basic account setup up then get into more detail about messaging features. The best web browser to use with the OASYS ePortal is Google Chrome.

2
User Guide OASYS ePortal Account and Messaging 2021
2. Initial Account Setup The following diagram provides an overview of the account setup process.

3
User Guide OASYS ePortal Account and Messaging 2021
2.1 You will receive an account creation email from PTO. This email will notify you that an
OASYS ePortal account has been opened for you. The email will also provide instructions
on how to finish setting up the account.
2.2 Browse to https://ptoportal.floridarevenue.com then click the First‐Time User link
under the Login button.
Jane Rinehart,
An account has been created for you in the Florida Department of Revenue
(Department) Property Tax Oversight (PTO) ePortal by PTO. To complete your
account creation, please complete the following steps in order.
1. Verify the spelling of the name (Jane Rinehart) on your account. If the spelling
is not correct, please reach out to PTO (SD‐[email protected]) to have
this corrected before proceeding with account setup.
2. Browse to http://ptoportal.floridarevenue.com
3. Click on the “First Time User” link under the Login button.
4. When prompted, enter the email address where you received the email and
your unique username (tyrpa‐rinehartj).
You will then follow the prompts to create a password so that you can gain access to
the PTO ePortal.
***Note: This message was sent from an unmonitored email address. Please do NOT
reply to this message.
Sincerely,

4
User Guide OASYS ePortal Account and Messaging 2021
2.3 You will arrive at the Welcome to the PTO Portal! screen. Here, you will enter the
following fields under Step 1: Enter Email and Username.
First Name
Enter your First Name (a). Make sure that the spelling of your name is correct as this
cannot be undone after an account is created.
Last Name
Enter your Last Name (b). Make sure that the spelling of your name is correct as this
cannot be undone after an account is created.
Enter your Email (c). This can be modified later if needed.
Username
Enter the Username (d) that was provided for you in your account creation email.
2.4 After entering the necessary information, click Send Code.
2.6 If the data entered is not found in the system, you will receive a message to review and
re‐enter your credentials. This message should also include a contact for help if you
continue to receive this message.

5
User Guide OASYS ePortal Account and Messaging 2021
2.7 If the data entered is found in the system, you will receive an email with a Verification Code.
2.8 Enter this Verification Code in the box titled Step 2: Enter Code. Then, click Submit.

6
User Guide OASYS ePortal Account and Messaging 2021
2.9 You will arrive at Step 3: Create Password where you will create and confirm your
password.
2.10 After confirming your password, click Update Password.
You will receive a confirmation message.
2.11 Click OK.
2.12 You are now finished setting up your account.

7
User Guide OASYS ePortal Account and Messaging 2021
3. Logon 3.1 Browse to https://ptoportal.floridarevenue.com and click the Login button.
3.2 You will arrive at the Florida Department of Revenue Logon screen. Here, you will enter the following information: Username
Enter the Username (a) that was provided to you in the account creation email
mentioned in the Initial Account Setup section of this document.
Password
Enter the Password (b) that you created.
8
User Guide OASYS ePortal Account and Messaging 2021
3.3 After entering the necessary information, click Sign In. 3.4 You will arrive at your OASYS ePortal Dashboard, which will be discussed in the
Dashboard (Home) section of this document.
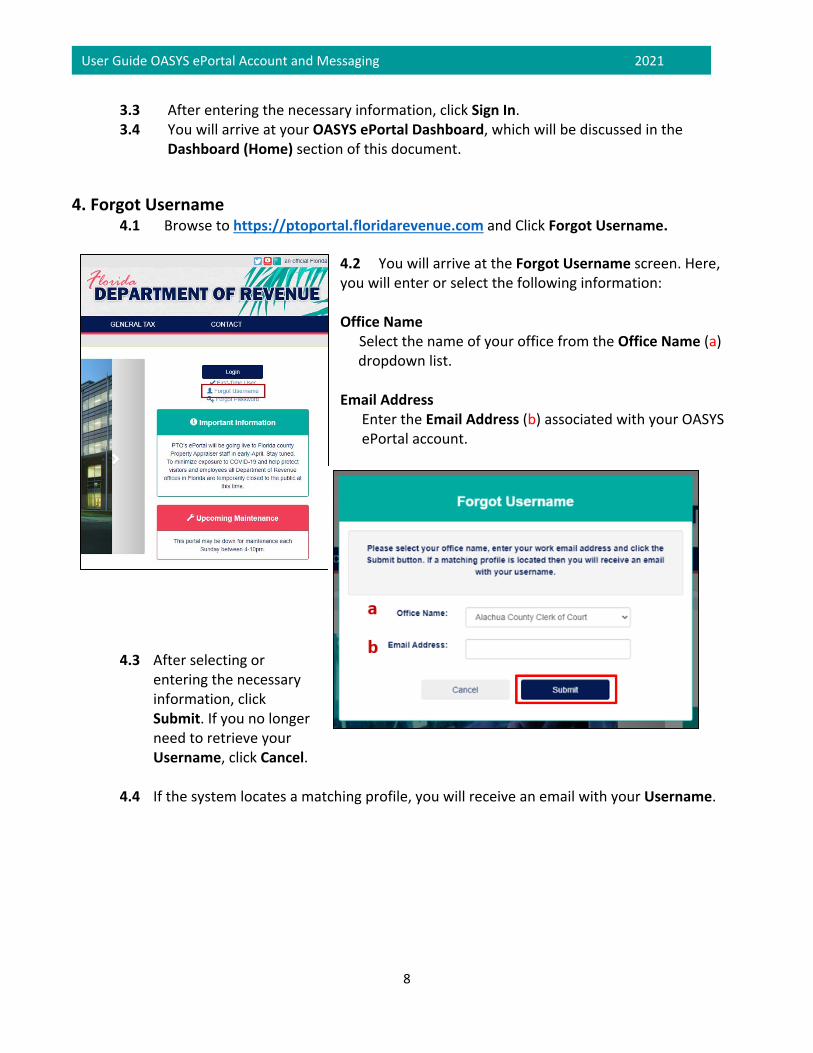
4. Forgot Username 4.1 Browse to https://ptoportal.floridarevenue.com and Click Forgot Username.
4.2 You will arrive at the Forgot Username screen. Here, you will enter or select the following information: Office Name Select the name of your office from the Office Name (a) dropdown list. Email Address Enter the Email Address (b) associated with your OASYS ePortal account.
4.3 After selecting or entering the necessary information, click Submit. If you no longer need to retrieve your Username, click Cancel.
4.4 If the system locates a matching profile, you will receive an email with your Username.

9
User Guide OASYS ePortal Account and Messaging 2021
4.5 If the system does not locate a matching profile, you will receive the below message.
4.6 Click OK. Then, reach out to the Contact Manager in your office or send an email to pto‐[email protected] for additional assistance.
5. Forgot Password 5.1 Browse to https://ptoportal.floridarevenue.com and click Forgot Password.
5.2 You will arrive at the Welcome to the PTO Portal! screen. 5.3 Enter the following fields under Step 1: Enter Email & Username: Email Enter the Email (a) address that is associated with your OASYS ePortal account. Username Enter the Username (b) that was provided for you in your account creation email.
5.4 Then, click Send Code.

10
User Guide OASYS ePortal Account and Messaging 2021
5.5 You will receive an email with a Verification Code.
5.6 Enter the Verification Code under Step 2: Enter Code.
5.7 Then, click Submit.

11
User Guide OASYS ePortal Account and Messaging 2021
5.8 You will arrive at Step 3: Create Password, where you will create and confirm your password.
5.9 After confirming your password, click Update Password.
5.10 You will receive a confirmation message.
5.11 Click OK.
5.12 You are now finished updating your password.

12
User Guide OASYS ePortal Account and Messaging 2021
6. Dashboard (Home) 6.1 When you successfully log in, you will arrive at your OASYS ePortal Dashboard. Here,
you will see several sections. Your Important Dates The Your Important Dates (a) section displays dates that important to your office type as well as any links to applicable Florida Statutes. This section shows important dates for the next 30 days.
Contact PTO The Contact PTO (b) section contains links to key contacts within PTO to reach out to with specific questions.
My Office The My Office (c) section contains information about the office in which you work.
References The References (d) section contains links to information that are closely linked with tasks you might perform for PTO.
Your Applications The Your Applications (e) section contains applications and functionality to which you currently have access.

13
User Guide OASYS ePortal Account and Messaging 2021
6.2 You will also see a message at the bottom of the Your Applications section informing you to contact the Access Manager for your office to request a change to your application access.
6.3 Finally, you will see links to new messages if you have them. Please refer to the User
Guide OASYS ePortal Account and Messaging document for more information on messaging features.
7. Important Dates 7.1 The Your Important Dates section on your OASYS ePortal Dashboard will display
important dates for your office type that occur within the next 30 days.
7.2 Click Search Calendar to access and view a full list of important dates.

14
User Guide OASYS ePortal Account and Messaging 2021
7.3 You will arrive at the Important Dates screen. 7.4 Here, you will select the following fields.
Office Type
Use the Office Type (a) dropdown list to select the type of office for which you wish to see important dates. Select Date Range
Use the Select Date Range (b) calendar to select the beginning and end date range for which you wish to see important dates.
7.5 After selecting the necessary information, click Search.
7.6 For example, if you wish to see important dates for tax collectors for November 1 – December 31, 2021, you will first select Tax Collector in the Office Type dropdown list.

15
User Guide OASYS ePortal Account and Messaging 2021
7.7 Next click in the Select Date Range box to open the calendar tool.
7.8 Select November 1, 2021 as the start date and December 31, 2021 as the end date.
7.9 This will populate the Select Date Range box with the appropriate date range selected.
7.10 After selecting the necessary information, click Search.

16
User Guide OASYS ePortal Account and Messaging 2021
7.11 This will bring up search results in a table. Note that the resulting table can be exported to CSV and sorted on every column.
7.12 The resulting table will contain the following fields.
Date The Date (a) column displays the actual deadline/date for the important date.
Office Type The Office Type (b) column displays the office to which this important date applies.
Responsible Party The Responsible Party (c) column displays the party responsible for performing an action by a specific date.
Item The Item (d) column describes the important date in detail. Florida Statute(s) The Florida Statute(s) (e) column lists any applicable Florida Statute(s) related to that important date.
References The References (f) column contains links to information relevant to that important date.

17
User Guide OASYS ePortal Account and Messaging 2021
8. User Profile 8.1 From your OASYS ePortal Dashboard click the Profile tab.
8.2 You will arrive at your User Profile. 8.3 Here, you will see several sections.
My Credentials The My Credentials (a) section allows you to change your password by clicking Change Password.
My Picture The My Picture (b) section allows you to upload a profile image by click Upload Profile Image.
My Contact Information The My Contact Information (c) section allows you to change select pieces of your contact information. You can click Update Nickname to update your nickname. You can also click Add/Update next to Certification(s) to modify any certifications that you hold.
My Application Access The My Application Access (d) section allows you to view the level of access that you have for PTO applications and/or office functionalities.
My Subscription Categories The My Subscription Categories (e) section allows you to manage the types of communications you receive from PTO. This is discussed in further detail in the User Guide OASYS ePortal Account and Messaging document.

18
User Guide OASYS ePortal Account and Messaging 2021
9. Manage Subscription Categories 9.1 From the Profile screen, you can also manage your subscription categories under My
Subscription Categories. 9.2 Select/unselect the checkboxes as appropriate and click Save.
9.3 This will control what messages you receive based on the recipients selected for each message sent from the internal message application.
19
User Guide OASYS ePortal Account and Messaging 2021
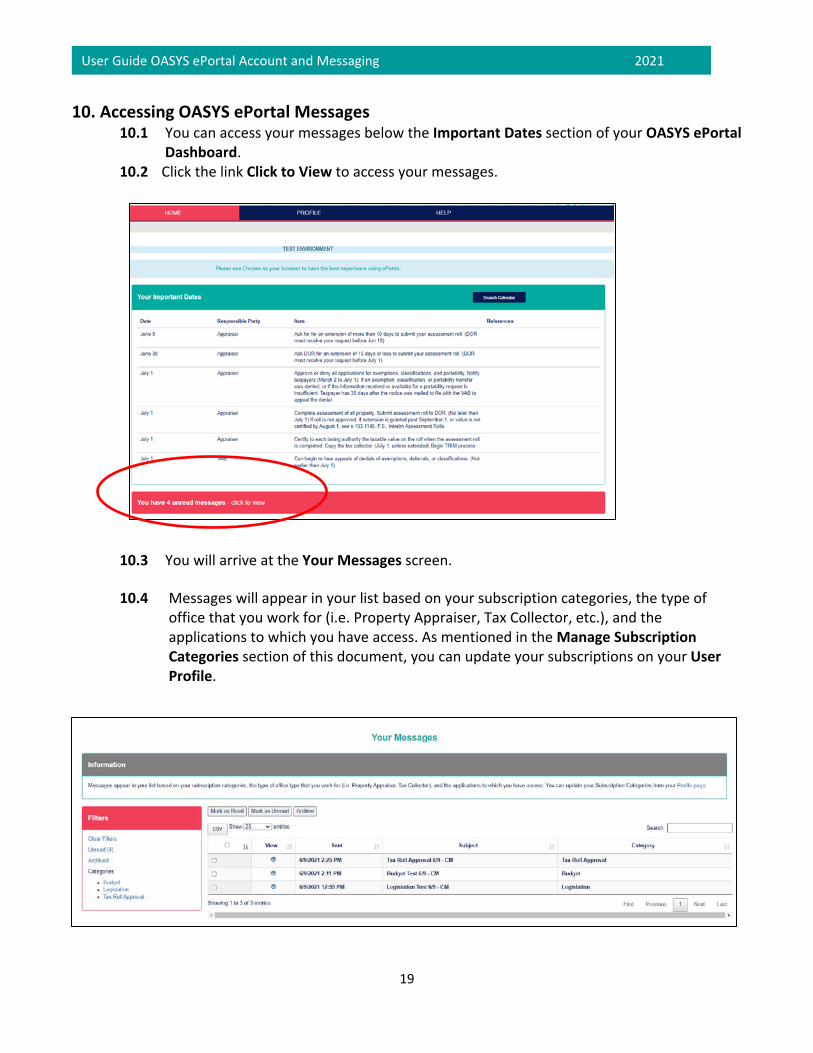
10. Accessing OASYS ePortal Messages 10.1 You can access your messages below the Important Dates section of your OASYS ePortal
Dashboard. 10.2 Click the link Click to View to access your messages.
10.3 You will arrive at the Your Messages screen.
10.4 Messages will appear in your list based on your subscription categories, the type of
office that you work for (i.e. Property Appraiser, Tax Collector, etc.), and the applications to which you have access. As mentioned in the Manage Subscription Categories section of this document, you can update your subscriptions on your User Profile.

20
User Guide OASYS ePortal Account and Messaging 2021
10.5 On the Your Messages screen, you will notice your inbox in a data table with the below listed columns. Note that you can export your inbox to CSV and can sort on all columns.
Select The Select (a) column allows you to select an individual message.
View
Click the icon in the View (b) column to pull the message up in a pop‐up window. Sent The Sent (c) column shows the date and time that the message was sent. Messages are automatically sorted newest to oldest. Subject The Subject (d) column lists the subject line or title of the message. Category The Category (e) column shows the category with which the message was tagged.

21
User Guide OASYS ePortal Account and Messaging 2021
10.6 Notice the three buttons above the inbox.
Mark as Read After selecting one or multiple messages, click Mark as Read (a) to indicate that you have read the message. Messages that are marked as read will appear without bolded text. Mark as Unread After selecting one or multiple messages, click Mark as Unread (b) to indicate that the message is unread. Messages that are marked as unread will appear in bolded text. Archive After selecting one or multiple messages, click Archive (c) to archive the message. This will send the message(s) to your Archived Inbox. Messages that are archived will appear in italics.
10.7 You may also search the message table contents by inputting any word, phrase, or number into the Search box above the inbox data table.
10.8 By clicking the icon in the View column next to a message, you will arrive at the View Message pop‐up window.

22
User Guide OASYS ePortal Account and Messaging 2021
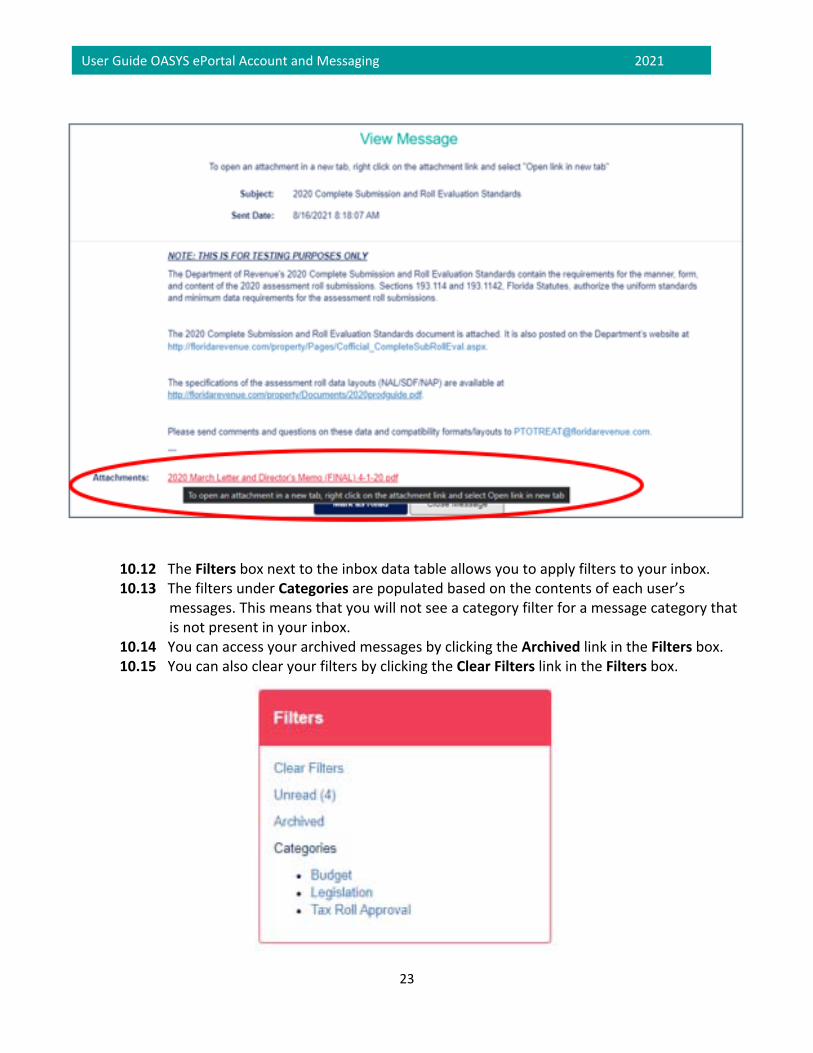
10.9 After reading the message, you can click one of two buttons. Mark as Read Click Mark as Read (a) if you wish to indicate that the message has been read upon closing the message window. This option will not be available if you are reading a message that is already marked as read. Close Message Click Close Message (b) if you wish to close the message without indicating that the message has been read. This is the only option available for messages that have already been marked as read.
10.10 Messages that contain an attachment will have the Paperclip icon next to the Subject of the message like the message below.
10.11 When viewing a message with an attachment, right click on the attachment link to open
the attachment documents in a new window tab as shown on the next page.
23
User Guide OASYS ePortal Account and Messaging 2021
10.12 The Filters box next to the inbox data table allows you to apply filters to your inbox. 10.13 The filters under Categories are populated based on the contents of each user’s
messages. This means that you will not see a category filter for a message category that is not present in your inbox.
10.14 You can access your archived messages by clicking the Archived link in the Filters box. 10.15 You can also clear your filters by clicking the Clear Filters link in the Filters box.

24
User Guide OASYS ePortal Account and Messaging 2021
10.16 It is important to note that OASYS ePortal communications are one‐way. This means that PTO can send messages to county users through the OASYS ePortal, but county users cannot reply to these messages through the OASYS ePortal.
11. Reporting Technical Problems 11.1 From your OASYS ePortal Dashboard click the Help tab.
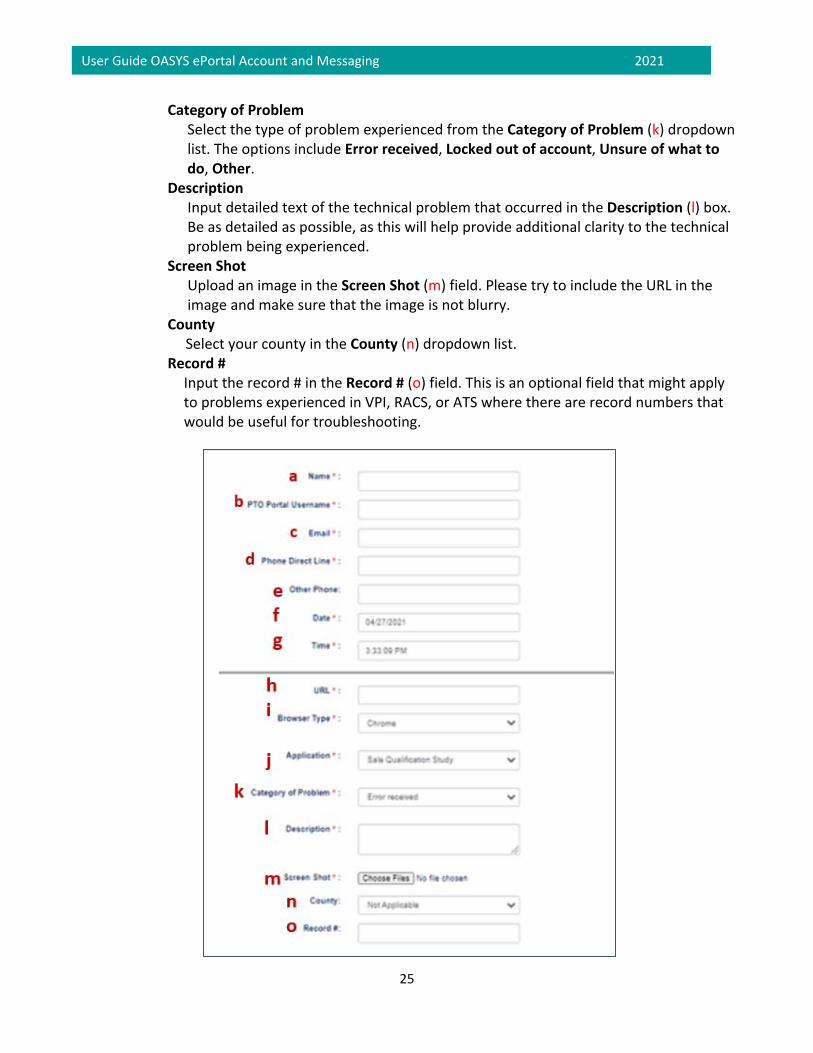
11.2 You will arrive at the Report Technical Problems screen. 11.3 Here, you will see many fields.
Name Input the first and last name of the person experiencing the technical problem in the Name (a) field. PTO Portal Username Input the portal username of the person experiencing the technical problem in the PTO Portal Username (b) field. Email Input the email address of the person experiencing the technical problem in the Email (c) field. Phone Direct Line Input the direct phone line of the person experiencing the technical problem in the Phone Direct Line (d) field. Other Phone Input an additional phone number for the person experiencing the technical problem in the Other Phone (e) field if applicable. Date The Date (f) field should be automatically populated with the current date. Time The Time (g) field should be automatically time stamped. URL Input the URL where the technical problem is occurring in the URL (h) field.
Browser Type Select the browser that you are using from the Browser Type (i) dropdown list. Options include Chrome, Edge (79 or above), Firefox, Safari, Edge (78 or below), Internet Explorer, Other.
Application Select the application where the technical problem was experienced from the Application (j) dropdown list. The options will include the currently available applications.
25
User Guide OASYS ePortal Account and Messaging 2021
Category of Problem Select the type of problem experienced from the Category of Problem (k) dropdown list. The options include Error received, Locked out of account, Unsure of what to do, Other.
Description Input detailed text of the technical problem that occurred in the Description (l) box. Be as detailed as possible, as this will help provide additional clarity to the technical problem being experienced.
Screen Shot Upload an image in the Screen Shot (m) field. Please try to include the URL in the image and make sure that the image is not blurry.
County Select your county in the County (n) dropdown list. Record # Input the record # in the Record # (o) field. This is an optional field that might apply to problems experienced in VPI, RACS, or ATS where there are record numbers that would be useful for troubleshooting.

26
User Guide OASYS ePortal Account and Messaging 2021
11.4 Above these fields, you will notice two buttons. Self By clicking the Self (a) button, you will automatically populate the Name, PTO Portal Username, Email, Phone Direct Line, and County fields mentioned above with your information.
Someone Else By clicking the Someone Else (b) button, you will have to manually enter or select, at minimum, all required fields.
11.5 After entering the necessary information, click Submit.

27
User Guide OASYS ePortal Account and Messaging 2021
11.6 The user associated with the technical problem will receive a confirmation email like the one below detailing the technical problem.
Related Documents


