Welcome message from author
This document is posted to help you gain knowledge. Please leave a comment to let me know what you think about it! Share it to your friends and learn new things together.
Transcript


For United States UsersThis equipment has been tested and found to comply with the limits for a class B digitaldevice, pursuant to Part 15 of the FCC Rules. These limits are designed to providereasonable protection against harmful interference in a residential installation. Thisequipment generates, uses, and can radiate radio frequency energy and; if not installed andused in accordance with the instructions, may cause harmful interference to radio ortelevision reception. However, there is no guarantee that interference will not occur in aparticular installation. If this equipment does cause interference to radio and televisionreception, which can be determined by turning the equipment off and on, the user isencouraged to try to correct the interference by one or more of the following measures:
• Reorient or relocate the receiving antenna
• Increase the separation between the equipment and receiver
• Connect the equipment into an outlet on a circuit different from that to which thereceiver is connected
• Consult the dealer or an experienced radio/TV technician for help.
WARNINGThe connection of a non-shielded equipment interface cable to this equipment willinvalidate the FCC Certification of this device and may cause interference levels whichexceed the limits established by the FCC for this equipment. It is the responsibility of theuser to obtain and use a shielded equipment interface cable with this device. If thisequipment has more than one interface connector, do not leave the cables connected tounused interfaces.Changes or modifications not expressly approved by the manufacturer could void the user’sauthority to operate the equipment.
For Canadian UsersThis digital apparatus does not exceed the Class B limits for radio noise emissions fromdigital apparatus as set out in the radio interference regulations of the Canadian Departmentof Communications.
Le present appareil numélique n’émet pas de bruits radioélectriques dépassant les limitesapplicables aux appareils numériques de Classe B prescrites dans le réglement sur lebrouillage radioélectrique édicté parle Ministére des Communications du Canada.


All rights reserved. No part of this publication may be reproduced, stored in aretrieval system, or transmitted in any form or by any means, mechanical,photocopying, recording, or otherwise, without the prior written permission ofSeiko Epson Corporation. No patent liability is assumed with respect to the use ofthe information contained herein. Neither is any liability assumed for damagesresulting from the use of the information contained herein.
Neither Seiko Epson Corporation nor its affiliates shall not be liable to thepurchaser of this product or third parties for damages, losses, costs, or expensesincurred by purchaser or third parties as a result of: accident, misuse, or abuse ofthis product or unauthorized modifications, repairs, or alterations to this product,or (excluding the U.S.) failure to strictly comply with Seiko Epson Corporation’soperation and maintenance instructions
Seiko Epson Corporation shall not be liable against any damages or problemsarising from the use of any options or any consumable products other than thosedesignated as Original Epson Products or Epson Approved Products by SeikoEpson Corporation
Epson and Epson ESC/P are registered trademarks of Seiko Epson Corporation.
IBM and IBM PC are trademarks of International Business Machines Corporation.
HP LaserJet, HP LaserJet+, HP LaserJet 500, HP LaserJet series II, HP LaserJet IIP,HP LaserJet series III, HP LaserJet IIIP and HP LaserJet IIISi are trademarks, andHewlett-Packard and PCL are registered trademarks of Hewlett-PackardCompany.
LocalTalk is a trademark of Apple Computer, Inc.
Centronics is a registered trademark of Centronics Data Computer Corporation.
PostScript is a trademark of Adobe Systems Incorporated.
ITC Zapf Dingbats is a U.S. registered trademark of International TypefaceCorporation.
Bitstream is a registered trademark of Bitstream Inc.
Speedo, Fontware and FaceLift are trademarks of Bitstream Inc.
CG Times is a product of AGFA Compugraphic, a Division of Agfa Corporation
Univers is a U.S. registered trademark of Linotype AG and its subsidiaries.
Copyright© 1991 by Seiko Epson CorporationNagano, Japan
ii

IMPORTANT SAFETY INSTRUCTIONS•
•
•
•
•
•
•
•
•
•
Read all of these instructions before you set up your printer.
Follow all warnings and instructions marked on the printer.
Unplug the printer from the wall outlet before you clean it,and use a damp cloth for cleaning, not liquid or aerosolcleaners.
Do not use your printer near water or spill any liquid on it.
Do not place the printer on an unstable cart, stand, table orother surface that may allow the printer to fall.
Do not block any slots or openings in the cabinet. These areprovided for the ventilation necessary to ensure reliableoperation and protection from overheating. Placing the printeron a bed, sofa, rug, or other similar surface may block theopenings. Also, do not place the printer in a built-ininstallation unless proper ventilation is provided.
Never place the printer near or over a radiator or heat register.
Use the type of power source indicated on the label. If you arenot sure of the type of power available, consult your dealer orlocal power company,
This printer may be equipped with a plug having a third(grounding) pin, which fits only into a grounding-type outlet.This is a safety feature. If you are unable to insert the pluginto the outlet, have an electrician replace your obsolete outlet.Do not defeat the purpose of the grounding-type plug.
Do not put the printer where the cord will be walked on.
iii

l If you use an extension cord, make sure that the total of theampere ratings on the products plugged into the extension corddoes not exceed the extension cord’s ampere rating. Also, makesure that the total of all products plugged into the wall outletdoes not exceed 15 amperes.
• Never push objects of any kind into your printer because theymay touch dangerous voltage points or short out parts thatcould result in a risk of fire or electric shock.
l Except as specifically explained in this user’s guide, do notattempt to repair the printer yourself. This could expose you todangerous voltage points or other risks. Refer all servicing inthose compartments to service personnel.
• Unplug the printer from the wall outlet and have it repaired bya qualified service person under the following conditions:
When the power cord or plug is damaged or frayed.
If liquid has been spilled into it.
If it has been exposed to rain or water.
If it does not operate normally when the operatinginstructions are followed. Adjust only those controls thatare covered by the operating instructions since improperadjustment of other controls may result in damage and willoften require extensive work by a qualified technician torestore the printer to normal operation.
If it has been dropped or the cabinet has been damaged.
If it exhibits a distinct change in performance, indicating aneed for service.
iv

Safety Information
Laser Safety
This printer is certified as a Class 1 laser product under the U.S.Department of Health and Human Services (DHHS) RadiationPerformance Standard according to the Radiation Control forHealth and Safety Act of 1968. This means that the printer doesnot produce hazardous laser radiation.
Since radiation emitted by the laser is completely confined withinprotective housings and external covers, the laser beam cannotescape from the machine during any phase of user operation.
CDRH Regulations
The Center for Devices and Radiological Health (CDRH) of theU.S. Food and Drug Administration implemented regulations forlaser products on August 2, 1976. Compliance is mandatory forproducts marketed in the United States. The label shown belowindicates compliance with the CDRH regulations and must beattached to laser products marketed in the United States.
0955-7321-01This laser product conforms to the applicablerequirement of 21 CFR Chapter 1. subchapter J.
SEIKO EPSON CORP.Hirooka,Office80 Hirooka. Shiojiri-shi, Nagano-ken,JAPAN
MANUFACTURED:
WARNING: Use of controls, adjustments or performanceof procedures other than those specified in this guidemay result in hazardous radiation exposure.
V

Your printer is a Class 1 laser product as defined in IEC 825specifications. The label shown below is attached in countrieswhere required.
Internal Laser Radiation
Max. Radiation Power _................ 5.7x10 -4 (W)Wave Length ....................................... 780 nm
This is a Class IIIb Laser Diode Assay that has an invisiblelaser beam. The print head unit is NOT A FIELD SERVICE ITEM.Therefore, the print head unit should not be opened under anycircumstance.
Ozone Emission
During printer operation, a small amount of ozone is released.This amount is not large enough to affect human beingsadversely.
However, it is best to make sure the room where you a usingthe printer has adequate circulation, especially when you areprinting a high volume of materials or using the printercontinuously over a long period of time.
vi

Contents
Introduction
Chapter 1 Setting UpFinding a Place for the Printer.. ............................................ 1-2Unpacking ................................................................................ 1-5Assembling .............................................................................. 1-8Turning On the Printer .......................................................... 1-21
Chapter 2 Testing and Connecting Your PrinterThe Control Panel ........................................................... 2-2Testing the Printer ..................................................................... 2-6Enhancing Print Quality ............................................................. 2-11Connecting the Printer to Your Computer ............................ 2-16Selecting the Printer Mode . . . . . . . . . . . . . . . . . . . . . . . . . . . . . . . . . . . . . . . . . 2-23Sharing the Printer . . . . . . . . . . . . . . . . . . . . . . . . . . . . . . . . . . . . . . . . . . . 2-25Switching the Printer Mode ........................................... 2-26
Chapter 3 SelecTypeSelecType Overview ... . . . . . . . . . . . . . . . . . . . . . . . . . . . . . . . . . . . . . . . . . . . . . . . . . 3-2Using SelecType.. .................................................................... 3-6Level 1 Options.. ..................................................................... 3-13Level 2 Options.. ..................................................................... 3-22
Chapter 4 Paper HandlingChoosing Paper ....................................................................... 4-2Choosing a Paper Size.. .......................................................... 4-5Paper Feeding and Paper Delivery ....................................... 4-6Loading Paper Manually.. ...................................................... 4-8Using the Optional Lower Paper Cassette.. ......................... 4-11Using the Optional Output Tray.. ........................................ 4-15
Contents vii

Chapter 5 Maintenance and Transportation
Replacing Consumable Parts ................................................. 5-2Cleaning the Printer ............................................................... 5-14Transporting Your Printer ..................................................... 5-22
Chapter 6 TroubleshootingStatus and Error Messages.. ................................................... 6-2Troubleshooting Directory.. ................................................... 6-9Paper Jam Problems ................................................................ 6-11Power Supply .......................................................................... 6-21Test Prints ................................................................................ 6-22Printing Problems ................................................................... 6-23Problems with Graphics.. ....................................................... 6-27SelecType Problems ................................................................ 6-29Paper Handling ....................................................................... 6-31Decline in Print Quality ........................................................ 6-34Options .................................................................................... 6-38Data Dump Mode.. ................................................................. 6-41
Chapter 7 OptionsIdentity Cards.. ........................................................................ 7-2Font Cartridges.. ...................................................................... 7-6The Lower Paper Cassette Unit ............................................ 7-13The Face-Up Output Tray.. ................................................... 7-16Optional Interface Cards.. ...................................................... 7-18Memory Options .................................................................... 7-22
Viii Contents

Appendix A Technical Specifications
Printer Specifications ............................................................. A-2Interface Specifications.. ........................................................ A-8Initialization.. .......................................................................... A-15Option Specifications ............................................................ A-16Shared Printer Language ....................................................... A-18
Appendix B HP Emulation ModeIntroduction ............................................................................ B-2SelecType Options ................................................................. B-9Available Fonts and Symbol Sets ........................................ B-12Default Settings ..................................................................... B-30HP Emulation Command Summary .................................... B-32
Appendix C LQ and FX Emulation ModeIntroduction ............................................................................ C-2SelecType Options ................................................................. C-4Available Fonts and Symbol Sets ........................................ C-12Default Settings ..................................................................... C-15LQ and FX Emulation Command Summary ...................... C-16
Glossary GL-1
Index- - IN-1
Contents ix

Introduction
The EPL-8000 is the latest in Epson’s advanced line of laserprinters, combining high performance and reliability with a widerange of features. The printer combines a semiconductor laser withthe electrophotographic technology used in office copiers to giveyou high-quality printing that is both fast and quiet.
The imaging system used by the printer is driven by a powerfulprocessor that allows the printer to compose an entire page ininternal memory before printing. The printer can manipulate thepage it holds in memory to provide you with many features notfound on other types of printers, including the ability to mix textand graphics, create pre-defined forms, and print with a range offonts normally associated with typeset material.
Features
In addition to the high-quality printing and ease of operation youexpect from an Epson printer, these features make using your newprinter even easier:
High-quality, 300 dots-per-inch (dpi) printing at a speed of upto ten pages per minute. You’ll appreciate the crisp,professional print quality produced by the EPL-8000 and itsleading edge processing speed.
HP LaserJet III emulation for easy access to the great varietyof application software written for Hewlett-Packard@ LaserJetprinters.
Resident outline fonts to enable you to print character fonts ina wide range of sizes. (These fonts provide the same characterwidths used in Adobe PostScript™.)
Epson’s new Resolution Improvement Technology (RITech) toenhance your graphical output and make jagged edges moresmooth.
A standard paper cassette that holds up to 250 sheets of paper.Add the optional lower paper cassette for continuous printingof up to 500 pages.
Introduction 1

introduction
Two Epson ESC/P® emulation modes for the compatibility withthe range of applications written for Epson 9-pin and 24-pinprinters.
1 megabyte (MB) of standard random access memory (RAM)built-in, expandable up to 7.5MB for graphics printing and forusing three interfaces at the same time when you add anoptional interface.
Two built-in interfaces: Centronics® parallel and RS-232C orRS-422 serial. You can also install an optional interface and useit as a third channel for data input.
Three independent interface channels (parallel, serial, andoptional). You can connect up to three computers to yourprinter and share it by using the autosense feature, whichautomatically switches the printer to the channel receiving data,or by dividing the RAM to produce a separate area for eachchannel.
An intelligent emulation switching feature allows the printer toswitch automatically between PostScript emulation and anothermode based on the data received. Also, a shared printerlanguage feature using printer commands.
Two paper delivery methods: standard face-down delivery andface-up delivery (with the optional face-up tray) for printingon media requiring a straight-through paper path and forimmediate viewing of printed output.
Manual feeding directly selectable from the control panel. It ispossible to feed and print on envelopes using the manual feedtray.
A large selection of international symbol sets to print with theletters, characters, and symbols of various languages.
Two IC card slots for adding optional identity and font cards,including a PostScript emulation card.
A combined photoconductive, developing, and toner unit in asingle disposable imaging cartridge for easy maintenance.
2 Introduction

Introduction
Options
Many printer options are available for your printer. For detailedinformation on the installation and use of these options, seeChapter 7. The last figure in option part numbers, represented byan asterisk (*), varies by country. Contact your local dealer for thepart number in your country.
The lower paper cassette unit (C81228*)
This optional lower paper cassette unit (model L) fits directlybeneath the printer and houses the adjustable paper cassette. Youcan load up to 250 sheets of A4, letter, legal, or executive-sizedpaper into this cassette, bringing your total capacity to 500 sheets.
Optional paper cassette (C81223*)
Optional paper cassettes are available for different sizes of paper.Contact your dealer for information on these cassettes.
Introduction 3

Introduction
The face-up output tray (C81227*)
The face-up output tray allows the printer to deliver paper face-upfor immediate viewing of your printed output. Use the face-upoutput tray for printing that requires a straight-through paperpath, such as labels and overhead transparencies.
IC cards
Two identity cards are available from your dealer. The identitycards allow your printer to use the Adobe PostScript pagedescription language or the Epson GL graphics language, givingyou additional printer operation modes.
4 Introduction

Introduction
Interface cardsOptional interface cards are available to supplement the printer’sbuilt-in parallel and serial interfaces. A complete list of availableinterfaces, guidelines for choosing the right interface and otherinstructions are given in Chapter 7.
Interface cableEpson supplies several types of interface cables. You can use anyinterface cable that meets the specifications listed below. See yourcomputer manual for any additional requirements.
Cable
C836021C836022
Interface
Parallel
Printer sideconnector
Amphenol 57
Computer sideconnector
D-SUB, 25 pin
Length
2m
C836031C836041
C836051C836061
Serial D-sub, 25 pin
Serial D-sub, 25 pin
D-SUB, 25 pin 2m
D-sub, 9 pin 2m
Introduction 5

Introduction
Memory chip set (C82904*, C82905*)
You can increase your printer’s current 1MB of RAM to a total of7.5MB by installing memory chip sets and a memory expansionboard. The C82904* chip set increases the printer memory byincrements of 0.5MB, and the C82905* chip set can increase it by2.0MB increments. You can install the 0.5MB chip sets on thecontroller board or the 0K expansion board (C82206*); you caninstall 2MB chip sets on the 0K expansion board only. See Chapter7 for more information.
Memory expansion boards (C82206*)
A OK optional memory expansion board is available to supplementyour printer’s memory. You can install up to four 0.5MB chip setsor up to three 2.0 MB chip sets on this memory expansion board.See Chapter 7 for information on configuring optional memory.
6 Introduction

Laser Printer Precautions
This printer uses laser technology. The following list of precautionsapplies whenever you open the printer cover. Even if you arefamiliar with other types of printers, be sure to follow theseprecautions carefully to ensure safe, efficient operation.
Be careful not to touch the fuser, which is marked by aCAUTION HOT SURFACE label. If you have been using theprinter, the fuser can be very hot.
Avoid touching the components inside the printer unlessinstructed to do so in this guide.
Protect the light-sensitive drum from exposure to light.Avoid exposing the imaging cartridge to room light any longerthan necessary. Do not open the drum’s protective cover.Overexposing the drum may cause abnormally dark or lightareas to appear on the printed page and reduce the service lifeof the drum.
If you must expose the drum either by taking the imagingcartridge out of the printer or by leaving the printer coveropen, cover the drum with a soft cloth or sheet of paper.
Be sure not to scratch the surface of the drum. When youremove the imaging cartridge from the printer, always set thecartridge on a clean, smooth surface. Also, avoid touching thedrum, since oils from your skin can permanently damage itssurface and may affect print quality.
Avoid pressing on the top of the toner cartridge. Pressingdirectly on the cartridge may cause toner to spill into theprinter. If there is a spill, see Chapter 5 for cleaninginstructions.
Never force the printer’s components into place. Although theprinter is designed to be sturdy, rough handling can damage it.
Laser Printer Precautions 7

Finding Your Way Around
Chapter 1 contains information on unpacking and setting up yourprinter. Be sure to read and follow these instructions first.
Chapter 2 contains information on using the control panel, testingand connecting the printer, and sharing the printer. It alsodescribes how to set the printer mode and use printer selectionmenus.
For detailed information on the SelecType options, see Chapter 3.
Chapter 4 contains the information on paper handling. Make sureyou read this chapter before purchasing your paper supply.
Chapter 5 gives you information on maintaining your printer.
If the printer does not operate properly or the printed results arenot what you expect, see Chapter 6 for troubleshooting tips.
Chapter 7 describes how to install the various options available foryour printer.
The appendixes contain information on technical specifications andprinter modes, including a list of available symbol sets andcharacter samples available for each printer mode. You will alsofind a glossary of printer terms and an index.
At the back of this guide is a Quick Reference card showing allSelecType options and submenus. The SelecType menu mapsfound on this card can be used as guides whenever you enter theSelecType mode.
On the back cover foldout are illustrations identifying the differentparts of your printer. You can look at these as you set it up.
8 Finding Your Way Around

Finding Your Way Around
Warnings, Cautions, and Notes
WARNINGS: must be followed carefully to avoid bodilyinjury.
CAUTIONS: must be observed to avoid damage to yourequipment.
Notes: contain important information and useful tips on theoperation of your printer.
Where to Get Help for United States Users
Epson America provides local customer support and servicethrough a nationwide network of authorized Epson dealers andService Centers.
Epson also provides the following support services through theEpson Consumer Resource Center at (800) 92243911:
Assistance in locating your nearest Authorized Epson Reselleror Service CenterTechnical assistance with the installation, configuration, andoperation of Epson productsEpson technical information library fax serviceProduct literature with technical specifications on our currentand new productsSales of ribbons, supplies, parts, documentation, and accessoriesfor your Epson productCustomer Relations.
Finding Your Way Around 9

Chapter 1Setting Up
Finding a Place for the Printer ................................................ 1-2
Unpacking ..................................................................................... 1-5
Assembling .............................................................................. 1-8Installing the cleaning pad.. ............................................... 1-8The imaging cartridge.. ....................................................... 1-12Attaching the power cord.. ................................................ 1-18Loading paper in the cassette.. .......................................... 1-19
Turning O n the Printer ............................................................. 1-21
Setting Up 1-1

Finding a Place for the Printer
Before unpacking the printer, find a suitable place to use it. Followthe guidelines below when selecting a location.
Place the printer on a flat, stable surface.
Place it close enough to the computer or workstation for itscable to reach.
Use a grounded outlet, one that has three holes to match thepower plug on the printer. Do not use an adapter plug.
Leave adequate room around the printer to allow easyoperation as well as maintenance and sufficient ventilation. Thediagram below shows the recommended amount of space.
1-2 Setting Up

Finding a Place for the Printer
l If you install the optional face-up tray, you need at least350 mm (14 inches) of space behind the printer.
l To give you enough room to open the printer cover, allow 530mm or 21 inches from the bottom of the printer to any shelf orsurface directly above it, as shown below.
Setting Up 1-3

Finding a Place for the Printer
If you install the optional lower paper cassette, you need anadditional 70 mm (3 inches) above the printer.
CAUTIONS:l Avoid locations that are subject to direct sunlight,
excessive heat, moisture, or dust.
l Avoid using an electrical outlet that is controlled bywall switches or automatic timers. Accidentaldisruption of power can wipe out valuableinformation in your computer’s and printer’s memory.
l Avoid using outlets on the same circuit with largemotors or other appliances that might disturb thepower supply.
l Keep the entire computer and printer system awayfrom potential sources of interference, such asloudspeakers or the base units of cordless telephones.
1-4 Setting Up

Unpacking
The printer and the imaging cartridge are packed in separate boxes.First, carefully unpack the main carton.
1. Remove the printer from the large carton and set it on a flat,stable surface. Since the printer is heavy, you may needsomeone to help you lift it.
2. Put the printer in the location you have selected for it.
Setting Up 1-5
Unpacking
Note: When moving your printer, carry it by grasping therecesses on each side.
The printer weighs about 18 kg (40 lb), so you may needsomeone to help you lift it.
1-6 Setting Up

Unpacking
3. Remove the plastic bag protecting the printer.
Note: Make sure that you save all packing materials. You mustrepack the printer in these materials whenever you ship it. SeeChapter 5 for details on transporting your printer.
4. Peel off the shipping tape as shown below.
Setting Up 1-7

Assembling
Now you must install a few important parts.
Power cord Imaging cartridge box
Installing the cleaning pad
The first component you install is the felt cleaning pad, which isin the imaging cartridge box. This pad constantly cleans the surfaceof the fusing roller, which fixes toner onto the paper.
1-8 Setting Up

Assembling
1. Open the imaging cartridge box and take out the cleaning pad.Leave everything else inside the box for now.
2. Open the front cover by pressing down the latch on the frontcover.
Setting Up 1-9
Assembling
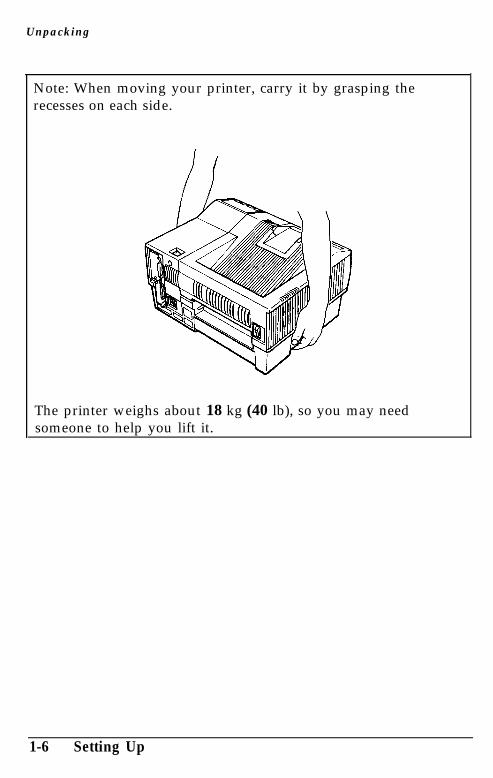
3. Press the blue release button inside the printer to openthe printer’s top cover. You can open the top cover to twopositions, a lower and an upper position. Open the top cover tothe upper position.
CAUTION: The paper support on the top cover is not ahandle. Do not use it to open the cover or to lift theprinter.
1-10 Setting Up

Assembling
4. Grasp the small yellow handle on the cleaning pad and insertthe pad in the open slot on top of the fuser. The fuser islocated toward the back of the printer on the inside. Make sureyou install the pad in the correct position. Match the mark onthe cleaning pad with the triangle on the fuser, as shownbelow.
WARNING: Never touch the fuser. When the printer isturned on, the fuser becomes very hot.
Setting Up 1-11

Assembling
The imaging cartridge
The imaging cartridge is the part of the printer mechanism thatforms the image and transfers it onto the paper.
CAUTION: Do not expose the drum to light any longerthan necessary. Because the drum is light-sensitive, neverexpose it to lighting brighter than normal room light.
Handling the imaging cartridge
Keep the following cautions in mind whenever you handle theimaging cartridge:
l Do not turn the cartridge upside down.
1-12 Setting Up

Assembling
l Do not open the drum’s protective cover, and do not scratch ormar the surface of the drum. Also avoid touching the drum,since oils from your skin can permanently mar its surface andreduce print quality.
l Do not expose the cartridge to direct sunlight. If you mustleave it outside the printer, first cover it with the aluminumpacking bag provided or a soft cloth.
• When handling the imaging cartridge, always set it on a clean,smooth surface.
l Do not attempt to modify or take apart the cartridge. It cannotbe refilled.
l Do not use a cartridge for at least one hour after moving itfrom a cool to a warm environment.
Setting Up 1-13

Assembling
Storing the imaging cartridge
To get the best print quality from your imaging cartridge, do notstore the cartridge in the following locations:
l In direct sunlight
l In dusty places
• Where salty air or corrosive gasses (such as ammonia) arepresent
• Where the temperature or humidity is high or subject to abruptchanges.
Installing the imaging cartridge
Here’s how to install the imaging cartridge:
1. Remove the imaging cartridge from its aluminum packing bag.
CAUTION: Do not open the drum’s protective cover; itprotects the drum from light and contact.
1-14 Setting Up

Assembling
2. Hold the imaging cartridge upright, as shown below, and shakethe cartridge from side to side a few times to distribute thetoner.
3. Hold the imaging cartridge steady and pull firmly on theyellow tab. Remove the clear seal completely.
Setting Up 1-15

Assembling
4. After you remove the seal, gently shake the imaging cartridgeagain four or five times.
5. Make sure the printer’s front cover is open and the top cover isopen to the lower position, as shown below.
1-16 Setting Up

Assembling
6. Hold the imaging cartridge as shown below and carefully placethe plastic runners on either side of the cartridge into the greengrooves inside the printer. Then slide the cartridge forward asfar as it will go.
7. Gently press down on the printer’s top cover until it clicks intothe closed position. Then close the front cover.
CAUTION: Never transport the printer with the imagingcartridge installed. See Chapter 5 for details on movingthe printer.
Setting Up 1-17

Assembling
Attaching the power cord
1. Before you attach the power cord, make sure the power switchon the top of the printer is turned off. It is off when the O onthe switch is pressed down, as shown below.
WARNING: If the rated voltage of the printer and youroutlet voltage do not match, contact your dealer forassistance. Do not plug in the power cable.
2. Insert the power cord into the socket at the back of the printer,as shown below. Then plug the other end of the power cordinto a properly grounded outlet.
1-18 Setting Up

Assembling
Loading paper in the cassette
The standard paper cassette holds up to 250 sheets of paper forautomatic feeding. See Chapter 4 if you need more information onpaper handling. To load paper into the cassette, follow these steps:
1. Remove the paper cassette by pulling it straight out.
2. Take a stack of paper and fan it thoroughly. Tap the edges ofthe paper on a flat surface to even up the stack.
Setting Up 1-19

Assembling
3. Insert a stack of paper into the cassette with the corners of thepaper beneath the two tabs at the front.
4. Insert the paper cassette into the front of the printer and pushit firmly into place.
Now you’re ready to turn on the printer.
1-20 Setting Up

Turning on the Printer
Make sure the printer is plugged in and the imaging cartridge isinstalled. Then turn on the power by pressing the vertical bar ( I )on the power switch located at the top of the printer.
Setting Up 1-21

Turning On the Printer
The indicator lights on the control panel light briefly when youturn on the printer. The following messages appear as the printerperforms a series of internal tests and warms up:
CAUTION:• Do not open the printer’s covers while the printer is
warming up or printing.l After you turn off the printer, always wait at least five
seconds before turning it back on.
It takes approximately 70 seconds for the printer to complete itspower-on routine. When the READY message appears, you canuse the printer. If the display remains blank, see Chapter 6 fortroubleshooting information.
Chapter 2 tells you how to test your printer, connect it to acomputer or computers, and begin using it with software.
1-22 Setting Up

Chapter 2Testing and Connecting Your Printer
The Control Panel ................................................................... 2-2
Display ................................................................................. 2-2Indicator lights .................................................................... 2-3Buttons ................................................................................. 2-4
Testing the Printer .................................................................. 2-6Running a test print ........................................................... 2-6Printing a status sheet ........................................................ 2-8Printing a font sample ........................................................ 2-10
Enhancing Print Quality ........................................................ 2-11Adjusting the print density ............................................... 2-11Resolution Improvement Technology ............................... 2-13
Connecting the Printer to Your Computer .......................... 2-16Choosing an interface ......................................................... 2-16Connecting the parallel interface ...................................... 2-17
Connecting the serial interface.. ........................................ 2-19Testing the computer-to-printer connection ................... 2-22
Selecting the Printer Mode.. .................................................. 2-23Using printer selection menus ........................................... 2-23
Sharing the Printer ,................................................................ 2-25
Switching the Printer Mode .................................................. 2-26Intelligent Emulation Switch (IES). ................................... 2-26Shared Printer Language .................................................... 2-26
Testing and Connecting Your Printer 2-1

The Control Panel
The printer control panel gives you easy control over mostcommon printer operations. The panel is made up of threeelements: a liquid crystal display, indicator lights, and buttons. Thedisplay and indicator lights tell you the current status of theprinter, and you use the buttons to select printer settings andfunctions.
Display
The display shows the followings:
l Status messages, such as WARMING UP, indicate the printer’scurrent status.
l Error messages, such as PAPER OUT, identify maintenanceprocedures you must perform or of error conditions you needto correct.
l SelecType options, such as MODE ASSIGN, allow you tocontrol the printer mode, font selection, paper handling, andmany other printer functions.
For a complete list of status and error messages, see Chapter 6.For information on SelecType, see Chapter 3.
2-2 Testing and Connecting Your Printer

The Control Panel
Indicator lights
LEVEL 1, LEVEL 2 One of these lights is on when the printer is inthe SelecType mode, depending on which levelyou enter. These lights are off if the printer is notin the SelecType mode. See Chapter 3 for moreinformation on SelecType.
CONTINUE
FEED
MANUAL
ON LINE
Flashes when an error is detected or a maintenanceprocedure must be performed. At the same time,an error or maintenance message appears on thedisplay.On when data is received and stored in theprinter’s buffer but not yet printed. Rapid flashingindicates the printer is receiving data from thecomputer. If the light flashes slowly, the printer isreceiving data through an interface other than thedefault interface in AUTOSENSE mode.On when the printer is set to feed paper manuallyonly. When this light is off, the printer feeds thepaper from the cassette.On when the printer is on line, indicating theprinter can receive and print data. When theprinter is off line, this light is off. The lightflashes as the system switches between on-lineand off-line status.
Testing and Connecting Your Printer 2-3

The Control Panel
Buttons
SelecType Enters SelecType mode. Press once to enter Level1; hold down to enter Level 2. For a completedescription of SelecType, see Chapter 3.
CONTINUERESETCOPY END
CONTINUE
This button has three functions:
Enables the printer to resume printingautomatically after certain error or maintenance-required conditions. If the CONTINUE light isflashing, read the corresponding status or errormessage on the display and correct the problem asdescribed in Chapter 6, which has a complete listof status and error messages.
2-4 Testing and Connecting Your Printer

The Control Panel
RESET Cancels some settings made with SelecType orsoftware commands. When you hold down thisbutton for several seconds, RESET appears on thedisplay and all settings return to their previously-saved values. The printer finishes printing thepage in progress at the moment this button ispressed, but it erases all remaining data. If youpress or , the printer returns to itsprevious status without printing data. If youcontinue to hold down this button after RESETappears, INITIALIZE appears on the display andthe printer settings return to the settings in effectat power on. See Chapter 3, SelecType.
COPY END Cancels the remaining copies during multi-copyprinting. This button is effective only when theprinter is off line.
FEEDMANUAL If the FEED light is lit, press ON LINE to take the
printer off line. Then press FEED to print out datain the printer’s memory. If you are using morethan one channel, you can print data received byeach channel.
ON LINE
To select manual paper feeding. Press this buttonwhen the FEED light is off or flashing slowly andthe printer is on line.
Switches the printer between-on line and off-linestatus. This switch is disabled when the printer isin SelecType mode.
Testing and Connecting Your Printer 2-5

Testing the Printer
The printer has four built-in print tests: two test prints, a statussheet, and a font sample. These tests let you check the operationof your printer and obtain information on printer settings.
Before running a test, make sure you have removed all packingmaterials from the printer and installed all printer parts, asdescribed in Chapter 1. You do not need to connect the printer toa computer to run these tests.
Running a test print
The test print option allows you to print two patterns: pattern 1consists of vertical lines and pattern 2 consists of horizontal lines.Follow these steps to run the test print.
1. Turn on the printer as described in Chapter 1.
2. Hold down the SelecType button until the LEVEL 2 indicatorlight comes on.
3. Next, TEST PRINT should appear on the display. If it does not,press or until it does.
If you cannot find the TEST PRINT option, you probably didnot hold down the button long enough to enter Level 2. If theLEVEL 1 indicator is on, press the SelecType button once toexit SelecType and repeat step 2.
2-6 Testing and Connecting Your Printer

Testing the Printer
4. Press once. The display reads as follows:
5. To run the test, press once more. The printer prints a testpattern of vertical lines and outputs the page face-down in thetop exit tray.
CAUTION: Never open the printer’s covers duringprinting.
Part of a typical pattern 1 test print is shown below:
Testing and Connecting Your Printer 2-7

Testing the Printer
After printing the page, the printer displays TEST PRINT. To printthe second test print pattern, follow these steps:
1. Press once.
2. Change the test pattern number by pressing or once.
3. Press to print second pattern.
After you print the test pattern, press the SelecType button twiceto exit SelecType.
If the test does not print properly, see Chapter 6 fortroubleshooting information.
Printing a status sheet
In addition to the test print patterns, you can print a status sheetthat lists the current printer settings.
Note: The status sheet lists the printer’s current settings. If youchange the macro number setting for the LOAD MACRO optionin the SYSTEM CONFIG submenu, the status sheet prints outthe new macro settings. MACRO 0 is the factory default setting.
2-8 Testing and Connecting Your Printer

Testing the Printer
Follow these steps to print the status sheet:
1. Press SelecType once to enter SelecType Level 1.
Note: If you have already chosen the INDIVIDUAL mode inSelecType and have set up more than one channel, the followingoption appears on the display (The display shows availablechannels only):
Press any arrow button to choose your channel; then go on tostep 2.
2. Press until STATUS SHEET appears on the display.
3. Press twice to print the status sheet.
4. Press the SelecType button twice to exit SelecType.
A portion of the status sheet printout is shown below.
Printer ConfigurationSTATUS SHEET E P S O N
Installed Memory : 4.5Mbytes Controller Version : 21.04Memory Share : AUTOSENSE CH Time out : 60Auto Continue : OFF Total Printed Count: 552216standby : DISABLE :ON
Form Length : 64 Symbol set : Roman-8
System ConfigurationTop Offset : 0Full Print : 0Load Macro : 0
Left Offset : 0Memory Left : 4110KbytesPower On Macro : 0
Testing and Connecting Your Printer 2-9

Testing the Printer
Printing a font sample
In addition to the test print patterns and the status sheet, you canprint a font sample that shows samples of the various fontsavailable in the selected printer mode.
1. Press SelecType once to enter SelecType Level 1.
Note: If you have already chosen the INDIVIDUAL mode inSelecType, and have set up more than one channel, thefollowing option appears on the display (the display showsavailable channels only):
Press any arrow button to choose your channel; then go on tostep 2.
2. Press until FONT SAMPLE appears on the display.
Press twice to print the font sample. The printer takesseveral seconds to compose the font sample before it startsprinting. A portion of the printout is shown below.
4. Press SelecType twice to exit SelecType.
2-10 Testing and Connecting Your Printer

Enhancing Print Quality
When your print quality is not satisfactory, be sure that you areusing smooth, high-quality paper. For information on choosingpaper, see Chapter 4.
If you still want to improve print quality, try adjusting the printdensity or changing the Resolution Improvement Technologysetting.
Adjusting the print density
If your test print is too light or too dark, use the print densitycontrol knob to change it.
1.
2.
3.
4.
5.
Turn off the printer and unplug its cord from the wall outlet.
Remove any paper in the paper output tray.
Open the front cover by pressing down on its latch. Then pressthe blue release button inside the printer and open the topcover to its lower position.
Remove the imaging cartridge.
Locate the green density control knob inside the printer on theright side, as shown below.
Testing and Connecting Your Printer 2-11

Enhancing Print Quality
6. Turn the knob clockwise for darker print, or counterclockwisefor lighter print as shown.
Notes:l Increasing the print density increases toner consumption. If
you select darker print, you may need to replace the imagingcartridge more often.
l If you want to return the print density to the factory setting(center position), align the vertical line on the center of theknob with the dot printed on the printer case.
7. Reinsert the imaging cartridge and close the printer’s covers.
8. Run the test print to check the new print density. See“Running a test print,” earlier in this chapter.
2-12 Testing and Connecting Your Printer

Enhancing Print Quality
Resolution Improvement Technology
Resolution Improvement Technology (RITech) is Epson’s newprinter technology that produces smoother and crisper lines, text,and graphics.
The illustration below shows an enlarged sample of a curve printedwith conventional laser technology and the same curve printedwith RITech.
The RITech setting
The factory setting for RITech gives the best quality text andgraphics for nearly all purposes. It does not require you to set oradjust anything. Occasionally, however, adjusting the RITechsetting with SelecType may further improve the print quality.
For example, you may want to change the setting after you replacean imaging cartridge or if you notice that your printing is not assmooth and crisp as it should be.
To guide you in choosing the optimum RITech setting, theSelecType RITech option prints a check pattern.
Testing and Connecting Your Printer 2-13

Enhancing Print Quality
Checking the RITech setting
1.
2.
3.
4.
Enter SelecType Level 2 by pressing the SelecType button untilthe Level 2 light comes on.
Press or until RITech and the current RITechsetting appear on the display.
Press three times. The printer prints the check pattern.
Look at your check pattern to see if your current setting iscorrect. The check pattern is a rectangle with a pattern insideit, as shown below. When the RITech setting is best, youcannot see the pattern inside the rectangle.
Incorrect Correct
Note: RITech may not improve graphics that include grayshading or a screen pattern. If you are printing such graphics,you may want to turn RITech off.
2-14 Testing and Connecting Your Printer

Enhancing Print Quality
Changing the RITech setting
To change the RITech setting, use SelecType Level 2. You canselect LIGHT, MEDIUM (the factory setting), HEAVY, or OFF. (Ifnecessary, see Chapter 3 for full instructions on using SelecType.)
If your check pattern is too heavy, change the setting to LIGHT; ifit is too light, change the setting to HEAVY; if you are printinggray shading or screen patterns, change the setting to OFF.
To change your RITech setting, follow these steps:
1.
2.
3.
4.
5.
Enter SelecType Level 2 by pressing the SelecType button untilthe Level 2 light comes on.
Press or until RITech appears on the display.
Press once and then press or until yourdesired setting (LIGHT, MEDIUM, HEAVY, or OFF) appearson the display.
Press twice to set the new setting and print a new checkpattern using the new RITech setting.
Look at the new check pattern to see if it is improved. If youwish, save the new setting by pressing once to return tothe main menu, then pressing or until P CONFIGSAVE appears on the display, then pressing twice.
If the pattern still needs to be improved, you probably need tochange the print density setting. For a darker (HEAVY) RITechsetting, make the print density lighter and vice versa. See“Adjusting the print density” earlier in this chapter forinstructions.
Note: Do not change the print density unless it is necessary.Changing the print density affects all text and graphics, so checkthe new setting by printing several pages.
Testing and Connecting Your Printer 2-15

Connecting the Printer to Your Computer
For the printer to receive information from your computer, theymust be set up so they can communicate properly. This requiresthe correct interface cable and communication settings. Yourprinter comes with the following built-in interfaces:
l Centronics-compatible parallel
l RS-232C/RS-422 serial
The interfaces are located as shown below.
Parallel interface
Serial interface
Several optional interface cards are also available for use with theprinter. See Chapter 7 for details on using these options.
Choosing an interface
To connect the printer to your computer, first determine whetheryou require a parallel or serial connection. If your computerprovides both types of connection, use the parallel interface for theprinter and leave the serial port on your computer free for devicessuch as modems. If you are in doubt about which type ofconnection to use, consult your dealer.
2-16 Testing and Connecting Your Printer

Connecting the Printer to Your Computer
Your printer is initially set up for parallel communication.If you are using a parallel interface, you should be able to connectyour computer to the printer with a properly shielded twisted-paircable and not change any factory settings.
If you decide to use a serial interface, you may need to useSelecType to change some of the printer’s serial settings, such asbaud rate or parity, to match the computer’s settings. See Chapter3 for details on using SelecType to set up the printer’s serialinterface settings.
If you plan to use an optional interface, see Chapter 7 for details.
Connecting the parallel interface
If you want to use the printer’s standard parallel interface, makesure you have a shielded twisted-pair cable suitable for aCentronics-compatible interface.
Follow these steps to connect the parallel interface:
1. Turn off both your printer and computer. Then unplug theprinter’s power cord from the electrical outlet.
Testing and Connecting Your Printer 2-17

Connecting the Printer to Your Computer
2. Plug the parallel cable connector securely into the parallelinterface on the back of the printer.
3. Squeeze the wire clips together until they lock in place oneither side of the connector.
2-18 Testing and Connecting Your Printer

Connecting the Printer to Your Computer
4. If your cable has a grounding wire, connect it to the printer’sground connector as shown below.
5. Plug the other end of the parallel cable into your computer andfasten the connector screws to the interface, if necessary. Someparallel cables have grounding wires at the computer end aswell. If so, connect this wire to the ground screw on thecomputer.
Connecting the serial interface
If you want to use the printer’s standard serial interface, make surethat you have a properly shielded cable and that it is the correctone for your printer.
Testing and Connecting Your Printer 2-19

Connecting the Printer to Your Computer
Follow these steps to connect the serial interface:
1. Turn off both the printer and computer. Then unplug theprinter’s power cord from the electrical outlet.
2. Plug the serial cable connector securely into the serial interfaceon the back of the printer.
3. Use a screwdriver to fasten the screws of the connector, ifrequired.
2-20 Testing and Connecting Your Printer

Connecting the Printer to Your Computer
4. If your cable has a grounding wire, connect it to the printer’sground connector.
5. Plug the other end of the cable into your computer.Fasten the connector screws to the interface, if necessary.
This completes the connection of the serial interface cable. Younow need to set the printer for serial communication with theSelecType I/F CONFIG option. You may also need to change someinterface settings, such as baud rate and parity, before your printerand computer can communicate properly. See Chapter 3 forinstructions on using SelecType.
Testing and Connecting Your Printer 2-21

Connecting the Printer to Your Computer
Testing the computer-to-printer connection
To make sure you properly connected your computer to yourprinter, follow these steps before you begin working with yourapplication software:
1. Turn on your computer; then turn on your printer.
2. A DOS prompt should apear on your computer screen.
C:>
If you do not have a C drive, A: > or B: > may appear.
3. Type DIR and press Enter. The screen shows a directory listingof the files in the designated drive.
4. Press the Print Screen button on your keyboard once.
5. Press ON LINE to set your printer off line. Then press theFEED button to print the data in the printer’s buffer. Theprinter prints what is on your screen. It should look somethinglike this:
C : \ E P L > d i r
V o l u m e i n d r i v e C h a s n o l a b e lD i r e c t o r y o f C : \EPL
• <DIR> 1 1 - 2 0 - 9 0 6 : 2 6 p. .PRNTWIN3 BAT
<DIR> 1 1 - 2 0 - 9 0 6 : 2 6 p166 1 1 - 2 0 - 9 0 2 : 0 9 p
REABWIN3 BAT 1 0 4 1 1 - 2 0 - 9 0 2 : 0 7 pREADWIN2 BAT 1 0 4 1 1 - 2 0 - 9 0 2 : 5 2 pPRNTWIN2 BAT 166 1 1 - 2 0 - 9 0 2 : 5 3 p
6. If nothing prints or the results are not what you expect, makesure that you used the proper cable, that the cable is connectedsecurely to both the computer and the printer, and that youselected the appropriate interface.
2-22 Testing and Connecting Your Printer

Selecting the Printer Mode
Your printer comes with the following resident printer modes:
l HP LaserJet series IIIl Epson LQ-2500l Epson FX-800/1000 (FX-86e/286e)
Other printer modes are available with the optional identity cardsdescribed in Chapter 7.
You use the SelecType MODE ASSIGN option to select the printermode. The default is HP LaserJet series III.
If you plan to use more than one channel with your printer, youcan assign the same or a different printer mode to each channel,using the SelecType MODE ASSIGN option. See Chapter 3 fordetails on using SelecType to set the printer mode for eachchannel.
The printer mode you select affects the following selectionsyou make when using your printer. See the Appendixes forinformation on each mode.
l The printer you select from your application software’s printerselection menu. See the next section, “Using printer selectionmenus,” for selection priority.
l Available symbol sets and fonts, including the optional cardsand cartridges.
l Some features concerning paper handling, such as bin selectionor printable area.
l Other methods besides SelecType are available for selectingand changing the printer mode. See “Switching the PrinterMode” later in this chapter.
Using printer selection menus
Once you’ve set up the printer, you start using it with yourapplication software program by choosing a printer name from theprogram’s printer selection menu.
Testing and Connecting Your Printer 2-23

Selecting the Printer Mode
HP LaserJet III emulation mode
When your printer is in HP LaserJet III (LJ-3) mode, the factorysetting, select one of the following drivers from your program’sprinter selection menu:
HP LaserJet IIISi™*
HP LaserJet IIIP™HP LaserJet series III™HP LaserJet IIP™HP LaserJet series II™HP LaserJet Plus™HP LaserJet 500™HP LaserJet™
* See Appendix B for information on the difference between theEPL-8000 and the IIISi.
If none of the above printers is listed among your program’soptions, select any printer model that uses the HP PrinterCommand Language (PCL).
Epson LQ and FX emulation modes
When your printer is in the Epson LQ or FX printer mode, selectone of the following drivers from your program’s printer selectionmenu:
LQ-2500 FX-1000/800 (286e/86e)LQ-1050/850 FX-85LQ-1000/800 (expanded ESC/P) FX-80LQ-500LQ-1500 (with version 2 ROM)LQ printer
If none of the printers listed are available from your program,choose the first available of the following: RX, Epson printer,Standard printer, or Draft printer.
2-24 Testing and Connecting Your Printer

Sharing the Printer
You can connect your printer to as many as three differentcomputers at the same time using any combination of the parallel,serial, and optional interfaces. Simply connect interface cables fromthe computers to the interfaces.
If you use the default printer mode LJ-3 for all the interfaces,that’s all you need to do unless you need to change serial interfacesettings. If you wish, however, you can choose differentprinter modes for each interface, and you can allocate a separatepart of the printer’s memory for each interface.
Your printer receives data from the computers through thefollowing channels:
Channel P is the parallel interface.Channel S is the serial interface.Channel O is the optional interface.
See Chapter 7 for information on the optional interfaces.
If you are sharing your printer, see the section on the CH settingon Page 3-32 for full information on the possible settings.
Testing and Connecting Your Printer 2-25

Switching the Printer Mode
Your printer comes with the following printer modes:
l HP LaserJet III (LJ-3)l Epson LQ (LQ)l Epson FX (FX)
Also, the following modes are available on optional identity cards.You can use only one of them at a time because your printer hasonly one identity card slot (Slot A.)
• PostScript (PS)• HP GL (EPSON GL)
If you use different printer modes with different applicationprograms, you have three different ways to switch from oneprinter mode to another. (Remember that PostScript and Epson GLrequire optional identity cards.)
l Intelligent Emulation Switching (IES)—switches betweenPostScript and one other mode
l SelecTypel Shared printer language (SPL)—uses printer commands to
switch from any mode to any other, except out of Epson GL.
Intelligent Emulation Switch (IES)
SelecType Level 2 has three Intelligent Emulation Switching modes:PostScript/LaserJet III, PostScrip/LQ, and PostScript/FX. Whenyou install the optional PostScript card and select one of the IESsettings with MODE ASSIGN, the printer switches automaticallybetween the two modes, depending on the data it receives. SeeMODE ASSIGN in Chapter 3 for more information.
Shared Printer Language
Shared printer language is designed for experienced users andprogrammers. You can find full information on this function at theend of Appendix A.
2-26 Testing and Connecting Your Printer

Chapter 3SelecType
SelecType Overview.. ......................................................................... 3-2Level 1 functions ............................................................................ 3 - 3Level 2 functions ............................................................................ 3-4
Using SelecType.. ................................................................................ 3-6The control panel.. .......................................................................... 3-6The display.. .................................................................................... 3-7Buttons.. ........................................................................................... 3-7Steps to using SelecType ............................................................... 3-8
Level 1 Options ................................................................................ 3-13INPUT.. .......................................................................................... 3-14PAGE SIZE .................................................................................... 3-15COPIES .......................................................................................... 3-15ORIENT.. ....................................................................................... 3-16FONT.. ........................................................................................... 3-16STATUS SHEET ........................................................................... 3-16FONT SAMPLE ............................................................................ 3-16SUB CONFIG.. .............................................................................. 3-17SYSTEM CONFIG.. ...................................................................... 3-17
Level 2 Options ................................................................................ 3-22TEST PRINT ................................................................................. 3-22MODE ASSIGN.. .......................................................................... 3-23I/F CONFIG.. ................................................................................ 3-24RX-BUFFER SIZE ......................................................................... 3-30CH .................................................................................................. 3-32TIMEOUT.. .................................................................................... 3-34CH TIMEOUT .............................................................................. 3-35AUTO CONT ............................................................................... 3-35BEEPER.. ........................................................................................ 3-36P-CONFIG SAVE ......................................................................... 3-36FACTORY RESET.. ...................................................................... 3-37VERSION.. ..................................................................................... 3-37PAGE COUNTER.. ....................................................................... 3-38RITech.. .......................................................................................... 3-38STANDBY.. ................................................................................... 3-38
SelecType 3-1

SelecType Overview
The SelecType function on the printer control panel allows you tocontrol most of the printer’s functions, such as printing test pages,selecting paper size, and changing the printer’s configuration.
SelecType is divided into two levels: Level 1 and Level 2. Level 1contains everyday printing and font selection functions, and Level2 contains functions that you are less likely to change frequently,such as printer mode and printer configuration.
Your application program may send printer commands thatoverride the SelecType settings. If you are not getting the resultsyou expect, check your application software settings.
Note: New SelecType settings are in effect only until you turnoff the printer unless you save them with the Level 1 SYSTEMCONFIG option or the Level 2 P-CONFIG SAVE optiondescribed later in this chapter.
To view the current SelecType settings, print the status sheet asdescribed in Chapter 2.
At the back of this guide, you’ll find a Quick Reference Card thatincludes a map of all the SelecType menus and options.
3-2 SelecType

SelecType Overview
Level 1 functions
Selects the serial, parallel, or optional channelwhen you have set up more than two interfacesand used the INDIVIDUAL mode.
Selects the standard or optional paper cassette.
Specifies the size of paper.
Selects the number of copies to be printed.
Selects the printing orientation: portrait(vertical) or landscape (horizontal).
Selects one of the fonts available in the currentprinter mode.
Prints a report listing the current printersettings.
Prints a sample of the fonts available in thecurrent printer mode.
Defines the printer’s subconfiguration;depending on the printer mode, controls suchfeatures as symbol set and number of text lines.
Defines the printer’s system configuration;saves Level 1 settings, displays the amount ofmemory remaining, changes top and left offsets,and enables printing of complex pages.
Se lecType 3-3

SelecType Overview
Level 2 functions
Prints two test patterns to check the printer’soperation.
Chooses one of the emulation modes: HPLaserJet III, Epson LQ, Epson FX, or IES modes.In the IES modes, the printer switchesautomatically between PostScript and anothermode (if PostScript is available). With anoptional identity card, you can also select EpsonGL or PostScript emulation.
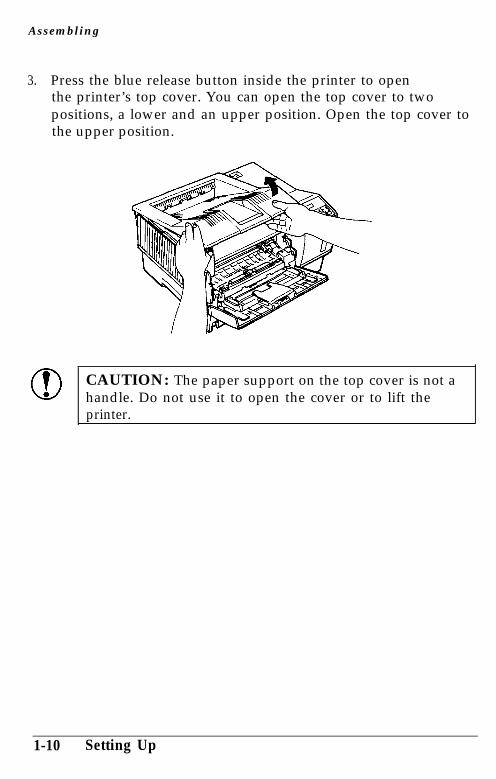
Configures the parallel and serial interfaces.
: Chooses the size of the receive buffer.
Selects the AUTOSENSE or INDIVIDUALmode and assigns memory for INDIVIDUAL.
Defines the auto emulation switch timeout; ifno more data is sent during the specified timeperiod, the printer switches from one emulationmode to the other.
Defines the channel timeout; if no data is sentduring the specified time period, the printerswitches from one channel to the other.
Selects automatic continue, which permits theprinter to continue printing instead of stoppingafter certain error conditions occur.
Turns the beeper on or off.
3-4 SelecType

SelecType Overview
Saves the printer’s configuration; saves all Level2 settings as defaults so they take effect eachtime you turn on the printer.
Returns all Level 1 and Level 2 settings to theirfactory settings.
Displays the version numbers of the printer’sfirmware components such as controller andfont.
Displays the total number of sheets printed bythe printer.
Selects one of the settings for Epson’sResolution Improvement Technology, whichproduces smooth text and graphics.
Conserves energy by reducing power to thefixer heater when the printer is not in use for30 minutes.
SelecType 3-5

Using SelecType
This section describes the control panel and explains how to useSelecType.
The control panel
The control panel contains the display, the SelecType button(which also functions as the left arrow button, six indicatorlights, and four arrow buttons.
3-6 SelecType

Using SelecType
The display
When you enter SelecType, menus and options appear on thedisplay. The display shows SelecType menu titles on the left sideand options for each menu on the right side.
The display also uses the icons shown below:
This icon to the left of an option indicates thatyou can press either or to viewother options in the menu.
Buttons
SelecType
This icon to the left of an option indicates thatthe displayed option is the current selection.You can use or to view otheroptions.
This icon indicates that you can press toenter a submenu, select an option, set anoption, or execute an action.
Enters and exits SelecType mode. To enterLevel 1, press the SelecType button untilSelecType LEVEL 1 appears on the display andthe LEVEL 1 light comes on. To enter Level 2,hold the button down longer until SelecTypeLEVEL 2 appears on the display and the LEVEL2 light comes on.
Use the arrow buttons to move through menus and to select,display, set, or execute SelecType options.
SelecType 3-7

Using SelecType
Enter a submenu, set an option, or select orexecute an action.
Return to the main menu or exit SelecType.
Display options in the same menu. You canview the options one at a time by pressing thebuttons once or you can scroll through themquickly by holding down one of these arrows.
Steps to using SelecType
Using SelecType involves seven basic steps:
1. Enter SelecType mode.
2. Select a channel (if necessary).
3. Display the main menu option.
4. Enter the option’s submenu.
5. Display the submenu options.
6. Set the option or select or execute an action.
7. Exit SelecType.
These steps are described on the following pages.
3-8 SelecType

Using SelecType
Enter SelecType mode
To enter SelecType, just press the SelecType button. SelecType hastwo levels; the level you enter depends on how long you press thebutton. Press and release the SelecType button to enter Level 1, orpress and hold the SelecType button to enter Level 2.
When you enter Level 1, the display shows SelecType LEVEL1briefly. Then one of the Level 1 main menu options appears. Whenyou enter Level 2, the display shows SelecType LEVEL2 briefly.Then, one of the Level 2 main menu options appears.
The following discussion uses the INPUT option in SelecTypeLevel 1 as an example.
Select a channel
If you are using INDIVIDUAL mode, SelecType Level 1 beginswith the display shown below.
The display shows the available channels only. See Chapter 2 formore information on sharing the printer.
If you are using AUTOSENSE mode, remember the channel (S, P,or O) displayed before you enter SelecType. All Level 1 settingsare stored in that channel. If you want to save the settingspermanently, store them in a macro and choose that macro as thepoweron macro. See pages 3-20 and 3-21.
The printer stores the settings for each channel separately. Thesettings you choose in one channel do not affect the settings in theother.
SelecType 3-9

Using SelecType
Display the main menu option
When you are in the SelecType main menu, an icon precedesthe names of each of the main menu options on the display. Inmany cases, the display also shows the current setting, as shownbelow.
The icon indicates that you can use or to display theother options on the main menu. The icon at the right of thedisplay indicates that you can enter the submenu by pressing Options with many submenus, such as SUB CONFIG, maydisplay only the main option.
Enter the options submenu
Most main menu options have at least one submenu. To enter anoption’s submenu, just press
indicates the option is selected, and in some cases a message(SET, EXEC, or PRINT) appears to the right of the option shown.
3-10 SelecType

Using SelecType
Display the submenu options
When you enter a submenu, the icon or the icon moves to theleft of the option. You can display other options in that submenuby pressing or . The icon indicates the currentlyselected option.
In the INPUT submenu, you can display any of the options listedbelow.
OPT appears only when you have installed the optional lowerpaper cassette.
Press or to move to the option you want to set.
indicates that the option is selected, indicates that the optionis not selected, and SET indicates that you can set the option.
Note: Although the main menu options are the same for allprinter modes, some Level 1 submenu options are different ineach mode. See the Appendix that describes the printer modeyou are using for a description of the submenu options for thatmode.
SelecType 3-11

Using SelecType
Set the option
When you reach the option you want to select, press to setthe option. SET disappears from the display and the icon movesto the right of the display indicating that the new option has beenselected.
At the same time, moves to the left of the main menu option,indicating that you are back in the main menu.
Note: If you want to return to the main menu at any timewithout changing a setting, press to exit the submenu.
Once you set an option, the setting remains in effect until youchange it again or turn off the printer. If you want a setting toremain in effect even when you turn the printer off and on, youcan use the SYSTEM CONFIG option to save Level 1 settings andthe PCONFIG SAVE option to save Level 2 settings.
Exit SelecType
To exit SelecType from any main menu or submenu, press theSelecType button as many times as necessary. When you see thefollowing message, press one more time to exit:
3-12 SelecType

Level 1 Options
This section lists all the menus and options available when you useSelecType Level 1. Most menus and options are the same in thedifferent printer modes. However, some have a different functionfor each mode. These menus are listed in the Appendix thatdescribes the printer mode. See the Quick Reference Card at theback of this manual for a map of all SelecType menus and options.
When you enter SelecType Level 1, you see one of these options:
Note: If you have set the CH option in Level 2 to INDIVIDUAL,the SelecType display shows CANCEL: S: I’: 0: whenever youenter Level 1. To select a channel, press the arrow thatcorresponds to the channel you plan to use. After you select thechannel, one of the main menu options listed above appears onthe display.
If you are using AUTOSENSE mode, remember the channel (S, P,or O) displayed before you enter SelecType. All Level 1 settingsare stored in that channel. If you want to save the settingspermanently, store them in a macro and choose that macro as thepoweron macro. See pages 3-20 and 3-21.
SelecType 3-13

Level 1 Options
INPUT
This option selects whether paper feeds into the printer from thestandard paper cassette or the optional lower paper cassette.
Menu/submenu Avai lable opt ions
STDOPTAUTO
If you choose STD, the printer loads paper from the standardpaper cassette.
If you choose OPT, the printer loads paper from the optional lowerpaper cassette. OPT appears as an option on the display only ifyou install the optional lower paper cassette unit.
If you choose AUTO, the printer loads paper from the papercassette containing the size of paper specified by the PAGE SIZEoption. If both cassettes contain the specified paper size, theprinter loads paper from the standard paper cassette until it isempty, then switches to the optional lower paper cassette.
If the paper in either cassette does not match the paper size setwith the PAGE SIZE option, the printer returns a paper size error.See Chapter 6 for the information on recovery.
3-14 SelecType

Level 1 Options
PAGE SIZE
You can choose any of the paper and envelope sizes shown belowwith the PAGE SIZE option.
Menu/submenu Available options
A4A5B5LT (Letter)HLT (Half Letter)LGL (Legal)GLT (Government
letter)GLG (Government
legal)EXE (Executive)F4MON (Monarch)C10 (CommercialDLC5
10)
COPIES
Use this option to print up to 999 copies of your print job. Thefactory setting is 1. If you select a number greater than one, thedisplay keeps count of the number of copies completed and thecurrent setting. For example, if you set the COPIES option to 10and five copies have been printed, the display shows 5/10.
Menu/submenu Available options
1 to 999
SelecType 3-15

Level 1 Options
ORIENT
This option selects the direction in which the characters are printedon a page. The ORIENT option is different for each printer mode;see the Appendixes for information on the printer mode you areusing.
FONT
Available options in the FONT submenu are different for eachprinter mode. See the Appendixes for information on the printermode you are using.
STATUS SHEET
Use this option to print a status sheet that lists the current printersettings. When you reach this option, press twice to print thestatus sheet. See Chapter 2 for information on the status sheet.
Menu/submenu Available options
FONT SAMPLE
Use this option to print fonts available for your selected printermode. The printer prints all bit-map and outline fonts; the portraitfonts and landscape fonts are printed on different pages. Press twice to print the font sample.
Menu/submenu Available options
3-16 SelecType

Level 1 Options
The following is part of a typical font sample in HP emulationmode.
SUB CONFIG
The submenu for the SUB CONFIG option is different in eachprinter mode. See the Appendixes for information on the printermode you are using.
SYSTEM CONFIG
This option includes the following eight submenus:
Menu/submenu Available options
FULL PRINTT-OFFSETL-OFFSETMEMORY LEFTLOAD MACROSAVE MACRODELETE MACROPOWERON MACRO
SelecType 3-17

Level 1 Options
Each submenu is explained below.
l FULL PRINT — The default setting of 0 is sufficient for mostuses of the printer. If you are printing complex pages, you mayneed to increase the setting. If the printer displays the messageSET FULL PRINT, increase this setting. The setting (anynumber from 0 through 62) times 20 is the number of kilobytes(KB) reserved in RAM for page composition. For example, asetting of 5 reserves 100KB.
Menu/submenu Available options
0 to 62 I
The following table shows the maximum setting necessary foreach size of paper. The setting may be lower than themaximum, but it will never need to be higher.
Paper Size
A4A5B5LTHLTLGGLT
Setting Paper Size
51 GLG 5735 EXE 454 3 F4 5747 MON 3136 C10 4162 DL 374 5 C5 38
Setting
Since the amount of RAM you reserve with this option is notavailable for any other purpose, it is best to leave the setting at0 until you see a SET FULL PRINT message. Then, increase thesetting in small increments until the error does not occur.
If FULL PRINT is set to the maximum value, the printer doesnot display the SET FULL PRINT error. If an INSUFFMEMORY or PAGE BUFFER FULL message appears, you mustinstall optional memory. See Chapter 7 for information oninstalling additional memory.
3-18 SelecType

Level 1 Options
l T-OFFSET — You can use the T-OFFSET (top offset)option to make fine adjustments in the position of the printingon the page. The setting is in dots; each dot is 1/300th of aninch (0.0846 mm), so you can use this option to raise or lowerthe printing on the page approximately 1/5th of an inch (5mm). The factory setting is 0.
Menu/submenu Available options
-64 t o + 6 3
l L-OFFSET — You can use the L-OFFSET (left offset) optionto make fine adjustments in the position of the printing on thepage. The setting is in dots; each dot is 1/300th of an inch(0.0846 mm). With this option, you can move the printing onthe page approximately 1/5th of an inch to the left (settingsfrom -1 to -64) or to the right (settings from 1 to i-63). Thefactory setting is 0.
Menu/submenu Available options
- 6 4 t o + 6 3
l MEMORY LEFT — Use this option to display the amount ofmemory available. You can use this information to see whethera newly-installed memory option is working correctly or to seehow much memory is available for fonts or complex graphics.
SelecType 3-19

Level 1 Options
l LOAD MACRO — Use this option to load one of themacros you created using the SAVE MACRO option. Thefactory setting is 0. When you press the followingappears on the display:
Menu/submenu Available options
0 t o 4
Press or to choose the number of the macro you wantto use. Then press to load the selected macro. Whenever youselect macro 0, all Level 1 settings return to their factory settings.Press to exit this submenu without loading a macro.
l SAVE MACRO — Use this option to save the current Level 1settings as a macro and recall them anytime. You can save upto four macros using the numbers 1 through 4. When you press the following appears on the display:
Menu/submenu Available options
1 to 4
Select a macro number for your setting by pressing or .Then press to save the current SelecType Level 1 settingsinto the macro. These settings will be in effect each time you turnthe printer on.
Press to exit this submenu without saving a macro.
3-20 SelecType

Level 1 Options
CAUTION: Do not turn off the printer while it is savingthe macro. If you do, you may see a START UP ERRORmessage the next time you turn the printer on.
You can save up to four different settings for each channel.However, if you are sharing the printer and use the same printermode for more than one channel, avoid using the same macronumber in different channels. For example, changes in the ChannelP macro 1 setting may affect the Channel S macro 1 setting.
l DELETE MACRO — Use this option to delete any macrosyou create. When you press , the display shows thefollowing:
Menu/submenu Available options
1 to 4
Select the number of the macro you want to delete by pressing or . Then press to delete the macro. The printerdeletes all settings saved with the specified macro.
Press to return to the main menu without deleting a macro.
l POWERON MACRO — Use this option to specify the macronumber you want to use as the power-on default for eachprinter mode. Select macro 0 to use the factory default settings.
Menu/submenu Available options
0 to 4
SelecType 3-21

Level 2 Options
This section lists all the menus and options available when you useSelecType Level 2. When you enter SelecType Level 2, you see oneof these options:
TEST PRINTMODE ASSIGNI/F CONFIGRX-BUFFER SIZECHTIMEOUTCH TIMEOUTAUTO CONTBEEPERP-CONFIG SAVEFACTORY RESETVERSIONPAGE COUNTERRITechSTANDBY
TEST PRINT
You can use this option to print two different test patterns tocheck whether your printer is working correctly. After TESTPRINT appears, press once to see the following display:
Menu/submenu Available options
1 to 2
Press to print pattern 1 (vertical lines). To print pattern 2(horizontal lines), press then press . See Chapter 2 fordetails on running a test print.
3-22 SelecType

Level 2 Options
MODE ASSIGN
Use this option to select the printer mode for each interface youare using. The default is LJ-3. For more information on eachprinter mode, see the appendixes. After MODE ASSIGN appears,press once to see the following display:
Menu/submenu Available options
LJ-3LQFXEPSON GL *PS *PS & LJ-3 *(IES setting)PS & LQ *(IES setting)PS & FX *(IES setting)
The printer lists these options when the corresponding identity card
is installed.
When you select the one of the intelligent emulation switch (IES)settings, the printer switches automatically between the twoindicated modes, depending on the data it receives. However,sometimes the display shows READY and the name of the modeused most recently. During this timeout period the printer can useonly the indicated mode. Do not send data in the other mode untilthe timeout is over, which is indicated by the display showingboth modes.
Note: When you are using a program you developed that sendsPostScript files, be sure that data is followed by a Ctrl-D ( ^ D).Otherwise, the printer does not switch the emulation modeproperly with the Intelligent Emulation Switch Feature.
SelecType 3-23

Level 2 Options
I/F CONFIG
Use this option to configure a printer interface. The settings areparallel for channel P and serial for channel S. This option is notavailable for channel O.
Menu/submenu Available options
P (Parallel)S (Serial)
The PARALLEL option has these three submenus:
Menu/submenu Available options
SLCTINAUTOFEEDBUSY DELAY
Normally, you do not need to change these settings. Change themonly when you have special requirements.
l SLCTIN — When you set SLCTIN to OFF, the printer iscontinuously selected and ignores device control codes DC1and DC3. In almost all cases, leave SLCTIN set to OFF. WhenSLCTIN is ON, the SLCTIN signal goes HIGH at power-onand the control codes DC1 and DC3 are valid.
Menu/submenu Available options
ON or OFF
3-24 SelecType

Level 2 Options
l AUTOFEED — When you set AUTOFEED to OFF, theprinter ignores the AUTOFEED signal on pin 14 and does notsend an automatic line feed (LF) command with each carriagereturn (CR). When you set AUTOFEED to ON, the printeradds a line feed to each carriage return it receives. If your textlines overprint each other, set AUTOFEED to ON.
Menu/submenu Available options
ON or OFF
l BUSY DELAY — Use BUSY DELAY to set the delay periodfrom the ACKNLG to the BUSY signal. Available settings are0, -5, and +5 microseconds plus MIN. The MIN option setsthe ACKNLG signal to high. For most applications, leave thisoption set to the factory setting, 0 microseconds.
Menu/submenu Available options
-5, 0, +5, or MIN
Before you can set options on the SERIAL submenus, you mustchoose either RS-232C or RS-422 to match your interface.
Menu/submenu Available or options
RS232C or RS422 I
SelecType 3-25
Level 2 Options
After you select the serial interface, you enter one of the submenusshown below.
Menu/submenu Available options
SERIAL WORD LENGTHBAUDRATEPARITYSTOP BITDTRXON/XOFFENQ/ACKDSRCTS
These settings must match the settings your computer is using.Check your computer’s manual.
The interface options are the same for both the RS-232C andRS-422 serial interface modes.
l WORD LENGTH - You can select B-bit word length or7-bit word length. See your computer manual and softwaredocumentation for the proper setting. The factory setting isB-bit.
Menu/submenu Available options
7 or 8
3-26 SelecType

Level 2 Options
BAUDRATE - Use this option to set the data transfer rate(baud) for the serial interface. The baud rate is measured inbits per second (bps). See your computer manual and softwaredocumentation for the proper setting. The factory setting is9600.
Menu/submenu Available options
30060012002400480096001920038400
P A R I T Y - When this option is set to NONE, paritychecking is disabled. The parity bit, if used, provides a basicform of error detection. See your computer manual andsoftware documentation for the proper setting.
I Menu/submenu Available options
NONEEVENODD
SelecType 3-27

Level 2 Options
l STOP BIT - Use this option to set the number of stop bitson each character of information sent to the printer. Stop bitssignal the end of a character.
Menu/submenu Available options
1 or 2
l DTR - Use this option to turn the printer’s readycommunications protocol ON or OFF. You can use DTRprotocol in combination with the XON/XOFF option setting.
Menu/submenu Available options
ON or OFF
l XON/XOFF - Use this option to turn the XON/XOFFcommunications protocol on or off. You can use XON/XOFFprotocol in combination with the DTR option setting.
Menu/submenu Available options
ON or OFF
l ENQ/ACK - This option appears but is not effective inyour printer. Leave it set to OFF.
Menu/submenu Available options
ON or OFF
3-28 SelecType

Level 2 Options
l DSR - When DSR (Data Set Ready) is OFF, the signallevel is permanently set HIGH, allowing the printer to senddata to the computer. The factory setting is OFF (signal levelHIGH). For most communications purposes, this option shouldbe set to OFF. When DSR is ON, data is sent to the computeronly when DSR is HIGH.
Menu/submenu Available options
ON or OFF
l CTS - When CTS (Clear To Send) is OFF, the signal level ispermanently set HIGH. The factory setting is OFF (signal levelis HIGH). This setting should be set to OFF for mostcommunications purposes. When CTS is ON, data is sent tothe computer only when CTS is HIGH.
Menu/submenu Available options
ON or OFF
SelecType 3-29

Level 2 Options
RX-BUFFER SIZE
The receive buffer option allows you to change the size of theprinter’s input buffer. A large receive buffer size allows you toquickly transfer the contents of a file from the computer’s memoryto the printer’s memory. The printer then prints the informationfrom its own memory and frees up the computer for other tasks.
If you set the buffer size too high, however, you may get an errormessage telling you to add memory. The factory default setting is5K.
When you press the display reads as follows.
Menu/submenu Available options
S,P,O
Press or to choose the channel for which you want tochange the buffer size. Then press
Menu/submenu Available options
See the table on thenext page
3-30 SelecType

Level 2 Options
The setting you can select for the RX-BUFFER SIZE variesdepending on the amount of total RAM size in your printer. Thetable below shows the available settings for the buffer sizes. X isthe amount of RAM that the printer has.
If you have not installed any additional memory in your printer,the factory setting is 5KB.
Press to increase the buffer size or to decrease it. Pressthe buffer briefly to change the value 1K at a time or hold thebutton down to change the value rapidly.
After changing the buffer size, you need to execute SAVE&INITfor the new setting to take effect. Press to execute or tocancel the save and initialize operation.
Menu/submenu Available options
< or >
Note: You can also save the settings with the P-CONFIG SAVEoption, and then initialize the printer. See the P-CONFIG SAVEoption later in this chapter.
SelecType 3-31

Level 2 Options
CH
You do not need to change this setting if you are using only onecomputer. If you are using two or three computers with yourprinter, read this section carefully before deciding what settings touse.
The CH option gives you the choice of two settings to specify howthe printer’s memory is used. With AUTOSENSE the printerautomatically detects which channel (parallel, serial, or optional) isreceiving data and allocates all of the printer’s available memory tothat channel. The INDIVIDUAL mode, on the other hand, uses aseparate area of memory for each channel.
Your printer has l.oMB of memory. If you use more than twochannels with the INDIVIDUAL setting or if you use one of theoptional identity cards with either mode, you have to add morememory. See Chapter 7.
AUTOSENSE is less complicated and requires less total memory,but there is a small chance that files sent from two differentcomputers at the same time will interfere with each other; theINDIVIDUAL setting eliminates this possibility.
CAUTION: New CH settings take effect only when youexecute SAVE&INIT, as described below.
Menu/submenu Available options
AUTOSENSE S,P, or OINDIVIDUAL
S, P, or O selects the first channel used when the printer is turnedon or initialized.
In AUTOSENSE mode all Level 1 settings are saved in the channeldisplayed just before you enter SelecType.
3-32 SelecType

Level 2 Options
If you select INDIVIDUAL, the next step is assigning memory toeach channel. Any channel using the LJ-3, LQ, or FX printer moderequires at least 0.5MB of memory, and any channel usingPostScript or Epson GL (available on optional identity cards)requires at least 1.5MB. (Add the requirements of all threechannels together to determine the minimum total memoryrequired.)
You assign the memory using a value from 0 to 9 for each channel.The factory setting is S:o P:1 O:o. If you want to change the ratio,assign an appropriate number to each channel. For example, if youare using PostScript in the S channel and HP LJ-3 in the I’ channeland nothing in the O channel, you could use S:3 P:l O:o becausePostScript requires approximately three times as much memory asHP LJ-3.
After choosing INDIVIDUAL, press to move to the followingdisplay:
The number on the left is the total number of megabytes available,and the number to the right of each channel is the proportion ofmemory allocated to that channel. Use the arrow buttons to choosethe new values for each channel. After you finish the memoryallocation, press The display shows the following:
Menu/submenu Available options
< (cancel) or >(execute)
Press to save the settings and restart the printer or press to cancel the settings.
SelecType 3-33

Level 2 Options
Note: You can also save the settings with the P-CONFIG SAVEoption, and then initialize the printer. See the P-CONFIG SAVEoption later in this chapter.
TIMEOUT
This option is available only when the PostScript card is installed.Use this option to specify the time (in seconds) for intelligentemulation switch timeout. When the intelligent emulationswitching channel receives no more data, it enters the timeoutstatus. During the timeout it cannot switch to another mode;instead, it prints all data received in the current mode. You can tellwhen the timeout is over by the display, which switches fromshowing READY and the current mode to showing PS and theother selected mode. For example, if LJ-3 is the other selectedmode, the display shows READY LJ-3 during the timeout andPS&LJ-3 after the timeout. Do not send any data in the new modeuntil the display changes. You can set a different timeout value foreach mode. The factory setting is 30 for PS mode and 10 for OTR(other). This option is available only when an IES setting isselected.
Menu/submenu Available options
PS or OTR
Press the button to select the mode for which you want tochange the setting; then press
Menu/submenu Available options
5 to 95 (in steps of 5)
For complete instructions on the intelligent emulation switch, seeChapter 2, Switching the emulation mode.
3-34 SelecType

Level 2 Options
CH TIMEOUT
Use this option to set the time for a channel timeout. If the printeris on line and receives no new data for the number of secondsspecified, and if there is data in an other channel, the printerautomatically switches to the channel with data. The factorysetting is 60.
Menu/submenu Available options
10 to 600 (in steps of10)
AUTO CONT
When you set automatic continue to ON, the printer automaticallycontinues to print after a certain period of time when one of thefollowing errors occurs: SET FULL PRINT, PAGE BUFFER FULL,PAPER SIZE ERROR, TRAY SET XXX, and INSUFF MEMORY.When this option is OFF, you must press the CONTINUE button toresume printing. In most cases, leave this option set to OFF.
Menu/submenu Available options ION or OFF
SelecType 3-35

Level 2 Options
BEEPER
When you set this option to ON, a buzzer sounds when a printererror occurs. When you set the option to OFF, the buzzer does notsound.
Menu/submenu Available options
ON or OFF
P-CONFIG SAVE
Use this option to save the settings you make in Level 2 so theytake effect each time you turn the printer on.
Menu/submenu Available options
EXE (save settings)
Note: If you have changed the CH or RX-BUFFER SIZE optionsand have not executed SAVE&INIT, pressing the buttonfor the P-CONFIG SAVE option shows the following:
Press to initialize the printer, or press to return to themain menu without initializing the printer.
3-36 SelecType

Level 2 Options
FACTORY RESET
Use this option to return all Level 1 and Level 2 settings to theirfactory settings. When you select the FACTORY RESET option,the display shows the following:
Menu/submenu Available options
EXE (execute reset)
Press to execute the reset, or press to return to themain menu without resetting the printer.
CAUTION: When you press to execute the reset,the display flashes until the reset procedure is complete.Do not turn off the printer until the READY messageappears on the display; if you turn off the printer toosoon, you may see a START UP ERROR message thenext time you turn the printer on.
VERSION
Use this option to display the version number of the printer’scontroller and font. Press to see the C-ROM version number,and then press or to see the FONT version number.
Menu/submenu Available options
C-ROMFONT
SelecType 3-37

Level 2 Options
PAGE COUNTER
Use this option to display the number of sheets printed since theprinter was installed.
RITech
RITech (Resolution Improvement Technology) produces smootherand crisper lines, text, and graphics. You will probably not have tochange the factory setting, which is MEDIUM. See Chapter 2 forfull information on RITech.
Menu/submenu Available options
LIGHTMEDIUMHEAVYOFF
STANDBY
The standby mode saves power by reducing the power to thefixing heater whenever no data is sent to the printer for 30minutes. In this mode, the printer begins warming up as soon asyou press the ON LINE button or send any data; it becomes readyto print within 70 seconds. The default is DISABLE, which keepsthe printer warmed up and ready to print at all times.
Menu/submenu Available options
ENABLEDISABLE
3-38 SelecType

Chapter 4Paper Handling
Choosing Paper ..,.................................................................... 4-2
Choosing a Paper Size . . . . . . . . . . . . . . . . . . . . . . . . . . . . . . . . . . . . . . . . . . . . . 4-5
Paper Feeding and Paper Delivery ....................................... 4-6Paper feeding ....................................................................... 4-6Paper del ivery .................................................................... 4-6
Loading Paper Manually . . . . . . . . . . . . . . . . . . . . . . . . . . . . . . . . . .. . . . . . . . 4-8
Using the Optional Lower Paper Cassette ,.......................... 4-11
Using the Optional Output Tray . . . . . . . . . . . . . . . . . . . . . . . . . . . . . 4-15
Paper Handling 4-1

Choosing Paper
With this printer you can print on many sizes and types of paper.You can also use other types of media, such as envelopes, labels,and overhead projector transparencies. The printer feeds mosttypes of media automatically from the paper cassette, but doesrequire that some media be manually fed for greater control. Thischapter describes the paper feed and delivery choices and how toselect and load paper.
The type of paper you use in your printer can affect the quality ofyour printed output. The printer forms an image by transferringmany tiny dots of toner to the paper. If the paper is rough, theedges of letters become ragged because some of the dots fall intoindentations on the paper. The smoother the paper you use, thesmoother your printing looks.
You should use especially smooth paper for printing originals fromwhich you plan to make reproductions. Because reproductionintroduces its own raggedness to the edges of letters, you want tostart with the best original possible.
For best results, store your paper supply in its original wrapper.The printer is sensitive to moisture absorbed by the paper. Do notstore paper in a humid or damp environment.
Below are some recommendations for selecting paper and otherprint media for the printer.
4-2 Paper Handling
Choosing Paper
Note: Since the quality of any particular brand or type of papermay be changed by the manufacturer at any time, Epson cannotguarantee any particular brand or type of paper. Always testsamples of paper stock before purchasing large quantities orprinting large jobs.
Standard office paper-You can use the printer’s paper cassetteto automatically feed most types of 60 to 90 g/m2 (16 to 24 lb)paper. This typically includes such paper as copier paper, memosheets, cotton bond, and letterhead. If you feed paper or othermedia manually from the manual feed tray, you can use 60 to157g/m 2 (16 to 42 lb) paper.
For best results, use paper made especially for laser printers. Papermade for plain-paper copiers is also a good choice.
If you want to use less expensive paper, test it thoroughly beforeregular use. Paper should be of good quality and relatively smooth.Also keep in mind that if the paper is textured or too rough, theprinted output may not be clear.
Some letterheads use inks or dyes that may smear or come offwhen subjected to the high temperature of the fuser. Try a fewsheets before you print on letterhead or other special paper.
Be sure to load letterhead and forms face-down in the papercassette with the top edge toward the front of the printer.
Special paper-You can use colored paper as long as it meets theweight limits given above for standard office paper. Do not,however, use coated paper (paper to which a clear or coloredcoating has been added).
Paper Handling 4-3

Choosing Paper
Labels — Use only labels designed for laser printers or plain-papercopiers in your printer. When printing labels, use the optionalface-up output tray; this keeps the labels from curling or comingoff the backing sheet. Always manually feed labels.
To prevent the adhesive from coming into contact with the printerparts, always use labels that completely cover the backing sheet sothat there are no gaps between the individual labels. You shouldtest the label sheet for leaking adhesive by pressing a sheet ofpaper on top of a sheet of labels. If the paper sticks at all, do notuse the labels.
Other materials — You can use overhead projector transparenciesand adhesive drafting film if they are made for use with plain-papercopiers or laser printers. When printing these materials, use theoptional face-up output tray.
Envelopes-You can insert several envelopes in the manual-feedslot for automatic loading. Load envelopes with the flap-side downas shown below.
The printing quality on envelopes may be irregular becausedifferent parts of an envelope have different thicknesses, and thethickness or weight of particular envelopes may affect your results.Test a sample envelope before you buy a large number. Also, usethe optional face-up output tray to keep the envelopes fromcurling. If the printing is too light, turn the print density knobcounterclockwise. Always return the print density knob to thecenter position when you go back to printing on ordinary paper.
4-4 Paper Handling

Choosing a Paper Size
The printer can feed several sizes of paper automatically.Whenever possible, use your software settings to choose the papersize you require for your print job. If you cannot select the papersize with your application program, you can use the SelecTypePAGE SIZE option.
Note: If you are using the optional lower paper cassette, seeChapter 3 for instructions on selecting a paper size.
The table below lists all of the paper sizes on the SelecType menu.The most commonly used paper sizes are marked on the manual-feed tray.
Paper:A4 210 X 297 mmA5 148 X 210 mmB5 182 X 257 mmLT (Letter) 8.5 X 11 inchesHLT (Half letter) 5.5 X 8.5 inchesLGL 8.5 X 14 inchesGLT (Government letter) 8 X 10.5 inchesGLG (Government legal) 8.5 X 13 inchesEXE (Executive) 7.25 X 10.5 inchesF4 210 X 330 mm
Envelopes:MON (Monarch) 3 718 X 7 l/2 inchesCl0 (Commercial-10) 4 l/8 X 9 l/2 inchesDL 110 X 220 mmC5 162 X 229 mm
If you use one paper size most of the time and you cannot selectpaper size with your software, you can use the SelecType SAVEMACRO option to save your paper size setting. The printer thenselects this paper size whenever you turn on, reset, or initialize it.See Chapter 3 for details.
Paper Handling 4-5

Paper Feeding and Paper Delivery
Your printer has two paper-feed methods and two paper-deliverymethods.
Paper feedingThe printer feeds paper automatically from the standard papercassette; you can also feed most types of media from the manual-feed tray.
Also available as an option is the lower paper cassette unit, whichautomatically feeds various sizes of paper. For information on thisoption, see Chapter 7.
See the table in the next section for recommended paper-feedmethods for different print media. If you want to try othermethods, be sure to test print a few sheets before beginningregular use.
Paper deliveryThe printer can deliver paper face down on top of the printer orface up into the optional face-up tray.
With face-down output on top of the printer, the printed pagescome out in the order in which you print them. When you turnthe printed stack of pages over, the first page of the document ison top and the last page is on the bottom.
With face-up output into the optional output tray, the printedpages pass straight through the printer without bending. You cansee your printed output immediately because the pages are face up.
4-6 Paper Handling

Paper Feeding and Paper Delivery
The following table lists recommended paper-feed and paper-delivery methods for different print media. Be sure to print a fewsheets before beginning regular use.
Material Feed Delivery
Regular paper Auto or manual Face down or60 to 90 g/m2, 16 to 24 lb face up
Heavy paper Manual feed Face up90to157 g/m2, 24 to 42 lb
Envelopes Manual feed Face up
Transparencies Manual feed Face up
Labels Manual feed Face up
P a p e r H a n d l i n g 4 - 7

Loading Paper Manually
If you want to print labels, envelopes, transparencies, heavy paper(over 90g/m2 or 24 lb), or other special papers, you can load thepaper one sheet at a time through the manual feed slot. Also, youcan manually feed paper when you want to print a small job ondifferent paper from the type loaded in the cassette.
You can manually feed paper ranging in size from 86 X 140 mm(3.4 X 5.5 inches) to 216 X 356 mm (8.5 X 14 inches).
Note: You can also insert several envelopes in the manual-feedslot. Because thickness and surface characteristics are especiallyimportant for envelopes, test a sample for print quality andproper feeding before you buy a large number of envelopes.
To use manual feed, follow these steps:
1. If necessary, use SelecType to choose the new paper size asdescribed in Chapter 3.
2. Open the front cover.
4-8 Paper Handling

Loading Paper Manually
3. Open the manual-feed paper guides, as shown below. If youare using legal-sized paper, open the paper support on theinside of the front cover and raise the other paper support onthe top cover.
4. Adjust the manual-feed paper guides to match the size of paperyou are using. Insert a sheet of paper face up into the manual-feed slot as far as it will go.
Paper Handling 4-9

Loading Paper Manually
5. For printing on labels, envelopes, transparencies, and heavypaper, install the optional face-up output tray. Set the paperpath selector on the back of the printer to the face-up position.
6. Press the MANUAL button. An M appears on the right side ofthe display, as shown below.
7. Make sure the ON LINE light is on; you can then send data tothe printer from your computer.
8. To return to automatic loading, press the MANUAL buttonagain.
Note: The manual feed selection is an attribute of the channelyou are using. This means you can use the panel to selectmanual feed for each channel separately; the setting remains,even if the printer mode for that channel is switched. Also, thisselection can not be canceled by printer command but only bythe panel.
4-10 Paper Handling

Using the Optional Lower Paper Cassette
The optional lower paper cassette holds up to 250 sheets of A4,letter, or executive-sized paper. Model L also holds legal-sizedpaper. For information on installing this option, see Chapter 7.
To load paper in the cassette, follow these steps:
1. Remove the paper cassette from the printer by pulling itstraight out. Then place it on a flat surface.
Paper Handling 4-11

Using the Optional Lower Paper Cassette
2. Slide the paper guides open, as shown below.
3. Open the back cover on the paper cassette. Then grasp the reargreen paper guide and slide it all the way to the back.
4. Take a stack of paper and fan it thoroughly. Tap the edges ofthe paper on a flat surface to even up the stack.
4-12 Paper Handling

Using the Optional Lower Paper Cassette
5. Insert the stack of paper face-down into the cassette with thecorners of the paper beneath the two tabs at the front of the
* paper cassette.
Note: Do not load paper above the marks on the paper guides.
6. Slide the side paper guides together until they both rest lightlyagainst the paper. Slide the rear paper guide forward until itrests against the paper. Then close the back cover.
Paper Handling 4-13

Using the Optional Lower Paper Cassette
7. Insert the paper cassette straight into the front of the printer inthe lower position and push it firmly into place.
Note: Insert the adjustable paper cassette in the lower positiononly. It does not fit in the standard paper cassette slot.
To feed paper from the optional lower paper cassette, you need tochange the input setting in your software or change the SelecTypeINPUT option. See Chapter 3 for information.
With the optional unit installed, the right side of the displayshows the size of paper in each cassette. For example, -- A4indicates the standard cassette is empty, and A4 paper is in theoptional cassette.
4-14 Paper Handling

Using the Optional Output Tray
The optional output tray allows you to deliver paper in the face-up position. For information on installing this option, see Chapter7.
When paper is output face-up into the optional output tray, theprinted pages pass straight through the printer without bending.
After installing the face-up output tray, you can switch the paperpath selector between face up and face down, as shown below.
Face-up position
Paper Handling 4-15

Using the Optional Output Tray
Face-down position
4-16 Paper Handling
Chapter 5Maintenance and Transportation
Replacing Consumable Parts ................................................. 5-2Removing the imaging cartridge ....................................... 5-3Cleaning the transfer charger wire ................................... 5-5Cleaning the glass lens.. ..................................................... 5-7Replacing the cleaning pad.. .............................................. 5-8Replacing the imaging cartridge.. ...................................... 5-10
Cleaning the Printer ............................................................... 5-14Replacing the ozone filter.. ................................................ 5-14Cleaning inside the printer ................................................ 5-17Cleaning the roller in the paper path.. ............................. 5-18Removing spilled toner ...................................................... 5-20Cleaning the printer case ................................................... 5-21
Transporting Your Printer ..................................................... 5-22Packing for transportation ................................................. 5-22Unpacking the printer after transportation.. .................... 5-23
Maintenance and Transportation 5-1

Replacing Consumable Parts
The printer’s imaging cartridge can print up to 8,000 pages,depending upon the complexity of your print jobs.
You see the following messages when your printer starts to runout of toner:
TONER LOWLittle toner is left; you must replace the imaging cartridge soon.When the TONER LOW message appears, you may printapproximately 25 additional pages.
TONER OUTNo toner is left; replace the imaging cartridge and the cleaning pad,and clean the transfer charger wire and the glass lens. When theTONER OUT message appears, you cannot print additional pageswithout replacing the imaging cartridge.
Whenever you see the TONER OUT message, perform these steps,described in the following sections:
1. Remove the imaging cartridge.
2. Clean the transfer charger wire.
3. Clean the glass lens.
4. Replace the cleaning pad.
5. Replace the imaging cartridge.
5-2 Maintenance and Transportation

Replacing Consumable Parts
Removing the imaging cartridge
Follow these steps to remove the imaging cartridge:
1. Make sure the printer is turned off. Then unplug the powercord from the wall outlet.
2. Remove any paper in the paper output tray.
3. Open the front cover.
4. Press the blue release button while lifting up on the printer’stop cover. Open the cover to the upper position, as shownbelow.
Maintenance and Transportation 5-3

Replacing Consumable Parts
5. Grasp the imaging cartridge as shown below and gently pull ittoward you to remove it.
6. Discard the imaging cartridge.
The imaging cartridge is made of non-hazardous materials.However, always follow local regulations regarding waste disposalwhen you discard a used imaging cartridge.
5-4 Maintenance and Transportation
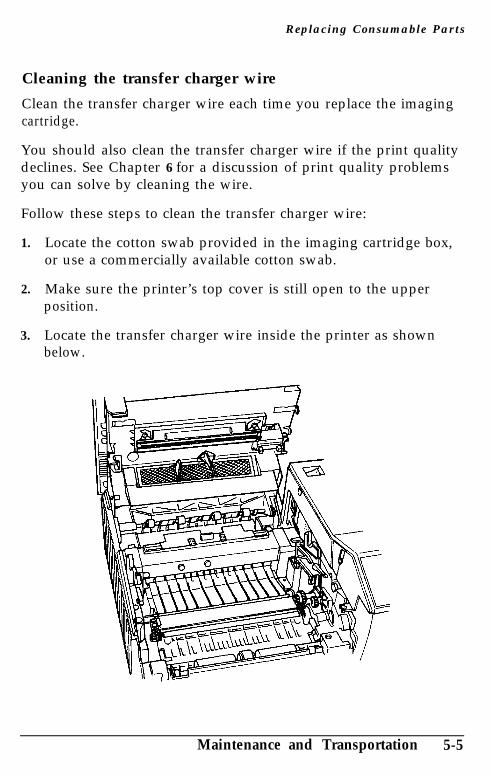
Replacing Consumable Parts
Cleaning the transfer charger wire
Clean the transfer charger wire each time you replace the imagingcartridge.
You should also clean the transfer charger wire if the print qualitydeclines. See Chapter 6 for a discussion of print quality problemsyou can solve by cleaning the wire.
Follow these steps to clean the transfer charger wire:
1. Locate the cotton swab provided in the imaging cartridge box,or use a commercially available cotton swab.
2. Make sure the printer’s top cover is still open to the upperposition.
3. Locate the transfer charger wire inside the printer as shownbelow.
Maintenance and Transportation 5-5

Replacing Consumable Parts
CAUTION: When cleaning the transfer charger wire, donot press too hard on the wire. It is delicate and canbreak if you apply too much pressure. Also, never touchthe wire with your fingers; the oil on your fingers maydamage it.
4. Clean the transfer charger wire by gently rubbing the cottonswab along its length as shown below. Only wipe from left toright. Do not moisten the cotton swab.
If this does not improve your printing, contact your dealer for theavailability of a special cleaning tool.
5-6 Maintenance and Transportation

Replacing Consumable Parts
Cleaning the glass lens
1. Locate the glass lens on the inside of the printer’s top cover. Itis under a black plastic protector.
2. Reach under the protector, as shown in the illustration below,and gently wipe the glass lens with a dry, soft cloth.
Maintenance and Transportation 5-7

Replacing Consumable Parts
Replacing the cleaning pad
After you clean the transfer charger wire and glass lens, you canreplace the cleaning pad and install a new imaging cartridge.
1. Make sure the printer is still open to the upper position.
2. Locate the cleaning pad inside the printer. It is the long blackpad with a yellow felt handle near the back of the printer.
WARNING: If the printer has been on, the fuser may behot. Let it cool before you replace the cleaning pad.
5-8 Maintenance and Transportation

Replacing Consumable Parts
3. Carefully grasp the yellow felt handle and lift out the usedcleaning pad, as shown below. Be careful not to let dirt fromthe pad drop into the printer. Discard the cleaning pad.
4. Locate the new cleaning pad packed with your replacementimaging cartridge.
Maintenance and Transportation 5-9
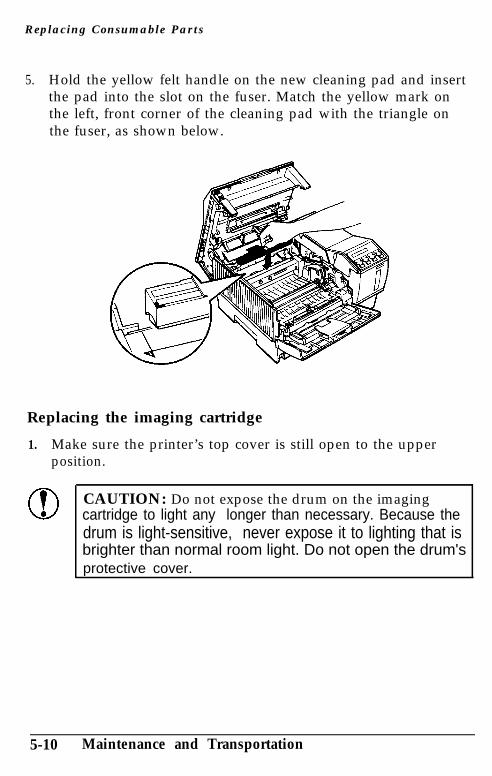
Replacing Consumable Parts
5. Hold the yellow felt handle on the new cleaning pad and insertthe pad into the slot on the fuser. Match the yellow mark onthe left, front corner of the cleaning pad with the triangle onthe fuser, as shown below.
Replacing the imaging cartridge
1. Make sure the printer’s top cover is still open to the upperposition.
CAUTION: Do not expose the drum on the imagingcartridge to light any longer than necessary. Because thedrum is light-sensitive, never expose it to lighting that isbrighter than normal room light. Do not open the drum'sprotective cover.
5-10 Maintenance and Transportation

Replacing Consumable Parts
2. Remove the new imaging cartridge from the aluminum bag.Holding the cartridge in the position shown below, gentlyshake it from side to side several times to distribute the tonerevenly.
3. Hold the cartridge steady, and pull firmly to remove the clearsealing tape.
Maintenance and Transportation 5-11

Replacing Consumable Parts
4. Now, gently shake the imaging cartridge a few times as shownbelow to further distribute the toner.
5. Carefully slide the plastic runners on either side of the imagingcartridge into the green grooves inside the printer. Push thecartridge in gently as far as it will go.
5-12 Maintenance and Transportation

Replacing Consumable Parts
6. Close the printer’s top cover by pressing down gently ontop of the case until the cover snaps closed. Then close thefront cover.
7. Turn the printer back on.
Maintenance and Transportation 5-13

Cleaning the Printer
The maintenance procedures you perform each time you replacethe imaging cartridge should keep your printer running at its best.However, fine particles of paper dust and ordinary dust can collectinside the printer. If you notice a decline in print quality, clean theinside of the printer, the roller in the paper path, and the paperfeed roller as described in this section.
You should also clean the paper cassette and the printer coverevery few months. These procedures are described later in thissection.
Whenever you clean the printer or replace the components,perform a test print as described in Chapter 2. If the test print isunsatisfactory, see Chapter 6 for troubleshooting tips.
Replacing the ozone filter
Ozone is generated inside the printer by the high voltages usedduring the printing process. The ozone filter is located inside theprinter cover toward the back, and should be replaced every sixmonths.
If you print many pages at a time, you may need to replace theozone filter more often. If you notice a peculiar smell when youare printing, it is time to change the ozone filter.
5-14 Maintenance and Transportation

Cleaning the Printer
Here’s how to replace the ozone filter:
1. Make sure the printer is turned off.
2. Open the front cover.
3. Open the printer’s top cover to its upper position.
4. Locate the ozone filter on the inside of the printer’s top cover.
Maintenance and Transportation 5-15

Cleaning the Printer
5. Firmly grasp the plastic tab on the ozone filter and pull up torelease the filter. Then lift the filter out of the printer anddiscard it.
6. Insert a new ozone filter, making sure it snaps into place.
7. Close the printer’s top and front covers.
8. Turn the printer back on.
5-16 Maintenance and Transportation
Cleaning the Printer
Cleaning inside the printer
Fine particles of paper dust and ordinary dust can collect inside theprinter. Follow the steps below to clean the inside of the printer:
1. Make sure the printer is turned off.
2. Open the front cover.
3. Raise the printer’s top cover to the upper position, as shownbelow.
WARNING: Opening the printer exposes the fuser,which is marked by a caution label. If the printer hasbeen on, the fuser may be hot; be careful not to touch it.Let the printer cool before you clean the inside.
4. Remove the imaging cartridge from the printer.
Maintenance and Transportation 5-17

Cleaning the Printer
5. Remove any dirt from the paper path with a soft cloth.
Cleaning the roller in the paper path
1. Locate the metal roller and its black gear on the left end of theroller.
5-18 Maintenance and Transportation

Cleaning the Printer
2. Wipe the dirt off the surface of the roller with a soft cloth, asshown below.
3. Replace the imaging cartridge.
4. Close the printer’s top and front covers.
Maintenance and Transportation 5-19

Cleaning the Printer
Removing spilled toner
If toner spills inside the printer, do not use the printer until youremove all the spilled toner. Follow these steps:
1. If only a small amount of toner is present, carefully wipe outthe inside of the printer with a damp cloth.
2. If a large amount of toner is present, use a small vacuumcleaner (available from computer supply stores) to remove it.
CAUTIONS:l Toner or any other fine powder can damage some
vacuum cleaners. Be sure to read the instructions foryour vacuum cleaner before you use it on spilledtoner.
l When you clean the paper input path, be careful notto touch the transfer charger wire with the vacuumcleaner.
Note: If you spill toner on your clothing, rinse it off with coldwater. Do not use hot water; it may cause the toner to leave apermanent stain.
5-20 Maintenance and Transportation

Cleaning the Printer
Cleaning the printer case
If the printer’s outer case is dirty or dusty, turn off the printer andclean it with a soft, clean cloth dampened with a mild detergent, asshown below.
CAUTIONS:l Never use alcohol or thinner to clean the printer
cover; these chemicals can damage the componentsand the case.
l Be careful not to get water on the printer mechanismor any electronic components.
Maintenance and Transportation 5-21

Transporting Your Printer
If you need to move the printer a short distance, such as from oneroom to another, make sure you keep the printer level to avoidspilling toner.
If you are shipping the printer some distance, repack the printerand its accessories in the original packing materials to avoiddamaging them.
CAUTION: Do not ship the printer with the imagingcartridge installed.
Packing for transportation
To pack the printer, assemble all the original packing materials andsome strong packing tape.
1. Be sure your printer and computer are turned off. Then,remove the power cord and the cable connecting your printerand computer.
2. If the optional lower paper cassette or the optional face-up trayis installed, remove and repack them. Remove any identity orfont cards or font cartridges.
3. Remove any paper from the paper cassette.
WARNING: If the printer has been on, the fuser may behot. Let it cool before proceeding.
5-22 Maintenance and Transportation

Transporting Your Printer
4. Open the front cover. Then open the printer’s top cover to thelower position and remove the imaging cartridge as describedearlier in this chapter.
CAUTION: Hold the imaging cartridge level as youremove it to prevent toner spills.
5. Close the printer’s top and front covers.
6. Pack the printer components in the reverse order of theunpacking procedure described in Chapter 1.
7. After all the components are packed in the original cartons, sealthem with packing tape.
Unpacking the printer after transportation
1. Unpack the printer as described in Chapter 1. When youunpack the imaging cartridge, use a clean soft cloth to wipe offany toner that spilled during shipment.
2. Assemble the printer as described in Chapter 1.
Maintenance and Transportation 5-23

Transporting Your Printer
5-24 Maintenance and Transportation

Chapter 6Troubleshooting
Status and Error Messages . . . . . . . . . . . . . . . . . . . . . . . . . . . . . . . . . . . . . . . . . . . . . . . . . . . . . 6-2
Troubleshooting Directory . . . . . . . . . . . . . . . . . . . . . . . . . . . . . . . . . . . . . . . . . . . . . . . . . . . . . 6-9
Paper Jam Problems.. .............................................................. 6-11FEED JAM.. ...................................................................... 6-12PAPER JAM.. ................................................................... 6-16
Power Supply . . . . . . . . . . . . . . . . . . . . . . . . . . . . . . . . . . . . . . . . . . . . . . . . . . . . . . . . . . . . . . . . . . . . . . . . . . 6-21
Test Prints . . . . . . . . .._.._.................................................................. 6-22
Printing Problems . . . . . . . . . . . . . . . . . . . . . . . . . . . . . . . . . . . . . . . . . . . . . . . . . . . . . . . . . . . . . . . . . . . 6-23
Problems with Graphics . . . . . . . . . . . . . . . . . . . . . . . . . . . . . . . . . . . . . . . . . . . . . . . .._....... 6-27
SelecType Problems . . . . . . . . . . . . . . . . . . . . . . . . . . . . . . . . . . . . . . . . . . . . . . . . . . . . . . . . . . . . . . . . 6-29
Paper Handling . . . . . . . . . . . . . . . . . . . . . . . . . . . . . . . . . . . . . . . . . . . . . . . . . . . . . . . . . . . . . . . . . . . . . . . 6-31
Decline in Print Quality . . . . . . . . . . . . . . . . . . . . . . . . . . . . . . . . . . . . . . . . . . . . . . . . . . . . . . . . 6-34
Options . . . . . . . . . . . . . . . . . . . . . . . . . . . . . . . . . . . . . . . . . . . . . . . . . . . . . . . . . . . . . . . . . . . . . . . . . . . . . . . . . . . . 6-38
Data Dump Mode.. ................................................................. 6-41Converting hexadecimal numbers to decimals.. .......... 6-43
Troubleshooting 6-1

Status and Error Messages
This section contains an alphabetical list of status and errormessages that you may encounter and includes likely solutions toproblems.
If an error occurs, the control panel displays an error message thattells you what is wrong and, in some cases, offers a solution.Status messages also appear on the display during normaloperation; they indicate the printer’s current status.
Note: In some cases, the red CONTINUE light flashes when anerror is detected. This requires you to correct the problem andthen press the CONTINUE button to clear the error. However, ifthe AUTO CONT option in SelecType is set to ON, some errorsmay clear automatically even though the problem remains. SeeChapter 3 for details on AUTO CONT.
In this section, status messages are preceded by [S], warningmessages are preceded by [W], and error messages are preceded by[E]. In some cases the message you see on your display also showsthe printer mode.
[E] ADD MEMORY FOR CH XThe printer has insufficient memory available in the channeldisplayed. You may have changed the printer mode, increasedthe RX-BUFFER SIZE setting, or changed the CHINDIVIDUAL setting. To correct the error, decrease the RX-BUFFER SIZE setting or change the CH INDIVIDUAL settingin SelecType. Changing the CH setting from INDIVIDUAL toAUTOSENSE may solve this problem. If necessary, addmemory to your printer,
6-2 Troubleshooting

Status and Error Messages
CANCEL MANUAL FEEDThere is no paper in the manual-feed tray when you haveselected manual feed. See Chapter 4 for instructions onloading paper in the manual-feed tray. To cancel manual feed,press the MANUAL button to feed paper from the cassette.This message alternates with the SET MANUAL message.
[E]
[S]
[S]
[E]
[S]
[E]
[S]
[S]
CARD MEMORY OVERFLOWThis message indicates that the combined memory of thecards in slots A or B exceeds 4MB. Remove one or both ofthe cards and press the CONTINUE button.
CHAR CREATINGThe printer is creating characters.
COPY END X/XMultiple-copy printing is canceled (you pressed the COPYEND button with the printer off line).
COVER OPENThe printer’s cover is open. Close the printer cover tocontinue printing.
DATAThe printer has received data but is not yet printing, or is offline. To resume printing, press ON LINE if the printer is offline, or press FEED.
FEED JAMPaper is not feeding into the printer from the specifiedcassette or has jammed on its way into the printer. If thepaper is jammed at the paper cassette, open the printer case,remove the jammed paper from the standard paper cassette oroptional paper cassette and then close the printer’s covers. Seethe FEED JAM section in this chapter for more information.
FONT CREATINGThe printer is creating a font.
GRAPHIC DRAWINGThe printer is composing a graphic.
Troubleshooting 6-3

[E]
[S]
[E]
[E]
[E]
[E]
[E]
Status and Error Messages
ILLEGAL CARDThe printer cannot read the card inserted in the slot indicatedon the display. To correct the error, press CONTINUE. If theerror message remains, make sure the printer is off line andremove the card. If the red CONTINUE light still flashes,press CONTINUE.
INITIALLIZE/The printer is being initialized to the factory settings.
INSERT IMAGING CRTGThe imaging cartridge is not installed. Install it as described inChapter 5.
INSERT TRAYThe standard paper cassette is not installed. Install it asdescribed in Chapter 1.
The printer has insufficient memory available for the currenttask. To correct the error, press CONTINUE. If the messageremains, press RESET or initialize the printer as described inChapter 3.
You can also clear this error by turning the printer off andback on again. However, it may be necessary to simplify thepage you are trying to print or add more memory to theprinter. See Chapter 7 for more information on memoryoptions.
INVALID ASSIGNIf you assign PostScript to more than one channel, thismessage appears when you attempt to exit from SelecType.Press to return to MODE ASSIGN and change theassignments.
PAGE BUFFER FULLText or graphics data has filled the printer’s buffer and theprinter has ejected an incomplete page. Press CONTINUE toclear the error. You may need to add more memory to yourprinter. See Chapter 7 for information on memory options.
6-4 Troubleshooting

Status and Error Messages
[S]
[E]
[P]
[E]
[E]
[E]
[S]
[S]
[S]
PAPER FEEDINGThe printer is feeding paper.
PAPER JAMPaper is not being fed into the printer or paper is jammed inthe paper path. Open the printer and clear the jammed paperas described later in this chapter.
PAPER OUTThere is no paper in the standard paper cassette or theoptional lower paper cassette (if installed). Load more paperinto the selected paper cassette. See Chapter 4 for instructionson loading paper.
PAPER OUT AUTO XXXThere is no paper in the standard cassette or the optionallower paper cassette (if installed). The display prompts you toload paper into the specified cassette.
PAPER OUT OPT XXXThere is no paper in the optional lower paper cassette.The display prompts you to load the correct paper size intothe lower paper cassette.
PAPER OUT STD XXXThere is no paper in the standard paper cassette. The displayprompts you to load the correct paper size into the cassette.
PRINTINGThe printer has received data and is printing.
PRINT STOP X/XThe printer stops printing during the multi-copy printoperation.
PS&XXXThe printer is using the intelligent emulation switch and isnot in a timeout status. It can use either one of the modesshown on the display.
Troubleshooting 6-5

[S]
[S]
[E]
[E]
[E]
[S]
[S]
Status and Error Messages
RAM Check X.X MBThe printer is checking the available RAM (X.X = capacity).
READYThe printer is ready to print.
REINSERT CARDYou may have removed an option card while the FEED lightwas still lit or while the printer was on line. To correct theerror, make sure the printer is off line. Next, reinsert the cardinto the correct slot and press CONTINUE. See Chapter 7 formoreinformation on optional cards.
REMOVE CARDYou may have inserted an option card while the printer wason line or while the FEED light was on. Data still remains inthe printer’s buffer. To correct this error, take the printer offline. Then remove the card and press CONTINUE. Before youreinsert the card, make sure that all data in the buffer hasbeen printed and that the printer is off line. If the FEED lightis on, press FEED to print any remaining data. See Chapter 7for more information on optional cards.
RESELECT TRAYThe optional lower paper cassette unit is not installed and theINPUT option is set to OPT or AUTO. Turn off the printerand install the optional lower paper cassette unit. If youdecide not to use the optional paper cassette unit, pressCONTINUE to select paper automatically from the standardpaper cassette. After printing, change the INPUT option toSTD.
RESETThe printer has been reset to the macro specified with theSelecType LOAD MACRO option.
ROM CheckThe printer is checking ROM.
6-6 Troubleshooting

Status and Error Messages
[E]
[E]
[E]
[E]
SAVE MEMORY OVERLOWThis message may appear when you are trying to save amacro with the SAVE MACRO option. The printer does nothave enough memory to save the macro. To correct this error,delete unused macros using the DELETE MACRO option.
SERVICE REQ. CXXXXA controller error has been detected. Write down the errornumber listed on the display and turn off the printer. Wait atleast five seconds and then turn it back on. If the errormessage still appears, turn off the printer, unplug the powercord, and contact a qualified service person.
SERVICE REQ. E00XXA print engine error has been detected. Write down the errornumber listed on the display and turn off the printer. Wait atleast five seconds and then turn it back on. If the errormessage still appears, turn off the printer, unplug the powercord, and contact a qualified service person.
SET FULL PRINTThis message may appear when you are trying to printgraphics or a mix of text and graphics. Press CONTINUE andthen change the SelecType FULL PRINT setting as describedin Chapter 3.
[W] SET MANUALThere is no paper in the manual feed tray and you haveselected manual feed. Load a sheet of paper in the manualfeed tray. To cancel manual feed, press the MANUAL buttonto feed paper from the paper cassette. This message alternateswith CANCEL MANUAL FEED.
[S] STANDBY MODEIf all of the channels receive no data for about thirty minutesand the STANDBY mode is enabled in SelecType, the printerenters standby mode. Press any panel button or send data towarm up the printer,
Troubleshooting 6-7

Status and Error Messages
[E] START UP ERRORIf this message appears when you turn on the printer, thepower may have been turned off while the printer wasperforming a save operation. To clear this error, press or to return the printer’s default settings to LT or A4paper, respectively.
[E]
[E]
[E]
[E]
[S]
[W] TONER LOWThe printer is almost out of toner. When you see thismessage, you can still print up to 25 more pages. You mustreplace the imaging cartridge soon.
TONER OUTYou must replace the imaging cartridge. Replace it asdescribed in Chapter 5.
TRAY SET AUTO XXXThe paper size setting does not match the paper loaded in thespecified paper cassette. The display indicates the expectedpaper size and the currently selected cassette. You can eitherchange the paper size setting or load the correct paper size.After you correct the paper mismatch, press CONTINUE.
TRAY SET OPT XXXThe specified paper size does not match the paper loaded inthe optional lower paper cassette. The display indicates theexpected paper size. After you correct the paper mismatch,press CONTINUE.
TRAY SET STD XXXThe specified paper size does not match the paper loaded inthe standard paper cassette. The display indicates the expectedpaper size. After you correct the paper mismatch, pressCONTINUE.
WARMING UPPrinter is warming up.
6-8 Troubleshooting

Troubleshooting Directory
Use the directory below to help you locate the printing problemyou are experiencing; then work through the suggested solutions tothe problem. If the exact problem is not listed, look for one of asimilar type. Most printing problems can be corrected easily.
Paper jam problems Page
. FEED JAM 6-12
. PAPER JAM 6-16
Power supply
l Power is not being supplied to the printer.
Test print
l The test prints do not print.
Printing problems
l The printer does not print or stops printing.
l The printout is not what you expect.
l The position of the printout is not what you expect.
Problems with graphics
l Graphic images do not print.
SelecType problems
l SelecType does not function as expected.
6-21
6-22
6-23
6-24
6-26
6-27
6-29
Troubleshooting 6-9

Troubleshooting Directory
Paper handling
l Paper does not feed properly.
l Paper feeds crookedly or jams.
l The printer prints a page and then stops.
Decline in print quality
l The print quality is not what you expect. 6-34
6-31
6-31
6-33
Options
l Using optional font cartridges, the printer does notoperate as expected. 6-38
l Using the optional lower paper cassette unit,the printer does not operate properly. 6-38
l Using the optional face-up tray, the printerdoes not operate properly. 6-39
l After you install additional memory (a memorychip set or the memory expansion board), theprinter does not function as expected. 6-40
6-10 Troubleshooting

Paper Jam Problems
This section gives you detailed instructions for correcting FEEDJAM and PAPER JAM errors. When one of these messages appearson the display, work through the steps in the appropriate sectionto clear it.
Many paper jams are caused by using the wrong paper for yourprinter. Make sure you are using paper that meets thespecifications. See Chapter 4 for tips on choosing paper.
Note:l Because the toner on the paper inside the printer may not be
fixed on the page, it may come off on your hands while youremove the paper. If you spill toner on your clothing, rinse itoff with cold water. Do not use hot water or the toner mayleave a permanent stain.
l If toner spills inside the printer, do not use the printer untilyou remove all of the spilled toner. When you resumenormal printing, the first few pages that pass through theprinter may be slightly smeared with excess toner.
Troubleshooting 6-11

Paper Jam Problems
FEED JAM
The FEED JAM message tells you that paper is not feeding intothe printer, or has jammed on its way into the printer from one ofthese input areas:
In the standard paper cassette . . . . . . . . . . . . . . . . . . . . . . . . . . . . . . . . . . . . . . See page 6-13
In the optional lower paper cassette unit . . . . . . . . . . . . . . . . . . . See page 6-14
At the manual-feed slot . . . . . . . . . . . . . . . . . . . . . . . . . . . . . . . . . . . . . . . . . . . . . . . . See page 6-15
6-12 Troubleshooting

Paper Jam Problems
In the paper cassette
1. Remove the paper cassette from the printer.
Note: You cannot pull out the paper cassette if the front coveris open.c
2.
3.
4.
5.
6.
Remove any folded or curled paper from the front opening. Ifthe paper tears, make sure you remove any pieces remaining inthe printer.
Remove any sheets that have been fed part way into theprinter, and remove all the sheets from the cassette. Discardany curled or wrinkled sheets.
Make sure you are using the correct paper size.
Tap the edges of the paper stack on a flat surface and reloadit into the paper cassette. Reinstall the paper cassette in theprinter.
After a FEED JAM is cleared, the jammed page isautomatically reprinted.
Troubleshooting 6-13

Paper Jam Problems
In the optional lower paper cassette unit
1. Remove the optional paper cassette from the printer.
2. Remove any folded or curled paper from the front opening.
3. Remove any sheets that have been fed part way into theprinter, and remove all the sheets from the cassette. Discardany curled or wrinkled sheets.
4. Make sure that you are using the correct paper size and thatthe paper guides are set correctly.
5. Tap the edges of the paper stack on a flat surface and reload itinto the paper cassette. Reinstall the paper cassette in theprinter.
6. After you clear the FEED JAM, printing resumes automaticallybegining with the jammed page.
6-14 Troubleshooting

Paper Jam Problems
At the manual feed slot
1. Gently pull the jammed paper out as shown below. If the papertears, make sure you remove any pieces remaining in theprinter.
2. Make sure you are using paper that meets the specifications forthis printer. See Chapter 2 for the correct paper to use.
If there are frequent paper feed jams of these types, clean thepaper cassette, feed roller, and the metal roller in the paper path asdescribed in Chapter 5. If paper feeding problems continue, seeChapter 4 to make sure that you are using the correct paper foryour printer.
Troubleshooting 6-15

Paper Jam Problems
PAPER JAM
The PAPER JAM message tells you that there is a jam at one ofthese locations along the paper path:
At the metal roller . . . . . . . . . . . . . . . . . . . . . . . . . . . . . . . . . . . . . . . . . . . . . . . . . . . . . . . . . See page 6-17
At the fuser . . . . . . . . . . . . . . . . . . . . . . . . . . . . . . . . . . . . . . . . . . . . . . . . . . . . . . . . . . . . . . . . . . . . . See page 6-19
At the paper output area . . . . . . . . . . . . . . . . . . . . . . . . . . . . . . . . . . . . . . . . . . . . . . . See page 6-20
6-16 Troubleshooting

Paper Jam Problems
At the metal roller
1. Open the printer’s covers and remove the imaging cartridge
WARNING: Removing the imaging cartridge exposes thefuser, which is marked by a CAUTION: HOT SURFACElabel. Be careful not to touch the fuser.
2. Locate the roller protector.
Troubleshooting 6-17

Paper Jam Problems
3. Raise the roller protector and gently pull the paper out. If ittears, make sure you remove any pieces remaining in theprinter.
4. Lower the roller protector. Then reinstall the imaging cartridge.
5. Close both printer covers.
6. After the READY message appears on the display, you canresume printing.
6-18 Troubleshooting

Paper Jam Problems
At the fuser
1. Open the printer’s covers and remove the imaging cartridge.
WARNING: Removing the imaging cartridge exposes thefuser, which is marked by a CAUTION: HOT SURFACElabel. Be careful not to touch the fuser.
2. Gently pull the paper out. If the paper tears, make sure youremove all the pieces.
Troubleshooting 6-19

Paper Jam Problems
3. If the paper is caught under both the roller and the fuser, firstpull the paper out from under the roller in the direction thepaper feeds; then pull it in the opposite direction until the pageis completely free.
4. Close the printer cover and the front cover.
5. When the READY message appears on the display, you canresume printing.
At the paper output area
1. Gently pull the paper in either direction to find the easiest wayto remove it.
2. When the READY message appears on the display, you canresume printing.
6-20 Troubleshooting

Power Supply
Power is not being supplied to the printer.
After you turn on the printer, the display panel remains blank.
l The power cable may be disconnected or may not becompletely plugged into the electrical outlet. Turn off theprinter and check the power cable connections between theprinter and the electrical outlet; then turn the printer back on.
l The problem may be with the electrical outlet itself. If theoutlet is controlled by an outside source such as a wall switch,make sure it is on. If the printer still does not operate, pluganother electrical device into the outlet to check whether theoutlet is operating properly.
The printer turns on briefly, but then the display goes blank andthe printer motor and fan stop running.
l The voltage may not be correct for your printer. Turn off theprinter and make sure the voltage of your electrical outletmatches the rating indicated on the label at the back of theprinter. If the voltages match, try turning on the printer again.If the voltages do not match, disconnect the power cable andcontact your dealer immediately.
Troubleshooting 6-21

Test Prints
The test prints do not print.
The paper does not feed at all.
l You may not have set the correct INPUT paper path withSelecType. See Chapter 3.
l After entering the TEST PRINT option in SelecType Level 2,you may not have pressed long enough to initiate theTEST PRINT. Try running the test again. This time, however,hold down until the display begins to flash.
The paper feeds but nothing is printed.
l The imaging cartridge may need to be replaced. Replace it asdescribed in Chapter 5.
l If the test print still does not print, contact your dealer forassistance.
6-22 Troubleshooting

Printing Problems
The printer does not print or stops printing.
The ON LINE light is on but nothing is printed.
The interface cable may not be plugged in securely. Checkboth ends of the cable between the printer and the computer.If you are using a parallel interface, secure the connector usingthe wire retaining clips.
You may not be using the correct interface cable. Make surethat your interface cable meets the specifications for the printerand computer.
You may not have selected the correct interface settings withSelecType. Select the appropriate interface (serial or parallel). Ifyou are using a serial interface, also set the protocol, baud rate,data bits, and related settings. See your computer manual forthe correct settings and interface requirements.
The software may not be installed properly for your printer.Use the program’s setup (or install) procedure to check theprinter settings then reset the values correctly. Make sure theSelecType printer mode matches your program’s printer driver.See Chapter 2.
The ON LINE light is off.
l The printer is off line. Press the ON LINE button once to setthe printer on line (the ON LINE light comes on).
The printer stops printing and the display reads PAPER OUT orTONER OUT.
l Replace the component specified. See Chapter 2 for paperloading instructions. See Chapter 5 for imaging cartridgereplacement instructions.
Troubleshooting 6-23

Printing Problems
The printout is not what you expect.
The font you selected with software commands cannot be printed.
. The correct orientation (portrait or landscape) may not beselected. Make sure that the orientation (portrait or landscape)matches the selected font. The correct font is not selected if thefont does not contain the selected orientation.
. The font you selected with your software may not be available.Be sure you have installed the correct font cartridge.
Characters not belonging to the selected symbol set are printed.
l The expected symbol set may not be selected. Specify thedesired symbol set (containing international characters orsymbols) with your software or with SelecType. Availablesymbol sets in SelecType vary depending on the selectedprinter mode. See Chapter 3 or the Appendixes for each modefor more information.
All the text is printed on the same line.
l A line feed command is not being sent at the end of each lineof text. If the SelecType Level 1 SUB CONFIG has an AUTOLF option in your mode, turn it to ON.
l If you are using the parallel interface, you may also be able tocorrect this problem by setting the SelecType Level 2AUTOFEED option to ON. See Chapter 3.
Text is printed with an extra blank line in between printed lines.
l An extra line feed signal is probably being sent. If theSelecType Level l SUB CONFIG option has an AUTO LFoption in your mode, turn it to OFF.
6-24 Troubleshooting

Printing Problems
Text is printed with an extra blank line even after you set AUTOLF to OFF.
l Your interface cable may be sending the extra line feedcommand. Disable the AUTO FEED signal of your interface.See the interface specifications in Appendix A.
Every other line of text is printed backwards.
l This may happen if you use a word processing programoriginally set up for use with a daisy-wheel printer. Theprogram is sending every other line backwards to compensatefor the reverse movement of the daisy-wheel print mechanism.See your software manual for information on how to adjust theprogram.
Some or all of the output is garbled or printed as asterisks.
The interface cable may not be plugged in completely.Make sure that both ends of the cable are plugged in securely.
The interface may not be configured correctly. If you are usinga serial interface, make sure that both the computer and printerare set to use the same number of data bits per word and thatthey both use the same parity, baud rate, and number of stopbits.
You can also use the data dump mode to check the data beingsent from the computer as described later in this chapter.
If the printer still does not print correctly, contact your dealer.
Troubleshooting 6-25

Printing Problems
The position of the printout is not what you expect.
The printed page length differs from the actual length of thepaper.
l The page length setting in your application program may beincorrect. Make sure that you have set it for the type of paperyou are using. You can also change the page length with theSelecType SUB CONFIG option as described in Chapter 3, butkeep in mind that your software overrides SelecType settings inmost cases.
The right or left margin setting does not match the actual width ofthe paper.
l The margin settings of your software program may not becorrect. Change the settings of your application program.If this does not correct the problem, you can change the rightand left margins with SelecType. The procedure for changingmargin settings varies depending on the selected operatingmode. See Chapter 3.
Even after changing the page length or margin positions, you findthat the printed position is not correct.
l You may need to set the absolute printing position with theT-OFFSET or L-OFFSET option in the SYSTEM CONFIGmenu of SelecType Level 1. This feature allows you to adjustthe position of the printable area on the page. See Chapter 3for more information on using this feature.
6-26 Troubleshooting

Problems with Graphics
Graphic images do not print.
After changing the printer mode, you are unable to print graphics.
l You may not have the correct printer driver installed. If youtry to print with a software package set for another printer,nothing will be printed. Make sure that the driver matches thecurrently selected operating mode.
You cannot print graphics using the serial interface (RS-232C orRS422).
l The WORD LENGTH option in SelecType Level 2 may not beset correctly. When printing graphics, make sure that you setan 8-bit data word and not a 7-bit word.
When printing a mix of text and graphics, the page does not printor is only partially printed. The display may also show SET FULLPRINT.
l The full print buffer setting needs to be changed. To correctthis error, change the FULL PRINT setting in the SelecTypeLEVEL l SYSTEM CONFIG submenu.
Graphics cannot be printed and the display shows PAGE BUFFERFULL.
l The full print buffer or the receive buffer setting needs to bechanged. to correct this error, change the FULL PRINT orRX-BUFFER setting in SelecType Level 1 as described inChapter 3.
l Your printer may not have enough memory installed. You needto simplify the page or install additional memory. Press theCONTINUE button to clear the error. For information onmemory options, see Chapter 7.
Troubleshooting 6-27

Problem with Graphics
The INSUFF MEMORY message appears and graphics cannot beprinted.
• The full print buffer or the receive buffer setting needs to bechanged. To correct this error, change the FULL PRINT orRX-BUFFER SIZE setting in SelecType Level 1 as described inChapter 3.
• The printer does not have sufficient memory available for thetask you have given it. It may be necessary to simplify thepage you are trying to print or add more memory to theprinter. Press CONTINUE or RESET to clear the error. SeeChapter 7 for information on memory options.
6-28 Troubleshooting

SelecType Problems
SelecType does not function as expected.
Settings made with SelecType are ignored.
The software may either be overriding the SelecType settingsor initializing the printer. The best solution for this problem isto use your software settings instead of SelecType settings.Otherwise, you may need to change the initialization sequencesent by your software. See your software manual for moreinformation.
You may be trying to set certain combinations of settings withSelecType that cannot be acted on by the printer.Usually,SelecType does not allow you to make incompatiblecombinations. However, certain combinations are not checked.
You may not have saved your settings before turning off orresetting the printer. Make sure you save your Level 1 settingswith SAVE MACRO or your Level 2 settings with P’-CONFIGSAVE. Once you save level 1 settings in a macro, you alsoselect a correct macro ID with the POWERON MACROoption. Otherwise, SelecType settings return to their previouslysaved default settings after you turn off or reset the printer.
Desired SelecType settings are not displayed.
l You may be trying to select a setting that is not available inthe currently selected printer mode. Not all settings areavailable in all printer modes. For example, some fonts that canbe selected in LJ-3 mode are not available in LQ or FX mode.To check the options available in your current printer mode,see the Appendixes.
l You may have entered the wrong level of SelecType. Makesure the SelecType light for your selected level is on.You may find it useful to refer to Chapter 3 or the SelecTypemap on the Quick Reference card.
Troubleshooting 6-29

SelecType Problems
After turning on the printer, the message START UP ERROR isdisplayed and your previously selected settings have changed.
• This message may appear if you turned off the printer while itwas in the process of saving settings made with the FACTORYRESET option in SelecType Level 2. If this occurs, the settingsmay not have been saved. Run the status sheet to checkSelecType settings and reset them if necessary as described inChapter 3.
After changing printer modes, you find that your previousSelecType Level 2 settings for that mode have changed.
• You may be trying to set up different SelecType Level 2configurations for a number of printer modes. This is notpossible because SelecType Level 2 settings are not specific to aparticular printer mode. For example, if you change the I/FCONFIG setting from PARALLEL to SERIAL in one mode andsave it with P-CONFIG SAVE, the change is reflected in allprinter modes. However, you can save up to four separateconfigurations for SelecType Level 1 as macros.
6-30 Troubleshooting

Paper Handling
Paper does not feed properly.
Paper does not feed at all.
l The correct paper cassette may not be selected. If you are usingthe optional lower paper cassette, make sure the INPUT menuis set to OPT or AUTO, When you select AUTO, the page sizesetting in the PAGE SIZE menu determines whether paperfeeds from the standard paper cassette. (The size of the paperin the optional cassette is checked first.) See Chapter 3 tochange the INPUT setting.
The ON LINE light is off.
l The printer is off line. Press ON LINE to set the printer online.
Paper feeds crookedly or jams.
Paper feeds crookedly into the printer.
l The paper guides on the optional paper cassette or on themanual feed tray may not be set correctly. Adjust the positionof the guides so that the paper can slide in and out freely. Ifthe paper guides are too tight, they can cause the paper tobind; if they are too loose, the paper may feed crookedly intothe printer.
The paper stops feeding and the FEED JAM or PAPER JAMmessage appears on the display.
l The paper has jammed in the printer. Clear the paper jamfollowing the instructions earlier in this chapter.
Troubleshooting 6-31

Paper Handling
Multiple pages feed into the printer.
l You may not have tapped the paper edges sufficiently toensure smooth paper feeding. If the paper has also jammed,remove it as described earlier in this chapter. Tap the edges ofthe stack of paper firmly on a flat surface to even up the stack;then reinsert the paper. Try printing again.
l Poor quality paper can cause paper feeding errors. Make sureyour paper supply is not too thin or rough. See Chapter 4 formore information on choosing the right paper for your printer.
The paper feeds but then jams at the paper eject area.
l There may be too much paper in the output tray. Never letmore than 150 sheets accumulate in the face-down output trayon top of the printer. If you install the optional face-up outputtray, never let more than 50 sheets accumulate in the face-uptray.
Printed pages curl too much and are not placed in the output trayproperly.
Your paper may be moist or damp. The printer is sensitive tomoisture absorbed by the paper. Do not store your paper in ahumid or damp environment.
You may not be using the correct type of paper for yourprinter. Use smooth, high-quality copier paper for best results.See Chapter 4 for more information on choosing paper.
Most paper has a natural curl that may be emphasized when itis run through a laser printer. Turn the stack of paper over inyour paper cassette and try printing on the other side.
Use the optional face-up tray. This tray provides a straight-through paper path that prevents excessive curling.
6-32 Troubleshooting

Paper Handling
The printer prints a page and then stops.
The display reads PAPER SIZE ERROR and the red CONTINUElight flashes.
l You may be trying to use a paper size that is not on the PAGESIZE menu in SelecType. You may be able to feed this papermanually as described in Chapter 4. Use only paper sizes thatare within the specified range listed in Appendix A.
l The paper size set with the PAGE SIZE option may not matchyour paper size. If the FEED light is out, press CONTINUE.Then make sure that correct paper cassette is selected and thepaper size you want to use matches the PAGE SIZE setting. Ifnot, change the PAGE SIZE setting and save it with the SAVEMACRO option.
l If the orange FEED light is on, indicating that data remains inthe printer, you cannot change SelecType settings. However,you can still enter SelecType Level 1 and check the INPUT andPAGE SIZE settings. If you have inserted an incorrect papersize in the paper cassette, simply replace it with the sizeindicated in PAGE SIZE and continue printing. If the SelecTypesettings are incorrect, press RESET to clear the data in theprinter. Next, change the paper size setting to match the size ofthe paper you are using. Save the new setting with the SAVEMACRO option and continue with your printing. For moreinformation on using SelecType, see Chapter 3.
CAUTION:l When you press the RESET button, any data
remaining in the printer is lost.l If you continue to print using paper that is smaller
than the SelecType setting, toner may accumulate onthe drum and damage the imaging cartridge. Makesure you set the PAGE SIZE option to match thepaper you are using.
Troubleshooting 6-33

Decline in Print Quality
If the print quality declines, read through the following section andtry to match your problem with the descriptions below. Thedescriptions may not always match your problem exactly, so try tofind one of a similar type.
For minor print quality adjustments, see the sections on adjustingthe print density knob and using RITech in Chapter 2.
Note: If the print quality problem remains after you workthrough the suggestions in this section, list the corrective stepsyou have taken and contact your dealer or qualified serviceperson for assistance.
The print quality is not what you expect.Printed pages have a dark or dirty background.
• The print density may be set for darker print. Turn the printdensity knob counterclockwise for lighter print.
l Printer components may be dirty. Clean inside the printer asdescribed in Chapter 5.
• There may be a problem with the imaging cartridge.Replace the cartridge as described in Chapter 5.
Vertical black or white bands or lines appear on printed pages.
• The glass lens on the inside of the printer’s top cover may bedirty. Clean the lens as described in Chapter 5.
l The transfer charger wire may be dirty. Clean the wire asdescribed in Chapter 5.
l The main charger wire may be dirty. The charger wire is a verythin wire in a long slot in the top of the imaging cartridge.Carefully clean the wire with a cotton swab.
l If the print quality problem persists, replace the imagingcartridge as described in Chapter 5.
6-34 Troubleshooting

Decline in Print Quality
Horizontal black or white bands appear on printed pages.
l The transfer charger wire may be dirty. Clean the wire asdescribed in Chapter 5.
l There may be a problem with the imaging cartridge.Replace it as described in Chapter 5.
Periodic dirty marks appear in the printout.
l There may be a scratch on the drum of the imaging cartridge.Replace the imaging cartridge as described in Chapter 5.
Toner smudges across the printed pages.
l The bottom of the imaging cartridge may be dirty. Remove itand wipe the bottom of the cartridge with a clean, dry cloth.Then reinstall it as described in Chapter 5.
l There may be a problem with the imaging cartridge.Replace it as described in Chapter 5.
Ghost images appear on printed pages.
l The cleaning pad may need to be replaced. Replace it asdescribed in Chapter 5.
l The inside of the printer may be dirty. Clean inside the printeras described in Chapter 5.
l There may be a problem with the imaging cartridge.Replace it as described in Chapter 5.
Troubleshooting 6-35

Decline in Print Quality
The darkness of the printout is uneven.
• The transfer charger wire may be dirty. Clean it as described inChapter 5.
l If this does not correct the problem, replace the imagingcartridge as described in Chapter 5.
Irregular areas of missing image appear on the printed page.
l Your paper may be moist or damp. The higher the moisturecontent in the paper, the lighter the printed output. Do notstore your paper in a humid or damp environment.
l You may not be using the correct type of paper for yourprinter. If the surface of your paper is too rough, printedcharacters appear distorted or broken. Smooth, high-qualitycopier paper is recommended for best results. See Chapter 4 forinformation on choosing paper.
l The transfer charger wire may be dirty. Clean it as described inChapter 5.
Completely blank pages are output.
If the TONER LOW warning appears on the display, replacethe imaging cartridge as described in Chapter 5.
The problem may be with your software program or interfacecable. Run a test print or print out a status sheet. If blankpages continue to print, the problem may be with the printer.Contact your dealer or a qualified service person.
If the test print does not print properly, the transfer chargerwire may be broken. Turn off the printer and check the wire.If it is broken, contact your dealer or a qualified service person.
6-36 Troubleshooting

Decline in Print Quality
A black page is printed.
l The imaging cartridge may need to be replaced. Replace it asdescribed in Chapter 5.
The printed image is light or faint.
The print density knob may not be set correctly. Adjust theknob by turning it clockwise.
If the TONER LOW warning appears, replace the imagingcartridge as described in Chapter 5.
The transfer charger wire may be dirty. Clean the wire asdescribed in Chapter 5.
Your paper may be moist or damp. The higher the moisturecontent in the paper, the lighter the printed output. Do notstore your paper in a humid or damp environment.
If the problem persists, replace the imaging cartridge asdescribed in Chapter 5.
The printed image is too dark.
l The print density knob may not be set correctly. Adjust theknob by turning it counterclockwise.
l If the problem persists, replace the imaging cartridge asdescribed in Chapter 5.
The non-printed side of the page is dirty.
l Toner may have spilled in the paper feed path. Clean the insideof the printer as described in Chapter 5.
Troubleshooting 6-37

Options
Using font cards or cartridges, the printer does not operateas expected.
The desired font cannot be selected.
• You may not have inserted the card or cartridge correctly.Reinsert it as described in Chapter 7.
• The SelecType FONT option may not be set correctly. Afteryou install the font card or cartridge, change the FONT settingas described in Chapter 3.
l SelecType may be set to an orientation that does not supportyour font card or cartridge.
Fonts cannot be selected from the card or cartridge and themessage CARD ERROR appears on the display.
l You may not have inserted the card or cartridge correctly. Seethe instructions for inserting font cartridge.
Using the optional lower paper cassette unit, the printerdoes not operate properly.
Paper does not feed from the lower paper cassette.
The INPUT menu in Level 1 may be set to STD. To use thelower paper cassette, the INPUT option must be set to OPT orAUTO. Change this setting as described in Chapter 3.
There may be no paper in the lower paper cassette tray.Load paper into the lower paper cassette tray.
The paper tray in the lower paper cassette may not be installedproperly. See Chapter 7 for instructions on using the lowercassette.
You may have loaded too much paper into the lower papercassette tray. The tray holds a maximum of 250 sheets ofpaper.
6-38 Troubleshooting

Options
Several sheets feed into the printer at one time and cause a jam.(The FEED JAM or PAPER JAM message appears on the display.)
You may not be tapping the stack of paper sufficiently beforeyou load it. Remove the jammed paper as described earlier inthis chapter. Before reloading paper, be sure to tap the paperfirmly to even up the edges of the stack. Do not load pagesthat are creased or folded.
You may not be using the correct paper for your printer.If the finish of the paper is too smooth or too rough, paperfeeding may be difficult. Try feeding each sheet manually fromthe standard paper cassette. Make sure your paper matches thespecifications listed in Appendix A.
The thickness of the paper also affects paper feeding.Always test your paper before purchasing it in large quantities.
The feed roller may be dirty. Clean the roller as described inthe maintenance section for the optional lower cassette inChapter 5.
Using the optional face-up output tray, the printer doesnot operate properly.
The paper does not feed onto the face-up tray.
l The face-up tray may not be installed properly. See Chapter 7for information on installing the face-up output tray.
l You may not have set the paper path correctly. Make sure thatthe paper path selector is set in the FACE UP position asdescribed in Chapter 4.
The paper feeds but then jams at the output area.
l There may be too much paper in the output tray. Never letmore than 100 sheets accumulate in the face-up output tray.
Troubleshooting 6-39

Options
After installing additional memory (memory chip set or amemory expansion board), the printer does not function asexpected
After you turn on the power, the RAM Check message does notdisplay the expected amount of memory.
• The RAM chips or the optional memory board may not beinstalled correctly. Turn off the printer and check theinstallation. Make sure that the chips are installed in thecorrect sector of the main board and that each chip is firmlyseated in its socket. Also make sure that the notches on thechips are all pointing in the correct direction. See Chapter 7 fordetailed instructions.
• If you are using the memory board (C82206*), you may nothave set the DIP switches correctly. See Chapter 7 forinstructions on installing the memory board.
Complex pages still cannot be printed and the INSUFF MEMORYmessage appears on the display.
l The SelecType FULL PRINT, RX-BUFFER SIZE, orINDIVIDUAL setting may need to be changed. See Chapter 3for more information.
l You may not have installed enough memory. You can add upto 6.5 MB of memory for a total of 7.5 MB. See Chapter 7 forinstructions on increasing the printer’s memory. If you haveadded all of the extra memory possible and the error messagecontinues to appear, you may have to simplify the documentyou are trying to print.
6-40 Troubleshooting

Data Dump Mode
Data dump mode is a special feature that makes it easy forexperienced users to find the cause of communication problemsbetween the printer and computer. In data dump mode, the printerproduces an exact printout of the codes it receives.
1. Make sure that paper is loaded and the printer is off.
2. Hold down the SelecType button while you turn on theprinter. Make sure you hold the button down until you seemessage HEX DUMP on the display.
3. Next, run any program that causes the printer to print (eitheran application program or a program written in anyprogramming language). Your printer prints out all the codes itreceives in hexadecimal format, as shown below.
0000 16 52 10 16 43 45 18 68 00 16 70 00 16 63 OC 1B0001 74 01 1B 32 54 72 6F 75 62 6C 65 20 73 68 6F 6F0002 74 69 6E 67 20 20 20 20 20 OD OA 54 68 69 73 200003 63 68 61 70 74 65 72 20 64 69 73 63 75 73 73 650004 73 20 70 72 6F 62 6C 65 6D 73 20 79 6F 75 20 6D0005 61 79 20 65 6E 63 6F 75 6E 74 65 72 20 61 6E 640006 20 74 68 65 69 72 20 6C 69 6B 65 6C 79 20 73 6F0007 6C 75 74 69 6F 6E 73 2E 20 OD OA 0D OA 49 66 200008 61 6E 20 65 72 72 6F 72 20 6F 63 63 75 72 73 2C0009 20 79 6F 75 72 20 62 65 73 74 20 73 6F 75 72 63000A 65 20 6F 66 20 69 6E 66 6F 72 6D 61 74 69 6F 6E0006 20 OD OA 69 73 20 74 68 65 20 64 69 73 70 6C 61000C 79 20 6F 6E 20 74 68 65 20 63 SF 6E 74 72 6F 6C000D 20 70 61 6E 65 6C 2E 20 OD OA
******** HEX DUMP LIST ******** PAGE 1
.R..CE.k..p..c..t..ZTrouble shooting ..Thischapter discusses problems you may encounter andtheir likely so
lutions. . . ..Ifan error occurs,your best sourc
e of information. . is the displa
y on the controlpanel. . .
Troubleshooting 6-41

Data Dump Mode
4. To turn off the data dump mode and stop printing, press ONLINE to set the printer off line. (If you press ON LINE while apage is being printed, the green ON LINE light flashes until thepage is ejected and the printer goes off line.) To exit the datadump mode, turn off the printer.
Look at the sample data dump printout. By reading the charactersprinted in the text field on the right side of the data dumpprintout or the printout of hexadecimal codes, you can check whatcodes are being sent to the printer. In the text field, printablecharacters appear as their true ASCII characters. Non-printablecodes, such as control codes, are represented by dots.
To interpret a data dump printout, look at the first twohexadecimal codes on line 0004 of the printout sample (73 20).Code 73 represents the letter s; code 20 represents a space.Check the fifth line of the text field on the right side of theprintout and you will find the letter s followed by a space.
6-42 Troubleshooting

Data Dump Mode
Converting hexadecimal numbers to decimals
If you prefer to use decimal numbers instead of hexadecimalnumbers, you can convert them with the chart below.
Just read down the column for the first digit of the hexadecimalvalue and across in the row for the second digit. The decimal valuethat corresponds to your hexadecimal number is at the intersectionof the column beginning with the hexadecimal number’s first digitand the row beginning with the hexadecimal number’s seconddigit.
For example, to find the decimal equivalent of the hexadecimalnumber 5A, find where column 5 intersects row A. There you willfind the hexadecimal’s equivalent, decimal 90.
Hex- to-decimal con version chart
CODE
0
1
2
3
4
5
6
7
8
9
A
B
C
D
E
F
0 1 2 3 4 5 6 7 8 9 A B C D E F
0 l6 32 48 64 80 96 112 128 144 l60 176 192 208 224 240
1 17 33 49 65 81 97 113 129 145 l61 177 193 209 225 241
2 18 34 50 66 82 98 114 130 146 162 178 194 210 226 242
3 19 35 51 67 83 99 115 131 147 163 179 195 211 227 243
4 20 36 52 68 84 100 116 132 148 164 180 196 212 228 244
5 21 37 53 69 85 101 117 133 149 165 181 197 213 229 245
6 22 38 54 70 86 102 118 134 150 166 182 198 214 230 246
7 23 39 55 71 87 103 119 135 151 167 183 199 215 231 247
8 24 40 56 72 88 104 120 136 152 168 184 200 216 232 248
9 25 41 57 73 89 105 121 137 153 169 185 201 217 233 249
10 26 42 58 74 90 106 122 138 154 170 186 202 218 234 250
11 27 43 59 75 91 107 123 139 155 171 187 203 219 235 251
12 28 44 60 76 92 108 124 140 156 172 188 204 220 236 252
13 29 45 61 77 93 109 125 141 157 173 189 205 221 237 253
14 30 46 62 78 94 110 126 142 158 174 190 206 222 238 254
15 31 47 63 79 95 111 127 143 159 175 191 207 223 239 255
Troubleshooting 6-43

Data Dump Mode
6-44 Troubleshooting

Chapter 7Options
Identity Cards .......................................................................... 7-2Epson PostScript card.. ....................................................... 7-2Epson GL identity card ...................................................... 7-3Caring for identity cards.. .................................................. 7-3Inserting an identity card.. ................................................. 7-4Removing an identity card ................................................ 7-5Recovering from an error.. ................................................. 7-5
Font Cartridges ........................................................................ 7-6Compatible font cartridges ................................................ 7-7Inserting a font cartridge .................................................... 7-10Selecting fonts ..................................................................... 7-11Removing a font cartridge ................................................. 7-11Recovering from an error ................................................... 7-12
The Lower Paper Cassette Unit ............................................ 7-13Installing the lower paper cassette unit ........................... 7-13
The Face-up Output Tray ..................................................... 7-16Installing the face-up output tray .................................... 7-16
Optional Interface Cards ........................................................ 7-18Installing an interface card ................................................ 7-19
Memory Options .................................................................... 7-22When to increase the printer memory ............................. 7-23Selecting a memory option ................................................ 7-23Installing additional memory ............................................. 7-25Checking the printer’s memory.. ....................................... 7-36
Options 7-1

Identity CardsAn identity card allows you to operate your printer in an optionalprinter mode. Two of the identity cards available for this printerare the Epson PostScript card and the Epson GL card. See yourdealer about the availability of other identity cards.
Note: You cannot use identity cards #5690 and #5691 withthis printer.
You can use only one identity card at a time. The card must beinstalled in slot A.
Note: You can also use optional font cards in slots A and B.Check with your dealer for availability.
Epson PostScript card
Follow these guidelines when using the optional Epson PostScriptidentity card.
You must allocate at least 1.5 megabytes (MB) of RAM for thechannel that will use the PostScript mode. This means youneed to add at least 0.5MB of RAM to your printer before youcan use PostScript. See “Memory Options” later in this chapter.You can select the PostScript mode for one channel at a timeonly.When you are using legal-sized paper, you may find that theprintable area is smaller than you expect. To clear this problem,decrease the RX-BUFFER SIZE option or increase the availableRAM. See Chapter 3 for instructions on using SelecType, or see“Memory Options” later in this chapter for information onadding RAM.
If you set MODE ASSIGN to one of the IES settings, be sureto turn off the start page printing feature in PostScript. If boththe automatic emulation switching feature and the start pageprinting feature are on, the printer prints the start page eachtime it switches from LJ-3 mode to PostScript mode.
For more information on the features the PostScript card offers,see “Switching the Emulation Mode” in Chapter 2.
7-2 Options

Identity Cards
Epson GL identity card
Follow these guidelines when using the Epson GL card.l You must allocate at least 1.5 MByte of RAM for the channel
that will use Epson GL mode. This means you need to add atleast 0.5 MB of RAM to your printer before you can use GLmode. See “Memory Options” later in this chapter.
l The printer ignores device control commands from optionalinterfaces even if the interface is serial. Use the printer’s serialinterface to enable the additional device control commands.
l The following restrictions apply when you are running theEpson GL mode using Channel S with the AUTOSENSE setting:-The power-on default channel becomes Channel S-Channel S cannot receive any data when another channel is
receiving data-You can select Channel S only when the FEED light is off.
l The maximum number of copies you can choose SelecType is99.
Caring for identity cards
When you use the cards, follow these precautions:Do not drop, crush, or bend the cards. Their curvature does notaffect their operation; do not try to straighten them.
Avoid touching the small gold connectors (contacts) along thecard’s edge.
If the card becomes dirty, clean the connectors by wiping theedge with a clean tissue. Do not use water, alcohol, or othersolvents to clean it.
Keep the cards in their slip cases and blue antistatic bags whenyou are not using them.
Do not store cards in direct sunlight or near heat sources. Theycan withstand temperatures from -30°C to 65°C (-29°F to150°F) and up to 90% humidity.
Options 7-3

Identity Cards
l Be careful when you insert and remove a card. You can damageit by attempting to insert it in the wrong way or by using toomuch force.
l Always turn the printer off before you insert or remove a card.
Inserting an identity card
You can insert an identity card into slot A only.
1. If the printer’s power is on, turn it off.
2. Hold the card so its arrow faces the side of the slot markedwith an arrow.
3. Gently slide the card into the slot until it is flush with thefront of the printer.
4. Turn on the printer.
CAUTION: If the message ILLEGAL CARD appears onthe display, repeat steps 1 through 4.
Now you can select the mode that the card offers. See thecard’s manual for more information.
7-4 Options

Identity Cards
Removing an identity card
1. Turn off the printer.
CAUTION: Never remove the card when the printer’spower is on.
2. Grasp the card at the center and gently pull it straight out ofthe slot.
Recovering from an error
When the display shows one of the following messages, a carderror has occurred:
REINSERT CARDILLEGAL CARDREMOVE CARDCARDMEMORY OVERFLOW
See “Status and Error Messages” in Chapter 6 for instructionson solving the problem.
Options 7 - 5

Font Cartridges
Optional fonts are available with optional font cartridges.
Font cartridges provide many different typestyles in addition toyour printer’s internal fonts. The printer has one slot for a fontcartridge, a variety of which are available from your dealer.
Note:. For slots A and B on the right side of the printer, optional
font cards may also be available from your dealer. Availablefonts vary by a printer mode; see the Appendixes for moreinformation on the available fonts.For instructions on caring for cards, see the previous sectionon identity cards. For details on inserting and removingcards, follow the instructions in this section, except that youuse Slot A or Slot B instead of Slot C.
• You can use font cartridges only in HP emulation mode(LJ-3). To change the printer mode, use the SelecTypeMODE ASSIGN option described in Chapter 3.
7-6 Options

Font Cartridges
Compatible font cartridges
The table below lists all font cartridges that you can usewith the printer. Each font cartridge manual contains informationabout its character and symbol sets.
Note: Some of these fonts may be the same as your printer’sfonts. See the Appendixes for a list of the fonts and charactersets available in each printer mode.
Bitmap font cartridges
Supplier Cartridge number Cartridge
HP 92286A Courier 1922868 Tms Proportional 192286C International 192286D Prestige Elite92286E Letter Gothic92286F Tms Proportional 2922866 Legal Elite92286H Legal Courier92286J Math Elite92286K Math TmsRmn92286L Courier P&L92286M Prestige Elite P&L92286N Letter Gothic P&L92286P TmsRmn P&L922860 Memo 192286R Presentattons 192286T Tax 192286U Forms Portrait92286V Forms Landscape92286W Bar Code 3-of-9/OCR A92286X EAN/UPC/OCR-B92286Y PC Courier 1922862 Microsoft 192290s 1 Courier Document 19229032 TmsRmn/Helv Report 192286PC ProCollection92286lC International CollectionC2055A #CO1 Great StartC2053A #CO 1 WordPerfectC2053A # CO2 MicrosoftC2053A #CO3 Polished Worksheets
Options 7-7

Font Cartridges
Supplier
HP
Anacom
Cartridge number Cartridge
C2053A #C04 Persuasive PresentationsC2053A #C05 Forms Etc.C2053A #C06 Bar Codes & MoreC2053A #C07 Text EquationsC2053A #C08 Global TextC2053A #C09 Pretty Faces
AlfaJet MX-1 Maxi-One CartridgeAlfaJet PC Maxi-Pro Cartrige
Peripherals JetFont SupersetJetFont 12/30JetFont 4-in-1JetFont SuperSet InternationalJetFont 425-in-One SuperSet Plus
Everex HardFont Cartridge BHardFont Cartridge FHardFont Cartridge THardFont Cartridge ZHardFont Cartridge LGLHardFont Cartridge SSTHardFont Cartridge BSTHardFont Cartridge All-in-1HardFont Cartridge A-TO-Z
IQ Super Cartridge 1Super Cartridge 2Super Cartridge 2LSuper Cartridge 2LCSuper Cartridge 2WPSuper Cartridge 2XPSuper Cartridge 2LSSeries II Package
Pacific 25 Cartridge in One Original Verslon25 Cartridge in One 17225 in One! IllHeadlrnes in a Cartridge
UDP DT1-TMS RMNDT2-HELVDP4-TMS RMNIHELVH-65 International 65.in-Onel-65 International 65-in-OnePRO 6586-IC25 PlusTurbo 25
7-8 Options

Font Cartridges
Supplier
UDP
lntercon
Bitstream
Cartridge number
CTG-A00 1 TYPE CITY STARTER PACK, DELI ADD-ON CARDMOD-A00 1 CENTRAL PARK ADD-ON CARDMOD-A002 SKYSCRAPER ADD-ON CARDMOD-A003 SOHO ADD-ON CARDDMOD-A004 CENTURY SCHOOLBOOK ADD-ON CARDMOD-A005 HUMANIST 521 ADD-ON CARDMOD-A006 BITSTREAM CHARTER ADD-ON CARDMOD-A007 DUTCH 901 ADD-ON CARDMOD-A008 HEADLINES II ADD-ON CARD
Scalable font cartridges
Cartridge
Super TimesT&F Tax and FinanceWP Plus C1MS Plus C1Spread sheets C3Presentation Plus C4Forms C5Bar Codes C6Equations C7Global C8
PHONT+PRO IIP
Supplier Cartridge number Cartridge
HP C205OB
C205OC# C8O/C90
# C8O/C90
Word Perfect
Pacific Pacific Outlines I
Pacific Outlines II
COMPLETE FONT LIBRARY CARTRIDGE
IQ Super Cartridge 3
CAUTION: Do not use any other HP font cartridgeswith your printer, or you may damage it.
Options 7 - 9

Font Cartridges
Inserting a font cartridge
You can insert a font cartridge into slot C located on the front ofthe printer.
CAUTION: Do not touch the connectors on the cartridgeor on the printer’s cartridge slot; you could damage them.
1. Make sure the printer is off or off line.
2. Hold the cartridge so its label faces left, as shown below.
3. Insert the cartridge into the slot and press firmly until it snapsinto place.
7-10 Options

Font Cartridges
4. Turn on the printer or set it on line.
CAUTION: If the message REMOVE CARD appears onthe display, you inserted the cartridge when the printerwas on line or when its memory contained data. If yousee this message, remove the cartridge and pressCONTINUE: then repeat steps 1 through 4.
Selecting fonts
Once you have inserted a font cartridge, you can select the fontsyou want to print using SelecType or your application program.
The steps to select a font with SelecType vary by the printer modeyou are using. See the appendix for information on the FONToption in that mode.
To select a font with an application program, see the Appendixes(depending on which printer mode you are using) for moreinformation.
Removing a font cartridge
CAUTION: Never remove a font cartridge when theprinter is on line, in SelecType mode, or resetting itself.If you do, a REINSERT or REMOVE CARD messageappears on the display. You will also see one of thesemessages if you remove a cartridge when the FEED lightis on (even if the printer is off line).
Options 7-11

Font Cartridges
1. Make sure the printer is off line or turned off. If the FEEDlight is on, press FEED to print out any data before youremove the cartridge.
2. Remove the cartridge by grasping it at the top and slowlypulling it straight out of the slot.
Recovering from an error
When the display shows one of the following messages, a carderror has occurred:
REINSERT CARDILLEGAL CARDREMOVE CARDCARDMEMORY OVERFLOW
A card error occurs if you insert or remove a font cartridge whenthe printer is on line or when its memory contains data.You cannot use the cartridge or print documents until you solvethe problem. See “Status and Error Messages” in Chapter 6 forinstructions.
7-12 Options

The Lower Paper Cassette Unit
The optional lower paper cassette unit is an automatic sheet feederthat fits directly beneath the printer. It houses the adjustable papercassette, which holds up to 250 sheets of paper to supplement thestandard paper cassette’s 250-sheet capacity.
With the optional cassette installed, you can load two differentsizes of paper in your printer at once: one in the lower cassette andthe other in the standard cassette. You can also use the SelecTypeINPUT AUTO setting to use both cassettes and print up to 500sheets of the same size paper.
Installing the lower paper cassette unit
If you purchased your printer and lower paper cassette unit at thesame time, first set up your printer by following the instructions inChapter 1 and then run a print test (described in Chapter 2). Then,when you are sure the printer is working properly, install theoptional cassette unit.
1. Turn off the printer.
2. Unplug the printer’s power cord from the electrical outlet andfrom the printer. Also unplug the interface cable.
3. Remove the face-up tray, if it is installed, by lifting it upslightly and pulling it out.
4. Move the printer and place the lower paper cassette in thelocation where you will operate your printer.
Options 7-13
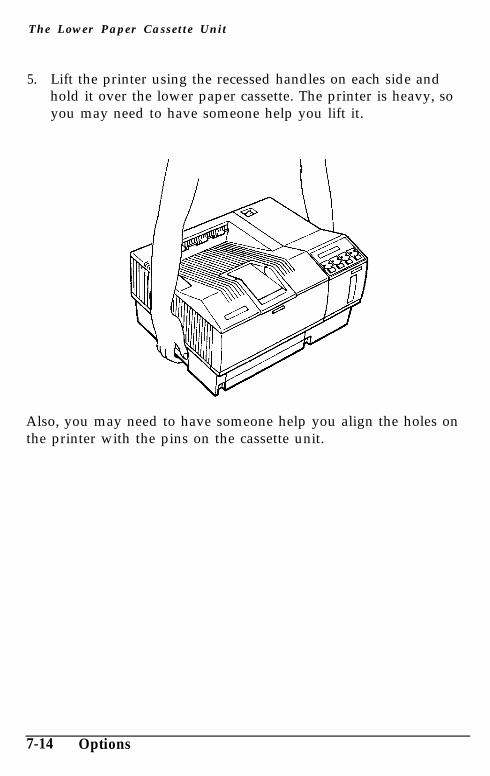
The Lower Paper Cassette Unit
5. Lift the printer using the recessed handles on each side andhold it over the lower paper cassette. The printer is heavy, soyou may need to have someone help you lift it.
Also, you may need to have someone help you align the holes onthe printer with the pins on the cassette unit.
7-14 Options

The Lower Paper Cassette Unit
6. Make sure the front of the printer faces the same way as thefront of the cassette. Then align the printer with the cassetteusing the two alignment pins, shown below. These pins fit intothe two holes on the bottom of the printer. Lower the printeruntil it rests on the cassette unit.
7. Plug the power cord back into the printer and into an electricaloutlet. Also re-attach the interface cable.
8. Turn the printer on. On the right of the display, you see boththe size of paper in the standard cassette and the size of paperin the lower paper cassette unit.
READY:P LY-3 -- A4
If you use A4 size in the optional cassette and the standardcassette is empty, you see the above display.
For information on using this option, see “Using the OptionalLower Paper Cassette” in Chapter 4 and “Level 1 Options” inChapter 3.
Options 7-15

The Face-up Output Tray
The printer normally delivers paper face down on top of theprinter. If you want face-up delivery, you can install the optionalface-up output tray. This tray gives you immediate viewing ofyour printed output and is recommended for printing on mediasuch as labels and overhead transparencies that require a straight-through paper path.
Installing the face-up output tray
1. Unpack both the tray and the static brush from the carton.
2. Turn off the printer.
WARNING: If you have used the printer recently, let itcool before you proceed.
3. Snap the static brush onto the upper edge of the face-upoutput slot shown below.
7-16 Options

The Face-up Output Tray
4. Slide the tray into the bottom of the face-up output slot so thenotches on each side fit under the tabs on the side of the slot.
The printer is factory set for face-down output. To select face-updelivery, set the paper path selector to the FACE UP position, asshown below.
Options 7-17

Optional Interface Cards
You can use various interface cards to supplement the capabilitiesof your printer’s built-in hardware interfaces. If you want to useChannel 0 (optional interface) instead of or in addition to ChannelP (parallel interface) or Channel S (serial interface), you mustinstall an optional interface card. See Chapter 2 for moreinformation about these channels.
The following Epson interface cards are compatible with yourprinter:
Interface Card Model Number
Serial Interface Card C823051/C82306132KB Serial Interface Card C823071lC82308132KB Parallel Interface Card C82310*32KB IEEE-488 Interface Card C82313*Interface Card for LocalTalk™ C82312*
* The asterisk is a substitute for the last digit, which varies by country.
If you’re not sure whether you need an optional interface or if youwant to know more about interfaces, contact your dealer.
7-18 Options

Optiona I Interface Cards
Installing an interface card
1. Turn off the printer.
2. Unplug the power cord from the electrical outlet and from theback of the printer.
3. Turn the printer around so you are facing the back anddisconnect any interface cables.
4. Use a cross-head screwdriver to remove the two screwssecuring the shield plate to the optional interface slot; then liftoff the plate. Be sure to keep both screws; you may use themagain in step 7.
Options 7-19

Optional Interface Cards
5. Slide the interface card into the grooves in the top and bottomof the interface slot shown below. Push it in firmly to makesure it connects to the printer’s internal socket.
6. Secure the interface card in the slot with the two screwsincluded with the interface card.
7-20 Options

Optional Interface Cards
7. Connect the proper interface cable to the interface card and toyour computer. If the cable has a grounding wire, connect itwith a screw you removed in step 4, as shown below.
Also, connect other interface cables, if you are using more thanone computer. Use the other screw you removed in step 4 toconnect the grounding wire. See “Connecting the Printer toYour Computer” for which screw you should connect.
8. Make sure the printer is turned off. Then plug the power cordinto the printer and into an electrical outlet.
Before you use the optional interface, you may need to change thesetting for the printer mode and the interface option in SelecType.If your optional interface is parallel and you want to use the HPemulation mode with it, you do not have to change these settings.If you need to change any settings, see Chapter 3 for instructions.
Options 7-21

Memory Options
The printer comes with 1MB of Random Access Memory (RAM).If you regularly print complex pages using graphics or downloadedfonts, you may need to increase your printer’s memory. You canincrease it up to 7.5MB.
You have two options for adding memory to your printer:
l Increase the memory on the main controller board with .5MBmemory chip sets. You can install up to two chip sets for atotal of 1MB of additional RAM (2MB RAM total).
l Add a OK memory expansion board and install up to four 2MBchip sets and/or .5MB chip sets for a total of up to 6.5MB ofadditional RAM (7.5 MB RAM total).
You can install memory on either the controller board or the OKexpansion board or both.
There are two types of chip sets you can buy:
. .5MB chip sets each containing four 256Kbit X 4 Sons DRAM20-pin DIP chips
l 2MB chip sets each containing four 1Mbit X 4 Sons DRAM20-pin DIP chips
You can install 5MB chip sets on the controller board or the OKexpansion board; you can install 2MB chip sets only on the OKexpansion board.
Note: You can use the 0.5MB or 2.OMB expansion board(C82201* or C82203*) in your printer with the followingconditions:l You must first increase the controller board’s memory to its
full 2OMB capacity.l You can use only 0.5MB chip sets to fill the expansion
board.l You do not need to change any DIP switches.
7-22 Options

Memory Options
When to increase the printer memory
The printer displays one of these status messages when you haveinsufficient memory.
• INSUFF MEMORY
• PAGE BUFFER FULL
• ADD MEMORY FOR CH X
These messages are described in more detail in Chapter 6.If one of these messages appears, you can try to reclaim anyunused RAM by changing the settings for the SelecType FULLPRINT and RX-BUFFER SIZE options. See Chapter 3 forinformation on changing these options. If insufficient memory isstill a problem, you can install additional memory, as described inthis section.
Using an optional identity card requires at least 1.5MB of RAM.Therefore, you must add at least 0.5MB of additional RAM toyour printer to use an identity card.
If you use the INDIVIDUAL setting in SelecType, each channelrequires at least 0.5MB of RAM. Therefore, if you plan to usemore than two interface channels, you must add RAM to yourprinter.
Selecting a memory option
Before adding memory, you should determine the combination ofcomponents you need to use to obtain the total amount of memoryyou want. Keep in mind that your printer comes with 1MB ofinternal memory.
If you need more than 2MB of RAM, you can install the OKBexpansion board and use either OSMB or 2MB chip sets.
The table below describes the chip sets you can install on thecontroller board and/or the OKB expansion board.
Options 7-23

Memory Options
* If you install 6.5MB of memory on the OKB expansion board, you do not need toinstall any additional chip sets on the controller board; your printer can access amaximum of 7.5MB.
7-24 Options

Memory Options
Installing additional memory
To install a memory chip set or a memory expansion board youneed a cross-head screwdriver and a chip puller or a flat-headscrewdriver. If you have questions about installing the chipset or the board, contact your dealer for assistance.
WARNING: High voltages are present inside the printerwhen the power is on. Do not attempt to remove thecontroller board unless the printer is turned off and thepower cord is unplugged. Also, try not to touch thecontacts on the printer’s circuit board because many ofthe components can be destroyed by the static electricityin your body.
The rest of this chapter describes the procedures for installing amemory chip set and/or the OK expansion board.
Removing the controller board
1. Unplug the power cable from the electrical outlet and from theback of the printer.
2. Disconnect all interface cables from the back of the printer.
Options 7-25

Memory Options
3. Remove the four screws that secure the metal bracket on theback of the printer. Keep the screws so you can use them toreinstall the controller board.
4. Press down on the lever at the bottom of the bracket to releasethe controller board, as shown below. Press firmly until theboard pops out slightly.
7-26 Options

Memory Options
5. Grasp the board with both hands and pull it straight out of itsslot.
6. Set the controller board on a clean, stable surface with thebracket (connector) facing to your right and the componentsfacing up.
7. If you have installed an optional interface card, you mustremove it before you can install a memory chip set on thecontroller board. Grasp the interface card and pull it straightout of the interface slot.
Note: If you are installing chip sets on the controller board, youmay want to remove the plastic guide rail above the RAM chipsockets. To do so, release the two tabs that secure the guide railand lift it off the board. Replace the rail after you install thechips.
Options 7-27

Memory Options
Installing chip sets on the controller board
The RAM chip sockets are located on the upper right side of thecontroller board.
There are two sectors on the board, each containing four chipsockets (identified by their IC numbers), as shown below.
If both two sectors are empty, install the first chip set in sector 1.If sector 1 is already filled, install the second chip set in sector 2.
Sector IC number Total RAM when filled I
1 10, 11, 12, 13 1.5MB
2 14, 15, 16, 17 2MB
CAUTION: You cannot install a 2MB chip set on thecontroller board; you can only use the .5MB chip sets.
7-28 Options

Memory Options
Follow these steps to install a memory chip set:
1. Make sure all the pins on the chip are aligned. They shouldpoint inward at slightly less than a 90” angle, as shown below.
If any of the pins are bent incorrectly, gently push them backinto alignment.
2. Line up the pins on the RAM chip with the holes in thesocket. Be sure that the small notch on the end of the chip istoward your right.
Options 7-29

Memory Options
3. Gently press the chip halfway into the socket. If it goes in atan angle, remove it with a chip puller or a small flat-headscrewdriver; then reinsert the chip.
CAUTION: Be careful not to scratch the chip or theboard when removing the chip.
4. Once the chip is properly inserted, push down firmly onboth ends to make sure it is fully seated.
5. Repeat steps 1 through 4 for each of the remaining chips.
6. Reinstall the interface card, if necessary.
Installing chip sets on the memory expansion board
There are four sectors on the memory expansion board, eachcontaining four chip sockets (identified by their IC numbers).
7-30 Options

Memory Options
The four sectors must be filled in alphabetical order. For example,if you are installing your first chip set, install it in sector A. Theninstall your next chip set in sector B and so on. See the table under“Selecting a memory option,” earlier in this chapter, for a list ofthe RAM configurations possible.
Before you install the chips, check their pin alignment as describedin step 1 of the previous section. Then follow these steps:
1. Place the expansion board on your work surface with thecomponents facing up.
2. Align the chip’s pins with the holes in the socket. Be sure thesmall notch on the end of the chip is facing in the directionshown below.
Options 7-31

Memory Options
3. Press the chip into the socket as described in steps 3 and 4 ofthe previous section.
4. Set the board’s DIP switches to indicate the amount of memoryyou have installed. Use a pointed object, such as a ball-pointpen, to set the DIP switches as shown below.
Set the switches according to the tables below.
DIP Switch
12
RAM (internal and amount added to controller board)
1MB 1.5MB 2MB
OFF ON ONON OFF ON
DIP Switch Sector
3 A4 B5 C6 D
ON OFF
2MB .5MB2MB .5MB2MB .5MB2MB .5MB
7-32 Options

Memory Options
Installing the expansion board on the controller board
1. Locate connector CN3 on the controller board. Position thememory expansion board as shown below, and carefully insertits connector into connector CN3.
2. Secure the expansion board with the three screws that camewith it.
Options 7-33

Memory Options
Reinstalling the controller board
1. Hold the controller board so the component side faces yourleft, and fit its top and bottom edges into. the grooves insidethe slot. Gently slide the board about halfway into the printer.
2. Make sure the lever on the bottom of the controller board is allthe way down. As you slide the board further into the printer,make sure the lever’s tab is positioned inside the opening inthe bracket, as shown below.
7-34 Options

3.
4.
5.
6
7.
Memory Options
Now slide the controller board into the printer. Thelever pivots outward. Firmly press up on the lever to lock theboard into place.
If the controller board does not fit smoothly into the printer,do not force it. Remove it and make sure the edges fit properlyinto the grooves in the slot.
Gently press in on the board to make sure it is fully seated.Then secure the board with the four screws you removedpreviously.
Replace the optional interface card, if you removed one.
Connect any interface cables you removed.
Be sure the power is turned off and then plug the power cordinto the printer and into an electrical outlet.
Options 7-35

Memory Options
Checking the printer’s memory
Perform the following steps to verify that you installed the chipsets properly and that the printer recognizes the memory:
1. Turn on the printer. You should then see the following:
l All indicator lights on the panel light briefly
l The ROM Check message appears.
2. When the RAM Check x.xMB message appears, make sure theprinter displays the total amount of RAM that you now haveinstalled (including the 1MB of internal memory).
If an incorrect amount appears, turn off the printer and removethe controller board. Make sure you installed each chip set inthe correct sector and that each chip is fully seated. If theRAM check message is still incorrect, contact your dealer forassistance.
7-36 Options

Appendix ATechnical Specifications
Printer Specifications ............................................................. A-2Printing ................................................................................ A-2Paper and paper delivery .................................................. A-3
Consumable products ........................................................ A-5Mechanical .......................................................................... A-6Electrical .............................................................................. A-7Controller hardware ........................................................... A-7Environmental .................................................................... A-7
Interface Specifications .......................................................... A-8Parallel interface.. ............................................................... A-8Serial interface .................................................................... A-11
Initialization . . . . . . . . . . . . . . . . . . . . . . . . . . . . . . . . . . . . . . . . . . . . . . . . . . . . . . . . . . . . . . . . . . . . . . . . . . . . A-15
Option Specifications.. .......................................................... A-16Lower paper cassette unit ................................................. A-16Face-up output tray ........................................................... A-17
Shared Printer Language . . . . . . . . . . . . . . . . . . . . . . . . . . . . . . . . . . . . . . . . . . . . . . . . . . . . . . . A-18
A p p e n d i x A A - 1

Printer Specifications
Printing
Printing method: Laser beam scanning and dryelectrophotographic process
Resolution: 300 X 300 dpi
Printing speed: Up to 10 pages per minute (letter or A4)(depending on the font and quantity ofdata)
First print: Less than 18 seconds with A4 or letter
Warm-up time: 70 seconds or less at normal temperature
Printer modes:• HP LaserJet series III emulationl ESC/P 24-pin printer emulation (LQ-2500)• ESC/P 9-pin printer emulation (FX-800/1000, FX-86e/286e)
IC card slots: 2 slots for identity or font cardsl Slot A holds identity or font cardsl Slot B holds font cards only
Cartridge slot: 1 slot for font cartridges
Resident fonts: Depends on the printer mode; see theappendixes
External fonts: Optional fonts provided with font cards orcartridgesDownload fonts
A-2 Appendix A

Printer Specifications
Paper and paper delivery
Paper specifications
Types: • Plain paper• Special papersl Labelsl Envelopesl Transparenciesl Colored paperl Card stock
Epson does not recommend or guarantee any particular brand ofpaper. Because paper characteristics are subject to change byindividual manufacturers, it is your responsibility to ensure thequality of paper used with the printer.
Paper weight: Plain paper: 60 to 90 g/m2, 16 to 24 lbCard stock: 90 to 157 g/m2, 24 to 42 lb
Appendix A A-3

Printer Specifications
Paper sizes:Paper: Type
A4A5B5LetterHalf-LetterLegalGovernment LetterGovernment LegalExecutiveF4
Envelope: Monarch 3 7/8 X 7 l/2 inchesCommercial 10 4 l/8 X 9 l/2 inchesDL 110 X 220 mmC.5 162 X 229 mm
Size210 X 297 mm148 X 210 mm182 X 257 mm8.5 X 11 inches5.5 X 8.5 inches8.5 X 14 inches8.0 X 10.5 inches8.5 X 13 inches7.25 X 10.5 inches210 X 330 mm
Printable area:Depends on the printer mode. See the Appendixes.
Range of paper width and length:
Paper cassette
Width
Size of yourstandard cassette
Length
Size of yourstandard cassette
1 Manual feed 86 to 216 mm(3.4 to 8.5 inches)
140 to 356 mm(5.5 to 14 inches)
A-4 Appendix A

Printer Specifications
Paper feed alignment and direction:Center alignment for all sizes
Paper feed: Automatic or manual feed
Input paper supply (75 g/m2 or 20 lb paper):250 sheets250 additional sheets with optional lower papercassette unit installedSeveral envelopes
Paper eject: Face-up or face-down
Paper eject capacity (75 g/m2 or 20 lb. paper):Face-down 150 sheetsFace-up 50 sheets with optional face-up outputtray
Consumable products
Long life imaging cartridge (SO51009):Storage temperature:
0 to 30°C (32 to 86°F)Storage humidity:
30 to 85 % RHShelf life: 18 months after productionLife: Up to 8000 pages under the following conditions:
Letter- or A4-size paper, continuous printing, and5% print ratio. Examples of a 5% print ratio areshown on the next page.
Appendix A A-5

Printer Specifications
The number of pages you can print with an imaging cartridgevaries depending on the type of printing. If you print a few pageat a time or print dense text exceeding the 5% print ratio, yourcartridge may print fewer pages.
Ozone filter (SOPlOO3):Needs to be replaced every six months.
Mechanical
Dimensions and weight:Height:Width:Depth:Weight:
266 mm (10.5 inches)477 mm (18.8 inches)384 mm (15.1 inches)18 kg (40 pounds)
Durability: 5 years or 300,000 sheets, whichever comes first
A-6 Appendix A

Printer Specifications
The number of pages you can print with an imaging cartridgevaries depending on the type of printing. If you print a few pageat a time or print dense text exceeding the 5% print ratio, yourcartridge may print fewer pages.
Ozone filter (6091003):Needs to be replaced every six months.
Mechanical
Dimensions and weight:Height:Width:Depth:Weight:
266 mm (10.5 inches)477 mm (18.8 inches)384 mm (15.1 inches)18 kg (40 pounds)
Durability: 5 years or 300,000 sheets, whichever comes first
A-6 Appendix A

Printer Specifications
Electrical
Voltage
120 V model 220/240 V model
108 V to 132 V 198 V to 264 V
Rated frequency 50 Hz to 60 Hz k 3 Hz 50 Hz to 60 Hz + 3 Hz
Power consumption
Insulation resistance
Less than 850 W
2 M 0 minimum
Less than 850 W
2 M R minimum
Dielectric strength(between AC line andchassis)
1000 VAC rms for one 1500 VAC rms for oneminute or 1000 VAC rms minute or 1500 VAC rmsfor one second for one second
Note: Check the label on the back of the printer for the voltageof your printer.
Controller hardware
CPU: 68000, 16.67 MHz
RAM: 1.0 MB (expandable up to 7.5 MB)
Environmental
Temperature: Operation: 10 to 35 “C (50 to 95 OF)Storage: 0 to 35° “C (32 to 95 “F)
Humidity: Operation: 15 to 85 % RHStorage: 30 to 85 % RH
Altitude: 2500 meters (8200 feet) maximum
Appendix A A-7

Interface Specifications
The printer has the following resident interfaces:
• Parallell RS-232C/RS-422 serial
Parallel interface
Your printer is equipped with an 8-bit parallel interface.
ParalIel interface pin assignments
The parallel interface connector pin assignments and a descriptionof the interface signals are shown in the table below.
Signal ReturnPin Pin
Signal Direction Description
1 19 STROBE IN The STROBE pulse to read data in. Pulsewidth must be more than 0.5microseconds at the receiving terminal.
2 20 DATA 1 IN These signals represent parallel data bits3 21 DATA2 IN 1 to 8, respectively. Each signal is at4 22 DATA3 IN HIGH level when data is logical 1 and at5 23 DATA4 IN LOW when it IS logical 0.6 24 DATA5 IN7 25 DATA6 IN8 26 DATA7 IN9 27 DATA8 IN
10 28 ACKNLG OUT About a IO-microsecond pulse. LOWindicates that data has been receivedand the printer is ready to accept moredata.
A-8 Appendix A

Interface Specifications
A p p e n d i x A A - 9

Interface Specifications
Signal ReturnPin Pin
Signal Direction Description
35 +5v Pulled up to +5V through 3.3KRresistance
36 SLCTIN IN The DC1/DCS control codes are validonly when this signal is HIGH (SLCTINset to OFF). This setting can be changedwith SelecType.
Notes:l All interface conditions are based on TTL level. Both the rise
and fall times of each signal must be less than 0.2microseconds.
l Data transfer must be carried out by observing the ACKNLGor BUSY signal. (Data transfer to this printer can be carriedout only after the receipt of the ACKNLG signal or whenthe level of the BUSY signal is LOW.
l The “Direction” column heading refers to the direction ofsignal flow as viewed from the printer.
• “Return” denotes the twisted-pair return to be connected atsignal ground level. For the interface wiring, be sure to use atwisted-pair cable for each signal and to complete theconnection on the return side.
A-10 Appendix A

Interface Specifications
Interface timing
The figure below shows the timing for the parallel interface.
Signal level: TTL compatible
Serial interface
The printer’s resident serial interface can be set for either RS-232Cor E-422 operation. These interfaces have the followingcharacteristics:
Data format
Word length: 7 or 8 bitsParity: none, odd, or evenStop bits: 1 or 2Printer ready protocol: enabled (DTR and XON/XOFF protocol
set to ON.)
You can set the data format using options and menu items inSelecType.
Appendix A A-11
Interface Specifications
Baud rate
300, 600, 1200, 2400, 4800, 9600, 19200, 38400 bits per second
Signal level
RS-232C: Conforms to EIA
Connector
D-sub 25pin connector
Handshaking
The printer’s serial interface can use DTR (Data Terminal Ready)signal levels and XON/XOFF communication protocols eitherseparately or in combination. When the vacant area for data in theinput buffer drops to 128 bytes, the printer outputs an XOFF codeor sets the DTR signal level to low (MARK), indicating it cannotreceive more data.
Once the vacant area for data in the buffer recovers to 256 bytes,the printer outputs the XON code or sets the DTR flag to high(SPACE), indicating it is again ready to receive data.
Error handling
A * character is printed if a parity error, framing error, or over runerror is detected.
Serial interface pin assignments
The serial interface connector pin assignments and a description ofthe interface signals are shown in the table below. The direction ofsignals is given relative to the printer.
A-12 Appendix A

Interface Specifications
Appendix A A-13

Interface Specifications
SignalPin RS-232C RS-422 Direction Description
20 DTR OUT Data terminal ready. This pin indicateswhether or not the printer is ready toreceive data. If the printer ready protocolis not selected, this pin is always high(the printer is ready to receive data). Ifthe printer ready protocol is selected, theprinter can accept data when the pinlevel is high and cannot accept datawhen the pin level is low. When the DTRsignal goes low, the host computer muststop sending data within 128 characters.Can be set high or low with SelecType.
Although RTS, CTS, DTR, and DC0 are designated as RS-232C signals, theycan also be used when RS-422 is selected with SelecType.
A-14 Appendix A

Initialization
There are four ways that the printer can be initialized (returned toa fixed set of conditions) as shown in the table below.
Hardware initialization l When you turn on the powerl When you execute the FACTORY
RESET option in SelecType Level2
Software initialization l When software sends the printer-initialize command
l When you press the RESETbutton on the printer
All initialization except FACTORY RESET have identical results.The FACTORY RESET option produces a different set ofparameters.
The default conditions differ according to the printer mode. Seethe Appendixes for information on the default settings for eachprinter mode.
Appendix A A-15

Option Specifications
Lower paper cassette unit
Electrical
AC power supply: DC 24 V supplied by the printer
Insulation resistance:10 M ohm minimum
Dielectric strength (between AC line and chassis):Can withstand 1000 VAC rms (120V model) or1500 VAC rms (220/24OV model) for one minute
Power consumption:12 W or less
Paper and paper delivery
Weight: 60 to 90 g / m2 (16 to 24 lb)
Paper feed: Automatic feed delivery system; tray capacity upto 250 sheets (75 g/m2 or 20 lb paper)
A-16 Appendix A

Option Specifications
Feeding speed: For first sheet, 18 seconds or less (A4 or letter-sizepaper)For subsequent sheets, up to 10 pages per minute(A4-size paper)
Types: Plain paper, such as copier paper, memo sheets,and letterheads
Mechanical
Dimensions and weigh ( (without the printer)Height: 70 mm (2.8 inches)Width: 480 mm (18.9 inches)Depth: 370 mm (15 inches) including the standard cassetteWeight: 3.8 kg (8.4lb) including the standard cassette
Face-up output tray
Dimensions and weight (without the printer:Height: 40 mm (1.6 inches)Width: 235 mm (9.2 inches)Depth: 285 mm (11.2 inches)Weight: 0.3 kg (0.71b)
Paper eject capacity:50 sheets (80g/m 2)
Appendix A A-17

Shared Printer Language
Three emulation control command languages are available tochange the printer mode:
l Epson Job Language (EJL)l Printer Job Language (PJL)• Emulation Switch (ES)
Epson Job Language (EJL)
The Epson Job Language is an original Epson language. It canperform the following operations for your printer:
l Switching the printer mode• Transferring the printer’s system information to the computerl Entering the Printer Job Language (PJL) mode
EJL can switch the printer mode with a monodirectional interface,but a bidirectional interface is required for the computer to receivesystem information from the printer.
For more details on EJL commands, see the end of this chapter. Forinformation on the PJL mode, see below and Appendix B.
Printer Job Language (PJL)
The Printer Job Language mode uses PJL commands to changeprinter modes. Because this mode emulates the HP LaserJet seriesIII printer PJL feature, you can use software written for that printerwhen it is shared in a network environment.
You can also enter the EJL mode from the PJL mode. Forinformation on the PJL commands, see Appendix B.
A-18 Appendix A

Shared Printer Language
Emulation Switch (ES)
This feature lets you use printer commands to switch directlybetween the PostScript and LaserJet III modes.
To switch from LJ-3 to I’S mode, send the following:
<ESC> <DEL>
To switch from PS to LJ-3, send the following:
executive, <CR >, [ < LF >]serverdict begin 0 exitserver, <CR >, [ < LF >]executive, <CR >, [ < LF >]statusdict begin, < CR >, [ < LF >]5 setsoftware io mode^D
The code in brackets [ ] is not absolutely necessary.
Epson Job Language command summary
The EJL mode enables your printer to switch to any modeavailable. To operate in EJL mode, you need to follow the stepsbelow.
1. Exit the current (or default) printer mode and enter EJL modewith the universal exit command.
2. Send other EJL commands, such as the comment command, tothe printer, if you wish.
3. Send an EJL command to enter a new printer mode from theEJL mode.
Appendix A A-19

Shared Printer Language
Perform these steps by sending specific commands from yourcomputer to your printer. For step 1, always send the universal exitcommand:
<ESC>, <SOH>
Next you must immediately send an EJL command. For example,you can enter LQ mode by sending the following:
“@ EJL ENTER LANGUAGE = LQ”, < LF >
Therefore, you need to send the commands below to switch to theLQ mode:
ESC, SOH, @EJL ENTER LANGUAGE = LQ, < LF >
The printer mode indicated on the display changes to the new one.
Overview of the EJL commands
EJL commands must be sent immediately after the printerreceives the universal exit command; otherwise, the printerreturns to its default printer mode.
Every EJL command starts with the following string: @EJL,which must be in uppercase letters, although other commandscan be in both upper and lower case.
You must send the LF code at the end of an EJL command;only an LF code terminates the EJL command. If the EJLcommand is not followed by an LF code, the printer does notrecognize it as an EJL command; it is then printed as acharacter string in the current printer mode.
If you are in EPSON GL mode, you cannot exit with theuniversal exit command. You must switch modes withSelecType.
A-20 Appendix A

Shared Printer Language
Command summary for using EJL
• Universal exit command
<ESC> <SOH> Universal exit language/Start of EJL
Format:ASCII code: ESC SOHDecimal: 27 1Hexadecimal: 1B 01
< description >Exit current printer mode and enter EJL mode
<Note >From EPSON GL mode, you cannot enter the EJL modewith this command. You must change the printer modewith SelecType.
l EJL commands
@EJL ENTER LANGUAGE = < Language > < LF > Enter printer mode
Format:ASCII code: @ EJL ENTER LANGUAGE = < Language >LFDecimal: 64 69 74 76 32 69 78 84
69 82 32 76 65 78 71 8565 71 69 61 (ASCII strings) 10
Hexadecimal: 40 45 4A 4C 20 45 4E 5445 52 20 4C 41 4E 47 5541 47 45 3D (ASCII strings) OA
<Language>PSLJ-3LQ
FXEPSON GLPJL
<description >Enter printer mode from EJL
Appendix A A-21
Shared Printer Language
@EJL COMMENT < comment strings > < LF > Comment
Format:ASCII code: @EJL COMMENT < comment strings >< L F >Decimal: 64 69 74 32 67 79 77 77
69 78 84 <comment > 10Hexadecimal: 4D 45 4A 4C 20 43 4F 4D
4D 45 4E 54 <comment > OA
@ EJL INQUIRE NAME < LF > Inquire printer name
Format:ASCII code: @ EJL INQUIRE NAME < LF>Decimal: 64 69 74 76 32 73 78 81
85 73 82 69 32 78 65 7769 10
Hexadecimal: 40 45 4A 4C 20 49 4E 5155 49 52 45 20 4E 41 4D45 OA
<Description >Inquires printer name
<Note >If you are using a bi-directional interface between thecomputer and the printer, your printer outputs thefollowing answer strings:
@EJL ANSWER NAME = EPL-8000 < CR > < LF >
A-22 Appendix A

Appendix BHP Emulation Mode
Introduction ............................................................................ B-2HP LaserJet series III printer mode .................................. B - 2
Operating the EPL-8000 as a LaserJet IIISi. .................... B - 8
SelecType Options ................................................................. B -9ORIENT .............................................................................. B - 9FONT .................................................................................. B - 9SUB CONFIG ..................................................................... B-10
Available Fonts and Symbol Sets ........................................ B-12Resident bitmap fonts ....................................................... B-12Resident scalable fonts.. .................................................... B-13Symbol sets ......................................................................... B-17
Default Settings . . . . . . . . . . . . . . . . . . . . . . . . . . . . . . . . . . . . . . . . . . . . . . . . . . . . . . . . . . . . . . . . . . . . . B -30
HP Emulation Command Summary .................................... B-32Printer commands arranged by topic ............................... B-33
Appendix B B-1

Introduction
HP emulation allows you to use application software designed forthe HP LaserJet series III printer. This means you can use softwareconfigured for an HP LaserJet series III printer without having tomodify it.
This section gives you information about using HP emulation. Itdescribes the unique features of your printer’s HP emulation aswell as the differences between your printer’s HP emulation andprinting with the HP LaserJet itself.
HP LaserJet series III printer mode
Operating the EPL-8000 in HP emulation mode differs slightlyfrom operating an HP LaserJet series III printer because the twoprinters use different technologies. The differences in print featuresare listed in the following table and described in the followingsections.
B-2 Appendix B

Introduction
Input paper supply
Output paper supplyFace-downFace-up (with option)
Paper size
Resident fonts
Epson EPL-8000
250 sheets500 sheets (with option)
150 sheets50 sheets
LetterLegalA4ExecutiveHalf-letter*B5*A5*G-letter*G-legal*F4*Monarch 7-314Commercial 10DLC5
Bitmap 14Scalable 13 **
HP LaserJet series Ill
200 sheets
100 sheets20 sheets
LetterLegalA4ExecutiveMonarch 7-3/4Commercial 10DLC5
Bitmap 10Scalable 8
* These paper sizes can be selected only with SelecType, not with
application software or printer commands. See Chapter 3 for information on
SelecType.
* * You can select only eight of the 13 scalable fonts with a LaserJet Ill printerdriver. Use a LaserJet IllSi driver or send printer commands to select any of
the other five fonts. See page B-8.
Printable area
The size of the printable area for the HP LaserJet series III andthis printer is the same. The maximum number of characters thatcan be printed per line is also the same. However, the absoluteprint position may not be exactly the same on this printer as onan HP LaserJet series III printer.
Appendix B B-3

Introduction
In order to match your printing to the output produced on anHP LaserJet series III printer, you can use the T-OFFSET andL-OFFSET features of the SYSTEM CONFIG option to make fineadjustments to the print start position. However, be careful not tomove the printing position to a point outside of the printable areabecause some of the data may not be printed.
B-4 Appendix B

Introduction
Paper size l X r t Y b
A4 50 2380 50 50 3407 50A5 50 2050 50 50 2380 5085 50 1648 50 50 2936 50Letter 50 2450 50 50 3200 50Legal 50 2450 50 50 4100 50Half letter 50 1550 50 50 2450 50Executive 50 2075 50 50 3050 50G-Legal 50 2450 50 50 3050 50G-Letter 50 2300 50 50 3800 50F4 50 2380 50 50 3798 50Commercial 10 50 1137 50 50 2750 50Monarch 50 1062 50 50 2150 50C5 50 1813 50 50 2604 50DL 50 1199 50 50 2498 50
(Units = dots at 300 dpl.)
Character clipping
If a character is partially outside the printable area, the HP LaserJetdoes not print any portion of the character. The EPL-8000 printsthat portion of the character that falls within the printable area.
Paper handling
When using the printer in HP emulation mode, the paper size isnot determined by the paper cassette as it is with an HP LaserJetseries III printer. Use the SelecType PAGE SIZE option to selectany of the fourteen paper sizes supported by the printer. Forcertain nonstandard sizes of paper, you may need to use themanual feed option described in Chapter 4.
Appendix B B-5

Introduction
Resident fonts
The printer offers a variety of resident fonts in HP emulationmode. Character samples of each font are included later in thisappendix. The following table lists the resident fonts available inHP emulation mode. Five fonts marked with an asterisk (*) areavailable only with a LaserJet IIISi driver or by using a printercommand. See page B-8 for more information.
EPL-8000
CourierCourier boldCourier italic
Software name
Courier
Line printer
EPSON Roman TEPSON Roman T BoldEPSON Roman T ItalicEPSON Roman T Bold Italic
Line printer
CG Times
EPSON Sans serif UEPSON Sans serif U ItalicEPSON Sans serif U Bold
Univers
EPSON Sans serif U Bold ItalicEPSON Sans serif U Medium Condensed*EPSON Sans serif U Bold Condensed*EPSON Sans serif U Medium Condensed Italic*EPSON Sans serif U Bold Condensed Italic’
ITC Zapf Dingbats* ITC Zapf Dingbats
You can use your application program to select a resident font.Select the font name in the right column from your software.
Symbol sets
Your printer can access a variety of symbol sets. Many of thesesymbol sets differ only in the international characters specific toeach language. This appendix provides character tables for thesymbol sets available in HP emulation mode. The table shows boththe characters and their hexadecimal values.
B-6 Appendix B

Introduction
Available fonts
Symbol name
Roman-8Norway 1Roman ExtensionFrenchHP GermanItalianJIS ASCIIECM94-1Swedish2ANSI ASCIINorweg2GermanHP SpanishLegalChineseSpanishIRVSwedishPortugueseIBM PortugueseIBM SpanishIBM-USIBM-DN
PsMathWindowsPsTextVelnternationalVeUSMsPublishingVeMathDeskTopMath-8PiFont
VeZapfDingbatsPsZapfDingbatsZdlOOZd200Zd300
Bitmap
00000000000000000000000
ScalableScalable
(ITC Zapf Dingbats)
00-0000000 -0000000000000
0000000000
A p p e n d i x B B - 7

Introduction
Operating the EPL-8000 as a LaserJet IIISi
If your application software does not list the EPL-8000 on itsprinter menu but does list the HP LaserJet IIISi, choose the LaserJetIIISi instead of the LaserJet III to take advantage of all of yourprinter’s features.
In addition to the differences between the EPL-8000 and theLaserJet III described in the previous section, there are only a fewadditional differences between the EPL-8000 and the LaserJet IIISi.
On the EPL-8000, JobOffset and PaperDestination commands areignored, and the Duplex command is treated as a page ejectcommand. Also, the HPGL/2 Proportional Stick Font and networkinterface boards are not available for the EPL-8000.
Note:If your program does not have a driver for HP LaserJet IIISi butdoes have a feature to send printer commands, send thecommands shown below to select the additional fonts.
For the value of # (ID number) in the Esc (# command, seepage B-17.
B-8 Appendix B

SelecType OptionsThis section lists unique menus and options available when youuse SelecType in HP emulation mode (LJ-3). See Chapter 3 formore information on SelecType.
ORIENTThe orientation option selects the direction in which the charactersare printed on a page. You can choose portrait (vertical), landscape(horizontal), reverse portrait (opposite direction of portrait), andreverse landscape (opposite direction of landscape).
Menu/submenu
ORIENT, PORTAvailable options
PORT (portrait)LAND (landscape)R-PORT
(reverse portrait)R-LAND
(reverse landscape)
FONTThe FONT option selects the font source and then the font.
Menu/submenu Available options
FONT RD- 0 RDABC
Only available options appear on the display. Options A, B, and Care available only if font cards or cartridges are in those slots.
Note: To find out what font cards are available in HP emulation
1 C h a p t e r 7 .mode, see your dealer. For a list of available font cartridges, see
Appendix B B-9

Selec Type Options
After you select the font source, press or until thedisplay shows the font number you want; then press toselect the font. If the font you select is a scalable font, you mustperform an additional step as follows.
If you selected a proportional font, press or to selectthe font’s point size. Then press once to set.
Menu/submenu Available options
4.00 to 999.75(in steps of 0.25)
If you selected a fixed pitch font, press or to select thespacing in characters per inch. Then press once to set.
Menu/submenu Available options
0.44 to 99.99(in steps of 0.01)
You can select fonts that match the current orientation settingonly. If you change the SYMSET or ORIENT settings, the availablefont numbers may change. To save the selected font as the defaultfont, use the SAVE MACRO option in the Level 1 SYSTEMCONFIG menu.
SUB CONFIGIn HP emulation mode, the SUB CONFIG option includes twosubmenus.
Menu/submenu Available options I FORM
SYMSET
F O R M - Use the FORM option to set the number for theselected paper size and orientation. The setting you choose alsochanges the line spacing. This setting is affected by the PAGESIZE, ORIENT, and FONT settings. If you select 0, the linespacing changes to l/6-inch.
B-10 Appendix B

Selec Type Options
Menu/submenu
FORM 64LINES
Available options
0 through 128 or ***
If *** appears on the display, the number of lines you selected isout of the possible range of 0 to 128.
. S Y M S E T - Use the SYMSET option to choose from 4 1resident HP symbol sets. In most cases, you will not changethis setting.
Menu/submenu
SYMSET Roman-8Available options
I. Roman-8 RomanEIBM-US LegalIBM-DN PcMultiECM94-1 P S M a t hIRV VenturaFrench PSTextUK VenturaUSChinese WindowsANSI AS MSPubliNorwegl VeMathSwedish DesktopNorweg2 Math-8Swedis2 PiFontFrench2 VeZapf DJIS ASC PsZapfDIBMPor ZdlooItalian Zd200IBMSpa Zd300PortuguHP GermSpanishHPSpanGerman
Appendix B B-11

Available Fonts and Symbol Sets
This section describes the fonts and symbol sets available in HPemulation mode.
The printer offers a variety of resident bitmap and scalable fonts inHP emulation mode. The following table lists attributes that can bechanged for bitmap and scalable fonts.
Attribute
OrientationSymbol SetPitchPoint sizeTypestyleWeight
Bitmap Scalable
Resident bitmap fonts
The following table lists the attributes (characteristics) of theresident bitmap fonts available in HP emulation mode.
• Both orientations (Portrait and Landscape) are available for the all fonts.• 26 symbol sets are available for all fonts. See the table on page B-7.• Style: U = Upright, I = Italic
B-12 Appendix B

Available Fonts and Symbol Sets
Resident scalable fonts
The following table lists the attributes of the resident scalable fonts.
• All of the orientations (Portrait, landscape, reverse portrait, and reverse landscape)are available for all the fonts.
• The spacing for all fonts is proportional.• Style: U =Upright, I = Italrc, CU =Condensed upright, Cl =Condensed Italic• In GL/2 mode, some font enhancements such as rotation, italic, mirror image, and
outline are available. Also, one more font (the stick font) is available only in GL/2mode.
Appendix B B-13

Available Fonts and Symbol Sets
The font samples below show only portrait orientation; thecharacters are the same in landscape orientation.
Courier 12point 0123456789
Courier bold 12point 0123456789
Courier italic 12point 0123456789
C o u r i e r lOpoint 0123456789
Courier bold 10point 0123456789
Courier italic lOpoint 0123456789
Line printer 8.5point 0123456789
EPSON Roman T
ABCDEFGHIJKLMNOPQRSTUWXYZabcdefghijklmnopqrstuvwxyz0123456789
EPSON Roman T Bold
ABCDEFGHIJKLMNOPQRSTUVWXYZabcdefghijklmnopqrstuvwxyz0123456789
B-14 Appendix B

Available Fonts and Symbol Sets
EPSON Roman T Italic
ABCDEFGHIJKLMNOPQRSTZa bcdefghijklmnopqrstuvwxyz0 1 2 3 4 5 6 7 8 9
EPSON Roman T Bold Italic
A B C D E F G H ~ K L M N O P Q R S T U V W X Y Zabcdefghijklmnopqrstvwxyz0123456789
EPSON Sam serif U
ABCDEFGHIJKLMNOPQRSTUVWXYZabcdefghijklmnopqrstuvwxyz0123456789
EPSON Sam serif U Bold
ABCDEFGHIJKLMNOPQRSTUWVXYZabcdefghijklmnopqrstuwvxyz0123456789
EPSON Sam serif LI Italic
ABCDEFGHIJKLMNOPQRSTUVWXYZabcdefghlj’krnnopgrstuvwxyz0 1 2 3 4 5 6 7 8 9
Appendix B B-15

Available Fonts and Symbol Sets
EPSON Sans serif U BoId Italic
ABCDEFGHIIJKLMNOPQRSTUVWXYZabcdefghijkMmnoPqrstuvwxyz0123456789
EPSON Sans serif U Medium Condensed
ABCDEFGHIJKLMNOPQRSTUVWXYZabcdefghijklmnopqrstuvwxyz0123456789
EPSON Sans serif U Bold Condensed
ABCDEFGHlJKLMNOPQflSTUVWXYZabcdefghijklmnopqrstuwvxyz0123456789
EPSON Sans setjf U Medium Condensed Italic
ABCDEFGHIJKLMNOPQRSTUVlMlZabcdefghijk/mnopqtxtuvwuyz0123456789
EPSON Sans serif Ll Bold Condensed Italic
ABCDEFGHIJKLMNOPQRSTUVWXYZabcdefghijklmnopqrstuvwxyz0123456789
B-16 Appendix B
Available Fonts and Symbol Sets
ITC Zapf Dingbats
Stick
ABCDEFGHIJKLMNOPQRSTUVWXYZa b c d e f g h i j k l m n o p q r s t u v w x y z0123456789
Note: The EPL-8000 printer can print fonts generated byBitstreams FaceLift™ and Bitstream Fontware@ Installation Kitsusing Bitstream Typeface Packages for the PC. Refer to yourFaceLift or Fontware User Guide for instructions on usingBitstream typefaces with HP LaserJet compatible printers.
Symbol setsYour printer can access a variety of symbol sets. Many of thesesymbol sets differ only in the international characters specific toeach language. Not all symbol sets are available in all modes. Thefollowing table lists the symbol sets in HP emulation mode.
The following symbol set tables show you the available charactersin HP emulation mode and their hexadecimal values.The ID number after the symbol set name provides the uniqueportion of the escape sequence needed to select that particularsymbol set.
Appendix B B-17

Available Fonts and Symbol Sets
Roman-8 (8U)
ECMA-94 Latin-1 (ON)
B-18 Appendix B
Available Fonts and Symbol Sets
IBM-US (IOU)
IBM-DN (11U)
Appendix B B-19

Available Fonts and Symbol Sets
PcA4ulfilingual (IZU)
Legal (IU)
CODE] 0 1 2 3 4 5 6 7 8 9 A B C D E F0 1 0 @ P o p
7
1234 56789ABCD
! 1 A Q a q* 2 B R b r# 3 C S c s$ 4 D T d t% S E U e u& 6 F V f v' 7 G W g w( 8 H X h x) 9 I Y i y* : J Z j z+ ; K [ k Sf - L @ l I :
= M 1 m t¢ N © n ™
; ? o - o #E
F
B-20 Appendix B
Available Fonts and Symbol Sets
I.0 ANSI ASCII (OU)
Ventura Math (6M)
Appendix B B-21

Available Fonts and Symbol Sets
Ven ha International (13J)
Ventura US (14J)
B-22 Appendix B

Available Fonts and Symbol Sets
PS Math f5A4)
PS Text (10J)
CODE 0 1 2 3 4 5 6 7 8 9 A B c D E F
0123456789ABCDEF
0 @P ‘ P! l A Q a q,, 2 B R b r# 3 C S c s$ 4 D T d t% 5 E U e u& 6 F V f v
; x x : :) 9 I Y i y* : J Z j z+ ; K [ k {, <L \ l 1- = M] m}
> N ” n -/ ? o - o
Appendix B B-23

Available Fonts and Symbol Sets
Math-8 (8M)
Pi Font (15U)
B-24 Appendix B

Available Fonts and Symbol Sets
Microsoft Publishing (6J)
Windows (9U)
Appendix B B-25

Available Fonts and Symbol Sets
Desk Top (7)
B-26 Appendix B

Available Fonts and Symbol Sets
PsZapf Dingbats (I OL)
Zd 100 (11L)
Appendix B B-27
Available Fonts and Symbol Sets
Zd 300 (13L)
B-28 Appendix B

Available Fonts and Symbol Sets
International Set for IS0 Sets
ANSI ASCII
Norwegian vl
French
HP German
Italian .
JIS ASCII
Swedish 2
Norwegian v2
UK
French 2
German
HP Spanish
Chinese
Spanish
IRV
Swedish
Portuguese
IBM Portuguese
IBM Spanish
58 5C 5D 5E 60 78 7C 70 7EID 23 24 40
Appendix B B-29

Default Settings
When your printer is initialized, the settings for the HP emulationmode are reset to the values shown in the table below.
Item Factory Reset
Paper input Standard paper cassette
Paper size Letter (US) or (A4) other
Orientation Portrait
Copy count 1
Page length 64 (US) or 70 (other) lines
Reset
SelecType setting
SelecType setting
SelecType setting
SelecType settrng
Depends on the paper sizeand orientation settings
VMI 8/48 inch (6 lines per inch) Page length minus 1 dtvidedby text lengih. Values arefixed and depend on theSelecType paper size setting.The page length and textlength are measured inInches.
HMI 12/120 Inch (IO cpi) HMI of the selected font
Top margin l/2 inch (150 dots) 1/2 Inch (150 dots) whenSelecType OFFSET is 0
Text lines 60 (US) or 64 (other) lines SelecType setting
Text length 60 (US) or 64 (other) lines SelecType settingPortrait
Left margin logical page left margln logical page left margin
Right margin logical page right margin logical page right margin
Line CR=CR, LF=LF, FF=FF CR=CR, LF=LF, FF=FFtermination
B-30 Appendix B

Default Settings
Item Factory Reset
Fonts (bothprimary andsecondary)
Symbol set Roman-8Spacing FixedPitch 10 cpiHeight 12 pointStyle UprightStrokeweight MediumTypeface Courier
Underline Off
Font ID 0
Character 0code
*******
Off
0
0
Reset
Raster graphic 75 dpi 75 dpiresolution
Macro ID
End of linewrap
Displayfunction
0 0
Off Off
Off Off
Advancedgraphics
H-size=O, V-size=O, ID=0 H-size=O, V-size=O, ID=0
Symbol set Roman-8 SelecType setting
* Font numbers are saved in EEPROM, and font attributes are selected with theSelecType SYMSET option.
Appendix B B-31

HP Emulation Command Summary
This section lists the commands supported by HP emulation mode.For more information on these commands, see the Hewlett-PackardLaserJet III Printer Technical Reference Manual.
All commands closely emulate the HP LaserJet series III except forthe following:
ESC &l#A can be used to select the following eight paper sizes:A4, Letter, Legal, Executive, Monarch, Commercial 10, DL, and C5.
This command overrides the SelecType PAGE SIZE setting.You cannot specify other paper sizes with this command.
ESC &l#H works differently whether it is used in INPUT AUTOor not. When you set INPUT AUTO, this command can only beused to specify manual paper feeding when the value of # is 2, 3,or 6; the printer returns to INPUT AUTO with any other values.When you set INPUT STD or OPT, the values for # produce theeffects listed in the following table. This command takes effectonly if the panel’s MANUAL light is off.
# Epson EPL-8000 HP LaserJet series III
0 Eject current page Eject current page
1 Feed from standard paper cassette Feed from cassette tray
2 Feed from manual feed slot Feed from manual feed slot
3 Feed from manual feed slot Ignore
4 Feed from optional lower paper cassette Ignore
The manual feed setting made with this command is canceledunder the following conditions: When the command specifying theinput tray is sent, when the MANUAL button is pressed, when theprinter mode is switched, or when the channel is switched toanother in the use of AUTOSENSE mode.
ESC &lP sets the page length and paper size. The paper sizes withthis command are the same as those with ESC &l#A.
B-32 Appendix B

Printer commands arranged by topic
The HP printer commands supported in HP LaserJet series IIIemulation are listed below.
PCL mode control:
BSLFFFCRs oSIESCHTSP
Orientation:
ESC &l#O
Font selection:
Primary
ESC (0AESC (0BESC (0CESC (0DESC (1DESC (0EESC (1EESC (OFESC (1FESC (0GESC (IGESC (SCESC (OH
Secondary
ESC )0AESC )0BESC )0CESC )0DESC )lDESC )0EESC )lEESC )0FESC )lFESC )0GESC )lGESC )BGESC )0H
BackspaceLine feedForm feedCarriage returnShift outShift inEscapeHorizontal tabSpace
Orientation
Symbol set
HP Math 7HP Line Draw-7HP Large CharactersIS0 60: Norwegian vlIS0 61: Norwegian v2HP Roman ExtensionIS0 4: United KingdomIS0 25: FrenchIS0 69: FrenchHP GermanIS0 21: GermanHP Greek8Hebrew-7
Appendix B B-33

ESC (BHESC (01ESC (6JESC (7JESC (SJESC (10JESC (13JESC (14JESC (OKESC (1KESC (2KESC (8KESC (9KESC (0LESC (1LESC (2LESC (8LESC (9LESC (10LESC (11LESC (12LESC (13LESC (0MESC (1MESC (5MESC (6MESC (8MESC (ONESC (2NGSC (5NESC (10N
ESC (00ESC (10ESC (20ESC (OPESC (1P
ESC )8HESC )01ESC )6JESC )7JESC )8JESC )l0JESC )13JESC )14JESC )0KESC )lKESC )2KESC )8KESC )9KESC )0LESC )lLESC )2LESC )8LESC )9LESC )l0LESC )llLESC )12LESC )13LESC )0MESC )lMESC )5MESC )6MESC )8MESC )0NESC )2NESC )5NESC )l0N
ESC )0OESC )1OESC )2OESC )0PESC )lP
Hebrew-8IS0 15: ItalianMicrosoft PublishingDeskTopDocumentI’S TextVentura InternationalVentura USIS0 41: JIS ASCIIIS0 13: KatakanaIS0 57: ChineseKana-8Korean-8Line Draw-7HP Block CharactersTax Line DrawLine Draw-8Ventura ITC Zapf DingbatsI’S ITC Zapf DingbatsITC Zapf Dingbats Series 100ITC Zapf Dingbats Series 200ITC Zapf Dingbats Series 300Math-7Tech-7I’S MathVentura MathMath-8ECMA-94 Latin 1 (IS0 8859/l)ECMA-94 Latin 2 (IS0 8859/2)ECMA-128 Latin 5 (IS0 8859/9)ECMA-113/88 Latin/Cyrillic(Iso 8859/5.2)OCR AOCR BOCR MAPL (Typewriter paired)APL (Bit paired)
HP Emulation Command Summary
B-34 Appendix B

ESC (OR
ESC (1RESC (3RESC (0SESC (1SESC (2SESC (3SESC (4SESC (5SESC (6SESC (7SESC (8SESC (16SESC (17SESC (18SESC (0TESC (8TESC (0UESC (1UESC (2U
ESC (5UESC (7UESC (SUESC (9UESC (10UESC (11UESC (12UESC (17UESC (15I-JESC (0VESC (SVESC (0YESC (1YESC (2Y
ESC )0R
ESC )lRESC )3RESC )0SESC )lSESC )2SESC )3SESC )4SESC )5SESC )6SESC )7SESC )BSESC )16SESC )17SESC )18SESC )0TESC )STESC )0UESC )lUESC )2U
ESC )5UESC )7UESC )8UESC )9UESC )10UESC )llUESC )12UESC )17UESC )15UESC )0VESC )8VESC )0YESC )lYESC )2Y
HP Emulation Command Summary
Cyrillic ASCII (ECMA-113/96,Iso 8859/5)CyrillicPC CyrillicIS0 11: Swedish for namesHP SpanishIS0 17: SpanishIS0 10: SwedishIS0 16: PortugueseIS0 84: PortugueseIS0 85: SpanishHP European SpanishHP Latin SpanishHP-GL DownloadHP-GL DraftingHP-GL Special SymbolsThai-8Turkish-8IS0 6: ASCIILegalIS0 2: International ReferenceVersionHPL Language SetOEM-1Roman-8WindowsPC-8PC-8 D/N (Danish/Norwegian)PC-850PC-852Pi FontArabicArabic-83 of 9 BarcodeIndustrial 2 of 5 BarcodeMatrix 2 of 5 Barcode
Appendix B B-35

HP Emulation Command Summary
ESC (4Y
ESC (5YESC (6Y
ESC (7Y
ESC (BY
ESC (15Y
ESC (s#PESC (s#HESC (s#VESC (s#SESC (s#BESC (s#TESC &k#S
ESC )4Y
ESC )5Y
ESC )6Y
ESC )7Y
ESC )BYESC )15Y
ESC )s#PESC )s#HESC )s#VESC )s#SESC )s#BESC )s#T
Interleaved 2 of 5 BarcodeCODABAR BarcodeMSI/Plessey BarcodeCode 11 BarcodeUPC/EAN BarcodeUSPS ZipSpacingPitch (cpi)Point sizeStyleStroke WeightTypefaceFont pitch
Page length, page size, text length:
ESC &l#P Page lengthESC &l#A Paper sizeESC &l#F Text length
Margins:
ESC &l#E Top marginESC &a#L Set left marginESC &a#M Set right marginESC 9 Clear side margins
Offset:
ESC &l#U Left offset registrationESC &l#Z Top offset registration
Vertical line spacing:
ESC &l#C Set vertical motion indexESC &l#D Set lines per inch
B-36 Appendix B

HP Emulation Command Summary
Half-line feed:
ESC = Half -line feed
Specialized printer control:
ESC E Printer reset
ESC &l#XESC %#X
Select number of copiesExit LaserJet mode
Miscellaneous:
ESC &k#HESC &k#GESC &s#CESC &l#H
Horizontal motion indexLine terminationEnd of line wrapPaper input control
Cursor positioning:
ESC &a#CESC &a#RESC &a#HESC &a#VESC *p#XESC “p#Y
Horizontal (columns)Vertical (lines)Horizontal (decipoints)Vertical (decipoints)Horizontal (dots)Vertical (dots)
Underline:
ESC &d#DESC &d@
Enable auto-underliningDisable auto-underlining
Display functions, transparent print data:
ESC Y Enable display functionsESC Z Disable display functions modeESC &p#X[data] Transparent print data
Appendix B B-37

HP Emulation Command Summary
Perforation skip mode:
ESC &l#L Perforation skip mode
Font management:
ESC *c#DESC *c#EESC *c#FESC (s # W[data]ESC )s # W [data]ESC (#XESC )#XESC (3@ESC )3@
Macros:
ESC &f#YESC &f#X
Specify font IDSpecify character codeFont and character controlDownload characterCreate font (font descriptor)Designate downloaded font (primary)Designate downloaded font (secondary)Font default (primary)Font default (secondary)
Macro IDMacro control
Push/Pop position:
ESC &f#S
Raster graphics:
ESC *t#RESC *r#FESC *r#AESC *b#YESC *b#MESC “b # W[data]ESC *r#TESC *r#SESC *rB
Push/Pop position
Raster graphics resolutionRaster graphics presentationStart raster graphicsRaster Y offsetSet raster compression modeTransfer raster graphicsRaster graphics heightRaster graphics widthEnd raster graphics
B-38 Appendix B

HP Emulation Command Summar.y
Advanced graphics:
ESC *v#TESC *v#NESC *v#OESC *c#AESC *c#BESC “c#HESC *c#VESC *c#I’ESC *c#G
Select patternSelect source transparency modeSelect pattern transparency modeHorizontal rectangle size (dots)Vertical rectangle size (dots)Horizontal rectangle size (decipoints)Vertical rectangle size (decipoints)Print graphicsSpecify graphic pattern
Vector graphics:
ESC %#B Enter GL/2 modeESC *c#K Plot horizontal sizeESC *c#L Plot vertical sizeESC “c#T Set picture frame anchor pointESC *c#X Picture frame horizontal sizeESC “c#Y Picture frame vertical size
GL/2 mode
Configuration and status group:
IPIRSCIWROINDF
Input P1 and P2Input relative P1 and P2ScaleInput windowRotate coordinate systemInitializeDefault values
Appendix B B-39
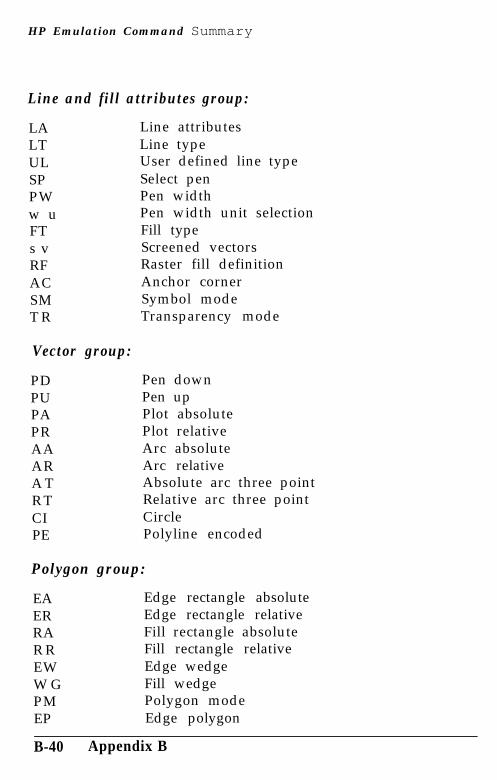
HP Emulation Command Summary
Line and fill attributes group:
LALTULSPPWw uFTs vRFACSMT R
Vector group:
PDPUPAPRAAARA TR TCIPE
Line attributesLine typeUser defined line typeSelect penPen widthPen width unit selectionFill typeScreened vectorsRaster fill definitionAnchor cornerSymbol modeTransparency mode
Pen downPen upPlot absolutePlot relativeArc absoluteArc relativeAbsolute arc three pointRelative arc three pointCirclePolyline encoded
Polygon group:
EA Edge rectangle absoluteER Edge rectangle relativeRA Fill rectangle absoluteR R Fill rectangle relativeEW Edge wedgeW G Fill wedgePM Polygon modeEP Edge polygon
B-40 Appendix B

HP Emulation Command Summary
FP Fill polygon
Character group:
SDADFIFMs s
SADID RSISRSLCFLBD TLOD VESCPT D
Standard font definitionAlternate font definitionPrimary font (standard font)Secondary font (alternate font)Select standard fontSelect alternate fontScalable or bitmap fontAbsolute directionRelative directionAbsolute character sizeRelative character sizeCharacter slantCharacter fill modeLabelDefine label terminatorLabel originDefine variable text pathExtra spaceCharacter plotTransparent data
Dual con text extension:
ESC %A Enter PCL modeESC E Reset
Printer Job Language (PJL):
ESC %-12345x Universal exit language/Startof PJL
@ PJL ENTER LANGUAGE Enter PCL= P C L < L F >@ PJL ENTER LANGUAGE Enter PostScript= PostScript < LF>@ PJL Comment [Comment Comment CommandString] < LF >
Appendix B B-41

Appendix CLQ and FX Emulation Mode
Introduction.. .......................................................................... C-2Operating as an LQ or FX printer ................................... C-2
SelecType Options.. ............................................................... C-4ORIENT .............................................................................. C-4FONT .................................................................................. C-4SUB CONFIG.. ................................................................... C-5
Available Fonts and Symbol Sets ........................................ C-12Resident fonts.. ................................................................... C-12Character sets ..................................................................... C-13
Default Settings . . . . . . . . . . . . . . . . . . . . . . . . . . . . . . . . . . . . . . . . . . . . . . . . . . . . . . . . . . . . . . . . . . . . . C-15
LQ and FX Emulation Command Summary ...................... C-16Printer commands arranged by topic.. ............................. C-19
Appendix C C-1

Introduction
Your printer has the ability to emulate an Epson LQ-2500, FX-800/l000, or FX-86e/286e printer. This means that you can useyour printer with software that supports only Epson LQ or FXprinters.
Operating as an LQ or FX printer
Before you can operate your printer as an LQ or FX printer, youneed to change the printer mode using the MODE ASSIGN settingin SelecType Level 2. See Chapter 3 for details on using SelecType.
Operating the printer in LQ or FX emulation mode offers someoptions not available with most LQ or FX printers, includingSelecType control over almost all printer features and laser qualityoutput.
C-2 Appendix C
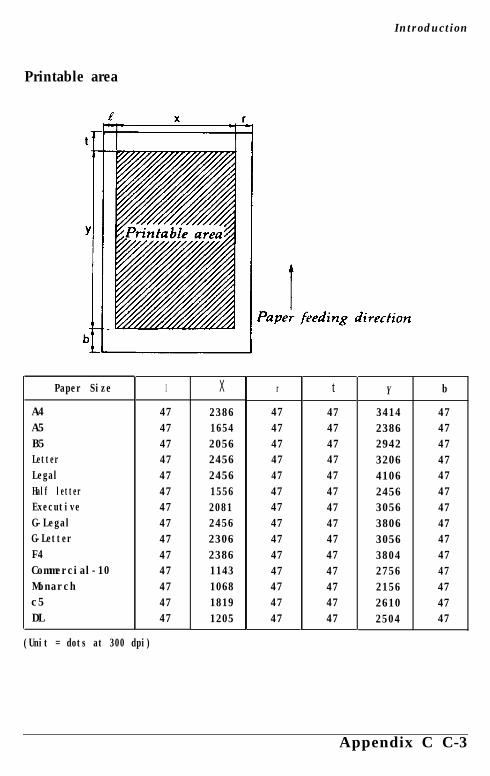
Introduction
Printable area
Paper Size
A4A5B5LetterLegalHalf letterExecutiveG-LegalG-LetterF4Commercial-10Monarchc5DL
I
4747474747474747474747474747
(Unit = dots at 300 dpi)
X r
2386 471654 472056 472456 472456 471556 472081 472456 472306 472386 471143 471068 471819 471205 47
t
4747474747474747474747474747
Y b
3414 472386 472942 473206 474106 472456 473056 473806 473056 473804 472756 472156 472610 472504 47
Appendix C C-3

SelecType Options
This section lists unique menus and options available when youuse SelecType in either LQ or FX emulation mode. See Chapter 3for details on using SelecType.
ORIENT
The orientation option selects the direction in which the charactersare printed on a page. You can choose portrait (vertical) orlandscape (horizontal) orientation.
Menu/submenu
ORIENT. PORTAvailable options
PORTLAND
FONT
The FONT option selects a font by typeface.
Menu/submenu
FONT C o u r i e rAvailable options
CourierPrestigeDL
The factory setting is Courier. After selecting the desired font, youcan also adjust the character spacing and size of the font with thePITCH and CONDENSED settings in this option’s submenu.
C-4 Appendix C

Selec Typr Options
SUB CONFIG
When you set up your printer to operate in LQ or FX mode, theSUB CONFIG option includes the submenus shown below:
Menu/submenu Available options
SUB CONFIG. P I T C HCONDENSEDL-MARGINR-MARGINFORM TOPTEXTSKIPBOTTOMCGTABLECOUNTRYJ-REPRINTAUTO CRZERO CHARWIDE PAGEB-IMAGE
PITCH - You can select a character pitch of 10, 12, or 15characters per inch (cpi), or choose proportional spacing.
Menu/submenu Available options
PITCH 10CPI 10, 12, 15, or PROP
CONDENSED - Use this option to change the characterspacing. Condensed printing is useful for spreadsheets andother applications where you need to fit a large amount ofinformation on each line. Fifteen cpi cannot be condensed.
Menu/submenu Available options
Appendix C C-5
CONDENSED OFF OFF-or ON

SelecType Options
• L-MARGIN - Use this option to set the left margin.Margin units are determined by the current pitch (charactersper inch) and the condensed setting (ON or OFF). The factorysetting is 0.
Menu/submenuL-MARGIN O
Available options
0 to available
If you select proportional, 10 cpi and condensed determinemargin units. If you change the setting of ORIENT, PAGESIZE, or WIDE PAGE (when PAGE SIZE is set to A4 or F4),the left margin defaults to 0.
l R-MARGIN - Use this option to set the right margin.Margin units are determined by current pitch (characters perinch) and the condensed setting (ON or OFF). The factorysetting is 80.
Menu/submenu
R-MARGIN 8 0Available options
1 to available
If you select proportional, 10 cpi and condensed determinemargin units. If you change the setting of ORIENT, PAGESIZE, or WIDE PAGE (when PAGE SIZE is set to A4 or F4),the right margin defaults to the setting shown in the table onthe next page.
C-6 Appendix C

Selec Type Options
Default right margin
l FORM TOP - Use this option to specify the distance fromthe top of the sheet to the baseline of the first printable line.This is measured in 0.05inch increments.The factory setting is 0.50 inches.
Menu/submenu
FORM TOP 0 .50Available options
0.50 - 1.50 (inch)
Appendix C C-7
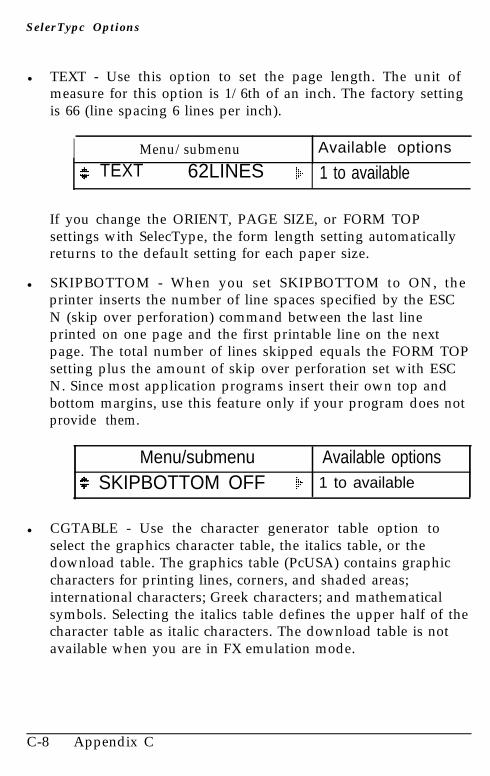
SelerTypc Options
l TEXT - Use this option to set the page length. The unit ofmeasure for this option is 1/6th of an inch. The factory settingis 66 (line spacing 6 lines per inch).
I Menu/submenu Available options
TEXT 62LINES 1 to available
If you change the ORIENT, PAGE SIZE, or FORM TOPsettings with SelecType, the form length setting automaticallyreturns to the default setting for each paper size.
l SKIPBOTTOM - When you set SKIPBOTTOM to ON, theprinter inserts the number of line spaces specified by the ESCN (skip over perforation) command between the last lineprinted on one page and the first printable line on the nextpage. The total number of lines skipped equals the FORM TOPsetting plus the amount of skip over perforation set with ESCN. Since most application programs insert their own top andbottom margins, use this feature only if your program does notprovide them.
Menu/submenu Available optionsSKIPBOTTOM OFF 1 to available
l CGTABLE - Use the character generator table option toselect the graphics character table, the italics table, or thedownload table. The graphics table (PcUSA) contains graphiccharacters for printing lines, corners, and shaded areas;international characters; Greek characters; and mathematicalsymbols. Selecting the italics table defines the upper half of thecharacter table as italic characters. The download table is notavailable when you are in FX emulation mode.
C-8 Appendix C
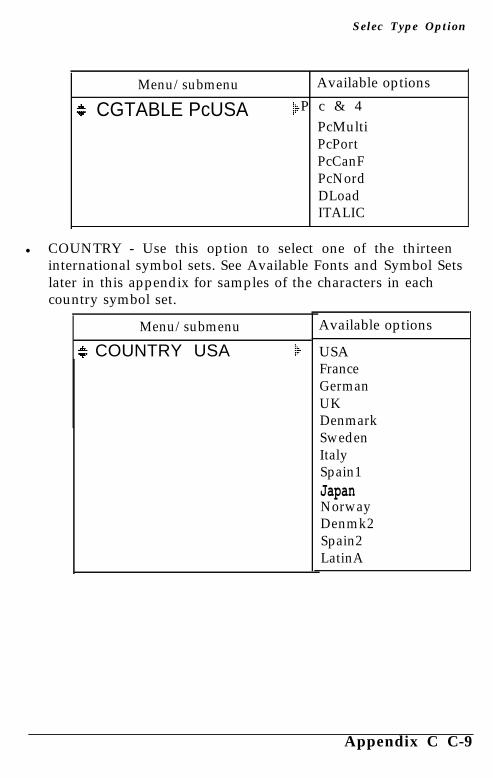
Selec Type Option
Menu/submenu
CGTABLE PcUSA
Available options
P c & 4PcMultiPcPortPcCanFPcNordDLoadITALIC
l COUNTRY - Use this option to select one of the thirteeninternational symbol sets. See Available Fonts and Symbol Setslater in this appendix for samples of the characters in eachcountry symbol set.
Menu/submenu Available options
COUNTRY USA USAFranceGermanUKDenmarkSwedenItalySpain1JapanNorwayDenmk2Spain2LatinA
Appendix C C-9

Selec Type Options
l J-REPRINT - Use this option to reprint after a paper jam.When it is set to ON and a page jams in the printer, the pageis reprinted after you clear the jam. If this option is set to OFF,the jammed page does not reprint automatically, but complexpages may print faster.
Menu/submenu
J-REPRINT OFF O N o r O F F
Available options
l AUTO CR - Use the automatic carriage return optionto perform a carriage-return line-feed (CR-LF) operationwhenever the print position exceeds the right margin. If AUTOCR is OFF, the printer does not print characters beyond theright margin, and it does not perform a linewrap until itreceives a CR. Most software programs take care of thisfunction.
Menu/submenu
AUTO CR ONAvailable options
ON or OFF
l ZERO CHAR - This option determines whether the printerprints a slashed zero (0) or an unslashed zero (0). This feature isuseful for clearly distinguishing between an uppercase letter 0and a zero when printing documents such as programming lists.
Menu/submenu
ZERO CHR. O 0 or OAvailable options I
C-10 Appendix C

Selec Type Options
l WIDE PAGE - When this option is ON, you can print upto 80 characters at 10 cpi across an A4-or F4-size page. Whenit is OFF, you can print up to 77 characters at 10 cpi. Thissetting is valid only when PAGE SIZE is set to A4 or F4. If youchange the WIDE PAGE setting when sizes other than A4 orF4 are selected with the PAGE SIZE option, L-MARGINautomatically defaults to 0 and the R-MARGIN and the TEXTLINES return to the default setting for the currently selectedpaper size.
Menu/submenu Available options
WIDEPAGE ON ON or OFF
l B-IMAGE - With B-IMAGE set to DARK or LIGHT,your printer can correctly emulate the graphics densities setwith the printer commands. When you select DARK, the bitimage density is high. When you select LIGHT, the bit imagedensity is low.
Menu/submenu Available options
B-IMAGE DARK D A R K
LIGHTBCODE
The BCODE setting converts bit images to bar codes byautomatically filling in any vertical gaps between dots. Thisproduces unbroken vertical lines that can be read by a bar codereader.
Note: This mode reduces the size of the image being printedand may cause some distortion when printing bit image graphics.
Appendix C c-11

Available Fonts and Symbol Sets
This section describes the resident fonts and symbol sets availablein LQ and FX emulation mode.
Resident fonts
The printer offers a variety of resident fonts in the LQ and FXemulation modes. The following table lists these resident fonts andshows samples of text printed with them.
Font name Pitch (cpi) Orientation Sample
Courier 10 P/L ABCDEFGHIabcdefg012345Courier bold 10 P/L ABCDEFGHIabcdefg012345Courier 12
Courier bold 12
Line printer 16.66
P/L ABCDEFGHIJabcdefghijOl2345
P/L ABCDEWHIJabcdefghijO12345
P/L ABCDEFGHIJKLHN~bcdefghijkLlnOl23456789
Prestige* 12 P ABCDEFGHIJabcdefghijOl2345
Prestige* 20 P ABCDEFGHIJKLtiNabcdefghijklmnOl23456789
P: Portrait, L: Landscape* Using your application program, you can make the font bold, oblique, or
landscape.
The font samples in the table show only portrait orientation; thecharacter is the same in portrait and landscape orientation.
C-12 Appendix C

Available Fonts and Symbol Sets
Character sets
This section provides character tables for the character setsavailable in the LQ and FX emulation modes. The tables showboth the characters and their hexadecimal values.
Epson Italic Character Table
Note: You can print italics when either the italic character tableor the extended graphics character table is selected.
Appendix C C-13

Available Fonts and Symbol Sets
Epson Extended Graphics Character Table
Epson International Character Sets
C-14 Appendix C

Default Settings
When the printer is initialized, the settings for the LQ and FXemulation modes are reset to the values shown in the table below.
Item
Paper input
Paper stze
Page length
Top of form
Left margin
Right margin
Horizontal tab settings
Verkal tab settings
VFU channel
Character spacing
International character set
Typeface
Proportional spacing
Character table (ESC 1)
Condensed
Underline, Superscript,
SubscrIpt. Double-width,
Bold
Factory setting Reset value
Standard paper cassette SelecType setting
A4 SelecType setting
66 lines Depends on the paper size
and onentatlon settings
0 5 inch SelecType setting
Left edge of the printable SelecType setting or left
area edge of the printable area
80 columns (1Ocp1) Depends on the default
right margin set with
SelecType
Every eight characters Every eight characters
(Character width IS 10 cpi) (Character width depends
on the SelecType
condensed print menu
setting)
Every l/6 Inch Every l/6 inch
Channel 0 Channel 0
10 cpl Depends on the condensed
print menu setting
USA SelecType setting
Courier SelecType settingF I X SelecType setting
On (ESC tl) SelecType setting
Off SelecType setting
Off Off
Italic Upnght
Intercharacter spacing 0
Justlficatlon Off
DC 1, DC 3 DC 1
MSB Enable
Upright
0
Off
DC 1
Enable
Appendix C C-15

LQ and FX Emulation Command Summary
This section lists the control codes and escape sequences supportedin the LQ and FX emulation modes. Some LQ and FX printer codesare not available, either because the functions are not required(such as draft printing) or are not possible because of the differenttechnologies used in these printers.
The following commands are either not available or are ignored inLQ or FX emulation mode:
ESC < Unidirectional mode (one line)ESC 8 Disable paper end detectorESC 9 Enable paper end detectorESC U Select print directionESC s Set/cancel half-speed printingESC r Select color printingESC i Incremental view
The following commands are available in FX mode but not in LQmode:
ESC 1 7/72-inch line feedESC * Select 9-pin graphics modeESC I Select character code table
The printer commands listed below function in a slightly differentway when used in LQ or FX emulation mode. Also, many of thecommands that control the print position use approximationsbecause of the difference in print density between the LQ and FXprinters.
ESC G / ESC E
These commands produce identical bolding effects on your printer.On an actual LQ series printer, these two commands create slightlydifferent effects and can be combined to produce darker characters.
C-16 Appendix C
LQ and FX Emulation Command Summary
SI / ESC SI
These commands print 10 cpi characters in a 16.66 cpi font, and 12cpi characters in a 20 cpi font. On an actual LQ or FX printer,these commands condense the font.
ESC x
This command is normally used to select between draft and LQquality with an LQ or FX printer. However, this command has noeffect on your printer’s print quality since all characters are printedat 300 dpi (dots per inch).
ESC w
This command produces double-height characters but differsbetween LQ and FX emulation modes, as follows:
LQ mode - If you send the ESC w command when theprint position is set at the first line of the logical page, LQprinters print only the bottom half of the characters.Your printer prints the entire character.
FX mode - When combining ESC w and ESC W to producedouble-width, double-height characters, FX printers do notincrease the stroke weight for vertical lines. Your printer in FXemulation does increase the vertical line weight. Also, whenthis command is set with the print position set at the first lineof the page, FX printers change the baseline position in order toprint the entire character. For your printer, the baseline is notchanged.
ESC &, ESC K, ESC L, ESC Y, ESC Z, ESC *, and ESC ^
This printer uses an image processing technique that emulates, asclosely as possible, the image densities available on FX and LQprinters. Because of this process, the graphics commands listedabove do not produce exactly the same output on the printer thatthey would on an FX or LQ printer.
Appendix C C-17

LQ and FX Emulation Command Summary
ESC C, ESC CO
When you send the ESC C or ESC CO command to change thepage length on the LQ or FX printers, you can print more than onepage on the same sheet of paper. Because your printer processesdata page-by-page, each page must be printed on a separate sheetof paper, so exact LQ or FX emulation cannot be provided.Problems will occur when the page length set with the ESC C orESC CO command differs from the actual page length.
DEL
The printer handles the DEL command as a BS command. Printportion return is the same as for an FX or LQ printer, althoughyour printer does not clear previous characters.
CAN
FX and LQ printers clear the data in their print buffer with thiscommand; your printer prints the data.
ESC EM
Your printer supports 1, 2, and R for n.
C-18 Appendix C

LQ and FX Emulation Command Summary
Printer commands arranged by topic
The following section lists and describes all FX and LQ commandsby topic.
Printer operation:
ESC @ Initialize printerDC 1 Select printerDC 3 Deselect printerESC EM Control paper loading/ejectingBEL Beeper
Data control:
CR Carriage returnCAN Cancel lineDEL Delete characterESC = Set MSB to 0ESC > Set MSB to 1ESC # Cancel MSB control
Vertical motion:
FFESC CESC COESC NESC 0LFESC 0ESC 1ESC 2ESC 3
ESC A
ESC +ESC J
Form feedSet page length in linesSet page length in inchesSet skip over perforationCancel skip over perforationLine feedSelect l/B-inch line spacingSelect 7/72-inch line spacing (FX only)Select l/6-inch line spacingSelect n/180-inch line spacing (LQ)Select n/216-inch line spacing (FX)Select n/60-inch line spacing (LQ)Select n/72-inch line spacing (FX)Select n/360-inch line spacing (LQ only)Perform n/180-inch line spacing (LQ)Perform n/216-inch line spacing (FX)
Appendix C C-19

LQ and FX Emulation Command Summary
ESC j Perform n/180-inch reverse feed (LQ)Perform n/216-inch reverse feed (FX)
VT Tab verticallyESC B Set vertical tabsESC b Set vertical tabs in channelsESC / Select vertical tab channel
Horizontal mo Con:
ESC $ESC \ESC 1ESC QBSHTESC D
Set absolute horizontal print positionSet relative horizontal print positionSet left marginSet right marginBackspaceTab horizontallySet horizontal tabs
Overall printing style:
ESC xESC kESC !
Select letter quality or draftSelect typeface familyMaster select
Print size and character width:
ESC gESC I’ESC MESC pSIESC SIDC 2s oESC SODC 4ESC WESC w
Select 15 cpiSelect 10 cpiSelect 12 cpiTurn proportional mode on/offSelect condensed modeSelect condensed modeCancel condensed modeSelect double-width mode (one line)Select double-width mode (one line)Cancel double-width mode (one line)Turn double-width mode on/offTurn double-height printing on/off
C-20 Appendix C

LQ and FX Emulation Command Summary
Font enhancement:
ESC EESC FESC GESC HESC SESC TESC 4ESC 5ESC -
Select emphasized modeCancel emphasized modeSelect double-strike modeCancel double-strike modeSelect superscript/subscript modeCancel superscript/subscript modeSelect italic modeCancel italic modeTurn underline mode on/off
Word processing:
ESC a Select justificationESC SP Set intercharacter space
Character handling:
ESC tESC RESC &ESC :ESC %ESC IESC 6ESC 7
Select character tableSelect international character setDefine user-defined charactersCopy ROM to RAMSelect user-defined setPrintable code area expansion (FX mode)Printable code area expansionEnable upper control codes
Graphics:
ESC KESC LESC Y
ESC ZESC *ESC ?ESC *
Select single-density graphics modeSelect double-density graphics modeSelect high-speed double-density graphicsmodeSelect quadruple-density graphics modeSelect graphics modeReassign graphics modeSelect 9-pin graphics mode (FX mode)
Appendix C C-21

Glossary
application programAny software program designed to carry out a particular task.For example, word processing or graphics packages are applicationprograms.
ASCIIAmerican Standard Code for Information Interchange. Astandardized way of assigning numerical codes to characters andcontrol codes. The system is widely used by manufacturers ofcomputers, printers, and software.
auto line feedWhen this feature is enabled using SelecType, each carriage returncode (CR) is automatically accompanied by a line feed (LF) code.
baud rateA measure of the speed of data transmission. It is used whensetting up the serial interface between the computer and printer.
binarySee number systems.
bitA binary digit (0 or 1), which is the smallest unit of informationused by a printer or computer. See also number systems.
bit image graphicsA graphics design formed by patterns of dots. Also called dotgraphics.
bitmap fontA font that is defined with specific attributes such as size andweight. See outline font.
Glossary GL-1
boldA print enhancement that produces darker than normal charactersand is typically used to add emphasis to a document. Bold is alsooffered as a font attribute. See weight.
bufferSee memory.
byteA unit of information consisting of eight bits. A byte usuallycorresponds to one character or code.
cacheThe area of memory that stores internally generated fonts.
character setA collection of letters, numbers, and symbols that provides youwith the characters used in a particular language.
character spacingRefers to two methods for horizontal character placement -fixed pitch and proportional spacing.
characters per inch (cpi)A measure of the size of fixed-pitch text characters.
control codesSpecial codes used to control printer functions such as soundingthe beeper and performing a carriage return or line feed.
cpiSee characters per inch
data dump modeSee hex dump mode.
GL-2 Glossary

decimalSee number systems.
defaultA value or setting that takes effect when the printer is turned on,reset, or initialized.
dot graphicsSee bit image graphics.
downloadA way of transferring information from the computer to theprinter.
download fontA font that is loaded into the printer’s memory from an outsidesource, such as a computer.
dpiDots per inch. This is a measure of print resolution.
driverThe part of an application program that converts commands fromthe program into commands used by the printer. Also known asthe printer driver.
drumThe part of the printer mechanism where the image is formed andtransferred to the paper.
EEPROMElectrically Erasable Programmable Read Only Memory. Theportion of the printer’s memory holding SelecType’s defaultsettings. It may by erased and reprogrammed, enabling you tochange the default settings.
Glossary GL-3

electrophotographic processThe printing method used by your printer. In this process, alow-power laser is used to expose selected portions of a revolvingphotosensitive drum. Toner is then attracted to the exposed areasof the drum to form a mirror image of the page to be printed. Thetoner adhering to the drum is then transferred to the surface of thepaper where it is fused in place using a process combining heatand pressure.
Epson Extended GraphicsA symbol set containing international accented characters, Greekcharacters, and character graphics for printing lines, corners, andshaded areas.
ESC (escape) codeA special control code used to begin most printer commands.
ESC/PAn abbreviation of Epson Standard Code for Printers. This systemof printer commands lets you perform software control of yourprinter from your computer. It is standard for all Epson printersand supported by most application software for personalcomputers.
fixed pitchRefers to the character spacing of a font in which the width is thesame for all characters, as distinguished from proportional spacing.For fixed-pitch fonts, narrow characters such as lowercase i take upas much space as wider characters such as uppercase W.
fontThe complete character set of a given design and size. A font isspecified by the following parameters: orientation, symbol set,spacing, pitch, point size, typeface, style, and weight.
GL-4 Glossary

font cachingA feature which keeps the most frequently used characters inprinter memory.
font cardAn optional card that contains additional fonts.
graphics driverA part of an applications program that allows a computer toproduce graphic images on a particular type of printer.
hexadecimal (hex)See number systems.
hex dump modeA printing mode that can be used to print out the exact codesreaching the printer. This mode can be used by experienced usersas a troubleshooting tool.
IC cardsOptional integrated circuit cards that can be plugged into the slotson the printer.
identity cardAn optional card that offers a printer operation mode so yourprinter emulates another printer.
imaging cartridgeThe imaging cartridge contains a photosensitive print drum and asupply of toner.
initializationReturns the printer to its defaults (fixed set of conditions).
Glossary GL-5

input bufferA portion of RAM used as a temporary holding area for datareceived from the computer until it is printed. Also known asprinter memory.
interfaceThe connection between the printer and the computer. A parallelinterface transmits data one character or code at a time, and aserial interface transmits data one bit at a time.
italicA typestyle in which the characters slant. This sentence is italicized.See also oblique.
landscapePrinting that is oriented sideways on the page. This orientationgives you a page that is wider than it is high and is useful forprinting spreadsheets.
LCDLiquid Crystal Display. The screen on the control panel thatdisplays the printer’s current status or available options oravailable settings.
line spaceThe distance between lines of text.
memoryThe part of the printer’s electronic system that is used to storeinformation. Some information is fixed and is used to control howthe printer operates. Information that is sent to the printer fromthe computer (such as download fonts and graphics) is storedtemporarily until it is printed out. See also EEPROM, RAM, andROM.
GL-6 Glossary

nonvolatile memoryThe portion of the printer’s memory that is not lost when you turnoff the printer. The ROM portion of nonvolatile memory ispermanent. The EEPROM portion is permanent unless it isreprogrammed.
number systemsThree number systems are commonly used with printers:
decimal is base 10 and uses the digits 0, 1, 2, 3, 4, 5, 6, 7, 8,and 9. This is the most familiar system.
hexadecimal (hex) is base 16 and uses the characters O-9 andA-F. This is frequently used by programmers. Any decimalnumber between 0 and 255 can be expressed by a two-digithexadecimal number.
binary is base 2 and uses only the digits 0 and 1. Allinformation in a computer system is handled in binary form torepresent electrical signals that are on or off. A binary digit isoften called a bit; any decimal between 0 and 255 can beexpressed by an eight-bit binary number.
obliqueRefers to a typestyle in which upright characters have beenpivoted to produce a slant. Sometimes referred to as italic.
off lineWhen the printer is off line, it cannot communicate with thecomputer.
on lineWhen the printer is on line, it can communicate with thecomputer.
Glossary GL-7

orientationRefers to the direction in which characters are printed on a page.This direction is either portrait with the text printed across thewidth of the page, or landscape with the text printed across thelength of the page.
outline fontA font defined by mathematical equations. Outline fonts allowcertain attributes, such as size and orientation, to be changed. Alsocalled scalable font.
parallel interfaceSee interface.
parityA method of checking the reliability of serial data transmissionbetween the computer and printer.
pitchA measure of character width. Characters can be fixed pitch, wherethe width is the same for all characters, or proportionally spaced,with varying width. Pitch is a measure of the number of charactersper inch (cpi) for fixed-pitch fonts.
point sizeThe height of a particular typeface as measured from the top ofthe tallest character to the bottom of the lowest. A point is atypographic unit of measure equivalent to l/72 of an inch.
portraitPrinting that is oriented upright on the page (as opposed tolandscape, in which printing is oriented sideways on the page).This is the standard orientation for printing letters or documents.
printer driverSee driver.
GL-8 Glossary

printer modeA set of operating commands that determines how data sent fromthe computer is interpreted and acted upon. Printer modes canemulate existing printers.
proportional spacingPrinting in which character width varies from character tocharacter. For example, a capital W receives much more space thana lowercase i. The result looks more like a typeset book than atypewritten draft.
RAMRandom Access Memory. The portion of the printer’s memoryused as an input buffer and for storing user-defined characters,downloaded fonts, and graphics images. Information stored inRAM is volatile and is lost when printer power is interrupted.
resetTo return a printer to its defaults, either by a command, interfacesignal, RESET button, or by turning the printer off and on.
Resolution Improvement Technology (RITech)This makes the jagged edges of printed lines or shapes smooth.
ROMRead Only Memory. The portion of the printer’s memory that ispermanent. Information stored in ROM is used to control how theprinter operates. Resident fonts are stored in ROM.
scalable fontSee outline fonts.
SelecTypeA feature of the printer that allows you to set printer values andcontrol most of the printer’s functions from the front panel.
Glossary GL-9

serial interfaceSee interface.
status sheetA report that lists the SelecType settings and other printerinformation. You can print this report using the SelecType feature.
styleRefers to whether or not a character is slanted. The two styles areupright and italic (oblique).
symbol setA collection of symbols (letters, numbers, and special characters)used by a font. Symbols are assigned to specific codes in acharacter table.
test printA method of checking the operation of the printer. When a testprint is performed with the SelecType feature, the printer printsout one of the two test patterns (vertical or horizontal lines).
tonerA dry, powder-like substance composed of resin and pigment.Toner is used to form the image during the printing process.
transfer charger wireA metal wire used to impact a static charge to the paper, causingtoner particles on the drum to transfer to the surface of the paper.
typefaceA set of characters all of a single design in which the charactersshare common features such as body shape. The typeface is givena name such as Courier.
weightThe boldness or thickness of a character. Weight is selected as afont parameter.
GL-10 Glossary

Index
AAdjusting print density, 2-11Arrow buttons, 3-7Assembling the printer, 1-8AUTO CONT function, 3-35
BBEEPER function, 3-36Buttons, control panel, 2-4
CCards, identity, 7-2--3Carrying the printer, 1-6CH function, 3-32CH TIMEOUT function, 3-35Channel
configuration, 3-32Character samples and
symbol sets, B-12, C-12Choosing
an interface, 2-16paper, 4-2
Cleaningglass lens, 5-7metal roller, 5-18printer case, 5-21transfer charger wire, 5-5
Computer, connecting to theprinter, 2-16
Index IN-1
Connectingparallel interface, 2-17printer to computer, 2-16printer to more than one
computer, 2-25serial interface, 2-19
Consumable productsreplacing, 5-2specifications, A-5
CONTINUEbutton, 2-4indicator light, 2-3
Continue, automatic, 3-35Control panel, 2-2--5Controller hardware
specifications, A-7Converting hexadecimal
numbers to decimals, 6-43COPIES function, 3-15COPY END button, 2-5Cord, power, 1-18--19
DData dump mode, 6-41Decline in print quality, 6-34Default settings, B-30, C-15DELETE MACRO, 3-21Density, adjusting print, 2-11Dimensions
options, A-17printer, A-6
Display, control panel, 2-2

EEJL, see Epson Job LanguageElectrical specifications,
A-7Emulation modes, see Printer
modesEnhancing, print quality, 2-11Envelopes, 4-4, 7, 8Environmental specifications,
A-7Epson Job Language, A-18Epson LQ and FX emulation
modes, C-1character sets, C-13printer menu, 2-24resident fonts, C-12
Epson GL optional identitycard, 4, 7-3Error
handling,messages, and status, 6-2
FFace-up output tray, optional,
4, 4-15, 7-16FACTORY RESET function,
3-37FEED indicator light, 2-3FEED JAM, 6-11FEED MANUAL button, 2-5Font cartfidges, 7-6
available, 7-7inserting, 7-10removing, 7-11
selecting a font, 7-11FONT function, 3-16, B-9, C-4FONT SAMPLE function,
2-10, 3-16Fonts
available, B-12, C-12resident, B-12, C-12
FULL PRINT, 3-18FX printer mode, 2-23, C-1
GGL, Epson optional card, 4,
7-3Glass lens, cleaning, 5-7Graphics, problems, 6-27
HHex dump, see Data dumpHexadecimal to decimal,
conversion, 6-43HP emulation mode, B-1
resident fonts, B-12--13symbol sets, B-17
IIcons, 3-7Identity card, 4, 7-2
Epson GL, 7-3Epson PostScript, 7-2
IES, see Intelligent emulationswitch
I/F CONFIG function, 3-24Imaging cartridge
handling, 1-12installing, 1-14life, A-5
IN-2 Index

Indicator lights, 2-3Initialization, A-15INPUT function, 3-14Inserting a font cartridge,
7-10INSUFF MEMORY, 6-4, 7-22Intelligent emulation switch, 2-26Interface
choosing, 2-16specifications, A-8
JJams
FEED, 6-11PAPER, 6-16
LLabels, 4-1,4-3, A-3Laser printer precautions, 7Lens, glass, cleaning, 5-7Level 1, indicator light, 2-3Level 2, indicator light, 2-3Lights, indicator, 2-3LOAD MACRO, 3-20
in optional cassette, 1-19in standard cassette, 4-11manually, 4-8
L-OFFSET, 3-19Lower paper cassette unit, 3,
4-11, 7-13LQ printer mode, 2-23, C-1
character sets, C-13resident fonts, C-12
MMaintenance, 5-1MANUAL, indicator light, 2-3
Manual paper feed, 4-8Memory, 7-22--26
chip sets, 6, 7-22expansion board, 6, 7-22
MEMORY LEFT, 3-19Menu, application program,
2-23Messages, status and error,
5-2MODE ASSIGN function,
3-23Moving the printer, 1-6,5-22
0ON LINE
button, 2-5indicator light, 2-3
Operating as an HP LaserJetIIISi printer, B-8
Options, 7-1--36Face-up output tray,
7-16--17, A-17Font cartridges, 7-6--12Identity cards, 7-2--5
Epson GL, 7-2PostScript, 7-2
Interface cards, 7-18Lower paper cassette, A-16Memory, 7-22--36
ORIENT function, 3-16, B-9,c-4
Output tray, optional face-up,7-6
Ozone filter, 5-14, A-6
Index IN-3
PPacking for transportation,
5-22PAGE COUNTER function,
3-38PAGE SIZE function, 3-15Paper
choosing, 4-2choosing size, 4-5handling, 4-1jam problems, 6-11loading in cassette, 1-19,4 - 1 1
loading manually, 4-8size, 4-5, A-4specifications, A-3
Paper cassette, 1-19, 4-11PAPER JAM, 6-16Paper size
choosing, 4-5setting, 3-15
Paper-feed method, 4-6Parallel interface
connecting, 2-17setting, SelecType, 3-24specifications, A-8
P-CONFIG SAVE function,3-36
PITCH, B-9POINT, B-9PostScript, optional card, 2-26
7-2Power
cord, attaching, 1-18--19supply, 6-21, A-7
POWERON MACRO, 3-21
Precautions, laser printer, 7Print
density, adjusting, 2-11quality, decline, 6-34quality, enhancing, 2-11
Printerconnecting to computer,
2-16mode switching, 2-26, A-18selection menu, using, 2-23sharing, 2-25specifications, A-2
Printer modesEpson GL, optional, 7-3FX, 2-23, C-1HP, 2-23, B-1LQ, 2-23, C-1PostScript, optional, 7-2
RRAM, 6, 7-22Replacing
consumable parts, 5-2imaging cartridge, 5-3ozone filter, 5-14
RESET button, 2-4Resident fonts, B-12, C-12Resolution Improvement
Technology, 2-13, 3-38,GL-9
RITech, see ResolutionImprovement Technology
RX-BUFFER SIZE function,3-30
IN-4 Index

SSafety precautions, 7SAVE MACRO, 3-20Selecting
and printing a font sample,2-10
and printing a status sheet,2-8
and printing a test print,2-6
printer modes, 2-23SelecType
buttons, 3-7display, 3-7Level 1 functions, 3-3, 3-13Level 2 functions, 3-4, 3-22problems, 6-29using, 3-6, 3-8
Serial interface,connecting, 2-19settings, SelecType, 3-24, 26specifications, A-11
Setting up the printer, 1-1Shared printer language, 2-26,A-18
Sharing the printer, 2-25Specifications
electrical, A-7environmental, A-7initialization, A-15interface, A-8mechanical, A-6option, A-16paper, A-3printer, A-2
STANDBY function, 3-38STARTUP error, 6-7
Status and error messages,6-2
STATUS SHEET function,3-16
SUB CONFIG function, 3-17B-10, C-5
Symbol sets,HP emulation mode, B-17LQ and FX emulation
modes, C-13SYMSET, B-10SYSTEM CONFIG function,
3-17Switching, printer mode,
2-26, 3-23,A-18
TTechnical specifications, A-1TEST PRINT function, 2-6,
3-22Testing
computer-printerconnection, 2-22
printer, 2-6TIMEOUT function, 3-34T-OFFSET, 3-19TONER LOW message, 5-2
6-8TONER OUT message, 5-2
6-8Toner, cleaning spilled, 5-20Transfer charger wire,
cleaning, 5-5Transporting the printer, 5-22Troubleshooting, 6-1
directory, 6-9Turning on the printer, 1-21
Index IN-5

UUnpacking the printer, 1-5
VVERSION function, 3-37
WWarnings, cautions, and
notes, 9Weight
paper, 4-2, A-3printer, A-6
IN-6 Index

SelecType Map
The following menu maps show the possible menus andoptions in SelecType. Mode-specific options, those marked“refer to mode,” are listed under each printer mode later onthis card. See Chapter 3 for a description of each option.
key( ) - Only available with option*+ -Only available with a font is downloaded

SelecType Level 1 LJ-3 mode
ORIENT
F O N T
SUB CONFIG. 7
PORTLANDR-PORT
R-LAND
RDABC
FORM
SYMSET
PITCHHEIGHT
0 to 128 or ***
Roman-8IBM-USI B M - D N
ECM94-1I R VFrenchUKChineseA N S I A S
Norweg1S w e d i s hNorweg2Swedis2French2JIS ASCIBM PorI t a l i a nI B M S p a
PortuguHP GermSpanishHP SpanG e r m a nRoman ELegalPcMultiPsMathVelnterPsTextVe USWindowsMsPubliVeMathDesk TopMath -8PiFontV e Z a p f DPsZapfDZ d 1 0 0Z d 1 0 0
Zd300

SelecType Level 1 in LQ and FX modes
FONT
SUB CONFIG.
CourierPrestige(OCR-B)(OCR-A)DL*
PITCH
CONDENSED
L-MARGINR-MARGINFORM TOPTEXT
SKIP BOTTOMCGTABLE
COUNTRY
J-REPRINT
AUTO CR
ZERO CHAR.WIDE PAGE
101215
Prop.
ON/OFF0 to available0 to available0.50 to 1.501 to available
ON/OFFITALIC
PC USAPcMultPcPort
PcCanFPcNordDLoad
USA
FranceGermanUKDenmark
SwedenItalySpain1JapanNorwayDemkPSpain2LatinA
ON/OFFON/OFF
O/OON/OFFDARKLIGHT
BCODE

SelecType level 1
CANCEL:< S:A P:V (0: >)
INPUT
PAGE SIZE
COPIES
ORIENT.
FONT
STATUS SHEET
FONT SAMPLE
SUB CONFIG.
SYSTEM CONFIG.
STD
(OPT)AUTO
A4
A585LTHLT
LGLGLTGLGEXEF4MONC l 0DL
c 5
1 - 999
Refer to Mode
Refer to Mode
Refer to Mode
FULL PRINTT-OFFSETL-OFFSET
MEMORY LEFT XX K
LOAD MACROSAVE MACRODELETE MACROPOWER ON MACRO
0to62-64 to 63-64 to 63
(0 to available)
o t o 41 to41 to40 to 4

SelecType Level 2
TEST PRINT
MODE ASSIGN
I/F CONFIG.
PATTERN 1PAlTERN 2
w - 3LQFX
(EPSON GL)
w(PS&LJ-3)(PS&LQ)(PS&FX)
PARALLEL
SERIAL
SLCTI N
AUTOFEEDBUSY DELAY
RS232CRS422
WORD LENGTH
BAUD RATEPARITY
STOP BITDTRXON/XOFFENQ/ACK
DSRCTSRX-BUFFER SIZE
CH AUTOSENSE
(TIMEOUT)INDIVIDUAL
S,P,OCG TIME OUT 10 to 600
AUTO CONT. O NOFF
BEEPER O N
OFFP-CONFIG. SAVEFACTORY RESETVERSION C - R O M
FONTRITech LIGHT
MEDIUMHEAVYOFF
STANDBY


Related Documents