EO Mini Pro 2 Installation Guide. © EO Charging 2020 EO Mini Pro 2 Installation Guide

Welcome message from author
This document is posted to help you gain knowledge. Please leave a comment to let me know what you think about it! Share it to your friends and learn new things together.
Transcript

EO Mini Pro 2 Installation Guide.© EO Charging 2020
EO Mini Pro 2 Installation Guide

© EO Charging 2020
EO Mini Pro 2 Installation Guide
1.0 Introduction (p2)
2.0 Pre-Installation (p3)
3.0 Installation Instructions for the EO Mini Pro 2 (p5)
4.0 Connecting the EO Mini Pro 2 to the EO Cloud (p10)
5.0 Connect the EO Mini Pro 2 to the Wi-Fi (p15)
6.0 Additional EO Mini Pro 2 Installation Information (p18)
7.0 How to use the EO Mini Pro 2 (p23)
8.0 EO Mini Pro 2 Status Light (p25)
9.0 Troubleshooting Guide (p28)
10.0 Further Technical Support (p30)
1
Contents
Introduction
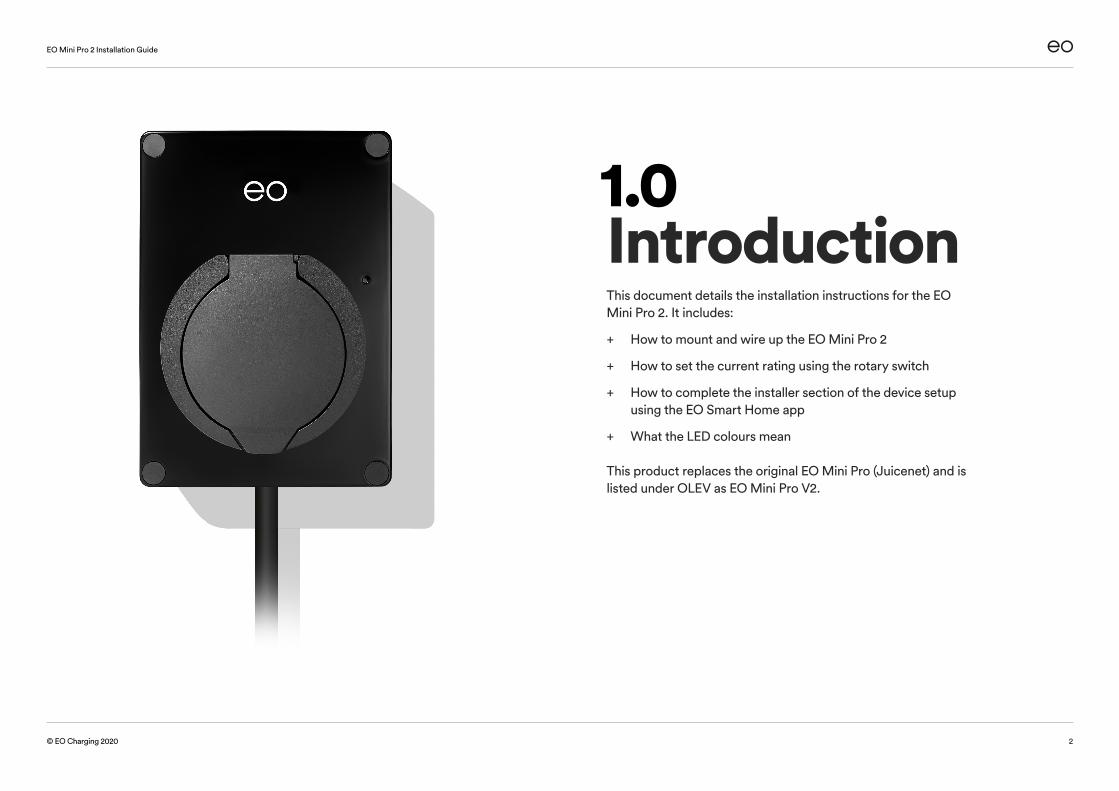
This document details the installation instructions for the EO Mini Pro 2. It includes:
+ How to mount and wire up the EO Mini Pro 2
+ How to set the current rating using the rotary switch
+ How to complete the installer section of the device setup using the EO Smart Home app
+ What the LED colours mean
This product replaces the original EO Mini Pro (Juicenet) and is listed under OLEV as EO Mini Pro V2.
© EO Charging 2020
EO Mini Pro 2 Installation Guide
2
1.0
© EO Charging 2020
EO Mini Pro 2 Installation Guide
2.0 Pre-Installation Instructions for the EO Mini Pro 2.
3
EO Mini Pro 2 Installation Guide
© EO Charging 2020 4
2.0 Pre-Installation.
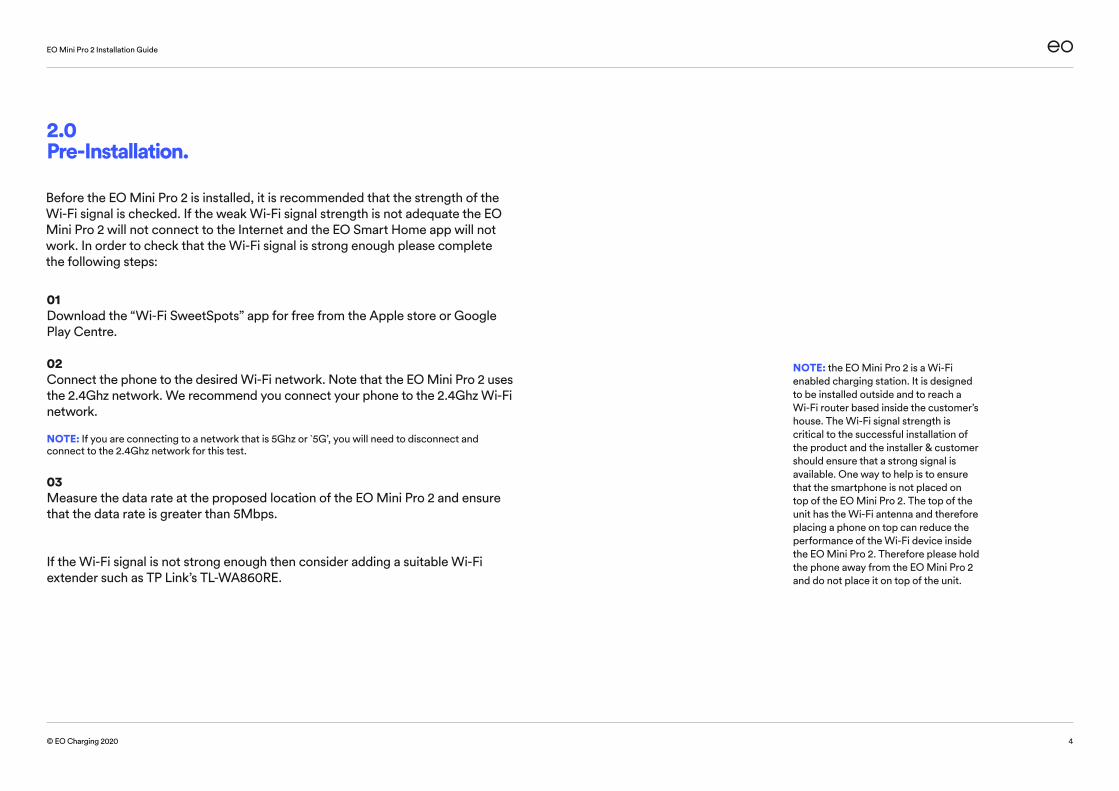
Before the EO Mini Pro 2 is installed, it is recommended that the strength of the Wi-Fi signal is checked. If the weak Wi-Fi signal strength is not adequate the EO Mini Pro 2 will not connect to the Internet and the EO Smart Home app will not work. In order to check that the Wi-Fi signal is strong enough please complete the following steps:
01Download the “Wi-Fi SweetSpots” app for free from the Apple store or Google Play Centre.
02 Connect the phone to the desired Wi-Fi network. Note that the EO Mini Pro 2 usesthe 2.4Ghz network. We recommend you connect your phone to the 2.4Ghz Wi-Fi network. NOTE: If you are connecting to a network that is 5Ghz or `5G’, you will need to disconnect and connect to the 2.4Ghz network for this test. 03Measure the data rate at the proposed location of the EO Mini Pro 2 and ensure that the data rate is greater than 5Mbps. If the Wi-Fi signal is not strong enough then consider adding a suitable Wi-Fi extender such as TP Link’s TL-WA860RE.
NOTE: the EO Mini Pro 2 is a Wi-Fi enabled charging station. It is designed to be installed outside and to reach a Wi-Fi router based inside the customer’s house. The Wi-Fi signal strength is critical to the successful installation of the product and the installer & customer should ensure that a strong signal is available. One way to help is to ensure that the smartphone is not placed on top of the EO Mini Pro 2. The top of the unit has the Wi-Fi antenna and therefore placing a phone on top can reduce the performance of the Wi-Fi device inside the EO Mini Pro 2. Therefore please hold the phone away from the EO Mini Pro 2 and do not place it on top of the unit.

© EO Charging 2020
EO Mini Pro 2 Installation Guide
3.0 Installation Instructions for the EO Mini Pro 2.
5
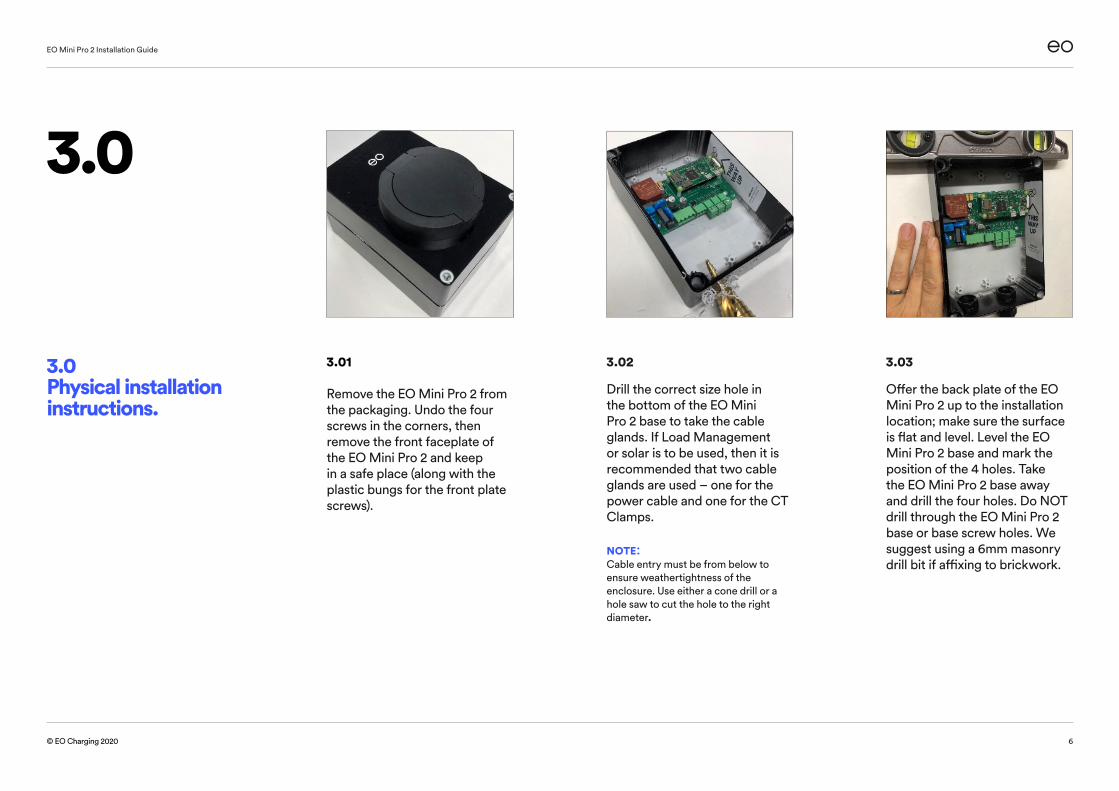
3.01 Remove the EO Mini Pro 2 from the packaging. Undo the four screws in the corners, then remove the front faceplate of the EO Mini Pro 2 and keep in a safe place (along with the plastic bungs for the front plate screws).
3.02
Drill the correct size hole in the bottom of the EO Mini Pro 2 base to take the cable glands. If Load Management or solar is to be used, then it is recommended that two cable glands are used – one for the power cable and one for the CT Clamps. NOTE: Cable entry must be from below to ensure weathertightness of the enclosure. Use either a cone drill or a hole saw to cut the hole to the right diameter.
3.03
Offer the back plate of the EO Mini Pro 2 up to the installation location; make sure the surface is flat and level. Level the EO Mini Pro 2 base and mark the position of the 4 holes. Take the EO Mini Pro 2 base away and drill the four holes. Do NOT drill through the EO Mini Pro 2 base or base screw holes. We suggest using a 6mm masonry drill bit if affixing to brickwork.
3.0 Physical installation instructions.
EO Mini Pro 2 Installation Guide
© EO Charging 2020 6
3.0
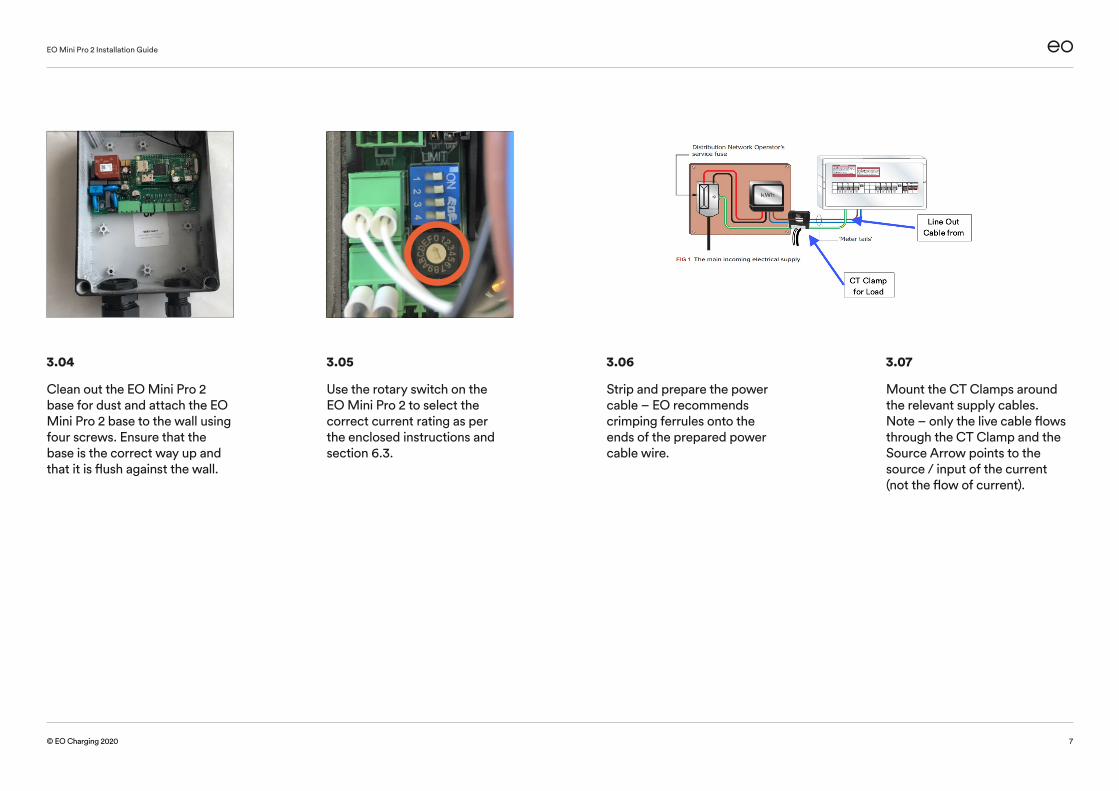
3.04
Clean out the EO Mini Pro 2 base for dust and attach the EO Mini Pro 2 base to the wall using four screws. Ensure that the base is the correct way up and that it is flush against the wall.
3.05
Use the rotary switch on the EO Mini Pro 2 to select the correct current rating as per the enclosed instructions and section 6.3.
3.06
Strip and prepare the power cable – EO recommends crimping ferrules onto the ends of the prepared power cable wire.
EO Mini Pro 2 Installation Guide
© EO Charging 2020
3.07
Mount the CT Clamps around the relevant supply cables. Note – only the live cable flows through the CT Clamp and the Source Arrow points to the source / input of the current (not the flow of current).
7
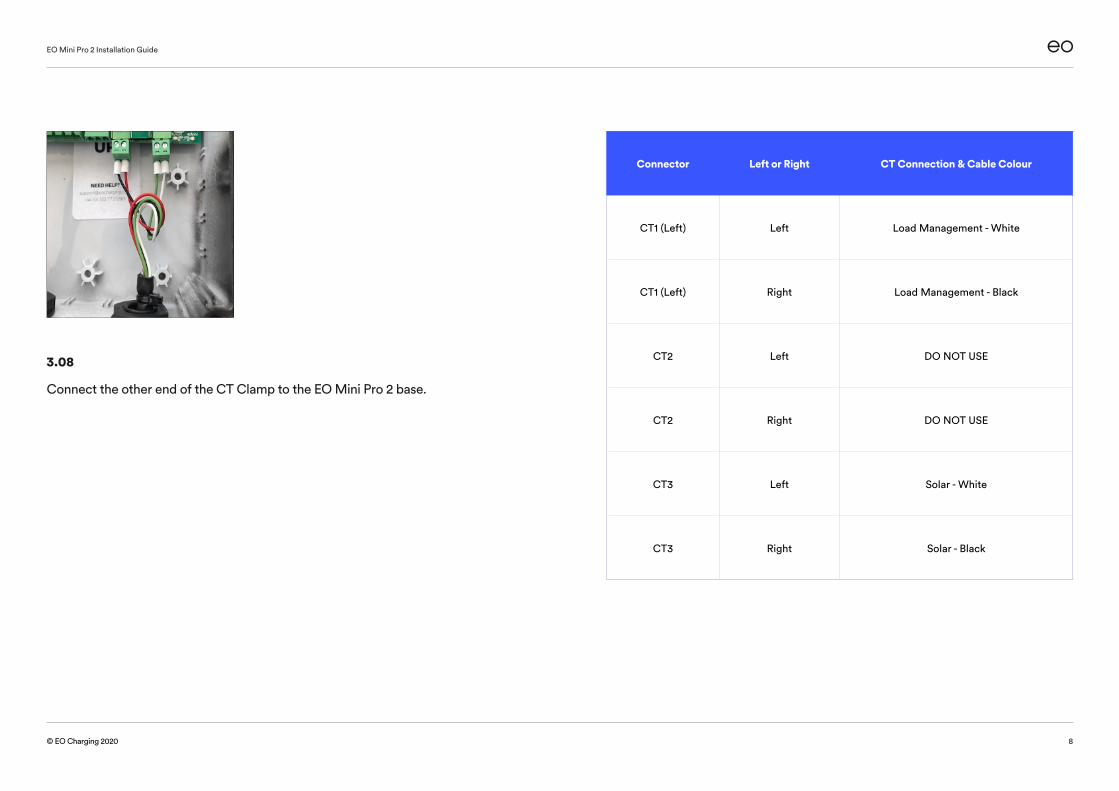
Connector Left or Right CT Connection & Cable Colour
CT1 (Left) Left Load Management - White
CT1 (Left) Right Load Management - Black
CT2 Left DO NOT USE
CT2 Right DO NOT USE
CT3 Left Solar - White
CT3 Right Solar - Black
3.08
Connect the other end of the CT Clamp to the EO Mini Pro 2 base.
EO Mini Pro 2 Installation Guide
© EO Charging 2020 8
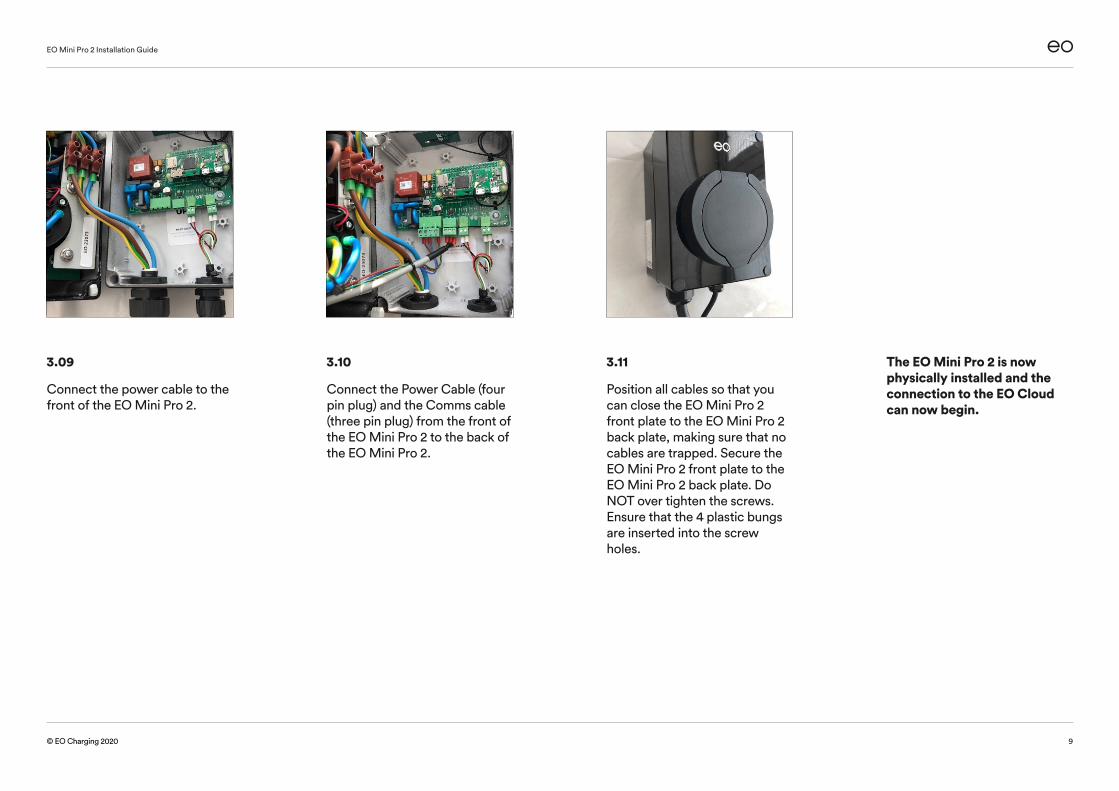
3.09
Connect the power cable to the front of the EO Mini Pro 2.
3.10
Connect the Power Cable (four pin plug) and the Comms cable (three pin plug) from the front of the EO Mini Pro 2 to the back of the EO Mini Pro 2.
3.11
Position all cables so that you can close the EO Mini Pro 2 front plate to the EO Mini Pro 2 back plate, making sure that no cables are trapped. Secure the EO Mini Pro 2 front plate to the EO Mini Pro 2 back plate. Do NOT over tighten the screws. Ensure that the 4 plastic bungs are inserted into the screw holes.
EO Mini Pro 2 Installation Guide
© EO Charging 2020
The EO Mini Pro 2 is now physically installed and the connection to the EO Cloud can now begin.
9
© EO Charging 2020
EO Mini Pro 2 Installation Guide
4.0 Connecting the EO Mini Pro 2 to the EO Cloud.
10
EO Mini Pro 2 Installation Guide
© EO Charging 2020
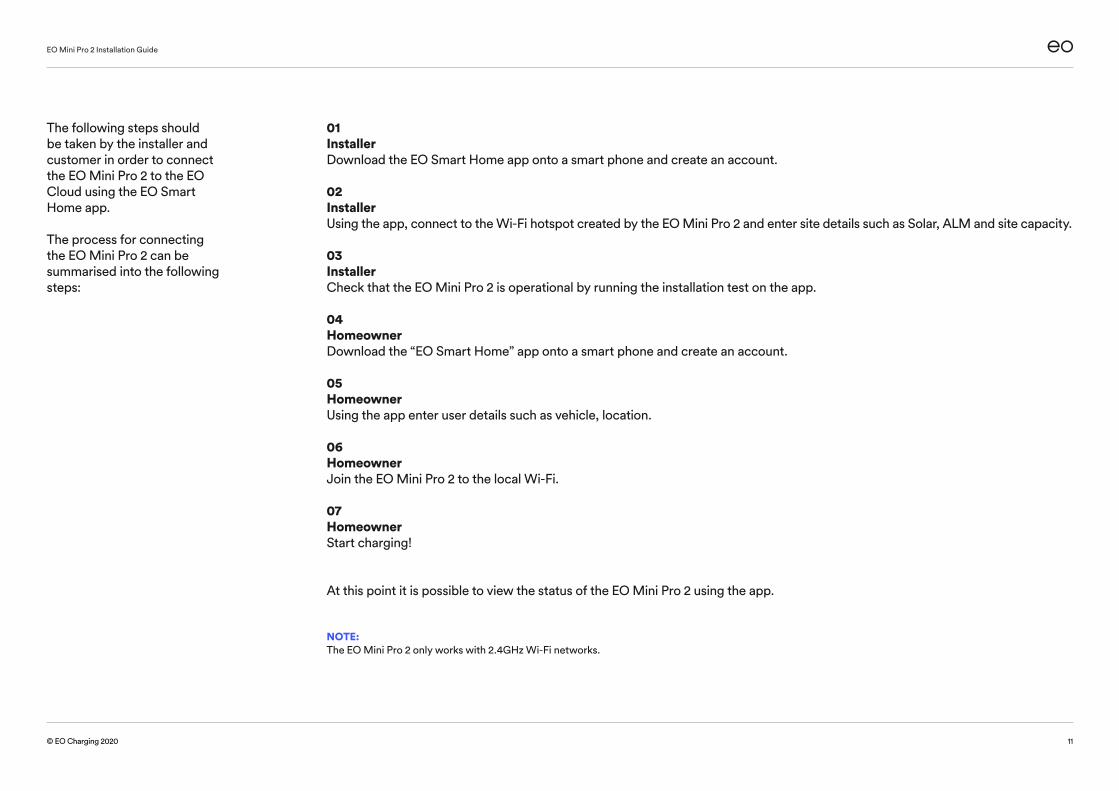
The following steps should be taken by the installer and customer in order to connect the EO Mini Pro 2 to the EO Cloud using the EO Smart Home app.
The process for connecting the EO Mini Pro 2 can be summarised into the following steps:
01Installer Download the EO Smart Home app onto a smart phone and create an account.
02Installer Using the app, connect to the Wi-Fi hotspot created by the EO Mini Pro 2 and enter site details such as Solar, ALM and site capacity. 03Installer Check that the EO Mini Pro 2 is operational by running the installation test on the app. 04Homeowner Download the “EO Smart Home” app onto a smart phone and create an account. 05Homeowner Using the app enter user details such as vehicle, location. 06Homeowner Join the EO Mini Pro 2 to the local Wi-Fi. 07Homeowner Start charging!
At this point it is possible to view the status of the EO Mini Pro 2 using the app. NOTE: The EO Mini Pro 2 only works with 2.4GHz Wi-Fi networks.
11
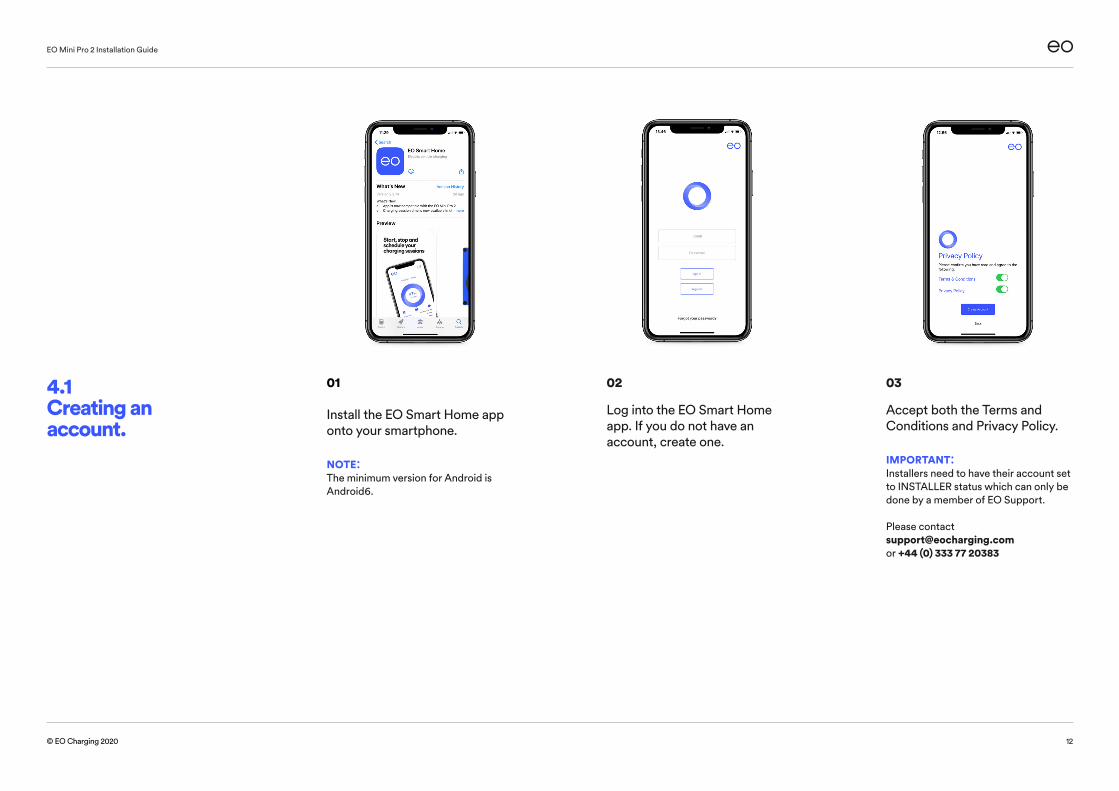
01 Install the EO Smart Home app onto your smartphone.
NOTE: The minimum version for Android is Android6.
02
Log into the EO Smart Home app. If you do not have an account, create one.
03
Accept both the Terms and Conditions and Privacy Policy. IMPORTANT: Installers need to have their account set to INSTALLER status which can only be done by a member of EO Support. Please contact [email protected] or +44 (0) 333 77 20383
EO Mini Pro 2 Installation Guide
© EO Charging 2020
4.1 Creating an account.
12

01 Select “Begin Installation” from the left hand menu if the above screen isn’t shown.
02
Click “Start Installation” and the app will ask the installer to scan the QR code on the side of the EO Mini Pro 2. Scan the QR code and then the app will attempt to join the Wi-Fi hotspot of the EO Mini Pro 2.
EO Mini Pro 2 Installation Guide
© EO Charging 2020
03
If successful then the installer will be able to configure the following options:
+ Does the site need Load Management? Yes/No
+ Site Voltage
+ Site Supply
+ Safety Margin (a 10% value is automatically suggested)
+ Does the site have Solar?
+ CT Rating for Site/Load Management
+ CT Rating for Solar
4.2 Installer - Check the EO Mini Pro 2 is wired correctly. The Installer must verify that the Mini Pro 2 is wired up correctly and that the CT Clamps correctly. This is done using these simple steps:
13
NOTE: Load Management should NOT be selected if CT1 is not connected (enter 0 amps)
NOTE: Solar should NOT be selected if CT3 is not connected (enter 0 amps) Check that the ratings on the CT clamps are entered into the app
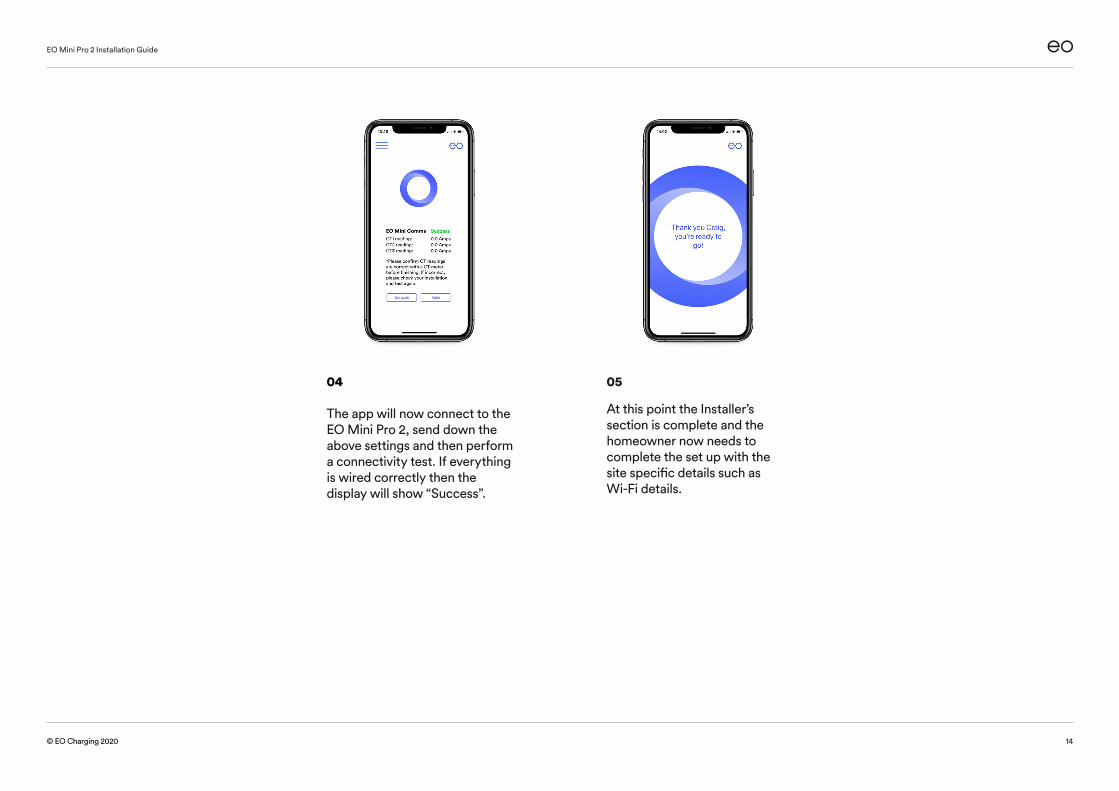
04 The app will now connect to the EO Mini Pro 2, send down the above settings and then perform a connectivity test. If everything is wired correctly then the display will show “Success”.
05
At this point the Installer’s section is complete and the homeowner now needs to complete the set up with the site specific details such as Wi-Fi details.
EO Mini Pro 2 Installation Guide
© EO Charging 2020 14
© EO Charging 2020
EO Mini Pro 2 Installation Guide
5.0 Connect the EO Mini Pro 2 to the Wi-Fi.
15

01 The homeowner needs to log into their version of the app. If the following screen is not shown then select “My EO Home” from the left hand menu.
02
Select the Vehicle from the database.
EO Mini Pro 2 Installation Guide
© EO Charging 2020
03
Enter the site address.
5.0 Connect the EO Mini Pro 2 to the Wi-Fi.
16
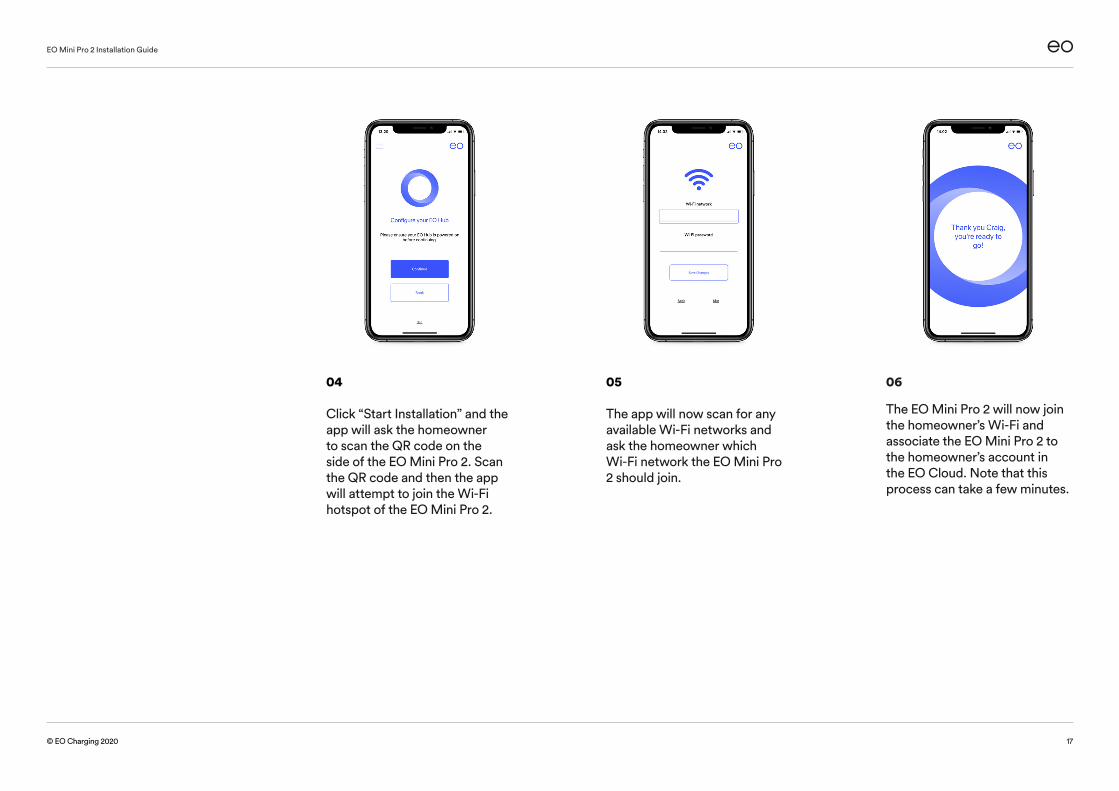
05 The app will now scan for any available Wi-Fi networks and ask the homeowner which Wi-Fi network the EO Mini Pro 2 should join.
06
The EO Mini Pro 2 will now join the homeowner’s Wi-Fi and associate the EO Mini Pro 2 to the homeowner’s account in the EO Cloud. Note that this process can take a few minutes.
EO Mini Pro 2 Installation Guide
© EO Charging 2020
04 Click “Start Installation” and the app will ask the homeowner to scan the QR code on the side of the EO Mini Pro 2. Scan the QR code and then the app will attempt to join the Wi-Fi hotspot of the EO Mini Pro 2.
17
© EO Charging 2020
EO Mini Pro 2 Installation Guide
6.0 AdditionalEO Mini Pro 2 Installation Information.
18
EO Mini Pro 2 Installation Guide
© EO Charging 2020
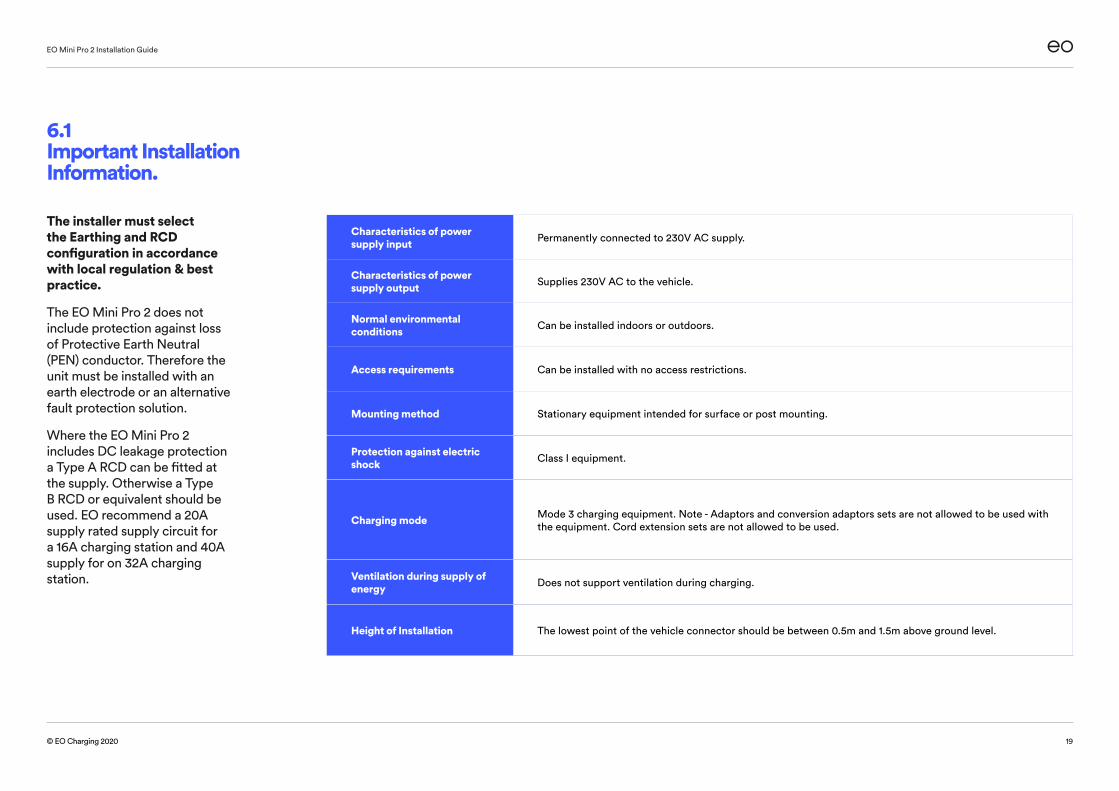
6.1 Important Installation Information.
Characteristics of power supply input Permanently connected to 230V AC supply.
Characteristics of power supply output Supplies 230V AC to the vehicle.
Normal environmental conditions Can be installed indoors or outdoors.
Access requirements Can be installed with no access restrictions.
Mounting method Stationary equipment intended for surface or post mounting.
Protection against electric shock Class I equipment.
Charging mode Mode 3 charging equipment. Note - Adaptors and conversion adaptors sets are not allowed to be used with the equipment. Cord extension sets are not allowed to be used.
Ventilation during supply of energy Does not support ventilation during charging.
Height of Installation The lowest point of the vehicle connector should be between 0.5m and 1.5m above ground level.
19
The installer must select the Earthing and RCD configuration in accordance with local regulation & best practice.
The EO Mini Pro 2 does not include protection against loss of Protective Earth Neutral (PEN) conductor. Therefore the unit must be installed with an earth electrode or an alternative fault protection solution.
Where the EO Mini Pro 2 includes DC leakage protection a Type A RCD can be fitted at the supply. Otherwise a Type B RCD or equivalent should be used. EO recommend a 20A supply rated supply circuit for a 16A charging station and 40A supply for on 32A charging station.
EO Mini Pro 2 Installation Guide
© EO Charging 2020
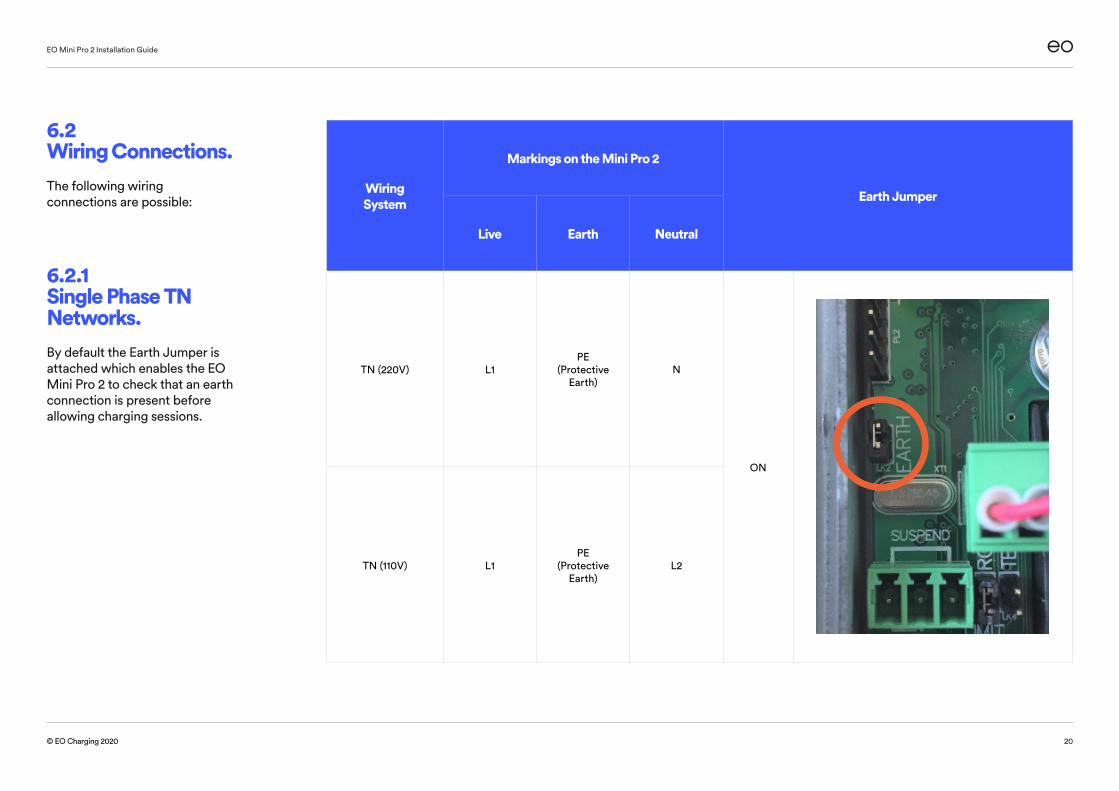
6.2 Wiring Connections. The following wiring connections are possible:
6.2.1 Single Phase TN Networks. By default the Earth Jumper is attached which enables the EO Mini Pro 2 to check that an earth connection is present before allowing charging sessions.
Wiring System
Markings on the Mini Pro 2
Earth Jumper
Live Earth Neutral
TN (220V) L1PE
(Protective Earth)
N
ON
TN (110V) L1PE
(Protective Earth)
L2
20
EO Mini Pro 2 Installation Guide
© EO Charging 2020
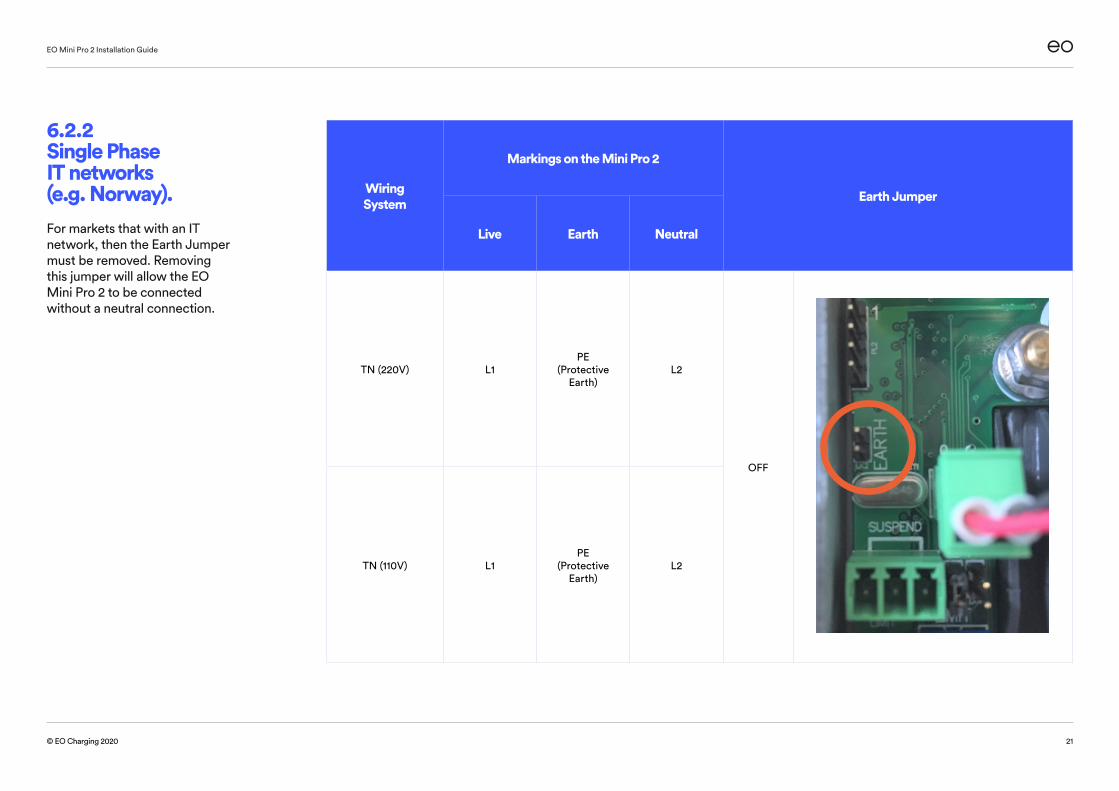
6.2.2 Single Phase IT networks (e.g. Norway). For markets that with an IT network, then the Earth Jumper must be removed. Removing this jumper will allow the EO Mini Pro 2 to be connected without a neutral connection.
Wiring System
Markings on the Mini Pro 2
Earth Jumper
Live Earth Neutral
TN (220V) L1PE
(Protective Earth)
L2
OFF
TN (110V) L1PE
(Protective Earth)
L2
21
EO Mini Pro 2 Installation Guide
© EO Charging 2020
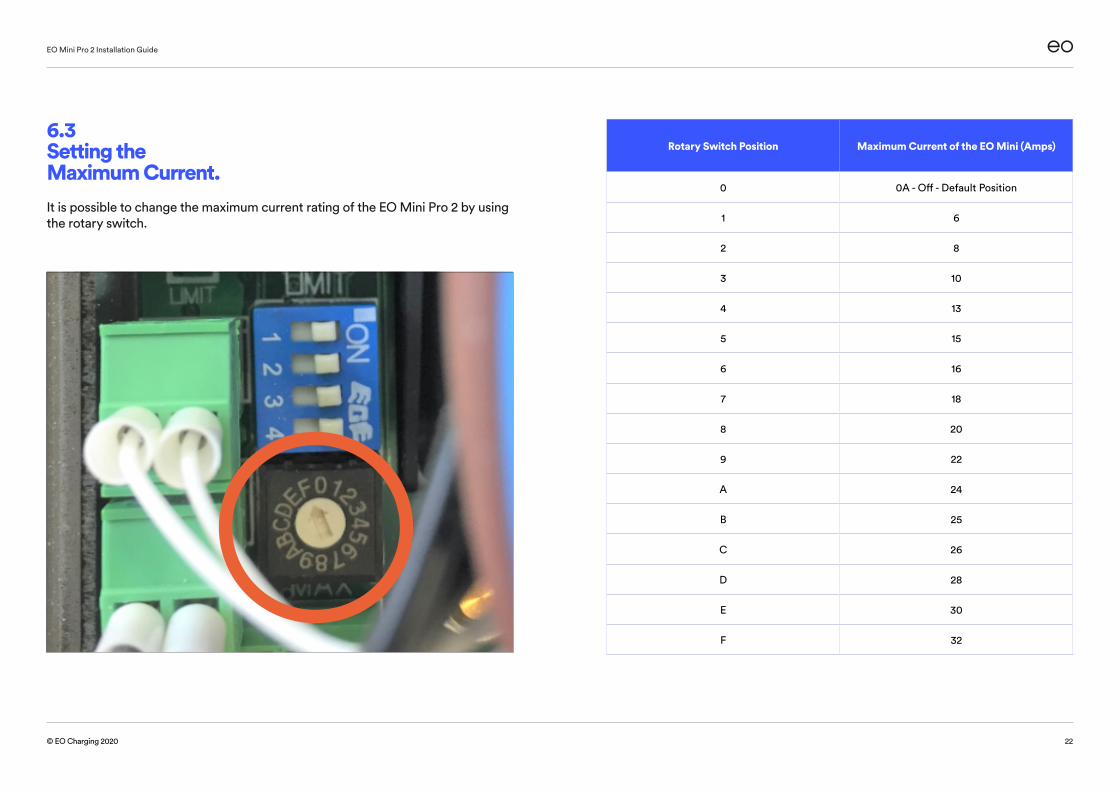
6.3 Setting the Maximum Current. It is possible to change the maximum current rating of the EO Mini Pro 2 by using the rotary switch.
Rotary Switch Position Maximum Current of the EO Mini (Amps)
0 0A - Off - Default Position
1 6
2 8
3 10
4 13
5 15
6 16
7 18
8 20
9 22
A 24
B 25
C 26
D 28
E 30
F 32
22

© EO Charging 2020
EO Mini Pro 2 Installation Guide
7.0 Basic user instructions for the EO Mini Pro 2.
23
The following sections detail the user instructions on how to use the EO Mini Pro 2.
EO Mini Pro 2 Installation Guide
© EO Charging 2020
7.1 Charging a vehicle. In order to charge a vehicle, the following steps should be followed:
+ Turn on the EO Mini Pro 2.
+ Plug the charging cable into vehicle.
+ Plug the charging cable into EO Mini Pro 2 (not applicable if a tethered unit is installed).
+ The vehicle should start to charge immediately or will charge at the scheduled time.
In order to stop a charging session, the following steps should be followed:
+ Stop the charging session from the vehicle e.g. unlock the vehicle.
+ Remove the cable from the vehicle.
+ Remove the cable from the EO Mini Pro 2 (not applicable if a tethered unit is installed).
7.2 Storage of tethered cable. When not in use, the tethered cable should be coiled and stored on a locally provided hook. The plug should latched into the plug holder on the front of the EO Mini Pro 2.
7.3 Cleaning. It is recommended to periodically clean the terminals of the socket with a suitable solvent based cleaner to ensure that the socket is free from dirt and other contaminates.
24
© EO Charging 2020
EO Mini Pro 2 Installation Guide
8.0 EO Mini Pro 2 Status Light.
23
EO Mini Pro 2 Installation Guide
© EO Charging 2020
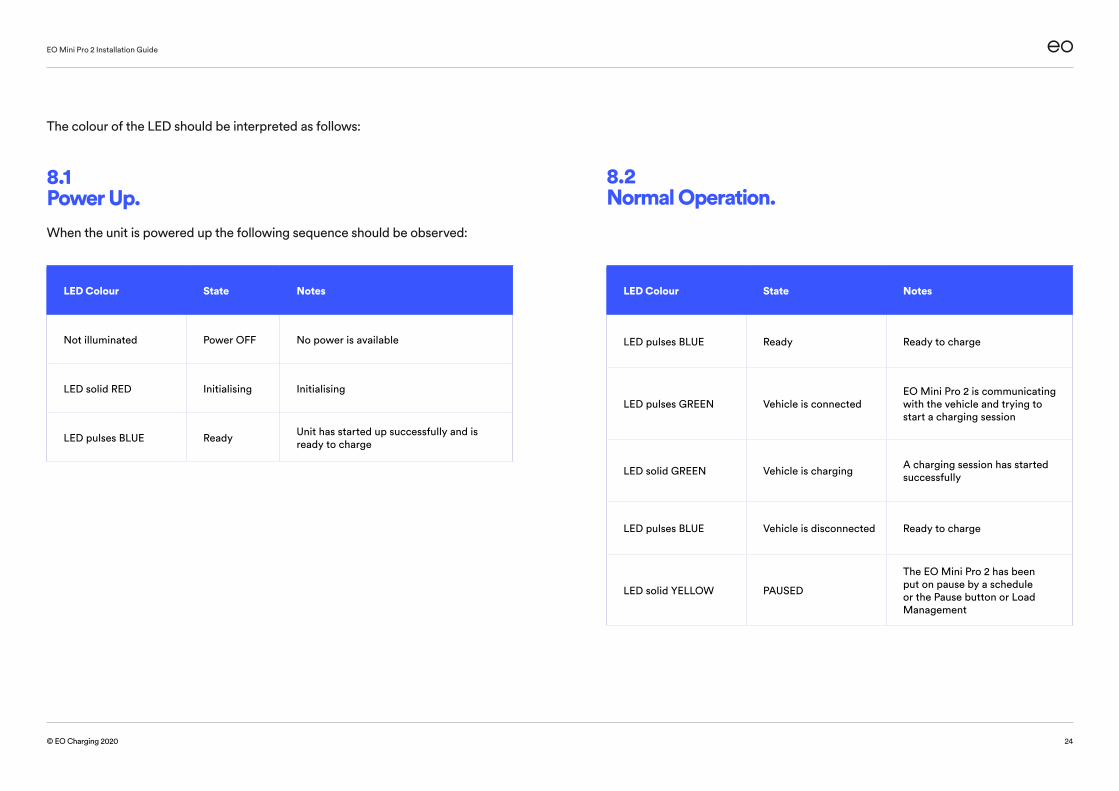
The colour of the LED should be interpreted as follows:
8.1 Power Up. When the unit is powered up the following sequence should be observed:
LED Colour State Notes
Not illuminated Power OFF No power is available
LED solid RED Initialising Initialising
LED pulses BLUE Ready Unit has started up successfully and is ready to charge
8.2 Normal Operation.
LED Colour State Notes
LED pulses BLUE Ready Ready to charge
LED pulses GREEN Vehicle is connectedEO Mini Pro 2 is communicating with the vehicle and trying to start a charging session
LED solid GREEN Vehicle is charging A charging session has started successfully
LED pulses BLUE Vehicle is disconnected Ready to charge
LED solid YELLOW PAUSED
The EO Mini Pro 2 has been put on pause by a schedule or the Pause button or Load Management
24
EO Mini Pro 2 Installation Guide
© EO Charging 2020
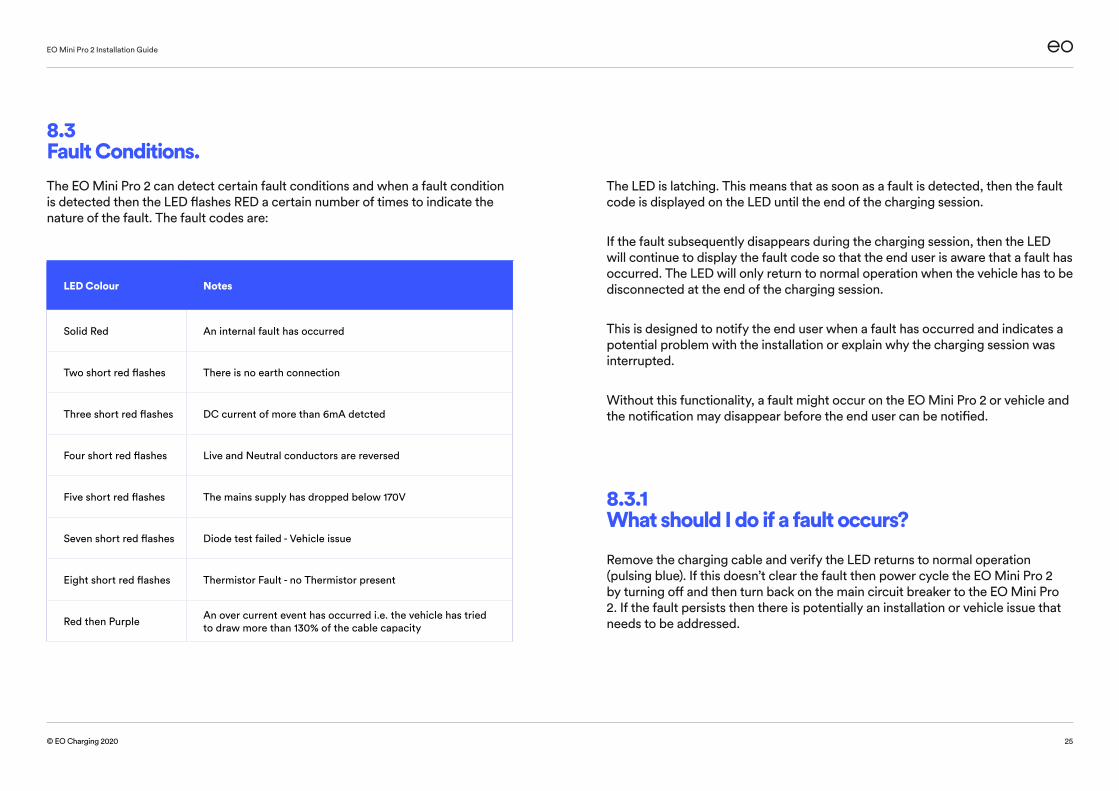
8.3 Fault Conditions. The EO Mini Pro 2 can detect certain fault conditions and when a fault condition is detected then the LED flashes RED a certain number of times to indicate the nature of the fault. The fault codes are:
LED Colour Notes
Solid Red An internal fault has occurred
Two short red flashes There is no earth connection
Three short red flashes DC current of more than 6mA detcted
Four short red flashes Live and Neutral conductors are reversed
Five short red flashes The mains supply has dropped below 170V
Seven short red flashes Diode test failed - Vehicle issue
Eight short red flashes Thermistor Fault - no Thermistor present
Red then Purple An over current event has occurred i.e. the vehicle has tried to draw more than 130% of the cable capacity
The LED is latching. This means that as soon as a fault is detected, then the fault code is displayed on the LED until the end of the charging session.
If the fault subsequently disappears during the charging session, then the LED will continue to display the fault code so that the end user is aware that a fault has occurred. The LED will only return to normal operation when the vehicle has to be disconnected at the end of the charging session.
This is designed to notify the end user when a fault has occurred and indicates a potential problem with the installation or explain why the charging session was interrupted.
Without this functionality, a fault might occur on the EO Mini Pro 2 or vehicle and the notification may disappear before the end user can be notified.
8.3.1 What should I do if a fault occurs? Remove the charging cable and verify the LED returns to normal operation (pulsing blue). If this doesn’t clear the fault then power cycle the EO Mini Pro 2 by turning off and then turn back on the main circuit breaker to the EO Mini Pro 2. If the fault persists then there is potentially an installation or vehicle issue that needs to be addressed.
25
© EO Charging 2020
EO Mini Pro 2 Installation Guide
9.0 Troubleshooting Guide.
26

EO Mini Pro 2 Installation Guide
© EO Charging 2020
9.0 Troubleshooting Guide.
The EO Mini Pro 2 is not connecting to the local Wi-FI:
+ Check to see if the EO Mini Pro 2 Wi-Fi hotspot is broadcasting e.g. eoHub-12345.
+ Repeat the installation process using the EO Smart Home app.
The EO Mini Pro 2 keeps dropping out of Wi-Fi:
+ The Signal strength of the Wi-Fi could be too weak to maintain a steady connection.
+ An alternative would be to use a hard wired ethernet connection.
+ Verify the strength of the Wifi signal strength using the Wifi Sweetspots app. The data rate at the desired location should be at least 5MBps. The vehicle didn’t charge on a scheduled charge:
+ Verify the scheduling settings of the EO Smart Home app.
+ Verify that the vehicle is capable of being woken up by a change in the control pilot signal (contact vehicle manufacturer for confirmation).
I get an error code on the app:
+ If you receive an error code then please note it down and contact EO Support who would be happy to help.
27
© EO Charging 2020
EO Mini Pro 2 Installation Guide
10.0 Further TechnicalSupport.
28
EO Mini Pro 2 Installation Guide
© EO Charging 2020
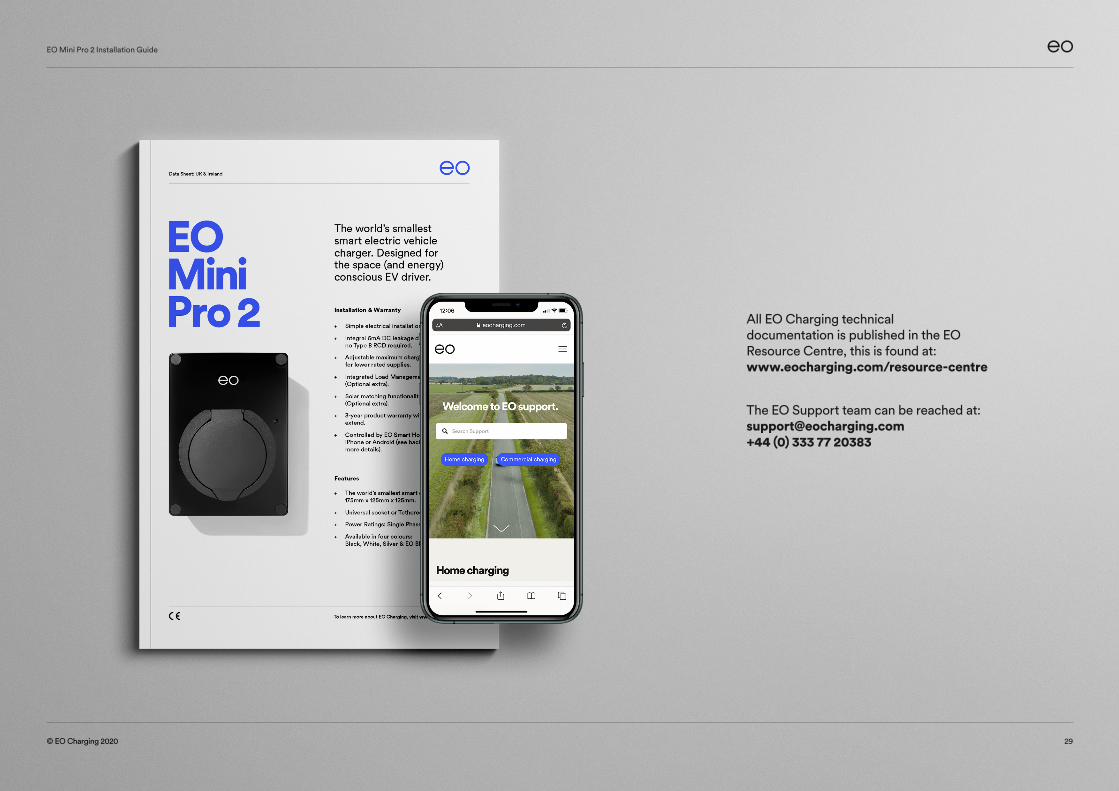
All EO Charging technical documentation is published in the EO Resource Centre, this is found at: www.eocharging.com/resource-centre
The EO Support team can be reached at: [email protected] +44 (0) 333 77 20383
29

© EO Charging 2020
EO Mini Pro 2 Installation Guide
Happy Charging!
Related Documents