Enterprise PeopleTools 8.48 Installation for DB2 UDB for z/OS June 2006

Welcome message from author
This document is posted to help you gain knowledge. Please leave a comment to let me know what you think about it! Share it to your friends and learn new things together.
Transcript

Enterprise PeopleTools 8.48Installation for DB2 UDB for z/OS
June 2006
Enterprise PeopleTools 8.48Installation for DB2 UDB for z/OSSKU itools848_062706_itdb20S390Copyright © 2006, Oracle. All rights reserved.
The Programs (which include both the software and documentation) contain proprietary information; they areprovided under a license agreement containing restrictions on use and disclosure and are also protected by copyright,patent, and other intellectual and industrial property laws. Reverse engineering, disassembly, or decompilation of thePrograms, except to the extent required to obtain interoperability with other independently created software or asspecified by law, is prohibited.
The information contained in this document is subject to change without notice. If you find any problems in thedocumentation, please report them to us in writing. This document is not warranted to be error-free. Except as maybe expressly permitted in your license agreement for these Programs, no part of these Programsmay be reproduced ortransmitted in any form or by anymeans, electronic or mechanical, for any purpose.If the Programs are delivered to the United States Government or anyone licensing or using the Programs on behalf ofthe United States Government, the following notice is applicable:
U.S. GOVERNMENT RIGHTSPrograms, software, databases, and related documentation and technical data delivered to U.S. Governmentcustomers are “commercial computer software” or “commercial technical data” pursuant to the applicable FederalAcquisition Regulation and agency-specific supplemental regulations. As such, use, duplication, disclosure,modification, and adaptation of the Programs, including documentation and technical data, shall be subject tothe licensing restrictions set forth in the applicable Oracle license agreement, and, to the extent applicable, theadditional rights set forth in FAR 52.227-19, Commercial Computer Software--Restricted Rights (June 1987).Oracle Corporation, 500 Oracle Parkway, Redwood City, CA 94065.The Programs are not intended for use in any nuclear, aviation, mass transit, medical, or other inherently dangerousapplications. It shall be the licensee’s responsibility to take all appropriate fail-safe, backup, redundancy and othermeasures to ensure the safe use of such applications if the Programs are used for such purposes, and we disclaimliability for any damages caused by such use of the Programs.The Programsmay provide links toWeb sites and access to content, products, and services from third parties.Oracle is not responsible for the availability of, or any content provided on, third-partyWeb sites. You bear all risksassociated with the use of such content. If you choose to purchase any products or services from a third party, therelationship is directly between you and the third party. Oracle is not responsible for: (a) the quality of third-partyproducts or services; or (b) fulfilling any of the terms of the agreement with the third party, including delivery ofproducts or services and warranty obligations related to purchased products or services. Oracle is not responsible forany loss or damage of any sort that youmay incur from dealing with any third party.Oracle, JD Edwards, PeopleSoft, and Siebel are registered trademarks of Oracle Corporation and/or its affiliates.Other namesmay be trademarks of their respective owners.
Open Source DisclosureOracle takes no responsibility for its use or distribution of any open source or shareware software or documentationand disclaims any and all liability or damages resulting from use of said software or documentation. The followingopen source software may be used in Oracle’s PeopleSoft products and the following disclaimers are provided.Apache Software FoundationThis product includes software developed by the Apache Software Foundation (http://www.apache.org/). Copyright© 2000-2003. The Apache Software Foundation. All rights reserved. Licensed under the Apache License, Version2.0 (the “License”); youmay not use this file except in compliance with the License. Youmay obtain a copy of theLicense at http://www.apache.org/licenses/LICENSE-2.0.Unless required by applicable law or agreed to in writing, software distributed under the License is distributed on an“AS IS” BASIS,WITHOUTWARRANTIESORCONDITIONSOFANYKIND, either express or implied. See theLicense for the specific language governing permissions and limitations under the License.

OpenSSLCopyright © 1998-2005 The OpenSSL Project. All rights reserved.This product includes software developed by the OpenSSL Project for use in the OpenSSL Toolkit(http://www.openssl.org/).THIS SOFTWARE IS PROVIDEDBYTHEOpenSSL PROJECT “AS IS” ANDANYEXPRESSEDORIMPLIEDWARRANTIES, INCLUDING, BUTNOTLIMITEDTO, THE IMPLIEDWARRANTIESOFMERCHANTABILITYANDFITNESS FORAPARTICULAR PURPOSEAREDISCLAIMED. INNOEVENTSHALLTHEOpenSSL PROJECTOR ITSCONTRIBUTORSBELIABLE FORANYDIRECT, INDIRECT,INCIDENTAL, SPECIAL, EXEMPLARY, ORCONSEQUENTIALDAMAGES (INCLUDING, BUTNOTLIMITEDTO, PROCUREMENTOF SUBSTITUTEGOODSORSERVICES; LOSSOFUSE, DATA, ORPROFITS; ORBUSINESS INTERRUPTION)HOWEVERCAUSEDANDONANYTHEORYOFLIABILITY,WHETHER INCONTRACT, STRICT LIABILITY, OR TORT (INCLUDINGNEGLIGENCEOROTHERWISE)ARISING INANYWAYOUTOFTHEUSEOFTHIS SOFTWARE, EVEN IFADVISEDOFTHE POSSIBILITYOF SUCHDAMAGE.Loki LibraryCopyright © 2001 byAndrei Alexandrescu. This code accompanies the book: Alexandrescu, Andrei. “Modern C++Design: Generic Programming and Design Patterns Applied”. Copyright © 2001Addison-Wesley. Permission touse, copy, modify, distribute and sell this software for any purpose is hereby granted without fee, provided that theabove copyright notice appear in all copies and that both that copyright notice and this permission notice appear insupporting documentation.Helma ProjectCopyright © 1999-2004 Helma Project. All rights reserved. THIS SOFTWARE IS PROVIDED “AS IS”ANDANYEXPRESSEDOR IMPLIEDWARRANTIES, INCLUDING, BUTNOTLIMITEDTO, THEIMPLIEDWARRANTIESOFMERCHANTABILITYANDFITNESS FORAPARTICULARPURPOSEAREDISCLAIMED. INNOEVENT SHALL THEHELMAPROJECTOR ITSCONTRIBUTORSBE LIABLE FORANYDIRECT, INDIRECT, INCIDENTAL, SPECIAL, EXEMPLARY, ORCONSEQUENTIALDAMAGES(INCLUDING, BUTNOTLIMITEDTO, PROCUREMENTOF SUBSTITUTEGOODSOR SERVICES;LOSSOFUSE, DATA, OR PROFITS; ORBUSINESS INTERRUPTION) HOWEVERCAUSEDANDONANYTHEORYOFLIABILITY,WHETHER INCONTRACT, STRICT LIABILITY, OR TORT (INCLUDINGNEGLIGENCEOROTHERWISE) ARISING INANYWAYOUTOF THEUSEOF THIS SOFTWARE, EVEN IFADVISEDOFTHE POSSIBILITYOF SUCHDAMAGE.Helma includes third party software released under different specific license terms. See the licenses directory in theHelma distribution for a list of these license.SarissaCopyright © 2004Manos Batsis.This library is free software; you can redistribute it and/or modify it under the terms of the GNULesser GeneralPublic License as published by the Free Software Foundation; either version 2.1 of the License, or (at your option)any later version.This library is distributed in the hope that it will be useful, butWITHOUTANYWARRANTY; without even theimplied warranty ofMERCHANTABILITY or FITNESS FORAPARTICULARPURPOSE. See the GNULesserGeneral Public License for more details.You should have received a copy of the GNULesser General Public License along with this library; if not, write tothe Free Software Foundation, Inc., 59 Temple Place, Suite 330, Boston,MA 02111-1307 USA.ICUICU License - ICU 1.8.1 and later COPYRIGHTANDPERMISSIONNOTICECopyright © 1995-2003International BusinessMachines Corporation and others. All rights reserved.

Permission is hereby granted, free of charge, to any person obtaining a copy of this software and associateddocumentation files (the “Software”), to deal in the Software without restriction, including without limitation therights to use, copy, modify, merge, publish, distribute, and/or sell copies of the Software, and to permit personsto whom the Software is furnished to do so, provided that the above copyright notice(s) and this permissionnotice appear in all copies of the Software and that both the above copyright notice(s) and this permission noticeappear in supporting documentation. THE SOFTWARE IS PROVIDED “AS IS,”WITHOUTWARRANTYOFANYKIND, EXPRESSOR IMPLIED, INCLUDINGBUTNOTLIMITEDTOTHEWARRANTIESOFMERCHANTABILITY, FITNESS FORAPARTICULAR PURPOSEANDNONINFRINGEMENTOFTHIRDPARTYRIGHTS. INNOEVENT SHALL THECOPYRIGHTHOLDERORHOLDERS INCLUDED IN THISNOTICEBELIABLE FORANYCLAIM, ORANYSPECIAL INDIRECTORCONSEQUENTIALDAMAGES,ORANYDAMAGESWHATSOEVERRESULTING FROMLOSSOFUSE, DATAORPROFITS,WHETHER INANACTIONOFCONTRACT, NEGLIGENCEOROTHERTORTIOUSACTION, ARISINGOUTOFOR INCONNECTIONWITHTHEUSEOR PERFORMANCEOF THIS SOFTWARE. Except as contained in this notice,the name of a copyright holder shall not be used in advertising or otherwise to promote the sale, use or other dealingsin this Software without prior written authorization of the copyright holder.All trademarks and registered trademarks mentioned herein are the property of their respective owners.Sun’s JAXB Implementation – JDSDK 1.5 relaxngDatatype.jar 1.0 LicenseCopyright © 2001, Thai Open Source Software Center Ltd, SunMicrosystems. All rights reserved.THIS SOFTWARE IS PROVIDEDBYTHECOPYRIGHTHOLDERSANDCONTRIBUTORS “ASIS” ANDANYEXPRESSOR IMPLIEDWARRANTIES, INCLUDING, BUTNOTLIMITEDTO, THEIMPLIEDWARRANTIESOFMERCHANTABILITYANDFITNESS FORAPARTICULARPURPOSEAREDISCLAIMED. INNOEVENT SHALLTHEREGENTSORCONTRIBUTORSBELIABLE FORANYDIRECT, INDIRECT, INCIDENTAL, SPECIAL, EXEMPLARY, ORCONSEQUENTIALDAMAGES(INCLUDING, BUTNOTLIMITEDTO, PROCUREMENTOF SUBSTITUTEGOODSOR SERVICES;LOSSOFUSE, DATA, OR PROFITS; ORBUSINESS INTERRUPTION) HOWEVERCAUSEDANDONANYTHEORYOF LIABILITY,WHETHER INCONTRACT, STRICT LIABILITY, ORTORT (INCLUDINGNEGLIGENCEOROTHERWISE) ARISING INANYWAYOUTOF THEUSEOF THIS SOFTWARE, EVEN IFADVISEDOFTHE POSSIBILITYOF SUCHDAMAGE.W3C IPR SOFTWARENOTICECopyright © 2000WorldWideWeb Consortium, (Massachusetts Institute of Technology, Institut National deRecherche en Informatique et en Automatique, Keio University). All Rights Reserved.Note: The original version of theW3C Software Copyright Notice and License could be found athttp://www.w3.org/Consortium/Legal/copyright-software-19980720.THIS SOFTWAREANDDOCUMENTATION IS PROVIDED “AS IS,” ANDCOPYRIGHTHOLDERSMAKENOREPRESENTATIONSORWARRANTIES, EXPRESSOR IMPLIED, INCLUDINGBUTNOTLIMITEDTO,WARRANTIESOFMERCHANTABILITYOR FITNESS FORANYPARTICULAR PURPOSEORTHATTHEUSEOFTHE SOFTWAREORDOCUMENTATIONWILLNOT INFRINGEANYTHIRD PARTYPATENTS,COPYRIGHTS, TRADEMARKSOROTHERRIGHTS. COPYRIGHTHOLDERSWILLNOTBELIABLE FORANYDIRECT, INDIRECT, SPECIALORCONSEQUENTIALDAMAGESARISINGOUTOFANYUSEOFTHE SOFTWAREORDOCUMENTATION.
Contents
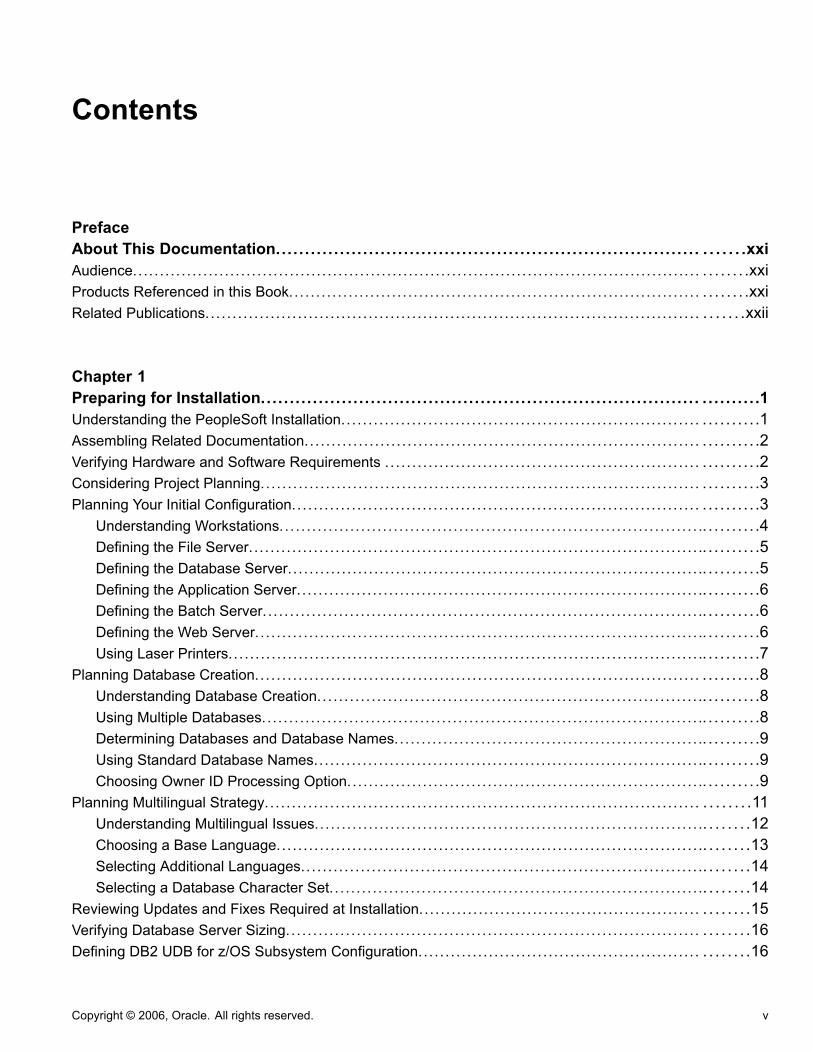
PrefaceAbout This Documentation... . . . . . . . . . . .. . . . . . . . . . . . . . . . . . . . . . . . . . . . . . . . . .. . . . . . . . . . . . . . . . . . . . . . . . . . . . . . . .xxiAudience.. . . . . . . . . . . . . . . . . . . . . . . . . . . . . . . . . . . . . . . . . . . . . . . . . . . . . . . . . . . . . . . . . . . . . . . . . . . . . . . . . . . . . . . . . . . . . . . . . . . . . . . . . . . . . . . .xxiProducts Referenced in this Book... . . . . . . . . . . . . . . . . . . . . . . . . . . . . . . . . . . . . . . . . . . . . . . . . . . . . . . . . . . . . . . . . . . . . . . . . . . . . . . . . .xxiRelated Publications.. . . . . . . . . . . . . . . . . . . . . . . . . . . . . . . . . . . . . . . . . . . . . . . . . . . . . . . . . . . . . . . . . . . . . . . . . . . . . . . . . . . . . . . . . . . . . . . . .xxii
Chapter 1Preparing for Installation.... . . . . . . . . . . . . . . . . . . . . . . . . . . . . . . . . . . . . . . . . . . . . . . . . . . . . . . . . . . . . . . . . . . . . . . . . . . . . . . . . . .1Understanding the PeopleSoft Installation.. . . . . . . . . . . . . . . . . . . . . . . . . . . . . . . . . . . . . . . . . . . . . . . . . . . . . . . . . . . . . . . . . . . . . . . . . . .1Assembling Related Documentation.. . . . . . . . . . . . . . . . . . . . . . . . . . . . . . . . . . . . . . . . . . . . . . . . . . . . . . . . . . . . . . . . . . . . . . . . . . . . . . . . . .2Verifying Hardware and Software Requirements .. . . . . . . . . . . . . . . . . . . . . . . . . . . . . . . . . . . . . . . . . . . . . . . . . . . . . . . . . . . . . . . . . . .2Considering Project Planning.. . . . . . . . . . . . . . . . . . . . . . . . . . . . . . . . . . . . . . . . . . . . . . . . . . . . . . . . . . . . . . . . . . . . . . . . . . . . . . . . . . . . . . . . . .3Planning Your Initial Configuration.. . . . . . . . . . . . . . . . . . . . . . . . . . . . . . . . . . . . . . . . . . . . . . . . . . . . . . . . . . . . . . . . . . . . . . . . . . . . . . . . . . . .3
Understanding Workstations.. . . . . . . . . . . . . . . . . . . . . . . . . . . . . . . . . . . . . . . . . . . . . . . . . . . . . . . . . . . . . . . . . . . . . . . . . . . . .. . . . . . . . . .4Defining the File Server... . . . . . . . . . . . . . . . . . . . . . . . . . . . . . . . . . . . . . . . . . . . . . . . . . . . . . . . . . . . . . . . . . . . . . . . . . . . . . . . . .. . . . . . . . . .5Defining the Database Server... . . . . . . . . . . . . . . . . . . . . . . . . . . . . . . . . . . . . . . . . . . . . . . . . . . . . . . . . . . . . . . . . . . . . . . . . . .. . . . . . . . . .5Defining the Application Server.. . . . . . . . . . . . . . . . . . . . . . . . . . . . . . . . . . . . . . . . . . . . . . . . . . . . . . . . . . . . . . . . . . . . . . . . . .. . . . . . . . . .6Defining the Batch Server. . . . . . . . . . . . . . . . . . . . . . . . . . . . . . . . . . . . . . . . . . . . . . . . . . . . . . . . . . . . . . . . . . . . . . . . . . . . . . . . .. . . . . . . . . .6Defining the Web Server.. . . . . . . . . . . . . . . . . . . . . . . . . . . . . . . . . . . . . . . . . . . . . . . . . . . . . . . . . . . . . . . . . . . . . . . . . . . . . . . . . .. . . . . . . . . .6Using Laser Printers.. . . . . . . . . . . . . . . . . . . . . . . . . . . . . . . . . . . . . . . . . . . . . . . . . . . . . . . . . . . . . . . . . . . . . . . . . . . . . . . . . . . . . . .. . . . . . . . . .7
Planning Database Creation.. . . . . . . . . . . . . . . . . . . . . . . . . . . . . . . . . . . . . . . . . . . . . . . . . . . . . . . . . . . . . . . . . . . . . . . . . . . . . . . . . . . . . . . . . . .8Understanding Database Creation.. . . . . . . . . . . . . . . . . . . . . . . . . . . . . . . . . . . . . . . . . . . . . . . . . . . . . . . . . . . . . . . . . . . . . .. . . . . . . . . .8Using Multiple Databases.. . . . . . . . . . . . . . . . . . . . . . . . . . . . . . . . . . . . . . . . . . . . . . . . . . . . . . . . . . . . . . . . . . . . . . . . . . . . . . . .. . . . . . . . . .8Determining Databases and Database Names... . . . . . . . . . . . . . . . . . . . . . . . . . . . . . . . . . . . . . . . . . . . . . . . . . . . . . .. . . . . . . . . .9Using Standard Database Names... . . . . . . . . . . . . . . . . . . . . . . . . . . . . . . . . . . . . . . . . . . . . . . . . . . . . . . . . . . . . . . . . . . . . .. . . . . . . . . .9Choosing Owner ID Processing Option.. . . . . . . . . . . . . . . . . . . . . . . . . . . . . . . . . . . . . . . . . . . . . . . . . . . . . . . . . . . . . . . . .. . . . . . . . . .9
Planning Multilingual Strategy. . . . . . . . . . . . . . . . . . . . . . . . . . . . . . . . . . . . . . . . . . . . . . . . . . . . . . . . . . . . . . . . . . . . . . . . . . . . . . . . . . . . . . . .11Understanding Multilingual Issues... . . . . . . . . . . . . . . . . . . . . . . . . . . . . . . . . . . . . . . . . . . . . . . . . . . . . . . . . . . . . . . . . . . . . .. . . . . . . .12Choosing a Base Language... . . . . . . . . . . . . . . . . . . . . . . . . . . . . . . . . . . . . . . . . . . . . . . . . . . . . . . . . . . . . . . . . . . . . . . . . . . . .. . . . . . . .13Selecting Additional Languages.. . . . . . . . . . . . . . . . . . . . . . . . . . . . . . . . . . . . . . . . . . . . . . . . . . . . . . . . . . . . . . . . . . . . . . . . .. . . . . . . .14Selecting a Database Character Set. . . . . . . . . . . . . . . . . . . . . . . . . . . . . . . . . . . . . . . . . . . . . . . . . . . . . . . . . . . . . . . . . . . . .. . . . . . . .14
Reviewing Updates and Fixes Required at Installation... . . . . . . . . . . . . . . . . . . . . . . . . . . . . . . . . . . . . . . . . . . . . . . . . . . . . . . . . .15Verifying Database Server Sizing.. . . . . . . . . . . . . . . . . . . . . . . . . . . . . . . . . . . . . . . . . . . . . . . . . . . . . . . . . . . . . . . . . . . . . . . . . . . . . . . . . . .16Defining DB2 UDB for z/OS Subsystem Configuration.. . . . . . . . . . . . . . . . . . . . . . . . . . . . . . . . . . . . . . . . . . . . . . . . . . . . . . . . . . .16
Copyright © 2006, Oracle. All rights reserved. v
Contents
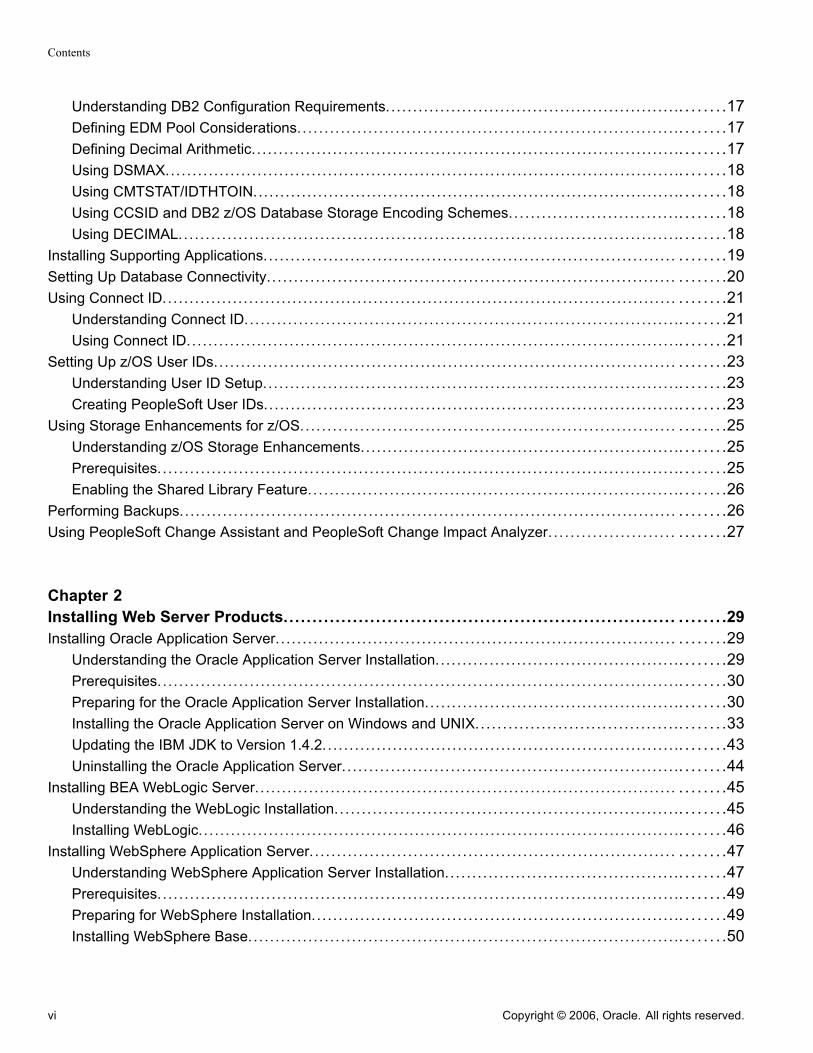
Understanding DB2 Configuration Requirements. . . . . . . . . . . . . . . . . . . . . . . . . . . . . . . . . . . . . . . . . . . . . . . . . . . . . .. . . . . . . .17Defining EDM Pool Considerations.. . . . . . . . . . . . . . . . . . . . . . . . . . . . . . . . . . . . . . . . . . . . . . . . . . . . . . . . . . . . . . . . . . . . .. . . . . . . .17Defining Decimal Arithmetic. . . . . . . . . . . . . . . . . . . . . . . . . . . . . . . . . . . . . . . . . . . . . . . . . . . . . . . . . . . . . . . . . . . . . . . . . . . . . . .. . . . . . . .17Using DSMAX... . . . . . . . . . . . . . . . . . . . . . . . . . . . . . . . . . . . . . . . . . . . . . . . . . . . . . . . . . . . . . . . . . . . . . . . . . . . . . . . . . . . . . . . . . . . .. . . . . . . .18Using CMTSTAT/IDTHTOIN... . . . . . . . . . . . . . . . . . . . . . . . . . . . . . . . . . . . . . . . . . . . . . . . . . . . . . . . . . . . . . . . . . . . . . . . . . . . .. . . . . . . .18Using CCSID and DB2 z/OS Database Storage Encoding Schemes.. . . . . . . . . . . . . . . . . . . . . . . . . . . . . .. . . . . . . .18Using DECIMAL.. . . . . . . . . . . . . . . . . . . . . . . . . . . . . . . . . . . . . . . . . . . . . . . . . . . . . . . . . . . . . . . . . . . . . . . . . . . . . . . . . . . . . . . . . . .. . . . . . . .18
Installing Supporting Applications.. . . . . . . . . . . . . . . . . . . . . . . . . . . . . . . . . . . . . . . . . . . . . . . . . . . . . . . . . . . . . . . . . . . . . . . . . . . . . . . . . . .19Setting Up Database Connectivity. . . . . . . . . . . . . . . . . . . . . . . . . . . . . . . . . . . . . . . . . . . . . . . . . . . . . . . . . . . . . . . . . . . . . . . . . . . . . . . . . . .20Using Connect ID.. . . . . . . . . . . . . . . . . . . . . . . . . . . . . . . . . . . . . . . . . . . . . . . . . . . . . . . . . . . . . . . . . . . . . . . . . . . . . . . . . . . . . . . . . . . . . . . . . . . . . .21
Understanding Connect ID.. . . . . . . . . . . . . . . . . . . . . . . . . . . . . . . . . . . . . . . . . . . . . . . . . . . . . . . . . . . . . . . . . . . . . . . . . . . . . . .. . . . . . . .21Using Connect ID.. . . . . . . . . . . . . . . . . . . . . . . . . . . . . . . . . . . . . . . . . . . . . . . . . . . . . . . . . . . . . . . . . . . . . . . . . . . . . . . . . . . . . . . . . .. . . . . . . .21
Setting Up z/OS User IDs.. . . . . . . . . . . . . . . . . . . . . . . . . . . . . . . . . . . . . . . . . . . . . . . . . . . . . . . . . . . . . . . . . . . . . . . . . . . . . . . . . . . . . . . . . . . .23Understanding User ID Setup.. . . . . . . . . . . . . . . . . . . . . . . . . . . . . . . . . . . . . . . . . . . . . . . . . . . . . . . . . . . . . . . . . . . . . . . . . . . .. . . . . . . .23Creating PeopleSoft User IDs.. . . . . . . . . . . . . . . . . . . . . . . . . . . . . . . . . . . . . . . . . . . . . . . . . . . . . . . . . . . . . . . . . . . . . . . . . . . .. . . . . . . .23
Using Storage Enhancements for z/OS... . . . . . . . . . . . . . . . . . . . . . . . . . . . . . . . . . . . . . . . . . . . . . . . . . . . . . . . . . . . . . . . . . . . . . . . . . .25Understanding z/OS Storage Enhancements.. . . . . . . . . . . . . . . . . . . . . . . . . . . . . . . . . . . . . . . . . . . . . . . . . . . . . . . . . .. . . . . . . .25Prerequisites.. . . . . . . . . . . . . . . . . . . . . . . . . . . . . . . . . . . . . . . . . . . . . . . . . . . . . . . . . . . . . . . . . . . . . . . . . . . . . . . . . . . . . . . . . . . . . . .. . . . . . . .25Enabling the Shared Library Feature.. . . . . . . . . . . . . . . . . . . . . . . . . . . . . . . . . . . . . . . . . . . . . . . . . . . . . . . . . . . . . . . . . . .. . . . . . . .26
Performing Backups.. . . . . . . . . . . . . . . . . . . . . . . . . . . . . . . . . . . . . . . . . . . . . . . . . . . . . . . . . . . . . . . . . . . . . . . . . . . . . . . . . . . . . . . . . . . . . . . . . . .26Using PeopleSoft Change Assistant and PeopleSoft Change Impact Analyzer. . . . . . . . . . . . . . . . . . . . . . . . . . . . . . .27
Chapter 2Installing Web Server Products..... . . . . . . . . . . . . . . . . . . . . . . . . . . . . . . . . . . . . . . . . . . . . . . . . . . . . . . . . . . . . . . . . . . . . . . .29Installing Oracle Application Server.. . . . . . . . . . . . . . . . . . . . . . . . . . . . . . . . . . . . . . . . . . . . . . . . . . . . . . . . . . . . . . . . . . . . . . . . . . . . . . . . .29
Understanding the Oracle Application Server Installation.. . . . . . . . . . . . . . . . . . . . . . . . . . . . . . . . . . . . . . . . . . . .. . . . . . . .29Prerequisites.. . . . . . . . . . . . . . . . . . . . . . . . . . . . . . . . . . . . . . . . . . . . . . . . . . . . . . . . . . . . . . . . . . . . . . . . . . . . . . . . . . . . . . . . . . . . . . .. . . . . . . .30Preparing for the Oracle Application Server Installation.. . . . . . . . . . . . . . . . . . . . . . . . . . . . . . . . . . . . . . . . . . . . . .. . . . . . . .30Installing the Oracle Application Server on Windows and UNIX.. . . . . . . . . . . . . . . . . . . . . . . . . . . . . . . . . . . .. . . . . . . .33Updating the IBM JDK to Version 1.4.2.. . . . . . . . . . . . . . . . . . . . . . . . . . . . . . . . . . . . . . . . . . . . . . . . . . . . . . . . . . . . . . . . .. . . . . . . .43Uninstalling the Oracle Application Server.. . . . . . . . . . . . . . . . . . . . . . . . . . . . . . . . . . . . . . . . . . . . . . . . . . . . . . . . . . . . .. . . . . . . .44
Installing BEA WebLogic Server... . . . . . . . . . . . . . . . . . . . . . . . . . . . . . . . . . . . . . . . . . . . . . . . . . . . . . . . . . . . . . . . . . . . . . . . . . . . . . . . . . . .45Understanding the WebLogic Installation. . . . . . . . . . . . . . . . . . . . . . . . . . . . . . . . . . . . . . . . . . . . . . . . . . . . . . . . . . . . . . .. . . . . . . .45Installing WebLogic.. . . . . . . . . . . . . . . . . . . . . . . . . . . . . . . . . . . . . . . . . . . . . . . . . . . . . . . . . . . . . . . . . . . . . . . . . . . . . . . . . . . . . . . .. . . . . . . .46
Installing WebSphere Application Server. . . . . . . . . . . . . . . . . . . . . . . . . . . . . . . . . . . . . . . . . . . . . . . . . . . . . . . . . . . . . . . . . . . . . . . . . . .47Understanding WebSphere Application Server Installation. . . . . . . . . . . . . . . . . . . . . . . . . . . . . . . . . . . . . . . . . . .. . . . . . . .47Prerequisites.. . . . . . . . . . . . . . . . . . . . . . . . . . . . . . . . . . . . . . . . . . . . . . . . . . . . . . . . . . . . . . . . . . . . . . . . . . . . . . . . . . . . . . . . . . . . . . .. . . . . . . .49Preparing for WebSphere Installation.. . . . . . . . . . . . . . . . . . . . . . . . . . . . . . . . . . . . . . . . . . . . . . . . . . . . . . . . . . . . . . . . . . .. . . . . . . .49Installing WebSphere Base.. . . . . . . . . . . . . . . . . . . . . . . . . . . . . . . . . . . . . . . . . . . . . . . . . . . . . . . . . . . . . . . . . . . . . . . . . . . . . .. . . . . . . .50
vi Copyright © 2006, Oracle. All rights reserved.

Contents
Installing WebSphere Base with the Silent Method.. . . . . . . . . . . . . . . . . . . . . . . . . . . . . . . . . . . . . . . . . . . . . . . . . . .. . . . . . . .53Verifying the WebSphere Base Installation... . . . . . . . . . . . . . . . . . . . . . . . . . .. . . . . . . . . . . . . . . . . . . . . . . . . . . . . . . . .. . . . . . . .54Uninstalling the Default WebSphere Application.. . . . . . . . . . . . . . . . . . . . . . . . . . . . . . . . . . . . . . . . . . . . . . . . . . . . . .. . . . . . . .54Installing the WebSphere Base 5.1 Plug-in for HTTP Proxy Server. . . . . . . . . . . . . . . . . . . . . . . . . . . . . . . . .. . . . . . . .54Installing WebSphere Network Deployment Manager.. . . . . . . . . . . . . . . . . . . . . . . . . . . . . . . . . . . . . . . . . . . . . . . .. . . . . . . .56Upgrading WebSphere 5.1 Base and WebSphere ND to 5.1.1.7. . . . . . . . . . . . . . . . . . . . . . . . . . . . . . . . . . . .. . . . . . . .56Troubleshooting the WebSphere Installation and Upgrade.. . . . . . . . . . . . . . . . . . . . . . . . . . . . . . . . . . . . . . . . . .. . . . . . . .57
Chapter 3Installing Additional Components... . . . . . . . . . . . . . . . . . . . . . . . . . . . . . . . . . . . . . . . . . . . . . . . . . . . . . . . . . . . . . . . . . . . . .59Installing Tuxedo on Windows... . . . . . . . . . . . . . . . . . . . . . . . . . . . . . . . . . . . . . . . . . . . . . . . . . . . . . . . . . . . . . . . . . . . . . . . . . . . . . . . . . . . . .59
Understanding Tuxedo.. . . . . . . . . . . . . . . . . . . . . . . . . . . . . . . . . . . . . . . . . . . . . . . . . . . . . . . . . . . . . . . . . . . . . . . . . . . . . . . . . . . .. . . . . . . .60Prerequisites.. . . . . . . . . . . . . . . . . . . . . . . . . . . . . . . . . . . . . . . . . . . . . . . . . . . . . . . . . . . . . . . . . . . . . . . . . . . . . . . . . . . . . . . . . . . . . . .. . . . . . . .60Uninstalling Tuxedo from Windows (Recommended).. . . . . . . . . . . . . . . . . . . . . . . . . . . . . . . . . . . . . . . . . . . . . . . . .. . . . . . . .61Designating the Application Server Administrator. . . . . . . . . . . . . . . . . . . . . . . . . . . . . . . . . . . . . . . . . . . . . . . . . . . . . .. . . . . . . .62Installing Tuxedo on Windows.. . . . . . . . . . . . . . . . . . . . . . . . . . . . . . . . . . . . . . . . . . . . . . . . . . . . . . . . . . . . . . . . . . . . . . . . . . .. . . . . . . .63Checking the Service Account. . . . . . . . . . . . . . . . . . . . . . . . . . . . . . . . . . . . . . . . . . . . . . . . . . . . . . . . . . . . . . . . . . . . . . . . . . . .. . . . . . . .63Setting Up the Tuxedo Services.. . . . . . . . . . . . . . . . . . . . . . . . . . . . . . . . . . . . . . . . . . . . . . . . . . . . . . . . . . . . . . . . . . . . . . . . .. . . . . . . .64Verifying the Server Installation.. . . . . . . . . . . . . . . . . . . . . . . . . . . . . . . . . . . . . . . . . . . . . . . . . . . . . . . . . . . . . . . . . . . . . . . . . .. . . . . . . .66Ensuring that Tuxedo Coexists with Earlier Versions.. . . . . . . . . . . . . . . . . . . . . . . . . . . . . . . . . . . . . . . . . . . . . . . . .. . . . . . . .67
Installing Tuxedo on UNIX... . . . . . . . . . . . . . . . . . . . . . . . . . . . . . . . . . . . . . . . . . . . . . . . . . . . . . . . . . . . . . . . . . . . . . . . . . . . . . . . . . . . . . . . . . .67Understanding Tuxedo.. . . . . . . . . . . . . . . . . . . . . . . . . . . . . . . . . . . . . . . . . . . . . . . . . . . . . . . . . . . . . . . . . . . . . . . . . . . . . . . . . . . .. . . . . . . .68Prerequisites.. . . . . . . . . . . . . . . . . . . . . . . . . . . . . . . . . . . . . . . . . . . . . . . . . . . . . . . . . . . . . . . . . . . . . . . . . . . . . . . . . . . . . . . . . . . . . . .. . . . . . . .69Removing Tuxedo on UNIX... . . . . . . . . . . . . . . . . . . . . . . . . . . . . . . . . . . . . . . . . . . . . . . . . . . . . . . . . . . . . . . . . . . . . . . . . . . . .. . . . . . . .69Completing the Preinstallation Checklist. . . . . . . . . . . . . . . . . . . . . . . . . . . . . . . . . . . . . . . . . . . . . . . . . . . . . . . . . . . . . . . .. . . . . . . .70FTPing Tuxedo Installation Files to UNIX... . . . . . . . . . . . . . . . . . . . . . . . . . . . . . . . . . . . . . . . . . . . . . . . . . . . . . . . . . . . .. . . . . . . .70Designating the Tuxedo Owner.. . . . . . . . . . . . . . . . . . . . . . . . . . . . . . . . . . . . . . . . . . . . . . . . . . . . . . . . . . . . . . . . . . . . . . . . . .. . . . . . . .71Installing Tuxedo on UNIX... . . . . . . . . . . . . . . . . . . . . . . . . . . . . . . . . . . . . . . . . . . . . . . . . . . . . . . . . . . . . . . . . . . . . . . . . . . . . . .. . . . . . . .71Verifying the Server Installation.. . . . . . . . . . . . . . . . . . . . . . . . . . . . . . . . . . . . . . . . . . . . . . . . . . . . . . . . . . . . . . . . . . . . . . . . . .. . . . . . . .72
Installing Micro Focus Net Express for Windows... . . . . . . . . . . . . . . . . . . . . . . . . . . . . . . . . . . . . . . . . . . . . . . . . . . . . . . . . . . . . . . . .73Understanding the Net Express Installation.. . . . . . . . . . . . . . . . . . . . . . . . . . . . . . . . . . . . . . . . . . . . . . . . . . . . . . . . . . . .. . . . . . . .73Prerequisites.. . . . . . . . . . . . . . . . . . . . . . . . . . . . . . . . . . . . . . . . . . . . . . . . . . . . . . . . . . . . . . . . . . . . . . . . . . . . . . . . . . . . . . . . . . . . . . .. . . . . . . .73Installing Net Express.. . . . . . . . . . . . . . . . . . . . . . . . . . . . . . . . . . . . . . . . . . . . . . . . . . . . . . . . . . . . . . . . . . . . . . . . . . . . . . . . . . . . .. . . . . . . .73
Installing Micro Focus Server Express for UNIX and Linux.. . . . . . . . . . . . . . . . . . . . . . . . . . . . . . . . . . . . . . . . . . . . . . . . . . . . . .73Understanding Micro Focus Server Express... . . . . . . . . . . . . . . . . . . . . . . . . . . . . . . . . . . . . . . . . . . . . . . . . . . . . . . . . .. . . . . . . .74Prerequisites.. . . . . . . . . . . . . . . . . . . . . . . . . . . . . . . . . . . . . . . . . . . . . . . . . . . . . . . . . . . . . . . . . . . . . . . . . . . . . . . . . . . . . . . . . . . . . . .. . . . . . . .74Installing Server Express.. . . . . . . . . . . . . . . . . . . . . . . . . . . . . . . . . . . . . . . . . . . . . . . . . . . . . . . . . . . . . . . . . . . . . . . . . . . . . . . . .. . . . . . . .75Installing Remotely.. . . . . . . . . . . . . . . . . . . . . . . . . . . . . . . . . . . . . . . . . . . . . . . . . . . . . . . . . . . . . . . . . . . . . . . . . . . . . . . . . . . . . . . .. . . . . . . .82Mounting and Unmounting CD-ROMs... . . . . . . . . . . . . . . . . . . . . . . . . . . . . . . . . . . . . . . . . . . . . . . . . . . . . . . . . . . . . . . . .. . . . . . . .83
Copyright © 2006, Oracle. All rights reserved. vii
Contents
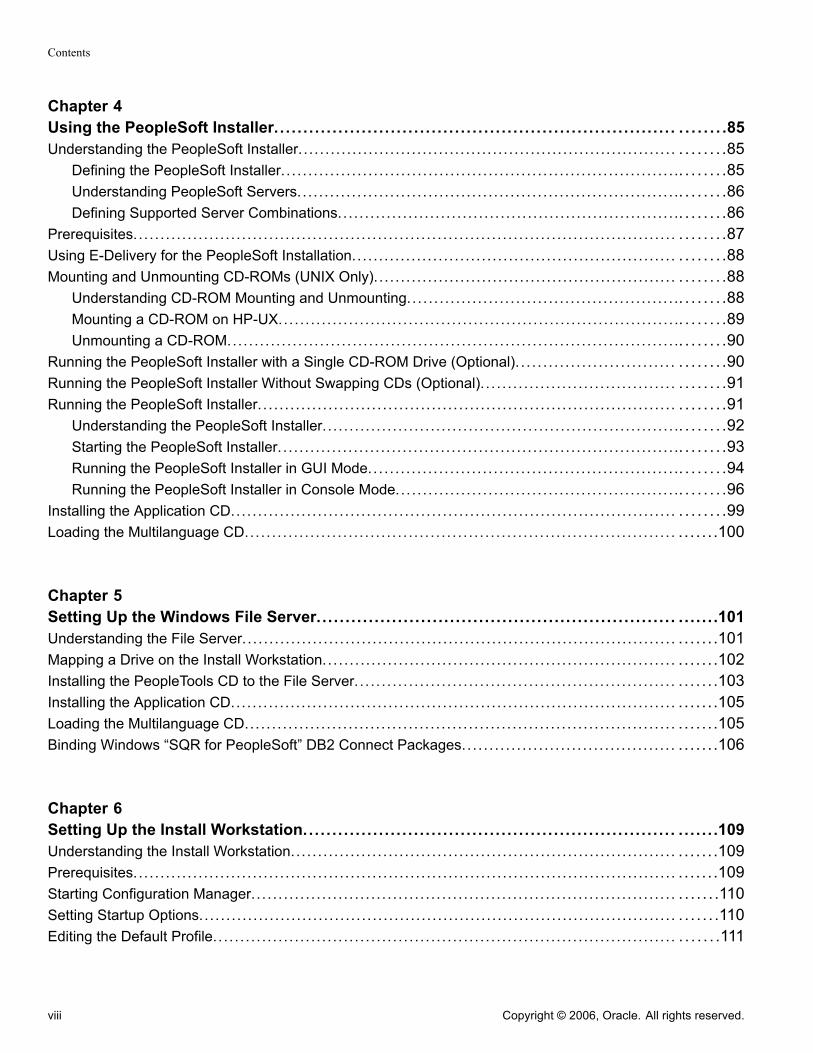
Chapter 4Using the PeopleSoft Installer. . . . . . . . . . . . . . . . . . . . . . . . . . . . . . . . . . . . . . . . . . . . . . . . . . . . . . . . . . . . . . . . . . . . . . . . . . . . .85Understanding the PeopleSoft Installer. . . . . . . . . . . . . . . . . . . . . . . . . . . . . . . . . . . . . . . . . . . . . . . . . . . . . . . . . . . . . . . . . . . . . . . . . . . . . .85
Defining the PeopleSoft Installer. . . . . . . . . . . . . . . . . . . . . . . . . . . . . . . . . . . . . . . . . . . . . . . . . . . . . . . . . . . . . . . . . . . . . . . . .. . . . . . . .85Understanding PeopleSoft Servers. . . . . . . . . . . . . . . . . . . . . . . . . . . . . . . . . . . . . . . . . . . . . . . . . . . . . . . . . . . . . . . . . . . . . .. . . . . . . .86Defining Supported Server Combinations.. . . . . . . . . . . . . . . . . . . . . . . . . . . . . . . . . . . . . . . . . . . . . . . . . . . . . . . . . . . . . .. . . . . . . .86
Prerequisites.. . . . . . . . . . . . . . . . . . . . . . . . . . . . . . . . . . . . . . . . . . . . . . . . . . . . . . . . . . . . . . . . . . . . . . . . . . . . . . . . . . . . . . . . . . . . . . . . . . . . . . . . . . .87Using E-Delivery for the PeopleSoft Installation.. . . . . . . . . . . . . . . . . . . . . . . . . . . . . . . . . . . . . . . . . . . . . . . . . . . . . . . . . . . . . . . . . . .88Mounting and Unmounting CD-ROMs (UNIX Only). . . . . . . . . . . . . . . . . . . . . . . . . . . . . . . . . . . . . . . . . . . . . . . . . . . . . . . . . . . . . . . .88
Understanding CD-ROM Mounting and Unmounting.. . . . . . . . . . . . . . . . . . . . . . . . . . . . . . . . . . . . . . . . . . . . . . . . .. . . . . . . .88Mounting a CD-ROM on HP-UX... . . . . . . . . . . . . . . . . . . . . . . . . . . . . . . . . . . . . . . . . . . . . . . . . . . . . . . . . . . . . . . . . . . . . . . .. . . . . . . .89Unmounting a CD-ROM... . . . . . . . . . . . . . . . . . . . . . . . . . . . . . . . . . . . . . . . . . . . . . . . . . . . . . . . . . . . . . . . . . . . . . . . . . . . . . . . .. . . . . . . .90
Running the PeopleSoft Installer with a Single CD-ROM Drive (Optional). . . . . . . . . . . . . . . . . . . . . . . . . . . . . . . . . . . . .90Running the PeopleSoft Installer Without Swapping CDs (Optional). . . . . . . . . . . . . . . . . . . . . . . . . . . . . . . . . . . . . . . . . . . .91Running the PeopleSoft Installer. . . . . . . . . . . . . . . . . . . . . . . . . . . . . . . . . . . . . . . . . . . . . . . . . . . . . . . . . . . . . . . . . . . . . . . . . . . . . . . . . . . . .91
Understanding the PeopleSoft Installer. .. . . . . . . . . . . . . . . . . . . . . . . . . . . . . . . . . . . . . . . . . . . . . . . . . . . . . . . . . . . . . . . .. . . . . . . .92Starting the PeopleSoft Installer. . . . . . . . . . . . . . . . . . . . . . . . . . . . . . . . . . . . . . . . . . . . . . . . . . . . . . . . . . . . . . . . . . . . . . . . . .. . . . . . . .93Running the PeopleSoft Installer in GUI Mode.. . . . . . . . . . . . . . . . . . . . . . . . . . . . . . . . . . . . . . . . . . . . . . . . . . . . . . . .. . . . . . . .94Running the PeopleSoft Installer in Console Mode... . . . . . . . . . . . . . . . . . . . . . . . . . . . . . . . . . . . . . . . . . . . . . . . . .. . . . . . . .96
Installing the Application CD... . . . . . . . . . . . . . . . . . . . . . . . . . . . . . . . . . . . . . . . . . . . . . . . . . . . . . . . . . . . . . . . . . . . . . . . . . . . . . . . . . . . . . . .99Loading the Multilanguage CD... . . . . . . . . . . . . . . . . . . . . . . . . . . . . . . . . . . . . . . . . . . . . . . . . . . . . . . . . . . . . . . . . . . . . . . . . . . . . . . . . . . .100
Chapter 5Setting Up the Windows File Server... . . . . . . . . . . . . . . . . . . .. . . . . . . . . . . . . . . . . . . .. . . . . . . . . . . . . . . . . . . . . . . . . . .101Understanding the File Server.. . . . . . . . . . . . . . . . . . . . . . . . . . . . . . . . . . . . . . . . . . . . . . . . . . . . . . . . . . . . . . . . . . . . . . . . . . . . . . . . . . . . . .101Mapping a Drive on the Install Workstation.. . . . . . . . . . . . . . . . . . . . . . . . . . . . . . . . . . . . . . . . . . . . . . . . . . . . . . . . . . . . . . . . . . . . . . .102Installing the PeopleTools CD to the File Server.. . . . . . . . . . . . . . . . . . . . . . . . . . . . . . . . . . . . . . . . . . . . . . . . . . . . . . . . . . . . . . . . .103Installing the Application CD... . . . . . . . . . . . . . . . . . . . . . . . . . . . . . . . . . . . . . . . . . . . . . . . . . . . . . . . . . . . . . . . . . . . . . . . . . . . . . . . . . . . . . .105Loading the Multilanguage CD... . . . . . . . . . . . . . . . . . . . . . . . . . . . . . . . . . . . . . . . . . . . . . . . . . . . . . . . . . . . . . . . . . . . . . . . . . . . . . . . . . . .105Binding Windows “SQR for PeopleSoft” DB2 Connect Packages.. . . . . . . . . . . . . . . . . . . . . . . . . . . . . . . . . . . . . . . . . . . . .106
Chapter 6Setting Up the Install Workstation... . . . . . . . . . . . . . . . . . . . . . . . . . . . . . . . . . . . . . . . . . . . . . . . . . . . . . . . . . . . . . . . . . . . .109Understanding the Install Workstation.. . . . . . . . . . . . . . . . . . . . . . . . . . . . . . . . . . . . . . . . . . . . . . . . . . . . . . . . . . . . . . . . . . . . . . . . . . . . .109Prerequisites.. . . . . . . . . . . . . . . . . . . . . . . . . . . . . . . . . . . . . . . . . . . . . . . . . . . . . . . . . . . . . . . . . . . . . . . . . . . . . . . . . . . . . . . . . . . . . . . . . . . . . . . . . .109Starting Configuration Manager.. . . . . . . . . . . . . . . . . . . . . . . . . . . . . . . . . . . . . . . . . . . . . . . . . . . . . . . . . . . . . . . . . . . . . . . . . . . . . . . . . . . .110Setting Startup Options.. . . . . . . . . . . . . . . . . . . . . . . . . . . . . . . . . . . . . . . . . . . . . . . . . . . . . . . . . . . . . . . . . . . . . . . . . . . . . . . . . . . . . . . . . . . . . .110Editing the Default Profile. . . . . . . . . . . . . . . . . . . . . . . . . . . . . . . . . . . . . . . . . . . . . . . . . . . . . . . . . . . . . . . . . . . . . . . . . . . . . . . . . . . . . . . . . . . .111
viii Copyright © 2006, Oracle. All rights reserved.

Contents
Running Client Setup.. . . . . . . . . . . . . . . . . . . . . . . . . . . . . . . . . . . . . . . . . . . . . . . . . . . . . . . . . . . . . . . . . . . . . . . . . . . . . . . . . . . . . . . . . . . . . . . .113
Chapter 7Setting Up the Batch Environment on z/OS..... . . . . . . . . . . . . . . . . . . . . . . . . . . . . . . . . . . . . . . . . . . . . . . . . . . . . . . .115Understanding COBOL... . . . . . . . . . . . . . . . . . . . . . . . . . . . . . . . . . . . . . . . . . . . . . . . . . . . . . . . . . . . . . . . . . . . . . . . . . . . . . . . . . . . . . . . . . . . .115Setting Up Your Batch Environment.. . . . . . . . . . . . . . . . . . . . . . . . . . . . . . . . . . . . . . . . . . . . . . . . . . . . . . . . . . . . . . . . . . . . . . . . . . . . . . .116Completing the Preinstallation Worksheet. . . . . . . . . . . . . . . . . . . . . . . . . . . . . . . . . . . . . . . . . . . . . . . . . . . . . . . . . . . . . . . . . . . . . . . . .116Allocating z/OS Partitioned Datasets.. . . . . . . . . . . . . . . . . . . . . . . . . . . . . . . . . . . . . . . . . . . . . . . . . . . . . . . . . . . . . . . . . . . . . . . . . . . . . .122Using PeopleSoft Server Transfer. . . . . . . . . . . . . . . . . . . . . . . . . . . . . . . . . . . . . . . . . . . . . . . . . . . . . . . . . . . . . . . . . . . . . . . . . . . . . . . . . . .123
Understanding PeopleSoft Server Transfer. . . . . . . . . . . . . . . . . . . . . . . . . . . . . . . . . . . . . . . . . . . . . . . . . . . . . . . . . . . . .. . . . . . .123Running the PeopleSoft Server Transfer Program... . . . . . . . . . . . . . . . . . . . . . . . . . . . . . . . . . . . . . . . . . . . . . . . . . .. . . . . . .124Transferring Files to Host Manually. . . . . . . . . . . . . . . . . . . . . . . . . . . . . . . . . . . . . . . . . . . . . . . . . . . . . . . . . . . . . . . . . . . . . .. . . . . . .126Mapping PeopleSoft Installation Directories to z/OS.. . . . . . . . . . . . . . . . . . . . . . . . . . . . . . . . . . . . . . . . . . . . . . . . .. . . . . . .127
Setting up the USS Environment Variables and Granting Access to USS Files. . . . . . . . . . . . . . . . . . . . . . . . . . . . . .129Installing SQR for z/OS... . . . . . . . . . . . . . . . . . . . . . . . . . . . . . . . . . . . . . . . . . . . . . . . . . . . . . . . . . . . . . . . . . . . . . . . . . . . . . . . . . . . . . . . . . . . .129Binding the SQR DB2 Plan.. . . . . . . . . . . . . . . . . . . . . . . . . . . . . . . . . . . . . . . . . . . . . . . . . . . . . . . . . . . . . . . . . . . . . . . . . . . . . . . . . . . . . . . . . .130Assembling PeopleTools Programs... . . . . . . . . . . . . . . . . . . . . . . . . . . . . . . . . . . . . . . . . . . . . . . . . . . . . . . . . . . . . . . . . . . . . . . . . . . . . . .130Compiling and Link-Editing DB2 COBOL.. . . . . . . . . . . . . . . . . . . . . . . . . . . . . . . . . . . . . . . . . . . . . . . . . . . . . . . . . . . . . . . . . . . . . . . . .130Compiling and Link-Editing COBOL.. . . . . . . . . . . . . . . . . . . . . . . . . . . . . . . . . . . . . . . . . . . . . . . . . . . . . . . . . . . . . . . . . . . . . . . . . . . . . . .131
Chapter 8Creating a Database.... . . . . . . . .. . . . . . . . . . . . . . . . .. . . . . . . . . . . . . . . . . .. . . . . . . . . . . . . . . . . .. . . . . . . . . . . . . . . . . . . . . . . .133Understanding Database Creation.. . . . . . . . . . . . . . . . . . . . . . . . . . . . . . . . . . . . . . . . . . . . . . . . . . . . . . . . . . . . . . . . . . . . . . . . . . . . . . . . .134Planning Your Installation.. . . . . . . . . . . . . . . . . . . . . . . . . . . . . . . . . . . . . . . . . . . . . . . . . . . . . . . . . . . . . . . . . . . . . . . . . . . . . . . . . . . . . . . . . . .134
Using %UpdateStats.. . . . . . . . . . . . . . . . . . . . . . . . . . . . . . . . . . . . . . . . . . . . . . . . . . . . . . . . . . . . . . . . . . . . . . . . . . . . . . . . . . . . . .. . . . . . .134Using Temporary Tables.. . . . . . . . . . . . . . . . . . . . . . . . . . . . . . . . . . . . . . . . . . . . . . . . . . . . . . . . . . . . . . . . . . . . . . . . . . . . . . . . . .. . . . . . .138
Transferring DDL Scripts to z/OS... . . . . . . . . . . . . . . . . . . . . . . . . . . . . . . . . . . . . . . . . . . . . . . . . . . . . . . . . . . . . . . . . . . . . . . . . . . . . . . . .138Creating PS.PSDBOWNER Table.. . . . . . . . . . . . . . . . . . . . . . . . . . . . . . . . . . . . . . . . . . . . . . . . . . . . . . . . . . . . . . . . . . . . . . . . . . . . . . . . . .140Granting Privileges on PS.PSDBOWNER... . . . . . . . . . . . . . . . . . . . . . . . . . . . . . . . . . . . . . . . . . . . . . . . . . . . . . . . . . . . . . . . . . . . . . .140Granting Privileges to Owner ID.. . . . . . . . . . . . . . . . . . . . . . . . . . . . . . . . . . . . . . . . . . . . . . . . . . . . . . . . . . . . . . . . . . . . . . . . . . . . . . . . . . . .141Creating DB2 Databases, Storage Groups, and Tablespaces.. . . . . . . . . . . . . . . . . . . . . . . . . . . . . . . . . . . . . . . . . . . . . . . . .141
Understanding DB2 Databases, Storage Groups, and Tablespaces.. . . . . . . . . . . . . . . . . . . . . . . . . . . . . . .. . . . . . .141Customizing the Database Name... . . . . . . . . . . . . . . . . . . . . . . . . . . . . . . . . . . . . . . . . . . . . . . . . . . . . . . . . . . . . . . . . . . . . .. . . . . . .142Working with Tablespaces.. . . . . . . . . . . . . . . . . . . . . . . . . . . . . . . . . . . . . . . . . . . . . . . . . . . . . . . . . . . . . . . . . . . . . . . . . . . . . . . .. . . . . . .143
Creating Tables.. . . . . . . . . . . . . . . . . . . . . . . . . . . . . . . . . . . . . . . . . . . . . . . . . . . . . . . . . . . . . . . . . . . . . . . . . . . . . . . . . . . . . . . . . . . . . . . . . . . . . . .147Configuring the DB2 Connect Gateway.. . . . . . . . . . . . . . . . . . . . . . . . . . . . . . . . . . . . . . . . . . . . . . . . . . . . . . . . . . . . . . . . . . . . . . . . . . .147Creating Data Mover Import Scripts.. . . . . . . . . . . . . . . . . . . . . . . . . . . . . . . . . . . . . . . . . . . . . . . . . . . . . . . . . . . . . . . . . . . . . . . . . . . . . . .148
Understanding Data Mover Import Scripts. . . . . . . . . . . . . . . . . . . . . . . . . . . . . . . . . . . . . . . . . . . . . . . . . . . . . . . . . . . . . .. . . . . . .148
Copyright © 2006, Oracle. All rights reserved. ix
Contents
Working with Multilingual Databases.. . . . . . . . . . . . . . . . . . . . . . . . . . . . . . . . . . . . . . . . . . . . . . . . . . . . . . . . . . . . . . . . . . . .. . . . . . .148Running Database Setup to Create Data Mover Import Scripts.. . . . . . . . . . . . . . . . . . . . . . . . . . . . . . . . . . . . .. . . . . . .148
Running Data Mover Import Scripts.. . . . . . . . . . . . . . . . . . . . . . . . . . . . . . . . . . . . . . . . . . . . . . . . . . . . . . . . . . . . . . . . . . . . . . . . . . . . . . . .154Understanding Data Mover Import Scripts.. . . . . . . . . . . . . . . . . . . . . . . . . . . . . . . . . . . . . . . . . . . . . . . . . . . . . . . . . . . . .. . . . . . .154Populating Tables in the PeopleSoft Database.. . . . . . . . . . . . . . . . . . . . . . . . . . . . . . . . . . . . . . . . . . . . . . . . . . . . . . . .. . . . . . .154Validating Files.. . . . . . . . . . . . . . . . . . . . . . . . . . . . . . . . . . . . . . . . . . . . . . . . . . . . . . . . . . . . . . . . . . . . . . . . . . . . . . . . . . . . . . . . . . . . .. . . . . . .155Troubleshooting.. . . . . . . . . . . . . . . . . . . . . . . . . . . . . . . . . . . . . . . . . . . . . . . . . . . . . . . . . . . . . . . . . . . . . . . . . . . . . . . . . . . . . . . . . . . .. . . . . . .155Improving Performance.. . . . . . . . . . . . . . . . . . . . . . . . . . . . . . . . . . . . . . . . . . . . . . . . . . . . . . . . . . . . . . . . . . . . . . . . . . . . . . . . . . .. . . . . . .157Improving Execution.. . . . . . . . . . . . . . . . . . . . . . . . . . . . . . . . . . . . . . . . . . . . . . . . . . . . . . . . . . . . . . . . . . . . . . . . . . . . . . . . . . . . . . .. . . . . . .158
Creating Indexes.. . . . . . . . . . . . . . . . . . . . . . . . . . . . . . . . . . . . . . . . . . . . . . . . . . . . . . . . . . . . . . . . . . . . . . . . . . . . . . . . . . . . . . . . . . . . . . . . . . . . .158Updating Database to Latest PeopleTools Release.. . . . . . . . . . . . . . . . . . . . . . . . . . . . . . . . . . . . . . . . . . . . . . . . . . . . . . . . . . . . .159
Understanding Database Updates.. . . . . . . . . . . . . . . . . . . . . . . . . . . . . . . . . . . . . . . . . . . . . . . . . . . . . . . . . . . . . . . . . . . . . .. . . . . . .160Cleaning Up Data... . . . . . . . . . . . . . . . . . . . . . . . . . . . . . . . . . . . . . . . . . . . . . . . . . . . . . . . . . . . . . . . . . . . . . . . . . . . . . . . . . . . . . . . .. . . . . . .161Updating PeopleTools System Tables.. . . . . . . . . . . . . . . . . . . . . . . . . . . . . . . . . . . . . . . . . . . . . . . . . . . . . . . . . . . . . . . . . .. . . . . . .161Updating PeopleTools Database Objects. . . . . . . . . . . . . . . . . . . . . . . . . . . . . . . . . . . . . . . . . . . . . . . . . . . . . . . . . . . . . . .. . . . . . .163Updating PeopleTools Multilingual Objects. . . . . . . . . . . . . . . . . . . . . . . . . . . . . . . . . . . . . . . . . . . . . . . . . . . . . . . . . . . . .. . . . . . .165Deleting Obsolete PeopleTools Database Objects.. . . . . . . . . . . . . . . . . . . . . . . . . . . . . . . . . . . . . . . . . . . . . . . . . . . .. . . . . . .167Altering PeopleTools Tables.. . . . . . . . . . . . . . . . . . . . . . . . . . . . . . . . . . . . . . . . . . . . . . . . . . . . . . . . . . . . . . . . . . . . . . . . . . . . . .. . . . . . .169Migrating Records to New Tablespaces.. . . . . . . . . . . . . . . . . . . . . . . . . . . . . . . . . . . . . . . . . . . . . . . . . . . . . . . . . . . . . . . .. . . . . . .173Updating PeopleTools System Data.. . . . . . . . . . . . . . . . . . . . . . . . . . . . . . . . . . . . . . . . . . . . . . . . . . . . . . . . . . . . . . . . . . . .. . . . . . .178Running PeopleTools Conversions.. . . . . . . . . . . . . . . . . . . . . . . . . . . . . . . . . . . . . . . . . . . . . . . . . . . . . . . . . . . . . . . . . . . . . .. . . . . . .180Converting Integration Broker.. . . . . . . . . . . . . . . . . . . . . . . . . . . . . . . . . . . . . . . . . . . . . . . . . . . . . . . . . . . . . . . . . . . . . . . . . . . .. . . . . . .183Changing the User Interface.. . . . . . . . . . . . . . . . . . . . . . . . . . . . . . . . . . . . . . . . . . . . . . . . . . . . . . . . . . . . . . . . . . . . . . . . . . . . .. . . . . . .185
Running the DB2 RUNSTATS Utility. . . . . . . . . . . . . . . . . . . . . . . . . . . . . . . . . . . . . . . . . . . . . . . . . . . . . . . . . . . . . . . . . . . . . . . . . . . . . . . .186Creating PeopleSoft Views.. . . . . . . . . . . . . . . . . . . . . . . . . . . . . . . . . . . . . . . . . . . . . . . . . . . . . . . . . . . . . . . . . . . . . . . . . . . . . . . . . . . . . . . . . .186
Understanding PeopleSoft Views.. . . . . . . . . . . . . . . . . . . . . . . . . . . . . . . . . . . . . . . . . . . . . . . . . . . . . . . . . . . . . . . . . . . . . . . .. . . . . . .186Creating Views in Data Mover. . . . . . . . . . . . . . . . . . . . . . . . . . . . . . . . . . . . . . . . . . . . . . . . . . . . . . . . . . . . . . . . . . . . . . . . . . . .. . . . . . .187Creating Views in Application Designer. . . . . . . . . . . . . . . . . . . . . . . . . . . . . . . . . . . . . . . . . . . . . . . . . . . . . . . . . . . . . . . . .. . . . . . .187
Updating Database and Tablespace Values for %UpdateStats Tables (Enhanced Install Only). . . . . . . . . . . .189Building Temporary Tables.. . . . . . . . . . . . . . . . . . . . . . . . . . . . . . . . . . . . . . . . . . . . . . . . . . . . . . . . . . . . . . . . . . . . . . . . . . . . . . . . . . . . . . . . . .190
Understanding Temporary Tables.. . . . . . . . . . . . . . . . . . . . . . . . . . . . . . . . . . . . . . . . . . . . . . . . . . . . . . . . . . . . . . . . . . . . . . .. . . . . . .190Running SQR SETSPACE.SQR... . . . . . . . . . . . . . . . . . . . . . . . . . . . . . . . . . . . . . . . . . . . . . . . . . . . . . . . . . . . . . . . . . . . . . . .. . . . . . .191Correcting Invalid Database/Tablespace Combinations. . . . . . . . . . . . . . . . . . . . . . . . . . . . . . . . . . . . . . . . . . . . . . .. . . . . . .191Setting the Number of Temporary Tables.. . . . . . . . . . . . . . . . . . . . . . . . . . . . . . . . . . . . . . . . . . . . . . . . . . . . . . . . . . . . . . .. . . . . . .193Using the Volatile Table Attribute.. . . . . . . . . . . . . . . . . . . . . . . . . . . . . . . . . . . . . . . . . . . . . . . . . . . . . . . . . . . . . . . . . . . . . . . .. . . . . . .193Building the Temporary Tables and Their Indexes.. . . . . . . . . . . . . . . . . . . . . . . . . . . . . . . . . . . . . . . . . . . . . . . . . . . .. . . . . . .193
Creating PeopleSoft Triggers. . . . . . . . . . . . . . . . . . . . . . . . . . . . . . . . . . . . . . . . . . . . . . . . . . . . . . . . . . . . . . . . . . . . . . . . . . . . . . . . . . . . . . . .197Understanding PeopleSoft Triggers.. . . . . . . . . . . . . . . . . . . . . . . . . . . . . . . . . . . . . . . . . . . . . . . . . . . . . . . . . . . . . . . . . . . . .. . . . . . .197Creating Triggers in Data Mover.. . . . . . . . . . . . . . . . . . . . . . . . . . . . . . . . . . . . . . . . . . . . . . . . . . . . . . . . . . . . . . . . . . . . . . . . .. . . . . . .197Creating Triggers in Application Designer.. . . . . . . . . . . . . . . . . . . . . . . . . . . . . . . . . . . . . . . . . . . . . . . . . . . . . . . . . . . . . .. . . . . . .197
x Copyright © 2006, Oracle. All rights reserved.

Contents
Running Additional Data Mover Scripts. . . . . . . . . . . . . . . . . . . . . . . . . . . . . . . . . . . . . . . . . . . . . . . . . . . . . . . . . . . . . . . . . . . . . . . . . . . .200Installing a Multilingual PeopleTools System Database.. . . . . . . . . . . . . . . . . . . . . . . . . . . . . . . . . . . . . . . . . . . . . . . . . . . . . . . . .200
Understanding the Multilingual Database Project. . . . . . . . . . . . . . . . . . . . . . . . . . . . . . . . . . . . . . . . . . . . . . . . . . . . . .. . . . . . .200Applying the Multilingual Database Project. . . . . . . . . . . . . . . . . . . . . . . . . . . . . . . . . . . . . . . . . . . . . . . . . . . . . . . . . . . . .. . . . . . .201Populating the Translated System Data. . . . . . . . . . . . . . . . . . . . . . . . . . . . . . . . . . . . . . . . . . . . . . . . . . . . . . . . . . . . . . . . .. . . . . . .201
Running SQR Reports.. . . . . . . . . . . . . . . . . . . . . . . . . . . . . . . . . . . . . . . . . . . . . . . . . . . . . . . . . . . . . . . . . . . . . . . . . . . . . . . . . . . . . . . . . . . . . . .201Binding the dbcalls.bnd.. . . . . . . . . . . . . . . . . . . . . . . . . . . . . . . . . . . . . . . . . . . . . . . . . . . . . . . . . . . . . . . . . . . . . . . . . . . . . . . . . . .. . . . . . .202Running SQRs on the Client Workstation.. . . . . . . . . . . . . . . . . . . . . . . . . . . . . . . . . . . . . . . . . . . . . . . . . . . . . . . . . . . . . .. . . . . . .202Creating a Shortcut to Run SQRs .. . . . . . . . . . . . . . . . . . . . . . . . . . . . . . . . . . . . . . . . . . . . . . . . . . . . . . . . . . . . . . . . . . . . . .. . . . . . .204
Updating PeopleSoft System Tables... . . . . . . . . . . . . . . . . . . . . . . . . . . . . . . . . . . . . . . . . . . . . . . . . . . . . . . . . . . . . . . . . . . . . . . . . . . . . .204Understanding PeopleSoft System Tables.. . . . . . . . . . . . . . . . . . . . . . . . . . . . . . . . . . . . . . . . . . . . . . . . . . . . . . . . . . . . .. . . . . . .204Updating PeopleSoft System Tables.. . . . . . . . . . . . . . . . . . . . . . . . . . . . . . . . . . . . . . . . . . . . . . . . . . . . . . . . . . . . . . . . . . . .. . . . . . .205
Binding DB2 Plans.. . . . . . . . . . . . . . . . . . . . . . . . . . . . . . . . . . . . . . . . . . . . . . . . . . . . . . . . . . . . . . . . . . . . . . . . . . . . . . . . . . . . . . . . . . . . . . . . . . .205Running VERSION Application Engine Program... . . . . . . . . . . . . . . . . . . . . . . . . . . . . . . . . . . . . . . . . . . . . . . . . . . . . . . . . . . . . . . .205Changing the Base Language... . . . . . . . . . . . . . . . . . . . . . . . . . . . . . . . . . . . . . . . . . . . . . . . . . . . . . . . . . . . . . . . . . . . . . . . . . . . . . . . . . . . .206Checking the Database.. . . . . . . . . . . . . . . . . . . . . . . . . . . . . . . . . . . . . . . . . . . . . . . . . . . . . . . . . . . . . . . . . . . . . . . . . . . . . . . . . . . . . . . . . . . . . .206Running Alter Audit. . . . . . . . . . . . . . . . . . . . . . . . . . . . . . . . . . . . . . . . . . . . . . . . . . . . . . . . . . . . . . . . . . . . . . . . . . . . . . . . . . . . . . . . . . . . . . . . . . . .207Disabling %UpdateStats... . . . . . . . . . . . . . . . . . . . . . . . . . . . . . . . . . . . . . . . . . . . . . . . . . . . . . . . . . . . . . . . . . . . . . . . . . . . . . . . . . . . . . . . . . . .211
Chapter 9AConfiguring the Application Server on Windows..... .. . . . . . . . . . . . . . . . . . . . . . . . . . . . . . . . . . . . . . . . . . . . . . .213Understanding the Application Server.. . . . . . . . . . . . . . . . . . . . . . . . . . . . . . . . . . . . . . . . . . . . . . . . . . . . . . . . . . . . . . . . . . . . . . . . . . . . .213Prerequisites.. . . . . . . . . . . . . . . . . . . . . . . . . . . . . . . . . . . . . . . . . . . . . . . . . . . . . . . . . . . . . . . . . . . . . . . . . . . . . . . . . . . . . . . . . . . . . . . . . . . . . . . . . .214Setting Up COBOL for Remote Call. . . . . . . . . . . . . . . . . . . . . . . . . . . . . . . . . . . . . . . . . . . . . . . . . . . . . . . . . . . . . . . . . . . . . . . . . . . . . . . .214Verifying Database Connectivity. . . . . . . . . . . . . . . . . . . . . . . . . . . . . . . . . . . . . . . . . . . . . . . . . . . . . . . . . . . . . . . . . . . . . . . . . . . . . . . . . . . . .215Creating, Configuring, and Starting an Initial Application Server Domain.. . . . . . . . . . . . . . . . . . . . . . . . . . . . . . . . . . . . .215
Creating, Configuring, and Starting the Application Server Domain.. . . . . . . . . . . . . . . . . . . . . . . . . . . . . . . .. . . . . . .215Testing the Three-Tier Connection.. . . . . . . . . . . . . . . . . . . . . . . . . . . . . . . . . . . . . . . . . . . . . . . . . . . . . . . . . . . . . . . . . . . . . .. . . . . . .218Importing an Existing Application Server Domain Configuration.. . . . . . . . . . . . . . . . . . . . . . . . . . . . . . . . . . . .. . . . . . .219Setting Up a Custom Application Server Domain Configuration. . . . . . . . . . . . . . . . . . . . . . . . . . . . . . . . . . . . .. . . . . . .220Troubleshooting Common Errors.. . . . . . . . . . . . . . . . . . . . . . . . . . . . . . . . . . . . . . . . . . . . . . . . . . . . . . . . . . . . . . . . . . . . . . . .. . . . . . .222
Configuring Fonts for Languages.. . . . . . . . . . . . . . . . . . . . . . . . . . . . . . . . . . . . . . . . . . . . . . . . . . . . . . . . . . . . . . . . . . . . . . . . . . . . . . . . . .223Configuring Asian Language Fonts.. . . . . . . . . . . . . . . . . . . . . . . . . . . . . . . . . . . . . . . . . . . . . . . . . . . . . . . . . . . . . . . . . . . . .. . . . . . .223
Chapter 9BConfiguring the Application Server on UNIX... . . . . . . . . . . . . . . . . . . . . . . . . . . . . . . . . . . . . . . . . . . . . . . . . . . . . . . .225Understanding the Application Server.. . . . . . . . . . . . . . . . . . . . . . . . . . . . . . . . . . . . . . . . . . . . . . . . . . . . . . . . . . . . . . . . . . . . . . . . . . . . .225Understanding the Application Server Domain Processes.. . . . . . . . . . . . . . . . . . . . . . . . . . . . . . . . . . . . . . . . . . . . . . . . . . . . . .226
Copyright © 2006, Oracle. All rights reserved. xi

Contents
Prerequisites.. . . . . . . . . . . . . . . . . . . . . . . . . . . . . . . . . . . . . . . . . . . . . . . . . . . . . . . . . . . . . . . . . . . . . . . . . . . . . . . . . . . . . . . . . . . . . . . . . . . . . . . . . .227Setting Environment Variables.. . . . . . . . . . . . . . . . . . . . . . . . . . . . . . . . . . . . . . . . . . . . . . . . . . . . . . . . . . . . . . . . . . . . . . . . . . . . . . . . . . . . . .227Setting Up COBOL for Remote Call. . . . . . . . . . . . . . . . . . . . . . . . . . . . . . . . . . . . . . . . . . . . . . . . . . . . . . . . . . . . . . . . . . . . . . . . . . . . . . . .227Verifying Database Connectivity. . . . . . . . . . . . . . . . . . . . . . . . . . . . . . . . . . . . . . . . . . . . . . . . . . . . . . . . . . . . . . . . . . . . . . . . . . . . . . . . . . . . .228Creating, Configuring, and Starting an Initial Application Server Domain.. . . . . . . . . . . . . . . . . . . . . . . . . . . . . . . . . . . . .228
Creating, Configuring, and Starting the Application Server Domain.. . . . . . . . . . . . . . . . . . . . . . . . . . . . . . . .. . . . . . .228Testing the Three-Tier Connection.. . . . . . . . . . . . . . . . . . . . . . . . . . . . . . . . . . . . . . . . . . . . . . . . . . . . . . . . . . . . . . . . . . . . . .. . . . . . .231Importing an Existing Application Server Domain Configuration.. . . . . . . . . . . . . . . . . . . . . . . . . . . . . . . . . . . .. . . . . . .231Setting Up a Custom Application Server Domain Configuration.. . . . . . . . . . . . . . . . . . . . . . . . . . . . . . . . . . . .. . . . . . .233Troubleshooting Common Errors.. . . . . . . . . . . . . . . . . . . . . . . . . . . . . . . . . . . . . . . . . . . . . . . . . . . . . . . . . . . . . . . . . . . . . . . .. . . . . . .235
Configuring Fonts for Languages.. . . . . . . . . . . . . . . . . . . . . . . . . . . . . . . . . . . . . . . . . . . . . . . . . . . . . . . . . . . . . . . . . . . . . . . . . . . . . . . . . .236Configuring Asian Language Fonts. . . . . . . . . . . . . . . . . . . . . . . . . . . . . . . . . . . . . . . . . . . . . . . . . . . . . . . . . . . . . . . . . . . . . .. . . . . . .236Installing TrueType Fonts for Tru64 UNIX... . . . . . . . . . . . . . . . . . . . . . . . . . . . . . . . . . . . . . . . . . . . . . . . . . . . . . . . . . . . .. . . . . . .237
Chapter 10ASetting Up the PeopleSoft Pure Internet Architecture in GUI Mode.... . . . . . . . . . . . . . . . . . . . . . . . . . .239Understanding PeopleSoft Pure Internet Architecture.. . . . . . . . . . . . . . . . . . . . . . . . . . . . . . . . . . . . . . . . . . . . . . . . . . . . . . . . . . .239Using Authentication Domains in the PeopleSoft Pure Internet Architecture Installation. . . . . . . . . . . . . . . . . . . .241Installing the PeopleSoft Pure Internet Architecture on Oracle Application Server in GUI Mode. . . . . . . . . . .242
Installing the PeopleSoft Pure Internet Architecture on Oracle Application Server. . . . . . . . . . . . . . . .. . . . . . .242Uninstalling the PeopleSoft Pure Internet Architecture from Oracle Application Server. . . . . . . . . .. . . . . . .252
Installing the PeopleSoft Pure Internet Architecture on WebLogic in GUI Mode... . . . . . . . . . . . . . . . . . . . . . . . . . . .252Installing the PeopleSoft Pure Internet Architecture on WebSphere.. . . . . . . . . . . . . . . . . . . . . . . . . . . . . . . . . . . . . . . . . .260
Prerequisites.. . . . . . . . . . . . . . . . . . . . . . . . . . . . . . . . . . . . . . . . . . . . . . . . . . . . . . . . . . . . . . . . . . . . . . . . . . . . . . . . . . . . . . . . . . . . . . .. . . . . . .260Installing the PeopleSoft Pure Internet Architecture on WebSphere. . . . . . . . . . . . . . . . . . . . . . . . . . . . . . . .. . . . . . .261Uninstalling the PeopleSoft Pure Internet Architecture from WebSphere.. . . . . . . . . . . . . . . . . . . . . . . . . .. . . . . . .267
Encrypting the Password (AIX Only). . . . . . . . . . . . . . . . . . . . . . . . . . . . . . . . . . . . . . . . . . . . . . . . . . . . . . . . . . . . . . . . . . . . . . . . . . . . . . . .267Testing the PeopleSoft Pure Internet Architecture Installation. . . . . . . . . . . . . . . . . . . . . . . . . . . . . . . . . . . . . . . . . . . . . . . . . .268
Starting and Stopping Oracle Application Server.. . . . . . . . . . . . . . . . . . . . . . . . . . . . . . . . . . . . . . . . . . . . . . . . . . . . . .. . . . . . .268Starting and Stopping WebLogic.. . . . . . . . . . . . . . . . . . . . . . . . . . . . . . . . . . . . . . . . . . . . . . . . . . . . . . . . . . . . . . . . . . . . . . . .. . . . . . .269Starting WebSphere.. . . . . . . . . . . . . . . . . . . . . . . . . . . . . . . . . . . . . . . . . . . . . . . . . . . . . . . . . . . . . . . . . . . . . . . . . . . . . . . . . . . . . . .. . . . . . .269Accessing the PeopleSoft Signon.. . . . . . . . . . . . . . . . . . . . . . . . . . . . . . . . . . . . . . . . . . . . . . . . . . . . . . . . . . . . . . . . . . . . . . .. . . . . . .270Updating Database Information.. . . . . . . . . . . . . . . . . . . . . . . . . . . . . . . . . . . . . . . . . . . . . . . . . . . . . . . . . . . . . . . . . . . . . . . . . .. . . . . . .271Updating PeopleTools Options.. . . . . . . . . . . . . . . . . . . . . . . . . . . . . . . . . . . . . . . . . . . . . . . . . . . . . . . . . . . . . . . . . . . . . . . . . . .. . . . . . .272
Chapter 10BSetting Up the PeopleSoft Pure Internet Architecture in Console Mode.... . . . . . . . . . . . . . . . . . . . .273Understanding PeopleSoft Pure Internet Architecture.. . . . . . . . . . . . . . . . . . . . . . . . . . . . . . . . . . . . . . . . . . . . . . . . . . . . . . . . . . .273
xii Copyright © 2006, Oracle. All rights reserved.
Contents
Using Authentication Domains in the PeopleSoft Pure Internet Architecture Installation. . . . . . . . . . . . . . . . . . . .275Installing the PeopleSoft Pure Internet Architecture on Oracle Application Server in ConsoleMode... . . . . . . . . . . . . . . . . . . . . . . . . . . . . . . . . . . . . . . . . . . . . . . . . . . . . . . . . . . . . . . . . . . . . . . . . . . . . . . . . . . . . . . . . . . . . . . . . . . . . . . . . . . . . . . . . .276
Installing the PeopleSoft Pure Internet Architecture on Oracle Application Server. . . . . . . . . . . . . . . .. . . . . . .276Uninstalling the PeopleSoft Pure Internet Architecture from Oracle Application Server. . . . . . . . . .. . . . . . .280
Installing the PeopleSoft Pure Internet Architecture on WebLogic in Console Mode. . . . . . . . . . . . . . . . . . . . . . . .280Installing the PeopleSoft Pure Internet Architecture on WebSphere in Console Mode. . . . . . . . . . . . . . . . . . . . . .285
Prerequisites.. . . . . . . . . . . . . . . . . . . . . . . . . . . . . . . . . . . . . . . . . . . . . . . . . . . . . . . . . . . . . . . . . . . . . . . . . . . . . . . . . . . . . . . . . . . . . . .. . . . . . .285Installing the PeopleSoft Pure Internet Architecture on WebSphere.. . . . . . . . . . . . . . . . . . . . . . . . . . . . . . .. . . . . . .286Uninstalling the PeopleSoft Pure Internet Architecture from WebSphere.. . . . . . . . . . . . . . . . . . . . . . . . . .. . . . . . .289
Encrypting the Password (AIX Only). . . . . . . . . . . . . . . . . . . . . . . . . . . . . . . . . . . . . . . . . . . . . . . . . . . . . . . . . . . . . . . . . . . . . . . . . . . . . . . .290Testing the PeopleSoft Pure Internet Architecture Installation. . . . . . . . . . . . . . . . . . . . . . . . . . . . . . . . . . . . . . . . . . . . . . . . . .290
Starting and Stopping Oracle Application Server.. . .. . . . . . . . . . . . . . . . . . . . . . . . . . . . . . . . . . . . . . . . . . . . . . . . . . .. . . . . . .290Starting and Stopping WebLogic.. . . . . . . . . . . . . . . . . . . . . . . . . . . . . . . . . . . . . . . . . . . . . . . . . . . . . . . . . . . . . . . . . . . . . . . .. . . . . . .291Starting WebSphere... . . . . . . . . . . . . . . . . . . . . . . . . . . . . . . . . . . . . . . . . . . . . . . . . . . . . . . . . . . . . . . . . . . . . . . . . . . . . . . . . . . . . .. . . . . . .292Accessing the PeopleSoft Signon.. . . . . . . . . . . . . . . . . . . . . . . . . . . . . . . . . . . . . . . . . . . . . . . . . . . . . . . . . . . . . . . . . . . . . . .. . . . . . .292Updating Database Information.. . . . . . . . . . . . . . . . . . . . . . . . . . . . . . . . . . . . . . . . . . . . . . . . . . . . . . . . . . . . . . . . . . . . . . . . . .. . . . . . .293Updating PeopleTools Options.. . . . . . . . . . . . . . . . . . . . . . . . . . . . . . . . . . . . . . . . . . . . . . . . . . . . . . . . . . . . . . . . . . . . . . . . . . .. . . . . . .294
Chapter 11ASetting Up Process Scheduler on Windows.... . . . . . . . . . . . . . . . . . . . . . . .. . . . . . . . . . . . . . . . . . . . . . . . . . . . . . . .295Prerequisites.. . . . . . . . . . . . . . . . . . . . . . . . . . . . . . . . . . . . . . . . . . . . . . . . . . . . . . . . . . . . . . . . . . . . . . . . . . . . . . . . . . . . . . . . . . . . . . . . . . . . . . . . . .295Setting Up Process Scheduler Security. . . . . . . . . . . . . . . . . . . . . . . . . . . . . . . . . . . . . . . . . . . . . . . . . . . . . . . . . . . . . . . . . . . . . . . . . . . .296
Understanding Process Scheduler Security. . . . . . . . . . . . . . . . . . . . . . . . . . . . . . . . . . . . . . . . . . . . . . . . . . . . . . . . . . . .. . . . . . .296Changing User Account to Start BEA ProcMGR V8.1 .. . . . . . . . . . . . . . . . . . . . . . . . . . . . . . . . . . . . . . . . . . . . . . .. . . . . . .296Granting Process Scheduler Administrative Rights.. . . . . . . . . . . . . . . . . . . . . . . . . . . . . . . . . . . . . . . . . . . . . . . . . . .. . . . . . .298
Setting Up Process Scheduler to Transfer Reports and Logs to the Report Repository. . . . . . . . . . . . . . . . . . . . .299Understanding Report Distribution.. . . . . . . . . . . . . . . . . . . . . . . . . . . . . . . . . . . . . . . . . . . . . . . . . . . . . . . . . . . . . . . . . . . . . .. . . . . . .300Setting Up Single Signon to Navigate from PIA to Report Repository.. . . . . . . . . . . . . . . . . . . . . . . . . . . . . .. . . . . . .301Determining the Transfer Protocol. . . . . . . . . . . . . . . . . . . . . . . . . . . . . . . . . . . . . . . . . . . . . . . . . . . . . . . . . . . . . . . . . . . . . . . .. . . . . . .302Starting the Distribution Agent.. . . . . . . . . . . . . . . . . . . . . . . . . . . . . . . . . . . . . . . . . . . . . . . . . . . . . . . . . . . . . . . . . . . . . . . . . . .. . . . . . .302Setting Up the Report Repository.. . . . . . . . . . . . . . . . . . . . . . . . . . . . . . . . . . . . . . . . . . . . . . . . . . . . . . . . . . . . . . . . . . . . . . .. . . . . . .302Setting Up the Distribution for Your Process Scheduler Server. . . . . . . . . . . . . . . . . . . . . . . . . . . . . . . . . . . . . .. . . . . . .308Setting Up Sending and Receiving of Report Folders in the Report Manager. . . . . . . . . . . . . . . . . . . . .. . . . . . .309
Setting Environment Variables.. . . . . . . . . . . . . . . . . . . . . . . . . . . . . . . . . . . . . . . . . . . . . . . . . . . . . . . . . . . . . . . . . . . . . . . . . . . . . . . . . . . . . .310Setting Up Process Scheduler Server Agent. . . . . . . . . . . . . . . . . . . . . . . . . . . . . . . . . . . . . . . . . . . . . . . . . . . . . . . . . . . . . . . . . . . . . .310
Understanding Process Scheduler Server Agent. . . . . . . . . . . . . . . . . . . . . . . . . . . . . . . . . . . . . . . . . . . . . . . . . . . . . .. . . . . . .310Creating and Configuring a Process Scheduler Server. . . . . . . . . . . . . . . . . . . . . . . . . . . . . . . . . . . . . . . . . . . . . . .. . . . . . .311Reconfiguring a Process Scheduler Server.. . . . . . . . . . . . . . . . . . . . . . . . . . . . . . . . . . . . . . . . . . . . . . . . . . . . . . . . . . . .. . . . . . .315Verifying the Process Scheduler Server Status... . . . . . . . . . . . . . . . . . . . . . . . . . . . . . . . . . . . . . . . . . . . . . . . . . . . . . .. . . . . . .316
Copyright © 2006, Oracle. All rights reserved. xiii
Contents
Starting Process Scheduler as a Windows Service (Optional). . . . . . . . . . . . . . . . . . . . . . . . . . . . . . . . . . . . . . . . . . . . . . . . . .318Configuring the Process Scheduler for Word for Windows (Optional). . . . . . . . . . . . . . . . . . . . . . . . . . . . . . . . . . . . . . . . . .320Configuring Setup Manager.. . . . . . . . . . . . . . . . . . . . . . . . . . . . . . . . . . . . . . . . . . . . . . . . . . . . . . . . . . . . . . . . . . . . . . . . . . . . . . . . . . . . . . . . .321
Chapter 11BSetting Up Process Scheduler on UNIX... . . . . . . . . . . . . . . . . . . . . . . . . . . . . . . . . . . . . . . . . . . . . . . . . . . . . . . . . . . . . .323Prerequisites.. . . . . . . . . . . . . . . . . . . . . . . . . . . . . . . . . . . . . . . . . . . . . . . . . . . . . . . . . . . . . . . . . . . . . . . . . . . . . . . . . . . . . . . . . . . . . . . . . . . . . . . . . .323Setting Up Process Scheduler Security. . . . . . . . . . . . . . . . . . . . . . . . . . . . . . . . . . . . . . . . . . . . . . . . . . . . . . . . . . . . . . . . . . . . . . . . . . . .324
Understanding Process Scheduler Security. . . . . . . . . . . . . . . . . . . . . . . . . . . . . . . . . . . . . . . . . . . . . . . . . . . . . . . . . . . .. . . . . . .324Granting Process Scheduler Administrative Rights.. . . . . . . . . . . . . . . . . . . . . . . . . . . . . . . . . . . . . . . . . . . . . . . . . . .. . . . . . .324
Setting Up Process Scheduler to Transfer Reports and Logs to the Report Repository. . . . . . . . . . . . . . . . . . . . .325Understanding Report Distribution.. . . . . . . . . . . . . . . . . . . . . . . . . . . . . . . . . . . . . . . . . . . . . . . . . . . . . . . . . . . . . . . . . . . . . .. . . . . . .326Setting Up Single Signon to Navigate from PIA to Report Repository... . . . . . . . . . . . . . . . . . . . . . . . . . . . .. . . . . . .327Determining the Transfer Protocol. . . . . . . . . . . . . . . . . . . . . . . . . . . . . . . . . . . . . . . . . . . . . . . . . . . . . . . . . . . . . . . . . . . . . . . .. . . . . . .328Starting the Distribution Agent.. . . . . . . . . . . . . . . . . . . . . . . . . . . . . . . . . . . . . . . . . . . . . . . . . . . . . . . . . . . . . . . . . . . . . . . . . . .. . . . . . .328Setting Up the Report Repository.. . . . . . . . . . . . . . . . . . . . . . . . . . . . . . . . . . . . . . . . . . . . . . . . . . . . . . . . . . . . . . . . . . . . . . .. . . . . . .328Setting Up the Distribution for Your Process Scheduler Server. . . . . . . . . . . . . . . . . . . . . . . . . . . . . . . . . . . . . .. . . . . . .333Setting Up Sending and Receiving of Report Folders in the Report Manager. . . . . . . . . . . . . . . . . . . . .. . . . . . .334
Setting Up Process Scheduler Server Agent. . . . . . . . . . . . . . . . . . . . . . . . . . . . . . . . . . . . . . . . . . . . . . . . . . . . . . . . . . . . . . . . . . . . . .334Understanding Process Scheduler Server Agent. . . . . . . . . . . . . . . . . . . . . . . . . . . . . . . . . . . . . . . . . . . . . . . . . . . . . .. . . . . . .334Changing the Default Operating System.. . . . . . . . . . . . . . . . . . . . . . . . . . . . . . . . . . . . . . . . . . . . . . . . . . . . . . . . . . . . . . .. . . . . . .335Creating and Configuring a Process Scheduler Server. . . . . . . . . . . . . . . . . . . . . . . . . . . . . . . . . . . . . . . . . . . . . . .. . . . . . .335Reconfiguring a Process Scheduler Server.. . . . . . . . . . . . . . . . . . . . . . . . . . . . . . . . . . . . . . . . . . . . . . . . . . . . . . . . . . . .. . . . . . .339Verifying the Process Scheduler Server Status... . . . . . . . . . . . . . . . . . . . . . . . . . . . . . . . . . . . . . . . . . . . . . . . . . . . . . .. . . . . . .340
Chapter 11CSetting Up Process Scheduler on z/OS.... . . . . . . . . . . . . . . . . . . . . . .. . . . . . . . . . . . . . . . . . . . . . . .. . . . . . . . . . . . . . .343Prerequisites.. . . . . . . . . . . . . . . . . . . . . . . . . . . . . . . . . . . . . . . . . . . . . . . . . . . . . . . . . . . . . . . . . . . . . . . . . . . . . . . . . . . . . . . . . . . . . . . . . . . . . . . . . .343Granting Required Authorization in DB2 and UNIX System Services.. . . . . . . . . . . . . . . . . . . . . . . . . . . . . . . . . . . . . . . . .344
Setting UNIX System Services Authorization.. . . . . . . . . . . . . . . . . . . . . . . . . . . . . . . . . . . . . . . . . . . . . . . . . . . . . . . . . .. . . . . . .344Setting DB2 Authorization.. . . . . . . . . . . . . . . . . . . . . . . . . . . . . . . . . . . . . . . . . . . . . . . . . . . . . . . . . . . . . . . . . . . . . . . . . . . . . . . .. . . . . . .346
Setting Up Process Scheduler Security. . . . . . . . . . . . . . . . . . . . . . . . . . . . . . . . . . . . . . . . . . . . . . . . . . . . . . . . . . . . . . . . . . . . . . . . . . . .346Understanding Process Scheduler Security. . . . . . . . . . . . . . . . . . . . . . . . . . . . . . . . . . . . . . . . . . . . . . . . . . . . . . . . . . . .. . . . . . .347Granting Process Scheduler Administrative Rights.. . . . . . . . . . . . . . . . . . . . . . . . . . . . . . . . . . . . . . . . . . . . . . . . . . .. . . . . . .347
Setting Up Process Scheduler to Transfer Reports and Logs to the Report Repository. . . . . . . . . . . . . . . . . . . . .348Understanding Report Distribution.. . . . . . . . . . . . . . . . . . . . . . . . . . . . . . . . . . . . . . . . . . . . . . . . . . . . . . . . . . . . . . . . . . . . . .. . . . . . .348Setting Up Single Signon to Navigate from PIA to Report Repository... . . . . . . . . . . . . . . . . . . . . . . . . . . . .. . . . . . .349Determining the Transfer Protocol. . . . . . . . . . . . . . . . . . . . . . . . . . . . . . . . . . . . . . . . . . . . . . . . . . . . . . . . . . . . . . . . . . . . . . . .. . . . . . .350
xiv Copyright © 2006, Oracle. All rights reserved.
Contents
Starting the Distribution Agent.. . . . . . . . . . . . . . . . . . . . . . . . . . . . . . . . . . . . . . . . . . . . . . . . . . . . . . . . . . . . . . . . . . . . . . . . . . .. . . . . . .350Setting Up the Report Repository.. . . . . . . . . . . . . . . . . . . . . . . . . . . . . . . . . . . . . . . . . . . . . . . . . . . . . . . . . . . . . . . . . . . . . . .. . . . . . .350Setting Up the Distribution for Your Process Scheduler Server. . . . . . . . . . . . . . . . . . . . . . . . . . . . . . . . . . . . . .. . . . . . .353Setting Up Sending and Receiving of Report Folders in the Report Manager. . . . . . . . . . . . . . . . . . . . .. . . . . . .354
Setting Up Process Scheduler Server Agent. . . . . . . . . . . . . . . . . . . . . . . . . . . . . . . . . . . . . . . . . . . . . . . . . . . . . . . . . . . . . . . . . . . . . .355Understanding Process Scheduler Server Agent. . . . . . . . . . . . . . . . . . . . . . . . . . . . . . . . . . . . . . . . . . . . . . . . . . . . . .. . . . . . .355Changing the Default Operating System... . . . . . . . . . . . . . . . . . . . . . . . . . . . . . . . . . . . . . . . . . . . . . . . . . . . . . . . . . . . . .. . . . . . .355Setting Up Your Environment.. . . . . . . . . . . . . . . . . . . . . . . . . . . . . . . . . . . . . . . . . . . . . . . . . . . . . . . . . . . . . . . . . . . . . . . . . . . .. . . . . . .356Validating and Editing the ODBC Initialization File.. . . . . . . . . . . . . . . . . . . . . . . . . . . . . . . . . . . . . . . . . . . . . . . . . . . .. . . . . . .356Creating and Configuring a Process Scheduler Server. . . . . . . . . . . . . . . . . . . . . . . . . . . . . . . . . . . . . . . . . . . . . . .. . . . . . .357Configuring Process Scheduler Server.. . . . . . . . . . . . . . . . . . . . . . . . . . . . . . . . . . . . . . . . . . . . . . . . . . . . . . . . . . . . . . . . .. . . . . . .358Working with Shell JCL Templates.. . . . . . . . . . . . . . . . . . . . . . . . . . . . . . . . . . . . . . . . . . . . . . . . . . . . . . . . . . . . . . . . . . . . . .. . . . . . .362Starting a Process Scheduler Server.. . . . . . . . . . . . . . . . . . . . . . . . . . . . . . . . . . . . . . . . . . . . . . . . . . . . . . . . . . . . . . . . . . .. . . . . . .367Verifying the Process Scheduler Server Status... . . . . . . . . . . . . . . . . . . . . . . . . . . . . . . . . . . . . . . . . . . . . . . . . . . . . . .. . . . . . .368Stopping the Process Scheduler Server.. . . . . . . . . . . . . . . . . . . . . . . . . . . . . . . . . . . . . . . . . . . . . . . . . . . . . . . . . . . . . . . .. . . . . . .369
Chapter 12Installing and Configuring Software for Crystal Reports... . . . . . . . . . . . . . . . . . . . . . . . . . . . . . . . . . . . . . . . .371Understanding Crystal Reports Software Installation and Configuration.. . . . . . . . . . . . . . . . . . . . . . . . . . . . . . . . . . . . . .371Determining the Crystal Reports Runtime Environment.. . . . . . . . . . . . . . . . . . . . . . . . . . . . . . . . . . . . . . . . . . . . . . . . . . . . . . . . .373Installing Crystal Reports 9.. . . . . . . . . . . . . . . . . . . . . . . . . . . . . . . . . . . . . . . . . . . . . . . . . . . . . . . . . . . . . . . . . . . . . . . . . . . . . . . . . . . . . . . . . .374
Understanding the Crystal Reports 9 Installation.. . . . . . . . . . . . . . . . . . . . . . . . . . . . . . . . . . . . . . . . . . . . . . . . . . . . . .. . . . . . .374Installing Crystal Reports 9.. . . . . . . . . . . . . . . . . . . . . . . . . . . . . . . . . . . . . . . . . . . . . . . . . . . . . . . . . . . . . . . . . . . . . . . . . . . . . . .. . . . . . .374
Installing BusinessObjects Enterprise XI.. . . . . . . . . . . . . . . . . . . . . . . . . . . . . . . . . . . . . . . . . . . . . . . . . . . . . . . . . . . . . . . . . . . . . . . . . .375Understanding the BusinessObjects Enterprise XI Installation.. . . . . . . . . . . . . . . . . . . . . . . . . . . . . . . . . . . . . .. . . . . . .376Understanding Integration Between BusinessObjects Enterprise XI and PeopleSoft Enterprise.. . . . . . .380Understanding Query Access Services.. . . . . . . . . . . . . . . . . . . . . . . . . . . . . . . . . . . . . . . . . . . . . . . . . . . . . . . . . . . . . . . . .. . . . . . .382Reviewing Key BusinessObjects Enterprise XI Components.. . . . . . . . . . . . . . . . . . . . . . . . . . . . . . . . . . . . . . . .. . . . . . .384Planning your BusinessObjects Enterprise XI Integration.. . . . . . . . . . . . . . . . . . . . . . . . . . . . . . . . . . . . . . . . . . . .. . . . . . .384Installing the PeopleSoft Application Environment.. . . . . . . . . . . . . . . . . . . . . . . . . . . . . . . . . . . . . . . . . . . . . . . . . . . .. . . . . . .386Installing BusinessObjects Enterprise XI on Windows... . . . . . . . . . . . . . . . . . . . . . . . . . . . . . . . . . . . . . . . . . . . . . .. . . . . . .386Installing BusinessObjects Enterprise XI Integration on Windows.. . . . . . . . . . . . . . . . . . . . . . . . . . . . . . . . . .. . . . . . .394Installing Patches Required at Installation Time... . . . . . . . . . . . . . . . . . . . . . . . . . . . . . . . . . . . . . . . . . . . . . . . . . . . . .. . . . . . .397Creating a Web Server for BusinessObjects Enterprise XI on Windows... . . . . . . . . . . . . . . . . . . . . . . . . .. . . . . . .397Installing BusinessObjects Enterprise XI on UNIX or Linux.. . . . . . . . . . . . . . . . . . . . . . . . . . . . . . . . . . . . . . . . . .. . . . . . .413Installing PeopleSoft BusinessObjects Enterprise XI Integration on UNIX or Linux. . . . . . . . . . . . . . .. . . . . . .415Installing Patches Required at Installation.. . . . . . . . . . . . . . . . . . . . . . . . . . . . . . . . . . . . . . . . . . . . . . . . . . . . . . . . . . . . .. . . . . . .418Creating a Web Server for BusinessObjects Enterprise on UNIX or Linux.. . . . . . . . . . . . . . . . . . . . . . . .. . . . . . .418Confirming Access to the BusinessObjects Enterprise XI Administration and User LaunchpadApplications.. . . . . . . . . . . . . . . . . . . . . . . . . . . . . . . . . . . . . . . . . . . . . . . . . . . . . . . . . . . . . . . . . . . . . . . . . . . . . . . . . . . . . . . . . . . . . . . . .. . . . . . .430
Copyright © 2006, Oracle. All rights reserved. xv

Contents
Configuring the PeopleSoft Application for BusinessObjects Enterprise XI Integration.. . . . . . . . . .. . . . . . .432Configuring the BusinessObjects Enterprise XI Server.. . . . . . . . . . . . . . . . . . . . . . . . . . . . . . . . . . . . . . . . . . . . . . .. . . . . . .441Verifying the PeopleSoft to BusinessObjects Enterprise XI Integration. . . . . . . . . . . . . . . . . . . . . . . . . . . . .. . . . . . .445
Migrating your BusinessObjects Enterprise XI Installation to a New Version of PeopleTools. . . . . . . . . . . . . . .446Installing Crystal Reports XI. . . . . . . . . . . . . . . . . . . . . . . . . . . . . . . . . . . . . . . . . . . . . . . . . . . . . . . . . . . . . . . . . . . . . . . . . . . . . . . . . . . . . . . . . .447Removing Crystal Reports XI. . . . . . . . . . . . . . . . . . . . . . . . . . . . . . . . . . . . . . . . . . . . . . . . . . . . . . . . . . . . . . . . . . . . . . . . . . . . . . . . . . . . . . . .450Administering and Using BusinessObjects Enterprise XI. . . . . . . . . . . . . . . . . . . . . . . . . . . . . . . . . . . . . . . . . . . . . . . . . . . . . . . .451
Understanding PeopleSoft Permission Lists, Roles, and Users Involved in PeopleSoftIntegration with BusinessObjects Enterprise XI. . . . . . . . . . . . . . . . . . . . . . . . . . . . . . . . . . . . . . . . . . . . . . . . . . . . . . . .. . . . . . .451Installing Patches.. . . . . . . . . . . . . . . . . . . . . . . . . . . . . . . . . . . . . . . . . . . . . . . . . . . . . . . . . . . . . . . . . . . . . . . . . . . . . . . . . . . . . . . . . .. . . . . . .453Changing the Data Source of the BusinessObjects Enterprise XI Report Repository.. . . . . . . . . . . .. . . . . . .453Uninstalling BusinessObjects Enterprise XI Integration.. . . . . . . . . . . . . . . . . . . . . . . . . . . . . . . . . . . . . . . . . . . . . .. . . . . . .455Switching to Crystal 9 from BusinessObjects Enterprise XI... . . . . . . . . . . . . . . . . . . . . . . . . . . . . . . . . . . . . . . . .. . . . . . .459Using Logging in BusinessObjects Enterprise XI.. . . . . . . . . . . . . . . . . . . . . . . . . . . . . . . . . . . . . . . . . . . . . . . . . . . . . .. . . . . . .459Understanding BusinessObjects Enterprise XI License Codes.. . . . . . . . . . . . . . . . . . . . . . . . . . . . . . . . . . . . .. . . . . . .462
Converting Crystal Reports.. . . . . . . . . . . . . . . . . . . . . . . . . . . . . . . . . . . . . . . . . . . . . . . . . . . . . . . . . . . . . . . . . . . . . . . . . . . . . . . . . . . . . . . . .465Selecting the Crystal Reports Conversion Method.. . . . . . . . . . . . . . . . . . . . . . . . . . . . . . . . . . . . . . . . . . . . . . . . . . . .. . . . . . .465Converting pre-PeopleTools 8 Crystal Reports to PeopleTools 8 Crystal Reports.. . . . . . . . . . . . . . . .. . . . . . .466Converting Reports from Crystal Reports 9 Format to Crystal Reports XI Format. . . . . . . . . . . . . . . .. . . . . . .468
Chapter 13ACompiling COBOL on Windows.... . . . . . . . . . . . . . . . . . . . . . . . . . . . . . . . . . . . . . . . . . . . . . . . . . . . . . . . . . . . . . . . . . . . . . .483Understanding COBOL... . . . . . . . . . . . . . . . . . . . . . . . . . . . . . . . . . . . . . . . . . . . . . . . . . . . . . . . . . . . . . . . . . . . . . . . . . . . . . . . . . . . . . . . . . . . .483Prerequisites.. . . . . . . . . . . . . . . . . . . . . . . . . . . . . . . . . . . . . . . . . . . . . . . . . . . . . . . . . . . . . . . . . . . . . . . . . . . . . . . . . . . . . . . . . . . . . . . . . . . . . . . . . .483Compiling COBOL Source Files.. . . . . . . . . . . . . . . . . . . . . . . . . . . . . . . . . . . . . . . . . . . . . . . . . . . . . . . . . . . . . . . . . . . . . . . . . . . . . . . . . . . .484
Understanding COBOL Compilation.. . . . . . . . . . . . . . . . . . . . . . . . . . . . . . . . . . . . . . . . . . . . . . . . . . . . . . . . . . . . . . . . . . . .. . . . . . .484Compiling COBOL with CBLBLD.BAT... . . . . . . . . . . . . . . . . . . . . . . . . . . . . . . . . . . . . . . . . . . . . . . . . . . . . . . . . . . . . . . . .. . . . . . .484Compiling COBOL with CBLMAKE.BAT... . . . . . . . . . . . . . . . . . . . . . . . . . . . . . . . . . . . . . . . . . . . . . . . . . . . . . . . . . . . . . .. . . . . . .485Defining the GNT and INT Files.. . . . . . . . . . . . . . . . . . . . . . . . . . . . . . . . . . . . . . . . . . . . . . . . . . . . . . . . . . . . . . . . . . . . . . . . .. . . . . . .487
Distributing COBOL Binaries.. . . . . . . . . . . . . . . . . . . . . . . . . . . . . . . . . . . . . . . . . . . . . . . . . . . . . . . . . . . . . . . . . . . . . . . . . . . . . . . . . . . . . . . .488
Chapter 13BCompiling COBOL on UNIX..... . . . . . . . . . . . . . . . . . . . . . . . . . . . . . . . . . . . . . . . . . . . . . . . . . . . . . . . . . . . . . . . . . . . . . . . . . . .489Understanding COBOL... . . . . . . . . . . . . . . . . . . . . . . . . . . . . . . . . . . . . . . . . . . . . . . . . . . . . . . . . . . . . . . . . . . . . . . . . . . . . . . . . . . . . . . . . . . . .489Prerequisites.. . . . . . . . . . . . . . . . . . . . . . . . . . . . . . . . . . . . . . . . . . . . . . . . . . . . . . . . . . . . . . . . . . . . . . . . . . . . . . . . . . . . . . . . . . . . . . . . . . . . . . . . . .490Modifying the Liblist (IBM AIX 5.1, IBM AIX 5.2, and HP-UX Only). . . . . . . . . . . . . . . . . . . . . . . . . . . . . . . . . . . . . . . . . . . . .490
Understanding Liblist Modifications.. . . . . . . . . . . . . . . . . . . . . . . . . . . . . . . . . . . . . . . . . . . . . . . . . . . . . . . . . . . . . . . . . . . . .. . . . . . .490Modifying the Liblist File.. . . . . . . . . . . . . . . . . . . . . . . . . . . . . . . . . . . . . . . . . . . . . . . . . . . . . . . . . . . . . . . . . . . . . . . . . . . . . . . . . .. . . . . . .490
xvi Copyright © 2006, Oracle. All rights reserved.

Contents
Compiling COBOL Programs... . . . . . . . . . . . . . . . . . . . . . . . . . . . . . . . . . . . . . . . . . . . . . . . . . . . . . . . . . . . . . . . . . . . . . . . . . . . . . . . . . . . . .491Understanding COBOL Compilation.. . . . . . . . . . . . . . . . . . . . . . . . . . . . . . . . . . . . . . . . . . . . . . . . . . . . . . . . . . . . . . . . . . . .. . . . . . .491Compiling COBOL on UNIX... . . . . . . . . . . . . . . . . . . . . . . . . . . . . . . . . . . . . . . . . . . . . . . . . . . . . . . . . . . . . . . . . . . . . . . . . . . . .. . . . . . .492
Linking COBOL... . . . . . . . . . . . . . . . . . . . . . . . . . . . . . . . . . . . . . . . . . . . . . . . . . . . . . . . . . . . . . . . . . . . . . . . . . . . . . . . . . . . . . . . . . . . . . . . . . . . . .493Understanding COBOL Linking.. . . . . . . . . . . . . . . . . . . . . . . . . . . . . . . . . . . . . . . . . . . . . . . . . . . . . . . . . . . . . . . . . . . . . . . . . .. . . . . . .493Linking COBOL Components on UNIX... . . . . . . . . . . . . . . . . . . . . . . . . . . . . . . . . . . . . . . . . . . . . . . . . . . . . . . . . . . . . . . .. . . . . . .493
Recompiling COBOL on UNIX... . . . . . . . . . . . . . . . . . . . . . . . . . . . . . . . . . . . . . . . . . . . . . . . . . . . . . . . . . . . . . . . . . . . . . . . . . . . . . . . . . . . .493
Chapter 14Installing PeopleSoft Change Assistant... . . . . . . . . . . . . . . . . . . . . . . . . . . . . . . . . .. . . . . . . . . . . . . . . . . . . . . . . . . . . .495Understanding PeopleSoft Change Assistant. . . . . . . . . . . . . . . . . . . . . . . . . . . . . . . . . . . . . . . . . . . . . . . . . . . . . . . . . . . . . . . . . . . . .495Installing and Configuring PeopleSoft Change Assistant. . . . . . . . . . . . . . . . . . . . . . . . . . . . . . . . . . . . . . . . . . . . . . . . . . . . . . . .495
Installing PeopleSoft Change Assistant. . . . . . . . . . . . . . . . . . . . . . . . . . . . . . . . . . . . . . . . . . . . . . . . . . . . . . . . . . . . . . . . .. . . . . . .496Setting Up Security for Change Assistant. . . . . . . . . . . . . . . . . . . . . . . . . . . . . . . . . . . . . . . . . . . . . . . . . . . . . . . . . . . . . . .. . . . . . .497Scanning the Workstation.. . . . . . . . . . . . . . . . . . . . . . . . . . . . . . . . . . . . . . . . . . . . . . . . . . . . . . . . . . . . . . . . . . . . . . . . . . . . . . . .. . . . . . .498
Specifying Options.. . . . . . . . . . . . . . . . . . . . . . . . . . . . . . . . . . . . . . . . . . . . . . . . . . . . . . . . . . . . . . . . . . . . . . . . . . . . . . . . . . . . . . . . . . . . . . . . . . .498Specifying Change Assistant Options.. . . . . . . . . . . . . . . . . . . . . . . . . . . . . . . . . . . . . . . . . . . . . . . . . . . . . . . . . . . . . . . . . . .. . . . . . .498Setting Email Options.. . . . . . . . . . . . . . . . . . . . . . . . . . . . . . . . . . . . . . . . . . . . . . . . . . . . . . . . . . . . . . . . . . . . . . . . . . . . . . . . . . . . .. . . . . . .499Setting Up Web Services Options.. . . . . . . . . . . . . . . . . . . . . . . . . . . . . . . . . . . . . . . . . . . . . . . . . . . . . . . . . . . . . . . . . . . . . . .. . . . . . .499Setting Environment Management Options.. . . . . . . . . . . . . . . . . . . . . . . . . . . . . . . . . . . . . . . . . . . . . . . . . . . . . . . . . . . .. . . . . . .500
Exporting Jobs to XML, HTML, or Microsoft Excel Format. . . . . . . . . . . . . . . . . . . . . . . . . . . . . . . . . . . . . . . . . . . . . . . . . . . . . .501Validating Change Assistant Settings... . . . . . . . . . . . . . . . . . . . . . . . . . . . . . . . . . . . . . . . . . . . . . . . . . . . . . . . . . . . . . . . . . . . . . . . . . . . .501
Chapter 15Installing PeopleSoft Change Impact Analyzer.. . . . . . . . . . . . . . . . . . . . . . . . . . . . . . . . . . . . . . . . . . . . . . . . . . . . . .505Prerequisites.. . . . . . . . . . . . . . . . . . . . . . . . . . . . . . . . . . . . . . . . . . . . . . . . . . . . . . . . . . . . . . . . . . . . . . . . . . . . . . . . . . . . . . . . . . . . . . . . . . . . . . . . . .505Installing Change Impact Analyzer.. . . . . . . . . . . . . . . . . . . . . . . . . . . . . . . . . . . . . . . . . . . . . . . . . . . . . . . . . . . . . . . . . . . . . . . . . . . . . . . . .505
Appendix AAdding New Product Modules... . . . . . . . . . . . . . . . . . . . . . . . . . . . . . . . . . . . . . . . . . . . . . . . . . . . . . . . . . . . . . . . . . . . . . . . . .509Adding New Module(s) to PeopleSoft 8.4 Installations.. . . . . . . . . . . . . . . . . . . . . . . . . . . . . . . . . . . . . . . . . . . . . . . . . . . . . . . . . .509
Appendix BInstalling PeopleBooks.... . . . . . . . . . . . . . . .. . . . . . . . . . . . . . . . . . . . .. . . . . . . . . . . . . . . . . . . . . .. . . . . . . . . . . . . . . . . . . . . . .511Understanding PeopleBooks.. . . . . . . . . . . . . . . . . . . . . . . . . . . . . . . . . . . . . . . . . . . . . . . . . . . . . . . . . . . . . . . . . . . . . . . . . . . . . . . . . . . . . . . .511Installing PeopleBooks.. . . . . . . . . . . . . . . . . . . . . . . . . . . . . . . . . . . . . . . . . . . . . . . . . . . . . . . . . . . . . . . . . . . . . . . . . . . . . . . . . . . . . . . . . . . . . . .511
Copyright © 2006, Oracle. All rights reserved. xvii

Contents
Prerequisites.. . . . . . . . . . . . . . . . . . . . . . . . . . . . . . . . . . . . . . . . . . . . . . . . . . . . . . . . . . . . . . . . . . . . . . . . . . . . . . . . . . . . . . . . . . . . . . .. . . . . . .512Installing the PeopleBooks CD... . . . . . . . . . . . . . . . . . . . . . . . . . . . . . . . . . . . . . . . . . . . . . . . . . . . . . . . . . . . . . . . . . . . . . . . . .. . . . . . .512
Implementing the PSOL Server for PeopleBooks.. . . . . . . . . . . . . . . . . . . . . . . . . . . . . . . . . . . . . . . . . . . . . . . . . . . . . . . . . . . . . . . .514Understanding PeopleBooks in the PeopleSoft Pure Internet Architecture.. . . . . . . . . . . . . . . . . . . . . . . .. . . . . . .515Starting Oracle Application Server Components. . . . . . . . . . . . . . . . . . . . . . . . . . . . . . . . . . . . . . . . . . . . . . . . . . . . . . .. . . . . . .515Creating the PSOL Server on WebSphere with Existing 8.4x PeopleSoft Pure InternetArchitecture... . . . . . . . . . . . . . . . . . . . . . . . . . . . . . . . . . . . . . . . . . . . . . . . . . . . . . . . . . . . . . . . . . . . . . . . . . . . . . . . . . . . . . . . . . . . . . . .. . . . . . .516Managing the PSOL Server on WebLogic or WebSphere.. . . . . . . . . . . . . . . . . . . . . . . . . . . . . . . . . . . . . . . . . . .. . . . . . .517
Setting up a Reverse Proxy Server.. . . . . . . . . . . . . . . . . . . . . . . . . . . . . . . . . . . . . . . . . . . . . . . . . . . . . . . . . . . . . . . . . . . . . . . . . . . . . . . .519Configuring Context-Sensitive Help.. . . . . . . . . . . . . . . . . . . . . . . . . . . . . . . . . . . . . . . . . . . . . . . . . . . . . . . . . . . . . . . . . . . . . . . . . . . . . . . .519
Enabling the Help Link from the Application Pages.. . . . . . . . . . . . . . . . . . . . . . . . . . . . . . . . . . . . . . . . . . . . . . . . . . .. . . . . . .519Enabling F1 Help.. . . . . . . . . . . . . . . . . . . . . . . . . . . . . . . . . . . . . . . . . . . . . . . . . . . . . . . . . . . . . . . . . . . . . . . . . . . . . . . . . . . . . . . . . .. . . . . . .520
Administering PeopleBooks.. . . . . . . . . . . . . . . . . . . . . . . . . . . . . . . . . . . . . . . . . . . . . . . . . . . . . . . . . . . . . . . . . . . . . . . . . . . . . . . . . . . . . . . . .521
Appendix CInstalling PeopleTools Mobile Agent... . . . . . . . . . . . . . . . . . . . . . . . . . . . . . . . . . . . . . . . . . . . . . . . . . . . . . . . . . . . . . . . . .523Understanding PeopleTools Mobile Agent. . . . . . . . . . . . . . . . . . . . . . . . . . . . . . . . . . . . . . . . . . . . . . . . . . . . . . . . . . . . . . . . . . . . . . . . .523Finding the Installation Program.... . . . . . . . . . . . . . . . . . . . . . . . . . . . . . . . . . . . . . . . . . . . . . . . . . . . . . . . . . . . . . . . . . . . . . . . . . . . . . . . . .523Installing PeopleTools Mobile Agent on a Laptop.. . . . . . . . . . . . . . . . . . . . . . . . . . . . . . . . . . . . . . . . . . . . . . . . . . . . . . . . . . . . . . . .524Installing PeopleTools Mobile Agent on a PDA... . . . . . . . . . . . . . . . . . . . . . . . . . . . . . . . . . . . . . . . . . . . . . . . . . . . . . . . . . . . . . . . . .525Modifying, Repairing, or Removing PeopleTools Mobile Agent. . . . . . . . . . . . . . . . . . . . . . . . . . . . . . . . . . . . . . . . . . . . . . . . .526Expediting the Initialization of a PDA... . . . . . . . . . . . . . . . . . . . . . . . . . . . . . . . . . . . . . . . . . . . . . . . . . . . . . . . . . . . . . . . . . . . . . . . . . . . .526Troubleshooting Installation Issues.. . . . . . . . . . . . . . . . . . . . . . . . . . . . . . . . . . . . . . . . . . . . . . . . . . . . . . . . . . . . . . . . . . . . . . . . . . . . . . . .527
Resolving Port Conflicts. . . . . . . . . . . . . . . . . . . . . . . . . . . . . . . . . . . . . . . . . . . . . . . . . . . . . . . . . . . . . . . . . . . . . . . . . . . . . . . . . . .. . . . . . .527Configuring the Web Server... . . . . . . . . . . . . . . . . . . . . . . . . . . . . . . . . . . . . . . . . . . . . . . . . . . . . . . . . . . . . . . . . . . . . . . . . . . . .. . . . . . .527
Appendix DInstalling Web Application Deployment Tools.. . . . . . . . . . . . . . . . . . . . . . . . . . . . . . . . . . . . . . . . . . . . . . . . . . . . . . .529Prerequisites.. . . . . . . . . . . . . . . . . . . . . . . . . . . . . . . . . . . . . . . . . . . . . . . . . . . . . . . . . . . . . . . . . . . . . . . . . . . . . . . . . . . . . . . . . . . . . . . . . . . . . . . . . .529Installing the Web Application Deployment Tools on Oracle Application Server in GUI Mode. . . . . . . . . . . . . .530Installing the Web Application Deployment Tools on WebLogic in GUI Mode... . . . . . . . . . . . . . . . . . . . . . . . . . . . . . .536Installing the Web Application Deployment Tools on WebSphere in GUI Mode.. . . . . . . . . . . . . . . . . . . . . . . . . . . . .541Installing the Web Application Deployment Tools on Oracle Application Server in Console Mode. . . . . . . . .546Installing the Web Application Deployment Tools on WebLogic in Console Mode... . . . . . . . . . . . . . . . . . . . . . . . . .548Installing the Web Application Deployment Tools on WebSphere in Console Mode. . . . . . . . . . . . . . . . . . . . . . . . .552Testing and Troubleshooting the Web Application Deployment. . . . . . . . . . . . . . . . . . . . . . . . . . . . . . . . . . . . . . . . . . . . . . . . .555
xviii Copyright © 2006, Oracle. All rights reserved.

Contents
Appendix EInstalling and Configuring DB2 Connect... . . . . . . . . . . . . . . . . . . . . . . . . . . . . . . . . . . . . . . . . . . . . . . . . . . . . . . . . . . . .557Understanding DB2 Connect. . . . . . . . . . . . . . . . . . . . . . . . . . . . . . . . . . . . . . . . . . . . . . . . . . . . . . . . . . . . . . . . . . . . . . . . . . . . . . . . . . . . . . . .557Verifying Supported Versions.. . . . . . . . . . . . . . . . . . . . . . . . . . . . . . . . . . . . . . . . . . . . . . . . . . . . . . . . . . . . . . . . . . . . . . . . . . . . . . . . . . . . . . .558Defining DB2 Connect Architecture.. . . . . . . . . . . . . . . . . . . . . . . . . . . . . . . . . . . . . . . . . . . . . . . . . . . . . . . . . . . . . . . . . . . . . . . . . . . . . . . .558
Understanding DB2 Connect Architecture. . . . . . . . . . . . . . . . . . . . . . . . . . . . . . . . . . . . . . . . . . . . . . . . . . . . . . . . . . . . . .. . . . . . .558Using DB2 Connect Enterprise Edition. . . . . . . . . . . . . . . . . . . . . . . . . . . . . . . . . . . . . . . . . . . . . . . . . . . . . . . . . . . . . . . . . .. . . . . . .559Using DB2 Connect Personal Edition.. . . . . . . . . . . . . . . . . . . . . . . . . . . . . . . . . . . . . . . . . . . . . . . . . . . . . . . . . . . . . . . . . . .. . . . . . .559Defining PeopleSoft Three-Tier Configuration with DB2 Connect.. . . . . . . . . . . . . . . . . . . . . . . . . . . . . . . . . . .. . . . . . .560
Setting Up DDF on the Mainframe... . . . . . . . . . . . . . . . . . . . . . . . . . . . . . . . . . . . . . . . . . . . . . . . . . . . . . . . . . . . . . . . . . . . . . . . . . . . . . . .561Configuring TCP/IP on the Client. . . . . . . . . . . . . . . . . . . . . . . . . . . . . . . . . . . . . . . . . . . . . . . . . . . . . . . . . . . . . . . . . . . . . . . . . . . . . . . . . . . .562Configuring the DB2 Connect Gateway on Windows... . . . . . . . . . . . . . . . . . . . . . . . . . . . . . . . . . . . . . . . . . . . . . . . . . . . . . . . . . .563Binding DB2 Connect Packages for an EBCDIC Installation.. . . . . . . . . . . . . . . . . . . . . . . . . . . . . . . . . . . . . . . . . . . . . . . . . . .574Binding DB2 Connect Packages for a Unicode Installation. . . . . . . . . . . . . . . . . . . . . . . . . . . . . . . . . . . . . . . . . . . . . . . . . . . . . .577Setting DB2CodePage For A Unicode Database.. . . . . . . . . . . . . . . . . . . . . . . . . . . . . . . . . . . . . . . . . . . . . . . . . . . . . . . . . . . . . . . .586Setting Up the DB2 Connect Gateway on UNIX.. . . . . . . . . . . . . . . . . . . . . . . . . . . . . . . . . . . . . . . . . . . . . . . . . . . . . . . . . . . . . . . . .587Confirming DB2 Connect/ODBC Settings.. . . . . . . . . . . . . . . . . . . . . . . . . . . . . . . . . . . . . . . . . . . . . . . . . . . . . . . . . . . . . . . . . . . . . . . . .587Setting CLI/ODBC Trace with the Client Configuration Assistant. . . . . . . . . . . . . . . . . . . . . . . . . . . . . . . . . . . . . . . . . . . . . . .589
Appendix FSecuring the Report Repository for HTTP... . . . . . . . . . . . . . . . . . . . . . . . . . . . . . . . . . . . . . . . . . . . . . . . . . . . . . . . . . .591Setting Up Security in the Web Server.. . . . . . . . . . . . . . . . . . . . . . . . . . . . . . . . . . . . . . . . . . . . . . . . . . . . . . . . . . . . . . . . . . . . . . . . . . . .591
Understanding Web Server Security. . . . . . . . . . . . . . . . . . . . . . . . . . . . . . . . . . . . . . . . . . . . . . . . . . . . . . . . . . . . . . . . . . . . .. . . . . . .591Setting Up Basic Authentication in Oracle Application Server. . . . . . . . . . . . . . . . . . . . . . . . . . . . . . . . . . . . . . . .. . . . . . .591Setting Up Basic Authentication in WebLogic.. . . . . . . . . . . . . . . . . . . . . . . . . . . . . . . . . . . . . . . . . . . . . . . . . . . . . . . . . .. . . . . . .596Setting Up Basic Authentication in WebSphere.. . . . . . . . . . . . . . . . . . . . . . . . . . . . . . . . . . . . . . . . . . . . . . . . . . . . . . .. . . . . . .596
Updating the Report Node Definition.. . . . . . . . . . . . . . . . . . . . . . . . . . . . . . . . . . . . . . . . . . . . . . . . . . . . . . . . . . . . . . . . . . . . . . . . . . . . . .599
Appendix GUsing the XSLT Mapper with Oracle BPEL Process Manager... . . . . . . . . . . . . . . . . . . . . . . . . . . . . . . . . . .601Understanding the XSLT Mapper.. . . . . . . . . . . . . . . . . . . . . . . . . . . . . . . . . . . . . . . . . . . . . . . . . . . . . . . . . . . . . . . . . . . . . . . . . . . . . . . . . . .601Installing BPEL Process Manager.. . . . . . . . . . . . . . . . . . . . . . . . . . . . . . . . . . . . . . . . . . . . . . . . . . . . . . . . . . . . . . . . . . . . . . . . . . . . . . . . . .601Setting Up the XSLT Mapper... . . . . . . . . . . . . . . . . . . . . . . . . . . . . . . . . . . . . . . . . . . . . . . . . . . . . . . . . . . . . . . . . . . . . . . . . . . . . . . . . . . . . . .602
Appendix HExtracting DDL for PTSYS Database... . . . . . . . . . . . . . . . . . . . . . . . . . . . . . . . . . . . . . . . . . . . . . . . . . . . . . . . . . . . . . . . . .603Understanding the PTGENDDL.DMS Script. . . . . . . . . . . . . . . . . . . . . . . . . . . . . . . . . . . . . . . . . . . . . . . . . . . . . . . . . . . . . . . . . . . . . . .603
Copyright © 2006, Oracle. All rights reserved. xix
Contents
Using the PTGENDDL.DMS Script. . . . . . . . . . . . . . . . . . . . . . . . . . . . . . . . . . . . . . . . . . . . . . . . . . . . . . . . . . . . . . . . . . . . . . . . . . . . . . . . . .603
Appendix ISetting Up a Unicode Database..... . . . . . . . . . . . . . . . . . . . . . . . . . . . . . . . . . . . . . . . . . . . . . . . . . . . . . . . . . . . . . . . . . . . . . .613Prerequisites.. . . . . . . . . . . . . . . . . . . . . . . . . . . . . . . . . . . . . . . . . . . . . . . . . . . . . . . . . . . . . . . . . . . . . . . . . . . . . . . . . . . . . . . . . . . . . . . . . . . . . . . . . .613Defining Conversion Pages for Unicode Conversion Services.. . . . . . . . . . . . . . . . . . . . . . . . . . . . . . . . . . . . . . . . . . . . . . . . .613Fulfilling Connectivity Requirements.. . . . . . . . . . . . . . . . . . . . . . . . . . . . . . . . . . . . . . . . . . . . . . . . . . . . . . . . . . . . . . . . . . . . . . . . . . . . . . .614
Appendix JUsing the PeopleSoft Tablespace DDL Automation Assistance Tool... . . . . . . . .. . . . . . . . . . . . . . . . .615Understanding the PeopleSoft Tablespace DDL Automation Assistance Tool. . . . . . . . . . . . . . . . . . . . . . . . . . . . . . . .615Understanding PSTAAT Workstation Requirements.. . . . . . . . . . . . . . . . . . . . . . . . . . . . . . . . . . . . . . . . . . . . . . . . . . . . . . . . . . . . .616Understanding the PSTAAT Graphical User Interface.. . . . . . . . . . . . . . . . . . . . . . . . . . . . . . . . . . . . . . . . . . . . . . . . . . . . . . . . . . .616Understanding the Various PSTAAT Input and Output Files.. . . . . . . . . . . . . . . . . . . . . . . . . . . . . . . . . . . . . . . . . . . . . . . . . . . .627Using PSTAAT to Create TBDDL and IXDDL.... . . . . . . . . . . . . . . . . . . . . . . . . . . . . . . . . . . . . . . . . . . . . . . . . . . . . . . . . . . . . . . . . . .632Using PSTAAT to Customize DDL.. . . . . . . . . . . . . . . . . . . . . . . . . . . . . . . . . . . . . . . . . . . . . . . . . . . . . . . . . . . . . . . . . . . . . . . . . . . . . . . . .635
Understanding How PSTAAT Assigns an Object Naming Convention.. . . . . . . . . . . . . . . . . . . . . . . . . . . . .. . . . . . .635Choosing a Primary Database Prefix and Maximum Number of Tables per Tablespace andTablespaces per Database.. . . . . . . . . . . . . . . . . . . . . . . . . . . . . . . . . . . . . . . . . . . . . . . . . . . . . . . . . . . . . . . . . . . . . . . . . . . . . . .. . . . . . .635Using the New Name Parameter to Override Tablespace Name.. . . . . . . . . . . . . . . . . . . . . . . . . . . . . . . . . . .. . . . . . .636Customizing DDL Scripts.. . . . . . . . . . . . . . . . . . . . . . . . . . . . . . . . . . . . . . . . . . . . . . . . . . . . . . . . . . . . . . . . . . . . . . . . . . . . . . . . .. . . . . . .637Recalculating Primary and Secondary Space Allocations and Setting a Minimum SecondarySpace Allocation With PSTAAT... . . . . . . . . . . . . . . . . . . . . . . . . . . . . . . . . . . . . . . . . . . . . . . . . . . . . . . . . . . . . . . . . . . . . . . . .. . . . . . .638Using PSTAAT to Override the Default Bufferpool Assignment. . . . . . . . . . . . . . . . . . . . . . . . . . . . . . . . . . . . . .. . . . . . .640Using PSTAAT to Override the Default Segment Size.. . . . . . . . . . . . . . . . . . . . . . . . . . . . . . . . . . . . . . . . . . . . . . . .. . . . . . .641Validating Input. . . . . . . . . . . . . . . . . . . . . . . . . . . . . . . . . . . . . . . . . . . . . . . . . . . . . . . . . . . . . . . . . . . . . . . . . . . . . . . . . . . . . . . . . . . . . .. . . . . . .642
Using PSTAAT to Reassign Temporary Tables to Additional Tablespaces.. . . . . . . . . . . . . . . . . . . . . . . . . . . . . . . . . . .644Using PSTAAT to Isolate Other Tables to Individual Tablespaces.. . . . . . . . . . . . . . . . . . . . . . . . . . . . . . . . . . . . . . . . . . . . .648Using PSTAAT to Convert EBCDIC DDL to Unicode DDL... . . . . . . . . . . . . . . . . . . . . . . . . . . . . . . . . . . . . . . . . . . . . . . . . . . . .649
Understanding the EBCDIC DDL to Unicode DDL Conversion.. . . . . . . . . . . . . . . . . . . . . . . . . . . . . . . . . . . . .. . . . . . .649Creating Database, Tablespace, and Table Shell DDL for an EBCDIC to Unicode DatabaseConversion.. . . . . . . . . . . . . . . . . . . . . . . . . . . . . . . . . . . . . . . . . . . . . . . . . . . . . . . . . . . . . . . . . . . . . . . . . . . . . . . . . . . . . . . . . . . . . . . . .. . . . . . .650
Using PSTAAT to Install PeopleSoft Databases.. . . . . . . . . . . . . . . . . . . . . . . . . . . . . . . . . . . . . . . . . . . . . . . . . . . . . . . . . . . . . . . . . .654
Index .... . . . . . . . . . . . . . .. . . . . . . . . . . . . . . .. . . . . . . . . . . . . . . .. . . . . . . . . . . . . . . . .. . . . . . . . . . . . . . . .. . . . . . . . . . . . . .. . . . . . . . . . .657
xx Copyright © 2006, Oracle. All rights reserved.
About This Documentation
This preface discusses:
• Audience
• Products Referenced in this Book
• Related Publications
Note. This book is designed to direct you through a basic PeopleSoft installation. It is not a substitute for the databaseadministration manuals provided by your RDBMS vendor, the network administration manuals provided by yournetwork vendor, or the installation and configuration manuals for additional software components used with PeopleSoft.
Note. Required updates to this installation documentation are provided in the form of “Required at Install” incidents,available on PeopleSoft Customer Connection. In addition, application-specific installation steps are provided ina separate document specific to the application. For instance, if you are performing Oracle’s PeopleSoft CRMinstallation, you need both this PeopleTools installation guide and any additional instructions provided by CRM. Tofind the installation documentation specific to your application, go to Customer Connection, choose Site Index, theletter I, Installation Guides and Notes, and then look under the subcategory for your particular application.
Note. Before proceeding with your installation, check PeopleSoft Customer Connection to ensure that you have thelatest version of this installation guide for the correct version of PeopleTools.
AudienceThis book is written for the individuals responsible for installing and administering the PeopleSoftenvironment. We assume that you are familiar with your operating environment and RDBMS and that youhave the necessary skills to support that environment. You should also have a working knowledge of SQL.We recommend that you have completed at least one PeopleSoft introductory training course (particularlythe Server Administration and Installation course) and have a basic understanding of the PeopleSoft System.Probably the most important component in the installation and maintenance of your PeopleSoft systemis your onsite expertise. Only qualified and experienced individuals should attempt to install PeopleSoft. Ifyou have any doubts as to whether your onsite staff is capable of successfully completing an installation,contact your PeopleSoft representative.
Products Referenced in this BookThis installation guide refers to these products:
• Oracle’s PeopleSoft Enterprise PeopleTools, referred to as PeopleTools• Oracle’s PeopleSoft Enterprise products, referred to as PeopleSoft• Oracle’s PeopleSoft Pure Internet Architecture• Oracle’s PeopleSoft Change Assistant
Copyright © 2006, Oracle. All rights reserved. xxi

Preface
• Oracle’s PeopleSoft Change Impact Analyzer• Oracle Application Server• Oracle Enterprise Manager• Oracle BPEL Process Manager• Applications such as Oracle’s PeopleSoft Enterprise Human Capital Management and Oracle’s PeopleSoftEnterprise Customer Relationship Management
See All PeopleSoft Enterprise Products on Oracle’s web site, http://www.oracle.com/applications/peoplesoft/all_ent_products.html
Related PublicationsTo install additional component software products for use with PeopleSoft, including those products that arepackaged with your PeopleSoft shipment, you should refer to the documentation provided with those productsas well as this documentation.
For reference information on PeopleTools, you may wish to consult the following books:
• Enterprise PeopleTools 8.48 PeopleBook: System and Server Administration: This includes informationon configuring the PeopleSoft application server and supported web servers, data integrity tools, databaselevel auditing, and PeopleTools utilities, including Configuration Manager.
• Enterprise PeopleTools 8.48 PeopleBook: Security Administration: This includes information on settingup and modifying user access to PeopleSoft applications, and defines the various IDs and passwordsused in installation.
• Enterprise PeopleTools 8.48 PeopleBook: Data Management: This includes information on PeopleSoftadministrative utilities, such as Data Mover, Data Archive Manager, and so on.
• Enterprise PeopleTools 8.48 PeopleBook: PeopleCode Language Reference: This includes referenceinformation on the PeopleCode language, such as built-in functions, classes, meta-SQL, system variables,and so on.
• Enterprise PeopleTools 8.48 PeopleBook: PeopleCode Developer's Guide: This includes generalinformation about the PeopleCode editor, the Component Processor, the data buffers, and how to usespecific functions and classes.
• Reporting and Analysis Tools: For information on PeopleSoft's reporting and analysis tools, see theEnterprise PeopleTools 8.48 PeopleBooks on Crystal Reports for PeopleSoft, PS/nVision, PeopleSoftQuery, PeopleSoft Tree Manager, PeopleSoft Process Scheduler, and PeopleSoft Cube Manager.
• Enterprise PeopleTools 8.48 PeopleBook: PeopleSoft Application Designer: This includes informationabout the main tool for developing PeopleTools applications.
• Enterprise PeopleTools 8.48 PeopleBook: Global Technology: This includes information on the role ofPeopleTools in the globalization of PeopleSoft applications.
• Enterprise PeopleTools 8.48 PeopleBook: PeopleSoft Application Engine: This includes information onthe PeopleSoft proprietary batch programming tool.For information on a tool to help you write transformation Application Engine programs see the appendix“Using XSLT Mapper with Oracle BPEL Process Manager.”
xxii Copyright © 2006, Oracle. All rights reserved.

Preface
For reference information on your particular application, refer to the documentation for your application.
Copyright © 2006, Oracle. All rights reserved. xxiii

Preface
xxiv Copyright © 2006, Oracle. All rights reserved.

CHAPTER 1
Preparing for Installation
This chapter discusses:
• Understanding the PeopleSoft Installation
• Assembling Related Documentation
• Verifying Hardware and Software Requirements
• Considering Project Planning
• Planning Your Initial Configuration
• Planning Database Creation
• Planning Multilingual Strategy
• Reviewing Updates and Fixes Required at Installation
• Verifying Database Server Sizing
• Defining DB2 UDB for z/OS Subsystem Configuration
• Installing Supporting Applications
• Setting Up Database Connectivity
• Using Connect ID
• Setting Up z/OS User IDs
• Using Storage Enhancements for z/OS
• Performing Backups
• Using PeopleSoft Change Assistant and PeopleSoft Change Impact Analyzer
Understanding the PeopleSoft InstallationThis chapter will help you plan and prepare for a basic PeopleSoft installation. Before you begin theinstallation, please note:
• If you will be upgrading your current release after you perform this installation, you also need to install theUpgrade Assistant or Change Assistant. The upgrade page on PeopleSoft Customer Connection includesinformation on which tool you need.
• For critical issues related to the installation process, see the PeopleSoft Customer Connection web site.Be sure to read the “Required for Installation or Upgrade” incidents for the PeopleTools version thatyou are installing.
Copyright © 2006, Oracle. All rights reserved. 1

Preparing for Installation Chapter 1
• For online, interactive technical support information, use the Oracle Metalink web site.
See Oracle Metalink, https://metalink.oracle.com
• To download software and documentation, use the Oracle Technology Network.
See Oracle Technology Network, http://www.oracle.com/technology/index.html• This installation guide may refer you to PeopleBooks for more information or instructions. If you installPeopleBooks to your web server, you can easily refer to the documentation during the installation process.
See Also“Installing PeopleBooks”
Enterprise PeopleTools 8.48 PeopleBook: PeopleSoft Upgrade Assistant
Enterprise PeopleTools 8.48 PeopleBook: Software Updates
“Installing PeopleSoft Change Assistant”
Task 1-1: Assembling Related DocumentationBefore you begin your installation, you should have the following documentation ready for reference:
• Locate the supplemental installation documentation for any PeopleSoft applications that you plan to install.Be sure to use both the PeopleTools Installation Guide for your database platform and the supplementalapplication installation instructions. (For example, if you are installing CRM, you need to have thePeopleTools Installation Guide for the appropriate PeopleTools release and the supplemental CRMinstallation instructions.) The application installation instructions are available on Customer Connection.
• Locate the database administration manuals provided by your RDBMS vendor, the network administrationmanuals provided by your network vendor, and the installation and configuration manuals for additionalsoftware components used with PeopleSoft.
• For administration information regarding your database platform, please refer to the relevant appendix inthe following PeopleBook.
See Enterprise PeopleTools 8.48 PeopleBook: Data Management.
Task 1-2: Verifying Hardware and Software RequirementsBefore you install PeopleSoft you must verify that you have the correct hardware and software in place tosupport a successful installation.
Warning! If you are unable to meet any of the criteria outlined in the Enterprise PeopleTools 8.48 Hardwareand Software Requirements documentation and Supported Platforms on PeopleSoft Customer Connection,contact PeopleSoft before going forward with the installation. Attempting to complete an installation on anunsupported configuration can be a very costly decision, and PeopleSoft will not provide support for suchinstallations.
Use the following sources of information on currently supported hardware and software:
2 Copyright © 2006, Oracle. All rights reserved.
Chapter 1 Preparing for Installation
• The Enterprise PeopleTools 8.48 Hardware and Software Requirements book provides an overview ofPeopleSoft architecture, as well as general information on the hardware and software required for asuccessful installation.This book is a snapshot of supported configurations; it does not provide up-to-the-minute information onsupported maintenance releases or required patches. Be sure to check Supported Platforms on PeopleSoftCustomer Connection (discussed next) to verify time-sensitive information, such as supported versions ofadditional software components used with PeopleTools. To find the hardware and software requirementsguide, sign on to PeopleSoft Customer Connection, select Site Index, select the letter H, select the entryhardware and software requirements, and then select PeopleTools.
• Supported Platforms on PeopleSoft Customer Connection provides the most current support informationon hardware platforms, RDBMS versions, client connectivity versions, required compiler versions,and additional component versions.The information in this database supplements and supersedes any information in the EnterprisePeopleTools 8.48 Hardware and Software Requirements book. To go to Supported Platforms, sign onto PeopleSoft Customer Connection, and select the link Implement, Optimize + Upgrade. Then selectImplementation Guide, Supported Platforms, PeopleSoft Enterprise.
• Before you begin your installation, read the version of the document "Required Operating System,RDBMS & Additional Component Patches Required for Installation" that is appropriate for your databaseplatform and other configuration.
See “Required Operating System, RDBMS & Additional Component Patches Required for Installation,”PeopleSoft Customer Connection (Implement, Optimize + Upgrade, Implementation Guide, SupportedPlatforms, PeopleSoft Enterprise.)
• Additional documentation for DB2 UDB for z/OS is available on PeopleSoft Customer Connection.
See PeopleSoft Customer Connection (Implement, Optimize + Upgrade, Implementation Guide, SupportedPlatforms, PeopleSoft Enterprise, By Database Management System, Platform Communications By Topic).
Note. DB2 UDB for z/OS is the official IBM name for the DBMS. For the sake of brevity, thisdocumentation sometimes refers to DB2 UDB for z/OS as DB2 z/OS, and it sometimes refers to DB2 UDBfor Linux, UNIX, and Windows as DB2/LUW.
Task 1-3: Considering Project PlanningIdentify the maintenance schedule for upcoming PeopleTools and application releases. These releases aretypically on a regular schedule (for example, quarterly, biannually) and should be included in your projectplanning and budgeting processes. Release dates are posted on Customer Connection. It is important toplan regular maintenance in your overall project plans. For example, for a year-long enterprise upgrade,development, and conversion project, make sure to set aside time for applying the PeopleTools minor releasesthat ship during that time frame. Otherwise, if you fall behind, you may find that you need a fix shipped withone of the minor releases that cannot be backported as a patch.
Task 1-4: Planning Your Initial ConfigurationThis section discusses:
• Understanding Workstations
Copyright © 2006, Oracle. All rights reserved. 3

Preparing for Installation Chapter 1
• Defining the File Server
• Defining the Database Server
• Defining the Application Server
• Defining the Batch Server
• Defining the Web Server
• Using Laser Printers
Note. DB2 UDB for z/OS is the official IBM name for the DBMS. For the sake of brevity, this documentationsometimes refers to DB2 UDB for z/OS as DB2 z/OS, and it sometimes refers to DB2 UDB for Linux, UNIX,and Windows as DB2/LUW.
Note. COBOL is not needed for PeopleTools or for applications that contain no COBOL programs. CheckSupported Platforms on Customer Connection for details about whether your application requires COBOL.
See “PeopleSoft Application COBOL Requirements,” PeopleSoft Customer Connection (Implement, Optimize+ Upgrade, Implementation Guide, Supported Platforms, PeopleSoft Enterprise, By PeopleTools release,Platform Communications by Topic, Batch).
Understanding WorkstationsThis section discusses:
• Using the PeopleTools Development Environment (Windows-Based Clients)
• Using Workstations Equipped with Supported Web Browsers
Note. With the PeopleSoft Pure Internet Architecture, Windows-based clients are primarily used as adevelopment environment. End users can use any machine equipped with a supported web browser.
Using the PeopleTools Development Environment (Windows-Based Clients)Windows-based clients are now called the PeopleTools Development Environment. These clients—whichrun on Windows XP and Windows Server 2003—can connect to the PeopleSoft database directly usingclient connectivity software (a two-tier connection) or through a PeopleSoft application server (a three-tierconnection).
Three-tier connectivity offers great performance advantages over two-tier (especially over a WAN), reducesnetwork traffic, and generally does not require that you install database connectivity on the client. However,any Windows-based clients that will be running Data Mover scripts against the database, or running COBOLor Structured Query Report (SQR) batch processes on the client, must have database connectivity installed.
You need to have the PeopleTools Development Environment set up to create your database. For moreinformation on setting up the PeopleTools Development Environment, refer to the following PeopleBook.
See Enterprise PeopleTools 8.48 PeopleBook: System and Server Administration, “Using PeopleSoftConfiguration Manager.”
For installation purposes, you must set up at least one Windows-based client for sign-on using a two-tierconnection to the database, so that it can create and populate the PeopleSoft database. This documentationrefers to this client as the install workstation. Depending on your installation plan, you may want to set upmore than one install workstation so that you can perform asynchronous installation tasks in parallel.
4 Copyright © 2006, Oracle. All rights reserved.

Chapter 1 Preparing for Installation
Note. The Windows machine that you use to perform your PeopleTools installation must be running in256-color mode or higher when running the CD install, Internet install, and Database configuration inWindows. This is not necessary for UNIX or console mode.
Using Workstations Equipped with Supported Web BrowsersTo run the PeopleSoft Pure Internet Architecture, the client workstation only needs a web browser that isHTML 4.0 compliant. You may need an additional workstation for demonstration and testing purposes if youplan to use a browser running on a platform other than Windows—such as Macintosh or UNIX.
See Enterprise PeopleTools 8.48 PeopleBook: Internet Technology.
Task 1-4-1: Defining the File ServerFor DB2 z/OS, the file server is used as a staging location to FTP files to the z/OS batch server only.
The file server is the environment (or file) repository for the PeopleTools Development Environment, which isneeded for the Database Configuration Wizard. The file server is also the repository for the files necessary toperform an upgrade. This includes Upgrade Assistant or Change Assistant, and all of the executables andscripts that are necessary to perform an upgrade. In addition, the file server is a source repository for COBOLand SQR (you will apply patches and updates from Customer Connection directly to the file server andthen copy the updated files to your other servers).
Important! Remember, a COBOL compiler is not needed for PeopleTools unless your application containsCOBOL programs. If your application requires COBOL and you're running on Windows, we require that youmaintain a central repository of your COBOL source code on the Windows file server.
See the following task later in this chapter for details on where you should install your COBOL compiler.
See Installing Supporting Applications.
If you follow the default procedures recommended in this documentation, the install workstations, Windowsbatch servers, and Windows report servers will access the PeopleSoft files on the file server by pointing to adirectory conventionally referred to as <PS_HOME> on a shared network drive. You can install SQR andCrystal Reports on the file server, or install them locally on Windows batch servers and on Windows-basedclients that will be running these processes locally.
Task 1-4-2: Defining the Database ServerThe servers that host your PeopleSoft databases need sufficient processing, storage, and networking resourcesto process the database requests, store the data and transaction logs, and communicate freely to the clients ofthis data. These databases will include your own PeopleSoft database prototypes as well as any system anddemonstration databases delivered directly from PeopleSoft on the PeopleSoft CDs.
See Planning Database Creation.
Database sizes vary depending on the applications that you install. The size of your prototype PeopleSoftdatabase will also depend on the amount of data to be converted from your legacy system. A good rule ofthumb for estimating the size of your prototype PeopleSoft database is to estimate the amount of disk spaceneeded for the data to be converted from your legacy system, add to this the size required for the PeopleSoftSystem database, and then add an additional 50 percent of this combined figure to allow for growth.
Copyright © 2006, Oracle. All rights reserved. 5

Preparing for Installation Chapter 1
Note. If possible, you may want to separate your PeopleSoft applications into their own subsystem away fromother applications. Most sites have separate subsystems for production, development, and testing.
Task 1-4-3: Defining the Application ServerThe application server is the centerpiece of the PeopleSoft Pure Internet Architecture. It connects to thePeopleSoft database and handles almost all SQL-intensive interactions with the database server required duringonline transaction processing. Windows-based clients, in three-tier, communicate with the application serverusing Tuxedo messages. In the PeopleSoft Pure Internet Architecture, the application server interacts withuser workstations through a web server.
The application server also provides functionality required for application messaging and for implementing thePeopleSoft Pure Internet Architecture. An application server is required in all PeopleSoft installations.
When installing PeopleSoft on the z/OS mainframe, you must install one or more dedicated UNIX or Windowsapplication servers. You should plan to connect the application server to the database using the highestbandwidth connection available.
All application servers require database connectivity to the database server. Before beginning your installation,make sure that you can connect from the application server to the database server using a SQL client tool.This topic will be addressed later in this chapter.
See AlsoEnterprise PeopleTools 8.48 PeopleBook: Internet Technology
Task 1-4-4: Defining the Batch ServerThe term batch server is equivalent to the term Process Scheduler server. PeopleSoft batch processes, such asCOBOL and SQR, are scheduled and invoked by a Process Scheduler server. In almost all configurations,batch server SQR and COBOL files are located and executed on the same computer as the database server.
For the DB2 z/OS batch server on the mainframe, the SQR and COBOL files must be transferred from the fileserver, and COBOL source files must be compiled.
PeopleSoft supports setting up the batch environments on a dedicated server, an application server, or evenon the database server.
For Windows-specific batch processes—such as Crystal Reports, nVision reports, Microsoft Word, orCube Manager—you need to set up a Windows batch environment on a Windows application server oron a dedicated Windows workstation.
Any computer operating as a batch server must have database connectivity installed so that it can makea two-tier connection to the PeopleSoft database.
See AlsoEnterprise PeopleTools 8.48 PeopleBook: PeopleSoft Process Scheduler.
Task 1-4-5: Defining the Web ServerA web server is required to run the PeopleSoft Pure Internet Architecture. The PeopleSoft Pure InternetArchitecture is certified to work with either of the following three J2EE web application servers (alsocommonly referred to as web servers):
6 Copyright © 2006, Oracle. All rights reserved.

Chapter 1 Preparing for Installation
• Oracle Application Server• BEA WebLogic Server• IBM WebSphere Server
These web servers are supported on the following operating systems:
Oracle Application Server BEA WebLogic Server IBM WebSphere Server
Windows Server 2003 Windows Server 2003 Windows Server 2003
HP-UX (Intel Itanium, PA-RISC64–bit)
HP-UX (Intel Itanium, PA-RISC64–bit)
HP-UX (PA-RISC 64–bit)
Solaris (64–bit SPARC) Solaris Solaris
Red Hat Linux Enterprise Server Red Hat Linux Enterprise Server Red Hat Linux Enterprise Server
SUSE Linux Enterprise Server SUSE Linux Enterprise Server SUSE Linux Enterprise Server
AIX AIX AIX
Tru64
In conjunction with BEA WebLogic and IBM WebSphere, PeopleSoft has also certified the use of thefollowing HTTP servers as reverse proxy servers (RPS):
• With Oracle Application Server, Oracle/PeopleSoft supports the Oracle HTTP Server and OracleApplication Server Web Cache as reverse proxy servers.
• With BEA WebLogic, the certified HTTP servers are Microsoft IIS, iPlanet web server, Apache HTTPserver, and BEA WebLogic Server.
• With IBM WebSphere, the certified HTTP servers are IBM HTTP Server (IHS), Microsoft IIS, andiPlanet web server.
WebLogic, WebSphere, and the above reverse proxy servers will provide out-of-the-box SSL support across allsupported operating systems. WebLogic and WebSphere provide demo digital certificates, but for productiongrade SSL you must purchase digital certificates from a Certificate Authority supported by the web server thatyou are using (for example, Verisign, Baltimore, Entrust, and so on).
Task 1-4-6: Using Laser PrintersAlong with the printer you will need a Windows printer driver to print the online reports that produce180-character-wide reports using the HP LinePrinter font. Your printer must be configured with sufficientmemory (typically 1.5 MB) to produce graphics images for page printouts.
See AlsoVerifying Hardware and Software Requirements
Enterprise PeopleTools 8.48 Hardware and Software Requirements
Supported Platforms, PeopleSoft Customer Connection (Implement, Optimize + Upgrade, ImplementationGuide, Supported Platforms, PeopleSoft Enterprise)
Copyright © 2006, Oracle. All rights reserved. 7

Preparing for Installation Chapter 1
Task 1-5: Planning Database CreationThis section discusses:
• Understanding Database Creation
• Using Multiple Databases
• Determining Databases and Database Names
• Using Standard Database Names
• Choosing Owner ID Processing Option
Understanding Database CreationWhen performing a PeopleSoft installation, you will create these types of PeopleSoft databases:
• System (also called SYS) databases, which contain the PeopleTools and product-specific metadatarequired for development of a production database.
• Demo (DMO) databases, which are populated with sample data for study, demonstration, or trainingpurposes.
Note. To properly install a Demo database, you must select both the System Database and the DemoDatabase options during the installation of PeopleSoft applications.
The System and Demo PeopleSoft databases are installed using a multiple-database strategy, where the“logical” PeopleSoft database actually comprises multiple “physical” databases that share a common ownerID. This is explained in more detail in the following section.
Task 1-5-1: Using Multiple DatabasesTo facilitate optimal performance and minimal use of shared mainframe resources, PeopleSoft employs amultiple-database strategy on DB2 z/OS. PeopleSoft uses multiple DB2 databases for installing both Demoand System PeopleSoft databases.
This multiple-database strategy provides the following benefits:
• Reducing DBD size improves performance by easing virtual storage constraints.
• Avoids exceeding the DB2 restriction limiting DBD size to no more than 25 percent of EDM pool size.
• Improves DDL concurrency in certain PeopleSoft operations.
For instance, when Process Scheduler is invoked, it holds share locks on the DBD of the database wherethe Process Scheduler tables are located. Isolating these tables to its own database avoids potentiallockouts of other processes running concurrently with Process Scheduler.
The installation process creates all of the DB2 objects with the same owner ID. The PeopleSoft reference toowner ID equates to the CREATOR field found in the SYSIBM SYSTABLES Catalog table. A PeopleSoftdatabase is a logical concept that includes all of the PeopleSoft objects and application data belonging to asingle PeopleSoft product line sharing the same owner ID, distributed across multiple physical DB2 databases.The owner ID common to all of these objects is stored in the PeopleTools tables PS.PSDBOWNER andPSSTATUS.
8 Copyright © 2006, Oracle. All rights reserved.
Chapter 1 Preparing for Installation
PeopleSoft defines a standard set of DB2 databases for each product line in a DDL script that you will beinstructed to edit and run in the "Creating a Database" chapter.
Task 1-5-2: Determining Databases and Database NamesBefore you begin the installation process, you should determine how many PeopleSoft databases (System orDemo) of which type you need and how you intend to use them. You should also determine the names of thedatabases at this point, using database names that:
• Are UPPERCASE.
• Capture information about the PeopleSoft product line and the type of database.
For example, you may want to create two databases with the names PSHRDMO and PSHRSYS, using thetwo characters HR (for Human Resources) to indicate the product line.
The PeopleSoft System and Demo databases are delivered with a seven-character database name thatserves two functions. It serves as:
• The name of the PeopleSoft logical database (which, for the System and Demo databases is actuallycomposed of multiple DB2 databases)
• The seven-character name of the "root" physical DB2 database, from which the names of the additionalphysical DB2 databases that comprise the single PeopleSoft logical database are derived
The DB2 database naming convention is explained in more detail in the following section.
Task 1-5-3: Using Standard Database NamesThe PeopleSoft database naming convention for DB2 z/OS uses one seven-character DB2 database name for adatabase containing all of the PeopleSoft system tables except for tables used by Process Scheduler. We referto this database as the root database. A second database name with an eighth character of T is reserved just forProcess Scheduler due to persistent share locks. The remaining DB2 database names have an eighth character,appended to the root database name, identifying a specific application group within a PeopleSoft product line.
Later in this guide, you will run a Data Mover Import script that requires you to select a database name toidentify this PeopleSoft database. This database name is actually nothing more than a label that serves twopurposes. It enables the DB2 Connect connectivity software to identify the appropriate configuration toconnect to your DB2 subsystem, and it is the high-level key on the table PS.PSDBOWNER from which theowner ID of the objects in the PeopleSoft database is derived during the sign-on process. When users sign onto a PeopleSoft database from a client workstation, they enter this database name in the PeopleSoft sign-onpanel. The database name must be catalogued in the IBM DB2 Connect connectivity software in order tocomplete the database connection.
See "Creating a Database."
Task 1-5-4: Choosing Owner ID Processing OptionThis section discusses:
• Understanding Owner ID Processing
• Using Primary Authorization ID Processing
• Using Secondary Authorization ID Processing
Copyright © 2006, Oracle. All rights reserved. 9

Preparing for Installation Chapter 1
Understanding Owner ID ProcessingEach PeopleSoft database that you create must have a valid owner ID. All of the objects in a PeopleSoftdatabase will share the same owner ID. Besides being found in the CREATOR field of the SYSIBMsystem catalog tables, such as SYSIBM.SYSTABLES, this value is stored in the OwnerID field of thePS.PSDBOWNER and PSSTATUS PeopleTools tables.
PeopleSoft recommends that you not use an owner ID used by a non-PeopleSoft application, because thiscan create problems when auditing your database.
There are two security-related processing options to choose from when establishing the owner ID:
• Primary authorization ID processing
• Secondary authorization ID processing
There is an additional PeopleSoft ID (known as the access ID) that is directly linked to the decision to useprimary or secondary authorization ID processing. Functionally, this is the ID that has the DB2 access andauthorities to perform the bulk of the SQL processing within the PeopleSoft database. Individual userIDs would not be granted the level of DB2 authority that the access ID possesses. There will either be adirect relationship between the name of this ID and the owner ID, or an indirect one, depending on whichauthorization method is chosen.
Using Primary Authorization ID ProcessingThe primary authorization ID is the simplest implementation of table ownership. The primary authorizationID and the DB2 owner ID of the PeopleSoft database objects are the same ID. In this option, the owner IDdefined in DB2 will be the same name as the PeopleSoft access ID defined in the PeopleTools tables. ThePeopleSoft access ID is the DB2 owner ID.
Using Secondary Authorization ID ProcessingMost PeopleSoft customers use secondary authorization ID processing to establish an owner ID.
The DB2 owner ID of the PeopleSoft database objects is established as an external security system group,referred to as a "secondary authorization ID," rather than a primary authorization ID. A secondary authorizationID is not given direct logon access to the database, but because it is the DB2 owner ID, it has direct access tothe PeopleSoft database objects. Logon access is generally granted to a primary authorization ID, but withsecondary authorization ID processing, the primary authorization ID has no direct access to the PeopleSoftdatabase objects.
By issuing the SQL command
SET CURRENT SQLID = <secondary authorization ID>
a primary authorization ID can "transform" itself into the secondary authorization ID, and thereby acquireall of the database object permissions owned by the secondary authorization ID. The mainframe securitymaintenance package (for example, RACF, Top Secret, ACFII) keeps track and monitors what secondaryauthorization IDs can be used by a primary authorization ID.
When setting up a PeopleSoft application using secondary authorization ID processing, the access ID isestablished as a primary authorization ID that has the authority to issue a SET CURRENT SQLID statementsetting itself equal to the secondary authorization ID.
The following table summarizes the roles and authorities of the DB2 owner ID, primary and secondaryauthorization IDs and the access IDs:
10 Copyright © 2006, Oracle. All rights reserved.

Chapter 1 Preparing for Installation
Primary Authorization ID Processing Secondary Authorization IDProcessing
PrimaryAuthorization ID
SecondaryAuthorization ID
PrimaryAuthorization ID
SecondaryAuthorization ID
Yes NA Same ID as DB2Object Owner ID(CREATOR)
No Yes
Yes NA Database Log OnAccess
Yes No
Yes NA DB2 Object Access No Yes
Yes NA Same ID asPeopleSoft AccessId
Yes No
No NA SET CURRENTSQLID statementrequired?
Yes NA
In secondary authorization ID processing, at sign on, PeopleTools, under authorization of the access ID, issuesthe SET CURRENT SQLID to the DB2 owner ID. This also occurs when you run COBOL on either the clientor the host, or when you run SQR on the client or host.
Note. Often customers ask whether the access ID needs SYSADM authority to the DB2 subsystem. Theanswer is no.
Note. With SYSADM authority, the access ID may issue SET CURRENT SQLID to any authorization ID. Ifyou do not have SYSADM authority, you may issue SET CURRENT SQLID only to your valid authorizationIDs. Your z/OS ID has a certain RACF (or equivalent) profile and that profile contains all your assignedsecondary authorization groups, which are used as valid authorization IDs. You can SET CURRENT SQLIDonly to the authorization IDs assigned to you.
Note. At PeopleSoft, we create secondary authorization groups that are equal to the owner of the tables. Theaccess ID is added to this secondary authorization group, and thus the access ID can issue a 'SET CURRENTSQLID' only to the owner of the tables (remember owner = RACF group). Using this approach, it is notnecessary to grant SYSADM authority to the access ID. The bottom line is that the access ID must haveproper security to issue "SET CURRENT SQLID" to the owner of the PeopleSoft tables but this does notrequire SYSADM authority to the DB2 subsystem.
Task 1-6: Planning Multilingual StrategyThis section discusses:
• Understanding Multilingual Issues
• Choosing a Base Language
Copyright © 2006, Oracle. All rights reserved. 11

Preparing for Installation Chapter 1
• Selecting Additional Languages
• Selecting a Database Character Set
Understanding Multilingual IssuesBefore beginning your installation, you should determine which languages your PeopleSoft system will needto support. If multiple languages are required, determine which language will be used most often. Thesedecisions will affect tasks at various stages of the installation, including file server setup, database creation,and the ability to change the base language of the PeopleSoft database after it is created. Even if you donot plan on running your system in more than one language, you should decide the following informationbefore completing this task:
• Database base language• Additional languages (if any)• Database character set
The current languages provided by PeopleSoft and their language codes are listed below. These are thelanguages for which PeopleSoft provides pretranslated products. If you plan to provide users access toyour applications in these languages, PeopleSoft recommends that you install the translations during yourinitial installation. This approach will keep you from having to perform an upgrade if you decide to add thePeopleSoft-provided translations at a later date. After installation, you also have the option of performing yourown translations, and adding additional languages.
Code Language
CFR Canadian French
DAN Danish
DUT Dutch
ENG US English
FIN Finnish
ESP Spanish
FRA French
GER German
ITA Italian
NOR Norwegian
POR Portuguese
SVE Swedish
Note. PeopleSoft MultiChannel Framework users who want to display certain Japanese characters shouldinstall JDK 1.4.2_11+.
12 Copyright © 2006, Oracle. All rights reserved.

Chapter 1 Preparing for Installation
See AlsoEnterprise PeopleTools 8.48 PeopleBook: Global Technology
Enterprise PeopleTools 8.48 PeopleBook: PeopleSoft MultiChannel Framework
Task 1-6-1: Choosing a Base LanguageEach PeopleSoft database can have only one base language. PeopleSoft databases ship with English asthe default base language. Typically, the base language of your database should match the language mostcommonly used by your organization, as it affects the performance of PeopleSoft applications.
When PeopleTools attempts to open language-sensitive objects (such as pages and menus), it first comparesthe operator's preferred language to the base language of the database. If the preferred language matches thebase language, PeopleTools immediately loads the required definition from the base language PeopleToolstables. However, if the user's preferred language differs from the database's base language, PeopleTools mustfirst query the related language tables for the object. Should a translation of the object not be found in theoperator's preferred language, a query is then performed on the base language tables. The following flowchartshows this logic:
Check Sign-on Language
Language Preference
Check related languagetable
Non-Base
Base
Translationfound
Display non-base language
Yes
Display baselanguage
No
Language selection process
Copyright © 2006, Oracle. All rights reserved. 13
Preparing for Installation Chapter 1
While these queries typically occur very quickly, they still take up valuable processing time. To optimizeperformance you should set the base language of your database as the language that is used most often byyour users.
Task 1-6-2: Selecting Additional LanguagesBecause more than one language can coexist in a single PeopleSoft database, you should decide whichlanguages to install. PeopleSoft provides translations of all end-user objects on the Global Multi-LanguageCD. It is much easier to install additional languages upon initial database creation than to add them later inyour implementation process, so we recommend that you choose which additional languages may be requirednow. There is no limit to the number of languages that can coexist in a single PeopleSoft database; however,remember that each language will require additional storage space, primarily for PeopleTools objects.
Task 1-6-3: Selecting a Database Character SetThis section discusses:
• Understanding Character Sets
• Using Unicode Databases
• Using Non-Unicode Databases
Understanding Character SetsDepending on the languages that you have selected for installation, you need to determine which character setcan represent these languages. There are two main steps in selecting a character set. First, if your databasesupports Unicode, you should decide whether to use it. Second, if you choose not to or cannot yet use Unicode,you should decide which legacy character set is appropriate for the language combination that you've selected.
Please refer to the discussion of CCSID later in this chapter for further information regarding character sets.
See Defining DB2 for z/OS Subsystem Configuration.
See Enterprise PeopleTools 8.48 PeopleBook: Global Technology, “Selecting and Configuring CharacterSets and Language Input and Output.”
Using Unicode DatabasesIn addition to supporting several legacy character sets, PeopleSoft supports creating Unicode databases usingDB2 UDB for z/OS v8.1 New Function Mode. Unicode enables you to maintain data in virtually any modernlanguage in a single database. Prior to Unicode, many languages could not coexist in one database, as theydid not share a common character set.
See “Setting Up a Unicode Database.”
To create a DB2 UDB for z/OS Unicode database, you must specify the CCSID UNICODE option ofthe CREATE DATABASE statement.
Unicode databases are particularly important if the languages that you selected do not share the same characterset. Typically, a single character set can encode all languages written in a single script. For example, English,French, and Spanish all share the same script (Latin), so they can coexist in a non-Unicode database. However,Japanese does not share the same script as French, so if you need to have Japanese and French coexist in asingle system, you need a Unicode database.
If you decide to use Unicode for your database, you do not need to select a character set as described below.
14 Copyright © 2006, Oracle. All rights reserved.

Chapter 1 Preparing for Installation
Using Non-Unicode DatabasesYou can safely use a non-Unicode character set only if your selected languages share the same character set. Inthis case, you need to decide in which character set your database should be created.
On DB2 UDB for z/OS, PeopleSoft supports the following CCSIDs:
CCSIDs Languages Supported
CCSID 37 ENCDIC English
CCSID 500 EBCDIC International
CCSID UNICODE Unicode
Note. Other languages—such as Arabic, Czech, Greek, Hebrew, Hungarian, Japanese, Korean, Polish,Russian, Thai, Turkish, Simplified Chinese, and Traditional Chinese—are only supported with Unicode.
Task 1-7: Reviewing Updates and Fixes Requiredat Installation
Before beginning the installation, check the Updates and Fixes database on PeopleSoft Customer Connectionto identify any updates and fixes required at installation that you will need to apply, based on the products,product version, and PeopleTools version that you are installing. Specific instructions for applying the updatesand fixes are included in each listed incident.
Make note of all the updates and fixes, and plan to apply them at appropriate stages during the installationprocedure. For example, a replacement for a PeopleTools executable would be applied after installing theCDs to the appropriate server, and so on.
The following procedure describes how to access the Updates and Fixes database. Contact PeopleSoft if youdon't have a user ID and password for PeopleSoft Customer Connection.
To review updates and fixes required at installation:
1. Go to the PeopleSoft Internet Home Page at www.peoplesoft.com.
2. Select the link Log in now under Customer Connection.
3. Enter your user name and password to log in.
Note. Be sure to log on, or you will not see all of the menu options.
4. Select Updates and Fixes.5. Select Required for Install or Upgrade.6. Select PeopleTools as the product line, PeopleTools as the product, and select the appropriate PeopleToolsrelease.Make sure that the Required for Install option is selected and click the search button (the arrow).
7. Note any PeopleTools updates and fixes that apply to your installation.8. Return to the Updates and Fixes search page and search for any application-related incidents by selectingthe appropriate product line, product, and release.
Copyright © 2006, Oracle. All rights reserved. 15

Preparing for Installation Chapter 1
Make sure the Required for Install option is selected and click the search button (the arrow).9. Note any application-specific updates and fixes that apply to your installation.
Note. Keep in mind that your installation may require additional software components. In this case you willalso need to check for updates and patches for the additional component software. Later chapters coverthis topic in detail.
After this installation, you can upgrade your Java Runtime Engine (JRE) to a newer version without upgradingPeopleTools, as long as the new JRE is certified.
See Also“Installing Web Server Products”
“Installing Additional Components”
“Required Operating System, RDBMS, and Additional Component Patches Required for Installation,”PeopleSoft Customer Connection (Implement, Optimize + Upgrade, Implementation Guide, SupportedPlatforms, PeopleSoft Enterprise. Select your database platform.)
Task 1-8: Verifying Database Server SizingOn your database server, the direct access storage device (DASD) volume(s) making up your storage group(s)should have sufficient space for the demo database. If you plan to substantially increase the size of tablesin your demo database, ensure that these volumes have plenty of space, or add additional volumes, so thatyour file systems have ample space to accommodate growth. You must also alter the primary and secondaryquantities of the tablespaces and indexes that you expect to expand. In addition to space requirements, theDatabase Administrator should verify that ample VTOC directory space is available to avoid problems duringinstallation.
Note. Because many PeopleSoft tables are delivered empty, they take up no physical space in the tablespace,whereas indexes, even those created on an empty table, require a minimum of one track each.
Task 1-9: Defining DB2 UDB for z/OS SubsystemConfiguration
This section discusses:
• Understanding DB2 Configuration Requirements
• Defining EDM Pool Considerations
• Defining Decimal Arithmetic
• Using DSMAX
• Using CMTSTAT/IDTHTOIN
• Using CCSID and DB2 z/OS Database Storage Encoding Schemes
• Using DECIMAL
16 Copyright © 2006, Oracle. All rights reserved.

Chapter 1 Preparing for Installation
Understanding DB2 Configuration RequirementsThe following information provides recommendations for the configuration of the DB2 subsystem that willhouse the PeopleSoft database. We recommend dedicating a DB2 subsystem to your PeopleSoft application.This will allow you to customize the DB2 ZPARM settings for the subsystem without having an impacton your existing applications.
Task 1-9-1: Defining EDM Pool ConsiderationsThe PeopleSoft installation procedure places all tables for the product you are installing into multiple physicaldatabases using a shared tablespace methodology. Depending on the applications you are installing, the DB2subsystem could have a minimum EDM Pool Size of 10 to 30 MB.
If the pool size is too small, the database administrator should either increase it or manually edit the DDLscripts provided to create additional databases. If you use DB2 Dynamic SQL Cache, you will need to increasethe EDM pool size. It is difficult to recommend an optimum size for the EDM pool. Like buffer pools, there isa tradeoff between performance and memory usage. It also depends very heavily on the mix of transactionsversus batch processes executing at a point in time. Customers traditionally allocate between 50 and 100 MBwhen Dynamic SQL Cache is enabled.
Place the DB2 Dynamic SQL Cache in a Data Space. This will allow for separating the cache from theEDM pool, which and results in less competition for EDM space. It also allows for a larger Dynamic SQLCache (up to 2 GB).
Task 1-9-2: Defining Decimal ArithmeticArithmetic operations involving decimal numbers in PeopleSoft require a greater decimal precision than earlierversions of PeopleSoft. DEC31 rules allow a maximum precision of 31 digits in a result rather than only 15.This allows for a greater number of digits in the scale (digits to the right of the decimal), resulting in moreaccurate calculations, particularly when the “unrestricted” result contains many digits to the right of thedecimal. DB2 truncates any digits beyond the calculated scale of the result, without rounding. For example,the number 1.45697, the result of multiplying or dividing another number by 1.456 (assume a scale of 3) willbe significantly different from 1.4569 (assume a scale of 4). In addition, in further support of greater accuracyin decimal operations, PeopleSoft is utilizing new functionality that permits calculation of a minimum scale of6 digits in decimal division operations. In prior releases, 3 digits was the maximum, minimum scale.
In past releases, PeopleSoft had specific requirements for the DB2 zparms DECARTH, DECDIV3 andMINDVSCL. Through a joint development effort with IBM, functionality has been enhanced to enablecontrol of the functionality provided by these zparms at the DB2 connection level, without impact to otherapplications running within the same DB2 subsystem.
IBM released PTFs for DB2 v6.1 and v7.1 to enhance the functionality of the special register “SET CURRENTPRECISION”. PeopleSoft code now executes the statement SET CURRENT PRECISION = “D31,6” for eachconnection into the database, which will have the effect of running the application in a DB2 subsystem withzparm settings of DECARTH=31 and MINDVSCL=6, overriding what the actual zparm settings may be.DECDIV3 is overridden by MINDVSCL so whether DECDIV3 is YES or NO has no impact on the PeopleSoftapplication. You will need to apply the PTF’s that provide this functionality in order to run PeopleTools 8.4 .Please refer to the list of PTF’s in Customer Connection for the specific PTF numbers.
See “Important PTFs on DB2 UDB for OS/390 and z/OS” PeopleSoft Customer Connection (Implement,Optimize + Upgrade, Implementation Guide, Supported Platforms, PeopleSoft Enterprise, By DatabaseManagement System, Platform Communications by Topic, Platforms—DB2 UDB for DB2 z/OS and OS/390).
Copyright © 2006, Oracle. All rights reserved. 17
Preparing for Installation Chapter 1
Task 1-9-3: Using DSMAXTo reduce the open and close activity of data sets, it is important to set DSMAX correctly. DSMAX should belarger than the maximum number of data sets that are open and in use at one time. For best performance, leaveenough margin in your specification of DSMAX that frequently used CLOSE YES data sets can remain openafter they are no longer referenced. If data sets are opened and closed frequently, such as every few seconds,you can improve performance by increasing DSMAX. DB2 v6.1 has increased the 10000 limit. Please see thelist of PTFs in Customer Connection, News and Information for the specific PTF numbers.
Task 1-9-4: Using CMTSTAT/IDTHTOINWe recommend setting the CMTSTAT parameter to INACTIVE and set the IDTHTOIN parameter to 0 (i.e. theIDTHTOIN zparm is ignored when CMTSTAT=INACTIVE). PeopleSoft two tier and three tier will functionproperly regardless of the values of CMTSTAT and IDTHTOIN. CMTSTAT is set in DSNTIPR and it specifieswhether to make a thread active or inactive after it successfully commits or rolls back and holds no databaselocks or cursors. ACTIVE threads use memory resources as well as contributing to the MAXDBAT limit.
Task 1-9-5: Using CCSID and DB2 z/OS DatabaseStorage Encoding SchemesPeopleTools supports only EBCDIC and Unicode data storage encoding schemes (not ASCII) on the z/OSdatabase server. Be careful to set the default system encoding scheme (SCCSID as specified in DSNHDECP)in your subsystem for valid EBCDIC translation. PeopleTools Unicode installations will override the SCCSIDvalue by explicitly specifying Unicode as the CCSID when creating the individual databases that will composea Unicode installation. Consult the DB2 zOS Installation and SQL Reference guides for assistance in settingthe default CCSID for your subsystem.
Note that unexpected results may occur when a binary sort is deployed from, or when the collating sequenceon a remote machine is different from the host—such as when running COBOL from a Windows or UNIXbased platform, and accessing DB2 for z/OS. In house, PeopleSoft has tested with CCSIDs of 37 and 500. Formore information, and especially if you use a CCSID other than 37, please consult the PeopleBooks for moredetails about the use of %BINARYSORT and PSOPTIONS.
Also, never change the CCSID in your subsystem without first consulting IBM technical support. Corruptionand/or loss of data could result.
See AlsoEnterprise PeopleTools 8.48 PeopleBook: Global Technology
Enterprise PeopleTools 8.48 PeopleBook: Data Management
Task 1-9-6: Using DECIMALPeopleTools supports zparm settings of both DECIMAL=PERIOD and DECIMAL=COMMA. ThePeopleTools API is able to identify the zparm value on your particular subsystem. For those subsystems withzparm DECIMAL=PERIOD, no additional logic is invoked. For those subsystems with DECIMAL=COMMA,a parsing routine is invoked to “reformat” any necessary SQL statements to avoid confusion by the DB2parser in distinguishing a decimal point from a comma. For COBOL programs running on the mainframe,a message is displayed in the job log indicating whether the parsing routine has been activated. Customersrunnng with zparm DECIMAL=COMMA should verify that the parsing function has indeed been activated.Customers running with zparm DECIMAL=PERIOD, should verify that the parsing function is not activated,as it is unnecessary and could have negative performance implications.
18 Copyright © 2006, Oracle. All rights reserved.
Chapter 1 Preparing for Installation
While PeopleTools fully supports either setting for zparm DECIMAL, not all product lines support bothsettings. SQR does not go through the PeopleTools API interface, and therefore each program must beinspected for compliance. Product lines that do not use SQR would support both zparm DECIMAL settings bydefault (e.g. CRM). Product lines that only support one setting will support DECIMAL=PERIOD. Pleaserefer to the product line specific Installation addenda for information on whether your product line supportszparm DECIMAL=COMMA.
Task 1-10: Installing Supporting ApplicationsPeopleSoft requires that a number of supporting applications be installed on batch servers and on anyWindows-based client on which batch processes will be run locally. (Throughout the rest of this section werefer to these Windows-based clients as two-tier clients.) Be sure to check PeopleSoft Customer Connection toensure that you are installing software versions that are certified by PeopleSoft.
See PeopleSoft Customer Connection (Implement, Optimize + Upgrade, Implementation Guide, SupportedPlatforms, PeopleSoft Enterprise).
• For PeopleSoft applications written in COBOL, install the appropriate version of the COBOL compileron the server where you will compile:
Note. Remember, COBOL is not needed for PeopleTools or for applications that do not contain COBOLprograms. See PeopleSoft Customer Connection to verify whether your application requires COBOL.
See “PeopleSoft Application COBOL Requirements,” PeopleSoft Customer Connection (Implement,Optimize + Upgrade, Implementation Guide, Supported Platforms, PeopleSoft Enterprise, By PeopleToolsrelease, Platform Communications by Topic, Batch).
- For UNIX servers, install the appropriate version of Micro Focus ServerExpress.
- For Windows servers, install the appropriate version of Micro Focus NetExpress.
- For z/OS servers, install the appropriate version of IBM Enterprise COBOL for z/OS and OS/390.
- If all your servers are on Windows, we recommend that you install a COBOL compiler on the fileserver.
You can install PeopleTools plus any patches on the file server, compile your COBOL there, and thencopy the COBOL binaries to your application and batch servers.
- If your application and batch servers are on UNIX, we recommend that you designate a single serveras the compile server, so that you can compile COBOL from this central location and then distribute itto the rest of your application and batch servers.
If you use this approach, you only need to copy patches or customizations over to the compile server.Note that this server must have the same operating system as any destination application or batchservers. For example, if your compile server is an HP-UX machine, you can only copy COBOLcompiled there to other HP-UX application and batch servers. PeopleSoft recommends this approach.It will help you keep your COBOL source code in sync and only requires that you install COBOLin a single location.
Copyright © 2006, Oracle. All rights reserved. 19
Preparing for Installation Chapter 1
- If you prefer, you can copy patches or customizations to all of your UNIX application and batchservers and compile the COBOL on each machine.
However, PeopleSoft does not recommend this approach. It requires that you install multiple versionsof the COBOL compiler, and makes it more likely that your COBOL source code will get out of sync.
Note. Before PeopleTools 8.4, PeopleSoft delivered both source and compiled COBOL for Windowsusers; on UNIX COBOL had to be compiled. From 8.4 onwards, we deliver source only on bothWindows and UNIX. If your application requires COBOL, you will need to compile it.
If your application requires COBOL and you are running UNIX, you need to install the COBOLruntime on every application and batch server. This is not necessary for Windows.
• You must install SQR on any non-Windows batch server.• On Windows batch servers and Windows two-tier clients, you have the option of installing SQR locally,or mapping to a copy installed on the file server.Because SQR does not require any local registry settings, you can execute SQR from any Windows batchserver or two-tier client once SQR has been installed to a shared directory. Installing SQR locally willresult in improved performance; over a slow network connection the improvement will be significant.
• z/OS customers should install the appropriate IBM z/OS Java to support JDK/JRE requirements forPeopleSoft.The minimum support level required for PeopleTools 8.45 and higher is 1.4.1
• Install Microsoft Office (Excel and Word) on any Windows batch server or two-tier client that will berunning nVision or Microsoft Word batch processes.Microsoft Office must be installed locally, because it requires registry settings.
See AlsoEnterprise PeopleTools 8.48 Hardware and Software Requirements
Task 1-11: Setting Up Database ConnectivityAs part of preparation, you may wish to set up database connectivity components on the mainframe, setup TCP/IP on database clients (including application servers and any dedicated batch servers), and installsoftware for the DB2 Connect Gateway.
However, it makes sense to wait until after the PeopleSoft database has been created before configuring theDB2 Connect Gateway—using either Client Configuration Assistant (NT) or the Command Line Processor(UNIX)—so that the connection to the database can be tested.
Note. The LDAP client (FMID HRSL180) is required for PSAE on z/OS. On z/OS, the LDAP client resides asa DLL named GLDCLDAP in /usr/lib. Note that /usr/lib must be part of the LIBPATH environment variable.
Note. Before you can run the Process Scheduler from z/OS UNIX System Services, the DB2 systemsprogrammer must have installed DB2 ODBC.
20 Copyright © 2006, Oracle. All rights reserved.

Chapter 1 Preparing for Installation
See Also“Creating a Database”
“Installing and Configuring DB2 Connect”
IBM DB2 Connect documentation
IBM DB2 Installation Guide (for DB2 ODBC)
Task 1-12: Using Connect IDThis section discusses:
• Understanding Connect ID
• Using Connect ID
Understanding Connect IDAll two-tier connections use the PeopleTools connect ID feature.
Two-tier connections include both client workstations and application servers. The connect ID feature allowscustomers to associate multiple PeopleSoft operators with the same connect ID. The connect ID is grantedthe minimum privileges required to connect to the database—that is, it has only SELECT privileges onspecific PeopleTools tables. After connection, PeopleSoft Security uses the PeopleSoft user ID to controlaccess to objects in the database. The PeopleSoft sign-on process validates the connect ID on the databaseserver, rather than the user ID. Connect ID simplifies database security maintenance. It is not necessary todefine and maintain individual user IDs within the database server security. For DB2 z/OS implementations,only the connect ID must be defined in the z/OS security management software (for example, RACF, ACF2,TopSecret), with logon capabilities. The connect ID option eliminates the need to set up each user ID as a validz/OS ID. One z/OS ID can be created and then many PeopleSoft operators can use this ID as the connect ID tosign on to PeopleSoft. This arrangement may be an appropriate choice at customer sites where the PeopleSoftuser’s only required access to the mainframe is to use the PeopleSoft applications.
The connect ID is granted access using the following steps:
• Define the connect ID as an ID with logon capabilities to the z/OS server in the z/OS security managementsoftware.
• Execute script Grant.sql against the database, after the table objects have been created. Grant.sql grantsSELECT access to the PeopleTools tables PS.PSDBOWNER, PSSTATUS, PSACCESSPRFL, andPSOPRDEFN.
In addition, the connect ID and connect ID password must be defined in either the Configuration Managersetting to allow a two-tier connection from the client workstation, or in the application server configurationsetting, to allow connection to the database from the application server.
Task 1-12-1: Using Connect IDAs an example, when logging into a PeopleSoft database in two-tier mode, the user enters a database name,PeopleSoft operator ID, and password in the PeopleSoft Signon dialog box.
Copyright © 2006, Oracle. All rights reserved. 21

Preparing for Installation Chapter 1
After making the initial connection to the database, the sign-on process performs SELECT statements againsta series of PeopleTools tables to obtain data required for sign-on and security. The PeopleSoft user ID andpassword are validated against the PSOPRDEFN table, regardless of the sign-on option. The access ID andpassword, which are encrypted, are obtained from the PSACCESSPRFL table.
The sign on process disconnects, and then connects again as the access ID, which has all DML authorities andcertain DDL authorities on the PeopleSoft database. If you are using the Secondary Authorization ID option,the sign-on process then sets the current SQLID equal to the owner ID obtained from the PS.PSDBOWNERtable.
The example below details the log on and connection process to the PeopleSoft database on z/OS. For clarity,we are using the following parameter values:
• Database Name: PT84• User ID/Pswd: PSUSER1/PSUSER1• Connect ID/Pswd: PSCONCT/PSCONCT• Access ID/Pswd: PSACCES1/PSACCESS1• Object Owner ID: PSDBOWNR
Activity Parameter Value and/or Underlying Statements
User initiates log on by entering the database name, userID and password.
PT84/PSUSER1/PSUSER1
The connection is established to DB2 z/OS using thedatabase name, the connect ID, and the password (not theuser ID).
Connect to PT84 user PSCONCT using PSCONCT
Get PeopleSoft Database owner ID. SELECT OWNERID FROM PS.PSDBOWNERWHEREDBNAME = :1
:1 = PT84, value returned for OWNERID = PSDBOWNR
Check PSSTATUS. SELECT OWNERID, TOOLSREL,LASTREFRESHDTTM, LASTCHANGEDTTMFROM PSDBOWNR.PSSTATUS
Validate the user ID and password. SELECT VERSION, OPERPSWD, ENCRYPTED,SYMBOLICID, ACCTLOCK FROMPSDBOWNR.PSOPRDEFNWHERE OPRID =:1
:1 = PSUSER1. The OPERPSWD retrieved is validatedagainst the value entered when the user initiated the log on.
Get the access ID and password. SELECT ACCESSID, ACCESSPSWD, ENCRYPTEDFROM PSDBOWNR.PSACCESSPRFLWHERESYMBOLICID = :1
The ACCESSID and ACCESSPSWD retrieved into thebuffer are PSACCES1/PSACCES1
The current connection with the connect ID is disconnected Disconnect
22 Copyright © 2006, Oracle. All rights reserved.

Chapter 1 Preparing for Installation
Activity Parameter Value and/or Underlying Statements
A new connection is established logging on with the accessID.
Connect to PT84 USER PSACCES1 USING PSACCES1
The "Set Current SQLID" statement is issued to permitaccess to the PeopleSoft tables via the access ID withoutrequiring explicit qualification of the SQL statements withthe Object Owner ID (PSDBOWNR).
Set CURRENT SQLID = :1
:1 = PSDBOWNR
At this point, access within the PeopleSoft application is governed by PeopleSoft security, based on thepermissions defined in the PeopleTools security tables for the user ID that was entered when the logon wasinitiated (PSUSER1).
Task 1-13: Setting Up z/OS User IDsThis section discusses:
• Understanding User ID Setup
• Creating PeopleSoft User IDs
Understanding User ID SetupOnce you have determined your sign-on strategy, as described in the preceding task, you are ready to create aset of z/OS user IDs required for the PeopleTools sign-on process and database table access.
Note. All IDs that you create must be in UPPERCASE.
Task 1-13-1: Creating PeopleSoft User IDsUse this following procedure to create new user Ids for the application.
To create PeopleSoft user IDs:
1. Create a mainframe user ID for connecting to the PeopleSoft database. This mainframe user ID needsto match the PeopleSoft connect ID.
Note. Once your PeopleSoft connect ID is created, you can specify the ID in either the ConfigurationManager Startup tab for Windows client connections or the Startup section in the application serverconfiguration file for application server connections. This is done so the client or the application serverpass the correct ID to connect to the database.
You must explicitly grant SELECT authority to this mainframe user ID on specific PeopleTools tables,before attempting to connect to the PeopleSoft database.
2. Create a second mainframe user ID to be used as the PeopleSoft access ID.The access ID, which is stored in encrypted form in the PeopleSoft database, should either be granted allDML authorities and certain DDL authorities on the PeopleSoft database if using Primary Authorization IDaccess, or associated with a Secondary Authorization ID with this access, if using Secondary Authorization
Copyright © 2006, Oracle. All rights reserved. 23

Preparing for Installation Chapter 1
ID access (the next step). The access ID and access password must be tightly controlled. Both areencrypted in the PeopleSoft database.PeopleSoft recommends that you set up the access ID in z/OS with a non-expiring password. If companystandards mandate that you periodically change the access ID’s password, or if the access ID is set upin the z/OS security system with a password that will expire, special processing will be necessary. Youmust ensure that PeopleSoft databases are updated with the access ID’s new password before the passwordchanges in the z/OS security system. PeopleSoft’s Security Administrator provides the functionality tochange the access ID’s password stored in the security tables.If the mainframe password for the access ID has expired or has been changed before the PeopleSoft databasehas been updated with the new password, no one will be able to access the PeopleSoft online system.
3. If you are using the Secondary Authorization ID option, set up an external security system group asthe owner ID. Make the access ID a member of this group, with authority to SET CURRENT SQLID= <Owner ID>.
4. Grant SELECT authority to owner ID on SYSIBM DB2 catalog tables.There are certain PeopleSoft processes that perform queries against the SYSIBM DB2 catalog tables. Forthis reason you must grant SELECT authority on these catalog tables to the owner ID that you choose forthe PeopleSoft database. The following table lists DB2 catalog tables used by PeopleSoft.
Table PeopleSoft Process(es)
SYSIBM.SYSTABLES Application Designer
DDDAUDIT.SQR
SETDBNAM.SQR
SETSPACE.SQR
SETTMPIN.SQR
%UpdateStats MetaSQL function
SYSIBM.SYSTABLESPACE SETSPACE.SQR
SETDBNAM.SQR
SYSIBM.SYSTRIGGERS Application Designer
DDDAUDIT.SQR
SYSIBM.SYSCOLUMNS Application Designer
SYSIBM.SYSINDEXES Application Designer
DDDAUDIT.SQR
SETBUFF.SQR
SYSIBM.SYSKEYS Application Designer
SYSIBM.SYSINDEXPART SETINDEX.SQR
If the Owner ID does not have proper authority to the SYSIBM tables, 551 SQL codes will result andit will mostly occur when you are attempting to SQL Create or Alter a table via Application Designer.If you are running the listed SQRs outside of PeopleSoft, the ID used to run the SQR will need Selectaccess to the listed tables.
24 Copyright © 2006, Oracle. All rights reserved.

Chapter 1 Preparing for Installation
See Also“Creating a Database”
Enterprise PeopleTools 8.48 PeopleBook: Internet Technology
Enterprise PeopleTools 8.48 PeopleBook: Data Management
Task 1-14: Using Storage Enhancements for z/OSThis section discusses:
• Understanding z/OS Storage Enhancements
• Prerequisites
• Enabling the Shared Library Feature
Understanding z/OS Storage EnhancementsYou must implement the new storage enhancement feature for z/OS. This enhancement introduces the sharedlibrary feature of UNIX in a z/OS environment. If your operating system is on z/OS, you must complete thefollowing task to take advantage of this storage enhancement.
Note. It is best to complete this task before installing any PeopleSoft Product.
PrerequisitesPeopleSoft requires the use of system shared library modules. When you use system shared library modules,keep in mind that you will want to:
• Specify a SHRLIBRGNSIZE value of at least 350 MB per PeopleTools version of Process Schedulerinstance(s).Approximately 350 MB is required for the PeopleSoft shared library modules residing in each discreteversion of PeopleTools installed on your system. Here are two examples of the settings you need if thereare three PeopleSoft USS environments installed on your system.
- If you are running the following three instances of Process Scheduler the SHRLIBRGNSIZEBPXPRMxx should be set to at least 1.1 GB:
Instance PeopleTools version
instance 1 $PS_HOME_8.44/bin
instance 2 $PS_HOME_8.43/bin
instance 3 $PS_HOME_8.42/bin
Copyright © 2006, Oracle. All rights reserved. 25

Preparing for Installation Chapter 1
- If you are running the following three instances of Process Scheduler the SHRLIBRGNSIZEBPXPRMxx should be set to at least 750 MB:
Instance PeopleTools version
instance 1 $PS_HOME_8.44/bin
instance 2 $PS_HOME_8.44/bin
instance 3 $PS_HOME_8.43/bin
• Allow the user read access to the BPX.FILEATTR.SHARELIB on class type of FACILITY in RACF toallow the usage of extattr command for +l.
• Set the shared library extended attribute on all of the DLL (binaries). This is done when psconfig.shand psmv.sh scripts are executed in the task “Running PSCONFIG.SH and PSMV.SH Shell Scripts toset up the USS Environment Variables and Grant Access to USS Files” in the chapter “Setting Up theBatch Environment on z/OS.”
Task 1-14-1: Enabling the Shared Library FeatureThe following procedure is required to enable the Shared Library feature to take advantage of new storageenhancements.
To enable the Shared Library feature:
1. In TSO/E, issue the following command to allow read access to user id "username":
PERMIT BPX.FILEATTR.SHARELIB CALSS(FACILITY) ACCESS(READ) ID(username)
2. If no other application on your system is using system shared library modules (files with .so extensions),you can define all the PeopleSoft Shared Library modules. For each Process Scheduler instance perPS_HOME/bin directory, set the SHRLIBRGNSIZE to 367001600 in BPXPRMxx. If other applicationson your system are using system shared library modules, add the amount that is required for the otherapplications to the amount required for PeopleSoft. This value will be enabled at the next IPL of the system.For testing purposes, you can dynamically implement the SHRLIBRGNSIZER from SDSF or the systemconsole by issuing a SETOMVS command to set the SHRLIBRGNSIZE:
SETOMVS SHRLIBRGNSIZE=367001600
To confirm the new setting, issue the SDSF command D OMVS,O to display the new setting in theMVS SYSLOG:D OMVS,O
Note. You can issue the SDSF command D OMVS,L to display the settings for the OMVS systemparameters while the processes are running.
Task 1-15: Performing BackupsBefore proceeding, you should back up all servers and workstations that are set up for installation so you canrecover to this point if necessary. Do the following:
26 Copyright © 2006, Oracle. All rights reserved.

Chapter 1 Preparing for Installation
• Back up any changes you made to the database server in setting up your PeopleSoft system.• Back up any changes you made to your file server while setting aside space for your PeopleSoft systemand setting up access privileges.
• Once you set up your install workstations to access the file server and database server simultaneously, backup the workstations.
Task 1-16: Using PeopleSoft Change Assistant andPeopleSoft Change Impact Analyzer
After you have completed the tasks in this book to install PeopleTools, including installing any necessarypatches and fixes, you need to install PeopleSoft Change Assistant. PeopleSoft Change Assistant is astandalone application that enables you to assemble and organize all of the steps necessary to apply patchesand fixes for maintenance updates.
PeopleSoft Change Assistant gathers all the necessary information for a maintenance update from theEnvironment Management Hub and uploads it to PeopleSoft Customer Connection. With the environment dataavailable, PeopleSoft Customer Connection can determine what updates are applicable to your environment.PeopleSoft Change Assistant carries out the following tasks:
• Uploads environment
• Finds required updates
• Downloads updates
• Applies all change packages
You can also install PeopleSoft Change Impact Analyzer, either as part of the PeopleTools installation, orby itself. PeopleSoft Change Impact Analyzer is a Windows-based tool that you can use to evaluate theeffect of changes you make on your installation.
See Also“Installing PeopleSoft Change Assistant”
“Installing PeopleSoft Change Impact Analyzer”
Enterprise PeopleTools 8.48 PeopleBook: Software Updates
Enterprise PeopleTools 8.48 PeopleBook: PeopleSoft Change Impact Analyzer
Copyright © 2006, Oracle. All rights reserved. 27

Preparing for Installation Chapter 1
28 Copyright © 2006, Oracle. All rights reserved.

CHAPTER 2
Installing Web Server Products
This chapter discusses:
• Installing Oracle Application Server
• Installing BEA WebLogic Server
• Installing WebSphere Application Server
See Also“Clustering and High Availability for PeopleSoft 8.4,” PeopleSoft Customer Connection (Site Index, Red Papers)
“Required Operating System, RDBMS, and Additional Component Patches Required for Installation,” PeopleSoftCustomer Connection (Implement, Optimize + Upgrade, Implementation Guide, Supported Platforms, PeopleSoftEnterprise. Select your database platform or release number.)
Task 2-1: Installing Oracle Application ServerThis section discusses:
• Understanding the Oracle Application Server Installation
• Prerequisites
• Preparing for the Oracle Application Server Installation
• Installing the Oracle Application Server on Windows and UNIX
• Updating the IBM JDK to Version 1.4.2
• Uninstalling the Oracle Application Server
Understanding the Oracle Application Server InstallationThis section describes the installation of the J2EE and Web Cache edition of the Oracle Application Server 10g(OAS) Release 2 (10.1.2.0.2). This documentation is concerned only with the installation of OAS for use asa web server with PeopleSoft software. Further information on the configuration of OAS can be found onCustomer Connection and on the Oracle web site.
Before beginning the installation, be sure to obtain any required patches for the installation fromftp://ftp.peoplesoft.com/outgoing/ptools/Oracle/OAS/101202.
Copyright © 2006, Oracle. All rights reserved. 29
Installing Web Server Products Chapter 2
Important! PeopleSoft customers are granted a license of Oracle Application Server J2EE and Web CacheEdition for use exclusively with PeopleSoft Enterprise at no additional cost. PeopleSoft Enterprise customerscan choose Oracle Application Server J2EE and Web Cache Edition as an alternative to BEA WebLogic orIBM WebSphere for use with PeopleSoft Enterprise. This license is provided solely for use with PeopleSoftEnterprise and any other use of Oracle Application Server J2EE and Web Cache Edition outside of usewith PeopleSoft Enterprise requires the purchase of an Oracle Application Server license. Please note thata separate installation of Oracle Application Server J2EE and Web Cache Edition is required for use withPeopleSoft Enterprise.
See AlsoEnterprise PeopleTools 8.48 PeopleBook: System and Server Administration, “Working with OracleApplication Server 10g (10.1.2.0.2)”
Oracle Application Server 10g Release 2 (10.1.2.0.2) Documentation, http://www.oracle.com/technology/documentation/appserver101202html
PrerequisitesThe OAS can be used as a web server for Enterprise PeopleTools for the following operating systems:
• Windows• Solaris• HP-UX• Linux• AIX
See “Preparing for Installation,” Defining the Web Server.
For a complete list of prerequisites, see the installation documentation for the OAS on Oracle’s web site.
See http://www.oracle.com/technology/documentation/appserver101202.html. Select the View Library link forthe appropriate operating system.
Task 2-1-1: Preparing for the Oracle ApplicationServer InstallationThis section discusses:
• Creating a Group for the Inventory Directory
• Creating oraInst.loc
• Creating the Operating System User
• Reviewing the Environment Variables
• Using Custom Port Numbers
Creating a Group for the Inventory DirectoryIf you plan to install Oracle Application Server on a computer that does not have Oracle products, create agroup to own the inventory directory. The installer writes its files in the inventory directory to keep trackof the Oracle products installed on the computer.
30 Copyright © 2006, Oracle. All rights reserved.

Chapter 2 Installing Web Server Products
This guide uses the name oinstall for this operating system group.
By having a separate group for the inventory directory, you allow different users to install Oracle products onthe computer. Users need write permission for the inventory directory. They can achieve this by belonging tothe oinstall group.
For the first time installation of any Oracle product on a computer, the installer displays a screen where youenter a group name for the inventory directory, and a screen where you enter the location of the inventorydirectory. The default name of the inventory directory is oraInventory. If you are unsure if there is alreadyan inventory directory on the computer, look in the /etc/oraInst.loc file for Linux and AIX systems and the/var/opt/oracle/oraInst.loc file for other UNIX platforms. This file lists the location of the inventory directoryand the group which owns it. If the file does not exist, the computer does not have Oracle products installedon it.
Creating oraInst.locIf the oraInst.loc file does not exist in the /etc directory for Linux and AIX systems or the /var/opt/oracledirectory for other UNIX platforms, you must create it before starting the silent and non-interactive installationof Oracle Application Server. This file is used by the installer.
1. Log in as the root user:
% su
2. Using a text editor such as vi or emacs, create the oraInst.loc file in the /etc directory for Linux and AIXplatforms, and in the /var/opt/oracle directory for other UNIX platforms.
3. Enter the following line in the file, where oui_inventory_directory is the full path to the directory whereyou want the installer to create the inventory directory:
inventory_loc=oui_inventory_directory
Make sure that the oinstall operating system group has write permission to this directory.
See Creating a Group for the Inventory Directory.4. Create an empty /etc/oratab file:
# touch /etc/oratab
5. Exit from the root user.
# exit
Creating the Operating System UserWindows:
The operating system user performing the installation must belong to the Administrators group.
UNIX:
Create an operating system user to install and upgrade Oracle products. This guide refers to this user as theoracle user. The oracle user running the installer must have write permission for these directories:
• the Oracle home directory, which contains files for the product you are installing• the inventory directory, which is used by the installer for all Oracle products
Copyright © 2006, Oracle. All rights reserved. 31

Installing Web Server Products Chapter 2
If the computer contains other Oracle products, you might already have a user for this purpose. Look in the/etc/oraInst.loc file for Linux and AIX platforms, and in the /var/opt/oracle/oraInst.loc file for other UNIXplatforms. This file lists the location of the inventory directory and the group who owns it. If the file doesnot exist, the computer does not have Oracle products installed on it.
See Creating oraInst.loc.
If you do not already have a user for installing Oracle products, create a user with the following properties:
Login name Select a name for the user. This guide uses oracle.
Group identifier Select a name for the group. This guide uses oinstall. The primary group ofthe oracle user must have write permission for the oraInventory directory.
Home directory The home directory path must not include any spaces. The home directory forthe oracle user can be the same as the home directories of other users.
Login shell The default login shell can be the C, Bourne, or Korn shell.
Reviewing the Environment VariablesMake sure the following conditions for environment variables are met:
• ENV, ORACLE_HOME, and ORACLE_SID must not be set. If necessary, unset these variables.• PATH, CLASSPATH, and LD_LIBRARY_PATH must not contain references to directories in any Oraclehome directories.
• Set DISPLAY to the monitor where you want the installer window to appear.
Note. On AIX platform, DISPLAY should be set even when using the OAS silent installation procedure.
• TNS_ADMIN must not be set.• TMP is optional. If TMP is not set, the value defaults to /tmp.
Note. If you use the su command to switch users (for example, switching from the root user to the oracleuser), check the environment variables when you are the new user because the environment variables mightnot be passed to the new user.
Using Custom Port NumbersBy default, the installer configures Oracle HTTP Server to use port 7777, not port 80. Port 7777 is thedefault port because on UNIX, components that use port numbers lower than 1024 require additional stepsto be done as the root user before the components can run. Because the installer does not have root access,it has to use a port greater than 1024.
If you want Oracle HTTP Server to use a different port, such as port 80, use the "static ports" feature, whichenables you to specify port numbers for components. Although you can change the port number afterinstallation, it is easier to set the port number during installation. The OAS cannot use port numbers that areless than 1024 and greater than 50000.
To instruct the installer to assign custom port numbers for components:
1. Create a file containing the component names and port numbers.This file is typically called the staticports.ini file, but you can name it anything you want. Asample staticports.ini file is located at <INSTALL_DIR>\Disk1\stage\Response.
32 Copyright © 2006, Oracle. All rights reserved.
Chapter 2 Installing Web Server Products
2. During the installation, on the Specify Port Configuration Options window, select Manual and enterthe full path to the staticports.ini file.If you do not specify the full path to the file, the installer will not be able to find the file. The installer willthen assign default ports for all the components, and it will do this without displaying any warning.
Task 2-1-2: Installing the Oracle Application Serveron Windows and UNIXThis procedure describes the installation of the OAS middle tier software, which comprises the OAS J2EE andWeb Cache. The OAS software is provided to the customer using Oracle E-Delivery.
See Oracle E-Delivery, https://edelivery.oracle.com/
1. Download the zipped files containing the OAS from Oracle E-Delivery.2. Create a temporary folder, <INSTALL_DIR>, for your operating system.3. Extract each zipped file into a separate folder labelled Disk<#> under <INSTALL_DIR>.4. Start the installation:
Note. For AIX, it will prompt you to run rootpre.sh. Enter y if rootpre.sh has already been run. If this is thefirst time any Oracle product is being installed on this AIX machine, please stop the OAS installation andrun rootpre.sh as the "root" user before continuing with OAS installation.
• For Windows, double-click <INSTALL_DIR>\Disk1\setup.exe.• For UNIX, run <INSTALL_DIR>/Disk1/runInstaller.
5. Click Next.The product selection window appears. Oracle Application Server 10g 10.1.2.0.2 is the default product.Accept the default.
Note. English is the default language. To install different languages, click the Product Languages button.Make the selection in the popup window and click OK.
Copyright © 2006, Oracle. All rights reserved. 33
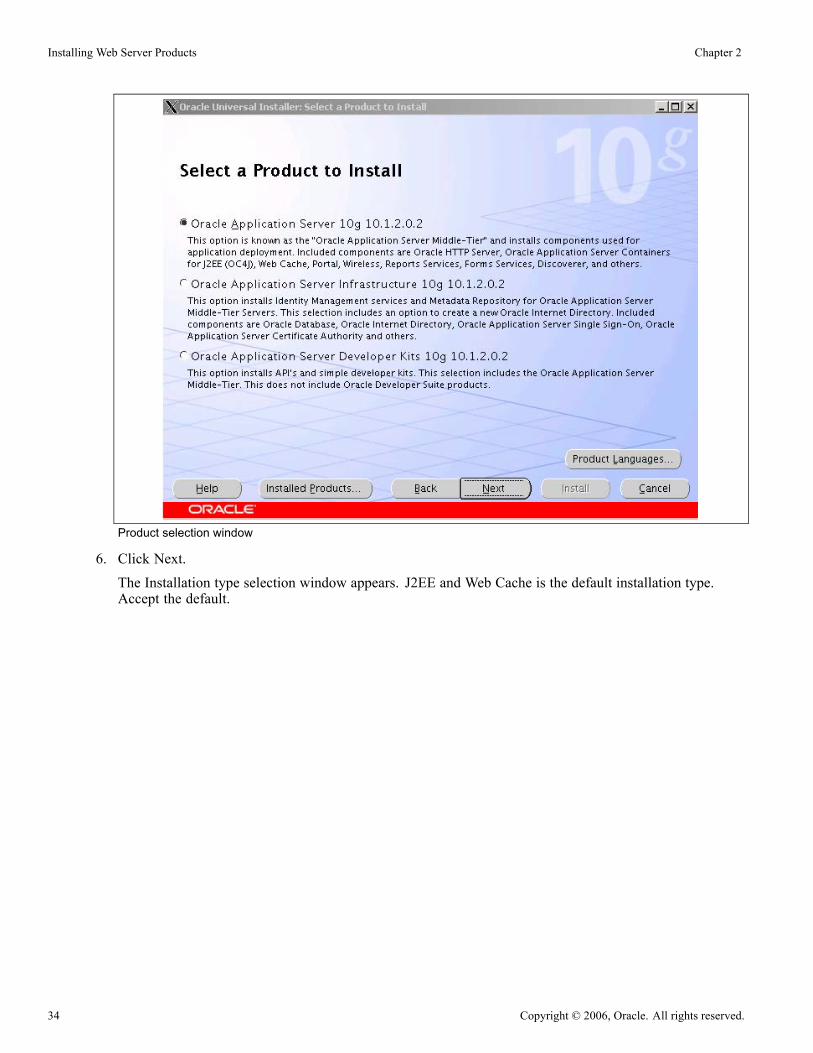
Installing Web Server Products Chapter 2
Product selection window
6. Click Next.The Installation type selection window appears. J2EE and Web Cache is the default installation type.Accept the default.
34 Copyright © 2006, Oracle. All rights reserved.

Chapter 2 Installing Web Server Products
Installation type selection window
7. Click Next.A window appears listing the pre-installation requirements. Select the Administrator privileges check box.
Copyright © 2006, Oracle. All rights reserved. 35

Installing Web Server Products Chapter 2
Confirm Pre-Installation Requirements window
8. Click Next.Confirm that the Oracle HTTP Server and OracleAS 10g Containers for J2EE are selected.
Note. Select Oracle Application Server 10g Web Cache only if the customer has purchased Web Cachelicense from Oracle.
36 Copyright © 2006, Oracle. All rights reserved.

Chapter 2 Installing Web Server Products
Select Configuration Options window
9. Click Next.
Copyright © 2006, Oracle. All rights reserved. 37

Installing Web Server Products Chapter 2
Specify Port Configuration Options window
Select one of the following radio buttons to specify the port configuration:• Automatic: Select this option to use the default port values.• Manual: Select this option to instruct the installer to assign custom port numbers for components.Specify the full path and name of the file containing the component names and port numbers.
See Preparing for the Oracle Application Server Installation, Using Custom Port Numbers.
10. Click Next.
Specify the OAS instance name and password. The Oracle instance name can be different from theOracle home name.
38 Copyright © 2006, Oracle. All rights reserved.

Chapter 2 Installing Web Server Products
Specify Instance Name and ias_admin Password
11. Click Next.Review the summary information. To make changes in the installation information, click Back. If youare ready to begin the installation, click Install.
Copyright © 2006, Oracle. All rights reserved. 39

Installing Web Server Products Chapter 2
Summary
12. Windows appear showing the progress of the installation and configuration.
40 Copyright © 2006, Oracle. All rights reserved.
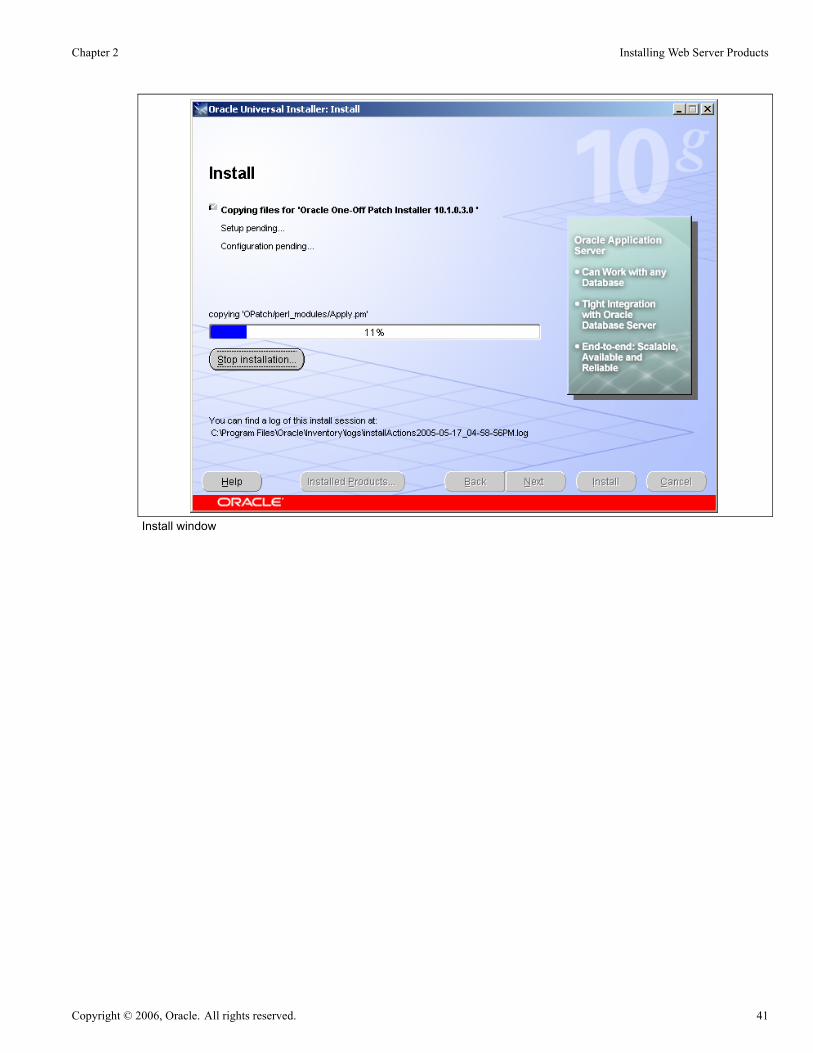
Chapter 2 Installing Web Server Products
Install window
Copyright © 2006, Oracle. All rights reserved. 41

Installing Web Server Products Chapter 2
Configuration Assistants window
13. When the installation is complete, the end of installation window appears.Make note of the information displayed on the installation log file and login URL. Click Exit.
42 Copyright © 2006, Oracle. All rights reserved.

Chapter 2 Installing Web Server Products
End of Installation window
14. On UNIX, the following message box appears.Open a new window and run the script <OAS_HOME>/root.sh as root.Click OK to complete the installation.
Setup Privileges for Oracle Application Server
Task 2-1-3: Updating the IBM JDK to Version 1.4.2This is a post-installation step for AIX only.
To update the IBM JDK build:
Copyright © 2006, Oracle. All rights reserved. 43
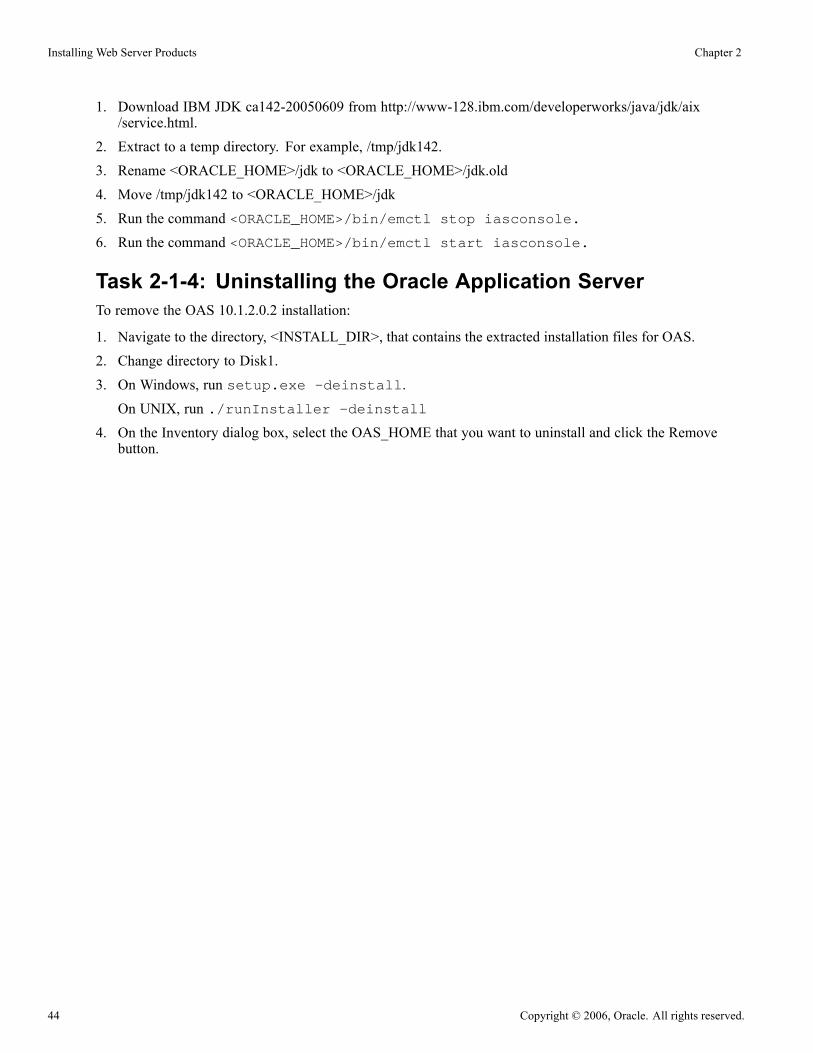
Installing Web Server Products Chapter 2
1. Download IBM JDK ca142-20050609 from http://www-128.ibm.com/developerworks/java/jdk/aix/service.html.
2. Extract to a temp directory. For example, /tmp/jdk142.3. Rename <ORACLE_HOME>/jdk to <ORACLE_HOME>/jdk.old4. Move /tmp/jdk142 to <ORACLE_HOME>/jdk5. Run the command <ORACLE_HOME>/bin/emctl stop iasconsole.
6. Run the command <ORACLE_HOME>/bin/emctl start iasconsole.
Task 2-1-4: Uninstalling the Oracle Application ServerTo remove the OAS 10.1.2.0.2 installation:
1. Navigate to the directory, <INSTALL_DIR>, that contains the extracted installation files for OAS.
2. Change directory to Disk1.
3. On Windows, run setup.exe -deinstall.
On UNIX, run ./runInstaller -deinstall
4. On the Inventory dialog box, select the OAS_HOME that you want to uninstall and click the Removebutton.
44 Copyright © 2006, Oracle. All rights reserved.

Chapter 2 Installing Web Server Products
Inventory dialog box for OAS
5. Review and accept the next two confirmation dialog boxes.6. When the Inventory dialog box reappears, click Close.7. On Windows, you must reboot and remove the OAS_HOME directory after the uninstall process.
Task 2-2: Installing BEA WebLogic ServerThis section discusses:
• Understanding the WebLogic Installation
• Installing WebLogic
Understanding the WebLogic InstallationPeopleSoft ships a licensed edition of BEA WebLogic Server 8.1. The Windows distribution of BEAWebLogic is located on the WebLogic CD-ROMs provided by PeopleSoft.
Copyright © 2006, Oracle. All rights reserved. 45

Installing Web Server Products Chapter 2
Note. The WebLogic server installation can be run from our CD or from a copy of the CD as long as the pathto the CD is not a UNC and does not contain spaces.
Note. To familiarize yourself with the most current support information and information about any requiredWebLogic Service packs based on OS platform or PeopleTools versions, consult PeopleSoft CustomerConnection or the Hardware and Software Requirements guide. Note that WebLogic Server Service packs arecumulative, and you must uninstall any previous service packs before upgrading (or downgrading).
Note. The installation of Weblogic Server 8.1 requires 500 MB of free temporary space to extract the requiredfiles and run. By default, /tmp and %TEMP% are used on UNIX and Windows, respectively. In addition 500MB of free space is required on the drive/device to which you opt to install WebLogic Server. If adequatespace is not available, you will be prompted for alternate locations.
See AlsoEnterprise PeopleTools 8.48 Hardware and Software Requirements
BEA's official installation instructions: http://e-docs.bea.com/wls/docs81/
PeopleSoft Customer Connection, Supported Platforms (Implement, Optimize + Upgrade, ImplementationGuide, Supported Platforms, PeopleSoft Enterprise)
Task 2-2-1: Installing WebLogicThe following steps assume that you have the PeopleTools WebLogic CD for your platform in the D drive.
Note. BEA WebLogic Server 5.1, 6.1 and 8.1 can coexist on a single machine. If you choose to install thisversion of WebLogic in an existing BEA_HOME directory (for example, c:\bea), you must shut down allinstances of WebLogic Server running in that BEA_HOME before performing this installation.
To install the WebLogic Server 8.1:
1. Insert the WebLogic Server 8.1 CD for your OS platform into an accessible CD-ROM drive and run theprovided install command (install.cmd on Windows and ./install.sh on UNIX).
Note. Running install.sh on SuSE 9 Linux generates the message "cat: /etc/redhat-release: No Such file ordirectory". This message is benign. You can safely ignore the message and continue the installation.
The install process will perform the base and service pack install, patch install, license install, and aJRE install if applicable. With prior releases of PeopleTools and WebLogic, each of these steps had tobe run manually.
Platform WebLogic Server CD
Windows Server 2003, Red Hat and SuSE LinuxEnterprise Server
CD1
AIX, HP-UX Intel Itanium CD2
HP-UX PA-RISC 64–bit CD3
46 Copyright © 2006, Oracle. All rights reserved.
Chapter 2 Installing Web Server Products
Platform WebLogic Server CD
Solaris CD4
Tru64 CD5
Note. The installation script accepts command line arguments for silent installs. For usage, run install -?or install -help.
2. Specify the directory where you want to install WebLogic 8.1. This directory is known as BEA_HOME.
Note. When you install WebLogic Server, a JRE, and at least a partial JDK is installed. PeopleSoft's JRE/JDKcertification for WebLogic Server is based on extending BEA's JRE/JDK certification of WebLogic Server.
Task 2-3: Installing WebSphere Application ServerThis section discusses:
• Understanding WebSphere Application Server Installation
• Prerequisites
• Preparing for WebSphere Installation
• Installing WebSphere Base
• Installing WebSphere Base with the Silent Method
• Verifying the WebSphere Base Installation
• Uninstalling the Default WebSphere Application
• Installing the WebSphere Base 5.1 Plug-in for HTTP Proxy Server
• Installing WebSphere Network Deployment Manager
• Upgrading WebSphere 5.1 Base and WebSphere ND to 5.1.1.7
• Troubleshooting the WebSphere Installation and Upgrade
Understanding WebSphere Application Server InstallationThis section covers the installation of the IBM WebSphere products IBM WebSphere 5.1.1.7 ApplicationServer (Base) and WebSphere Network Deployment. For convenience and brevity, this documentation refersto these products as WebSphere Base and WebSphere ND, respectively, or collectively as WebSphere. Youalso have the option of installing IBM HTTP Server (IHS). The directory where you install the WebSphereproducts is referred to as <WAS_HOME>. This section concerns that portion of the installation that is neededfor a basic PeopleTools installation.
Install the WebSphere components in the following order:
1. Confirm that minimum system requirements, including those for hardware and software, have been met.
See Prerequisites.2. Install WebSphere Base in GUI or silent mode.
See Installing WebSphere Base.
Copyright © 2006, Oracle. All rights reserved. 47
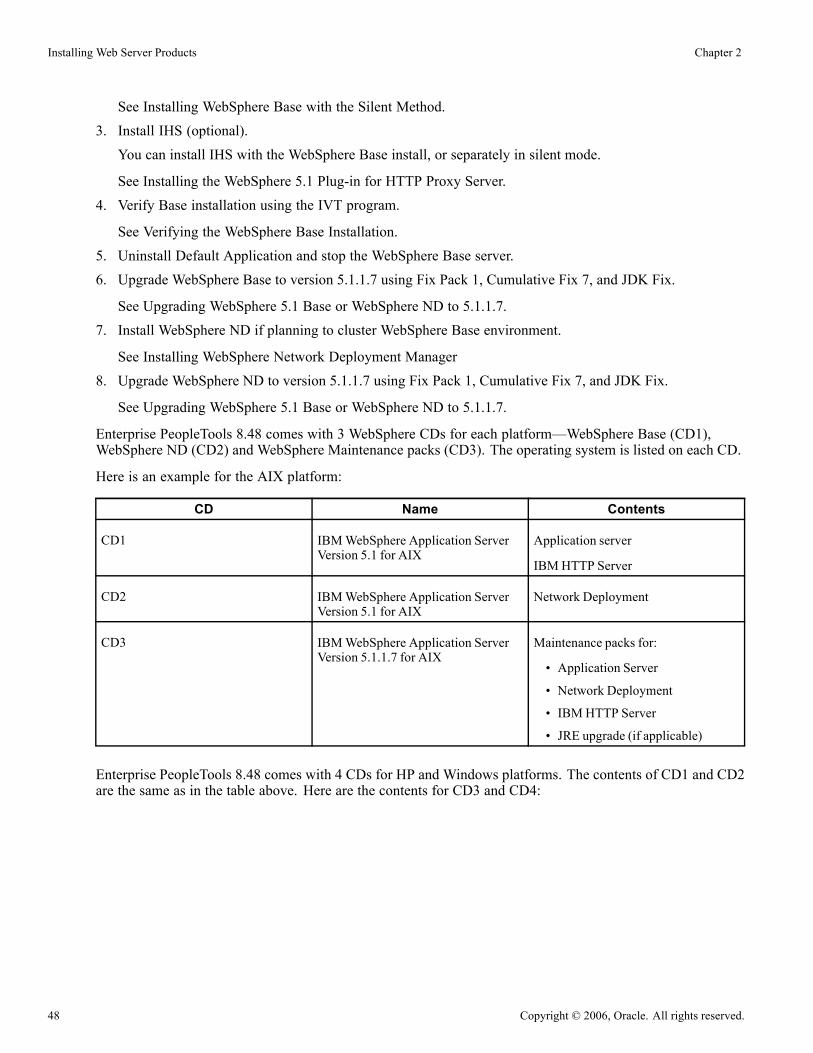
Installing Web Server Products Chapter 2
See Installing WebSphere Base with the Silent Method.3. Install IHS (optional).You can install IHS with the WebSphere Base install, or separately in silent mode.
See Installing the WebSphere 5.1 Plug-in for HTTP Proxy Server.
4. Verify Base installation using the IVT program.
See Verifying the WebSphere Base Installation.5. Uninstall Default Application and stop the WebSphere Base server.6. Upgrade WebSphere Base to version 5.1.1.7 using Fix Pack 1, Cumulative Fix 7, and JDK Fix.
See Upgrading WebSphere 5.1 Base or WebSphere ND to 5.1.1.7.7. Install WebSphere ND if planning to cluster WebSphere Base environment.
See Installing WebSphere Network Deployment Manager
8. Upgrade WebSphere ND to version 5.1.1.7 using Fix Pack 1, Cumulative Fix 7, and JDK Fix.
See Upgrading WebSphere 5.1 Base or WebSphere ND to 5.1.1.7.
Enterprise PeopleTools 8.48 comes with 3 WebSphere CDs for each platform—WebSphere Base (CD1),WebSphere ND (CD2) and WebSphere Maintenance packs (CD3). The operating system is listed on each CD.
Here is an example for the AIX platform:
CD Name Contents
CD1 IBMWebSphere Application ServerVersion 5.1 for AIX
Application server
IBMHTTP Server
CD2 IBMWebSphere Application ServerVersion 5.1 for AIX
Network Deployment
CD3 IBMWebSphere Application ServerVersion 5.1.1.7 for AIX
Maintenance packs for:
• Application Server
• Network Deployment
• IBMHTTP Server
• JRE upgrade (if applicable)
Enterprise PeopleTools 8.48 comes with 4 CDs for HP and Windows platforms. The contents of CD1 and CD2are the same as in the table above. Here are the contents for CD3 and CD4:
48 Copyright © 2006, Oracle. All rights reserved.

Chapter 2 Installing Web Server Products
CD Contents
CD3 Maintenance packs for :
• Application Server
• IBMHTTP Server
• JRE upgrade (if applicable)
CD4 Maintenance packs for:
• Network Deployment
• JRE upgrade (if applicable)
See AlsoEnterprise PeopleTools 8.48 PeopleBook: System and Server Administration, “Working with IBMWebSphere”
PrerequisitesThe full list of prerequisites for WebSphere Base and ND are available on the IBM website.
See http://www-3.ibm.com/software/webservers/appserv/doc/latest/prereq.html
If your operating system is not at the required patch level, a warning message will appear at the beginning ofthe installation. It is important to stop the installation and apply the requested patches to the system. Alongwith the hardware and software requirements above, you must complete the steps in the next section.
Task 2-3-1: Preparing for WebSphere InstallationThe following steps are required for WebSphere Base and the WebSphere ND Embedded Messaging service:
Microsoft Windows:
• Define the process user ID with these authorizations:
- Assign the user ID to the Administrator group.
- Give the user ID the advanced user right Act as part of the operating system.
- Give the user ID the advanced user right Log on as a service.
• Allocate space for Base Messaging and Message Broker.
The following table lists the default locations for the base messaging functions and the messaging brokerfunctions (for publish or subscribe messaging).
Base Messaging Messaging Broker
Installation directory C:\Program Files\IBM\WebSphereMQ
C:\Program Files\IBM\WebSphereMQ\WEMPS
Typical space needed 70MB (server) or 15 MB (client) 45 MB (server)
See Troubleshooting the WebSphere Installation and Upgrade.
UNIX:
Copyright © 2006, Oracle. All rights reserved. 49
Installing Web Server Products Chapter 2
Define the operating system groups and users needed for embedded messaging:
1. If you have not already done so, create the groups mqm and mqbrkrs.
2. Add the users mqm and root to the mqm group.
3. Add the user root to the mqbrkrs group.
4. Log in once as user mqm, then log in again as root.
Solaris and HP-UX only:
Before installing Embedded Messaging PeopleSoft recommends that you review the machine's configurationappropriate kernel settings as described on the IBM web site.
See WebSphere Software Information Center, http://publib.boulder.ibm.com/infocenter/wasinfo/index.jsp?topic=/com.ibm.websphere.base.doc/info/aes/ae/rins_prereq.html.
Note. User IDs longer than 12 characters cannot be used for authentication with the embedded messaging.Also we recommend that you run the JMS server process for Embedded Messaging under the root user ID.
Embedded Messaging is installed in fixed locations. The following table shows the required disk space andinstallation directories for UNIX platforms:
Base code Broker code Base data Broker data
AIX:
Installation directory
/usr/mqm /usr/opt/wemps /var/mqm /var/wemps
AIX:
Required disk space
40 MB (server) or 15MB (client)
80 MB (server) or 15MB (client)
8 MB (server) or 5MB (client)
5 MB (server)
Linux/Intel/HP-UXand Solaris:
Installation directory
/opt/mqm /opt/wemps /var/mqm /var/wemps
Linux/Intel/HP-UX:
Required disk space
40 MB (server) or 15MB (client)
105 MB (server) or 15MB (client)
8 MB (server) or 5MB (client)
5 MB (server)
Solaris:
Required disk space
40 MB (server) or 15MB (client)
70 MB (server) or 15MB (client)
20 MB (server) or 15MB (client)
5 MB (server)
Note. The /var file system is used to store all the security logging information for the system, and is usedto store the temporary files for email and printing. Therefore, it is critical that you maintain free space in/var for these operations.
Task 2-3-2: Installing WebSphere BasePeopleTools 8.48 supports the IBM HTTP Server (IHS) embedded within WebSphere for both http and https.Use of an external proxy server is optional. Supported proxy servers are IHS, Sun Java System Web Serverand Internet Information Server (Windows only).
50 Copyright © 2006, Oracle. All rights reserved.

Chapter 2 Installing Web Server Products
Important! You must be a member of the Administrator group (or root on UNIX) to install WebSphereBase and IHS.
WebSphere Base can be installed using a GUI or silent installation option. This section explains the GUIinstallation. The silent installation option is covered in PeopleBooks.
See Enterprise PeopleTools 8.48 PeopleBook: System and Server Administration, “Working with IBMWebSphere.”
To install WebSphere Base from the CD:
1. If you plan to use an HTTP proxy server other than IHS, you must install it before beginning theWebSphere Base installation.
Note. If you are planning to use IHS as the HTTP server, it can be installed as a part of WebSphere installand does not require any additional installation.
2. Stop any HTTP server (for example, IIS or Sun ONE Web Server and so on) running on the system.3. Insert the WebSphere CD into your CD-ROM drive.4. Navigate to the CD-ROM drive.Run the command installBase.bat (installBase.sh for UNIX) from a command prompt,which will start the installation of WebSphere Base.This invokes the default GUI install.
5. If you are prompted to select a language, select English (the default) and click OK.If you are running on a UNIX system and a window does not appear, check that the DISPLAY environmentvariable is set properly.
6. Click Next on the Welcome to IBM WebSphere Application Server, Version 5.1 panel.7. On the Software License Agreement panel, check I accept the terms in the license agreement and click Next.
Note. If the installation is on a machine that has no other copies of WebSphere on it, you will not see thepanel described in steps 8 and 9. If WebSphere is already installed, use the next panel to specify whetheryou want multiple versions of WebSphere to coexist and run on the same computer.
8. Select Modify ports for coexistence to allow multiple versions to coexist and run on this computer bymodifying the port numbers and click Next.
9. Click Next.A panel appears with the ports listed. PeopleSoft recommends that you add 10000 to the value of eachlisted port. That is, add 1 in front of the existing value.
Note. The install wizard suggests new ports by incrementing various digits in the default ports.
Please write down these port changes, especially the HTTP Transport Port (Default 9080), HTTPSTransport Port (Default 9443), and Admin Console Port (Default 9090).
The port for IBM HTTP Server port (Default 80) should not be changed from port 80. Change the valueback to 80 if necessary.
Copyright © 2006, Oracle. All rights reserved. 51
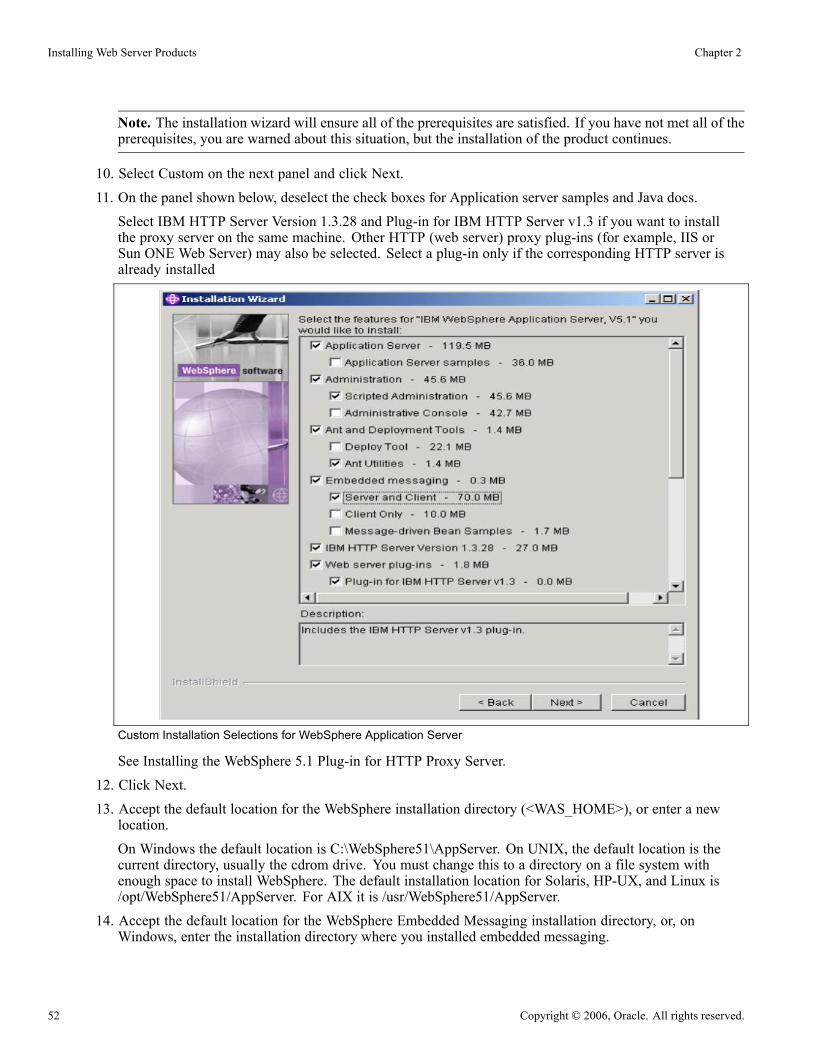
Installing Web Server Products Chapter 2
Note. The installation wizard will ensure all of the prerequisites are satisfied. If you have not met all of theprerequisites, you are warned about this situation, but the installation of the product continues.
10. Select Custom on the next panel and click Next.11. On the panel shown below, deselect the check boxes for Application server samples and Java docs.Select IBM HTTP Server Version 1.3.28 and Plug-in for IBM HTTP Server v1.3 if you want to installthe proxy server on the same machine. Other HTTP (web server) proxy plug-ins (for example, IIS orSun ONE Web Server) may also be selected. Select a plug-in only if the corresponding HTTP server isalready installed
Custom Installation Selections for WebSphere Application Server
See Installing the WebSphere 5.1 Plug-in for HTTP Proxy Server.12. Click Next.13. Accept the default location for the WebSphere installation directory (<WAS_HOME>), or enter a newlocation.On Windows the default location is C:\WebSphere51\AppServer. On UNIX, the default location is thecurrent directory, usually the cdrom drive. You must change this to a directory on a file system withenough space to install WebSphere. The default installation location for Solaris, HP-UX, and Linux is/opt/WebSphere51/AppServer. For AIX it is /usr/WebSphere51/AppServer.
14. Accept the default location for the WebSphere Embedded Messaging installation directory, or, onWindows, enter the installation directory where you installed embedded messaging.
52 Copyright © 2006, Oracle. All rights reserved.

Chapter 2 Installing Web Server Products
On Windows the default installation location is C:\Program Files\WebSphere MQ. The default locationsfor UNIX platforms were listed in a previous section.
Note. On UNIX, WebSphere fix packs expect embedded messaging to be at the default location.
See Preparing for WebSphere Installation.15. If you selected the IBM HTTP Server in step 11, accept the default path or update the path to reflectthe version number, for example, C:\IHS1.3.28.
16. Click Next.The next panel allows you to enter the WebSphere node name and the machine’s hostname (or IP address).The default node name is <hostname>Node where <hostname> is your machine’s hostname. The defaultfor Hostname or IP Address is <hostname>. You can modify these fields to include the fully qualifiedhostname or the IP address of the machine, but PeopleSoft recommends that you keep these defaults.
17. Click Next.18. If you are running on Windows, you can choose the option to Run WebSphere Application Server as aserver.Enter the password for the user id you are using.
Note. By choosing to run the Application server as a service, you can use the Control Panel – Serviceto manage the Application Server. The specified username must be part of the Administrator group.Enter the password for the user id you are using.
19. Click Next.20. Verify the selected options and click Next to begin the installation.
21. Deselect the option Select Register this product now.
22. Click Next and then Finish to complete the installation.
Note. Check the log for any errors encountered during installation. For WebSphere this is found in<WAS_HOME>/logs/log.txt and for IHS it is found in <WAS_HOME>/logs/log_ihs.txt
Refer to the Customer Connection link ftp://ftp.peoplesoft.com/outgoing/PTools/websphere/511PT848 tocheck whether any iFixes are needed. If they are present, you must install them.
Task 2-3-3: Installing WebSphere Base with the Silent MethodTo install WebSphere Base from the CD using the silent method, navigate to the CD-ROM drive and run oneof the following commands:
Windows:
installBase.bat -silent
UNIX:installBase.sh -silent
Important! The silent installation does not install any HTTP proxy server plug-ins or the IBM HTTP Server.
Copyright © 2006, Oracle. All rights reserved. 53
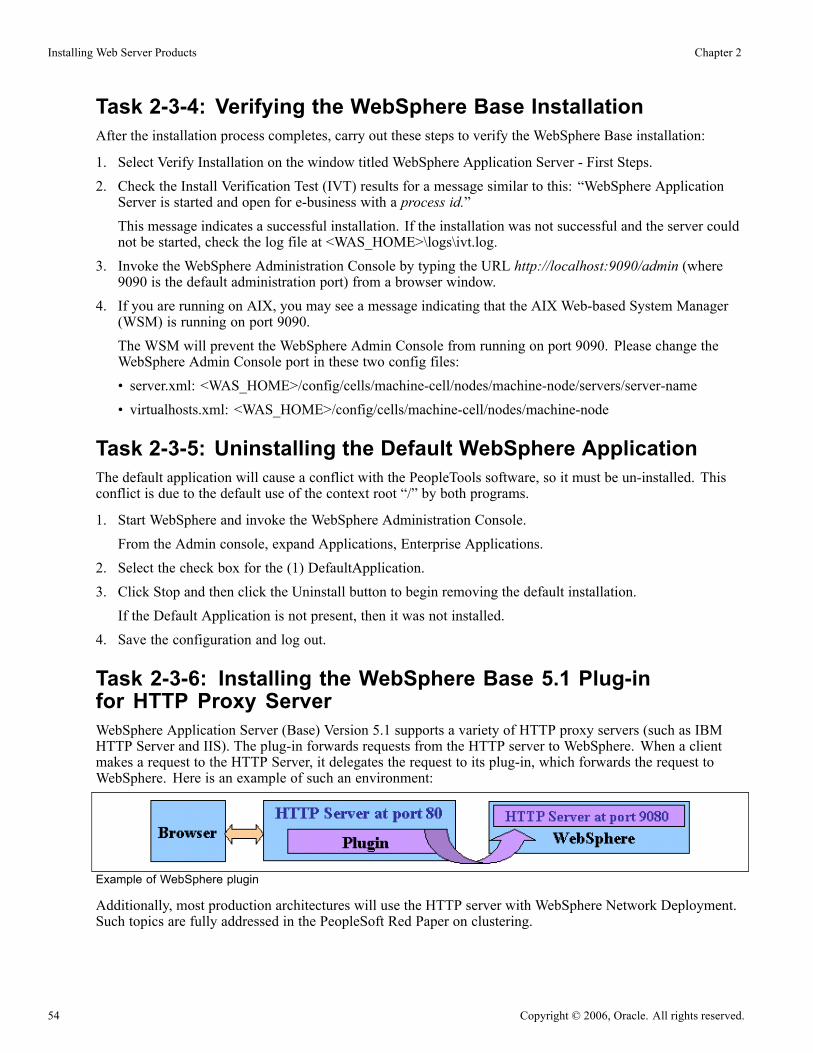
Installing Web Server Products Chapter 2
Task 2-3-4: Verifying the WebSphere Base InstallationAfter the installation process completes, carry out these steps to verify the WebSphere Base installation:
1. Select Verify Installation on the window titled WebSphere Application Server - First Steps.2. Check the Install Verification Test (IVT) results for a message similar to this: “WebSphere ApplicationServer is started and open for e-business with a process id.”This message indicates a successful installation. If the installation was not successful and the server couldnot be started, check the log file at <WAS_HOME>\logs\ivt.log.
3. Invoke the WebSphere Administration Console by typing the URL http://localhost:9090/admin (where9090 is the default administration port) from a browser window.
4. If you are running on AIX, you may see a message indicating that the AIX Web-based System Manager(WSM) is running on port 9090.The WSM will prevent the WebSphere Admin Console from running on port 9090. Please change theWebSphere Admin Console port in these two config files:• server.xml: <WAS_HOME>/config/cells/machine-cell/nodes/machine-node/servers/server-name• virtualhosts.xml: <WAS_HOME>/config/cells/machine-cell/nodes/machine-node
Task 2-3-5: Uninstalling the Default WebSphere ApplicationThe default application will cause a conflict with the PeopleTools software, so it must be un-installed. Thisconflict is due to the default use of the context root “/” by both programs.
1. Start WebSphere and invoke the WebSphere Administration Console.From the Admin console, expand Applications, Enterprise Applications.
2. Select the check box for the (1) DefaultApplication.3. Click Stop and then click the Uninstall button to begin removing the default installation.If the Default Application is not present, then it was not installed.
4. Save the configuration and log out.
Task 2-3-6: Installing the WebSphere Base 5.1 Plug-infor HTTP Proxy ServerWebSphere Application Server (Base) Version 5.1 supports a variety of HTTP proxy servers (such as IBMHTTP Server and IIS). The plug-in forwards requests from the HTTP server to WebSphere. When a clientmakes a request to the HTTP Server, it delegates the request to its plug-in, which forwards the request toWebSphere. Here is an example of such an environment:
Example of WebSphere plugin
Additionally, most production architectures will use the HTTP server with WebSphere Network Deployment.Such topics are fully addressed in the PeopleSoft Red Paper on clustering.
54 Copyright © 2006, Oracle. All rights reserved.
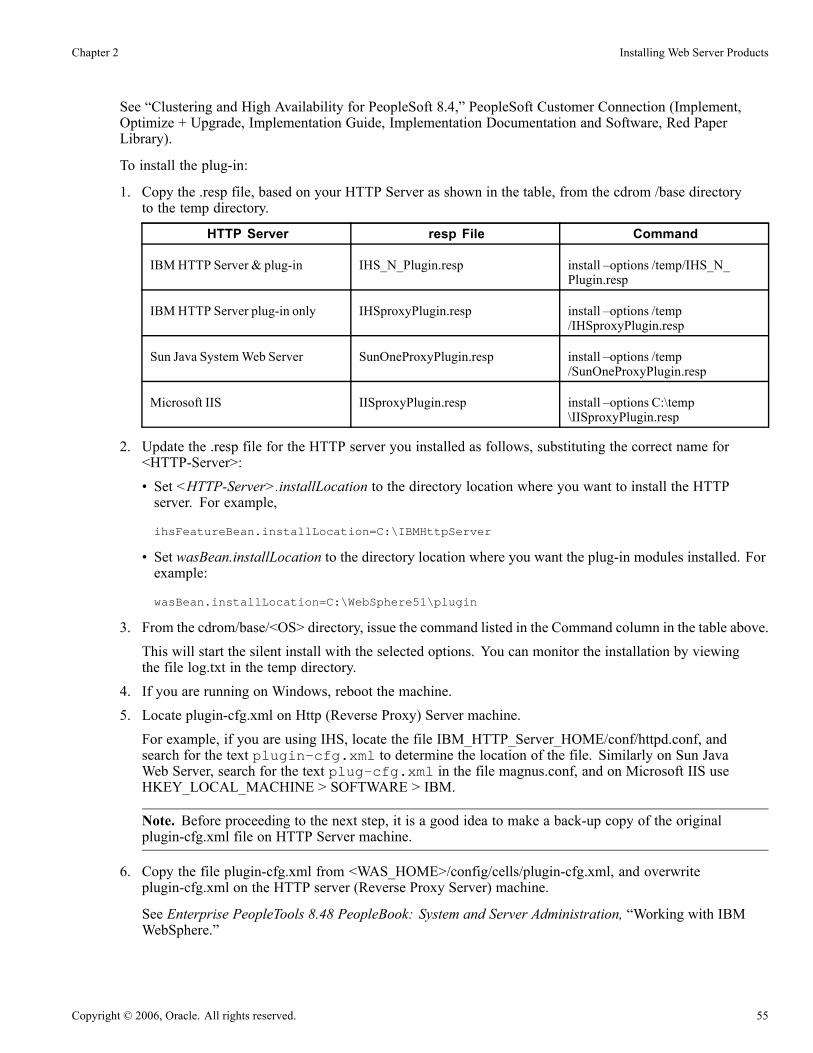
Chapter 2 Installing Web Server Products
See “Clustering and High Availability for PeopleSoft 8.4,” PeopleSoft Customer Connection (Implement,Optimize + Upgrade, Implementation Guide, Implementation Documentation and Software, Red PaperLibrary).
To install the plug-in:
1. Copy the .resp file, based on your HTTP Server as shown in the table, from the cdrom /base directoryto the temp directory.
HTTP Server resp File Command
IBMHTTP Server & plug-in IHS_N_Plugin.resp install –options /temp/IHS_N_Plugin.resp
IBMHTTP Server plug-in only IHSproxyPlugin.resp install –options /temp/IHSproxyPlugin.resp
Sun Java SystemWeb Server SunOneProxyPlugin.resp install –options /temp/SunOneProxyPlugin.resp
Microsoft IIS IISproxyPlugin.resp install –options C:\temp\IISproxyPlugin.resp
2. Update the .resp file for the HTTP server you installed as follows, substituting the correct name for<HTTP-Server>:• Set <HTTP-Server>.installLocation to the directory location where you want to install the HTTPserver. For example,
ihsFeatureBean.installLocation=C:\IBMHttpServer
• Set wasBean.installLocation to the directory location where you want the plug-in modules installed. Forexample:
wasBean.installLocation=C:\WebSphere51\plugin
3. From the cdrom/base/<OS> directory, issue the command listed in the Command column in the table above.This will start the silent install with the selected options. You can monitor the installation by viewingthe file log.txt in the temp directory.
4. If you are running on Windows, reboot the machine.5. Locate plugin-cfg.xml on Http (Reverse Proxy) Server machine.For example, if you are using IHS, locate the file IBM_HTTP_Server_HOME/conf/httpd.conf, andsearch for the text plugin-cfg.xml to determine the location of the file. Similarly on Sun JavaWeb Server, search for the text plug-cfg.xml in the file magnus.conf, and on Microsoft IIS useHKEY_LOCAL_MACHINE > SOFTWARE > IBM.
Note. Before proceeding to the next step, it is a good idea to make a back-up copy of the originalplugin-cfg.xml file on HTTP Server machine.
6. Copy the file plugin-cfg.xml from <WAS_HOME>/config/cells/plugin-cfg.xml, and overwriteplugin-cfg.xml on the HTTP server (Reverse Proxy Server) machine.
See Enterprise PeopleTools 8.48 PeopleBook: System and Server Administration, “Working with IBMWebSphere.”
Copyright © 2006, Oracle. All rights reserved. 55

Installing Web Server Products Chapter 2
Task 2-3-7: Installing WebSphere Network Deployment ManagerWebSphere Application Server (Base) Version 5.1 also contains the Network Deployment (ND) component. Ifyou plan on implementing a WebSphere Base clustered environment, install WebSphere 5.1 ND.
Note. WebSphere ND can be installed using either GUI or silent install method. You only need to choose oneof these methods to install an instance of WebSphere ND.
In order to use WebSphere ND, you will first install the Deployment Manager:
1. Stop any HTTP Server (IHS, IIS, or Sun ONE) running on the system.
Open a Command prompt window on Windows, (or xterm on UNIX), navigate to <WAS_HOME>\bin,and type stopserver servern (where n is the server number, for example server1). Wait until youget a confirmation message that the server has stopped.
If you get the error “Could not create SOAP connector”, the server was not running.
2. Run the following command from the CD-ROM drive directory.
• Windows:
installDeployMgr.bat
• UNIX:
installDeployMgr.sh
Task 2-3-8: Upgrading WebSphere 5.1 Base andWebSphere ND to 5.1.1.7PrerequisitesThis section discusses upgrading WebSphere Base or ND to version 5.1.1.7 using Fix pack 1, Cumulative Fix7, and JDK Fix.
If you are planning to use WebSphere Base or ND and IHS on the same machine, then install IHS firstbefore upgrading WebSphere.
• Stop both WebSphere Base and IHS.• Ensure you have adequate space in your respective <base-home> and <ND-home> directories for theFix pack installation.
• If WebSphere ND is used in the environment, apply the Fixpack to ND first before upgrading WebSphereBase.
• Set the JAVA_HOME variable to WAS_Home/java.On AIX, for example: export JAVA_HOME=/usr/WebSphere51/AppServer/java
Applying the Fix Pack, Cumulative Fix, and JDK FixTo apply Fix Pack 1 to WebSphere Base and ND:
1. Run one of the following command from the cdrom directory:• For WebSphere Base, run UpdateBase.sh (bat)
• For WebSphere ND, run UpdateDeployMgr.sh (bat)
56 Copyright © 2006, Oracle. All rights reserved.
Chapter 2 Installing Web Server Products
2. Enter the WebSphere and IHS home directories.The install program will then start to apply the fix pack based on these user inputs.
Note. OnWindows, if you have installedWebSphere Base 5.1 in “c:\Program Files\WebSphere\AppServer”,please enter the WebSphere home directory as c:\progra~1\WebSphere\AppServer when you runUpdateBase.cmd.
3. After the fix pack has been applied, run the versionInfo.sh (bat) program from<WAS_HOME>/bin directory to verify the installation of the fix pack.The WebSphere Installed Product should be at version 5.1.1.7 and IBM WebSphere JDK at 1.4.2.1.1.
4. Check PeopleSoft Customer Connection at ftp://ftp.peoplesoft.com/outgoing/PTools/websphere/511PT848to check whether any iFixes are needed.If iFixes are present, you must install them.
Note. If the upgrade did not complete successfully, refer to the next section on troubleshooting.
Note. Upgrade IBM HTTP Server only: If you are planning to use IHS on a separate machine, then invoke theUpdateIHSOnly.sh (bat) script from the cdrom directory to apply the fixpack to IHS only.
The UpdateBase or UpdateDeployMgr scripts generate the following output logs in the TMP directory onWindows:
Fixpack fixpack.log
Cumulative Fix CumlFix5117.log
JdkFix 1421 JdkFix5117.log
IFix log ifixes.log
Task 2-3-9: Troubleshooting the WebSphereInstallation and UpgradeRead this section if you were not able to upgrade WebSphere Base or WebSphere ND or to apply the FixPack, Cumulative Fix pack, or JDK Fix successfully.
1. If the installation of the Fix Pack 1 does not complete successfully, check for errors in the followinglogs, where <fixpack>.log is the package name:• UNIX: /tmp/<fixpack>.log• Windows: C:/temp/<fixpack>.log• WebSphere update logs: <WAS_HOME>/logs/update
2. Try applying the Fix Pack, Cumulative Fix, or JDK fix using GUI mode, by running the command
<WAS_HOME>/update/UpdateWizard.sh (bat)
For example:On UNIX: /usr/WebSphere51/AppServer/update/UpdateWizard.shOn Windows: C:\webSphere511\AppServer\update\UpdateWizard.bat
Copyright © 2006, Oracle. All rights reserved. 57

Installing Web Server Products Chapter 2
Use this method if you are running on Windows, and you are unable to upgrade WebSphere Base orWebSphere ND due to the installation of Embedded Messaging in a non-default location.
3. Enter the home directories for WebSphere Base or ND.Select the Install fix packs radio button.
Update Installation wizard - Select installation type
4. Enter the Fix Pack location.The location of the Fix Pack for WebSphere Base is typically <WAS_HOME>/update/fixPacks_base andthe location for WebSphere ND is <ND_HOME>/update/fixPacks_nd. The GUI Wizard also asks you tospecify the location of Embedded Messaging to be upgraded.
Update Installation wizard - Specify fix pack location
See AlsoIBM WebSphere 5.1.1 InfoCenter, http://publib.boulder.ibm.com/infocenter/ws51help/index.jsp
58 Copyright © 2006, Oracle. All rights reserved.
CHAPTER 3
Installing Additional Components
This chapter discusses:
• Installing Tuxedo on Windows
• Installing Tuxedo on UNIX
• Installing Micro Focus Net Express for Windows
• Installing Micro Focus Server Express for UNIX and Linux
See Also“Clustering and High Availability for PeopleSoft 8.4,” PeopleSoft Customer Connection (Implement, Optimize +Upgrade, Implementation Guide, Implementation Documentation and Software, Red Paper Library)
“Required Operating System, RDBMS, and Additional Component Patches Required for Installation,” PeopleSoftCustomer Connection, (Implement, Optimize + Upgrade, Implementation Guide, Supported Platforms, PeopleSoftEnterprise. Select your database platform or release number.)
“Installing and Configuring Software for Crystal Reports”
Task 3-1: Installing Tuxedo on WindowsThis section discusses:
• Understanding Tuxedo
• Prerequisites
• Uninstalling Tuxedo from Windows (Recommended)
• Designating the Application Server Administrator
• Installing Tuxedo on Windows
• Checking the Service Account
• Setting Up the Tuxedo Services
• Verifying the Server Installation
• Ensuring that Tuxedo Coexists with Earlier Versions
Copyright © 2006, Oracle. All rights reserved. 59

Installing Additional Components Chapter 3
Understanding TuxedoThe PeopleSoft application server uses BEA's middleware product, Tuxedo, to perform transactionmanagement, messaging, and administration. This task guides you through the installation of Tuxedo onyour server. It is essential that you install PeopleSoft Edition - BEA Tuxedo version 8.1, which you receivewith your PeopleSoft shipment as part of the CD-ROM Library. You need to install Tuxedo before you goany further in setting up your application server and your PeopleSoft Pure Internet Architecture. After youperform the installation described here, you will configure the application server environment to incorporateTuxedo with the PeopleSoft components.
See Enterprise PeopleTools 8.48 PeopleBook: System and Server Administration.
Note. Only one instance of Tuxedo 8.1 can be installed on a Windows machine at any given time, due tosystem-wide registry settings.
The installation process uses a single installation script (install.sh on UNIX and pstuxinstall.exeon Windows) to automatically install Tuxedo.
Note. It is critical that you use the PeopleSoft Edition - BEA/Tuxedo 8.1 delivered with PeopleSoft; theversion of Tuxedo that you receive with your PeopleSoft shipment is the only version of Tuxedo thatPeopleSoft supports with this version of PeopleTools. You cannot use any other version of Tuxedo withPeopleSoft applications. For example, if you obtain BEA/Tuxedo 8.1 directly from BEA, it may not support allfunctions required due to patch-level differences.
Note. All customers receive the 128-bit version of the CD-ROM, which allows users to enable 128-bitencryption.
The PeopleSoft Edition - BEA/Tuxedo CD-ROM installs serial and license information transparently to theuser; there are no numbers to obtain. If you encounter a serial or licensing error on installation, you probablyhave an old version of Tuxedo installed.
PeopleSoft Edition - BEA/Tuxedo CD-ROM licenses users to use Tuxedo's runtime/administrationenvironment for the purposes of installing, monitoring, and tuning their Tuxedo-based PeopleSoft applicationservers. Users are not licensed to directly use the Tuxedo development environment. Users will be ableto use any higher level API or tools that PeopleTools developers build with Tuxedo and will be able torun applications that are processed with our Tuxedo enhanced tools. If you wish to extend the PeopleSoftapplication's functionality by directly using the Tuxedo development API, you need to acquire a full-uselicense for Tuxedo from BEA Systems.
See AlsoEnterprise PeopleTools 8.48 PeopleBook: Internet Technology
PrerequisitesBefore you begin to install Tuxedo, make sure that you have the following resources in place:
• PeopleSoft Edition - BEA/Tuxedo System 8.1 Installation for Windows and UNIX CD-ROM• TCP/IP connectivity (required for PeopleSoft 8.4x) between the client machine and the application server• Approximately 235 MB of free disk space on the application server• A CD-ROM drive or access—locally or through the network—for the machine on which you planto install Tuxedo
60 Copyright © 2006, Oracle. All rights reserved.

Chapter 3 Installing Additional Components
Task 3-1-1: Uninstalling Tuxedo from Windows (Recommended)You may already have Tuxedo 8.1 installed on your system from an earlier version of PeopleTools. There maybe patch level differences between the release which you are using and that to which you are upgrading. Inthis case you must uninstall the existing version plus patch and reinstall using the latest version provided byPeopleSoft.
Note that you can verify the required Tuxedo patch level for this release in the Release Notes. You can verifythat patch level which has been installed by examining the file %TUXDIR%\udataobj\patchlev. This file willindicate the patch level installed. At the end of the file you will see an entry such as:
192. CR229736 TUX8.1 : Please propagate CR208755 from Tuxedo7.1
The above entry indicates that patch level 192 has been installed. The absence of this file indicates that nopatch has been installed.
This version of Tuxedo is only supported for PeopleTools 8.44 and above, and will not work with earlierversions of PeopleTools. If you have a previous version of BEA/Tuxedo installed, we recommend that youuninstall the old version or use another machine. Only one instance of Tuxedo 8.1 can exist on a Windows boxsince the BEA ProcMGR service is a machine-level service capable of searching a single registry tree.
Note. If you wish to use two versions of PeopleTools that depend on different versions of Tuxedo, you shouldread the section “Ensuring that Tuxedo Coexists with Earlier Versions” before continuing.
You may have to uninstall Tuxedo for these reasons:
• You are having problems starting Tuxedo and decide to reinstall.
• You no longer need Tuxedo on a machine.
• You are installing a newer release of Tuxedo.
• Patch differences exist between the version of Tuxedo 8.1 that is currently installed and that requiredfor this PeopleTools release.
To uninstall Tuxedo from Windows:
1. Using PSADMIN, shut down any application server and process scheduler domains that may be runningon the machine.
2. Stop the processes for the Tuxedo Monitor and the Tuxedo Administrative Web Server (wlisten andtuxwsvr), if applicable.a. Right-click on the taskbar and select Task Manager.b. Highlight wlisten, and click the End Task button.c. Highlight tuxwsvr and click the End Task button.d. Exit Task Manager.
3. Stop and set the TListen 8.1 service to manual, if applicable.a. Select Start, Settings, Control Panel. Double-click Administrative Tools, and double-click theServices icon.
b. Select TListen 8.1 and click the Stop button.c. Choose the Startup Type and set to Manual.
4. Stop and set the BEA ProcMGR V8.1 service to manual.
Copyright © 2006, Oracle. All rights reserved. 61
Installing Additional Components Chapter 3
a. Select Start, Settings, Control Panel. Double-click Administrative Tools, and double-click theServices icon.
b. Select BEA ProcMGR V8.1 and click the Stop button.c. Choose the Startup Type and set to Manual.
5. Reboot your machine.6. Uninstall Tuxedo in one of the following ways:• Using the Tuxedo 8.1 installation CD provided by PeopleSoft, open a Command Window, navigate to theroot of the CD, and enter pstuxinstall rmall. This will remove Tuxedo 8.1 plus any deliveredTuxedo patches from your system.
• Using the Add/Remove Programs dialog, in sequence remove: Tuxedo 8.1 RP and then Tuxedo 8.1.7. Go to the Control Panel, double-click on the System icon, and then perform the following:a. Make sure <TUXDIR>\bin is deleted from PATH.b. Delete the environment variable TUXDIR.c. Make sure you click on Apply and OK to save your changes.
8. Using Explorer, delete the Tuxedo home directory, such as c:\bea\tuxedo8.1.If you are unable to delete any files, reboot your machine and retry.
Task 3-1-2: Designating the Application Server AdministratorFirst you need to designate an existing user—or create a new user such as TUXADM or some otheraccount—to be the Application Server Administrator.
Note. The designated user must be a local Windows administrator and must have full system privileges. TheTuxedo install program creates a new service for Windows—called BEA ProcMGR V8.1—for which youneed administrator privileges. This service was developed to port BEA/Tuxedo from UNIX to Windows.Administrator rights are required since system registry settings are updated. Once this new service is created,you must reboot to start it.
Note. The Application Server Administrator, not the Windows Administrator, will install Tuxedo.
To designate the Application Server Administrator:
1. To add the user, add the user ID by choosing Start, Settings, Control Panel, Administrative Tools,Computer Management, Local Users and Groups.Keep in mind that you can also use an existing account if you don't care to create a new one. You canset this to the system account or an account that is a domain administrator (if there is a need to accessfiles on the domain).
2. Expand Local Users and Groups.3. If the user ID does not yet exist, highlight the Users folder, and select Action, New User.4. On the New User dialog box, specify the information for the new account.Make sure to deselect the User must change password at next logon check box.
5. Expand the Groups folder.6. Right-click the Administrators group, and select All Tasks, Add to Group, Add.
62 Copyright © 2006, Oracle. All rights reserved.

Chapter 3 Installing Additional Components
7. Click Locations to select the local machine or the network domain in which you created the new user.8. Enter the new user name you created in the object names box.9. Click OK, and click Apply and OK again to accept the changes.
Task 3-1-3: Installing Tuxedo on WindowsHere is how to properly install the Tuxedo component of your application server.
To install Tuxedo on Windows:
1. Insert the PeopleSoft Tuxedo CD-ROM labeled “Tuxedo 8.1 CD-1” into the CD-ROM drive.Using Explorer, navigate to the root directory on the CD:
D:\
(This assumes that your CD-ROM drive is your D drive.)2. Double-click pstuxinstall.exe to begin the installation process.3. You are prompted for the BEA Home directory. If you have existing BEA products on the machine, youmay supply an already designated BEA Home location or accept the default of c:\bea.
4. You are prompted for the Tuxedo installation directory. This can be a subdirectory of the BEA Homedirectory or a directory of your choice.
5. You are prompted for the TListen port. The TListen service is not used by PeopleSoft application serversso you can accept the default unless you intend to use the Tuxedo Web Monitor. Unless you use the TuxedoWeb Monitor, you should disable the TListen service following the installation.
Note. If you intend to maintain multiple versions of Tuxedo on the same physical machine, it is wise tochoose a port other than the default 3050 because the default port may clash with an existing TListenentry for an earlier version of Tuxedo.
See Ensuring that Tuxedo Coexists with Earlier Versions.6. You are prompted for the TListen password. Again, unless you plan to use the Tuxedo Web Monitor, thisservice will be disabled following installation so you may go ahead and accept the default.
Note. If you intend to use the Tuxedo Web monitor for domain administration, PeopleSoft recommendsthat the TListen password be hard to guess and securely protected, since the Web monitor can start and stopproduction application server domains.
7. If you are satisfied with your selections confirm this when requested. This is your final opportunity tochoose your Tuxedo installation location.
8. Tuxedo 8.1 plus patch will now be installed to your system. When the installation has completed you arenotified by the command line installer.
9. Reboot your machine to complete the installation.
Task 3-1-4: Checking the Service AccountNow you need to ensure that the Windows services are properly configured. PeopleSoft recommends installingthe application server binaries locally on your C drive, for best performance, and using the Local Systemaccount radio button (see below) to start the BEA ProcMGR V8.1 service, with these exceptions:
Copyright © 2006, Oracle. All rights reserved. 63

Installing Additional Components Chapter 3
• If you plan to install the PeopleSoft application server binaries (as in, psappsrv.exe and so on) on a remotefile server, you must select the This Account radio button. If you intend to use this Windows service tostart Process Scheduler, you must always select the This Account radio button. Enter the name of yourDomain/Windows username—not the machine name—and your password. Then click OK.
• If the PeopleSoft application server binaries are local, that is, they exist on your local hard drive, you canuse either the Local System account or This Account radio button.
Note. When using Tuxedo with Process Scheduler, you must use the Windows username that starts theProcess Scheduler server agent. This is necessary because the installation of the PeopleSoft ODBC driversets up the registry settings to be accessible only by this username. If you do not use the correct Windowsusername, processes that require the ODBC registry information (such as Crystal Reports) will fail.
Task 3-1-5: Setting Up the Tuxedo ServicesTo set up the Tuxedo services:
1. Log on again as the Application Server Administrator, TUXADM, or a designated user ID.2. Open the Control Panel and double-click Administrative Tools.3. Select Computer Management and expand Services and Applications.4. Select Services and locate the service labeled BEA ProcMGR V8.1.Double-click BEA ProcMGR V8.1 to open the properties dialog box.
5. On the General tab, if the Stop button is enabled, click on it to stop the current BEA ProcMGRV8.1 process.6. Select Log On.
64 Copyright © 2006, Oracle. All rights reserved.

Chapter 3 Installing Additional Components
BEA ProcMGR V8.1 Properties dialog box: Log On tab
Note. The option used—Local System account or This Account—must be consistent with your ODBCcatalog definition, due to registry operations. For example, if you use the Local System Account option,you must also catalog your ODBC data source using System DSN.
7. Choose either Local System account or This Account.
Note. When you configure your application server domain, the user ID designated to be the ApplicationServer Administrator must have read and write permissions to the PeopleSoft file directory and readpermission to the %TUXDIR% directory, such as c:\bea\tuxedo8.1.
See “Configuring the Application Server on Windows.”
Note. If you are running on Windows and are configuring a search index that resides on a mapped networkdrive, you must ensure that the User ID of the BEA ProcMGR service has access to network drivesaccessed by the search engine. The search engine stores the search indexes at <PS_HOME>/data/search.However, this path can be changed in the application or the Process Scheduler's configuration. If thispath is changed in these configurations and it points to a network drive, please ensure that the user IDthat starts the BEA ProcMGR V8.1 service has access to these network drives. The application serverand the process scheduler are started by the BEA ProcMGR V8.1 service and therefore inherit the samepermissions as the BEA ProcMGR V8.1 service.
8. Select General.
Make sure that Startup Type is set to Automatic.
Copyright © 2006, Oracle. All rights reserved. 65

Installing Additional Components Chapter 3
BEA ProcMGR V8.1 Properties dialog box: General tab
9. Select Start.A message in the Services dialog box will indicate the Started status. Close the dialog box to returnto the Control Panel.
10. As mentioned, unless you intend to use the Tuxedo Web Monitor, you should disable the TListen 8.1service.
Task 3-1-6: Verifying the Server InstallationAt this point, you should verify that the server installation was successful.
To verify the server installation:
1. Go to the udataobj directory under <TUXDIR>.
2. Ensure that the lic.txt file exists.
3. Verify that the file patchlev exists.
If neither of these files exist:
• Verify that no error messages were displayed during installation of Tuxedo 8.1.
• Verify that you have sufficient disk space on the directory or file system used for <TUXDIR>.
• Reinstall BEA/Tuxedo 8.1.
66 Copyright © 2006, Oracle. All rights reserved.
Chapter 3 Installing Additional Components
Task 3-1-7: Ensuring that Tuxedo Coexists with Earlier VersionsThis section discusses:
• Understanding the Use of Multiple Tuxedo Versions
• Checking Your Environment Variables
• Changing the TListen Port
Understanding the Use of Multiple Tuxedo VersionsPeopleTools 8.44 and above use Tuxedo 8.1. Earlier versions of PeopleTools rely on earlier versions ofTuxedo—for example, PeopleTools 8.41 uses Tuxedo 6.5. If you are installing only PeopleTools 8.48, you cansafely skip this section. If you need to run application servers on PeopleTools 8.48 and earlier PeopleToolsversions on the same machine, read this section to learn about coexistence issues. Although Tuxedo 8.1coexists with earlier Tuxedo versions on the same machine, you may need to take a number of manual stepsto ensure that these products share the same environment gracefully.
Checking Your Environment VariablesInstalling Tuxedo changes your TUXDIR and PATH environment variables. Although you do not need tochange these environment variables to successfully run PeopleTools 8.48 with Tuxedo 8.1, earlier versions ofPeopleTools rely on these environment variables being set.
To change your environment variables:
1. Set your <TUXDIR> environment variable to reflect the installation directory of your earlier Tuxedorelease. For example, Tuxedo 6.5 may be installed to c:\tux65. This means that TUXDIR=C:\tux65is the correct setting.
2. Your <PATH> environment variable must contain <TUXDIR>\bin for the earlier Tuxedoversion before any entries for Tuxedo 8.1 <TUXDIR>\bin. For example the settingPATH=c:\winnt;c:\bea\tuxedo8.1\bin;c:\tux65\bin will cause your pre-8.44 application server domains tono longer work. You would need to change this to PATH=c:\winnt;c:\tux65\bin;c:\bea\tuxedo8.1\bin;
Note. PeopleTools 8.44 and later do not use the environment variables to discover the installation locationof Tuxedo 8.1. The PSADMIN tool retrieves these values from the Windows registry.
Changing the TListen PortInstalling Tuxedo 8.1 and earlier creates a new service known as TListen. In most cases, you can disable thisservice as it is not required to run PeopleTools application server domains. However, if you intend to use theTuxedo Web Monitor you may wish to ensure that there is no port clash with earlier versions. This port isdetermined at installation and should be changed to a port other than the default 3050 if you intend on usingthe TListen service for Tuxedo 8.1 and an earlier version concurrently.
Task 3-2: Installing Tuxedo on UNIXThis section discusses:
• Understanding Tuxedo
• Prerequisites
• Removing Tuxedo on UNIX
Copyright © 2006, Oracle. All rights reserved. 67
Installing Additional Components Chapter 3
• Completing the Preinstallation Checklist
• FTPing Tuxedo Installation Files to UNIX
• Designating the Tuxedo Owner
• Installing Tuxedo on UNIX
• Verifying the Server Installation
Understanding TuxedoThe PeopleSoft application server uses BEA's middleware product, Tuxedo, to perform transactionmanagement, messaging, and administration. This chapter guides you through the installation of Tuxedo onyour server. It is essential that you install PeopleSoft Edition - BEA Tuxedo version 8.1, which you receivewith your PeopleSoft shipment as part of the CD-ROM Library. You need to install Tuxedo before you go anyfurther in setting up your application server and your PeopleSoft Internet Architecture. After you performthe installation described here, you will configure the application server environment to incorporate Tuxedowith the PeopleSoft components.
Note. PeopleSoft ships Tuxedo 8.1 with PeopleTools 8.44 and above. If you have a previous version ofTuxedo installed, you need to install the new version of Tuxedo, and re-create your application server domains.(You must create your domains using PSADMIN; you cannot migrate existing domains.) You can alsouse PSADMIN's domain import utility.
See Enterprise PeopleTools 8.48 PeopleBook: System and Server Administration.
Note. Tuxedo should only be installed once for each release on a machine, regardless of the number ofPeopleSoft applications or databases the server supports. For example, if you are a PeopleTools 8.1x customerand have Tuxedo 6.5 installed, you may install Tuxedo 6.5 and 8.1 on the same machine in separate directories(for example, /bea/tuxedo/8.1 and /prod/tuxedo/6.5).
The installation process uses a single installation script (install.sh on UNIX and pstuxinstall.exeon Windows) to automatically install all of these products.
Note. It is critical that you use the PeopleSoft Edition - BEA/Tuxedo 8.1 delivered with PeopleSoft; theversion of Tuxedo that you receive with your PeopleSoft shipment is the only version of Tuxedo thatPeopleSoft supports with this version of PeopleTools. You cannot use any other version of Tuxedo withPeopleSoft applications. For example, if you obtain BEA/Tuxedo 8.1 directly from BEA, it may not support allfunctions required due to patch-level differences.
Note. All customers receive the 128-bit version of the CD-ROM, which allows users to enable 128-bitencryption.
The PeopleSoft Edition - BEA/Tuxedo CD-ROM installs serial and license information transparently to theuser; there are no numbers to obtain. If you encounter a serial or licensing error on installation, you probablyhave an old version of Tuxedo installed.
68 Copyright © 2006, Oracle. All rights reserved.
Chapter 3 Installing Additional Components
PeopleSoft Edition - BEA/Tuxedo CD-ROM licenses users to use Tuxedo's runtime/administrationenvironment for the purposes of installing, monitoring, and tuning their Tuxedo-based PeopleSoft applicationservers. Users are not licensed to directly use the Tuxedo development environment. Users will be ableto use any higher level API or tools that PeopleTools developers build with Tuxedo and will be able torun applications that are processed with our Tuxedo enhanced tools. If you wish to extend the PeopleSoftapplication's functionality by directly using the Tuxedo development API, you need to acquire a full-uselicense for Tuxedo from BEA Systems.
See AlsoEnterprise PeopleTools 8.48 PeopleBook: Internet Technology
PrerequisitesBefore you begin to install Tuxedo, make sure that you have the following resources in place:
• PeopleSoft Edition - BEA/Tuxedo System 8.1 Installation for Windows and UNIX CD-ROM• TCP/IP connectivity (required for PeopleSoft 8.4x) between the client machine and the application server• A CD-ROM drive or access—locally or through the network—for the machine on which you planto install Tuxedo
Note. If CD-ROM access is unavailable, you must FTP files from the BEA/Tuxedo CD to UNIX, usingthe instructions provided below.
• Root access on the UNIX machine• Approximately 250 MB of free disk space on the application server
Task 3-2-1: Removing Tuxedo on UNIXYou may already have Tuxedo 8.1 installed on your system from an earlier release of PeopleTools. There maybe patch level differences between the release which you are using and that to which you are upgrading. Notethat you can verify the required Tuxedo patch level for this release in the Release Notes. You can verify thatpatch level which has been installed by examining the file $TUXDIR/udataobj/patchlev. This file will indicatethe patch level installed. At the end of the file you will see an entry such as:
192. CR229736 TUX8.1 : Please propagate CR208755 from Tuxedo7.1
The above entry indicates that patch level 192 has been installed. The absence of this file indicates that nopatch has been installed.
You may have to remove your Tuxedo installation on UNIX for the following reasons:
• You are having problems starting Tuxedo and decide to reinstall.• You no longer need Tuxedo on a machine.• You are installing a newer release of Tuxedo.• Patch differences exist between the version of Tuxedo 8.1 that is currently installed and that requiredfor this PeopleTools release.
To remove Tuxedo from UNIX:
1. Using PSADMIN, shut down any application server and process scheduler domains that may be runningon the machine.
Copyright © 2006, Oracle. All rights reserved. 69
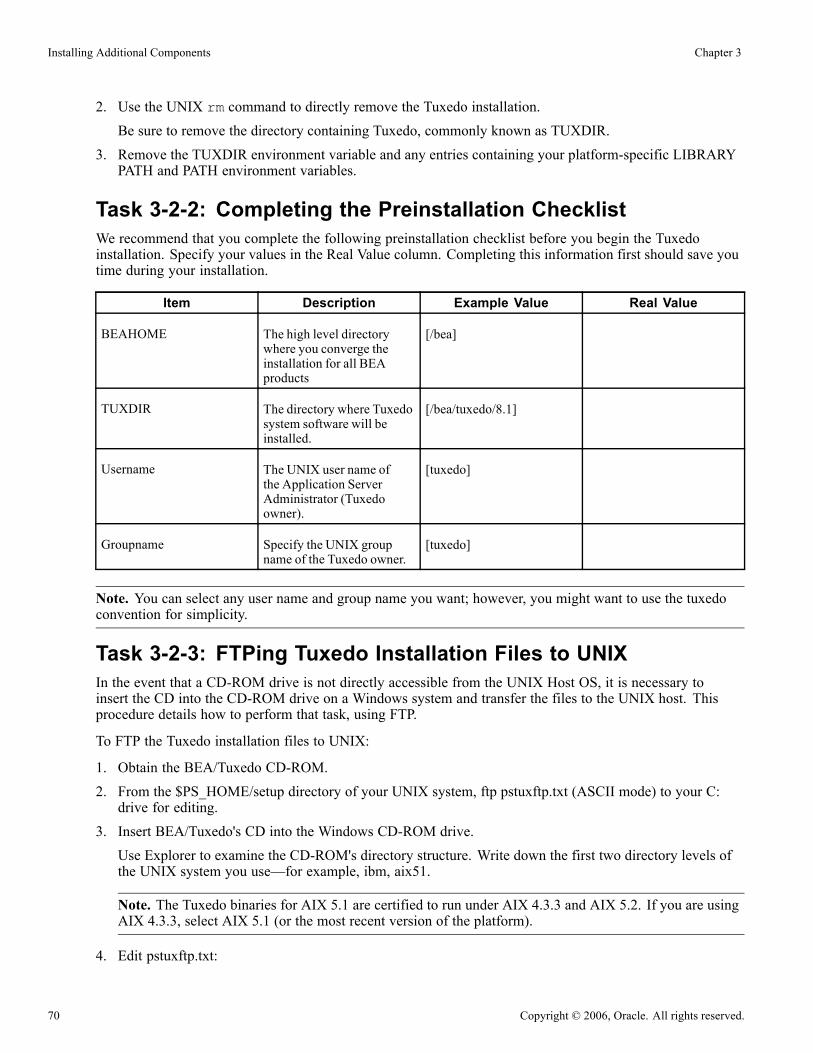
Installing Additional Components Chapter 3
2. Use the UNIX rm command to directly remove the Tuxedo installation.Be sure to remove the directory containing Tuxedo, commonly known as TUXDIR.
3. Remove the TUXDIR environment variable and any entries containing your platform-specific LIBRARYPATH and PATH environment variables.
Task 3-2-2: Completing the Preinstallation ChecklistWe recommend that you complete the following preinstallation checklist before you begin the Tuxedoinstallation. Specify your values in the Real Value column. Completing this information first should save youtime during your installation.
Item Description Example Value Real Value
BEAHOME The high level directorywhere you converge theinstallation for all BEAproducts
[/bea]
TUXDIR The directory where Tuxedosystem software will beinstalled.
[/bea/tuxedo/8.1]
Username The UNIX user name ofthe Application ServerAdministrator (Tuxedoowner).
[tuxedo]
Groupname Specify the UNIX groupname of the Tuxedo owner.
[tuxedo]
Note. You can select any user name and group name you want; however, you might want to use the tuxedoconvention for simplicity.
Task 3-2-3: FTPing Tuxedo Installation Files to UNIXIn the event that a CD-ROM drive is not directly accessible from the UNIX Host OS, it is necessary toinsert the CD into the CD-ROM drive on a Windows system and transfer the files to the UNIX host. Thisprocedure details how to perform that task, using FTP.
To FTP the Tuxedo installation files to UNIX:
1. Obtain the BEA/Tuxedo CD-ROM.2. From the $PS_HOME/setup directory of your UNIX system, ftp pstuxftp.txt (ASCII mode) to your C:drive for editing.
3. Insert BEA/Tuxedo's CD into the Windows CD-ROM drive.Use Explorer to examine the CD-ROM's directory structure. Write down the first two directory levels ofthe UNIX system you use—for example, ibm, aix51.
Note. The Tuxedo binaries for AIX 5.1 are certified to run under AIX 4.3.3 and AIX 5.2. If you are usingAIX 4.3.3, select AIX 5.1 (or the most recent version of the platform).
4. Edit pstuxftp.txt:
70 Copyright © 2006, Oracle. All rights reserved.
Chapter 3 Installing Additional Components
a. Replace the tuxadmin and password entries with an appropriate user name and password to installthe Tuxedo binaries on the destination machine.This user name and password should correspond to the correct set of privileges to install and administerTuxedo on the UNIX machine.
b. Replace vendor with the vendor name, such as ibm, and release with the OS release, such as aix51.These are the details that you noted in the previous step. Be sure to enter these values in lowercase only.
c. Replace all /home/tux81cd entries with the directory name you wish to use as your high-level, virtualCD directory, such as /cdromtux.Make this change for the lines beginning with mkdir, put, and cd.
Note. Do not forget about case sensitivity. Windows file names are case insensitive; it does not matter whatcase you enter them in. UNIX directory names must be in the correct case, matching the case on the CD.
d. You may also need to replace all d:\ entries if your CD-ROM drive is not installed as the D: drive.5. Run the pstuxftp.txt script to transfer files to UNIX. This script should be run using ftp from a DOScommand prompt. This script should be run as follows:
ftp -n -s:pstuxftp.txt unix_machinename
6. On UNIX, chmod the install.sh file to make it executable. For example:
chmod +x install.sh
7. Continue to step 5 in the following section, Installing Tuxedo on UNIX.
Task 3-2-4: Designating the Tuxedo OwnerA new or existing user must be designated as the Tuxedo owner.
To designate the Tuxedo owner:
1. Log in as root.2. Create the UNIX group and the user name of the individual who will be the owner of Tuxedo.Using the values from the preinstallation checklist, create the group and specify the group name. Thencreate the user who will be the Tuxedo owner, specifying the user name, group name, and home directory,denoted by TUXDIR from the checklist.
Note. Depending on your operating system, the utility you use to create the user and group is different.For example, HP-UX uses the "sam" utility, AIX uses the "smit" utility, and so on. For the exact utility,refer to your operating system documentation.
Task 3-2-5: Installing Tuxedo on UNIXThe following procedure describes how to properly install Tuxedo plus the latest patch on your UNIX server.
Note. Remove any existing version of Tuxedo 8.1 delivered with an earlier version of PeopleTools, plus anyexisting Tuxedo patches, before continuing. The Tuxedo installation CD delivered with this package containsthe latest patches required for this release.
To install Tuxedo on UNIX:
Copyright © 2006, Oracle. All rights reserved. 71
Installing Additional Components Chapter 3
1. Insert the CD-ROM into the CD-ROM drive, and mount the CD-ROM from the root login.For mounting instructions, consult the operating system manufacturer's documentation or the UNIXmanual page on mounting (use the command man mount).
2. List the root directory on the CD-ROM.3. Log in as the Tuxedo administrator.You should no longer be logged on as root.
4. Change to the root directory on the CD-ROM.5. Execute the shell script, install.sh.
sh ./install.sh
6. Follow the selected prompts as indicated in the following table:
Prompt Standard PeopleSoft Response
Please select a platform
Note. This question is only asked if you did not use theftp script.
Specify the number associated with the desired operatingsystem platform you wish to install.
BEA Home being defaulted to /bea (y/n) Type y to indicate Yes or suggest an alternative BEAHOME.
Tuxedo 8.1 will be installed to /bea/tuxedo81 (y/n): Acknowledge the Tuxedo installation location or suggestan alternative
Accept default TListen password 'password' (y/n): Enter password. You will need to enter this passwordagain if you use the BEAWebGUIMonitor. Otherwise,you can just use 'password,' the default.
Task 3-2-6: Verifying the Server InstallationAt this point, you should verify that the server installation was successful.
To verify the server installation:
1. Go to the udataobj directory under <TUXDIR>.2. Ensure that the file lic.txt exists.3. Ensure that the file tlisten.pw exists.4. If the files lic.txt and tlisten.pw do not exist:• Verify that no error messages were displayed during installation of Tuxedo 8.1.• Verify that you have sufficient disk space on the directory or file system used for <TUXDIR>.• Reinstall BEA/Tuxedo 8.1.
Note. If you will be booting Application Server or Process Scheduler in a shell using a locale other than C,create a symlink in <TUXDIR> to the C directory. For instance, if the locale is Ja_JP, run this command:
ln –s <TUXDIR>/locale/C <TUXDIR>/locale/Ja_JP
72 Copyright © 2006, Oracle. All rights reserved.

Chapter 3 Installing Additional Components
Task 3-3: Installing Micro Focus Net Express for WindowsThis section discusses:
• Understanding the Net Express Installation
• Prerequisites
• Installing Net Express
Understanding the Net Express InstallationMicro Focus® Net Express™ 4.0 is supplied on two CDs. CD-1 contains the Net Express and Net ExpressStudio software and documentation, and Microsoft Internet Explorer. CD-2 contains the Microsoft Win32Software Development Kit for Microsoft Windows.
In the following sections, d: refers to the drive-ID of your CD-ROM drive, and the Run dialog is the dialogbox you see if you select the Run... option on the Windows Start menu.
PrerequisitesTo install and use Net Express you must have Microsoft Internet Explorer 5.0 or later installed. You can installInternet Explorer 6.0 from the Net Express 4.0 CD home page.
Task 3-3-1: Installing Net ExpressTo install Net Express 4.0:
1. Insert CD-1 into your CD-ROM drive. After a few moments, you should see the Net Express 4.0 CDhome page in your browser.
2. If the home page does not appear, enter the following command in the Run dialog box:
d:\setup.exe
3. Select Installing on the contents list on the Net Express home page, then select the link Click here to installor upgrade Net Express 4.0. The Startup process begins.
4. Follow the instructions displayed. For information on which of the options to choose for PeopleSoftsoftware, see the instructions for installing Server Express on UNIX.
If you encounter any problems during or after the installation, refer to the Installation Notes on the homepage.
Task 3-4: Installing Micro Focus Server Expressfor UNIX and Linux
This section discusses:
• Understanding Micro Focus Server Express
• Prerequisites
Copyright © 2006, Oracle. All rights reserved. 73

Installing Additional Components Chapter 3
• Installing Server Express
• Installing Remotely
• Mounting and Unmounting CD-ROMs
Understanding Micro Focus Server ExpressThis section provides installation instructions for Micro Focus® Server Express™ 4.0 SP2 COBOL compilerand the License Management Facility used to manage product licenses. These instructions are specifically forinstalling the Server Express COBOL compiler to use with PeopleSoft software. For more general installationinstructions or other supporting documentation concerning Server Express, consult the documentation that youreceived with your Server Express CD.
Throughout this section references are made to $COBDIR. $COBDIR is the location at which you installyour COBOL products.
All example command lines are specific to sh and ksh. If you are using csh you should use the equivalent cshcommands for the examples provided.
See AlsoMicro Focus web site: http://supportline.microfocus.com/
Server Express Documentation CD-ROM
PrerequisitesEach application created using a Server Express product that will be deployed in a UNIX environment mustinclude a Micro Focus Application Server for Server Express license from Micro Focus or from your MicroFocus licensed supplier. Application Server must be installed on the machine on which the application is torun. Please contact your Micro Focus Account Representative or your Micro Focus licensed supplier fordetails on purchasing Application Server licenses.
If you have a previous Micro Focus COBOL product installed we recommend that you make a backup ofany COBOL systems files that you have changed. Examples include cobkeymp, ADISCTRL, cobopt andcobconfig. After you have installed Server Express you might want to apply to the new COBOL product thechanges previously applied to these files.
If you are installing a COBOL system over an existing COBOL system, you must first delete the existingsystem. Alternatively, you might prefer to move your existing COBOL system to another directory untilyou have verified the new installation.
If you have installed, or plan to install, Application Server or any other Micro Focus product on the samemachine as this product, you must install them in different directories.
This Micro Focus product is managed by a License Management Facility (LMF). This facility helps you keeptrack of the number of licenses you have for the product. In order to use this product it is necessary for you toinstall the License Management Facility (which is provided with the Server Express software). This softwareshould be installed in a different directory to Server Express; the default directory is /opt/lib/mflmf for HP-UX,/usr/lib/mflmf for RS/6000 and PowerPC systems running AIX, and /opt/lib/mflmf on other systems. If/opt/lib does not exist, use /usr/lib/mflmf instead.
74 Copyright © 2006, Oracle. All rights reserved.
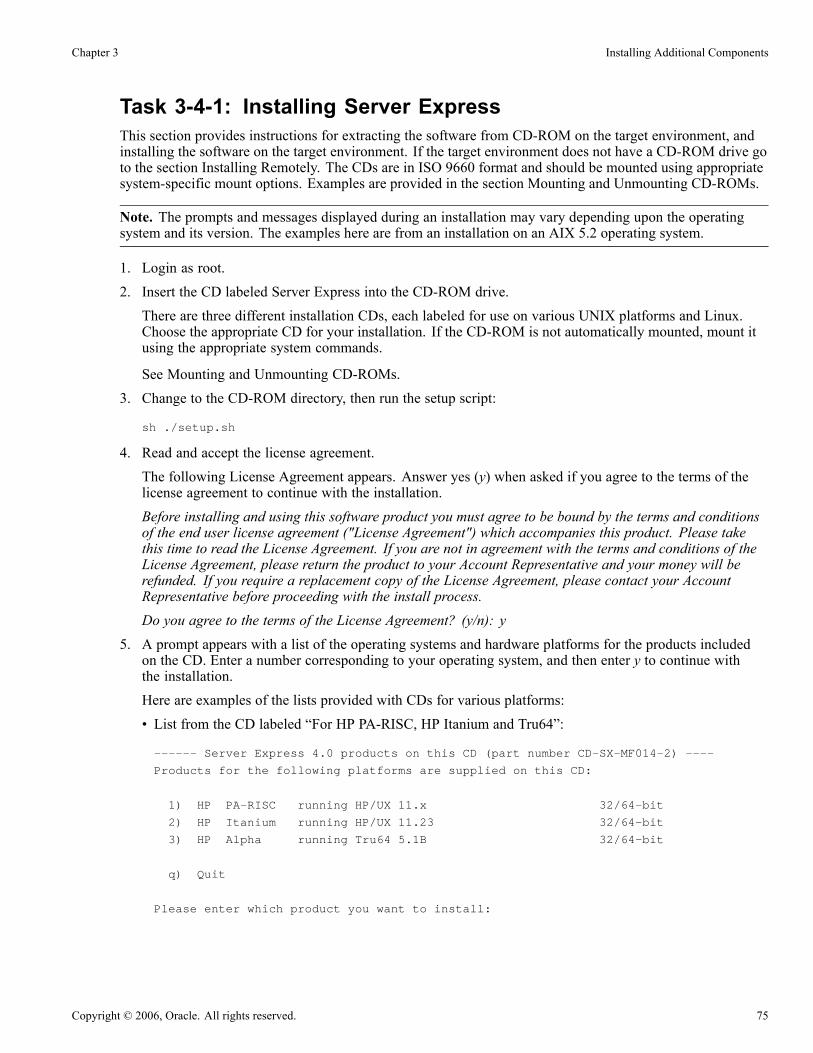
Chapter 3 Installing Additional Components
Task 3-4-1: Installing Server ExpressThis section provides instructions for extracting the software from CD-ROM on the target environment, andinstalling the software on the target environment. If the target environment does not have a CD-ROM drive goto the section Installing Remotely. The CDs are in ISO 9660 format and should be mounted using appropriatesystem-specific mount options. Examples are provided in the section Mounting and Unmounting CD-ROMs.
Note. The prompts and messages displayed during an installation may vary depending upon the operatingsystem and its version. The examples here are from an installation on an AIX 5.2 operating system.
1. Login as root.2. Insert the CD labeled Server Express into the CD-ROM drive.There are three different installation CDs, each labeled for use on various UNIX platforms and Linux.Choose the appropriate CD for your installation. If the CD-ROM is not automatically mounted, mount itusing the appropriate system commands.
See Mounting and Unmounting CD-ROMs.
3. Change to the CD-ROM directory, then run the setup script:
sh ./setup.sh
4. Read and accept the license agreement.The following License Agreement appears. Answer yes (y) when asked if you agree to the terms of thelicense agreement to continue with the installation.Before installing and using this software product you must agree to be bound by the terms and conditionsof the end user license agreement ("License Agreement") which accompanies this product. Please takethis time to read the License Agreement. If you are not in agreement with the terms and conditions of theLicense Agreement, please return the product to your Account Representative and your money will berefunded. If you require a replacement copy of the License Agreement, please contact your AccountRepresentative before proceeding with the install process.Do you agree to the terms of the License Agreement? (y/n): y
5. A prompt appears with a list of the operating systems and hardware platforms for the products includedon the CD. Enter a number corresponding to your operating system, and then enter y to continue withthe installation.Here are examples of the lists provided with CDs for various platforms:• List from the CD labeled “For HP PA-RISC, HP Itanium and Tru64”:
------ Server Express 4.0 products on this CD (part number CD-SX-MF014-2) ----
Products for the following platforms are supplied on this CD:
1) HP PA-RISC running HP/UX 11.x 32/64-bit
2) HP Itanium running HP/UX 11.23 32/64-bit
3) HP Alpha running Tru64 5.1B 32/64-bit
q) Quit
Please enter which product you want to install:
Copyright © 2006, Oracle. All rights reserved. 75

Installing Additional Components Chapter 3
• List from the CD labeled “For Red Hat Linux and SuSe Linux”:
------ Server Express 4.0 products on this CD (part number CD-SX-MF015-3) ----
Products for the following platforms are supplied on this CD:
1) Intel x86 running Red Hat Enterprise Linux Rel 3/4 32-bit
2) Intel Itanium running Red Hat Enterprise Linux Rel 3/4 64-bit
3) IBM pSeries running Red Hat Enterprise Linux Rel 3 64-bit
4) Intel x86 running SuSE Linux (SLES 8/9) 32-bit
5) Intel Itanium running SuSE Linux (SLES 9) 64-bit
6) IBM pSeries running SuSE Linux (SLES 9) 64-bit
7) IBM zSeries running SuSE Linux (SLES 8/9) 31/64-bit
q) Quit
Please enter which product you want to install:
Note. For Intel x86 Redhat Enterprise Linux Release 4, choose 1 to install the 32-bit version.
For Intel x86 SuSE Linux, SLES 9, choose 4, to install the 32-bit version.
For zSeries SuSE Linux, SLES 9, choose 7, to install the 31/64-bit version.
• List from the CD labeled “For AIX, Solaris SPARC and UnixWare”
------ Server Express 4.0 products on this CD (part number CD-SX-MF015) ------
Products for the following platforms are supplied on this CD:
1) Intel x86 running SCO UnixWare 7.1.3/7.1.4/OS6 32-bit
2) IBM RS6000 running AIX 5.1/5.2/5.3 32/64-bit
3) Sun SPARC running Solaris 8/9/10 32/64-bit
4) x64 running Solaris 10 32-bit
q) Quit
Please enter which product you want to install: 2
Platform 2 selected: IMB RS6000 running AIX 5.1/5.2/5.3
Note. For AIX, either 5.1, 5.2, or 5.3, choose 2 to install the 32/64-bit version.
For Solaris, either 8, 9, or 10, choose 3 to install the 32/64-bit version.
6. Specify which Server Express product you want to install. Enter 1 to install the Server ExpressDevelopment System.
Select the product to be installed:
1) Server Express Development System - 32/64-bit - PRN=RXCAK/AAL:9i.T4.40.02
(COBOL and Enterprise Server Development System)
2) Enterprise Server Development System
76 Copyright © 2006, Oracle. All rights reserved.

Chapter 3 Installing Additional Components
(for installation over previously installed Server Express Development
System as in 1 above)
3) Server Express Application Server - 32/64-bit - PRN=R1CAK/AAC:9i.T4.40.02
(COBOL Deployment System, not required if you are using
Development System)
4) Enterprise Server - 32-bit - PRN=RBCAK/AAB:9i.T4.40.02
(Enterprise Server Deployment System, not required if you are using
Development System)
5) Server Express SQL Option - 32-bit
(for Development only)
q) quit
Enter choice: 1
7. Enter y to confirm that you have enough disk space to install the Server Express Development Systemsoftware.
Installing the Server Express Development System product.
This product will need a maximum of approximately 92 Mb of disk space.
At a later stage you can choose not to install Enterprise Server Development
System which will reduce the final amount of disk space used.
Do you want to continue? (y/n): y
8. Enter the directory name where you want to install the Server Express product, and then press ENTER.The example here uses the directory /products/mf/sx40sp2-64bit. If you want to accept the default directory/opt/lib/cobol, just press ENTER. If the directory does not exist, you will be asked if the script shouldcreate the directory. When the system asks if you want to continue with the installation, enter y.
Note. This can be any directory on any file system that has the requisite disk space.
Enter the name of the directory where you want to install this product
(Press Enter for default directory /opt/microfocus/cobol)
/products/mf/sx40sp2-64bit
/products/mf/sx40sp2-64bit does not exist, do you want to create it? (y/n): y
Installing into /products/mf/sx40sp2-64bit
Do you want to continue? (y/n): y
Copying files. This can take several minutes. Please wait....
9. Reply y if you see a message stating that the product was built on a different version of the operatingsystem. Here is an example from HP-UX:
Copyright © 2006, Oracle. All rights reserved. 77

Installing Additional Components Chapter 3
Micro Focus Install
This product was built on version B.11.00 of this Operating
System, this machine is running B.11.11.
Please confirm that you want to continue with this installation (y/n): y
10. Verify the system environment details displayed.The system displays a list of the operating system features. This report will vary depending upon theoperating system and its version. The example here is from an installation on an AIX operating system.At the end of the report, the system asks if you understand the reference environment details. Enter y tocontinue with the installation.
Note. The report output is presented in “more” format. You can use standard “more” navigation to viewthe report. For example, press the space bar to page through the report.
When you press return you will be shown details of the reference
environment (and any compatibility environments).
Please press return when you are ready
This product is certified on the following reference environment:
The command(s) used to gather the information is given following each entry.
Operating System
----------------
AIX 5.1 Maintenance Level 3 plus ’APAR’ IY22854.
uname -s
oslevel
Operating System Patches
------------------------
instfix -ik IY22854
C Compiler
----------
/usr/vac/bin/xlc 6.0.0.6
lslpp -L vac.C | grep vac.C | cut -c29-36
C++ Compiler
------------
/usr/vacpp/bin/xlC 6.0.0.0
lslpp -L vacpp.cmp.core | grep vacpp.cmp.core | cut -c29-36
Assembler
---------
as 5.1.0.25
78 Copyright © 2006, Oracle. All rights reserved.

Chapter 3 Installing Additional Components
lslpp -L bos.adt.base | grep bos.adt.base | cut -c29-36
Supported versions of Java
--------------------------
Java version = 1.3.1
Java vendor = IBM Corporation
Java OS name = AIX
Java OS arch = ppc
Java OS version = 5.1
Java version = 1.4.1
Java vendor = IBM Corporation
Java OS name = AIX
Java OS arch = ppc
Java OS version = 5.1
$JAVA_HOME/bin/java -classpath $COBDIR/lib WhatJava
Unicode
-------
Unicode mapping tables must be installed for J2EE and Web Services to
function correctly. These tables are required for converting between
any combination of UTF-16/UCS-2, UTF-8 and other installed locales.
J2EE and Web Services
---------------------
J2EE and Web Services have been tested with :-
WebSphere 5.1
-------------------------------------------------------------------------------
This product is also certified on the following environment:
Operating System
----------------
AIX 5.2.0.0
uname -s
oslevel
C Compiler
----------
/usr/vac/bin/xlc 6.0.0.7
lslpp -L vac.C | grep vac.C | cut -c29-36
Copyright © 2006, Oracle. All rights reserved. 79
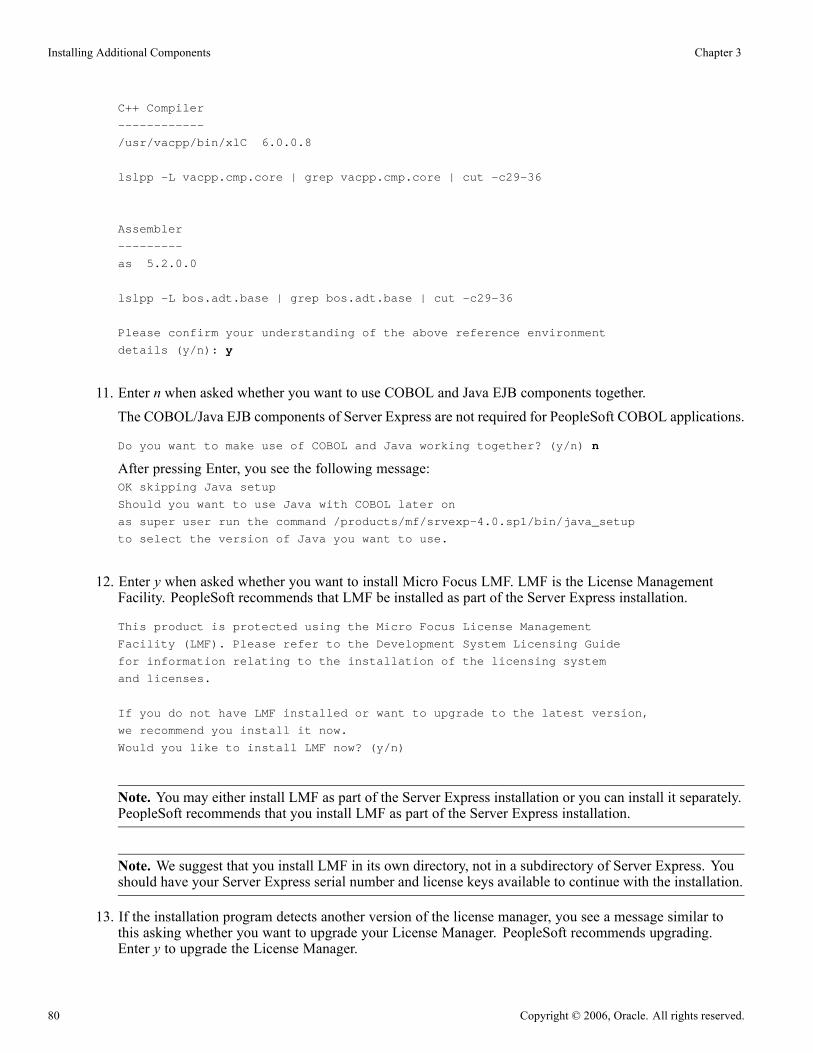
Installing Additional Components Chapter 3
C++ Compiler
------------
/usr/vacpp/bin/xlC 6.0.0.8
lslpp -L vacpp.cmp.core | grep vacpp.cmp.core | cut -c29-36
Assembler
---------
as 5.2.0.0
lslpp -L bos.adt.base | grep bos.adt.base | cut -c29-36
Please confirm your understanding of the above reference environment
details (y/n): y
11. Enter n when asked whether you want to use COBOL and Java EJB components together.
The COBOL/Java EJB components of Server Express are not required for PeopleSoft COBOL applications.
Do you want to make use of COBOL and Java working together? (y/n) n
After pressing Enter, you see the following message:OK skipping Java setup
Should you want to use Java with COBOL later on
as super user run the command /products/mf/srvexp-4.0.sp1/bin/java_setup
to select the version of Java you want to use.
12. Enter y when asked whether you want to install Micro Focus LMF. LMF is the License ManagementFacility. PeopleSoft recommends that LMF be installed as part of the Server Express installation.
This product is protected using the Micro Focus License Management
Facility (LMF). Please refer to the Development System Licensing Guide
for information relating to the installation of the licensing system
and licenses.
If you do not have LMF installed or want to upgrade to the latest version,
we recommend you install it now.
Would you like to install LMF now? (y/n)
Note. You may either install LMF as part of the Server Express installation or you can install it separately.PeopleSoft recommends that you install LMF as part of the Server Express installation.
Note. We suggest that you install LMF in its own directory, not in a subdirectory of Server Express. Youshould have your Server Express serial number and license keys available to continue with the installation.
13. If the installation program detects another version of the license manager, you see a message similar tothis asking whether you want to upgrade your License Manager. PeopleSoft recommends upgrading.Enter y to upgrade the License Manager.
80 Copyright © 2006, Oracle. All rights reserved.
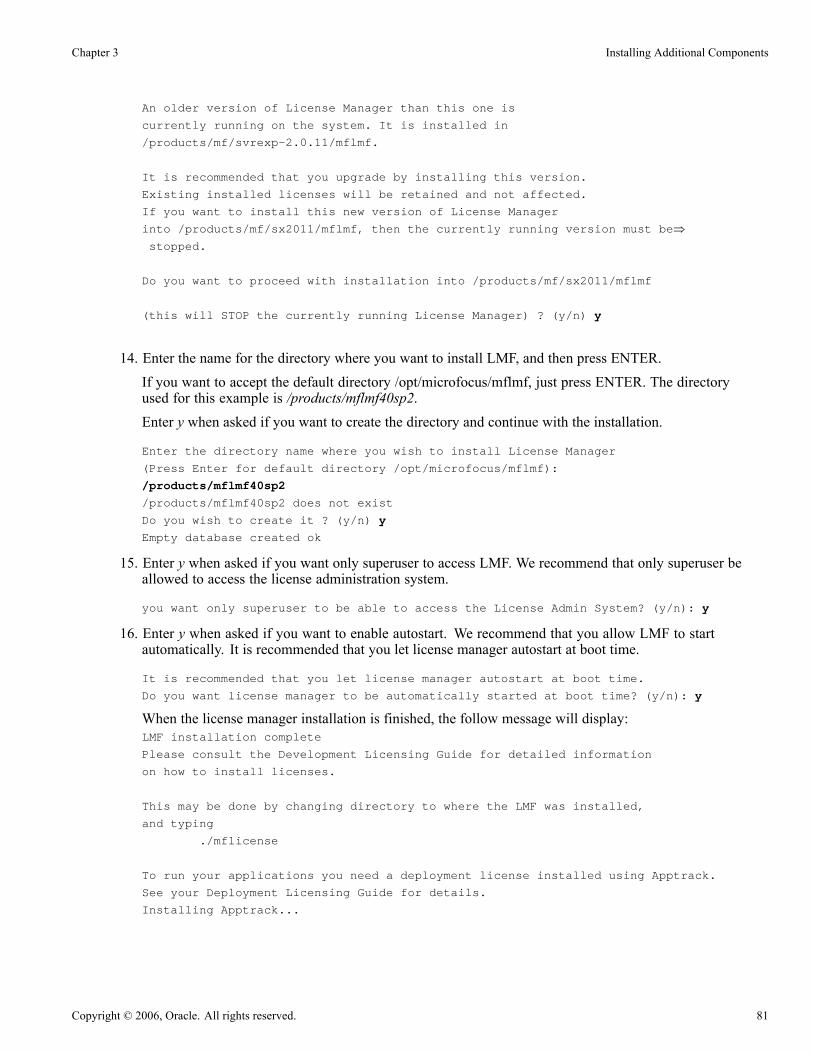
Chapter 3 Installing Additional Components
An older version of License Manager than this one is
currently running on the system. It is installed in
/products/mf/svrexp-2.0.11/mflmf.
It is recommended that you upgrade by installing this version.
Existing installed licenses will be retained and not affected.
If you want to install this new version of License Manager
into /products/mf/sx2011/mflmf, then the currently running version must be⇒stopped.
Do you want to proceed with installation into /products/mf/sx2011/mflmf
(this will STOP the currently running License Manager) ? (y/n) y
14. Enter the name for the directory where you want to install LMF, and then press ENTER.If you want to accept the default directory /opt/microfocus/mflmf, just press ENTER. The directoryused for this example is /products/mflmf40sp2.Enter y when asked if you want to create the directory and continue with the installation.
Enter the directory name where you wish to install License Manager
(Press Enter for default directory /opt/microfocus/mflmf):
/products/mflmf40sp2
/products/mflmf40sp2 does not exist
Do you wish to create it ? (y/n) y
Empty database created ok
15. Enter y when asked if you want only superuser to access LMF. We recommend that only superuser beallowed to access the license administration system.
you want only superuser to be able to access the License Admin System? (y/n): y
16. Enter y when asked if you want to enable autostart. We recommend that you allow LMF to startautomatically. It is recommended that you let license manager autostart at boot time.
It is recommended that you let license manager autostart at boot time.
Do you want license manager to be automatically started at boot time? (y/n): y
When the license manager installation is finished, the follow message will display:LMF installation complete
Please consult the Development Licensing Guide for detailed information
on how to install licenses.
This may be done by changing directory to where the LMF was installed,
and typing
./mflicense
To run your applications you need a deployment license installed using Apptrack.
See your Deployment Licensing Guide for details.
Installing Apptrack...
Copyright © 2006, Oracle. All rights reserved. 81
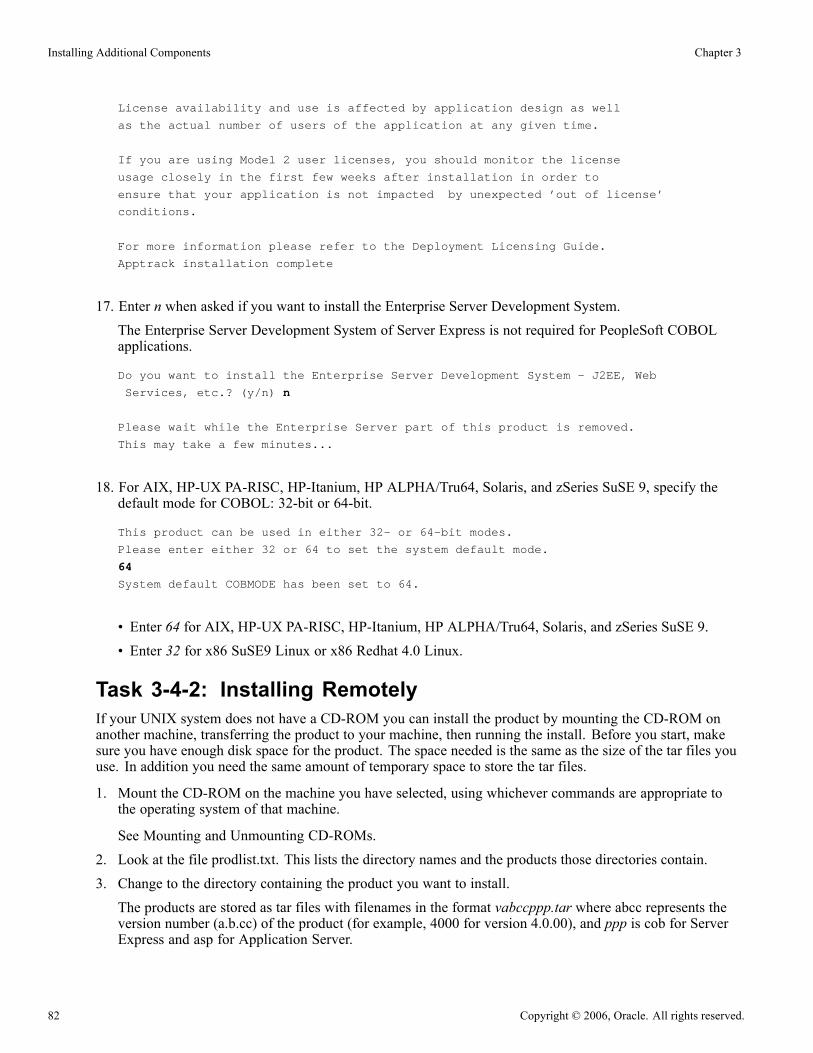
Installing Additional Components Chapter 3
License availability and use is affected by application design as well
as the actual number of users of the application at any given time.
If you are using Model 2 user licenses, you should monitor the license
usage closely in the first few weeks after installation in order to
ensure that your application is not impacted by unexpected ’out of license’
conditions.
For more information please refer to the Deployment Licensing Guide.
Apptrack installation complete
17. Enter n when asked if you want to install the Enterprise Server Development System.The Enterprise Server Development System of Server Express is not required for PeopleSoft COBOLapplications.
Do you want to install the Enterprise Server Development System - J2EE, Web
Services, etc.? (y/n) n
Please wait while the Enterprise Server part of this product is removed.
This may take a few minutes...
18. For AIX, HP-UX PA-RISC, HP-Itanium, HP ALPHA/Tru64, Solaris, and zSeries SuSE 9, specify thedefault mode for COBOL: 32-bit or 64-bit.
This product can be used in either 32- or 64-bit modes.
Please enter either 32 or 64 to set the system default mode.
64
System default COBMODE has been set to 64.
• Enter 64 for AIX, HP-UX PA-RISC, HP-Itanium, HP ALPHA/Tru64, Solaris, and zSeries SuSE 9.• Enter 32 for x86 SuSE9 Linux or x86 Redhat 4.0 Linux.
Task 3-4-2: Installing RemotelyIf your UNIX system does not have a CD-ROM you can install the product by mounting the CD-ROM onanother machine, transferring the product to your machine, then running the install. Before you start, makesure you have enough disk space for the product. The space needed is the same as the size of the tar files youuse. In addition you need the same amount of temporary space to store the tar files.
1. Mount the CD-ROM on the machine you have selected, using whichever commands are appropriate tothe operating system of that machine.
See Mounting and Unmounting CD-ROMs.
2. Look at the file prodlist.txt. This lists the directory names and the products those directories contain.
3. Change to the directory containing the product you want to install.
The products are stored as tar files with filenames in the format vabccppp.tar where abcc represents theversion number (a.b.cc) of the product (for example, 4000 for version 4.0.00), and ppp is cob for ServerExpress and asp for Application Server.
82 Copyright © 2006, Oracle. All rights reserved.

Chapter 3 Installing Additional Components
4. Select the product you want to install and transfer that file (for example, by using ftp) to the required UNIXmachine. If you want to install the ODBC drivers, you should also transfer any files called odbc.tar
5. On the target UNIX system, create the directory into which you want to install the product, for example:
mkdir /opt/lib/cobol
6. Extract the contents of the tar file into that directory, for example:
cd /opt/lib/cobol
tar -xvf /tmp/v4000cob.tar
where /tmp is the path of the directory into which the tar file was transferred from the machine upon whichthe CD-ROM was mounted.
7. Install the software by entering the following command:
sh ./install
8. Continue with the installation as described in the previous section.
See Installing Server Express.
Task 3-4-3: Mounting and Unmounting CD-ROMsBelow are examples of mount and unmount commands for several UNIX systems.
• The mount directory is /cdrom. If /cdrom does not already exist, you must first create it using thecommand: mkdir /cdrom
• Device names differ from system to system.
• The name starting /dev/ is the name of the CD-ROM drive.
Use these commands to mount and unmount the CD-ROM on your machine:
Platform Mounting Command Unmounting Command
Compaq Alpha systems runningTRU64 UNIX
mount -t cdfs –o noversion
/dev/disk/cdrom0c /cdrom
umount /cdrom
HP9000 Series running HP-UX mount –F cdfs –o cdcase
/dev/dsk/c0t4d0 /cdrom
umount /cdrom
IBM RS/6000 and Power PC systemsrunning AIX
mount –v cdrfs –o ro
/dev/cd0 /cdrom
umount /cdrom
RedHat Linux mount /mnt/cdrom umount /cdrom
SuSE Linux mount /mnt/cdrom umount /cdrom
Sun SPARC running Solaris V2.4 orlater
CD-ROM is automatically mounted at/cdrom/cdrom0
eject cdrom
Copyright © 2006, Oracle. All rights reserved. 83

Installing Additional Components Chapter 3
84 Copyright © 2006, Oracle. All rights reserved.
CHAPTER 4
Using the PeopleSoft Installer
This chapter discusses:
• Understanding the PeopleSoft Installer
• Prerequisites
• Using E-Delivery for the PeopleSoft Installation
• Mounting and Unmounting CD-ROMs (UNIX Only)
• Running the PeopleSoft Installer with a Single CD-ROM Drive (Optional)
• Running the PeopleSoft Installer Without Swapping CDs (Optional)
• Running the PeopleSoft Installer
• Installing the Application CD
• Loading the Multilanguage CD
Note. You must install the necessary web server products and any additional component software as described in theprevious chapters before you run the PeopleSoft Installer.
Understanding the PeopleSoft InstallerThis section discusses:
• Defining the PeopleSoft Installer
• Understanding PeopleSoft Servers
• Defining Supported Server Combinations
Defining the PeopleSoft InstallerThe PeopleSoft Installer is a Java-based tool that delivers software to your servers.
You run the PeopleSoft installer to install the necessary products on the target machines. Which files areinstalled depends on which products you are licensed for, the operating system on the target machine, thedatabase platform, and the selected server option. The PeopleSoft Installer installs files directly to Windows,UNIX, and Linux machines. PeopleTools and PeopleSoft Applications use the same PeopleSoft Installtemplate. This chapter discusses the installation of PeopleTools, followed by the installation of applicationsCDs and the Multilanguage CD.
To obtain the software from an FTP site, see “Using E-Delivery for the PeopleSoft Installation.”
Copyright © 2006, Oracle. All rights reserved. 85

Using the PeopleSoft Installer Chapter 4
Note. During the installation you select the servers you want to install. Keep in mind that you can installmultiple servers at the same time, but they will all be installed on the same machine. If you want to installservers on separate machines, you need to run the PeopleSoft installer on each server machine.
Note. If you need to set up the file server on a separate Windows machine, you should install PeopleTools, anyapplications CDs, and the Multilanguage CD, as discussed in the next chapter.
See “Setting Up the File Server on Windows.”
All licensed components of the PeopleSoft Architecture must be installed on each server. Ideally, you shouldinstall the Windows file server component first and then take your PeopleSoft CDs to a CD Jukebox connectedto your UNIX systems. If you have multiple servers but no Jukebox for your UNIX environment, you mayneed to use the CD for each server.
You can install multiple logical servers to the same machine. For example, you can have the application serverand the batch server on the same machine. But, if you want to install different servers to different machines,you have to run the PeopleSoft Installer once for each server.
Understanding PeopleSoft ServersYou can install the whole range of PeopleSoft servers (file server, application server, and so on) with thePeopleSoft Installer. You can install PeopleSoft server software separately or together. Keep in mind whichPeopleTools functionality resides in each server:
• File Server: All Client executables (PSIDE...), Nvision, Upgrade Assistant or Change Assistant, files anddirectories necessary to perform upgrade, and Client SQR.
• Application Server: PSADMIN, COBOL for remote call, Verity.• Web Server: Windows PeopleSoft Pure Internet Architecture (PIA) install, UNIX web files and shellscripts, Portal Search data files, Verity, and Enterprise Resource Planning Connectors.
• Process Scheduler Server: PSADMIN, COBOL, SQR, Verity.• Database Server: Scripts and data directories, files necessary to run Data Mover.
Defining Supported Server CombinationsThe following table lists the supported operating systems for the various PeopleSoft servers for your databaseplatform.
See Enterprise PeopleTools 8.48 Hardware and Software Requirements.
Note. If you plan to install PeopleTools and application software on Red Hat Linux, you must first installX11 client software.
86 Copyright © 2006, Oracle. All rights reserved.
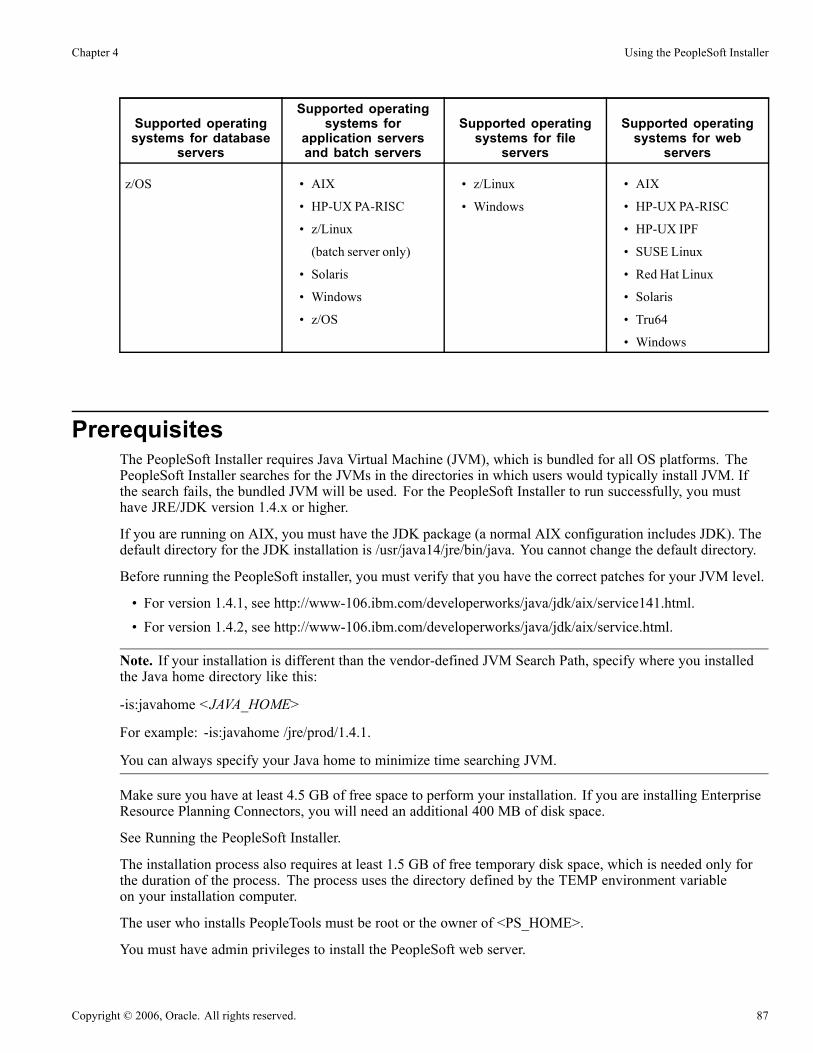
Chapter 4 Using the PeopleSoft Installer
Supported operatingsystems for database
servers
Supported operatingsystems for
application serversand batch servers
Supported operatingsystems for file
servers
Supported operatingsystems for web
servers
z/OS • AIX
• HP-UX PA-RISC
• z/Linux
(batch server only)
• Solaris
• Windows
• z/OS
• z/Linux
• Windows
• AIX
• HP-UX PA-RISC
• HP-UX IPF
• SUSE Linux
• Red Hat Linux
• Solaris
• Tru64
• Windows
PrerequisitesThe PeopleSoft Installer requires Java Virtual Machine (JVM), which is bundled for all OS platforms. ThePeopleSoft Installer searches for the JVMs in the directories in which users would typically install JVM. Ifthe search fails, the bundled JVM will be used. For the PeopleSoft Installer to run successfully, you musthave JRE/JDK version 1.4.x or higher.
If you are running on AIX, you must have the JDK package (a normal AIX configuration includes JDK). Thedefault directory for the JDK installation is /usr/java14/jre/bin/java. You cannot change the default directory.
Before running the PeopleSoft installer, you must verify that you have the correct patches for your JVM level.
• For version 1.4.1, see http://www-106.ibm.com/developerworks/java/jdk/aix/service141.html.• For version 1.4.2, see http://www-106.ibm.com/developerworks/java/jdk/aix/service.html.
Note. If your installation is different than the vendor-defined JVM Search Path, specify where you installedthe Java home directory like this:
-is:javahome <JAVA_HOME>
For example: -is:javahome /jre/prod/1.4.1.
You can always specify your Java home to minimize time searching JVM.
Make sure you have at least 4.5 GB of free space to perform your installation. If you are installing EnterpriseResource Planning Connectors, you will need an additional 400 MB of disk space.
See Running the PeopleSoft Installer.
The installation process also requires at least 1.5 GB of free temporary disk space, which is needed only forthe duration of the process. The process uses the directory defined by the TEMP environment variableon your installation computer.
The user who installs PeopleTools must be root or the owner of <PS_HOME>.
You must have admin privileges to install the PeopleSoft web server.
Copyright © 2006, Oracle. All rights reserved. 87
Using the PeopleSoft Installer Chapter 4
Task 4-1: Using E-Delivery for the PeopleSoft InstallationYou can obtain the software by downloading it as a zip file from a secure FTP site. E-Delivery customersreceive a welcome letter that includes the URL for the PeopleSoft E-Delivery site. When you unzip thedownloaded file, it creates a folder and extracts all the files into the folder. You can then copy the folder and itscontents to any machines that you will use as servers.
The E-Delivery installation process asks for your license code. Obtain your license code by going to theURL included in your welcome letter.
If you obtain your software using E-Delivery, follow the instructions in this chapter for installing PeopleTools,but skip the sections concerning mounting and unmounting CD-ROMs:
• Mounting and Unmounting CD-ROMs (UNIX Only)• Running the PeopleSoft Installer with a Single CD (Optional)• Running the PeopleSoft Installer Without Swapping CDs (Optional)
If you obtain your software using E-Delivery, you must carry out an additional step after completing theinstallation process, creating the database, installing the Application Server, and installing the Pure InternetArchitecture. Sign into the PeopleSoft system and navigate to the Installation table on the Products tab. Thelocation of this table will vary depending upon the application you installed. In the Installation table, uncheckthe products for which you have not purchased support.
Note. PeopleSoft does not support CDs that you burn at your own site from E-Delivery files.
See Also“Setting Up the PeopleSoft Pure Internet Architecture,” Testing the PeopleSoft Pure Internet ArchitectureInstallation
Application-specific installation instructions, PeopleSoft Customer Connection (Site Index, installationguides and notes)
Task 4-2: Mounting and Unmounting CD-ROMs (UNIX Only)This section discusses:
• Understanding CD-ROM Mounting and Unmounting
• Mounting a CD-ROM on HP-UX
• Unmounting a CD-ROM
Understanding CD-ROM Mounting and UnmountingThis task includes sample commands to mount and unmount CDs for various UNIX platforms. We do notsupport automounting of CDs; automounting sometimes puts the volume label as part of the mount point, inwhich case the PeopleSoft Installer will not recognize the second PeopleTools CD.
88 Copyright © 2006, Oracle. All rights reserved.
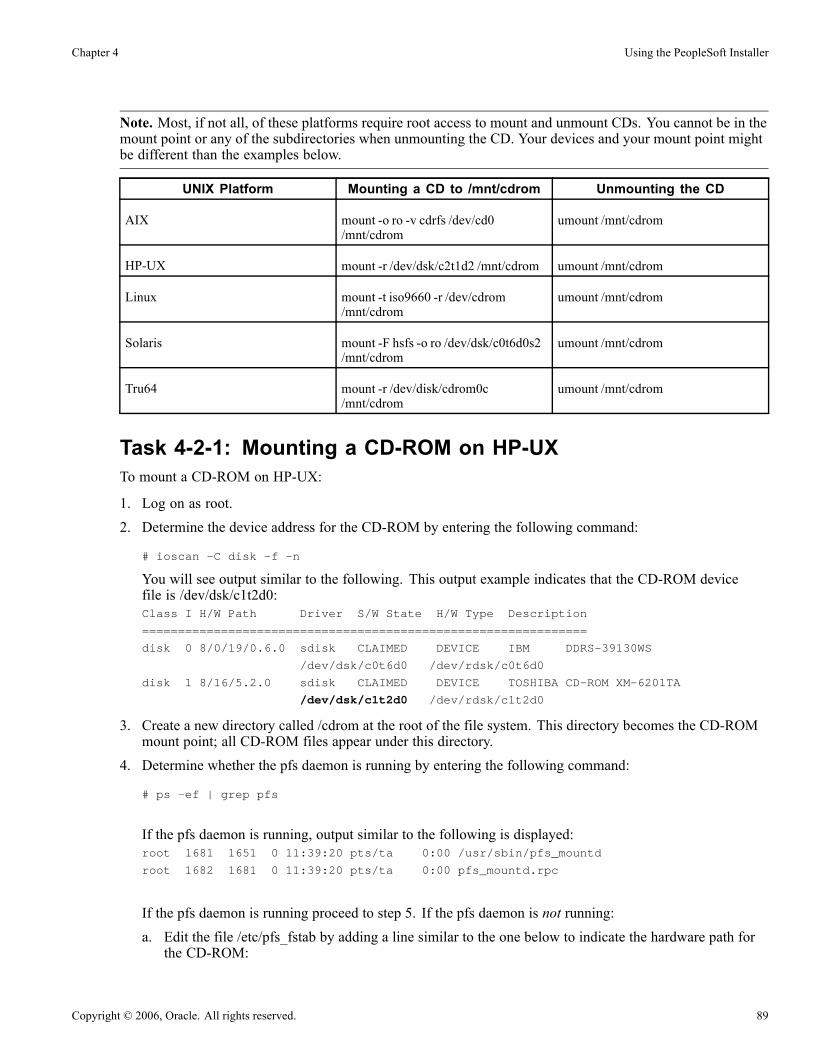
Chapter 4 Using the PeopleSoft Installer
Note. Most, if not all, of these platforms require root access to mount and unmount CDs. You cannot be in themount point or any of the subdirectories when unmounting the CD. Your devices and your mount point mightbe different than the examples below.
UNIX Platform Mounting a CD to /mnt/cdrom Unmounting the CD
AIX mount -o ro -v cdrfs /dev/cd0/mnt/cdrom
umount /mnt/cdrom
HP-UX mount -r /dev/dsk/c2t1d2 /mnt/cdrom umount /mnt/cdrom
Linux mount -t iso9660 -r /dev/cdrom/mnt/cdrom
umount /mnt/cdrom
Solaris mount -F hsfs -o ro /dev/dsk/c0t6d0s2/mnt/cdrom
umount /mnt/cdrom
Tru64 mount -r /dev/disk/cdrom0c/mnt/cdrom
umount /mnt/cdrom
Task 4-2-1: Mounting a CD-ROM on HP-UXTo mount a CD-ROM on HP-UX:
1. Log on as root.2. Determine the device address for the CD-ROM by entering the following command:
# ioscan -C disk -f -n
You will see output similar to the following. This output example indicates that the CD-ROM devicefile is /dev/dsk/c1t2d0:Class I H/W Path Driver S/W State H/W Type Description
==============================================================
disk 0 8/0/19/0.6.0 sdisk CLAIMED DEVICE IBM DDRS-39130WS
/dev/dsk/c0t6d0 /dev/rdsk/c0t6d0
disk 1 8/16/5.2.0 sdisk CLAIMED DEVICE TOSHIBA CD-ROM XM-6201TA
/dev/dsk/c1t2d0 /dev/rdsk/c1t2d0
3. Create a new directory called /cdrom at the root of the file system. This directory becomes the CD-ROMmount point; all CD-ROM files appear under this directory.
4. Determine whether the pfs daemon is running by entering the following command:
# ps -ef | grep pfs
If the pfs daemon is running, output similar to the following is displayed:root 1681 1651 0 11:39:20 pts/ta 0:00 /usr/sbin/pfs_mountd
root 1682 1681 0 11:39:20 pts/ta 0:00 pfs_mountd.rpc
If the pfs daemon is running proceed to step 5. If the pfs daemon is not running:a. Edit the file /etc/pfs_fstab by adding a line similar to the one below to indicate the hardware path forthe CD-ROM:
Copyright © 2006, Oracle. All rights reserved. 89

Using the PeopleSoft Installer Chapter 4
/dev/dsk/c0t6d0 /cdrom pfs-rrip xlat=unix 0 0
b. Enter the following commands:
# nohup /usr/sbin/pfs_mountd &
# nohup /usr/sbin/pfsd &
You must reenter these commands every time you restart your system.5. To physically mount the CD-ROM, place the CD-ROM in the machine and enter the following command:
# /usr/sbin/pfs_mount /cdrom
Task 4-2-2: Unmounting a CD-ROMTo unmount a CD-ROM:
1. After you finish using the CD-ROM, enter the following command:
# /usr/sbin/pfs_umount /cdrom
2. Eject the CD-ROM.
Task 4-3: Running the PeopleSoft Installer with aSingle CD-ROM Drive (Optional)
The following information is provided for mounting PeopleTools 8.4x CDs for a single CD-ROM drive ormounting multiple CDs for easier access.
To run the PeopleSoft Installer on a machine with a single CD:
1. Open two telnet sessions (such as telnet1 and telnet2).2. In telnet1, mount the first PeopleTools CD to a directory (for example, /cdrom).3. In telnet2, go to any directory except /cdrom (for example, /tmp).Run the PeopleSoft Installer, pointing to the executable in /cdrom—for example:
/cdrom/setup.aix -is:javaconsole -console -is:tempdir $HOME/tmp
4. Go through the install prompts in telnet2.5. When prompted in telnet2 to swap media (to change to media 2), go back to telnet1.Unmount and eject the CD, then mount the second PeopleTools CD as /cdrom.
6. In telnet2, press ENTER to continue the install.7. Repeat steps 5 and 6 for all the CDs.
Note. A common problem is that in one of the telnet sessions, the user changes the directory to /cdrom (or anyof its subdirectories). As a result, the OS will not allow you to unmount and eject the CD.
90 Copyright © 2006, Oracle. All rights reserved.
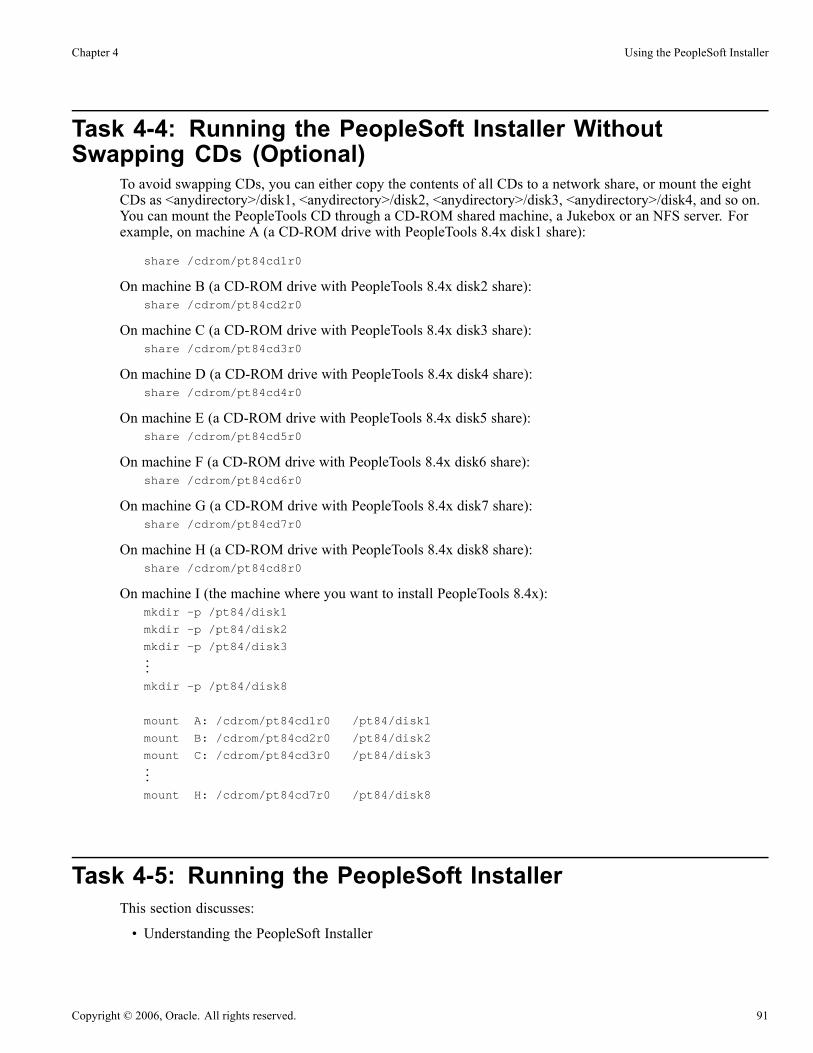
Chapter 4 Using the PeopleSoft Installer
Task 4-4: Running the PeopleSoft Installer WithoutSwapping CDs (Optional)
To avoid swapping CDs, you can either copy the contents of all CDs to a network share, or mount the eightCDs as <anydirectory>/disk1, <anydirectory>/disk2, <anydirectory>/disk3, <anydirectory>/disk4, and so on.You can mount the PeopleTools CD through a CD-ROM shared machine, a Jukebox or an NFS server. Forexample, on machine A (a CD-ROM drive with PeopleTools 8.4x disk1 share):
share /cdrom/pt84cd1r0
On machine B (a CD-ROM drive with PeopleTools 8.4x disk2 share):share /cdrom/pt84cd2r0
On machine C (a CD-ROM drive with PeopleTools 8.4x disk3 share):share /cdrom/pt84cd3r0
On machine D (a CD-ROM drive with PeopleTools 8.4x disk4 share):share /cdrom/pt84cd4r0
On machine E (a CD-ROM drive with PeopleTools 8.4x disk5 share):share /cdrom/pt84cd5r0
On machine F (a CD-ROM drive with PeopleTools 8.4x disk6 share):share /cdrom/pt84cd6r0
On machine G (a CD-ROM drive with PeopleTools 8.4x disk7 share):share /cdrom/pt84cd7r0
On machine H (a CD-ROM drive with PeopleTools 8.4x disk8 share):share /cdrom/pt84cd8r0
On machine I (the machine where you want to install PeopleTools 8.4x):mkdir -p /pt84/disk1
mkdir -p /pt84/disk2
mkdir -p /pt84/disk3...
mkdir -p /pt84/disk8
mount A: /cdrom/pt84cd1r0 /pt84/disk1
mount B: /cdrom/pt84cd2r0 /pt84/disk2
mount C: /cdrom/pt84cd3r0 /pt84/disk3...
mount H: /cdrom/pt84cd7r0 /pt84/disk8
Task 4-5: Running the PeopleSoft InstallerThis section discusses:
• Understanding the PeopleSoft Installer
Copyright © 2006, Oracle. All rights reserved. 91

Using the PeopleSoft Installer Chapter 4
• Starting the PeopleSoft Installer
• Running the PeopleSoft Installer in GUI Mode
• Running the PeopleSoft Installer in Console Mode
Understanding the PeopleSoft InstallerThe PeopleSoft Installer guides you through the process of installing files to your various servers. You mustrun the PeopleSoft Installer on each machine that you use for one or more PeopleSoft server.
The files will be installed into a high-level PeopleSoft directory. This directory, which is referred to in thisdocumentation as <PS_HOME>, is the location for PeopleTools, application, and multilanguage files. It is agood idea to use a directory name that indicates the application you are installing and the version number, suchas HRMS881 for the 8.8 SP1 version of Human Resources.
The following error may appear during your installation:
............The wizard cannot continue because of the following error: could not
load wizard specified in /wizard.inf (104)
If you see this error message during the installation of PeopleTools, your application CDs, PeopleSoftPure Internet Architecture, or when using the Database Configuration Wizard, run <PS_HOME>/setup/uninstall_endorsed.sh (for UNIX) or <PS_HOME>\setup\uninstall_endorsed.bat(Windows) to uninstall the xerces.jar file that is located in the <PS_HOME>\jre\lib\endorsed directory. Run<PS_HOME>/setup/install_endorsed.sh or <PS_HOME>\setup\install_endorsed.batagain to install this xerces.jar back after your installation is complete. This problem happens only when thexerces.jar is installed in <PS_HOME>/jre/lib/endorsed and when this JRE is used for the installation.
Note. For HP-UX 11.11 machines, the values of maxfiles and maxfiles_lim must be at least 2048 in order forthe installation to be successful.
You can run the installer in GUI mode or in console (text) mode. Running the installer on UNIX in GUImode requires an X-Windows interface.
Note. The machine that you use to perform your PeopleTools installation must be running in 256-colormode or higher when running the CD install, PeopleSoft Pure Internet Architecture install, and Databaseconfiguration in Windows. This is not necessary for UNIX or console mode.
The PeopleSoft Installer asks whether you want to install supporting features such as Enterprise ResourcePlanning Connectors, Unicode support, or Environment Management Hub. Before you run the PeopleSoftInstaller, you may want to consult supporting documentation to help you in choosing these options. To confirmthat Enterprise Resource Planning Connectors will run on the operating systems and database platforms youare using, consult the Hardware and Software Requirements book.
See AlsoEnterprise PeopleTools 8.48 PeopleBook: PeopleSoft Integration Broker
Enterprise PeopleTools 8.48 PeopleBook: Global Technology
Enterprise PeopleTools 8.48 PeopleBook: System and Server Administration
Enterprise PeopleTools 8.48 Hardware and Software Requirements, “Server Requirements”
92 Copyright © 2006, Oracle. All rights reserved.

Chapter 4 Using the PeopleSoft Installer
Task 4-5-1: Starting the PeopleSoft InstallerTo start the PeopleSoft Installer in GUI mode, type:
[path]setup.<OS> [additional flags]
To start the PeopleSoft Installer in console mode, type:[path]setup.<OS> [additional flags] -is:javaconsole -console
These are the additional flags:
Flag Description
-is:tempdir <<specify the temp dir>> Use this flag to specify the temporary directory to extracttemporary files and the bundled JRE if Java is not found.This is needed if you have less than 1.5 GB of free diskspace in your temp directory.
-is:log <<specify the log file>> Use this flag to create a log file if you encounteredproblems with the native launcher.
-is:javahome <<specify the java home directory>>
For example, -is:javahome c:\myjdk1.4.0
Use this flag to specify where you installed the Javahome directory, if your installation is different than thevendor-defined JRE Search Path.
The following table lists the native launchers and the platforms to run them:
Operating System Platform Native Launcher to Use
AIX setup.aix
HP-UX (PA-RISC) setup.hp
HP-UX (IPF) setup.hp-ia64
Linux (SuSE or Red Hat) setup.linux
z/Linux setup.zlinux
Note. See the information below for the correct process touse when running the installer on z/Linux.
z/OS Use setup.exe to install onWindows, and then use ServerTransfer. This is the same procedure used in PeopleTools8.1x
Solaris setup.solaris
Windows setup.exe
If you are running on z/Linux:
1. Verify the location of the temporary directory for the installation (<TEMPDIR>), or create a temporarydirectory if necessary. You must have at least 1.5 GB of free temporary disk space. For example,
Copyright © 2006, Oracle. All rights reserved. 93
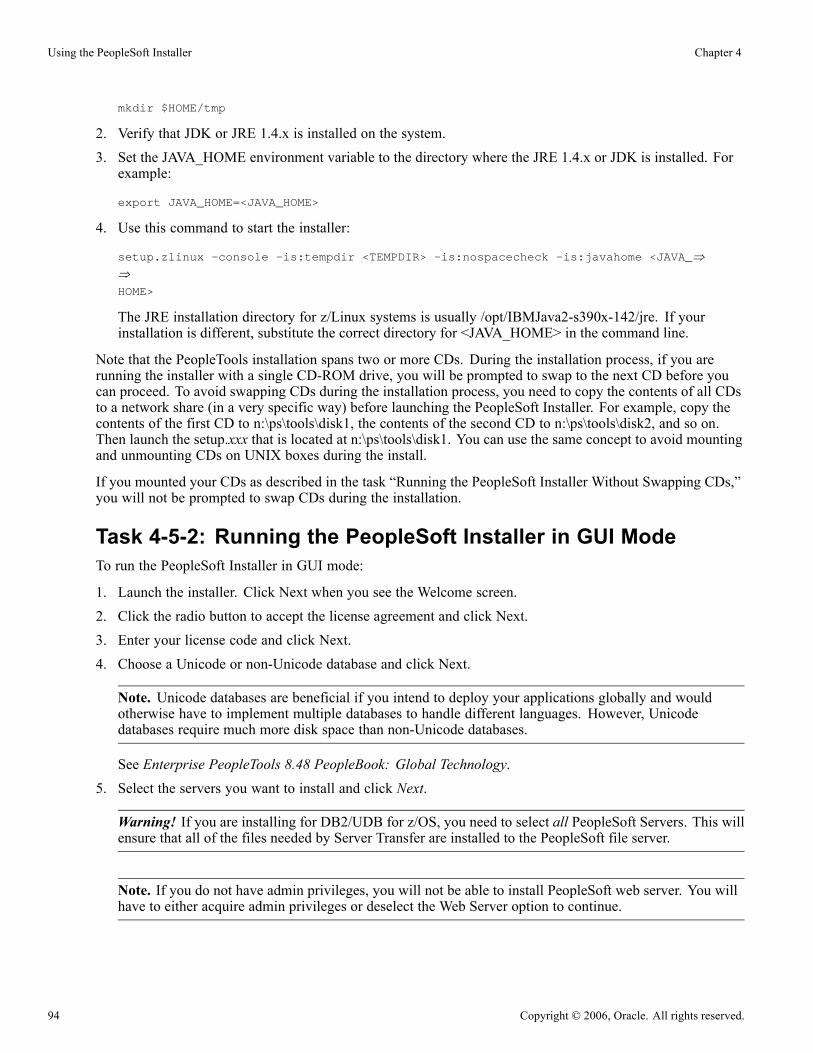
Using the PeopleSoft Installer Chapter 4
mkdir $HOME/tmp
2. Verify that JDK or JRE 1.4.x is installed on the system.
3. Set the JAVA_HOME environment variable to the directory where the JRE 1.4.x or JDK is installed. Forexample:
export JAVA_HOME=<JAVA_HOME>
4. Use this command to start the installer:
setup.zlinux -console -is:tempdir <TEMPDIR> -is:nospacecheck -is:javahome <JAVA_⇒⇒HOME>
The JRE installation directory for z/Linux systems is usually /opt/IBMJava2-s390x-142/jre. If yourinstallation is different, substitute the correct directory for <JAVA_HOME> in the command line.
Note that the PeopleTools installation spans two or more CDs. During the installation process, if you arerunning the installer with a single CD-ROM drive, you will be prompted to swap to the next CD before youcan proceed. To avoid swapping CDs during the installation process, you need to copy the contents of all CDsto a network share (in a very specific way) before launching the PeopleSoft Installer. For example, copy thecontents of the first CD to n:\ps\tools\disk1, the contents of the second CD to n:\ps\tools\disk2, and so on.Then launch the setup.xxx that is located at n:\ps\tools\disk1. You can use the same concept to avoid mountingand unmounting CDs on UNIX boxes during the install.
If you mounted your CDs as described in the task “Running the PeopleSoft Installer Without Swapping CDs,”you will not be prompted to swap CDs during the installation.
Task 4-5-2: Running the PeopleSoft Installer in GUI ModeTo run the PeopleSoft Installer in GUI mode:
1. Launch the installer. Click Next when you see the Welcome screen.
2. Click the radio button to accept the license agreement and click Next.
3. Enter your license code and click Next.
4. Choose a Unicode or non-Unicode database and click Next.
Note. Unicode databases are beneficial if you intend to deploy your applications globally and wouldotherwise have to implement multiple databases to handle different languages. However, Unicodedatabases require much more disk space than non-Unicode databases.
See Enterprise PeopleTools 8.48 PeopleBook: Global Technology.5. Select the servers you want to install and click Next.
Warning! If you are installing for DB2/UDB for z/OS, you need to select all PeopleSoft Servers. This willensure that all of the files needed by Server Transfer are installed to the PeopleSoft file server.
Note. If you do not have admin privileges, you will not be able to install PeopleSoft web server. You willhave to either acquire admin privileges or deselect the Web Server option to continue.
94 Copyright © 2006, Oracle. All rights reserved.

Chapter 4 Using the PeopleSoft Installer
Note. You can install multiple servers at the same time, but they will all be installed on the same machine.If you want to install servers on separate machines, you need to run the PeopleSoft Installer on eachserver machine.
Note. You must select the web server if you want to install Enterprise Resource Planning Connectors.
6. Specify the directory where you want to install PeopleTools and click Next.
Note. Please substitute your network drive and the directory name of your choice for the default selection.The installation directory name cannot contain a space. Note that directory names containing periods ornon-US-ASCII characters may not work with some additional component software.
Note. If you are installing on UNIX, do not use Symbolic Links. Use the actual directory.
7. UNIX only: If you have checked Application Server, Batch Server, or Database Server, you are promptedto enter the TUXEDO directory.
8. Choose whether to install Enterprise Resource Planning Connectors. If you choose Yes, specify theinstallation directory. Note that this directory must not be the location in which PeopleTools is installed, ora subdirectory of that directory.
Note. The Enterprise Resource Planning Connectors feature is supported on Windows, Solaris, AIX,HP-UX, and Linux. (If you are on another platform, you will not see this screen.) PeopleSoft providesaccess to an additional software product, iWay SOAPswitch, which provides ERP adaptors, or connectors,that generate Web Service Description Language (WSDL) for bridging to SAP, Oracle, and Siebeldevelopment environments. You can then easily import the WSDL into PeopleSoft to create the desiredintegration points. For information on configuring iWay SOAPswitch consult the PeopleSoft IntegrationBroker PeopleBook.
See Enterprise PeopleTools 8.48 PeopleBook: PeopleSoft Integration Broker
Note. If you need to refer to the ERP installation log files, they will either be in your user home directoryor in the directory in which ERP is installed.
9. Specify the location of your Connectivity Program Directory and click Next.The default location for the connectivity software for your platform (as set by the vendor) is listed inthe following table. If the database connectivity software was installed to a different directory, enterthat path instead.
Platform Name Default Location of Database ConnectivityLibraries
DB2 for z/OS C:\sqllib\bin
10. Depending on the PeopleSoft servers you selected, choose whether to install the PeopleTools iconsand click Next.
11. If you elected to install PeopleTools icons, choose a valid group folder in which to create them andclick Next.
12. At this point, enter the configuration information for Environment Management.
Copyright © 2006, Oracle. All rights reserved. 95

Using the PeopleSoft Installer Chapter 4
Select the machine name of the web server running the Environment Manager Hub. (This will very likelybe the machine on which you run PIA). Select the hub port number (the default is 80). This needs to matchthe PIA port. If you change the port number for the PIA configuration, you must also change the webserver listener port number for all the agents in the configuration.properties file.
See Enterprise PeopleTools 8.48 PeopleBook: System and Server Administration, “Using EnvironmentManagement Component.”
13. The next screen lists the PeopleTools components (features) for which you are licensed. Accept thedefaults for the PeopleTools features and click Next.
• Select PeopleTools to install PeopleTools and the PeopleSoft Pure Internet Architecture. This componentcontains the core PeopleTools files and is required for the proper operation of the PeopleSoft systemand the PeopleSoft Pure Internet Architecture.
• Select PeopleTools System Database to allow your developers to create custom PeopleTools applicationsoutside of the delivered PeopleSoft Application.
• The PeopleTools Language Pack and PeopleTools Language Development Kit contain the translatedPeopleTools DLLs and the resource files and headers needed to build them.
Select PeopleTools Language Pack if you plan on running the Windows components of the installation inlanguages other than English. This component contains the compiled PeopleSoft translations for theWindows client. If you are not using multiple languages throughout your implementation, you do notneed this component.
Select PeopleTools Language Development Kit if you plan on modifying or creating your own newtranslations for the PeopleTools Windows client components. It contains the source and header filesrequired to modify and compile new versions of these translations. Again, you do not need thiscomponent if you are not using multiple languages.
14. You will see an installation confirmation window. If the information is correct, choose Next. If you need tomodify any of the information, choose the Back button and make your changes.
15. If prompted, change your CD during the installation process.
16. After the files have been installed, click Finish to complete the setup.
Note. If you have chosen to install ERP connectors, you see an informational message indicating that theyare being installed.
Task 4-5-3: Running the PeopleSoft Installer in Console ModeTo run the PeopleSoft Installer in console mode:
Note. The console mode installation is typically used on UNIX platforms.
1. Launch the PeopleSoft Installer in console mode. At the Welcome screen, press ENTER to continue.
See Starting the PeopleSoft Installer.
Note. If you are running the installer with a single CD-ROM drive, you should always follow theinstruction in the task “Running the PeopleSoft Installer with a Single CD.”
96 Copyright © 2006, Oracle. All rights reserved.

Chapter 4 Using the PeopleSoft Installer
Note. If you mounted your CDs (as described in the task “Running the PeopleSoft Installer WithoutSwapping CDs”), we recommend that you launch the installer from an existing directory on the box, andnot the directory that links to the CD, in the following two cases: for HP-UX, if the CDs are mountedon Jukebox; for TRU64, if the CDs are mounted on a NFS server.
2. Windows only: Accept the license agreement by selecting 1. Select 0 when you are finished.3. Enter your license code, and press ENTER to continue.4. Select the PeopleSoft servers you want to install.By default, all of the servers supported for your database platform are selected.
Note. If you are installing on UNIX, do not use Symbolic Links. Use the actual directory.
Note. z/OS customers need to select all servers when running the installer on Windows. This is becausethere are additional steps using Server Transfer to upload the files. Also, to install a UNICODE database,z/OS customers must select the Unicode Database option.
After your selection, press ENTER; you will be prompted for the destination (for example, <PS_HOME>).Specify the directory and press ENTER to continue.
Note. In console mode, the browse option for specifying a different install directory is unavailable.
Note. You must select the web server if you want to install Enterprise Resource Planning Connectors.
5. Choose whether to install Enterprise Resource Planning Connectors.If you choose Yes, specify the installation directory. Note that this directory must not be the location inwhich PeopleTools is installed, or a subdirectory of that directory.
Note. For the current release, the Enterprise Resource Planning Connectors feature is supported only onWindows, Solaris, AIX, HP-UX, and Linux. (If you are on another platform, you will not see this screen.)PeopleSoft provides access to a third-party software product, iWay SOAPswitch, which provides ERPadaptors, or connectors, that generate Web Service Description Language (WSDL) for touchpoints in SAP,Oracle, and Siebel systems. You can then easily import the WSDL into PeopleSoft to create the desiredintegration points.
See Enterprise PeopleTools 8.48 PeopleBook: PeopleSoft Integration Broker6. UNIX only: If you checked Application Server, Batch Server, or Database Server, you are prompted toenter the TUXEDO directory.
7. At this point, enter the configuration for Environment Management. Select the machine name and portnumber.Select the machine name of the web server running the Environment Manager Hub. (This will very likelybe the machine on which you run PIA). Select the hub port number (the default is 80). This needs to matchthe PIA port. If you change the port number for the PIA configuration, you must also change the webserver listener port number for all the agents in the configuration.properties file.
See Enterprise PeopleTools 8.48 PeopleBook: Software Updates, “Configuring and Running EnvironmentManagement Components.”
Copyright © 2006, Oracle. All rights reserved. 97

Using the PeopleSoft Installer Chapter 4
8. Windows only: Specify the database connectivity directory.The default location for the connectivity software for your platform (as set by the vendor) is listed inthe following table. If the database connectivity software was installed to a different directory, enterthat path instead.
Platform Name Default Location of Database ConnectivityLibraries
DB2 UDB for z/OS C:\sqllib\bin
9. Windows only: Indicate whether you want icons to be created.10. Choose the products that you wish to install:
To select/deselect a feature or to view its children, type its number
1. [X] PeopleTools
2. [X] PeopleTools System Database
3. [X] PeopleTools Language Pack
4. [X] PeopleTools Language Development Kit
11. At this point, you can toggle the install status of each product. Press 0 and then ENTER to continueand the PeopleSoft Installer will give you a summary of your selection. This summary will depend onyour earlier selections.
PeopleTools 8.48 will be installed in the following location:
c:\temp\ptest
with the following features:
PeopleTools
PeopleTools System Database
PeopleTools Language Pack
PeopleTools Language Development Kit
The following PeopleSoft Servers were selected by you:
PeopleSoft Application Server
PeopleSoft Batch Server
PeopleSoft Database Server
PeopleSoft File Server
PeopleSoft Web Server
Database Type:
<Database Name>
ERP Connectors Installation:
Not selected
Environment Hub Configuration:
Hub machine name: PSEMHUB
Hub port number: 80
Press 1 for Next, 2 for Previous, 3 to Cancel, or 4 to Redisplay [1]
98 Copyright © 2006, Oracle. All rights reserved.

Chapter 4 Using the PeopleSoft Installer
12. Press ENTER to start the installation. You may be prompted to insert the next CD.13. The PeopleSoft Installer will create a text-based progress bar to indicate the progress of the install.14. Please press ENTER to exit.
Note. For UNIX platforms, if you chose PeopleSoft servers that require a JRE, you see the “UnpackingJRE” message after the progress bar.
Note. If you chose to install ERP connectors, you see an informational message indicating that they arebeing installed.
Task 4-6: Installing the Application CDAfter installing the PeopleTools CD, install the application CD to the same <PS_HOME> directory. Thescreens may look slightly different depending upon which application you install.
Note. If you are installing more than one application, it is a good idea to create an application-specific<PS_HOME> and carry out an installation of PeopleTools for each application. This helps you to maintainyour applications more efficiently, since you can easily match each application version to the correct versionof PeopleTools.
Note. To properly install a Demo database, you must select both the System Database and the Demo Databaseoptions during the installation of your PeopleSoft applications.
Note. The next chapter discusses the installation of the application database component to the database server.
To install the application CD:
1. Insert the application CD into the CD-ROM drive and run the setup application from the root directoryof the CD.
See Running the PeopleSoft Installer.2. After reading the Welcome information, click Next.3. Click Yes to agree to the Software License Agreement.4. Enter the PeopleSoft license code and click Next.
Note. All modules for the product line you are installing exist on the PeopleSoft Application and DatabaseCDs regardless of the modules purchased. Your unique license code will “unlock” the combination ofmodules you purchased. A master license key no longer exists.
5. Select the servers you want to install and click Next.6. Specify the directory where you want to install the application. You must specify the <PS_HOME>directory; that is the directory where you installed PeopleTools for a given server. Click Next.
7. A feature selection screen appears. (What you see depends on what product you are installing.) Select thefeatures that you wish to install and click Next.
Copyright © 2006, Oracle. All rights reserved. 99
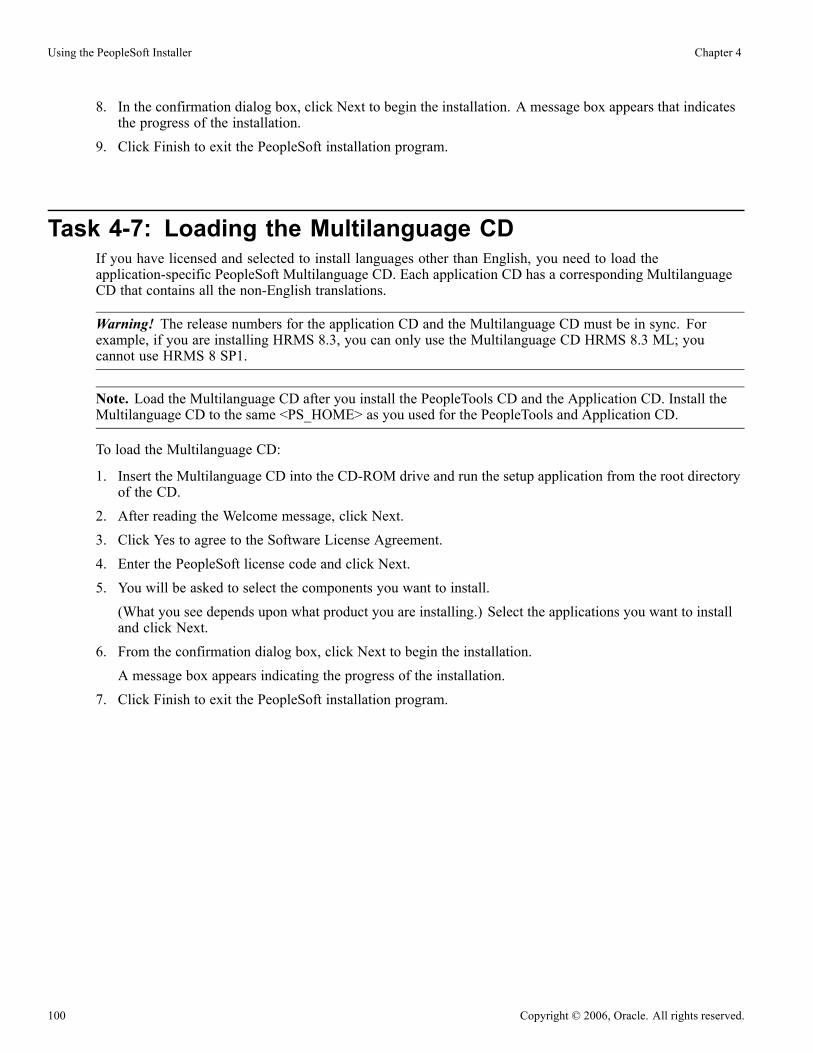
Using the PeopleSoft Installer Chapter 4
8. In the confirmation dialog box, click Next to begin the installation. A message box appears that indicatesthe progress of the installation.
9. Click Finish to exit the PeopleSoft installation program.
Task 4-7: Loading the Multilanguage CDIf you have licensed and selected to install languages other than English, you need to load theapplication-specific PeopleSoft Multilanguage CD. Each application CD has a corresponding MultilanguageCD that contains all the non-English translations.
Warning! The release numbers for the application CD and the Multilanguage CD must be in sync. Forexample, if you are installing HRMS 8.3, you can only use the Multilanguage CD HRMS 8.3 ML; youcannot use HRMS 8 SP1.
Note. Load the Multilanguage CD after you install the PeopleTools CD and the Application CD. Install theMultilanguage CD to the same <PS_HOME> as you used for the PeopleTools and Application CD.
To load the Multilanguage CD:
1. Insert the Multilanguage CD into the CD-ROM drive and run the setup application from the root directoryof the CD.
2. After reading the Welcome message, click Next.3. Click Yes to agree to the Software License Agreement.4. Enter the PeopleSoft license code and click Next.5. You will be asked to select the components you want to install.(What you see depends upon what product you are installing.) Select the applications you want to installand click Next.
6. From the confirmation dialog box, click Next to begin the installation.A message box appears indicating the progress of the installation.
7. Click Finish to exit the PeopleSoft installation program.
100 Copyright © 2006, Oracle. All rights reserved.

CHAPTER 5
Setting Up the Windows File Server
This chapter discusses:
• Understanding the File Server
• Mapping a Drive on the Install Workstation
• Installing the PeopleTools CD to the File Server
• Installing the Application CD
• Loading the Multilanguage CD
• Binding Windows “SQR for PeopleSoft” DB2 Connect Packages
Understanding the File ServerThe file server is the environment (or file) repository for the PeopleTools Development Environment, which isrequired for the Database Configuration Wizard to run. The file server is also used for the files necessaryto perform an upgrade. This includes Upgrade Assistant or Change Assistant and all of the executables andscripts necessary to perform an upgrade. You will apply patches and updates from PeopleSoft CustomerConnection directly to the file server and then copy the updated files to your other servers. In addition, the fileserver is a source repository for COBOL and SQR.
See “Preparing for Installation,” Installing Supporting Applications.
Note. The information in this chapter applies to installations on both UNIX and Windows. If you are doing aninstallation only for UNIX boxes, you need a Windows file server. If you are working only on Windows, andyou set up your file server in the previous chapter, you can skip this chapter.
Note. For DB2 UDB for z/OS, the file server is used as a staging location to FTP files to the z/OS batchserver only.
In some cases you may choose to set up local copies of the PeopleSoft executables on the PeopleToolsDevelopment Environment and Windows batch servers, rather than mapping to a shared directory on the fileserver. You can use the instructions in this chapter to perform such local installations.
Copyright © 2006, Oracle. All rights reserved. 101
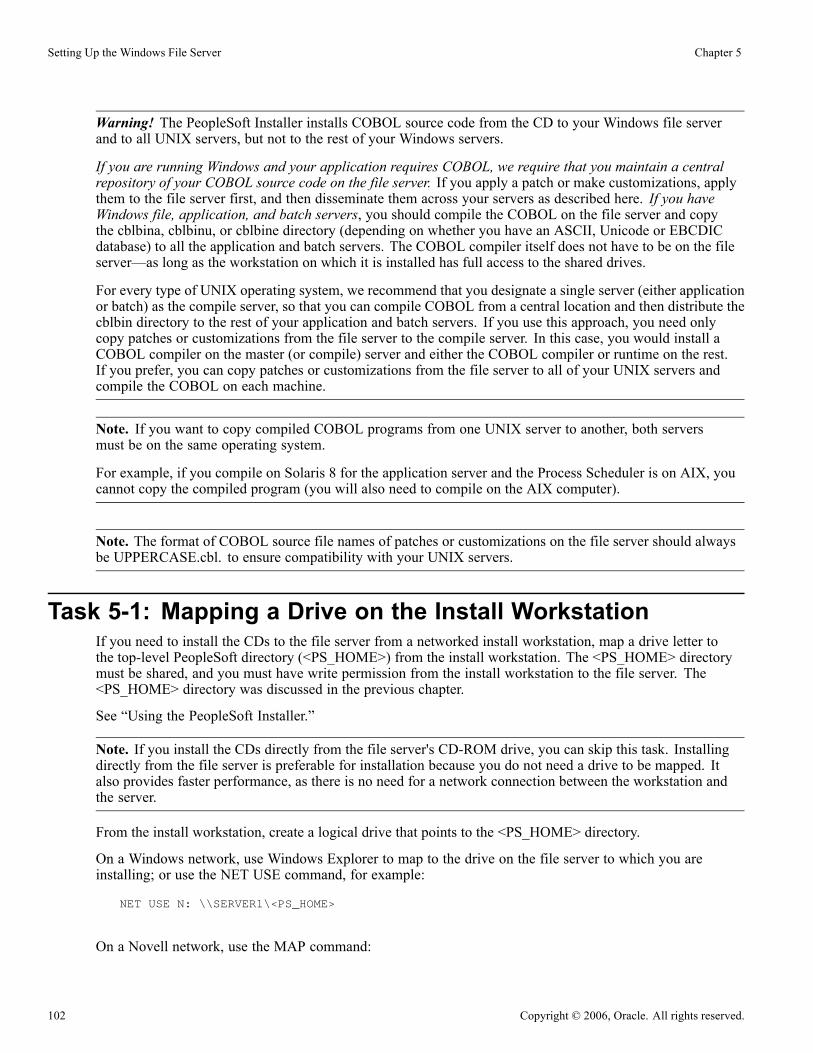
Setting Up the Windows File Server Chapter 5
Warning! The PeopleSoft Installer installs COBOL source code from the CD to your Windows file serverand to all UNIX servers, but not to the rest of your Windows servers.
If you are running Windows and your application requires COBOL, we require that you maintain a centralrepository of your COBOL source code on the file server. If you apply a patch or make customizations, applythem to the file server first, and then disseminate them across your servers as described here. If you haveWindows file, application, and batch servers, you should compile the COBOL on the file server and copythe cblbina, cblbinu, or cblbine directory (depending on whether you have an ASCII, Unicode or EBCDICdatabase) to all the application and batch servers. The COBOL compiler itself does not have to be on the fileserver—as long as the workstation on which it is installed has full access to the shared drives.
For every type of UNIX operating system, we recommend that you designate a single server (either applicationor batch) as the compile server, so that you can compile COBOL from a central location and then distribute thecblbin directory to the rest of your application and batch servers. If you use this approach, you need onlycopy patches or customizations from the file server to the compile server. In this case, you would install aCOBOL compiler on the master (or compile) server and either the COBOL compiler or runtime on the rest.If you prefer, you can copy patches or customizations from the file server to all of your UNIX servers andcompile the COBOL on each machine.
Note. If you want to copy compiled COBOL programs from one UNIX server to another, both serversmust be on the same operating system.
For example, if you compile on Solaris 8 for the application server and the Process Scheduler is on AIX, youcannot copy the compiled program (you will also need to compile on the AIX computer).
Note. The format of COBOL source file names of patches or customizations on the file server should alwaysbe UPPERCASE.cbl. to ensure compatibility with your UNIX servers.
Task 5-1: Mapping a Drive on the Install WorkstationIf you need to install the CDs to the file server from a networked install workstation, map a drive letter tothe top-level PeopleSoft directory (<PS_HOME>) from the install workstation. The <PS_HOME> directorymust be shared, and you must have write permission from the install workstation to the file server. The<PS_HOME> directory was discussed in the previous chapter.
See “Using the PeopleSoft Installer.”
Note. If you install the CDs directly from the file server's CD-ROM drive, you can skip this task. Installingdirectly from the file server is preferable for installation because you do not need a drive to be mapped. Italso provides faster performance, as there is no need for a network connection between the workstation andthe server.
From the install workstation, create a logical drive that points to the <PS_HOME> directory.
On a Windows network, use Windows Explorer to map to the drive on the file server to which you areinstalling; or use the NET USE command, for example:
NET USE N: \\SERVER1\<PS_HOME>
On a Novell network, use the MAP command:
102 Copyright © 2006, Oracle. All rights reserved.

Chapter 5 Setting Up the Windows File Server
MAP ROOT N:=SERVER1/SYS:<PS_HOME>
In this example, SERVER1 is the name of the file server.
Task 5-2: Installing the PeopleTools CD to the File ServerTo install the PeopleTools CD-ROM to the file server:
1. Insert the PeopleTools CD into the CD-ROM drive and run the setup application from the root directoryof the CD.A welcome screen appears.
2. Click Next.The licensing agreement appears.
3. Click Yes and enter your 31-digit license code from the license code sheet.
4. Click Next and choose whether to use a Unicode or a non-Unicode database.
See "Preparing for Installation," Planning Multilingual Strategy.
Note. Unicode databases are beneficial to customers who intend to deploy their applications globally andwould otherwise have to implement multiple databases to handle different languages. However, Unicodedatabases require much more disk space than non-Unicode databases.
See Enterprise PeopleTools 8.48 PeopleBook: Global Technology.
5. Select all of the servers for installation and click Next.
Warning! If you are installing for DB2 UDB for z/OS, you need to select all PeopleSoft Servers. This willensure that all of the files needed by Server Transfer are installed to the PeopleSoft File Server.
6. Click the Browse button, choose the path of the <PS_HOME> directory on the file server, and click OK.Click Next.
7. Choose whether to install the Enterprise Resource Planning connectors.If you choose Yes, specify the installation directory. Note that this directory must not be the location inwhich PeopleTools is installed, or a subdirectory of that directory.
Note. The Enterprise Resource Planning Connectors feature is supported on Windows, Solaris, AIX,HP-UX, and Linux. (If you are on another platform, you will not see this screen.) PeopleSoft providesaccess to an additional software product, iWay SOAPswitch, which provides ERP adaptors, or connectors,that generate Web Service Description Language (WSDL) for bridging to SAP, Oracle, and Siebeldevelopment environments. You can then easily import the WSDL into PeopleSoft to create the desiredintegration points. For information on configuring iWay SOAPswitch consult the PeopleSoft IntegrationBroker PeopleBook.
See Enterprise PeopleTools 8.48 PeopleBook: Integration Broker.8. Select the location of your connectivity software.
Copyright © 2006, Oracle. All rights reserved. 103

Setting Up the Windows File Server Chapter 5
The default location for your connectivity software (as set by the vendor) is listed in the following table. Ifthe database connectivity software was installed to a different directory, enter that path instead.
Platform Name Location of Database Connectivity Libraries
DB2 UDB for z/OS C:\sqllib\bin
9. In the next dialog box, choose Yes to install an Installation icon group on the install workstation. Thenclick Next.
10. Then specify the desired program group folder (the default is PeopleTools 8.4 Installation) and click Next(a program folder name cannot contain any of the following characters: \ / : * ? " < > |). This step createsan icon group on the installing machine that supplies shortcuts to every program needed throughoutthe installation process.
11. Enter the configuration information for Environment Management.
Select the machine name of the web server running the Environment Manager Hub. (This will very likelybe the machine on which you run PIA). Select the hub port number (the default is 80). This needs to matchthe PIA port. If you change the port number for the PIA configuration, you must also change the webserver listener port number for all the agents in the configuration.properties file.
See Enterprise PeopleTools 8.48 PeopleBook: Software Updates, “Configuring and Running EnvironmentManagement Components.”
12. A component selection window appears. This screen lists the PeopleTools components for which youare licensed. Select the products to install from the Components list.
Note. The components PeopleTools Language Pack and PeopleTools Language Development Kit containthe translated PeopleTools DLLs and the resource files and headers needed to build them. If you do notneed translated files, you may choose to not install these two components.
• Select PeopleTools to install PeopleTools Development Environment and the Upgrade EnvironmentThis component contains the core PeopleTools files and is required for the proper operation of yourPeopleSoft Development and Upgrade environment.
• Select PeopleTools Language Pack if you plan on running the Windows components of your installationin languages other than English. This component contains the compiled PeopleSoft translations for theWindows client. If you are not using multiple languages throughout your implementation, you don'tneed this component.
• Select PeopleTools Language Development Kit if you plan on modifying or creating your own newtranslations for the PeopleTools Windows client components. It contains the source and header filesrequired to modify and compile new versions of these translations. Again, you do not need thiscomponent if you are not using multiple languages.
• Select PeopleTools System Database to allow your developers to create custom PeopleTools applicationsoutside of the delivered PeopleSoft Application.
13. Click Next. You should see the Confirm Products dialog box.14. Click Next to verify that you want to install to the specified directory. You'll see a progress indicator soyou can monitor the progress of your installation.
15. When the setup program successfully completes the installation of PeopleTools, click Finish to exit theinstallation program.
104 Copyright © 2006, Oracle. All rights reserved.
Chapter 5 Setting Up the Windows File Server
Task 5-3: Installing the Application CDAfter installing the PeopleTools CD, install the application CD to the same <PS_HOME> directory. Thescreens may look slightly different depending upon which application you install.
Note. If you are installing more than one application, it is a good idea to create an application-specific<PS_HOME> and carry out an installation of PeopleTools for each application. This helps you to maintainyour applications more efficiently, since you can easily match each application version to the correct versionof PeopleTools.
Note. To properly install a Demo database, you must select both the System Database and the Demo Databaseoptions during the installation of your PeopleSoft applications.
Note. The next chapter discusses the installation of the application database component to the database server.
To install the application CD:
1. Insert the application CD into the CD-ROM drive and run the setup application from the root directoryof the CD.
See Running the PeopleSoft Installer.
2. After reading the Welcome information, click Next.
3. Click Yes to agree to the Software License Agreement.
4. Enter the PeopleSoft license code and click Next.
Note. All modules for the product line you are installing exist on the PeopleSoft Application and DatabaseCDs regardless of the modules purchased. Your unique license code will “unlock” the combination ofmodules you purchased. A master license key no longer exists.
5. Select the servers you want to install and click Next.6. Specify the directory where you want to install the application. You must specify the <PS_HOME>directory; that is the directory where you installed PeopleTools for a given server. Click Next.
7. A feature selection screen appears. (What you see depends on what product you are installing.) Select thefeatures that you wish to install and click Next.
8. In the confirmation dialog box, click Next to begin the installation. A message box appears that indicatesthe progress of the installation.
9. Click Finish to exit the PeopleSoft installation program.
Task 5-4: Loading the Multilanguage CDIf you have licensed and selected to install languages other than English, you need to load theapplication-specific PeopleSoft Multilanguage CD. Each application CD has a corresponding MultilanguageCD that contains all the non-English translations.
Copyright © 2006, Oracle. All rights reserved. 105
Setting Up the Windows File Server Chapter 5
Warning! The release numbers for the application CD and the Multilanguage CD must be in sync. Forexample, if you are installing HRMS 8.3, you can only use the Multilanguage CD HRMS 8.3 ML; youcannot use HRMS 8 SP1.
Note. Load the Multilanguage CD after you install the PeopleTools CD and the Application CD. Install theMultilanguage CD to the same <PS_HOME> as you used for the PeopleTools and Application CD.
To load the Multilanguage CD:
1. Insert the Multilanguage CD into the CD-ROM drive and run the setup application from the root directoryof the CD.
2. After reading the Welcome message, click Next.3. Click Yes to agree to the Software License Agreement.4. Enter the PeopleSoft license code and click Next.5. You will be asked to select the components you want to install.(What you see depends upon what product you are installing.) Select the applications you want to installand click Next.
6. From the confirmation dialog box, click Next to begin the installation.A message box appears indicating the progress of the installation.
7. Click Finish to exit the PeopleSoft installation program.
Task 5-5: Binding Windows “SQR for PeopleSoft”DB2 Connect Packages
To bind Windows "SQR for PeopleSoft" DB2 Connect packages:
1. Using an ID with mainframe logon and BINDADD privileges, log on to DB2 Connect Command LineProcessor:
db2 => CONNECT TO <database name> USER <mainframe User Id>
Note. Enter your current password for "mainframe User Id": <mainframe User Id password>.
Database Connection Information:Database server = DB2 OS/390 7.1.0SQL authorization ID = <mainframe User Id>Local database alias = <database name>
2. The Windows SQR bind executable is located in the File or Report Server directory (for example,<PS_HOME>\bin\sqr\db2\BINW\dbcalls.bnd).For an EBCDIC installation, issue the following bind command:
db2 => bind <ps_home>\bin\sqr\db2\BINW\dbcalls.bnd blocking all grant public⇒
106 Copyright © 2006, Oracle. All rights reserved.
Chapter 5 Setting Up the Windows File Server
sqlerror continue
For a Unicode installation, issue the following command to bind the Windows SQR executable withencoding Unicode:db2 -> bind <ps_home>\bin\sqr\db2\BINW\dbcalls.bnd encoding unicode blocking⇒all grant public sqlerror continue
Collection id (COLLID) of SQR will be added to SYSPACKAGE catalog table and package executeauthority to PUBLIC in SYSPACKAUTH catalog table.
Note. This bind needs to be executed for each new version of SQR for PeopleSoft on every DB2subsystem or database.
Copyright © 2006, Oracle. All rights reserved. 107

Setting Up the Windows File Server Chapter 5
108 Copyright © 2006, Oracle. All rights reserved.
CHAPTER 6
Setting Up the Install Workstation
This chapter discusses:
• Understanding the Install Workstation
• Prerequisites
• Starting Configuration Manager
• Setting Startup Options
• Editing the Default Profile
• Running Client Setup
Understanding the Install WorkstationThis chapter describes how to set up a PeopleSoft Windows-based client for connecting to the database serverin two-tier mode, specifically for the purpose of performing install-related tasks from the workstation. Youmust configure at least one two-tier Windows-based client for running the Server Transfer, Data Mover andSQR processes required for setting up the batch server and for creating the PeopleSoft database. For someinstallations you may wish to set up multiple install workstations, so that you can perform asynchronous tasksat the same time; for example, you could create and populate multiple databases simultaneously. You canquickly configure multiple workstations by exporting a configuration file from one workstation and importingit to another workstation.
See AlsoEnterprise PeopleTools 8.48 PeopleBook: System and Server Administration
PrerequisitesThe following tasks are prerequisites for setting up the install workstation:
• The workstation must have database connectivity software installed.• You must have planned your database creation strategy. You should know the precise names of thedatabases that you intend to create.
• Make sure that you have created your connect strategy. You must use a Connect ID. You should know boththe Connect ID and Connect password.
• The workstation must have a logical drive mapped to <PS_HOME> on the file server (or, if the file serverand install workstation are one and the same, <PS_HOME> can be installed on a local drive).
Copyright © 2006, Oracle. All rights reserved. 109

Setting Up the Install Workstation Chapter 6
• The person performing the installation must have read access to the <PS_HOME> directory.
If this is the same workstation on which the CD installation was performed, it should have a PeopleTools 8.4Installation program group, which was created when you loaded the PeopleTools CD-ROM. This isn't arequirement, but it does make it more convenient to run the PeopleTools install applications.
See Also“Preparing for Installation”
“Setting Up the File Server”
Task 6-1: Starting Configuration ManagerConfiguration Manager is a utility for configuring workstations being used as the PeopleTools DevelopmentEnvironment. These are its principal functions:
• Sets up and make changes to PeopleSoft configuration settings.• Creates a program group containing Windows shortcuts to PeopleSoft applications.• Installs local DLLs.• Installs the PeopleSoft ODBC driver, which is used for PeopleSoft Open Query and for Crystal Reports,and sets up an ODBC user data source name (DSN).
The first time you run Configuration Manager on the client, it will populate certain fields with default valuesspecified in a configuration file stored on the file server, specifically: <PS_HOME>\setup\pstools.cfg. Thisconfiguration file was set up when you ran the CD installation. Once you set up and run ConfigurationManager, it will populate fields using values that are stored in the Windows system registry.
To start Configuration Manager, do one of the following:
• Select Start, Programs, PeopleTools 8.4 Installation, Configuration Manager. (This program group willbe available if you installed the PeopleSoft CDs from this workstation.)
• If the PeopleSoft 8.4 program group was not installed on this workstation, run pscfg.exe directly from the<PS_HOME>\bin\client\winx86 directory on the file server.
Task 6-2: Setting Startup OptionsThe Startup tab of Configuration Manager sets the default options for the PeopleSoft sign-on screen that isused for connecting to a PeopleSoft database. It also contains a setting that specifies the local directory forstoring cached PeopleSoft data.
To set Startup options:
1. Make sure you are viewing the Configuration Manager Startup tab (this tab is what you see if you startedConfiguration Manager as described in the previous task).
Set the following options:
• Database type — Verify the type of RDBMS. This should already be set to DB2 UDB for OS/390.
110 Copyright © 2006, Oracle. All rights reserved.

Chapter 6 Setting Up the Install Workstation
• Application Server Name — This option appears if you select a database type of Application Server. It iswhere you enter your application server name if you are setting up a three-tier connection.
• Database name — The name of the default database to connect to. Enter the name of one of thedatabases that you intend to create.
• User ID — The name of the default user that will appear in the sign-on screen. This can be any valid username, although for installation setup it normally matches the name of one of the built-in PeopleSoftusers (typically PS or VP1) that will be installed in the database.If you have decided to modify the PeopleSoft database directly and use a user ID other than a user IDdelivered by PeopleSoft, type your user ID into this field.
• Connect ID and Connect Password — Type your connect ID and password into these fields. ConnectID is required for PeopleSoft 8. The connect ID and password must match the z/OS ID that you setup in Chapter 1.
2. Select the Crystal/Bus. Interlink/JDeveloper tab and set the following options:• Crystal EXEs Path— Set this to the location of your Crystal Reports executables.• Default Crystal Reports— Set this to the path on the file server where the Crystal reports reside. Notethat the specified path should not contain reports run in production. This option is used when runningfrom PSQuery to Crystal.
• Use trace during execution— This option is used when running Crystal Reports from Process Scheduleron the client.
• Business Interlink Directory—You can leave this option blank. If you do so, the system uses its defaultdirectory <PS_HOME>\bin\<client>|<server>\winx86\interfacedrivers.
• JDeveloper Directory— See the appendix “Using the XSLT Mapper with Oracle BPEL ProcessManager” for information on using this option.
See Also“Preparing for Installation,” Using Connect ID
Task 6-3: Editing the Default ProfileBegin by editing the default profile for the workstation. Among other things, this will verify that the paths to<PS_HOME> and its subdirectories are correctly set, which is required for subsequent tasks.
To edit the default profile:
1. Select the Profile tab in Configuration Manager. Only one profile, the Default Profile, has been defined.
2. Select Edit to display the Edit Profile dialog box, and then select the Process Scheduler tab.
3. In the Process Scheduler tab, verify the following options; these should have been set correctly by the CDinstallation program:
• Verify that the PeopleSoft Home Directory (PS_HOME) field is set to the path to <PS_HOME> onthe file server.
• Set the Database Drivers (DBBIN) field to the location of the database connectivity files on theworkstation; such as c:\sqllib\bin.
Copyright © 2006, Oracle. All rights reserved. 111

Setting Up the Install Workstation Chapter 6
• Set the SQR Executables (SQRBIN) field to the file server directory where SQR for Windows wasinstalled when you ran the PeopleSoft Installer.
• Set the SQR Flags (PSSQRFLAGS) field to -ZIF<PS_HOME>\sqr\pssqr.ini.• Set the SQR Report Search 1 (PSSQR1) field to <PS_HOME>\sqr. The remaining SQR Report Searchfields can be left blank, because no additional SQR report directories have been created yet.
4. Select the Common tab of the Edit Profile dialog box.
Edit Profile dialog box
The following fields are used to set Data Mover default input, output, and log directories.• Verify that the Input Directory and Output Directory fields are set to <PS_HOME>\data. This directorywill store the Data Mover scripts required to populate the PeopleSoft database.
• Set the Log Directory to a local workstation directory to store the Data Mover log files. The default isC:\TEMP.
5. Select OK to close the Edit Profile dialog box.
See AlsoEnterprise PeopleTools 8.48 PeopleBook: System and Server Administration, “Using PeopleSoft ConfigurationManager”
112 Copyright © 2006, Oracle. All rights reserved.

Chapter 6 Setting Up the Install Workstation
Task 6-4: Running Client SetupThe Client Setup tab does the following:
• Installs a PeopleSoft program group on the workstation.
• Installs the PeopleSoft ODBC driver required for Open Query and Crystal Reports.
• Installs system DLLs on the workstation.
These Client Setup functions are performed when you click OK or Apply from Configuration Manager only ifthe Install Workstation option on the Client Setup tab is selected.
Note. Any files installed by Client Setup on the workstation from the file server, including ODBC driverfiles, use the paths specified in the default profile.
To run Client Setup:
1. Select the Client Setup tab in Configuration Manager.2. In the Group Title text box enter the name of the program group for the icons you want on the clientworkstation. (A program group name cannot contain any of the following characters: \ / : * ? " < > |)You can call the program group anything you want, but this documentation uses the default name,PeopleTools 8.4.
3. If you do not have a PeopleTools 8.4 program group set up on the workstation, be sure to check thefollowing two options for installing shortcuts to applications essential for installation:
Note. When you run Client Setup, it will uninstall any existing shortcuts in the PeopleTools 8.4 programgroup, and install shortcuts for the applications you have selected. If you subsequently want to install oruninstall shortcuts, you can always re-run Client Setup.
• Data Mover• Configuration Manager
4. If applicable, select the option Install PeopleSoft ODBC Driver. This installs the ODBC driver, and sets upa user ODBC data source name required by PeopleSoft Query and by Crystal Reports.
5. Select the option Install Workstation.
This check box determines whether Client Setup runs when you click Apply or OK in ConfigurationManager. If this option is not selected, Client Setup will create or update settings in the registry, but itwon't set up the PeopleTools 8.4 program group or install local DLLs.
6. Click OK to run Client Setup and close Configuration Manager.
See AlsoEnterprise PeopleTools 8.48 PeopleBook: PeopleSoft Query
Enterprise PeopleTools 8.48 PeopleBook: Crystal Reports for PeopleSoft
Copyright © 2006, Oracle. All rights reserved. 113

Setting Up the Install Workstation Chapter 6
114 Copyright © 2006, Oracle. All rights reserved.
CHAPTER 7
Setting Up the Batch Environment on z/OS
This chapter discusses:
• Understanding COBOL
• Setting Up Your Batch Environment
• Completing the Preinstallation Worksheet
• Allocating z/OS Partitioned Datasets
• Using PeopleSoft Server Transfer
• Setting up the USS Environment Variables and Granting Access to USS Files
• Installing SQR for z/OS
• Binding the SQR DB2 Plan
• Assembling PeopleTools Programs
• Compiling and Link-Editing DB2 COBOL
• Compiling and Link-Editing COBOL
Understanding COBOLThis chapter describes how to compile and link PeopleSoft ASSEMBLER and COBOL batch programs, ifnecessary. Note that COBOL is no longer needed for PeopleTools because the Process Scheduler has beenre-written in C++. In addition, COBOL is not required for applications that contain no COBOL programs.
Note. We require that you maintain a “central repository” of your COBOL source code on the file server. Themultiplatform installer will place all the needed COBOL source code on your Windows and UNIX serversduring the initial install. However, if you download any COBOL patches or make any customizations, youshould apply them to your file server. From there you can transfer the updated COBOL source code out to anyrelevant application or batch servers. This approach will help you keep your COBOL source code in sync,even if it resides on multiple machines. For Windows, COBOL stored SQL statements are only installed onthe file server as well.
See AlsoEnterprise PeopleTools 8.48 Hardware and Software Requirements
Enterprise PeopleTools 8.48 PeopleBook: Global Technology
PeopleSoft Customer Connection, Supported Platforms (Implement, Optimize + Upgrade, ImplementationGuide, Supported Platforms, PeopleSoft Enterprise)
Copyright © 2006, Oracle. All rights reserved. 115

Setting Up the Batch Environment on z/OS Chapter 7
Setting Up Your Batch EnvironmentThis chapter describes how to set up your batch environment on a z/OS database server. This process involvescompiling and linking PeopleSoft COBOL batch programs that you will use for such PeopleSoft products asPayroll or General Ledger. The PeopleSoft Server Transfer program creates a script that your FTP programwill use to transfer files from the file server to the database or batch server. It also creates scripts to configurethe batch environment.
Note. Remember, COBOL is not required for applications that contain no COBOL programs.
The batch environment components reside in two locations: the z/OS server and UNIX System Services.COBOL, SQR and other installation-related components reside on the z/OS server; Process Scheduler andApplication Engine components reside in UNIX System Services.
Note. The Server Transfer process must be executed using an ID that has the authority to access both the z/OSServer and UNIX System Services (USS). PDS and PDSE members will be created on the z/OS server, anddirectories and files will be created in UNIX System Services. UNIX System Services security requires that anyIDs or USER values deployed in subsequent batch processes must belong to the same GROUP as the User IDthat initially created the libraries and files on USS. During batch execution, both permanent and temporary filesare written to UNIX Systems Services, and the ID creating these files must have the proper authority to createdirectories and files. PeopleSoft recommends that this be administered at the UNIX security GROUP level.
After you compile your COBOL components in the following steps you will only need to re-compile COBOLin the following situations:
• Any COBOL programs change• The supported COBOL compiler changes• You change the version of your RDBMS• You change your version of your operating system• You apply a patch or a fix
See AlsoEnterprise PeopleTools 8.48 Hardware and Software Requirements
PeopleSoft Customer Connection, Updates and Fixes
Task 7-1: Completing the Preinstallation WorksheetUse the preinstallation worksheet below to record site-specific information to expedite editing and transferringCOBOL and SQR files to z/OS. Try to complete it before going on to the next step. Typically, z/OS and DB2systems administrators should be able to supply the required information.
Parameter values will be blank the first time you run the PeopleSoft Server Transfer program. You mustspecify your own site-specific values. The sample values, where provided, are only suggestions. In subsequentexecutions of the Server Transfer program, the program will use the values stored in \%TEMP%\PSXFR.CFG,built during the initial run. Note that %TEMP% is a system or environment variable.
116 Copyright © 2006, Oracle. All rights reserved.

Chapter 7 Setting Up the Batch Environment on z/OS
Note. Reinstalling PeopleTools overwrites your customized PSXFR.CFG file with a blank version.
Transfer Parameters Site-Specific Value Sample Value
1. z/OS Dataset High Level Qualifier
The high-level qualifier used forPeopleSoft COBOL and SQR datasets.
Suggested Default: HLQ.ppvvv
where ppvvv is the PeopleSoft productand release (such as HR840).
PS.HR840
2. PeopleSoft File Server High LevelDirectory
<PS_HOME>—the directory towhich you installed the PeopleSoftCD-ROM, such as N:\HR840.
N:\HR840
3. Target Directory for GeneratedFiles
The workstation directory that willcontain a variety of files generatedwhen you run the PeopleSoft ServerTransfer program, including filetransfers, COBOL compile JCL, andtranslated SQRs (for example [ and ]translated to \).
Suggested Default: <PS_HOME>\STAGE
N:\HR840\STAGE
4. File Transfer Method
Indicates which file transfer protocolwill be used. Supported protocolsinclude:
3270/Send
Microsoft FTP
Suggested Default: Microsoft FTP
Microsoft File Transfer Protocal (FTP)
5. Database Server Host/Node Name
FTP Only: Symbolic IP Name Forz/OS System
Suggested Default: IP Name of Server
If you do not use FTP, specify anyalphanumeric character in this field.
Copyright © 2006, Oracle. All rights reserved. 117

Setting Up the Batch Environment on z/OS Chapter 7
Transfer Parameters Site-Specific Value Sample Value
6. Database Server Login ID
FTP Only: z/OS user ID used toconnect to z/OS server and create filesand directories on USS.
Note: This IDMUST be in the sameUNIX GROUP as any IDs underwhich subsequent batch processingwill be executed.
Suggested Default: LOGONID
If you do not use FTP, specify anyalphanumeric character in this field.
USER1
7. Job Card Line 1
This is the first line of a job card thatwill be inserted into JCL files by thePeopleSoft Server Transfer program.
Enter // in first two positions followedby job card information such asjob name, keyword JOB, accountinformation, and so on. If the job cardextends to two lines, end the first linewith a comma and complete Job CardLine 2.
Note: Any USER= parm coded MUSTbe in the same UNIX GROUP as theDatabase Server Logon ID noted inParameter 6 above.
//PSHR840 JOB(PSOFT),’J’,CLASS=A,MSGCLASS=A
8. Job Card Line 2
This is the second line of a job cardthat will be inserted into JCL filesby the PeopleSoft Server Transferprogram.
Enter // in first two positions followedby at least one space before continuingto add job card information.
Suggested Default: //*
//REGION=OM,MSGLEVEL=(1,1),USER=BATCHID1,PASSWORD=BPSWD1
9. Job Card Line 3
This is the third line of a job card thatwill be inserted into JCL files by thePeopleSoft Server Transfer program.
Enter // in first two positions followedby at least one space before continuingto add job card information.
Suggested Default: //*
// NOTIFY=&SYSUID
118 Copyright © 2006, Oracle. All rights reserved.

Chapter 7 Setting Up the Batch Environment on z/OS
Transfer Parameters Site-Specific Value Sample Value
10. OS390z/OS/DB2 Operator ID
This parameter is for PeopleSoftinternal use. Let it default to OPRID.
OPRID
11. OS390z/OS/DB2 Table Owner ID
This is the PeopleSoft table ownerID—the high-level qualifier for DB2tables. (also known as "CREATOR" inthe IBM SYS Catalog tables). If youare using secondary authorization, thiswill be your secondary authorizationID, otherwise it will be your primaryauthorization ID.
Suggested Default: PSOWNER
PS001
12. DB2 Subsystem Name
This is the DB2 Subsystem used forthe PeopleSoft application you arecurrently installing (DMO or SYS).
Suggested Default: DDDD
DSNT
13. DB2 System Dataset ContainingDSNMember
This is the DB2 system dataset thatcontains member DSN.
Suggested Default:SYS1.DB2.DDDD.DSNLOAD
DSN710.SDSNLOAD
14. DB2 System Dataset ContainingDSN3@ATHMember
This is the DB2 system dataset thatcontains member [email protected]@ATH is a sample authorizationexit. By implementing the sampleauthorization exits you canprovide group names as secondaryauthorization IDs.
Suggested Default:SYS1.DB2.DDDD.EXIT
DSN710.SDSNEXIT
15. DB2 System Dataset ContainingDSNTEP2 Member
This is the DB2 runtime system datasetcontaining member DSNTEP2.
Suggested Default:SYS1.DB2.DDDD.RUNLIB.LOAD
DSN710.RUNLIB.LOAD
Copyright © 2006, Oracle. All rights reserved. 119

Setting Up the Batch Environment on z/OS Chapter 7
Transfer Parameters Site-Specific Value Sample Value
16. PeopleSoft Database Name
Suggested Default: DB
PSHR840
17. Plan Name for PTPSQLRT viaTSO Attach Facility
This is DB2 Plan used by PTPSQLRT(the COBOL/DB2 API used byCOBOL batch and process schedulerjobs).
Suggested Default: PTPSQLRT
PTPSQLRT
18. Plan Name for PTPSQLRT viaCall Attach facility (for USS)
Suggested Default: PTPSQLRA
PTPSQLRA
19. Language Environment runtimelibrary (that is, CEE.SCEERUN)
We recommend that you ensure theLE runtime libraries are present on thesystem:
xxx.SCEERUNxxx.SCEERUN2
Suggested Default: CEE.SCEERUN
Check with System Administrator forinstallation LE library name.
For example:
SYS1.CEE.SCEERUN
20. Language Environment linkeditlibrary (that is, CEE.SCEELKED)
Note that in SQR in 8.44 uses PMBinder CEE.SCEEBIND
Suggested Default: CEE.SCEELKED
CEE.SCEELKED
21. COBOL System Dataset NameContaining IGY*Members
This is the COBOL load librarycontaining modules used by COBOLcompiler. Its members includeIGYCASM1, IGYCINIT, and so on.
Suggested Defaults:
IGY.V3R2M0.SIGYCOMP orIGY.V3R3M0.SIGYCOMP for ANSIDatabase (EBCDIC)
IGY.V3R4M0.SIGYCOMP forUnicode Database
IGY.V3R3M0.SIGYCOMP
120 Copyright © 2006, Oracle. All rights reserved.

Chapter 7 Setting Up the Batch Environment on z/OS
Transfer Parameters Site-Specific Value Sample Value
22. System Storage Name forTemporary Datasets
This is the storage device name usedfor temporary datasets—used insorting, passing temporary datasets,and so forth—that are deleted after thejob completes.
Suggested Default: SYSTEMP
SYSTEMP
23. System Storage Name forPermanent Datasets
This is the storage device name usedfor permanent datasets used in datasetallocation, such as those used to storeCOBOL and SQR files.
Suggested Default: SYSPERM
SYSPERM
24. Assembler System DatasetContaining STIMER
SYS1.MACLIB
25. Assembler Program Name ASMA90
26. SQR High Level Qualifier
This is the high-level qualifier used forSQR datasets.
Suggested Default: PS.HR840.SQR
PS.HR840.SQR
27. SQR Program Name Found inSQR Load Library
This is the name of the SQR programcontained in the SQR Load Library.
Suggested Default: SQR
SQR
28. SQR Plan Name
This is the DB2 Plan name assignedfor SQR.
Suggested Default: DBCALLS
SQR840
29. Target Server Hardware Platform UNIX System Services (OS390z/OS)
30. PeopleSoft Unix System ServicesHome Directory
Suggested Default: /u/data001/dbname
/u/data001/PSHR800
31. Library for DB2 CLI Load Module(that is, DSNAOCLI)
DSN710.SDSNLOAD
Copyright © 2006, Oracle. All rights reserved. 121

Setting Up the Batch Environment on z/OS Chapter 7
Transfer Parameters Site-Specific Value Sample Value
32. Plan Name for CLI Packages (thatis, DSNACLI)
Suggested Default: DSNACLI
DSNACLI
33. Attachment Type for ODBC toConnect to DB2
Suggested Default: RRSAF
RRSAF (Resource Recovery ServicesAttachment Facility)
34. HFS path to top level of JDKproduct
This will provide the value for theJDK_HOME environment variable inthe psconfig.sh file.
Suggested Default: /usr/lpp/java/IBM/J1.4.2
/usr/lpp/java/J1.4.2
Task 7-2: Allocating z/OS Partitioned DatasetsAllocate a z/OS partitioned dataset as HLQ.PSvvv.CNTL, where HLQ is any high-level dataset qualifier, PS isa constant, and vvv is the current release of your PeopleSoft software (such as 840).
File attributes are: FB, LRECL=80,BLKSIZE=6160, Dir Blks 5, SPACE (Primary 15 Tracks, Secondary 5Tracks). This dataset will be used to transfer allocation JCL.
To complete allocating the datasets:
1. Transfer <PS_HOME>\SRC\CBL\MVS\PSLIBCBL.JCL to HLQ.PSvvv.CNTL(PSLIBCBL).2. Transfer <PS_HOME>\SRC\CBL\MVS\PSLIBSQR.JCL to HLQ.PSvvv.CNTL(PSLIBSQR).3. Log on to z/OS and edit PSLIBCBL and PSLIBSQR to reflect the appropriate values for your siteas follows:a. Add a job card.b. Change all occurrences of $PSHLQ$ to the z/OS Dataset High Level Qualifier determined in thepreinstallation worksheet.
c. Change all occurrences of $SYSPERM$ to the System Storage Name for Permanent Datasets valuedetermined in the preinstallation worksheet.
d. Change all occurrences of $SQRHLQ$ to the z/OS Dataset High Level Qualifier determined in thepreinstallation worksheet.
See Completing the Preinstallation Worksheet.4. Submit (PSLIBCBL) and (PSLIBSQR) to allocate files.
122 Copyright © 2006, Oracle. All rights reserved.

Chapter 7 Setting Up the Batch Environment on z/OS
Task 7-3: Using PeopleSoft Server TransferThis section discusses:
• Understanding PeopleSoft Server Transfer
• Running the PeopleSoft Server Transfer Program
• Transferring Files to Host Manually
• Mapping PeopleSoft Installation Directories to z/OS
Understanding PeopleSoft Server TransferThe PeopleSoft Server Transfer program simplifies editing and transferring COBOL and SQR files to z/OS.Pre-compile, Compile, Linkedit, binds, and Process Scheduler-initiated COBOL and SQR jobs are ready tosubmit following the file transfer, assuming the worksheet values you enter are correct.
Note. Remember, before you can run the Server Transfer program to set up a batch server on z/OS, you needto have run the PeopleSoft Installer, as described in the chapter “Using the PeopleSoft Installer.” Run it ona Windows machine, making sure to select all of the PeopleSoft servers. This Windows machine will thenfunction as your file server, from which you can run Server Transfer.
The PeopleSoft Server Transfer program performs the following functions:
• Generates a file containing transfer commands to transfer files to z/OS and UNIX System Services(USS). This file is named PSFTXFR.BAT or PSFTXFR.TXT, depending on whether you transfer filesto z/OS using 3270/Send or FTP, respectively.
• Generates COBOL compile JCL—program preparation JCL.• Edits various JCL and PRC files to site-specific standards using values from the transfer parametersspecified in the PeopleSoft Server Transfer program.
• Translates [ and ] characters to a \ (backslash) to correct an ASCII-to-EBCDIC translation problem thatoccurs during the transfer of SQR files.
Later in this chapter you will learn how workstation file directories relate to z/OS partitioned datasets.
See Mapping PeopleSoft Installation Directories to z/OS.
Before running the PeopleSoft Server Transfer program, ensure that a DOS environment variable (%TMP%) isset to a “temporary” directory to which you have write access. PeopleSoft recommends using C:\temp.
The transfer program writes the following two files to the %TMP% directory:
• PSXFR.LOG—a log file that summarizes the program’s execution.• PSXFR.CFG—a configuration file that stores the parameters you selected.
Note. The PeopleSoft Server Transfer program writes the above files to the %TMP% directory, or to the%TEMP% directory if the %TMP% environment variable is undefined.
See “Using the PeopleSoft Installer.”
Copyright © 2006, Oracle. All rights reserved. 123
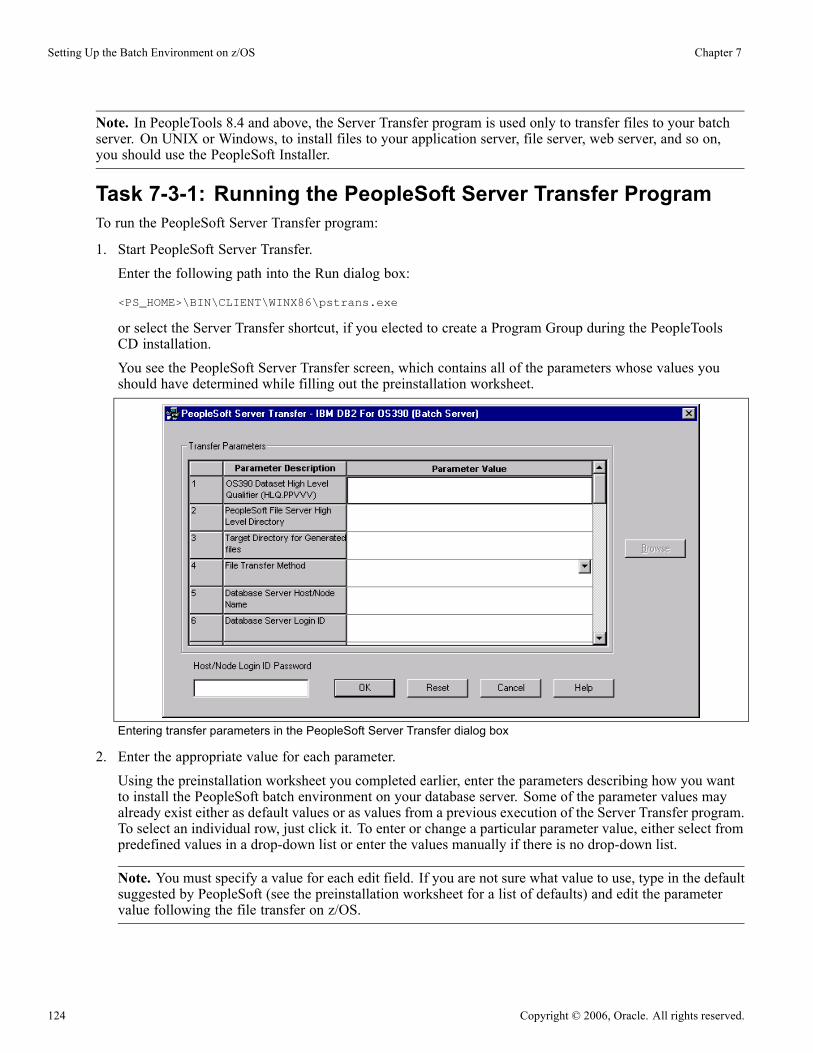
Setting Up the Batch Environment on z/OS Chapter 7
Note. In PeopleTools 8.4 and above, the Server Transfer program is used only to transfer files to your batchserver. On UNIX or Windows, to install files to your application server, file server, web server, and so on,you should use the PeopleSoft Installer.
Task 7-3-1: Running the PeopleSoft Server Transfer ProgramTo run the PeopleSoft Server Transfer program:
1. Start PeopleSoft Server Transfer.Enter the following path into the Run dialog box:
<PS_HOME>\BIN\CLIENT\WINX86\pstrans.exe
or select the Server Transfer shortcut, if you elected to create a Program Group during the PeopleToolsCD installation.You see the PeopleSoft Server Transfer screen, which contains all of the parameters whose values youshould have determined while filling out the preinstallation worksheet.
Entering transfer parameters in the PeopleSoft Server Transfer dialog box
2. Enter the appropriate value for each parameter.Using the preinstallation worksheet you completed earlier, enter the parameters describing how you wantto install the PeopleSoft batch environment on your database server. Some of the parameter values mayalready exist either as default values or as values from a previous execution of the Server Transfer program.To select an individual row, just click it. To enter or change a particular parameter value, either select frompredefined values in a drop-down list or enter the values manually if there is no drop-down list.
Note. You must specify a value for each edit field. If you are not sure what value to use, type in the defaultsuggested by PeopleSoft (see the preinstallation worksheet for a list of defaults) and edit the parametervalue following the file transfer on z/OS.
124 Copyright © 2006, Oracle. All rights reserved.

Chapter 7 Setting Up the Batch Environment on z/OS
For parameters that require a directory path, you may enter it directly. If you don’t know the exact location,click Browse to select the directory from the Select Directory dialog box. The Browse button is availablewhen you click in a field that requires a directory path.
3. Enter the appropriate value for Host/Node Login ID Password. This value should be the password for theHost/Node Name specified as parameter number 5 in the Server Transfer panel.This password is mandatory regardless of your database platform or site specifications. Microsoft’s FTPsoftware requires a password.
4. Once you enter all the correct parameter values for your site, click OK. (If instead you want to clear allof your entries and start over, press Reset. To close this instance of the PeopleSoft Server Transfer,press Cancel.)The PeopleSoft Server Transfer prepares the files for transfer, which can take from a few seconds to a fewminutes, depending on the number of files and the type of processing required.The PeopleSoft Server Transfer program will generate a number of files that will be located in the TargetDirectory for Generated Files that you specified previously.
5. In the PeopleSoft Server Transfer Output window, if you want to verify that the Transfer program createdall the proper files, click the Display Log button.The Display Log button calls the PSXFR.LOG in your %TMP% directory (or %TEMP% directoryif %TMP% is undefined) and displays it in Microsoft Notepad. PSXFR.LOG provides summaryinformation about the transfer program’s execution that can be helpful for identifying potential errors andinconsistencies. It contains the following sections:• SELECTED PARAMETERS: Shows the parameters you selected from the PeopleSoft Server Transfermain window.
• SUMMARY OF SELECTED FILES: Shows which files—and how many of them—will be transferred. Italso shows which directory they were copied from and their new location.
• FILE TRANSFER NOTES: Shows important details regarding your transfer process, such as thecommand line option and where log files are located.
Note. Only click Close if you want to dismiss the PeopleSoft Server Transfer Output window andtransfer the files manually from the command line.
6. Click the Transfer Now button to begin the transfer process. This button will launch the file transfermethod that you selected on the server transfer main screen.
Note. The Transfer Now button assumes that the destination partitioned datasets exist. See “Allocatingz/OS Partitioned Datasets.”
7. When the transfer has completed, the FTPOUT.LOG will display in Notepad. You should review thisfile for any errors that may have occurred during the transfer. The file is located in the Target Directoryfor Generated Files that you specified previously.
8. Close Notepad and press the CLOSE button on the PeopleSoft Server Transfer Output Panel.
Note. If your transfer is unsuccessful or you would rather transfer the files manually, read the followingsection.
The following table summarizes the files generated during the use of the PeopleSoft Server Transfer utility, inthe order in which they are generated.
Copyright © 2006, Oracle. All rights reserved. 125

Setting Up the Batch Environment on z/OS Chapter 7
File Name Location Contents
PSXFR.CFG %TMP% Configuration file generated by thePeopleSoft Server Transfer Utility. Itcontains the parameters entered in asomewhat cryptic format
PSXFR.LOG %TMP% Summary file generated by thePeopleSoft Server Transfer Utility.It contains a summary of theparameters entered, the files thatwill be transferred, and instructions onhow to manually transfer the files, ifyou choose to do so later.
PSFTXFR.TXT The Target Directory for GeneratedFiles that you specified previously.
AMicrosoft FTP command file thatcontains the FTP statements to beexecuted to transfer the files. This fileis only generated if you selected theMicrosoft FTP file transfer protocoloption.
PSFTXFR.BAT The Target Directory for GeneratedFiles that you specified previously.
A 3270/TSO Send command file thatcontains 3270/TSO Send statementsto transfer the files. This script is analternative to PSFTXFR.TXT andis only generated if you selected the3270/TSO Send file transfer protocoloption.
FTPEXEC.BAT The Target Directory for GeneratedFiles that you specified previously.
The .bat file that calls either theMicrosoft FTP command file or the3270/TSO Send command file, fromwhich the FTP process is initiated. ThePeopleSoft Server Transfer Utility willinitiate this batch file if you select theTransfer Now option.
FTPOUT.LOG The Target Directory for GeneratedFiles that you specified previously.
This is the FTP log file generated bythe FTP utility that details the transferresults for each file processed.
Task 7-3-2: Transferring Files to Host ManuallyFrom DOS, or a DOS shell in Windows, transfer application files to z/OS using the transfer/send file generatedby the PeopleSoft Server Transfer program. If you are using a 3270/TSO Send file transfer protocol, the filecontaining transfer commands is in <PS_HOME>\STAGE and is entitled PSFTXFR.BAT. If you are usingthe Microsoft FTP file transfer protocol, the file containing transfer commands is in <PS_HOME>\STAGEand is called PSFTXFR.TXT.
You can initiate either Server Transfer by executing the FTPEXEC.BAT file in <PS_HOME>\STAGE. Allowat least 45 minutes to complete the file transfer. If the transfer fails:
• Make sure the z/OS datasets to which the files are transferred have been allocated.• Check whether a z/OS dataset is underallocated or allocated on a volume with insufficient space.
126 Copyright © 2006, Oracle. All rights reserved.
Chapter 7 Setting Up the Batch Environment on z/OS
• Verify that the Database Server Login Id specified in Parameter 6 has write access to z/OS and UNIXSystem Services.
Task 7-3-3: Mapping PeopleSoft Installation Directories to z/OSThe following table shows the mapping between workstation files and the suggested z/OS target datasets. Theroot directory is assumed to be PPVVV, which denotes the high-level PeopleSoft directory, such as \HR840.
Copyright © 2006, Oracle. All rights reserved. 127
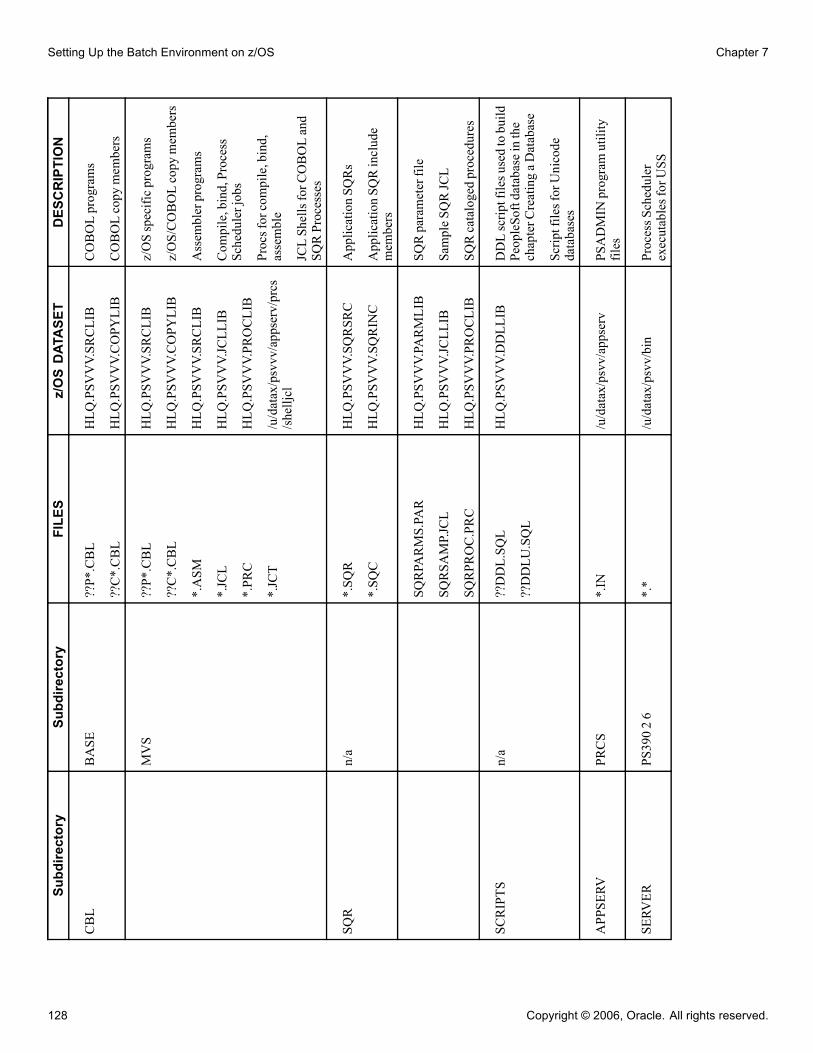
Setting Up the Batch Environment on z/OS Chapter 7Subdirectory
Subdirectory
FILES
z/OSDATASET
DESCRIPTION
CBL
BASE
??P*.CBL
??C*.CBL
HLQ.PSVVV.SRCLIB
HLQ.PSVVV.COPYLIB
COBOLprograms
COBOLcopymembers
MVS
??P*.CBL
??C*.CBL
*.ASM
*.JCL
*.PRC
*.JCT
HLQ.PSVVV.SRCLIB
HLQ.PSVVV.COPYLIB
HLQ.PSVVV.SRCLIB
HLQ.PSVVV.JCLLIB
HLQ.PSVVV.PROCLIB
/u/datax/psvvv/appserv/prcs
/shelljcl
z/OSspecificprograms
z/OS/COBOLcopymembers
Assemblerprograms
Compile,bind,Process
Schedulerjobs
Procsforcompile,bind,
assemble
JCLShellsforCOBOLand
SQRProcesses
SQR
n/a
*.SQR
*.SQC
HLQ.PSVVV.SQRSRC
HLQ.PSVVV.SQRINC
ApplicationSQRs
ApplicationSQRinclude
members
SQRPARMS.PAR
SQRSAMP.JCL
SQRPROC.PRC
HLQ.PSVVV.PARMLIB
HLQ.PSVVV.JCLLIB
HLQ.PSVVV.PROCLIB
SQRparameterfile
SampleSQRJCL
SQRcatalogedprocedures
SCRIPTS
n/a
??DDL.SQL
??DDLU.SQL
HLQ.PSVVV.DDLLIB
DDLscriptfilesusedtobuild
PeopleSoftdatabaseinthe
chapterCreatingaDatabase
ScriptfilesforUnicode
databases
APPSERV
PRCS
*.IN
/u/datax/psvv/appserv
PSADMINprogramutility
files
SERVER
PS39026
*.*
/u/datax/psvv/bin
ProcessScheduler
executablesforUSS
128 Copyright © 2006, Oracle. All rights reserved.

Chapter 7 Setting Up the Batch Environment on z/OS
Note. The \CBL\MVS directory contains files specifically for the DB2 UDB for z/OS platform. Certain fileswill appear in both the \CBL\BASE and \CBL\MVS directories. The *.CBL files in the \CBL\BASE directorywill be transferred first, followed by the *.CBL files in the \CBL\MVS directory. As a result, the z/OS-specificfiles will overwrite the generic files. In other words, the order in which files are FTPed to the server doesmatter. The PeopleSoft Server Transfer program FTPs the files to the server in the correct order.
Task 7-4: Setting up the USS Environment Variablesand Granting Access to USS Files
Before installing SQR for z/OS, you need to set up USS environment variables by executing the psconfig.shshell script, and grant access to specific libraries in UNIX System Services by executing the psmv.sh shellscript.
To execute the psconfig.sh and psmv.sh shell scripts:
1. Locate the files psconfig.sh and psmv.sh in USS Home directory /u/datax/ppvvv.This is the same directory specified in the preinstallation worksheet, parameter 30. Make this directoryyour current working directory.
2. Grant execute authority to the file by entering
chmod 755 psmv.sh
at the prompt.3. Execute the scripts by entering psconfig.sh and psmv.sh at the prompt.
Task 7-5: Installing SQR for z/OSTo install SQR in the designated partitioned dataset, you need to run the INSTALLSQR.SH shell script. Theshell script performs the following tasks:
• Copies all SQR installation binary files from the HFS directory <PS_HOME>/bin/sqr into the designatedSQR sequential data sets.
• Submits HLQ.PPVVV.JCLLIB (RECVSQR.JCL) that will use IBM’s RECV utility to migrate all thebinaries from the sequential data set to the designated SQR partitioned datataset.
To execute the installsqr.sh shell script:
1. Change directory to the USS Home directory /u/datax/ppvvv. This is the same directory specified in thepreinstallation worksheet (item 30).
2. Enter installsqr.sh at the prompt.When the shell script submits the JCL to unpack all the SQR binaries from the installation sequential dataset, review the status of the JCL from TSO to verify that all steps using the RECV utility have successfullycompleted with return code of 0.
Copyright © 2006, Oracle. All rights reserved. 129

Setting Up the Batch Environment on z/OS Chapter 7
Task 7-6: Binding the SQR DB2 PlanOnce SQR is installed, you have to run the DSN subcommand BIND to build an application plan for SQR. AllDB2 programs require an application plan to allocate resources and to support SQL requests made duringexecution. The keywords and parameters you should use when exercising the DSN BIND commands follow.Refer to the IBM DB2 Command and Utility Reference Manual for further information on BIND.
To create the DB2 Plan for SQR, submit the following JCL job:
HLQ.PSVVV.JCLLIB(PSBNDSQR)
Note. To execute an XPLINK program, the SCEERUN2 as well as the SCEERUN data set must be in the z/OSprogram search order (see the {_PLIB_PREFIX} environment variable). The following data sets are also used:The data sets {_PLIB_PREFIX}.SCEERUN and {_PLIB_PREFIX}.SCEERUN2 contains the runtime libraryprograms. These data sets are listed here for information only, to assist in identifying the correct data sets to beadded to the z/OS program search order. The default value is "CEE".
Task 7-7: Assembling PeopleTools ProgramsYou need to assemble the PeopleSoft programs PTPSQLTM. PTPSQLTM, called by PTPSQLRT, collectstime interval data to produce the statistics report.
In z/OS, submit the following job:
HLQ..PPVVV.JCLLIB (PSASM)
On job output, the expected return code is 0 or 4.
Note. In the catalogued procedure PSASM, the ASM step EXEC statement contains the assembler programspecified during the PeopleSoft Server Transfer program. $ASMLIB$ is replaced by the “Assembler ProgramName” transfer parameter. The expected assembler program name is ASMA90. However, IEV90 may also beused, but the SYSLIN DD statement in the ASM step must be commented first to be assembled successfully.
Task 7-8: Compiling and Link-Editing DB2 COBOLPrecompile, compile, and link-edit PTPSQLRT (PeopleSoft’s COBOL/DB2 API) as follows:
• Submit HLQ.PPVVV.JCLLIB(PSCOB*). Acceptable return codes are 0 and 4 for pre-compiles andcompiles, and 0 for the link-edit step.
• PSCOBDA: for DB2 precompile, compile and linkedit of program PTPSQLRT for Native CAF for USS.• PSCOBDE: for DB2 precompile, compile and linkedit of program PTPSQLRT for TSO CAF.• PSCOBNET: for compile and linkedit COBOL program PTPNETRT for Native CAF for USS.
Common compile errors include:
• Users inadvertently introducing tab characters into source code while viewing it using workstation editorsbefore file transfer. Check to see if you have X’05’ (or other odd hex values) in the z/OS source.
130 Copyright © 2006, Oracle. All rights reserved.

Chapter 7 Setting Up the Batch Environment on z/OS
• Failure to transfer all the BASE and z/OS copy members from the file server, or perhaps overwriting thez/OS versions with the BASE versions. Check PSFTXFR.TXT to see the order in which the files weretransferred.
• Failure in LINKEDIT of PSCOBNET with error message “Attempt to get file status for an HFS filefailed...” usually results when the User ID under which the PSCOBNET job is running does not haveread access to the necessary USS file.
Note. PeopleSoft delivers procedure library members PSCOBD, PSCOBDA, and PSCOBDE, whichset the DB2 precompiler options DATE(ISO) and TIME(ISO). Do not change these settings, becausePeopleSoft applications rely on the ISO format for date and time processing.
Task 7-9: Compiling and Link-Editing COBOLSubmit HLQ.PPVVV.JCLLIB(PSCOB*) to compile COBOL programs.
Note. Previous versions of PSCOB had to be manually divided into multiple jobs if they contained morethan 125 COBOL programs to compile. This step is now done by the Server Transfer process, which willcreate the PSCOB* members.
Next, serialize compile jobs to avoid problems associated with concurrent PDS updating, and submit thePSCOB job(s). Acceptable return codes are 0 or 4 for pre-compiles and compiles, and 0 for the link-edit step.
Common compile errors include:
• Users inadvertently introducing tab characters to source code while viewing them using workstationeditors before file transfer. Check to see if you have X’05’ (or other odd hex values) in the z/OS source.
• Failure to transfer all the BASE and z/OS copy members from the file server, or perhaps overlaying thez/OS versions with the BASE versions. Check PSFTXFR.TXT to see the order in which the files weretransferred.
Copyright © 2006, Oracle. All rights reserved. 131

Setting Up the Batch Environment on z/OS Chapter 7
132 Copyright © 2006, Oracle. All rights reserved.

CHAPTER 8
Creating a Database
This chapter discusses:
• Understanding Database Creation
• Planning Your Installation
• Transferring DDL Scripts to z/OS
• Creating PS.PSDBOWNER Table
• Granting Privileges on PS.PSDBOWNER
• Granting Privileges to Owner ID
• Creating DB2 Databases, Storage Groups, and Tablespaces
• Creating Tables
• Configuring the DB2 Connect Gateway
• Creating Data Mover Import Scripts
• Running Data Mover Import Scripts
• Creating Indexes
• Updating Database to Latest PeopleTools Release
• Running the DB2 RUNSTATS Utility
• Creating PeopleSoft Views
• Updating Database and Tablespace Values for %UpdateStats Tables (Enhanced Install Only)
• Building Temporary Tables
• Creating PeopleSoft Triggers
• Running Additional Data Mover Scripts
• Installing a Multilingual PeopleTools System Database
• Running SQR Reports
• Updating PeopleSoft System Tables
• Binding DB2 Plans
• Running VERSION Application Engine Program
• Changing the Base Language
• Checking the Database
• Running Alter Audit
Copyright © 2006, Oracle. All rights reserved. 133
Creating a Database Chapter 8
• Disabling %UpdateStats
Understanding Database CreationThis section describes the tasks required to create a PeopleSoft product database. During a standard PeopleSoftinstallation you will execute these tasks to create two distinct types of databases.
• System: The System database has no company specific data, and can be used to load your data andbegin development of your production database.
• Demo: The Demo database contains data for a sample company, and can be used immediately fordemonstration, for testing, and as a development reference.
The requirements for these databases vary, so not all of this section's tasks apply to each database. Theinstructions will note any distinctions between creating a Demo and a System database.
Remember, you need to have the PeopleTools Development Environment set up to create your database.
Important! Do not forget that application-specific installation steps are provided in a separate documentspecific to the application. For instance, if you are performing PeopleSoft CRM installation, you need boththis PeopleTools installation guide and any additional instructions provided by CRM. To find the installationdocumentation specific to your application, go to PeopleSoft Customer Connection. Under the Site Index,find the category “Installation Guides and Notes,” and then look under the subcategory for your particularapplication.
Note. DB2 UDB for z/OS is the official IBM name for the DBMS. For the sake of brevity, this documentationsometimes refers to DB2 UDB for z/OS as DB2 z/OS, and it sometimes refers to DB2 UDB for Linux, UNIX,and Windows as DB2/LUW.
Planning Your InstallationThis section discusses:
• Using %UpdateStats
• Using Temporary Tables
Note. Two features that impact how you install your PeopleSoft database are the %UpdateStats MetaSQLfunction, and the Application Designer Object Type of “Temporary Table.”
Using %UpdateStats%UpdateStats is an optional feature that lets you invoke the DB2 Utility RUNSTATS from within anApplication Engine or COBOL process. Consider the following if you plan to use %UpdateStats:
• You can initiate RUNSTATS dynamically via the IBM stored procedure DSNUTILS. Before you can use%UpdateStats, the stored procedure DSNUTILS must be configured in the DB2 subsystem in which yourun the PeopleSoft applications. If %UpdateStats is enabled but DSNUTILS is not in place, a processingerror will result. Please refer to your IBM Systems documentation for instructions on enabling andconfiguring the DSNUTILS stored procedure.
134 Copyright © 2006, Oracle. All rights reserved.
Chapter 8 Creating a Database
• Using %UpdateStats with COBOL requires modifications to some delivered PeopleSoft code. Thesemodifications are described in the Data Management PeopleBook.
See Enterprise PeopleTools 8.48 PeopleBook: Data Management
• %UpdateStats can be enabled or disabled based on the DBFLAGS Process Scheduler configurationparameter. Disabling %UpdateStats will cause the functionality to be bypassed, without causing anyprocessing errors. Note that the default setting for DBFLAGS for UNIX and Windows Process Schedulersis ON (DBFLAGS=0). The default setting for USS is DBFLAGS=0 (Enable Second DB Connection).
• The %UpdateStats MetaSql is specified in the code, per table, but on DB2 z/OS, the RUNSTATS utilityprocesses at the tablespace level. This can present a performance issue with our standard databaseinstallation strategy, which combines multiple tables into a single tablespace. To alleviate this issue, andassist you in installing your database to optimally utilize the %UpdateStats feature, we provide two pathsfor building the database objects: The “traditional” path places all tables in shared tablespaces, for thosecustomers who may not want to use the %UpdateStats feature; and the “enhanced” path segregates eachtable that is the object of the %UpdateStats MetaSql into its own unique tablespace.
You may install with either path. If you choose the enhanced path, you are not forced into enabling the%UpdateStats feature, but if you chose to enable it, or anticipate enabling it in the near future, we stronglyrecommend that you follow the enhanced path.
The installation steps are similar, but the scripts to be executed are different for each path. Also, theenhanced path requires one additional script.
Note. Beginning with PeopleSoft Enterprise 9.0 Applications, the PeopleSoft Tablespace DDL AutomationAssistance Tool (PSTAAT) is required to complete the enhanced path installation. See the appendix “Using thePeopleSoft Tablespace DDL Automation Assistance Tool.”
PeopleSoft Enterprise Learning Solutions 9 is an exception. It was released on PeopleTools 8.47, and includesthe scripts for the enhanced path. Customers installing this release who choose the enhanced path should usethe delivered scripts. PeopleSoft Enterprise Learning Solutions 8.9 does not use %UpdateStats, so doesnot have scripts for the enhanced path.
The following tables show the scripts that are required for the traditional and enhanced paths.
Copyright © 2006, Oracle. All rights reserved. 135

Creating a Database Chapter 8ScriptsRequiredforTraditionalPaths,by
ProductLine
Com
ments
HRMS
FIN/SCM
EPM
PACRM
LMIM
HCDDL.sql
EPDDL.sql
PFDDL.sql
PADDL.sql
CRDDL.sql
LMDDL.sql
IMDDL.sql
ContainsDDLtocreate
stogroups,databasesand
tablespaces.
HCDDLU.sql
EPDDLU.sql
PFDDLU.sql
PADDLU.sql
CRDDLU.sql
n/a
n/a
ContainsDDLtocreate
stogroups,databasesand
tablespacesforUnicode
databases.
TBDDL.sql
TBDDL.sql
TBDDL.sql
TBDDL.sql
TBDDL.sql
TBDDL.sql
TBDDL.sql
ContainsDDLtocreate
tables.
TBDDLU.sql
TBDDLU.sql
TBDDLU.sql
TBDDLU.sql
TBDDLU.sql
n/a
n/a
ContainsDDLtocreate
tablesforUnicode
databases.
n/a
n/a
n/a
n/a
n/a
n/a
n/a
ContainsUpdate
statementsto’reassign’
tablespacesforTemp
Tableobjecttypes.
136 Copyright © 2006, Oracle. All rights reserved.
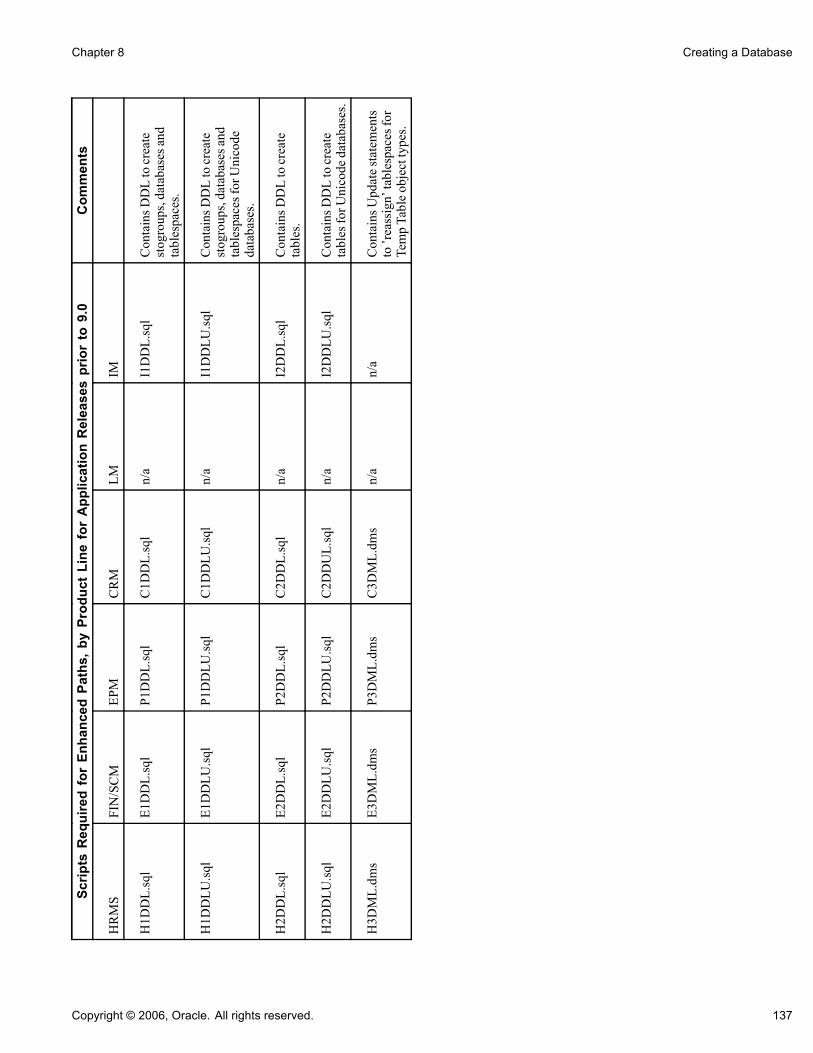
Chapter 8 Creating a Database
ScriptsRequiredforEnhanced
Paths,by
ProductLine
forApplicationReleasespriorto9.0
Com
ments
HRMS
FIN/SCM
EPM
CRM
LMIM
H1DDL.sql
E1DDL.sql
P1DDL.sql
C1DDL.sql
n/a
I1DDL.sql
ContainsDDLtocreate
stogroups,databasesand
tablespaces.
H1DDLU.sql
E1DDLU.sql
P1DDLU.sql
C1DDLU.sql
n/a
I1DDLU.sql
ContainsDDLtocreate
stogroups,databasesand
tablespacesforUnicode
databases.
H2DDL.sql
E2DDL.sql
P2DDL.sql
C2DDL.sql
n/a
I2DDL.sql
ContainsDDLtocreate
tables.
H2DDLU.sql
E2DDLU.sql
P2DDLU.sql
C2DDUL.sql
n/a
I2DDLU.sql
ContainsDDLtocreate
tablesforUnicodedatabases.
H3DML.dms
E3DML.dms
P3DML.dms
C3DML.dms
n/a
n/a
ContainsUpdatestatements
to’reassign’tablespacesfor
TempTableobjecttypes.
Copyright © 2006, Oracle. All rights reserved. 137

Creating a Database Chapter 8
Note. Beginning with PeopleSoft Enterprise 9.0 Applications, these scripts will no longer appear on theinstallation CD. Use the PeopleSoft Tablespace DDL Automation Assistance Tool (PSTAAT) to completethe enhanced installation. See the appendix “Using the PeopleSoft Tablespace DDL Automation AssistanceTool” for more details.
Using Temporary TablesTemporary tables are a new object type defined in Application Designer to support Application Engineconcurrent processing. Within PeopleSoft 8 applications, we refer to these objects as temporary tables, but tothe DB2 z/OS database they will be defined as “permanent” SQL tables. Each temporary table defines a basetable from which additional instances or copies of the base table are scripted and physically created on yourDB2 z/OS PeopleSoft database. Only the definition of the base table is stored in Application Designer. Theactual number of instances is governed by a global value for Online concurrent processes, and a value definedeither at a Global level (for EPM) or at the Application Engine Process Level for batch processes.
See Enterprise PeopleTools 8.48 PeopleBook: PeopleSoft Application Engine.
In an attempt to limit the number of potentially unused objects created on your database, we have reducedthe number of temporary table instances to a minimum setting. Depending on the actual products you areinstalling, your processing characteristics and workloads, you may need to modify the number of temporarytable instances to improve performance. This will become evident if you have a number of processes queuingto use a limited number of temporary table instances. The actual scripting and creation of the temporary tablesare performed as a separate step in the installation process, so you may intervene during this process toincrease the number of temporary table instances if you feel you have substantial batch processing workloadsand/or a large volume of online transaction processing. Temporary tables can be regenerated at any time inthe life of your database, so you don’t need to determine the exact number of instances that will be right foryour environment at installation time.
When the number of instances of the temporary tables within the PeopleSoft application is changed, alltemporary tables should be regenerated. The same values in the PeopleTools tables that are used to determinehow many temporary tables instances should be created, are also used to determine how many should beavailable to an Application Engine process. The expectation is that the number of instances defined within thePeopleTools tables actually exists on the database. A later task in this chapter describes how to create thetemporary tables.
Lastly, since each instance of a base temporary table is not defined within the PeopleTools tables, databaseand tablespace information is not stored for these instances. When the DDL is generated to create the basetemporary table and its instances, each instance is put in the same database and tablespace as the basetemporary table. To avoid concurrency issues and obtain optimal performance, each temporary table instanceshould also be assigned to its own unique tablespace, particularly when the temporary table is also the object ofthe %UpdateStats functionality, described earlier. Use the PeopleSoft Tablespace DDL Automation AssistanceTool (PSTAAT) to put the base temporary table and each of its instances in separate tablespaces. See theappendix “Using the PeopleSoft Tablespace DDL Automation Assistance Tool” for more details.
Task 8-1: Transferring DDL Scripts to z/OSIf you have set up your batch environment on the z/OS mainframe following the instructions in the chapter“Setting Up the Batch Environment on z/OS,” these files have already been transferred and you can skip thisstep.
138 Copyright © 2006, Oracle. All rights reserved.

Chapter 8 Creating a Database
All DDL script files to create the DB2 objects for the PeopleSoft database reside in the <PS_HOME>\SCRIPTSdirectory of your file server (where <PS_HOME> is the root directory where PeopleSoft has been installed inyour file server). This task requires that you manually transfer these files to z/OS. Each of these files must becustomized with site-specific values and standards before you submit them either through SPUFI or DSNTEP2.
To transfer DDL scripts:
1. Allocate a partitioned dataset named HLQ.PSvvv.DDLLIB on z/OS, where HLQ is any high-level datasetqualifier, PS is a constant, and vvv is the current release of your PeopleSoft software (such as 800).File attributes are: FB, LRECL=80, Dir Blks 10, SPACE (Primary 800 Tracks, Secondary 300 Tracks). Forexample, DCB=(RECFM=FB,LRECL=80,BLKSIZE=6160) SPACE=(TRK,(800,300,10)).
2. Transfer the following files from the <PS_HOME>\SCRIPTS directory, as a member of theHLQ.PSvvv.DDLLIB PDS library using Microsoft File Transfer Protocol (FTP) or 3270/TSO SEND.
Files in the SCRIPTSsubdirectory Value of XX Description
XXDDL.SQL • Use "HC" and "H1" forPeopleSoft HRMS.
• Use "EP" and "E1"for PeopleSoftFinancials/Supply ChainManagement.
• Use "PF" and "P1" forEnterprise PerformanceManagement
• Use “IM” and “I1” forIncentive Management.
• Use "PA" for EnterprisePortal Solutions.
• Use "CR" and "C1" forCustomer RelationshipManagement.
This script contains all the DDL statementsto create database, storage groups, and tablespaces
XXDDLU.SQL • Use "HC" and "H1" forPeopleSoft HRMS.
• Use "EP" and "E1"for PeopleSoftFinancials/Supply ChainManagement.
• Use "PF" and "P1" forEnterprise PerformanceManagement.
• Use “IM” and “I1” forIncentive Management.
• Use "PA" for EnterprisePortal Solutions.
• Use "CR" and "C1" forCustomer RelationshipManagement.
This script contains all the DDL statementsto create database, storage groups, and tablespaces for an UNICODE database.
Copyright © 2006, Oracle. All rights reserved. 139

Creating a Database Chapter 8
Files in the SCRIPTSsubdirectory Value of XX Description
X2DDL.SQL • Use "H" for PeopleSoftHRMS.
• Use "E" for PeopleSoftFinancials/Supply ChainManagement.
• Use “C” for CustomerRelationship Management.
• Use “I” for IncentiveManagement.
• Use "P" for EnterprisePerformance Management.
The script is an alternative to script TBDDL,which contains DDL to create tables.
PSDDL.SQL This script contains the DDL statements tocreate the PS.PSDBOWNER table.
TBDDL.SQL This script contains all the CREATE TABLEstatements for the product line.
IXDDL.SQL This script contains all the CREATE INDEXstatements for the product line.
Task 8-2: Creating PS.PSDBOWNER TableYou can skip this step if a PS.PSDBOWNER table already exists in the same DB2 subsystem as your newdatabase. This would be the case if you already have an existing PeopleSoft database in the target DB2subsystem. You will have one PS.PSDBOWNER table per subsystem.
Edit and execute HLQ.PSvvv.DDLLIB(PSDDL) using SPUFI or DSNTEP2. The PS.PSDBOWNER mustexist in each DB2 subsystem where PeopleSoft databases will be installed and it is the only table thatPeopleSoft provides where an OWNERID cannot be customized. PeopleTools applications select from thistable to obtain the Owner ID and Database Name information during the PeopleSoft Sign-on process.
Note. For UNICODE databases, it is not necessary to use the CCSID=UNICODE option of the CreateDatabase statement when creating the PSOWNRDB (this contains the PS.PSDBOWNER table). IBMsupports the use of Unicode, EBCDIC, and ASCII tables in the same subsystem, and the ability to join datausing any of these encoding schemes in DB2 for z/OS V8.1 New Function Mode. DB2 for z/OS v8.1 NFMis required for a Unicode installation.
Task 8-3: Granting Privileges on PS.PSDBOWNERGrant the ALL authority to the table owner ID used for the PeopleSoft database:
GRANT ALL ON TABLE PS.PSDBOWNER TO <Owner_ID> WITH GRANT OPTION;
140 Copyright © 2006, Oracle. All rights reserved.

Chapter 8 Creating a Database
Task 8-4: Granting Privileges to Owner IDBefore creating your DB2 databases, make sure the owner ID has authorization to use the following DB2resources:
Grant use of bufferpool to the Owner ID:
GRANT USE OF BUFFERPOOL BP1 TO <Owner_ID>;
GRANT USE OF BUFFERPOOL BP2 TO <Owner_ID>;
GRANT USE OF BUFFERPOOL BP3 TO <Owner_ID>;
GRANT USE OF BUFFERPOOL BP32K TO <Owner_ID>;
Task 8-5: Creating DB2 Databases, Storage Groups,and Tablespaces
This section discusses:
• Understanding DB2 Databases, Storage Groups, and Tablespaces
• Customizing the Database Name
• Working with Tablespaces
Understanding DB2 Databases, Storage Groups,and TablespacesPeopleSoft delivers a generic script to create the DB2 UDB for z/OS storage groups, database shells andtablespaces. Unless you are installing the System (SYS) or Demo (DMO) database using the generic defaultsin the script, you need to edit various parameters to comply with the standard at the customer site. Theseparameters include:
• Storage group names and volumes (if you have already created stogroups, you may comment out thestatements in the script to create them)
• Database names• Tablespace names• Bufferpool names• Owner_ID
Note. There is a SET CURRENT SQLID = ’OWNER#ID’ statement in the script. It is recommendedthat the Current SQLID be set to the ID that will be used to "own" all the database tables (even thoughno tables are being created in this step). This will either be the Secondary Authorization ID, if usingSecondary Authorization ID processing, or the Primary Authorization ID, if not. (In the scripts to createthe tables found in the next step, this value is referred to as OBJ#OWNER). The "CREATOR" field inthe SYSIBM.SYSTABLESPACE catalog table will be the same value as the "CREATOR" field in theSYSIBM.SYSTABLES catalog table. Having these two fields being the same value will facilitate runningthe optional SQR SETDBNAM and creating the temporary tables, mentioned later in the chapter.
Copyright © 2006, Oracle. All rights reserved. 141

Creating a Database Chapter 8
The following instructions detail where to make these edits as necessary.
Using SPUFI, DSNTEP2, or an equivalent product, create your DB2 objects (that is, databases, storage groups,and tablespaces) using the HLQ.PSvvv.DDLLIB(XXDDL/XXDDLU) file.
The XXDDL version is used for the traditional installation, and the X1DDL version is used for the enhancedinstallation for pre 9.0 Application releases, as discussed at the beginning of this chapter. Use the XXDDLUversion for Unicode installation.
The following table shows a few examples of the product identifiers in HLQ.PSvvv.DDLLIB(XXDDL/XXDDLU):
Product Identifier
HRMS HC or H1
Financials/Supply Chain Management EP or E1
Enterprise Performance Management PF or P1
Customer Relationship Management CR or C1
Task 8-5-1: Customizing the Database NameThis section discusses:
• Understanding Database Name Customization
• Editing the xxDDL Script
Understanding Database Name CustomizationYou can customize the database name found in the CREATE DATABASE statements to your organizationstandards. However, make note of the database names you change because you will have to makecorresponding changes to the DDL scripts for creating the tables.
Note. Because of the large number of objects delivered in the database, and to facilitate performance, multiplephysical databases are deployed to contain the single, logical PeopleSoft database. The objects in the physicaldatabases are unified into one logical database by sharing the same Owner ID (the CREATOR field inSYSIBM.SYSTABLES). For consistency, and to facilitate editing, the physical database names all share acommon root value of seven characters. A unique eighth character is appended to the root name, resulting in adistinct database name. As an example, the HRMS Product is delivered with a "root" value of PSHRDMO forthe database name. The actual physical database names include PSHRDMO, PSHRDMOB, PSHRDMOH,PSHRDMOP, PSHRDMOT, PSHRDMO1 and PSHRDMO2. The PeopleSoft applications contain a substantialnumber of DB2 objects, and we do not recommend putting all these objects into a single database. Doing sowill require an inordinately large EDM pool size, and will produce undesirable results in your DB2 system.Note also that the PTPRC tablespace is assigned to its own database PSxxDMOT. This tablespace contains allthe tables used by Process Scheduler. Combining these tables in one of the other databases could potentiallycause the lockout of other processes, such as DB2 utilities running concurrently with Process Scheduler.Finally, note that several tablespaces specify LOCKSIZE ROW. If any tables we deliver within thesetablespaces are moved, they should only be moved to a tablespace that was defined with row level locking.
142 Copyright © 2006, Oracle. All rights reserved.

Chapter 8 Creating a Database
Note. Use the PeopleSoft Tablespace DDL Automation Assistance Tool (PSTAAT) to customize the physicaldatabase names that constitute your logical PeopleSoft database. See the appendix “Using the PeopleSoftTablespace DDL Automation Assistance Tool” for more details.
Editing the xxDDL ScriptTo edit the xxDDL script, edit the CREATE STOGROUP statements to site-specific values. Storage groupname defaults are PSSGTSxx and PSSGIXxx for tablespaces and index spaces, respectively, but you canchange them to comply with your organization’s standards. You may also comment out the CREATESTOGROUP statements if you have already established Stogroups on your DB2 subsystem, but you will stillneed to edit the CREATE TABLESPACE statements with your site specific Stogroup value.
We highly recommend that you use standard PeopleSoft tablespace names when installing the demonstrationdatabase to simplify the installation process.
The script contains the GRANT DBADM commands for each DB2 database you plan to create for yourPeopleSoft database. This is the easiest way to grant the required privileges to the owner ID. This enables theowner ID to perform other tasks, such as starting and stopping the PeopleSoft database, and running DB2utilities such as RUNSTATS.
Note. References to owner ID in this document, and in the accompanying scripts, refer to the DB2 SecondaryAuthorization ID if using Secondary Authorization ID processing, or to the DB2 Primary AuthorizationID, if not.
The options are to grant DBADM to the Owner ID or to issue individual grants for the following:
• Grant bind capability to the Owner ID:
GRANT BINDADD TO <Owner_ID>;
• Grant create tablespace capabilities to the Owner ID:
GRANT CREATETS ON DATABASE <database_name> TO <Owner_ID>;
• Grant create table capability to the Owner ID:
GRANT CREATETAB ON DATABASE <database_name> TO <Owner_ID>;
Note. You may use the PeopleSoft Tablespace DDL Automation Assistance Tool (PSTAAT) to customizetablespace DDL. See the appendix “Using the PeopleSoft Tablespace DDL Automation Assistance Tool”for more details.
Task 8-5-2: Working with TablespacesThis section discusses:
• Using Tablespaces
• Following the Standard Tablespace Names Formats
• Naming Tablespace Defaults
• Parsing Tablespaces
Copyright © 2006, Oracle. All rights reserved. 143

Creating a Database Chapter 8
Using TablespacesFor tablespaces, PeopleSoft provides a strategy for Demo and System databases aimed at identifying highgrowth and frequently updated tables. This limits the number of tables the DBA must monitor and analyze,and simplifies capacity planning and database tuning activities. In addition, with Release 8, a new type oftable is introduced referred to as a temporary table. A temporary table is permanently created in the database,but its usage, by Application Engine programs, is temporary. The tables are delivered empty, but becauseof the potential for a volatile increase and decrease in the number of rows populating the table during theexecution of a process, the temporary tables are also segregated into their own tablespaces, buffer pool, anddatabases. This segregation seeks to facilitate administration of these tables and tablespaces separate from thetablespaces in which the core application tables reside.
For customers that elect to use the %UpdateStats functionality, the x1DDL.SQL scripts are provided forpre-9.0 Application releases to facilitate placing each table that is the object of the %UpdateStats function to itsown unique tablespace. Use the PeopleSoft Tablespace DDL Automation Assistance Tool (PSTAAT) to placeeach table that is the target of the %UpdateStats function in its own tablespace for Enterprise 9.0 Applications.See the appendix “Using the PeopleSoft Tablespace DDL Automation Assistance Tool” for more details.
Note. For multilingual installs, the PTTBL, PTTLRG and PSIMAGE tablespaces may need to be increasedin size.
Following the Standard Tablespace Names FormatsThe standard tablespace names that PeopleSoft delivers categorize tables as follows:
• High growth and frequently updated tables for Applications are grouped together into tablespaces namedXXLARGE, where XX is a PeopleSoft application identifier. Similarly, the PeopleTools tables identifiedas large tables or frequently updated tables are grouped in the PTTLRG tablespace. Depending oncustomer-specific requirements and environment, it may be advisable to move those tables containing thelargest amount of data from this shared tablespace into their own segmented or partitioned tablespaces.This should be done for performance and concurrency reasons.
• Tables with static or relatively minimal growth are grouped into tablespaces named XXAPP, where XX isa PeopleSoft application identifier. These tablespaces are defined with a moderate free space specification.
• Tables that are classified by record type as Temporary tables are grouped into tablespaces namedXXWORK, where XX is a PeopleSoft application identifier.
• Tables, which have rows exceeding 4K in length, are placed in the PSIMAGE tablespace, which iscreated using a 32K buffer pool.
• The scripts x1DDL.SQL further categorize tablespaces as follows:• MAIN#### — Tables defined in Application Designer as SQL Tables that are the object of the%UpdateStats feature, where #### is the number assigned to make the tablespace name unique.
• TEMP#### — Tables defined in Application Designer as temporary tables that are the object of the%UpdateStats feature, where #### is the number assigned to make the tablespace name unique.
• Tables that benefit from row level locking exist in the following tablespaces:
- PTPRC — Tables used by the Process Scheduler
- PTPRJWK — Tools Project Work Table
- PTAUDIT — Table used by PeopleTools Audit functionality
- PTAMSG — Tables used by Application Messaging
144 Copyright © 2006, Oracle. All rights reserved.

Chapter 8 Creating a Database
- PTLOCK — PSLOCK and PSVERSION tables are stored in this tablespace. These tables consist ofmultiple rows and are used for concurrency and version control respectively.
- PTRPTS — Tables used by Report Repository processes
- PTCMSTAR — Tables generated by PeopleTools Cube Manager
- PSIMGR— Tables that benefit from row level locking that also require use of a 32K bufferpool.• Other tablespaces exist to group tables in PeopleTools by functionality (that is, PTTREE for tree tables,and PTAPPE for Application Engine tables).
Simple or partitioned tablespaces (one table per tablespace) are not supported for the initial installation, butmay be implemented for demonstration and production databases using the PeopleTools Application Designer.
Naming Tablespace DefaultsThe following tables lists common tablespaces and their defaults.
Tablespaces Comments
PTAPP, PTTBL Contain moderate sized PeopleTools tables with littleexpected growth.
PTTLRG Contains larger PeopleTools tables that have the potentialto grow large.
PTAUDIT Contains table PSAUDIT used by PeopleTools auditfunctionality. Row level locking is specified for thistablespace.
PTCMSTAR Tables dynamically created by CubeManager will use thistablespace.
PSIMAGE Contains all PeopleSoft tables requiring 32K bufferpoolsize.
PSIMGR Contains tables requiring a 32K bufferpool size that alsobenefit from row level locking. Row level locking isspecified for this tablespace.
PTAMSG Tables used by Application Messaging. Row level lockingis used for this tablespace.
PTAPPE Tables used for Application Engine. Please note that otherAE tables exist in PSIMAGE because they require 32KBbufferpool.
PTLOCK Contains PSLOCK and PSVERSION. Row level locking isused for this tablesapce.
PTTREE Contains tables specific to PeopleTools trees.
PTPRC All tables used by ProcessScheduler. Row level lockingused for this tablespace.
Copyright © 2006, Oracle. All rights reserved. 145
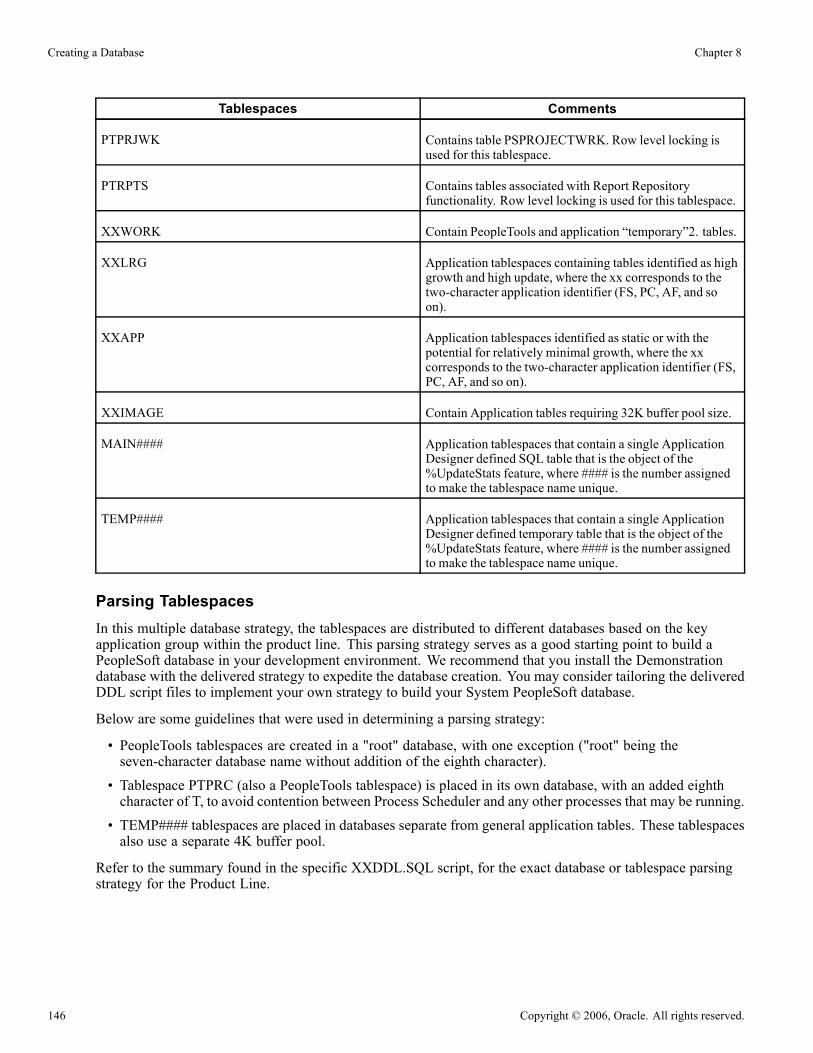
Creating a Database Chapter 8
Tablespaces Comments
PTPRJWK Contains table PSPROJECTWRK. Row level locking isused for this tablespace.
PTRPTS Contains tables associated with Report Repositoryfunctionality. Row level locking is used for this tablespace.
XXWORK Contain PeopleTools and application “temporary”2. tables.
XXLRG Application tablespaces containing tables identified as highgrowth and high update, where the xx corresponds to thetwo-character application identifier (FS, PC, AF, and soon).
XXAPP Application tablespaces identified as static or with thepotential for relatively minimal growth, where the xxcorresponds to the two-character application identifier (FS,PC, AF, and so on).
XXIMAGE Contain Application tables requiring 32K buffer pool size.
MAIN#### Application tablespaces that contain a single ApplicationDesigner defined SQL table that is the object of the%UpdateStats feature, where #### is the number assignedto make the tablespace name unique.
TEMP#### Application tablespaces that contain a single ApplicationDesigner defined temporary table that is the object of the%UpdateStats feature, where #### is the number assignedto make the tablespace name unique.
Parsing TablespacesIn this multiple database strategy, the tablespaces are distributed to different databases based on the keyapplication group within the product line. This parsing strategy serves as a good starting point to build aPeopleSoft database in your development environment. We recommend that you install the Demonstrationdatabase with the delivered strategy to expedite the database creation. You may consider tailoring the deliveredDDL script files to implement your own strategy to build your System PeopleSoft database.
Below are some guidelines that were used in determining a parsing strategy:
• PeopleTools tablespaces are created in a "root" database, with one exception ("root" being theseven-character database name without addition of the eighth character).
• Tablespace PTPRC (also a PeopleTools tablespace) is placed in its own database, with an added eighthcharacter of T, to avoid contention between Process Scheduler and any other processes that may be running.
• TEMP#### tablespaces are placed in databases separate from general application tables. These tablespacesalso use a separate 4K buffer pool.
Refer to the summary found in the specific XXDDL.SQL script, for the exact database or tablespace parsingstrategy for the Product Line.
146 Copyright © 2006, Oracle. All rights reserved.

Chapter 8 Creating a Database
Note. You can further improve performance by remapping tables to additional tablespaces, and tablespaces toadditional databases with the PeopleSoft Tablespace DDL Automation Assistance Tool (PSTAAT). Consult theappendix “Using the PeopleSoft Tablespace DDL Automation Assistance Tool” to help you plan a strategyfor implementing production PeopleSoft databases.
See Enterprise PeopleTools 8.48 PeopleBook: Data Management.
Task 8-6: Creating TablesThe CREATE TABLE statements to build the tables for the application group are in Partitioned Data SetHLQ.PSvvv.DDLLIB. There are several versions of the file containing the DDL to create the tables.TBDDL is used for the traditional installation path, and X2DDL is used for the enhanced installation path(pre-9.0 Application releases; X is a one-letter code denoting the Product Line). For Unicode databases,TBDDLU is used for the traditional installation path, and X2DDLU is used for the enhanced installation path(pre-9.0 Application releases). If any changes were made to the name of the databases or tablespaces in theHLQ.PSvvv.DDLLIB(XXDDL) or HLQ.PSvvv.DDLLIB(X1DDL) script, you must make the same parameterchanges to the file you will use to create the tables. The key values you need to modify are:
• Owner#ID— This value equates to the "CREATOR" field in the SYSIBM.SYSTABLES catalog tableand is offered to facilitate Seondary Authorization ID processing.
• OBJ#OWNER— This value should equate to the CREATOR field in the SYSIBM.SYSTABLES catalogtable.
• Database names• Tablespace names—Only if you changed the default names specified in the HLQ.PSvvv.DDLLIB(XXDDL)
After reviewing all your changes, submit this file, preferably through DSNTEP2, since this task will takebetween one and two hours.
Note. You may use the PeopleSoft Tablespace DDL Automation Assistance Tool (PSTAAT) to optimize thedefault installation DDL scripts (xxDDL, TBDDL) for a production environment. See the appendix “Using thePeopleSoft Tablespace DDL Automation Assistance Tool” for more details.
Warning! By default DSNTEP2 allows 10 errors, failing on the 11th error. Allowing 10 errors before thescript stops could leave your database in an inconsistent state. It is important that your script stop at the firsterror so you can assess the problem, fix it and resubmit the job. You may want to change the default forDSNTEP2 to fail on the first error or use SPUFI to submit the TBDDL.
Task 8-7: Configuring the DB2 Connect GatewayBecause subsequent installation tasks require connectivity to the remote database, you now need to configurethe DB2 Connect Gateway, cataloging an alias for the PeopleSoft database. You also need to perform anyadditional tasks required for connectivity that you didn’t already complete during preparation. For instructionson performing these tasks, see the appendix “Installing and Configuring DB2 Connect.” For details on DB2Connect configuration, refer to your IBM DB2 Connect documentation.
Copyright © 2006, Oracle. All rights reserved. 147

Creating a Database Chapter 8
Task 8-8: Creating Data Mover Import ScriptsThis section discusses:
• Understanding Data Mover Import Scripts
• Working with Multilingual Databases
• Running Database Setup to Create Data Mover Import Scripts
Understanding Data Mover Import ScriptsThe Data Mover Import scripts are used to populate the PeopleSoft database with data. You use the DatabaseSetup feature of the PeopleSoft Data Mover program to create the Data Mover Import scripts.
You need to perform this procedure for each type of database that you create (System and Demo databases).Also, if your database supports Unicode, you need to have decided whether to use a Unicode or ANSI database.
See Enterprise PeopleTools 8.48 PeopleBook: Global Technology
Task 8-8-1: Working with Multilingual DatabasesAll PeopleSoft releases are shipped with English as the database’s base language. Therefore when selectingcomponents for the Data Mover Import script, you must select the English components in addition to any otherlanguages you have licensed. After the installation is complete, you can change the database’s base languageto the language that you plan to use most frequently.
Note. If you are creating a database and want to load PeopleSoft-provided translations for non-Englishlanguages, you must load English (ENG) in addition to the foreign language components.
Note. If you haven’t already done so, refer to Chapter 1 before determining whether to install multiplelanguages and whether to change your base language. See “Preparing for Installation,” Planning MultilingualStrategy.
Task 8-8-2: Running Database Setup to CreateData Mover Import ScriptsThe following procedure describes how to use the Database Setup feature to generate Data Mover importscripts.
To create Data Mover import scripts:
1. In Configuration Manager, verify in the Signon Defaults that the Database Type of DB2 UDB forOS/390 is selected. If not, you will be prompted for the application server name, instead of the requireddatabase name.
148 Copyright © 2006, Oracle. All rights reserved.

Chapter 8 Creating a Database
Configuration Manager dialog box
2. Log onto the database shell in Bootstrap mode via Data Mover.Bootstrap mode means starting Data Mover with the database Access ID and password, rather than witha PeopleSoft user ID. When you start Data Mover in bootstrap mode, the word “BootStrap” appears inthe Data Mover status bar. (The opposite of Bootstrap mode is User mode. When in User mode, noactual mode displays on the status bar.)
Note. You must limit Access ID to eight characters or less.
3. Select Start, Programs, PeopleTools 8.4, Data Mover (or go to <PS_HOME>\bin\client\winx86 and runpsdmt.exe). The PeopleSoft Logon window appears.
4. Log on using the Access ID and password you defined in your mainframe security software application;this will start Data Mover in bootstrap mode.
See “Preparing for Installation,” Planning Database Creation.5. Choose File, Database Setup. You see the Database Setup dialog:
Copyright © 2006, Oracle. All rights reserved. 149

Creating a Database Chapter 8
Database Setup dialog box
6. If necessary, change your Character Set, and click Next.
Note. DB Setup does not actually modify the encoding scheme of your database. That is accomplishedduring creation. DB Setup only creates customized scripts based on your selections.
7. Select the Demo or System radio button, depending on which type of PeopleSoft database you are installing.
150 Copyright © 2006, Oracle. All rights reserved.

Chapter 8 Creating a Database
Choosing the PeopleSoft Database type in the Database Setup dialog box
8. Select the Product(s) for which you want to create a Data Mover script from the PeopleSoft Application listbox. Only the Products and languages that you have licensed will be available. Move the item(s) you haveselected into the Data Mover Scripts to Create list box by clicking on the Add or Add All button.If you installed the Multilanguage CD, each application will be listed several times, once for eachlanguage. See the chapter on preparing for installation for a list of the PeopleSoft-provided languagesand abbreviations. If you are installing languages other than English, make sure to select the appropriatelanguage data files for each application you select in English. This will load the translated database objects.
See “Preparing for Installation,” Planning Multilingual Strategy.
Copyright © 2006, Oracle. All rights reserved. 151
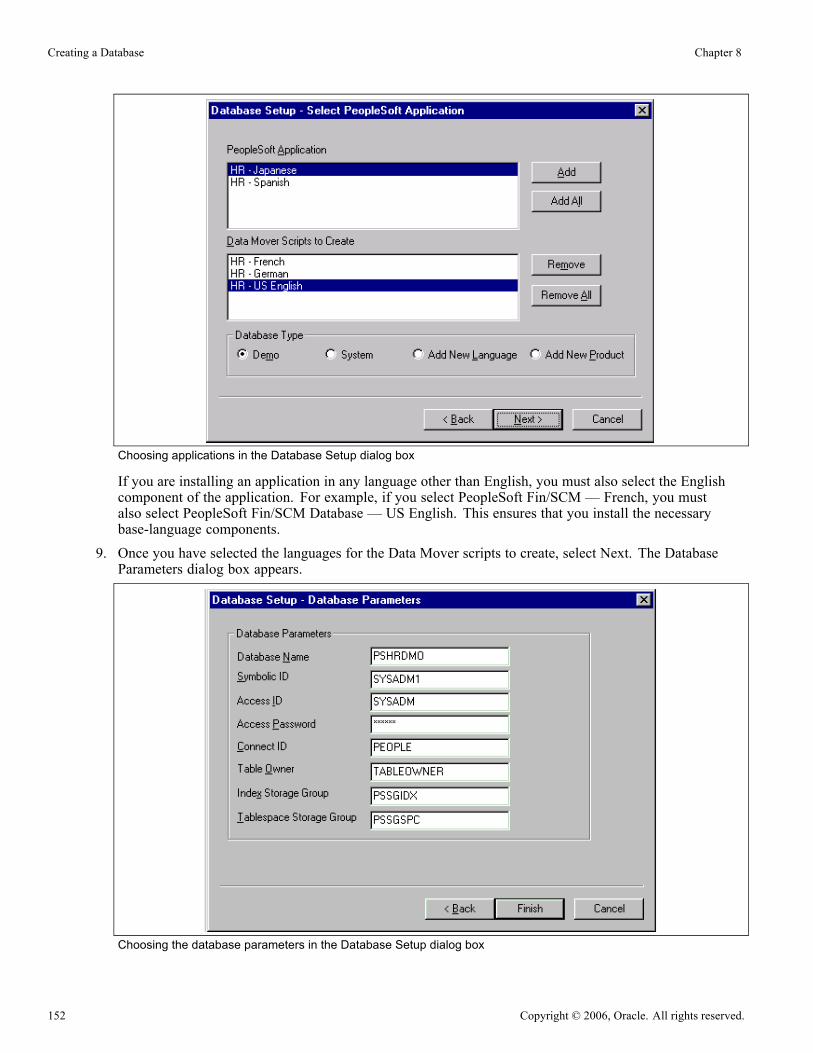
Creating a Database Chapter 8
Choosing applications in the Database Setup dialog box
If you are installing an application in any language other than English, you must also select the Englishcomponent of the application. For example, if you select PeopleSoft Fin/SCM — French, you mustalso select PeopleSoft Fin/SCM Database — US English. This ensures that you install the necessarybase-language components.
9. Once you have selected the languages for the Data Mover scripts to create, select Next. The DatabaseParameters dialog box appears.
Choosing the database parameters in the Database Setup dialog box
152 Copyright © 2006, Oracle. All rights reserved.

Chapter 8 Creating a Database
The various parameters are discussed below:• Database Name — the logical DB2 database name determined in the chapter Preparing for Installation inthe task “Planning Database Creation.”The database name must also be defined as an alias in DB2 Connect to establish a successful connectionto your PeopleSoft database, as described in the appendix “Installing and Configuring DB2 Connect.”
• Symbolic ID — the key to retrieve ACCESSID and ACCESSPSWD from PSACCESSPRFL. For initialinstallation set it equal to the Database Name. The Symbolic ID cannot be longer than eight characters.
• Access ID — the PeopleSoft Access ID defined in the chapter Preparing for Installation under “PlanningDatabase Creation.” This is also the User ID value with which you should be currently logged on to DataMover. This value is case sensitive.
• Access Password — the PeoleSoft Access Password defined in the chapter Preparing for Installationunder “Planning Database Creation.” This is also the User password value with which you should becurrently logged on to Data Mover.
• Connect ID — for DB2 UDB for z/OS, this is the Connect ID that can be used for the initial connectionto DB2 z/OS. This ID is used for connecting to the database. The use of Connect ID is mandatorywith PeopleTools 8.4.
Note. The Connect ID must be defined as a valid logon ID in the database security management software.The Connect ID only needs to be granted SELECT access on PS.PSDBOWNER, PSACCESSPRFL,PSOPERDEFN, and PSSTATUS. This ID should be granted no other database authorities.
• Table Owner — the name of the table owner ID determined in the chapter Preparing for Installationunder “Planning Database Creation.” (This value will populate the CREATOR field in the systemcatalog table SYSIBM.SYSTABLES.) It is this value that identifies all the tables as belonging to thelogical PeopleSoft database.
• Index Storage Group — the storage group where the index spaces will be created. Later you have to editthe delivered script IXDDL.SQL with this value.
• Tablespace Storage Group — the storage group for tablespaces. This value must be the same as that usedin the XXDDL.SQL/XXDDLU.SQL script described earlier when the Tablespaces were created.
10. Provide the parameter values, and click Finish.A script <dbname>dbo.dms is created in the <PS_HOME>\scripts directory, and the script is displayedin the Data Mover input window. The log files will be written to the location you have specified for theData Mover Log Directory in the Configuration Manager profile.
Note. If you selected a Database Type of System in the Database Setup dialog (above), you must use theData Mover DBSPACE command to properly override the default database names in the generated DataMover script (script <dbname>dbo.dms). The appendix “Extracting DDL for PTSYS Database” discussesa sample script that you can use to customize the database names for your location. Refer to this appendixfor information on creating a PTSYS database.
See AlsoEnterprise PeopleTools 8.48 PeopleBook: Data Management
“Extracting DDL for PTSYS Database”
Copyright © 2006, Oracle. All rights reserved. 153

Creating a Database Chapter 8
Task 8-9: Running Data Mover Import ScriptsThis section discusses:
• Understanding Data Mover Import Scripts
• Populating Tables in the PeopleSoft Database
• Validating Files
• Troubleshooting
• Improving Performance
• Improving Execution
Understanding Data Mover Import ScriptsNow you will run the Data Mover scripts (DMS) that you created in the preceding task to import the data foryour PeopleSoft database. The Data Mover script creates either a system (SYS) or a demo (DMO) database.
When you initially logged onto Data Mover to create the DMS scripts, you logged in using bootstrap mode.Bootstrap mode means starting Data Mover with the database Access ID and password, rather than with aPeopleSoft user ID. You need to use bootstrap mode to run the Data Mover import script, because there are notyet any PeopleSoft security tables in the database.
Note. If you want to run Data Mover on the same machine as the application server or Process Scheduler,you need to start a new telnet session without running PSADMIN and make sure the PS_SERVER_CFGenvironment variable is not set. PS_SERVER_CFG is only set when you run PSADMIN, so if you have notrun it before this should not be a concern. When running Data Mover, you do not need to run PSADMIN.
Note. You should already be signed on in Bootstrap mode from having completed the previous task.
Verify that the same Connect ID was used in the Database Setup, and Configuration Manager panel. If youaccepted all defaults, the Connect ID/Password is: people/peop1e (password has the number 1).
See Enterprise PeopleTools 8.48 PeopleBook: Data Management.
Warning! The Data Mover utility uses the INSERT SQL command to populate all the tables in PeopleSoftdatabase. Notify your systems programmer and operations staff that this activity will generate more DB2z/OS logging activity than usual.
Task 8-9-1: Populating Tables in the PeopleSoft DatabaseTo populate tables in the PeopleSoft database:
1. The DMS import script for your application will contain hard-coded file names for log files and data files.Modify the DMS script if you have moved any files from the delivered directories or want to write log filesto another location than that specified in the script.
2. If you have logged out of Data Mover after creating the DMS script, log back on again in Bootstrapmode; otherwise skip the next instruction.
3. Choose File, Open to open the DMS script you created earlier.
154 Copyright © 2006, Oracle. All rights reserved.

Chapter 8 Creating a Database
Browse the directory where the script was created: <PS_HOME>\SCRIPTS. Open the DMS script with thename <dbname>DBO.dms, where <dbname> is the name of the database you provided when creatingthe script.
4. One of the statements in the script grants select authority on PS.PSDBOWNER to the Connect ID.
GRANT SELECT ON PS.PSDBOWNER TO <Connect Id>;
5. If you have not granted the Access ID (the ID that you used to log on to Data Mover to execute thescript) a level of authority that would permit it to execute this statement, the Data Mover script willfail and stop at the statement.You can exercise three options to prevent this failure:• Grant SELECT access on PS.PSDBOWNER to PUBLIC, and remove this GRANT statement fromthe script.
• Remove this GRANT statement from the script and perform it later with an ID that is authorized toissue grants on PS.PSDBOWNER.
• Grant authority to the Access ID to grant access on PS.PSDBOWNER to other User Ids.6. Select File, Run to execute the script.
When you run the script, Data Mover typically does the following:
• IMPORT *Create all the PeopleTools and application tables with their indexes.
• ENCRYPT_PASSWORD *Encrypt security information for the database.
Task 8-9-2: Validating FilesEach script will produce .LOG files. The log files are located in the directory you specified in the DataMover Script.
This is the same directory you specified for the Data Mover Log Directory in the Configuration Managerprofile, unless you edited this location in the DMS script.
Task 8-9-3: TroubleshootingIf your script has stopped midway (this can happen for a number of reasons) you need to edit the script andstart again.
To edit and restart the DMS script:
1. Determine the record that was being imported (that is, which IMPORT command was running) when thescript stopped. (See the note below for additional information on determining where the script stopped.)
Copyright © 2006, Oracle. All rights reserved. 155

Creating a Database Chapter 8
Note. When building a DMO database or a multilingual database, adding the SET START statement canbe tricky because the Data Mover script used to load the database will include more than one IMPORTstatement. The key is to view the LOG files and determine which IMPORT section of the script DataMover failed on. If the failure occurred during the first IMPORT, add the SET START statement beforethe first IMPORT *; statement (no problem with this one). If the failure occurred during a subsequentIMPORT, comment out all preceding IMPORT *; statements and add the SET START statement beforethe IMPORT*; statement of the section in which the failure occurred. This is very important. If you seeany 'unique index constraint' error messages in the 'Create Indexes' step (found later in the chapter), yourIMPORT script failed during a subsequent IMPORT but the SET START statement was added to the firstIMPORT. In this situation, you can run the Data Mover script in its originally generated form, with onlyone modification. In the first IMPORT section, change the statement IMPORT *; to REPLACE_DATA*;. This will delete all the data in the tables, and re-import it. This process will take some time to run,and you will need to separately create each of the indexes that failed.
2. Add the following line before the offending IMPORT command (the one being executed when the failureoccurred):
Set start <RECORD NAME>;
where <RECORD NAME> is the name of the record that failed. Make sure to review the Data Mover logfile to see where the script failed and locate the last record that imported successfully. The 'SET START'will begin the Data Mover import at the <RECORD NAME> specified.<RECORD NAME> is the PeopleSoft record name as defined in PSRECDEFN, not necessarily the sameas the DB2 table name. With the exception of the PeopleTools tables, most PeopleSoft record names areappended with PS_ to create the DB2 table name.
Note. It is a good idea to change the name of the log file in the script before each attempt at running it.This ensures that you have a separate log file for each attempt, if you run the import more than once.
Example:If the script stops and the table is partially inserted with a message similar to this one:Importing PSPNLFIELD
Rows inserted into PSPNLFIELD
First delete the rows from the partially inserted table (for example, record) by using the DELETE FROM<table> command, and then restart Data Mover at the record that failed using the SET START commandand continue the Data Mover import. With PeopleTools 8.4, this can be done in a single pass.Add the following lines before the offending IMPORT command (the one being executed when thefailure occurred):SET START <RECORD NAME>;
DELETE FROM <RECORD NAME>;
where <RECORD NAME> is the name of the record that failed. Make sure to review the Data Mover logfile to see where the script failed and locate the last record that imported successfully. The 'SET START'will begin the Data Mover import at the <RECORD NAME> specified.Example:Before:
156 Copyright © 2006, Oracle. All rights reserved.

Chapter 8 Creating a Database
REM - PeopleTools System Database - US English
/
SET LOG ptengs.log;
SET INPUT ptengs.db;
SET NO RECORD;
SET NO VIEW;
SET NO SPACE;
SET NO TRACE;
SET UNICODE OFF;
IMPORT *;
After:
REM - PeopleTools System Database - US English
/
SET LOG ptengs.log;
SET INPUT ptengs.db;
SET NO RECORD;
SET NO VIEW;
SET NO SPACE;
SET NO TRACE;
SET UNICODE OFF;
SET START PSPNLFIELD;
DELETE FROM PSPNLFIELD;
IMPORT *;
For the DELETE Statement, for records with a recname without a leading PS, add PS_ to the beginning ofthe recname; otherwise the table will not be found.Example:PS_<RECNAME>
3. Re-start the script (File, Run Script).
Task 8-9-4: Improving PerformanceThe following tips can help you save time when running the Data Mover scripts:
• Run only a single instance of Data Mover, and do not have any other applications running during the import.• In the PeopleSoft Configuration Manager, turn off all Trace options. Tracing during a DMS load willadd considerable time to the process.
Copyright © 2006, Oracle. All rights reserved. 157

Creating a Database Chapter 8
Task 8-9-5: Improving ExecutionData Mover, by default, commits at the end of each table. If you prefer, when running Data Mover, you caninclude a SET COMMIT command (such as SET COMMIT 5000) to force a commit after the specifiednumber of rows have been inserted into the table. However, if you use this option, and Data Mover endsabnormally again, you must mass delete the rows contained in the current table.
If the script stops and the table is partially inserted with the message below:
Importing PSPNLFIELD
Rows inserted into PSPNLFIELD
5000, 10000, 15000
Bypass the record using the SET START AFTER command and complete the import. In a second pass,import the partially inserted table using this command:
Replace_data <record_name>;
Task 8-10: Creating IndexesAll DDL statements to create the indexes for your application are located in the HLQ.PSvvv.DDLLIB(IXDDL)file. Edit the IXDDL file to make changes to the delivered DDL to customize the OWNER#ID, OBJ#OWNER,DEFINE YES, DEFINE NO, and STOGROUP values to the specific values used at your site:
Note. You may then use the IXDDL script with the PeopleSoft Tablespace DDL Automation AssistanceTool (PSTAAT) to further optimize index DDL. See the appendix “Using the PeopleSoft Tablespace DDLAutomation Assistance Tool” for more details.
• OWNER#ID: The statement SET CURRENT SQLID may be used, but is not required. All objects in theCREATE INDEX statements are fully qualified.
• OBJ#OWNER: This value should equate to the CREATOR field in the SYSIBM.SYSINDEXES catalogtable.
• DEFINE YES or DEFINE NO: The default for the delivered index DDL is DEFINE NO.
If you do not want to defer creation of the underlying VSAM index datasets until rows are inserted intotables (DEFINE NO), edit the IXDDL file in ISPF as follows:
change all ’DEFINE NO’ to ’DEFINE YES’
orchange all ’DEFINE NO’ to ’ ’
If you want to permanently change the delivered default for index DDL to DEFINE YES, edit the DataMover script <PS_HOME>/SCRIPTS/DDLDB2.DMS by removing DEFINE NO from the end of theindex model statement. Terminate the statement with a semi-colon and save the script. For example:Original:CREATE [UNIQUE] INDEX **OWNER**.[IDXNAME] ON **OWNER2**.[TBNAME] ([IDXCOLLIST])⇒USING STOGROUP **STOGROUP** PRIQTY **PRIQTY** SECQTY **SECQTY** [CLUSTER]⇒BUFFERPOOL **BUFFERPL** CLOSE NO DEFINE NO;
New:
158 Copyright © 2006, Oracle. All rights reserved.
Chapter 8 Creating a Database
CREATE [UNIQUE] INDEX **OWNER**.[IDXNAME] ON **OWNER2**.[TBNAME] ([IDXCOLLIST])⇒USING STOGROUP **STOGROUP** PRIQTY **PRIQTY** SECQTY **SECQTY** [CLUSTER]⇒BUFFERPOOL **BUFFERPL** CLOSE NO;
After you edit the script, you must run the STOREDDL.DMS script to update the index model ddldefinition.
See Updating PeopleTools System Data.• STOGROUP
Save your changes and submit the DDL statements either through SPUFI or DSNTEP2. It is preferable tosubmit this in batch mode using DSNTEP2. This task can take several hours to complete, depending on theproduct line you are installing.
If you decide to submit this through SPUFI, verify that the designated output data set is allocated withsufficient tracks or cylinders to hold the result of processing all the CREATE INDEX statements. You shouldconsider creating a SPUFI output dataset with file attributes: VB,Record Length =4092,Blk size=4096,SPACE (Primary 20 cylinders, Secondary 5 cylinders).
Important! Do not change the name of any index. All indexes in this script are cataloged in the PeopleSoftsystem tables. If you change an index name, the physical index will not match the index definition stored inPeopleTools. These index discrepancies will be reported as exceptions in the DDDAUDIT report.
Task 8-11: Updating Database to Latest PeopleTools ReleaseThis section discusses:
• Understanding Database Updates
• Cleaning Up Data
• Updating PeopleTools System Tables
• Updating PeopleTools Database Objects
• Updating PeopleTools Multilingual Objects
• Deleting Obsolete PeopleTools Database Objects
• Altering PeopleTools Tables
• Migrating Records to New Tablespaces
• Updating PeopleTools System Data
• Running PeopleTools Conversions
• Converting Integration Broker
• Changing the User Interface
Copyright © 2006, Oracle. All rights reserved. 159
Creating a Database Chapter 8
Understanding Database UpdatesYour PeopleSoft application database may be on a PeopleTools release prior to the version that you arecurrently running. For you to be able to sign on to your database after running the Data Mover script to loadyour database, the PeopleTools versions for your database and your file server must match. The steps in thistask ensure that your PeopleSoft database is in sync with the PeopleTools version that you are running.
Note. You will use Application Designer for several steps in this portion of the installation. Consult theApplication Designer documentation if you have questions.
See Enterprise PeopleTools 8.48 PeopleBook: PeopleSoft Application Designer
Note. If you are installing a PeopleTools System Database or if your database is delivered on PeopleTools8.48, the delivered database already contains the updated PeopleTools objects. Skip this task and continuewith the install at the task “Running Additional Data Mover Scripts.”
Here is a list of applications for which this task must be run because the version of the database that wasshipped is different than the version of PeopleTools that you are running. If your application release is earlierthan the release listed in the table, you must run this task:
Application Release Application Database Version Requires Update to 8.48?
CRM 8.9 8.45 Yes
CRM 9.0 8.48 No
ELS 8.8 SP1 8.43 Yes
ELS 9.0 8.47 Yes
EPM 8.9 8.46 Yes
EPM 9.0 8.48 No
Fin/SCM 8.9 8.46 Yes
Fin/SCM 9.0 8.48 No
HRMS 8.8 SP1 8.43 Yes
HRMS 8.9 8.45 Yes
Portal 8.8 8.42 Yes
Portal 8.9 8.46 Yes
SIM 8.9 8.45 Yes
If your application is not listed above, look for your application and PeopleTools release information onCustomer Connection. Navigate to Site Index, product releases (roadmaps and schedules), Release Definitions,select your product line, and then select the product you are installing. If the Tools version is not 8.48, youmust run this task. Otherwise, continue to the task “Running Additional Data Mover Scripts.”
160 Copyright © 2006, Oracle. All rights reserved.
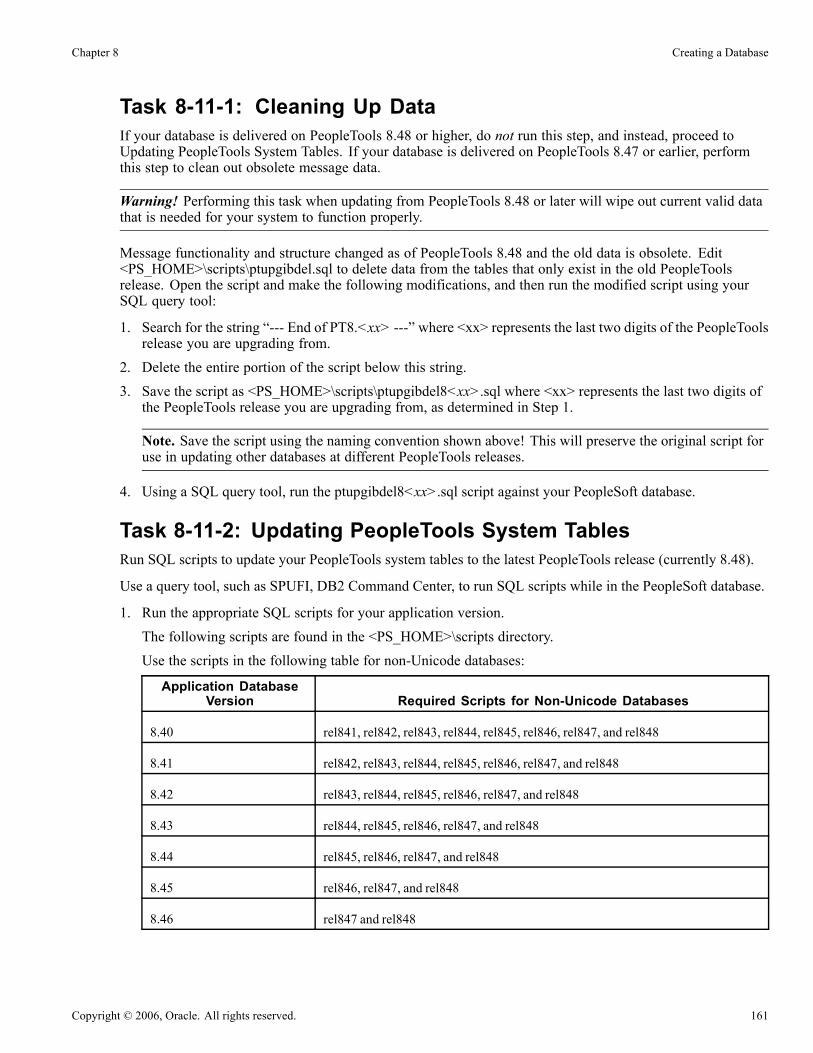
Chapter 8 Creating a Database
Task 8-11-1: Cleaning Up DataIf your database is delivered on PeopleTools 8.48 or higher, do not run this step, and instead, proceed toUpdating PeopleTools System Tables. If your database is delivered on PeopleTools 8.47 or earlier, performthis step to clean out obsolete message data.
Warning! Performing this task when updating from PeopleTools 8.48 or later will wipe out current valid datathat is needed for your system to function properly.
Message functionality and structure changed as of PeopleTools 8.48 and the old data is obsolete. Edit<PS_HOME>\scripts\ptupgibdel.sql to delete data from the tables that only exist in the old PeopleToolsrelease. Open the script and make the following modifications, and then run the modified script using yourSQL query tool:
1. Search for the string “--- End of PT8.<xx> ---” where <xx> represents the last two digits of the PeopleToolsrelease you are upgrading from.
2. Delete the entire portion of the script below this string.3. Save the script as <PS_HOME>\scripts\ptupgibdel8<xx>.sql where <xx> represents the last two digits ofthe PeopleTools release you are upgrading from, as determined in Step 1.
Note. Save the script using the naming convention shown above! This will preserve the original script foruse in updating other databases at different PeopleTools releases.
4. Using a SQL query tool, run the ptupgibdel8<xx>.sql script against your PeopleSoft database.
Task 8-11-2: Updating PeopleTools System TablesRun SQL scripts to update your PeopleTools system tables to the latest PeopleTools release (currently 8.48).
Use a query tool, such as SPUFI, DB2 Command Center, to run SQL scripts while in the PeopleSoft database.
1. Run the appropriate SQL scripts for your application version.The following scripts are found in the <PS_HOME>\scripts directory.Use the scripts in the following table for non-Unicode databases:
Application DatabaseVersion Required Scripts for Non-Unicode Databases
8.40 rel841, rel842, rel843, rel844, rel845, rel846, rel847, and rel848
8.41 rel842, rel843, rel844, rel845, rel846, rel847, and rel848
8.42 rel843, rel844, rel845, rel846, rel847, and rel848
8.43 rel844, rel845, rel846, rel847, and rel848
8.44 rel845, rel846, rel847, and rel848
8.45 rel846, rel847, and rel848
8.46 rel847 and rel848
Copyright © 2006, Oracle. All rights reserved. 161

Creating a Database Chapter 8
Application DatabaseVersion Required Scripts for Non-Unicode Databases
8.47 rel848
8.48 None
Use the scripts in the following table for Unicode databases:
Application DatabaseVersion Required Scripts for Unicode Databases
8.40 rel848u
8.41 rel848u
8.42 rel848u
8.43 rel848u
8.44 rel848u
8.45 rel848u
8.46 rel848u
8.47 rel848u
8.48 None
2. If the application database version you are installing is either 8.42 or 8.43, run the following SQL command:
DROP TABLE PS_PSMCFQUEUESLANG
Note. PS_PSMCFQUEUESLANG may not exist in some 8.43 application databases. Do not drop thetable PSMCFQUEUESLANG.
3. If the application database you are installing is 8.45 or lower, run the following SQL command:
DROP TABLE PSOPTSTATUS
4. Edit and run the grant.sql script in the <PS_HOME>\scripts directory. This will grant permissions tothe Connect ID.
5. Invoke Data Mover by running <PS_HOME>\bin\client\winx86\psdmt.exe.The PeopleSoft Logon window appears.Log on using a valid PeopleSoft Operator ID, such as PS for HRMS or VP1 for FDM.
6. Run the storeddl.dms Data Mover script in the <PS_HOME>\scripts directory.This will update your platform-specific DDL model statements.Log out of Data Mover for the next step.
7. Invoke Data Mover by running <PS_HOME>\bin\client\winx86\psdmt.exe.The PeopleSoft Logon window appears.
162 Copyright © 2006, Oracle. All rights reserved.

Chapter 8 Creating a Database
Log on using the access ID you specified when you created your Data Mover scripts with the DatabaseSetup program.This will start Data Mover in bootstrap mode.
8. Run the msgtlsupg.dms Data Mover script in the <PS_HOME>\scripts directory.This will update the PeopleTools messages in your database.
Task 8-11-3: Updating PeopleTools Database ObjectsTo update PeopleTools database objects to the current release you must be in Application Designer. The Copyfrom File functionality lets you update your PeopleTools database objects from a file. You must perform thisstep to bring the database objects in sync with the PeopleTools release. Failure to run this step will introduceproblems to your environment.
To update PeopleTools database objects:
1. Launch Application Designer and sign on to your database with a valid PeopleSoft user ID.2. Select Tools, Copy Project, From File.3. In the resulting dialog box, change the import directory to <PS_HOME>\projects, select PPLTLS84CURfrom the list of projects and click the Select button.
Note. If the project already exists on the database, a confirmation dialog box appears asking if you want tooverwrite the existing project. Select the File radio button and click OK to overwrite the existing project.
Copyright © 2006, Oracle. All rights reserved. 163
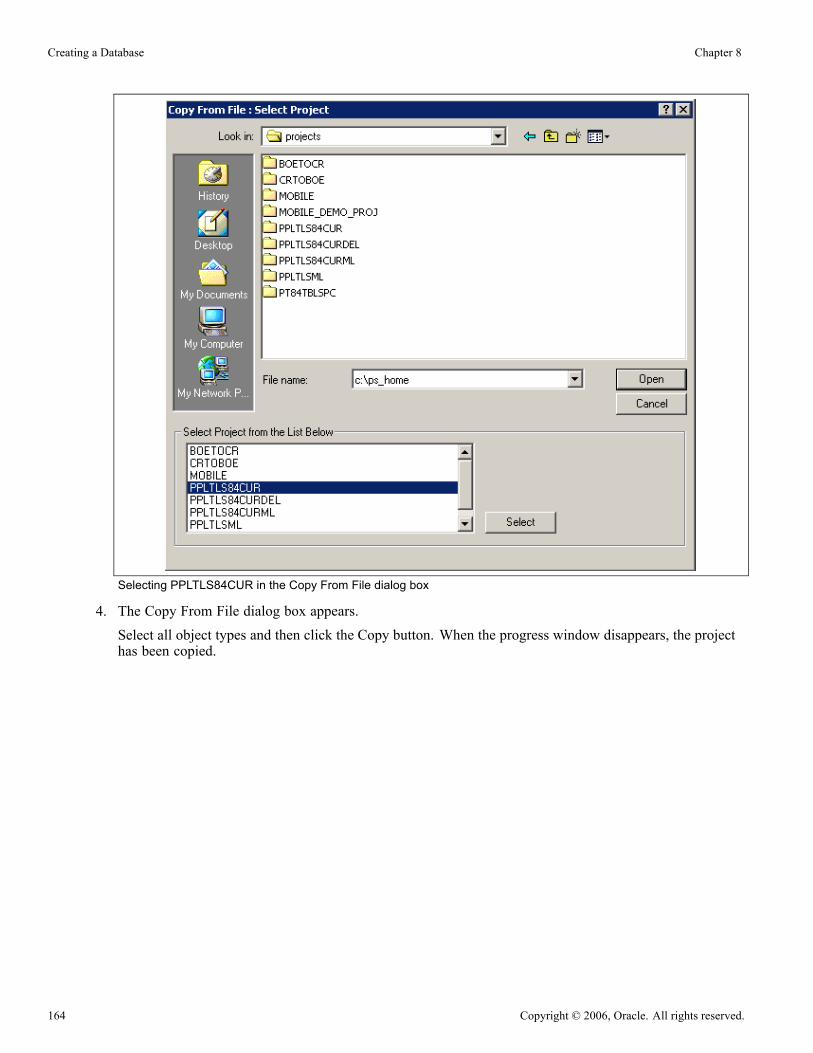
Creating a Database Chapter 8
Selecting PPLTLS84CUR in the Copy From File dialog box
4. The Copy From File dialog box appears.
Select all object types and then click the Copy button. When the progress window disappears, the projecthas been copied.
164 Copyright © 2006, Oracle. All rights reserved.
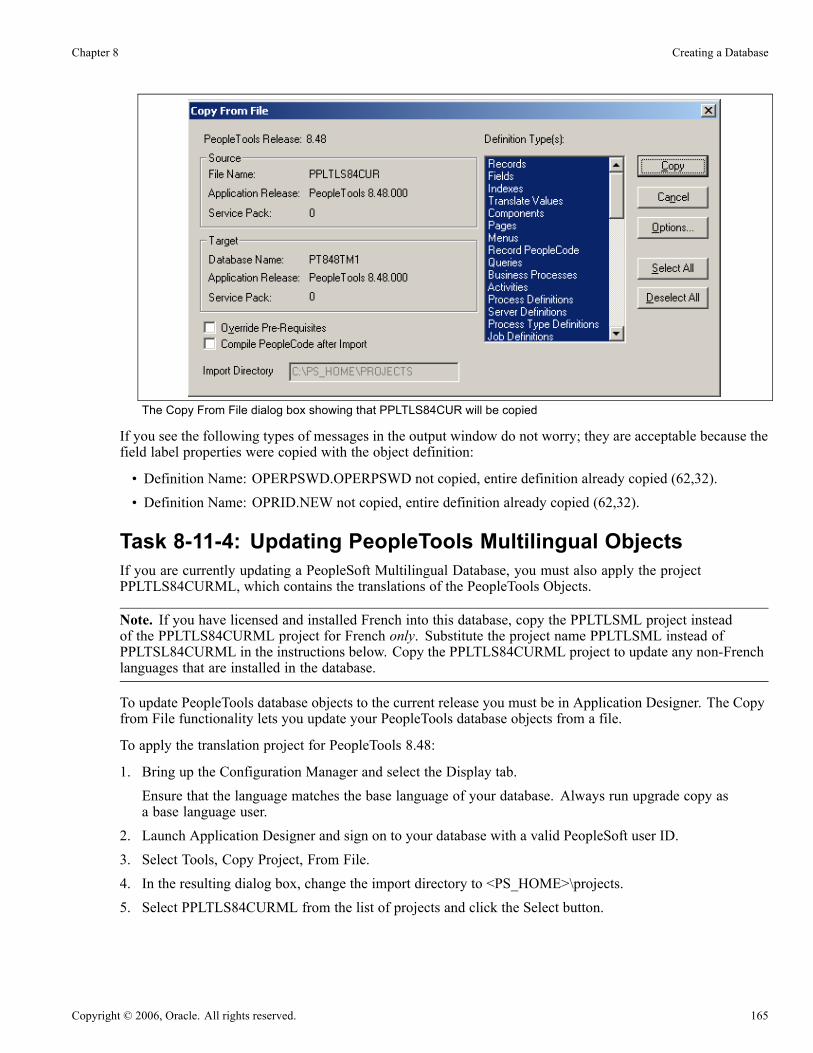
Chapter 8 Creating a Database
The Copy From File dialog box showing that PPLTLS84CUR will be copied
If you see the following types of messages in the output window do not worry; they are acceptable because thefield label properties were copied with the object definition:
• Definition Name: OPERPSWD.OPERPSWD not copied, entire definition already copied (62,32).
• Definition Name: OPRID.NEW not copied, entire definition already copied (62,32).
Task 8-11-4: Updating PeopleTools Multilingual ObjectsIf you are currently updating a PeopleSoft Multilingual Database, you must also apply the projectPPLTLS84CURML, which contains the translations of the PeopleTools Objects.
Note. If you have licensed and installed French into this database, copy the PPLTLSML project insteadof the PPLTLS84CURML project for French only. Substitute the project name PPLTLSML instead ofPPLTSL84CURML in the instructions below. Copy the PPLTLS84CURML project to update any non-Frenchlanguages that are installed in the database.
To update PeopleTools database objects to the current release you must be in Application Designer. The Copyfrom File functionality lets you update your PeopleTools database objects from a file.
To apply the translation project for PeopleTools 8.48:
1. Bring up the Configuration Manager and select the Display tab.Ensure that the language matches the base language of your database. Always run upgrade copy asa base language user.
2. Launch Application Designer and sign on to your database with a valid PeopleSoft user ID.3. Select Tools, Copy Project, From File.4. In the resulting dialog box, change the import directory to <PS_HOME>\projects.5. Select PPLTLS84CURML from the list of projects and click the Select button.
Copyright © 2006, Oracle. All rights reserved. 165

Creating a Database Chapter 8
Note. If the project already exists on the database, a confirmation dialog box appears asking if you want tooverwrite the existing project. Select the File radio button and click OK to overwrite the existing project.
Selecting PPLTLS84CURML in the Copy From File dialog box
6. The Upgrade Copy dialog box appears.Make sure that all object types are selected.
7. Click the Options button, select the Copy Options tab, and ensure that only the non-English languages youhave installed are selected.Please note that English and Common should not be selected.
8. Select the languages that you are currently installing from the Copy Options dialog box.9. Click the Copy button.
166 Copyright © 2006, Oracle. All rights reserved.
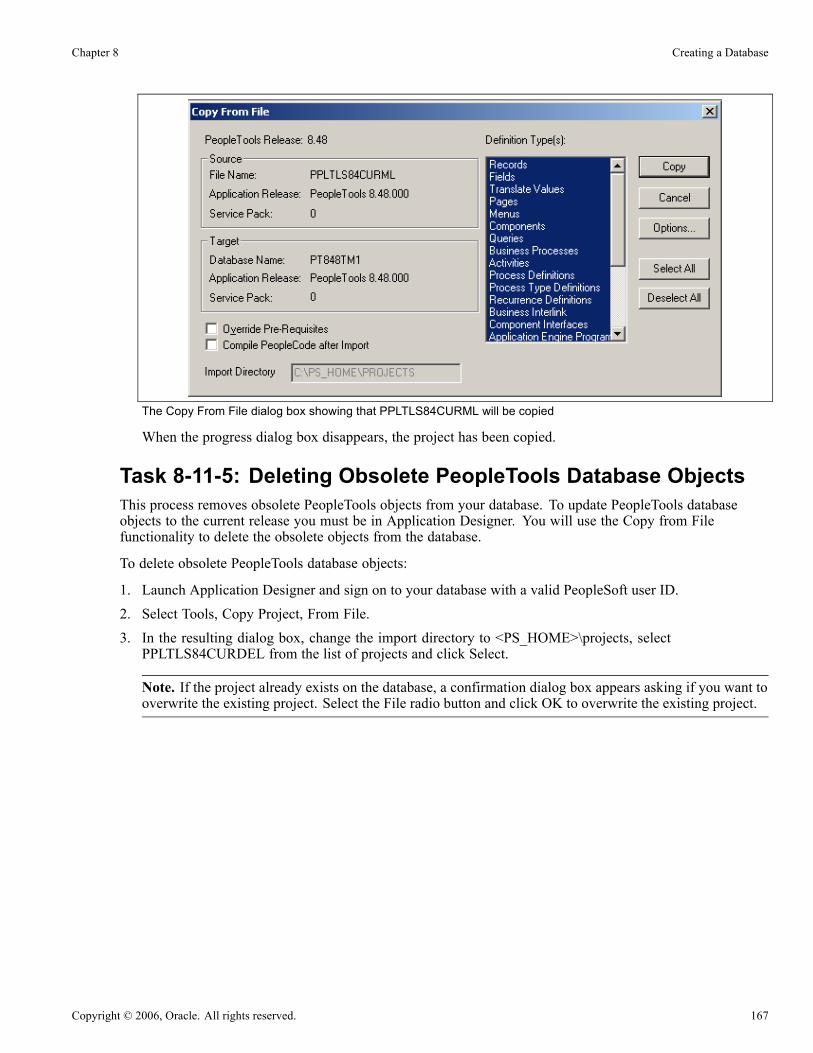
Chapter 8 Creating a Database
The Copy From File dialog box showing that PPLTLS84CURML will be copied
When the progress dialog box disappears, the project has been copied.
Task 8-11-5: Deleting Obsolete PeopleTools Database ObjectsThis process removes obsolete PeopleTools objects from your database. To update PeopleTools databaseobjects to the current release you must be in Application Designer. You will use the Copy from Filefunctionality to delete the obsolete objects from the database.
To delete obsolete PeopleTools database objects:
1. Launch Application Designer and sign on to your database with a valid PeopleSoft user ID.2. Select Tools, Copy Project, From File.3. In the resulting dialog box, change the import directory to <PS_HOME>\projects, selectPPLTLS84CURDEL from the list of projects and click Select.
Note. If the project already exists on the database, a confirmation dialog box appears asking if you want tooverwrite the existing project. Select the File radio button and click OK to overwrite the existing project.
Copyright © 2006, Oracle. All rights reserved. 167

Creating a Database Chapter 8
Selecting PPLTLS84CURDEL in the Copy From File dialog box
4. The Copy From File dialog box appears.Select all object types and click the Copy button. When the progress dialog box disappears, the projecthas been copied.
168 Copyright © 2006, Oracle. All rights reserved.

Chapter 8 Creating a Database
The Copy From File dialog box showing that PPLTLS84CURDEL will be copied
Note. If you are applying a required for install PeopleTools patch and if a database project is included,apply the database projects now. Make sure to read the patch release notes to find out if database changesare in the patch.
Task 8-11-6: Altering PeopleTools TablesALTER AUDIT is an online utility used to check whether the PeopleTools tables are synchronized with theunderlying SQL data tables in your database. This process compares the data structures of your database tableswith the PeopleTools tables to uncover inconsistencies. ALTER AUDIT then reports its findings. In thisrelease, we expect to see differences between the database structure and the tools tables. You will generate andrun a SQL script to synchronize the PeopleTools table definitions with the underlying tables in your database.
To alter PeopleTools tables:
1. Launch PeopleTools and sign on to the installed database.2. From the Application Designer, select File, Open.3. Select Project, enter PPLTLS84CUR in the name dialog box, and click OK.4. Select Build, Project.The Build dialog box appears:
Copyright © 2006, Oracle. All rights reserved. 169

Creating a Database Chapter 8
The Build dialog box
5. Select Create Tables and Alter Tables in the Build Options region (Create Indexes and Create Trigger willautomatically be selected).
6. Select Build script file in the Build Execute Options region.7. Click Settings.The Build Settings dialog box appears:
170 Copyright © 2006, Oracle. All rights reserved.
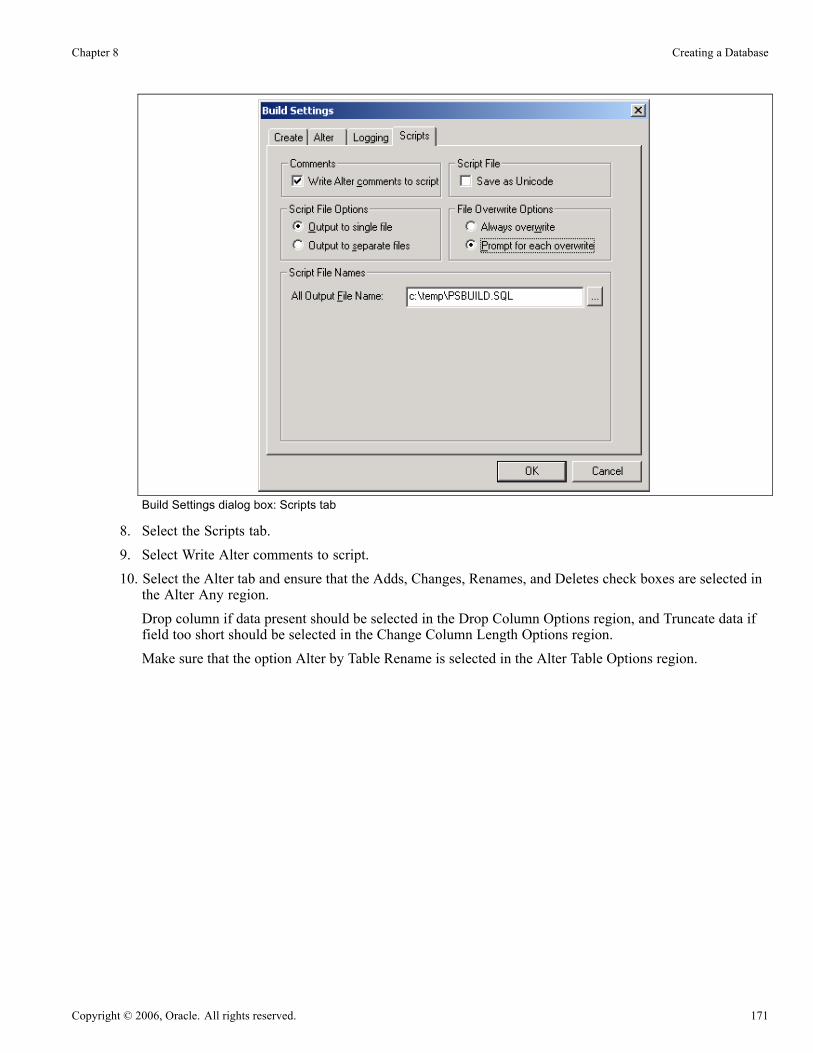
Chapter 8 Creating a Database
Build Settings dialog box: Scripts tab
8. Select the Scripts tab.9. Select Write Alter comments to script.10. Select the Alter tab and ensure that the Adds, Changes, Renames, and Deletes check boxes are selected inthe Alter Any region.Drop column if data present should be selected in the Drop Column Options region, and Truncate data iffield too short should be selected in the Change Column Length Options region.Make sure that the option Alter by Table Rename is selected in the Alter Table Options region.
Copyright © 2006, Oracle. All rights reserved. 171

Creating a Database Chapter 8
Build Settings dialog box: Alter tab
11. Select the Create tab and ensure that the Skip table if it already exists, Recreate view if it already exists,and Recreate index only if modified options are selected.
172 Copyright © 2006, Oracle. All rights reserved.
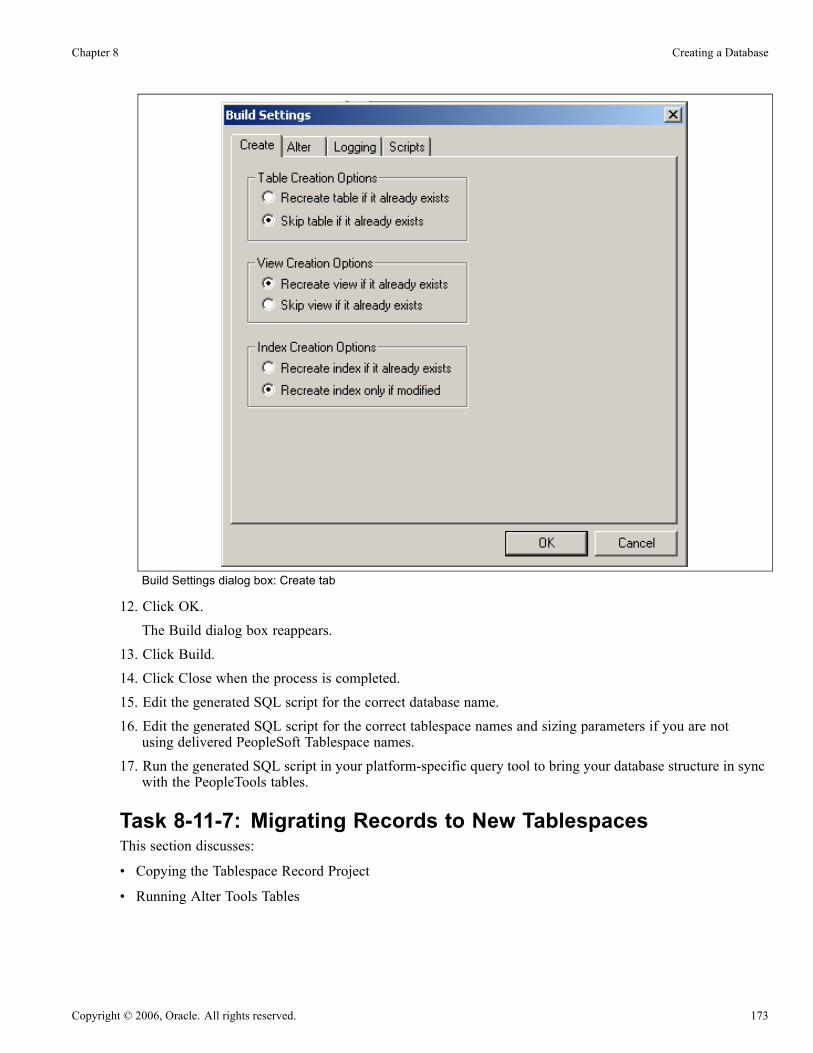
Chapter 8 Creating a Database
Build Settings dialog box: Create tab
12. Click OK.The Build dialog box reappears.
13. Click Build.14. Click Close when the process is completed.15. Edit the generated SQL script for the correct database name.16. Edit the generated SQL script for the correct tablespace names and sizing parameters if you are notusing delivered PeopleSoft Tablespace names.
17. Run the generated SQL script in your platform-specific query tool to bring your database structure in syncwith the PeopleTools tables.
Task 8-11-7: Migrating Records to New TablespacesThis section discusses:
• Copying the Tablespace Record Project
• Running Alter Tools Tables
Copyright © 2006, Oracle. All rights reserved. 173

Creating a Database Chapter 8
Copying the Tablespace Record ProjectPeopleSoft has moved some delivered tables to different Tablespaces in 8.44 and above. You must runthis step to move the tables.
To copy the Tablespace Record project:
1. Launch Application Designer and sign on to your database with a valid PeopleSoft user ID.2. Select Tools, Copy Project, From File.3. In the resulting dialog box, change the import directory to <PS_HOME>\projects, select PT84TBLSPCfrom the list of projects, and click Select.
Note. If the project already exists on the database, a confirmation dialog box appears asking if you want tooverwrite the existing project. Select the File radio button and click OK to overwrite the existing project.
Selecting PT84TBLSPC in the Copy From File dialog box
4. The Copy From File dialog box appears.Select all object types and click the Options button. Navigate to General Options and make sure that theTake DDL from Source option is selected.Click OK.
174 Copyright © 2006, Oracle. All rights reserved.
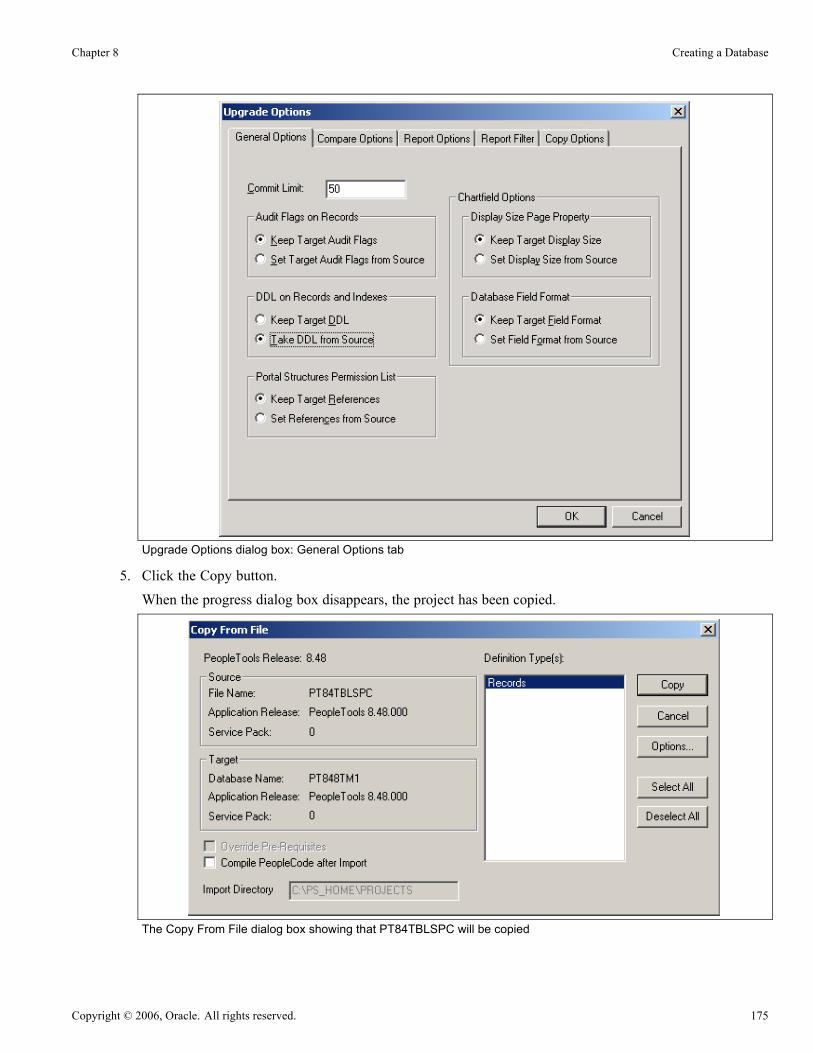
Chapter 8 Creating a Database
Upgrade Options dialog box: General Options tab
5. Click the Copy button.When the progress dialog box disappears, the project has been copied.
The Copy From File dialog box showing that PT84TBLSPC will be copied
Copyright © 2006, Oracle. All rights reserved. 175

Creating a Database Chapter 8
Running Alter Tools TablesTo run Alter Tools tables:
1. Launch PeopleTools and sign on to Installed database.2. From the Application Designer, select File, Open.3. Select Project, enter PT84TBLSPC in the name dialog box, and click OK.4. Select Build, Project.The Build dialog box appears:
The Build dialog box
5. Select Alter Tables in the Build Options region (Create Indexes and Create Trigger will automatically beselected).
6. Select Build script file in the Build Execute Options region.7. Click Settings.The Build Settings dialog box appears:
176 Copyright © 2006, Oracle. All rights reserved.

Chapter 8 Creating a Database
Build Settings dialog box: Scripts tab
8. Select the Scripts tab.9. Select Write Alter comments to script.10. Select the Alter tab and ensure that the Adds, Changes, Renames, and Deletes check boxes are selected inthe Alter Any region, and that the Alter even if no changes check box has been selected.Drop column if data present should be selected in the Drop Column Options region, and Truncate data iffield too short should be selected in the Change Column Length Options region.
Copyright © 2006, Oracle. All rights reserved. 177

Creating a Database Chapter 8
Build Settings dialog box: Alter tab
11. Click OK.The Build dialog box reappears.
12. Click Build.13. Click Close when the process is completed.14. Edit the generated SQL script for the correct database name.15. Edit the generated SQL script for the correct Tablespace names and sizing parameters if you are notusing delivered PeopleSoft Tablespace names.
16. Run the generated SQL script in your platform-specific query tool move the tables to the correctTablespaces.
Task 8-11-8: Updating PeopleTools System DataData Mover scripts that update PeopleTools system data are run to enable new features and load new messagesfor the PeopleTools 8.48 release. Several of the scripts that you need to run are dependent upon the version ofthe application you are running.
See Understanding Database Updates.
To update PeopleTools system data:
178 Copyright © 2006, Oracle. All rights reserved.
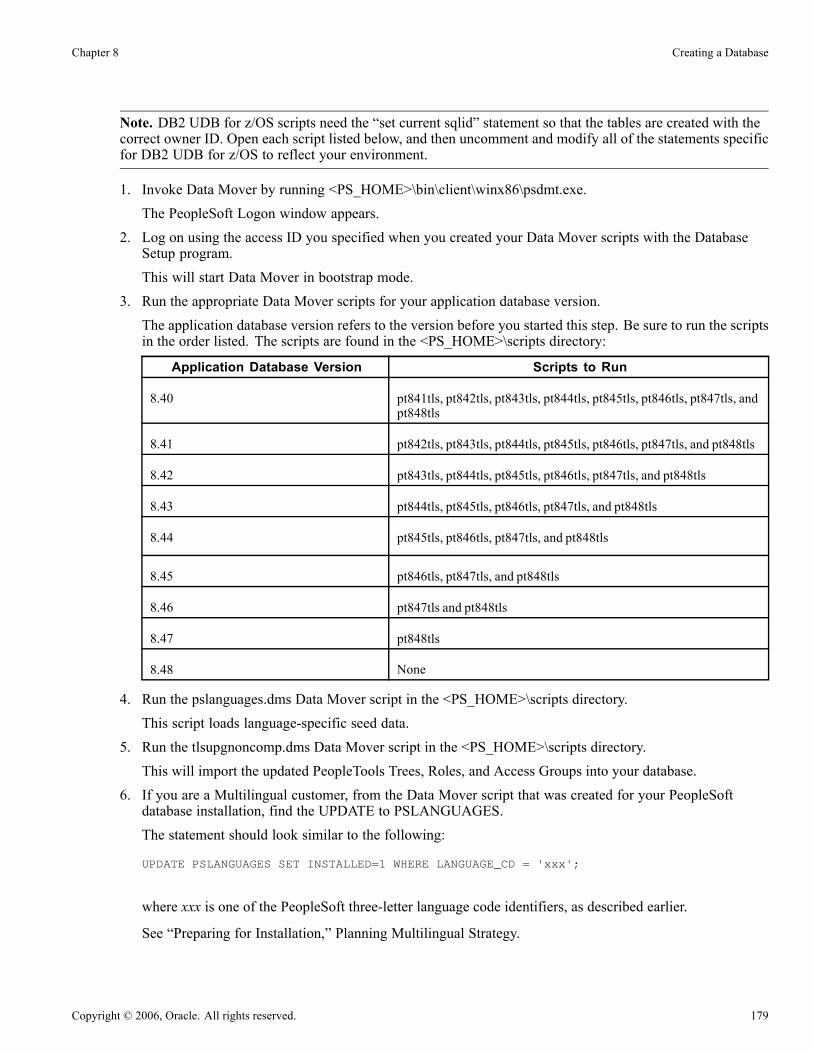
Chapter 8 Creating a Database
Note. DB2 UDB for z/OS scripts need the “set current sqlid” statement so that the tables are created with thecorrect owner ID. Open each script listed below, and then uncomment and modify all of the statements specificfor DB2 UDB for z/OS to reflect your environment.
1. Invoke Data Mover by running <PS_HOME>\bin\client\winx86\psdmt.exe.The PeopleSoft Logon window appears.
2. Log on using the access ID you specified when you created your Data Mover scripts with the DatabaseSetup program.This will start Data Mover in bootstrap mode.
3. Run the appropriate Data Mover scripts for your application database version.The application database version refers to the version before you started this step. Be sure to run the scriptsin the order listed. The scripts are found in the <PS_HOME>\scripts directory:
Application Database Version Scripts to Run
8.40 pt841tls, pt842tls, pt843tls, pt844tls, pt845tls, pt846tls, pt847tls, andpt848tls
8.41 pt842tls, pt843tls, pt844tls, pt845tls, pt846tls, pt847tls, and pt848tls
8.42 pt843tls, pt844tls, pt845tls, pt846tls, pt847tls, and pt848tls
8.43 pt844tls, pt845tls, pt846tls, pt847tls, and pt848tls
8.44 pt845tls, pt846tls, pt847tls, and pt848tls
8.45 pt846tls, pt847tls, and pt848tls
8.46 pt847tls and pt848tls
8.47 pt848tls
8.48 None
4. Run the pslanguages.dms Data Mover script in the <PS_HOME>\scripts directory.This script loads language-specific seed data.
5. Run the tlsupgnoncomp.dms Data Mover script in the <PS_HOME>\scripts directory.This will import the updated PeopleTools Trees, Roles, and Access Groups into your database.
6. If you are a Multilingual customer, from the Data Mover script that was created for your PeopleSoftdatabase installation, find the UPDATE to PSLANGUAGES.The statement should look similar to the following:
UPDATE PSLANGUAGES SET INSTALLED=1 WHERE LANGUAGE_CD = 'xxx';
where xxx is one of the PeopleSoft three-letter language code identifiers, as described earlier.
See “Preparing for Installation,” Planning Multilingual Strategy.
Copyright © 2006, Oracle. All rights reserved. 179

Creating a Database Chapter 8
Run the SQL command identified above using your SQL tool.7. Open Data Mover using a valid PeopleSoft Operator ID, such as PS for HRMS or VP1 for FDM.8. If you are a Multilingual customer and have licensed non-English languages, run the pt848tlsxxx.dmsscripts in the <PS_HOME>\scripts directory.This will update the language-specific PeopleTools system data in your database.
Note. The portion of the script name xxx is equivalent to the language code (that is, FRA, CFR, GER,JPN, and so on) of the non-English languages you have installed. There will be a Data Mover script foreach non-English language.
9. Run the msgtleng.dms Data Mover Script in the <PS_HOME>\scripts directory.Non-English message data was loaded in the pt848tlsxxx.dms scripts. This will update the messagesin your database.
10. Run the ptstreng.dms Data Mover script in the <PS_HOME>\scripts directory.Non-English system data was loaded in the pt848tlsxxx.dms scripts. This will update the SQR stringsin your database.
11. Run the storept.dms Data Mover script in the <PS_HOME>\src\cbl\base directory.This will update your PeopleTools COBOL stored statements.
12. Run the ptdefnsec.dms Data Mover script in the <PS_HOME>\scripts directory.This will update the PeopleTools Definition Security group.
13. Run the createvw.dms Data Mover script in the <PS_HOME>\scripts directory.This will recreate all the views in your database.
Task 8-11-9: Running PeopleTools ConversionsThis section discusses:
• Convert Portal Objects
• Convert Query Headings
• Convert Setup Manager
• Convert Navigation Collection and Pagelet Wizard Data
• Convert Additional Pagelet Wizard Data
Convert Portal ObjectsThe Application Engine program UPG844PORTAL splits PSPRSMDEFN.PORTAL_URLTEXT intosegments. This is performed for PeopleSoft Components URLs to extract Menu, Component, and Marketinformation. Record, Field, Event, and Function Names are extracted from Iscript URLs. This program mustbe run by a PeopleSoft user with the Portal Administrator or PeopleSoft Administrator role. The followingSQL will identify which users have the PeopleSoft Administrator or Portal Administrator roles:
select ROLEUSER, ROLENAME from PSROLEUSER where ROLENAME in (’PeopleSoft⇒Administrator’,’Portal Administrator’)
Run the UPG844PORTAL Application Engine program on your database. From the DOS command line,the syntax is:
180 Copyright © 2006, Oracle. All rights reserved.
Chapter 8 Creating a Database
<PS_HOME>\bin\client\winx86\psae -CD <dbname> -CT DB2ODBC -CO <oprid> -CP <pswd> -⇒R INSTALL -AI UPG844PORTAL
Use the values for the database name and user ID that you entered on the startup tab of the ConfigurationManager for <dbname> and <oprid>, respectively. However, be aware that <pswd> is not the same as theconnect password that you entered on the Configuration Manager startup tab. Enter a value for <pswd> that isthe password you want to be associated with the <oprid>.
See “Setting Up the Install Workstation.”
See Running the Database Configuration Wizard.
You may see some of the following errors when running this Application Engine program:
• Not authorized CRef: <Portal Object Name> (95,5032).
This means that you do not have proper privileges to run this conversion. The user ID that you are using torun this conversion needs to have Portal Administrator permissions.
• Security synchronization failed for Portal Object: <Portal Object Name>(96,61).
This is not a fatal error. It may be caused by a content reference that contains invalid URL text andindicates that there was an internal error writing to the security table. The invalid URL text may bepointing to a component or script that does not exist in the database. If you receive this error, please checkPeopleSoft Customer Connection for Required at Install patches for your application and apply thepatches after installing your database.
• Cref <Portal Object Name> points to Menu: <Menu Name>, Component<Component Name> which doesn’t exist. (96,80).
The content reference is pointing to an invalid Menu/Component combination. If you receive this error,please check PeopleSoft Customer Connection for Required at Install patches for your application andapply the patches after installing your database.
See Enterprise PeopleTools 8.48 PeopleBook: Internet Technology.
Convert Query HeadingsCrystal 9 when run through Process Scheduler will not handle queries with two or more prompts that have thesame heading. These duplicates are also not legal in Query. Any old queries that have this condition need to bealtered to work with Crystal. This Application Engine program searches for duplicate prompt headings in thetable PSQRYBIND and appends numbers onto the text. For example "Item ID" would become "Item ID 2".
Run the UPGQRYDUPHED Application Engine program on your database. From the DOS command line,the syntax is:
<PS_HOME>\bin\client\winx86\psae -CD <dbname> -CT DB2ODBC -CO <oprid> -CP <pswd> -⇒R INSTALL -AI UPGQRYDUPHED
Note. If a duplicate heading is found that will exceed the length of the field HEADING, the heading will needto be manually changed. The following error will be written to the log file in these cases :
The prompt heading <HEADING> for Query <QUERY> is duplicated.Please manually correct. (108, 1108)
See Enterprise PeopleTools 8.48 PeopleBook: PeopleSoft Query.
Copyright © 2006, Oracle. All rights reserved. 181

Creating a Database Chapter 8
Convert Setup ManagerThe application engine program UPGPTSMDAT upgrades Setup Manager Version 1 (shipped with Fin SCM8.8, CRM 8.9, and with HCM 8.9) to Setup Manager Version 2 (shipped with PeopleTools 8.46 and above).The program moves all data from Setup Manager Version 1 tables to Version 2 tables.
The application engine program was designed so that it can be run in any database, and can be rerun in thesame database. In either case, it will determine if there is data to convert and run as appropriate. For detailedinformation, see comments attached to the Steps and Actions in this Application Engine Program withinApplication Designer. This program must be run by a PeopleSoft User with PeopleSoft Administrator role.
Run the UPGPTSMDAT Application Engine program on your database. From the DOS command line,the syntax is:
<PS_HOME>\bin\client\winx86\psae -CD <dbname> -CT DB2ODBC -CO <oprid> -CP <pswd> -⇒R INSTALL -AI UPGPTSMDAT
Convert Navigation Collection and Pagelet Wizard DataThe application engine program UPGPT846PP adds Navigation Collection and Pagelet Wizard data from theCommon Components and Enterprise Portal storage tables into PeopleTools tables.
The application engine program performs the following conversions:
1. Moves data from Common Components tables to PeopleTools tables.2. Moves data from Enterprise Portal tables to PeopleTools tables.3. Updates the registry definitions to enable displaying Navigation pages.4. Adds, updates, and deletes the Navigation Collections folders and content references in the portal registryto the new structures.
5. Converts Pagelet Wizard definitions to the PeopleTools Pagelet Wizard version.6. Renames Navigation Collection and Pagelet Wizard portal registry attributes to the PeopleTools attributenames.
This program must be run by a PeopleSoft user with the Portal Administrator or PeopleSoft Administrator role.
Run the UPGPT846PP Application Engine program on your database. From the DOS command line, thesyntax is:
<PS_HOME>\bin\client\winx86\psae -CD <dbname> -CT DB2ODBC -CO <oprid> -CP <pswd> -⇒⇒R INSTALL -AI UPGPT846PP
You may see the following error when running this Application Engine program:You are not authorized for the <objecttype>...
This means that you do not have proper privileges to run this conversion. The user ID that you are using torun this conversion needs to have Portal Administrator permissions.
You can ignore any other errors encountered on PeopleSoft delivered objects at this time. Check PeopleSoftCustomer Connection for Required at Install patches for your application and apply the patches after installingyour database. You can safely rerun UPGPT846PP to check for any remaining errors after applying patches.
182 Copyright © 2006, Oracle. All rights reserved.
Chapter 8 Creating a Database
Convert Additional Pagelet Wizard DataThe application engine program UPGPT848PP adds the following Pagelet Wizard data sources from EnterprisePortal to PeopleTools: IB Connector, Integration Broker, SOAP, and URL. In addition, the application programtransforms the WSRP Portlets created in PeopleTools 8.46 or 8.47 versions of Pagelet Wizard. The processincludes the following:
• Move data from Enterprise Portal tables to PeopleTools tables.• Convert WSRP Portlets created by Pagelet Wizard to the new version.
This program must be run by a PeopleSoft user with the Portal Administrator or PeopleSoft Administrator role.
Run the UPGPT848PP Application Engine program on your database. From the DOS command line, thesyntax is:
<PS_HOME>\bin\client\winx86\psae -CD <dbname> -CT DB2ODBC -CO <oprid> -CP <pswd> -⇒R INSTALL -AI UPGPT848PP
You may see the following error when running this Application Engine program:You are not authorized for the <objecttype>...
This means that you do not have proper privileges to run this conversion. The user ID that you are using torun this conversion needs to have Portal Administrator permissions.
You can ignore any other errors encountered on PeopleSoft delivered objects at this time. Check PeopleSoftCustomer Connection for Required at Install patches for your application and apply the patches after installingyour database. You can safely rerun UPGPT848PP to check for any remaining errors after applying patches.
Task 8-11-10: Converting Integration BrokerThis section discusses:
• Updating Integration Broker Defaults
• Creating Integration Broker Objects
• Saving Application Messaging Objects
• Exporting Node Transactions
• Deleting Application Messaging Objects
• Deleting Node Transactions
If your database is delivered with PeopleTools 8.48 or higher, do not run this task since the database isalready delivered with the new Integration Broker objects as of PeopleTools 8.48. Instead, proceed toChanging the User Interface.
Updating Integration Broker DefaultsUser-level node security and transactional security have been added as of PeopleTools 8.48. Servicenamespace information, a low-level user on the node, and a low-level permission list for service operations,need to be specified. Edit <PS_HOME>\scripts\ptibupgrade.dms and make the necessary modifications asdocumented in the script. Consult with your Integration Broker specialist for assistance.
Open Data Mover using a valid PeopleSoft Operator ID and run this script.
Copyright © 2006, Oracle. All rights reserved. 183
Creating a Database Chapter 8
Creating Integration Broker ObjectsThe application engine program UPGPT848IBUG converts Application Package metadata into IntegrationBroker metadata. It also creates the projects PTUPGIBCLONE and PTUPGIBDELETE, and the scriptptupg_trx.dms.
Note. Conversion errors in the Application Engine log file will be resolved by applying application-specificRequired for Install patches.
Run the UPGPT848IBUG Application Engine program on your database. From the DOS command line,the syntax is:
<PS_HOME>\bin\client\winx86\psae -CD <dbname> -CT DB2ODBC -CO <oprid> -CP <pswd> -⇒R INSTALL -AI UPGPT848IBUG
Saving Application Messaging ObjectsThe PTUPGIBCLONE project was created by the UPGPT848IBUG Application Engine program and containsobjects that were successfully converted. Copy this project to a directory of your choice where it will not beoverwritten. The objects are copied to file as a precautionary measure since you will delete them from thedatabase in a subsequent step.
To save Application Messaging Objects:
1. Launch Application Designer and sign on to your database with a valid PeopleSoft user ID.2. From the Application Designer, select File, Open.3. Select Project, enter PTUPGIBCLONE in the name dialog box, and click OK.4. Select Tools, Copy Project, To File.5. In the resulting dialog box, change the export directory to one of your choice, and click Copy.When the progress dialog box disappears, the project has been copied to the specified location.
Exporting Node TransactionsOpen Data Mover using a valid PeopleSoft Operator ID and run the script <PS_HOME>\scripts\ptupg_trx_export.dms to save the old pre-conversion node transaction data.
Deleting Application Messaging ObjectsDelete the obsolete pre-conversion object definitions from the database by first copying the PTUPGIBDELETEproject to file, and then copying the same project from file. This project was created by the UPGPT848IBUGApplication Engine program and contains the same objects as PTUPGIBCLONE.
To delete Application Messaging Objects:
1. Launch Application Designer and sign on to your database with a valid PeopleSoft user ID.2. From the Application Designer, select File, Open.3. Select Project, enter PTUPGIBDELETE in the name dialog box, and click OK.4. Select Tools, Copy Project, To File.5. In the resulting dialog box, change the export directory to the same one you used for PTUPGIBCLONE,and click Copy.When the progress dialog box disappears, the project has been copied to the specified location.
184 Copyright © 2006, Oracle. All rights reserved.
Chapter 8 Creating a Database
6. Select Tools, Copy Project, From File.7. In the resulting dialog box, change the import directory to the previously specified directory, selectPTUPGIBDELETE from the list of projects, and click Select.
Note. Because the project already exists on the database, a confirmation dialog box appears askingif you want to overwrite the existing project. Select the File radio button and click OK to overwrite theexisting project.
8. Select all object types and click the Copy button.When the progress dialog box disappears, the project has been copied. The actions in the project are set toDelete, so this will delete the obsolete pre-conversion object definitions from the database.
Deleting Node TransactionsThe script ptupg_trx.dms is generated by the UPGPT848IBUG Application Engine program. This script canbe found in the location specified in the OUTPUT variable set in Configuration Manager.
To view the OUTPUT variable:
1. Open Configuration Manager.2. Select the Profile tab.3. Click Edit to open the Default profile.4. Select the Process Scheduler tab.5. Examine the Output Directory value.
Open Data Mover using a valid PeopleSoft Operator ID and run this script to remove obsolete node transactiondata associated with the obsolete objects in the PTUPGIBDELETE project.
Task 8-11-11: Changing the User InterfacePeopleTools has updated the styles that define the user interface. This PeopleTools release delivers the classic(old) style as well as two new styles: a dark blue style and a light blue style. PeopleTools System Databasesand PeopleSoft 8.4 applications use the classic style, but all other applications use the new dark blue style. Theclassic style is set as the default. To use one of the new user interfaces, you have to delete the substyle sheetsassociated with the classic style and replace them with either the light or dark blue substyle sheet.
Note. The new user interface is supported by Internet Explorer release 5 and above and Netscape Navigatorrelease 6 and above. If you are using a browser and release other than these, the system defaults to theclassic style.
To enable a new user interface:
1. In Application Designer, select File, Open.
2. On the Open Definition dialog box, select Style Sheet from the Definition drop-down list.
3. Enter the name PSSTYLEDEF in the Selection Criteria Name field, and select Open.
4. Highlight PSSTYLEDEF in the list, and select Open.
5. Click the PSALTERNATE Sub Style Sheet and press DELETE.
6. Select Insert, Insert Sub Style Sheet.
7. Select PSALTERNATE_LIGHTBLUE or PSALTERNATE_DARKBLUE.
Copyright © 2006, Oracle. All rights reserved. 185
Creating a Database Chapter 8
8. Repeat steps 5 through 7 for the PTSTYLEDEF Sub Style Sheet, making sure to use the same extension(_LIGHTBLUE or _DARKBLUE) you used for PSALTERNATE.
9. Select File, Save.10. Open the style sheet PSQUERYSTYLEDEF as in steps 1 through 4.11. Click the PTQUERYSTYLESUB Sub Style Sheet and press DELETE.12. Select Insert, Insert Sub Style Sheet.13. Select PTQUERYSTYLESUB_LIGHTBLUE or PTQUERYSTYLESUB_DARKBLUE.Use the same extension that you used in step 8.
14. Select File, Save.
Task 8-12: Running the DB2 RUNSTATS UtilityRun the DB2 RUNSTATS utility against all tablespaces that do not follow the naming standard MAIN####,TEMP#### and xxWORK. The tables in these tablespaces are either designated as TEMPORARY TABLESand/or Tables against which %UpdateStats is being performed. The TEMP#### and xxWORK tablespacescontain tables that are delivered empty. Performing RUNSTATS on these tables at this time could actuallyprove detrimental to performance. These tables have been segregated into tablespaces separate from theregular application tables, so that they may be conveniently excluded from RUNSTATS and other routinedatabase maintenance jobs.
Note. The PeopleSoft Tablespace DDL Automation Assistance Tool (PSTAAT) isolates temporary tables toindividual tablespaces named as follows: TMP00001, TMP00002 and so on. Do not run Runstats againstany of the TMPnnnnn tablespaces at this time because this could prove detrimental to performance. TheTMPnnnnn tablespaces should also be excluded from routine Runstats and other database maintenance jobs.See the appendix “Using the PeopleSoft Tablespace DDL Automation Assistance Tool” for more details.
Task 8-13: Creating PeopleSoft ViewsThis section discusses:
• Understanding PeopleSoft Views
• Creating Views in Data Mover
• Creating Views in Application Designer
Understanding PeopleSoft ViewsIf you had to carry out the task "Updating Database to Latest PeopleTools Release" you have already createdyour views, in which case you can skip this task.
When creating the PeopleSoft Views, you can use Data Mover or Application Designer to create the objectsdirectly, or you may use Application Designer to generate a DDL script of SQL statements, which can then berun using another utility such as SPUFI or DSNTEP2 and/or a User ID other than the Access ID.
186 Copyright © 2006, Oracle. All rights reserved.

Chapter 8 Creating a Database
Task 8-13-1: Creating Views in Data MoverTo create views in Data Mover:
1. Start Data Mover in User mode using a valid PeopleSoft operator ID, for example, PS or VP1.2. Select File, Open from the Data Mover menu and navigate to <PS_HOME>\scripts.3. Select the script CREATEVW.dms.4. Select File, Run to execute the script.5. Exit Data Mover.
Task 8-13-2: Creating Views in Application DesignerTo create views in Application Designer:
1. Start Application Designer (Start, Programs, PeopleTools 8.4, Application Designer).2. Create a new project. Choose File, New, and then select Project from the New dialog.3. Insert all PeopleTools view records into the project:a. Choose Insert, Definitions into Project. The Insert into Project dialog appears.b. Select a Definition Type of Records.c. In the Selection Criteria control group, choose a Type of View/Query View; and then press ENTERto select the records.
Insert into Project dialog box
d. Click Select All, and then click Insert to insert the View/Query View records into the project.e. Click Close to close the Insert into Project dialog.
Copyright © 2006, Oracle. All rights reserved. 187

Creating a Database Chapter 8
4. Build the project.a. Choose Build, Project. The Build dialog displays.b. In the Build Options group, select the Create Views check box. In the Build Execute Options group,select the Execute SQL now radio button to create the views directly, or the Build script file radio buttonto generate a DDL script of CREATE VIEW statements.
Selecting Create Views and Execute SQL now in the Build dialogbox
c. If you select Build script file, click Settings, go to the Scripts tab, and enter the output directory andfilename where you want the DDL statement script written.
188 Copyright © 2006, Oracle. All rights reserved.
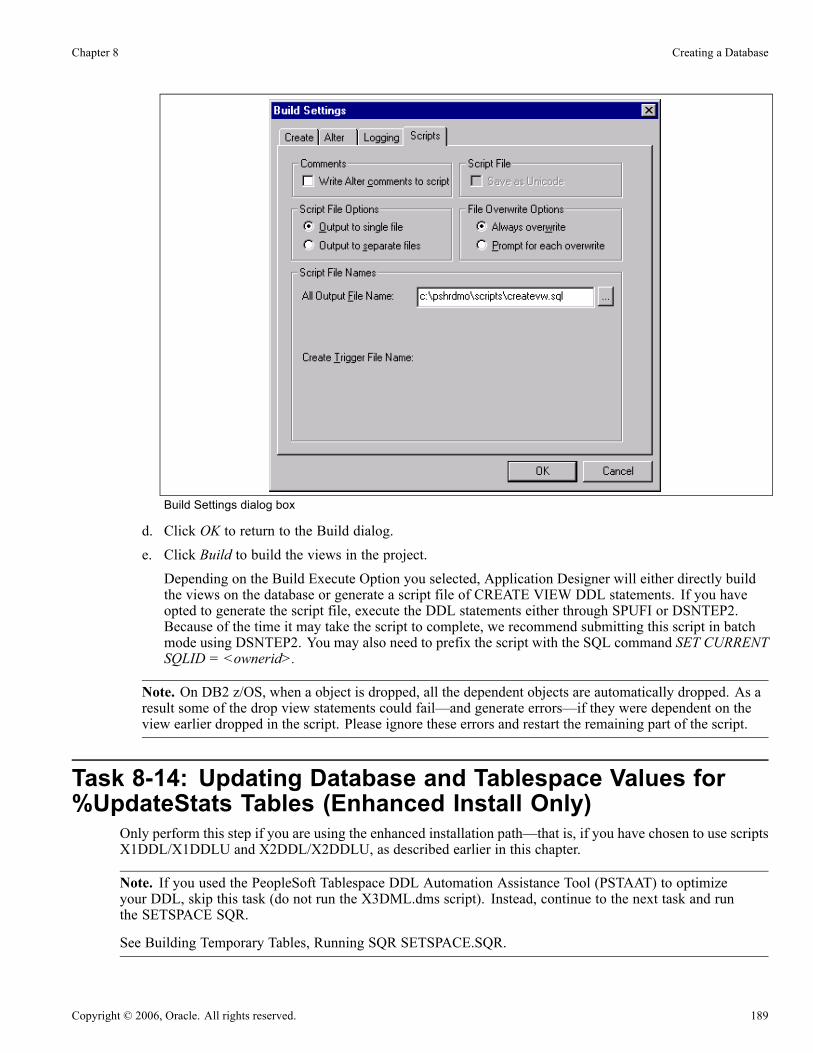
Chapter 8 Creating a Database
Build Settings dialog box
d. Click OK to return to the Build dialog.e. Click Build to build the views in the project.Depending on the Build Execute Option you selected, Application Designer will either directly buildthe views on the database or generate a script file of CREATE VIEW DDL statements. If you haveopted to generate the script file, execute the DDL statements either through SPUFI or DSNTEP2.Because of the time it may take the script to complete, we recommend submitting this script in batchmode using DSNTEP2. You may also need to prefix the script with the SQL command SET CURRENTSQLID = <ownerid>.
Note. On DB2 z/OS, when a object is dropped, all the dependent objects are automatically dropped. As aresult some of the drop view statements could fail—and generate errors—if they were dependent on theview earlier dropped in the script. Please ignore these errors and restart the remaining part of the script.
Task 8-14: Updating Database and Tablespace Values for%UpdateStats Tables (Enhanced Install Only)
Only perform this step if you are using the enhanced installation path—that is, if you have chosen to use scriptsX1DDL/X1DDLU and X2DDL/X2DDLU, as described earlier in this chapter.
Note. If you used the PeopleSoft Tablespace DDL Automation Assistance Tool (PSTAAT) to optimizeyour DDL, skip this task (do not run the X3DML.dms script). Instead, continue to the next task and runthe SETSPACE SQR.
See Building Temporary Tables, Running SQR SETSPACE.SQR.
Copyright © 2006, Oracle. All rights reserved. 189
Creating a Database Chapter 8
The database and tablespace values for any table defined in the database are stored in the DBNAME andDDLSPACENAME fields, respectively, of the PSRECTBLSPC table. Because the database is delivered in astate compatible with the traditional installation path, the database and tablespace values in PSRECTBLSPCwill be out of synch with the database and tablespace names created on your database, for the temporary tables.To create accurate DDL to create these objects, you need to run Data Mover script X3DML.dms, which willupdate the affected tables with new tablespace values that are compatible with those created when you ranthe X1DDL/X1DDLU script.
If you have modified any of the database or tablespace names in the X1DDL/X1DDLU script, you need tomake the corresponding changes in the X3DML.dms script before running it, to keep the database names andtablespaces created in the X1DDL/X1DDLU script in synch with database names and tablespaces used inthe X3DML.dms script.
To run the Data Mover script X3DML.dms:
1. Start Data Mover using a valid PeopleSoft operator ID, for example, PS or VP1.2. Select File, Open from the Data Mover menu and navigate to <PS_HOME>\scripts.3. Select the script X3DML.dms.4. Select File, Run to execute the script.5. Exit Data Mover.
Task 8-15: Building Temporary TablesThis section discusses:
• Understanding Temporary Tables
• Running SQR SETSPACE.SQR
• Correcting Invalid Database/Tablespace Combinations
• Setting the Number of Temporary Tables
• Using the Volatile Table Attribute
• Building the Temporary Tables and Their Indexes
Understanding Temporary TablesIn this task you use Application Designer to create temporary tables. PeopleSoft has introduced a newtemporary table structure where the number of instances for each base temporary table is controlled internallyto PeopleTools. The definition of each base temporary table is stored in the PeopleTools table PSRECDEFN.The temporary table instances themselves are not defined. The table PSRECTBLSPC contains the databaseand tablespace values for each record defined in PSRECDEFN. The DDL generated by Application Designerto create the temporary tables uses the database and tablespace information from the base temporary tabledefinition in PSRECTBLSPC. The delivered database and tablespace values are in synch with the xxDDLscript that you ran earlier to create the databases and tablespaces. If you changed the database or tablespacename values in this script for tablespaces originally named xxWORK, you need to either update thePSRECTBLSPC table or revise the DDL script to be generated to create the temporary tables.
190 Copyright © 2006, Oracle. All rights reserved.

Chapter 8 Creating a Database
PeopleSoft recommends that you run SQR SETSPACE.SQR against your database and use the output from theSQR as a guide in making the necessary updates or revisions. How and where to make the adjustments isdiscussed in the later section "Correcting Invalid Database/Tablespace Combinations."
Note. If you used the PeopleSoft Tablespace DDL Automation Assistance Tool (PSTAAT) to optimize theinstallation DDL, run the SETSPACE.SQR to update table PSRECTBLSPC with the database and tablespacevalues created by PSTAAT.
Task 8-15-1: Running SQR SETSPACE.SQRIn this procedure, you run SQR SETSPACE.SQR to update table PSRECTBLSPC with the database andtablespace values from the DB2 system catalog. Application Designer uses the database and tablespace valuesstored in PSRECTBLSPC to generate DDL statements to create the tables.
SETSPACE.SQR serves multiple purposes:
• It updates PSRECTBLSPC with the database/tablespace values from the DB2 system catalog tableSYSIBM.SYSTABLES for the tables defined in the DB2 System Catalog.
• It reports tables in PSRECTBLSPC that are updated with a new database or tablespace name.• It reports tables that are defined in PSRECTBLSPC, but not defined in the DB2 system catalogs, andwhether the database/tablespace combination defined for the record is valid or invalid (not defined in theDB2 system catalog table SYSIBM.SYSTABLESPACE).
• It synchs up the database/tablespace combinations used in PSRECTBLSPC with the PeopleTools "master"tablespace table PSTBLSPCCAT by inserting the valid combinations in PSTBLSPCCAT if they have notalready been defined.
• It reports those database/tablespace values added to the PSTBLSPCCAT table.• It summarizes and reports database/tablespace combinations defined in PSTBLSPCCAT that are not valid.The reports are a valuable tool in determining how and where to make revisions so the temporary tablesare created in the correct location, and without error.
To run SQR SETSPACE.SQR:
Submit the Job PSHLQ.PPvvv.JCLLIB(SETSPACE) to execute the SQR on the mainframe.
The SDSF logs will display the results of running the SQR and information related to the success of executingthis SQR.
An output file will be written to PSHLQ.PPvvv.SQRLIST(SETSPACE) detailing the records processedand actions taken.
Note. The SQR can be run multiple times without any negative impact, but the output file will be overwrittenwith each execution. You may want to rename the member PSHLQ.Ppyyy.SQRLIST(SETSPACE) to anothername before each resubmission of the SQR.
Task 8-15-2: Correcting Invalid Database/TablespaceCombinationsReview the output in PSHLQ.PPvvv.SQRLIST(SETSPACE). Note any messages with "Table Undefined —DB/TS Invalid," but most importantly, note any Warning messages in the second Phase of the output report.These warning messages summarize the database/tablespace name combinations defined in PSRECTBLSPCthat have not been defined in the DB2 system catalog tables.
Copyright © 2006, Oracle. All rights reserved. 191

Creating a Database Chapter 8
There are five options for making the necessary revisions. Of these options, Option 1 is the recommended one.Editing can be done globally, no table data will be impacted as it would in other options, you are guaranteedthat the temporary table will be built in the database and tablespace that you intend and you may have alreadyfound it necessary to edit the script file of DDL statements to create the Temporary table for other reasons.
• Option 1: Proceed through the Installation process and build a script file of the DDL statements to createthe temporary tables. After the script has been generated, but before executing it, globally edit thedatabase/tablespace name combinations using the second Phase of the output report as a guide to the"before" values, changing them to your preferred site specific values. (Recommended option)
• Option 2: Update the PSRECTBLSPC table directly via the database interface of choice before buildingthe script file of DDL statements to create the temporary tables. Use the second Phase of the output reportas a guide. The SQL to correct each invalid database/tablespace combination would be scripted as follows:
UPDATE PSRECTBLSPC SET DBNAME = ’<new dbname>’,
DDLSPACENAME = ’<new tablespacename>’
WHERE DBNAME = ’<old dbname>’
AND DDLSPACENAME = ’<old tablespacename>’
AND DBTYPE = (SELECT MAX(A.DBTYPE) FROM PSRECTBLSPC A
WHERE RECNAME = A.RECNAME
AND A.DBTYPE IN (’ ’,’1’))
• Option 3: Run SQR SETDBNAM to update the database value in PSRECTBLSPC with a "best guess"value based on the tablespace value defined in PSRECTBLSPC. The accuracy of this SQR is based onthe following caveats:
- The ID or Current SqlID that was used to create the tablespaces must be the same value as theowner ID of the tables comprising the logical PeopleSoft database. In other words, the CREATORfield value in SYSIBM.SYSTABLESPACE must be the same value as the CREATOR field inSYSIBM.SYSTABLES.
- The given tablespace name and CREATOR value in SYSIBM.SYSTABLESPACE must represent aunique relationship. For a given CREATOR, if you have defined a given tablespace name in morethan one database, the SQR will use the database value associated with the tablespace that containsthe fewest number of tables.
If either of these requirements is not met, either a database value will not be found and PSRECTBLSPC willnot be updated, or PSRECTBLSPC could be updated with a database value different from that intended.
To run the SQR SETDBNAM, follow the same procedure as running SQR SETSPACE, using the JCLJob PSHLQ.PPvvv.JCLLIB(SETDBNAM) intead.
• Option 4: Log into the database via Application Designer, and update the record definitions with validdatabase/tablespace combinations, before building the script of DDL statements to create the temporarytables. Use the first Phase of the output report as a guide. (This could be a tedious and time-consumingprocess and is not recommended over the previously described options.)
• Option 5: Create the database/tablespace combinations in DB2 so they are no longer invalid, beforeexecuting the script file of DDL statements to create the Temporary tables. Use the second Phase of theoutput report as a guide to the databases and tablespaces that need to be created. (This is not recommendedsimply because it is likely to contradict the naming standards established for your DB2 installation.)
192 Copyright © 2006, Oracle. All rights reserved.

Chapter 8 Creating a Database
Task 8-15-3: Setting the Number of Temporary TablesNormally, you will leave the number of temporary tables set to the default defined in the database. You maywant to change this setting for optimal performance, depending on various aspects of your implementation,including account transaction volumes, benchmark numbers for the current hardware and database platform,and your service-level requirements.
PeopleSoft delivers a minimum of three temporary table instances in most cases. You cannot adjust thenumber of temporary tables unless you have installed the PeopleSoft Pure Internet Architecture. (See “SettingUp the PeopleSoft Pure Internet Architecture in GUI Mode” or “Setting Up the PeopleSoft Pure InternetArchitecture in Console Mode.”) You may skip this step entirely, and come back to it after PeopleSoft PureInternet Architecture has been installed and you have a better idea of how many instances of the temporarytables might best fit your processing requirements. Another option is to update the PeopleTools table thatcontrols the number of temporary table instances directly. Using the Database SQL interface of choice,issue the following SQL:
UPDATE PSOPTIONS SET TEMPTBLINSTANCES = <#>, TEMPINSTANCEONLINE = <#> WHERE⇒TEMPINSTANCEBATCH = 0
The number of instances (#) for either field should not be less than 3 or greater than 9.
For non-EPM applications, it is strongly recommended that the TEMPTBLINSTANCES andTEMPINSTANCEONLINE values be the same. For EPM applications we strongly recommend that you takethe delivered defaults.
Note. Again, this step can be performed at installation and/or at any time during the life of your database. Theonly caveat is that when any of the parameters are changed that would impact the number of temporary tableinstances, all temporary tables should be regenerated.
Task 8-15-4: Using the Volatile Table AttributeBeginning with PeopleTools 8.48, all temporary tables will be created using the volatile keyword ifPeopleTools detects that the database server is running DB2 UDB for z/OS release V8.1. Temporary tableDDL for DB2 UDB for z/OS V7 environments will not be generated with the volatile attribute.
Sample DB2 UDB for z/OS V8.1 volatile temporary DDL follows:
CREATE TABLE Q848902.PS_AEEXT_TAO (PROCESS_INSTANCE DECIMAL(10) NOT
NULL,
AE_INT_1 SMALLINT NOT NULL,
AE_APPLID CHAR(12) NOT NULL,
AE_SECTION CHAR(8) NOT NULL,
AE_STEP CHAR(8) NOT NULL) VOLATILE IN Q848902.PTAPPE;
The volatile attribute specifies that the DB2 optimizer should favor index access on this table wheneverpossible for SQL operations regardless of the presence of statistics.
For more details on the volatile table attribute, refer to the DB2 UDB for z/OS V8 SQL Reference andthe DB2 UDB for z/OS V8 Administration Guide.
Task 8-15-5: Building the Temporary Tables and Their IndexesUse the following procedure to build temporary tables in the database.
Copyright © 2006, Oracle. All rights reserved. 193
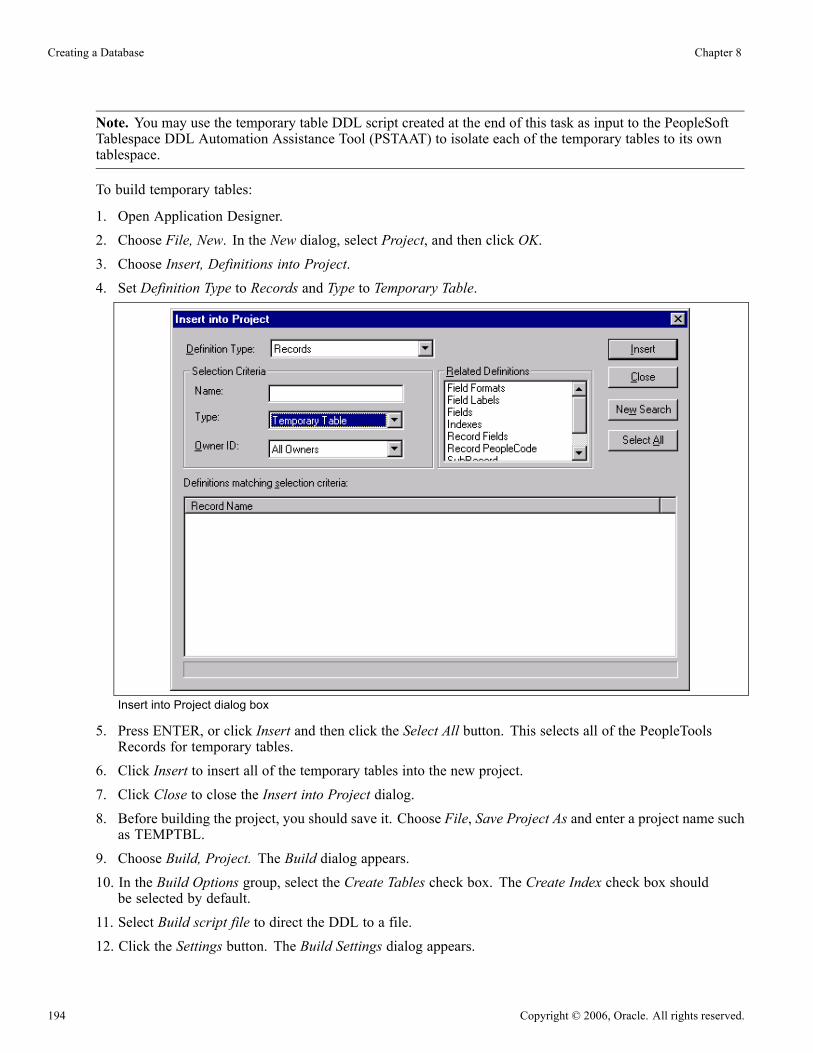
Creating a Database Chapter 8
Note. You may use the temporary table DDL script created at the end of this task as input to the PeopleSoftTablespace DDL Automation Assistance Tool (PSTAAT) to isolate each of the temporary tables to its owntablespace.
To build temporary tables:
1. Open Application Designer.2. Choose File, New. In the New dialog, select Project, and then click OK.3. Choose Insert, Definitions into Project.4. Set Definition Type to Records and Type to Temporary Table.
Insert into Project dialog box
5. Press ENTER, or click Insert and then click the Select All button. This selects all of the PeopleToolsRecords for temporary tables.
6. Click Insert to insert all of the temporary tables into the new project.7. Click Close to close the Insert into Project dialog.8. Before building the project, you should save it. Choose File, Save Project As and enter a project name suchas TEMPTBL.
9. Choose Build, Project. The Build dialog appears.10. In the Build Options group, select the Create Tables check box. The Create Index check box shouldbe selected by default.
11. Select Build script file to direct the DDL to a file.12. Click the Settings button. The Build Settings dialog appears.
194 Copyright © 2006, Oracle. All rights reserved.

Chapter 8 Creating a Database
13. On the Create tab, select Recreate table if it already exists (if it is not already selected) under TableCreation Options.
Selecting the Recreate table if it already exists in the BuildSettings dialog box
14. Select the Scripts tab, and select Output to Single File under Script File Options.15. Under Script File Names, specify the path and filename for the output file to contain the DDL to create theTemporary tables and their indexes (for example, <PS_HOME>\scripts\TEMPDDL.SQL).
Copyright © 2006, Oracle. All rights reserved. 195
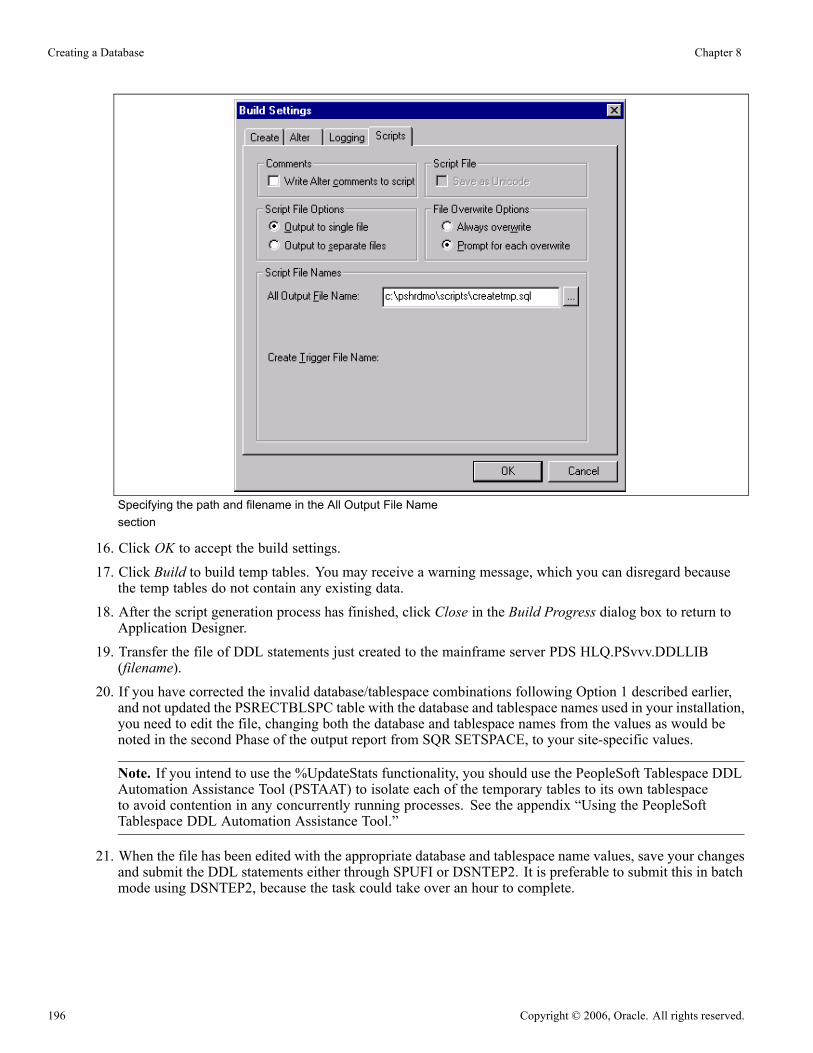
Creating a Database Chapter 8
Specifying the path and filename in the All Output File Namesection
16. Click OK to accept the build settings.17. Click Build to build temp tables. You may receive a warning message, which you can disregard becausethe temp tables do not contain any existing data.
18. After the script generation process has finished, click Close in the Build Progress dialog box to return toApplication Designer.
19. Transfer the file of DDL statements just created to the mainframe server PDS HLQ.PSvvv.DDLLIB(filename).
20. If you have corrected the invalid database/tablespace combinations following Option 1 described earlier,and not updated the PSRECTBLSPC table with the database and tablespace names used in your installation,you need to edit the file, changing both the database and tablespace names from the values as would benoted in the second Phase of the output report from SQR SETSPACE, to your site-specific values.
Note. If you intend to use the %UpdateStats functionality, you should use the PeopleSoft Tablespace DDLAutomation Assistance Tool (PSTAAT) to isolate each of the temporary tables to its own tablespaceto avoid contention in any concurrently running processes. See the appendix “Using the PeopleSoftTablespace DDL Automation Assistance Tool.”
21. When the file has been edited with the appropriate database and tablespace name values, save your changesand submit the DDL statements either through SPUFI or DSNTEP2. It is preferable to submit this in batchmode using DSNTEP2, because the task could take over an hour to complete.
196 Copyright © 2006, Oracle. All rights reserved.

Chapter 8 Creating a Database
Task 8-16: Creating PeopleSoft TriggersThis section discusses:
• Understanding PeopleSoft Triggers
• Creating Triggers in Data Mover
• Creating Triggers in Application Designer
Understanding PeopleSoft TriggersWhen creating the PeopleSoft Triggers, you can use Data Mover or Application Designer to create theobjects directly, or you can use Application Designer to generate a DDL script of SQL statements, whichcan then be run using another utility such as SPUFI or DSNTEP2, and with a UserID with a greater levelof database authority.
Task 8-16-1: Creating Triggers in Data MoverTo create triggers in Data Mover:
1. Start Data Mover in User mode, using a valid PeopleSoft operator ID, for example, PS or VP1.2. Choose File, Open from the Data Mover menu and navigate to <PS_HOME>\scripts.3. Select the script CREATETRGR.dms.4. Choose File, Run to execute the script.5. Exit Data Mover.
Task 8-16-2: Creating Triggers in Application DesignerTo create triggers in Application Designer:
1. Start Application Designer (Start, Programs, PeopleTools 8.4, Application Designer).2. Create a new project. Choose File, New, and then select Project from the New dialog.3. Insert all PeopleTools Table records into the project.To insert the Table records:a. Choose Insert, Definitions into Project. The Insert into Project dialog appears.b. Select a Definition Type of Records.c. In the Selection Criteria control group, choose a Type of Table; and then press ENTER to selectthe records.
Copyright © 2006, Oracle. All rights reserved. 197
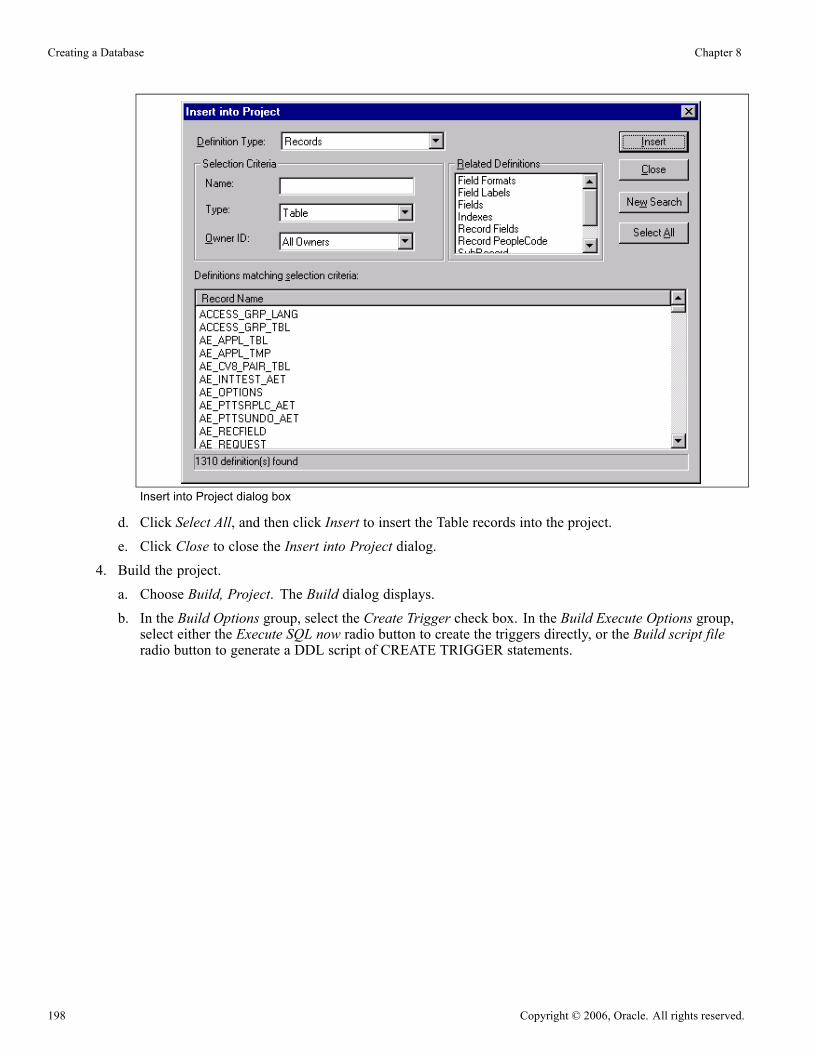
Creating a Database Chapter 8
Insert into Project dialog box
d. Click Select All, and then click Insert to insert the Table records into the project.e. Click Close to close the Insert into Project dialog.
4. Build the project.a. Choose Build, Project. The Build dialog displays.b. In the Build Options group, select the Create Trigger check box. In the Build Execute Options group,select either the Execute SQL now radio button to create the triggers directly, or the Build script fileradio button to generate a DDL script of CREATE TRIGGER statements.
198 Copyright © 2006, Oracle. All rights reserved.

Chapter 8 Creating a Database
Build dialog box
c. If you have selected the Build script file radio button, click the Settings button, go to the Scripts tab,and enter the output directory and filename where you want the DDL statement script written.
Build Settings dialog box
d. Click OK to return to the Build dialog.
5. Click Build to build the triggers associated with the tables in the project.
Copyright © 2006, Oracle. All rights reserved. 199
Creating a Database Chapter 8
Depending on the Build Execute Option selected, Application Designer will either directly build thetriggers on the database or generate a script file of CREATE TRIGGER DDL statements. If you have optedto generate the script file, execute the DDL statements either through SPUFI or DSNTEP2. Because ofthe time it may take the script to complete, we recommend submitting this script in batch mode usingDSNTEP2. You may also need to prefix the script with the SQL command SET CURRENT SQLID =<ownerid>.
Task 8-17: Running Additional Data Mover ScriptsTo import additional data for your specific PeopleSoft database, or to make other required changes, you mayneed to run additional Data Mover scripts. These script files have the extension .dms and are sometimesreferred to as “DMS scripts.” They are located in the <PS_HOME>\scripts directory of your file server, andneed to be run from the file server by means of Data Mover.
For the details on which additional application-specific Data Mover scripts to run, consult yourapplication-specific installation instructions.
If you have installed a language other than English, you may need additional instructions on language-specificData Mover scripts.
See Installing a Multilingual PeopleTools System Database.
Task 8-18: Installing a Multilingual PeopleToolsSystem Database
This section discusses:
• Understanding the Multilingual Database Project
• Applying the Multilingual Database Project
• Populating the Translated System Data
Understanding the Multilingual Database ProjectThe information in this section applies if you are installing a multilingual PeopleTools System database. If not,skip this task and go on to the task “Running VERSION Application Engine Program.” If you are installing anapplication database (for example, HRMS, FSCM, EPM, and so on), you do not need to run this task.
If you are adding a new (PeopleSoft-delivered) language to the PTSYS database, you must execute this stepfor that language. For example, if you want to add Polish to your current multilingual database, you shouldinstall Polish from PPLTLSML so you will get all objects. If you only "upgrade" your database to have Polishusing PPLTLS84CURML, you will only get the objects that changed between 8.40 and the current release.
If you are installing a PeopleTools System database and you want it to be multilingual, you need to perform thesteps in the following section after the database has been loaded with Data Mover.
See Applying the Multilingual Database Project.
200 Copyright © 2006, Oracle. All rights reserved.
Chapter 8 Creating a Database
Note. When you log onto the multilingual database, be sure to select the base language of the database.
Task 8-18-1: Applying the Multilingual Database ProjectThis procedure describes how to apply the multilingual database project that contains translations of thePeopleTools objects.
To apply the multilingual database project:
1. Launch Application Designer.2. Select Tools, Copy Project, From File.3. In the resulting dialog box, change the import directory to <PS_HOME>\projects.4. Select PPLTLSML from the list of projects and click the Open button.5. In the Upgrade Copy dialog box, make sure that all object types are selected.6. Click the Options button, select the Copy Options tab, and ensure that only the non-English languages youhave installed are selected.Please note that English and Common should not be selected.
7. Select the languages that you are currently installing from the Copy Options dialog box.8. Click the Copy button.(The Reset Done Flags check box will be selected; accept this default.)
Task 8-18-2: Populating the Translated System DataTo populate the translated system data:
Note. You need to run the following script in User mode.
1. Launch Data Mover.2. Open the pt848tlsxxx.dms script using File, Open.3. Select File, Run
Note. The portion of the script name xxx is equivalent to the language code (that is, FRA, CFR, GER, JPN,and so on) of the languages you have installed. There will be a Data Mover script for each language.
Task 8-19: Running SQR ReportsThis section discusses:
• Binding the dbcalls.bnd
• Running SQRs on the Client Workstation
• Creating a Shortcut to Run SQRs
Copyright © 2006, Oracle. All rights reserved. 201

Creating a Database Chapter 8
Note. The following instructions describe how to run SQR reports from the client workstation. On theWindows client, you may prefer to create a shortcut to allow you to run the reports repeatedly. You can usethese instructions to run SQRs required in the upcoming task “Checking the Database.” You can also choose torun SQR reports from the command line in console mode.
Task 8-19-1: Binding the dbcalls.bndYou need to bind the dbcalls.bnd before running SQR reports.
To bind dbcalls.bnd:
1. Using an ID with mainframe logon and BINDADD privileges, log on to DB2 Connect Command LineProcessor:
db2 => CONNECT TO <database name> USER <mainframe User Id>
Note. Enter your current password for "mainframe User Id": <mainframe User Id password>.
2. The Windows SQR bind executable is located in the File or Report Server directory (for example,<PS_HOME>\bin\sqr\db2\BINW\dbcalls.bnd).• Issue the following bind command for an EBCDIC installation:
db2 => bind <ps_home>\bin\sqr\db2\BINW\dbcalls.bnd blocking all grant public⇒sqlerror continue
• For a Unicode installation, you must bind the windows SQR executable with encoding unicode as follows:
db2 -> bind <ps_home>\bin\sqr\db2\BINW\dbcalls.bnd encoding unicode blocking⇒all grant public sqlerror continue
Note. The executable program PSSQR.EXE is a wrapper program used by PeopleSoft Process Scheduler torun SQR reports. It is not designed to run manually outside of Process Scheduler. That is, PeopleSoft does notsupport running PSSQR from the command line.
Task 8-19-2: Running SQRs on the Client WorkstationTo run an SQR on the client workstation:
1. Select Start, Run, click Browse, and navigate to <PS_HOME>\bin\sqr\DB2\binw.Select sqrw.exe and click Open.
2. Add any needed flags at the end of the command line.Refer to the table that follows. For those flags that require attributes, append the attributes to the flags withno intervening spaces (for example, –fd:\psbase\psenv\cr881dmo\).
202 Copyright © 2006, Oracle. All rights reserved.

Chapter 8 Creating a Database
Running an SQR report on the client
The following table summarizes the SQR report arguments used by PeopleSoft. (For a full listing of reportarguments, press the Help button to view the SQR help topic for this dialog box.)
Flag Description
-I Specifies the directories that SQR will search for the #INCLUDE files.(A trailing slash is required.)
-f Specifies the directory where the report output will be sent.
If you use the –keep flag, specify a directory with an ending slash.
If you use the –printer flag, specify a full pathname with a filename forthe HTML file.
-ZIF Sets the full path and name of the SQR initialization file. The -ZIF flagshould point to your <PS_HOME>\sqr\pssqr.ini file.
-keep Keeps the .SPF file after the program runs. This enables you to viewthe report with the SQR viewer.
-printer:ht Generates the output file in HTML format. Specify the filename, withpath location, with the –f flag.
3. Click OK.The resulting dialog box should look something like this:
SQR for PeopleSoft dialog box
Copyright © 2006, Oracle. All rights reserved. 203

Creating a Database Chapter 8
4. Enter the following values:• Enter the report name.You must specify the full path.
• Enter the access ID in the Username field.• Enter the access password in the Password field.• Enter the database name.
5. Click OK to run the SQR report.
Task 8-19-3: Creating a Shortcut to Run SQRsIf you think you may need to run the SQR reports more than once, you may want to create a shortcut on theWindows client workstation. To save the report arguments:
1. Open Windows Explorer on the machine on which you want to run SQR.
2. Navigate to <PS_HOME>\bin\sqr\DB2\binw.
3. Right-click sqrw.exe and click Create Shortcut.
4. Right-click the shortcut that you just created and select Properties.
5. On the Shortcut tab, add the same sqr flags that you used in the previous task after sqrw.exe in the Targetentry box.
6. Click OK.7. To run the report, double-click the shortcut and specify the following information in the dialog box:
• Report Name: Enter the full path and the name.
• Database name• Username: Enter the access ID.
• Password: Enter the access password.
• Report arguments: Make any necessary modifications to the saved arguments.
8. Click OK.
Task 8-20: Updating PeopleSoft System TablesThis section discusses:
• Understanding PeopleSoft System Tables
• Updating PeopleSoft System Tables
Understanding PeopleSoft System TablesIn this task, you run SQR scripts that update PeopleTools tables with information from the DB2 systemcatalog tables.
• SETSPACE.SQR was run in an earlier task, but should be re-run at this point. It updates PSRECTBLSPCwith the database and tablespace information captured from the DB2 system catalog table
204 Copyright © 2006, Oracle. All rights reserved.

Chapter 8 Creating a Database
SYSIBM.SYSTABLES, inserts valid database and tablespace combinations defined in PSRECTBLSPCthat have not yet been defined in PSTBLSPCCAT, and provides an audit report of actions taken and invaliddatabase and tablespace combinations defined in PSRECTBLSPC but not defined in the DB2 systemcatalog table SYSIBM.SYSTABLESPACE. You can run this SQR multiple times without negative impact.
• SETTMPIN.SQR inserts rows into PSRECTBLSPC to store the database and tablespace location for eachtemporary table instance defined in the DB2 system catalog table SYSIBM.SYSTABLES. You need torun this SQR after each time you create or refresh the temporary tables on your database. You can runthis SQR multiple times without negative impact.
Note. This SQR will not facilitate regeneration of the temporary tables by ensuring that each instance isrebuilt in the database/tablespace location to which it was originally assigned. The purpose of the SQR isto capture the location of each temporary table instance after it has been created in the database, and syncPSRECTBLSPC with the DB2 system catalog.
Task 8-20-1: Updating PeopleSoft System TablesTo update PeopleSoft system tables initiate SQRW.exe as you did in the task Running SQR Reports and runthe SETSPACE.SQR and SETTMPIN.SQR (if applicable) programs.
Note. PeopleSoft also provides SETINDEX.SQR and SETBUFF.SQR, which will help the PeopleSoft DBAkeep the PeopleSoft system tables in sync with the DB2 catalogs.
Task 8-21: Binding DB2 PlansIf you are not planning to run COBOL on the mainframe, this step is not necessary.
You need to bind the following DB2 Plans used by PTPSQLRT—the first one is for the Native Attach Facilityfor UNIX System Services, and the second one is for the Call Attach Facility. On the z/OS server, submitthe following two JCL jobs:
HLQ.PSVVV.JCLLIB(BINDAADD)
HLQ.PSVVV.JCLLIB(BINDEADD)
The only acceptable message reads:BIND SUCCESSFUL
If you receive any other message, it means you have encountered an error. Common bind errors include:
• Program PTPSQLRT failed to precompile (jobs PSCOBDA and/or PSCOBDE) and the DBRM was notgenerated. If this is the case, run PSCOBDA or PSCOBDE again, and carefully examine the return codes.
• If you get a "Plan Already Exists" error, do a bind/replace using BINDAREP and BINDEREP.
Task 8-22: Running VERSION Application Engine ProgramRun the VERSION Application Engine program on your database. From the DOS command line, the syntax is:
<PS_HOME>\bin\client\winx86\psae -CD <dbname> -CT DB2ODBC -CO <userid> -CP⇒
Copyright © 2006, Oracle. All rights reserved. 205

Creating a Database Chapter 8
<userpswd> -R INSTALL -AI VERSION
Use the values for the database name and user ID that you entered on the startup tab of the ConfigurationManager for <dbname> and <userid> respectively. However, be aware that <userpswd> is not the same as theconnect password you entered on the Configuration Manager startup tab. Enter a value for <userpswd> that isthe password you want to be associated with the <userid>.
See “Setting Up the Install Workstation.”
See Running the Database Configuration Wizard.
Task 8-23: Changing the Base LanguageChapter 1 will help you determine whether you should change your base language, and lists the currentlysupported languages.
See “Preparing for Installation,” Planning Multilingual Strategy.
This task applies only if your users will be operating PeopleSoft applications primarily in one particularlanguage other than English. It gives a performance boost to the language you designate as the base language,but requires more administrative overhead than leaving English as the base language. The details are spelledout in the following PeopleBook:
See Enterprise PeopleTools 8.48 PeopleBook: Global Technology.
Task 8-24: Checking the DatabaseRun and examine two SQR reports to verify that your database is complete.
See Updating PeopleTools System Tables.
To verify that the database is complete, run the following SQR reports from the <PS_HOME>\sqr directory:
• dddaudit.sqr• sysaudit.sqr.
For further information about the dddaudit and sysaudit reports, consult PeopleBooks. This documentationincludes specific information on how to interpret the reports and how to fix any errors found there.
See Enterprise PeopleTools 8.48 PeopleBook: Data Management, “Ensuring Data Integrity.”
Note. If any records show up in the VIEWS-2 or TABLE-3 section of dddaudit and are contained within thePPLTLS84CURDEL project, you may safely drop these records using the SQL query tool for your platform.
See AlsoEnterprise PeopleTools 8.48 PeopleBook: Data Management
Enterprise PeopleTools 8.48 PeopleBook: System and Server Administration
206 Copyright © 2006, Oracle. All rights reserved.

Chapter 8 Creating a Database
Task 8-25: Running Alter AuditALTER AUDIT is an online utility used to check whether the PeopleTools tables are synchronized with theunderlying SQL data tables in your database. This process compares the data structures of your database tableswith the PeopleTools tables to uncover inconsistencies. ALTER AUDIT then reports its findings. At this pointof time in the install, we do not expect to see differences between the database structure and the tools tables.
Note. If your application database was delivered on the PeopleTools release you are installing (see chart at thebeginning of the task “Updating PeopleTools System Tables”), this task is optional.
Note. Triggers are always dropped and re-created during the alter process and will always show up in thegenerated Alter Audit script. You can ignore the generated script for triggers.
To alter PeopleTools tables:
1. Launch PeopleTools and sign on to the installed database.2. From the Application Designer select File, New.3. Select Project and click OK.4. Select Insert, Definitions into Project.5. Select Records from the Definition Type drop-down list box.6. Select Table from the Type drop-down list box.7. Click Insert, and then click Select All.8. Click Insert, and then click Close.9. Select Build, Project.The Build dialog box appears:
Copyright © 2006, Oracle. All rights reserved. 207

Creating a Database Chapter 8
The Build dialog box
10. Select Create Tables and Alter Tables in the Build Options region (Create Indexes and Create Trigger willautomatically be selected).
11. Select Build script file in the Build Execute Options region.12. Click Settings.The Build Settings dialog box appears:
208 Copyright © 2006, Oracle. All rights reserved.

Chapter 8 Creating a Database
Build Settings dialog box: Scripts tab
13. Select the Scripts tab.14. Select Write Alter comments to script.15. Enter a unique output file name for each type.16. Select the Alter tab and ensure that the Adds, Changes, Renames, and Deletes check boxes are selected inthe Alter Any region.Drop column if data present should be selected in the Drop Column Options region, and Truncate data iffield too short should be selected in the Change Column Length Options region.Make sure that Alter by Table Rename is selected in the Alter Table Options region.
Copyright © 2006, Oracle. All rights reserved. 209
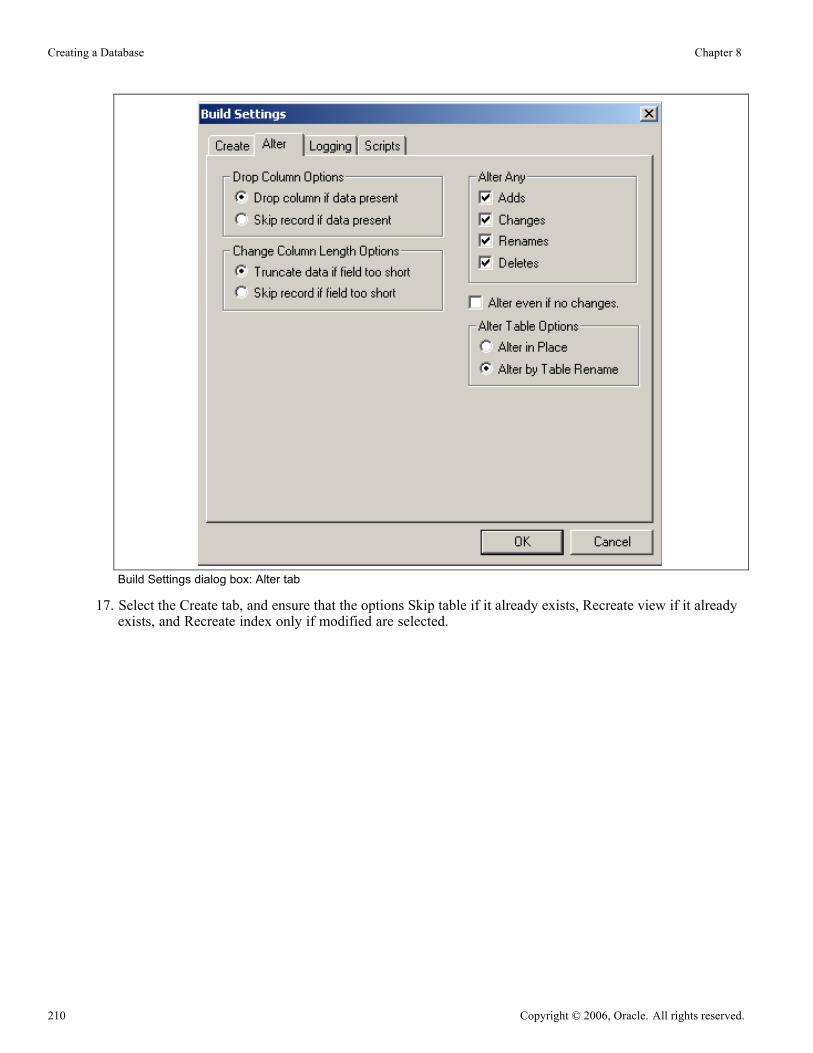
Creating a Database Chapter 8
Build Settings dialog box: Alter tab
17. Select the Create tab, and ensure that the options Skip table if it already exists, Recreate view if it alreadyexists, and Recreate index only if modified are selected.
210 Copyright © 2006, Oracle. All rights reserved.

Chapter 8 Creating a Database
Build Setting dialog box: Create tab
18. Click OK.The Build dialog box reappears.
19. Click Build.20. Click Close when the process is completed.21. Edit the generated SQL script for the correct database name.22. Edit the generated SQL script for the correct tablespace names and sizing parameters if you are not usingdelivered PeopleSoft tablespace names.
23. Run the generated SQL scripts in your platform-specific query tool to bring your database structurein sync with the PeopleTools tables.
Task 8-26: Disabling %UpdateStatsThis step is required if you followed the traditional installation path, and optional if you followed the enhancedinstallation path.
Copyright © 2006, Oracle. All rights reserved. 211
Creating a Database Chapter 8
PeopleSoft 8 introduced the meta-SQL %UpdateStats to allow an Application Engine program to updatestatistics in the DB2 catalog tables. For the DB2 z/OS platform, there are certain caveats to successfullyimplementing the %UpdateStats functionality. The primary consideration for using %UpdateStats functionalityis the database schema. It is highly recommended that tables subject to this feature be placed in their owntablespace. %UpdateStats invokes the DB2 utility RUNSTATS, which is executed at the tablespace level. Themore tables in a given tablespace, the longer it will take for the RUNSTATS job to complete. If the enhancedinstallation path is not taken, this can severely degrade rather than improve performance. PeopleSoft 8 uses theIBM Stored Procedure DSNUTILS to invoke DB2 Utility RUNSTATS.
If you have not implemented the DSNUTILS stored procedure and/or followed the traditional installation path,you might consider disabling recognition of the %UpdateStats function by setting DBFLAGS to 1 in yourProcess Scheduler configuration file. See the previous section, “Using %UpdateStats,” or search PeopleBooksfor more details on using DBFLAGS to disable %UpdateStats.
See Enterprise PeopleTools 8.48 PeopleBook: Data Management.
212 Copyright © 2006, Oracle. All rights reserved.

CHAPTER 9A
Configuring the Application Server on Windows
This chapter discusses:
• Understanding the Application Server
• Prerequisites
• Setting Up COBOL for Remote Call
• Verifying Database Connectivity
• Creating, Configuring, and Starting an Initial Application Server Domain
• Configuring Fonts for Languages
Understanding the Application ServerThe information in this chapter is provided to help you configure your PeopleSoft application server.
Note. COBOL is not needed for PeopleTools or for applications that contain no COBOL programs. Checkthe information on PeopleSoft Customer Connection, and your application-specific documentation for thedetails on whether your application requires COBOL.
PeopleSoft supports a Windows application server to use with any of our supported databases.
Application servers are not supported on z/OS because Tuxedo cannot run on the mainframe. For this reason,you can only install an application server in a “physical” three-tier configuration—with the applicationserver on a machine separate from the database server machine. You cannot run a “logical” three-tierconfiguration—with the application server on the same machine as the database server.
Note. You can start application servers as a Windows service, which means that administrators no longer needto manually start each application server that runs on a Windows machine.
Note. To test a three-tier connection from the PeopleTools Development Environment (the Windows-basedclient), sign on to PeopleSoft using Application Server as the Connection Type, and enter <Machine name orIP Address>:<WSL port number> for the application server name—for example, 224.160.192.128:7000. (Asanother alternative, you can use the Configuration Manager Startup tab to insert signon defaults and use theProfiles, Database/Application Server tab to specify connect information regarding your application server.)
Copyright © 2006, Oracle. All rights reserved. 213

Configuring the Application Server on Windows Chapter 9A
See Also“Using the PeopleSoft Installer,” Understanding PeopleSoft Servers
“Setting Up Process Scheduler on Windows,” Starting Process Scheduler as a Windows Service
Enterprise PeopleTools 8.48 PeopleBook: System and Server Administration, “Using PSADMIN Menus”
Enterprise PeopleTools 8.48 PeopleBook: Data Management
PeopleSoft Customer Connection (Implement, Optimize + Upgrade, Implementation Guide, SupportedPlatforms, PeopleSoft Enterprise)
“Compiling COBOL on Windows”
PrerequisitesBefore beginning this procedure, you should have completed the following tasks:
• Installed your application server.
See “Using the PeopleSoft Installer,” Understanding PeopleSoft Servers.• Installed Tuxedo 8.1.
See “Installing Additional Components.”• Granted authorization to a PeopleSoft user ID to start the application server. User ID: VP1 for EnterprisePerformance Management and Financials/Supply Chain Management, and PS for HRMS, should bedelivered with authorization to start the application server.
• Run the following SQL statements on your database server to review and if needed, update thePSCLASSDEFN table:
SELECT CLASSID, STARTAPPSERVER FROM PSCLASSDEFN
WHERE CLASSID IN (SELECT OPRCLASS FROM PSOPRCLS WHERE OPRID='<OPRID>')
UPDATE PSCLASSDEFN SET STARTAPPSERVER=1 WHERE CLASSID='<CLASSID>'
Note. Installers typically use VP1 or PS to test the application server, and the password for these usersis stored in a fairly accessible text file. If these users are deleted or their passwords are changed, theapplication server will no longer be available. To avoid this problem, you can set up a new operator (calledPSADMIN or PSASID, for instance) with privileges to start the application server. If you do this, you canuse the new operator for your application servers and you won't need to change the password each timeVP1 or PS is changed.
Task 9A-1: Setting Up COBOL for Remote CallRemote Call is a PeopleCode feature that launches a COBOL program from an application server, PeopleCodeprogram or a batch Application Engine PeopleCode program and waits for it to complete execution beforecontinuing. The execution of a COBOL program via Remote Call is completely independent of the ProcessScheduler. You need to set up a COBOL runtime environment and COBOL executables on the applicationserver to support Remote Call.
214 Copyright © 2006, Oracle. All rights reserved.
Chapter 9A Configuring the Application Server on Windows
See “Compiling COBOL on Windows.”
If your application does not contain COBOL programs, you do not need to purchase or compile COBOL.
See Enterprise PeopleTools 8.48 Hardware and Software Requirements.
Task 9A-2: Verifying Database ConnectivityBefore continuing, it is critical to verify connectivity to the database that the application server domain willuse. To verify connectivity, connect to the database server from the application server using the native SQLtool on the application server.
If you are running DB2 UDB for z/OS, you can issue this command from the UNIX prompt:
db2 connect to <database name> user <z/OS ID> using <password>
If you are running DB2 UDB for z/OS and are setting up your application server on a Windows machine, enterthe preceding command at a DB2 Connect command window, or use DB2 Connect's Command Center orClient Configuration Assistant.
See “Installing and Configuring DB2 Connect.”
Task 9A-3: Creating, Configuring, and Starting anInitial Application Server Domain
This section discusses:
• Creating, Configuring, and Starting the Application Server Domain
• Testing the Three-Tier Connection
• Importing an Existing Application Server Domain Configuration
• Setting Up a Custom Application Server Domain Configuration
• Troubleshooting Common Errors
Task 9A-3-1: Creating, Configuring, and Starting theApplication Server DomainTo create, configure, and start the application server domain:
1. To run PSADMIN, enter the following command:
cd <PS_HOME>\appserv
psadmin
Note. Make sure you change the directory from the <PS_HOME> on the file server to the <PS_HOME>,or high-level directory, on the application server.
Copyright © 2006, Oracle. All rights reserved. 215

Configuring the Application Server on Windows Chapter 9A
2. When the menu appears, specify 1 for Application Server and press ENTER.3. Specify 2 to Create a domain and press ENTER.4. Specify the domain name. For example:
Please enter name of domain to create :HR84
Domain names are case sensitive and must be eight US-ASCII characters or less. The domain name is usedto create a directory name under the <PS_HOME>\appserv directory.
5. Specify 4 for small if this is your initial domain installation, press ENTER.
See Enterprise PeopleTools 8.48 PeopleBook: System and Server Administration.6. After the system creates the domain, this prompt appears:
Would you like to configure this domain now? (y/n) [y] :
Enter y. The PeopleSoft Application Server Administration menu appears with a Quick-configure menusimilar to this:---------------------------------------------------------
Quick-configure menu -- domain: HR84
---------------------------------------------------------
Features Settings
========== ==========
1) Pub/Sub Servers : No 15) DBNAME :[HR84]
2) Quick Server : No 16) DBTYPE :[DB2ODBC]
3) Query Servers : No 17) UserId :[QEDMO]
4) Jolt : Yes 18) UserPswd :[QEDMO]
5) Jolt Relay : No 19) DomainID :[TESTSERV]
6) WSL : No 20) AddToPATH :[c:\Program Files⇒\Microsoft SQL Server\80\Tools\Binn]
7) PC Debugger : No 21) ConnectID :[people]
8) Event Notification : Yes 22) ConnectPswd :[peop1e]
9) MCF Servers : No 23) ServerName :[]
10) Perf Collator : No 24) WSL Port :[7000]
11) Analytic Servers : Yes 25) JSL Port :[9000]
12) Domains Gateway : No 26) JRAD Port :[9100]
Actions
=========
13) Load config as shown
14) Custom configuration
h) Help for this menu
q) Return to previous menu
HINT: Enter 15 to edit DBNAME, then 13 to load
Enter selection (1-26, h, or q):
216 Copyright © 2006, Oracle. All rights reserved.

Chapter 9A Configuring the Application Server on Windows
Note. If you intend to use the PeopleSoft Report Distribution system, you must select Yes for feature 8,Event Notification. This enables the REN server, which is used by the “run to window” functionality of theReport Distribution system. The Report Distribution system, MultiChannel Framework, and OptimizationFramework use REN servers. You must also remember to enter an Authentication Token Domain wheninstalling the PeopleSoft Pure Internet Architecture (PIA).
Note. If your installation includes more than one application server domain on a given machine, readthe troubleshooting section for more information.
See Troubleshooting Common Errors.
Note. If you are configuring an application server domain to support applications based on the PeopleSoftMultiChannel Framework (such as PeopleSoft CRM ERMS), select feature 9, MCF Servers.
See Enterprise PeopleTools 8.48 PeopleBook: PeopleSoft MultiChannel Framework, “ConfiguringREN Servers.”
7. If you need to modify any of the values for these settings, enter the number next to the parameter name,type the new value, and press ENTER.
8. Configure the WSL to boot by changing option 6 to Yes.
Enter 6, and press ENTER.
9. If you are not installing a REN server, after you update the settings you can load the configuration byentering 13, for Load config as shown, from the Quick-configure menu.
10. If you are installing a REN server:
a. Enter 14 for Custom configuration.
b. Reply y, and press ENTER, at this prompt:
Do you want to change any config values <y/n> [n]?
c. Reply n, and press ENTER, at this prompt:
Do you want to change any values <y/n> [n]?
Continue to enter n, for No, for all sections until you see the PSRENSRV section, and then answery. (Be aware that there are several sections.)
d. Leave the defaults for all settings except for default_auth_token, which you should set to the domainname for your web server.
Note. The default_auth_token setting should be identical to the Authentication Token Domain that youset during PIA installation.
See “Setting Up the PeopleSoft Pure Internet Architecture in GUI Mode.”e. Accept the defaults for the next series of questions until asked if you want Event Notificationconfigured. In this case, answer y.
f. Accept the default for the remaining questions; the configuration will load automatically.11. To start the application server (whether you installed a REN server or not), select 1, Boot this domain,from the PeopleSoft Domain administration menu.
Copyright © 2006, Oracle. All rights reserved. 217

Configuring the Application Server on Windows Chapter 9A
12. Select 1, Boot (Serial Boot) or 2, Parallel Boot, from the PeopleSoft Domain Boot Menu.
Note. The messages you see and the number of processes started will depend on the options you choseduring configuration.
13. If you plan to continue with PIA installation and testing, do not shut down the application server at this time.14. If you want to shut down your PeopleSoft application server domain later, follow these simple steps:a. From the PeopleSoft Domain Administration menu, enter 2 for Domain shutdown menu.b. From the PeopleTools Domain Shutdown Menu, enter 1 for Normal shutdown.You see messages about the application server processes being shut down. The number of processesstopped will vary depending on the number of processes that started when you booted the domain.
c. Enter q to quit the PeopleSoft Domain Administration Menu.
Task 9A-3-2: Testing the Three-Tier ConnectionIf you get an error message when you try to start the application server, it may be due to an incorrect servername or port number, or because the server was not booted. To test a three-tier connection from thePeopleTools Development Environment (the Windows-based client):
1. Select Start, Programs, PeopleTools 8.4, Configuration Manager to start Configuration Manager.2. Select the Profile Tab. Highlight Default and select Edit.3. On the Edit Profile dialog box, select Application Server as the Connection Type.4. Enter values for these parameters:• Application Server Name• Machine Name or IP Address• Port Number (WSL)
5. Select Set to add the definition to the list and select OK to close the dialog box.6. On the Configuration Manager dialog box, select the Startup tab.7. Select Application Server from the Database Type list. Your application server name should be displayed.8. Enter the values for User ID, Connect ID, and password.9. Click OK.
Note. Confirm that the application server is running by booting it. Select 1, Boot this domain, from thePeopleSoft Domain administration menu. Select option 1, Boot (Serial Boot) or 2, Parellel Boot, fromthe PeopleSoft Domain Boot menu.
10. Select Start, Programs, PeopleTools 8.4, Application Designer.11. In the PeopleSoft Signon dialog box, select Application Server as the Connection Type, and confirm thatthe Application Server Name is correct. Enter values for User ID and password.
12. Select OK to open Application Designer.
218 Copyright © 2006, Oracle. All rights reserved.

Chapter 9A Configuring the Application Server on Windows
Task 9A-3-3: Importing an Existing ApplicationServer Domain ConfigurationIf you have an existing application server configuration for a previous PeopleTools release, you can import itto create a new domain. You can import an existing domain configuration by specifying a file or by specifyingthe path to an existing domain. To import from a file, you must use the psappsrv.cfg file found inside anexisting application server domain folder (you must specify the full path to psappsrv.cfg). This file can belocated anywhere in the file system, but must be named psappsrv.cfg. To import from an existing domainconfiguration, you must specify <PS_HOME> and the name of an existing application server domain.
To import an existing application server domain configuration:
1. Run PSADMIN:
cd <PS_HOME>\appserv
psadmin
Note. Make sure you change the directory from the <PS_HOME> on the file server to the <PS_HOME>on the application server.
2. Specify 1 for Application Server:
--------------------------------
PeopleSoft Server Administration
--------------------------------
1) Application Server
2) Process Scheduler
3) Search Server
4) Service Setup
q) Quit
Command to execute (1-4, q): 1
3. Specify 4 for Import domain configuration.
--------------------------------------------
PeopleSoft Application Server Administration
--------------------------------------------
1) Administer a domain
2) Create a domain
3) Delete a domain
4) Import domain configuration
q) Quit
Command to execute (1-4, q): 4
4. Specify whether to import the domain configuration from a file (1) or from an existing application domainconfiguration (2).
--------------------------------------------
PeopleSoft Import Application Server Configuration
--------------------------------------------
1) Import from file
Copyright © 2006, Oracle. All rights reserved. 219

Configuring the Application Server on Windows Chapter 9A
2) Import from application domain
q) Quit
Command to execute (1-2, q) :
5. If you selected 1, provide the full path to the file psappsrv.cfg, and then specify the name of the domainyou want to create. If you selected 2, go to the next step.
Enter full path to configuration file
:C:\temp\oldconfig\psappsrv.cfg
Enter domain name to create
:HR84
6. If you selected 2, provide the full path to the <PS_HOME> of the existing domain.
Enter PS_HOME of domain you wish to import
:C:\HR84
If applicable, choose among the existing application server domains in the specified <PS_HOME>:Tuxedo domain list:
1) HR84A
2) HR84B
Select domain number to import: 1
Enter a name for new domain: HR84
Note. Once you create the domain, continue to the next task to verify that the imported configurationparameters are appropriate for the newly created domain. You may need to change the following values:DBName, DBType, UserId, UserPswd, Workstation Listener Port, Jolt Listener Port, Jolt Relay AdapterListener Port. DBName can be the same or different, depending on which database the application serverneeds to point to. DBType depends on the database type of DBName. UserId and UserPswd are the user'schoice. Workstation Listener Port will need to be modified if the old domain will be up and running in thesame machine. Jolt Listener Port will also need a different number if the old domain will be up and runningin the same machine. Jolt Relay Adapter Listener Port will need a different number if the old domain willbe up and running in the same machine, and will be using Jolt Relay Adapter.
Task 9A-3-4: Setting Up a Custom ApplicationServer Domain ConfigurationThe Quick-configure menu is initially displayed when you choose to configure your domain. This menuis intended for the commonly adjusted parameters—those most likely to change from domain to domain.However, there are additional configuration parameters that are not available through the Quick-configuremenu. For such configuration parameters, you must use the Custom Configuration option, which you canaccess from the Quick-configure menu. Feel free to skip this procedure if you have already created andconfigured your Application Server using the Quick-configure menu and want to move forward.
The following steps assume you will be using PSADMIN to specify parameter settings.
To reconfigure an application server domain:
220 Copyright © 2006, Oracle. All rights reserved.

Chapter 9A Configuring the Application Server on Windows
1. Start PSADMIN by entering:
cd <PS_HOME>\appserv
psadmin
2. Specify 1 for Application Server and press ENTER.3. Specify 1 for Administer a domain and press ENTER.4. Select the domain to administer and press ENTER.5. Specify 4 for Configure this domain and press ENTER.The option Configure this domain performs the following tasks:• Shuts down the application server, if it is running. (Shutdown is required since the binary filePSTUXCFG must be deleted and re-created to enable new configuration values. If there are no processesrunning when shutdown is attempted, an error will be displayed but the script continues on. Thisis normal.)
• Initiates an interactive dialog, prompting for configuration parameters.• Updates psappsrv.cfg, generates psappsrv.ubb, and internally invokes Tuxedo's tmloadcf executable tocreate binary file PSTUXCFG used during the domain boot process.
6. Specify 14 for Custom Configuration and press ENTER.7. Respond to this prompt:
Do you want to change any config values (y/n):
• Specify y to start an interactive dialog to change or examine parameter values, as described in thenext step.PeopleSoft recommends this option for more experienced users.
• Specify n if you have already edited psappsrv.cfg, skip the next step, and continue with step 9.
8. Complete the interactive dialog to specify configuration parameters.
Configuration parameters are grouped into sections. For each section, you are asked whether you want tochange any parameters in that section, as in the following example:
Values for config section - Startup
DBName=
DBType=
UserId=
UserPswd=
ConnectId=
ConnectPswd=
ServerName=
Do you want to change any values (y/n)? [n]: y
Note. Enter the user ID and user password that has security to start the application server. All applicationdatabases are delivered with one or more application server security users, usually PS or VP1.
Copyright © 2006, Oracle. All rights reserved. 221

Configuring the Application Server on Windows Chapter 9A
• Specify y to change any parameter values for the current configuration section displayed.You are prompted for each parameter value. Either specify a new value, or press ENTER to accept thedefault if applicable. After pressing ENTER, you are positioned at the next parameter in that section.When you are done with that section, you are again asked whether you want to re-edit any of thevalues you changed.
• If you do not wish to change any values, specify n and you will be prompted for the next configurationsection.
Note. The WSL, JSL, and JRAD port numbers have default values of 7000, 9000, and 9100, respectively.These values must be unique for each application server domain. You may alter the port values ifnecessary to ensure that they are unique.
Note. When setting up your application server, make a note of the values you use for Database Name,Application Server Name (the machine name), and JSL Port. You will need to use these same valueswhen installing the PeopleSoft Pure Internet Architecture.
See Enterprise PeopleTools 8.48 PeopleBook: System and Server Administration.9. Select server process options.At this point, you will be prompted to select server process options. If this is your initial installation, wesuggest you accept the defaults. A message similar to this appears:
Setting Log Directory to the default... [PS_SERVDIR\LOGS]
Configuration file successfully created.
Loading new configuration...
“Loading new configuration” indicates that PSADMIN is generating a binary file named PSTUXCFG,which is used to boot the application server. At this point, your application server should be properlyconfigured.
Task 9A-3-5: Troubleshooting Common ErrorsFor troubleshooting help, you can access a log file through the PeopleSoft Domain Administration menu. Thefollowing information is a list of possible errors you may encounter.
• Use PSADMIN menu option 6 for Edit configuration/log files menu to check for errors in<PS_HOME>\appserv\<domain>\LOGS\APPSRV_mmdd.log and <PS_HOME>\appserv\<domain>\LOGS\TUXLOG.mmddyy.
• If a PeopleSoft server such as PSAPPSRV fails, examine your configuration parameters. The failure of thePSAPPSRV process is often signalled by the message “Assume started”—which is usually misleading,because the process has often failed to start. Check the SIGNON section for misspelled or invalid databasename, an invalid or unauthorized OprId, or ConnectId or ServerName is missing or invalid. Finally,make sure the database connectivity is set correctly.
• If a WSL (or JSL) fails to start, try specifying another port number (it may be in use already by anotherapplication server domain process).
• If you are unable to start the BBL, check that your Tuxedo is installed fully and that the directory reallyexists.
• If the installation includes more than one application server domain on a single machine, before bootingthe second domain, adjust the REN server configuration to avoid conflict in one of these ways:
222 Copyright © 2006, Oracle. All rights reserved.

Chapter 9A Configuring the Application Server on Windows
- Use PSADMIN to disable Event Notification (option 8 on the Quick-configure menu) for the secondand subsequent app server domains.
- Change default_http_port to a value other than 7180.
See AlsoEnterprise PeopleTools 8.48 PeopleBook: System and Server Administration
Enterprise PeopleTools 8.48 PeopleBook: PeopleSoft MultiChannel Framework
Task 9A-4: Configuring Fonts for LanguagesThis section discusses:
• Configuring Asian Language Fonts
Task 9A-4-1: Configuring Asian Language FontsFor text that is rendered by the Java Virtual Machine on the application server (for example, charting)the appropriate fonts must be available on the system. If characters are missing or fail to display afterinstallation, additional configuration may be needed. Fonts are defined with a logical name (suchas 'psjvm.1') in the database, and a system font name (such as HGGothic) on the application server.Mappings between the logical name and the system font name are defined on the application server in<PSHOME>\class\PSOFTFonts.properties. These mappings generally do not need to be specified fornon-Asian languages.
Note. psjvm.1 is used by default.
The information that follows is an example of the Japanese entries on Windows:
ps.lang.1=JPN
JPN.psjvm.1=MS Mincho
JPN.psjvm.2=MS Gothic
In the example above, 'psjvm.1' and 'psjvm.2' can be used in charting style classes.
See AlsoEnterprise PeopleTools 8.48 PeopleBook: PeopleCode Language Reference, “Chart Class”
Copyright © 2006, Oracle. All rights reserved. 223

Configuring the Application Server on Windows Chapter 9A
224 Copyright © 2006, Oracle. All rights reserved.
CHAPTER 9B
Configuring the Application Server on UNIX
This chapter discusses:
• Understanding the Application Server
• Understanding the Application Server Domain Processes
• Prerequisites
• Setting Environment Variables
• Setting Up COBOL for Remote Call
• Verifying Database Connectivity
• Creating, Configuring, and Starting an Initial Application Server Domain
• Configuring Fonts for Languages
Understanding the Application ServerThe information in this chapter is provided to help you configure your PeopleSoft application server.
Note. We do not support application servers on z/OS.
Note. COBOL is not needed for PeopleTools or for applications that contain no COBOL programs. Checkthe information on PeopleSoft Customer Connection, and your application-specific documentation for thedetails on whether your application requires COBOL.
PeopleSoft supports UNIX application servers on the following platforms:
• Hewlett-Packard HP-UX• IBM AIX• Tru64• Linux
Application servers are not supported on z/OS because Tuxedo cannot run on the mainframe. For this reason,you can only install an application server in a “physical” three-tier configuration—with the applicationserver on a machine separate from the database server machine. You cannot run a “logical” three-tierconfiguration—with the application server on the same machine as the database server.
Copyright © 2006, Oracle. All rights reserved. 225
Configuring the Application Server on UNIX Chapter 9B
Note. To test a three-tier connection from the PeopleTools Development Environment (the Windows-basedclient), sign on to PeopleSoft using Application Server as the Connection Type, and enter <Machine name orIP Address>:<WSL port number> for the application server name—for example, 224.160.192.128:7000. (Asanother alternative, you can use the Configuration Manager Startup tab to insert signon defaults and use theProfiles, Database/Application Server tab to specify connect information regarding your application server.)
See Also“Using the PeopleSoft Installer,” Understanding PeopleSoft Servers
Enterprise PeopleTools 8.48 PeopleBook: System and Server Administration, “Using PSADMIN Menus”
Enterprise PeopleTools 8.48 PeopleBook: Data Management
PeopleSoft Customer Connection (Implement, Optimize + Upgrade, Implementation Guide, SupportedPlatforms, PeopleSoft Enterprise)
“Compiling COBOL on UNIX”
Understanding the Application Server Domain ProcessesOn most platforms (AIX, Solaris, Tru64, Linux, and HP-UX 11.23, also known as 11i V2, and higher, forIPF and PA-RISC) no changes are required from the system defaults, in order to allow the “small” and“development” domains that are shipped with PeopleTools to boot successfully.
Refer to the performance Red Paper for guidance in configuring your system to run larger domains. Thatdocument will describe the suggested minimum kernel settings for running PeopleTools in a real-worldenvironment.
See PeopleSoft Customer Connection (Implement, Optimize + Upgrade, Optimization Guide, OptimizationDocumentation and Software, Red Paper Library. Select the link “Online Performance ConfigurationGuidelines for PeopleTools” for your PeopleTools version under the heading “PeopleTools, PeopleSoftEnterprise Portal, and Other Technology.”)
Permanently changing system-wide parameters generally requires root privileges, and any changes to thekernel configuration of your operating system should be done with care.
On HP-UX 11.11, also known as 11i V1 (for PA-RISC), the following kernel parameters, at a minimum, needto be changed to allow a small domain to boot successfully:
• increase maxfiles from 60 to 1024• increase maxuprc from 75 to 256• increase max_thread_proc from 75 to 256
These can be changed with the kernel parameter command, kmtune (1), or with the system administrationmanager, SAM, with root access. Some examples are:
Query a parameter value: kmtune -q maxfiles
Change a parameter value: kmtune -s maxfiles=1024
226 Copyright © 2006, Oracle. All rights reserved.
Chapter 9B Configuring the Application Server on UNIX
PrerequisitesBefore beginning this procedure, you should have completed the following tasks:
• Installed your application server.
See “Using the PeopleSoft Installer,” Understanding PeopleSoft Servers.• Installed Tuxedo 8.1.
See “Installing Additional Components.”• Granted authorization to a PeopleSoft user ID to start the application server. User ID: VP1 for EnterprisePerformance Management and Financials/Supply Chain Management, and PS for HRMS, should bedelivered with authorization to start the application server.
• Run the following SQL statements on your database server to review and if needed, update thePSCLASSDEFN table:
SELECT CLASSID, STARTAPPSERVER FROM PSCLASSDEFN
WHERE CLASSID IN (SELECT OPRCLASS FROM PSOPRCLS WHERE OPRID='<OPRID>')
UPDATE PSCLASSDEFN SET STARTAPPSERVER=1 WHERE CLASSID='<CLASSID>'
Note. Installers typically use VP1 or PS to test the application server, and the password for these usersis stored in a fairly accessible text file. If these users are deleted or their passwords are changed, theapplication server will no longer be available. To avoid this problem, you can set up a new operator (calledPSADMIN or PSASID, for instance) with privileges to start the application server. If you do this, you canuse the new operator for your application servers and you won't need to change the password each timeVP1 or PS is changed.
Task 9B-1: Setting Environment VariablesTelnet to your UNIX system. Log in and ensure the following environment variables are set appropriately.
One method to ensure the required PeopleSoft environment variables are set is to source psconfig.sh. Enterthe following command:
cd <PS_HOME>
. ./psconfig.sh
Task 9B-2: Setting Up COBOL for Remote CallRemote Call is a PeopleCode feature that launches a COBOL program from an application server, PeopleCodeprogram or a batch Application Engine PeopleCode program and waits for it to complete execution beforecontinuing. The execution of a COBOL program via Remote Call is completely independent of the ProcessScheduler. You need to set up a COBOL runtime environment and COBOL executables on the applicationserver to support Remote Call.
See “Compiling COBOL on UNIX.”
If your application does not contain COBOL programs, you do not need to purchase or compile COBOL.
Copyright © 2006, Oracle. All rights reserved. 227

Configuring the Application Server on UNIX Chapter 9B
See Enterprise PeopleTools 8.48 Hardware and Software Requirements.
Task 9B-3: Verifying Database ConnectivityBefore continuing, it is critical to verify connectivity to the database that the application server domain willuse. To verify connectivity, connect to the database server from the application server using the native SQLtool on the application server.
If you are running DB2 UDB for z/OS, you can issue this command from the UNIX prompt:
db2 connect to <database name> user <z/OS ID> using <password>
If you are running DB2 UDB for z/OS and are setting up your application server on a Windows machine, enterthe preceding command at a DB2 Connect command window, or use DB2 Connect's Command Center orClient Configuration Assistant.
See “Installing and Configuring DB2 Connect.”
Task 9B-4: Creating, Configuring, and Starting anInitial Application Server Domain
This section discusses:
• Creating, Configuring, and Starting the Application Server Domain
• Testing the Three-Tier Connection
• Importing an Existing Application Server Domain Configuration
• Setting Up a Custom Application Server Domain Configuration
• Troubleshooting Common Errors
Task 9B-4-1: Creating, Configuring, and Starting theApplication Server DomainTo create, configure, and start the application server domain:
1. To run PSADMIN, enter the following command:
cd <PS_HOME>/appserv
psadmin
Note. Make sure you change the directory from the <PS_HOME> on the file server to the <PS_HOME>,or high-level directory, on the application server.
2. When the menu appears, specify 1 for Application Server and press ENTER.3. Specify 2 to Create a domain and press ENTER.
228 Copyright © 2006, Oracle. All rights reserved.
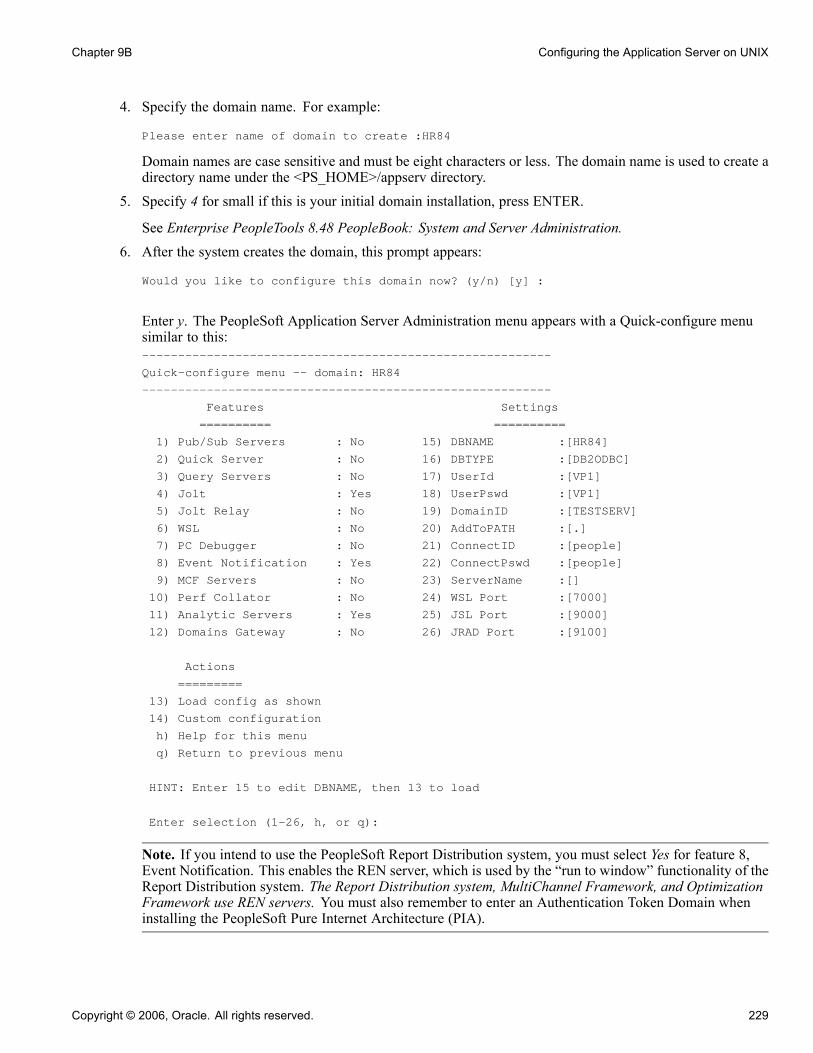
Chapter 9B Configuring the Application Server on UNIX
4. Specify the domain name. For example:
Please enter name of domain to create :HR84
Domain names are case sensitive and must be eight characters or less. The domain name is used to create adirectory name under the <PS_HOME>/appserv directory.
5. Specify 4 for small if this is your initial domain installation, press ENTER.
See Enterprise PeopleTools 8.48 PeopleBook: System and Server Administration.6. After the system creates the domain, this prompt appears:
Would you like to configure this domain now? (y/n) [y] :
Enter y. The PeopleSoft Application Server Administration menu appears with a Quick-configure menusimilar to this:---------------------------------------------------------
Quick-configure menu -- domain: HR84
---------------------------------------------------------
Features Settings
========== ==========
1) Pub/Sub Servers : No 15) DBNAME :[HR84]
2) Quick Server : No 16) DBTYPE :[DB2ODBC]
3) Query Servers : No 17) UserId :[VP1]
4) Jolt : Yes 18) UserPswd :[VP1]
5) Jolt Relay : No 19) DomainID :[TESTSERV]
6) WSL : No 20) AddToPATH :[.]
7) PC Debugger : No 21) ConnectID :[people]
8) Event Notification : Yes 22) ConnectPswd :[peop1e]
9) MCF Servers : No 23) ServerName :[]
10) Perf Collator : No 24) WSL Port :[7000]
11) Analytic Servers : Yes 25) JSL Port :[9000]
12) Domains Gateway : No 26) JRAD Port :[9100]
Actions
=========
13) Load config as shown
14) Custom configuration
h) Help for this menu
q) Return to previous menu
HINT: Enter 15 to edit DBNAME, then 13 to load
Enter selection (1-26, h, or q):
Note. If you intend to use the PeopleSoft Report Distribution system, you must select Yes for feature 8,Event Notification. This enables the REN server, which is used by the “run to window” functionality of theReport Distribution system. The Report Distribution system, MultiChannel Framework, and OptimizationFramework use REN servers. You must also remember to enter an Authentication Token Domain wheninstalling the PeopleSoft Pure Internet Architecture (PIA).
Copyright © 2006, Oracle. All rights reserved. 229
Configuring the Application Server on UNIX Chapter 9B
Note. If your installation includes more than one application server domain on a given machine, readthe troubleshooting section for more information.
See Troubleshooting Common Errors.
Note. If you are configuring an application server domain to support applications based on the PeopleSoftMultiChannel Framework (such as PeopleSoft CRM ERMS), select feature 9, MCF Servers.
See Enterprise PeopleTools 8.48 PeopleBook: PeopleSoft MultiChannel Framework, “ConfiguringREN Servers.”
7. If you need to modify any of the values for these settings, enter the number next to the parameter name,type the new value, and press ENTER.
8. Configure the WSL to boot by changing option 6 to Yes.Enter 6, and press ENTER.
9. If you are not installing a REN server, after you update the settings you can load the configuration byentering 13, for Load config as shown, from the Quick-configure menu.
10. If you are installing a REN server:a. Enter 14 for Custom configuration.b. Reply y, and press ENTER, at this prompt:
Do you want to change any config values <y/n> [n]?
c. Reply n, and press ENTER, at this prompt:
Do you want to change any values <y/n> [n]?
Continue to enter n, for No, for all sections until you see the PSRENSRV section, and then answery. (Be aware that there are several sections.)
d. Leave the defaults for all settings except for default_auth_token, which you should set to the domainname for your web server.
Note. The default_auth_token setting should be identical to the Authentication Token Domain that youset during PIA installation.
See “Setting Up the PeopleSoft Pure Internet Architecture in GUI Mode.”e. Accept the defaults for the next series of questions until asked if you want Event Notificationconfigured. In this case, answer y.
f. Accept the default for the remaining questions; the configuration will load automatically.11. To start the application server (whether you installed a REN server or not), select 1, Boot this domain,from the PeopleSoft Domain administration menu.
12. Select 1, Boot (Serial Boot) or 2, Parallel Boot, from the PeopleSoft Domain Boot Menu.
Note. The messages you see and the number of processes started will depend on the options you choseduring configuration.
13. If you plan to continue with PIA installation and testing, do not shut down the application server at this time.
230 Copyright © 2006, Oracle. All rights reserved.
Chapter 9B Configuring the Application Server on UNIX
14. If you want to shut down your PeopleSoft application server domain later, follow these simple steps:a. From the PeopleSoft Domain Administration menu, enter 2 for Domain shutdown menu.b. From the PeopleTools Domain Shutdown Menu, enter 1 for Normal shutdown.You see messages about the application server processes being shut down. The number of processesstopped will vary depending on the number of processes that started when you booted the domain.
c. Enter q to quit the PeopleSoft Domain Administration Menu.
Task 9B-4-2: Testing the Three-Tier ConnectionIf you get an error message when you try to start the application server, it may be due to an incorrect servername or port number, or because the server was not booted. To test a three-tier connection from thePeopleTools Development Environment (the Windows-based client):
1. Select Start, Programs, PeopleTools 8.4, Configuration Manager to start Configuration Manager.
2. Select the Profile Tab. Highlight Default and select Edit.
3. On the Edit Profile dialog box, select Application Server as the Connection Type.
4. Enter values for these parameters:
• Application Server Name
• Machine Name or IP Address
• Port Number (WSL)
5. Select Set to add the definition to the list and select OK to close the dialog box.
6. On the Configuration Manager dialog box, select the Startup tab.
7. Select Application Server from the Database Type list. Your application server name should be displayed.
8. Enter the values for User ID, Connect ID, and password.
9. Click OK.
Note. Confirm that the application server is running by booting it. Select 1, Boot this domain, from thePeopleSoft Domain administration menu. Select option 1, Boot (Serial Boot) or 2, Parellel Boot, fromthe PeopleSoft Domain Boot menu.
10. Select Start, Programs, PeopleTools 8.4, Application Designer.11. In the PeopleSoft Signon dialog box, select Application Server as the Connection Type, and confirm thatthe Application Server Name is correct. Enter values for User ID and password.
12. Select OK to open Application Designer.
Task 9B-4-3: Importing an Existing ApplicationServer Domain ConfigurationIf you have an existing application server configuration for a previous PeopleTools release, you can import itto create a new domain. You can import an existing domain configuration by specifying a file or by specifyingthe path to an existing domain. To import from a file, you must use the psappsrv.cfg file found inside anexisting application server domain folder (you must specify the full path to psappsrv.cfg). This file can belocated anywhere in the file system, but must be named psappsrv.cfg. To import from an existing domainconfiguration, you must specify <PS_HOME> and the name of an existing application server domain.
Copyright © 2006, Oracle. All rights reserved. 231

Configuring the Application Server on UNIX Chapter 9B
To import an existing application server domain configuration:
1. Run PSADMIN:
cd <PS_HOME>/appserv
psadmin
Note. Make sure you change the directory from the <PS_HOME> on the file server to the <PS_HOME>on the application server.
2. Specify 1 for Application Server:
--------------------------------
PeopleSoft Server Administration
--------------------------------
1) Application Server
2) Process Scheduler
3) Search Server
q) Quit
Command to execute (1-3, q): 1
3. Specify 4 for Import domain configuration.
--------------------------------------------
PeopleSoft Application Server Administration
--------------------------------------------
1) Administer a domain
2) Create a domain
3) Delete a domain
4) Import domain configuration
q) Quit
Command to execute (1-4, q): 4
4. Specify whether to import the domain configuration from a file (1) or from an existing application domainconfiguration (2).
--------------------------------------------
PeopleSoft Import Application Server Configuration
--------------------------------------------
1) Import from file
2) Import from application domain
q) Quit
Command to execute (1-2, q) :
5. If you selected 1, provide the full path to the file psappsrv.cfg, and then specify the name of the domainyou want to create. If you selected 2, go to the next step.
Enter full path to configuration file
:/home/oldconfig/psappsrv.cfg
232 Copyright © 2006, Oracle. All rights reserved.

Chapter 9B Configuring the Application Server on UNIX
Enter domain name to create
:HR84
6. If you selected 2, provide the full path to the <PS_HOME> of the existing domain.
Enter PS_HOME of domain you wish to import
:/home/HR84
If applicable, choose among the existing application server domains in the specified <PS_HOME>:Tuxedo domain list:
1) HR84A
2) HR84B
Select domain number to import: 1
Enter a name for new domain: HR84
Note. Once you create the domain, continue to the next task to verify that the imported configurationparameters are appropriate for the newly created domain. You may need to change the following values:DBName, DBType, UserId, UserPswd, Workstation Listener Port, Jolt Listener Port, Jolt Relay AdapterListener Port. DBName can be the same or different, depending on which database the application serverneeds to point to. DBType depends on the database type of DBName. UserId and UserPswd are the user'schoice. Workstation Listener Port will need to be modified if the old domain will be up and running in thesame machine. Jolt Listener Port will also need a different number if the old domain will be up and runningin the same machine. Jolt Relay Adapter Listener Port will need a different number if the old domain willbe up and running in the same machine, and will be using Jolt Relay Adapter.
Task 9B-4-4: Setting Up a Custom ApplicationServer Domain ConfigurationThe Quick-configure menu is initially displayed when you choose to configure your domain. This menuis intended for the commonly adjusted parameters—those most likely to change from domain to domain.However, there are additional configuration parameters that are not available through the Quick-configuremenu. For such configuration parameters, you must use the Custom Configuration option, which you canaccess from the Quick-configure menu. Feel free to skip this procedure if you have already created andconfigured your Application Server using the Quick-configure menu and want to move forward.
The following steps assume you will be using PSADMIN to specify parameter settings.
To reconfigure an application server domain:
1. Start PSADMIN by entering:
cd <PS_HOME>/appserv
psadmin
2. Specify 1 for Application Server and press ENTER.3. Specify 1 for Administer a domain and press ENTER.4. Select the domain to administer and press ENTER.5. Specify 4 for Configure this domain and press ENTER.The option Configure this domain performs the following tasks:
Copyright © 2006, Oracle. All rights reserved. 233
Configuring the Application Server on UNIX Chapter 9B
• Shuts down the application server, if it is running. (Shutdown is required since the binary filePSTUXCFG must be deleted and re-created to enable new configuration values. If there are no processesrunning when shutdown is attempted, an error will be displayed but the script continues on. Thisis normal.)
• Initiates an interactive dialog, prompting for configuration parameters.• Updates psappsrv.cfg, generates psappsrv.ubb, and internally invokes Tuxedo's tmloadcf executable tocreate binary file PSTUXCFG used during the domain boot process.
6. Specify 14 for Custom Configuration and press ENTER.7. Respond to this prompt:
Do you want to change any config values (y/n):
• Specify y to start an interactive dialog to change or examine parameter values, as described in thenext step.PeopleSoft recommends this option for more experienced users.
• Specify n if you have already edited psappsrv.cfg, skip the next step, and continue with step 9.
8. Complete the interactive dialog to specify configuration parameters.
Configuration parameters are grouped into sections. For each section, you are asked whether you want tochange any parameters in that section, as in the following example:
Values for config section - Startup
DBName=
DBType=
UserId=
UserPswd=
ConnectId=
ConnectPswd=
ServerName=
Do you want to change any values (y/n)? [n]: y
Note. Enter the user ID and user password that has security to start the application server. All applicationdatabases are delivered with one or more application server security users, usually PS or VP1.
• Specify y to change any parameter values for the current configuration section displayed.You are prompted for each parameter value. Either specify a new value, or press ENTER to accept thedefault if applicable. After pressing ENTER, you are positioned at the next parameter in that section.When you are done with that section, you are again asked whether you want to re-edit any of thevalues you changed.
234 Copyright © 2006, Oracle. All rights reserved.

Chapter 9B Configuring the Application Server on UNIX
• If you do not wish to change any values, specify n and you will be prompted for the next configurationsection.
Note. The WSL, JSL, and JRAD port numbers have default values of 7000, 9000, and 9100, respectively.These values must be unique for each application server domain. You may alter the port values ifnecessary to ensure that they are unique.
Note. When setting up your application server, make a note of the values you use for Database Name,Application Server Name (the machine name), and JSL Port. You will need to use these same valueswhen installing the PeopleSoft Pure Internet Architecture.
See Enterprise PeopleTools 8.48 PeopleBook: System and Server Administration.9. Select server process options.At this point, you will be prompted to select server process options. If this is your initial installation, wesuggest you accept the defaults. A message similar to this appears:
Setting Log Directory to the default... [PS_SERVDIR/LOGS]
Configuration file successfully created.
Loading new configuration...
“Loading new configuration” indicates that PSADMIN is generating a binary file named PSTUXCFG,which is used to boot the application server. At this point, your application server should be properlyconfigured.
Task 9B-4-5: Troubleshooting Common ErrorsFor troubleshooting help, you can access a log file through the PeopleSoft Domain Administration menu. Thefollowing information is a list of possible errors you may encounter.
• Use the PSADMIN PeopleSoft Domain Administration menu option 6 for Edit configuration/logfiles menu to check for errors in <PS_HOME>/appserv/<domain>/LOGS/APPSRV_mmdd.LOG and<PS_HOME>/appserv/<domain>/LOGS/TUXLOG.mmddyy.
• If a PeopleSoft server such as PSAPPSRV fails, examine your configuration parameters. The failure of thePSAPPSRV process is often signalled by the message “Assume started”—which is usually misleading,because the process has often failed to start. Check the SIGNON section for misspelled or invalid databasename, an invalid or unauthorized OprId, or ConnectId or ServerName is missing or invalid. Finally,make sure the database connectivity is set correctly.
• If a WSL (or JSL) fails to start, try specifying another port number (it may be in use already by anotherapplication server domain process).
• If you are unable to start the BBL, check that your Tuxedo is installed fully and that the directory reallyexists.
• If the installation includes more than one application server domain on a single machine, before bootingthe second domain, adjust the REN server configuration to avoid conflict in one of these ways:
- Use PSADMIN to disable Event Notification (option 8 on the Quick-configure menu) for the secondand subsequent app server domains.
- Change default_http_port to a value other than 7180.
Also check that you do not have older Tuxedo releases (such as Tuxedo 6.4) prepended in your PATH orruntime library (LIBPATH, SHLIB_PATH or LD_LIBRARY_PATH, depending on UNIX platform).
Copyright © 2006, Oracle. All rights reserved. 235

Configuring the Application Server on UNIX Chapter 9B
See AlsoEnterprise PeopleTools 8.48 PeopleBook: System and Server Administration
Enterprise PeopleTools 8.48 PeopleBook: PeopleSoft MultiChannel Framework
Task 9B-5: Configuring Fonts for LanguagesThis section discusses:
• Configuring Asian Language Fonts
• Installing TrueType Fonts for Tru64 UNIX
Task 9B-5-1: Configuring Asian Language FontsFor text that is rendered by the Java Virtual Machine on the application server (for example, charting)the appropriate fonts must be available on the system. If characters are missing or fail to display afterinstallation, additional configuration may be needed. Fonts are defined with a logical name (suchas psjvm.1) in the database, and a system font name (such as HGGothic) on the application server.Mappings between the logical name and the system font name are defined on the application server in<PSHOME>/appserver/classes/PSOFTFonts.properties. These mappings generally do not need to be specifiedfor non-Asian languages.
Note. On UNIX, the X11 font packages must be installed.
Note. psjvm.1 is used by default.
The information that follows is an example of the Japanese entries on HP-UX:
ps.lang.1=JPN
JPN.psjvm.1=HGGothicB
JPN.psjvm.2=HGMinchoL
In the example above, 'psjvm.1' and 'psjvm.2' can be used in charting style classes. Extra fonts and languagescan be added if needed.
Note. On all UNIX platforms, the <PS_HOME>/jre/lib/fonts.propertiesXXX file (where XXX represents thelocale that the machine is operating under) must contain the mappings for all the fonts that will be used bythe application server to generate charts. On most platforms, the default font.propertiesXXX files containmappings only for those fonts most commonly used by each locale. If you wish to generate charts using fontsthat are not by default mapped into the font.propertiesXXX file for your locale, you must manually modifythe default file to include this information. Find the font.propertiesXXX files containing the appropriatemapping information, and append that mapping information to the end of the font.propertiesXXX file thatmatches your machine's locale.
236 Copyright © 2006, Oracle. All rights reserved.
Chapter 9B Configuring the Application Server on UNIX
Note. On HP-UX, the path to the fonts must be entered in the JVM’s font.propertiesXXX file (whereXXX is the locale that the machine is operating under). Each full path must be separated by colonsunder the setting hp.fontpath. This file is located in <PSHOME>/jre/lib. Following is an example:hp.fontpath=/usr/lib/X11/fonts/ms.st/typefaces:/usr/lib/X11/fonts/TrueType/japanese.st/typefaces:
See AlsoEnterprise PeopleTools 8.48 PeopleBook: PeopleCode Language Reference, “Chart Class”
Task 9B-5-2: Installing TrueType Fonts for Tru64 UNIXBecause the fonts that come with the Tru64 UNIX do not include European characters, you must obtain andinstall TrueType fonts to display European and Asian characters on Tru64. You can purchase these fonts fromvendors such as Founder, Dynalab Inc., and Ricoh. Once you obtain a suitable font you must install it for useby the Application Server's JVM, as described here.
To install the TrueType fonts:
1. Copy the TrueType font to the <PS_HOME>/jre/lib/fonts directory.2. The font should come with an example fonts.scale.* file. Find this file and append the entries (notincluding the number at the top) to the fonts.scale file in <PS_HOME>/jre/lib/fonts.
3. Edit the number at the top of the new fonts.scale file to reflect the number of entries (the old numberplus the number at the top of the example file).
4. Run mkfontdir in this directory.5. Edit PSOFTFont.properties to point to this file for the language you are configuring (see above).
See AlsoFounder: www.foundertype.com
Dynalab Inc.: www.dynalab.com
Ricoh: www.ricoh.com
Copyright © 2006, Oracle. All rights reserved. 237

Configuring the Application Server on UNIX Chapter 9B
238 Copyright © 2006, Oracle. All rights reserved.

CHAPTER 10A
Setting Up the PeopleSoft Pure InternetArchitecture in GUI Mode
This chapter discusses:
• Understanding PeopleSoft Pure Internet Architecture
• Using Authentication Domains in the PeopleSoft Pure Internet Architecture Installation
• Installing the PeopleSoft Pure Internet Architecture on Oracle Application Server in GUI Mode
• Installing the PeopleSoft Pure Internet Architecture on WebLogic in GUI Mode
• Installing the PeopleSoft Pure Internet Architecture on WebSphere
• Encrypting the Password (AIX Only)
• Testing the PeopleSoft Pure Internet Architecture Installation
Understanding PeopleSoft Pure Internet ArchitectureThis chapter explains how to install and configure the components of the PeopleSoft Pure Internet Architecture(PIA) in GUI mode. It includes instructions for installing the PeopleSoft files on Oracle Application Server(OAS), WebLogic, and WebSphere. Only complete the instructions for the web server product that youinstalled.
See “Installing Web Server Products.”
The setup program for the PeopleSoft Pure Internet Architecture is installed to the web server machine whenyou run the PeopleSoft Installer and select the PeopleSoft Web Server option.
See “Using the PeopleSoft Installer.”
PeopleSoft only supports customer installations that use the version of the web servers packaged withPeopleTools. You must install the web server before you install the PeopleSoft Pure Internet Architecture.Before you install the PeopleSoft Pure Internet Architecture, you must also have configured an applicationserver, as described in the previous chapter.
If your web server is on a different machine than your application server, you need to make sure you have JREinstalled on your web server to run the PIA installation.
The initial PIA setup automatically creates the default PeopleSoft site named ps. In subsequent PIA setups,change the site name from ps to a unique value. We recommend using the database name. This is handy foreasy identification and ensures that the database web server files are installed in a unique web site.
Copyright © 2006, Oracle. All rights reserved. 239
Setting Up the PeopleSoft Pure Internet Architecture in GUI Mode Chapter 10A
The URL that you use to invoke PIA must conform to ASN.1 specifications. That is, it may containonly alphanumeric characters, dots ("."), or dashes ("-"). The URL must not begin or end with a dotor dash, or contain consecutive dots (".."). If the URL includes more than one portion, separated bydots, do not use a number to begin a segment if the other segments contain letters. For example,"mycompany.second.country.com" is correct, but "mycompany.2nd.country.com" is wrong.
Note. If you want to connect between multiple application databases, you need to implement single signon.
Note. If the PeopleSoft Pure Internet Architecture installation encounters an error, it will indicate which logfiles to refer to.
See “Installing Web Server Products.”
Warning! Do not use GUI mode to install the PeopleSoft Pure Internet Architecture if you want to installon a WebSphere server and you are running on a UNIX platform. In this situation, use console mode toset up the PeopleSoft Pure Internet Architecture.
Note. The machine on which you run the PeopleSoft Pure Internet Architecture install must be running in 256color mode. This is not necessary for UNIX or console mode.
The PeopleSoft Pure Internet Architecture installation includes the following products:
• PeopleSoft Pure Internet Architecture. This product is the centerpiece of the PeopleSoft architecturethat enables users to work on a machine with only a supported browser installed. This option installsthe servlets required for deploying PeopleSoft Applications and for the PeopleSoft Portal. The portalpacks and Enterprise Portal have their own installation instructions, which are available on CustomerConnection. For an overview of the various types of portals, consult the following.
See Enterprise PeopleTools 8.48 PeopleBook: Internet Technology.• PeopleSoft Report Repository. This product works in conjunction with Process Scheduler to allow reportdistribution over the web.
• PeopleSoft Integration Gateway. This product is the entry and exit point for all messages to and fromthe Integration Broker. Its Java-based Connector architecture allows asynchronous and synchronousmessages to be sent over a variety of standard protocols, many that are delivered at install, or throughcustom connectors.
• PeopleSoft CTI Console. This product works in conjunction with CTI vendor software to enable call centeragents to take advantage of browser based teleset management and automatic population of applicationpages with relevant data associated with incoming calls, such as customer or case details.
See Enterprise PeopleTools 8.48 PeopleBook: PeopleSoft MultiChannel Framework.• PeopleSoft Sync Server Gateway. The Sync Server is a specialized application server optimized forconcurrent multi-user synchronization processing in support of PeopleTools Mobile Agent. The webserver-based Sync Gateway routes synchronization requests and messages to and from the appropriateSync Server.
See Enterprise PeopleTools 8.48 PeopleBook: PeopleSoft Mobile Agent.
• Environment Management Hub. The Environment Management hub is a web application that is installedwith the PeopleSoft Pure Internet Architecture and portal. It is started along with the rest of the webapplications when the user boots the web server. You cannot start the Environment Management Hub on a
240 Copyright © 2006, Oracle. All rights reserved.
Chapter 10A Setting Up the PeopleSoft Pure Internet Architecture in GUI Mode
server that is configured to run HTTPS; in other words, if you plan to run Environment Management, yourPIA server needs to be configured in HTTP mode.
See Enterprise PeopleTools 8.48 PeopleBook: Software Updates.
See AlsoEnterprise PeopleTools 8.48 PeopleBook: Security Administration
Enterprise PeopleTools 8.48 PeopleBook: System and Server Administration
Using Authentication Domains in the PeopleSoft PureInternet Architecture Installation
You have the option to specify an authentication domain when you install the PeopleSoft Pure InternetArchitecture on OAS, WebLogic, or WebSphere.
Note. The authentication domain was referred to as the Authentication Token Domain in previous releases,and that term is still seen in the software.
When an authentication domain is specified during the PeopleSoft Pure Internet Architecture install, that valuegets used as the Cookie domain in the web server configuration. The main requirements when setting acookie domain are:
• The host must have a fully qualified domain name (FQDN). The requirement that you must have a domainname does not imply that you must have a DNS, but you do need some type of naming service such asDNS or some managed ..\etc\hosts file that contains a list of the servers with their domain name.
• The cookie domain value being set must begin with a dot (.ps.com is valid, ps.com is NOT valid).• The cookie domain value being set must contain at least 1 embedded dot (.ps.com is valid, .corp.ps.comis valid, .com is NOT valid).
• The cookie domain value can only be a single domain name. It cannot be a delimiter-separated list ofdomains.
By default, the browser only sends cookies back to the machine that set the cookie. So if web servercrm.yourdomain.com sets a cookie, the browser will only send it back there. You can make the browser sendthe single signon cookie to all servers at yourdomain.com by typing your domain name in the AuthenticationToken Domain list box of web server crm.
Specifying the authentication domain may be necessary in certain cases. For example, if you plan to use thePeopleSoft portal technology, be sure to read the supporting documentation to determine whether setting theauthentication domain is required for correct operation.
See Enterprise PeopleTools 8.48 PeopleBook: Internet Technology, “Configuring the Portal Environment.”
Specify an authentication domain if you plan to run a REN Server. REN Servers are required for PeopleSoftMultiChannel Framework, Reporting, and some PeopleSoft CRM applications supported by PeopleSoftMultiChannel Framework.
See Enterprise PeopleTools 8.48 PeopleBook: PeopleSoft MultiChannel Framework.
Specify an authentication domain if you plan to use Business Objects Enterprise.
Copyright © 2006, Oracle. All rights reserved. 241

Setting Up the PeopleSoft Pure Internet Architecture in GUI Mode Chapter 10A
See “Installing and Configuring Software for Crystal Reports, ” Installing BusinessObjects Enterprise XI.
Task 10A-1: Installing the PeopleSoft Pure InternetArchitecture on Oracle Application Server in GUI Mode
This section discusses:
• Installing the PeopleSoft Pure Internet Architecture on Oracle Application Server
• Uninstalling the PeopleSoft Pure Internet Architecture from Oracle Application Server
Note. The installation of the PeopleSoft Pure Internet Architecture on Oracle Application Server includes thePeopleSoft Provider. Use this to configure PeopleSoft portlets on Oracle Portal pages.
See Enterprise PeopleTools 8.48 PeopleBook: Internet Technology, “Deploying PeopleSoft Portlets onOracle Portal Pages.”
Task 10A-1-1: Installing the PeopleSoft Pure InternetArchitecture on Oracle Application ServerBefore installing the PeopleSoft Pure Internet Architecture (PIA) on Oracle Application Server (OAS), youmust have installed the OAS software.
See “Installing Web Server Products, ” Installing Oracle Application Server.
When installing PIA on OAS, you must work with a local copy of the PIA installation software; you cannotinstall remotely. If you are doing the installation on a machine other than the one on which you installedPeopleTools, copy the <PS_HOME>\setup\mpinternet directory to the local machine.
1. Start opmn process if necessary.
To check the status of the opmn process run this command:
<OAS_HOME>\opmn\bin\opmnctl status
If you get the response, “Unable to connect to opmn”, start it by running this command:<OAS_HOME>\opmn\bin\opmnctl start
See “Installing Web Server Products,” Installing Oracle Application Server.
2. Start dcm-daemon process if necessary.
To check the status of dcm-daemon run this command:
<OAS_HOME>\opmn\bin\opmnctl status
If the dcm-daemon’s status is not “Alive”, start it by running this command:<OAS_HOME>\opmn\bin\opmnctl startproc ias-component=dcm-daemon
3. Navigate to <PS_HOME>\setup\mpinternet.
4. Run setup.<OS>.
242 Copyright © 2006, Oracle. All rights reserved.
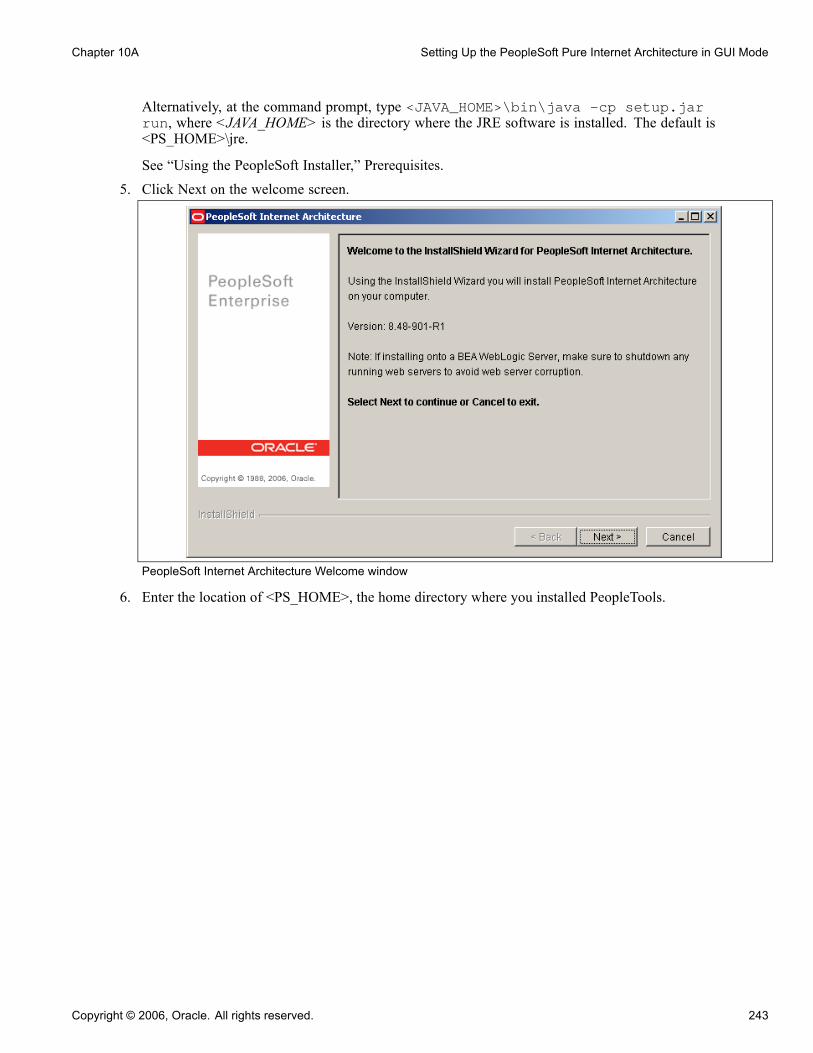
Chapter 10A Setting Up the PeopleSoft Pure Internet Architecture in GUI Mode
Alternatively, at the command prompt, type <JAVA_HOME>\bin\java -cp setup.jarrun, where <JAVA_HOME> is the directory where the JRE software is installed. The default is<PS_HOME>\jre.
See “Using the PeopleSoft Installer,” Prerequisites.
5. Click Next on the welcome screen.
PeopleSoft Internet Architecture Welcome window
6. Enter the location of <PS_HOME>, the home directory where you installed PeopleTools.
Copyright © 2006, Oracle. All rights reserved. 243
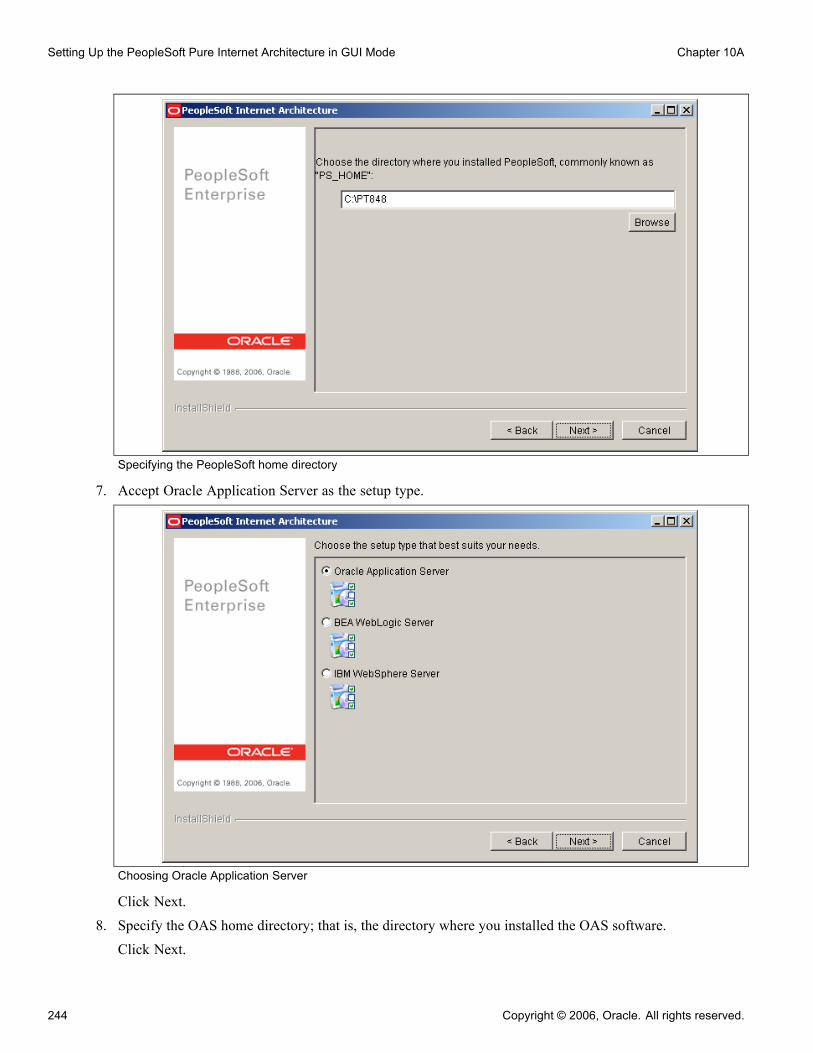
Setting Up the PeopleSoft Pure Internet Architecture in GUI Mode Chapter 10A
Specifying the PeopleSoft home directory
7. Accept Oracle Application Server as the setup type.
Choosing Oracle Application Server
Click Next.8. Specify the OAS home directory; that is, the directory where you installed the OAS software.Click Next.
244 Copyright © 2006, Oracle. All rights reserved.

Chapter 10A Setting Up the PeopleSoft Pure Internet Architecture in GUI Mode
Specifying the OAS home directory
9. Enter an application name for this web server (for example, PeopleSoft) and select the type of server youwant to install.
The Single Component Server option creates one OC4J component to hold all the PeopleSoft webapplications. The installer uses the Application Name you enter for the new component’s name.
The Multi Component Server option splits the PeopleSoft web application into three OC4Jcomponents—PIA_<application_name>, PSOL_<application_name> (for the PeopleSoft Online Library),and PSEMHUB_<application_name> (for the PeopleSoft Environment Management Framework). EachOC4J component has its own JVM, so the multicomponent option will be better suited for installationsneeding higher performance or reliability. If you are not sure which to pick choose Single.
See Enterprise PeopleTools 8.48 PeopleBook: System and Server Administration, “Working with OracleApplication Server 10g.”
See “Installing PeopleBooks.”
See Enterprise PeopleTools 8.48 PeopleBook: Software Updates, “Configuring and Running EnvironmentManagement Components.”
10. If you entered a new (unused) name, click Next and skip the next two steps. Continue with step 13.
Copyright © 2006, Oracle. All rights reserved. 245

Setting Up the PeopleSoft Pure Internet Architecture in GUI Mode Chapter 10A
Specifying the application name and server type
11. If the name you enter belongs to an OAS web server application that already exists, select SingleComponent Server or Multi Component Server and click Next.
12. Select one of the following options for the type of installation:
Selecting the installation options for an existing OAS application
246 Copyright © 2006, Oracle. All rights reserved.

Chapter 10A Setting Up the PeopleSoft Pure Internet Architecture in GUI Mode
• Create an additional site in the existing application: Select this option to install only the necessary filesfor defining an additional PeopleSoft site onto the existing OAS web server configuration.
• Deploy additional PeopleSoft application extensions: This option is solely for use with PeopleSoftproduct applications. PeopleSoft application extensions are provided with certain PeopleSoftapplications, and this option allows you to deploy those extensions. Consult the installationdocumentation for your PeopleSoft application to see whether this option is appropriate. PeopleToolsdoes not use application extensions.
• Go back to enter a new application name: Select this option to return to the previous window.
Note. To redeploy PIA on OAS, you must remove the OC4J component(s) and perform a fresh PIAinstallation. Use Application Server Control or dcmctl commands to remove the OC4J component(s). Notethat any customizations done after the PIA install must be done again.
13. If you select the option Deploy additional PeopleSoft application extensions, a window appears listing theavailable application packages. Select the check boxes for those applications you want to deploy:
Selecting application packages to deploy
14. Enter a web site name; the default is ps.
Copyright © 2006, Oracle. All rights reserved. 247
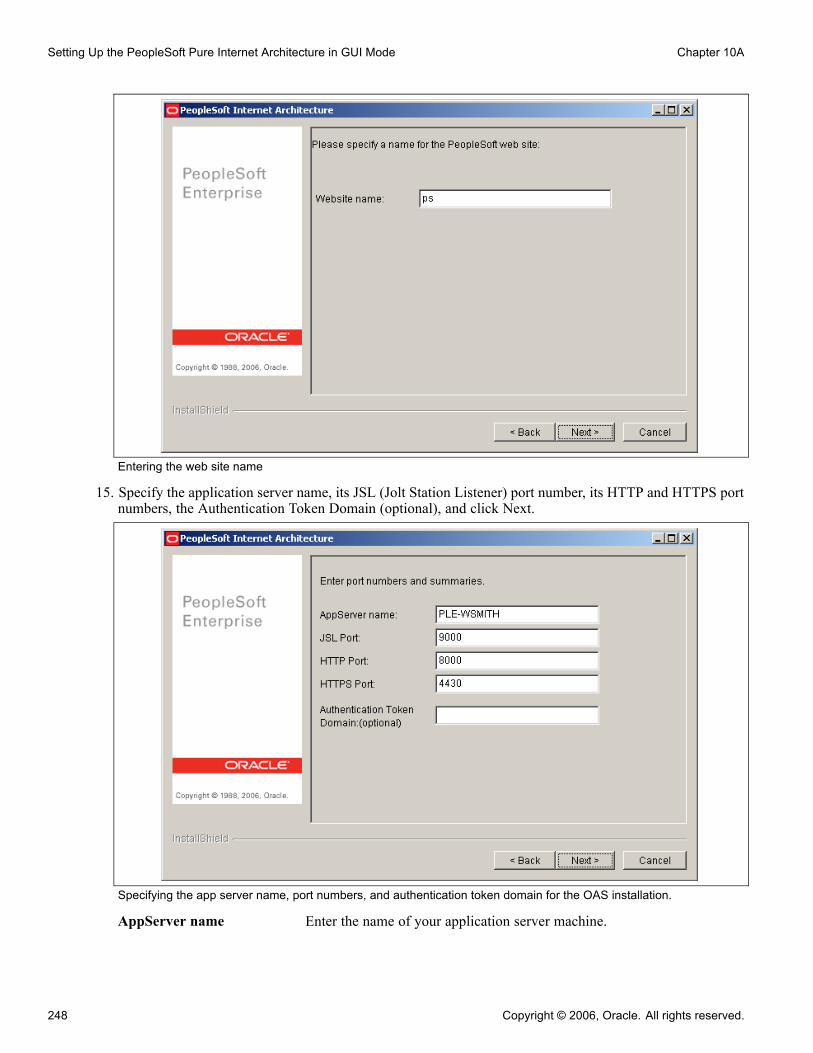
Setting Up the PeopleSoft Pure Internet Architecture in GUI Mode Chapter 10A
Entering the web site name
15. Specify the application server name, its JSL (Jolt Station Listener) port number, its HTTP and HTTPS portnumbers, the Authentication Token Domain (optional), and click Next.
Specifying the app server name, port numbers, and authentication token domain for the OAS installation.
AppServer name Enter the name of your application server machine.
248 Copyright © 2006, Oracle. All rights reserved.

Chapter 10A Setting Up the PeopleSoft Pure Internet Architecture in GUI Mode
JSL Port Enter the JSL port number you specified when setting up the applicationserver (the default is 9000).
HTTP/HTTPS The default HTTP/HTTPS ports of the Oracle HTTP Server (OHS) are80/443 for Windows and 7777/4443 for UNIX/Linux. However, youshould enter different HTTP/HTTPS port values at this point for the PIAinstallation. Please use any unused port other than 80/443 for Windowsand 7777/4443 for UNIX/Linux. The PIA installation may fail or maynot work properly if you enter the same HTTP/HTTPS ports for the PIAinstallation as the default OHS ports.To access PIA, specify a URL with either the default OHS portvalues, or the port values you enter here for PIA. For example,http://<machine_name>:<port_number>/<site_name>/signon.html.For Multi Component Server, the HTTP/HTTPS ports that you enter herecorrespond to the OC4J component PIA_<application_name>.
Authentication TokenDomain
The value you enter for Authentication Token Domain must match thevalue you specify for the authentication domain when configuring yourapplication server. In addition, certain installation configurations requirethat you specify an authentication domain.
See Using Authentication Domains in the PeopleSoft Pure Internet Architecture Installation.16. Enter the name of the web profile in the database that will be used to configure this PeopleSoft web site.This can be either a predelivered name as shown on the page, or one you intend to create yourself usingPeopleTools, Web Profile Configuration, after logging in. Each site is configured according to the profileyou specify here when it is first accessed after the web server is booted. The user ID and password will beused by the PIA servlets themselves at runtime to log in to the application server to retrieve the profile. Forapplications on PeopleTools 8.44 and above, PeopleSoft predelivers the PTWEBSERVER user ID for thepurpose of configuring PIA servlets at runtime and running the Performance Monitor Agents. You mayhave to unlock that user profile in certain application databases. If you have any problems logging in afterstarting the web server, refer to the application server domain logs.
See Enterprise PeopleTools 8.48 PeopleBook: Internet Technology.
Note. If you are upgrading your application database to PeopleTools 8.44 and above, you must set up thePTWEBSERVER user ID. Go to PeopleTools, Security, User Profiles, User Profiles. Click Add a NewValue, enter PTWEBSERVER for User ID, and click Add. Enter and confirm a password, and enter adescription. Enter the role PeopleTools Web Server and then click Save.
Copyright © 2006, Oracle. All rights reserved. 249

Setting Up the PeopleSoft Pure Internet Architecture in GUI Mode Chapter 10A
Specifying the web profile, user ID, and password
17. Specify the root directory for the Report Repository (c:\psreports by default), and click Next. You caninstals to any location.
Note. For the Report Repository directory, specify the same directory that you specify as the HomeDirectory. Make sure that this directory is shared.
See “Setting Up Process Scheduler on Windows,” Setting Up the Process Scheduler to Transfer Reportsand Logs to Report Repository.
250 Copyright © 2006, Oracle. All rights reserved.

Chapter 10A Setting Up the PeopleSoft Pure Internet Architecture in GUI Mode
Specifying the Report Repository location
18. Verify your selections on the summary window (click Back if you need to make any changes).Click Install to start the installation. An indicator appears showing the progress of the installation.
Verifying the installation information
19. Click Finish.
The default installation directory is <OAS_HOME>\j2ee\<component>\application\<application>.
Copyright © 2006, Oracle. All rights reserved. 251
Setting Up the PeopleSoft Pure Internet Architecture in GUI Mode Chapter 10A
Task 10A-1-2: Uninstalling the PeopleSoft Pure InternetArchitecture from Oracle Application ServerTo uninstall using the distributed configuration management control (dcmctl):
1. Change directory to <OAS_HOME>\dcm\bin.2. Run this command to view a list of component names:
dcmctl listcomponents
The component name is the name you entered when asked for Application Name in the task “Installing thePeopleSoft Pure Internet Architecture on Oracle Application Server.” The documentation used PeopleSoftas an example.
3. Run the following command, substituting your application name for <PIA_COMPONENT>:
dcmctl removecomponent -component <PIA_COMPONENT>
4. Run the following command:
dcmctl updateconfig
It is also possible to uninstall using the Application Server Control pages.
See Enterprise PeopleTools 8.48 PeopleBook: System and Server Administration, “Working with OracleApplication Server 10g.”
Task 10A-2: Installing the PeopleSoft Pure InternetArchitecture on WebLogic in GUI Mode
This section describes how to install the PeopleSoft Pure Internet Architecture on WebLogic.
See “Installing Web Server Products,” Installing WebLogic.
See Enterprise PeopleTools 8.48 PeopleBook: System and Server Administration, “Working with BEAWebLogic.”
Note. The installation will not proceed with an incorrect version of the WebLogic Server Service Pack. Makesure the correct service pack version (at least SP5) for WebLogic Server is properly installed prior to runningthis PeopleSoft Pure Internet Architecture install.
To install the PeopleSoft Pure Internet Architecture on WebLogic:
1. Go to <PS_HOME>\setup\mpinternet.2. Run setup.<OS>.3. Click Next in the Welcome screen.4. Enter the same <PS_HOME> directory that you specified when running the PeopleTools Installer.5. Choose BEA WebLogic Server and click Next.
252 Copyright © 2006, Oracle. All rights reserved.
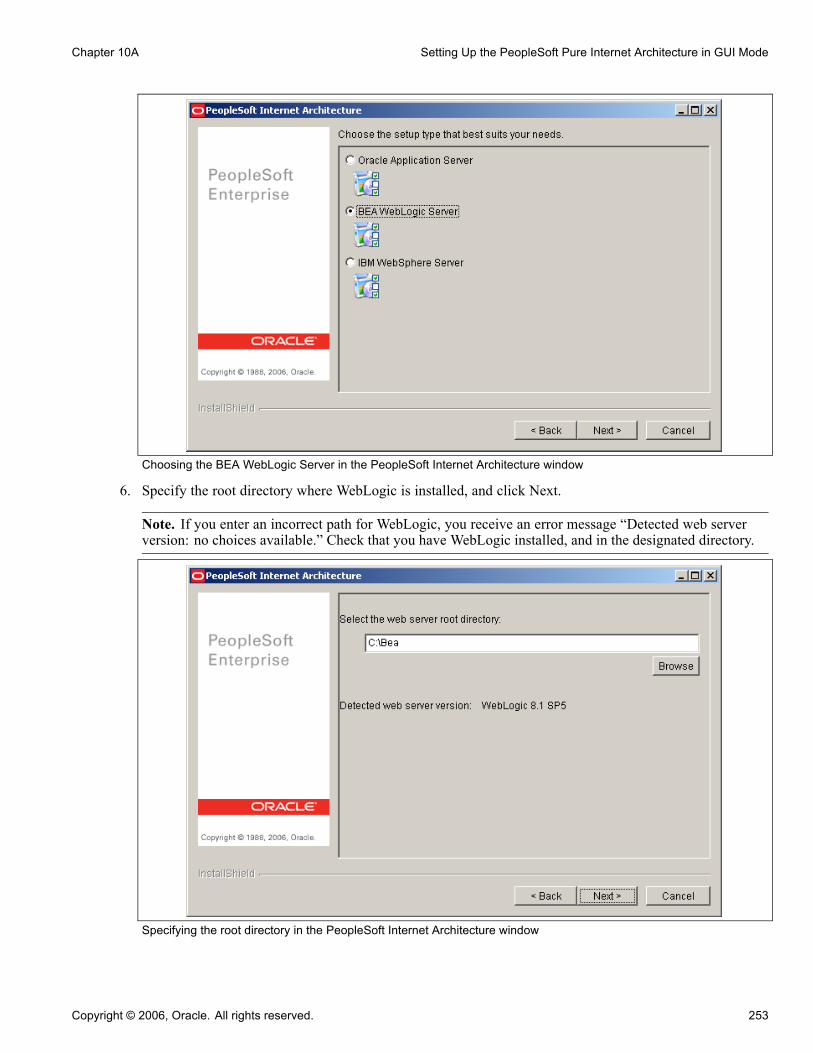
Chapter 10A Setting Up the PeopleSoft Pure Internet Architecture in GUI Mode
Choosing the BEA WebLogic Server in the PeopleSoft Internet Architecture window
6. Specify the root directory where WebLogic is installed, and click Next.
Note. If you enter an incorrect path for WebLogic, you receive an error message “Detected web serverversion: no choices available.” Check that you have WebLogic installed, and in the designated directory.
Specifying the root directory in the PeopleSoft Internet Architecture window
Copyright © 2006, Oracle. All rights reserved. 253
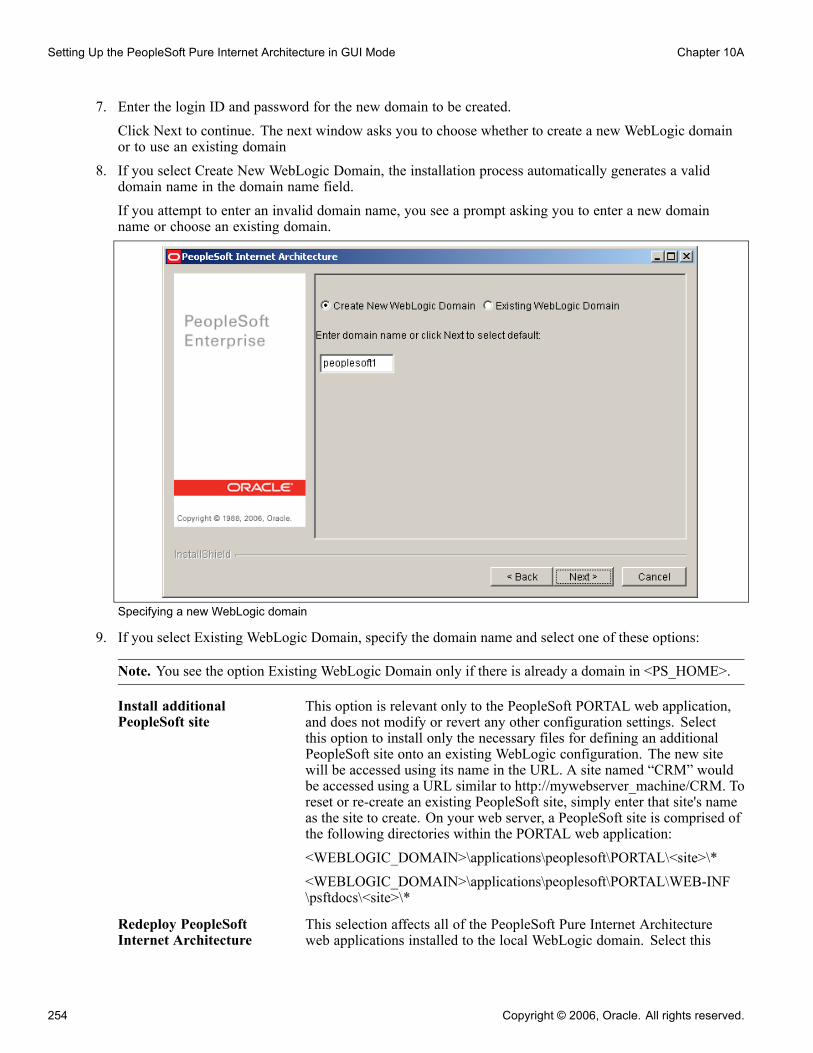
Setting Up the PeopleSoft Pure Internet Architecture in GUI Mode Chapter 10A
7. Enter the login ID and password for the new domain to be created.Click Next to continue. The next window asks you to choose whether to create a new WebLogic domainor to use an existing domain
8. If you select Create New WebLogic Domain, the installation process automatically generates a validdomain name in the domain name field.If you attempt to enter an invalid domain name, you see a prompt asking you to enter a new domainname or choose an existing domain.
Specifying a new WebLogic domain
9. If you select Existing WebLogic Domain, specify the domain name and select one of these options:
Note. You see the option Existing WebLogic Domain only if there is already a domain in <PS_HOME>.
Install additionalPeopleSoft site
This option is relevant only to the PeopleSoft PORTAL web application,and does not modify or revert any other configuration settings. Selectthis option to install only the necessary files for defining an additionalPeopleSoft site onto an existing WebLogic configuration. The new sitewill be accessed using its name in the URL. A site named “CRM” wouldbe accessed using a URL similar to http://mywebserver_machine/CRM. Toreset or re-create an existing PeopleSoft site, simply enter that site's nameas the site to create. On your web server, a PeopleSoft site is comprised ofthe following directories within the PORTAL web application:<WEBLOGIC_DOMAIN>\applications\peoplesoft\PORTAL\<site>\*<WEBLOGIC_DOMAIN>\applications\peoplesoft\PORTAL\WEB-INF\psftdocs\<site>\*
Redeploy PeopleSoftInternet Architecture
This selection affects all of the PeopleSoft Pure Internet Architectureweb applications installed to the local WebLogic domain. Select this
254 Copyright © 2006, Oracle. All rights reserved.

Chapter 10A Setting Up the PeopleSoft Pure Internet Architecture in GUI Mode
option to redeploy all of the class files and jar files that comprise webcomponents of PeopleSoft Pure Internet Architecture. WebLogic Serverconfiguration files, scripts and any existing PeopleSoft (PORTAL) sitesare not overwritten, unless you specify an existing PeopleSoft siteduring this setup.
Re-create WebLogicdomain and redeployPeopleSoft InternetArchitecture
This option affects WebLogic Server configuration and all of thePeopleSoft Pure Internet Architecture web applications installed to thelocal WebLogic domain. Select this option to completely remove anexisting WebLogic domain and create the newly specified PeopleSoft site.
Deploy additionalPeopleSoft applicationextensions
This option is solely for use with PeopleSoft applications. PeopleSoftapplication extensions are provided with certain PeopleSoft applications,and this option allows you to deploy those extensions. Consult theinstallation documentation for your PeopleSoft application to see if thisoption is appropriate. PeopleTools does not use application extensions.
Warning! Re-creating an existing domain will delete everything previously installed into that domain,including PeopleBooks. If you choose to re-create—instead of redeploying—a domain, you may firstwant to back up your PeopleBooks <docroot> directory (typically, htmldoc) at the top level of thePeopleSoft Online Library (PSOL) web site. You can then restore it after the PeopleSoft Pure InternetArchitecture installation.
See Enterprise PeopleTools 8.48 PeopleBook: Internet Technology.
Selecting an existing WebLogic domain
10. If there are application packages in the archives directory, you'll be asked whether you want to deploythem. (If you are using an existing domain, you'll only be prompted if you selected Deploy additionalPeopleSoft extensions.)
Copyright © 2006, Oracle. All rights reserved. 255
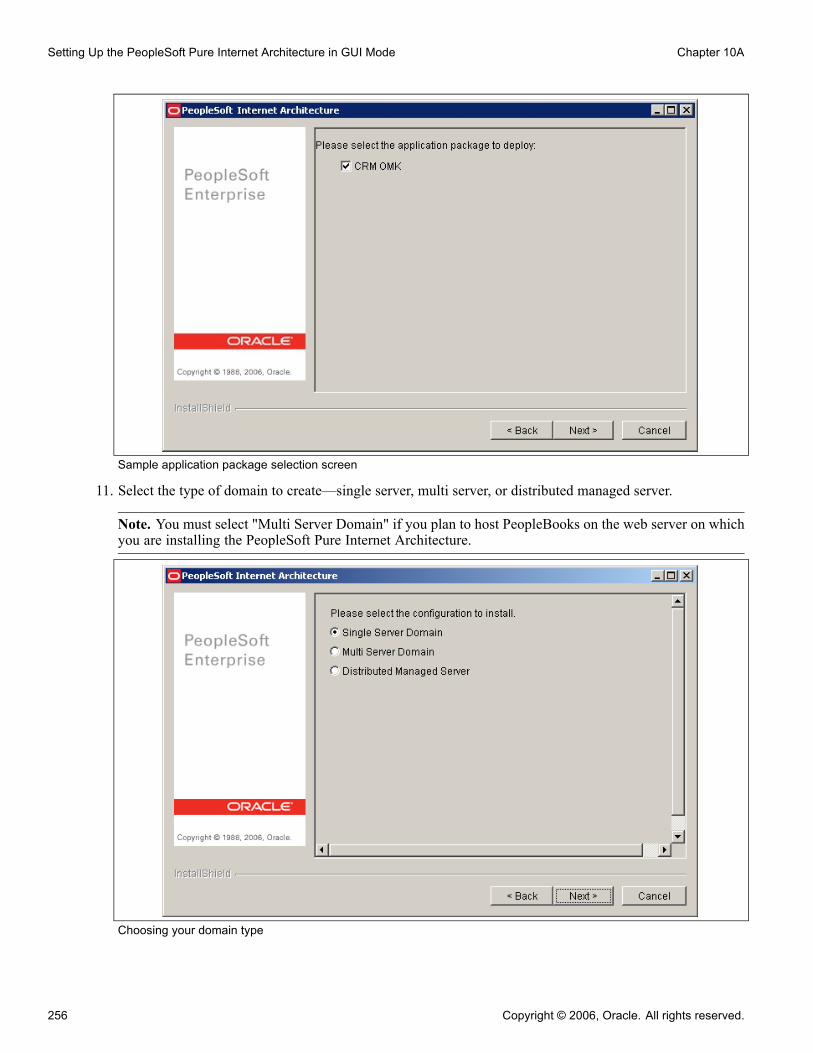
Setting Up the PeopleSoft Pure Internet Architecture in GUI Mode Chapter 10A
Sample application package selection screen
11. Select the type of domain to create—single server, multi server, or distributed managed server.
Note. You must select "Multi Server Domain" if you plan to host PeopleBooks on the web server on whichyou are installing the PeopleSoft Pure Internet Architecture.
Choosing your domain type
256 Copyright © 2006, Oracle. All rights reserved.
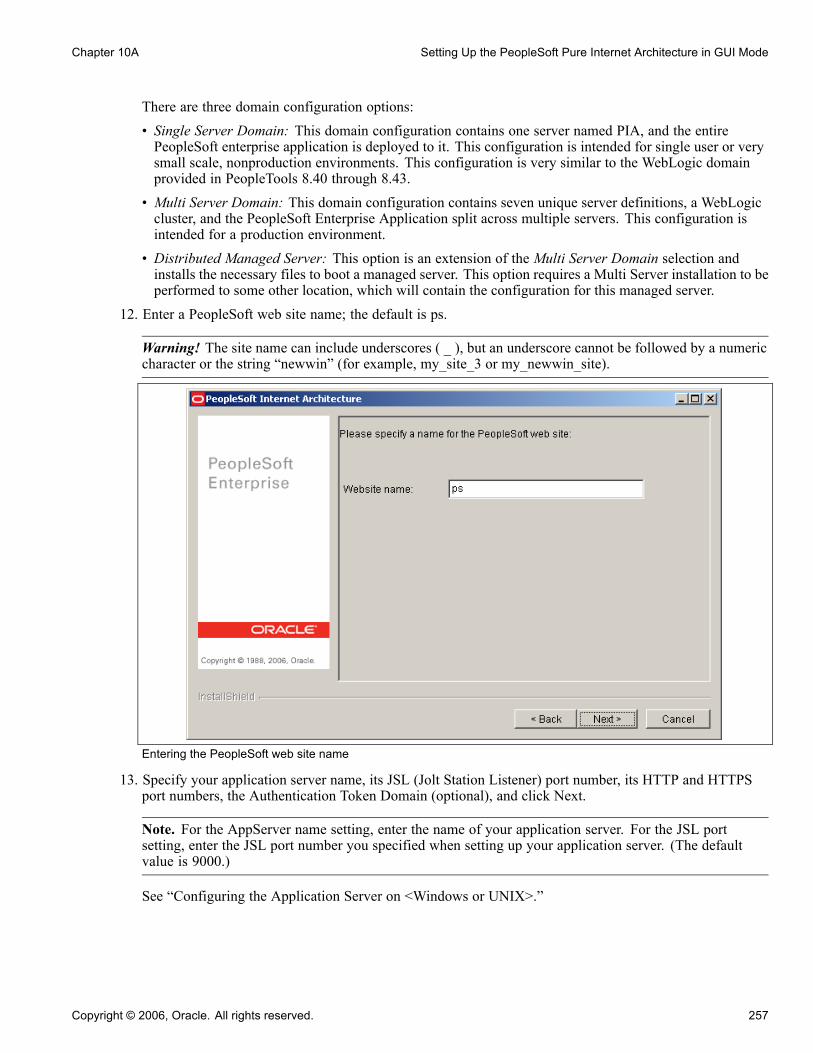
Chapter 10A Setting Up the PeopleSoft Pure Internet Architecture in GUI Mode
There are three domain configuration options:• Single Server Domain: This domain configuration contains one server named PIA, and the entirePeopleSoft enterprise application is deployed to it. This configuration is intended for single user or verysmall scale, nonproduction environments. This configuration is very similar to the WebLogic domainprovided in PeopleTools 8.40 through 8.43.
• Multi Server Domain: This domain configuration contains seven unique server definitions, a WebLogiccluster, and the PeopleSoft Enterprise Application split across multiple servers. This configuration isintended for a production environment.
• Distributed Managed Server: This option is an extension of the Multi Server Domain selection andinstalls the necessary files to boot a managed server. This option requires a Multi Server installation to beperformed to some other location, which will contain the configuration for this managed server.
12. Enter a PeopleSoft web site name; the default is ps.
Warning! The site name can include underscores ( _ ), but an underscore cannot be followed by a numericcharacter or the string “newwin” (for example, my_site_3 or my_newwin_site).
Entering the PeopleSoft web site name
13. Specify your application server name, its JSL (Jolt Station Listener) port number, its HTTP and HTTPSport numbers, the Authentication Token Domain (optional), and click Next.
Note. For the AppServer name setting, enter the name of your application server. For the JSL portsetting, enter the JSL port number you specified when setting up your application server. (The defaultvalue is 9000.)
See “Configuring the Application Server on <Windows or UNIX>.”
Copyright © 2006, Oracle. All rights reserved. 257

Setting Up the PeopleSoft Pure Internet Architecture in GUI Mode Chapter 10A
Specifying your application server name, your port numbers, andthe authentication token domain
Note. The value you enter for Authentication Token Domain must match the value you specify whenconfiguring your application server, as described earlier in this book. In addition, certain installationconfigurations require that you specify an authentication domain.
See Using Authentication Domains in the PeopleSoft Pure Internet Architecture Installation.
Note. If you enter a value for Authentication Token Domain, the URL to invoke PeopleSoft PureInternet Architecture must include the network domain name in the URL. For example, if youdo not enter an authentication domain, the URL to invoke PeopleSoft Pure Internet Architectureis http://MachineName/ps/signon.html. If you do enter a value for the authentication domain(for example, .myCompany.com), the URL to invoke PeopleSoft Pure Internet Architecture ishttp://MachineName.myCompany.com/ps/signon.html. In addition, if the web server for the databaseis using an http port other than the default port of 80, the URL must include the port number,for example http://MachineName:8080/ps/signon.html if there is no authentication domain, orhttp://MachineName.myCompany.com:8080/ps/signon.html if there is an authentication domain. The URLmust also comply with the naming rules given earlier in this chapter.
See Understanding the PeopleSoft Pure Internet Architecture.14. Enter the name of the web profile name in the database that will be used to configure this PeopleSoftweb site.This can be the name of either a predelivered one shown on the page, or one you intend to create yourselfusing PeopleTools, Web Profile Configuration, after logging in. Each site is configured according to theprofile you specify here when it is first accessed after the web server is booted. The user ID and passwordwill be used by the PIA servlets themselves at runtime to log in to the application server to retrieve theprofile. For applications on PeopleTools 8.44 and above, PeopleSoft predelivers the PTWEBSERVER userID for the purpose of configuring PIA servlets at runtime and running the Performance Monitor Agents.
258 Copyright © 2006, Oracle. All rights reserved.
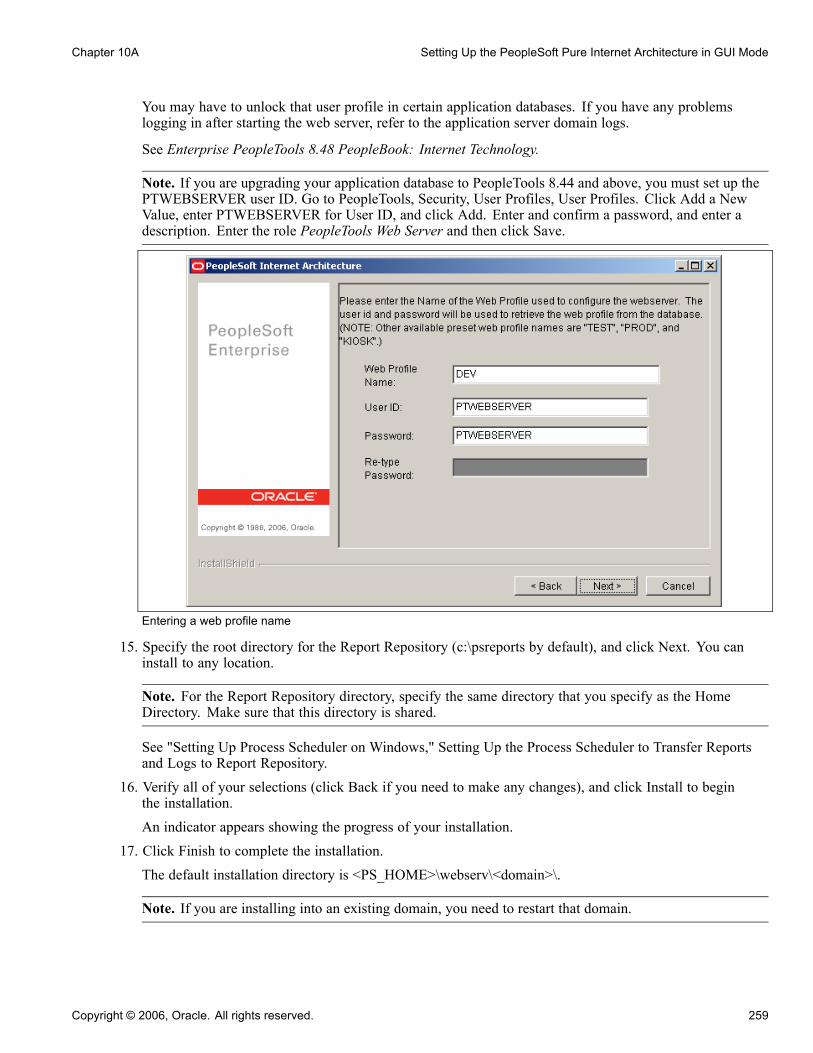
Chapter 10A Setting Up the PeopleSoft Pure Internet Architecture in GUI Mode
You may have to unlock that user profile in certain application databases. If you have any problemslogging in after starting the web server, refer to the application server domain logs.
See Enterprise PeopleTools 8.48 PeopleBook: Internet Technology.
Note. If you are upgrading your application database to PeopleTools 8.44 and above, you must set up thePTWEBSERVER user ID. Go to PeopleTools, Security, User Profiles, User Profiles. Click Add a NewValue, enter PTWEBSERVER for User ID, and click Add. Enter and confirm a password, and enter adescription. Enter the role PeopleTools Web Server and then click Save.
Entering a web profile name
15. Specify the root directory for the Report Repository (c:\psreports by default), and click Next. You caninstall to any location.
Note. For the Report Repository directory, specify the same directory that you specify as the HomeDirectory. Make sure that this directory is shared.
See "Setting Up Process Scheduler on Windows," Setting Up the Process Scheduler to Transfer Reportsand Logs to Report Repository.
16. Verify all of your selections (click Back if you need to make any changes), and click Install to beginthe installation.An indicator appears showing the progress of your installation.
17. Click Finish to complete the installation.The default installation directory is <PS_HOME>\webserv\<domain>\.
Note. If you are installing into an existing domain, you need to restart that domain.
Copyright © 2006, Oracle. All rights reserved. 259
Setting Up the PeopleSoft Pure Internet Architecture in GUI Mode Chapter 10A
Task 10A-3: Installing the PeopleSoft Pure InternetArchitecture on WebSphere
This section discusses:
• Prerequisites
• Installing the PeopleSoft Pure Internet Architecture on WebSphere
• Uninstalling the PeopleSoft Pure Internet Architecture from WebSphere
PrerequisitesThe information in this section applies to the installation of PeopleSoft Pure Internet Architecture on aWebSphere server.
Important! For more detailed WebSphere installation topics and Frequently Asked Questions (FAQs) refer tothe PeopleSoft Customer Connection link ftp://ftp.peoplesoft.com/outgoing/PTools/websphere/51/docs.
Each WebSphere server runs one PeopleSoft Pure Internet Architecture application. If you need to install morethan one PeopleSoft Pure Internet Architecture application on your WebSphere server, you must create a newserver from the WebSphere Administration console and then deploy the PeopleSoft Pure Internet Architectureapplication to the new WebSphere server. Deploy PeopleSoft Pure Internet Architecture to WebSphereBase before clustering using Network Deployment.
You must select a unique name for each PeopleSoft Pure Internet Architecture application that you install on aWebSphere node. You cannot install two PeopleSoft Pure Internet Architecture applications with the samename to one WebSphere node.
Note. On UNIX, install the PeopleSoft Pure Internet Architecture with a user who owns WebSphere, and whoowns <PS_HOME>. Here are two examples: If WebSphere is owned by user “root” and group “system,”PeopleSoft Pure Internet Architecture must be installed with “root” and group “system.” If WebSphereis owned by user “wsadmin” and group “wsadmin,” then PeopleSoft Pure Internet Architecture must beinstalled with wsadmin/wsadmin as the user and group.
If PeopleSoft Pure Internet Architecture needs to be installed through WebSphere Network Deployment as anEAR file, refer to the Red Paper section of Customer Connection for instructions.
See “Clustering and High Availability for PeopleSoft 8.4” (PeopleSoft Customer Connection, Site Index,Red Papers).
Be sure the Default Application is uninstalled through the Admin console before installing PeopleSoft PureInternet Architecture.
Note. You do not need to uninstall previous WebSphere PeopleSoft Pure Internet Architecture installs beforecontinuing. However, if you do decide to uninstall any previous PeopleSoft Pure Internet Architectureinstalls, you cannot just delete <PS_HOME>. Instead you need to follow the officially sanctioned uninstallprocedure described in a later section.
260 Copyright © 2006, Oracle. All rights reserved.
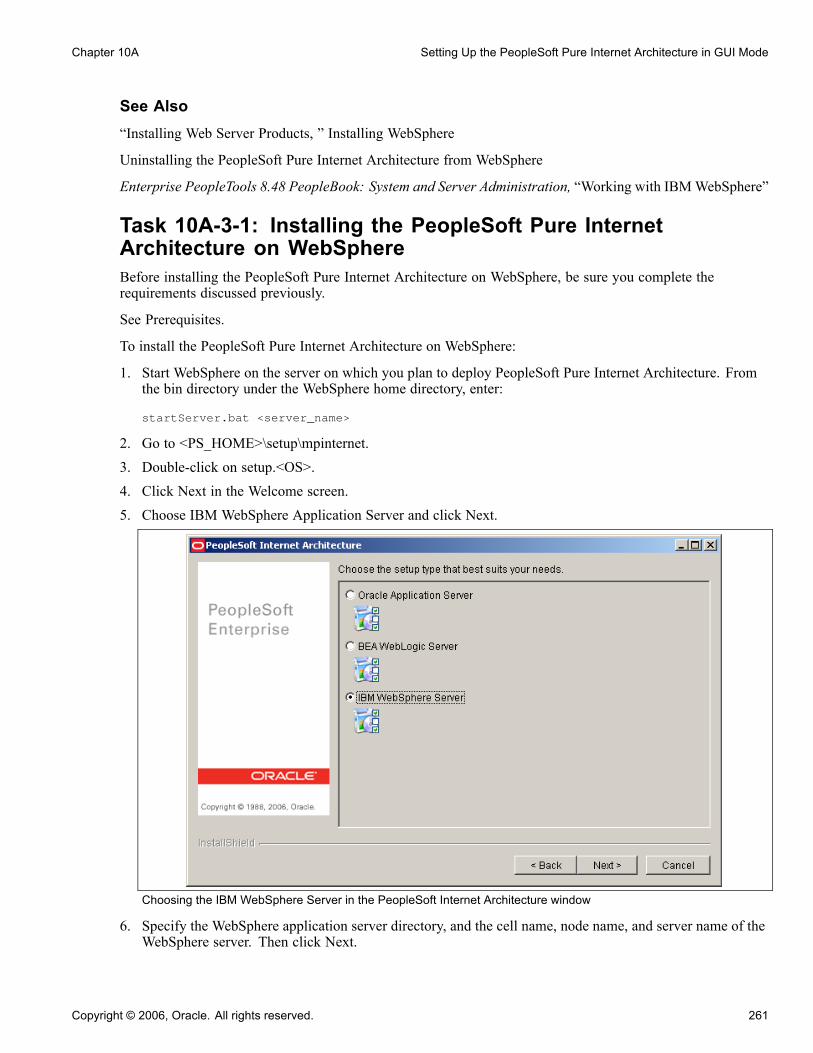
Chapter 10A Setting Up the PeopleSoft Pure Internet Architecture in GUI Mode
See Also“Installing Web Server Products, ” Installing WebSphere
Uninstalling the PeopleSoft Pure Internet Architecture from WebSphere
Enterprise PeopleTools 8.48 PeopleBook: System and Server Administration, “Working with IBMWebSphere”
Task 10A-3-1: Installing the PeopleSoft Pure InternetArchitecture on WebSphereBefore installing the PeopleSoft Pure Internet Architecture on WebSphere, be sure you complete therequirements discussed previously.
See Prerequisites.
To install the PeopleSoft Pure Internet Architecture on WebSphere:
1. Start WebSphere on the server on which you plan to deploy PeopleSoft Pure Internet Architecture. Fromthe bin directory under the WebSphere home directory, enter:
startServer.bat <server_name>
2. Go to <PS_HOME>\setup\mpinternet.3. Double-click on setup.<OS>.4. Click Next in the Welcome screen.5. Choose IBM WebSphere Application Server and click Next.
Choosing the IBM WebSphere Server in the PeopleSoft Internet Architecture window
6. Specify the WebSphere application server directory, and the cell name, node name, and server name of theWebSphere server. Then click Next.
Copyright © 2006, Oracle. All rights reserved. 261

Setting Up the PeopleSoft Pure Internet Architecture in GUI Mode Chapter 10A
Note. If the web server on which you're installing PeopleSoft Pure Internet Architecture is not up andrunning, you'll receive an error message that you need to start your web server.
Specifying the WebSphere application server directory
See Enterprise PeopleTools 8.48 PeopleBook: System and Server Administration.7. Choose whether to create a new WebSphere application (domain) or to use an existing application, andspecify the name of the application.
Note. The name you specify for each PeopleSoft Enterprise Application must be unique for eachWebSphere Node.
Note. You only see the option Existing WebSphere Application if there is already an application in<PS_HOME>.
If you select Create New WebSphere Application, the install automatically generates a valid applicationname in the application name field. If you attempt to enter an invalid application name, you'll be promptedto enter a new application name or choose an existing application.If you select Existing WebSphere Application, you can choose from a drop-down list of existingapplications, and can select whether to install an additional PeopleSoft site, redeploy PeopleSoft PureInternet Architecture, or deploy additional PeopleSoft application extensions.
262 Copyright © 2006, Oracle. All rights reserved.
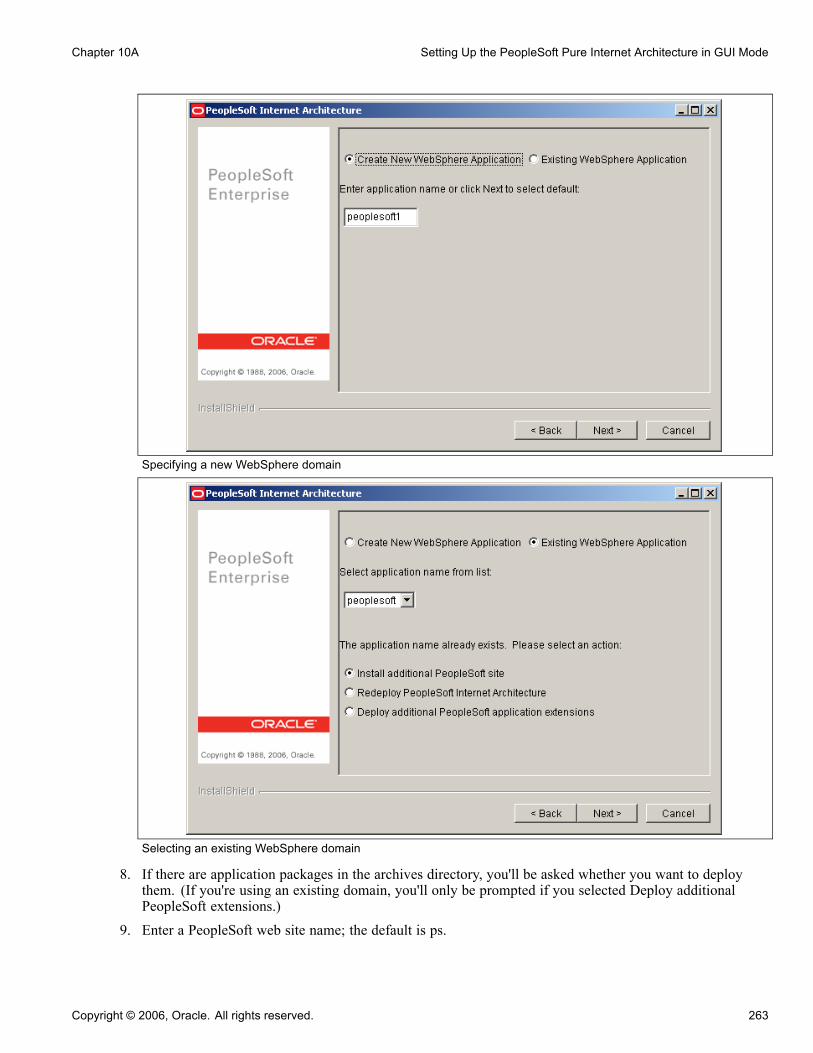
Chapter 10A Setting Up the PeopleSoft Pure Internet Architecture in GUI Mode
Specifying a new WebSphere domain
Selecting an existing WebSphere domain
8. If there are application packages in the archives directory, you'll be asked whether you want to deploythem. (If you're using an existing domain, you'll only be prompted if you selected Deploy additionalPeopleSoft extensions.)
9. Enter a PeopleSoft web site name; the default is ps.
Copyright © 2006, Oracle. All rights reserved. 263

Setting Up the PeopleSoft Pure Internet Architecture in GUI Mode Chapter 10A
Warning! The site name can include underscores ( _ ), but an underscore cannot be followed by a numericcharacter or the string “newwin” (for example, my_site_3 or my_newwin_site).
Entering the PeopleSoft web site name
10. Specify your application server name, its JSL (Jolt Station Listener) port number, its HTTP and HTTPSport numbers, the authentication token domain, and click Next.
Note. For the AppServer name setting, enter the name of your application server. For the JSL portsetting, enter the JSL port number you specified when setting up your application server. (The defaultvalue is 9000.)
See “Configuring the Application Server on Windows.”
Note. The HTTP/HTTPS port numbers are reset to those that you just specified when you restart yourWebSphere server.
264 Copyright © 2006, Oracle. All rights reserved.
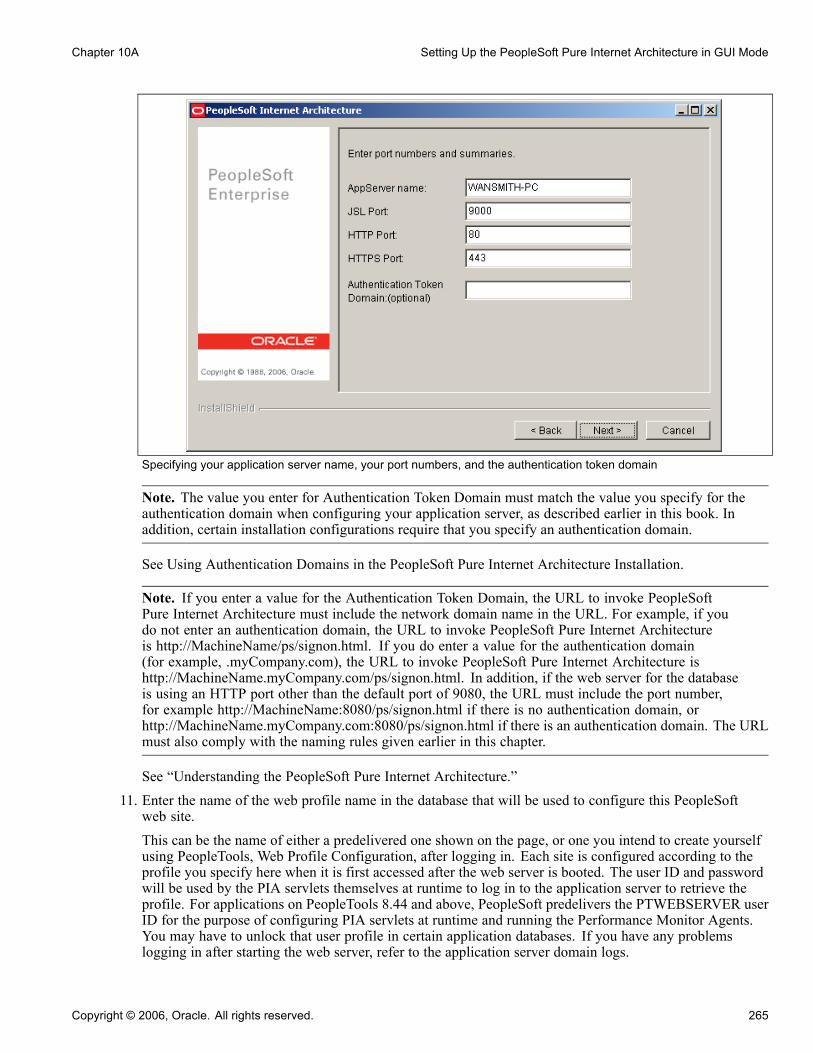
Chapter 10A Setting Up the PeopleSoft Pure Internet Architecture in GUI Mode
Specifying your application server name, your port numbers, and the authentication token domain
Note. The value you enter for Authentication Token Domain must match the value you specify for theauthentication domain when configuring your application server, as described earlier in this book. Inaddition, certain installation configurations require that you specify an authentication domain.
See Using Authentication Domains in the PeopleSoft Pure Internet Architecture Installation.
Note. If you enter a value for the Authentication Token Domain, the URL to invoke PeopleSoftPure Internet Architecture must include the network domain name in the URL. For example, if youdo not enter an authentication domain, the URL to invoke PeopleSoft Pure Internet Architectureis http://MachineName/ps/signon.html. If you do enter a value for the authentication domain(for example, .myCompany.com), the URL to invoke PeopleSoft Pure Internet Architecture ishttp://MachineName.myCompany.com/ps/signon.html. In addition, if the web server for the databaseis using an HTTP port other than the default port of 9080, the URL must include the port number,for example http://MachineName:8080/ps/signon.html if there is no authentication domain, orhttp://MachineName.myCompany.com:8080/ps/signon.html if there is an authentication domain. The URLmust also comply with the naming rules given earlier in this chapter.
See “Understanding the PeopleSoft Pure Internet Architecture.”11. Enter the name of the web profile name in the database that will be used to configure this PeopleSoftweb site.This can be the name of either a predelivered one shown on the page, or one you intend to create yourselfusing PeopleTools, Web Profile Configuration, after logging in. Each site is configured according to theprofile you specify here when it is first accessed after the web server is booted. The user ID and passwordwill be used by the PIA servlets themselves at runtime to log in to the application server to retrieve theprofile. For applications on PeopleTools 8.44 and above, PeopleSoft predelivers the PTWEBSERVER userID for the purpose of configuring PIA servlets at runtime and running the Performance Monitor Agents.You may have to unlock that user profile in certain application databases. If you have any problemslogging in after starting the web server, refer to the application server domain logs.
Copyright © 2006, Oracle. All rights reserved. 265
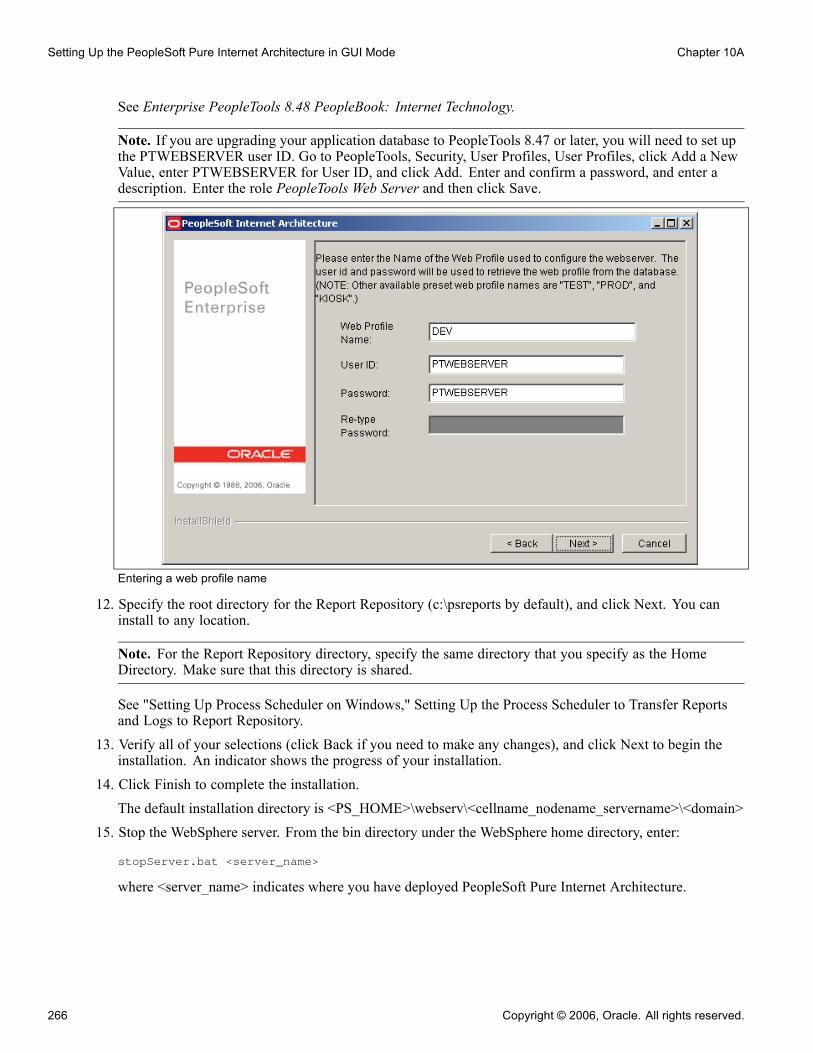
Setting Up the PeopleSoft Pure Internet Architecture in GUI Mode Chapter 10A
See Enterprise PeopleTools 8.48 PeopleBook: Internet Technology.
Note. If you are upgrading your application database to PeopleTools 8.47 or later, you will need to set upthe PTWEBSERVER user ID. Go to PeopleTools, Security, User Profiles, User Profiles, click Add a NewValue, enter PTWEBSERVER for User ID, and click Add. Enter and confirm a password, and enter adescription. Enter the role PeopleTools Web Server and then click Save.
Entering a web profile name
12. Specify the root directory for the Report Repository (c:\psreports by default), and click Next. You caninstall to any location.
Note. For the Report Repository directory, specify the same directory that you specify as the HomeDirectory. Make sure that this directory is shared.
See "Setting Up Process Scheduler on Windows," Setting Up the Process Scheduler to Transfer Reportsand Logs to Report Repository.
13. Verify all of your selections (click Back if you need to make any changes), and click Next to begin theinstallation. An indicator shows the progress of your installation.
14. Click Finish to complete the installation.The default installation directory is <PS_HOME>\webserv\<cellname_nodename_servername>\<domain>
15. Stop the WebSphere server. From the bin directory under the WebSphere home directory, enter:
stopServer.bat <server_name>
where <server_name> indicates where you have deployed PeopleSoft Pure Internet Architecture.
266 Copyright © 2006, Oracle. All rights reserved.

Chapter 10A Setting Up the PeopleSoft Pure Internet Architecture in GUI Mode
Task 10A-3-2: Uninstalling the PeopleSoft Pure InternetArchitecture from WebSphereYou cannot uninstall PeopleSoft Pure Internet Architecture simply by deleting <PS_HOME>, withoutuninstalling it from WebSphere Administration Console. If you do so, the WebSphere registry becomescorrupt, and subsequent attempts to install PeopleSoft Pure Internet Architecture will fail. Instead, if necessary,you must uninstall PeopleSoft Pure Internet Architecture on WebSphere as described here:
To uninstall PeopleSoft Pure Internet Architecture on WebSphere:
1. Open WebSphere Administration Console at http://<machine-name>:9090/admin.
To invoke PeopleSoft Pure Internet Architecture on a non-default admin port, consult the section onWebSphere in PeopleBooks.
See Enterprise PeopleTools 8.48 PeopleBook: System and Server Administration, “Working with IBMWebSphere.”
2. Log in as any user.3. Choose Applications, Enterprise Applications.4. Select the check boxes for the PeopleSoft Pure Internet Architecture applications you want to uninstall,and click Stop.
5. Select the check boxes for the PeopleSoft Pure Internet Architecture applications you want to uninstall, andclick Uninstall.
6. Save your configuration.7. Stop WebSphere server.8. Delete the directory <PS_HOME>\WebServ\<cellname>_<nodename>_<servername>.
Task 10A-4: Encrypting the Password (AIX Only)If you installed either the WebLogic or WebSphere web server on an AIX operating system, you must encryptthe password manually.
1. Navigate to <PS_HOME>/webserv/<domain_name>, where the default value for <domain_name> ispeoplesoft.
2. Run the following commands, substituting your User ID and its password for <userid> and <password>:
PSCipher.sh <userid>
PSCipher.sh <password>
The commands return encrypted values. Save these values.3. Navigate to <PS_HOME>/webserv/<domain_name>/applications/peoplesoft/PORTAL/WEB-INF/psftdocs/<site_name>.The default values for <domain_name> and <site_name>, respectively, are peoplesoft and ps. If you usedother values when setting up the PeopleSoft Pure Internet Architecture, use those values here.
4. Open the file configuration.properties in a text editor.5. Replace the values of WebUserId andWebPassword in this file with the encrypted values for <userid> and<password>, respectively, from step 2.
Copyright © 2006, Oracle. All rights reserved. 267

Setting Up the PeopleSoft Pure Internet Architecture in GUI Mode Chapter 10A
Task 10A-5: Testing the PeopleSoft Pure InternetArchitecture Installation
This section discusses:
• Starting and Stopping Oracle Application Server
• Starting and Stopping WebLogic
• Starting WebSphere
• Accessing the PeopleSoft Signon
• Updating Database Information
• Updating PeopleTools Options
Note. After installing the PeopleSoft Pure Internet Architecture, you should make sure that your configurationis functional. You can test this by signing on to PeopleSoft, navigating within the menu structure, andaccessing pages. (Make sure the application server is configured and booted.)
Task 10A-5-1: Starting and Stopping Oracle Application ServerThere are several commands you can use to start and stop OAS and PIA, either separately or together.
Action Command (full path)
Start PIA and other related processes <OAS_HOME>\opmn\bin\opmnctl startall
Stop PIA and other related processes <OAS_HOME>\opmn\bin\opmnctl stopall
View the status of the PIA installation on OAS <OAS_HOME>\opmn\bin\opmnctl status
Start the OAS admin console <OAS_HOME>\bin\emctl start em
Stop the OAS admin console <OAS_HOME>\bin\emctl stop em
Start only PIA.
In a single-component installation, PIA_component is thesame as the application name entered during the installationof PIA on OAS.
In a multi-component installation, PIA_component is acombination of the application name entered during theinstallation and the specific OC4J component type. Thedefault name for the PIA component in a multi-componentinstallation is PIA_PeopleSoft.
<OAS_HOME>\opmn\bin\opmnctl.exe⇒startproc ias-component=OC4J process-⇒type=PIA_component
Stop only PIA. <OAS_HOME>\opmn\bin\opmnctl.exe⇒stopproc ias-component=OC4J process-⇒type=PIA_component
268 Copyright © 2006, Oracle. All rights reserved.
Chapter 10A Setting Up the PeopleSoft Pure Internet Architecture in GUI Mode
Task 10A-5-2: Starting and Stopping WebLogicIf you are using the WebLogic web server, you need to sign on to WebLogic. If you are using WebSphereinstead, go on to the next procedure.
To start WebLogic:
1. To start BEA WebLogic Server as a Windows service, install the server as a windows service using thefollowing command in your WebLogic domain directory:Single Server:
installNTservicePIA.cmd
Multi Server or Distributed Server:installNTservice.cmd <ServerName>
The Windows service name will be WebLogicDomain-WebLogicServer. For example, to install serverPIA as an NT service in a domain named peoplesoft, run installNTservice.cmd PIA and youwill see "peoplesoft-PIA" as a service.
2. To start BEAWebLogic Server as a foreground process, execute the following command in your WebLogicdomain directory (the default directory is <PS_HOME>\webserv\<domain_name>):Single Server:
startPIS.cmd (on Windows)
startPIA.sh (on UNIX)
Multi Server or Distributed Server:startWebLogicAdmin.cmd (on Windows)
startWebLogicAdmin.sh (on UNIX)
and thenstartManagedWebLogic.cmd <ManagedServerName> (on Windows)
startManagedWebLogic.sh <ManagedServerName> (on UNIX)
3. To stop the server, execute the following command in your WebLogic domain directory:Single Server:
stopPIA.cmd (on Windows)
stopPIA.sh (on UNIX)
Multi Server or Distributed Server:stopWebLogic.cmd [-url t3://ServerHostName:port | <ManagedServerName>] (on⇒Windows)
stopWebLogic.sh [-url t3://ServerHostName:port | <ManagedServerName>] (on UNIX)
See Enterprise PeopleTools 8.48 PeopleBook: Internet Technology.
Task 10A-5-3: Starting WebSphereIf you are using the WebSphere web server, you need to sign on to WebSphere. If you are using WebLogicinstead, you should have used the previous procedure.
To start WebSphere:
1. Change directories to the folder in which WebSphere is installed—the bin directory under the WebSpherehome directory.
Copyright © 2006, Oracle. All rights reserved. 269
Setting Up the PeopleSoft Pure Internet Architecture in GUI Mode Chapter 10A
2. Enter the command
startServer.bat <server_name>
where <server_name> indicates where you have deployed PeopleSoft Pure Internet Architecture.
3. To stop the server, change directories to the folder in which WebSphere is installed and enter the command
stopserver <server_name>
where <server_name> indicates where you have deployed PeopleSoft Pure Internet Architecture.
Task 10A-5-4: Accessing the PeopleSoft SignonTo access the PeopleSoft signon:
1. Open your web browser.2. Enter the name of the site you want to access—for example (the default value for <site_name> is ps):
http://<machine_name>:<http_port>/<site_name>/signon.html
Note. PeopleSoft Pure Internet Architecture installed on WebSphere server listens at the HTTP/HTTPSports specified during the PeopleSoft Pure Internet Architecture install. Invoke PeopleSoft Pure InternetArchitecture through a browser by using the specified HTTP or HTTPS ports—that is, http://<WebSphere_machine_name>:<server_port>/<site_name>/signon.html (if AuthTokenDomain is not specified ) orhttp://<WebSphere_machine_name.mycompany.com>:<server_port>/<site_name>/signon.html (if youspecified .mycompany.com as the AuthTokenDomain).
This will take you to the signon screen corresponding to your browser's language preference.
270 Copyright © 2006, Oracle. All rights reserved.

Chapter 10A Setting Up the PeopleSoft Pure Internet Architecture in GUI Mode
Oracle PeopleSoft Enterprise Sign in window
Note. If you do not see the signon screen, check that you supplied all the correct variables and that yourapplication server and the database server are running.
3. Sign in to the PeopleSoft system by entering a valid user ID and password.Different applications use different default user IDs and passwords. For instance, for HRMS applicationsyou enter PS for the user ID and the password. For Financials applications, you enter VP1 for the user IDand the password. Your application-specific install instructions contain any custom/delivered user IDs thatyou should use for the demonstration environment.
Note. The user ID and password are case sensitive. You need to enter the user ID and password usingUPPERCASE.
Task 10A-5-5: Updating Database InformationThe database information updated in this procedure is used by the PeopleSoft software update tools to identifyyour PeopleSoft database when searching for updates. These steps should be followed for all additionaldatabases that you create to enable the accurate identification of your databases.
1. Sign on to your PeopleSoft database.2. Navigate to PeopleTools, Utilities, Administration, PeopleTools Options.3. Specify long and short names for your environment. For example:• Environment Long Name — Customer HR Demo Database
Copyright © 2006, Oracle. All rights reserved. 271
Setting Up the PeopleSoft Pure Internet Architecture in GUI Mode Chapter 10A
• Environment Short Name — HR Demo DB4. Select a system type from the drop-down list. For example, Demo Database.5. Save your changes.
Task 10A-5-6: Updating PeopleTools OptionsYou can set the following options on the PeopleTools Options page:
• Multi-Currency — Check this box if you plan to use currency conversion.
See Enterprise PeopleTools 8.48 PeopleBook: Global Technology, “Controlling Currency Display Format.”• Base Time Zone — Check this box to set the base time zone for your PeopleTools database.
See Enterprise PeopleTools 8.48 PeopleBook: Global Technology “Setting and Maintaining Time Zones.”• Data Field Length Checking Flag — Check this box if you are using a Japanese EBCDIC (DB2 MBCS) orJapanese Shift-JIS (MBCS) database.
See Enterprise PeopleTools 8.48 PeopleBook: Global Technology, “Selecting and Configuring CharacterSets and Language Input and Output.”
• Sort Order Option — If you specified a non-binary sort order for your database, choose the Sort OrderOption that most closely approximates your database sort order.
See Enterprise PeopleTools 8.48 PeopleBook: Global Technology, “Sorting in PeopleTools.”
272 Copyright © 2006, Oracle. All rights reserved.
CHAPTER 10B
Setting Up the PeopleSoft Pure InternetArchitecture in Console Mode
This chapter discusses:
• Understanding PeopleSoft Pure Internet Architecture
• Using Authentication Domains in the PeopleSoft Pure Internet Architecture Installation
• Installing the PeopleSoft Pure Internet Architecture on Oracle Application Server in Console Mode
• Installing the PeopleSoft Pure Internet Architecture on WebLogic in Console Mode
• Installing the PeopleSoft Pure Internet Architecture on WebSphere in Console Mode
• Encrypting the Password (AIX Only)
• Testing the PeopleSoft Pure Internet Architecture Installation
Understanding PeopleSoft Pure Internet ArchitectureThis chapter explains how to install and configure the components of the PeopleSoft Pure Internet Architecturein console mode. It includes instructions for installing the PeopleSoft files on Oracle Application Server (OAS),WebLogic, and WebSphere. Only complete the instructions for the web server product that you installed.
Note. The console mode installation is typically used on UNIX platforms.
See “Installing Web Server Products.”
The setup program for the PeopleSoft Pure Internet Architecture is installed to the web server machine whenyou run the PeopleSoft Installer and select the PeopleSoft Web Server option.
See “Using the PeopleSoft Installer.”
PeopleSoft only supports customer installations that use the version of the web servers packaged withPeopleTools. You must install the web server before you install the PeopleSoft Pure Internet Architecture.Before you install the PeopleSoft Pure Internet Architecture, you must also have configured an applicationserver, as described in the previous chapter.
Before performing the steps in this chapter, verify that Sun’s international version of JRE version 1.4.1 orhigher is properly installed on the system and its path is in the system’s environment variable PATH.
If your web server is on a different machine than your application server, you need to make sure you have JREinstalled on your web server to run the PIA installation.
Copyright © 2006, Oracle. All rights reserved. 273
Setting Up the PeopleSoft Pure Internet Architecture in Console Mode Chapter 10B
The initial PIA setup automatically creates the default PeopleSoft site named ps. In subsequent PIA setups,change the site name from ps to a unique value. We recommend using the database name. This is handy foreasy identification and ensures that the database web server files are installed in a unique web site.
The URL that you use to invoke PIA must conform to ASN.1 specifications. That is, it may containonly alphanumeric characters, dots ("."), or dashes ("-"). The URL must not begin or end with a dotor dash, or contain consecutive dots (".."). If the URL includes more than one portion, separated bydots, do not use a number to begin a segment if the other segments contain letters. For example,"mycompany.second.country.com" is correct, but "mycompany.2nd.country.com" is wrong.
Note. If you want to connect between multiple application databases, you need to implement single signon.
Note. If the PeopleSoft Pure Internet Architecture installation encounters an error, it will indicate which logfiles to refer to.
See “Installing Web Server Products.”
Note. The machine on which you run the PeopleSoft Pure Internet Architecture install must be running in 256color mode. This is not necessary for UNIX or console mode.
Note. We do not support web servers on z/OS.
Note. If you encounter the error message “No Matching JVM,” you need to specify the location of theJava Runtime Environment (JRE) to the installer using the –is:javahome command line parameter; forexample: /PA84206/setup.<OS> –is:javaconsole –console –is:tempdir<tempdir>–is:javahome <jredir>.
The PeopleSoft Pure Internet Architecture installation includes the following products:
• PeopleSoft Pure Internet Architecture. This product is the centerpiece of the PeopleSoft architecturethat enables users to work on a machine with only a supported browser installed. This option installsthe servlets required for deploying PeopleSoft Applications and for the PeopleSoft Portal. The portalpacks and Enterprise Portal have their own installation instructions, which are available on CustomerConnection. For an overview of the various types of portals, consult the following.
See Enterprise PeopleTools 8.48 PeopleBook: Internet Technology.• PeopleSoft Report Repository. This product works in conjunction with Process Scheduler to allow reportdistribution over the web.
• PeopleSoft Integration Gateway. This product is the entry and exit point for all messages to and fromthe Integration Broker. Its Java-based Connector architecture allows asynchronous and synchronousmessages to be sent over a variety of standard protocols, many that are delivered at install, or throughcustom connectors.
• PeopleSoft CTI Console. This product works in conjunction with CTI vendor software to enable call centeragents to take advantage of browser based teleset management and automatic population of applicationpages with relevant data associated with incoming calls, such as customer or case details.
See Enterprise PeopleTools 8.48 PeopleBook: PeopleSoft MultiChannel Framework.• PeopleSoft Sync Server Gateway. The Sync Server is a specialized application server optimized forconcurrent multi-user synchronization processing in support of PeopleTools Mobile Agent. The web
274 Copyright © 2006, Oracle. All rights reserved.
Chapter 10B Setting Up the PeopleSoft Pure Internet Architecture in Console Mode
server-based Sync Gateway routes synchronization requests and messages to and from the appropriateSync Server.
See Enterprise PeopleTools 8.48 PeopleBook: PeopleSoft Mobile Agent.
• Environment Management Hub. The Environment Management hub is a web application that is installedwith the PeopleSoft Pure Internet Architecture and portal. It is started along with the rest of the webapplications when the user boots the web server. You cannot start the Environment Management Hub on aserver that is configured to run HTTPS; in other words, if you plan to run Environment Management, yourPIA server needs to be configured in HTTP mode.
See Enterprise PeopleTools 8.48 PeopleBook: Software Updates.
See AlsoEnterprise PeopleTools 8.48 PeopleBook: Security Administration
Enterprise PeopleTools 8.48 PeopleBook: System and Server Administration
Using Authentication Domains in the PeopleSoft PureInternet Architecture Installation
You have the option to specify an authentication domain when you install the PeopleSoft Pure InternetArchitecture on OAS, WebLogic, or WebSphere.
Note. The authentication domain was referred to as the Authentication Token Domain in previous releases,and that term is still seen in the software.
When an authentication domain is specified during the PeopleSoft Pure Internet Architecture install, that valuegets used as the Cookie domain in the web server configuration. The main requirements when setting acookie domain are:
• The host must have a fully qualified domain name (FQDN). The requirement that you must have a domainname does not imply that you must have a DNS, but you do need some type of naming service such asDNS or some managed ../etc/hosts file that contains a list of the servers with their domain name.
• The cookie domain value being set must begin with a dot (.ps.com is valid, ps.com is NOT valid).
• The cookie domain value being set must contain at least 1 embedded dot (.ps.com is valid, .corp.ps.comis valid, .com is NOT valid).
• The cookie domain value can only be a single domain name. It cannot be a delimiter-separated list ofdomains.
By default, the browser only sends cookies back to the machine that set the cookie. So if web servercrm.yourdomain.com sets a cookie, the browser will only send it back there. You can make the browser sendthe single signon cookie to all servers at yourdomain.com by typing your domain name in the AuthenticationToken Domain list box of web server crm.
Specifying the authentication domain may be necessary in certain cases. For example, if you plan to use thePeopleSoft portal technology, be sure to read the supporting documentation to determine whether setting theauthentication domain is required for correct operation.
See Enterprise PeopleTools 8.48 PeopleBook: Internet Technology, “Configuring the Portal Environment.”
Copyright © 2006, Oracle. All rights reserved. 275

Setting Up the PeopleSoft Pure Internet Architecture in Console Mode Chapter 10B
Specify an authentication domain if you plan to run a REN Server. REN Servers are required for PeopleSoftMultiChannel Framework, Reporting, and some PeopleSoft CRM applications supported by PeopleSoftMultiChannel Framework.
See Enterprise PeopleTools 8.48 PeopleBook: PeopleSoft MultiChannel Framework.
Specify an authentication domain if you plan to use Business Objects Enterprise.
See “Installing and Configuring Software for Crystal Reports, ” Installing BusinessObjects Enterprise XI.
Task 10B-1: Installing the PeopleSoft Pure InternetArchitecture on Oracle Application Server in Console Mode
This section discusses:
• Installing the PeopleSoft Pure Internet Architecture on Oracle Application Server
• Uninstalling the PeopleSoft Pure Internet Architecture from Oracle Application Server
Note. The installation of the PeopleSoft Pure Internet Architecture on Oracle Application Server includes thePeopleSoft Provider. Use this to configure PeopleSoft portlets on Oracle Portal pages.
See Enterprise PeopleTools 8.48 PeopleBook: Internet Technology, “Deploying PeopleSoft Portlets onOracle Portal Pages.”
Task 10B-1-1: Installing the PeopleSoft Pure InternetArchitecture on Oracle Application ServerBefore you begin the installation of the PeopleSoft Pure Internet Architecture (PIA) on Oracle ApplicationServer (OAS), you must have installed the OAS software as described previously.
See “Installing Web Server Products,” Installing Oracle Application Server.
When installing PIA on OAS, you must work with a local copy of the PIA installation software; you cannotinstall remotely. If you are doing the installation on a machine other than the one on which you installedPeopleTools, copy the <PS_HOME>/setup/mpinternet directory to the local machine.
To install the PeopleSoft Pure Internet Architecture on Oracle Application Server:
1. Start opmn process if necessary.To check the status of the opmn process run this command:
<OAS_HOME>/opmn/bin/opmnctl status
If you get the response, “Unable to connect to opmn”, start it by running this command:<OAS_HOME>/opmn/bin/opmnctl start
See “Installing Web Server Products,” Installing Oracle Application Server.2. Start dcm-daemon process if necessary.To check the status of dcm-daemon run this command:
<OAS_HOME>/opmn/bin/opmnctl status
276 Copyright © 2006, Oracle. All rights reserved.

Chapter 10B Setting Up the PeopleSoft Pure Internet Architecture in Console Mode
If the dcm-daemon’s status is not “Alive”, start it by running this command:<OAS_HOME>/opmn/bin/opmnctl startproc ias-component=dcm-daemon
3. Change directory to <PS_HOME>/setup/mpinternet and run one of these commands:
setup.<OS> -console
or<JAVA_HOME>/bin/java -cp setup.jar run -console
where <JAVA_HOME> is the directory where the JRE software is installed. The default is<PS_HOME>/jre.
See “Using the PeopleSoft Installer,” Prerequisites.
A welcome message appears.
4. Select Enter to continue.
5. Enter the <PS_HOME> directory, where you installed the PeopleSoft software.
6. At the prompt:
[X] 1 - Oracle Application Server
[ ] 2 - BEA WebLogic Server
[ ] 3 - IBM WebSphere Application Server
Press ENTER to select the default selection 1, for the Oracle Application Server.7. At the prompt:
Select an Oracle Application Server home:
Directory Name: [/opt/OraHome_1]
Enter the directory where you installed OAS, or press ENTER to accept the default.8. Enter an application name for this web server.9. Select the type of server you want to install, and press ENTER to continue:
Select the server install type:
[X] 1 - Single Component Server
[ ] 2 - Multi Component Server
The Single Component Server option creates one OC4J component to hold all the PeopleSoft webapplications. The Application Name you enter in the next step is used for the new component’s name.
The Multi Component Server option splits the PeopleSoft web application into threeOC4J components—PIA_<application_name>, PSOL_<application_name>, andPSEMFHUB_<application_name>. Each OC4J component has its own JVM so the multi componentoption is better suited for installations needing higher performance or reliability. If you are not surewhich to pick, choose Single.
See Enterprise PeopleTools 8.48 PeopleBook: System and Server Administration, “Working with OracleApplication Server 10g.”
10. If you enter a new name, for example, peoplesoft, press ENTER.Skip the next two steps, and continue with step 13.
Copyright © 2006, Oracle. All rights reserved. 277

Setting Up the PeopleSoft Pure Internet Architecture in Console Mode Chapter 10B
11. If the name you enter belongs to an OAS web application that already exists, for example, jwong_single,select one of the options below and press ENTER to continue:
The PeopleSoft application "jwong_single" already exists.
Select from the following:
[X] 1 - Create an additional site in the existing application
[ ] 2 - Deploy additional PeopleSoft application extensions
[ ] 3 - Go back to enter a new application name
Note. To redeploy PIA on OAS, you must remove the OC4J component(s) and perform a fresh installationof PIA. Use Application Server Control or dcmctl commands to remove the OC4J component(s). Note thatany customizations done after the PIA install needs to be done again.
• Create an additional site in the existing application: Select this option to install only the necessary filesfor defining an additional PeopleSoft site on the existing OAS web server configuration.
• Deploy additional PeopleSoft application extensions: This option is solely for use with PeopleSoftproduct applications. PeopleSoft application extensions are provided with certain PeopleSoftapplications, and this option allow you to deploy those extensions. Consult the installation documentationfor your PeopleSoft application to see whether this option is appropriate. PeopleTools does not useapplication extensions.
• Go back to enter a new application name: Select this option to return to the previous screen.
12. If you select the option Deploy additional PeopleSoft application extension, select the applicationpackages you want to deploy:
[X] 1 -EMP PeopleSoft Activity Based Mgmt
13. Enter a web site name; the default is ps.14. Specify the application server name, its JSL (Jolt Station Listener) port number, its HTTP and HTTPS portnumbers, and the authentication token domain (optional):
Enter port numbers and summaries.
AppServer name: [<App Server Machine Name>]
JSL Port: [9000]
HTTP Port: [8000]
HTTPS Port: [4430]
Authentication Token Domain: (optional) []
AppServer name Enter the name of your application server machine.
JSL Port Enter the JSL port number you specified when setting up the applicationserver (the default is 9000).
HTTP/HTTPS The default HTTP/HTTPS ports of the Oracle HTTP Server (OHS) are80/443 for Windows and 7777/4443 for UNIX/Linux. However, youshould enter different HTTP/HTTPS port values at this point for the PIAinstallation. Please use any unused port other than 80/443 for Windowsand 7777/4443 for UNIX/Linux. The PIA installation may fail or maynot work properly if you enter the same HTTP/HTTPS ports for the PIAinstallation as the default OHS ports.
278 Copyright © 2006, Oracle. All rights reserved.
Chapter 10B Setting Up the PeopleSoft Pure Internet Architecture in Console Mode
To access PIA, specify a URL with either the default OHS portvalues, or the port values you enter here for PIA. For example,http://<machine_name>:<port_number>/<site_name>/signon.html.For Multi Component Server, the HTTP/HTTPS ports that you enter herecorrespond to the OC4J component PIA_<application_name>.
Authentication TokenDomain
The value you enter for Authentication Token Domain must match thevalue you specify for the authentication domain when configuring yourapplication server. In addition, certain installation configurations requirethat you specify an authentication domain.
See Using Authentication Domains in the PeopleSoft Pure Internet Architecture Installation.
Note. If you enter a value for the Authentication Token Domain, the URL to invoke PeopleSoftPure Internet Architecture must include the network domain name in the URL. For example,if you do not enter an authentication domain, the URL to invoke PeopleSoft Pure InternetArchitecture is http://MachineName/ps/signon.html. If you do enter a value for authenticationdomain (for example, .myCompany.com), the URL to invoke PeopleSoft Pure Internet Architectureis http://MachineName.myCompany.com/ps/signon.html. In addition, if the web server for thedatabase is using an http port other than the default port of 80, the URL must include the portnumber, for example http://MachineName:8080/ps/signon.html if there is no authentication domain, orhttp://MachineName.myCompany.com:8080/ps/signon.html if there is an authentication domain. The URLmust also comply with the naming rules given earlier in this chapter.
See Understanding the PeopleSoft Pure Internet Architecture15. Enter the name of the web profile in the database that will be used to configure this PeopleSoft web site.This can either be the predelivered name as shown on the page, or one that you intend to create yourselfusing PeopleTools, Web Profile Configuration after logging in. Each site is configured according to theprofile you specify here when it is first accessed after the web server is booted. The user ID and passwordwill be used by the PIA servlets themselves at runtime to log in to the application server to retrieve theprofile. For applications on PeopleTools 8.44 and above, PeopleSoft predelivers the PTWEBSERVER userID for the purpose of configuring PIA servlets at runtime and running the Performance Monitor Agents.You may have to unlock that user profile in certain application databases. If you have any problemslogging in after starting the web server, refer to the application server domain logs.
See Enterprise PeopleTools 8.48 PeopleBook: Internet Technology.
Note. If you are upgrading your application database to PeopleTools 8.44 and above, you must set up thePTWEBSERVER user ID. Go to PeopleTools, Security, User Profiles, User Profiles. Click Add a NewValue, enter PTWEBSERVER for User ID, and click Add. Enter and confirm a password, and enter adescription. Enter the role PeopleTools Web Server and then click Save.
16. Specify the root directory for the Report Repository (c:\psreports by default). You can install to anylocation.
Note. For the Report Repository directory, specify the same directory that you specify as the HomeDirectory. Make sure that this directory is shared. See "Setting Up Process Scheduler," Setting Up theProcess Scheduler to Transfer Reports and Logs to Report Repository.
17. Verify your selection and press ENTER to start the installation.You see an indicator showing the progress of the installation.
18. When the installation is complete, exit from the console window.
Copyright © 2006, Oracle. All rights reserved. 279
Setting Up the PeopleSoft Pure Internet Architecture in Console Mode Chapter 10B
The default installation directory is <OAS_HOME>/j2ee/<component>/applications/<application>.
Task 10B-1-2: Uninstalling the PeopleSoft Pure InternetArchitecture from Oracle Application ServerTo uninstall using the distributed configuration management control (dcmctl):
1. Change directory to <OAS_HOME>/dcm/bin.2. Run this command to view a list of component names:
dcmctl listcomponents
The component name is the name you entered when asked for Application Name in the task “Installing thePeopleSoft Pure Internet Architecture on Oracle Application Server.” The documentation used PeopleSoftas an example.
3. Run the following command, substituting your application name for <PIA_COMPONENT>:
dcmctl removecomponent -component <PIA_COMPONENT>
4. Run the following command:
dcmctl updateconfig
It is also possible to uninstall using the Application Server Control pages.
See Enterprise PeopleTools 8.48 PeopleBook: System and Server Administration, “Working with OracleApplication Server 10g.”
Task 10B-2: Installing the PeopleSoft Pure InternetArchitecture on WebLogic in Console Mode
This section describes how to install the PeopleSoft Pure Internet Architecture on WebLogic.
See Enterprise PeopleTools 8.48 PeopleBook: System and Server Administration, “Working with BEAWebLogic.”
Note. The installation will not proceed with an incorrect version of the WebLogic Server Service Pack. Makesure the correct service pack version (at least SP5) for WebLogic Server is properly installed prior to runningthis PeopleSoft Pure Internet Architecture installation.
To install the PeopleSoft Pure Internet Architecture on WebLogic:
1. Change directory to <PS_HOME>/setup/mpinternet and run one of these commands:
setup.<OS> -console
or<JAVA_HOME>/bin/java -cp setup.jar run -console
where <JAVA_HOME> is the directory where the JRE software is installed. The default is<PS_HOME>/jre.
See “Using the PeopleSoft Installer,” Prerequisites.
280 Copyright © 2006, Oracle. All rights reserved.

Chapter 10B Setting Up the PeopleSoft Pure Internet Architecture in Console Mode
A welcome message appears.Welcome to the InstallShield Wizard for PeopleSoft Internet Architecture.
Using the InstallShield Wizard you will install PeopleSoft Internet⇒Architecture on your computer.
Version: 8.48
If installing onto a BEA WebLogic Server, make sure to shutdown any running⇒webservers to avoid web server configuration.
2. Select Enter to continue.
3. Choose the directory where you installed PeopleSoft, or <PS_HOME>.
4. At the prompt
[X] 1 - Oracle Application Server
[ ] 2 - BEA WebLogic Server
[ ] 3 - IBM WebSphere Application Server
Enter 2 to select the BEA WebLogic Server.5. At the prompt
Select the web server root directory:
Please specify a directory name or press Enter [/opt/bea] /data4/syb/bea
Enter the top-level directory where WebLogic is installed. Press ENTER to continue.
Note. You will get an error message if you specify a directory that does not contain WebLogic, or thatcontains an incorrect WebLogic version.
6. Enter the administrator login and password for your WebLogic domain. Press ENTER to continue.
Please enter the administrator login and password for WebLogic domain.
Login ID:
[system]
Password:
[password]
Re-type Password:
[password]
At the next prompt you must choose whether to create a new WebLogic domain or to use an existingdomain.
7. If you select Create New WebLogic domain, the installation process automatically generates a validdomain name in the domain name field.
If you attempt to enter an invalid domain name, you see a prompt asking you to enter a new domainname or choose an existing domain.
Copyright © 2006, Oracle. All rights reserved. 281

Setting Up the PeopleSoft Pure Internet Architecture in Console Mode Chapter 10B
8. If you select Existing WebLogic Domain, specify the domain name and select one of these options:
Note. You only see the option Existing WebLogic Domain if there is already a domain in <PS_HOME>.
Install additionalPeopleSoft site
This option is relevant only to the PeopleSoft PORTAL web application,and does not modify or revert any other configuration settings. Selectthis option to install only the necessary files for defining an additionalPeopleSoft site onto an existing WebLogic configuration. The new site willbe accessed using its name in the URL. A site named “CRM” would beaccessed using a URL similar to http://<mywebserver_machine>/CRM. Toreset or re-create an existing PeopleSoft site, simply enter that site's nameas the site to create. On your web server, a PeopleSoft site is comprised ofthe following directories within the PORTAL web application:<WEBLOGIC_DOMAIN>/applications/peoplesoft/PORTAL/site/*<WEBLOGIC_DOMAIN>/applications/peoplesoft/PORTAL/WEB-INF/psftdocs/site/*
Redeploy PeopleSoftInternet Architecture
This selection affects all of the PeopleSoft Pure Internet Architectureweb applications installed to the local WebLogic domain. Select thisoption to redeploy all of the class files and jar files that comprise webcomponents of PeopleSoft Pure Internet Architecture. WebLogic Serverconfiguration files, scripts and any existing PeopleSoft (PORTAL) sitesare not overwritten, unless you specify an existing PeopleSoft siteduring this setup.
Re-create WebLogicdomain and redeployPeopleSoft InternetArchitecture
This option affects WebLogic Server configuration and all of thePeopleSoft Pure Internet Architecture web applications installed to thelocal WebLogic domain. Select this option to completely remove anexisting WebLogic domain and create the newly specified PeopleSoft site.
Deploy additionalPeopleSoft applicationextensions
This option is solely for use with PeopleSoft applications. PeopleSoftapplication extensions are provided with certain PeopleSoft applications,and this option allows you to deploy those extensions. Consult theinstallation documentation for your PeopleSoft application to see if thisoption is appropriate. PeopleTools does not use application extensions.
Warning! Re-creating an existing domain will delete everything previously installed into that domain,including PeopleBooks. If you choose to re-create—instead of redeploying—a domain, you may first wantto back up your PeopleBooks docroot directory (typically, htmldoc) below the PSOL directory. You canthen restore it after the PeopleSoft Pure Internet Architecture installation.
See Enterprise PeopleTools 8.48 PeopleBook: Internet Technology.9. Specify the name of the domain.10. If there are application packages in the archives directory, select whether you want to deploy them. (Ifyou are using an existing domain, you see a prompt for this only if you elected to Deploy AdditionalPeopleSoft Extensions.)
11. Select the type of domain to create—single server, multi server, or distributed managed server.
Note. You must select "Multi Server Domain" if you plan to host PeopleBooks on the web server on whichyou are installing the PeopleSoft Pure Internet Architecture.
282 Copyright © 2006, Oracle. All rights reserved.

Chapter 10B Setting Up the PeopleSoft Pure Internet Architecture in Console Mode
Please select the configuration to install.
[X] 1 - Single Server Domain
[ ] 2 - Multi Server Domain
[ ] 3 - Distributed Managed Server
There are three domain configuration options:• Single Server Domain: This domain configuration contains one server, named PeopleSoft Pure InternetArchitecture and the entire PeopleSoft enterprise application is deployed to it. This configuration isintended for single user or very small scale, nonproduction environments. This configuration is verysimilar to the WebLogic domain provided in PeopleTools 8.40 through 8.43.
• Multi Server Domain: This domain configuration is contains seven unique server definitions, aWebLogic cluster, and the PeopleSoft Enterprise Application split across multiple servers. Thisconfiguration is the intended for a production environment.
• Distributed Managed Server: This option is an extension of the Multi Server Domain selection andinstalls the necessary files to boot a managed server. This option requires a Multi Server installation to beperformed to some other location, which will contain the configuration for this managed server.
12. Enter a PeopleSoft web site name; the default is ps.
Warning! The site name can include underscores ( _ ), but an underscore cannot be followed by a numericcharacter or the string “newwin” (for example, my_site_3 or my_newwin_site).
13. Specify your application server name, its JSL (Jolt Station Listener) port number, its HTTP and HTTPSport numbers, the Authentication Token Domain (optional).
Enter port numbers and summaries.
AppServer name:
[APPSRVNAME]
JSL Port:
[9000]
HTTP Port:
[80]
HTTPS Port:
[443]
Authentication Token Domain:(optional)
Note. For the AppServer name setting, enter the name of your application server. For the JSL portsetting, enter the JSL port number you specified when setting up your application server. (The defaultvalue is 9000.)
Copyright © 2006, Oracle. All rights reserved. 283

Setting Up the PeopleSoft Pure Internet Architecture in Console Mode Chapter 10B
See “Configuring the Application Server on <Windows or UNIX>.”
Note. The value you enter for the Authentication Token Domain must match the value you specify whenconfiguring your application server, as described earlier in this book. In addition, certain installationconfigurations require that you specify an authentication domain.
See Using Authentication Domains in the PeopleSoft Pure Internet Architecture Installation.
Note. If you enter a value for the Authentication Token Domain, the URL to invoke PeopleSoftPure Internet Architecture must include the network domain name in the URL. For example,if you do not enter an authentication domain, the URL to invoke PeopleSoft Pure InternetArchitecture is http://MachineName/ps/signon.html. If you do enter a value for authenticationdomain (for example, .myCompany.com), the URL to invoke PeopleSoft Pure Internet Architectureis http://MachineName.myCompany.com/ps/signon.html. In addition, if the web server for thedatabase is using an http port other than the default port of 80, the URL must include the portnumber, for example http://MachineName:8080/ps/signon.html if there is no authentication domain, orhttp://MachineName.myCompany.com:8080/ps/signon.html if there is an authentication domain. The URLmust also comply with the naming rules given earlier in this chapter.
See “Understanding the PeopleSoft Pure Internet Architecture.”
14. Enter the name of the web profile name in the database that will be used to configure this PeopleSoftweb site.This can be the name of either a predelivered one shown on the page, or one you intend to create yourselfusing PeopleTools, Web Profile Configuration after logging in. Each site is configured according to theprofile you specify here when it is first accessed after the web server is booted. The user ID and passwordwill be used by the PIA servlets themselves at runtime to log in to the application server to retrieve theprofile. For applications on PeopleTools 8.44 and above, PeopleSoft predelivers the PTWEBSERVER userID for the purpose of configuring PIA servlets at runtime and running the Performance Monitor Agents.You may have to unlock that user profile in certain application databases. If you have any problemslogging in after starting the web server, refer to the application server domain logs.
See Enterprise PeopleTools 8.48 PeopleBook: Internet Technology.
Note. If you are upgrading your application database to PeopleTools 8.44 and above, you must set up thePTWEBSERVER user ID. Go to PeopleTools, Security, User Profiles, User Profiles. Click Add a NewValue, enter PTWEBSERVER for User ID, and click Add. Enter and confirm a password, and enter adescription. Enter the role PeopleTools Web Server and then click Save.
15. Specify the root directory for the Report Repository (/opt/psreports by default). You can install to anylocation.
Note. For the Report Repository directory, specify the same directory that you specify as the HomeDirectory. Make sure that this directory is shared.
See "Setting Up Process Scheduler," Setting Up the Process Scheduler to Transfer Reports and Logsto Report Repository.
16. Verify all of your selections and press Enter to begin the installation.You see a progress indicator showing the progress of your installation.
17. When the installation is complete, exit from the console window.
284 Copyright © 2006, Oracle. All rights reserved.

Chapter 10B Setting Up the PeopleSoft Pure Internet Architecture in Console Mode
The default installation directory is <PS_HOME>/webserv/<domain>/, where <domain> is the webserver domain (peoplesoft by default).
Task 10B-3: Installing the PeopleSoft Pure InternetArchitecture on WebSphere in Console Mode
This section discusses:
• Prerequisites
• Installing the PeopleSoft Pure Internet Architecture on WebSphere
• Uninstalling the PeopleSoft Pure Internet Architecture from WebSphere
PrerequisitesThe information in this section applies to the installation of PeopleSoft Pure Internet Architecture on aWebSphere server.
Important! For more detailed WebSphere installation topics and Frequently Asked Questions (FAQs) refer tothe PeopleSoft Customer Connection link ftp://ftp.peoplesoft.com/outgoing/PTools/websphere/51/docs.
Each WebSphere server runs one PeopleSoft Pure Internet Architecture application. If you need to install morethan one PeopleSoft Pure Internet Architecture application on your WebSphere server, you must create a newserver from the WebSphere Administration console and then deploy the PeopleSoft Pure Internet Architectureapplication to the new WebSphere server. Deploy PeopleSoft Pure Internet Architecture to WebSphereBase before clustering using Network Deployment.
You must select a unique name for each PeopleSoft Pure Internet Architecture application that you install on aWebSphere node. You cannot install two PeopleSoft Pure Internet Architecture applications with the samename to one WebSphere node.
Note. On UNIX, install the PeopleSoft Pure Internet Architecture with a user who owns WebSphere, and whoowns <PS_HOME>. Here are two examples: If WebSphere is owned by user “root” and group “system,”PeopleSoft Pure Internet Architecture must be installed with “root” and group “system.” If WebSphereis owned by user “wsadmin” and group “wsadmin,” then PeopleSoft Pure Internet Architecture must beinstalled with wsadmin/wsadmin as the user and group.
If PeopleSoft Pure Internet Architecture needs to be installed through WebSphere Network Deployment as anEAR file, refer to the Red Paper section of Customer Connection for instructions.
See “Clustering and High Availability for PeopleSoft 8.4” (PeopleSoft Customer Connection, Site Index,Red Papers).
Be sure the Default Application is uninstalled through the Admin console before installing PeopleSoft PureInternet Architecture.
Note. You do not need to uninstall previous WebSphere PeopleSoft Pure Internet Architecture installs beforecontinuing. However, if you do decide to uninstall any previous PeopleSoft Pure Internet Architectureinstalls, you cannot just delete <PS_HOME>. Instead you need to follow the officially sanctioned uninstallprocedure described in a later section.
Copyright © 2006, Oracle. All rights reserved. 285

Setting Up the PeopleSoft Pure Internet Architecture in Console Mode Chapter 10B
See Also“Installing Web Server Products, ” Installing WebSphere
Uninstalling the PeopleSoft Pure Internet Architecture from WebSphere
Enterprise PeopleTools 8.48 PeopleBook: System and Server Administration, “Working with IBMWebSphere”
Task 10B-3-1: Installing the PeopleSoft Pure InternetArchitecture on WebSphereBefore installing the PeopleSoft Pure Internet Architecture on WebSphere, be sure you complete therequirements discussed previously.
See Prerequisites.
To install the PeopleSoft Pure Internet Architecture on WebSphere:
1. Start WebSphere on the server on which you plan to deploy PeopleSoft Pure Internet Architecture. Fromthe bin directory under the WebSphere home directory, enter:
startServer.sh <server_name>
2. In your shell prompt under the <PS_HOME>/setup/mpinternet directory, type
java -cp setup.jar run -console
orsetup.<OS>
You see the following:Welcome to the InstallShield Wizard for PeopleSoft Internet Architecture.
Using the InstallShield Wizard you will install PeopleSoft Internet⇒Architecture on your computer.
Please be sure to shutdown any running web servers at this time to avoid data⇒corruption.
3. Select Enter to continue.4. Choose the directory where you installed PeopleSoft, or <PS_HOME>.5. At the prompt
[X] 1 - Oracle Application Server
[ ] 2 - BEA WebLogic Server
[ ] 3 - IBM WebSphere Application Server
Enter 3, to select the IBM WebSphere Application Server.6. At the following prompt
Select the WebSphere Application Server directory:
Directory Name:
Please specify a directory name or press Enter [C:\WebSphere\AppServer] c:\we
286 Copyright © 2006, Oracle. All rights reserved.
Chapter 10B Setting Up the PeopleSoft Pure Internet Architecture in Console Mode
bsphere5\WebSphere\AppServer
Enter the directory where WebSphere is installed. Press Enter to continue.
Note. You will get an error message if you specify a directory that does not contain WebSphere, or thatcontains an incorrect WebSphere version.
7. Enter a cell name.8. Enter a node name.9. Enter a server name.
Note. If the web server on which you are installing PeopleSoft Pure Internet Architecture is not up andrunning, you'll receive an error message that you need to start your web server.
10. Choose whether to create a new WebSphere application (domain) or to use an existing domain.
Note. You only see the option Existing WebSphere Application if there is already a domain in<PS_HOME>.
If you select Create New WebSphere application, the install automatically generates a valid domain namein the domain name field. If you attempt to enter an invalid domain name, you'll be prompted to enter anew domain name or choose an existing domain.
11. Select an application name.
Note. The PeopleSoft Enterprise Application name you specify must be unique for each WebSphere node.
12. If you selected Existing WebSphere application, you can choose from a drop-down list of existingdomains, and can select whether to install an additional PeopleSoft site, redeploy PeopleSoft Pure InternetArchitecture, or deploy additional PeopleSoft application extensions.
13. Enter a PeopleSoft web site name; the default is ps.
Warning! The site name can include underscores ( _ ), but an underscore cannot be followed by a numericcharacter or the string “newwin” (for example, my_site_3 or my_newwin_site).
14. Specify your application server name, its JSL (Jolt Station Listener) port number, its HTTP and HTTPSport numbers, the authentication token domain (optional).
Enter port numbers and summaries.
AppServer name:
[<MACHINENAME]
JSL Port:
[9000]
HTTP Port:
Copyright © 2006, Oracle. All rights reserved. 287

Setting Up the PeopleSoft Pure Internet Architecture in Console Mode Chapter 10B
[80]
HTTPS Port:
[443]
Authentication Token Domain:(optional)
Note. For the AppServer name setting, enter the name of your application server. For the JSL portsetting, enter the JSL port number you specified when setting up your application server. (The defaultvalue is 9000.)
See “Configuring the Application Server on UNIX.”
Note. The HTTP/HTTPS port numbers are reset to those that you just specified when you restart yourWebSphere server.
Note. The value you enter for the Authentication Token Domain must match the value you specific whenconfiguring your application server, as described earlier in this book. In addition, certain installationconfigurations require that you specify an authentication domain.
See Using Authentication Domains in the PeopleSoft Pure Internet Architecture Installation.
Note. If you enter a value for the Authentication Token Domain, the URL to invoke PeopleSoftPure Internet Architecture must include the network domain name in the URL. For example, if youdo not enter an authentication domain, the URL to invoke PeopleSoft Pure Internet Architectureis http://MachineName/ps/signon.html. If you do enter a value for the authentication domain(for example, .myCompany.com), the URL to invoke PeopleSoft Pure Internet Architecture ishttp://MachineName.myCompany.com/ps/signon.html. In addition, if the web server for the databaseis using an HTTP port other than the default port of 9080, the URL must include the port number,for example http://MachineName:8080/ps/signon.html if there is no authentication domain, orhttp://MachineName.myCompany.com:8080/ps/signon.html if there is an authentication domain. The URLmust also comply with the naming rules given earlier in this chapter.
See “Understanding the PeopleSoft Pure Internet Architecture.”15. Enter the name of the web profile name in the database that will be used to configure this PeopleSoftweb site.This can be the name of either a predelivered one shown on the page, or one you intend to create yourselfusing PeopleTools, Web Profile Configuration after logging in. Each site is configured according to theprofile you specify here when it is first accessed after the web server is booted. The user ID and passwordwill be used by the PIA servlets themselves at runtime to log in to the application server to retrieve theprofile. For applications on PeopleTools 8.44 and above, PeopleSoft predelivers the PTWEBSERVER userID for the purpose of configuring PIA servlets at runtime and running the Performance Monitor Agents.You may have to unlock that user profile in certain application databases. If you have any problemslogging in after starting the web server, refer to the application server domain logs.
See Enterprise PeopleTools 8.48 PeopleBook: Internet Technology.
288 Copyright © 2006, Oracle. All rights reserved.
Chapter 10B Setting Up the PeopleSoft Pure Internet Architecture in Console Mode
Note. If you are upgrading your application database to PeopleTools 8.44 and above, you must set up thePTWEBSERVER user ID. Go to PeopleTools, Security, User Profiles, User Profiles, click Add a NewValue, enter PTWEBSERVER for User ID, and click Add. Enter and confirm a password, and enter adescription. Enter the role PeopleTools Web Server and then click Save.
16. Specify the root directory for the Report Repository (c:\psreports by default). You can install to anylocation.
Note. For the Report Repository directory, specify the same directory that you specify as the HomeDirectory. Make sure that this directory is shared.
See "Setting Up Process Scheduler," Setting Up the Process Scheduler to Transfer Reports and Logsto Report Repository.
17. Verify all of your selections and press Enter to kick off the installation. You see a progress indicatorshowing the progress of your installation.
18. Click Finish to complete the installation.The default installation directory is <PS_HOME>\webserv\<cellname_nodename_servername>\<domain>.
19. Stop the WebSphere server. From the bin directory under the WebSphere home directory, enter:
stopServer.sh <server_name>
where <server_name> indicates where you have deployed PeopleSoft Pure Internet Architecture.
Task 10B-3-2: Uninstalling the PeopleSoft Pure InternetArchitecture from WebSphereYou cannot uninstall PeopleSoft Pure Internet Architecture simply by deleting <PS_HOME>, withoutuninstalling it from WebSphere Administration Console. If you do so, the WebSphere registry becomescorrupt, and subsequent attempts to install PeopleSoft Pure Internet Architecture will fail. Instead, if necessary,you must uninstall PeopleSoft Pure Internet Architecture on WebSphere as described here:
To uninstall PeopleSoft Pure Internet Architecture on WebSphere:
1. Open WebSphere Administration Console at http://<machine-name>:9090/admin.To invoke PeopleSoft Pure Internet Architecture on a non-default admin port, consult the section onWebSphere in PeopleBooks.
See Enterprise PeopleTools 8.48 PeopleBook: System and Server Administration, “Working with IBMWebSphere.”
2. Log in as any user.3. Choose Applications, Enterprise Applications.4. Select the check boxes for the PeopleSoft Pure Internet Architecture applications you want to uninstall,and click Stop.
5. Select the check boxes for the PeopleSoft Pure Internet Architecture applications you want to uninstall, andclick Uninstall.
6. Save your configuration.7. Stop WebSphere server.
Copyright © 2006, Oracle. All rights reserved. 289
Setting Up the PeopleSoft Pure Internet Architecture in Console Mode Chapter 10B
8. Delete the directory <PS_HOME>/WebServ/<cellname>_<nodename>_<servername>.
Task 10B-4: Encrypting the Password (AIX Only)If you installed either the WebLogic or WebSphere web server on an AIX operating system, you must encryptthe password manually.
1. Navigate to <PS_HOME>/webserv/<domain_name>, where the default value for <domain_name> ispeoplesoft.
2. Run the following commands, substituting your User ID and its password for <userid> and <password>:
PSCipher.sh <userid>
PSCipher.sh <password>
The commands return encrypted values. Save these values.
3. Navigate to <PS_HOME>/webserv/<domain_name>/applications/peoplesoft/PORTAL/WEB-INF/psftdocs/<site_name>.
The default values for <domain_name> and <site_name>, respectively, are peoplesoft and ps. If you usedother values when setting up the PeopleSoft Pure Internet Architecture, use those values here.
4. Open the file configuration.properties in a text editor.
5. Replace the values of WebUserId andWebPassword in this file with the encrypted values for <userid> and<password>, respectively, from step 2.
Task 10B-5: Testing the PeopleSoft Pure InternetArchitecture Installation
This section discusses:
• Starting and Stopping Oracle Application Server
• Starting and Stopping WebLogic
• Starting WebSphere
• Accessing the PeopleSoft Signon
• Updating Database Information
• Updating PeopleTools Options
Note. After installing the PeopleSoft Pure Internet Architecture, you should make sure that your configurationis functional. You can test this by signing on to PeopleSoft, navigating within the menu structure, andaccessing pages. (Make sure the application server is configured and booted.)
Task 10B-5-1: Starting and Stopping Oracle Application ServerThere are several commands you can use to start and stop OAS and PIA, either separately or together.
290 Copyright © 2006, Oracle. All rights reserved.
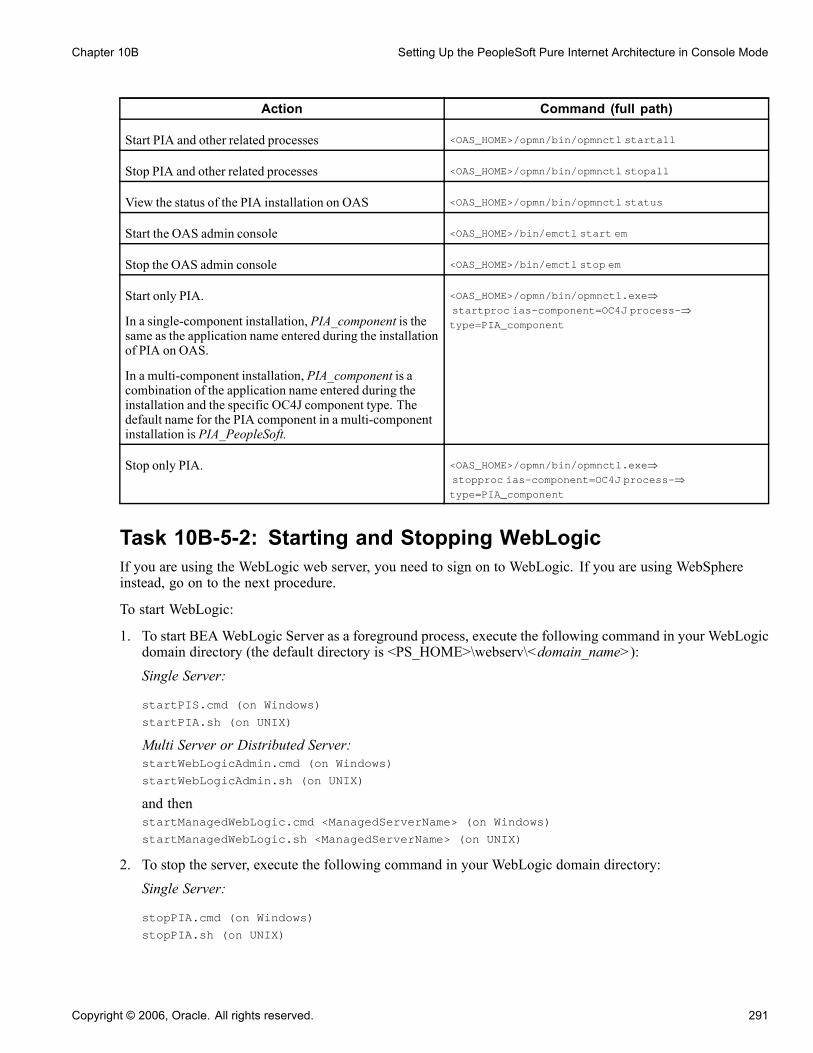
Chapter 10B Setting Up the PeopleSoft Pure Internet Architecture in Console Mode
Action Command (full path)
Start PIA and other related processes <OAS_HOME>/opmn/bin/opmnctl startall
Stop PIA and other related processes <OAS_HOME>/opmn/bin/opmnctl stopall
View the status of the PIA installation on OAS <OAS_HOME>/opmn/bin/opmnctl status
Start the OAS admin console <OAS_HOME>/bin/emctl start em
Stop the OAS admin console <OAS_HOME>/bin/emctl stop em
Start only PIA.
In a single-component installation, PIA_component is thesame as the application name entered during the installationof PIA on OAS.
In a multi-component installation, PIA_component is acombination of the application name entered during theinstallation and the specific OC4J component type. Thedefault name for the PIA component in a multi-componentinstallation is PIA_PeopleSoft.
<OAS_HOME>/opmn/bin/opmnctl.exe⇒startproc ias-component=OC4J process-⇒type=PIA_component
Stop only PIA. <OAS_HOME>/opmn/bin/opmnctl.exe⇒stopproc ias-component=OC4J process-⇒type=PIA_component
Task 10B-5-2: Starting and Stopping WebLogicIf you are using the WebLogic web server, you need to sign on to WebLogic. If you are using WebSphereinstead, go on to the next procedure.
To start WebLogic:
1. To start BEAWebLogic Server as a foreground process, execute the following command in your WebLogicdomain directory (the default directory is <PS_HOME>\webserv\<domain_name>):Single Server:
startPIS.cmd (on Windows)
startPIA.sh (on UNIX)
Multi Server or Distributed Server:startWebLogicAdmin.cmd (on Windows)
startWebLogicAdmin.sh (on UNIX)
and thenstartManagedWebLogic.cmd <ManagedServerName> (on Windows)
startManagedWebLogic.sh <ManagedServerName> (on UNIX)
2. To stop the server, execute the following command in your WebLogic domain directory:Single Server:
stopPIA.cmd (on Windows)
stopPIA.sh (on UNIX)
Copyright © 2006, Oracle. All rights reserved. 291

Setting Up the PeopleSoft Pure Internet Architecture in Console Mode Chapter 10B
Multi Server or Distributed Server:stopWebLogic.cmd [-url t3://ServerHostName:port | <ManagedServerName>] (on⇒Windows)
stopWebLogic.sh [-url t3://ServerHostName:port | <ManagedServerName>] (on UNIX)
See Enterprise PeopleTools 8.48 PeopleBook: Internet Technology.
Task 10B-5-3: Starting WebSphereIf you are using the WebSphere web server, you need to sign on to WebSphere. If you are using WebLogicinstead, you should have used the previous procedure.
To start WebSphere:
1. Change directories to the folder in which WebSphere is installed—the bin directory under the WebSpherehome directory.
2. Enter the command
./startServer.sh <server_name>
where <server_name> indicates where you have deployed PeopleSoft Pure Internet Architecture.
3. To stop the server, change directories to the folder in which WebSphere is installed and enter the command
./stopServer <server_name>
where <server_name> indicates where you have deployed PeopleSoft Pure Internet Architecture.
Task 10B-5-4: Accessing the PeopleSoft SignonTo access the PeopleSoft signon:
1. Open your web browser.2. Enter the name of the site you want to access—for example (the default value for <site_name> is ps):
http://<machine_name>:<http_port>/<site_name>/signon.html
Note. PeopleSoft Pure Internet Architecture installed on WebSphere server listens at the HTTP/HTTPSports specified during the PeopleSoft Pure Internet Architecture install. Invoke PeopleSoft Pure InternetArchitecture through a browser by using the specified HTTP or HTTPS ports—that is, http://<WebSphere_machine_name>:<server_port>/<site_name>/signon.html (if AuthTokenDomain is not specified ) orhttp://<WebSphere_machine_name.mycompany.com>:<server_port>/<site_name>/signon.html (if youspecified .mycompany.com as the AuthTokenDomain).
This will take you to the signon screen corresponding to your browser's language preference.
292 Copyright © 2006, Oracle. All rights reserved.
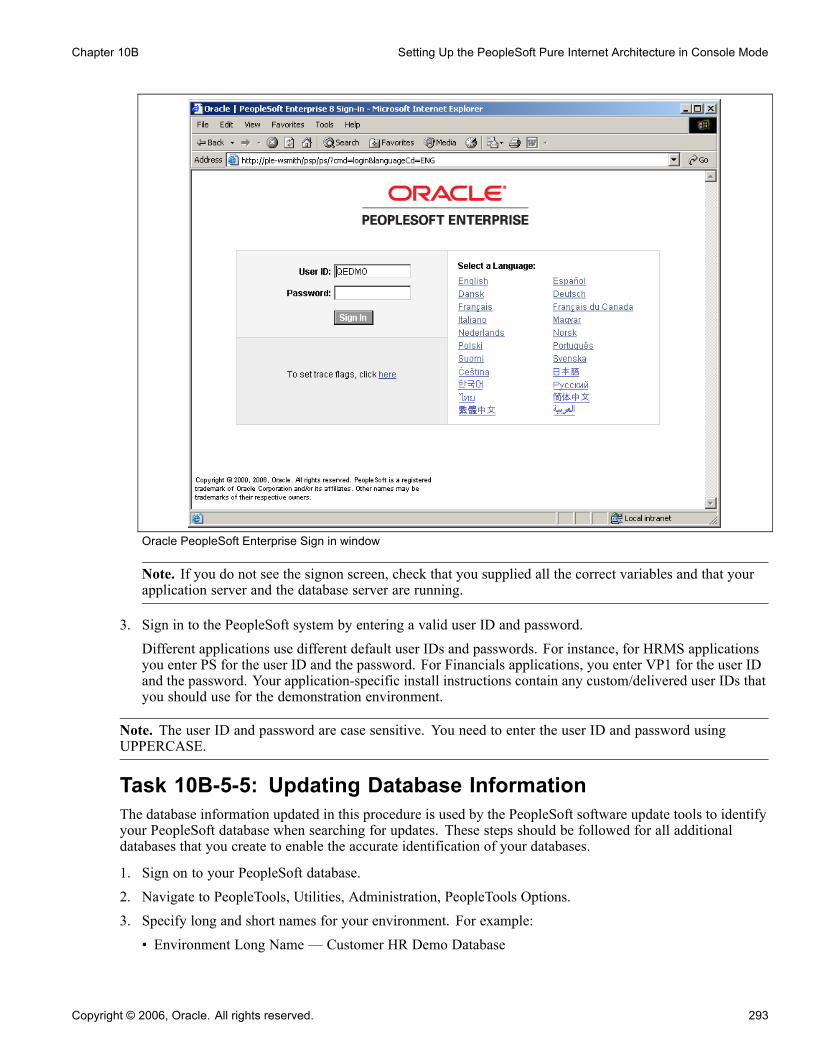
Chapter 10B Setting Up the PeopleSoft Pure Internet Architecture in Console Mode
Oracle PeopleSoft Enterprise Sign in window
Note. If you do not see the signon screen, check that you supplied all the correct variables and that yourapplication server and the database server are running.
3. Sign in to the PeopleSoft system by entering a valid user ID and password.Different applications use different default user IDs and passwords. For instance, for HRMS applicationsyou enter PS for the user ID and the password. For Financials applications, you enter VP1 for the user IDand the password. Your application-specific install instructions contain any custom/delivered user IDs thatyou should use for the demonstration environment.
Note. The user ID and password are case sensitive. You need to enter the user ID and password usingUPPERCASE.
Task 10B-5-5: Updating Database InformationThe database information updated in this procedure is used by the PeopleSoft software update tools to identifyyour PeopleSoft database when searching for updates. These steps should be followed for all additionaldatabases that you create to enable the accurate identification of your databases.
1. Sign on to your PeopleSoft database.2. Navigate to PeopleTools, Utilities, Administration, PeopleTools Options.3. Specify long and short names for your environment. For example:• Environment Long Name — Customer HR Demo Database
Copyright © 2006, Oracle. All rights reserved. 293
Setting Up the PeopleSoft Pure Internet Architecture in Console Mode Chapter 10B
• Environment Short Name — HR Demo DB4. Select a system type from the drop-down list. For example, Demo Database.5. Save your changes.
Task 10B-5-6: Updating PeopleTools OptionsYou can set the following options on the PeopleTools Options page:
• Multi-Currency — Check this box if you plan to use currency conversion.
See Enterprise PeopleTools 8.48 PeopleBook: Global Technology, “Controlling Currency Display Format.”• Base Time Zone — Check this box to set the base time zone for your PeopleTools database.
See Enterprise PeopleTools 8.48 PeopleBook: Global Technology “Setting and Maintaining Time Zones.”• Data Field Length Checking Flag — Check this box if you are using a Japanese EBCDIC (DB2 MBCS) orJapanese Shift-JIS (MBCS) database.
See Enterprise PeopleTools 8.48 PeopleBook: Global Technology, “Selecting and Configuring CharacterSets and Language Input and Output.”
• Sort Order Option — If you specified a non-binary sort order for your database, choose the Sort OrderOption that most closely approximates your database sort order.
See Enterprise PeopleTools 8.48 PeopleBook: Global Technology, “Sorting in PeopleTools.”
294 Copyright © 2006, Oracle. All rights reserved.

CHAPTER 11A
Setting Up Process Scheduler on Windows
This chapter discusses:
• Prerequisites
• Setting Up Process Scheduler Security
• Setting Up Process Scheduler to Transfer Reports and Logs to the Report Repository
• Setting Environment Variables
• Setting Up Process Scheduler Server Agent
• Starting Process Scheduler as a Windows Service (Optional)
• Configuring the Process Scheduler for Word for Windows (Optional)
• Configuring Setup Manager
Note. Windows COBOL Support for z/OS DB2 databases:
RemoteCall COBOL and batch COBOL are supported for Financials/SCM applications. RemoteCall COBOL andbatch COBOL are supported for other applications only if your host DB2 subsystem's CCSID=37.
See AlsoEnterprise PeopleTools 8.48 Hardware and Software Requirements
Enterprise PeopleTools 8.48 PeopleBook: PeopleSoft Process Scheduler
PeopleSoft Customer Connection, Supported Platforms (Implement, Optimize + Upgrade, Implementation Guide,Supported Platforms, PeopleSoft Enterprise)
PrerequisitesBefore setting up your Process Scheduler, you must:
• Install Tuxedo (except for z/Linux).
See “Installing Additional Components.”• Install database connectivity to be able to communicate with your database server (Process Schedulerrequires a direct connection to the database).
See “Preparing for Installation.”• Set up the web server with the PeopleSoft Pure Internet Architecture, as described in the previous chapter.This is required to set up the Process Scheduler to transfer reports or log files to the Report Repository.
Copyright © 2006, Oracle. All rights reserved. 295

Setting Up Process Scheduler on Windows Chapter 11A
• Set up your COBOL batch environment if you need to run COBOL processes through Process Scheduler.COBOL is no longer required to start a Process Scheduler Server Agent because the program for ProcessScheduler has been rewritten in C++. If the PeopleSoft modules purchased do not contain any COBOLmodules, the COBOL run time libraries are not required. Also, COBOL is not required for applicationsthat contain no COBOL programs. Consult Customer Connection for the details on whether yourapplication requires COBOL.
See “PeopleSoft Application COBOL Requirements,” PeopleSoft Customer Connection (Implement,Optimize + Upgrade, Implementation Guide, Supported Platforms, PeopleSoft Enterprise, By PeopleToolsrelease, Platform Communications by Topic, Batch)
• Install the Microsoft Office products Microsoft Word and Microsoft Excel.
• Have both your application server and the PeopleSoft Pure Internet Architecture started. In this chapter,you must modify security options of the designated PeopleSoft user ID that will be used to boot up ProcessScheduler. This requires that the user ID's profile be modified through the User Security component.Please refer to earlier chapters for the details on starting the application server and the PeopleSoft PureInternet Architecture.
Task 11A-1: Setting Up Process Scheduler SecurityThis section discusses:
• Understanding Process Scheduler Security
• Changing User Account to Start BEA ProcMGR V8.1
• Granting Process Scheduler Administrative Rights
Understanding Process Scheduler SecurityThis task—in which you set up the PeopleSoft User ID that will be used to boot Process Scheduler serverso it has administrative rights to both Process Scheduler and Report Manager—guarantees that security isset up properly both in Windows and within your PeopleSoft database.
You must carry out this task to start Process Scheduler successfully.
Set up BEA ProcMGR V8.1 with a network user ID.
When you install BEA Tuxedo, the BEA ProcMGR V8.1 service is set up by default to be started by localsystem account—a user account that does not have access to the Windows network. If the Process Schedulerserver or processes initiated through Process Scheduler will be using a network printer, accessing files from anetwork drive, or using Windows utilities such as XCOPY that may access UNC paths, you need to change theuser account used to start BEA ProcMGR with a network user account.
Task 11A-1-1: Changing User Account to StartBEA ProcMGR V8.1To change User Account to start BEA ProcMGR V8.1:
1. Select Start, Settings, Control Panel. Double-click Administrative Tools, and double-click the Servicesicon.
296 Copyright © 2006, Oracle. All rights reserved.
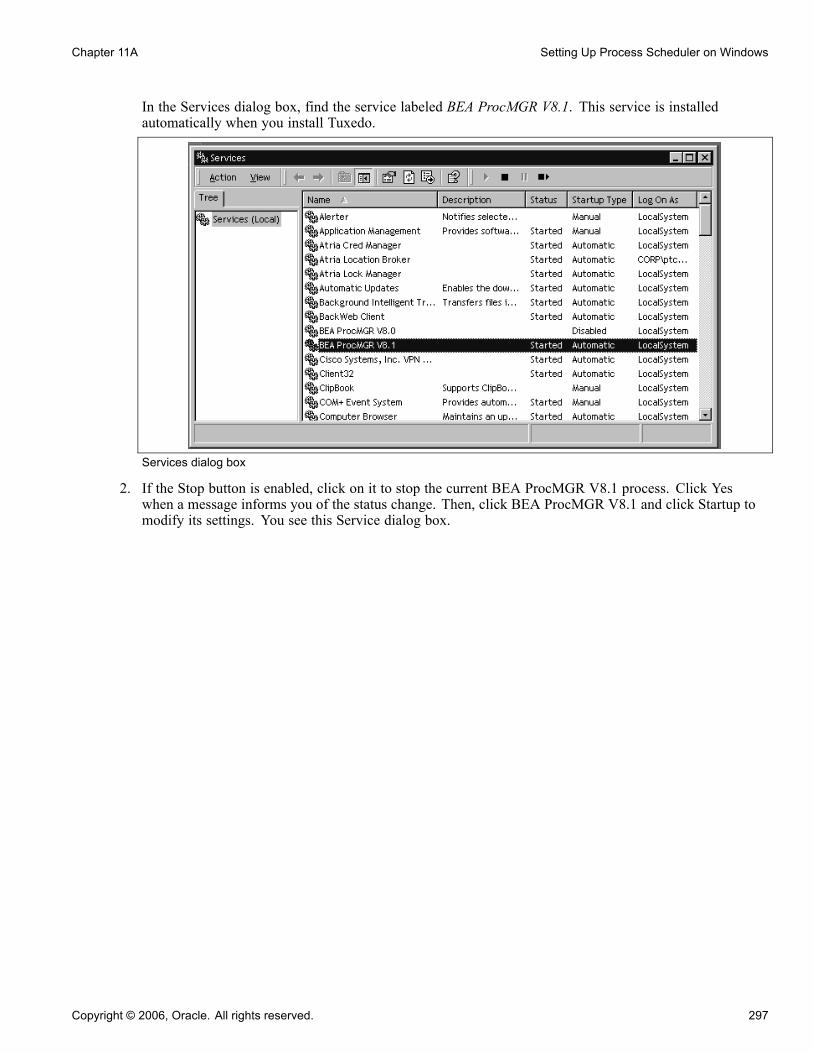
Chapter 11A Setting Up Process Scheduler on Windows
In the Services dialog box, find the service labeled BEA ProcMGR V8.1. This service is installedautomatically when you install Tuxedo.
Services dialog box
2. If the Stop button is enabled, click on it to stop the current BEA ProcMGR V8.1 process. Click Yeswhen a message informs you of the status change. Then, click BEA ProcMGR V8.1 and click Startup tomodify its settings. You see this Service dialog box.
Copyright © 2006, Oracle. All rights reserved. 297
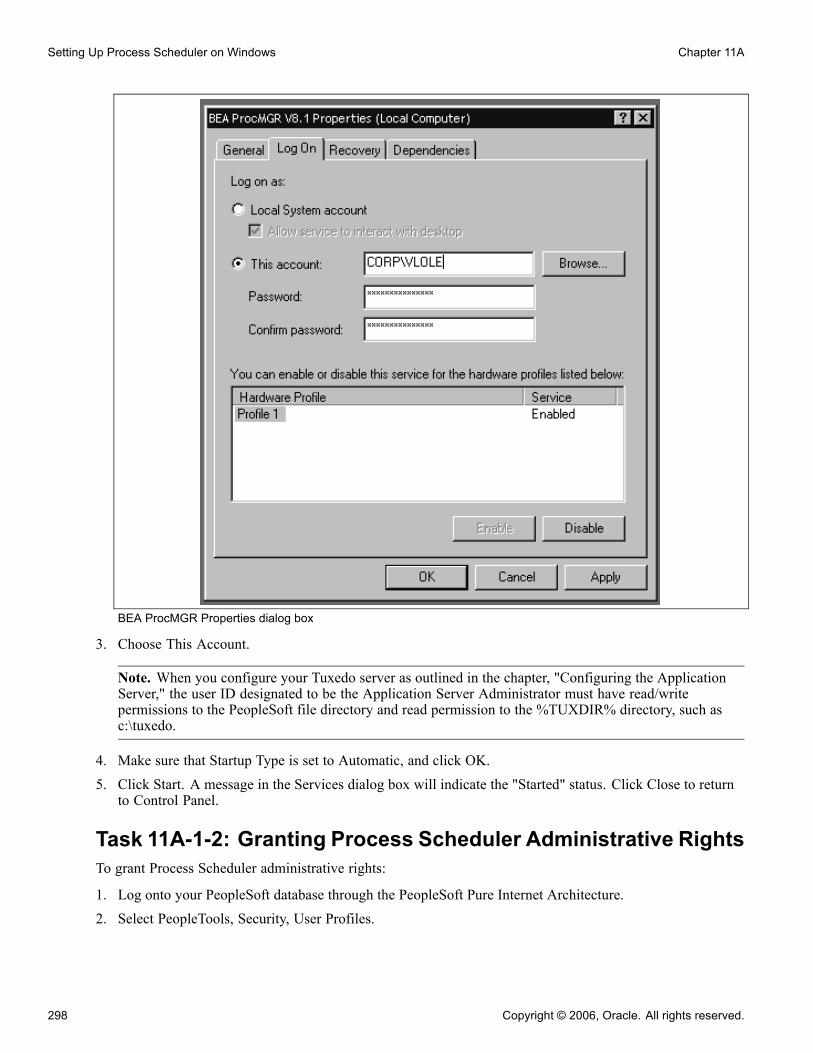
Setting Up Process Scheduler on Windows Chapter 11A
BEA ProcMGR Properties dialog box
3. Choose This Account.
Note. When you configure your Tuxedo server as outlined in the chapter, "Configuring the ApplicationServer," the user ID designated to be the Application Server Administrator must have read/writepermissions to the PeopleSoft file directory and read permission to the %TUXDIR% directory, such asc:\tuxedo.
4. Make sure that Startup Type is set to Automatic, and click OK.5. Click Start. A message in the Services dialog box will indicate the "Started" status. Click Close to returnto Control Panel.
Task 11A-1-2: Granting Process Scheduler Administrative RightsTo grant Process Scheduler administrative rights:
1. Log onto your PeopleSoft database through the PeopleSoft Pure Internet Architecture.2. Select PeopleTools, Security, User Profiles.
298 Copyright © 2006, Oracle. All rights reserved.

Chapter 11A Setting Up Process Scheduler on Windows
3. Select the User Profiles component. Use the Search dialog to select the PeopleSoft User ID you plan to useto boot the Process Scheduler server.
4. Click the Roles tab, click the plus icon to insert a new row, and there enter the ProcessSchedulerAdmin roleto grant the user ID with administrative rights in the Process Scheduler components.
Process Scheduler window: Roles tab
5. Repeat the instructions in step 4 to add the role ReportDistAdmin. This will grant the user ID administrativerights to the Report Manager component.
6. Click Save to save your changes.7. Select the General tab and jot down the Permission List name assigned to the Process Profile field.8. From the Portal menu, choose PeopleTools, Security, Permissions & Roles, Permission Lists.9. In the Search dialog, enter the Permission List you noted in step 7.10. Select the Can Start Application Server check box.11. Click Save to save your changes.
Task 11A-2: Setting Up Process Scheduler to TransferReports and Logs to the Report Repository
This section discusses:
• Understanding Report Distribution
• Setting Up Single Signon to Navigate from PIA to Report Repository
Copyright © 2006, Oracle. All rights reserved. 299
Setting Up Process Scheduler on Windows Chapter 11A
• Determining the Transfer Protocol
• Starting the Distribution Agent
• Setting Up the Report Repository
• Setting Up the Distribution for Your Process Scheduler Server
• Setting Up Sending and Receiving of Report Folders in the Report Manager
Understanding Report DistributionThe PeopleTools Report Distribution lets you access reports and log files generated from process requests runby a Process Scheduler Server Agent. Using the PeopleSoft Pure Internet Architecture, you can view reportsand log files from the web browser through the Report Manager or Process Monitor Detail page. ReportDistribution enables you to restrict access to these reports to authorized users based either on user ID or role ID.
This product also includes the Distribution Agent component, which runs on the same server as the ProcessScheduler Server Agent. The Distribution Agent, a process that runs concurrently with the Process SchedulerServer Agent, transfers to the Report Repository files generated by process requests initiated by the ProcessScheduler Server Agent.
The Distribution Agent transfers files to the Report Repository when one of these criteria is true:
• The Process Scheduler Server Agent is set up in the Server Definition to transfer all log files to theReport Repository.
• The process request output destination type is Web/Window.
In either case, the Process Scheduler Server Agent inserts a row in the Report List table (PS_CDM_LIST).The server agent then updates the distribution status for a process request to Posting upon completion of theprogram associated with the process request. The distribution status of Posting signals the Distribution Statusthat the files for the process request are ready for transfer to the Report Repository. The Distribution Agent isnotified by Process Scheduler for any process requests that are ready for transferring. As part of the process totransfer files to the Report Repository, the Distribution Agent performs the following steps:
• Transfer files to the Report Repository. All the report and log files are transferred to the Report Repository.For each process request transferred, a directory is created in the Report Repository using the followingformat: \<database name\<date yyyymmdd>\<report id>. All the files for a process request are storedin this directory.
• Delete the directory from the Process Scheduler Agent's Log/Output directory. When the output destinationtype specified for a process request is Web/Window, all the files and directory associated with the processrequest are deleted from the Process Scheduler Log/Output directory after the files are transferred tothe Report Repository.
The following diagram illustrates the Process Scheduler and Report Repository architecture.
300 Copyright © 2006, Oracle. All rights reserved.

Chapter 11A Setting Up Process Scheduler on Windows
Process Scheduler and Report Repository Architecture
Note. The PeopleSoft Pure Internet Architecture must be installed for Process Scheduler to be able to transferreports to the Repository.
Note. Before users can view a report, they are authenticated against the PeopleSoft database.
Note. You should set up single signon if you do not want users to have to log on an additional time to viewreports in the Report Repository. For the details on setting up single signon, consult the security PeopleBook.
See Enterprise PeopleTools 8.48 PeopleBook: Security Administration.
Task 11A-2-1: Setting Up Single Signon to Navigatefrom PIA to Report RepositoryTo view reports (log files or system files) from Report Repository, you need to pass the authentication. ReportRepository should be treated as a separate PeopleSoft application. To navigate from PeopleSoft Pure InternetArchitecture (PIA) to Report Repository, you need to set up single signon to avoid getting a prompt for a secondsignon. Here are some considerations for setting up single signon to navigate from PIA to Report Repository:
If Report Repository resides on the same web server as the PeopleSoft Pure Internet Architecture, make sureyour Local Message Node is set up to be a "trusted" node for single signon for your system.
If Report Repository resides on a different web server than PeopleSoft Pure Internet Architecture, do thefollowing:
• Make sure your Local Message Node is set up to be a "trusted" node for single signon for your system.• Use a fully qualified domain name when addressing the web server for both PIA and Report Repository.For example, enter http://<machineName>.peoplesoft.com/<site_name>/signon.html instead ofhttp://<machineName>/<site_name>/signon.html.
Copyright © 2006, Oracle. All rights reserved. 301

Setting Up Process Scheduler on Windows Chapter 11A
• Specify the Authentication Domain for your application during installation. If you have multipleapplications, and you want them to employ single signon, it is important to specify the same AuthenticationDomain for all applications.
See Enterprise PeopleTools 8.48 PeopleBook: Security Administration, “Implementing Single Signon.”
• Set up single signon with a password, like this:
- Choose PeopleTools, Integration Broker, Integration Setup, Nodes.
- Click Search and then select the node marked as Default Local Node.
- Select Password for the Authentication Option.
- Enter a password of your choice.
- Enter the password again in the Confirm Password field.
- Enter the user ID for which you are setting up single signon in the Default User ID field.
- Save the Node Definition.
- Sign off of PIA.
- Reboot your application server.
See AlsoEnterprise PeopleTools 8.48 PeopleBook: Security Administration
Task 11A-2-2: Determining the Transfer ProtocolWe recommend using HTTP as your transfer protocol.
Before transferring the files to the Report Repository, you need to determine which transfer protocol touse. If you have a Windows Process Scheduler and a Windows web server, you can use either an XCOPY,FTP, or HTTP/HTTPS. (If FTP information is not specified, Process Scheduler will perform an XCOPY.)If you have any other combination of servers (such as a Windows or z/OS Process Scheduler and a UNIXweb server), you must use FTP or HTTP/HTTPS.
Note. If you are using FTP, the FTP service must be set up in your web server.
Note. If you are on DB2 z/OS, you need to have JRE set up on your Process Scheduler server.
Task 11A-2-3: Starting the Distribution AgentThe Distribution Agent is automatically started as another Tuxedo server when a Process Scheduler Serveris booted. If a Process Scheduler Server was set up without specifying a Distribution Node in the ServerDefinition page, the Process Scheduler server will have a status in Process Monitor of “Running with NoReport Node.” Once a node is defined for the Process Scheduler server and in the next cycle the ProcessScheduler server checks the state of the system, the Distribution Agent dynamically sets up its environment.
Task 11A-2-4: Setting Up the Report RepositoryThis section discusses:
• Defining ReportRepositoryPath
302 Copyright © 2006, Oracle. All rights reserved.

Chapter 11A Setting Up Process Scheduler on Windows
• Defining the Report Node to Use HTTP/HTTPS
• Defining the Report Node to Use XCOPY
• Defining the Report Node to Use FTP
Defining ReportRepositoryPathThe ReportRepositoryPath specifies the location of a directory for the Report Repository. You can specifythe location for the Report Repository Path on the General page of the Web Profile during installation.If you do not set the location in the Web Profile, the location given by ReportRepositoryPath in theconfiguration.properties file is used for the default location. Note that the value entered for Report RepositoryPath in the Web Profile overrides any entry in the configuration.properties file.
See Enterprise PeopleTools 8.48 PeopleBook: Internet Technology, “Configuring the Portal Environment.”
Use the following formats to enter the name for the directory that you want to use for the ReportRepositoryPath.The examples below give the default values. Note that you must use a forward slash ('/') in both cases:
• Windows: ReportRepositoryPath=c:/psreports• UNIX: ReportRepositoryPath=/opt/psreports
Defining the Report Node to Use HTTP/HTTPSTo define the report node to use HTTP/HTTPS:
1. Select PeopleTools, Process Scheduler, Report Nodes.2. Select the Add a New Value link and enter the Report node name.The Report Node Definition page appears. You are on the Http Distribution Node page.
3. Verify that the Http Information option is selected.
Copyright © 2006, Oracle. All rights reserved. 303

Setting Up Process Scheduler on Windows Chapter 11A
Report Node Definition page for HTTP
4. Enter the URL of the web server using the following format:
http://<machine name>:<port number>/psreports/<site name>
Replace <machine name> with the name of your machine. Use the fully qualified host name for your webserver. If you are using an http port other than 80, you need to specify the port number.
Note. If you specify the Authentication Token Domain name during the PeopleSoft Pure InternetArchitecture installation, you must include a fully qualified domain name for the URL instead of theIP address.
• Description: Enter a description of the server (optional).• Operating System: Select the web server operating system.
5. Enter the following Connection Information:• http/https: Select the http option if you are not using SSL (default). Select the https option if you are usingSSL. Note that if you are using SSL you need to have Client Certificates installed on your web server.
• URI Host: Enter the machine name for the report repository.
Note. In a basic setup, the machine name for the report repository will match the machine name of theweb server URL. However, under certain circumstances—for example, if you are using a reverse proxyserver—the URL and URI Host may have different machine names.
• URI Port: Enter the port number, which must match the port number of your web server (defaults arehttp = 80, https = 443). If you change a port number you will lose the default values for both protocols.
304 Copyright © 2006, Oracle. All rights reserved.

Chapter 11A Setting Up Process Scheduler on Windows
• URI Resource: Enter SchedulerTransfer/<site name>.
Note. The setup of basic authentication is optional, but is recommended for security of the ReportRepository when using the HTTP to transfer files. For detailed instructions on setting up basicauthentication on the web server where the Report Repository resides, refer to the appendix “Securingthe Report Repository for HTTP.”
• Login ID: Enter the Login ID. This is not required, unless basic authentication has been set up on theweb server by the Web Administrator.
• Password: Enter the password for the user ID specified in the Login ID field. This is not required, unlessbasic authentication has been set up on the web server by the Web Administrator.
• Confirm Password: Enter the password a second time as a confirmation. This is not required, unlessbasic authentication has been set up on the web server by the Web Administrator.
6. Click Save to save your entries.7. To add additional report nodes, select Add to return to the Search page.
The following fields are shared between the FTP/XCOPY Distribution Node page and the Http Distributionpage:
• URL• Description• Operating System
• Login ID• Password• Confirm Password.
When you enter the information on one page, the information is also displayed on the shared fields of theother page but the fields are grayed out.
Note. If you complete the information for one protocol and then change your selection to another protocol, theshared fields will become active on the other page and grayed out on the original page. When you save, thesystem automatically clears the fields that are not shared.
Defining the Report Node to Use XCOPYTo define the report node to use XCOPY:
Note. If you use XCOPY the following parameters must be configured: URL, Operating System (must beWindows Server), Network Path (must be DOS or UNC paths and should be a shared directory with writepermissions for the account running the Process Scheduler). Both the Process Scheduler machine and theReport Repository machine must be Windows for XCOPY to be used.
1. Select PeopleTools, Process Scheduler, Report Nodes.
2. Select Add a New Value, enter the Report node name, and click Add.
3. Select the FTP/XCopy option.
The FTP/XCopy Distribution page appears.
Copyright © 2006, Oracle. All rights reserved. 305
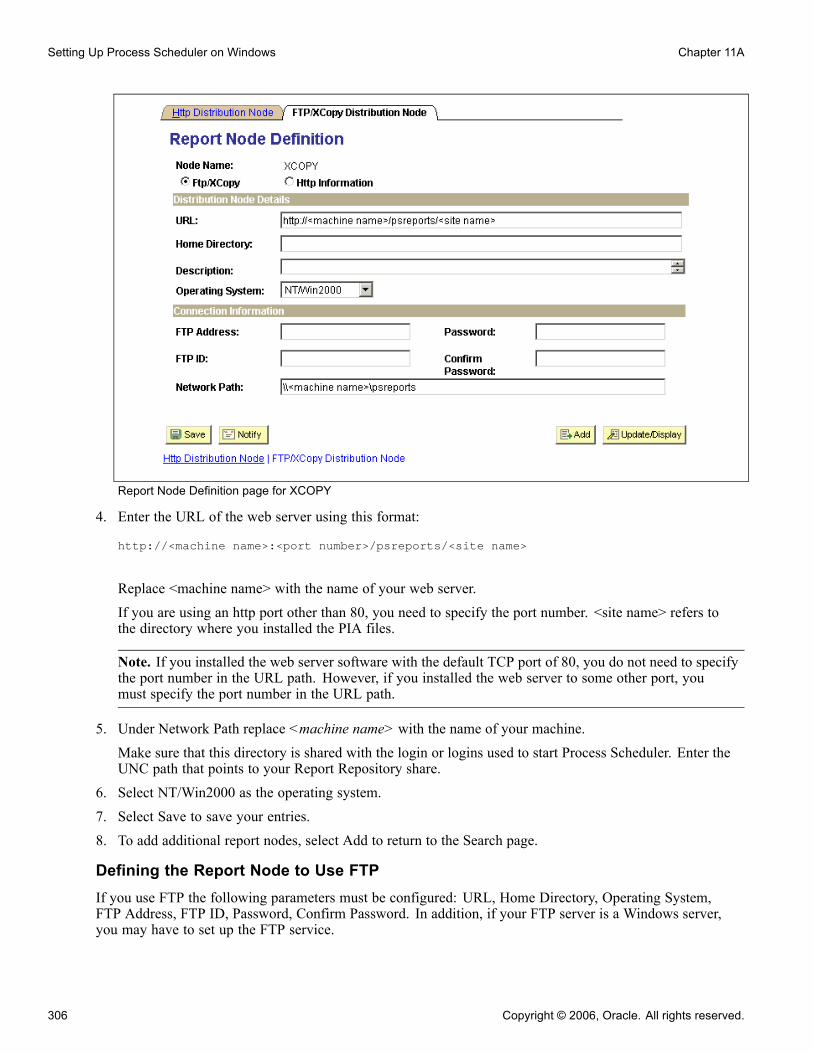
Setting Up Process Scheduler on Windows Chapter 11A
Report Node Definition page for XCOPY
4. Enter the URL of the web server using this format:
http://<machine name>:<port number>/psreports/<site name>
Replace <machine name> with the name of your web server.If you are using an http port other than 80, you need to specify the port number. <site name> refers tothe directory where you installed the PIA files.
Note. If you installed the web server software with the default TCP port of 80, you do not need to specifythe port number in the URL path. However, if you installed the web server to some other port, youmust specify the port number in the URL path.
5. Under Network Path replace <machine name> with the name of your machine.
Make sure that this directory is shared with the login or logins used to start Process Scheduler. Enter theUNC path that points to your Report Repository share.
6. Select NT/Win2000 as the operating system.
7. Select Save to save your entries.
8. To add additional report nodes, select Add to return to the Search page.
Defining the Report Node to Use FTPIf you use FTP the following parameters must be configured: URL, Home Directory, Operating System,FTP Address, FTP ID, Password, Confirm Password. In addition, if your FTP server is a Windows server,you may have to set up the FTP service.
306 Copyright © 2006, Oracle. All rights reserved.
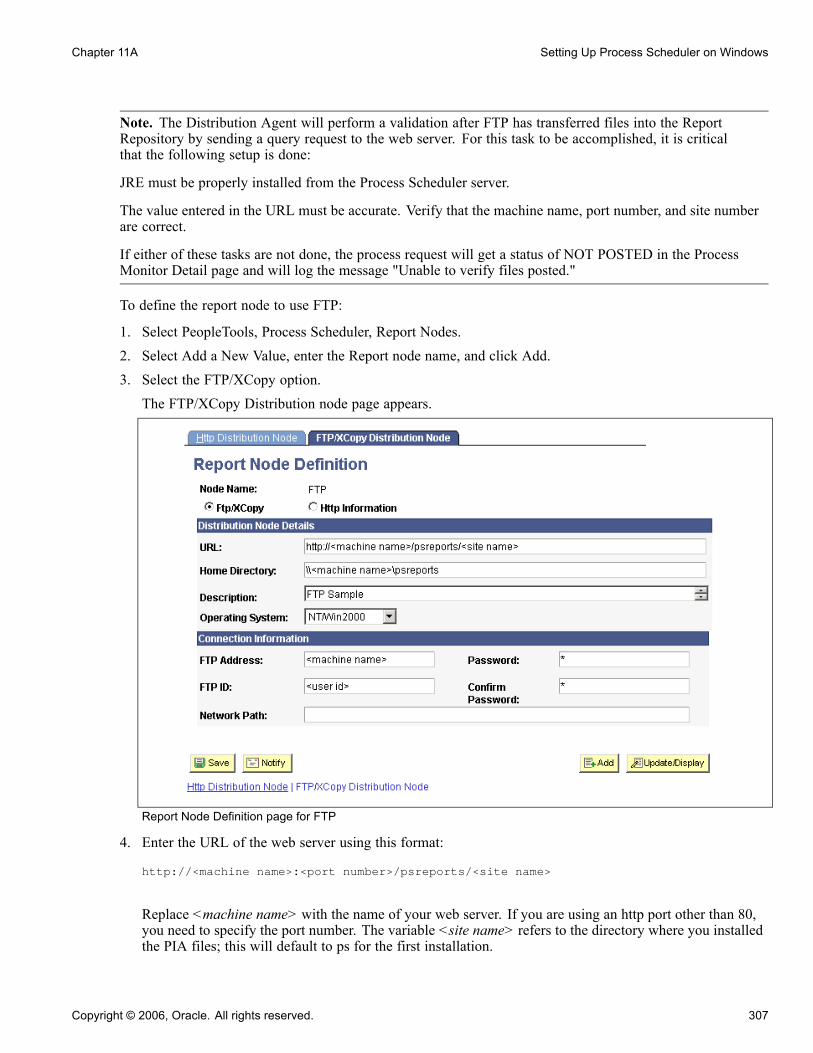
Chapter 11A Setting Up Process Scheduler on Windows
Note. The Distribution Agent will perform a validation after FTP has transferred files into the ReportRepository by sending a query request to the web server. For this task to be accomplished, it is criticalthat the following setup is done:
JRE must be properly installed from the Process Scheduler server.
The value entered in the URL must be accurate. Verify that the machine name, port number, and site numberare correct.
If either of these tasks are not done, the process request will get a status of NOT POSTED in the ProcessMonitor Detail page and will log the message "Unable to verify files posted."
To define the report node to use FTP:
1. Select PeopleTools, Process Scheduler, Report Nodes.2. Select Add a New Value, enter the Report node name, and click Add.3. Select the FTP/XCopy option.The FTP/XCopy Distribution node page appears.
Report Node Definition page for FTP
4. Enter the URL of the web server using this format:
http://<machine name>:<port number>/psreports/<site name>
Replace <machine name> with the name of your web server. If you are using an http port other than 80,you need to specify the port number. The variable <site name> refers to the directory where you installedthe PIA files; this will default to ps for the first installation.
Copyright © 2006, Oracle. All rights reserved. 307

Setting Up Process Scheduler on Windows Chapter 11A
Note. If you specify the Authentication Token Domain name during the PeopleSoft Pure InternetArchitecture installation, you must include a fully qualified domain name for the URL instead of theIP address.
Note. If you installed the web server software with the default TCP port of 80, you do not need to specifythe port number in the URL path. However, if you installed the web server to some other port, youmust specify the port number in the URL path.
5. Enter the following additional parameters:• Home Directory: Specify the directory specified during the installation of PeopleSoft Pure InternetArchitecture as the Report Repository. The FTP user ID must have write access to this directory.Note that this is not a required field for HTTP transfer, as the system uses the Report Repositorydirectory specified at install time or the current directory assigned to ReportRepositoryPath inconfiguration.properties. Note that the value you enter for the Report Repository Path in the Web Profileat install time overrides any entry for ReportRepositoryPath in configuration.properties.For Windows, the directory needs to match the Report Repository path. Make sure that you do notinclude any drive information—as in c:\psreports\—because you are using the FTP protocol to interpretthis parameter.
• Description: Enter a description of the server (optional).• Operating System: Select the operating system of the Report Repository.• FTP Address: Enter the machine name or the IP address of the Report Repository. If the name of themachine is used, it must be included on a DNS server.
• FTP ID: FTP user ID.• Password: Enter the password for the user ID specified in the FTP ID field.• Confirm Password: Enter the password a second time as a confirmation.
6. Select Save to save your entries.7. To add additional report nodes, select Add to return to the Search page.
Task 11A-2-5: Setting Up the Distribution for YourProcess Scheduler ServerTo set up the Distribution Settings for your Process Scheduler Server:
1. Choose PeopleTools, Process Scheduler, Servers.
2. Enter the Server Name (such as PSNT). The Server Definition page appears.
3. Select the Distribution tab.
308 Copyright © 2006, Oracle. All rights reserved.

Chapter 11A Setting Up Process Scheduler on Windows
Server Definition page: Distribution tab
4. Click the lookup button to display the report node names and select the name of the required report node.
5. Enter a number for the Maximum Transfer Retries. This is the maximum number of times the server cantry to send a report before it errors out.
6. Enter the number of seconds for the Interval for Transfer Attempt field. This is the interval betweenattempts to send the report.
7. Select the check box Transfer Log Files to Report Repository if you want to transfer all log and tracefiles from processes that do not generate reports.
8. Click Save to save your entries.
9. If Process Scheduler is running, you must reboot for any new settings to take effect.
To view reports (log files or system files) from Report Repository, you need to pass the authentication. ReportRepository should be treated as a separate PeopleSoft Application. To navigate from PIA to Report Repository,you need to setup single signon in order to avoid getting prompt for second signon.
Task 11A-2-6: Setting Up Sending and Receiving ofReport Folders in the Report ManagerTo be able to view reports in the Report Manager Explorer and List pages, you need to set up the sendingand receiving of report folders in the Report Manager by activating the domain on which a sending andreceiving server resides. Consult the documentation covering the PeopleSoft Integration Broker to learn howto activate the sending and receiving server domain.
See Enterprise PeopleTools 8.48 PeopleBook: PeopleSoft Integration Broker, “Using the Service OperationsMonitor.”
Copyright © 2006, Oracle. All rights reserved. 309

Setting Up Process Scheduler on Windows Chapter 11A
Task 11A-3: Setting Environment VariablesTo set the appropriate Tuxedo environment variables, carry out these steps. (If you have already set thesevariables on the machine you are using as your Process Scheduler Server, you can skip this task.)
See “Installing Additional Components,” Installing Tuxedo on Windows.
To set the variables:
1. Choose Start, Settings, Control Panel.2. Double-click the System icon.3. Make sure that the NLSPATH environment variable is set.NLSPATH does not need to be explicitly set since BEA/Tuxedo sets NLSPATH in its own registry tree.This value can be displayed using Control Panel, BEA/Tuxedo, on the Environment tab. However, theinstallation of certain products, such as IBM DB2 connectivity (DB2 UDB for z/OS and DB2 for Linux,UNIX, and Windows) sets NLSPATH to a value that causes Tuxedo to fail. The solution is to either setNLSPATH=c:\tuxedo\locale\c, or to delete it entirely and let Tuxedo pick up the value from its registrytree. If you are running DB2 for Linux, UNIX, and Windows, the solution instead is to append thec:\tuxedo\locale\c directory in the NLSPATH directory.
Task 11A-4: Setting Up Process Scheduler Server AgentThis section discusses:
• Understanding Process Scheduler Server Agent
• Creating and Configuring a Process Scheduler Server
• Reconfiguring a Process Scheduler Server
• Verifying the Process Scheduler Server Status
Understanding Process Scheduler Server AgentFor installation purposes, you can use predefined server names and other definitions. The predefined name thatyou might use is as follows:
Server Name Operating System
PSNT Windows
To test this, use processes already defined in your PeopleSoft database. To set up a new server definition inyour PeopleSoft database, refer to the Process Scheduler PeopleBook.
See Enterprise PeopleTools 8.48 PeopleBook: PeopleSoft Process Scheduler
Note. When creating multiple Process Scheduler Servers for the same database, each server must havea unique server name. For example, two Process Scheduler Servers, both named PSNT, cannot run againstthe same database.
310 Copyright © 2006, Oracle. All rights reserved.

Chapter 11A Setting Up Process Scheduler on Windows
Task 11A-4-1: Creating and Configuring a ProcessScheduler ServerThis section describes how to create and configure a Process Scheduler server.
Note. You can set Process Scheduler configuration parameters either by using PSADMIN,which provides an interactive dialog, or by editing the configuration file psprcs.cfg located in the<PS_HOME>\appserv\prcs\database name directory. The following steps assume you are using PSADMINto specify parameter settings.
To create and configure a Process Scheduler Server:
1. From <PS_HOME>\appserv on the batch server, type psadmin and press ENTER to access the PeopleSoftServer Administration menu.
2. Select 2 to access the Process Scheduler submenus.
---------------------------------
PeopleSoft Server Administration
---------------------------------
1) Application Server
2) Process Scheduler
3) Search Server
4) Service Setup
q) Quit
Command to execute (1-4 q): 2
3. Select 4 from the PeopleSoft Process Scheduler Administration menu.
-------------------------------------------
PeopleSoft Process Scheduler Administration
-------------------------------------------
1) Start a Process Scheduler Server
2) Stop a Process Scheduler Server
3) Configure a Process Scheduler Server
4) Create a Process Scheduler Server Configuration
5) Delete a Process Scheduler Server Configuration
6) Edit a Process Scheduler Configuration File
7) Import an existing Process Scheduler Configuration
8) Show Status of a Process Scheduler Server
9) Kill a Process Scheduler Server
10) Clean IPC resources of a Process Scheduler Domain
q) Quit
Command to execute (1-9, q) : 4
4. When prompted for the name of the database that your server will access
Please enter name of Database that server will access :
enter the name of the database and press ENTER.
Copyright © 2006, Oracle. All rights reserved. 311

Setting Up Process Scheduler on Windows Chapter 11A
5. Specify 1 for nt for the configuration templates.The nt configuration is based on the operating system Process Scheduler server will be booted from.
Process Scheduler Configuration templates:
1) nt
2) os390
Select config template number:
6. After the system creates the domain, you see the prompt
Would you like to configure this Process Scheduler Server now? (y/n) [y] :
Choose y; you'll see a Quick-configure menu something like this:------------------------------------------------------------
Quick-configure menu -- Scheduler for Database: HRDMO
------------------------------------------------------------
Features Settings
========== ==========
1) Master Schdlr : Yes 5) DBNAME :[HRDMO]
2) App Eng Server : Yes 6) DBTYPE :[DB2ODBC]
7) PrcsServer :[PSNT]
8) UserId :[PS]
9) UserPswd :[PS]
10) ConnectID :[people]
11) ConnectPswd:[peop1e]
12) ServerName :[]
Actions 13) Log/Output Dir:[%PS_SERVDIR%\log_output]
========= 14) SQRBIN :[%PS_HOME%\bin\sqr\ODB\binw]
3) Load config as shown 15) AddToPATH :[%WINDIR%;%WINDIR%\SYSTEM32]
4) Custom configuration 16) DBBIN :[C:\<connectivity directory>]
h) Help for this menu
q) Return to previous menu
HINT: Enter 5 to edit DBNAME, then 3 to load
Enter selection (1-16, h, or q):
Note. Cognos/Cube Manager Installs: Make sure to specify the proper path for Cognos in the Add to Pathparameter. By default, that path is C:\Program Files\Cognos\cer2\bin;C:\ODI\OStore\bin. The Cognos andODI are the important top level directories, and could change depending on the install.
7. If you need to modify any of these settings, enter the number next to the parameter name, type the newvalue, and press ENTER.
312 Copyright © 2006, Oracle. All rights reserved.
Chapter 11A Setting Up Process Scheduler on Windows
Parameter Description
Master Schdlr Flag to enable the Master Scheduler Server(PSMSTPRC). Default is to enable the server.
See Enterprise PeopleTools 8.48 PeopleBook:PeopleSoft Process Scheduler.
App Eng Server Flag to initiate Application Engine programs through theAE Tuxedo Server (PSAESRV). Default is set to run AEusing PSAESRV.
See Enterprise PeopleTools 8.48 PeopleBook:PeopleSoft Process Scheduler.
Load config as shown Load the selections you made in the Quick Configuremenu.
Custom configuration Make custom selections in PSADMIN, using optionsthat are not available in the Quick Configure menu.
DBNAME Specify the database name that is associated with aPeopleSoft Process Scheduler Server Agent, such asHRDMO, FSDMO, SADMO, and so on.
DBTYPE Specify the database type: DB2ODBC (for DB2 UDBfor z/OS).
PrcsServer Specify the process server name. This must match thename defined in the Server Definition table, such asPSNT or PSUNX.
UserId Enter the user ID. For Enterprise Resource Planning(ERP), this is typically VP1, and for Human Resources(HR) it's PS.
UserPswd Enter the user password. For Enterprise ResourcePlanning, this is typically VP1, and for HumanResources it's PS.
ConnectID Enter the connect ID. This value is required.
ConnectPswd Enter the connect password. This value is required.
ServerName This value is required for Sybase users.
Copyright © 2006, Oracle. All rights reserved. 313
Setting Up Process Scheduler on Windows Chapter 11A
Parameter Description
Log/Output Dir Specify the directory in which files that are generatedby the program are written. When PeopleSoftProcess Scheduler initiates a process request, itcreates a subdirectory in the format <Process TypeID>_<Program Name>_<Process Instance> thatcontains the generated files. For instance, the SQRprogram XRFWIN that ran with process instance 20has all reports, trace, and log files in the subdirectorySQR_XRFWIN_20. It is also the optional directoryused with the Output Destination field when schedulinga request. This variable (%%OutputDirectory%%) canbe used in the File/Printer field of the Process SchedulerRequest dialog box.
SQRBIN Enter the path to the SQR executables.
AddToPATH (Optional for Tuxedo) Specify an additional directorythat is appended to the PATH environment variable.
DBBIN Enter the path to the database drivers; that is, yourconnectivity software.
For descriptions of the PSADMIN options that do not appear in the Quick-configure menu, consult thefollowing. For a basic install, in most cases you can accept the defaults.
See Enterprise PeopleTools 8.48 PeopleBook: PeopleSoft Process Scheduler.8. When you have updated the settings as needed, choose 3, Load config as shown, from the Quick-Configuremenu to save your settings to the Process Scheduler configuration file, pstuxcfg.
9. To start Process Scheduler, choose 1 and select the item number corresponding to your database to start.
Note. The correct Crystal and nVision libraries and components are automatically configured whenProcess Scheduler is booted.
Note. To stop Process Scheduler Server, choose 2, Stop a Process Scheduler Server, from the PeopleSoftProcess Scheduler Administration menu, and then enter the number corresponding to the name of theappropriate database.
314 Copyright © 2006, Oracle. All rights reserved.
Chapter 11A Setting Up Process Scheduler on Windows
Note. If you see the following message, then the server is already down:
Command to execute (1-2, q) [q]: 1
Loading command line administration utility ...
tmadmin - Copyright (c) 1996 BEA Systems, Inc.
Portions * Copyright 1986-1997 RSA Data Security, Inc.
All Rights Reserved.
Distributed under license by BEA Systems, Inc.
Tuxedo is a registered trademark.
No bulletin board exists. Entering boot mode.
> TMADMIN_CAT:111: ERROR: No such command.
Task 11A-4-2: Reconfiguring a Process Scheduler ServerIf you create and then immediately configure a Process Scheduler server, you can use the Quick-configuremenu. However, if you want to update the configuration of an existing domain, or carry out a number of otheradministrative tasks, this handy shortcut is not available. Instead you can use PSADMIN as follows. Feel freeto skip this procedure if you have already created and configured your Process Scheduler Server using theQuick-configure menu and want to move forward with your installation.
Note. If you want to configure the Process Scheduler Server while it is running, you need to stop and restartthe server to load the new settings.
To reconfigure a Process Scheduler Server:
1. Start PSADMIN by entering:
cd <PS_HOME>\appserv
psadmin
2. Select 2 for Process Scheduler in the PeopleSoft Server Administration menu.3. In the PeopleSoft Process Scheduler Administration menu, select 3 for Configure a Process Scheduler.4. Select the database for which the Process Scheduler needs to be configured.5. At the prompt
Do you want to change any config values (y/n)? [n]:
Specify y to start an interactive dialog that lets you examine or change parameter values.6. Now you specify configuration parameters one by one. Configuration parameters are grouped into sections.At each section, you are asked whether to change any parameters—for example:
Values for config section - Startup
DBName=
DBType=
UserId=
Copyright © 2006, Oracle. All rights reserved. 315

Setting Up Process Scheduler on Windows Chapter 11A
UserPswd=
ConnectId=
ConnectPswd=
ServerName=
Do you want to change any values (y/n)? [n]:
• Specify y to change any parameter values for the current section. You are prompted for each parametervalue. Either specify a new value or press ENTER to accept the default. After you press ENTER, you arepositioned at the next parameter in that section. When you are done with that section, you are againasked whether you want to re-edit any of the values you changed.
• If you do not want to change any values, specify n and you are prompted for the next configurationsection.
7. Once you have selected all your parameters, you see this message
You will need to shut down and start up the server to read the new settings.
For descriptions of the Process Scheduler options in the PSADMIN, consult the following. In most cases youcan accept the defaults.
See Enterprise PeopleTools 8.48 PeopleBook: PeopleSoft Process Scheduler.
Task 11A-4-3: Verifying the Process Scheduler Server StatusAt this stage it is a good idea to verify the Process Scheduler Server status.
To verify the Process Scheduler Server status:
1. From the PeopleSoft Process Scheduler Administration menu, select option 8.
-------------------------------------------
PeopleSoft Process Scheduler Administration
-------------------------------------------
1) Start a Process Scheduler Server
2) Stop a Process Scheduler Server
3) Configure a Process Scheduler Server
4) Create a Process Scheduler Server Configuration
5) Delete a Process Scheduler Server Configuration
6) Edit a Process Scheduler Configuration File
7) Import an existing Process Scheduler Configuration
8) Show Status of a Process Scheduler Server
9) Kill a Process Scheduler Server
10) Clean IPC resources of a Process Scheduler Domain
q) Quit
Command to execute (1-10, q) : 8
2. To verify the status of the Process Scheduler Server for a specific database, type the number correspondingto the appropriate database.For example:
316 Copyright © 2006, Oracle. All rights reserved.

Chapter 11A Setting Up Process Scheduler on Windows
Database list:
1) HRDMO
Select item number to start: 1
will verify the status of the Process Scheduler Server for the database HRDMO.
Verifying Status
You can also verify the status of the Process Scheduler Server from Process Monitor in PIA. To verify theProcess Scheduler Server status from the Process Monitor page, go to PeopleTools, Process Scheduler, ProcessMonitor, and select Server List.
If the user has the process security rights to update the server status, the Refresh button can be used torefresh the screen, too.
See Setting Up Process Scheduler Security.
Process Monitor page: Server List tab
Copyright © 2006, Oracle. All rights reserved. 317

Setting Up Process Scheduler on Windows Chapter 11A
Task 11A-5: Starting Process Scheduler as aWindows Service (Optional)
You can start the Process Scheduler Server as a Windows service. This means that administrators do not needto manually boot each Process Scheduler Server that runs on a Windows machine. Instead, each time youboot the Windows server where the Process Scheduler Server resides, the Process Scheduler Server will bootautomatically. You can also still manually boot Process Scheduler Servers on your Windows server.
Note. If you have set up TUXDIR and TEMP as new SYSTEM variables, you need to reboot your machinebefore any Windows services will pick up the value of these environment variables.
Note. You can also set up application servers as a Windows service using the instructions provided here.
Note. The following directions assume that the Process Scheduler is already configured on the Windows server.
To set up the Windows Service for a Process Scheduler Server:
1. Open the System utility within the Control Panel, and set the following variables in the System Variablessection of the Environment tab.
Note. Even if the following variables are in the User Variables section, they must also be in the SystemVariables section because the Windows service will be started under the System Account.
Variable Value
TEMP Specify the location of the TEMP directory on theWindows server, as in C:\TEMP.
TUXDIR Specify the location of the Tuxedo directory on theWindows server, as in C:\tuxedo.
2. Reboot the Windows computer if any changes or additions were made for the system variables.3. Run the PeopleSoft PSADMIN utility (psadmin.exe in the <PS_HOME>\appserv directory).4. Select 4 from the PeopleSoft Server Administration menu.
--------------------------------
PeopleSoft Server Administration
--------------------------------
1) Application Server
2) Process Scheduler
3) Search Server
4) Service Setup
q) Quit
Command to execute (1-4, q): 4
5. Select 1 from the PeopleSoft Services Administration menu.
318 Copyright © 2006, Oracle. All rights reserved.
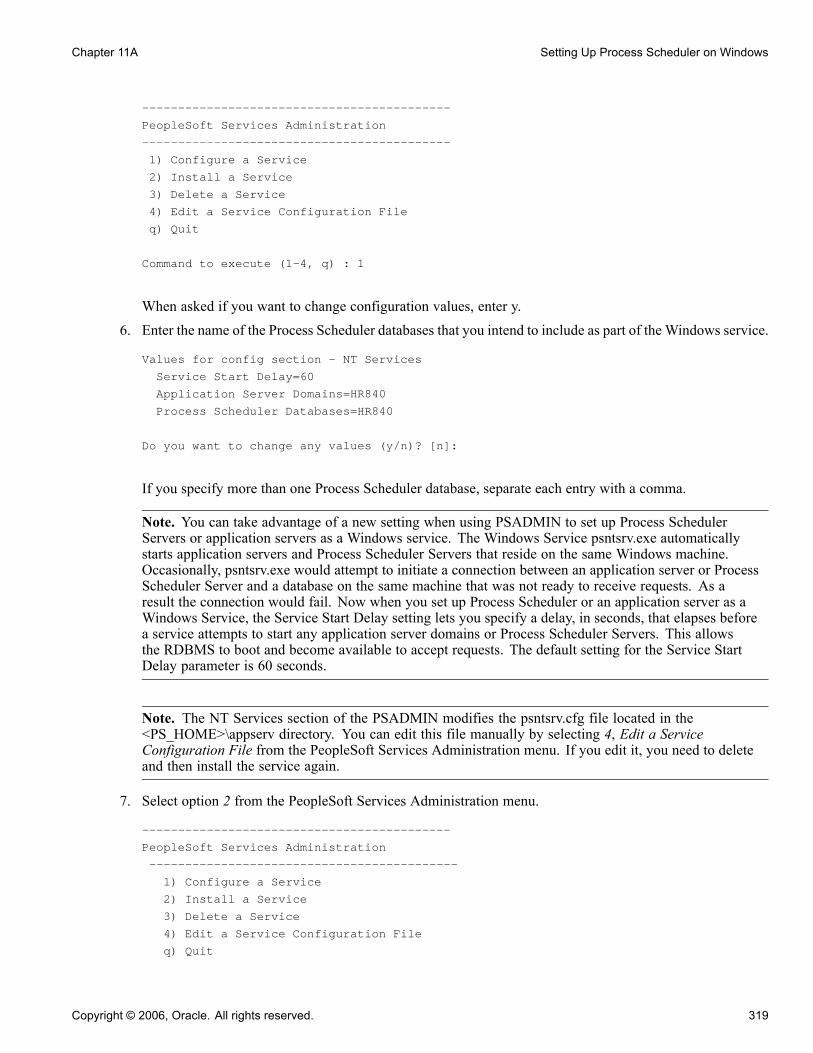
Chapter 11A Setting Up Process Scheduler on Windows
-------------------------------------------
PeopleSoft Services Administration
-------------------------------------------
1) Configure a Service
2) Install a Service
3) Delete a Service
4) Edit a Service Configuration File
q) Quit
Command to execute (1-4, q) : 1
When asked if you want to change configuration values, enter y.6. Enter the name of the Process Scheduler databases that you intend to include as part of the Windows service.
Values for config section - NT Services
Service Start Delay=60
Application Server Domains=HR840
Process Scheduler Databases=HR840
Do you want to change any values (y/n)? [n]:
If you specify more than one Process Scheduler database, separate each entry with a comma.
Note. You can take advantage of a new setting when using PSADMIN to set up Process SchedulerServers or application servers as a Windows service. The Windows Service psntsrv.exe automaticallystarts application servers and Process Scheduler Servers that reside on the same Windows machine.Occasionally, psntsrv.exe would attempt to initiate a connection between an application server or ProcessScheduler Server and a database on the same machine that was not ready to receive requests. As aresult the connection would fail. Now when you set up Process Scheduler or an application server as aWindows Service, the Service Start Delay setting lets you specify a delay, in seconds, that elapses beforea service attempts to start any application server domains or Process Scheduler Servers. This allowsthe RDBMS to boot and become available to accept requests. The default setting for the Service StartDelay parameter is 60 seconds.
Note. The NT Services section of the PSADMIN modifies the psntsrv.cfg file located in the<PS_HOME>\appserv directory. You can edit this file manually by selecting 4, Edit a ServiceConfiguration File from the PeopleSoft Services Administration menu. If you edit it, you need to deleteand then install the service again.
7. Select option 2 from the PeopleSoft Services Administration menu.
-------------------------------------------
PeopleSoft Services Administration
-------------------------------------------
1) Configure a Service
2) Install a Service
3) Delete a Service
4) Edit a Service Configuration File
q) Quit
Copyright © 2006, Oracle. All rights reserved. 319
Setting Up Process Scheduler on Windows Chapter 11A
Command to execute (1-4, q) : 2
8. Return to the Control Panel, choose Administrative Tools, and launch the Services utility.9. On the Services dialog, scroll to find the entry that adheres to the following naming convention, andselect it:
PeopleSoft <PS_HOME>
Note. The default Startup mode is Manual.
10. Click Startup.11. On the Service dialog in the Startup Type group, select Automatic, and in the Log On As group, selectSystem Account. Then click OK.
Note. The Log On As setting needs to reflect that which you set for your BEA ProcMGR V8.1 and Tlistenprocesses. PeopleSoft recommends that you set these services to System Account when you install Tuxedo.The Log On As value only affects the application server because Process Scheduler runs independentlyfrom Tuxedo. See the chapter “Installing Additional Components” for more information on installingTuxedo, and refer to the chapter “Configuring the Application Server” for the details on configuringthe application server.
12. On the Services dialog, make sure the PeopleSoft service is selected, and click Start.13. Use the Process Monitor to verify that the Process Scheduler Server is running. You can also use TaskManager to verify that the executables involved with the service are running.
For the Process Scheduler, make sure that the psprcsrv.exe is running. If you have customized the name ofpsprcsrv.exe, make sure the appropriate executable is running.
Task 11A-6: Configuring the Process Scheduler forWord for Windows (Optional)
Some applications process documents using Word for Windows. Here is how to configure Word to work withthe Process Scheduler.
Note. Microsoft Word must already be installed on the server; it is not included with the PeopleTools install.
Note. If spaces exist in the WINWORD path in the Process Scheduler configuration file (psprcs.cfg), WinWordreports will fail. You will need to modify the Process Type Definition and add quotes around the entry in theCommand Line field, for example " %%WINWORD%%\winword.exe".
To configure Process Scheduler for Word for Windows:
320 Copyright © 2006, Oracle. All rights reserved.
Chapter 11A Setting Up Process Scheduler on Windows
1. Edit the Process Scheduler configuration file. In the [Process Scheduler] section, edit theWINWORD entry so that it points to the directory where winword.exe is installed—for example,WINWORD=C:\Apps\Office2000\Office.
Note. The Process Scheduler configuration file psprcs.cfg is located in <PS_HOME>\appserv\prcs\databasename directory.
2. Change the Microsoft Word macro security to allow macros to be run. Start Microsoft Word and selectTools, Macro, Security. Select the Low security setting and click OK.
Task 11A-7: Configuring Setup ManagerBefore you can use PeopleTools Setup Manager, you must fulfill these requirements:
• To use the Excel to CI template-generation feature of Setup manager, the Process Scheduler must be PSNT.That is, Process Scheduler must be installed on a Windows machine.
• Process Scheduler must be running.• Any Process Scheduler environment variables (especially %PS_FILEDIR%) must be specified.• Microsoft Office 2000 must be present on the process scheduler server, and Microsoft Excel must beinstalled.
• The MSXML COM object for Excel, msxml4.dll, must be present on the system.For confirmation, navigate to %SystemRoot%\system32\msxml4.dll. Right-click and select Properties,Versions, Product Version. The version number must be 4.20 or above.
Copyright © 2006, Oracle. All rights reserved. 321
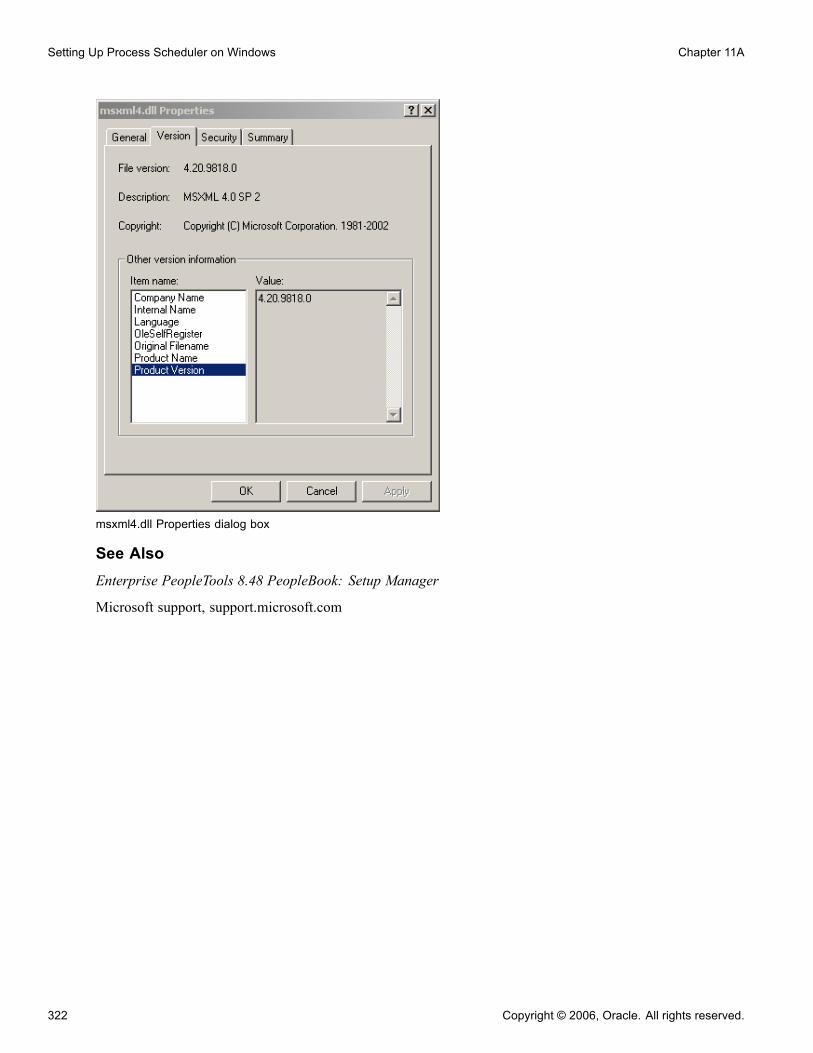
Setting Up Process Scheduler on Windows Chapter 11A
msxml4.dll Properties dialog box
See AlsoEnterprise PeopleTools 8.48 PeopleBook: Setup Manager
Microsoft support, support.microsoft.com
322 Copyright © 2006, Oracle. All rights reserved.

CHAPTER 11B
Setting Up Process Scheduler on UNIX
This chapter discusses:
• Prerequisites
• Setting Up Process Scheduler Security
• Setting Up Process Scheduler to Transfer Reports and Logs to the Report Repository
• Setting Up Process Scheduler Server Agent
Note. If your database runs on UNIX, you need to set up a Windows batch environment on a Windows applicationserver or on a dedicated Windows workstation for Windows-specific batch processes, such as Crystal Reports, nVisionreports, Microsoft Word, or Cube Manager. These processes are Windows-specific applications that cannot be executedby the Process Scheduler on UNIX or z/OS.
Note. If you are running DB2 UDB for z/OS, SQR is not supported on UNIX Process Schedulers.
Note. UNIX COBOL Support for z/OS DB2 (EBCDIC) databases:
RemoteCall COBOL and Batch COBOL are only supported for Financials/SCM Applications. RemoteCall COBOLand Batch COBOL are not supported for any other product lines.
UNIX and Windows COBOL support for z/OS DB2 Unicode databases:
RemoteCall Cobol and Batch Cobol are supported for Financials/SCM applications. RemoteCall Cobol and BatchCobol are also supported for any other product lines.
See AlsoEnterprise PeopleTools 8.48 Hardware and Software Requirements
Enterprise PeopleTools 8.48 PeopleBook: PeopleSoft Process Scheduler
PeopleSoft Customer Connection (Implement, Optimize + Upgrade, Implementation Guide, Supported Platforms,PeopleSoft Enterprise)
PrerequisitesBefore setting up your Process Scheduler, you must:
• Install Tuxedo (except for z/Linux).
Copyright © 2006, Oracle. All rights reserved. 323

Setting Up Process Scheduler on UNIX Chapter 11B
See “Installing Additional Components.”• Install database connectivity to be able to communicate with your database server (Process Schedulerrequires a direct connection to the database).
See “Preparing for Installation.”
• Set up the web server with the PeopleSoft Pure Internet Architecture, as described in the previous chapter.This is required to set up the Process Scheduler to transfer reports or log files to the Report Repository.
• Have both your application server and the PeopleSoft Pure Internet Architecture started. In this chapter,you must modify security options of the designated PeopleSoft user ID that will be used to boot up ProcessScheduler. This requires that the user ID's profile be modified through the User Security component.Please refer to earlier chapters for the details on starting the application server and the PeopleSoft PureInternet Architecture.
Task 11B-1: Setting Up Process Scheduler SecurityThis section discusses:
• Understanding Process Scheduler Security
• Granting Process Scheduler Administrative Rights
Understanding Process Scheduler SecurityThis task—in which you set up the PeopleSoft User ID that will be used to boot Process Scheduler serverso it has administrative rights to both Process Scheduler and Report Manager—guarantees that security isset up properly within your PeopleSoft database.
You must carry out this task to start Process Scheduler successfully.
Task 11B-1-1: Granting Process Scheduler Administrative RightsTo grant Process Scheduler administrative rights:
1. Log onto your PeopleSoft database through the PeopleSoft Pure Internet Architecture.2. Select PeopleTools, Security, User Profiles.3. Select the User Profiles component. Use the Search dialog to select the PeopleSoft User ID you plan to useto boot the Process Scheduler server.
4. Click the Roles tab, click the plus icon to insert a new row, and there enter the ProcessSchedulerAdmin roleto grant the user ID with administrative rights in the Process Scheduler components.
324 Copyright © 2006, Oracle. All rights reserved.

Chapter 11B Setting Up Process Scheduler on UNIX
Process Scheduler window: Roles tab
5. Repeat the instructions in step 4 to add the role ReportDistAdmin. This will grant the user ID administrativerights to the Report Manager component.
6. Click Save to save your changes.7. Select the General tab and jot down the Permission List name assigned to the Process Profile field.8. From the Portal menu, choose PeopleTools, Security, Permissions & Roles, Permission Lists.9. In the Search dialog, enter the Permission List you noted in step 7.10. Select the Can Start Application Server check box.11. Click Save to save your changes.
Task 11B-2: Setting Up Process Scheduler to TransferReports and Logs to the Report Repository
This section discusses:
• Understanding Report Distribution
• Setting Up Single Signon to Navigate from PIA to Report Repository
• Determining the Transfer Protocol
• Starting the Distribution Agent
• Setting Up the Report Repository
• Setting Up the Distribution for Your Process Scheduler Server
Copyright © 2006, Oracle. All rights reserved. 325

Setting Up Process Scheduler on UNIX Chapter 11B
• Setting Up Sending and Receiving of Report Folders in the Report Manager
Understanding Report DistributionThe PeopleTools Report Distribution lets you access reports and log files generated from process requests runby a Process Scheduler Server Agent. Using the PeopleSoft Pure Internet Architecture, you can view reportsand log files from the web browser through the Report Manager or Process Monitor Detail page. ReportDistribution enables you to restrict access to these reports to authorized users based either on user ID or role ID.
This product also includes the Distribution Agent component, which runs on the same server as the ProcessScheduler Server Agent. The Distribution Agent, a process that runs concurrently with the Process SchedulerServer Agent, transfers to the Report Repository files generated by process requests initiated by the ProcessScheduler Server Agent.
The Distribution Agent transfers files to the Report Repository when one of these criteria is true:
• The Process Scheduler Server Agent is set up in the Server Definition to transfer all log files to theReport Repository.
• The process request output destination type is Web/Window.
In either case, the Process Scheduler Server Agent inserts a row in the Report List table (PS_CDM_LIST).The server agent then updates the distribution status for a process request to Posting upon completion of theprogram associated with the process request. The distribution status of Posting signals the Distribution Statusthat the files for the process request are ready for transfer to the Report Repository. The Distribution Agent isnotified by Process Scheduler for any process requests that are ready for transferring. As part of the process totransfer files to the Report Repository, the Distribution Agent performs the following steps:
• Transfer files to the Report Repository. All the report and log files are transferred to the Report Repository.For each process request transferred, a directory is created in the Report Repository using the followingformat: \<database name\<date yyyymmdd>\<report id>. All the files for a process request are storedin this directory.
• Delete the directory from the Process Scheduler Agent's Log/Output directory. When the output destinationtype specified for a process request is Web/Window, all the files and directory associated with the processrequest are deleted from the Process Scheduler Log/Output directory after the files are transferred tothe Report Repository.
The following diagram illustrates the Process Scheduler and Report Repository architecture.
326 Copyright © 2006, Oracle. All rights reserved.

Chapter 11B Setting Up Process Scheduler on UNIX
Process Scheduler and Report Repository Architecture
Note. The PeopleSoft Pure Internet Architecture must be installed for Process Scheduler to be able to transferreports to the Repository.
Note. Before users can view a report, they are authenticated against the PeopleSoft database.
Note. You should set up single signon if you do not want users to have to log on an additional time to viewreports in the Report Repository. For the details on setting up single signon, consult the security PeopleBook.
See Enterprise PeopleTools 8.48 PeopleBook: Security Administration.
Task 11B-2-1: Setting Up Single Signon to Navigatefrom PIA to Report RepositoryTo view reports (log files or system files) from Report Repository, you need to pass the authentication. ReportRepository should be treated as a separate PeopleSoft application. To navigate from PeopleSoft Pure InternetArchitecture (PIA) to Report Repository, you need to set up single signon to avoid getting a prompt for a secondsignon. Here are some considerations for setting up single signon to navigate from PIA to Report Repository:
If Report Repository resides on the same web server as the PeopleSoft Pure Internet Architecture, make sureyour Local Message Node is set up to be a "trusted" node for single signon for your system.
If Report Repository resides on a different web server than PeopleSoft Pure Internet Architecture, do thefollowing:
• Make sure your Local Message Node is set up to be a "trusted" node for single signon for your system.• Use a fully qualified domain name when addressing the web server for both PIA and Report Repository.For example, enter http://<machineName>.peoplesoft.com/<site_name>/signon.html instead ofhttp://<machineName>/<site_name>/signon.html.
Copyright © 2006, Oracle. All rights reserved. 327
Setting Up Process Scheduler on UNIX Chapter 11B
• Specify the Authentication Domain for your application during installation. If you have multipleapplications, and you want them to employ single signon, it is important to specify the same AuthenticationDomain for all applications.
See Enterprise PeopleTools 8.48 PeopleBook: Security Administration, “Implementing Single Signon.”
• Set up single signon with a password, like this:
- Choose PeopleTools, Integration Broker, Integration Setup, Nodes.
- Click Search and then select the node marked as Default Local Node.
- Select Password for the Authentication Option.
- Enter a password of your choice.
- Enter the password again in the Confirm Password field.
- Enter the user ID for which you are setting up single signon in the Default User ID field.
- Save the Node Definition.
- Sign off of PIA.
- Reboot your application server.
See AlsoEnterprise PeopleTools 8.48 PeopleBook: Security Administration
Task 11B-2-2: Determining the Transfer ProtocolWe recommend using HTTP as your transfer protocol.
Before transferring the files to the Report Repository, you need to determine which transfer protocol touse. If you have a Windows Process Scheduler and a Windows web server, you can use either an XCOPY,FTP, or HTTP/HTTPS. (If FTP information is not specified, Process Scheduler will perform an XCOPY.)If you have any other combination of servers (such as a Windows or z/OS Process Scheduler and a UNIXweb server), you must use FTP or HTTP/HTTPS.
Note. If you are using FTP, the FTP daemon must be set up in your web server.
Note. If you are on DB2 z/OS, you need to have JRE set up on your Process Scheduler server.
Task 11B-2-3: Starting the Distribution AgentThe Distribution Agent is automatically started as another Tuxedo server when a Process Scheduler Serveris booted. If a Process Scheduler Server was set up without specifying a Distribution Node in the ServerDefinition page, the Process Scheduler server will have a status in Process Monitor of “Running with NoReport Node.” Once a node is defined for the Process Scheduler server and in the next cycle the ProcessScheduler server checks the state of the system, the Distribution Agent dynamically sets up its environment.
Task 11B-2-4: Setting Up the Report RepositoryThis section discusses:
• Defining ReportRepositoryPath
328 Copyright © 2006, Oracle. All rights reserved.
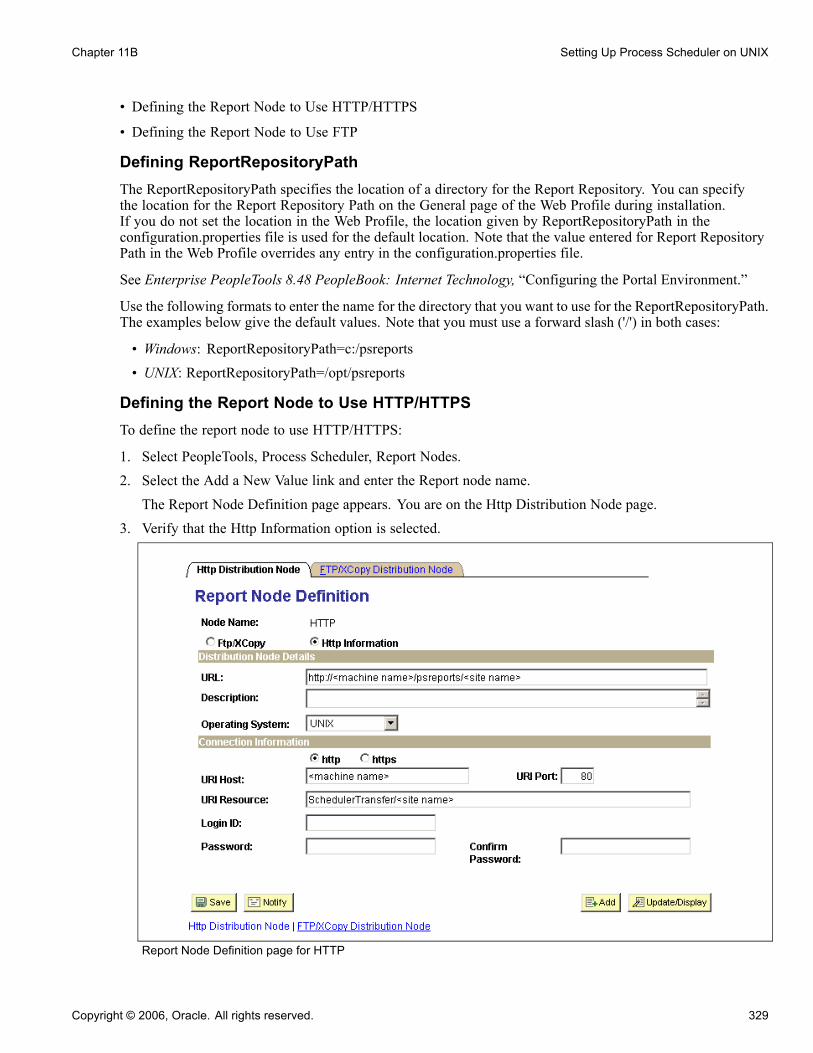
Chapter 11B Setting Up Process Scheduler on UNIX
• Defining the Report Node to Use HTTP/HTTPS
• Defining the Report Node to Use FTP
Defining ReportRepositoryPathThe ReportRepositoryPath specifies the location of a directory for the Report Repository. You can specifythe location for the Report Repository Path on the General page of the Web Profile during installation.If you do not set the location in the Web Profile, the location given by ReportRepositoryPath in theconfiguration.properties file is used for the default location. Note that the value entered for Report RepositoryPath in the Web Profile overrides any entry in the configuration.properties file.
See Enterprise PeopleTools 8.48 PeopleBook: Internet Technology, “Configuring the Portal Environment.”
Use the following formats to enter the name for the directory that you want to use for the ReportRepositoryPath.The examples below give the default values. Note that you must use a forward slash ('/') in both cases:
• Windows: ReportRepositoryPath=c:/psreports
• UNIX: ReportRepositoryPath=/opt/psreports
Defining the Report Node to Use HTTP/HTTPSTo define the report node to use HTTP/HTTPS:
1. Select PeopleTools, Process Scheduler, Report Nodes.
2. Select the Add a New Value link and enter the Report node name.
The Report Node Definition page appears. You are on the Http Distribution Node page.
3. Verify that the Http Information option is selected.
Report Node Definition page for HTTP
Copyright © 2006, Oracle. All rights reserved. 329

Setting Up Process Scheduler on UNIX Chapter 11B
4. Enter the URL of the web server using the following format:
http://<machine name>:<port number>/psreports/<site name>
Replace <machine name> with the name of your machine. Use the fully qualified host name for your webserver. If you are using an http port other than 80, you need to specify the port number.
Note. If you specify the Authentication Token Domain name during the PeopleSoft Pure InternetArchitecture installation, you must include a fully qualified domain name for the URL instead of theIP address.
• Description: Enter a description of the server (optional).• Operating System: Select the web server operating system.
5. Enter the following Connection Information:• http/https: Select the http option if you are not using SSL (default). Select the https option if you are usingSSL. Note that if you are using SSL you need to have Client Certificates installed on your web server.
• URI Host: Enter the machine name for the report repository.
Note. In a basic setup, the machine name for the report repository will match the machine name of theweb server URL. However, under certain circumstances—for example, if you are using a reverse proxyserver—the URL and URI Host may have different machine names.
• URI Port: Enter the port number, which must match the port number of your web server (defaults arehttp = 80, https = 443). If you change a port number you will lose the default values for both protocols.
• URI Resource: Enter SchedulerTransfer/<site name>.
Note. The setup of basic authentication is optional, but is recommended for security of the ReportRepository when using the HTTP to transfer files. For detailed instructions on setting up basicauthentication on the web server where the Report Repository resides, refer to the appendix “Securingthe Report Repository for HTTP.”
• Login ID: Enter the Login ID. This is not required, unless basic authentication has been set up on theweb server by the Web Administrator.
• Password: Enter the password for the user ID specified in the Login ID field. This is not required, unlessbasic authentication has been set up on the web server by the Web Administrator.
• Confirm Password: Enter the password a second time as a confirmation. This is not required, unlessbasic authentication has been set up on the web server by the Web Administrator.
6. Click Save to save your entries.7. To add additional report nodes, select Add to return to the Search page.
The following fields are shared between the FTP/XCOPY Distribution Node page and the Http Distributionpage:
• URL• Description• Operating System• Login ID
330 Copyright © 2006, Oracle. All rights reserved.
Chapter 11B Setting Up Process Scheduler on UNIX
• Password• Confirm Password.
When you enter the information on one page, the information is also displayed on the shared fields of theother page but the fields are grayed out.
Note. If you complete the information for one protocol and then change your selection to another protocol, theshared fields will become active on the other page and grayed out on the original page. When you save, thesystem automatically clears the fields that are not shared.
Defining the Report Node to Use FTPIf you use FTP the following parameters must be configured: URL, Home Directory, Operating System,FTP Address, FTP ID, Password, Confirm Password. In addition, if your FTP server is a Windows server,you may have to set up the FTP service.
Note. The Distribution Agent will perform a validation after FTP has transferred files into the ReportRepository by sending a query request to the web server. For this task to be accomplished, it is criticalthat the following setup is done:
JRE must be properly installed from the Process Scheduler server.
The value entered in the URL must be accurate. Verify that the machine name, port number, and site numberare correct.
If either of these tasks are not done, the process request will get a status of NOT POSTED in the ProcessMonitor Detail page and will log the message "Unable to verify files posted."
To define the report node to use FTP:
1. Select PeopleTools, Process Scheduler, Report Nodes.
2. Select Add a New Value, enter the Report node name, and click Add.
3. Select the FTP/XCopy option.
The FTP/XCopy Distribution node page appears.
Copyright © 2006, Oracle. All rights reserved. 331

Setting Up Process Scheduler on UNIX Chapter 11B
Report Node Definition page for FTP
4. Enter the URL of the web server using this format:
http://<machine name>:<port number>/psreports/<site name>
Replace <machine name> with the name of your web server. If you are using an http port other than 80,you need to specify the port number. The variable <site name> refers to the directory where you installedthe PIA files; this will default to ps for the first installation.
Note. If you specify the Authentication Token Domain name during the PeopleSoft Pure InternetArchitecture installation, you must include a fully qualified domain name for the URL instead of theIP address.
Note. If you installed the web server software with the default TCP port of 80, you do not need to specifythe port number in the URL path. However, if you installed the web server to some other port, youmust specify the port number in the URL path.
5. Enter the following additional parameters:• Home Directory: Specify the directory specified during the installation of PeopleSoft Pure InternetArchitecture as the Report Repository. The FTP user ID must have write access to this directory.Note that this is not a required field for HTTP transfer, as the system uses the Report Repositorydirectory specified at install time or the current directory assigned to ReportRepositoryPath inconfiguration.properties. Note that the value you enter for the Report Repository Path in the Web Profileat install time overrides any entry for ReportRepositoryPath in configuration.properties.For UNIX, the directory will look like $PS_HOME/psreports/.
332 Copyright © 2006, Oracle. All rights reserved.

Chapter 11B Setting Up Process Scheduler on UNIX
• Description: Enter a description of the server (optional).• Operating System: Select the operating system of the Report Repository.• FTP Address: Enter the machine name or the IP address of the Report Repository. If the name of themachine is used, it must be included on a DNS server.
• FTP ID: FTP user ID.• Password: Enter the password for the user ID specified in the FTP ID field.• Confirm Password: Enter the password a second time as a confirmation.
6. Select Save to save your entries.7. To add additional report nodes, select Add to return to the Search page.
Task 11B-2-5: Setting Up the Distribution for YourProcess Scheduler ServerTo set up the Distribution Settings for your Process Scheduler Server:
1. Choose PeopleTools, Process Scheduler, Servers.2. Enter the Server Name (such as PSUNX). The Server Definition page appears.3. Select the Distribution tab.
Server Definition page: Distribution tab
4. Click the lookup button to display the report node names and select the name of the required report node.5. Enter a number for the Maximum Transfer Retries. This is the maximum number of times the server cantry to send a report before it errors out.
Copyright © 2006, Oracle. All rights reserved. 333
Setting Up Process Scheduler on UNIX Chapter 11B
6. Enter the number of seconds for the Interval for Transfer Attempt field. This is the interval betweenattempts to send the report.
7. Select the check box Transfer Log Files to Report Repository if you want to transfer all log and tracefiles from processes that do not generate reports.
8. Click Save to save your entries.9. If Process Scheduler is running, you must reboot for any new settings to take effect.
To view reports (log files or system files) from Report Repository, you need to pass the authentication. ReportRepository should be treated as a separate PeopleSoft Application. To navigate from PIA to Report Repository,you need to setup single signon in order to avoid getting prompt for second signon.
Task 11B-2-6: Setting Up Sending and Receiving ofReport Folders in the Report ManagerTo be able to view reports in the Report Manager Explorer and List pages, you need to set up the sendingand receiving of report folders in the Report Manager by activating the domain on which a sending andreceiving server resides. Consult the documentation covering the PeopleSoft Integration Broker to learn howto activate the sending and receiving server domain.
See Enterprise PeopleTools 8.48 PeopleBook: PeopleSoft Integration Broker, “Using the Service OperationsMonitor.”
Task 11B-3: Setting Up Process Scheduler Server AgentThis section discusses:
• Understanding Process Scheduler Server Agent
• Changing the Default Operating System
• Creating and Configuring a Process Scheduler Server
• Reconfiguring a Process Scheduler Server
• Verifying the Process Scheduler Server Status
Understanding Process Scheduler Server AgentFor installation purposes, you can use predefined server names and other definitions. The predefined name thatyou might use is as follows:
Server Name Operating System
PSUNX UNIX
To test this, use processes already defined in your PeopleSoft database. To set up a new server definition inyour PeopleSoft database, refer to the Process Scheduler PeopleBook.
See Enterprise PeopleTools 8.48 PeopleBook: PeopleSoft Process Scheduler
334 Copyright © 2006, Oracle. All rights reserved.
Chapter 11B Setting Up Process Scheduler on UNIX
Note. When creating multiple Process Scheduler Servers for the same database, each server must havea unique server name. For example, two Process Scheduler Servers, both named PSNT, cannot run againstthe same database.
Task 11B-3-1: Changing the Default Operating SystemBy default, Process Scheduler is set up to run a process request from a Process Scheduler Server Agent startedin a Windows server when the value of the ServerName field in the Process Request Dialog page is left blank.If you plan to run all processes other than Windows-based programs (that is, nVision or Crystal Reports) fromUNIX, you must change the default operating system.
Note. If you do not change the default operating system from Windows to UNIX and you do not plan to setup a Process Scheduler Server Agent in Windows, process requests that are created will be directed to aWindows-based operating system and will remain in the "Queued" status.
To change the default operating system for process requests that were not assigned a Process SchedulerServer Name:
1. Navigate to PeopleTools, Process Scheduler, System Settings.2. Under Primary Operating System, choose UNIX from the drop-down list.3. Click on the System Purge Options tab. Enter the date for the next purge of process requests in the NextPurge Date field.
4. Enter the time for the next purge of process requests in the Next Purge Time field. The default timeis 12:00:00AM.
5. Enter a Recurrence if you want to set a regular purging basis.6. Choose Save.
Task 11B-3-2: Creating and Configuring a ProcessScheduler ServerThis section describes how to create and configure a Process Scheduler server.
Note. You can set Process Scheduler configuration parameters either by using PSADMIN,which provides an interactive dialog, or by editing the configuration file psprcs.cfg located in the<PS_HOME>/appserv/prcs/database name directory. The following steps assume you are using PSADMINto specify parameter settings.
To create and configure a Process Scheduler Server:
1. From <PS_HOME>/appserv on the batch server, type psadmin and press ENTER to access the PeopleSoftServer Administration menu.
2. Select 2 to access the Process Scheduler submenus.
---------------------------------
PeopleSoft Server Administration
---------------------------------
1) Application Server
2) Process Scheduler
3) Search Server
Copyright © 2006, Oracle. All rights reserved. 335

Setting Up Process Scheduler on UNIX Chapter 11B
q) Quit
Command to execute (1-3 q): 2
3. Select 4 from the PeopleSoft Process Scheduler Administration menu.
-------------------------------------------
PeopleSoft Process Scheduler Administration
-------------------------------------------
1) Start a Process Scheduler Server
2) Stop a Process Scheduler Server
3) Configure a Process Scheduler Server
4) Create a Process Scheduler Server Configuration
5) Delete a Process Scheduler Server Configuration
6) Edit a Process Scheduler Configuration File
7) Import an existing Process Scheduler Configuration
8) Show Status of a Process Scheduler Server
9) Kill a Process Scheduler Server
10) Clean IPC resources of a Process Scheduler Domain
q) Quit
Command to execute (1-9, q) : 4
4. When prompted for the name of the database that your server will access
Please enter name of Database that server will access :
enter the name of the database and press ENTER.5. After the system creates the domain, you see the prompt
Would you like to configure this Process Scheduler Server now? (y/n) [y] :
Choose y; you'll see a Quick-configure menu something like this:------------------------------------------------------------
Quick-configure menu -- Scheduler for Database: HRDMO
------------------------------------------------------------
Features Settings
========== ==========
1) Master Schdlr : Yes 5) DBNAME :[HRDMO]
2) App Eng Server : Yes 6) DBTYPE :[DB2ODBC]
7) PrcsServer :[PSUNX]
8) UserId :[QEDMO]
9) UserPswd :[QEDMO]
10) ConnectID :[people]
11) ConnectPswd:[peop1e]
12) ServerName :[]
Actions 13) Log/Output Dir:[%PS_SERVDIR%/log_output]
========= 14) SQRBIN :[%PS_HOME%/bin/sqr/ODB/bin]
3) Load config as shown 15) AddToPATH :[%PS_HOME%/cblbin]
4) Custom configuration
336 Copyright © 2006, Oracle. All rights reserved.
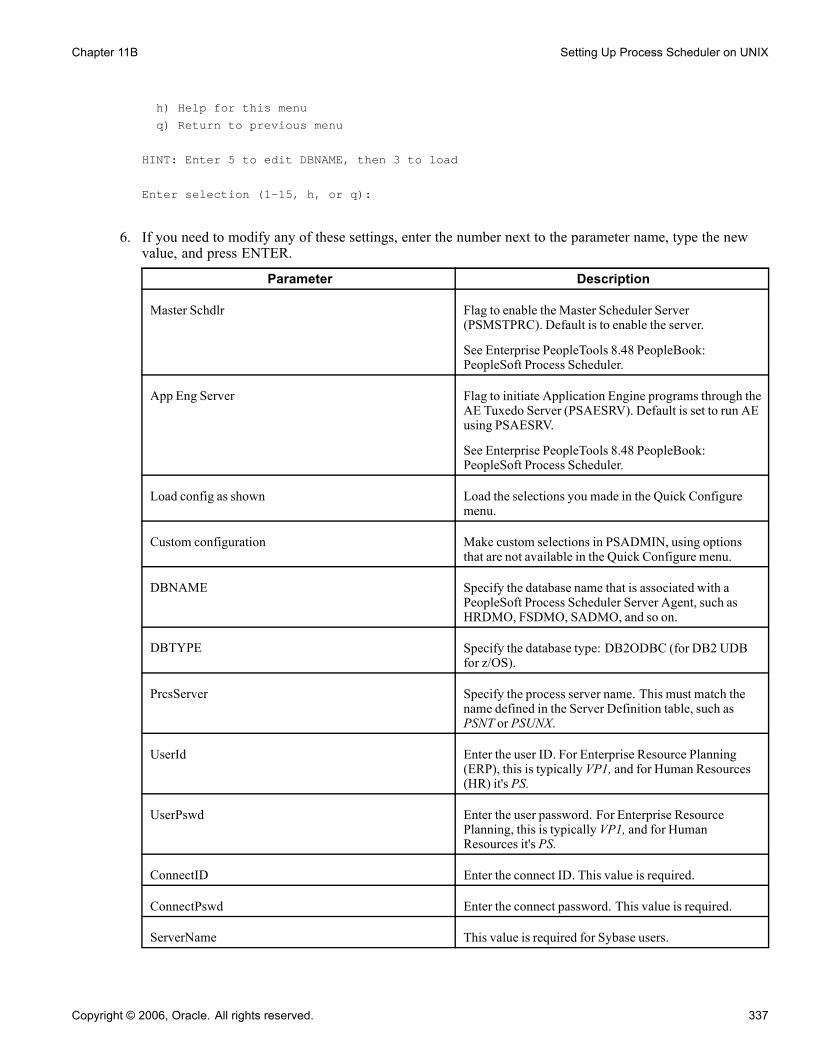
Chapter 11B Setting Up Process Scheduler on UNIX
h) Help for this menu
q) Return to previous menu
HINT: Enter 5 to edit DBNAME, then 3 to load
Enter selection (1-15, h, or q):
6. If you need to modify any of these settings, enter the number next to the parameter name, type the newvalue, and press ENTER.
Parameter Description
Master Schdlr Flag to enable the Master Scheduler Server(PSMSTPRC). Default is to enable the server.
See Enterprise PeopleTools 8.48 PeopleBook:PeopleSoft Process Scheduler.
App Eng Server Flag to initiate Application Engine programs through theAE Tuxedo Server (PSAESRV). Default is set to run AEusing PSAESRV.
See Enterprise PeopleTools 8.48 PeopleBook:PeopleSoft Process Scheduler.
Load config as shown Load the selections you made in the Quick Configuremenu.
Custom configuration Make custom selections in PSADMIN, using optionsthat are not available in the Quick Configure menu.
DBNAME Specify the database name that is associated with aPeopleSoft Process Scheduler Server Agent, such asHRDMO, FSDMO, SADMO, and so on.
DBTYPE Specify the database type: DB2ODBC (for DB2 UDBfor z/OS).
PrcsServer Specify the process server name. This must match thename defined in the Server Definition table, such asPSNT or PSUNX.
UserId Enter the user ID. For Enterprise Resource Planning(ERP), this is typically VP1, and for Human Resources(HR) it's PS.
UserPswd Enter the user password. For Enterprise ResourcePlanning, this is typically VP1, and for HumanResources it's PS.
ConnectID Enter the connect ID. This value is required.
ConnectPswd Enter the connect password. This value is required.
ServerName This value is required for Sybase users.
Copyright © 2006, Oracle. All rights reserved. 337
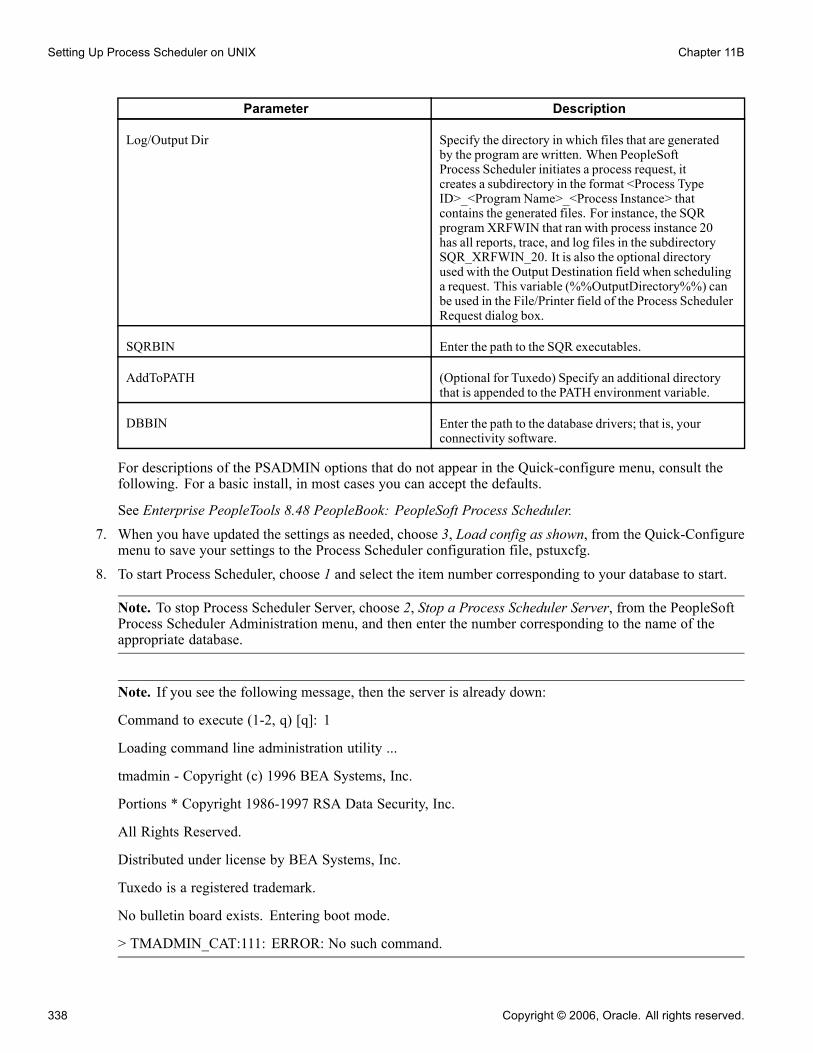
Setting Up Process Scheduler on UNIX Chapter 11B
Parameter Description
Log/Output Dir Specify the directory in which files that are generatedby the program are written. When PeopleSoftProcess Scheduler initiates a process request, itcreates a subdirectory in the format <Process TypeID>_<Program Name>_<Process Instance> thatcontains the generated files. For instance, the SQRprogram XRFWIN that ran with process instance 20has all reports, trace, and log files in the subdirectorySQR_XRFWIN_20. It is also the optional directoryused with the Output Destination field when schedulinga request. This variable (%%OutputDirectory%%) canbe used in the File/Printer field of the Process SchedulerRequest dialog box.
SQRBIN Enter the path to the SQR executables.
AddToPATH (Optional for Tuxedo) Specify an additional directorythat is appended to the PATH environment variable.
DBBIN Enter the path to the database drivers; that is, yourconnectivity software.
For descriptions of the PSADMIN options that do not appear in the Quick-configure menu, consult thefollowing. For a basic install, in most cases you can accept the defaults.
See Enterprise PeopleTools 8.48 PeopleBook: PeopleSoft Process Scheduler.7. When you have updated the settings as needed, choose 3, Load config as shown, from the Quick-Configuremenu to save your settings to the Process Scheduler configuration file, pstuxcfg.
8. To start Process Scheduler, choose 1 and select the item number corresponding to your database to start.
Note. To stop Process Scheduler Server, choose 2, Stop a Process Scheduler Server, from the PeopleSoftProcess Scheduler Administration menu, and then enter the number corresponding to the name of theappropriate database.
Note. If you see the following message, then the server is already down:
Command to execute (1-2, q) [q]: 1
Loading command line administration utility ...
tmadmin - Copyright (c) 1996 BEA Systems, Inc.
Portions * Copyright 1986-1997 RSA Data Security, Inc.
All Rights Reserved.
Distributed under license by BEA Systems, Inc.
Tuxedo is a registered trademark.
No bulletin board exists. Entering boot mode.
> TMADMIN_CAT:111: ERROR: No such command.
338 Copyright © 2006, Oracle. All rights reserved.

Chapter 11B Setting Up Process Scheduler on UNIX
Task 11B-3-3: Reconfiguring a Process Scheduler ServerIf you create and then immediately configure a Process Scheduler server, you can use the Quick-configuremenu. However, if you want to update the configuration of an existing domain, or carry out a number of otheradministrative tasks, this handy shortcut is not available. Instead you can use PSADMIN as follows. Feel freeto skip this procedure if you have already created and configured your Process Scheduler Server using theQuick-configure menu and want to move forward with your installation.
Note. If you want to configure the Process Scheduler Server while it is running, you need to stop and restartthe server to load the new settings.
To reconfigure a Process Scheduler Server:
1. Start PSADMIN by entering:
cd <PS_HOME>/appserv
psadmin
2. Select 2 for Process Scheduler in the PeopleSoft Server Administration menu.
3. In the PeopleSoft Process Scheduler Administration menu, select 3 for Configure a Process Scheduler.
4. Select the database for which the Process Scheduler needs to be configured.
5. At the prompt
Do you want to change any config values (y/n)? [n]:
Specify y to start an interactive dialog that lets you examine or change parameter values.
6. Now you specify configuration parameters one by one. Configuration parameters are grouped into sections.At each section, you are asked whether to change any parameters—for example:
Values for config section - Startup
DBName=
DBType=
UserId=
UserPswd=
ConnectId=
ConnectPswd=
ServerName=
Do you want to change any values (y/n)? [n]:
• Specify y to change any parameter values for the current section. You are prompted for each parametervalue. Either specify a new value or press ENTER to accept the default. After you press ENTER, you arepositioned at the next parameter in that section. When you are done with that section, you are againasked whether you want to re-edit any of the values you changed.
• If you do not want to change any values, specify n and you are prompted for the next configurationsection.
7. Once you have selected all your parameters, you see this message
You will need to shut down and start up the server to read the new settings.
Copyright © 2006, Oracle. All rights reserved. 339

Setting Up Process Scheduler on UNIX Chapter 11B
For descriptions of the Process Scheduler options in the PSADMIN, consult the following. In most cases youcan accept the defaults.
See Enterprise PeopleTools 8.48 PeopleBook: PeopleSoft Process Scheduler.
Task 11B-3-4: Verifying the Process Scheduler Server StatusAt this stage it is a good idea to verify the Process Scheduler Server status.
To verify the Process Scheduler Server status:
1. From the PeopleSoft Process Scheduler Administration menu, select option 8.
-------------------------------------------
PeopleSoft Process Scheduler Administration
-------------------------------------------
1) Start a Process Scheduler Server
2) Stop a Process Scheduler Server
3) Configure a Process Scheduler Server
4) Create a Process Scheduler Server Configuration
5) Delete a Process Scheduler Server Configuration
6) Edit a Process Scheduler Configuration File
7) Import an existing Process Scheduler Configuration
8) Show Status of a Process Scheduler Server
9) Kill a Process Scheduler Server
10) Clean IPC resources of a Process Scheduler Domain
q) Quit
Command to execute (1-10, q) : 8
2. To verify the status of the Process Scheduler Server for a specific database, type the number correspondingto the appropriate database.For example:
Database list:
1) HRDMO
Select item number to start: 1
will verify the status of the Process Scheduler Server for the database HRDMO.
340 Copyright © 2006, Oracle. All rights reserved.

Chapter 11B Setting Up Process Scheduler on UNIX
Verifying Status
Note. You can also do this using the following command line argument:
psadmin -p status -d <DBNAME>
Note. You can also verify the status of the Process Scheduler Server from Process Monitor in PIA. To verifythe Process Scheduler Server status from the Process Monitor page, go to PeopleTools, Process Scheduler,Process Monitor, and select Server List.
Copyright © 2006, Oracle. All rights reserved. 341

Setting Up Process Scheduler on UNIX Chapter 11B
342 Copyright © 2006, Oracle. All rights reserved.
CHAPTER 11C
Setting Up Process Scheduler on z/OS
This chapter discusses:
• Prerequisites
• Granting Required Authorization in DB2 and UNIX System Services
• Setting Up Process Scheduler Security
• Setting Up Process Scheduler to Transfer Reports and Logs to the Report Repository
• Setting Up Process Scheduler Server Agent
Note. If your database runs on UNIX or z/OS, you need to set up a Windows batch environment on a Windowsapplication server or on a dedicated Windows workstation for Windows-specific batch processes, such as CrystalReports, nVision reports, Microsoft Word, or Cube Manager. These processes are Windows-specific applications thatcannot be executed by the Process Scheduler on UNIX or z/OS.
See AlsoEnterprise PeopleTools 8.48 Hardware and Software Requirements
Enterprise PeopleTools 8.48 PeopleBook: PeopleSoft Process Scheduler
PeopleSoft Customer Connection (Implement, Optimize + Upgrade, Implementation Guide, Supported Platforms,PeopleSoft Enterprise )
PrerequisitesBefore setting up your Process Scheduler, you must:
• Install database connectivity to be able to communicate with your database server (Process Schedulerrequires a direct connection to the database).The Process Scheduler running on z/OS USS uses the DB2 ODBC component to connect to DB2. DB2ODBC must be installed by your DB2 systems programmer; installation details are available in theIBM DB2 Installation Guide.
• Set up the web server with the PeopleSoft Pure Internet Architecture, as described in the previous chapter.This is required to set up the Process Scheduler to transfer reports or log files to the Report Repository.
• Set up your COBOL batch environment if you need to run COBOL processes through Process Scheduler.COBOL is no longer required to start a Process Scheduler Server Agent because the program for ProcessScheduler has been rewritten in C++. If the PeopleSoft modules purchased do not contain any COBOLmodules, the COBOL run time libraries are not required. Also, COBOL is not required for applications
Copyright © 2006, Oracle. All rights reserved. 343

Setting Up Process Scheduler on z/OS Chapter 11C
that contain no COBOL programs. Consult Customer Connection for the details on whether yourapplication requires COBOL.
See “PeopleSoft Application COBOL Requirements,” PeopleSoft Customer Connection (Implement,Optimize + Upgrade, Implementation Guide, Supported Platforms, PeopleSoft Enterprise, By PeopleToolsrelease, Platform Communications by Topic, Batch)
• Install the appropriate version of SQR.
See “Creating a Database.”• Install JDK/JRE 1.4.1 (z/OS Java 2 kit) on z/OS.• Apply all the required IBM patches listed in the document "Important PTFs for the PeopleSoft on DB2for OS390 and z/OS."
See “Important PTFs for the PeopleSoft on DB2 for OS390 and z/OS,” PeopleSoft Customer Connection(Implement, Optimize + Upgrade, Implementation Guide, Supported Platforms, PeopleSoft Enterprise,By PeopleTools release, Platform Communications by Topic, Platforms - DB2 UDB for DB2 OS/390and z/OS)
• Set up your database connectivity to access the PeopleSoft database from UNIX System Servicesvia ODBC for z/OS.
• Install IBM's system stored procedure DSNUTILS. This is only required if you intend to run%UPDATESTAT meta-SQL coded in Application Engine, COBOL and Process Scheduler. If you donot have DSNUTILS installed, make sure you set the DBFLAGS parameter in the Process SchedulerConfiguration file to "1" to disable performing this statistics within.
See “Creating a Database,” Planning Your Installation.
• Have both your application server and the PeopleSoft Pure Internet Architecture started. In this chapter,you must modify security options of the designated PeopleSoft user ID that will be used to boot up ProcessScheduler. This requires that the user ID's profile be modified through the User Security component.Please refer to earlier chapters for the details on starting the application server and the PeopleSoft PureInternet Architecture.
• PeopleSoft binaries are compiled and linked with IBM's XPLINK (Extra option Linkage) option enabled.In order for all PeopleSoft executables successfully run from UNIX System Services (USS), it isrecommended to include the IBM Language Environment Run Time library CEE.SCEERUN2 datasetconcatenated into your system library using IBM's LNKLIST utility. This IBM library CEE.SCEERUN2may have been renamed in your system. It will be the dataset containing the CELHV003 load module.
Task 11C-1: Granting Required Authorization in DB2and UNIX System Services
This section discusses:
• Setting UNIX System Services Authorization
• Setting DB2 Authorization
Task 11C-1-1: Setting UNIX System Services AuthorizationThis section discusses:
344 Copyright © 2006, Oracle. All rights reserved.

Chapter 11C Setting Up Process Scheduler on z/OS
• Providing Read/Write Access to the Designated Log/Output Directory
• Providing Access to TSO and USS
Providing Read/Write Access to the Designated Log/Output DirectoryAll processes released by Process Scheduler will create and write files to an Hierarchical File System (HFS)directory in UNIX System Services (USS). This HFS directory is designated by the Log/Output Directoryparameter found in the Process Scheduler section of the Process Scheduler Configuration file. By defaultthe log/output directory will be
$PS_HOME/appserv/prcs/<database name>/log_output
JCL's generated by Process Scheduler to submit COBOL or SQR include step(s) that will copy the log file(s)and reports (for SQR) to the Log/Output directory in USS. If the JCL job card includes the USER/PASSWORDparameter, the user ID specified in the USER parameter must also be given read/write access to this HFSdirectory. In this case, where multiple mainframe ID's will be writing to this directory, you need to set up agroup ID (GID) in RACF and assign the mainframe user ID to this GID. Once you have established this inRACF, make sure the group ID is the owning group of the log/output directory.
As an example, HRASB and PSOFT IDs are required to write to the log/output directory. A DBAUNIXgroup ID is set up so both HRASB and PSOFT are connected to this group in RACF. For the group to haveread/write access, the mode of the directory is changed (using the UNIX command chmod) so UID andGID have read/write access.
$ ls -l
total 152
drwxrwx--- 11 HRASB DBAUNIX 8192 Dec 5 17:43 log_output
Providing Access to TSO and USSAll mainframe user IDs involved in submitting a JCL in TSO or Process Scheduler and Application Enginein USS must be set up in RACF to have access to both TSO and USS environments. Certain procedures inProcess Scheduler will perform a OCOPY (from a JCL) or OPUT as a TSO command in USS to transfer filesfrom a PDS into an HFS directory. These procedures are triggered when posting reports and log files from aCOBOL and/or SQR. The Distribution Agent will temporarily copy the files from a partitioned dataset (PDS)or sequential file into a designated HFS directory before posting the files to the repository.
To verify that the mainframe ID has all the proper authorization to perform the transfer, you can issue this testfrom USS.
To verify the mainframe ID's authorization:
1. Log in to the USS with the user ID that will be used to boot Process Scheduler2. Enter the following command in USS:
tso OPUT "'<Partitioned data set(member)>' '<HFS file>"
As an example:$ tso OPUT "'FS.FS840A8.JCLLIB(SQRSAMP)' '/tmp/test.txt'"
OPUT 'FS.FS840A8.JCLLIB(SQRSAMP)' '/tmp/test.txt'
IGD103I SMS ALLOCATED TO DDNAME SYS00001
In this example, the PDS member SQRSAMP is copied into the HFS file /tmp/test.txt.
Copyright © 2006, Oracle. All rights reserved. 345
Setting Up Process Scheduler on z/OS Chapter 11C
See AlsoIBM publications available at: http://www-1.ibm.com/servers/eserver/zseries/zos/unix/bpxa1pub.html
Systems Planning Guide (SA22-7800)
User's Guide (SA22-7801)
Task 11C-1-2: Setting DB2 AuthorizationThis section discusses:
• Setting Authorization for DB2 Plan for ODBC for OS390
• Setting Authorization for DB2 Plans for COBOL
• Setting Authorization for DB2 Plan for SQR
Setting Authorization for DB2 Plan for ODBC for OS390The privilege to execute the DB2 plan for the CLI/ODBC package DSNAOCLI must be given to themainframe ID used to login to UNIX System Services to start Process Scheduler Server Agent. When ProcessScheduler or Application Engine program connects to the DB2 database, CLI/ODBC authenticates theconnection based on the user ID that initiates the program from UNIX System Services.
Grant EXECUTE on PLAN <PLAN for CLI Package DSNAOCLI> To <Unix Service Login ID>
Setting Authorization for DB2 Plans for COBOLEnter the following command to set authorization for DB2 Plans for COBOL:
Grant EXECUTE on PLAN <SQLRT Plan PTPSQLRA and PTPSQLRE> To <Access-Id> or⇒<Ownerid>;
The <SQLRT Plan PTPSQLRA and PTPSQLRE > refers to the plans created here:
See "Creating a Database," Binding DB2 Plans.
Setting Authorization for DB2 Plan for SQREnter the following command to set authorization for DB2 Plan for SQR:
Grant EXECUTE on PLAN <SQR PLAN> To <Access-Id> or <Ownerid>;
The <SQR Plan> refers to the plan created when installing SQR for z/OS.
Task 11C-2: Setting Up Process Scheduler SecurityThis section discusses:
• Understanding Process Scheduler Security
• Granting Process Scheduler Administrative Rights
346 Copyright © 2006, Oracle. All rights reserved.

Chapter 11C Setting Up Process Scheduler on z/OS
Understanding Process Scheduler SecurityThis task—in which you set up the PeopleSoft User ID that will be used to boot Process Scheduler serverso it has administrative rights to both Process Scheduler and Report Manager—guarantees that security isset up properly within your PeopleSoft database.
You must carry out this task to start Process Scheduler successfully.
Task 11C-2-1: Granting Process Scheduler Administrative RightsTo grant Process Scheduler administrative rights:
1. Log onto your PeopleSoft database through the PeopleSoft Pure Internet Architecture.2. Select PeopleTools, Security, User Profiles.3. Select the User Profiles component. Use the Search dialog to select the PeopleSoft User ID you plan to useto boot the Process Scheduler server.
4. Click the Roles tab, click the plus icon to insert a new row, and there enter the ProcessSchedulerAdmin roleto grant the user ID with administrative rights in the Process Scheduler components.
Process Scheduler window: Roles tab
5. Repeat the instructions in step 4 to add the role ReportDistAdmin. This will grant the user ID administrativerights to the Report Manager component.
Note. When setting up Process Scheduler on UNIX or Windows, you must have the right user ID to start anapplication server. This authorization is not required to bring up Process Scheduler in z/OS UNIX SystemServices because Process Scheduler is not booted through Tuxedo in this platform.
Copyright © 2006, Oracle. All rights reserved. 347

Setting Up Process Scheduler on z/OS Chapter 11C
Task 11C-3: Setting Up Process Scheduler to TransferReports and Logs to the Report Repository
This section discusses:
• Understanding Report Distribution
• Setting Up Single Signon to Navigate from PIA to Report Repository
• Determining the Transfer Protocol
• Starting the Distribution Agent
• Setting Up the Report Repository
• Setting Up the Distribution for Your Process Scheduler Server
• Setting Up Sending and Receiving of Report Folders in the Report Manager
Understanding Report DistributionThe PeopleTools Report Distribution lets you access reports and log files generated from process requests runby a Process Scheduler Server Agent. Using the PeopleSoft Pure Internet Architecture, you can view reportsand log files from the web browser through the Report Manager or Process Monitor Detail page. ReportDistribution enables you to restrict access to these reports to authorized users based either on user ID or role ID.
This product also includes the Distribution Agent component, which runs on the same server as the ProcessScheduler Server Agent. The Distribution Agent, a process that runs concurrently with the Process SchedulerServer Agent, transfers to the Report Repository files generated by process requests initiated by the ProcessScheduler Server Agent.
The Distribution Agent transfers files to the Report Repository when one of these criteria is true:
• The Process Scheduler Server Agent is set up in the Server Definition to transfer all log files to theReport Repository.
• The process request output destination type is Web/Window.
In either case, the Process Scheduler Server Agent inserts a row in the Report List table (PS_CDM_LIST).The server agent then updates the distribution status for a process request to Posting upon completion of theprogram associated with the process request. The distribution status of Posting signals the Distribution Statusthat the files for the process request are ready for transfer to the Report Repository. The Distribution Agent isnotified by Process Scheduler for any process requests that are ready for transferring. As part of the process totransfer files to the Report Repository, the Distribution Agent performs the following steps:
• Transfer files to the Report Repository. All the report and log files are transferred to the Report Repository.For each process request transferred, a directory is created in the Report Repository using the followingformat: \<database name\<date yyyymmdd>\<report id>. All the files for a process request are storedin this directory.
• Delete the directory from the Process Scheduler Agent's Log/Output directory. When the output destinationtype specified for a process request is Web/Window, all the files and directory associated with the processrequest are deleted from the Process Scheduler Log/Output directory after the files are transferred tothe Report Repository.
The following diagram illustrates the Process Scheduler and Report Repository architecture.
348 Copyright © 2006, Oracle. All rights reserved.
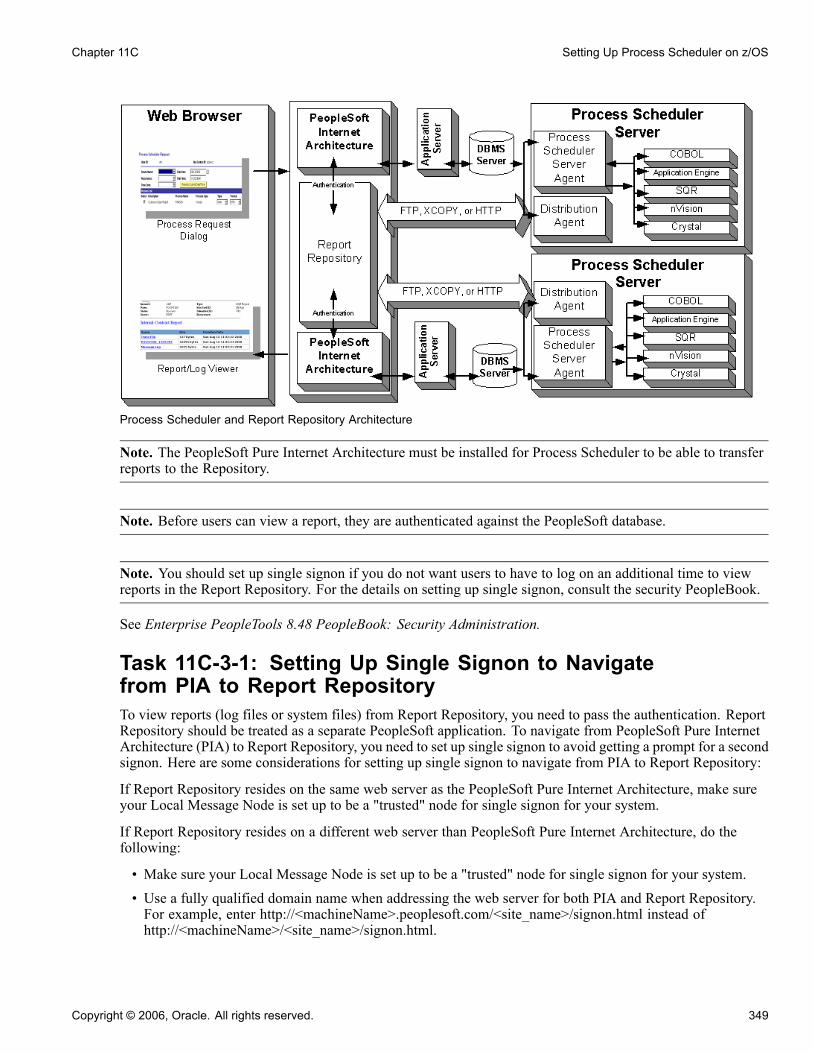
Chapter 11C Setting Up Process Scheduler on z/OS
Process Scheduler and Report Repository Architecture
Note. The PeopleSoft Pure Internet Architecture must be installed for Process Scheduler to be able to transferreports to the Repository.
Note. Before users can view a report, they are authenticated against the PeopleSoft database.
Note. You should set up single signon if you do not want users to have to log on an additional time to viewreports in the Report Repository. For the details on setting up single signon, consult the security PeopleBook.
See Enterprise PeopleTools 8.48 PeopleBook: Security Administration.
Task 11C-3-1: Setting Up Single Signon to Navigatefrom PIA to Report RepositoryTo view reports (log files or system files) from Report Repository, you need to pass the authentication. ReportRepository should be treated as a separate PeopleSoft application. To navigate from PeopleSoft Pure InternetArchitecture (PIA) to Report Repository, you need to set up single signon to avoid getting a prompt for a secondsignon. Here are some considerations for setting up single signon to navigate from PIA to Report Repository:
If Report Repository resides on the same web server as the PeopleSoft Pure Internet Architecture, make sureyour Local Message Node is set up to be a "trusted" node for single signon for your system.
If Report Repository resides on a different web server than PeopleSoft Pure Internet Architecture, do thefollowing:
• Make sure your Local Message Node is set up to be a "trusted" node for single signon for your system.• Use a fully qualified domain name when addressing the web server for both PIA and Report Repository.For example, enter http://<machineName>.peoplesoft.com/<site_name>/signon.html instead ofhttp://<machineName>/<site_name>/signon.html.
Copyright © 2006, Oracle. All rights reserved. 349

Setting Up Process Scheduler on z/OS Chapter 11C
• Specify the Authentication Domain for your application during installation. If you have multipleapplications, and you want them to employ single signon, it is important to specify the same AuthenticationDomain for all applications.
See Enterprise PeopleTools 8.48 PeopleBook: Security Administration, “Implementing Single Signon.”
• Set up single signon with a password, like this:
- Choose PeopleTools, Integration Broker, Integration Setup, Nodes.
- Click Search and then select the node marked as Default Local Node.
- Select Password for the Authentication Option.
- Enter a password of your choice.
- Enter the password again in the Confirm Password field.
- Enter the user ID for which you are setting up single signon in the Default User ID field.
- Save the Node Definition.
- Sign off of PIA.
- Reboot your application server.
See AlsoEnterprise PeopleTools 8.48 PeopleBook: Security Administration
Task 11C-3-2: Determining the Transfer ProtocolWe recommend using HTTP as your transfer protocol.
Before transferring the files to the Report Repository, you need to determine which transfer protocol touse. If you have a Windows Process Scheduler and a Windows web server, you can use either an XCOPY,FTP, or HTTP/HTTPS. (If FTP information is not specified, Process Scheduler will perform an XCOPY.)If you have any other combination of servers (such as a Windows or z/OS Process Scheduler and a UNIXweb server), you must use FTP or HTTP/HTTPS.
Note. If you are on DB2 z/OS, you need to have JRE set up on your Process Scheduler server.
Task 11C-3-3: Starting the Distribution AgentThe Distribution Agent is automatically started as another Tuxedo server when a Process Scheduler Serveris booted. If a Process Scheduler Server was set up without specifying a Distribution Node in the ServerDefinition page, the Process Scheduler server will have a status in Process Monitor of “Running with NoReport Node.” Once a node is defined for the Process Scheduler server and in the next cycle the ProcessScheduler server checks the state of the system, the Distribution Agent dynamically sets up its environment.
Task 11C-3-4: Setting Up the Report RepositoryThis section discusses:
• Defining ReportRepositoryPath
• Defining the Report Node to Use HTTP/HTTPS
• Defining the Report Node to Use FTP
350 Copyright © 2006, Oracle. All rights reserved.

Chapter 11C Setting Up Process Scheduler on z/OS
Defining ReportRepositoryPathThe ReportRepositoryPath specifies the location of a directory for the Report Repository. You can specifythe location for the Report Repository Path on the General page of the Web Profile during installation.If you do not set the location in the Web Profile, the location given by ReportRepositoryPath in theconfiguration.properties file is used for the default location. Note that the value entered for Report RepositoryPath in the Web Profile overrides any entry in the configuration.properties file.
See Enterprise PeopleTools 8.48 PeopleBook: Internet Technology, “Configuring the Portal Environment.”
Use the following formats to enter the name for the directory that you want to use for the ReportRepositoryPath.The examples below give the default values. Note that you must use a forward slash ('/') in both cases:
• Windows: ReportRepositoryPath=c:/psreports
• UNIX: ReportRepositoryPath=/opt/psreports
Defining the Report Node to Use HTTP/HTTPSTo define the report node to use HTTP/HTTPS:
1. Select PeopleTools, Process Scheduler, Report Nodes.
2. Select the Add a New Value link and enter the Report node name.
The Report Node Definition page appears. You are on the Http Distribution Node page.
3. Verify that the Http Information option is selected.
4. Enter the URL of the web server using the following format:
http://<machine name>:<port number>/psreports/<site name>
Replace <machine name> with the name of your machine. Use the fully qualified host name for your webserver. If you are using an http port other than 80, you need to specify the port number.
Note. If you specify the Authentication Token Domain name during the PeopleSoft Pure InternetArchitecture installation, you must include a fully qualified domain name for the URL instead of theIP address.
• Description: Enter a description of the server (optional).• Operating System: Select the web server operating system.
5. Enter the following Connection Information:• http/https: Select the http option if you are not using SSL (default). Select the https option if you are usingSSL. Note that if you are using SSL you need to have Client Certificates installed on your web server.
• URI Host: Enter the machine name for the report repository.
Note. In a basic setup, the machine name for the report repository will match the machine name of theweb server URL. However, under certain circumstances—for example, if you are using a reverse proxyserver—the URL and URI Host may have different machine names.
• URI Port: Enter the port number, which must match the port number of your web server (defaults arehttp = 80, https = 443). If you change a port number you will lose the default values for both protocols.
Copyright © 2006, Oracle. All rights reserved. 351

Setting Up Process Scheduler on z/OS Chapter 11C
• URI Resource: Enter SchedulerTransfer/<site name>.
Note. The setup of basic authentication is optional, but is recommended for security of the ReportRepository when using the HTTP to transfer files. For detailed instructions on setting up basicauthentication on the web server where the Report Repository resides, refer to the appendix “Securingthe Report Repository for HTTP.”
• Login ID: Enter the Login ID. This is not required, unless basic authentication has been set up on theweb server by the Web Administrator.
• Password: Enter the password for the user ID specified in the Login ID field. This is not required, unlessbasic authentication has been set up on the web server by the Web Administrator.
• Confirm Password: Enter the password a second time as a confirmation. This is not required, unlessbasic authentication has been set up on the web server by the Web Administrator.
6. Click Save to save your entries.7. To add additional report nodes, select Add to return to the Search page.
The following fields are shared between the FTP/XCOPY Distribution Node page and the Http Distributionpage:
• URL• Description• Operating System
• Login ID• Password• Confirm Password.
When you enter the information on one page, the information is also displayed on the shared fields of theother page but the fields are grayed out.
Note. If you complete the information for one protocol and then change your selection to another protocol, theshared fields will become active on the other page and grayed out on the original page. When you save, thesystem automatically clears the fields that are not shared.
Defining the Report Node to Use FTPIf you use FTP the following parameters must be configured: URL, Home Directory, Operating System,FTP Address, FTP ID, Password, Confirm Password. In addition, if your FTP server is a Windows server,you may have to set up the FTP service.
Note. The Distribution Agent will perform a validation after FTP has transferred files into the ReportRepository by sending a query request to the web server. For this task to be accomplished, it is criticalthat the following setup is done:
JRE must be properly installed from the Process Scheduler server.
The value entered in the URL must be accurate. Verify that the machine name, port number, and site numberare correct.
If either of these tasks are not done, the process request will get a status of NOT POSTED in the ProcessMonitor Detail page and will log the message "Unable to verify files posted."
352 Copyright © 2006, Oracle. All rights reserved.

Chapter 11C Setting Up Process Scheduler on z/OS
To define the report node to use FTP:
1. Select PeopleTools, Process Scheduler, Report Nodes.
2. Select Add a New Value, enter the Report node name, and click Add.
3. Select the FTP/XCopy option.
The FTP/XCopy Distribution node page appears.
4. Enter the URL of the web server using this format:
http://<machine name>:<port number>/psreports/<site name>
Replace <machine name> with the name of your web server. If you are using an http port other than 80,you need to specify the port number. The variable <site name> refers to the directory where you installedthe PIA files; this will default to ps for the first installation.
Note. If you specify the Authentication Token Domain name during the PeopleSoft Pure InternetArchitecture installation, you must include a fully qualified domain name for the URL instead of theIP address.
Note. If you installed the web server software with the default TCP port of 80, you do not need to specifythe port number in the URL path. However, if you installed the web server to some other port, youmust specify the port number in the URL path.
5. Enter the following additional parameters:• Home Directory: Specify the directory specified during the installation of PeopleSoft Pure InternetArchitecture as the Report Repository. The FTP user ID must have write access to this directory.Note that this is not a required field for HTTP transfer, as the system uses the Report Repositorydirectory specified at install time or the current directory assigned to ReportRepositoryPath inconfiguration.properties. Note that the value you enter for the Report Repository Path in the Web Profileat install time overrides any entry for ReportRepositoryPath in configuration.properties.
• Description: Enter a description of the server (optional).• Operating System: Select the operating system of the Report Repository.• FTP Address: Enter the machine name or the IP address of the Report Repository. If the name of themachine is used, it must be included on a DNS server.
• FTP ID: FTP user ID.• Password: Enter the password for the user ID specified in the FTP ID field.• Confirm Password: Enter the password a second time as a confirmation.
6. Select Save to save your entries.7. To add additional report nodes, select Add to return to the Search page.
Task 11C-3-5: Setting Up the Distribution for YourProcess Scheduler ServerTo set up the Distribution Settings for your Process Scheduler Server:
1. Choose PeopleTools, Process Scheduler, Servers.
Copyright © 2006, Oracle. All rights reserved. 353
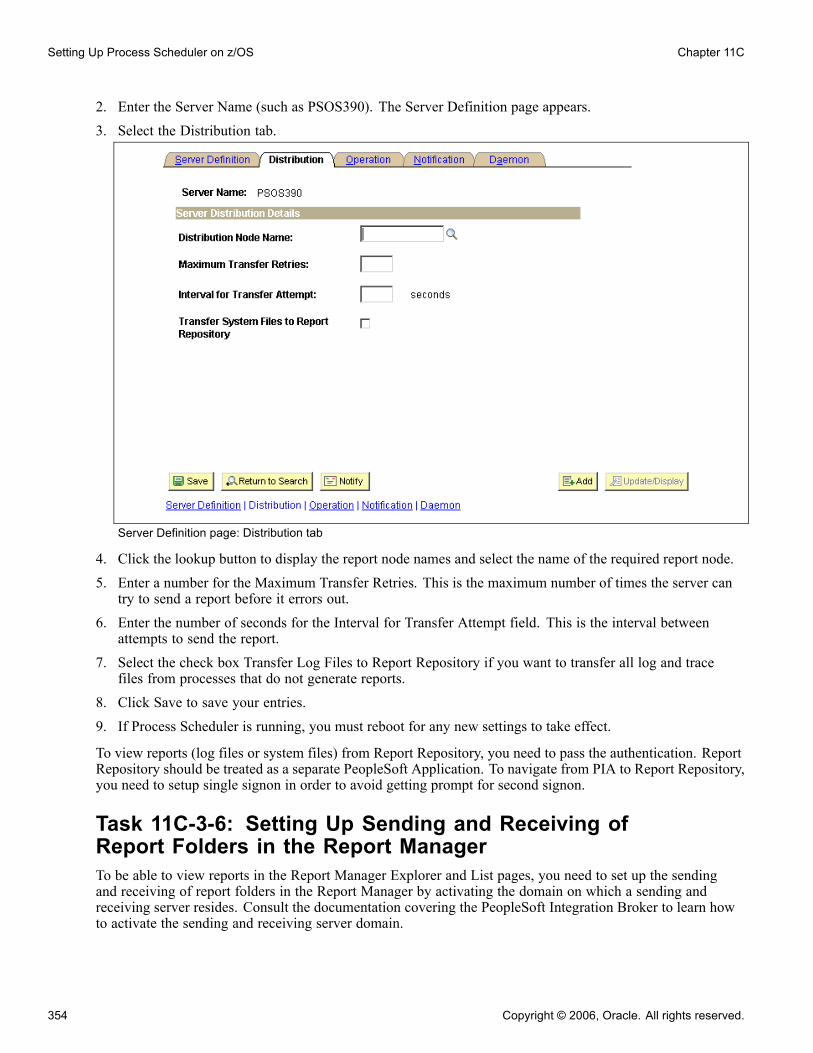
Setting Up Process Scheduler on z/OS Chapter 11C
2. Enter the Server Name (such as PSOS390). The Server Definition page appears.3. Select the Distribution tab.
Server Definition page: Distribution tab
4. Click the lookup button to display the report node names and select the name of the required report node.5. Enter a number for the Maximum Transfer Retries. This is the maximum number of times the server cantry to send a report before it errors out.
6. Enter the number of seconds for the Interval for Transfer Attempt field. This is the interval betweenattempts to send the report.
7. Select the check box Transfer Log Files to Report Repository if you want to transfer all log and tracefiles from processes that do not generate reports.
8. Click Save to save your entries.9. If Process Scheduler is running, you must reboot for any new settings to take effect.
To view reports (log files or system files) from Report Repository, you need to pass the authentication. ReportRepository should be treated as a separate PeopleSoft Application. To navigate from PIA to Report Repository,you need to setup single signon in order to avoid getting prompt for second signon.
Task 11C-3-6: Setting Up Sending and Receiving ofReport Folders in the Report ManagerTo be able to view reports in the Report Manager Explorer and List pages, you need to set up the sendingand receiving of report folders in the Report Manager by activating the domain on which a sending andreceiving server resides. Consult the documentation covering the PeopleSoft Integration Broker to learn howto activate the sending and receiving server domain.
354 Copyright © 2006, Oracle. All rights reserved.
Chapter 11C Setting Up Process Scheduler on z/OS
See Enterprise PeopleTools 8.48 PeopleBook: PeopleSoft Integration Broker, “Using the Service OperationsMonitor.”
Task 11C-4: Setting Up Process Scheduler Server AgentThis section discusses:
• Understanding Process Scheduler Server Agent
• Changing the Default Operating System
• Setting Up Your Environment
• Validating and Editing the ODBC Initialization File
• Creating and Configuring a Process Scheduler Server
• Configuring Process Scheduler Server
• Working with Shell JCL Templates
• Starting a Process Scheduler Server
• Verifying the Process Scheduler Server Status
• Stopping the Process Scheduler Server
Understanding Process Scheduler Server AgentFor installation purposes, you can use predefined server names and other definitions. The predefined name thatyou might use is as follows:
Server Name Operating System
PSOS390 z/OS
To test this, use processes already defined in your PeopleSoft database. To set up a new server definition inyour PeopleSoft database, refer to the Process Scheduler PeopleBook.
See Enterprise PeopleTools 8.48 PeopleBook: PeopleSoft Process Scheduler
Note. When creating multiple Process Scheduler Servers for the same database, each server must havea unique server name. For example, two Process Scheduler Servers, both named PSNT, cannot run againstthe same database.
Task 11C-4-1: Changing the Default Operating SystemBy default, Process Scheduler is set up to run a process request from a Process Scheduler Server Agent startedin a Windows server when the value of the ServerName field in the Process Request Dialog page is left blank.If you plan to run all processes other than Windows-based programs (that is, nVision or Crystal Reports) fromz/OS, you must change the default operating system.
Copyright © 2006, Oracle. All rights reserved. 355
Setting Up Process Scheduler on z/OS Chapter 11C
Note. If you do not change the default operating system from Windows to z/OS and you do not plan to setup a Process Scheduler Server Agent in Windows, process requests that are created will be directed to aWindows-based operating system and will remain in the "Queued" status.
To change the default operating system for process requests that were not assigned a Process SchedulerServer Name:
1. Navigate to PeopleTools, Process Scheduler, System Settings.2. Under Primary Operating System, choose OS390 from the drop-down list.3. Click on the System Purge Options tab. Enter the date for the next purge of process requests in the NextPurge Date field.
4. Enter the time for the next purge of process requests in the Next Purge Time field. The default timeis 12:00:00AM.
5. Enter a Recurrence if you want to set a regular purging basis.6. Choose Save.
Task 11C-4-2: Setting Up Your EnvironmentRun psconfig.sh file from <PS_HOME>:
. ./psconfig.sh
Task 11C-4-3: Validating and Editing the ODBC Initialization FileThe PeopleSoft Batch Transfer program generates the ODBC initialization file based on the parameters enteredin the PeopleSoft Server Transfer panel. The ODBC initialization file is written to:
$PS_HOME/appserv/odbc.ini
The ODBC initialization file contains the following key information:
• DB2 subsystem name• Plan name for the DSNAOCLI CLI package• Method used to attach to DB2 (default is RRSAF)
Here is an example of an initialization file for a DB2 subsystem called DSNW with DB2 plan DSNACLI:[COMMON]
MVSDEFAULTSSID=DSNW
APPLTRACE=0
APPLTRACEFILENAME=
MULTICONTEXT=1
CONNECTTYPE=1
; Set up the DB2 Subsystem Definition
[DSNW]
MVSATTACHTYPE=RRSAF
PLANNAME=DSNACLI
356 Copyright © 2006, Oracle. All rights reserved.
Chapter 11C Setting Up Process Scheduler on z/OS
Verify that all the information contained in this file is accurate. If you plan to set up multiple Process SchedulerServer Agents for different instances of a PeopleSoft database and these databases reside in different DB2subsystems, you must create a different ODBC initialization file for each DB2 subsystem.
Task 11C-4-4: Creating and Configuring a ProcessScheduler ServerThis section describes how to create a Process Scheduler server.
Note. You can set Process Scheduler configuration parameters either by using PSADMIN,which provides an interactive dialog, or by editing the configuration file psprcs.cfg located in the<PS_HOME>/appserv/prcs/database name directory. The following steps assume you are using PSADMINto specify parameter settings.
To create a Process Scheduler Server:
1. From <PS_HOME>/appserv on the batch server, type psadmin and press ENTER to access the PeopleSoftServer Process Scheduler Administration menu.
2. Select 4 from the PeopleSoft Process Scheduler Administration menu.
-------------------------------------------
PeopleSoft Process Scheduler Administration
-------------------------------------------
1) Start a Process Scheduler Server
2) Stop a Process Scheduler Server
3) Configure a Process Scheduler Server
4) Create a Process Scheduler Server Configuration
5) Delete a Process Scheduler Server Configuration
6) Edit a Process Scheduler Configuration File
7) Import an existing Process Scheduler Configuration
8) Show Status of a Process Scheduler Server
9) Kill a Process Scheduler Server
10) Edit a Shell JCL
q) Quit
Command to execute (1-10, q) : 4
3. When prompted for the name of the database that your server will access
Please enter name of Database that server will access :
enter the name of the database and press ENTER.
You see screen messages like these:Process Scheduler Configuration templates:
1) os390
Selecting the only Process Scheduler Configuration template available...
Creating Process Scheduler Server for Database HRDMO...
Copying Process Scheduler Server configuration file(s)...
Copying Process Scheduler JCL template files...
Process Scheduler Shell JCL template files copied.
Copyright © 2006, Oracle. All rights reserved. 357

Setting Up Process Scheduler on z/OS Chapter 11C
Process Scheduler Server configuration created.
At this point, you'll be returned to the PeopleSoft Process Scheduler Administration menu.
Task 11C-4-5: Configuring Process Scheduler ServerThis section discusses:
• Configuring a Process Scheduler Server
• Using [Startup]
• Using [OS390]
• Using [Process Scheduler]
• Using [Application Engine]
Note. The section may not mention certain PSADMIN sections, if you do not need to change any of theirdefaults. For more in depth descriptions of the Process Scheduler options in the PSADMIN, consult theProcess Scheduler PeopleBook.
See Enterprise PeopleTools 8.48 PeopleBook: PeopleSoft Process Scheduler, “Using the PSADMIN Utility.”
Configuring a Process Scheduler ServerTo configure a Process Scheduler Server:
1. The PeopleSoft Process Scheduler Server Administration interface should already be on your screenfrom the last step, but if it is not, enter:
cd <PS_HOME>/appserv
psadmin
2. From the PeopleSoft Process Scheduler Administration menu, select option 3:
-------------------------------------------
PeopleSoft Process Scheduler Administration
-------------------------------------------
1) Start a Process Scheduler Server
2) Stop a Process Scheduler Server
3) Configure a Process Scheduler Server
4) Create a Process Scheduler Server Configuration
5) Delete a Process Scheduler Server Configuration
6) Edit a Process Scheduler Configuration File
7) Import an existing Process Scheduler Configuration
8) Show Status of a Process Scheduler Server
9) Kill a Process Scheduler Server
10) Edit a Shell JCL
q) Quit
Command to execute (1-10, q) : 3
358 Copyright © 2006, Oracle. All rights reserved.
Chapter 11C Setting Up Process Scheduler on z/OS
3. Select the database for which the Process Scheduler needs to be configured.
Database list:
1) HRDMO
Select item number to configure:
4. At the prompt
Do you want to change any config values (y/n):
Specify y to start an interactive dialog to change or examine parameter values, as described in the nextstep. Specify n if you have already edited psprcs.cfg.
See Enterprise PeopleTools 8.48 PeopleBook: PeopleSoft Process Scheduler.
Using [Startup]When using PSADMIN to configure a Process Scheduler Server Agent, you first encounter the Startup section:
Values for config section - Startup
DBName=
DBType=DB2ODBC
UserId=
UserPswd=
ConnectId=
ConnectPswd=
ServerName
Do you want to change any values (y/n)? [n]: y
The following table describes each value in the Startup section:
Value Description
DBName Specify the database name associated with a particularProcess Scheduler Server Agent, such as HRDMO,FSDMO, SADMO, and so on.
DBType Specify the database type. The default for DB2 UDB forz/OS is DB2ODBC.
UserId Enter the user ID.
UserPswd Enter the user password.
ConnectId Enter the connect ID. This value is required.
ConnectPswd Enter the connect password. This value is required.
ServerName For DB2 UDB for z/OS, ignore this item.
Copyright © 2006, Oracle. All rights reserved. 359

Setting Up Process Scheduler on z/OS Chapter 11C
When you change the UserPswd or ConnectPswd field, you are prompted for an option to encrypt the valueentered for the password field:
Do you want to encrypt this password? [y]:y
Enter y if you want the password stored in encrypted form in the Process Scheduler configuration file. (Thedefault is to encrypt the password.)
Using [OS390]The OS390 section contains OS/390-specific values:
Values for config section - OS390
ODBC Initialization File=%PS_HOME%/appserv/odbc.ini
Shell JCL Library=%PS_SERVDIR%/shelljcl
High Level Qualifier for System Datasets=
High Level Qualifier for Log Datasets=
Plan name for PTPSQLRT with CAF=
Plan name for PTPSQLRT with TSO=
DB2 Sub-System=
VIO eligible unit group=SYSDA
Enable Parallel Processing=0
DECIMAL=PERIOD
TSO Character Set=cp037
Do you want to change any values (y/n)? [n]:
The following table describes each parameter in the OS390 section.
Parameter Description
ODBC Initialization File File containing ODBC setting to connect to the DB2subsystem where the PS database is created.
Shell JCL Library The subdirectory containing all JCL templates used forsubmitting COBOL or SQR in native z/OS.
High Level Qualifier for System Datasets Datasets to which PeopleSoft installations are copiedduring batch transfer. For example, PT.PT810TA.
High Level Qualifier for Log Datasets Datasets that represent the high level qualifier for all logsand reports generated from processes submitted throughProcess Scheduler.
Plan name for PTPSQLRT with CAF DB2 plan used to run COBOL called within an ApplicationEngine program via Remote Call
Plan name for PTPSQLRT with TSO DB2 plan used to run COBOL from TSO via JCL createdfrom the COBOL shell JCL template (SHECBL.JCT)
DB2 Sub-System DB2 subsystem name where your database resides—forexample, DSND
VIO eligible unit group DASD volume group used by Remote COBOL invoked byan Application Engine program
360 Copyright © 2006, Oracle. All rights reserved.
Chapter 11C Setting Up Process Scheduler on z/OS
Parameter Description
Enable Parallel Processing A Y/N flag which sets the Parallel processing parameter inthe COBOL shell JCL template (SHECBL.JCT)
DECIMAL The value should reflect the setting for the DECIMALparameter found in the ZPARM of the DB2 subsystemwhere the database resides. Valid values are DECIMAL orCOMMA.
TSO Character Set The codepage for the TSO environment. The default valueis CP037 (IBM037: Latin1 code page).
Using [Process Scheduler]After you have set your Trace values, the Process Scheduler section allows you to set all of the environmentvariables associated with the Process Scheduler.
Values for config section - Process Scheduler
Prcs Job Name=
Prcs Job Account=
PrcsServerName=PSOS390
PS Configuration File=%PS_HOME%/psconfig.sh
Max Reconnect Attempt=12
Reconnection Interval=300
Authentication Timeout=5
TOOLBIN=%PS_HOME%/bin
Log/Output Directory=%PS_SERVDIR%/log_output
LogFence=5
DEFAULTPRINTER=
Do you want to change any values (y/n)? [n]:
The following table describes the parameters you'll need to update in the Process Scheduler section:
Parameter Description
Prcs Job Name Job name assigned to the Process Scheduler program. Thisis set in USS using the __BPX_JOBNAME environmentvariable setting.
Prcs Job Account= Job Account assigned to the Process Scheduler program.This is set in USS using the __BPX_ACCT_DATAenvironment variable setting.
Using [Application Engine]This section contains Application Engine values:
Values for config section - Application Engine
AE Job Name=%JOBNAME%%SFX%
AE Job Account=%JOBACCT%
Copyright © 2006, Oracle. All rights reserved. 361

Setting Up Process Scheduler on z/OS Chapter 11C
Do you want to change any values (y/n)? [n]:
The following table describes each parameter in the Application Engine section:
Parameter Description
AE Job Name Job name assigned to an Application Engine program. Thisis set in USS using the __BPX_JOBNAME environmentvariable setting.
AE Job Account Account assigned to an Application Engine program. Thisis set in USS using the __BPX_ACCT_DATA environmentvariable setting.
Note. After you complete your changes in PSADMIN, you must shut down and restart the server to put thenew settings into place.
Task 11C-4-6: Working with Shell JCL TemplatesThis section discusses:
• Understanding Shell JCL Templates
• Editing a Shell JCL Template
• Customizing the Process Scheduler's Shell JCL Template
Understanding Shell JCL TemplatesWhen starting a Process Scheduler Server, shell JCL template files are read once and stored into memory aspart of the initialization procedure. Process Scheduler will generate a JCL for COBOL and SQR based onthe JCL stored in memory. If you have modified any of the shell JCL templates after the Process SchedulerServer was started, Process Scheduler will refresh the JCL stored in memory before submitting the nextCOBOL or SQR request.
The PeopleSoft Server Transfer program creates a directory $PS_HOME/appserv/prcs/shelljcl in UNIXServices to store a master copy of the shell JCL templates. When you create a Process Scheduler ServerConfiguration, it copies this shell JCL templates into the $PS_HOME/appserv/prcs/<database name>/shelljcldirectory. This includes all the JCL's used for running COBOL and SQR through Process Scheduler.
See “Creating a Database.”
The following table lists the shell JCL templates used in Process Scheduler:
JCL Description
SHELCBL.JCT Invoked by Process Scheduler when user requests to run a COBOLprogram
SHELSQRF.JCT Invoked by Process Scheduler when user requests to run an SQRprogram and specifies from the Process Scheduler page to routethe output to a file, web or email.
SHELSQRP.JCT Invoked by Process Scheduler when user requests to run an SQRprogram and specifies from the Process Scheduler panel to routethe output to a printer.
362 Copyright © 2006, Oracle. All rights reserved.

Chapter 11C Setting Up Process Scheduler on z/OS
JCL Description
SHELSQROUTP.JCT Used in conjunction with SHELSQRP.JCT or SHELSQRF.JCT.This template contains the file definition for creating a partitioneddata set for SQR report files. Process Scheduler will use thistemplate when the SQR output format is one of the following:
• Acrobat Reader (PDF)
• Post Script (PS)
• Line Printer (HP)
• HP format
SHELSQROUTS.JCT Used in conjunction with SHELSQRP.JCT or SHELSQRF.JCT.This template contains the file definition for creating a sequentialdata set for SQR report files. Process Scheduler will use thistemplate when the SQR output format is one of the following:
HTM
SPF
These shell JCL templates need to be modified to comply with your site standards.
Note. Process Scheduler does not use a JCL to submit an Application Engine program. Instead, ProcessScheduler will fork another (child) process in UNIX System Services and run Application Engine in this newprocess. This schema is similar to Windows or UNIX operating system.
Editing a Shell JCL TemplateTo edit a shell JCL template:
1. To edit a shell JCL template, select option 10 from the PeopleSoft Process Scheduler Administration menu:
-------------------------------------------
PeopleSoft Process Scheduler Administration
-------------------------------------------
1) Start a Process Scheduler Server
2) Stop a Process Scheduler Server
3) Configure a Process Scheduler Server
4) Create a Process Scheduler Server Configuration
5) Delete a Process Scheduler Server Configuration
6) Edit a Process Scheduler Configuration File
7) Import an existing Process Scheduler Configuration
8) Show Status of a Process Scheduler Server
9) Kill a Process Scheduler Server
10) Edit a Shell JCL
q) Quit
Command to execute (1-10, q) : 10
2. Select the database for which the Process Scheduler needs to be configured.
Database list:
Copyright © 2006, Oracle. All rights reserved. 363

Setting Up Process Scheduler on z/OS Chapter 11C
1) HRDMO
Select item number to edit: 1
3. Select the JCL from the list you intend to modify. This will open the JCL in a vi editor screen.
JCL list:
1) shelcbl.jct
2) shelsqrf.jct
3) shelsqroutp.jct
4) shelsqrouts.jct
5) shelsqrp.jct
Select JCL file to edit: 1
4. Modify the JCL using vi commands5. Save your changes by using the vi command :wq
If you are not familiar with the vi editor and would prefer to edit the JCL's using ISPF editor, you can usethe TSO oedit command in the TSO session. IBM's TSO oedit command allows you to modify any filesresiding in UNIX System Services from a TSO session. You can edit any of the shell JCL templates found in$PS_HOME/appserv/prcs/<database name>/shelljcl directory as shown below. Please consult your OS390system administrator for using the oedit command at your site.
Editing a shell JCL template
Customizing the Process Scheduler's Shell JCL TemplateAll the Process Scheduler's shell JCLs use meta-strings to pass data stored in the database or Process Schedulerconfiguration files. Process Scheduler takes advantage of meta-strings to generate the JCL based on oneof these sources:
• User's profile who initiated the request• Parameters defined in the Process Scheduler Configuration file.
364 Copyright © 2006, Oracle. All rights reserved.

Chapter 11C Setting Up Process Scheduler on z/OS
• Parameters defined in the Process Type Definition Page or Process Definition Page
A good example of data that can be passed includes job account and job name. To enter the values of someof these variables you need to identify the Process Profile being used. Choose PeopleTools, Security, UserProfiles, User Profiles. Then search on the ID used to log on to the PeopleSoft Internet Architecture. Makenote of the Process Profile Name. Then choose PeopleTools, Security, Permissions & Roles, Permission Listsand select the Process Profile Name that was identified. Select Process tab, Process Profile Permissions.
The shell JCL templates are tunable and should be changed according to your site-specific standards. The tablebelow identifies all the available meta-strings you can use in a shell JCL template.
If you create a new JCL template, you must be aware of the following:
• The Shell ID is restricted to three characters.
• The Shell ID is associated with the Process Type Definition.
Meta-Strings Description
%JOBNAME% Specifies the value entered in z/OS Job Controls Namefield of the Process Profile Permission page for thePermission Lists specified as the User ID's ProcessProfile. The Process Profile for a User ID can be setusing the User Profiles page in the Maintain Securitycomponent.
%JOBACCT% Specifies the value entered in z/OS Job ControlsAccount field of the Process Profile Permission page.
%OUTDEST% Specifies the output destination based on the valueentered in the Server Destinations File or Printer fieldsof the Process Profile Permission page.
%SFX% A one-character code issued by Process Scheduler.The system will randomly assign a value from A to Z.
%OPRID% The user ID used to submit the request from ProcessScheduler.
%PRCSLOGFILE% The name of the log file Process Scheduler used toredirect all data written to output for ApplicationEngine or SYSOUT in COBOL or SQR
%PRCSLOGDIR% The directory where all log files or reports are writtento in UNIX System Services for a process.
%ACCESSID% The access ID assigned for a user ID defined inPSOPRDEFN.
%INSTANCE% The process instance number assigned to a processrequest.
%RUNID% The run control ID used to submit the process request.
%OWNERID% The owner ID for the PeopleSoft database.
Copyright © 2006, Oracle. All rights reserved. 365

Setting Up Process Scheduler on z/OS Chapter 11C
Meta-Strings Description
%PRCSNAME% The program name as defined in the Process Definitionpage.
%DB2SUB% The name of the DB2 subsystem specified in theDB2Sub-System parameter of theOS390 section found inthe Process Scheduler Configuration file.
%PERFSTAT% The flag used to set the Performance Statistic option inthe COBOL shell JCL. This is set to 'Y' when the bitvalue of 128 is assigned to the TraceSQL parameterof the Trace section found in the Process SchedulerConfiguration file.
%DYNEXPLN% The flag used to set the Dynamic Explain option inthe COBOL shell JCL. This is set to 'Y' when the bitvalue of 256 is assigned to the TraceSQL parameterof the Trace section found in the Process SchedulerConfiguration file.
%PARALLEL% The flag used to set the Dynamic Explain option in theCOBOL shell JCL. This is based on the flag set in theEnable Parallel Processing parameter of theOS390section found in the Process Scheduler Configurationfile.
"%TSOPLAN% The DB2 plan name subsystem specified in thePlan name for PTPSQLRT with TSO parameter oftheOS390 section found in the Process SchedulerConfiguration file.
%PSHLQ% The high level qualifier of the PeopleSoft datasetspecified in High Level Qualifier for Datasetsparameter of theOS390 section found in the ProcessScheduler Configuration file.
Here is a sample job control card in one of the shell JCLs:
//%JOBNAME%%SFX% JOB %JOBACCT%,'PS-PRCS ',CLASS=E,MSGCLASS=X,
// NOTIFY=%OPRID%
If you choose not to use meta-strings, you can also update the job cards to remove all these variablesand replace them with actual values.In the SHELL JCL for SQR, OUTNODE denotes either a z/OS partitioned data set (PDS) or sequentialdata set. The PDS is a requirement for SQR output. If the SQR report XRFPANEL were directed to fileoutput, the following substitution would occur:The following line in SHELSQRF.JCT// OUTNODE='%OUTDEST%'
would be changed to:// OUTNODE='HR.H800RAB',
366 Copyright © 2006, Oracle. All rights reserved.
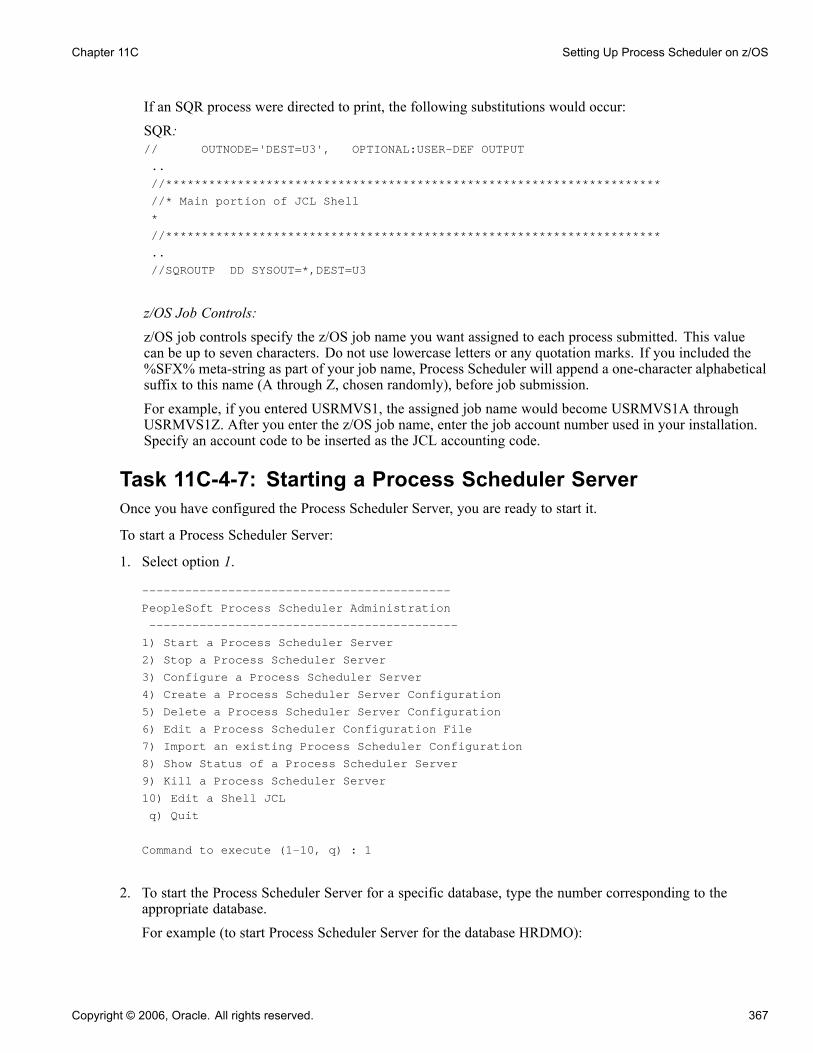
Chapter 11C Setting Up Process Scheduler on z/OS
If an SQR process were directed to print, the following substitutions would occur:SQR:// OUTNODE='DEST=U3', OPTIONAL:USER-DEF OUTPUT
..
//*********************************************************************
//* Main portion of JCL Shell
*
//*********************************************************************
..
//SQROUTP DD SYSOUT=*,DEST=U3
z/OS Job Controls:
z/OS job controls specify the z/OS job name you want assigned to each process submitted. This valuecan be up to seven characters. Do not use lowercase letters or any quotation marks. If you included the%SFX% meta-string as part of your job name, Process Scheduler will append a one-character alphabeticalsuffix to this name (A through Z, chosen randomly), before job submission.
For example, if you entered USRMVS1, the assigned job name would become USRMVS1A throughUSRMVS1Z. After you enter the z/OS job name, enter the job account number used in your installation.Specify an account code to be inserted as the JCL accounting code.
Task 11C-4-7: Starting a Process Scheduler ServerOnce you have configured the Process Scheduler Server, you are ready to start it.
To start a Process Scheduler Server:
1. Select option 1.
-------------------------------------------
PeopleSoft Process Scheduler Administration
-------------------------------------------
1) Start a Process Scheduler Server
2) Stop a Process Scheduler Server
3) Configure a Process Scheduler Server
4) Create a Process Scheduler Server Configuration
5) Delete a Process Scheduler Server Configuration
6) Edit a Process Scheduler Configuration File
7) Import an existing Process Scheduler Configuration
8) Show Status of a Process Scheduler Server
9) Kill a Process Scheduler Server
10) Edit a Shell JCL
q) Quit
Command to execute (1-10, q) : 1
2. To start the Process Scheduler Server for a specific database, type the number corresponding to theappropriate database.For example (to start Process Scheduler Server for the database HRDMO):
Copyright © 2006, Oracle. All rights reserved. 367
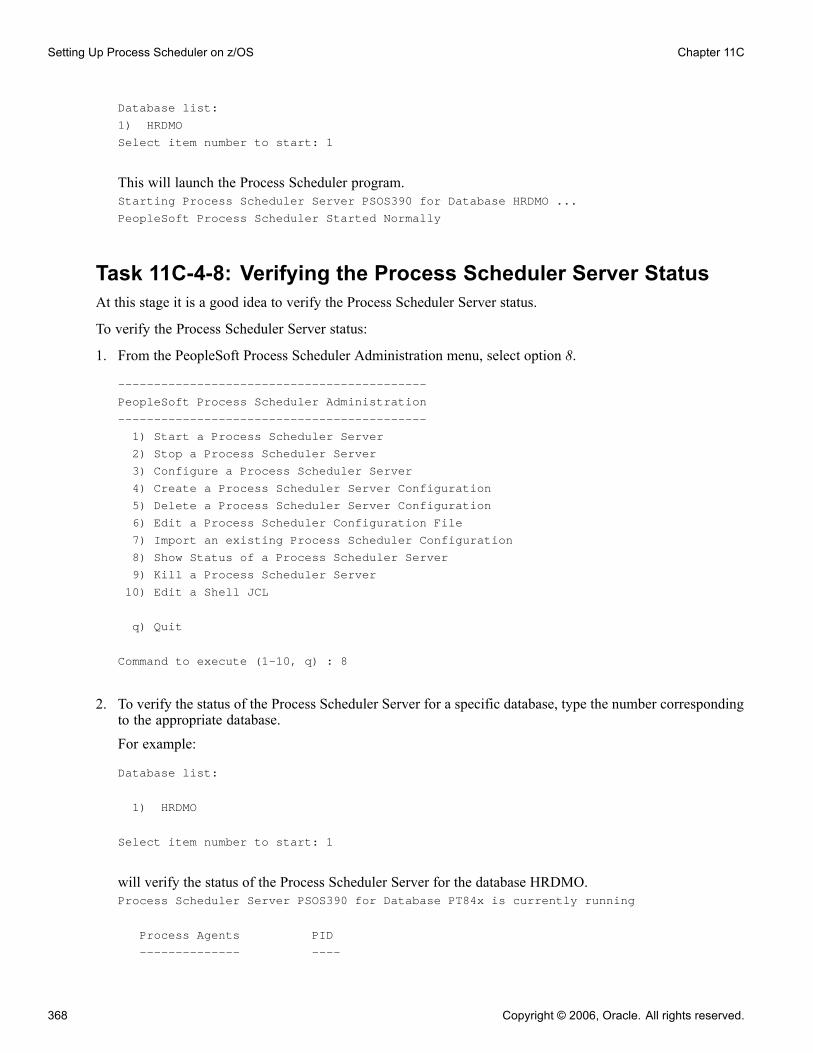
Setting Up Process Scheduler on z/OS Chapter 11C
Database list:
1) HRDMO
Select item number to start: 1
This will launch the Process Scheduler program.Starting Process Scheduler Server PSOS390 for Database HRDMO ...
PeopleSoft Process Scheduler Started Normally
Task 11C-4-8: Verifying the Process Scheduler Server StatusAt this stage it is a good idea to verify the Process Scheduler Server status.
To verify the Process Scheduler Server status:
1. From the PeopleSoft Process Scheduler Administration menu, select option 8.
-------------------------------------------
PeopleSoft Process Scheduler Administration
-------------------------------------------
1) Start a Process Scheduler Server
2) Stop a Process Scheduler Server
3) Configure a Process Scheduler Server
4) Create a Process Scheduler Server Configuration
5) Delete a Process Scheduler Server Configuration
6) Edit a Process Scheduler Configuration File
7) Import an existing Process Scheduler Configuration
8) Show Status of a Process Scheduler Server
9) Kill a Process Scheduler Server
10) Edit a Shell JCL
q) Quit
Command to execute (1-10, q) : 8
2. To verify the status of the Process Scheduler Server for a specific database, type the number correspondingto the appropriate database.
For example:
Database list:
1) HRDMO
Select item number to start: 1
will verify the status of the Process Scheduler Server for the database HRDMO.Process Scheduler Server PSOS390 for Database PT84x is currently running
Process Agents PID
-------------- ----
368 Copyright © 2006, Oracle. All rights reserved.

Chapter 11C Setting Up Process Scheduler on z/OS
Process Scheduler 1144
Distribution Agent 35163243
Note. You can also verify the status of the Process Scheduler Server from Process Monitor in PIA. To verifythe Process Scheduler Server status from the Process Monitor page, go to PeopleTools, Process Scheduler,Process Monitor, and select Server List.
Note. If you have not configured z/OS with a Distribution Node, the Distribution Agent will not be started.You must execute that task before the Distribution Agent will be booted with the Process Scheduler server. SeeValidating and Editing the ODBC Initialization File.
Task 11C-4-9: Stopping the Process Scheduler ServerYou can stop the Process Scheduler Server as follows.
To stop the Process Scheduler Server:
1. From the PeopleSoft Process Scheduler Administration menu, select option 2.
-------------------------------------------
PeopleSoft Process Scheduler Administration
-------------------------------------------
1) Start a Process Scheduler Server
2) Stop a Process Scheduler Server
3) Configure a Process Scheduler Server
4) Create a Process Scheduler Server Configuration
5) Delete a Process Scheduler Server Configuration
6) Edit a Process Scheduler Configuration File
7) Import an existing Process Scheduler Configuration
8) Show Status of a Process Scheduler Server
9) Kill a Process Scheduler Server
10) Edit a Shell JCL
q) Quit
Command to execute (1-10, q) : 2
2. To stop the Process Scheduler Server for a specific database, type the number corresponding to theappropriate database.Example (to stop Process Scheduler Server for the database HRDMO):
Database list:
1) HRDMO
Select item number to stop: 1
Command sent to stop Process Scheduler Server PSOS390 for Database HRDMO. The⇒Server Will stop the next time that it wakes up.
Copyright © 2006, Oracle. All rights reserved. 369

Setting Up Process Scheduler on z/OS Chapter 11C
370 Copyright © 2006, Oracle. All rights reserved.
CHAPTER 12
Installing and Configuring Software forCrystal Reports
This chapter discusses:
• Understanding Crystal Reports Software Installation and Configuration
• Determining the Crystal Reports Runtime Environment
• Installing Crystal Reports 9
• Installing BusinessObjects Enterprise XI
• Migrating your BusinessObjects Enterprise XI Installation to a New Version of PeopleTools
• Installing Crystal Reports XI
• Removing Crystal Reports XI
• Administering and Using BusinessObjects Enterprise XI
• Converting Crystal Reports
Understanding Crystal Reports Software Installationand Configuration
This chapter addresses the installation and administration of your Crystal Reports environment. Depending onthe type of installation that you have some parts of the chapter will not be relevant to you.
The chapter is divided into sections. Within each section are parts that provide informative backgroundinformation or describe installation and administration tasks.
The following flowchart describes how to use the information in this chapter to install and configure thesoftware that you need to run Crystal Reports on your PeopleSoft system:
Copyright © 2006, Oracle. All rights reserved. 371

Installing and Configuring Software for Crystal Reports Chapter 12
DetermineType of
Installation
Start
The CrystalReports 9Installation
TheBusinessObjects
Enterprise XIInstallation
The CrystalReports XIInstallation
OtherBusinessObjects
Enterprise XIInstallation andAdministration
Topics
BusinessObjects Enterprise XI
Crystal Reports 9
Crystal Reports XI Designer
Yes
Finish
Other BOE XIAdministration
Tasks?
No
Chapter navigation
See AlsoEnterprise PeopleTools 8.48 PeopleBook: Crystal Reports for PeopleSoft
PeopleSoft Customer Connection (Implement, Optimize + Upgrade, Implementation Guide, SupportedPlatforms, PeopleSoft Enterprise)
372 Copyright © 2006, Oracle. All rights reserved.

Chapter 12 Installing and Configuring Software for Crystal Reports
Task 12-1: Determining the Crystal ReportsRuntime Environment
PeopleSoft applications are delivered to work with the Crystal Reports 9 runtime environment. Processscheduler report definitions are configured to use the Crystal Reports 9 print engine, and the Crystal reportdefinition files delivered by PeopleSoft are in the Crystal 9 format. You use the Crystal Reports 9 product tocreate and edit report definitions.
If you are using PeopleTools 8.48 and are using PeopleSoft applications at Release 9 or higher, you canoptionally use the BusinessObjects Enterprise XI runtime environment to run and view your reports. Youuse the Crystal Reports XI product to create and edit report definitions.
For any particular PeopleSoft application you must use either Crystal 9 or BusinessObjects Enterprise XI—youcannot run a “mixed” environment where some reports are run using Crystal 9 and some reports are runusing BusinessObjects Enterprise XI.
If you decide to use BusinessObjects Enterprise XI, you can run a PeopleSoft supplied conversion programto convert report definitions from Crystal 9 format to Crystal XI format. There is no conversion program toconvert from Crystal XI format to Crystal 9 format.
The advantages of BusinessObjects Enterprise XI (compared to Crystal Reports 9) are:
• Runs on other operating systems (Solaris, AIX, Linux) besides Windows
• Runs on a scalable server platform; that is, you can scale across machines
• Users can view interaction reports over the web (such as search, filter, or table of contents).
The restrictions of the PeopleSoft Integration with BusinessObjects Enterprise XI are:
• The PeopleSoft Process Scheduler that you use to run reports on the BusinessObjects Enterprise XI servercan run only on one of the operating systems that BusinessObjects Enterprise XI runs on.
• You need to convert all your reports from Crystal 9 format to Crystal XI format to run them usingBusinessObjects Enterprise XI.
• The PeopleSoft Integration does not support some platforms that a standalone BusinessObjects EnterpriseXI installation supports.That is, not all platforms that BusinessObjects Enterprise XI runs on were tested in the integratedBusinessObjects Enterprise XI/PeopleSoft solution. For example, while standalone BusinessObjectsEnterprise XI support Tomcat as a web server, the integrated BusinessObjects Enterprise XI/PeopleSoftsolution does not.
The advantages of using Crystal Reports 9 are:
• Works the same as previous releases of PeopleTools• Requires little configuration and administration• Run to Crystal Reports 9 from Windows Query Designer is available• Does not require a database management system for report management• Report output is smaller in size compared to BusinessObjects Enterprise XI, as the latter contains moreinternal information about the report.The observed difference in tests indicates that report output generated from BusinessObjects Enterprise XIwill be 30 to 40% larger. This may vary by report and by the amount of business data in the report.
Copyright © 2006, Oracle. All rights reserved. 373

Installing and Configuring Software for Crystal Reports Chapter 12
One restriction on Crystal Reports 9 is that it runs only on Windows.
Task 12-2: Installing Crystal Reports 9This section discusses:
• Understanding the Crystal Reports 9 Installation
• Installing Crystal Reports 9
Understanding the Crystal Reports 9 InstallationCrystal Reports 9 is packaged with PeopleSoft. The Crystal Reports installation is required for Windows-basedworkstations (also referred to as the PeopleTools Development Environment) where reports will be designed.Workstations that will only run existing reports via Process Scheduler do not need Crystal Reports. Thefunctionality for running these reports on the client is provided in DLLs that are installed when you runClient Setup in Configuration Manager.
Note. Depending upon the languages you licensed from PeopleSoft, you may receive more than one CrystalReports CD-ROM. You should repeat the following installation instructions for each language of CrystalReports that you plan to use in the PeopleTools Development Environment.
Note. Although some versions of Crystal Reports include web server applications such as Web ComponentServer, they are not tested, certified, or supported by PeopleSoft.
You can install Crystal Reports 9 locally on a workstation where reports will be designed, or on a Windowsbatch server where Crystal Reports will be executed by Process Scheduler. You can also install Crystal Reportsto a network file server; typically it would be installed to a subdirectory of the <PS_HOME> directory. If youinstall Crystal Reports to a network file server, you need to run a Crystal Reports setup on each Windows-basedworkstation or batch server where Crystal Reports will be run. To do so, make sure to select the Completeinstallation when running the CD setup program.
Note. When installing Crystal Reports to a Netware file server, the ideal solution is to use Windows as theinstallation workstation environment. If, however, you are installing Crystal under Windows 95 to a Novellfile server, install Crystal on a local drive and then copy the Crystal directory to the Novell server from anMS-DOS command prompt.
See AlsoEnterprise PeopleTools 8.48 PeopleBook: Crystal Reports for PeopleSoft, “Using Crystal Reports 9”
Task 12-2-1: Installing Crystal Reports 9To install Crystal Reports 9:
1. Insert the Crystal CD into your CD-ROM drive and run the setup program from the root of the drive.
Note. If you are installing to a network, you must run setup.exe from the command prompt withthe /a option, as in <path>setup.exe /a.
374 Copyright © 2006, Oracle. All rights reserved.
Chapter 12 Installing and Configuring Software for Crystal Reports
The install program will search for any previous version of Crystal and then present a Welcome message.2. Click Next.A license dialog box appears.
3. Select the I accept the License Agreement radio button and click Next.A window appears with the possible installation types.
4. Select the Typical radio button. If necessary, use the Browse button to set your destination folder.5. Click Next.A screen appears displaying the features you have selected. Review and modify your selections if necessary.
6. Click Next.You are prompted to start the installation or go back to modify any of the information added.
7. Select Next to begin the installation.A progress screen appears.
8. Select Finish to complete the installation.
Note. For additional instructions on installing the Crystal Reports CD-ROM, see the Crystal installationdocumentation, which is delivered in the \DOCS directory of the Crystal Reports CD as install.rtf.
Note. To install Crystal on a local machine but run it from the network, consult the Crystal documentation.
Note. If you are upgrading your system to PeopleTools 8.48 from a version of PeopleTools earlier than an 8.xversion, you may have to convert your custom Crystal report definitions to Crystal 9. Please see the sectionConverting Crystal Reports for additional information and tasks.
If this is not the case, at this point if you are using Crystal 9 you are finished. Ignore the rest of the chapter as itaddresses BusinessObjects Enterprise XI exclusively.
Task 12-3: Installing BusinessObjects Enterprise XIThis section discusses:
• Understanding the BusinessObjects Enterprise XI Installation
• Understanding Integration Between BusinessObjects Enterprise XI and PeopleSoft Enterprise
• Understanding Query Access Services
• Reviewing Key BusinessObjects Enterprise XI Components
• Planning your BusinessObjects Enterprise XI Integration
• Installing the PeopleSoft Application Environment
• Installing BusinessObjects Enterprise XI on Windows
• Installing BusinessObjects Enterprise XI Integration on Windows
• Installing Patches Required at Installation Time
Copyright © 2006, Oracle. All rights reserved. 375

Installing and Configuring Software for Crystal Reports Chapter 12
• Creating a Web Server for BusinessObjects Enterprise XI on Windows
• Installing BusinessObjects Enterprise XI on UNIX or Linux
• Installing PeopleSoft BusinessObjects Enterprise XI Integration on UNIX or Linux
• Installing Patches Required at Installation
• Creating a Web Server for BusinessObjects Enterprise on UNIX or Linux
• Confirming Access to the BusinessObjects Enterprise XI Administration and User Launchpad Applications
• Configuring the PeopleSoft Application for BusinessObjects Enterprise XI Integration
• Configuring the BusinessObjects Enterprise XI Server
• Verifying the PeopleSoft to BusinessObjects Enterprise XI Integration
Understanding the BusinessObjects Enterprise XI InstallationUse the following flowcharts to understand which parts of this section are relevant to your particularcircumstances.
376 Copyright © 2006, Oracle. All rights reserved.
Chapter 12 Installing and Configuring Software for Crystal Reports
BackgroundTopics
Overview ofInstallation andConfiguration
Tasks
Install PrerequisiteSoftware
WindowsInstallation orUNIX/LinuxInstallation
Start
Windows
Configuring thePeopleSoft
application forBOE XI Integration
Configuring theBOE XI Server
ConvertingReports from
Crystal Reports 9format to CrystalReports XI format
End
B
UNIX/Linux
A
PSft appsearlier thanrelease 9?
Yes
No
See Fig.2 See Fig. 3
Navigating the BOE XI installation and configuration - Figure 1
Copyright © 2006, Oracle. All rights reserved. 377
Installing and Configuring Software for Crystal Reports Chapter 12
InstallingBusinessObjectsEnterprise XI on
Windows
InstallingPeopleSoft
BusinessObjectsEnterprise XIIntegration on
Windows
Installing PatchesRequired atInstallation
Type of WebServer
Creating aWebLogic Server
on Windows
Deploying theBusinessObjects
Enterprise XILaunchpad
Applications onWebLogic/Windows
WebLogic
Creating aWebSphereServer onWindows
WebSphere
Deploying theBusinessObjects
Enterprise XI LaunchpadApplications on
WebSphere/Windows
Creating an OracleApplication Server
on Windows
Oracle Application Server
Deploying theBusinessObjects
Enterprise XILaunchpad
Applications onOAS/Windows
Return to Fig.1
A
Navigating the BOE XI installation and configuration - Figure 2
378 Copyright © 2006, Oracle. All rights reserved.

Chapter 12 Installing and Configuring Software for Crystal Reports
InstallingBusinessObjectsEnterprise XI on
UNIX/Linux
InstallingPeopleSoft
BusinessObjectsEnterprise XIIntegration onUNIX/Linux
Installing PatchesRequired atInstallation
Type of WebServer
Creating aWebLogic Server
on UNIX/Linux
Deploying theBusinessObjects
Enterprise XILaunchpad
Applications onWebLogic/UNIX/
Linux
WebLogic
Creating aWebSphere
Server on UNIX/Linux
WebSphere
Deploying theBusinessObjects
Enterprise XI LaunchpadApplications on
WebSphere/UNIX/Linux
Creating an OracleApplication Server
on UNIX/Linux
Oracle Application Server
Deploying theBusinessObjects
Enterprise XILaunchpad
Applications onOAS/UNIX/Linux
Return to Fig. 1
B
Navigating the BOE XI installation and configuration - Figure 3
Copyright © 2006, Oracle. All rights reserved. 379

Installing and Configuring Software for Crystal Reports Chapter 12
Understanding Integration Between BusinessObjectsEnterprise XI and PeopleSoft EnterprisePeopleSoft Enterprise, together with Business Objects, provides a robust suite of reporting tools to be usedwith PeopleSoft products. The diagrams below illustrates how BusinessObjects Enterprise XI integrates withPeopleSoft Enterprise.
Crystal Reports XIDesigner
PS BOEIntegration
QASPeopleSoftIntegration
Broker
Integration GatewayWeb Server
PeopleSoftApplication
Server
Client Workstation
PeopleSoftDatabase
SOAP
Jolt
Design a report
380 Copyright © 2006, Oracle. All rights reserved.

Chapter 12 Installing and Configuring Software for Crystal Reports
BOE Report Server
BOE Report Repository
PSBOERUNBOEAPI
QASPeopleSoftIntegration
Broker
Integration GatewayWeb Server
PeopleSoftProcess
Scheduler
PeopleSoftApplication
Server
PeopleSoftAnalyticServer
(QUERY)
PeopleSoftDatabase
PeopleSoftReport
Repository
Jolt
SOAP
Query Results
Run a report
BrowserBOE
InteractiveViewer
BOEReport
Repository
View a report stored in the BusinessObjects Enterprise XI Repository
Implementation of this integration requires:
Copyright © 2006, Oracle. All rights reserved. 381
Installing and Configuring Software for Crystal Reports Chapter 12
• installation of BusinessObjects Enterprise XI server• installation of PeopleSoft-specific components on the BusinessObjects Enterprise server• configuration tasks in your PeopleSoft database• configuration tasks in your BusinessObjects Enterprise XI server• conversion of Crystal report definitions from Crystal 9 format to Crystal XI format.
BusinessObjects Enterprise XI for PeopleSoft Enterprise interacts with PeopleSoft Enterprise security serverusing a plug-in. This integration provides single signon and ensures the synchronization of users and rolesbetween PeopleSoft Enterprise and BusinessObjects Enterprise XI. Using a data driver that calls the QueryAccess Services, BusinessObjects Enterprise receives data from PS Query and builds a report using ReportApplication Server (RAS) API.
Understanding Query Access ServicesThe primary goal of Query Access Services (QAS) is to provide streaming PeopleSoft query results toBusinessObjects Enterprise over the web to create Crystal reports.
QAS plays the following roles in BusinessObjects Enterprise XI for PeopleSoft Enterprise:
• Provides a mechanism for the BusinessObjects Enterprise XI to access Query metadata so that userscan design Crystal Reports based on the queries.
• Provides a mechanism for the BusinessObjects Enterprise XI to obtain results for a query to be usedin report definitions.
The following diagram illustrates the QAS architecture:
382 Copyright © 2006, Oracle. All rights reserved.

Chapter 12 Installing and Configuring Software for Crystal Reports
Business Objects Enterprise
Call Query AccessServices (QAS)
LoginRequest()ListQueryRequest()ExecuteQueryReq()GetQueryResult()
PeopleSoft
SOAPClient
Web Server
IntegrationGateway
PIA
ResultRepository
Analytic ServerQuery Engine
Application ServerQAS MessagePeopleCode
JOLT
PeopleSoftDatabase
HTTP(S)
Tuxedo
PeopleSoftQAS
WSDL
SOAPOver
HTTP(S)
Query Access Services architecture
The following sections describe the components in the Query Access Services architecture:
• Integration GatewayThe Integration Gateway receives every Simple Object Access Protocol (SOAP) request coming fromBusinessObjects Enterprise XI. The Gateway forwards the request to the integration engine running onthe web server.
• Web ServerThe Integration Gateway resides on a PeopleSoft web server that generates the URL to navigate insideBusinessObjects Enterprise. The Integration Gateway receives every SOAP request coming fromBusinessObjects Enterprise over HTTP/HTTPS. Using the QueryListening Connector class, resultsare received directly from the report repository.
• Application ServerPeopleCode running on the application server implements most of the QAS services and generates therequired response. The integration engine is installed on an application server as part of the PeopleSoftapplication.
• Analytic Server
Copyright © 2006, Oracle. All rights reserved. 383

Installing and Configuring Software for Crystal Reports Chapter 12
The Analytic server provides asynchronous query execution. The query engine is embedded in the analyticserver. When a query execution request arrives, the PeopleCode delegates the request to one of theavailable analytic servers running within the same application server domain. The query engine startsexecuting the query based on the input parameters.
• Result RepositoryOnce the query engine fetches the first block of results, it encapsulates the results in a well-defined XMLformat and posts the XML data in the Result Repository.
• BusinessObjects Enterprise XIWhen BusinessObjects Enterprise XI makes a request to obtain the XML data from the Report Repository,the request is authenticated and the data is sent directly from the report repository.
Reviewing Key BusinessObjects Enterprise XI ComponentsBusinessObjects Enterprise involves the interaction of the following components:
• Central Management Console (CMC)
The Central Management Console (CMC) enables you to perform administrative tasks. Administrativetasks include authenticating users, granting rights to groups, adding domains, mapping PeopleSoft roleswith BusinessObjects Enterprise roles, and adding users.
• Security Plugin
The Central Management Server uses the BusinessObjects Enterprise XI security plug-in to verify theuser name and password against the system database. In the context of BusinessObjects Enterprisefor PeopleSoft Enterprise, the security plug-in enables you to map user accounts and groups fromPeopleSoft into BusinessObjects Enterprise XI. The user names and passwords are authenticated againstthe BusinessObjects Enterprise XI user list that is synchronized with the users and roles in the PeopleSoftdatabase.
Task 12-3-1: Planning your BusinessObjectsEnterprise XI IntegrationThis section discusses:
• Installing Prerequisite Software
• Configuring UNIX Environment Variables
Note. These are steps that should be done prior to starting the installation and configuration of PeopleToolsand BusinessObjects Enterprise XI. Completing these tasks will make the installation and configurationprocess proceed smoothly.
Installing Prerequisite SoftwareSeveral different alternative software packages are supported for BusinessObjects Enterprise XI. Thesealternatives are listed in the PeopleTools 8.48 Hardware and Software guide. Additional detailed informationon specific release levels supported is available online on Customer Connection.
See Enterprise PeopleTools 8.48 Hardware and Software Requirements.
• Operating SystemBefore you begin to install BusinessObjects Enterprise XI on UNIX or Linux operating systems usingterminal emulation, make sure that you are using an X-Windows terminal emulation program.
384 Copyright © 2006, Oracle. All rights reserved.

Chapter 12 Installing and Configuring Software for Crystal Reports
Note. You can install BusinessObjects Enterprise XI from the server console or with X-Windows terminalemulation software such as Cygwin. Telnet and ssh clients, such as Putty, will not allow you to installthe software properly.
• Database SoftwareBusinessObjects Enterprise XI requires a relational database, which stores report definitions as well asreport output. Oracle, DB2 LUW, Microsoft SQL Server, and Sybase are all supported database platforms.The database server software can run on a different machine in the same network as your installation ofBusinessObjects Enterprise XIBefore you begin to install BusinessObjects Enterprise XI, you should identify the database server thatyou want to use. Make note of the database or schema name, user account name, and password for thedatabase, as you will need this information to complete the BusinessObjects Enterprise XI installation. Adatabase must exist, which will become the Central Management Server database.
Note. MySQL is not a supported database platform for the integration between PeopleTools andBusinessObjects Enterprise XI.
• Database Connectivity SoftwareBusinessObjects Enterprise XI runs under a web server and requires a database, which stores reportdefinitions as well as report output. In order for BusinessObjects Enterprise XI to communicate with thedatabase software, the appropriate database client connectivity software must be installed on the serverrunning BusinessObjects Enterprise XI.Before you begin to install BusinessObjects Enterprise XI, install the appropriate database connectivitysoftware on the server where BusinessObjects Enterprise XI will reside.
• Java SDKIf your web application server software does not automatically install the Java SDK as part of itsinstallation process, you must install the J2SE SDK first. Ensure that your machine’s PATH environmentvariable includes the Java SDK bin directory.
• Web Application Server SoftwareBusinessObjects Enterprise XI runs under a web application server, either Oracle Application Server(OAS), BEA WebLogic, or IBM WebSphere. Before you begin to install BusinessObjects Enterprise XI,install the appropriate web server software on the server where BusinessObjects Enterprise XI will reside.
Note. You must install BusinessObjects Enterprise XI with the same user account as that used to install theweb server software.
See “Installing Web Server Products.”
The instructions in this section assume BusinessObjects Enterprise XI is installed on one server machine that isseparate from the machine on which you have installed (or will install) the PeopleSoft software.
Configuring UNIX Environment VariablesTo configure environment variables for UNIX platforms:
1. Set the JAVA_HOME environment variable:
JAVA_HOME= java_installDirectory; export JAVA_HOME
Copyright © 2006, Oracle. All rights reserved. 385

Installing and Configuring Software for Crystal Reports Chapter 12
2. Set LC_ALL and LANG environment variable to your preferred locale in your login environment. Forexample:
LANG=en_US.UTF-8
LC_ALL=en_US.UTF-8
3. Run the locale command to verify that all of the related locale environment variables were properlyset by LC_AL. For example:
st-sun17:$ locale
LANG=en_US.UTF-8
LC_CTYPE="en_US.UTF-8"
LC_NUMERIC="en_US.UTF-8"
LC_TIME="en_US.UTF-8"
LC_COLLATE="en_US.UTF-8"
LC_MONETARY="en_US.UTF-8"
LC_MESSAGES="en_US.UTF-8"
LC_ALL=en_US.UTF-8
Note. If the locale command does not return values exactly like this, contact your system administratorto set the values properly.
Task 12-3-2: Installing the PeopleSoft Application EnvironmentInstall your PeopleSoft application environment as you normally would. There are special configuration stepsthat you will have to perform later in order to complete the integration of PeopleSoft with BusinessObjectsEnterprise XI.
Note. In order for the integration between PeopleSoft and BusinessObjects Enterprise XI to work, thePeopleSoft Process Scheduler must be installed on an operating system that BusinessObjects Enterprise XIsupports. This is because PSBOERUN.EXE, the PeopleSoft process that calls BusinessObjects Enterprise XI,uses Business Objects-supplied APIs.
Task 12-3-3: Installing BusinessObjects EnterpriseXI on WindowsYou must log on to the Windows machine as a user included in the Administrator group.
To install BusinessObjects Enterprise XI from the CD:
1. Insert the BusinessObjects Enterprise XI CD into the server machine’s CD-ROM drive.2. Navigate to the CD-ROM's root directory and run setup.exe.
Note. If you are installing from a network, you must run setup.exe from the network location.
The install program will search for any previous version of BusinessObjects Enterprise XI and thenpresent a Welcome message.
3. Click Next.A license dialog box appears.
4. Accept the license agreement.
386 Copyright © 2006, Oracle. All rights reserved.
Chapter 12 Installing and Configuring Software for Crystal Reports
5. Select Perform Server Installation.
Select Client or Server Installation window
6. Accept the default location for the installation directory or use the Browse button to select another location.
Note. The folder that you enter here is referred to as the <BOE_DIR> later in this document.
Copyright © 2006, Oracle. All rights reserved. 387

Installing and Configuring Software for Crystal Reports Chapter 12
Directory Selection window
7. On the Install Type dialog, select New as the installation type.If you are using the MS SQL Server and it is located on the same machine on which you are installingBusinessObjects Enterprise XI, select the Install MSDE or use existing local SQL Server check box.
Note. MSDE is not supported in the PeopleSoft integration with BusinessObjects Enterprise XI, althoughSQL Server is supported.
Note. This database will become the BusinessObjects Server database. If Microsoft SQL Server is tobe used, the installation wizard creates the BusinessObjects Server database automatically. If you areusing another database management system, you must create the database manually prior to installingBusinessObjects Enterprise.
388 Copyright © 2006, Oracle. All rights reserved.
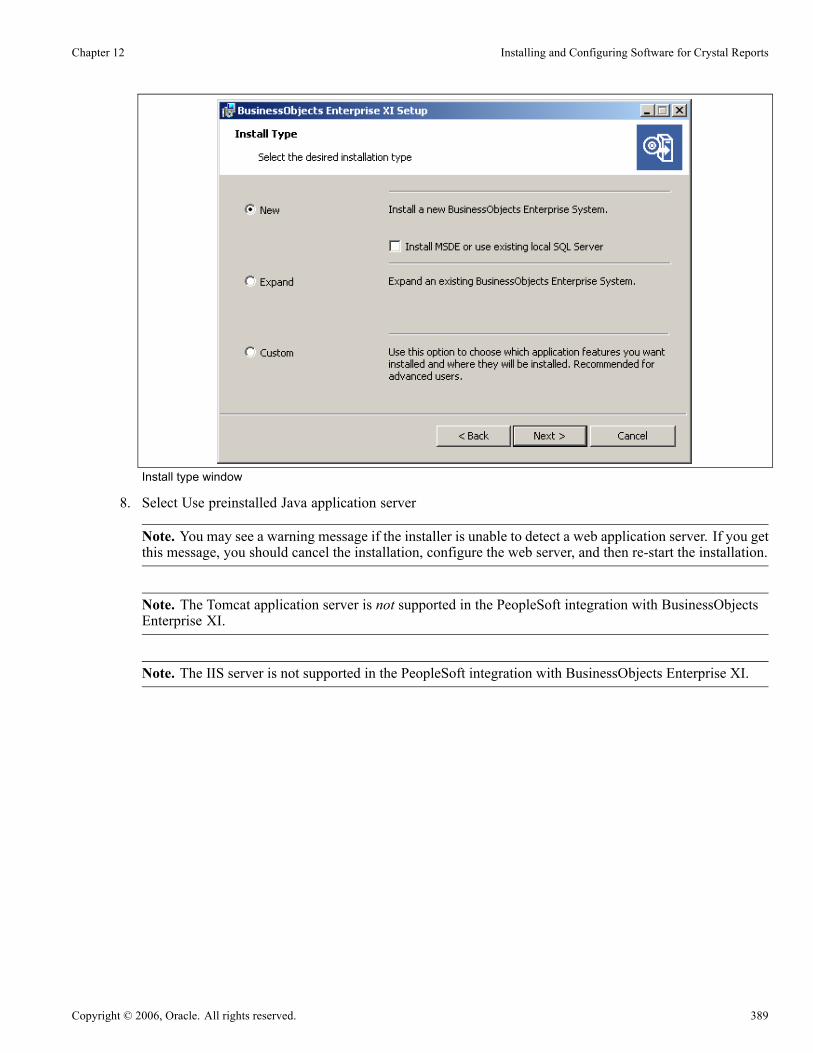
Chapter 12 Installing and Configuring Software for Crystal Reports
Install type window
8. Select Use preinstalled Java application server
Note. You may see a warning message if the installer is unable to detect a web application server. If you getthis message, you should cancel the installation, configure the web server, and then re-start the installation.
Note. The Tomcat application server is not supported in the PeopleSoft integration with BusinessObjectsEnterprise XI.
Note. The IIS server is not supported in the PeopleSoft integration with BusinessObjects Enterprise XI.
Copyright © 2006, Oracle. All rights reserved. 389
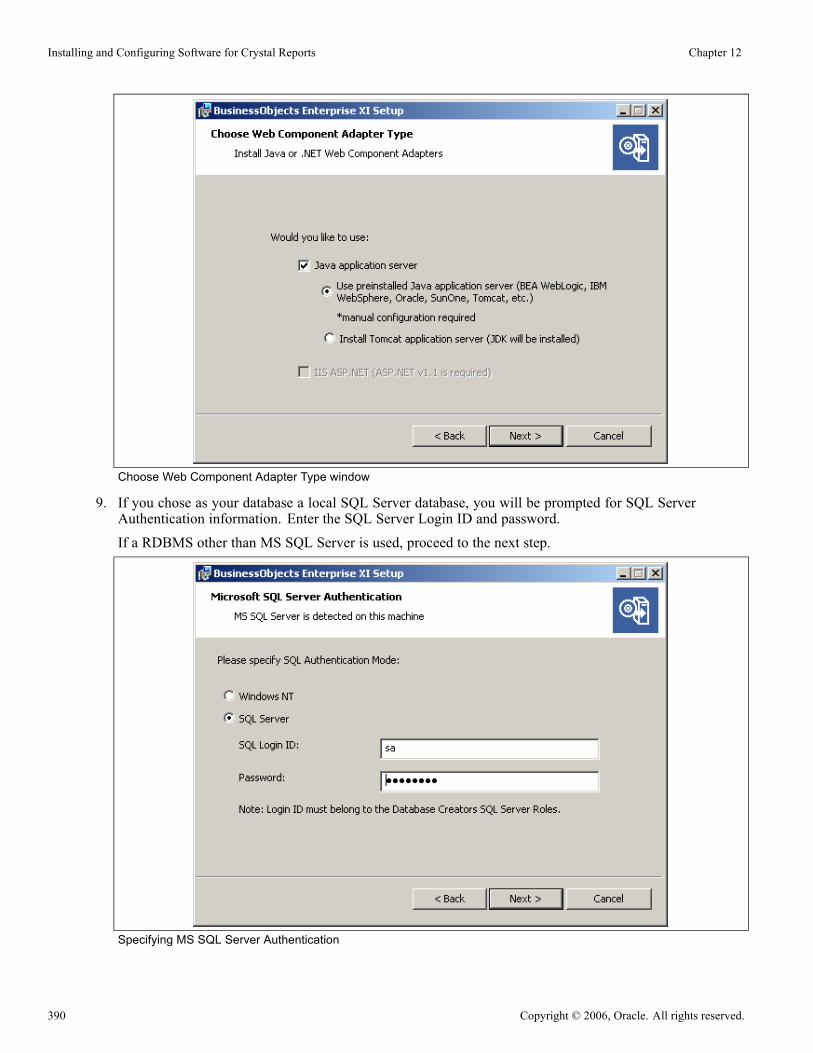
Installing and Configuring Software for Crystal Reports Chapter 12
Choose Web Component Adapter Type window
9. If you chose as your database a local SQL Server database, you will be prompted for SQL ServerAuthentication information. Enter the SQL Server Login ID and password.If a RDBMS other than MS SQL Server is used, proceed to the next step.
Specifying MS SQL Server Authentication
390 Copyright © 2006, Oracle. All rights reserved.

Chapter 12 Installing and Configuring Software for Crystal Reports
10. If a database other than a local SQL Server database is used, select the appropriate database connectionradio button and provide connection information.
CMS Database Information window
11. Click Next on the Start Installation dialog box.
BusinessObject Enterprise XI Start Installation window
Copyright © 2006, Oracle. All rights reserved. 391
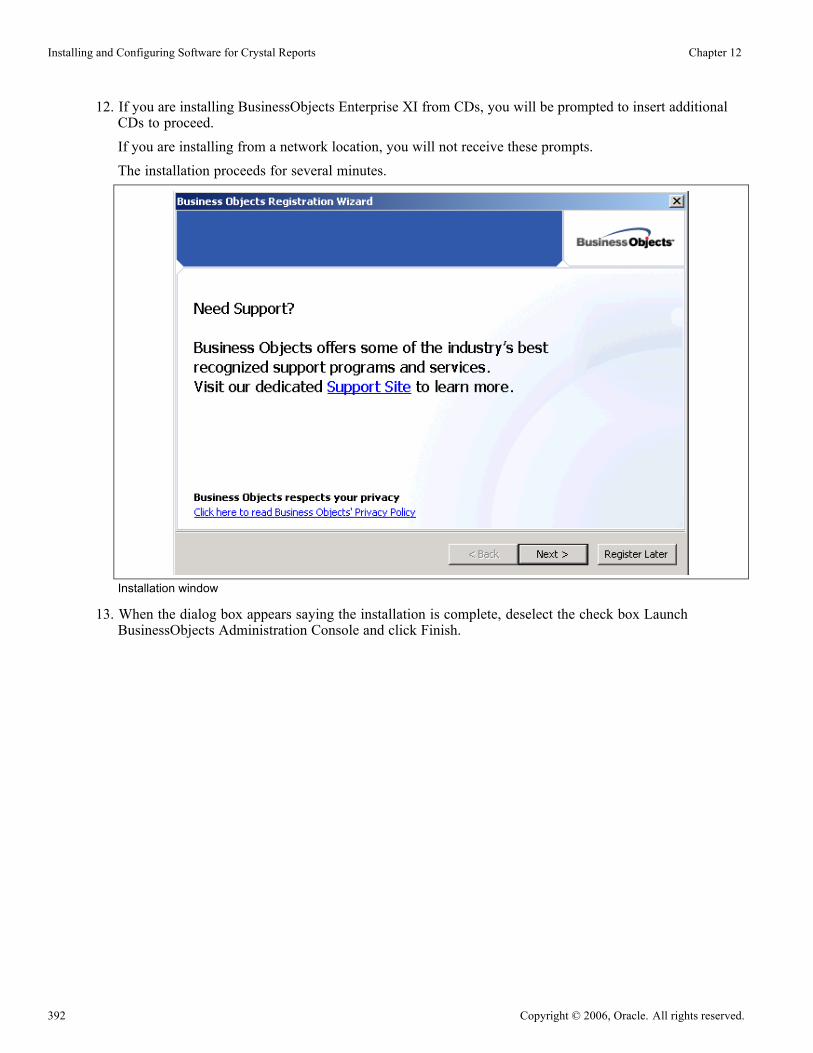
Installing and Configuring Software for Crystal Reports Chapter 12
12. If you are installing BusinessObjects Enterprise XI from CDs, you will be prompted to insert additionalCDs to proceed.If you are installing from a network location, you will not receive these prompts.The installation proceeds for several minutes.
Installation window
13. When the dialog box appears saying the installation is complete, deselect the check box LaunchBusinessObjects Administration Console and click Finish.
392 Copyright © 2006, Oracle. All rights reserved.
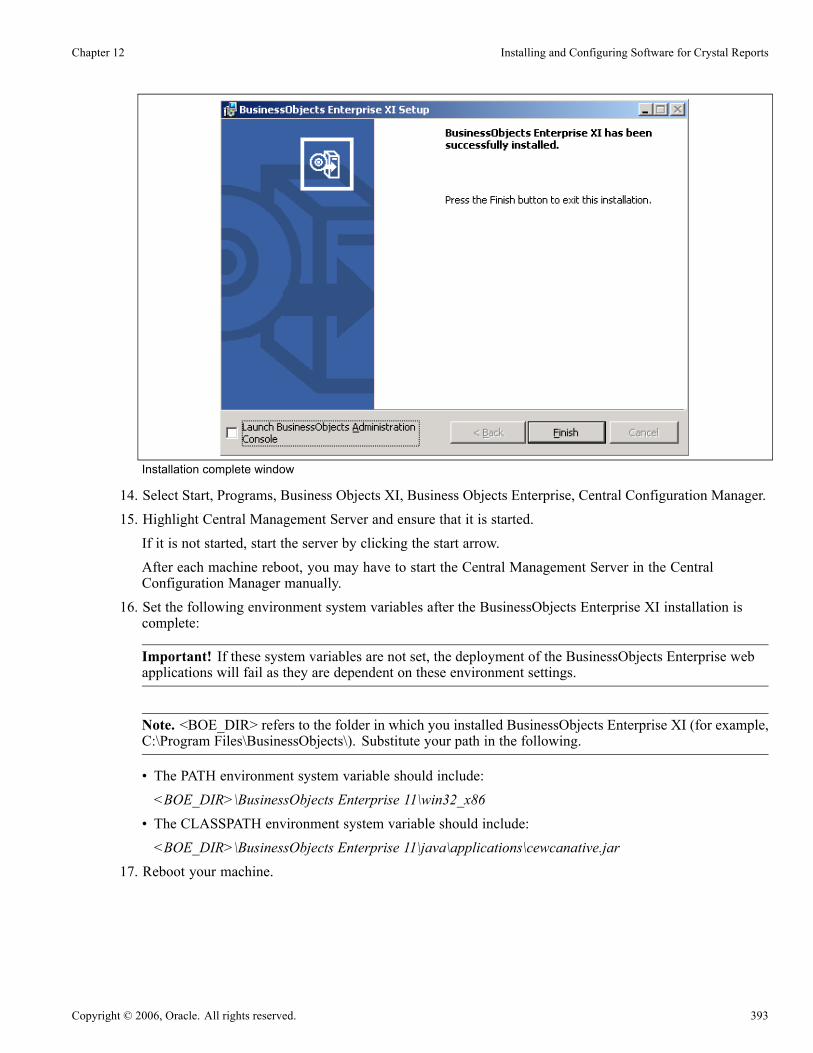
Chapter 12 Installing and Configuring Software for Crystal Reports
Installation complete window
14. Select Start, Programs, Business Objects XI, Business Objects Enterprise, Central Configuration Manager.15. Highlight Central Management Server and ensure that it is started.If it is not started, start the server by clicking the start arrow.After each machine reboot, you may have to start the Central Management Server in the CentralConfiguration Manager manually.
16. Set the following environment system variables after the BusinessObjects Enterprise XI installation iscomplete:
Important! If these system variables are not set, the deployment of the BusinessObjects Enterprise webapplications will fail as they are dependent on these environment settings.
Note. <BOE_DIR> refers to the folder in which you installed BusinessObjects Enterprise XI (for example,C:\Program Files\BusinessObjects\). Substitute your path in the following.
• The PATH environment system variable should include:<BOE_DIR>\BusinessObjects Enterprise 11\win32_x86
• The CLASSPATH environment system variable should include:<BOE_DIR>\BusinessObjects Enterprise 11\java\applications\cewcanative.jar
17. Reboot your machine.
Copyright © 2006, Oracle. All rights reserved. 393
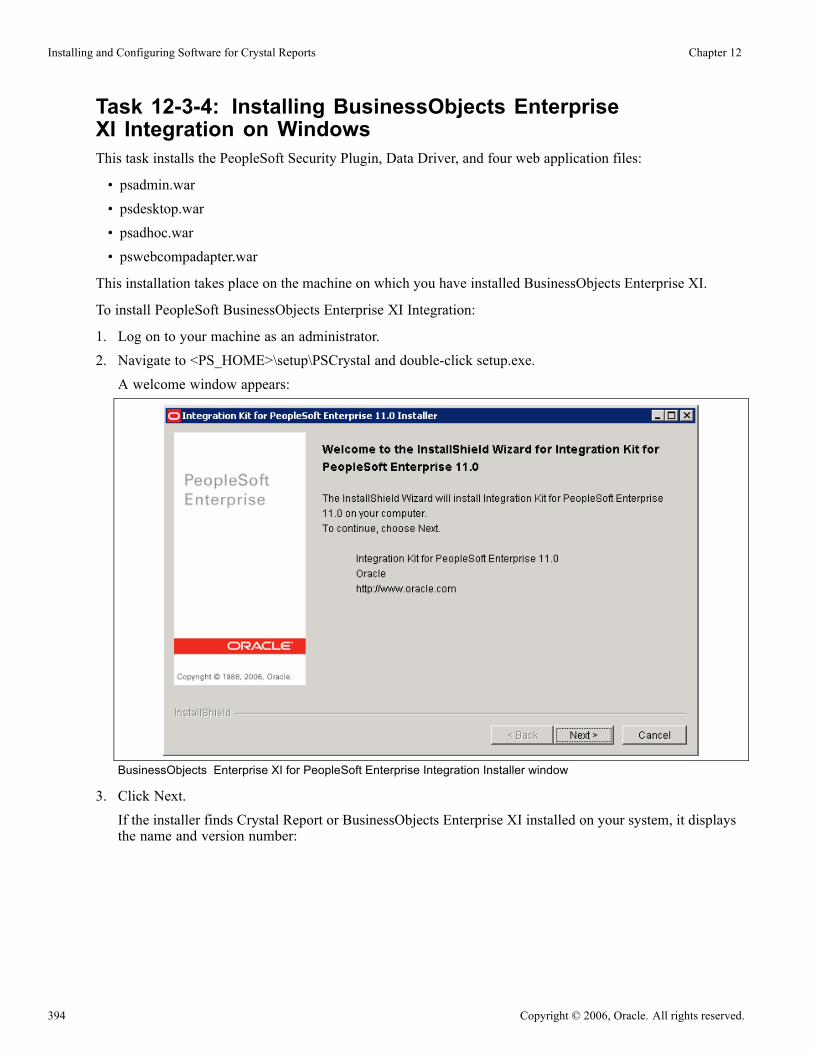
Installing and Configuring Software for Crystal Reports Chapter 12
Task 12-3-4: Installing BusinessObjects EnterpriseXI Integration on WindowsThis task installs the PeopleSoft Security Plugin, Data Driver, and four web application files:
• psadmin.war• psdesktop.war• psadhoc.war• pswebcompadapter.war
This installation takes place on the machine on which you have installed BusinessObjects Enterprise XI.
To install PeopleSoft BusinessObjects Enterprise XI Integration:
1. Log on to your machine as an administrator.2. Navigate to <PS_HOME>\setup\PSCrystal and double-click setup.exe.A welcome window appears:
BusinessObjects Enterprise XI for PeopleSoft Enterprise Integration Installer window
3. Click Next.If the installer finds Crystal Report or BusinessObjects Enterprise XI installed on your system, it displaysthe name and version number:
394 Copyright © 2006, Oracle. All rights reserved.

Chapter 12 Installing and Configuring Software for Crystal Reports
Confirming BusinessObjects Products
Note. If the installer cannot find Crystal Reports or BusinessObjects Enterprise XI on your system, itdisplays an error message. You must exit and install one of these products to continue.
4. Accept the default installation directory on the next window, or click Browse to find another installationdirectory:
Selecting installation directory for BusinessObjects Enterprise XI Integration
Copyright © 2006, Oracle. All rights reserved. 395
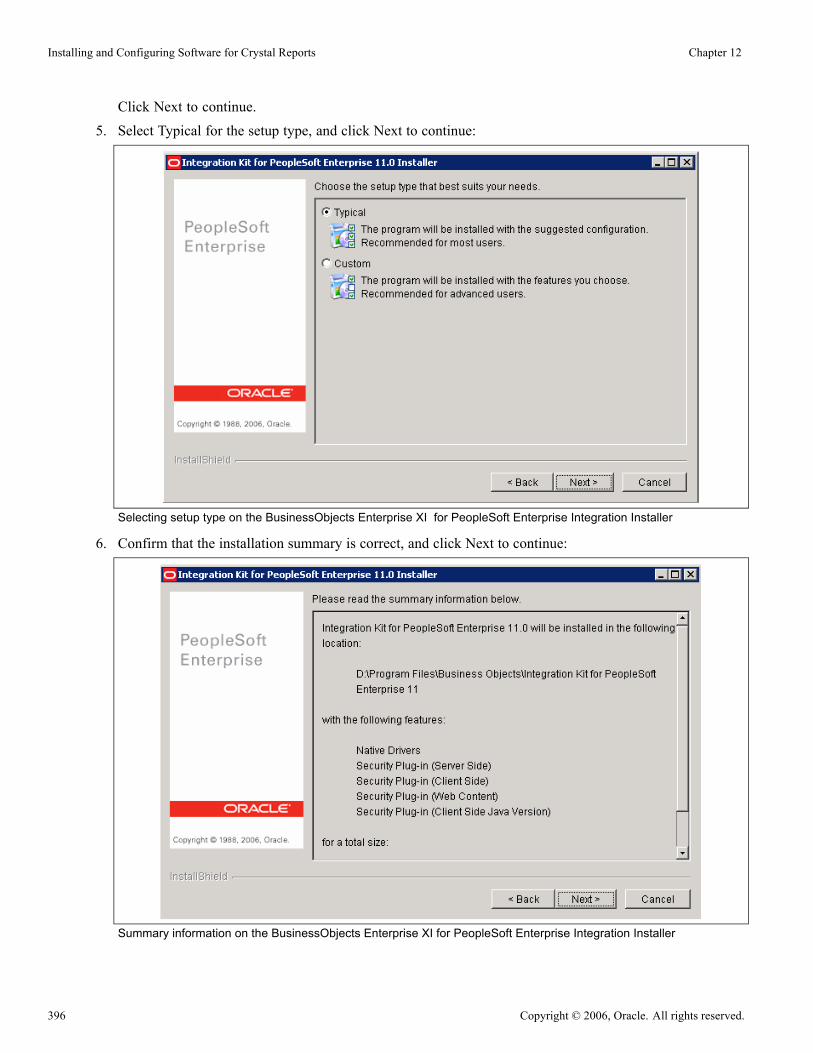
Installing and Configuring Software for Crystal Reports Chapter 12
Click Next to continue.5. Select Typical for the setup type, and click Next to continue:
Selecting setup type on the BusinessObjects Enterprise XI for PeopleSoft Enterprise Integration Installer
6. Confirm that the installation summary is correct, and click Next to continue:
Summary information on the BusinessObjects Enterprise XI for PeopleSoft Enterprise Integration Installer
396 Copyright © 2006, Oracle. All rights reserved.

Chapter 12 Installing and Configuring Software for Crystal Reports
7. Click Next.An indicator shows the progress of your installation.
8. Click Finish to complete the installation:
Completion message on the BusinessObjects Enterprise XI for PeopleSoft Enterprise Integration Installer window
Task 12-3-5: Installing Patches Required at Installation TimeThere may be patches for BusinessObjects Enterprise XI as well as the PeopleSoft Integration forBusinessObjects Enterprise XI that must be installed at installation.
Log onto Customer Connection to check using the Required for Install or Upgrade search page. You cansearch using the following criteria:
Product Line PeopleTools
Product PeopleTools
Release the release of PeopleTools that you are using
Task 12-3-6: Creating a Web Server for BusinessObjectsEnterprise XI on WindowsThis section discusses:
• Creating an Oracle Application Server (OAS) Server on Windows
• Deploying the BusinessObjects Enterprise XI Launchpad Applications for OAS on Windows
• Creating a WebLogic Server on Windows
• Deploying the BusinessObjects Enterprise XI Launchpad Applications for WebLogic on Windows
Copyright © 2006, Oracle. All rights reserved. 397

Installing and Configuring Software for Crystal Reports Chapter 12
• Creating a WebSphere Server on Windows
• Deploying the BusinessObjects Enterprise XI Launchpad Applications for WebSphere on Windows
Creating an Oracle Application Server (OAS) Server on WindowsBefore beginning this procedure you must have installed OAS on the server where BusinessObjects EnterpriseXI is installed.
1. Change the deployment values for the Java WCA, if you are using Oracle 10g server.a. Stop java application server.
Note. To stop OAS, use the command <OAS_HOME>\opmn\bin\opmnctl stopall.
b. Extract web.xml from pswebcompadapter.war using a tool such as WinZip.
The default location for pswebcompadapter.war is C:\Program Files\Business Objects\BusinessObjectsEnterprise 11\java\applications.
c. Open web.xml with a text editor.
d. Change “false” to “true” in the following entry:
<!-- if you are using oracle10g, turn this flag to true -->
<context-param>
<param-name>was.oracle</param-name>
<param-value>false</param-value>
<description>Reserved.</description>
</context-param>
e. Save web.xml and reinsert into WEB-INF in pswebcompadapter.war.
Note. Tip: To insert web.xml to WEB-INF using WinZip. Open WinZip. From the Option menu, selectConfiguration. In the View tab of the Configuration dialog box, ensure that the “Allow all upper casefile names” check box is selected. Return to your file directory, right-click the WEB-INF directory thatcontains your edited web.xml file and select Add to Zip File. Adding the file in this way ensures that it isplaced in the correct directory inside the archive.
2. Open a browser window and enter the following URL to verify that the OAS server is running correctly:
http://<machine_name>:<port>
where <machine name> is the name of the machine on which OAS is installed and <port> is the OAS portnumber (1810 is the default).
Enter the administrator user name (ias_admin is the default) and the password that was set during the install.
398 Copyright © 2006, Oracle. All rights reserved.

Chapter 12 Installing and Configuring Software for Crystal Reports
OAS login dialog box
3. Click on the Start button to launch the server “home”.4. Click OK after you receive a message that server has been started.5. Select the Administration tab.
Administration tab
6. Configure the class path:
Class Paths page
a. Click Global Web Module.b. Click the General link under Properties.c. Click Add Another Row in the Class Paths section.
Copyright © 2006, Oracle. All rights reserved. 399
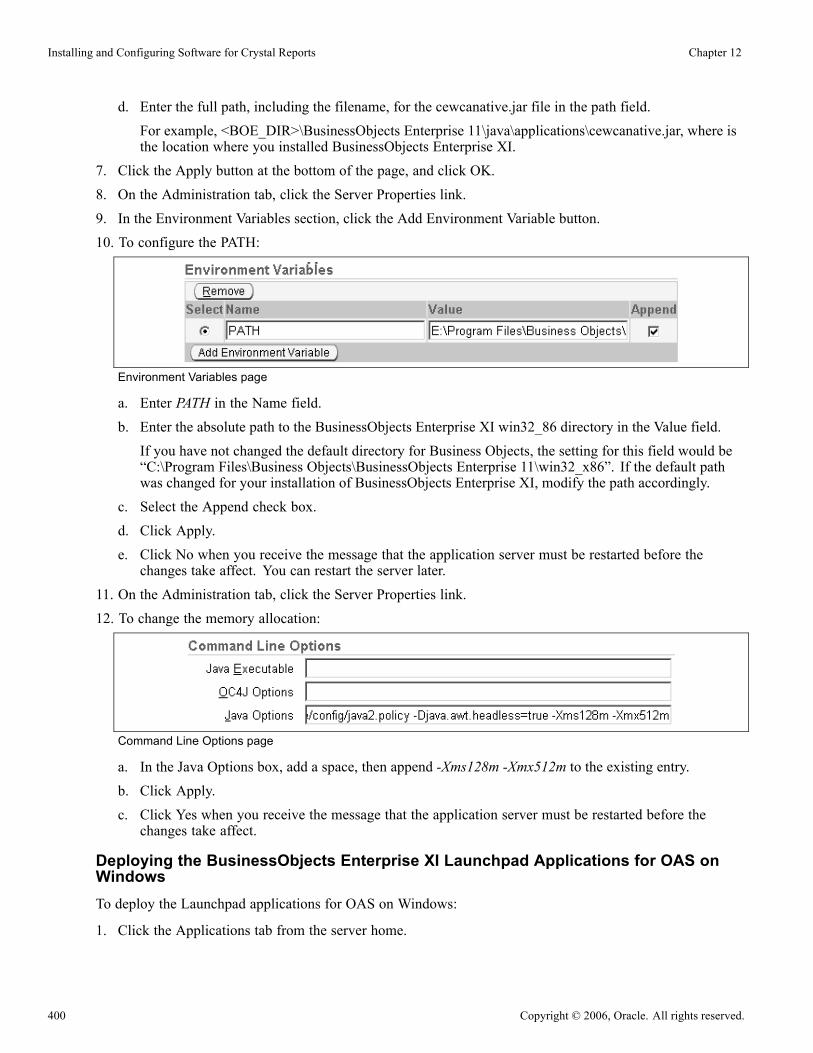
Installing and Configuring Software for Crystal Reports Chapter 12
d. Enter the full path, including the filename, for the cewcanative.jar file in the path field.For example, <BOE_DIR>\BusinessObjects Enterprise 11\java\applications\cewcanative.jar, where isthe location where you installed BusinessObjects Enterprise XI.
7. Click the Apply button at the bottom of the page, and click OK.8. On the Administration tab, click the Server Properties link.9. In the Environment Variables section, click the Add Environment Variable button.10. To configure the PATH:
Environment Variables page
a. Enter PATH in the Name field.b. Enter the absolute path to the BusinessObjects Enterprise XI win32_86 directory in the Value field.If you have not changed the default directory for Business Objects, the setting for this field would be“C:\Program Files\Business Objects\BusinessObjects Enterprise 11\win32_x86”. If the default pathwas changed for your installation of BusinessObjects Enterprise XI, modify the path accordingly.
c. Select the Append check box.d. Click Apply.e. Click No when you receive the message that the application server must be restarted before thechanges take affect. You can restart the server later.
11. On the Administration tab, click the Server Properties link.12. To change the memory allocation:
Command Line Options page
a. In the Java Options box, add a space, then append -Xms128m -Xmx512m to the existing entry.
b. Click Apply.
c. Click Yes when you receive the message that the application server must be restarted before thechanges take affect.
Deploying the BusinessObjects Enterprise XI Launchpad Applications for OAS onWindowsTo deploy the Launchpad applications for OAS on Windows:
1. Click the Applications tab from the server home.
400 Copyright © 2006, Oracle. All rights reserved.
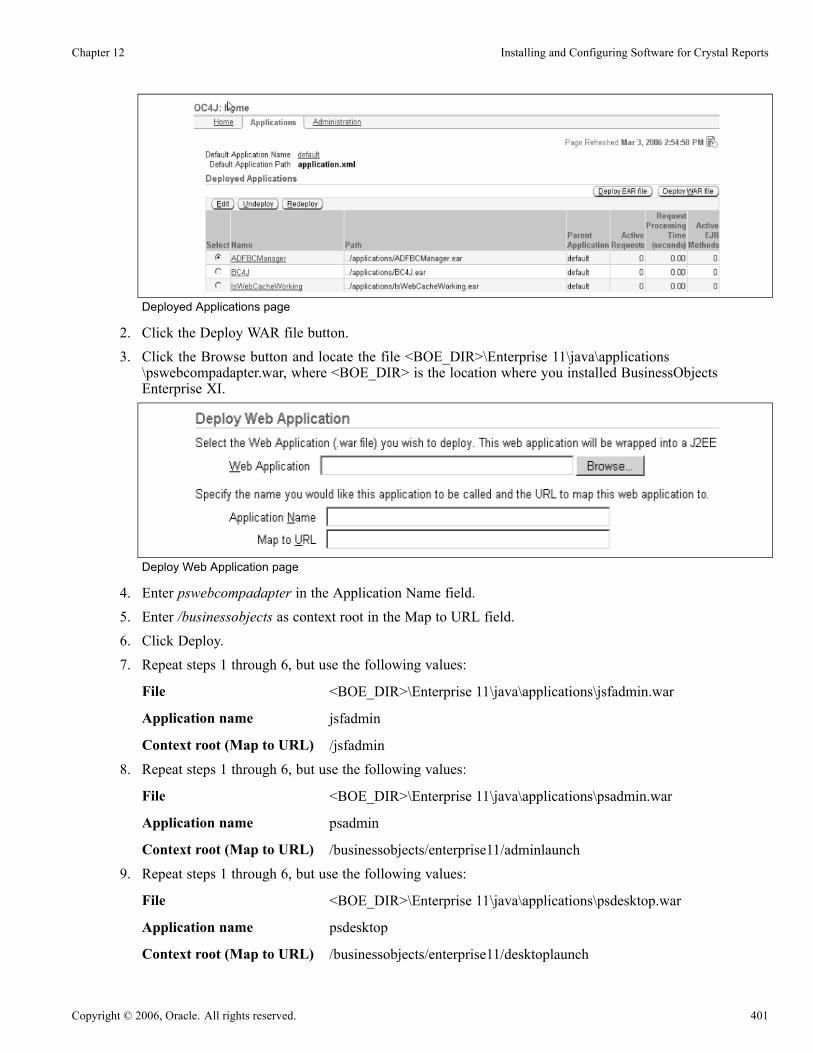
Chapter 12 Installing and Configuring Software for Crystal Reports
Deployed Applications page
2. Click the Deploy WAR file button.3. Click the Browse button and locate the file <BOE_DIR>\Enterprise 11\java\applications\pswebcompadapter.war, where <BOE_DIR> is the location where you installed BusinessObjectsEnterprise XI.
Deploy Web Application page
4. Enter pswebcompadapter in the Application Name field.5. Enter /businessobjects as context root in the Map to URL field.6. Click Deploy.7. Repeat steps 1 through 6, but use the following values:
File <BOE_DIR>\Enterprise 11\java\applications\jsfadmin.war
Application name jsfadmin
Context root (Map to URL) /jsfadmin8. Repeat steps 1 through 6, but use the following values:
File <BOE_DIR>\Enterprise 11\java\applications\psadmin.war
Application name psadmin
Context root (Map to URL) /businessobjects/enterprise11/adminlaunch9. Repeat steps 1 through 6, but use the following values:
File <BOE_DIR>\Enterprise 11\java\applications\psdesktop.war
Application name psdesktop
Context root (Map to URL) /businessobjects/enterprise11/desktoplaunch
Copyright © 2006, Oracle. All rights reserved. 401
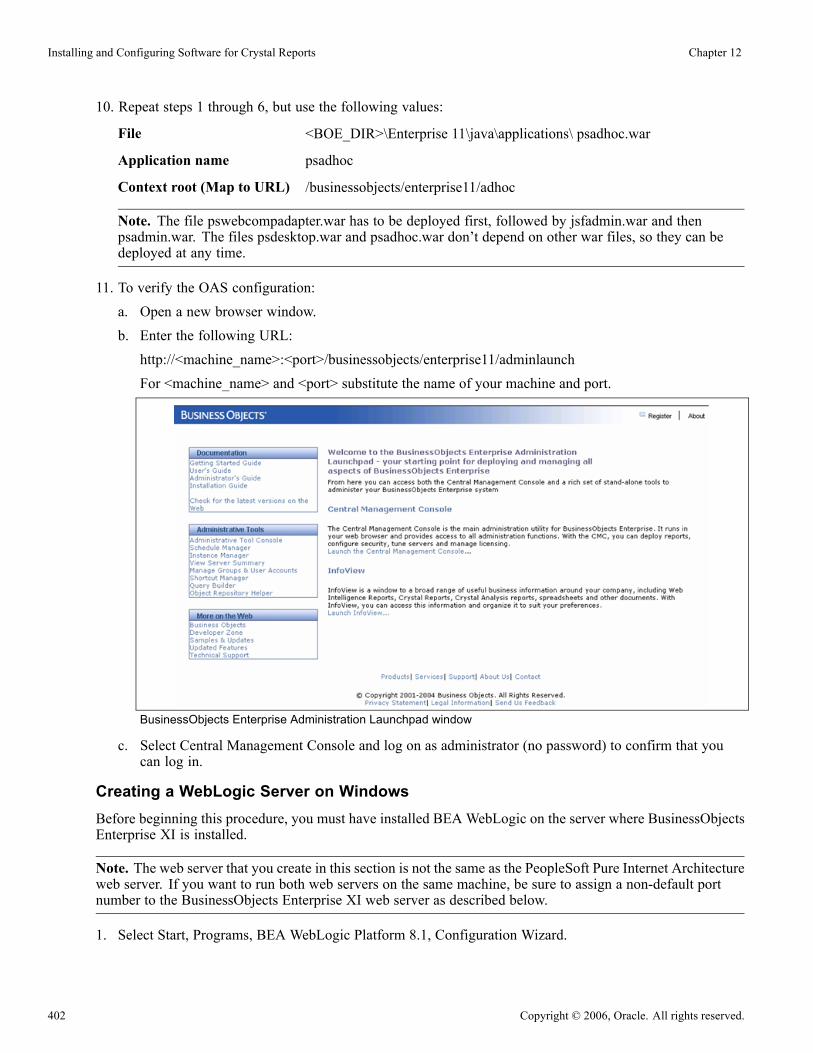
Installing and Configuring Software for Crystal Reports Chapter 12
10. Repeat steps 1 through 6, but use the following values:
File <BOE_DIR>\Enterprise 11\java\applications\ psadhoc.war
Application name psadhoc
Context root (Map to URL) /businessobjects/enterprise11/adhoc
Note. The file pswebcompadapter.war has to be deployed first, followed by jsfadmin.war and thenpsadmin.war. The files psdesktop.war and psadhoc.war don’t depend on other war files, so they can bedeployed at any time.
11. To verify the OAS configuration:a. Open a new browser window.b. Enter the following URL:http://<machine_name>:<port>/businessobjects/enterprise11/adminlaunchFor <machine_name> and <port> substitute the name of your machine and port.
BusinessObjects Enterprise Administration Launchpad window
c. Select Central Management Console and log on as administrator (no password) to confirm that youcan log in.
Creating a WebLogic Server on WindowsBefore beginning this procedure, you must have installed BEA WebLogic on the server where BusinessObjectsEnterprise XI is installed.
Note. The web server that you create in this section is not the same as the PeopleSoft Pure Internet Architectureweb server. If you want to run both web servers on the same machine, be sure to assign a non-default portnumber to the BusinessObjects Enterprise XI web server as described below.
1. Select Start, Programs, BEA WebLogic Platform 8.1, Configuration Wizard.
402 Copyright © 2006, Oracle. All rights reserved.

Chapter 12 Installing and Configuring Software for Crystal Reports
2. Verify that Create a new Weblogic configuration is selected and click Next.The Select a Configuration Template window appears.
3. Verify that Basic WebLogic Server Domain is highlighted and click Next.4. Verify that the Express radio button is selected and click Next.5. Accept the default user name, enter a password, confirm the password, and click Next.For testing, “password” is often used as the password.
Configure Administrative Username and Password window
The Configure Server Start Mode and Java SDK window appears.6. Accept the defaults and click Next.7. Enter a meaningful Configuration Name, such as BOE, and click Create.A progress indicator appears.
Copyright © 2006, Oracle. All rights reserved. 403
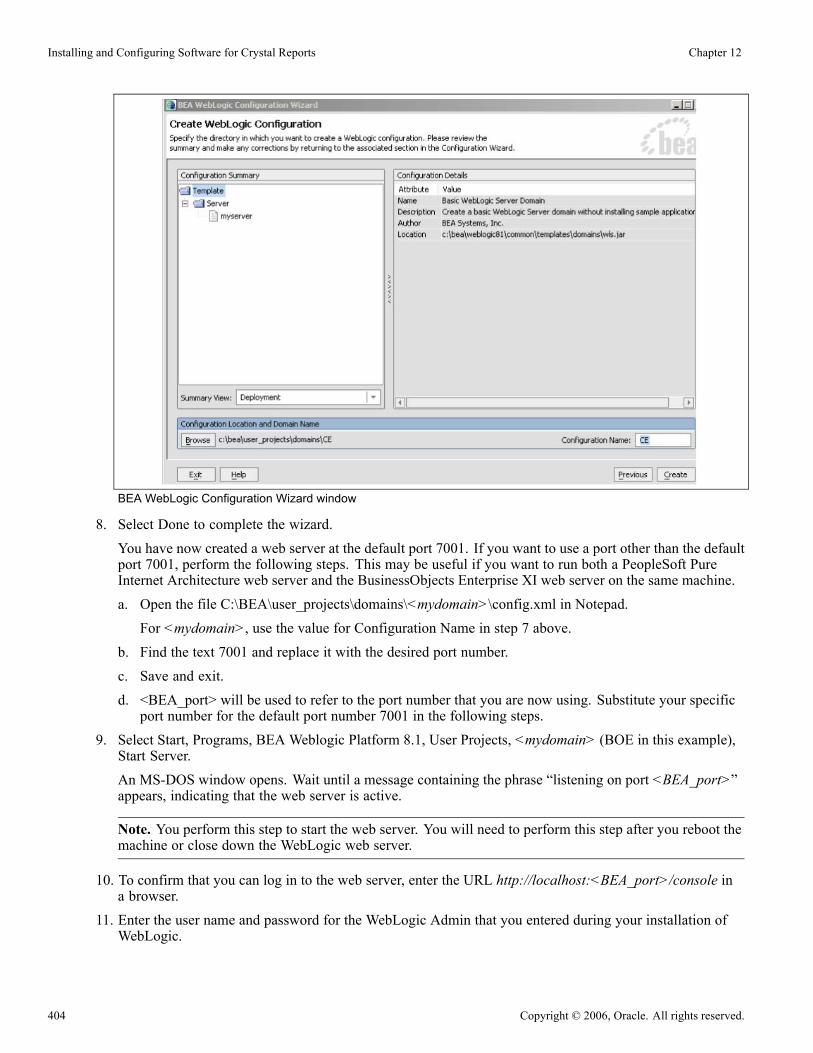
Installing and Configuring Software for Crystal Reports Chapter 12
BEA WebLogic Configuration Wizard window
8. Select Done to complete the wizard.
You have now created a web server at the default port 7001. If you want to use a port other than the defaultport 7001, perform the following steps. This may be useful if you want to run both a PeopleSoft PureInternet Architecture web server and the BusinessObjects Enterprise XI web server on the same machine.
a. Open the file C:\BEA\user_projects\domains\<mydomain>\config.xml in Notepad.
For <mydomain>, use the value for Configuration Name in step 7 above.
b. Find the text 7001 and replace it with the desired port number.
c. Save and exit.
d. <BEA_port> will be used to refer to the port number that you are now using. Substitute your specificport number for the default port number 7001 in the following steps.
9. Select Start, Programs, BEA Weblogic Platform 8.1, User Projects, <mydomain> (BOE in this example),Start Server.
An MS-DOS window opens. Wait until a message containing the phrase “listening on port <BEA_port>”appears, indicating that the web server is active.
Note. You perform this step to start the web server. You will need to perform this step after you reboot themachine or close down the WebLogic web server.
10. To confirm that you can log in to the web server, enter the URL http://localhost:<BEA_port>/console ina browser.
11. Enter the user name and password for the WebLogic Admin that you entered during your installation ofWebLogic.
404 Copyright © 2006, Oracle. All rights reserved.

Chapter 12 Installing and Configuring Software for Crystal Reports
Click the Sign In button.
WebLogic Server sign in
Deploying the BusinessObjects Enterprise XI Launchpad Applications for WebLogicon WindowsThis procedure assumes that you have logged into the WebLogic web server in a browser.
1. Select the Web Application Modules link.
BEA WebLogic Server home
Copyright © 2006, Oracle. All rights reserved. 405

Installing and Configuring Software for Crystal Reports Chapter 12
2. Select Deploy a new Web Application.
Web Applications window
3. Navigate to <BOE_DIR>\Enterprise 11\java\applications, where <BOE_DIR> is the location where youinstalled BusinessObjects Enterprise XI.
4. Select the psadmin.war radio button and click the Target Module button.This deploys the Administrator Launchpad application.
Deploy a Web Application Module window
5. Accept the defaults on the confirmation window and click Deploy.The process is complete when the status is shown as “Success.”
406 Copyright © 2006, Oracle. All rights reserved.

Chapter 12 Installing and Configuring Software for Crystal Reports
Deploy tab on the Web Applications window
6. Select Home to return to the WebLogic web server home page.7. Repeat steps 1 through 6, but in step 3, select the psdesktop.war radio button to deploy the User Launchpadapplication.
8. Repeat steps 1 through 6, but in step 3, select the pswebcompadapter.war radio button to deploy thepswebcompadapter.war application.
9. Repeat steps 1 through 6, but in step 3, select the psadhoc.war radio button to deploy the Crystal ReportsExplorer application.
10. Repeat steps 1 through 6, but in step 3, select the jfsadmin.war radio button to deploy the Crystal ReportsExplorer application.
11. Select Home to return to the WebLogic web server home page.12. To test the installation, stop and start the web server:a. To stop the server, navigate to C:\BEA\user_projects\domains\<mydomain>, where <mydomain> isthe name you entered in the task Creating a WebLogic Server, and double-click stopWebLogic.cmd.
b. To start the server, navigate to C:\BEA\user_projects\domains\<mydomain>, and double-clickstartWebLogic.cmd.
13. In a new browser window, enter the following URL:http://<machine_name>:<port>/businessobjects/enterprise11/adminlaunch/.
Copyright © 2006, Oracle. All rights reserved. 407

Installing and Configuring Software for Crystal Reports Chapter 12
BusinessObjects Enterprise Administration Launchpad window
Creating a WebSphere Server on WindowsBefore beginning this procedure, you must have installed IBMWebSphere on the server where BusinessObjectsEnterprise XI is installed.
1. Select Start, Programs, IBM WebSphere, Application Server 5.1, Start the Server.Wait until the server finishes starting.
2. Select Start, Programs, IBM WebSphere, Application Server 5.1, Administrative Console.3. Enter admin as the User ID and select OK.
WebSphere Application Server login window
4. Expand the Environment node and select the Shared Libraries link:
408 Copyright © 2006, Oracle. All rights reserved.
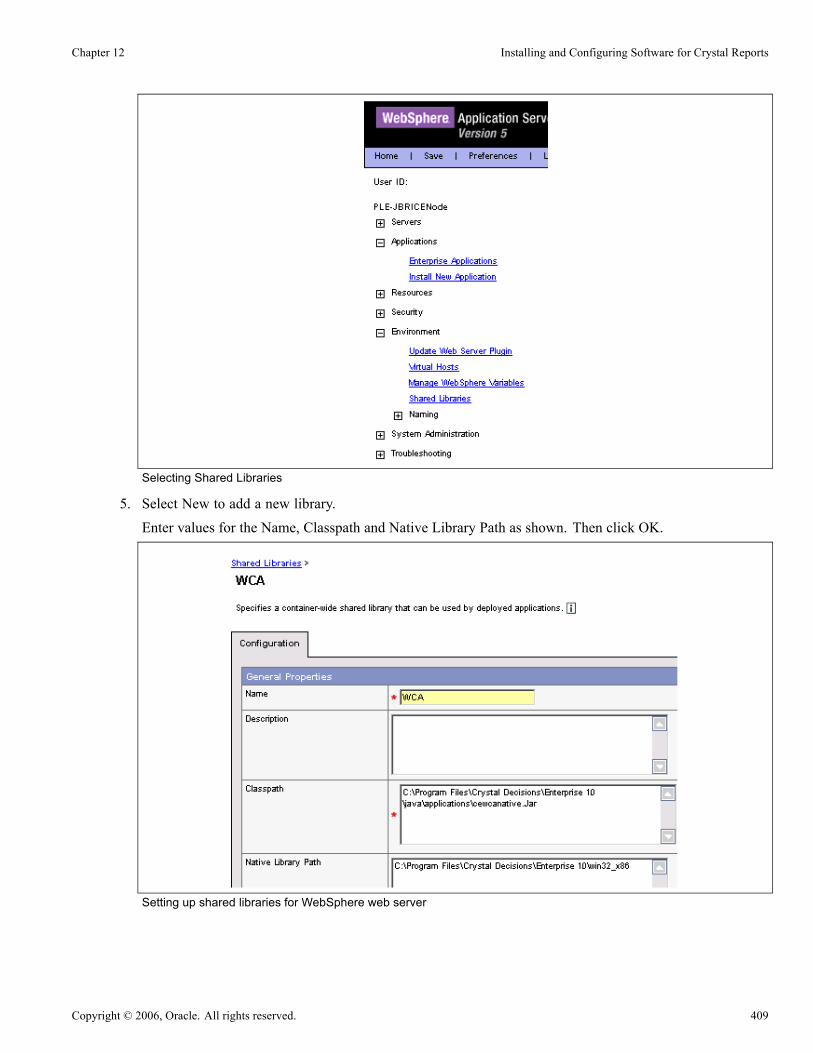
Chapter 12 Installing and Configuring Software for Crystal Reports
Selecting Shared Libraries
5. Select New to add a new library.Enter values for the Name, Classpath and Native Library Path as shown. Then click OK.
Setting up shared libraries for WebSphere web server
Copyright © 2006, Oracle. All rights reserved. 409
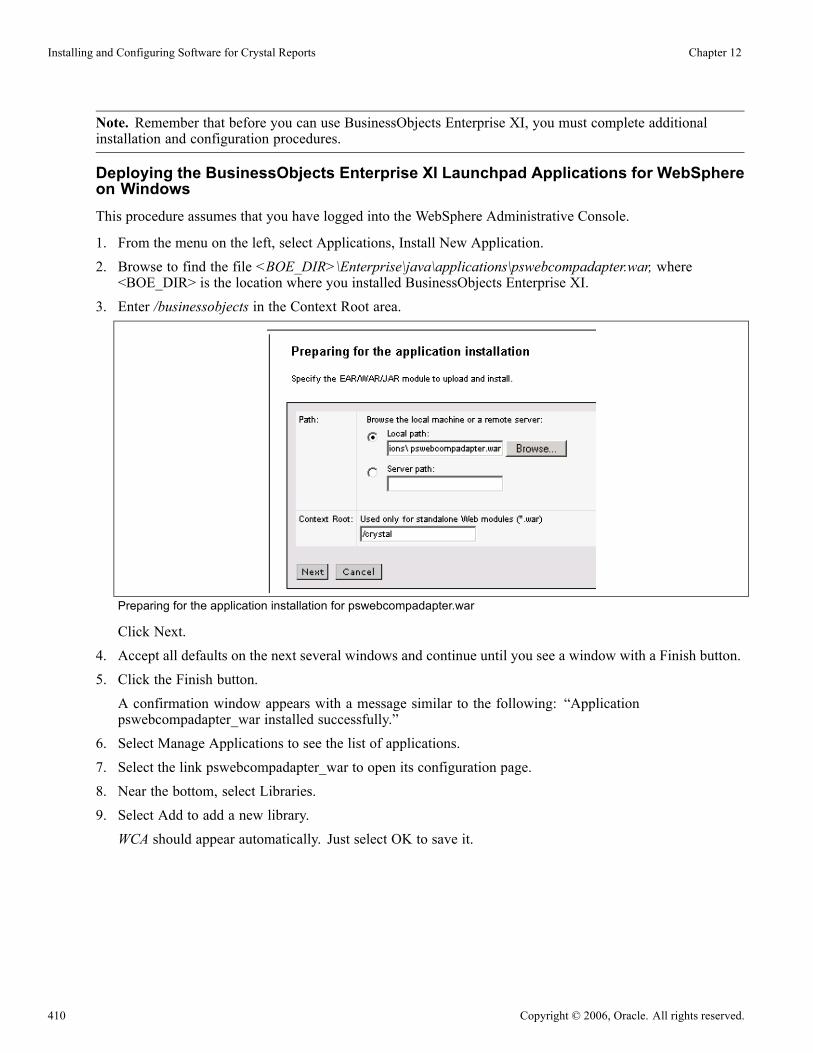
Installing and Configuring Software for Crystal Reports Chapter 12
Note. Remember that before you can use BusinessObjects Enterprise XI, you must complete additionalinstallation and configuration procedures.
Deploying the BusinessObjects Enterprise XI Launchpad Applications for WebSphereon WindowsThis procedure assumes that you have logged into the WebSphere Administrative Console.
1. From the menu on the left, select Applications, Install New Application.2. Browse to find the file <BOE_DIR>\Enterprise\java\applications\pswebcompadapter.war, where<BOE_DIR> is the location where you installed BusinessObjects Enterprise XI.
3. Enter /businessobjects in the Context Root area.
Preparing for the application installation for pswebcompadapter.war
Click Next.4. Accept all defaults on the next several windows and continue until you see a window with a Finish button.5. Click the Finish button.A confirmation window appears with a message similar to the following: “Applicationpswebcompadapter_war installed successfully.”
6. Select Manage Applications to see the list of applications.7. Select the link pswebcompadapter_war to open its configuration page.8. Near the bottom, select Libraries.9. Select Add to add a new library.WCA should appear automatically. Just select OK to save it.
410 Copyright © 2006, Oracle. All rights reserved.

Chapter 12 Installing and Configuring Software for Crystal Reports
Adding a new shared library
10. Repeat steps 2 through 9, but use these parameters:
File <BOE_DIR>\Enterprise\java\applications\psadmin.war
Context Root /businessobjects/enterprise11/adminlaunch11. Repeat steps 2 through 9 with these parameters:
File <BOE_DIR>\Enterprise\java\applications\psdesktop.war
Context Root /businessobjects/enterprise11/desktoplaunch12. Repeat steps 2 through 9 with these parameters:
File <BOE_DIR>\Enterprise\java\applications\psadhoc.war
Context Root /adhoc13. Repeat steps 2 through 9 with these parameters:
File <BOE_DIR>\Enterprise\java\applications\jfsadmin.war
Context Root /jfsadmin14. Select the link Save to permanently save all changes.
Saving changes on WebSphere Administrative Console
15. Click the Save button on the confirmation window and wait for the changes to be saved.
Copyright © 2006, Oracle. All rights reserved. 411

Installing and Configuring Software for Crystal Reports Chapter 12
Saving changes on the Master Configuration window
To stop the server, select Start, Programs, IBM WebSphere, Application Server 5.1, Stop the Server.16. To restart the server, select Start, Programs, IBM WebSphere, Application Server 5.1, Start the Server.17. In a new browser window, enter the following URL for the admin launchpad (where <machine_name> isthe computer name):http://<machine_name>:9080/businessobjects/enterprise11/adminlaunch/
BusinessObjects Enterprise Administration Launchpad window
18. Select the Central Management Console link and enter administrator (no password) to confirm thatyou can log in.
412 Copyright © 2006, Oracle. All rights reserved.
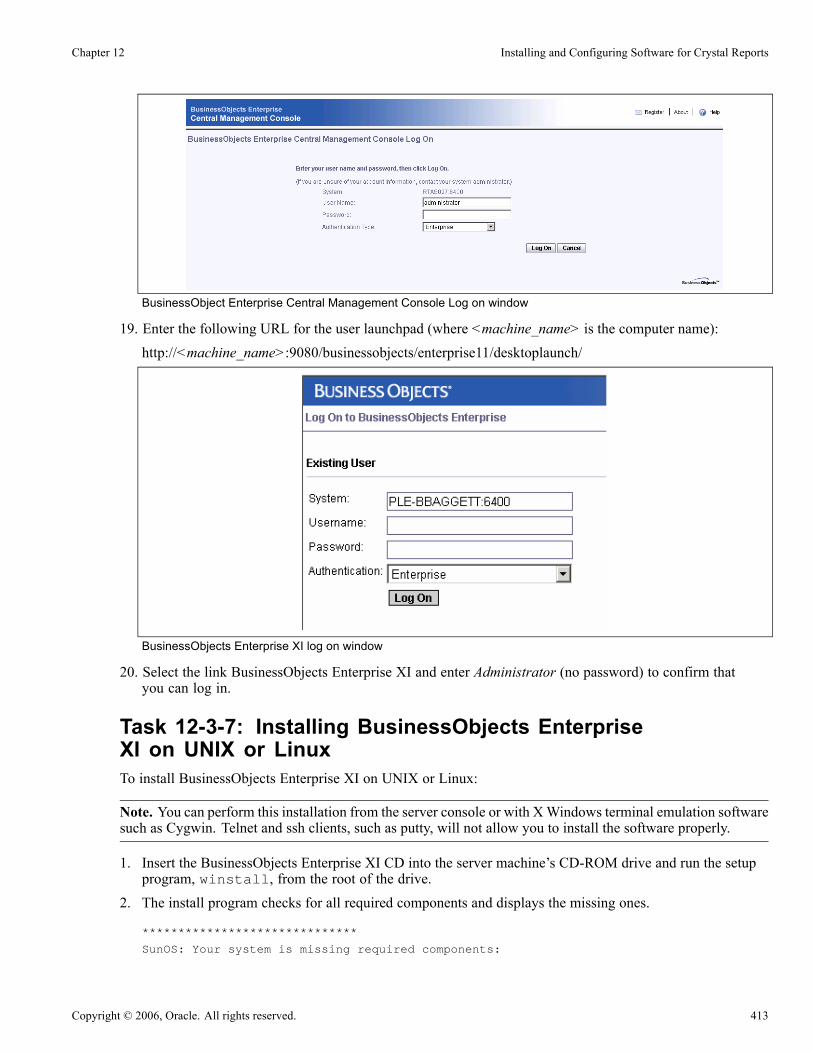
Chapter 12 Installing and Configuring Software for Crystal Reports
BusinessObject Enterprise Central Management Console Log on window
19. Enter the following URL for the user launchpad (where <machine_name> is the computer name):http://<machine_name>:9080/businessobjects/enterprise11/desktoplaunch/
BusinessObjects Enterprise XI log on window
20. Select the link BusinessObjects Enterprise XI and enter Administrator (no password) to confirm thatyou can log in.
Task 12-3-7: Installing BusinessObjects EnterpriseXI on UNIX or LinuxTo install BusinessObjects Enterprise XI on UNIX or Linux:
Note. You can perform this installation from the server console or with XWindows terminal emulation softwaresuch as Cygwin. Telnet and ssh clients, such as putty, will not allow you to install the software properly.
1. Insert the BusinessObjects Enterprise XI CD into the server machine’s CD-ROM drive and run the setupprogram, winstall, from the root of the drive.
2. The install program checks for all required components and displays the missing ones.
******************************
SunOS: Your system is missing required components:
Copyright © 2006, Oracle. All rights reserved. 413

Installing and Configuring Software for Crystal Reports Chapter 12
******************************
Missing package: SUNWeu8os (American English/UTF-8 L10N For OS Environment User⇒Files)
Missing package: SUNWeuluf (UTF-8 L10N For Language Environment User Files)
If you continue your installation may not work correctly.
Please press Enter to continue...
Ensure all missing components are installed before proceeding.3. Select the language that you want to install.
BusinessObjects Enterprise XI Setup
Please select the current language for the installation
1 - Dutch
2 - English
3 - French
4 - German
5 - Italian
6 - Japanese
7 - Korean
8 - Simplified Chinese
9 - Spanish
10 - Traditional Chinese
4. Select New Installation.5. Read and accept the license agreement.6. At the Installation Directory prompt, enter your own path for the installation directory, or press Enter toaccept the default one, which is your current directory.
7. Choose User Install at the Install Option prompt.8. Select New for the Installation Type.9. The next page prompts you to choose between using an existing database as CMS repository, or installingMySQL as the default repository. Select Use an existing database and press Enter.
Note. MySQL is not supported in the PeopleSoft integration with BusinessObjects Enterprise XI.
10. Choose the type of database (Oracle, DB2 or Sybase) from the list and press Enter.If prompted, provide the location and connection information for the database, and press Enter.If prompted “Overwrite existing configuration?”, reply Y.If prompted “Re-initialize database?”, reply Y.
11. Select Use an existing Java application server and press Enter.You will need to configure your web application server after the installation is complete.
12. The final page of the setup program displays the installation directory. Press Enter to complete theinstallation.
414 Copyright © 2006, Oracle. All rights reserved.

Chapter 12 Installing and Configuring Software for Crystal Reports
BusinessObjects Enterprise XI Setup
Operation CompletePress [Enter] to go to the⇒next screen
Business Objects products have been successfully installed :
/ds2/home/bobje/install
Please read installation guide for information on how to manually configure⇒your java application server
13. You must manually set the following environment variables after BusinessObjects Enterprise XI isinstalled. Then run env.sh, so that the updated environment variables take effect
export CLASSPATH=$CLASSPATH:/$bobje_home/bobje/enterprise11/java/applications⇒/cewcanative.jar
export PATH= /$bobje_home /bobje/enterprise11/solaris_sparc:$PATH
cd /$bobje_home /bobje/setup
. ./env.sh
Important! If these system variables are not set, the deployment of BusinessObjects Enterprise XI webapplications will fail as they are dependent on these environment settings.
The ccm.sh script provides you with a command-line interface to the various BusinessObjects Enterprise XIserver components. The installation setup program starts and enables servers automatically. The followinginformation is included for reference.
Action Command
Go to bobje directory that was created by the installation cd <BOE_DIR>/bobje
Note. The commands below are run from this directory.
Start all BusinessObjects Enterprise XI servers as daemons ./ccm.sh –start all
Enable all BusinessObjects Enterprise XI servers usingdefault ports
./ccm.sh –enable all
Stop all BusinessObjects Enterprise XI servers ./ccm.sh –stop all
View the help on ccm.sh ./ccm.sh –help | more
This completes the installation of BusinessObjects Enterprise XI on UNIX or Linux.
Task 12-3-8: Installing PeopleSoft BusinessObjectsEnterprise XI Integration on UNIX or LinuxThis task installs the PeopleSoft Security Plugin, Data Driver, and four web application files:
• psadmin.war
Copyright © 2006, Oracle. All rights reserved. 415

Installing and Configuring Software for Crystal Reports Chapter 12
• psdesktop.war• psadhoc.war• pswebcompadapter.war
To install BusinessObjects Enterprise XI Integration in console mode:
Note. The console mode installation is typically used on UNIX platforms.
1. Enter the following commands, where <PS_HOME> is the main PeopleSoft directory, and <OS> isthe UNIX operating system:
Note. The notation at the beginning of the second line is “dot-space-dot,” not “dot-dot.”
cd <PS_HOME>
. ./psconfig.sh
cd setup/PSCrystal
setup.<OS> -console
See “Using the PeopleSoft Installer,” Starting the PeopleSoft Installer.You see the following message:Welcome to the InstallShield Wizard for BusinessObjects Enterprise for People⇒Soft Enterprise Integration
The InstallShield Wizard will install BusinessObjects Enterprise for PeopleSoft⇒Enterprise Integration on your computer.
To continue, choose Next.
BusinessObjects Enterprise for PeopleSoft Enterprise Integration
PeopleSoft, Inc
http://www.peoplesoft.com
Press 1 for Next, 3 to Cancel or 4 to Redisplay [1]
2. Enter 1 for Next to continue.
3. At the prompt:
Please enter the BusinessObjects Enterprise XI installation directory [/opt⇒/crystal] /home/jwong/BOE_AIX/enterprise
Press 1 for Next, 2 for Previous, 3 to Cancel or 4 to Redisplay [1]
Enter the directory where BusinessObjects Enterprise is installed and then enter 1.
4. At the prompt:
BusinessObjects Enterprise for PeopleSoft Enterprise Integration Install⇒Location
Please specify a directory or press Enter to accept the default directory.
Directory Name: [/home/BusinessObjects/enterprise/PeopleSoft_BOE]
416 Copyright © 2006, Oracle. All rights reserved.

Chapter 12 Installing and Configuring Software for Crystal Reports
Press 1 for Next, 2 for Previous, 3 to Cancel or 4 to Redisplay [1]
Accept the default location for the BusinessObjects Enterprise Integration installation by pressing ENTER,or enter a new location, then enter 1 to continue.
5. At the prompt, choose the Typical setup type:
Choose the setup type that best suits your needs.
[X] 1 - Typical
The program will be installed with the suggested configuration.
Recommended for most users.
[ ] 2 - Custom
The program will be installed with the features you choose.
Recommended for advanced users.
To select an item enter its number, or 0 when you are finished: [0]
Press 1 for Next, 2 for Previous, 3 to Cancel or 4 to Redisplay [1]
Press ENTER twice to accept the default, Typical installation, and continue.6. Confirm that the installation summary is correct:
BusinessObjects Enterprise for PeopleSoft Enterprise Integration will be⇒installed in
the following location:
/home/BusinessObjects/enterprise/PeopleSoft_BOE
with the following features:
Native Drivers
Security Plug-in (Server Side)
Security Plug-in (Web Content)
Security Plug-in (Client Side Java Version)
for a total size:
15.8 MB
Press 1 for Next, 2 for Previous, 3 to Cancel or 4 to Redisplay [1]
Enter 1 to continue and begin the installation.7. You see a message showing the progress of the installation.8. When the installation is complete, you see the following message:
The InstallShield Wizard has successfully installed BusinessObjects Enterprise⇒for
PeopleSoft Enterprise Integration. Choose Finish to exit the wizard.
Copyright © 2006, Oracle. All rights reserved. 417

Installing and Configuring Software for Crystal Reports Chapter 12
Press 3 to Finish or 4 to Redisplay [3]
Enter 3 to finish and exit the installation.
Task 12-3-9: Installing Patches Required at InstallationThere may be patches for BusinessObjects Enterprise XI as well as the PeopleSoft Integration forBusinessObjects Enterprise XI that must be installed at installation.
Log onto Customer Connection to check using the Required for Install or Upgrade search page. You cansearch using the following criteria:
Product Line PeopleTools
Product PeopleTools
Release the release of PeopleTools that you are using
Task 12-3-10: Creating a Web Server for BusinessObjectsEnterprise on UNIX or LinuxThis section discusses:
• Creating an Oracle Application Server on UNIX or Linux
• Deploying the BusinessObjects Enterprise XI Launchpad Applications for OAS on UNIX or Linux
• Creating a WebLogic Server on UNIX or Linux
• Deploying the BusinessObjects Enterprise XI Launchpad Applications for WebLogic on UNIX or Linux
• Creating a WebSphere Server on UNIX or Linux
• Deploying the BusinessObjects Enterprise XI Launchpad Applications on WebSphere
Creating an Oracle Application Server on UNIX or LinuxBefore beginning this procedure you must have installed OAS on the server where BusinessObjects EnterpriseXI is installed. You must use the same user account to install OAS and BusinessObjects Enterprise XI.
To create an Oracle Application Server on UNIX or Linux:
1. Change the deployment values for the Java WCA, if you are using Oracle 10g server.a. Stop the java application server if it is running.
Note. To stop OAS, use the command <OAS_HOME>/opmn/bin/opmnctl stopall.
b. Extract web.xml from pswebcomadapter.war with the following command:
jar -xf pswebcomadapter.war WEB-INF/web.xml
The default location for pswebcompadapter.war is $bobje_home/bobje/enterprise11/java/applications.c. Open web.xml with a text editor.d. Change “false” to “true” in the following entry:
<!-- if you are using oracle10g, turn this flag to true -->
<context-param>
418 Copyright © 2006, Oracle. All rights reserved.
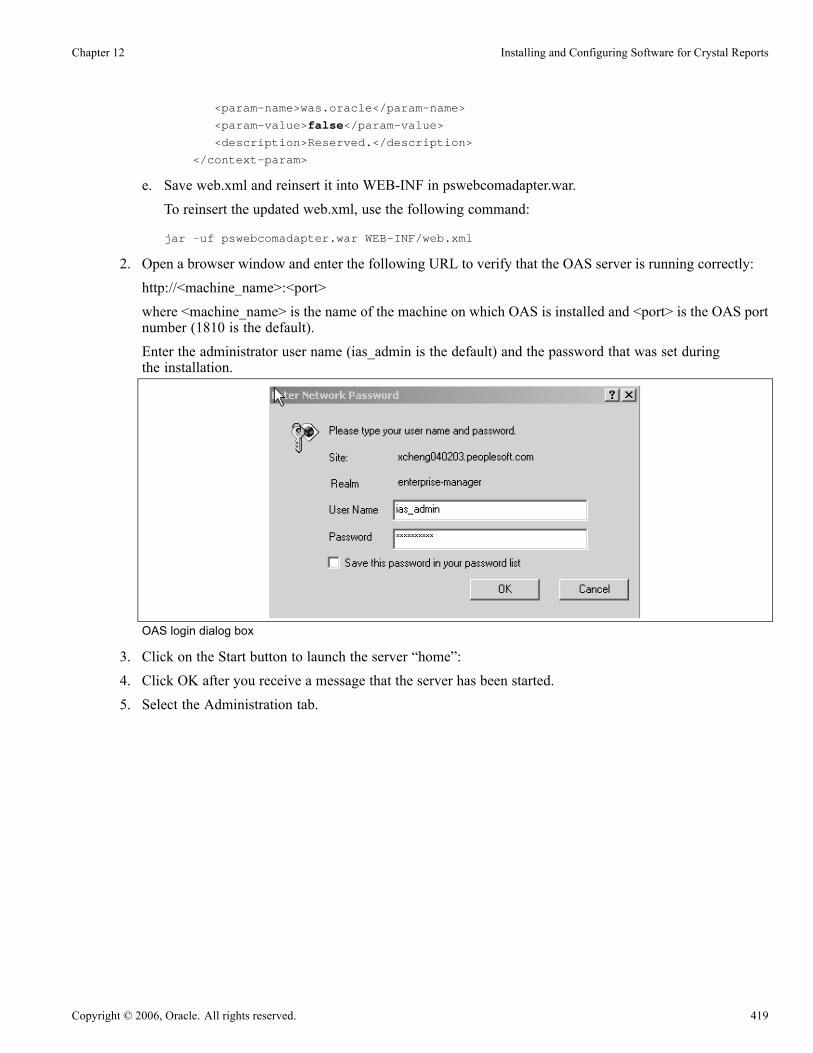
Chapter 12 Installing and Configuring Software for Crystal Reports
<param-name>was.oracle</param-name>
<param-value>false</param-value>
<description>Reserved.</description>
</context-param>
e. Save web.xml and reinsert it into WEB-INF in pswebcomadapter.war.
To reinsert the updated web.xml, use the following command:
jar -uf pswebcomadapter.war WEB-INF/web.xml
2. Open a browser window and enter the following URL to verify that the OAS server is running correctly:http://<machine_name>:<port>where <machine_name> is the name of the machine on which OAS is installed and <port> is the OAS portnumber (1810 is the default).Enter the administrator user name (ias_admin is the default) and the password that was set duringthe installation.
OAS login dialog box
3. Click on the Start button to launch the server “home”:4. Click OK after you receive a message that the server has been started.5. Select the Administration tab.
Copyright © 2006, Oracle. All rights reserved. 419

Installing and Configuring Software for Crystal Reports Chapter 12
Administration tab
6. Configure the class path:
Class Paths page
a. Click Global Web Module.b. Click the General link under Properties.c. Click Add Another Row in the Class Paths section.d. Enter the full path, including the filename, for the cewcanative.jar file in the path field.For example, $bobje_home/bobje/enterprise11/java/applications/cewcanative.jar, where $bobje_homeis the directory where you installed BusinessObjects Enterprise XI.
7. Click the Apply button at the bottom of the page, and click OK.8. On the Administration tab, click the Server Properties link.9. In the Environment Variables section, click the Add Environment Variable button.10. To configure the PATH:
Environment Variables page
a. Enter PATH in the Name field.
420 Copyright © 2006, Oracle. All rights reserved.
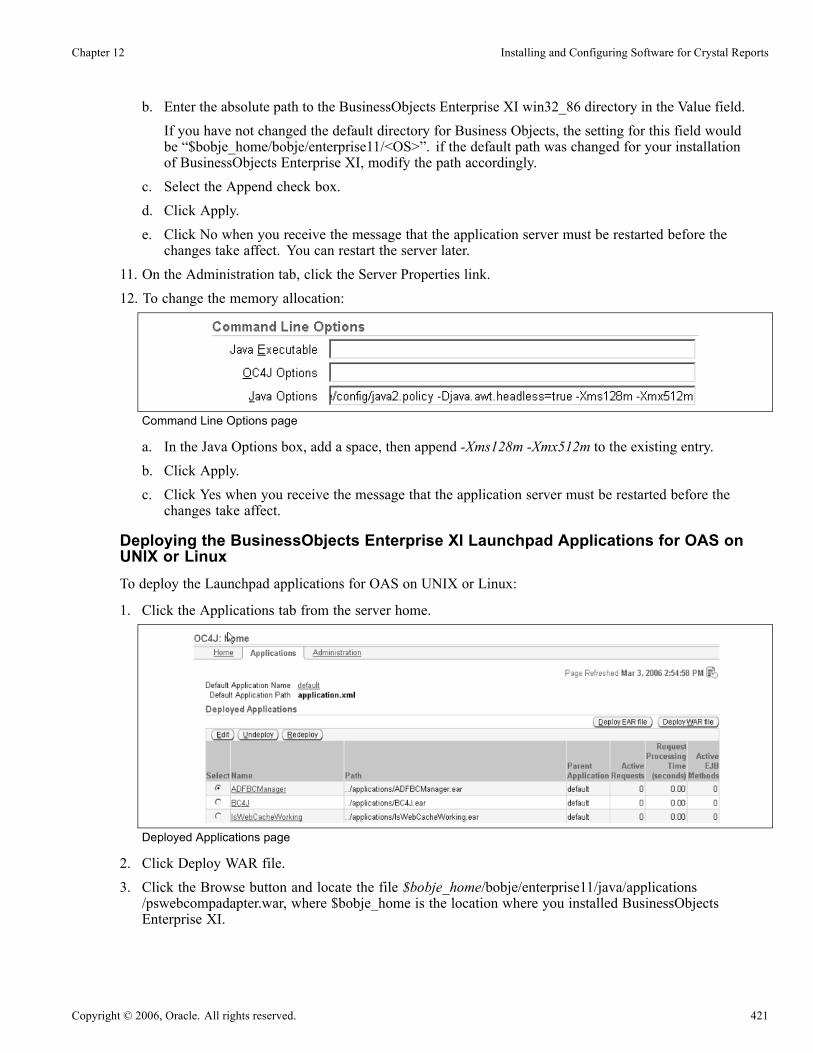
Chapter 12 Installing and Configuring Software for Crystal Reports
b. Enter the absolute path to the BusinessObjects Enterprise XI win32_86 directory in the Value field.If you have not changed the default directory for Business Objects, the setting for this field wouldbe “$bobje_home/bobje/enterprise11/<OS>”. if the default path was changed for your installationof BusinessObjects Enterprise XI, modify the path accordingly.
c. Select the Append check box.d. Click Apply.e. Click No when you receive the message that the application server must be restarted before thechanges take affect. You can restart the server later.
11. On the Administration tab, click the Server Properties link.12. To change the memory allocation:
Command Line Options page
a. In the Java Options box, add a space, then append -Xms128m -Xmx512m to the existing entry.b. Click Apply.c. Click Yes when you receive the message that the application server must be restarted before thechanges take affect.
Deploying the BusinessObjects Enterprise XI Launchpad Applications for OAS onUNIX or LinuxTo deploy the Launchpad applications for OAS on UNIX or Linux:
1. Click the Applications tab from the server home.
Deployed Applications page
2. Click Deploy WAR file.3. Click the Browse button and locate the file $bobje_home/bobje/enterprise11/java/applications/pswebcompadapter.war, where $bobje_home is the location where you installed BusinessObjectsEnterprise XI.
Copyright © 2006, Oracle. All rights reserved. 421

Installing and Configuring Software for Crystal Reports Chapter 12
Deploy Web Application page
4. Enter pswebcompadapter in the Application Name field.5. Enter /businessobjects as context root in the Map to URL field.6. Click Deploy.7. Repeat steps 1 through 6, but use the following values:
File $bobje_home/bobje/enterprise11/java/applications/jsfadmin.war
Application name jsfadmin
Context root (Map to URL) /jsfadmin8. Repeat steps 1 through 6, but use the following values:
File $bobje_home/bobje/enterprise11/java/applications/psadmin.war
Application name psadmin
Context root (Map to URL) /businessobjects/enterprise11/adminlaunch9. Repeat steps 1 through 6, but use the following values:
File $bobje_home/bobje/enterprise11/java/applications/psdesktop.war
Application name psdesktop
Context root (Map to URL) /businessobjects/enterprise11/desktoplaunch10. Repeat steps 1 through 6, but use the following values:
File $bobje_home/bobje/enterprise11/java/applications/psadhoc.war
Application name psadhoc
Context root (Map to URL) /businessobjects/enterprise11/adhoc
Note. pswebcompadapter.war has to be deployed first, followed by jsfadmin.war and then psadmin.war.psdesktop.war and psadhoc.war don’t depend on other war files, so they can be deployed at any time.
11. To verify the OAS configuration:a. Open a new browser window.b. Enter the following URL:http://<machine_name>:<port>/businessobjects/enterprise11/adminlaunchFor <machine_name> and <port> substitute the name of your machine and port.
422 Copyright © 2006, Oracle. All rights reserved.
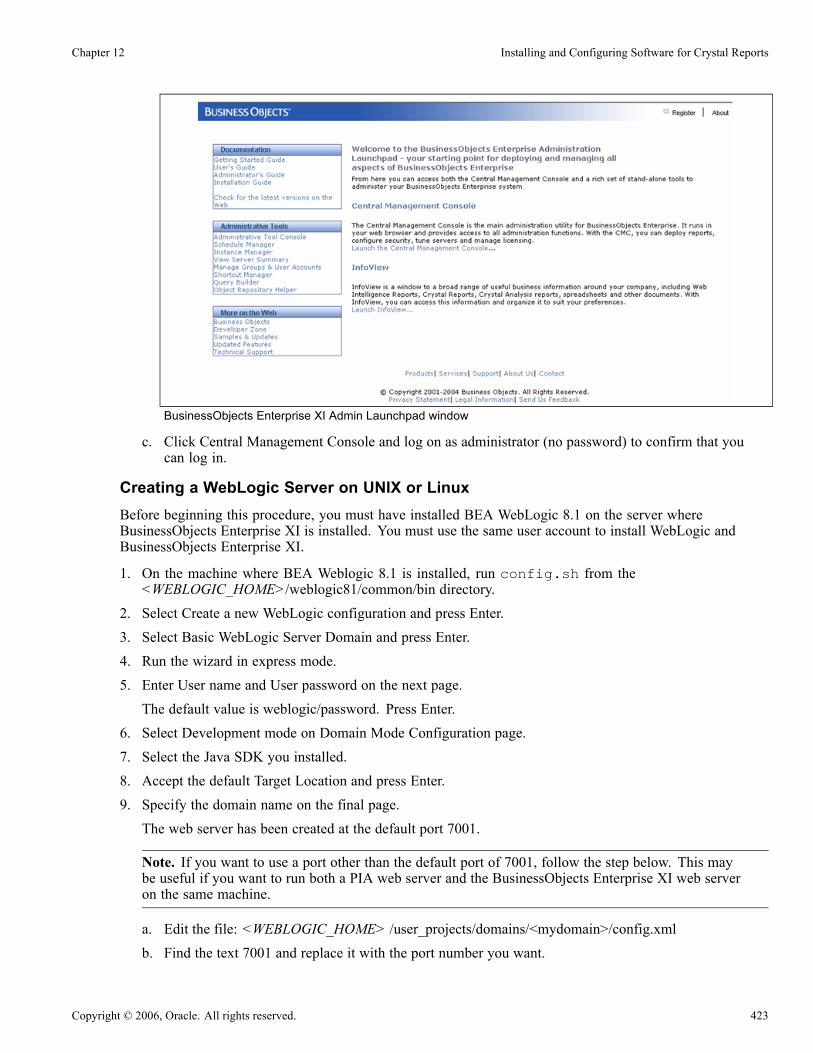
Chapter 12 Installing and Configuring Software for Crystal Reports
BusinessObjects Enterprise XI Admin Launchpad window
c. Click Central Management Console and log on as administrator (no password) to confirm that youcan log in.
Creating a WebLogic Server on UNIX or LinuxBefore beginning this procedure, you must have installed BEA WebLogic 8.1 on the server whereBusinessObjects Enterprise XI is installed. You must use the same user account to install WebLogic andBusinessObjects Enterprise XI.
1. On the machine where BEA Weblogic 8.1 is installed, run config.sh from the<WEBLOGIC_HOME>/weblogic81/common/bin directory.
2. Select Create a new WebLogic configuration and press Enter.3. Select Basic WebLogic Server Domain and press Enter.4. Run the wizard in express mode.5. Enter User name and User password on the next page.The default value is weblogic/password. Press Enter.
6. Select Development mode on Domain Mode Configuration page.7. Select the Java SDK you installed.8. Accept the default Target Location and press Enter.9. Specify the domain name on the final page.The web server has been created at the default port 7001.
Note. If you want to use a port other than the default port of 7001, follow the step below. This maybe useful if you want to run both a PIA web server and the BusinessObjects Enterprise XI web serveron the same machine.
a. Edit the file: <WEBLOGIC_HOME> /user_projects/domains/<mydomain>/config.xmlb. Find the text 7001 and replace it with the port number you want.
Copyright © 2006, Oracle. All rights reserved. 423

Installing and Configuring Software for Crystal Reports Chapter 12
c. Then save the config.xml file and exit.<BEA_port> will be used to refer to the port number that you are now using. Substitute your specificport number as needed in the following steps.
10. Start the web server by running startWebLogic.sh from <WEBLOGIC_HOME>/user_projects/domains/<mydomain>Wait until a message containing “listening on port <BEA_port>” appears. The web server is now started.
11. Confirm that you can log in to the web server. In a browser, enter the URL:http://<machine_name>:<BEA_port>/console
12. At the login page, enter the user name and password for the WebLogic admin that you entered during theWebLogic installation, for example, weblogic and password.Click the Sign In button.
BEA WebLogic Administration Console window for UNIX
If you are logged in this verifies your WebLogic server set up was successful.
Deploying the BusinessObjects Enterprise XI Launchpad Applications for WebLogicon UNIX or LinuxTo deploy the BusinessObjects Enterprise XI Launchpad applications:
1. Click the Web Application Modules link on the BEA WebLogic Server home page:
424 Copyright © 2006, Oracle. All rights reserved.

Chapter 12 Installing and Configuring Software for Crystal Reports
BEA WebLogic Server Home window for UNIX
2. On the Configuration tab, click the Deploy a new Web Application link:
Web Applications window for UNIX: Configuration tab
3. Navigate to <BOE_DIR>/enterprise/java/applications, where <BOE_DIR> is the location where youinstalled BusinessObjects Enterprise XI.
Copyright © 2006, Oracle. All rights reserved. 425
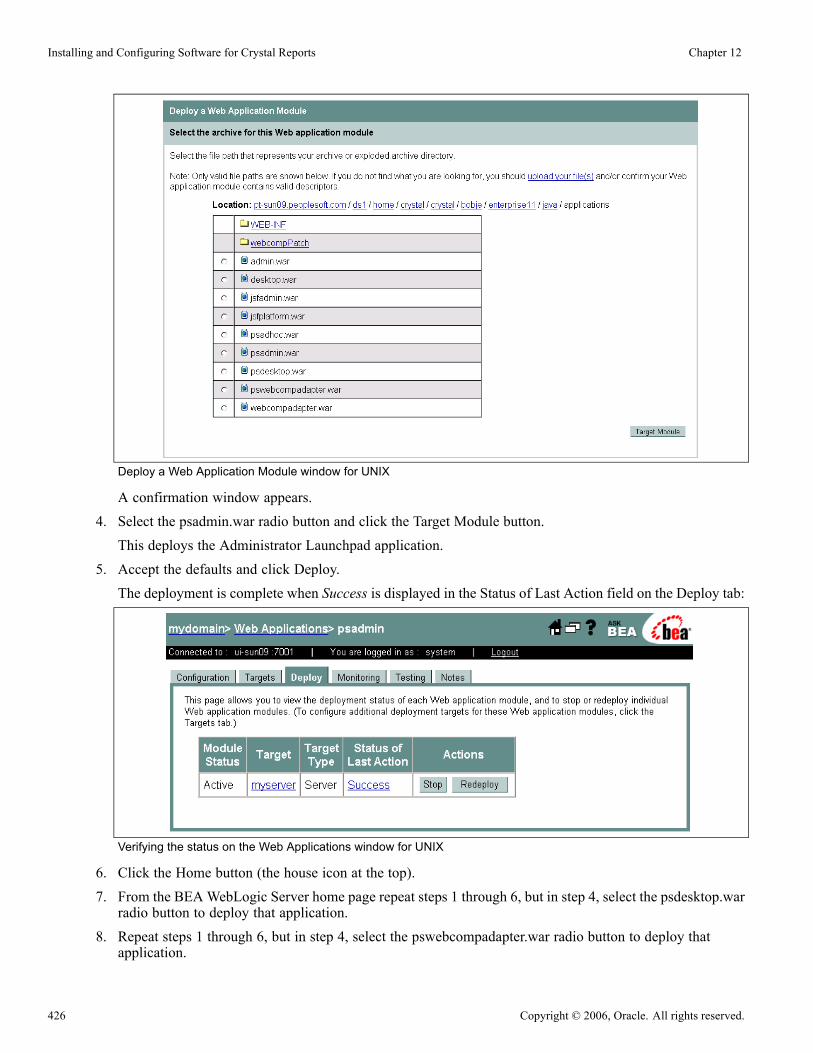
Installing and Configuring Software for Crystal Reports Chapter 12
Deploy a Web Application Module window for UNIX
A confirmation window appears.4. Select the psadmin.war radio button and click the Target Module button.This deploys the Administrator Launchpad application.
5. Accept the defaults and click Deploy.The deployment is complete when Success is displayed in the Status of Last Action field on the Deploy tab:
Verifying the status on the Web Applications window for UNIX
6. Click the Home button (the house icon at the top).7. From the BEAWebLogic Server home page repeat steps 1 through 6, but in step 4, select the psdesktop.warradio button to deploy that application.
8. Repeat steps 1 through 6, but in step 4, select the pswebcompadapter.war radio button to deploy thatapplication.
426 Copyright © 2006, Oracle. All rights reserved.
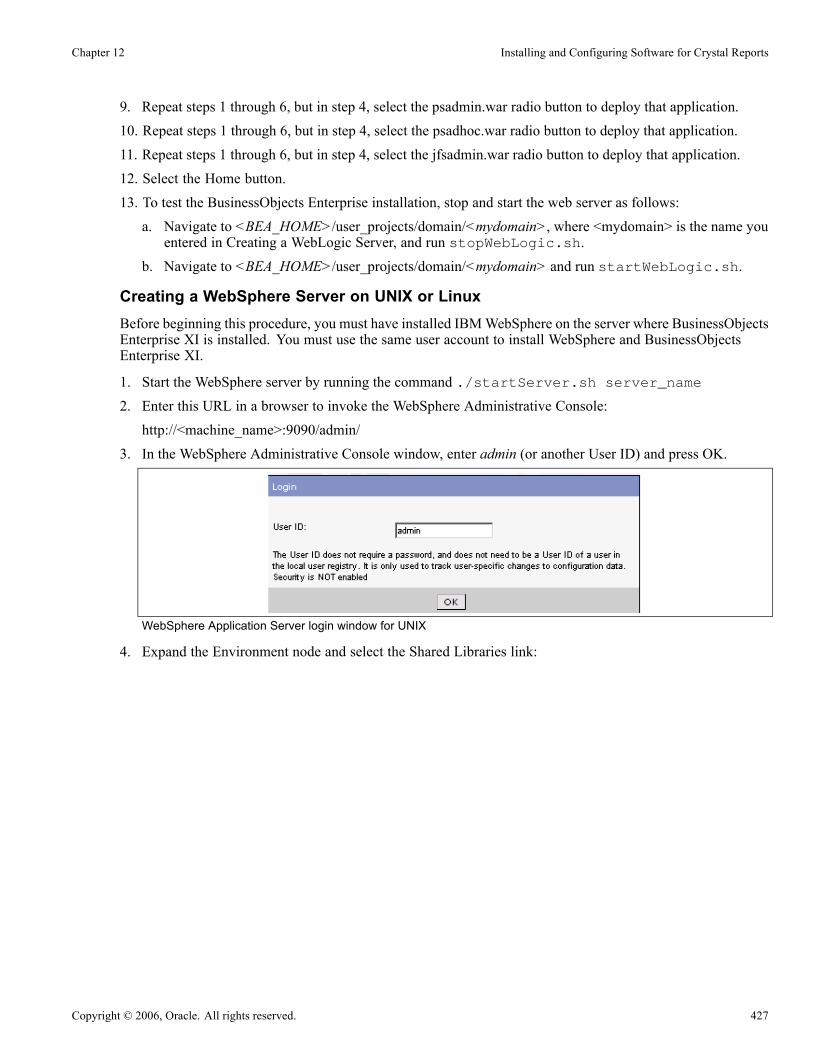
Chapter 12 Installing and Configuring Software for Crystal Reports
9. Repeat steps 1 through 6, but in step 4, select the psadmin.war radio button to deploy that application.10. Repeat steps 1 through 6, but in step 4, select the psadhoc.war radio button to deploy that application.11. Repeat steps 1 through 6, but in step 4, select the jfsadmin.war radio button to deploy that application.12. Select the Home button.13. To test the BusinessObjects Enterprise installation, stop and start the web server as follows:a. Navigate to <BEA_HOME>/user_projects/domain/<mydomain>, where <mydomain> is the name youentered in Creating a WebLogic Server, and run stopWebLogic.sh.
b. Navigate to <BEA_HOME>/user_projects/domain/<mydomain> and run startWebLogic.sh.
Creating a WebSphere Server on UNIX or LinuxBefore beginning this procedure, you must have installed IBMWebSphere on the server where BusinessObjectsEnterprise XI is installed. You must use the same user account to install WebSphere and BusinessObjectsEnterprise XI.
1. Start the WebSphere server by running the command ./startServer.sh server_name
2. Enter this URL in a browser to invoke the WebSphere Administrative Console:http://<machine_name>:9090/admin/
3. In the WebSphere Administrative Console window, enter admin (or another User ID) and press OK.
WebSphere Application Server login window for UNIX
4. Expand the Environment node and select the Shared Libraries link:
Copyright © 2006, Oracle. All rights reserved. 427
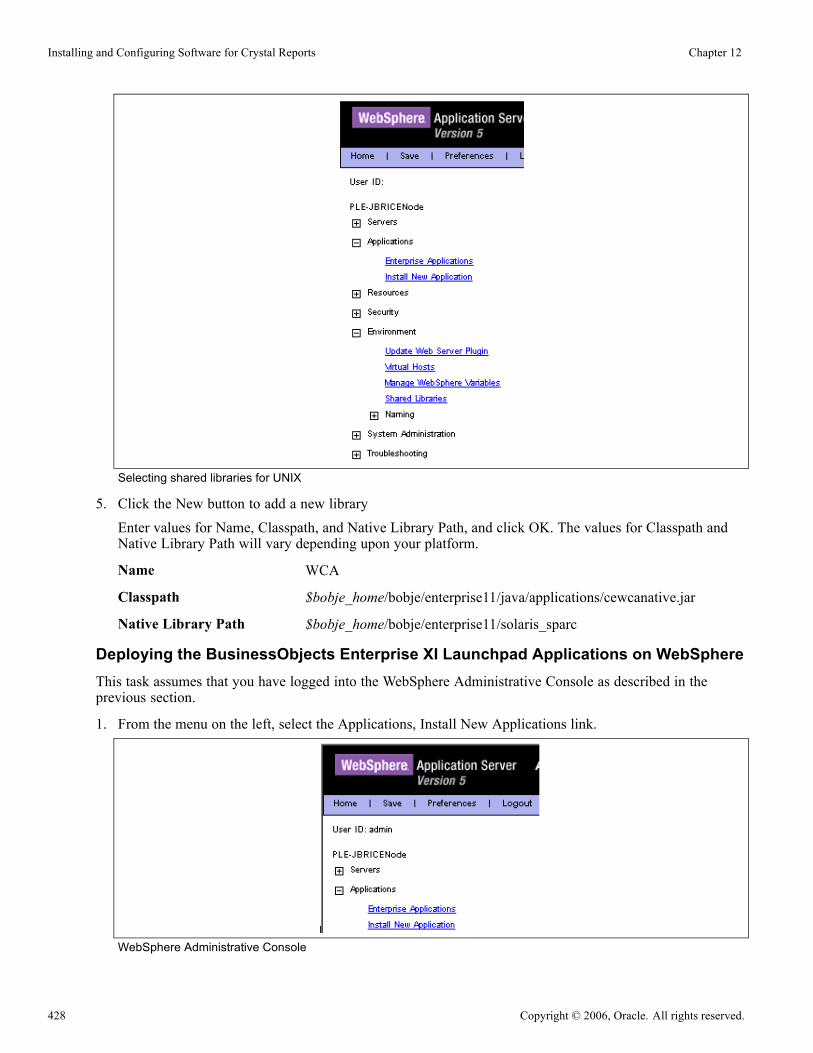
Installing and Configuring Software for Crystal Reports Chapter 12
Selecting shared libraries for UNIX
5. Click the New button to add a new libraryEnter values for Name, Classpath, and Native Library Path, and click OK. The values for Classpath andNative Library Path will vary depending upon your platform.
Name WCA
Classpath $bobje_home/bobje/enterprise11/java/applications/cewcanative.jar
Native Library Path $bobje_home/bobje/enterprise11/solaris_sparc
Deploying the BusinessObjects Enterprise XI Launchpad Applications on WebSphereThis task assumes that you have logged into the WebSphere Administrative Console as described in theprevious section.
1. From the menu on the left, select the Applications, Install New Applications link.
WebSphere Administrative Console
428 Copyright © 2006, Oracle. All rights reserved.

Chapter 12 Installing and Configuring Software for Crystal Reports
2. Select Server path, and specify the war file to install:$bobje_home/bobje/enterprise11/java/applications/webcompadapter.war
3. Enter /businessobjects in the context root area, and click Next.
Preparing for the application installation for webcompadapter.war
4. Accept all defaults on the next several windows and continue until you see a window with a Finish button.5. Click the Finish button.A confirmation window appears with a message similar to the following: “Applicationwebcompadapter_war installed successfully.”
6. Click Manage Applications to see the list of applications.7. Select the webcompadapter_war link to open its configuration page.8. Near the bottom, select the Libraries link.
Additional Properties page
9. Click the Add button to add a new library.WCA should appear automatically. Just click OK to save it.
Adding a new shared library for UNIX
10. Repeat steps 2 through 9, but use these parameters:
Copyright © 2006, Oracle. All rights reserved. 429

Installing and Configuring Software for Crystal Reports Chapter 12
File $bobje_home/bobje/enterprise11/java/applications/psadmin.war
Context Root /businessobjects/enterprise11/adminlaunch11. Repeat steps 2 through 9 with these parameters:
File $bobje_home/bobje/enterprise11/java/applications/psdesktop.war
Context Root /businessobjects/enterprise11/desktoplaunch12. Repeat steps 2 through 9 with these parameters:
File $bobje_home/bobje/enterprise11/java/applications/psadhoc.war
Context Root /adhoc13. Repeat steps 2 through 9 with these parameters:
File $bobje_home/bobje/enterprise11/java/applications/jfsadmin.war
Context Root /jfsadmin14. Select the Save link to permanently save all changes.
Saving changes on WebSphere Administrative Console for UNIX
15. Click the Save button on the confirmation window and wait for the changes to be saved.
Saving changes on the Master Configuration window for UNIX
16. Stop and start the WebSphere server.
Task 12-3-11: Confirming Access to the BusinessObjectsEnterprise XI Administration and User Launchpad ApplicationsAfter you have completed the installations, you should confirm that you can access the administration consoleand User Launchpad. Use this procedure for both the Windows and UNIX/Linux installations.
Before beginning this task, start the web server software under which you installed BusinessObjects EnterpriseXI.
430 Copyright © 2006, Oracle. All rights reserved.

Chapter 12 Installing and Configuring Software for Crystal Reports
1. In a new browser window, enter the following URL for the admin launchpad (where <machine_name> isthe computer name and <port> is the web server port):http://<machine_name>:<port>/businessobjects/enterprise11/adminlaunch/
BusinessObjects Enterprise XI Admin Launchpad window
2. Select the Central Management Console link and enter administrator (no password) to confirm thatyou can log in.
3. To confirm that you can access the user launch, enter the following URL in the browser address line for theuser launchpad (where <machine_name> is the computer name and <port> is the web server port):http://<machine_name>:<port>/businessobjects/enterprise11/desktoplaunch
4. Select the link BusinessObjects Enterprise XI and enter the following to confirm that you can log in:
System <machine_name>:6400
Username administrator
Password (none)
Authentication Enterprise
Copyright © 2006, Oracle. All rights reserved. 431

Installing and Configuring Software for Crystal Reports Chapter 12
BusinessObjects Enterprise XI logon window
Note. Remember that before you can use BusinessObjects Enterprise XI, you must complete additionalinstallation and configuration procedures
Task 12-3-12: Configuring the PeopleSoft Application forBusinessObjects Enterprise XI IntegrationThis section discusses:
• Preparing the PeopleSoft Application to Integrate with BusinessObjects Enterprise XI
• Running the Data Mover Script and Database Project
• Configuring the PeopleSoft Application Server
• Configuring the PeopleSoft Pure Internet Architecture
• Adding PeopleSoft Users for Integration
• Identifying the Local Default Node in your System
• Adding the Local Default Node as a Message Node to your Gateway
• Configuring Query Access Services
• Configuring Query Access Services Node Security
Preparing the PeopleSoft Application to Integrate with BusinessObjects Enterprise XIIn the PeopleSoft application that you wish to integrate with BusinessObjects Enterprise XI, you will have toconfigure settings in the following areas:
• PeopleSoft Application Server• PeopleSoft Web Server• PeopleSoft Integration Broker• Query Access Services (QAS)
432 Copyright © 2006, Oracle. All rights reserved.

Chapter 12 Installing and Configuring Software for Crystal Reports
Running the Data Mover Script and Database ProjectThe PeopleSoft database as delivered is configured to run reports using Crystal 9. In order to useBusinessObjects Enterprise XI you need to run a data mover script and a project.
This will add pertinent roles and change the Crystal process types to use the BusinessObjects Enterprise XIexecutable.
1. Run Data Mover script CRTOBOE.2. Run Project CRTOBOE.
Configuring the PeopleSoft Application ServerTo configure the application server:
1. Make sure that your PeopleSoft application server is down.2. Access the PSADMIN Quick-Configure menu by launching psadmin.exe from the<PS_HOME>\appserv directory.Select the domain to configure.
See “Configuring the Application Server on Windows.”
3. Set Analytic Servers (Feature 11) to Yes.
------------------------------------------------------
Quick-configure menu -- domain: HR84
------------------------------------------------------
Features Settings
========== ==========
1) Pub/Sub Servers : No 15) DBNAME :[HR84]
2) Quick Server : No 16) DBTYPE :[MICROSFT]
3) Query Servers : No 17) UserId :[QEDMO]
4) Jolt : Yes 18) UserPswd :[QEDMO]
5) Jolt Relay : No 19) DomainId :[TESTSERV]
6) WSL : No 20) AddToPATH :[c:\Program Files\Microsoft⇒SQL Server\80\Tools\Binn]
7) PC Debugger : No 21) ConnectID :[people]
8) Event Notification : Yes 22) ConnectPswd :[peop1e]
9) MCF Servers : No 23) ServerName :[]
10) Perf Collator : No 24) WSL Port :[7000]
11) Analytic Servers : Yes 25) JSL Port :[9000]
12) Domains Gateway : No 26) JRAD Port :[9100]
Actions
=========
13) Load config as shown
14) Custom configuration
h) Help for this menu
q) Return to previous menu
Enter selection (1-26, h, or q):
Copyright © 2006, Oracle. All rights reserved. 433

Installing and Configuring Software for Crystal Reports Chapter 12
4. Open psappsrv.cfg, the PeopleSoft Application Server configuration file, from the<PS_HOME>\appserv\<DOMAIN> directory.
5. Change the MIN Instances and MAX Instances for the Application Server and Analytic Server to be greaterthan 1. (Of course, the MAX setting should be no less than the MIN setting.)
[PSAPPSRV]
;=====================================================
; Settings for PSAPPSRV
;=====================================================
;-----------------------------------------------------
; UBBGEN settings
Min Instances=2
Max Instances=4
6. Re-start the application server.
Configuring the PeopleSoft Pure Internet ArchitectureTo ensure that single sign-on works properly in the integration between PeopleSoft and BusinessObjectsEnterprise XI the Authentication Token Domain in the PIA architecture must be configured and the PeopleSoftIntegration Gateway properties must be set.
1. Run <PS_HOME>\setup\mpinternet\setup.exe.
2. Enter a value for the Authentication Token Domain.
See “Setting Up the PeopleSoft Pure Internet Architecture in GUI Mode,” Using Authentication Domainsin the PeopleSoft Pure Internet Architecture Installation.
Specifying the Authentication Token Domain
434 Copyright © 2006, Oracle. All rights reserved.
Chapter 12 Installing and Configuring Software for Crystal Reports
Adding PeopleSoft Users for IntegrationTo add User QAS_Admin:
1. Navigate to PeopleTools, Security, User Profiles, User Profiles.2. Select the Add a New Value tab.3. Enter QAS_Admin, and click the Add button.4. Choose a symbolic id from the drop-down list.5. Enter QAS_Admin for password.6. Select the ID tab.7. Select none for the ID Type.Enter “QAS administrative user” for description.
8. Select the Roles tab.9. Enter QAS Admin, and click the Save button.
To add User BOE_Admin:
1. Return to the Add a New User page.
2. Select the Add a New Value tab.
3. Enter BOE_Admin, and click the Add button.
4. Choose a symbolic id from the drop-down list.
5. Enter BOE_Admin for password.
6. Select the ID tab.
7. Select none for ID Type.
Enter “BOE administrative user” for description.
8. Select the Roles tab.
9. Enter BOE Admin, and QAS Admin, and click the Save button.
To add User BOE_Viewing:
1. Return to the Add a New User page.2. Select the Add a New Value tab.3. Enter BOE_Viewing, and click the Add button.4. Choose a symbolic id from the drop-down list.5. Enter BOE_Viewing for password.6. Select the ID tab.7. Select none for ID Type.Enter “BOE viewing user” for description.
8. Select the Roles tab.9. Enter BOE Viewing, and click the Save button.
Copyright © 2006, Oracle. All rights reserved. 435

Installing and Configuring Software for Crystal Reports Chapter 12
Identifying the Local Default Node in your SystemAfter you identify the Local default node, use it in the next procedure.
1. Select PeopleTools, Integration Broker, Integration Setup, Nodes.2. Click the Search button to display a list of all nodes defined in the system.There should be one (and only one) node designated as the Default Local Node. You can sort on theDefault Local Node column header to quickly find the proper node. Look for the node that has a “Y” in theDefault Local Node column in the search results.
Finding the Default Local Node
3. Copy the node name to a text editor, as you will use it in a later step.
See Adding the Local Default Node as a Message Node to your Gateway.
Adding the Local Default Node as a Message Node to your GatewayYou must update the PeopleSoft Integration Broker Gateway to recognize your PeopleSoft application server.
To add the Local default node:
1. Log onto your PeopleSoft system with a user ID that has rights to access PeopleTools.2. Select PeopleTools, Integration Broker, Configuration, Gateways.3. Search and select the Gateway that is designated as the Local Gateway (that is, the Local Gateway checkbox is selected).
4. In the URL field, enter the following value, where <machine_name> is the machine where the IntegrationBroker is installed, and <port> is the port number where the PeopleSoft web server is listening:http://<machine_name>:<port>/PSIGW/PeopleSoftListeningConnector
5. Click Save.You should get a “Loading Process was successful” message.
436 Copyright © 2006, Oracle. All rights reserved.

Chapter 12 Installing and Configuring Software for Crystal Reports
Note. If you are configuring the Gateway for the first time, you get a message prompting you to loadconnectors. Click OK. You get a confirmation message. click OK again.
Gateways page
6. Select the Gateway Setup Properties link on this page.This will take you to a page where you must enter the administrator userid and password.
Copyright © 2006, Oracle. All rights reserved. 437

Installing and Configuring Software for Crystal Reports Chapter 12
Gateway Properties sign on window
7. Add a new node in the PeopleSoft Node Configuration page and save.
PeopleSoft Node Configuration page
Note. If the proper message node name already exists, you do not have to add it.
Enter the following values:
Message Node Name The name of the Default Local Node that you had copied to your texteditor earlier.
Web Server URL Enter the URL of the web server that is connected (through Jolt) to yourPeopleSoft database’s application server
User ID Enter user BOE_Admin and its password
Password Enter the password for user BOE_Admin
Tools Release Provide the precise PeopleTools release that your application serveris using.
438 Copyright © 2006, Oracle. All rights reserved.

Chapter 12 Installing and Configuring Software for Crystal Reports
8. Click Save.Click the Ping Node button beside the message node name that you added to confirm success.
9. Click OK.10. Restart the PeopleSoft web server in order for the configuration file changes to take effect.
Configuring Query Access ServicesTo configure Query Access Services (QAS):
1. Select PeopleTools, Query Access Services, Configure.2. All of the information on the screen is automatically pre-populated.3. Click the Save button to save the information.
Query Access Services page
4. Copy the QAS URL entry into a text editor.Later when you configure the BusinessObjects Enterprise XI server, you will need to paste this text.
5. Select the BusinessObjects Enterprise tab.6. Enter the user BOE_Admin as the Administrative User, and enter its password.
Copyright © 2006, Oracle. All rights reserved. 439
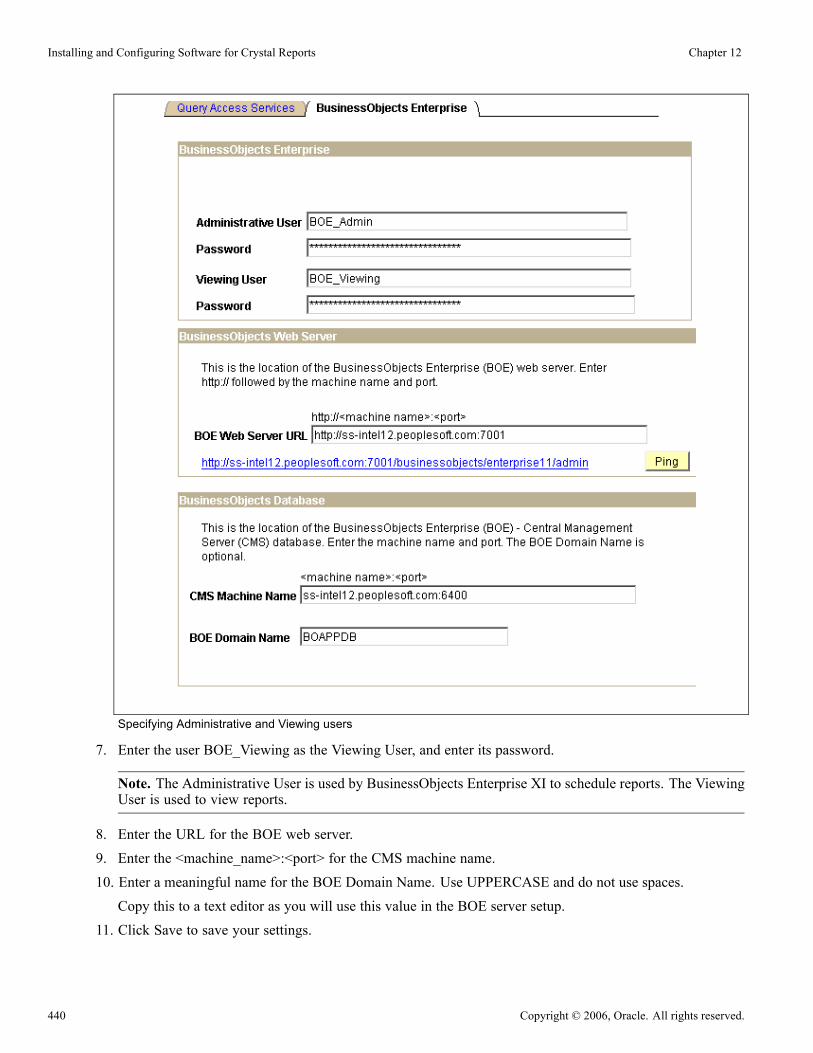
Installing and Configuring Software for Crystal Reports Chapter 12
Specifying Administrative and Viewing users
7. Enter the user BOE_Viewing as the Viewing User, and enter its password.
Note. The Administrative User is used by BusinessObjects Enterprise XI to schedule reports. The ViewingUser is used to view reports.
8. Enter the URL for the BOE web server.9. Enter the <machine_name>:<port> for the CMS machine name.10. Enter a meaningful name for the BOE Domain Name. Use UPPERCASE and do not use spaces.Copy this to a text editor as you will use this value in the BOE server setup.
11. Click Save to save your settings.
440 Copyright © 2006, Oracle. All rights reserved.

Chapter 12 Installing and Configuring Software for Crystal Reports
Configuring Query Access Services Node SecurityTo configure QAS node security:
1. Navigate to PeopleTools, Integration Setup, Node Definition. Search for node QAS_REMOTE.2. Enter user QAS_Admin and save.3. Navigate to PeopleTools, Integration Setup, Node Definition. Search for the default local node.4. Enter user QAS_Admin and save.
Task 12-3-13: Configuring the BusinessObjectsEnterprise XI ServerTo enter PeopleSoft authentication information in BusinessObjects Enterprise XI:
1. In a browser, enter the following URL, substituting the name of your BusinessObjects Enterprise XI serverfor <machine_name>, and the BusinessObjects Enterprise XI port number for <BOE_port>:
http://<machine_name>:<BOE_port>/businessobjects/enterprise11/adminlaunch/
Note. You can also click the Webserver Ping button on the QAS admin page to open the Central ManagerConsole.
2. Log on with administrator and no password.
Central Management Console log on
3. On the CMC Home page, click Authentication.
Copyright © 2006, Oracle. All rights reserved. 441

Installing and Configuring Software for Crystal Reports Chapter 12
CMC Home page
4. Click the PeopleSoft Enterprise tab.
Note. If this tab is not present, it means the PeopleSoft Data Driver and Security Plugin have not beeninstalled.
See Installing BusinessObjects Enterprise XI Integration on Windows.
See Installing BusinessObjects Enterprise XI Integration on UNIX or Linux.
Authentication page
5. Enter information on this page, then press the Update button at the bottom.
442 Copyright © 2006, Oracle. All rights reserved.

Chapter 12 Installing and Configuring Software for Crystal Reports
PeopleSoft Enterprise page
Query Access Services Integration Gateway URL page
• Select the check box Enable PeopleSoft Enterprise Authentication.
• In the PeopleSoft Enterprise System User field, enter BOE_Admin as the user, and enter its password.
• Enter PeopleSoft Enterprise Domain information.
You can have up to one PeopleSoft Enterprise domain listed in the Current PeopleSoft EnterpriseDomain box. To add a domain to this box enter the information into the New PeopleSoft EnterpriseDomain box and click the Add button.
The value you enter here has two components separated by an equal (“=”) sign. The left-hand side is thename of the domain. This must be the same as the BOE Domain Name that you entered on the QASconfiguration page, and that you copied to a text editor.
See Configuring the PeopleSoft Application for BusinessObjects Enterprise XI Integration, ConfiguringQuery Access Services.The right-hand side is the Query Access Services Integration Gateway URL that you copied into a texteditor earlier when you configured the PeopleSoft application (see the second screen immediately above).
Copyright © 2006, Oracle. All rights reserved. 443
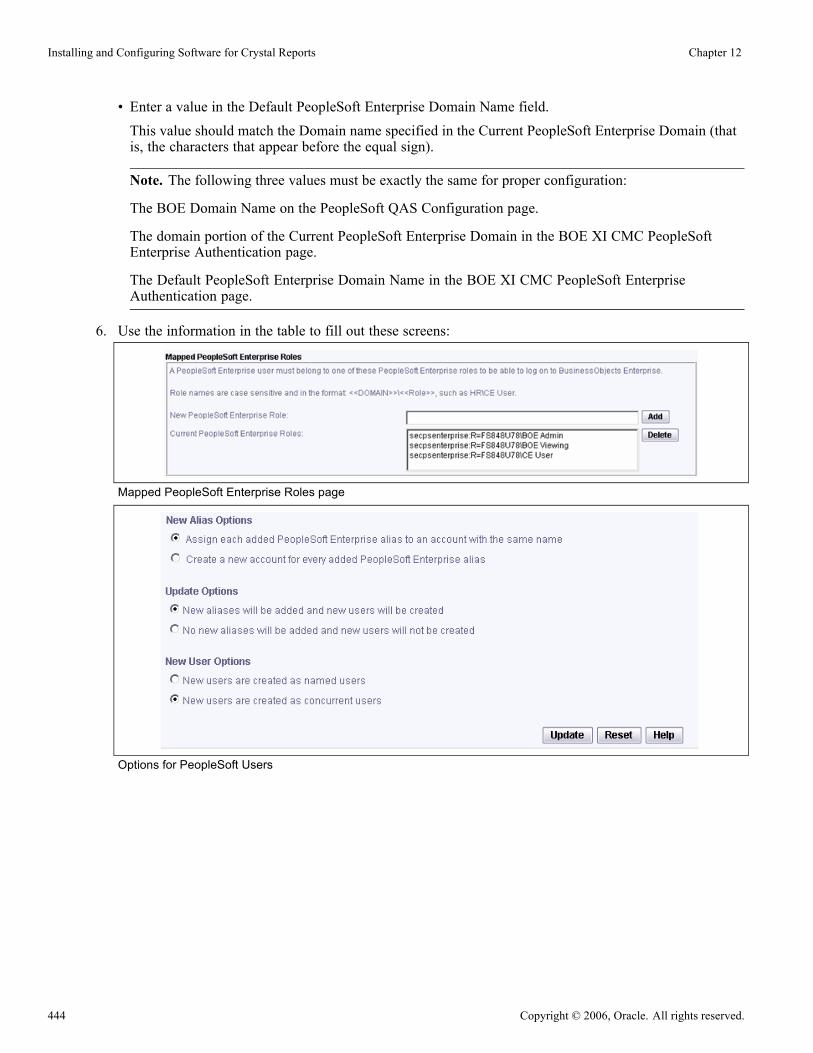
Installing and Configuring Software for Crystal Reports Chapter 12
• Enter a value in the Default PeopleSoft Enterprise Domain Name field.This value should match the Domain name specified in the Current PeopleSoft Enterprise Domain (thatis, the characters that appear before the equal sign).
Note. The following three values must be exactly the same for proper configuration:
The BOE Domain Name on the PeopleSoft QAS Configuration page.
The domain portion of the Current PeopleSoft Enterprise Domain in the BOE XI CMC PeopleSoftEnterprise Authentication page.
The Default PeopleSoft Enterprise Domain Name in the BOE XI CMC PeopleSoft EnterpriseAuthentication page.
6. Use the information in the table to fill out these screens:
Mapped PeopleSoft Enterprise Roles page
Options for PeopleSoft Users
444 Copyright © 2006, Oracle. All rights reserved.

Chapter 12 Installing and Configuring Software for Crystal Reports
PeopleSoft Role New Alias Options Update Options New User Options
BOE Admin (Choice 1) Assigneach added PeopleSoftEnterprise alias to anaccount with the samename
(Choice 1) New aliaseswill be added and newusers will be created
(Choice 1) New users arecreated as named users
BOE Viewing (Choice 1) Assigneach added PeopleSoftEnterprise alias to anaccount with the samename
(Choice 1) New aliaseswill be added and newusers will be created
(Choice 2) New users arecreated as concurrent users
For each PeopleSoft role in the table:
a. Enter the role name.
Note. Enter the role name only. The remaining information (for example, secpsenterprise:R=PSIGW\) willbe pre-pended after you click the Update button at the bottom of the page.
b. Click the Add button.c. Select the options indicated in the table.d. Click the Update button.
After you add the PeopleSoft roles and update, you will see PeopleSoft Enterprise as a new AuthenticationType when you log into the BusinessObjects Enterprise XI Central Management Console:
Authentication Type list
Also, User IDs from the PeopleSoft database with the given roles have been automatically added intoBusinessObjects Enterprise XI.
You have completed the installation and configuration. Proceed to run the verification tests in the next section.
Task 12-3-14: Verifying the PeopleSoft to BusinessObjectsEnterprise XI IntegrationUse these tests to ensure that the various features of BusinessObjects Enterprise XI are functional:
Note. Prior to running your verification tests, you need to convert your Crystal Reports from Crystal 9 formatto Crystal 11 format. See Converting Crystal Reports for details.
1. Schedule and run a Crystal Reporta. Login to PeopleSoft as a user who has the authority to run report XRFWIN.b. Select PeopleTools, Process Scheduler, System Process Request.
Copyright © 2006, Oracle. All rights reserved. 445

Installing and Configuring Software for Crystal Reports Chapter 12
c. Select the Add New Value tab.d. Enter a new run control ID of BOETEST, and click the Add button.Click the Run button in the Process Request dialog box.
e. Select an active process scheduler server.f. Select the check box next to the crystal report XRFWIN.g. Select Web for the type and CE RPT for the format.h. Click OK to run the report. It should generate a process instance id.
2. View Report output in InfoViewera. Using the Process Instance ID, ensure the process runs to completion in process monitor.b. Select Reporting Tools, Report Manager, and select the Administration Tab.c. Search for the report using the process instance id generated from step 2.d. Click the Details link next to the report, then the .RPT link to view the report in the BusinessObjectsEnterprise XI report viewer.
Task 12-4: Migrating your BusinessObjects Enterprise XIInstallation to a New Version of PeopleTools
You must complete several steps in order to ensure that your new version of PeopleTools integrates properlywith your BusinessObjects Enterprise XI installation.
Important! If you fail to perform these steps in the correct order, you could compromise the installation.
1. Delete all PeopleSoft Users from the BusinessObjects Enterprise XI server as follows:a. Login to the Central Management Console.b. Select USERS from the navigation drop-down list and click the GO button.c. Click the check box next to all PeopleSoft Users (not administrator or guest) and delete them.
2. Delete Roles in the BusinessObjects Enterprise XI server:a. Login to the Central Management Console.b. Click on the PeopleSoft Authentication tab.c. Delete All the roles. Click Update.
3. Delete the Domains:a. Delete All the Domains. Click Update.b. Click LOGOFF.c. Log back in to the Central Management Console and verify all that the roles and domains are gone.
4. Stop the BusinessObjects Enterprise XI Web Server and all the BusinessObjects Enterprise XI services.5. Uninstall the PeopleSoft Integration for BusinessObjects Enterprise XI from the server.This is the integration that was installed for the old version of PeopleTools.
446 Copyright © 2006, Oracle. All rights reserved.
Chapter 12 Installing and Configuring Software for Crystal Reports
6. Install the PeopleSoft Integration for BusinessObjects Enterprise XI for the new version of PeopleTools.7. Run the PeopleSoft Integration installer from the PeopleTools build you installed.8. Run the verification steps in the task Installing BusinessObjects Enterprise XI, Verifying the PeopleSoft toBusinessObjects Enterprise XI Integration
Task 12-5: Installing Crystal Reports XIInstall Crystal Reports XI only on workstations of those people who:
• will be creating or modifying report definitions
• will be running the conversion program to convert reports from Crystal 9 format to Crystal XI format
Simply running reports does not require installation of Crystal Reports XI.
Before beginning this task, verify that the target workstation meets the minimum system requirements asdetailed in the Enterprise PeopleTools 8.48 Hardware and Software Requirements guide.
To install Crystal Reports XI:
1. Insert Crystal Reports XI for PeopleSoft Disk 1.It should start automatically. If it does not, run CRXI_Autorun.exe from the CD directory.
2. Select your language and click Install.
Copyright © 2006, Oracle. All rights reserved. 447

Installing and Configuring Software for Crystal Reports Chapter 12
Crystal Reports XI dialog box
3. Accept the defaults on the following windows.4. Select Typical installation and, if necessary change the destination folder and common files folder (it isrecommended that you accept the defaults).
448 Copyright © 2006, Oracle. All rights reserved.
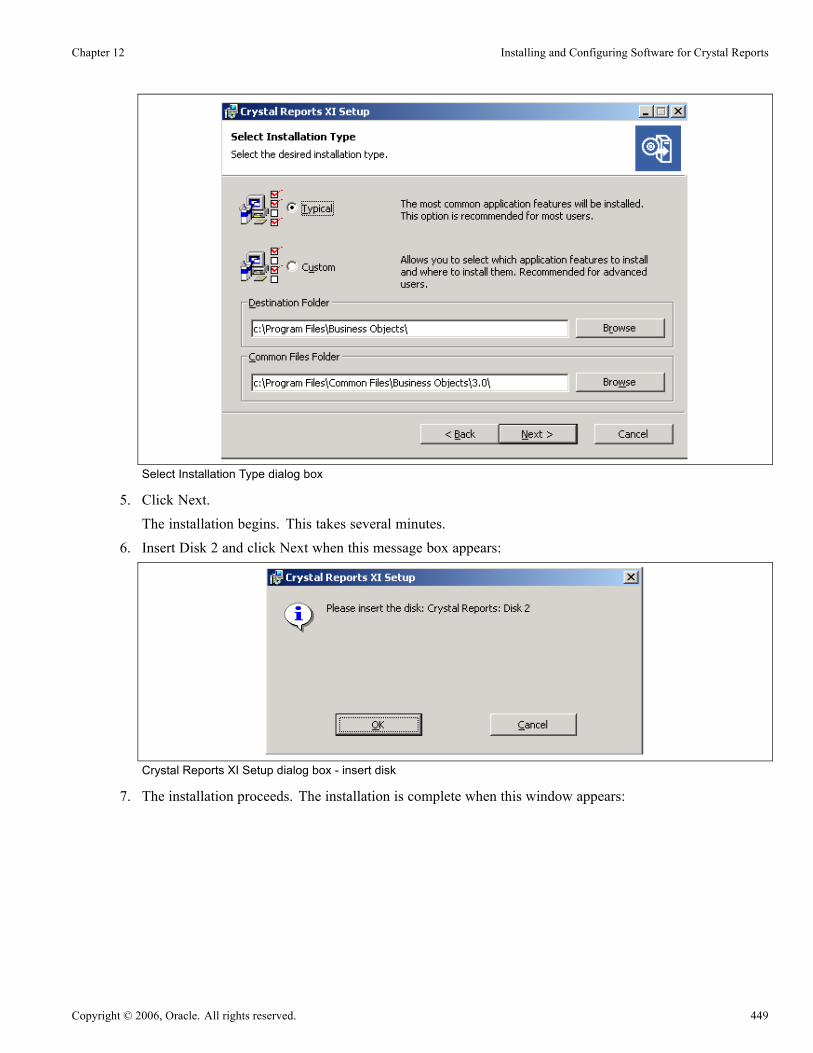
Chapter 12 Installing and Configuring Software for Crystal Reports
Select Installation Type dialog box
5. Click Next.The installation begins. This takes several minutes.
6. Insert Disk 2 and click Next when this message box appears:
Crystal Reports XI Setup dialog box - insert disk
7. The installation proceeds. The installation is complete when this window appears:
Copyright © 2006, Oracle. All rights reserved. 449
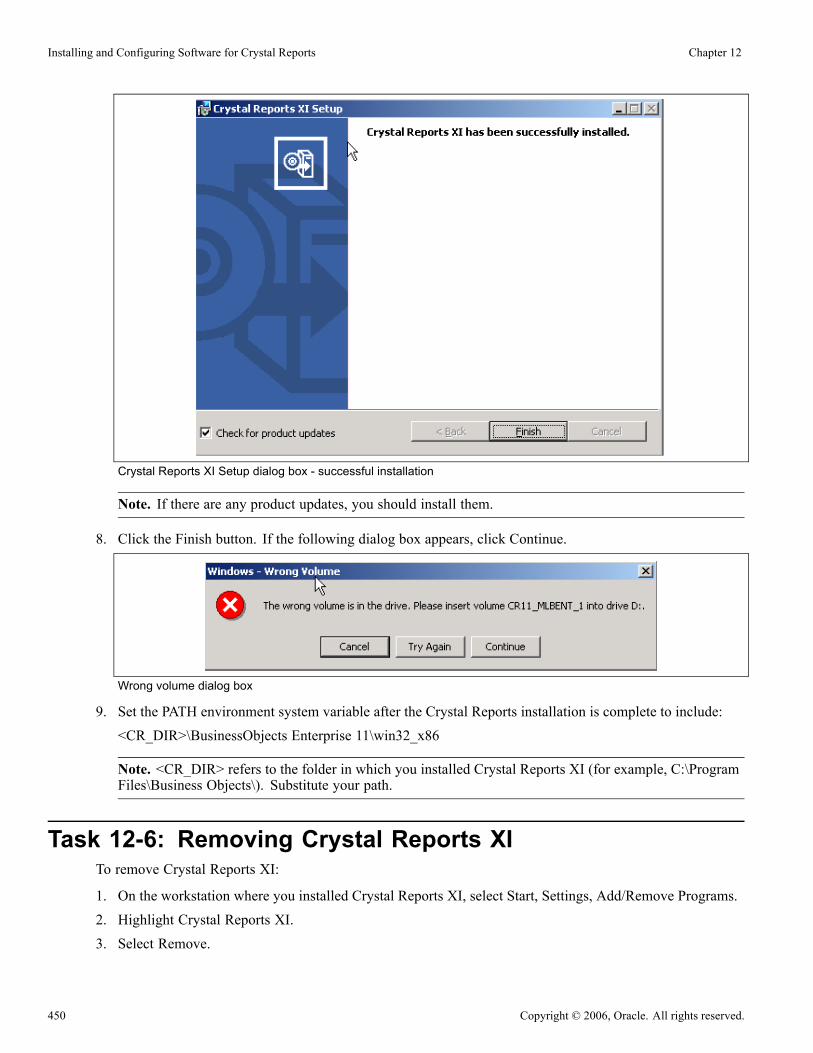
Installing and Configuring Software for Crystal Reports Chapter 12
Crystal Reports XI Setup dialog box - successful installation
Note. If there are any product updates, you should install them.
8. Click the Finish button. If the following dialog box appears, click Continue.
Wrong volume dialog box
9. Set the PATH environment system variable after the Crystal Reports installation is complete to include:<CR_DIR>\BusinessObjects Enterprise 11\win32_x86
Note. <CR_DIR> refers to the folder in which you installed Crystal Reports XI (for example, C:\ProgramFiles\Business Objects\). Substitute your path.
Task 12-6: Removing Crystal Reports XITo remove Crystal Reports XI:
1. On the workstation where you installed Crystal Reports XI, select Start, Settings, Add/Remove Programs.2. Highlight Crystal Reports XI.3. Select Remove.
450 Copyright © 2006, Oracle. All rights reserved.

Chapter 12 Installing and Configuring Software for Crystal Reports
It will take several minutes for the removal to finish.
Task 12-7: Administering and Using BusinessObjectsEnterprise XI
This section discusses:
• Understanding PeopleSoft Permission Lists, Roles, and Users Involved in PeopleSoft Integration withBusinessObjects Enterprise XI
• Installing Patches
• Changing the Data Source of the BusinessObjects Enterprise XI Report Repository
• Uninstalling BusinessObjects Enterprise XI Integration
• Switching to Crystal 9 from BusinessObjects Enterprise XI
• Using Logging in BusinessObjects Enterprise XI
• Understanding BusinessObjects Enterprise XI License Codes
Understanding PeopleSoft Permission Lists, Roles,and Users Involved in PeopleSoft Integration withBusinessObjects Enterprise XICertain PeopleSoft permission lists, roles, and users are necessary in order to have your PeopleSoft applicationintegrate with BusinessObjects Enterprise XI. To run BusinessObjects Enterprise XI the following need to bepresent in the PeopleSoft database and then referenced in the appropriate places (described in the installationinstructions) in both the PeopleSoft application and BusinessObjects Enterprise XI:
• PeopleSoft Permission Lists
• PeopleSoft Roles
• PeopleSoft Users IDs
The Permission Lists and Roles are added to the PeopleSoft database when you run the CRTOBOE project andCRTOBOE Data Mover script. The PeopleSoft users must be created manually.
Note. You should use the objects (that is, permission list and roles) as delivered. Do not rename them, deletethem or otherwise alter them. This will only complicate and possibly compromise your installation.
PeopleSoft Permission Lists:
The following Permission Lists are inserted into the PeopleSoft database when you run the project CRTOBOE:
• PTPT2200This is the “QAS Access” permission list. It provides permission to a number of web services related toQuery Access Services (QAS).This permission list is used only by the “QAS Admin” role. When the role is created, this association isalready defined.
Copyright © 2006, Oracle. All rights reserved. 451

Installing and Configuring Software for Crystal Reports Chapter 12
• PTPT2300This is the “BOE Viewing” permission list.
PeopleSoft Roles
The three roles listed here work hand-in-hand with the three PeopleSoft users that you need to create. Thefollowing Roles are inserted into the PeopleSoft database when you run the project CRTOBOE:
• “QAS Admin”This role is associated with the QAS_Admin and BOE_Admin user IDs. This role (through the permissionlist associated with it) allows users associated with the role to make QAS web-service calls. Note that thename of this role CANNOT be changed, as it is hardcoded into the QAS web service implementation.
• “BOE Admin”This role is associated with the BOE_Admin user ID (which is configured in the PeopleSoftBusinessObjects Enterprise PIA page).
• “BOE Viewing”This role is associated with the BOE_Viewing user ID (which is configured in the PeopleSoftBusinessObjects Enterprise PIA page).
PeopleSoft Users
You will have to create 3 PeopleSoft users in the PeopleSoft database. They work hand-in-hand with the threePeopleSoft roles described above. For ease of supportability we strongly suggest that you create the userswith exactly the names specified. The users are:
• QAS_AdminThis user makes QAS web service calls to PeopleSoft from BusinessObjects Enterprise. It is known onlywithin the PeopleSoft application. BusinessObjects Enterprise XI is not aware of this user.When user BOE_Admin calls the PeopleSoft application from BusinessObjects Enterprise XI witha request to run a query through QAS, the user is switched programmatically from BOE_Admin toQAS_Admin to run the query.
• BOE_AdminThis user is used:
- to run the Crystal 9 to Crystal XI report convert/publish utility
- by Process Scheduler to run reports in BusinessObjects Enterprise XI
This user is specified in the PeopleSoft BusinessObjects Enterprise PIA configuration page. The user willbe created in BusinessObjects Enterprise XI automatically by specifying its corresponding role (that is,“BOE Admin”) in that application. This user is considered a named user in BusinessObjects Enterprise.Additionally, this user must also be in the BusinessObjects Enterprise XI administrators group.• BOE_ViewingPeopleSoft Report Manager logs in to BusinessObjects Enterprise XI Interactive Viewer as this user inorder to permit viewing dynamic report output. This user is specified in the PeopleSoft BusinessObjectsEnterprise XI PIA configuration page.The user will be created automatically in BusinessObjects Enterprise XI by specifying its correspondingrole (that is, “BOE Viewing”) in that application.This user id is a concurrent user in BusinessObjects Enterprise XI, which means that each time it logs intoBusinessObjects Enterprise XI it will use a BOE concurrent access license.
452 Copyright © 2006, Oracle. All rights reserved.
Chapter 12 Installing and Configuring Software for Crystal Reports
Please note that multiple end-users (that is, real people) accessing reports concurrently in theBusinessObjects Enterprise XI Interactive Viewer via the PeopleSoft Report Manager will appear fromthe perspective of the BusinessObjects XI Interactive Viewer to be concurrent logins from the sameuser – BOE_Viewing.
Task 12-7-1: Installing PatchesWhile you may have installed patches for both BusinessObject Enterprise XI and the PeopleSoft Integrationfor BusinessObject Enterprise XI that were required at installation time, there may be other patches that youneed to install after installation.
Check PeopleSoft Customer Connection to see whether there are patches you must install.
Installation instruction for each patch will be included with the patch.
Task 12-7-2: Changing the Data Source of the BusinessObjectsEnterprise XI Report RepositoryThis section discusses:
• Changing the Data Source on Windows
• Changing the Data Source on UNIX or Linux
Changing the Data Source on WindowsUse the steps in this section if you want to change the data source after you have completed the installationand integration.
1. Select Start, Programs, Business Objects XI, Business Objects Enterprise, Central Configuration Manager.
2. Right-click the Central Management Server and choose the Stop option.
3. Right-click the Central Management Server and select Properties.
4. Select the Configuration tab.
5. Click the Specify button in the CMS Data Source area.
Copyright © 2006, Oracle. All rights reserved. 453

Installing and Configuring Software for Crystal Reports Chapter 12
Central Management Server Properties dialog box: Configuration tab
6. Select the radio button Select a Data Source and click OK.
CMC Database Setup window
7. Specify whether you want to connect to the production CMS database through ODBC or through one ofthe native drivers, and then click OK.
454 Copyright © 2006, Oracle. All rights reserved.

Chapter 12 Installing and Configuring Software for Crystal Reports
Select Database Driver dialog box
• If you select ODBC, the Windows “Select Data Source” dialog box appears.Select the ODBC data source that corresponds to your CMS database; then click OK. If prompted,provide your database credentials and click OK.
• If you select a native driver, you are prompted for your database server name, user id and password.8. Click OK.The SvcMgr dialog box notifies you when the CMS database setup is complete.
9. Start the Central Management Server.
Changing the Data Source on UNIX or LinuxUse the steps in this section if you want to change the data source after you have completed the installationand integration.
1. Use the script ccm.sh to stop the Central Management Server.2. Run cmsdbsetup.sh.When prompted, enter the CMS name or press Enter to select the default one.
3. Type 6 in order to specify source CMS.4. Select the type of database connection.5. Enter the database server name, user ID and password.6. The script notifies you when the setup is complete.
Task 12-7-3: Uninstalling BusinessObjects EnterpriseXI IntegrationThis section discusses:
• Uninstalling PeopleSoft for BusinessObjects Enterprise XI on Windows
• Uninstalling BusinessObjects Enterprise XI on Windows
• Uninstalling PeopleSoft for BusinessObjects Enterprise XI on UNIX or Linux
• Uninstalling BusinessObjects Enterprise XI on UNIX or Linux
Copyright © 2006, Oracle. All rights reserved. 455

Installing and Configuring Software for Crystal Reports Chapter 12
Uninstalling PeopleSoft for BusinessObjects Enterprise XI on WindowsTo remove the BusinessObjects Enterprise XI integration to PeopleSoft Enterprise, you must first uninstall thePeopleSoft for BusinessObjects Enterprise XI integration, then uninstall BusinessObjects Enterprise XI.
1. Select Start, Settings, Control Panel.2. Select Add/Remove Programs.3. Select BusinessObjects Enterprise XI for PeopleSoft Integration.4. Click Remove.
Uninstalling BusinessObjects Enterprise XI on WindowsAfter removing the BusinessObjects Enterprise XI integration to PeopleSoft, use these steps to uninstallBusinessObjects Enterprise XI:
Note. These instructions assume that Crystal Reports XI is not installed on the same machine asBusinessObjects Enterprise XI.
1. Select Start, Settings, Control Panel, Add or Remove Programs.2. Remove Business Objects XI.3. Remove the following directories:• <BOE_DIR>\Business Objects, where <BOE_DIR> is the directory where you installed BusinessObjectsEnterprise XI. If you accepted the defaults during installation, this is C:\Program Files\Business Objects.
• <BOE_DIR>\Common Files\Business Objects4. Find and delete the following registry keys.
Warning! Using the Registry Editor incorrectly can cause serious problems that may require you toreinstall the Windows operating system. Use Registry Editor at your own risk. It is strongly advised thatyou make a backup copy of the registry files (System.dat and User.dat on Win9x computers) beforeyou edit the registry.
• HKEY_LOCAL_MACHINE\SOFTWARE\Business Objects• HKEY_LOCAL_MACHINE\Software\Business Objects• HKEY_USERS\S-#-#-##...-####\Software\Business ObjectsThe number signs (#) represent a series of numbers that are different on each computer.
• HKEY_USERS\.DEFAULT\Software\Business Objects5. If you have both Business Objects and Crystal Reports installed on your system, you must also delete theCrystal Reports folders, and delete the Crystal Reports registry key, as described above.
6. Reboot your system.
Uninstalling PeopleSoft for BusinessObjects Enterprise XI on UNIX or LinuxTo uninstall the BusinessObjects Enterprise XI integration to PeopleSoft on UNIX or Linux, you must firstuninstall the PeopleSoft for BusinessObjects Enterprise XI integration, then uninstall BusinessObjectsEnterprise XI.
1. Enter the following command, where <BOE_INTEG_HOME> is the directory where you installedBusinessObjects Enterprise XI Integration, and <OS> is your database platform:
456 Copyright © 2006, Oracle. All rights reserved.
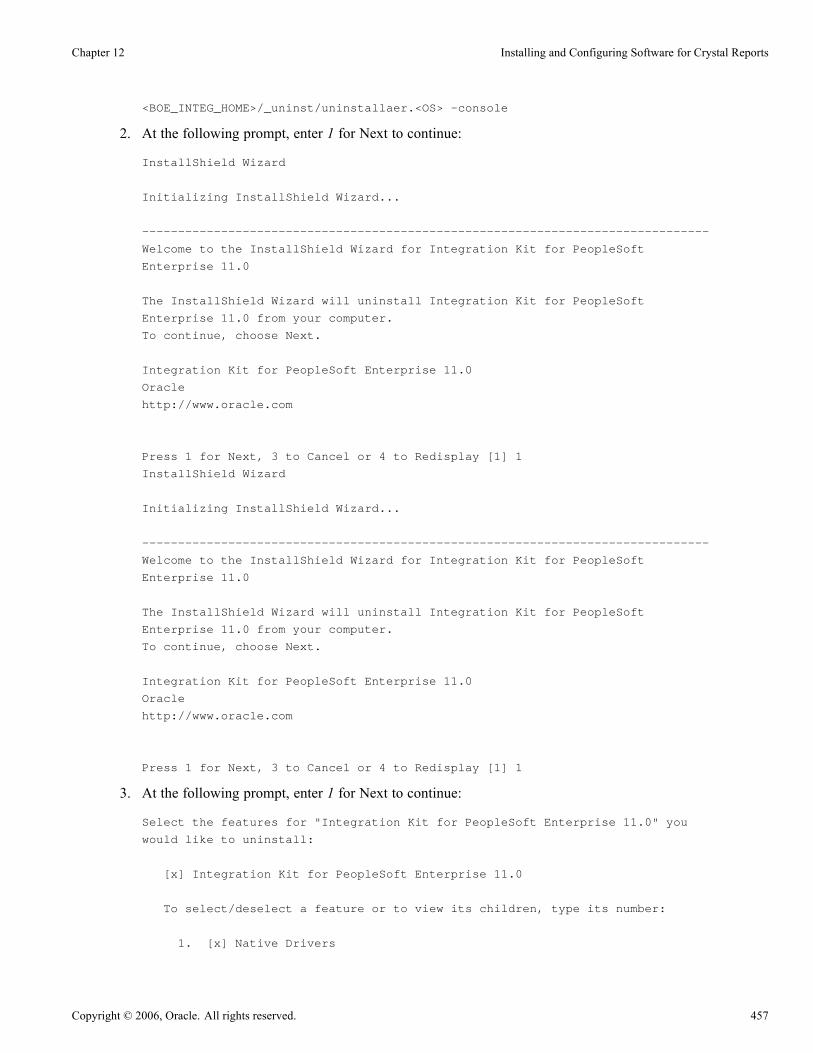
Chapter 12 Installing and Configuring Software for Crystal Reports
<BOE_INTEG_HOME>/_uninst/uninstallaer.<OS> -console
2. At the following prompt, enter 1 for Next to continue:
InstallShield Wizard
Initializing InstallShield Wizard...
-------------------------------------------------------------------------------
Welcome to the InstallShield Wizard for Integration Kit for PeopleSoft
Enterprise 11.0
The InstallShield Wizard will uninstall Integration Kit for PeopleSoft
Enterprise 11.0 from your computer.
To continue, choose Next.
Integration Kit for PeopleSoft Enterprise 11.0
Oracle
http://www.oracle.com
Press 1 for Next, 3 to Cancel or 4 to Redisplay [1] 1
3. At the following prompt, enter 1 for Next to continue:
Select the features for "Integration Kit for PeopleSoft Enterprise 11.0" you
would like to uninstall:
[x] Integration Kit for PeopleSoft Enterprise 11.0
To select/deselect a feature or to view its children, type its number:
1. [x] Native Drivers
Copyright © 2006, Oracle. All rights reserved. 457

Installing and Configuring Software for Crystal Reports Chapter 12
2. [x] Security Plug-in (Server Side)
3. [x] Security Plug-in (Web Content)
4. [x] Security Plug-in (Client Side Java Version)
Other options:
-1. Deselect ’Integration Kit for PeopleSoft Enterprise 11.0’
0. Continue uninstalling
Enter command [0]
Press 1 for Next, 2 for Previous, 3 to Cancel or 4 to Redisplay [1] 1
4. At the following prompt, confirm the directory where BusinessObjects Enterprise is installed and thenenter 1 for Next to continue:
Integration Kit for PeopleSoft Enterprise 11.0 will be uninstalled from the
following location:
/ds1/home/bobje/installation/peoplesoft
with the following features:
Native Drivers
Security Plug-in (Server Side)
Security Plug-in (Web Content)
Security Plug-in (Client Side Java Version)
Press 1 for Next, 2 for Previous, 3 to Cancel or 4 to Redisplay [1]
5. Confirm the uninstallation is correct and enter 3 to finish:
Uninstalling Integration Kit for PeopleSoft Enterprise 11.0...
-------------------------------------------------------------------------------
The InstallShield Wizard has successfully uninstalled Integration Kit for
PeopleSoft Enterprise 11.0. Choose Finish to exit the wizard.
Press 3 to Finish or 4 to Redisplay [3]
Uninstalling BusinessObjects Enterprise XI on UNIX or LinuxAfter removing the BusinessObjects Enterprise XI integration to PeopleSoft, use these steps to uninstallBusinessObjects Enterprise IX:
1. Disable and stop all of the BusinessObjects Enterprise XI servers.2. Run the script $bobje/uninstallBOBJE.sh.This script deletes all of the files installed during your original installation of BusinessObjects EnterpriseXI.
458 Copyright © 2006, Oracle. All rights reserved.

Chapter 12 Installing and Configuring Software for Crystal Reports
Note. You may also notice scripts in the %bobje/uninstall directory. Do not run the scripts in the%bobje/uninstall directory manually. Each of these scripts removes only the files associated with asingle BusinessObjects Enterprise XI component, which may leave your BusinessObjects EnterpriseXI system in an indeterminate state.
3. Remove all of the files in the $bobje directory by running the command rm -rf.This removes files that are created during the installation process, or files created by the system or by usersafter installation, that are not removed by the uninstallBOBJE.sh script.
4. If you performed the “system” installation type, you will also need to delete the run control scripts from theappropriate /etc/rc# directories.
Task 12-7-4: Switching to Crystal 9 from BusinessObjectsEnterprise XIUse the instructions in this section if you need to switch your environment back to run Crystal Reports usingthe Crystal Reports 9 runtime instead of the BusinessObjects Enterprise XI server.
To switch from using BusinessObjects Enterprise XI to Crystal Reports:
1. Run the DMS script boetocr.dms2. Run the project BOEtoCR.Running this script and project will change your delivered Crystal process type back to use Crystal 9.
Note. This will not change any process types that you created.
You cannot run any reports converted to BusinessObjects Enterprise XI format using Crystal Reports. Youhave to run your original Crystal reports.
Task 12-7-5: Using Logging in BusinessObjects Enterprise XIThis section discusses:
• Enabling Web Component Adapter Logging
• Enabling BusinessObjects Enterprise XI Server Logging
• Enabling Security Plug-in Logging
• Enabling BusinessObjects Enterprise XI Services Tracing
Enabling Web Component Adapter LoggingThe integration between PeopleSoft and BusinessObjects Enterprise XI requires a special version of the WebComponent Adapter. It is delivered as a war file called pswebcompadapter.war.
To enable logging:
1. Stop the application server running BusinessObjects Enterprise XI.2. Extract the web.xml file from the pswebcompadapter.war archive.3. Edit the file using a text editor. The relevant entries to edit are:
Copyright © 2006, Oracle. All rights reserved. 459

Installing and Configuring Software for Crystal Reports Chapter 12
Context Parameter Description
Log.file Filename of the log file including full real path to file,including extension. The default is WCA, with no path.
Log.ext File extension of log file; the default is .log
Log.isRolling Determines whether or not the logs will be rotated; thedefault value is true.
Log.size If log rolling is turned on, this will govern the maximumsize allowed before the log file is rotated. Acceptedsuffixes: MB, KB, and GB
Log.level The default log level is “ERROR”
Possible values are: ALL, DEBUG, INFO,WARN,FATAL, ERROR, OFF
Log.entryPattern This is the log4j Pattern Layout. Log4j is a standardfor logging in XML files for Java application servers.It formats logging events according to the patternspecified.
If no value is specified, the entry in the log will displaythe date, thread, level or priority of the logging event,and the message.
Conversion patterns are composed of literal textand conversion specifiers. Literal text is output asis. Conversion specifiers consist of the % characterfollowed by an optional format modifier and amandatory conversion character.
For example: %-5p [%t]: %m%n
Please refer to log4j documentation for accepted logpatterns.
Log.Flags Possible values are:
-trace
-reqtrace
-noassert
-stackdump
-nativeassert
-nonativeassert
-notraceoutput
-filelogFilter
4. Reinsert the file into the WEB-INF directory in pswebcompadapter.war.
Note. To reinsert web.xml into WEB-INF using WinZip, right-click on the WEB-INF directory thatcontains your edited web.xml file and select “Add to Zip File...”. Adding the file in this way ensures that itis placed in the correct directory inside the archive.
5. Restart your application server.
460 Copyright © 2006, Oracle. All rights reserved.

Chapter 12 Installing and Configuring Software for Crystal Reports
When you install more than one WCA, each pswebcompadapter.war file contains its own web.xml filecontaining configuration parameters for that WCA.
For more information on configuring the Web Component Adapter please refer to the section in theBusinessObjects Administration Guide, “Configuring the Web Component Adapter.”
Enabling BusinessObjects Enterprise XI Server LoggingEach of the BusinessObjects Enterprise XI servers is designed to log messages to your operating system’sstandard system log.
On Windows, BusinessObjects Enterprise XI logs to the Event Log service. You can view the results with theEvent Viewer (in the Application Log).
On UNIX, BusinessObjects Enterprise XI logs to the syslog daemon as a User application. Each serverprepends its name and PID to any messages that it logs.
Each server also logs assert messages to the logging directory of your product installation. The programmaticinformation logged to these files is typically useful only to Business Objects support staff for advanceddebugging purposes. The location of these log files depends upon your operating system:
• On Windows, the default logging directory is C:\Program Files\Business Objects\BusinessObjectsEnterprise 11\Logging.
• On UNIX, the default logging directory is the <INSTALL_ROOT>/bobje/logging directory of yourinstallation.
It is important to note that these log files are cleaned up automatically, so there will never be more thanapproximately 1 MB of logged data per server.
For more information on Logging BusinessObjects Enterprise XI server activity please refer to theBusinessObjects Enterprise Admin Guide Section “Logging Server Activity.”
Enabling Security Plug-in LoggingThe procedure to turn on security plug-in logging varies by operating system.
Note. Return the log mode to a value of 0 when you do not need logging. Performance will be impactedotherwise.
• Windows:To turn on logging, edit the Windows registry.
HKLM\SOFTWARE\Business Objects\Suite 11.0\Integration Kit for PeopleSoft⇒Enterprise
Log Mode
1. Change the Log Mode value from 0 to 1.2. Restart the services CMS.This will then generate log files in the directory specified in Path Log. You may want to clean up thatdirectory first, if logging had been turned on before.
• UNIX and Linux:To turn on logging you need to update the Log Mode setting in the registry file.The registry file is located at: <BOE_DIR>/bobje/data/.bobj/registry
Copyright © 2006, Oracle. All rights reserved. 461

Installing and Configuring Software for Crystal Reports Chapter 12
1. Open the file in a text editor and set the value of "Log Mode" to "1".2. Restart the services (CMS, Job Server, Page Server, Report Application Server). This will turnon the driver/security plug-in tracing.
Enabling BusinessObjects Enterprise XI Services TracingIt is also possible to turn on tracing for the BusinessObjects Enterprise XI services. This involves updating thecommand line for each of the services and adding -trace at the end. Depending on the Operating System onwhich you are running BusinessObjects Enterprise XI the procedure to do this varies.
Remove the -trace from the command line after your testing is complete as it can cause performance issueswith the servers because of the large number of log files created.
Windows:
1. Log on to the Crystal Configuration Manager with an account with administrative privileges.2. Highlight the server you would like to enable tracing on and click the Stop button.3. Double-click the server, add -trace to the command line, and click the Start button.Completing the steps will enable advanced logging on a Crystal Enterprise, Crystal Reports Server, orBusinessObjects Enterprise XI server for Windows.To review the logs open Windows Explorer and navigate to the logging directory:X:\Program Files\Business Objects\BusinessObjects Enterprise 11\Loggingwhere X is the drive letter where software was installed.
UNIX or Linux:
1. Go to the $bobje$\bobje folder.
2. Edit ccm.config file. Add "-trace" at the end of services that you want to logging.
3. Restart all servers.
The log files write to the $bobje$\bobje\logging folder.
Task 12-7-6: Understanding BusinessObjects EnterpriseXI License CodesAccess to BusinessObjects Enterprise XI is based on license codes. There are two types of license codesrelevant to BusinessObjects Enterprise XI:
• Named Users licences
• Concurrent Access licences
Named users licenses allow a specific user access to BusinessObjects Enterprise XI. If you are a named user,you have access to BusinessObjects Enterprise XI regardless of how many other users are connected tothe system.
Concurrent access licenses allow a certain number of unspecified users access to BusinessObjects EnterpriseXI from a pool of users. If you are a concurrent user, you have access to BusinessObjects Enterprise XI only ifthere are Concurrent Access Licenses that are not being used by other concurrent users.
The OEM license codes delivered by Oracle for the integration between PeopleSoft and BusinessObjectsEnterprise allow for:
462 Copyright © 2006, Oracle. All rights reserved.

Chapter 12 Installing and Configuring Software for Crystal Reports
• 1 Named User license• 5 Concurrent Access licences
In the context of PeopleSoft applications integrated with BusinessObjects Enterprise XI, the one NamedUser License is reserved for use by Process Scheduler to schedule reports to be run by BusinessObjectsEnterprise XI.
In the context of PeopleSoft applications integrated with BusinessObjects Enterprise XI, Concurrent AccessLicenses are used in these ways:
• when a user views a report using the BusinessObjects Enterprise XI Interactive Viewer• when a user logs into the BusinessObjects Enterprise XI Central Management Console (CMC) directlyusing a user id set up as a concurrent user
After a user is done viewing the report in either scenario, the Concurrent Access license is then free to be usedby another user.
Note. Viewing a report in Acrobat (pdf) format or in viewers other than the BusinessObjects Enterprise XIInteractive Viewer does not use a Concurrent Access License.
A relatively small number of concurrent access licenses can support a large number of users. The number ofusers that it will support depends on how many reports users view and how long they view them.
It is likely that you will want to purchase additional Concurrent Access licenses to provide greater access formore users. You can do so by contacting your Oracle sales representative.
When you purchase more Concurrent Access Licenses, you will be provided a License Code. You will need toadd this License Code to your BusinessObjects Enterprise XI installation.
To enter license codes:
1. In a browser, enter the following URL, substituting the name of your BusinessObjects Enterprise XI serverfor <machine_name>, and the BusinessObjects Enterprise XI port number for <BOE_port>:
http://<machine_name>:<BOE_port>/businessobjects/enterprise11/adminlaunch/
Note. You can also click the Webserver Ping button on the QAS admin page to open the Central ManagerConsole.
2. Log on with administrator and no password.
Copyright © 2006, Oracle. All rights reserved. 463
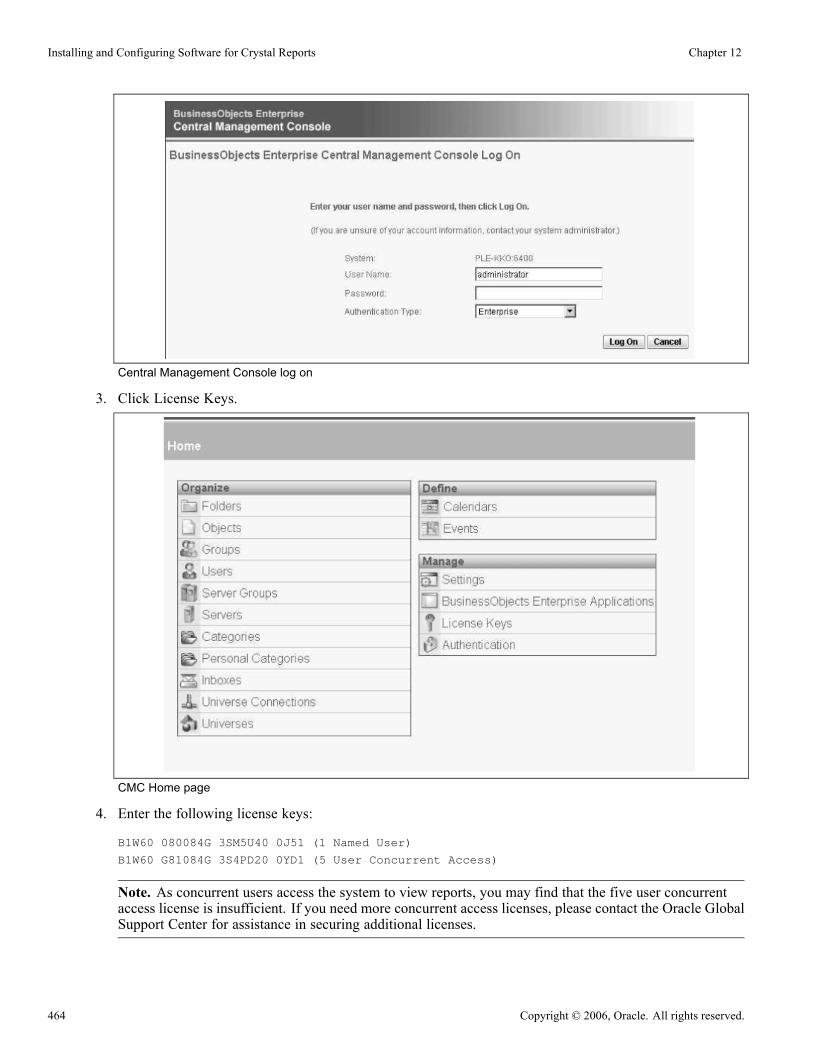
Installing and Configuring Software for Crystal Reports Chapter 12
Central Management Console log on
3. Click License Keys.
CMC Home page
4. Enter the following license keys:
B1W60 080084G 3SM5U40 0J51 (1 Named User)
B1W60 G81084G 3S4PD20 0YD1 (5 User Concurrent Access)
Note. As concurrent users access the system to view reports, you may find that the five user concurrentaccess license is insufficient. If you need more concurrent access licenses, please contact the Oracle GlobalSupport Center for assistance in securing additional licenses.
464 Copyright © 2006, Oracle. All rights reserved.

Chapter 12 Installing and Configuring Software for Crystal Reports
Entering license keys
5. Click Go to return to the home page.
Task 12-8: Converting Crystal ReportsThis section discusses:
• Selecting the Crystal Reports Conversion Method
• Converting pre-PeopleTools 8 Crystal Reports to PeopleTools 8 Crystal Reports
• Converting Reports from Crystal Reports 9 Format to Crystal Reports XI Format
Selecting the Crystal Reports Conversion MethodThis section includes information on converting from Crystal Reports to various formats. You will fall intoone of the following scenarios:
• Scenario 1:
You are upgrading your PeopleSoft installation to run on PeopleTools 8 and you do not plan to useBusinessObjects Enterprise XI. You will use the Windows-based Crystal Report Print Engine packagedwith PeopleTools instead.
Copyright © 2006, Oracle. All rights reserved. 465

Installing and Configuring Software for Crystal Reports Chapter 12
You will have to run a conversion program to convert your Crystal reports so that they can run onPeopleTools 8.
See Converting pre-PeopleTools 8 Crystal Reports to PeopleTools 8 Crystal Reports.
• Scenario 2:Your PeopleSoft installation is already running on PeopleTools 8 and you want to run your Crystal reportsusing BusinessObjects Enterprise XI.
You will have to convert your reports from Crystal 9 format to Crystal XI format.
See Converting Reports from Crystal Reports 9 Format to Crystal Reports XI Format.• Scenario 3:You are upgrading your PeopleSoft installation to run on PeopleTools 8.48 from a pre-PeopleTools 8environment and plan to use BusinessObjects Enterprise XI.You will have to:
- first run a conversion program to convert your Crystal reports so that they can run on PeopleTools 8;
- then run the conversion program that will convert them from Crystal 9 format to Crystal 11 format.
See the section Converting pre-PeopleTools 8 Crystal Reports to PeopleTools 8 Crystal Reports.
Then see the section Converting Reports from Crystal Reports 9 format to Crystal Reports XI format.• Scenario 4:You are upgrading your PeopleSoft installation and are already running your reports on BusinessObjectsEnterprise XI.No report conversion is necessary.
Task 12-8-1: Converting pre-PeopleTools 8 Crystal Reportsto PeopleTools 8 Crystal ReportsThis section discusses:
• Understanding the PeopleTools RPT Conversion Utility
• Converting RPT Files
• Repairing RPT Files
Understanding the PeopleTools RPT Conversion UtilityThe PeopleTools RPT Conversion utility is a standalone program that converts your .rpt files from the formatPeopleSoft used in previous releases to the PeopleTools 8 format. You only need to run this program if you areupgrading from previous versions of PeopleTools. This section discusses how to:
• Convert .rpt files• Repair .rpt files
See the PeopleSoft upgrade guide for your platform.
Converting RPT FilesBefore you run the PeopleSoft RPT Conversion utility, you should move your report files to a specificdirectory. You can then point the conversion utility to that directory.
466 Copyright © 2006, Oracle. All rights reserved.

Chapter 12 Installing and Configuring Software for Crystal Reports
Note. You should also back up your report files. If any problem occurs while you run this program, your reportfiles may become corrupted.
To run the conversion:
1. Select Start, Programs, PeopleSoft 8, PeopleTools RPT Converter.Alternatively, run pscvtrpt.exe from <PS_HOME>\bin\client\winx86.
2. Accept the default directory or browse to select a new directory.The Selected Report directory default is the location of your Crystal Reports as specified in theConfiguration Manager. If you wish to convert files in a different location, select the new directory.
3. Select the check box Convert RPT files in subdirectories.The database information is automatically removed from older reports that are converted. After theconversion, reports that were successfully converted appear in the Files Converted list box.
4. Select Convert.If you have not signed into the PeopleSoft database, you are prompted to do so. After you successfully signinto a database, you can see a progress window.
5. At the prompt “Successful conversion of x files. Skipped x files,” click OK.When the conversion is complete, a Close button is enabled.
6. Select Close.Before closing, take note of any .rpt files that failed to convert. This is usually due to read only access.
Repairing RPT FilesYou can use the RPT Conversion utility when you are experiencing problems with a report that has alreadybeen converted as part of the upgrade procedure.
Note. Select the Run Verify Database option first. If the problem is still not resolved, select the Removedatabase info from current Crystal reports option.
To repair RPT files:
1. Select Start, Programs, PeopleSoft 8, PeopleTools RPT Converter.2. Accept the default directory or browse to select a different directory.The Selected Report directory default is the location of your Crystal Reports as specified in theConfiguration Manager. If you wish to repair files in a different location, select the new directory.
3. Select either the Run Verify Database or the Remove database info from current Crystal reports check box.The Run Verify Database option verifies whether the query information saved in the report is in sync withthe query definition.When it is complete, reports that were current and had the database information removed appear in theFiles Converted list box, with a * to the left of the report name.
4. Select Convert.A progress window appears.
5. At the prompt “Successful conversion of x files. Skipped x files,” click OK.
Copyright © 2006, Oracle. All rights reserved. 467

Installing and Configuring Software for Crystal Reports Chapter 12
When the conversion is complete, a Close button is enabled.6. Select Close.Before closing, take note of any .rpt files that failed. This is usually due to read-only access.
Task 12-8-2: Converting Reports from Crystal Reports 9Format to Crystal Reports XI FormatThis section discusses:
• Understanding the Conversion from Crystal Reports 9 to Crystal Reports XI
• Preparing for Conversion of Crystal 9 Reports
• Running the Conversion
• Verifying the Conversion and Publish
• Reviewing Common Conversion Errors and Warning Messages
Understanding the Conversion from Crystal Reports 9 to Crystal Reports XIThe PeopleTools RPT Conversion utility pscrconv.exe is a program that converts your Crystal Reports .rpt filesfrom the format that PeopleSoft used in previous PeopleTools 8.x releases to the PeopleTools 8.48 format foruse with Crystal Reports XI. This utility also publishes the converted Crystal Reports files by moving theminto the BusinessObjects Enterprise Repository so that they can run in the PeopleSoft database.
Note. The PeopleTools RPT Conversion Utility is not intended to be run on reports with non-PeopleSoftdata sources.
Overview of the Conversion and Publish Processes
There are two key processes:
• Converting report definition files from Crystal 9 format to Crystal XI format• Publishing Crystal XI report definition files into the BusinessObjects Enterprise XI Report Repository
In order to run reports using BusinessObjects Enterprise XI through PeopleSoft, the Crystal Reports XI reportdefinitions must reside in the BusinessObjects Enterprise XI Report Repository.
You can perform each process individually or both together. Here are some examples that might make this clear:
• In a development environment you might run convert and publish together to populate your developmentenvironment.
• In a test environment you may want to run the conversion by itself, and then run the publish processmultiple times in order to publish the same reports to different test environments.
Here is a diagram that illustrates conversion and publishing:
468 Copyright © 2006, Oracle. All rights reserved.
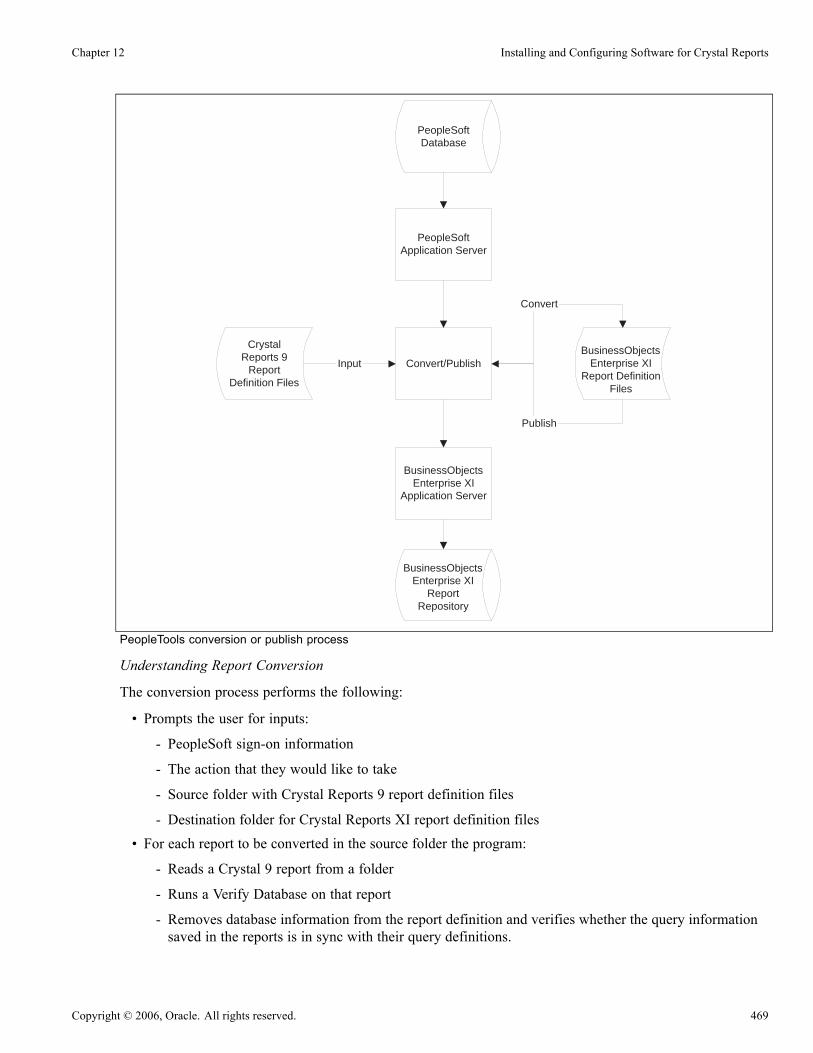
Chapter 12 Installing and Configuring Software for Crystal Reports
Convert/Publish
PeopleSoftDatabase
CrystalReports 9
ReportDefinition Files
Input
BusinessObjectsEnterprise XI
ReportRepository
PeopleSoftApplication Server
BusinessObjectsEnterprise XI
Application Server
BusinessObjectsEnterprise XI
Report DefinitionFiles
Convert
Publish
PeopleTools conversion or publish process
Understanding Report Conversion
The conversion process performs the following:
• Prompts the user for inputs:
- PeopleSoft sign-on information
- The action that they would like to take
- Source folder with Crystal Reports 9 report definition files
- Destination folder for Crystal Reports XI report definition files
• For each report to be converted in the source folder the program:
- Reads a Crystal 9 report from a folder
- Runs a Verify Database on that report
- Removes database information from the report definition and verifies whether the query informationsaved in the reports is in sync with their query definitions.
Copyright © 2006, Oracle. All rights reserved. 469
Installing and Configuring Software for Crystal Reports Chapter 12
- For every field on the report the program determines the name by which QAS recognizes it.
The program identifies all the possible field names that could be used in a report (as either a selectedfield, parameter field, expression field) and then provides the name QAS will use for those same fields.
- Calls a Business Objects-supplied conversion routine to convert report definition contents fromCrystal 9 format to Crystal XI format
- Runs a Verify Database on the converted report definition
Understanding Report Publishing
Report publishing can be accomplished by:
• Publishing reports automatically after converting them
• Publishing reports in a separate execution of the program
If you are publishing Crystal XI report files for the first time to the BusinessObjects Enterprise XI ReportRepository for a PeopleSoft database, folders are created in the BusinessObjects Enterprise XI Repositoryunder the database name. Report definitions must be published for each PeopleSoft database for which youplan to run reports. Published report definitions cannot be shared across databases. BusinessObjects EnterpriseXI security on these folders is set with full access granted to the BusinessObject Enterprise AdministrativeUser (BOE_Admin) identified on the PeopleTools, Query Access Services, Configure, BusinessObjectEnterprise page. Read access is granted to individual users.
The publish process:
• Requires login information for the administrative PeopleSoft user (user BOE_Admin)
• Requires as input the user for the source folder with Crystal XI reports
• Stores (publishes) the converted report in the BusinessObjects Enterprise XI Report Repository
• Updates information in the PeopleSoft Report Manager so that the Report Manager is aware of the reportdefinitions in the BusinessObjects Enterprise XI Report Repository
Note. If you publish a report that has been previously published to the BusinessObjects Enterprise XIRepository for a PeopleSoft database, the earlier version will be overwritten.
In order to successfully convert and publish you must have the following environment in place:
• A properly installed BusinessObjects Enterprise XI server
• A properly installed PeopleSoft application (database and application server)
• Integration between the PeopleSoft application and the BusinessObjects Enterprise XI server properlyinstalled and configured
• A designated machine on which you will run the conversion program
See the PeopleSoft upgrade guide for your platform.
Preparing for Conversion of Crystal 9 ReportsBefore running the conversion, there are several steps you must complete.
To prepare the conversion workstation:
1. Confirm the Operating System of the workstation.
470 Copyright © 2006, Oracle. All rights reserved.

Chapter 12 Installing and Configuring Software for Crystal Reports
The conversion program must be run on a machine that is running Windows 2000, Windows Server2003, or Windows XP.
2. Confirm access to the PeopleSoft application.The workstation must have connectivity to the PeopleSoft application (that is, you can log on to theapplication through the PeopleSoft logon page).
3. Confirm access to the BusinessObjects Enterprise XI application.The workstation must have connectivity to the BusinessObjects Enterprise XI application. Users can verifyconnectivity by bringing up the BusinessObjects Enterprise XI server CMC (management console) onthe workstation.
4. Install PeopleTools on the workstation.The way to install the conversion program on the conversion workstation is to simply install PeopleToolson the workstation. PSCRCONV.EXE is one of the files installed on the machine.
5. Install Crystal Reports XI on the workstation.Install the latest version of Crystal Reports XI and any hotfixes. Crystal Reports XI will install certaindynamic link libraries that are required for the installation program.
6. Perform a PeopleTools Workstation Installation on the workstation.The conversion program (specifically, the portion of the conversion program supplied by Business Objects),performs a “Verify Database” on each Crystal 9 report definition to be converted. “Verify Database”requires the PeopleSoft ODBC driver. PeopleSoft ODBC driver requires the PeopleTools workstationinstallation in order to remove the pipe character ‘|’ which would otherwise cause the Crystal Report XIreport resulting from conversion to fail creation within BusinessObjects Enterprise XI environment.Do this by navigating to Start, Programs, PeopleSoft 8, Configuration Manager and selecting the ClientSetup tab. Alternatively, run pscfg.exe from <PS_HOME>\bin\client\winx86.
7. Install PSODBC on the Workstation.PSODBC provides connectivity between Crystal 9 reports and the PeopleSoft application database.The PSODBC ODBC driver can be installed by navigating to Start, Programs, PeopleSoft 8,Configuration Manager and selecting the Client Setup tab. Alternatively, run pscfg.exe from<PS_HOME>\bin\client\winx86.
Copyright © 2006, Oracle. All rights reserved. 471

Installing and Configuring Software for Crystal Reports Chapter 12
PeopleSoft Configuration Manager Client Setup tab
To confirm the PeopleSoft Application environment:
1. Confirm the application version of the database and application version of the Crystal 9 Reports.The PeopleSoft database that you have must be associated with the Crystal 9 reports that you want toconvert. That is, the database must have the queries that the Crystal 9 reports access. And the applicationversion of the database must match the application version of the reports that you plan to convert.
2. Verify that the user that will convert the reports has Query access for all the reports that you are planningto convert.The simplest way to do this is to assign user BOE_Admin the “PeopleSoft Administrator” role. That roleallows the user access to run all queries. To assign this role to BOE_Admin:a. Log onto PIA and navigate to PeopleTools, Security, User Profiles.b. Open the User Profile for BOE_Admin and go to the “Roles” tab.c. If not already present in the list of Roles, add Role “PeopleSoft Administrator” to the roles assignedto BOE_Admin and save the page.
Note. The PeopleSoft Administrator Role should be removed from BOE_Admin as soon as you are doneconverting reports to minimize security concerns.
d. Run the process to update the Query Access List Cache.Select PeopleTools, Security, Query Security, Query Access List Cache. On the Query Access ListCache page, verify that the radio button Enable Access List Cache is selected, and click the Runbutton to run the process.
472 Copyright © 2006, Oracle. All rights reserved.

Chapter 12 Installing and Configuring Software for Crystal Reports
Query Access List Cache page
e. If you do not want to assign the PeopleSoft Administrator Role to user BOE_Admin, there are twooptions:Run the conversion by running the conversion program logged on as a PeopleSoft user who does havethe “PeopleSoft Administrator” role assigned to it.
orManually assign query security to user BOE_Admin such that BOE_Admin has security access to allqueries used in Crystal reports. This can be time consuming and error prone, however.
3. Confirm the integrity of the PeopleSoft application database.
Verify the integrity of the PeopleSoft application database by running SYSAUDIT.SQR on the database.In particular, there should be no anomalies in the database as regards Query definitions (SysQuery-01through SysQuery-26). For more information on SYSAUDIT.SQR refer to Enterprise PeopleTools 8.48PeopleBook: Data Management.
4. Turn logging levels to low.
Excessive logging will slow the conversion process. Make sure that you have logging for the applicationserver, PeopleCode, SQL, and Integration Broker set to Low levels. If you experience problems whileexecuting the conversion process, you can selectively increase logging to get better diagnostic information.
5. Confirm your BusinessObjects Enterprise XI environment and integration with PeopleSoft.
The conversion program relies on having a properly installed and configured BusinessObjects EnterpriseXI so that the converted report definitions can be inserted in the BusinessObjects Enterprise XI repository.There are no special steps in this section that are not part of the basic installation steps covered elsewherein this installation guide.
Running the ConversionTo run the conversion:
1. Run pscrconv.exe from <PS_HOME>bin\client\winx86 directory.
2. Sign into the PeopleSoft database, if you have not already done so. Log in as user BOE_Admin.
Ensure that log into the correct database for the reports that you are converting. For example, do not signinto a Human Resources database if the reports were created against a Financials database.
Copyright © 2006, Oracle. All rights reserved. 473
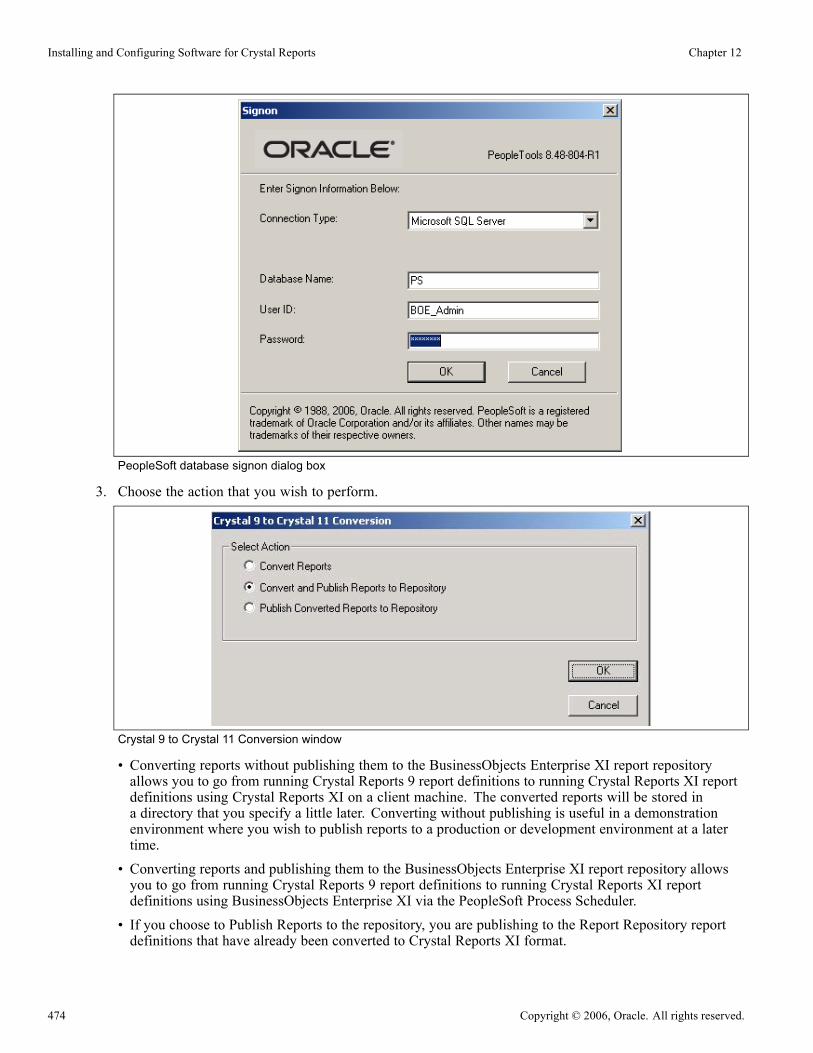
Installing and Configuring Software for Crystal Reports Chapter 12
PeopleSoft database signon dialog box
3. Choose the action that you wish to perform.
Crystal 9 to Crystal 11 Conversion window
• Converting reports without publishing them to the BusinessObjects Enterprise XI report repositoryallows you to go from running Crystal Reports 9 report definitions to running Crystal Reports XI reportdefinitions using Crystal Reports XI on a client machine. The converted reports will be stored ina directory that you specify a little later. Converting without publishing is useful in a demonstrationenvironment where you wish to publish reports to a production or development environment at a latertime.
• Converting reports and publishing them to the BusinessObjects Enterprise XI report repository allowsyou to go from running Crystal Reports 9 report definitions to running Crystal Reports XI reportdefinitions using BusinessObjects Enterprise XI via the PeopleSoft Process Scheduler.
• If you choose to Publish Reports to the repository, you are publishing to the Report Repository reportdefinitions that have already been converted to Crystal Reports XI format.
474 Copyright © 2006, Oracle. All rights reserved.
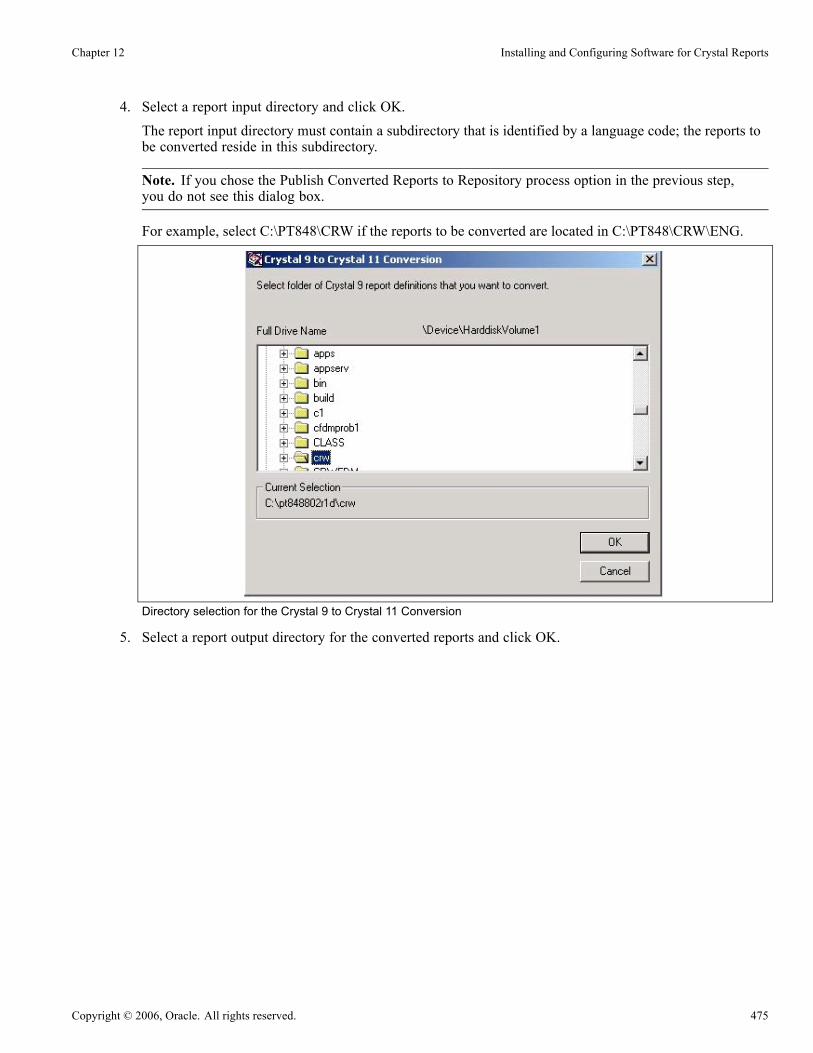
Chapter 12 Installing and Configuring Software for Crystal Reports
4. Select a report input directory and click OK.The report input directory must contain a subdirectory that is identified by a language code; the reports tobe converted reside in this subdirectory.
Note. If you chose the Publish Converted Reports to Repository process option in the previous step,you do not see this dialog box.
For example, select C:\PT848\CRW if the reports to be converted are located in C:\PT848\CRW\ENG.
Directory selection for the Crystal 9 to Crystal 11 Conversion
5. Select a report output directory for the converted reports and click OK.
Copyright © 2006, Oracle. All rights reserved. 475
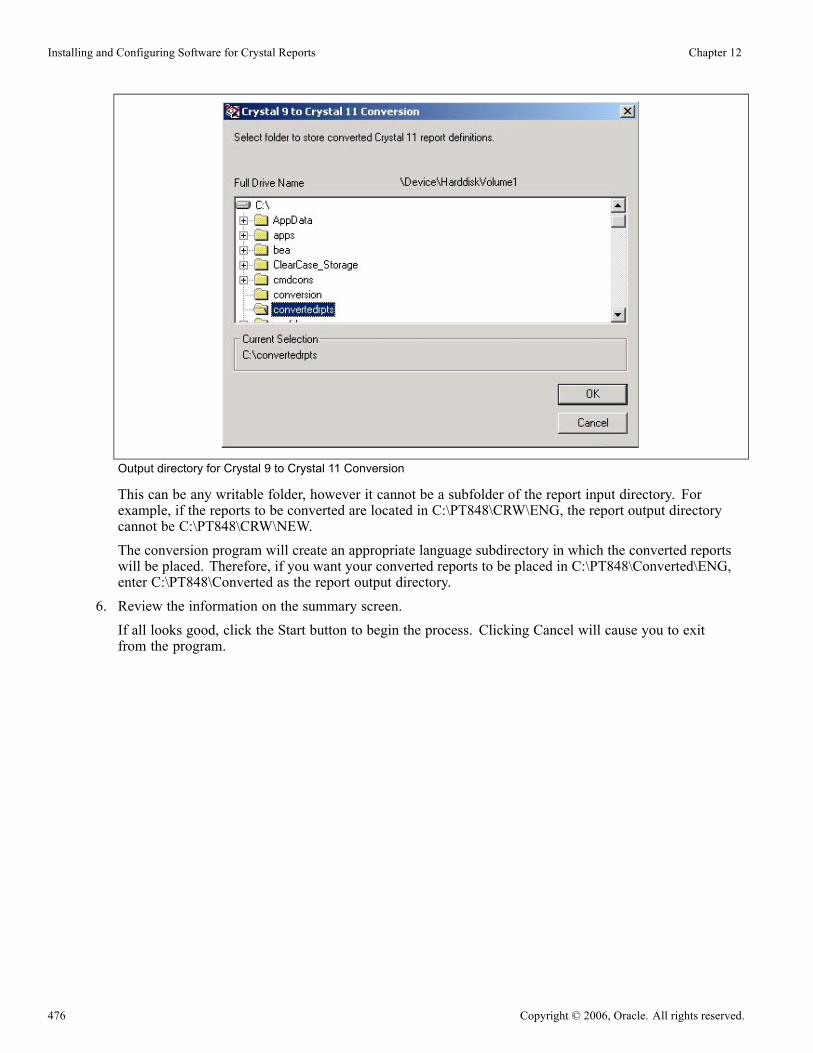
Installing and Configuring Software for Crystal Reports Chapter 12
Output directory for Crystal 9 to Crystal 11 Conversion
This can be any writable folder, however it cannot be a subfolder of the report input directory. Forexample, if the reports to be converted are located in C:\PT848\CRW\ENG, the report output directorycannot be C:\PT848\CRW\NEW.The conversion program will create an appropriate language subdirectory in which the converted reportswill be placed. Therefore, if you want your converted reports to be placed in C:\PT848\Converted\ENG,enter C:\PT848\Converted as the report output directory.
6. Review the information on the summary screen.If all looks good, click the Start button to begin the process. Clicking Cancel will cause you to exitfrom the program.
476 Copyright © 2006, Oracle. All rights reserved.
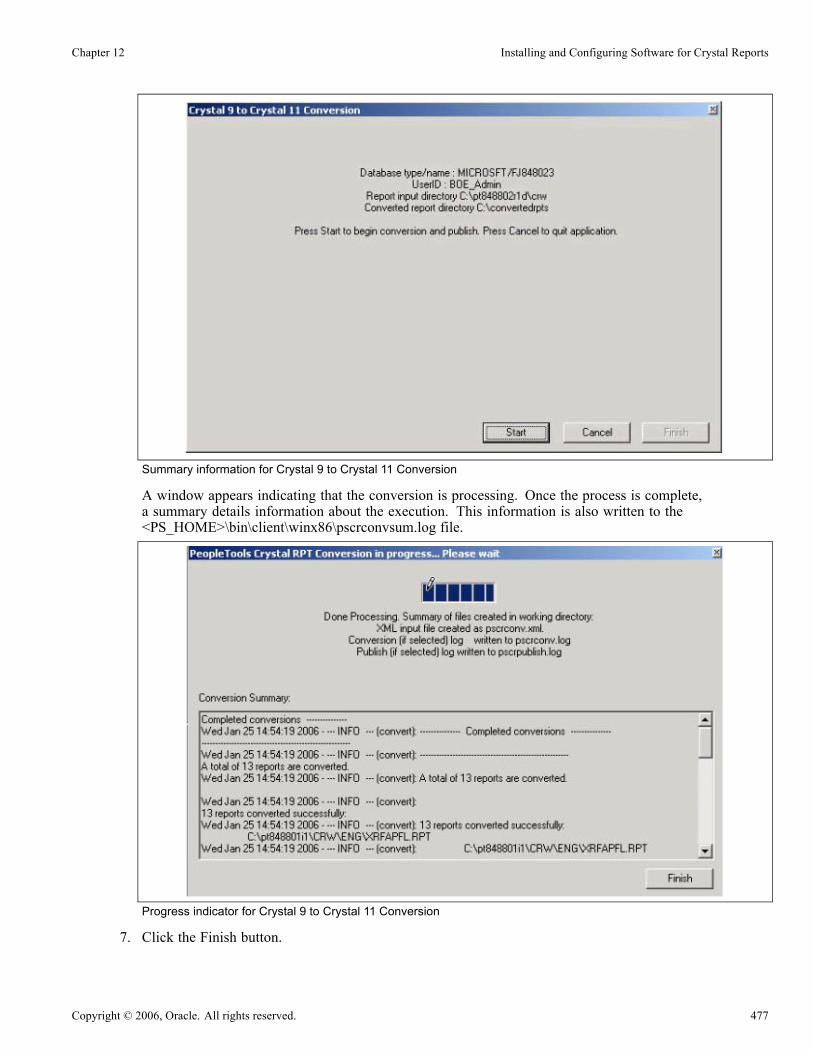
Chapter 12 Installing and Configuring Software for Crystal Reports
Summary information for Crystal 9 to Crystal 11 Conversion
A window appears indicating that the conversion is processing. Once the process is complete,a summary details information about the execution. This information is also written to the<PS_HOME>\bin\client\winx86\pscrconvsum.log file.
Progress indicator for Crystal 9 to Crystal 11 Conversion
7. Click the Finish button.
Copyright © 2006, Oracle. All rights reserved. 477

Installing and Configuring Software for Crystal Reports Chapter 12
Verifying the Conversion and PublishUse these steps to verify that your reports converted properly are:
1. Review the conversion logs.Two log files are generated every time the conversion is run.
PSCRCONVSUM.LOG the summary log
PSCRCONV.LOG the detailed logThese files will be found in the working folder (generally this will be your \client\bin folder).
Note. These files will be overwritten each time you run the conversion program. If you want to save thelogs from a previous run, rename them before you run the process.
The log files will contain information about the conversion for all reports that you submitted for conversionin that execution of the conversion program.a. Review the Summary conversion log, PSCRCONVSUM.LOG.The fastest way is to search the summary log for “Error” and “Warn”. If no reports had error orwarnings then the conversion was successful. If an error or warning condition is indicated on thesummary log, proceed to the next step to check the detailed log.Here is a sample summary conversion log:
Completed conversions ---------------
Fri Jan 20 13:24:31 2006 - --- INFO --- (convert): --------------- ⇒Completed conversions ---------------
-------------------------------------------------------
Fri Jan 20 13:24:31 2006 - --- INFO --- (convert): -------------------------⇒⇒------------------------------
A total of 13 reports are converted.
Fri Jan 20 13:24:31 2006 - --- INFO --- (convert): A total of 13 reports⇒are converted.
Fri Jan 20 13:24:31 2006 - --- INFO --- (convert):
13 reports converted successfully:
Fri Jan 20 13:24:31 2006 - --- INFO --- (convert): 13 reports converted⇒successfully:
C:\pt848801i1\CRW\ENG\XRFAPFL.RPT
Fri Jan 20 13:24:31 2006 - --- INFO --- (convert): C:\pt848801i1\CRW\ENG⇒\XRFAPFL.RPT
C:\pt848801i1\CRW\ENG\XRFFLPC.RPT
Fri Jan 20 13:24:31 2006 - --- INFO --- (convert): C:\pt848801i1\CRW\ENG⇒\XRFFLPC.RPT
C:\pt848801i1\CRW\ENG\XRFFLPN.RPT
Fri Jan 20 13:24:31 2006 - --- INFO --- (convert): C:\pt848801i1\CRW\ENG⇒\XRFFLPN.RPT
C:\pt848801i1\CRW\ENG\XRFFLRC.RPT
Fri Jan 20 13:24:31 2006 - --- INFO --- (convert): C:\pt848801i1\CRW\ENG⇒\XRFFLRC.RPT
478 Copyright © 2006, Oracle. All rights reserved.

Chapter 12 Installing and Configuring Software for Crystal Reports
C:\pt848801i1\CRW\ENG\XRFIELDS.RPT
Fri Jan 20 13:24:31 2006 - --- INFO --- (convert): C:\pt848801i1\CRW\ENG⇒\XRFIELDS.RPT
C:\pt848801i1\CRW\ENG\XRFMENU.RPT
Fri Jan 20 13:24:31 2006 - --- INFO --- (convert): C:\pt848801i1\CRW\ENG⇒\XRFMENU.RPT
C:\pt848801i1\CRW\ENG\XRFPANEL.RPT
Fri Jan 20 13:24:31 2006 - --- INFO --- (convert): C:\pt848801i1\CRW\ENG⇒\XRFPANEL.RPT
C:\pt848801i1\CRW\ENG\XRFPCFL.RPT
Fri Jan 20 13:24:31 2006 - --- INFO --- (convert): C:\pt848801i1\CRW\ENG⇒\XRFPCFL.RPT
C:\pt848801i1\CRW\ENG\XRFPNPC.RPT
Fri Jan 20 13:24:31 2006 - --- INFO --- (convert): C:\pt848801i1\CRW\ENG⇒\XRFPNPC.RPT
C:\pt848801i1\CRW\ENG\XRFRCFL.RPT
Fri Jan 20 13:24:31 2006 - --- INFO --- (convert): C:\pt848801i1\CRW\ENG⇒\XRFRCFL.RPT
C:\pt848801i1\CRW\ENG\XRFRCPN.RPT
Fri Jan 20 13:24:31 2006 - --- INFO --- (convert): C:\pt848801i1\CRW\ENG⇒\XRFRCPN.RPT
C:\pt848801i1\CRW\ENG\XRFWIN.RPT
Fri Jan 20 13:24:31 2006 - --- INFO --- (convert): C:\pt848801i1\CRW\ENG⇒\XRFWIN.RPT
C:\pt848801i1\CRW\ENG\XRFWNFL.RPT
Fri Jan 20 13:24:31 2006 - --- INFO --- (convert): C:\pt848801i1\CRW\ENG⇒\XRFWNFL.RPT
0 reports converted with warnings:
Fri Jan 20 13:24:31 2006 - --- INFO --- (convert): 0 reports converted with⇒warnings:
0 reports failed to convert:
Fri Jan 20 13:24:31 2006 - --- INFO --- (convert): 0 reports failed to⇒convert:
Fri Jan 20 13:24:31 2006 - --- INFO --- (convert):
-------------------------------------------------------
Fri Jan 20 13:24:31 2006 - --- INFO --- (convert): -------------------------⇒⇒------------------------------
b. If necessary review the detailed conversion log, PSCRCONV.LOG
It is not necessary to perform this step if the summary conversion log indicates that all reportsconverted successfully.
The detailed log contains three types of messages:
INFO
WARN
ERROR
Copyright © 2006, Oracle. All rights reserved. 479

Installing and Configuring Software for Crystal Reports Chapter 12
You need to eliminate all ERROR messages. The best policy is to understand why all WARN messagesare generated and eliminate them if you can.Here’s a portion of the detailed log that illustrates a successfully converted report:...
...
Converting the report "C:\pt848801i1\CRW\ENG\XRFAPFL.RPT".
Fri Jan 20 13:29:46 2006 - --- INFO --- (convert): Converting the report "C:⇒⇒\pt848801i1\CRW\ENG\XRFAPFL.RPT".
Fri Jan 20 13:29:46 2006 - --- INFO --- (verify ): Verifying the report⇒before conversion.
Fri Jan 20 13:29:46 2006 - --- INFO --- (verify ): Successfully verified⇒the report.
Fri Jan 20 13:29:50 2006 - --- INFO --- (convert): Successfully converted⇒report "C:\pt848801i1\CRW\ENG\XRFAPFL.RPT" to target "c:\cnew\ENG⇒
\XRFAPFL.RPT".
...
...
If a report has one or more ERROR messages associated with it, it failed conversion. If a report hasonly WARN and INFO messages associated with it, it passed conversion and will run. The WARNmessages may indicate some changes you may want to make to the report definition.
See Reviewing Common Conversion Errors and Warning Messages.
2. Re-run the conversion on the altered reports
After you have made changes to address the ERRORs and WARNs, re-run the conversion program.You should exclude from this execution of the conversion program any reports that were successfullyconverted in prior executions.
3. Verify report publishing.
To verify that the reports published properly, launch the BusinessObjects Enterprise XI Admin Console(on Infoview) and locate the shared folder with the database name you used to publish. Ensure that thenumber of reports with the datetime of the Publish process matches the number of Crystal Reports XIreport definition files that you wanted to publish.
4. Run the converted reports.
For final verification that the reports you converted are correct, you should run the converted reports andcompare their output to their unconverted (that is, Crystal 9) counterparts. You should compare them forequivalent layouts and equivalent data.
To run the report in BusinessObjects Enterprise XI InfoView:
a. Log onto BusinessObjects Enterprise XI Infoview with user BOE_Admin.
b. Use search edit box at top to find the report that you want to run.
c. In the search results choose the report.
d. Enter report parameters, if any, and the report displays.
480 Copyright © 2006, Oracle. All rights reserved.

Chapter 12 Installing and Configuring Software for Crystal Reports
Reviewing Common Conversion Errors and Warning MessagesHere are some conversion errors that you may encounter as you convert your reports. For each we suggestpossible ways to address the problem.
• ERROR — Failed to update the data source of table [datasource(table name)] to QUERY.[query name]For example:
Converting the report "C:\M\CRWFDM\ENG\FORA003-.RPT".
Fri Jan 13 18:10:00 2006 - --- INFO --- (convert): Converting the report "C:\M⇒\CRWFDM\ENG\FORA003-.RPT".
Fri Jan 13 18:10:00 2006 - --- INFO --- (verify ): Verifying the report before⇒conversion.
Fri Jan 13 18:10:00 2006 - --- INFO --- (verify ): Successfully verified the⇒report.
Fri Jan 13 18:10:01 2006 - --- ERROR --- (convert): Failed to update the data⇒source of table EB_EAB(EB_EAB_GEN0) to QUERY.EB_EAB.
Things to check:
- Does the offending query exist in the database?
- Does the PeopleSoft user doing the conversion (that is, the PeopleSoft user that you provided to theconversion program) have security in the PeopleSoft database to access the query?
• WARN — Encountered a duplicate table [table name]. Skipping element.WARN — Encountered an element "field" within an invalid "table" element. Skipping element.For example:
Thu Jan 19 11:07:29 2006 - --- INFO --- ( parse ): -----------------------------⇒⇒--------------------------
Thu Jan 19 11:07:29 2006 - --- INFO --- ( parse ): --------------- Reading⇒command file ---------------
Thu Jan 19 11:07:29 2006 - --- INFO --- ( parse ): -----------------------------⇒⇒--------------------------
Thu Jan 19 11:07:29 2006 - --- INFO --- ( parse ): Parse commands from file⇒pscrconv.xml
Thu Jan 19 11:07:29 2006 - --- WARN --- ( parse ): Encountered a duplicate⇒table WFA0001_AVERAGES_BY_BP_WL. Skipping element.
Thu Jan 19 11:07:29 2006 - --- WARN --- ( parse ): Encountered an element⇒"field" within an invalid "table" element. Skipping element.
Thu Jan 19 11:07:29 2006 - --- WARN --- ( parse ): Encountered an element⇒"field" within an invalid "table" element. Skipping element.
Thu Jan 19 11:07:29 2006 - --- WARN --- ( parse ): Encountered an element⇒"field" within an invalid "table" element. Skipping element
These two warnings are often seen together. They can be generated when two reports being converted inthe same execution of the conversion program use the same query.
There is no need to take action on these warnings.
Copyright © 2006, Oracle. All rights reserved. 481

Installing and Configuring Software for Crystal Reports Chapter 12
482 Copyright © 2006, Oracle. All rights reserved.

CHAPTER 13A
Compiling COBOL on Windows
This chapter discusses:
• Understanding COBOL
• Prerequisites
• Compiling COBOL Source Files
• Distributing COBOL Binaries
Understanding COBOLThis chapter describes how to compile and link PeopleSoft COBOL batch programs, if necessary.
COBOL is not needed for PeopleTools because the Process Scheduler has been re-written in C++. In addition,COBOL is not required for applications that contain no COBOL programs. See Supported Platforms onCustomer Connection for the details on whether your application requires COBOL.
See “PeopleSoft Application COBOL Requirements,” PeopleSoft Customer Connection (Implement, Optimize+ Upgrade, Implementation Guide, Supported Platforms, PeopleSoft Enterprise, By PeopleTools release,Platform Communications by Topic, Batch).
For more details about running COBOL in Unicode, consult the following.
See Enterprise PeopleTools 8.48 PeopleBook: Global Technology, “Running COBOL in a UnicodeEnvironment.”
See Enterprise PeopleTools 8.48 PeopleBook: Global Technology, “Running COBOL in a z/OS UnicodeEnvironment.”
Warning! If your database server is DB2 UDB for z/OS and your CCSID is not 37, you must read theCCSID discussion under “DB2 UDB for z/OS Subsystem Configuration” in Chapter 1 of this book. Alsorefer to Enterprise PeopleTools 8.48 PeopleBook: Global Technology (%BINARYSORT) and to EnterprisePeopleTools 8.48 PeopleBook: Data Management (PSOPTIONS) before proceeding.
PrerequisitesBefore you attempt to run COBOL from the command line you should do the following:
• For UNIX and Windows systems, make sure the variable PS_SERVER_CFG points to a valid psprcs.cfgfile.
Copyright © 2006, Oracle. All rights reserved. 483
Compiling COBOL on Windows Chapter 13A
• For Windows systems, make sure %PS_HOME%\bin\server\winx86 is in your path. It should appearbefore %PS_HOME%\bin\client\winx86 if that also appears in the path.
Task 13A-1: Compiling COBOL Source FilesThis section discusses:
• Understanding COBOL Compilation
• Compiling COBOL with CBLBLD.BAT
• Compiling COBOL with CBLMAKE.BAT
• Defining the GNT and INT Files
Understanding COBOL CompilationWith PeopleTools 8.4, your COBOL always needs to be compiled on Windows. (This is a change fromprevious versions of PeopleTools, which delivered compiled COBOL for Windows.) This chapter assumesthat you are carrying out the compile from your file server. (The COBOL compiler itself doesn't need to beon the file server, as long as the user can write to the file server and can link to the src and bin directories.)PeopleSoft's recommended approach is to use CBLBLD.BAT to compile all your COBOL at once. Anotheralternative is CBLMAKE.BAT, which you can use to compile selected COBOL files.
Make certain to check whether you need to apply any late-breaking patches.
See PeopleSoft Customer Connection, Updates and Fixes.
Task 13A-1-1: Compiling COBOL with CBLBLD.BATTo compile COBOL with CBLBLD.BAT:
1. Set up two environment variables, PS_HOME and COBROOT, on the machine from which you'll compileCOBOL. (This should be either your file server or a machine that has access to your file server.) You cando this from a DOS command prompt window.
Environment Variable Purpose
PS_HOME PeopleSoft home directory—that is, the drive letter andhigh-level PeopleSoft directory where you installedPeopleTools and the application.
COBROOT Drive letter and root directory of the COBOL compiler.
For example, you could enter the following at the DOS command prompt:
set PS_HOME=C:\hr840
set COBROOT=c:\netexpress\base
2. Open a DOS command prompt window if you do not have one open already, and change directories to<PS_HOME>\setup.
3. Execute CBLBLD.BAT as follows
cblbld <compile drive> <compile directory> EBCDIC
484 Copyright © 2006, Oracle. All rights reserved.

Chapter 13A Compiling COBOL on Windows
where <compile drive> is the drive where the compile takes place, <compile directory> is the tempdirectory where the compile takes placeand EBCDIC is a parameter for collating sequence comparisons on DB2 (by default it compiles withASCII mode)The CBLBLD.BAT file will create the compile directory for you if it does not already exist.
Note. If the database server is DB2 UDB for z/OS, the EBCDIC parameter is required; it is not needed forother platforms.
Note. Make sure to include a space between the <compile drive> and <compile directory> parameters; theyare treated as two different parameters within the CBLBLD.BAT batch program. Also ensure that you havewrite permission to <compile drive> and <compile directory> as the compile process will take place there.
For example, the following command will take the COBOL source from <PS_HOME>\src\cbl and do thecompile process under c:\temp\compile:cblbld c: \temp\compile
Make note of the information that is displayed on the screen while the process is running; it provides thelocations of important files that you will need to examine.
4. After you have successfully compiled your source code, all of the executables should have been placedin your <PS_HOME>\CBLBINX directory (this directory will be named CBLBINA, CBLBINU, orCBLBINE, depending on whether you are using ANSI, Unicode or EBCDIC). Make sure that all ofthe files were copied correctly to this directory.
5. If the files were copied correctly, you can delete the entire temporary compile directory to free space onyour disk drive.
Note. You may want to keep the files in the compile directory for testing purposes. Make sure that youhave enough space on the drive where <compile directory> is located. Estimate about three times theamount in the <PS_HOME>\CBLBINX directory.
Note. If you chose the Unicode option while running the PeopleSoft Installer, the file UNICODE.CFGwas created in the setup directory. UNICODE.CFG automatically triggers the batch file CBL2UNI.BATwhen you run CBLBLD.BAT. Another batch file, CBLRTCPY.BAT, copies four DLLs (CBLINTS.DLL,CBLRTSS.DLL, CBLVIOS.DLL, COB32API.DLL) from the Microfocus compiler directory (identified by%COBROOT% setting) into the appropriate CBLBIN directory (CBLBINA, CBLBINU, or CBLBINE)when you run CBLBLD. These files are needed for COBOL to run; they can reside anywhere as long asthey are in the path. You can run either of these BAT files independently from the DOS command line(they reside in <PS_HOME>\setup). For CBLRTCPY.BAT you need to specify a target directory.
Task 13A-1-2: Compiling COBOL with CBLMAKE.BATCBLBLD.BAT compiles all your COBOL at once, which can take a lot of time. CBLMAKE.BAT, incontrast, lets you employ one or more parameters to compile a specific COBOL file or a selected group ofCOBOL files. Unlike CBLBLD.BAT, however, CBLMAKE.BAT does not automatically trigger the batch fileCBL2UNI.BAT or CBLRTCPY.BAT.
Here is the basic syntax for CBLMAKE.BAT:
CBLMAKE.BAT [] [ALL] [wildcard filename[ALL]] [wildcard filename | wildcard⇒
Copyright © 2006, Oracle. All rights reserved. 485

Compiling COBOL on Windows Chapter 13A
filename without extension[INT | GNT | EXE]] [EBCDIC] [LIST]
Note. The switches are well documented in the CBLMAKE.BAT file in the form of comments.
Note. If you are running z/OS, you must use the EBCDIC parameter.
Note. If the change in the COBOL source is a copy member, you must compile all of the COBOL programsusing CBLBLD.BAT. You know it is a copy member when the third letter in the file name is a C, as inPTCSQLRT.CBL.
The following table describes the various options for CBLMAKE.BAT.
Option Purpose
Cblmake Compiles all source
Cblmake all Compiles all source
Cblmake EBCDIC Compiles all source files for DB2 UDB for z/OS
Cblmake PT* Compiles all source files that start with PT
Cblmake PT* ALL Compiles all source files that start with PT
Cblmake PT* INT Generates INT files for all source files that start with PT
Cblmake PT* GNT Generates GNT files for all source files that start with PT
Cblmake PT* EXE Generates EXE files for all source files that start with PT
Cblmake PTPDBTST INT Generates PTPDBTST.INT file
Cblmake PTPDBTST INT LIST Generates PTPDBTST.INT and source listing file
Cblmake PTPDBTST GNT Generates PTPDBTST.GNT file
Cblmake PTPDBTST EXE Generates PTPDBTST.EXE file
The LIST option creates a source listing file under <compile directory>\<filename>.lis. The LIST option isuseful when the compile fails during the debugging phase. The source listing files show exactly where anerror occurred. This option is not recommended when the program compiles successfully because the .LISfiles can grow to be quite large.
Note. By default, when the program fails to compile, the system will generate a .LIS file.
To compile with CBLMAKE.BAT:
1. Verify that the PS_HOME and COBROOT environment variables are set up correctly.2. Open a DOS command prompt window.
486 Copyright © 2006, Oracle. All rights reserved.
Chapter 13A Compiling COBOL on Windows
3. Make sure the compile directory exists; it may already if you've run CBLBLD.BAT. If it does exist, removeany files residing there—just as a safeguard. If it does not exist, you need to create it.
Note. Make sure you have write permission to <compile directory> as the compile process will takeplace there.
4. Change to the <PS_HOME>\setup directory.5. If the installation is Unicode, run CBL2UNI (with no parameters).6. Execute the following command to copy all the COBOL source files from the <PS_HOME> directory tothe compile directory:
cblsrc <source directory> <compile directory>
where <source directory> is the drive and directory where the source resides (it should be the same as<PS_HOME>), and <compile directory> is the drive and directory to which the source files will be copied.For example, the following command will take the COBOL source from <PS_HOME> and copy all thenecessary files to the location where the compile process will take place.cblsrc <PS_HOME> c:\temp\compile
If the COBOL source that will be compiled is different from the one under <PS_HOME>, copy thatCOBOL source to <compile directory>.
Note. The compile in the next step will generate a GNT file unless the exception file, CBLINT.XXalready exists (the XX represents the Product ID). CBLINT.XX contains the list of files that need to becompiled to the INT file. Make sure the intended CBLINT.XX is located under <compile directory>before executing CBLMAKE.
7. After CBLSRC completes, change directories to the compile directory, and run CBLMAKE.BAT, using thebasic syntax as well as the CBLMAKE table shown earlier as your guide.
8. After CBLMAKE.BAT completes, copy the EXE, GNT, or INT files to the appropriate<PS_HOME>\CBLBINX directory (CBLBINA, CBLBINU, or CBLBINE).
copy *.exe <PS_HOME>\cblbina
copy *.gnt <PS_HOME>\cblbina
copy *.int <PS_HOME>\cblbina
Note. You have to copy these files to the appropriate cblbin directory manually when you use CBLMAKE;they are not copied automatically, as when you use CBLBLD.
Task 13A-1-3: Defining the GNT and INT FilesBy default, the compile generates a GNT file unless the exception file, CBLINT.XX already exists.CBLINT.XX contains the list of files that need to be compiled to the INT file.
Note. The INT exception file is sometimes needed to overcome MicroFocus execution error with GNT files.
For example, the exception file, CBLINT.PT, where PT represents PeopleTools, would contain the followinginformation:
Call cblcrint <file name without file extension>
Copyright © 2006, Oracle. All rights reserved. 487

Compiling COBOL on Windows Chapter 13A
or:Call cblcprint PTPDBTST
Task 13A-2: Distributing COBOL BinariesOnce you've compiled your COBOL, you must transfer it to the needed locations. Copy the contents of<PS_HOME>\CBLBINX (CBLBINA, CBLBINU, or CBLBINE) directory into <PS_HOME>\CBLBINX(CBLBINA, CBLBINU, or CBLBINE) on your batch and application server machines.
488 Copyright © 2006, Oracle. All rights reserved.

CHAPTER 13B
Compiling COBOL on UNIX
This chapter discusses:
• Understanding COBOL
• Prerequisites
• Modifying the Liblist (IBM AIX 5.1, IBM AIX 5.2, and HP-UX Only)
• Compiling COBOL Programs
• Linking COBOL
• Recompiling COBOL on UNIX
Understanding COBOLThis chapter describes how to compile and link PeopleSoft COBOL batch programs, if necessary.
COBOL is not needed for PeopleTools because the Process Scheduler has been re-written in C++. In addition,COBOL is not required for applications that contain no COBOL programs. See Supported Platforms onCustomer Connection for the details on whether your application requires COBOL.
See “PeopleSoft Application COBOL Requirements,” PeopleSoft Customer Connection (Implement, Optimize+ Upgrade, Implementation Guide, Supported Platforms, PeopleSoft Enterprise, By PeopleTools release,Platform Communications by Topic, Batch).
For more details about running COBOL in Unicode, consult the following.
See Enterprise PeopleTools 8.48 PeopleBook: Global Technology, “Running COBOL in a UnicodeEnvironment.”
See Enterprise PeopleTools 8.48 PeopleBook: Global Technology, “Running COBOL in a z/OS UnicodeEnvironment.”
Warning! If your database server is DB2 UDB for z/OS and your CCSID is not 37, you must read theCCSID discussion under “DB2 UDB for z/OS Subsystem Configuration” in Chapter 1 of this book. Alsorefer to Enterprise PeopleTools 8.48 PeopleBook: Global Technology (%BINARYSORT) and to EnterprisePeopleTools 8.48 PeopleBook: Data Management (PSOPTIONS) before proceeding.
Copyright © 2006, Oracle. All rights reserved. 489

Compiling COBOL on UNIX Chapter 13B
PrerequisitesBefore you attempt to run COBOL from the command line you should do the following:
• For UNIX and Windows systems, make sure the variable PS_SERVER_CFG points to a valid psprcs.cfgfile.
• For Windows systems, make sure %PS_HOME%\bin\server\winx86 is in your path. It should appearbefore %PS_HOME%\bin\client\winx86 if that also appears in the path.
Task 13B-1: Modifying the Liblist (IBM AIX 5.1, IBMAIX 5.2, and HP-UX Only)
This section discusses:
• Understanding Liblist Modifications
• Modifying the Liblist File
Understanding Liblist ModificationsIf you are compiling COBOL on AIX 5.1 or 5.2, or HP-UX, modify the liblist or liblist64 file as describedhere. See the document “COBOL: Installation, versions, fixpacks, etc. PT8.44+” on Customer Connection foradditional information about modifications that need to be made in the liblist or liblist64 file.
See “COBOL: Installation, versions, fixpacks, etc. PT8.44+,” PeopleSoft Customer Connection (Implement,Optimize + Upgrade, Implementation Guide, Supported Platforms, PeopleSoft Enterprise, By PeopleToolsRelease, Platform Communications by Topic, Batch).
Task 13B-1-1: Modifying the Liblist FileThis section discusses:
• Modifying the Liblist File for AIX
• Modifying the Liblist64 File for HP-UX
Modifying the Liblist File for AIXTo modify the liblist file for AIX 5.1 and 5.2:
1. cd to $COBDIR/lib.
2. Add the following line to the liblist file:
x:*:s!t:-lC
The following listing shows where to make the changes:
# More emulation of cc (MUST be after MF/user libraries):
x:*:sg:-lg
x:*:sg:-bE:/usr/lib/libg.exp
x:*:st:-L/usr/lib/threads
490 Copyright © 2006, Oracle. All rights reserved.

Chapter 13B Compiling COBOL on UNIX
x:*:st:-lpthreads
x:*:s!t:-lC <=== Add this line
x:*:s:-lc
Modifying the Liblist64 File for HP-UXYou must modify $COBDIR/lib/liblist64 if both of the following conditions exist:
Note. This modification is for the liblist64 (sixty-four) file, not the liblist file.
• You get this error message when running psrun.mak:
$ ./psrun.mak
./psrun.mak - linking PSRUN ...
./psrun.mak - Error(s) encountered creating PSRUN!
./psrun.mak - See psrun.err for messages
• The psrun.err error file contains the following error:
ld: Can’t open /opt/langtools/lib/pa20_64/crt0.o
ld: No such file or directory
To modify the liblist64 file for HP-UX PA RISC:
1. Login into the system as user root.2. cd to $COBDIR/lib and find the liblist64 file.3. Edit $COBDIR/lib/liblist64 with vi, emacs or your favorite editor, and change the crt0.o specification asdepicted below.From this:
x:*:s:/opt/langtools/lib/pa20_64/crt0.o
To this:x:*:s:/usr/ccs/lib/ps20_64/crt0.o
Task 13B-2: Compiling COBOL ProgramsThis section discusses:
• Understanding COBOL Compilation
• Compiling COBOL on UNIX
Understanding COBOL CompilationUnder UNIX, you always need to compile your COBOL at installation time. After you run the PeopleSoftInstaller to set up your application or batch server, carry out the following steps.
Copyright © 2006, Oracle. All rights reserved. 491

Compiling COBOL on UNIX Chapter 13B
Note. You have two options for compiling. You can treat one application or batch server as your compile server,compile all your COBOL there, and then distribute cblbin from there to all other relevant servers. In this case,only that one server would require a COBOL compiler, and you would copy any patches and customizationsfrom your file server to this designated server before carrying out the compile. The second option is to compileon all servers. In this situation, all servers would need a COBOL compiler, and you would need to copy anypatches and customizations from the file server to all of these servers before carrying out the compile.
Note. To copy a compiled COBOL program from one UNIX server to another, they must be on the sameOS that the compile took place on. For example, if you compile on Solaris 8 and/or 9 for the ApplicationServer and the Process Scheduler is on AIX you cannot copy the compiled program (you will also needto compile on the AIX box).
Task 13B-2-1: Compiling COBOL on UNIXTo compile COBOL on UNIX:
1. If you haven't already done so, download all required patches to your file server, and from there to FTP thecontents of src\cbl\base and src\cbl\unix over to src/cbl on the relevant application or batch server.
Note. When you bring patches up from the file server, the files need to have a lowercase cbl extension andan uppercase program name, as in PATCH.cbl.
2. Run psconfig.sh from <PS_HOME> to set up environment variables correctly on your applicationor batch server.
3. Change to the <PS_HOME>/setup directory:
cd $PS_HOME/setup
4. To compile all the COBOL source dynamically, issue the command:
./pscbl.mak
The dynamic compile creates INT, LST, and GNT files, which are copied to these locations:
File Location
INT <PS_HOME>/src/cbl/int
LST <PS_HOME>/src/cbl/lst
GNT <PS_HOME>/cblbin
Warning! Proposed ISO 2000 COBOL features are enabled. Please refer to documentation for details, anddo not rely on these features being supported in future products from Micro Focus due to changes in theproposed COBOL standard.
Note. For Server Express, PeopleSoft sets the COBOL directive INTLEVEL to 4. Setting this directive tothis value enables you to raise the significant digits of numeric fields from 18 to 31. This is in accordancewith the ISO 2000 COBOL standard. During the compilation of each program, the vendor of ServerExpress will display a warning. This should not be considered a compilation error.
492 Copyright © 2006, Oracle. All rights reserved.
Chapter 13B Compiling COBOL on UNIX
Task 13B-3: Linking COBOLThis section discusses:
• Understanding COBOL Linking
• Linking COBOL Components on UNIX
Understanding COBOL LinkingPSRUN is the PeopleSoft procedure that connects the COBOL batch programs with the RDBMS API. It iscompiled uniquely for each platform and consists of modules from PeopleSoft, the RDBMS vendor, andthe operating system.
You need to create the PSRUN program in the following situations:
• You are installing PeopleSoft for the first time.
• Any COBOL programs have changed.
• The version of the RDBMS running PeopleSoft has changed.
• The COBOL compiler has changed.
• One of the C programs supplied by PeopleSoft has changed.
Note. PeopleSoft only supports dynamic linking of COBOL. Static linking is not an option.
Task 13B-3-1: Linking COBOL Components on UNIXTo link COBOL components on UNIX:
1. Change to the <PS_HOME>/setup directory:
cd $PS_HOME/setup
2. For dynamic linking, run:
./psrun.mak
The PSRUN.MAK script should return the UNIX prompt when done. If the compile completes withouterrors, the file PSRUN will now exist in the <PS_HOME>/bin directory. If you encounter errors, check<PS_HOME>/setup/psrun.err.
Task 13B-4: Recompiling COBOL on UNIXYou always need to compile at installation, so you will only need to recompile COBOL in the followingsituations:
• Any COBOL programs change
• The supported COBOL compiler changes
Copyright © 2006, Oracle. All rights reserved. 493
Compiling COBOL on UNIX Chapter 13B
• You change the version of your RDBMS• You change your version of your operating system• You apply a patch or a fix
Note. Remember, you must always use your file server as the source repository for your COBOL. Youshould download any patches and apply any customizations to the file server, and disseminate themfrom there.
You can compile a single COBOL program dynamically by using this command syntax:
./pscbl.mak <PROGRAM NAME WITHOUT "cbl" EXTENSION>
For example,./pscbl.mak PTPDBTST
compiles the lone file PTPDBTST.
Note. If you want to recompile all your COBOL, you can follow the procedure described earlier.
See “Compiling COBOL Programs.”
The compile should run without errors until it completes. After the script is complete, check thedestination directories for the newly created files in <PS_HOME>/src/cbl/int, <PS_HOME>/src/cbl/lst, and<PS_HOME>/cblbin. They should have a length greater than zero as well as a current date and time stamp.
Note. You can also use pscbl.mak PTP or pscbl.mak PTP* to compile all source files that start with PTP.
494 Copyright © 2006, Oracle. All rights reserved.
CHAPTER 14
Installing PeopleSoft Change Assistant
This chapter discusses:
• Understanding PeopleSoft Change Assistant
• Installing and Configuring PeopleSoft Change Assistant
• Specifying Options
• Exporting Jobs to XML, HTML, or Microsoft Excel Format
• Validating Change Assistant Settings
Understanding PeopleSoft Change AssistantOracle’s PeopleSoft Change Assistant is a standalone application that enables you to assemble and organizethe steps necessary to apply patches and fixes for maintenance updates. You also use PeopleSoft ChangeAssistant for software upgrades, that is, the process of moving from one PeopleTools release to anotherPeopleTools release.
Note. If you are upgrading to PeopleTools 8.44 or below, you must use PeopleSoft Upgrade Assistant.
In order to perform reliable and accurate updates, PeopleSoft Change Assistant gathers all the necessaryinformation including the change log from the Environment Management hub and uploads it to PeopleSoftCustomer Connection. With the environment data available, PeopleSoft Customer Connection can determinewhat updates apply to your environment.
When you access PeopleSoft Customer Connection, you can obtain a list of all unapplied updates for agiven application environment including all prerequisites. You can then download a set of change packagesassociated with the update IDs and install the patches and fixes with minimal effort.
Task 14-1: Installing and Configuring PeopleSoftChange Assistant
This section discusses:
• Installing PeopleSoft Change Assistant
• Setting Up Security for Change Assistant
• Scanning the Workstation
Copyright © 2006, Oracle. All rights reserved. 495

Installing PeopleSoft Change Assistant Chapter 14
Task 14-1-1: Installing PeopleSoft Change AssistantAt the end of the installation, you have the option of installing PeopleSoft Change Impact Analyzer. For moreinformation on that installation, see the following chapter.
See “Installing PeopleSoft Change Impact Analyzer.”
To install PeopleSoft Change Assistant:
Note. A Windows-based operating system is required to use Change Assistant.
1. From the <PS_HOME>/setup/PsCA directory, run Setup.exe.2. If there is an existing installation of PeopleSoft Change Assistant the following screen appears:
Change Assistant Setup Maintenance
Select the Remove radio button, then click Next to remove the previous installation and close the screen.Run <PS_HOME>/setup/PsCA/setup.exe again.
3. On the Welcome screen, select Next.The Change Assistant screen appears.
4. Accept the default Destination Folder or specify another Destination Folder.5. Select Next.The Start Copying Files screen appears.
6. Click Back to review or change any settings.If you are satisfied with your settings, click Next to begin copying files. Change Assistant copies filesto the designated directory.
7. On the screen asking whether you want to install Change Impact Analyzer, select No, and click Next.
496 Copyright © 2006, Oracle. All rights reserved.

Chapter 14 Installing PeopleSoft Change Assistant
If you select Yes, the PeopleSoft Change Impact Analyzer installation begins. You will do this installationin the next chapter. Instead, continue with the tasks in this chapter to finish setting up PeopleSoft ChangeAssistant.
Choosing not to install Change Impact Analyzer
8. Click Finish to complete the installation process.9. Reboot your machine after the installation process is complete.
Task 14-1-2: Setting Up Security for Change AssistantTo use PeopleSoft Enterprise Change Assistant, you must configure your firewall settings so that the firewalldoes not filter PeopleSoft domain and IP names.
Note. When setting trust rules or bypass rules on your proxy server, or in browser security, it is easier tomaintain rules by domain or IP subnet.
The following features must be set to allow access for PeopleSoft Enterprise Change Assistant:
• Domains: Allow access for the domains www.peoplesoft.com and update.peoplesoft.com.We recommend that you set domain rules to allow access to *.peoplesoft.com.
• IP addresses: Allow access for the IP addresses 192.206.43.114 and 192.206.43.105.We recommend that you set IP rules at the subnet 192.206.43.0.
• FTP sites: Configure your firewall to allow inbound ftp when the request is not initiated on the same port.Software update requests go to PeopleSoft Customer Connection on one port number, and the actualdownload comes back on a different ftp port number.
Copyright © 2006, Oracle. All rights reserved. 497
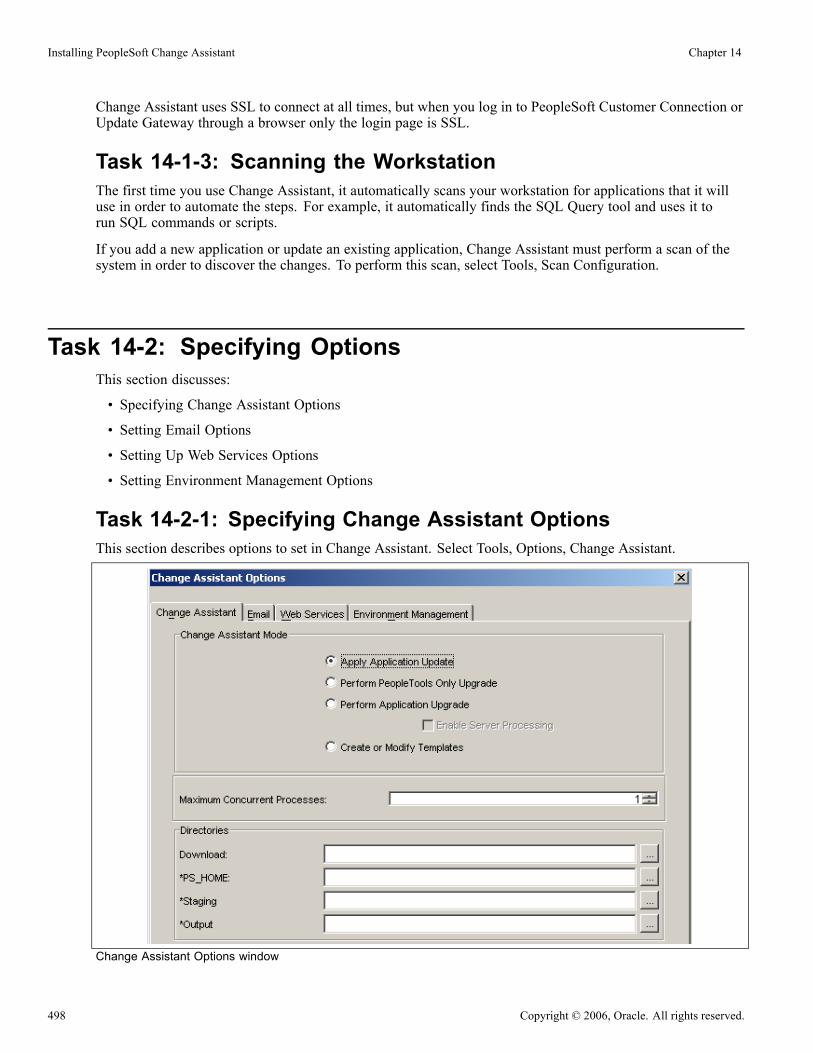
Installing PeopleSoft Change Assistant Chapter 14
Change Assistant uses SSL to connect at all times, but when you log in to PeopleSoft Customer Connection orUpdate Gateway through a browser only the login page is SSL.
Task 14-1-3: Scanning the WorkstationThe first time you use Change Assistant, it automatically scans your workstation for applications that it willuse in order to automate the steps. For example, it automatically finds the SQL Query tool and uses it torun SQL commands or scripts.
If you add a new application or update an existing application, Change Assistant must perform a scan of thesystem in order to discover the changes. To perform this scan, select Tools, Scan Configuration.
Task 14-2: Specifying OptionsThis section discusses:
• Specifying Change Assistant Options
• Setting Email Options
• Setting Up Web Services Options
• Setting Environment Management Options
Task 14-2-1: Specifying Change Assistant OptionsThis section describes options to set in Change Assistant. Select Tools, Options, Change Assistant.
Change Assistant Options window
498 Copyright © 2006, Oracle. All rights reserved.

Chapter 14 Installing PeopleSoft Change Assistant
Change Assistant Mode Select one of the following radio buttons; the window changes dependingupon the mode you choose:
• Apply Application Update• Perform PeopleTools Only Upgrade• Perform Application Upgrade• Enable Server ProcessingSelect this check box to enable Change Assistant to run ApplicationEngine, Data Mover User, Data Mover Bootstrap, and SQL Scriptson Remote Agents as configured through Environment ManagementFramework as part of the Application upgrade.
• Create or Modify Templates
Maximum ConcurrentProcesses
Specify the maximum number of processes that can be executed concurrentlyon the local machine. The default at installation time is one.
Download Directory Enter the full path of the location to which you want to download yourchange packages.
*PS_HOME Enter the full path of the directory in which you installed PeopleTools.
*Staging Directory Enter the directory in which you would like to stage all the Change Assistantupdate files. This is the location that Change Assistant will store files to beused during the apply update process.
*Output Directory Enter the directory in which you want the log files generated by the updateprocess to reside.
Task 14-2-2: Setting Email OptionsSelect Tools, Options, Email.
Send email notifications Select this check box to receive email notifications if there are errors in theupdate process. Change Assistant also sends you a completion message whenit encounters a Stop in the update process.
SMTP Server Enter the SMTP mail server from which you receive the error or completionmessages.
Port Enter the port from which you want to access the email.
Send To Enter the address to which you want the email sent.
Return Address Enter the email address of the sender. Use this to identify who sent thenotification.
Test Use to validate that email is sent to the designated recipients and is workingcorrectly
Task 14-2-3: Setting Up Web Services OptionsSelect Tools, Options, Web Services.
Copyright © 2006, Oracle. All rights reserved. 499
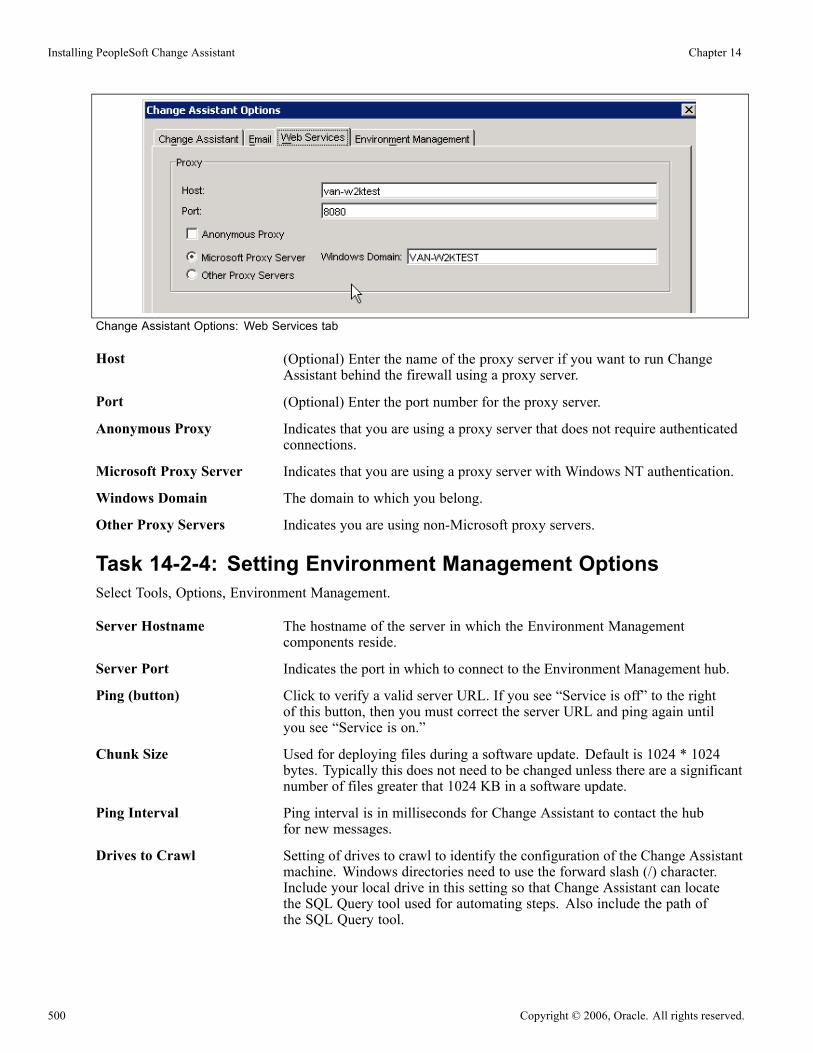
Installing PeopleSoft Change Assistant Chapter 14
Change Assistant Options: Web Services tab
Host (Optional) Enter the name of the proxy server if you want to run ChangeAssistant behind the firewall using a proxy server.
Port (Optional) Enter the port number for the proxy server.
Anonymous Proxy Indicates that you are using a proxy server that does not require authenticatedconnections.
Microsoft Proxy Server Indicates that you are using a proxy server with Windows NT authentication.
Windows Domain The domain to which you belong.
Other Proxy Servers Indicates you are using non-Microsoft proxy servers.
Task 14-2-4: Setting Environment Management OptionsSelect Tools, Options, Environment Management.
Server Hostname The hostname of the server in which the Environment Managementcomponents reside.
Server Port Indicates the port in which to connect to the Environment Management hub.
Ping (button) Click to verify a valid server URL. If you see “Service is off” to the rightof this button, then you must correct the server URL and ping again untilyou see “Service is on.”
Chunk Size Used for deploying files during a software update. Default is 1024 * 1024bytes. Typically this does not need to be changed unless there are a significantnumber of files greater that 1024 KB in a software update.
Ping Interval Ping interval is in milliseconds for Change Assistant to contact the hubfor new messages.
Drives to Crawl Setting of drives to crawl to identify the configuration of the Change Assistantmachine. Windows directories need to use the forward slash (/) character.Include your local drive in this setting so that Change Assistant can locatethe SQL Query tool used for automating steps. Also include the path ofthe SQL Query tool.
500 Copyright © 2006, Oracle. All rights reserved.

Chapter 14 Installing PeopleSoft Change Assistant
Task 14-3: Exporting Jobs to XML, HTML, orMicrosoft Excel Format
Change Assistant allows users to export jobs to XML, HTML, or Microsoft Excel file formats. Do this byselecting File, Export Job in Change Assistant. Then, enter the desired exported filename and select thedesired file type format.
Task 14-4: Validating Change Assistant SettingsAfter you have set up and configured Change Assistant and the Environment Management components, youshould validate your Change Assistant and environment settings.
Change Assistant validates settings by:
• Locating valid SQL query tools required to run SQL scripts.
• Testing the Environment Management hub and ensuring that Change Assistant can communicate with it.
• Testing Customer Connection and ensuring that Change Assistant can communicate with it.
You can also print a summary of your environment, which can facilitate the diagnosis of problems byPeopleSoft Global Support.
To validate your environment, select Tools, Options, Validate. Click Start Validation.
If any of the steps were unable to complete successfully, open the log file to determine the cause.
Copyright © 2006, Oracle. All rights reserved. 501
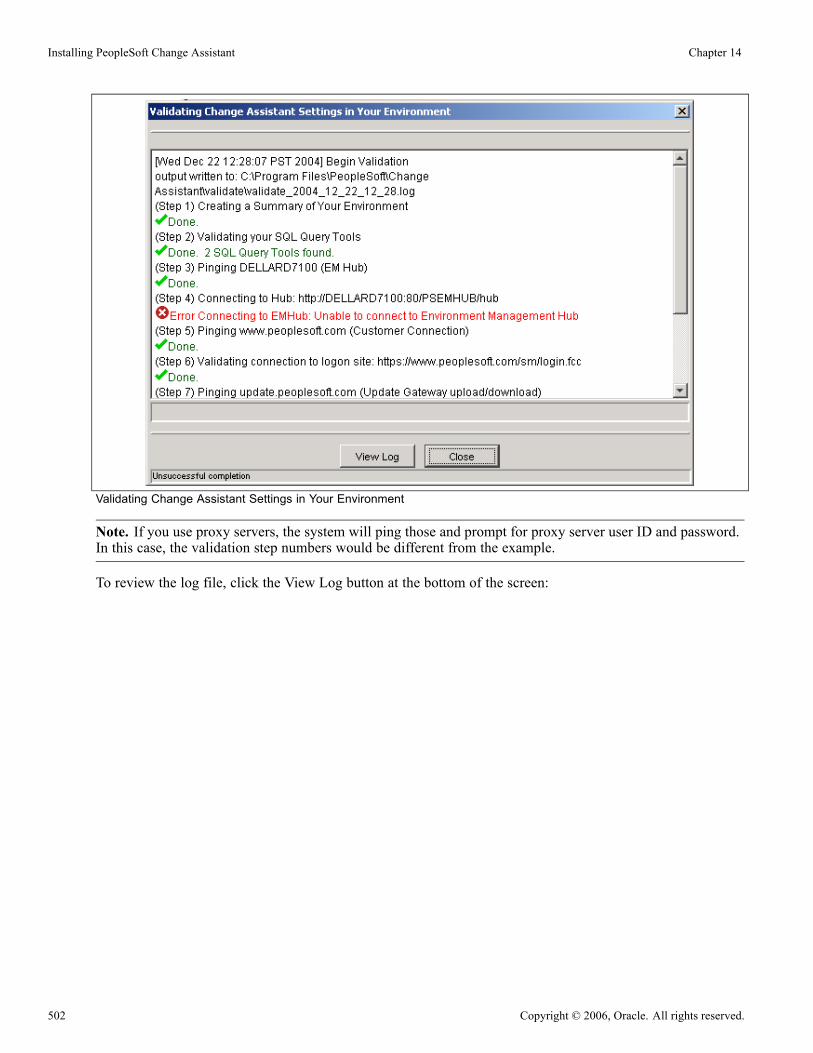
Installing PeopleSoft Change Assistant Chapter 14
Validating Change Assistant Settings in Your Environment
Note. If you use proxy servers, the system will ping those and prompt for proxy server user ID and password.In this case, the validation step numbers would be different from the example.
To review the log file, click the View Log button at the bottom of the screen:
502 Copyright © 2006, Oracle. All rights reserved.
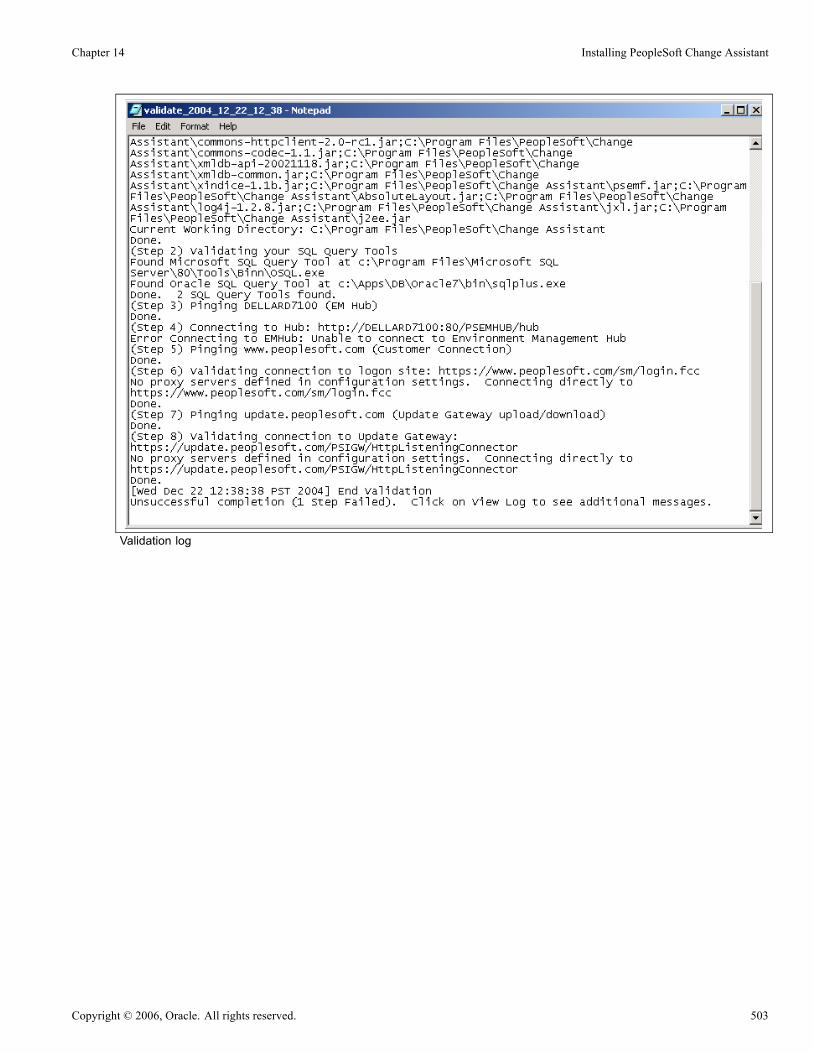
Chapter 14 Installing PeopleSoft Change Assistant
Validation log
Copyright © 2006, Oracle. All rights reserved. 503

Installing PeopleSoft Change Assistant Chapter 14
504 Copyright © 2006, Oracle. All rights reserved.

CHAPTER 15
Installing PeopleSoft Change Impact Analyzer
This chapter discusses:
• Prerequisites
• Installing Change Impact Analyzer
PrerequisitesOracle’s PeopleSoft Change Impact Analyzer (PsCIA) is a tool you can use to evaluate the effect of changesyou make on your installation. CIA can help you monitor the impact a Change Package has on your system, aswell as monitor the impact from other changes such as customizations.
Ensure that your system meets the following requirements before you begin this installation:
• The PsCIA runs on Windows. For database platforms that do not run on Windows, install PsCIA on theWindows client.
• You can install PsCIA from downloaded files as a standalone application, or as a part of your PeopleToolsinstallation. You can also install PsCIA as a part of the PeopleSoft Change Assistant installation, asmentioned in the previous chapter. These instructions assume you have installed PeopleTools on themachine on which you want to run PsCIA, and have completed the PeopleSoft Change Assistantinstallation.
• You must install JDBC drivers for connectivity to your database platform. PsCIA uses Type 4 JDBCdrivers by default.You can normally obtain JDBC drivers from your RDBMS vendor. Search the vendor’s web site or contactthe vendor for information.
See AlsoEnterprise PeopleTools 8.48 PeopleBook: Software Updates
Task 15-1: Installing Change Impact AnalyzerTo install Change Impact Analyzer and Rules Editor:
1. From the <PS_HOME>\setup\PsCIA directory, run setup.exe.A Welcome screen appears.
2. If there is an existing installation of PsCIA on your machine, a screen appears asking whether you want toModify, Update, or Remove the existing installation.
Copyright © 2006, Oracle. All rights reserved. 505

Installing PeopleSoft Change Impact Analyzer Chapter 15
PeopleSoft Change Impact Analyzer Setup Maintenance window
Select the Remove radio button, then click Next to remove the previous installation and close the screen.Run <PS_HOME>/setup/PsCIA/setup.exe again.
3. Click Next.
PeopleSoft Change Impact Analyzer welcome window
4. Select the JDBC drivers for your database platform.
506 Copyright © 2006, Oracle. All rights reserved.
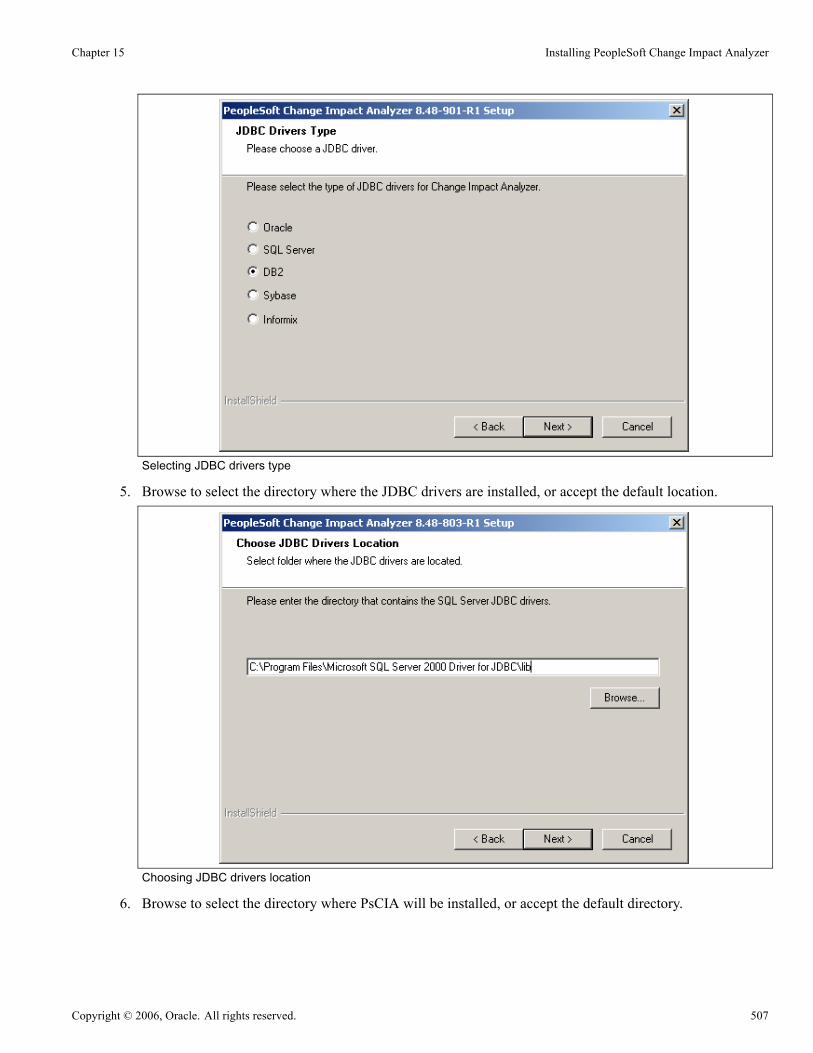
Chapter 15 Installing PeopleSoft Change Impact Analyzer
Selecting JDBC drivers type
5. Browse to select the directory where the JDBC drivers are installed, or accept the default location.
Choosing JDBC drivers location
6. Browse to select the directory where PsCIA will be installed, or accept the default directory.
Copyright © 2006, Oracle. All rights reserved. 507

Installing PeopleSoft Change Impact Analyzer Chapter 15
Selecting the destination folder
7. Click Back to review or change any settings.If you are satisfied with your settings, click Next to begin copying files to the designated directory.
8. Click Finish to exit when the installation is complete:
Installation complete
9. To start PsCIA, select Start, Programs, PeopleTools 8, Change Impact Analyzer.
508 Copyright © 2006, Oracle. All rights reserved.

APPENDIX A
Adding New Product Modules
This appendix discusses:
• Adding New Module(s) to PeopleSoft 8.4 Installations
Task A-1: Adding New Module(s) to PeopleSoft8.4 Installations
This task explains how to add new application modules to an existing PeopleSoft installation. Follow thisprocedure if, for example, you already installed HRMS and now you need to install Time and Labor.
When you add new application modules to an existing installation, you may overwrite files that were includedas part of a patch or fixes, or customizations that you applied. For example, suppose you customize a reportthat PeopleSoft then redelivers. If you install the update into your current working directory, your customizedreport will be overwritten with the newly installed, updated report.
PeopleSoft does not currently provide an automated way to notify you before overwriting customized modulesor patch files. You can make preparations to protect important files from being overwritten. For yourcustomized modules, you need to maintain a backup of any customizations. It is also a good idea to make a copyof your <PS_HOME> directory before beginning this process, so that you can find and restore necessary patchfiles. Check PeopleSoft Customer Connection to identify any patches or fixes required for your installation.
See PeopleSoft Customer Connection, Updates and Fixes.
To add new module(s) to PeopleSoft 8.4 installations:
1. Back up the database, file server, application server, Process Scheduler Server, and web server componentsof your current system.
2. Make sure you have the new license code that includes the new module(s). The new license code allowsyou to load the batch components for the new module(s).
3. Install the Application CD on the file server.4. When prompted, enter the new license code for your applications.Initially, all installation options will be selected. You must deselect those programs you do not wishto install.
5. Launch Data Mover in bootstrap mode (sign in as the accessid and password).Data Mover is located in <PS_HOME>\bin\client\winx86\psdmt.exe.
6. Select File, Database Setup and choose your database type in the resulting dialog.7. Select Next and select add new product.8. Select Finish and a Data Mover script that updates the license code will be generated in Data Mover.
Copyright © 2006, Oracle. All rights reserved. 509
Adding New Product Modules Appendix A
9. Select File, Run script and your database updates are complete.10. Install software to your batch server.
See “Setting Up Process Scheduler.”
11. Reapply all code customizations if needed.
Note. Remember to maintain back-up copies of your customizations.
12. Compile and link COBOL.
See Compiling COBOL.
13. Verify that the appropriate Installation Records are selected.
If they are not checked, check them and save the page. To open the page, select Setup <apptype>, Install,Installation Options, where <apptype> is HRMS, CRM, Financials/Supply, and so on. (For HRMS thenavigation is Setup <apptype>, Install, Installation Table.)
14. Run the DDDAUDIT and SYSAUDIT SQRs.
See “Creating a Database.”15. Shut down all application servers.16. Install software to your application server.
See “Configuring the Application Server.”17. Restart all required application servers.18. Shut down all web servers.19. Install software to your web server.
See “Setting Up the PeopleSoft Pure Internet Architecture.”
510 Copyright © 2006, Oracle. All rights reserved.
APPENDIX B
Installing PeopleBooks
This appendix discusses:
• Understanding PeopleBooks
• Installing PeopleBooks
• Implementing the PSOL Server for PeopleBooks
• Setting up a Reverse Proxy Server
• Configuring Context-Sensitive Help
• Administering PeopleBooks
Understanding PeopleBooksPeopleBooks are the documentation delivered with PeopleTools and every PeopleSoft application. Thisappendix describes how to install and configure PeopleBooks so that you can deploy the PeopleSoftdocumentation at your site.
There are three options for configuring PeopleBooks. Most sites will want to take advantage of all three.
• Browse: Browse the PeopleBooks from a file server or web server.• Full-text Search: Requires installation of the PeopleSoft Pure Internet Architecture and hostingPeopleBooks on a web server.
• Context-sensitive help: Configure PeopleTools to call PeopleBooks as context-sensitive help from bothinternet applications and Windows-based programs. For instance, when a user clicks the Help link in abrowser or presses F1 in Windows, the appropriate documentation appears.
Note. The F1 button calls PeopleBooks Help only for the PeopleTools Development Environment (theWindows-based client). If you press F1 while using the portal, you invoke the help for your current browser.For context-sensitive help in the portal, end users need to click the Help link to call PeopleBooks Help.
Task B-1: Installing PeopleBooksThis section discusses:
• Prerequisites
• Installing the PeopleBooks CD
Copyright © 2006, Oracle. All rights reserved. 511
Installing PeopleBooks Appendix B
PrerequisitesYou can install PeopleBooks to your PeopleTools 8.48 dedicated web server machine or to a separate webserver machine. Either way, the web server software must be installed before you install PeopleBooks. Youcan also install PeopleBooks on a file server, but you will not be able to search or to use PeopleBooks ascontext-sensitive help for your PeopleSoft applications.
Before you begin the installation, make sure you are installing to a supported web server and operatingsystem platform. PeopleBooks 8.48 is supported on the same web server platforms as the PeopleSoft PureInternet Architecture (PIA) for PeopleTools 8.48, and on the same operating systems as the PeopleTools8.48 application server.
Note. PeopleBooks must be installed on a system other than HP-UX Itanium if full-text search is required.Asian language full-text search is not available on HP-UX systems.
See AlsoEnterprise PeopleTools 8.48 Hardware and Software Requirements
PeopleSoft Customer Connection (Implement, Optimize + Upgrade, Implementation Guide, SupportedPlatforms, PeopleSoft Enterprise)
Task B-1-1: Installing the PeopleBooks CDUnlike in past releases, PeopleBooks can now be installed directly to a UNIX machine. In addition,PeopleBooks can be installed over an existing PeopleBooks site, effectively upgrading the site and merging innew content. (Duplicate book titles will be overwritten.)
Note. The PeopleSoft Pure Internet Architecture file structure has changed for PeopleTools 8.44 and above, soyou cannot install PeopleBooks 8.48 into a pre-8.44 PIA site. However, after installing PIA 8.48, you canmove your old PeopleBooks structure into the PSOL web module directory created during the PIA installation,and then install PeopleBooks 8.48 on top of it.
Note. The following instructions are based on using the GUI InstallShield program. If you run the installationin console mode, follow the instructions on your command line to make selections and progress throughthe installation prompts.
To install the PeopleBooks CD:
1. If your server does not have a built-in CD-ROM drive, share a CD-ROM drive elsewhere on the networkand mount that drive on your server. You also have the option of copying the CDs to the network.
2. On UNIX, if you have not run psconfig.sh in the current shell, run it now at the command line:
. ./psconfig.sh
3. Insert the PeopleBooks CD into the CD-ROM drive.4. If your Windows CD-ROM drive is set to autorun, the PeopleBook Installer welcome screen appears.Otherwise, at the command line launch the setup program for your operating system platform:
512 Copyright © 2006, Oracle. All rights reserved.
Appendix B Installing PeopleBooks
Platform Launch Program
AIX setup.aix
HP-UX (PA RISC) setup.hp
HP-UX Itanium setup.hp-ia64
Linux setup.linux
Solaris setup.solaris
Tru64 setup.tru64
Windows setup.exe
Note. If you are installing to a UNIX machine and do not have a GUI interface tool, use the commandsetup.<OS> -is:javaconsole -console.
5. Enter your application license code and click Next.
6. Accept the license terms and click Next.
7. Select one of the following options, and click Next:
• Option 1: Generate search collection on this product only
• Option 2: Generate search collection on entire site
Note. The collection generation can take up to 20 minutes to complete per PeopleBooks CD. If youare installing multiple PeopleBooks CDs, you might want to install all but the last without building thecollections, and then generate them for the entire site (option 2) when installing the last CD. You shouldalso choose option 2 if you are installing over an older version of PeopleBooks.
You can generate or regenerate the search collections at any time after installation using the PSOLManager utility.
See About These PeopleBooks, “Managing PeopleBooks and the PeopleSoft Online Library.”• Option 3: Do not generate search collection
Note. If you do not plan to use the Full-Text Search functionality, select this option.
8. Select which PeopleTools web server you are installing to and whether PIA is installed on the machineand click Next.
Note. This information is used to build the default install path for PeopleBooks. If you are not using one ofthese web servers, it does not matter which you choose.
9. Enter the paths to the PeopleTools home directory (<PS_HOME>) and to the directory where you installedthe Oracle Application Server (OAS), WebLogic, or WebSphere web server software (for example,specify your <OAS_HOME> for OAS, <WebLogic_Home> for WebLogic, and <WAS_HOME> forWebSphere). Then click Next.
Copyright © 2006, Oracle. All rights reserved. 513

Installing PeopleBooks Appendix B
Note. This information is used to build the default install path for PeopleBooks. If you are installing to anon-PeopleTools machine, enter any valid directory. If your are installing to a web server other than OAS,WebLogic, or WebSphere, enter any valid directory.
Warning! After clicking Next, you may be warned that you have a non-standard PSOL path. If so, thisis either because you are not using the PIA default domain/node name, or because PIA is not installedand you selected the “PIA” option on the previous panel. If you have a custom domain/node name,continue to the next step and be sure to edit the default path to reflect your PIA installation. If PIA is notinstalled, you must either cancel the PeopleBooks installation and install it first, or go back the previouspanel and deselect the “PIA” option.
10. Enter the install location and click Next.
If you plan to use the Full-Text Search feature, you must specify a subdirectory immediately below thePSOL module directory in your PIA installation. Edit the default path as necessary to reflect your PIAinstallation.
Note. You can opt to use an install directory other than the default, 'htmldoc'. It will be createdautomatically.
Note. If you do not plan to use PeopleBooks Full-Text Search, you can enter any valid path you like—forinstance, to the docroot of your alternate web server.
For OAS the path should be:
<OAS_HOME>\j2ee\PSOL_<domain_name>\applications\<domain_name>\PSOL\htmldoc
For WebLogic, the path should be:<PS_HOME>\webserv\<PIA_domain_name>\applications\peoplesoft\PSOL\htmldoc
For WebSphere, the path should be:<PS_HOME>\webserv\<CellName_NodeName_ServerName>\peoplesoft.ear\PSOL\htmldoc
11. The screen now lists the PeopleBooks that you are entitled to install. If you do not want to install aparticular book, deselect the check box next to that book title. Click Next.
Note. If you are running the installation to apply a maintenance patch, just click Next.
12. Specify whether you want to install the selected titles (default) or install just the PeopleBooks infrastructure(for applying maintenance patches only) and click Next.
13. Confirm your selections and click Next to install PeopleBooks.14. After the CD content has been installed (and collections generated, if applicable), click Finish to end thesetup program.
Task B-2: Implementing the PSOL Server for PeopleBooksThis section discusses:
514 Copyright © 2006, Oracle. All rights reserved.
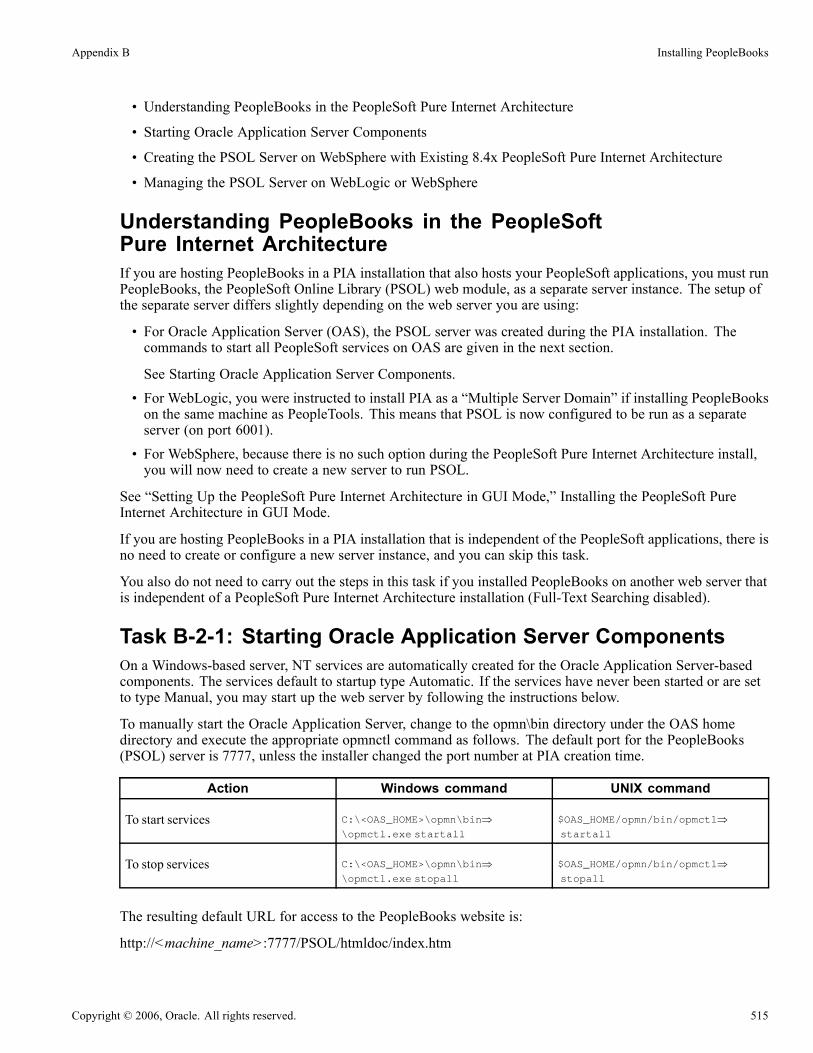
Appendix B Installing PeopleBooks
• Understanding PeopleBooks in the PeopleSoft Pure Internet Architecture
• Starting Oracle Application Server Components
• Creating the PSOL Server on WebSphere with Existing 8.4x PeopleSoft Pure Internet Architecture
• Managing the PSOL Server on WebLogic or WebSphere
Understanding PeopleBooks in the PeopleSoftPure Internet ArchitectureIf you are hosting PeopleBooks in a PIA installation that also hosts your PeopleSoft applications, you must runPeopleBooks, the PeopleSoft Online Library (PSOL) web module, as a separate server instance. The setup ofthe separate server differs slightly depending on the web server you are using:
• For Oracle Application Server (OAS), the PSOL server was created during the PIA installation. Thecommands to start all PeopleSoft services on OAS are given in the next section.
See Starting Oracle Application Server Components.• For WebLogic, you were instructed to install PIA as a “Multiple Server Domain” if installing PeopleBookson the same machine as PeopleTools. This means that PSOL is now configured to be run as a separateserver (on port 6001).
• For WebSphere, because there is no such option during the PeopleSoft Pure Internet Architecture install,you will now need to create a new server to run PSOL.
See “Setting Up the PeopleSoft Pure Internet Architecture in GUI Mode,” Installing the PeopleSoft PureInternet Architecture in GUI Mode.
If you are hosting PeopleBooks in a PIA installation that is independent of the PeopleSoft applications, there isno need to create or configure a new server instance, and you can skip this task.
You also do not need to carry out the steps in this task if you installed PeopleBooks on another web server thatis independent of a PeopleSoft Pure Internet Architecture installation (Full-Text Searching disabled).
Task B-2-1: Starting Oracle Application Server ComponentsOn a Windows-based server, NT services are automatically created for the Oracle Application Server-basedcomponents. The services default to startup type Automatic. If the services have never been started or are setto type Manual, you may start up the web server by following the instructions below.
To manually start the Oracle Application Server, change to the opmn\bin directory under the OAS homedirectory and execute the appropriate opmnctl command as follows. The default port for the PeopleBooks(PSOL) server is 7777, unless the installer changed the port number at PIA creation time.
Action Windows command UNIX command
To start services C:\<OAS_HOME>\opmn\bin⇒\opmctl.exe startall
$OAS_HOME/opmn/bin/opmctl⇒startall
To stop services C:\<OAS_HOME>\opmn\bin⇒\opmctl.exe stopall
$OAS_HOME/opmn/bin/opmctl⇒stopall
The resulting default URL for access to the PeopleBooks website is:
http://<machine_name>:7777/PSOL/htmldoc/index.htm
Copyright © 2006, Oracle. All rights reserved. 515
Installing PeopleBooks Appendix B
Task B-2-2: Creating the PSOL Server on WebSphere withExisting 8.4x PeopleSoft Pure Internet ArchitectureThese instructions explain how to install a new server instance via the WebSphere administration console. Thistask is only required if running PeopleBooks on the same PeopleSoft Pure Internet Architecture installationthat hosts your PeopleSoft applications.
Warning! These steps will cause the PIA application to be redeployed, which will remove directories createdduring the PIA installation. It is imperative that you back up your webserv folder as instructed below.
To create a new PSOL server:
1. Stop the WebSphere server, if it is running.At the command line, navigate to <WAS_HOME>\AppServer\bin and enter the following command:
stopServer server1
2. Make a copy of your <PS_HOME>\webserv folder.3. Start the WebSphere server.At the command line, navigate to <WAS_HOME>\AppServer\bin and enter the following command:
startServer server1
4. In a web browser, launch the WebSphere Administrative Console.The URL address is http://<machine_name>:<port>/admin/, with <machine_name> and<port> replaced by your onsite values. By default, the port number is 9090.
5. Log in with your user name. (For change tracking purposes only.)6. In the left-hand frame, click Servers, Application Servers.7. In the right-hand frame, add a new application server by clicking the New button.8. In the form in the right-hand frame, enter PSOL as the Server name, select Generate Unique Http Ports,and select Existing application server as the server template. Then click Next.
9. Confirm your selections and click Finish to install the server.10. In the upper left-hand corner of the browser window, click Save to save your changes. Then click theSave button in the right-hand frame.
11. In the left-hand frame, click Applications, Enterprise Applications.12. In the right-hand frame click the link peoplesoft.13. In the new page in the right-hand frame, scroll to the bottom and click Map modules to application servers.14. The new page in the right-hand frame lists the available Clusters and Servers, including the PSOL serveryou just created. Select the PSOL server entry in that list.
15. Select the PSOL module check box and click Apply.After the screen refreshes, re-select the PSOL module check box, and then click OK.
16. Save your changes a final time. In the upper left-hand corner of the browser window, click Save, andthen click the Save button in the right-hand frame.
17. Navigate to the Application Servers page again and click PSOL.
516 Copyright © 2006, Oracle. All rights reserved.

Appendix B Installing PeopleBooks
In the new page in the right-hand frame, click Web Container. In the new page, click Http transports. Thenew page shows the port numbers assigned to the PSOL server. Make a note of these values.
18. Stop server1, as described in step 1.19. Copy the contents of your backed up webserv folder into the real webserv folder, overwriting anyduplicate files.
See the next task for instructions on starting the PSOL server.
See Managing the PSOL Server on WebLogic or WebSphere.
Note. In the future, you may see warnings that the peoplesoft application could not be launched on PSOL.You can ignore these warnings.
Task B-2-3: Managing the PSOL Server on WebLogicor WebSphereThis section discusses:
• Modifying the PSOL Admin Scripts
• Using the PSOL Admin Scripts
During the PeopleBooks installation, two script files were generated in the admin directory below yourinstallation directory. You can use these scripts to manage your PSOL server.
Note. The PSOL script files will have a .bat extension on Windows machines and a .sh extension on UNIXmachines. The following discussion omits the file extensions.
The two PSOL script files are:
• psolAdmin. The command script used to start the PSOL server, stop the PSOL server, etc.• set_psol_env. A configuration script used to store information about your PSOL environment.
Modifying the PSOL Admin ScriptsFor convenience, you may want to copy the scripts from the admin directory to the location where your otherweb server scripts and commands are located. This is not required, however. The scripts will run properly nomatter where they are located or where they are run from.
If you want to copy the scripts to the same directory where your other web server scripts are located:
• On WebLogic, copy the scripts to <PS_HOME>\webserv\<domain>
• On WebSphere, copy the scripts to <WAS_HOME>\AppServer\bin
Note. The two script files must reside in the same directory.
Before you use the psolAdmin script, you should check the configuration in the set_psol_env script andcompare it against the variable descriptions below. Make any necessary changes according to your systemenvironment, depending upon whether your domain is WebLogic, WebSphere, Single Server or MultiServer. This script was created during the PeopleBooks installation and contains directory paths and otherinformation required for launching the PSOL server properly. There are eight PSOL environment variablesthat you can verify and set accordingly:
Copyright © 2006, Oracle. All rights reserved. 517

Installing PeopleBooks Appendix B
Variable Description
PSOL_SERVERNAME This is the name of the server instance that runs PSOL. ForWebLogic Multi Server Domain andWebSphere, this valueis set to PSOL. For WebLogic Single Server Domain, it isset to PIA. You should only have to modify this value if youinstalled a PeopleTools-independent PIA for WebSphere(and so did not create a new PSOL server). In that case, youshould change this value to server1.
PSOL_SERVERURL This stores the URL of yourWebLogic administrationserver domain and port. In someMulti Server Domainenvironments, it may be necessary to pass this valueas an argument when starting the PSOL server. It isalso necessary if the IP address of the PSOL servermachine resolves to multiple values. In that case theURL should specify the proper IP address—for example:http://55.234.667.91:9999.
PSOL_SVC_NAME This is the name that will be used when creating a Windowsservice for PSOL.
Note. OnWebLogic, this name will be prependedwith “peoplesoft - ”. OnWebSphere, the name will beprepended with “IBMWebSphere Application Server V5- ”.
PSOL_PSHOME The location of your PeopleTools home directory.
PSOL_WEBSERVER_HOME The location of your WebLogic or WebSphere installation.
PSOL_WEBSERVER_CMD_PATH The directory where your web server commandscripts are stored. OnWebLogic, this is <PS_HOME>\webserv\<domain>. OnWebSphere this isPSOL_WEBSERVER_HOME\bin.
PSOL_ENV_SCRIPT The path to the set_psol_env script (the file you arecurrently editing). If you moved your scripts in theprevious step, be sure to update this path accordingly.
PSOL_WEBSERVER_TYPE The web server you are running on.
Important! If you make any changes to set_env_psol, save your changes and then also save a backup copy ofthe set_psol_env script under another name, as the script will be recreated with any subsequent PeopleBooksinstallation.
Using the PSOL Admin ScriptsOnce your scripts are edited and in the desired location, you can use psolAdmin to start and stop the PSOLserver, as well as to install or uninstall a Windows service for PSOL.
Note. The following instructions assume that the script files are in the current working directory.
Enter each command at the command line. The command arguments must be in UPPERCASE. If you launchthe script without an argument, explanatory text will be displayed.
518 Copyright © 2006, Oracle. All rights reserved.

Appendix B Installing PeopleBooks
Action Command Comment
Start the PSOL server psolAdmin START OnWebLogic in a multi serverdomain, you must launch theadministration server beforestarting PSOL. To do this, use thestartWebLogicAdmin command.
Stop the PSOL server psolAdmin STOP none
Create a Windows service for PSOL psolAdmin INST_SVC none
Remove the PSOLWindows service psolAdmin RMV_SVC Stop the PSOL service beforeattempting to remove it.
Task B-3: Setting up a Reverse Proxy ServerA reverse proxy server (RPS) is a web server that acts as a front-end gateway to user requests, usuallyforwarding transaction requests to a back-end server and hosting the static HTML pages itself. WebLogic andWebSphere both support various popular web servers (Apache, Microsoft IIS, Sun ONE) as RPS platforms. Ifyou would like to use WebLogic or WebSphere as a back-end server to an RPS, you can configure the RPSto host static PeopleBooks requests and forward PeopleBooks Full-Text Search (servlet) requests to theback-end server. More information on setting up an RPS can be found in the PeopleTools documentation. Andinstructions on configuring PeopleBooks on an RPS can be found in About These PeopleBooks.
See AlsoEnterprise PeopleTools 8.48 PeopleBook: System and Server Administration, “Working with BEA WebLogic”
Enterprise PeopleTools 8.48 PeopleBook: System and Server Administration, “Working with IBMWebSphere”
About These PeopleBooks, “Managing PeopleBooks and the PeopleSoft Online Library”
Task B-4: Configuring Context-Sensitive HelpThis section discusses:
• Enabling the Help Link from the Application Pages
• Enabling F1 Help
Task B-4-1: Enabling the Help Link from the Application PagesEach page in your PeopleSoft applications includes a Help icon that, when clicked, opens a new browserwindow displaying help topics that discuss that page.
To enable the Help link from application pages:
1. In your PeopleSoft application, navigate to the PeopleTools, Web Profile, Web Profile Configuration page.
Copyright © 2006, Oracle. All rights reserved. 519
Installing PeopleBooks Appendix B
2. Click Search and select the Profile Name you specified during your PeopleSoft Pure Internet Architectureinstallation.
3. Change the value for the Help URL field by replacing the "helpweb server" string with the domainname and port number of your web server. Also, if you installed to a directory other than "htmldoc" (thedefault), replace "htmldoc" accordingly.Example:If your PSOL server is named “mywebserver” and listens to port 5080, you would modify the defaultHelp URL from:
http://helpweb server/htmldoc/f1search.htm?ContextID=%CONTEXT_ID%&LangCD=%LANG_⇒CD%
to:http://mywebserver:5080/PSOL/htmldoc/f1search.htm?ContextID=%CONTEXT_ID%&LangCD=⇒⇒%LANG_CD%
Note. The system resolves %CONTEXT_ID% to the page name from which you called help. The systemresolves %LANG_CD% to the signon language of the user.
Note. If you do not want the Help icon to display in your applications, clear the Help URL field value.
Note. The default port for PSOL in a WebLogic multi-server domain installation is 6001.
4. Save and exit the Web Profile Configuration page.
5. Before testing help functionality, purge the browser cache on the client and close all web browsers.
Restart the application server and web server for PIA.
6. Test the help functionality by clicking the Help icon on a PeopleSoft application page.
Task B-4-2: Enabling F1 HelpThis procedure describes how to enable F1 help for Application Designer, PeopleCode Editor, and otherWindows-based PeopleSoft programs.
To enable F1 help:
1. Sign on to your PeopleSoft application using your browser.2. Navigate to the PeopleTools, Utilities, Administration, PeopleTools Options page.3. Enter the same URL as in the previous procedure (where <web_server>/<directory>/ reflects yourinstallation) into the F1 Help URL field:
http://<web_server>/<directory>/f1search.htm?ContextID=%CONTEXT_ID%&LangCD=⇒%LANG_CD%
4. Save the page.
520 Copyright © 2006, Oracle. All rights reserved.

Appendix B Installing PeopleBooks
Task B-5: Administering PeopleBooksA special browser-based tool, psolmanager.htm, may assist you in administering your PeopleBooks web site.
For security purposes, this tool is disabled by default on installation. When enabled, you may use it to recreatecollections upon demand, and view system parameters.
See About These PeopleBooks, “Managing PeopleBooks and the PeopleSoft Online Library”
Copyright © 2006, Oracle. All rights reserved. 521

Installing PeopleBooks Appendix B
522 Copyright © 2006, Oracle. All rights reserved.

APPENDIX C
Installing PeopleTools Mobile Agent
This appendix discusses:
• Understanding PeopleTools Mobile Agent
• Finding the Installation Program
• Installing PeopleTools Mobile Agent on a Laptop
• Installing PeopleTools Mobile Agent on a PDA
• Modifying, Repairing, or Removing PeopleTools Mobile Agent
• Expediting the Initialization of a PDA
• Troubleshooting Installation Issues
Understanding PeopleTools Mobile AgentThis chapter describes how to install the PeopleTools Mobile Agent software to a laptop computer or personaldigital assistant (PDA).
The PeopleTools Mobile Agent is a product that is licensed separately from the PeopleTools product, and onlythose customers who have a license for PeopleTools Mobile Agent may install and use this product. Use of theMobile Agent functionality described herein is subject to the licensing conditions for the PeopleTools MobileAgent product. Please refer to the applicable contract to determine restrictions regarding this product.
Task C-1: Finding the Installation ProgramThe installation program for PeopleTools Mobile Agent can be delivered in several ways:
• From a web site established by your administrator.• From an FTP site established by your administrator.• As an attachment to an email.• As a link to a web or FTP site in an email.• In the mobile portal web site directory of your web server:
Note. PeopleSoft delivers a sample index.html file to be used to deploy the PeopleSoft Mobile Agent froma web site. This is only a sample and needs to be modified if it is to support web server configurationsother than the delivered defaults and provide option of customer branding.
Copyright © 2006, Oracle. All rights reserved. 523

Installing PeopleTools Mobile Agent Appendix C
- On an Oracle Application Server web server the location of index.html is
c:\<OAS_HOME>\j2ee\PeopleSoft\applications\PeopleSoft\PORTAL\ps\mobile
- On a BEA WebLogic web server the location of index.html is
c:\<PS_HOME>\webserv\peoplesoft\applications\peoplesoft\PORTAL\ps\mobile\
- On an IBM WebSphere web server the location of index.html is
c:\<PS_HOME>\webserv\<cellname_nodename_servername>\peoplesoft.ear\PORTAL\ps\mobile\
Task C-2: Installing PeopleTools Mobile Agent on a LaptopUse a web page like the following to distribute PeopleTools Mobile Agent installation files.
PeopleSoft 8 window
To install PeopleTools Mobile Agent on a laptop:
1. Locate and run setup.exe:The PeopleTools Mobile Agent Setup window appears.
2. Click Next.
524 Copyright © 2006, Oracle. All rights reserved.

Appendix C Installing PeopleTools Mobile Agent
3. Specify the directory in which PeopleTools Mobile Agent will be installed, or accept the default.4. Click Next.5. Select whether to automatically start PeopleTools Mobile Agent on login.6. Click Next.7. Select the preferred language.After installation, you cannot change this selection except by reinstalling PeopleTools Mobile Agent.
8. Click Next.9. Enter the address of your Sync Server in the URL text box.This address will usually be the same as that of your PIA web server. For example, if youaccess PeopleSoft applications at http://mywebserver/ps/signon.html, your Sync Server address ishttp://mywebserver:80/SyncServer. Contact your system administrator to confirm this information.
10. Click Next.A summary page appears, listing your installation selections.
11. Click Back to change a selection, or click Next to proceed with installation.12. Click Finish when the installation completion window appears.
Task C-3: Installing PeopleTools Mobile Agent on a PDAInstalling PeopleTools Mobile Agent to a PDA requires:
• Installing the appropriate version of PeopleTools Mobile Agent to the computer that connects to your PDA.
• Installing PeopleTools Mobile Agent to your PDA.
Note. The following procedure assumes that you have already established connectivity between thecomputer and PDA, including applicable synchronization software.
To install PeopleTools Mobile Agent on a PDA:
1. Locate and run setup_<processor_type>.exe:
The <processor_type> is the type of processor present in the PDA to which PeopleTools Mobile Agent isbeing installed.
The PeopleTools Mobile Agent Welcome window appears.
2. Click Next.3. Specify the directory in which PeopleTools Mobile Agent will be installed on the computer, or acceptthe default.
4. Click Next.5. Select the preferred language.
The only way you can change the preferred language on the PDA is by reinstalling PeopleTools MobileAgent.
6. Click Next.
Copyright © 2006, Oracle. All rights reserved. 525
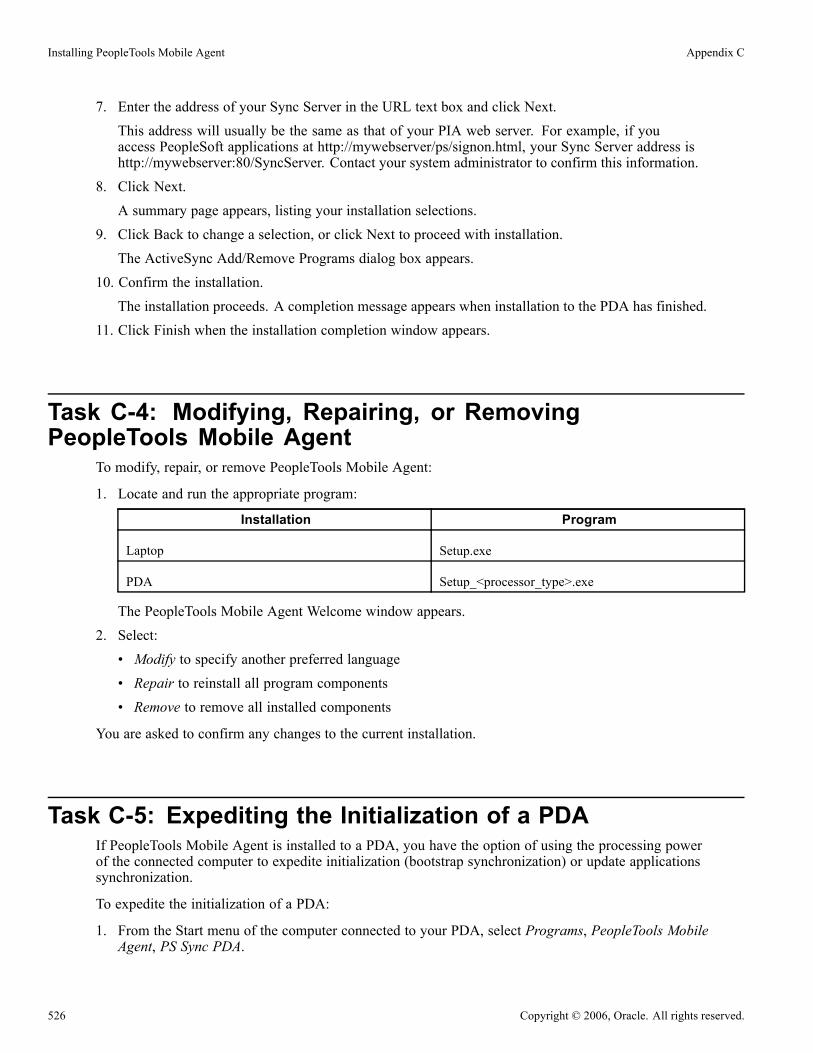
Installing PeopleTools Mobile Agent Appendix C
7. Enter the address of your Sync Server in the URL text box and click Next.This address will usually be the same as that of your PIA web server. For example, if youaccess PeopleSoft applications at http://mywebserver/ps/signon.html, your Sync Server address ishttp://mywebserver:80/SyncServer. Contact your system administrator to confirm this information.
8. Click Next.A summary page appears, listing your installation selections.
9. Click Back to change a selection, or click Next to proceed with installation.The ActiveSync Add/Remove Programs dialog box appears.
10. Confirm the installation.The installation proceeds. A completion message appears when installation to the PDA has finished.
11. Click Finish when the installation completion window appears.
Task C-4: Modifying, Repairing, or RemovingPeopleTools Mobile Agent
To modify, repair, or remove PeopleTools Mobile Agent:
1. Locate and run the appropriate program:
Installation Program
Laptop Setup.exe
PDA Setup_<processor_type>.exe
The PeopleTools Mobile Agent Welcome window appears.2. Select:• Modify to specify another preferred language• Repair to reinstall all program components• Remove to remove all installed components
You are asked to confirm any changes to the current installation.
Task C-5: Expediting the Initialization of a PDAIf PeopleTools Mobile Agent is installed to a PDA, you have the option of using the processing powerof the connected computer to expedite initialization (bootstrap synchronization) or update applicationssynchronization.
To expedite the initialization of a PDA:
1. From the Start menu of the computer connected to your PDA, select Programs, PeopleTools MobileAgent, PS Sync PDA.
526 Copyright © 2006, Oracle. All rights reserved.

Appendix C Installing PeopleTools Mobile Agent
The PeopleTools Mobile Device Bootstrap page appears.2. Enter your User ID and Password.Your User ID and its associated roles determine the application metadata and business data that will beinstalled to your mobile device.
3. Click Synchronize.The PeopleTools Mobile Synchronization Results page appears, showing the progress of your bootstrapsynchronization.
4. After Update PDA Applications completes successfully, open the PeopleSoft program folder on the PDA.5. Start PS Mobile Agent.6. Start PS Mobile Application.7. Select Synchronization, Last Results to view the synchronization results.
Task C-6: Troubleshooting Installation IssuesThis section discusses:
• Resolving Port Conflicts
• Configuring the Web Server
Task C-6-1: Resolving Port ConflictsThe default HTTP listening port for PeopleTools Mobile Agent is port 8080, which is specified in thepsmobile.ini file. If possible, ensure that port 8080 is not used by another application. If PeopleTools MobileAgent encounters a port conflict because another process is already using port 8080, it reports an error in thelog file (\temp\psmobile.log), and stops processing.
You can resolve the conflict by editing the psmobile.ini file. For example, change Port=8080 to Port=80 orPort=8888.
• For a laptop installation, edit the Port setting in the psmobile.ini file.
Find the file in C:\Windows or C:\WinNT.
• For a PDA installation, copy the psmobile.ini file to the laptop or desktop computer using ActiveSync, editit there, and then copy it back.
After changing the port assignment in psmobile.ini, start PeopleTools Mobile Agent to determine whetherthe new setting is acceptable.
Note. If you change the port assignment in psmobile.ini, update any shortcuts, bookmarks, or favorites thatreference the changed setting. For example, if you changed Port=8080 to Port=8888, change a browser favoriteor bookmark from http://localhost:8080 to http://localhost:8888. If you use PS Sync PDA to expedite PDAsynchronization, change the port number in any shortcuts to the port number specified in psmobile.ini + 1. Forexample, if you change psmobile.ini to Port=8888, change the PS Sync PDA shortcut to http://localhost:8889.
Task C-6-2: Configuring the Web ServerConfigure the web server to identify the application server (Sync Server gateway) used for synchronization.
Copyright © 2006, Oracle. All rights reserved. 527
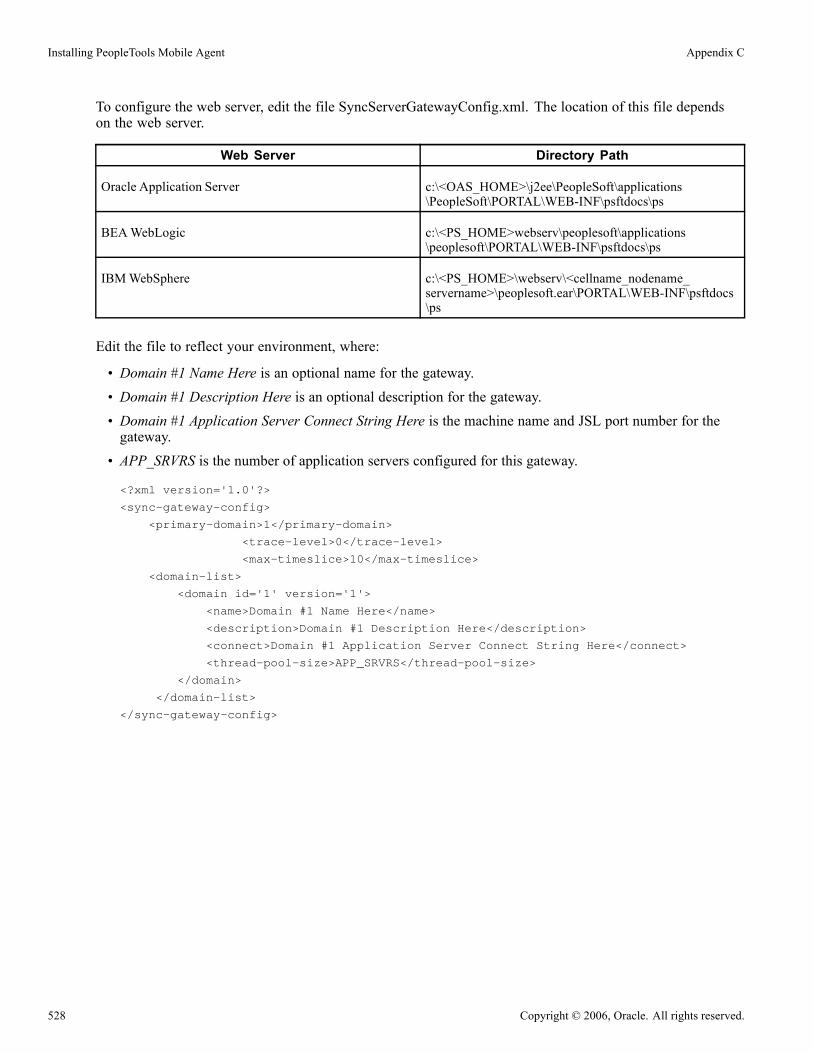
Installing PeopleTools Mobile Agent Appendix C
To configure the web server, edit the file SyncServerGatewayConfig.xml. The location of this file dependson the web server.
Web Server Directory Path
Oracle Application Server c:\<OAS_HOME>\j2ee\PeopleSoft\applications\PeopleSoft\PORTAL\WEB-INF\psftdocs\ps
BEAWebLogic c:\<PS_HOME>webserv\peoplesoft\applications\peoplesoft\PORTAL\WEB-INF\psftdocs\ps
IBMWebSphere c:\<PS_HOME>\webserv\<cellname_nodename_servername>\peoplesoft.ear\PORTAL\WEB-INF\psftdocs\ps
Edit the file to reflect your environment, where:
• Domain #1 Name Here is an optional name for the gateway.
• Domain #1 Description Here is an optional description for the gateway.
• Domain #1 Application Server Connect String Here is the machine name and JSL port number for thegateway.
• APP_SRVRS is the number of application servers configured for this gateway.
<?xml version='1.0'?>
<sync-gateway-config>
<primary-domain>1</primary-domain>
<trace-level>0</trace-level>
<max-timeslice>10</max-timeslice>
<domain-list>
<domain id='1' version='1'>
<name>Domain #1 Name Here</name>
<description>Domain #1 Description Here</description>
<connect>Domain #1 Application Server Connect String Here</connect>
<thread-pool-size>APP_SRVRS</thread-pool-size>
</domain>
</domain-list>
</sync-gateway-config>
528 Copyright © 2006, Oracle. All rights reserved.
APPENDIX D
Installing Web Application Deployment Tools
This appendix discusses:
• Prerequisites
• Installing the Web Application Deployment Tools on Oracle Application Server in GUI Mode
• Installing the Web Application Deployment Tools on WebLogic in GUI Mode
• Installing the Web Application Deployment Tools on WebSphere in GUI Mode
• Installing the Web Application Deployment Tools on Oracle Application Server in Console Mode
• Installing the Web Application Deployment Tools on WebLogic in Console Mode
• Installing the Web Application Deployment Tools on WebSphere in Console Mode
• Testing and Troubleshooting the Web Application Deployment
PrerequisitesThis appendix includes instructions for installing the Web Application Deployment tools on Oracle ApplicationServer (OAS), WebLogic, and WebSphere. Complete the instructions for the web server you selected whenyou carried out the PeopleTools installation. Typically, you would choose GUI mode for Windows platformsand console mode for UNIX or Linux platforms.
Before you install the Web Application Deployment tools, confirm that you have completed the followingrequirements.
If you use OAS as your web server, you must fulfill these requirements:
• You must install the PeopleSoft web server during the PeopleTools installation.• The OAS 10g software must be installed.
If you use WebLogic as your web server, you must fulfill these requirements:
• JDK 1.4.x must be installed and working properly. Your PATH environment variable must include anentry for JDK 1.4.x (for example, <jdk14x>/bin). If you do not install JDK 1.4.x the deployment will faildue to the absence of a java compiler.
• You must install the PeopleSoft web server during the PeopleTools installation.• WebLogic 8.x must be installed.
If you use WebSphere as your web server, you must fulfill these requirements:
• JRE 1.4.1 or above must be installed and working properly. You can use the JRE software that is suppliedwith the PeopleTools installation CD.
Copyright © 2006, Oracle. All rights reserved. 529
Installing Web Application Deployment Tools Appendix D
• You must install the PeopleSoft web server during the PeopleTools installation.• The WebSphere 5.x software must be installed and the web server must be up and running when you carryout the Web Application Deployment tools installation.
• If you are running on UNIX or Linux, run the Web Application Deployment install with a user who ownsWebSphere, and who owns <PS_HOME>. Here are two examples: If WebSphere is owned by "root" andgroup "system", the Web Application Deployment install must be run with "root" and group "system." IfWebSphere is owned by user "wsadmin" and group "wsadmin", then the Web Application Deploymentinstall must be run with wsadmin/wsadmin as the user and group.
See Also“Installing Web Server Products”
“Using the PeopleSoft Installer”
Enterprise PeopleTools 8.48 PeopleBook: System and Server Administration.
Task D-1: Installing the Web Application Deployment Toolson Oracle Application Server in GUI Mode
To install the Web Application Deployment tools on Oracle Application Server (OAS):
1. Copy the required Web application (EAR) files to <PS_HOME>/setup/mpwebappdeploy/archive.
2. Navigate to <PS_HOME>/setup/mpwebappdeploy.
3. Double-click on setup.<OS>.
4. Click Next on the Welcome page.
5. Enter the same <PS_HOME> that you specified when you ran the PeopleTools installer, and click Next.
530 Copyright © 2006, Oracle. All rights reserved.

Appendix D Installing Web Application Deployment Tools
Specifying directory on PeopleSoft Webapp Deploy window
6. Accept Oracle Application Server as the setup type, and click Next.
Selecting Oracle Application Server
7. Specify the OAS home directory, or accept the default, and click Next.This is the directory where you installed the OAS software.
Copyright © 2006, Oracle. All rights reserved. 531
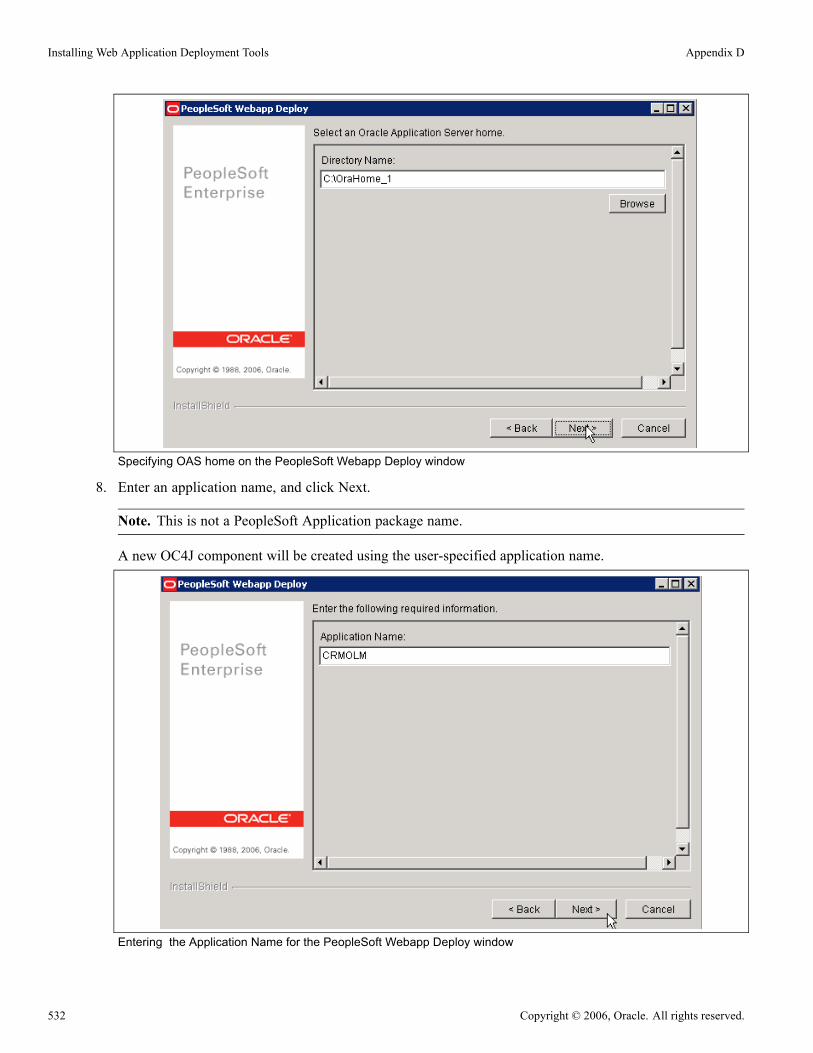
Installing Web Application Deployment Tools Appendix D
Specifying OAS home on the PeopleSoft Webapp Deploy window
8. Enter an application name, and click Next.
Note. This is not a PeopleSoft Application package name.
A new OC4J component will be created using the user-specified application name.
Entering the Application Name for the PeopleSoft Webapp Deploy window
532 Copyright © 2006, Oracle. All rights reserved.
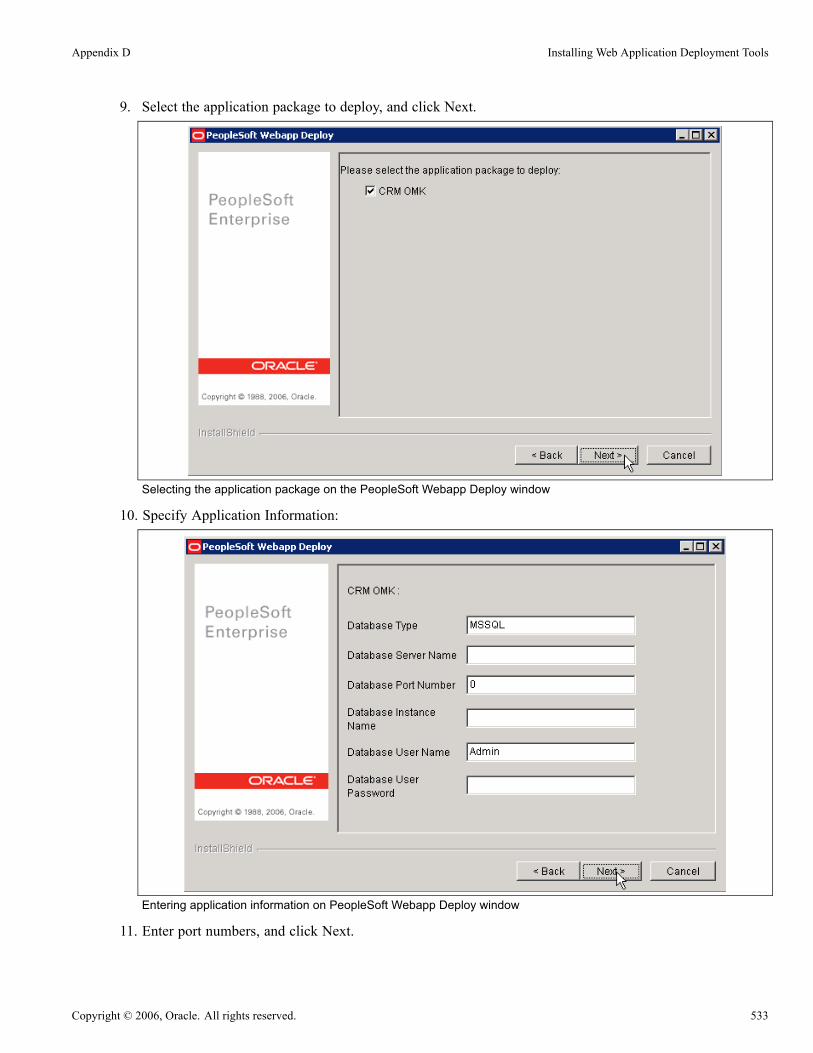
Appendix D Installing Web Application Deployment Tools
9. Select the application package to deploy, and click Next.
Selecting the application package on the PeopleSoft Webapp Deploy window
10. Specify Application Information:
Entering application information on PeopleSoft Webapp Deploy window
11. Enter port numbers, and click Next.
Copyright © 2006, Oracle. All rights reserved. 533

Installing Web Application Deployment Tools Appendix D
Note. Review the reserved port numbers for OAS in the file <OAS_HOME>/install/portlist.ini and enter adifferent port number here.
Entering port numbers on PeopleSoft Webapp Deploy window
12. Verify that the information on the confirmation window is correct, and click Next.
Verifying information on PeopleSoft Webapp Deploy window
534 Copyright © 2006, Oracle. All rights reserved.

Appendix D Installing Web Application Deployment Tools
A progress window appears.
Progress window for PeopleSoft Webapp Deploy
13. A confirmation window appears when the installation is complete. Click Finish to exit.
Successful installation on the PeopleSoft Webapp Deploy window
Copyright © 2006, Oracle. All rights reserved. 535

Installing Web Application Deployment Tools Appendix D
Task D-2: Installing the Web Application DeploymentTools on WebLogic in GUI Mode
Use these instructions to install the Web Application Deployment Tools on WebLogic in GUI mode.
1. Copy the required Web Applications (EAR) files to <PS_HOME>/setup/mpwebappdeploy/archive.2. Navigate to <PS_HOME>/setup/mpwebappdeploy.3. Double-click on setup.exe.
Note. If the setup executable fails, and an error message appears saying the JVM directory cannot befound, open a command prompt. Navigate to <PS_HOME>\setup\mpwebappdeploy, and use the commandsetup.exe –is:javahome <jre_dir>, where <jre_dir> is the location of the JRE files.
4. Click Next on the Welcome page.5. Enter the same <PS_HOME> directory that you specified when you ran the PeopleTools Installer.6. Select BEA WebLogic Server and click Next.
Selecting BEA WebLogic on the PeopleSoft Webapp Deploy window
7. Specify the root directory where you installed WebLogic, and click Next.
536 Copyright © 2006, Oracle. All rights reserved.
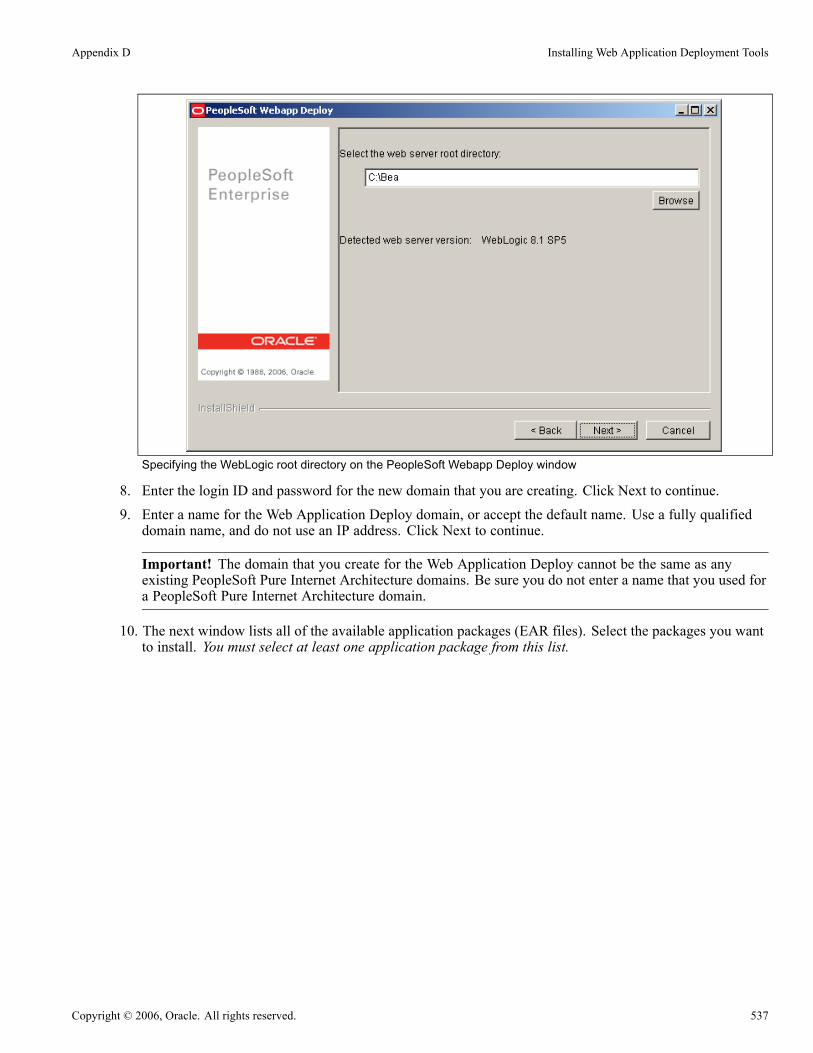
Appendix D Installing Web Application Deployment Tools
Specifying the WebLogic root directory on the PeopleSoft Webapp Deploy window
8. Enter the login ID and password for the new domain that you are creating. Click Next to continue.9. Enter a name for the Web Application Deploy domain, or accept the default name. Use a fully qualifieddomain name, and do not use an IP address. Click Next to continue.
Important! The domain that you create for the Web Application Deploy cannot be the same as anyexisting PeopleSoft Pure Internet Architecture domains. Be sure you do not enter a name that you used fora PeopleSoft Pure Internet Architecture domain.
10. The next window lists all of the available application packages (EAR files). Select the packages you wantto install. You must select at least one application package from this list.
Copyright © 2006, Oracle. All rights reserved. 537
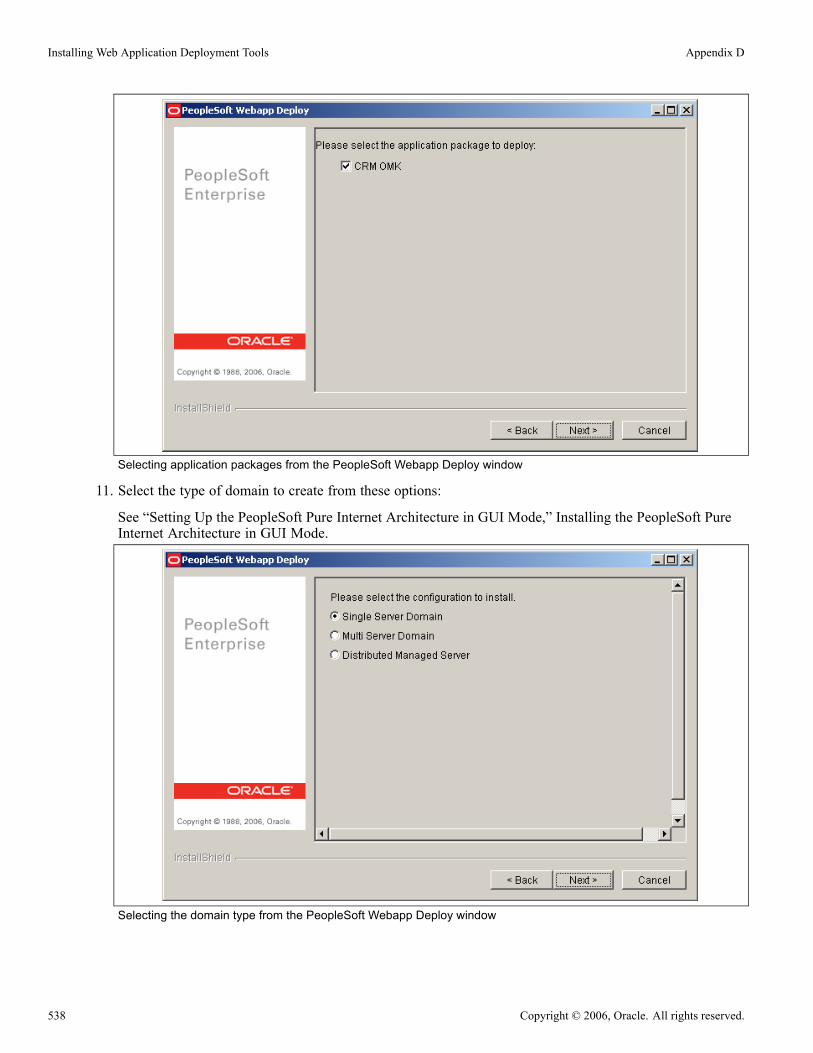
Installing Web Application Deployment Tools Appendix D
Selecting application packages from the PeopleSoft Webapp Deploy window
11. Select the type of domain to create from these options:
See “Setting Up the PeopleSoft Pure Internet Architecture in GUI Mode,” Installing the PeopleSoft PureInternet Architecture in GUI Mode.
Selecting the domain type from the PeopleSoft Webapp Deploy window
538 Copyright © 2006, Oracle. All rights reserved.
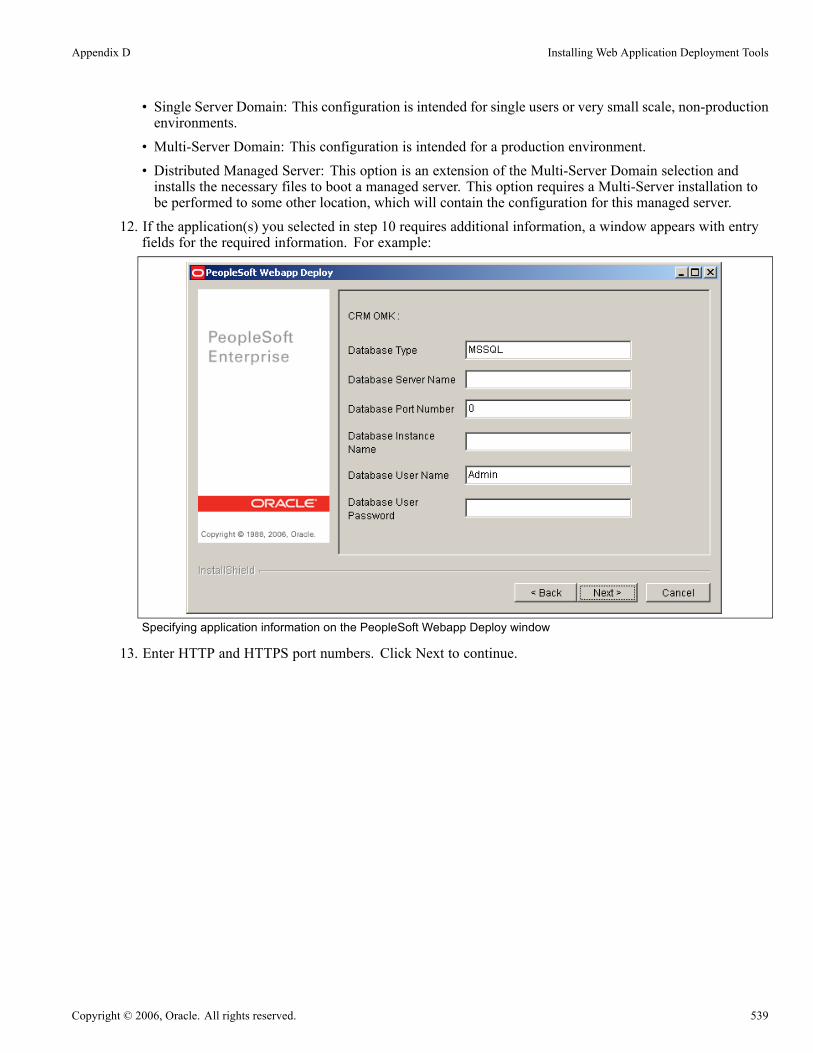
Appendix D Installing Web Application Deployment Tools
• Single Server Domain: This configuration is intended for single users or very small scale, non-productionenvironments.
• Multi-Server Domain: This configuration is intended for a production environment.• Distributed Managed Server: This option is an extension of the Multi-Server Domain selection andinstalls the necessary files to boot a managed server. This option requires a Multi-Server installation tobe performed to some other location, which will contain the configuration for this managed server.
12. If the application(s) you selected in step 10 requires additional information, a window appears with entryfields for the required information. For example:
Specifying application information on the PeopleSoft Webapp Deploy window
13. Enter HTTP and HTTPS port numbers. Click Next to continue.
Copyright © 2006, Oracle. All rights reserved. 539
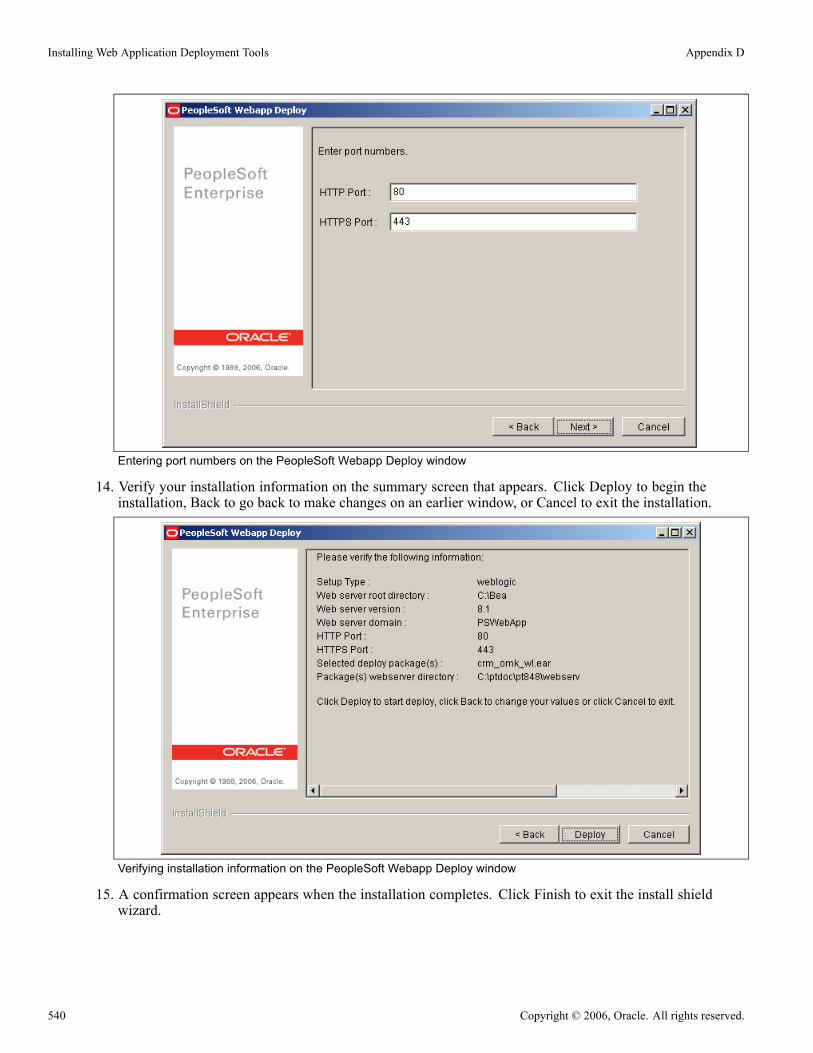
Installing Web Application Deployment Tools Appendix D
Entering port numbers on the PeopleSoft Webapp Deploy window
14. Verify your installation information on the summary screen that appears. Click Deploy to begin theinstallation, Back to go back to make changes on an earlier window, or Cancel to exit the installation.
Verifying installation information on the PeopleSoft Webapp Deploy window
15. A confirmation screen appears when the installation completes. Click Finish to exit the install shieldwizard.
540 Copyright © 2006, Oracle. All rights reserved.
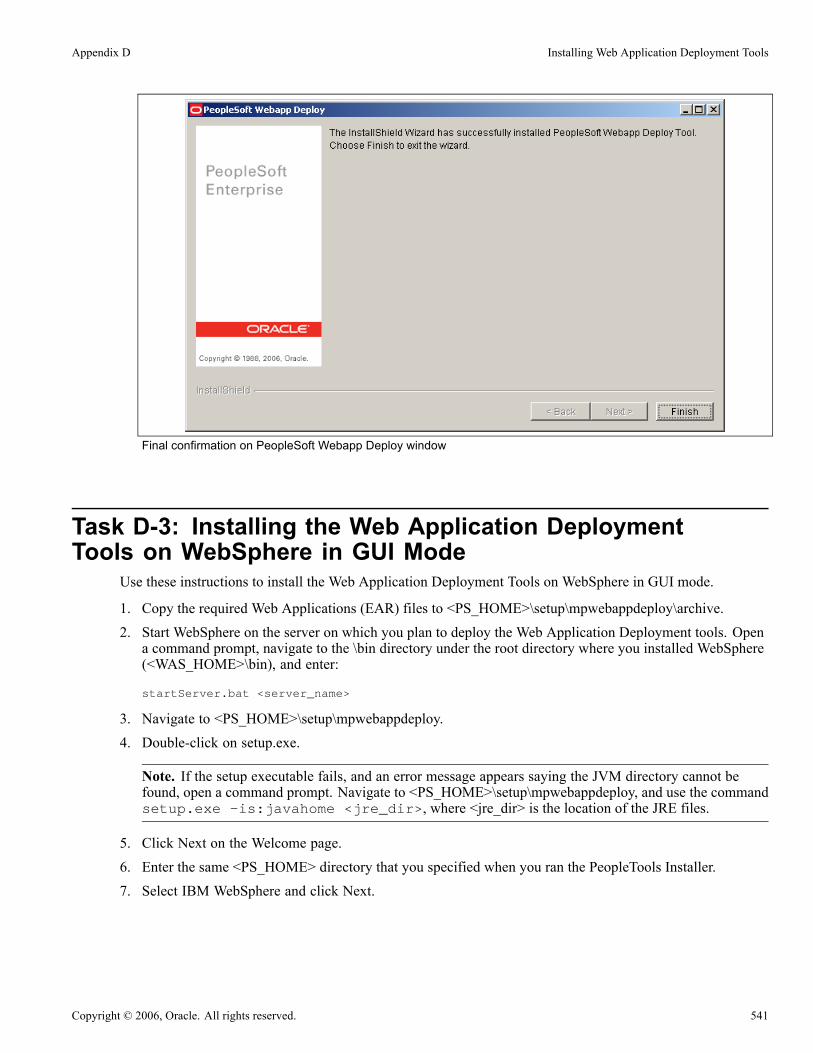
Appendix D Installing Web Application Deployment Tools
Final confirmation on PeopleSoft Webapp Deploy window
Task D-3: Installing the Web Application DeploymentTools on WebSphere in GUI Mode
Use these instructions to install the Web Application Deployment Tools on WebSphere in GUI mode.
1. Copy the required Web Applications (EAR) files to <PS_HOME>\setup\mpwebappdeploy\archive.2. Start WebSphere on the server on which you plan to deploy the Web Application Deployment tools. Opena command prompt, navigate to the \bin directory under the root directory where you installed WebSphere(<WAS_HOME>\bin), and enter:
startServer.bat <server_name>
3. Navigate to <PS_HOME>\setup\mpwebappdeploy.4. Double-click on setup.exe.
Note. If the setup executable fails, and an error message appears saying the JVM directory cannot befound, open a command prompt. Navigate to <PS_HOME>\setup\mpwebappdeploy, and use the commandsetup.exe –is:javahome <jre_dir>, where <jre_dir> is the location of the JRE files.
5. Click Next on the Welcome page.6. Enter the same <PS_HOME> directory that you specified when you ran the PeopleTools Installer.7. Select IBM WebSphere and click Next.
Copyright © 2006, Oracle. All rights reserved. 541

Installing Web Application Deployment Tools Appendix D
Selecting IBM WebSphere on the PeopleSoft Webapp Deploy window
8. Specify the root directory where you installed WebSphere, and the cell name, node name and servername of the WebSphere server.
Specifying the WebSphere directory on the PeopleSoft Webapp Deploy window
Note. If the web server on which you are installing the Web Application Deployment tools is not up andrunning, you receive an error message at this point instructing you to start your web server.
542 Copyright © 2006, Oracle. All rights reserved.

Appendix D Installing Web Application Deployment Tools
See Enterprise PeopleTools 8.48 PeopleBook: System and Server Administration9. Enter a name for the Web Application Deploy domain, or accept the default name. Use a fully qualifieddomain name, and do not use an IP address. Click Next to continue.
Important! The domain that you create for the Web Application Deploy cannot be the same as anyexisting PeopleSoft Pure Internet Architecture domains. Be sure you do not enter a name that you used fora PeopleSoft Pure Internet Architecture domain.
10. The next window lists all of the available application packages (EAR files). Select the packages you wantto install. You must select at least one application package from this list.
Selecting application packages on the PeopleSoft Webapp Deploy window
11. If the application(s) you selected in step 10 requires additional information, a window appears with entryfields for the required information. For example:
Copyright © 2006, Oracle. All rights reserved. 543

Installing Web Application Deployment Tools Appendix D
Specifying application information on the PeopleSoft Webapp Deploy window
12. Enter HTTP and HTTPS port numbers. Click Next to continue.
Entering port numbers on the PeopleSoft Webapp Deploy window for WebSphere
13. Verify your installation information on the summary screen that appears. Click Deploy to begin theinstallation, Back to go back to make changes on an earlier window, or Cancel to exit the installation.
544 Copyright © 2006, Oracle. All rights reserved.

Appendix D Installing Web Application Deployment Tools
Verifying installation information on the PeopleSoft Webapp Deploy
14. A window appears with a progress indicator. A confirmation screen appears when the installationcompletes. Click Finish to exit the install shield wizard.
Confirming installation on the PeopleSoft Webapp Deploy window
Copyright © 2006, Oracle. All rights reserved. 545

Installing Web Application Deployment Tools Appendix D
Task D-4: Installing the Web Application Deployment Toolson Oracle Application Server in Console Mode
To install the Web Application Deployment Tools on OAS in console mode:
Note. The console mode installation is typically used on UNIX platforms.
1. Copy the required Web Applications (EAR) files to <PS_HOME>/setup/mpwebappdeploy/archive.
2. Set up the PeopleSoft environment as follows:
cd <PS_HOME>
../psconfig.sh
3. To run the installer:
cd <PS_HOME>/setup/mpwebappdeploy
setup.<OS> -console [-is:javahome<jre14x>]
• Use the same platform-specific extension for the setup executable as you used for the PeopleSoft Installer.
See “Using the PeopleSoft Installer,” Running the PeopleSoft Installer.• Use the optional flag -is:javahome<jre14x> if you installed the JRE/JDK files in a directorythat is different than the vendor-defined JRE search path. For example, to run on a HP-UX platformand use the JRE that PeopleSoft supplies with PeopleTools, use the command setup.hp -console-is:javahome <PS_HOME>/jre.
4. You see a welcome message. Enter 1 to continue.
Welcome to the InstallShield Wizard for PeopleSoft Webapp Deploy Tool.
Using the InstallShield Wizard you will deploy PeopleSoft Application(s) on⇒your computer.
Note: If installing onto a BEA WebLogic Server, make sure to shutdown any⇒running web servers to avoid web server corruption.
Select Next to continue or Cancel to exit.
Press 1 for Next, 3 to Cancel or 4 to Redisplay [1]
5. Choose the <PS_HOME> directory that you specified when you installed PeopleTools. Enter 1 to continue.
Choose the directory where you installed PeopleSoft, commonly known as "PS_⇒HOME":
Please specify a directory name or press Enter [/opt/PS_HOME]
Press 1 for Next, 2 for Previous, 3 to Cancel or 4 to Redisplay [1]
6. Press ENTER to select the default, Oracle Application Server, at the following prompt, and then enter 1 tocontinue.
Choose the setup type that best suits your needs.
[X] 1 - Oracle Application Server
546 Copyright © 2006, Oracle. All rights reserved.

Appendix D Installing Web Application Deployment Tools
[ ] 2 - BEA WebLogic Server
[ ] 3 - IBM WebSphere Server
To select an item enter its number, or 0 when you are finished: [0]
Press 1 for Next, 2 for Previous, 3 to Cancel or 4 to Redisplay [1]
7. Enter the directory where you installed the OAS software, and press ENTER to continue at the followingprompt.
Select the web server root directory:
Please specify a directory name or press ENTER [/home/OraHome_1]
8. Enter a name for the web application, or accept the default name.
Enter application name or click Next to select default:
[CRMOLM]
A New OC4J component will be created using the user-specified application name.9. The next prompt lists all of the available application packages (EAR files). Enter the numbers beside thepackages you want to install. You must select at least one application package from this list.
Please select the application package to deploy:
[X] 1 - CRM Package
[ ] 2 - Financial Package
To select an item enter its number, or 0 when you are finished [0]:
10. If the application(s) you selected in step 9 requires additional information, supply the necessaryinformation at the next prompt. For example:
CRM OMK :
Database Type
[MSSSQL]
Database Server Name
[]
Database Port Number
[0]
Database Instance Name
[]
Database User Name
[Admin]
Database User Password
[]
11. Enter HTTP and HTTPS port numbers.
Copyright © 2006, Oracle. All rights reserved. 547

Installing Web Application Deployment Tools Appendix D
Note. Review the reserved port numbers for OAS in the file <OAS_HOME>/install/portlist.ini and enter adifferent port number here.
Enter port numbers.
HTTP Port : [80] 8091
HTTPS Port : [443] 4431
12. Verify your installation information on the next prompt and press ENTER to begin the installation. Anindicator shows your installation progress.
Please verify the following information:
Setup Type : OAS
Web server root directory : /home/OraHome_1
Web server version : 10.1.2
PeopleSoft App Name : CRMOLM
HTTP Port : 8091
HTTPS Port : 4431
Selected deploy package(s) : crm_omk_wl.ear
13. A confirmation screen appears when the installation completes. Click Finish to exit the install shieldwizard.
Task D-5: Installing the Web Application DeploymentTools on WebLogic in Console Mode
Use these instructions to install the Web Application Deployment Tools on WebLogic in console mode.
Note. The console mode installation is typically used on UNIX platforms.
1. Copy the required Web Applications (EAR) files to <PS_HOME>/setup/pswebappdeploy/archive.2. Set up the PeopleSoft environment as follows:
cd <PS_HOME>
../psconfig.sh
3. To run the installer:
cd <PS_HOME>/setup/pswebappdeploy
548 Copyright © 2006, Oracle. All rights reserved.

Appendix D Installing Web Application Deployment Tools
setup.<platform> -console [-is:javahome<jre14x>]
• Use the same platform-specific extension for the setup executable as you used for the PeopleSoft Installer.
See “Using the PeopleSoft Installer,” Running the PeopleSoft Installer.• Use the optional flag -is:javahome<jre14x> if you installed the JRE/JDK files in a directorythat is different than the vendor-defined JRE search path. For example, to run on a HP-UX platformand use the JRE that PeopleSoft supplies with PeopleTools, use the command setup.hp –console–is:javahome <PS_HOME>/jre.
4. You see a welcome message. Enter 1 to continue.
Welcome to the InstallShield Wizard for PeopleSoft Webapp Deploy Tool.
Using the InstallShield Wizard you will deploy PeopleSoft Application(s) on⇒your computer.
Note: If installing onto a BEA WebLogic Server, make sure to shutdown any⇒running web servers to avoid web server corruption.
Select Next to continue or Cancel to exit.
Press 1 for Next, 3 to Cancel or 4 to Redisplay [1]
5. Choose the <PS_HOME> directory that you specified when you installed PeopleTools. Enter 1 to continue.
Choose the directory where you installed PeopleSoft, commonly known as "PS_⇒HOME":
Please specify a directory name or press Enter [/opt/PS_HOME]
Press 1 for Next, 2 for Previous, 3 to Cancel or 4 to Redisplay [1]
6. Enter 2 to select BEA WebLogic Server, at the following prompt, and then enter 1 to continue.
Choose the setup type that best suits your needs.
[X] 1 - Oracle Application Server
[ ] 2 - BEA WebLogic Server
[ ] 3 - IBM WebSphere Server
To select an item enter its number, or 0 when you are finished: [0]
Press 1 for Next, 2 for Previous, 3 to Cancel or 4 to Redisplay [1]
7. Enter the directory where you installed WebLogic, and press ENTER to continue at the following prompt.
Select the web server root directory:
Please specify a directory name or press ENTER [/opt/bea_ps]
Note. You receive an error message if the correct WebLogic version is not found in the directory you enter.
8. Enter a name for the Web Application Deploy domain, or accept the default name. Use a fully qualifieddomain name, and do not use an IP address.
Enter domain name or click Next to select default:
[PSWebApp]
Copyright © 2006, Oracle. All rights reserved. 549

Installing Web Application Deployment Tools Appendix D
Important! The domain that you create for the Web Application Deploy cannot be the same as anyexisting PeopleSoft Pure Internet Architecture domains. Be sure you do not enter a name that you used fora PeopleSoft Pure Internet Architecture domain.
9. Enter the administrator login and password for your WebLogic domain, and press ENTER to continue.
Please enter the administrator login and password for WebLogic domain.
Login ID:
[system]
Password:
[password]
Re-type Password:
[password]
10. The next prompt lists all of the available application packages (EAR files). Enter the numbers beside thepackages you want to install. You must select at least one application package from this list.
Please select the application package to deploy:
[X] 1 - CRM Package
[ ] 2 - Financial Package
To select an item enter its number, or 0 when you are finished [0]:
11. Select the type of domain to create—single server, multi server, or distributed managed server.
See “Setting Up the PeopleSoft Pure Internet Architecture in Console Mode,” Installing the PeopleSoftPure Internet Architecture in Console Mode.
Please select the configuration to install.
[X] 1 - Single Server Domain
[ ] 2 - Multi Server Domain
[ ] 3 - Distributed Managed Server
To select an item enter its number, or 0 when you are finished: [0]
• Single Server Domain: This configuration is intended for single user or very small scale, non-productionenvironments.
• Multi–Server Domain: This configuration is intended for a production environment.• Distributed Managed Server: This option is an extension of the Multi-Server Domain selection andinstalls the necessary files to boot a managed server. This option requires a Multi Server installation to beperformed to some other location, which will contain the configuration for this managed server.
550 Copyright © 2006, Oracle. All rights reserved.
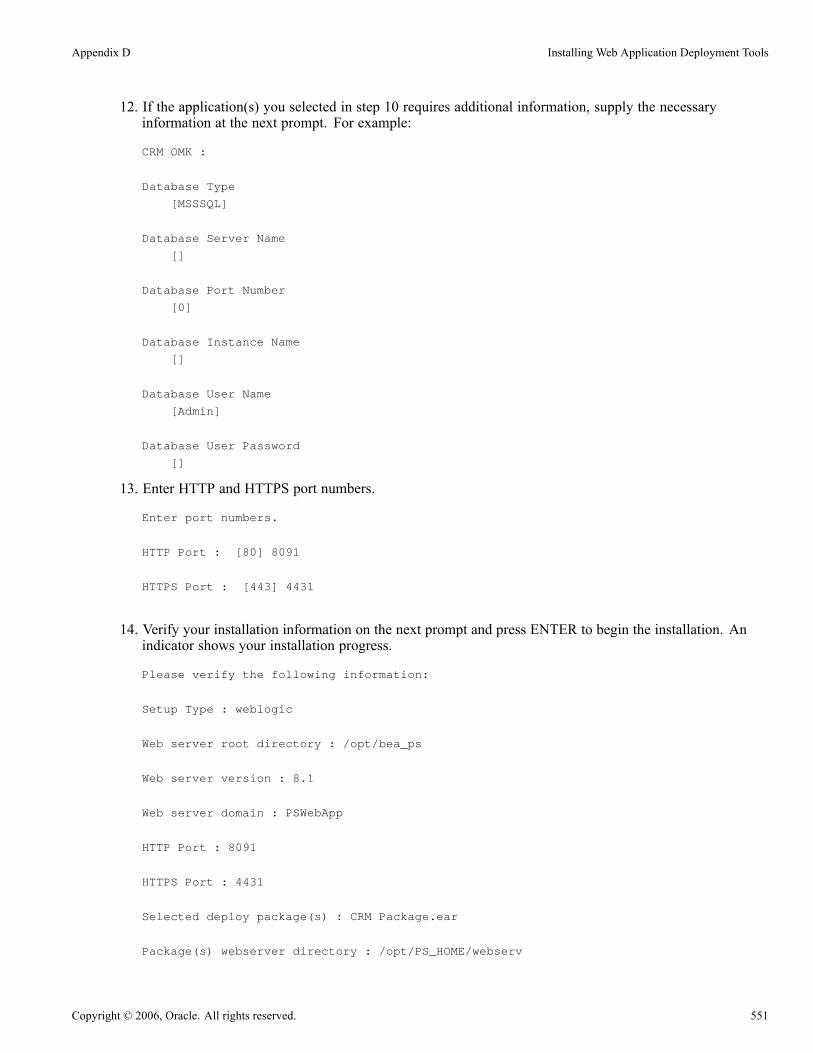
Appendix D Installing Web Application Deployment Tools
12. If the application(s) you selected in step 10 requires additional information, supply the necessaryinformation at the next prompt. For example:
CRM OMK :
Database Type
[MSSSQL]
Database Server Name
[]
Database Port Number
[0]
Database Instance Name
[]
Database User Name
[Admin]
Database User Password
[]
13. Enter HTTP and HTTPS port numbers.
Enter port numbers.
HTTP Port : [80] 8091
HTTPS Port : [443] 4431
14. Verify your installation information on the next prompt and press ENTER to begin the installation. Anindicator shows your installation progress.
Please verify the following information:
Setup Type : weblogic
Web server root directory : /opt/bea_ps
Web server version : 8.1
Web server domain : PSWebApp
HTTP Port : 8091
HTTPS Port : 4431
Selected deploy package(s) : CRM Package.ear
Package(s) webserver directory : /opt/PS_HOME/webserv
Copyright © 2006, Oracle. All rights reserved. 551

Installing Web Application Deployment Tools Appendix D
15. After the installation is complete, you must deploy the Web Application Deploy tools. Use the followingcommands:
cd <PS_HOME>/webserv/<domain_name>
startPSWEBAPPS.sh
For <domain_name>, use the name you entered in step 8.
Note. You can choose to deploy at a later time using the same commands.
Task D-6: Installing the Web Application DeploymentTools on WebSphere in Console Mode
Use these instructions to install the Web Application Deployment Tools on WebSphere in console mode.
Note. The console mode installation is typically used on UNIX platforms.
1. Copy the required Web Applications (EAR) files to <PS_HOME>/setup/pswebappdeploy/archive.2. Set up the PeopleSoft environment using the following commands:
cd <PS_HOME>
../psconfig.sh
3. Start WebSphere on the server on which you plan to deploy the Web Application Deployment tools.Navigate to the bin directory under the directory where you installed WebSphere, <WAS_HOME>.Use the following commands:
cd <WAS_HOME>/bin
startServer.sh <server_name>
4. To run the installer:
cd <PS_HOME>/setup/pswebappdeploy
setup.<platform> -console [-is:javahome<jre14x>]
• Use the same platform-specific extension for the setup executable as you used for the PeopleSoft Installer.
See “Using the PeopleSoft Installer,” Running the PeopleSoft Installer.
• Use the optional flag -is:javahome<jre14x> if you installed the JRE/JDK files in a directorythat is different than the vendor-defined JRE search path. For example, to run on a HP-UX platformand use the JRE that PeopleSoft supplies with PeopleTools, use the command setup.hp –console–is:javahome <PS_HOME>/jre.
5. You see a Welcome message. Enter 1 to continue.
Welcome to the InstallShield Wizard for PeopleSoft Webapp Deploy Tool.
Using the InstallShield Wizard you will deploy PeopleSoft Application(s) onyour⇒computer.
Note: If installing onto a BEA WebLogic Server, make sure to shutdown any⇒running web servers to avoid web server corruption.
552 Copyright © 2006, Oracle. All rights reserved.

Appendix D Installing Web Application Deployment Tools
Select Next to continue or Cancel to exit.
Press 1 for Next, 3 to Cancel or 4 to Redisplay [1]
6. Choose the same <PS_HOME> directory that you specified when you ran the PeopleTools Installer.
Choose the directory where you installed PeopleSoft, commonly known as "PS_⇒HOME":
Please specify a directory name or press Enter [/opt/PS_HOME]
7. Enter 3, to select the IBM WebSphere Server, at the following prompt:
Choose the setup type that best suits your needs.
[X] 1 - Oracle Application Server
[ ] 2 - BEA WebLogic Server
[ ] 3 - IBM WebSphere Server
To select an item enter its number, or 0 when you are finished: [0]
8. Enter the root directory where you installed WebSphere at the following prompt, and press ENTER tocontinue:
Select the WebSphere Server directory:
Directory Name:
Please specify a directory name or press Enter [/opt/webserv]
Note. If the web server on which you are installing the Web Application Deployment tools is not up andrunning, you receive an error message at this point instructing you to start your web server.
See Enterprise PeopleTools 8.48 PeopleBook: System and Server Administration.
9. At the next prompts, enter a cell name, node name, and server name.
10. Enter a name for the Web Application Deploy domain, or accept the default name. Use a fully qualifieddomain name, and do not use an IP address. Press 1 to continue.
Enter domain name or click Next to select default:
[PSWebApp]
Important! The domain that you create for the Web Application Deploy cannot be the same as anyexisting PeopleSoft Pure Internet Architecture domains. Be sure you do not enter a name that you used fora PeopleSoft Pure Internet Architecture domain.
11. The next prompt lists all of the available application packages (EAR files). Enter the number correspondingto the packages you want to install. You must select at least one application package from this list.
Please select the application package to deploy:
Copyright © 2006, Oracle. All rights reserved. 553

Installing Web Application Deployment Tools Appendix D
[X] 1 - CRM Package
[ ] 2 - Financial Package
To select an item enter its number, or 0 when you are finished [0]:
12. If the application(s) you selected in the previous step requires additional information, supply the necessaryinformation at the next prompt. For example:
CRM OMK :
Database Type
[MSSQL]
Database Server Name
[]
Database Port Number
[0]
Database Instance Name
[]
Database User Name
[Admin]
Database User Password
[]
13. Enter HTTP and HTTPS port numbers at the following prompt. Press 1 to continue.
Enter port numbers.
HTTP Port: [80] 8091
HTTPS Port: [443] 4431
14. Verify your installation information at the next prompt and press ENTER to begin the installation. Anindicator shows your installation progress.
15. A confirmation screen appears when the installation completes. Click Finish to exit the install shieldwizard.
16. After the installation is complete, you must stop and start the WebSphere server. Use the followingcommands:
cd <WAS_HOME>/bin
../stopServer.sh <server_name>
../startServer.sh <server_name>
For <server_name>, use the name of the WebSphere server you used in step 3.
554 Copyright © 2006, Oracle. All rights reserved.

Appendix D Installing Web Application Deployment Tools
Task D-7: Testing and Troubleshooting the WebApplication Deployment
Check the log file for any problems encountered during installation. The log file is saved in the followinglocations:
• If you installed on OAS, the log files are found in <OAS_HOME>/j2ee/home/webappdeploy_install.log.• If you installed on WebLogic, the log file is found in <PS_HOME>/webserv/<domain_name>logs/*.log• If you installed on WebSphere, look in <WAS_HOME>/appserver/log/<server_name>*.log
If you need to start or stop OAS, WebLogic, or WebSphere, use the commands given in the chapter oninstalling the PeopleSoft Pure Internet Architecture.
See “Setting Up the PeopleSoft Pure Internet Architecture (in GUI Mode or Console Mode),” Testing thePeopleSoft Pure Internet Architecture Installation.
Copyright © 2006, Oracle. All rights reserved. 555

Installing Web Application Deployment Tools Appendix D
556 Copyright © 2006, Oracle. All rights reserved.
APPENDIX E
Installing and Configuring DB2 Connect
This appendix discusses:
• Understanding DB2 Connect
• Verifying Supported Versions
• Defining DB2 Connect Architecture
• Setting Up DDF on the Mainframe
• Configuring TCP/IP on the Client
• Configuring the DB2 Connect Gateway on Windows
• Binding DB2 Connect Packages for an EBCDIC Installation
• Binding DB2 Connect Packages for a Unicode Installation
• Setting DB2CodePage For A Unicode Database
• Setting Up the DB2 Connect Gateway on UNIX
• Confirming DB2 Connect/ODBC Settings
• Setting CLI/ODBC Trace with the Client Configuration Assistant
Understanding DB2 ConnectThis appendix discusses installing and configuring DB2 Connect connectivity for z/OS. The points during theinstallation when you will need to perform these procedures are noted in the chapters where they apply. Youwill need to set up connectivity on the following locations:
• On the mainframe.• On any application server (Windows or UNIX).• On any Windows or UNIX Server acting as DB2 Connect gateway.• On any dedicated Windows or UNIX batch server.• On any Windows client that will be making a two-tier connection to the database; this is required for anyclients that will be running COBOL or SQR batch processes locally, but not for clients that are connectingexclusively in three-tier and running all batch processes on the server.
This appendix describes specific environment variables and parameters that you’ll need to set for each DB2Connect component so that it will work optimally with PeopleSoft. For the complete instructions on installingDB2 Connect, refer to their product documentation.
See the DB2 Connect Product documentation.
Copyright © 2006, Oracle. All rights reserved. 557

Installing and Configuring DB2 Connect Appendix E
Verifying Supported VersionsTo use PeopleSoft 8.4 with DB2 Connect, verify the following release information:
• Consult Supported Platforms on PeopleSoft Customer Connection to verify that PeopleSoft supports theversion of DB2 Connect that you intend to use with your particular release of DB2 UDB for z/OS.
• Consult Supported Platforms on PeopleSoft Customer Connection also to verify that PeopleSoft supportsthe particular release of UNIX or Windows on which you plan to install DB2 Connect.
• When configuring DB2 Connect on supported releases of either Windows or UNIX, no additional TCP/IPsoftware is required.
• TCP/IP for z/OS is required on the mainframe.
• See PeopleSoft Customer Connection for the minimum required z/OS version for PeopleTools 8.48.
See AlsoPeopleSoft Customer Connection (Implement, Optimize + Upgrade, Implementation Guide, SupportedPlatforms, PeopleSoft Enterprise)
Defining DB2 Connect ArchitectureThis section discusses:
• Understanding DB2 Connect Architecture
• Using DB2 Connect Enterprise Edition
• Using DB2 Connect Personal Edition
• Defining PeopleSoft Three-Tier Configuration with DB2 Connect
Understanding DB2 Connect ArchitectureDB2 Connect connects your client PeopleSoft applications to DB2’s Distributed Data Facility (DDF)components on the mainframe. DB2 Connect performs the following tasks when connecting to DB2 UDBfor z/OS via DDF:
• Provides a control point for client connections.
• Performs the proper character conversions when receiving data from DB2.
• Responds to the connect requests from PeopleSoft client computers and creates corresponding TCP/IPconversations with DDF.
• Sends requests and replies between client computers and DDF.
IBM offers two different DB2 Connect products: DB2 Connect Enterprise Edition and DB2 Connect PersonalEdition.
558 Copyright © 2006, Oracle. All rights reserved.

Appendix E Installing and Configuring DB2 Connect
Using DB2 Connect Enterprise EditionDB2 Connect Enterprise Edition requires a gateway machine; individual clients connect to the gatewaymachine using DB2 Connect CAE. The DB2 Connect gateway manages the TCP/IP conversation with theDDF on the mainframe. DB2 Connect Enterprise Edition can be used with either PeopleSoft’s two-tier orthree-tier architecture.
The DB2 Connect CAE (Client Application Enabler) component of DB2 Connect Enterprise Edition comeswith the base product and must reside on each Windows client machine. It provides a logical connectionbetween the PeopleSoft client and the DB2 Connect gateway machine. The router sends the PeopleSoftSQL requests by way of network protocol to the gateway, and then receives the result set in return. Thecommunication between the Windows client machine and the DB2 Connect gateway is accomplished using theTCP/IP protocol.
Windows or IBM AIX with DB2Connect Enterprise Edition and
SNA software (APPC only)
DB2
z/OS
DDF
DB2 Connect gateway
TCP/IP or
APPC
Windows Client withCAE
TCP/IP
DB2 Connect Enterprise Edition architecture
The physical connection between the DB2 Connect gateway and the mainframe can be made by a Token Ringattachment, a bridged Token Ring attachment, Ethernet, FDDI, Escon Channels, or a leased-line or dial-upSDLC connection. This connectivity is a critical piece for performance such that it should be configured with ahigh-bandwidth and located very close to the mainframe.
Using DB2 Connect Personal EditionDB2 Connect Personal Edition is installed on each client workstation and allows clients to connect directly toDB2 DDF. It does not require an intermediary DB2 Connect gateway to access your database.
Copyright © 2006, Oracle. All rights reserved. 559

Installing and Configuring DB2 Connect Appendix E
DB2
z/OS
DDF
Windows Client with DB2Connect Personal Edition
TCP/IP
DB2 Connect Personal Edition architecture
DB2 Connect Personal Edition allows direct TCP/IP connection to the host with no gateway requirement.
Defining PeopleSoft Three-Tier Configuration with DB2 ConnectThe Peoplesoft application server processes all transactions requested by Windows clients and Web serversand sends SQL to the database server using DB2 Connect. BEA’s Tuxedo middleware product manages allthese transactions in the application server. In addition to BEA’s Tuxedo, the server hosting the PeopleSoftapplication server must be configured with DB2 Connect Enterprise Edition to establish connectivity to thedatabase server.
On DB2 UDB for z/OS, the application server can be configured either on Windows NT 4.0, Windows 2000,IBM AIX, SUN Solaris or HP-UX. Since all SQL is handled in the application server, it is paramount forperformance reasons that the application server machine be connected to the mainframe via Fast Ethernet,Escon channel attached, FDDI, or some comparable network connection that allows maximum through-put.
When connecting via the PeopleSoft three-tier, the individual client workstations do not require DB2Connect CAE. No connectivity is required on the client machines for PeoplesSoft three-tier connectivity;communication between client workstation and application server is handled via BEA Tuxedo. If clients havespecifics needs to connect via two-tier (for example, to run Data Mover, client COBOL, perform upgradesteps), they will need to either install DB2 Connect Personal Edition for a direct connection to DDF on themainframe, or install DB2 Connect CAE and connect to DDF via the DB2 Connect EE gateway. In either case,they will still be connecting via the DB2 Connect option but will not be using the PeopleSoft application server
560 Copyright © 2006, Oracle. All rights reserved.
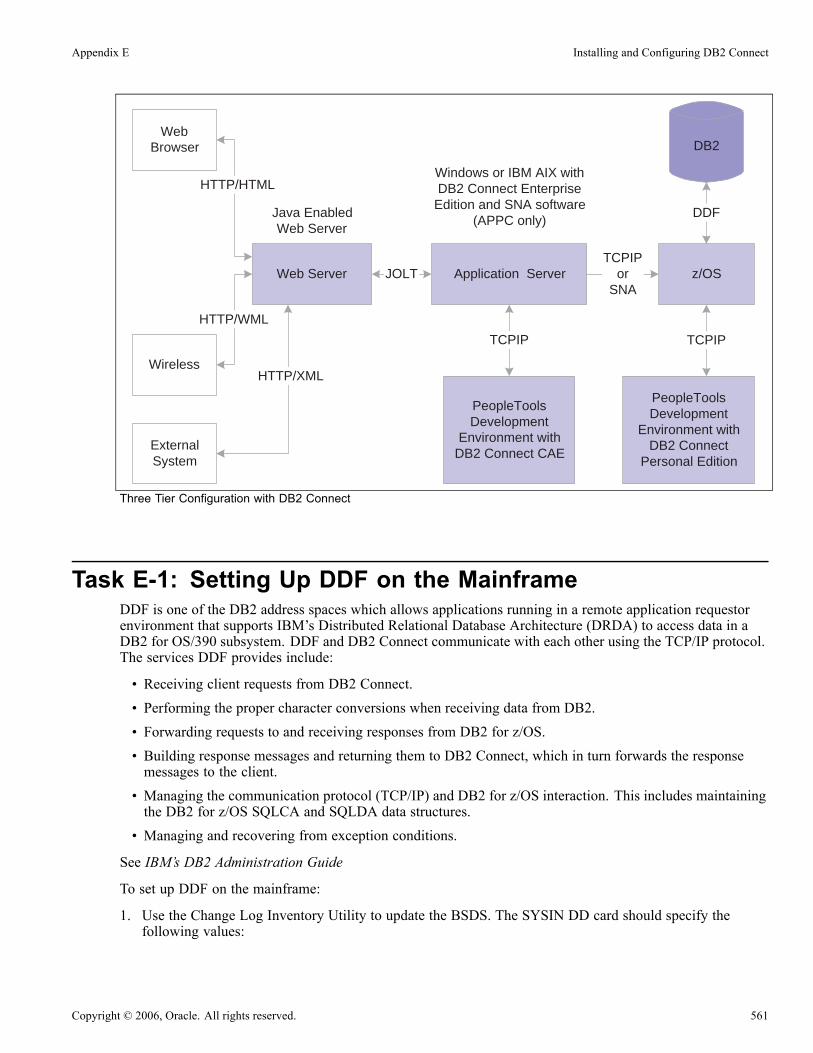
Appendix E Installing and Configuring DB2 Connect
Windows or IBM AIX withDB2 Connect Enterprise
Edition and SNA software(APPC only)
DB2
z/OS
DDF
Application ServerWeb Server
PeopleToolsDevelopment
Environment withDB2 Connect
Personal Edition
TCPIP
TCPIPor
SNA
PeopleToolsDevelopment
Environment withDB2 Connect CAE
TCPIP
Java EnabledWeb Server
JOLT
WebBrowser
Wireless
ExternalSystem
HTTP/XML
HTTP/WML
HTTP/HTML
Three Tier Configuration with DB2 Connect
Task E-1: Setting Up DDF on the MainframeDDF is one of the DB2 address spaces which allows applications running in a remote application requestorenvironment that supports IBM’s Distributed Relational Database Architecture (DRDA) to access data in aDB2 for OS/390 subsystem. DDF and DB2 Connect communicate with each other using the TCP/IP protocol.The services DDF provides include:
• Receiving client requests from DB2 Connect.
• Performing the proper character conversions when receiving data from DB2.
• Forwarding requests to and receiving responses from DB2 for z/OS.
• Building response messages and returning them to DB2 Connect, which in turn forwards the responsemessages to the client.
• Managing the communication protocol (TCP/IP) and DB2 for z/OS interaction. This includes maintainingthe DB2 for z/OS SQLCA and SQLDA data structures.
• Managing and recovering from exception conditions.
See IBM’s DB2 Administration Guide
To set up DDF on the mainframe:
1. Use the Change Log Inventory Utility to update the BSDS. The SYSIN DD card should specify thefollowing values:
Copyright © 2006, Oracle. All rights reserved. 561

Installing and Configuring DB2 Connect Appendix E
DDF LOCATION=<location name>
LUNAME=<vtam appl id>
PASSWORD=<password>
2. Start DDF (-STA DDF).
3. When DB2 is started you should see the LU Name and port number for the DB2 for z/OS DistributedData Facility (DDF). Look at the DDF startup messages in the system log and you should see informationsimilar to the following:
DSNL004I %Z DDF START COMPLETE
LOCATION DB2DSNZ
LU NETA.DB2APPLZ
GENERICLU -NONE
DOMAIN sysaoe.peoplesoft.com
TCPPORT 5070
RESPORT 5071
Task E-2: Configuring TCP/IP on the ClientUse the following procedure to configure TCP/IP on the client.
1. Obtain the host name or IP address of the z/OS server that you will be connecting to. You may need tocontact your network administrator to obtain the IP address. You can test the IP address by attemptingto ping it using the ping hostname command.
C:\ping mvsptown
PING mvsptown.peoplesoft.com: (207.135.44.20): 56 data bytes
64 bytes from 207.135.44.99: icmp_seq=0 ttl=56 time=10 ms
64 bytes from 207.135.44.99: icmp_seq=1 ttl=56 time=5 ms
64 bytes from 207.135.44.99: icmp_seq=2 ttl=56 time=9 ms
64 bytes from 207.135.44.99: icmp_seq=3 ttl=56 time=5 ms
You can also obtain the host’s IP address by entering TSO NETSTAT HOME from the z/OS server.2. Obtain the Port number to use to connect to target DB2 subsystem. The port number must be a uniquevalue and can be obtained by looking in DB2MSTR at the DDF startup. The parameter TCPPORTidentifies the port used for that DB2 subsystem. You may need to contact your database administratorfor TCPPORT used by DDF at startup.
3. Catalog a TCP/IP Node.
Note. The TCPIP Node will automatically get cataloged when you create a Database Alias via the ClientConfiguration Assistant. In the previous release of the product, known as DDCS, the TCPIP Nodes had tobe cataloged manually using the steps below. Manually cataloging the Nodes is no longer the only option.You may skip this step if using the Client Configuration Assistant. To see the Nodes that are currentlycataloged, type the following line in Command Line Processor: Db2 => list node directory.You can also use the uncatalog node command to remove a node catalog.
562 Copyright © 2006, Oracle. All rights reserved.

Appendix E Installing and Configuring DB2 Connect
You must add an entry to the client’s node directory to describe the remote node. This entry specifies thenode name, the hostname (or ip_address), and the port number. To catalog a TCP/IP node, perform thefollowing steps from the Command Line Processor:
Db2 => catalog tcpip node node_name remote [hostname|ip_address] server [⇒svcename|port_number]
For example, to catalog a remote server with the IP Name MVSPTOWN on the node called DB2DSNT,using the port number 5070, enter the following:Db2 => catalog tcpip node DB2DSNT remote MVSPTOWN server 5070
4. Catalog the Database.
Note. The Database will automatically get cataloged when you create a Database Alias via the ClientConfiguration Assistant. In the previous release of the product, known as DDCS, the Database had to becataloged manually using the steps below. Manually cataloging the database is no longer the only option.You may also skip this step if using the Client Configuration Assistant. To see the Databases that arecurrently cataloged, enter the following line in Command Line Processor: Db2 => list databasedirectory. You can also use the uncatalog database command to remove a database catalog.
5. Before a client application can access a remote database, the database must be cataloged on the TCPIPNode.
DB2 => catalog database database_name as database_alias at node node_name
For example, to catalog a remote database PT800T8 so that it has the alias ⇒PT800T8, on the node DB2DSNT, enter the following commands:
DB2 => catalog database PT800T8 as PT800T8 at node DB2DSNT
6. Test connection to database. You can test the connection to the database using the following command:
Db2 => connect to database_alias user userid using password
For example, to connect to database_alias PT800T8 using valid mainframe id PEOPLE1 and passwordPASSWRD1 then enter the following:Db2 => connect to PT800T8 user PEOPLE1 using PASSWRD1
Authentication takes place on the DB2 server, so userid and password must be valid mainframe ids. If theconnection is successful, you will get a message showing the name of the database to which you haveconnected. This step is synonymous to the TEST button in Client Configuration Assistant. You cannow execute SQL statements against the database.
Task E-3: Configuring the DB2 Connect Gateway on WindowsTo install the DB2 Connect Gateway to run properly with PeopleSoft applications, configure the DB2Database in Client Configuration Assistant.
See DB2 Connect Enterprise Edition Quick Beginnings manual.
1. Open Configuration Assistant. On the Selected menu, select Add Database Using Wizard. The AddDatabase Wizard window opens.
Copyright © 2006, Oracle. All rights reserved. 563
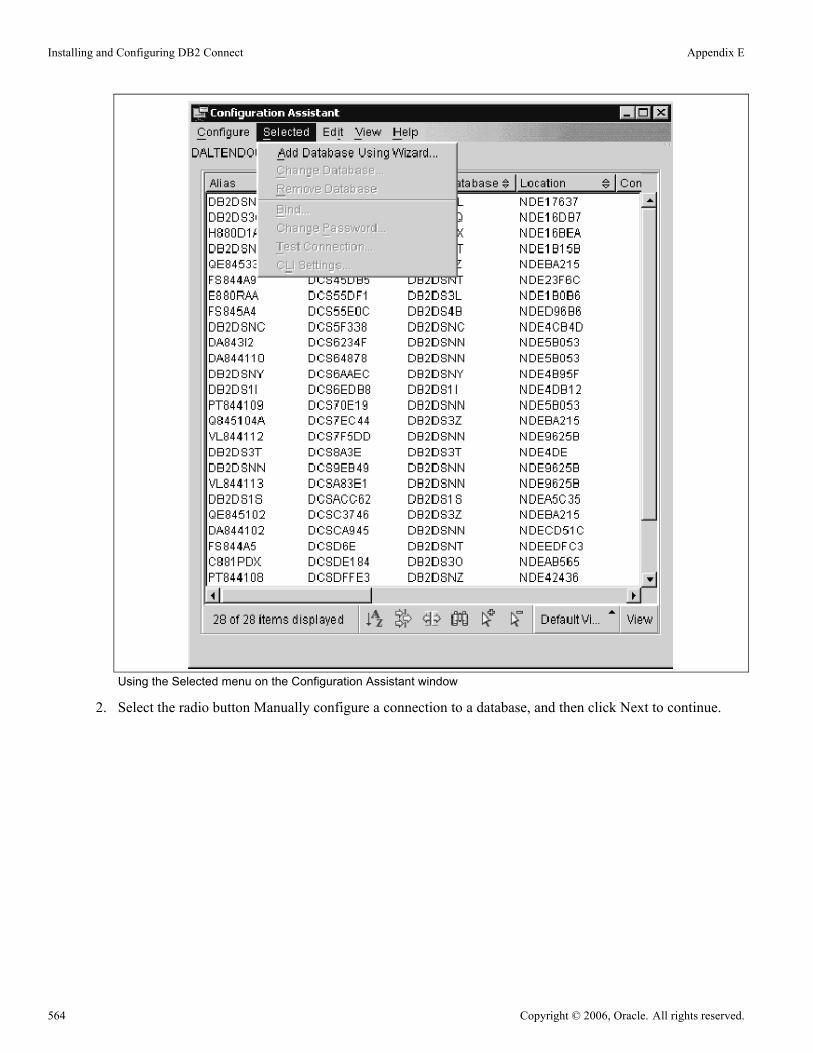
Installing and Configuring DB2 Connect Appendix E
Using the Selected menu on the Configuration Assistant window
2. Select the radio button Manually configure a connection to a database, and then click Next to continue.
564 Copyright © 2006, Oracle. All rights reserved.

Appendix E Installing and Configuring DB2 Connect
Selecting a connection method on the Add Database Wizard window
3. Select the radio button Add database to your local machine and click Next.
Copyright © 2006, Oracle. All rights reserved. 565

Installing and Configuring DB2 Connect Appendix E
Specifying catalog options on the Add Database Wizard window
4. Select the radio button TCP/IP and select the check box labelled The database physically resides on ahost or OS/400 system. The Connect directly to the server option is selected by default. Leave thisoption selected and click the Next button.
566 Copyright © 2006, Oracle. All rights reserved.

Appendix E Installing and Configuring DB2 Connect
Selecting a communications protocol on the Add Database Wizard window
5. Enter either the DNS or IP address of your mainframe in the Host name field. For the Port number, use theTCPPORT used to start DDF for the DB2 subsystem that you want to connect to. You may need to consultyour systems programmer for this value or you can look in the DB2MSTR log for the DB2 subsystem.
Copyright © 2006, Oracle. All rights reserved. 567

Installing and Configuring DB2 Connect Appendix E
Specifying communication parameters on the Change Database Wizard window
6. Enter the database name defined in your LU in the Target database field in the entry boxDatabase name.For Database alias, enter the name of the database. Click Next.
568 Copyright © 2006, Oracle. All rights reserved.
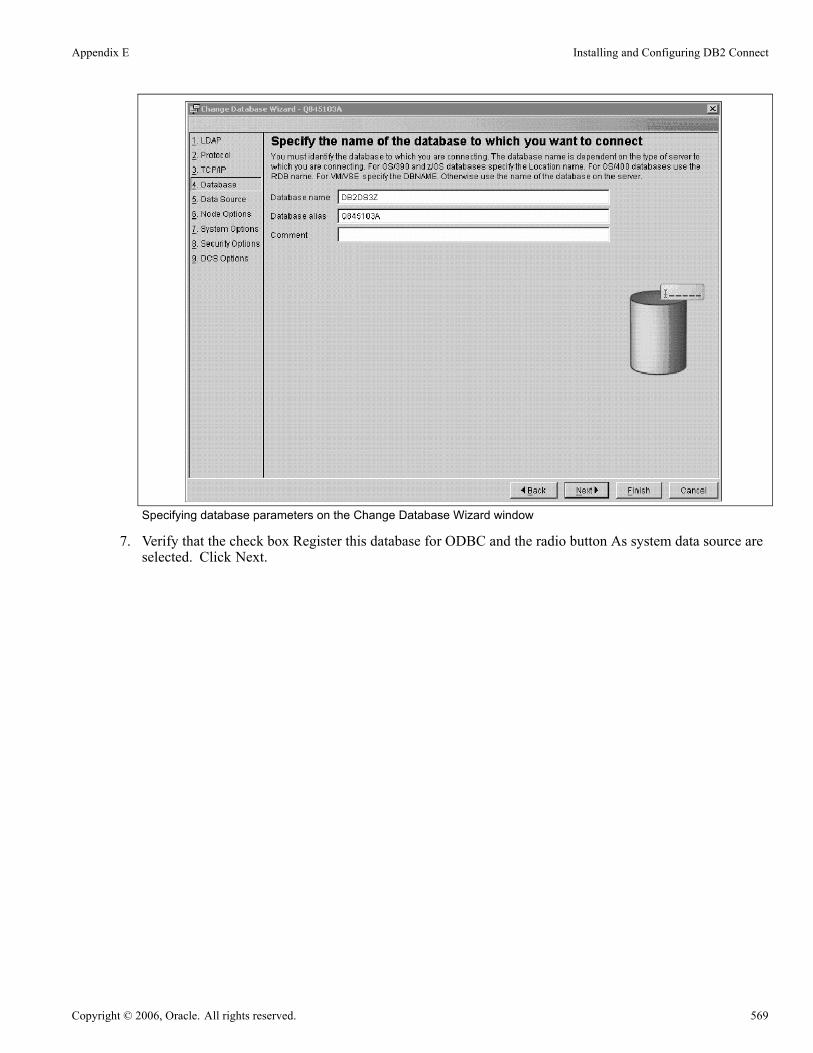
Appendix E Installing and Configuring DB2 Connect
Specifying database parameters on the Change Database Wizard window
7. Verify that the check box Register this database for ODBC and the radio button As system data source areselected. Click Next.
Copyright © 2006, Oracle. All rights reserved. 569
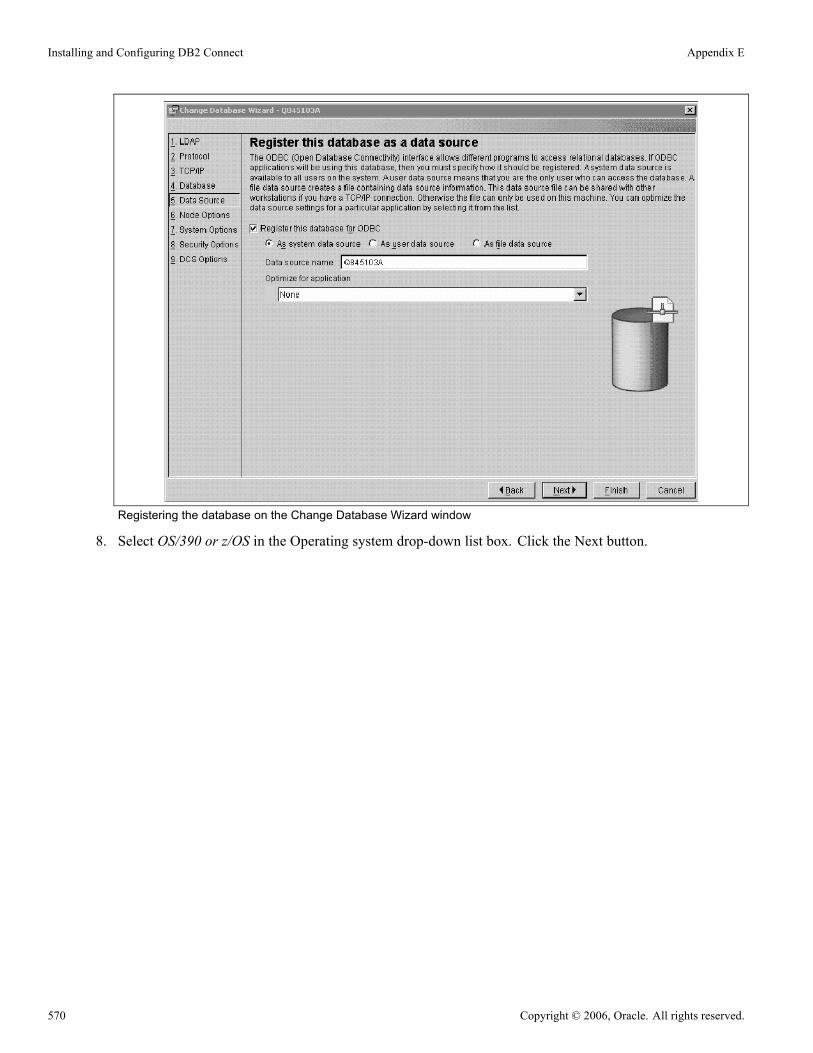
Installing and Configuring DB2 Connect Appendix E
Registering the database on the Change Database Wizard window
8. Select OS/390 or z/OS in the Operating system drop-down list box. Click the Next button.
570 Copyright © 2006, Oracle. All rights reserved.
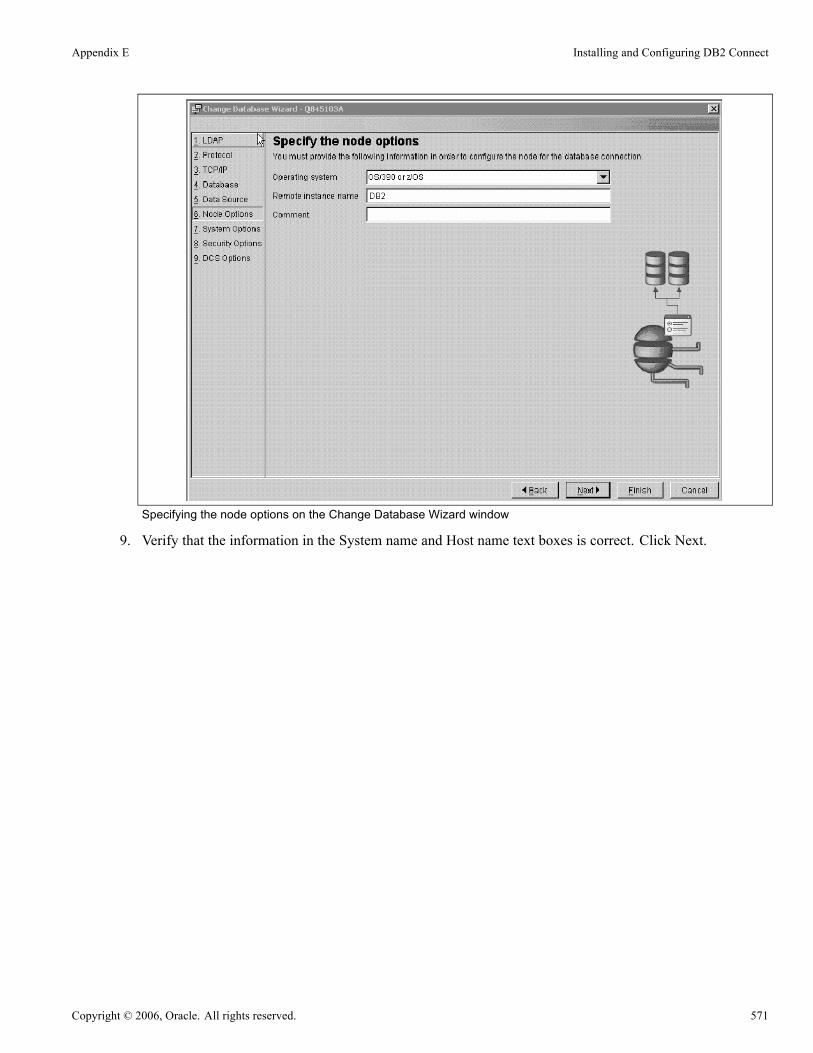
Appendix E Installing and Configuring DB2 Connect
Specifying the node options on the Change Database Wizard window
9. Verify that the information in the System name and Host name text boxes is correct. Click Next.
Copyright © 2006, Oracle. All rights reserved. 571

Installing and Configuring DB2 Connect Appendix E
Verifying System name and Host name in the Change Database Wizard window
10. Make sure that the radio button Server authentication is selected and click Finish.
572 Copyright © 2006, Oracle. All rights reserved.

Appendix E Installing and Configuring DB2 Connect
Specifying security options on the Change Database Wizard window
11. Enter User ID and Password and click Test Connection on the Test Connection dialog box.
Test Connection dialog box: Connections tab
Confirm that the connection test was successful by selecting the Results tab. You are now ready to use yourentry to create or access a PeopleSoft database.
Copyright © 2006, Oracle. All rights reserved. 573

Installing and Configuring DB2 Connect Appendix E
Test Connection dialog box: Results tab
It may be necessary to bind the packages for DB2 Connect to the DRDA server for the first connection.
See “Binding DB2 Connect Packages for an EBCDIC Installation or Binding DB2 Connect Packages for anUnicode Installation.”
Task E-4: Binding DB2 Connect Packages foran EBCDIC Installation
Use the instructions in this task if you have to bind the packages for DB2 Connect for a EBCDIC installation.
1. Open the Configuration Assistant. Highlight your database name and select Bind from the Selected.The Bind window appears.
574 Copyright © 2006, Oracle. All rights reserved.

Appendix E Installing and Configuring DB2 Connect
Selecting Bind on the Configuration Assistant window
2. Click Select All and enter your User ID and password.
Copyright © 2006, Oracle. All rights reserved. 575

Installing and Configuring DB2 Connect Appendix E
Files tab on the Bind window
3. Scroll through the results. You should see ’Bind Completed Successfully’ at the bottom.
576 Copyright © 2006, Oracle. All rights reserved.

Appendix E Installing and Configuring DB2 Connect
Results tab on the Bind window
Note. You may see some warning messages in the list indicating that some bind options are not validfor all .bnd files. The Configuration Assistant may attempt to bind some Connect packages that areactually specific to the use of DB2 UDB for Linux, UNIX, or Windows and not DB2 UDB for z/OS. Youcan ignore these warning messages.
Task E-5: Binding DB2 Connect Packages fora Unicode Installation
Use the instructions in this task if you have to bind the packages for DB2 Connect for a Unicode installation.
1. Open the Configuration Assistant.
Copyright © 2006, Oracle. All rights reserved. 577

Installing and Configuring DB2 Connect Appendix E
Configuration Assistant window
2. Highlight the database and on the Selected menu, select Bind.
578 Copyright © 2006, Oracle. All rights reserved.

Appendix E Installing and Configuring DB2 Connect
Selecting Bind on the Configuration Assistant
3. Enter a valid user ID and password. Click Select All and then click Add. The Add Bind Option windowappears.
Copyright © 2006, Oracle. All rights reserved. 579

Installing and Configuring DB2 Connect Appendix E
Files tab on the Bind window
4. Highlight ENCODING in the list, and select the UNICODE radio button in the Encoding area. Click Apply.
580 Copyright © 2006, Oracle. All rights reserved.
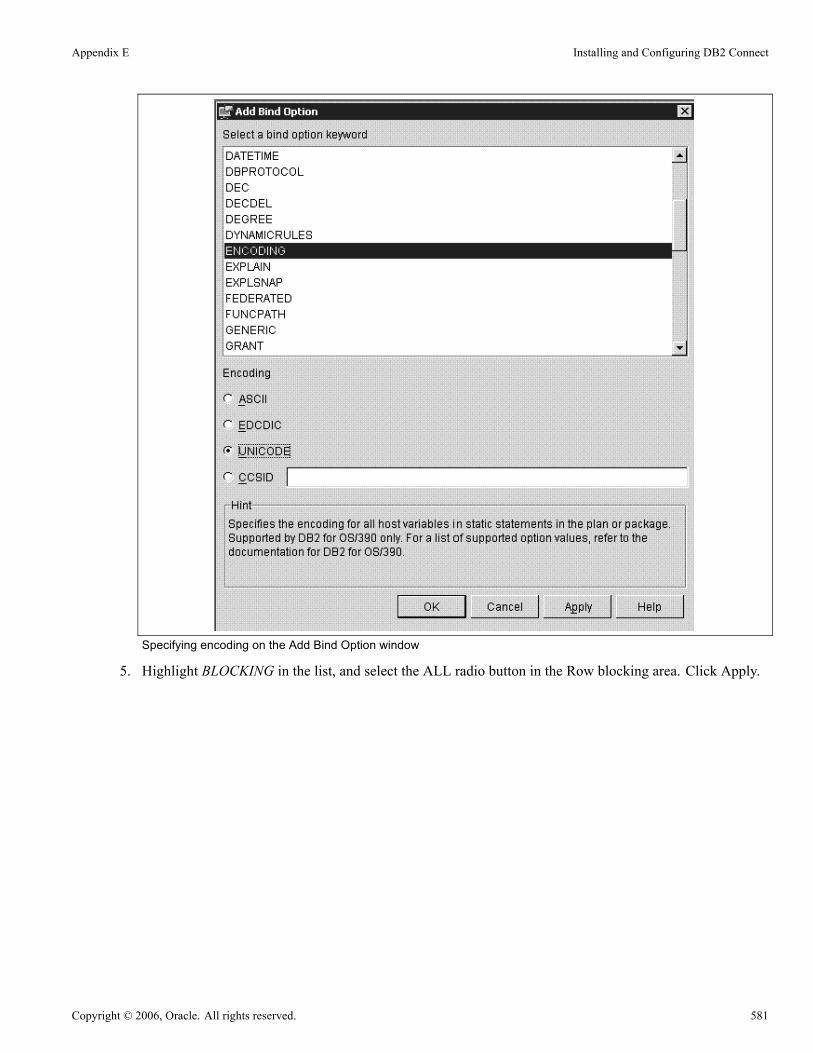
Appendix E Installing and Configuring DB2 Connect
Specifying encoding on the Add Bind Option window
5. Highlight BLOCKING in the list, and select the ALL radio button in the Row blocking area. Click Apply.
Copyright © 2006, Oracle. All rights reserved. 581

Installing and Configuring DB2 Connect Appendix E
Specifying row blocking on the Add Bind Option window
6. Highlight GRANT from the list, and select the PUBLIC radio button from the Grant EXECUTE andBIND privileges area. Click Apply.
582 Copyright © 2006, Oracle. All rights reserved.

Appendix E Installing and Configuring DB2 Connect
Specifying granting privileges on the Add Bind Option window
7. Highlight SQLERROR in the list, and select the Creates a package even if errors occur (CONTINUE) radiobutton. Click Apply, and then click OK to return to the Bind window.
Copyright © 2006, Oracle. All rights reserved. 583
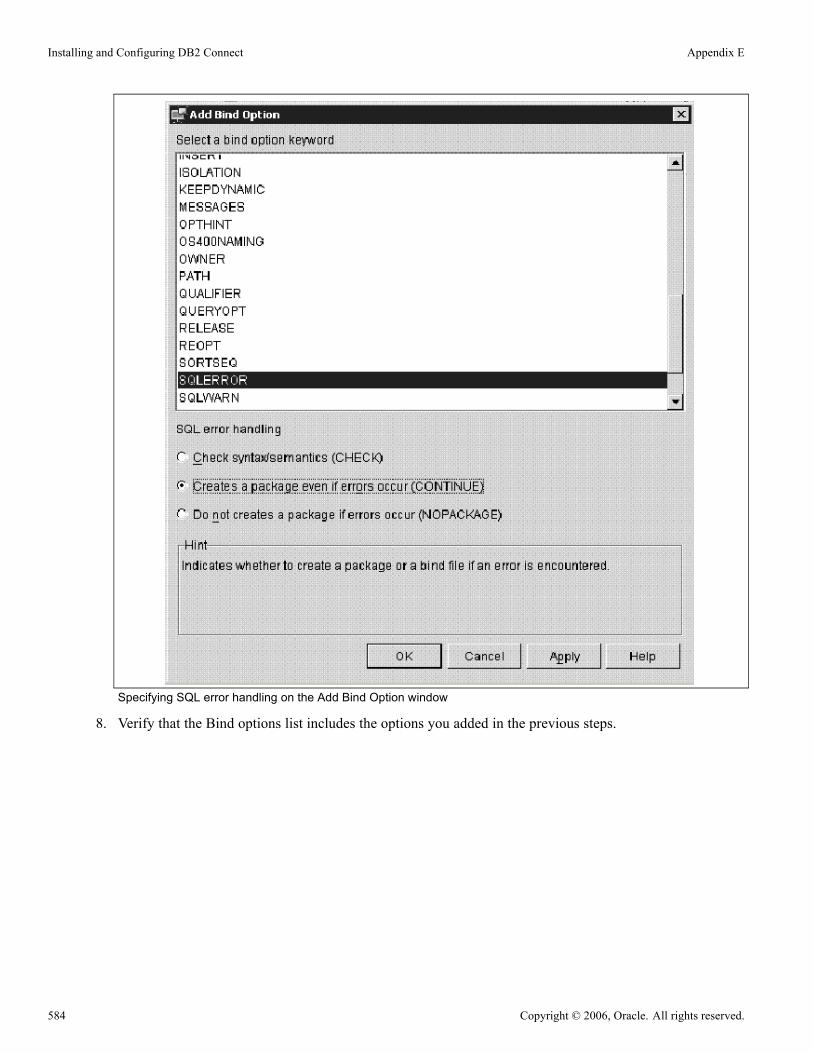
Installing and Configuring DB2 Connect Appendix E
Specifying SQL error handling on the Add Bind Option window
8. Verify that the Bind options list includes the options you added in the previous steps.
584 Copyright © 2006, Oracle. All rights reserved.

Appendix E Installing and Configuring DB2 Connect
Verifying bind options on the Bind window
You should see these parameters in the Bind options area:
Keyword Value
ENCODING UNICODE
BLOCKING ALL
GRANT PUBLIC
SQLERROR CONTINUE
9. Add a user ID and password and click Bind to view the Results tab.
Copyright © 2006, Oracle. All rights reserved. 585

Installing and Configuring DB2 Connect Appendix E
Verifying results on the Bind window
Note. You may see some warning messages in the list indicating that some bind options are not valid forall .bnd files. The Configuration Assistant may attempt to bind some Connect packages that are actuallyspecific to the use of DB2 UDB for Linux, UNIX, and Windows and not DB2 UDB for z/OS. You canignore these warning messages.
Task E-6: Setting DB2CodePage For A Unicode DatabaseUse these instructions to set DB2CodePage for a Unicode Database.
1. From a command prompt issue the db2set command as follows:
c:\apps\DB\DB2ODBC8\bin db2set DB2CODEPAGE=1208
2. Issue the following command to verify that it has been set:
586 Copyright © 2006, Oracle. All rights reserved.
Appendix E Installing and Configuring DB2 Connect
C:\Apps\DB\db2odbc8>db2set -all
You should see:[i] DB2CODEPAGE=1208
Task E-7: Setting Up the DB2 Connect Gateway on UNIXUse this task to set up the DB2 Connect Gateway on UNIX, as required for a UNIX application server orProcess Scheduler.
1. The Client Configuration Assistant (CCA) helps you manage your database connections to remote servers.This is the preferred method to set up any Windows client to communicate with a server. You can usethe Command Line Processor to set up DB2 clients on any platform and this will be the method used toconfigure DB2 Connect on the UNIX operating system.
2. If you are using TCP/IP to connect to the z/OS server and to catalog Nodes and Databases for a TCP/IPconnection, the procedure is the same.
See “Setting Up TCP/IP on the Client.”
3. Test connection. From the UNIX command line type the following command:
Db2 => connect to database_alias user userid using password
For example:Db2 => connect to PT800T9 user PEOPLE1 using PASSWRD1
4. It may be necessary to bind the packages for DB2 Connect to the DRDA server for the first connection.The following is a sample bind of the DB2 Connect packages:
Db2 => bind /usr/lpp/db2_05_00/[email protected] action replace blocking all⇒grant public release commit sqlerror continue
Task E-8: Confirming DB2 Connect/ODBC SettingsDB2 Connect reads the DB2CLI.INI file in the \SQLLIB directory to obtain information at connection time.This file contains any overrides that are set via the Client Configuration Assistant when cataloguing thedatabase. In past versions of PeopleSoft and DB2 Connect (formerly DDCS) there have been a number ofDB2CLI.INI settings that have been recommended to improve performance.
Note. Use special care when you add settings to the DB2CLI.INI file. DB2 Connect will not inform you if asetting is misspelled; it just disregards the setting and uses the default.
Copyright © 2006, Oracle. All rights reserved. 587

Installing and Configuring DB2 Connect Appendix E
We have made numerous changes to the PeopleSoft software to enable or disable DB2 Connect functionality atruntime that will result in improved performance. One example is the cursorhold setting. In PeopleTools 8.4x,we are completely controlling the cursorhold setting and we enable cursorhold for batch and disable it forPeopleSoft online activity. The following section lists the settings in the DB2CLI.INI file of special interestto PeopleSoft customers along with the PeopleSoft recommendation:
• DEFERREDPREPARE — Defer Prepare chains together OPEN and PREPARE statements. This reducesnetwork traffic which can have a significant impact in reducing response. DB2 Connect, by default,activates the Defer Prepare when creating new entries through Client Configuration Assistant.
For PeopleSoft: Use default setting (DEFERREDPREPARE=1) It is the default setting – It is notnecessary to add the setting to your DB2CLI.INI file.
• CURSORHOLD — Cursor Hold determines at what point of the transaction to release a SQL cursor.Deactivating Cursor Hold releases cursors after a transaction has been committed. Programs withinPeoplesoft control at what point a cursor needs to be released. The DB2 Connect default is Cursor Holdenabled.For PeopleSoft: Use default setting (CURSORHOLD=1) It is the default setting – It is not necessary toadd the setting to your DB2CLI.INI file.
• DISABLEKEYSETCURSOR — Support for Keyset cursors was introduced in DB2 Connect 6.1.PeopleTools testing has found a very high overhead in DB2 Connect when Keyset cursors are enabled.PeopleTools uses forward cursors rather than Keyset cursors, so this extra overhead is not justified forPeopleSoft.
For PeopleSoft: Override the default setting by adding DISABLEKEYSETCURSOR=1 in DB2CLI.INI.
Note. In a Keyset Cursor, the membership and order of rows in the result set are fixed at cursor-opentime. Keyset cursors are controlled by a set of unique identifiers (keys) known as the Keyset. The keysare built from a set of columns that uniquely identify the rows in the result set. Changes to data valuesin non-Keyset columns (made by the cursor owner or committed by other users) are visible as the userscrolls through the cursor.
Note. If a change disqualifies a row for membership or affects the order of a row, the row does notdisappear or move unless the cursor is closed and reopened. Inserts to the database made outside the cursorare also not visible in the cursor unless the cursor is closed and reopened.
• DISABLEUNICODE — This is an undocumented DB2 Connect parameter. DB2 Connect will attempt tocommunicate with a DB2 z/OS database server via Unicode. If an Unicode conversion service has notbeen enabled on your mainframe, you will be unable to connect to the database. If ICONV is used for theUnicode conversion, IBM has documented cases in which data corruption has ocurred. For this reason,PeopleSoft requires that the DISABLEUNICODE=1 parameter be used to suppress DB2 Connect fromcommunicating in Unicode, and use ANSI instead. The default is enabled. PeopleSoft requires addingDISABLEUNICODE=1 to the DB2CLI.INI file.
Note. For a Unicode installation, do not add DISABLEUNICODE=1 to the DB2CLI.INI file.
Note. If you are using DB2 Connect with multiple DB2 platforms (z/OS, Linux, UNIX, or Windows),add this statement to the stanzas pertaining to each individual DB2 z/OS database configured in theDB2CLI.INI file. Do not add this parameter to any non-z/OS database configurations, and do not add it tothe COMMON stanza. If you are connecting to DB2 z/OS databases exclusively, then you may add thisparameter once in the DB2CLI.INI file, in the COMMON stanza.
588 Copyright © 2006, Oracle. All rights reserved.

Appendix E Installing and Configuring DB2 Connect
• CLI/ODBC Trace settings — If you want to enable DB2 Connect Trace, you need to add the parametersfor turning the trace On in the [Common] section only. Adding the trace information in a database-specificsection will be ignored. So if you turn trace on for any database, the trace gets activated for every databasethat is catalogued on the workstation.These are the recommended settings for turning Trace on:
[COMMON]
TRACEFLUSH=1
TRACEPATHNAME=C:\TEMP\DB2TRACE\
TRACECOMM=1
TRACE=1 (trace=0 turns the trace OFF)
Note. The DB2CLI.INI file contains a section for each database you configure. For example, if you catalogdatabase PT800T1 you will see a [PT800T1] section in the DB2CLI.INI. A convenient way to set an overridefor all databases is to add it to the [Common] section of the DB2CLI.INI. If you add the overrides to thissection, you do not need to add the override for each database because the [Common] section applies to alldatabases. For example:
[Common]
DISABLEKEYSETCURSOR=1
Task E-9: Setting CLI/ODBC Trace with the ClientConfiguration Assistant
The DB2 CLI/ODBC trace is a valuable tool for debugging conversations between client workstations and theDB2 UDB for z/OS database server. The trace can be set via the DB2CLI.INI file directly (see the previoussection) or via the Client Configuration Assistant. You now need to alter the database settings specific foruse with Peoplesoft database.
To set CLI/ODBC Trace with the Client Configuration Assistant:
1. From the Client Configuration Assistant panel, highlight the database entry you just added and click onthe Properties button. This brings up the Database Properties panel.
2. Click on the Settings button. This will give you the DB2 Message box requesting you to connect tothe data source.
3. Choose No. This will take you to the CLI/ODBC Settings panel.
4. Click on the Advanced button to open the Advanced Settings panel.
Copyright © 2006, Oracle. All rights reserved. 589
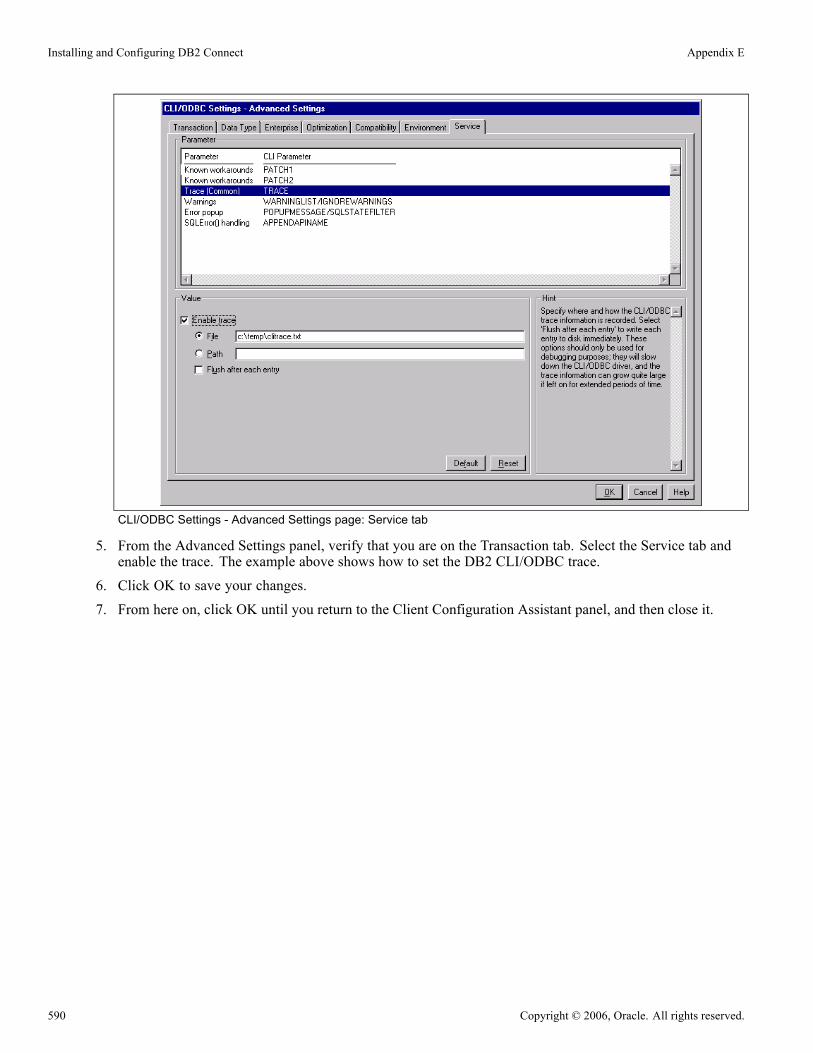
Installing and Configuring DB2 Connect Appendix E
CLI/ODBC Settings - Advanced Settings page: Service tab
5. From the Advanced Settings panel, verify that you are on the Transaction tab. Select the Service tab andenable the trace. The example above shows how to set the DB2 CLI/ODBC trace.
6. Click OK to save your changes.
7. From here on, click OK until you return to the Client Configuration Assistant panel, and then close it.
590 Copyright © 2006, Oracle. All rights reserved.

APPENDIX F
Securing the Report Repository for HTTP
This appendix discusses:
• Setting Up Security in the Web Server
• Updating the Report Node Definition
Note. The SchedulerTransfer Java servlet is used to migrate reports to and from the report repository when usingHTTP or HTTPS transfer protocol.
Task F-1: Setting Up Security in the Web ServerThis section discusses:
• Understanding Web Server Security
• Setting Up Basic Authentication in Oracle Application Server
• Setting Up Basic Authentication in WebLogic
• Setting Up Basic Authentication in WebSphere
Understanding Web Server SecurityTo prevent unauthorized users from accessing the report repository, when using HTTP or HTTPS transferprotocol, access to the SchedulerTransfer Java servlet needs to be secured. To do this you first need to set upan authorized user ID through the web server. Procedures for setting up the user ID are different in OracleApplication Server, WebLogic, and WebSphere.
Task F-1-1: Setting Up Basic Authentication inOracle Application ServerYou should carry out the procedure in this section to edit the application EAR file before deploying theapplication to Oracle Application Server (OAS).
To set up basic authentication in OAS:
1. Extract the application EAR file into a temp directory (for example, C:\temp).
Note. For single server installation, the EAR file is peoplesoft-OAS.ear. For multi-server installation, theEAR file is PIA.ear.
2. Modify the application.xml file and add the text as shown below in the <security_role> area.a. Open C:\temp\META-INF\application.xml.
Copyright © 2006, Oracle. All rights reserved. 591

Securing the Report Repository for HTTP Appendix F
b. Add the security section shown below (bold font):
<application>
...
...
</module>
<module id="WebModule_1084297392069">
<web>
<web-uri>PSEMHUB</web-uri>
<context-root>/PSEMHUB</context-root>
</web>
</module>
<security-role id="SecurityRole_1083944662253">
<description>Role for SchedulerTransfer Servlet</description>
<role-name>SchedulerTransferRole</role-name>
</security-role>
</application>
c. Save and close the file.3. Modify the PORTAL web.xml file.a. Extract C:\temp\PORTAL.war to C:\temp\PORTAL directory.b. Open C:\temp\PORTAL\WEB-INF\web.xml.c. Add the following section (bold font) after the <welcome-file-list> element, and before the </web-app>element:
<welcome-file-list>
<welcome-file>index.html</welcome-file>
</welcome-file-list>
<security-constraint>
<web-resource-collection>
<web-resource-name>SchedulerTransferWebResource</web-resource-name>
<description>SchedulerTransferWebResourceDescription</description>
<url-pattern>/SchedulerTransfer/*</url-pattern>
<http-method>GET</http-method>
<http-method>POST</http-method>
</web-resource-collection>
<auth-constraint>
<description></description>
<role-name>SchedulerTransferRole</role-name>
</auth-constraint>
</security-constraint>
<security-role>
<description></description>
<role-name>SchedulerTransferRole</role-name>
</security-role>
</web-app>
d. Save and close the file.
4. Recreate the EAR file by running the following commands:
592 Copyright © 2006, Oracle. All rights reserved.
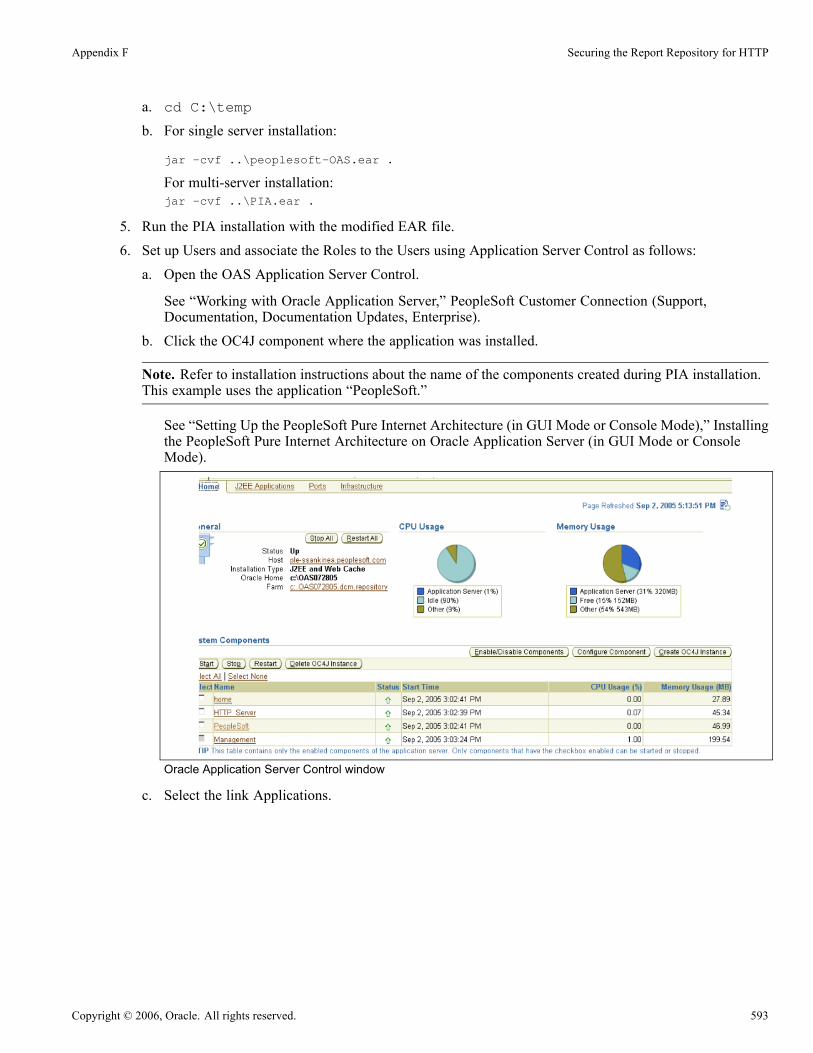
Appendix F Securing the Report Repository for HTTP
a. cd C:\temp
b. For single server installation:
jar -cvf ..\peoplesoft-OAS.ear .
For multi-server installation:jar -cvf ..\PIA.ear .
5. Run the PIA installation with the modified EAR file.6. Set up Users and associate the Roles to the Users using Application Server Control as follows:a. Open the OAS Application Server Control.
See “Working with Oracle Application Server,” PeopleSoft Customer Connection (Support,Documentation, Documentation Updates, Enterprise).
b. Click the OC4J component where the application was installed.
Note. Refer to installation instructions about the name of the components created during PIA installation.This example uses the application “PeopleSoft.”
See “Setting Up the PeopleSoft Pure Internet Architecture (in GUI Mode or Console Mode),” Installingthe PeopleSoft Pure Internet Architecture on Oracle Application Server (in GUI Mode or ConsoleMode).
Oracle Application Server Control window
c. Select the link Applications.
Copyright © 2006, Oracle. All rights reserved. 593

Securing the Report Repository for HTTP Appendix F
Reviewing component information on the OAS control window
d. Click the application name.
OAS Control window: Applications tab
e. In the Administration area, select Security.
Administration area on the OAS Control window
f. Click the Add User button.
594 Copyright © 2006, Oracle. All rights reserved.

Appendix F Securing the Report Repository for HTTP
Viewing application security information on the OAS Control window
g. Enter the user name and password, and click OK.
Note. Specify a user that is part of the Administration group on Windows. On UNIX, use the root username and password, or a user who has permission to run OAS.
Adding a user on the OAS Control window
h. Click on the button "Map Roles to Principals" that is part of Security Roles.i. Select the check box for the user just created and click the Apply button.
Mapping role to users on the OAS Control window
7. Restart the OC4J component.
Copyright © 2006, Oracle. All rights reserved. 595

Securing the Report Repository for HTTP Appendix F
Task F-1-2: Setting Up Basic Authentication in WebLogicThe procedure for restricting and securing access for servlets on WebLogic is covered in PeopleBooksdocumentation. To restrict access to the SchedulerTransfer Java servlet, substitute /SchedulerTransfer/* for “/”when the procedure asks you to specify the URL which will require authentication.
See Enterprise PeopleTools 8.48 PeopleBook: System and Server Administration, “Working with BEAWebLogic.”
Note. When prompted for a User Name and Password, specify the WebLogic system ID and password. Ifyou followed the default WebLogic Server install, the User Name and Password are system and password.Otherwise, specify the password supplied during your WebLogic server installation.
Task F-1-3: Setting Up Basic Authentication in WebSphereTo set up basic authentication in WebSphere:
1. Open Admin Console and enable security.
a. Select Security, Global Security, and select the Enabled check box.
b. Click OK and then enter the user name and password.
c. Enter the user ID and password.
Note. When prompted for a user ID and password, specify a user that is part of the Administration group onWindows. On UNIX, use the root user name and password, or a user who has permission to run WebSphere.
d. Save the configuration in the Admin Console and log out.2. Modify the application.xml file and add the text below in the <security_role> area.a. Open <PS_HOME>\webserv\<cell>_<node>_<server>\peoplesoft.ear\META-INF\application.xmlb. Add the security section shown below:
</module>
<module id="WebModule_1084297392069">
<web>
<web-uri>PSEMHUB</web-uri>
<context-root>/PSEMHUB</context-root>
</web>
</module>
<security-role id="SecurityRole_1083944662253">
<description>Role for SchedulerTransfer Servlet</description>
<role-name>SchedulerTransferRole</role-name>
</security-role>
</application>
c. Save and close the file.3. Modify the ibm-application-bnd.xmi file.a. Open <PS_HOME>\webserv\<cell>_<node>_<server>\peoplesoft.ear\META-INF\ibm-application-bnd.xmi.
b. Make the change indicated below:
596 Copyright © 2006, Oracle. All rights reserved.

Appendix F Securing the Report Repository for HTTP
Note. In the UserName line to be replaced, make sure you have added the user name to access the servlet.
Before Update:
<?xml version="1.0" encoding="UTF-8"?>
<com.ibm.ejs.models.base.bindings.applicationbnd:ApplicationBinding xmi:⇒version="2.0" xmlns:xmi="http://www.omg.org/XMI" xmlns:⇒com.ibm.ejs.models.base.bindings.applicationbnd="applicationbnd.xmi" xmi:id=⇒"ApplicationBinding_1064609410468">
<authorizationTable xmi:id="AuthorizationTable_1064609410468"/>
<application href="META-INF/application.xml#Application_ID"/>
<runAsMap xmi:id="RunAsMap_1064609410468"/>
</com.ibm.ejs.models.base.bindings.applicationbnd:ApplicationBinding>
After Update:<?xml version="1.0" encoding="UTF-8"?>
<applicationbnd:ApplicationBinding xmi:version="2.0" xmlns:xmi="http:⇒//www.omg.org/XMI" xmlns:applicationbnd="applicationbnd.xmi" xmi:id=⇒"ApplicationBinding_1083944662253">
<authorizationTable xmi:id="AuthorizationTable_1083944662253">
<authorizations xmi:id="RoleAssignment_1083944662253">
<users xmi:id="User_1083944662253" name="<Change to UserName part of
Admin group on NT and on UNIX either root or any user set up to
run as non-root>"/>
<role href="META-INF/application.xml#SecurityRole_1083944662253"/>
<groups xmi:id="Group_1083946750626" name="Administrators"/>
</authorizations>
</authorizationTable>
<application href="META-INF/application.xml#Application_ID"/>
</applicationbnd:ApplicationBinding>
c. Save and close the file.4. Modify the web.xml file.a. Open <PS_HOME>\webserv\<cell>_<node>_<server>\peoplesoft.ear\PORTAL\WEB-INF\web.xml.b. Add the following section after the <welcome-file-list> element, and before the </web-app> element:
<welcome-file-list>
<welcome-file>index.html</welcome-file>
</welcome-file-list>
<security-constraint>
<web-resource-collection>
<web-resource-name>SchedulerTransferWebResource</web-resource-name>
<description>SchedulerTransferWebResourceDescription</description>
<url-pattern>/SchedulerTransfer/*</url-pattern>
<http-method>
Copyright © 2006, Oracle. All rights reserved. 597

Securing the Report Repository for HTTP Appendix F
GET</http-method>
<http-method>
POST</http-method>
</web-resource-collection>
<auth-constraint>
<description></description>
<role-name>SchedulerTransferRole</role-name>
</auth-constraint>
</security-constraint>
<security-role>
<description></description>
<role-name>SchedulerTransferRole</role-name>
</security-role>
</web-app>
c. Save and close the file.5. Test authentication.a. Re-start the Websphere server, as follows:
stopServer server1 -user <username> -password <password>
startServer server1 -user <username> -password <password>
b. You will be prompted for the user name and password. Enter the user name and password that weredefined in the <PS_HOME>\webserv\<cell>_<node>_<server>\peoplesoft.ear\META-INF\ibm-application-bnd.xmi file.
c. You will be allowed access to the servlet after you enter the user name and password.To secure the SchedulerTransfer servlet in clustered environment using ND (Network Deployment),refer to the clustering and high availability Red Paper. It has instructions for creating a single EARfile. Update the following files within the exploded EAR file using the instructions in this sectionto secure the servlet.
<PS_HOME>\webserv\<cell>_<node>_<server>\peoplesoft.ear\META-INF⇒\application.xml
<PS_HOME>\webserv\<cell>_<node>_<server>\peoplesoft.ear\META-INF\ibm-⇒application-bnd.xmi
<PS_HOME>\webserv\<cell>_<node>_<server>\peoplesoft.ear\PORTAL\WEB-INF⇒\web.xml
After updating the files, compress the exploded PIA into a single EAR. Continue the rest of theinstructions to deploy EAR to ND.
See Clustering and High Availability for PeopleSoft 8.4, PeopleSoft Customer Connection (Implement,Optimize + Upgrade, Implementation Guide, Implementation Documentation and Software, RedPaper Library).
598 Copyright © 2006, Oracle. All rights reserved.

Appendix F Securing the Report Repository for HTTP
Task F-2: Updating the Report Node DefinitionTo secure the report repository, the new web server user account is added to the report node definition. TheDistribution Agent will use this login information when it accesses the report repository to post files.
Process Scheduler - Report Node Definition page
To update the report node definition:
1. Sign into the PeopleSoft system.2. Navigate to PeopleTools, Process Scheduler, Report Nodes.3. Select Find an Existing Value, and enter the report node name associated with the report repositorywhere the basic authentication was set up.
4. Select Search.The Report Node Definition page appears.
5. Go to the Connection Information section and enter the new web server user account information:• Login ID—Webserver user ID that was created in the previous procedure.• Password— Password for the webserver user ID.• Confirm Password— Enter the password again as confirmation.
Copyright © 2006, Oracle. All rights reserved. 599

Securing the Report Repository for HTTP Appendix F
600 Copyright © 2006, Oracle. All rights reserved.
APPENDIX G
Using the XSLT Mapper with Oracle BPELProcess Manager
This appendix discusses:
• Understanding the XSLT Mapper
• Installing BPEL Process Manager
• Setting Up the XSLT Mapper
Understanding the XSLT MapperThe Extensible Stylesheet Language Transformation (XSLT) mapper is intended for application developers andconsultants who write PeopleSoft Application Engine programs of type “transform.” The XSLT mapper allowsyou to write transformation programs without hard-coding each XSLT step. The XSLT mapper is integratedwith JDeveloper BPEL Designer, a component of Oracle BPEL Process Manager. To use the XSLT mapper,you must first install Oracle BPEL Process Manager, and then specify the location of the JDeveloper files inyour PeopleSoft installation.
This section assumes that you have installed the PeopleSoft workstation.
See Also“Setting Up the Install Workstation”
Enterprise PeopleTools 8.48 PeopleBook: Integration Broker, “Applying Filtering, Transformation andTranslation”
Task G-1: Installing BPEL Process ManagerDownload the Oracle BPEL Process Manager software and installation instructions from the OracleTechnology Network (OTN). Install the BPEL Process Manager on a Windows-based machine.
See Oracle Technology Network, http://www.oracle.com/technology/index.html
Search the OTN documentation web site for information on installing BPEL Process Manager.
See Oracle Documentation, http://www.oracle.com/technology/documentation/index.html
Be sure to obtain any patches that are required for the installation from the following location:
ftp://ftp.peoplesoft.com/outgoing/ptools/Oracle/BPEL
Copyright © 2006, Oracle. All rights reserved. 601

Using the XSLT Mapper with Oracle BPEL Process Manager Appendix G
Task G-2: Setting Up the XSLT MapperTo use the XSLT mapper, use Configuration Manager to specify the directory for JDeveloper:
1. Launch Configuration Manager by doing one of the following:
• Select Start, Program, PeopleTools 8.48, Configuration Manager.
• Double-click <PS_HOME>/bin/client/winx86/pscfg.exe.
2. Select the Crystal/Bus. Interlink/JDeveloper tab.
Configuration Manager: Crystal/Bus. Interlink/JDeveloper tab
3. Click the JDeveloper Path browse button (...) and select the JDeveloper directory.In a default installation of the BPEL Process Manager, the JDeveloper path is <OraBPELPM_HOME>/integration/jdev.Configuration Manager will verify that the version of JDeveloper is valid. If not, when you click OK tosave the changes and exit Configuration Manager, an error message appears.
4. Click OK.
602 Copyright © 2006, Oracle. All rights reserved.
APPENDIX H
Extracting DDL for PTSYS Database
This appendix discusses:
• Understanding the PTGENDDL.DMS Script
• Using the PTGENDDL.DMS Script
Understanding the PTGENDDL.DMS ScriptYou can customize and use the PTGENDDL.DMS sample script to extract the DDL (Data DefinitionLanguage) SQL statements to create a separate PTSYS database for the PeopleTools Performance Monitor.The script is found in the <PS_HOME>/SCRIPTS directory.
First use the PTDDL.SQL (or PTDDLU.SQL for Unicode) script to create the database and tablespacesfor the PeopleTools Performance Monitor database. Then follow the directions in the following section togenerate the PTSYS table and index DDL.
See Using the PTGENDDL.DMS Script.
When executed in bootstrap mode, the sample Data Mover script PTGENDDL.DMS will generate the DDLstatements for both tables and indexes using default values (for ownerid and tablespaces) and store the DDLstatements in the output file C:\TEMP\PTSYSDDL.SQL. The sample script is given in the following section,and includes information on prerequisites and instructions for using it for various scenarios.
See AlsoEnterprise PeopleTools 8.48 PeopleBook: PeopleSoft Performance Monitor
Using the PTGENDDL.DMS Script
“Creating a Database, ” Creating Data Mover Import Scripts
Task H-1: Using the PTGENDDL.DMS ScriptSince most DB2 UDB for z/OS customers edit scripts in order to change the delivered ownerid and tablespacenames to local installation naming standards, several usage scenarios are included as comments within thePTGENDDL.DMS script.
The PTGENDDL.DMS sample script includes the following usage scenarios:
• Usage_#1: Extract from PTENGS.DB all tables and index DDL definitions using imbedded defaults.This is delivered as the default enabled commands
Copyright © 2006, Oracle. All rights reserved. 603
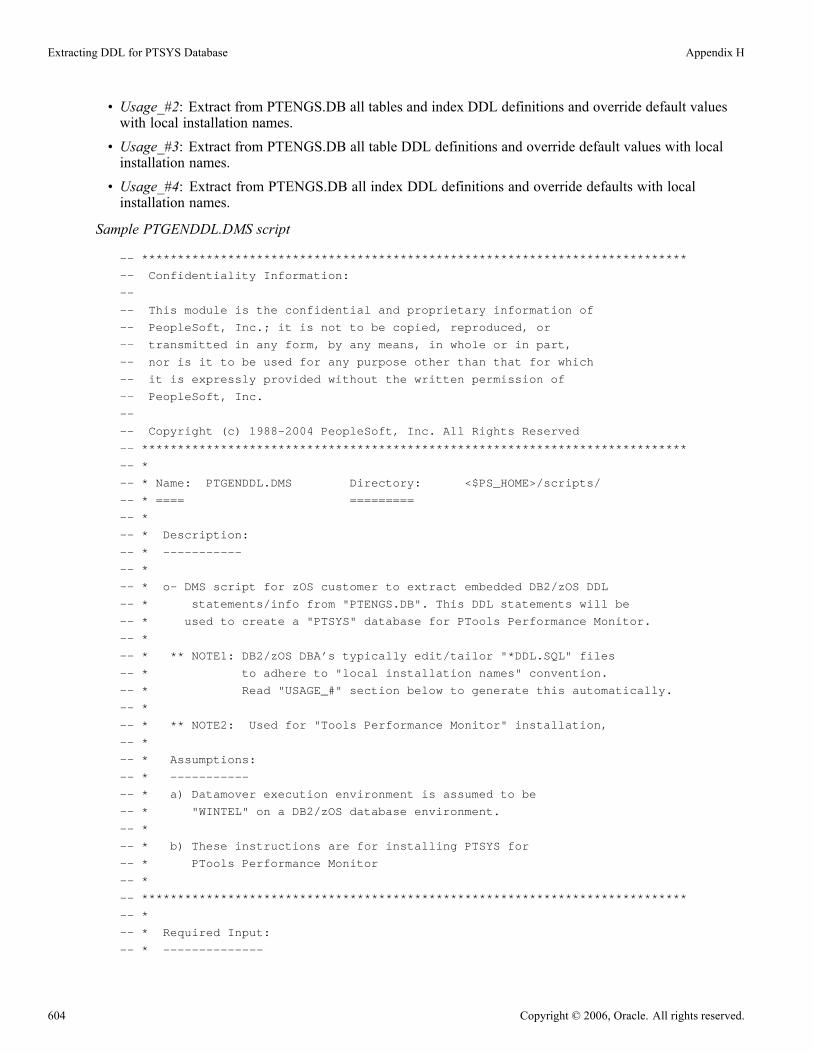
Extracting DDL for PTSYS Database Appendix H
• Usage_#2: Extract from PTENGS.DB all tables and index DDL definitions and override default valueswith local installation names.
• Usage_#3: Extract from PTENGS.DB all table DDL definitions and override default values with localinstallation names.
• Usage_#4: Extract from PTENGS.DB all index DDL definitions and override defaults with localinstallation names.
Sample PTGENDDL.DMS script
-- ****************************************************************************
-- Confidentiality Information:
--
-- This module is the confidential and proprietary information of
-- PeopleSoft, Inc.; it is not to be copied, reproduced, or
-- transmitted in any form, by any means, in whole or in part,
-- nor is it to be used for any purpose other than that for which
-- it is expressly provided without the written permission of
-- PeopleSoft, Inc.
--
-- Copyright (c) 1988-2004 PeopleSoft, Inc. All Rights Reserved
-- ****************************************************************************
-- *
-- * Name: PTGENDDL.DMS Directory: <$PS_HOME>/scripts/
-- * ==== =========
-- *
-- * Description:
-- * -----------
-- *
-- * o- DMS script for zOS customer to extract embedded DB2/zOS DDL
-- * statements/info from "PTENGS.DB". This DDL statements will be
-- * used to create a "PTSYS" database for PTools Performance Monitor.
-- *
-- * ** NOTE1: DB2/zOS DBA’s typically edit/tailor "*DDL.SQL" files
-- * to adhere to "local installation names" convention.
-- * Read "USAGE_#" section below to generate this automatically.
-- *
-- * ** NOTE2: Used for "Tools Performance Monitor" installation,
-- *
-- * Assumptions:
-- * -----------
-- * a) Datamover execution environment is assumed to be
-- * "WINTEL" on a DB2/zOS database environment.
-- *
-- * b) These instructions are for installing PTSYS for
-- * PTools Performance Monitor
-- *
-- ****************************************************************************
-- *
-- * Required Input:
-- * --------------
604 Copyright © 2006, Oracle. All rights reserved.

Appendix H Extracting DDL for PTSYS Database
-- *
-- * <$PS_HOME>\data\PTENGS.DB ==> PTSYS database name.
-- *
-- * *** NOTE: $PS_HOME is the PTOOLS installation directory
-- *
-- * Output(s): ==> (using Usage_#1 script; as delivered)
-- * ---------
-- *
-- * C:\TEMP\PTGENDDL.LOG -> Datamover log output
-- * C:\TEMP\PTSYSDDL.SQL -> DB2 DDL statements to create "PTSYS"
-- *
-- *
-- ****************************************************************************
-- *
-- * INSTRUCTIONS:
-- * ============
-- *
-- * A. BEFORE EXECUTING THIS FILE, PERFORM THE FOLLOWING STEPS.
-- *
-- * 1) Replace <$PS_HOME> with the valid directory value.
-- *
-- * 2) IF YOU ARE USING SECONDARY AUTHORIZATION, CHANGE
-- * ’OWNER#ID’ TO THE DATABASE OWNERID, ELSE CHANGE
-- * ’OWNER#ID’ TO YOUR PEOPLESOFT ACCESS ID.
-- *
-- * 3) CHANGE ’OBJ#OWNER’ TO THE COMMON CREATOR ID (OBJECT OWNER).
-- *
-- * 4) CHANGE THE DATABASE NAMES TO THE SITE SPECIFIC VALUES.
-- *
-- * 5) IF NOT USING THE RECOMMENDED PEOPLESOFT TABLESPACE NAMES,
-- * CHANGE THEM TO THE SITE SPECIFIC VALUES (see Usage_#2 example).
-- *
-- * 6) CHANGE ’SET UNICODE OFF’ TO ’SET UNICODE ON’, IF IT IS
-- * AN UNICODE DATABASE.
-- *
-- * B. AFTER EXECUTING THIS FILE, PERFORM THE FOLLOWING STEPS.
-- *
-- * 1) Check the LOG file for successful execution.
-- *
-- * 2) Validate the "local installation values" have been generated.
-- *
-- * 3) Submit the DDL (via SPUFI/DSNTEP2, etc) to create the DB2 objects.
-- *
-- *
-- ****************************************************************************
--
-- Usage_#1: Extract all DDL statements <using PSFT default values>
--
-- *NOTE: As delivered, both tables and index DDLs will be
-- generated and stored in C:\TEMP\PTSYSDDL.SQL
Copyright © 2006, Oracle. All rights reserved. 605
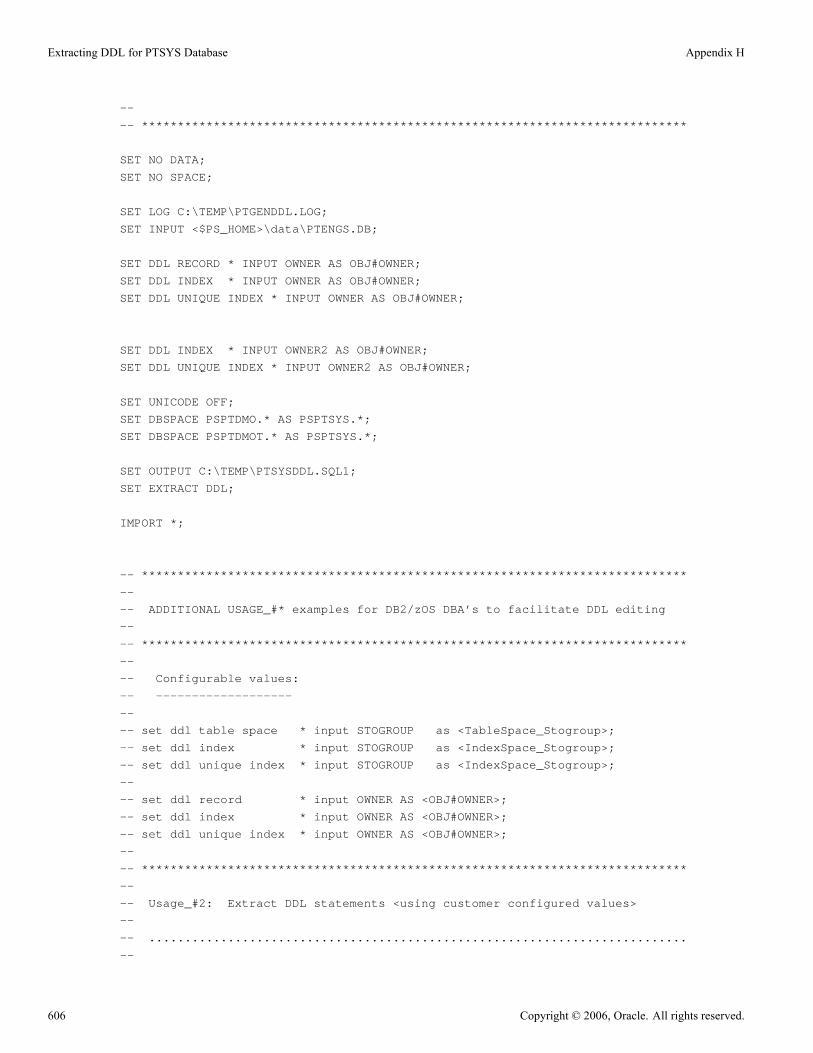
Extracting DDL for PTSYS Database Appendix H
--
-- ****************************************************************************
SET NO DATA;
SET NO SPACE;
SET LOG C:\TEMP\PTGENDDL.LOG;
SET INPUT <$PS_HOME>\data\PTENGS.DB;
SET DDL RECORD * INPUT OWNER AS OBJ#OWNER;
SET DDL INDEX * INPUT OWNER AS OBJ#OWNER;
SET DDL UNIQUE INDEX * INPUT OWNER AS OBJ#OWNER;
SET DDL INDEX * INPUT OWNER2 AS OBJ#OWNER;
SET DDL UNIQUE INDEX * INPUT OWNER2 AS OBJ#OWNER;
SET UNICODE OFF;
SET DBSPACE PSPTDMO.* AS PSPTSYS.*;
SET DBSPACE PSPTDMOT.* AS PSPTSYS.*;
SET OUTPUT C:\TEMP\PTSYSDDL.SQL1;
SET EXTRACT DDL;
IMPORT *;
-- ****************************************************************************
--
-- ADDITIONAL USAGE_#* examples for DB2/zOS DBA’s to facilitate DDL editing
--
-- ****************************************************************************
--
-- Configurable values:
-- -------------------
--
-- set ddl table space * input STOGROUP as <TableSpace_Stogroup>;
-- set ddl index * input STOGROUP as <IndexSpace_Stogroup>;
-- set ddl unique index * input STOGROUP as <IndexSpace_Stogroup>;
--
-- set ddl record * input OWNER AS <OBJ#OWNER>;
-- set ddl index * input OWNER AS <OBJ#OWNER>;
-- set ddl unique index * input OWNER AS <OBJ#OWNER>;
--
-- ****************************************************************************
--
-- Usage_#2: Extract DDL statements <using customer configured values>
--
-- ...........................................................................
--
606 Copyright © 2006, Oracle. All rights reserved.
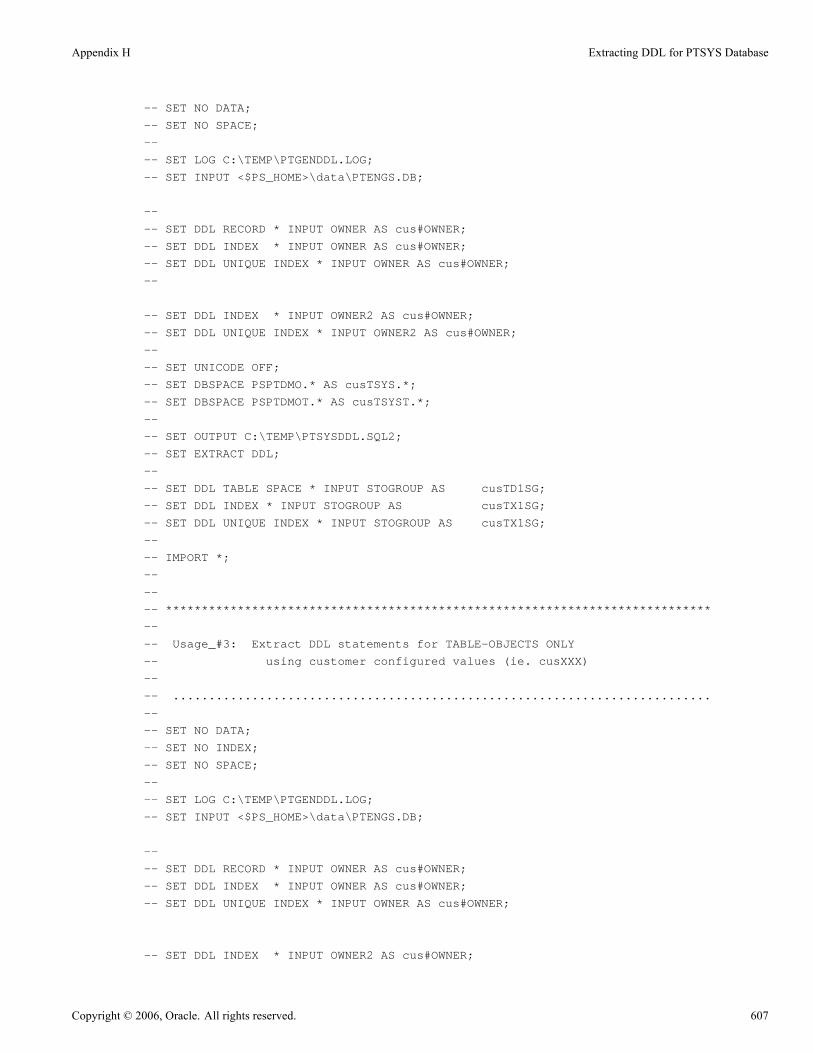
Appendix H Extracting DDL for PTSYS Database
-- SET NO DATA;
-- SET NO SPACE;
--
-- SET LOG C:\TEMP\PTGENDDL.LOG;
-- SET INPUT <$PS_HOME>\data\PTENGS.DB;
--
-- SET DDL RECORD * INPUT OWNER AS cus#OWNER;
-- SET DDL INDEX * INPUT OWNER AS cus#OWNER;
-- SET DDL UNIQUE INDEX * INPUT OWNER AS cus#OWNER;
--
-- SET DDL INDEX * INPUT OWNER2 AS cus#OWNER;
-- SET DDL UNIQUE INDEX * INPUT OWNER2 AS cus#OWNER;
--
-- SET UNICODE OFF;
-- SET DBSPACE PSPTDMO.* AS cusTSYS.*;
-- SET DBSPACE PSPTDMOT.* AS cusTSYST.*;
--
-- SET OUTPUT C:\TEMP\PTSYSDDL.SQL2;
-- SET EXTRACT DDL;
--
-- SET DDL TABLE SPACE * INPUT STOGROUP AS cusTD1SG;
-- SET DDL INDEX * INPUT STOGROUP AS cusTX1SG;
-- SET DDL UNIQUE INDEX * INPUT STOGROUP AS cusTX1SG;
--
-- IMPORT *;
--
--
-- ****************************************************************************
--
-- Usage_#3: Extract DDL statements for TABLE-OBJECTS ONLY
-- using customer configured values (ie. cusXXX)
--
-- ...........................................................................
--
-- SET NO DATA;
-- SET NO INDEX;
-- SET NO SPACE;
--
-- SET LOG C:\TEMP\PTGENDDL.LOG;
-- SET INPUT <$PS_HOME>\data\PTENGS.DB;
--
-- SET DDL RECORD * INPUT OWNER AS cus#OWNER;
-- SET DDL INDEX * INPUT OWNER AS cus#OWNER;
-- SET DDL UNIQUE INDEX * INPUT OWNER AS cus#OWNER;
-- SET DDL INDEX * INPUT OWNER2 AS cus#OWNER;
Copyright © 2006, Oracle. All rights reserved. 607
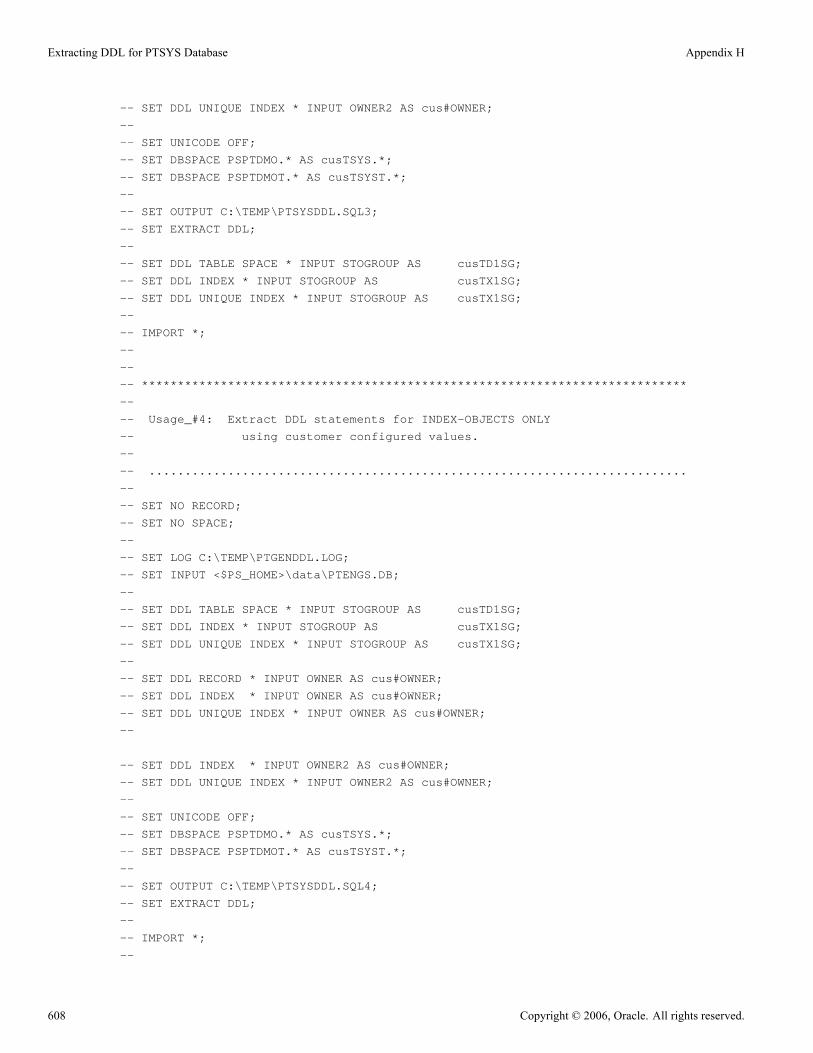
Extracting DDL for PTSYS Database Appendix H
-- SET DDL UNIQUE INDEX * INPUT OWNER2 AS cus#OWNER;
--
-- SET UNICODE OFF;
-- SET DBSPACE PSPTDMO.* AS cusTSYS.*;
-- SET DBSPACE PSPTDMOT.* AS cusTSYST.*;
--
-- SET OUTPUT C:\TEMP\PTSYSDDL.SQL3;
-- SET EXTRACT DDL;
--
-- SET DDL TABLE SPACE * INPUT STOGROUP AS cusTD1SG;
-- SET DDL INDEX * INPUT STOGROUP AS cusTX1SG;
-- SET DDL UNIQUE INDEX * INPUT STOGROUP AS cusTX1SG;
--
-- IMPORT *;
--
--
-- ****************************************************************************
--
-- Usage_#4: Extract DDL statements for INDEX-OBJECTS ONLY
-- using customer configured values.
--
-- ...........................................................................
--
-- SET NO RECORD;
-- SET NO SPACE;
--
-- SET LOG C:\TEMP\PTGENDDL.LOG;
-- SET INPUT <$PS_HOME>\data\PTENGS.DB;
--
-- SET DDL TABLE SPACE * INPUT STOGROUP AS cusTD1SG;
-- SET DDL INDEX * INPUT STOGROUP AS cusTX1SG;
-- SET DDL UNIQUE INDEX * INPUT STOGROUP AS cusTX1SG;
--
-- SET DDL RECORD * INPUT OWNER AS cus#OWNER;
-- SET DDL INDEX * INPUT OWNER AS cus#OWNER;
-- SET DDL UNIQUE INDEX * INPUT OWNER AS cus#OWNER;
--
-- SET DDL INDEX * INPUT OWNER2 AS cus#OWNER;
-- SET DDL UNIQUE INDEX * INPUT OWNER2 AS cus#OWNER;
--
-- SET UNICODE OFF;
-- SET DBSPACE PSPTDMO.* AS cusTSYS.*;
-- SET DBSPACE PSPTDMOT.* AS cusTSYST.*;
--
-- SET OUTPUT C:\TEMP\PTSYSDDL.SQL4;
-- SET EXTRACT DDL;
--
-- IMPORT *;
--
608 Copyright © 2006, Oracle. All rights reserved.
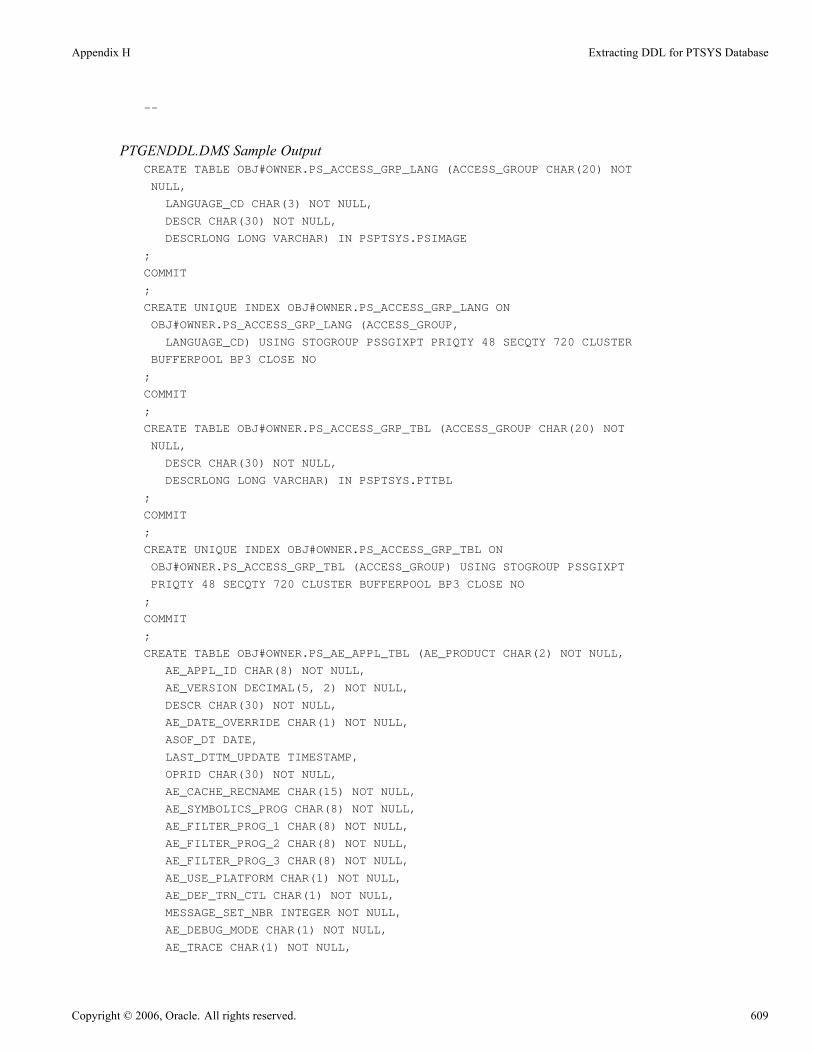
Appendix H Extracting DDL for PTSYS Database
--
PTGENDDL.DMS Sample OutputCREATE TABLE OBJ#OWNER.PS_ACCESS_GRP_LANG (ACCESS_GROUP CHAR(20) NOT
NULL,
LANGUAGE_CD CHAR(3) NOT NULL,
DESCR CHAR(30) NOT NULL,
DESCRLONG LONG VARCHAR) IN PSPTSYS.PSIMAGE
;
COMMIT
;
CREATE UNIQUE INDEX OBJ#OWNER.PS_ACCESS_GRP_LANG ON
OBJ#OWNER.PS_ACCESS_GRP_LANG (ACCESS_GROUP,
LANGUAGE_CD) USING STOGROUP PSSGIXPT PRIQTY 48 SECQTY 720 CLUSTER
BUFFERPOOL BP3 CLOSE NO
;
COMMIT
;
CREATE TABLE OBJ#OWNER.PS_ACCESS_GRP_TBL (ACCESS_GROUP CHAR(20) NOT
NULL,
DESCR CHAR(30) NOT NULL,
DESCRLONG LONG VARCHAR) IN PSPTSYS.PTTBL
;
COMMIT
;
CREATE UNIQUE INDEX OBJ#OWNER.PS_ACCESS_GRP_TBL ON
OBJ#OWNER.PS_ACCESS_GRP_TBL (ACCESS_GROUP) USING STOGROUP PSSGIXPT
PRIQTY 48 SECQTY 720 CLUSTER BUFFERPOOL BP3 CLOSE NO
;
COMMIT
;
CREATE TABLE OBJ#OWNER.PS_AE_APPL_TBL (AE_PRODUCT CHAR(2) NOT NULL,
AE_APPL_ID CHAR(8) NOT NULL,
AE_VERSION DECIMAL(5, 2) NOT NULL,
DESCR CHAR(30) NOT NULL,
AE_DATE_OVERRIDE CHAR(1) NOT NULL,
ASOF_DT DATE,
LAST_DTTM_UPDATE TIMESTAMP,
OPRID CHAR(30) NOT NULL,
AE_CACHE_RECNAME CHAR(15) NOT NULL,
AE_SYMBOLICS_PROG CHAR(8) NOT NULL,
AE_FILTER_PROG_1 CHAR(8) NOT NULL,
AE_FILTER_PROG_2 CHAR(8) NOT NULL,
AE_FILTER_PROG_3 CHAR(8) NOT NULL,
AE_USE_PLATFORM CHAR(1) NOT NULL,
AE_DEF_TRN_CTL CHAR(1) NOT NULL,
MESSAGE_SET_NBR INTEGER NOT NULL,
AE_DEBUG_MODE CHAR(1) NOT NULL,
AE_TRACE CHAR(1) NOT NULL,
Copyright © 2006, Oracle. All rights reserved. 609

Extracting DDL for PTSYS Database Appendix H
AE_FORCE_COMMIT CHAR(1) NOT NULL,
AE_FORCE_ABEND CHAR(1) NOT NULL,
AE_COMMIT_MSG CHAR(1) NOT NULL,
AE_DISABLE_RESTART CHAR(1) NOT NULL,
AE_CHUNK_FACTOR SMALLINT NOT NULL,
AE_CHUNK_METHOD CHAR(1) NOT NULL,
AE_ADJ_DTTM TIMESTAMP) IN PSPTSYS.PTAPPE
;
COMMIT
;
CREATE UNIQUE INDEX OBJ#OWNER.PS_AE_APPL_TBL ON
OBJ#OWNER.PS_AE_APPL_TBL (AE_PRODUCT,
AE_APPL_ID) USING STOGROUP PSSGIXPT PRIQTY 48 SECQTY 720 CLUSTER
BUFFERPOOL BP3 CLOSE NO
;
COMMIT
;
CREATE TABLE OBJ#OWNER.PS_AE_APPL_TMP (AE_PRODUCT CHAR(2) NOT NULL,
AE_APPL_ID CHAR(8) NOT NULL,
AE_VERSION DECIMAL(5, 2) NOT NULL,
DESCR CHAR(30) NOT NULL,
AE_DATE_OVERRIDE CHAR(1) NOT NULL,
ASOF_DT DATE,
LAST_DTTM_UPDATE TIMESTAMP,
OPRID CHAR(30) NOT NULL,
AE_CACHE_RECNAME CHAR(15) NOT NULL,
AE_SYMBOLICS_PROG CHAR(8) NOT NULL,
AE_FILTER_PROG_1 CHAR(8) NOT NULL,
AE_FILTER_PROG_2 CHAR(8) NOT NULL,
AE_FILTER_PROG_3 CHAR(8) NOT NULL,
AE_USE_PLATFORM CHAR(1) NOT NULL,
AE_DEF_TRN_CTL CHAR(1) NOT NULL,
MESSAGE_SET_NBR INTEGER NOT NULL,
AE_DEBUG_MODE CHAR(1) NOT NULL,
AE_TRACE CHAR(1) NOT NULL,
AE_FORCE_COMMIT CHAR(1) NOT NULL,
AE_FORCE_ABEND CHAR(1) NOT NULL,
AE_COMMIT_MSG CHAR(1) NOT NULL,
AE_DISABLE_RESTART CHAR(1) NOT NULL,
AE_CHUNK_FACTOR SMALLINT NOT NULL,
AE_CHUNK_METHOD CHAR(1) NOT NULL) IN PSPTSYS.PTWORK
;
COMMIT
;
CREATE UNIQUE INDEX OBJ#OWNER.PS_AE_APPL_TMP ON
OBJ#OWNER.PS_AE_APPL_TMP (AE_PRODUCT,
AE_APPL_ID) USING STOGROUP PSSGIXPT PRIQTY 48 SECQTY 720 CLUSTER
BUFFERPOOL BP3 CLOSE NO
;
COMMIT
610 Copyright © 2006, Oracle. All rights reserved.

Appendix H Extracting DDL for PTSYS Database
;
CREATE TABLE OBJ#OWNER.PS_AE_CV8_PAIR_TBL (FIELDNAME CHAR(18) NOT NULL
,
FIELDNAME_TO CHAR(18) NOT NULL,
AE_FROM_CHAR CHAR(1) NOT NULL,
AE_TO_CHAR CHAR(1) NOT NULL) IN PSPTSYS.PTAPPE
;
COMMIT
;
CREATE UNIQUE INDEX OBJ#OWNER.PS_AE_CV8_PAIR_TBL ON
OBJ#OWNER.PS_AE_CV8_PAIR_TBL (FIELDNAME,
FIELDNAME_TO,
AE_FROM_CHAR) USING STOGROUP PSSGIXPT PRIQTY 48 SECQTY 720 CLUSTER
BUFFERPOOL BP3 CLOSE NO
;
COMMIT
;
CREATE TABLE OBJ#OWNER.PS_AE_INTTEST_AET (PROCESS_INSTANCE DECIMAL(10)
NOT NULL,
AE_STEP CHAR(8) NOT NULL,
AE_SECTION CHAR(8) NOT NULL,
AE_INT_15 DECIMAL(15) NOT NULL,
AE_INT_14 DECIMAL(14) NOT NULL,
AE_INT_13 DECIMAL(13) NOT NULL,
AE_INT_12 DECIMAL(12) NOT NULL,
AE_INT_11 DECIMAL(11) NOT NULL,
AE_INT_10 DECIMAL(10) NOT NULL,
AE_INT_9 INTEGER NOT NULL,
AE_INT_8 INTEGER NOT NULL,
AE_INT_7 INTEGER NOT NULL,
AE_INT_6 INTEGER NOT NULL,
AE_INT_5 INTEGER NOT NULL,
AE_INT_4 SMALLINT NOT NULL,
AE_INT_3 SMALLINT NOT NULL,
AE_INT_2 SMALLINT NOT NULL,
AE_INT_1 SMALLINT NOT NULL) IN PSPTSYS.PTAPPE
;
COMMIT
;
CREATE UNIQUE INDEX OBJ#OWNER.PS_AE_INTTEST_AET ON
OBJ#OWNER.PS_AE_INTTEST_AET (PROCESS_INSTANCE) USING STOGROUP
PSSGIXPT PRIQTY 48 SECQTY 720 CLUSTER BUFFERPOOL BP3 CLOSE NO
;
COMMIT
;
CREATE TABLE OBJ#OWNER.PS_AE_OPTIONS (AE_CHUNK_SIZE INTEGER NOT NULL,
AE_INS_SEL_LONGS CHAR(1) NOT NULL) IN PSPTSYS.PTAPPE
;
COMMIT
;
Copyright © 2006, Oracle. All rights reserved. 611

Extracting DDL for PTSYS Database Appendix H
CREATE TABLE OBJ#OWNER.PS_AE_PTTSRPLC_AET (PROCESS_INSTANCE
DECIMAL(10) NOT NULL,
OPRID CHAR(30) NOT NULL,
TS_SRCH_ID CHAR(30) NOT NULL,
TS_SRCH_STATUS CHAR(1) NOT NULL,
TS_RPLC_RDY CHAR(1) NOT NULL,
LANGUAGE_CD CHAR(3) NOT NULL,
BASE_LANGUAGE_CD CHAR(3) NOT NULL,
BASELINE CHAR(1) NOT NULL,
TS_RESULT_SEQ INTEGER NOT NULL,
RECNAME CHAR(15) NOT NULL,
RECNAME_TMP CHAR(15) NOT NULL,
SQLTABLENAME CHAR(18) NOT NULL,
TABLE_NAME CHAR(30) NOT NULL,
RELLANGRECNAME CHAR(15) NOT NULL,
TS_COMBINED CHAR(1) NOT NULL,
FIELDNAME CHAR(18) NOT NULL,
TS_RPLC CHAR(1) NOT NULL,
TS_RPLC_TEXT CHAR(254) NOT NULL,
FIELDTYPE SMALLINT NOT NULL,
LENGTH SMALLINT NOT NULL,
FIELDNAME0 CHAR(18) NOT NULL,
TS_KEY_CHAR CHAR(50) NOT NULL,
TS_KEY_NUMBER DECIMAL(10) NOT NULL,
TS_KEY_DATE DATE,
FLDFIELDTYPE SMALLINT NOT NULL,
SQL_STMT_254 CHAR(254) NOT NULL,
REFRESH CHAR(1) NOT NULL) IN PSPTSYS.PTTBL
;
COMMIT
;
CREATE UNIQUE INDEX OBJ#OWNER.PS_AE_PTTSRPLC_AET ON
OBJ#OWNER.PS_AE_PTTSRPLC_AET (PROCESS_INSTANCE) USING STOGROUP
PSSGIXPT PRIQTY 48 SECQTY 720 CLUSTER BUFFERPOOL BP3 CLOSE NO
;
COMMIT
;
612 Copyright © 2006, Oracle. All rights reserved.
APPENDIX I
Setting Up a Unicode Database
This appendix discusses:
• Prerequisites
• Defining Conversion Pages for Unicode Conversion Services
• Fulfilling Connectivity Requirements
PrerequisitesPeopleTools 8.48 Unicode support for the z/OS operating system requires the following:
• DB2 UDB for z/OS V8.1 (minimum) in New Function Mode• IBM z/OS 1.4 (minimum)• Refer to Customer Connection for a list of mandatory APARs and PTFs.
See “Important PTFs for PeopleSoft 8 on DB2 UDB for OS390 and zOS,” PeopleSoft CustomerConnection (Implement, Optimize + Upgrade, Implementation Guide, Supported Platforms, PeopleSoftEnterprise, By PeopleTools release, Platform Communications by Topic, Platforms - DB2 UDB forDB2 OS/390 and z/OS).
Task I-1: Defining Conversion Pages for UnicodeConversion Services
The following conversion images must be defined to successfully operate a PeopleSoft Unicode database:
• CCSID 367 (7-bit ASCII) <-> ASCII & EBCDIC System CCSID(s)• CCSID 1208 (UTF-8) <-> ASCII & EBCDIC System CCSID(s)• CCSID 1200 (UTF-16) <-> ASCII & EBCDIC System CCSID(s)• Client CCSID(s) <-> Unicode CCSIDs (367, 1208, 1200)• CCSID 367 <-> CCSID 1047• CCSID 1200 <-> CCSID 1047• CCSID 1208 <-> CCSID 1047
Copyright © 2006, Oracle. All rights reserved. 613
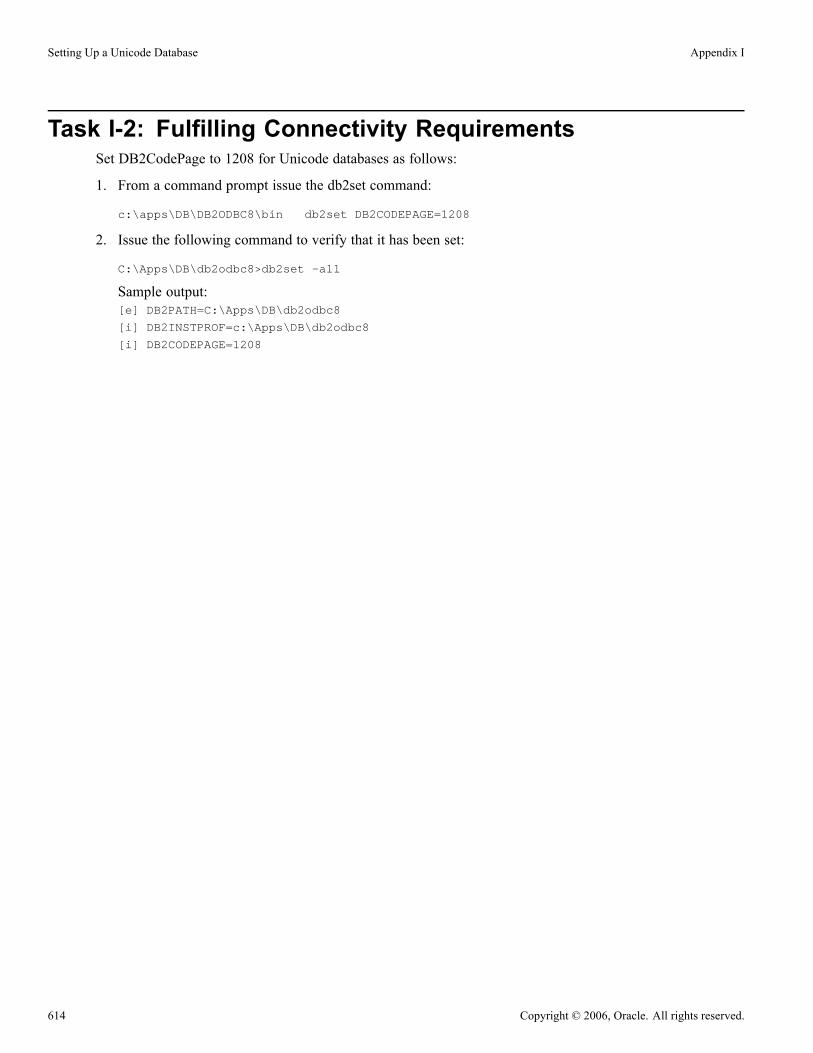
Setting Up a Unicode Database Appendix I
Task I-2: Fulfilling Connectivity RequirementsSet DB2CodePage to 1208 for Unicode databases as follows:
1. From a command prompt issue the db2set command:
c:\apps\DB\DB2ODBC8\bin db2set DB2CODEPAGE=1208
2. Issue the following command to verify that it has been set:
C:\Apps\DB\db2odbc8>db2set -all
Sample output:[e] DB2PATH=C:\Apps\DB\db2odbc8
[i] DB2INSTPROF=c:\Apps\DB\db2odbc8
[i] DB2CODEPAGE=1208
614 Copyright © 2006, Oracle. All rights reserved.

APPENDIX J
Using the PeopleSoft Tablespace DDLAutomation Assistance Tool
This appendix discusses:
• Understanding the PeopleSoft Tablespace DDL Automation Assistance Tool
• Understanding PSTAAT Workstation Requirements
• Understanding the PSTAAT Graphical User Interface
• Understanding the Various PSTAAT Input and Output Files
• Using PSTAAT to Create TBDDL and IXDDL
• Using PSTAAT to Customize DDL
• Using PSTAAT to Reassign Temporary Tables to Additional Tablespaces
• Using PSTAAT to Isolate Other Tables to Individual Tablespaces
• Using PSTAAT to Convert EBCDIC DDL to Unicode DDL
• Using PSTAAT to Install PeopleSoft Databases
Understanding the PeopleSoft Tablespace DDLAutomation Assistance Tool
The PeopleSoft Tablespace DDL Automation Assistance tool (PSTAAT) is a DDL script parsing utilityintended to assist you in customizing your PeopleTools and Application DDL. The utility provides greaterflexibility in allowing you to override the supported PeopleTools DDL parameters for DB2 z/OS so that theymore closely fit your shop standards, and to better optimize the mapping of tables among tablespaces anddatabases.
Note. The use of PSTAAT to customize the installation DDL is optional. You may elect not to use PSTAATand complete the installation of your database as documented in the chapter, “Creating a Database.” The nextseveral sections describe the basic functions of this utility. Please be sure to review the final section, UsingPSTAAT to Install PeopleSoft Databases, before attempting to use PSTAAT for the first time.
PSTAAT serves the following functions:
• Generates the TBDDL and IXDDL scripts for the traditional installation.
PSTAAT is capable of dynamically creating the default TBDDL and IXDDL scripts. Note that the TBDDLand IXDDL scripts created by PSTAAT will be identical to those found on your Installation CD. You arefree to optimize either set of scripts with PSTAAT.
Copyright © 2006, Oracle. All rights reserved. 615

Using the PeopleSoft Tablespace DDL Automation Assistance Tool Appendix J
See “Creating a Database.”• Optimizes DDL for installation.PSTAAT may be used to parse and rewrite the default xxDDL, TBDDL, and IXDDL scripts to moreoptimally distribute the PeopleTools and Applications objects among additional tablespaces and databases.It provides basic override capability of certain tablespace DDL parameters, and allows you to control thenumber of tables created per tablespace, and the number of tablespaces created per database.
• Beginning with PeopleSoft Enterprise 9.0 Applications, PSTAAT will replace the previously delivered“enhanced” installation scripts.PSTAAT will be used to isolate Application Engine temporary tables and other tables intended to be usedwith the %UpdateStats metaSQL function to individual tablespaces. As a result, the X1DDL.SQL,X2DDL.SQL, and X3DML.DMS scripts will no longer be delivered on the Enterprise 9.0 Applicationinstallation CDs.
• Converts EBCDIC DDL data types to Unicode DDL data types.PSTAAT may be used to “convert” EBCDIC DDL data types to those data types required to create aPeopleSoft Unicode database. Note that this is simply one step in a multi-step process when convertingan EBCDIC PeopleSoft environment to Unicode. Complete instructions for converting an EBCDICPeopleSoft environment to Unicode are beyond the scope of this manual. For more details, consult thewhite paper titled Converting a PeopleSoft Enterprise Database from EBCDIC to Unicode EncodingScheme on DB2 for z/OS.
See “Converting a PeopleSoft Enterprise Database from EBCDIC to Unicode Encoding Scheme onDB2 for z/OS,” PeopleSoft Customer Connection (Support, User Groups, Product User Groups, DB2z/OS, General Information).
Understanding PSTAAT Workstation RequirementsPSTAAT is a C++ Microsoft Windows application. It automatically invokes both Data Mover and ApplicationDesigner in command line mode depending on the particular functionality that is being used.
• PSTAAT must run from a PeopleTools Install Workstation, or traditional Windows-based developmentclient. For more details regarding the requirements of such a workstation, review the chapter titledThe PeopleTools Development Environment in the Enterprise PeopleTools Hardware and SoftwareRequirements guide.
• Both Data Mover and Application Designer require DB2 Connect, and thus it must also be installed on theclient workstation from which you intend to run PSTAAT. See the appendix “Installing and ConfiguringDB2 Connect,” for more details regarding the installation and configuration of DB2 Connect.
• The PeopleTools Installer will place the PSTAAT executable file in the <PS_HOME>\bin\client\winx86directory of the PeopleTools “Install Workstation”, file server, or Windows-based two-tier developmentclient.
Understanding the PSTAAT Graphical User InterfaceThis section describes the tabs found on the PSTAAT graphical user interface (GUI) and the input expectedfor each text box.
616 Copyright © 2006, Oracle. All rights reserved.
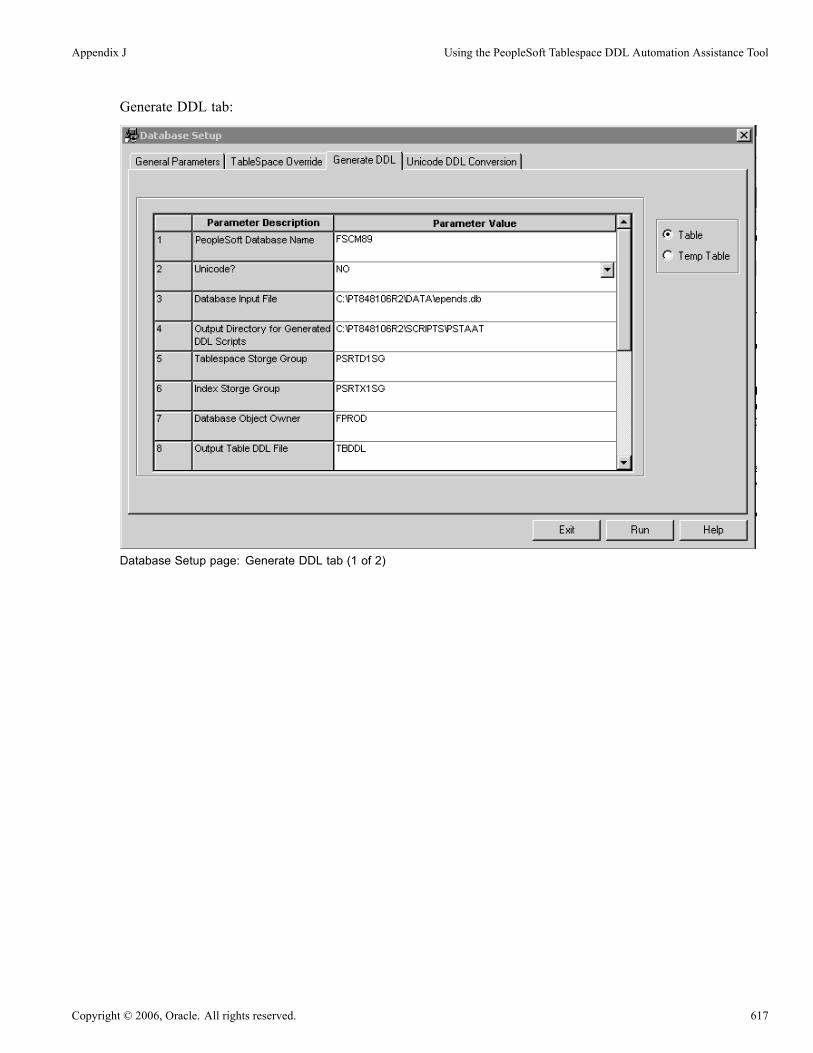
Appendix J Using the PeopleSoft Tablespace DDL Automation Assistance Tool
Generate DDL tab:
Database Setup page: Generate DDL tab (1 of 2)
Copyright © 2006, Oracle. All rights reserved. 617

Using the PeopleSoft Tablespace DDL Automation Assistance Tool Appendix J
Database Setup page: Generate DDL tab (2 of 2)
Table and Temp Tableradio buttons
Enable the Temp Table radio button to generate a DDL script for the creationof Application Engine temporary tables and indexes. Enable the Table radiobutton to generate a DDL script for the creation of all other table and indextypes.
(1) PeopleSoft DatabaseName
This is the logical database name of the PeopleSoft database to be created. Itmust match the alias cataloged in DB2 Connect as shown in the ConfigurationAssistant (see figure below).
Configuration Assistant page
(2) Unicode? Indicates whether PSTAAT should create DDL with EBCDIC or Unicodedata types.
(3) Database Input File Name of the database input file located in <PS_HOME>\data.
618 Copyright © 2006, Oracle. All rights reserved.
Appendix J Using the PeopleSoft Tablespace DDL Automation Assistance Tool
(4) Output Directory forGenerated DDL Scripts
Specify a folder on the workstation where PSTAAT will store the generatedDDL scripts.
Note. The path must already exist—PSTAAT will not create it for you.
(5) Tablespace StorageGroup
Storage group to be used for tablespace data sets
(6) Index Storage Group Storage group to be used for Index data sets.
(7) Database Object Owner The name of the table owner ID as previously determined from the “Preparingfor Installation” chapter. This value qualifies all tables as belonging to thelogical PeopleSoft database. This value will be stored in the Creator field ofSYSIBM.SYSTABLES.
(8) Output Table DDL File Name of the output file that contains DDL to create all tables. (TBDDL.SQL)
(9) Output Index DDL File Name of the output file that contains DDL to create all indexes. (IXDDL.SQL)
(10) Application DesignerProject Name
Name of PeopleTools project that contains the temporary table recorddefinitions. This is only used when creating temporary table DDL.
See Using PSTAAT To Reassign Temporary Tables To Additional Tablespaces.
(11) Application DesignerOutput Log File
Application Designer log file. This is only used when creating ApplicationEngine temporary table DDL.
See Using PSTAAT To Reassign Temporary Tables To Additional Tablespaces.
(12) User ID The userid specified must either be a valid mainframe ID such as the databaseAccess ID, or a PeopleSoft user ID depending on which of the Table/TempTable radio buttons has been enabled.Recall from the section titled Understanding PSTAAT WorkstationRequirements, that PSTAAT invokes Data Mover and Application Designer,which in turn make connections to the DB2 z/OS database server throughDB2 Connect.When creating the TBDDL.SQL and IXDDL.SQL, the Table radio button mustbe enabled. PSTAAT will invoke Data Mover in bootstrap mode to extractthe default table and index DDL, thus this ID must be a valid mainframe IDsuch as the Access ID because it will be validated by your security softwarepackage (RACF, Top Secret, and so on).When creating temporary table DDL with the Generate DDL tab, the TempTable radio button must be enabled. In this case, PSTAAT will invokeApplication Designer through a command line, thus the ID passed will bevalidated by PeopleSoft security. This id must be a valid PeopleSoft user idsuch as VP1 or PS.
(13) Password This is the password that matches the ID supplied for input parameter 12(above).
General Parameters Tab:
PSTAAT is a text parsing and DDL generation utility. It requires input files such as the default TBDDL.SQLand IXDDL.SQL scripts to operate. PSTAAT parses the text of the original files to create new versions of eachscript using the input supplied for the parameters below to override default values.
Copyright © 2006, Oracle. All rights reserved. 619

Using the PeopleSoft Tablespace DDL Automation Assistance Tool Appendix J
Database Setup page: General Parameters tab (1 of 3)
620 Copyright © 2006, Oracle. All rights reserved.

Appendix J Using the PeopleSoft Tablespace DDL Automation Assistance Tool
Database Setup page: General Parameters tab (2 of 3)
Copyright © 2006, Oracle. All rights reserved. 621
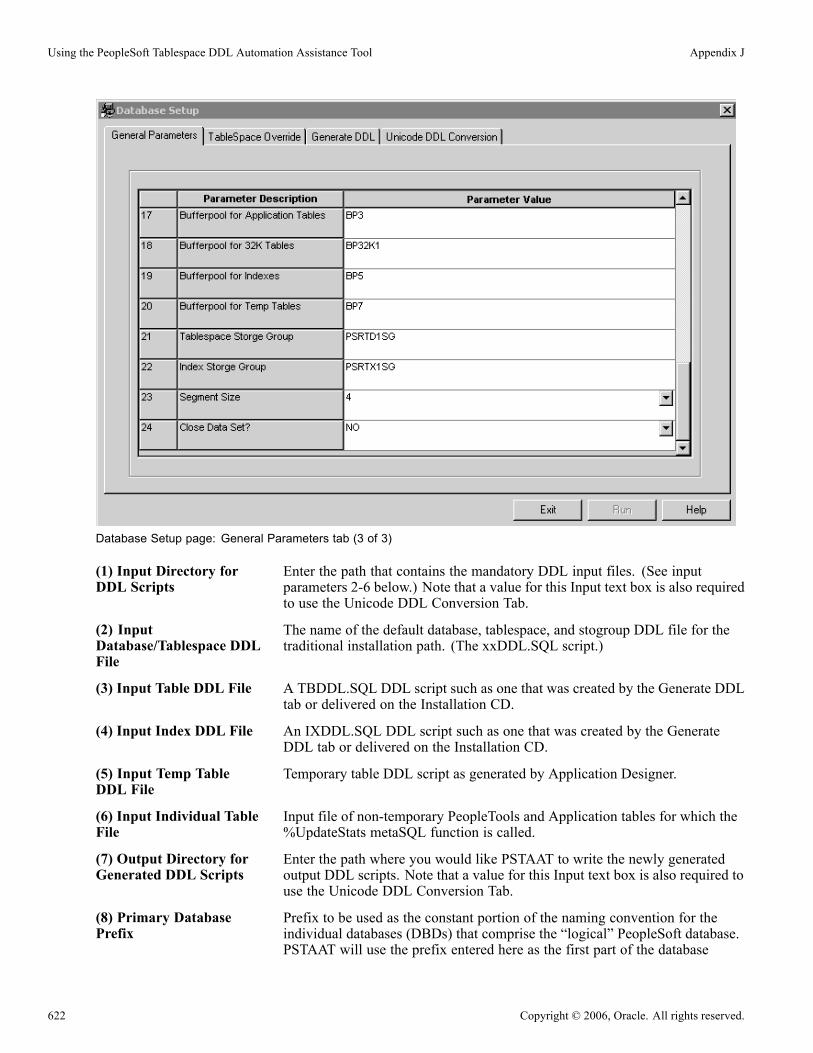
Using the PeopleSoft Tablespace DDL Automation Assistance Tool Appendix J
Database Setup page: General Parameters tab (3 of 3)
(1) Input Directory forDDL Scripts
Enter the path that contains the mandatory DDL input files. (See inputparameters 2-6 below.) Note that a value for this Input text box is also requiredto use the Unicode DDL Conversion Tab.
(2) InputDatabase/Tablespace DDLFile
The name of the default database, tablespace, and stogroup DDL file for thetraditional installation path. (The xxDDL.SQL script.)
(3) Input Table DDL File A TBDDL.SQL DDL script such as one that was created by the Generate DDLtab or delivered on the Installation CD.
(4) Input Index DDL File An IXDDL.SQL DDL script such as one that was created by the GenerateDDL tab or delivered on the Installation CD.
(5) Input Temp TableDDL File
Temporary table DDL script as generated by Application Designer.
(6) Input Individual TableFile
Input file of non-temporary PeopleTools and Application tables for which the%UpdateStats metaSQL function is called.
(7) Output Directory forGenerated DDL Scripts
Enter the path where you would like PSTAAT to write the newly generatedoutput DDL scripts. Note that a value for this Input text box is also required touse the Unicode DDL Conversion Tab.
(8) Primary DatabasePrefix
Prefix to be used as the constant portion of the naming convention for theindividual databases (DBDs) that comprise the “logical” PeopleSoft database.PSTAAT will use the prefix entered here as the first part of the database
622 Copyright © 2006, Oracle. All rights reserved.

Appendix J Using the PeopleSoft Tablespace DDL Automation Assistance Tool
naming convention. It will generate an ascending sequence for the remainderof the eight characters to be used for the DB2 z/OS database name. Werecommend a primary database prefix of five characters or less.
(9) Database Object Owner Enter the ‘owner’ id that will qualify each of the objects in the logicalPeopleSoft database. This is the name previously determined from the“Preparing for Installation” chapter. It will be the value stored in the Creatorfield of SYSIBM.SYSTABLES.
(10) Maximum Number ofTablespaces per Database
Enter the maximum number of tablespaces that you want PSTAAT to allocateper database.
(11) Maximum Numberof Tables per Tablespace(Regular)
Enter the maximum number of tables that you want PSTAAT to allocateper tablespace.
(12) Maximum Numberof Tables per Tablespace(Large)
Enter the desired maximum number of tables per tablespace for those tablesassigned to the xxLARGE tablespaces by default. These have been identifiedas high growth tables. An input value of one (1) would segregate each of thetables delivered in these tablespaces to its own tablespace.
(13) Commit Frequency An explicit commit is issued after each table and index is created in the defaultDDL scripts. It is possible to vary the commit frequency between tables andindexes with this input parameter. A commit frequency of 10, for example,will indicate that PSTAAT should force an explicit commit after approximatelyevery ten DDL statements.
(14) Recalculate TablespaceAllocation
Indicates whether you want PSTAAT to recalculate the Primary and Secondaryspace allocations for tablespaces, or use the defaults as indicated in the xxDDLscript. For more details regarding the algorithm used to recalculate PRI andSEC space allocation, see the section titled Using PSTAAT to CustomizeDDL; Recalculating Primary and Secondary Space Allocations and Setting aMinimum Secondary Space Allocation.
(15) MinimumPRIQTY/SECQTYAllocation
Allows you to specify a minimum Primary and Secondary space allocation fortablespaces when allowing PSTAAT to recalculate the Primary and Secondaryallocations. See the section titled Recalculating Primary and Secondary SpaceAllocations and Setting a Minimum Secondary Space Allocation for moredetails regarding the manner in which PSTAAT uses this input parameter.
(16) Bufferpool forPeopleTools Tables
PSTAAT will allocate PeopleTools tables to this bufferpool.
(17) Bufferpool forApplication Tables
PSTAAT will allocate Application tables to this bufferpool.
(18) Bufferpool for 32KTables
Indicate the particular 32K bufferpool to be used for tables automaticallyallocated to 32K bufferpools.
(19) Bufferpool for Indexes PSTAAT will allocate index data sets to this bufferpool.
(20) Bufferpool for TempTables
PSTAAT will allocate Temporary Tables to this bufferpool.
Copyright © 2006, Oracle. All rights reserved. 623

Using the PeopleSoft Tablespace DDL Automation Assistance Tool Appendix J
(21) Tablespace StorageGroup
Stogroup to be used for tablespaces.
Note. All tablespaces will be created using this stogroup. PSTAAT is notcapable of assigning multiple tablespace stogroups.
(22) Index Storage Group Stogroup to be used for indexes.
Note. All indexes will be created using this stogroup. PSTAAT is not capableof assigning multiple index stogroups.
(23) Segment Size Select a default segment size to be used for all tablespaces.
(24) Close Data Set? Default close rule for VSAM data sets.
Note. All tablespaces will use this close rule.
Note. LOCKSIZE does not appear as an override parameter on the GUI. LOCKSIZE is controlledautomatically by PSTAAT. Those tables originally delivered in tablespaces set to a LOCKSIZE of ROW willbe remapped to tablespaces also set to a LOCKSIZE of ROW automatically. All other tablespace DDL will begenerated with a LOCKSIZE of ANY.
TableSpace Override Tab:
The Tablespace Override tab works in conjunction with the General Parameters tab. After completing theGeneral Parameters tab, click the TableSpace Override tab to determine the exact object mapping as deliveredby the default (traditional) installation.
PSTAAT determines the values in the TableSpace Override grid by parsing the following input from theGeneral Parameters tab:
• Input Database/Tablespace DDL File, also known as the xxDDL script (General Parameters tab, parameter2).
• Input Table DDL File, or TBDDL.SQL script (General Parameters tab, parameter 3).
624 Copyright © 2006, Oracle. All rights reserved.

Appendix J Using the PeopleSoft Tablespace DDL Automation Assistance Tool
Database Setup page: TableSpace Override tab
Tablespace There is one row in the grid for each tablespace found in the xxDDL script.The name of each tablespace is listed in this column.
Table Count This is the number of tables that will be assigned to the tablespace by thedefault installation.
PRIQTY Default Primary space allocation for the tablespace.
SECQTY Default Secondary space allocation for the tablespace.
New Name Allows you to override the default tablespace name with a custom tablespacename. Although it is possible to completely override the name of anytablespace, for documentation purposes, we recommend that you use thedefault PSTAAT behavior of using part of the default tablespace name as aprefix in generating new tablespace names for you. Use of the New Nameinput parameter is required in a specific circumstance that is documented laterin this appendix. See Understanding How PSTAAT Assigns An ObjectNaming Convention later in this appendix for a more detailed explanation ofhow PSTAAT determines the tablespace naming convention.
Run Button Click the Run button to optimize the DDL. PSTAAT will recreate thetable-tablespace-database mapping based on the input parameters supplied inthe General Parameters tab.
Unicode DDL Conversion tab:
Copyright © 2006, Oracle. All rights reserved. 625

Using the PeopleSoft Tablespace DDL Automation Assistance Tool Appendix J
The Unicode DDL Conversion Tab is used to ‘convert’ EBCDIC DDL data types to those data types required tocreate a PeopleSoft Unicode database. Note that this is simply one step in a multi-step process when convertingan EBCDIC PeopleSoft environment to Unicode. Complete instructions for converting an EBCDIC PeopleSoftenvironment to Unicode are beyond the scope of this guide. For more details, consult Customer Connection.
See “Converting a PeopleSoft Enterprise Database from EBCDIC to Unicode Encoding Scheme on DB2 forz/OS” PeopleSoft Customer Connection (Support, User Groups, Product User Groups, DB2 z/OS, GeneralInformation).
Database Setup page: Unicode DDL Conversion tab
(1) InputEBCDIC/Tablespace DDLFile
Enter the name of the EBCDIC Database/Tablespace DDL script (that is,xxDDL.SQL) for conversion. Note that the path where this file is locatedmust be entered in input box 1 (Input Directory for DDL scripts) of theGeneral Parameters tab.
(2) Input EBCDIC TableDDL File
Enter the name of the EBCDIC table DDL script to be converted to Unicodedata types. This can be a DDL script created from an Application Designerproject that contains PeopleTools record definitions; or, a default TBDDL.SQLscript. Note that this file must also be located in the folder specified by inputparameter 1 (Input Directory for DDL scripts) on the General Parameters tab.
See “Converting a PeopleSoft Enterprise Database from EBCDIC toUnicode Encoding Scheme on DB2 for z/OS” PeopleSoft CustomerConnection (Support, User Groups, Product User Groups, DB2 z/OS, GeneralInformation).
626 Copyright © 2006, Oracle. All rights reserved.
Appendix J Using the PeopleSoft Tablespace DDL Automation Assistance Tool
(3) Output UnicodeDatabase/Tablespace DDLFile
Enter the name of the newly generated DDL script for creating databases,tablespaces, and stogroups using the Unicode encoding scheme. This outputfile will be written to the folder identified by input parameter 7, OutputDirectory for Generated DDL scripts on the General Parameters tab.
(4) Output Unicode TableDDL File
Enter the name of the newly created DDL script to create tables for storingdata using the Unicode encoding scheme. This output file will also be writtento the folder specified by input parameter 7, Output Directory for GeneratedDDL scripts on the General Parameters tab.
(5) Remove ‘Drop Table’DDL
DDL created by Application Designer (when building a PeopleTools project)may contain Drop Table statements for tables that Application Designerhas determined already exist. When YES is selected from the drop down,PSTAAT will comment the Drop Table statements in the newly generatedDDL. When NO is selected, the Drop Table statements are left uncommentedin the new DDL script.
Understanding the Various PSTAAT Input and Output FilesPSTAAT is completely file driven. Although PSTAAT invokes Data Mover and Application Designer, each ofwhich require a connection to the database server, PSTAAT itself does not communicate directly with DB2z/OS and thus it is not capable of querying DB2. PSTAAT operates entirely by parsing various types offiles (primarily DDL scripts), and then rewriting those files based on the input parameters specified in theGeneral Parameters tab.
The following table describes the various input files:
GUI Tab File Description
Generate DDL Tab Database Input File Located in <PS_HOME>\data.
This is the same file used by DataMover to populate the PeopleSoftdatabase.
Copyright © 2006, Oracle. All rights reserved. 627

Using the PeopleSoft Tablespace DDL Automation Assistance Tool Appendix J
GUI Tab File Description
Input Database/Tablespace DDL File The name of the default database,tablespace, and stogroup DDL script(i.e. xxDDL.SQL)
Input Table DDL File The TBDDL.SQL DDL script that wasgenerated from the Generate DDL tabor delivered through the InstallationCD.
Input Index DDL File The IXDDL.SQL DDL script that wasgenerated from the Generate DDL tabor delivered through the InstallationCD.
Input Temp Table DDL File A temporary table DDL script asgenerated by Application Designer.
General Parameters Tab
Input Individual Table File Input file of non-temporaryPeopleTools and Application tablesfor which the %UpdateStats metaSQLfunction is called. This file is deliveredthrough the installation CD.
EBCDIC/Tablespace DDL File An EBCDIC default database,tablespace, and stogroup DDL script(i.e. xxDDL.SQL).
Unicode Conversion Tab
Input EBCDIC Table DDL File An EBCDIC table DDL script to beconverted to Unicode data types.This can be a DDL script createdfrom an Application Designer projectthat contains PeopleTools recorddefinitions; or, a default TBDDL.SQLscript. See the Converting aPeopleSoft Enterprise Databasefrom EBCDIC to Unicode EncodingScheme on DB2 for z/OS white paperfor more details.
The following table describes the various output (new) files:
628 Copyright © 2006, Oracle. All rights reserved.

Appendix J Using the PeopleSoft Tablespace DDL Automation Assistance Tool
GUI Tab File Description
Generate DDL Tab
PSTAAT will write five files to thefolder specified in ‘Output Directoryfor Generated DDL Scripts’, inputparameter four (4), of the GenerateDDL tab.
Output Table DDL File
Log File
Default table DDL script (i.e.TBDDL.SQL).
The actual script name will dependon the value entered in Output TableDDL File, parameter eight (8), ofthe Generate DDL tab. To maintainconsistency with previous releasesof PeopleTools, we recommendthat you name the Table DDL script‘TBDDL.SQL’ as shown in theexamples in these instructions.
A file with extension “.log” is alsocreated with a name similar to the tableDDL script (.i.e. TBDDL.log). Eachtable name is written to this outputlog as Data Mover ‘extracts’ the tableDDL from the database input file.
Output Index DDL File
Log File
Default index DDL script (i.e.IXDDL.SQL).
The actual script name will dependon the value entered in Output IndexDDL File, parameter nine (9), ofthe Generate DDL tab. To maintainconsistency with previous releasesof PeopleTools, we recommendthat you name the Index DDL script‘IXDDL.SQL’ as shown in theexamples in these instructions.
A file with extension “.log” is alsocreated with a name similar to theindex DDL script (.i.e. IXDDL.log).Each index name is written to thisoutput log as Data Mover ‘extracts’the index DDL from the database inputfile.
pstaatExtractDDL.DMS Data Mover extract script generatedby PSTAAT. This is the actualscript passed to Data Mover forthe extraction of the default tableand index DDL (TBDDL.SQL andIXDDL.SQL).
Copyright © 2006, Oracle. All rights reserved. 629
Using the PeopleSoft Tablespace DDL Automation Assistance Tool Appendix J
GUI Tab File Description
General Parameters and TablespaceOverride Tabs
PSTAAT will write several newDDL scripts to the folder specifiedin ‘Output Directory for GeneratedDDL Scripts’, parameter seven (7), ofthe General Parameters tab. Each willbe prefaced with a lower case ‘n’. Inaddition to the DDL scripts, PSTAATalso produces a log file.
nXXDDL.SQL This is the new tablespace anddatabase (DBD) DDL script.Non-temporary tables will bere-mapped among these tablespacesand databases based on the inputparameters supplied to the GeneralParameters tab (that is, parameters10-12; Maximum Number of Tablesper Tablespace; Maximum Number ofTablespaces per Database, Bufferpoolallocations, and so on).
nTBDDL.SQL This is the new table DDL script.Non-temporary tables will bere-mapped among the tablespacesand databases found in the newnXXDDL.SQL script. The objectmapping is based on the inputparameters supplied to the GeneralParameters tab.
nIXDDL.SQL This is the new index DDL script forall tables except temporary tables.
nTEMP.SQL This is the new temporary tableDDL script. It contains DDL tocreate temporary tables and indexes.Tables will be re-mapped among thetablespaces and databases generated inthe tXXDDL.SQL script (see below)The DBDmapping is based on theinput parameters supplied to theGeneral Parameters tab. Tablespacenames for temporary tables only, arehard-coded with the following namingconvention: TMPnnnn, where nnnn isan ascending sequence number.
Note. This file is produced onlywhen the Input Temp Table DDLFile parameter has been entered.See the task Using PSTAAT ToReassign Temporary Tables ToAdditional Tablespaces elsewhere inthis appendix for further details.
tXXDDL.SQL This script contains database andtablespace DDL for temporary tables
630 Copyright © 2006, Oracle. All rights reserved.
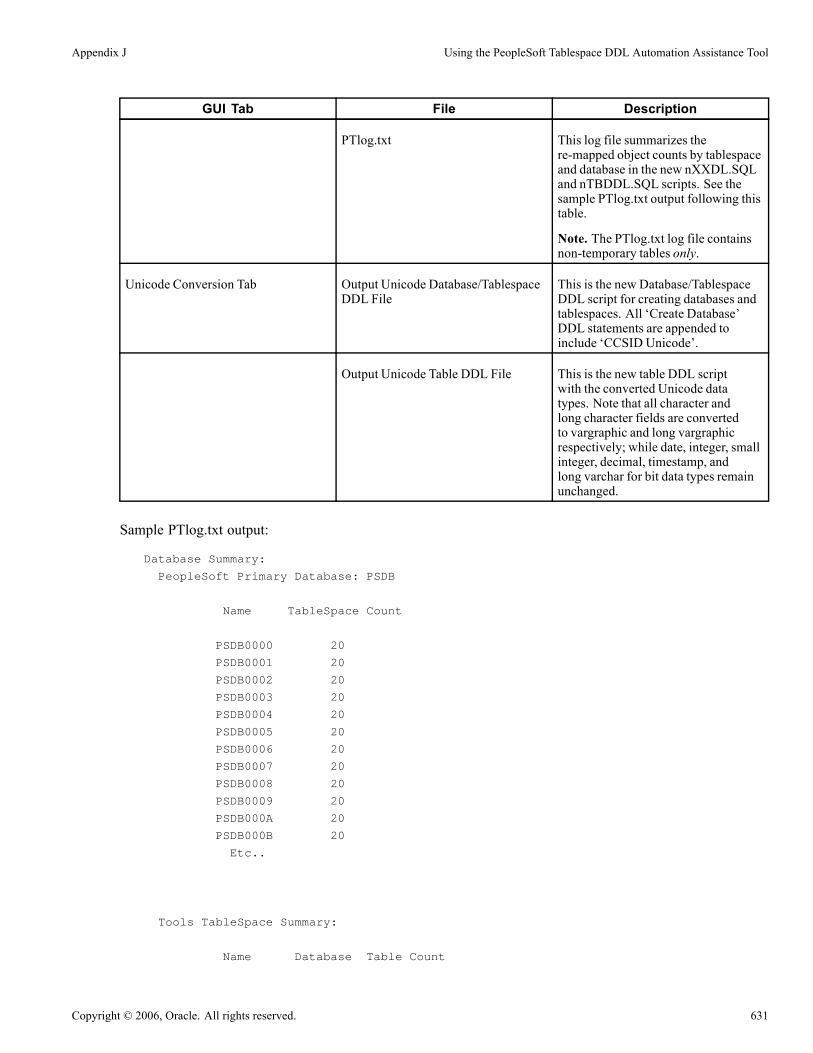
Appendix J Using the PeopleSoft Tablespace DDL Automation Assistance Tool
GUI Tab File Description
PTlog.txt This log file summarizes there-mapped object counts by tablespaceand database in the new nXXDL.SQLand nTBDDL.SQL scripts. See thesample PTlog.txt output following thistable.
Note. The PTlog.txt log file containsnon-temporary tables only.
Unicode Conversion Tab Output Unicode Database/TablespaceDDL File
This is the new Database/TablespaceDDL script for creating databases andtablespaces. All ‘Create Database’DDL statements are appended toinclude ‘CCSID Unicode’.
Output Unicode Table DDL File This is the new table DDL scriptwith the converted Unicode datatypes. Note that all character andlong character fields are convertedto vargraphic and long vargraphicrespectively; while date, integer, smallinteger, decimal, timestamp, andlong varchar for bit data types remainunchanged.
Sample PTlog.txt output:
Database Summary:
PeopleSoft Primary Database: PSDB
Name TableSpace Count
PSDB0000 20
PSDB0001 20
PSDB0002 20
PSDB0003 20
PSDB0004 20
PSDB0005 20
PSDB0006 20
PSDB0007 20
PSDB0008 20
PSDB0009 20
PSDB000A 20
PSDB000B 20
Etc..
Tools TableSpace Summary:
Name Database Table Count
Copyright © 2006, Oracle. All rights reserved. 631

Using the PeopleSoft Tablespace DDL Automation Assistance Tool Appendix J
PTTBL
PTTBL01 PSDB0000 30
PTTBL02 PSDB0000 30
Etc..
Application TableSpace Summary:
Name Database Table Count
OMAPP
OMAPP01 PSDB000H 30
OMAPP02 PSDB000H 30
Etc.
EXLARGE
EXLARG01 PSDB002O 1
Etc.
Task J-1: Using PSTAAT to Create TBDDL and IXDDLThe Generate DDL tab of the PSTAAT interface is capable of extracting TBDDL.SQL and IXDDL.SQL scriptsfrom the database import file located in <PS_HOME>\data. Note that the TBDDL and IXDDL scripts extractedfrom PSTAAT will be identical to those delivered on the Installation CD. You are free to use either set of scripts
Perform this task on a workstation with the ability to connect to the DB2 z/OS database server. PSTAAT willinvoke Data Mover to extract the default table and index DDL from the database file. Data Mover requiresDB2 Connect. Recall that the User ID and Password input parameters require a valid mainframe ID (suchas the database Access ID) and password because Data Mover will be invoked in bootstrap mode. Yourmainframe security package (such as RACF or Top Secret) must be able to authenticate this ID.
To create the TBDDL.SQL and IXDDL.SQL scripts:
1. Start PSTAAT by double-clicking the PSTAAT executable file found in <PS_HOME>\bin\client\winx86.2. Enter input values for parameters 1-9; and 12-13 of the Generate DDL tab.Refer to Generate DDL tab Input Parameters under the section titled Understanding the PSTAAT GraphicalUser Interface for a detailed explanation of each input parameter. To maintain consistency with previousreleases of PeopleTools, we recommend that you use TBDDL and IXDDL as the DDL script file names forinput parameters eight (8) and nine (9).
3. Select the Table radio button.4. Click the Run button.
632 Copyright © 2006, Oracle. All rights reserved.

Appendix J Using the PeopleSoft Tablespace DDL Automation Assistance Tool
Generate DDL page (1 of 2)
Generate DDL page (2 of 2)
Clicking the run button invokes Data Mover. Data Mover will open a window similar to the following as itwrites the TBDDL and IXDDL scripts to the path specified in input parameter four (4), Output Directory forGenerated DDL Scripts. Table DDL is extracted first, followed by the index DDL.
Copyright © 2006, Oracle. All rights reserved. 633
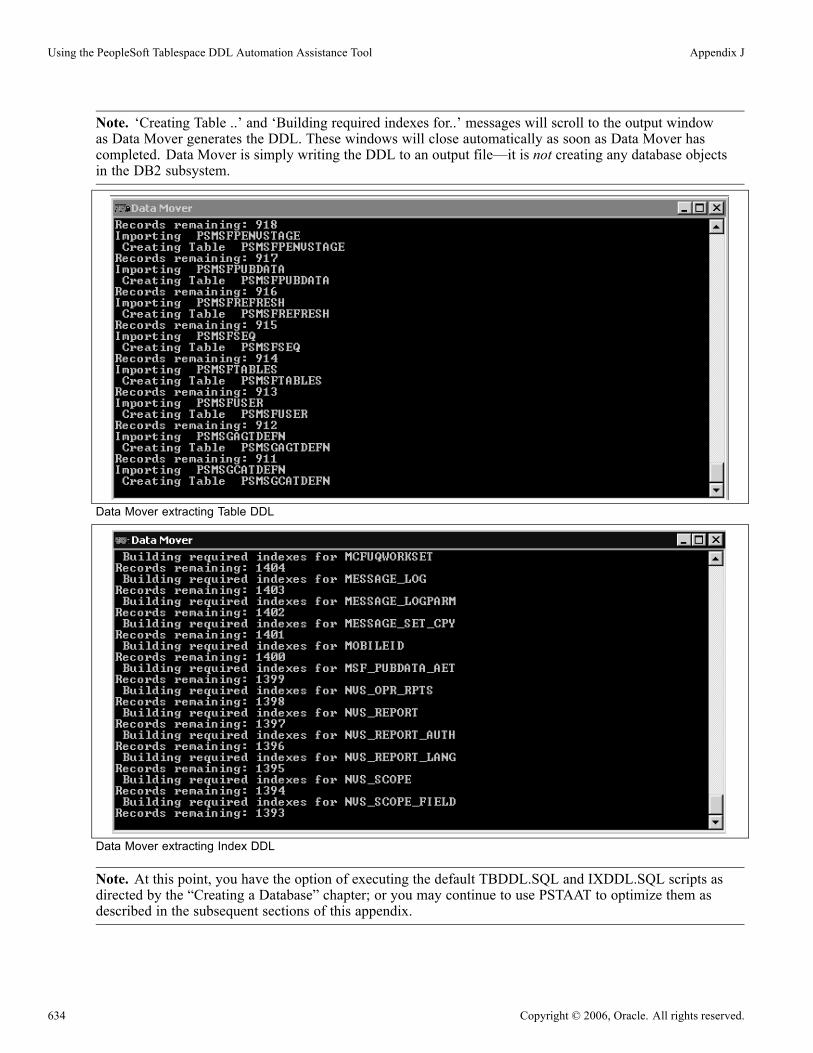
Using the PeopleSoft Tablespace DDL Automation Assistance Tool Appendix J
Note. ‘Creating Table ..’ and ‘Building required indexes for..’ messages will scroll to the output windowas Data Mover generates the DDL. These windows will close automatically as soon as Data Mover hascompleted. Data Mover is simply writing the DDL to an output file—it is not creating any database objectsin the DB2 subsystem.
Data Mover extracting Table DDL
Data Mover extracting Index DDL
Note. At this point, you have the option of executing the default TBDDL.SQL and IXDDL.SQL scripts asdirected by the “Creating a Database” chapter; or you may continue to use PSTAAT to optimize them asdescribed in the subsequent sections of this appendix.
634 Copyright © 2006, Oracle. All rights reserved.

Appendix J Using the PeopleSoft Tablespace DDL Automation Assistance Tool
Task J-2: Using PSTAAT to Customize DDLThis section discusses:
• Understanding How PSTAAT Assigns an Object Naming Convention
• Choosing a Primary Database Prefix and Maximum Number of Tables per Tablespace and Tablespacesper Database
• Using the New Name Parameter to Override Tablespace Name
• Customizing DDL Scripts
• Recalculating Primary and Secondary Space Allocations and Setting a Minimum Secondary SpaceAllocation With PSTAAT
• Using PSTAAT to Override the Default Bufferpool Assignment
• Using PSTAAT to Override the Default Segment Size
• Validating Input
Understanding How PSTAAT Assigns an ObjectNaming ConventionFor databases, PSTAAT uses the Primary Database Prefix of the General Parameters tab as a constant whenderiving the naming convention to be used for the individual physical databases that will comprise the logicalPeopleSoft database. PSTAAT will use the prefix entered here as the first part of the database namingconvention, and generate an ascending sequence for the remainder of the eight character DB2 z/OS databasename.
For example, entering HCMPD as the Primary Database Prefix on the General Parameters tab allows PSTAATto use the remaining three “free” characters to generate database names with the following ascending namingconvention:
HCMPD000, HCMPD001, HCMPD002, HCMPD003,...HCMPD009, HCMPD00A, HCMPD00B…etc.
Choosing a Primary Database Prefix and Maximum Number ofTables per Tablespace and Tablespaces per DatabaseDatabases:
Note. Depending on the desired number of tables to be assigned per tablespace, desired number of tablespacesto be assigned per database, and the total number of tables to be created; entering a Primary DatabasePrefix value greater than five characters may cause PSTAAT to exhaust the possible unique values to use ingenerating the ascending sequence. This can result in duplicate database names, causing the DDL to fail whenit is ultimately executed on the DB2 z/OS database server.
A primary database prefix of three characters—five characters at the most, is highly recommended to preventduplicate database names in the generated DDL script.
Copyright © 2006, Oracle. All rights reserved. 635

Using the PeopleSoft Tablespace DDL Automation Assistance Tool Appendix J
Note. The maximum number of databases that can be created in a DB2 subsystem is approximately 65,271(see Appendix A of the DB2 UDB for z/OS SQL Reference for details). Be aware that it is possible to reachthis limit when using PSTAAT to install large PeopleSoft applications and in doing so, allocating very fewtables per tablespace and grouping very few tablespaces per database. Hence, a complete one table pertablespace, one tablespace per database configuration may not be possible depending on the number of tablescontained in the application. It is also possible to reach the internal DB2 database limit in situations wherePeopleSoft applications share the subsystem with other applications.
IBM has suggested the following very general guidelines with respect to ‘object mapping’ for DB2 z/OS:
• If possible, create no more than 50 tables per individual physical database.• Try to limit the total number of objects created per database descriptor (DBD) to no more than 1000.Objects that constitute the DBD include but are not limited to all tablespaces, tables, indexes, index spaces,relationships, and so on, that reside in a single physical DB2 database.
Note that these are only general guidelines and may not be adequate for every installation.
Tablespaces:
The tablespace naming convention is controlled internally by PSTAAT. PSTAAT derives an ascendingsequence for tablespace names similarly to the manner in which it does so for database names. Depending onthe length of the default tablespace name and the number of tables to be assigned per tablespace, PSTAATwill use up to five or six characters of the default tablespace name, and then append an ascending sequencefor the remainder of the eight character DB2 z/OS tablespace name.
For example, the Tablespace Override tab (below) indicates that there are 1,211 tables by default in tablespacePTTBL. Requesting a one table per tablespace configuration by entering one (1) in the Maximum Number ofTables per Tablespace text box of the General Parameters tab causes PSTAAT to create 1,211 tablespaces—onefor each table delivered in tablespace PTTBL. The 1,211 tablespaces will be named as follows:
PTTBL01, PTTBL02, PTTBL03, PTTBL04...PTTBL0A, PTTBL0B...etc., through PTTBLXN
Reviewing Table Count on the TableSpace Override tab
Using the New Name Parameter to Override Tablespace NameAs indicated previously, this input parameter, found on the Tablespace Override tab, allows you to override thedefault tablespace name with a custom tablespace name. Although it is possible to completely override thename of any tablespace, we do recommend that you allow PSTAAT to determine new tablespace names foryou except for the circumstance described in this section.
Use this information to prevent duplicate Tablespace names when the default xxDDL script contains similarlynamed Tablespaces:
636 Copyright © 2006, Oracle. All rights reserved.

Appendix J Using the PeopleSoft Tablespace DDL Automation Assistance Tool
Some of the delivered xxDDL.SQL scripts contain default tablespace names that are similar to the namingconvention used by PSTAAT. The following example is from the EPDDL.SQL script:
Using the New Name parameter on the TableSpace Override tab
Because PSTAAT may use up to five or six of the original characters when determining the new tablespacename, it is possible that PSTAAT will create duplicate tablespace names when it encounters multipletablespaces in the default xxDDL.SQL script named with as many identical, consecutive characters. Forexample:
CULARGE, CULARG1, CULARG2, CULARG3
To prevent duplicate tablespace names in this circumstance, review the list of default tablespace names inthe TableSpace Override grid before clicking the Run button in the procedure below to generate optimizedDDL. Add an override value to the New Name text box next to any series of tablespaces for which the defaultnaming convention includes 5 or more identical consecutive characters. PSTAAT will substitute the specifiedoverride value when it is generating tablespace names for optimized DDL.
Task J-2-1: Customizing DDL ScriptsPSTAAT can assist you in the following:
• Customizing the DDL by allowing you to override the supported PeopleTools DDL parameters for DB2z/OS so they more closely fit standards at your site.
• Creating a more optimal mapping of non-temporary tables among tablespaces and databases.• Isolating temporary tables and certain Application and PeopleTools tables to individual tablespaces for usewith the %UpdateStats metaSQL function and to enhance concurrency.
To optimize the default xxDDL.SQL, TBDDL.SQL, and IXDDL.SQL scripts:
1. If it is not already running, start PSTAAT by double-clicking on the executable file found in<PS_HOME>\bin\client\winx86.
2. Select the General Parameters tab.3. Enter the desired General Parameters input values.For a detailed explanation of each of these input parameters, refer to the previous section titled GeneralParameters Tab Input under the section called Understanding the PSTAAT Graphical User Interface.
4. Click the Tablespace Override tab to view the table count per tablespace as defined by the defaultxxDDL.SQL and TBDDL.SQL scripts; and the default Primary and Secondary space allocations.
5. Click the Run button.
Copyright © 2006, Oracle. All rights reserved. 637
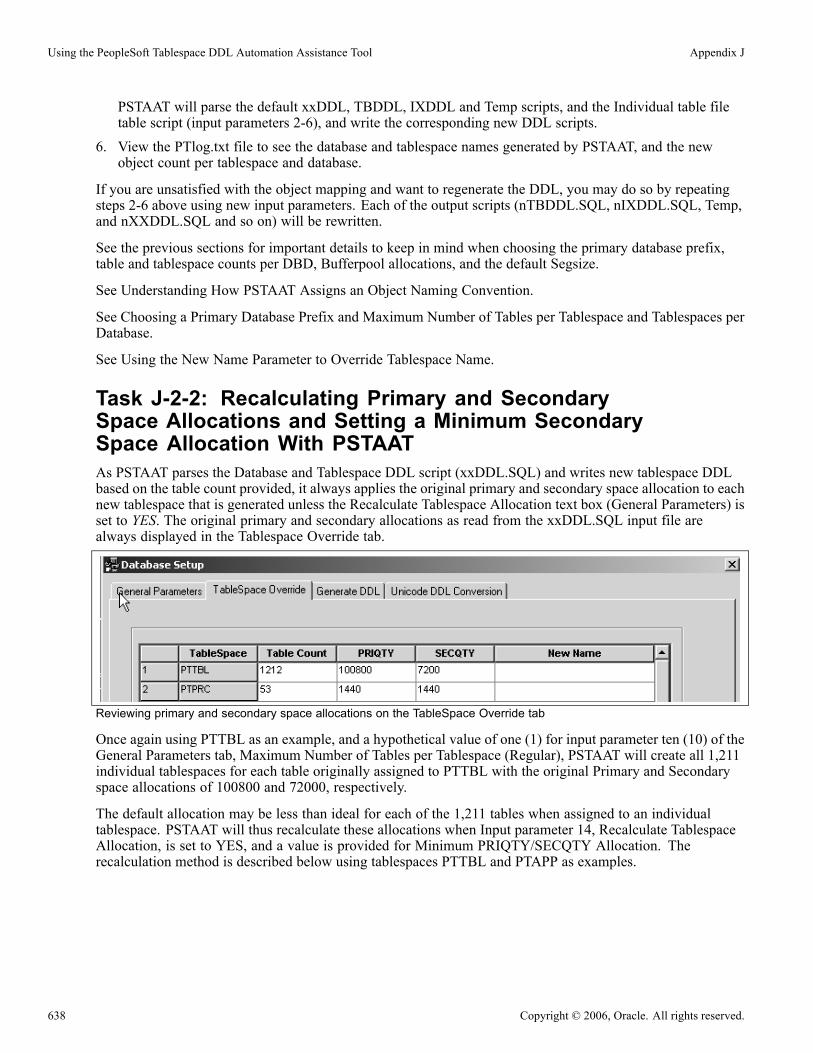
Using the PeopleSoft Tablespace DDL Automation Assistance Tool Appendix J
PSTAAT will parse the default xxDDL, TBDDL, IXDDL and Temp scripts, and the Individual table filetable script (input parameters 2-6), and write the corresponding new DDL scripts.
6. View the PTlog.txt file to see the database and tablespace names generated by PSTAAT, and the newobject count per tablespace and database.
If you are unsatisfied with the object mapping and want to regenerate the DDL, you may do so by repeatingsteps 2-6 above using new input parameters. Each of the output scripts (nTBDDL.SQL, nIXDDL.SQL, Temp,and nXXDDL.SQL and so on) will be rewritten.
See the previous sections for important details to keep in mind when choosing the primary database prefix,table and tablespace counts per DBD, Bufferpool allocations, and the default Segsize.
See Understanding How PSTAAT Assigns an Object Naming Convention.
See Choosing a Primary Database Prefix and Maximum Number of Tables per Tablespace and Tablespaces perDatabase.
See Using the New Name Parameter to Override Tablespace Name.
Task J-2-2: Recalculating Primary and SecondarySpace Allocations and Setting a Minimum SecondarySpace Allocation With PSTAATAs PSTAAT parses the Database and Tablespace DDL script (xxDDL.SQL) and writes new tablespace DDLbased on the table count provided, it always applies the original primary and secondary space allocation to eachnew tablespace that is generated unless the Recalculate Tablespace Allocation text box (General Parameters) isset to YES. The original primary and secondary allocations as read from the xxDDL.SQL input file arealways displayed in the Tablespace Override tab.
Reviewing primary and secondary space allocations on the TableSpace Override tab
Once again using PTTBL as an example, and a hypothetical value of one (1) for input parameter ten (10) of theGeneral Parameters tab, Maximum Number of Tables per Tablespace (Regular), PSTAAT will create all 1,211individual tablespaces for each table originally assigned to PTTBL with the original Primary and Secondaryspace allocations of 100800 and 72000, respectively.
The default allocation may be less than ideal for each of the 1,211 tables when assigned to an individualtablespace. PSTAAT will thus recalculate these allocations when Input parameter 14, Recalculate TablespaceAllocation, is set to YES, and a value is provided for Minimum PRIQTY/SECQTY Allocation. Therecalculation method is described below using tablespaces PTTBL and PTAPP as examples.
638 Copyright © 2006, Oracle. All rights reserved.
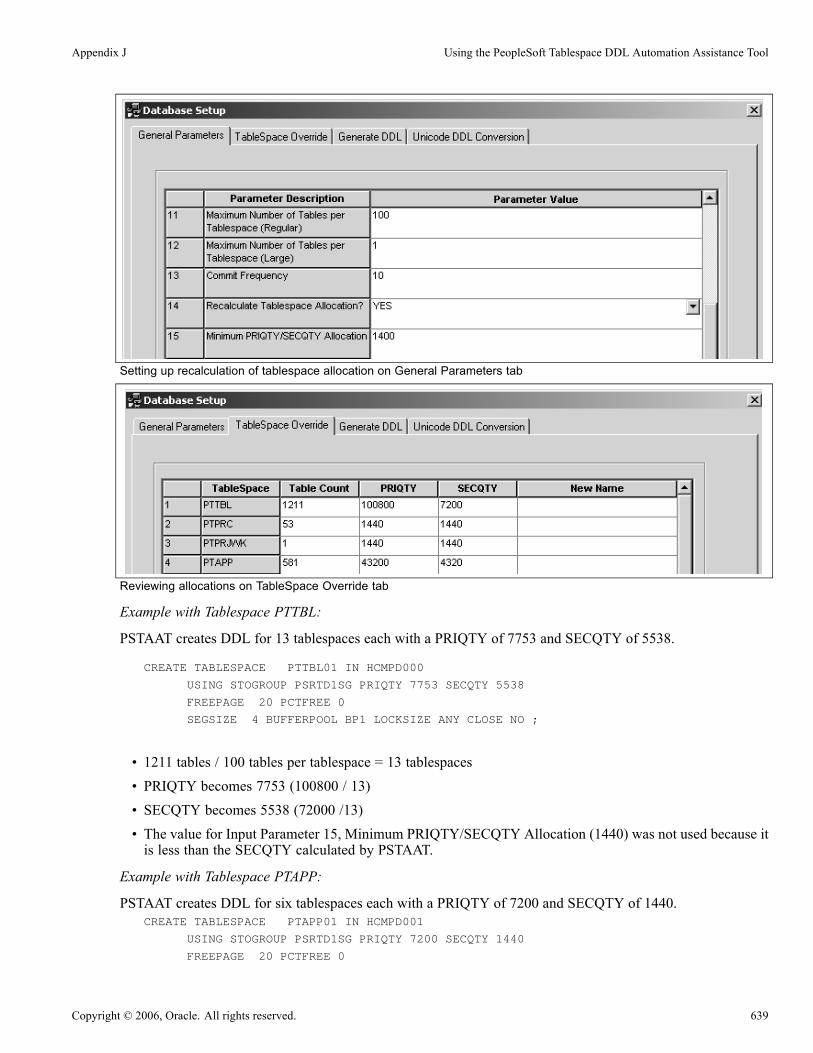
Appendix J Using the PeopleSoft Tablespace DDL Automation Assistance Tool
Setting up recalculation of tablespace allocation on General Parameters tab
Reviewing allocations on TableSpace Override tab
Example with Tablespace PTTBL:
PSTAAT creates DDL for 13 tablespaces each with a PRIQTY of 7753 and SECQTY of 5538.
CREATE TABLESPACE PTTBL01 IN HCMPD000
USING STOGROUP PSRTD1SG PRIQTY 7753 SECQTY 5538
FREEPAGE 20 PCTFREE 0
SEGSIZE 4 BUFFERPOOL BP1 LOCKSIZE ANY CLOSE NO ;
• 1211 tables / 100 tables per tablespace = 13 tablespaces• PRIQTY becomes 7753 (100800 / 13)• SECQTY becomes 5538 (72000 /13)• The value for Input Parameter 15, Minimum PRIQTY/SECQTY Allocation (1440) was not used because itis less than the SECQTY calculated by PSTAAT.
Example with Tablespace PTAPP:
PSTAAT creates DDL for six tablespaces each with a PRIQTY of 7200 and SECQTY of 1440.CREATE TABLESPACE PTAPP01 IN HCMPD001
USING STOGROUP PSRTD1SG PRIQTY 7200 SECQTY 1440
FREEPAGE 20 PCTFREE 0
Copyright © 2006, Oracle. All rights reserved. 639
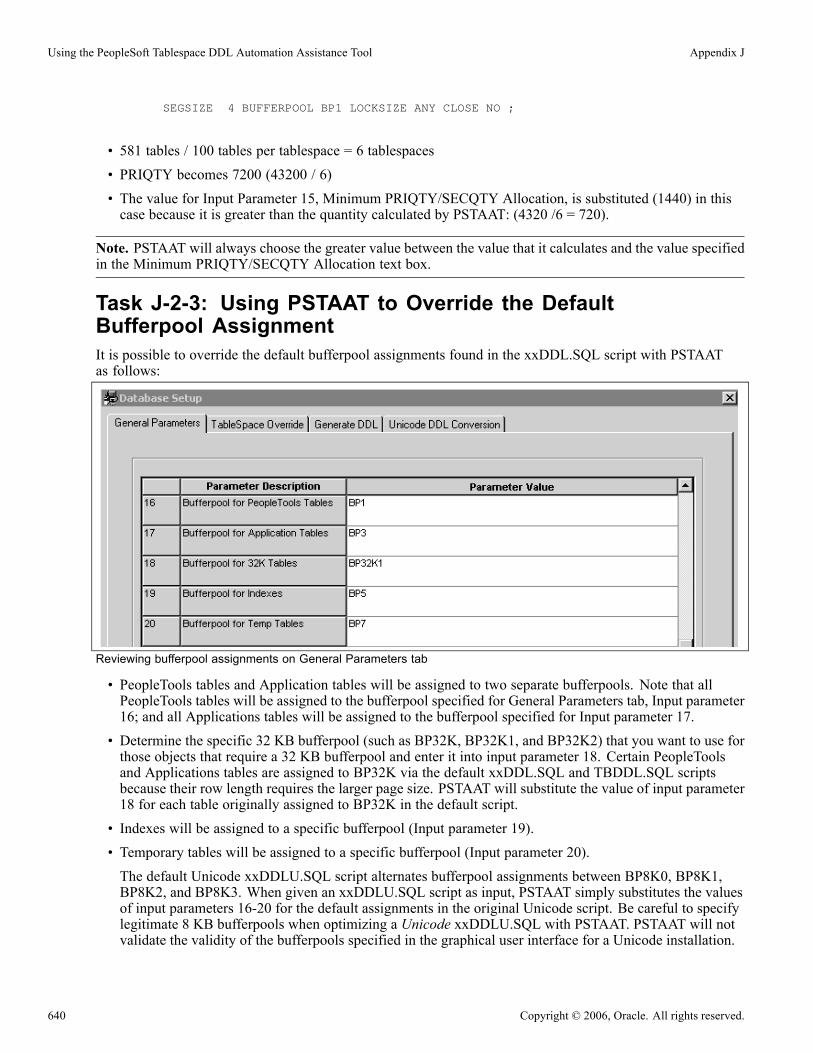
Using the PeopleSoft Tablespace DDL Automation Assistance Tool Appendix J
SEGSIZE 4 BUFFERPOOL BP1 LOCKSIZE ANY CLOSE NO ;
• 581 tables / 100 tables per tablespace = 6 tablespaces• PRIQTY becomes 7200 (43200 / 6)• The value for Input Parameter 15, Minimum PRIQTY/SECQTY Allocation, is substituted (1440) in thiscase because it is greater than the quantity calculated by PSTAAT: (4320 /6 = 720).
Note. PSTAAT will always choose the greater value between the value that it calculates and the value specifiedin the Minimum PRIQTY/SECQTY Allocation text box.
Task J-2-3: Using PSTAAT to Override the DefaultBufferpool AssignmentIt is possible to override the default bufferpool assignments found in the xxDDL.SQL script with PSTAATas follows:
Reviewing bufferpool assignments on General Parameters tab
• PeopleTools tables and Application tables will be assigned to two separate bufferpools. Note that allPeopleTools tables will be assigned to the bufferpool specified for General Parameters tab, Input parameter16; and all Applications tables will be assigned to the bufferpool specified for Input parameter 17.
• Determine the specific 32 KB bufferpool (such as BP32K, BP32K1, and BP32K2) that you want to use forthose objects that require a 32 KB bufferpool and enter it into input parameter 18. Certain PeopleToolsand Applications tables are assigned to BP32K via the default xxDDL.SQL and TBDDL.SQL scriptsbecause their row length requires the larger page size. PSTAAT will substitute the value of input parameter18 for each table originally assigned to BP32K in the default script.
• Indexes will be assigned to a specific bufferpool (Input parameter 19).• Temporary tables will be assigned to a specific bufferpool (Input parameter 20).The default Unicode xxDDLU.SQL script alternates bufferpool assignments between BP8K0, BP8K1,BP8K2, and BP8K3. When given an xxDDLU.SQL script as input, PSTAAT simply substitutes the valuesof input parameters 16-20 for the default assignments in the original Unicode script. Be careful to specifylegitimate 8 KB bufferpools when optimizing a Unicode xxDDLU.SQL with PSTAAT. PSTAAT will notvalidate the validity of the bufferpools specified in the graphical user interface for a Unicode installation.
640 Copyright © 2006, Oracle. All rights reserved.

Appendix J Using the PeopleSoft Tablespace DDL Automation Assistance Tool
Note. You must enter legitimate, active bufferpools for input parameters 16-20, or the DDL generatedby PSTAAT will fail. PSTAAT will not validate the syntax or legitimacy of the bufferpools entered forany of these input parameters.
The bufferpool override capability of PSTAAT is merely intended to provide a modest level of additionalflexibility in making bufferpool assignments over the default assignments found in the xxDDL.SQLscripts. It is not possible for PSTAAT to determine an optimal run time configuration for productionenvironments based on its script parsing and reformatting capabilities.
Task J-2-4: Using PSTAAT to Override the Default Segment SizeIt is possible to override the default SEGSIZE assignment for each tablespace found in the xxDDL.SQLscript with PSTAAT as follows:
Reviewing segment size on General Parameters tab
• Select a valid SEGSIZE from the drop-down list box provided for input parameter 23 of the GeneralParameters tab.
• PSTAAT will substitute the value selected from the list box of input parameter 23 for the SEGSIZE ofall tablespaces.
Note. Obviously, using the same SEGSIZE value for all tablespaces leads to a less than optimal configurationfor a production run-time environment. Using a particularly large SEGSIZE for a table that consumes fewpages will waste excessive amounts of disk space.
Similar to the bufferpool override capability of PSTAAT, the SEGSIZE override is merely intended to providea modest level of additional flexibility in making SEGSIZE assignments over the default assignments found inthe xxDDL.SQL scripts. It is not possible for PSTAAT to provide an optimal run time configuration for aproduction environment based on its script parsing and reformatting capabilities.
For more details regarding the use of the SEGSIZE parameter, consult the DB2 UDB for z/OS AdministrationGuide.
Copyright © 2006, Oracle. All rights reserved. 641
Using the PeopleSoft Tablespace DDL Automation Assistance Tool Appendix J
Task J-2-5: Validating InputAs previously alluded, PSTAAT is not capable of validating the legitimacy of certain input parameters that willultimately be substituted into the reformatted nxxDDL.SQL, nTBDDL.SQL, and nIXDDL.SQL scripts.
Warning! Caution must be exercised when entering certain input parameters because PSTAAT does notvalidate the syntax or legitimacy of these items. Please review all DDL scripts generated by PSTAAT beforeexecuting them.
Invalid input for the following parameters could lead to DDL that will fail when executed on the DB2 z/OSdatabase server:
Generate DDL Tab:
• Input Parameter 1: PeopleSoft Database NamePSTAAT is incapable of determining whether the logical database name that you have chosen alreadyexists in PS.PSDBOWNER, nor can it validate that it has been properly cataloged with DB2 Connect.
• Input Parameters 5 and 6: Tablespace and Index Storage GroupPSTAAT is not capable of pre-determining whether the STOGROUPs provided exist in the DB2subsystem, nor can it validate the names for the presence of typographical errors.
• Input Parameter 7: Database Object OwnerPSTAAT is incapable of determining whether the value entered as the Database Object Owner has alreadybeen used within the DB2 zOS subsystem for a non-PeopleSoft application. Using an owner id previouslyused by a non-PeopleSoft application can create problems when auditing the PeopleSoft database.PSTAAT is also incapable of determining whether the proper security setup steps have been completedwith respect to the Database Object Owner. Review the section Understanding Database Creation in thefirst chapter for more details regarding the specific requirements of the Owner Id.
See “Preparing for Installation,” Planning Database Creation.• Input Parameter 10: Application Designer Project NamePSTAAT is incapable of determining whether this project exists in the PeopleSoft database. This projectmust already exist, as PSTAAT will pass the project name directly to Application Designer to createtemporary table DDL.Any error messages that indicate a problem with the Application Designer project are directed to the logfile specified in the Logging tab of the Build Settings dialog. Here is an example of the log file error output:
PeopleSoft Project Command Line
Build Project
Project Name: WRONG
Tools Release: 8.48
-CT Source Database Type = DB2ODBC
-CD Source Database Name = PTAAT848
-CO Source Database Operator = QEDMO
Project WRONG is not valid or does not exist in the database.
Error - failure in command line build
See Using PSTAAT to Isolate Temporary Tables To Individual Tablespaces.• Input Parameters 12 and 13: User Id and Password
642 Copyright © 2006, Oracle. All rights reserved.
Appendix J Using the PeopleSoft Tablespace DDL Automation Assistance Tool
PSTAAT will pass the user id and password entered in input parameters 12 and 13 directly to a commandline initiated Data Mover or Application Designer task depending on the settings of the Table/TemporaryTable radio buttons. Data Mover or Application Designer (not PSTAAT) will subsequently make aconnection to DB2 z/OS through DB2 Connect when creating the default TBDDL.SQL and IXDDL.SQLscripts, or creating temporary table DDL.PSTAAT is incapable of validating the accuracy of the user ID and password prior to passing them onto Data Mover or Application Designer. Both the Data Mover task initiated to extract default table andindex DDL, and the Application Designer task initiated to create temporary tables run asynchronously toPSTAAT, and there will be no Windows message boxes sent to the workstation in the event that the user idand password combination is invalid.
- Invalid ID and/or password passed to Data Mover:
When attempting to extract table and index DDL with an invalid ID or password, an error message isdisplayed temporarily as Data Mover scrolls data to its output window (see Using PSTAAT to CreateTBDDL and IXDDL); and the task will end without generating DDL. In most cases, if PSTAATruns but fails to generate the TBDDL.SQL and IXDDL.SQL, the cause will be an incorrect userid-password combination, or a failed Data Mover connection to DB2 z/OS due to problems with theDB2 Connect configuration.
- Invalid ID and/or password passed to Application Designer:
When creating temporary table DDL, any messages issued by Application Designer due to an invalidID and/or password will be written to the log file specified for input parameter 11, ApplicationDesigner Output Log File.
General Parameters Tab:
• Input Parameter 8: Primary Database PrefixPSTAAT is incapable of determining whether the value supplied as the Primary Database Prefix willcause database names to be generated that already exist in the DB2 z/OS subsystem as it creates the newnxxDDL.SQL script.
• Input Parameter 9: Database Object OwnerThe same restrictions apply to those for input parameter 7 of the Generate DDL tab (see above).
• Input Parameters 16-20: Bufferpool OverridesPSTAAT cannot validate the syntax or legitimacy of the bufferpools entered for any of these inputparameters. It cannot determine whether a particular bufferpool has been activated in the DB2 subsystem,or whether 32 KB or 8 KB bufferpools have been supplied when required. See the section titled UsingPSTAAT to Override the Default Bufferpool Assignment for additional details.
• Input Parameters 21-22: Tablespace and Index Storage GroupsThe same restrictions apply to those for input parameters 5 and 6 of the Generate DDL tab (see above).
Copyright © 2006, Oracle. All rights reserved. 643
Using the PeopleSoft Tablespace DDL Automation Assistance Tool Appendix J
Task J-3: Using PSTAAT to Reassign TemporaryTables to Additional Tablespaces
Prior to PeopleTools 8.48, the following scripts were delivered on the installation CD to group temporarytables and non-temporary Application tables intended to be used with the %UpdateStats metaSQL functioninto separate tablespaces: X1DDL.SQL, X2DDL.SQL, and X3DML.DMS. Each base temporary tableand its iterations were grouped together into a single tablespace. Executing these scripts, known as the“enhanced” installation, was optional although many customers chose to do so to improve the performanceand concurrency of Application Engine and %UpdateStats processing. Starting with PeopleTools 8.48, theX1DDL.SQL, X2DDL.SQL, and X3DML.DMS scripts are no longer delivered on the installation CD, andPSTAAT will be used to reassign temporary table instances to additional tablespaces.
Here is an overview of the process:
1. Generate the temporary table and index DDL from an Application Designer project.
2. Create the project must as described in the task Building the Temporary Tables and their Indexes (steps 1-8).
See “Creating a Database” Building Temporary Tables.3. After the project has been created:Use PSTAAT to invoke Application Designer through the command line to build the project (write thetable DDL script). This procedure is described below.ORBuild the project manually by selecting the Build Script File option on the Build Execute Options dialogbox as described in the task Building the Temporary Tables and their Indexes (steps 9-18).
See “Creating a Database” Building Temporary Tables.
The result is identical whether you let PSTAAT call Application Designer to build the project, or build ityourself (by following steps 1-18 of the task Building the Temporary Tables and their Indexes)—the defaulttemporary table and index DDL file.
4. Use PSTAAT to parse the default temporary table DDL, create the additional databases, and remap thetablespace assignments.
Instructions for obtaining the default temporary DDL script by allowing PSTAAT to invoke ApplicationDesigner to build the project follow:
1. Start PSTAAT by double-clicking on the PSTAAT.exe found in <PS_HOME>\bin\client\winx86.Select the Generate DDL tab.
2. Enter the name of the database into Parameter 1, PeopleSoft Database Name on the Generate DDL tab.Recall that a database connection is required to invoke Application Designer, so this database name mustmatch the alias name cataloged with DB2 Connect.
3. Create an Application Designer project that contains the temporary table object definitions as described insteps 1-8 of the task Building the Temporary Tables and their Indexes.Save the project name as TEMPTBL.
4. From Application Designer, choose Build, Project.5. In the Build Settings dialog box, enter a log file name on the Logging tab, and check Log to File if it isnot already checked.
644 Copyright © 2006, Oracle. All rights reserved.

Appendix J Using the PeopleSoft Tablespace DDL Automation Assistance Tool
Enter the name of this log file into Parameter 11, Application Designer Output Log File, of the GenerateDDL tab of PSTAAT.
Build Settings dialog box: Logging tab
6. Select the Scripts tab of the Build Settings dialog box.7. Select the Output to a single file radio button under Script File Options, and enter a script name for the DDLfile to be created under Script File Names. The temporary table DDL script will be written to this location.You may close Application Designer now.
Copyright © 2006, Oracle. All rights reserved. 645
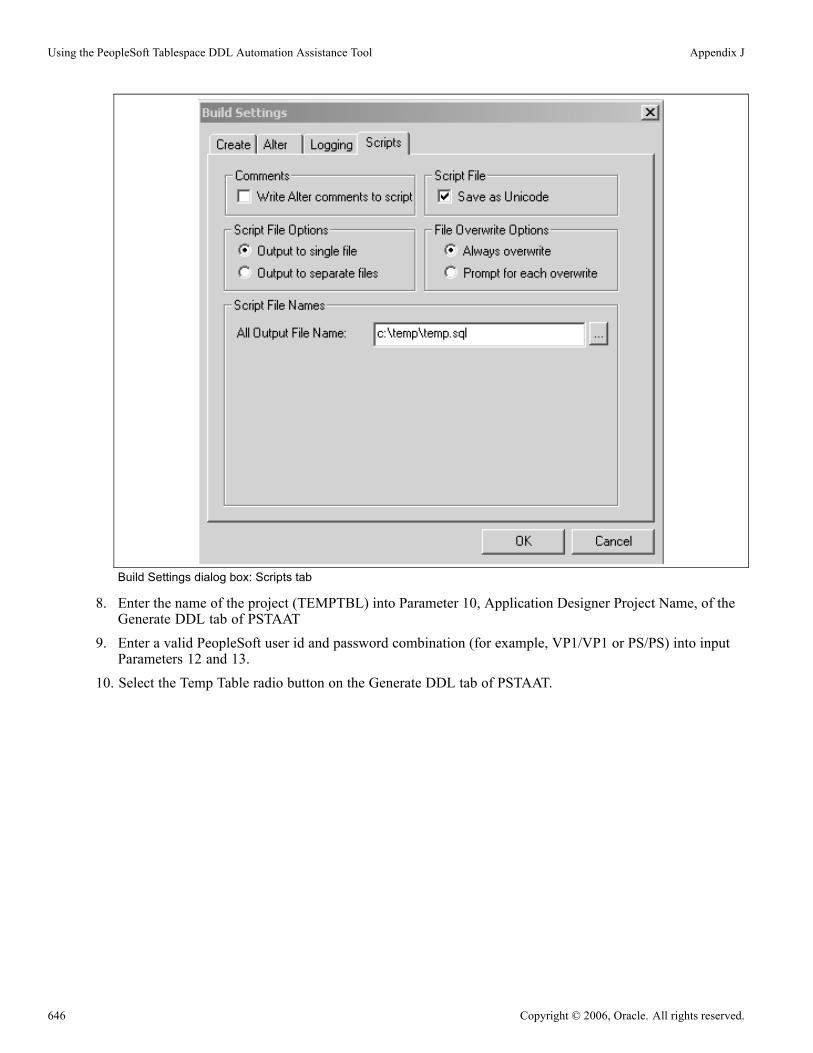
Using the PeopleSoft Tablespace DDL Automation Assistance Tool Appendix J
Build Settings dialog box: Scripts tab
8. Enter the name of the project (TEMPTBL) into Parameter 10, Application Designer Project Name, of theGenerate DDL tab of PSTAAT
9. Enter a valid PeopleSoft user id and password combination (for example, VP1/VP1 or PS/PS) into inputParameters 12 and 13.
10. Select the Temp Table radio button on the Generate DDL tab of PSTAAT.
646 Copyright © 2006, Oracle. All rights reserved.

Appendix J Using the PeopleSoft Tablespace DDL Automation Assistance Tool
Selecting Temp Table option on the Generate DDL tab
11. Click the Run button.PSTAAT will invoke Application Designer via command line to build the project, and create the defaulttemporary table DDL. If you closed Application Designer after creating the TEMPTBL project, youwill briefly see the PeopleTools splash screen as PSTAAT invokes Application Designer to build theTEMPTBL project and generate the default temporary table DDL script. This will be the only visual cuethat Application Designer has been invoked. Note that you will not see the splash screen if you leftApplication Designer running after creating the TEMPTBL project.
12. Look for the temporary table DDL script in the folder specified on the Scripts tab of the Build Settingsdialog box (see step 7 above).
13. Select the General Parameters Tab of PSTAAT to reassign the temporary tables to additional tablespacesand databases.
14. Copy the default temporary table DDL script just created (TEMP.SQL in the example shown) to thelocation specified in Parameter 1, Input Directory for DDL scripts on the General Parameters tab.
15. Enter the name of the temporary table DDL script (TEMP.SQL) for Parameter 5, Input Temp DDL File ofthe General Parameters tab.
16. Fill in all of the remaining General Parameters tab inputs.Review these sections for more details on the General Parameters tab and its input parameters:Understanding the PSTAAT Graphical User Interface, Understanding the Various PSTAAT Input andOutput Files, and Using PSTAAT to Customize DDL.
17. Click the TableSpace Override tab, and then click the Run button.PSTAAT will write the following files to the Output Directory for Generated DDL Scripts:
tXXDDL.SQL
nTEMP.SQL
nXXDDL.SQL
Copyright © 2006, Oracle. All rights reserved. 647

Using the PeopleSoft Tablespace DDL Automation Assistance Tool Appendix J
nTBDDL.SQL
nIXDDL.SQL
Ptlog.txt
See the Output Files section of Understanding the Various PSTAAT Input and Output Files.
nTEMP.SQL is the “new” temporary table DDL script. tXXDDL.SQL contains database and tablespaceDDL for the temporary tables found in nTEMP.SQL.
Tables will be re-mapped as follows:
• The DBD (database) mapping is based on the input parameters supplied to the General Parameters tab.• Tablespace names within the tXXDDL.SQL script are hard-coded with the following naming convention:TMPnnnn, where nnnn is an ascending sequence number.
• PRI and SEC quantities are hard-coded (720 and 1400 respectively). You are free to customize them foryour environment prior to executing the DDL.
• Bufferpool assignment, CLOSE rule, and SEGSIZE are determined by the input specified on the GeneralParameters tab.
Sample tablespace DDL:
CREATE TABLESPACE TMP0001 IN Q848107G
USING STOGROUP PSRTD1SG PRIQTY 720 SECQTY 1400
FREEPAGE 10 PCTFREE 0
SEGSIZE 4 BUFFERPOOL BP1 LOCKSIZE ANY CLOSE YES ;
Task J-4: Using PSTAAT to Isolate Other Tablesto Individual Tablespaces
PSTAAT is also capable of isolating certain non-temporary PeopleTools and Application tables, for which the%UpdateStats metaSQL function is called, to individual tablespaces. Beginning with PeopleSoft Enterprise9.0 Applications, PSTAAT will replace the previously delivered “enhanced” installation scripts.
A list of such tables is contained in the xxENHANCED.txt text file, where xx is the standard PeopleSoftEnterprise two character Application prefix (HC for HRCS, EP for FSCM, PF for EPM, CR for CRM, and PAfor Portal). The xxENHANCED.txt file is located in the <PS_HOME>\scripts directory of the installation CD.
Note. There may not be an xxENHANCED.txt file for all PeopleSoft Enterprise Applications (such as thePortal).
To remap these tables to individual tablespaces, use the PSTAAT General Parameters tab as follows:
1. Enter the name of the xxENHANCED.txt file as the input for parameter 6, Input Individual Table File, onthe General Parameters tab
2. Copy the xxENHANCED.txt file from <PS_HOME>\scripts to the location specified in Parameter 1, InputDirectory for DDL scripts on the General Parameters tab.
3. Enter the remaining input parameters required by the General Parameters tab.
648 Copyright © 2006, Oracle. All rights reserved.
Appendix J Using the PeopleSoft Tablespace DDL Automation Assistance Tool
Review the following sections for more details on the General Parameters tab and its input parameters:Understanding the PSTAAT Graphical User Interface, Understanding the Various PSTAAT Input andOutput Files, and Using PSTAAT to Customize DDL.
4. Click the Tablespace Override tab and click the Run button.PSTAAT will write the following files to the Output Directory for Generated DDL:Scripts: nTEMP.SQL, nXXDDL.SQL, nTBDDL.SQL, nIXDDL.SQL, Ptlog.txtSee the output files section of Understanding the Various PSTAAT Input and Output Files for anexplanation of each file.These tables will be remapped in the nXXDDL.SQL, nTBDDL.SQL and nIXDDL.SQL files based on theinput parameters supplied to the General Parameters tab. PSTAAT will derive tablespace names by usingthe first three to five characters of the original tablespace name, followed by an ascending sequence number.
Task J-5: Using PSTAAT to Convert EBCDIC DDLto Unicode DDL
This section discusses:
• Understanding the EBCDIC DDL to Unicode DDL Conversion
• Creating Database, Tablespace, and Table Shell DDL for an EBCDIC to Unicode Database Conversion
Understanding the EBCDIC DDL to Unicode DDL ConversionThis section can be ignored entirely if you do not intend to store data using the Unicode encoding schemein your PeopleSoft database. Likewise, if you intend to install and import a Unicode database from scratch,ignore this section and instead follow the standard instructions for installing a Unicode database previouslydocumented in this Enterprise PeopleTools Installation Guide for DB2 UDB for z/OS.
However, if you have an EBCDIC database that already exists and you wish to convert that database to theUnicode encoding scheme, please continue with this section.
Converting an existing EBCDIC PeopleSoft database to a Unicode database requires a multi-phase processthat is documented in the white paper titled “Converting a PeopleSoft Enterprise Database from EBCDICto Unicode Encoding Scheme on DB2 for z/OS.” See this white paper for complete details on completingan EBCDIC to Unicode encoding scheme conversion. One such step of this process with which PSTAAT isable to assist, is the “conversion” of the EBCDIC data types to Unicode data types within PeopleTools andApplication DDL. Specifically, DDL produced from the Unicode DDL Conversion tab of PSTAAT offers anadditional option in creating the DDL scripts required to create the Unicode shell as described in Phase One,Creating the Unicode Database Shell, of the EBCDIC to Unicode conversion white paper. See the followingsections of the “Converting a PeopleSoft Enterprise Database from EBCDIC to Unicode Encoding Scheme onDB2 for z/OS” white paper for instructions on running the scripts that can be created either by the methoddescribed here with PSTAAT, or the method described in the conversion white paper:
• Phase One – Unicode Database Shell
• Creating Create Table and Create Index DDL for the Target Unicode Database
• Creating A DDL Script to Build the Target Unicode Physical Databases
• Creating A DDL Script to Build the Target Unicode Tablespaces
Copyright © 2006, Oracle. All rights reserved. 649

Using the PeopleSoft Tablespace DDL Automation Assistance Tool Appendix J
• Creating The Unicode Logical Database Shell
See “Converting a PeopleSoft Enterprise Database from EBCDIC to Unicode Encoding Scheme on DB2 forz/OS” PeopleSoft Customer Connection (Support, User Groups, Product User Groups, DB2 z/OS, GeneralInformation).
Task J-5-1: Creating Database, Tablespace, and Table ShellDDL for an EBCDIC to Unicode Database ConversionWhen supplied with EBCDIC Database/Tablespace (xxDDL.SQL) and table DDL scripts (TBDDL.SQL) asinput, PSTAAT is capable of parsing and recreating them with the necessary data types for creating theUnicode shell database. For the table DDL script, PSTAAT converts all character and long character fields tovargraphic and long vargraphic respectively; while date, integer, small integer, decimal, timestamp, and longvarchar for bit data types remain unchanged. All ‘Create Database’ DDL within the Database/Tablespacescript will be appended with ‘CCSID Unicode’.
Note. The following instructions are divided into two procedures.
To use PSTAAT to convert EBCDIC DDL to Unicode DDL, begin by inserting all of the record definitionscontained in the EBCDIC database into an Application Designer project, and then create the EBCDIC DDL forall tables and indexes in the database:
1. Open Application Designer.2. Choose File, New.In the New dialog box, select Project, and then click OK.
3. Choose Insert, Definitions into Project.4. Set Definition Type to Records, and Type to All Records.
Note. Selecting All Records will insert views, sub-records, dynamic views and derived records in additionto table and temporary table definition types into the project. This is necessary to capture both the table andtemporary table definition types in a single DDL file for PSTAAT. These are the two table types that willrequire the data type conversion from char to vargraphic and so on. Although these other definition typesexist in the project, Application Designer will write table and index DDL for the table and temporary tabledefinition types only based on the Build options that will be selected in a subsequent step.
5. Press ENTER, or click Insert and then click the Select All button.
This selects all of the records.
6. Click Insert to insert all records into the new project.
7. Click Close to close the Insert into Project dialog box.
8. Before building the project, save it.
Choose File, Save Project As and enter a project name.
9. Choose Build, Project.
The Build dialog box appears.
10. In the Build Options group, select the Create Tables check box.
The Create Index check box is checked by default.
11. Select Build script file to direct the DDL to a file.
650 Copyright © 2006, Oracle. All rights reserved.

Appendix J Using the PeopleSoft Tablespace DDL Automation Assistance Tool
12. Click the Settings button.The Build Settings dialog box appears.
13. On the Create tab, select the following:
Build Settings dialog box: Create tab
• Recreate table if it already exists under Table Creation Options• Skip view if it already exists under View Creation Options• Recreate index if it already exists under Index Creation Options
14. Select the Scripts tab, and select Output to Separate Files under Script File Options.15. Under Script File Names, specify the path and filename for the output files that will contain the tableand index DDL.
Copyright © 2006, Oracle. All rights reserved. 651

Using the PeopleSoft Tablespace DDL Automation Assistance Tool Appendix J
Build Settings dialog box: Scripts tab
16. Click OK to accept the build settings.17. Click Build to create the table and index DDL script.Disregard the subsequent warning message about “potentially destructive settings.” The output is directedto a script only. Database objects will not be dropped.
18. After the script generation process has finished, click Close in the Build Progress dialog box to return toApplication Designer.
After completing the previous steps:
1. Start PSTAAT by double clicking on the PSTAAT.exe found in <PS_HOME>\bin\client\winx86.Click on the Unicode DDL Conversion tab.
2. Enter the EBCDIC Database/Tablespace DDL script (xxDDL.SQL) name into input parameter 1, InputEBCDIC Database/Tablespace DDL File, of the Unicode DDL Conversion tab.
3. Enter the name of the EBCDIC table DDL script that was just created by Application Designer in inputparameter 2, Input EBCDIC Table DDL File, of the Unicode DDL Conversion tab. (EBCDIC.SQL inthe example shown above.)
4. Enter Output file names for input parameters three (3) and four (4) of the Unicode DDL Conversion tab.These will become the names of the new DDL scripts.
652 Copyright © 2006, Oracle. All rights reserved.

Appendix J Using the PeopleSoft Tablespace DDL Automation Assistance Tool
Specifying output files on Unicode DDL conversion tab
5. Select YES from the drop-down list box in input parameter five (5), Remove ‘Drop Table’ DDL.The Recreate table if it already exists option was set earlier in the Build Settings dialog box when theproject was built so that Application Designer would create DDL for all record definitions for which a tableexists in the database. Application Designer thus generates ‘Drop Table’ DDL prior to each ‘Create table’DDL statement in the script. Choosing YES from this list box instructs PSTAAT to put comment marksprior to each Drop Table statement in the new Unicode table DDL script. This will prevent the EBCDICtables from being dropped when the new Unicode DDL scripts are executed. Again, refer to the previouslymentioned EBCDIC to Unicode conversion white paper before executing these scripts.
6. Click the General Parameters tab and enter the directory location of the EBCDIC Database/Tablespacescript and the EBCDIC table DDL script (to be converted) into parameter 1 (Input Directory for DDLscripts).Enter the Output Directory for the new Unicode shell database scripts into parameter 7 (Output Directoryfor Generated DDL Scripts).
Copyright © 2006, Oracle. All rights reserved. 653

Using the PeopleSoft Tablespace DDL Automation Assistance Tool Appendix J
Specifying input and output directories on General Parameters tab
7. Click the Run button on the Unicode Conversion Tab.The new scripts will be written to the path specified in the Output Directory for Generated DDL Scripts onthe General Parameters tab.
Note. All tablespaces in the converted tablespace DDL (nXXDDL.SQL) will be allocated to BP8K1 bydefault. The General Parameters tab can be used to further optimize the DDL and assign additional 8KB bufferpools.
8. Continue with the rest of the process documented in the “Converting a PeopleSoft Enterprise Databasefrom EBCDIC to Unicode Encoding Scheme on DB2 for z/OS” white paper.
See “Converting a PeopleSoft Enterprise Database from EBCDIC to Unicode Encoding Scheme on DB2for z/OS” PeopleSoft Customer Connection (Support, User Groups, Product User Groups, DB2 z/OS,General Information).
Task J-6: Using PSTAAT to Install PeopleSoft DatabasesPrevious sections of this Appendix describe the individual tabs of the PSTAAT graphical user interface andtheir various functions to either generate default DDL, or optimize default DDL. This section describes severalimportant points to consider when using PSTAAT.
We recommend that you use PSTAAT to create environments that are more production-capable after you firstbecome thoroughly familiar with the default installation process.
654 Copyright © 2006, Oracle. All rights reserved.
Appendix J Using the PeopleSoft Tablespace DDL Automation Assistance Tool
PSTAAT operates independently of the PeopleTools metadata, has no direct knowledge of the data modelof the individual Applications, and no mechanism itself to communicate directly with a DB2 z/OS databaseserver. Its primary capability is that of parsing DDL input files, and subsequently rewriting modified versionsof those files for output. Because Application Designer is required to create temporary table DDL froma project containing record definitions, you must obviously complete enough of the installation steps tosuccessfully connect Application Designer to the database. Additionally, because most customer installationswill include multiple database environments, including one Demo copy of each Application, you may find itmost convenient to use PSTAAT to create additional more production-worthy environments than the defaultinstallation process is capable of producing. PSTAAT can be used effectively to create such an environmentas follows:
See “Creating a Database,” Building Temporary Tables.
1. First, create and import a complete Demo environment without optimizing the DDL.Obtain the default TBDDL.SQL and IXDDL.SQL scripts from the installation CD, or use the GenerateDDL tab of PSTAAT to create them.
2. Obtain a DDL script for temporary tables by building (script only) an Application Designer project (DDLscript only) from the Demo environment created in step one (above) as directed in the task Building theTemporary Tables and their Indexes.
See “Creating a Database,” Building Temporary Tables.3. Collect the following files for input to PSTAAT:
xxENHANCED.txt file for your application
xxDDL
TBDDL.SQL
IXDDL.SQL
Temporary table DDL script
See Using PSTAAT To Reassign Temporary Tables To Additional Tablespaces and Using PSTAAT toIsolate Other Tables to Individual Tablespaces.
4. Fill in all 24 text boxes of the General Parameters tab, and use the Tablespace Override tab to optimize theDDL as described in the previous sections of this appendix.
5. FTP the DDL generated from PSTAAT to the mainframe (HLQ.PSvvv.DDLIB) and make any otherdesired modifications.
6. Execute the DDL using DSNTEP2, or some other batch SQL processor.7. Save a copy of the DDL scripts generated from PSTAAT in <PS_HOME>\scripts on the file server.8. Continue with the rest of the process as documented in the Enterprise PeopleTools 8.48 InstallationGuide for DB2 UDB for z/OS.
Other important considerations when using PSTAAT:
• Be sure to run the SETSPACE and SETTMPIN SQRs as directed after successfully executing all DDL asdocumented in this installation guide.
• PeopleSoft upgrade processes may attempt to create new tables in the default tablespaces. These scriptswill fail if the default tablespace does not exist. To prevent failures during an upgrade, execute the defaultxxDDL.SQL script so the vanilla tablespaces exist in each of your environments. You may reduce theprimary space allocations on these tablespaces to avoid excessive waste of disk space.
• As indicated previously, always store a copy of all PSTAAT modified DDL in the <PS_HOME>\scriptsfolder of the PeopleTools file server.
Copyright © 2006, Oracle. All rights reserved. 655

Using the PeopleSoft Tablespace DDL Automation Assistance Tool Appendix J
656 Copyright © 2006, Oracle. All rights reserved.
Index
Aadditional languages 14ALTER AUDITrunning as part of updating database tolatest PeopleTools release 169running during database creation 207
alter PeopleTools tablesas part of updating database to latestPeopleTools release 169
Application CDinstalling 99, 105
application server 6configuring domain processes 226configuring domains, UNIX 228configuring domains, Windows 215creating domains, UNIX 228creating domains, Windows 215designating the application serveradministrator 62getting started, UNIX 227getting started, Windows 214importing configuration, UNIX 231importing configuration, Windows 219reconfiguring a domain, UNIX 233reconfiguring a domain, Windows 220setting up on UNIX 225setting up on Windows 213specifying domain parameters,UNIX 233specifying domain parameters,Windows 220starting domains, UNIX 228starting domains, Windows 215
Asian languagesconfiguration issues on UNIX 236configuration issues on Windows 223
auditing database 206authenticationsetting up on OAS for reportrepository 591setting up on WebLogic for reportrepository 596setting up on WebSphere for reportrepository 596
authentication domains, using in consolemode 275authentication domains, using in GUImode 241
Bbackups 26base languagechanging 206choosing 13
base time zone option 272, 294batch server 6setting up on z/OS 116
BEA WebLogicinstalling on Windows 45
binding Windows SQR forPeopleSoft 106BPEL Process Manager, installing forXSLT mapper integration 601bufferpools, using PSTAAT tooverride 640BusinessObjects Enterprise XIchanging Report Repository datasource 453creating a web server on UNIX orLinux 418creating a web server on Windows 397enabling logging 459installation overview 376installing on UNIX or Linux 413installing on Windows 386license code types 462PeopleSoft permission lists 451PeopleSoft roles 451PeopleSoft users 451Report Repository 453
CCBLBLD.BAT 484CBLMAKE.BAT 485CCSID 18CDsmounting and unmounting forMicroFocus Server Express 83
Copyright © 2006, Oracle. All rights reserved. 657
Index
mounting and unmounting for thePeopleSoft installer 88
Central Management Console(BusinessObjects Enterprise XI) 384Change Assistant, See PeopleSoft ChangeAssistantcharacter set 14CIA, See PeopleSoft Change ImpactAnalyzerCLI/ODBC tracesetting 589
client setup 113CMC, See Central Management ConsoleCMTSTAT/IDTHTOIN 18COBOL 19compiling on UNIX 491compiling on Windows 484compiling on z/OS 131distributing binaries 488link-editing on z/OS 131linking 493recompiling 493setting up for Remote Call 214, 227
COBOL compilerinstalling on UNIX or Linux 73installing on Windows 73
compiling COBOLon UNIX 491on Windows 484on z/OS 131
compiling DB2 COBOLon z/OS 130
configurationDB2 UDB for z/OS subsystem 16planning initial 3
Configuration ManagerClient Setup tab 113editing profiles 111starting 110startup options 110
connect ID 21connect strategy 21Crystal Reports 9installing 374
Crystal Reports XIinstalling 447removing 450
Ddata field length checking option 272,294Data Moverimport script, creating 148running additional scripts 200running scripts 154
databaseauditing 206creating 141multiple-database strategy 8names 9naming conventions 9planning creation of 8server 5setting up connectivity 20updating database name and type 271,293updating to latest PeopleToolsrelease 159verifying connectivity 215, 228
database namecustomizing 142
database serveroverview 5transferring files to 123verifying sizing 16
Database Setup 148DB2 COBOLcompiling on z/OS 130link-editing on z/OS 130
DB2 Connectarchitecture 558confirm ODBC settings 587installing and configuring 557setting CLI/ODBC trace 589
DB2 Connect gatewayconfiguring 147
DB2 Connect Gatewayconfiguring on UNIX 587configuring on Windows 563
DB2 plansbinding 205
DB2 UDB for z/OSsubsystem configuration 16
DB2CodePage 586DBNAME field 189DBSetup 148dddaudit.sqr 206
658 Copyright © 2006, Oracle. All rights reserved.

Index
DDFsetting up on the mainframe 561
DDL scriptstransferring to z/OS 138
DDL, customizing with PSTAAT 635DDLSPACENAME field 189DECIMAL 18decimal arithmetic precision 17Distribution Agentstarting on UNIX 328starting on Windows 302starting on z/OS 350
DMS script 148See Also Data Mover
documentationassembling installation related 2installing PeopleBooks 511
DSMAX 18
EE-Delivery 88EBCDICconverting to Unicode withPSTAAT 649
EDM pool 17environment variablessetting 310setting for application serverconfiguration 227
Ffile server 5installing the PeopleTools CD 103
filesGNT and INT 487
GGNT files 487granting access to USS files 129
Hhardware and software requirements 2HTTPsecuring Report Repository for 591
HTTP proxy serverinstalling for WebSphere 54
Iindexes
creating 158install workstationprerequisites 109
installationmapping directories for z/OS 127planning 134
INT files 487Integration Broker, updating 183Integration Gateway URL, configuring forBusinessObjects Enterprise XI 439Internet Architecture (PeopleSoft), SeePeopleSoft Pure Internet ArchitectureIXDDL.SQL script, creating withPSTAAT 632
JJCLscustomizing job cards 364editing a shell template 363editing for Process Schedulerserver 362
Llaser printer 7liblist, modifying 490link-editingCOBOL on z/OS 131DB2 COBOL on z/OS 130
linking COBOL 493logical drivecreating 102
Mmanual file transfer 126mapping logical drive 102message data, cleaning obsolete 161Micro Focus Net Express 73Micro Focus Server Express 73Microsoft Office 20Mobile Agentconfiguring 527finding the installation program 523installing on a laptop 524installing on a PDA 525modifying, repairing, or removing 526PDA initialization 526troubleshooting 527understanding 523
mounting CDs
Copyright © 2006, Oracle. All rights reserved. 659
Index
for MicroFocus Server Express 83for the PeopleSoft Installer 88
multi-currency option 272, 294Multilanguage CDloading 100, 105
multilingual database issues 148multilingual objectsupdating PeopleTools 165
multilingual strategyplanning 11
multilingual system databaseinstalling 200
multiple-database strategy 8
NNavigation Collection dataconverting 182
new tablespacesmigrating records to 173
NLSPATH environment variable 310non-Unicode databases 15
OOAS, See Oracle Application ServerOracle Application Serverenvironment variables 32installing 33installing PeopleSoft Pure InternetArchitecture in console mode 276installing PeopleSoft Pure InternetArchitecture in GUI mode 242setting up authentication for reportrepository 591uninstalling 44uninstalling PeopleSoft Pure InternetArchitecture in console mode 280uninstalling PeopleSoft Pure InternetArchitecture in GUI mode 252using custom port numbers 32
owner IDgranting privileges to 141processing option 9
PPagelet Wizard dataconverting 182
partioned datasetsz/OS 122
PATH environment variable 310
PeopleBooksconfiguring context sensitive help 519enabling F1 help 520implementing a PSOL server 514installation overview 511installing the CD-ROM 511setting up a reverse proxy server 519
PeopleSoft Change Assistantfirewall settings 497installing 496introduction 27setting email options 499setting environment managementoptions 500setting up web services options 499specifying Change Assistantoptions 498
PeopleSoft Change Impact Analyzerinstalling 505introduction 27
PeopleSoft Installerrunning 91running in console mode 96running in GUI mode 94running with single CD 90running without swapping CDs 91
PeopleSoft integration withBusinessObjects Enterprise XIpermission lists, roles, and users 451
PeopleSoft Pure Internet Architectureinstalling in console mode on OracleApplication Server 276installing in console mode onWebLogic 280installing in console mode onWebSphere 286installing in GUI mode on OracleApplication Server 242installing in GUI mode onWebSphere 261installing on Oracle Application Serverin GUI mode 242installing on WebLogic in GUImode 252installing on WebSphere in consolemode 285installing on WebSphere in GUImode 260testing the installation, consolemode 290
660 Copyright © 2006, Oracle. All rights reserved.
Index
testing the installation, GUI mode 268uninstalling from Oracle ApplicationServer in console mode 280uninstalling from Oracle ApplicationServer in GUI mode 252uninstalling on WebSphere in consolemode 289uninstalling on WebSphere in GUImode 267using authentication domains in consolemode 275using authentication domains in GUImode 241
PeopleSoft Server Transfer Program 116,123PeopleSoft servers 86PeopleSoft system tablesupdating 204
PeopleSoft Tablespace DDL AutomationAssistance toolcreating TBDLL and IXDDLscripts 632customizing DDL 635entering input and outputparameters 616functions 615graphical user interface 616input and output files 627overriding default bufferpoolassignment 640overriding default segment size 641setting space allocations 638using to reassign temporary tables 644workstation requirements 616
PeopleSoft Tablespace DDL AutomationAssistance Toolconverting EBCDIC DDL to UnicodeDDL 649
PeopleSoft triggerscreating 197
PeopleTools CDinstalling on the file server 103
PeopleTools database objectsdeleting obsolete 167updating 163
PeopleTools Development Environment 4PeopleTools Mobile Agentfinding the installation program 523understanding 523
PeopleTools multilingual objects
updating 165PeopleTools programsassembling 130
PeopleTools system dataupdating 178
PeopleTools system databaseinstalling multilingual 200
PeopleTools system tablesupdating 161
PeopleTools tablesaltering 169
PIA, See PeopleSoft Pure InternetArchitectureplanningconnect strategy 21
Portal objectsconverting 180
primary authorization ID 10printer 7Process Scheduler serverconfiguring 358configuring [Application Engine]section 361configuring [OS390 Config]section 360configuring [Process Scheduler]section 361configuring [Startup] section 359configuring for Word for Windows 320creating on UNIX 335creating on Windows 311creating on z/OS 357customizing job cards in JCL 364editing JCLs 362ODBC initialization file 356overview 6reconfiguring on UNIX 339reconfiguring on Windows 315Report Repository, on UNIX 325Report Repository, on Windows 299Report Repository, on z/OS 348setting authorization 344setting up distribution settings onUNIX 333setting up distribution settings onWindows 308setting up distribution settings onz/OS 353setting up Process Scheduler ServerAgent on UNIX 334
Copyright © 2006, Oracle. All rights reserved. 661
Index
setting up Process Scheduler ServerAgent on Windows 310setting up Process Scheduler ServerAgent on z/OS 355setting up security on UNIX 324setting up security on Windows 296setting up security on z/OS 346starting 367starting as Windows service 318stopping 369verifying status on UNIX 340verifying status on Windows 316verifying status on z/OS 368
product modulesadding 509
profileediting default 111
PSADMINand application server domains,UNIX 228and application server domains,Windows 215importing application server domainwith, UNIX 231importing application server domainwith, Windows 219
PsCIA, See PeopleSoft Change ImpactAnalyzerPSCONFIG.SH shell scriptrunning for the batch environment 129
PSMV.SH shell script 129psolmanager.htm 521PSRECTBLSPC table 189PSTAAT, See PeopleSoft Tablespace DDLAutomation Assistance toolPTGENDLL.DMS sample scriptcustomizing 603using 603
PTSYS databaseextracting DDL for 603
QQAS, See Query Access ServicesQuery Access Servicesconfiguring for BusinessObjectsEnterprise XI 439overview 382
query headingsconverting 181
Rrecompiling COBOL 493recordsmigrating to new tablespaces 173
Remote Callsetting up COBOL for 214, 227
REN serverconfiguring for UNIX 230configuring for Windows 217
Report Managersetting up sending and receiving of reportfolders on UNIX 334setting up sending and receiving of reportfolders on Windows 309setting up sending and receiving of reportfolders on z/OS 354
report nodedefining to use FTP on UNIX 331defining to use FTP on Windows 306defining to use FTP on z/OS 352defining to use HTTP/HTTPS onUNIX 329defining to use HTTP/HTTPS onWindows 303defining to use HTTP/HTTPS onz/OS 351defining to use XCOPY 305updating definition 599
Report Repositoryenabling on UNIX 328enabling on Windows 302enabling on z/OS 350securing for HTTP 591selecting transfer protocol onUNIX 328selecting transfer protocol onWindows 302selecting transfer protocol on z/OS 350setting up single signon on UNIX 327setting up single signon onWindows 301setting up single signon on z/OS 349
Report Repository, UNIX 325Report Repository, Windows 299Report Repository, z/OS 348RPT Conversion utility 466Rules Editor, installing 505RUNSTATS 186
662 Copyright © 2006, Oracle. All rights reserved.
Index
SSCCSID 18secondary authorization ID 10Server Transfer Program 116, 123serversPeopleSoft types 86setting the SMTP server 499supported combinations 86
SETSPACE.SQRrunning 191
Setup Managerconfiguring 321converting 182
shell JCLsediting 363
single signonfor Report Repository access onUNIX 327for Report Repository access onWindow 301for Report Repository access onz/OS 349
sort order option 272, 294SQR 20binding the DB2 plan 130database auditing 206installing for z/OS 129running 201
storage enhancementsz/OS 25
storage groupscreating 141
supporting applications 19sysaudit.sqr 206system tablesupdating 204
Ttablesbuilding temporary 193creating 147setting number of 193system, updating 204temporary 138
tablespaceoverriding default segment size withPSTAAT 641
tablespacescreating 141
recalculating space allocations withPSTAAT 638
TBDDL.SQL script, creating withPSTAAT 632TCP/IPconfiguring on the client 562
temporary tables 138building 193building indexes 193setting number of 193structure 190using PSTAAT to reassign 644
transferring filesmanually 126to database server 123under z/OS 123
transformation programs, PeopleSoftApplication Engine 601triggerscreating 197
TrueType fontsinstalling 237
TUXDIR environment variable 310Tuxedochecking Windows Services 63checklist for installing on UNIX 70designating the owner 71installing on UNIX 71installing on Windows 63prerequisites for installing on UNIX 69prerequisites for installing onWindows 60removing on UNIX 69setting up services 64uninstalling from Windows 61verifying installation on Windows 66verifying server installation onUNIX 72
UUnicode databaseschoosing when selecting a characterset 14setting up 613
unmounting CDsfor MicroFocus Server Express 83for the PeopleSoft Installer 88
updates and fixes 15%UpdateStats 134disabling 211
Copyright © 2006, Oracle. All rights reserved. 663

Index
updating database 159updating PeopleToolsdatabase objects 163multilingual objects 165Navigation Collection data 182Pagelet Wizard Data 182Portal objects 180query headings 181Setup Manager 182system data 178system tables 161
UPG844PORTAL Application Engineprogram 180UPGPT846PP Application Engineprogram 182UPGPT848PP Application Engineprogram 183UPGPTSMDAT Application Engineprogram 182UPGQRYDUPHED Application Engineprogram 181user IDsz/OS 23
user interfacechanging 185
USS environment variablessetting up 129
VVERSION Application Engineprogram 205viewscreating 186
volatile table attribute 193
WWeb Application Deployment tools 529installing on OAS in console mode 546installing on OAS in GUI mode 530installing on WebLogic in consolemode 548installing on WebLogic in GUImode 536installing on WebSphere in consolemode 552installing on WebSphere in GUImode 541
web serversetting up security 591
supported types 6WebLogicinstalling on Windows 45installing PeopleSoft Pure InternetArchitecture in console mode 280installing PeopleSoft Pure InternetArchitecture in GUI mode 252setting up authentication for reportrepository 596
WebSphereHTTP proxy server installation 54installing Network Deploymentmanager 56installing PeopleSoft Pure InternetArchitecture in console mode 286installing PeopleSoft Pure InternetArchitecture in GUI mode 261installing WebSphere Base with the silentmethod 53setting up authentication for reportrepository 596troubleshooting the installation 57uninstalling PeopleSoft Pure InternetArchitecture in console mode 289uninstalling PeopleSoft Pure InternetArchitecture in GUI mode 267uninstalling the default application 54upgrading 56
WebSphere Application Serverinstalling 47installing base product 50prerequisites 49
WebSphere ND 56Windows servicestarting Process Scheduler as 318Tuxedo 63
Windows-based clients 4Word for Windowsconfiguring Process Scheduler for 320
workstations 4
XX1DDL.SQL, replaced by PSTAAT 644X2DDL.SQL, replaced by PSTAAT 644X3DML.DMS, replaced by PSTAAT 644XSLT mapper 601
Zz/OS
664 Copyright © 2006, Oracle. All rights reserved.

Index
mapping installation directories 127partioned datasets 122preinstallation worksheet 116storage enhancements 25
z/OS user IDs 23
Copyright © 2006, Oracle. All rights reserved. 665

Index
666 Copyright © 2006, Oracle. All rights reserved.
Related Documents


![PeopleTools 8.48 Documentation Issues and Corrections[1]](https://static.cupdf.com/doc/110x72/544ac04daf7959a0438b4bcd/peopletools-848-documentation-issues-and-corrections1.jpg)