1 ENGI E1112 Departmental Project Report: Computer Science/Computer Engineering Daniel Estrada Taylor, Dev Harrington, Sekou Harris December 2012 Abstract This document is the final report for ENGI E1112, an introductory laboratory course in computer science and computer engineering, and a summary of our work this semester. We created new firmware for the HP 20b—a commercially available business calculator—as a practical introduction to embedded programming, coding software for hardware platforms besides traditional computers. The objective of our project with the HP 20b was to implement a calculator that uses reverse Polish notation (RPN). In order to do this, we wrote new firmware for the HP 20b so that it can perform some basic functions: displaying numbers, detecting when keys are pressed, displaying numbers and operations entered by the user, and performing basic calculations using RPN. 1 Introduction This report summarizes our work for ENGI E1112, an introductory lab in computer science and computer engineering. The course provides a practical introduction to embedded programming, coding for hardware platforms besides traditional computers. The ultimate objective of our project was to implement a calculator that uses reverse Polish notation (RPN). Section 2 describes RPN and how a user would interact with an RPN calculator to perform basic computations. The platform we used to implement our RPN calculator is the HP 20b, a standard, commercially available business calculator. HP provides an astonishingly thorough software development kit [1] for it, so it can be repurposed relatively easily for projects like this one. Section 3 describes the main features of the HP 20b: the processor, the liquid crystal display (LCD), and the keyboard. In a series of labs, we wrote new firmware for the HP 20b so that it can perform some of the basic functions of an RPN calculator: displaying numbers, detecting when keys are pressed, displaying numbers and operations entered by the user, and performing basic calculations using

Welcome message from author
This document is posted to help you gain knowledge. Please leave a comment to let me know what you think about it! Share it to your friends and learn new things together.
Transcript

1
ENGI E1112 Departmental Project Report: Computer Science/Computer Engineering
Daniel Estrada Taylor, Dev Harrington, Sekou Harris
December 2012
Abstract
This document is the final report for ENGI E1112, an introductory laboratory course in computer science and computer engineering, and a summary of our work this semester. We created new firmware for the HP 20b—a commercially available business calculator—as a practical introduction to embedded programming, coding software for hardware platforms besides traditional computers.
The objective of our project with the HP 20b was to implement a calculator that uses reverse Polish notation (RPN). In order to do this, we wrote new firmware for the HP 20b so that it can perform some basic functions: displaying numbers, detecting when keys are pressed, displaying numbers and operations entered by the user, and performing basic calculations using RPN.
1 Introduction
This report summarizes our work for ENGI E1112, an introductory lab in computer science and computer engineering. The course provides a practical introduction to embedded programming, coding for hardware platforms besides traditional computers.
The ultimate objective of our project was to implement a calculator that uses reverse Polish notation (RPN). Section 2 describes RPN and how a user would interact with an RPN calculator to perform basic computations.
The platform we used to implement our RPN calculator is the HP 20b, a standard, commercially available business calculator. HP provides an astonishingly thorough software development kit [1] for it, so it can be repurposed relatively easily for projects like this one. Section 3 describes the main features of the HP 20b: the processor, the liquid crystal display (LCD), and the keyboard.
In a series of labs, we wrote new firmware for the HP 20b so that it can perform some of the basic functions of an RPN calculator: displaying numbers, detecting when keys are pressed, displaying numbers and operations entered by the user, and performing basic calculations using

2
Figure 1: The HP 20b, with functional keys highlighted. The number keys (0-9) are in yellow, operators ( +, -, *, /) in green, and other important keys (power, input, and backspace) in red. Source: HP Calculator Archive (2012, online http://commerce.hpcalc.org/20b.php ).
RPN. Section 4 describes how these sections of code work together, and section 5 explains each section of code in detail.
Sections 6 and 7 have our reflections on the course, describing the lessons we learned and our criticism of the course respectively. References follow.
2 User Guide
For the user, the HP 20b has a relatively standard calculator keyboard and display; Figure 1 shows which keys we made functional. The user can enter numbers using the keys 0 to 9 and use four basic operators (+, -, *, /); other important keys include the power button, the INPUT key, and the backspace key.
To perform calculations, the calculator uses reverse Polish notation (RPN). The basic principle of RPN is that operators follow operands. A user enters integers to populate a stack by pressing number keys and then INPUT after each integer. The user can then enter operators, which perform the given operation on the two most recent items in the stack and modify the stack such that the result appears as the most recent item. The screen displays intermediate results—it displays whatever the most recent item in the stack is, including numbers as they are entered. Figure 2 goes through two examples of using the calculator for basic computations.

3
Figure 2: Two examples of using RPN for basic calculations. Above shows the keystrokes, display readout, and stack contents for computing 1 + 5; right has the same for (15 / 5) * (7 – 1). Source for key images: HP 20b Business Consultant, HP 30b Business Professional Financial User’s Guide (December 2009, online http://bizsupport2.austin.hp.com/bc/docs/support/SupportManual/c02651527/c02651527.pdf). 3 The Platform
The hardware platform we used for implementing our RPN calculator is the HP 20b. The HP 20b mostly consists of a processor, a liquid crystal display (LCD) screen, and a keyboard, each of which is described in more detail in this section. HP released a software development kit for the HP 20b, so it can be repurposed relatively readily.
The software development kit from HP [1] describes the hardware and provides schematics; we also used the documentation of the processor provided by Atmel [2] and the introductions to each lab to compile this description of the components of the HP 20b.
3.1 The Processor
The most important hardware component of the HP 20b is an Atmel AT91SAM7L128 processor. It is part of the Atmel AT91SAM series, which is based on ARM processor cores—AT stands for

4
Atmel and SAM for “smart ARM core.” The SAM7L series is built around an ARM7TDMI processor and is designed for low power applications, such as calculators. The AT91SAM7L128 is the member of the series with 128KB of flash memory, hence the final three digits. The SAM7L128
has 6KB of SRAM, of which 2KB are backup and 4KB are volatile, and it operates at a maximum speed of 36MHz.
Figure 3 shows a block diagram of the SAM7L. The microcontroller has an assortment of peripherals, but the most relevant parts to understand for this project are the core processor, the system controller, the LCD controller, and the JTAG port. The core processor, an ARM7TDMI, is a RISC processor based on ARMv4T Von Neumann architecture; it is designed for low power usage, which becomes very important in systems like the HP 20b. The system controller manages all vital blocks of the microcontroller, interrupts, clocks, power, time, debug, and reset. Since it controls power for all the peripherals, the system controller is vital for actually using the SAM7L. The LCD controller generates the AC waveforms for the display from a series of memory locations; it can handle up to 40 segments. The JTAG port allows us to communicate with the SAM7L and therefore the HP 20b. A JTAG connector soldered on to the HP 20b’s circuit board and then USB adapters allow us to send information to the SAM7L and actually implement our software. [2]
3.2 The Liquid Crystal Display (LCD)
The HP 20b’s LCD is a 400 pixel screen. It includes a 6 by 43 matrix display, 11 indicators, and a 12 + 3 seven segment display with decimals, commas, and leading negative signs. Figure 4 is a technical drawing of the wiring for the display; Figure 5 shows what the screen looks like if all the pixels are turned on. [1]
We were provided with several important library functions for using the LCD. Lcd_init( ) enables the LCD; it turns on its power supply through the system controller and sets various counters. Lcd_put_char7(char ch, int col) displays a given ASCII character in the given column of the seven segment display area, and lcd_print7(const char *c) displays a left-justified string in the seven segment display area. Lcd_print_int_neg(int negative, unsigned int n) displays an integer with an optional leading negative sign, this time right-justified; lcd_print_int(int n) displays a signed integer, again right-justified.
3.3 The Keyboard
The HP 20b has a thirty-seven key keyboard. The wiring is a standard matrix type—each key is on two wires, one for its row and one for its column, and when the key is pressed the two are shorted together. There are seven “columns” and six “rows;” as the schematic in Figure 6 shows, these are actually flipped such that the “columns” are horizontal and the “rows” are vertical with respect to the normal viewing angle. These wires connect to pins on the SAM7L chip and are interpreted by the parallel I/O controller. Figure 7 shows how the matrix connects to the SAM7L
chip. [1]

5
Figure 3: A block diagram of the AT91SAM7L128 microcontroller. Source: Atmel. [2]

6
Figure 4: A technical drawing of the wiring for the LCD screen. Source: HP. [1]
Figure 5: A technical drawing of the LCD screen with all pixels turned on. Source: HP. [1]

7
Figure 6: A schematic of the keyboard matrix for the HP 20b. Source: HP. [1]
Figure 7: A schematic showing the connections between the keyboard matrix and the SAM7L
processor. Source: HP. [1]

8
We were provided with several important functions for using the keyboard. Keyboard_init( ) initializes the keyboard and sets all columns high with pull-up resistors on the rows such that if no keys are shorted in a row, then the pin will have the value 1. Keyboard_column_low(int column) sets a given column low; keyboard_column_low(int column) sets a given column high again. Keyboard_row_read(int row) returns true if a row is high and false otherwise.
4 Software Architecture
In the first lab, we wrote code to display an integer argument on the LCD. For the second lab we wrote a function keyboard_key that scans the keyboard and determines which key is being pressed, if any. In the third lab we wrote a function keyboard_get_entry that allows a user to enter numbers and an operation and sends them to a struct.
In theory, the fourth lab uses our code from the first three labs to implement an RPN calculator. It uses keyboard_get_entry from lab 3 to get numbers and operations for the stack; keyboard_get_entry in turn uses keyboard_key from lab 2 to read the user’s input from the keyboard. The calculator then displays the results on the LCD, so it also uses the code from the first lab.
5 Software Details
5.1 Lab 1: Hello World
For this lab, we were asked to create a function that takes an integer argument and displays it on the calculator. Figure 8 shows our code.
First, the function clears the screen. If the integer is 0, ‘0’ is displayed. Otherwise, the function checks if the integer is negative and if necessary takes the absolute value, prints ‘-’, and increments the screen column counter accordingly. Then it checks to see how long the number is and displays the modulus of the number for as many digits as the number is long.
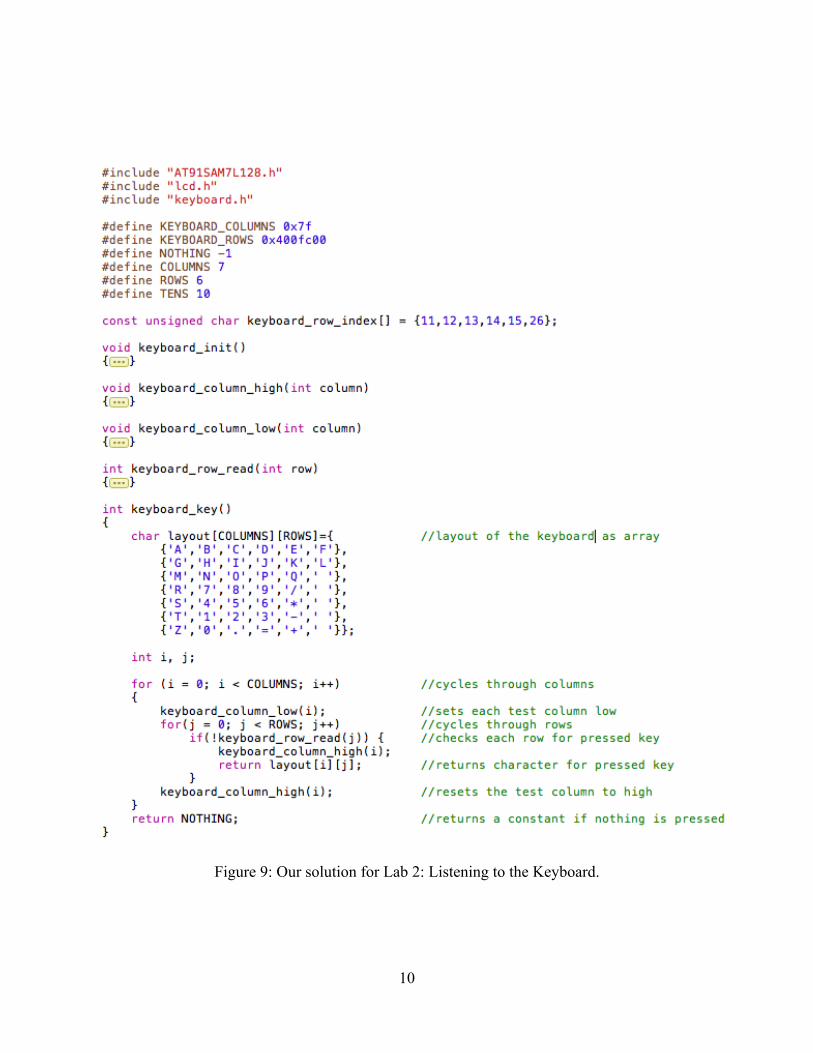
5.2 Lab 2: Listening to the Keyboard
The goal of this lab was to write software to read the keyboard on the calculator and display which key is pressed. See Figure 9 for our code.
In keyboard.c we wrote a function, keyboard_key, which scanned the keyboard and determined which key was being pressed or that no key was being pressed. Keyboard_key has two nested for loops. The outer loop cycles through the columns, setting each one low, one at a time. The inner loop cycles through the rows, checking each row for a high value, which indicates that a button is pressed in that row. If a button is pressed, then keyboard_key returns the character that corresponds to that key as indicated in our layout matrix. Otherwise, it goes back to the outer loop and resets the test column to high before setting a new test column to low. While nothing is pressed, keyboard_key returns a constant, NOTHING.

9
Figure 8: Our solution for Lab 1: Hello World.
10
Figure 9: Our solution for Lab 2: Listening to the Keyboard.

11
We modified main.c so that the LCD display reports what key is being pressed. After setting all the columns high, we added an infinite loop that constantly checks what keyboard_key is returning. If keyboard_key is returning the constant NOTHING, then the calculator displays ‘?’. Otherwise, main.c displays the character returned by keyboard_key.
5.3 Lab 3: Entering and Displaying Numbers
Lab 3 allows a user to enter and edit numbers. See Figure 10 for our code. We wrote a function, keyboard_get_entry, in keyboard.c. Inside an infinite for loop, we have a while loop that waits for a key to be pressed, followed by another while loop that waits for it to be released. We immediately increment the counter for the screen size; if the number is too long for the display, keyboard_get_entry returns without a number or operation because the number is too big.
If the key pressed is a number key, we output it and test whether it is the first digit of the integer, positive or negative; if it is, we set the number equal to it. If the number is not the first digit, we add it as a digit to the number.
If the key pressed is an operator, we output it. If the Boolean indicates that the number is negative when an operator is pressed, then we make the number negative, send the number and the operation to the struct, and return. If the user enters a leading ‘-‘ sign, we simply change the Boolean for whether the number is negative. Otherwise, we just send the number and operation to the struct and return.
If the key pressed is backspace, we clear the last space on the screen, shift the counter appropriately, and truncate the number.
5.4 Lab 4: An RPN Calculator
The goal of lab 4 is to make the HP 20b behave like an RPN calculator. We did not complete this lab. If we had, we would allow for the numbers sent from keyboard_get_entry to be stored in a stack until an operation is entered, in which case we would perform that operation on the first two numbers in the stack. We would then output the resulting number and place the result first on the stack.
6 Lessons Learned
We came into this lab with limited at best experience in C specifically and embedded programming in general, and so one of the most important developments over the course of the semester has been a practical introduction to the most immediately relevant parts of C and embedded programming. We learned by trial and error (and occasionally brute force) some basic problem solving skills for handling both our software and our hardware difficulties.
Our main advice for future students or our past selves at the beginning of the semester is to be prepared to work outside of the weekly lab session if necessary. The supplementary materials available on the course website are extremely helpful, but only if you read them, and there is not necessarily enough time in class to thoroughly read through them and also complete the coding if you are still working on understanding basic principles.

12
Figure 10: Our solution for Lab 3: Entering and Displaying Numbers.

13
7 Criticism of the Course
The overall project of reprogramming the HP 20b is interesting and compelling, and the ultimate objective of implementing a functional RPN calculator was clearly conveyed throughout the course. The individual labs were approximately of an appropriate difficulty. What would have been helpful is more thorough introductions for each lab to explain necessary concepts and syntax. Actually completing the labs was not difficult, but for each we spent an unnecessary amount of time lost because we were missing some fundamental principle, often about appropriate syntax in C.
The resources on the course website are all generally helpful and in-class assistance was always good, but another resource that would have been extremely useful is a basic tutorial in using Terminal, including a list of useful commands for basic tasks like unzipping the lab files, tarring the lab folder to submit it, moving through levels of the directory, and running the lab.
References
[1] Developer kit for HP 20b financial calculator. Version 2.0, 22 Oct 2009. Online http://h20000.www2.hp.com/bizsupport/TechSupport/SoftwareDescription.jsp?lang=en&cc=us&prodTypeId=215348&prodSeriesId=3732534&prodNameId=3732535&swEnvOID=54&swLang=13&mode=2&taskId=135&swItem=ca-62901-2.
[2] AT91SAM7L128/64 Preliminary Summary. Revision AS, February 2008. Online http://www.atmel.com/Images/6257s.pdf.
Related Documents


![Engi 5035fa05[Assignment6solution]](https://static.cupdf.com/doc/110x72/563db840550346aa9a91fabf/engi-5035fa05assignment6solution.jpg)


