1. Endmill Sharpener Instructions INSTALL THE SPINDLE Attgchcompressed air-ofat least90 psi to the sleeve housing. (lt'sbest to have an air filter and watertrap installed between the shopair and the air spindle.) Thoroughly clean the spindle and the sleeve bore(with the air on) usinga clean lint-free cloth and a cleaner thai leaves no residue. Remove the drawbar fromthe spindle and withthe air on, care- fullyplace the spindle into the sleeve. Make surethe spindle is in itshighest position by loosening the spindle lever knoband moving the spindle lever all the way to the left (Figure 2). 2. BEGIN WITH A STANDARD ENDMILL with these instructions and a Darex Endmill sharpener; youwillfind thatgetting "the feel" of goodendmillsharpening is nofdifficult. At first, a9 withanything new the steps willseemunfimiliar, evenif you have had sharpening experience. But these instructions were designed to alleviate any apprehension you mighthave First of all,there are no hidden "tricks" you need to knowbefore you can resharpen yourendmills. Everything is revealed step-by-step in theseinstructions. lf you start at tfrebeginning and takeyourtime, youwillsoonlearn howto sharpen endmills withease and precision. The realkeyis patience..since youwill learn by doing and by mak- ing some mistakes, don'tfeel bad about them. Figu;e on an hour q19o of practice to become comfortable with yourbarex. lMpoR- TANT start with a two or four flute endmiil of at least 3/g" in diameter. lt'ssometimes herpfurto color the areas youwillbe grind- ing with a felt pen. This helpsyou see what you -have ground. SHARPENING THE PRIMARY ANGLEON THE FLUTES FIGURE 2 ENDMILL I.IOMENCLATURE Primary --n F-- Primary Clearance

Welcome message from author
This document is posted to help you gain knowledge. Please leave a comment to let me know what you think about it! Share it to your friends and learn new things together.
Transcript

1 .
Endmill Sharpener Instructions
INSTALL THE SPINDLE
Attgch compressed air-of at least 90 psi to the sleeve housing.(lt's best to have an air filter and watertrap installed between theshop air and the air spindle.)
Thoroughly clean the spindle and the sleeve bore (with the airon) using a clean lint-free cloth and a cleaner thai leaves noresidue.
Remove the drawbar from the spindle and with the air on, care-fully place the spindle into the sleeve.
Make sure the spindle is in its highest position by loosening thespindle lever knob and moving the spindle lever all the way tothe left (Figure 2).
2.
BEGIN WITH A STANDARD ENDMILL
with these instructions and a Darex Endmill sharpener; you willfindthat getting "the feel" of good endmillsharpening is nof difficult. Atfirst, a9 with anything new the steps will seem unfimiliar, even if youhave had sharpening experience. But these instructions weredesigned to alleviate any apprehension you might have
First of all, there are no hidden "tricks" you need to know before youcan resharpen yourendmills. Everything is revealed step-by-step inthese instructions. lf you start at tfre beginning and take your time,you will soon learn how to sharpen endmills with ease and precision.
The real key is patience..since you will learn by doing and by mak-ing some mistakes, don't feel bad about them. Figu;e on an hourq19o of practice to become comfortable with yourbarex. lMpoR-TANT start with a two or four flute endmiil of at least 3/g" indiameter. lt's sometimes herpfurto color the areas you will be grind-ing with a felt pen. This helps you see what you
-have ground.
SHARPENING THE PRIMARY ANGLEON THE FLUTES
FIGURE 2ENDMILL
I.IOMENCLATURE
Primary--n F--
Primary Clearance

SHARPENING THE SECONDARY ANGLE

SHARPEN THE ENDS
Make sure the corner of the grinding wheel is sharp beforesharpening the end. (See wheel dressing, page Z). Thesharpener is set to automatically produce i e'oegree ,,fish-tail" on the end.
Note: E-80 users should position the grinding wheel so itscenterline height is approximately 114,, aboie the centerheight of the spindle in its highest position.

CHANGING THE RELIEF ON THE FLUTES
changing the relief of the primary and secondary angle isvery simple. For more relief, instead of aligning the stylus inthe middle of the outside edge of the wheel, position it to theright of the high point. The further to the right you go, the morerelief you will get. To get less rerief, simply lower the spindleheight a small amount using the spindle lever. The lower thespindle is, the less relief you will get.
DRESSING THE WHEEL
lf you have a diamond dresser attachment (Darex No. 90s0)first remove the stylus fixture and the spindle fixture from theways. Mount the dresser attachment to the ways so the han-dle swings parallel to the grinding wheel. (lt should also beparallelwith the wheel guard cover.) Feed the wheel into thedresser and swing the dresser across the face of the wheel.
lf you do not have a Darex diamond dresser attachment.manually dress the wheel with a dressing stick.
RE.SETTING THE STYLUS HEIGHT
lf the stylus is accidentally ground, its height will have to bere-set to .010" below the center of the spindle. This is easilyaccomplished using the gauge supplied with your machine.You will find it located in the collet storage area.
lb set the stylus, mount the gauge in the spindle using a3lg,,collet. Position the stylus under the gauge. (Make sure thestylus fixture is in the "primary" position.) Loosen the styluslock nut and adjust the styrus until the tip intersects the bot-tom of the flat area at the tip of the gauge, as shown.
lf there is not enough adjustment, the stylus will have to bereplaced. Order Darex part No. g1S2

WHEEL BALANCER INSTRUCTIONS
The Darex endmill sharpeners are equipped with a device for balancing the grinding wheel. lt is a washer than rto counter-balance variations in the grinding wheel. Loosen the three wheel mounting screws and try positioning tl3itliru,ffi#ffi:,]
the machine runs smoothlv. (wheels purchased from Darex wir have "n "rro* indicating I
Trouble Shooting Guide
PROBLEM CAUSE
1. Stylus not inproper position.
2. Stylus not atproper height.
3. Primary edgetoo wide.
4. lmproper relief.
2. End primary too wide.
SOLUTION
Use the cross feed knobto move edge of the wheelso it aligns with thecenter on the stylus.
Flutes don't cut.'
I Re-set the height of theI stylus. (See settingI stylus height, page 7.)I
I Sharpen more off the
I secondary angte.
t"":r""t'- r"-t t* t
By hand, on a bench Erinder.
Grind more off secondary.
spindle and sleeve.
Remove sleeve from sleeve housingand clean out holes with small wire.
Endmill won't plunge cut.
Spindle won't float.
-Index pin won't drop inindex collar holes.
Inconsistent results (not grindingthe same amount off each flute.
Machine u,Or",* *"r"ry
1. Spindle and/orsleeve not clean.
| 2. Spindle sleeve
I noles ptugged.
I
I 3. Not enough air pressure
1. Spindle sleeve not inproper position.
1. cottet*o^ffiwhere collet seats is not clean.
2. Coflet is not accurate.
1 . Wheel needs balancing.
I Increase PSI to g0 or above.I
I n4ove sleeve in housing until you
I can drop pin into index collar.
I Clean thoroughly with aclean lint-free cloth.
Try another collet thatyou know is accurate.
See wheel balancinginstructions above.

0nly remove enough material to 'touch-upi' the endmill. A secondary angle is not necessary for ball endmills. Remove the air spindle fixture
sHARPENING A BALL ENDMILL SltlH;311.ffi?ii:X'JSy"$f'J.Sll,ilU'1HSlil'ilJllllHl';,il:Jl'iJ:ff[31,y'ffi! iJiitsil8'l ?flSil#lil;J
SHARPENING A CORNER RADIUS

SHARPENING A TAPERED ENDMILL
SHARPENING SECONDARY ANGLESharpen the secondary the same way after re-positioning the stylus for a secondary angle the same way you would for a star
10
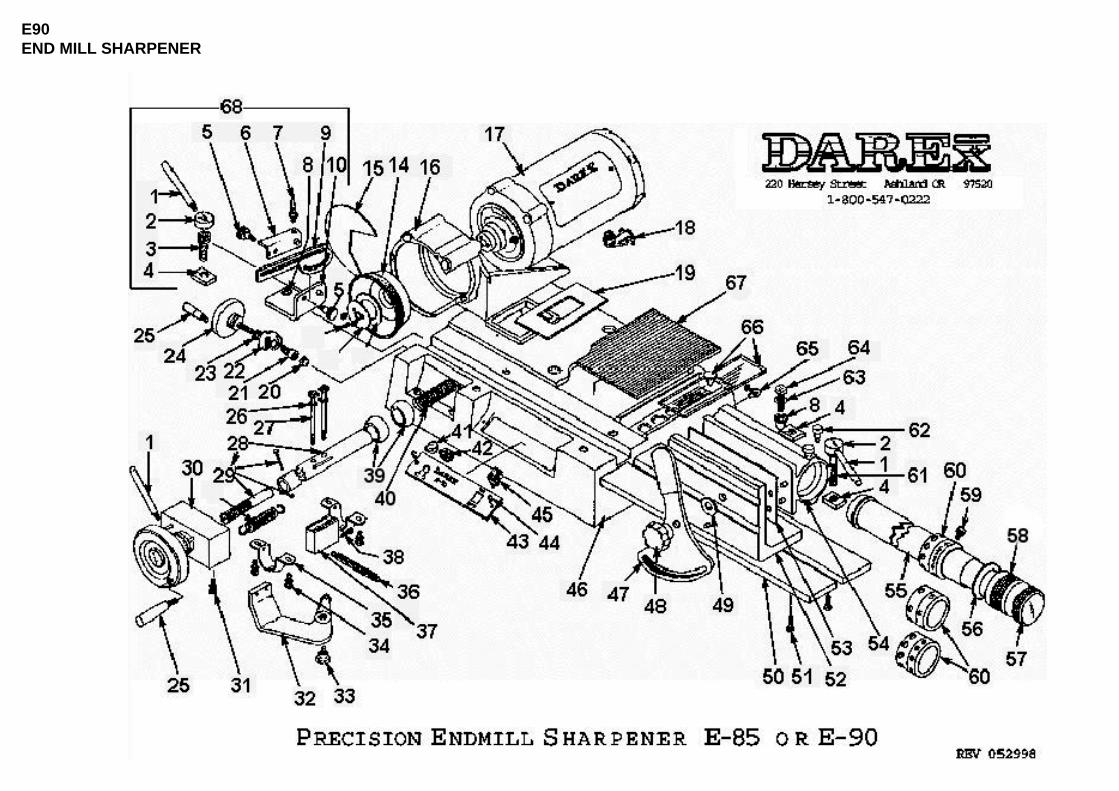
E90END MILL SHARPENER

E90PARTS LIST
NUMBER ITEM ITEM_DESC NUMBER ITEM ITEM_DESCNOT SHOWN PP04033EF CORDSET 27 PP08516FF 1/4-20X3-1/4 HEX BOLT GR.8NOT SHOWN PP05868EF M5/E90/BK65 LAMP (MOFFAT) 28 SA08535TA MAIN ARBOR ASSEMBLYNOT SHOWN PP08078FF 1/4X1/8 MPT REDUCING NPPL. 29 SA08536TA MAIN ARBOR SCREW/ROLL PINNOT SHOWN PP08086SF PIN SPANNER WRENCH 30 SA08300TA INFEED MECHANISM ASSEMBLYNOT SHOWN PP08654EF #2 E-90 WIRE HARNESS 230V. 31 PP04055FF 1/4-20X3/4 HEX BOLTNOT SHOWN PP08656EF E-90 WIRE HARNESS 230V. 32 SA08550SA CROSS FEED ARM W/ WEAR PLATENOT SHOWN PP08684TF STYLUS HEIGHT SETTING PIN 33 PP08554TF CR.FD.ARM MOUNTING BOLTNOT SHOWN PP08735KF EM80/85/90 INSTRUCTIONS 34 PP08544FF 1/4-20X1-1/4 HSSS CP PTNOT SHOWN PP09028NF AIR LINE FILTER 35 PP08539SF ARBOR BEARING CLAMPNOT SHOWN PP09050NF DIAMOND DRESSER 36 PP08525RF MOTOR EXTENSION SPRINGNOT SHOWN PP09090PF SP EM & DS PROTECTIVE COVER 37 PP08514BF FISHTAIL FOLLOWER BLOCK (OBSO)NOT SHOWN SA08030TA SPINDLE SLEEVE W/O-RINGS 38 PP03928FF 1/4-20X3/4 SHCSNOT SHOWN SA09050NA DIAMOND DRESSER FIXTURE 39 SA08538LA ARBOR SLEEVE BUSHINGS (2)-SELF-NOT SHOWN SA09080NA 5C COLLET SET 40 PP08537RF ARBOR COMPRESSION SPRINGNOT SHOWN SA09085NA METRIC 5C COLLET SET 41 PP09012PF FOR./REV. SWITCH KNOB
1 PP08122TF BOLT HANDLE LEVER 42 PP09010EF FORWARD/REVERSE SWITCH2 PP08114TF BOLT HANDLE BUSHING 43 PP08660DF E85 NAME PLATE3 PP08614FF 3/8-16X1-1/4 SHCS .558-.560 HEAD DI 43 PP08662DF E90 NAME PLATE4 PP08126SF MOUNTING PLATE T-NUT 44 PP08678FF 6-32X3/8 TYPE F SCREW5 PP08140TF STYLUS FIXTURE KNOB 45 PP02165EF 115V/230V. SWITCH SERIES 526 SA08144SA STYLUS SIZE ADJ. PLATE W/PIN 46 PP08500CF BASE CASTING7 SA08154TA CARBIDE STYLUS W/LOCKNUT 47 SA08072SA SPINDLE HEIGHT LEVER W/COVER8 PP08084TF GUIDE FLANGE PIN 48 SA08064PA SPINDLE HEIGHT KNOB/SCREW9 PP08130SF STYLUS ANGLE ADJ. PLATE 49 PP08074FF .375X1X.125 NYLON FLAT WASHER
10 PP08105SF STYLUS MOUNTING PLATE 50 SA08690BA E85/E90 WAYS (2)11 PP08648FF 10-32X3/4 BHCS (USE PP08634FF) 51 PP03330FF 1/4-20X1/2 HEX BOLT11 PP08650FF #10 MED. DUTY SPLIT L/W 52 PP08060XF SPNDL.HOUS.SUPP.EXTRUSION12 PP08646SF WHEEL FLANGE 53 PP08054SF HOUSING NYLON BUFF. PLATE13 PP08644SF WHEEL BALANCING WASHER 54 SA08040XA AIR SPINDLE HOUSING W/SLEEVE14 PP08620GF CUP WHEEL 5X1-3/4X1-1/4 55 SA08002TA AIR SPINDLE W/RET. RING14 PP08624GF DIAMOND CUP WHEEL 5X1-3/4X1-1/4 56 PP08017SF DRAW TUBE THRUST WASHER14 PP08626GF BORAZON CUP WHEEL 5X1-3/4X1-1/4 57 PP08019TF DRAW TUBE SLIP KNOB15 PP08630SF WHEEL GUARD COVER 58 SA08016TA DRAW TUBE & KNOB ASSEMBLY16 PP08505CF MOTOR/WHEEL CASTING 59 PP08024TF SPINDLE COLLAR LOCK KNOB17 SA08600MA 115V EM MOTOR/WHEEL HUB 60 PP08020TF SPINDLE INDEXING COLLAR17 SA08602MA 230V EM MOTOR/WHEEL HUB 61 PP08080FF 3/8-16X1-3/8 SHCS18 PP08676EF 3/8 90 DEG. FLEX-CONNECTOR 62 SA08044TA INDEXING PIN/KNOB/& BUSHING19 PP08512SF MAIN ARBOR GRIT SEAL 63 PP08742FF 3/8 SAE FLAT WASHER20 SA08564FA CROSS FEED ACORN NUT W/SET 64 PP08740FF 3/8-16X1-1/2 HEX BOLT GR 521 PP08580TF CROSS FEED SCREW BUSHING 65 PP08048SF AIR SPINDLE LOCK DOG22 PP08584SF CR.FD.SCREW GRIT COVER 66 SA08680SA COLLET COVER W/KNOB23 PP08586FF 15/32-32 .07THK.HEX NUT 67 PP09018PF TOOL TRAY MAT24 SA08568TA CROSS FEED SCREW W/KNOB 68 SA08100SA STYLUS FIXTURE ASSEMBLY25 PP08324TF FEED KNOB HANDLE26 PP04057FF 1/4 MED DUTY SPLIT L/W
Related Documents