Norfolk State University Encryption using Windows or TrueCrypt

Welcome message from author
This document is posted to help you gain knowledge. Please leave a comment to let me know what you think about it! Share it to your friends and learn new things together.
Transcript

Norfolk State University Encryption using
Windows or TrueCrypt

2 | P a g e

3 | P a g e
Encrypting Data Using Windows or TrueCrypt
IMPORTANT NOTES:
• Caution should be observed when implementing any encryption technology. The loss of a password or, where applicable, the key file, can leave the data in an unrecoverable state.
• In the event that a password, whether for the volume or the workstation, has been learned by others, all security precautions can be considered null and void.
• Avoid putting this documentation, the TrueCrypt files or any other reference to data being encrypted on the device being used for storing the encrypted data. If an indication of encryption is available on the device, an attacker will be one step closer to compromising the data.
Windows
Part I: Installation 1. Windows 2000, XP, and Vista have built in encryption for local hard drives only. It is
not available for use on external devices such as flash or thumb drives. No installation is necessary.
Part II: Encrypting (Windows is capable of encrypting files or folders)
1. Create the file or folder you want to encrypt. In the case of a folder, any contents in the folder or added later will be encrypted.
2. Right click on the file or folder and left click “Properties.”

4 | P a g e
3. Click the “Advanced button”
4. Put a check mark in “Encrypt contents to secure data” and click OK twice.
5 | P a g e
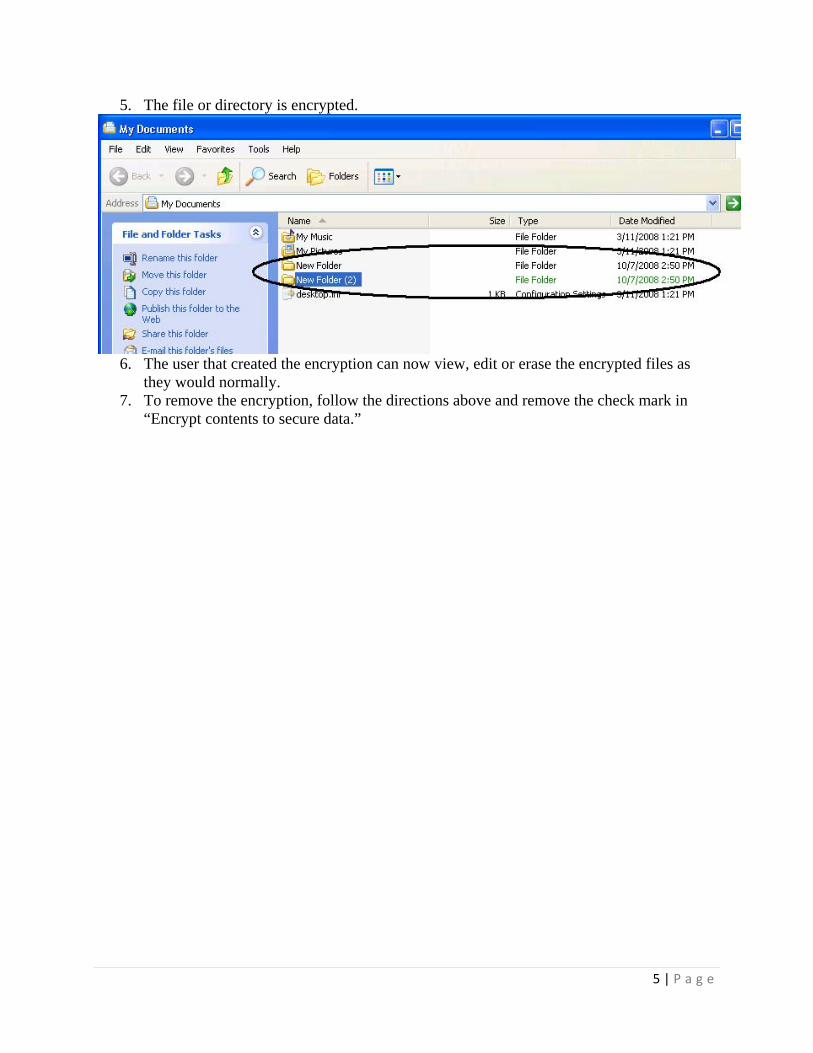
5. The file or directory is encrypted.
6. The user that created the encryption can now view, edit or erase the encrypted files as
they would normally. 7. To remove the encryption, follow the directions above and remove the check mark in
“Encrypt contents to secure data.”

6 | P a g e
TrueCrypt
Background: The Commonwealth of Virginia and Norfolk State University require encryption be utilized with regard to mobile devices and computing. Wikipedia defines encryption as “the process of transforming information (referred to as plaintext) using an algorithm (called cipher) to make it unreadable to anyone except those possessing special knowledge, usually referred to as a key.” To provide users the tools to comply with these policies, the Norfolk State University Security Team has chosen TrueCrypt to be used for mobile devices. TrueCrypt is an open source application that allows you to create encrypted files or encrypt entire devices, which are called volumes. NSU has chosen this utility based on its ease of use as well as its affordability. It is recommended that this utility only be used in the case of mobile devices, specifically; thumb drives (also known as flash or USB drives). TrueCrypt will need to be installed on all computers that will need to access these volumes. In order to work with an encrypted volume, TrueCrypt views the file as a device that will need to be “mounted” to access it and “dismounted” when the user has completed utilizing it. More information can be found at the home page of TrueCrypt, http://www.truecrypt.org. Part I: Installation
1. Download the latest version of TrueCrypt from http://www.truecrypt.org/downloads.php and unzip/extract it.
2. Double click “TrueCrypt Setup” and launch the installation.
7 | P a g e
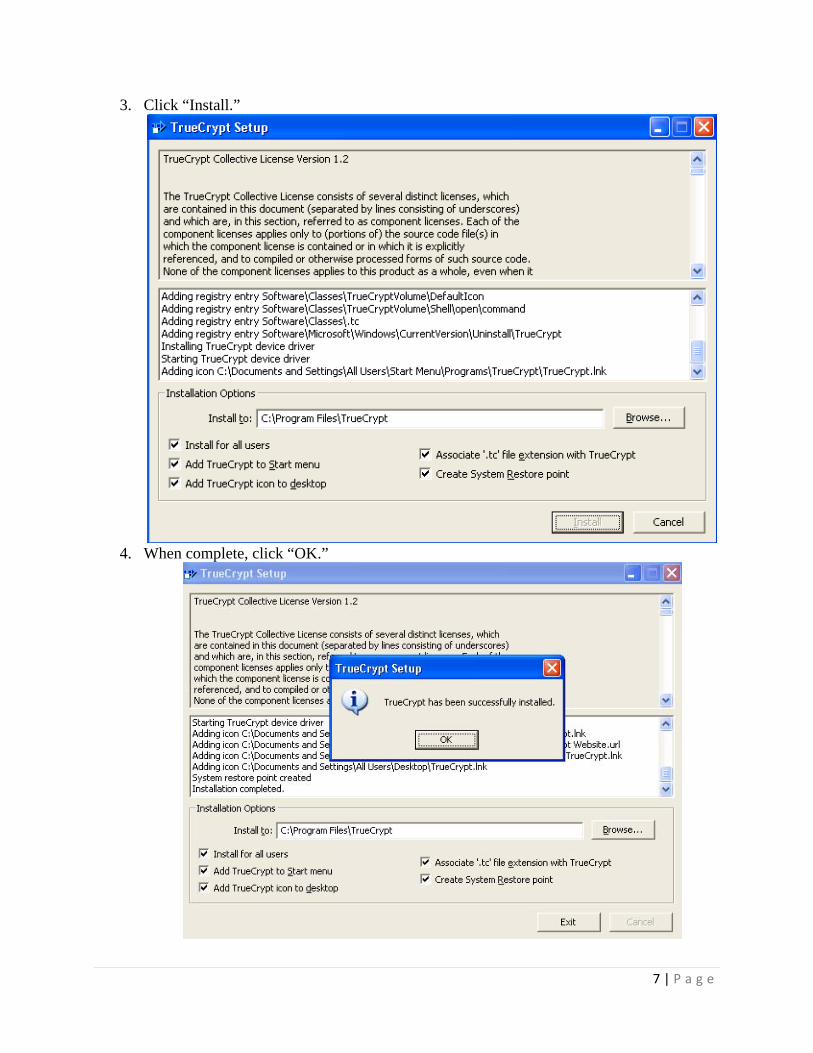
3. Click “Install.”
4. When complete, click “OK.”

8 | P a g e
5. A prompt will appear asking if the user would like to read the Beginner’s Tutorial. It is recommended that all users read the tutorial.
The tutorial will go through instructions for creating an encrypted volume on a local computer. The rest of this guide will guide the user through the creation and use of encrypted volumes on thumb drives.
6. Click “Exit.”
9 | P a g e
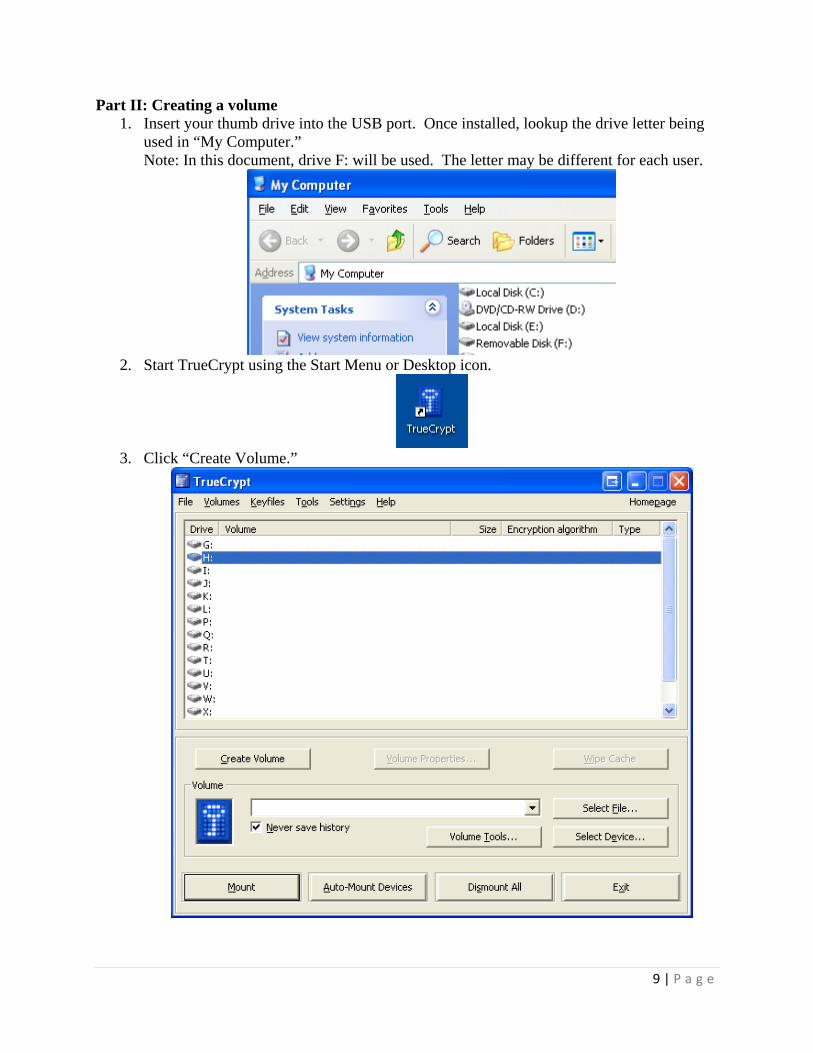
Part II: Creating a volume 1. Insert your thumb drive into the USB port. Once installed, lookup the drive letter being
used in “My Computer.” Note: In this document, drive F: will be used. The letter may be different for each user.
2. Start TrueCrypt using the Start Menu or Desktop icon.
3. Click “Create Volume.”
10 | P a g e
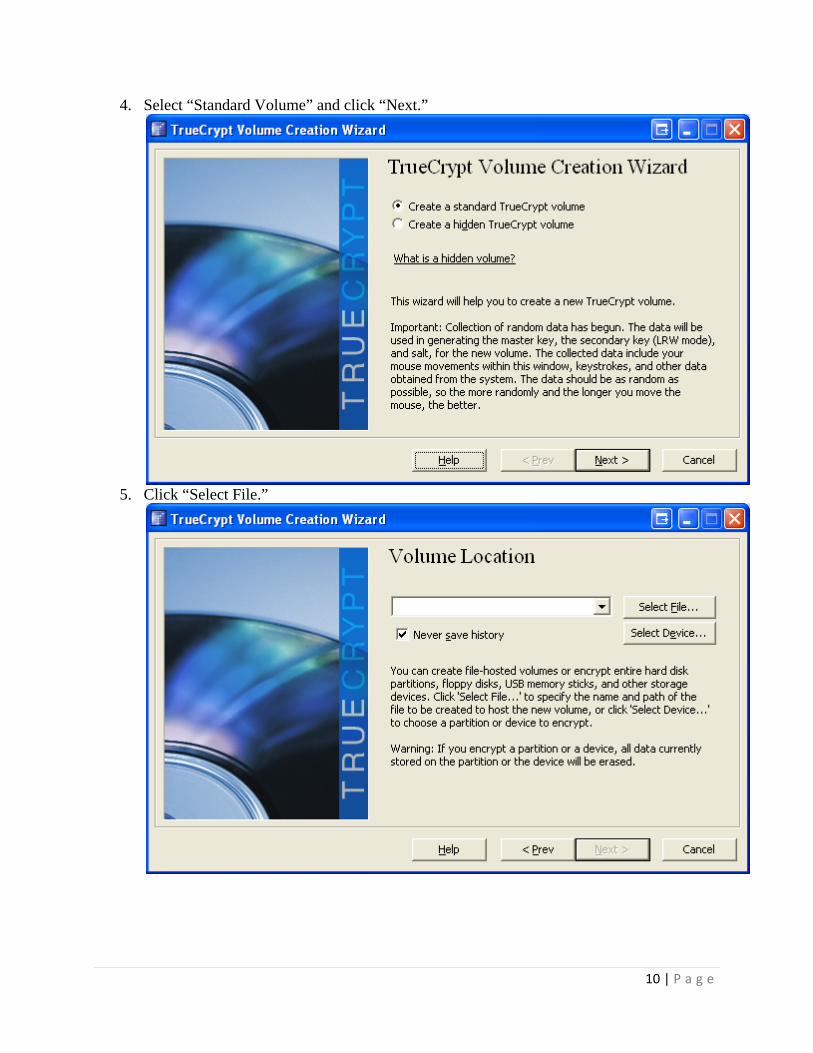
4. Select “Standard Volume” and click “Next.”
5. Click “Select File.”
11 | P a g e
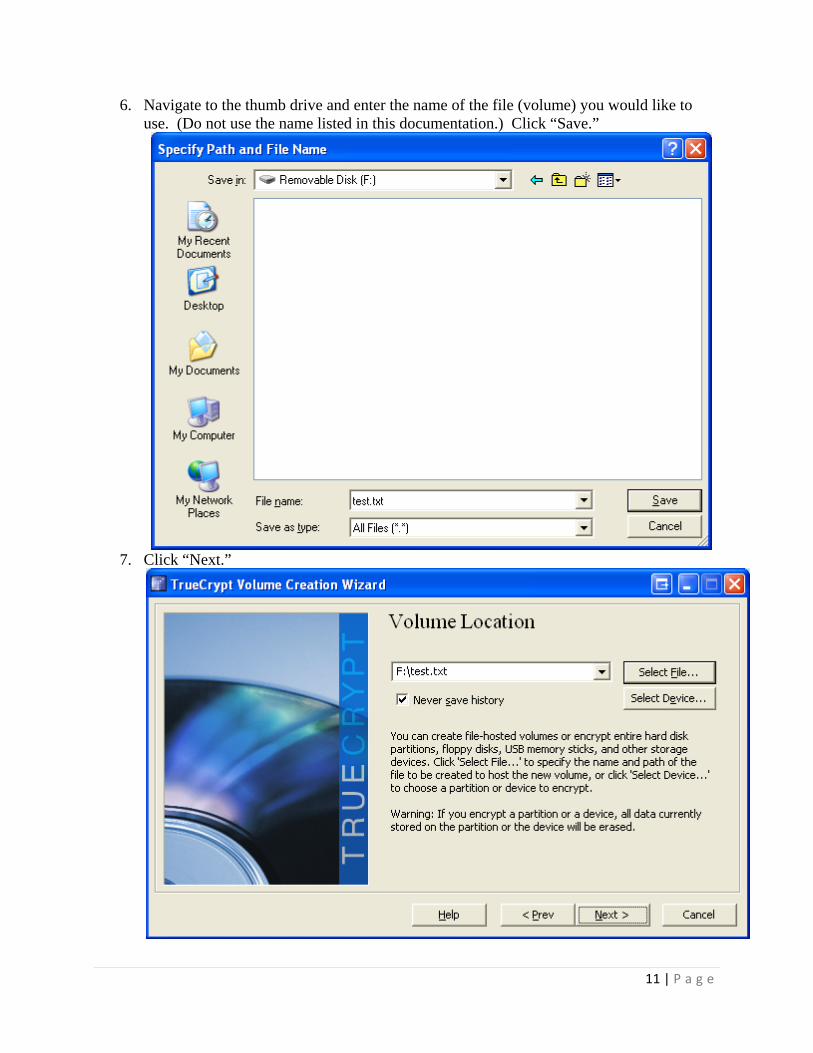
6. Navigate to the thumb drive and enter the name of the file (volume) you would like to use. (Do not use the name listed in this documentation.) Click “Save.”
7. Click “Next.”
12 | P a g e
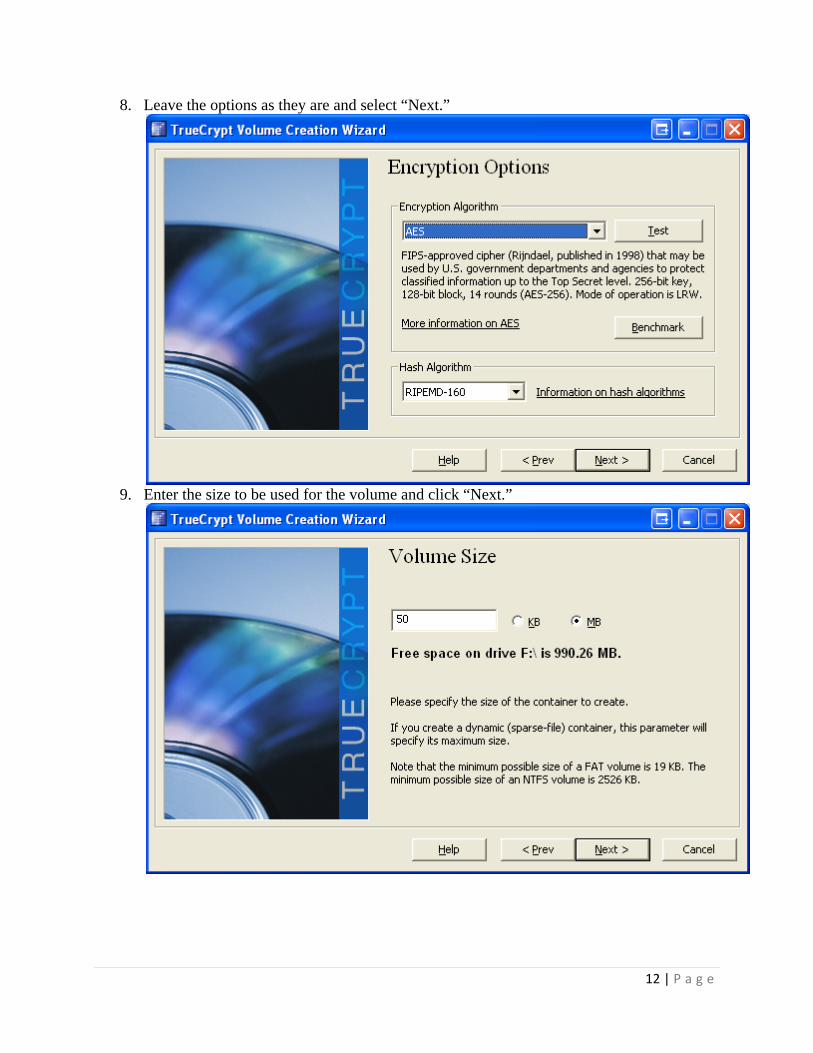
8. Leave the options as they are and select “Next.”
9. Enter the size to be used for the volume and click “Next.”
13 | P a g e
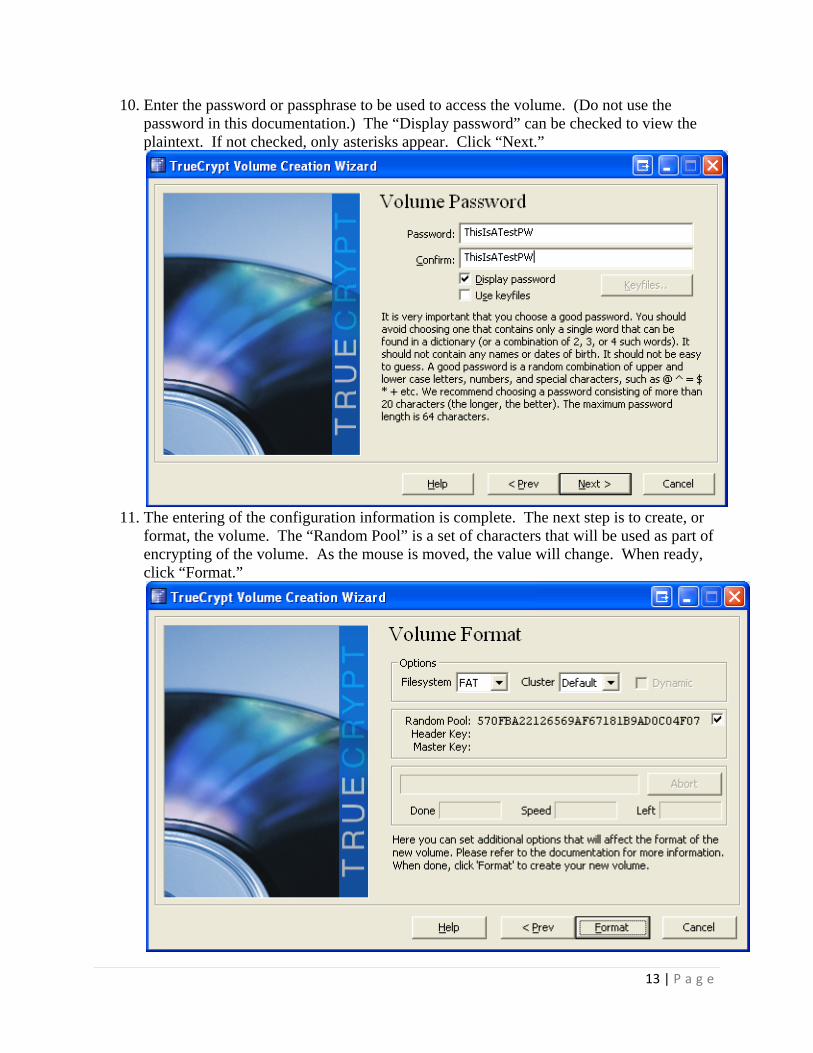
10. Enter the password or passphrase to be used to access the volume. (Do not use the password in this documentation.) The “Display password” can be checked to view the plaintext. If not checked, only asterisks appear. Click “Next.”
11. The entering of the configuration information is complete. The next step is to create, or
format, the volume. The “Random Pool” is a set of characters that will be used as part of encrypting of the volume. As the mouse is moved, the value will change. When ready, click “Format.”
14 | P a g e
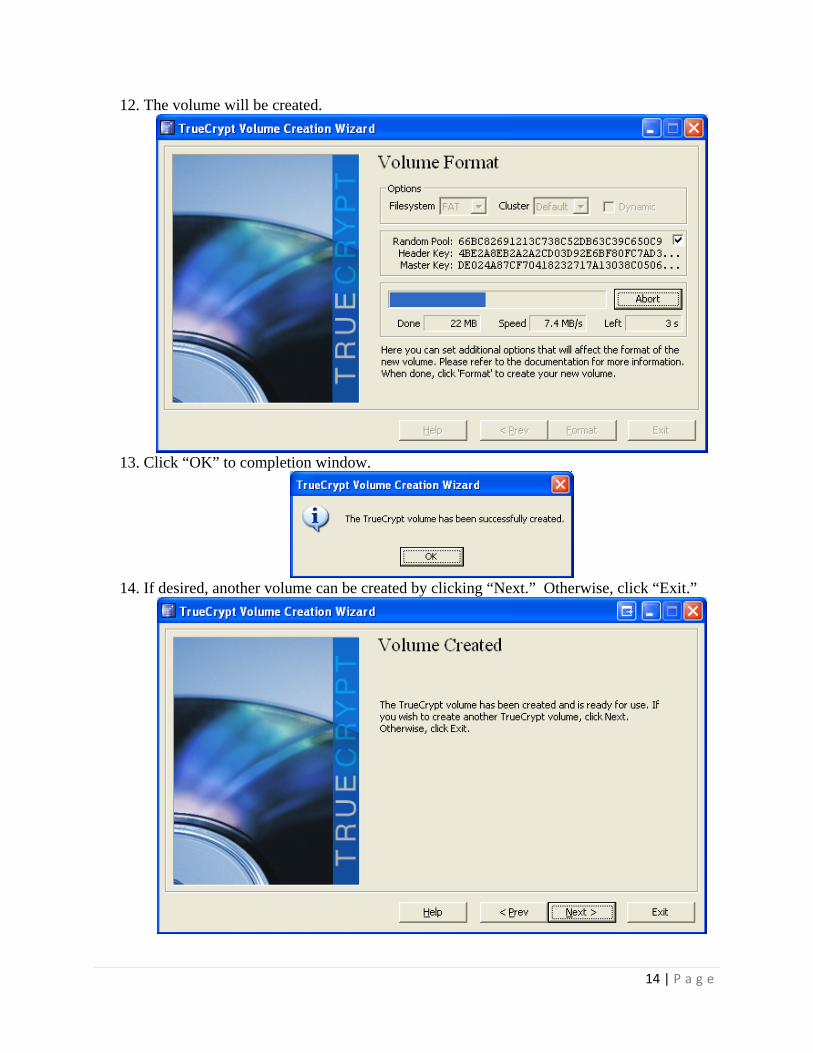
12. The volume will be created.
13. Click “OK” to completion window.
14. If desired, another volume can be created by clicking “Next.” Otherwise, click “Exit.”
15 | P a g e
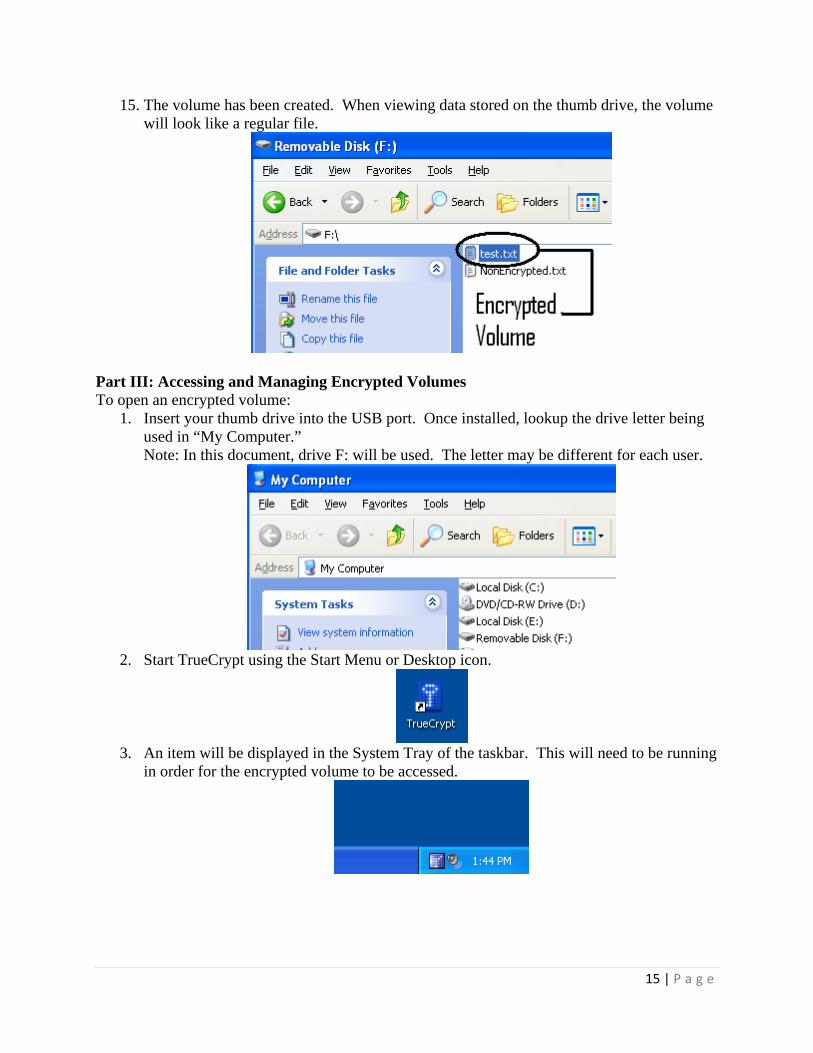
15. The volume has been created. When viewing data stored on the thumb drive, the volume will look like a regular file.
Part III: Accessing and Managing Encrypted Volumes To open an encrypted volume:
1. Insert your thumb drive into the USB port. Once installed, lookup the drive letter being used in “My Computer.” Note: In this document, drive F: will be used. The letter may be different for each user.
2. Start TrueCrypt using the Start Menu or Desktop icon.
3. An item will be displayed in the System Tray of the taskbar. This will need to be running
in order for the encrypted volume to be accessed.
16 | P a g e
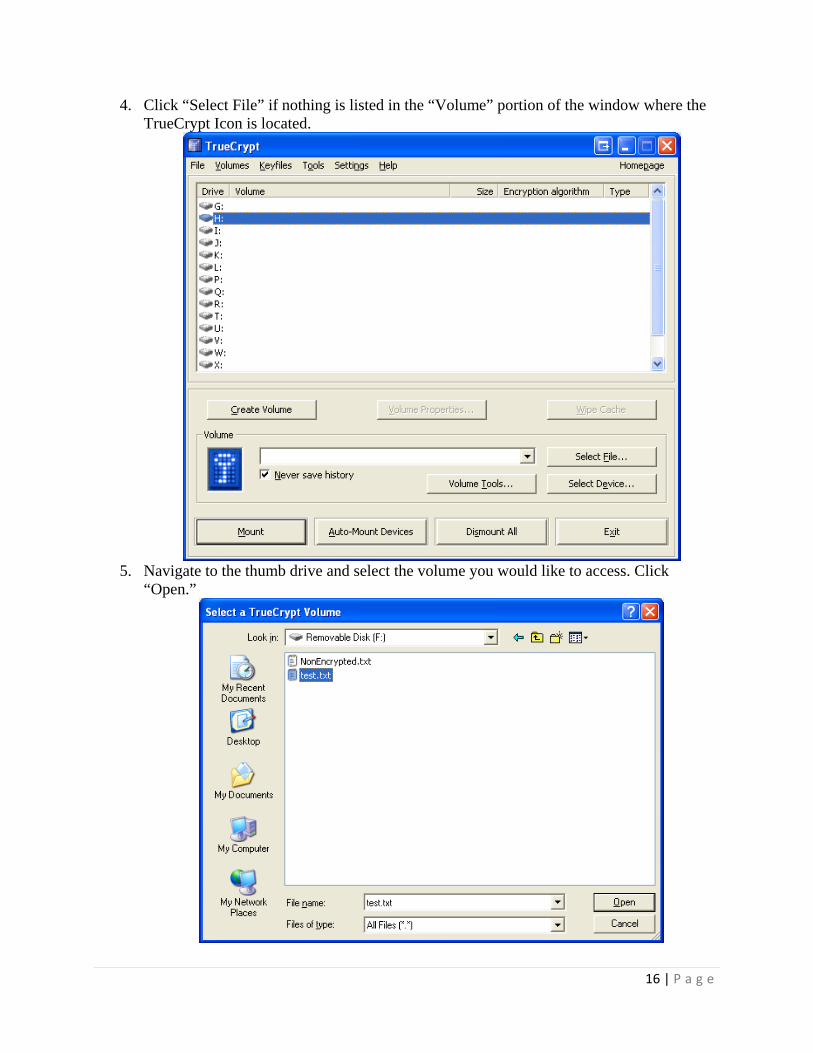
4. Click “Select File” if nothing is listed in the “Volume” portion of the window where the TrueCrypt Icon is located.
5. Navigate to the thumb drive and select the volume you would like to access. Click
“Open.”
17 | P a g e
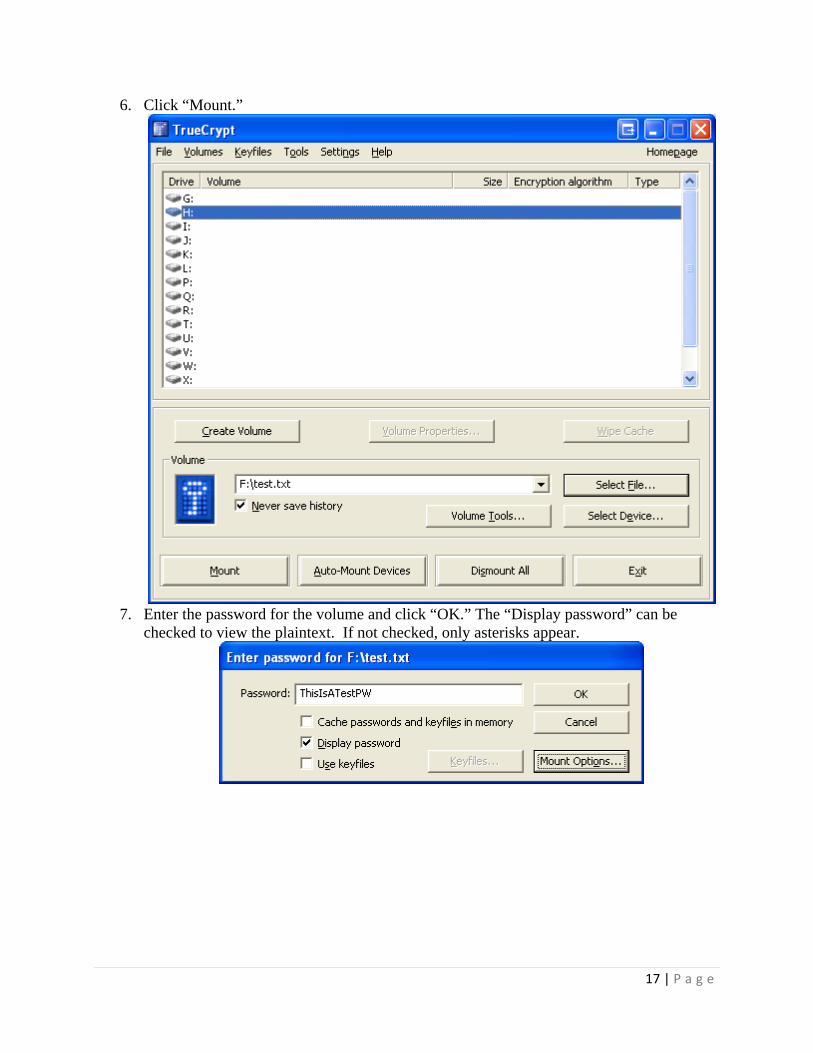
6. Click “Mount.”
7. Enter the password for the volume and click “OK.” The “Display password” can be
checked to view the plaintext. If not checked, only asterisks appear.
18 | P a g e
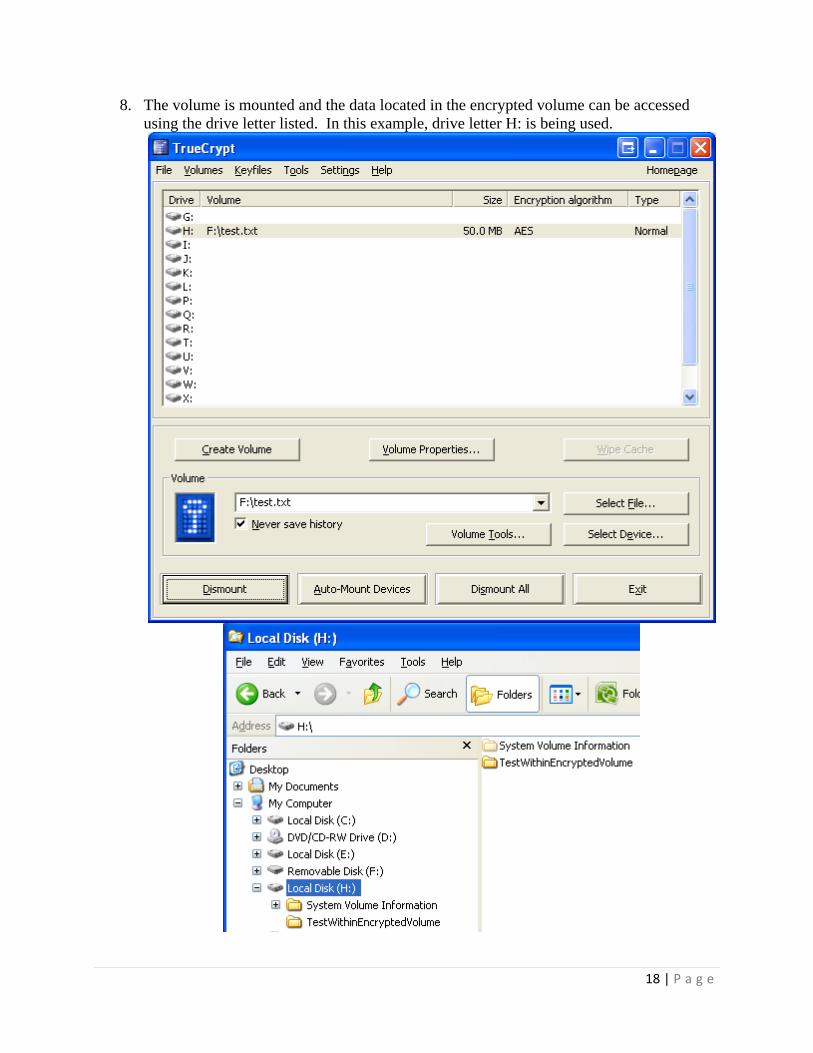
8. The volume is mounted and the data located in the encrypted volume can be accessed using the drive letter listed. In this example, drive letter H: is being used.
19 | P a g e
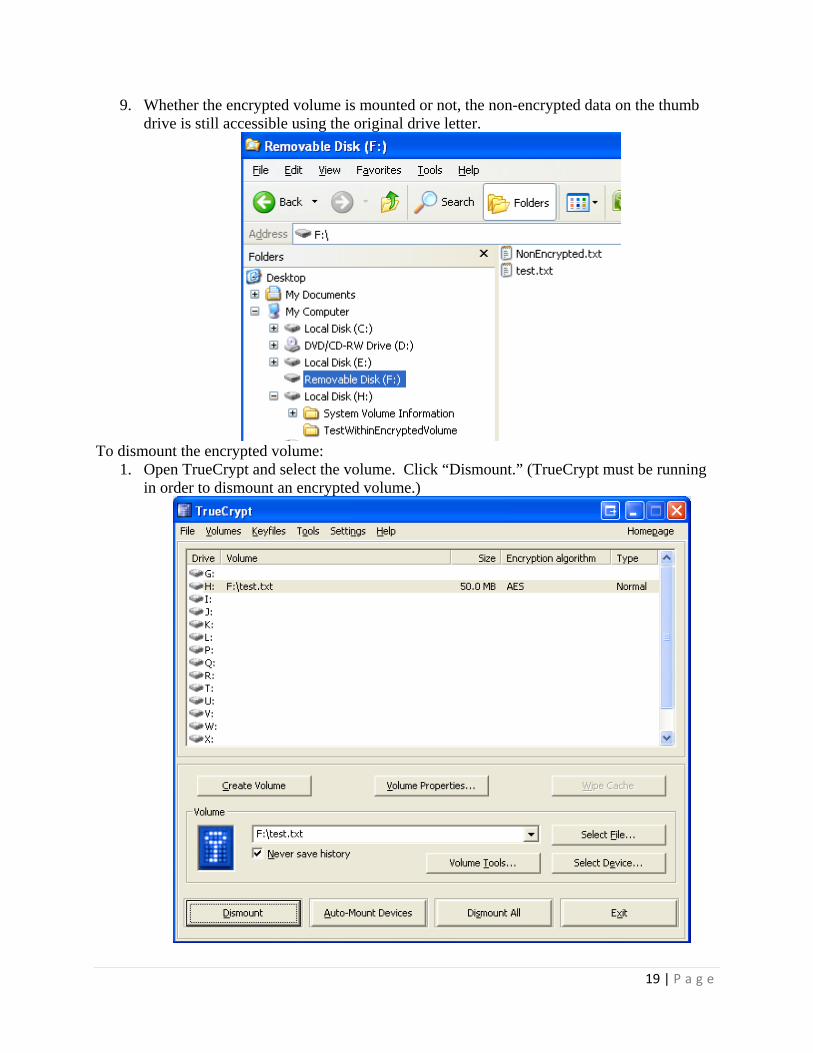
9. Whether the encrypted volume is mounted or not, the non-encrypted data on the thumb drive is still accessible using the original drive letter.
To dismount the encrypted volume:
1. Open TrueCrypt and select the volume. Click “Dismount.” (TrueCrypt must be running in order to dismount an encrypted volume.)
20 | P a g e
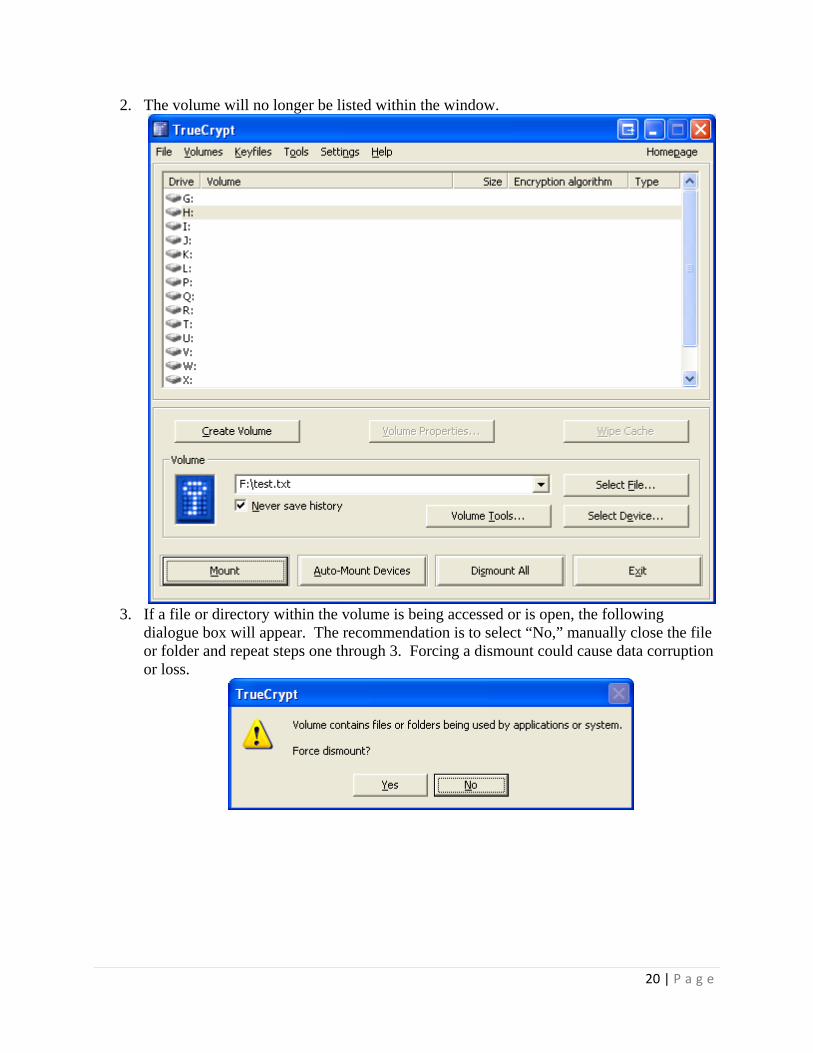
2. The volume will no longer be listed within the window.
3. If a file or directory within the volume is being accessed or is open, the following
dialogue box will appear. The recommendation is to select “No,” manually close the file or folder and repeat steps one through 3. Forcing a dismount could cause data corruption or loss.
21 | P a g e
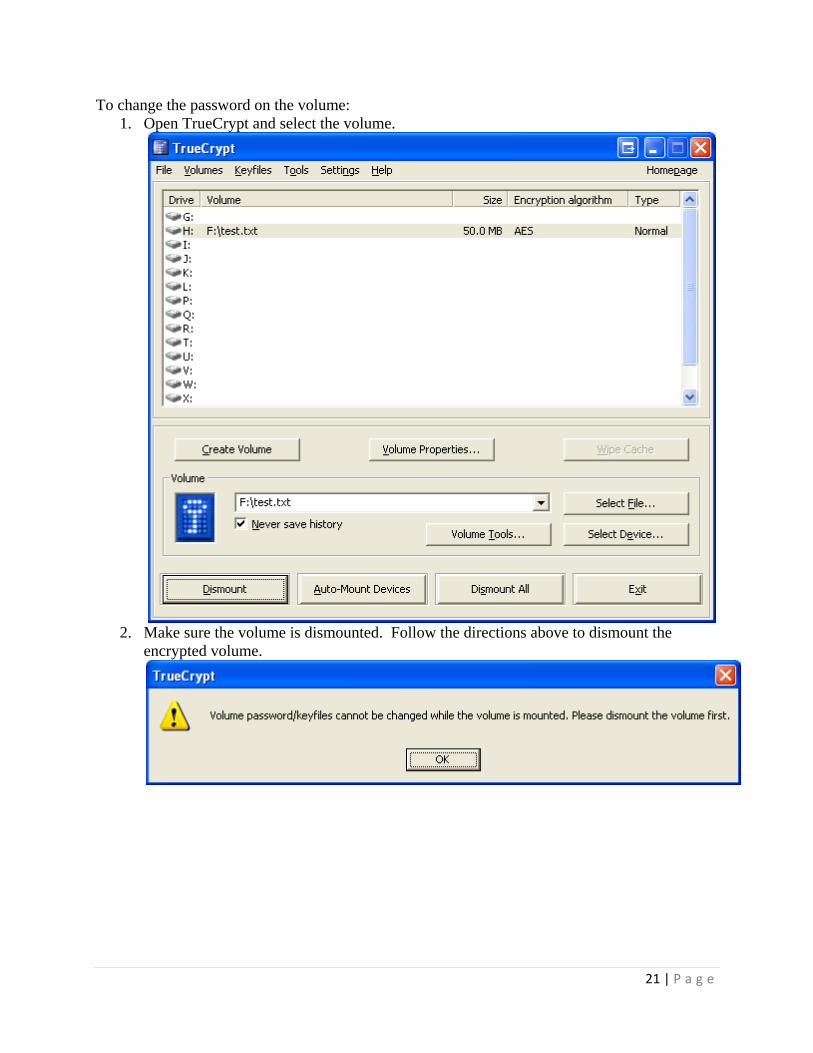
To change the password on the volume: 1. Open TrueCrypt and select the volume.
2. Make sure the volume is dismounted. Follow the directions above to dismount the
encrypted volume.
22 | P a g e
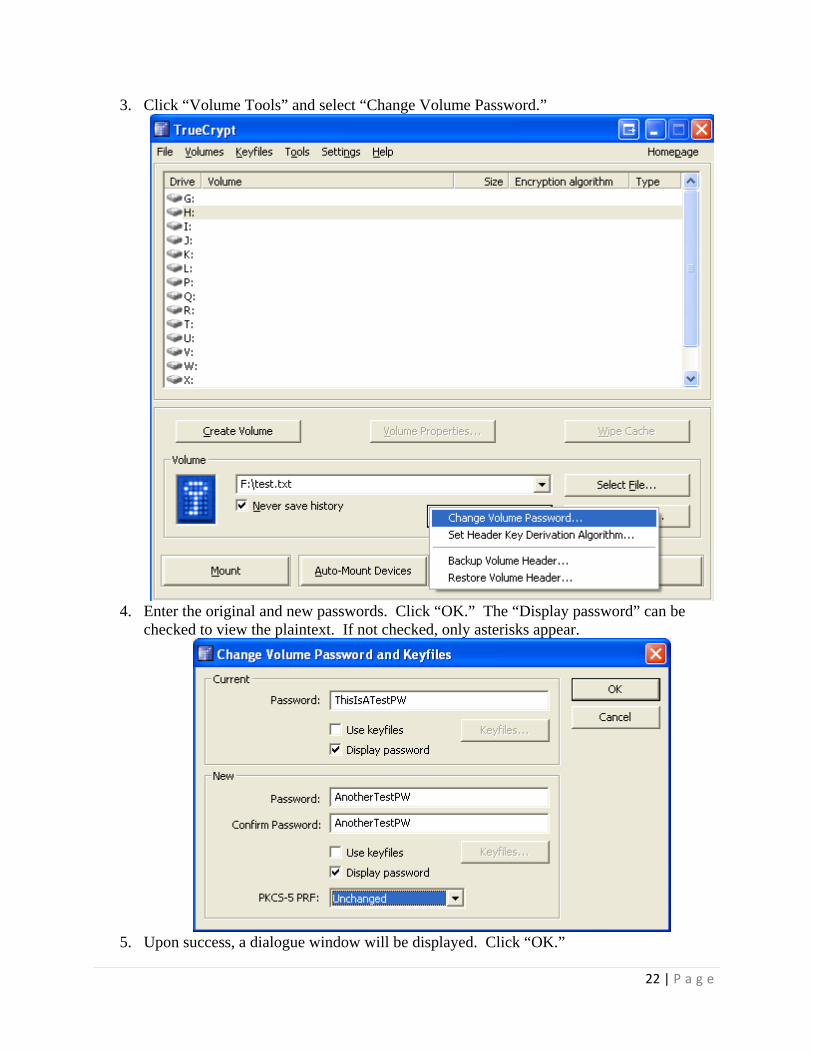
3. Click “Volume Tools” and select “Change Volume Password.”
4. Enter the original and new passwords. Click “OK.” The “Display password” can be
checked to view the plaintext. If not checked, only asterisks appear.
5. Upon success, a dialogue window will be displayed. Click “OK.”
23 | P a g e
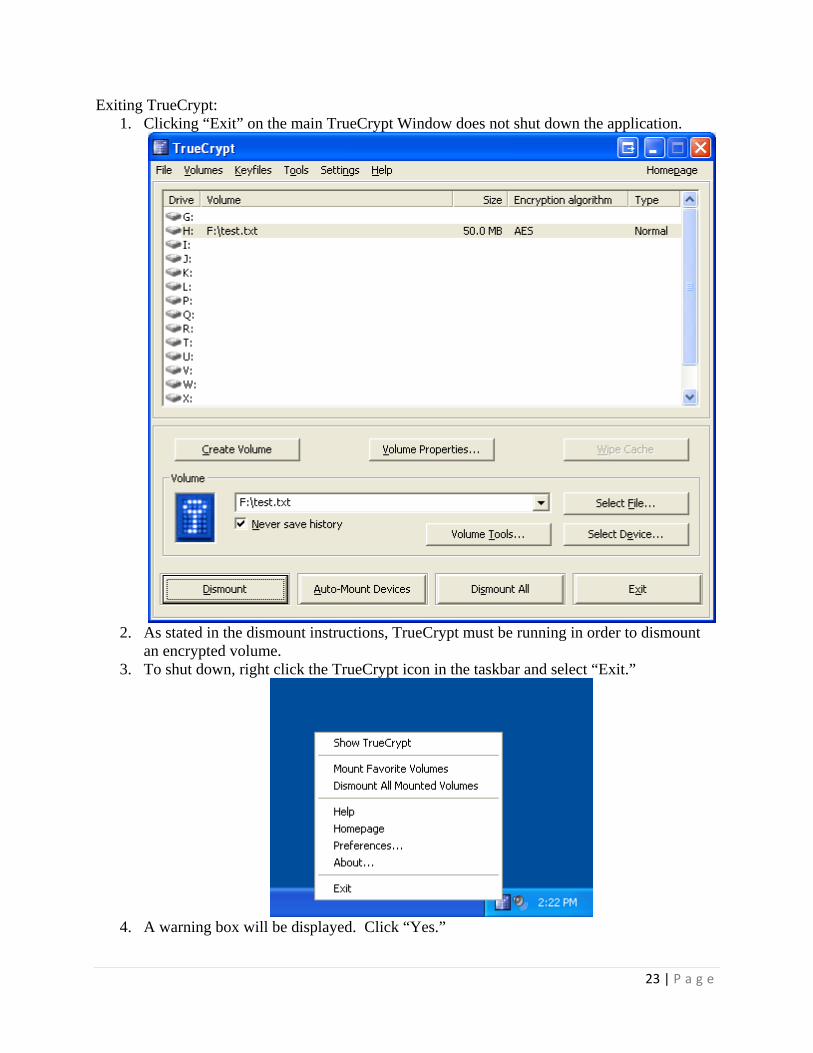
Exiting TrueCrypt: 1. Clicking “Exit” on the main TrueCrypt Window does not shut down the application.
2. As stated in the dismount instructions, TrueCrypt must be running in order to dismount
an encrypted volume. 3. To shut down, right click the TrueCrypt icon in the taskbar and select “Exit.”
4. A warning box will be displayed. Click “Yes.”

24 | P a g e
5. Click “Yes” if you are done suing your encrypted volume.
Related Documents