EnCase Forensic Version 5 User Manual TM Guidance Software 215 north marengo avenue, 2nd floor pasadena, california 91101 phone: 626.229.9191 fax: 626.229.9199 e-mail: [email protected] www.guidancesoftware.com EnCase Forensic v5.05 User Manual

Welcome message from author
This document is posted to help you gain knowledge. Please leave a comment to let me know what you think about it! Share it to your friends and learn new things together.
Transcript

E n C a s e F o r e n s i c
V e r s i o n 5
U s e r M a n u a l
T M
Guidance Software215 north marengo avenue, 2nd floor
pasadena, california 91101phone: 626.229.9191
fax: 626.229.9199e-mail: [email protected]
www.guidancesoftware.comEnCase Forensic v5.05 User Manual

Copyright © 2006 Guidance Software, Inc. May not be copied or reproduced without the written permission of Guidance Software, Inc.
Table of ContentsLegal Notice ..................................................................................................................................................... 1
EnCase® License Agreement ................................................................................................................................. 1Copyright ................................................................................................................................................................. 1Definitions ............................................................................................................................................................... 1License and Certain Restrictions ....................................................................................................................... 1Non-Exclusive License ......................................................................................................................................... 1
Support ............................................................................................................................................................... 3Support for the Law Enforcement/Government Edition of the PROGRAM ............................................. 3Support for the Corporate Edition of the PROGRAM ................................................................................. 3Support for the Corporate Deluxe Edition of the PROGRAM .................................................................... 3Premium License Support Program, Annual Payment Option .................................................................. 4Premium License Support Program, Three-Year Payment Option .......................................................... 4
EnScript® Macros WARNING ............................................................................................................................ 4Disclaimer of Warranties ..................................................................................................................................... 4Limitation of Liability and Damages .................................................................................................................. 5
Export Restrictions ........................................................................................................................................... 6U.S. Government End Users: ........................................................................................................................... 6
General Provisions ................................................................................................................................................ 6Preface ............................................................................................................................................................. 9
Manual Organization ............................................................................................................................................. 9Minimum Recommended Requirements ........................................................................................................... 9Help Resources .................................................................................................................................................... 10
Technical Support ........................................................................................................................................... 10EnCase Message Boards ................................................................................................................................... 11
About Guidance Software ....................................................................................................................................... 11EnCase Forensic .................................................................................................................................................. 11EnCase Enterprise ............................................................................................................................................... 12Guidance Software's Professional Development and Training ................................................................... 12
Law Enforcement Courses ............................................................................................................................. 12Computer Forensics and Incident Response Courses ............................................................................. 12Expert Courses ................................................................................................................................................ 13
Guidance Software's Professional Services Division ................................................................................... 13Additional Corporate Services .......................................................................................................................... 13
What’s New in EnCase Version 5 .............................................................................................................. 15Enhanced User Interface ................................................................................................................................... 15
Home Subtab .................................................................................................................................................... 17
iv Field Intelligence Module v5.05 User Manual
Copyright © 2006 Guidance Software, Inc. May not be copied or reproduced without the written permission of Guidance Software, Inc.
Entries subtab ................................................................................................................................................. 17Secure Storage Subtab .................................................................................................................................. 17Email Subtab .................................................................................................................................................... 18History and WebCache Subtabs ................................................................................................................... 18File Extents, Permissions and Bookmarks Subtabs ................................................................................. 19Sources Subtab and Table Column ............................................................................................................. 20Subjects Subtab .............................................................................................................................................. 21Local Keywords ................................................................................................................................................ 21
EnCase LinEn Acquisition Utility ...................................................................................................................... 21Additional File System Support ........................................................................................................................ 22Symbolic Link Table Column ............................................................................................................................. 22Ability to Create ENBCD From ISO Image ....................................................................................................... 22Go To Parent ......................................................................................................................................................... 22Acquisition Options ............................................................................................................................................. 23
Quick Reacquisition Option ........................................................................................................................... 23Read Ahead ...................................................................................................................................................... 23Granularity ........................................................................................................................................................ 23Block Size ......................................................................................................................................................... 23Restart Acquisition ......................................................................................................................................... 23
Globally Unique Identifiers (GUIDs) ................................................................................................................. 24Evidence File Segment/Splitting File Size ...................................................................................................... 24CD/DVD Inspector File Support ......................................................................................................................... 24Logon User Identification ................................................................................................................................... 25EnCase Installation Files and Folders ............................................................................................................. 25Export and Import of Bookmarks ..................................................................................................................... 26Flag Lost Files Option ......................................................................................................................................... 26Keyword Tester .................................................................................................................................................... 27Ability to Create a Logical Evidence File ........................................................................................................ 27Single Files Option .............................................................................................................................................. 27Filter Conditions .................................................................................................................................................. 27EnScripts Added to Filter Pane ........................................................................................................................ 28PDF and Windows Help Files ............................................................................................................................ 28Device Configuration Overlay (DCO) and Host Protected Area (HPA) Support ....................................... 28Virtual PC Images ................................................................................................................................................ 29Support for SlySoft CloneCD‰ Images ......................................................................................................... 29PC Guardian Access ............................................................................................................................................ 29Additional Servlet Support ................................................................................................................................ 29CD/DVD Module .................................................................................................................................................... 30FastBloc SE Module ............................................................................................................................................ 30Improved Enterprise Snapshot Functionality ................................................................................................. 30Enhanced EnScript Support .............................................................................................................................. 30
Table of Contents v
Copyright © 2006 Guidance Software, Inc. May not be copied or reproduced without the written permission of Guidance Software, Inc.
Installing EnCase .......................................................................................................................................... 31The EnCase Installation CD and Autorun ........................................................................................................ 31Disk 1 CD Installation Menu and Contents .................................................................................................... 31Security Key Drivers Installation ...................................................................................................................... 31
Installing EnCase Version 5 ................................................................................................................................... 32Installing the Servlet ............................................................................................................................................... 34
Software Updates ................................................................................................................................................ 36To Download the Latest EnCase Version 5 Update .................................................................................. 36
Configuration Questions ......................................................................................................................................... 37Security Key Questions ........................................................................................................................................... 38
Creating the EnCase Boot Disk ................................................................................................................. 39Windows Acquisition Issues ............................................................................................................................. 39Creating the EnCase Boot Disk ......................................................................................................................... 39Steps to Create the EnCase Barebones Boot Disk ....................................................................................... 40
Creating an EnCase Boot CD ................................................................................................................................. 42Booting a Computer with the EnCase Boot Disk ............................................................................................... 44EnCase Network Boot Disk .................................................................................................................................... 45FAQs about EnCase Boot Disk ............................................................................................................................... 46
EnCase for DOS ............................................................................................................................................. 47Launching EnCase for DOS ................................................................................................................................ 47EnCase for DOS Functions ................................................................................................................................. 47
Locking / Unlocking (L) .................................................................................................................................. 47Acquiring ........................................................................................................................................................... 48Hashing ............................................................................................................................................................. 48Server ................................................................................................................................................................ 50
Mode ...................................................................................................................................................................... 52Quit ......................................................................................................................................................................... 53
EnCase LinEn Utility ..................................................................................................................................... 55Description ............................................................................................................................................................ 55LinEn Setup .......................................................................................................................................................... 57
For SuSE 9.1 ..................................................................................................................................................... 57For Red Hat ...................................................................................................................................................... 57
Drive-to-Drive Acquisition ................................................................................................................................. 58Preview or Acquisition via Crossover .............................................................................................................. 59
Previewing vs. Acquiring ............................................................................................................................. 63Limitations of Previewing .................................................................................................................................. 63Advantages of Previewing ................................................................................................................................. 64Live Device and FastBloc Indicators ............................................................................................................... 64
Preview Questions ................................................................................................................................................... 64Acquisition Questions ............................................................................................................................................. 65
vi Field Intelligence Module v5.05 User Manual
Copyright © 2006 Guidance Software, Inc. May not be copied or reproduced without the written permission of Guidance Software, Inc.
Parallel Port Cable Acquisition .................................................................................................................. 67Parallel Preview \ Acquisition Process .......................................................................................................... 67
Network Cable Acquisition ......................................................................................................................... 73Creating the EnCase Network Boot Disk (ENBD) or LinEn CD ................................................................... 73
EnCase Network Boot Disk (ENBD) ............................................................................................................. 73EnCase LinEn Utility ....................................................................................................................................... 75
Using the ENBD ................................................................................................................................................... 75Using the EnCase LinEn Utility ......................................................................................................................... 77
Troubleshooting LinEn connectivity issues ................................................................................................ 77Preview or Acquisition ............................................................................................................................................ 78
Windows XP SP2 ............................................................................................................................................. 78Windows 2000, XP, and 2003 ....................................................................................................................... 79
Drive-to-Drive DOS Acquisition ................................................................................................................. 81Drive Geometry Problems .................................................................................................................................. 81Benefits and Drawbacks .................................................................................................................................... 82Steps to Follow .................................................................................................................................................... 82Acquiring Macintosh Devices ........................................................................................................................... 89Acquiring Unix and Linux ................................................................................................................................... 89After the Acquisition Is Complete .................................................................................................................... 90
FastBloc Acquisitions .................................................................................................................................. 91FastBloc Acquisition Process ........................................................................................................................... 91Live Device and FastBloc Indicators ............................................................................................................... 93Acquiring in Windows Without FastBloc ...................................................................................................... 100Acquiring in Windows with a non-FastBloc Write-Blocker ...................................................................... 101After Acquisition Is Complete ......................................................................................................................... 101
Acquiring Disk Configurations ................................................................................................................ 103Software RAID .................................................................................................................................................... 104
Windows NT: Software Disk Configurations ............................................................................................ 104Dynamic Disk ................................................................................................................................................. 105
Hardware Disk Configuration .......................................................................................................................... 106Disk Configuration Set Acquired as One Drive ....................................................................................... 106Disk Configurations Acquired as Separate Drives ................................................................................. 106Validating Parity on a RAID-5 ..................................................................................................................... 108RAID-10 ........................................................................................................................................................... 108
SCSI Drives and DOS ........................................................................................................................................ 108Acquiring Palm PDAs ................................................................................................................................ 109
Palms Supported ............................................................................................................................................... 109Directions ............................................................................................................................................................ 109Getting Out of Console Mode .......................................................................................................................... 116One Final Note on Palms ................................................................................................................................. 117
Acquiring Removable Media ................................................................................................................... 119
Table of Contents vii
Copyright © 2006 Guidance Software, Inc. May not be copied or reproduced without the written permission of Guidance Software, Inc.
Zip / Jaz Disks ................................................................................................................................................... 119Floppy Disks ....................................................................................................................................................... 120
Write-Protecting a Floppy Disk ................................................................................................................. 121Superdisks (LS-120) ..................................................................................................................................... 121
CD-ROM, CD-R, CD-RW ................................................................................................................................... 121Flash media ........................................................................................................................................................ 122
Equipment needed to preview/acquire flash media ............................................................................... 122How to acquire flash media ........................................................................................................................ 122Examining flash media ................................................................................................................................. 122
Acquiring Multiple Pieces of Media .............................................................................................................. 123First Steps .................................................................................................................................................. 125
Connecting to Remote Media .............................................................................................................................. 125SAFE Administration and User Accounts ...................................................................................................... 125Logging Into a SAFE Server ............................................................................................................................. 126Creating a New Case ........................................................................................................................................ 127Connecting to Media ........................................................................................................................................ 127Remote Acquisition ........................................................................................................................................... 129Time Zone Settings ........................................................................................................................................... 130Recover Folders on FAT Volumes ................................................................................................................... 133
Behind the Scenes with Recover Folders ................................................................................................ 133Recovering NTFS Folders ................................................................................................................................. 134Lost Files in UFS and EXT2/3 Partitions ....................................................................................................... 136Signature Analysis ............................................................................................................................................ 136
File Signatures .............................................................................................................................................. 136Adding a New Signature .................................................................................................................................. 138Starting a Signature Analysis ......................................................................................................................... 139
Viewing Results ............................................................................................................................................. 140Hash Analysis ..................................................................................................................................................... 141
File Hashing ................................................................................................................................................... 141Creating a Hash Set .......................................................................................................................................... 141Importing Hash Sets ......................................................................................................................................... 143
HashKeeper .................................................................................................................................................... 143NSRL Hash Sets ............................................................................................................................................ 145
Rebuilding the Hash Library ............................................................................................................................ 147Benefits of a Hash Analysis ............................................................................................................................. 147
Starting a Hash Analysis ............................................................................................................................. 148Analyzing the Hash Results ............................................................................................................................. 148EnScripts ............................................................................................................................................................. 149
Initialize Case ................................................................................................................................................ 149FAT and NTFS Info Record Finder .............................................................................................................. 149File Finder ....................................................................................................................................................... 149
viii Field Intelligence Module v5.05 User Manual
Copyright © 2006 Guidance Software, Inc. May not be copied or reproduced without the written permission of Guidance Software, Inc.
Link File Parser ............................................................................................................................................. 150Find Unique EMail Address List ................................................................................................................. 150
Navigating EnCase .................................................................................................................................... 151Creating a New Case ............................................................................................................................................. 151
Case Management ............................................................................................................................................ 153Concurrent Case Management ................................................................................................................... 153
The Options Dialog ............................................................................................................................................ 154Global Options ............................................................................................................................................... 155Colors .............................................................................................................................................................. 157Fonts ................................................................................................................................................................ 158EnScript .......................................................................................................................................................... 158Storage Paths ................................................................................................................................................ 159Enterprise ....................................................................................................................................................... 160
Adding Evidence Files to a Case ......................................................................................................................... 164Sessions Option ................................................................................................................................................. 167Error Messages ................................................................................................................................................. 169Verifying the Evidence ...................................................................................................................................... 170Adding Raw Image Files ................................................................................................................................... 171SafeBack and VMware Images ....................................................................................................................... 173Single Files ......................................................................................................................................................... 175Logical Evidence Files ...................................................................................................................................... 176
Interface .................................................................................................................................................................. 176Docking and Undocking ................................................................................................................................... 177
Undocking ....................................................................................................................................................... 177Docking ........................................................................................................................................................... 177
EnCase Views ..................................................................................................................................................... 178The Set Include Option Button ................................................................................................................... 178The Cases Tab ............................................................................................................................................... 178File Types ........................................................................................................................................................ 183File Signatures .............................................................................................................................................. 184File Viewers .................................................................................................................................................... 184Keywords ........................................................................................................................................................ 185Security IDs .................................................................................................................................................... 185Text Styles ...................................................................................................................................................... 188EnScripts ........................................................................................................................................................ 189Hash Sets ....................................................................................................................................................... 190EnScript Types ............................................................................................................................................... 190
Table Pane \ View .................................................................................................................................................. 191Table View Columns Explained ................................................................................................................... 192
Organizing Columns .......................................................................................................................................... 200
Table of Contents ix
Copyright © 2006 Guidance Software, Inc. May not be copied or reproduced without the written permission of Guidance Software, Inc.
Rearranging Columns ................................................................................................................................... 200Hiding and Showing Columns ..................................................................................................................... 201Sorting Files in Columns ............................................................................................................................. 201
EnCase Icon Descriptions .................................................................................................................................... 202Gallery View ........................................................................................................................................................ 210America Online .ART files ................................................................................................................................ 212Timeline View ..................................................................................................................................................... 213Report View ........................................................................................................................................................ 214EnScript View ..................................................................................................................................................... 215View (Bottom) Pane .......................................................................................................................................... 215Panes ................................................................................................................................................................... 219
Date and Time Questions ..................................................................................................................................... 220Viewing Files .............................................................................................................................................. 221
Copy/UnErasing Files ........................................................................................................................................ 221Copying/UnErasing Bookmarks ....................................................................................................................... 223Copying Entire Folders ..................................................................................................................................... 224Viewing Files Outside of EnCase .................................................................................................................... 225
File Viewers .................................................................................................................................................... 225Setting up a File Viewer ................................................................................................................................... 225File Types ............................................................................................................................................................ 226
File Viewing FAQs .................................................................................................................................................. 226E-Mail and Internet Artifacts .................................................................................................................. 229
E-Mail .................................................................................................................................................................. 229Using the Email Option ................................................................................................................................ 230
E-mail Attachments tab ................................................................................................................................... 233Email Table Columns Explained ...................................................................................................................... 233History ................................................................................................................................................................. 235
Finding Web Artifacts .................................................................................................................................. 235Time interpretations formats: .................................................................................................................... 236History Table Columns Explained .............................................................................................................. 237
Web Cache .......................................................................................................................................................... 238Finding Web Cache data ............................................................................................................................. 239WebCache Table Columns Explained ........................................................................................................ 240
Keyword Searches ..................................................................................................................................... 243Creating Keyword Groups ................................................................................................................................ 243Entering Keywords ............................................................................................................................................ 244
Search Options .............................................................................................................................................. 245International Keywords .................................................................................................................................... 246Keyword Tester Tab .......................................................................................................................................... 247Exporting/Importing Keywords ....................................................................................................................... 248
Exporting Keywords ...................................................................................................................................... 248
x Field Intelligence Module v5.05 User Manual
Copyright © 2006 Guidance Software, Inc. May not be copied or reproduced without the written permission of Guidance Software, Inc.
Importing Keywords .......................................................................................................................................... 250Adding Keyword Lists ....................................................................................................................................... 251Starting a Search .............................................................................................................................................. 251
Search Options .............................................................................................................................................. 252Viewing Search Hits .......................................................................................................................................... 253Bookmarking Search Hits ................................................................................................................................ 258The Refresh Button ........................................................................................................................................... 258Canceling a Search ........................................................................................................................................... 259
Viewing Compound Files .......................................................................................................................... 261Registry Files ..................................................................................................................................................... 261OLE Files .............................................................................................................................................................. 262Compressed Files .............................................................................................................................................. 264Outlook Express E-Mail .................................................................................................................................... 264Base64 and UUE Encoding ............................................................................................................................... 265MS Outlook E-Mail ............................................................................................................................................ 266NTFS Compressed Files ................................................................................................................................... 267
Search Compressed NTFS Files and Folders ........................................................................................... 267Thumbs.db ........................................................................................................................................................... 268
EnScript and Filters .................................................................................................................................. 269EnScript Path ..................................................................................................................................................... 270Include Folder .................................................................................................................................................... 270Running EnScripts ............................................................................................................................................. 271Editing EnScripts ............................................................................................................................................... 271Console ................................................................................................................................................................ 272The EnScript Library ......................................................................................................................................... 273Filters ................................................................................................................................................................... 273
Editing Filters ................................................................................................................................................ 274Starting and Stopping Filters ..................................................................................................................... 274
Creating a Filter ................................................................................................................................................. 275Creating a Condition ......................................................................................................................................... 275Queries ................................................................................................................................................................ 275
Advanced Analysis ..................................................................................................................................... 277Recovering Partitions ....................................................................................................................................... 277
Adding Partitions .......................................................................................................................................... 277Deleting Partitions ........................................................................................................................................ 281Recovering Folders from a Formatted Drive ............................................................................................ 282
Web Browsing History ...................................................................................................................................... 282Reading What the Subject Threw Away ............................................................................................................ 284
Making Sense of a DriveSpace Volume ........................................................................................................ 285Cracking Encrypted or Password Protected Files ...................................................................................... 286System Snapshot ............................................................................................................................................... 286
Table of Contents xi
Copyright © 2006 Guidance Software, Inc. May not be copied or reproduced without the written permission of Guidance Software, Inc.
Volatile Data Defined ........................................................................................................................................ 286Volatile Data Components .................................................................................................................................... 287
Volatile Data Capture Using Snapshot .......................................................................................................... 287Open Ports ...................................................................................................................................................... 288Open Ports Table Columns .......................................................................................................................... 288Active Processes ........................................................................................................................................... 289Processes Table Columns ........................................................................................................................... 290
Open Files ........................................................................................................................................................... 292Network Interfaces and Users .................................................................................................................... 292
Foreign Language Support (Unicode) ................................................................................................... 295Viewing Unicode Files ...................................................................................................................................... 297Unicode Fonts .................................................................................................................................................... 299
Changing Font Size ....................................................................................................................................... 302Font Recommendations ............................................................................................................................... 302
Viewing Non-Unicode Files .............................................................................................................................. 303Right to Left (RTL) Languages ................................................................................................................... 306
Foreign Language Keyword Searches ........................................................................................................... 307Copying and Pasting ..................................................................................................................................... 307Character Map ............................................................................................................................................... 308
Regional Settings .............................................................................................................................................. 310Foreign Language Bookmarking ..................................................................................................................... 311Rich Edit Control in Bookmarks ..................................................................................................................... 313More Information .............................................................................................................................................. 314
Restoring Evidence ................................................................................................................................... 315Physical vs. Logical Restore ........................................................................................................................... 315Preparing the Target Media ............................................................................................................................ 316
Physical Restore ........................................................................................................................................... 316Logical Restore .............................................................................................................................................. 320
Booting the Restored Hard Drive ................................................................................................................... 320Restoration FAQs ................................................................................................................................................... 322
Archiving Evidence .................................................................................................................................... 323What Should Be Archived ................................................................................................................................ 323Verifying Evidence Files ................................................................................................................................... 324Cleaning House .................................................................................................................................................. 325
Bookmarks .................................................................................................................................................. 329Understanding Bookmarks .............................................................................................................................. 329Highlighted Data Bookmark ............................................................................................................................. 330
Text .................................................................................................................................................................. 331Picture ............................................................................................................................................................. 332Integers ........................................................................................................................................................... 333

xii Field Intelligence Module v5.05 User Manual
Copyright © 2006 Guidance Software, Inc. May not be copied or reproduced without the written permission of Guidance Software, Inc.
Dates ............................................................................................................................................................... 333Windows ......................................................................................................................................................... 333Styles ............................................................................................................................................................... 334
Notes Bookmark ................................................................................................................................................ 335Folder Information Bookmark ......................................................................................................................... 337Notable File Bookmark ..................................................................................................................................... 338File Group Bookmark ........................................................................................................................................ 340Snapshot ............................................................................................................................................................. 343Documentation Options for Threads .............................................................................................................. 343Bookmark Options ............................................................................................................................................. 344Move or Copy Bookmarks ................................................................................................................................ 348Notable (Bookmarks table) ............................................................................................................................. 348Exporting Bookmarks ........................................................................................................................................ 348
The Report .................................................................................................................................................. 351Presenting the Findings ................................................................................................................................... 351Reordering Bookmarks for Reports ............................................................................................................... 354Presenting Multiple Images ............................................................................................................................ 356Exporting the Report ........................................................................................................................................ 358Documenting All Files and Folders Contained on Media .......................................................................... 361Presenting Search Results .............................................................................................................................. 362
Appendix A .................................................................................................................................................. 367Forensic Terminology ............................................................................................................................................ 367
PC Hardware ....................................................................................................................................................... 367Hard Drive Anatomy .......................................................................................................................................... 368Hard Drive Layout .............................................................................................................................................. 370File System Concepts ....................................................................................................................................... 372File Systems ....................................................................................................................................................... 374Disk Configurations Explained ........................................................................................................................ 376Evidence Storage ............................................................................................................................................... 379Evidence Files Explained .................................................................................................................................. 381
Appendix B .................................................................................................................................................. 383GREP ......................................................................................................................................................................... 383
GREP Syntax ....................................................................................................................................................... 383GREP Examples .................................................................................................................................................. 384
Appendix C .................................................................................................................................................. 389Third Party Utilities ............................................................................................................................................... 389
Quick View Plus ................................................................................................................................................. 389IrfanView ............................................................................................................................................................. 389AC/DSee ............................................................................................................................................................... 389DBXtract .............................................................................................................................................................. 389MBXtract ............................................................................................................................................................. 390
Table of Contents xiii
Copyright © 2006 Guidance Software, Inc. May not be copied or reproduced without the written permission of Guidance Software, Inc.
Decode Shell Extension .................................................................................................................................... 390Disk Compare ..................................................................................................................................................... 390Mailbag Assistant ............................................................................................................................................. 390PST Cracker ........................................................................................................................................................ 390OST2PST .............................................................................................................................................................. 390Gpart .................................................................................................................................................................... 390CD-R Diagnostic ................................................................................................................................................ 391Dir to HTML ........................................................................................................................................................ 391
Appendix D .................................................................................................................................................. 393The Forensic Lab .................................................................................................................................................... 393
Field Acquisitions .............................................................................................................................................. 393Lab Analysis ........................................................................................................................................................ 394Need Additional Information? ......................................................................................................................... 394
Index ............................................................................................................................................................ 395
xiv Field Intelligence Module v5.05 User Manual
Copyright © 2006 Guidance Software, Inc. May not be copied or reproduced without the written permission of Guidance Software, Inc.
Copyright © 2006 Guidance Software, Inc. May not be copied or reproduced without the written permission of Guidance Software, Inc.
Legal Notice
EnCase® License AgreementCopyright
EnCase® version 5 is furnished under this license agreement (this “Agreement”) andmay be used only in accordance with the terms of this Agreement. Copyright 1998-2006 Guidance Software, Inc. All Rights Reserved.
Definitions
PROGRAM is defined as the computer program “EnCase” including the softwarein executable form only and the single dongle hardware key with which thisAgreement is included or remotely re-programmed by COMPANY, and any updatesor maintenance releases thereto that COMPANY may provide to you. COMPANYis defined as Guidance Software, Inc., a California Corporation.
License and Certain Restrictions
This Agreement applies to both the trial and full versions of the PROGRAM. Do notuse the PROGRAM until you have carefully read the following Agreement. ThisAgreement sets forth the terms and conditions for licensing of the PROGRAM fromCOMPANY to you, and installing the PROGRAM indicates that you have read andunderstand this Agreement and accept its terms and conditions. If you do not agreewith this Agreement, promptly return the PROGRAM and accompanying items toCOMPANY within ten (10) days of purchase for a full refund with receipt. Absentsuch return, the PROGRAM will be deemed accepted by you upon shipment.
Non-Exclusive License
Authorized Use. You are granted a limited non-exclusive license to use a copy of theenclosed PROGRAM on the computer(s) used by a single individual. By your use
2 EnCase Forensic v5.05 User Manual
Copyright © 2006 Guidance Software, Inc. May not be copied or reproduced without the written permission of Guidance Software, Inc.
of the PROGRAM pursuant to this Agreement, you recognize and acknowledgeCOMPANY's proprietary rights in the PROGRAM. You may not distribute thePROGRAM, including any demonstration version of the PROGRAM, to third partieswithout the written authorization from COMPANY. You may copy the “encase.exe”,“en.exe”, and “LinEn” executables to create and verify EnCase® evidence files, butyou may not make or distribute copies of such executables, or copies, includingdemonstration versions, of the PROGRAM, for use in conjunction with any thirdparty software. You may make additional backup copies of the PROGRAM for yourown use, as long as only one copy may be used at any one time. No copies or duplicatesof the dongle hardware key may be made. Restrictions. You may not copy the printed materials, if any, accompanying thePROGRAM, or print multiple copies of any user documentation. Applicablecopyright laws protect the PROGRAM in its entirety. The PROGRAM also containsCOMPANY trade secrets, and thus you may not decompile, reverse engineer,disassemble, or otherwise reduce the PROGRAM to human-perceivable form ordisable any functionality that limits the use of the PROGRAM. You may not modify,adapt, translate, rent, sublicense, assign, loan, resell for profit, distribute, or networkthe PROGRAM, disk, or related materials or create derivative works based upon thePROGRAM or any part thereof. You may not publicly display the PROGRAM orprovide technical training or instruction for monetary compensation or otherconsideration in any form. Your license is automatically terminated if you take anyof the actions prohibited by the paragraph. Transfer. You may not transfer the PROGRAM to a third party, or sell the computeron which the PROGRAM is installed to a third party, without written consent fromCOMPANY and written acceptance of the terms of this Agreement by the transferee.If you transfer the PROGRAM with the written consent of COMPANY, you musttransfer all computer programs and documentation and erase any copies residing oncomputer equipment. Your license is automatically terminated if you transfer thePROGRAM without the written consent of COMPANY. You are to ensure that thePROGRAM is not made available in any form to anyone not subject to thisAgreement. A transfer fee of $150 will be charged to transfer the PROGRAM (notapplicable to transfers associated with orders from VARs, distributors, or resellersor intra-company transfers). Title. At all times, full title and ownership of the PROGRAM shall remain withCOMPANY. You are granted a non-exclusive license to utilize the PROGRAMsubject to the terms of this Agreement.
Legal Notice 3
Copyright © 2006 Guidance Software, Inc. May not be copied or reproduced without the written permission of Guidance Software, Inc.
Support
There are five separate levels of support available: (1) Support for the LawEnforcement/Government Edition of the PROGRAM, (2) Support for the CorporateEdition of the PROGRAM, (3) Support for the Corporate Deluxe Edition of thePROGRAM; (4) Premium License Support Program (“PLSP”), annual paymentoption, which is available to law enforcement and government only; and (5) PLSP,three-year payment option, which is available to law enforcement and governmentonly. The five separate levels of support have the following terms:
Support for the Law Enforcement/Government Edition of the PROGRAM
As part of your license of the PROGRAM, you will receive one year of telephoneand E-mail support only in accordance with COMPANY's standard telephone andE-mail support policies, and you are entitled to receive updates (e.g., version 5.01to version 5.05), if any, of version 5 of the PROGRAM only for one (1) year fromthe date of purchase. Support will begin upon the effective date of this Agreement,which is defined as the date the PROGRAM is licensed to you. After the initial yearof support, you may elect to continue your support for additional periods of time fora separate fee. Such continued support will include during the applicable time periodonly: (i) telephone and E-mail support, and (ii) updates (e.g., version 5.01 to version5.05), if any, of version 5 of the PROGRAM.
Support for the Corporate Edition of the PROGRAM
As part of your license of the PROGRAM, you purchased one, two, or three yearsof support. For the applicable time period purchased, you will receive: (i) telephoneand E-mail support, (ii) updates (e.g., version 5.01 to version 5.05), if any, of version5 of the PROGRAM, and (iii) any major releases of the PROGRAM (e.g., version5 to version 6), and subsequent updates, if any, of such release, during such applicabletime period. Support will begin upon the effective date of this Agreement, which isdefined as the date the PROGRAM is licensed to you. After the initial period ofsupport that you purchased, you may elect to continue your support for additionalperiods of time for a separate fee.
Support for the Corporate Deluxe Edition of the PROGRAM
As part of your license of the PROGRAM, you licensed EnCase® Virtual FileSystem, EnCase® Physical Disk Emulator, and EnCase® Decryption Suite, and youpurchased one, two, or three years of support. In addition, you will receive FastBloc®Software Edition upon public release of such product by COMPANY. For theapplicable time period purchased, you will receive: (i) telephone and E-mail support,(ii) updates (e.g., version 5.01 to version 5.05), if any, of version 5 of the PROGRAM,
4 EnCase Forensic v5.05 User Manual
Copyright © 2006 Guidance Software, Inc. May not be copied or reproduced without the written permission of Guidance Software, Inc.
(iii) any updates to EnCase® Virtual File System, EnCase® Physical Disk Emulator,and/or EnCase® Decryption Suite, and (iv) any major releases of the PROGRAM(e.g., version 5 to version 6), and subsequent updates, if any, of such release, duringsuch applicable time period. Support will begin upon the effective date of thisAgreement, which is defined as the date the PROGRAM is licensed to you. Afterthe initial period of support that you purchased, you may elect to continue yoursupport for additional periods of time for a separate fee.
Premium License Support Program, Annual Payment Option
PLSP is available only to law enforcement and government agencies. If youpurchased PLSP, annual payment option, you have agreed to pay for three years ofPLSP with three annual payments: the first annual fee upon purchase, the secondannual fee on the first anniversary of your purchase, and the third annual fee on thesecond anniversary of your purchase. PLSP includes, for the entire three-year term,the “Support for the Law Enforcement/Government Edition of the PROGRAM”described above, as well as (i) any major releases of the PROGRAM (e.g., version5 to version 6), and subsequent updates, if any, of such release, (ii) FastBloc®Software Edition (upon public release of such product by COMPANY), and (iii) anyupdates to EnCase® Forensic Edition Modules (e.g., EnCase® Virtual File System,EnCase® Physical Disk Emulator, or EnCase® Decryption Suite).
Premium License Support Program, Three-Year Payment Option
PLSP is available only to law enforcement and government agencies. If youpurchased PLSP, three-year payment option, you have agreed to pay for three yearsof PLSP with one annual payment upon purchase. The features of PLSP are asdescribed above.
EnScript® Macros WARNING
EnScript® Macros are executable files and thus should be treated with the samecaution as any other executable file received from a third party over the Internet orby other means. Like other executable files, it is possible to intentionally writeEnScript® Macros with malicious code or to imbed viruses within the code of anEnScript® Macro. It is thus imperative that you identify and trust the source fromwhich you receive an EnScript® Macro. As with any other file, EnScripts® Macrosreceived from third parties should be screened for viruses.
Disclaimer of Warranties
EXCEPT AS PROVIDED ABOVE, THIS PROGRAM AND ANY RELATEDSERVICES ARE PROVIDED AS-IS, AND TO THE MAXIMUM EXTENT
Legal Notice 5
Copyright © 2006 Guidance Software, Inc. May not be copied or reproduced without the written permission of Guidance Software, Inc.
PERMITTED BY APPLICABLE LAW, COMPANY DISCLAIMS ALL OTHERREPRESENTATION AND WARRANTIES, EXPRESS OR IMPLIED,REGARDING THIS PROGRAM, DISKETTE, RELATED MATERIALS ANDANY SERVICES, INCLUDING THEIR FITNESS FOR A PARTICULARPURPOSE, THEIR QUALITY, THEIR MERCHANTABILITY, TITLE OR THEIRNON-INFRINGEMENT. COMPANY DOES NOT WARRANT THAT THEPROGRAM IS FREE FROM BUGS, ERRORS, OR OTHER PROGRAMLIMITATIONS. SOME STATES DO NOT ALLOW THE EXCLUSION OFIMPLIED WARRANTIES, SO THE ABOVE EXCLUSIONS MAY NOT APPLYTO YOU. IN THAT EVENT, ANY IMPLIED WARRANTIES ARE LIMITED INDURATION TO NINETY (90) DAYS FROM THE DATE OF PURCHASE OF THEPROGRAM. HOWEVER, SOME STATES DO NOT ALLOW LIMITATIONS ONHOW LONG AN IMPLIED WARRANTY LASTS, SO THE ABOVELIMITATION MAY NOT APPLY TO YOU. THIS WARRANTY GIVES YOUSPECIFIC LEGAL RIGHTS, AND YOU MAY HAVE OTHER RIGHTS ASWELL, WHICH VARY FROM STATE TO STATE.
Limitation of Liability and Damages
THE ENTIRE LIABILITY OF COMPANY AND ITS REPRESENTATIVES (ASDEFINED BELOW) FOR ANY REASON SHALL BE LIMITED TO THEAMOUNT PAID BY THE CUSTOMER FOR THE PROGRAM AND RELATEDSERVICES PURCHASED FROM COMPANY. TO THE MAXIMUM EXTENTPERMITTED BY APPLICABLE LAW, COMPANY AND ITS SUBSIDIARIES,AFFILIATES, LICENSORS, PARTICIPATING FINANCIAL INSTITUTIONS,THIRD-PARTY CONTENT OR SERVICE PROVIDERS, DISTRIBUTORS,DEALERS OR SUPPLIERS (COLLECTIVELY, “REPRESENTATIVES”) ARENOT LIABLE FOR ANY INDIRECT, SPECIAL, INCIDENTAL, ORCONSEQUENTIAL DAMAGES (INCLUDING, BUT NOT LIMITED TO:DAMAGES FOR LOSS OF BUSINESS, LOSS OF PROFITS OR INVESTMENT,OR THE LIKE), WHETHER BASED ON BREACH OF CONTRACT, BREACHOF WARRANTY, TORT (INCLUDING NEGLIGENCE), PRODUCT LIABILITYOR OTHERWISE, EVEN IF COMPANY OR ITS REPRESENTATIVES HAVEBEEN ADVISED OF THE POSSIBILITY OF SUCH DAMAGES, AND EVEN IFA REMEDY SET FORTH HEREIN IS FOUND TO HAVE FAILED OF ITSESSENTIAL PURPOSE. COMPANY WILL NOT BE SUBJECT TO LIABILITYFOR ANY BUGS OR DAMAGES CAUSED BY EnScript® MACROS,INCLUDING EnScript MACROS INTENTIONALLY WRITTEN BY THIRDPARTIES WITH MALICIOUS CODE AND/OR COMPUTER VIRUSES. SOMESTATES DO NOT ALLOW THE LIMITATION AND/OR EXCLUSION OF
6 EnCase Forensic v5.05 User Manual
Copyright © 2006 Guidance Software, Inc. May not be copied or reproduced without the written permission of Guidance Software, Inc.
LIABILITY FOR INCIDENTAL OR CONSEQUENTIAL DAMAGES, SO THEABOVE LIMITATION OR EXCLUSION MAY NOT APPLY TO YOU. THELIMITATIONS OF DAMAGES SET FORTH ABOVE ARE FUNDAMENTALELEMENTS OF THE BASIS OF THE BARGAIN BETWEEN COMPANY ANDYOU. COMPANY WOULD NOT BE ABLE TO HAVE PROVIDED THISPROGRAM WITHOUT SUCH LIMITATIONS.
Export Restrictions
You acknowledge that the PROGRAM is subject to export and import control lawsof the United States of America and other countries. You agree that PROGRAM willbe exported, re-exported or resold only in compliance with such laws. You representand warrant that the PROGRAM shall not be used for any nuclear, chemical/biological warfare, missile end-use or training related thereto. You also agree thatit will not, without first procuring a BIS license or License Exception, (a) re-exportor release the above PROGRAM to a national of a country in Country Code D:1 orE:2; nor (b) export to Country Groups D:1 or E:2 the direct product of the PROGRAM,if such foreign produced product is subject to national security controls as identifiedon the Commerce Control List (See General Prohibition Three Sec. 736.2(b)(3) ofthe Export Administration Regulations).
U.S. Government End Users:
The PROGRAM and software documentation are “Commercial Items” and“commercial software documentation,” as such terms are used in 48 C.F.R. 12.212(SEPT 1995) and are provided to the Government (i) for acquisition by or on behalfof civilian agencies, consistent with the policy set forth in 48 C.F.R. 12.212; or (ii)for acquisition by or on behalf of units of the Department of Defense, consistent withthe policies set forth in 48 C.F.R. 227.7202-1 (JUN 1995) and 227.7203-3 (JUN1995).
General Provisions
This Agreement sets forth COMPANY's and it's Representatives' entire liability andyour exclusive remedy with respect to the PROGRAM. You acknowledge that thisAgreement is a complete statement of the agreement between you and COMPANY,and that there are no other prior or contemporaneous understandings, promises,representations, or descriptions regarding the PROGRAM or any related services.This Agreement does not limit any rights that COMPANY may have under tradesecret, copyright, patent, or other laws. The Representatives of COMPANY are notauthorized to make modifications to this Agreement, or to make any additionalrepresentations, commitments, or warranties binding on COMPANY, other than in
Legal Notice 7
Copyright © 2006 Guidance Software, Inc. May not be copied or reproduced without the written permission of Guidance Software, Inc.
writing signed by an officer of COMPANY. Accordingly, such additional statementsare not binding on COMPANY and you should not rely upon such statements. If anyprovision of this Agreement is invalid or unenforceable under applicable law, thenit is, to that extent, deemed omitted and the remaining provisions will continue infull force and effect. The validity and performance of this Agreement shall begoverned by California law (without reference to choice of law principles), exceptas to copyright and trademark matters, which are covered by federal laws. The partiesspecifically exclude the United Nations Convention on Contracts for theInternational Sale of Goods. This Agreement is deemed entered into at Los Angeles,California, and shall be construed as to its fair meaning and not strictly for or againsteither party.© 2003-2006 Guidance Software, Inc. All rights reserved. EnCase is a registeredtrademark and EnScript is a trademark of Guidance Software, Inc.
215 North Marengo Avenue, Pasadena, CA 91101Phone: 626.229.9191 Fax: 626.229.9199http://www.guidancesoftware.com

8 EnCase Forensic v5.05 User Manual
Copyright © 2006 Guidance Software, Inc. May not be copied or reproduced without the written permission of Guidance Software, Inc.
Copyright © 2006 Guidance Software, Inc. May not be copied or reproduced without the written permission of Guidance Software, Inc.
Preface
Thank you for purchasing EnCase Forensic. You now have the world's leadingtechnology for computer investigations. EnCase Forensic Version 5 (hereafter,“EnCase”) is a court-validated solution used by law enforcement, and governmentand corporate investigators worldwide. At Guidance Software, we continually striveto improve our product and at the same time add more features to ensure that youhave the best forensic software solution today and tomorrow.
Manual Organization
This manual is organized by chapters detailing the features of EnCase Version 5,media acquisition options, how to analyze and document acquired evidence andtechnical appendices (featuring forensic terminology, detailed technical information,EnScript syntax, third-party resources, and more).This manual is not a substitute for the training classes. To fully learn the EnCaseMethodology, and to earn the prestigious EnCE certification, we encourage all usersto attend our licensed training classes.
Minimum Recommended Requirements
For best performance, it is recommended that examination machines using EnCasebe configured, at a minimum, as described here:
• EnCase security key (Aladdin HASP HL dongle)• Certificates for all purchased modules• Current version of EnCase Forensic (updates are available for download from
Guidance Software's web site at http://www.guidancesoftware.com• Pentium IV 1.4 GHz or faster processor• 1 GB of RAM• Windows 2000, XP Professional or 2003 Server• At least 15 MB free hard drive space
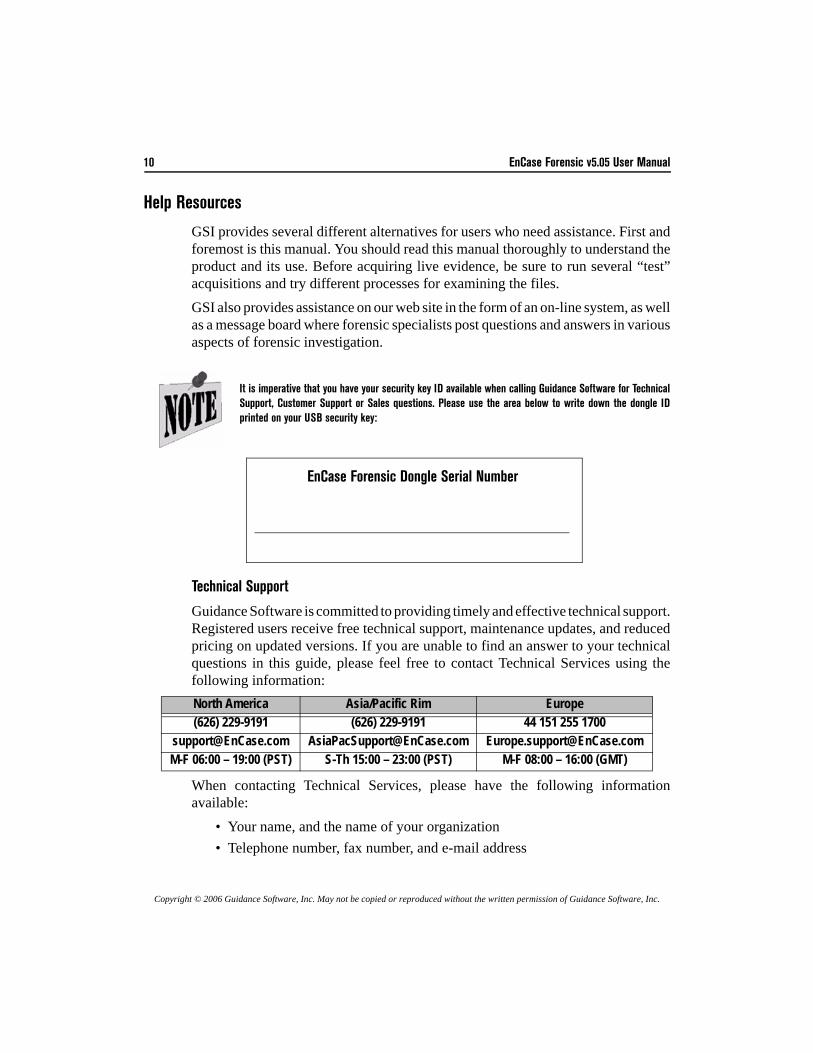
10 EnCase Forensic v5.05 User Manual
Copyright © 2006 Guidance Software, Inc. May not be copied or reproduced without the written permission of Guidance Software, Inc.
Help Resources
GSI provides several different alternatives for users who need assistance. First andforemost is this manual. You should read this manual thoroughly to understand theproduct and its use. Before acquiring live evidence, be sure to run several “test”acquisitions and try different processes for examining the files. GSI also provides assistance on our web site in the form of an on-line system, as wellas a message board where forensic specialists post questions and answers in variousaspects of forensic investigation.
Technical Support
Guidance Software is committed to providing timely and effective technical support.Registered users receive free technical support, maintenance updates, and reducedpricing on updated versions. If you are unable to find an answer to your technicalquestions in this guide, please feel free to contact Technical Services using thefollowing information:
When contacting Technical Services, please have the following informationavailable:
• Your name, and the name of your organization• Telephone number, fax number, and e-mail address
It is imperative that you have your security key ID available when calling Guidance Software for TechnicalSupport, Customer Support or Sales questions. Please use the area below to write down the dongle IDprinted on your USB security key:
North America Asia/Pacific Rim Europe(626) 229-9191 (626) 229-9191 44 151 255 1700
[email protected] [email protected] [email protected] 06:00 – 19:00 (PST) S-Th 15:00 – 23:00 (PST) M-F 08:00 – 16:00 (GMT)
EnCase Forensic Dongle Serial Number
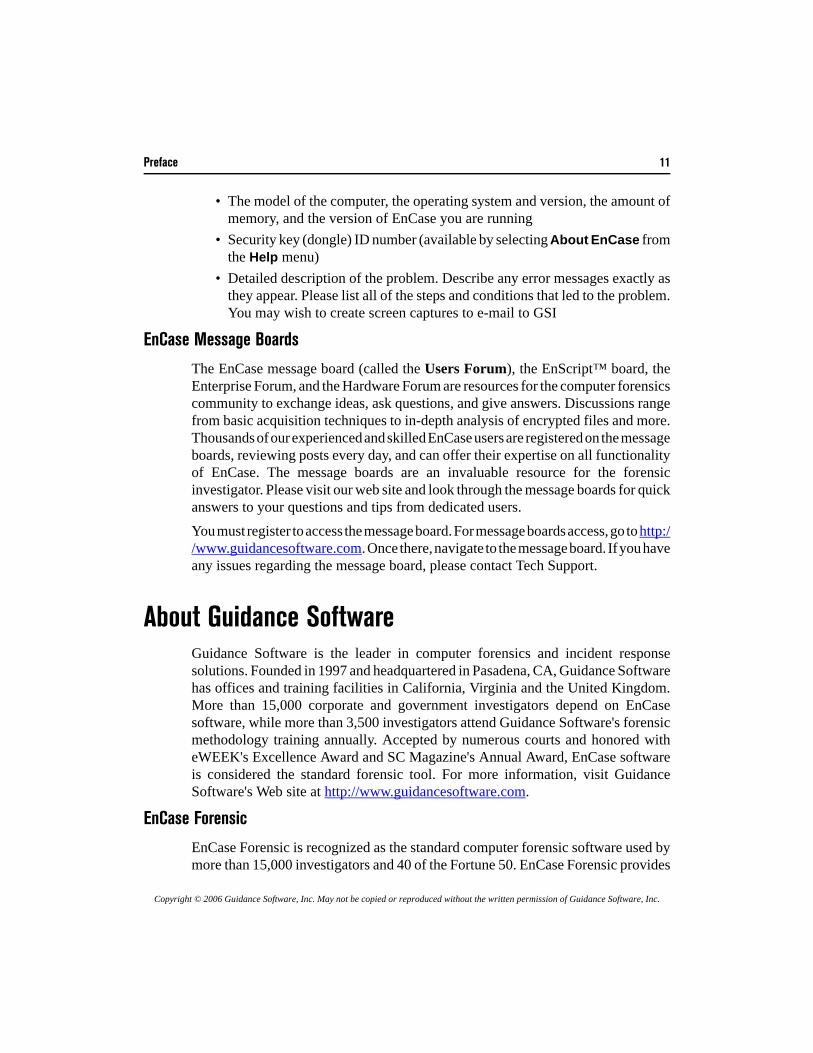
Preface 11
Copyright © 2006 Guidance Software, Inc. May not be copied or reproduced without the written permission of Guidance Software, Inc.
• The model of the computer, the operating system and version, the amount ofmemory, and the version of EnCase you are running
• Security key (dongle) ID number (available by selecting About EnCase fromthe Help menu)
• Detailed description of the problem. Describe any error messages exactly asthey appear. Please list all of the steps and conditions that led to the problem.You may wish to create screen captures to e-mail to GSI
EnCase Message Boards
The EnCase message board (called the Users Forum), the EnScript™ board, theEnterprise Forum, and the Hardware Forum are resources for the computer forensicscommunity to exchange ideas, ask questions, and give answers. Discussions rangefrom basic acquisition techniques to in-depth analysis of encrypted files and more.Thousands of our experienced and skilled EnCase users are registered on the messageboards, reviewing posts every day, and can offer their expertise on all functionalityof EnCase. The message boards are an invaluable resource for the forensicinvestigator. Please visit our web site and look through the message boards for quickanswers to your questions and tips from dedicated users.You must register to access the message board. For message boards access, go to http://www.guidancesoftware.com. Once there, navigate to the message board. If you haveany issues regarding the message board, please contact Tech Support.
About Guidance Software Guidance Software is the leader in computer forensics and incident responsesolutions. Founded in 1997 and headquartered in Pasadena, CA, Guidance Softwarehas offices and training facilities in California, Virginia and the United Kingdom.More than 15,000 corporate and government investigators depend on EnCasesoftware, while more than 3,500 investigators attend Guidance Software's forensicmethodology training annually. Accepted by numerous courts and honored witheWEEK's Excellence Award and SC Magazine's Annual Award, EnCase softwareis considered the standard forensic tool. For more information, visit GuidanceSoftware's Web site at http://www.guidancesoftware.com.
EnCase Forensic
EnCase Forensic is recognized as the standard computer forensic software used bymore than 15,000 investigators and 40 of the Fortune 50. EnCase Forensic provides
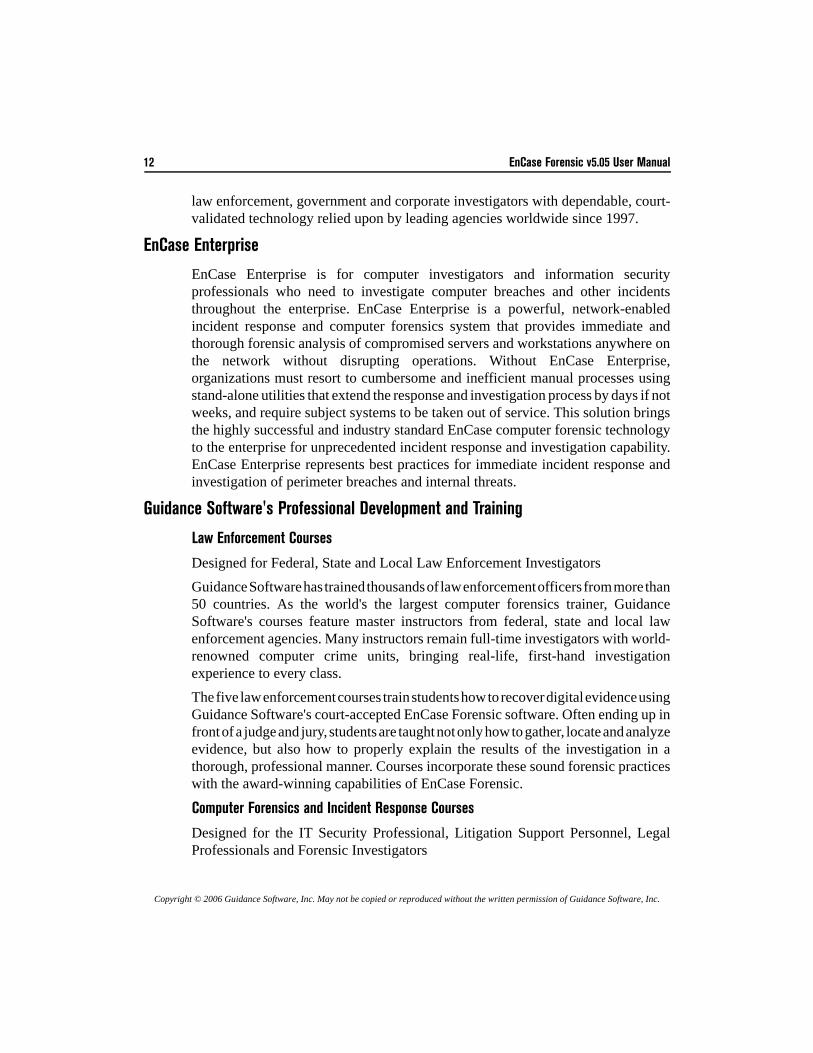
12 EnCase Forensic v5.05 User Manual
Copyright © 2006 Guidance Software, Inc. May not be copied or reproduced without the written permission of Guidance Software, Inc.
law enforcement, government and corporate investigators with dependable, court-validated technology relied upon by leading agencies worldwide since 1997.
EnCase Enterprise
EnCase Enterprise is for computer investigators and information securityprofessionals who need to investigate computer breaches and other incidentsthroughout the enterprise. EnCase Enterprise is a powerful, network-enabledincident response and computer forensics system that provides immediate andthorough forensic analysis of compromised servers and workstations anywhere onthe network without disrupting operations. Without EnCase Enterprise,organizations must resort to cumbersome and inefficient manual processes usingstand-alone utilities that extend the response and investigation process by days if notweeks, and require subject systems to be taken out of service. This solution bringsthe highly successful and industry standard EnCase computer forensic technologyto the enterprise for unprecedented incident response and investigation capability.EnCase Enterprise represents best practices for immediate incident response andinvestigation of perimeter breaches and internal threats.
Guidance Software's Professional Development and Training
Law Enforcement Courses
Designed for Federal, State and Local Law Enforcement InvestigatorsGuidance Software has trained thousands of law enforcement officers from more than50 countries. As the world's the largest computer forensics trainer, GuidanceSoftware's courses feature master instructors from federal, state and local lawenforcement agencies. Many instructors remain full-time investigators with world-renowned computer crime units, bringing real-life, first-hand investigationexperience to every class. The five law enforcement courses train students how to recover digital evidence usingGuidance Software's court-accepted EnCase Forensic software. Often ending up infront of a judge and jury, students are taught not only how to gather, locate and analyzeevidence, but also how to properly explain the results of the investigation in athorough, professional manner. Courses incorporate these sound forensic practiceswith the award-winning capabilities of EnCase Forensic.
Computer Forensics and Incident Response Courses
Designed for the IT Security Professional, Litigation Support Personnel, LegalProfessionals and Forensic Investigators
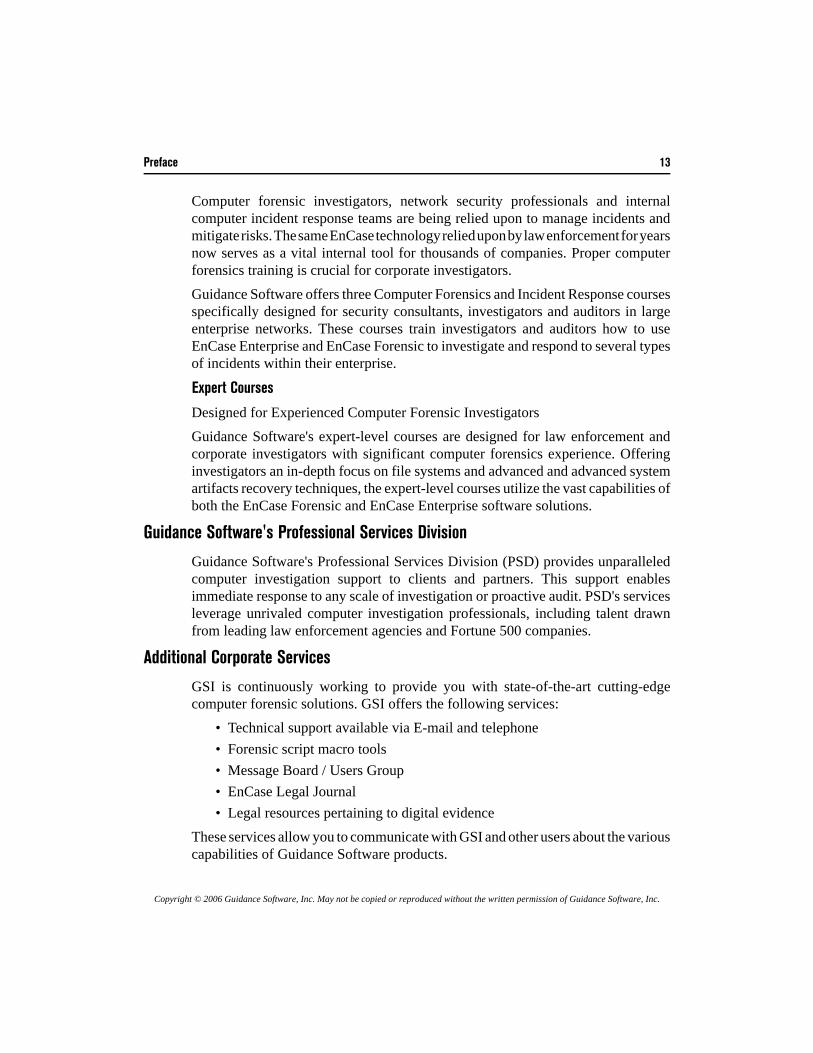
Preface 13
Copyright © 2006 Guidance Software, Inc. May not be copied or reproduced without the written permission of Guidance Software, Inc.
Computer forensic investigators, network security professionals and internalcomputer incident response teams are being relied upon to manage incidents andmitigate risks. The same EnCase technology relied upon by law enforcement for yearsnow serves as a vital internal tool for thousands of companies. Proper computerforensics training is crucial for corporate investigators.Guidance Software offers three Computer Forensics and Incident Response coursesspecifically designed for security consultants, investigators and auditors in largeenterprise networks. These courses train investigators and auditors how to useEnCase Enterprise and EnCase Forensic to investigate and respond to several typesof incidents within their enterprise.
Expert Courses
Designed for Experienced Computer Forensic InvestigatorsGuidance Software's expert-level courses are designed for law enforcement andcorporate investigators with significant computer forensics experience. Offeringinvestigators an in-depth focus on file systems and advanced and advanced systemartifacts recovery techniques, the expert-level courses utilize the vast capabilities ofboth the EnCase Forensic and EnCase Enterprise software solutions.
Guidance Software's Professional Services Division
Guidance Software's Professional Services Division (PSD) provides unparalleledcomputer investigation support to clients and partners. This support enablesimmediate response to any scale of investigation or proactive audit. PSD's servicesleverage unrivaled computer investigation professionals, including talent drawnfrom leading law enforcement agencies and Fortune 500 companies.
Additional Corporate Services
GSI is continuously working to provide you with state-of-the-art cutting-edgecomputer forensic solutions. GSI offers the following services:
• Technical support available via E-mail and telephone• Forensic script macro tools• Message Board / Users Group• EnCase Legal Journal• Legal resources pertaining to digital evidence
These services allow you to communicate with GSI and other users about the variouscapabilities of Guidance Software products.

14 EnCase Forensic v5.05 User Manual
Copyright © 2006 Guidance Software, Inc. May not be copied or reproduced without the written permission of Guidance Software, Inc.

Copyright © 2006 Guidance Software, Inc. May not be copied or reproduced without the written permission of Guidance Software, Inc.
What’s New inEnCase Version 5
Enhanced User Interface
The Version 5 GUI is designed to better organize new and existing EnCasefunctionality. Windows, available from the View pull-down menu in Version 4 arenow accessible via submenus named for the pane in which they appear, as illustratedin Figure 1-1.
Figure 1-1: Expanded View Menu
Each submenu in turn, relates to a display GUI on the main page. For example, theTable Pane submenu contains six selections, including Table, Report, Gallery and
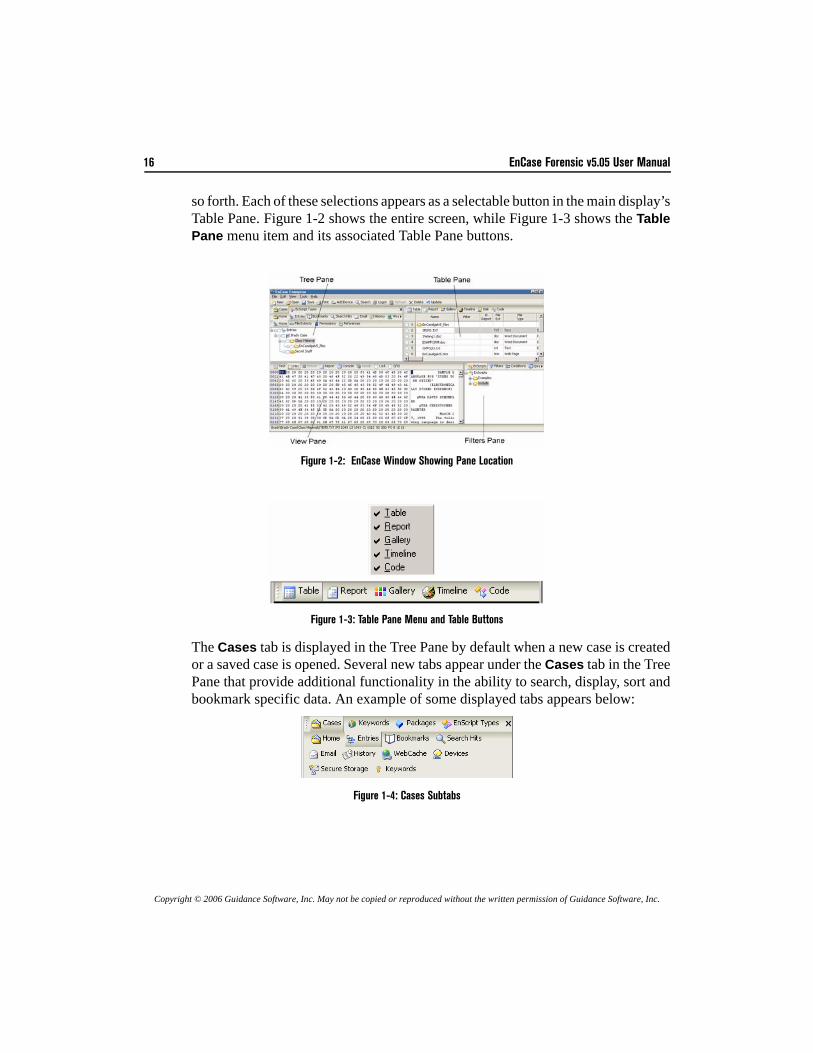
16 EnCase Forensic v5.05 User Manual
Copyright © 2006 Guidance Software, Inc. May not be copied or reproduced without the written permission of Guidance Software, Inc.
so forth. Each of these selections appears as a selectable button in the main display’sTable Pane. Figure 1-2 shows the entire screen, while Figure 1-3 shows the TablePane menu item and its associated Table Pane buttons.
Figure 1-2: EnCase Window Showing Pane Location
Figure 1-3: Table Pane Menu and Table Buttons
The Cases tab is displayed in the Tree Pane by default when a new case is createdor a saved case is opened. Several new tabs appear under the Cases tab in the TreePane that provide additional functionality in the ability to search, display, sort andbookmark specific data. An example of some displayed tabs appears below:
Figure 1-4: Cases Subtabs
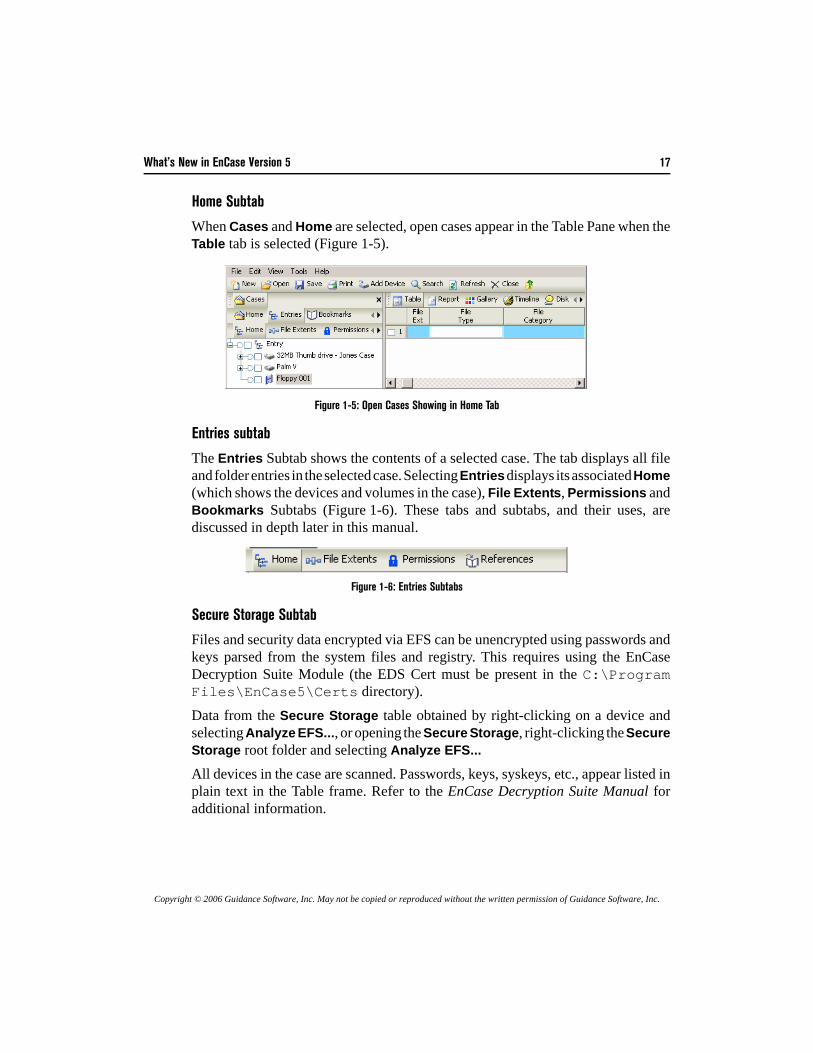
What’s New in EnCase Version 5 17
Copyright © 2006 Guidance Software, Inc. May not be copied or reproduced without the written permission of Guidance Software, Inc.
Home Subtab
When Cases and Home are selected, open cases appear in the Table Pane when theTable tab is selected (Figure 1-5).
Figure 1-5: Open Cases Showing in Home Tab
Entries subtab
The Entries Subtab shows the contents of a selected case. The tab displays all fileand folder entries in the selected case. Selecting Entries displays its associated Home(which shows the devices and volumes in the case), File Extents, Permissions andBookmarks Subtabs (Figure 1-6). These tabs and subtabs, and their uses, arediscussed in depth later in this manual.
Figure 1-6: Entries Subtabs
Secure Storage Subtab
Files and security data encrypted via EFS can be unencrypted using passwords andkeys parsed from the system files and registry. This requires using the EnCaseDecryption Suite Module (the EDS Cert must be present in the C:\ProgramFiles\EnCase5\Certs directory). Data from the Secure Storage table obtained by right-clicking on a device andselecting Analyze EFS..., or opening the Secure Storage, right-clicking the SecureStorage root folder and selecting Analyze EFS... All devices in the case are scanned. Passwords, keys, syskeys, etc., appear listed inplain text in the Table frame. Refer to the EnCase Decryption Suite Manual foradditional information.
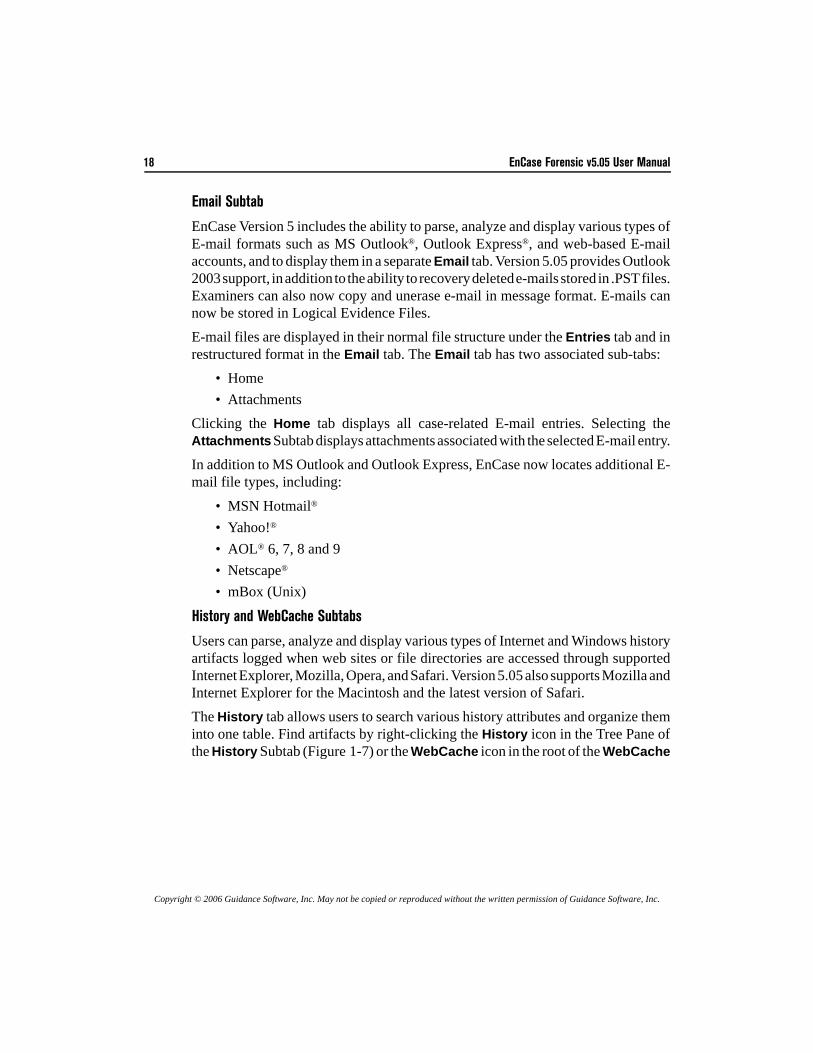
18 EnCase Forensic v5.05 User Manual
Copyright © 2006 Guidance Software, Inc. May not be copied or reproduced without the written permission of Guidance Software, Inc.
Email Subtab
EnCase Version 5 includes the ability to parse, analyze and display various types ofE-mail formats such as MS Outlook®, Outlook Express®, and web-based E-mailaccounts, and to display them in a separate Email tab. Version 5.05 provides Outlook2003 support, in addition to the ability to recovery deleted e-mails stored in .PST files.Examiners can also now copy and unerase e-mail in message format. E-mails cannow be stored in Logical Evidence Files.E-mail files are displayed in their normal file structure under the Entries tab and inrestructured format in the Email tab. The Email tab has two associated sub-tabs:
• Home• Attachments
Clicking the Home tab displays all case-related E-mail entries. Selecting theAttachments Subtab displays attachments associated with the selected E-mail entry.In addition to MS Outlook and Outlook Express, EnCase now locates additional E-mail file types, including:
• MSN Hotmail®
• Yahoo!®
• AOL® 6, 7, 8 and 9• Netscape®
• mBox (Unix)
History and WebCache Subtabs
Users can parse, analyze and display various types of Internet and Windows historyartifacts logged when web sites or file directories are accessed through supportedInternet Explorer, Mozilla, Opera, and Safari. Version 5.05 also supports Mozilla andInternet Explorer for the Macintosh and the latest version of Safari.The History tab allows users to search various history attributes and organize theminto one table. Find artifacts by right-clicking the History icon in the Tree Pane ofthe History Subtab (Figure 1-7) or the WebCache icon in the root of the WebCache
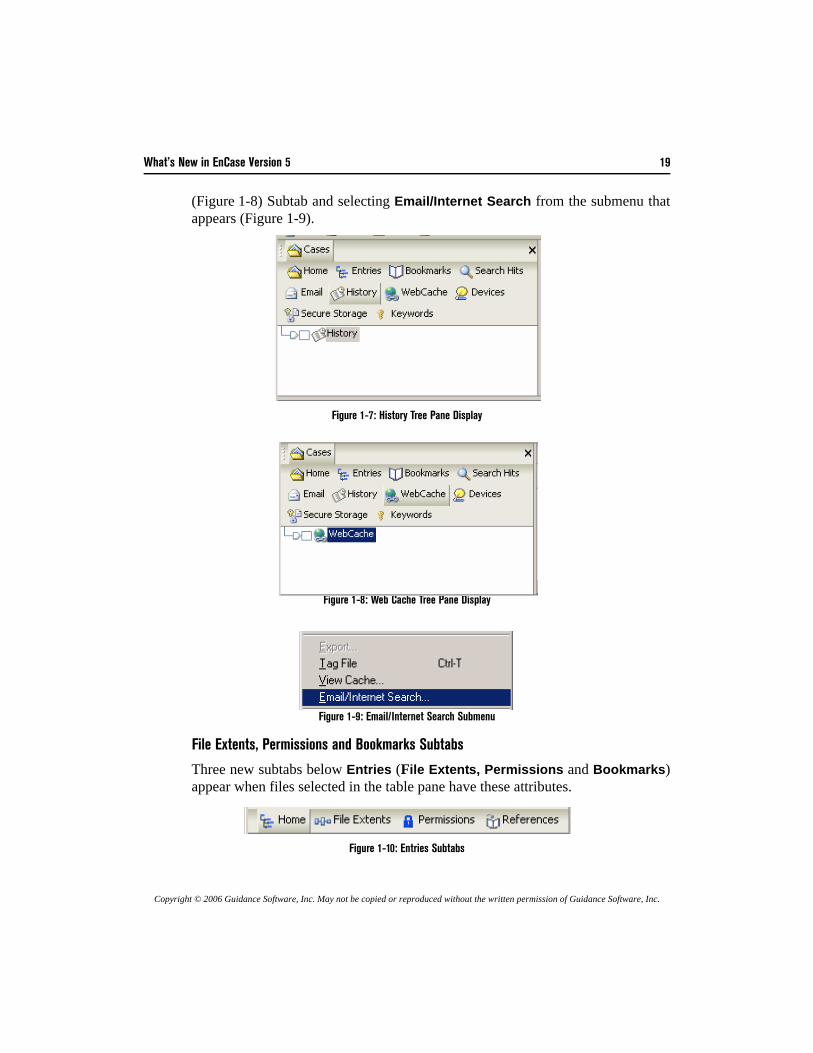
What’s New in EnCase Version 5 19
Copyright © 2006 Guidance Software, Inc. May not be copied or reproduced without the written permission of Guidance Software, Inc.
(Figure 1-8) Subtab and selecting Email/Internet Search from the submenu thatappears (Figure 1-9).
Figure 1-7: History Tree Pane Display
Figure 1-8: Web Cache Tree Pane Display
Figure 1-9: Email/Internet Search Submenu
File Extents, Permissions and Bookmarks Subtabs
Three new subtabs below Entries (File Extents, Permissions and Bookmarks)appear when files selected in the table pane have these attributes.
Figure 1-10: Entries Subtabs
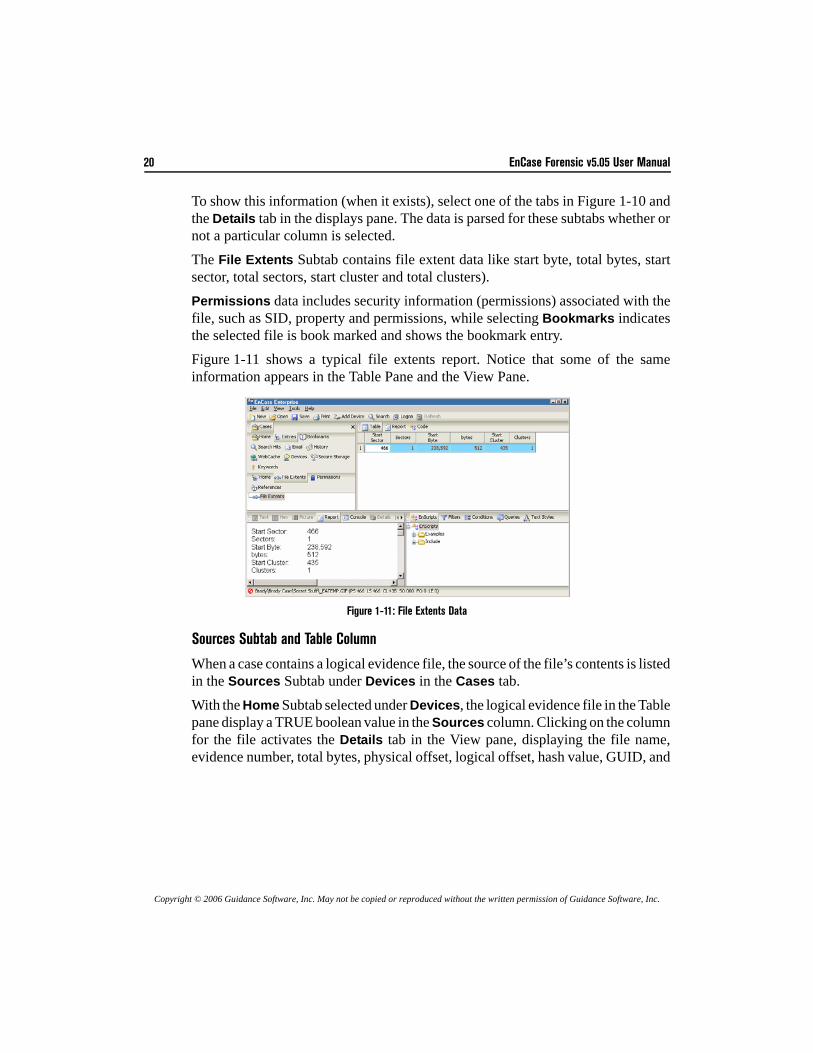
20 EnCase Forensic v5.05 User Manual
Copyright © 2006 Guidance Software, Inc. May not be copied or reproduced without the written permission of Guidance Software, Inc.
To show this information (when it exists), select one of the tabs in Figure 1-10 andthe Details tab in the displays pane. The data is parsed for these subtabs whether ornot a particular column is selected. The File Extents Subtab contains file extent data like start byte, total bytes, startsector, total sectors, start cluster and total clusters). Permissions data includes security information (permissions) associated with thefile, such as SID, property and permissions, while selecting Bookmarks indicatesthe selected file is book marked and shows the bookmark entry.Figure 1-11 shows a typical file extents report. Notice that some of the sameinformation appears in the Table Pane and the View Pane.
Figure 1-11: File Extents Data
Sources Subtab and Table Column
When a case contains a logical evidence file, the source of the file’s contents is listedin the Sources Subtab under Devices in the Cases tab.
With the Home Subtab selected under Devices, the logical evidence file in the Tablepane display a TRUE boolean value in the Sources column. Clicking on the columnfor the file activates the Details tab in the View pane, displaying the file name,evidence number, total bytes, physical offset, logical offset, hash value, GUID, and
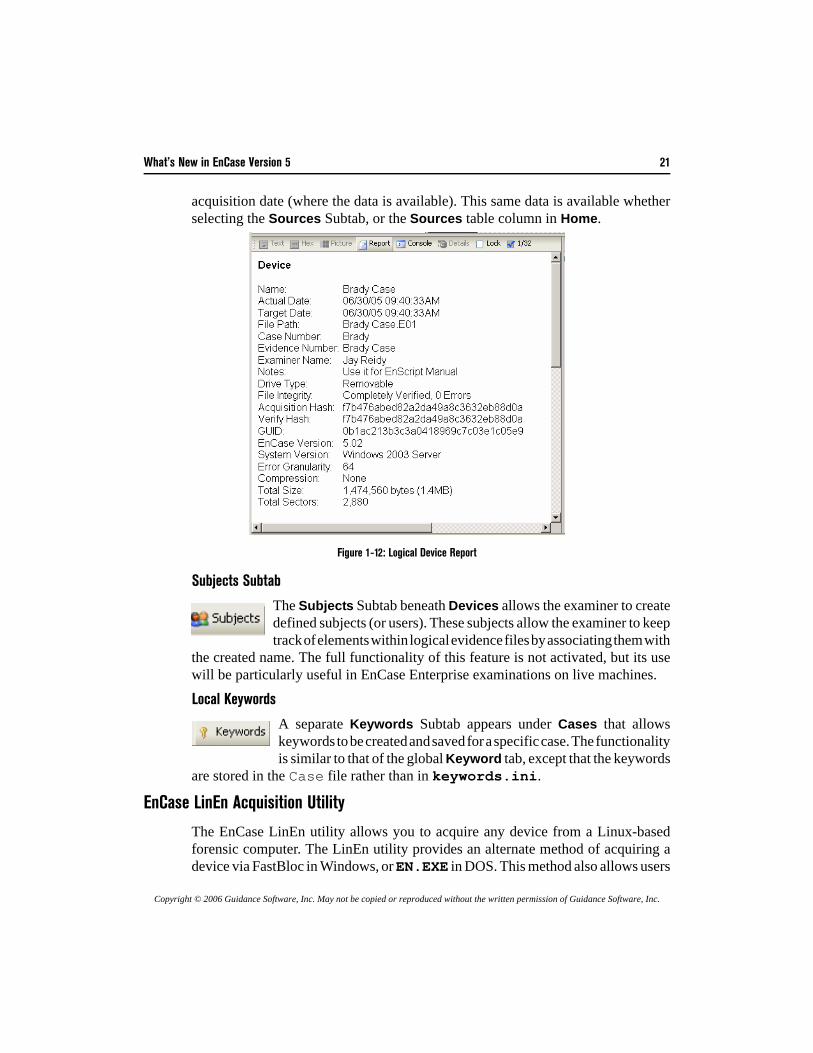
What’s New in EnCase Version 5 21
Copyright © 2006 Guidance Software, Inc. May not be copied or reproduced without the written permission of Guidance Software, Inc.
acquisition date (where the data is available). This same data is available whetherselecting the Sources Subtab, or the Sources table column in Home.
Figure 1-12: Logical Device Report
Subjects Subtab
The Subjects Subtab beneath Devices allows the examiner to createdefined subjects (or users). These subjects allow the examiner to keeptrack of elements within logical evidence files by associating them with
the created name. The full functionality of this feature is not activated, but its usewill be particularly useful in EnCase Enterprise examinations on live machines.
Local Keywords
A separate Keywords Subtab appears under Cases that allowskeywords to be created and saved for a specific case. The functionalityis similar to that of the global Keyword tab, except that the keywords
are stored in the Case file rather than in keywords.ini.
EnCase LinEn Acquisition Utility
The EnCase LinEn utility allows you to acquire any device from a Linux-basedforensic computer. The LinEn utility provides an alternate method of acquiring adevice via FastBloc in Windows, or EN.EXE in DOS. This method also allows users
22 EnCase Forensic v5.05 User Manual
Copyright © 2006 Guidance Software, Inc. May not be copied or reproduced without the written permission of Guidance Software, Inc.
to hash any device present on the Linux operating system it is running on. With theintroduction of LinEn, users are now able to acquire Linux machines via a crossovercable from the Windows EnCase client by putting it into Server Mode. LinEn isdependent on the distribution of Linux it is installed on. In Version 5.05, ATA supporthas been added to LinEn functionality, working similarly as to the way it does in theDOS version of EnCase (EN.EXE). See the section of this document titled, “EnCaseLinen Utility” for more detailed information.
Additional File System Support
EnCase Version 5 supports TiVo® 1 and TiVo 2 file systems, as well as AIX JournalingFile System (JFS1 and JFS2) and LVM8. For JFS file systems, you will need to runthe Scan for LVM option on the device to see the file structure.
Symbolic Link Table Column
In Unix-based file systems (including AIX), symbolic, or soft links are files, similarto Windows .LNK shortcut files, that point to other files. Symbolic links do notcontain the data found in the target file, but can provide links to directories, or fileson remote devices. A column has been added to the Table view that indicates the pathindicated in the symbolic link.
Ability to Create ENBCD From ISO Image
Using the Create Boot Disk... option in the Tools menu, you can select an ISO imageto add EN.EXE or the LinEn executable to, creating an image that can be burned toan EnCase Boot CD.
Go To Parent
Version 5 contains a feature that allows the user to go upward in the folder structureto the parent folder in four different ways:
• Right click the selected folder then select Go To Parent.• Hitting the [Backspace] key.• Selecting Go To Parent from the Edit menu.• Clicking on the icon on the top toolbar with the folder and green arrow.
What’s New in EnCase Version 5 23
Copyright © 2006 Guidance Software, Inc. May not be copied or reproduced without the written permission of Guidance Software, Inc.
Acquisition Options
Quick Reacquisition Option
Reacquiring an evidence file to resize file segments is much faster if the QuickReacquisition box is check. Using this option, a user can reacquire a file whilechanging segment size. Other acquisition options, such as compression, block size,granularity, assigning name or evidence number are grayed out and unavailable.
Read Ahead
The Read Ahead feature is available for EnCase Enterprise users only. It is grayedout and unavailable in EnCase Forensic.
Granularity
Historically during an acquisition, if a read error is found on a hard disk, the entiredata block containing the read error is zeroed out by EnCase. Using granularity, theinvestigator has the flexibility of specifying the number of sectors within thecorrupted data block to be zeroed out. This means that instead of all the sectors beingzeroed out whenever there are read errors, the user can now specify the degree towhich the analysis is refined by setting the granularity from the default 64 sectorsfor hard drives (16 sectors for CDs and DVDs), down to 1. Using a finer setting willdecrease the acquisition speed of the evidence file. The settings and subsequentnumber of sectors zeroed out are described in the table below:
Block Size
The block size used to calculate the CRC value can be increased from the defaultof 64 by using the Block Size option in the acquisition options window. Granularityshould always be a value less than the selected block size. Additional informationis available in the Acquisition sections of this document.
Restart Acquisition
The Restart Acquisition option allows a user to continue a Windows-basedacquisition from the exact point where it was terminated. It is designed so if aninvestigator manually terminates the acquisition in EnCase, the acquisition can berestarted by pointing the acquisition to the location where the already acquiredevidence files reside. This option is available in EnCase Forensic as well as EnCaseEnterprise.
Granularity setting 64 32 16 8 4 2 1Sectors zeroed perblock
64 32 16 8 4 4 1
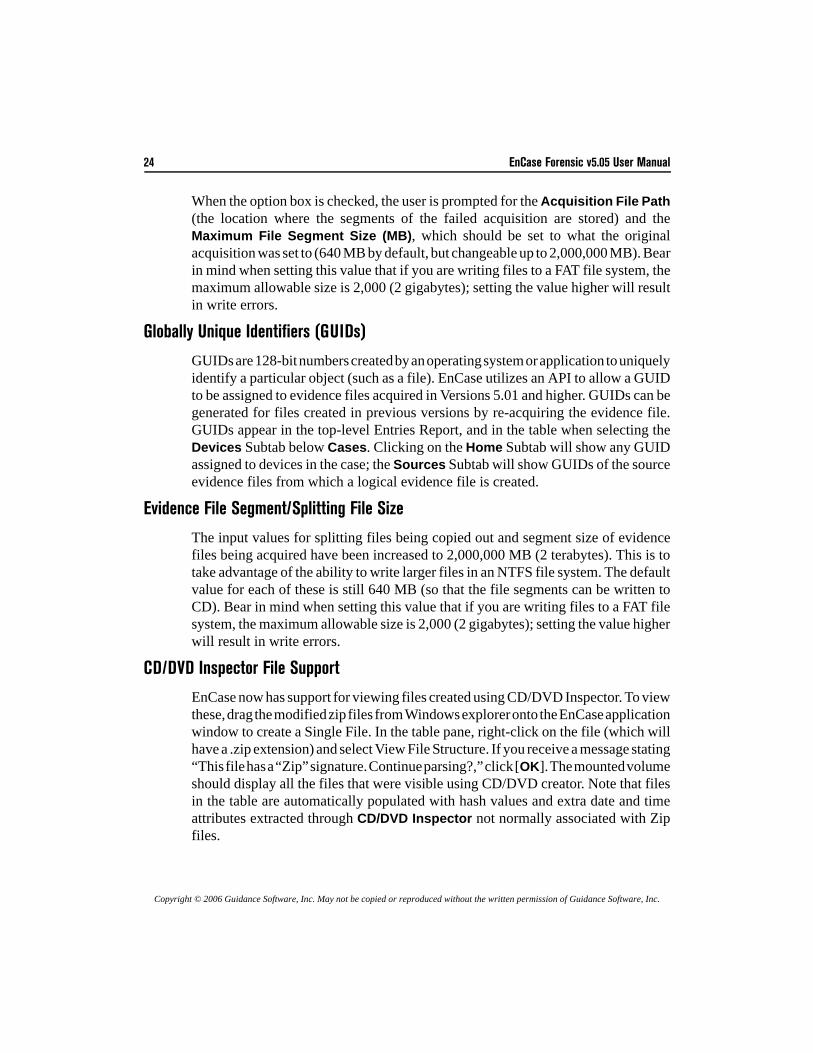
24 EnCase Forensic v5.05 User Manual
Copyright © 2006 Guidance Software, Inc. May not be copied or reproduced without the written permission of Guidance Software, Inc.
When the option box is checked, the user is prompted for the Acquisition File Path(the location where the segments of the failed acquisition are stored) and theMaximum File Segment Size (MB), which should be set to what the originalacquisition was set to (640 MB by default, but changeable up to 2,000,000 MB). Bearin mind when setting this value that if you are writing files to a FAT file system, themaximum allowable size is 2,000 (2 gigabytes); setting the value higher will resultin write errors.
Globally Unique Identifiers (GUIDs)
GUIDs are 128-bit numbers created by an operating system or application to uniquelyidentify a particular object (such as a file). EnCase utilizes an API to allow a GUIDto be assigned to evidence files acquired in Versions 5.01 and higher. GUIDs can begenerated for files created in previous versions by re-acquiring the evidence file.GUIDs appear in the top-level Entries Report, and in the table when selecting theDevices Subtab below Cases. Clicking on the Home Subtab will show any GUIDassigned to devices in the case; the Sources Subtab will show GUIDs of the sourceevidence files from which a logical evidence file is created.
Evidence File Segment/Splitting File Size
The input values for splitting files being copied out and segment size of evidencefiles being acquired have been increased to 2,000,000 MB (2 terabytes). This is totake advantage of the ability to write larger files in an NTFS file system. The defaultvalue for each of these is still 640 MB (so that the file segments can be written toCD). Bear in mind when setting this value that if you are writing files to a FAT filesystem, the maximum allowable size is 2,000 (2 gigabytes); setting the value higherwill result in write errors.
CD/DVD Inspector File Support
EnCase now has support for viewing files created using CD/DVD Inspector. To viewthese, drag the modified zip files from Windows explorer onto the EnCase applicationwindow to create a Single File. In the table pane, right-click on the file (which willhave a .zip extension) and select View File Structure. If you receive a message stating“This file has a “Zip” signature. Continue parsing?,” click [OK]. The mounted volumeshould display all the files that were visible using CD/DVD creator. Note that filesin the table are automatically populated with hash values and extra date and timeattributes extracted through CD/DVD Inspector not normally associated with Zipfiles.
What’s New in EnCase Version 5 25
Copyright © 2006 Guidance Software, Inc. May not be copied or reproduced without the written permission of Guidance Software, Inc.
Logon User Identification
A new Mark Logon Users option in the Scan Local Machine EnScript dialog boxallows the investigator to identify the user currently logged on to the forensic machinewith a double asterisk. After the script is run, accessing the Network Subtab belowthe Snapshot tab in Bookmarks will show the network users in the table, with thedouble asterisks following the name of the currently logged on user.
EnCase Installation Files and Folders
When EnCase is installed, a copy of the installer (Setup 5.05.exe) isautomatically placed in the root of the application directory (typically C:\ProgramFiles\EnCase5). The Scripts folder name has been changed to EnScripts. As of Version 5.05, there are twelve folders created in the root installation directory,depending on which modules are installed:
• BackupWith AutoSave turned on in Global Options, the backup case file (*.CBAK)will be automatically saved to this folder. • CacheThe Cache folder holds temporary ISO images when using the CD/DVDModule• CertsThe Certs folder is the repository for certificates for all modules such asFastBloc SE, VFS, PDE, EDS, and the encase.Pcert file used for securityauthentication.• ConfigThe Config folder contains all the .INI files that maintain the EnCaseconfiguration settings.• EnScriptsEnScripts that are shipped with EnCase are stored in this folder by default.• ExportThe Export folder is the Default Export Folder for any files marked for exportthrough an EnScript, or for table data, keywords, etc. exported from EnCase.It can be changed through the Case Options menu when opening a new case,or in the Case Options tab when selecting Options from the Tools menu.
26 EnCase Forensic v5.05 User Manual
Copyright © 2006 Guidance Software, Inc. May not be copied or reproduced without the written permission of Guidance Software, Inc.
• Hash SetsThe Hash Sets folder is the default storage area for Hash Sets imported intoor created in EnCase.• HelpThis folder contains the WinHelp files accessed by selecting Help from theHelp pull-down menu. This folder must reside in this location for the Help filesto be accessed by EnCase.• KeysModule cert files and encryption keys are stored in this folder.• LicenseThe License folder is used for storage of licenses used to define permissionsfor Packages.• StorageThis folder is used as a temporary repository of data related to certain EnScriptfunctions. It is empty at the time of installation, and is purged automaticallyby EnCase. There is no need to place anything in or remove anything from thisfolder. • TempThe Temp folder is the default Temporary Folder for files sent throughEnCase to a viewer, where they are copied out and stored until closed fromthe viewer. It can be changed through the Case Options menu when openinga new case, or in the Case Options tab when selecting Options from the Toolsmenu.
Export and Import of Bookmarks
EnCase has introduced a new feature in the Bookmarks tab that allows the user toimport and export bookmarks. This feature allows the user to submit bookmarks toanother investigator for review without the cumbersome task of including keywords,search hits, etc. Multiple investigators can also use this to access bookmarks whenexamining different aspects of an evidence file without having to create multiple casefiles. See the "Bookmarks", on Page 329 of this document for additional information.
Flag Lost Files Option
When an acquired drive contains many lost clusters, the time it takes to open theevidence file is significantly longer because EnCase marks and attempts to resolvethese lost files. Version 5 provides a Flag Lost Files checkbox in the Global tab of
What’s New in EnCase Version 5 27
Copyright © 2006 Guidance Software, Inc. May not be copied or reproduced without the written permission of Guidance Software, Inc.
the Tools Options menu. By default, this option is unchecked which means lostclusters are treated as unallocated space, drastically decreasing the amount of timerequired to process the volume. If this option is checked, EnCase will tag all lostclusters in Disk view (indicated by yellow blocks with a question mark). This optionmust be set before an evidence file is added to the case.
Keyword Tester
When creating a keyword, the user can test a search string against a known file byclicking the Keyword Tester tab. This is also useful for testing the ability to searchGREP expressions or foreign languages. More information is available in"Bookmarks", on Page 329 of this document.
Ability to Create a Logical Evidence File
Users can now isolate files from inside an evidence file and access them through alogical evidence file. When the desired files are blue-checked in the table, rightclicking anywhere in the Tree Pane will show the option to Create Logical EvidenceFile.... Logical Evidence Files can contain Single Files, files from a previewed device,files from evidence files, or a combination of these. In Version 5.05, Logical Evidence File support is upgraded to provide users withoptions for retaining file content. This includes folder content and hash valueomission, as well as making them accessible through EnScript.For more information, refer to the Navigating EnCase section of this document.
Single Files Option
The Single Files option allows the creation of a logical evidence file containing anumber of external files. When active, an icon will appear in the Tree Pane, called“Single Files”. The user can add files to the folder, and then save the file by blue-checking files within the Single Files, right-clicking and selecting Acquire LogicalEvidence File.
Filter Conditions
A new tab, Conditions, has been added to the Filters Pane. Conditions allow the userto specify parameters for filtering the files viewable in the table. Where Filters requirethe user to enter code for the filter conditions, the new tab allows the user to createfilters based on pre-set conditions, selectable from a menu. As with Filters,Conditions can be combined using the Queries tab in the Filter Pane. See "EnScriptand Filters", on Page 269 for more information.
28 EnCase Forensic v5.05 User Manual
Copyright © 2006 Guidance Software, Inc. May not be copied or reproduced without the written permission of Guidance Software, Inc.
EnScripts Added to Filter Pane
An EnScripts tab has been added to the Filter Pane which allows immediate accessto the EnScripts regardless of what is selected in the Tree Pane.
PDF and Windows Help Files
When EnCase Version 5 is installed from the CD, a PDF version of the manual andWindows help files are installed. These can be accessed from the EnCase Help pull-down menu. Users can now search or follow hypertext links to the HTML help filesthrough the Help menu for topics pertaining to EnCase, or open the PDF version ofthe manual, provided Adobe Acrobat Reader is installed on the forensic machine.Updated Help files and the PDF manual are available from Guidance Software’s website on the Downloads page.In Version 5.05, EnCase Help supports the .CHM file format. A .CHM file increasesfunctionality by incorporating a set of web pages written in a subset of HTML anda hyperlinked table of contents. Files in .CHM format are optimized for reading andthe files are heavily indexed.
Device Configuration Overlay (DCO) and Host Protected Area (HPA) Support
Version 5.05 has the ability for users to detect and image DCO and/or HPA areas onany ATA-6 or higher-level disk drive. These areas are detected using EN.EXE (DOS),LinEn (Linux), or the FastBloc SE module; they are not detected using EnCase inWindows with a hardware write-block device. EnCase now shows if a DCO area exists in addition to the HPA area on a target drive.HPA is a special area located at the end of a disk. It is usually configured so the casualobserver cannot see it, and can only be accessed by reconfiguring the disk. HPA andDCO are extremely similar; the difference is the SET_MAX_ADDRESS bit settingthat allows recovery of a removed HPA at reboot. EnCase sees both areas if they co-exist on a hard drive. For more information, see the EnCase Modules Manual or thechapters in this document on EnCase for DOS and EnCase Linen Utility.
NOTE: When upgrading from an earlier version of EnCase to Version 5.05, delete the existing .hlp file located inthe ...\EnCase5\Help directory and replace it with the latest version of the file. The file can be found at http://www.guidancesofatwre.com/support/downloads.asp to find the most up to date file.
What’s New in EnCase Version 5 29
Copyright © 2006 Guidance Software, Inc. May not be copied or reproduced without the written permission of Guidance Software, Inc.
Virtual PC Images
Microsoft Virtual PC 2004 permits a user to run multiple PC-based operating systemssimultaneously on one workstation. Users can save images of these virtual PCs ina fashion similar to VMware. EnCase treats Microsoft Virtual PC 2004 images asdevices that can be added, parsed and submitted to the same investigation as physicaldevices. Virtual PC is capable of creating flat files and sparse files, both of which are supportedtransparently by EnCase.Virtual PC files are added via the Add Devices dialog box. From the dialog, navigateto the folder containing the primary Virtual PC files (*.vhd) and add them as anEnCase evidence file. See the Navigating EnCase chapter of this document foradditional information.
Support for SlySoft CloneCD™ Images
Version 5.05 allows users to add raw images of Raw CD-ROM images created usingSlySoft CloneCD. When adding these images, users can specify the Pre-Sector Bytes,Post-Sector Bytes and Start Byte of the image.
PC Guardian Access
PC Guardian software provides users with full-volume encryption. The softwarecontrols access to the operating system and encrypts every sector of a computer harddrive including temp files, system files and unused disk space.EnCase Enterprise can see a PC Guardian drive decrypted since the drive has alreadybeen booted and the server is deployed to it, but in version 5.05, evidence files ofhard drives encrypted with PC Guardian can be decrypted in EnCase Forensic usingthe new PC Guardian Access tool. This tool provides the ability to decrypt a physicalhard drive that has been encrypted with PC Guardian software by detecting that itis protected and providing for input of the decryption key user name and passwordcombination to decrypt the data.
Additional Servlet Support
EnCase Enterprise and FIM Version 5.05 now support servlets for AIX operatingsystem version 4.3, 5.1, 5.2 and 5.3. The new servlets have the same functionalityas previous *nix servlets, and provide system-level file system access and the abilityto conduct remediation.
30 EnCase Forensic v5.05 User Manual
Copyright © 2006 Guidance Software, Inc. May not be copied or reproduced without the written permission of Guidance Software, Inc.
This software automatically determines which drivers and servlets to install. If themachine has a 64-bit processor, the process installs two servlets and two drivers.Also new to Version 5.05 is support for an Apple OSX servlet. The servlet can bedeployed to Apple computers on a LAN running version OSX.2 and higher.For information on deploying the AIX or OSX servlet, refer to the Servlet DeploymentGuide section of the EnCase Enterprise or EnCase FIM Administrator Manual
CD/DVD Module
This EnCase cert-based module provides the user with the ability to select entries,reports and other selected data and writes to a CD or DVD. This includes the abilityto select and burn EnCase Evidence files (.E01) and Logical Evidence Files (.L01),or to write them to media at acquisition. For more information, see the EnCaseModules Manual.
FastBloc SE Module
The new FastBloc SE module provides a collection of disk controller utilities suchas the same safe subject media preview and acquisition in Windows to an EnCaseevidence file currently available from FastBloc hardware, and wiping and restoringof drives attached to the PCI controller card. IDE, SCSI, USB and FireWire drivesattached to supported PCI controller cards are write-blocked when configured as suchby the module. Wiping and restoring of drives attached to the controller is alsopossible, with the logical restore retaining the same hash value as the original drive.FastBloc SE also allows access to HPA and DCO areas of a suspect drive in Windows(this functionality is not available using a hardware write-blocker with EnCase inWindows). For detail, refer to the EnCase Modules Manual.
Improved Enterprise Snapshot Functionality
The Enterprise Snapshot function has been updated to provide improved root kitdetection support, improved .dll analysis, the ability to detect other communicationprotocols and hidden port detection.
Enhanced EnScript Support
Newly added EnScript support gives user the ability to scan a directory listing ofmounted shared files. In addition to a new EnScript interface to the Email view, thereis also EnScript support for sockets in EnCase Enterprise. Users can now useEnScripts to recover folders, as well as for searching and hashing.
Copyright © 2006 Guidance Software, Inc. May not be copied or reproduced without the written permission of Guidance Software, Inc.
Installing EnCase
Two CDs ship with EnCase Enterprise, Examiner and SAFE Software. Updates areavailable at http://www.guidancesoftware.com. A security key ID and e-mailaddress is required to download. Instructions for installing the SAFE are in theEnCase Enterprise Administrator Manual.
The EnCase Installation CD and Autorun
The EnCase Installation CD is set to start when placed in the drive. If Autorun is turnedoff, start Windows Explorer, go to the CD-ROM icon and double-click SETUP.EXE.
Disk 1 CD Installation Menu and Contents
Security Key Drivers Installation
• Ensure that the dongle is not attached to the machine. Insert the EnCase CD-ROM into the CD-ROM drive.
• If Autorun is enabled, the EnCase splash screen automatically appears.
If the Examiner or SAFE is running Windows XP SP2, configure Windows Firewall for proper operation ofEnCase. Refer to the whitepaper, Enabling EE SAFE and Servlet Traffic on Windows XP SP2, at http://www.guidancesoftware.com.
Install Examiner Software Installs EnCase Version 5 ExaminerSecurity Key Drivers Installs the latest Aladdin Security Key drivers
View Manual (PDF) The User Manual in Adobe Acrobat PDF formatView White Papers Guidance Software’s white papers
View Help File The WinHelp file for EnCaseVisit Guidance Software Direct link to Guidance Software’s web site
Install Adobe Acrobat Installs Acrobat Reader 5.0 to read PDF documents
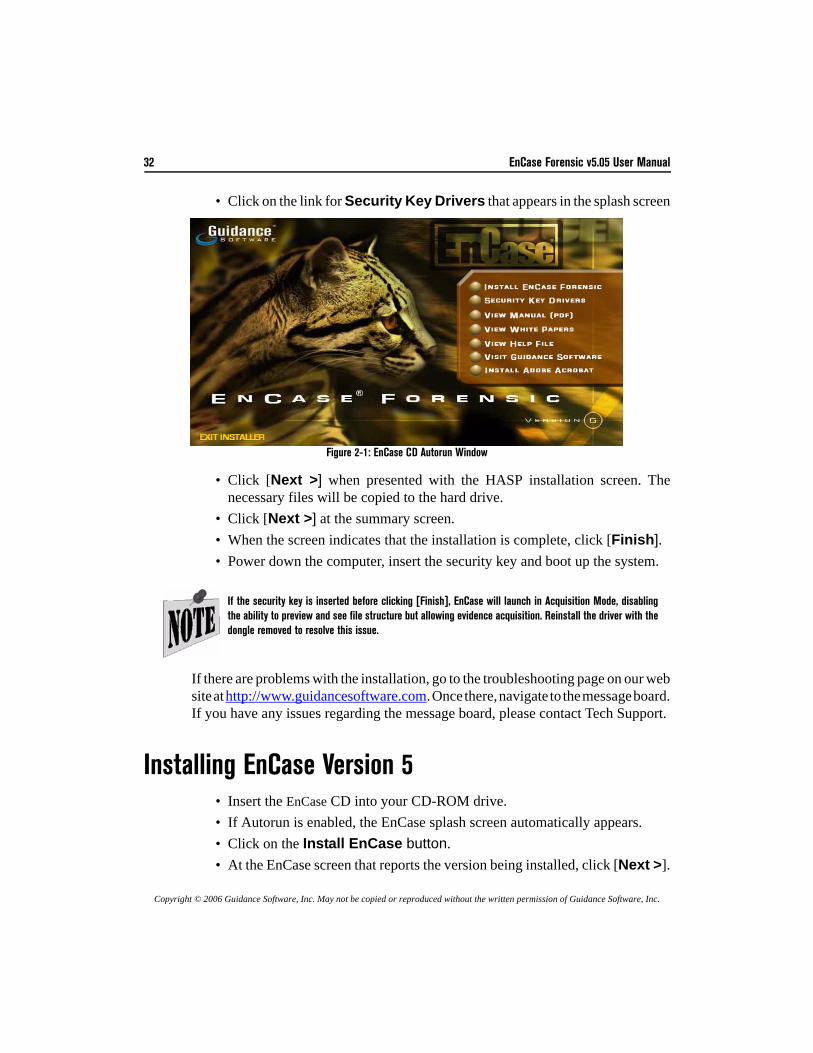
32 EnCase Forensic v5.05 User Manual
Copyright © 2006 Guidance Software, Inc. May not be copied or reproduced without the written permission of Guidance Software, Inc.
• Click on the link for Security Key Drivers that appears in the splash screen.
Figure 2-1: EnCase CD Autorun Window
• Click [Next >] when presented with the HASP installation screen. Thenecessary files will be copied to the hard drive.
• Click [Next >] at the summary screen.• When the screen indicates that the installation is complete, click [Finish].• Power down the computer, insert the security key and boot up the system.
If there are problems with the installation, go to the troubleshooting page on our website at http://www.guidancesoftware.com. Once there, navigate to the message board.If you have any issues regarding the message board, please contact Tech Support.
Installing EnCase Version 5 • Insert the EnCase CD into your CD-ROM drive.• If Autorun is enabled, the EnCase splash screen automatically appears.• Click on the Install EnCase button.• At the EnCase screen that reports the version being installed, click [Next >].
If the security key is inserted before clicking [Finish], EnCase will launch in Acquisition Mode, disablingthe ability to preview and see file structure but allowing evidence acquisition. Reinstall the driver with thedongle removed to resolve this issue.
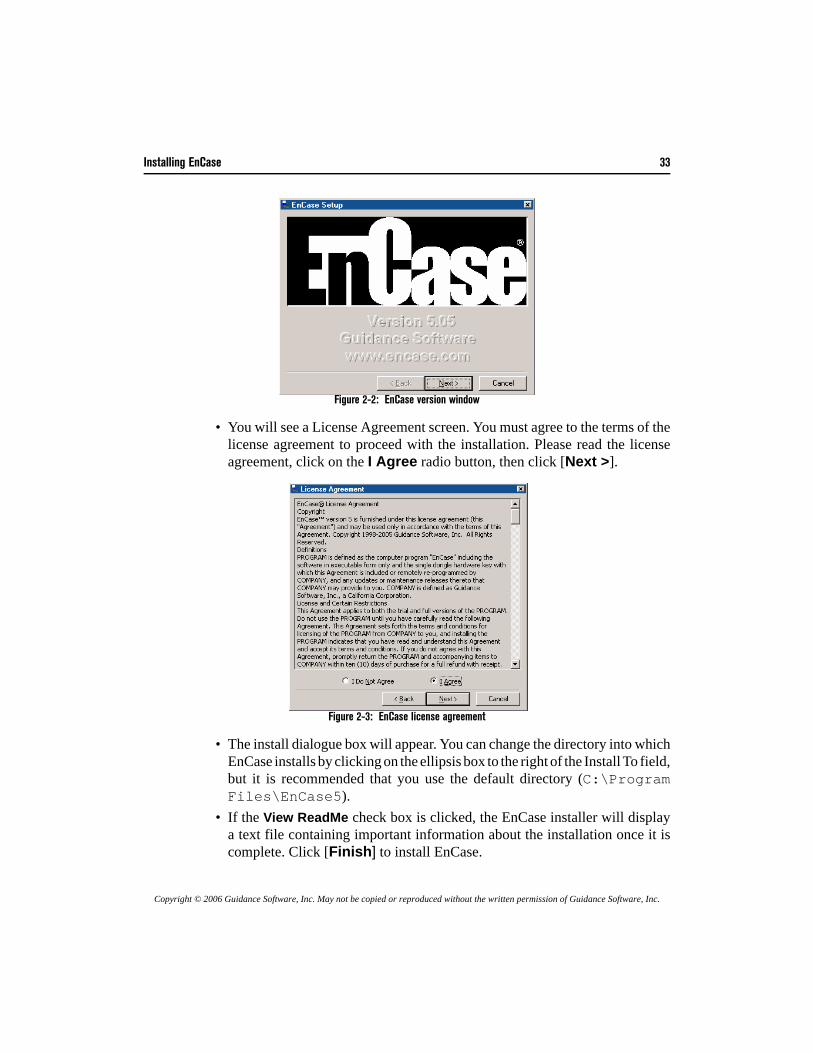
Installing EnCase 33
Copyright © 2006 Guidance Software, Inc. May not be copied or reproduced without the written permission of Guidance Software, Inc.
Figure 2-2: EnCase version window
• You will see a License Agreement screen. You must agree to the terms of thelicense agreement to proceed with the installation. Please read the licenseagreement, click on the I Agree radio button, then click [Next >].
Figure 2-3: EnCase license agreement
• The install dialogue box will appear. You can change the directory into whichEnCase installs by clicking on the ellipsis box to the right of the Install To field,but it is recommended that you use the default directory (C:\ProgramFiles\EnCase5).
• If the View ReadMe check box is clicked, the EnCase installer will displaya text file containing important information about the installation once it iscomplete. Click [Finish] to install EnCase.
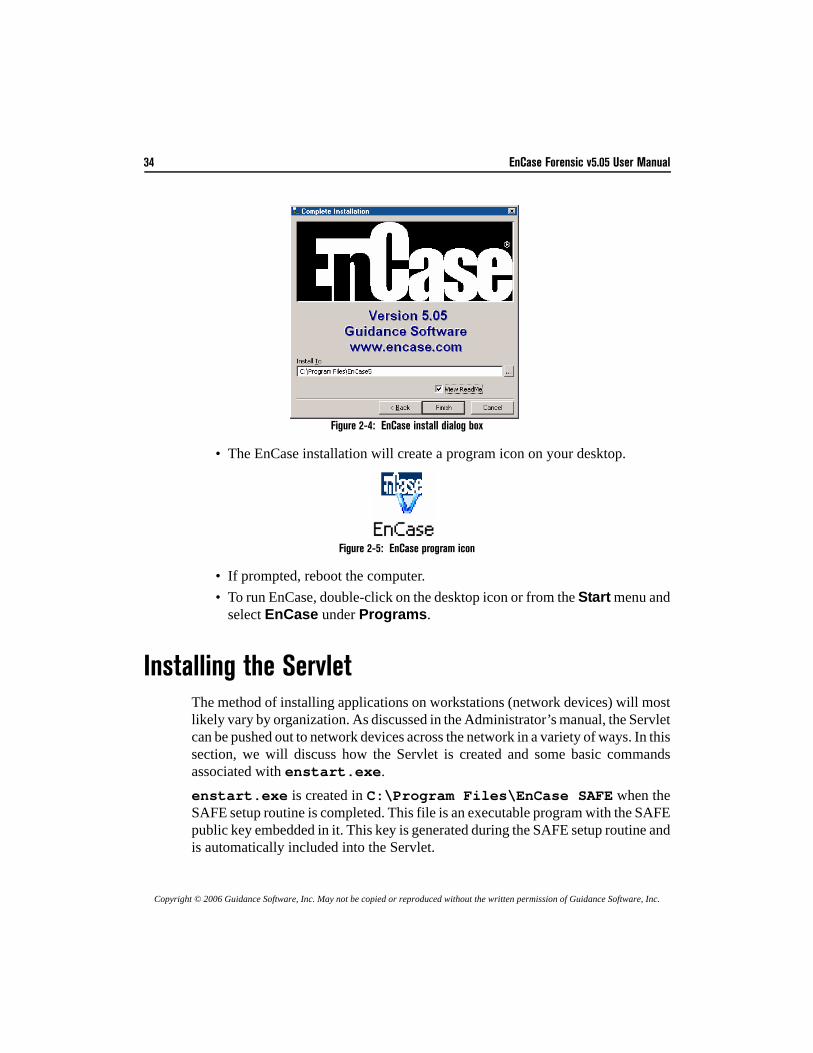
34 EnCase Forensic v5.05 User Manual
Copyright © 2006 Guidance Software, Inc. May not be copied or reproduced without the written permission of Guidance Software, Inc.
Figure 2-4: EnCase install dialog box
• The EnCase installation will create a program icon on your desktop.
Figure 2-5: EnCase program icon
• If prompted, reboot the computer.• To run EnCase, double-click on the desktop icon or from the Start menu and
select EnCase under Programs.
Installing the ServletThe method of installing applications on workstations (network devices) will mostlikely vary by organization. As discussed in the Administrator’s manual, the Servletcan be pushed out to network devices across the network in a variety of ways. In thissection, we will discuss how the Servlet is created and some basic commandsassociated with enstart.exe.enstart.exe is created in C:\Program Files\EnCase SAFE when theSAFE setup routine is completed. This file is an executable program with the SAFEpublic key embedded in it. This key is generated during the SAFE setup routine andis automatically included into the Servlet.
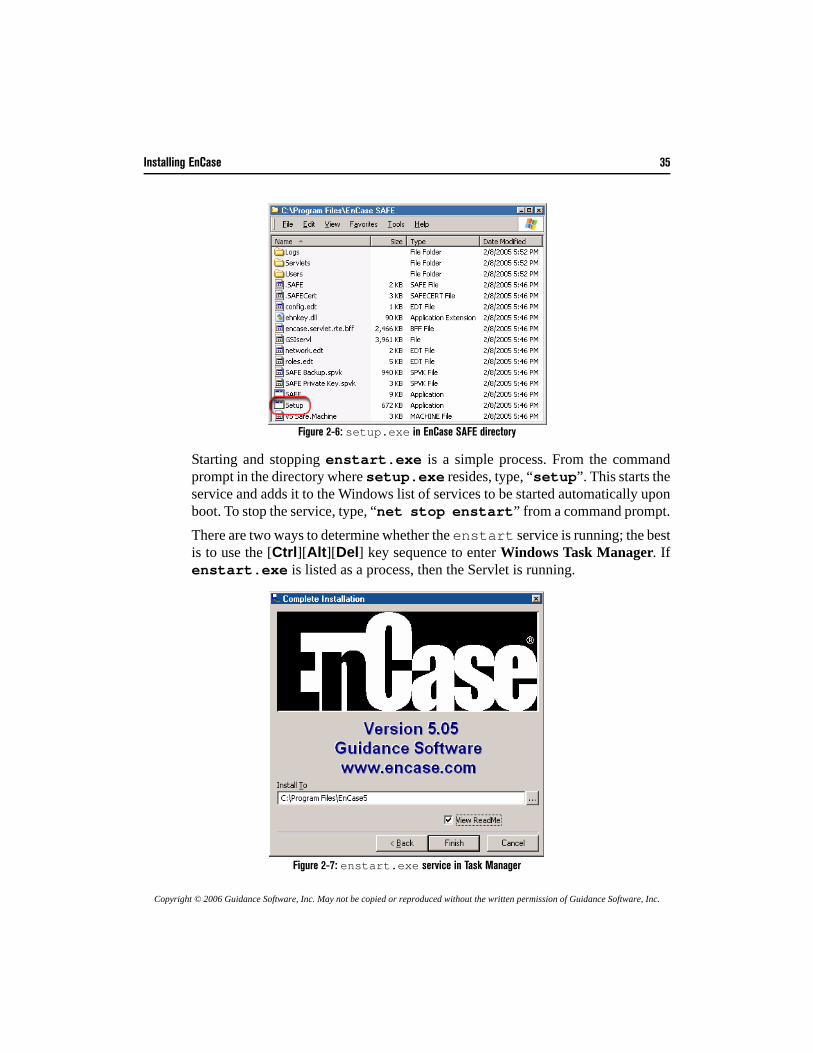
Installing EnCase 35
Copyright © 2006 Guidance Software, Inc. May not be copied or reproduced without the written permission of Guidance Software, Inc.
Figure 2-6: setup.exe in EnCase SAFE directory
Starting and stopping enstart.exe is a simple process. From the commandprompt in the directory where setup.exe resides, type, “setup”. This starts theservice and adds it to the Windows list of services to be started automatically uponboot. To stop the service, type, “net stop enstart” from a command prompt.There are two ways to determine whether the enstart service is running; the bestis to use the [Ctrl][Alt][Del] key sequence to enter Windows Task Manager. Ifenstart.exe is listed as a process, then the Servlet is running.
Figure 2-7: enstart.exe service in Task Manager
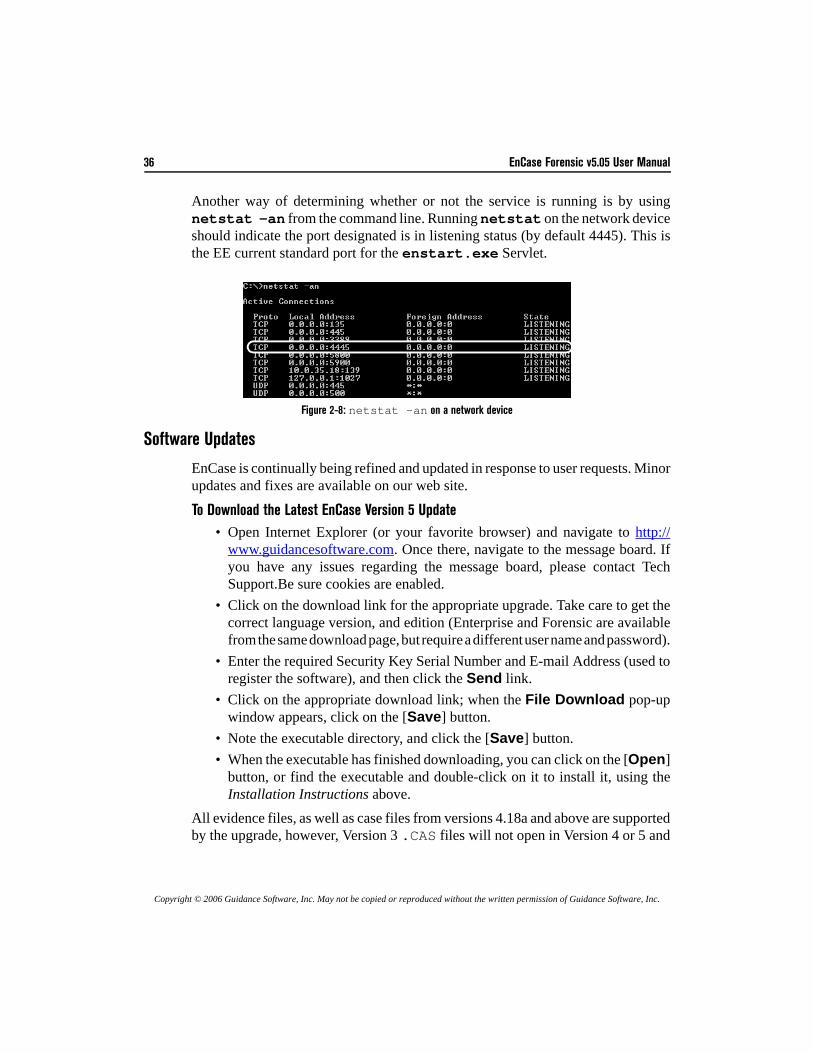
36 EnCase Forensic v5.05 User Manual
Copyright © 2006 Guidance Software, Inc. May not be copied or reproduced without the written permission of Guidance Software, Inc.
Another way of determining whether or not the service is running is by usingnetstat –an from the command line. Running netstat on the network deviceshould indicate the port designated is in listening status (by default 4445). This isthe EE current standard port for the enstart.exe Servlet.
Figure 2-8: netstat -an on a network device
Software Updates
EnCase is continually being refined and updated in response to user requests. Minorupdates and fixes are available on our web site.
To Download the Latest EnCase Version 5 Update• Open Internet Explorer (or your favorite browser) and navigate to http://
www.guidancesoftware.com. Once there, navigate to the message board. Ifyou have any issues regarding the message board, please contact TechSupport.Be sure cookies are enabled.
• Click on the download link for the appropriate upgrade. Take care to get thecorrect language version, and edition (Enterprise and Forensic are availablefrom the same download page, but require a different user name and password).
• Enter the required Security Key Serial Number and E-mail Address (used toregister the software), and then click the Send link.
• Click on the appropriate download link; when the File Download pop-upwindow appears, click on the [Save] button.
• Note the executable directory, and click the [Save] button.• When the executable has finished downloading, you can click on the [Open]
button, or find the executable and double-click on it to install it, using theInstallation Instructions above.
All evidence files, as well as case files from versions 4.18a and above are supportedby the upgrade, however, Version 3 .CAS files will not open in Version 4 or 5 and

Installing EnCase 37
Copyright © 2006 Guidance Software, Inc. May not be copied or reproduced without the written permission of Guidance Software, Inc.
vice versa. Evidence files will open in any version of EnCase regardless of the versionused to acquire them.
Configuration Questions• What systems will EnCase run on?You can acquire evidence with any PC that can run DOS, Linux or Windowsversions Windows 2000, XP or 2003 Server; evidence files can only beexamined on Windows 2000, NT, XP or 2003 Server PCs.• What systems will the EnCase servlet run on?The EnCase servlet enstart.exe can be installed on Windows operatingsystems from Windows 95 to Windows 2003 Server, with the setup.exeinstaller. The EnCase servlet enlinuxpc can be installed on Linux operatingsystems based on kernel 2.4 and above; and it was designed for the Red Hat,Mandrake, and SuSE distributions.• What is the optimal PC configuration to run EnCase for Windows
on?See Appendix D: The Forensic Lab.• What file systems does EnCase Version 5 support?EnCase can interpret FAT12, FAT16, FAT32, NTFS, and EXT2/3, HFS andHFS+, FFS (BSD), UFS (Unix), Reiser, JFS and JFS2 (AIX), Palm and all CDand DVD file systems. EnCase Version 5 will also allow preview andacquisition of TiVo Series 1 and 2 hard drives.If EnCase does not recognize the file system on the drive (HPFS for example),it will show unrecognized file system as an “unallocated cluster” file. Keywordand file-header searches are still possible, as is the ability to create bookmarks,but file names or folder structures will not be available. EnScripts can beexecuted against these file-systems as well.
If the security key is inserted before clicking [Finish], EnCase will launch in Acquisition Mode, disabling theability to preview and see file structure but allowing evidence acquisition. Reinstall the driver with the dongleremoved to resolve this issue.
38 EnCase Forensic v5.05 User Manual
Copyright © 2006 Guidance Software, Inc. May not be copied or reproduced without the written permission of Guidance Software, Inc.
Security Key Questions• When I run EnCase for Windows, I cannot see file structure, and
the title bar reads “EnCase Acquisition”, yet my security key isplugged into the USB port / parallel port of my PC.
• Make sure the drivers for the security key are installed, following the directions forproper installation; you cannot use a parallel port security key with EnCase V5.
• For EnCase Version 5, make sure your security key is an Aladdin HASP HL USBsecurity key.
• In some cases, USB security keys fail for no apparent reason. This can often be tracedto a hardware conflict between a SCSI card and the second IDE channel. Tryremoving devices or the SCSI card.
• Do not connect the security key into a USB hub.• Ensure that your forensic machine is set to the correct date and time.• Make sure that you do not have another Aladdin dongle inserted into the machine.• The C:\Program Files\EnCase5\Certs\encase.PCert file
may have become corrupted; delete this file and re-install EnCase.• The security key could be defective. To determine if this is the case, please call our
Technical Services department at 626-229-9191 or send e-mail [email protected].
• If I purchased a parallel-port security key, can I exchange it fora USB security key (or vice-versa)?
Version 5 works only with new HASP HL USB dongles. Dongles distributedfor version 4 (parallel or USB) do not work with EnCase 5. Contact GuidanceSoftware Customer Service department to replacing the dongle.
Copyright © 2006 Guidance Software, Inc. May not be copied or reproduced without the written permission of Guidance Software, Inc.
Creating theEnCase Boot Disk
Before starting a DOS acquisition, you should first create an EnCase Boot Disk. TheEnCase Boot Disk is used to safely acquire digital media in DOS when a forensicallysound acquisition in Windows is not possible.
Windows Acquisition Issues
Windows will write to any local hard drive it detects, sharing such files as the RecycleBin and desktop.ini. Last Accessed dates and times will be changed, thustainting the evidentiary integrity of the subject drive. Forensically sound acquisitionsin Windows are not possible unless special write blocking, such as FastBloc, is used.The 16-bit DOS operating system allows forensically sound acquisitions (writeblocking) without taking special precautions. For that reason, whether acquiring viathe bare bones boot disk or previewing via the EnCase Network Boot Disk (ENBD),examiners will need an EnCase (“bare bones”) Boot Disk which uses DOS ratherthan Windows.
Creating the EnCase Boot Disk
An EnCase Boot diskette is used to boot the computer to DOS. The support files onthese disks have been modified to allow the diskette to boot to a non-writable state.The diskettes are used throughout the forensics process and are referred to throughoutthis manual. Follow the steps below to create this diskette.
There are two types of EnCase Boot Disk: the barebones boot disk (described here), and the EnCase NetworkBoot Disk (ENBD), detailed later in this chapter. The ENBD has the features of the barebones boot disk, but alsoallows for crossover cable previews \ acquisitions.

40 EnCase Forensic v5.05 User Manual
Copyright © 2006 Guidance Software, Inc. May not be copied or reproduced without the written permission of Guidance Software, Inc.
Steps to Create the EnCase Barebones Boot Disk
• Open an Internet browser and download the barebones boot disk image fromGuidance Software’s web site at http://www.guidancesoftware.com saving thebootfloppy.E01 file to the root EnCase directory (typicallyC:\Program Files\EnCase5)
• Launch EnCase for Windows.• From the Tools… menu, select Create Boot Disk…
Figure 3-1: Create Boot Disk option
• Put a diskette in the drive (all data on the diskette are overwritten). Select theappropriate radio button (in most cases, A:) and click [Next >].
Figure 3-2: Select floppy drive
• The next screen provides several formatting options via radio buttons:• Update existing boot floppy - This option allows upgrading an EnCase boot
disk from an earlier to a current EnCase version.• Overwrite diskette with a boot floppy base image - This option takes the
EnCase boot disk image (bootfloppy.E01) and creates a boot disk from it. Ifa boot disk image of a different name is used, or is located somewhere besides thedefault location (C:\Program Files\EnCase5), you can specify the correctpath or name by clicking on the ellipsis box to the right of the Image path fieldand browsing to the appropriate file and location. Select this option to create the bootdisk as described in these steps, and then click [Next >].
• Change from a system diskette to a boot floppy - This option allowsio.sys and command.com on a boot floppy to be altered so that the hard drive’sio.sys and command.com are not accessed at boot. Use this option only if aWindows 98 version of DOS is used.
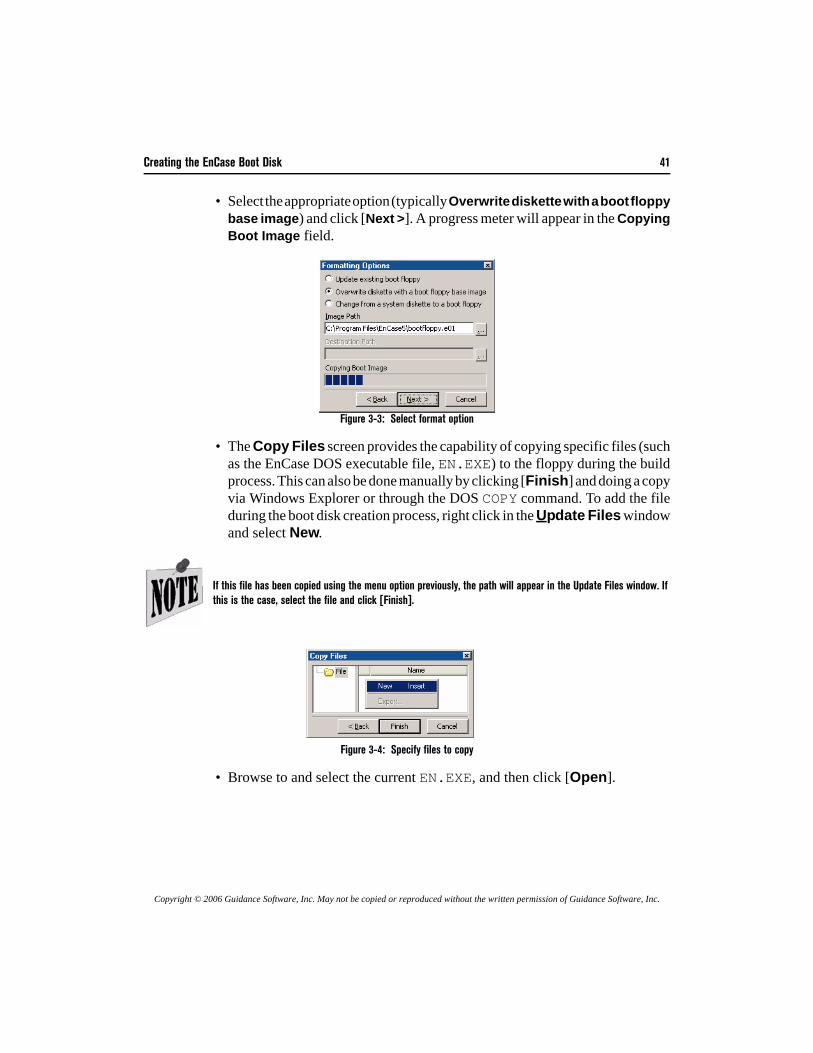
Creating the EnCase Boot Disk 41
Copyright © 2006 Guidance Software, Inc. May not be copied or reproduced without the written permission of Guidance Software, Inc.
• Select the appropriate option (typically Overwrite diskette with a boot floppybase image) and click [Next >]. A progress meter will appear in the CopyingBoot Image field.
Figure 3-3: Select format option
• The Copy Files screen provides the capability of copying specific files (suchas the EnCase DOS executable file, EN.EXE) to the floppy during the buildprocess. This can also be done manually by clicking [Finish] and doing a copyvia Windows Explorer or through the DOS COPY command. To add the fileduring the boot disk creation process, right click in the Update Files windowand select New.
Figure 3-4: Specify files to copy
• Browse to and select the current EN.EXE, and then click [Open].
If this file has been copied using the menu option previously, the path will appear in the Update Files window. Ifthis is the case, select the file and click [Finish].

42 EnCase Forensic v5.05 User Manual
Copyright © 2006 Guidance Software, Inc. May not be copied or reproduced without the written permission of Guidance Software, Inc.
Figure 3-5: Find and select EN.EXE
• The path with the EN.EXE file will populate the window and be highlightedin blue. Click [Finish] to complete the disk creation process.
Figure 3-6: Copying files
• A progress meter will indicate that files are being copied to the floppy. Whenprompted that the disk was successfully created, click [OK].
Figure 3-7: Successful disk creation
• Eject the EnCase Boot Disk and label it accurately.• Be sure to test the new disk on a machine without drives that will be used as
evidence, going by the guidelines set in the chapter on EnCase for DOS.
Creating an EnCase Boot CDIt is also possible to create a bootable CD to run EnCase for DOS. As with the disketteversion, support files are modified to allow the diskette to boot to a non-writable state.
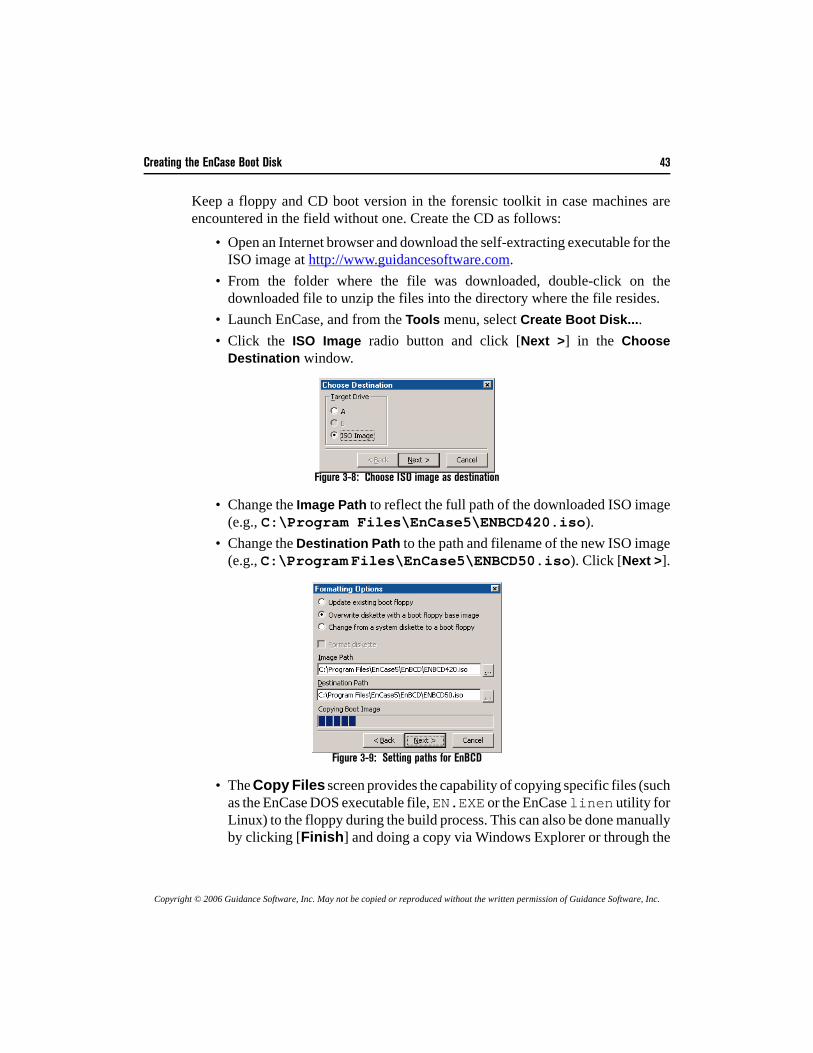
Creating the EnCase Boot Disk 43
Copyright © 2006 Guidance Software, Inc. May not be copied or reproduced without the written permission of Guidance Software, Inc.
Keep a floppy and CD boot version in the forensic toolkit in case machines areencountered in the field without one. Create the CD as follows:
• Open an Internet browser and download the self-extracting executable for theISO image at http://www.guidancesoftware.com.
• From the folder where the file was downloaded, double-click on thedownloaded file to unzip the files into the directory where the file resides.
• Launch EnCase, and from the Tools menu, select Create Boot Disk....• Click the ISO Image radio button and click [Next >] in the Choose
Destination window.
Figure 3-8: Choose ISO image as destination
• Change the Image Path to reflect the full path of the downloaded ISO image(e.g., C:\Program Files\EnCase5\ENBCD420.iso).
• Change the Destination Path to the path and filename of the new ISO image(e.g., C:\Program Files\EnCase5\ENBCD50.iso). Click [Next >].
Figure 3-9: Setting paths for EnBCD
• The Copy Files screen provides the capability of copying specific files (suchas the EnCase DOS executable file, EN.EXE or the EnCase linen utility forLinux) to the floppy during the build process. This can also be done manuallyby clicking [Finish] and doing a copy via Windows Explorer or through the
44 EnCase Forensic v5.05 User Manual
Copyright © 2006 Guidance Software, Inc. May not be copied or reproduced without the written permission of Guidance Software, Inc.
DOS COPY command. To add the file during the boot disk creation process,right click in the Update Files window and select New.
• Browse to and select the current EN.EXE, and then click [Open].• The path with the EN.EXE file will populate the window and be highlighted
in blue. Click [Finish] to complete the disk creation process.• Refer to the documentation of the software manufacturer of the CD burning
software you are using for instructions on creating a CD using the newlyupdated ISO image.
• Remove the EnCase Boot CD and label it accurately.Be sure to test the new disk on a machine without drives that will be used as evidence,going by the guidelines set in the chapter on EnCase for DOS. Also note that is youare using the CD for doing a network crossover cable or parallel cable acquisition,you will need to make sure the EnCase Examiner software is running the same versionof EnCase as the EN.EXE you updated to the CD.
Booting a Computer with the EnCase Boot DiskBecause of the uncertainty of a suspect machine’s configuration, the process ofbooting the machine can be the riskiest part of the investigation. One mistake canlead to the accidental booting of the hard drive, which may alter or destroy evidence.A complete description of the boot process is beyond the scope of this manual, butthe following guidelines will help aid the investigator to safely boot most PCs.
If this file has been copied using the menu option previously, the path will appear in the Update Files window. Ifthis is the case, select the file and click [Finish].
The ISO image for creating the EnCase Boot CD (EnBCD) is provided as a courtesy of the Ontario ProvincialPolice, Electronic Crime Section.
Follow your established procedure, usually dependant on Operating Systems, when shutting down a system.
Creating the EnCase Boot Disk 45
Copyright © 2006 Guidance Software, Inc. May not be copied or reproduced without the written permission of Guidance Software, Inc.
• Confirm that the subject computer is powered off.• Open the computer and inspect the inside for unusual connections or
configurations. It is not unheard of for a computer to house a disconnected harddrive.
• Disconnect the power cables to all the resident hard drives.• Insert the EnCase Boot Disk or EnCase Boot CD and turn on the computer.
You can open the CD drive by pushing a paper clip into the small hole on theface of the drive while power is off.
• Run the CMOS (BIOS) setup routine to ensure that the computer is set to bootfrom the floppy drive (or CD ROM, if EnBCD used). Most systems displaythe correct setup key on the screen as the system boots. If not, the followingis a list of common setup keys:• Compaq Computers:[F10]• IBM Computers:[F1]• IBM clones:[Del], [F2], [Ctrl][Alt][Esc] or [Ctrl][Alt][Enter]
• Verify that the computer is set to boot from the appropriate drive by reviewingthe boot order settings, and note any changes made.
• Exit the BIOS setup and save changes.• Allow the computer to continue to boot from the selected device. Confirm that
a boot from the floppy or CD is possible. You may wish to attach a storage driveat this time to see if the system tries to boot from the hard drive.
• Power off the computer and reconnect the disk drive power cables.• Confirm that the EnCase Boot Disk is still in the drive and turn on the computer,
allowing the computer to boot from the floppy disk or CD.
EnCase Network Boot DiskOne way to preview and acquire media when hardware write blocking is unavailableis using the crossover or parallel cable acquisition method (detailed in the chaptertitled Network Cable Acquisitions.) In order to perform this type of acquisition, youwill need to create an EnCase Network Boot Disk (ENBD) or EnCase Network BootCD. The various ENBD creation utilities are available from links in an articledownloadable from Guidance Software’s web site at http://www.guidancesoftware.com. Detailed instructions, including which ENBD utilityto download and how to do a network crossover preview/acquisition, are included.
46 EnCase Forensic v5.05 User Manual
Copyright © 2006 Guidance Software, Inc. May not be copied or reproduced without the written permission of Guidance Software, Inc.
The ENBD is capable of auto-detecting network interface cards, as well as allowingthe user to specify which network card to load drivers for. If the user allows the ENBDto auto-detect the card, the appropriate DOS driver should be loaded and EnCase forDOS is launched into server mode. If the user selects the manual method, the usermust specify the network card in the subject’s machine. ENBD then loads theappropriate DOS driver and launches EnCase for DOS. (additional information canbe found in the chapter titled EnCase for DOS)
FAQs about EnCase Boot Disk• How do I make sure the computer does not boot to the hard drive
on startup?• Physically unplug the hard drives before turning on the computer. Power on and run
the BIOS setup routine to ensure that the computer is set to boot from the floppydrive (drive A:), or the CD if the EnCase Boot CD is used.
• To access the BIOS setup, you will need to press a specific key sequence repeatedlyas soon as the power comes on. On most IBM compatible PCs, the key is [F1] or[Delete]. Compaq computers often use the [F10] key. If possible, check thecomputer's documentation. There is usually a message flashed on the power splash-screen indicating which key to press to access the BIOS setup.
• Once in the BIOS, look for the boot order section. After setting the BIOS to bootfrom the floppy disk, reboot the computer to confirm that it does. After confirmation,turn off the computer, reconnect the hard drives, and reboot the computer with theEnCase Boot Disk inserted in the floppy drive.
• Does the EnCase Boot Disk prevent writing to the hard drive onboot up?
Yes. When you create an EnCase Boot Disk, all references to C:\ are changed to A:\ in COMMAND.COM and IO.SYS to prevent files from being accessed on the C drive on boot up. By starting EnCase for DOS immediately, you will prevent any accidental access to the hard drive from that point.
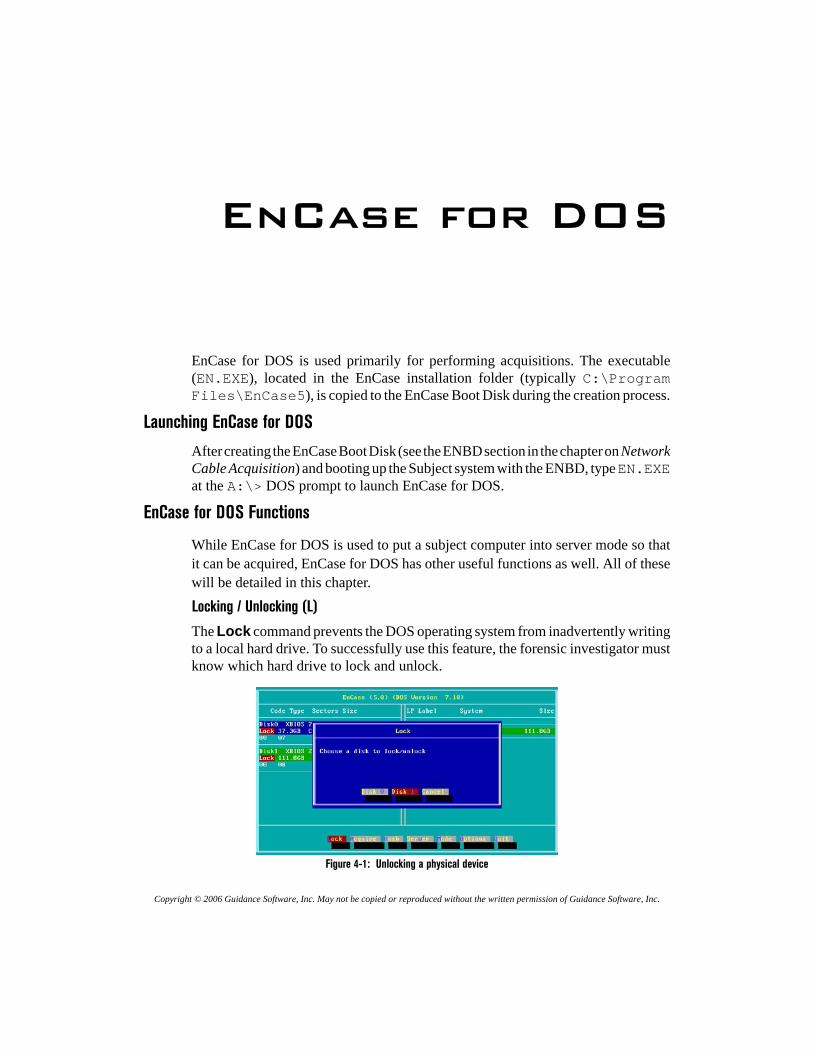
Copyright © 2006 Guidance Software, Inc. May not be copied or reproduced without the written permission of Guidance Software, Inc.
EnCase for DOS
EnCase for DOS is used primarily for performing acquisitions. The executable(EN.EXE), located in the EnCase installation folder (typically C:\ProgramFiles\EnCase5), is copied to the EnCase Boot Disk during the creation process.
Launching EnCase for DOS
After creating the EnCase Boot Disk (see the ENBD section in the chapter on NetworkCable Acquisition) and booting up the Subject system with the ENBD, type EN.EXEat the A:\> DOS prompt to launch EnCase for DOS.
EnCase for DOS Functions
While EnCase for DOS is used to put a subject computer into server mode so thatit can be acquired, EnCase for DOS has other useful functions as well. All of thesewill be detailed in this chapter.
Locking / Unlocking (L)
The Lock command prevents the DOS operating system from inadvertently writingto a local hard drive. To successfully use this feature, the forensic investigator mustknow which hard drive to lock and unlock.
Figure 4-1: Unlocking a physical device
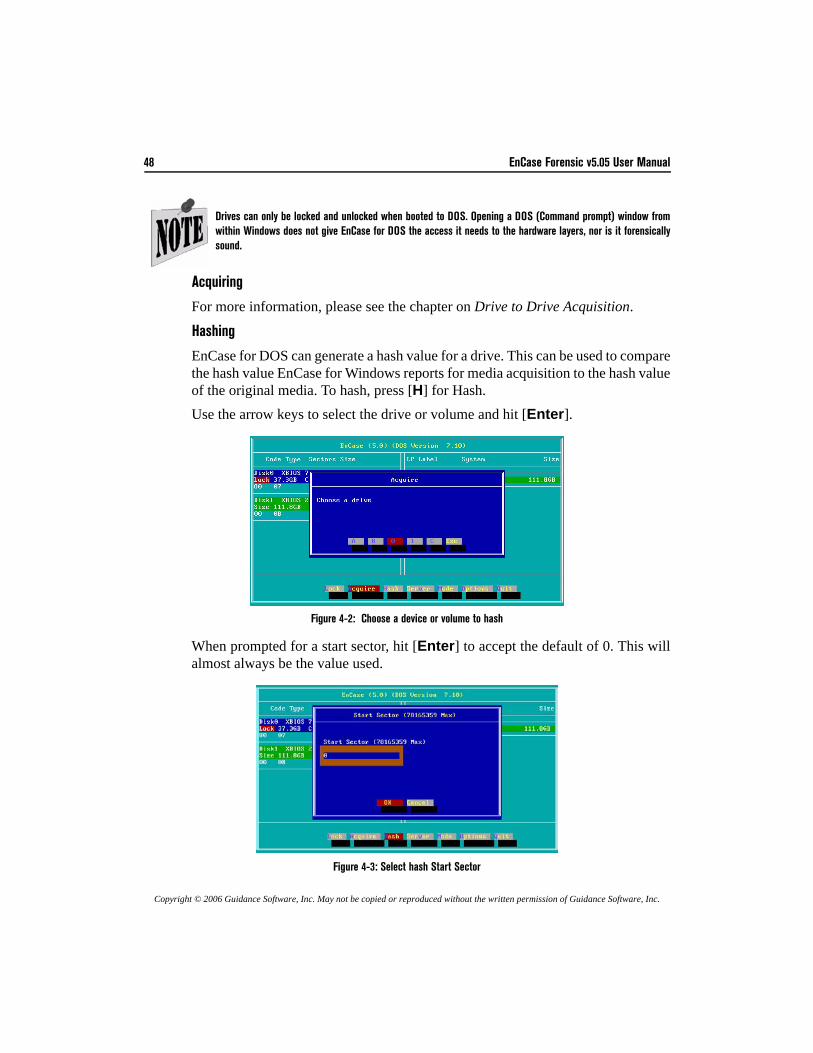
48 EnCase Forensic v5.05 User Manual
Copyright © 2006 Guidance Software, Inc. May not be copied or reproduced without the written permission of Guidance Software, Inc.
Acquiring
For more information, please see the chapter on Drive to Drive Acquisition.
Hashing
EnCase for DOS can generate a hash value for a drive. This can be used to comparethe hash value EnCase for Windows reports for media acquisition to the hash valueof the original media. To hash, press [H] for Hash. Use the arrow keys to select the drive or volume and hit [Enter].
Figure 4-2: Choose a device or volume to hash
When prompted for a start sector, hit [Enter] to accept the default of 0. This willalmost always be the value used.
Figure 4-3: Select hash Start Sector
Drives can only be locked and unlocked when booted to DOS. Opening a DOS (Command prompt) window fromwithin Windows does not give EnCase for DOS the access it needs to the hardware layers, nor is it forensicallysound.

EnCase for DOS 49
Copyright © 2006 Guidance Software, Inc. May not be copied or reproduced without the written permission of Guidance Software, Inc.
Take the default value for stop sector unless you are hashing a SafeBack image.Hashing SafeBack images requires knowing the specific start and stop sectors of theimage. Change the stop sector or accept the by hitting the [Enter] key.
Figure 4-4: Select hash Stop Sector (SafeBack example)
When EnCase starts the hash, the option buttons at the bottom disappear, replacedby a hashing progress meter.
Figure 4-5: Hashing progress meter
When the device has been hashed, a status screen will appear with the hash valueand the option to write the value to a file. The hash value can be written out to a textfile on the floppy or an unlocked storage device with a FAT file system (the volumeletter will appear in the right pane). To store this information, make sure the [Yes]button is highlighted in red (or press the [Y] key), then press [Enter].
You do not have to hash SafeBack images in EnCase for DOS, since in EnCase for Windows (version 4.19 andhigher), SafeBack images can be brought directly into EnCase in the same manner as EnCase evidence files
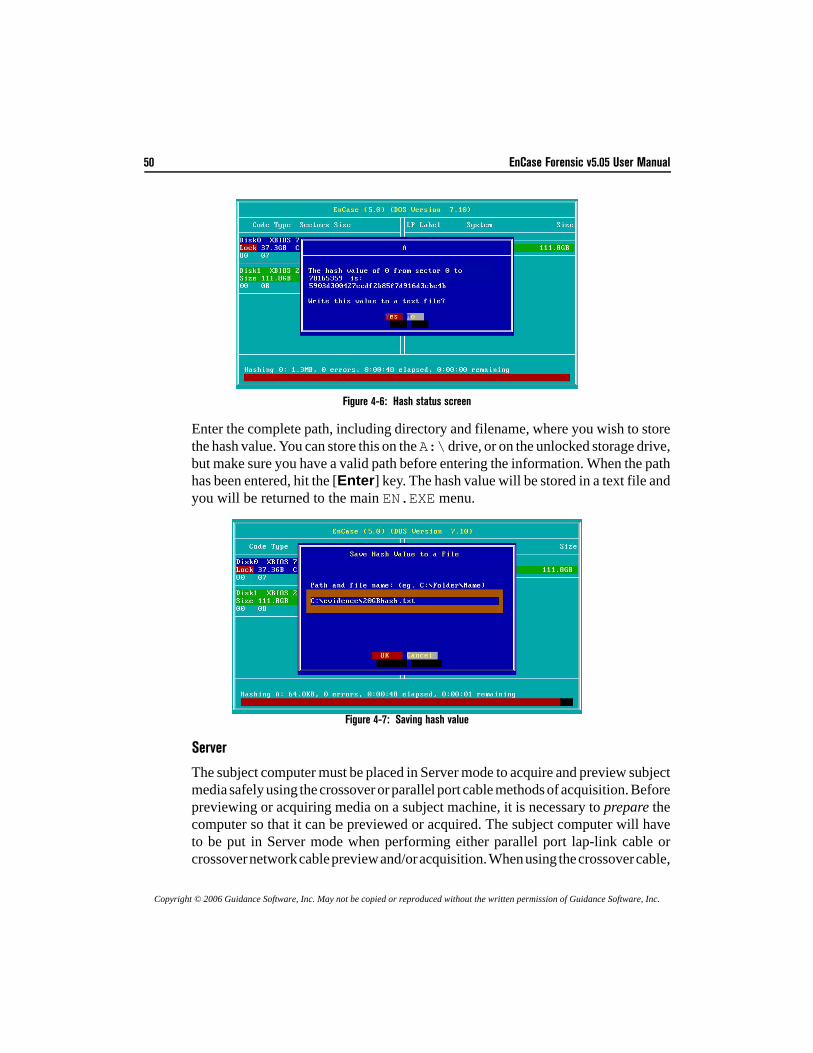
50 EnCase Forensic v5.05 User Manual
Copyright © 2006 Guidance Software, Inc. May not be copied or reproduced without the written permission of Guidance Software, Inc.
Figure 4-6: Hash status screen
Enter the complete path, including directory and filename, where you wish to storethe hash value. You can store this on the A:\ drive, or on the unlocked storage drive,but make sure you have a valid path before entering the information. When the pathhas been entered, hit the [Enter] key. The hash value will be stored in a text file andyou will be returned to the main EN.EXE menu.
Figure 4-7: Saving hash value
Server
The subject computer must be placed in Server mode to acquire and preview subjectmedia safely using the crossover or parallel port cable methods of acquisition. Beforepreviewing or acquiring media on a subject machine, it is necessary to prepare thecomputer so that it can be previewed or acquired. The subject computer will haveto be put in Server mode when performing either parallel port lap-link cable orcrossover network cable preview and/or acquisition. When using the crossover cable,
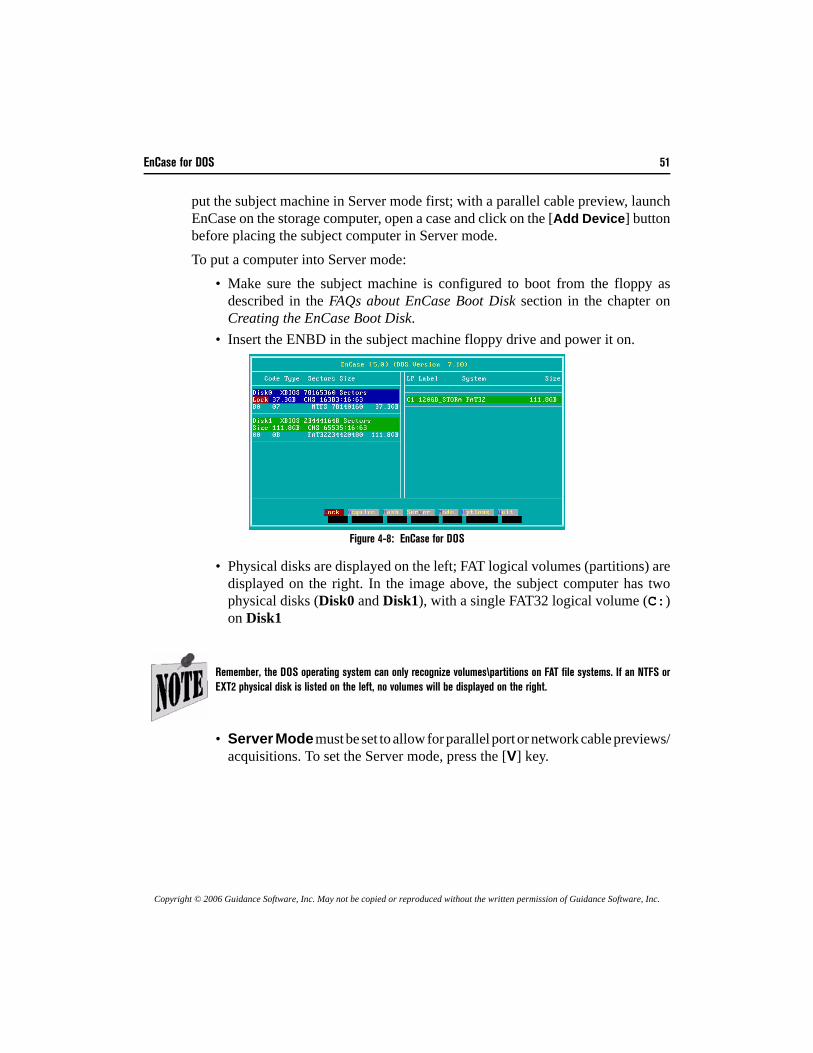
EnCase for DOS 51
Copyright © 2006 Guidance Software, Inc. May not be copied or reproduced without the written permission of Guidance Software, Inc.
put the subject machine in Server mode first; with a parallel cable preview, launchEnCase on the storage computer, open a case and click on the [Add Device] buttonbefore placing the subject computer in Server mode. To put a computer into Server mode:
• Make sure the subject machine is configured to boot from the floppy asdescribed in the FAQs about EnCase Boot Disk section in the chapter onCreating the EnCase Boot Disk.
• Insert the ENBD in the subject machine floppy drive and power it on.
Figure 4-8: EnCase for DOS
• Physical disks are displayed on the left; FAT logical volumes (partitions) aredisplayed on the right. In the image above, the subject computer has twophysical disks (Disk0 and Disk1), with a single FAT32 logical volume (C:)on Disk1
.
• Server Mode must be set to allow for parallel port or network cable previews/acquisitions. To set the Server mode, press the [V] key.
Remember, the DOS operating system can only recognize volumes\partitions on FAT file systems. If an NTFS orEXT2 physical disk is listed on the left, no volumes will be displayed on the right.
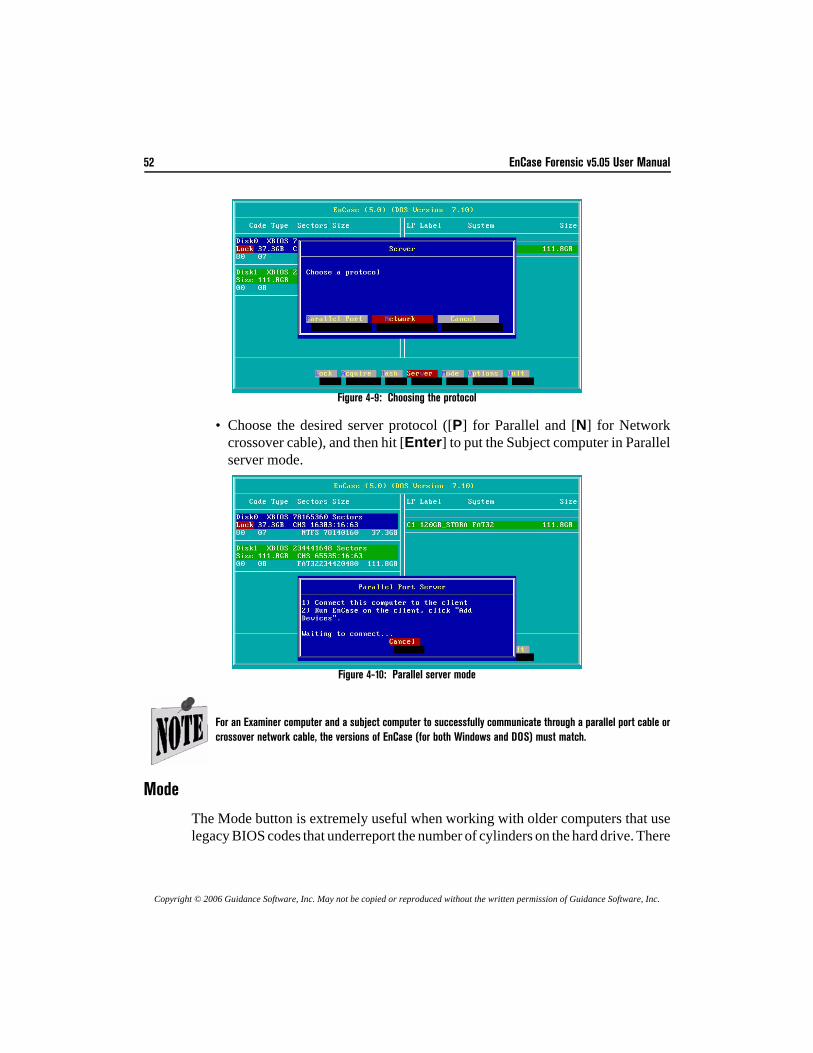
52 EnCase Forensic v5.05 User Manual
Copyright © 2006 Guidance Software, Inc. May not be copied or reproduced without the written permission of Guidance Software, Inc.
Figure 4-9: Choosing the protocol
• Choose the desired server protocol ([P] for Parallel and [N] for Networkcrossover cable), and then hit [Enter] to put the Subject computer in Parallelserver mode.
Figure 4-10: Parallel server mode
Mode
The Mode button is extremely useful when working with older computers that uselegacy BIOS codes that underreport the number of cylinders on the hard drive. There
For an Examiner computer and a subject computer to successfully communicate through a parallel port cable orcrossover network cable, the versions of EnCase (for both Windows and DOS) must match.
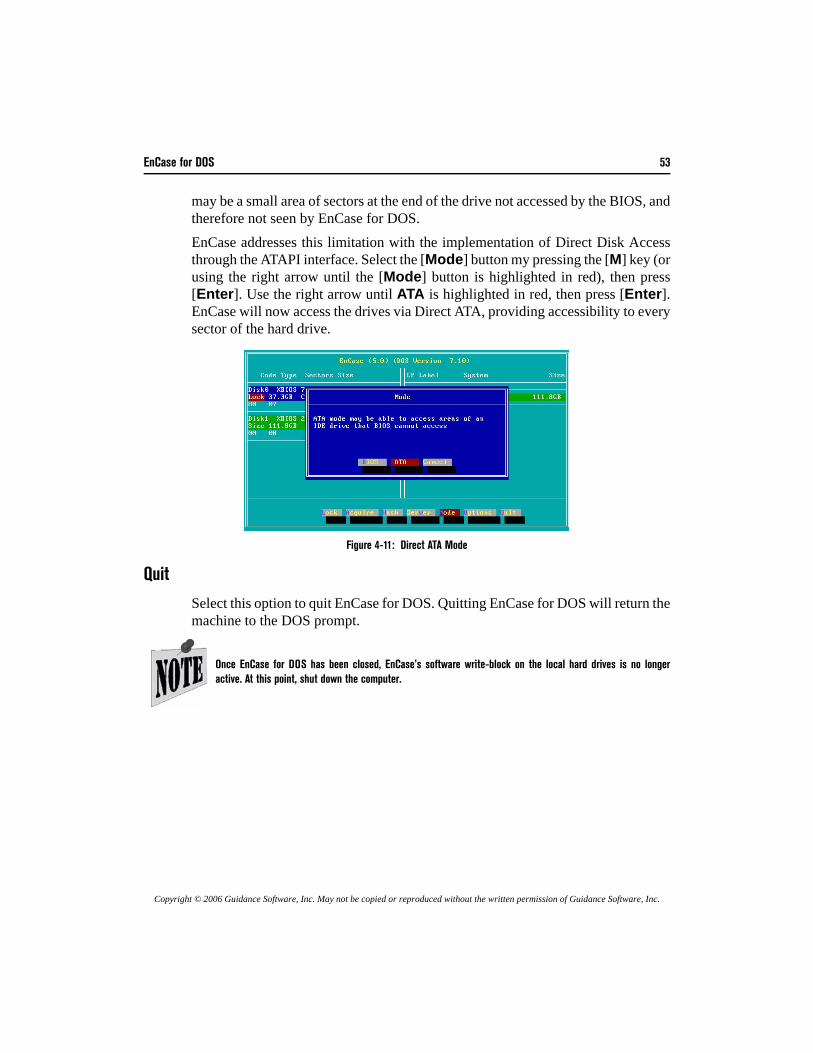
EnCase for DOS 53
Copyright © 2006 Guidance Software, Inc. May not be copied or reproduced without the written permission of Guidance Software, Inc.
may be a small area of sectors at the end of the drive not accessed by the BIOS, andtherefore not seen by EnCase for DOS.EnCase addresses this limitation with the implementation of Direct Disk Accessthrough the ATAPI interface. Select the [Mode] button my pressing the [M] key (orusing the right arrow until the [Mode] button is highlighted in red), then press[Enter]. Use the right arrow until ATA is highlighted in red, then press [Enter].EnCase will now access the drives via Direct ATA, providing accessibility to everysector of the hard drive.
Figure 4-11: Direct ATA Mode
Quit
Select this option to quit EnCase for DOS. Quitting EnCase for DOS will return themachine to the DOS prompt.
Once EnCase for DOS has been closed, EnCase’s software write-block on the local hard drives is no longeractive. At this point, shut down the computer.
54 EnCase Forensic v5.05 User Manual
Copyright © 2006 Guidance Software, Inc. May not be copied or reproduced without the written permission of Guidance Software, Inc.
Copyright © 2006 Guidance Software, Inc. May not be copied or reproduced without the written permission of Guidance Software, Inc.
EnCase LinEnUtility
The LinEn utility provides an alternate method of acquiring a device from using aFastBloc in Windows, or EN.EXE in DOS. This method allows you to acquire harddrives, USB and FireWire drives, and to apply a granularity which refines the numberof sectors EnCase looks at one time. It also allows users to hash any device presenton the Linux operating system it is running on. With the introduction of LinEn usersare now able to acquire Linux machines via a crossover cable from the WindowsEnCase client similar to the method used with EnCase for DOS. LinEn is dependenton the distribution of Linux it is installed on; for that reason there will be somevariation in the setup in each distribution.
Description
The LinEn product is similar to EnCase for DOS (EN.EXE) in terms of the hashingand acquisition functionality. Among other benefits of using LinEn is its performancein hashing and acquisition. As with EnCase for DOS, LinEn also allows users toacquire a drive with greater precision around sectors with read errors throughgranularity settings. Features of LinEn include the following:
• Drive-to-drive acquisition capability (logical partition to FAT32partition)
LinEn provides the ability to acquire a single partition, no matter what theformat of that partition is. Partitions are acquired from the device where theyreside in their native environment, requiring only a FAT32 storage drive toplace the evidence on. • Drive-to-drive acquisition capability (physical device to FAT32
partition)Entire physical devices can be acquired, and the evidence files stored on aFAT32 storage partition. As with logical acquisitions, devices can be acquired
56 EnCase Forensic v5.05 User Manual
Copyright © 2006 Guidance Software, Inc. May not be copied or reproduced without the written permission of Guidance Software, Inc.
in their native environment, requiring only a FAT32 storage drive to place theevidence on.• Crossover cable acquisition capabilityThrough a crossover connection, the user can preview or acquire a machineby putting the computer into “server mode” without having to open up thecomputer and physically remove any drives. This method can be used foracquiring RAID arrays on a server, or in the event that a field acquisition isonly permitted after evidence is found via previewing the volume or device.As is the case with Drive-to-Drive acquisitions, a FAT32 storage drive isrequired to place the evidence on. The crossover method allows preview and/or acquisition of a device on a Linux-based machine, provided it has a properlyinstalled NIC. You may need to specify an IP address when performing acrossover preview or acquisition. To determine the name of the networkinterface card, type “ifconfig” in the Console. Typically a compatiblenetwork card would show up as “eth0.” If this is the case, you need to specifyan IP address by typing “ifconfig eth0 10.0.0.1 netmask255.0.0.0" at the Console. A crossover acquisition will take longer thanan acquisition via FastBloc.• Acquisition of and storage to FireWire and USB devices• With LinEn, you can acquire USB and FireWire devices. This feature can be useful
for acquiring thumb drives, or hard drives within enclosures.• As with any storage device in Linux, to store evidence to a FireWire or USB device,
the device must first be mounted first; refer to your Linux manual for moreinformation.
• Hash analysisAn MD5 hash can be run against an entire drive or an individual partition togenerate a 128-bit MD5 checksum. The command can be used to compare thehash value that EnCase for Windows reports on an acquisition of media to thehash value for the original media.• Acquisition granularity for increasing the amount of data
retained when bad sectors are encounteredHistorically, when a read error is found after an acquisition, the 64-sector blockof data that contains the read error is “zeroed out” by EnCase (all of the datawithin the bad block is replaced with a 0). Through the use of granularity, theinvestigator has the flexibility to specify the number of sectors to zero outwithin a block of data generating a read error. What this means is that insteadof all 64 sectors in a bad block being replaced by zeros, the user can narrow
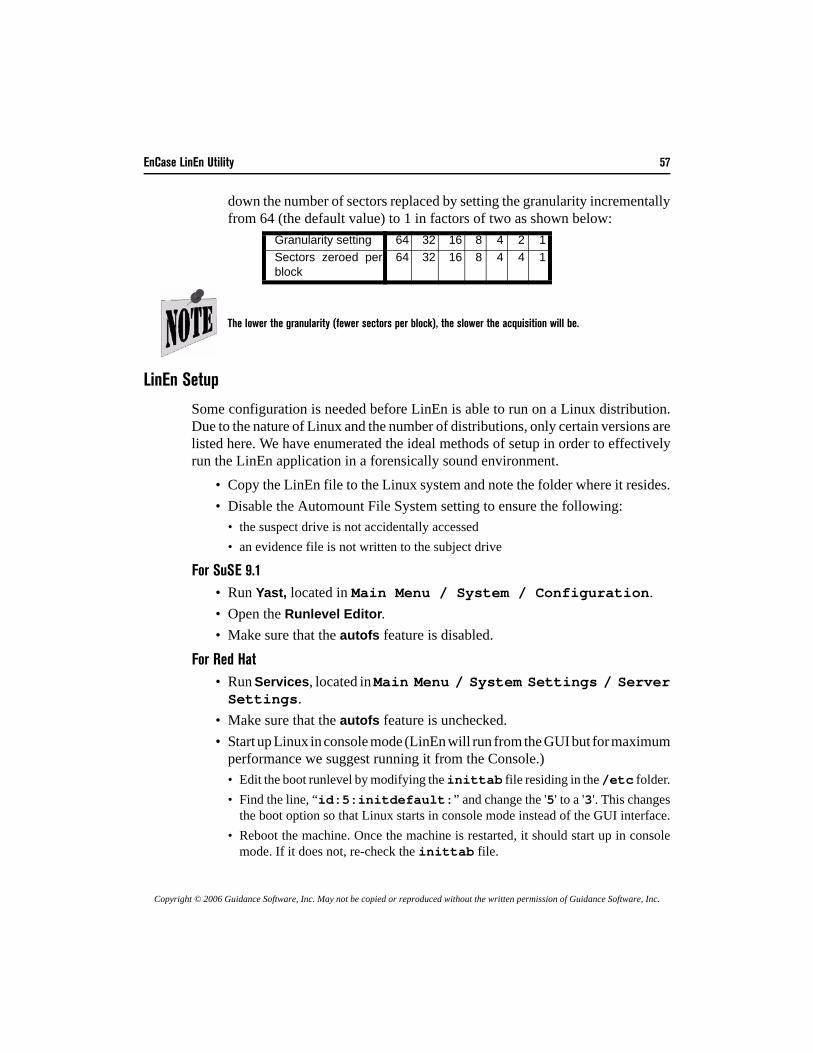
EnCase LinEn Utility 57
Copyright © 2006 Guidance Software, Inc. May not be copied or reproduced without the written permission of Guidance Software, Inc.
down the number of sectors replaced by setting the granularity incrementallyfrom 64 (the default value) to 1 in factors of two as shown below:
LinEn Setup
Some configuration is needed before LinEn is able to run on a Linux distribution.Due to the nature of Linux and the number of distributions, only certain versions arelisted here. We have enumerated the ideal methods of setup in order to effectivelyrun the LinEn application in a forensically sound environment.
• Copy the LinEn file to the Linux system and note the folder where it resides.• Disable the Automount File System setting to ensure the following:
• the suspect drive is not accidentally accessed• an evidence file is not written to the subject drive
For SuSE 9.1 • Run Yast, located in Main Menu / System / Configuration.• Open the Runlevel Editor.• Make sure that the autofs feature is disabled.
For Red Hat• Run Services, located in Main Menu / System Settings / ServerSettings.
• Make sure that the autofs feature is unchecked.• Start up Linux in console mode (LinEn will run from the GUI but for maximum
performance we suggest running it from the Console.)• Edit the boot runlevel by modifying the inittab file residing in the /etc folder.• Find the line, “id:5:initdefault:” and change the '5' to a '3'. This changes
the boot option so that Linux starts in console mode instead of the GUI interface.• Reboot the machine. Once the machine is restarted, it should start up in console
mode. If it does not, re-check the inittab file.
Granularity setting 64 32 16 8 4 2 1Sectors zeroed perblock
64 32 16 8 4 4 1
The lower the granularity (fewer sectors per block), the slower the acquisition will be.
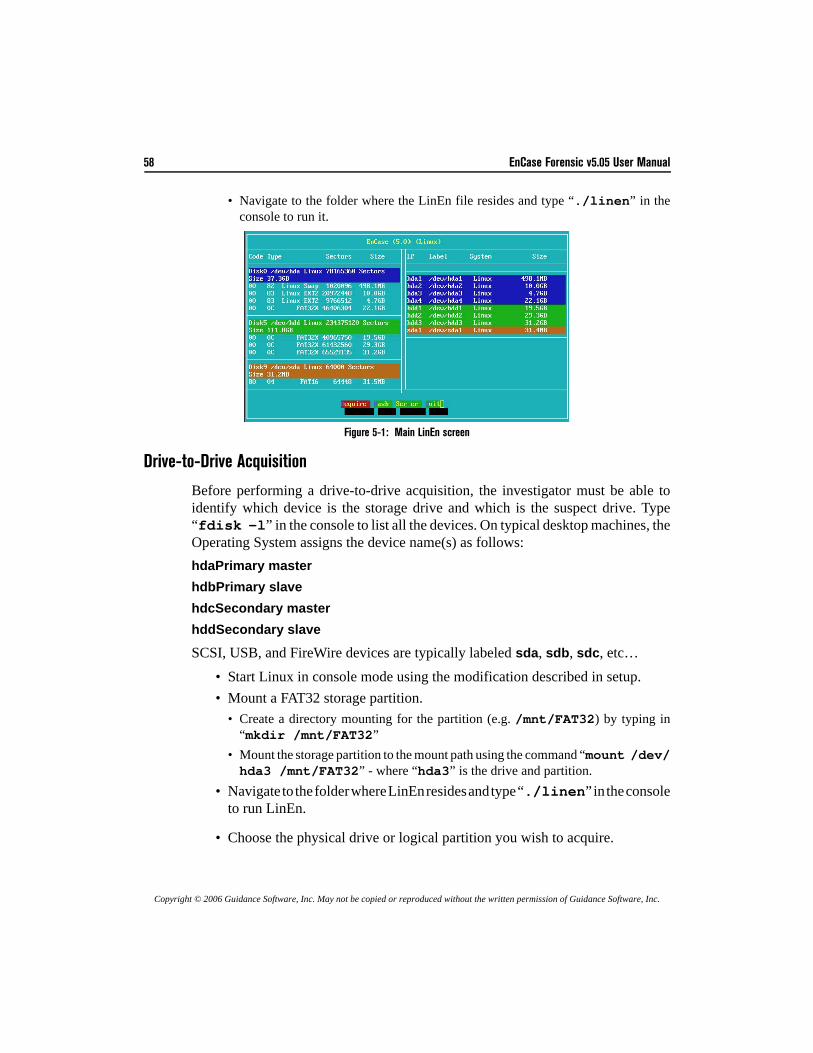
58 EnCase Forensic v5.05 User Manual
Copyright © 2006 Guidance Software, Inc. May not be copied or reproduced without the written permission of Guidance Software, Inc.
• Navigate to the folder where the LinEn file resides and type “./linen” in theconsole to run it.
Figure 5-1: Main LinEn screen
Drive-to-Drive Acquisition
Before performing a drive-to-drive acquisition, the investigator must be able toidentify which device is the storage drive and which is the suspect drive. Type“fdisk -l” in the console to list all the devices. On typical desktop machines, theOperating System assigns the device name(s) as follows: hdaPrimary masterhdbPrimary slavehdcSecondary masterhddSecondary slave
SCSI, USB, and FireWire devices are typically labeled sda, sdb, sdc, etc…• Start Linux in console mode using the modification described in setup.• Mount a FAT32 storage partition.
• Create a directory mounting for the partition (e.g. /mnt/FAT32) by typing in“mkdir /mnt/FAT32”
• Mount the storage partition to the mount path using the command “mount /dev/hda3 /mnt/FAT32” - where “hda3” is the drive and partition.
• Navigate to the folder where LinEn resides and type “./linen” in the consoleto run LinEn.
• Choose the physical drive or logical partition you wish to acquire.
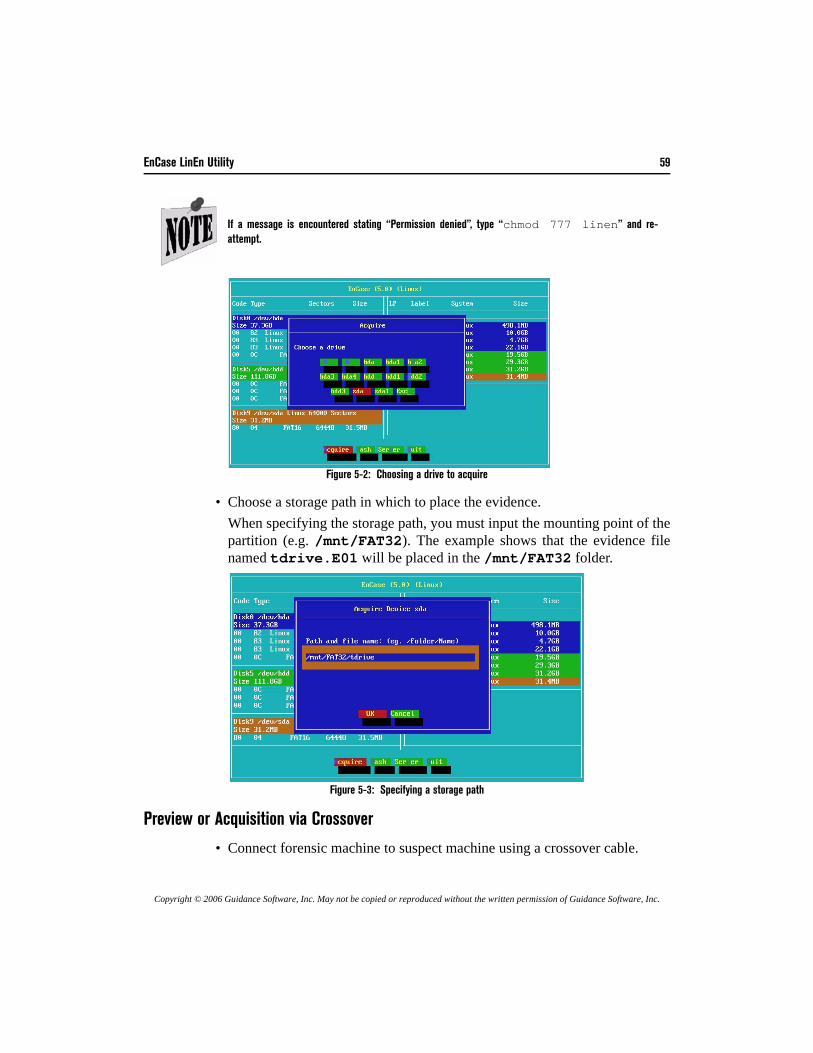
EnCase LinEn Utility 59
Copyright © 2006 Guidance Software, Inc. May not be copied or reproduced without the written permission of Guidance Software, Inc.
Figure 5-2: Choosing a drive to acquire
• Choose a storage path in which to place the evidence.When specifying the storage path, you must input the mounting point of thepartition (e.g. /mnt/FAT32). The example shows that the evidence filenamed tdrive.E01 will be placed in the /mnt/FAT32 folder.
Figure 5-3: Specifying a storage path
Preview or Acquisition via Crossover
• Connect forensic machine to suspect machine using a crossover cable.
If a message is encountered stating “Permission denied”, type “chmod 777 linen” and re-attempt.
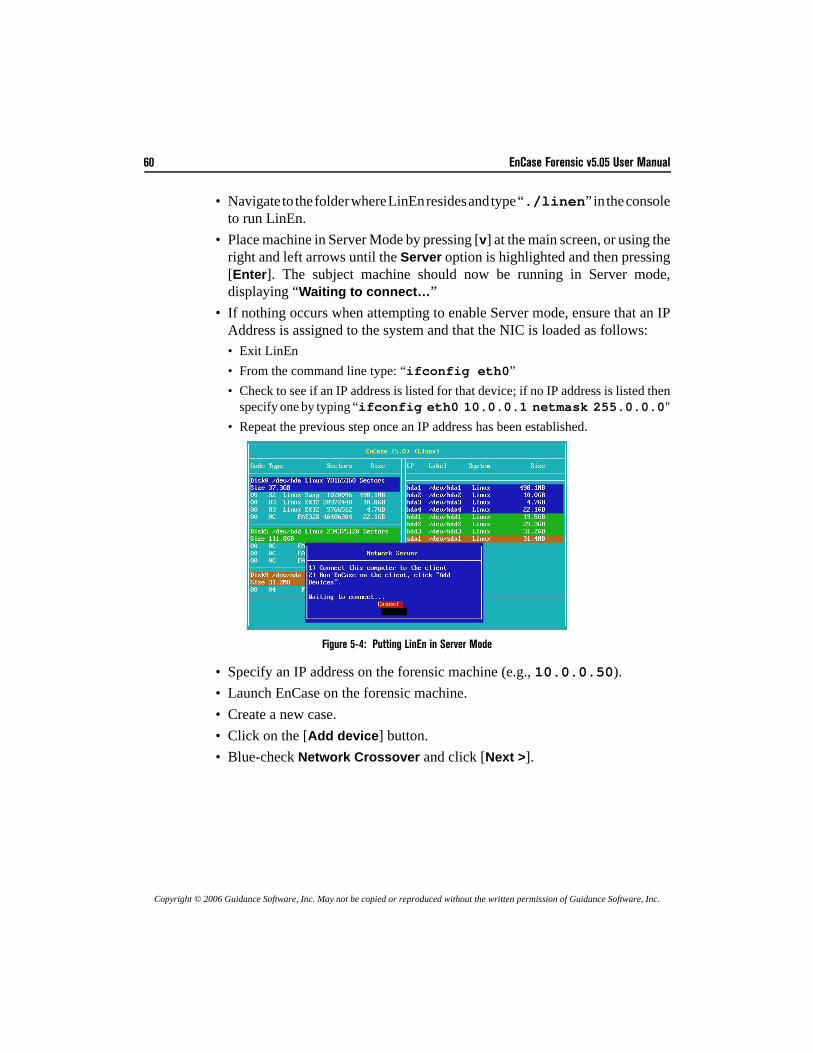
60 EnCase Forensic v5.05 User Manual
Copyright © 2006 Guidance Software, Inc. May not be copied or reproduced without the written permission of Guidance Software, Inc.
• Navigate to the folder where LinEn resides and type “./linen” in the consoleto run LinEn.
• Place machine in Server Mode by pressing [v] at the main screen, or using theright and left arrows until the Server option is highlighted and then pressing[Enter]. The subject machine should now be running in Server mode,displaying “Waiting to connect…”
• If nothing occurs when attempting to enable Server mode, ensure that an IPAddress is assigned to the system and that the NIC is loaded as follows:• Exit LinEn• From the command line type: “ifconfig eth0”• Check to see if an IP address is listed for that device; if no IP address is listed then
specify one by typing “ifconfig eth0 10.0.0.1 netmask 255.0.0.0"• Repeat the previous step once an IP address has been established.
Figure 5-4: Putting LinEn in Server Mode
• Specify an IP address on the forensic machine (e.g., 10.0.0.50).• Launch EnCase on the forensic machine.• Create a new case.• Click on the [Add device] button.• Blue-check Network Crossover and click [Next >].
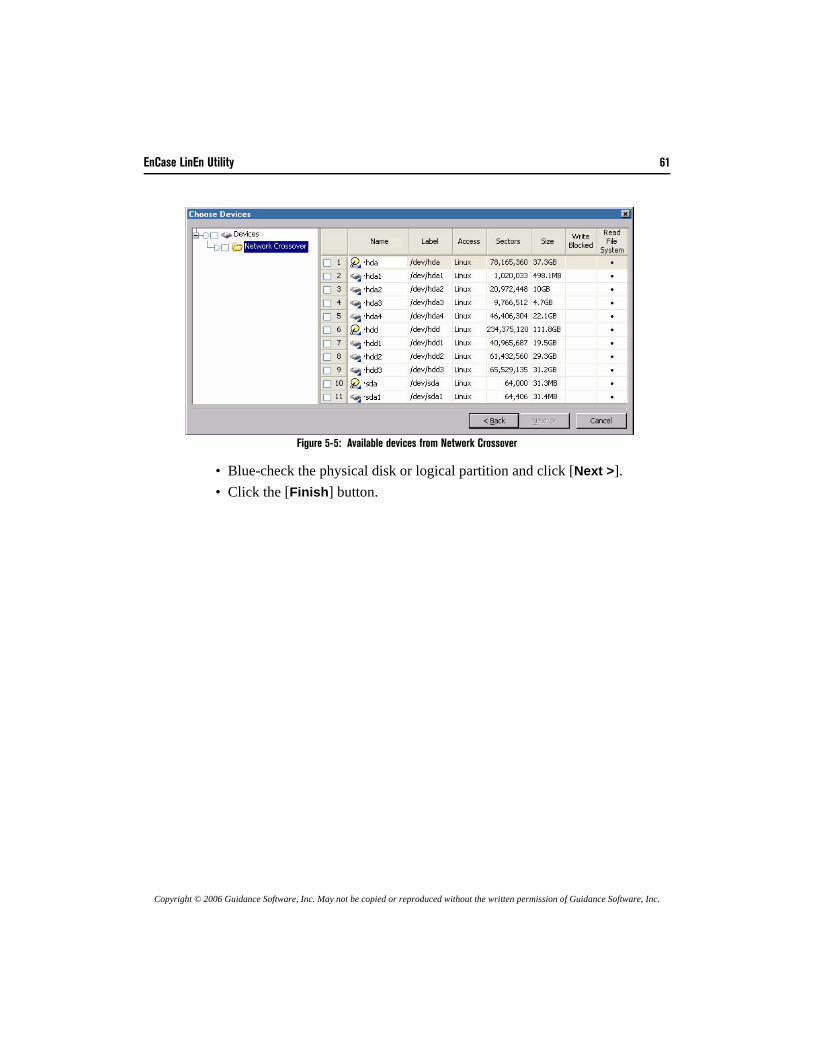
EnCase LinEn Utility 61
Copyright © 2006 Guidance Software, Inc. May not be copied or reproduced without the written permission of Guidance Software, Inc.
Figure 5-5: Available devices from Network Crossover
• Blue-check the physical disk or logical partition and click [Next >].• Click the [Finish] button.

62 EnCase Forensic v5.05 User Manual
Copyright © 2006 Guidance Software, Inc. May not be copied or reproduced without the written permission of Guidance Software, Inc.
Copyright © 2006 Guidance Software, Inc. May not be copied or reproduced without the written permission of Guidance Software, Inc.
Previewingvs. Acquiring
In EnCase for Windows, investigators preview a device before starting an acquisition.Preview can be saved in a case file without acquiring, however, if the device isaccessed by another investigator or user before being acquired, contents of the devicemay have changed. When running EnCase in Acquisition mode without a dongle inserted, you mustpreview a device prior to imaging it, but the preview does not show file structure.This does not prevent acquisition however.
Limitations of Previewing
Previewing media allows the investigator to view the media as if it has been acquired.An investigator previews media first in order to determine if a full investigation(acquisition and analysis) of the media must be performed. Previewing media is onlyavailable in EnCase for Windows.Attaching a hard drive to the forensic machine and booting to Windows without writeblocking in place will alter data on that drive. Unless a write-blocking device is used,changes to this drive will occur regardless of the precautions that EnCase makes,because of swap file activity.
The preview feature is so easy to use that many investigators mistake the previewfor the actual acquisition. Be aware that although it is a quick way to find evidence,and it is still possible to save evidence results, the preview feature will only allowyou to view case results while physically connected to the subject media.
It is possible to preview a local hard drive safely (without changing the media) if write-blocking, such as aFastBloc, is used. If write-blocking is not available, previews should be conducted through the parallel-portcable or crossover network cable with DOS disk on target machine.
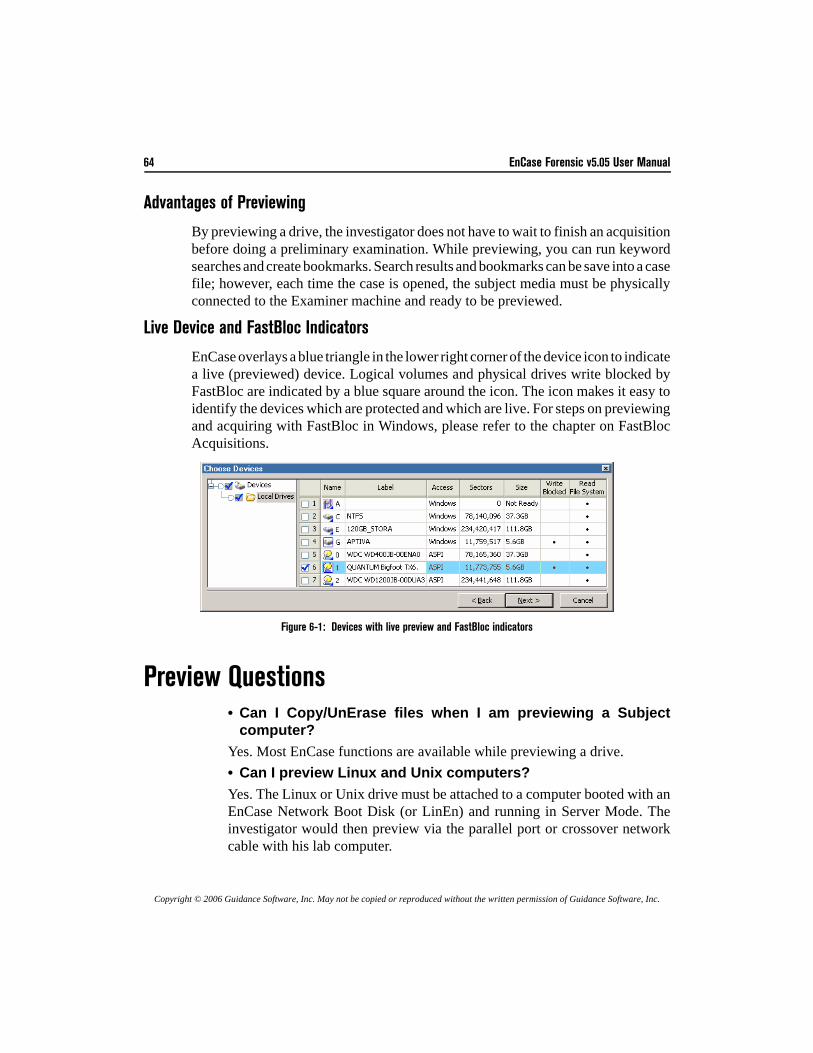
64 EnCase Forensic v5.05 User Manual
Copyright © 2006 Guidance Software, Inc. May not be copied or reproduced without the written permission of Guidance Software, Inc.
Advantages of Previewing
By previewing a drive, the investigator does not have to wait to finish an acquisitionbefore doing a preliminary examination. While previewing, you can run keywordsearches and create bookmarks. Search results and bookmarks can be save into a casefile; however, each time the case is opened, the subject media must be physicallyconnected to the Examiner machine and ready to be previewed.
Live Device and FastBloc Indicators
EnCase overlays a blue triangle in the lower right corner of the device icon to indicatea live (previewed) device. Logical volumes and physical drives write blocked byFastBloc are indicated by a blue square around the icon. The icon makes it easy toidentify the devices which are protected and which are live. For steps on previewingand acquiring with FastBloc in Windows, please refer to the chapter on FastBlocAcquisitions.
Figure 6-1: Devices with live preview and FastBloc indicators
Preview Questions• Can I Copy/UnErase files when I am previewing a Subject
computer?Yes. Most EnCase functions are available while previewing a drive.• Can I preview Linux and Unix computers?Yes. The Linux or Unix drive must be attached to a computer booted with anEnCase Network Boot Disk (or LinEn) and running in Server Mode. Theinvestigator would then preview via the parallel port or crossover networkcable with his lab computer.
Previewing vs. Acquiring 65
Copyright © 2006 Guidance Software, Inc. May not be copied or reproduced without the written permission of Guidance Software, Inc.
• Why does my laptop computer shut down when I am trying topreview the Subject computer?
Laptop computers, and many desktops, have power-saving features in theBIOS. These features will shut down ports or hard drives down to save energyafter a given time. Disable this feature during setup on both subject and storagecomputers.
Acquisition Questions• How can I verify an evidence file to see if it is still intact?Select it from within the Cases tab, right-click, and choose Verify EvidenceFiles....• I am acquiring a huge drive. My evidence files are up to .E99. Can
I still create more evidence file chunks?Yes, EnCase will keep creating them, beginning at .A01.• If my data drive fills with evidence files, do I have to stop the
acquisition and start over with a larger drive>No. Attach another hard drive, or point to another hard drive that you havealready attached and continue acquisition.

66 EnCase Forensic v5.05 User Manual
Copyright © 2006 Guidance Software, Inc. May not be copied or reproduced without the written permission of Guidance Software, Inc.
Copyright © 2006 Guidance Software, Inc. May not be copied or reproduced without the written permission of Guidance Software, Inc.
Parallel PortCable Acquisition
Use the parallel port method of acquisition only when no other method of acquisitionor preview is viable because of the slow speed of the process. This may include:
• When acquiring a laptop computer hard drive that cannot easily be removedand with no DOS-supported PCMCIA or on-board network interface card
• When acquiring a computer hard drive when no write-blocking device isavailable and there is no DOS-supported network interface card
• When acquiring a hardware RAID that is in a computer that does not have anon-board IDE channel
When acquiring using the parallel port and lap-link (null modem) parallel cable, thesubject computer must be booted to DOS using the EnCase Network Boot Disk.
Parallel Preview \ Acquisition Process
• Ensure EnCase on DOS and Windows machines match prior to acquisition.• Make sure the subject machine is configured to boot from the floppy as
described in the FAQs about EnCase Boot Disk section of this manual.• Connect the two computers with the parallel port lap-link (null-modem) cable.• Boot the storage computer into Windows.• Launch EnCase and open a new case by clicking on the [New] button.• Click the [Add Device] button or select Add Device from the File menu.
It is imperative that the following steps be performed in the order shown to ensure a proper connection.
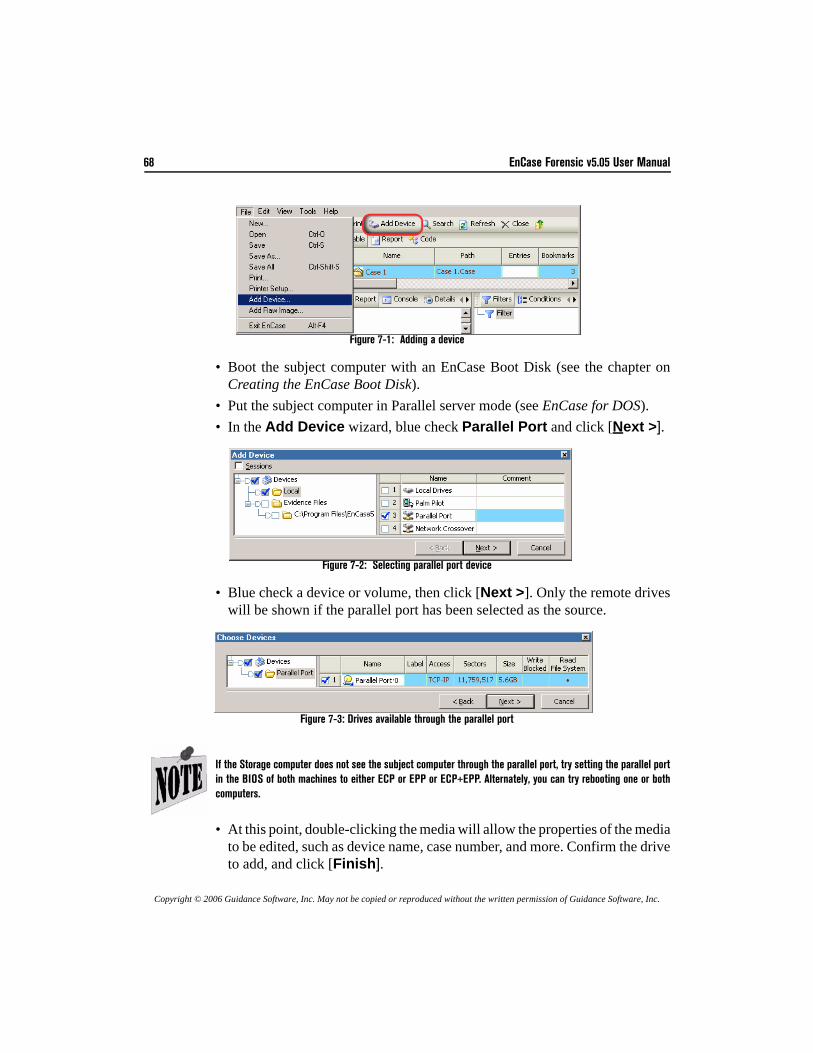
68 EnCase Forensic v5.05 User Manual
Copyright © 2006 Guidance Software, Inc. May not be copied or reproduced without the written permission of Guidance Software, Inc.
Figure 7-1: Adding a device
• Boot the subject computer with an EnCase Boot Disk (see the chapter onCreating the EnCase Boot Disk).
• Put the subject computer in Parallel server mode (see EnCase for DOS).• In the Add Device wizard, blue check Parallel Port and click [Next >].
Figure 7-2: Selecting parallel port device
• Blue check a device or volume, then click [Next >]. Only the remote driveswill be shown if the parallel port has been selected as the source.
Figure 7-3: Drives available through the parallel port
• At this point, double-clicking the media will allow the properties of the mediato be edited, such as device name, case number, and more. Confirm the driveto add, and click [Finish].
If the Storage computer does not see the subject computer through the parallel port, try setting the parallel portin the BIOS of both machines to either ECP or EPP or ECP+EPP. Alternately, you can try rebooting one or bothcomputers.
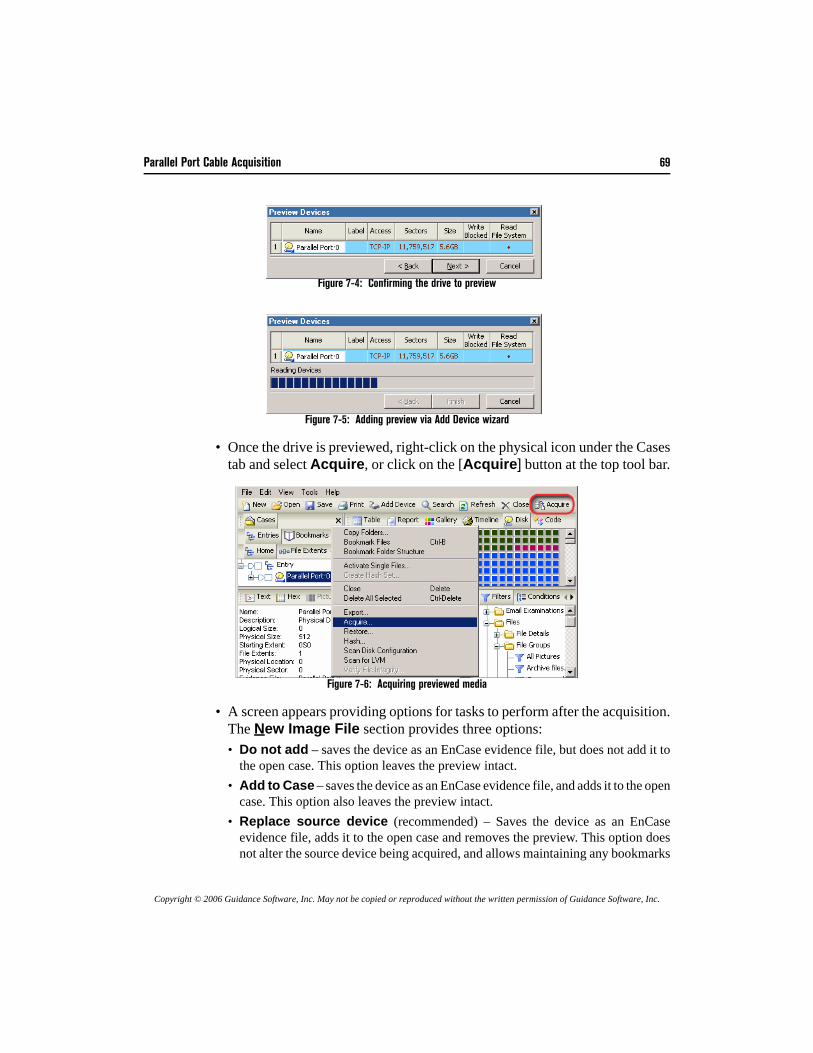
Parallel Port Cable Acquisition 69
Copyright © 2006 Guidance Software, Inc. May not be copied or reproduced without the written permission of Guidance Software, Inc.
Figure 7-4: Confirming the drive to preview
Figure 7-5: Adding preview via Add Device wizard
• Once the drive is previewed, right-click on the physical icon under the Casestab and select Acquire, or click on the [Acquire] button at the top tool bar.
Figure 7-6: Acquiring previewed media
• A screen appears providing options for tasks to perform after the acquisition.The New Image File section provides three options:• Do not add – saves the device as an EnCase evidence file, but does not add it to
the open case. This option leaves the preview intact.• Add to Case – saves the device as an EnCase evidence file, and adds it to the open
case. This option also leaves the preview intact.• Replace source device (recommended) – Saves the device as an EnCase
evidence file, adds it to the open case and removes the preview. This option doesnot alter the source device being acquired, and allows maintaining any bookmarks
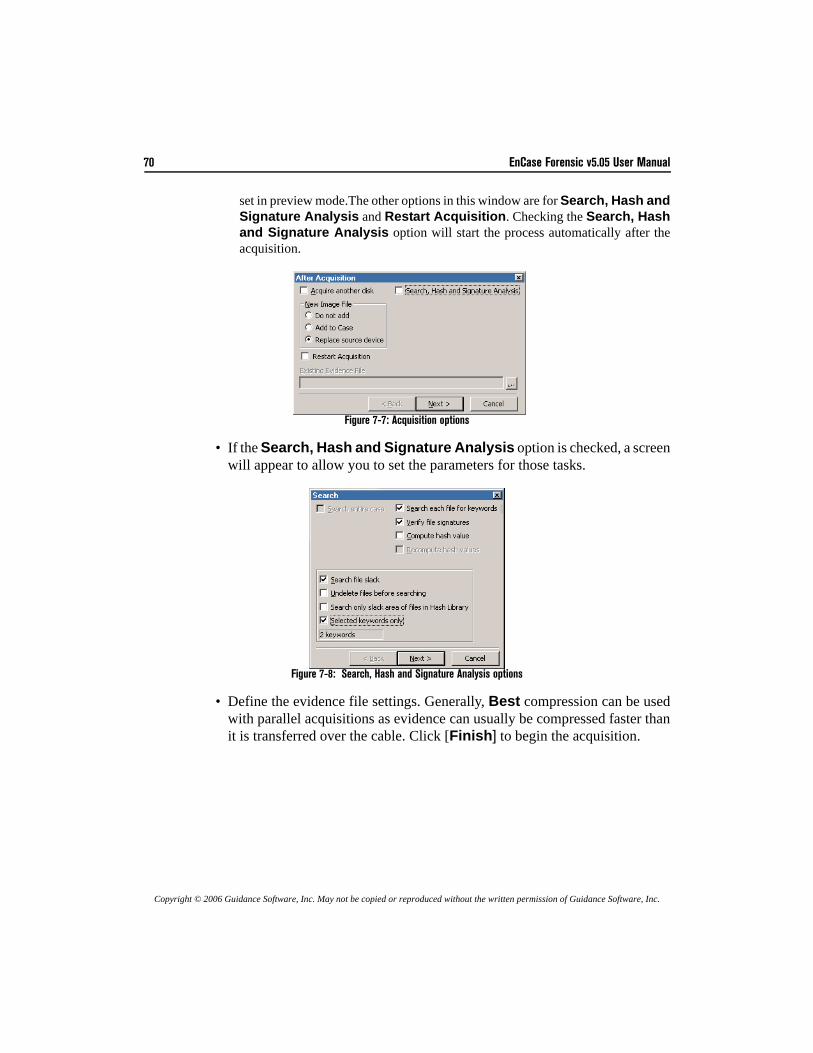
70 EnCase Forensic v5.05 User Manual
Copyright © 2006 Guidance Software, Inc. May not be copied or reproduced without the written permission of Guidance Software, Inc.
set in preview mode.The other options in this window are for Search, Hash andSignature Analysis and Restart Acquisition. Checking the Search, Hashand Signature Analysis option will start the process automatically after theacquisition.
Figure 7-7: Acquisition options
• If the Search, Hash and Signature Analysis option is checked, a screenwill appear to allow you to set the parameters for those tasks.
Figure 7-8: Search, Hash and Signature Analysis options
• Define the evidence file settings. Generally, Best compression can be usedwith parallel acquisitions as evidence can usually be compressed faster thanit is transferred over the cable. Click [Finish] to begin the acquisition.
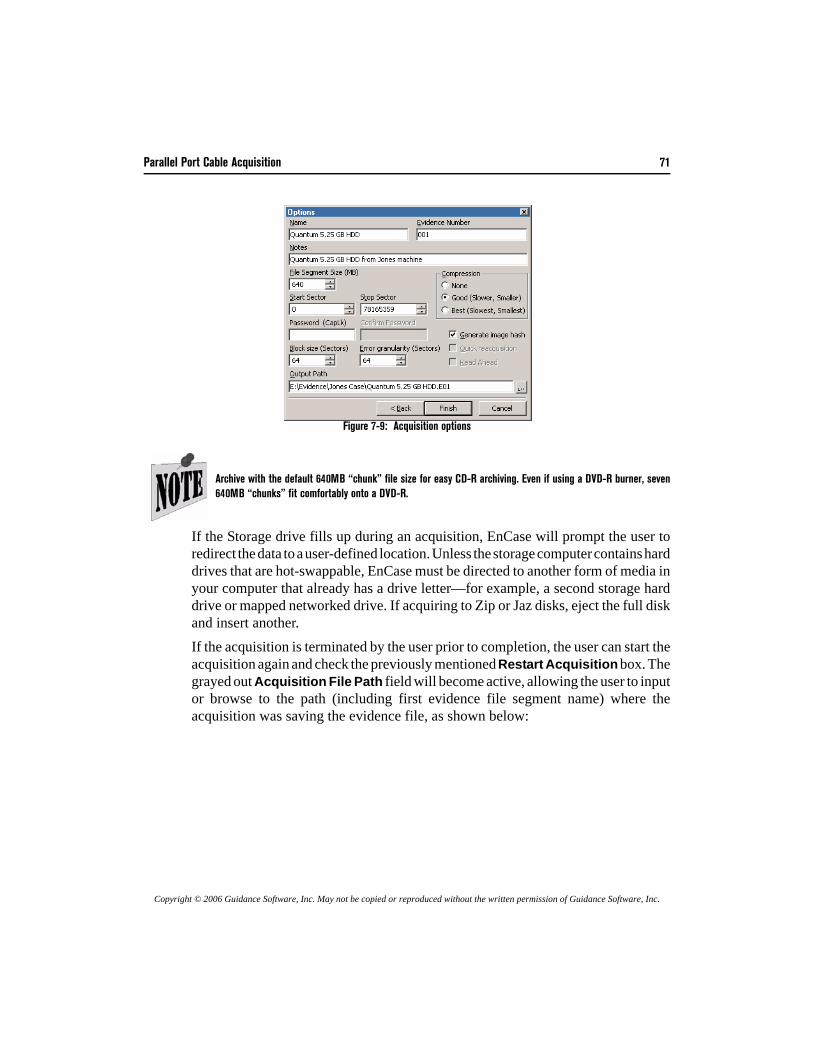
Parallel Port Cable Acquisition 71
Copyright © 2006 Guidance Software, Inc. May not be copied or reproduced without the written permission of Guidance Software, Inc.
Figure 7-9: Acquisition options
If the Storage drive fills up during an acquisition, EnCase will prompt the user toredirect the data to a user-defined location. Unless the storage computer contains harddrives that are hot-swappable, EnCase must be directed to another form of media inyour computer that already has a drive letter—for example, a second storage harddrive or mapped networked drive. If acquiring to Zip or Jaz disks, eject the full diskand insert another.If the acquisition is terminated by the user prior to completion, the user can start theacquisition again and check the previously mentioned Restart Acquisition box. Thegrayed out Acquisition File Path field will become active, allowing the user to inputor browse to the path (including first evidence file segment name) where theacquisition was saving the evidence file, as shown below:
Archive with the default 640MB “chunk” file size for easy CD-R archiving. Even if using a DVD-R burner, seven640MB “chunks” fit comfortably onto a DVD-R.
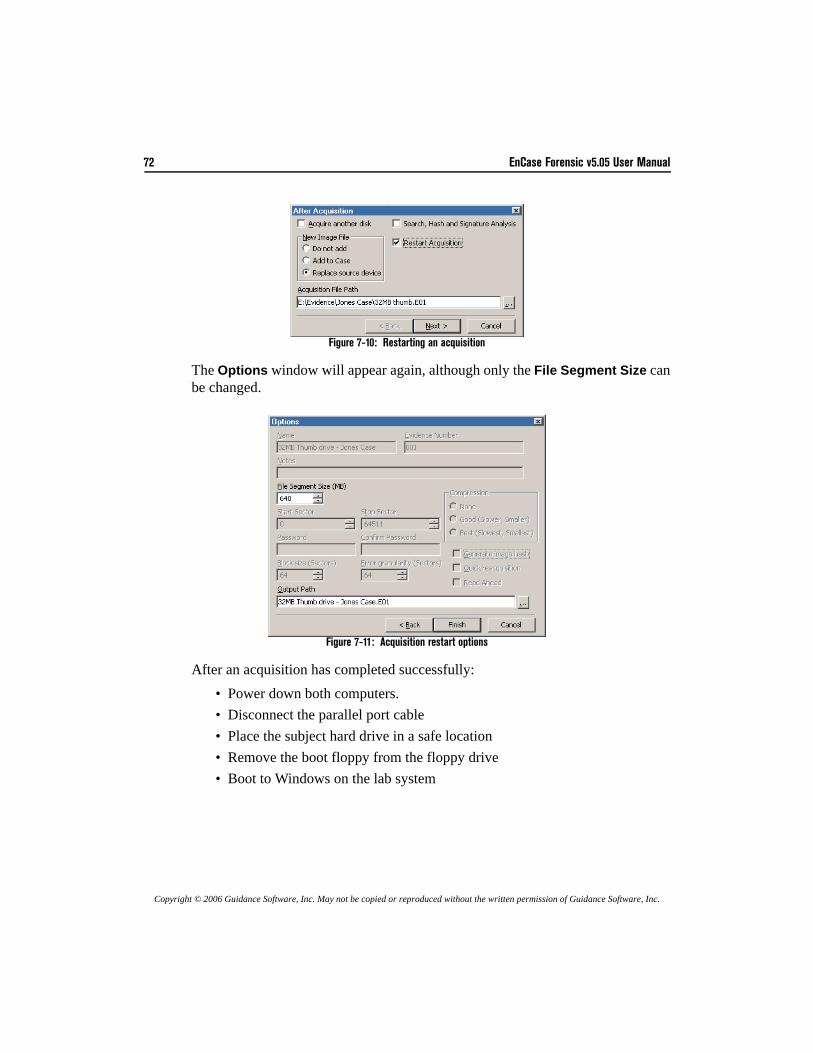
72 EnCase Forensic v5.05 User Manual
Copyright © 2006 Guidance Software, Inc. May not be copied or reproduced without the written permission of Guidance Software, Inc.
Figure 7-10: Restarting an acquisition
The Options window will appear again, although only the File Segment Size canbe changed.
Figure 7-11: Acquisition restart options
After an acquisition has completed successfully:• Power down both computers.• Disconnect the parallel port cable• Place the subject hard drive in a safe location• Remove the boot floppy from the floppy drive• Boot to Windows on the lab system
Copyright © 2006 Guidance Software, Inc. May not be copied or reproduced without the written permission of Guidance Software, Inc.
Network CableAcquisition
EnCase allows users to preview and acquire data via the crossover network cable.
Creating the EnCase Network Boot Disk (ENBD) or LinEn CD
Making a crossover network cable acquisition work requires loading a DOS packetdriver so that EnCase for DOS can communicate with the installed PCI or PCMCIAnetwork interface card (NIC), or loading the drivers through Linux via the EnCaseLinEn CD.
EnCase Network Boot Disk (ENBD)
Guidance Software provides investigators with a downloadable creation utility forthe EnCase Network Boot Disk (ENBD, created by the Ontario Provincial Police e-crime section) to facilitate the detection and loading of the correct DOS packet driver.The boot disk has the ability to manually or automatically detect NICs and load thedrivers, giving the examiner maximum convenience and flexibility when acquiringor previewing media.
• Auto-detect automatically attempts detection of the NIC in the subject andforensic computers.
• Manual functionality allows the investigator to specify the NIC driver to loadfrom a list of supported cards.
Previewing and acquiring with this method only works with a crossover cable. A yellow crossover cable wasshipped with your EnCase software. Crossover cables are Ethernet cables using RJ-45 connectors, where oneend of the cable is wired so that the Receive signal pins on one connector are connected to the Transmit signalpins on the other side. They are designed for direct workstation-to-workstation connectivity. A common CAT5“straight-through” Ethernet cable will not work, nor will previews \ acquisitions across a LAN, unless usingEnCase Enterprise.
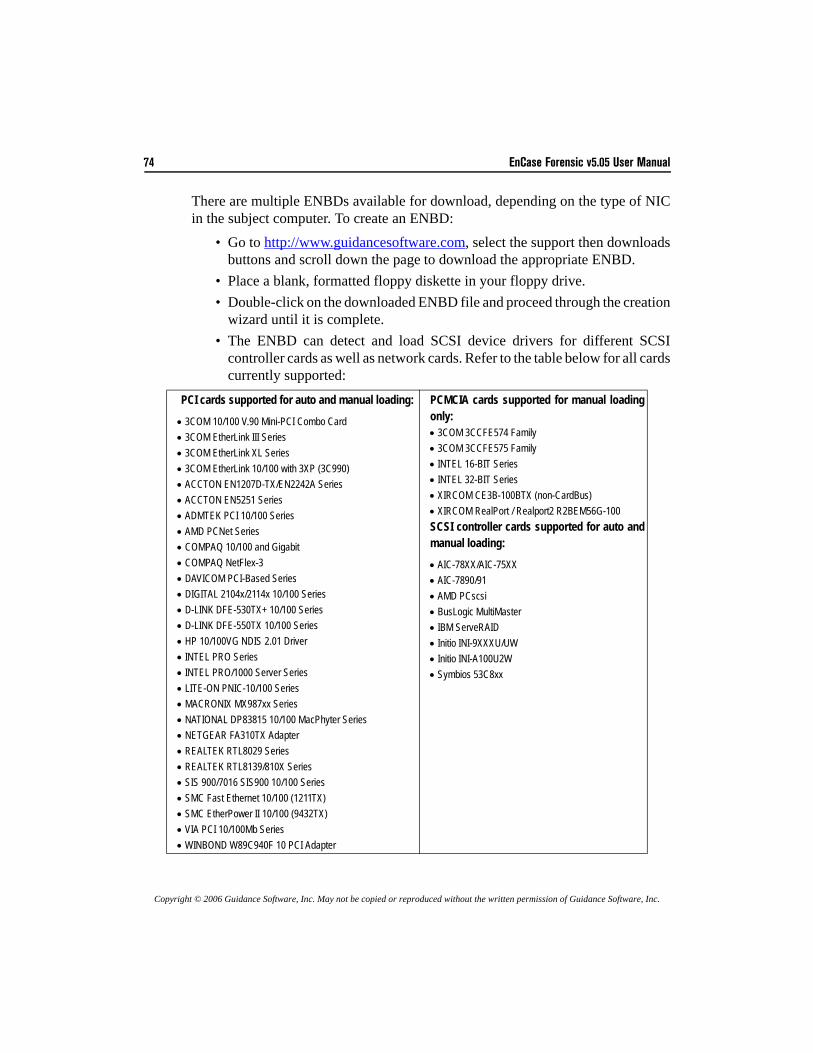
74 EnCase Forensic v5.05 User Manual
Copyright © 2006 Guidance Software, Inc. May not be copied or reproduced without the written permission of Guidance Software, Inc.
There are multiple ENBDs available for download, depending on the type of NICin the subject computer. To create an ENBD:
• Go to http://www.guidancesoftware.com, select the support then downloadsbuttons and scroll down the page to download the appropriate ENBD.
• Place a blank, formatted floppy diskette in your floppy drive. • Double-click on the downloaded ENBD file and proceed through the creation
wizard until it is complete.• The ENBD can detect and load SCSI device drivers for different SCSI
controller cards as well as network cards. Refer to the table below for all cardscurrently supported:
PCI cards supported for auto and manual loading:
• 3COM 10/100 V.90 Mini-PCI Combo Card • 3COM EtherLink III Series • 3COM EtherLink XL Series • 3COM EtherLink 10/100 with 3XP (3C990) • ACCTON EN1207D-TX/EN2242A Series • ACCTON EN5251 Series • ADMTEK PCI 10/100 Series • AMD PCNet Series • COMPAQ 10/100 and Gigabit • COMPAQ NetFlex-3 • DAVICOM PCI-Based Series • DIGITAL 2104x/2114x 10/100 Series • D-LINK DFE-530TX+ 10/100 Series • D-LINK DFE-550TX 10/100 Series • HP 10/100VG NDIS 2.01 Driver • INTEL PRO Series• INTEL PRO/1000 Server Series• LITE-ON PNIC-10/100 Series • MACRONIX MX987xx Series • NATIONAL DP83815 10/100 MacPhyter Series • NETGEAR FA310TX Adapter • REALTEK RTL8029 Series • REALTEK RTL8139/810X Series • SIS 900/7016 SIS900 10/100 Series • SMC Fast Ethernet 10/100 (1211TX) • SMC EtherPower II 10/100 (9432TX) • VIA PCI 10/100Mb Series • WINBOND W89C940F 10 PCI Adapter
PCMCIA cards supported for manual loadingonly:• 3COM 3CCFE574 Family • 3COM 3CCFE575 Family • INTEL 16-BIT Series • INTEL 32-BIT Series • XIRCOM CE3B-100BTX (non-CardBus) • XIRCOM RealPort / Realport2 R2BEM56G-100SCSI controller cards supported for auto andmanual loading:• AIC-78XX/AIC-75XX • AIC-7890/91 • AMD PCscsi • BusLogic MultiMaster • IBM ServeRAID • Initio INI-9XXXU/UW • Initio INI-A100U2W • Symbios 53C8xx
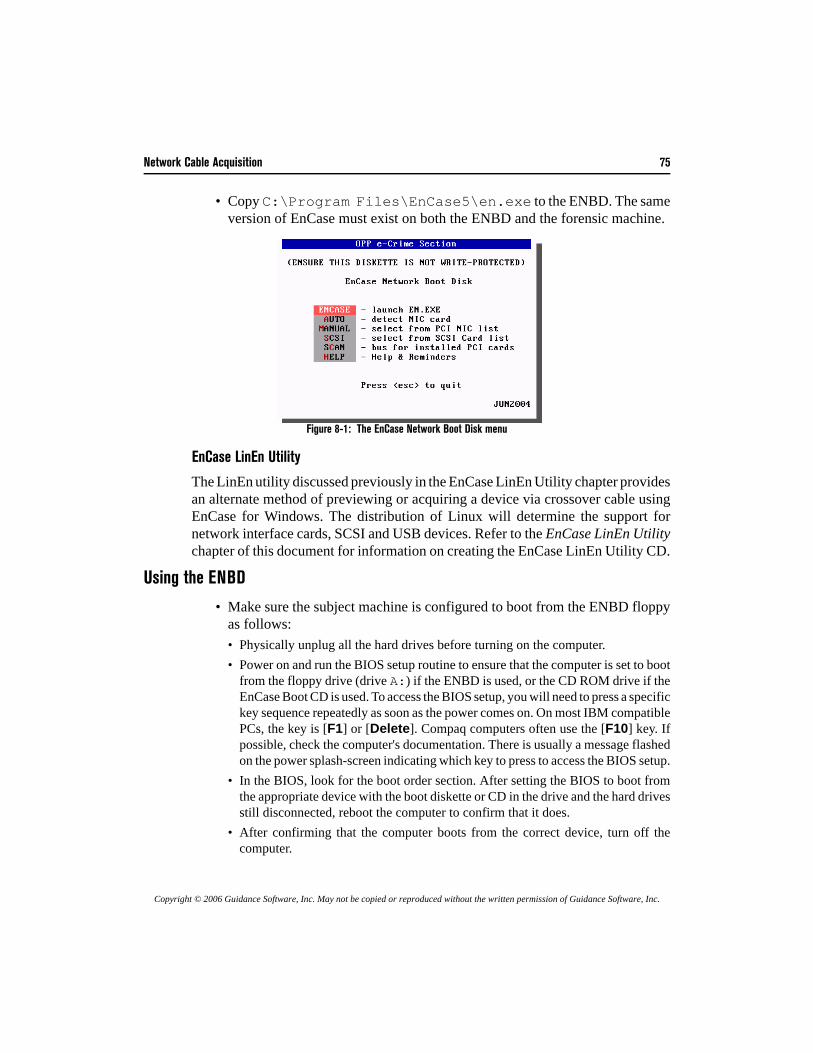
Network Cable Acquisition 75
Copyright © 2006 Guidance Software, Inc. May not be copied or reproduced without the written permission of Guidance Software, Inc.
• Copy C:\Program Files\EnCase5\en.exe to the ENBD. The sameversion of EnCase must exist on both the ENBD and the forensic machine.
Figure 8-1: The EnCase Network Boot Disk menu
EnCase LinEn Utility
The LinEn utility discussed previously in the EnCase LinEn Utility chapter providesan alternate method of previewing or acquiring a device via crossover cable usingEnCase for Windows. The distribution of Linux will determine the support fornetwork interface cards, SCSI and USB devices. Refer to the EnCase LinEn Utilitychapter of this document for information on creating the EnCase LinEn Utility CD.
Using the ENBD
• Make sure the subject machine is configured to boot from the ENBD floppyas follows:• Physically unplug all the hard drives before turning on the computer.• Power on and run the BIOS setup routine to ensure that the computer is set to boot
from the floppy drive (drive A:) if the ENBD is used, or the CD ROM drive if theEnCase Boot CD is used. To access the BIOS setup, you will need to press a specifickey sequence repeatedly as soon as the power comes on. On most IBM compatiblePCs, the key is [F1] or [Delete]. Compaq computers often use the [F10] key. Ifpossible, check the computer's documentation. There is usually a message flashedon the power splash-screen indicating which key to press to access the BIOS setup.
• In the BIOS, look for the boot order section. After setting the BIOS to boot fromthe appropriate device with the boot diskette or CD in the drive and the hard drivesstill disconnected, reboot the computer to confirm that it does.
• After confirming that the computer boots from the correct device, turn off thecomputer.
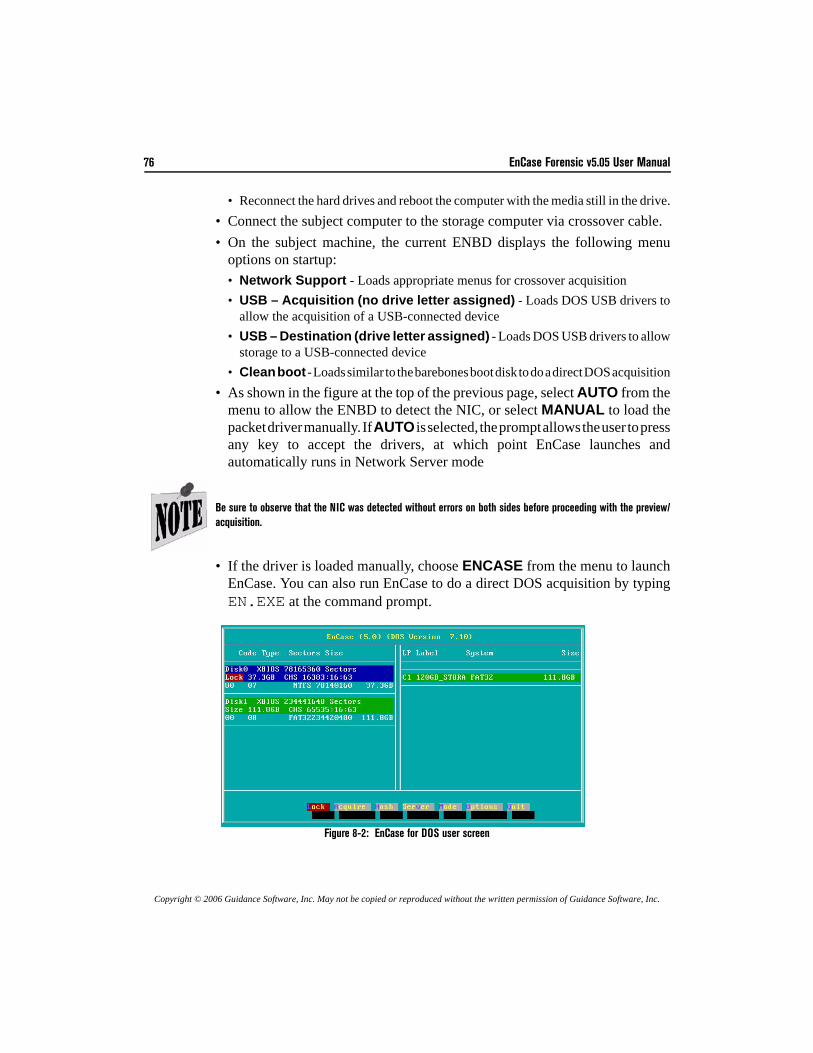
76 EnCase Forensic v5.05 User Manual
Copyright © 2006 Guidance Software, Inc. May not be copied or reproduced without the written permission of Guidance Software, Inc.
• Reconnect the hard drives and reboot the computer with the media still in the drive.• Connect the subject computer to the storage computer via crossover cable.• On the subject machine, the current ENBD displays the following menu
options on startup:• Network Support - Loads appropriate menus for crossover acquisition• USB – Acquisition (no drive letter assigned) - Loads DOS USB drivers to
allow the acquisition of a USB-connected device• USB – Destination (drive letter assigned) - Loads DOS USB drivers to allow
storage to a USB-connected device• Clean boot - Loads similar to the barebones boot disk to do a direct DOS acquisition
• As shown in the figure at the top of the previous page, select AUTO from themenu to allow the ENBD to detect the NIC, or select MANUAL to load thepacket driver manually. If AUTO is selected, the prompt allows the user to pressany key to accept the drivers, at which point EnCase launches andautomatically runs in Network Server mode
• If the driver is loaded manually, choose ENCASE from the menu to launchEnCase. You can also run EnCase to do a direct DOS acquisition by typingEN.EXE at the command prompt.
Figure 8-2: EnCase for DOS user screen
Be sure to observe that the NIC was detected without errors on both sides before proceeding with the preview/acquisition.
Network Cable Acquisition 77
Copyright © 2006 Guidance Software, Inc. May not be copied or reproduced without the written permission of Guidance Software, Inc.
• Put EnCase for DOS in Server mode by using the arrow keys to select the[Server] button and clicking [Enter].
• Choose Network. The subject machine should now be running in Servermode, displaying a message stating Waiting to connect...
• Connect from the Windows forensic machine as described in the Preview orAcquisition section of this chapter.
Using the EnCase LinEn Utility
• Make sure the subject machine is configured to boot from the EnCase LinEnUtility CD as follows:• Physically unplug all the hard drives before turning on the computer.• Power on and run the BIOS setup routine to ensure that the computer is set to boot
from the CD ROM drive. To access the BIOS setup, you will need to press a specifickey sequence repeatedly as soon as the power comes on. On most IBM compatiblePCs, the key is [F1] or [Delete]. Compaq computers often use the [F10] key. Ifpossible, check the computer's documentation. There is usually a message flashedon the power splash-screen indicating which key to press to access the BIOS setup.
• In the BIOS, look for the boot order section. After setting the BIOS to boot fromthe CD ROM, with the LinEn CD in the drive and the hard drives still disconnected,reboot the computer to confirm that it does.
• After confirming that the computer boots from the correct device, turn it off.• Reconnect hard drives and reboot with the media still in the CD ROM drive.
• Connect the subject computer to the storage computer via the crossover cable.• Navigate to the folder where LinEn resides and type “./linen” in the console
to run LinEn.• Place machine in Server Mode by pressing [v] at the main screen, or using the
right and left arrows until the Server option is highlighted and then pressing[Enter]. The subject machine should now be running in Server mode,displaying “Waiting to connect…”
Troubleshooting LinEn connectivity issues
If nothing occurs when attempting to enable Server mode, ensure that an IP Addressis assigned to the system and that the NIC is loaded as follows:
• Exit LinEn• From the command line type: “ifconfig eth0”• Check to see if an IP address is listed for that device; if no IP address is listed then
specify one by typing “ifconfig eth0 10.0.0.1 netmask 255.0.0.0"
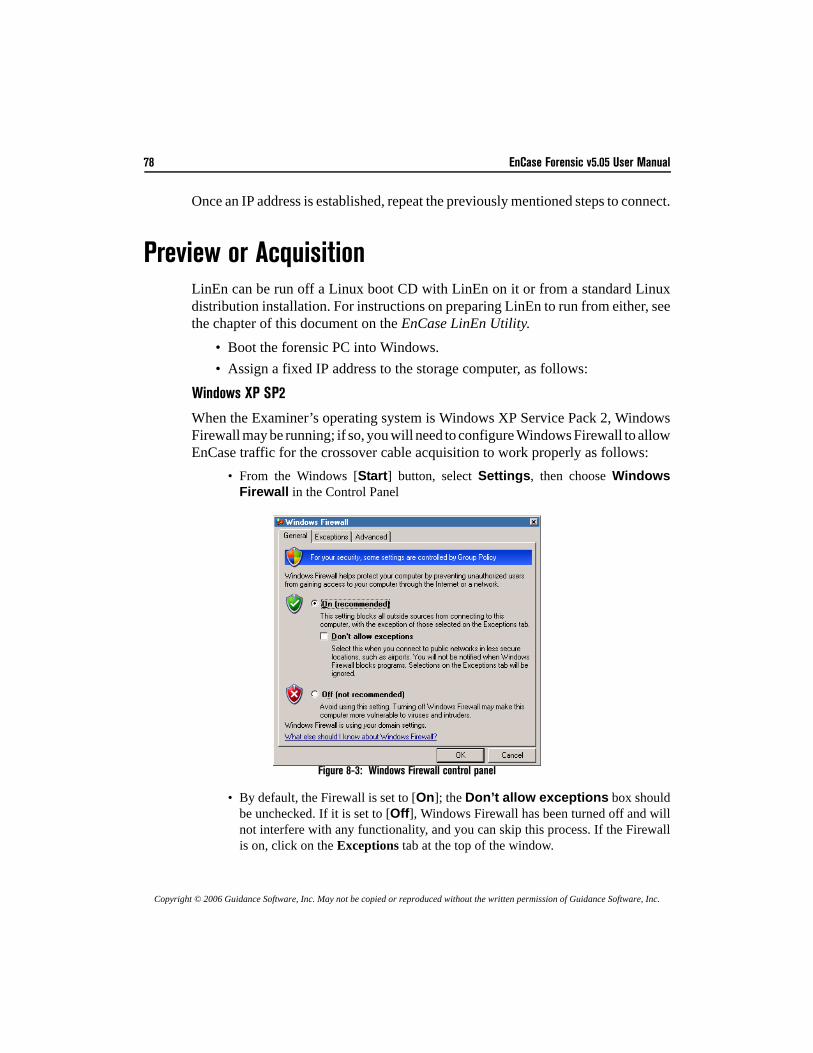
78 EnCase Forensic v5.05 User Manual
Copyright © 2006 Guidance Software, Inc. May not be copied or reproduced without the written permission of Guidance Software, Inc.
Once an IP address is established, repeat the previously mentioned steps to connect.
Preview or AcquisitionLinEn can be run off a Linux boot CD with LinEn on it or from a standard Linuxdistribution installation. For instructions on preparing LinEn to run from either, seethe chapter of this document on the EnCase LinEn Utility.
• Boot the forensic PC into Windows.• Assign a fixed IP address to the storage computer, as follows:
Windows XP SP2
When the Examiner’s operating system is Windows XP Service Pack 2, WindowsFirewall may be running; if so, you will need to configure Windows Firewall to allowEnCase traffic for the crossover cable acquisition to work properly as follows:
• From the Windows [Start] button, select Settings, then choose WindowsFirewall in the Control Panel
.
Figure 8-3: Windows Firewall control panel
• By default, the Firewall is set to [On]; the Don’t allow exceptions box shouldbe unchecked. If it is set to [Off], Windows Firewall has been turned off and willnot interfere with any functionality, and you can skip this process. If the Firewallis on, click on the Exceptions tab at the top of the window.
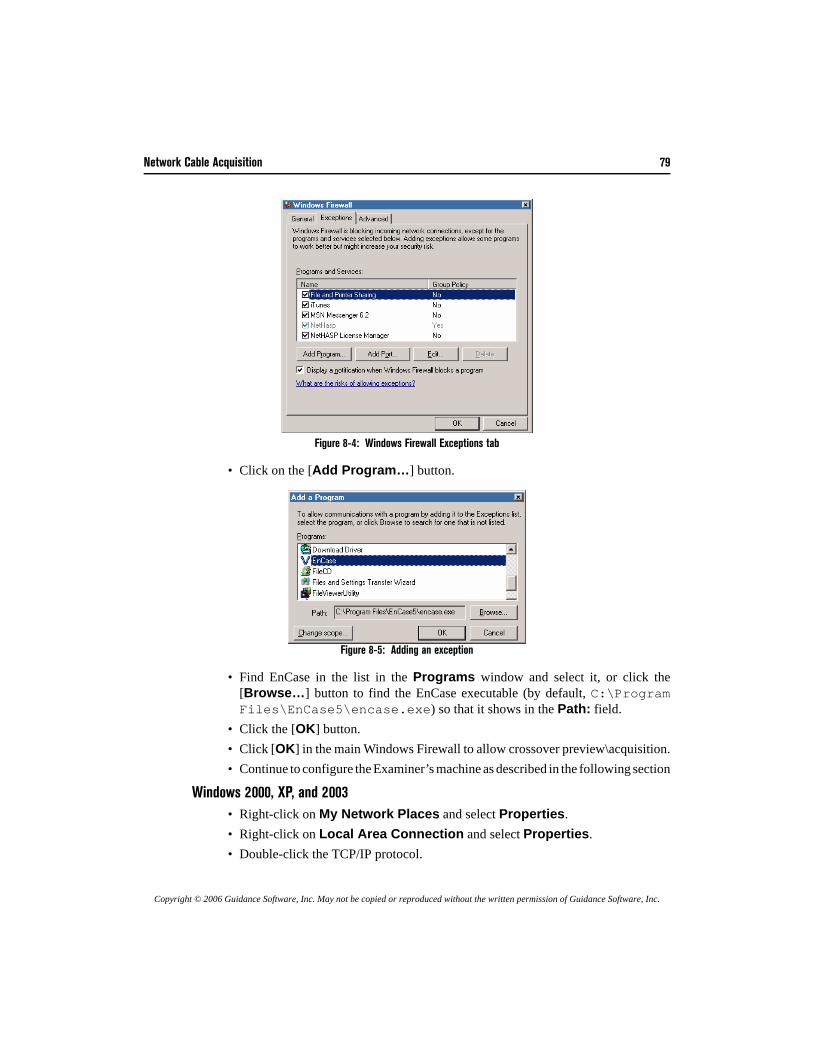
Network Cable Acquisition 79
Copyright © 2006 Guidance Software, Inc. May not be copied or reproduced without the written permission of Guidance Software, Inc.
Figure 8-4: Windows Firewall Exceptions tab
• Click on the [Add Program…] button.
Figure 8-5: Adding an exception
• Find EnCase in the list in the Programs window and select it, or click the[Browse…] button to find the EnCase executable (by default, C:\ProgramFiles\EnCase5\encase.exe) so that it shows in the Path: field.
• Click the [OK] button.• Click [OK] in the main Windows Firewall to allow crossover preview\acquisition.• Continue to configure the Examiner’s machine as described in the following section
Windows 2000, XP, and 2003• Right-click on My Network Places and select Properties.• Right-click on Local Area Connection and select Properties.• Double-click the TCP/IP protocol.
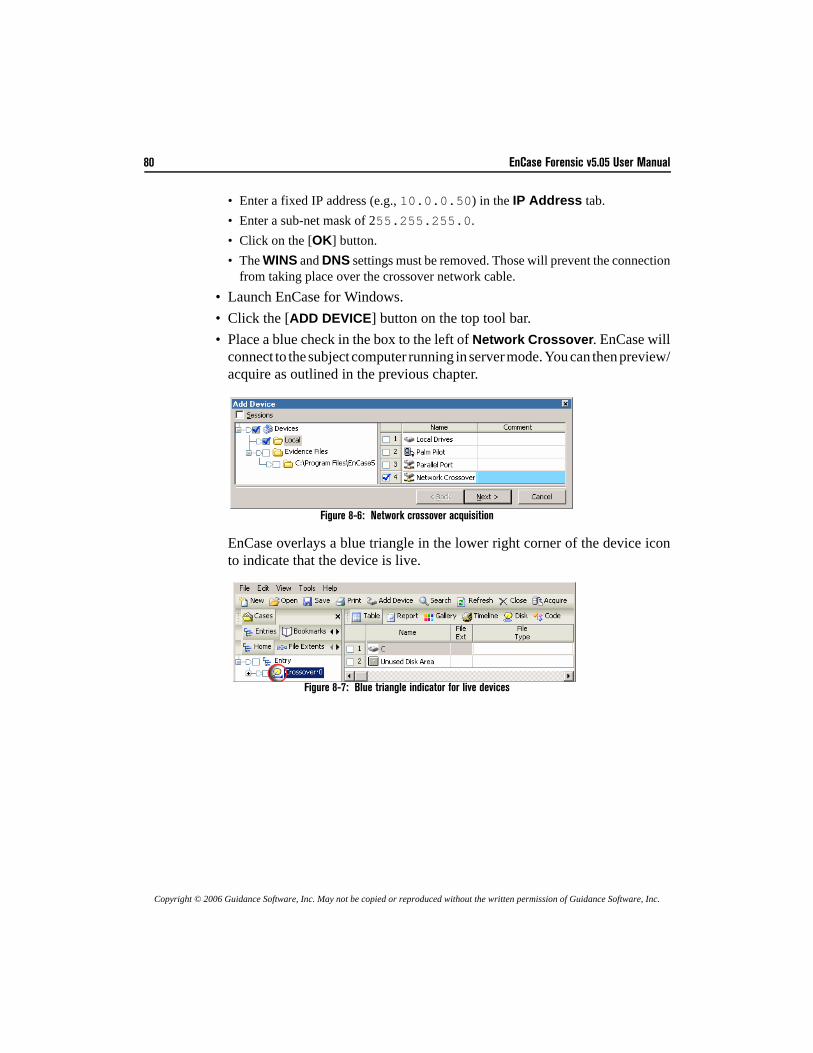
80 EnCase Forensic v5.05 User Manual
Copyright © 2006 Guidance Software, Inc. May not be copied or reproduced without the written permission of Guidance Software, Inc.
• Enter a fixed IP address (e.g., 10.0.0.50) in the IP Address tab.• Enter a sub-net mask of 255.255.255.0. • Click on the [OK] button. • The WINS and DNS settings must be removed. Those will prevent the connection
from taking place over the crossover network cable.• Launch EnCase for Windows. • Click the [ADD DEVICE] button on the top tool bar.• Place a blue check in the box to the left of Network Crossover. EnCase will
connect to the subject computer running in server mode. You can then preview/acquire as outlined in the previous chapter.
Figure 8-6: Network crossover acquisition
EnCase overlays a blue triangle in the lower right corner of the device iconto indicate that the device is live.
Figure 8-7: Blue triangle indicator for live devices
Copyright © 2006 Guidance Software, Inc. May not be copied or reproduced without the written permission of Guidance Software, Inc.
Drive-to-DriveDOS Acquisition
One method of acquisition takes place entirely within EnCase for DOS. Typically,the Subject IDE hard drive will be placed in the Storage computer so that both theSubject and Storage IDE drives are on the same motherboard, hence the term “drive-to-drive”. There is no server mode in a drive-to-drive acquisition.
Drive Geometry Problems
Performing a drive-to-drive acquisition in the Subject computer’s environment mightbe necessary in certain situations. This method avoids any drive geometry problemsthat might result if the Subject hard drive is removed from its native environment.As an example to illustrate this issue, assume a 20GB hard drive in the subjectcomputer has a Phoenix BIOS from 1997. With the drive in a top-of-the-line computerwith an Award BIOS from 2002, it is entirely likely that the BIOS in each are set toauto detect hard drives. Since they are different, they will likely also auto detect thesame hard drive at a slightly different cylinders-heads-sectors setting. If you acquiredrive-to-drive in the storage (forensic) system, you might encounter sporadic errormessages or not see every sector that the Subject computer used. The solution wouldbe to reacquire the original media in the media’s original (native) environment.The caveat is that you must be certain the subject computer is set to boot from a disketteand not the hard drive. This can be checked in the BIOS. Ensure all hard drives aredisconnected when booting the first time via diskette to ensure the subject computerwill boot from the EnCase Boot Disk, not the subject media. If you are uncertain,it may be better to acquire the subject media in the forensic computer, although aspreviously mentioned, you may encounter drive geometry problems.

82 EnCase Forensic v5.05 User Manual
Copyright © 2006 Guidance Software, Inc. May not be copied or reproduced without the written permission of Guidance Software, Inc.
Benefits and Drawbacks
If a FastBloc is not available, the drive-to-drive acquisition is the fastest way toperform an acquisition without compromising the data. Data is transferred over anIDE ribbon cable, a much faster pipeline than a parallel port lap-link cable orcrossover network cable. There is a risk to the drive-to-drive acquisition: if both drives are the same make andmodel, and the storage partition is not labeled “STORAGE” (or something similar),it can be difficult to determine which drive to acquire to and which drive to acquirefrom. In that situation, it would be easy to acquire the Storage hard drive to the Subjecthard drive, which could overwrite the unallocated space on the subject drive, thusaltering it.
Steps to Follow
• Attach the subject hard drive to an IDE ribbon cable on the storage computer(or visa-versa to avoid drive geometry problems). Note that EnCase for DOScan only store evidence on a device formatted FAT32.
• Boot the storage computer with an EnCase Boot Disk.• Launch EnCase for DOS (type EN at the a:\> prompt).• All drives are locked by default, preventing the computer from writing to any
drive by accident. Click [L] for LOCKING and specify the storage drive tounlock it.
• Click the [A] key to acquire.• Choose the subject drive to acquire.
Figure 9-1: Starting acquisitions in EnCase for DOS
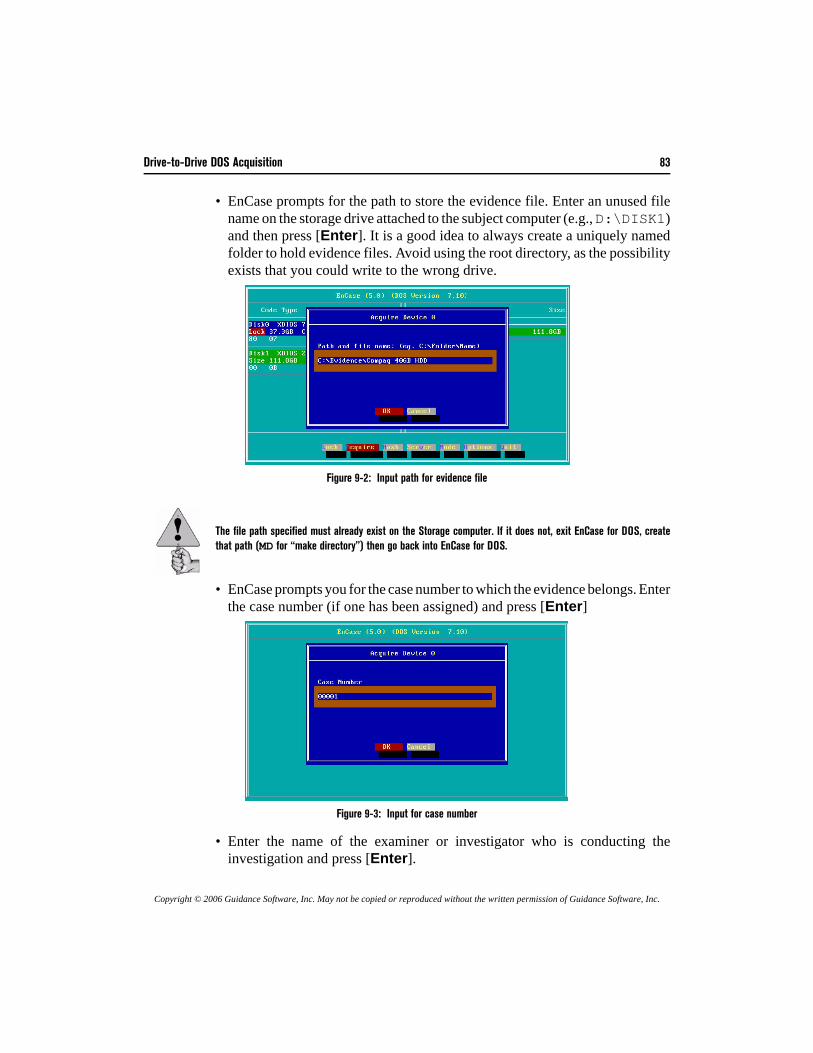
Drive-to-Drive DOS Acquisition 83
Copyright © 2006 Guidance Software, Inc. May not be copied or reproduced without the written permission of Guidance Software, Inc.
• EnCase prompts for the path to store the evidence file. Enter an unused filename on the storage drive attached to the subject computer (e.g., D:\DISK1)and then press [Enter]. It is a good idea to always create a uniquely namedfolder to hold evidence files. Avoid using the root directory, as the possibilityexists that you could write to the wrong drive.
Figure 9-2: Input path for evidence file
• EnCase prompts you for the case number to which the evidence belongs. Enterthe case number (if one has been assigned) and press [Enter]
.
Figure 9-3: Input for case number
• Enter the name of the examiner or investigator who is conducting theinvestigation and press [Enter].
The file path specified must already exist on the Storage computer. If it does not, exit EnCase for DOS, createthat path (MD for “make directory”) then go back into EnCase for DOS.
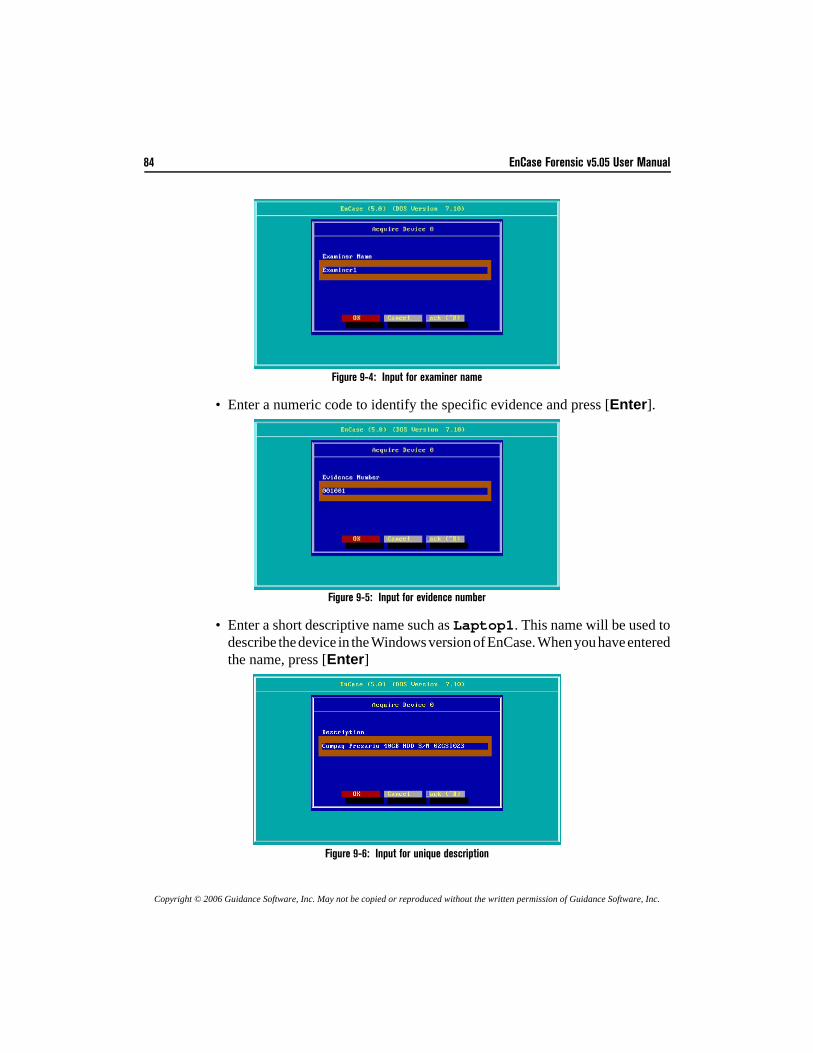
84 EnCase Forensic v5.05 User Manual
Copyright © 2006 Guidance Software, Inc. May not be copied or reproduced without the written permission of Guidance Software, Inc.
Figure 9-4: Input for examiner name
• Enter a numeric code to identify the specific evidence and press [Enter].
Figure 9-5: Input for evidence number
• Enter a short descriptive name such as Laptop1. This name will be used todescribe the device in the Windows version of EnCase. When you have enteredthe name, press [Enter]
.
Figure 9-6: Input for unique description
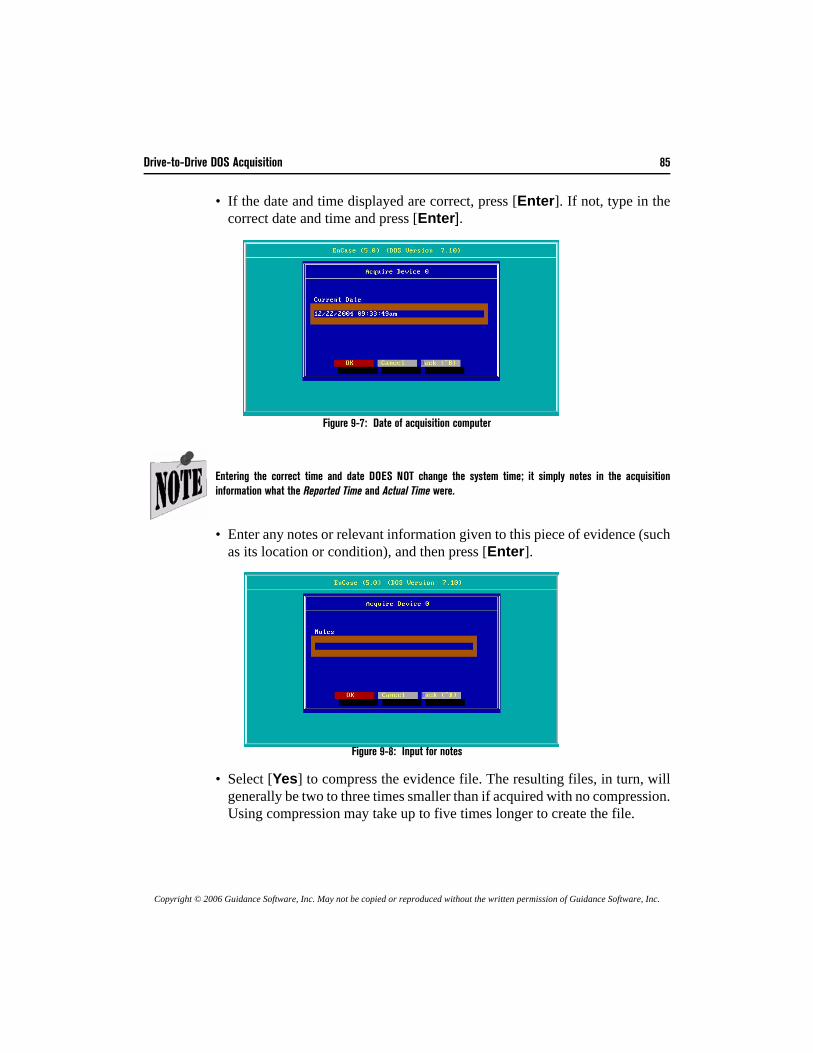
Drive-to-Drive DOS Acquisition 85
Copyright © 2006 Guidance Software, Inc. May not be copied or reproduced without the written permission of Guidance Software, Inc.
• If the date and time displayed are correct, press [Enter]. If not, type in thecorrect date and time and press [Enter].
Figure 9-7: Date of acquisition computer
• Enter any notes or relevant information given to this piece of evidence (suchas its location or condition), and then press [Enter].
Figure 9-8: Input for notes
• Select [Yes] to compress the evidence file. The resulting files, in turn, willgenerally be two to three times smaller than if acquired with no compression.Using compression may take up to five times longer to create the file.
Entering the correct time and date DOES NOT change the system time; it simply notes in the acquisitioninformation what the Reported Time and Actual Time were.

86 EnCase Forensic v5.05 User Manual
Copyright © 2006 Guidance Software, Inc. May not be copied or reproduced without the written permission of Guidance Software, Inc.
Figure 9-9: Select [Yes] to compress
• Choose whether or not to create an MD5 hash value. Choose [Yes] to generatean MD5 hash of the evidence at the time of acquisition (recommended).
Figure 9-10: Select [Yes] to obtain MD5 hash
• To add a password to an evidence file, type in the password and click [OK].If the password is lost or forgotten, the evidence file is inaccessible.
• Enter the maximum size of the resulting file segments (chunks). The defaultis 640MB for CD-R archival, but this may be increased up to 2000MB or assmall as 1MB.
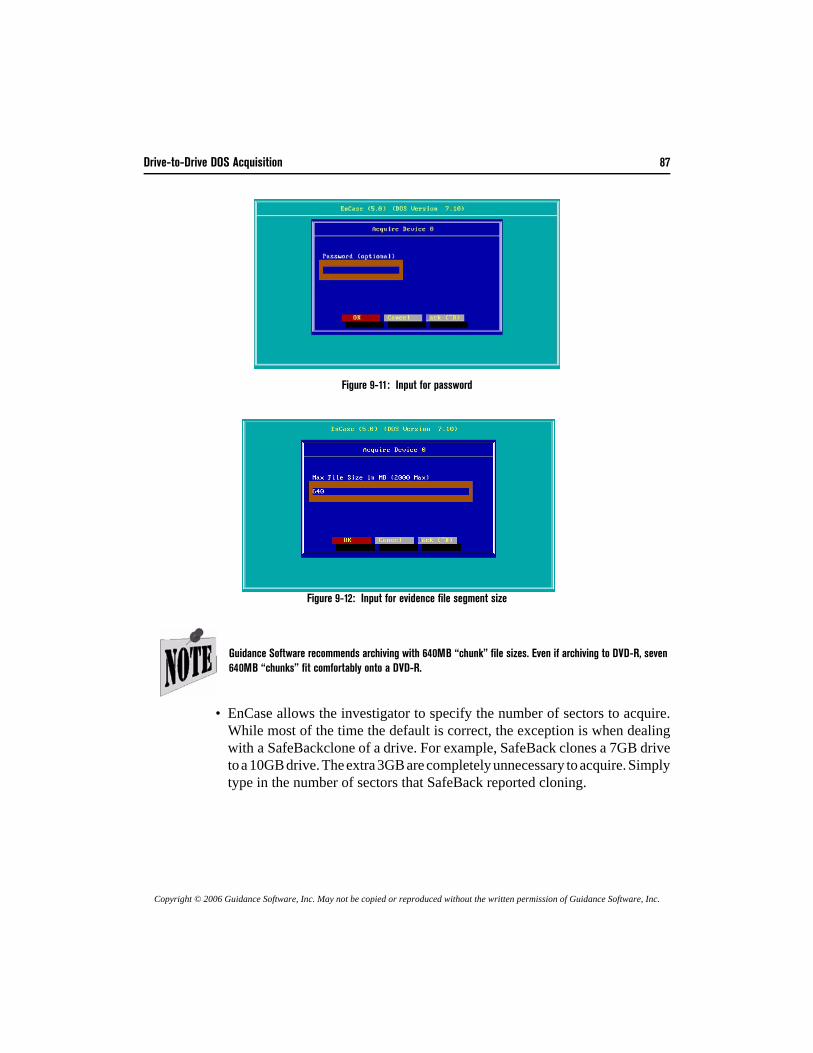
Drive-to-Drive DOS Acquisition 87
Copyright © 2006 Guidance Software, Inc. May not be copied or reproduced without the written permission of Guidance Software, Inc.
Figure 9-11: Input for password
Figure 9-12: Input for evidence file segment size
• EnCase allows the investigator to specify the number of sectors to acquire.While most of the time the default is correct, the exception is when dealingwith a SafeBackclone of a drive. For example, SafeBack clones a 7GB driveto a 10GB drive. The extra 3GB are completely unnecessary to acquire. Simplytype in the number of sectors that SafeBack reported cloning.
Guidance Software recommends archiving with 640MB “chunk” file sizes. Even if archiving to DVD-R, seven640MB “chunks” fit comfortably onto a DVD-R.
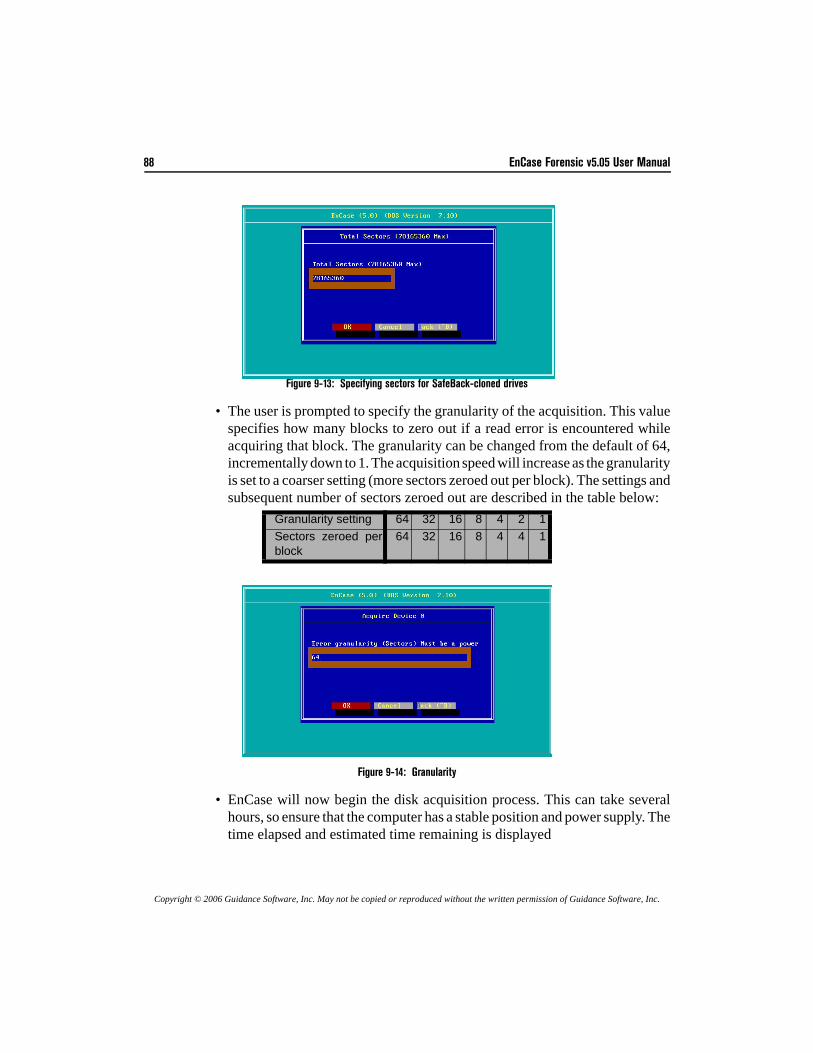
88 EnCase Forensic v5.05 User Manual
Copyright © 2006 Guidance Software, Inc. May not be copied or reproduced without the written permission of Guidance Software, Inc.
Figure 9-13: Specifying sectors for SafeBack-cloned drives
• The user is prompted to specify the granularity of the acquisition. This valuespecifies how many blocks to zero out if a read error is encountered whileacquiring that block. The granularity can be changed from the default of 64,incrementally down to 1. The acquisition speed will increase as the granularityis set to a coarser setting (more sectors zeroed out per block). The settings andsubsequent number of sectors zeroed out are described in the table below:
Figure 9-14: Granularity
• EnCase will now begin the disk acquisition process. This can take severalhours, so ensure that the computer has a stable position and power supply. Thetime elapsed and estimated time remaining is displayed
Granularity setting 64 32 16 8 4 2 1Sectors zeroed perblock
64 32 16 8 4 4 1
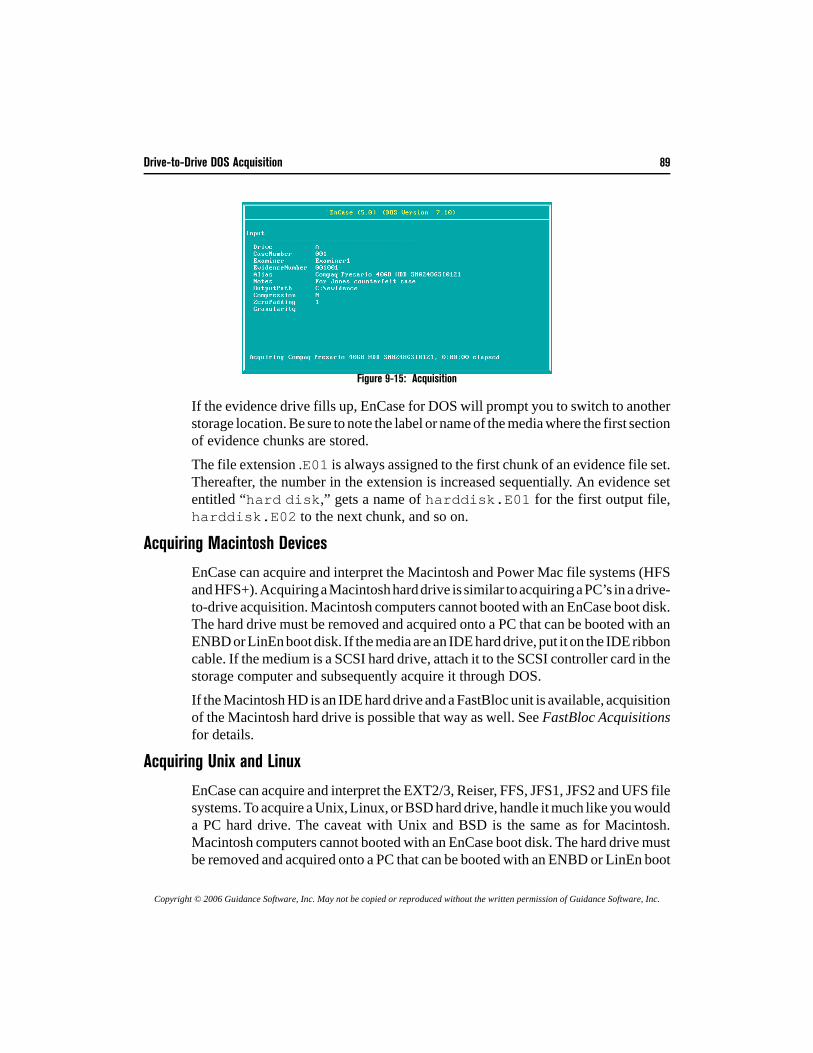
Drive-to-Drive DOS Acquisition 89
Copyright © 2006 Guidance Software, Inc. May not be copied or reproduced without the written permission of Guidance Software, Inc.
.
Figure 9-15: Acquisition
If the evidence drive fills up, EnCase for DOS will prompt you to switch to anotherstorage location. Be sure to note the label or name of the media where the first sectionof evidence chunks are stored.The file extension .E01 is always assigned to the first chunk of an evidence file set.Thereafter, the number in the extension is increased sequentially. An evidence setentitled “hard disk,” gets a name of harddisk.E01 for the first output file,harddisk.E02 to the next chunk, and so on.
Acquiring Macintosh Devices
EnCase can acquire and interpret the Macintosh and Power Mac file systems (HFSand HFS+). Acquiring a Macintosh hard drive is similar to acquiring a PC’s in a drive-to-drive acquisition. Macintosh computers cannot booted with an EnCase boot disk.The hard drive must be removed and acquired onto a PC that can be booted with anENBD or LinEn boot disk. If the media are an IDE hard drive, put it on the IDE ribboncable. If the medium is a SCSI hard drive, attach it to the SCSI controller card in thestorage computer and subsequently acquire it through DOS.If the Macintosh HD is an IDE hard drive and a FastBloc unit is available, acquisitionof the Macintosh hard drive is possible that way as well. See FastBloc Acquisitionsfor details.
Acquiring Unix and Linux
EnCase can acquire and interpret the EXT2/3, Reiser, FFS, JFS1, JFS2 and UFS filesystems. To acquire a Unix, Linux, or BSD hard drive, handle it much like you woulda PC hard drive. The caveat with Unix and BSD is the same as for Macintosh.Macintosh computers cannot booted with an EnCase boot disk. The hard drive mustbe removed and acquired onto a PC that can be booted with an ENBD or LinEn boot
90 EnCase Forensic v5.05 User Manual
Copyright © 2006 Guidance Software, Inc. May not be copied or reproduced without the written permission of Guidance Software, Inc.
disk. If it is an IDE hard drive, put it on the IDE ribbon cable. If the subject mediais SCSI, attach it to the SCSI controller card. Acquire through DOS using EnCaseboot disk.With an IDE hard drive, a FastBloc unit can provide an alternate means of acquisitionof the UFS hard drive. Please see the chapter in this document on FastBlocAcquisitions for details.
After the Acquisition Is Complete
After the acquisition is complete, boot the storage computer into Windows to analyzethe just-created evidence file. Remember to remove any connections to the subjecthard drive before booting to Windows.If completing a drive-to-drive (same IDE ribbon cable) acquisition in the Storagecomputer, follow these steps:
• Power down the computer.• Disconnect the subject hard drive from the ribbon cable and power cable.• Replace the cover on the storage computer.• Place the subject hard drive in a safe, static-free location for safety.• Remove the boot floppy from the floppy drive.• Boot the storage computer and launch EnCase for Windows.• If you performed an acquisition of another type, disconnect the cable
connecting the subject media to the storage computer.
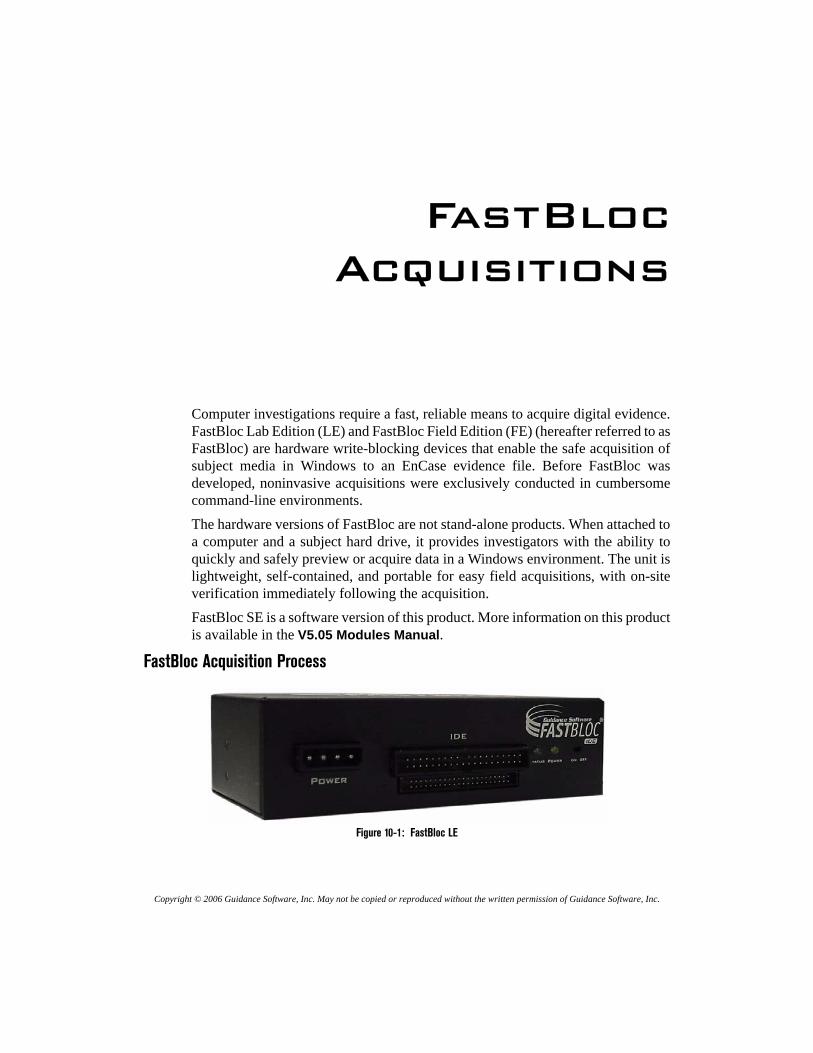
Copyright © 2006 Guidance Software, Inc. May not be copied or reproduced without the written permission of Guidance Software, Inc.
FastBlocAcquisitions
Computer investigations require a fast, reliable means to acquire digital evidence.FastBloc Lab Edition (LE) and FastBloc Field Edition (FE) (hereafter referred to asFastBloc) are hardware write-blocking devices that enable the safe acquisition ofsubject media in Windows to an EnCase evidence file. Before FastBloc wasdeveloped, noninvasive acquisitions were exclusively conducted in cumbersomecommand-line environments.The hardware versions of FastBloc are not stand-alone products. When attached toa computer and a subject hard drive, it provides investigators with the ability toquickly and safely preview or acquire data in a Windows environment. The unit islightweight, self-contained, and portable for easy field acquisitions, with on-siteverification immediately following the acquisition.FastBloc SE is a software version of this product. More information on this productis available in the V5.05 Modules Manual.
FastBloc Acquisition Process
Figure 10-1: FastBloc LE
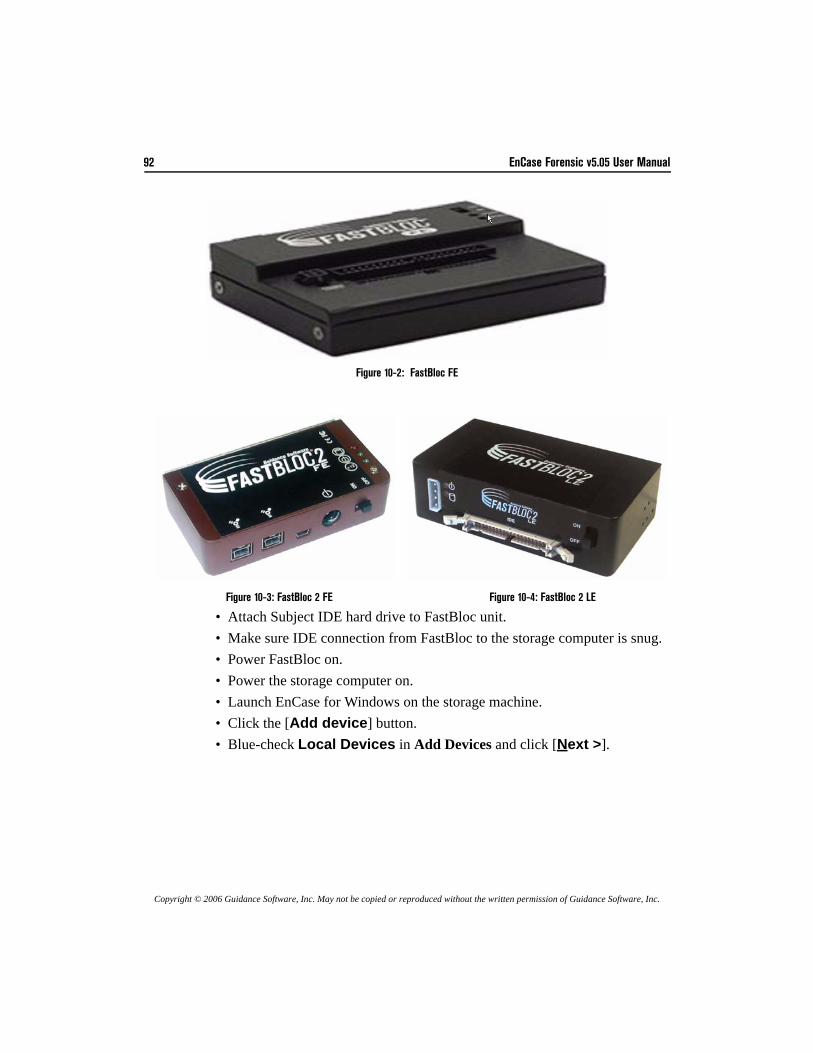
92 EnCase Forensic v5.05 User Manual
Copyright © 2006 Guidance Software, Inc. May not be copied or reproduced without the written permission of Guidance Software, Inc.
Figure 10-2: FastBloc FE
• Attach Subject IDE hard drive to FastBloc unit.• Make sure IDE connection from FastBloc to the storage computer is snug.• Power FastBloc on.• Power the storage computer on.• Launch EnCase for Windows on the storage machine.• Click the [Add device] button. • Blue-check Local Devices in Add Devices and click [Next >].
Figure 10-3: FastBloc 2 FE Figure 10-4: FastBloc 2 LE
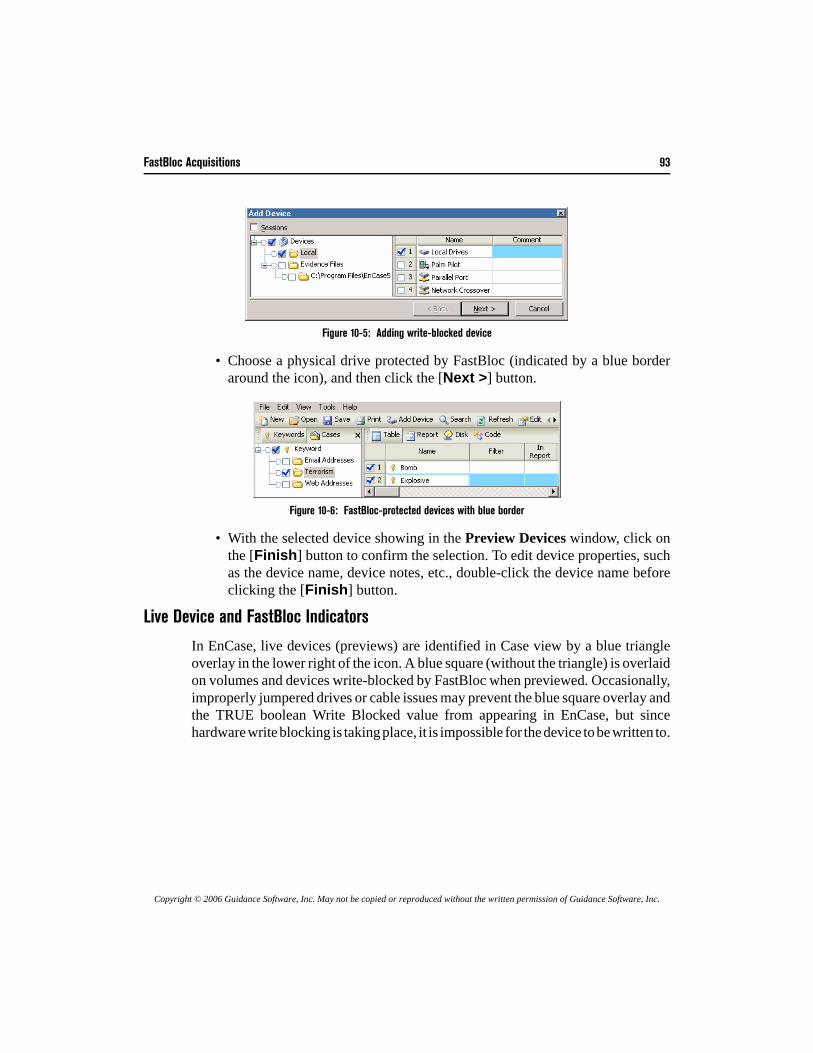
FastBloc Acquisitions 93
Copyright © 2006 Guidance Software, Inc. May not be copied or reproduced without the written permission of Guidance Software, Inc.
Figure 10-5: Adding write-blocked device
• Choose a physical drive protected by FastBloc (indicated by a blue borderaround the icon), and then click the [Next >] button.
Figure 10-6: FastBloc-protected devices with blue border
• With the selected device showing in the Preview Devices window, click onthe [Finish] button to confirm the selection. To edit device properties, suchas the device name, device notes, etc., double-click the device name beforeclicking the [Finish] button.
Live Device and FastBloc Indicators
In EnCase, live devices (previews) are identified in Case view by a blue triangleoverlay in the lower right of the icon. A blue square (without the triangle) is overlaidon volumes and devices write-blocked by FastBloc when previewed. Occasionally,improperly jumpered drives or cable issues may prevent the blue square overlay andthe TRUE boolean Write Blocked value from appearing in EnCase, but sincehardware write blocking is taking place, it is impossible for the device to be written to.
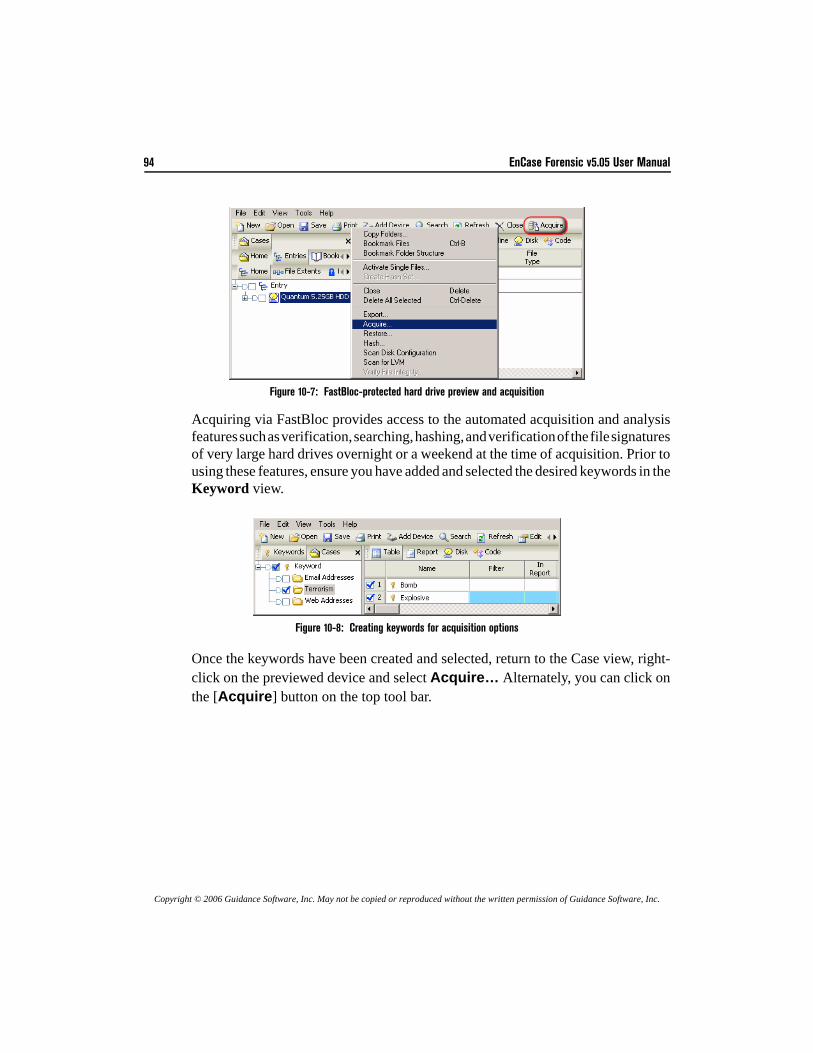
94 EnCase Forensic v5.05 User Manual
Copyright © 2006 Guidance Software, Inc. May not be copied or reproduced without the written permission of Guidance Software, Inc.
Figure 10-7: FastBloc-protected hard drive preview and acquisition
Acquiring via FastBloc provides access to the automated acquisition and analysisfeatures such as verification, searching, hashing, and verification of the file signaturesof very large hard drives overnight or a weekend at the time of acquisition. Prior tousing these features, ensure you have added and selected the desired keywords in theKeyword view.
Figure 10-8: Creating keywords for acquisition options
Once the keywords have been created and selected, return to the Case view, right-click on the previewed device and select Acquire… Alternately, you can click onthe [Acquire] button on the top tool bar.
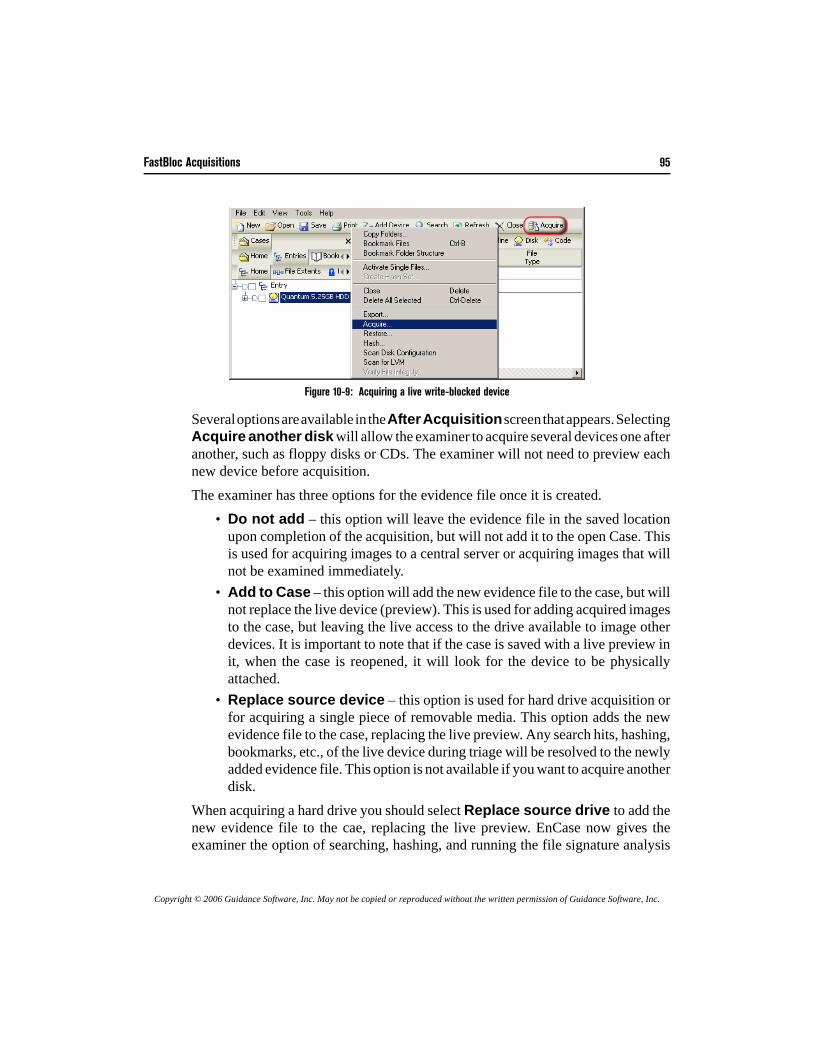
FastBloc Acquisitions 95
Copyright © 2006 Guidance Software, Inc. May not be copied or reproduced without the written permission of Guidance Software, Inc.
Figure 10-9: Acquiring a live write-blocked device
Several options are available in the After Acquisition screen that appears. SelectingAcquire another disk will allow the examiner to acquire several devices one afteranother, such as floppy disks or CDs. The examiner will not need to preview eachnew device before acquisition. The examiner has three options for the evidence file once it is created.
• Do not add – this option will leave the evidence file in the saved locationupon completion of the acquisition, but will not add it to the open Case. Thisis used for acquiring images to a central server or acquiring images that willnot be examined immediately.
• Add to Case – this option will add the new evidence file to the case, but willnot replace the live device (preview). This is used for adding acquired imagesto the case, but leaving the live access to the drive available to image otherdevices. It is important to note that if the case is saved with a live preview init, when the case is reopened, it will look for the device to be physicallyattached.
• Replace source device – this option is used for hard drive acquisition orfor acquiring a single piece of removable media. This option adds the newevidence file to the case, replacing the live preview. Any search hits, hashing,bookmarks, etc., of the live device during triage will be resolved to the newlyadded evidence file. This option is not available if you want to acquire anotherdisk.
When acquiring a hard drive you should select Replace source drive to add thenew evidence file to the cae, replacing the live preview. EnCase now gives theexaminer the option of searching, hashing, and running the file signature analysis
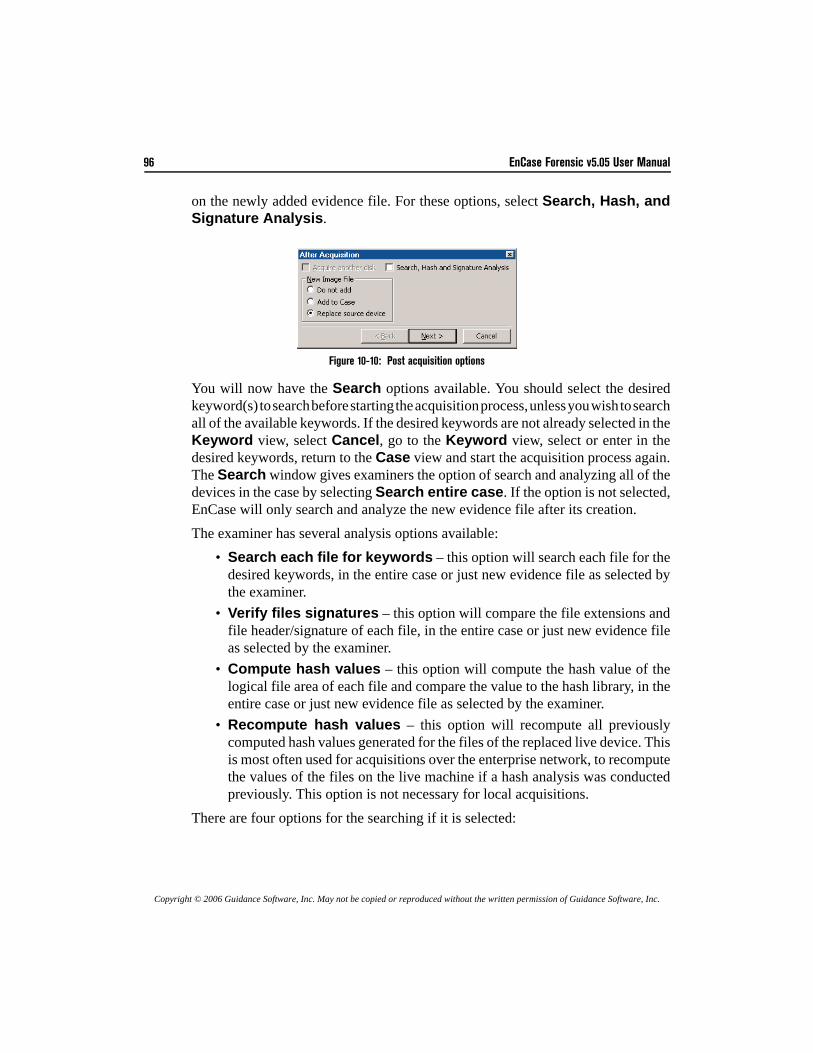
96 EnCase Forensic v5.05 User Manual
Copyright © 2006 Guidance Software, Inc. May not be copied or reproduced without the written permission of Guidance Software, Inc.
on the newly added evidence file. For these options, select Search, Hash, andSignature Analysis.
Figure 10-10: Post acquisition options
You will now have the Search options available. You should select the desiredkeyword(s) to search before starting the acquisition process, unless you wish to searchall of the available keywords. If the desired keywords are not already selected in theKeyword view, select Cancel, go to the Keyword view, select or enter in thedesired keywords, return to the Case view and start the acquisition process again.The Search window gives examiners the option of search and analyzing all of thedevices in the case by selecting Search entire case. If the option is not selected,EnCase will only search and analyze the new evidence file after its creation.The examiner has several analysis options available:
• Search each file for keywords – this option will search each file for thedesired keywords, in the entire case or just new evidence file as selected bythe examiner.
• Verify files signatures – this option will compare the file extensions andfile header/signature of each file, in the entire case or just new evidence fileas selected by the examiner.
• Compute hash values – this option will compute the hash value of thelogical file area of each file and compare the value to the hash library, in theentire case or just new evidence file as selected by the examiner.
• Recompute hash values – this option will recompute all previouslycomputed hash values generated for the files of the replaced live device. Thisis most often used for acquisitions over the enterprise network, to recomputethe values of the files on the live machine if a hash analysis was conductedpreviously. This option is not necessary for local acquisitions.
There are four options for the searching if it is selected:
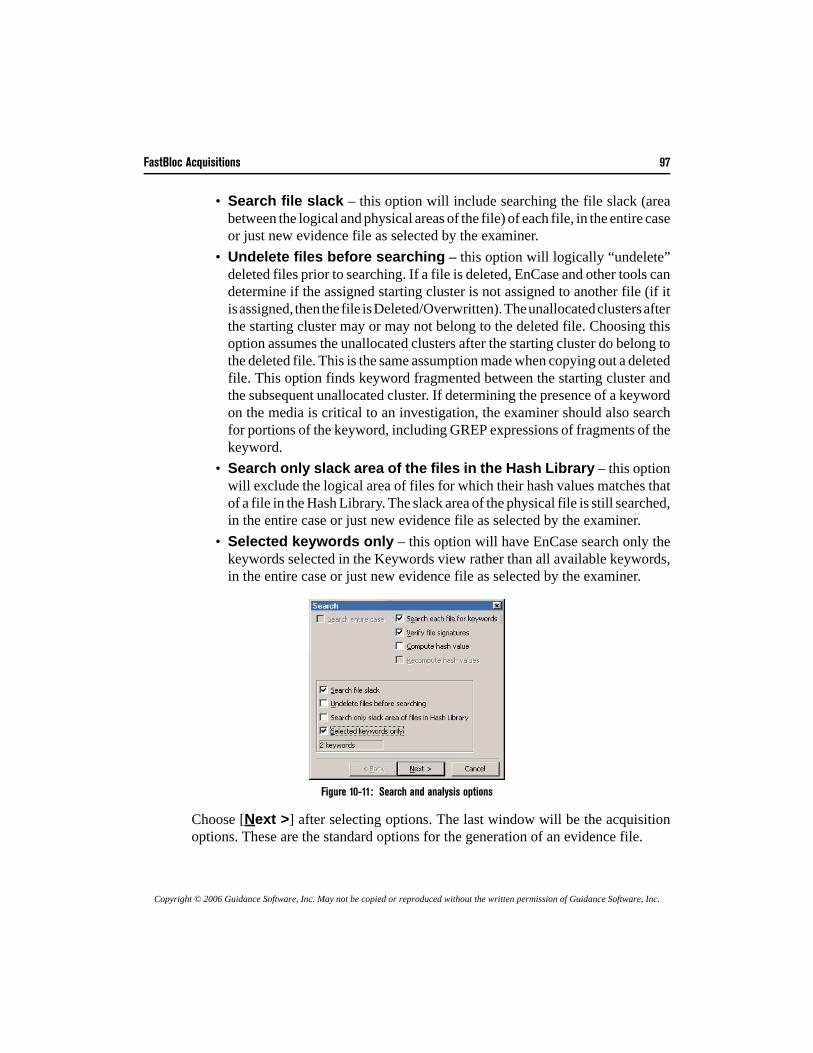
FastBloc Acquisitions 97
Copyright © 2006 Guidance Software, Inc. May not be copied or reproduced without the written permission of Guidance Software, Inc.
• Search file slack – this option will include searching the file slack (areabetween the logical and physical areas of the file) of each file, in the entire caseor just new evidence file as selected by the examiner.
• Undelete files before searching – this option will logically “undelete”deleted files prior to searching. If a file is deleted, EnCase and other tools candetermine if the assigned starting cluster is not assigned to another file (if itis assigned, then the file is Deleted/Overwritten). The unallocated clusters afterthe starting cluster may or may not belong to the deleted file. Choosing thisoption assumes the unallocated clusters after the starting cluster do belong tothe deleted file. This is the same assumption made when copying out a deletedfile. This option finds keyword fragmented between the starting cluster andthe subsequent unallocated cluster. If determining the presence of a keywordon the media is critical to an investigation, the examiner should also searchfor portions of the keyword, including GREP expressions of fragments of thekeyword.
• Search only slack area of the files in the Hash Library – this optionwill exclude the logical area of files for which their hash values matches thatof a file in the Hash Library. The slack area of the physical file is still searched,in the entire case or just new evidence file as selected by the examiner.
• Selected keywords only – this option will have EnCase search only thekeywords selected in the Keywords view rather than all available keywords,in the entire case or just new evidence file as selected by the examiner.
Figure 10-11: Search and analysis options
Choose [Next >] after selecting options. The last window will be the acquisitionoptions. These are the standard options for the generation of an evidence file.
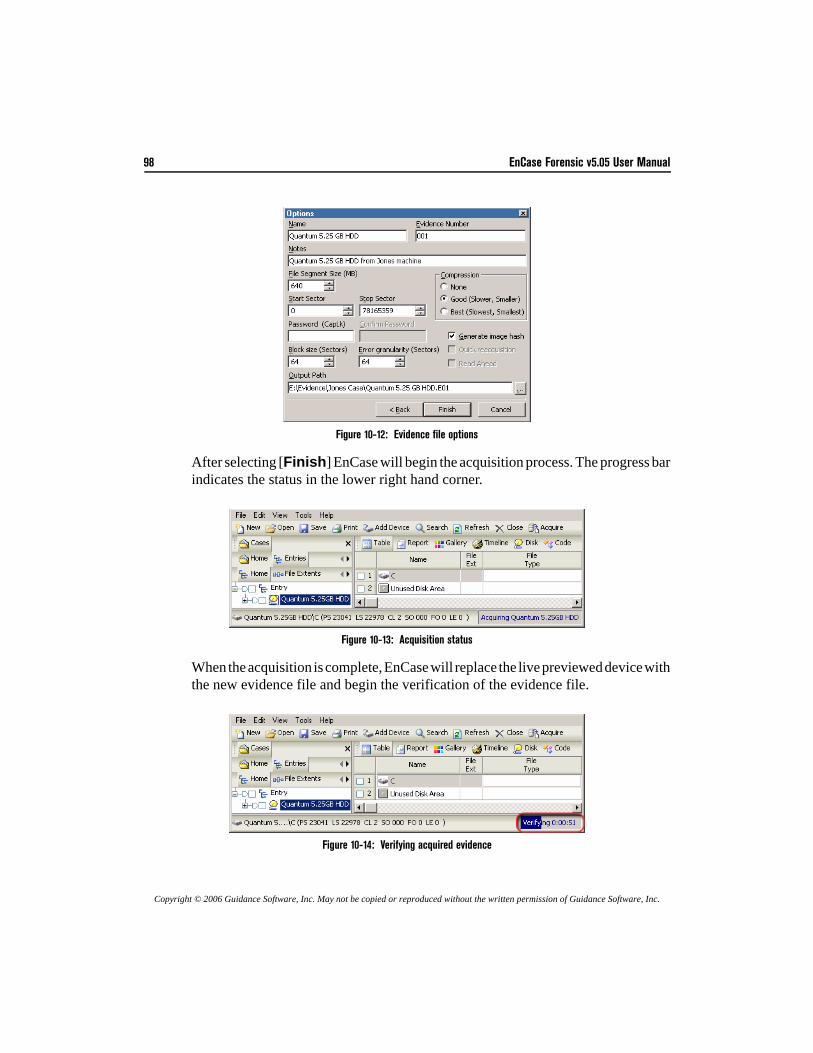
98 EnCase Forensic v5.05 User Manual
Copyright © 2006 Guidance Software, Inc. May not be copied or reproduced without the written permission of Guidance Software, Inc.
Figure 10-12: Evidence file options
After selecting [Finish] EnCase will begin the acquisition process. The progress barindicates the status in the lower right hand corner.
Figure 10-13: Acquisition status
When the acquisition is complete, EnCase will replace the live previewed device withthe new evidence file and begin the verification of the evidence file.
Figure 10-14: Verifying acquired evidence
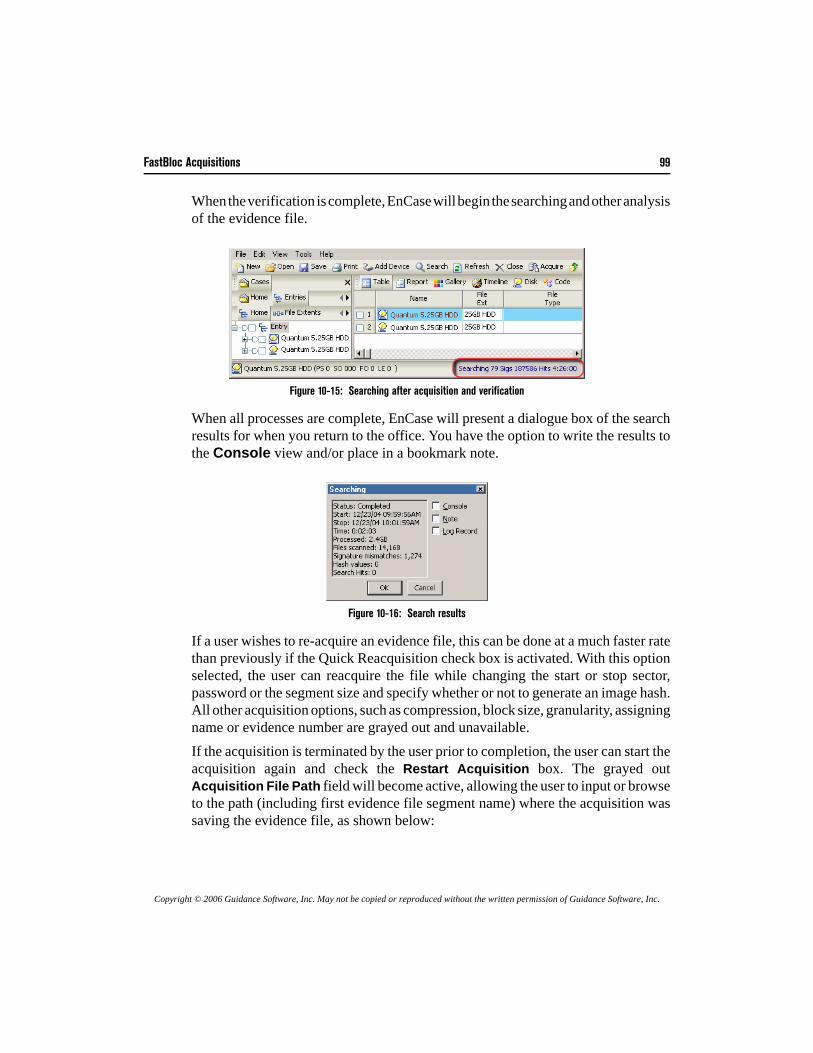
FastBloc Acquisitions 99
Copyright © 2006 Guidance Software, Inc. May not be copied or reproduced without the written permission of Guidance Software, Inc.
When the verification is complete, EnCase will begin the searching and other analysisof the evidence file.
Figure 10-15: Searching after acquisition and verification
When all processes are complete, EnCase will present a dialogue box of the searchresults for when you return to the office. You have the option to write the results tothe Console view and/or place in a bookmark note.
Figure 10-16: Search results
If a user wishes to re-acquire an evidence file, this can be done at a much faster ratethan previously if the Quick Reacquisition check box is activated. With this optionselected, the user can reacquire the file while changing the start or stop sector,password or the segment size and specify whether or not to generate an image hash.All other acquisition options, such as compression, block size, granularity, assigningname or evidence number are grayed out and unavailable.If the acquisition is terminated by the user prior to completion, the user can start theacquisition again and check the Restart Acquisition box. The grayed outAcquisition File Path field will become active, allowing the user to input or browseto the path (including first evidence file segment name) where the acquisition wassaving the evidence file, as shown below:
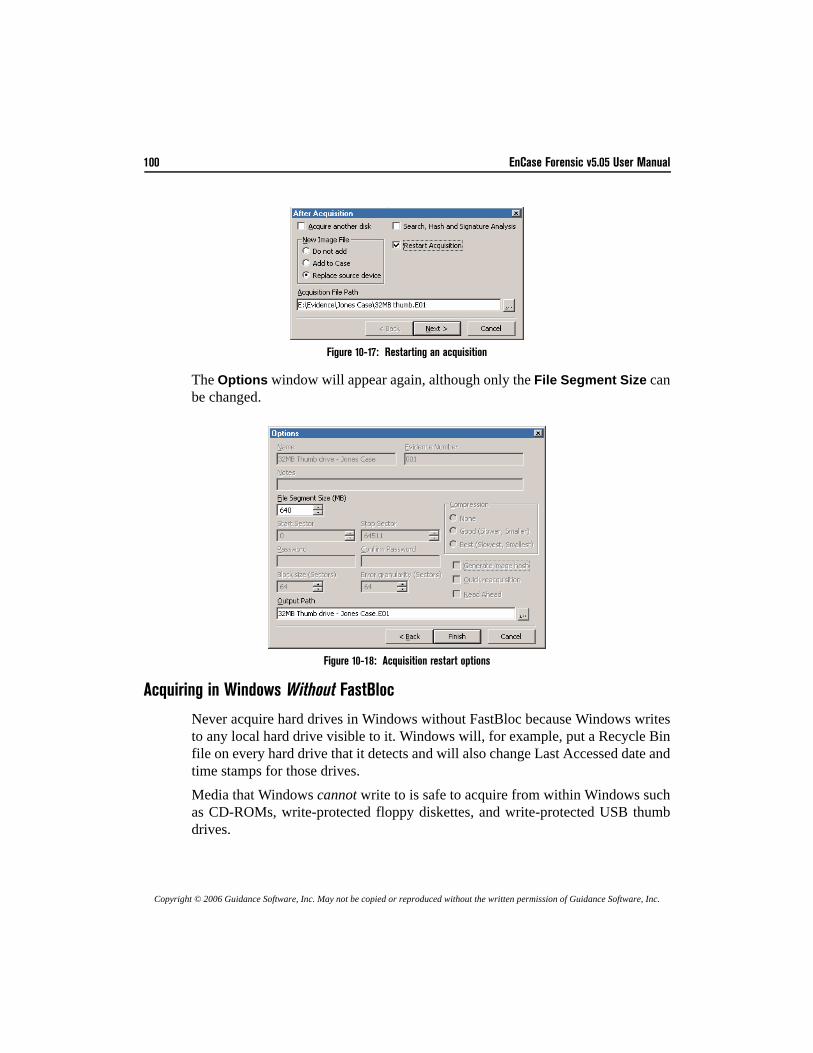
100 EnCase Forensic v5.05 User Manual
Copyright © 2006 Guidance Software, Inc. May not be copied or reproduced without the written permission of Guidance Software, Inc.
Figure 10-17: Restarting an acquisition
The Options window will appear again, although only the File Segment Size canbe changed.
Figure 10-18: Acquisition restart options
Acquiring in Windows Without FastBloc
Never acquire hard drives in Windows without FastBloc because Windows writesto any local hard drive visible to it. Windows will, for example, put a Recycle Binfile on every hard drive that it detects and will also change Last Accessed date andtime stamps for those drives. Media that Windows cannot write to is safe to acquire from within Windows suchas CD-ROMs, write-protected floppy diskettes, and write-protected USB thumbdrives.
FastBloc Acquisitions 101
Copyright © 2006 Guidance Software, Inc. May not be copied or reproduced without the written permission of Guidance Software, Inc.
Acquiring in Windows with a non-FastBloc Write-Blocker
EnCase cannot recognize the presence of any hard drive write-blocker, other thanFastBloc. For that reason, EnCase will report that the subject hard drive is NOTprotected, when it very well could be. Users of non-FastBloc write-blockers areencouraged to test their equipment and become familiar with their capabilities.
After Acquisition Is Complete
Power down the computer, power down FastBloc, disconnect the subject media andstore it in a safe location, and boot your computer back into Windows. Launch EnCaseand prepare to analyze the evidence.

102 EnCase Forensic v5.05 User Manual
Copyright © 2006 Guidance Software, Inc. May not be copied or reproduced without the written permission of Guidance Software, Inc.

Copyright © 2006 Guidance Software, Inc. May not be copied or reproduced without the written permission of Guidance Software, Inc.
Acquiring DiskConfigurations
Please see the Forensic Terminology appendix for definitions and detailedexplanations of the types of Disk Configurations available. Guidance Software usesthe term “disk configuration” instead of RAID. A software disk configuration iscontrolled by the operating system software whereas a controller card controls ahardware disk configuration. In a software disk configuration, the informationpertinent to the layout of the partitions across the disks is located in the registry orat the end of the disk, depending on the operating system used to build the set; in ahardware disk configuration, it is stored in the BIOS of the controller card. With eachof these methods, 6 disk configuration types can be created: spanned, mirrored,striped, RAID-5, RAID-10 and basic.
Figure 11-1: Possible setup for disk configuration
104 EnCase Forensic v5.05 User Manual
Copyright © 2006 Guidance Software, Inc. May not be copied or reproduced without the written permission of Guidance Software, Inc.
Software RAID
Windows NT: Software Disk Configurations
In a Windows NT file system it is possible to use the operating system to createdifferent types of disk configurations across multiple drives. The disk configurationspossible are spanned, mirrored, striped, RAID 5, and basic. The information detailingthe types of partitions and the specific layout across multiple disks is contained inthe registry of the operating system used to create the disk configuration. EnCase canread this registry information and resolve the configuration based on the key. EnCasecan then virtually mount the software disk configuration within the EnCase case.There are two ways to obtain the registry key.
• Acquire the drive with the operating system on it. It is likely that this drive willbe part of the disk configuration set, but in the event it is not—such as the diskconfiguration being used for storage purposes only—acquire the OS drive andadd it to the case along with the disk configuration set drives.
• On the Subject PC, go to the Windows Disk Manager and make a backup diskby selecting Backup from the Partition option. This will create a backup diskof the disk configuration information, placing the backup on a floppy disk. Youcan then copy the file into EnCase using the Single Files option, or acquirethe floppy disk and add it to the case. The case must have the disk configurationset drives added to it as well. This situation would only work if working witha restored clone of a subject computer. It is also possible a registry backup diskmay be found at the location.
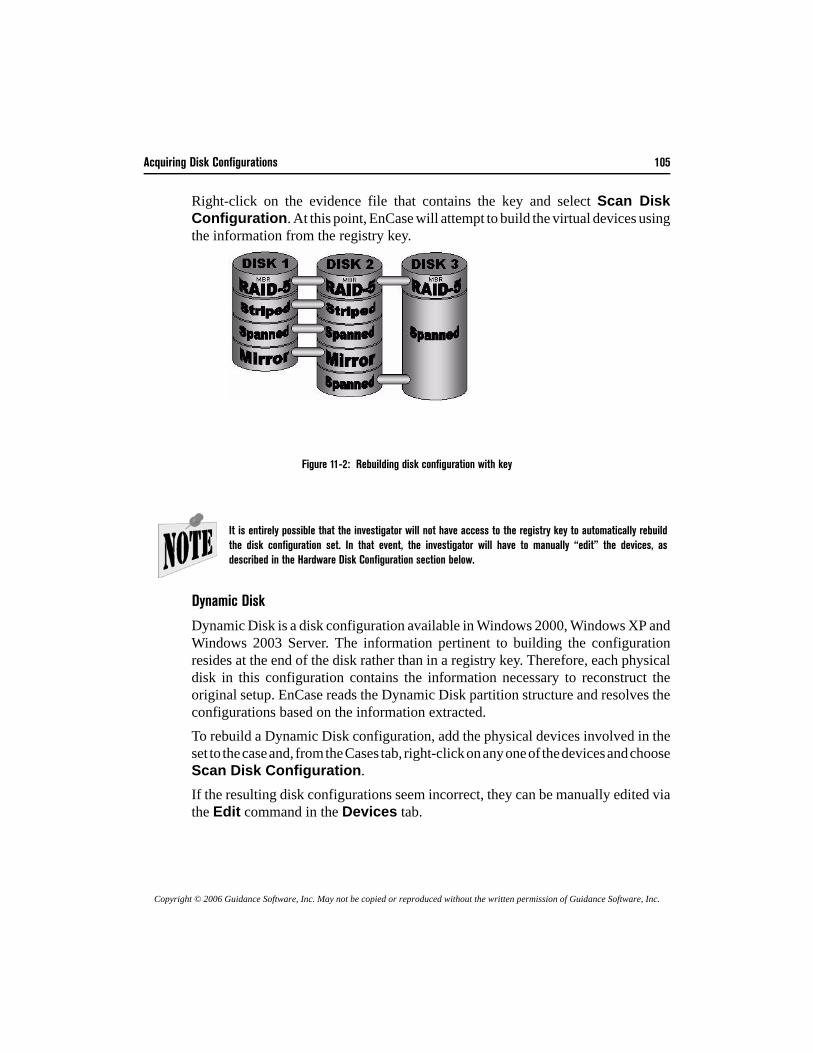
Acquiring Disk Configurations 105
Copyright © 2006 Guidance Software, Inc. May not be copied or reproduced without the written permission of Guidance Software, Inc.
Right-click on the evidence file that contains the key and select Scan DiskConfiguration. At this point, EnCase will attempt to build the virtual devices usingthe information from the registry key.
Figure 11-2: Rebuilding disk configuration with key
Dynamic Disk
Dynamic Disk is a disk configuration available in Windows 2000, Windows XP andWindows 2003 Server. The information pertinent to building the configurationresides at the end of the disk rather than in a registry key. Therefore, each physicaldisk in this configuration contains the information necessary to reconstruct theoriginal setup. EnCase reads the Dynamic Disk partition structure and resolves theconfigurations based on the information extracted.To rebuild a Dynamic Disk configuration, add the physical devices involved in theset to the case and, from the Cases tab, right-click on any one of the devices and chooseScan Disk Configuration.If the resulting disk configurations seem incorrect, they can be manually edited viathe Edit command in the Devices tab.
It is entirely possible that the investigator will not have access to the registry key to automatically rebuildthe disk configuration set. In that event, the investigator will have to manually “edit” the devices, asdescribed in the Hardware Disk Configuration section below.
106 EnCase Forensic v5.05 User Manual
Copyright © 2006 Guidance Software, Inc. May not be copied or reproduced without the written permission of Guidance Software, Inc.
Hardware Disk Configuration
Disk Configuration Set Acquired as One Drive
Unlike software disk configurations, those controlled by hardware contain thenecessary configuration information in the card’s BIOS. Since the disk configurationis controlled by hardware, EnCase cannot reconstruct the configurations from thephysical disks. However, since the pertinent information to rebuild the set is containedwithin the controller, the computer (with the controller card) will actually see ahardware disk configuration as one (virtual) drive, regardless if the set is on two ormore drives. If the investigator acquires the set in its native environment, the diskconfiguration can be acquired as one drive—by far the easiest option. The best methodfor performing such an acquisition would be to conduct a crossover network cableacquisition. (The EnCase Network Boot Disk for the Subject computer will have tohave DOS drivers for that particular RAID controller card.) To acquire the set:
• Keep the disk configuration intact in its native environment.• Boot the subject computer with an EnCase Network Boot Disk.• Launch EnCase for DOS (remember, the BIOS interprets the disk
configuration as one drive, so EnCase will too. The investigator will see thedisk configuration as one drive).
• Acquire the disk configuration as you would normally acquire a single harddrive depending on the means of acquisition. Parallel port, crossover networkcable, or “drive to drive,” acquisition of a hardware disk configuration set isstraightforward, as long as the set is acquired as one drive.
If the physical drives were acquired separately, or could not be acquired in the nativeenvironment, EnCase has the ability to edit the hardware set manually (see below).
Disk Configurations Acquired as Separate Drives
Sometimes acquiring the hardware disk configuration as one drive is not possible,or the method of assembly of a software disk configuration seems incorrect. To edita disk configuration, several items of information are required: the stripe-size, startsector and length per physical disk as well as if the striping is right handed or not.This data can be collected from the BIOS of the controller card, for a hardware set,or from the registry for software sets. To build the disk configuration:
• Add the evidence files to one case.• Select Devices from the View menu.• Right-click on any of the evidence file rows and select Edit Disk
Configuration…
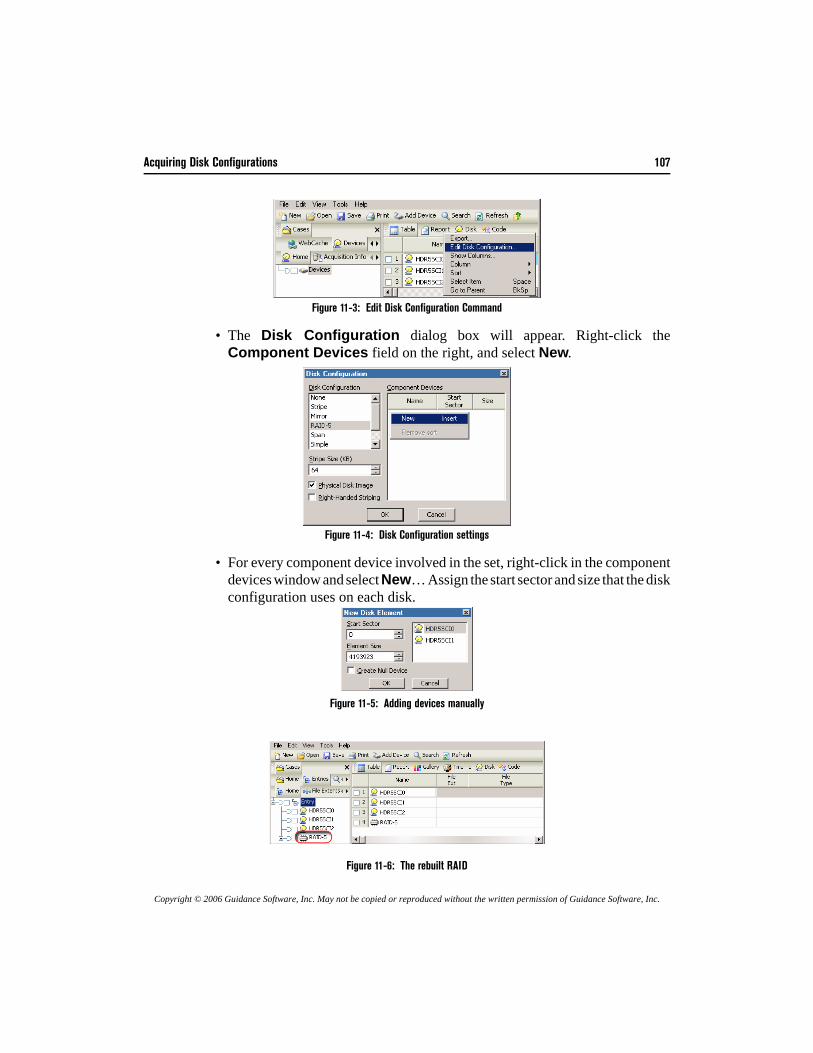
Acquiring Disk Configurations 107
Copyright © 2006 Guidance Software, Inc. May not be copied or reproduced without the written permission of Guidance Software, Inc.
Figure 11-3: Edit Disk Configuration Command
• The Disk Configuration dialog box will appear. Right-click theComponent Devices field on the right, and select New.
Figure 11-4: Disk Configuration settings
• For every component device involved in the set, right-click in the componentdevices window and select New… Assign the start sector and size that the diskconfiguration uses on each disk.
Figure 11-5: Adding devices manually
Figure 11-6: The rebuilt RAID
108 EnCase Forensic v5.05 User Manual
Copyright © 2006 Guidance Software, Inc. May not be copied or reproduced without the written permission of Guidance Software, Inc.
RAID-5 is composed of three or more disks. If one disk was missing or bad, EnCasecan still rebuild the virtual disk using the parity information from the other disks inthe configuration, which will be detected and done automatically during thereconstruction of hardware disk configurations using the Scan DiskConfiguration command.When rebuilding the RAID from the first two disks, the results of running Validateparity will be meaningless as you created the parity to build the missing disk.
Validating Parity on a RAID-5
The Validate Parity command checks the parity of the physical disks used toassemble the RAID-5. Thus, if the RAID-5 was rebuilt with a missing disk, thisfeature will not work. To check the parity from the Cases tab, right-click on the RAID5 volume icon, and choose Validate Parity from the contextual menu. The processwill run in the lower right hand corner of the screen as a background thread.
RAID-10
RAID-10 arrays require at least 4 drives, implemented as a striped array of RAID-1 arrays. This type of RAID is also supported by EnCase Version 5.
SCSI Drives and DOS
Most hardware disk configurations are SCSI. Whether acquiring the set’s drivesindividually or as one drive, you will probably have to acquire these SCSI drives inDOS.If you were to attempt a DOS acquisition of a SCSI drive without loading any devicedrivers, the acquisition might work. However, the computer’s BIOS would not beseeing the SCSI drive accurately. To see the SCSI drive correctly, load DOS SCSIdrivers when booting the computer. The EnCase Network Boot Disk has an auto-detection and auto-loading of drivers for SCSI cards (see the chapter on Creating theEnCase Boot Disk for the list of SCSI cards supported.)
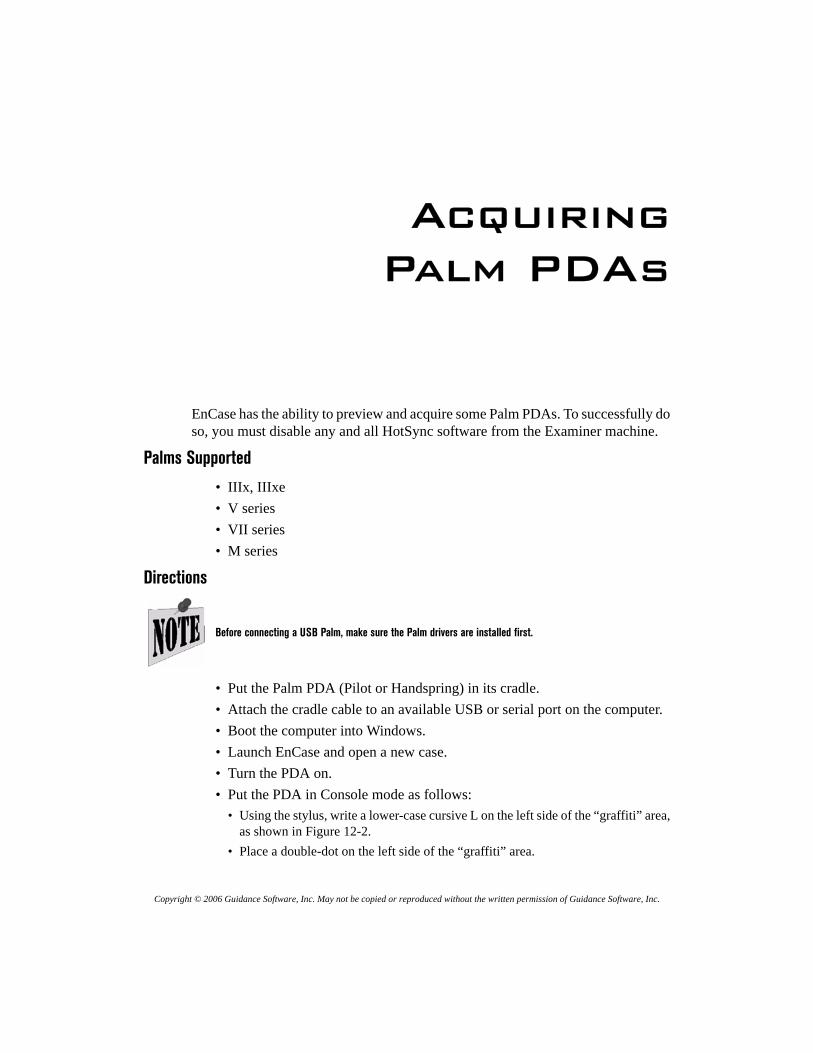
Copyright © 2006 Guidance Software, Inc. May not be copied or reproduced without the written permission of Guidance Software, Inc.
AcquiringPalm PDAs
EnCase has the ability to preview and acquire some Palm PDAs. To successfully doso, you must disable any and all HotSync software from the Examiner machine.
Palms Supported
• IIIx, IIIxe• V series• VII series• M series
Directions
• Put the Palm PDA (Pilot or Handspring) in its cradle.• Attach the cradle cable to an available USB or serial port on the computer. • Boot the computer into Windows.• Launch EnCase and open a new case.• Turn the PDA on.• Put the PDA in Console mode as follows:
• Using the stylus, write a lower-case cursive L on the left side of the “graffiti” area,as shown in Figure 12-2.
• Place a double-dot on the left side of the “graffiti” area.
Before connecting a USB Palm, make sure the Palm drivers are installed first.
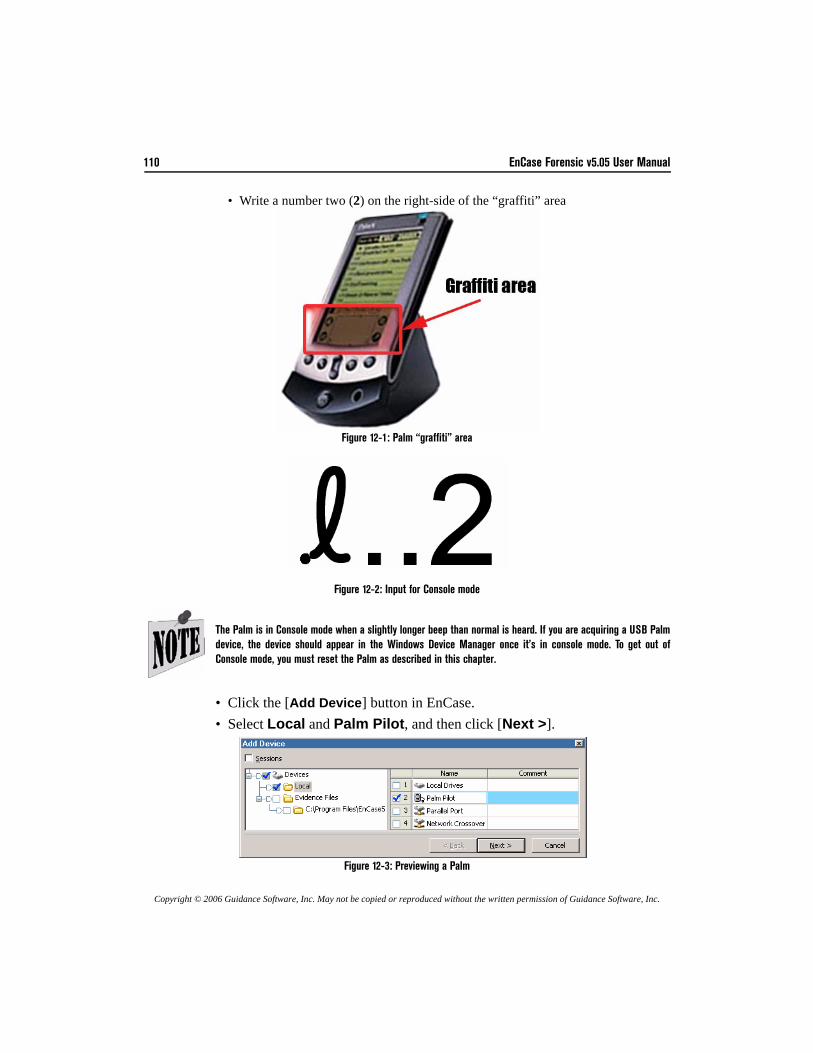
110 EnCase Forensic v5.05 User Manual
Copyright © 2006 Guidance Software, Inc. May not be copied or reproduced without the written permission of Guidance Software, Inc.
• Write a number two (2) on the right-side of the “graffiti” area
Figure 12-1: Palm “graffiti” area
Figure 12-2: Input for Console mode
• Click the [Add Device] button in EnCase. • Select Local and Palm Pilot, and then click [Next >].
Figure 12-3: Previewing a Palm
The Palm is in Console mode when a slightly longer beep than normal is heard. If you are acquiring a USB Palmdevice, the device should appear in the Windows Device Manager once it’s in console mode. To get out ofConsole mode, you must reset the Palm as described in this chapter.
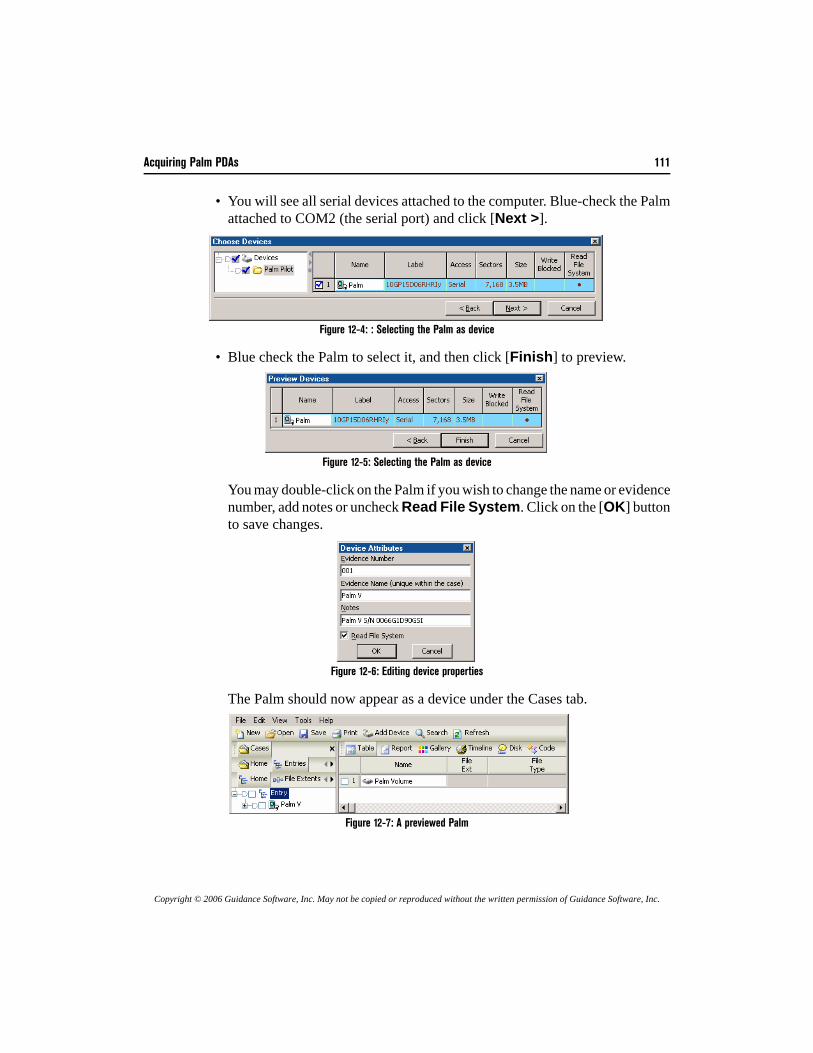
Acquiring Palm PDAs 111
Copyright © 2006 Guidance Software, Inc. May not be copied or reproduced without the written permission of Guidance Software, Inc.
• You will see all serial devices attached to the computer. Blue-check the Palmattached to COM2 (the serial port) and click [Next >].
Figure 12-4: : Selecting the Palm as device
• Blue check the Palm to select it, and then click [Finish] to preview.
Figure 12-5: Selecting the Palm as device
You may double-click on the Palm if you wish to change the name or evidencenumber, add notes or uncheck Read File System. Click on the [OK] buttonto save changes.
Figure 12-6: Editing device properties
The Palm should now appear as a device under the Cases tab.
Figure 12-7: A previewed Palm
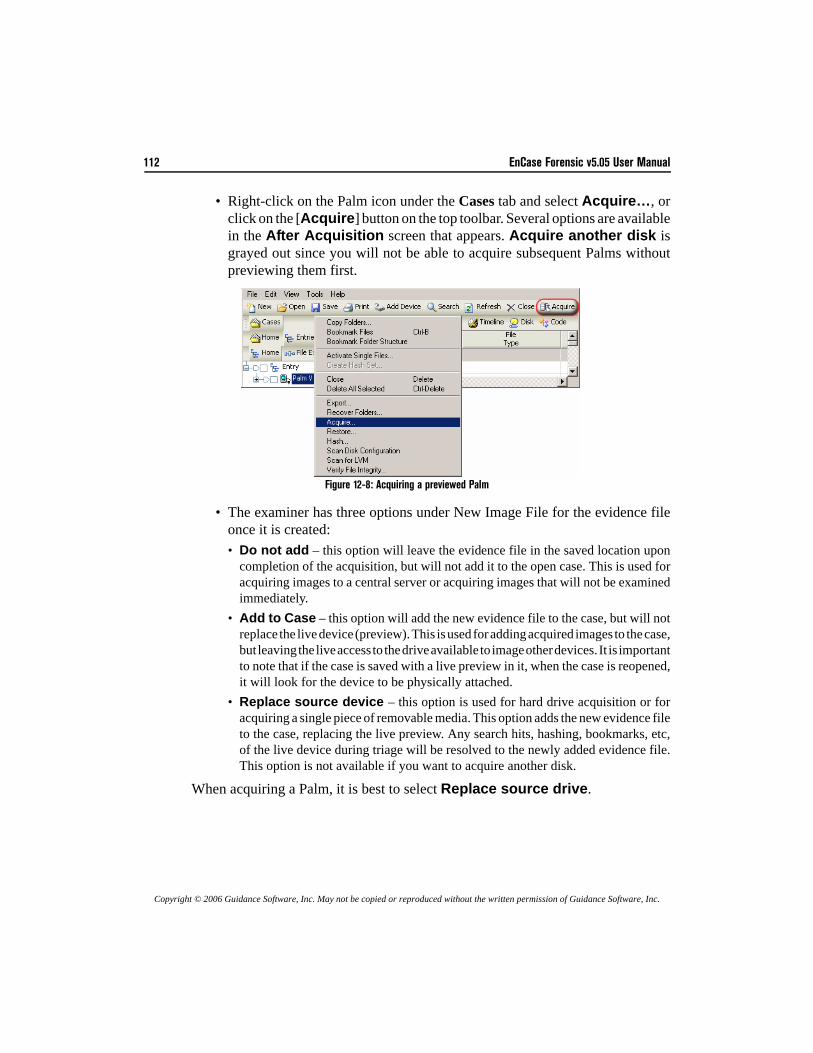
112 EnCase Forensic v5.05 User Manual
Copyright © 2006 Guidance Software, Inc. May not be copied or reproduced without the written permission of Guidance Software, Inc.
• Right-click on the Palm icon under the Cases tab and select Acquire…, orclick on the [Acquire] button on the top toolbar. Several options are availablein the After Acquisition screen that appears. Acquire another disk isgrayed out since you will not be able to acquire subsequent Palms withoutpreviewing them first.
Figure 12-8: Acquiring a previewed Palm
• The examiner has three options under New Image File for the evidence fileonce it is created:• Do not add – this option will leave the evidence file in the saved location upon
completion of the acquisition, but will not add it to the open case. This is used foracquiring images to a central server or acquiring images that will not be examinedimmediately.
• Add to Case – this option will add the new evidence file to the case, but will notreplace the live device (preview). This is used for adding acquired images to the case,but leaving the live access to the drive available to image other devices. It is importantto note that if the case is saved with a live preview in it, when the case is reopened,it will look for the device to be physically attached.
• Replace source device – this option is used for hard drive acquisition or foracquiring a single piece of removable media. This option adds the new evidence fileto the case, replacing the live preview. Any search hits, hashing, bookmarks, etc,of the live device during triage will be resolved to the newly added evidence file.This option is not available if you want to acquire another disk.
When acquiring a Palm, it is best to select Replace source drive.
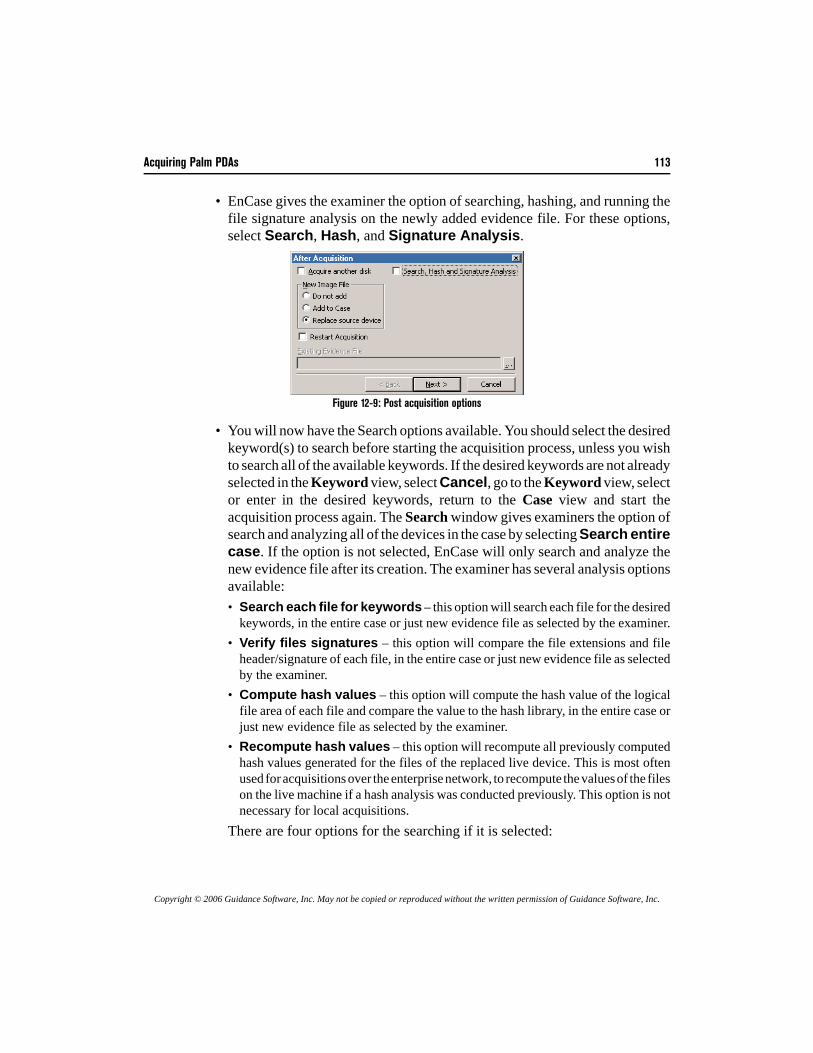
Acquiring Palm PDAs 113
Copyright © 2006 Guidance Software, Inc. May not be copied or reproduced without the written permission of Guidance Software, Inc.
• EnCase gives the examiner the option of searching, hashing, and running thefile signature analysis on the newly added evidence file. For these options,select Search, Hash, and Signature Analysis.
Figure 12-9: Post acquisition options
• You will now have the Search options available. You should select the desiredkeyword(s) to search before starting the acquisition process, unless you wishto search all of the available keywords. If the desired keywords are not alreadyselected in the Keyword view, select Cancel, go to the Keyword view, selector enter in the desired keywords, return to the Case view and start theacquisition process again. The Search window gives examiners the option ofsearch and analyzing all of the devices in the case by selecting Search entirecase. If the option is not selected, EnCase will only search and analyze thenew evidence file after its creation. The examiner has several analysis optionsavailable:• Search each file for keywords – this option will search each file for the desired
keywords, in the entire case or just new evidence file as selected by the examiner.• Verify files signatures – this option will compare the file extensions and file
header/signature of each file, in the entire case or just new evidence file as selectedby the examiner.
• Compute hash values – this option will compute the hash value of the logicalfile area of each file and compare the value to the hash library, in the entire case orjust new evidence file as selected by the examiner.
• Recompute hash values – this option will recompute all previously computedhash values generated for the files of the replaced live device. This is most oftenused for acquisitions over the enterprise network, to recompute the values of the fileson the live machine if a hash analysis was conducted previously. This option is notnecessary for local acquisitions.
There are four options for the searching if it is selected:
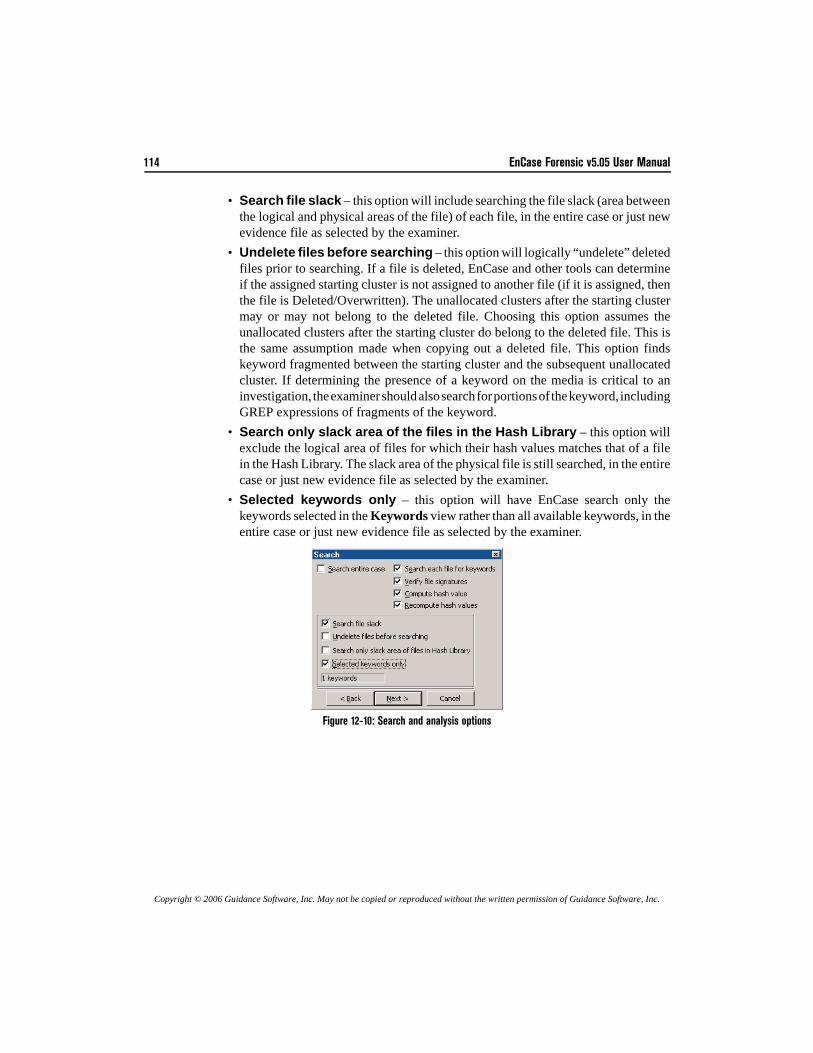
114 EnCase Forensic v5.05 User Manual
Copyright © 2006 Guidance Software, Inc. May not be copied or reproduced without the written permission of Guidance Software, Inc.
• Search file slack – this option will include searching the file slack (area betweenthe logical and physical areas of the file) of each file, in the entire case or just newevidence file as selected by the examiner.
• Undelete files before searching – this option will logically “undelete” deletedfiles prior to searching. If a file is deleted, EnCase and other tools can determineif the assigned starting cluster is not assigned to another file (if it is assigned, thenthe file is Deleted/Overwritten). The unallocated clusters after the starting clustermay or may not belong to the deleted file. Choosing this option assumes theunallocated clusters after the starting cluster do belong to the deleted file. This isthe same assumption made when copying out a deleted file. This option findskeyword fragmented between the starting cluster and the subsequent unallocatedcluster. If determining the presence of a keyword on the media is critical to aninvestigation, the examiner should also search for portions of the keyword, includingGREP expressions of fragments of the keyword.
• Search only slack area of the files in the Hash Library – this option willexclude the logical area of files for which their hash values matches that of a filein the Hash Library. The slack area of the physical file is still searched, in the entirecase or just new evidence file as selected by the examiner.
• Selected keywords only – this option will have EnCase search only thekeywords selected in the Keywords view rather than all available keywords, in theentire case or just new evidence file as selected by the examiner.
Figure 12-10: Search and analysis options
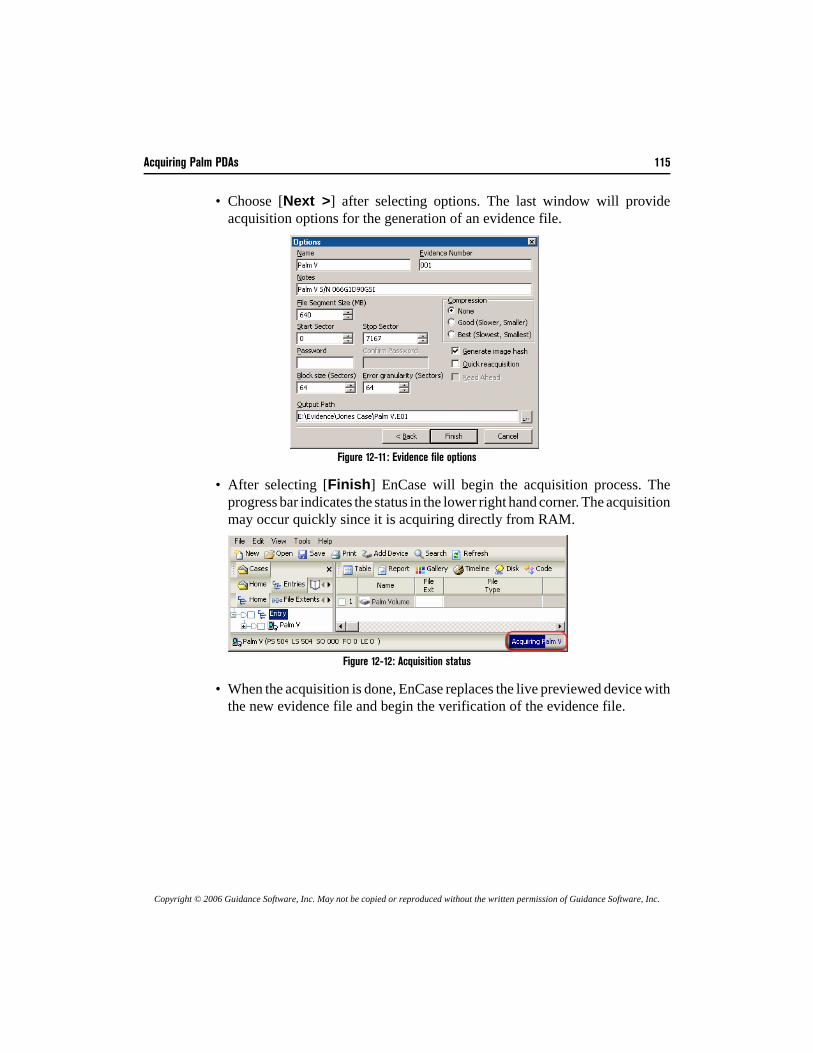
Acquiring Palm PDAs 115
Copyright © 2006 Guidance Software, Inc. May not be copied or reproduced without the written permission of Guidance Software, Inc.
• Choose [Next >] after selecting options. The last window will provideacquisition options for the generation of an evidence file.
Figure 12-11: Evidence file options
• After selecting [Finish] EnCase will begin the acquisition process. Theprogress bar indicates the status in the lower right hand corner. The acquisitionmay occur quickly since it is acquiring directly from RAM.
Figure 12-12: Acquisition status
• When the acquisition is done, EnCase replaces the live previewed device withthe new evidence file and begin the verification of the evidence file.
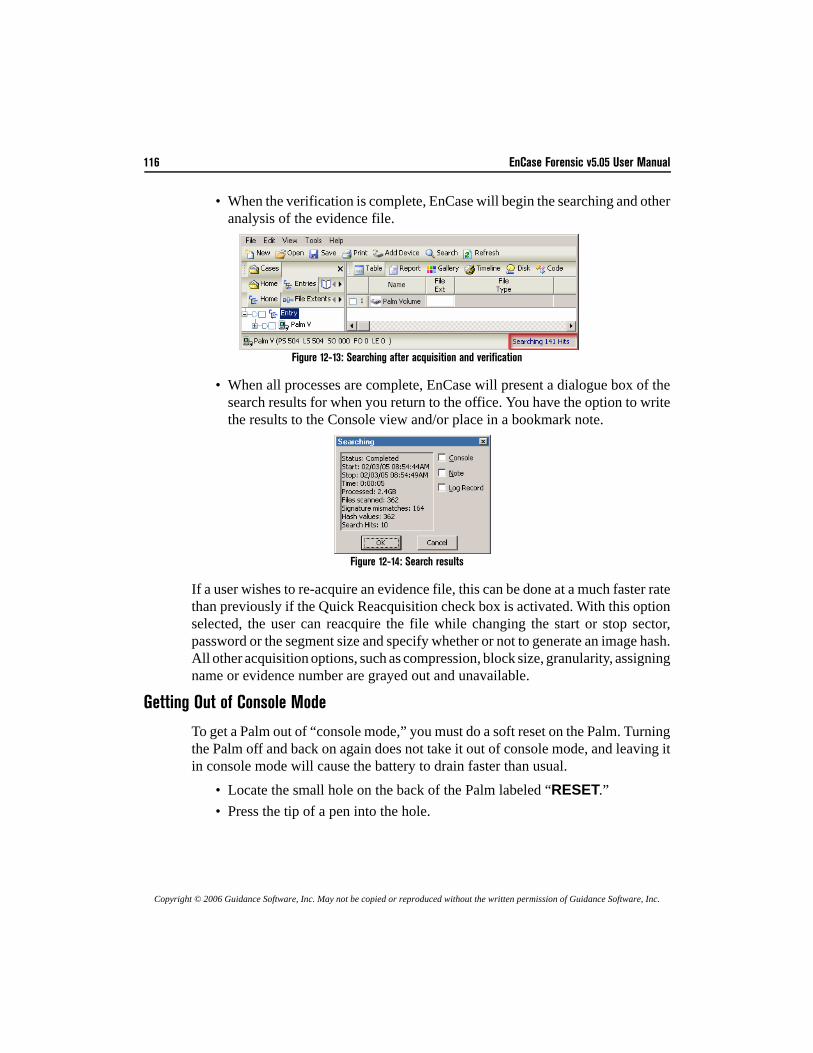
116 EnCase Forensic v5.05 User Manual
Copyright © 2006 Guidance Software, Inc. May not be copied or reproduced without the written permission of Guidance Software, Inc.
• When the verification is complete, EnCase will begin the searching and otheranalysis of the evidence file.
Figure 12-13: Searching after acquisition and verification
• When all processes are complete, EnCase will present a dialogue box of thesearch results for when you return to the office. You have the option to writethe results to the Console view and/or place in a bookmark note.
Figure 12-14: Search results
If a user wishes to re-acquire an evidence file, this can be done at a much faster ratethan previously if the Quick Reacquisition check box is activated. With this optionselected, the user can reacquire the file while changing the start or stop sector,password or the segment size and specify whether or not to generate an image hash.All other acquisition options, such as compression, block size, granularity, assigningname or evidence number are grayed out and unavailable.
Getting Out of Console Mode
To get a Palm out of “console mode,” you must do a soft reset on the Palm. Turningthe Palm off and back on again does not take it out of console mode, and leaving itin console mode will cause the battery to drain faster than usual.
• Locate the small hole on the back of the Palm labeled “RESET.”• Press the tip of a pen into the hole.
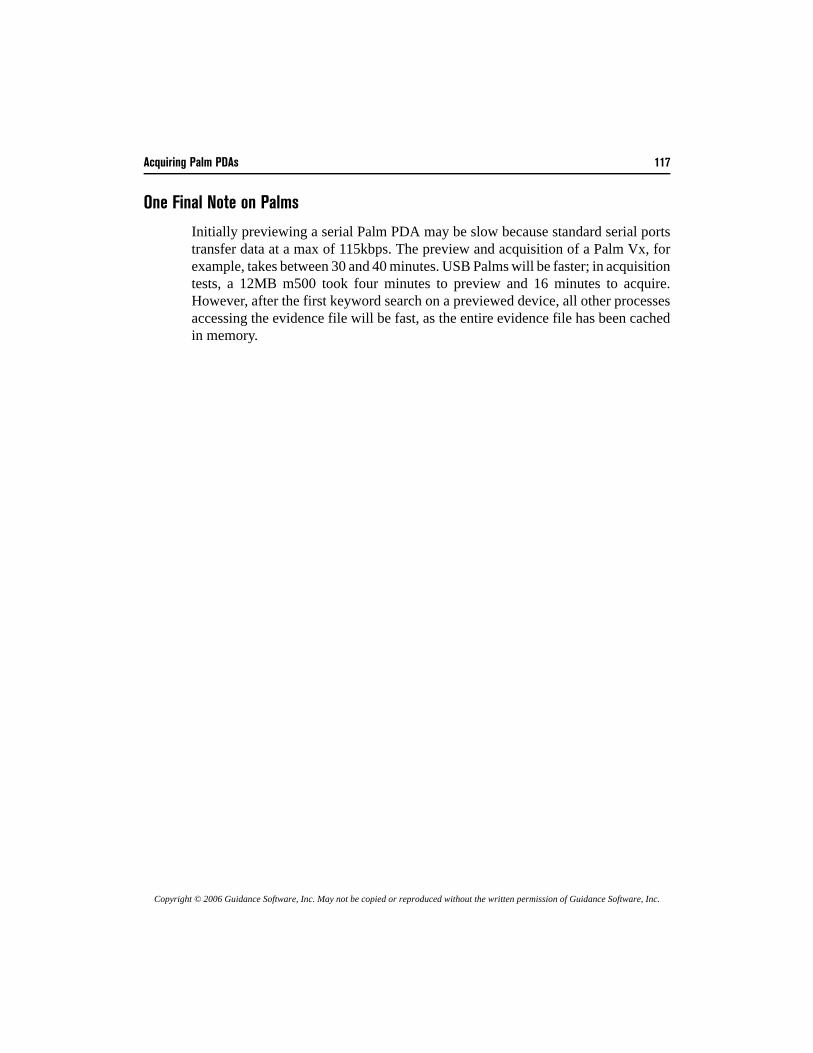
Acquiring Palm PDAs 117
Copyright © 2006 Guidance Software, Inc. May not be copied or reproduced without the written permission of Guidance Software, Inc.
One Final Note on Palms
Initially previewing a serial Palm PDA may be slow because standard serial portstransfer data at a max of 115kbps. The preview and acquisition of a Palm Vx, forexample, takes between 30 and 40 minutes. USB Palms will be faster; in acquisitiontests, a 12MB m500 took four minutes to preview and 16 minutes to acquire.However, after the first keyword search on a previewed device, all other processesaccessing the evidence file will be fast, as the entire evidence file has been cachedin memory.

118 EnCase Forensic v5.05 User Manual
Copyright © 2006 Guidance Software, Inc. May not be copied or reproduced without the written permission of Guidance Software, Inc.
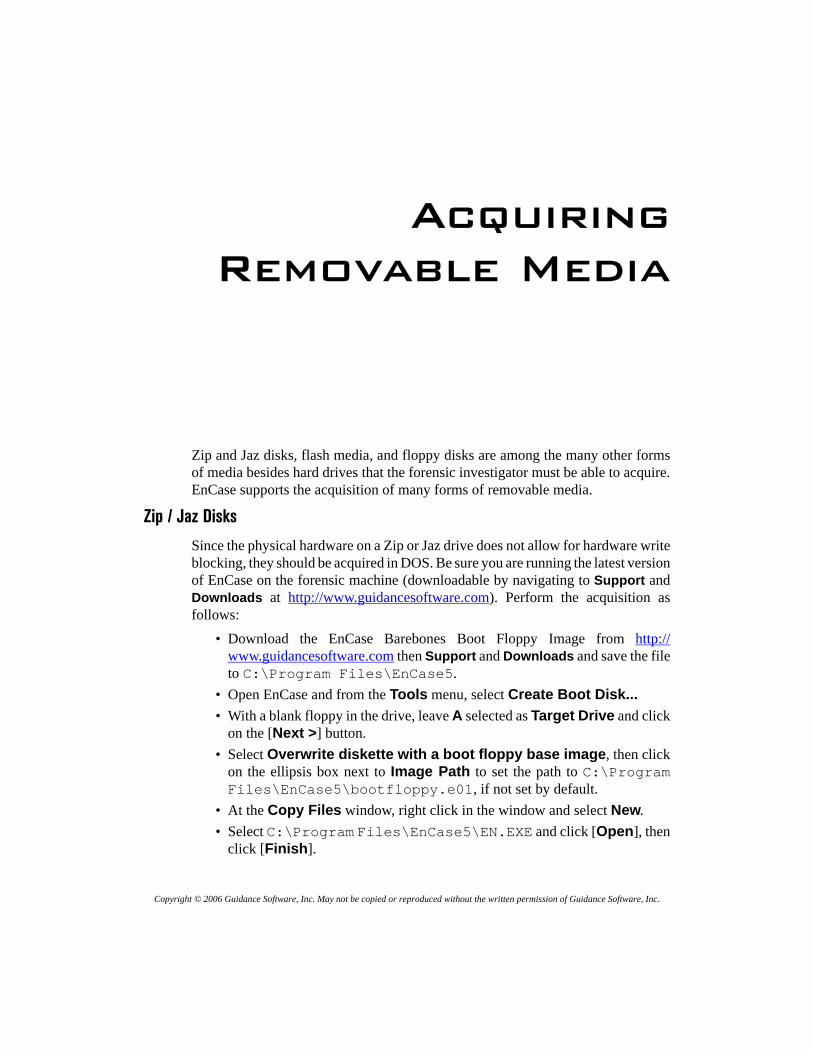
Copyright © 2006 Guidance Software, Inc. May not be copied or reproduced without the written permission of Guidance Software, Inc.
AcquiringRemovable Media
Zip and Jaz disks, flash media, and floppy disks are among the many other formsof media besides hard drives that the forensic investigator must be able to acquire.EnCase supports the acquisition of many forms of removable media.
Zip / Jaz Disks
Since the physical hardware on a Zip or Jaz drive does not allow for hardware writeblocking, they should be acquired in DOS. Be sure you are running the latest versionof EnCase on the forensic machine (downloadable by navigating to Support andDownloads at http://www.guidancesoftware.com). Perform the acquisition asfollows:
• Download the EnCase Barebones Boot Floppy Image from http://www.guidancesoftware.com then Support and Downloads and save the fileto C:\Program Files\EnCase5.
• Open EnCase and from the Tools menu, select Create Boot Disk... • With a blank floppy in the drive, leave A selected as Target Drive and click
on the [Next >] button. • Select Overwrite diskette with a boot floppy base image, then click
on the ellipsis box next to Image Path to set the path to C:\ProgramFiles\EnCase5\bootfloppy.e01, if not set by default.
• At the Copy Files window, right click in the window and select New.• Select C:\Program Files\EnCase5\EN.EXE and click [Open], then
click [Finish].
120 EnCase Forensic v5.05 User Manual
Copyright © 2006 Guidance Software, Inc. May not be copied or reproduced without the written permission of Guidance Software, Inc.
• Click [OK] to close the boot disk creation session. • Click on the [Next >] button.• Create a temporary directory (such as C:\IOMEGA\TEMP), download the
executable to create GUEST.EXE from Iomega’s web site (ftp://download.iomega.com/english/iodrv-dos-x86-10.exe),saving it to the newly created folder.
• Go to the temporary folder and double-click on IODRV-DOS-X86-10.EXEto extract the files.
• Copy all the expanded files in that directory (except IODRV-DOS-X86-10.EXE and AUTORUN.EXE) to the floppy (A:).
• Shut down the forensic or suspect machine with a storage drive and Zip drive,removing the cables to all drives, including the Zip or Jaz drive.
• Boot the machine ensuring that the BIOS is configured to boot from floppyonly.
• Shut the machine down, connect the cables to the storage drive and Zip or Jazdrive, and put the boot floppy in the diskette drive.
• Boot the machine. • At the A:\> prompt, type GUEST.EXE. • Run EnCase by typing EN.EXE, adding the /B switch if you get “divide by”
errors.The Zip or Jaz drive may be viewed as both a physical disk and a logical volume.Acquire in DOS as you would normally acquire a hard drive.
Floppy Disks
Floppy disks can be acquired safely in either DOS or Windows. Write-protect thedisk and insert it into the floppy drive. Launch EnCase and acquire the floppy.
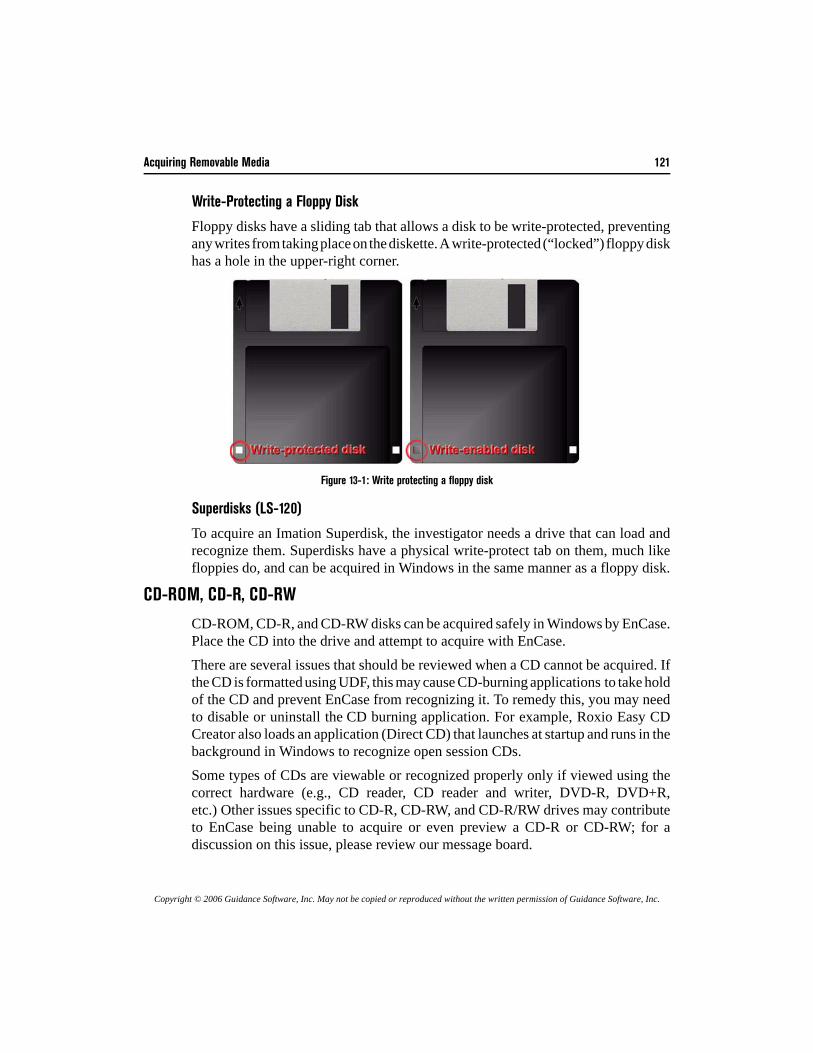
Acquiring Removable Media 121
Copyright © 2006 Guidance Software, Inc. May not be copied or reproduced without the written permission of Guidance Software, Inc.
Write-Protecting a Floppy Disk
Floppy disks have a sliding tab that allows a disk to be write-protected, preventingany writes from taking place on the diskette. A write-protected (“locked”) floppy diskhas a hole in the upper-right corner.
Figure 13-1: Write protecting a floppy disk
Superdisks (LS-120)
To acquire an Imation Superdisk, the investigator needs a drive that can load andrecognize them. Superdisks have a physical write-protect tab on them, much likefloppies do, and can be acquired in Windows in the same manner as a floppy disk.
CD-ROM, CD-R, CD-RW
CD-ROM, CD-R, and CD-RW disks can be acquired safely in Windows by EnCase.Place the CD into the drive and attempt to acquire with EnCase.There are several issues that should be reviewed when a CD cannot be acquired. Ifthe CD is formatted using UDF, this may cause CD-burning applications to take holdof the CD and prevent EnCase from recognizing it. To remedy this, you may needto disable or uninstall the CD burning application. For example, Roxio Easy CDCreator also loads an application (Direct CD) that launches at startup and runs in thebackground in Windows to recognize open session CDs.Some types of CDs are viewable or recognized properly only if viewed using thecorrect hardware (e.g., CD reader, CD reader and writer, DVD-R, DVD+R,etc.) Other issues specific to CD-R, CD-RW, and CD-R/RW drives may contributeto EnCase being unable to acquire or even preview a CD-R or CD-RW; for adiscussion on this issue, please review our message board.
122 EnCase Forensic v5.05 User Manual
Copyright © 2006 Guidance Software, Inc. May not be copied or reproduced without the written permission of Guidance Software, Inc.
If a CD cannot be acquired, wipe and format a small hard drive and copy the activefiles from the CD to this drive. Acquire the drive with EnCase. All file date and timestamps will have to be documented in other ways (such as looking at the CD-R inWindows and noting the file date/time stamps there).
Flash media
Flash media are memory storage cards for a portable devices such as PDAs, cellphones, and digital cameras. These are small matchbox-sized cards that can storedata, music, applications etc. They are most commonly used in digital cameras tostore images and transfer data from one portable device to another.These cards come in different sizes and have different storage capacities. Forexample, Compact Flash cards can be found in digital cameras and pocket PCs andcan store from 8MB of data up to 1GB. Common flash media devices are CompactFlash, Smart Media, and Memory Stick.
Equipment needed to preview/acquire flash media
Flash Card reader/writers are relatively inexpensive. Use a flash card reader toconfirm that the process of examining this media is forensically sound. Most flashcard readers connect via USB so ensure that a USB port is available. Ensure the flashcard reader is compatible with the operating system running.It is recommended using a 5-in-1 flash card reader that can read data from differentsize cards, such as Compact Flash, Smart Media, and Memory Sticks.
How to acquire flash media• Place the flash card into the reading device and confirm all necessary device
drivers are loaded. • EnCase will recognize the flash card reader as a local device with a logical drive
letter. It can be previewed or acquired as you would a local hard drive.• If acquiring in Windows, EnCase cannot put a write-lock on the device. If either
the memory card itself or the flash card reader has a write-lock facility, makesure this is set to the “lock” position.
• Most flash media use the FAT file system. Examining data on them is muchlike examining your average hard drive. It is possible to search both allocatedand unallocated space.
Examining flash media
Images taken using a digital camera generally have unique image headers, specificto the camera manufacturer. The File Finder EnScript has a tab (Custom File Type)
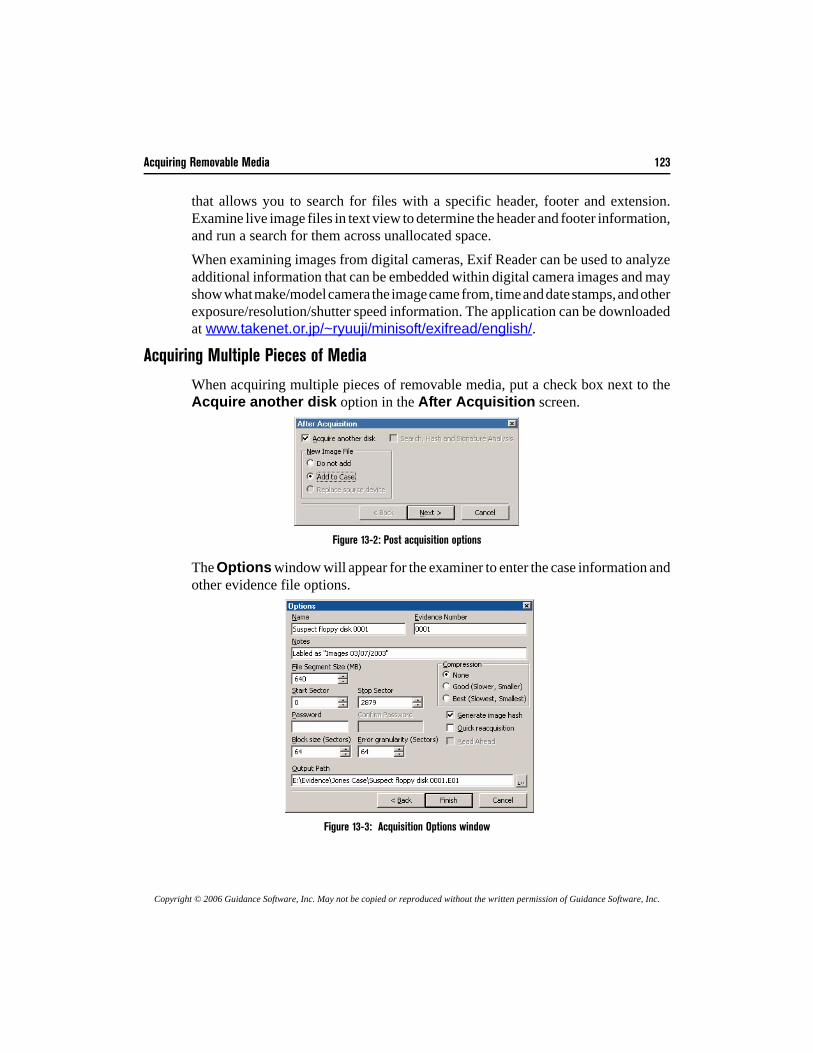
Acquiring Removable Media 123
Copyright © 2006 Guidance Software, Inc. May not be copied or reproduced without the written permission of Guidance Software, Inc.
that allows you to search for files with a specific header, footer and extension.Examine live image files in text view to determine the header and footer information,and run a search for them across unallocated space.When examining images from digital cameras, Exif Reader can be used to analyzeadditional information that can be embedded within digital camera images and mayshow what make/model camera the image came from, time and date stamps, and otherexposure/resolution/shutter speed information. The application can be downloadedat www.takenet.or.jp/~ryuuji/minisoft/exifread/english/.
Acquiring Multiple Pieces of Media
When acquiring multiple pieces of removable media, put a check box next to theAcquire another disk option in the After Acquisition screen.
Figure 13-2: Post acquisition options
The Options window will appear for the examiner to enter the case information andother evidence file options.
Figure 13-3: Acquisition Options window
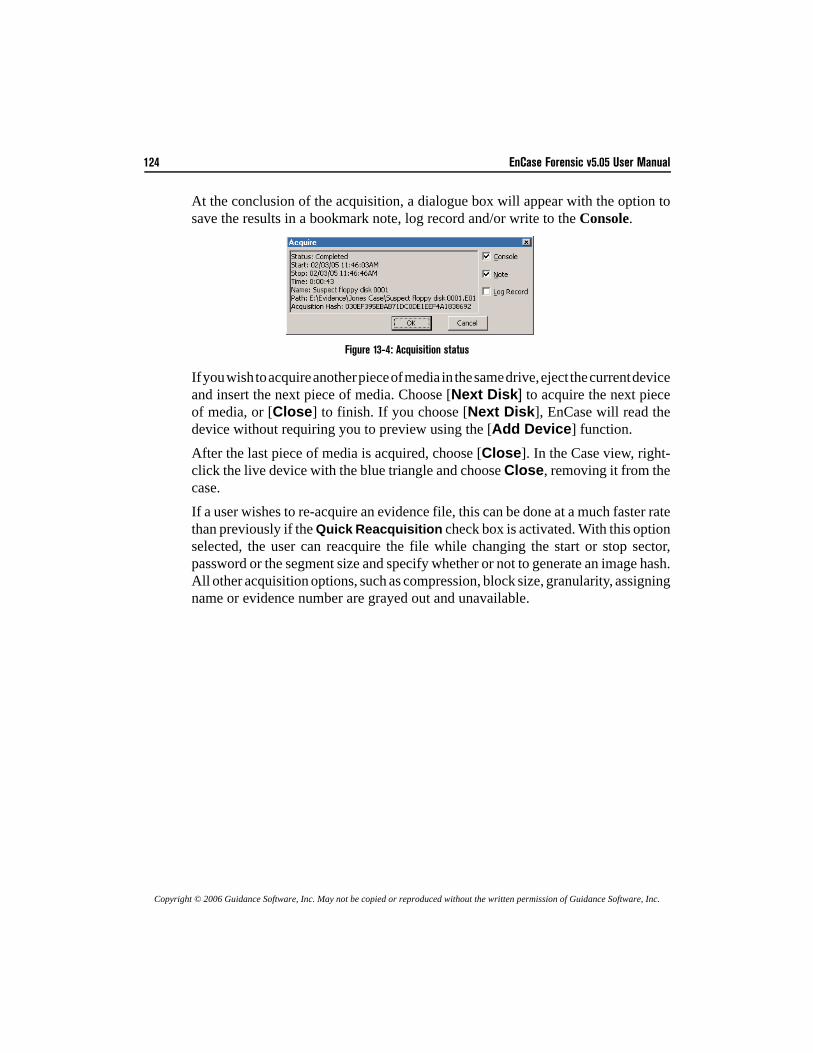
124 EnCase Forensic v5.05 User Manual
Copyright © 2006 Guidance Software, Inc. May not be copied or reproduced without the written permission of Guidance Software, Inc.
At the conclusion of the acquisition, a dialogue box will appear with the option tosave the results in a bookmark note, log record and/or write to the Console.
Figure 13-4: Acquisition status
If you wish to acquire another piece of media in the same drive, eject the current deviceand insert the next piece of media. Choose [Next Disk] to acquire the next pieceof media, or [Close] to finish. If you choose [Next Disk], EnCase will read thedevice without requiring you to preview using the [Add Device] function.
After the last piece of media is acquired, choose [Close]. In the Case view, right-click the live device with the blue triangle and choose Close, removing it from thecase.If a user wishes to re-acquire an evidence file, this can be done at a much faster ratethan previously if the Quick Reacquisition check box is activated. With this optionselected, the user can reacquire the file while changing the start or stop sector,password or the segment size and specify whether or not to generate an image hash.All other acquisition options, such as compression, block size, granularity, assigningname or evidence number are grayed out and unavailable.
Copyright © 2006 Guidance Software, Inc. May not be copied or reproduced without the written permission of Guidance Software, Inc.
First Steps
This chapter describes several features of EnCase that should be used at the start ofany investigation. Whether responding to an incident, conducting an electronicdiscovery request, or auditing workstations, these steps are designed to save time andhelp ensure an accurate display of all data pertaining to the case.
Connecting to Remote MediaThe enterprise functionality of EnCase allows the investigator to conduct forensicallysound, remote previews over the Enterprise network without the Subject even beingaware of the connection. For this reason, the security necessary to conduct suchinvestigations is rigorous. The first step in initiating a remote preview or acquisitionis to log onto a SAFE server, the machine that contains all administration rules andrights, and keeps logs of all transactions.
Figure 14-1: EnCase version 5 desktop icon
SAFE Administration and User Accounts
The keymaster must logon to the SAFE in order to create initial users or to createone user to perform the administration tasks associated with adding, editing, anddeleting users and roles. Information on SAFE administration, user accounts, androles is contained in the EnCase Enterprise Administrator Manual.
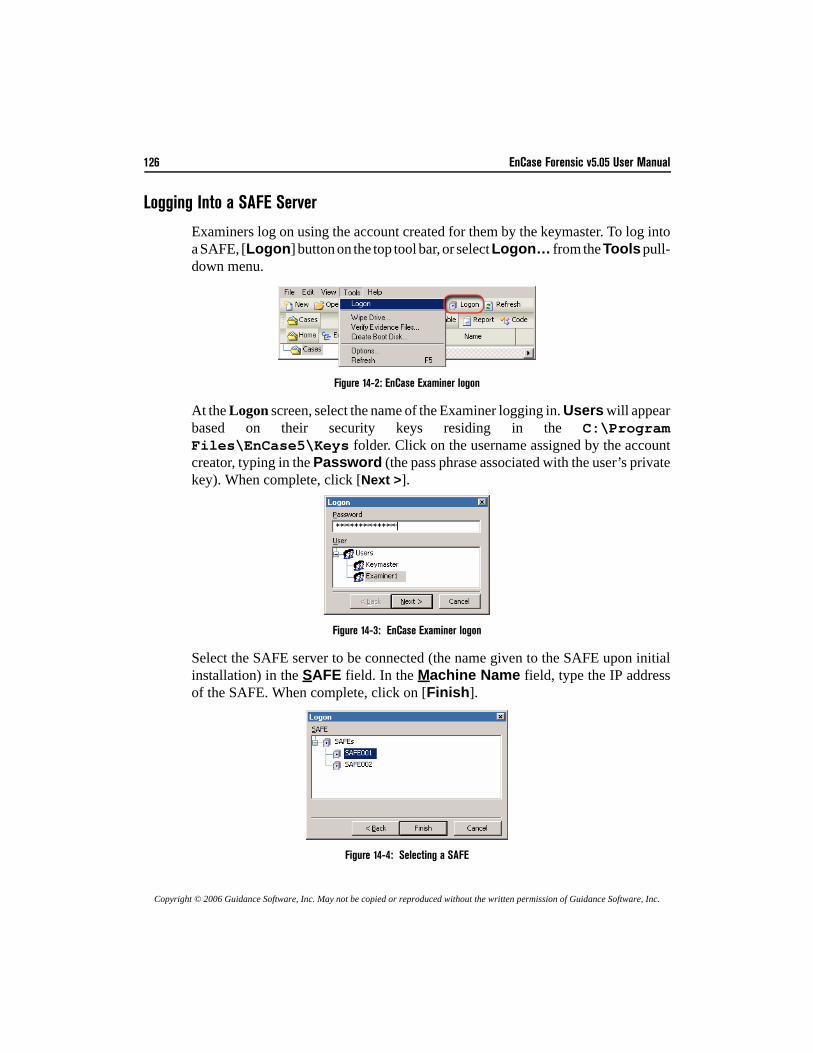
126 EnCase Forensic v5.05 User Manual
Copyright © 2006 Guidance Software, Inc. May not be copied or reproduced without the written permission of Guidance Software, Inc.
Logging Into a SAFE Server
Examiners log on using the account created for them by the keymaster. To log intoa SAFE, [Logon] button on the top tool bar, or select Logon… from the Tools pull-down menu.
Figure 14-2: EnCase Examiner logon
At the Logon screen, select the name of the Examiner logging in. Users will appearbased on their security keys residing in the C:\ProgramFiles\EnCase5\Keys folder. Click on the username assigned by the accountcreator, typing in the Password (the pass phrase associated with the user’s privatekey). When complete, click [Next >].
Figure 14-3: EnCase Examiner logon
Select the SAFE server to be connected (the name given to the SAFE upon initialinstallation) in the SAFE field. In the Machine Name field, type the IP addressof the SAFE. When complete, click on [Finish].
Figure 14-4: Selecting a SAFE
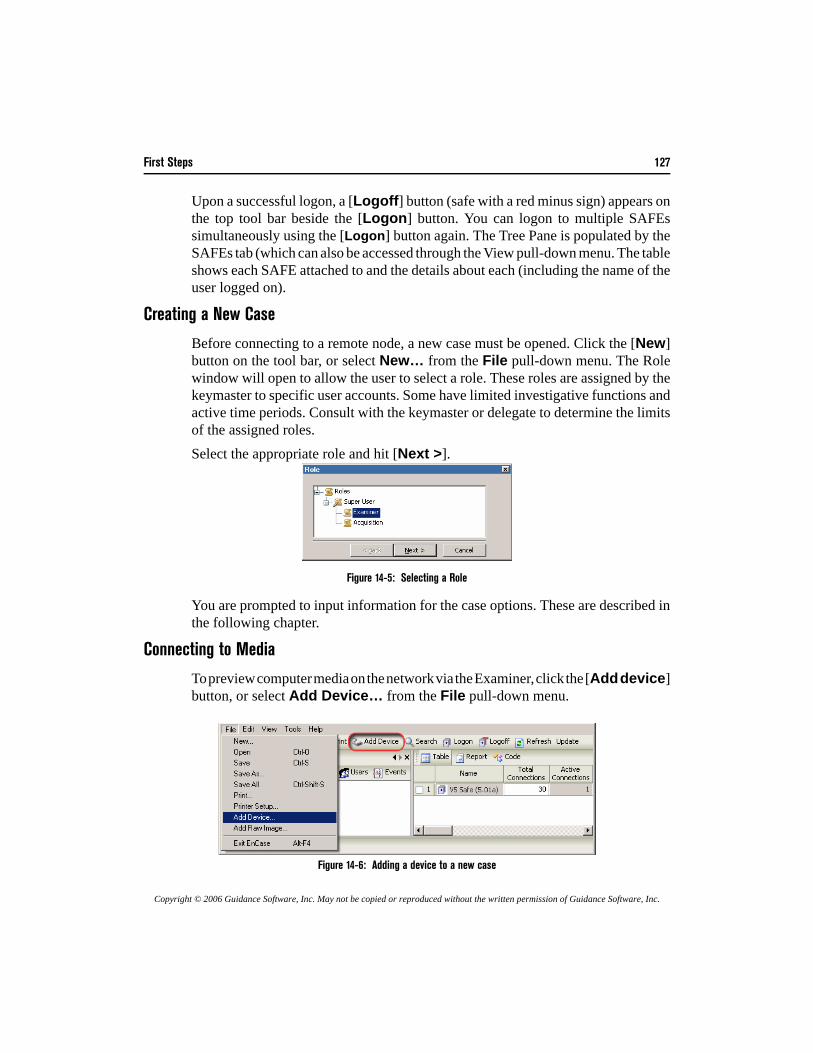
First Steps 127
Copyright © 2006 Guidance Software, Inc. May not be copied or reproduced without the written permission of Guidance Software, Inc.
Upon a successful logon, a [Logoff] button (safe with a red minus sign) appears onthe top tool bar beside the [Logon] button. You can logon to multiple SAFEssimultaneously using the [Logon] button again. The Tree Pane is populated by theSAFEs tab (which can also be accessed through the View pull-down menu. The tableshows each SAFE attached to and the details about each (including the name of theuser logged on).
Creating a New Case
Before connecting to a remote node, a new case must be opened. Click the [New]button on the tool bar, or select New… from the File pull-down menu. The Rolewindow will open to allow the user to select a role. These roles are assigned by thekeymaster to specific user accounts. Some have limited investigative functions andactive time periods. Consult with the keymaster or delegate to determine the limitsof the assigned roles.Select the appropriate role and hit [Next >].
Figure 14-5: Selecting a Role
You are prompted to input information for the case options. These are described inthe following chapter.
Connecting to Media
To preview computer media on the network via the Examiner, click the [Add device]button, or select Add Device… from the File pull-down menu.
.
Figure 14-6: Adding a device to a new case

128 EnCase Forensic v5.05 User Manual
Copyright © 2006 Guidance Software, Inc. May not be copied or reproduced without the written permission of Guidance Software, Inc.
The user is prompted to select the type of media (the computer to preview or thepreexisting evidence files) to add to the new Case. To find devices running the EnCaseservlet on the enterprise network, click on the Enterprise folder and find the desireddevice in the table on the right. Blue check to select the desired machine(s) to preview,then click [Next >].
Figure 14-7: Selecting a machine
Select either the physical disk, logical volume or removable media (floppy disks canonly be previewed on the local machine, not remotely). Blue check the desired mediaand click [Next >] to preview the device.
Figure 14-8: Selecting the appropriate media
Refer to the following chapter for instructions on how to change the device name,functionality of the available options, etc. Once the desired options have beenselected, click [Finish] on the last screen to add the device(s) to the Case.The hard drive of the machine is being previewed over a TCP/IP network. The redtriangle in the bottom right corner of the device icon indicates that this is a live networkconnection. If the connection is lost, the icon will be covered with a pink squareoverlay; however, all of the information in the table (file names, dates, file sizes, etc.)will remain, and can be exported out as a report. You can also save your work as aCase file, reconnect to the machine, and resume the examination.
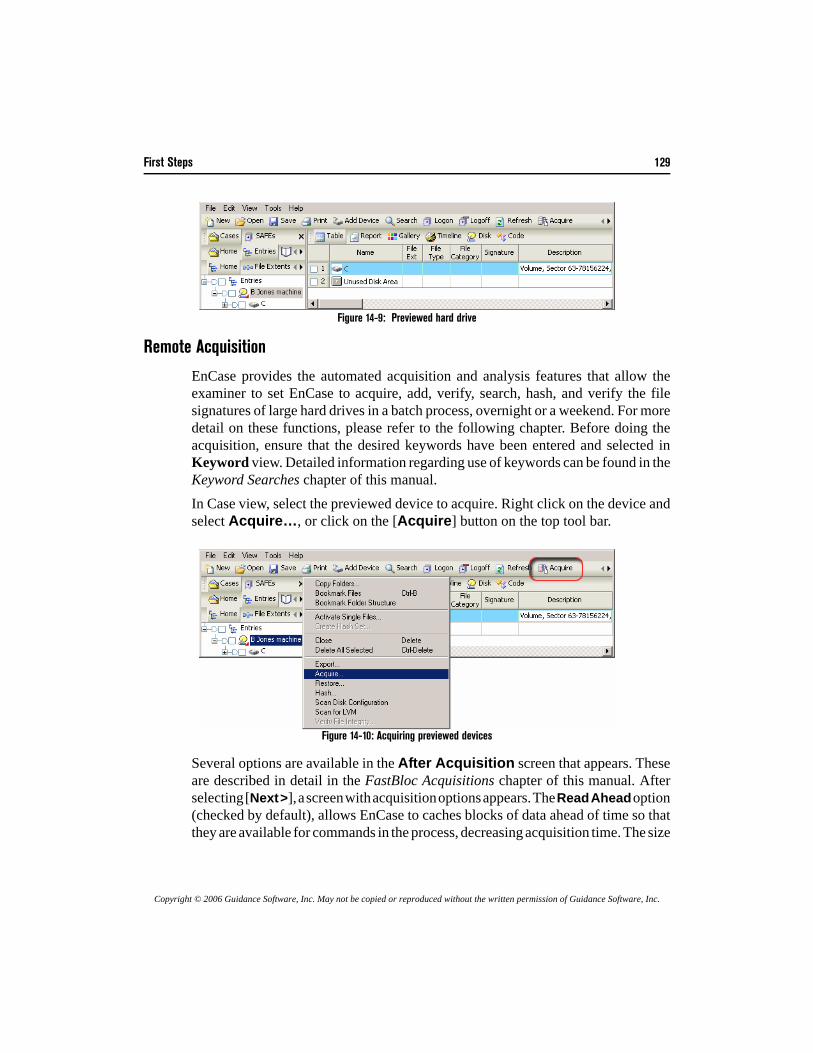
First Steps 129
Copyright © 2006 Guidance Software, Inc. May not be copied or reproduced without the written permission of Guidance Software, Inc.
Figure 14-9: Previewed hard drive
Remote Acquisition
EnCase provides the automated acquisition and analysis features that allow theexaminer to set EnCase to acquire, add, verify, search, hash, and verify the filesignatures of large hard drives in a batch process, overnight or a weekend. For moredetail on these functions, please refer to the following chapter. Before doing theacquisition, ensure that the desired keywords have been entered and selected inKeyword view. Detailed information regarding use of keywords can be found in theKeyword Searches chapter of this manual.In Case view, select the previewed device to acquire. Right click on the device andselect Acquire…, or click on the [Acquire] button on the top tool bar.
Figure 14-10: Acquiring previewed devices
Several options are available in the After Acquisition screen that appears. Theseare described in detail in the FastBloc Acquisitions chapter of this manual. Afterselecting [Next >], a screen with acquisition options appears. The Read Ahead option(checked by default), allows EnCase to caches blocks of data ahead of time so thatthey are available for commands in the process, decreasing acquisition time. The size
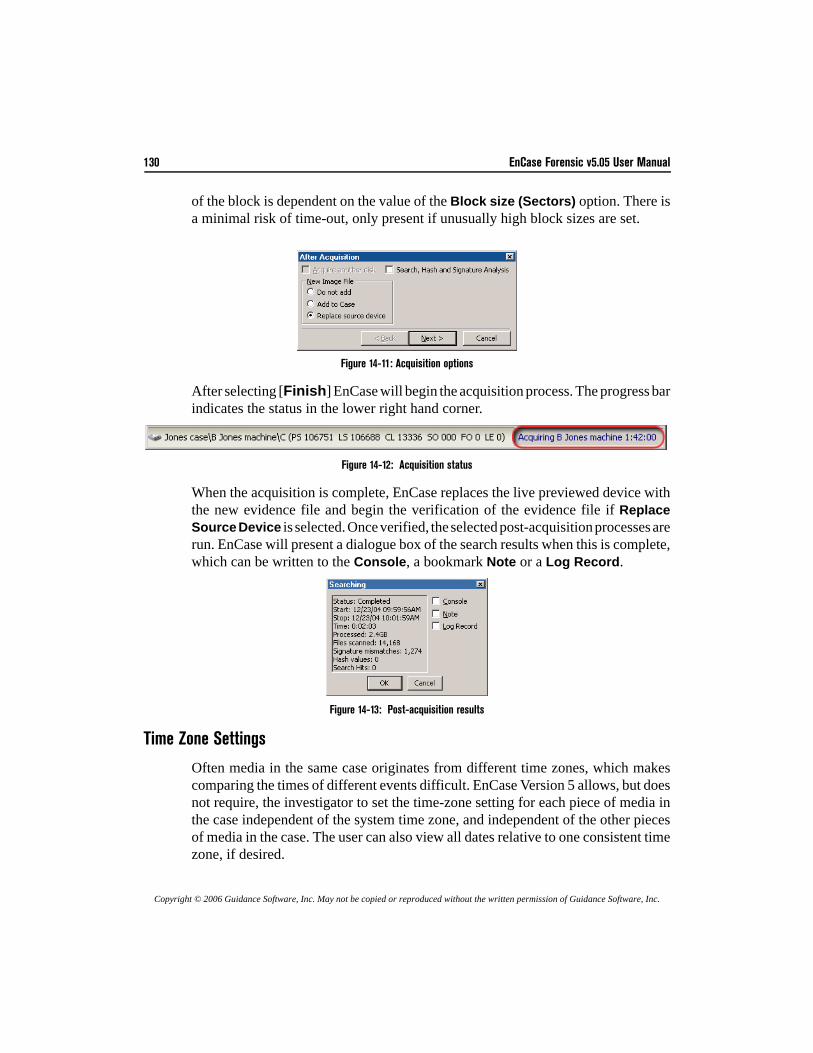
130 EnCase Forensic v5.05 User Manual
Copyright © 2006 Guidance Software, Inc. May not be copied or reproduced without the written permission of Guidance Software, Inc.
of the block is dependent on the value of the Block size (Sectors) option. There isa minimal risk of time-out, only present if unusually high block sizes are set.
Figure 14-11: Acquisition options
After selecting [Finish] EnCase will begin the acquisition process. The progress barindicates the status in the lower right hand corner.
Figure 14-12: Acquisition status
When the acquisition is complete, EnCase replaces the live previewed device withthe new evidence file and begin the verification of the evidence file if ReplaceSource Device is selected. Once verified, the selected post-acquisition processes arerun. EnCase will present a dialogue box of the search results when this is complete,which can be written to the Console, a bookmark Note or a Log Record.
Figure 14-13: Post-acquisition results
Time Zone Settings
Often media in the same case originates from different time zones, which makescomparing the times of different events difficult. EnCase Version 5 allows, but doesnot require, the investigator to set the time-zone setting for each piece of media inthe case independent of the system time zone, and independent of the other piecesof media in the case. The user can also view all dates relative to one consistent timezone, if desired.

First Steps 131
Copyright © 2006 Guidance Software, Inc. May not be copied or reproduced without the written permission of Guidance Software, Inc.
When a new time zone is assigned, dates and times in GMT-based file systems suchas NTFS will be adjusted accordingly. File systems, such as FAT16 and FAT32, whichsave dates and times in local time, will not display adjusted times when a new timezone is assigned. However, setting the time zone on a local-time system is importantwhen dealing with case-level time settings; it lets EnCase know what time zone thesystem was originally in. With regard to Daylight Saving Time, EnCase checks the date portion of an entry,determines if it falls within standard or daylight time (if applicable), and displaysthe adjusted time. To disregard seasonal settings, uncheck Account for seasonalDaylight Saving Time adjustment in the Case Time Settings dialog box. Tomodify a time zone setting for a piece of media, right-click on the media and selectModify Time Zone Settings… from the contextual menu.
Figure 14-14: Time zone settings
Select the time zone for the piece of media. The default settings are read from theinvestigating computer's registry and displayed at right. If time zone settings are notspecified, EnCase will default to deriving the date and time stamps from the currentWindows registry settings on the investigating computer.
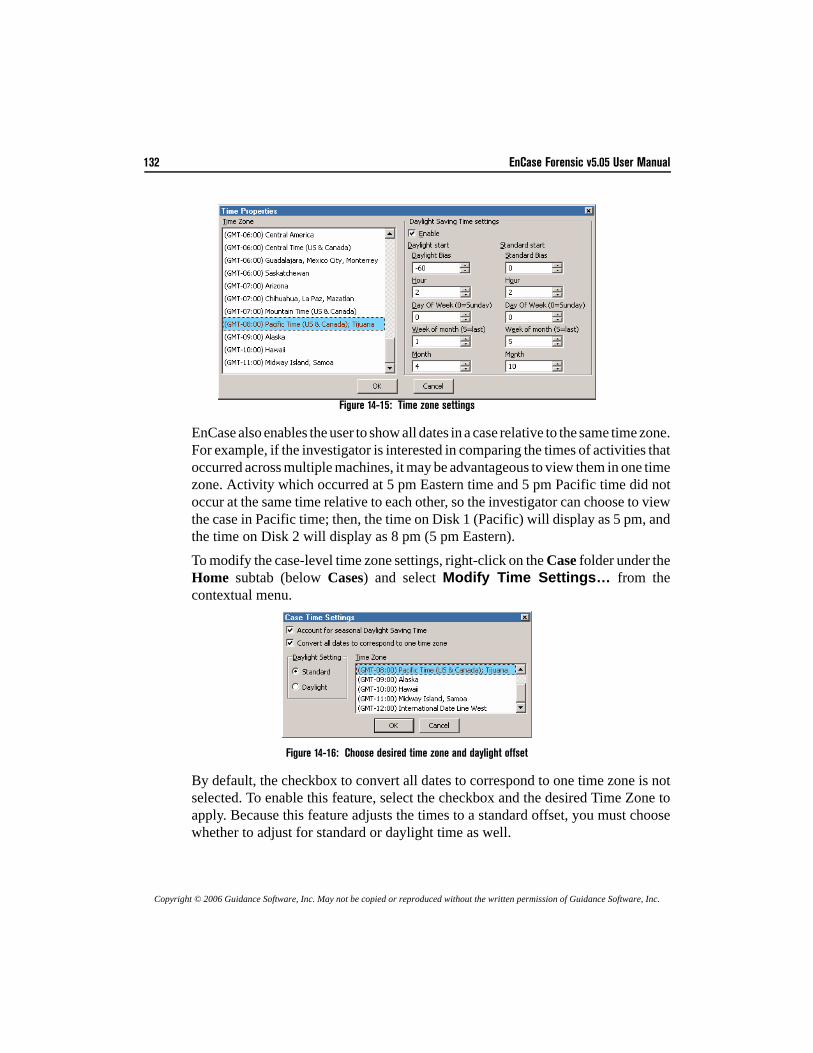
132 EnCase Forensic v5.05 User Manual
Copyright © 2006 Guidance Software, Inc. May not be copied or reproduced without the written permission of Guidance Software, Inc.
Figure 14-15: Time zone settings
EnCase also enables the user to show all dates in a case relative to the same time zone.For example, if the investigator is interested in comparing the times of activities thatoccurred across multiple machines, it may be advantageous to view them in one timezone. Activity which occurred at 5 pm Eastern time and 5 pm Pacific time did notoccur at the same time relative to each other, so the investigator can choose to viewthe case in Pacific time; then, the time on Disk 1 (Pacific) will display as 5 pm, andthe time on Disk 2 will display as 8 pm (5 pm Eastern). To modify the case-level time zone settings, right-click on the Case folder under theHome subtab (below Cases) and select Modify Time Settings… from thecontextual menu.
Figure 14-16: Choose desired time zone and daylight offset
By default, the checkbox to convert all dates to correspond to one time zone is notselected. To enable this feature, select the checkbox and the desired Time Zone toapply. Because this feature adjusts the times to a standard offset, you must choosewhether to adjust for standard or daylight time as well.
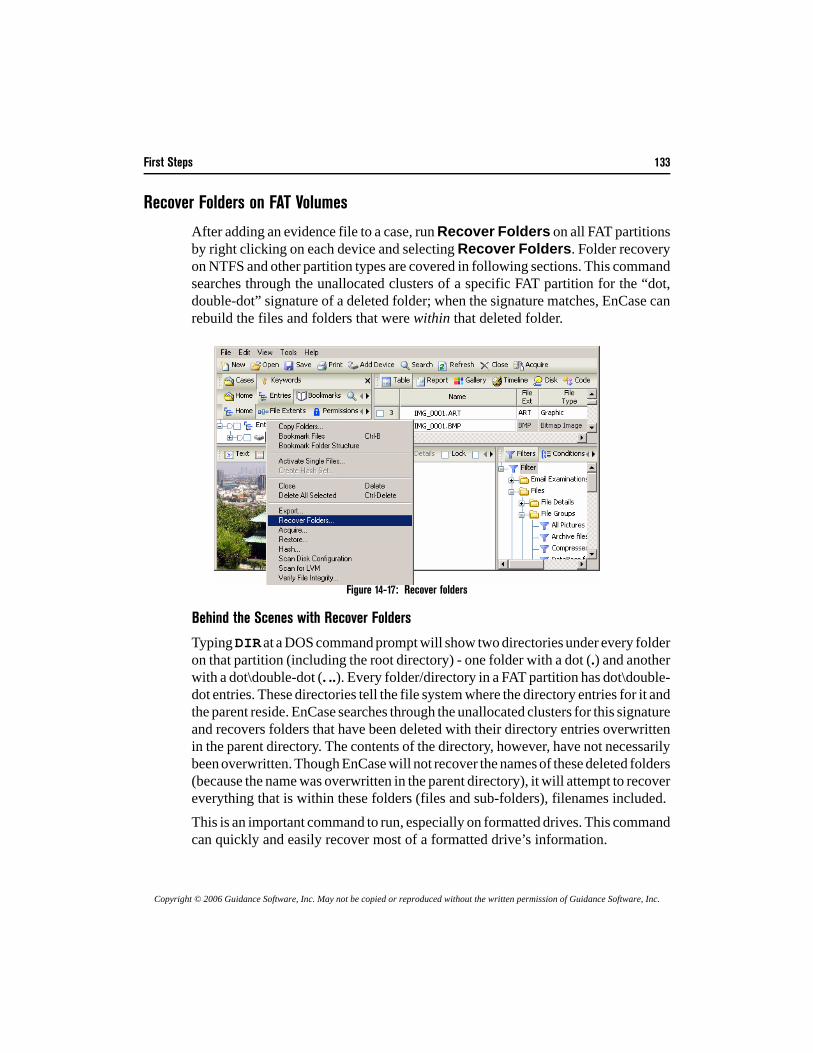
First Steps 133
Copyright © 2006 Guidance Software, Inc. May not be copied or reproduced without the written permission of Guidance Software, Inc.
Recover Folders on FAT Volumes
After adding an evidence file to a case, run Recover Folders on all FAT partitionsby right clicking on each device and selecting Recover Folders. Folder recoveryon NTFS and other partition types are covered in following sections. This commandsearches through the unallocated clusters of a specific FAT partition for the “dot,double-dot” signature of a deleted folder; when the signature matches, EnCase canrebuild the files and folders that were within that deleted folder.
Figure 14-17: Recover folders
Behind the Scenes with Recover Folders
Typing DIR at a DOS command prompt will show two directories under every folderon that partition (including the root directory) - one folder with a dot (.) and anotherwith a dot\double-dot (. ..). Every folder/directory in a FAT partition has dot\double-dot entries. These directories tell the file system where the directory entries for it andthe parent reside. EnCase searches through the unallocated clusters for this signatureand recovers folders that have been deleted with their directory entries overwrittenin the parent directory. The contents of the directory, however, have not necessarilybeen overwritten. Though EnCase will not recover the names of these deleted folders(because the name was overwritten in the parent directory), it will attempt to recovereverything that is within these folders (files and sub-folders), filenames included.This is an important command to run, especially on formatted drives. This commandcan quickly and easily recover most of a formatted drive’s information.

134 EnCase Forensic v5.05 User Manual
Copyright © 2006 Guidance Software, Inc. May not be copied or reproduced without the written permission of Guidance Software, Inc.
This command is available only when an evidence file volume is highlighted. Right-click on a volume under the Entry subtab under Home in the Cases tab and selectRecover Folders. You will be prompted to scan the volume for lost folders; click[OK]. After the process executes, a gray Recovered Folders folder appears in theCase view. The folder will not appear until EnCase has searched the entire volumefor deleted folders. If folders are recovered, you will be prompted to view the results.
Figure 14-18: Recover Folders results
Recovering NTFS Folders
EnCase can recover NTFS files and folders from Unallocated Clusters and continueto parse through the current Master File Table (MFT) records for files without parentfolders. This is particularly useful when a drive has been reformatted or the MFT iscorrupted. Lost files that are recovered are placed in the gray Recovered Foldersvirtual folder in the root of the NTFS partition. To recover folders on an NTFSpartition, right-click on the volume and select Recover Folders.EnCase will open a window to confirm the user wishes to scan the volume for folders.Choose [OK] to begin the search for NTFS folders, or [Cancel] to cancel the request.
Figure 14-19: Begin scan for lost files
NOTE: Let Recover Folders finish before running any further analysis on the drive. Other EnCase functions,such as keyword searches, will prompt you to terminate the Recover Folders command. If you do so, you willlose any folders recovered to that point.
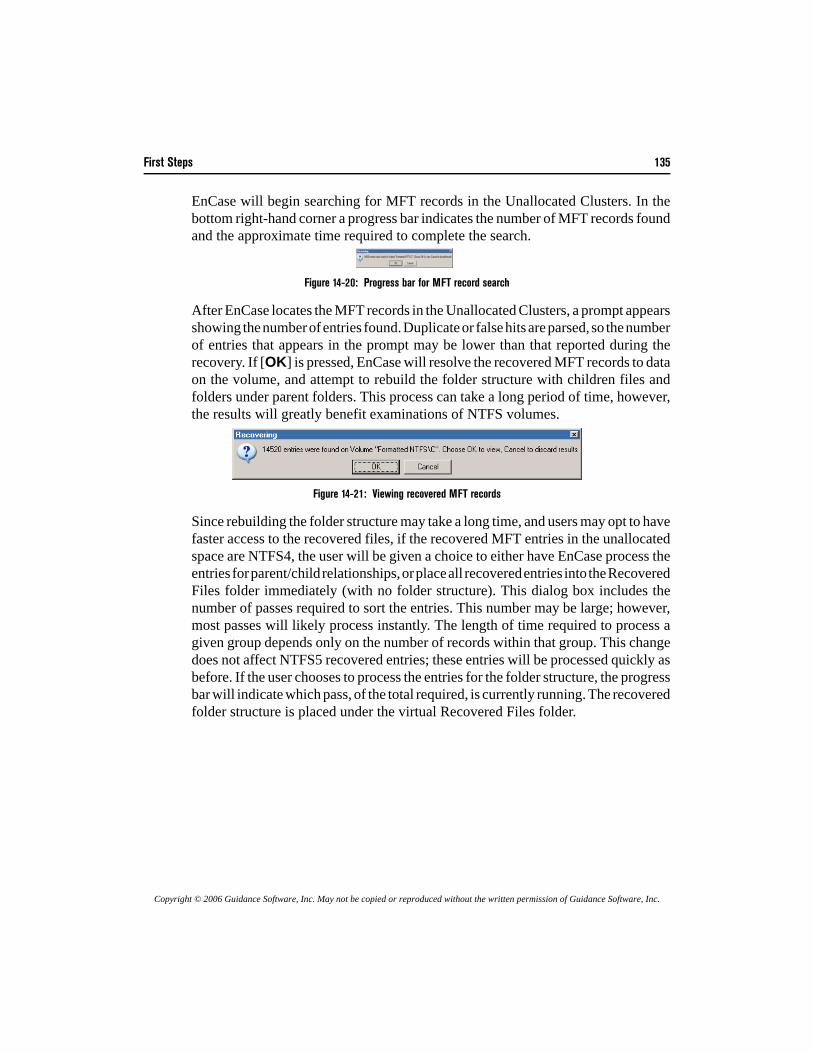
First Steps 135
Copyright © 2006 Guidance Software, Inc. May not be copied or reproduced without the written permission of Guidance Software, Inc.
EnCase will begin searching for MFT records in the Unallocated Clusters. In thebottom right-hand corner a progress bar indicates the number of MFT records foundand the approximate time required to complete the search.
Figure 14-20: Progress bar for MFT record search
After EnCase locates the MFT records in the Unallocated Clusters, a prompt appearsshowing the number of entries found. Duplicate or false hits are parsed, so the numberof entries that appears in the prompt may be lower than that reported during therecovery. If [OK] is pressed, EnCase will resolve the recovered MFT records to dataon the volume, and attempt to rebuild the folder structure with children files andfolders under parent folders. This process can take a long period of time, however,the results will greatly benefit examinations of NTFS volumes.
Figure 14-21: Viewing recovered MFT records
Since rebuilding the folder structure may take a long time, and users may opt to havefaster access to the recovered files, if the recovered MFT entries in the unallocatedspace are NTFS4, the user will be given a choice to either have EnCase process theentries for parent/child relationships, or place all recovered entries into the RecoveredFiles folder immediately (with no folder structure). This dialog box includes thenumber of passes required to sort the entries. This number may be large; however,most passes will likely process instantly. The length of time required to process agiven group depends only on the number of records within that group. This changedoes not affect NTFS5 recovered entries; these entries will be processed quickly asbefore. If the user chooses to process the entries for the folder structure, the progressbar will indicate which pass, of the total required, is currently running. The recoveredfolder structure is placed under the virtual Recovered Files folder.
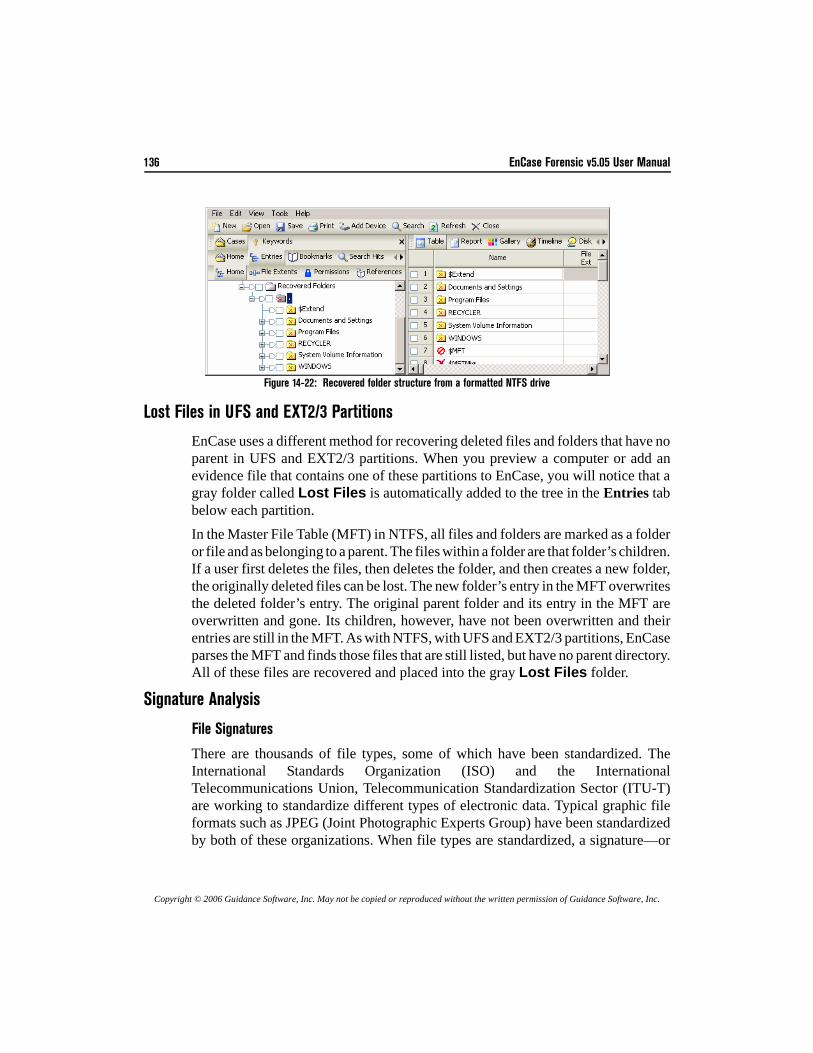
136 EnCase Forensic v5.05 User Manual
Copyright © 2006 Guidance Software, Inc. May not be copied or reproduced without the written permission of Guidance Software, Inc.
Figure 14-22: Recovered folder structure from a formatted NTFS drive
Lost Files in UFS and EXT2/3 Partitions
EnCase uses a different method for recovering deleted files and folders that have noparent in UFS and EXT2/3 partitions. When you preview a computer or add anevidence file that contains one of these partitions to EnCase, you will notice that agray folder called Lost Files is automatically added to the tree in the Entries tabbelow each partition. In the Master File Table (MFT) in NTFS, all files and folders are marked as a folderor file and as belonging to a parent. The files within a folder are that folder’s children.If a user first deletes the files, then deletes the folder, and then creates a new folder,the originally deleted files can be lost. The new folder’s entry in the MFT overwritesthe deleted folder’s entry. The original parent folder and its entry in the MFT areoverwritten and gone. Its children, however, have not been overwritten and theirentries are still in the MFT. As with NTFS, with UFS and EXT2/3 partitions, EnCaseparses the MFT and finds those files that are still listed, but have no parent directory.All of these files are recovered and placed into the gray Lost Files folder.
Signature Analysis
File Signatures
There are thousands of file types, some of which have been standardized. TheInternational Standards Organization (ISO) and the InternationalTelecommunications Union, Telecommunication Standardization Sector (ITU-T)are working to standardize different types of electronic data. Typical graphic fileformats such as JPEG (Joint Photographic Experts Group) have been standardizedby both of these organizations. When file types are standardized, a signature—or
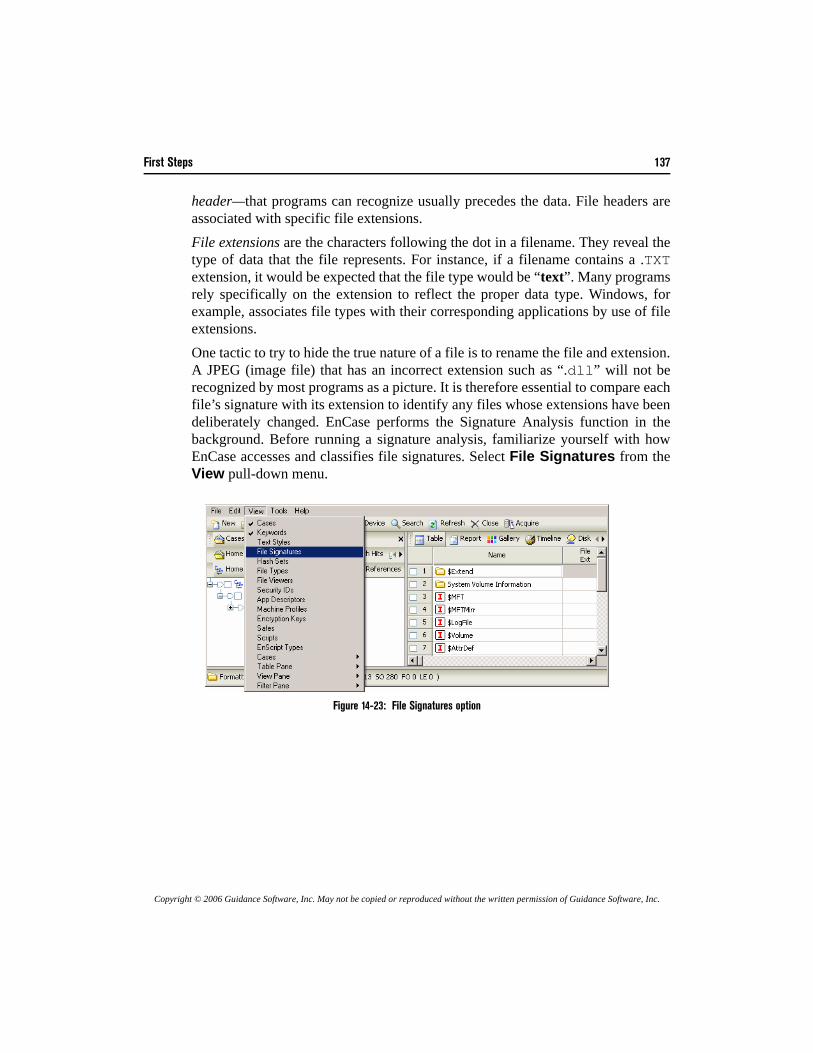
First Steps 137
Copyright © 2006 Guidance Software, Inc. May not be copied or reproduced without the written permission of Guidance Software, Inc.
header—that programs can recognize usually precedes the data. File headers areassociated with specific file extensions.File extensions are the characters following the dot in a filename. They reveal thetype of data that the file represents. For instance, if a filename contains a .TXTextension, it would be expected that the file type would be “text”. Many programsrely specifically on the extension to reflect the proper data type. Windows, forexample, associates file types with their corresponding applications by use of fileextensions. One tactic to try to hide the true nature of a file is to rename the file and extension.A JPEG (image file) that has an incorrect extension such as “.dll” will not berecognized by most programs as a picture. It is therefore essential to compare eachfile’s signature with its extension to identify any files whose extensions have beendeliberately changed. EnCase performs the Signature Analysis function in thebackground. Before running a signature analysis, familiarize yourself with howEnCase accesses and classifies file signatures. Select File Signatures from theView pull-down menu.
Figure 14-23: File Signatures option
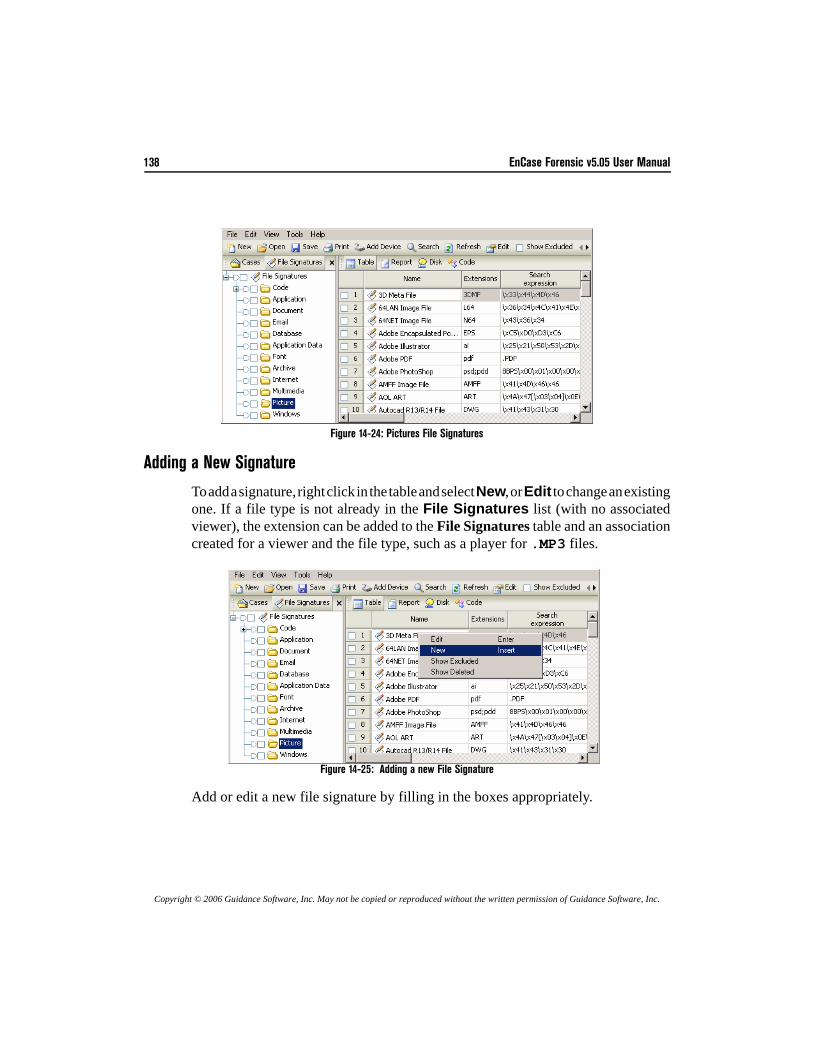
138 EnCase Forensic v5.05 User Manual
Copyright © 2006 Guidance Software, Inc. May not be copied or reproduced without the written permission of Guidance Software, Inc.
Figure 14-24: Pictures File Signatures
Adding a New Signature
To add a signature, right click in the table and select New, or Edit to change an existingone. If a file type is not already in the File Signatures list (with no associatedviewer), the extension can be added to the File Signatures table and an associationcreated for a viewer and the file type, such as a player for .MP3 files.
Figure 14-25: Adding a new File Signature
Add or edit a new file signature by filling in the boxes appropriately.
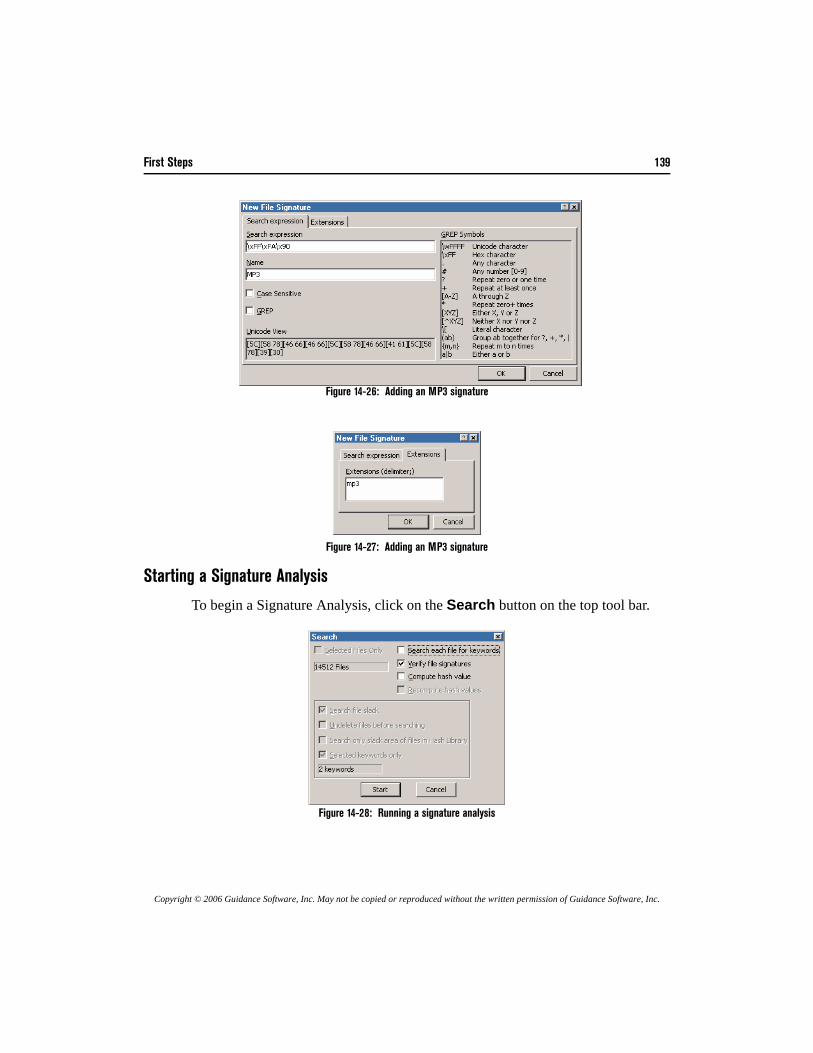
First Steps 139
Copyright © 2006 Guidance Software, Inc. May not be copied or reproduced without the written permission of Guidance Software, Inc.
Figure 14-26: Adding an MP3 signature
Figure 14-27: Adding an MP3 signature
Starting a Signature Analysis
To begin a Signature Analysis, click on the Search button on the top tool bar.
Figure 14-28: Running a signature analysis
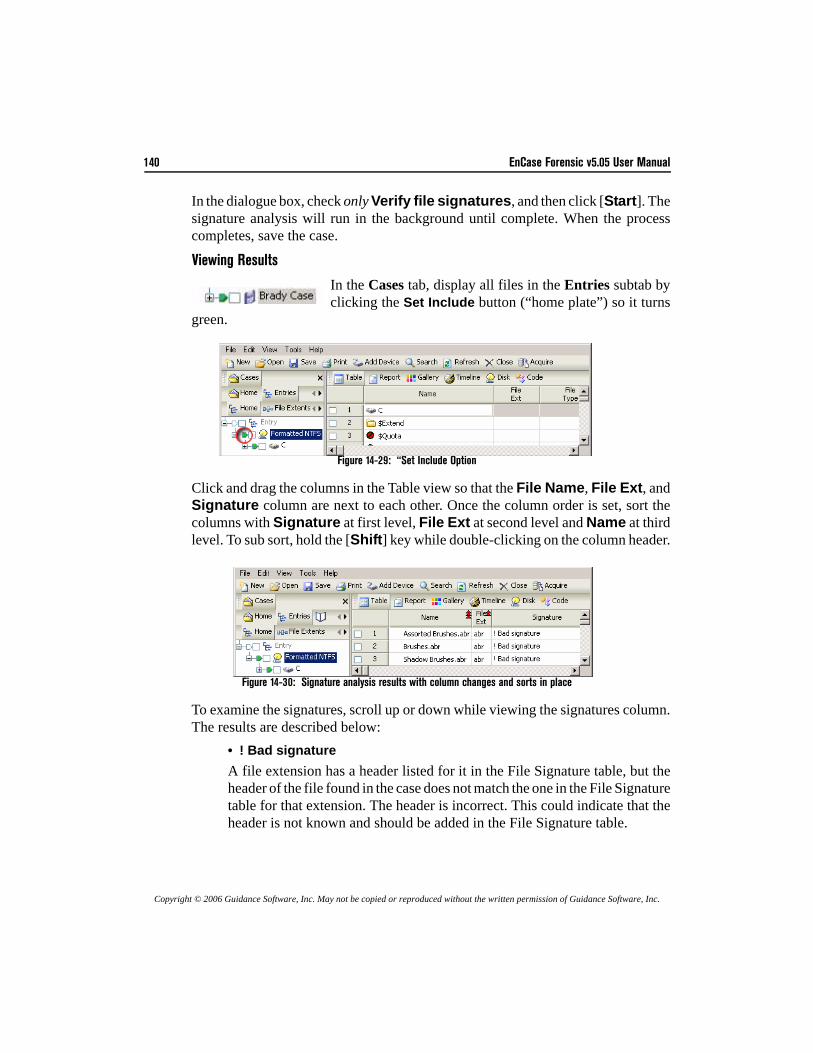
140 EnCase Forensic v5.05 User Manual
Copyright © 2006 Guidance Software, Inc. May not be copied or reproduced without the written permission of Guidance Software, Inc.
In the dialogue box, check only Verify file signatures, and then click [Start]. Thesignature analysis will run in the background until complete. When the processcompletes, save the case.
Viewing Results
In the Cases tab, display all files in the Entries subtab byclicking the Set Include button (“home plate”) so it turns
green.
Figure 14-29: “Set Include Option
Click and drag the columns in the Table view so that the File Name, File Ext, andSignature column are next to each other. Once the column order is set, sort thecolumns with Signature at first level, File Ext at second level and Name at thirdlevel. To sub sort, hold the [Shift] key while double-clicking on the column header.
Figure 14-30: Signature analysis results with column changes and sorts in place
To examine the signatures, scroll up or down while viewing the signatures column.The results are described below:
• ! Bad signatureA file extension has a header listed for it in the File Signature table, but theheader of the file found in the case does not match the one in the File Signaturetable for that extension. The header is incorrect. This could indicate that theheader is not known and should be added in the File Signature table.
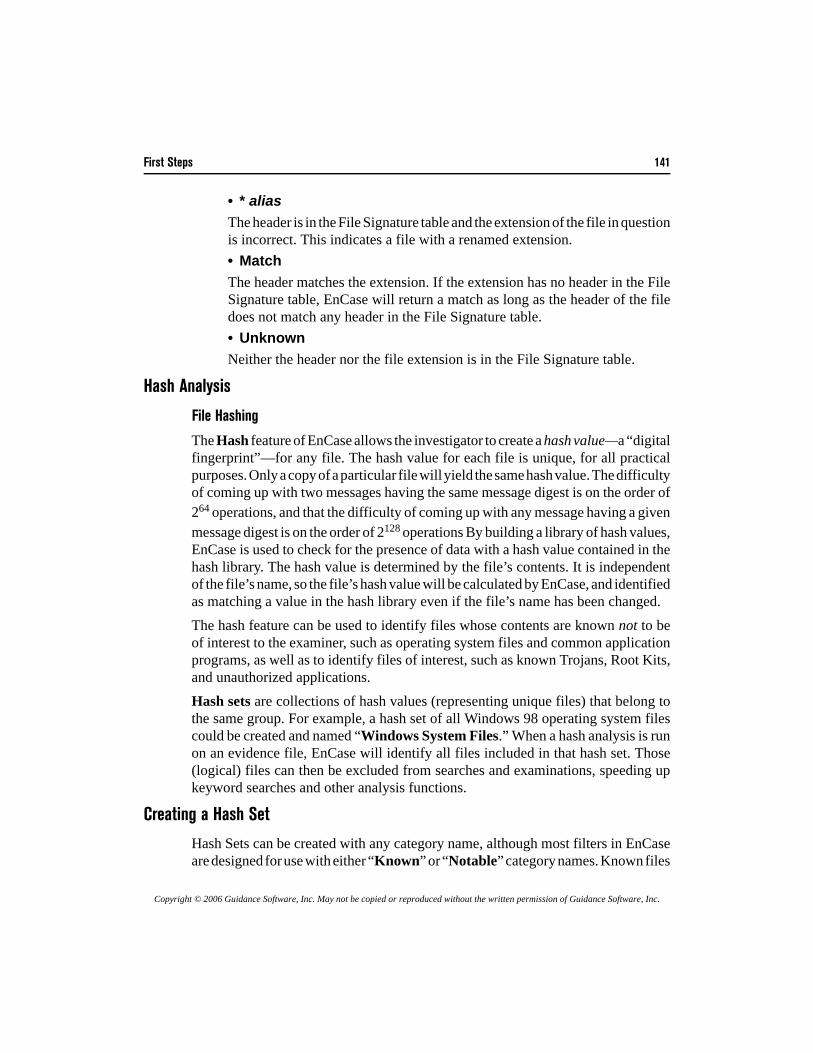
First Steps 141
Copyright © 2006 Guidance Software, Inc. May not be copied or reproduced without the written permission of Guidance Software, Inc.
• * aliasThe header is in the File Signature table and the extension of the file in questionis incorrect. This indicates a file with a renamed extension.• MatchThe header matches the extension. If the extension has no header in the FileSignature table, EnCase will return a match as long as the header of the filedoes not match any header in the File Signature table.• UnknownNeither the header nor the file extension is in the File Signature table.
Hash Analysis
File Hashing
The Hash feature of EnCase allows the investigator to create a hash value—a “digitalfingerprint”—for any file. The hash value for each file is unique, for all practicalpurposes. Only a copy of a particular file will yield the same hash value. The difficultyof coming up with two messages having the same message digest is on the order of264 operations, and that the difficulty of coming up with any message having a givenmessage digest is on the order of 2128 operations By building a library of hash values,EnCase is used to check for the presence of data with a hash value contained in thehash library. The hash value is determined by the file’s contents. It is independentof the file’s name, so the file’s hash value will be calculated by EnCase, and identifiedas matching a value in the hash library even if the file’s name has been changed.The hash feature can be used to identify files whose contents are known not to beof interest to the examiner, such as operating system files and common applicationprograms, as well as to identify files of interest, such as known Trojans, Root Kits,and unauthorized applications.Hash sets are collections of hash values (representing unique files) that belong tothe same group. For example, a hash set of all Windows 98 operating system filescould be created and named “Windows System Files.” When a hash analysis is runon an evidence file, EnCase will identify all files included in that hash set. Those(logical) files can then be excluded from searches and examinations, speeding upkeyword searches and other analysis functions.
Creating a Hash Set
Hash Sets can be created with any category name, although most filters in EnCaseare designed for use with either “Known” or “Notable” category names. Known files
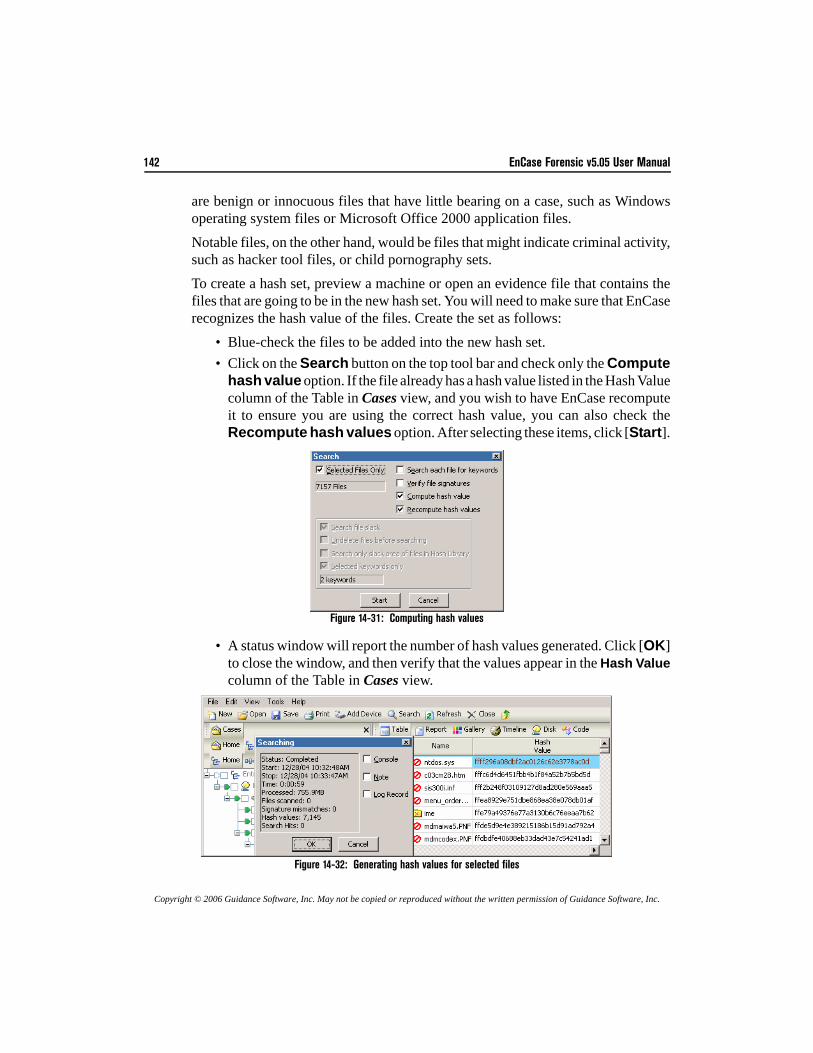
142 EnCase Forensic v5.05 User Manual
Copyright © 2006 Guidance Software, Inc. May not be copied or reproduced without the written permission of Guidance Software, Inc.
are benign or innocuous files that have little bearing on a case, such as Windowsoperating system files or Microsoft Office 2000 application files.Notable files, on the other hand, would be files that might indicate criminal activity,such as hacker tool files, or child pornography sets. To create a hash set, preview a machine or open an evidence file that contains thefiles that are going to be in the new hash set. You will need to make sure that EnCaserecognizes the hash value of the files. Create the set as follows:
• Blue-check the files to be added into the new hash set.• Click on the Search button on the top tool bar and check only the Compute
hash value option. If the file already has a hash value listed in the Hash Valuecolumn of the Table in Cases view, and you wish to have EnCase recomputeit to ensure you are using the correct hash value, you can also check theRecompute hash values option. After selecting these items, click [Start].
Figure 14-31: Computing hash values
• A status window will report the number of hash values generated. Click [OK]to close the window, and then verify that the values appear in the Hash Valuecolumn of the Table in Cases view.
Figure 14-32: Generating hash values for selected files
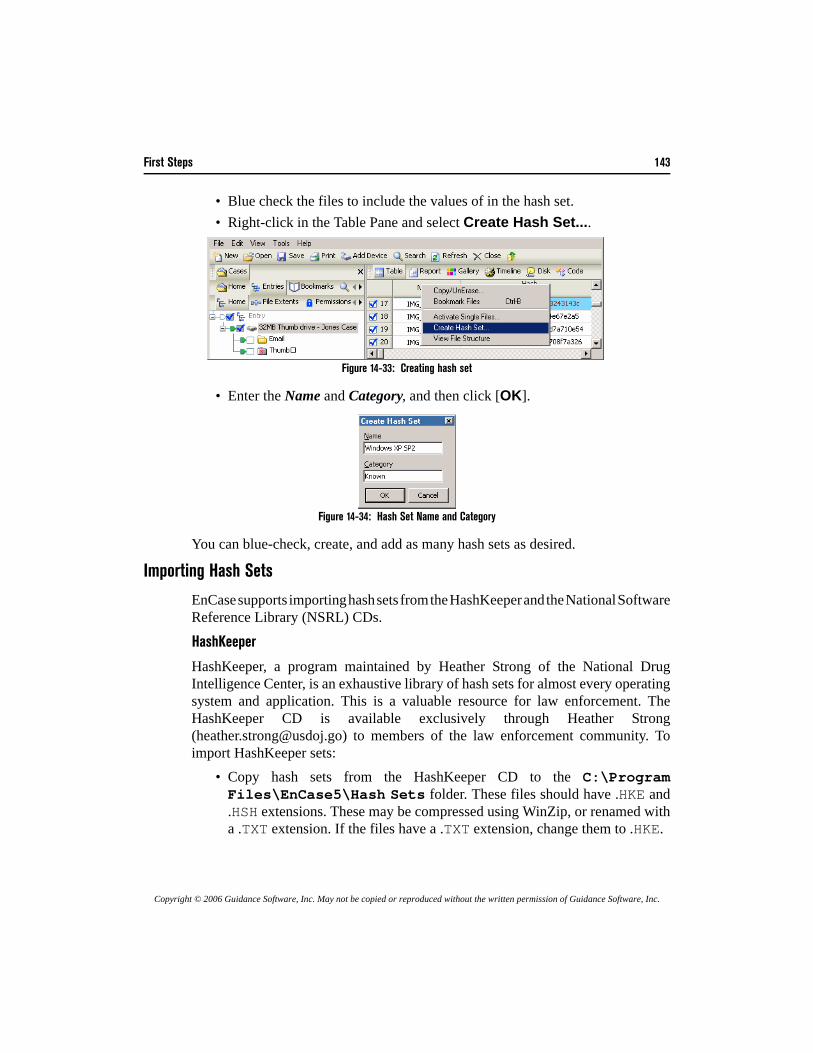
First Steps 143
Copyright © 2006 Guidance Software, Inc. May not be copied or reproduced without the written permission of Guidance Software, Inc.
• Blue check the files to include the values of in the hash set.• Right-click in the Table Pane and select Create Hash Set....
Figure 14-33: Creating hash set
• Enter the Name and Category, and then click [OK].
Figure 14-34: Hash Set Name and Category
You can blue-check, create, and add as many hash sets as desired.
Importing Hash Sets
EnCase supports importing hash sets from the HashKeeper and the National SoftwareReference Library (NSRL) CDs.
HashKeeper
HashKeeper, a program maintained by Heather Strong of the National DrugIntelligence Center, is an exhaustive library of hash sets for almost every operatingsystem and application. This is a valuable resource for law enforcement. TheHashKeeper CD is available exclusively through Heather Strong([email protected]) to members of the law enforcement community. Toimport HashKeeper sets:
• Copy hash sets from the HashKeeper CD to the C:\ProgramFiles\EnCase5\Hash Sets folder. These files should have .HKE and.HSH extensions. These may be compressed using WinZip, or renamed witha .TXT extension. If the files have a .TXT extension, change them to .HKE.
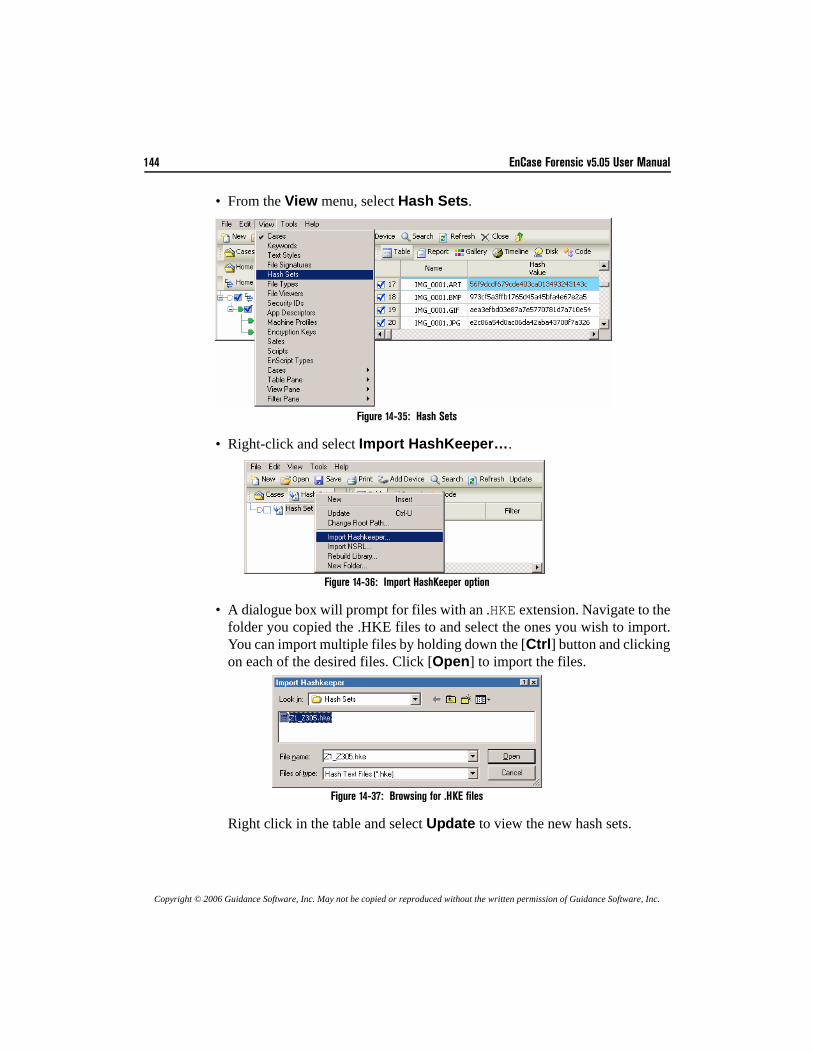
144 EnCase Forensic v5.05 User Manual
Copyright © 2006 Guidance Software, Inc. May not be copied or reproduced without the written permission of Guidance Software, Inc.
• From the View menu, select Hash Sets.
Figure 14-35: Hash Sets
• Right-click and select Import HashKeeper….
Figure 14-36: Import HashKeeper option
• A dialogue box will prompt for files with an .HKE extension. Navigate to thefolder you copied the .HKE files to and select the ones you wish to import.You can import multiple files by holding down the [Ctrl] button and clickingon each of the desired files. Click [Open] to import the files.
Figure 14-37: Browsing for .HKE files
Right click in the table and select Update to view the new hash sets.
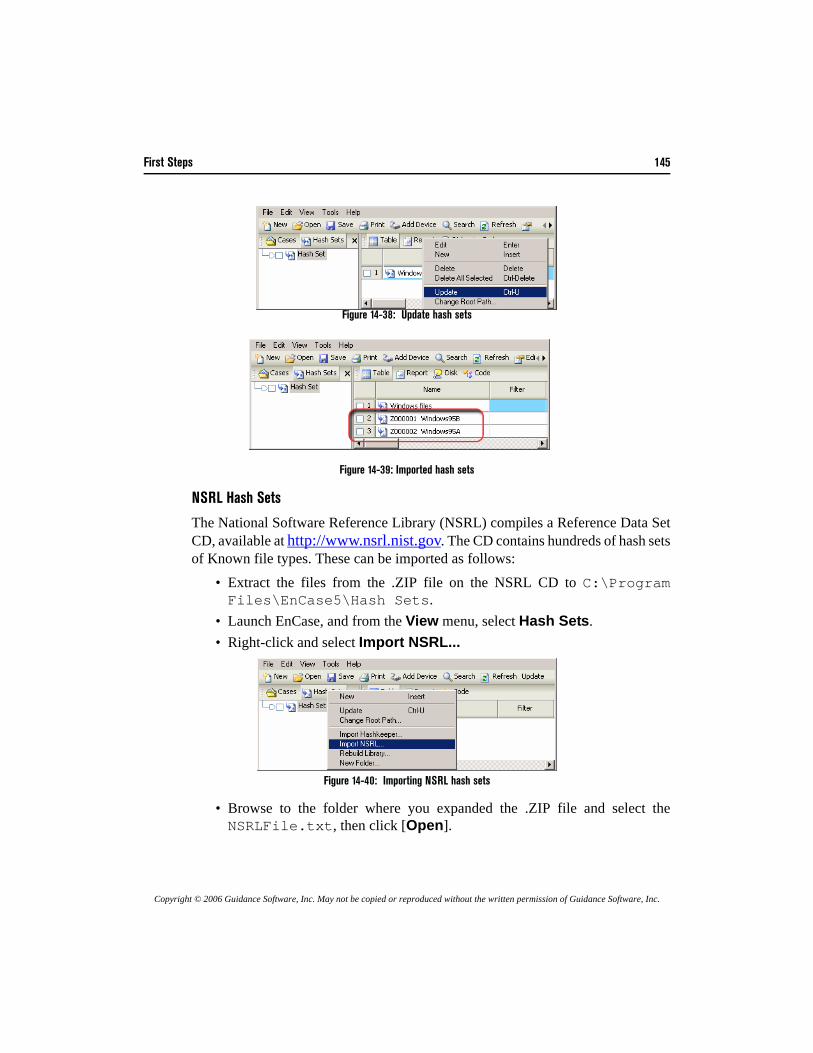
First Steps 145
Copyright © 2006 Guidance Software, Inc. May not be copied or reproduced without the written permission of Guidance Software, Inc.
Figure 14-38: Update hash sets
Figure 14-39: Imported hash sets
NSRL Hash Sets
The National Software Reference Library (NSRL) compiles a Reference Data SetCD, available at http://www.nsrl.nist.gov. The CD contains hundreds of hash setsof Known file types. These can be imported as follows:
• Extract the files from the .ZIP file on the NSRL CD to C:\ProgramFiles\EnCase5\Hash Sets.
• Launch EnCase, and from the View menu, select Hash Sets.• Right-click and select Import NSRL...
Figure 14-40: Importing NSRL hash sets
• Browse to the folder where you expanded the .ZIP file and select theNSRLFile.txt, then click [Open].
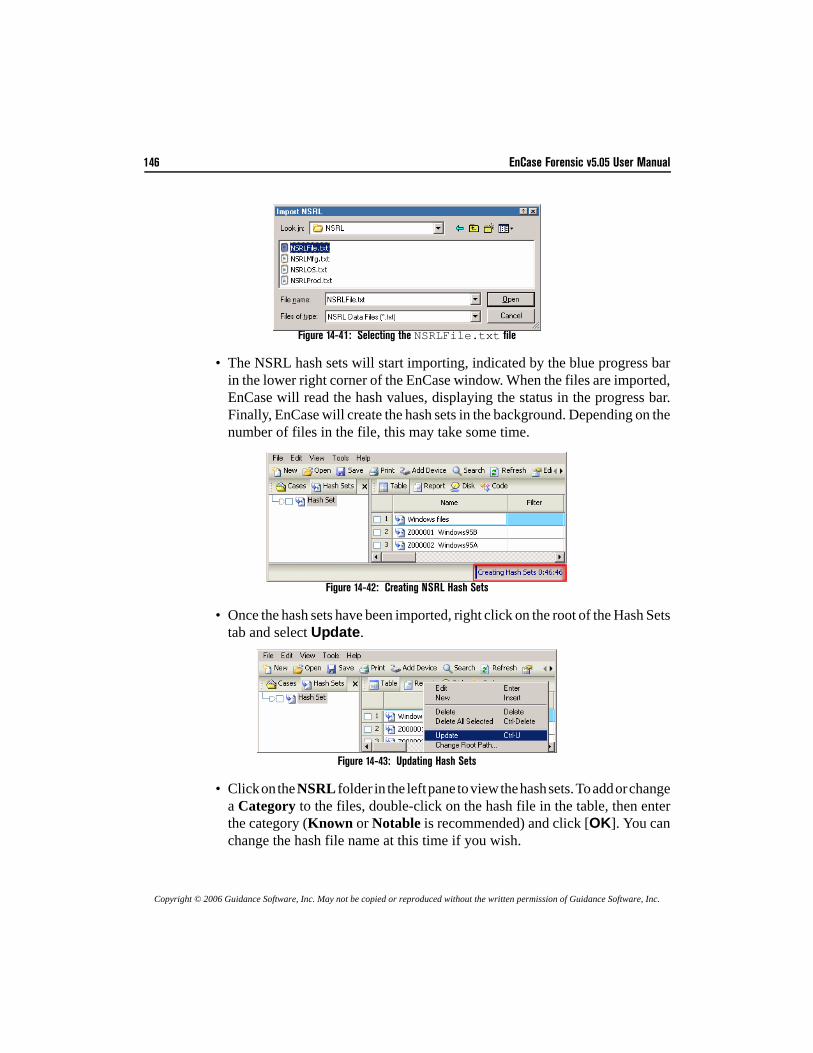
146 EnCase Forensic v5.05 User Manual
Copyright © 2006 Guidance Software, Inc. May not be copied or reproduced without the written permission of Guidance Software, Inc.
Figure 14-41: Selecting the NSRLFile.txt file
• The NSRL hash sets will start importing, indicated by the blue progress barin the lower right corner of the EnCase window. When the files are imported,EnCase will read the hash values, displaying the status in the progress bar.Finally, EnCase will create the hash sets in the background. Depending on thenumber of files in the file, this may take some time.
Figure 14-42: Creating NSRL Hash Sets
• Once the hash sets have been imported, right click on the root of the Hash Setstab and select Update.
Figure 14-43: Updating Hash Sets
• Click on the NSRL folder in the left pane to view the hash sets. To add or changea Category to the files, double-click on the hash file in the table, then enterthe category (Known or Notable is recommended) and click [OK]. You canchange the hash file name at this time if you wish.
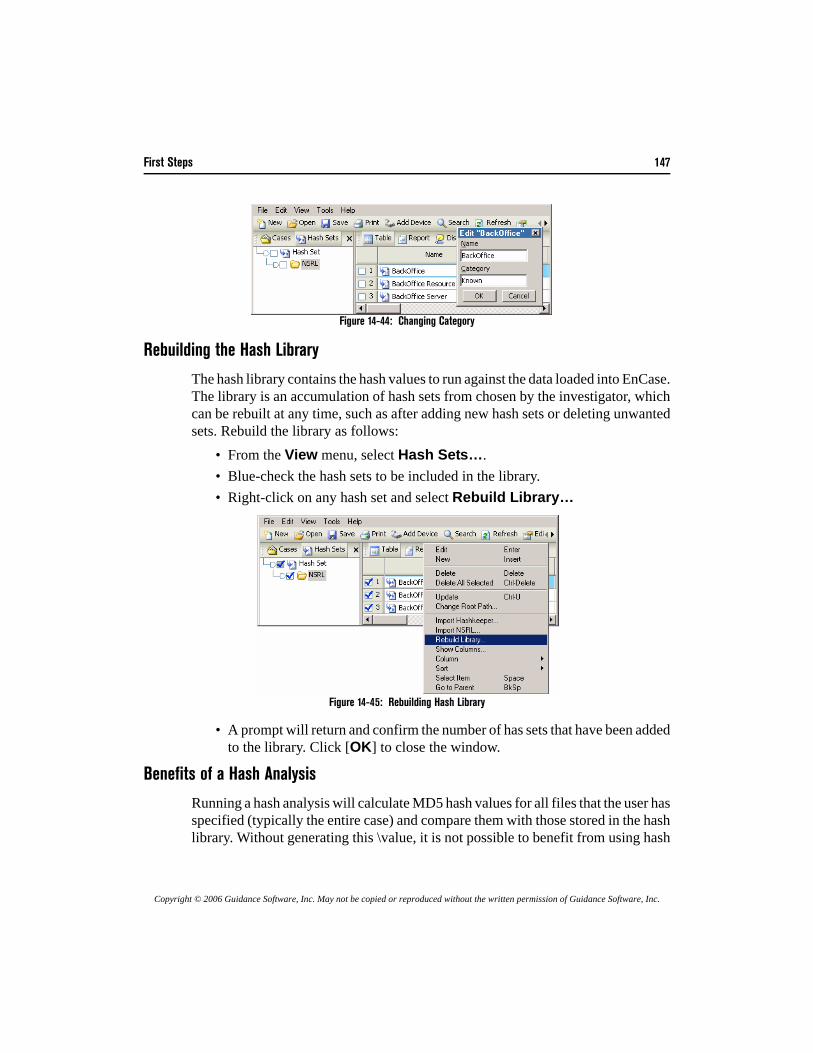
First Steps 147
Copyright © 2006 Guidance Software, Inc. May not be copied or reproduced without the written permission of Guidance Software, Inc.
Figure 14-44: Changing Category
Rebuilding the Hash Library
The hash library contains the hash values to run against the data loaded into EnCase.The library is an accumulation of hash sets from chosen by the investigator, whichcan be rebuilt at any time, such as after adding new hash sets or deleting unwantedsets. Rebuild the library as follows:
• From the View menu, select Hash Sets…. • Blue-check the hash sets to be included in the library. • Right-click on any hash set and select Rebuild Library…
Figure 14-45: Rebuilding Hash Library
• A prompt will return and confirm the number of has sets that have been addedto the library. Click [OK] to close the window.
Benefits of a Hash Analysis
Running a hash analysis will calculate MD5 hash values for all files that the user hasspecified (typically the entire case) and compare them with those stored in the hashlibrary. Without generating this \value, it is not possible to benefit from using hash
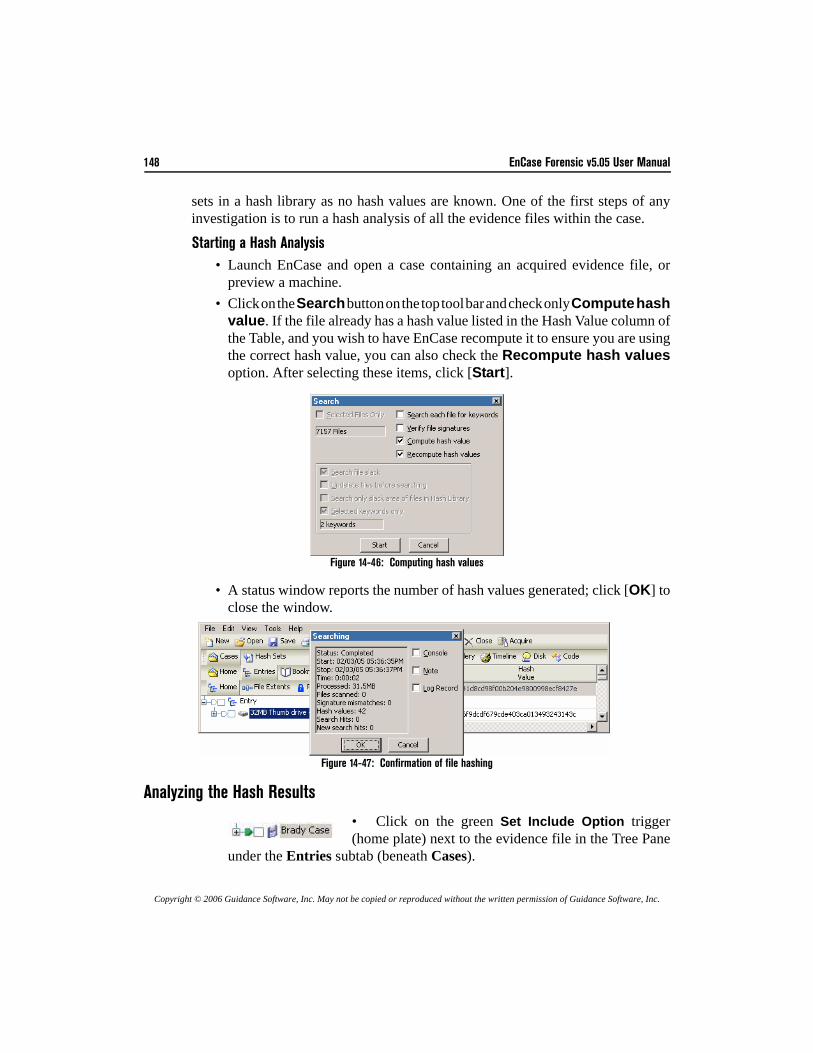
148 EnCase Forensic v5.05 User Manual
Copyright © 2006 Guidance Software, Inc. May not be copied or reproduced without the written permission of Guidance Software, Inc.
sets in a hash library as no hash values are known. One of the first steps of anyinvestigation is to run a hash analysis of all the evidence files within the case.
Starting a Hash Analysis• Launch EnCase and open a case containing an acquired evidence file, or
preview a machine.• Click on the Search button on the top tool bar and check only Compute hash
value. If the file already has a hash value listed in the Hash Value column ofthe Table, and you wish to have EnCase recompute it to ensure you are usingthe correct hash value, you can also check the Recompute hash valuesoption. After selecting these items, click [Start].
Figure 14-46: Computing hash values
• A status window reports the number of hash values generated; click [OK] toclose the window.
Figure 14-47: Confirmation of file hashing
Analyzing the Hash Results
• Click on the green Set Include Option trigger(home plate) next to the evidence file in the Tree Pane
under the Entries subtab (beneath Cases).
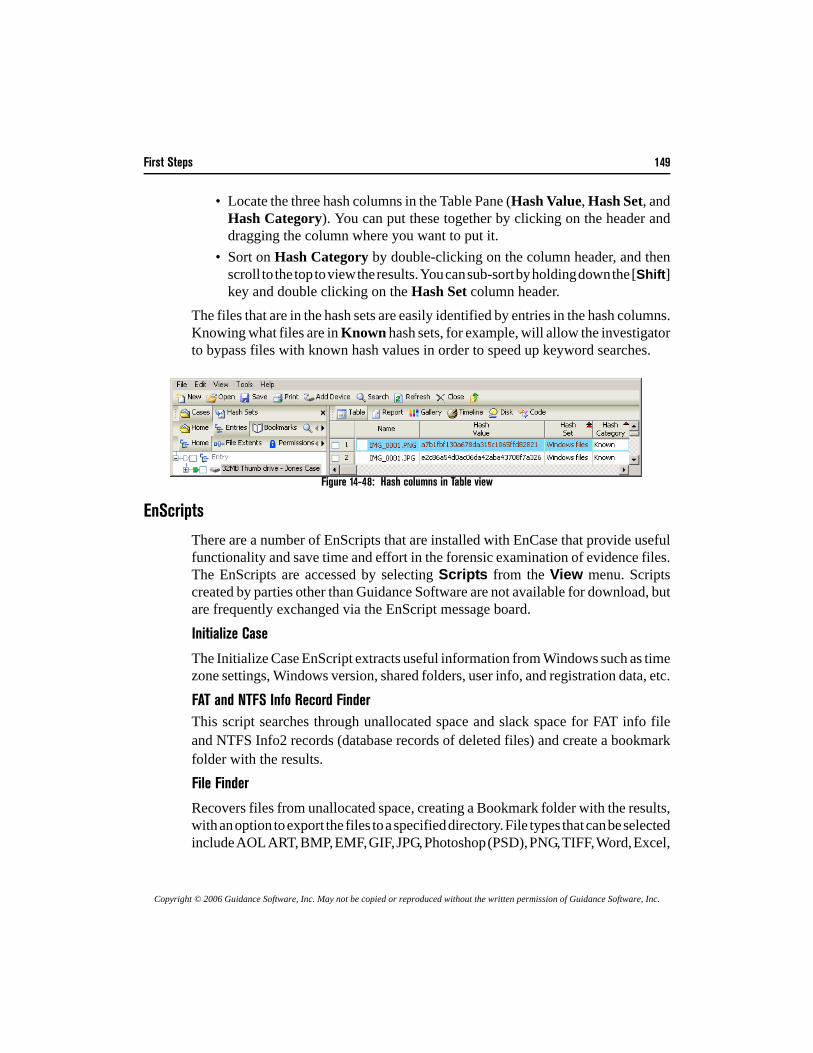
First Steps 149
Copyright © 2006 Guidance Software, Inc. May not be copied or reproduced without the written permission of Guidance Software, Inc.
• Locate the three hash columns in the Table Pane (Hash Value, Hash Set, andHash Category). You can put these together by clicking on the header anddragging the column where you want to put it.
• Sort on Hash Category by double-clicking on the column header, and thenscroll to the top to view the results. You can sub-sort by holding down the [Shift]key and double clicking on the Hash Set column header.
The files that are in the hash sets are easily identified by entries in the hash columns.Knowing what files are in Known hash sets, for example, will allow the investigatorto bypass files with known hash values in order to speed up keyword searches.
Figure 14-48: Hash columns in Table view
EnScripts
There are a number of EnScripts that are installed with EnCase that provide usefulfunctionality and save time and effort in the forensic examination of evidence files.The EnScripts are accessed by selecting Scripts from the View menu. Scriptscreated by parties other than Guidance Software are not available for download, butare frequently exchanged via the EnScript message board.
Initialize Case
The Initialize Case EnScript extracts useful information from Windows such as timezone settings, Windows version, shared folders, user info, and registration data, etc.
FAT and NTFS Info Record FinderThis script searches through unallocated space and slack space for FAT info fileand NTFS Info2 records (database records of deleted files) and create a bookmarkfolder with the results.
File Finder
Recovers files from unallocated space, creating a Bookmark folder with the results,with an option to export the files to a specified directory. File types that can be selectedinclude AOL ART, BMP, EMF, GIF, JPG, Photoshop (PSD), PNG, TIFF, Word, Excel,
150 EnCase Forensic v5.05 User Manual
Copyright © 2006 Guidance Software, Inc. May not be copied or reproduced without the written permission of Guidance Software, Inc.
Zip and GZip, with the ability to create a custom file type to search for based on header,footer and/or extension.
Link File Parser
The link file parser EnScript will extract information contained within Windows.LNK (shortcut) files. This information may include flags and attributes specific tothe link file; the link type; creation, modification and last accessed dates; volumelabel; drive type; drive serial number; file length; icon file; link description; file linkpath; base path; application path; working directory; network share name, andcommand line.
Find Unique EMail Address List
This script searches through selected files for a “basic” e-mail signature. The “hit”is then confirmed using a built-in EnScript function. If the hit passes the confirmationtest, it is added to an e-mail list, so that if the same address is found again later inthe evidence file, it will not be added again to the list.
Copyright © 2006 Guidance Software, Inc. May not be copied or reproduced without the written permission of Guidance Software, Inc.
Navigating EnCase
This chapter describes how to create a new case, add evidence files and verify themusing EnCase Version 5 and details the different tabs and views.
Creating a New CaseLaunch EnCase by double-clicking on the desktop icon, or launching the applicationfrom the Program menu on the [Start] button.
Figure 15-1: EnCase Version 5 desktop icon
The interface for EnCase Version 5 has changed significantly from Version 4. Please read this chapterthoroughly, especially the section which explains the different “views” of EnCase.
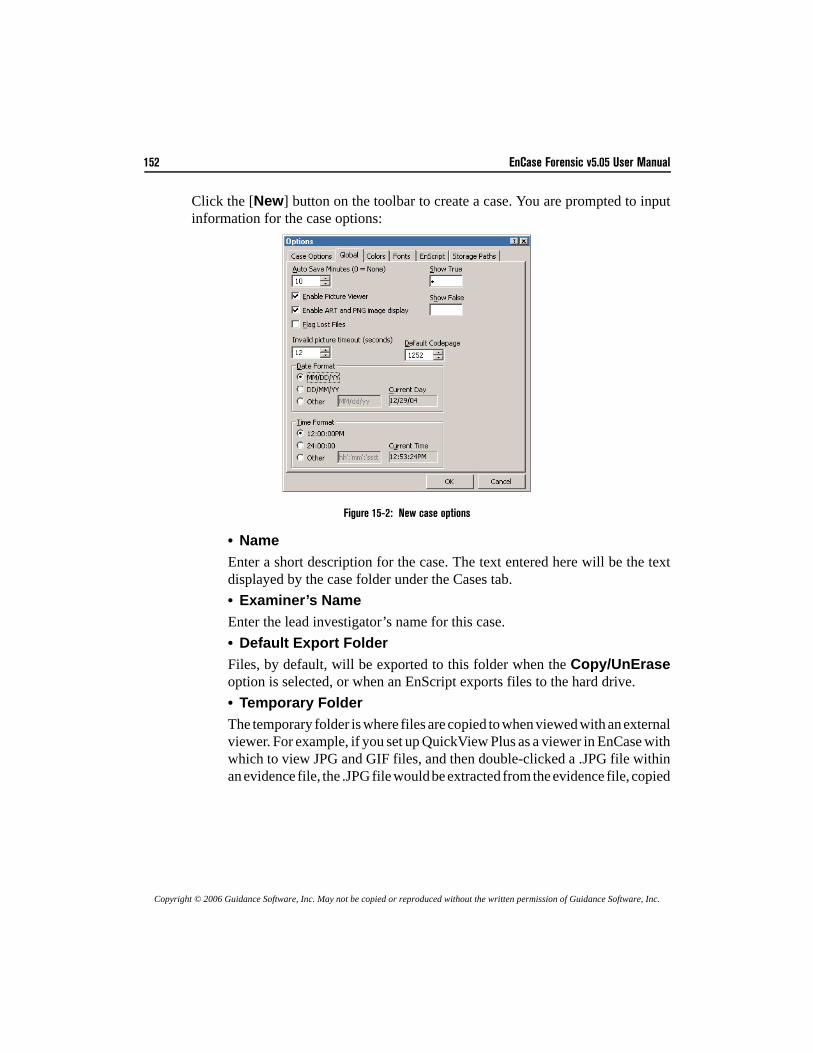
152 EnCase Forensic v5.05 User Manual
Copyright © 2006 Guidance Software, Inc. May not be copied or reproduced without the written permission of Guidance Software, Inc.
Click the [New] button on the toolbar to create a case. You are prompted to inputinformation for the case options:
Figure 15-2: New case options
• NameEnter a short description for the case. The text entered here will be the textdisplayed by the case folder under the Cases tab.• Examiner’s NameEnter the lead investigator’s name for this case.• Default Export FolderFiles, by default, will be exported to this folder when the Copy/UnEraseoption is selected, or when an EnScript exports files to the hard drive.• Temporary FolderThe temporary folder is where files are copied to when viewed with an externalviewer. For example, if you set up QuickView Plus as a viewer in EnCase withwhich to view JPG and GIF files, and then double-clicked a .JPG file withinan evidence file, the .JPG file would be extracted from the evidence file, copied
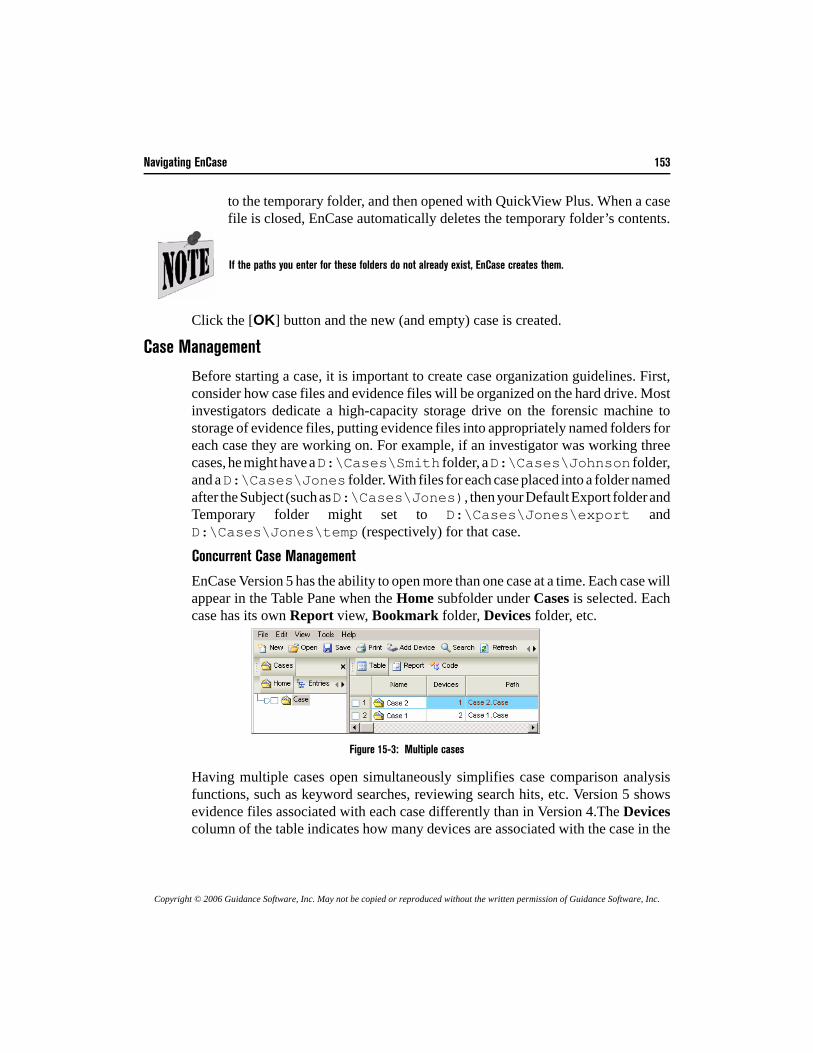
Navigating EnCase 153
Copyright © 2006 Guidance Software, Inc. May not be copied or reproduced without the written permission of Guidance Software, Inc.
to the temporary folder, and then opened with QuickView Plus. When a casefile is closed, EnCase automatically deletes the temporary folder’s contents.
Click the [OK] button and the new (and empty) case is created.
Case Management
Before starting a case, it is important to create case organization guidelines. First,consider how case files and evidence files will be organized on the hard drive. Mostinvestigators dedicate a high-capacity storage drive on the forensic machine tostorage of evidence files, putting evidence files into appropriately named folders foreach case they are working on. For example, if an investigator was working threecases, he might have a D:\Cases\Smith folder, a D:\Cases\Johnson folder,and a D:\Cases\Jones folder. With files for each case placed into a folder namedafter the Subject (such as D:\Cases\Jones), then your Default Export folder andTemporary folder might set to D:\Cases\Jones\export andD:\Cases\Jones\temp (respectively) for that case.
Concurrent Case Management
EnCase Version 5 has the ability to open more than one case at a time. Each case willappear in the Table Pane when the Home subfolder under Cases is selected. Eachcase has its own Report view, Bookmark folder, Devices folder, etc.
Figure 15-3: Multiple cases
Having multiple cases open simultaneously simplifies case comparison analysisfunctions, such as keyword searches, reviewing search hits, etc. Version 5 showsevidence files associated with each case differently than in Version 4.The Devicescolumn of the table indicates how many devices are associated with the case in the
If the paths you enter for these folders do not already exist, EnCase creates them.
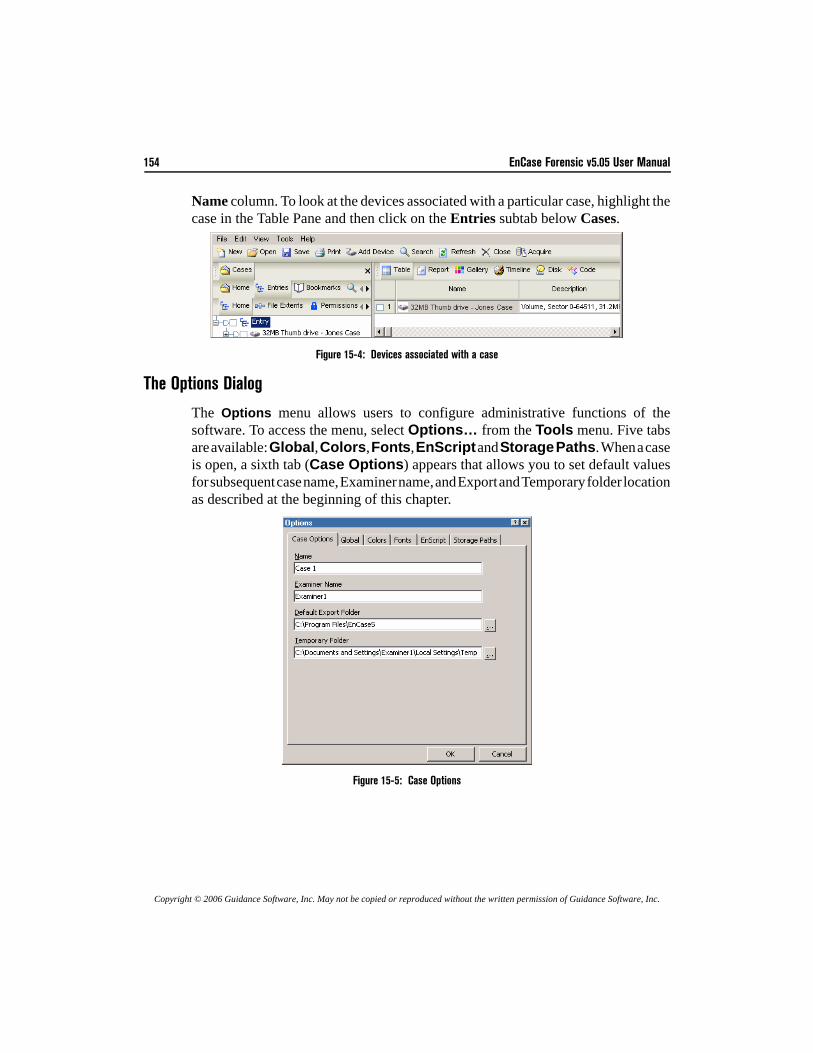
154 EnCase Forensic v5.05 User Manual
Copyright © 2006 Guidance Software, Inc. May not be copied or reproduced without the written permission of Guidance Software, Inc.
Name column. To look at the devices associated with a particular case, highlight thecase in the Table Pane and then click on the Entries subtab below Cases.
Figure 15-4: Devices associated with a case
The Options Dialog
The Options menu allows users to configure administrative functions of thesoftware. To access the menu, select Options… from the Tools menu. Five tabsare available: Global, Colors, Fonts, EnScript and Storage Paths. When a caseis open, a sixth tab (Case Options) appears that allows you to set default valuesfor subsequent case name, Examiner name, and Export and Temporary folder locationas described at the beginning of this chapter.
Figure 15-5: Case Options
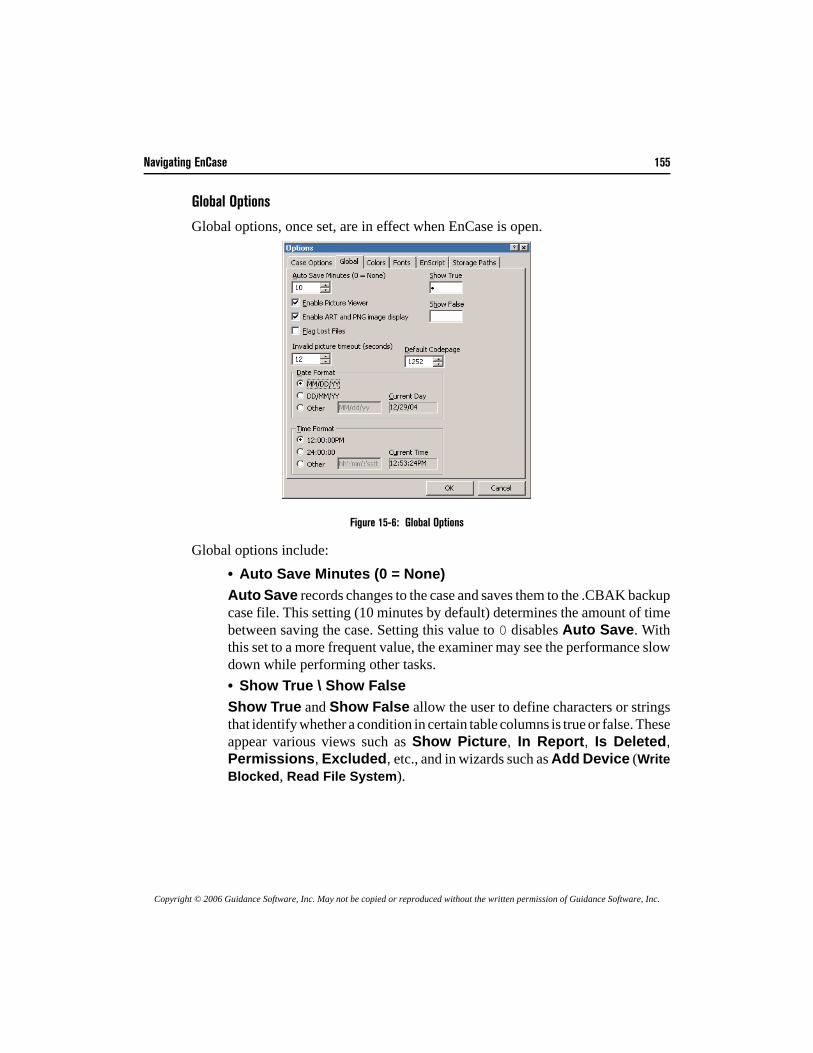
Navigating EnCase 155
Copyright © 2006 Guidance Software, Inc. May not be copied or reproduced without the written permission of Guidance Software, Inc.
Global Options
Global options, once set, are in effect when EnCase is open.
Figure 15-6: Global Options
Global options include:• Auto Save Minutes (0 = None)Auto Save records changes to the case and saves them to the .CBAK backupcase file. This setting (10 minutes by default) determines the amount of timebetween saving the case. Setting this value to 0 disables Auto Save. Withthis set to a more frequent value, the examiner may see the performance slowdown while performing other tasks.• Show True \ Show FalseShow True and Show False allow the user to define characters or stringsthat identify whether a condition in certain table columns is true or false. Theseappear various views such as Show Picture, In Report, Is Deleted,Permissions, Excluded, etc., and in wizards such as Add Device (WriteBlocked, Read File System).
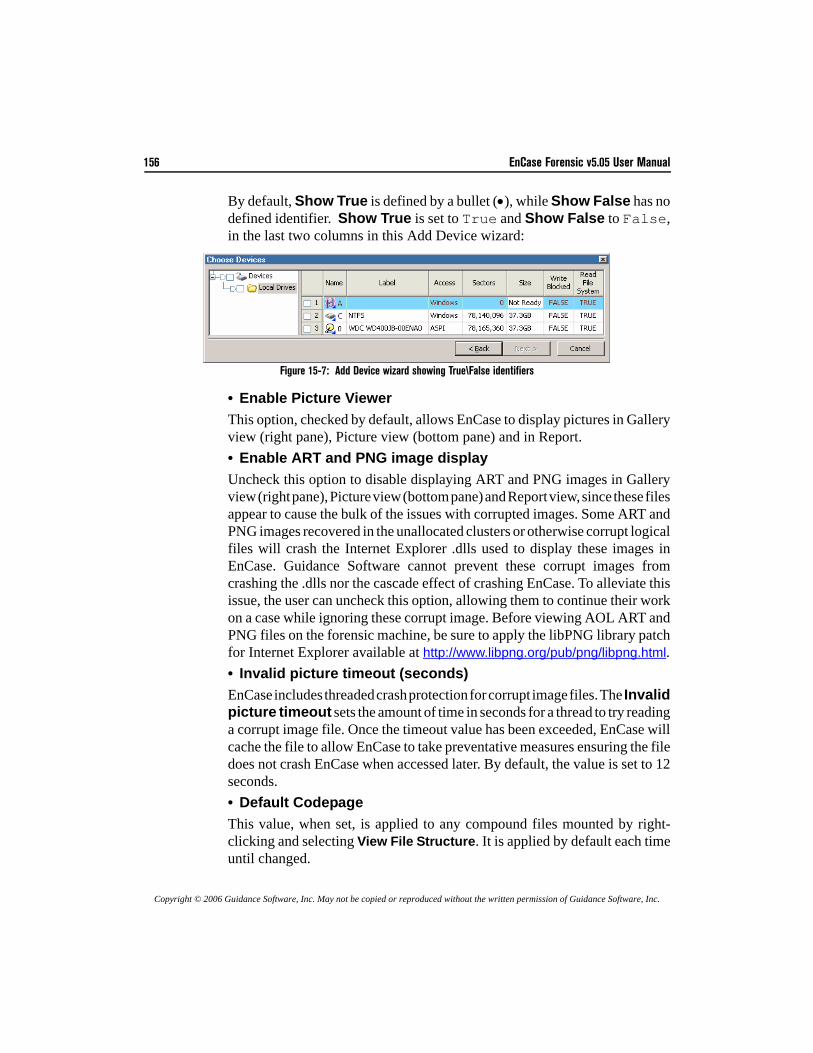
156 EnCase Forensic v5.05 User Manual
Copyright © 2006 Guidance Software, Inc. May not be copied or reproduced without the written permission of Guidance Software, Inc.
By default, Show True is defined by a bullet (•), while Show False has nodefined identifier. Show True is set to True and Show False to False,in the last two columns in this Add Device wizard:
Figure 15-7: Add Device wizard showing True\False identifiers
• Enable Picture ViewerThis option, checked by default, allows EnCase to display pictures in Galleryview (right pane), Picture view (bottom pane) and in Report. • Enable ART and PNG image displayUncheck this option to disable displaying ART and PNG images in Galleryview (right pane), Picture view (bottom pane) and Report view, since these filesappear to cause the bulk of the issues with corrupted images. Some ART andPNG images recovered in the unallocated clusters or otherwise corrupt logicalfiles will crash the Internet Explorer .dlls used to display these images inEnCase. Guidance Software cannot prevent these corrupt images fromcrashing the .dlls nor the cascade effect of crashing EnCase. To alleviate thisissue, the user can uncheck this option, allowing them to continue their workon a case while ignoring these corrupt image. Before viewing AOL ART andPNG files on the forensic machine, be sure to apply the libPNG library patchfor Internet Explorer available at http://www.libpng.org/pub/png/libpng.html.• Invalid picture timeout (seconds)EnCase includes threaded crash protection for corrupt image files. The Invalidpicture timeout sets the amount of time in seconds for a thread to try readinga corrupt image file. Once the timeout value has been exceeded, EnCase willcache the file to allow EnCase to take preventative measures ensuring the filedoes not crash EnCase when accessed later. By default, the value is set to 12seconds.• Default CodepageThis value, when set, is applied to any compound files mounted by right-clicking and selecting View File Structure. It is applied by default each timeuntil changed.
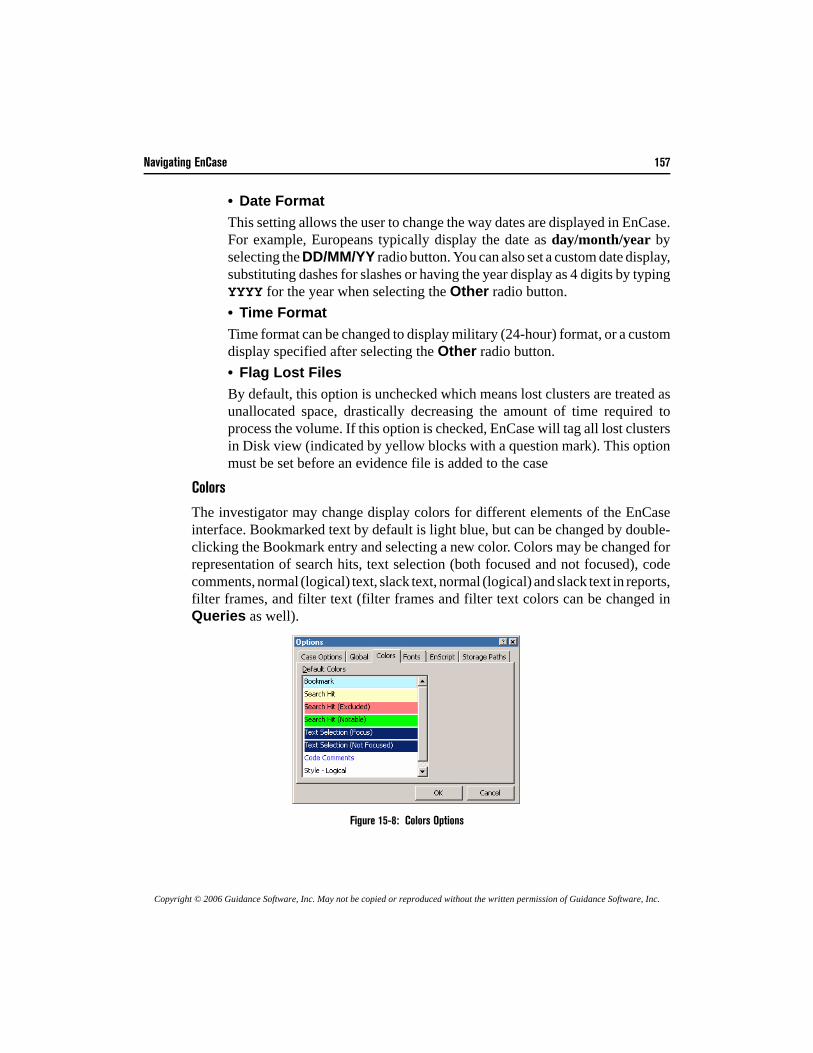
Navigating EnCase 157
Copyright © 2006 Guidance Software, Inc. May not be copied or reproduced without the written permission of Guidance Software, Inc.
• Date FormatThis setting allows the user to change the way dates are displayed in EnCase.For example, Europeans typically display the date as day/month/year byselecting the DD/MM/YY radio button. You can also set a custom date display,substituting dashes for slashes or having the year display as 4 digits by typingYYYY for the year when selecting the Other radio button.• Time FormatTime format can be changed to display military (24-hour) format, or a customdisplay specified after selecting the Other radio button.• Flag Lost FilesBy default, this option is unchecked which means lost clusters are treated asunallocated space, drastically decreasing the amount of time required toprocess the volume. If this option is checked, EnCase will tag all lost clustersin Disk view (indicated by yellow blocks with a question mark). This optionmust be set before an evidence file is added to the case
Colors
The investigator may change display colors for different elements of the EnCaseinterface. Bookmarked text by default is light blue, but can be changed by double-clicking the Bookmark entry and selecting a new color. Colors may be changed forrepresentation of search hits, text selection (both focused and not focused), codecomments, normal (logical) text, slack text, normal (logical) and slack text in reports,filter frames, and filter text (filter frames and filter text colors can be changed inQueries as well).
Figure 15-8: Colors Options
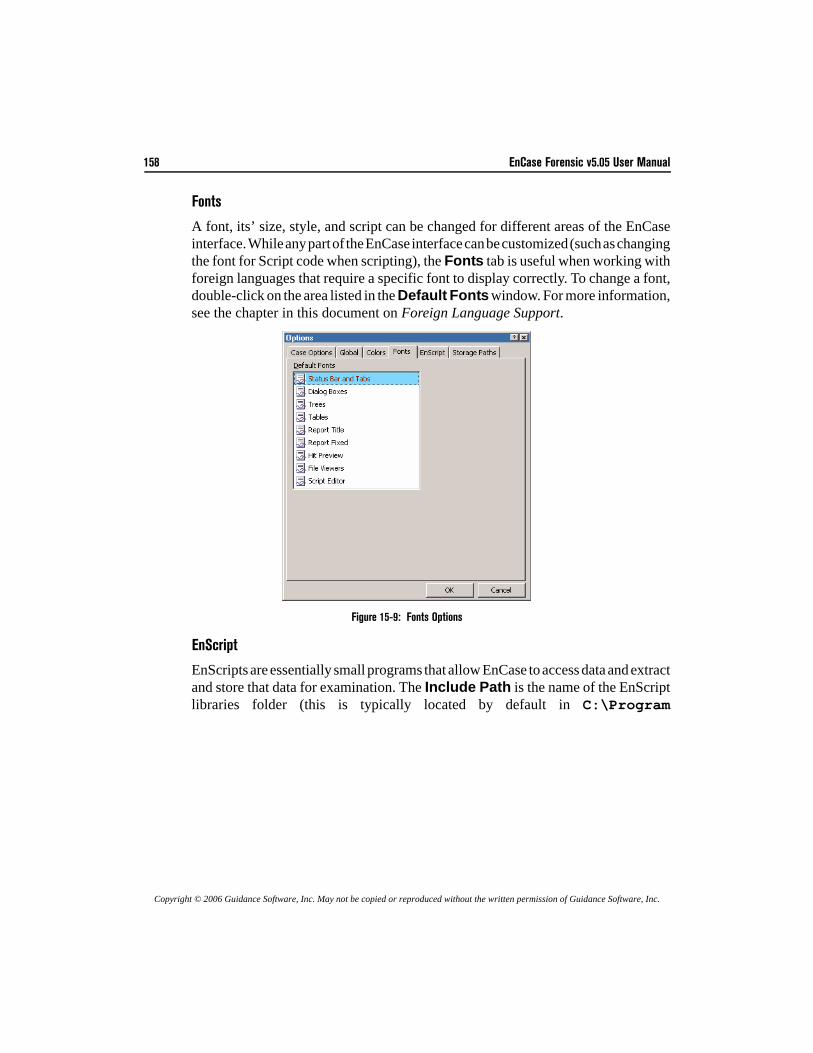
158 EnCase Forensic v5.05 User Manual
Copyright © 2006 Guidance Software, Inc. May not be copied or reproduced without the written permission of Guidance Software, Inc.
Fonts
A font, its’ size, style, and script can be changed for different areas of the EnCaseinterface. While any part of the EnCase interface can be customized (such as changingthe font for Script code when scripting), the Fonts tab is useful when working withforeign languages that require a specific font to display correctly. To change a font,double-click on the area listed in the Default Fonts window. For more information,see the chapter in this document on Foreign Language Support.
Figure 15-9: Fonts Options
EnScript
EnScripts are essentially small programs that allow EnCase to access data and extractand store that data for examination. The Include Path is the name of the EnScriptlibraries folder (this is typically located by default in C:\Program
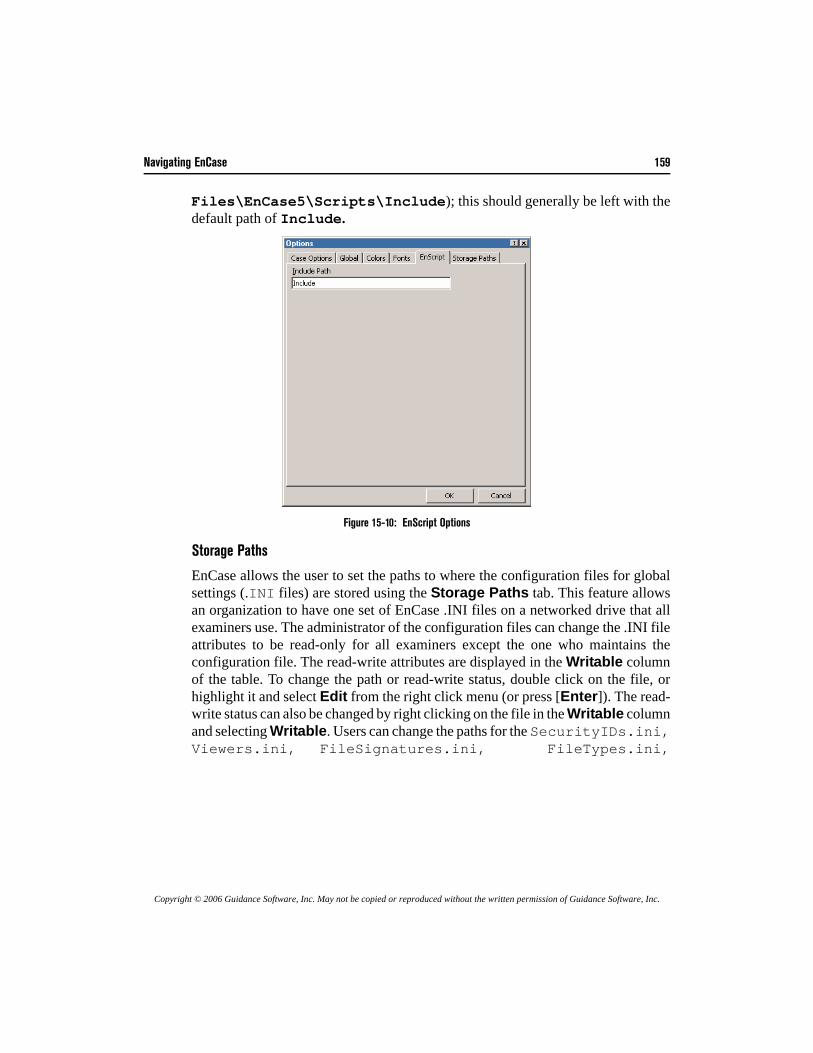
Navigating EnCase 159
Copyright © 2006 Guidance Software, Inc. May not be copied or reproduced without the written permission of Guidance Software, Inc.
Files\EnCase5\Scripts\Include); this should generally be left with thedefault path of Include.
Figure 15-10: EnScript Options
Storage Paths
EnCase allows the user to set the paths to where the configuration files for globalsettings (.INI files) are stored using the Storage Paths tab. This feature allowsan organization to have one set of EnCase .INI files on a networked drive that allexaminers use. The administrator of the configuration files can change the .INI fileattributes to be read-only for all examiners except the one who maintains theconfiguration file. The read-write attributes are displayed in the Writable columnof the table. To change the path or read-write status, double click on the file, orhighlight it and select Edit from the right click menu (or press [Enter]). The read-write status can also be changed by right clicking on the file in the Writable columnand selecting Writable. Users can change the paths for the SecurityIDs.ini,Viewers.ini, FileSignatures.ini, FileTypes.ini,
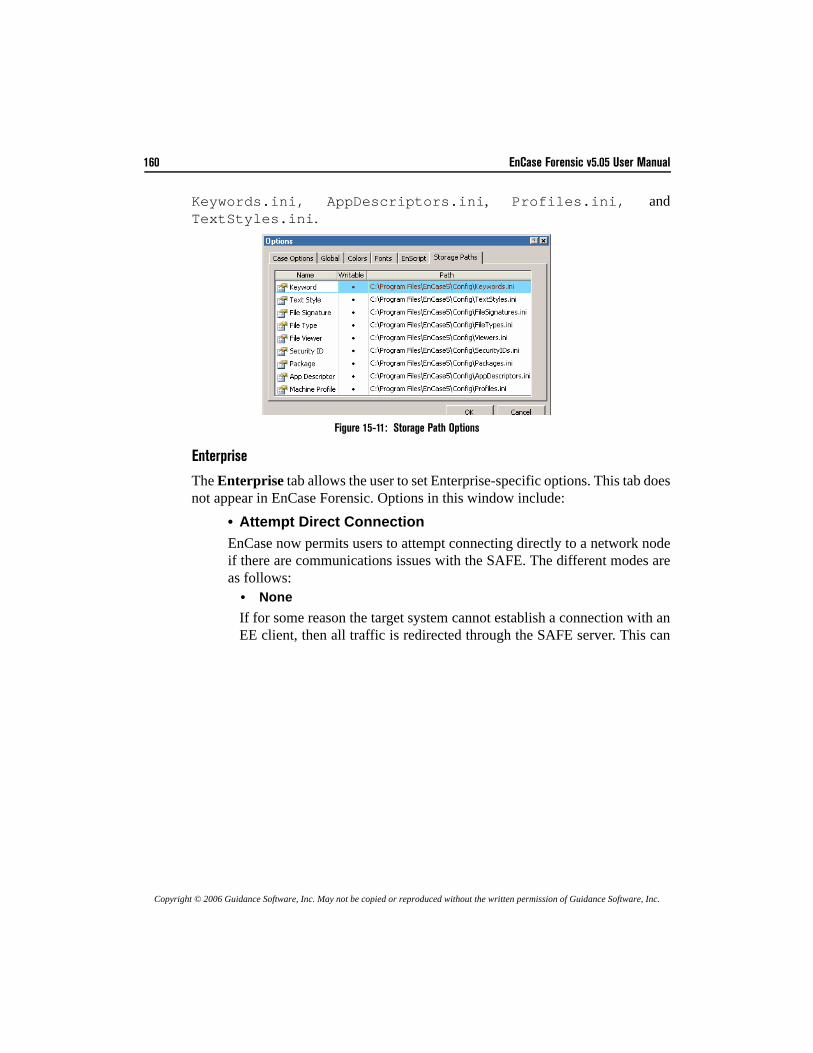
160 EnCase Forensic v5.05 User Manual
Copyright © 2006 Guidance Software, Inc. May not be copied or reproduced without the written permission of Guidance Software, Inc.
Keywords.ini, AppDescriptors.ini, Profiles.ini, andTextStyles.ini.
Figure 15-11: Storage Path Options
Enterprise
The Enterprise tab allows the user to set Enterprise-specific options. This tab doesnot appear in EnCase Forensic. Options in this window include:
• Attempt Direct ConnectionEnCase now permits users to attempt connecting directly to a network nodeif there are communications issues with the SAFE. The different modes areas follows:
• NoneIf for some reason the target system cannot establish a connection with anEE client, then all traffic is redirected through the SAFE server. This can
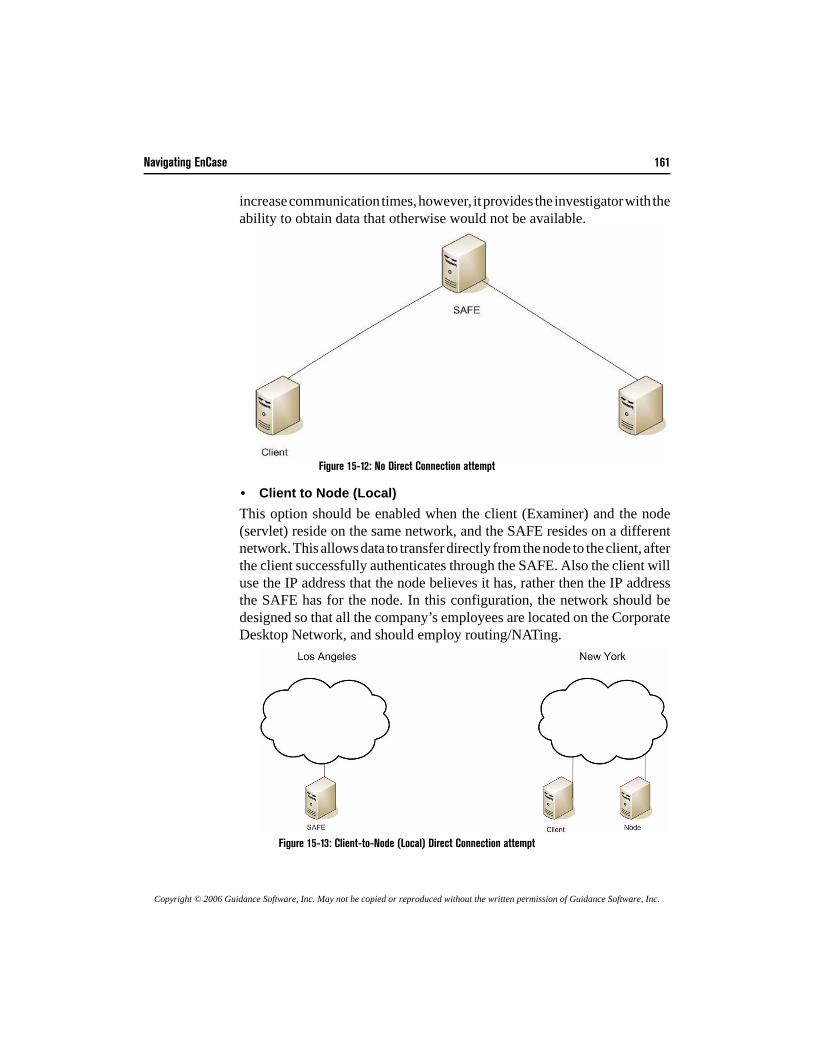
Navigating EnCase 161
Copyright © 2006 Guidance Software, Inc. May not be copied or reproduced without the written permission of Guidance Software, Inc.
increase communication times, however, it provides the investigator with theability to obtain data that otherwise would not be available.
Figure 15-12: No Direct Connection attempt
• Client to Node (Local)This option should be enabled when the client (Examiner) and the node(servlet) reside on the same network, and the SAFE resides on a differentnetwork. This allows data to transfer directly from the node to the client, afterthe client successfully authenticates through the SAFE. Also the client willuse the IP address that the node believes it has, rather then the IP addressthe SAFE has for the node. In this configuration, the network should bedesigned so that all the company’s employees are located on the CorporateDesktop Network, and should employ routing/NATing.
Figure 15-13: Client-to-Node (Local) Direct Connection attempt
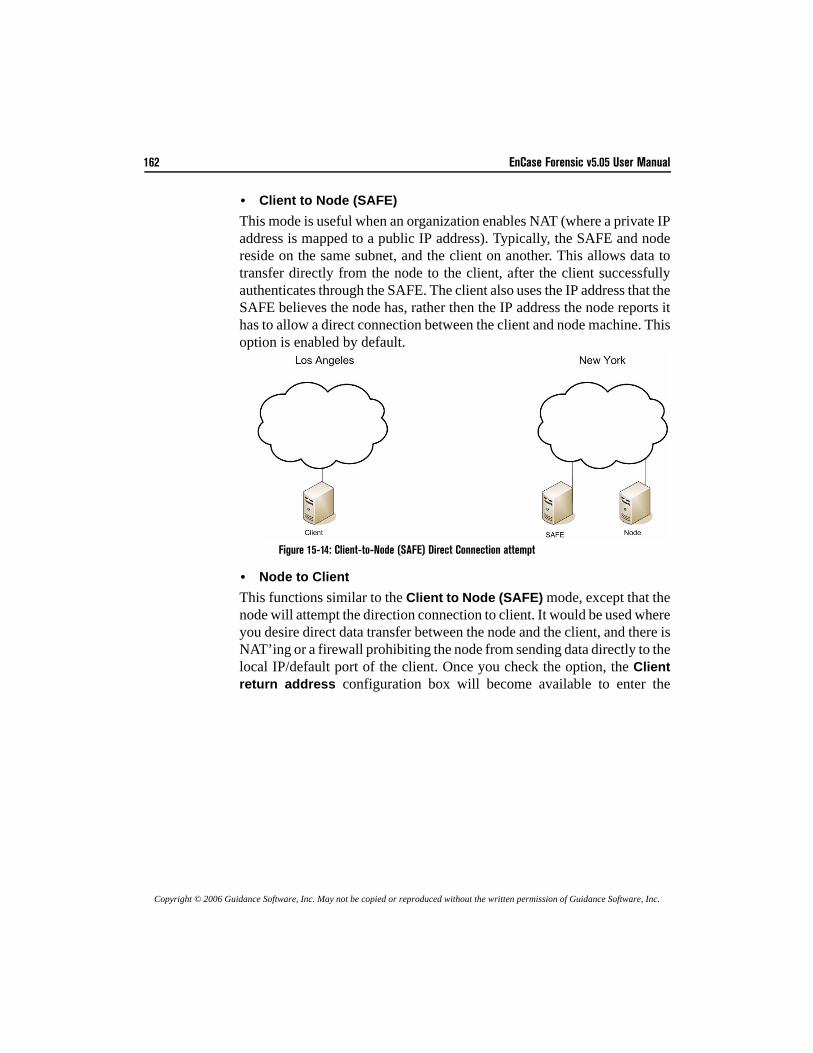
162 EnCase Forensic v5.05 User Manual
Copyright © 2006 Guidance Software, Inc. May not be copied or reproduced without the written permission of Guidance Software, Inc.
• Client to Node (SAFE)This mode is useful when an organization enables NAT (where a private IPaddress is mapped to a public IP address). Typically, the SAFE and nodereside on the same subnet, and the client on another. This allows data totransfer directly from the node to the client, after the client successfullyauthenticates through the SAFE. The client also uses the IP address that theSAFE believes the node has, rather then the IP address the node reports ithas to allow a direct connection between the client and node machine. Thisoption is enabled by default.
Figure 15-14: Client-to-Node (SAFE) Direct Connection attempt
• Node to ClientThis functions similar to the Client to Node (SAFE) mode, except that thenode will attempt the direction connection to client. It would be used whereyou desire direct data transfer between the node and the client, and there isNAT’ing or a firewall prohibiting the node from sending data directly to thelocal IP/default port of the client. Once you check the option, the Clientreturn address configuration box will become available to enter the
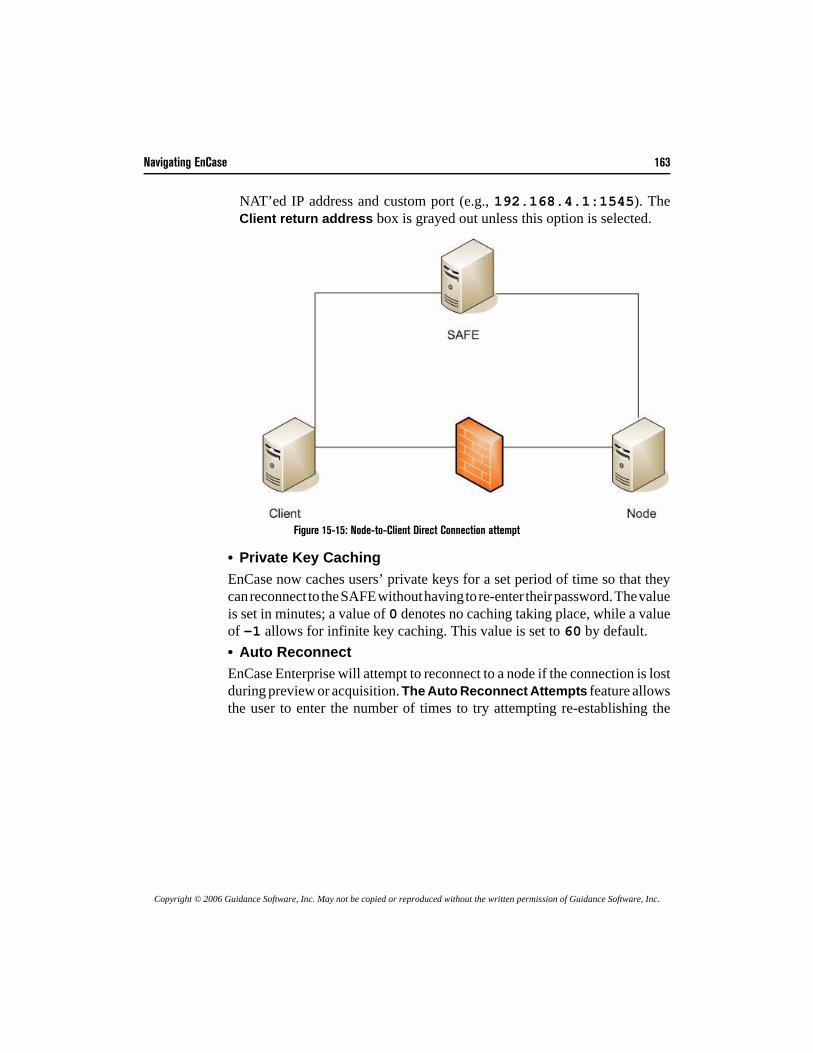
Navigating EnCase 163
Copyright © 2006 Guidance Software, Inc. May not be copied or reproduced without the written permission of Guidance Software, Inc.
NAT’ed IP address and custom port (e.g., 192.168.4.1:1545). TheClient return address box is grayed out unless this option is selected.
Figure 15-15: Node-to-Client Direct Connection attempt
• Private Key CachingEnCase now caches users’ private keys for a set period of time so that theycan reconnect to the SAFE without having to re-enter their password. The valueis set in minutes; a value of 0 denotes no caching taking place, while a valueof -1 allows for infinite key caching. This value is set to 60 by default.• Auto ReconnectEnCase Enterprise will attempt to reconnect to a node if the connection is lostduring preview or acquisition. The Auto Reconnect Attempts feature allowsthe user to enter the number of times to try attempting re-establishing the
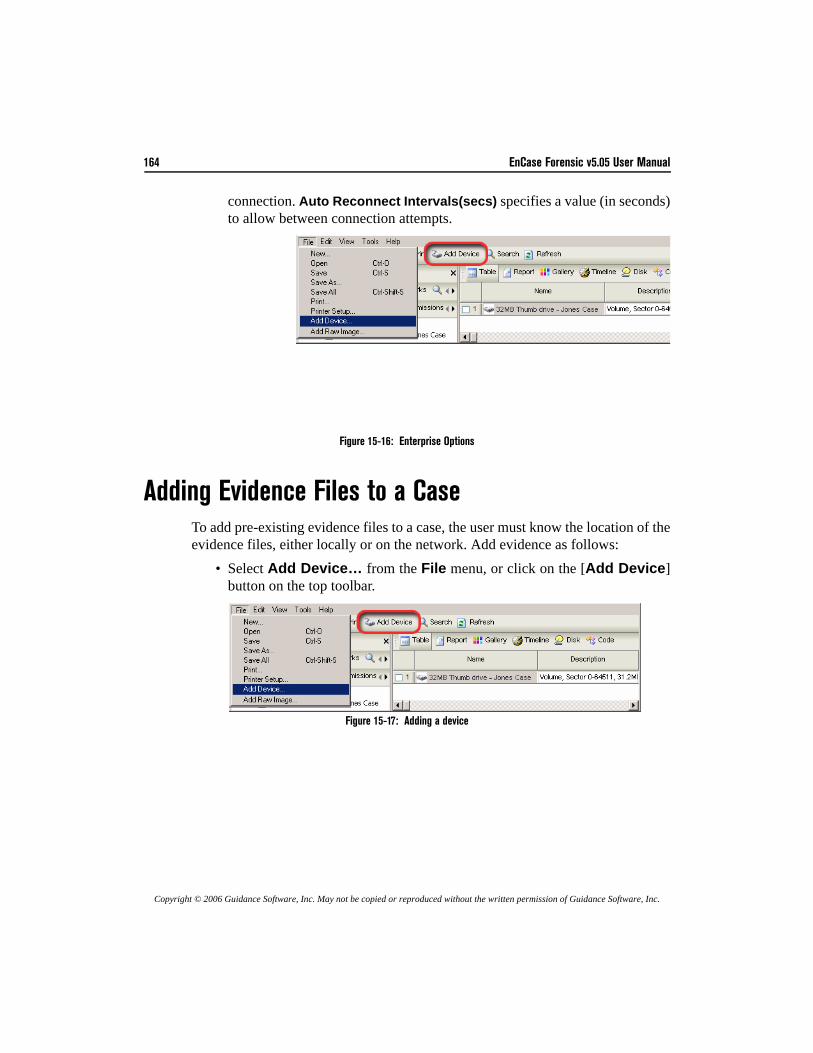
164 EnCase Forensic v5.05 User Manual
Copyright © 2006 Guidance Software, Inc. May not be copied or reproduced without the written permission of Guidance Software, Inc.
connection. Auto Reconnect Intervals(secs) specifies a value (in seconds)to allow between connection attempts.
Figure 15-16: Enterprise Options
Adding Evidence Files to a CaseTo add pre-existing evidence files to a case, the user must know the location of theevidence files, either locally or on the network. Add evidence as follows:
• Select Add Device… from the File menu, or click on the [Add Device]button on the top toolbar.
Figure 15-17: Adding a device
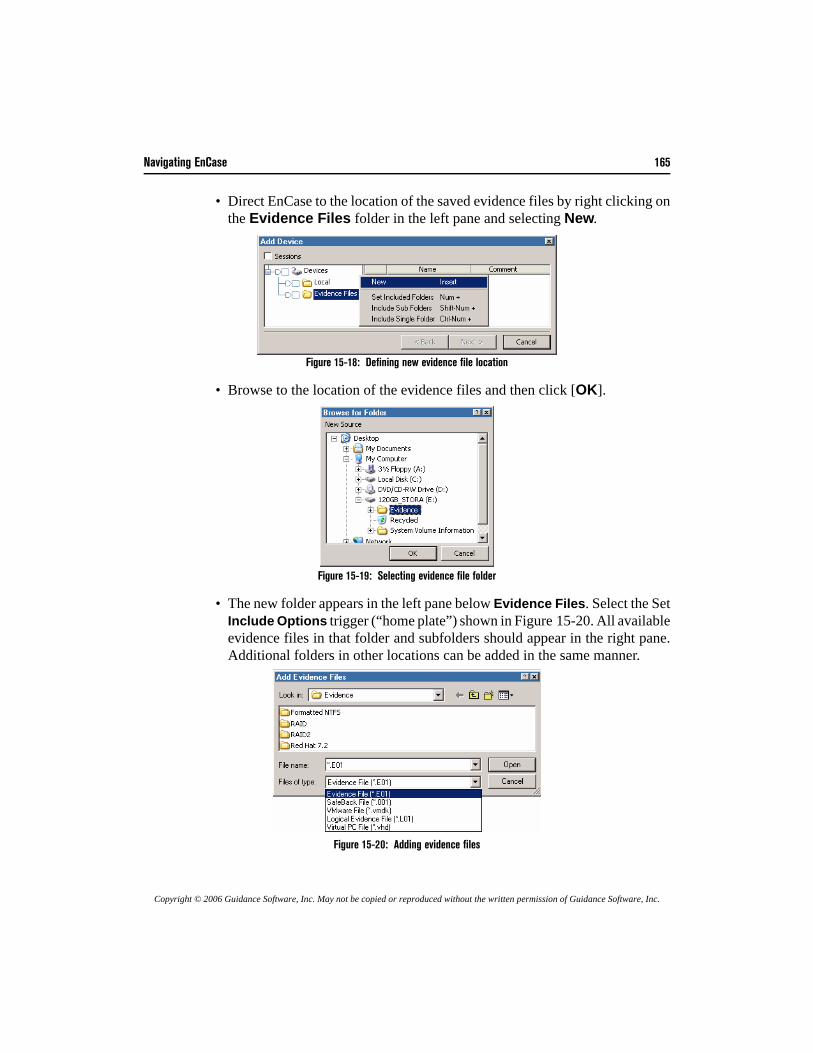
Navigating EnCase 165
Copyright © 2006 Guidance Software, Inc. May not be copied or reproduced without the written permission of Guidance Software, Inc.
• Direct EnCase to the location of the saved evidence files by right clicking onthe Evidence Files folder in the left pane and selecting New.
Figure 15-18: Defining new evidence file location
• Browse to the location of the evidence files and then click [OK].
Figure 15-19: Selecting evidence file folder
• The new folder appears in the left pane below Evidence Files. Select the SetInclude Options trigger (“home plate”) shown in Figure 15-20. All availableevidence files in that folder and subfolders should appear in the right pane.Additional folders in other locations can be added in the same manner.
Figure 15-20: Adding evidence files
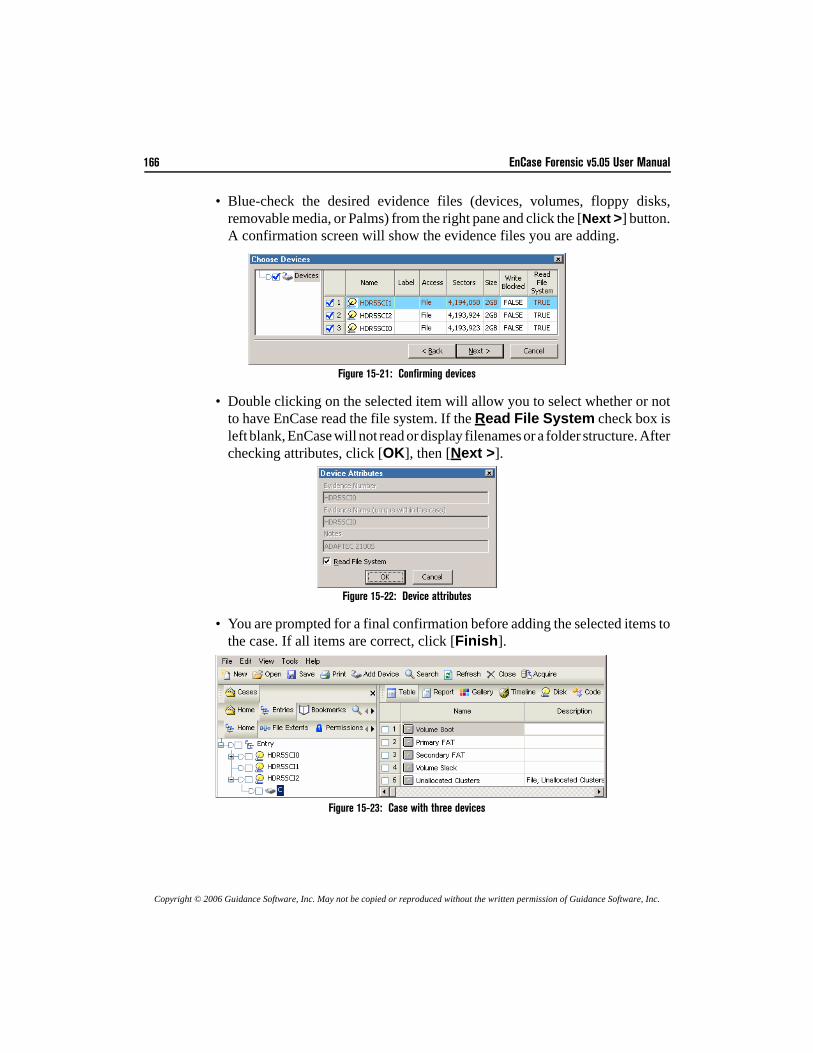
166 EnCase Forensic v5.05 User Manual
Copyright © 2006 Guidance Software, Inc. May not be copied or reproduced without the written permission of Guidance Software, Inc.
• Blue-check the desired evidence files (devices, volumes, floppy disks,removable media, or Palms) from the right pane and click the [Next >] button.A confirmation screen will show the evidence files you are adding.
Figure 15-21: Confirming devices
• Double clicking on the selected item will allow you to select whether or notto have EnCase read the file system. If the Read File System check box isleft blank, EnCase will not read or display filenames or a folder structure. Afterchecking attributes, click [OK], then [Next >].
Figure 15-22: Device attributes
• You are prompted for a final confirmation before adding the selected items tothe case. If all items are correct, click [Finish].
Figure 15-23: Case with three devices
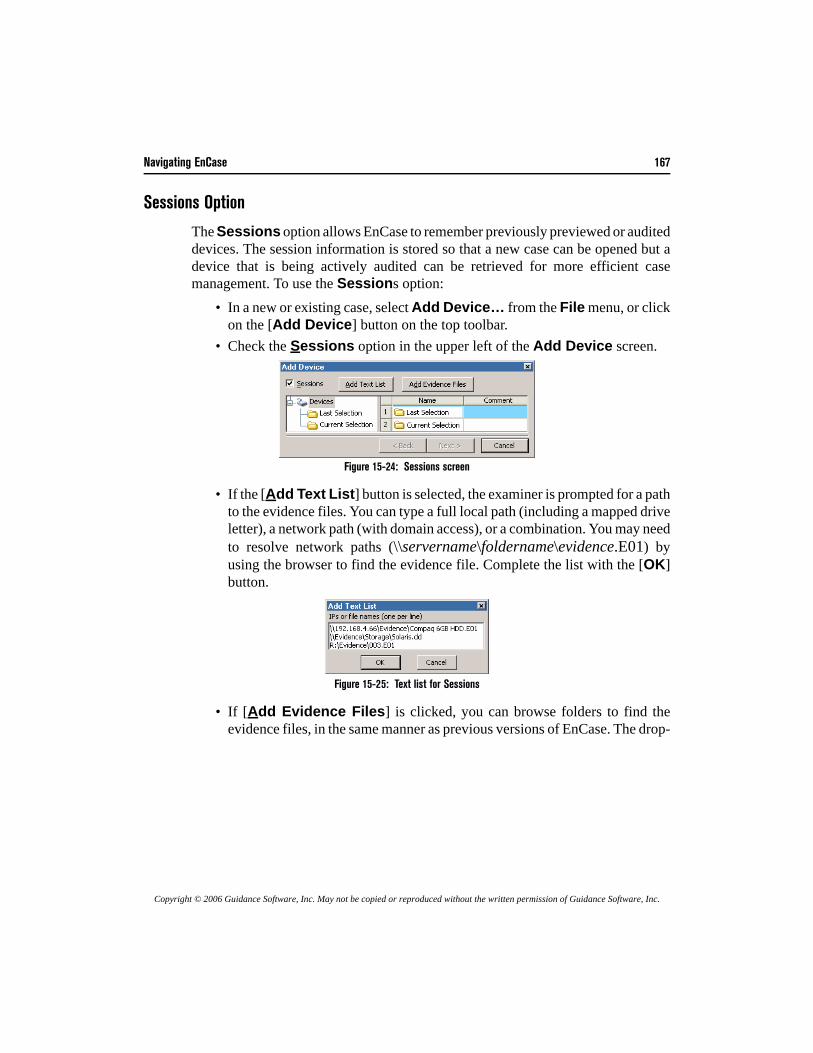
Navigating EnCase 167
Copyright © 2006 Guidance Software, Inc. May not be copied or reproduced without the written permission of Guidance Software, Inc.
Sessions Option
The Sessions option allows EnCase to remember previously previewed or auditeddevices. The session information is stored so that a new case can be opened but adevice that is being actively audited can be retrieved for more efficient casemanagement. To use the Sessions option:
• In a new or existing case, select Add Device… from the File menu, or clickon the [Add Device] button on the top toolbar.
• Check the Sessions option in the upper left of the Add Device screen.
Figure 15-24: Sessions screen
• If the [Add Text List] button is selected, the examiner is prompted for a pathto the evidence files. You can type a full local path (including a mapped driveletter), a network path (with domain access), or a combination. You may needto resolve network paths (\\servername\foldername\evidence.E01) byusing the browser to find the evidence file. Complete the list with the [OK]button.
Figure 15-25: Text list for Sessions
• If [Add Evidence Files] is clicked, you can browse folders to find theevidence files, in the same manner as previous versions of EnCase. The drop-
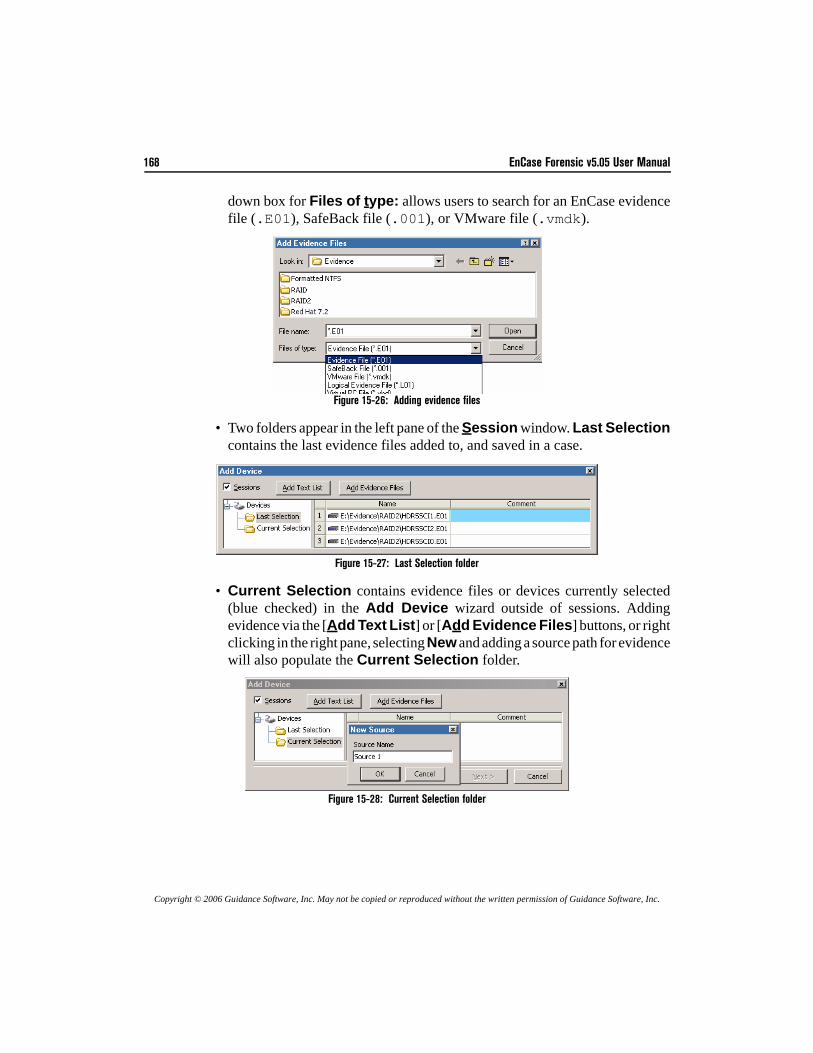
168 EnCase Forensic v5.05 User Manual
Copyright © 2006 Guidance Software, Inc. May not be copied or reproduced without the written permission of Guidance Software, Inc.
down box for Files of type: allows users to search for an EnCase evidencefile (.E01), SafeBack file (.001), or VMware file (.vmdk).
Figure 15-26: Adding evidence files
• Two folders appear in the left pane of the Session window. Last Selectioncontains the last evidence files added to, and saved in a case.
Figure 15-27: Last Selection folder
• Current Selection contains evidence files or devices currently selected(blue checked) in the Add Device wizard outside of sessions. Addingevidence via the [Add Text List] or [Add Evidence Files] buttons, or rightclicking in the right pane, selecting New and adding a source path for evidencewill also populate the Current Selection folder.
Figure 15-28: Current Selection folder

Navigating EnCase 169
Copyright © 2006 Guidance Software, Inc. May not be copied or reproduced without the written permission of Guidance Software, Inc.
• You can also create new folders and subfolders to store links to evidence filesthe forensic machine has access to. Right click in the location where you wishto place the folder and select New Folder.
Figure 15-29: Creating a new Session folder
Error Messages
Below are typical error messages encountered when adding evidence. • “’X:\PATH\EVIDENCE.Exx’ could not be found. Choose a new
path for this file?”EnCase cannot add an evidence file unless all the segments (or “chunks”) aremounted at the same time. If possible, place all chunks of an evidence file ina single location on your hard drive. If storage space prevents this, select [Yes]to choose a new path and then browse to the location of the missing chunks.If the chunks in question are missing, you will be asked if you wish to zeroout the sectors represented by the missing file.
• “Error verifying checksum in the file [EVIDENCE.Exx]”The media on which the file is stored may have become corrupted. This erroroccurs when the evidence file header is corrupted to the point at which EnCasewill no longer recognize it, rejecting it when adding it to a case. Try to re-acquirethe original media to different media than before, or add a copy of the evidence(it is advisable to make multiple acquisitions for backup purposes).• “Unable to read 64 sectors starting at absolute sector
nnnnnnnnn”This message usually indicates that a file-pointer in the directory structure ofthe evidence file is pointing to an area of the disk EnCase did not acquire. Thisis the fault of the BIOS reporting the wrong size of the physical disk.To determine if the BIOS has misreported the size of the disk, check the DriveGeometry section of the EnCase report for Total Size in sectors. The PartitionTable section of the Report displays the sector size of each partition. The total
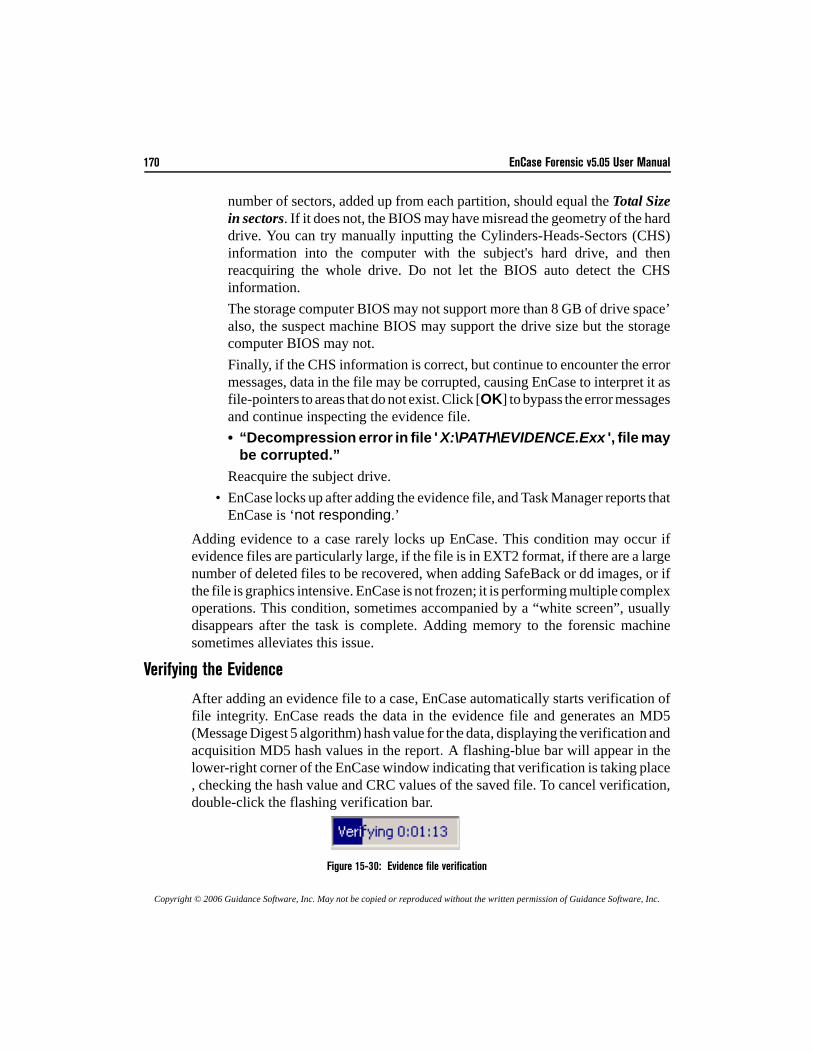
170 EnCase Forensic v5.05 User Manual
Copyright © 2006 Guidance Software, Inc. May not be copied or reproduced without the written permission of Guidance Software, Inc.
number of sectors, added up from each partition, should equal the Total Sizein sectors. If it does not, the BIOS may have misread the geometry of the harddrive. You can try manually inputting the Cylinders-Heads-Sectors (CHS)information into the computer with the subject's hard drive, and thenreacquiring the whole drive. Do not let the BIOS auto detect the CHSinformation.The storage computer BIOS may not support more than 8 GB of drive space’also, the suspect machine BIOS may support the drive size but the storagecomputer BIOS may not.Finally, if the CHS information is correct, but continue to encounter the errormessages, data in the file may be corrupted, causing EnCase to interpret it asfile-pointers to areas that do not exist. Click [OK] to bypass the error messagesand continue inspecting the evidence file.• “Decompression error in file ' X:\PATH\EVIDENCE.Exx ', file may
be corrupted.”Reacquire the subject drive.
• EnCase locks up after adding the evidence file, and Task Manager reports thatEnCase is ‘not responding.’
Adding evidence to a case rarely locks up EnCase. This condition may occur ifevidence files are particularly large, if the file is in EXT2 format, if there are a largenumber of deleted files to be recovered, when adding SafeBack or dd images, or ifthe file is graphics intensive. EnCase is not frozen; it is performing multiple complexoperations. This condition, sometimes accompanied by a “white screen”, usuallydisappears after the task is complete. Adding memory to the forensic machinesometimes alleviates this issue.
Verifying the Evidence
After adding an evidence file to a case, EnCase automatically starts verification offile integrity. EnCase reads the data in the evidence file and generates an MD5(Message Digest 5 algorithm) hash value for the data, displaying the verification andacquisition MD5 hash values in the report. A flashing-blue bar will appear in thelower-right corner of the EnCase window indicating that verification is taking place, checking the hash value and CRC values of the saved file. To cancel verification,double-click the flashing verification bar.
Figure 15-30: Evidence file verification
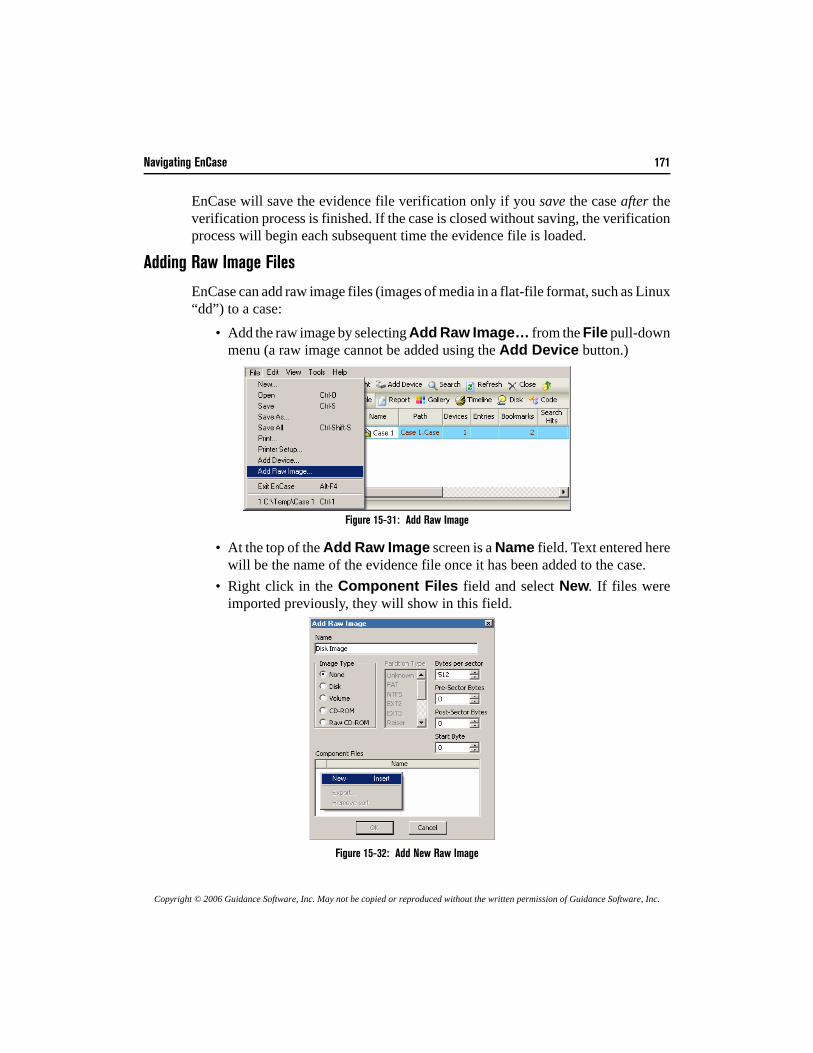
Navigating EnCase 171
Copyright © 2006 Guidance Software, Inc. May not be copied or reproduced without the written permission of Guidance Software, Inc.
EnCase will save the evidence file verification only if you save the case after theverification process is finished. If the case is closed without saving, the verificationprocess will begin each subsequent time the evidence file is loaded.
Adding Raw Image Files
EnCase can add raw image files (images of media in a flat-file format, such as Linux“dd”) to a case:
• Add the raw image by selecting Add Raw Image… from the File pull-downmenu (a raw image cannot be added using the Add Device button.)
Figure 15-31: Add Raw Image
• At the top of the Add Raw Image screen is a Name field. Text entered herewill be the name of the evidence file once it has been added to the case.
• Right click in the Component Files field and select New. If files wereimported previously, they will show in this field.
Figure 15-32: Add New Raw Image
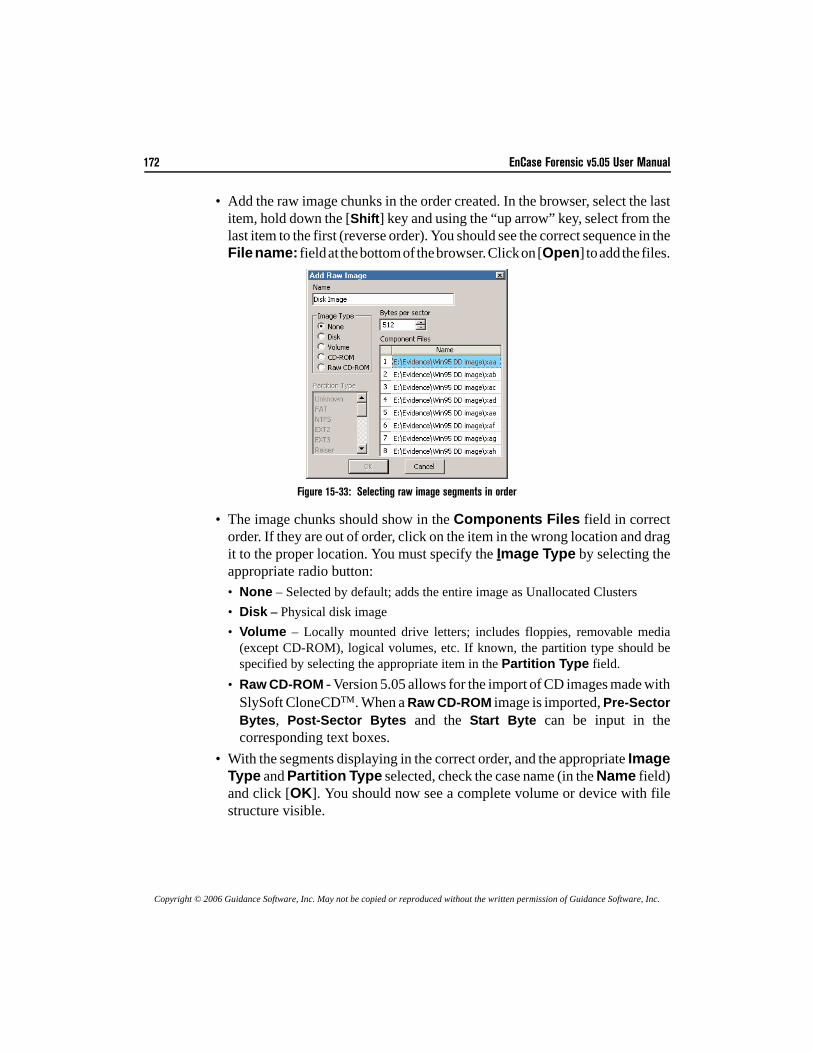
172 EnCase Forensic v5.05 User Manual
Copyright © 2006 Guidance Software, Inc. May not be copied or reproduced without the written permission of Guidance Software, Inc.
• Add the raw image chunks in the order created. In the browser, select the lastitem, hold down the [Shift] key and using the “up arrow” key, select from thelast item to the first (reverse order). You should see the correct sequence in theFile name: field at the bottom of the browser. Click on [Open] to add the files.
Figure 15-33: Selecting raw image segments in order
• The image chunks should show in the Components Files field in correctorder. If they are out of order, click on the item in the wrong location and dragit to the proper location. You must specify the Image Type by selecting theappropriate radio button: • None – Selected by default; adds the entire image as Unallocated Clusters• Disk – Physical disk image• Volume – Locally mounted drive letters; includes floppies, removable media
(except CD-ROM), logical volumes, etc. If known, the partition type should bespecified by selecting the appropriate item in the Partition Type field.
• Raw CD-ROM - Version 5.05 allows for the import of CD images made withSlySoft CloneCD™. When a Raw CD-ROM image is imported, Pre-SectorBytes, Post-Sector Bytes and the Start Byte can be input in thecorresponding text boxes.
• With the segments displaying in the correct order, and the appropriate ImageType and Partition Type selected, check the case name (in the Name field)and click [OK]. You should now see a complete volume or device with filestructure visible.
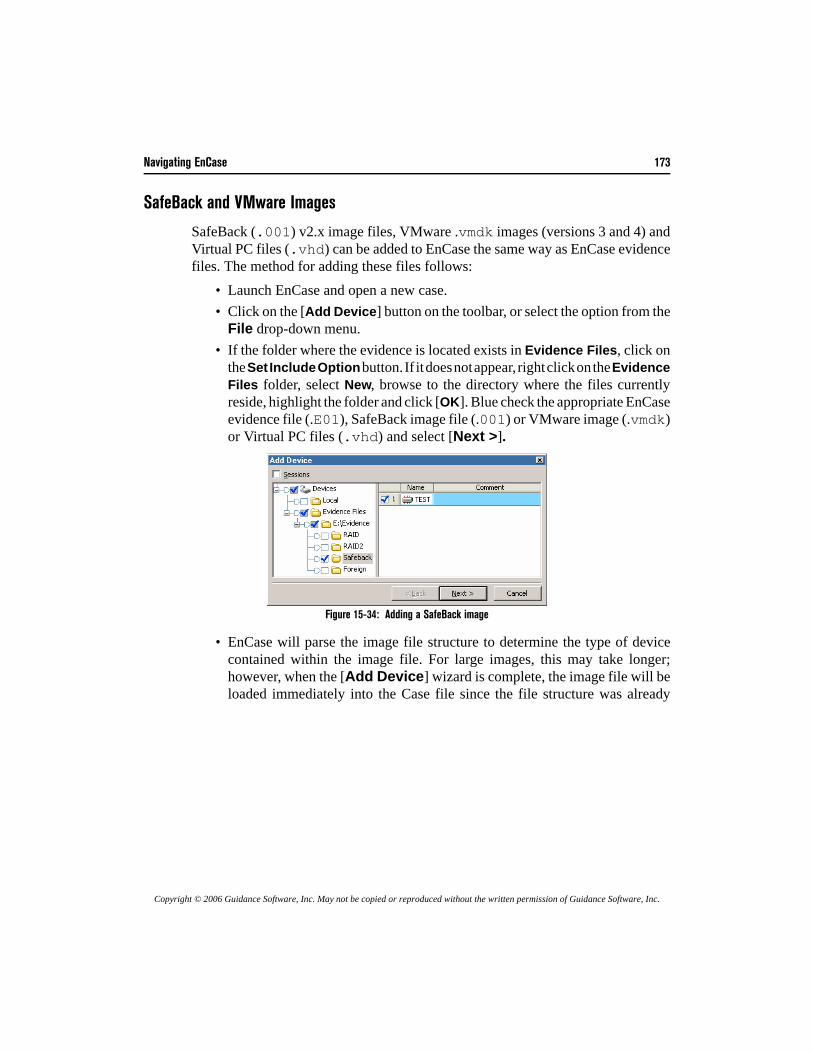
Navigating EnCase 173
Copyright © 2006 Guidance Software, Inc. May not be copied or reproduced without the written permission of Guidance Software, Inc.
SafeBack and VMware Images
SafeBack (.001) v2.x image files, VMware .vmdk images (versions 3 and 4) andVirtual PC files (.vhd) can be added to EnCase the same way as EnCase evidencefiles. The method for adding these files follows:
• Launch EnCase and open a new case.• Click on the [Add Device] button on the toolbar, or select the option from the
File drop-down menu.• If the folder where the evidence is located exists in Evidence Files, click on
the Set Include Option button. If it does not appear, right click on the EvidenceFiles folder, select New, browse to the directory where the files currentlyreside, highlight the folder and click [OK]. Blue check the appropriate EnCaseevidence file (.E01), SafeBack image file (.001) or VMware image (.vmdk)or Virtual PC files (.vhd) and select [Next >].
Figure 15-34: Adding a SafeBack image
• EnCase will parse the image file structure to determine the type of devicecontained within the image file. For large images, this may take longer;however, when the [Add Device] wizard is complete, the image file will beloaded immediately into the Case file since the file structure was already
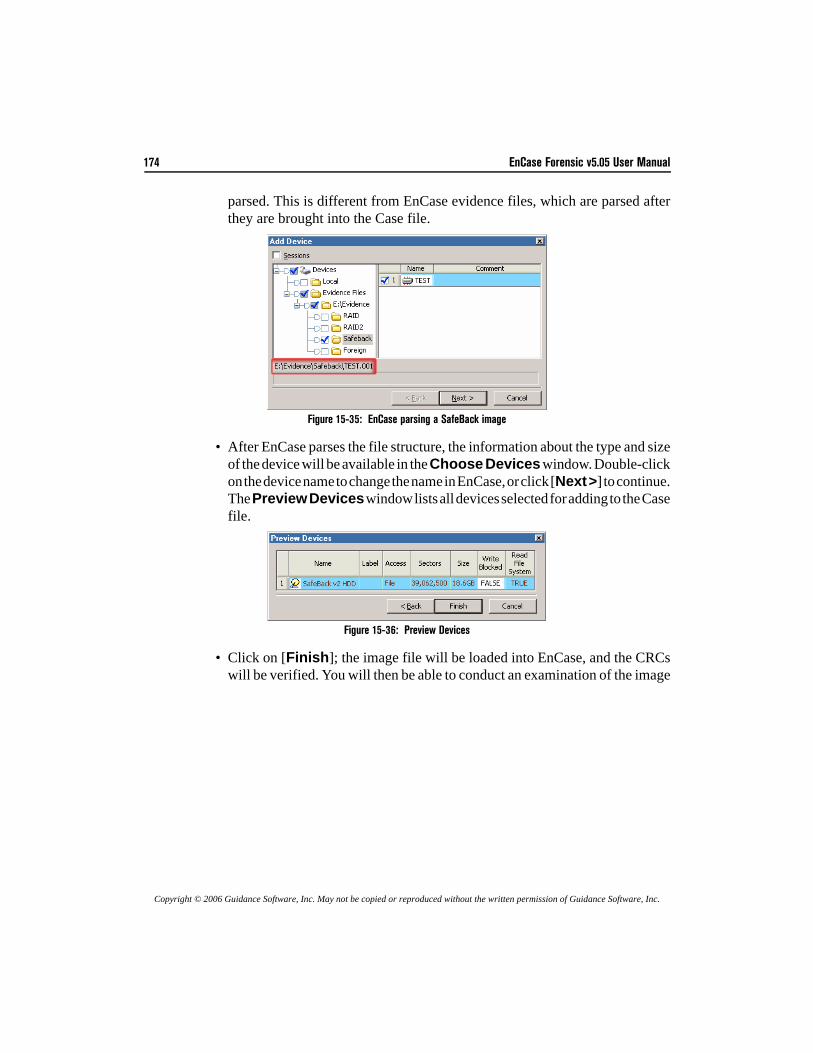
174 EnCase Forensic v5.05 User Manual
Copyright © 2006 Guidance Software, Inc. May not be copied or reproduced without the written permission of Guidance Software, Inc.
parsed. This is different from EnCase evidence files, which are parsed afterthey are brought into the Case file.
Figure 15-35: EnCase parsing a SafeBack image
• After EnCase parses the file structure, the information about the type and sizeof the device will be available in the Choose Devices window. Double-clickon the device name to change the name in EnCase, or click [Next >] to continue.The Preview Devices window lists all devices selected for adding to the Casefile.
Figure 15-36: Preview Devices
• Click on [Finish]; the image file will be loaded into EnCase, and the CRCswill be verified. You will then be able to conduct an examination of the image
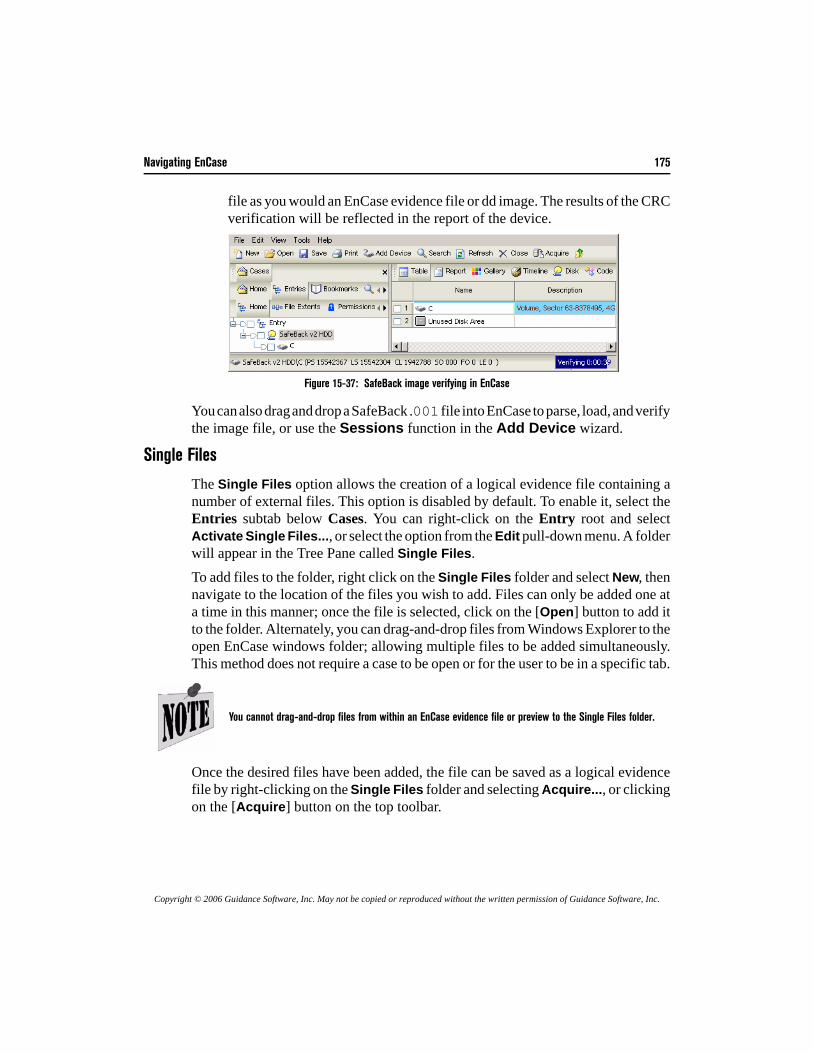
Navigating EnCase 175
Copyright © 2006 Guidance Software, Inc. May not be copied or reproduced without the written permission of Guidance Software, Inc.
file as you would an EnCase evidence file or dd image. The results of the CRCverification will be reflected in the report of the device.
Figure 15-37: SafeBack image verifying in EnCase
You can also drag and drop a SafeBack .001 file into EnCase to parse, load, and verifythe image file, or use the Sessions function in the Add Device wizard.
Single Files
The Single Files option allows the creation of a logical evidence file containing anumber of external files. This option is disabled by default. To enable it, select theEntries subtab below Cases. You can right-click on the Entry root and selectActivate Single Files..., or select the option from the Edit pull-down menu. A folderwill appear in the Tree Pane called Single Files.To add files to the folder, right click on the Single Files folder and select New, thennavigate to the location of the files you wish to add. Files can only be added one ata time in this manner; once the file is selected, click on the [Open] button to add itto the folder. Alternately, you can drag-and-drop files from Windows Explorer to theopen EnCase windows folder; allowing multiple files to be added simultaneously.This method does not require a case to be open or for the user to be in a specific tab.
Once the desired files have been added, the file can be saved as a logical evidencefile by right-clicking on the Single Files folder and selecting Acquire..., or clickingon the [Acquire] button on the top toolbar.
You cannot drag-and-drop files from within an EnCase evidence file or preview to the Single Files folder.

176 EnCase Forensic v5.05 User Manual
Copyright © 2006 Guidance Software, Inc. May not be copied or reproduced without the written permission of Guidance Software, Inc.
Logical Evidence Files
Users can now isolate files from inside an evidence file and access them through alogical evidence file. When the desired files are blue checked in the table, rightclicking anywhere in the Tree Pane will show the option to Create Logical EvidenceFile.... An options screen appears, similar to that which appears when acquiring adevice. You can add the files to a pre-existing logical evidence file by checking thebox next to the Add to existing Logical Evidence File options and selecting thepath and file name in the Output Path field. The Lock file when completed optionallows the new logical evidence file to be locked so that it can not be appended.
Figure 15-38: Creating a logical evidence file
Logical Evidence Files (.L01) can contain Single Files, files from a previeweddevice, files from evidence files, or a combination of these.
InterfaceWith the introduction of Version 5, the interface is more powerful and versatile thanbefore. Tabs and menus that appeared in the separate panes previously are nowcategorized in the View menu by the pane in which they appear. These tabs also havesubtabs to allow the user to see items specific to a case or device.
Figure 15-39: Cases tab with multiple cases
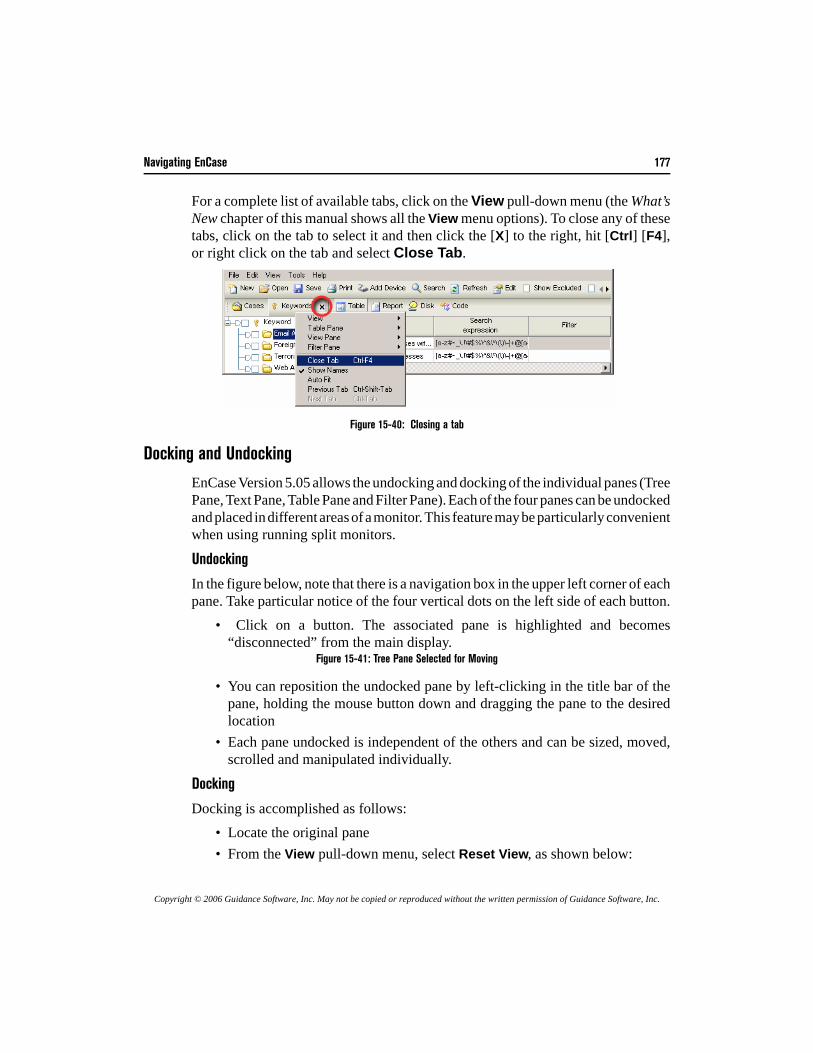
Navigating EnCase 177
Copyright © 2006 Guidance Software, Inc. May not be copied or reproduced without the written permission of Guidance Software, Inc.
For a complete list of available tabs, click on the View pull-down menu (the What’sNew chapter of this manual shows all the View menu options). To close any of thesetabs, click on the tab to select it and then click the [X] to the right, hit [Ctrl] [F4],or right click on the tab and select Close Tab.
Figure 15-40: Closing a tab
Docking and Undocking
EnCase Version 5.05 allows the undocking and docking of the individual panes (TreePane, Text Pane, Table Pane and Filter Pane). Each of the four panes can be undockedand placed in different areas of a monitor. This feature may be particularly convenientwhen using running split monitors.
Undocking
In the figure below, note that there is a navigation box in the upper left corner of eachpane. Take particular notice of the four vertical dots on the left side of each button.
• Click on a button. The associated pane is highlighted and becomes“disconnected” from the main display.
Figure 15-41: Tree Pane Selected for Moving
• You can reposition the undocked pane by left-clicking in the title bar of thepane, holding the mouse button down and dragging the pane to the desiredlocation
• Each pane undocked is independent of the others and can be sized, moved,scrolled and manipulated individually.
Docking
Docking is accomplished as follows:• Locate the original pane• From the View pull-down menu, select Reset View, as shown below:
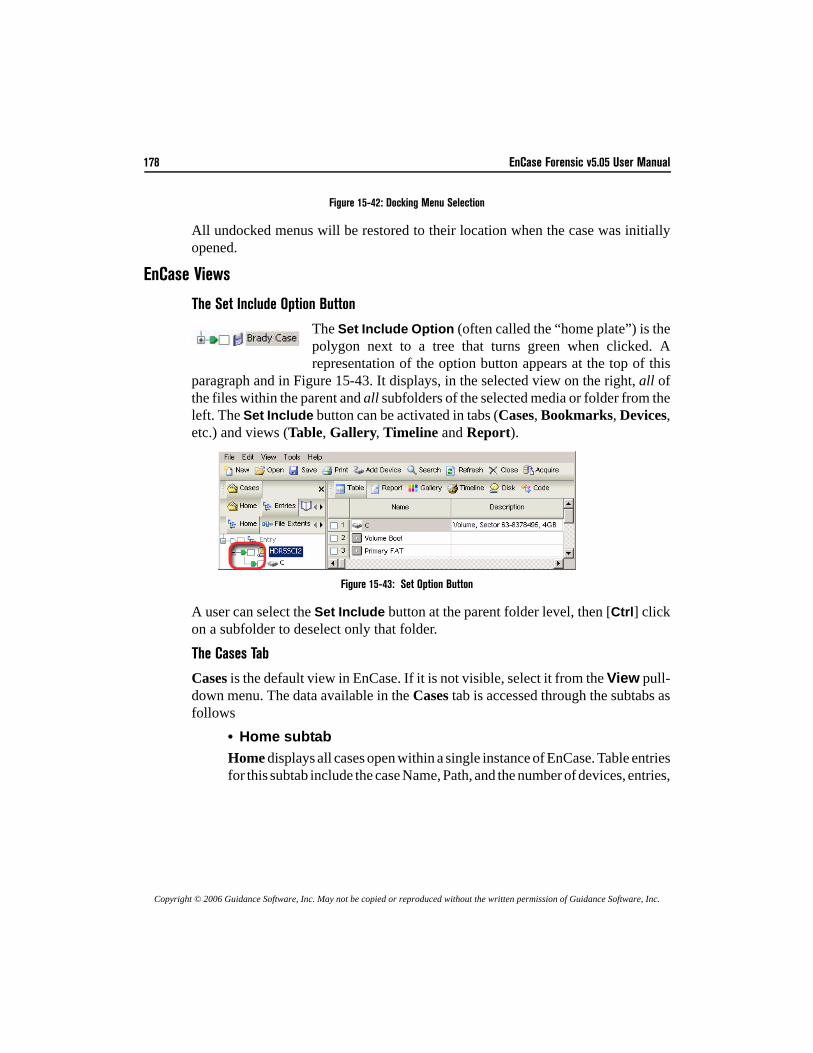
178 EnCase Forensic v5.05 User Manual
Copyright © 2006 Guidance Software, Inc. May not be copied or reproduced without the written permission of Guidance Software, Inc.
Figure 15-42: Docking Menu Selection
All undocked menus will be restored to their location when the case was initiallyopened.
EnCase Views
The Set Include Option Button
The Set Include Option (often called the “home plate”) is thepolygon next to a tree that turns green when clicked. Arepresentation of the option button appears at the top of this
paragraph and in Figure 15-43. It displays, in the selected view on the right, all ofthe files within the parent and all subfolders of the selected media or folder from theleft. The Set Include button can be activated in tabs (Cases, Bookmarks, Devices,etc.) and views (Table, Gallery, Timeline and Report).
Figure 15-43: Set Option Button
A user can select the Set Include button at the parent folder level, then [Ctrl] clickon a subfolder to deselect only that folder.
The Cases Tab
Cases is the default view in EnCase. If it is not visible, select it from the View pull-down menu. The data available in the Cases tab is accessed through the subtabs asfollows
• Home subtabHome displays all cases open within a single instance of EnCase. Table entriesfor this subtab include the case Name, Path, and the number of devices, entries,
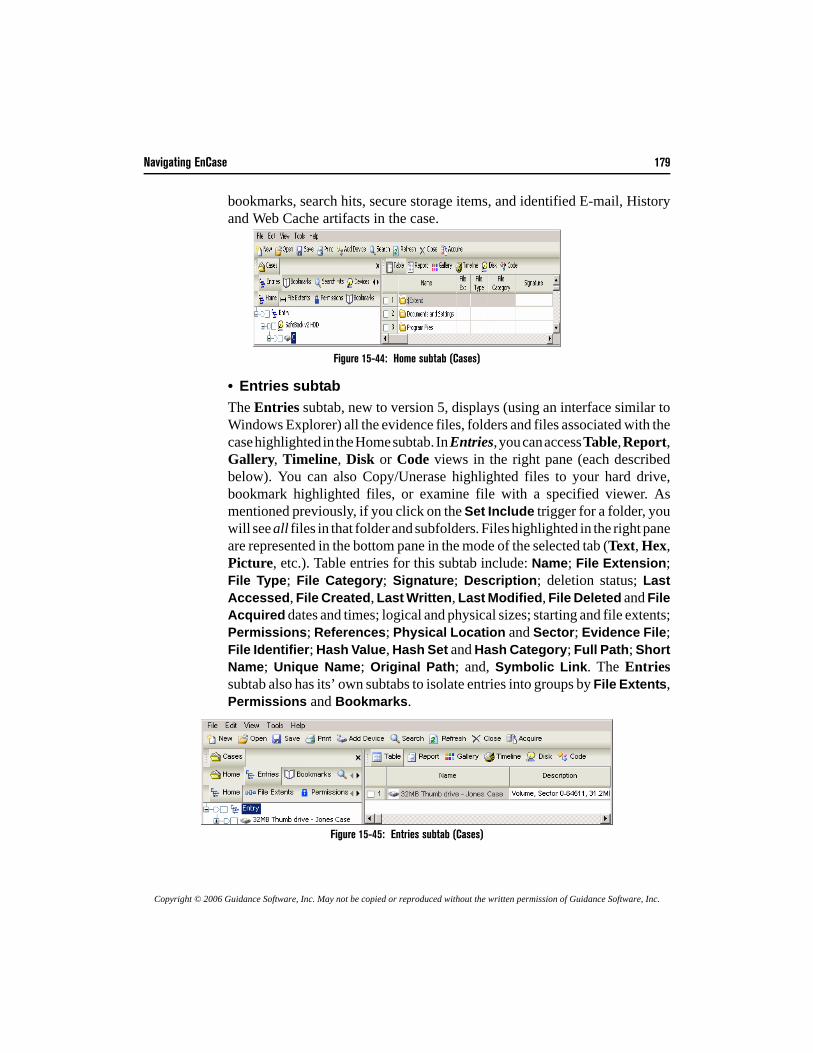
Navigating EnCase 179
Copyright © 2006 Guidance Software, Inc. May not be copied or reproduced without the written permission of Guidance Software, Inc.
bookmarks, search hits, secure storage items, and identified E-mail, Historyand Web Cache artifacts in the case.
Figure 15-44: Home subtab (Cases)
• Entries subtabThe Entries subtab, new to version 5, displays (using an interface similar toWindows Explorer) all the evidence files, folders and files associated with thecase highlighted in the Home subtab. In Entries, you can access Table, Report,Gallery, Timeline, Disk or Code views in the right pane (each describedbelow). You can also Copy/Unerase highlighted files to your hard drive,bookmark highlighted files, or examine file with a specified viewer. Asmentioned previously, if you click on the Set Include trigger for a folder, youwill see all files in that folder and subfolders. Files highlighted in the right paneare represented in the bottom pane in the mode of the selected tab (Text, Hex,Picture, etc.). Table entries for this subtab include: Name; File Extension;File Type; File Category; Signature; Description; deletion status; LastAccessed, File Created, Last Written, Last Modified, File Deleted and FileAcquired dates and times; logical and physical sizes; starting and file extents;Permissions; References; Physical Location and Sector; Evidence File;File Identifier; Hash Value, Hash Set and Hash Category; Full Path; ShortName; Unique Name; Original Path; and, Symbolic Link. The Entriessubtab also has its’ own subtabs to isolate entries into groups by File Extents,Permissions and Bookmarks.
Figure 15-45: Entries subtab (Cases)
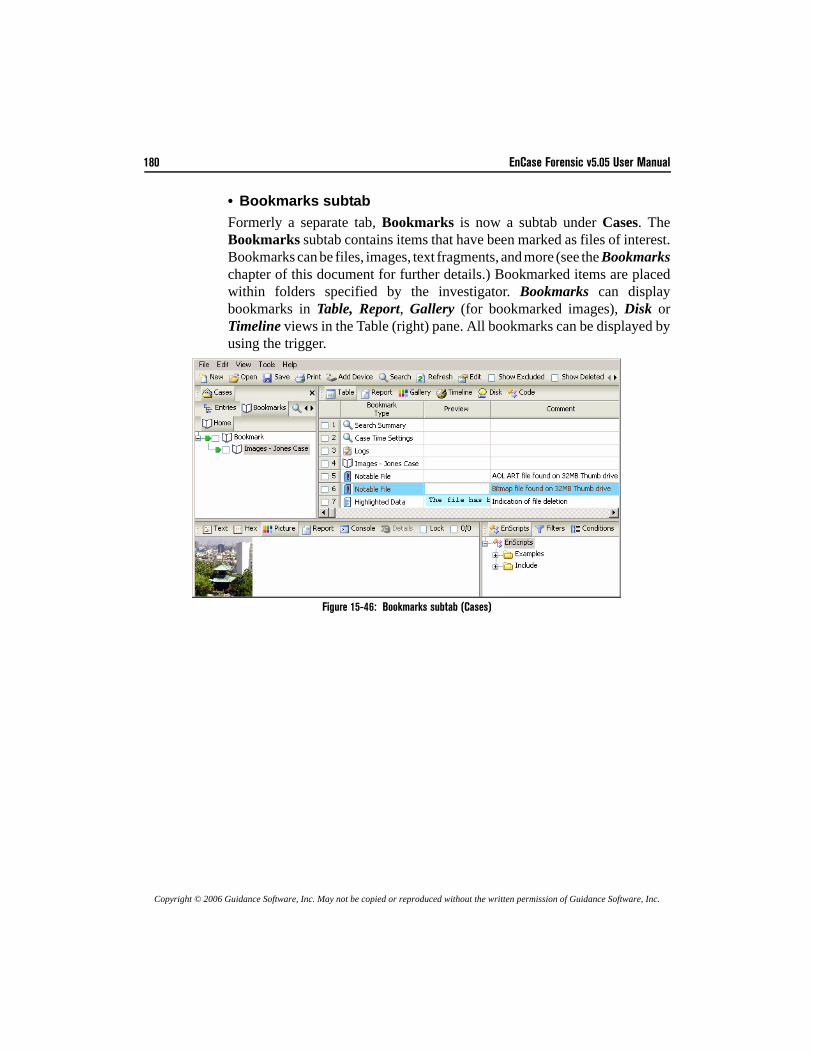
180 EnCase Forensic v5.05 User Manual
Copyright © 2006 Guidance Software, Inc. May not be copied or reproduced without the written permission of Guidance Software, Inc.
• Bookmarks subtabFormerly a separate tab, Bookmarks is now a subtab under Cases. TheBookmarks subtab contains items that have been marked as files of interest.Bookmarks can be files, images, text fragments, and more (see the Bookmarkschapter of this document for further details.) Bookmarked items are placedwithin folders specified by the investigator. Bookmarks can displaybookmarks in Table, Report, Gallery (for bookmarked images), Disk orTimeline views in the Table (right) pane. All bookmarks can be displayed byusing the trigger.
Figure 15-46: Bookmarks subtab (Cases)
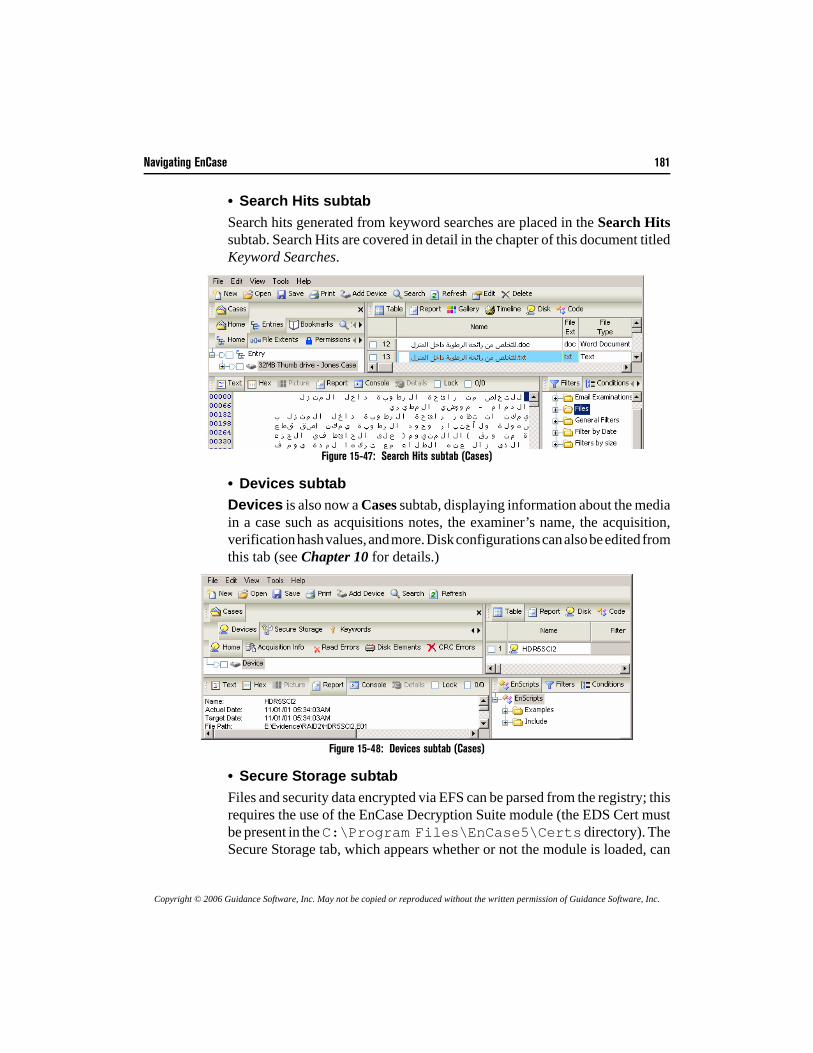
Navigating EnCase 181
Copyright © 2006 Guidance Software, Inc. May not be copied or reproduced without the written permission of Guidance Software, Inc.
• Search Hits subtabSearch hits generated from keyword searches are placed in the Search Hitssubtab. Search Hits are covered in detail in the chapter of this document titledKeyword Searches.
Figure 15-47: Search Hits subtab (Cases)
• Devices subtabDevices is also now a Cases subtab, displaying information about the mediain a case such as acquisitions notes, the examiner’s name, the acquisition,verification hash values, and more. Disk configurations can also be edited fromthis tab (see Chapter 10 for details.)
Figure 15-48: Devices subtab (Cases)
• Secure Storage subtabFiles and security data encrypted via EFS can be parsed from the registry; thisrequires the use of the EnCase Decryption Suite module (the EDS Cert mustbe present in the C:\Program Files\EnCase5\Certs directory). TheSecure Storage tab, which appears whether or not the module is loaded, can
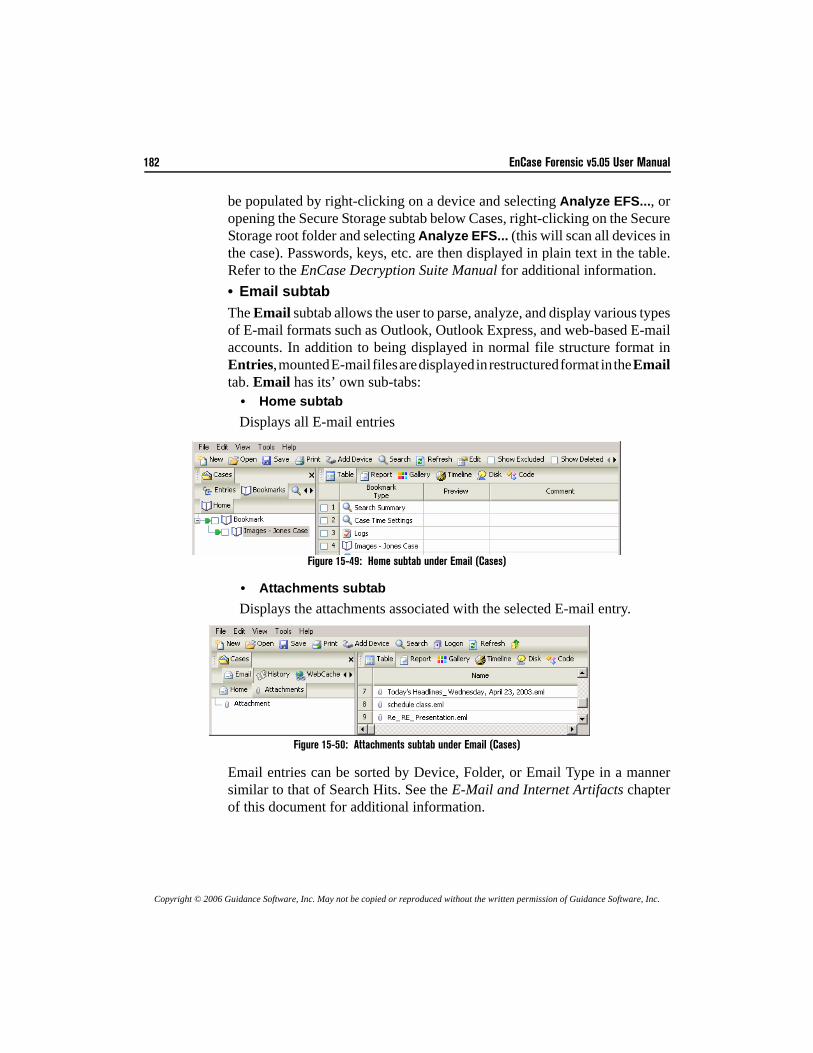
182 EnCase Forensic v5.05 User Manual
Copyright © 2006 Guidance Software, Inc. May not be copied or reproduced without the written permission of Guidance Software, Inc.
be populated by right-clicking on a device and selecting Analyze EFS..., oropening the Secure Storage subtab below Cases, right-clicking on the SecureStorage root folder and selecting Analyze EFS... (this will scan all devices inthe case). Passwords, keys, etc. are then displayed in plain text in the table.Refer to the EnCase Decryption Suite Manual for additional information.• Email subtabThe Email subtab allows the user to parse, analyze, and display various typesof E-mail formats such as Outlook, Outlook Express, and web-based E-mailaccounts. In addition to being displayed in normal file structure format inEntries, mounted E-mail files are displayed in restructured format in the Emailtab. Email has its’ own sub-tabs:
• Home subtabDisplays all E-mail entries
Figure 15-49: Home subtab under Email (Cases)
• Attachments subtabDisplays the attachments associated with the selected E-mail entry.
Figure 15-50: Attachments subtab under Email (Cases)
Email entries can be sorted by Device, Folder, or Email Type in a mannersimilar to that of Search Hits. See the E-Mail and Internet Artifacts chapterof this document for additional information.

Navigating EnCase 183
Copyright © 2006 Guidance Software, Inc. May not be copied or reproduced without the written permission of Guidance Software, Inc.
• History and WebCache subtabsUsers can now parse, analyze, and display various types of Internet andWindows history artifacts logged when web sites or file directories areaccessed through supported browsers, include; Internet Explorer, Mozilla,Opera, and Safari. The History tab allows users to search for various historyattributes and organize them all in one table. See the E-Mail and InternetArtifacts chapter of this document for additional information.
Figure 15-51: History and WebCache subtabs (Cases)
File Types
To access the File Types tab, select File Types from the View pull-down menu.This tab contains information on all file types and their associated viewers. EnCaseallows the user to review, add, edit, or delete file types and to match file types toviewers. While EnCase has many file types already matched to specific applicationsfor proper file access, it also provide a means to add viewers for file types that are

184 EnCase Forensic v5.05 User Manual
Copyright © 2006 Guidance Software, Inc. May not be copied or reproduced without the written permission of Guidance Software, Inc.
new or unrecognized by EnCase. File Types are covered in full in the chapter onViewing Files.
Figure 15-52: File Types tab
File Signatures
The File Signatures tab is accessed by selecting File Signatures from the Viewpull-down menu. File Signatures are the unique hex signature headers associated withspecific file types. For example, an industry-standard JPG image must begin withthe hex header signature \xFF\xD8\xFF[\xFE\xE0]\x00. From this tab, filesignatures can be reviewed, added, edited, and deleted.
Figure 15-53: File Signatures tab
File Viewers
To access the File Viewers tab, select File Viewers from the View pull-down menu.File Viewers are applications that can be configured in EnCase in File Types toassociate file types and viewers. By default, EnCase can view different file types,such as JPG or TXT, but some files types cannot be displayed natively by EnCase.
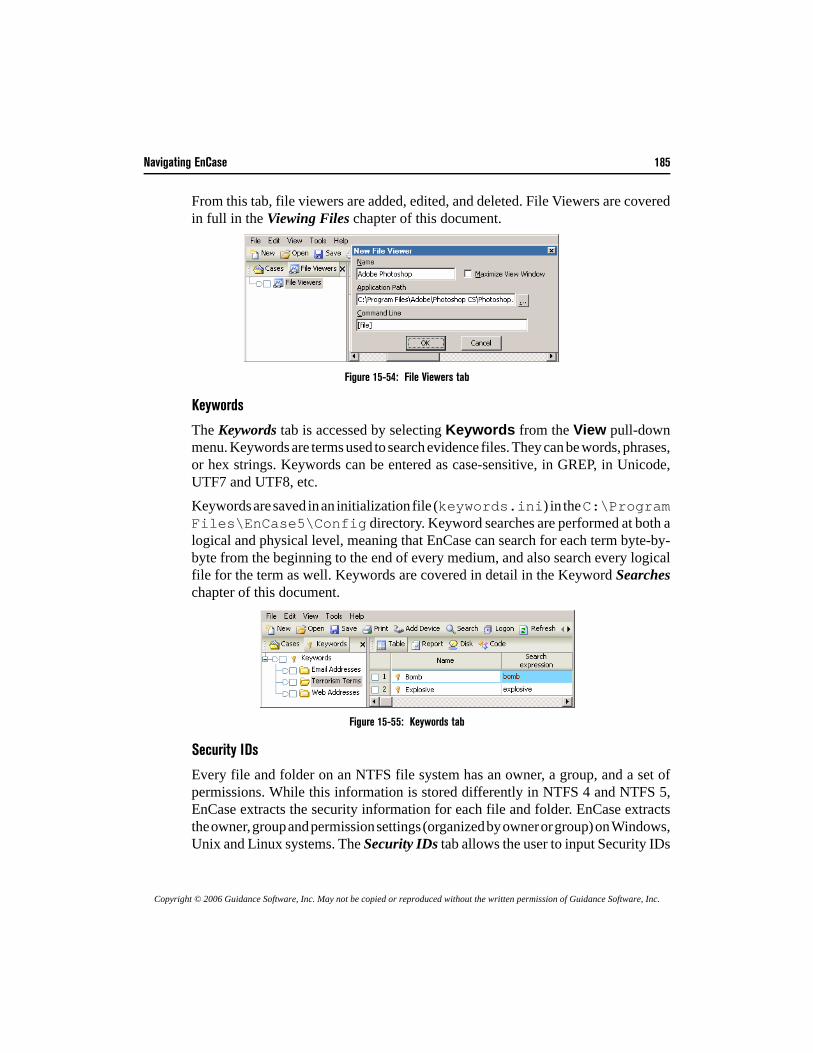
Navigating EnCase 185
Copyright © 2006 Guidance Software, Inc. May not be copied or reproduced without the written permission of Guidance Software, Inc.
From this tab, file viewers are added, edited, and deleted. File Viewers are coveredin full in the Viewing Files chapter of this document.
Figure 15-54: File Viewers tab
Keywords
The Keywords tab is accessed by selecting Keywords from the View pull-downmenu. Keywords are terms used to search evidence files. They can be words, phrases,or hex strings. Keywords can be entered as case-sensitive, in GREP, in Unicode,UTF7 and UTF8, etc.Keywords are saved in an initialization file (keywords.ini) in the C:\ProgramFiles\EnCase5\Config directory. Keyword searches are performed at both alogical and physical level, meaning that EnCase can search for each term byte-by-byte from the beginning to the end of every medium, and also search every logicalfile for the term as well. Keywords are covered in detail in the Keyword Searcheschapter of this document.
Figure 15-55: Keywords tab
Security IDs
Every file and folder on an NTFS file system has an owner, a group, and a set ofpermissions. While this information is stored differently in NTFS 4 and NTFS 5,EnCase extracts the security information for each file and folder. EnCase extractsthe owner, group and permission settings (organized by owner or group) on Windows,Unix and Linux systems. The Security IDs tab allows the user to input Security IDs
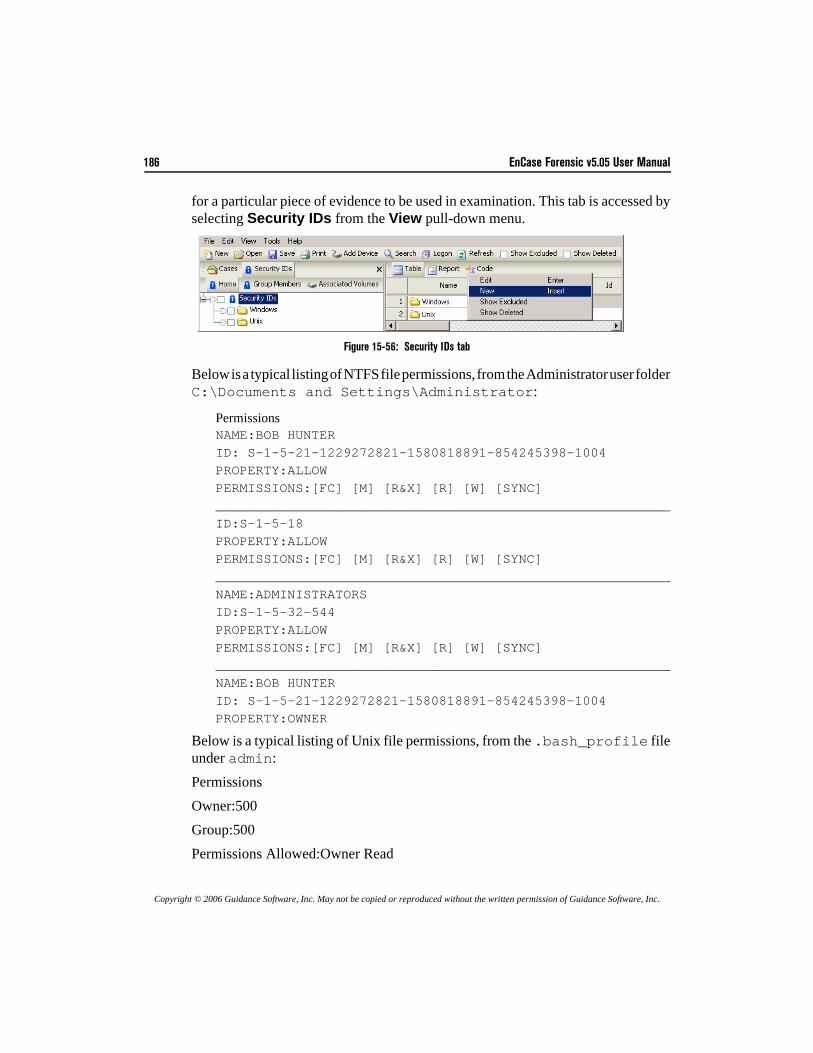
186 EnCase Forensic v5.05 User Manual
Copyright © 2006 Guidance Software, Inc. May not be copied or reproduced without the written permission of Guidance Software, Inc.
for a particular piece of evidence to be used in examination. This tab is accessed byselecting Security IDs from the View pull-down menu.
Figure 15-56: Security IDs tab
Below is a typical listing of NTFS file permissions, from the Administrator user folderC:\Documents and Settings\Administrator:
PermissionsNAME:BOB HUNTERID: S-1-5-21-1229272821-1580818891-854245398-1004PROPERTY:ALLOWPERMISSIONS:[FC] [M] [R&X] [R] [W] [SYNC]_________________________________________________________ID:S-1-5-18PROPERTY:ALLOWPERMISSIONS:[FC] [M] [R&X] [R] [W] [SYNC]_________________________________________________________NAME:ADMINISTRATORSID:S-1-5-32-544PROPERTY:ALLOWPERMISSIONS:[FC] [M] [R&X] [R] [W] [SYNC]_________________________________________________________NAME:BOB HUNTERID: S-1-5-21-1229272821-1580818891-854245398-1004PROPERTY:OWNER
Below is a typical listing of Unix file permissions, from the .bash_profile fileunder admin:PermissionsOwner:500Group:500Permissions Allowed:Owner Read
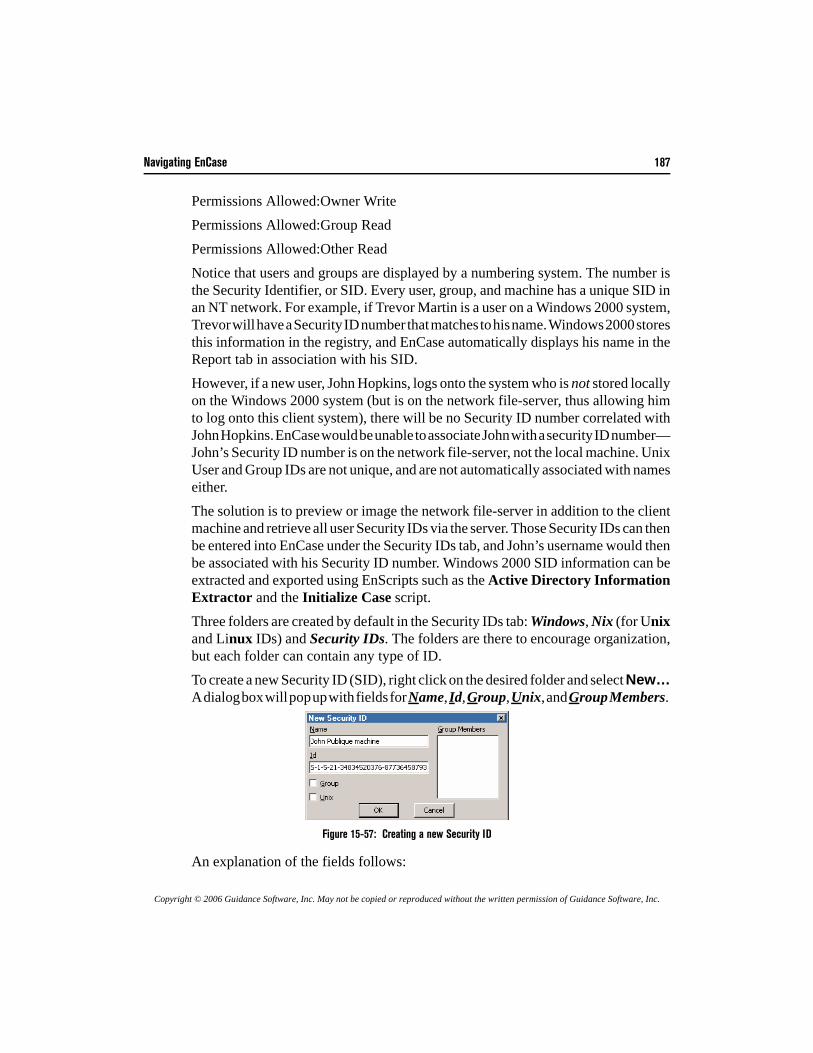
Navigating EnCase 187
Copyright © 2006 Guidance Software, Inc. May not be copied or reproduced without the written permission of Guidance Software, Inc.
Permissions Allowed:Owner WritePermissions Allowed:Group ReadPermissions Allowed:Other ReadNotice that users and groups are displayed by a numbering system. The number isthe Security Identifier, or SID. Every user, group, and machine has a unique SID inan NT network. For example, if Trevor Martin is a user on a Windows 2000 system,Trevor will have a Security ID number that matches to his name. Windows 2000 storesthis information in the registry, and EnCase automatically displays his name in theReport tab in association with his SID.However, if a new user, John Hopkins, logs onto the system who is not stored locallyon the Windows 2000 system (but is on the network file-server, thus allowing himto log onto this client system), there will be no Security ID number correlated withJohn Hopkins. EnCase would be unable to associate John with a security ID number—John’s Security ID number is on the network file-server, not the local machine. UnixUser and Group IDs are not unique, and are not automatically associated with nameseither.The solution is to preview or image the network file-server in addition to the clientmachine and retrieve all user Security IDs via the server. Those Security IDs can thenbe entered into EnCase under the Security IDs tab, and John’s username would thenbe associated with his Security ID number. Windows 2000 SID information can beextracted and exported using EnScripts such as the Active Directory InformationExtractor and the Initialize Case script.Three folders are created by default in the Security IDs tab: Windows, Nix (for Unixand Linux IDs) and Security IDs. The folders are there to encourage organization,but each folder can contain any type of ID.To create a new Security ID (SID), right click on the desired folder and select New…A dialog box will pop up with fields for Name, Id, Group, Unix, and Group Members.
Figure 15-57: Creating a new Security ID
An explanation of the fields follows:
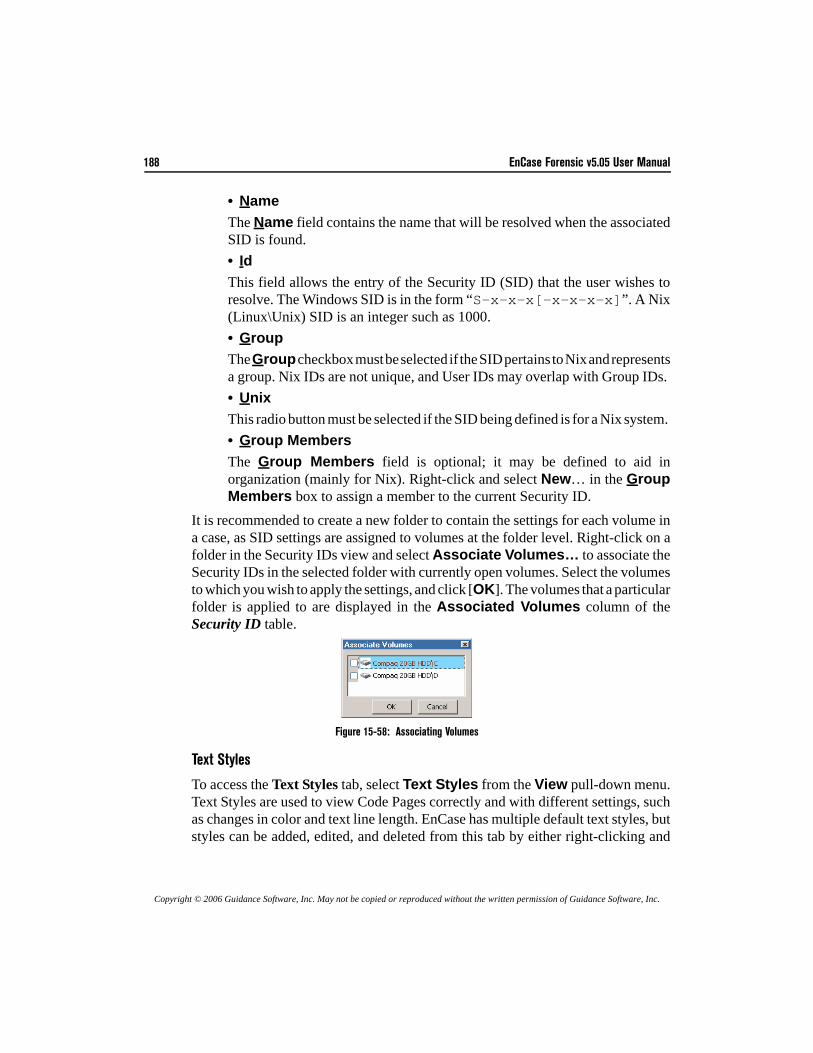
188 EnCase Forensic v5.05 User Manual
Copyright © 2006 Guidance Software, Inc. May not be copied or reproduced without the written permission of Guidance Software, Inc.
• NameThe Name field contains the name that will be resolved when the associatedSID is found. • IdThis field allows the entry of the Security ID (SID) that the user wishes toresolve. The Windows SID is in the form “S-x-x-x[-x-x-x-x]”. A Nix(Linux\Unix) SID is an integer such as 1000. • GroupThe Group checkbox must be selected if the SID pertains to Nix and representsa group. Nix IDs are not unique, and User IDs may overlap with Group IDs. • UnixThis radio button must be selected if the SID being defined is for a Nix system. • Group Members The Group Members field is optional; it may be defined to aid inorganization (mainly for Nix). Right-click and select New… in the GroupMembers box to assign a member to the current Security ID.
It is recommended to create a new folder to contain the settings for each volume ina case, as SID settings are assigned to volumes at the folder level. Right-click on afolder in the Security IDs view and select Associate Volumes… to associate theSecurity IDs in the selected folder with currently open volumes. Select the volumesto which you wish to apply the settings, and click [OK]. The volumes that a particularfolder is applied to are displayed in the Associated Volumes column of theSecurity ID table.
Figure 15-58: Associating Volumes
Text Styles
To access the Text Styles tab, select Text Styles from the View pull-down menu.Text Styles are used to view Code Pages correctly and with different settings, suchas changes in color and text line length. EnCase has multiple default text styles, butstyles can be added, edited, and deleted from this tab by either right-clicking and
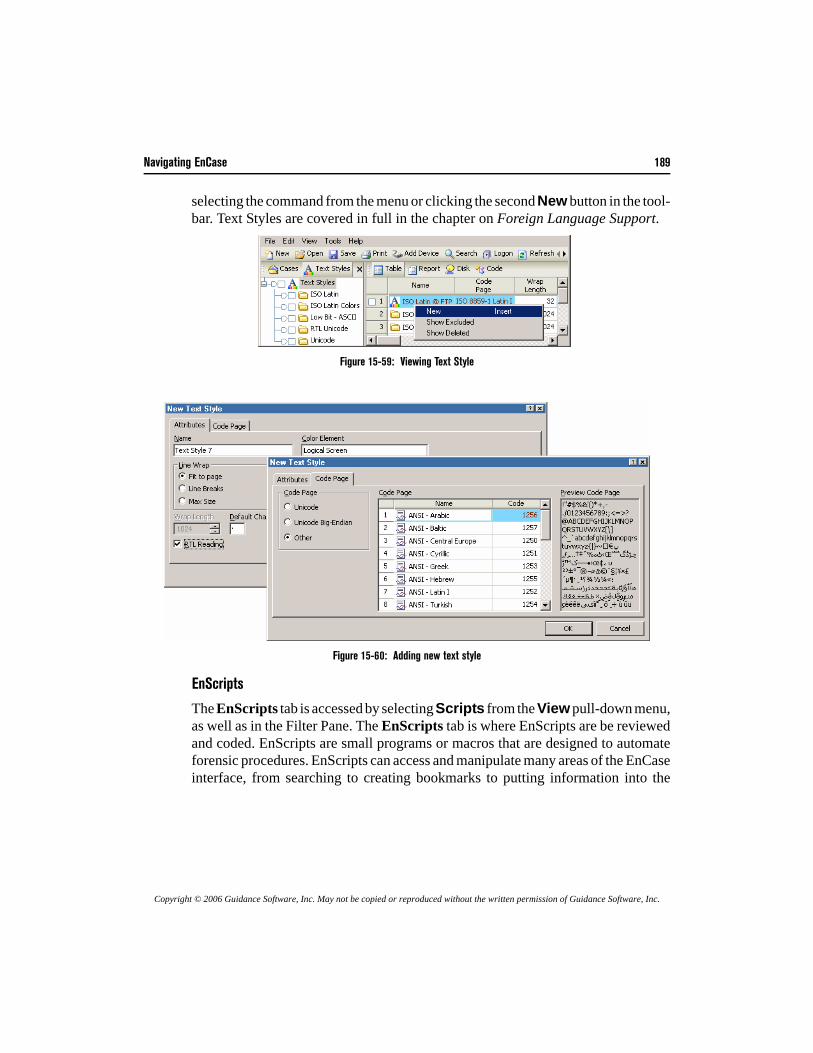
Navigating EnCase 189
Copyright © 2006 Guidance Software, Inc. May not be copied or reproduced without the written permission of Guidance Software, Inc.
selecting the command from the menu or clicking the second New button in the tool-bar. Text Styles are covered in full in the chapter on Foreign Language Support.
Figure 15-59: Viewing Text Style
Figure 15-60: Adding new text style
EnScripts
The EnScripts tab is accessed by selecting Scripts from the View pull-down menu,as well as in the Filter Pane. The EnScripts tab is where EnScripts are be reviewedand coded. EnScripts are small programs or macros that are designed to automateforensic procedures. EnScripts can access and manipulate many areas of the EnCaseinterface, from searching to creating bookmarks to putting information into the
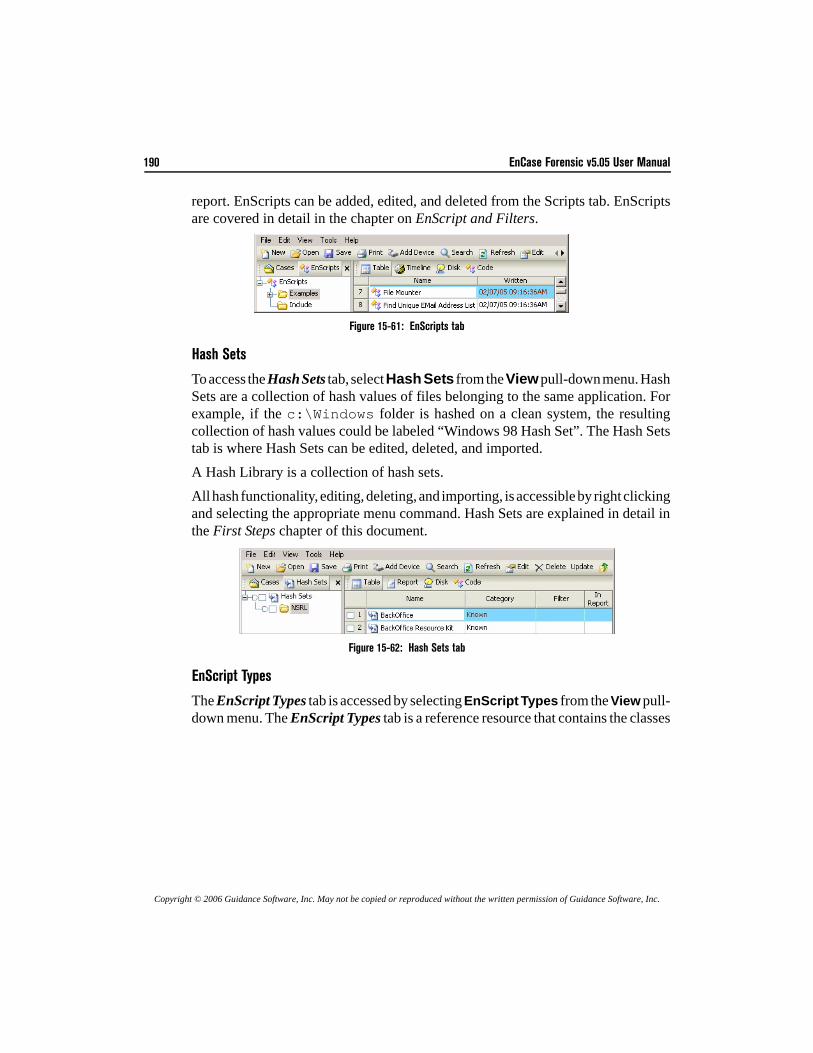
190 EnCase Forensic v5.05 User Manual
Copyright © 2006 Guidance Software, Inc. May not be copied or reproduced without the written permission of Guidance Software, Inc.
report. EnScripts can be added, edited, and deleted from the Scripts tab. EnScriptsare covered in detail in the chapter on EnScript and Filters.
Figure 15-61: EnScripts tab
Hash Sets
To access the Hash Sets tab, select Hash Sets from the View pull-down menu. HashSets are a collection of hash values of files belonging to the same application. Forexample, if the c:\Windows folder is hashed on a clean system, the resultingcollection of hash values could be labeled “Windows 98 Hash Set”. The Hash Setstab is where Hash Sets can be edited, deleted, and imported.A Hash Library is a collection of hash sets.All hash functionality, editing, deleting, and importing, is accessible by right clickingand selecting the appropriate menu command. Hash Sets are explained in detail inthe First Steps chapter of this document.
Figure 15-62: Hash Sets tab
EnScript Types
The EnScript Types tab is accessed by selecting EnScript Types from the View pull-down menu. The EnScript Types tab is a reference resource that contains the classes
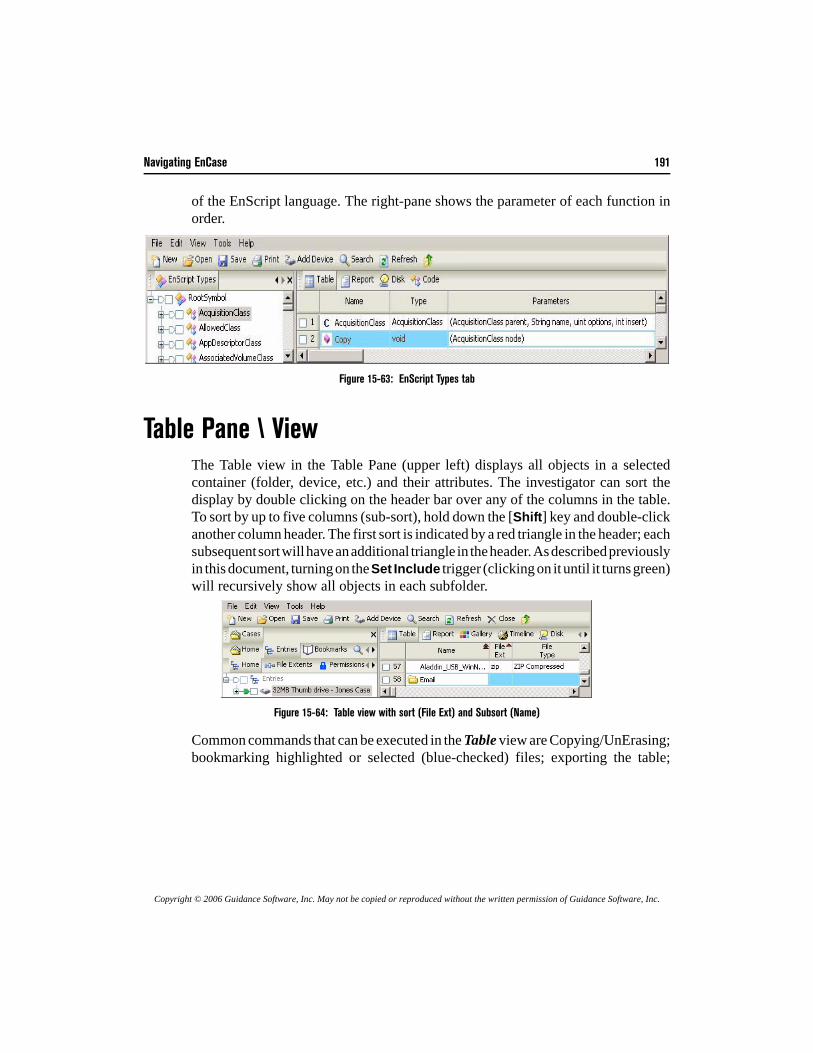
Navigating EnCase 191
Copyright © 2006 Guidance Software, Inc. May not be copied or reproduced without the written permission of Guidance Software, Inc.
of the EnScript language. The right-pane shows the parameter of each function inorder.
Figure 15-63: EnScript Types tab
Table Pane \ ViewThe Table view in the Table Pane (upper left) displays all objects in a selectedcontainer (folder, device, etc.) and their attributes. The investigator can sort thedisplay by double clicking on the header bar over any of the columns in the table.To sort by up to five columns (sub-sort), hold down the [Shift] key and double-clickanother column header. The first sort is indicated by a red triangle in the header; eachsubsequent sort will have an additional triangle in the header. As described previouslyin this document, turning on the Set Include trigger (clicking on it until it turns green)will recursively show all objects in each subfolder.
Figure 15-64: Table view with sort (File Ext) and Subsort (Name)
Common commands that can be executed in the Table view are Copying/UnErasing;bookmarking highlighted or selected (blue-checked) files; exporting the table;
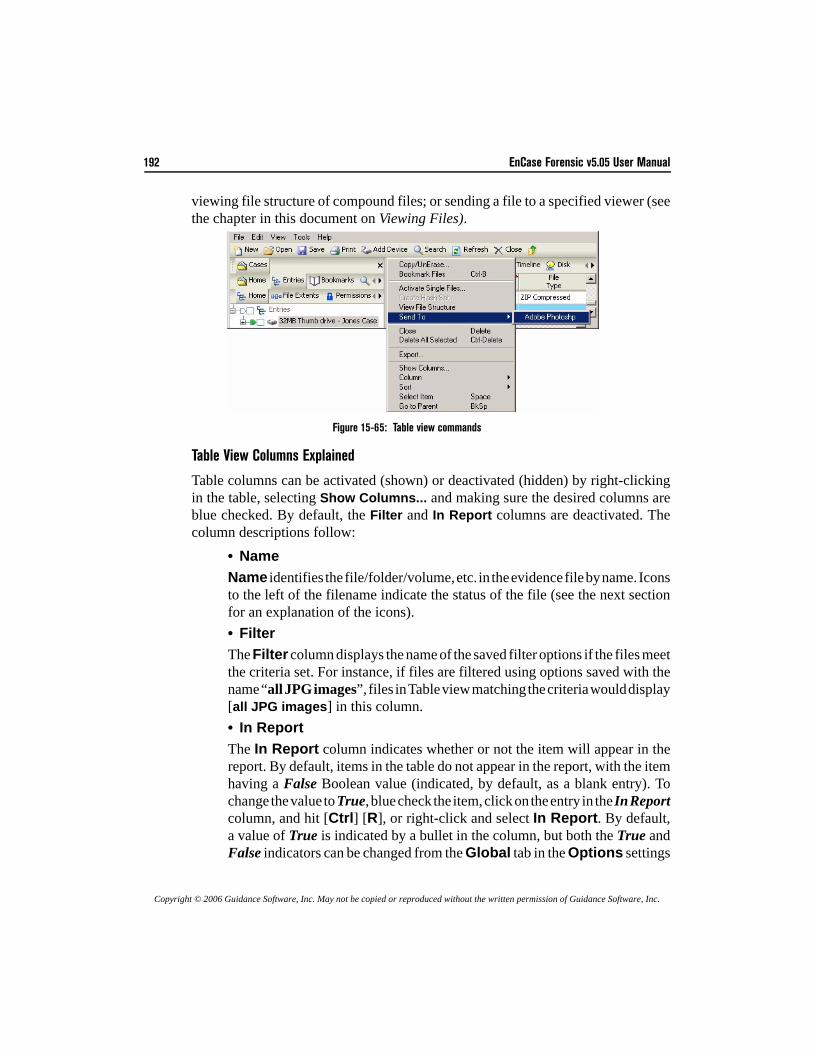
192 EnCase Forensic v5.05 User Manual
Copyright © 2006 Guidance Software, Inc. May not be copied or reproduced without the written permission of Guidance Software, Inc.
viewing file structure of compound files; or sending a file to a specified viewer (seethe chapter in this document on Viewing Files).
Figure 15-65: Table view commands
Table View Columns Explained
Table columns can be activated (shown) or deactivated (hidden) by right-clickingin the table, selecting Show Columns... and making sure the desired columns areblue checked. By default, the Filter and In Report columns are deactivated. Thecolumn descriptions follow:
• NameName identifies the file/folder/volume, etc. in the evidence file by name. Iconsto the left of the filename indicate the status of the file (see the next sectionfor an explanation of the icons).• FilterThe Filter column displays the name of the saved filter options if the files meetthe criteria set. For instance, if files are filtered using options saved with thename “all JPG images”, files in Table view matching the criteria would display[all JPG images] in this column. • In ReportThe In Report column indicates whether or not the item will appear in thereport. By default, items in the table do not appear in the report, with the itemhaving a False Boolean value (indicated, by default, as a blank entry). Tochange the value to True, blue check the item, click on the entry in the In Reportcolumn, and hit [Ctrl] [R], or right-click and select In Report. By default,a value of True is indicated by a bullet in the column, but both the True andFalse indicators can be changed from the Global tab in the Options settings
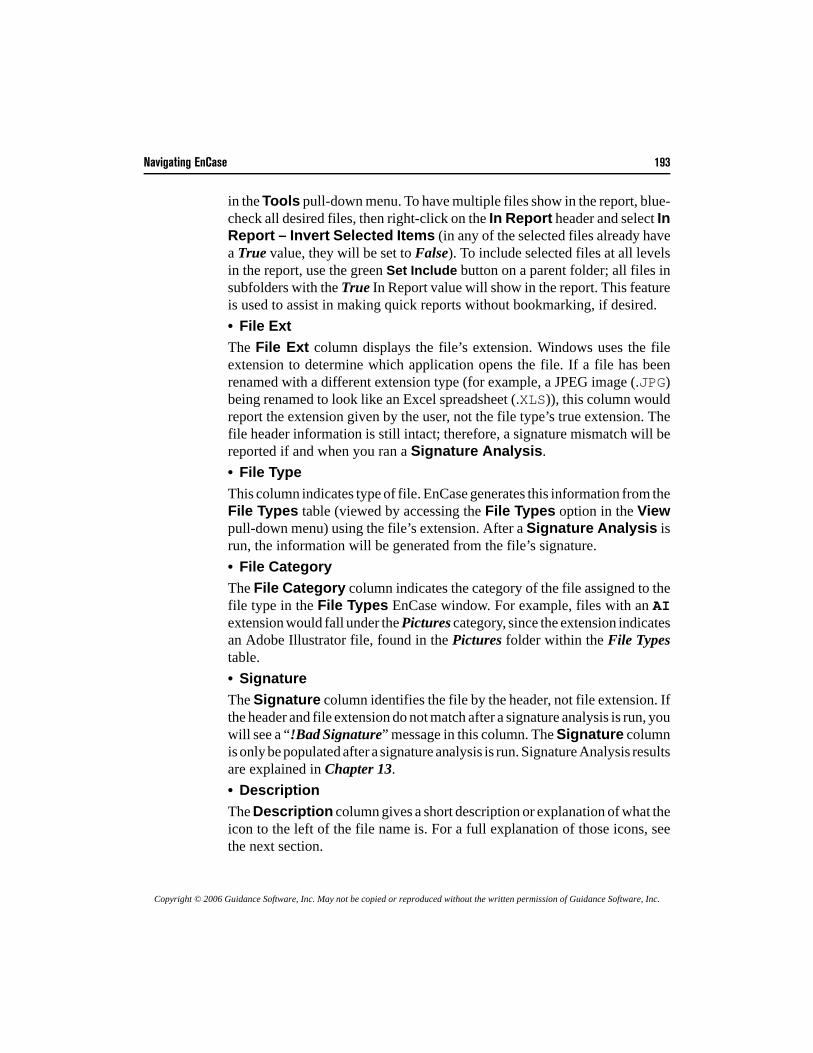
Navigating EnCase 193
Copyright © 2006 Guidance Software, Inc. May not be copied or reproduced without the written permission of Guidance Software, Inc.
in the Tools pull-down menu. To have multiple files show in the report, blue-check all desired files, then right-click on the In Report header and select InReport – Invert Selected Items (in any of the selected files already havea True value, they will be set to False). To include selected files at all levelsin the report, use the green Set Include button on a parent folder; all files insubfolders with the True In Report value will show in the report. This featureis used to assist in making quick reports without bookmarking, if desired.• File ExtThe File Ext column displays the file’s extension. Windows uses the fileextension to determine which application opens the file. If a file has beenrenamed with a different extension type (for example, a JPEG image (.JPG)being renamed to look like an Excel spreadsheet (.XLS)), this column wouldreport the extension given by the user, not the file type’s true extension. Thefile header information is still intact; therefore, a signature mismatch will bereported if and when you ran a Signature Analysis.• File TypeThis column indicates type of file. EnCase generates this information from theFile Types table (viewed by accessing the File Types option in the Viewpull-down menu) using the file’s extension. After a Signature Analysis isrun, the information will be generated from the file’s signature.• File CategoryThe File Category column indicates the category of the file assigned to thefile type in the File Types EnCase window. For example, files with an AIextension would fall under the Pictures category, since the extension indicatesan Adobe Illustrator file, found in the Pictures folder within the File Typestable.• SignatureThe Signature column identifies the file by the header, not file extension. Ifthe header and file extension do not match after a signature analysis is run, youwill see a “!Bad Signature” message in this column. The Signature columnis only be populated after a signature analysis is run. Signature Analysis resultsare explained in Chapter 13.• DescriptionThe Description column gives a short description or explanation of what theicon to the left of the file name is. For a full explanation of those icons, seethe next section.
194 EnCase Forensic v5.05 User Manual
Copyright © 2006 Guidance Software, Inc. May not be copied or reproduced without the written permission of Guidance Software, Inc.
• Is DeletedA TRUE Boolean value displays in this column if this file has been deletedand not emptied from the Recycle Bin.• Last AccessedLast Accessed column displays a date of the last access date of the file. Afile does not have to be altered for the last accessed date to change—onlyaccessed. Any activity (such as viewing, dragging, or even right-clicking) maychange the last accessed date. The last accessed date may also change if thefile is accessed by a program such as a virus checker.• File CreatedThe File Created column is a record of when a particular file was createdat that location. If a file is edited and changed on January 3rd, then copied toa floppy diskette on January 15th, and then that floppy diskette is acquired onJanuary 28th, EnCase would show that the file (on the floppy) was created afterit was last written or even accessed.• Last WrittenThe Last Written column displays the last date and time that a file was actuallyopened, edited, and then saved. If a file is opened then closed, but not altered,the last written date and time do not change.• Entry ModifiedThe Entry Modified column, pertinent to NTFS (Windows NT, Windows2000, Windows XP, and Windows 2003 Server) and Linux file-system files,refers to the pointer for the file-entry and the information that the pointercontains, such as the size of the file. If a file was changed but its size not altered,then the Entry Modified column would NOT change. However, if the filesize has changed (from eight sectors to ten sectors, for example), then thiscolumn would change.• File DeletedIf an entry in an INFO2 file on an NTFS volume has a deleted date, the timeand date of deletion will appear in this column. A TRUE Boolean value willalso appear in the Is Deleted column.• File AcquiredThis field displays the date and time the evidence file the file resides in wasacquired.
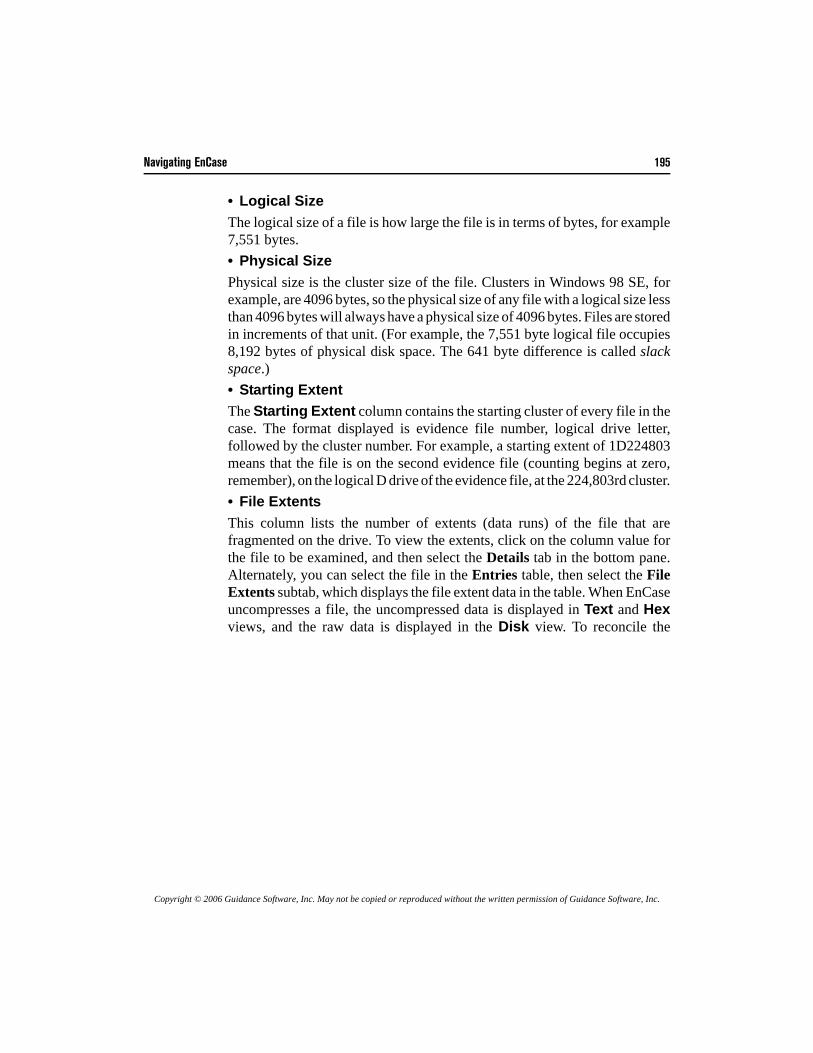
Navigating EnCase 195
Copyright © 2006 Guidance Software, Inc. May not be copied or reproduced without the written permission of Guidance Software, Inc.
• Logical SizeThe logical size of a file is how large the file is in terms of bytes, for example7,551 bytes.• Physical SizePhysical size is the cluster size of the file. Clusters in Windows 98 SE, forexample, are 4096 bytes, so the physical size of any file with a logical size lessthan 4096 bytes will always have a physical size of 4096 bytes. Files are storedin increments of that unit. (For example, the 7,551 byte logical file occupies8,192 bytes of physical disk space. The 641 byte difference is called slackspace.) • Starting ExtentThe Starting Extent column contains the starting cluster of every file in thecase. The format displayed is evidence file number, logical drive letter,followed by the cluster number. For example, a starting extent of 1D224803means that the file is on the second evidence file (counting begins at zero,remember), on the logical D drive of the evidence file, at the 224,803rd cluster.• File ExtentsThis column lists the number of extents (data runs) of the file that arefragmented on the drive. To view the extents, click on the column value forthe file to be examined, and then select the Details tab in the bottom pane.Alternately, you can select the file in the Entries table, then select the FileExtents subtab, which displays the file extent data in the table. When EnCaseuncompresses a file, the uncompressed data is displayed in Text and Hexviews, and the raw data is displayed in the Disk view. To reconcile the
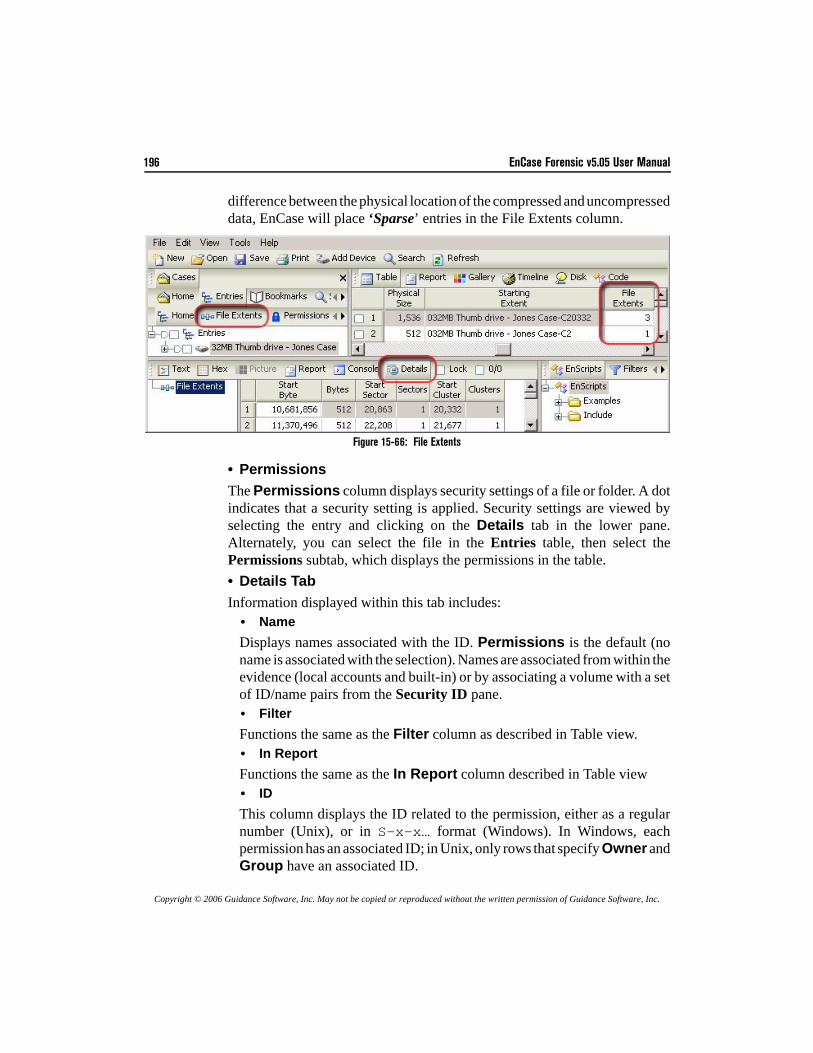
196 EnCase Forensic v5.05 User Manual
Copyright © 2006 Guidance Software, Inc. May not be copied or reproduced without the written permission of Guidance Software, Inc.
difference between the physical location of the compressed and uncompresseddata, EnCase will place ‘Sparse’ entries in the File Extents column.
Figure 15-66: File Extents
• PermissionsThe Permissions column displays security settings of a file or folder. A dotindicates that a security setting is applied. Security settings are viewed byselecting the entry and clicking on the Details tab in the lower pane.Alternately, you can select the file in the Entries table, then select thePermissions subtab, which displays the permissions in the table. • Details TabInformation displayed within this tab includes:
• NameDisplays names associated with the ID. Permissions is the default (noname is associated with the selection). Names are associated from within theevidence (local accounts and built-in) or by associating a volume with a setof ID/name pairs from the Security ID pane.• FilterFunctions the same as the Filter column as described in Table view.• In ReportFunctions the same as the In Report column described in Table view• IDThis column displays the ID related to the permission, either as a regularnumber (Unix), or in S-x-x… format (Windows). In Windows, eachpermission has an associated ID; in Unix, only rows that specify Owner andGroup have an associated ID.
Navigating EnCase 197
Copyright © 2006 Guidance Software, Inc. May not be copied or reproduced without the written permission of Guidance Software, Inc.
• PropertyThis column shows the significance of each particular row in the table (forinstance, Allow, Deny, Owner or Group)• PermissionsExtracted permissions specific to the highlighted item are listed here.
Figure 15-67: Permissions Column window
Each permission is enclosed in brackets ([); a key to the permissiondefinitions follows: The permissions for the Unix environment are:
G-R Generic readG-W Generic writeG-X Generic execute
The permissions for the Windows environment are:Obj In ACE Object Inherit ACE
Cont In ACE Container Inherit ACENo Prop In ACE No Propagate Inherit ACE
In Only ACE Inherit only ACEFC Full ControlM Modify
R&X Read and ExecuteR ReadW Write
Delete DeleteR Attr Read Attributes
D Sbfldr & Fl Delete Subfolders and FilesTrav Fldr/X Fl Traverse Folder/Execute File
W EA Write Extended Attributes
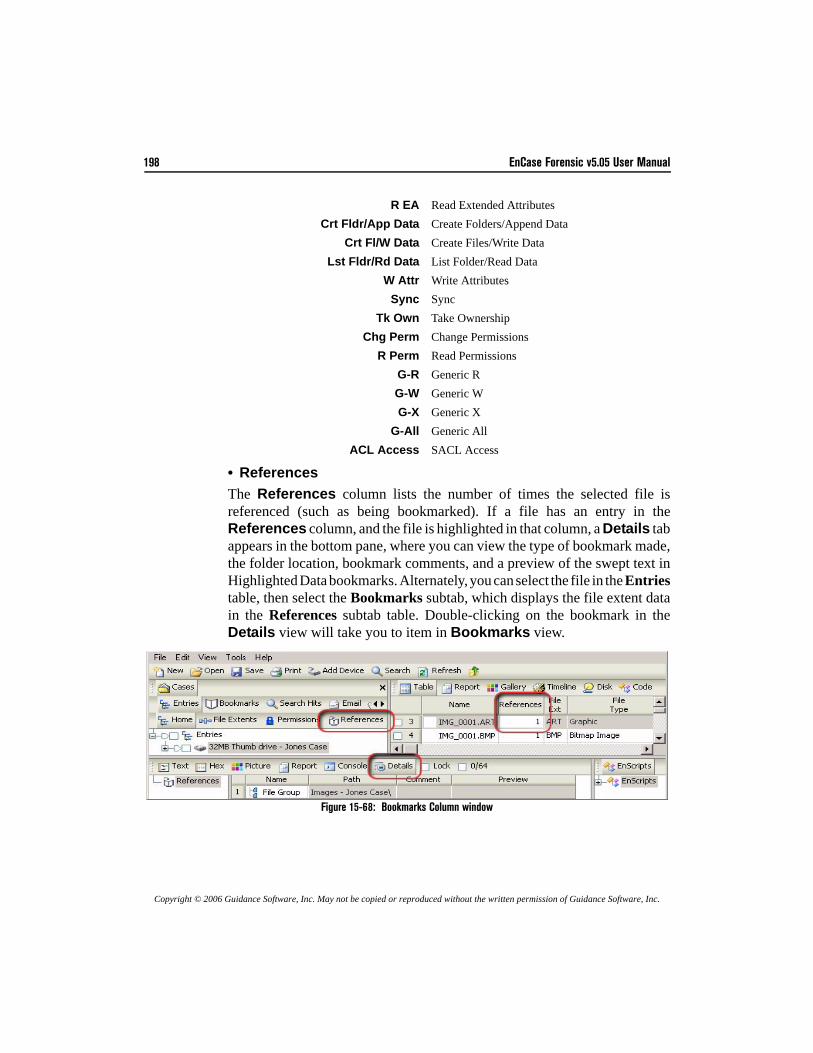
198 EnCase Forensic v5.05 User Manual
Copyright © 2006 Guidance Software, Inc. May not be copied or reproduced without the written permission of Guidance Software, Inc.
R EA Read Extended AttributesCrt Fldr/App Data Create Folders/Append Data
Crt Fl/W Data Create Files/Write DataLst Fldr/Rd Data List Folder/Read Data
W Attr Write AttributesSync Sync
Tk Own Take OwnershipChg Perm Change Permissions
R Perm Read PermissionsG-R Generic RG-W Generic WG-X Generic X
G-All Generic AllACL Access SACL Access
• ReferencesThe References column lists the number of times the selected file isreferenced (such as being bookmarked). If a file has an entry in theReferences column, and the file is highlighted in that column, a Details tabappears in the bottom pane, where you can view the type of bookmark made,the folder location, bookmark comments, and a preview of the swept text inHighlighted Data bookmarks. Alternately, you can select the file in the Entriestable, then select the Bookmarks subtab, which displays the file extent datain the References subtab table. Double-clicking on the bookmark in theDetails view will take you to item in Bookmarks view.
Figure 15-68: Bookmarks Column window
Navigating EnCase 199
Copyright © 2006 Guidance Software, Inc. May not be copied or reproduced without the written permission of Guidance Software, Inc.
• Physical LocationEnCase organizes the Unallocated Clusters (UC) of a device into one virtualfile. It reads the FAT (File Allocation Table) of the file system, or the $Bitmapin NTFS to create this virtual file. This allows the examiner to examine all ofthe UC very efficiently with keyword searches and EnScripts. PhysicalLocation is the number of bytes into the device at which that the UC begins.• Physical SectorThe Physical Sector column lists the starting sector where the item residesin Unallocated Space, based on an algorithm applied to the data in the PhysicalLocation column. This coincides with the Start Sector in the Details tab whenviewing the File Extents in the table. This feature was added in version 4.20.• Evidence FileThe Evidence File column displays which evidence file the file resides in.• File IdentifierThe File Identifier is a file table index number, stored in the Master File Table.It is a unique number allocated to file/folders in an NTFS file system.• Hash ValueThe Hash Value column displays the hash value of every file in the case. TheCompute Hash Value command must be run to generate this information.• Hash SetThe Hash Set column displays the hash set to which a file belongs. If no hashsets have been created or imported, this column will be unpopulated.• Hash CategoryThe Hash Category column displays the hash category to which a filebelongs. If you have not created or imported any hash sets, then this columnwill either be unpopulated, or display both Known and Notable.• Full PathThe Full Path column displays the location the file is located within theevidence file. It includes the evidence file name in the path.• Short NameThe Short Name is name that Windows gives the file using the DOS “8.3”naming convention. For example, a file with the file name“onethousanddollarbill.jpg” would appear in this column as“onetho~1.jpg”.
200 EnCase Forensic v5.05 User Manual
Copyright © 2006 Guidance Software, Inc. May not be copied or reproduced without the written permission of Guidance Software, Inc.
• Unique NameThis column is used to display the name for files mounted with the EnCaseVirtual File System (VFS) Module in Windows Explorer. For moreinformation about the EnCase VFS Module, please refer to the VFS usermanual available from www.guidancesoftware.com/support/downloads.asp. • Original PathThe Original Path column displays information derived from the INFO2 fileon deleted files sitting in the Recycle Bin; specifically, where the deleted fileoriginally came from.
•For allocated (not deleted) files, the column is blank•For files within the Recycle Bin, this column shows where they originatedfrom before they were deleted•For deleted/overwritten files, this column shows what file has overwrittenthe original
• Symbolic LinkIn Unix-based file systems (including AIX), symbolic, or soft links are files,similar to Windows .LNK shortcut files, that point to other files. Symbolic linksdo not contain the data found in the target file, but can provide links todirectories, or files on remote devices.
Organizing Columns
Rearranging Columns
Table columns can be arranged in any order. Use the horizontal scrollbar or the rightarrow to maneuver to the desired column, left click on the header of the column andhold the button, and drag the column to the desired position. To reset the column
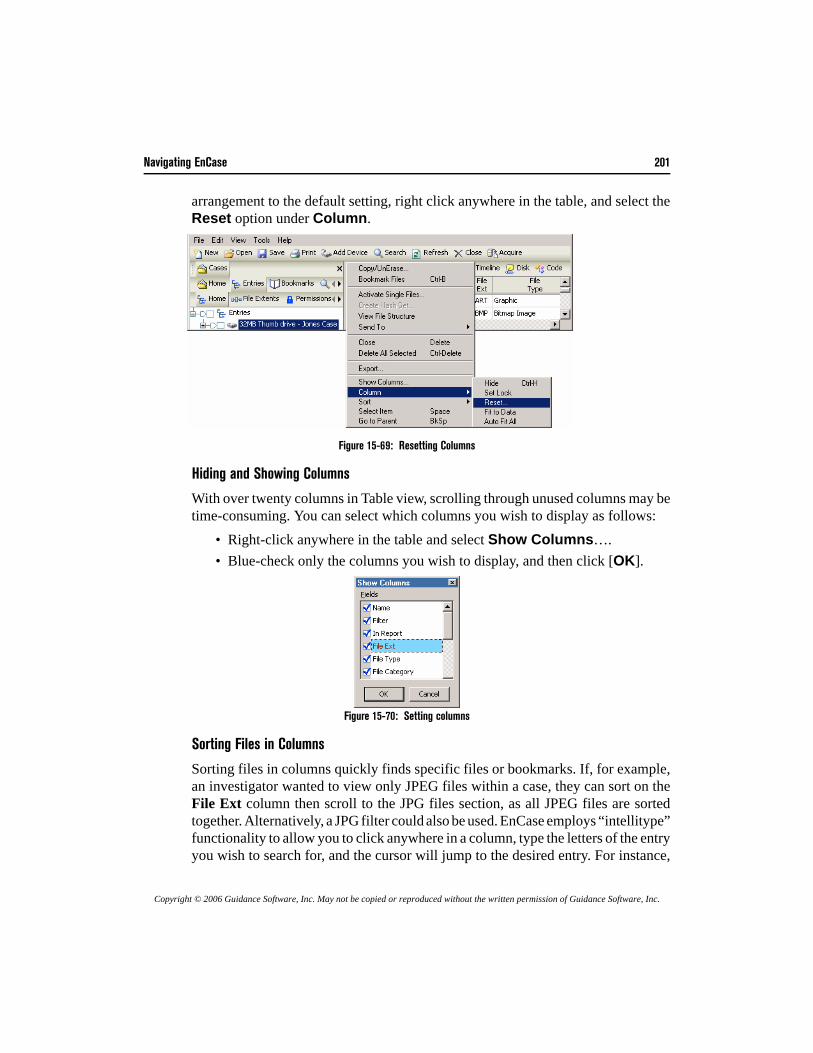
Navigating EnCase 201
Copyright © 2006 Guidance Software, Inc. May not be copied or reproduced without the written permission of Guidance Software, Inc.
arrangement to the default setting, right click anywhere in the table, and select theReset option under Column.
Figure 15-69: Resetting Columns
Hiding and Showing Columns
With over twenty columns in Table view, scrolling through unused columns may betime-consuming. You can select which columns you wish to display as follows:
• Right-click anywhere in the table and select Show Columns….• Blue-check only the columns you wish to display, and then click [OK].
Figure 15-70: Setting columns
Sorting Files in Columns
Sorting files in columns quickly finds specific files or bookmarks. If, for example,an investigator wanted to view only JPEG files within a case, they can sort on theFile Ext column then scroll to the JPG files section, as all JPEG files are sortedtogether. Alternatively, a JPG filter could also be used. EnCase employs “intellitype”functionality to allow you to click anywhere in a column, type the letters of the entryyou wish to search for, and the cursor will jump to the desired entry. For instance,
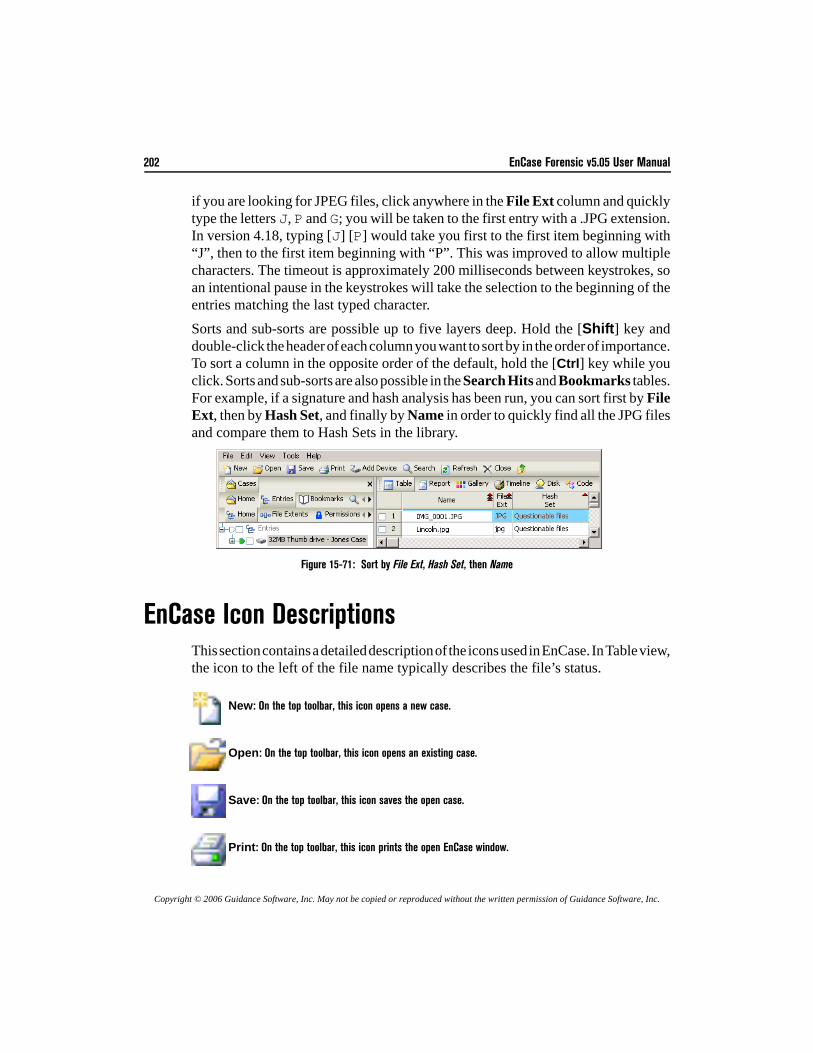
202 EnCase Forensic v5.05 User Manual
Copyright © 2006 Guidance Software, Inc. May not be copied or reproduced without the written permission of Guidance Software, Inc.
if you are looking for JPEG files, click anywhere in the File Ext column and quicklytype the letters J, P and G; you will be taken to the first entry with a .JPG extension.In version 4.18, typing [J] [P] would take you first to the first item beginning with“J”, then to the first item beginning with “P”. This was improved to allow multiplecharacters. The timeout is approximately 200 milliseconds between keystrokes, soan intentional pause in the keystrokes will take the selection to the beginning of theentries matching the last typed character.Sorts and sub-sorts are possible up to five layers deep. Hold the [Shift] key anddouble-click the header of each column you want to sort by in the order of importance.To sort a column in the opposite order of the default, hold the [Ctrl] key while youclick. Sorts and sub-sorts are also possible in the Search Hits and Bookmarks tables.For example, if a signature and hash analysis has been run, you can sort first by FileExt, then by Hash Set, and finally by Name in order to quickly find all the JPG filesand compare them to Hash Sets in the library.
Figure 15-71: Sort by File Ext, Hash Set, then Name
EnCase Icon Descriptions This section contains a detailed description of the icons used in EnCase. In Table view,the icon to the left of the file name typically describes the file’s status.
New: On the top toolbar, this icon opens a new case.
Open: On the top toolbar, this icon opens an existing case.
Save: On the top toolbar, this icon saves the open case.
Print: On the top toolbar, this icon prints the open EnCase window.
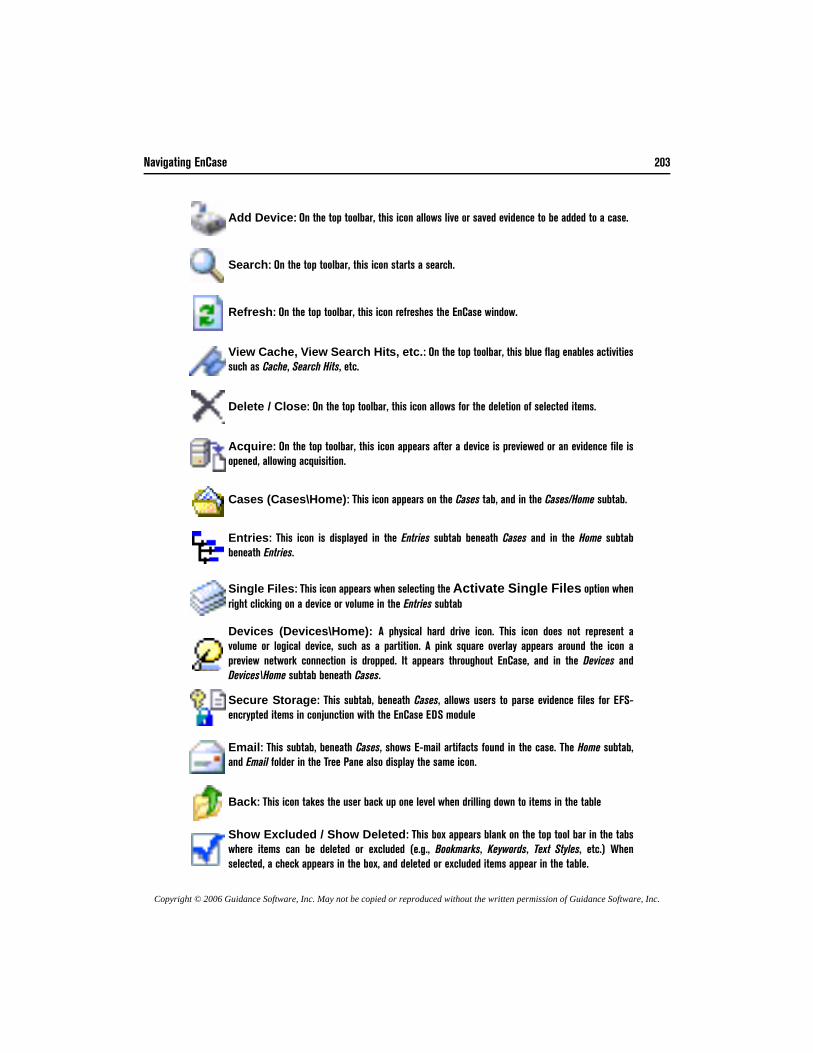
Navigating EnCase 203
Copyright © 2006 Guidance Software, Inc. May not be copied or reproduced without the written permission of Guidance Software, Inc.
Add Device: On the top toolbar, this icon allows live or saved evidence to be added to a case.
Search: On the top toolbar, this icon starts a search.
Refresh: On the top toolbar, this icon refreshes the EnCase window.
View Cache, View Search Hits, etc.: On the top toolbar, this blue flag enables activitiessuch as Cache, Search Hits, etc.
Delete / Close: On the top toolbar, this icon allows for the deletion of selected items.
Acquire: On the top toolbar, this icon appears after a device is previewed or an evidence file isopened, allowing acquisition.
Cases (Cases\Home): This icon appears on the Cases tab, and in the Cases/Home subtab.
Entries: This icon is displayed in the Entries subtab beneath Cases and in the Home subtabbeneath Entries.
Single Files: This icon appears when selecting the Activate Single Files option whenright clicking on a device or volume in the Entries subtab
Devices (Devices\Home): A physical hard drive icon. This icon does not represent avolume or logical device, such as a partition. A pink square overlay appears around the icon apreview network connection is dropped. It appears throughout EnCase, and in the Devices andDevices\Home subtab beneath Cases.
Secure Storage: This subtab, beneath Cases, allows users to parse evidence files for EFS-encrypted items in conjunction with the EnCase EDS module
Email: This subtab, beneath Cases, shows E-mail artifacts found in the case. The Home subtab,and Email folder in the Tree Pane also display the same icon.
Back: This icon takes the user back up one level when drilling down to items in the table
Show Excluded / Show Deleted: This box appears blank on the top tool bar in the tabswhere items can be deleted or excluded (e.g., Bookmarks, Keywords, Text Styles, etc.) Whenselected, a check appears in the box, and deleted or excluded items appear in the table.
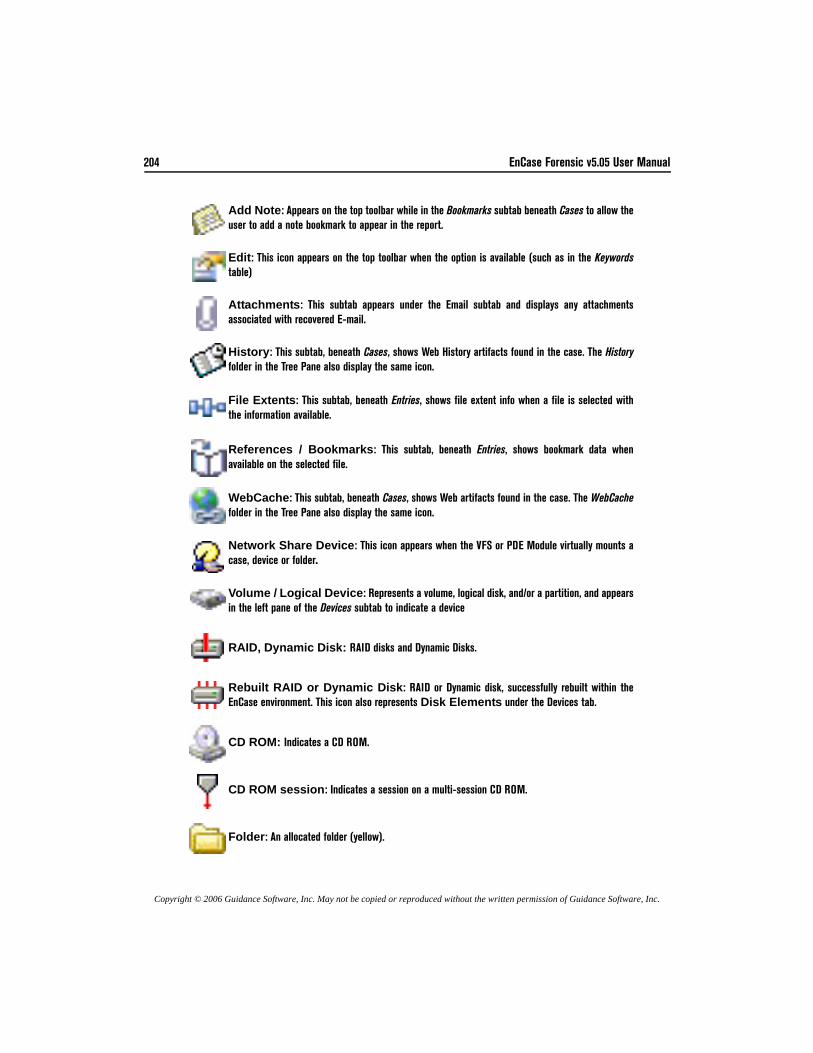
204 EnCase Forensic v5.05 User Manual
Copyright © 2006 Guidance Software, Inc. May not be copied or reproduced without the written permission of Guidance Software, Inc.
Add Note: Appears on the top toolbar while in the Bookmarks subtab beneath Cases to allow theuser to add a note bookmark to appear in the report.
Edit: This icon appears on the top toolbar when the option is available (such as in the Keywordstable)
Attachments: This subtab appears under the Email subtab and displays any attachmentsassociated with recovered E-mail.
History: This subtab, beneath Cases, shows Web History artifacts found in the case. The Historyfolder in the Tree Pane also display the same icon.
File Extents: This subtab, beneath Entries, shows file extent info when a file is selected withthe information available.
References / Bookmarks: This subtab, beneath Entries, shows bookmark data whenavailable on the selected file.
WebCache: This subtab, beneath Cases, shows Web artifacts found in the case. The WebCachefolder in the Tree Pane also display the same icon.
Network Share Device: This icon appears when the VFS or PDE Module virtually mounts acase, device or folder.
Volume / Logical Device: Represents a volume, logical disk, and/or a partition, and appearsin the left pane of the Devices subtab to indicate a device
RAID, Dynamic Disk: RAID disks and Dynamic Disks.
Rebuilt RAID or Dynamic Disk: RAID or Dynamic disk, successfully rebuilt within theEnCase environment. This icon also represents Disk Elements under the Devices tab.
CD ROM: Indicates a CD ROM.
CD ROM session: Indicates a session on a multi-session CD ROM.
Folder: An allocated folder (yellow).
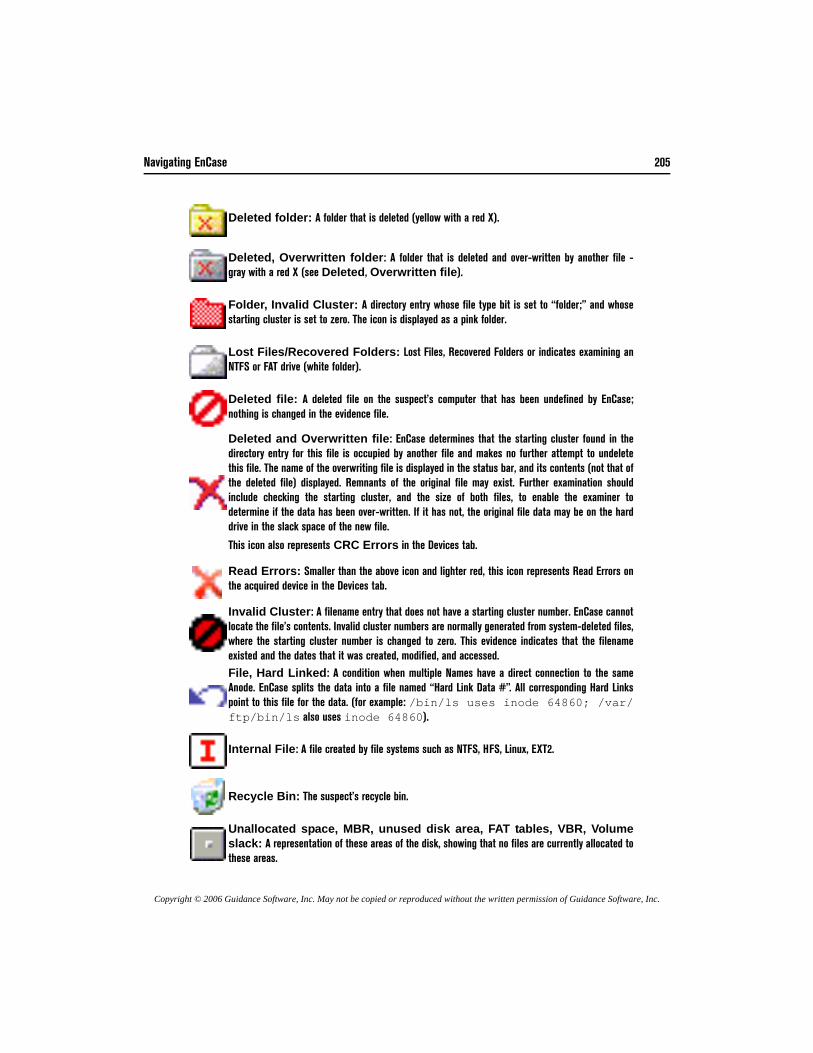
Navigating EnCase 205
Copyright © 2006 Guidance Software, Inc. May not be copied or reproduced without the written permission of Guidance Software, Inc.
Deleted folder: A folder that is deleted (yellow with a red X).
Deleted, Overwritten folder: A folder that is deleted and over-written by another file -gray with a red X (see Deleted, Overwritten file).
Folder, Invalid Cluster: A directory entry whose file type bit is set to “folder;” and whosestarting cluster is set to zero. The icon is displayed as a pink folder.
Lost Files/Recovered Folders: Lost Files, Recovered Folders or indicates examining anNTFS or FAT drive (white folder).
Deleted file: A deleted file on the suspect’s computer that has been undefined by EnCase;nothing is changed in the evidence file.
Deleted and Overwritten file: EnCase determines that the starting cluster found in thedirectory entry for this file is occupied by another file and makes no further attempt to undeletethis file. The name of the overwriting file is displayed in the status bar, and its contents (not that ofthe deleted file) displayed. Remnants of the original file may exist. Further examination shouldinclude checking the starting cluster, and the size of both files, to enable the examiner todetermine if the data has been over-written. If it has not, the original file data may be on the harddrive in the slack space of the new file.
This icon also represents CRC Errors in the Devices tab.
Read Errors: Smaller than the above icon and lighter red, this icon represents Read Errors onthe acquired device in the Devices tab.
Invalid Cluster: A filename entry that does not have a starting cluster number. EnCase cannotlocate the file’s contents. Invalid cluster numbers are normally generated from system-deleted files,where the starting cluster number is changed to zero. This evidence indicates that the filenameexisted and the dates that it was created, modified, and accessed.File, Hard Linked: A condition when multiple Names have a direct connection to the sameAnode. EnCase splits the data into a file named “Hard Link Data #”. All corresponding Hard Linkspoint to this file for the data. (for example: /bin/ls uses inode 64860; /var/ftp/bin/ls also uses inode 64860).
Internal File: A file created by file systems such as NTFS, HFS, Linux, EXT2.
Recycle Bin: The suspect’s recycle bin.
Unallocated space, MBR, unused disk area, FAT tables, VBR, Volumeslack: A representation of these areas of the disk, showing that no files are currently allocated tothese areas.
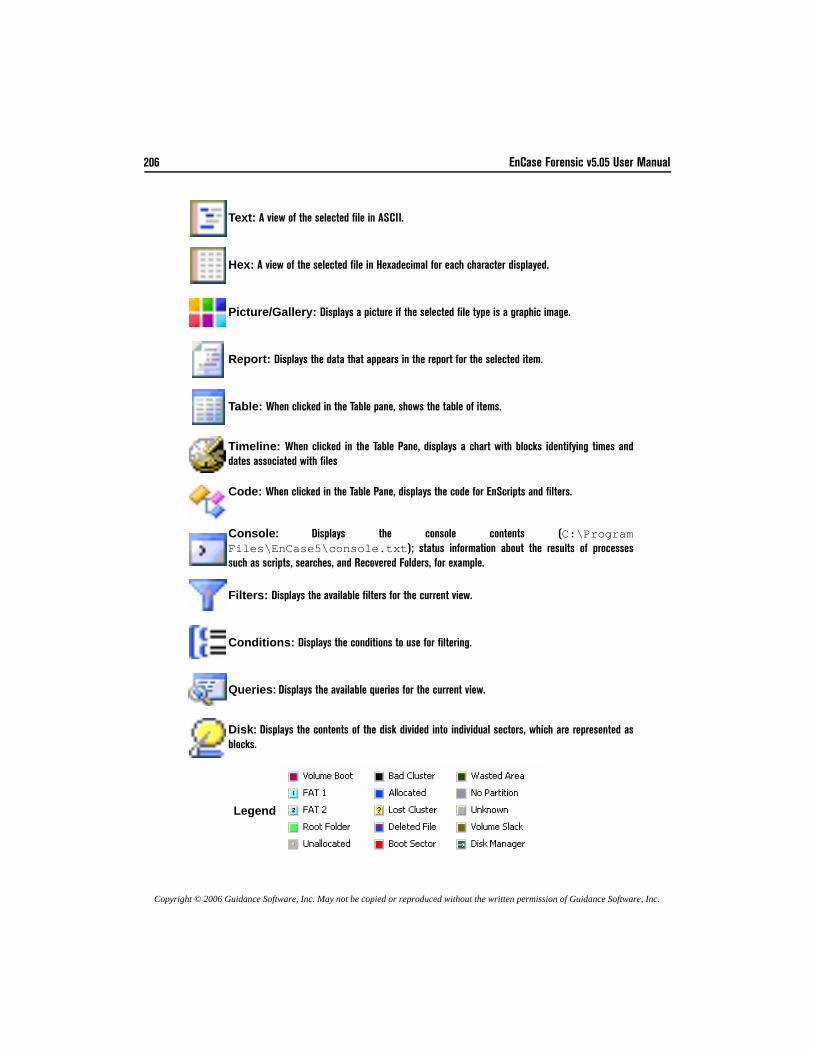
206 EnCase Forensic v5.05 User Manual
Copyright © 2006 Guidance Software, Inc. May not be copied or reproduced without the written permission of Guidance Software, Inc.
Text: A view of the selected file in ASCII.
Hex: A view of the selected file in Hexadecimal for each character displayed.
Picture/Gallery: Displays a picture if the selected file type is a graphic image.
Report: Displays the data that appears in the report for the selected item.
Table: When clicked in the Table pane, shows the table of items.
Timeline: When clicked in the Table Pane, displays a chart with blocks identifying times anddates associated with files
Code: When clicked in the Table Pane, displays the code for EnScripts and filters.
Console: Displays the console contents (C:\ProgramFiles\EnCase5\console.txt); status information about the results of processessuch as scripts, searches, and Recovered Folders, for example.
Filters: Displays the available filters for the current view.
Conditions: Displays the conditions to use for filtering.
Queries: Displays the available queries for the current view.
Disk: Displays the contents of the disk divided into individual sectors, which are represented asblocks.
Legend
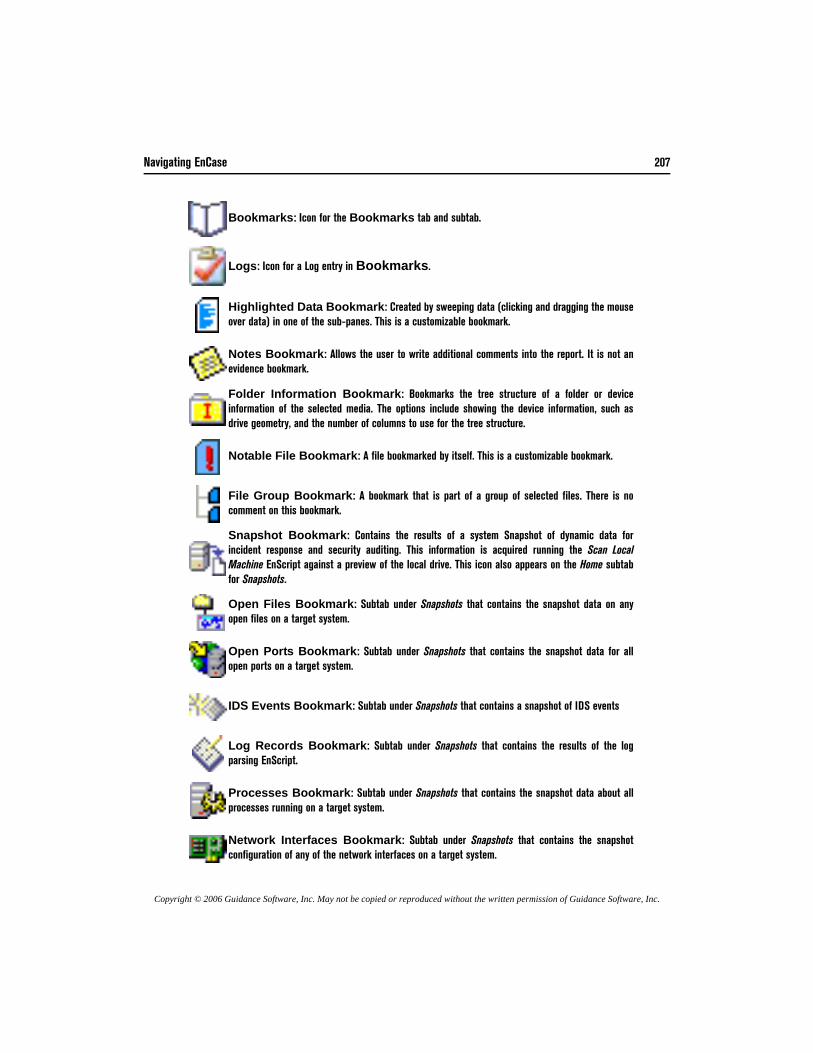
Navigating EnCase 207
Copyright © 2006 Guidance Software, Inc. May not be copied or reproduced without the written permission of Guidance Software, Inc.
Bookmarks: Icon for the Bookmarks tab and subtab.
Logs: Icon for a Log entry in Bookmarks.
Highlighted Data Bookmark: Created by sweeping data (clicking and dragging the mouseover data) in one of the sub-panes. This is a customizable bookmark.
Notes Bookmark: Allows the user to write additional comments into the report. It is not anevidence bookmark.
Folder Information Bookmark: Bookmarks the tree structure of a folder or deviceinformation of the selected media. The options include showing the device information, such asdrive geometry, and the number of columns to use for the tree structure.
Notable File Bookmark: A file bookmarked by itself. This is a customizable bookmark.
File Group Bookmark: A bookmark that is part of a group of selected files. There is nocomment on this bookmark.
Snapshot Bookmark: Contains the results of a system Snapshot of dynamic data forincident response and security auditing. This information is acquired running the Scan LocalMachine EnScript against a preview of the local drive. This icon also appears on the Home subtabfor Snapshots.
Open Files Bookmark: Subtab under Snapshots that contains the snapshot data on anyopen files on a target system.
Open Ports Bookmark: Subtab under Snapshots that contains the snapshot data for allopen ports on a target system.
IDS Events Bookmark: Subtab under Snapshots that contains a snapshot of IDS events
Log Records Bookmark: Subtab under Snapshots that contains the results of the logparsing EnScript.
Processes Bookmark: Subtab under Snapshots that contains the snapshot data about allprocesses running on a target system.
Network Interfaces Bookmark: Subtab under Snapshots that contains the snapshotconfiguration of any of the network interfaces on a target system.
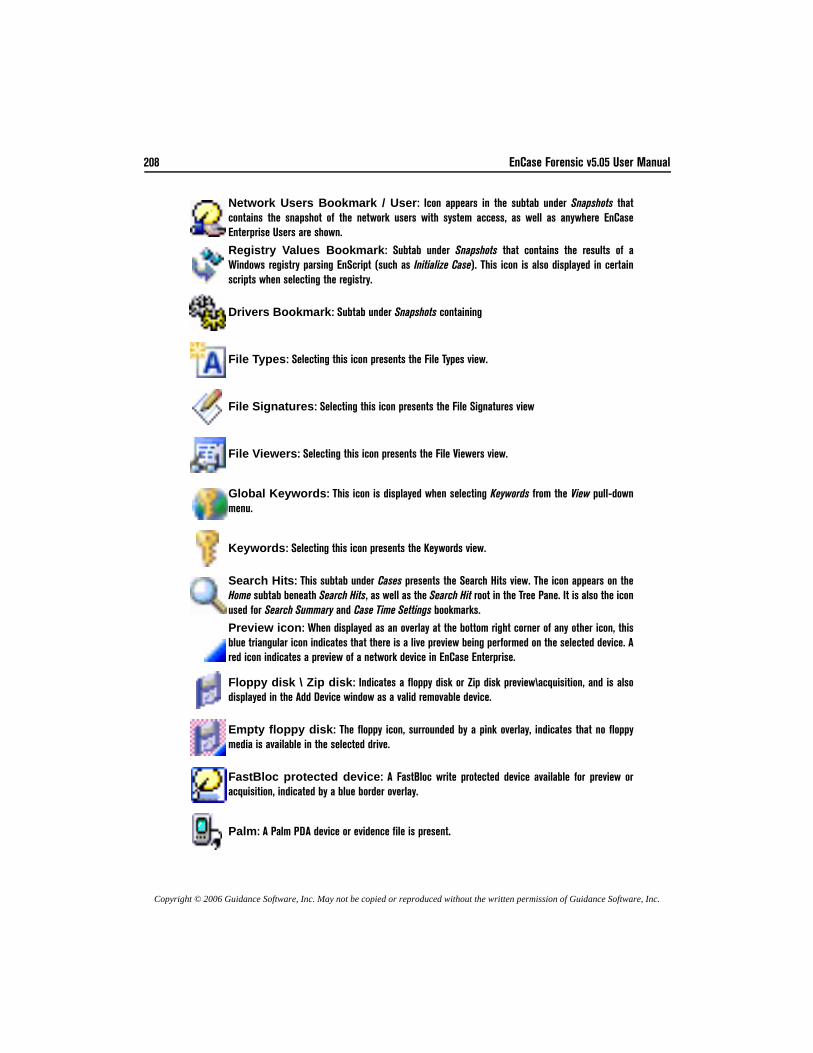
208 EnCase Forensic v5.05 User Manual
Copyright © 2006 Guidance Software, Inc. May not be copied or reproduced without the written permission of Guidance Software, Inc.
Network Users Bookmark / User: Icon appears in the subtab under Snapshots thatcontains the snapshot of the network users with system access, as well as anywhere EnCaseEnterprise Users are shown.
Registry Values Bookmark: Subtab under Snapshots that contains the results of aWindows registry parsing EnScript (such as Initialize Case). This icon is also displayed in certainscripts when selecting the registry.
Drivers Bookmark: Subtab under Snapshots containing
File Types: Selecting this icon presents the File Types view.
File Signatures: Selecting this icon presents the File Signatures view
File Viewers: Selecting this icon presents the File Viewers view.
Global Keywords: This icon is displayed when selecting Keywords from the View pull-downmenu.
Keywords: Selecting this icon presents the Keywords view.
Search Hits: This subtab under Cases presents the Search Hits view. The icon appears on theHome subtab beneath Search Hits, as well as the Search Hit root in the Tree Pane. It is also the iconused for Search Summary and Case Time Settings bookmarks.
Preview icon: When displayed as an overlay at the bottom right corner of any other icon, thisblue triangular icon indicates that there is a live preview being performed on the selected device. Ared icon indicates a preview of a network device in EnCase Enterprise.
Floppy disk \ Zip disk: Indicates a floppy disk or Zip disk preview\acquisition, and is alsodisplayed in the Add Device window as a valid removable device.
Empty floppy disk: The floppy icon, surrounded by a pink overlay, indicates that no floppymedia is available in the selected drive.
FastBloc protected device: A FastBloc write protected device available for preview oracquisition, indicated by a blue border overlay.
Palm: A Palm PDA device or evidence file is present.

Navigating EnCase 209
Copyright © 2006 Guidance Software, Inc. May not be copied or reproduced without the written permission of Guidance Software, Inc.
Parallel Port \ Network Crossover: A device has been added using a parallel port or anetwork crossover cable.
Security IDs / Permissions (Entries subtab): Displays EnCase extracted file andfolder security information (owner, group and permissions) for an NTFS file system as well asowner, group and permission settings for a Unix, or Linux system.Text Styles: Selects the text style to view Code Pages in different settings, like variations incolor and text line length. EnCase is configured with default text styles, but additional styles can beadded, edited, and deleted from this tab by either right-clicking and selecting the command fromthe contextual menu or clicking the button in the toolbar
EnScripts / Code: Shows available EnScripts (small programs or macros designed toautomate forensic procedures). When Code is selected in Table Pane, displays EnScript code in thatwindow.
Run: The Run button appears on the top toolbar when code for an EnScript is selected and readyto run.
Hash Sets: A collection of hash values of files that belong to the same application.
App Descriptors: This view enables examiners to organize the hash values of live processesrunning on a system scanned by the Snapshot function.
Machine Profiles: This view enables examiners to create a custom profile of the authorizedapplications or processes that should be running on a target machine. The icon also appears on theHome subtab beneath Machine Profiles, and represents network nodes in the Network tabs. When anode is included, the icon has a green plus sign overlay in the upper right,
Allowed: Subtab beneath Machine Profiles that shows allowed permissions.
Encryption Keys: This view enables users to generate key pairs to be used with EnCaseEnterprise.
EnScript Types: A reference resource containing the EnScript language classes. The right-pane displays each functions parameter.
Redirect: Indicates the file that overwrote a deleted file, displayed in the status bar. Thecontents being displayed are not the contents of the deleted file.
EnScript Member Functions: Functions that are defined within the Script or Class. Thisicon appears in the Tree Pane under EnScript Types.
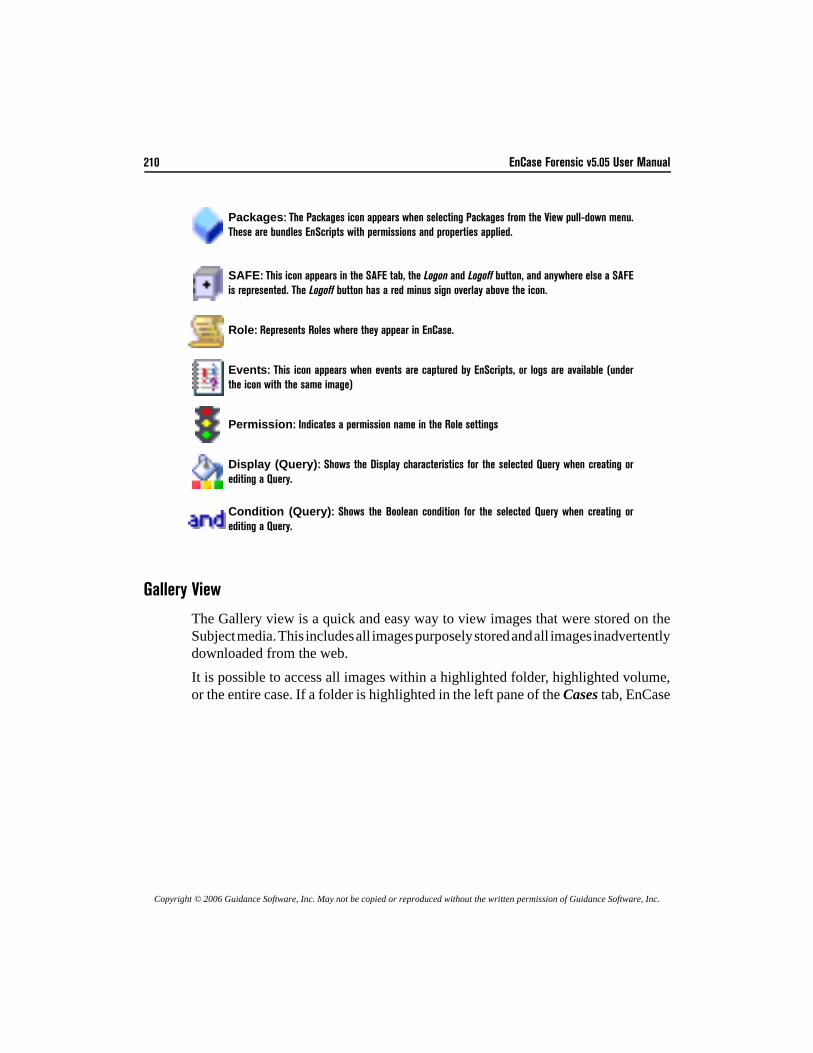
210 EnCase Forensic v5.05 User Manual
Copyright © 2006 Guidance Software, Inc. May not be copied or reproduced without the written permission of Guidance Software, Inc.
Gallery View
The Gallery view is a quick and easy way to view images that were stored on theSubject media. This includes all images purposely stored and all images inadvertentlydownloaded from the web. It is possible to access all images within a highlighted folder, highlighted volume,or the entire case. If a folder is highlighted in the left pane of the Cases tab, EnCase
Packages: The Packages icon appears when selecting Packages from the View pull-down menu.These are bundles EnScripts with permissions and properties applied.
SAFE: This icon appears in the SAFE tab, the Logon and Logoff button, and anywhere else a SAFEis represented. The Logoff button has a red minus sign overlay above the icon.
Role: Represents Roles where they appear in EnCase.
Events: This icon appears when events are captured by EnScripts, or logs are available (underthe icon with the same image)
Permission: Indicates a permission name in the Role settings
Display (Query): Shows the Display characteristics for the selected Query when creating orediting a Query.
Condition (Query): Shows the Boolean condition for the selected Query when creating orediting a Query.
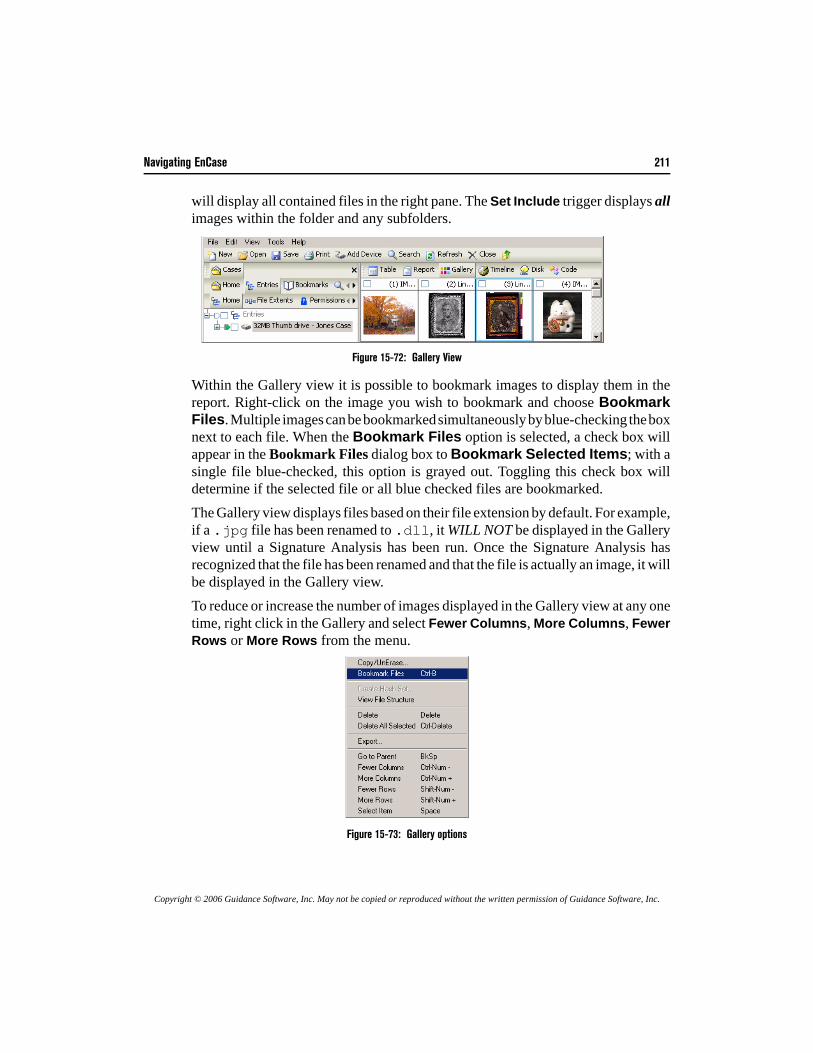
Navigating EnCase 211
Copyright © 2006 Guidance Software, Inc. May not be copied or reproduced without the written permission of Guidance Software, Inc.
will display all contained files in the right pane. The Set Include trigger displays allimages within the folder and any subfolders.
Figure 15-72: Gallery View
Within the Gallery view it is possible to bookmark images to display them in thereport. Right-click on the image you wish to bookmark and choose BookmarkFiles. Multiple images can be bookmarked simultaneously by blue-checking the boxnext to each file. When the Bookmark Files option is selected, a check box willappear in the Bookmark Files dialog box to Bookmark Selected Items; with asingle file blue-checked, this option is grayed out. Toggling this check box willdetermine if the selected file or all blue checked files are bookmarked.The Gallery view displays files based on their file extension by default. For example,if a .jpg file has been renamed to .dll, it WILL NOT be displayed in the Galleryview until a Signature Analysis has been run. Once the Signature Analysis hasrecognized that the file has been renamed and that the file is actually an image, it willbe displayed in the Gallery view.To reduce or increase the number of images displayed in the Gallery view at any onetime, right click in the Gallery and select Fewer Columns, More Columns, FewerRows or More Rows from the menu.
Figure 15-73: Gallery options
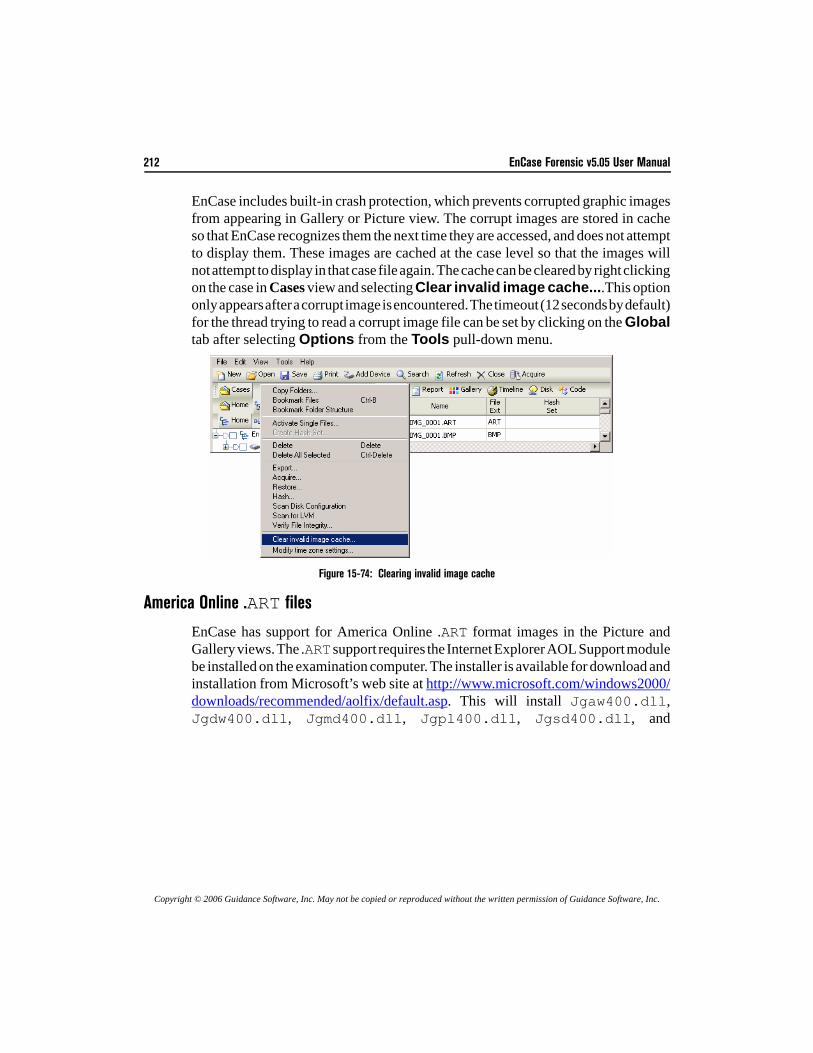
212 EnCase Forensic v5.05 User Manual
Copyright © 2006 Guidance Software, Inc. May not be copied or reproduced without the written permission of Guidance Software, Inc.
EnCase includes built-in crash protection, which prevents corrupted graphic imagesfrom appearing in Gallery or Picture view. The corrupt images are stored in cacheso that EnCase recognizes them the next time they are accessed, and does not attemptto display them. These images are cached at the case level so that the images willnot attempt to display in that case file again. The cache can be cleared by right clickingon the case in Cases view and selecting Clear invalid image cache....This optiononly appears after a corrupt image is encountered. The timeout (12 seconds by default)for the thread trying to read a corrupt image file can be set by clicking on the Globaltab after selecting Options from the Tools pull-down menu.
Figure 15-74: Clearing invalid image cache
America Online .ART files
EnCase has support for America Online .ART format images in the Picture andGallery views. The .ART support requires the Internet Explorer AOL Support modulebe installed on the examination computer. The installer is available for download andinstallation from Microsoft’s web site at http://www.microsoft.com/windows2000/downloads/recommended/aolfix/default.asp. This will install Jgaw400.dll,Jgdw400.dll, Jgmd400.dll, Jgpl400.dll, Jgsd400.dll, and
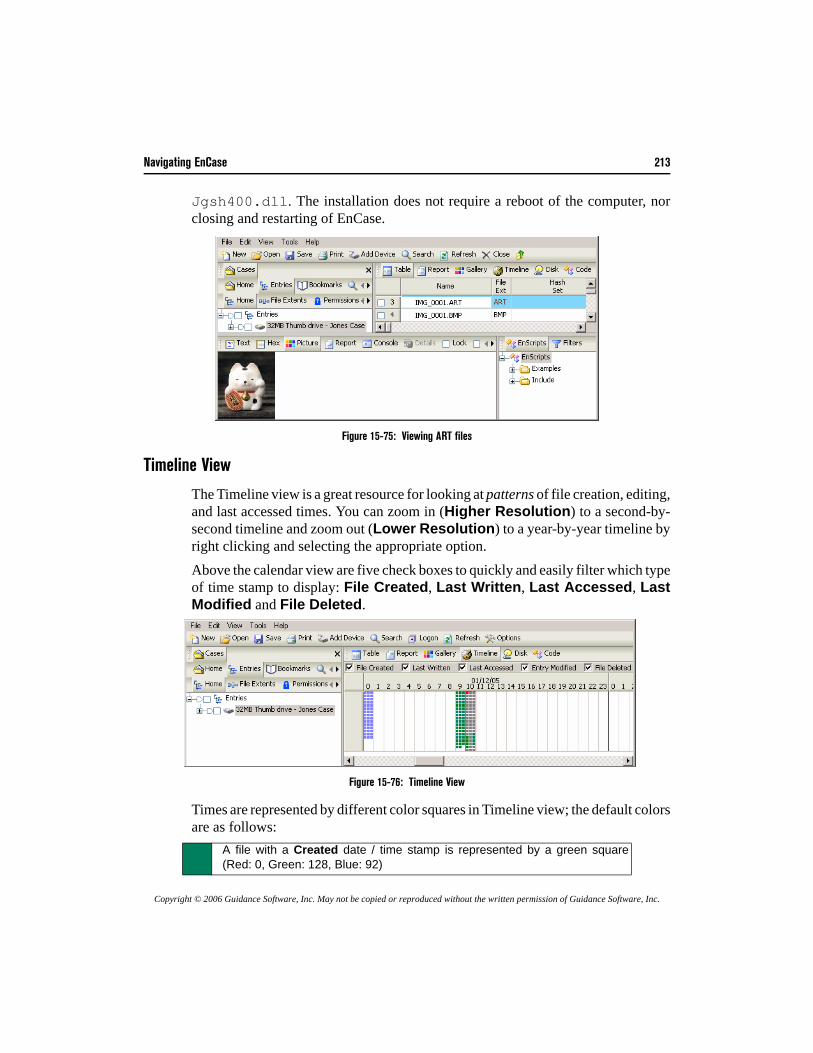
Navigating EnCase 213
Copyright © 2006 Guidance Software, Inc. May not be copied or reproduced without the written permission of Guidance Software, Inc.
Jgsh400.dll. The installation does not require a reboot of the computer, norclosing and restarting of EnCase.
Figure 15-75: Viewing ART files
Timeline View
The Timeline view is a great resource for looking at patterns of file creation, editing,and last accessed times. You can zoom in (Higher Resolution) to a second-by-second timeline and zoom out (Lower Resolution) to a year-by-year timeline byright clicking and selecting the appropriate option.Above the calendar view are five check boxes to quickly and easily filter which typeof time stamp to display: File Created, Last Written, Last Accessed, LastModified and File Deleted.
Figure 15-76: Timeline View
Times are represented by different color squares in Timeline view; the default colorsare as follows:
A file with a Created date / time stamp is represented by a green square(Red: 0, Green: 128, Blue: 92)
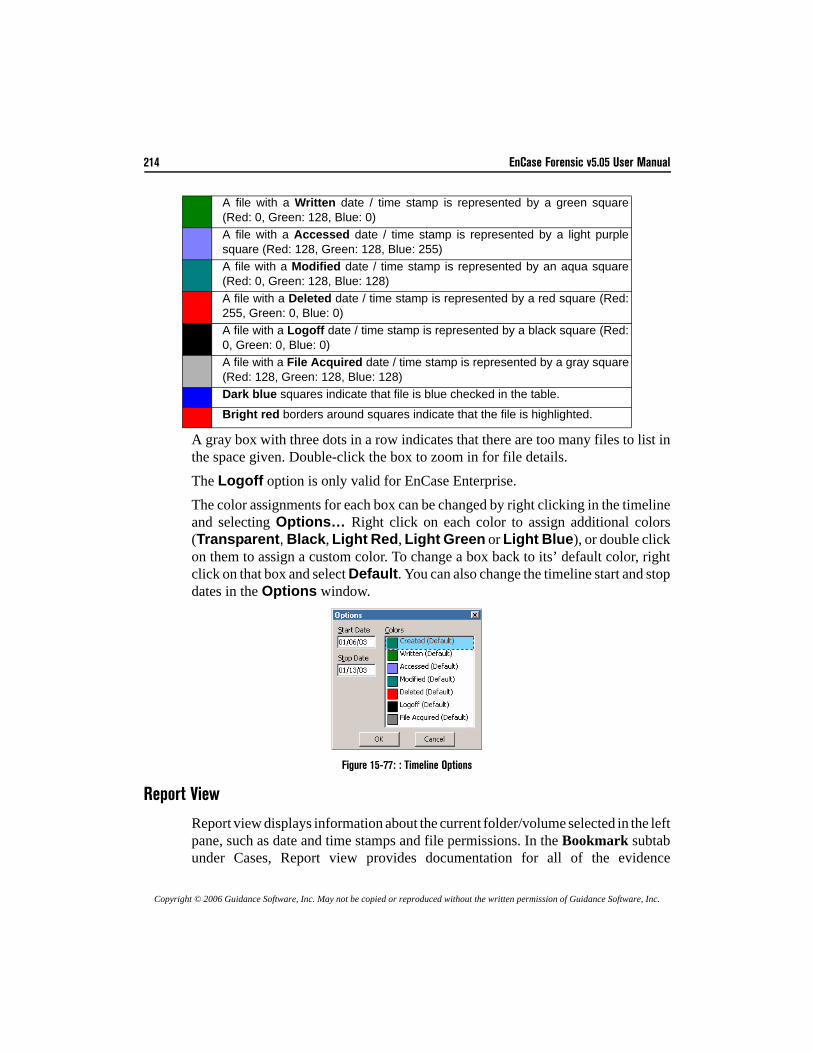
214 EnCase Forensic v5.05 User Manual
Copyright © 2006 Guidance Software, Inc. May not be copied or reproduced without the written permission of Guidance Software, Inc.
A gray box with three dots in a row indicates that there are too many files to list inthe space given. Double-click the box to zoom in for file details.The Logoff option is only valid for EnCase Enterprise.The color assignments for each box can be changed by right clicking in the timelineand selecting Options… Right click on each color to assign additional colors(Transparent, Black, Light Red, Light Green or Light Blue), or double clickon them to assign a custom color. To change a box back to its’ default color, rightclick on that box and select Default. You can also change the timeline start and stopdates in the Options window.
Figure 15-77: : Timeline Options
Report View
Report view displays information about the current folder/volume selected in the leftpane, such as date and time stamps and file permissions. In the Bookmark subtabunder Cases, Report view provides documentation for all of the evidence
A file with a Written date / time stamp is represented by a green square(Red: 0, Green: 128, Blue: 0)A file with a Accessed date / time stamp is represented by a light purplesquare (Red: 128, Green: 128, Blue: 255)A file with a Modified date / time stamp is represented by an aqua square(Red: 0, Green: 128, Blue: 128)A file with a Deleted date / time stamp is represented by a red square (Red:255, Green: 0, Blue: 0)A file with a Logoff date / time stamp is represented by a black square (Red:0, Green: 0, Blue: 0)A file with a File Acquired date / time stamp is represented by a gray square(Red: 128, Green: 128, Blue: 128)Dark blue squares indicate that file is blue checked in the table.
Bright red borders around squares indicate that the file is highlighted.
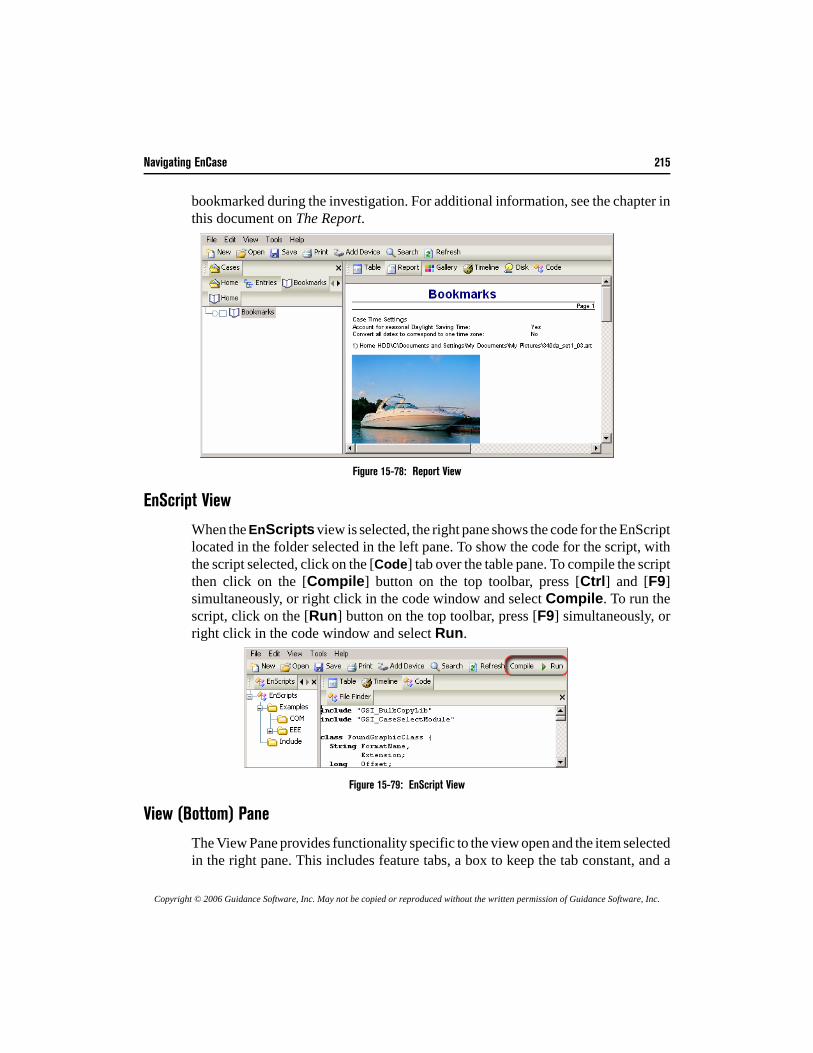
Navigating EnCase 215
Copyright © 2006 Guidance Software, Inc. May not be copied or reproduced without the written permission of Guidance Software, Inc.
bookmarked during the investigation. For additional information, see the chapter inthis document on The Report.
Figure 15-78: Report View
EnScript View
When the EnScripts view is selected, the right pane shows the code for the EnScriptlocated in the folder selected in the left pane. To show the code for the script, withthe script selected, click on the [Code] tab over the table pane. To compile the scriptthen click on the [Compile] button on the top toolbar, press [Ctrl] and [F9]simultaneously, or right click in the code window and select Compile. To run thescript, click on the [Run] button on the top toolbar, press [F9] simultaneously, orright click in the code window and select Run.
Figure 15-79: EnScript View
View (Bottom) Pane
The View Pane provides functionality specific to the view open and the item selectedin the right pane. This includes feature tabs, a box to keep the tab constant, and a
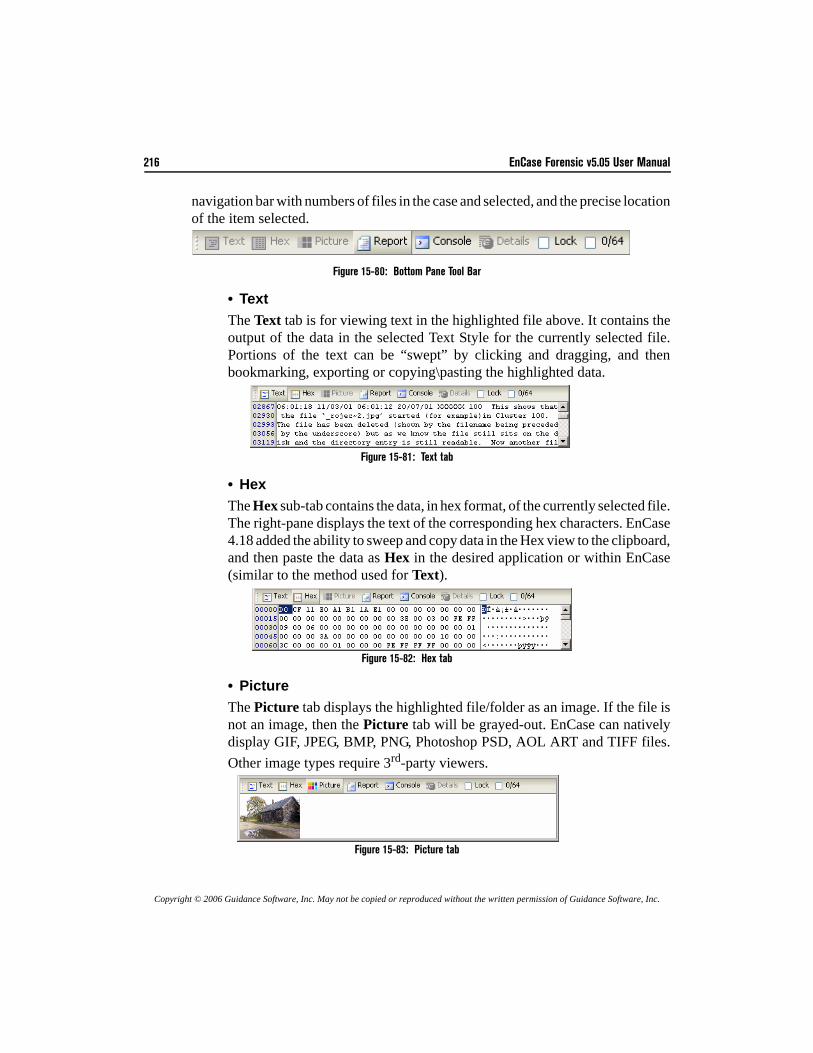
216 EnCase Forensic v5.05 User Manual
Copyright © 2006 Guidance Software, Inc. May not be copied or reproduced without the written permission of Guidance Software, Inc.
navigation bar with numbers of files in the case and selected, and the precise locationof the item selected.
Figure 15-80: Bottom Pane Tool Bar
• TextThe Text tab is for viewing text in the highlighted file above. It contains theoutput of the data in the selected Text Style for the currently selected file.Portions of the text can be “swept” by clicking and dragging, and thenbookmarking, exporting or copying\pasting the highlighted data.
Figure 15-81: Text tab
• HexThe Hex sub-tab contains the data, in hex format, of the currently selected file.The right-pane displays the text of the corresponding hex characters. EnCase4.18 added the ability to sweep and copy data in the Hex view to the clipboard,and then paste the data as Hex in the desired application or within EnCase(similar to the method used for Text).
Figure 15-82: Hex tab
• PictureThe Picture tab displays the highlighted file/folder as an image. If the file isnot an image, then the Picture tab will be grayed-out. EnCase can nativelydisplay GIF, JPEG, BMP, PNG, Photoshop PSD, AOL ART and TIFF files.Other image types require 3rd-party viewers.
Figure 15-83: Picture tab
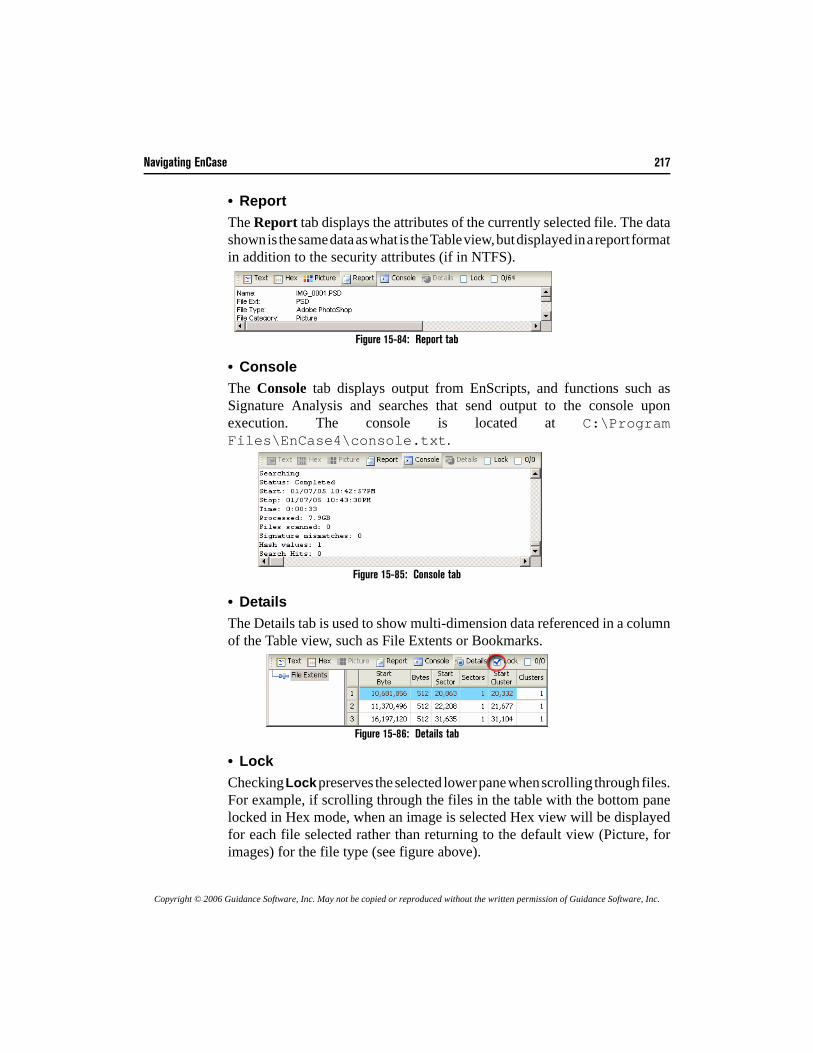
Navigating EnCase 217
Copyright © 2006 Guidance Software, Inc. May not be copied or reproduced without the written permission of Guidance Software, Inc.
• ReportThe Report tab displays the attributes of the currently selected file. The datashown is the same data as what is the Table view, but displayed in a report formatin addition to the security attributes (if in NTFS).
Figure 15-84: Report tab
• ConsoleThe Console tab displays output from EnScripts, and functions such asSignature Analysis and searches that send output to the console uponexecution. The console is located at C:\ProgramFiles\EnCase4\console.txt.
Figure 15-85: Console tab
• DetailsThe Details tab is used to show multi-dimension data referenced in a columnof the Table view, such as File Extents or Bookmarks.
Figure 15-86: Details tab
• LockChecking Lock preserves the selected lower pane when scrolling through files.For example, if scrolling through the files in the table with the bottom panelocked in Hex mode, when an image is selected Hex view will be displayedfor each file selected rather than returning to the default view (Picture, forimages) for the file type (see figure above).
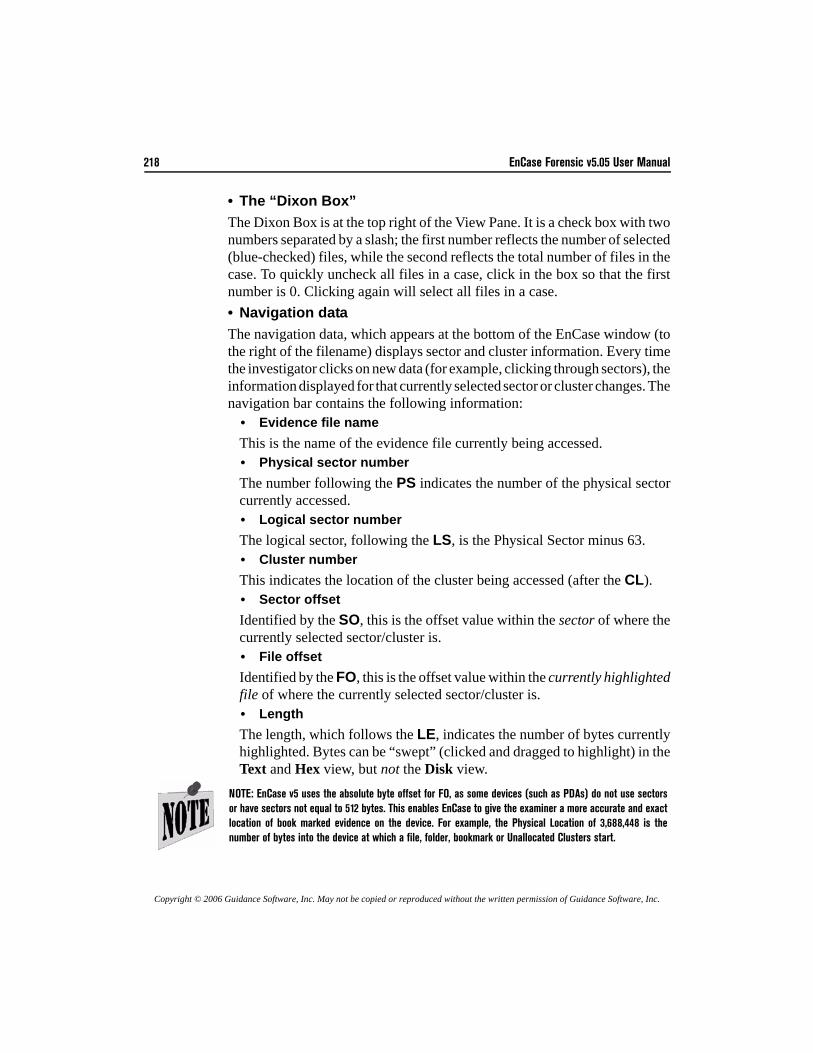
218 EnCase Forensic v5.05 User Manual
Copyright © 2006 Guidance Software, Inc. May not be copied or reproduced without the written permission of Guidance Software, Inc.
• The “Dixon Box”The Dixon Box is at the top right of the View Pane. It is a check box with twonumbers separated by a slash; the first number reflects the number of selected(blue-checked) files, while the second reflects the total number of files in thecase. To quickly uncheck all files in a case, click in the box so that the firstnumber is 0. Clicking again will select all files in a case.• Navigation dataThe navigation data, which appears at the bottom of the EnCase window (tothe right of the filename) displays sector and cluster information. Every timethe investigator clicks on new data (for example, clicking through sectors), theinformation displayed for that currently selected sector or cluster changes. Thenavigation bar contains the following information:
• Evidence file nameThis is the name of the evidence file currently being accessed.• Physical sector numberThe number following the PS indicates the number of the physical sectorcurrently accessed.• Logical sector numberThe logical sector, following the LS, is the Physical Sector minus 63.• Cluster numberThis indicates the location of the cluster being accessed (after the CL).• Sector offsetIdentified by the SO, this is the offset value within the sector of where thecurrently selected sector/cluster is.• File offsetIdentified by the FO, this is the offset value within the currently highlightedfile of where the currently selected sector/cluster is.• LengthThe length, which follows the LE, indicates the number of bytes currentlyhighlighted. Bytes can be “swept” (clicked and dragged to highlight) in theText and Hex view, but not the Disk view.
NOTE: EnCase v5 uses the absolute byte offset for FO, as some devices (such as PDAs) do not use sectorsor have sectors not equal to 512 bytes. This enables EnCase to give the examiner a more accurate and exactlocation of book marked evidence on the device. For example, the Physical Location of 3,688,448 is thenumber of bytes into the device at which a file, folder, bookmark or Unallocated Clusters start.
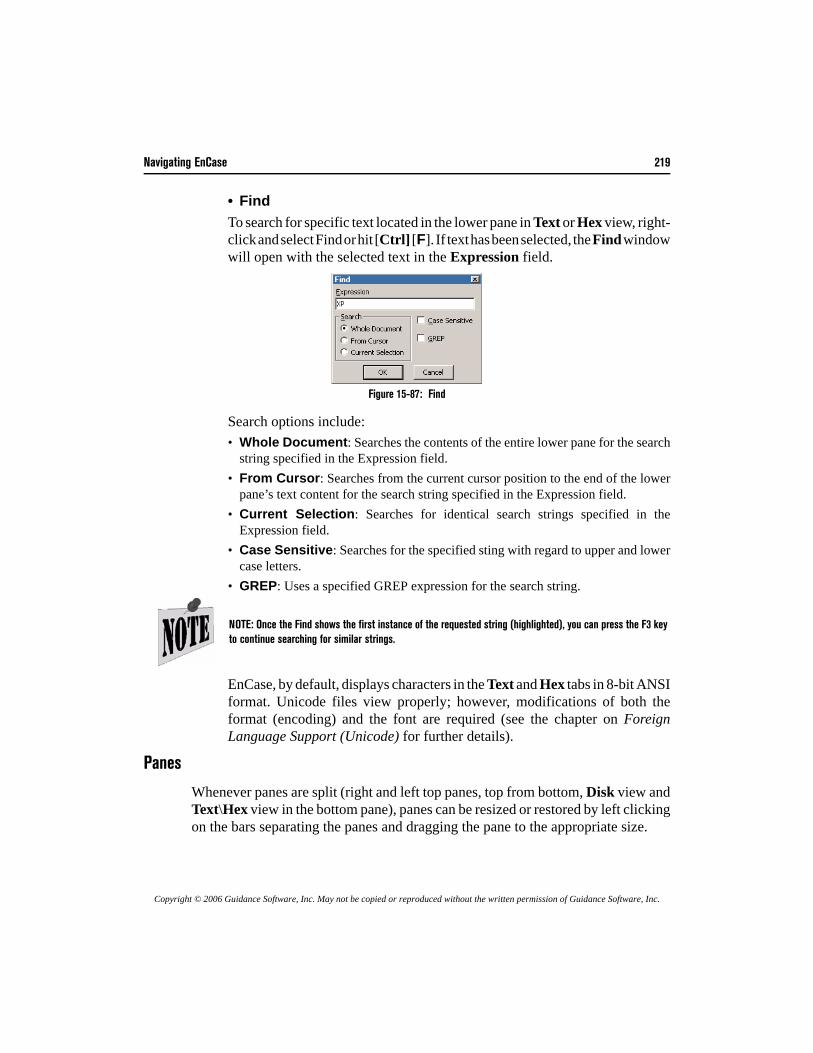
Navigating EnCase 219
Copyright © 2006 Guidance Software, Inc. May not be copied or reproduced without the written permission of Guidance Software, Inc.
• FindTo search for specific text located in the lower pane in Text or Hex view, right-click and select Find or hit [Ctrl] [F]. If text has been selected, the Find windowwill open with the selected text in the Expression field.
Figure 15-87: Find
Search options include:• Whole Document: Searches the contents of the entire lower pane for the search
string specified in the Expression field.• From Cursor: Searches from the current cursor position to the end of the lower
pane’s text content for the search string specified in the Expression field.• Current Selection: Searches for identical search strings specified in the
Expression field.• Case Sensitive: Searches for the specified sting with regard to upper and lower
case letters.• GREP: Uses a specified GREP expression for the search string.
EnCase, by default, displays characters in the Text and Hex tabs in 8-bit ANSIformat. Unicode files view properly; however, modifications of both theformat (encoding) and the font are required (see the chapter on ForeignLanguage Support (Unicode) for further details).
Panes
Whenever panes are split (right and left top panes, top from bottom, Disk view andText\Hex view in the bottom pane), panes can be resized or restored by left clickingon the bars separating the panes and dragging the pane to the appropriate size.
NOTE: Once the Find shows the first instance of the requested string (highlighted), you can press the F3 keyto continue searching for similar strings.
220 EnCase Forensic v5.05 User Manual
Copyright © 2006 Guidance Software, Inc. May not be copied or reproduced without the written permission of Guidance Software, Inc.
Date and Time Questions• Is the Last Accessed Date the same as the deleted date?No. DOS does not store the deleted date of a file in the directory entry record.The only time that you can recover the deleted date and time is when the fileis in the Recycle Bin. EnCase will recover these times when possible anddisplay them in the Deleted column.• On some files, there are no time stamps in the Last Accessed
column.If the file was created by a version of DOS prior to 7.0, the last access datewill be blank.
NOTE: Let Recover Folders finish before running any further analysis on the drive. Other EnCase functions,such as keyword searches, will prompt you to terminate the Recover Folders command. If you do so, you willlose any folders recovered to that point.
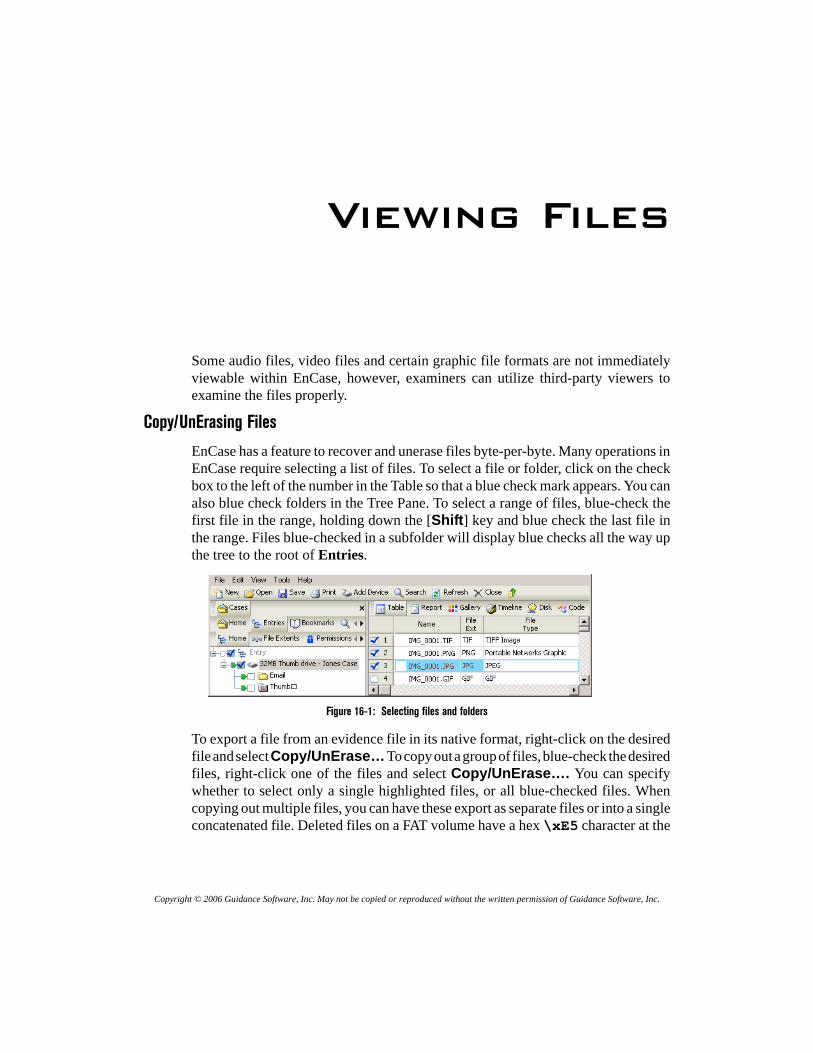
Copyright © 2006 Guidance Software, Inc. May not be copied or reproduced without the written permission of Guidance Software, Inc.
Viewing Files
Some audio files, video files and certain graphic file formats are not immediatelyviewable within EnCase, however, examiners can utilize third-party viewers toexamine the files properly.
Copy/UnErasing Files
EnCase has a feature to recover and unerase files byte-per-byte. Many operations inEnCase require selecting a list of files. To select a file or folder, click on the checkbox to the left of the number in the Table so that a blue check mark appears. You canalso blue check folders in the Tree Pane. To select a range of files, blue-check thefirst file in the range, holding down the [Shift] key and blue check the last file inthe range. Files blue-checked in a subfolder will display blue checks all the way upthe tree to the root of Entries.
Figure 16-1: Selecting files and folders
To export a file from an evidence file in its native format, right-click on the desiredfile and select Copy/UnErase… To copy out a group of files, blue-check the desiredfiles, right-click one of the files and select Copy/UnErase…. You can specifywhether to select only a single highlighted files, or all blue-checked files. Whencopying out multiple files, you can have these export as separate files or into a singleconcatenated file. Deleted files on a FAT volume have a hex \xE5 character at the
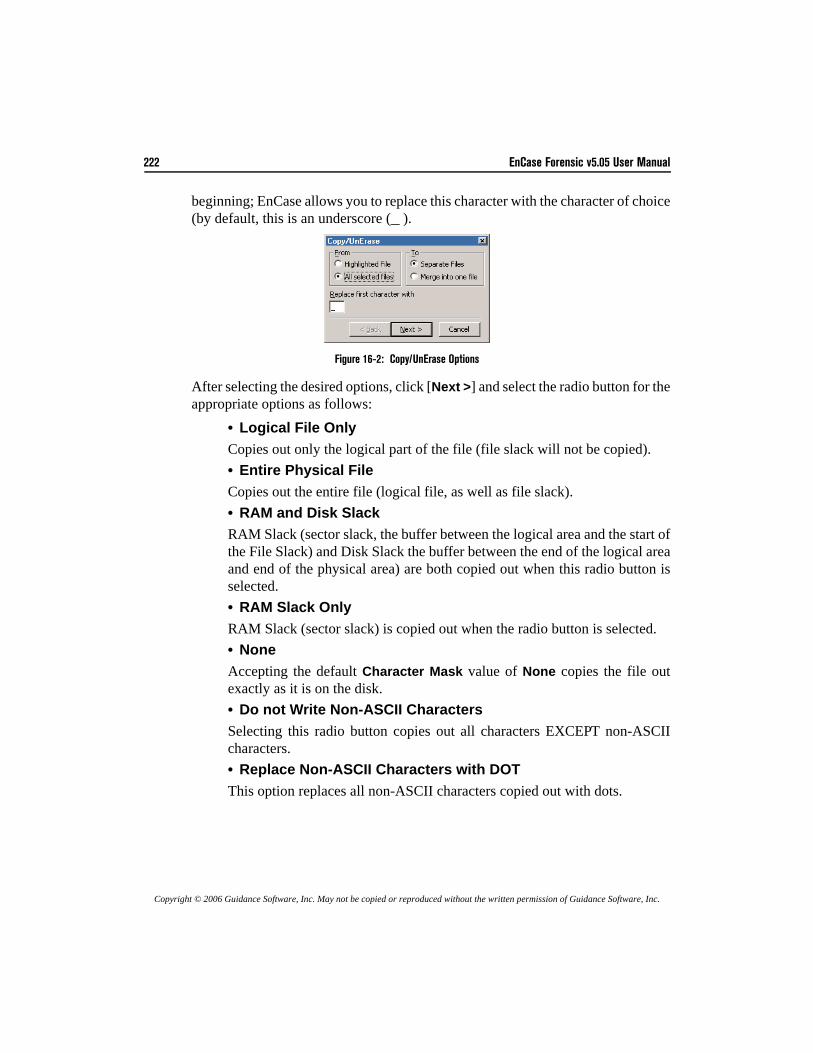
222 EnCase Forensic v5.05 User Manual
Copyright © 2006 Guidance Software, Inc. May not be copied or reproduced without the written permission of Guidance Software, Inc.
beginning; EnCase allows you to replace this character with the character of choice(by default, this is an underscore (_ ).
Figure 16-2: Copy/UnErase Options
After selecting the desired options, click [Next >] and select the radio button for theappropriate options as follows:
• Logical File OnlyCopies out only the logical part of the file (file slack will not be copied).• Entire Physical FileCopies out the entire file (logical file, as well as file slack).• RAM and Disk SlackRAM Slack (sector slack, the buffer between the logical area and the start ofthe File Slack) and Disk Slack the buffer between the end of the logical areaand end of the physical area) are both copied out when this radio button isselected.• RAM Slack OnlyRAM Slack (sector slack) is copied out when the radio button is selected.• NoneAccepting the default Character Mask value of None copies the file outexactly as it is on the disk.• Do not Write Non-ASCII CharactersSelecting this radio button copies out all characters EXCEPT non-ASCIIcharacters.• Replace Non-ASCII Characters with DOTThis option replaces all non-ASCII characters copied out with dots.
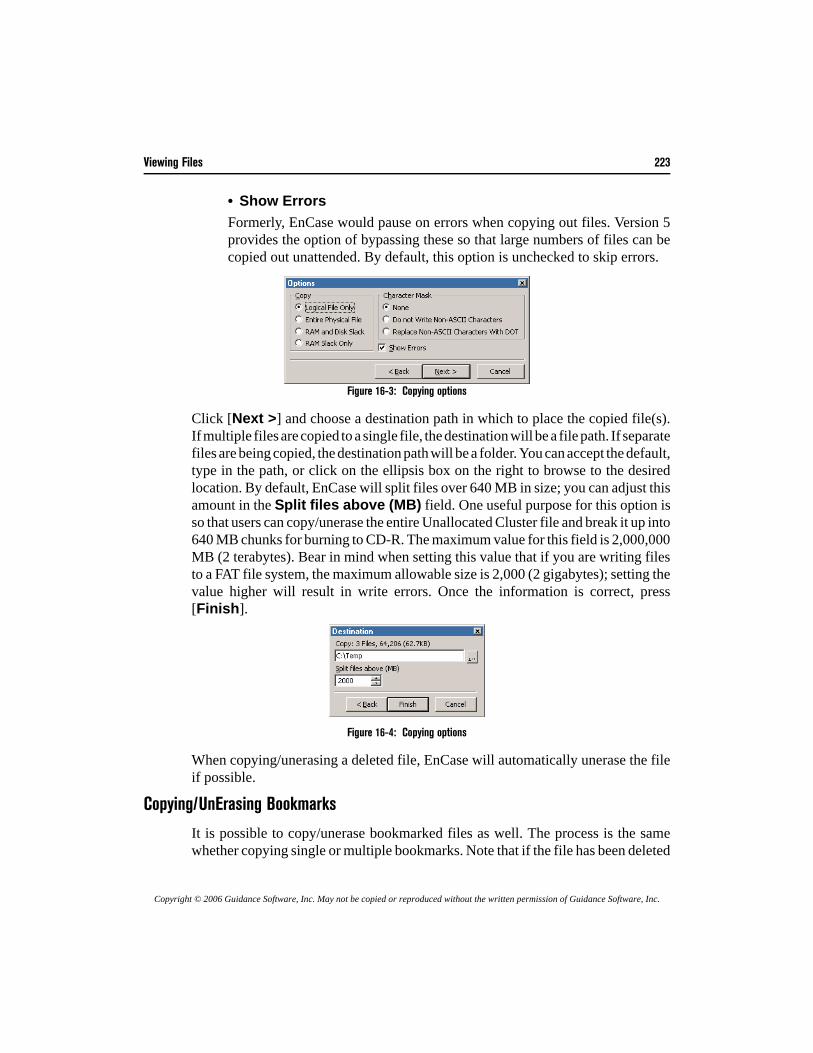
Viewing Files 223
Copyright © 2006 Guidance Software, Inc. May not be copied or reproduced without the written permission of Guidance Software, Inc.
• Show ErrorsFormerly, EnCase would pause on errors when copying out files. Version 5provides the option of bypassing these so that large numbers of files can becopied out unattended. By default, this option is unchecked to skip errors.
Figure 16-3: Copying options
Click [Next >] and choose a destination path in which to place the copied file(s).If multiple files are copied to a single file, the destination will be a file path. If separatefiles are being copied, the destination path will be a folder. You can accept the default,type in the path, or click on the ellipsis box on the right to browse to the desiredlocation. By default, EnCase will split files over 640 MB in size; you can adjust thisamount in the Split files above (MB) field. One useful purpose for this option isso that users can copy/unerase the entire Unallocated Cluster file and break it up into640 MB chunks for burning to CD-R. The maximum value for this field is 2,000,000MB (2 terabytes). Bear in mind when setting this value that if you are writing filesto a FAT file system, the maximum allowable size is 2,000 (2 gigabytes); setting thevalue higher will result in write errors. Once the information is correct, press[Finish].
Figure 16-4: Copying options
When copying/unerasing a deleted file, EnCase will automatically unerase the fileif possible.
Copying/UnErasing Bookmarks
It is possible to copy/unerase bookmarked files as well. The process is the samewhether copying single or multiple bookmarks. Note that if the file has been deleted
224 EnCase Forensic v5.05 User Manual
Copyright © 2006 Guidance Software, Inc. May not be copied or reproduced without the written permission of Guidance Software, Inc.
and resides in Unallocated Space, Copy/UnErase will try to copy out the entireUnallocated Space, since the data pertaining to the file resides within.
• Click on the Dixon box or the root folder to blue-check all files, and then clickagain to remove all blue checks.
• Click on the Bookmarks tab under Cases.• Blue-check the bookmarked file you wish to copy out. If you are copying
multiple files, blue-check all files to be copied. To copy all files, or a rangeof files, you can blue check the first bookmark in the range, hold down the[Shift] key and then click on the check box of the last bookmark in the range.All bookmarks between the checked bookmarks will be checked.
• Right click anywhere in the Table view and select Tag Selected Files.• Click on the Entries subtab and note that the files corresponding to the
bookmarks you checked are now also all blue-checked. • Right click on one of the blue-checked files and select Copy/Unerase. • Make sure the radio buttons for All selected files and Separate files are
selected and click [Next >]• Select the appropriate Copy and Character Mask options (typically Logical
File Only and None) and click [Next >]• Set the appropriate path you wish to copy the files to and then click [Finish]
All tagged files (corresponding to the checked bookmarks) will be copied to thespecified directory.
Copying Entire Folders
It is possible to copy out a folder and its' contents, including subfolders. To performthis task, do the following:
• In the Entries subtab, blue check the folder in the tree pane to copy• Right click on the folder and select Copy Folders….• In the field below Copy:, enter the destination path• If you do not wish to copy all the files in the recursive folders, blue check the
files you wish to be copied and place a check in the box labeled Copy onlyselected files inside each folder
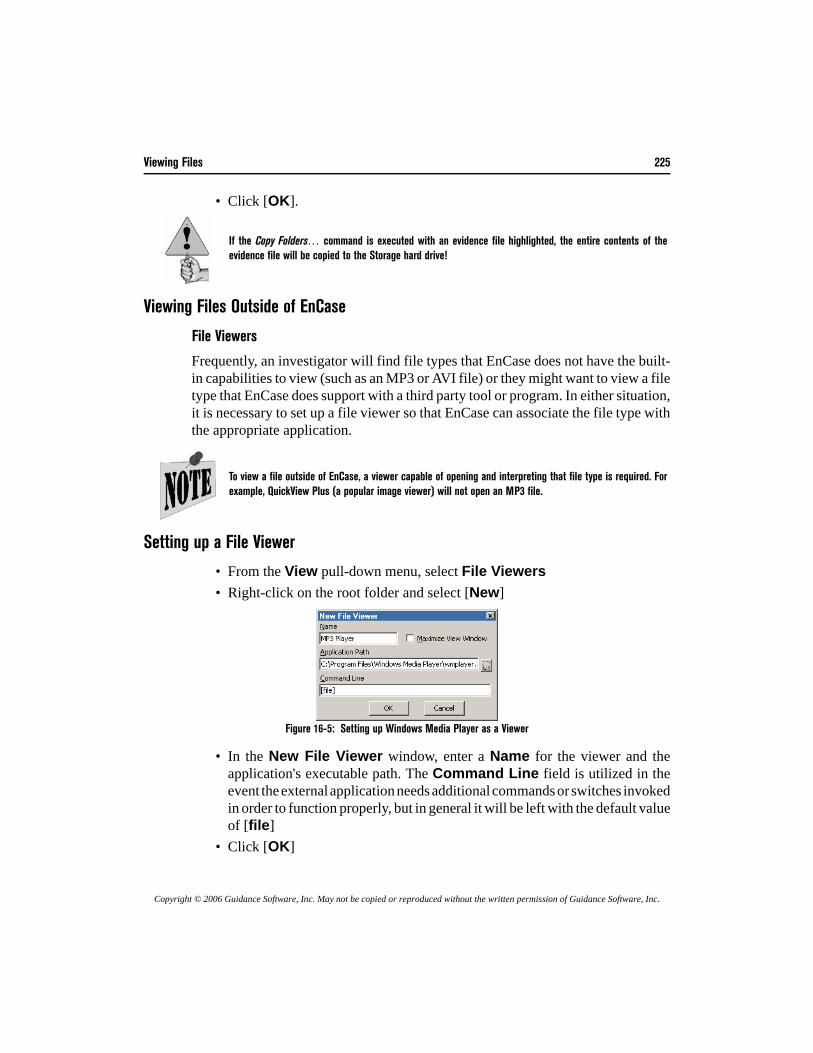
Viewing Files 225
Copyright © 2006 Guidance Software, Inc. May not be copied or reproduced without the written permission of Guidance Software, Inc.
• Click [OK].
Viewing Files Outside of EnCase
File Viewers
Frequently, an investigator will find file types that EnCase does not have the built-in capabilities to view (such as an MP3 or AVI file) or they might want to view a filetype that EnCase does support with a third party tool or program. In either situation,it is necessary to set up a file viewer so that EnCase can associate the file type withthe appropriate application.
Setting up a File Viewer
• From the View pull-down menu, select File Viewers• Right-click on the root folder and select [New]
Figure 16-5: Setting up Windows Media Player as a Viewer
• In the New File Viewer window, enter a Name for the viewer and theapplication's executable path. The Command Line field is utilized in theevent the external application needs additional commands or switches invokedin order to function properly, but in general it will be left with the default valueof [file]
• Click [OK]
If the Copy Folders… command is executed with an evidence file highlighted, the entire contents of theevidence file will be copied to the Storage hard drive!
To view a file outside of EnCase, a viewer capable of opening and interpreting that file type is required. Forexample, QuickView Plus (a popular image viewer) will not open an MP3 file.
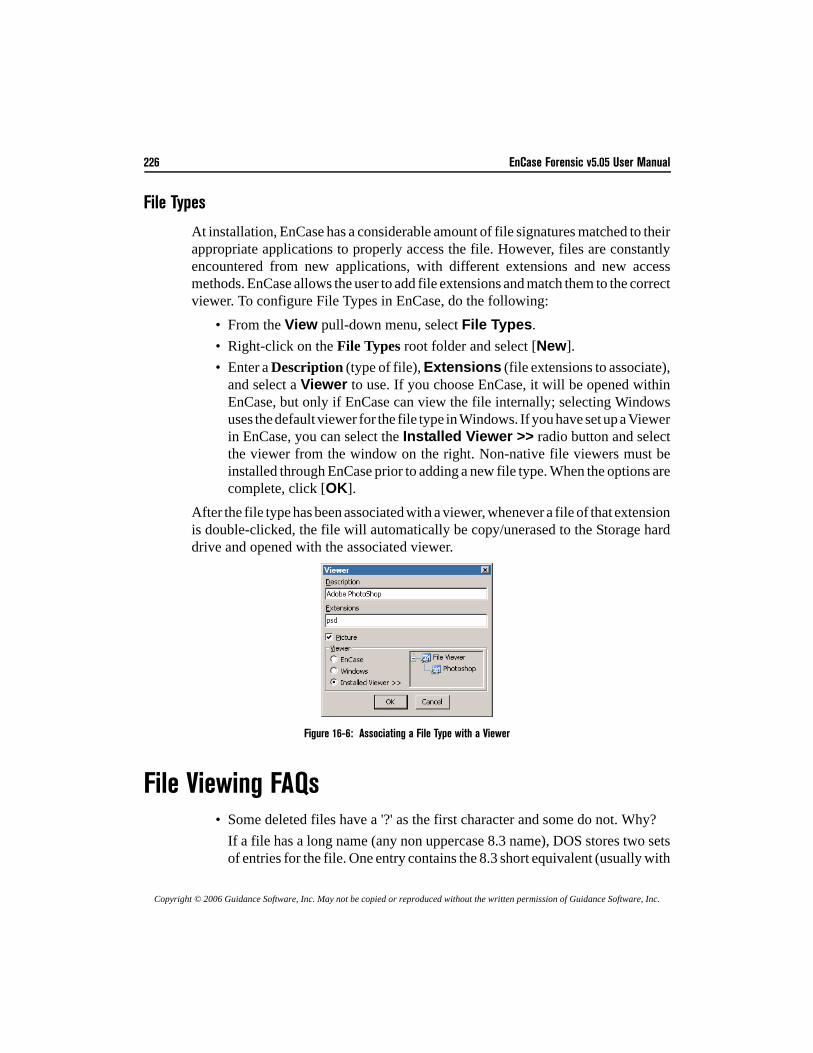
226 EnCase Forensic v5.05 User Manual
Copyright © 2006 Guidance Software, Inc. May not be copied or reproduced without the written permission of Guidance Software, Inc.
File Types
At installation, EnCase has a considerable amount of file signatures matched to theirappropriate applications to properly access the file. However, files are constantlyencountered from new applications, with different extensions and new accessmethods. EnCase allows the user to add file extensions and match them to the correctviewer. To configure File Types in EnCase, do the following:
• From the View pull-down menu, select File Types.• Right-click on the File Types root folder and select [New]. • Enter a Description (type of file), Extensions (file extensions to associate),
and select a Viewer to use. If you choose EnCase, it will be opened withinEnCase, but only if EnCase can view the file internally; selecting Windowsuses the default viewer for the file type in Windows. If you have set up a Viewerin EnCase, you can select the Installed Viewer >> radio button and selectthe viewer from the window on the right. Non-native file viewers must beinstalled through EnCase prior to adding a new file type. When the options arecomplete, click [OK].
After the file type has been associated with a viewer, whenever a file of that extensionis double-clicked, the file will automatically be copy/unerased to the Storage harddrive and opened with the associated viewer.
Figure 16-6: Associating a File Type with a Viewer
File Viewing FAQs• Some deleted files have a '?' as the first character and some do not. Why?
If a file has a long name (any non uppercase 8.3 name), DOS stores two setsof entries for the file. One entry contains the 8.3 short equivalent (usually with
Viewing Files 227
Copyright © 2006 Guidance Software, Inc. May not be copied or reproduced without the written permission of Guidance Software, Inc.
a ~ at the end) and the other set contains the long name. When a file is deleted,the first character of the 8.3 name is replaced with a hex E5 (set to '?' to makeit readable) but the first character of the long name is preserved. EnCasereplaces the '?' character in the short name entry with the first character of thelong name if it exists. • When I copy an entire folder, do the deleted files get copied too?Yes. You can circumvent this by selecting the entire folder, then de-selectingthe files that should not be copied. Then check Copy only selected filesin the Folder Copy dialog. • Is it possible to recover a deleted file in its entirety?Not always. Some deleted files may not be recoverable at all or only partiallyrecoverable. It is possible that the only remnant of a deleted file is its directoryentry. Occasionally, some data may be recovered, but it is not necessarily theoriginal contents of the file. • How do I select all files in the Case?In the Entries subtab below the Cases tab, checking any folder checks all thefiles and folders contained within. To check all the files and folders in the case,blue-check the root folder at the top of the tree. Checking it again will deselectall folders and files.To select a range of items in the table view, blue-check the first item, hold the[Shift] key down and check the last item.

228 EnCase Forensic v5.05 User Manual
Copyright © 2006 Guidance Software, Inc. May not be copied or reproduced without the written permission of Guidance Software, Inc.
Copyright © 2006 Guidance Software, Inc. May not be copied or reproduced without the written permission of Guidance Software, Inc.
E-Mailand Internet
Artifacts
New to EnCase version 5 are several tabs that allow examination of evidence filesand the ability to extract specific artifacts, including:
• E-Mail• History• Web Cache
These tabs allow the examiner to isolate the information in separate windows thatcan be searched, bookmarked, sorted, etc. Each tab is described in depth here.
When evidence is previewed in a case, EnCase can search for various types of E-mail and parse the contents. The results then become available in a user friendlyformat via the Email tab. This subtab resides below Cases and houses entry metadatasuch as From, To, Subject, Created Date, Sent Date, Received Date, HeaderInformation, and Attachments. This feature can be run on the following emailapplication types:
• AOL 6.0, 7.0, 8.0, 9.0• Outlook Express (.DBX)• Outlook (.PST)• Hotmail• Yahoo!
230 EnCase Forensic v5.05 User Manual
Copyright © 2006 Guidance Software, Inc. May not be copied or reproduced without the written permission of Guidance Software, Inc.
• Netscape• mbox
Once the Email\Internet Search feature is run on evidence containing supportedemail applications, EnCase populates the contents into the Home and Attachmentssubtab, with the parsed contents gathered from the search.The Email subtab also contains E-mail artifacts if a compound mail file is mountedmanually from the Entries tab. For example, if a .PST, .DBX, or AOL .PFC file ismounted in the Entries tab, the E-mail entries will be automatically be displayed.Along with the new Email tab, EnCase now supports additional E-mail file types,such as AOL 6, 7, 8 and 9, support for web-based E-mail such as Yahoo, Hotmail,and Netscape, MBox (Unix) support, and Outlook Newsgroups (.DBX) formatsupport.
Webmail is populated from any relevant files in the WebCache tab. If you chooseto search for any web mail types, the History and WebCache searches will be runautomatically.
Using the Email Option
In order to use this feature, you must first add evidence that contains any or all ofthe above stated supported E-mail applications to a case. To view E-mail, do thefollowing:
• Add evidence with supported E-mail entries• Under the Cases tab, select Email• Under the Home tab, right click on the root Email folder and select
Email\Internet Search. Alternately, you can select Email\Internet Search
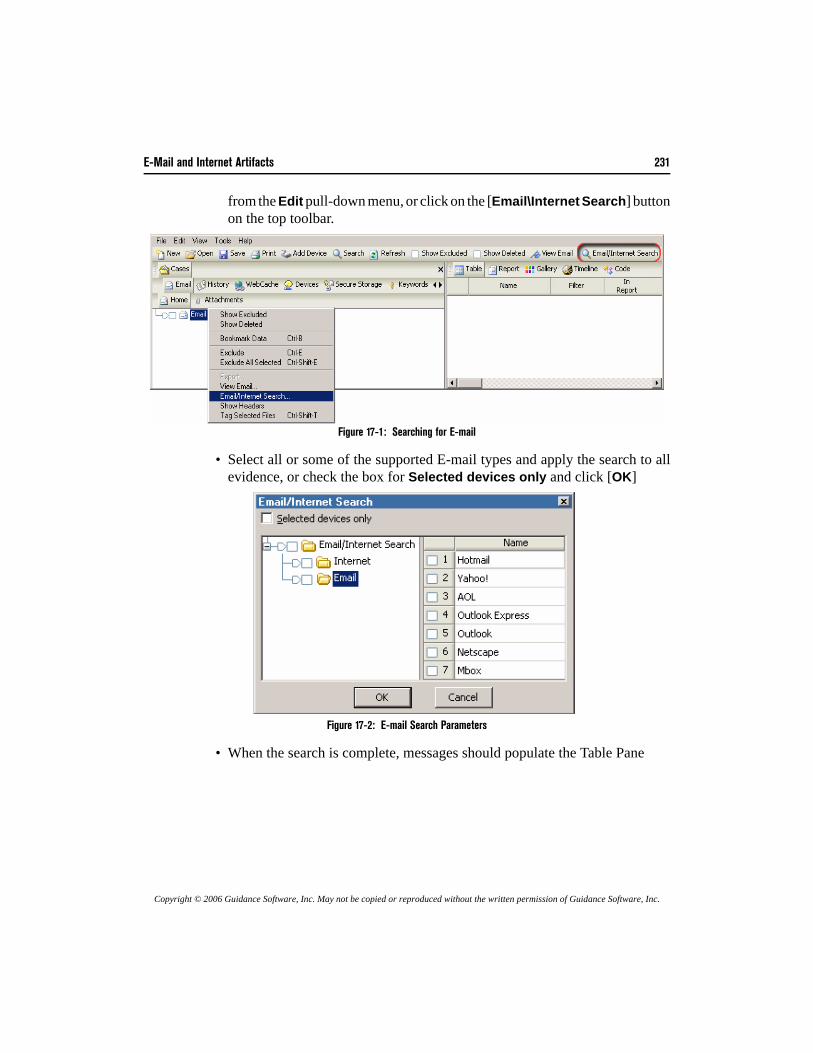
E-Mail and Internet Artifacts 231
Copyright © 2006 Guidance Software, Inc. May not be copied or reproduced without the written permission of Guidance Software, Inc.
from the Edit pull-down menu, or click on the [Email\Internet Search] buttonon the top toolbar.
Figure 17-1: Searching for E-mail
• Select all or some of the supported E-mail types and apply the search to allevidence, or check the box for Selected devices only and click [OK]
Figure 17-2: E-mail Search Parameters
• When the search is complete, messages should populate the Table Pane
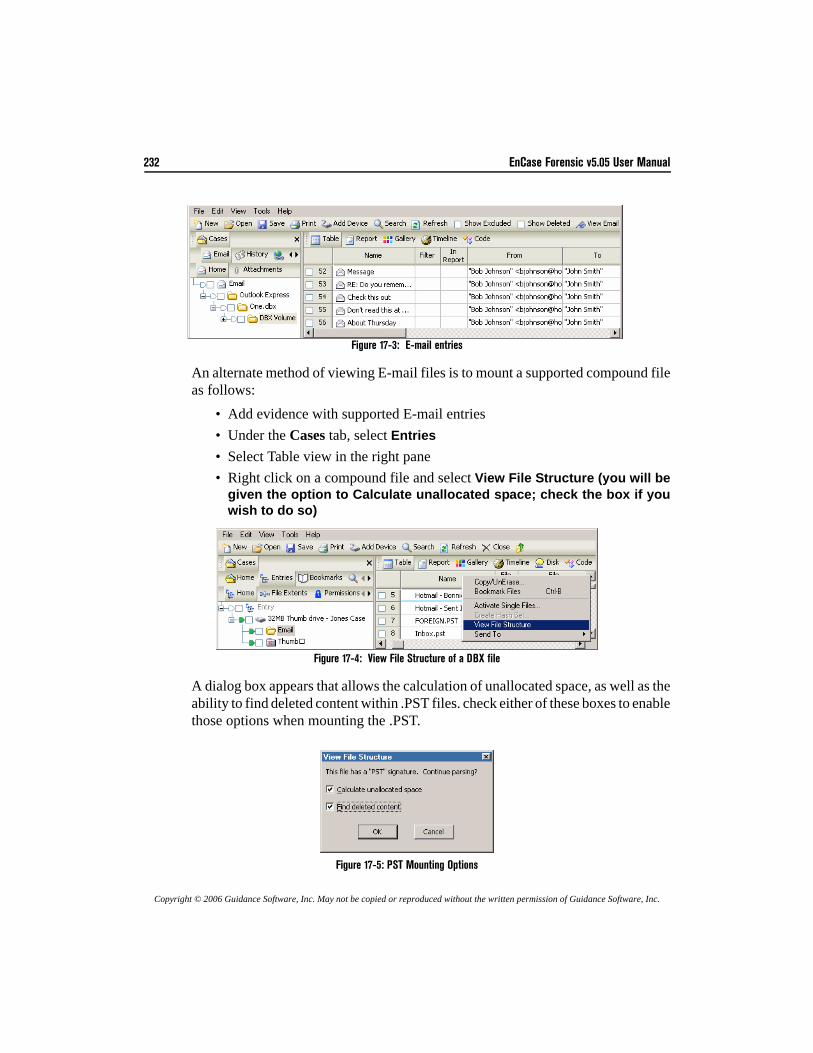
232 EnCase Forensic v5.05 User Manual
Copyright © 2006 Guidance Software, Inc. May not be copied or reproduced without the written permission of Guidance Software, Inc.
Figure 17-3: E-mail entries
An alternate method of viewing E-mail files is to mount a supported compound fileas follows:
• Add evidence with supported E-mail entries • Under the Cases tab, select Entries• Select Table view in the right pane• Right click on a compound file and select View File Structure (you will be
given the option to Calculate unallocated space; check the box if youwish to do so)
Figure 17-4: View File Structure of a DBX file
A dialog box appears that allows the calculation of unallocated space, as well as theability to find deleted content within .PST files. check either of these boxes to enablethose options when mounting the .PST.
Figure 17-5: PST Mounting Options
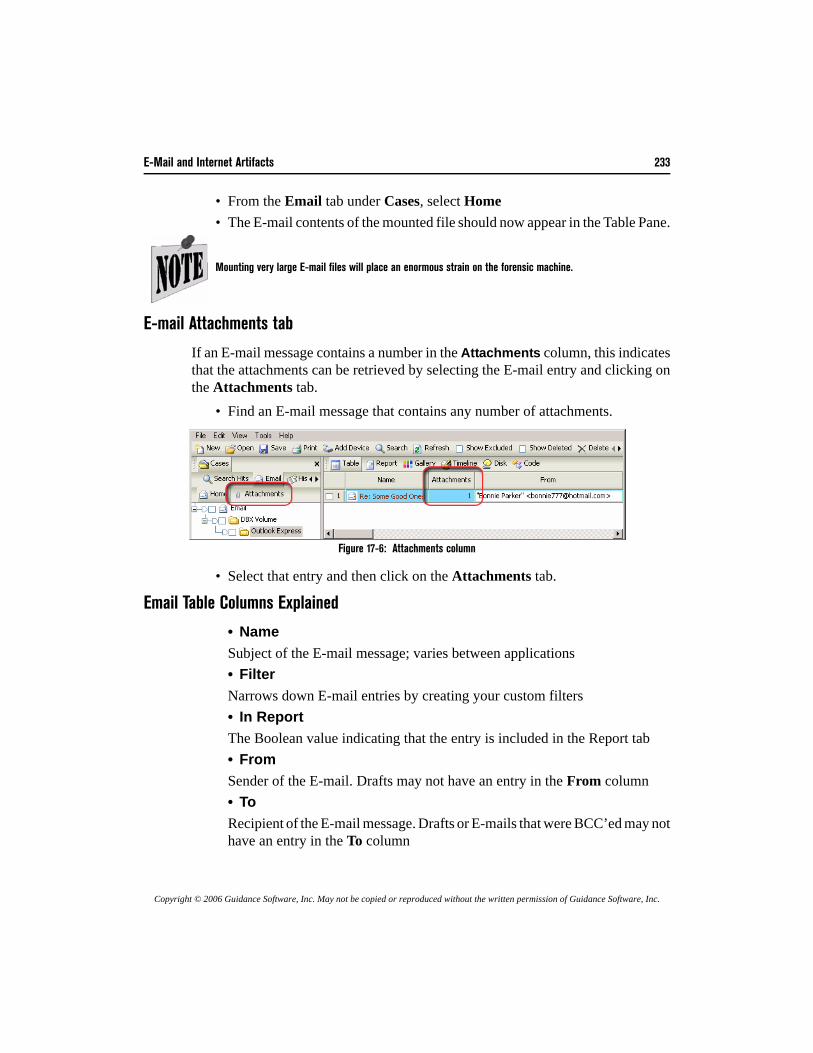
E-Mail and Internet Artifacts 233
Copyright © 2006 Guidance Software, Inc. May not be copied or reproduced without the written permission of Guidance Software, Inc.
• From the Email tab under Cases, select Home • The E-mail contents of the mounted file should now appear in the Table Pane.
E-mail Attachments tab
If an E-mail message contains a number in the Attachments column, this indicatesthat the attachments can be retrieved by selecting the E-mail entry and clicking onthe Attachments tab.
• Find an E-mail message that contains any number of attachments.
Figure 17-6: Attachments column
• Select that entry and then click on the Attachments tab.
Email Table Columns Explained
• NameSubject of the E-mail message; varies between applications• FilterNarrows down E-mail entries by creating your custom filters• In ReportThe Boolean value indicating that the entry is included in the Report tab• FromSender of the E-mail. Drafts may not have an entry in the From column• ToRecipient of the E-mail message. Drafts or E-mails that were BCC’ed may nothave an entry in the To column
Mounting very large E-mail files will place an enormous strain on the forensic machine.
234 EnCase Forensic v5.05 User Manual
Copyright © 2006 Guidance Software, Inc. May not be copied or reproduced without the written permission of Guidance Software, Inc.
• SubjectSubject of the E-mail message. Not all E-mail messages require a subject;therefore this entry may not appear• CcParty to whom E-mail message was Carbon Copied (cc). Since not all E-mailmessages are copied to other parties this entry may not appear• BccParty to whom E-mail message was Blind Carbon Copied (bcc). Since not allE-mail messages are copied to other parties this entry may not appear. Thedifference between cc and bcc recipients is that bcc recipients are not seen byothers receiving the message.• CreatedDate the E-mail message was created in Local Time format.• SentDate the E-mail message was sent in Local Time format.• ReceivedDate the E-mail message was received in Local Time format.• HeaderHeader information of the message. Internal E-mail messages may not haveheader information available• FolderThe location of the entry from within the compound file. Column informationmay vary for different E-mail types• EntryPathThe location within the mounted volume of the E-mail artifact• AttachmentsThe number of attachments for a particular E-mail message
All E-mail types do not follow a standardized format. The fields of the columns represented above may or maynot be populated by data from retrieved E-mails. For example, some versions of AOL may or may not populatethe header field.
E-Mail and Internet Artifacts 235
Copyright © 2006 Guidance Software, Inc. May not be copied or reproduced without the written permission of Guidance Software, Inc.
History
When evidence is added to a case, EnCase has the ability to search through it forvarious types of web artifacts. The Email\Internet Search feature allows you tosearch for Internet usage via the following browsers:
• Internet Explorer• Mozilla (Firefox)• Opera• Safari
Once the feature is run on evidence containing the supported browsers, EnCase willpopulate the History tab with the artifacts that were found. This option also populatesthe WebCache tab with the appropriate artifacts (see the section in this chapter onthe WebCache tab). This data can also be extracted by opening the History tab, right-clicking on the History icon and selecting Email\Internet Search.All the information found in the History tab is parsed from various files. The locationof these files may vary from browser to browser. For example, Internet Explorer mayuse INDEX.DAT files that usually reside in %root%\Documents andSettings\USERNAME\Local Settings\History\HistoryIE5\ andits subfolders, while Firefox may store data in HISTORY.DAT residing in%root%\Documents and Settings\USERNAME\ApplicationData\Mozilla\Firefox\Profiles\*.default\. Depending on whichfiles the history artifacts are parsed from, interpretations of the times listed under FirstDate and Second Date will vary. To better understand the time stamps please see the Time Interpretation Formatsection below. Another method to better understand time interpretations is to clearthe cache and history on your local machine, browse the Internet, and then previewthe local machine. The EnCase Internet and E-mail Examinations training courseis another useful resource for information on Web, E-mail, and P2P artifacts.
Finding Web Artifacts
To use the Email\Internet Search option to find web artifacts, you must first addevidence to a case that contains any or all of the above stated web artifacts entries.The option has the same functionality under either the History or WebCache tabs.You can also find this function on the toolbar when the History tab or WebCachetab is selected.
• Launch EnCase and open a new case.• Add evidence containing supported web artifact entries.
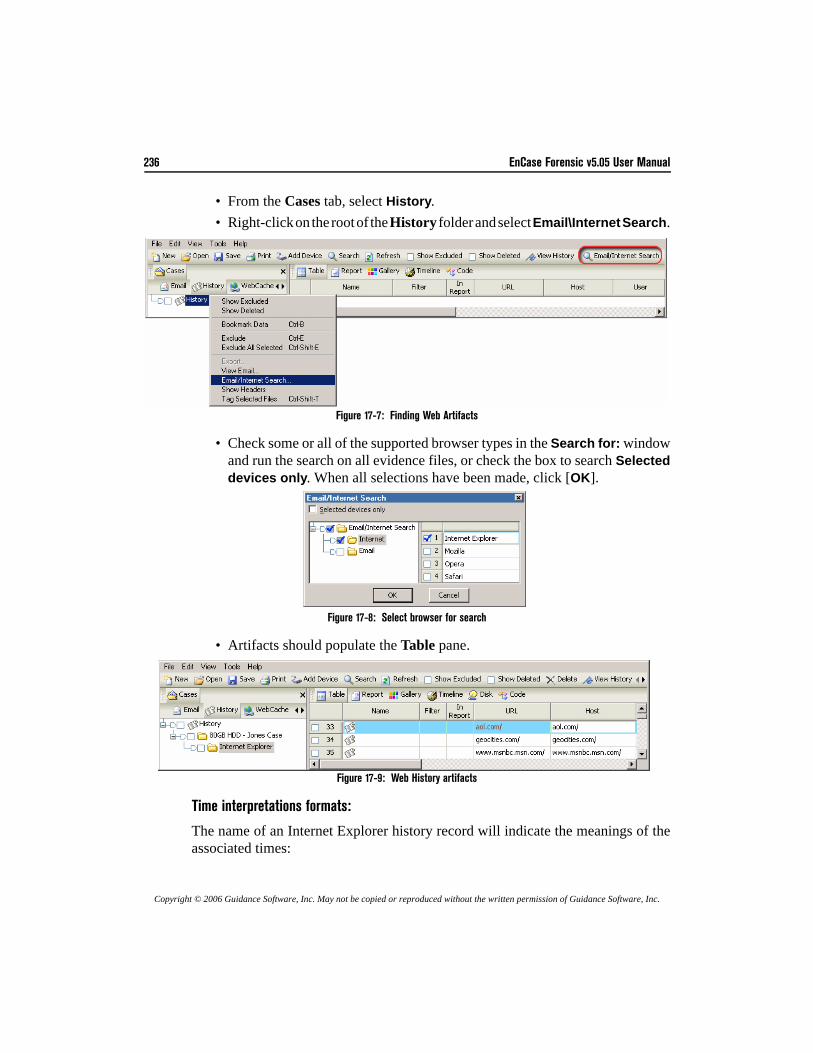
236 EnCase Forensic v5.05 User Manual
Copyright © 2006 Guidance Software, Inc. May not be copied or reproduced without the written permission of Guidance Software, Inc.
• From the Cases tab, select History.• Right-click on the root of the History folder and select Email\Internet Search.
Figure 17-7: Finding Web Artifacts
• Check some or all of the supported browser types in the Search for: windowand run the search on all evidence files, or check the box to search Selecteddevices only. When all selections have been made, click [OK].
Figure 17-8: Select browser for search
• Artifacts should populate the Table pane.
Figure 17-9: Web History artifacts
Time interpretations formats:
The name of an Internet Explorer history record will indicate the meanings of theassociated times:
E-Mail and Internet Artifacts 237
Copyright © 2006 Guidance Software, Inc. May not be copied or reproduced without the written permission of Guidance Software, Inc.
• CookiesFirst Date: Cookie createdSecond Date: Cookie last accessed• HistoryFirst Date: Last accessedSecond Date: Last accessed• Content.IE5First Date: Server modifiedSecond Date: Last accessed• DailyFirst Date: Last accessed (Local Time)Second Date: Last accessed• WeeklyFirst Date: Last accessed (Local Time)Second Date: File created
• Time interpretation for other browsers (Safari, Mozilla andOpera):
First Date: Last accessed
History Table Columns Explained• NameWill display the record name (History, Daily, Weekly, etc.) for an IE Historyrecord; otherwise, it will be blank• FilterNarrows down the History artifact entries by custom filters• In ReportContains a Boolean value to indicate entry is included in the report tab• URLComplete URL address of History entry
The timestamps of the Daily and Weekly Internet Explorer records warrant a special note. The Second Dateis a normal Windows date which will display in the current Time Zone setting for the volume. However, theFirst Date is not a standard Windows timestamp. This timestamp is saved by Internet Explorer in the user'sLocal Time (rather than GMT). EnCase will adjust this time to display properly using the current time zonesettings, however, if the First Date and Second date on a Daily history record do not match, it's anindication that the current time zone settings are not correct.
238 EnCase Forensic v5.05 User Manual
Copyright © 2006 Guidance Software, Inc. May not be copied or reproduced without the written permission of Guidance Software, Inc.
• HostDomain Host of the URL• UserCurrent user that was logged on at the time of visit• TitleTitle of web page (if available)• VisitCountNumber of times site was visited by the user. A blank field indicates that noinformation about the number of times visited is available• First DateDate and time of last visit of user (may or may not be GMT offset)
• Second DateSee Time Interpretations Formats table. This only applies to IE.• CachedContains a Boolean value to indicate if the entry also has an entry in theWebCache tab• HistoryPathLocation of the .DAT file from where the entry was parsed
Web Cache
The WebCache tab under Cases allows the user to search evidence for various typesof web artifacts. The Email\Internet Search feature allows you to search for thefollowing types of Internet usage:
• Internet Explorer• Mozilla (Firefox)• Opera• Safari
Once the Email\Internet Search is run on evidence containing the supported internetbrowsers, EnCase will populate the WebCache tab with the artifacts that were found.The Email\Internet Search feature is closely related to the functionality of theHistory tab previously discussed.The function searches for artifacts located in cache folders. The locations of thosecached archives depend on the Internet browser you are using (e.g., Opera storescache files in \Documents and Settings\UserName\Application
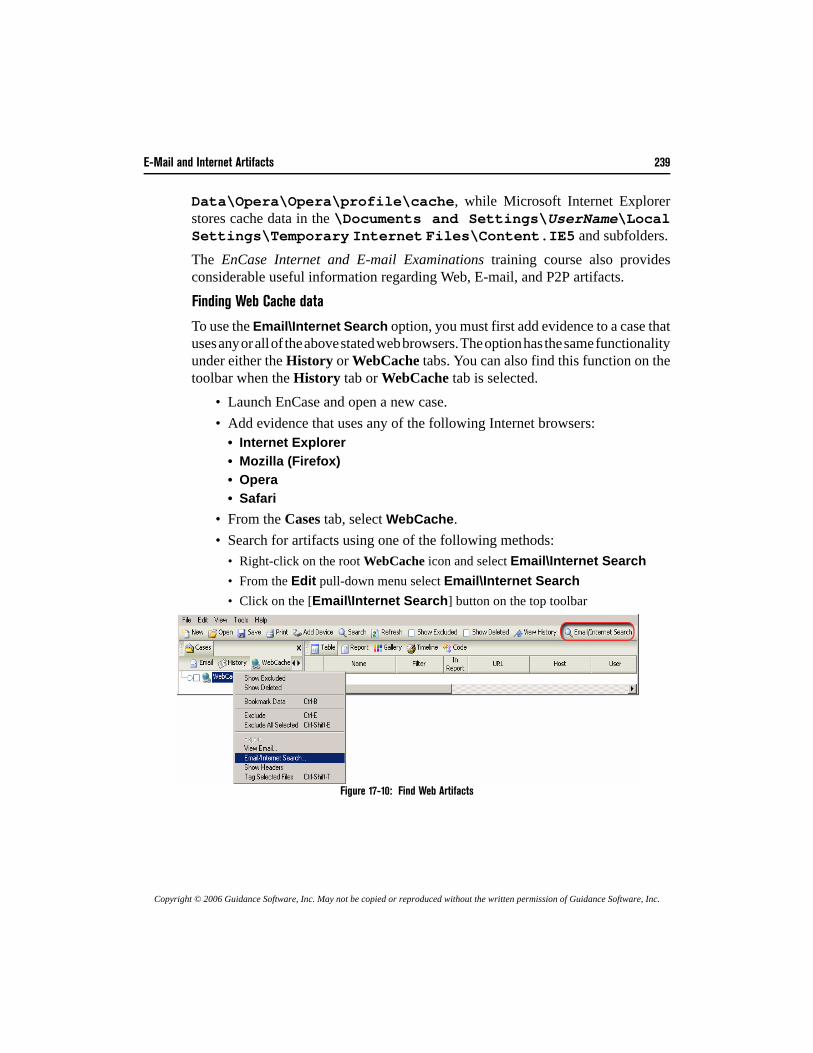
E-Mail and Internet Artifacts 239
Copyright © 2006 Guidance Software, Inc. May not be copied or reproduced without the written permission of Guidance Software, Inc.
Data\Opera\Opera\profile\cache, while Microsoft Internet Explorerstores cache data in the \Documents and Settings\UserName\LocalSettings\Temporary Internet Files\Content.IE5 and subfolders.The EnCase Internet and E-mail Examinations training course also providesconsiderable useful information regarding Web, E-mail, and P2P artifacts.
Finding Web Cache data
To use the Email\Internet Search option, you must first add evidence to a case thatuses any or all of the above stated web browsers. The option has the same functionalityunder either the History or WebCache tabs. You can also find this function on thetoolbar when the History tab or WebCache tab is selected.
• Launch EnCase and open a new case.• Add evidence that uses any of the following Internet browsers:
• Internet Explorer• Mozilla (Firefox)• Opera• Safari
• From the Cases tab, select WebCache.• Search for artifacts using one of the following methods:
• Right-click on the root WebCache icon and select Email\Internet Search• From the Edit pull-down menu select Email\Internet Search• Click on the [Email\Internet Search] button on the top toolbar
Figure 17-10: Find Web Artifacts
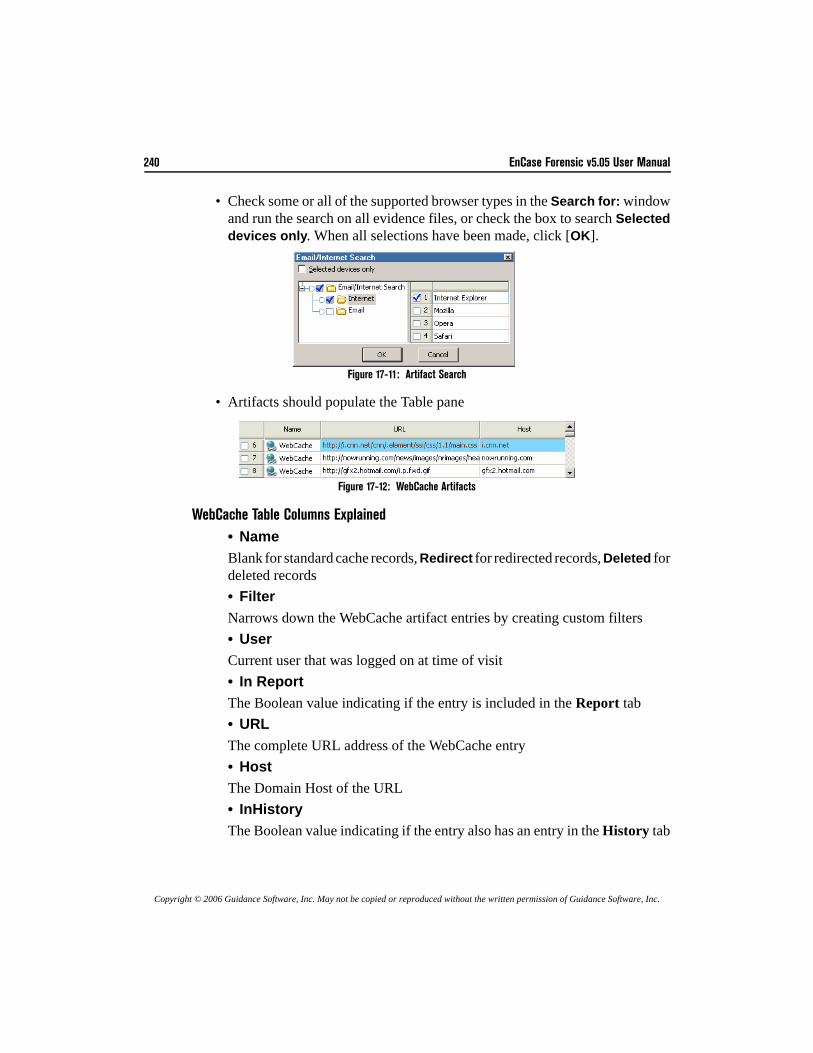
240 EnCase Forensic v5.05 User Manual
Copyright © 2006 Guidance Software, Inc. May not be copied or reproduced without the written permission of Guidance Software, Inc.
• Check some or all of the supported browser types in the Search for: windowand run the search on all evidence files, or check the box to search Selecteddevices only. When all selections have been made, click [OK].
Figure 17-11: Artifact Search
• Artifacts should populate the Table pane
Figure 17-12: WebCache Artifacts
WebCache Table Columns Explained• NameBlank for standard cache records, Redirect for redirected records, Deleted fordeleted records• FilterNarrows down the WebCache artifact entries by creating custom filters• UserCurrent user that was logged on at time of visit• In ReportThe Boolean value indicating if the entry is included in the Report tab• URLThe complete URL address of the WebCache entry• HostThe Domain Host of the URL• InHistoryThe Boolean value indicating if the entry also has an entry in the History tab
E-Mail and Internet Artifacts 241
Copyright © 2006 Guidance Software, Inc. May not be copied or reproduced without the written permission of Guidance Software, Inc.
• CachedDateThe date and time of when the artifact was cached on the local drive• CachePathThe location in which the cached file is located (usually from the Temp folderof the Internet browser used)
242 EnCase Forensic v5.05 User Manual
Copyright © 2006 Guidance Software, Inc. May not be copied or reproduced without the written permission of Guidance Software, Inc.
Copyright © 2006 Guidance Software, Inc. May not be copied or reproduced without the written permission of Guidance Software, Inc.
Keyword Searches
The search function of EnCase can locate information anywhere on the physical orlogical media within current open cases. EnCase can search for each keyword byte-by-byte from the beginning to the end of every medium, and also search every logicalfile. Keywords can be either global or case specific. Global keywords are saved in the keywords.ini initialization file within theEnCase directory. They are accessed by selecting the Keywords option from theView pull-down menu.Case specific keywords are saved in the case file. They are managed from theKeywords subtab below Cases, which is enabled by checking the Keywords optionunder Cases in the View pull-down menu. The functionality of the local keywordtab is identical to that of the global tab.
Creating Keyword Groups
Global keywords may be accessed by any open case, therefore, it is important to groupkeywords properly so that they can be located easily when needed. To do this, folderscan be created and moved around within the Keywords tab. This, and all functionalityspecific to keywords applies to keywords stored in either global or case-specificKeyword tabs.To create a group, right-click where the folder is to be created, and select New Folder.To give that folder a specific name, hit the [Backspace] key after the folder is createduntil the name is blank, then type the name in. Alternately, once the folder is created,
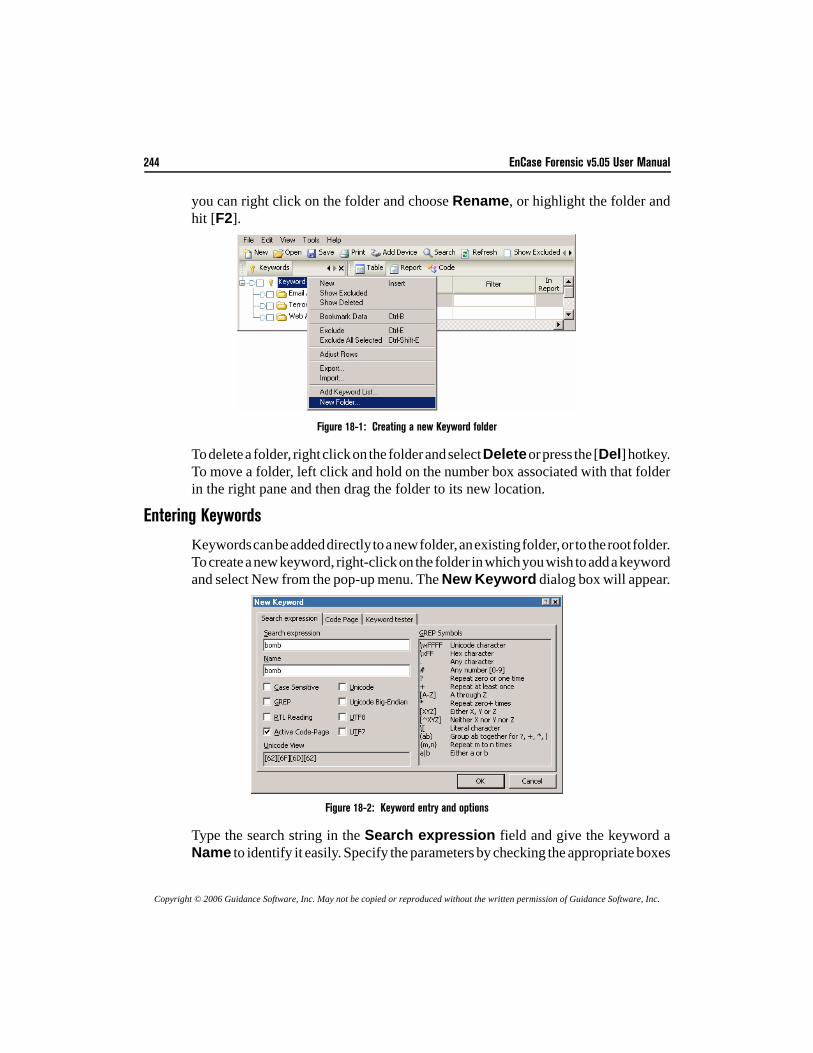
244 EnCase Forensic v5.05 User Manual
Copyright © 2006 Guidance Software, Inc. May not be copied or reproduced without the written permission of Guidance Software, Inc.
you can right click on the folder and choose Rename, or highlight the folder andhit [F2].
Figure 18-1: Creating a new Keyword folder
To delete a folder, right click on the folder and select Delete or press the [Del] hotkey.To move a folder, left click and hold on the number box associated with that folderin the right pane and then drag the folder to its new location.
Entering Keywords
Keywords can be added directly to a new folder, an existing folder, or to the root folder.To create a new keyword, right-click on the folder in which you wish to add a keywordand select New from the pop-up menu. The New Keyword dialog box will appear.
Figure 18-2: Keyword entry and options
Type the search string in the Search expression field and give the keyword aName to identify it easily. Specify the parameters by checking the appropriate boxes
Keyword Searches 245
Copyright © 2006 Guidance Software, Inc. May not be copied or reproduced without the written permission of Guidance Software, Inc.
for Case Sensitive, GREP, etc. The section below describes each option and its'function. Once you have entered the search parameters, click [OK].
Search Options• Case SensitiveWith this box checked, EnCase will search for the specified keyword only inthe exact case specified.• GREPThis option uses the input symbols and text to search using the GREP (Globallysearch for the Regular Expression and Print) advanced searching syntax (seethe GREP appendix for token syntax and examples). • RTL ReadingThe RTL Reading option will search for the keyword in a right-to-leftsequence. If, for example, a user enters “Arabic keyword,” and specifiesthe keyword as RTL Reading, EnCase would show hits on that expression,flush-right, in the reverse sequence as “drowyek cibarA.”• Active Code-PageEnCase Version 5 has the ability to enter keywords in different languages. TheActive Code-Page option must be checked to enter keywords in certainlanguages. English character searches use the Latin I code page.• UnicodeThe Unicode standard attempts to provide a unique encoding number for everycharacter, regardless of platform, computer program, or language. Unicodeuses 16-bits to represent each character, as opposed to ASCII (which uses 7-bits). Unicode on Intel-based PCs is referred to as Little Endian. The Unicodeoption will search for the keyword only in Unicode. For more details onUnicode, please see http://www.unicode.org and the chapter on ForeignLanguage Support.• Big-Endian UnicodeBig-Endian Unicode uses the non-Intel PC data formatting scheme, inwhich the operating system addresses data by the most significant numbersfirst (the reverse of Little Endian).
If a GREP keyword includes a slash (\), it must be escaped with another backslash to get the literal “\”,since it is the escape character in GREP.
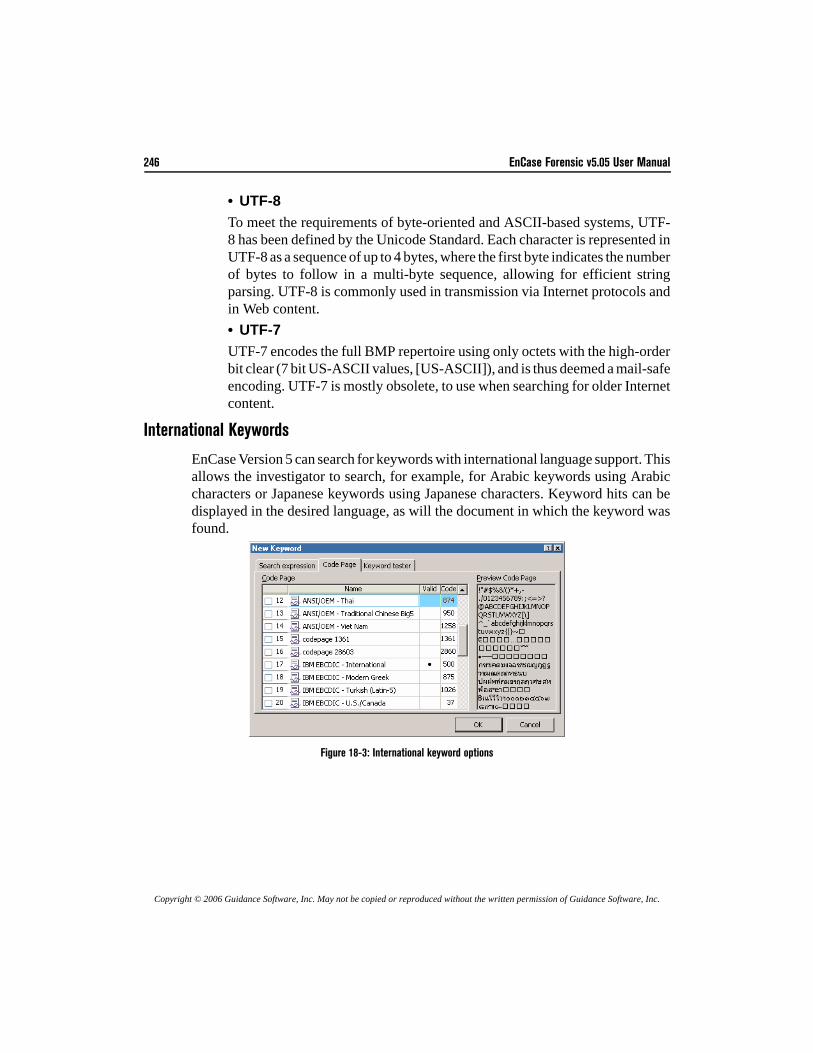
246 EnCase Forensic v5.05 User Manual
Copyright © 2006 Guidance Software, Inc. May not be copied or reproduced without the written permission of Guidance Software, Inc.
• UTF-8To meet the requirements of byte-oriented and ASCII-based systems, UTF-8 has been defined by the Unicode Standard. Each character is represented inUTF-8 as a sequence of up to 4 bytes, where the first byte indicates the numberof bytes to follow in a multi-byte sequence, allowing for efficient stringparsing. UTF-8 is commonly used in transmission via Internet protocols andin Web content.• UTF-7UTF-7 encodes the full BMP repertoire using only octets with the high-orderbit clear (7 bit US-ASCII values, [US-ASCII]), and is thus deemed a mail-safeencoding. UTF-7 is mostly obsolete, to use when searching for older Internetcontent.
International Keywords
EnCase Version 5 can search for keywords with international language support. Thisallows the investigator to search, for example, for Arabic keywords using Arabiccharacters or Japanese keywords using Japanese characters. Keyword hits can bedisplayed in the desired language, as will the document in which the keyword wasfound.
Figure 18-3: International keyword options
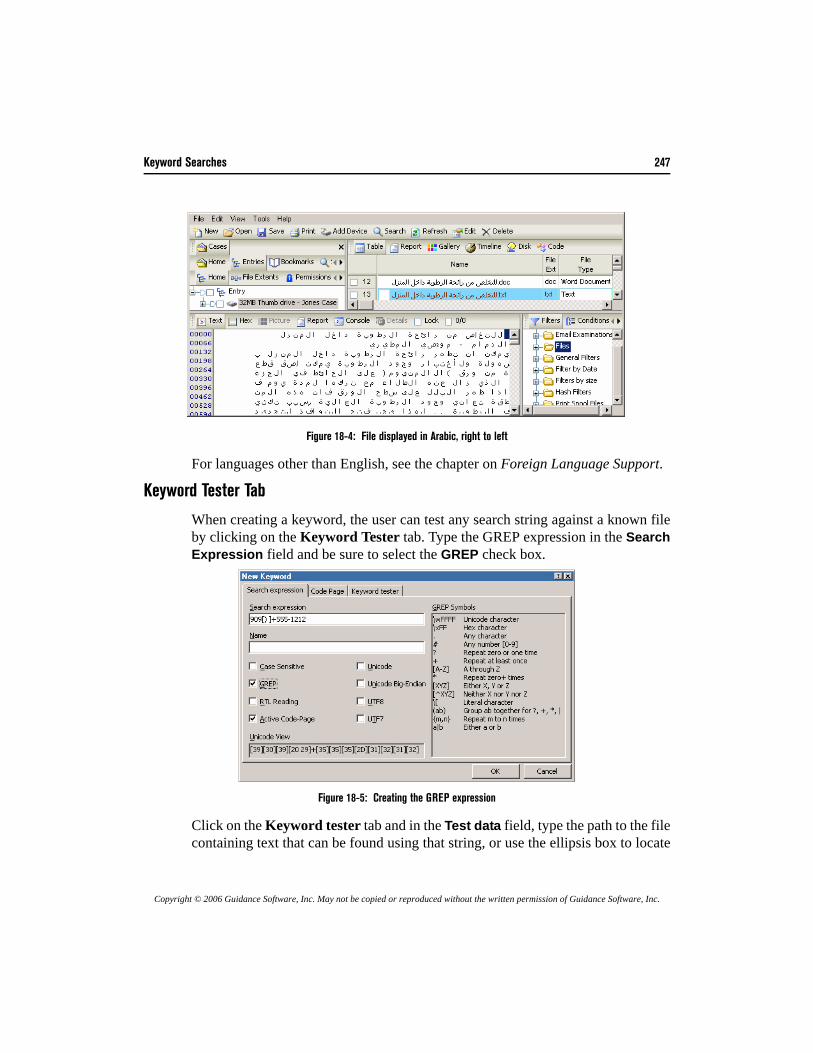
Keyword Searches 247
Copyright © 2006 Guidance Software, Inc. May not be copied or reproduced without the written permission of Guidance Software, Inc.
Figure 18-4: File displayed in Arabic, right to left
For languages other than English, see the chapter on Foreign Language Support.
Keyword Tester Tab
When creating a keyword, the user can test any search string against a known fileby clicking on the Keyword Tester tab. Type the GREP expression in the SearchExpression field and be sure to select the GREP check box.
Figure 18-5: Creating the GREP expression
Click on the Keyword tester tab and in the Test data field, type the path to the filecontaining text that can be found using that string, or use the ellipsis box to locate
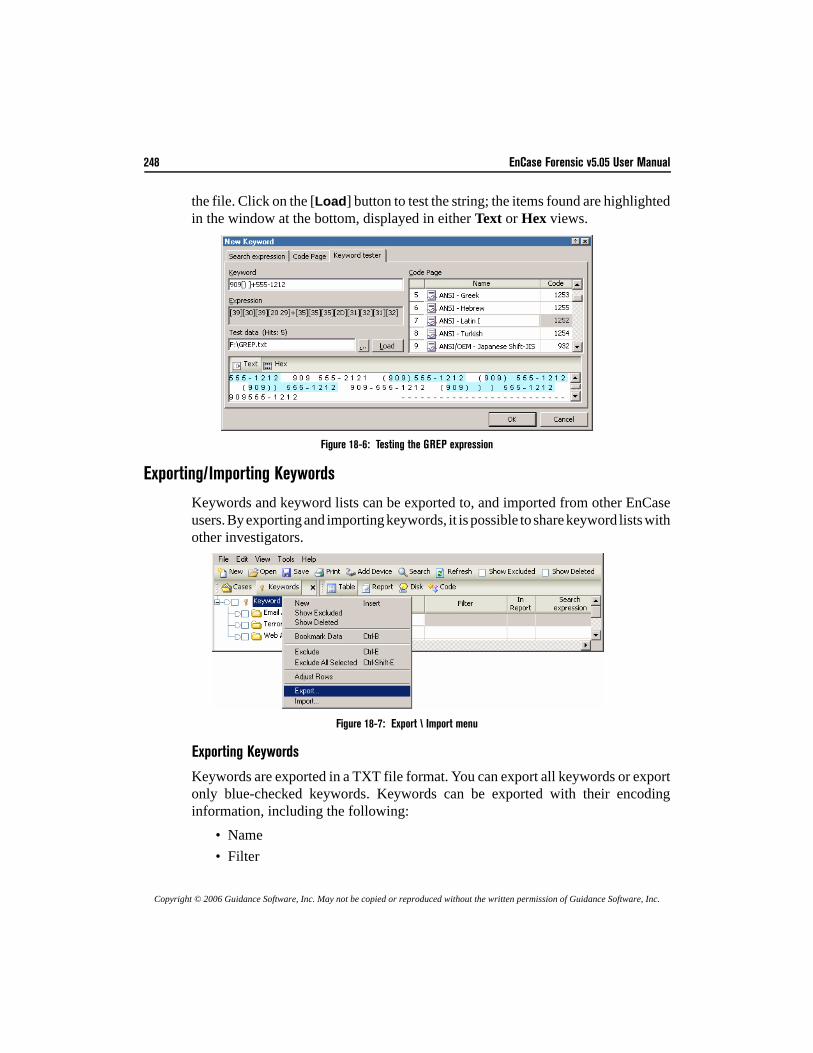
248 EnCase Forensic v5.05 User Manual
Copyright © 2006 Guidance Software, Inc. May not be copied or reproduced without the written permission of Guidance Software, Inc.
the file. Click on the [Load] button to test the string; the items found are highlightedin the window at the bottom, displayed in either Text or Hex views.
Figure 18-6: Testing the GREP expression
Exporting/Importing Keywords
Keywords and keyword lists can be exported to, and imported from other EnCaseusers. By exporting and importing keywords, it is possible to share keyword lists withother investigators.
Figure 18-7: Export \ Import menu
Exporting Keywords
Keywords are exported in a TXT file format. You can export all keywords or exportonly blue-checked keywords. Keywords can be exported with their encodinginformation, including the following:
• Name• Filter
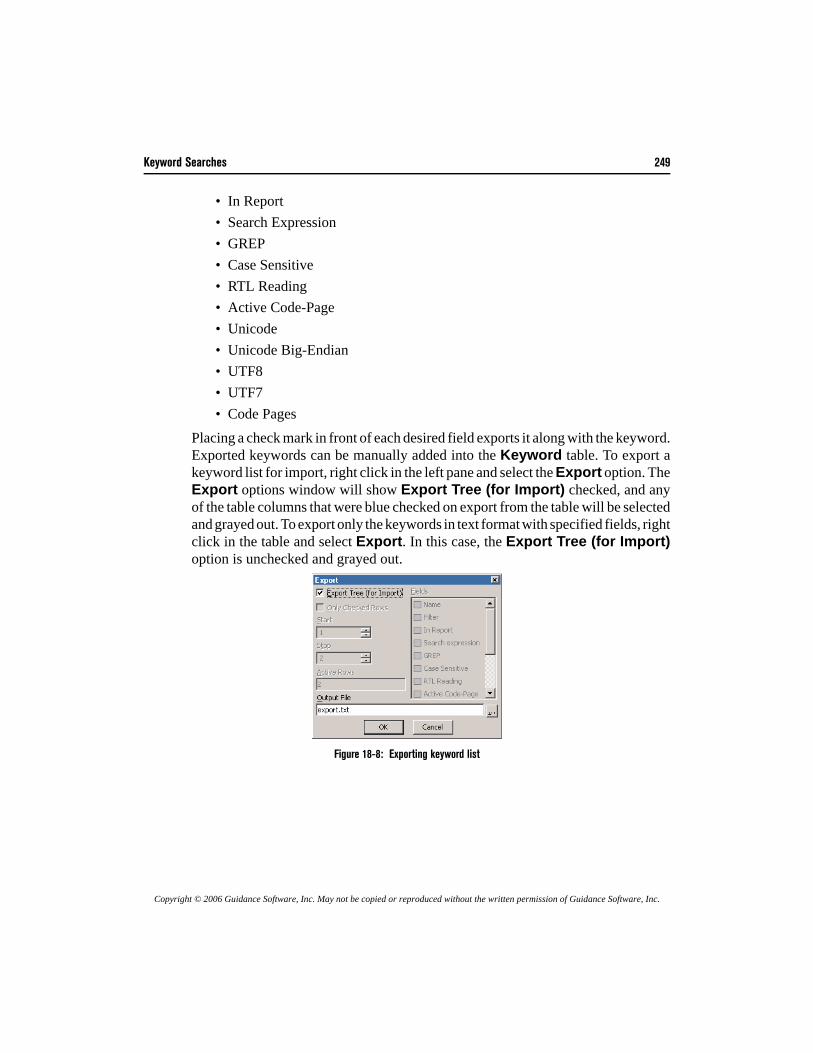
Keyword Searches 249
Copyright © 2006 Guidance Software, Inc. May not be copied or reproduced without the written permission of Guidance Software, Inc.
• In Report• Search Expression• GREP• Case Sensitive• RTL Reading• Active Code-Page• Unicode• Unicode Big-Endian• UTF8• UTF7• Code Pages
Placing a check mark in front of each desired field exports it along with the keyword.Exported keywords can be manually added into the Keyword table. To export akeyword list for import, right click in the left pane and select the Export option. TheExport options window will show Export Tree (for Import) checked, and anyof the table columns that were blue checked on export from the table will be selectedand grayed out. To export only the keywords in text format with specified fields, rightclick in the table and select Export. In this case, the Export Tree (for Import)option is unchecked and grayed out.
Figure 18-8: Exporting keyword list
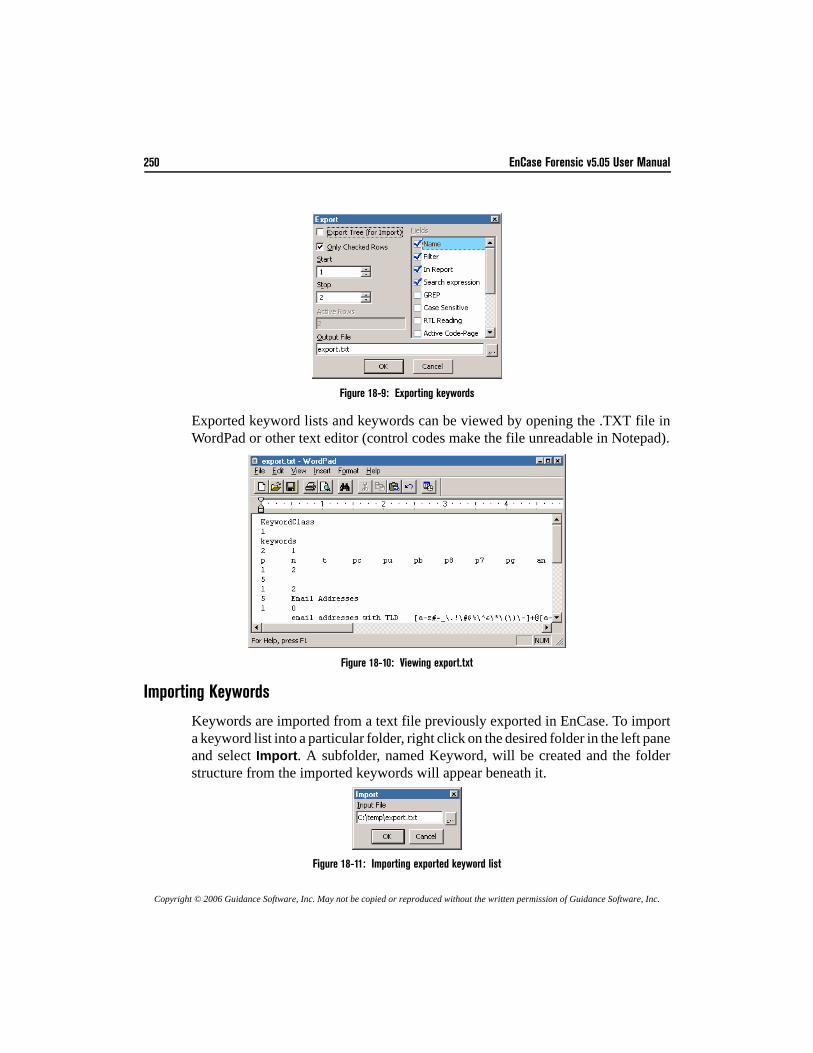
250 EnCase Forensic v5.05 User Manual
Copyright © 2006 Guidance Software, Inc. May not be copied or reproduced without the written permission of Guidance Software, Inc.
Figure 18-9: Exporting keywords
Exported keyword lists and keywords can be viewed by opening the .TXT file inWordPad or other text editor (control codes make the file unreadable in Notepad).
Figure 18-10: Viewing export.txt
Importing Keywords
Keywords are imported from a text file previously exported in EnCase. To importa keyword list into a particular folder, right click on the desired folder in the left paneand select Import. A subfolder, named Keyword, will be created and the folderstructure from the imported keywords will appear beneath it.
Figure 18-11: Importing exported keyword list
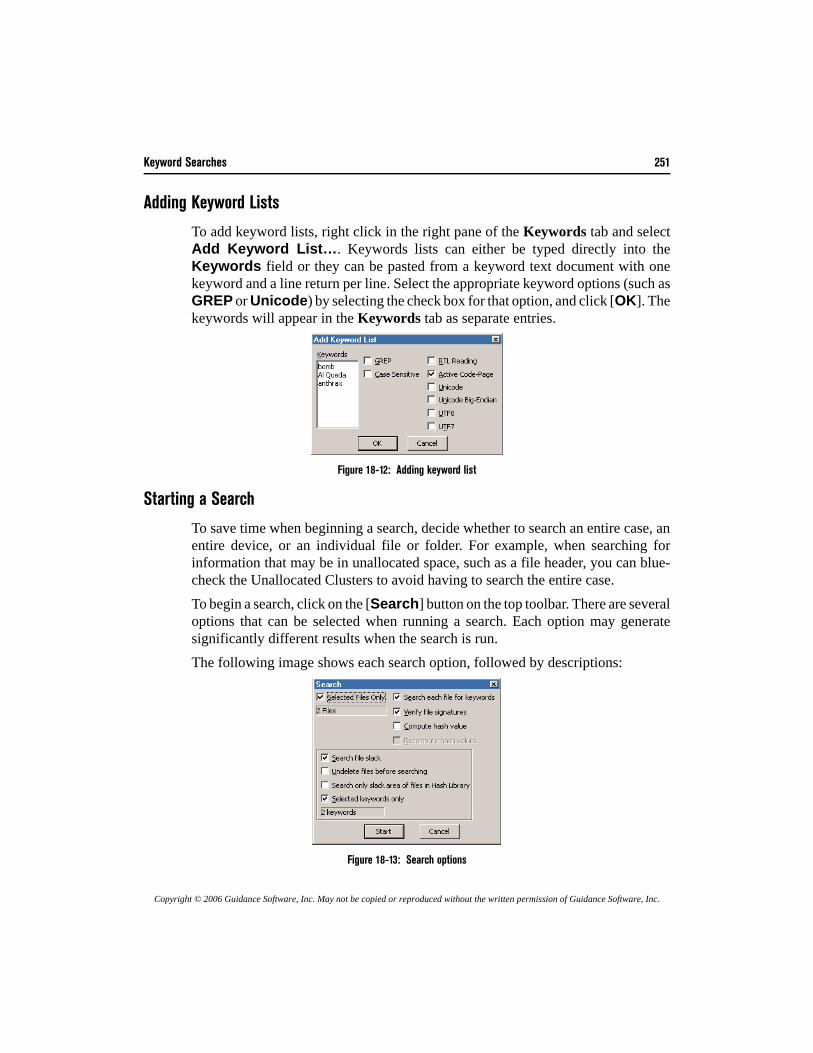
Keyword Searches 251
Copyright © 2006 Guidance Software, Inc. May not be copied or reproduced without the written permission of Guidance Software, Inc.
Adding Keyword Lists
To add keyword lists, right click in the right pane of the Keywords tab and selectAdd Keyword List…. Keywords lists can either be typed directly into theKeywords field or they can be pasted from a keyword text document with onekeyword and a line return per line. Select the appropriate keyword options (such asGREP or Unicode) by selecting the check box for that option, and click [OK]. Thekeywords will appear in the Keywords tab as separate entries.
Figure 18-12: Adding keyword list
Starting a Search
To save time when beginning a search, decide whether to search an entire case, anentire device, or an individual file or folder. For example, when searching forinformation that may be in unallocated space, such as a file header, you can blue-check the Unallocated Clusters to avoid having to search the entire case.To begin a search, click on the [Search] button on the top toolbar. There are severaloptions that can be selected when running a search. Each option may generatesignificantly different results when the search is run.The following image shows each search option, followed by descriptions:
Figure 18-13: Search options
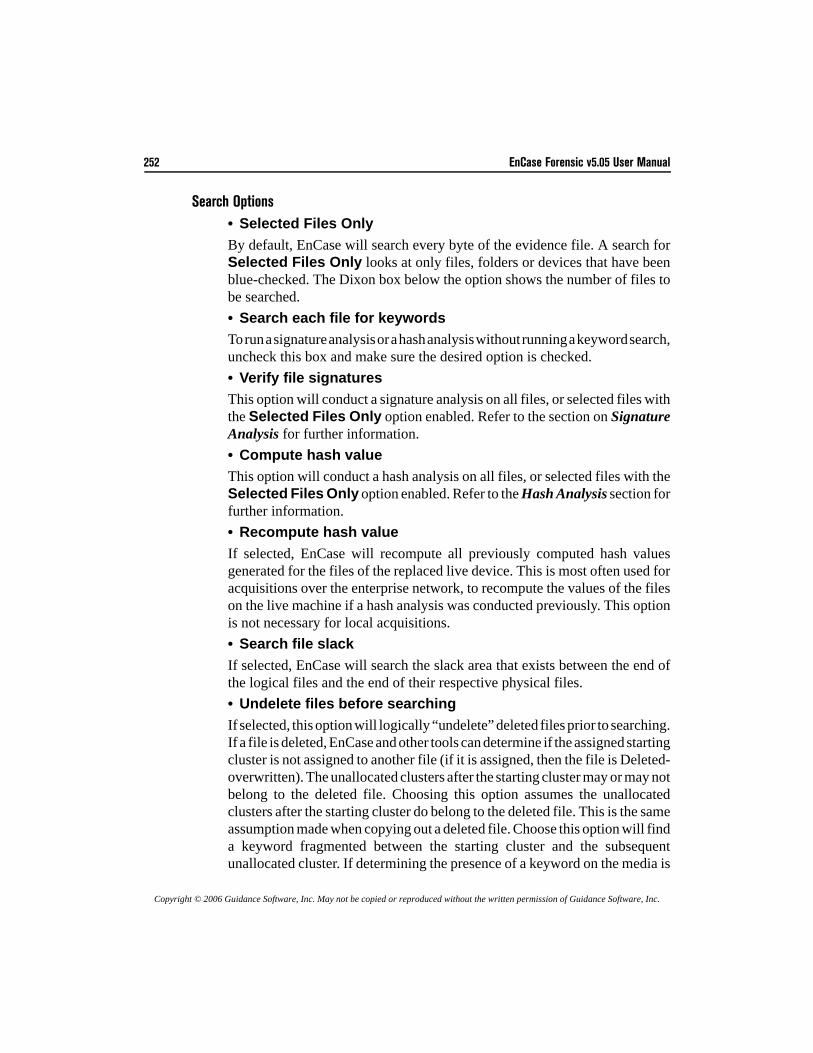
252 EnCase Forensic v5.05 User Manual
Copyright © 2006 Guidance Software, Inc. May not be copied or reproduced without the written permission of Guidance Software, Inc.
Search Options• Selected Files OnlyBy default, EnCase will search every byte of the evidence file. A search forSelected Files Only looks at only files, folders or devices that have beenblue-checked. The Dixon box below the option shows the number of files tobe searched.• Search each file for keywordsTo run a signature analysis or a hash analysis without running a keyword search,uncheck this box and make sure the desired option is checked.• Verify file signaturesThis option will conduct a signature analysis on all files, or selected files withthe Selected Files Only option enabled. Refer to the section on SignatureAnalysis for further information.• Compute hash valueThis option will conduct a hash analysis on all files, or selected files with theSelected Files Only option enabled. Refer to the Hash Analysis section forfurther information.• Recompute hash valueIf selected, EnCase will recompute all previously computed hash valuesgenerated for the files of the replaced live device. This is most often used foracquisitions over the enterprise network, to recompute the values of the fileson the live machine if a hash analysis was conducted previously. This optionis not necessary for local acquisitions.• Search file slackIf selected, EnCase will search the slack area that exists between the end ofthe logical files and the end of their respective physical files. • Undelete files before searchingIf selected, this option will logically “undelete” deleted files prior to searching.If a file is deleted, EnCase and other tools can determine if the assigned startingcluster is not assigned to another file (if it is assigned, then the file is Deleted-overwritten). The unallocated clusters after the starting cluster may or may notbelong to the deleted file. Choosing this option assumes the unallocatedclusters after the starting cluster do belong to the deleted file. This is the sameassumption made when copying out a deleted file. Choose this option will finda keyword fragmented between the starting cluster and the subsequentunallocated cluster. If determining the presence of a keyword on the media is
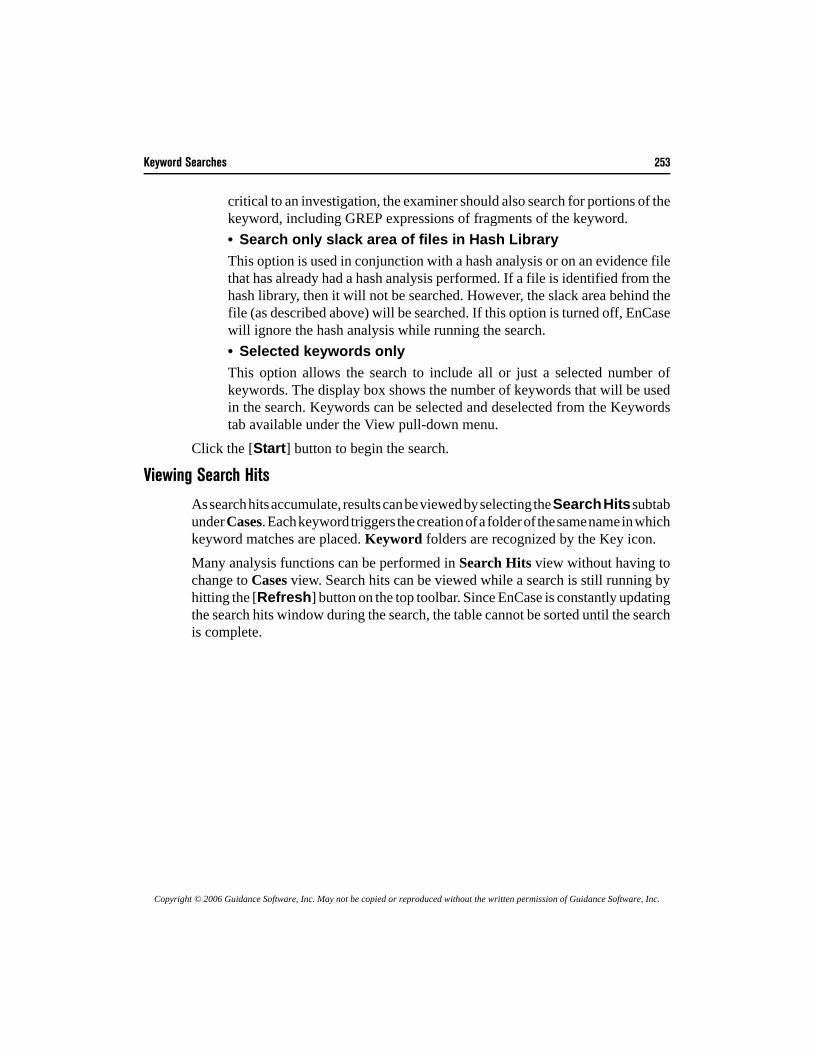
Keyword Searches 253
Copyright © 2006 Guidance Software, Inc. May not be copied or reproduced without the written permission of Guidance Software, Inc.
critical to an investigation, the examiner should also search for portions of thekeyword, including GREP expressions of fragments of the keyword.• Search only slack area of files in Hash LibraryThis option is used in conjunction with a hash analysis or on an evidence filethat has already had a hash analysis performed. If a file is identified from thehash library, then it will not be searched. However, the slack area behind thefile (as described above) will be searched. If this option is turned off, EnCasewill ignore the hash analysis while running the search.• Selected keywords onlyThis option allows the search to include all or just a selected number ofkeywords. The display box shows the number of keywords that will be usedin the search. Keywords can be selected and deselected from the Keywordstab available under the View pull-down menu.
Click the [Start] button to begin the search.
Viewing Search Hits
As search hits accumulate, results can be viewed by selecting the Search Hits subtabunder Cases. Each keyword triggers the creation of a folder of the same name in whichkeyword matches are placed. Keyword folders are recognized by the Key icon. Many analysis functions can be performed in Search Hits view without having tochange to Cases view. Search hits can be viewed while a search is still running byhitting the [Refresh] button on the top toolbar. Since EnCase is constantly updatingthe search hits window during the search, the table cannot be sorted until the searchis complete.
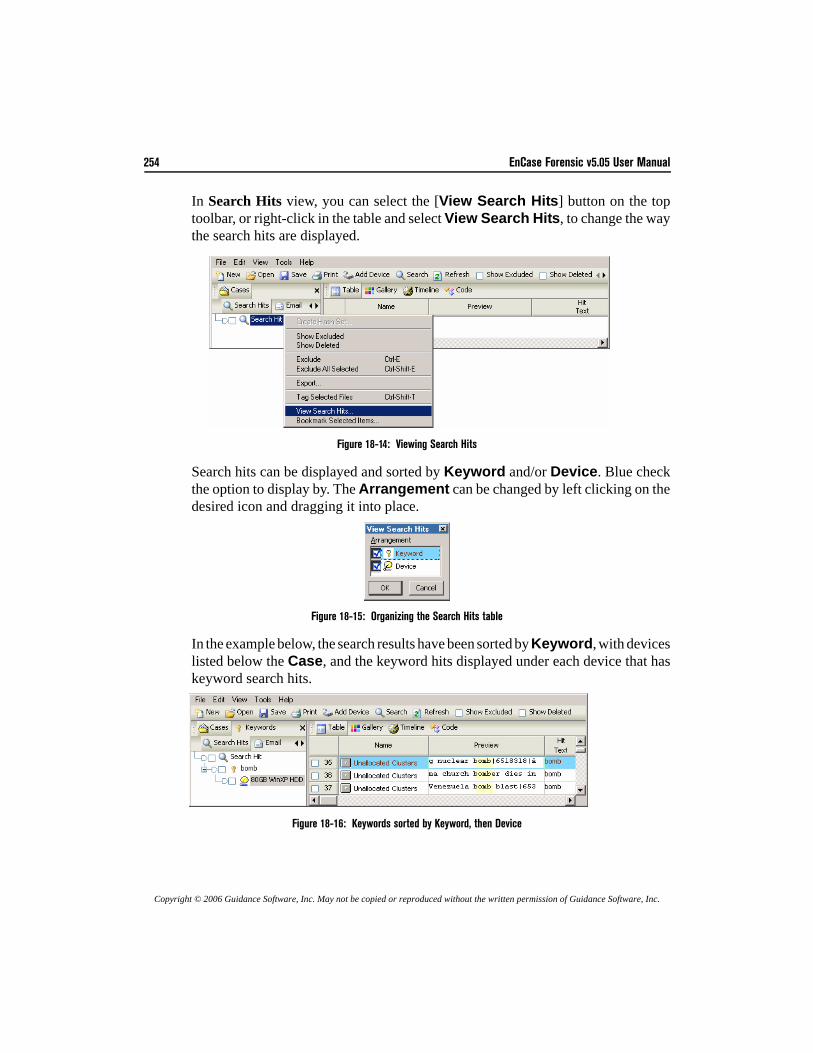
254 EnCase Forensic v5.05 User Manual
Copyright © 2006 Guidance Software, Inc. May not be copied or reproduced without the written permission of Guidance Software, Inc.
In Search Hits view, you can select the [View Search Hits] button on the toptoolbar, or right-click in the table and select View Search Hits, to change the waythe search hits are displayed.
Figure 18-14: Viewing Search Hits
Search hits can be displayed and sorted by Keyword and/or Device. Blue checkthe option to display by. The Arrangement can be changed by left clicking on thedesired icon and dragging it into place.
Figure 18-15: Organizing the Search Hits table
In the example below, the search results have been sorted by Keyword, with deviceslisted below the Case, and the keyword hits displayed under each device that haskeyword search hits.
Figure 18-16: Keywords sorted by Keyword, then Device
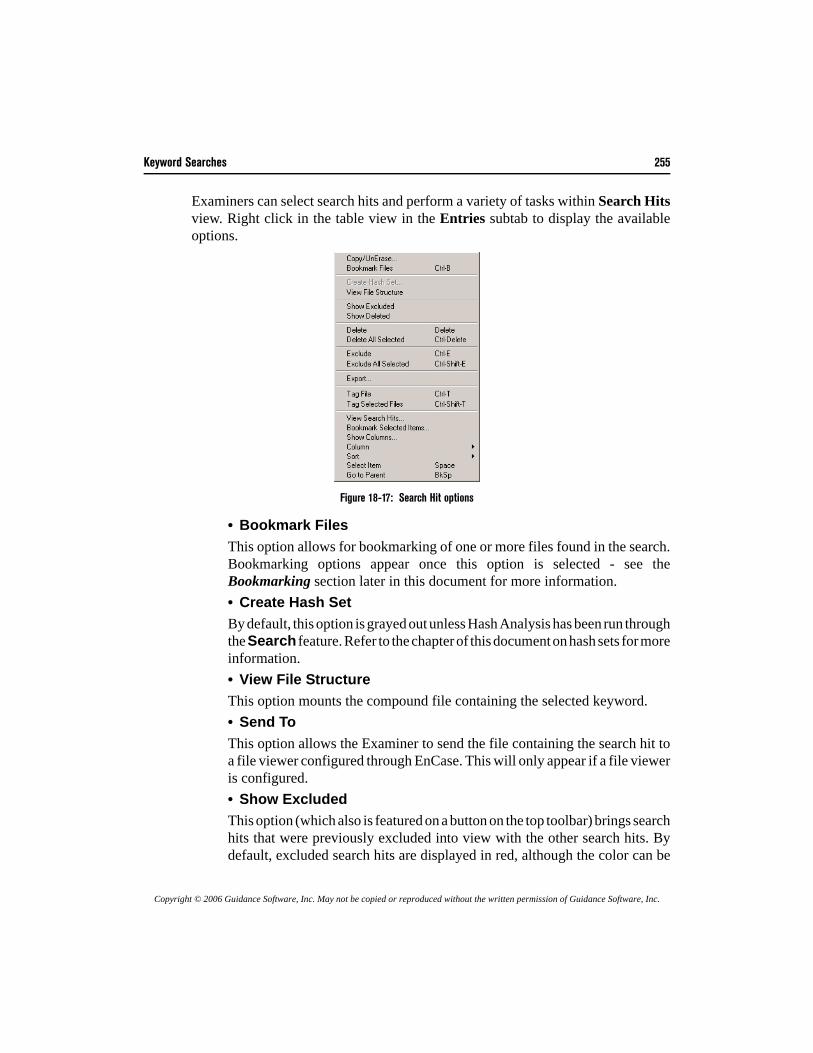
Keyword Searches 255
Copyright © 2006 Guidance Software, Inc. May not be copied or reproduced without the written permission of Guidance Software, Inc.
Examiners can select search hits and perform a variety of tasks within Search Hitsview. Right click in the table view in the Entries subtab to display the availableoptions.
Figure 18-17: Search Hit options
• Bookmark FilesThis option allows for bookmarking of one or more files found in the search.Bookmarking options appear once this option is selected - see theBookmarking section later in this document for more information.• Create Hash SetBy default, this option is grayed out unless Hash Analysis has been run throughthe Search feature. Refer to the chapter of this document on hash sets for moreinformation.• View File StructureThis option mounts the compound file containing the selected keyword.• Send ToThis option allows the Examiner to send the file containing the search hit toa file viewer configured through EnCase. This will only appear if a file vieweris configured.• Show ExcludedThis option (which also is featured on a button on the top toolbar) brings searchhits that were previously excluded into view with the other search hits. Bydefault, excluded search hits are displayed in red, although the color can be
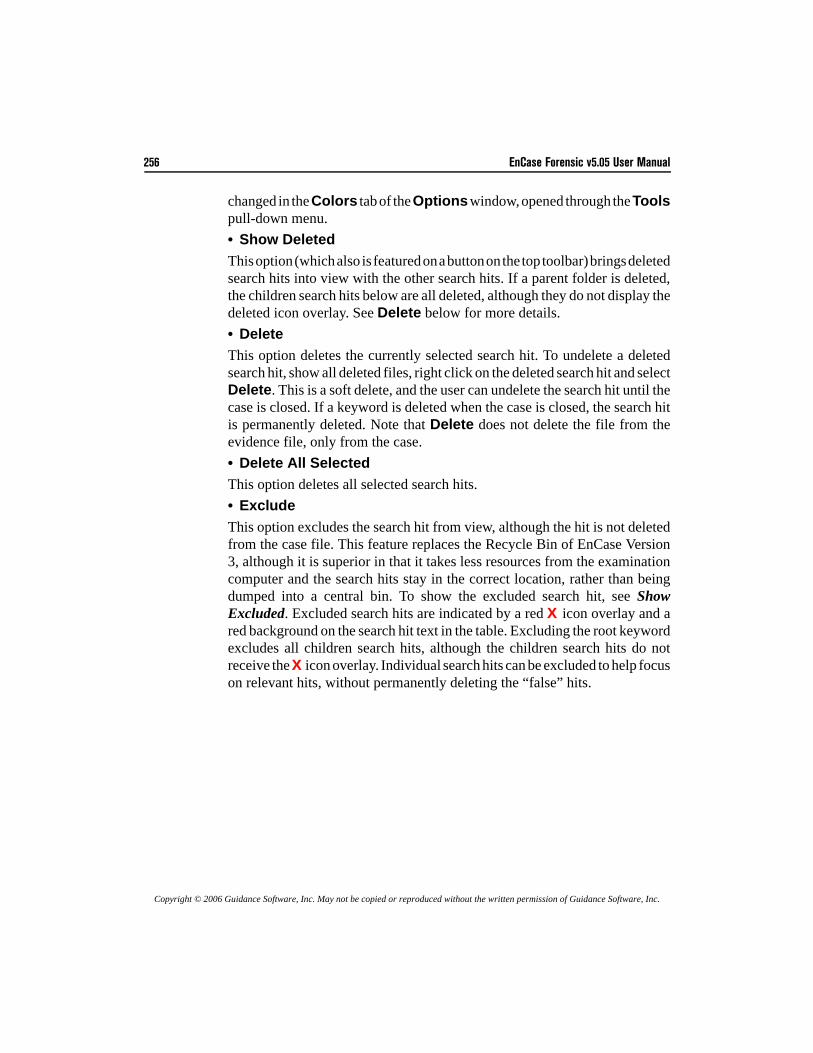
256 EnCase Forensic v5.05 User Manual
Copyright © 2006 Guidance Software, Inc. May not be copied or reproduced without the written permission of Guidance Software, Inc.
changed in the Colors tab of the Options window, opened through the Toolspull-down menu.• Show DeletedThis option (which also is featured on a button on the top toolbar) brings deletedsearch hits into view with the other search hits. If a parent folder is deleted,the children search hits below are all deleted, although they do not display thedeleted icon overlay. See Delete below for more details.• DeleteThis option deletes the currently selected search hit. To undelete a deletedsearch hit, show all deleted files, right click on the deleted search hit and selectDelete. This is a soft delete, and the user can undelete the search hit until thecase is closed. If a keyword is deleted when the case is closed, the search hitis permanently deleted. Note that Delete does not delete the file from theevidence file, only from the case.• Delete All SelectedThis option deletes all selected search hits.• ExcludeThis option excludes the search hit from view, although the hit is not deletedfrom the case file. This feature replaces the Recycle Bin of EnCase Version3, although it is superior in that it takes less resources from the examinationcomputer and the search hits stay in the correct location, rather than beingdumped into a central bin. To show the excluded search hit, see ShowExcluded. Excluded search hits are indicated by a red X icon overlay and ared background on the search hit text in the table. Excluding the root keywordexcludes all children search hits, although the children search hits do notreceive the X icon overlay. Individual search hits can be excluded to help focuson relevant hits, without permanently deleting the “false” hits.
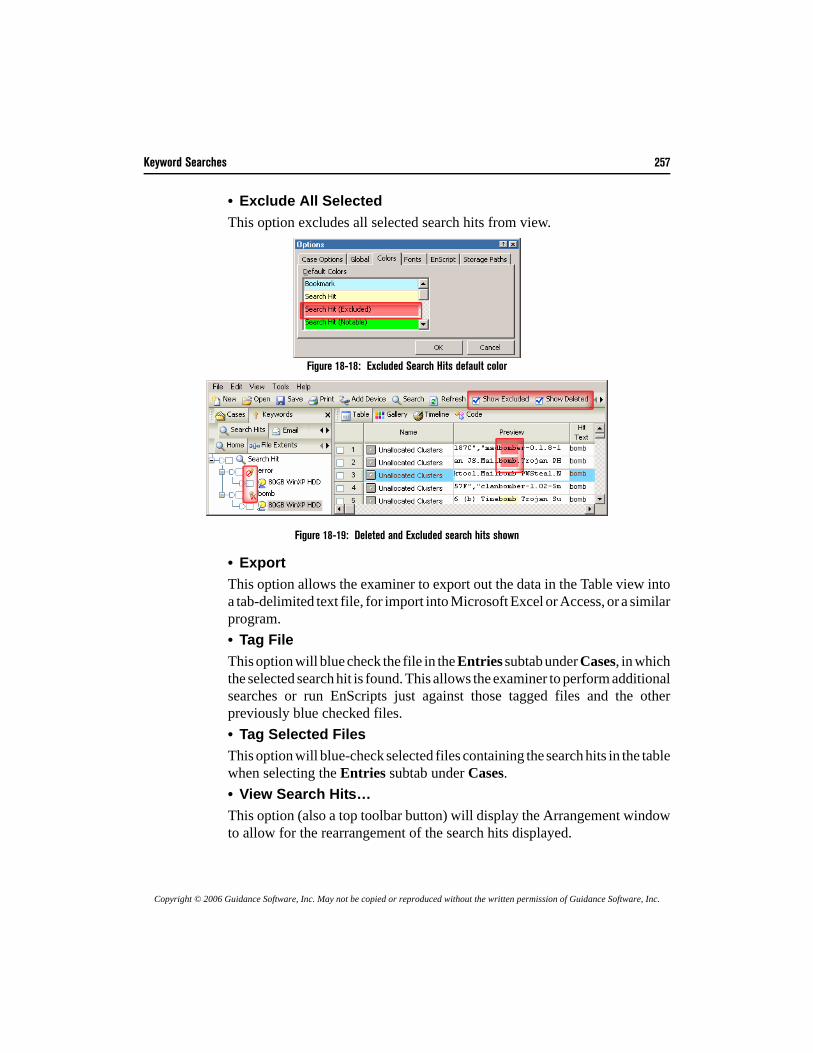
Keyword Searches 257
Copyright © 2006 Guidance Software, Inc. May not be copied or reproduced without the written permission of Guidance Software, Inc.
• Exclude All SelectedThis option excludes all selected search hits from view.
Figure 18-18: Excluded Search Hits default color
Figure 18-19: Deleted and Excluded search hits shown
• ExportThis option allows the examiner to export out the data in the Table view intoa tab-delimited text file, for import into Microsoft Excel or Access, or a similarprogram.• Tag FileThis option will blue check the file in the Entries subtab under Cases, in whichthe selected search hit is found. This allows the examiner to perform additionalsearches or run EnScripts just against those tagged files and the otherpreviously blue checked files.• Tag Selected FilesThis option will blue-check selected files containing the search hits in the tablewhen selecting the Entries subtab under Cases.• View Search Hits…This option (also a top toolbar button) will display the Arrangement windowto allow for the rearrangement of the search hits displayed.
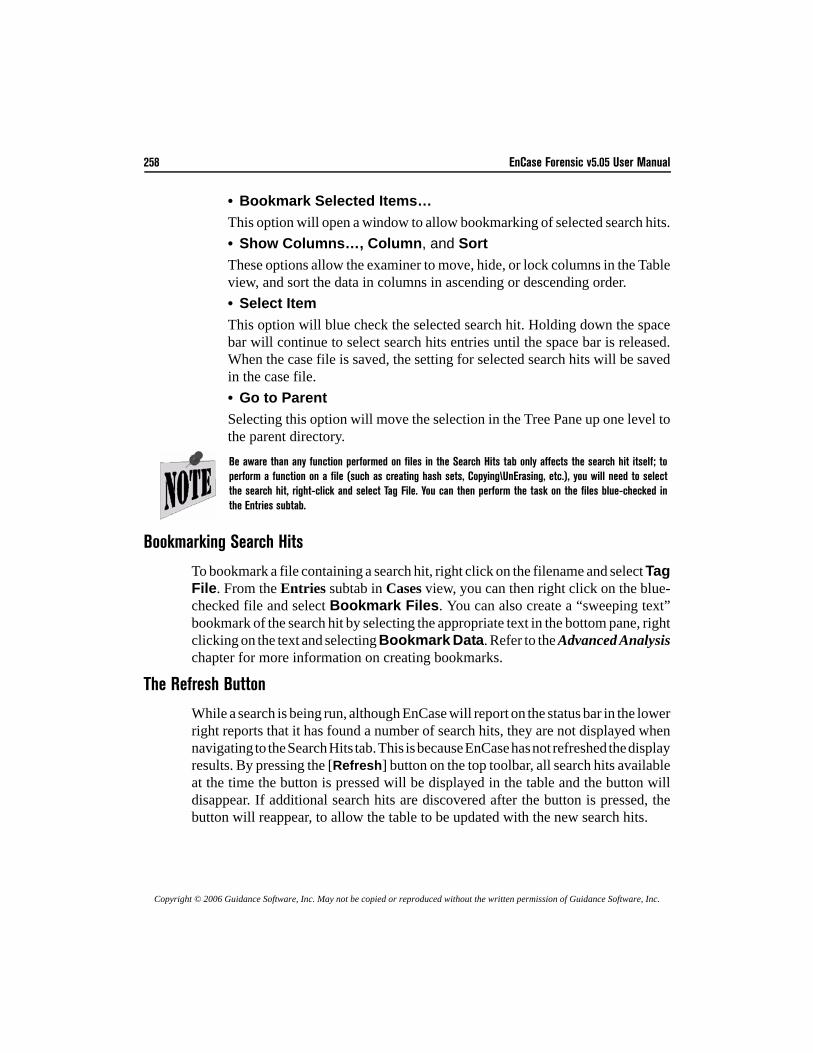
258 EnCase Forensic v5.05 User Manual
Copyright © 2006 Guidance Software, Inc. May not be copied or reproduced without the written permission of Guidance Software, Inc.
• Bookmark Selected Items…This option will open a window to allow bookmarking of selected search hits.• Show Columns…, Column, and SortThese options allow the examiner to move, hide, or lock columns in the Tableview, and sort the data in columns in ascending or descending order.• Select ItemThis option will blue check the selected search hit. Holding down the spacebar will continue to select search hits entries until the space bar is released.When the case file is saved, the setting for selected search hits will be savedin the case file.• Go to ParentSelecting this option will move the selection in the Tree Pane up one level tothe parent directory.
Bookmarking Search Hits
To bookmark a file containing a search hit, right click on the filename and select TagFile. From the Entries subtab in Cases view, you can then right click on the blue-checked file and select Bookmark Files. You can also create a “sweeping text”bookmark of the search hit by selecting the appropriate text in the bottom pane, rightclicking on the text and selecting Bookmark Data. Refer to the Advanced Analysischapter for more information on creating bookmarks.
The Refresh Button
While a search is being run, although EnCase will report on the status bar in the lowerright reports that it has found a number of search hits, they are not displayed whennavigating to the Search Hits tab. This is because EnCase has not refreshed the displayresults. By pressing the [Refresh] button on the top toolbar, all search hits availableat the time the button is pressed will be displayed in the table and the button willdisappear. If additional search hits are discovered after the button is pressed, thebutton will reappear, to allow the table to be updated with the new search hits.
Be aware than any function performed on files in the Search Hits tab only affects the search hit itself; toperform a function on a file (such as creating hash sets, Copying\UnErasing, etc.), you will need to selectthe search hit, right-click and select Tag File. You can then perform the task on the files blue-checked inthe Entries subtab.
Keyword Searches 259
Copyright © 2006 Guidance Software, Inc. May not be copied or reproduced without the written permission of Guidance Software, Inc.
Canceling a Search
To cancel a keyword search, double-click the blue status bar in the lower-right cornerof the screen. Click [Yes] in the dialog box that appears to cancel the search.

260 EnCase Forensic v5.05 User Manual
Copyright © 2006 Guidance Software, Inc. May not be copied or reproduced without the written permission of Guidance Software, Inc.
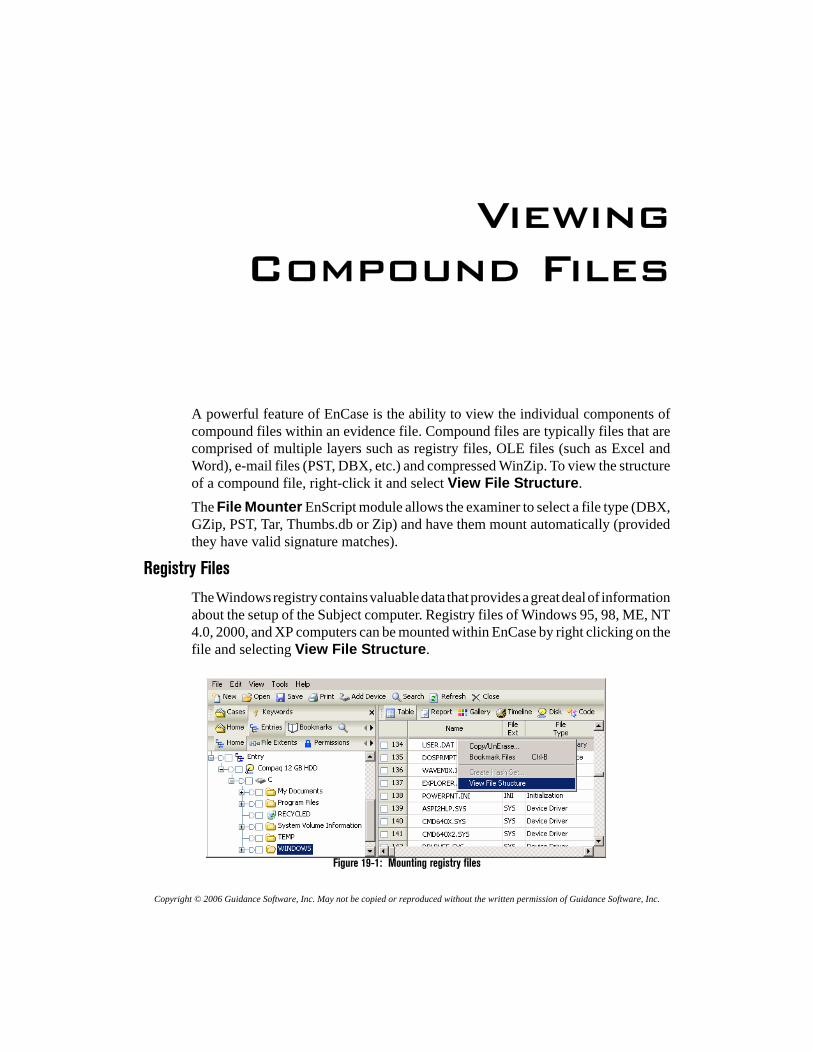
Copyright © 2006 Guidance Software, Inc. May not be copied or reproduced without the written permission of Guidance Software, Inc.
ViewingCompound Files
A powerful feature of EnCase is the ability to view the individual components ofcompound files within an evidence file. Compound files are typically files that arecomprised of multiple layers such as registry files, OLE files (such as Excel andWord), e-mail files (PST, DBX, etc.) and compressed WinZip. To view the structureof a compound file, right-click it and select View File Structure.The File Mounter EnScript module allows the examiner to select a file type (DBX,GZip, PST, Tar, Thumbs.db or Zip) and have them mount automatically (providedthey have valid signature matches).
Registry Files
The Windows registry contains valuable data that provides a great deal of informationabout the setup of the Subject computer. Registry files of Windows 95, 98, ME, NT4.0, 2000, and XP computers can be mounted within EnCase by right clicking on thefile and selecting View File Structure.
Figure 19-1: Mounting registry files
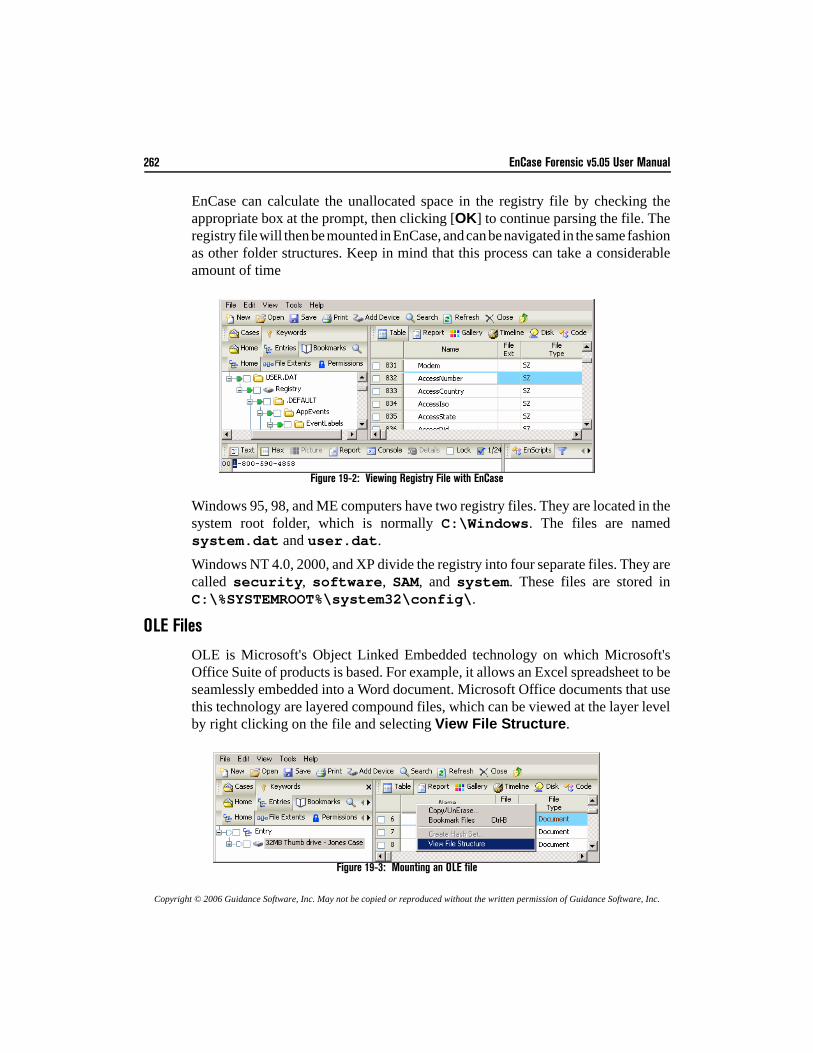
262 EnCase Forensic v5.05 User Manual
Copyright © 2006 Guidance Software, Inc. May not be copied or reproduced without the written permission of Guidance Software, Inc.
EnCase can calculate the unallocated space in the registry file by checking theappropriate box at the prompt, then clicking [OK] to continue parsing the file. Theregistry file will then be mounted in EnCase, and can be navigated in the same fashionas other folder structures. Keep in mind that this process can take a considerableamount of time
.
Figure 19-2: Viewing Registry File with EnCase
Windows 95, 98, and ME computers have two registry files. They are located in thesystem root folder, which is normally C:\Windows. The files are namedsystem.dat and user.dat.Windows NT 4.0, 2000, and XP divide the registry into four separate files. They arecalled security, software, SAM, and system. These files are stored inC:\%SYSTEMROOT%\system32\config\.
OLE Files
OLE is Microsoft's Object Linked Embedded technology on which Microsoft'sOffice Suite of products is based. For example, it allows an Excel spreadsheet to beseamlessly embedded into a Word document. Microsoft Office documents that usethis technology are layered compound files, which can be viewed at the layer levelby right clicking on the file and selecting View File Structure.
Figure 19-3: Mounting an OLE file
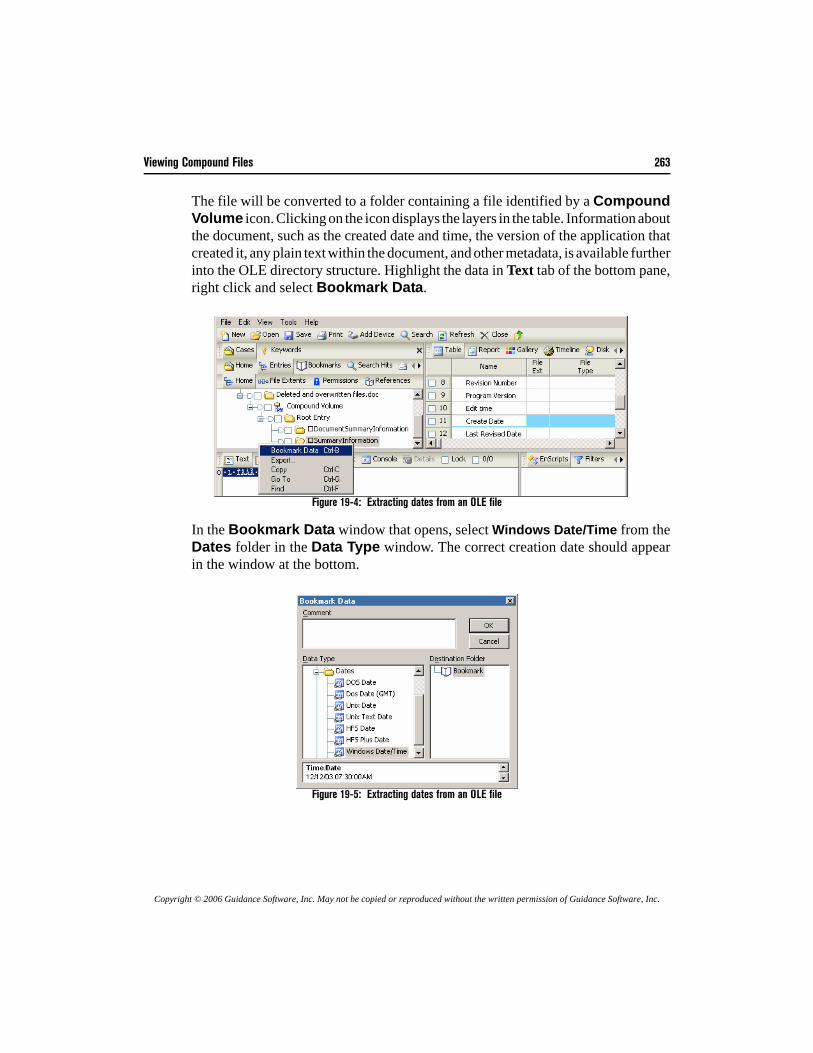
Viewing Compound Files 263
Copyright © 2006 Guidance Software, Inc. May not be copied or reproduced without the written permission of Guidance Software, Inc.
The file will be converted to a folder containing a file identified by a CompoundVolume icon. Clicking on the icon displays the layers in the table. Information aboutthe document, such as the created date and time, the version of the application thatcreated it, any plain text within the document, and other metadata, is available furtherinto the OLE directory structure. Highlight the data in Text tab of the bottom pane,right click and select Bookmark Data.
Figure 19-4: Extracting dates from an OLE file
In the Bookmark Data window that opens, select Windows Date/Time from theDates folder in the Data Type window. The correct creation date should appearin the window at the bottom.
Figure 19-5: Extracting dates from an OLE file
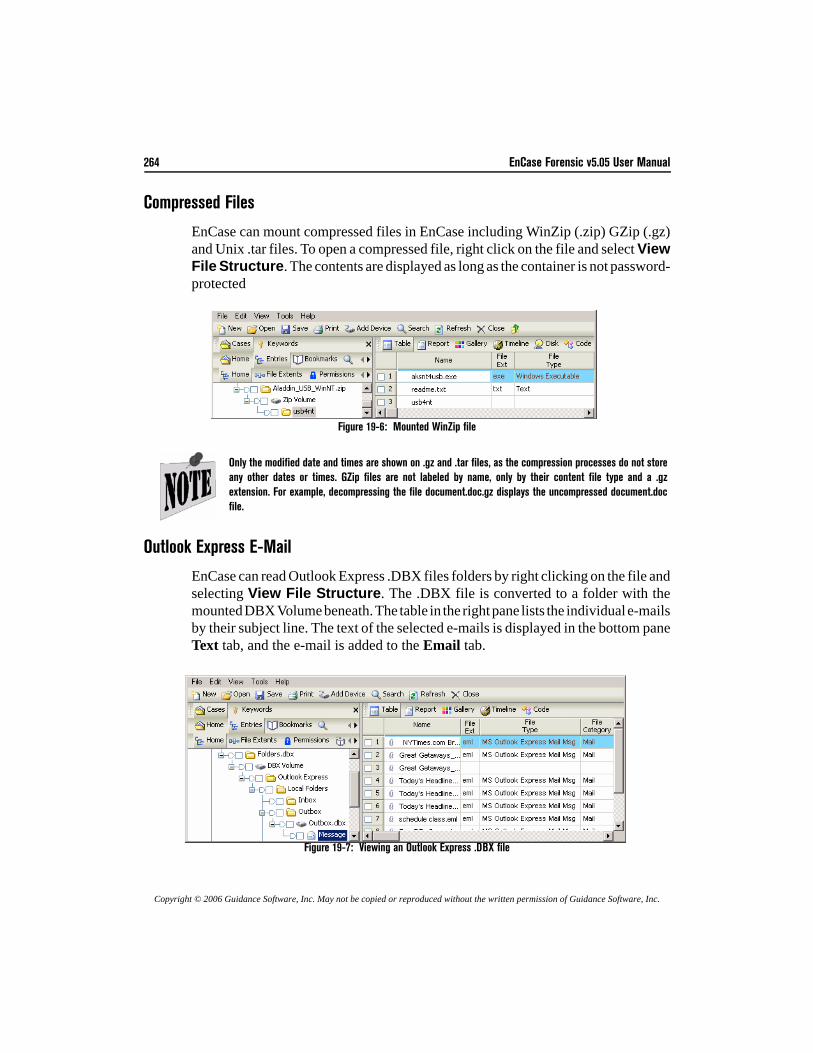
264 EnCase Forensic v5.05 User Manual
Copyright © 2006 Guidance Software, Inc. May not be copied or reproduced without the written permission of Guidance Software, Inc.
Compressed Files
EnCase can mount compressed files in EnCase including WinZip (.zip) GZip (.gz)and Unix .tar files. To open a compressed file, right click on the file and select ViewFile Structure. The contents are displayed as long as the container is not password-protected
.
Figure 19-6: Mounted WinZip file
Outlook Express E-Mail
EnCase can read Outlook Express .DBX files folders by right clicking on the file andselecting View File Structure. The .DBX file is converted to a folder with themounted DBX Volume beneath. The table in the right pane lists the individual e-mailsby their subject line. The text of the selected e-mails is displayed in the bottom paneText tab, and the e-mail is added to the Email tab.
Figure 19-7: Viewing an Outlook Express .DBX file
Only the modified date and times are shown on .gz and .tar files, as the compression processes do not storeany other dates or times. GZip files are not labeled by name, only by their content file type and a .gzextension. For example, decompressing the file document.doc.gz displays the uncompressed document.docfile.
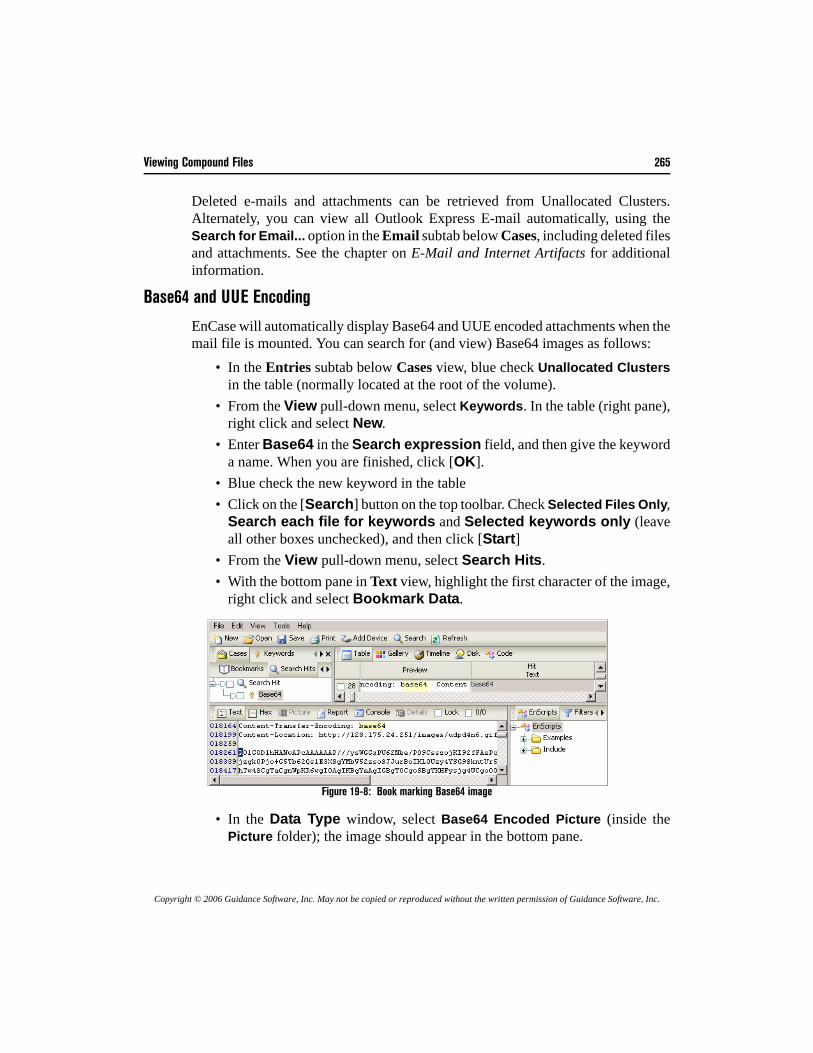
Viewing Compound Files 265
Copyright © 2006 Guidance Software, Inc. May not be copied or reproduced without the written permission of Guidance Software, Inc.
Deleted e-mails and attachments can be retrieved from Unallocated Clusters.Alternately, you can view all Outlook Express E-mail automatically, using theSearch for Email... option in the Email subtab below Cases, including deleted filesand attachments. See the chapter on E-Mail and Internet Artifacts for additionalinformation.
Base64 and UUE Encoding
EnCase will automatically display Base64 and UUE encoded attachments when themail file is mounted. You can search for (and view) Base64 images as follows:
• In the Entries subtab below Cases view, blue check Unallocated Clustersin the table (normally located at the root of the volume).
• From the View pull-down menu, select Keywords. In the table (right pane),right click and select New.
• Enter Base64 in the Search expression field, and then give the keyworda name. When you are finished, click [OK].
• Blue check the new keyword in the table• Click on the [Search] button on the top toolbar. Check Selected Files Only,
Search each file for keywords and Selected keywords only (leaveall other boxes unchecked), and then click [Start]
• From the View pull-down menu, select Search Hits.• With the bottom pane in Text view, highlight the first character of the image,
right click and select Bookmark Data.
Figure 19-8: Book marking Base64 image
• In the Data Type window, select Base64 Encoded Picture (inside thePicture folder); the image should appear in the bottom pane.
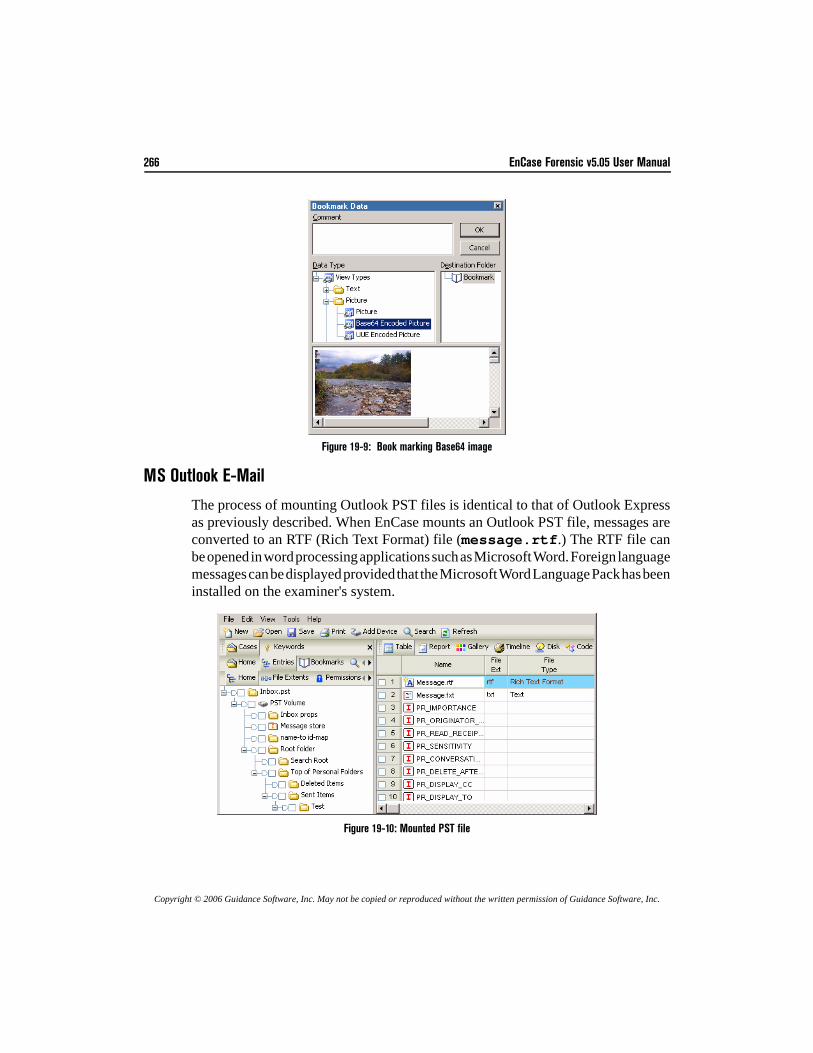
266 EnCase Forensic v5.05 User Manual
Copyright © 2006 Guidance Software, Inc. May not be copied or reproduced without the written permission of Guidance Software, Inc.
Figure 19-9: Book marking Base64 image
MS Outlook E-Mail
The process of mounting Outlook PST files is identical to that of Outlook Expressas previously described. When EnCase mounts an Outlook PST file, messages areconverted to an RTF (Rich Text Format) file (message.rtf.) The RTF file canbe opened in word processing applications such as Microsoft Word. Foreign languagemessages can be displayed provided that the Microsoft Word Language Pack has beeninstalled on the examiner's system.
Figure 19-10: Mounted PST file
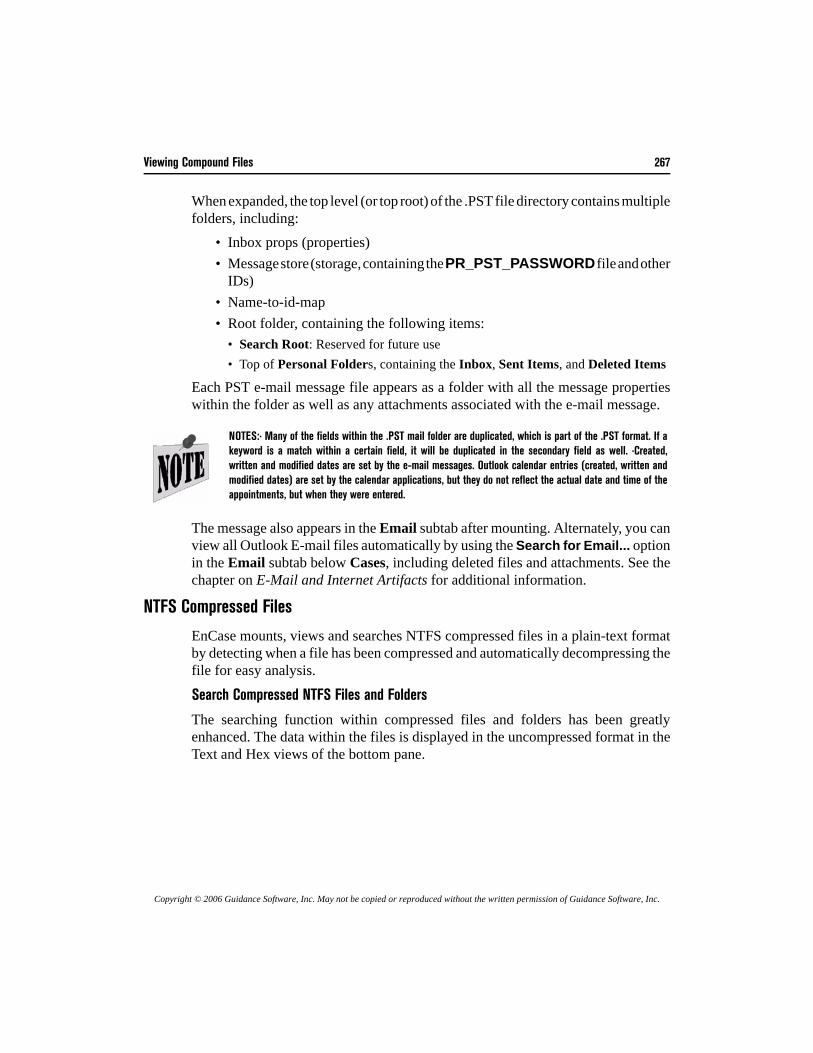
Viewing Compound Files 267
Copyright © 2006 Guidance Software, Inc. May not be copied or reproduced without the written permission of Guidance Software, Inc.
When expanded, the top level (or top root) of the .PST file directory contains multiplefolders, including:
• Inbox props (properties)• Message store (storage, containing the PR_PST_PASSWORD file and other
IDs)• Name-to-id-map• Root folder, containing the following items:
• Search Root: Reserved for future use• Top of Personal Folders, containing the Inbox, Sent Items, and Deleted Items
Each PST e-mail message file appears as a folder with all the message propertieswithin the folder as well as any attachments associated with the e-mail message.
The message also appears in the Email subtab after mounting. Alternately, you canview all Outlook E-mail files automatically by using the Search for Email... optionin the Email subtab below Cases, including deleted files and attachments. See thechapter on E-Mail and Internet Artifacts for additional information.
NTFS Compressed Files
EnCase mounts, views and searches NTFS compressed files in a plain-text formatby detecting when a file has been compressed and automatically decompressing thefile for easy analysis.
Search Compressed NTFS Files and Folders
The searching function within compressed files and folders has been greatlyenhanced. The data within the files is displayed in the uncompressed format in theText and Hex views of the bottom pane.
NOTES:· Many of the fields within the .PST mail folder are duplicated, which is part of the .PST format. If akeyword is a match within a certain field, it will be duplicated in the secondary field as well. ·Created,written and modified dates are set by the e-mail messages. Outlook calendar entries (created, written andmodified dates) are set by the calendar applications, but they do not reflect the actual date and time of theappointments, but when they were entered.
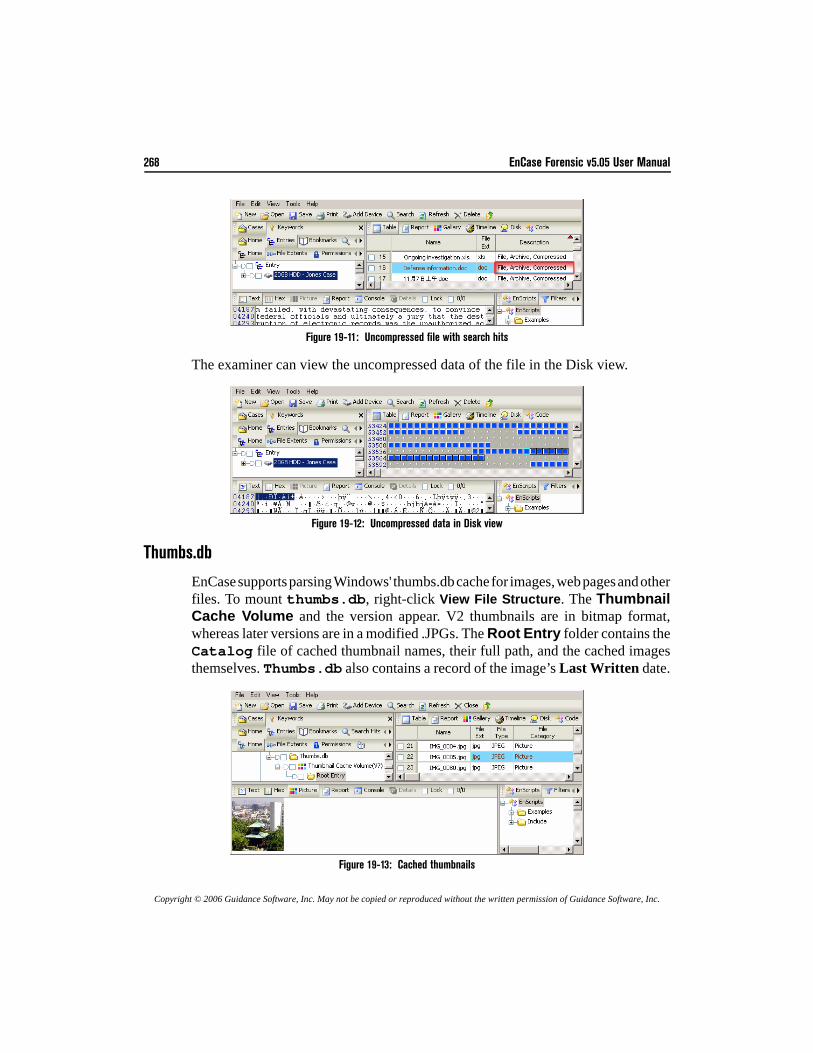
268 EnCase Forensic v5.05 User Manual
Copyright © 2006 Guidance Software, Inc. May not be copied or reproduced without the written permission of Guidance Software, Inc.
Figure 19-11: Uncompressed file with search hits
The examiner can view the uncompressed data of the file in the Disk view.
Figure 19-12: Uncompressed data in Disk view
Thumbs.db
EnCase supports parsing Windows' thumbs.db cache for images, web pages and otherfiles. To mount thumbs.db, right-click View File Structure. The ThumbnailCache Volume and the version appear. V2 thumbnails are in bitmap format,whereas later versions are in a modified .JPGs. The Root Entry folder contains theCatalog file of cached thumbnail names, their full path, and the cached imagesthemselves. Thumbs.db also contains a record of the image’s Last Written date.
Figure 19-13: Cached thumbnails
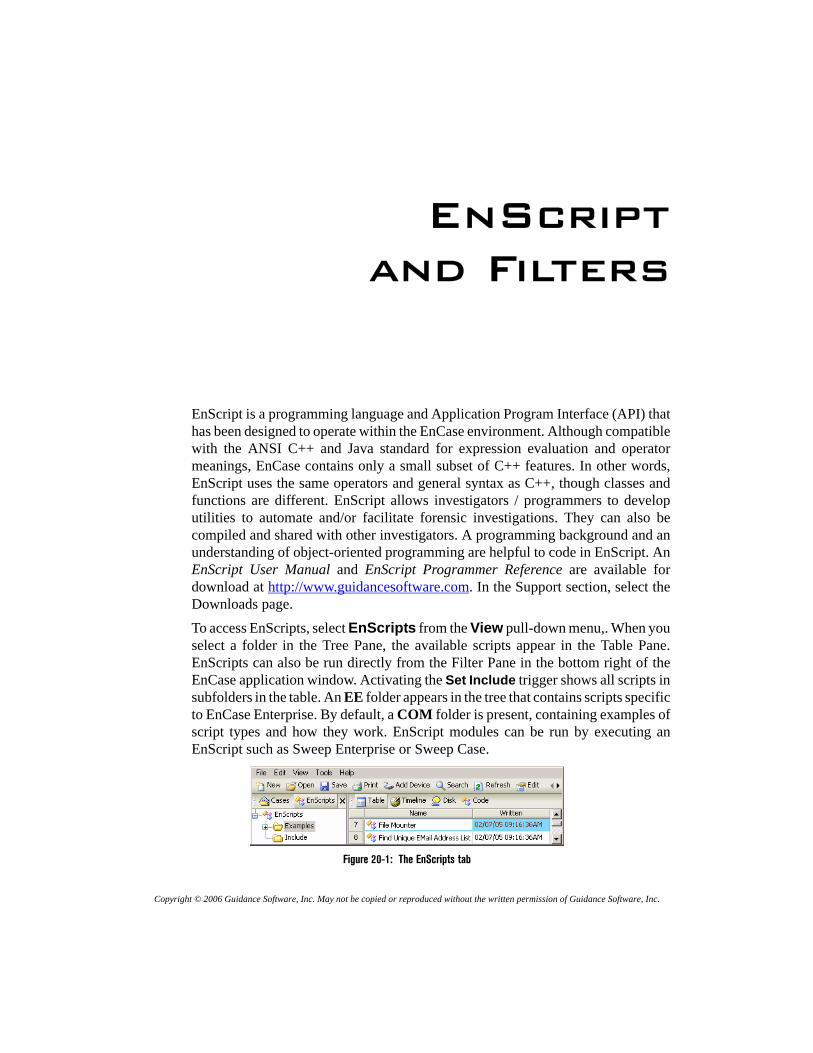
Copyright © 2006 Guidance Software, Inc. May not be copied or reproduced without the written permission of Guidance Software, Inc.
EnScriptand Filters
EnScript is a programming language and Application Program Interface (API) thathas been designed to operate within the EnCase environment. Although compatiblewith the ANSI C++ and Java standard for expression evaluation and operatormeanings, EnCase contains only a small subset of C++ features. In other words,EnScript uses the same operators and general syntax as C++, though classes andfunctions are different. EnScript allows investigators / programmers to developutilities to automate and/or facilitate forensic investigations. They can also becompiled and shared with other investigators. A programming background and anunderstanding of object-oriented programming are helpful to code in EnScript. AnEnScript User Manual and EnScript Programmer Reference are available fordownload at http://www.guidancesoftware.com. In the Support section, select theDownloads page. To access EnScripts, select EnScripts from the View pull-down menu,. When youselect a folder in the Tree Pane, the available scripts appear in the Table Pane.EnScripts can also be run directly from the Filter Pane in the bottom right of theEnCase application window. Activating the Set Include trigger shows all scripts insubfolders in the table. An EE folder appears in the tree that contains scripts specificto EnCase Enterprise. By default, a COM folder is present, containing examples ofscript types and how they work. EnScript modules can be run by executing anEnScript such as Sweep Enterprise or Sweep Case.
Figure 20-1: The EnScripts tab
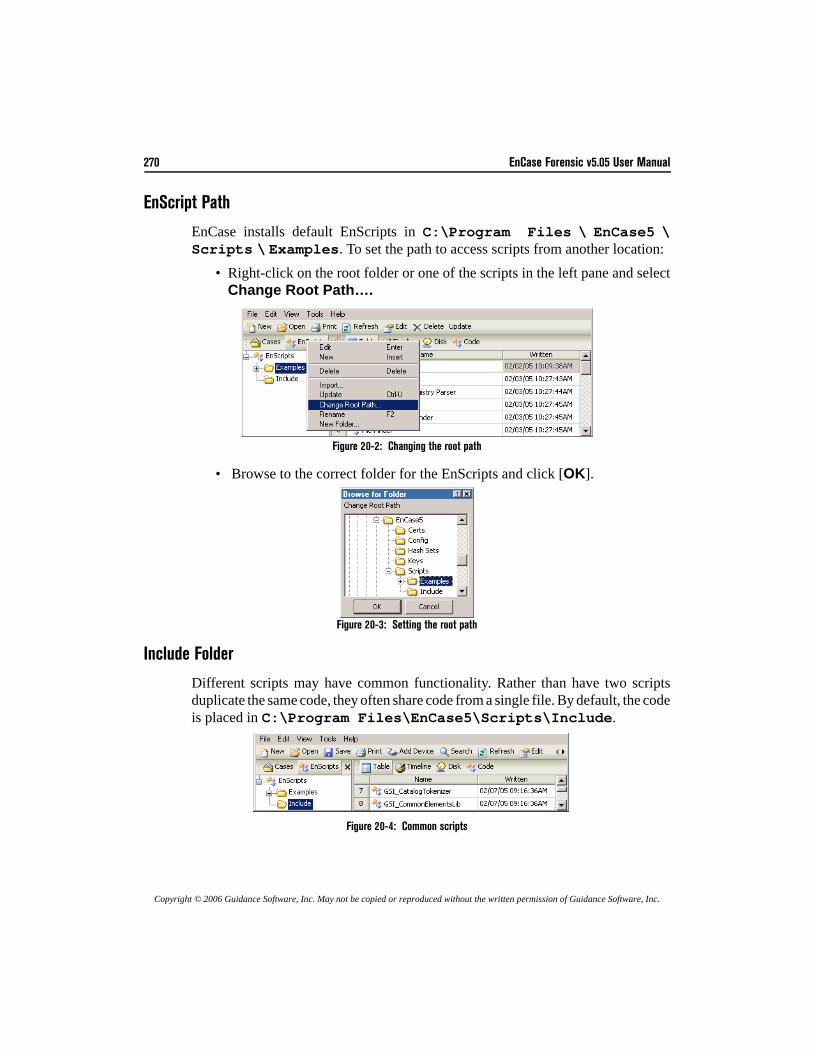
270 EnCase Forensic v5.05 User Manual
Copyright © 2006 Guidance Software, Inc. May not be copied or reproduced without the written permission of Guidance Software, Inc.
EnScript Path
EnCase installs default EnScripts in C:\Program Files \ EnCase5 \Scripts \ Examples. To set the path to access scripts from another location:
• Right-click on the root folder or one of the scripts in the left pane and selectChange Root Path….
Figure 20-2: Changing the root path
• Browse to the correct folder for the EnScripts and click [OK].
Figure 20-3: Setting the root path
Include Folder
Different scripts may have common functionality. Rather than have two scriptsduplicate the same code, they often share code from a single file. By default, the codeis placed in C:\Program Files\EnCase5\Scripts\Include.
Figure 20-4: Common scripts
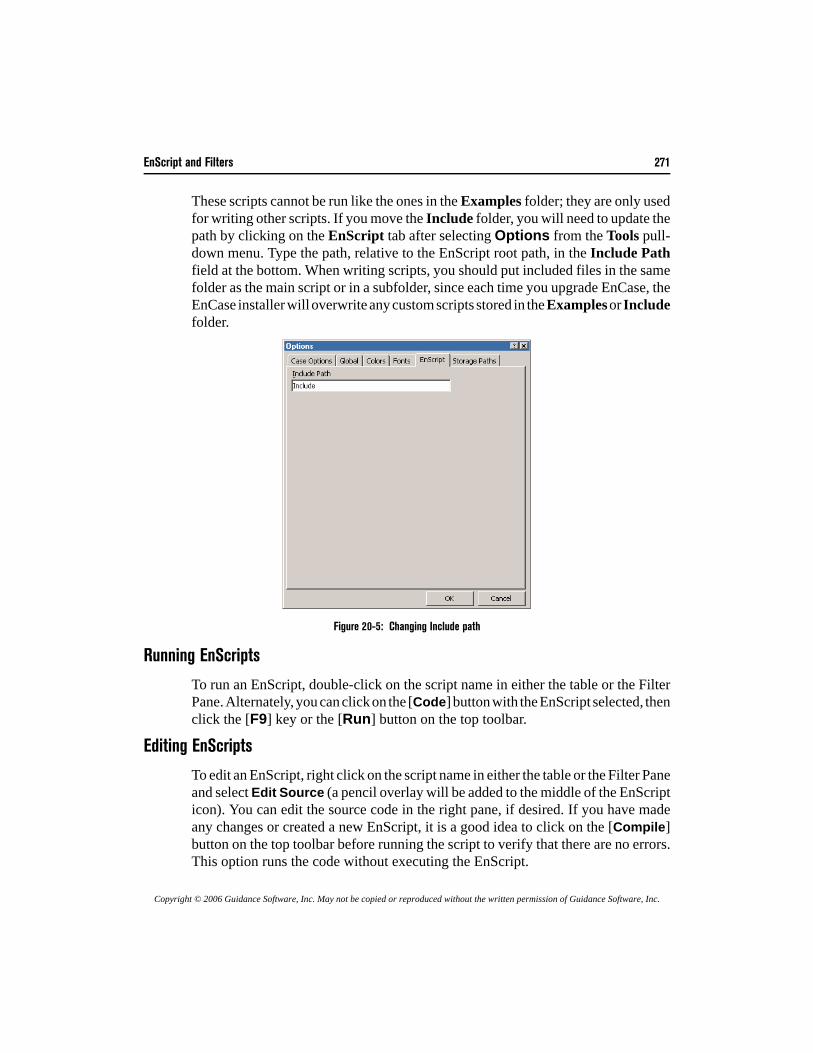
EnScript and Filters 271
Copyright © 2006 Guidance Software, Inc. May not be copied or reproduced without the written permission of Guidance Software, Inc.
These scripts cannot be run like the ones in the Examples folder; they are only usedfor writing other scripts. If you move the Include folder, you will need to update thepath by clicking on the EnScript tab after selecting Options from the Tools pull-down menu. Type the path, relative to the EnScript root path, in the Include Pathfield at the bottom. When writing scripts, you should put included files in the samefolder as the main script or in a subfolder, since each time you upgrade EnCase, theEnCase installer will overwrite any custom scripts stored in the Examples or Includefolder.
Figure 20-5: Changing Include path
Running EnScripts
To run an EnScript, double-click on the script name in either the table or the FilterPane. Alternately, you can click on the [Code] button with the EnScript selected, thenclick the [F9] key or the [Run] button on the top toolbar.
Editing EnScripts
To edit an EnScript, right click on the script name in either the table or the Filter Paneand select Edit Source (a pencil overlay will be added to the middle of the EnScripticon). You can edit the source code in the right pane, if desired. If you have madeany changes or created a new EnScript, it is a good idea to click on the [Compile]button on the top toolbar before running the script to verify that there are no errors.This option runs the code without executing the EnScript.
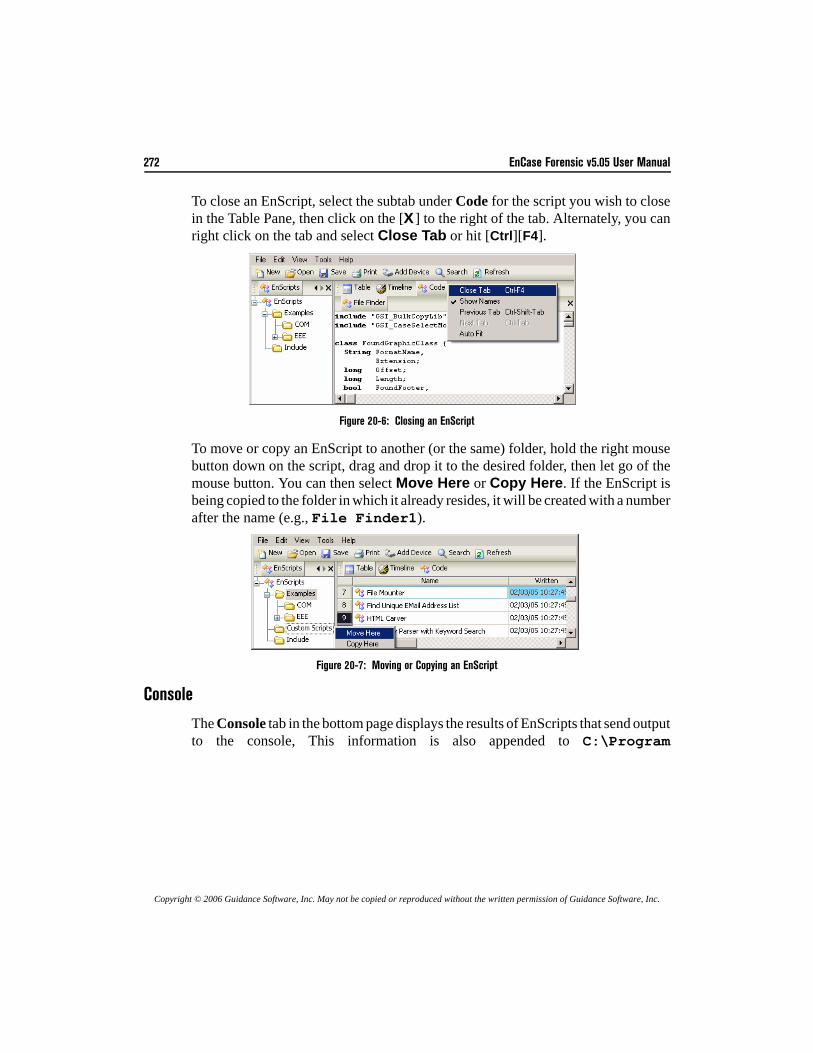
272 EnCase Forensic v5.05 User Manual
Copyright © 2006 Guidance Software, Inc. May not be copied or reproduced without the written permission of Guidance Software, Inc.
To close an EnScript, select the subtab under Code for the script you wish to closein the Table Pane, then click on the [X] to the right of the tab. Alternately, you canright click on the tab and select Close Tab or hit [Ctrl][F4].
Figure 20-6: Closing an EnScript
To move or copy an EnScript to another (or the same) folder, hold the right mousebutton down on the script, drag and drop it to the desired folder, then let go of themouse button. You can then select Move Here or Copy Here. If the EnScript isbeing copied to the folder in which it already resides, it will be created with a numberafter the name (e.g., File Finder1).
Figure 20-7: Moving or Copying an EnScript
Console
The Console tab in the bottom page displays the results of EnScripts that send outputto the console, This information is also appended to C:\Program
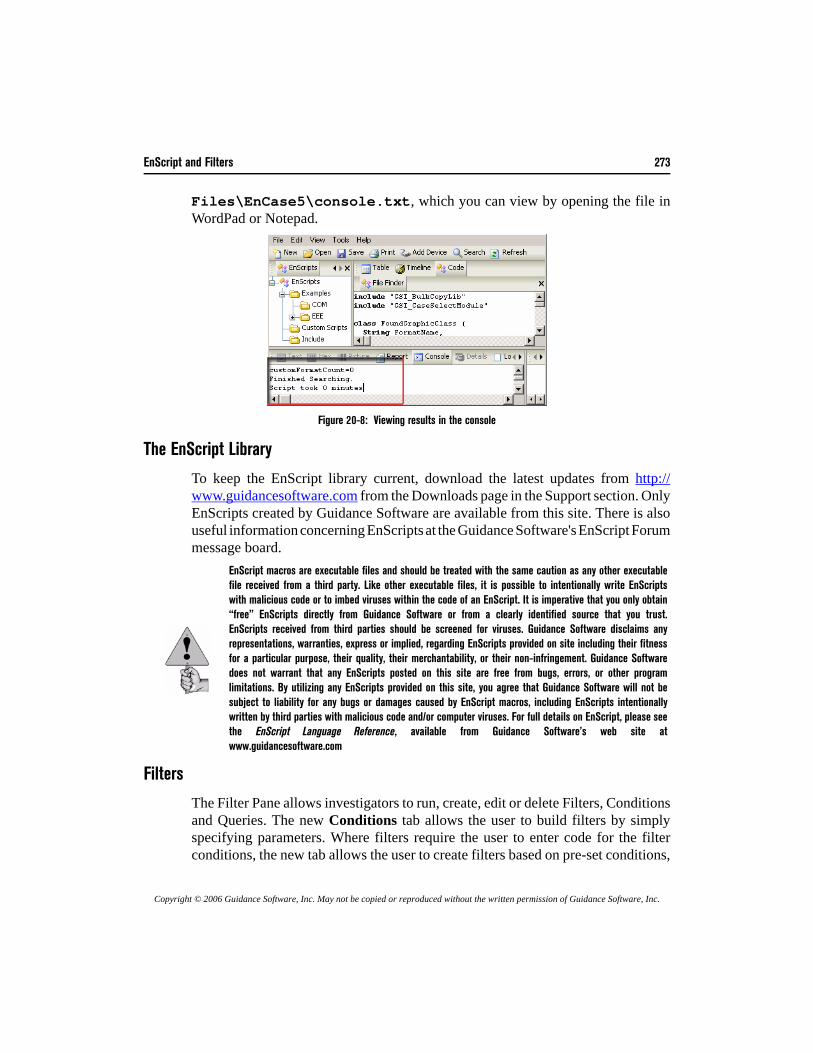
EnScript and Filters 273
Copyright © 2006 Guidance Software, Inc. May not be copied or reproduced without the written permission of Guidance Software, Inc.
Files\EnCase5\console.txt, which you can view by opening the file inWordPad or Notepad.
Figure 20-8: Viewing results in the console
The EnScript Library
To keep the EnScript library current, download the latest updates from http://www.guidancesoftware.com from the Downloads page in the Support section. OnlyEnScripts created by Guidance Software are available from this site. There is alsouseful information concerning EnScripts at the Guidance Software's EnScript Forummessage board.
Filters
The Filter Pane allows investigators to run, create, edit or delete Filters, Conditionsand Queries. The new Conditions tab allows the user to build filters by simplyspecifying parameters. Where filters require the user to enter code for the filterconditions, the new tab allows the user to create filters based on pre-set conditions,
EnScript macros are executable files and should be treated with the same caution as any other executablefile received from a third party. Like other executable files, it is possible to intentionally write EnScriptswith malicious code or to imbed viruses within the code of an EnScript. It is imperative that you only obtain“free” EnScripts directly from Guidance Software or from a clearly identified source that you trust.EnScripts received from third parties should be screened for viruses. Guidance Software disclaims anyrepresentations, warranties, express or implied, regarding EnScripts provided on site including their fitnessfor a particular purpose, their quality, their merchantability, or their non-infringement. Guidance Softwaredoes not warrant that any EnScripts posted on this site are free from bugs, errors, or other programlimitations. By utilizing any EnScripts provided on this site, you agree that Guidance Software will not besubject to liability for any bugs or damages caused by EnScript macros, including EnScripts intentionallywritten by third parties with malicious code and/or computer viruses. For full details on EnScript, please seethe EnScript Language Reference, available from Guidance Software’s web site atwww.guidancesoftware.com
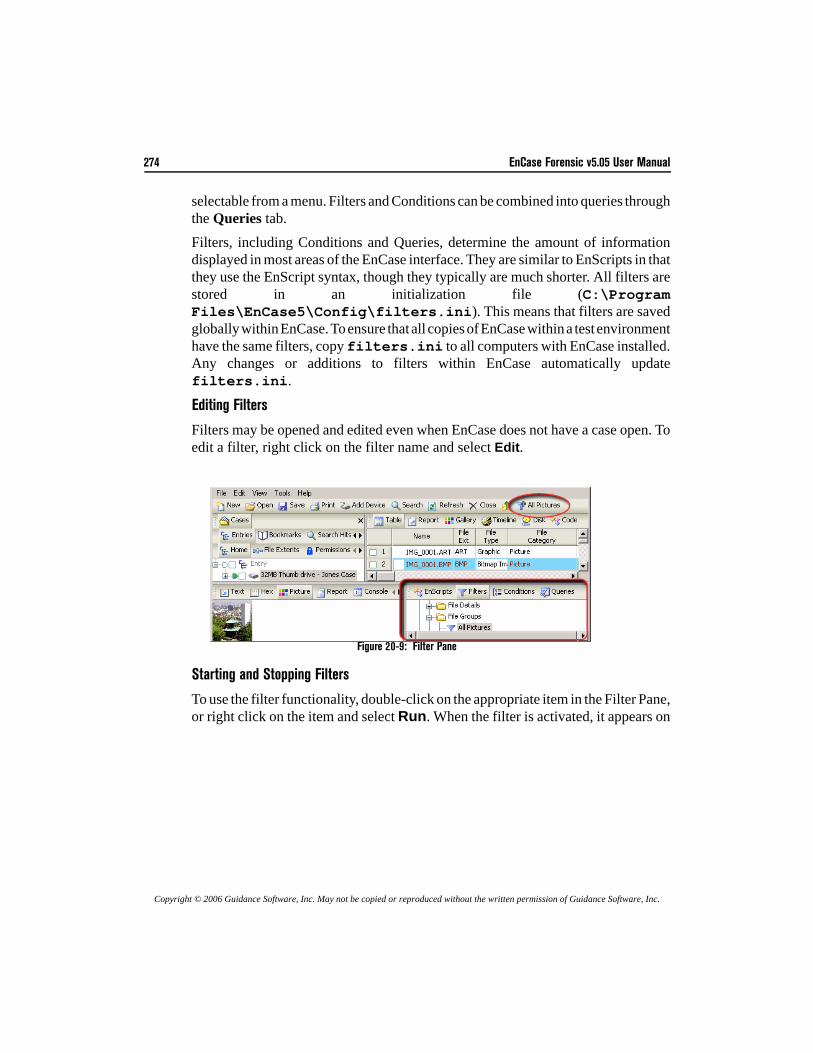
274 EnCase Forensic v5.05 User Manual
Copyright © 2006 Guidance Software, Inc. May not be copied or reproduced without the written permission of Guidance Software, Inc.
selectable from a menu. Filters and Conditions can be combined into queries throughthe Queries tab.Filters, including Conditions and Queries, determine the amount of informationdisplayed in most areas of the EnCase interface. They are similar to EnScripts in thatthey use the EnScript syntax, though they typically are much shorter. All filters arestored in an initialization file (C:\ProgramFiles\EnCase5\Config\filters.ini). This means that filters are savedglobally within EnCase. To ensure that all copies of EnCase within a test environmenthave the same filters, copy filters.ini to all computers with EnCase installed.Any changes or additions to filters within EnCase automatically updatefilters.ini.
Editing Filters
Filters may be opened and edited even when EnCase does not have a case open. Toedit a filter, right click on the filter name and select Edit.
Figure 20-9: Filter Pane
Starting and Stopping Filters
To use the filter functionality, double-click on the appropriate item in the Filter Pane,or right click on the item and select Run. When the filter is activated, it appears on
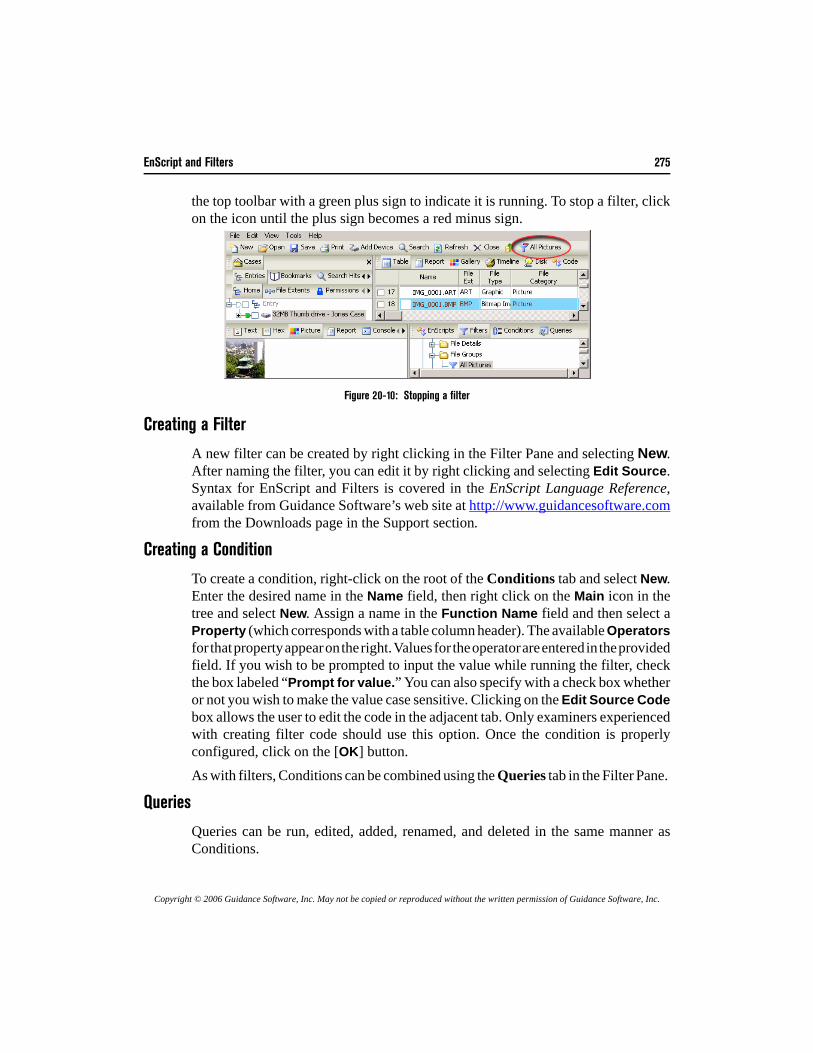
EnScript and Filters 275
Copyright © 2006 Guidance Software, Inc. May not be copied or reproduced without the written permission of Guidance Software, Inc.
the top toolbar with a green plus sign to indicate it is running. To stop a filter, clickon the icon until the plus sign becomes a red minus sign.
Figure 20-10: Stopping a filter
Creating a Filter
A new filter can be created by right clicking in the Filter Pane and selecting New.After naming the filter, you can edit it by right clicking and selecting Edit Source.Syntax for EnScript and Filters is covered in the EnScript Language Reference,available from Guidance Software’s web site at http://www.guidancesoftware.comfrom the Downloads page in the Support section.
Creating a Condition
To create a condition, right-click on the root of the Conditions tab and select New.Enter the desired name in the Name field, then right click on the Main icon in thetree and select New. Assign a name in the Function Name field and then select aProperty (which corresponds with a table column header). The available Operatorsfor that property appear on the right. Values for the operator are entered in the providedfield. If you wish to be prompted to input the value while running the filter, checkthe box labeled “Prompt for value.” You can also specify with a check box whetheror not you wish to make the value case sensitive. Clicking on the Edit Source Codebox allows the user to edit the code in the adjacent tab. Only examiners experiencedwith creating filter code should use this option. Once the condition is properlyconfigured, click on the [OK] button.As with filters, Conditions can be combined using the Queries tab in the Filter Pane.
Queries
Queries can be run, edited, added, renamed, and deleted in the same manner asConditions.

276 EnCase Forensic v5.05 User Manual
Copyright © 2006 Guidance Software, Inc. May not be copied or reproduced without the written permission of Guidance Software, Inc.

Copyright © 2006 Guidance Software, Inc. May not be copied or reproduced without the written permission of Guidance Software, Inc.
Advanced Analysis
Recovering Partitions
Occasionally a device has been formatted or even FDISKed in an attempt to destroyevidence. Formatting and FDISKing a hard drive does not actually delete data.Formatting deletes the structure indicating where the folders and files are on the disk.FDISKing a drive deletes a drive's partition information. EnCase can rebuild bothpartition information and directory and folder structure.
Adding Partitions
A formatted and/or FDISKed hard drive should be acquired using normal procedures.Add the evidence file to a new case within EnCase.
• A formatted drive will display logical volumes within EnCase, but eachvolume will have only an Unallocated Clusters entry in the table.
• An FDISKed drive will not show logical volume information. The entire drivewill be displayed as Unused Disk Area in the table.
Restructure these portions of the disk as follows:• Expand the Examples folder in the lower right pane in EnCase.
Figure 21-1: Expanding Examples
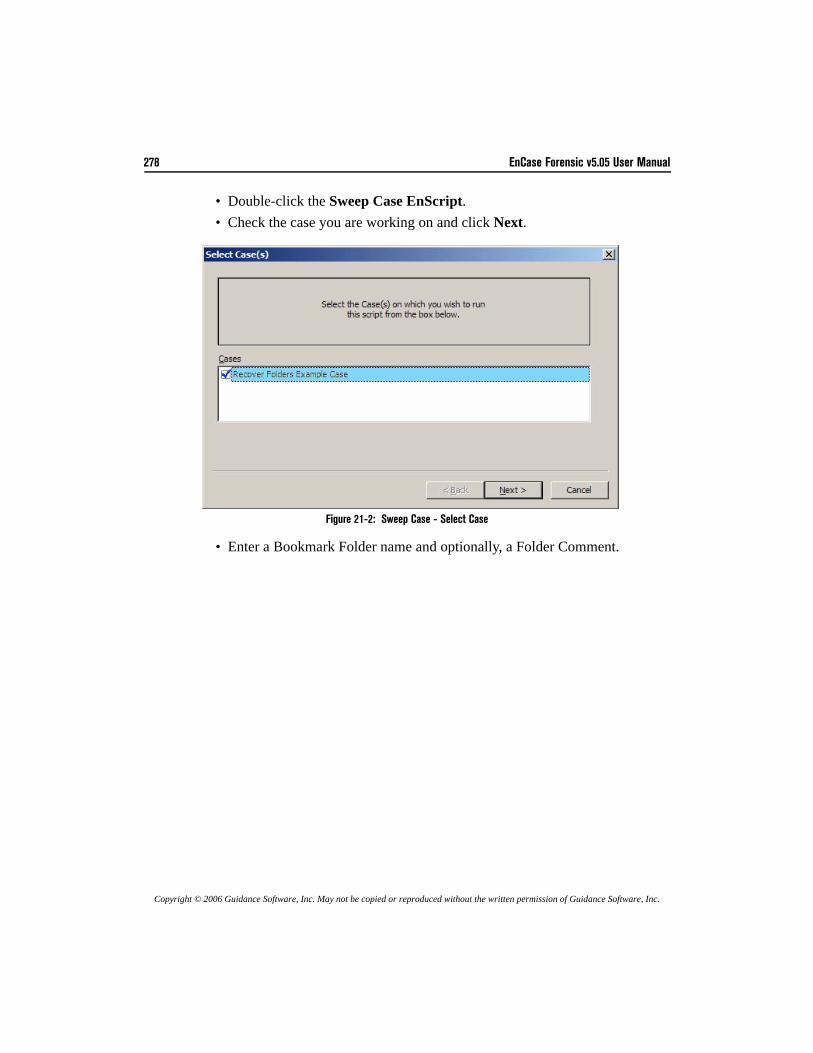
278 EnCase Forensic v5.05 User Manual
Copyright © 2006 Guidance Software, Inc. May not be copied or reproduced without the written permission of Guidance Software, Inc.
• Double-click the Sweep Case EnScript.• Check the case you are working on and click Next.
Figure 21-2: Sweep Case - Select Case
• Enter a Bookmark Folder name and optionally, a Folder Comment.
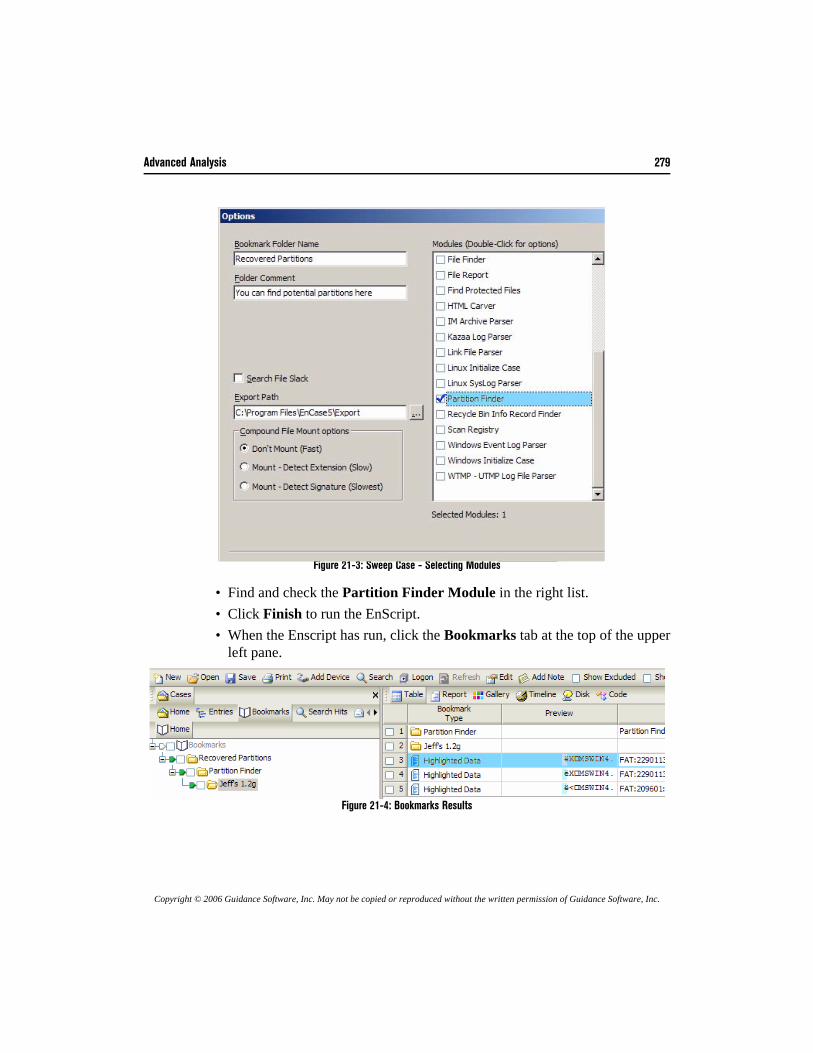
Advanced Analysis 279
Copyright © 2006 Guidance Software, Inc. May not be copied or reproduced without the written permission of Guidance Software, Inc.
Figure 21-3: Sweep Case - Selecting Modules
• Find and check the Partition Finder Module in the right list.• Click Finish to run the EnScript.• When the Enscript has run, click the Bookmarks tab at the top of the upper
left pane.
Figure 21-4: Bookmarks Results
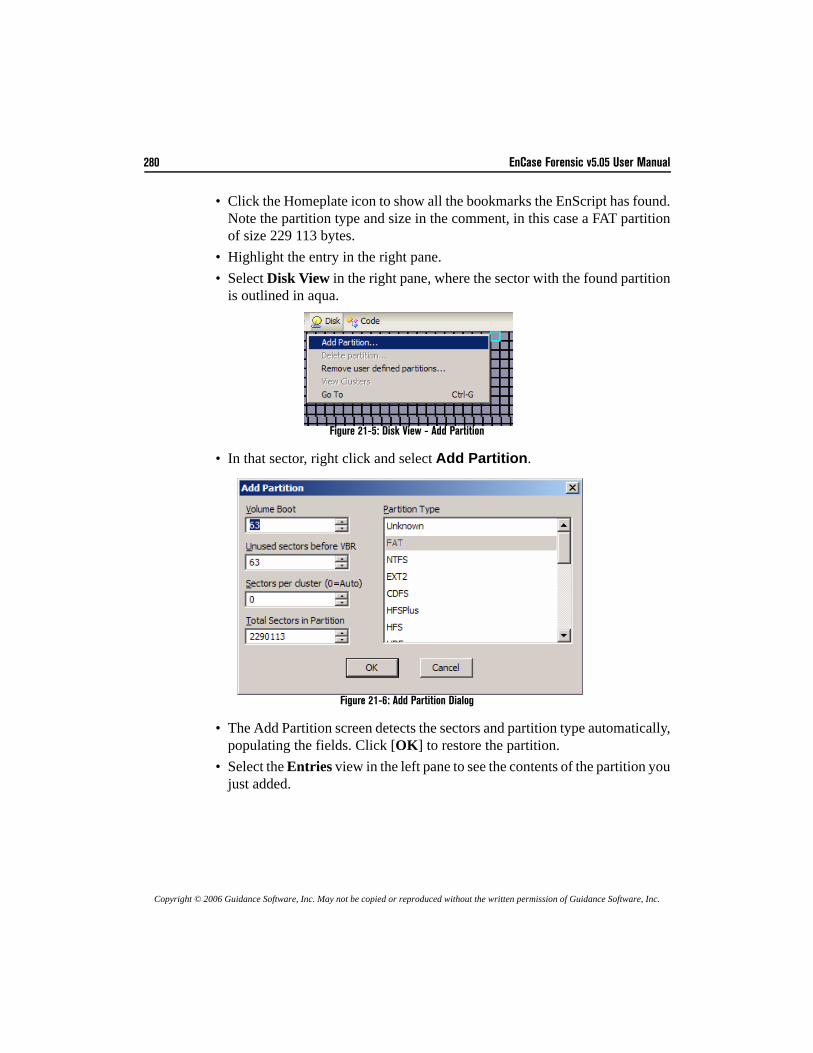
280 EnCase Forensic v5.05 User Manual
Copyright © 2006 Guidance Software, Inc. May not be copied or reproduced without the written permission of Guidance Software, Inc.
• Click the Homeplate icon to show all the bookmarks the EnScript has found.Note the partition type and size in the comment, in this case a FAT partitionof size 229 113 bytes.
• Highlight the entry in the right pane.• Select Disk View in the right pane, where the sector with the found partition
is outlined in aqua.
Figure 21-5: Disk View - Add Partition
• In that sector, right click and select Add Partition.
Figure 21-6: Add Partition Dialog
• The Add Partition screen detects the sectors and partition type automatically,populating the fields. Click [OK] to restore the partition.
• Select the Entries view in the left pane to see the contents of the partition youjust added.
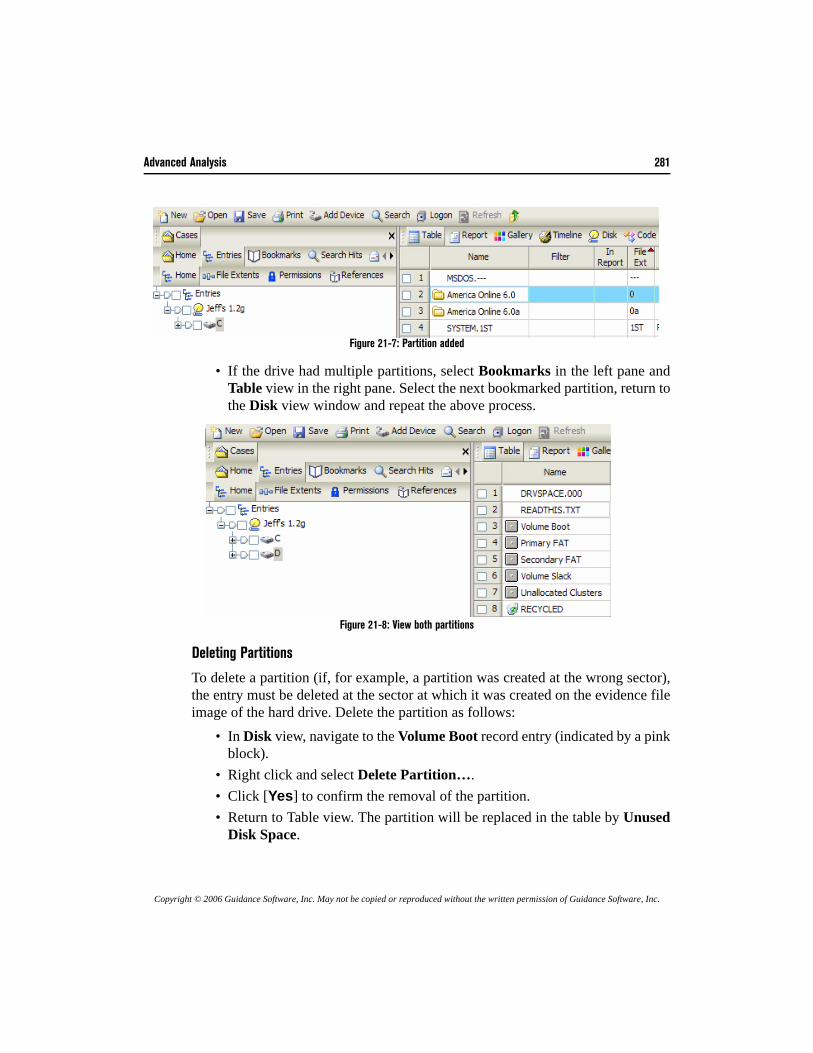
Advanced Analysis 281
Copyright © 2006 Guidance Software, Inc. May not be copied or reproduced without the written permission of Guidance Software, Inc.
Figure 21-7: Partition added
• If the drive had multiple partitions, select Bookmarks in the left pane andTable view in the right pane. Select the next bookmarked partition, return tothe Disk view window and repeat the above process.
Figure 21-8: View both partitions
Deleting Partitions
To delete a partition (if, for example, a partition was created at the wrong sector),the entry must be deleted at the sector at which it was created on the evidence fileimage of the hard drive. Delete the partition as follows:
• In Disk view, navigate to the Volume Boot record entry (indicated by a pinkblock).
• Right click and select Delete Partition….• Click [Yes] to confirm the removal of the partition.• Return to Table view. The partition will be replaced in the table by Unused
Disk Space.
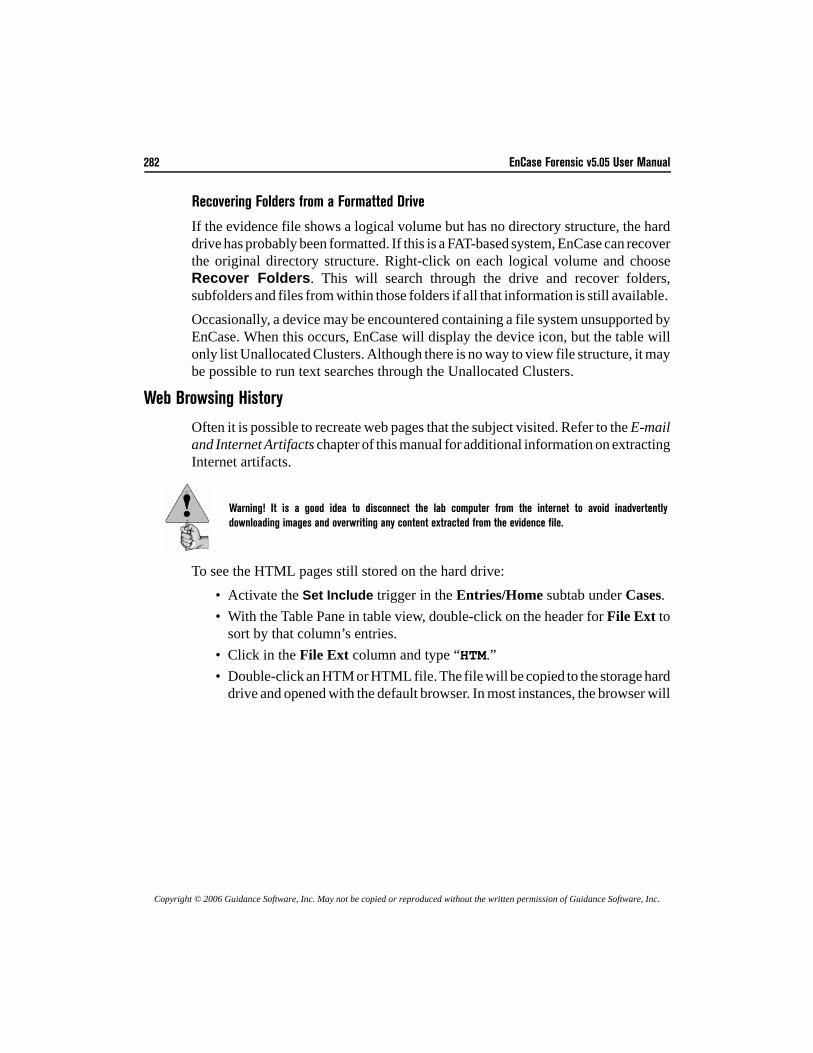
282 EnCase Forensic v5.05 User Manual
Copyright © 2006 Guidance Software, Inc. May not be copied or reproduced without the written permission of Guidance Software, Inc.
Recovering Folders from a Formatted Drive
If the evidence file shows a logical volume but has no directory structure, the harddrive has probably been formatted. If this is a FAT-based system, EnCase can recoverthe original directory structure. Right-click on each logical volume and chooseRecover Folders. This will search through the drive and recover folders,subfolders and files from within those folders if all that information is still available. Occasionally, a device may be encountered containing a file system unsupported byEnCase. When this occurs, EnCase will display the device icon, but the table willonly list Unallocated Clusters. Although there is no way to view file structure, it maybe possible to run text searches through the Unallocated Clusters.
Web Browsing History
Often it is possible to recreate web pages that the subject visited. Refer to the E-mailand Internet Artifacts chapter of this manual for additional information on extractingInternet artifacts.
To see the HTML pages still stored on the hard drive:• Activate the Set Include trigger in the Entries/Home subtab under Cases.• With the Table Pane in table view, double-click on the header for File Ext to
sort by that column’s entries. • Click in the File Ext column and type “HTM.” • Double-click an HTM or HTML file. The file will be copied to the storage hard
drive and opened with the default browser. In most instances, the browser will
Warning! It is a good idea to disconnect the lab computer from the internet to avoid inadvertentlydownloading images and overwriting any content extracted from the evidence file.
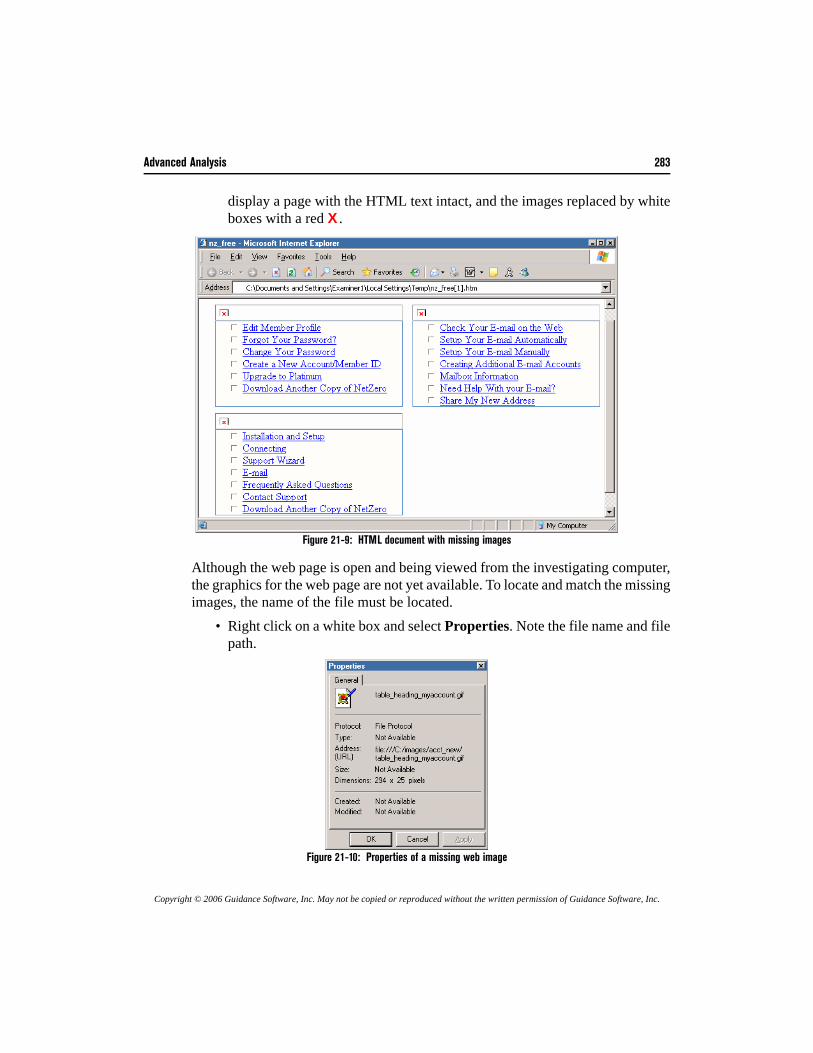
Advanced Analysis 283
Copyright © 2006 Guidance Software, Inc. May not be copied or reproduced without the written permission of Guidance Software, Inc.
display a page with the HTML text intact, and the images replaced by whiteboxes with a red X.
Figure 21-9: HTML document with missing images
Although the web page is open and being viewed from the investigating computer,the graphics for the web page are not yet available. To locate and match the missingimages, the name of the file must be located.
• Right click on a white box and select Properties. Note the file name and filepath.
Figure 21-10: Properties of a missing web image
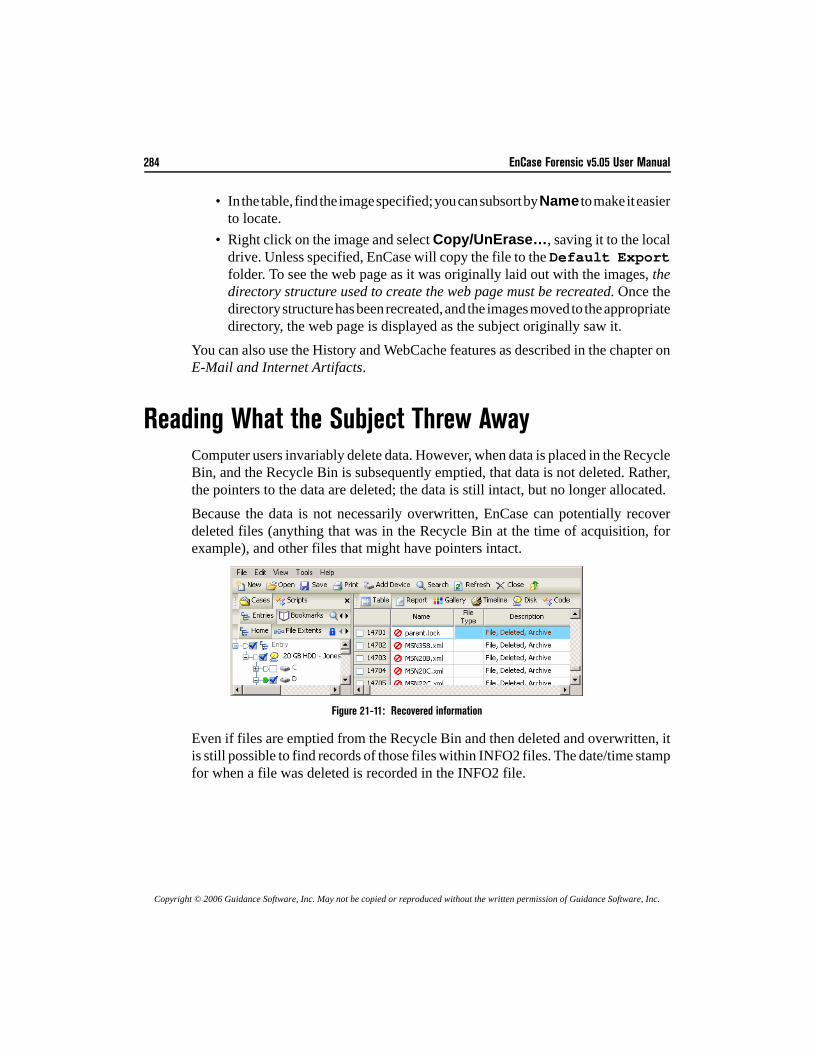
284 EnCase Forensic v5.05 User Manual
Copyright © 2006 Guidance Software, Inc. May not be copied or reproduced without the written permission of Guidance Software, Inc.
• In the table, find the image specified; you can subsort by Name to make it easierto locate.
• Right click on the image and select Copy/UnErase…, saving it to the localdrive. Unless specified, EnCase will copy the file to the Default Exportfolder. To see the web page as it was originally laid out with the images, thedirectory structure used to create the web page must be recreated. Once thedirectory structure has been recreated, and the images moved to the appropriatedirectory, the web page is displayed as the subject originally saw it.
You can also use the History and WebCache features as described in the chapter onE-Mail and Internet Artifacts.
Reading What the Subject Threw AwayComputer users invariably delete data. However, when data is placed in the RecycleBin, and the Recycle Bin is subsequently emptied, that data is not deleted. Rather,the pointers to the data are deleted; the data is still intact, but no longer allocated.Because the data is not necessarily overwritten, EnCase can potentially recoverdeleted files (anything that was in the Recycle Bin at the time of acquisition, forexample), and other files that might have pointers intact.
Figure 21-11: Recovered information
Even if files are emptied from the Recycle Bin and then deleted and overwritten, itis still possible to find records of those files within INFO2 files. The date/time stampfor when a file was deleted is recorded in the INFO2 file.
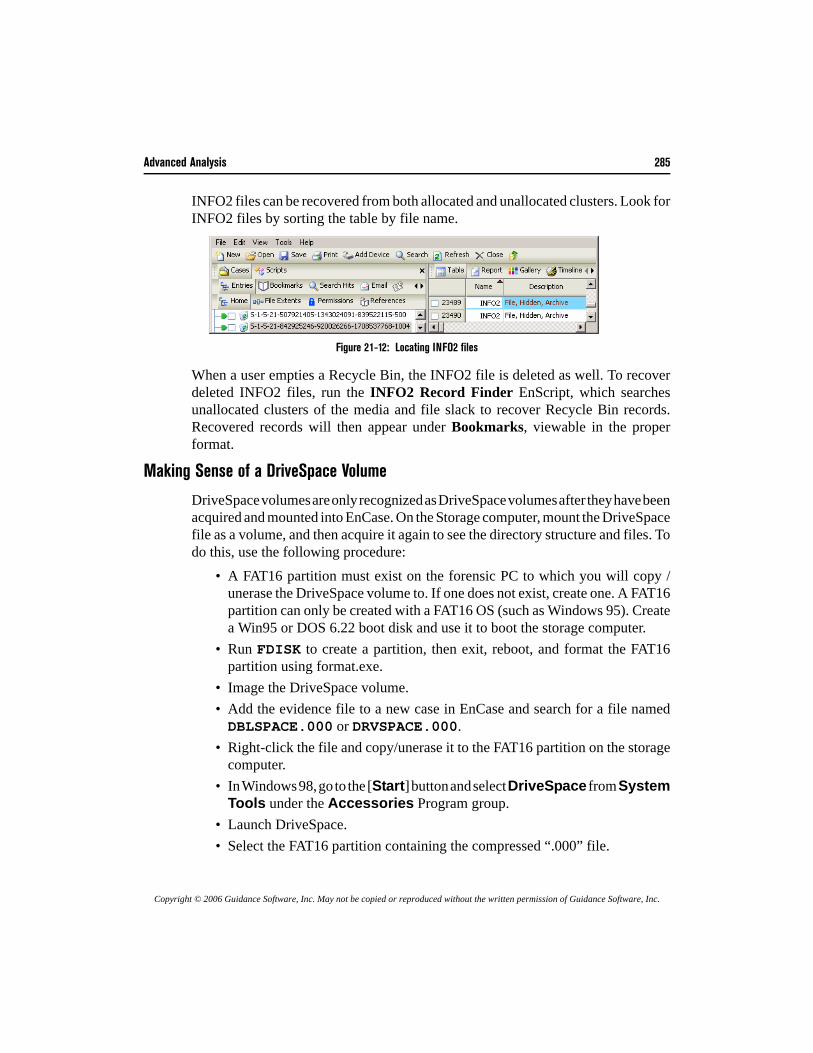
Advanced Analysis 285
Copyright © 2006 Guidance Software, Inc. May not be copied or reproduced without the written permission of Guidance Software, Inc.
INFO2 files can be recovered from both allocated and unallocated clusters. Look forINFO2 files by sorting the table by file name.
Figure 21-12: Locating INFO2 files
When a user empties a Recycle Bin, the INFO2 file is deleted as well. To recoverdeleted INFO2 files, run the INFO2 Record Finder EnScript, which searchesunallocated clusters of the media and file slack to recover Recycle Bin records.Recovered records will then appear under Bookmarks, viewable in the properformat.
Making Sense of a DriveSpace Volume
DriveSpace volumes are only recognized as DriveSpace volumes after they have beenacquired and mounted into EnCase. On the Storage computer, mount the DriveSpacefile as a volume, and then acquire it again to see the directory structure and files. Todo this, use the following procedure:
• A FAT16 partition must exist on the forensic PC to which you will copy /unerase the DriveSpace volume to. If one does not exist, create one. A FAT16partition can only be created with a FAT16 OS (such as Windows 95). Createa Win95 or DOS 6.22 boot disk and use it to boot the storage computer.
• Run FDISK to create a partition, then exit, reboot, and format the FAT16partition using format.exe.
• Image the DriveSpace volume.• Add the evidence file to a new case in EnCase and search for a file namedDBLSPACE.000 or DRVSPACE.000.
• Right-click the file and copy/unerase it to the FAT16 partition on the storagecomputer.
• In Windows 98, go to the [Start] button and select DriveSpace from SystemTools under the Accessories Program group.
• Launch DriveSpace.• Select the FAT16 partition containing the compressed “.000” file.
286 EnCase Forensic v5.05 User Manual
Copyright © 2006 Guidance Software, Inc. May not be copied or reproduced without the written permission of Guidance Software, Inc.
• Select Advance, and then Mount.• Select DRVSPACE.000 and click [OK], noting the drive letter assigned to it.• In EnCase, the Compressed Volume File (.000) from the previous drive will
now be seen as folders and files in a new logical volume. Acquire this newvolume.
• Create the evidence file and add to your case. It is now possible to view thecontents of the compressed drive.
Cracking Encrypted or Password Protected Files
If an encrypted or password-protected file is found, at the moment, a third-party utilitymust be used to crack the file. Copy / unerase the file to the storage hard drive andattempt to crack the file. Please see the appendix regarding Third Party Utilities fora list of different utilities helpful to the forensic examiner.
System Snapshot
The System Snapshot feature allow you to see all open files, processes and ports onthe local system, effectively capturing volatile data. With EnCase Forensic, this canonly be done with the local (forensic) machine using the Scan Local MachineEnScript; EnCase Enterprise or FIM allow the snapshot to be performed on a livepreview of a remote machine using a different EnScript.
Volatile Data Defined
Volatile data exists in the main memory (RAM) of a server or workstation. If poweris lost, or if a system fault occurs the data is lost. By contrast, static data is storedon hard drives, USB devices, CD's, etc., and is typically not lost when a loss of poweror a system fault occurs.A computer tracks numerous items that could be critical during incident responseactivities including; users on a system, TCP and UDP port information, open files,running processes and applications, and system resource utilization. Much of thisinformation is contained within volatile data and is used by the system foradministration and processing purposes. Snapshot captures this volatile data andprovides information on what was occurring on a system at a given point in time.
An investigator may encounter this situation if the operating system of the evidence file is Windows 98.
Advanced Analysis 287
Copyright © 2006 Guidance Software, Inc. May not be copied or reproduced without the written permission of Guidance Software, Inc.
During or after an incident, volatile data may reveal invaluable information. Are anyports open that should not be? Are unfamiliar services or machines accessing thesystem? Are unknown applications or processes executing? This information helpsthe examiner determine what is happening on the system at the current point in time,and if an attack is active.The correlation of volatile data and static data is essential, but not exhaustive to theincident response process. Volatile data will help an examiner determine if suspiciousactivities or applications are active on a system, and help guide the examiner to searchfor backdoors or malicious code. Additionally, it may help the examiner determinewho and what is accessing the system and its resources whether internal or externally.The most critical aspect of volatile data capture is it provides the examiner with theability to quickly ascertain if unauthorized ports, processes or applications are active.This information is critical when deciding whether to continue system operation ortake the system out of service. This is a crucial component of incident response triage;the ability to rapidly determine to what extent, if any, a system has been compromised.
Volatile Data Components• Open PortsOpen ports are the active endpoints to a logical TCP connection on a systemat a particular point in time.• Active Processes Active processes are the executables that are running on a computer at aparticular point in time. • Open FilesOpen files are the files that are in use on a computer at a particular point in time.• Live Windows RegistryLive Windows Registry keys are those that are active only during the loggedon user's session.
Volatile Data Capture Using Snapshot
EnCase Forensic has the capability to capture volatile data from the local machineonly. The examiner can view active processes, open ports and open files, and the liveWindows Registry.
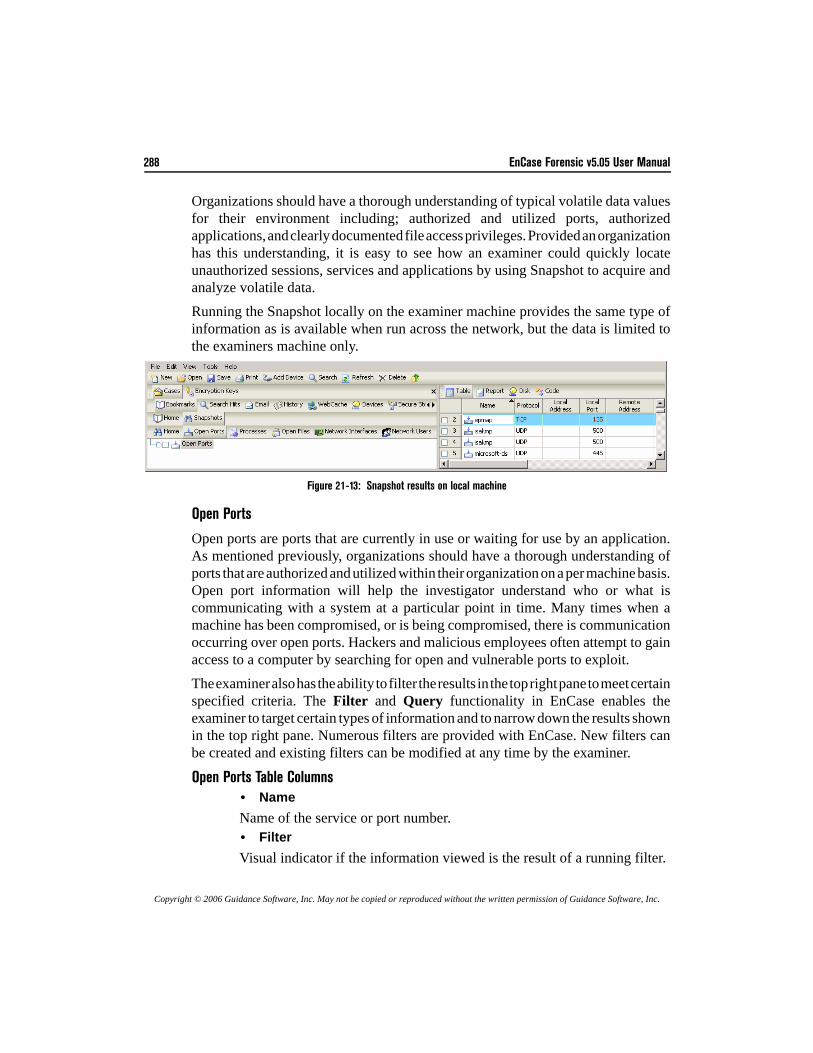
288 EnCase Forensic v5.05 User Manual
Copyright © 2006 Guidance Software, Inc. May not be copied or reproduced without the written permission of Guidance Software, Inc.
Organizations should have a thorough understanding of typical volatile data valuesfor their environment including; authorized and utilized ports, authorizedapplications, and clearly documented file access privileges. Provided an organizationhas this understanding, it is easy to see how an examiner could quickly locateunauthorized sessions, services and applications by using Snapshot to acquire andanalyze volatile data. Running the Snapshot locally on the examiner machine provides the same type ofinformation as is available when run across the network, but the data is limited tothe examiners machine only.
Figure 21-13: Snapshot results on local machine
Open Ports
Open ports are ports that are currently in use or waiting for use by an application.As mentioned previously, organizations should have a thorough understanding ofports that are authorized and utilized within their organization on a per machine basis.Open port information will help the investigator understand who or what iscommunicating with a system at a particular point in time. Many times when amachine has been compromised, or is being compromised, there is communicationoccurring over open ports. Hackers and malicious employees often attempt to gainaccess to a computer by searching for open and vulnerable ports to exploit.The examiner also has the ability to filter the results in the top right pane to meet certainspecified criteria. The Filter and Query functionality in EnCase enables theexaminer to target certain types of information and to narrow down the results shownin the top right pane. Numerous filters are provided with EnCase. New filters canbe created and existing filters can be modified at any time by the examiner.
Open Ports Table Columns• NameName of the service or port number.• FilterVisual indicator if the information viewed is the result of a running filter.
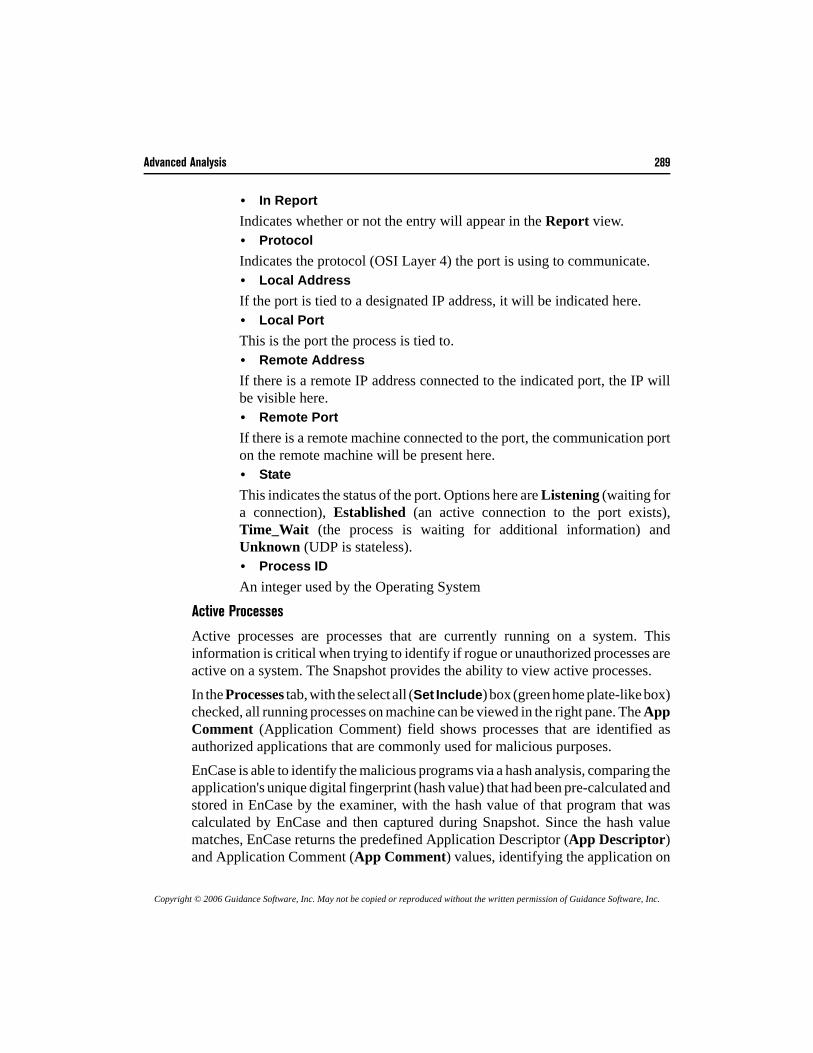
Advanced Analysis 289
Copyright © 2006 Guidance Software, Inc. May not be copied or reproduced without the written permission of Guidance Software, Inc.
• In ReportIndicates whether or not the entry will appear in the Report view.• ProtocolIndicates the protocol (OSI Layer 4) the port is using to communicate.• Local AddressIf the port is tied to a designated IP address, it will be indicated here.• Local PortThis is the port the process is tied to.• Remote AddressIf there is a remote IP address connected to the indicated port, the IP willbe visible here.• Remote PortIf there is a remote machine connected to the port, the communication porton the remote machine will be present here.• StateThis indicates the status of the port. Options here are Listening (waiting fora connection), Established (an active connection to the port exists),Time_Wait (the process is waiting for additional information) andUnknown (UDP is stateless).• Process ID An integer used by the Operating System
Active Processes
Active processes are processes that are currently running on a system. Thisinformation is critical when trying to identify if rogue or unauthorized processes areactive on a system. The Snapshot provides the ability to view active processes.In the Processes tab, with the select all (Set Include) box (green home plate-like box)checked, all running processes on machine can be viewed in the right pane. The AppComment (Application Comment) field shows processes that are identified asauthorized applications that are commonly used for malicious purposes. EnCase is able to identify the malicious programs via a hash analysis, comparing theapplication's unique digital fingerprint (hash value) that had been pre-calculated andstored in EnCase by the examiner, with the hash value of that program that wascalculated by EnCase and then captured during Snapshot. Since the hash valuematches, EnCase returns the predefined Application Descriptor (App Descriptor)and Application Comment (App Comment) values, identifying the application on
290 EnCase Forensic v5.05 User Manual
Copyright © 2006 Guidance Software, Inc. May not be copied or reproduced without the written permission of Guidance Software, Inc.
the suspect computer. Application Descriptor provides categorization ofexecutables via hash values, which enables the examiner to positively identifyexecutables running on a system via a hash value match. Application Descriptorworks in concert with Machine Profile, which contains an inventory of what shouldbe running on a specific machine. Together the Machine Profile and the ApplicationDescriptor let the examiner know what should be running on a specific computerand what is actually running on that machine. The examiner can identify directories,commands that were entered, times, and more.
Figure 21-14: Active Processes
Processes Table Columns• NameName of the process.• FilterVisual indicator if the information viewed is the result of a running filter.• In ReportIndicates whether or not the entry will appear in the Report view.• IDThis is the process ID (PID) assigned by the Operating System.• Parent IDThis is the Parent Process ID (PPID) in the event that the viewed process wasspawned by another process.• User IDIn Linux and Windows this is the ID of the User who spawned the process.
Advanced Analysis 291
Copyright © 2006 Guidance Software, Inc. May not be copied or reproduced without the written permission of Guidance Software, Inc.
• Current Directory This is the current working directory.• Root DirectoryOn a Linux system, this is the root directory for the machine.• Command LineThese are the parameters that were passed when the process was started.• ExecutableThis indicates the location of the binary executable, which spawned theprocess.• Start TimeThis is the date and time the process was started.• Hash ValueMD5 Hash value for the process.• Hash SetIf the hash value of the process is contained in the Hash Library, the hash setthat includes the hash value will be listed here. • Hash CategoryIf the hash value is included a hash set of the Hash Library, the category ofthe hash set will be listed here. • App CommentComments that are associated with an App Descriptor (if applicable).• ProfileThis will list the Profile which includes the process (if applicable).• StateThis is the state of the process in regards to the App Descriptor. The 3 possibleentries are:
• No ProfileThe process hash is not assigned to a machine profile.• No HashNo hash value has been assigned to the process.• ApprovedThe process has been assigned to an .app descriptor and included in thecurrent profile.
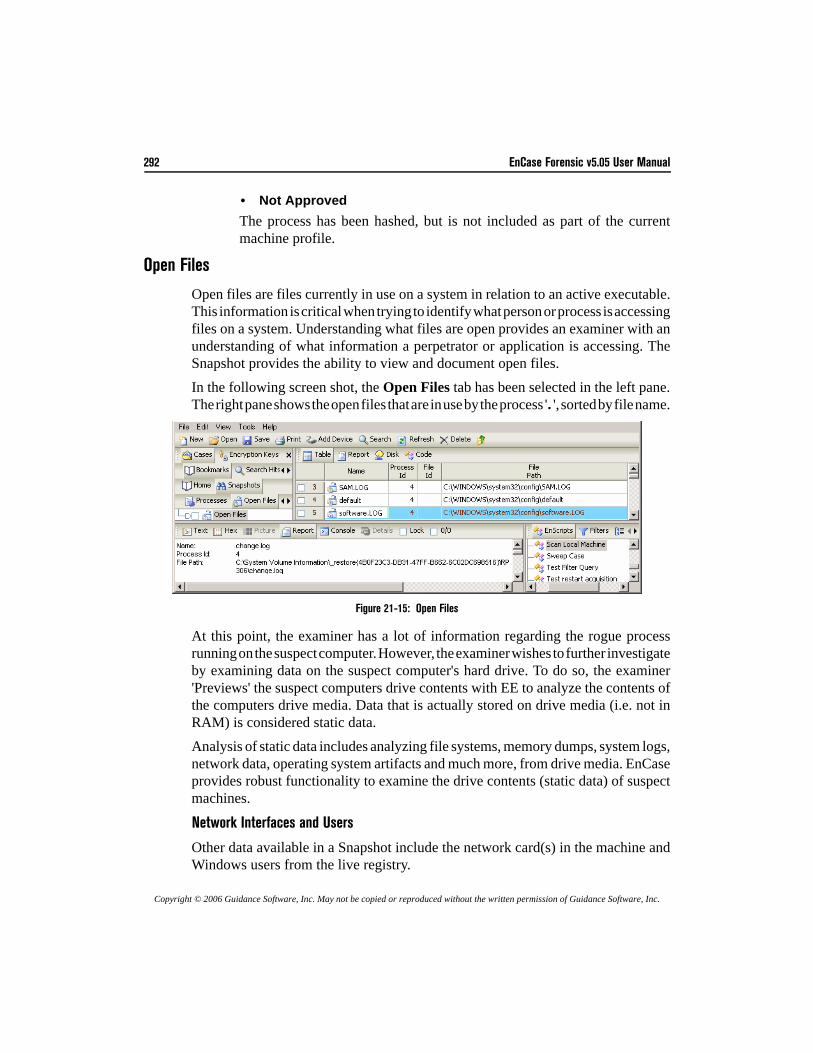
292 EnCase Forensic v5.05 User Manual
Copyright © 2006 Guidance Software, Inc. May not be copied or reproduced without the written permission of Guidance Software, Inc.
• Not ApprovedThe process has been hashed, but is not included as part of the currentmachine profile.
Open Files
Open files are files currently in use on a system in relation to an active executable.This information is critical when trying to identify what person or process is accessingfiles on a system. Understanding what files are open provides an examiner with anunderstanding of what information a perpetrator or application is accessing. TheSnapshot provides the ability to view and document open files. In the following screen shot, the Open Files tab has been selected in the left pane.The right pane shows the open files that are in use by the process '. ', sorted by file name.
Figure 21-15: Open Files
At this point, the examiner has a lot of information regarding the rogue processrunning on the suspect computer. However, the examiner wishes to further investigateby examining data on the suspect computer's hard drive. To do so, the examiner'Previews' the suspect computers drive contents with EE to analyze the contents ofthe computers drive media. Data that is actually stored on drive media (i.e. not inRAM) is considered static data.Analysis of static data includes analyzing file systems, memory dumps, system logs,network data, operating system artifacts and much more, from drive media. EnCaseprovides robust functionality to examine the drive contents (static data) of suspectmachines.
Network Interfaces and Users
Other data available in a Snapshot include the network card(s) in the machine andWindows users from the live registry.
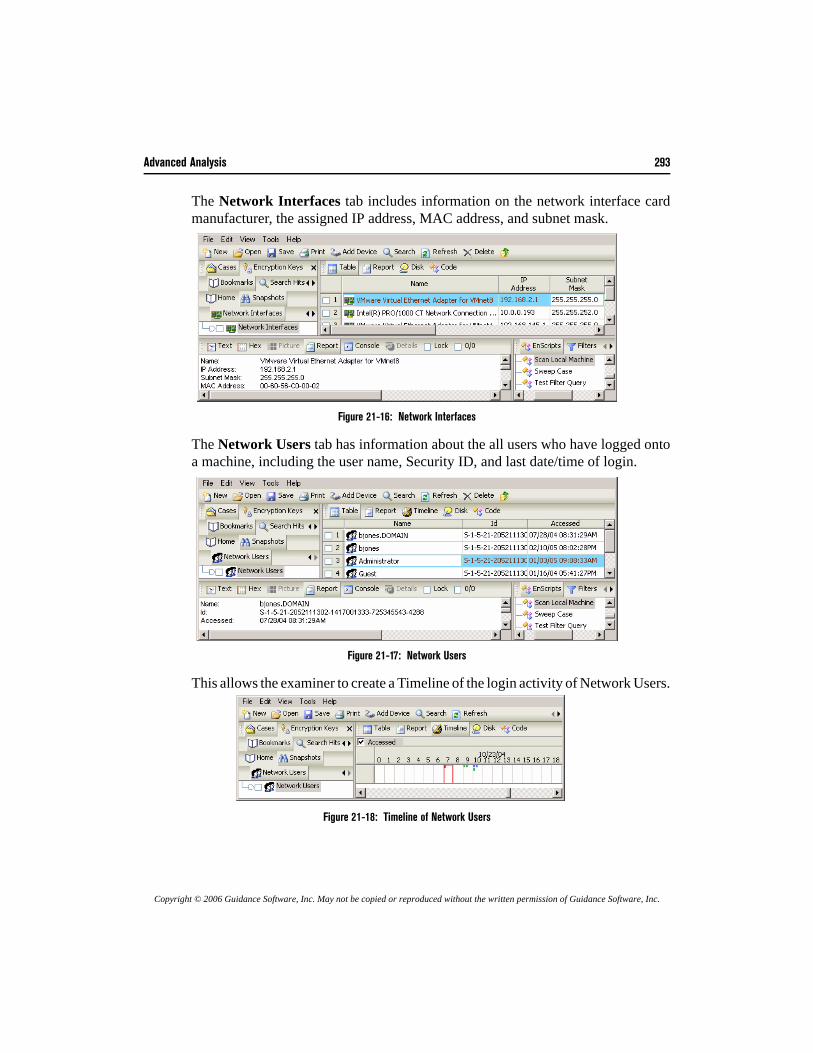
Advanced Analysis 293
Copyright © 2006 Guidance Software, Inc. May not be copied or reproduced without the written permission of Guidance Software, Inc.
The Network Interfaces tab includes information on the network interface cardmanufacturer, the assigned IP address, MAC address, and subnet mask.
Figure 21-16: Network Interfaces
The Network Users tab has information about the all users who have logged ontoa machine, including the user name, Security ID, and last date/time of login.
Figure 21-17: Network Users
This allows the examiner to create a Timeline of the login activity of Network Users.
Figure 21-18: Timeline of Network Users

294 EnCase Forensic v5.05 User Manual
Copyright © 2006 Guidance Software, Inc. May not be copied or reproduced without the written permission of Guidance Software, Inc.
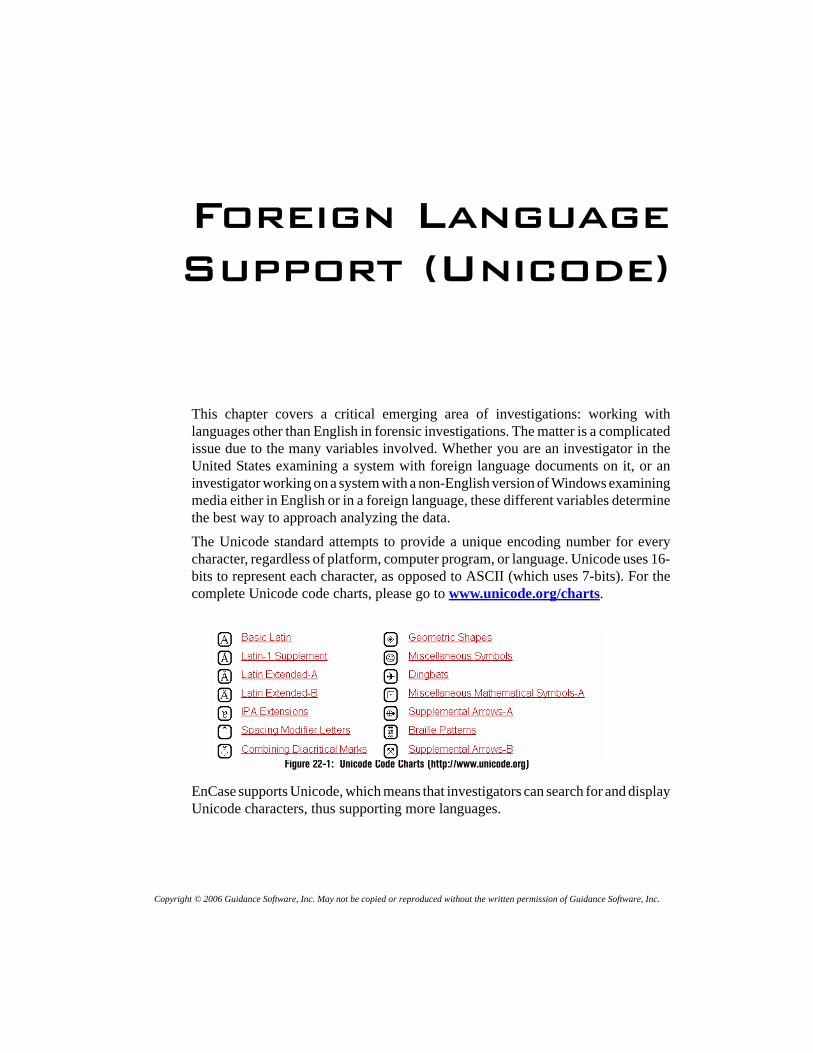
Copyright © 2006 Guidance Software, Inc. May not be copied or reproduced without the written permission of Guidance Software, Inc.
Foreign LanguageSupport (Unicode)
This chapter covers a critical emerging area of investigations: working withlanguages other than English in forensic investigations. The matter is a complicatedissue due to the many variables involved. Whether you are an investigator in theUnited States examining a system with foreign language documents on it, or aninvestigator working on a system with a non-English version of Windows examiningmedia either in English or in a foreign language, these different variables determinethe best way to approach analyzing the data.The Unicode standard attempts to provide a unique encoding number for everycharacter, regardless of platform, computer program, or language. Unicode uses 16-bits to represent each character, as opposed to ASCII (which uses 7-bits). For thecomplete Unicode code charts, please go to www.unicode.org/charts.
Figure 22-1: Unicode Code Charts (http://www.unicode.org)
EnCase supports Unicode, which means that investigators can search for and displayUnicode characters, thus supporting more languages.
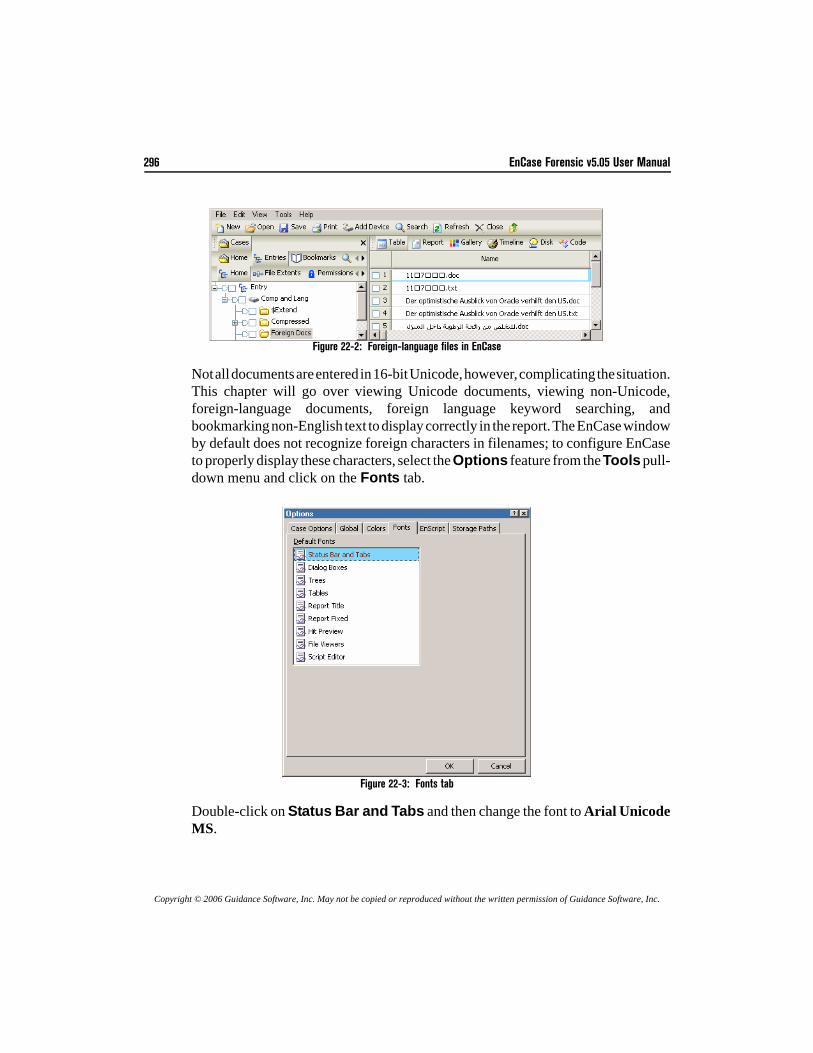
296 EnCase Forensic v5.05 User Manual
Copyright © 2006 Guidance Software, Inc. May not be copied or reproduced without the written permission of Guidance Software, Inc.
Figure 22-2: Foreign-language files in EnCase
Not all documents are entered in 16-bit Unicode, however, complicating the situation.This chapter will go over viewing Unicode documents, viewing non-Unicode,foreign-language documents, foreign language keyword searching, andbookmarking non-English text to display correctly in the report. The EnCase windowby default does not recognize foreign characters in filenames; to configure EnCaseto properly display these characters, select the Options feature from the Tools pull-down menu and click on the Fonts tab.
Figure 22-3: Fonts tab
Double-click on Status Bar and Tabs and then change the font to Arial UnicodeMS.
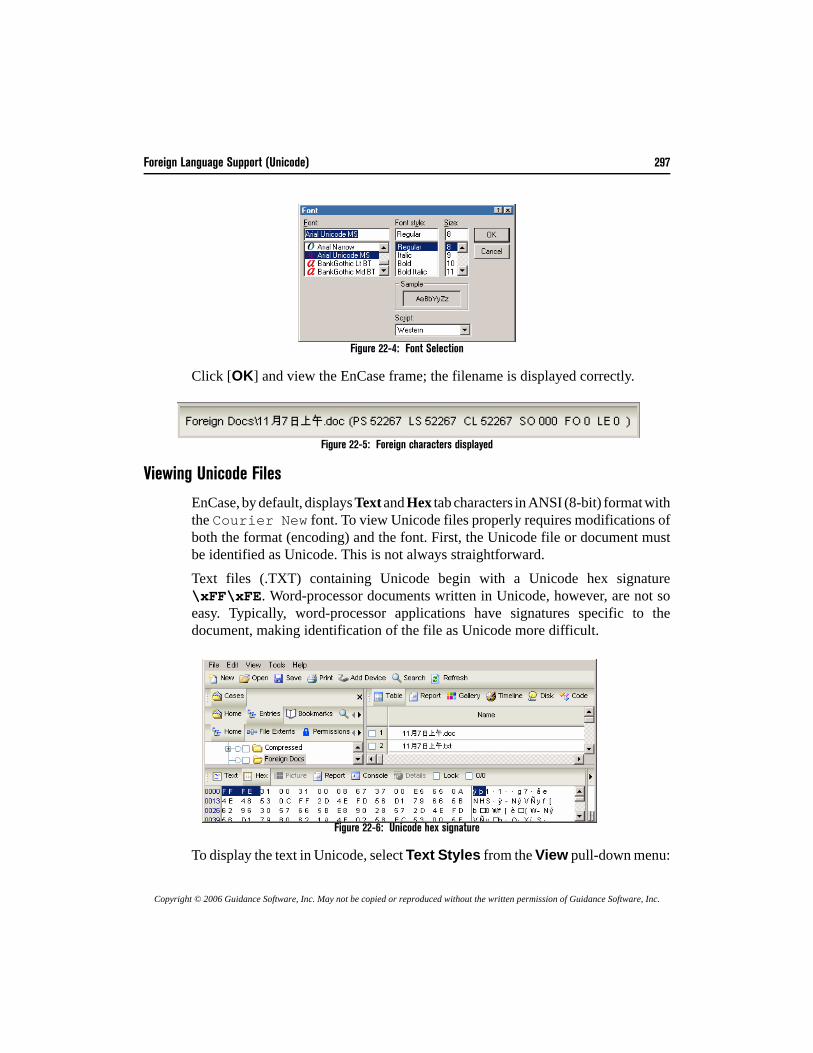
Foreign Language Support (Unicode) 297
Copyright © 2006 Guidance Software, Inc. May not be copied or reproduced without the written permission of Guidance Software, Inc.
Figure 22-4: Font Selection
Click [OK] and view the EnCase frame; the filename is displayed correctly.
Figure 22-5: Foreign characters displayed
Viewing Unicode Files
EnCase, by default, displays Text and Hex tab characters in ANSI (8-bit) format withthe Courier New font. To view Unicode files properly requires modifications ofboth the format (encoding) and the font. First, the Unicode file or document mustbe identified as Unicode. This is not always straightforward.Text files (.TXT) containing Unicode begin with a Unicode hex signature\xFF\xFE. Word-processor documents written in Unicode, however, are not soeasy. Typically, word-processor applications have signatures specific to thedocument, making identification of the file as Unicode more difficult.
Figure 22-6: Unicode hex signature
To display the text in Unicode, select Text Styles from the View pull-down menu:
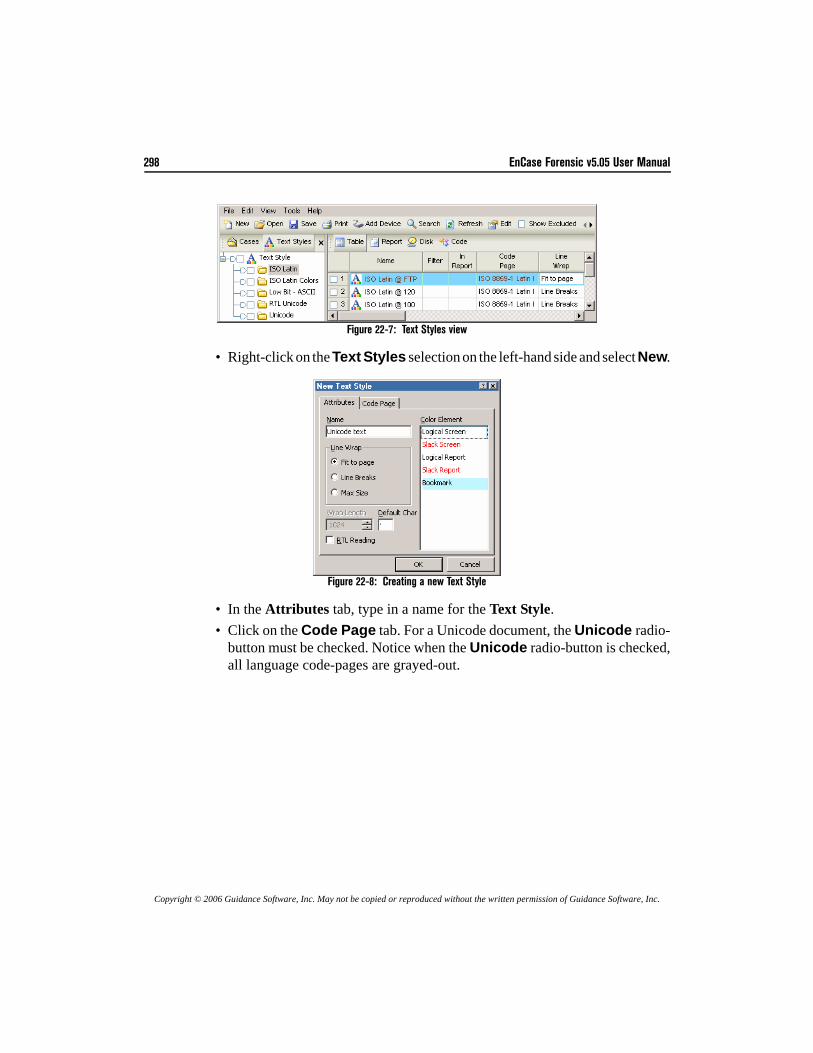
298 EnCase Forensic v5.05 User Manual
Copyright © 2006 Guidance Software, Inc. May not be copied or reproduced without the written permission of Guidance Software, Inc.
Figure 22-7: Text Styles view
• Right-click on the Text Styles selection on the left-hand side and select New.
Figure 22-8: Creating a new Text Style
• In the Attributes tab, type in a name for the Text Style.• Click on the Code Page tab. For a Unicode document, the Unicode radio-
button must be checked. Notice when the Unicode radio-button is checked,all language code-pages are grayed-out.
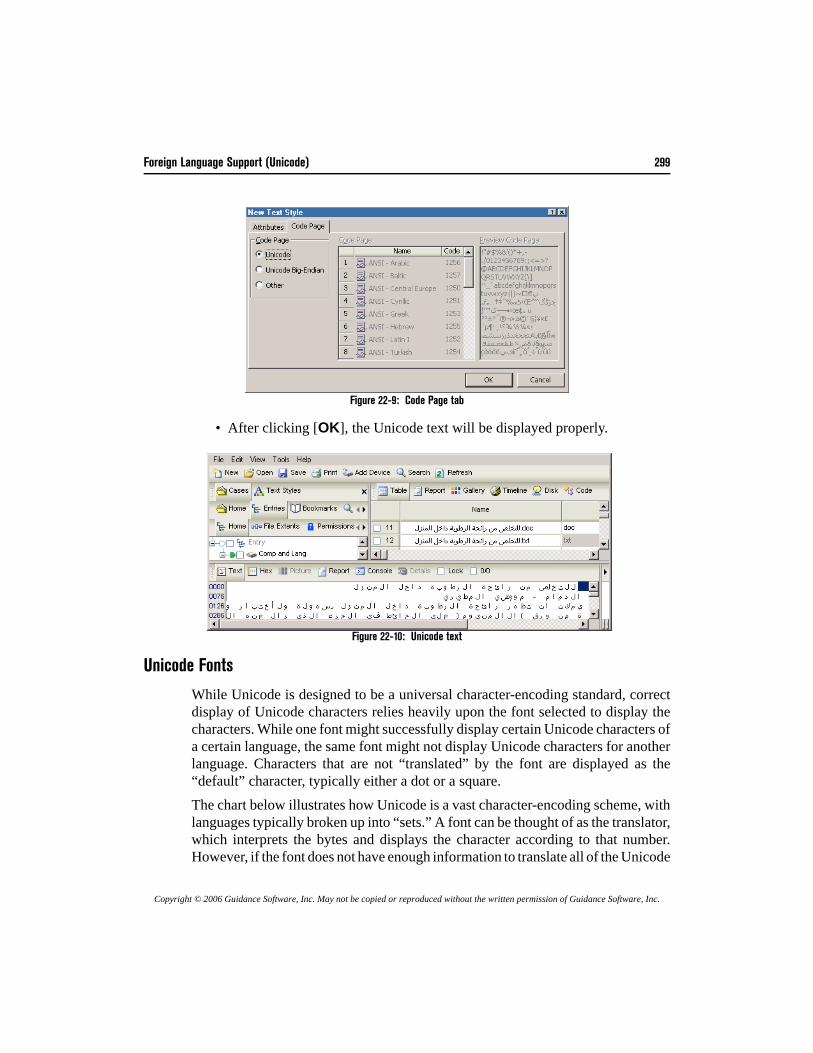
Foreign Language Support (Unicode) 299
Copyright © 2006 Guidance Software, Inc. May not be copied or reproduced without the written permission of Guidance Software, Inc.
Figure 22-9: Code Page tab
• After clicking [OK], the Unicode text will be displayed properly.
Figure 22-10: Unicode text
Unicode Fonts
While Unicode is designed to be a universal character-encoding standard, correctdisplay of Unicode characters relies heavily upon the font selected to display thecharacters. While one font might successfully display certain Unicode characters ofa certain language, the same font might not display Unicode characters for anotherlanguage. Characters that are not “translated” by the font are displayed as the“default” character, typically either a dot or a square.The chart below illustrates how Unicode is a vast character-encoding scheme, withlanguages typically broken up into “sets.” A font can be thought of as the translator,which interprets the bytes and displays the character according to that number.However, if the font does not have enough information to translate all of the Unicode
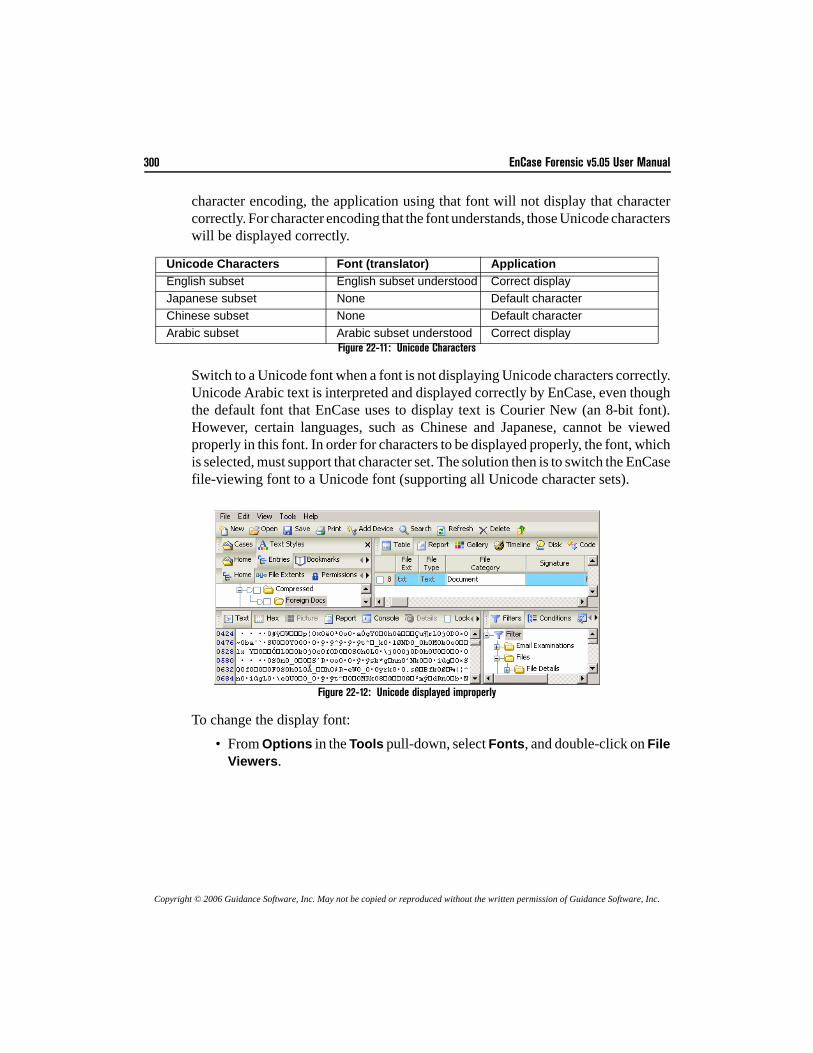
300 EnCase Forensic v5.05 User Manual
Copyright © 2006 Guidance Software, Inc. May not be copied or reproduced without the written permission of Guidance Software, Inc.
character encoding, the application using that font will not display that charactercorrectly. For character encoding that the font understands, those Unicode characterswill be displayed correctly.
Figure 22-11: Unicode Characters
Switch to a Unicode font when a font is not displaying Unicode characters correctly.Unicode Arabic text is interpreted and displayed correctly by EnCase, even thoughthe default font that EnCase uses to display text is Courier New (an 8-bit font).However, certain languages, such as Chinese and Japanese, cannot be viewedproperly in this font. In order for characters to be displayed properly, the font, whichis selected, must support that character set. The solution then is to switch the EnCasefile-viewing font to a Unicode font (supporting all Unicode character sets).
Figure 22-12: Unicode displayed improperly
To change the display font:• From Options in the Tools pull-down, select Fonts, and double-click on File
Viewers.
Unicode Characters Font (translator) ApplicationEnglish subset English subset understood Correct displayJapanese subset None Default characterChinese subset None Default characterArabic subset Arabic subset understood Correct display
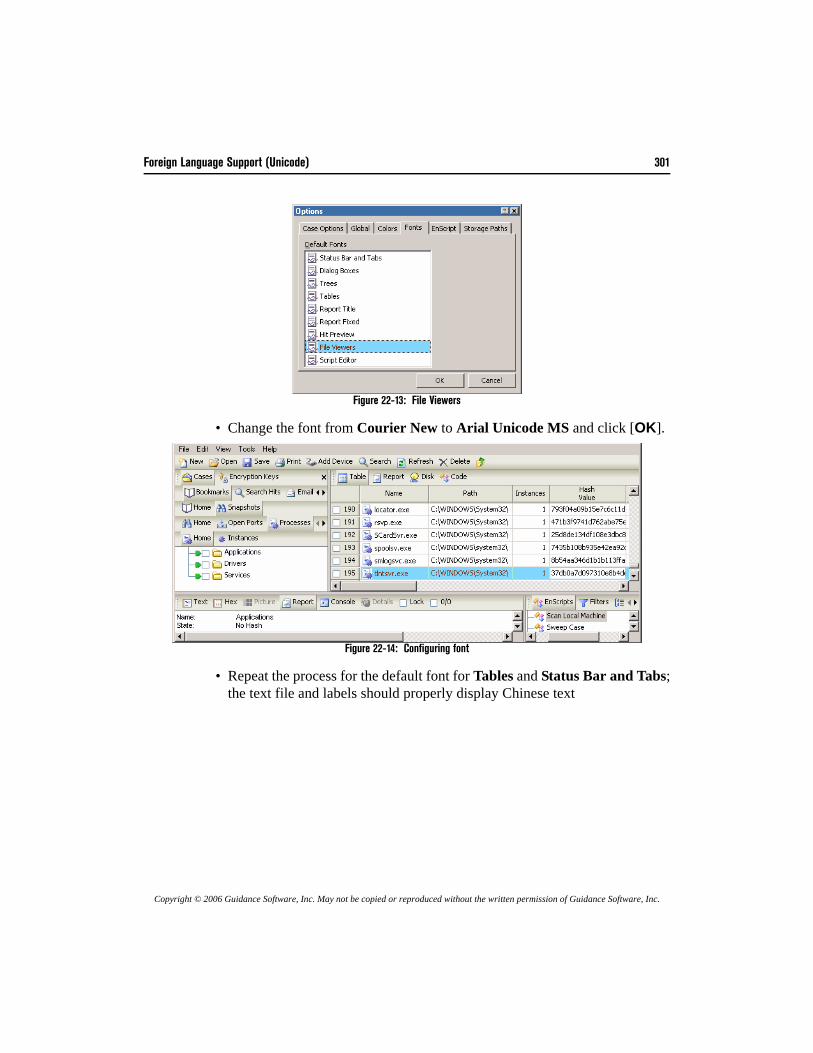
Foreign Language Support (Unicode) 301
Copyright © 2006 Guidance Software, Inc. May not be copied or reproduced without the written permission of Guidance Software, Inc.
Figure 22-13: File Viewers
• Change the font from Courier New to Arial Unicode MS and click [OK].
Figure 22-14: Configuring font
• Repeat the process for the default font for Tables and Status Bar and Tabs;the text file and labels should properly display Chinese text
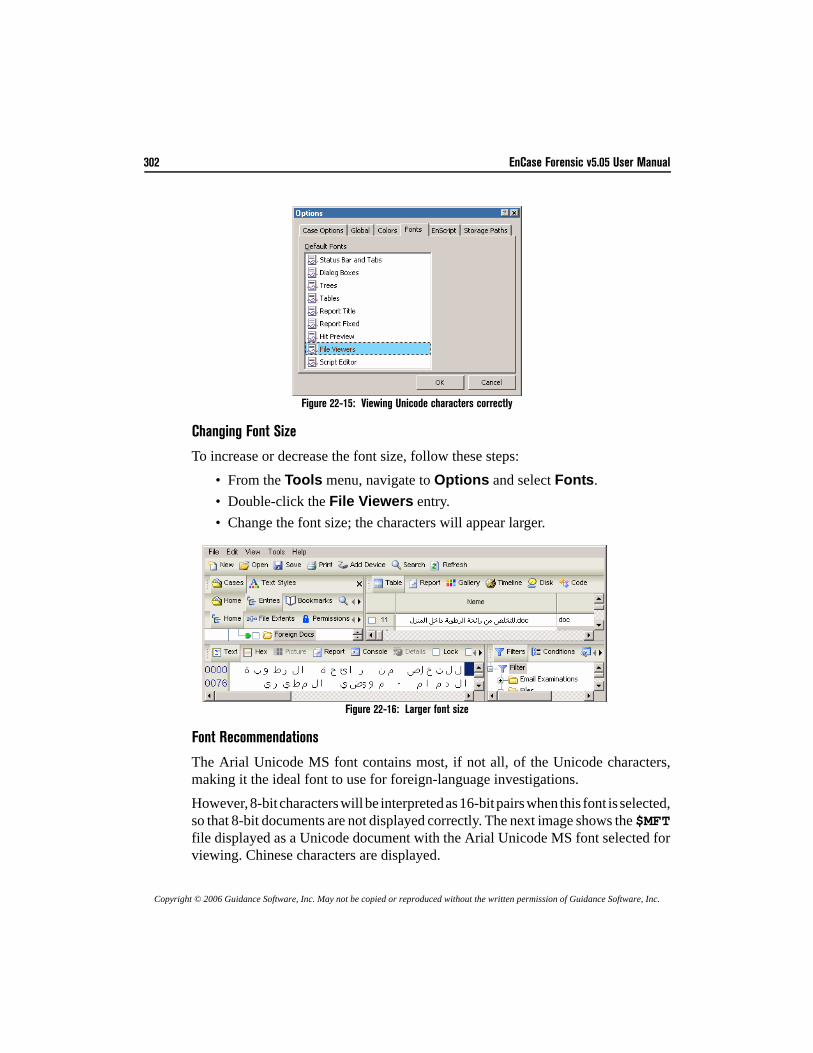
302 EnCase Forensic v5.05 User Manual
Copyright © 2006 Guidance Software, Inc. May not be copied or reproduced without the written permission of Guidance Software, Inc.
.
Figure 22-15: Viewing Unicode characters correctly
Changing Font Size
To increase or decrease the font size, follow these steps:• From the Tools menu, navigate to Options and select Fonts.• Double-click the File Viewers entry.• Change the font size; the characters will appear larger.
Figure 22-16: Larger font size
Font Recommendations
The Arial Unicode MS font contains most, if not all, of the Unicode characters,making it the ideal font to use for foreign-language investigations. However, 8-bit characters will be interpreted as 16-bit pairs when this font is selected,so that 8-bit documents are not displayed correctly. The next image shows the $MFTfile displayed as a Unicode document with the Arial Unicode MS font selected forviewing. Chinese characters are displayed.
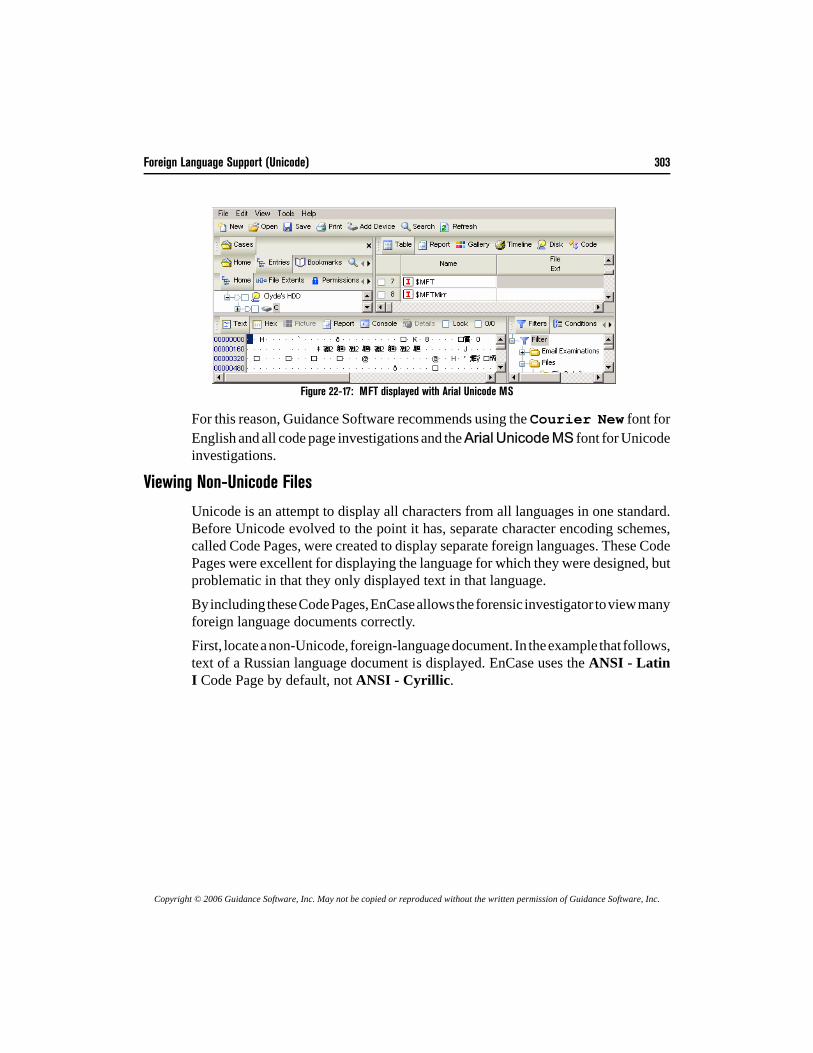
Foreign Language Support (Unicode) 303
Copyright © 2006 Guidance Software, Inc. May not be copied or reproduced without the written permission of Guidance Software, Inc.
Figure 22-17: MFT displayed with Arial Unicode MS
For this reason, Guidance Software recommends using the Courier New font forEnglish and all code page investigations and the Arial Unicode MS font for Unicodeinvestigations.
Viewing Non-Unicode Files
Unicode is an attempt to display all characters from all languages in one standard.Before Unicode evolved to the point it has, separate character encoding schemes,called Code Pages, were created to display separate foreign languages. These CodePages were excellent for displaying the language for which they were designed, butproblematic in that they only displayed text in that language. By including these Code Pages, EnCase allows the forensic investigator to view manyforeign language documents correctly. First, locate a non-Unicode, foreign-language document. In the example that follows,text of a Russian language document is displayed. EnCase uses the ANSI - LatinI Code Page by default, not ANSI - Cyrillic.
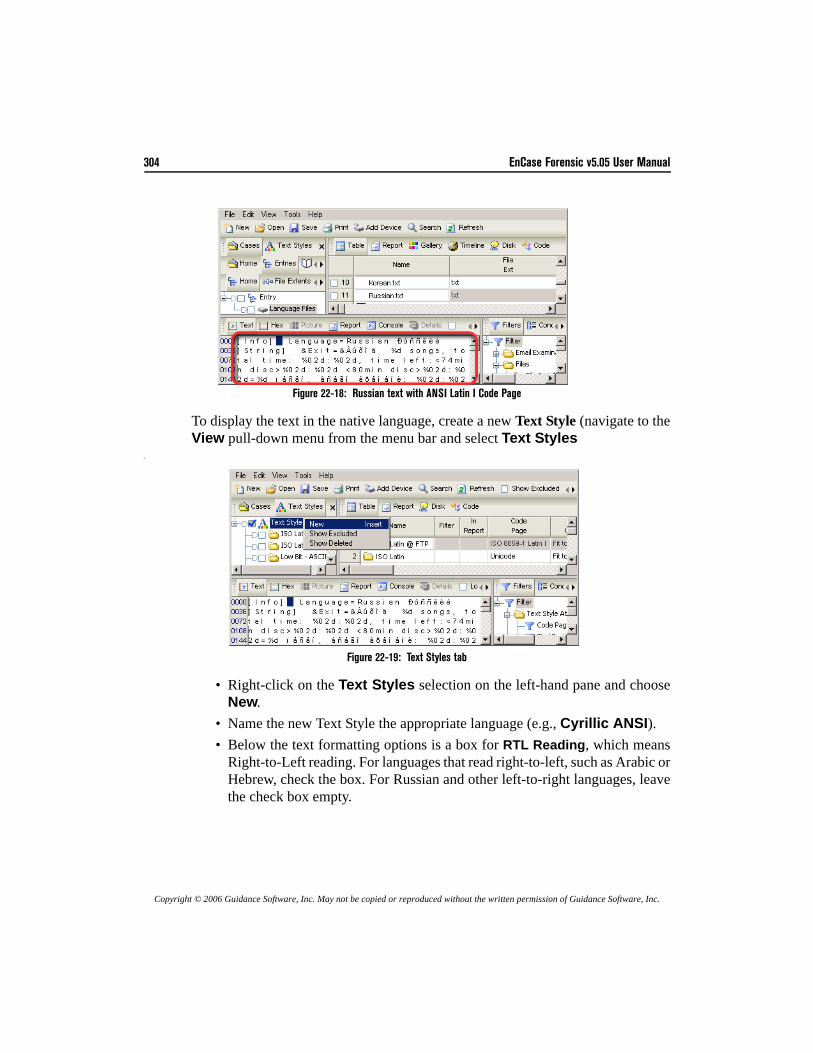
304 EnCase Forensic v5.05 User Manual
Copyright © 2006 Guidance Software, Inc. May not be copied or reproduced without the written permission of Guidance Software, Inc.
Figure 22-18: Russian text with ANSI Latin I Code Page
To display the text in the native language, create a new Text Style (navigate to theView pull-down menu from the menu bar and select Text Styles
).
Figure 22-19: Text Styles tab
• Right-click on the Text Styles selection on the left-hand pane and chooseNew.
• Name the new Text Style the appropriate language (e.g., Cyrillic ANSI). • Below the text formatting options is a box for RTL Reading, which means
Right-to-Left reading. For languages that read right-to-left, such as Arabic orHebrew, check the box. For Russian and other left-to-right languages, leavethe check box empty.
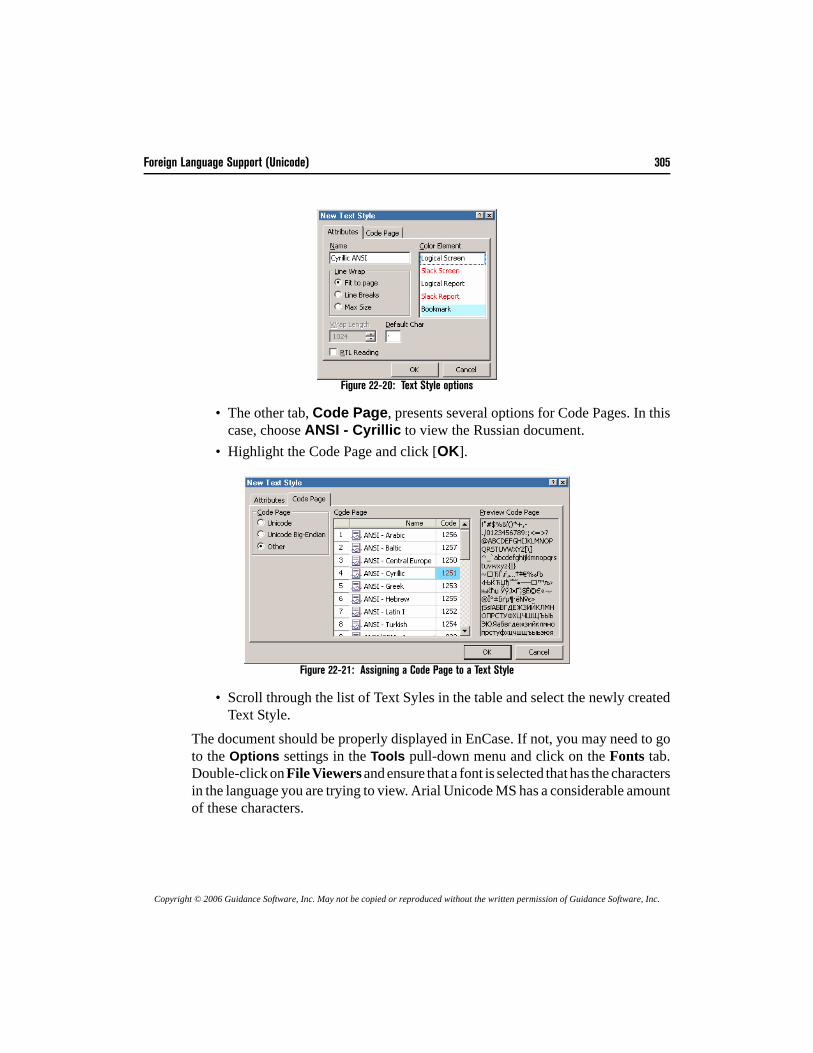
Foreign Language Support (Unicode) 305
Copyright © 2006 Guidance Software, Inc. May not be copied or reproduced without the written permission of Guidance Software, Inc.
Figure 22-20: Text Style options
• The other tab, Code Page, presents several options for Code Pages. In thiscase, choose ANSI - Cyrillic to view the Russian document.
• Highlight the Code Page and click [OK].
Figure 22-21: Assigning a Code Page to a Text Style
• Scroll through the list of Text Syles in the table and select the newly createdText Style.
The document should be properly displayed in EnCase. If not, you may need to goto the Options settings in the Tools pull-down menu and click on the Fonts tab.Double-click on File Viewers and ensure that a font is selected that has the charactersin the language you are trying to view. Arial Unicode MS has a considerable amountof these characters.
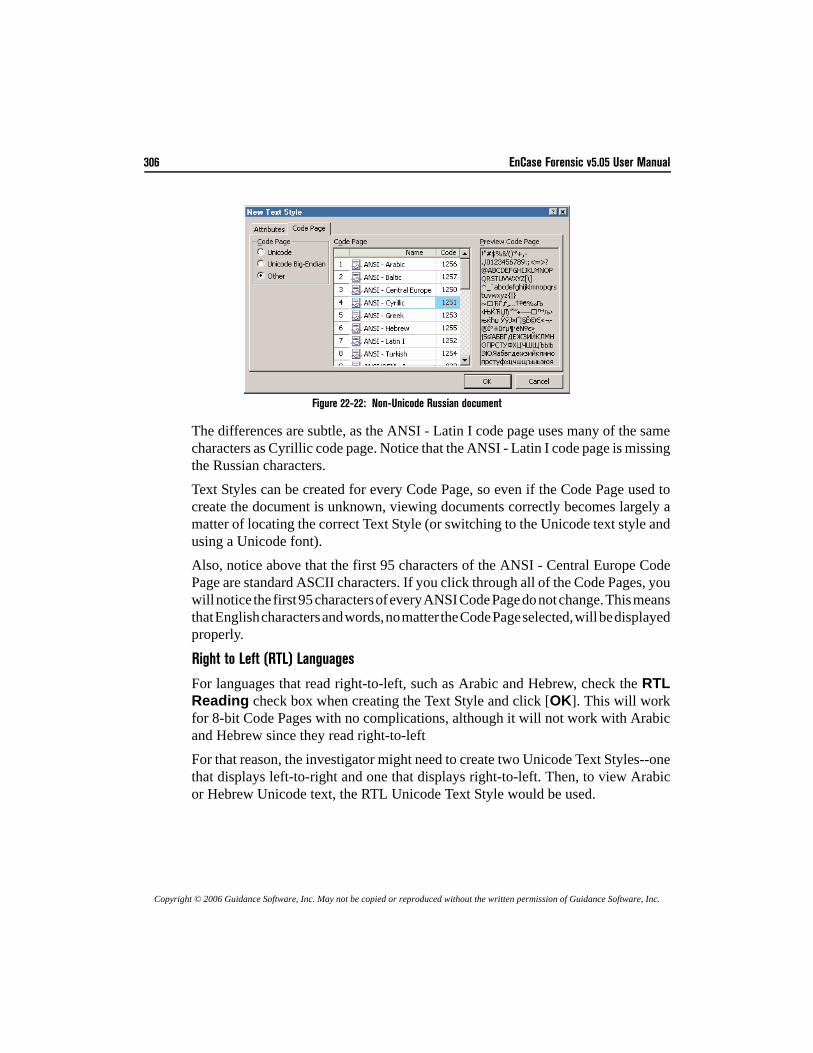
306 EnCase Forensic v5.05 User Manual
Copyright © 2006 Guidance Software, Inc. May not be copied or reproduced without the written permission of Guidance Software, Inc.
Figure 22-22: Non-Unicode Russian document
The differences are subtle, as the ANSI - Latin I code page uses many of the samecharacters as Cyrillic code page. Notice that the ANSI - Latin I code page is missingthe Russian characters.Text Styles can be created for every Code Page, so even if the Code Page used tocreate the document is unknown, viewing documents correctly becomes largely amatter of locating the correct Text Style (or switching to the Unicode text style andusing a Unicode font).Also, notice above that the first 95 characters of the ANSI - Central Europe CodePage are standard ASCII characters. If you click through all of the Code Pages, youwill notice the first 95 characters of every ANSI Code Page do not change. This meansthat English characters and words, no matter the Code Page selected, will be displayedproperly.
Right to Left (RTL) Languages
For languages that read right-to-left, such as Arabic and Hebrew, check the RTLReading check box when creating the Text Style and click [OK]. This will workfor 8-bit Code Pages with no complications, although it will not work with Arabicand Hebrew since they read right-to-left For that reason, the investigator might need to create two Unicode Text Styles--onethat displays left-to-right and one that displays right-to-left. Then, to view Arabicor Hebrew Unicode text, the RTL Unicode Text Style would be used.
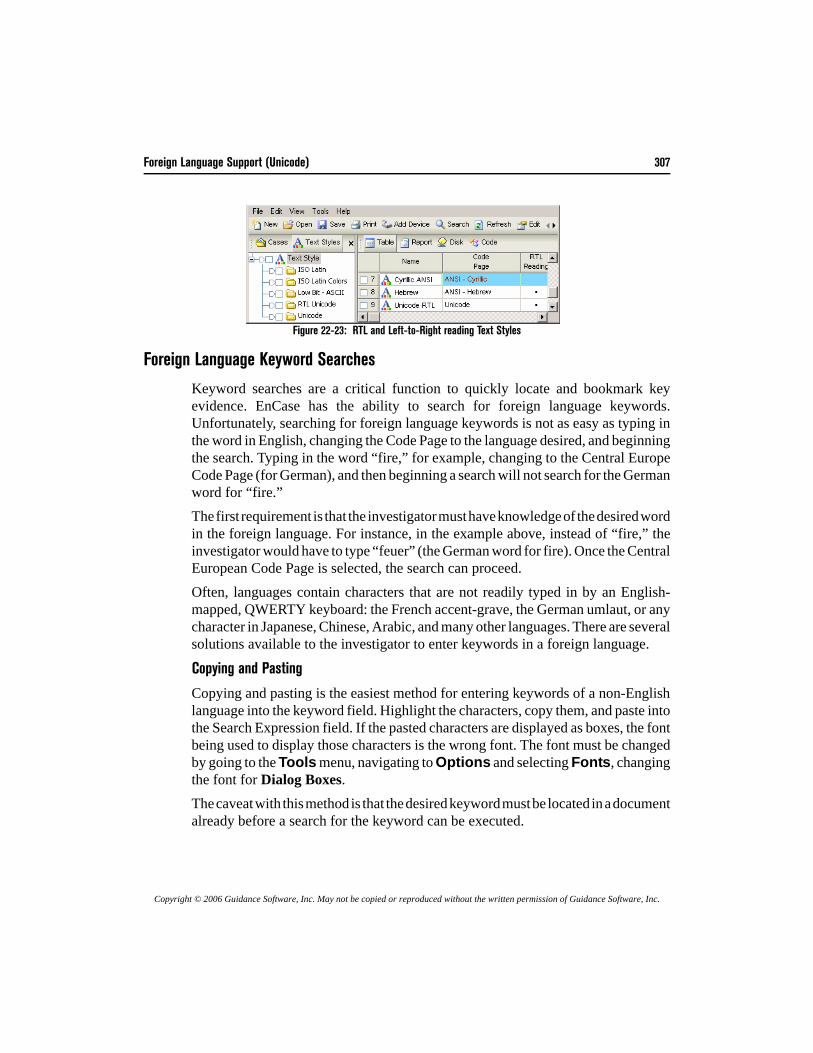
Foreign Language Support (Unicode) 307
Copyright © 2006 Guidance Software, Inc. May not be copied or reproduced without the written permission of Guidance Software, Inc.
Figure 22-23: RTL and Left-to-Right reading Text Styles
Foreign Language Keyword Searches
Keyword searches are a critical function to quickly locate and bookmark keyevidence. EnCase has the ability to search for foreign language keywords.Unfortunately, searching for foreign language keywords is not as easy as typing inthe word in English, changing the Code Page to the language desired, and beginningthe search. Typing in the word “fire,” for example, changing to the Central EuropeCode Page (for German), and then beginning a search will not search for the Germanword for “fire.”The first requirement is that the investigator must have knowledge of the desired wordin the foreign language. For instance, in the example above, instead of “fire,” theinvestigator would have to type “feuer” (the German word for fire). Once the CentralEuropean Code Page is selected, the search can proceed.Often, languages contain characters that are not readily typed in by an English-mapped, QWERTY keyboard: the French accent-grave, the German umlaut, or anycharacter in Japanese, Chinese, Arabic, and many other languages. There are severalsolutions available to the investigator to enter keywords in a foreign language.
Copying and Pasting
Copying and pasting is the easiest method for entering keywords of a non-Englishlanguage into the keyword field. Highlight the characters, copy them, and paste intothe Search Expression field. If the pasted characters are displayed as boxes, the fontbeing used to display those characters is the wrong font. The font must be changedby going to the Tools menu, navigating to Options and selecting Fonts, changingthe font for Dialog Boxes.The caveat with this method is that the desired keyword must be located in a documentalready before a search for the keyword can be executed.
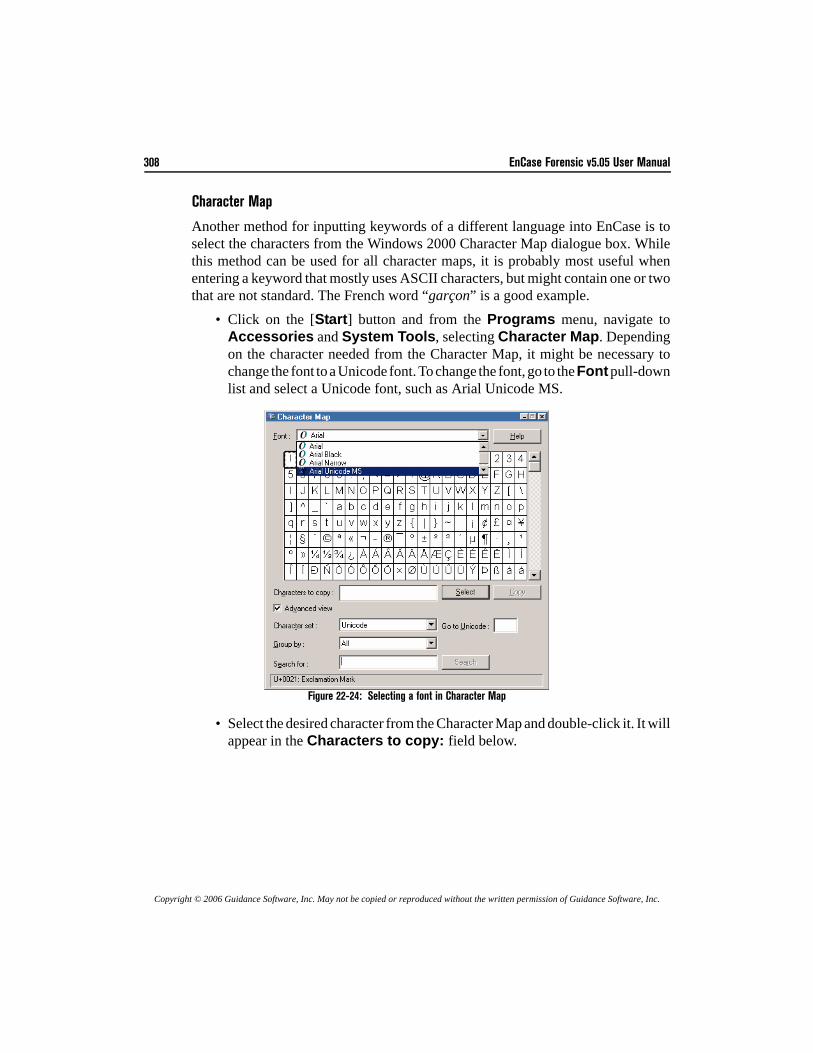
308 EnCase Forensic v5.05 User Manual
Copyright © 2006 Guidance Software, Inc. May not be copied or reproduced without the written permission of Guidance Software, Inc.
Character Map
Another method for inputting keywords of a different language into EnCase is toselect the characters from the Windows 2000 Character Map dialogue box. Whilethis method can be used for all character maps, it is probably most useful whenentering a keyword that mostly uses ASCII characters, but might contain one or twothat are not standard. The French word “garçon” is a good example.
• Click on the [Start] button and from the Programs menu, navigate toAccessories and System Tools, selecting Character Map. Dependingon the character needed from the Character Map, it might be necessary tochange the font to a Unicode font. To change the font, go to the Font pull-downlist and select a Unicode font, such as Arial Unicode MS.
Figure 22-24: Selecting a font in Character Map
• Select the desired character from the Character Map and double-click it. It willappear in the Characters to copy: field below.
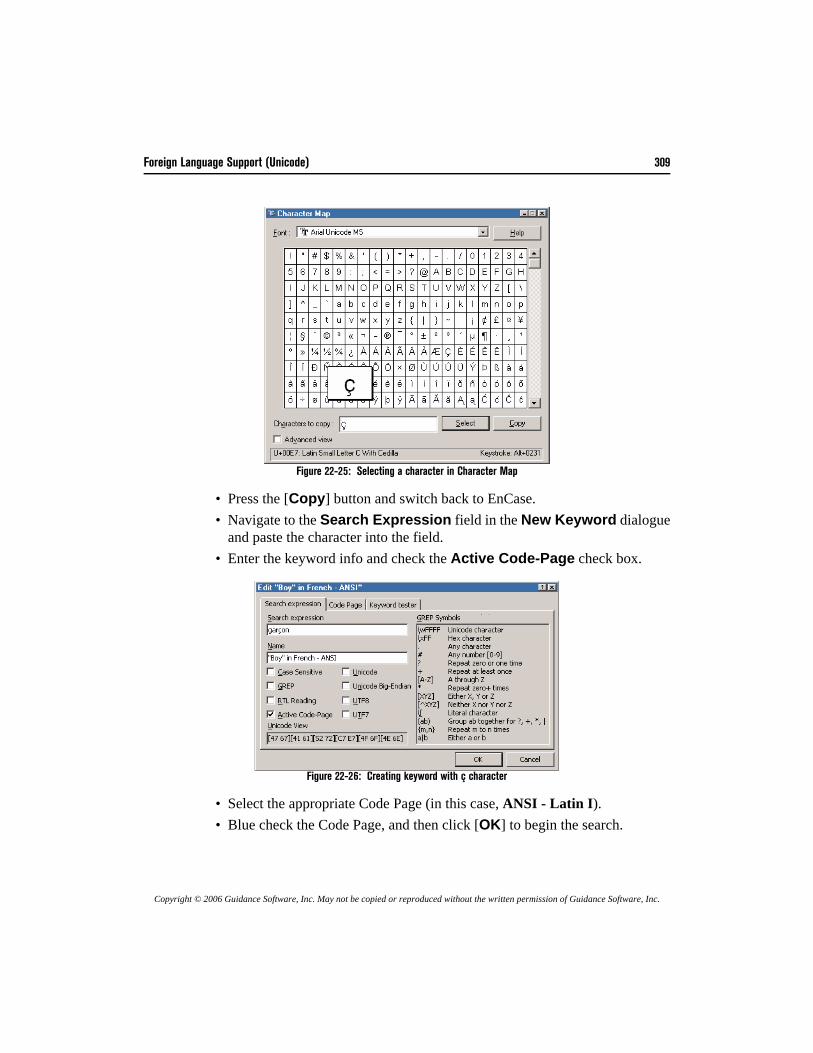
Foreign Language Support (Unicode) 309
Copyright © 2006 Guidance Software, Inc. May not be copied or reproduced without the written permission of Guidance Software, Inc.
Figure 22-25: Selecting a character in Character Map
• Press the [Copy] button and switch back to EnCase.• Navigate to the Search Expression field in the New Keyword dialogue
and paste the character into the field.• Enter the keyword info and check the Active Code-Page check box.
Figure 22-26: Creating keyword with ç character
• Select the appropriate Code Page (in this case, ANSI - Latin I).• Blue check the Code Page, and then click [OK] to begin the search.
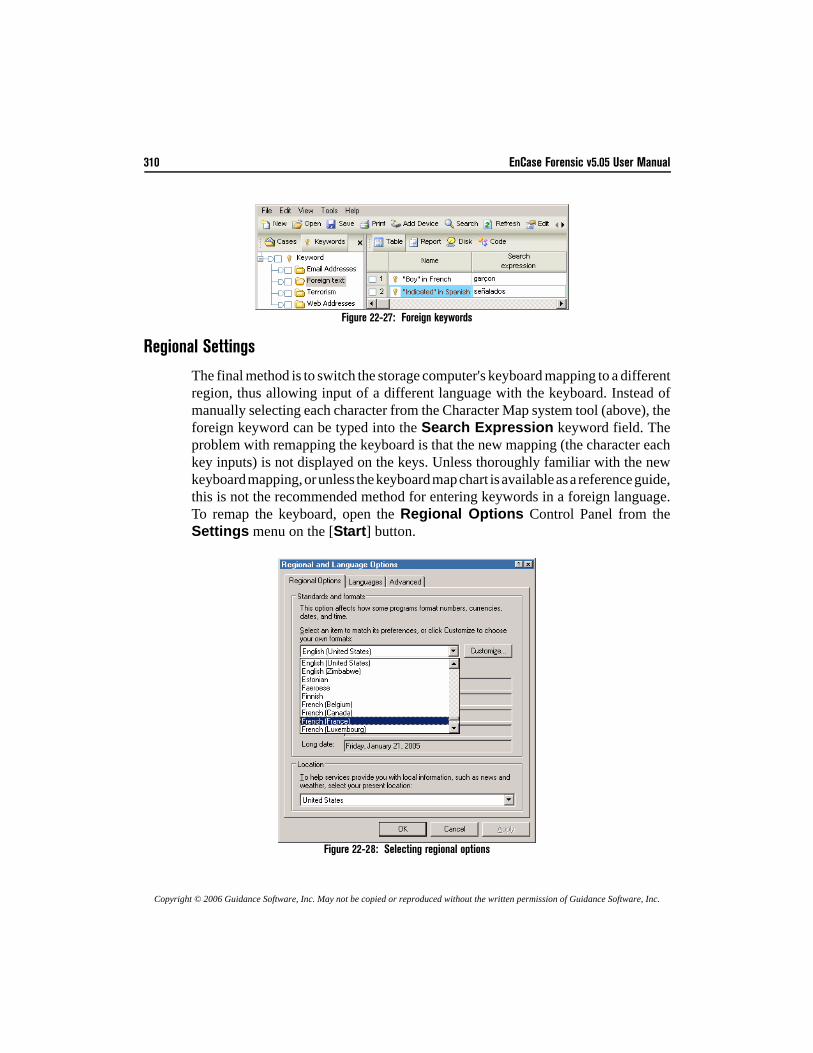
310 EnCase Forensic v5.05 User Manual
Copyright © 2006 Guidance Software, Inc. May not be copied or reproduced without the written permission of Guidance Software, Inc.
Figure 22-27: Foreign keywords
Regional Settings
The final method is to switch the storage computer's keyboard mapping to a differentregion, thus allowing input of a different language with the keyboard. Instead ofmanually selecting each character from the Character Map system tool (above), theforeign keyword can be typed into the Search Expression keyword field. Theproblem with remapping the keyboard is that the new mapping (the character eachkey inputs) is not displayed on the keys. Unless thoroughly familiar with the newkeyboard mapping, or unless the keyboard map chart is available as a reference guide,this is not the recommended method for entering keywords in a foreign language.To remap the keyboard, open the Regional Options Control Panel from theSettings menu on the [Start] button.
Figure 22-28: Selecting regional options
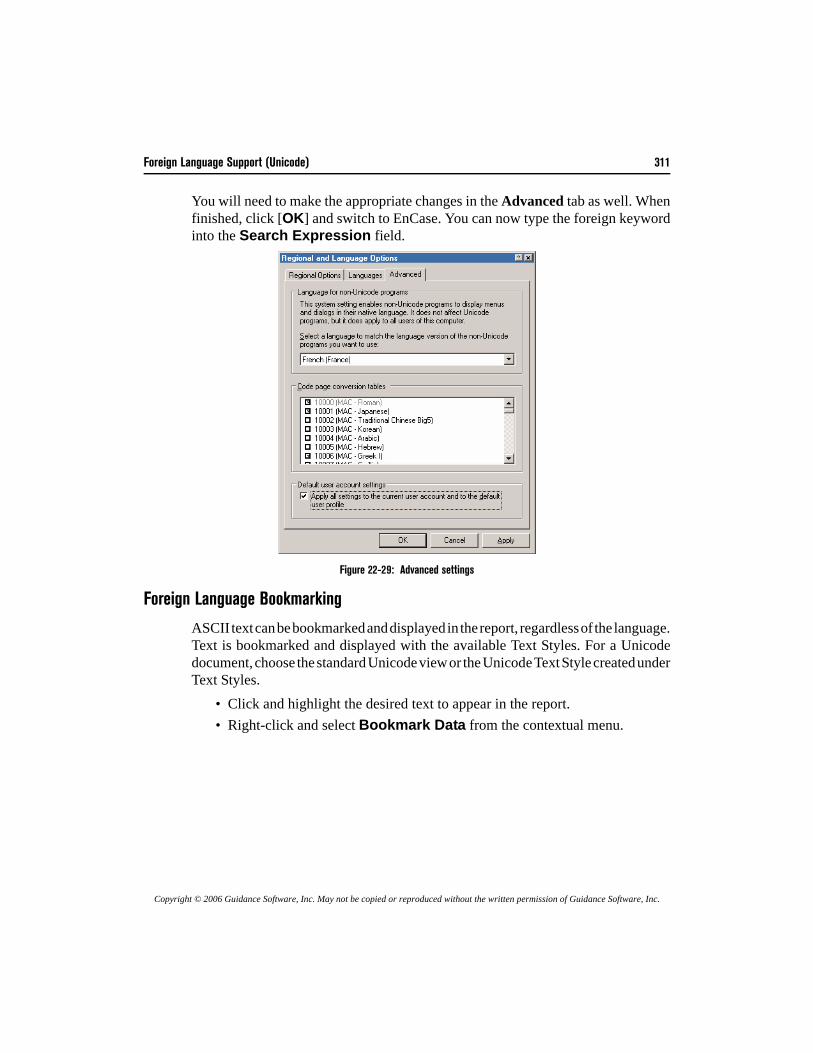
Foreign Language Support (Unicode) 311
Copyright © 2006 Guidance Software, Inc. May not be copied or reproduced without the written permission of Guidance Software, Inc.
You will need to make the appropriate changes in the Advanced tab as well. Whenfinished, click [OK] and switch to EnCase. You can now type the foreign keywordinto the Search Expression field.
Figure 22-29: Advanced settings
Foreign Language Bookmarking
ASCII text can be bookmarked and displayed in the report, regardless of the language.Text is bookmarked and displayed with the available Text Styles. For a Unicodedocument, choose the standard Unicode view or the Unicode Text Style created underText Styles.
• Click and highlight the desired text to appear in the report.• Right-click and select Bookmark Data from the contextual menu.
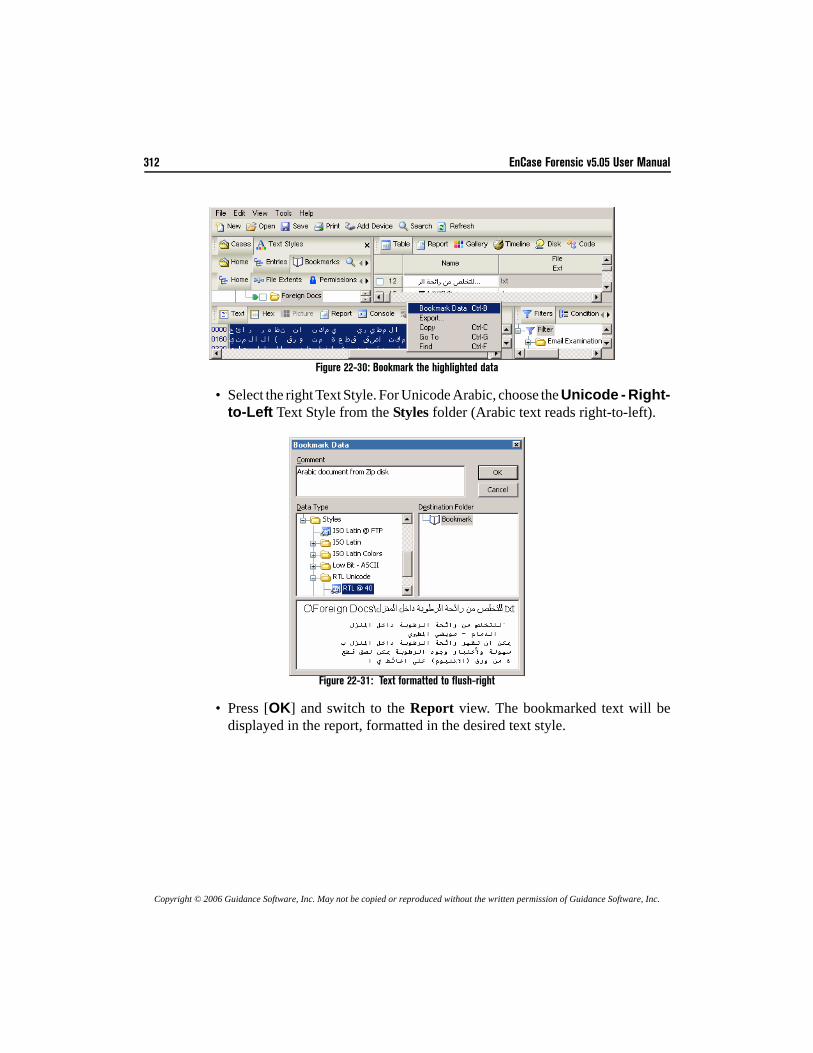
312 EnCase Forensic v5.05 User Manual
Copyright © 2006 Guidance Software, Inc. May not be copied or reproduced without the written permission of Guidance Software, Inc.
Figure 22-30: Bookmark the highlighted data
• Select the right Text Style. For Unicode Arabic, choose the Unicode - Right-to-Left Text Style from the Styles folder (Arabic text reads right-to-left).
Figure 22-31: Text formatted to flush-right
• Press [OK] and switch to the Report view. The bookmarked text will bedisplayed in the report, formatted in the desired text style.
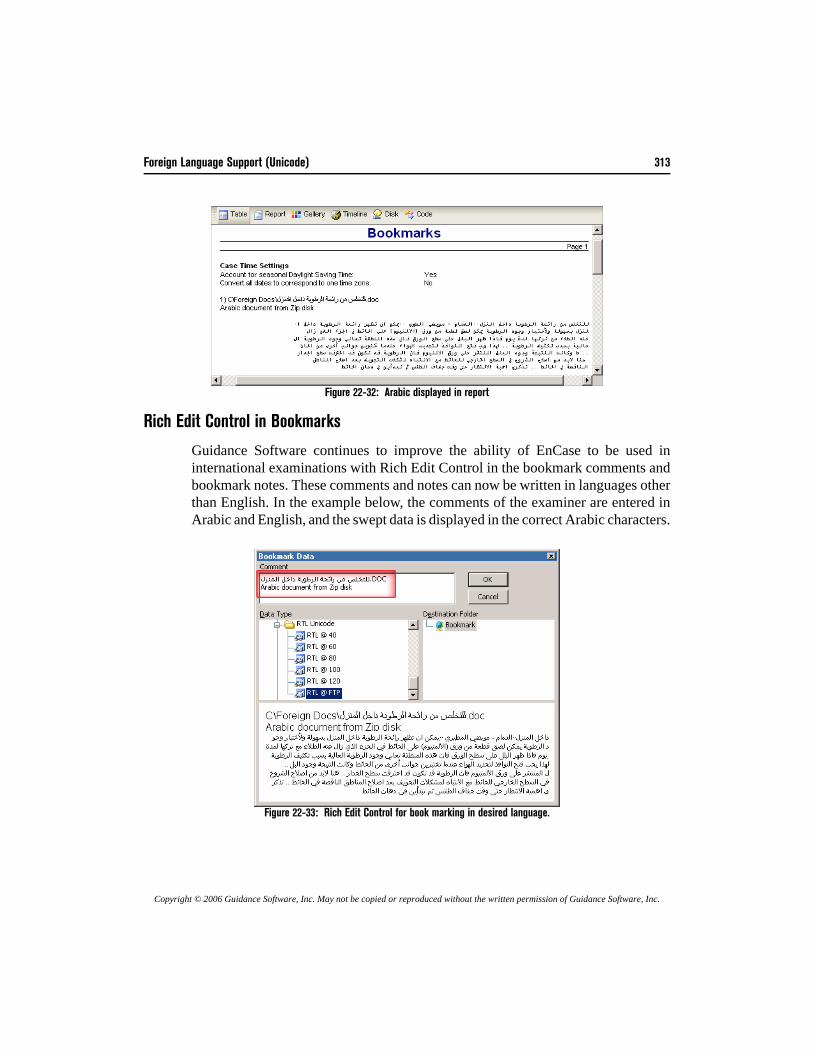
Foreign Language Support (Unicode) 313
Copyright © 2006 Guidance Software, Inc. May not be copied or reproduced without the written permission of Guidance Software, Inc.
Figure 22-32: Arabic displayed in report
Rich Edit Control in Bookmarks
Guidance Software continues to improve the ability of EnCase to be used ininternational examinations with Rich Edit Control in the bookmark comments andbookmark notes. These comments and notes can now be written in languages otherthan English. In the example below, the comments of the examiner are entered inArabic and English, and the swept data is displayed in the correct Arabic characters.
Figure 22-33: Rich Edit Control for book marking in desired language.
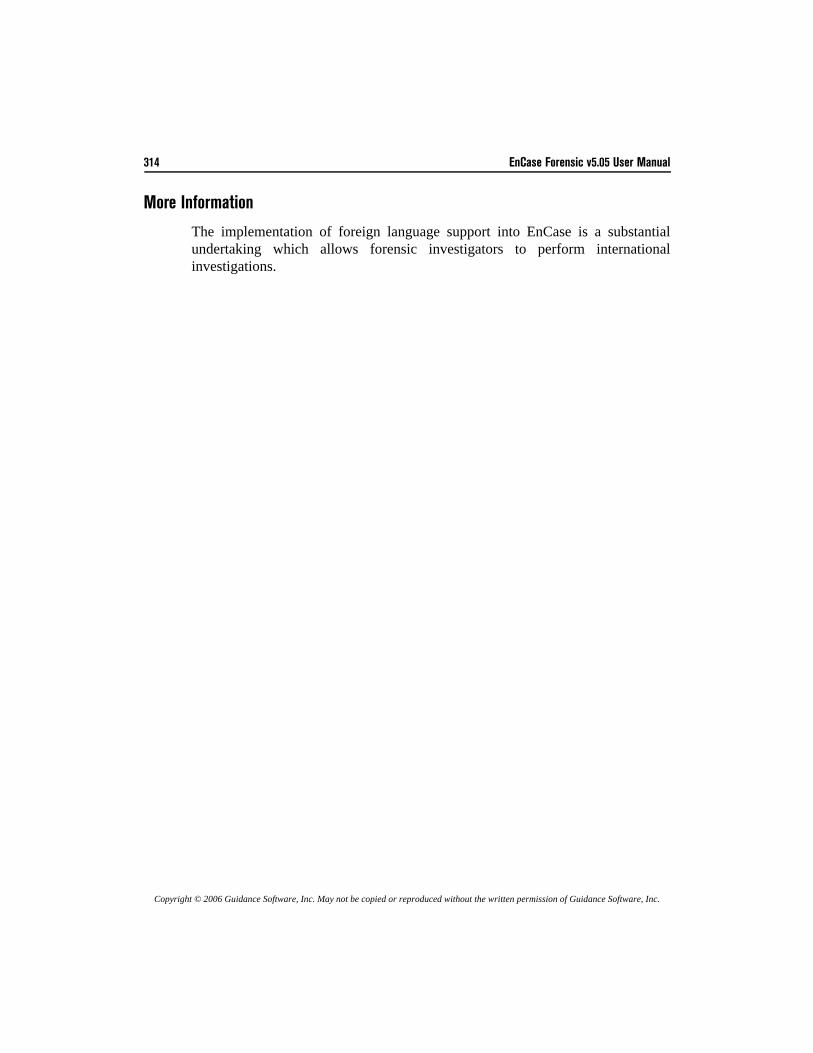
314 EnCase Forensic v5.05 User Manual
Copyright © 2006 Guidance Software, Inc. May not be copied or reproduced without the written permission of Guidance Software, Inc.
More Information
The implementation of foreign language support into EnCase is a substantialundertaking which allows forensic investigators to perform internationalinvestigations.
Copyright © 2006 Guidance Software, Inc. May not be copied or reproduced without the written permission of Guidance Software, Inc.
Restoring Evidence
EnCase allows an investigator to restore evidence files to prepared media. Restoringevidence files to media theoretically permits the investigator to boot the restoredmedia and view the subject's computing environment without altering the originalevidence. Restoring media, however, can be challenging. Read this chapter carefullybefore attempting a restore. Additional information is also available in the Validation Testingof the EnCase Restore Process in Windows white paper, available on GuidanceSoftware’s web site at http://www.guidancesoftware.com in the Support section fromthe Downloads page.
Physical vs. Logical Restore
EnCase allows the investigator to restore either a logical volume or a physical drive.• A logical volume is a volume that does not contain a Master Boot Record
(MBR) or the Unused Disk Space.• A physical volume contains the Master Boot Record and Unused Disk Space.
Unused Disk Space, however, is typically not accessible to the user.Most often, when complying with discovery issues, one must perform a physicalrestore, not a logical one. Logical restores are less desirable as they cannot be verifiedas an exact copy of the subject media. When a drive is restored for the purposes ofbooting the subject machine, a physical restore is the correct choice.Whether restoring a drive physically or logically, restore the evidence files to a driveslightly larger in capacity than the original Subject hard drive. For example, ifrestoring a 2-gig hard drive image, restore the image to a 2 to 4-gig hard drive.Restoring media to a drive that is substantially bigger than the subject media can
DO NOT boot up the Subject's drive. Do not boot up your forensic hard drive with the Subject drive attached.There is no need to touch the original media at all. Remember, it is still evidence.

316 EnCase Forensic v5.05 User Manual
Copyright © 2006 Guidance Software, Inc. May not be copied or reproduced without the written permission of Guidance Software, Inc.
prevent the restored clone from booting at all, possibly defeating the purpose of therestore.
Preparing the Target Media
Preparation of the target media (to which the image is going to be restored) is essentialfor a forensically sound restore.
• The target media must be wiped (see the chapter on Advanced Analysis).• For logical restores, the target media must be FDISKed.• For logical restores, the target media must be partitioned and formatted with
the same file-type system as the volume to be restored (e.g., FAT32 to FAT32,NTFS to NTFS, etc.).
• For physical restores, do not FDISK, partition, or format the hard drive. Bringup EnCase and restore the image, physically, to the target media.
Physical Restore
Restoring a physical drive means that EnCase will copy everything, sector-by-sector,to the prepared target drive, thereby creating an exact copy of the subject drive. Thetarget drive should be larger than the subject hard drive. When EnCase completesthe restore it will provide the hash values verifying that the lab drive is an exact copyof the subject drive. If a separate, independent MD5 hash of the lab drive is run, becertain to choose to compute the hash over only the exact number of sectors includedon the suspect's drive so that the MD5 hash will be accurate.To restore a physical hard drive in EnCase:
• Install a sterile, unpartitioned, unformatted restoration drive to your forensicPC, using a connection other than IDE 0 (EnCase cannot restore a physicaldrive to IDE 0.) Ensure the intended restoration drive is at least as large as (butpreferably larger than) the original from which the image was taken so that therestored data will never overwrite all sectors on the target hard drive. EnCasecan wipe the remaining sectors of the target hard drive after the actual data fromthe evidence file is restored. Wiping remaining sectors is recommended.
• Using the EnCase, look at the acquired drive in Report view and note the precisephysical drive geometry of the forensic image you are restoring from, includingCylinders, Heads and Sectors. Note the acquisition hash for later comparisonon the restored drive.
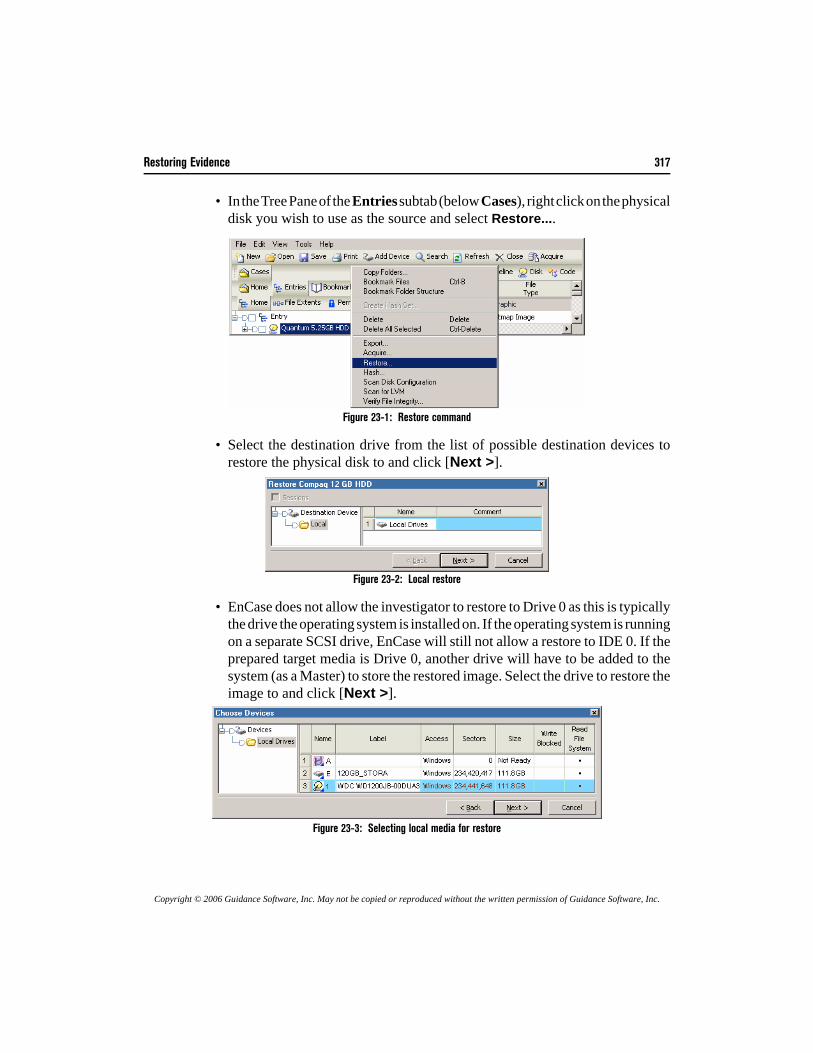
Restoring Evidence 317
Copyright © 2006 Guidance Software, Inc. May not be copied or reproduced without the written permission of Guidance Software, Inc.
• In the Tree Pane of the Entries subtab (below Cases), right click on the physicaldisk you wish to use as the source and select Restore....
Figure 23-1: Restore command
• Select the destination drive from the list of possible destination devices torestore the physical disk to and click [Next >].
Figure 23-2: Local restore
• EnCase does not allow the investigator to restore to Drive 0 as this is typicallythe drive the operating system is installed on. If the operating system is runningon a separate SCSI drive, EnCase will still not allow a restore to IDE 0. If theprepared target media is Drive 0, another drive will have to be added to thesystem (as a Master) to store the restored image. Select the drive to restore theimage to and click [Next >].
Figure 23-3: Selecting local media for restore
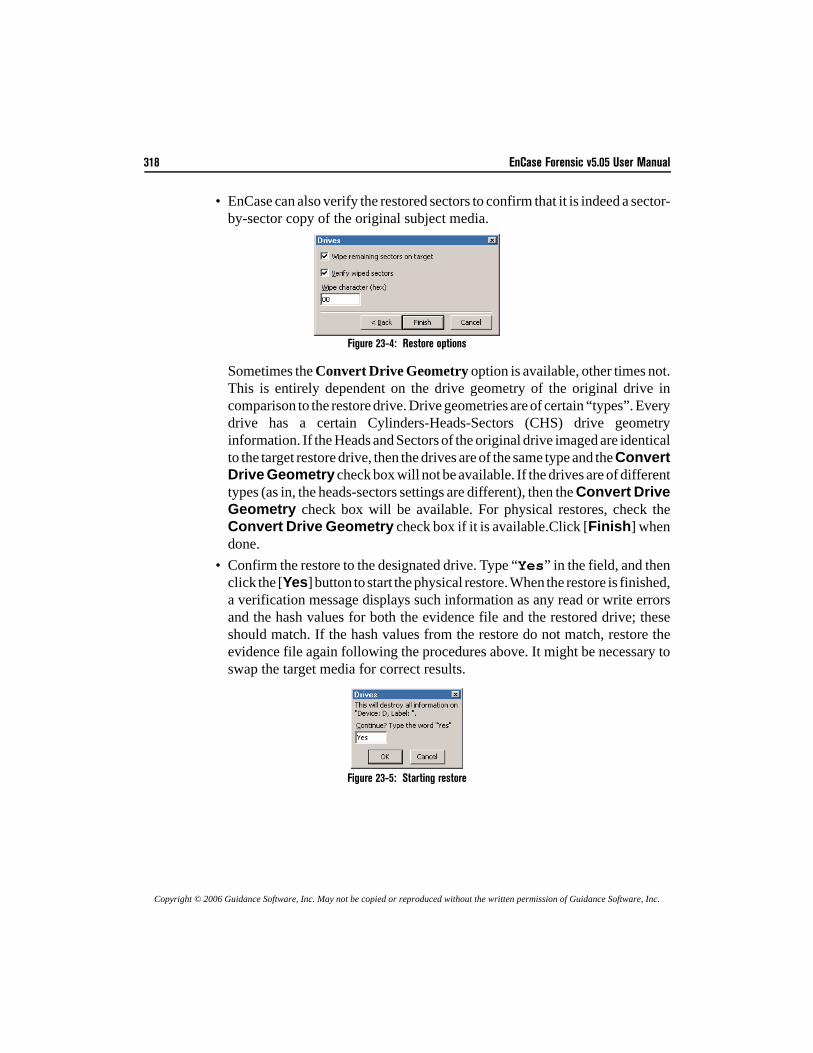
318 EnCase Forensic v5.05 User Manual
Copyright © 2006 Guidance Software, Inc. May not be copied or reproduced without the written permission of Guidance Software, Inc.
• EnCase can also verify the restored sectors to confirm that it is indeed a sector-by-sector copy of the original subject media.
Figure 23-4: Restore options
Sometimes the Convert Drive Geometry option is available, other times not.This is entirely dependent on the drive geometry of the original drive incomparison to the restore drive. Drive geometries are of certain “types”. Everydrive has a certain Cylinders-Heads-Sectors (CHS) drive geometryinformation. If the Heads and Sectors of the original drive imaged are identicalto the target restore drive, then the drives are of the same type and the ConvertDrive Geometry check box will not be available. If the drives are of differenttypes (as in, the heads-sectors settings are different), then the Convert DriveGeometry check box will be available. For physical restores, check theConvert Drive Geometry check box if it is available.Click [Finish] whendone.
• Confirm the restore to the designated drive. Type “Yes” in the field, and thenclick the [Yes] button to start the physical restore. When the restore is finished,a verification message displays such information as any read or write errorsand the hash values for both the evidence file and the restored drive; theseshould match. If the hash values from the restore do not match, restore theevidence file again following the procedures above. It might be necessary toswap the target media for correct results.
Figure 23-5: Starting restore
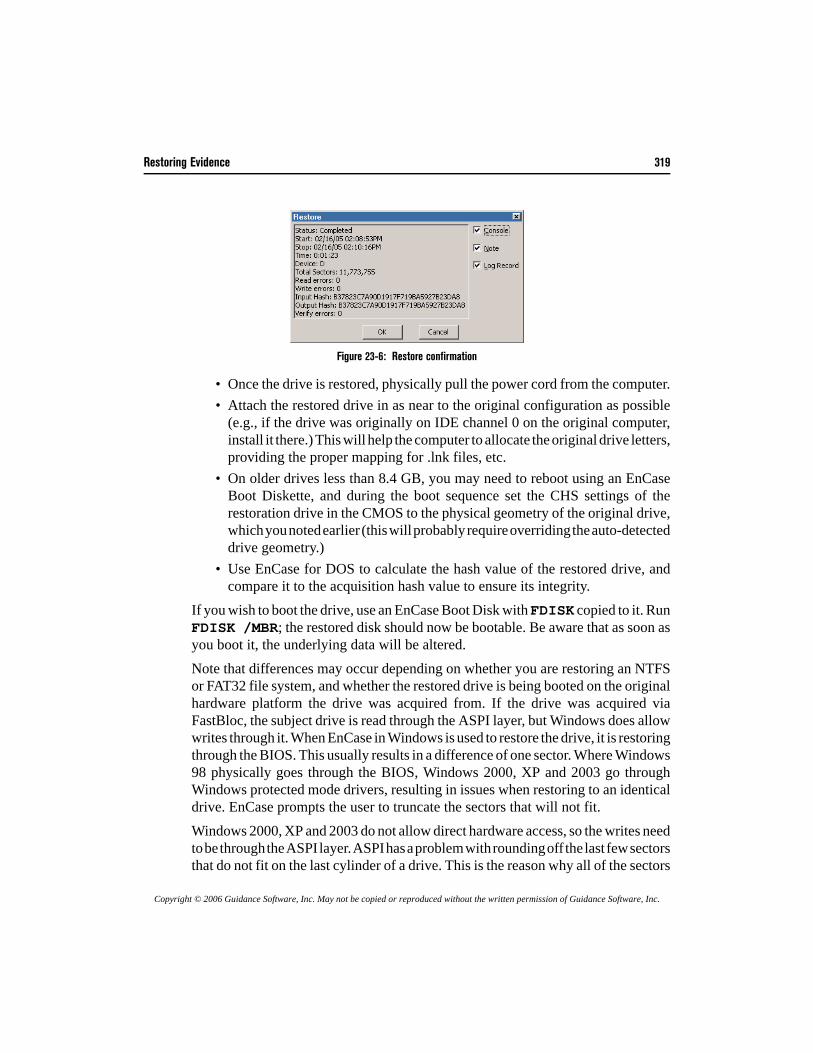
Restoring Evidence 319
Copyright © 2006 Guidance Software, Inc. May not be copied or reproduced without the written permission of Guidance Software, Inc.
Figure 23-6: Restore confirmation
• Once the drive is restored, physically pull the power cord from the computer.• Attach the restored drive in as near to the original configuration as possible
(e.g., if the drive was originally on IDE channel 0 on the original computer,install it there.) This will help the computer to allocate the original drive letters,providing the proper mapping for .lnk files, etc.
• On older drives less than 8.4 GB, you may need to reboot using an EnCaseBoot Diskette, and during the boot sequence set the CHS settings of therestoration drive in the CMOS to the physical geometry of the original drive,which you noted earlier (this will probably require overriding the auto-detecteddrive geometry.)
• Use EnCase for DOS to calculate the hash value of the restored drive, andcompare it to the acquisition hash value to ensure its integrity.
If you wish to boot the drive, use an EnCase Boot Disk with FDISK copied to it. RunFDISK /MBR; the restored disk should now be bootable. Be aware that as soon asyou boot it, the underlying data will be altered.Note that differences may occur depending on whether you are restoring an NTFSor FAT32 file system, and whether the restored drive is being booted on the originalhardware platform the drive was acquired from. If the drive was acquired viaFastBloc, the subject drive is read through the ASPI layer, but Windows does allowwrites through it. When EnCase in Windows is used to restore the drive, it is restoringthrough the BIOS. This usually results in a difference of one sector. Where Windows98 physically goes through the BIOS, Windows 2000, XP and 2003 go throughWindows protected mode drivers, resulting in issues when restoring to an identicaldrive. EnCase prompts the user to truncate the sectors that will not fit.Windows 2000, XP and 2003 do not allow direct hardware access, so the writes needto be through the ASPI layer. ASPI has a problem with rounding off the last few sectorsthat do not fit on the last cylinder of a drive. This is the reason why all of the sectors

320 EnCase Forensic v5.05 User Manual
Copyright © 2006 Guidance Software, Inc. May not be copied or reproduced without the written permission of Guidance Software, Inc.
are visible when the drive is read, yet when writes are attempted a small number ofsectors may be missing. This is a Windows/ASPI limitation and not one of EnCase.Although in an OS that allows direct hardware access (such as Windows 98) youshould see the same number of sectors, both for reading and writing purposes,Windows 98 is not supported to run EnCase Version 5. Drive manufacturers also state that even though drives may appear identical, oncepartitioned they may not have the same capacity. If possible, drives from the samebatch should be used so that both will be read with the same capacity (check the dateon the drive's label). Older hard drives may have 2 platters, while the newer versionmay only have one, with the single platter drive having a few less bytes available.
Logical Restore
Media have different types depending on the CHS (cylinders-heads-sectors)information. The same type might have different “cylinders” settings, but their headsand sectors information (the HS in CHS) will be the same. If the heads-sectorsinformation is different, then the media type differs and another target restore harddrive should be used. A logical volume must be restored to a volume of the same size,or larger, and of the same type.To prepare for a logical restore, the target media should be wiped, FDISKed,partitioned, and formatted prior to restore. Format the target drive with the same file-type system as the volume to be restored (e.g., FAT32 to FAT32, NTFS to NTFS, etc.).The procedure for restoring a logical volume is identical to that of restoring a physicaldevice. In the case of the logical volume, right click on the volume in Case view andselect Restore. When the logical restore is finished, a confirmation message will be displayed. Thecomputer must be restarted to allow the restored volume to be recognized. Note thatthe restore volume contains only the information that was inside the selected partition.
Booting the Restored Hard Drive
After the restore operation has finished with no errors, remove the target hard drivefrom the storage system and place it into a test system. Switch the power on.Depending what operating system the subject ran, the test system should now bebooting up exactly as the subject computer.There are quite a few difficulties that can occur at this stage of the investigation. Themost common is that the clone of the subject drive will not boot. Before tryinganything else, check the restored disk using FDISK and verify it is set as an Active
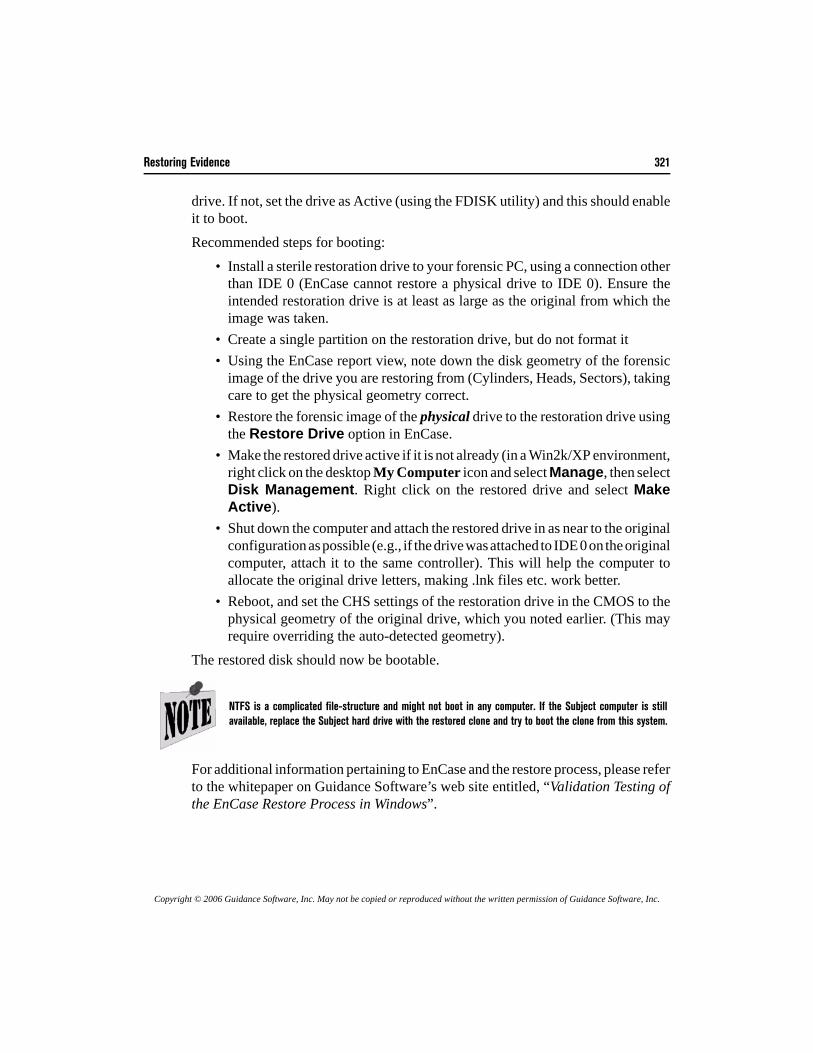
Restoring Evidence 321
Copyright © 2006 Guidance Software, Inc. May not be copied or reproduced without the written permission of Guidance Software, Inc.
drive. If not, set the drive as Active (using the FDISK utility) and this should enableit to boot.Recommended steps for booting:
• Install a sterile restoration drive to your forensic PC, using a connection otherthan IDE 0 (EnCase cannot restore a physical drive to IDE 0). Ensure theintended restoration drive is at least as large as the original from which theimage was taken.
• Create a single partition on the restoration drive, but do not format it• Using the EnCase report view, note down the disk geometry of the forensic
image of the drive you are restoring from (Cylinders, Heads, Sectors), takingcare to get the physical geometry correct.
• Restore the forensic image of the physical drive to the restoration drive usingthe Restore Drive option in EnCase.
• Make the restored drive active if it is not already (in a Win2k/XP environment,right click on the desktop My Computer icon and select Manage, then selectDisk Management. Right click on the restored drive and select MakeActive).
• Shut down the computer and attach the restored drive in as near to the originalconfiguration as possible (e.g., if the drive was attached to IDE 0 on the originalcomputer, attach it to the same controller). This will help the computer toallocate the original drive letters, making .lnk files etc. work better.
• Reboot, and set the CHS settings of the restoration drive in the CMOS to thephysical geometry of the original drive, which you noted earlier. (This mayrequire overriding the auto-detected geometry).
The restored disk should now be bootable.
For additional information pertaining to EnCase and the restore process, please referto the whitepaper on Guidance Software’s web site entitled, “Validation Testing ofthe EnCase Restore Process in Windows”.
NTFS is a complicated file-structure and might not boot in any computer. If the Subject computer is stillavailable, replace the Subject hard drive with the restored clone and try to boot the clone from this system.
322 EnCase Forensic v5.05 User Manual
Copyright © 2006 Guidance Software, Inc. May not be copied or reproduced without the written permission of Guidance Software, Inc.
Restoration FAQs• I restored an image to a hard drive, and now, with that hard drive
in a separate PC, it's not booting. Why not? The Cylinders-Heads-Sectors information (CHS) in the Master Boot Record(MBR) from the image does not match the CHS information of the actual harddrive. Reset the CHS information for the MBR. Boot with a DOS boot diskand, at the A:\> prompt, type “FDISK /MBR” (without the quotes) to resetthe Master Boot Record.Verify that the MBR has the correct io.sys file. “Re-SYS” the boot drivewith the correct sys version. For example, if the subject had Windows 95B,then the hard drive should be sys'd from a Windows 95B-created boot disk.At the A:\> prompt, type “SYS C:”.
Copyright © 2006 Guidance Software, Inc. May not be copied or reproduced without the written permission of Guidance Software, Inc.
Archiving Evidence
It is good forensic methodology to archive all evidence. Guidance Softwarerecommends archiving evidence files as soon as they have been acquired. This way,should evidence files become corrupted during an investigation, the archived copieswill still be available. Archive evidence files to either compact disc-recordable (CD-R) or digital versatile disc-recordable (DVD-R).
What Should Be Archived
Archiving EnCase evidence files is identical to archiving any other data. A deviceto archive the data and media to hold the data are necessary. CD-Rs are popular dueto their ease, cost, speed, and endurance. Tape media can fail quite easily after yearsof storage in vaults, as can removable media like Jaz or Zip disks. Although CDs andDVDs are more stable than tape media, many investigators are moving to hard drivestorage due to the recent decrease in cost and higher stability.When acquiring media, the default evidence file segment size is 640MB, which isdesigned for CD archiving. The maximum value is 2,000,000 MB (2 terabytes). Bearin mind when setting this value that if you are writing files to a FAT file system, themaximum allowable size is 2,000 (2 gigabytes); setting the value higher will resultin write errors. Archiving to CD or DVD, requires the following:
• A CD-R or DVD-R burner• CD-R burning software or similar product for DVD-R• Multiple blank CD-R discs or DVD-R discs
Use the disc-burning software to archive the evidence file segments to the opticalmedia. The last evidence file segment is usually smaller than 640MB, and the finalCD-R or DVD-R disc frequently has free space. Therefore, in addition to the evidencefile, add the following items:
• The version of EnCase used for the examination
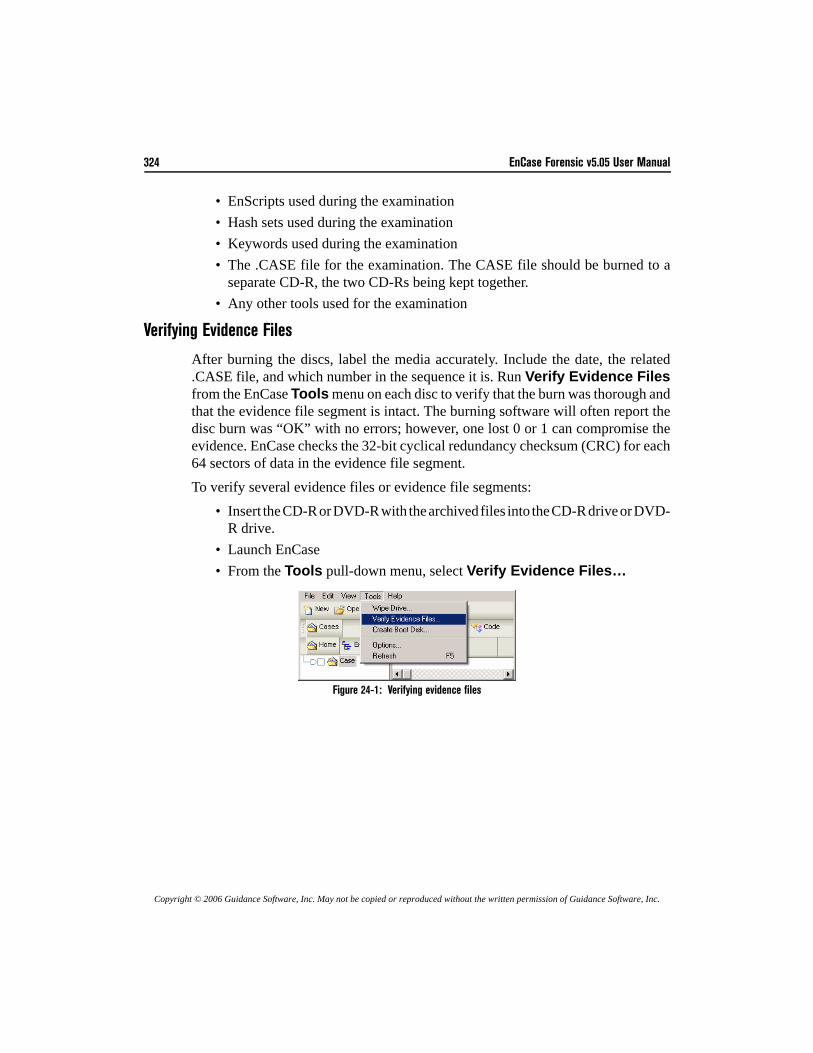
324 EnCase Forensic v5.05 User Manual
Copyright © 2006 Guidance Software, Inc. May not be copied or reproduced without the written permission of Guidance Software, Inc.
• EnScripts used during the examination• Hash sets used during the examination• Keywords used during the examination• The .CASE file for the examination. The CASE file should be burned to a
separate CD-R, the two CD-Rs being kept together. • Any other tools used for the examination
Verifying Evidence Files
After burning the discs, label the media accurately. Include the date, the related.CASE file, and which number in the sequence it is. Run Verify Evidence Filesfrom the EnCase Tools menu on each disc to verify that the burn was thorough andthat the evidence file segment is intact. The burning software will often report thedisc burn was “OK” with no errors; however, one lost 0 or 1 can compromise theevidence. EnCase checks the 32-bit cyclical redundancy checksum (CRC) for each64 sectors of data in the evidence file segment.To verify several evidence files or evidence file segments:
• Insert the CD-R or DVD-R with the archived files into the CD-R drive or DVD-R drive.
• Launch EnCase• From the Tools pull-down menu, select Verify Evidence Files…
Figure 24-1: Verifying evidence files
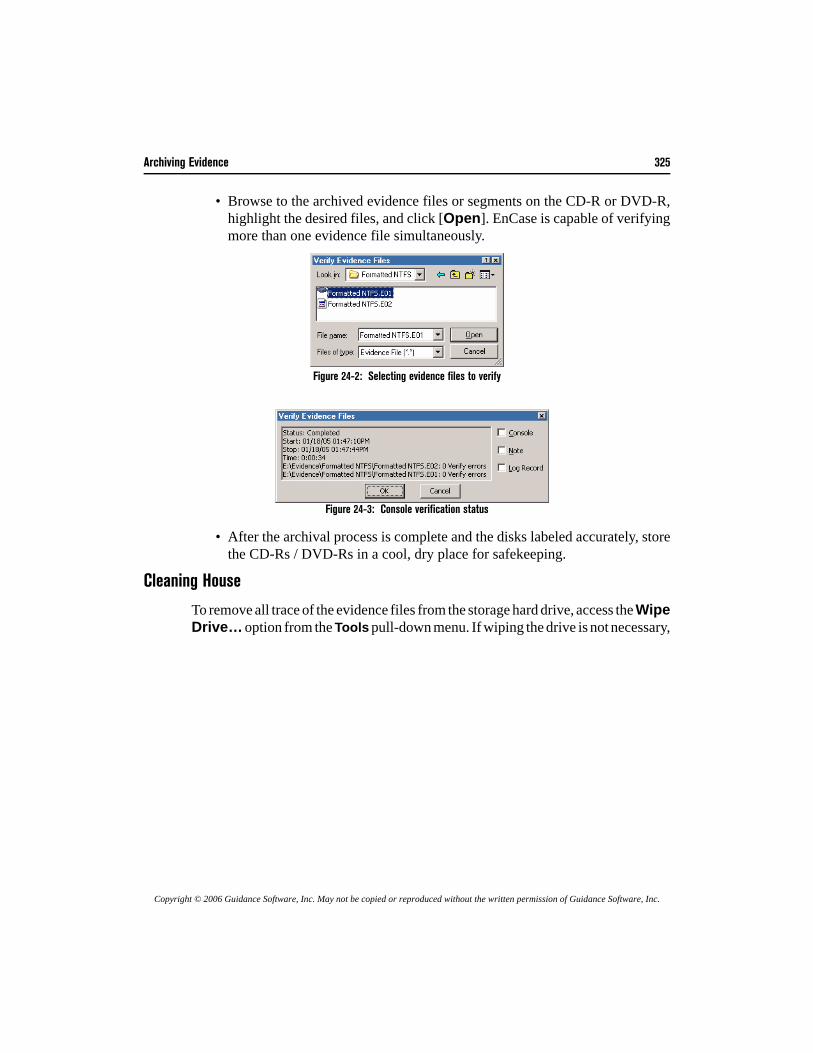
Archiving Evidence 325
Copyright © 2006 Guidance Software, Inc. May not be copied or reproduced without the written permission of Guidance Software, Inc.
• Browse to the archived evidence files or segments on the CD-R or DVD-R,highlight the desired files, and click [Open]. EnCase is capable of verifyingmore than one evidence file simultaneously.
Figure 24-2: Selecting evidence files to verify
Figure 24-3: Console verification status
• After the archival process is complete and the disks labeled accurately, storethe CD-Rs / DVD-Rs in a cool, dry place for safekeeping.
Cleaning House
To remove all trace of the evidence files from the storage hard drive, access the WipeDrive… option from the Tools pull-down menu. If wiping the drive is not necessary,
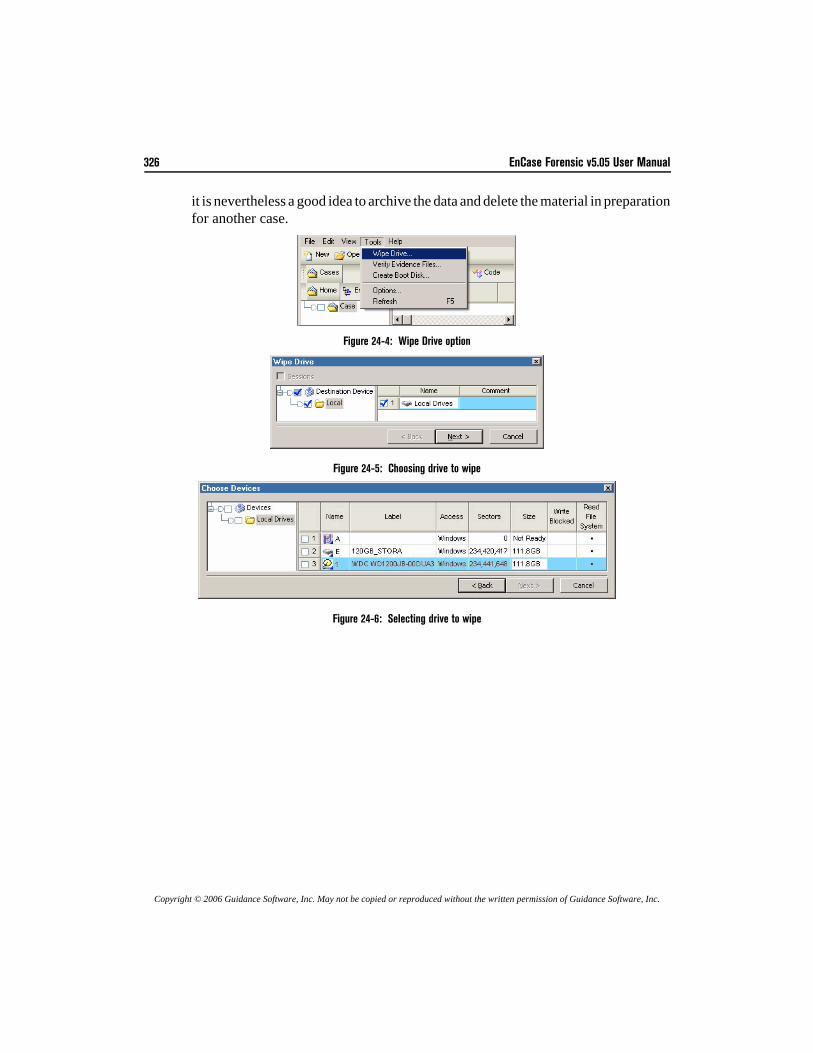
326 EnCase Forensic v5.05 User Manual
Copyright © 2006 Guidance Software, Inc. May not be copied or reproduced without the written permission of Guidance Software, Inc.
it is nevertheless a good idea to archive the data and delete the material in preparationfor another case.
Figure 24-4: Wipe Drive option
Figure 24-5: Choosing drive to wipe
Figure 24-6: Selecting drive to wipe
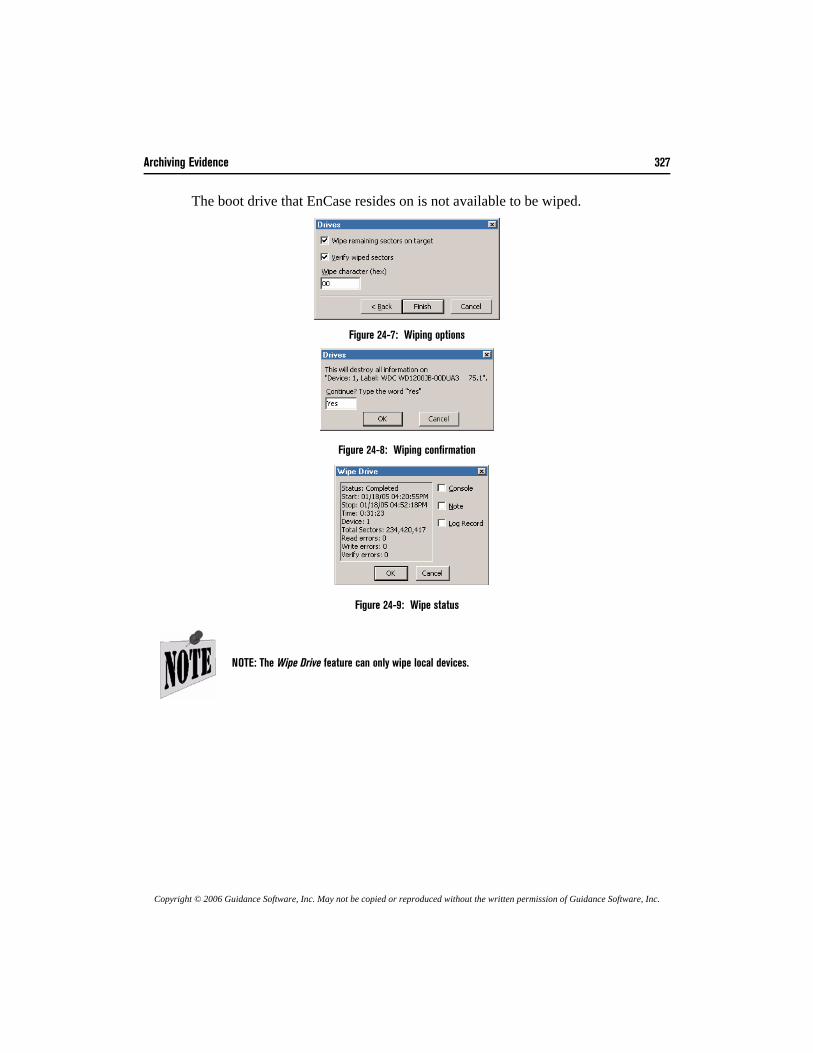
Archiving Evidence 327
Copyright © 2006 Guidance Software, Inc. May not be copied or reproduced without the written permission of Guidance Software, Inc.
The boot drive that EnCase resides on is not available to be wiped.
Figure 24-7: Wiping options
Figure 24-8: Wiping confirmation
Figure 24-9: Wipe status
NOTE: The Wipe Drive feature can only wipe local devices.

328 EnCase Forensic v5.05 User Manual
Copyright © 2006 Guidance Software, Inc. May not be copied or reproduced without the written permission of Guidance Software, Inc.
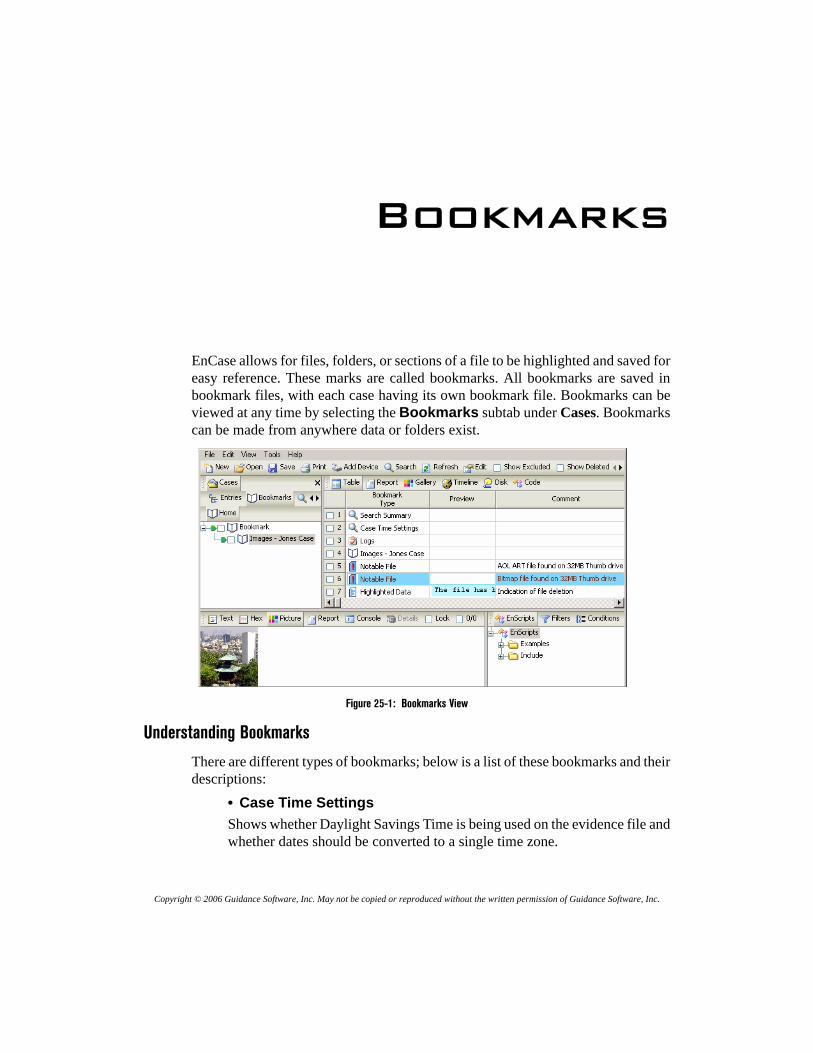
Copyright © 2006 Guidance Software, Inc. May not be copied or reproduced without the written permission of Guidance Software, Inc.
Bookmarks
EnCase allows for files, folders, or sections of a file to be highlighted and saved foreasy reference. These marks are called bookmarks. All bookmarks are saved inbookmark files, with each case having its own bookmark file. Bookmarks can beviewed at any time by selecting the Bookmarks subtab under Cases. Bookmarkscan be made from anywhere data or folders exist.
Figure 25-1: Bookmarks View
Understanding Bookmarks
There are different types of bookmarks; below is a list of these bookmarks and theirdescriptions:
• Case Time SettingsShows whether Daylight Savings Time is being used on the evidence file andwhether dates should be converted to a single time zone.
330 EnCase Forensic v5.05 User Manual
Copyright © 2006 Guidance Software, Inc. May not be copied or reproduced without the written permission of Guidance Software, Inc.
• Search SummaryDisplays search results, times, keywords, etc. for a particular case• Highlighted Data BookmarkCreated by clicking and dragging the mouse over data (“sweeping”) in one ofthe sub-panes. This is a fully customizable bookmark.• Notes BookmarkUsed to allow the user to write additional comments into the report. It has afew formatting features. It is not a bookmark of evidence.• Folder Information BookmarkTo bookmark the tree structure of a folder or device information of specificmedia. There is no comment on this bookmark. The options include showingthe device information, such as drive geometry, and the number of columnsto use for the tree structure. • Notable File BookmarkA file bookmarked by itself. This is a fully customizable bookmark.• File Group BookmarkIndicates that the bookmark was made as part of a group of selected files. Thereis no comment on this bookmark. • Snapshot BookmarkBookmark containing the results of a System Snapshot of dynamic data forIncident Response and Security Auditing.• Log Record BookmarkBookmark containing the results of log parsing EnScripts.• Registry BookmarkBookmark containing the results of Windows registry parsing EnScripts.
Highlighted Data Bookmark
The Highlighted Data bookmark, also known as a sweeping bookmark or a textfragment bookmark, can be used to show a larger expanse of text. This type ofbookmark is created by clicking and dragging-known as “sweeping” text or hex inthe View Pane. To sweep an area of data, left-click on the first character and holddown the mouse button. Drag the mouse to the end of the data to be highlighted.
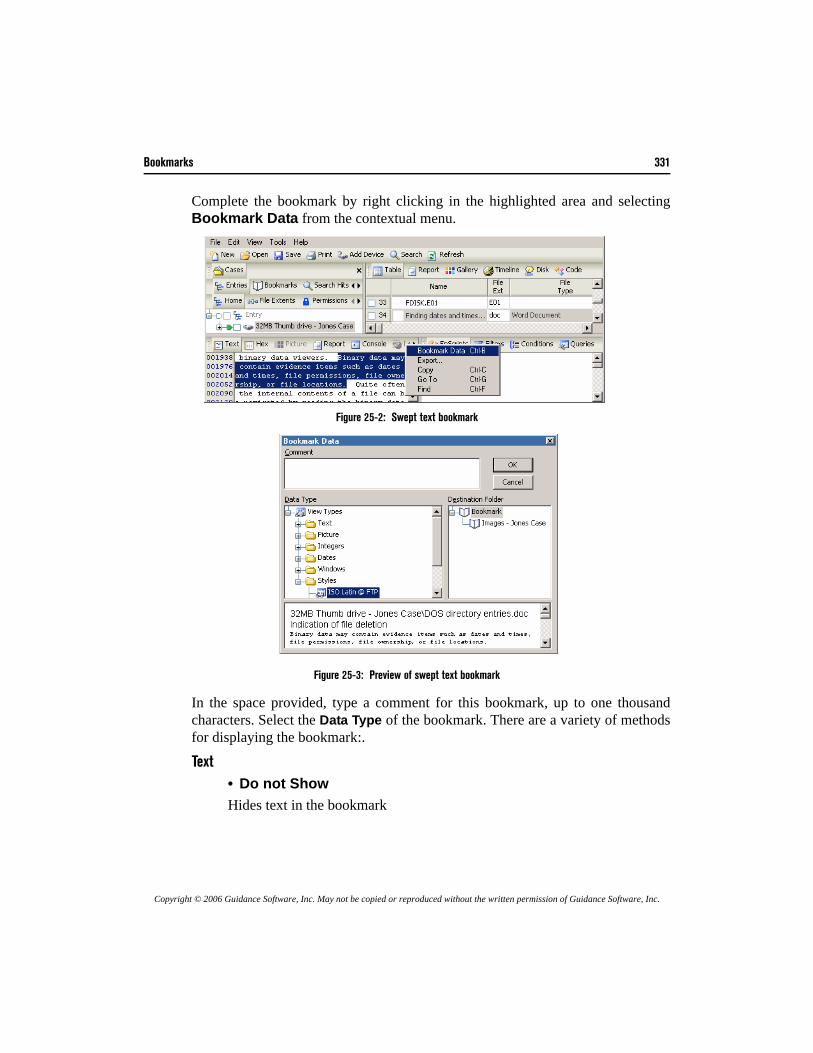
Bookmarks 331
Copyright © 2006 Guidance Software, Inc. May not be copied or reproduced without the written permission of Guidance Software, Inc.
Complete the bookmark by right clicking in the highlighted area and selectingBookmark Data from the contextual menu.
Figure 25-2: Swept text bookmark
Figure 25-3: Preview of swept text bookmark
In the space provided, type a comment for this bookmark, up to one thousandcharacters. Select the Data Type of the bookmark. There are a variety of methodsfor displaying the bookmark:.
Text• Do not ShowHides text in the bookmark

332 EnCase Forensic v5.05 User Manual
Copyright © 2006 Guidance Software, Inc. May not be copied or reproduced without the written permission of Guidance Software, Inc.
• High ASCIIHigh ASCII includes additional ASCII characters (up to 256), which mayinclude foreign language accents, math symbols, trademark and copyrightsymbols, etc. These characters are not the same on all computers.• Low ASCIIASCII defines code numbers for 128 characters, which are the alphabetic andnumeric characters on a keyboard and some additional characters such aspunctuation marks.• HexHexadecimal. The base 16 numbering system, sometimes used as a short wayof representing binary numbers. The digits 0-9 are used, plus the letters A-F,which represent the numbers 10 to 15. The farthest-right digit is the ones place;the digit next to the left is the 16s place; the next place to the left is 16^2 =256, etc. Each place is 16 times the place immediately to the right of it.• UnicodeA character set that uses 16 bits (two bytes) for each character, and thereforeis able to include more characters than ASCII, which is based on 8-bitcharacters. Unicode can have 65,536 characters and therefore can be used toencode almost all the languages of the world. Unicode includes the ASCIIcharacter set within it.• ROT 13 EncodingROT13 does simple text encoding by rotating the characters alphabetically by13 characters, but does not encrypt it. Highlighted ROT13-encoded text willbe converted when using this Data Type. • Reconstructed HTMLReconstructs HTML code into a bookmarked page when the code ishighlighted and tagged
Picture• PictureEnCase can view natively JPG, GIF, EMF, TIFF, BMP, AOL ART and(occasionally) PSD file formats.• Base64 Encoded PicturePicture encoded for e-mail transport in Base64.• UUE Encoded PicturePicture encoded for e-mail transport with UUE.
Bookmarks 333
Copyright © 2006 Guidance Software, Inc. May not be copied or reproduced without the written permission of Guidance Software, Inc.
Integers• The selected data is displayed in the integer format. Options are 8-Bit Integer,
16-Bit Integer, 16-Bit Big-Endian, 32-Bit Integer and 32-Bit Big-Endian. BigEndian is an order in which the “big end” (most significant value in thesequence) is stored first (at the lowest storage address).
Dates• DOS DatePacked 16-bit value that specifies the month, day, year, and time of day an MS-DOS file was last written to• DOS Date (GMT)• UNIX DateA Unix timestamp (in seconds) based on the standard Unix epoch of 01/01/1970 at 00:00:00 GMT• UNIX Text DateA Unix timestamp (in seconds) based on the standard Unix epoch of 01/01/1970 at 00:00:00 GMT, in text format• HFS DateA numeric value on a Macintosh that specifies the month, day, year, and timethat a Macintosh file was last written to• HFS Plus DateA numeric value on a Power Macintosh that specifies the month, day, year, andtime that the file was last written to• Windows Date/TimeA numeric value on a Windows system that specifies the month, day, year, andtime that a file was last written to• Lotus DateDate from a Lotus Notes database file
Windows• Partition EntryCharacters indicating the beginning of a Windows partition entry• DOS Directory EntryMS-DOS uses one directory entry for each file and subdirectory. Thesecharacters can be interpreted by EnCase to view the DOS directory entry.
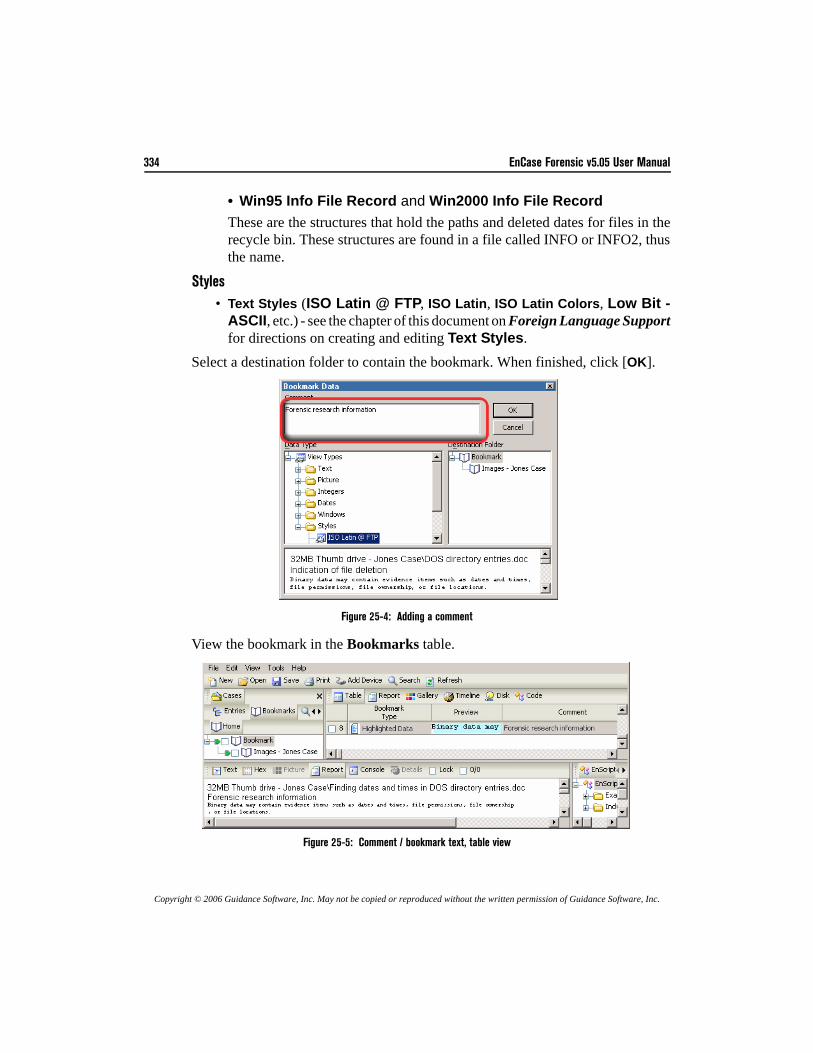
334 EnCase Forensic v5.05 User Manual
Copyright © 2006 Guidance Software, Inc. May not be copied or reproduced without the written permission of Guidance Software, Inc.
• Win95 Info File Record and Win2000 Info File RecordThese are the structures that hold the paths and deleted dates for files in therecycle bin. These structures are found in a file called INFO or INFO2, thusthe name.
Styles• Text Styles (ISO Latin @ FTP, ISO Latin, ISO Latin Colors, Low Bit -
ASCII, etc.) - see the chapter of this document on Foreign Language Supportfor directions on creating and editing Text Styles.
Select a destination folder to contain the bookmark. When finished, click [OK].
Figure 25-4: Adding a comment
View the bookmark in the Bookmarks table.
Figure 25-5: Comment / bookmark text, table view
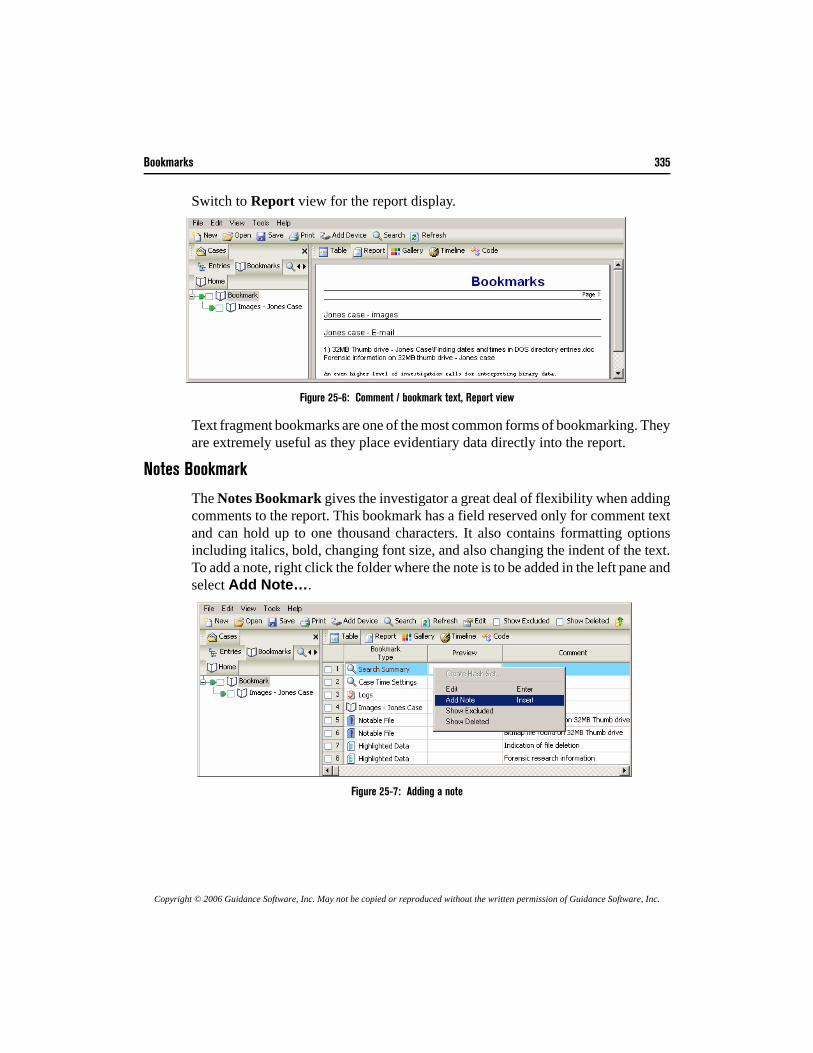
Bookmarks 335
Copyright © 2006 Guidance Software, Inc. May not be copied or reproduced without the written permission of Guidance Software, Inc.
Switch to Report view for the report display.
Figure 25-6: Comment / bookmark text, Report view
Text fragment bookmarks are one of the most common forms of bookmarking. Theyare extremely useful as they place evidentiary data directly into the report.
Notes Bookmark
The Notes Bookmark gives the investigator a great deal of flexibility when addingcomments to the report. This bookmark has a field reserved only for comment textand can hold up to one thousand characters. It also contains formatting optionsincluding italics, bold, changing font size, and also changing the indent of the text.To add a note, right click the folder where the note is to be added in the left pane andselect Add Note….
Figure 25-7: Adding a note
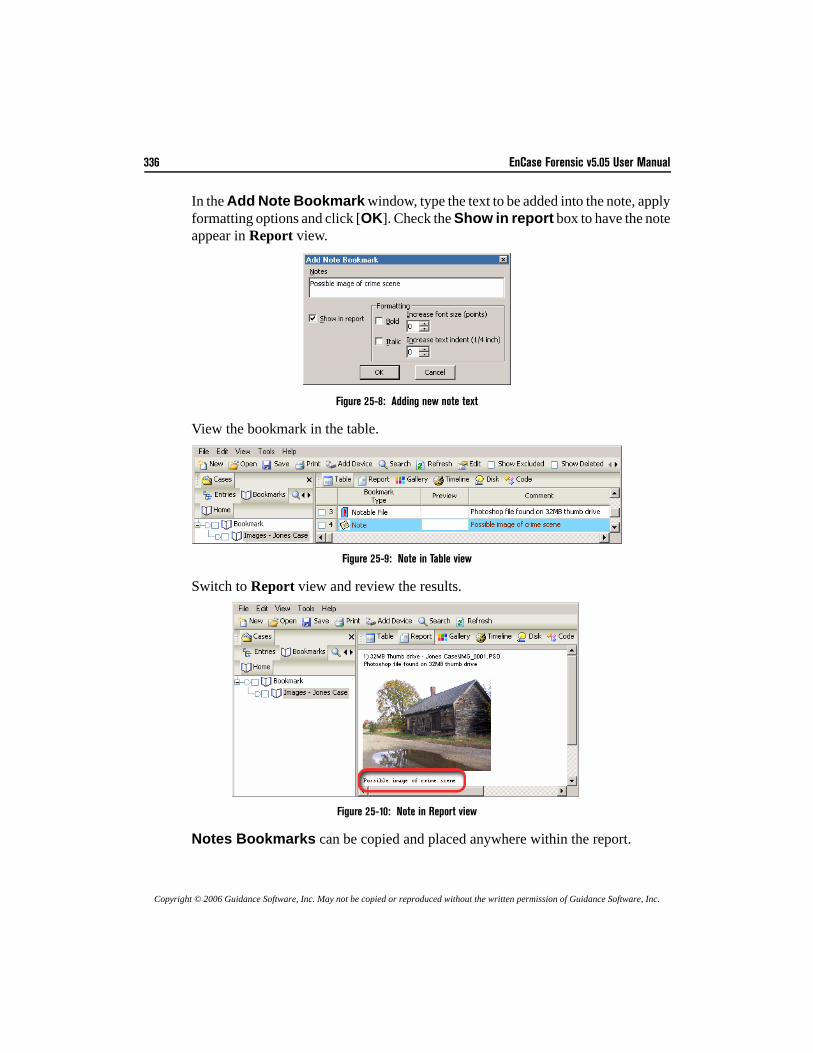
336 EnCase Forensic v5.05 User Manual
Copyright © 2006 Guidance Software, Inc. May not be copied or reproduced without the written permission of Guidance Software, Inc.
In the Add Note Bookmark window, type the text to be added into the note, applyformatting options and click [OK]. Check the Show in report box to have the noteappear in Report view.
Figure 25-8: Adding new note text
View the bookmark in the table.
Figure 25-9: Note in Table view
Switch to Report view and review the results.
Figure 25-10: Note in Report view
Notes Bookmarks can be copied and placed anywhere within the report.
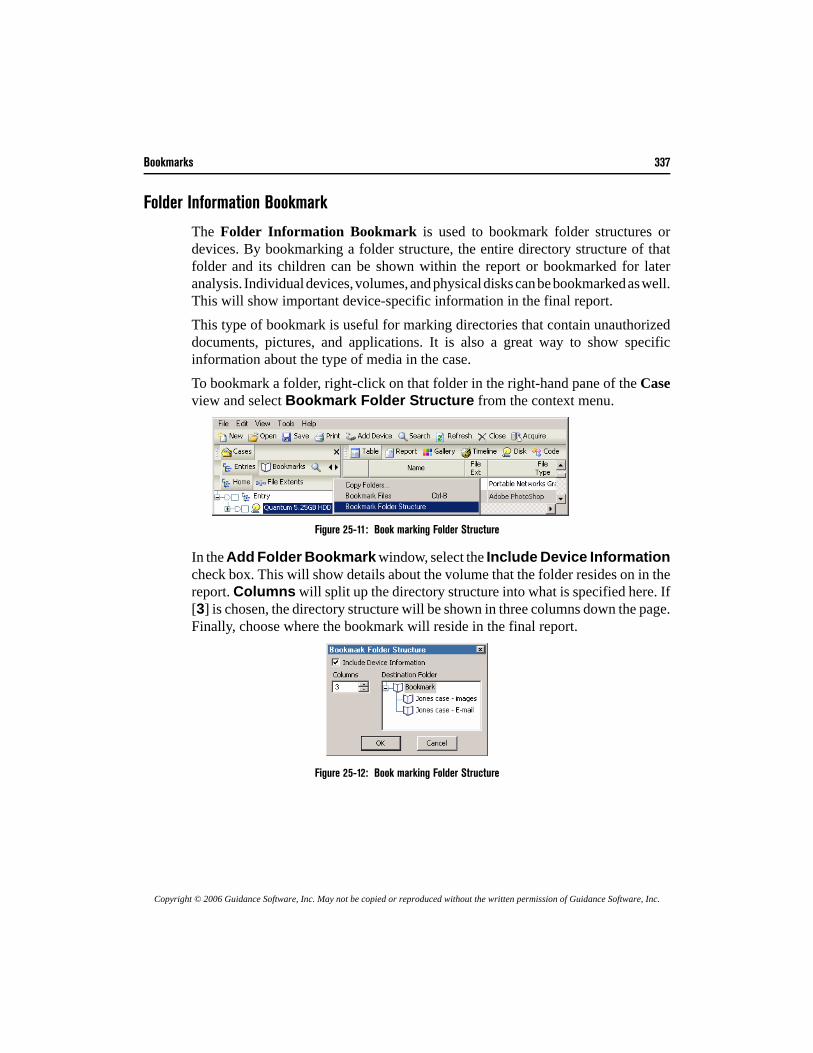
Bookmarks 337
Copyright © 2006 Guidance Software, Inc. May not be copied or reproduced without the written permission of Guidance Software, Inc.
Folder Information Bookmark
The Folder Information Bookmark is used to bookmark folder structures ordevices. By bookmarking a folder structure, the entire directory structure of thatfolder and its children can be shown within the report or bookmarked for lateranalysis. Individual devices, volumes, and physical disks can be bookmarked as well.This will show important device-specific information in the final report. This type of bookmark is useful for marking directories that contain unauthorizeddocuments, pictures, and applications. It is also a great way to show specificinformation about the type of media in the case.To bookmark a folder, right-click on that folder in the right-hand pane of the Caseview and select Bookmark Folder Structure from the context menu.
Figure 25-11: Book marking Folder Structure
In the Add Folder Bookmark window, select the Include Device Informationcheck box. This will show details about the volume that the folder resides on in thereport. Columns will split up the directory structure into what is specified here. If[3] is chosen, the directory structure will be shown in three columns down the page.Finally, choose where the bookmark will reside in the final report.
Figure 25-12: Book marking Folder Structure
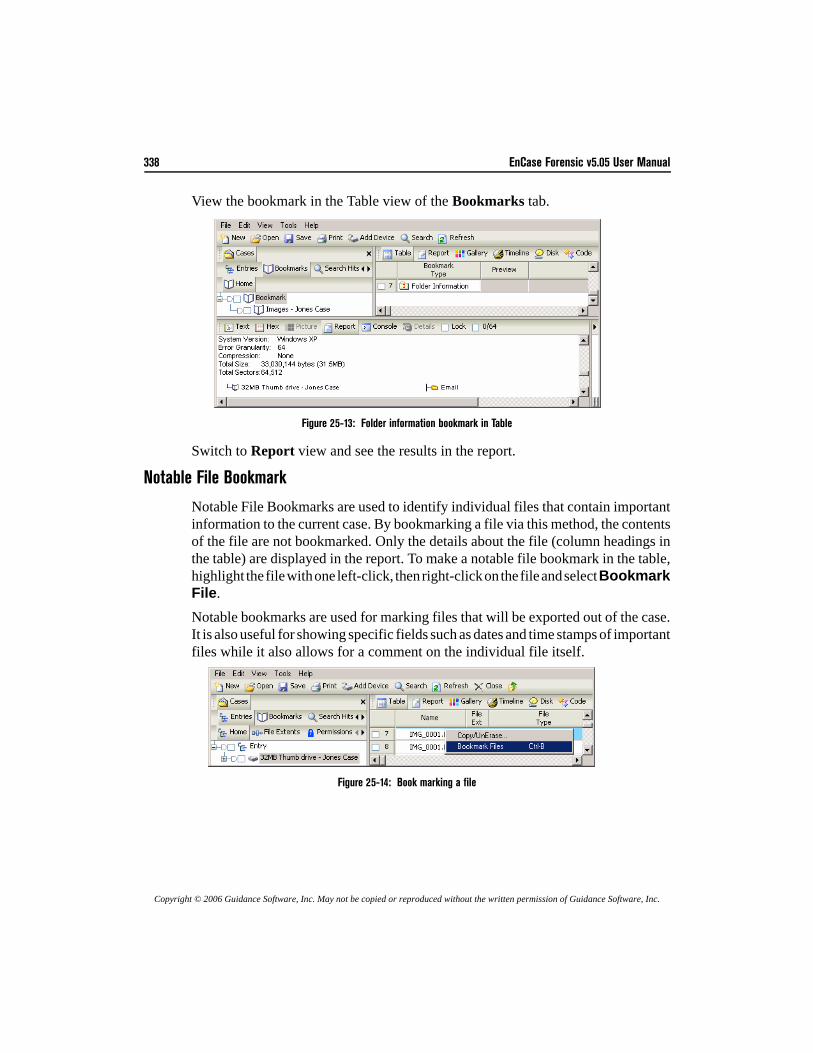
338 EnCase Forensic v5.05 User Manual
Copyright © 2006 Guidance Software, Inc. May not be copied or reproduced without the written permission of Guidance Software, Inc.
View the bookmark in the Table view of the Bookmarks tab.
Figure 25-13: Folder information bookmark in Table
Switch to Report view and see the results in the report.
Notable File Bookmark
Notable File Bookmarks are used to identify individual files that contain importantinformation to the current case. By bookmarking a file via this method, the contentsof the file are not bookmarked. Only the details about the file (column headings inthe table) are displayed in the report. To make a notable file bookmark in the table,highlight the file with one left-click, then right-click on the file and select BookmarkFile.Notable bookmarks are used for marking files that will be exported out of the case.It is also useful for showing specific fields such as dates and time stamps of importantfiles while it also allows for a comment on the individual file itself.
Figure 25-14: Book marking a file
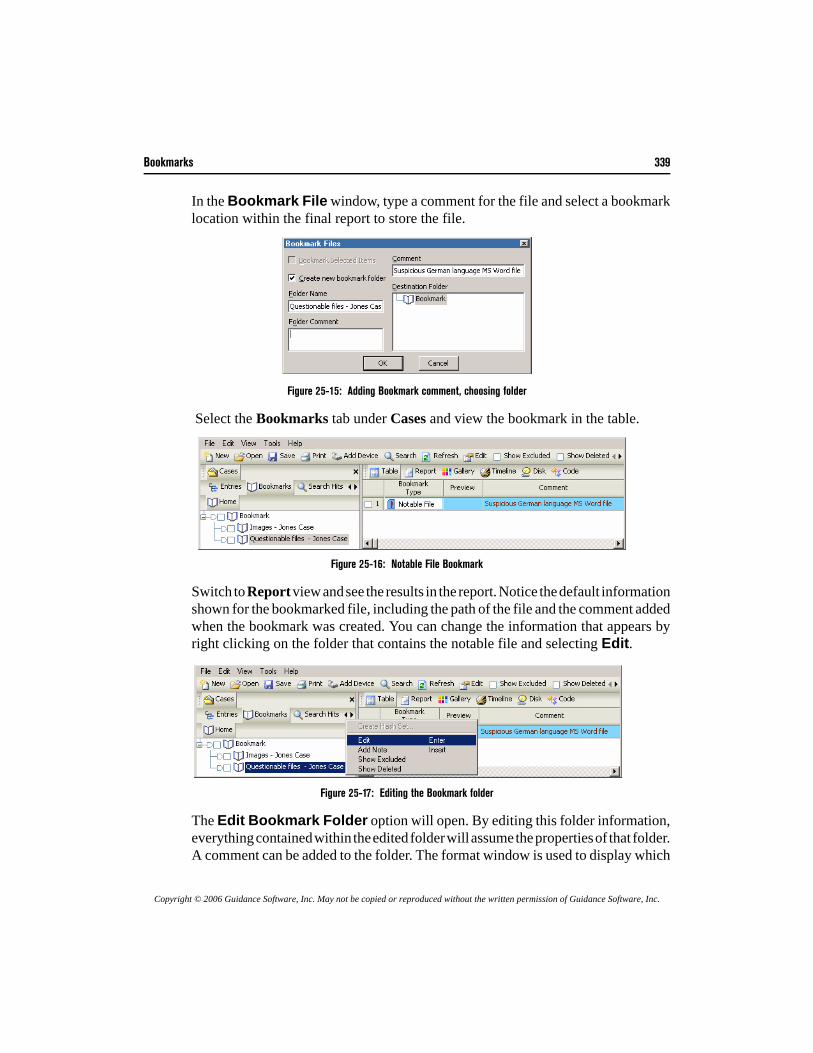
Bookmarks 339
Copyright © 2006 Guidance Software, Inc. May not be copied or reproduced without the written permission of Guidance Software, Inc.
In the Bookmark File window, type a comment for the file and select a bookmarklocation within the final report to store the file.
Figure 25-15: Adding Bookmark comment, choosing folder
Select the Bookmarks tab under Cases and view the bookmark in the table.
Figure 25-16: Notable File Bookmark
Switch to Report view and see the results in the report. Notice the default informationshown for the bookmarked file, including the path of the file and the comment addedwhen the bookmark was created. You can change the information that appears byright clicking on the folder that contains the notable file and selecting Edit.
Figure 25-17: Editing the Bookmark folder
The Edit Bookmark Folder option will open. By editing this folder information,everything contained within the edited folder will assume the properties of that folder.A comment can be added to the folder. The format window is used to display which
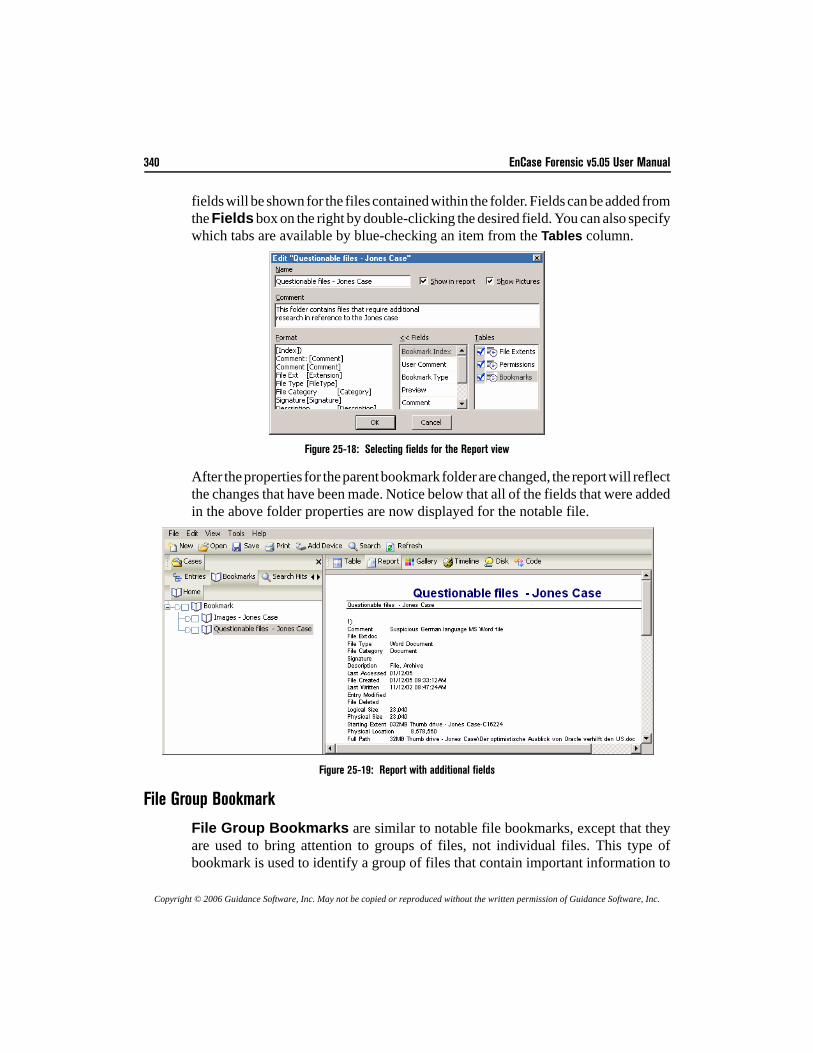
340 EnCase Forensic v5.05 User Manual
Copyright © 2006 Guidance Software, Inc. May not be copied or reproduced without the written permission of Guidance Software, Inc.
fields will be shown for the files contained within the folder. Fields can be added fromthe Fields box on the right by double-clicking the desired field. You can also specifywhich tabs are available by blue-checking an item from the Tables column.
Figure 25-18: Selecting fields for the Report view
After the properties for the parent bookmark folder are changed, the report will reflectthe changes that have been made. Notice below that all of the fields that were addedin the above folder properties are now displayed for the notable file.
Figure 25-19: Report with additional fields
File Group Bookmark
File Group Bookmarks are similar to notable file bookmarks, except that theyare used to bring attention to groups of files, not individual files. This type ofbookmark is used to identify a group of files that contain important information to
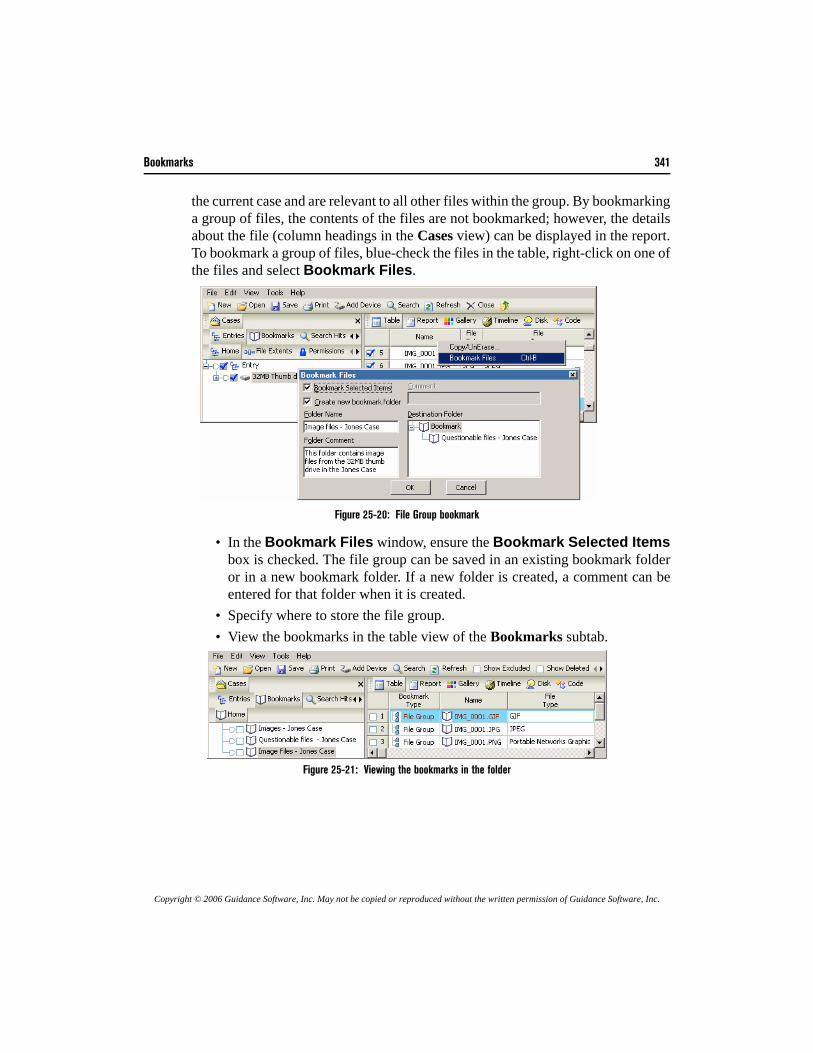
Bookmarks 341
Copyright © 2006 Guidance Software, Inc. May not be copied or reproduced without the written permission of Guidance Software, Inc.
the current case and are relevant to all other files within the group. By bookmarkinga group of files, the contents of the files are not bookmarked; however, the detailsabout the file (column headings in the Cases view) can be displayed in the report.To bookmark a group of files, blue-check the files in the table, right-click on one ofthe files and select Bookmark Files.
Figure 25-20: File Group bookmark
• In the Bookmark Files window, ensure the Bookmark Selected Itemsbox is checked. The file group can be saved in an existing bookmark folderor in a new bookmark folder. If a new folder is created, a comment can beentered for that folder when it is created.
• Specify where to store the file group.• View the bookmarks in the table view of the Bookmarks subtab.
Figure 25-21: Viewing the bookmarks in the folder
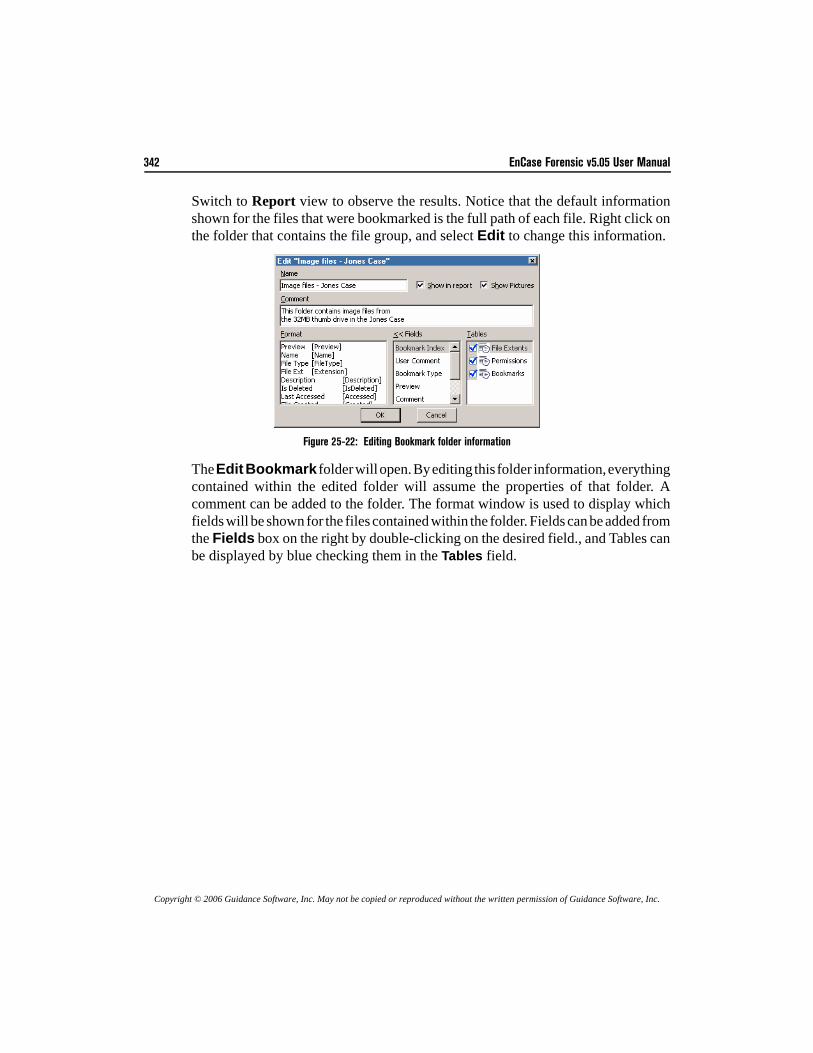
342 EnCase Forensic v5.05 User Manual
Copyright © 2006 Guidance Software, Inc. May not be copied or reproduced without the written permission of Guidance Software, Inc.
Switch to Report view to observe the results. Notice that the default informationshown for the files that were bookmarked is the full path of each file. Right click onthe folder that contains the file group, and select Edit to change this information.
Figure 25-22: Editing Bookmark folder information
The Edit Bookmark folder will open. By editing this folder information, everythingcontained within the edited folder will assume the properties of that folder. Acomment can be added to the folder. The format window is used to display whichfields will be shown for the files contained within the folder. Fields can be added fromthe Fields box on the right by double-clicking on the desired field., and Tables canbe displayed by blue checking them in the Tables field.
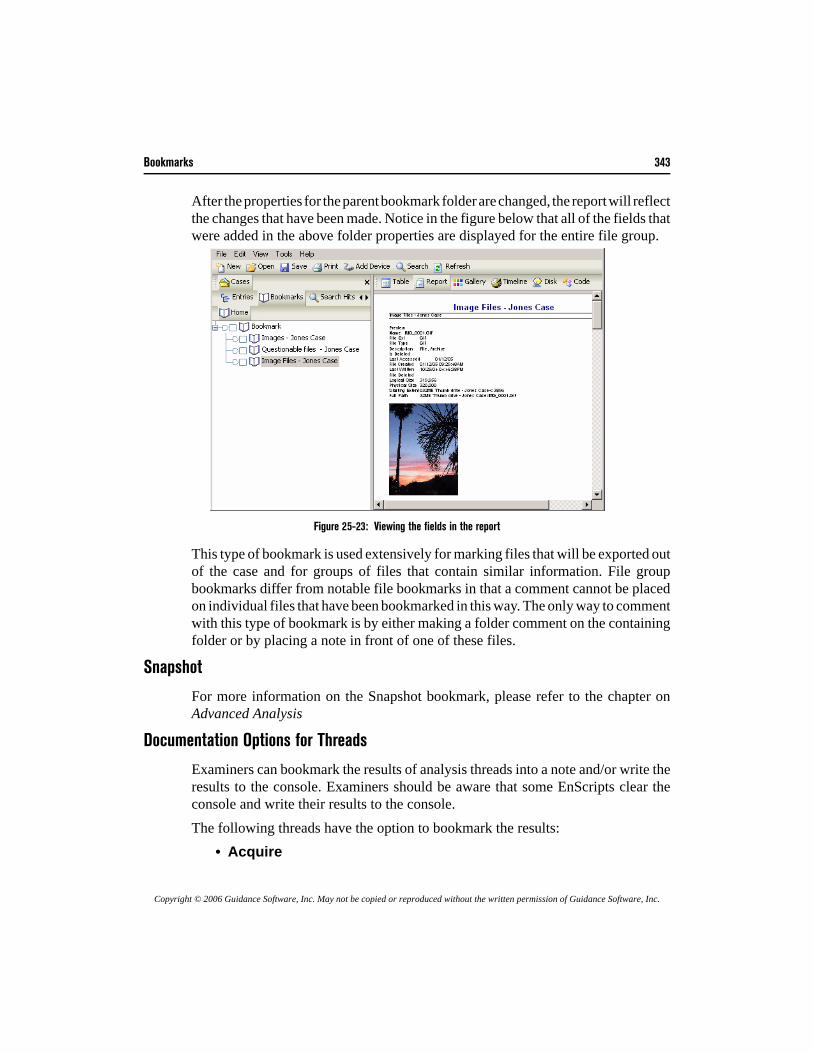
Bookmarks 343
Copyright © 2006 Guidance Software, Inc. May not be copied or reproduced without the written permission of Guidance Software, Inc.
After the properties for the parent bookmark folder are changed, the report will reflectthe changes that have been made. Notice in the figure below that all of the fields thatwere added in the above folder properties are displayed for the entire file group.
Figure 25-23: Viewing the fields in the report
This type of bookmark is used extensively for marking files that will be exported outof the case and for groups of files that contain similar information. File groupbookmarks differ from notable file bookmarks in that a comment cannot be placedon individual files that have been bookmarked in this way. The only way to commentwith this type of bookmark is by either making a folder comment on the containingfolder or by placing a note in front of one of these files.
Snapshot
For more information on the Snapshot bookmark, please refer to the chapter onAdvanced Analysis
Documentation Options for Threads
Examiners can bookmark the results of analysis threads into a note and/or write theresults to the console. Examiners should be aware that some EnScripts clear theconsole and write their results to the console.The following threads have the option to bookmark the results:
• Acquire
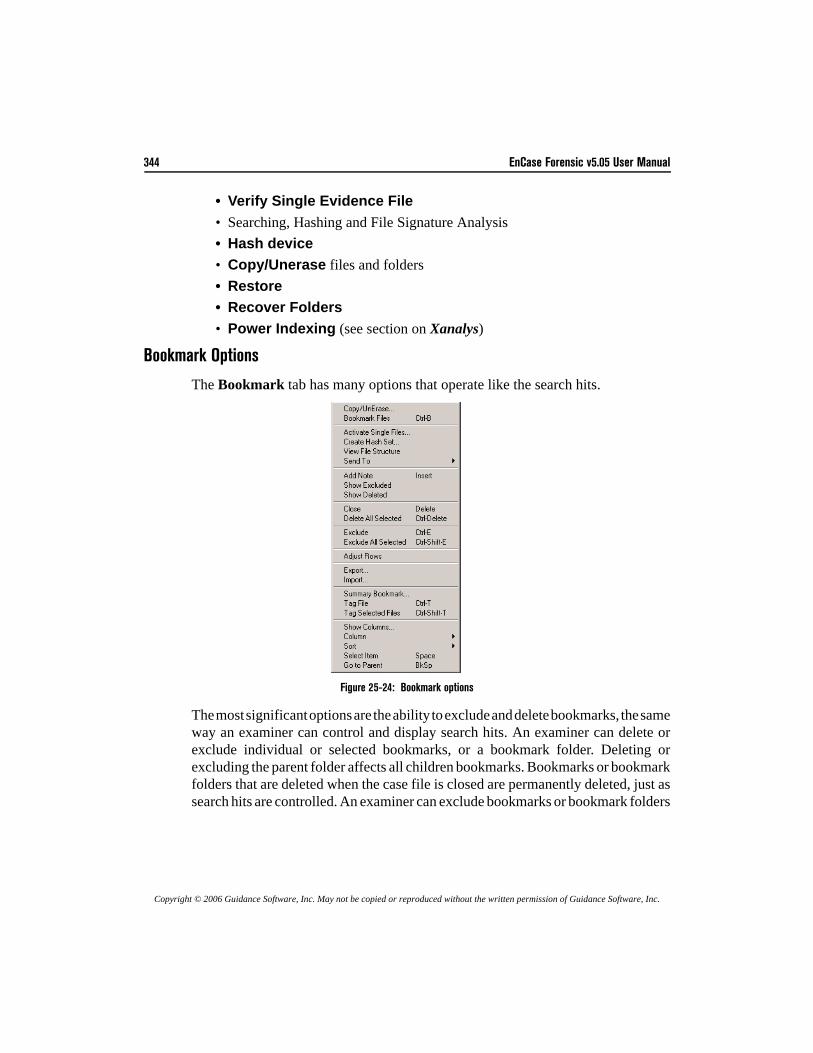
344 EnCase Forensic v5.05 User Manual
Copyright © 2006 Guidance Software, Inc. May not be copied or reproduced without the written permission of Guidance Software, Inc.
• Verify Single Evidence File• Searching, Hashing and File Signature Analysis• Hash device• Copy/Unerase files and folders• Restore• Recover Folders• Power Indexing (see section on Xanalys)
Bookmark Options
The Bookmark tab has many options that operate like the search hits.
Figure 25-24: Bookmark options
The most significant options are the ability to exclude and delete bookmarks, the sameway an examiner can control and display search hits. An examiner can delete orexclude individual or selected bookmarks, or a bookmark folder. Deleting orexcluding the parent folder affects all children bookmarks. Bookmarks or bookmarkfolders that are deleted when the case file is closed are permanently deleted, just assearch hits are controlled. An examiner can exclude bookmarks or bookmark folders
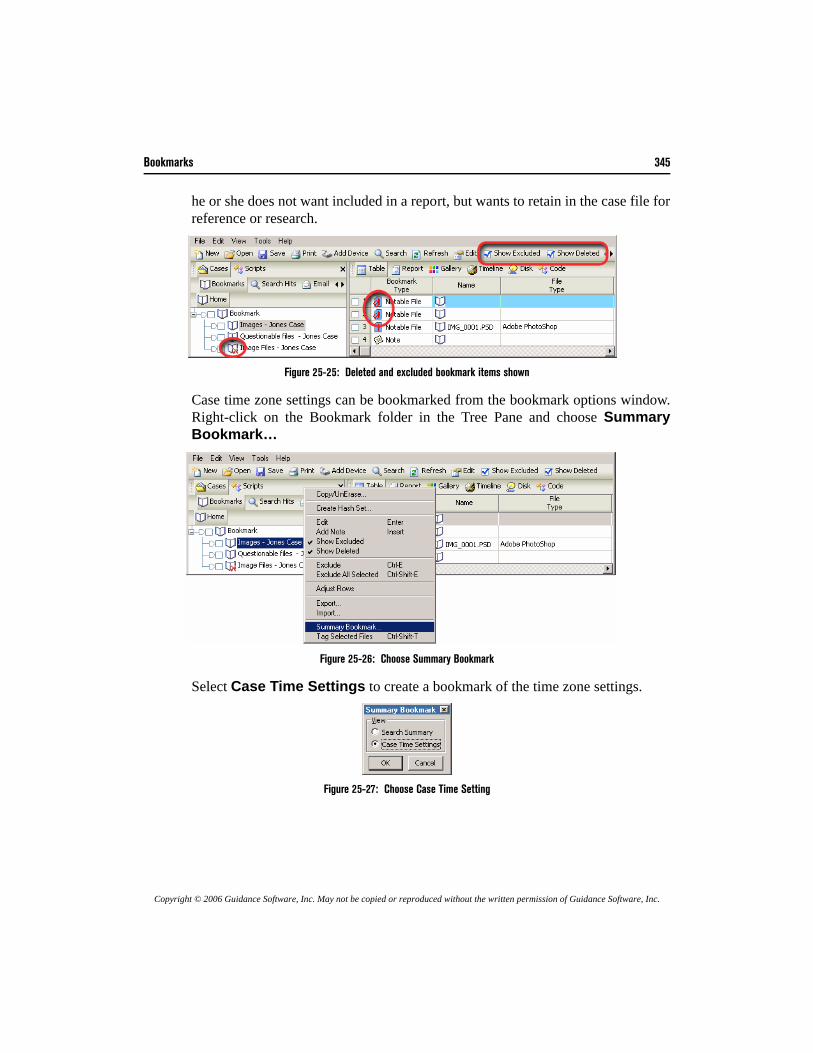
Bookmarks 345
Copyright © 2006 Guidance Software, Inc. May not be copied or reproduced without the written permission of Guidance Software, Inc.
he or she does not want included in a report, but wants to retain in the case file forreference or research.
Figure 25-25: Deleted and excluded bookmark items shown
Case time zone settings can be bookmarked from the bookmark options window.Right-click on the Bookmark folder in the Tree Pane and choose SummaryBookmark…
Figure 25-26: Choose Summary Bookmark
Select Case Time Settings to create a bookmark of the time zone settings.
Figure 25-27: Choose Case Time Setting
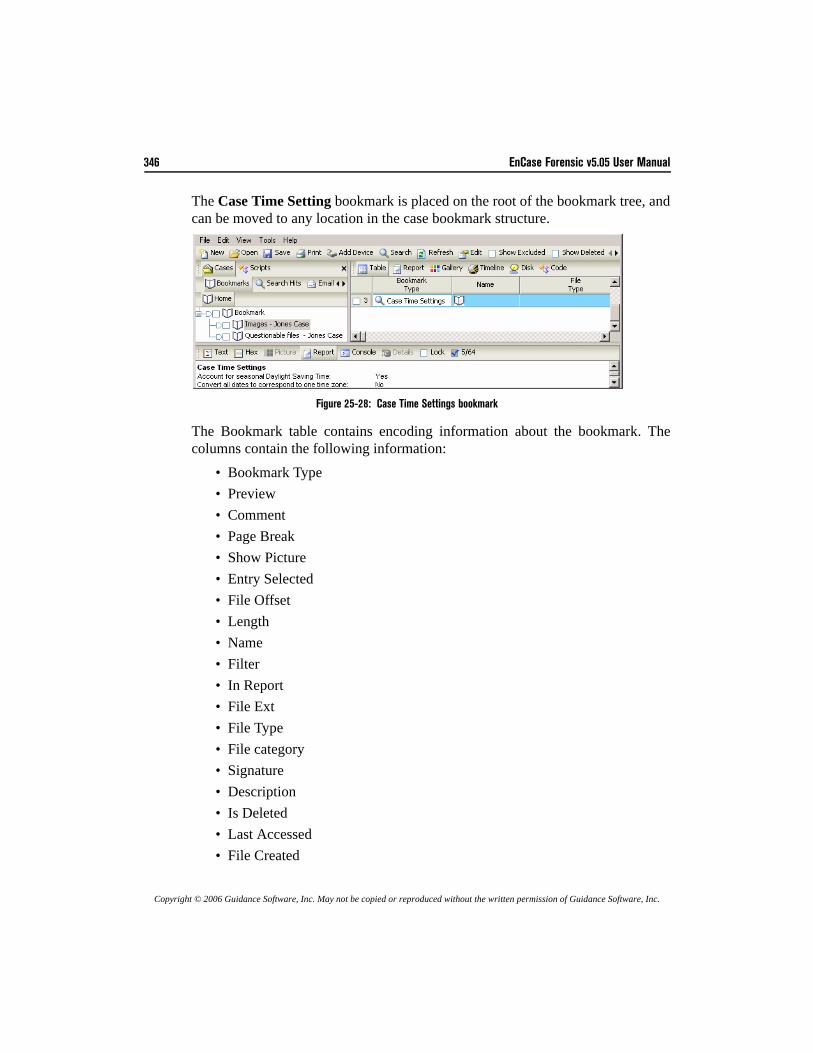
346 EnCase Forensic v5.05 User Manual
Copyright © 2006 Guidance Software, Inc. May not be copied or reproduced without the written permission of Guidance Software, Inc.
The Case Time Setting bookmark is placed on the root of the bookmark tree, andcan be moved to any location in the case bookmark structure.
Figure 25-28: Case Time Settings bookmark
The Bookmark table contains encoding information about the bookmark. Thecolumns contain the following information:
• Bookmark Type• Preview• Comment• Page Break• Show Picture• Entry Selected• File Offset• Length• Name• Filter• In Report• File Ext• File Type• File category• Signature• Description• Is Deleted• Last Accessed• File Created

Bookmarks 347
Copyright © 2006 Guidance Software, Inc. May not be copied or reproduced without the written permission of Guidance Software, Inc.
• Last Written• Entry Modified• File Deleted• File Acquired• Logical Size• Physical Size• Starting Extent• File Extents• Permissions• Bookmarks• Physical Location• Physical Sector• Evidence File• File Identifier• Hash Value• Hash Set• Hash Category• Full Path• Short Name• Unique name• Original Path• Symbolic Link• Bookmark Path• Bookmark Start• Bookmark Sector• Excluded• Hit Deleted• Notable
These items are described in the Table View Columns Explained section of theNavigating EnCase chapter.
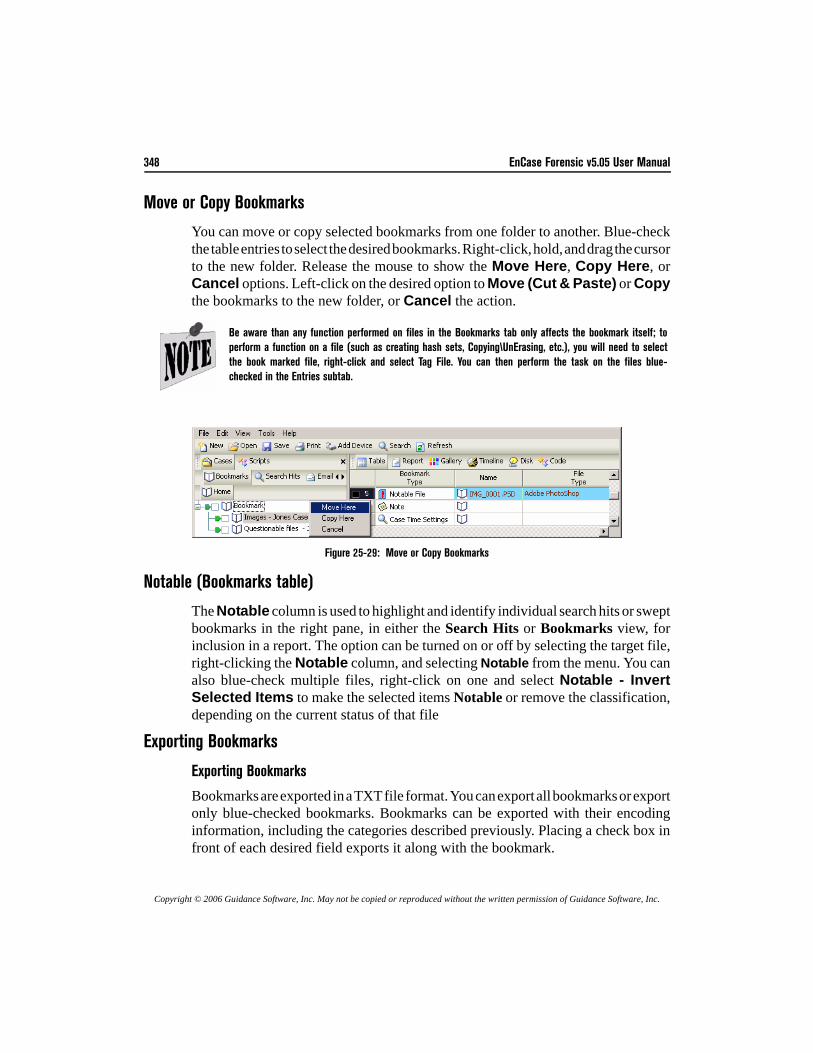
348 EnCase Forensic v5.05 User Manual
Copyright © 2006 Guidance Software, Inc. May not be copied or reproduced without the written permission of Guidance Software, Inc.
Move or Copy Bookmarks
You can move or copy selected bookmarks from one folder to another. Blue-checkthe table entries to select the desired bookmarks. Right-click, hold, and drag the cursorto the new folder. Release the mouse to show the Move Here, Copy Here, orCancel options. Left-click on the desired option to Move (Cut & Paste) or Copythe bookmarks to the new folder, or Cancel the action.
Figure 25-29: Move or Copy Bookmarks
Notable (Bookmarks table)
The Notable column is used to highlight and identify individual search hits or sweptbookmarks in the right pane, in either the Search Hits or Bookmarks view, forinclusion in a report. The option can be turned on or off by selecting the target file,right-clicking the Notable column, and selecting Notable from the menu. You canalso blue-check multiple files, right-click on one and select Notable - InvertSelected Items to make the selected items Notable or remove the classification,depending on the current status of that file
Exporting Bookmarks
Exporting Bookmarks
Bookmarks are exported in a TXT file format. You can export all bookmarks or exportonly blue-checked bookmarks. Bookmarks can be exported with their encodinginformation, including the categories described previously. Placing a check box infront of each desired field exports it along with the bookmark.
Be aware than any function performed on files in the Bookmarks tab only affects the bookmark itself; toperform a function on a file (such as creating hash sets, Copying\UnErasing, etc.), you will need to selectthe book marked file, right-click and select Tag File. You can then perform the task on the files blue-checked in the Entries subtab.
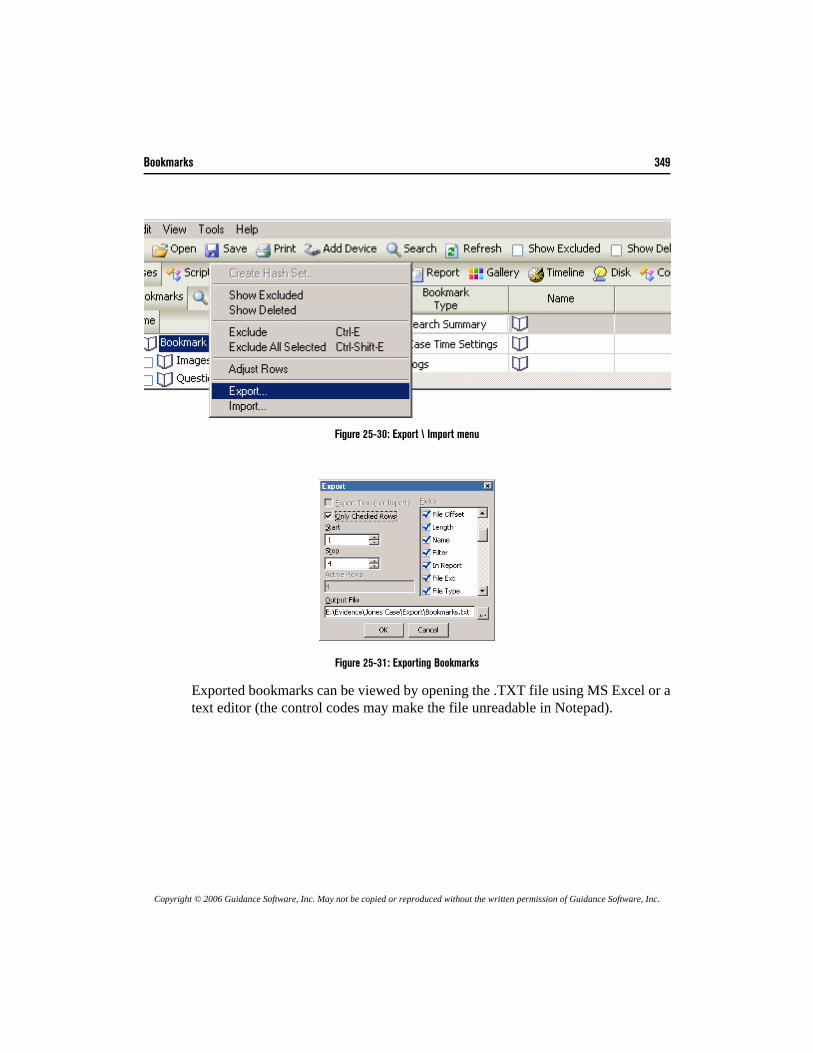
Bookmarks 349
Copyright © 2006 Guidance Software, Inc. May not be copied or reproduced without the written permission of Guidance Software, Inc.
Figure 25-30: Export \ Import menu
Figure 25-31: Exporting Bookmarks
Exported bookmarks can be viewed by opening the .TXT file using MS Excel or atext editor (the control codes may make the file unreadable in Notepad).
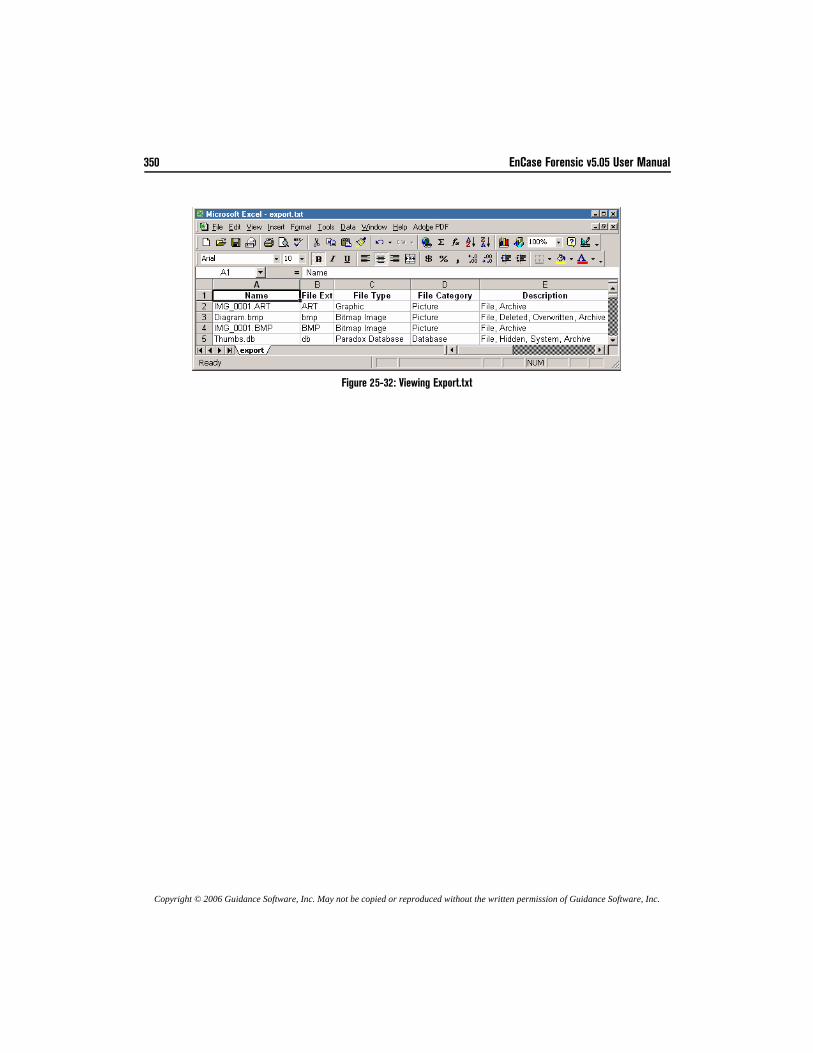
350 EnCase Forensic v5.05 User Manual
Copyright © 2006 Guidance Software, Inc. May not be copied or reproduced without the written permission of Guidance Software, Inc.
Figure 25-32: Viewing Export.txt
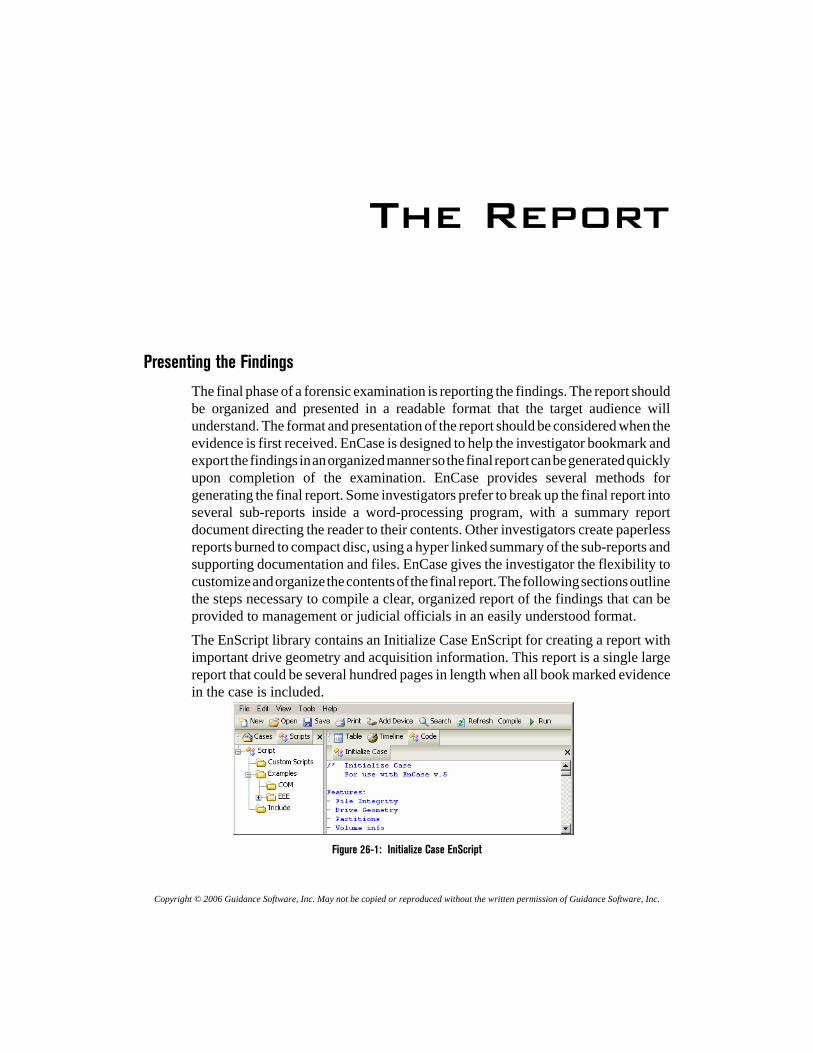
Copyright © 2006 Guidance Software, Inc. May not be copied or reproduced without the written permission of Guidance Software, Inc.
The Report
Presenting the Findings
The final phase of a forensic examination is reporting the findings. The report shouldbe organized and presented in a readable format that the target audience willunderstand. The format and presentation of the report should be considered when theevidence is first received. EnCase is designed to help the investigator bookmark andexport the findings in an organized manner so the final report can be generated quicklyupon completion of the examination. EnCase provides several methods forgenerating the final report. Some investigators prefer to break up the final report intoseveral sub-reports inside a word-processing program, with a summary reportdocument directing the reader to their contents. Other investigators create paperlessreports burned to compact disc, using a hyper linked summary of the sub-reports andsupporting documentation and files. EnCase gives the investigator the flexibility tocustomize and organize the contents of the final report. The following sections outlinethe steps necessary to compile a clear, organized report of the findings that can beprovided to management or judicial officials in an easily understood format.The EnScript library contains an Initialize Case EnScript for creating a report withimportant drive geometry and acquisition information. This report is a single largereport that could be several hundred pages in length when all book marked evidencein the case is included.
Figure 26-1: Initialize Case EnScript
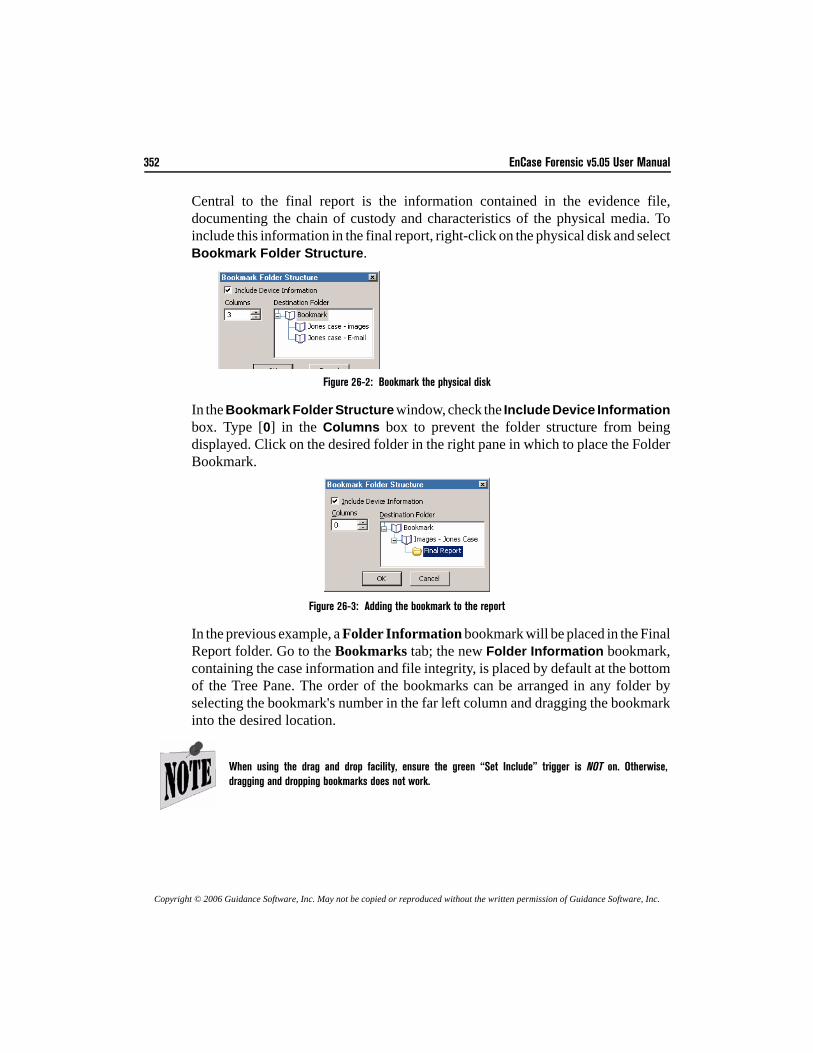
352 EnCase Forensic v5.05 User Manual
Copyright © 2006 Guidance Software, Inc. May not be copied or reproduced without the written permission of Guidance Software, Inc.
Central to the final report is the information contained in the evidence file,documenting the chain of custody and characteristics of the physical media. Toinclude this information in the final report, right-click on the physical disk and selectBookmark Folder Structure.
Figure 26-2: Bookmark the physical disk
In the Bookmark Folder Structure window, check the Include Device Informationbox. Type [0] in the Columns box to prevent the folder structure from beingdisplayed. Click on the desired folder in the right pane in which to place the FolderBookmark.
Figure 26-3: Adding the bookmark to the report
In the previous example, a Folder Information bookmark will be placed in the FinalReport folder. Go to the Bookmarks tab; the new Folder Information bookmark,containing the case information and file integrity, is placed by default at the bottomof the Tree Pane. The order of the bookmarks can be arranged in any folder byselecting the bookmark's number in the far left column and dragging the bookmarkinto the desired location.
When using the drag and drop facility, ensure the green “Set Include” trigger is NOT on. Otherwise,dragging and dropping bookmarks does not work.
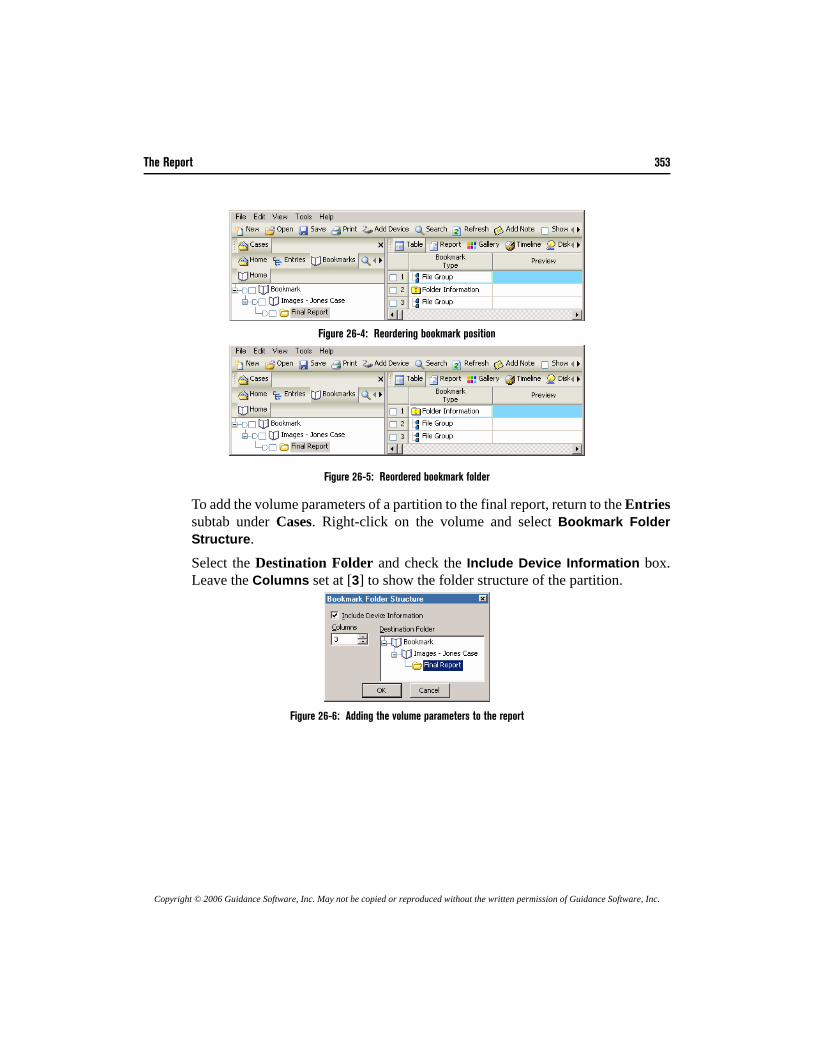
The Report 353
Copyright © 2006 Guidance Software, Inc. May not be copied or reproduced without the written permission of Guidance Software, Inc.
Figure 26-4: Reordering bookmark position
Figure 26-5: Reordered bookmark folder
To add the volume parameters of a partition to the final report, return to the Entriessubtab under Cases. Right-click on the volume and select Bookmark FolderStructure.Select the Destination Folder and check the Include Device Information box.Leave the Columns set at [3] to show the folder structure of the partition.
Figure 26-6: Adding the volume parameters to the report
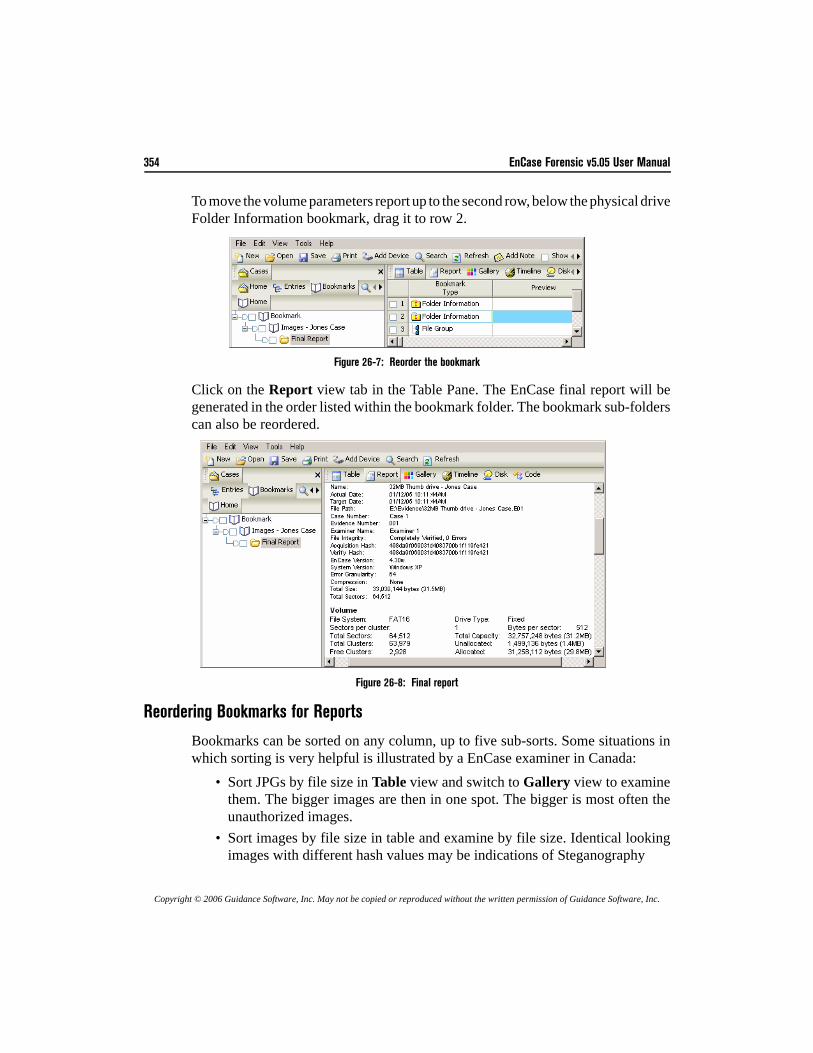
354 EnCase Forensic v5.05 User Manual
Copyright © 2006 Guidance Software, Inc. May not be copied or reproduced without the written permission of Guidance Software, Inc.
To move the volume parameters report up to the second row, below the physical driveFolder Information bookmark, drag it to row 2.
Figure 26-7: Reorder the bookmark
Click on the Report view tab in the Table Pane. The EnCase final report will begenerated in the order listed within the bookmark folder. The bookmark sub-folderscan also be reordered.
Figure 26-8: Final report
Reordering Bookmarks for Reports
Bookmarks can be sorted on any column, up to five sub-sorts. Some situations inwhich sorting is very helpful is illustrated by a EnCase examiner in Canada:
• Sort JPGs by file size in Table view and switch to Gallery view to examinethem. The bigger images are then in one spot. The bigger is most often theunauthorized images.
• Sort images by file size in table and examine by file size. Identical lookingimages with different hash values may be indications of Steganography
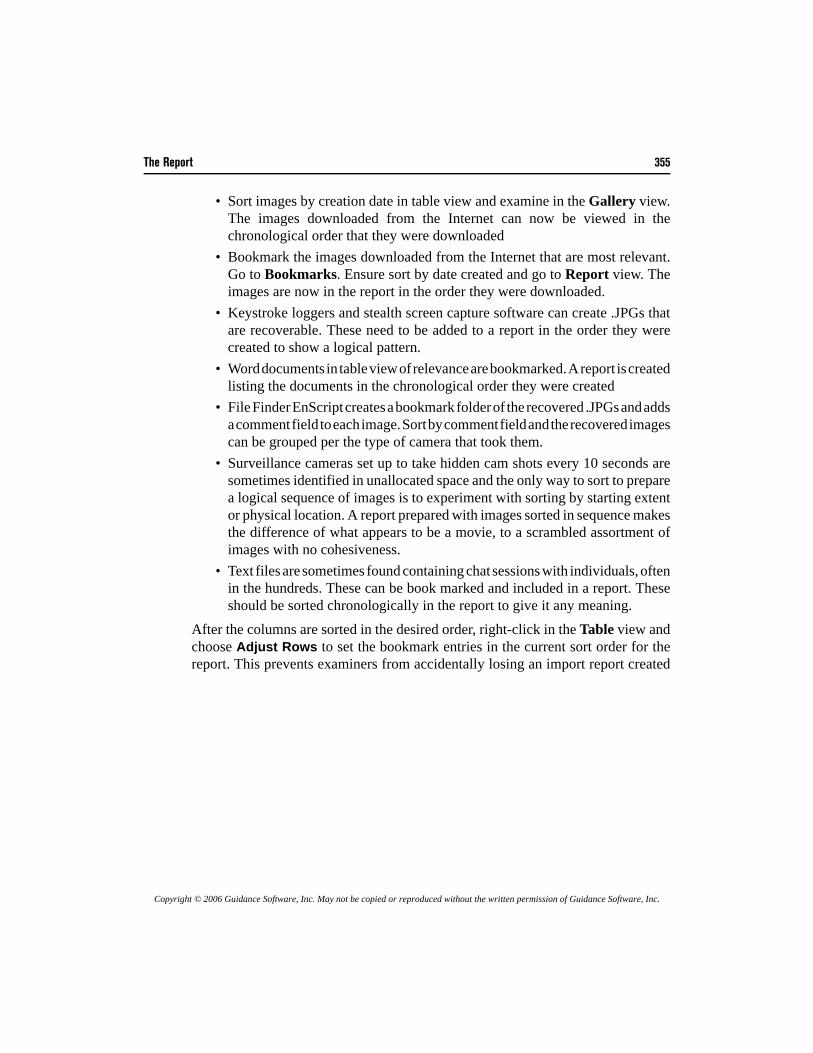
The Report 355
Copyright © 2006 Guidance Software, Inc. May not be copied or reproduced without the written permission of Guidance Software, Inc.
• Sort images by creation date in table view and examine in the Gallery view.The images downloaded from the Internet can now be viewed in thechronological order that they were downloaded
• Bookmark the images downloaded from the Internet that are most relevant.Go to Bookmarks. Ensure sort by date created and go to Report view. Theimages are now in the report in the order they were downloaded.
• Keystroke loggers and stealth screen capture software can create .JPGs thatare recoverable. These need to be added to a report in the order they werecreated to show a logical pattern.
• Word documents in table view of relevance are bookmarked. A report is createdlisting the documents in the chronological order they were created
• File Finder EnScript creates a bookmark folder of the recovered .JPGs and addsa comment field to each image. Sort by comment field and the recovered imagescan be grouped per the type of camera that took them.
• Surveillance cameras set up to take hidden cam shots every 10 seconds aresometimes identified in unallocated space and the only way to sort to preparea logical sequence of images is to experiment with sorting by starting extentor physical location. A report prepared with images sorted in sequence makesthe difference of what appears to be a movie, to a scrambled assortment ofimages with no cohesiveness.
• Text files are sometimes found containing chat sessions with individuals, oftenin the hundreds. These can be book marked and included in a report. Theseshould be sorted chronologically in the report to give it any meaning.
After the columns are sorted in the desired order, right-click in the Table view andchoose Adjust Rows to set the bookmark entries in the current sort order for thereport. This prevents examiners from accidentally losing an import report created
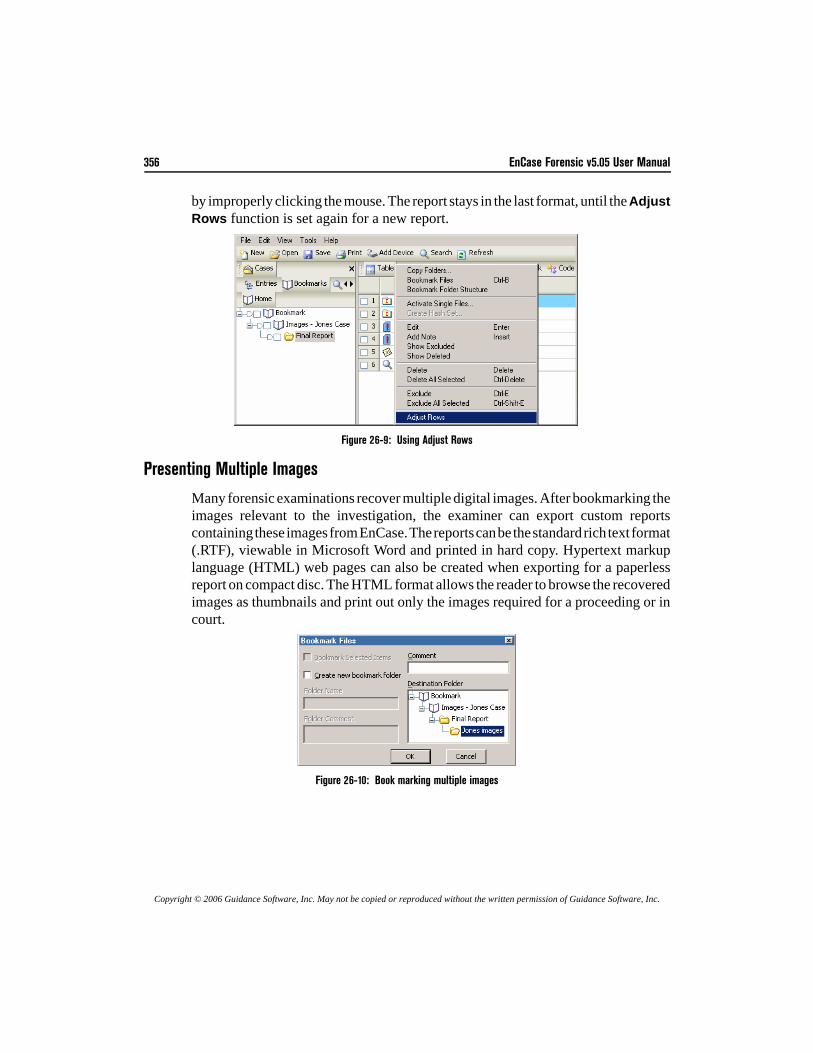
356 EnCase Forensic v5.05 User Manual
Copyright © 2006 Guidance Software, Inc. May not be copied or reproduced without the written permission of Guidance Software, Inc.
by improperly clicking the mouse. The report stays in the last format, until the AdjustRows function is set again for a new report.
Figure 26-9: Using Adjust Rows
Presenting Multiple Images
Many forensic examinations recover multiple digital images. After bookmarking theimages relevant to the investigation, the examiner can export custom reportscontaining these images from EnCase. The reports can be the standard rich text format(.RTF), viewable in Microsoft Word and printed in hard copy. Hypertext markuplanguage (HTML) web pages can also be created when exporting for a paperlessreport on compact disc. The HTML format allows the reader to browse the recoveredimages as thumbnails and print out only the images required for a proceeding or incourt.
Figure 26-10: Book marking multiple images
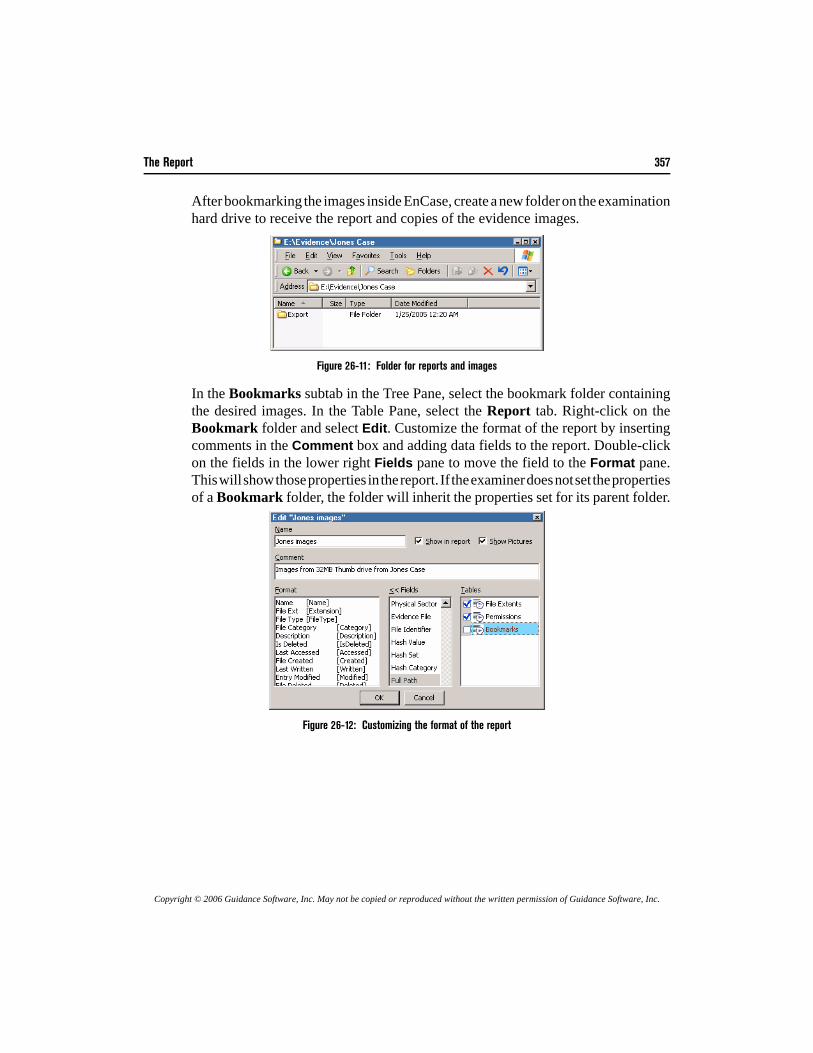
The Report 357
Copyright © 2006 Guidance Software, Inc. May not be copied or reproduced without the written permission of Guidance Software, Inc.
After bookmarking the images inside EnCase, create a new folder on the examinationhard drive to receive the report and copies of the evidence images.
Figure 26-11: Folder for reports and images
In the Bookmarks subtab in the Tree Pane, select the bookmark folder containingthe desired images. In the Table Pane, select the Report tab. Right-click on theBookmark folder and select Edit. Customize the format of the report by insertingcomments in the Comment box and adding data fields to the report. Double-clickon the fields in the lower right Fields pane to move the field to the Format pane.This will show those properties in the report. If the examiner does not set the propertiesof a Bookmark folder, the folder will inherit the properties set for its parent folder.
Figure 26-12: Customizing the format of the report
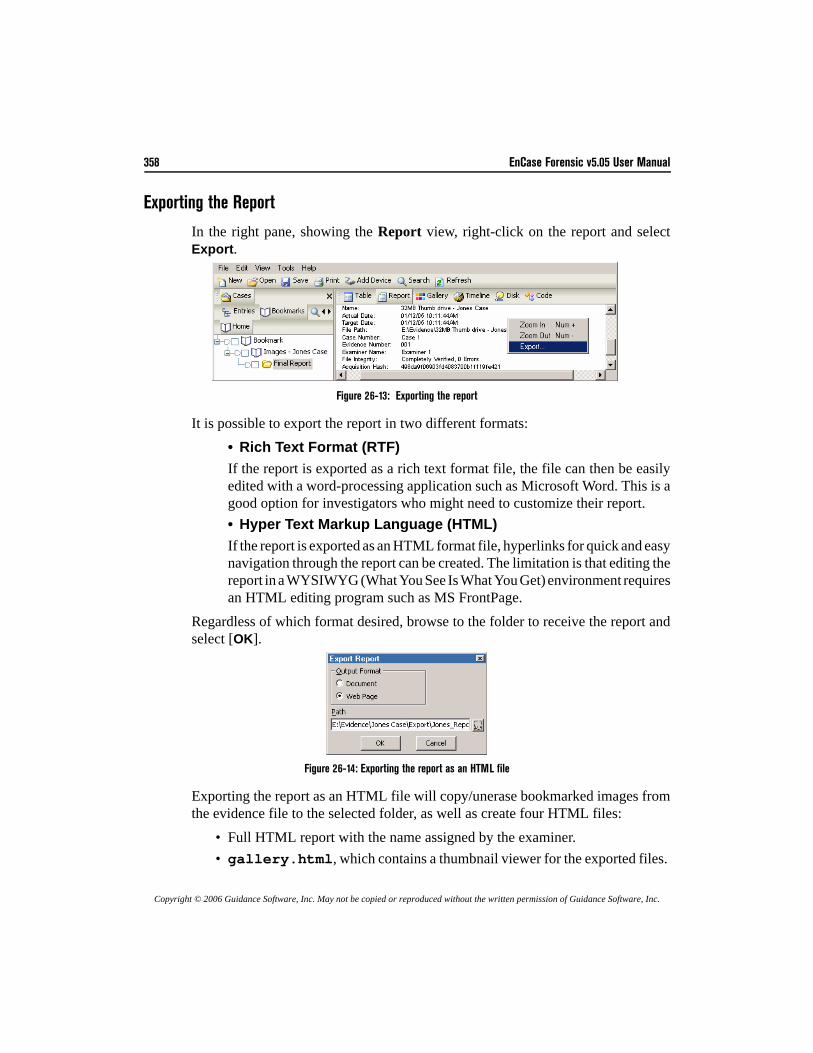
358 EnCase Forensic v5.05 User Manual
Copyright © 2006 Guidance Software, Inc. May not be copied or reproduced without the written permission of Guidance Software, Inc.
Exporting the Report
In the right pane, showing the Report view, right-click on the report and selectExport.
Figure 26-13: Exporting the report
It is possible to export the report in two different formats:• Rich Text Format (RTF)If the report is exported as a rich text format file, the file can then be easilyedited with a word-processing application such as Microsoft Word. This is agood option for investigators who might need to customize their report.• Hyper Text Markup Language (HTML)If the report is exported as an HTML format file, hyperlinks for quick and easynavigation through the report can be created. The limitation is that editing thereport in a WYSIWYG (What You See Is What You Get) environment requiresan HTML editing program such as MS FrontPage.
Regardless of which format desired, browse to the folder to receive the report andselect [OK].
Figure 26-14: Exporting the report as an HTML file
Exporting the report as an HTML file will copy/unerase bookmarked images fromthe evidence file to the selected folder, as well as create four HTML files:
• Full HTML report with the name assigned by the examiner. • gallery.html, which contains a thumbnail viewer for the exported files.
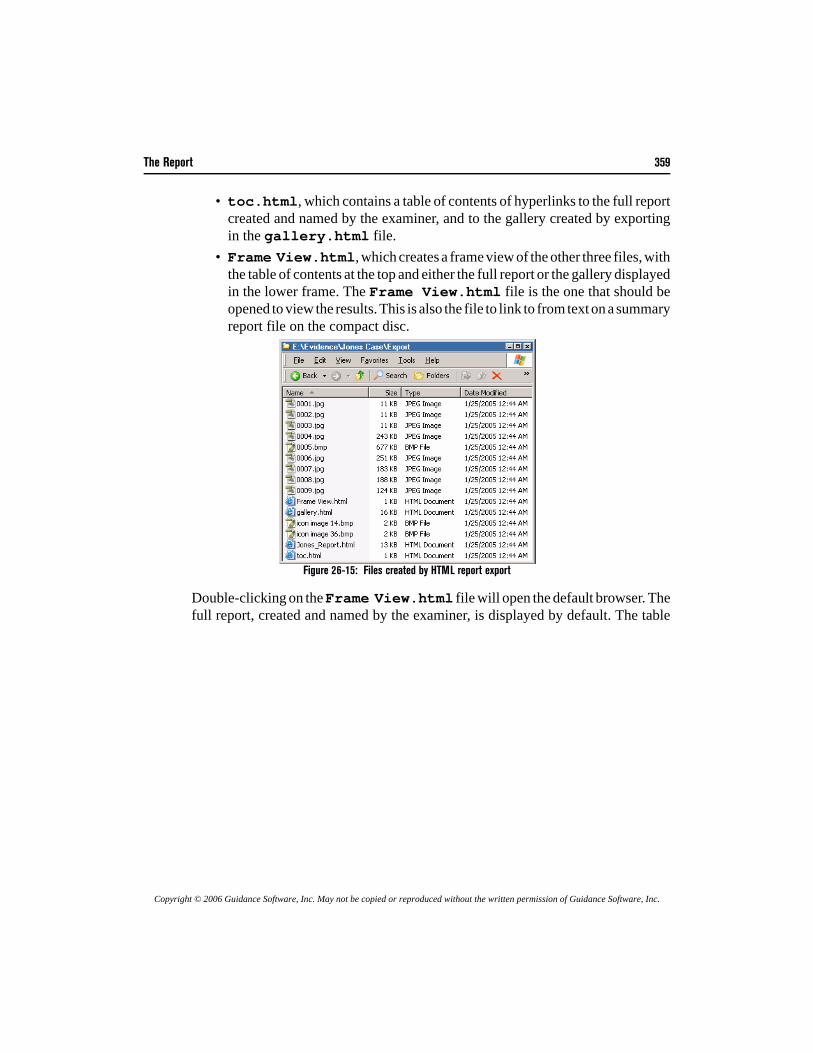
The Report 359
Copyright © 2006 Guidance Software, Inc. May not be copied or reproduced without the written permission of Guidance Software, Inc.
• toc.html, which contains a table of contents of hyperlinks to the full reportcreated and named by the examiner, and to the gallery created by exportingin the gallery.html file.
• Frame View.html, which creates a frame view of the other three files, withthe table of contents at the top and either the full report or the gallery displayedin the lower frame. The Frame View.html file is the one that should beopened to view the results. This is also the file to link to from text on a summaryreport file on the compact disc.
Figure 26-15: Files created by HTML report export
Double-clicking on the Frame View.html file will open the default browser. Thefull report, created and named by the examiner, is displayed by default. The table

360 EnCase Forensic v5.05 User Manual
Copyright © 2006 Guidance Software, Inc. May not be copied or reproduced without the written permission of Guidance Software, Inc.
of contents in the upper frame provides hyperlinks to browse to the Gallery viewand to return to the report.
Figure 26-16: HTML report, full view
Clicking on the Gallery hyperlink will open gallery.html in the lower pane,and display thumbnails of the images copied/unerased out of the EnCase evidencefile. The reader can use the Gallery to browse the exported files.
Figure 26-17: HTML report, gallery view
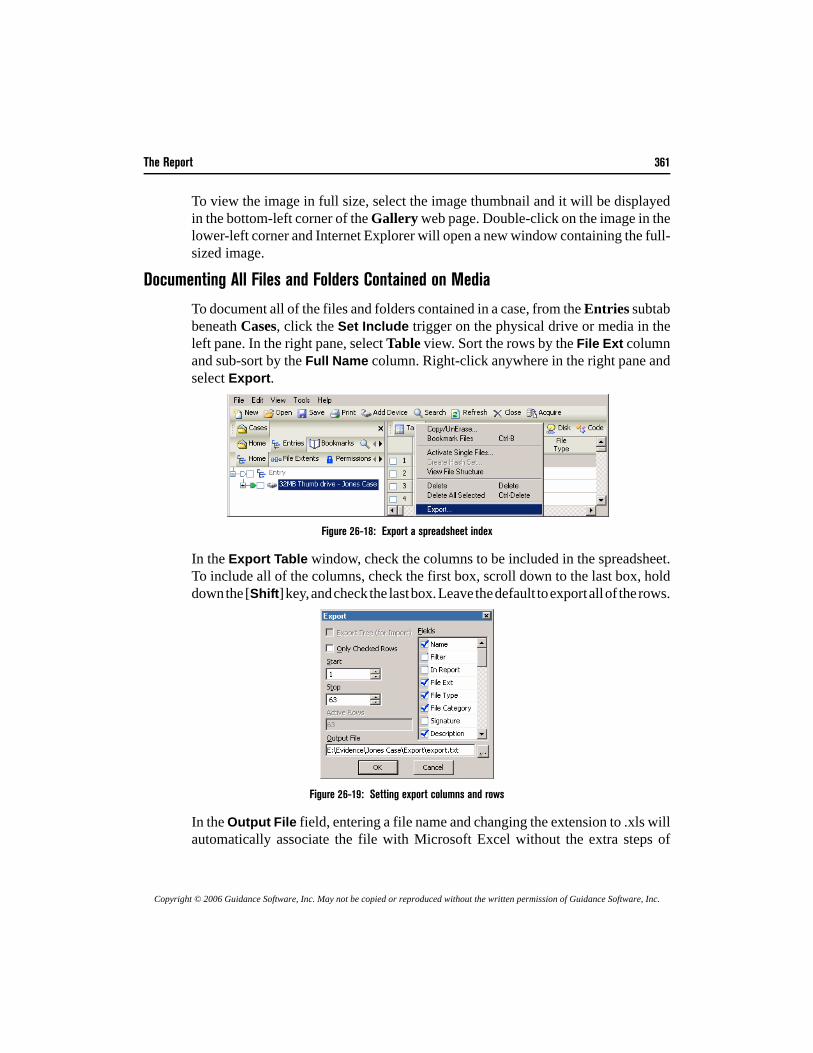
The Report 361
Copyright © 2006 Guidance Software, Inc. May not be copied or reproduced without the written permission of Guidance Software, Inc.
To view the image in full size, select the image thumbnail and it will be displayedin the bottom-left corner of the Gallery web page. Double-click on the image in thelower-left corner and Internet Explorer will open a new window containing the full-sized image.
Documenting All Files and Folders Contained on Media
To document all of the files and folders contained in a case, from the Entries subtabbeneath Cases, click the Set Include trigger on the physical drive or media in theleft pane. In the right pane, select Table view. Sort the rows by the File Ext columnand sub-sort by the Full Name column. Right-click anywhere in the right pane andselect Export.
Figure 26-18: Export a spreadsheet index
In the Export Table window, check the columns to be included in the spreadsheet.To include all of the columns, check the first box, scroll down to the last box, holddown the [Shift] key, and check the last box. Leave the default to export all of the rows.
Figure 26-19: Setting export columns and rows
In the Output File field, entering a file name and changing the extension to .xls willautomatically associate the file with Microsoft Excel without the extra steps of
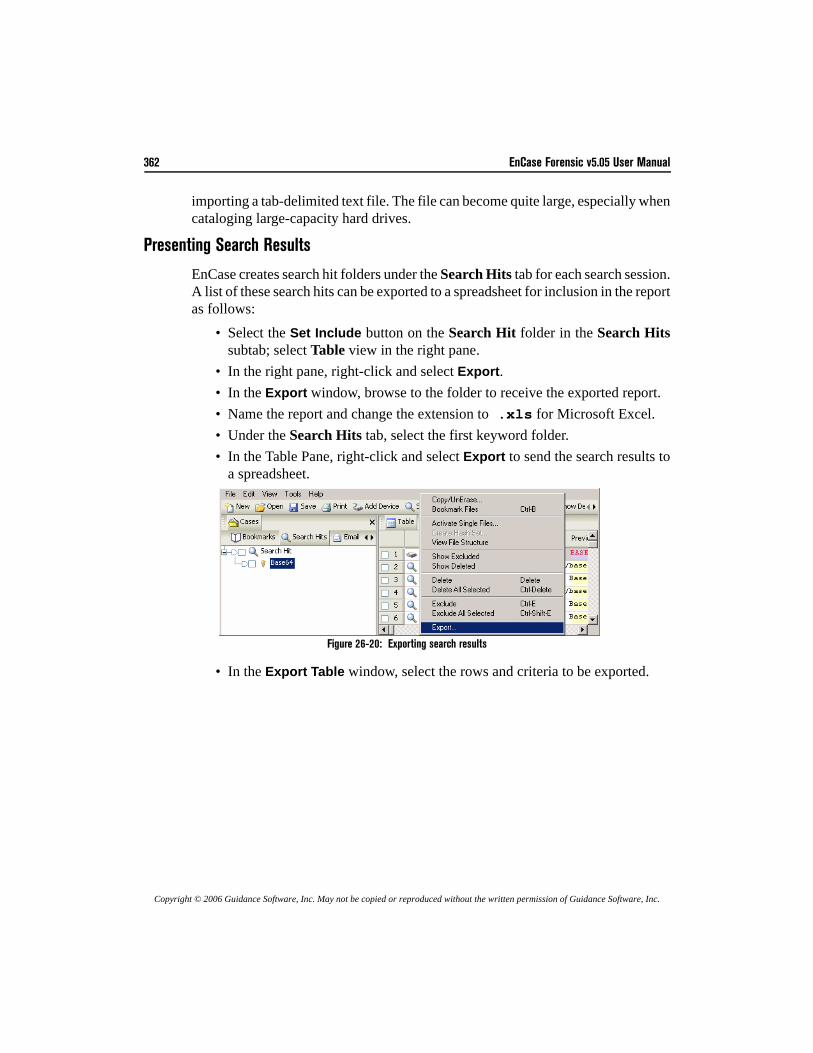
362 EnCase Forensic v5.05 User Manual
Copyright © 2006 Guidance Software, Inc. May not be copied or reproduced without the written permission of Guidance Software, Inc.
importing a tab-delimited text file. The file can become quite large, especially whencataloging large-capacity hard drives.
Presenting Search Results
EnCase creates search hit folders under the Search Hits tab for each search session.A list of these search hits can be exported to a spreadsheet for inclusion in the reportas follows:
• Select the Set Include button on the Search Hit folder in the Search Hitssubtab; select Table view in the right pane.
• In the right pane, right-click and select Export.• In the Export window, browse to the folder to receive the exported report.• Name the report and change the extension to .xls for Microsoft Excel.• Under the Search Hits tab, select the first keyword folder.• In the Table Pane, right-click and select Export to send the search results to
a spreadsheet.
Figure 26-20: Exporting search results
• In the Export Table window, select the rows and criteria to be exported.
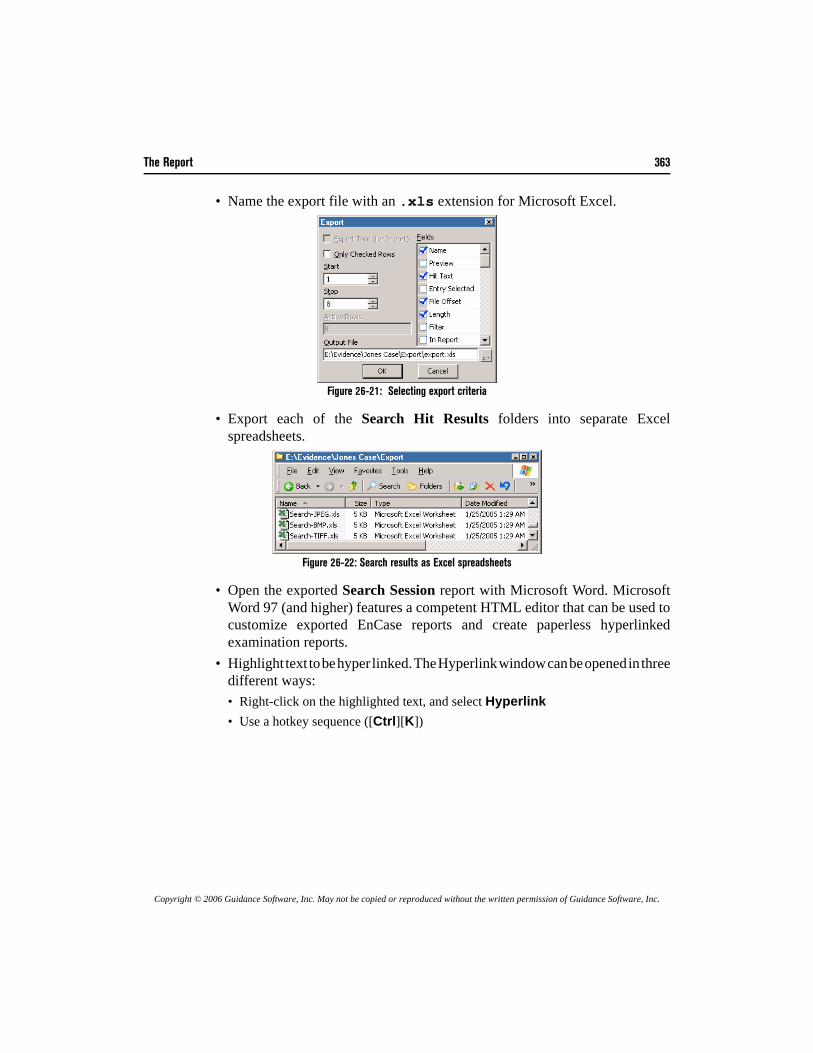
The Report 363
Copyright © 2006 Guidance Software, Inc. May not be copied or reproduced without the written permission of Guidance Software, Inc.
• Name the export file with an .xls extension for Microsoft Excel.
Figure 26-21: Selecting export criteria
• Export each of the Search Hit Results folders into separate Excelspreadsheets.
Figure 26-22: Search results as Excel spreadsheets
• Open the exported Search Session report with Microsoft Word. MicrosoftWord 97 (and higher) features a competent HTML editor that can be used tocustomize exported EnCase reports and create paperless hyperlinkedexamination reports.
• Highlight text to be hyper linked. The Hyperlink window can be opened in threedifferent ways:• Right-click on the highlighted text, and select Hyperlink• Use a hotkey sequence ([Ctrl][K])
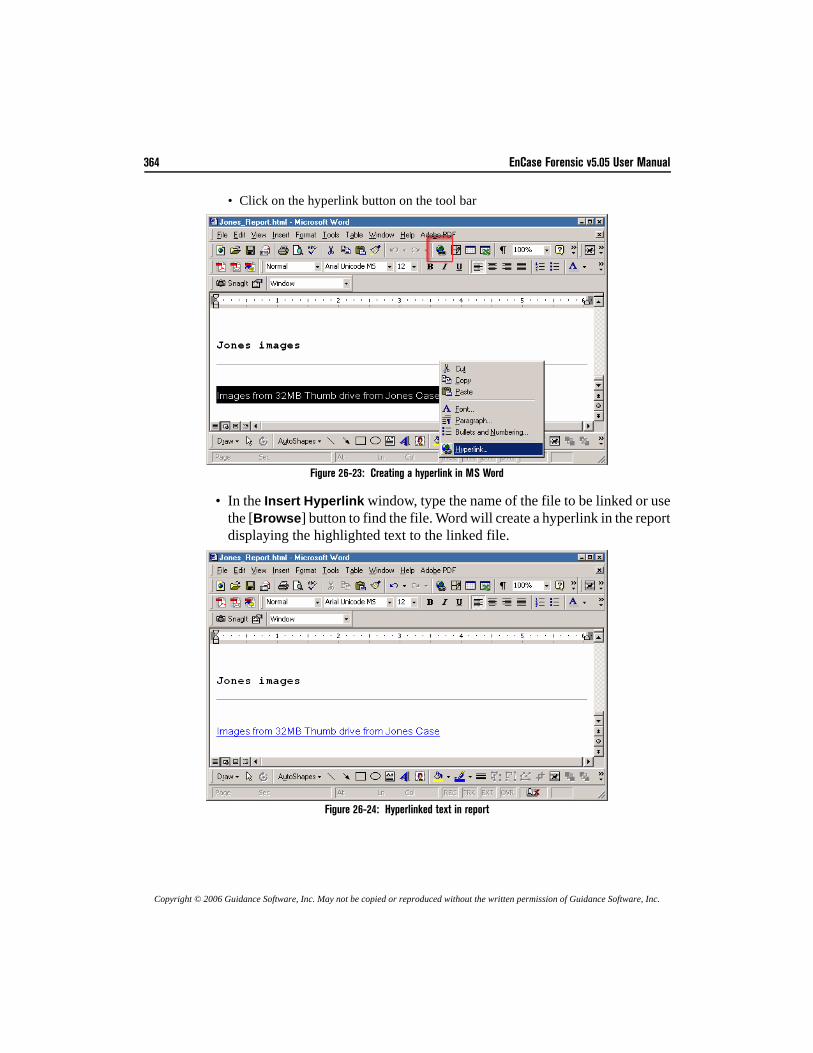
364 EnCase Forensic v5.05 User Manual
Copyright © 2006 Guidance Software, Inc. May not be copied or reproduced without the written permission of Guidance Software, Inc.
• Click on the hyperlink button on the tool bar
Figure 26-23: Creating a hyperlink in MS Word
• In the Insert Hyperlink window, type the name of the file to be linked or usethe [Browse] button to find the file. Word will create a hyperlink in the reportdisplaying the highlighted text to the linked file.
Figure 26-24: Hyperlinked text in report
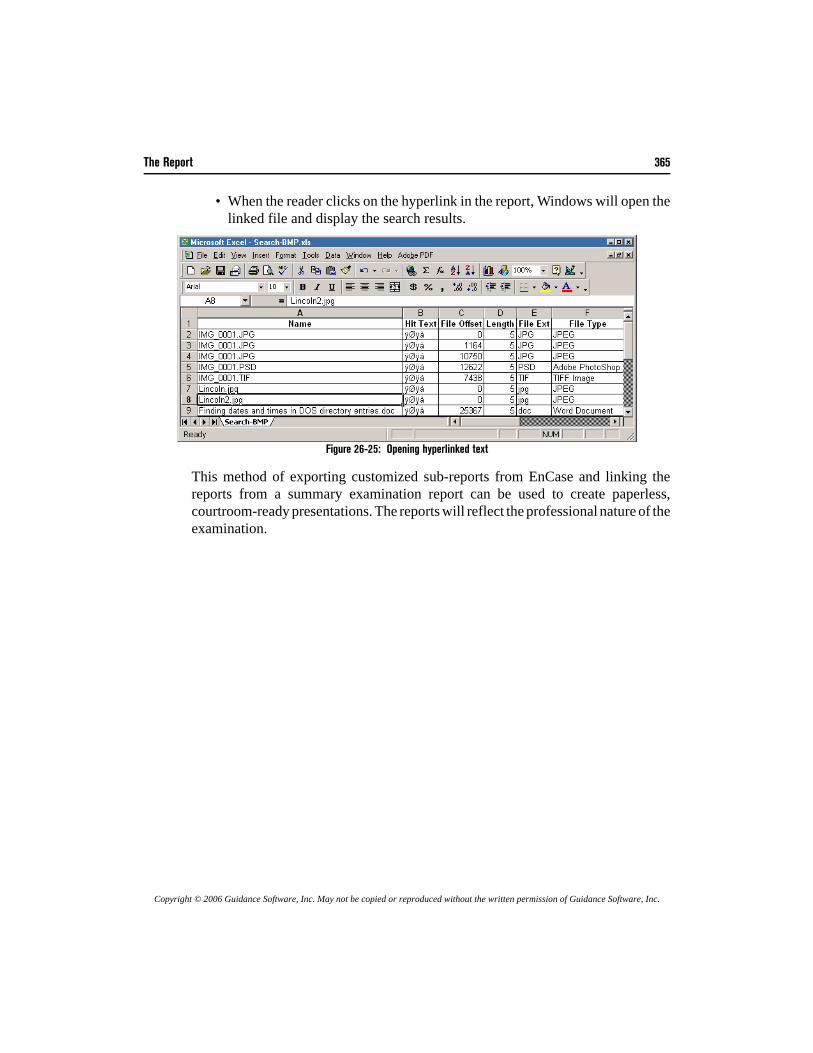
The Report 365
Copyright © 2006 Guidance Software, Inc. May not be copied or reproduced without the written permission of Guidance Software, Inc.
• When the reader clicks on the hyperlink in the report, Windows will open thelinked file and display the search results.
Figure 26-25: Opening hyperlinked text
This method of exporting customized sub-reports from EnCase and linking thereports from a summary examination report can be used to create paperless,courtroom-ready presentations. The reports will reflect the professional nature of theexamination.

366 EnCase Forensic v5.05 User Manual
Copyright © 2006 Guidance Software, Inc. May not be copied or reproduced without the written permission of Guidance Software, Inc.
Copyright © 2006 Guidance Software, Inc. May not be copied or reproduced without the written permission of Guidance Software, Inc.
Appendix A
Forensic TerminologyComputer forensics, like most technical fields, has its share of jargon. Many of theterms in this guide have a precise meaning and should be understood thoroughlybefore attempting to use EnCase.
PC Hardware
• Storage Computer/MediaThe Storage computer is the EnCase investigator's computer. The term Storagewill loosely refer to either the examiner's hard drive or the examiner's computer. • Subject Computer/MediaThe Subject is the computer or media that is being examined. In the past thishas been referred to as the Target or Source. However, those terms are vagueand open to interpretation. Subject is the term that will be used from now on. • RAMRandom Access Memory. Each computer has a certain amount of volatile read/write memory locations whose contents are lost when the power is turned off.The operating system, programs and drivers are all loaded into RAM at thesame time.• ROMRead Only Memory. Chips that contain a permanent program that is “burnedin” at the factory and maintained when the power to the computer is turnedoff. As its name implies, the information on the chips can only be read and notwritten to (i.e. your computer cannot store information in these chips). Theyusually contain small programs and data that are needed to boot the computer.
368 EnCase Forensic v5.05 User Manual
Copyright © 2006 Guidance Software, Inc. May not be copied or reproduced without the written permission of Guidance Software, Inc.
• BIOSThe Basic Input Output System of a PC. This is usually a number of machinecode routines that are stored in ROM and available for execution at boot time.The “boot strap loader” is contained in ROM and is the first code to executewhen the computer is turned on. The BIOS contains commands for readingthe physical disks sector by sector.
Hard Drive Anatomy
• Drive GeometryA physical drive is usually composed of any number of rapidly rotating platterswith a set of read/write heads for each side of each platter. Each platter is dividedinto a series of concentric rings called tracks. Each track is further divided intosectors. Each sector is then divided into bytes. The number and position of thesestructures is referred to as the drive geometry.• CylinderA cylinder, like a track, is a logical term and does not refer to a physical pieceof hardware. In other words, you can't open a disk drive cover and see the“cylinders”. A cylinder refers to the set of tracks on every side of every platterthat are at the same head position, as if an actual cylindrical cross-section hadbeen taken out of the whole drive. If a drive contains 4 heads, a cylinder refersto all the information that is available to all the heads while on a single track.• HeadThere is one head for every side of every platter in a hard disk drive. They ridevery close to the surface of the platter and allow information to be read fromand written to the platter. The heads are attached to an arm, which is in turnattached to a head stack assembly. Normally, all heads move together and arepositioned on the same logical track together. Heads are numbered sequentiallyfrom zero.• SectorA sector is a group of bytes within a track and is the smallest group of bytesthat can be addressed on a drive. There are normally tens or hundreds of sectorswithin each track. The number of bytes in a sector can vary, but it is almostalways 512. CD ROMs normally have 2048 bytes per sector (this does notinclude the hundreds of bytes per sector for error checking and correction).Sectors are numbered sequentially within a track, starting at 1. The numberingrestarts on every track, so that “track 0, sector 1" and “track 5, sector 1" referto different sectors.
Appendix A 369
Copyright © 2006 Guidance Software, Inc. May not be copied or reproduced without the written permission of Guidance Software, Inc.
• TrackEach platter on a disk is divided into thin concentric bands called Tracks. Thereis no physical structure associated with a track. Tracks are established whenthe disk is low level formatted. Tracks are numbered sequentially starting withtrack 0 on the outermost part of the platter, moving inwards.• Absolute SectorsEarly disk drives contained a number of cylinders, heads and sectors and thesenumbers would refer to actual hardware present in the drive. The BIOS wouldaddress the disk controller directly and translate absolute sector numbers intoC-H-S before writing to or reading from the disk. As disk capacities increasedto unforeseen sizes, manufacturers and software developers were forced tochange the stated number of cylinders, heads and sectors in order to trick theBIOS into addressing the additional space.Today, the Cylinder, Head and Sector numbers are usually fictional and do notrefer to actual disk structures or hardware. These numbers are first translatedby the BIOS, and then translated by the low-level disk device driver, and thenagain by the drive hardware, into numbers that make sense for the actual media.You can run yourself ragged trying to figure out exactly where on the physicaldevice the data is stored, and it rarely makes any difference.Fortunately, there is always a well-defined order in which the sectors areaddressed. They are numbered sequentially from 0 to N-1, N being the totalnumber of software addressable sectors present on the drive.Some disk utilities will report Cylinder-Head-Sector numbers, but the newBIOS extensions have made this convention obsolete. Also, as a practicalmatter, it is easier to refer to a sector by one number, rather than three.EnCase follows the new convention and refers to sectors as if the entire drivewere a large flat array of sectors, starting at sector 0. When viewing a locationon a physical disk, EnCase will show the CHS numbers for compatibility withother disk utilities.• PlatterA platter is a magnetized disk that the actual data of the hard drive is storedon. Modern hard drives typically have two platters, with heads reading andwriting data to the platters simultaneously.
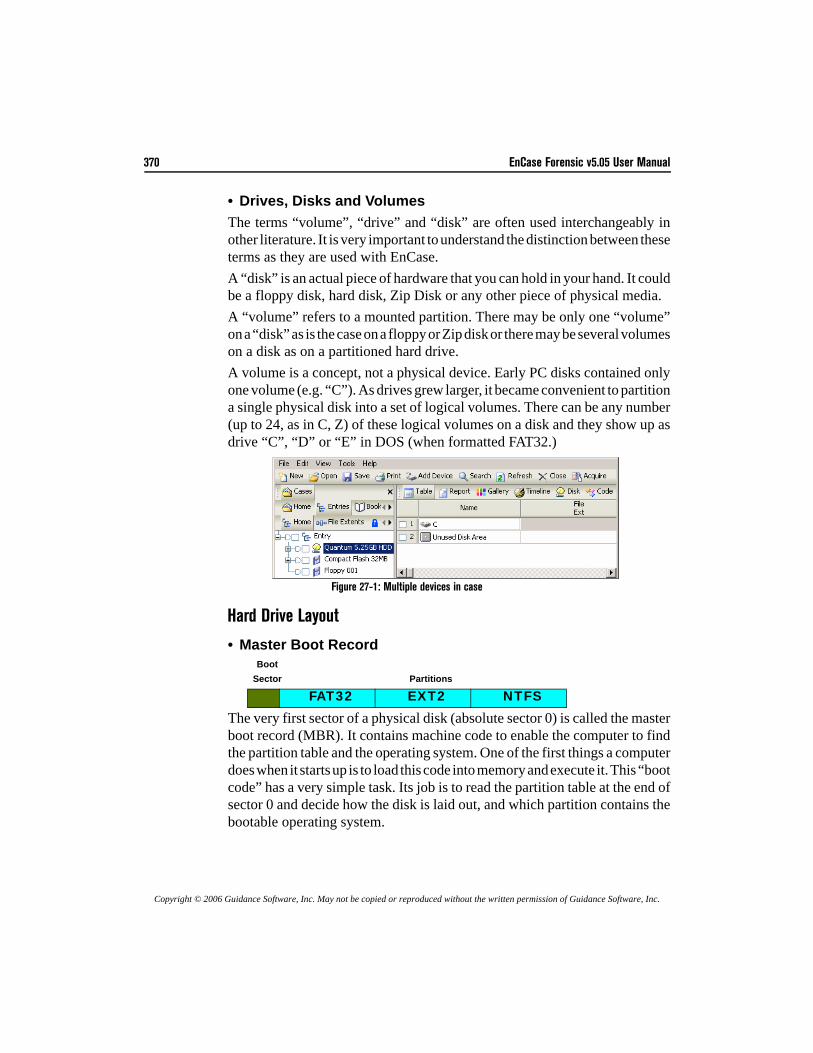
370 EnCase Forensic v5.05 User Manual
Copyright © 2006 Guidance Software, Inc. May not be copied or reproduced without the written permission of Guidance Software, Inc.
• Drives, Disks and VolumesThe terms “volume”, “drive” and “disk” are often used interchangeably inother literature. It is very important to understand the distinction between theseterms as they are used with EnCase.A “disk” is an actual piece of hardware that you can hold in your hand. It couldbe a floppy disk, hard disk, Zip Disk or any other piece of physical media.A “volume” refers to a mounted partition. There may be only one “volume”on a “disk” as is the case on a floppy or Zip disk or there may be several volumeson a disk as on a partitioned hard drive. A volume is a concept, not a physical device. Early PC disks contained onlyone volume (e.g. “C”). As drives grew larger, it became convenient to partitiona single physical disk into a set of logical volumes. There can be any number(up to 24, as in C, Z) of these logical volumes on a disk and they show up asdrive “C”, “D” or “E” in DOS (when formatted FAT32.)
Figure 27-1: Multiple devices in case
Hard Drive Layout
• Master Boot RecordBoot
Sector Partitions
The very first sector of a physical disk (absolute sector 0) is called the masterboot record (MBR). It contains machine code to enable the computer to findthe partition table and the operating system. One of the first things a computerdoes when it starts up is to load this code into memory and execute it. This “bootcode” has a very simple task. Its job is to read the partition table at the end ofsector 0 and decide how the disk is laid out, and which partition contains thebootable operating system.
FAT32 EXT2 NTFS
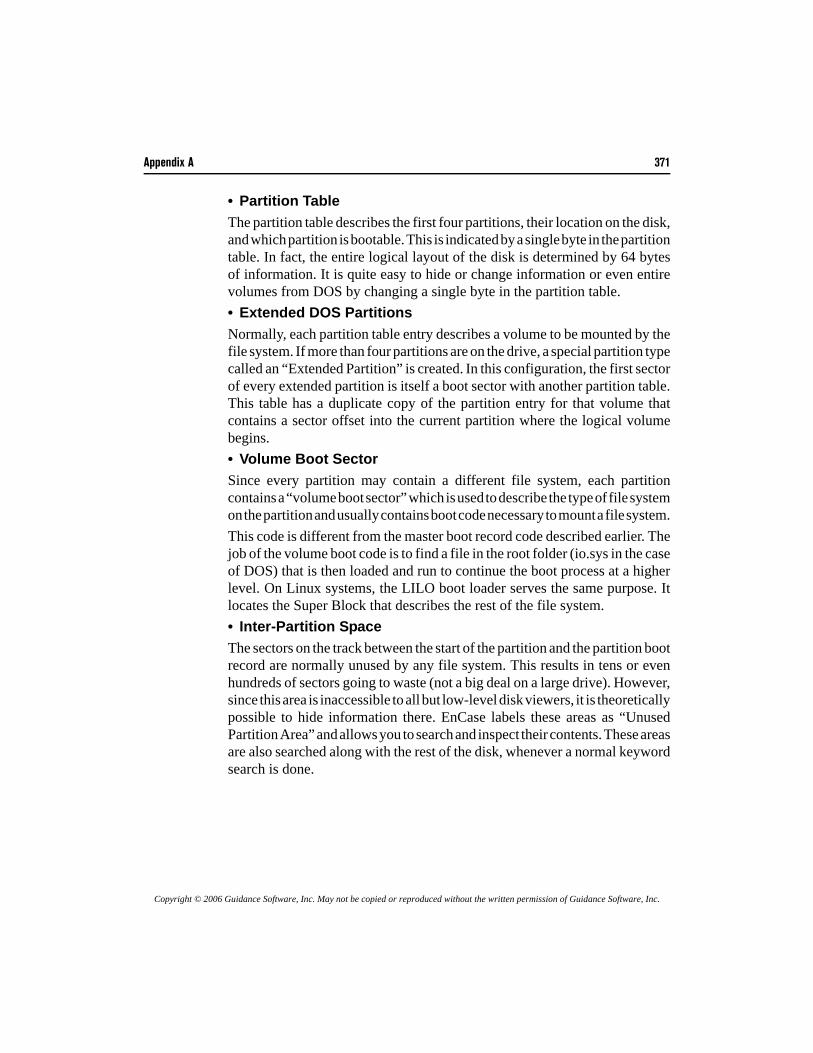
Appendix A 371
Copyright © 2006 Guidance Software, Inc. May not be copied or reproduced without the written permission of Guidance Software, Inc.
• Partition TableThe partition table describes the first four partitions, their location on the disk,and which partition is bootable. This is indicated by a single byte in the partitiontable. In fact, the entire logical layout of the disk is determined by 64 bytesof information. It is quite easy to hide or change information or even entirevolumes from DOS by changing a single byte in the partition table.• Extended DOS PartitionsNormally, each partition table entry describes a volume to be mounted by thefile system. If more than four partitions are on the drive, a special partition typecalled an “Extended Partition” is created. In this configuration, the first sectorof every extended partition is itself a boot sector with another partition table.This table has a duplicate copy of the partition entry for that volume thatcontains a sector offset into the current partition where the logical volumebegins. • Volume Boot SectorSince every partition may contain a different file system, each partitioncontains a “volume boot sector” which is used to describe the type of file systemon the partition and usually contains boot code necessary to mount a file system.This code is different from the master boot record code described earlier. Thejob of the volume boot code is to find a file in the root folder (io.sys in the caseof DOS) that is then loaded and run to continue the boot process at a higherlevel. On Linux systems, the LILO boot loader serves the same purpose. Itlocates the Super Block that describes the rest of the file system.• Inter-Partition SpaceThe sectors on the track between the start of the partition and the partition bootrecord are normally unused by any file system. This results in tens or evenhundreds of sectors going to waste (not a big deal on a large drive). However,since this area is inaccessible to all but low-level disk viewers, it is theoreticallypossible to hide information there. EnCase labels these areas as “UnusedPartition Area” and allows you to search and inspect their contents. These areasare also searched along with the rest of the disk, whenever a normal keywordsearch is done.
372 EnCase Forensic v5.05 User Manual
Copyright © 2006 Guidance Software, Inc. May not be copied or reproduced without the written permission of Guidance Software, Inc.
File System Concepts
• ClustersA cluster is a group of sectors in a logical volume that is used to store files andfolders. Clusters must contain a number of sectors that is a power of 2 (i.e. 2,4, 8, 16, etc.…). DOS maintains information about each cluster in the FileAllocation Table. NTFS partitions store that same information in the fileextents tables and the volume bitmap. EXT2 partitions store the informationin the Inode Tables and Block Bitmaps. CD's usually have unfragmented fileextents, so there is no need for a cluster bitmap or a FAT.• Cluster BitmapsEach cluster on a file system is either used or available for allocation (free).In DOS, the state of the clusters is kept track of in the File Allocation Table.A “0” entry in the FAT indicates that the cluster is free, otherwise there aredifferent codes to indicate which part of its file the cluster belongs to. NTFSkeeps track of free clusters with a “bitmap”. This is a file that contains 1 bitfor every cluster on the volume. This file is put on the drive when it is formatted.EXT2 drives contain a block bitmap for every group, but the concept is thesame.• Root FolderAll file systems have a “tree” structure that supports files and folders withinfolders to an arbitrary depth. The “root” of this tree is always stored in a knownlocation.On FAT12 and FAT16 volumes, the root folder resides at a fixed location onthe drive and contains a maximum number of entries that is determined whenthe volume is formatted. The number of files and folders in the root folder ofsuch a volume is limited, but the number and size of the rest of the folders inthe disk is essentially unlimited, because they are treated like normal files andcan expand if space is available on the volume.On FAT32 volumes, the root folder is also treated like a file and can containany number of files or folders. Its location is stored in the volume boot record.NTFS stores the root as a special file in the Master File Table. The name ofthe file is “.” (dot).EXT2 drives store the root as a special Inode in the first group.CDFS give the location of the root folder in the boot sector.
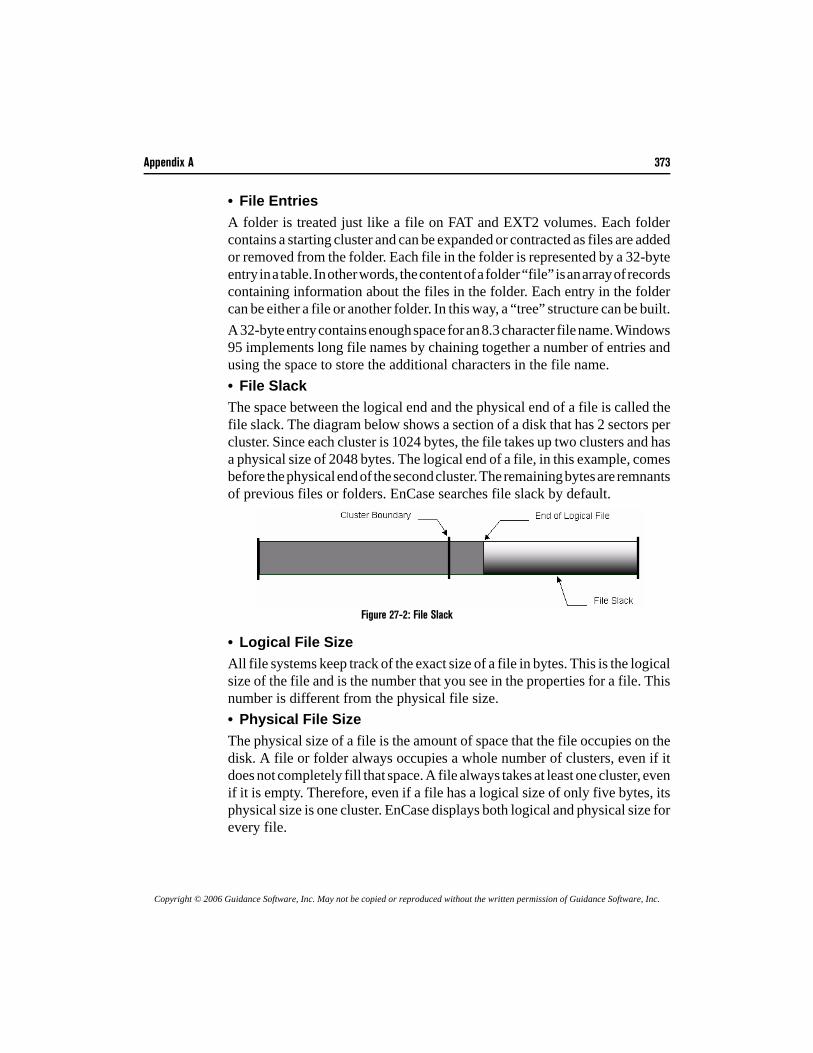
Appendix A 373
Copyright © 2006 Guidance Software, Inc. May not be copied or reproduced without the written permission of Guidance Software, Inc.
• File EntriesA folder is treated just like a file on FAT and EXT2 volumes. Each foldercontains a starting cluster and can be expanded or contracted as files are addedor removed from the folder. Each file in the folder is represented by a 32-byteentry in a table. In other words, the content of a folder “file” is an array of recordscontaining information about the files in the folder. Each entry in the foldercan be either a file or another folder. In this way, a “tree” structure can be built.A 32-byte entry contains enough space for an 8.3 character file name. Windows95 implements long file names by chaining together a number of entries andusing the space to store the additional characters in the file name.• File SlackThe space between the logical end and the physical end of a file is called thefile slack. The diagram below shows a section of a disk that has 2 sectors percluster. Since each cluster is 1024 bytes, the file takes up two clusters and hasa physical size of 2048 bytes. The logical end of a file, in this example, comesbefore the physical end of the second cluster. The remaining bytes are remnantsof previous files or folders. EnCase searches file slack by default.
Figure 27-2: File Slack
• Logical File SizeAll file systems keep track of the exact size of a file in bytes. This is the logicalsize of the file and is the number that you see in the properties for a file. Thisnumber is different from the physical file size.• Physical File SizeThe physical size of a file is the amount of space that the file occupies on thedisk. A file or folder always occupies a whole number of clusters, even if itdoes not completely fill that space. A file always takes at least one cluster, evenif it is empty. Therefore, even if a file has a logical size of only five bytes, itsphysical size is one cluster. EnCase displays both logical and physical size forevery file.
374 EnCase Forensic v5.05 User Manual
Copyright © 2006 Guidance Software, Inc. May not be copied or reproduced without the written permission of Guidance Software, Inc.
• RAM SlackThe space from the end of the file to the end of the containing sector is calledRAM slack. Before a sector is written to disk, it is stored in a buffer somewherein RAM. If the buffer is only partially filled with information before beingcommitted to disk, remnants from the end of the buffer will be written to disk.In this way, information that was never saved can be found in RAM slack ondisk. EnCase searches all file slack by default.• Volume SlackOn a formatted volume, there are a certain number of available sectors. Thesesectors are grouped together in clusters or blocks depending on the file system.If the number of possible clusters does not divide evenly into the number ofavailable sectors, there will be some sectors left over at the end of the partition.These sectors are not used to store file/folder information by the file system.This wasted space is known as Volume Slack, and is usually less than the sizeof a cluster/block. Deleted files, hidden data and remnants of previouspartitions could possibly be found in the volume slack
File Systems
• File Allocation Table (FAT) The FAT is an array of numbers that sits near the beginning of a DOS volume.These numbers can be 1½ bytes (12 bits), 2 bytes (16 bits) or 4 bytes (32 bits)long depending on the size of the volume. This is why volumes are sometimesreferred to as FAT12, FAT16 or FAT32.Each entry in the FAT corresponds directly to one cluster and there is alwaysone FAT entry for every cluster. Each entry is either a code indicating that thecluster is free, the cluster is bad or that this is the last cluster in a file. If it isnot one of these codes, then the number refers to the next cluster in the chainbelonging to a file. The first cluster in the chain for a file is recorded in theproperties for that file, which are stored in its parent folder. The FAT is thereforea one way linked list of clusters for every file in a volume.Folders on FAT drives are stored as special files. The content of these files arethe records for each of its children. These “folder files” take up space on thevolume along with the other normal files.• NTFSNTFS has an advanced structure that is designed to overcome the limitationsof other file systems that have come before it. The file descriptors for everyfile on an NTFS volume are stored in the Master File Table (MFT), including
Appendix A 375
Copyright © 2006 Guidance Software, Inc. May not be copied or reproduced without the written permission of Guidance Software, Inc.
a reference to the MFT itself. Each file descriptor contains the name and otherattributes of the file along with its extents list. This list contains the locationof the file on the volume. Another file called the volume bitmap describes thefree clusters on the volume. Folders are stored in a b-tree structure for quickdisk access.• EXT2/3The EXT2 file system is the primary file system used on the Linux operatingsystem. EXT2 partitions are divided into a series of Groups. Each Groupcontains a series of Inodes and Blocks. The Inode tables describe the files thatare located within each group. As with the FAT file system, a folder is a filethat contains descriptors for each of its children. EnCase can read and interpretthe EXT2 file system and present its folder structure and files along side therest of your evidence. EXT3 is EXT2 with journaling.• REISERThe Reiser file-system is a “flavor” of EXT2. EnCase has the ability to mountand interpret the Reiser file system.• CDFSThis ISO9660 standard is used to describe the files structure on a CD. Thereare many variations of the basic structure. The most notable is the Jolietstandard that is used by Windows to allow for Unicode file names. EnCase canread and interpret the CDFS file system and present its folder structure andfiles along side the rest of your evidence.• HFS and HFS+This is the Macintosh and Power Macintosh file format. EnCase has alsorefined its support for other files systems. The Macintosh OS X Serveroperating system uses the Hierarchical Files System Plus (HFS+) without thewrapper of HFS. EnCase now supports this configuration.• PalmThe PalmOS file system consists of databases with records, which store bothexecutable applications and program data. Currently, the PalmOS is found ondevices manufactured by Palm, Inc. (Palm), Handspring (Visor, Treo), Sony(Clié), some cell-phones (Kyocera pdQ and Samsung I-300) as well as ahandful of other devices made by companies such as IBM, Handera, andSymbol.
376 EnCase Forensic v5.05 User Manual
Copyright © 2006 Guidance Software, Inc. May not be copied or reproduced without the written permission of Guidance Software, Inc.
• UFSThis is a common Unix file-system. However, Unix, like ice cream, has manyflavors. Though EnCase can acquire all flavors, at this time, it can only interpretUFS.
Disk Configurations Explained
A Disk Configuration is a Redundant Array of Inexpensive Disks or RAID. Thereare commonly three types of RAIDs: RAID 0, RAID 1, and RAID 5.
• RAID 0: StripingThe first but not necessarily the most basic RAID type is RAID 0, or striping.The main purpose of RAID 0 is to provide speed. In fact, RAID 0 has no faulttolerance. If one drive in the array fails, the whole array is shot. There is noway to rebuild or repair the information stored on a RAID 0 array. This makesa RAID 0 setup the most susceptible to failure, a fact that usually keeps userswith sensitive data from choosing RAID 0 as their RAID setup.At the same time, however, RAID 0 is the fastest of all RAID setups. Sincethere is no overhead required to store extra information for fault tolerance, thespeed of RAID 0 can theoretically perform 2 times the speed of a single drivewhen there are 2 drives in the array. Adding more drives only increases thistheoretical performance amount a six-drive RAID 0 array's performance couldbe as fast as 6 times the performance of a single drive.• RAID 1: MirroringAlthough speed can be an important aspect of computing, so can the safety andreliability that comes with fault tolerance. Speed is sacrificed, but RAID 1provides users with a level of safety nonexistent in RAID 0.RAID 1 works by writing identical sets of information to two drives in an array,otherwise known as mirroring. When the controller is sent a 64KB file to bewritten to a two disk RAID 1 array, the controller sends identical copies of this64KB file to both disks in the array. Reads are the same as on a single drivethe controller requests the file from one of the two drives.The special feature of RAID 1 is its fault tolerance. If either of the two drivesin the array fails, no data is lost. When a drive fails, the RAID controller usesthe information off of the drive that is still available. When a new drive is addedto the array to fix the failed one, a mirroring occurs in which the data from thegood drive is written to the new drive to recreate the array again.As one could suspect, RAID-1 offers very little in terms of performance. Whenrequesting data from a drive, some RAID controllers take information from
Appendix A 377
Copyright © 2006 Guidance Software, Inc. May not be copied or reproduced without the written permission of Guidance Software, Inc.
the drive that is not busy or closer to the desired information, theoreticallyresulting in faster data access. When writing, on the other hand, there is someoverhead when compared to a single drive as the controller must duplicate thefile it is sent and then pass it along to the drives.In a RAID-1 setup, identical drives are best in order to prevent lost space. Sincethe same data is being written to two drives, the size of the RAID-1 array isequal to the size of the smallest drive in the array. For example, if a 20GB driveand a 30GB drive are used in a RAID-1 setup, the array would only be 20GBwith the 10 extra gigabytes on the 30GB drive going to waste. The performancedifference between two drives is also an issue here, since a faster drive wouldhave to wait for a slower drive before it could write more information.RAID-1 is a good solution for those looking for security over speed. Althoughnot the slowest of the common RAID types, RAID-1 can be slower than a singledrive in some cases (more on that in the benchmarks). What RAID-1 doesprovide is a very safe environment, where failure of a single drive does notequate to any down time.In addition, EnCase now supports the Mirror RAID (RAID-1) configurationof NTFS Dynamic Disks normally found on Compaq Windows's servers. Ifonly one of the mirrored drives is present, the file structure is still availablefor examination.• RAID 5RAID 5 requires at least 3 drives and attempts to combine the speed of stripingwith the reliability of mirroring. This is done by striping the data across twodrives in the array at a user defined stripe size. The third drive in the array, theone not getting striped data, is given a parity bit. A parity bit is generated fromthe original file using an algorithm to produce data that can recreate theinformation stored on both drives that received the striped data.The two drives receiving the striped data and the one receiving the parity bitare constantly changing. For example, if drives 1 and 2 receive striped dataon a write and drive 3 receives a parity bit, on the next write drives 2 and 3will receive the striped data and drive 1 will receive the parity bit. The shiftingcontinues and eliminates the random write performance hit that comes witha dedicated drive receiving the parity information.The parity information is typically calculated on the RAID controller itself,and thus these types of controllers are called hardware RAID controllers sincethey require a special chip to make the parity information and decide what driveto send it to.
378 EnCase Forensic v5.05 User Manual
Copyright © 2006 Guidance Software, Inc. May not be copied or reproduced without the written permission of Guidance Software, Inc.
RAID 5 arrays provide a balance between RAID 0 and RAID 1 configurations.With RAID 5, some of the features of striping are in place as well as the featuresof mirroring. Thanks to the parity bit, if information is lost on one of the threedrives in the array, it can be rebuilt. Thanks to the striping it uses to break upthe data and send it to multiple drives, aspects of speed from RAID 0 are present.Recreation works in the following manner. Let's use a 3 drive RAID 5 arraywith a 64KB stripe size for an example with a 128KB file that needs to bewritten. First, a parity bit is created for the file that the controller card hasreceived by performing an XOR calculation on the data. Next, the 128KB fileis broken into two 64KB files, one of which is sent to drive 1 and the otherto drive 2. Finally, the parity information calculated above is written to the thirddrive in the array.Now, if one of the drives, or a portion of a drive, in the array goes bad and the128KB file is lost, the data can be recreated via an xor operation between theremaining drives. It does not matter which drive fails all the data is stillavailable. If the third drive in the above example, the one that received the parityinformation for this write, fails then the original data can be read off of drives1 and 2 to recreate the parity information. If either drive 1 or drive 2 fails, thenthe parity information stored on drive 3 can be used to recreate the informationlost on the original drive.There is a significant overhead associated with RAID 5, however, due to theparity bit that must be calculated and written to on each drive. This is especiallypresent when changing only one piece of information on one drive in the array.During this process, not only does the information that requires changingrequire writing but the parity bit must also be recreated. This means that oncethe data is written, both drives with the stripe blocks on them must be read,a new parity bit be calculated, and then the new parity bit has to be written tothe third drive. This problem only increases as additional drives are added tothe array.For the same reasons mentioned in both the RAID 0 and RAID 1 discussions,it is best to use identical drives for a RAID 5 setup. Not only does this ensurespeed, it also ensures that all of the array's storage capacity is utilized. The sizeof a RAID 5 array is equal to the size of the smallest drive times the numberof drives in the array minus one (since one of the drives is always getting aparity bit).RAID 5 does provide a good balance between speed and reliability and is apopular configuration for arrays in a variety of systems, from servers toworkstations. The data security made possible with the parity bit as well as the
Appendix A 379
Copyright © 2006 Guidance Software, Inc. May not be copied or reproduced without the written permission of Guidance Software, Inc.
speed and space provided by RAID 5 have many high-end system buildersturning to RAID 5.
Evidence Storage
• CompressionCompression technology allows EnCase to store a large disk in a relativelysmall file. EnCase uses an industry standard compression algorithm to achievean average of 50% size reduction. If most of the disk is unused, the compressionratio can be much higher. This can result in great savings in disk storage space.Compressed Evidence Files take longer to generate because of the additionalprocessing time required to compress information. Compression NEVER has any effect on the final evidence, and compressedblocks are checked for validity in the same way as uncompressed ones.• MD5 HashThe MD5 hash is a 128-bit (16-byte) number that uniquely describes thecontents of a file. The code to compute the MD5 was developed by RSA andis publicly available. For this reason, the MD5 hash is a standard in the forensicsworld.Professor Ronald Rivest created the MD5 hash algorithm in 1991. It is usedto create digital signatures. It is intended for use with 32 bit machines and issafer than the MD4 algorithm, which has been broken. MD5 is a one-way hashfunction, meaning that it takes a message and converts it into a fixed string ofdigits, also called a message digest. The odds that two files with different contents have the same hash value isroughly 2128 or 3.4x1038. If the hash values match, there is reasonablecertainty that the file contents matches.The purpose of the MD5 hash value within EnCase is two-fold. The first is toverify that the evidence file EnCase created is indeed the same in byte-structureas the original media; the second is for the creation of Hash Sets to add to yourHash Library.EnCase calculates an MD5 Hash when it acquires a physical drive or logicalvolume. The hash value is written into the evidence file and becomes part ofthe documentation of the evidence. When an evidence file is added to a case,EnCase automatically verifies the CRC values, and re-computes the hash valuefor the evidence data within evidence file. The hash value that is stored in theevidence file, and the hash value that is computed when the evidence file isadded to a case, appear in the Report for immediate confirmation that the
380 EnCase Forensic v5.05 User Manual
Copyright © 2006 Guidance Software, Inc. May not be copied or reproduced without the written permission of Guidance Software, Inc.
evidence file has not changed since it was acquired. At any time while usingEnCase, you can select the case view, right-click on the physical drive or logicalvolume, and select Hash to re-compute the hash value of the drive or volume.The hash is generated as the data is read from the source device. The acquisitionhash is the hash of the data that is acquired, and the verification hash is theconfirmation of the acquired data. Both EnCase for DOS and EnCase forWindows give the examiner the option of hashing the source device itselfbefore or after acquisition. This is not done by default due to the amount oftime required, and is instead provided as an option to the user. In EnCase 4.13and above, if you choose to hash a device separately from an acquisition inWindows, EnCase will automatically create a note of the date/time and resultsof hashing the device. This note is placed on the root folder of the device underthe Bookmark view, for inclusion in your Final Report if you wish. Of coursein EnCase for DOS, it still writes the results to a text file. You can bring thetext file results into EnCase with Add Raw Image function under the File tab,for inclusion in your report.One note on imaging devices with corrupted or damaged sectors. EnCase isbuilding the hash value of the acquired device as it is reading the data fromthe sectors. If a sector is damaged or has corrupted data, the next time you makea hash of the device, the hash value may be different, as well as the next, andthe next and so on.• CRC (Cyclical Redundancy Checksum)EnCase uses a CRC to verify the integrity of each block of data. The CyclicalRedundancy Checksum is a variation of the standard checksum, and works inmuch the same way. The advantage of the CRC is that it is order sensitive. Theodds that two different data blocks produce the same CRC are roughly 1 in 4billion.Most hard drives store one CRC for every sector (512 bytes). When a read erroris generated from a disk, this usually means that the CRC value of the sectoron disk does not match the value that is recomputed by the drive hardware afterthe sector is read.CRC values can be “reverse engineered” meaning that it is possible (thoughdifficult) to force the CRC value of one document to match that of another byaltering non-printing characters within the document. For this reason themethod of choice for document verification is the MD5 hash. (See MD5 Hash)
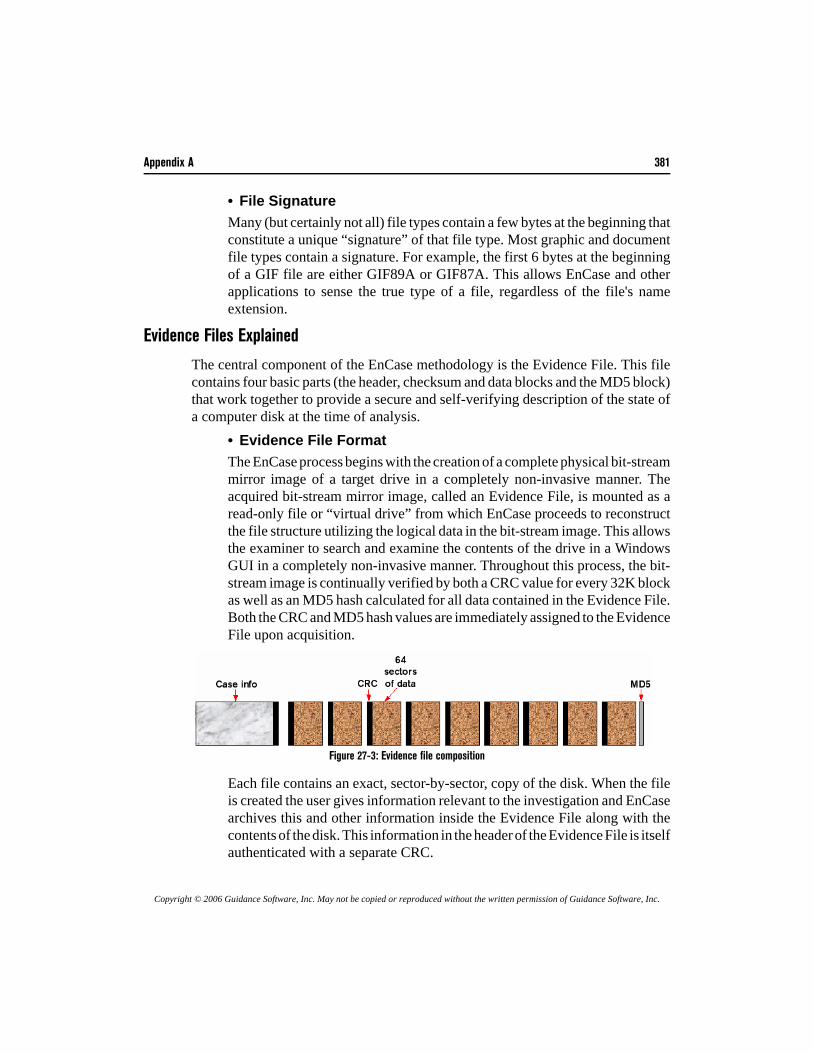
Appendix A 381
Copyright © 2006 Guidance Software, Inc. May not be copied or reproduced without the written permission of Guidance Software, Inc.
• File SignatureMany (but certainly not all) file types contain a few bytes at the beginning thatconstitute a unique “signature” of that file type. Most graphic and documentfile types contain a signature. For example, the first 6 bytes at the beginningof a GIF file are either GIF89A or GIF87A. This allows EnCase and otherapplications to sense the true type of a file, regardless of the file's nameextension.
Evidence Files Explained
The central component of the EnCase methodology is the Evidence File. This filecontains four basic parts (the header, checksum and data blocks and the MD5 block)that work together to provide a secure and self-verifying description of the state ofa computer disk at the time of analysis.
• Evidence File FormatThe EnCase process begins with the creation of a complete physical bit-streammirror image of a target drive in a completely non-invasive manner. Theacquired bit-stream mirror image, called an Evidence File, is mounted as aread-only file or “virtual drive” from which EnCase proceeds to reconstructthe file structure utilizing the logical data in the bit-stream image. This allowsthe examiner to search and examine the contents of the drive in a WindowsGUI in a completely non-invasive manner. Throughout this process, the bit-stream image is continually verified by both a CRC value for every 32K blockas well as an MD5 hash calculated for all data contained in the Evidence File.Both the CRC and MD5 hash values are immediately assigned to the EvidenceFile upon acquisition.
Figure 27-3: Evidence file composition
Each file contains an exact, sector-by-sector, copy of the disk. When the fileis created the user gives information relevant to the investigation and EnCasearchives this and other information inside the Evidence File along with thecontents of the disk. This information in the header of the Evidence File is itselfauthenticated with a separate CRC.
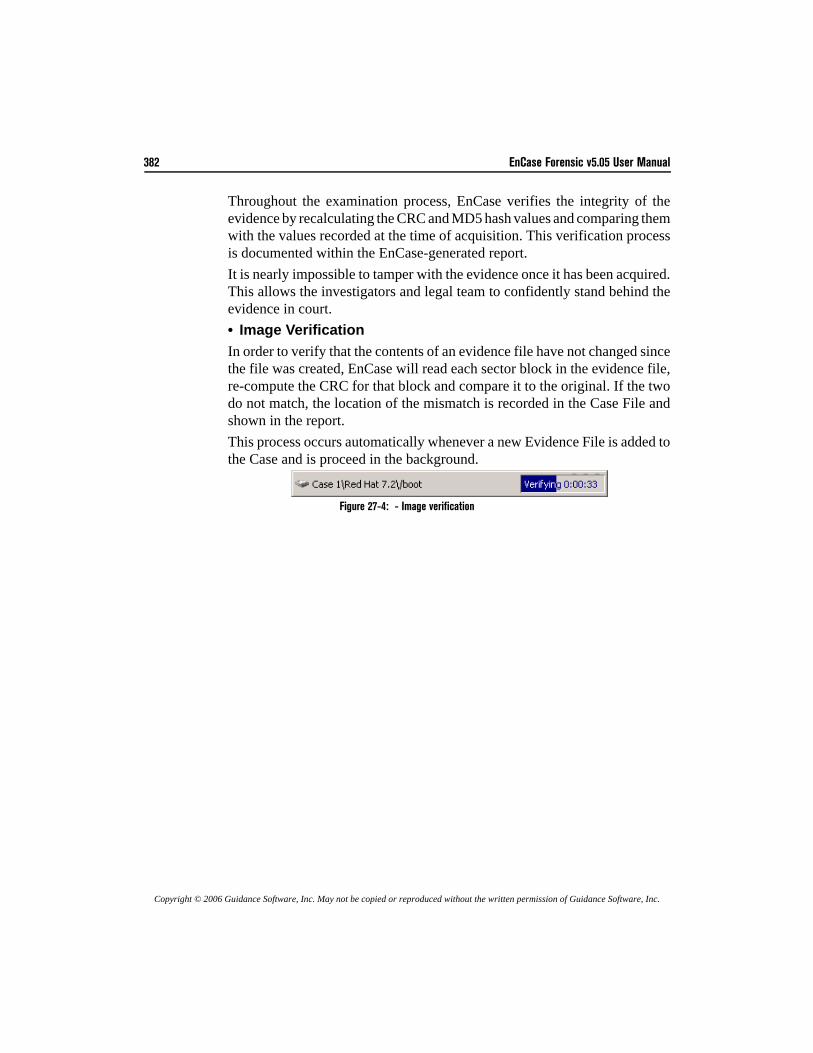
382 EnCase Forensic v5.05 User Manual
Copyright © 2006 Guidance Software, Inc. May not be copied or reproduced without the written permission of Guidance Software, Inc.
Throughout the examination process, EnCase verifies the integrity of theevidence by recalculating the CRC and MD5 hash values and comparing themwith the values recorded at the time of acquisition. This verification processis documented within the EnCase-generated report.It is nearly impossible to tamper with the evidence once it has been acquired.This allows the investigators and legal team to confidently stand behind theevidence in court.• Image VerificationIn order to verify that the contents of an evidence file have not changed sincethe file was created, EnCase will read each sector block in the evidence file,re-compute the CRC for that block and compare it to the original. If the twodo not match, the location of the mismatch is recorded in the Case File andshown in the report.This process occurs automatically whenever a new Evidence File is added tothe Case and is proceed in the background.
Figure 27-4: - Image verification

Copyright © 2006 Guidance Software, Inc. May not be copied or reproduced without the written permission of Guidance Software, Inc.
Appendix B
GREPGREP Syntax
Symbol Meaning
. A period matches any single character.
\255 Decimal character (period)
\x A character represented by its ASCII value in hex. For example, \x09is a tab. \x0A is a line feed. Both hex digits should be present, even ifthey are 0.
? A question mark after a character or set matches one or zerooccurrences of that character or set. For example, "##?/##?/##"would match "1/1/98" or "01/01/89" but would NOT match "123/01/98."
* An asterisk after a character matches any number of occurrences ofthat character, including zero time. For example, "john,*smith" wouldmatch "john,smith", "john,,smith", and "johnsmith".
+ A plus sign after a character matches any number of occurrences ofthat character except zero. For example, "john,+smith" would match"john,smith" or "john,,smith" but would NOT match "johnsmith".
# A pound sign matches any numeric character [0-9]. For example, ####### matches any number in the form 327-4323 (if looking for aphone number, for example).
[XYZ] Characters in brackets match any one character that appears in thebrackets. For example, "smit[hy]" would match "smith" and "smity".
[^XYZ] A circumflex at the start of the string in brackets means NOT. Hence,[^hy] matches any characters except h and y.

384 EnCase Forensic v5.05 User Manual
Copyright © 2006 Guidance Software, Inc. May not be copied or reproduced without the written permission of Guidance Software, Inc.
GREP Examples
The following examples show some of the power that GREP expressions deliverwhen looking for text. The first line is the example, followed by an explanation ofthe symbols used, followed by examples of text found using the expression.
• john.smithThe "." matches any single character. This expression finds "john" followedby any character followed by "smith".
john smith
john,smith
johnQsmith
NOT john@%smith• john[ ,;]smithThe characters inside the brackets are called a set. The characters in a set aretreated as a single character. This expression finds "john" followed by a spaceOR a comma OR a semicolon followed by "smith".
john smith
john,smith
john;smith
[A-Z] A dash within the brackets signifies a range of characters. Forexample, [a-e] matches any character from “a” through “e” (inclusive).
\[ A backslash before a character indicates that the character is to betreated literally and not as a GREP character. For example,"one\+two" matches "one+two". A slash (\) must be placed in front ofany GREP token (including a slash (\) itself) that you wish to be aliteral part of the match.
{X,Y} Repeat X-Y times. Example {3,7} would repeat three to seven times.
(ab) Functions like a parenthesis in a mathematical expression. Groups abtogether for , +, *, |
\wCDEF Allows the investigator to enter Unicode code for a particularcharacter; 4 integer code is required. See the Unicode chart formapping.
a | b The 'pipe' acts as a logical OR. So it would read 'a or b'.
Appendix B 385
Copyright © 2006 Guidance Software, Inc. May not be copied or reproduced without the written permission of Guidance Software, Inc.
• john[0-9a-z]smithThe "-" indicates a range of characters when inside a set. This expression finds"john" followed by any character between ("0" and "9" or "a" and "z")followed by "smith".
john0smith
john1smith
johnzsmith
• john[^#]smithThe "^" at the start of a set indicates any character other than those in the set.This expression finds "john" followed by any character other than "0"-"9"followed by "smith".
john smith
johnQsmith
john,smith
• john +smithThe "+" means to repeat the preceding character (or set) any number of times,but at least once. This expression finds "john" followed by any number spacesfollowed by "smith".
john smith
john smith
john smith
• john-*smithThe "*" indicates to repeat the preceding character (or set) any number of timesincluding zero times. This expression finds "john" followed by any numberof dashes followed by "smith".
johnsmith
john-smith
john--smith
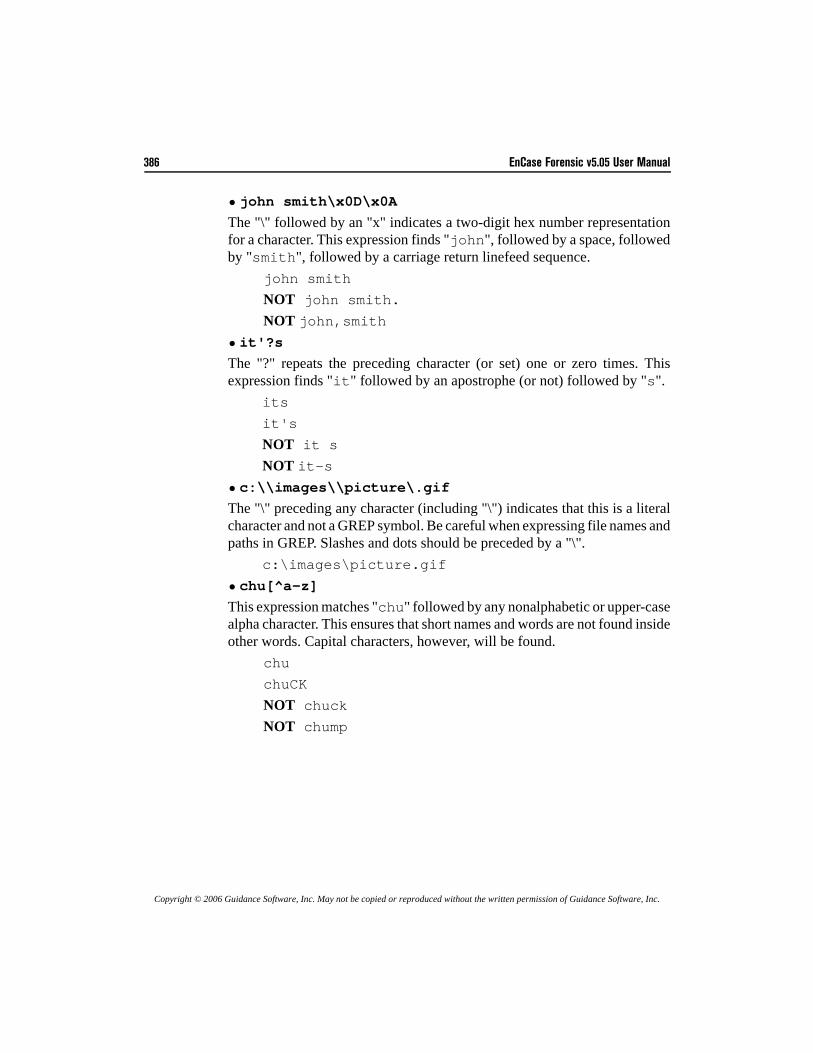
386 EnCase Forensic v5.05 User Manual
Copyright © 2006 Guidance Software, Inc. May not be copied or reproduced without the written permission of Guidance Software, Inc.
• john smith\x0D\x0AThe "\" followed by an "x" indicates a two-digit hex number representationfor a character. This expression finds "john", followed by a space, followedby "smith", followed by a carriage return linefeed sequence.
john smith
NOT john smith.NOT john,smith
• it'?sThe "?" repeats the preceding character (or set) one or zero times. Thisexpression finds "it" followed by an apostrophe (or not) followed by "s".
its
it's
NOT it sNOT it-s
• c:\\images\\picture\.gifThe "\" preceding any character (including "\") indicates that this is a literalcharacter and not a GREP symbol. Be careful when expressing file names andpaths in GREP. Slashes and dots should be preceded by a "\".
c:\images\picture.gif
• chu[^a-z]This expression matches "chu" followed by any nonalphabetic or upper-casealpha character. This ensures that short names and words are not found insideother words. Capital characters, however, will be found.
chu
chuCK
NOT chuckNOT chump
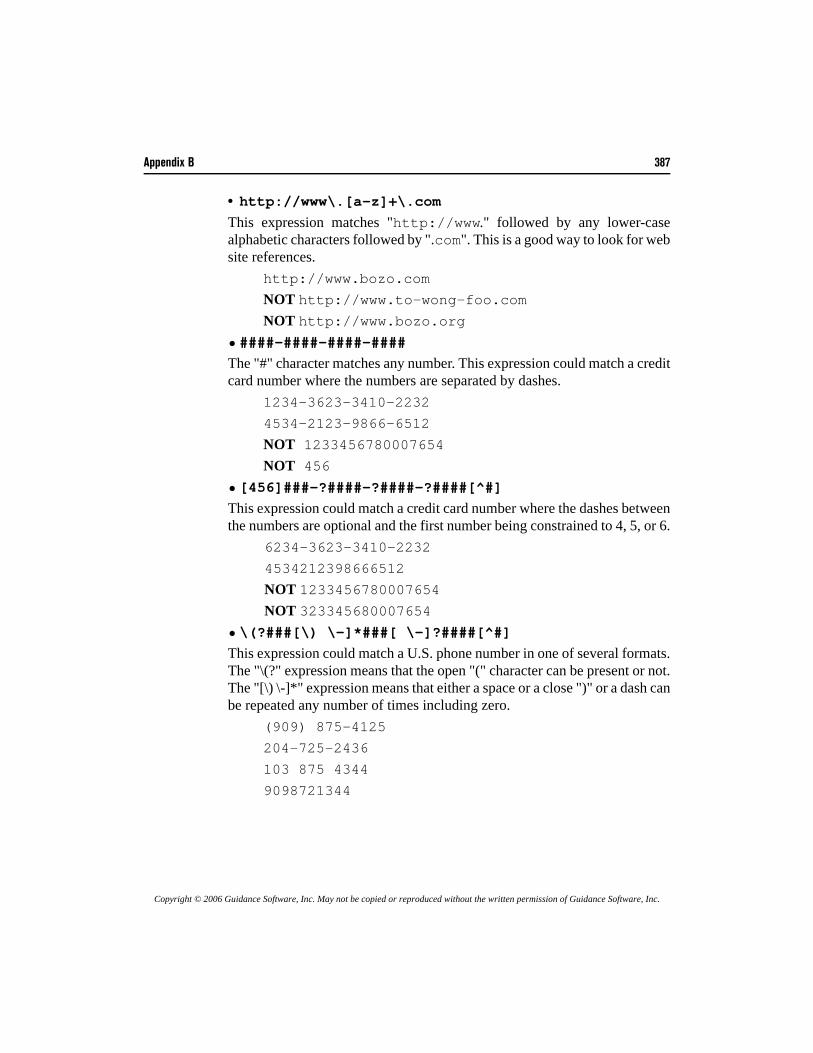
Appendix B 387
Copyright © 2006 Guidance Software, Inc. May not be copied or reproduced without the written permission of Guidance Software, Inc.
• http://www\.[a-z]+\.comThis expression matches "http://www." followed by any lower-casealphabetic characters followed by ".com". This is a good way to look for website references.
http://www.bozo.com
NOT http://www.to-wong-foo.comNOT http://www.bozo.org
• ####-####-####-####The "#" character matches any number. This expression could match a creditcard number where the numbers are separated by dashes.
1234-3623-3410-2232
4534-2123-9866-6512
NOT 1233456780007654NOT 456
• [456]###-?####-?####-?####[^#]This expression could match a credit card number where the dashes betweenthe numbers are optional and the first number being constrained to 4, 5, or 6.
6234-3623-3410-2232
4534212398666512
NOT 1233456780007654NOT 323345680007654
• \(?###[\) \-]*###[ \-]?####[^#]This expression could match a U.S. phone number in one of several formats.The "\(?" expression means that the open "(" character can be present or not.The "[\) \-]*" expression means that either a space or a close ")" or a dash canbe repeated any number of times including zero.
(909) 875-4125
204-725-2436
103 875 4344
9098721344
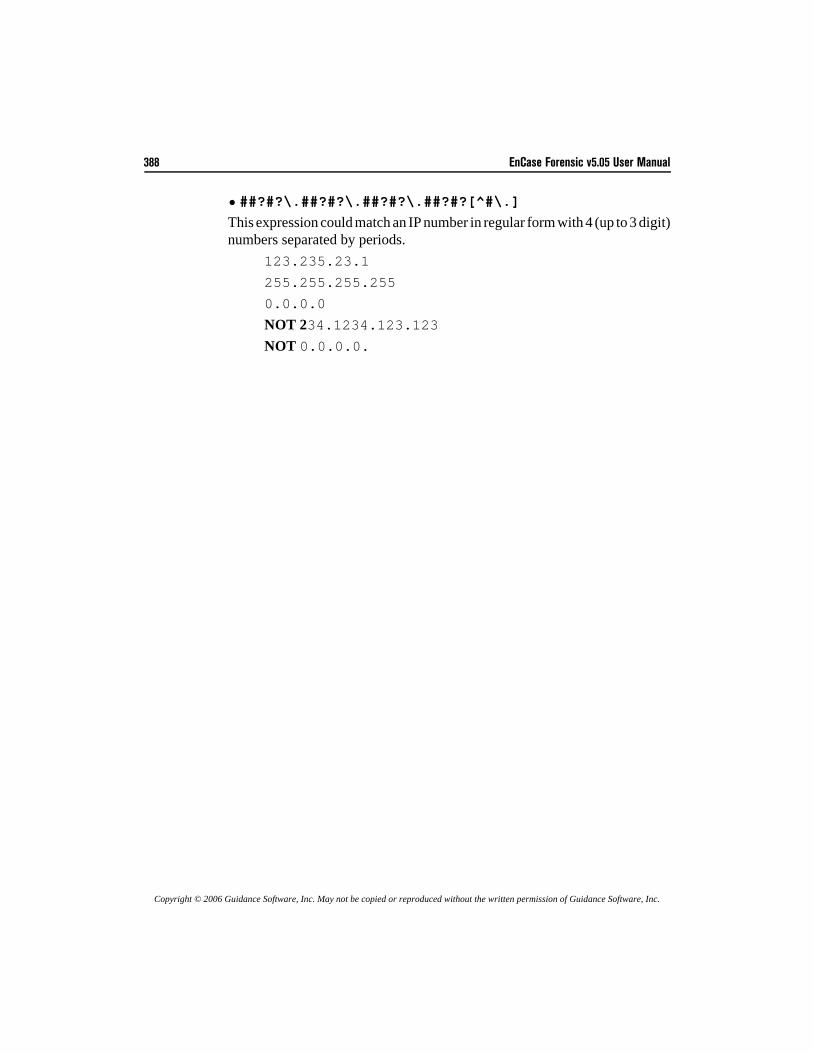
388 EnCase Forensic v5.05 User Manual
Copyright © 2006 Guidance Software, Inc. May not be copied or reproduced without the written permission of Guidance Software, Inc.
• ##?#?\.##?#?\.##?#?\.##?#?[^#\.]This expression could match an IP number in regular form with 4 (up to 3 digit)numbers separated by periods.
123.235.23.1
255.255.255.255
0.0.0.0
NOT 234.1234.123.123NOT 0.0.0.0.
Copyright © 2006 Guidance Software, Inc. May not be copied or reproduced without the written permission of Guidance Software, Inc.
Appendix C
Third Party UtilitiesWhile EnCase has many capabilities, it does not and cannot do everything. Thereforewe recommend certain third-party utilities that would be helpful to forensicinvestigators. Guidance Software does not and cannot be responsible for the performance,availability, or reliability of any of these third-party utilities. We do not and cannotguarantee that we can help you set up, run, or troubleshoot any of these utilities either.We offer the following solely for your benefit and education.
Quick View Plus
For viewing fileshttp://www.avantstar.com
IrfanView
For viewing graphic files (free for home use)http://www.irfanview.com
AC/DSee
For viewing graphic files (free trial version)http://www.acdsee.com
DBXtract
To read Outlook Express 5.0 e-mails (free)http://chattanooga.net/~scochran/DBXtract.htm
390 EnCase Forensic v5.05 User Manual
Copyright © 2006 Guidance Software, Inc. May not be copied or reproduced without the written permission of Guidance Software, Inc.
MBXtract
To read Outlook Express 4.0 e-mails (free)http://chattanooga.net/~scochran/MBXtract.htm
Decode Shell Extension
For decoding MIME or UUencoded e-mail attachments. Other potentially usefulshareware utilities available at this site as well. (free)http://www.funduc.com
Disk Compare
Compare two disks side-by-side (free)http://tp.lc.ehu.es/JMA/win95.html
Mailbag Assistant
Mailbag Assistant supports several mailboxes, including Outlook Express, Eudora,Netscape Messenger, Pegasus, Forte Agent and The Bat! Support for additionalmailers is planned in future versions ($29.95).www.fookes.com/mailbag
PST Cracker
Crack passwords in password-protected PST files (free)http://www.crak.com/downsoft.htm
OST2PST
Converts .OST files to .PST files for easy viewing (free)http://www.pwdservice.com
Gpart
A free tool which tries to guess the primary partition table of a PC-type hard diskin case the primary partition table in sector 0 is damaged, incorrect or deleted. Theguessed table can be written to a file or device. Supported (guessable) file systemor partition types:
• DOS/Windows FAT (FAT 12/16/32)• Linux ext2
Appendix C 391
Copyright © 2006 Guidance Software, Inc. May not be copied or reproduced without the written permission of Guidance Software, Inc.
• Linux swap partitions versions 0 and 1 (Linux >= v2.2.X)• OS/2 HPFS• Windows NT/2000 FS• *BSD disk labels• Solaris/x86 disk labels • Minix FS • Reiser FS • Linux LVM physical volume module (LVM by Heinz Mauelshagen) • SGI XFS on Linux• BeOS file system• QNX 4.x fleshiest
http://www.stud.uni-hannover.de/user/76201/gpart/
CD-R Diagnostic
A CD-R diagnostic utility ($50.00)www.cdrom-prod.com
Dir to HTML
Free download version; Dir to Html Pro £ 4.99http://www.silvermaine.co.uk/dir_to_html.asp

392 EnCase Forensic v5.05 User Manual
Copyright © 2006 Guidance Software, Inc. May not be copied or reproduced without the written permission of Guidance Software, Inc.
Copyright © 2006 Guidance Software, Inc. May not be copied or reproduced without the written permission of Guidance Software, Inc.
Appendix D
The Forensic LabInvestigators use EnCase mainly for two different functions – acquisition andanalysis. Forensic systems should be designed and built around those two functions.Two different computers might be the best solution.
Field Acquisitions
The most important feature to keep in mind for field acquisitions is connectivity. Ifyou cannot bring the Subject's computer or hard drive back to the forensic lab withyou, it is of the utmost importance that the correct tools are on-site so that the Subjectmedia can be successfully and reliably imaged. Either a media device or a fieldcomputer that will attach to all types of hardware is required.A luggable computer - a small desktop designed for field acquisitions - is an option.The advantage of these computers is that most, if not all, connectivity is on the outsideof the case. Attaching an internal hard drive to the luggable without even openingthe storage computer cover is possible. Many also come with drive drawers, wherethe subject hard drive can be placed to acquire its data.Of course, options like that can get expensive. Cheaper alternatives are to bring anexternal FireWire hard drive into the field (as well as an EnCase Boot Disk with theappropriate DOS drivers for the drive) and attach that to the perpetrator's PC. Thiscould also include external removable media such as external Jaz drives, external Zipdrives, etc. With removable media, however, a large amount of media might berequired. For a 20-gig hard drive, at least 20 Jaz cartridges would be needed.Furthermore, Jaz drives and other forms of removable media are not as reliable ashard drives. Guidance Software always recommends acquiring media to a hard drive.Another option is to purchase a small desktop and stock it with a SCSI card (theAdaptec 29160 is recommended), a large hard drive, and at least 512 MB of RAM.A full-fledged field computer is much more versatile than a laptop.
394 EnCase Forensic v5.05 User Manual
Copyright © 2006 Guidance Software, Inc. May not be copied or reproduced without the written permission of Guidance Software, Inc.
Many investigators use laptop computers in the field for their portability, but laptopscan be restrictive in terms of connectivity. The only ports available (that EnCase forDOS can take advantage of) are the parallel port (very slow) or the PCMCIA portfor an external hard-drive. It seems almost easier to bring a small desktop. Thedifference in terms of acquisition time will more than make up for the transportingand setup time.Regardless, remember to bring the EnCase Network Boot Disk and always performacquisitions in EnCase for DOS, unless using a FastBloc.
Lab Analysis
The lab analysis machine (the Forensic PC) is the work-horse. Important featuresto keep in mind for the analysis machine are speed and hard drive space. A Pentium-IV running at 2 GHz or higher with 1 GB of RAM is a good start. One hard driveshould be dedicated to the OS and applications (10 GB recommended) and a secondFAT32-formatted hard drive dedicated to evidence file storage (80 GBrecommended). Both hard drives should be 7200 RPM drives. A good lab analysismachine should also have a “computer forensic friendly” BIOS. An excellent resource for computers built explicitly for computer forensics isForensic-Computers.com, at www.forensic-computers.com.
Need Additional Information?
All questions about Storage computer or acquisition computer hardwareconfigurations can be addressed to [email protected].
Index 395
Copyright © 2006 Guidance Software, Inc. May not be copied or reproduced without the written permission of Guidance Software, Inc.
IndexAAbsolute Sectors 369AC/DSee 389Acquire 69Acquire Logical Evidence File 27Acquiring 63Acquiring drives in Windows without FastBloc 100Acquiring flash media 122Acquiring Macs 89Acquiring multiple pieces of removable media 123Acquiring Palm PDAs 109Acquiring Removable Media 119Acquiring UNIX 89Acquiring Unix and Linux 89Acquiring, DOS 48Acquisition File Path 24, 71, 99Acquisition Options 23Acquisition options 23Acquisition Restart 23Acquisition, Crossover Cable 73Acquisition, Parallel Port 67Active Code-Page 245Active Processes 287, 289Add Device 67Add to Case 69, 95, 112Adding a new signature 138Adding evidence files to a case 164Adding Keyword Lists 251Adding partitions 277Adding Raw Image files 171After Acquisition 95, 101, 112, 129After acquisition 90AIX Journaling File System 22Alias 141America Online .ART files 212Analyze EFS 17Analyzing hash results 148App Descriptor 289
Archiving Evidence 323Attachments subtab 182Attempt Direct Connection 160Auto Reconnect 163Auto Save Minutes 155
BBackup 25Backup folder 25Bad signature 140Barebones Boot Disk 39, 40Base64 and UUE encoding 265Big-Endian Unicode 245BIOS 81, 368Block Size 23Bookmark Folder Structure 352Bookmark options 344Bookmarking Search Hits 258Bookmarks 19, 180, 329Bookmarks subtab 17, 19, 180Bookmarks tab 180Bookmarks, Copy/UnErase 223Bookmarks, Export and Import 26Bookmarks, exporting 26Boot Procedure 44bootfloppy.E01 40Booting the restored drive 320
CCanceling a search 259Case files compatibility 36Case Management 153Case management 153Case Options 154Case Time Settings 329Cases 178Cases tab 16, 178CD and DVD file systems 37CDFS 375CD-R 121CD-R Diagnostic 391CD-ROM 121CD-RW 121
396 EnCase Forensic v5.05 User Manual
Copyright © 2006 Guidance Software, Inc. May not be copied or reproduced without the written permission of Guidance Software, Inc.
Archiving Evidence 323Attachments subtab 182Attempt Direct Connection 160Auto Reconnect 163Auto Save Minutes 155
BBackup 25Backup folder 25Bad signature 140Barebones Boot Disk 39, 40Base64 and UUE encoding 265Big-Endian Unicode 245BIOS 81, 368Block Size 23Bookmark Folder Structure 352Bookmark options 344Bookmarking Search Hits 258Bookmarks 19, 180, 329Bookmarks subtab 17, 19, 180Bookmarks tab 180Bookmarks, Copy/UnErase 223Bookmarks, Export and Import 26Bookmarks, exporting 26Boot Procedure 44bootfloppy.E01 40Booting the restored drive 320
CCanceling a search 259Case files compatibility 36Case Management 153Case management 153Case Options 154Case Time Settings 329Cases 178Cases tab 16, 178CD and DVD file systems 37CDFS 375CD-R 121CD-R Diagnostic 391CD-ROM 121CD-RW 121
Certs 25Change from a system diskette to a boot floppy 40Changing font size 302Character Map 308Clean boot 76Cleaning house 325Client to Node (Local) 161Client to Node (SAFE) 162Cluster 20Cluster Bitmaps 372Cluster number 218Clusters 372Code Page tab 298Colors Options 157Compressed files 264Compression 379Compute hash values 96, 113Concurrent case management 153Conditions tab 27Configuration Questions 37Connecting to media 127Connecting to remote media 125Console 99, 217, 272Convert Drive Geometry 318Copy Folders 224Copy/UnErase 64, 221Cracking encrypted or password-protected files 286CRC 23CRC (Cyclical Redundancy Checksum) 380Create Boot Disk 43Creating a Hash Set 141Creating a new case 151Creating a new cCase 127Creating Conditions 275Creating Filters 275Crossover preview / acquisition, LinEn 59Cylinder 368
DDate and time FAQs 220Date Bookmark 333Date Format 157DBXtract 389
Index 397
Copyright © 2006 Guidance Software, Inc. May not be copied or reproduced without the written permission of Guidance Software, Inc.
Decode Shell Extension 390Default Export Folder 152Deleting partitions 281Details 217Devices 181Devices subtab 181Dir to Html 391Disk 1 31Disk 2 31Disk Compare 390Disk Configurations 103Dixon Box 218Do not add 69, 95, 112Do not Write Non-ASCII Characters 222Documenting files on media 361DOS 39DOS Directory Entry Bookmark 333Download 36Drive geometry 368Drive geometry problems 81Drives, disks and volumes 370DriveSpace volume 285Drive-to-Drive acquisition, LinEn 58Dynamic Disk 105
EEditing EnScripts 271Editing Filters 274E-Mail 229E-Mail and Internet artifacts 229Email subtab 18, 182EN.EXE 44, 75, 76Enable ART and PNG image display 156Enable Picture Viewer 156ENBCD 22EnCase Acquisition 38EnCase Boot CD (ENBCD) 42EnCase Boot Disk 39, 42EnCase Boot Disk (ENBD) 47EnCase Boot Disk FAQs 46EnCase Boot Disk, booting 44EnCase Enterprise 12EnCase for DOS 47
EnCase Forensic 11EnCase icon descriptions 202EnCase Installation CD 31EnCase Network Boot CD (ENBCD) 45EnCase Network Boot Disk 45EnCase Network Boot Disk (ENBD) 39, 45, 73EnCase program icon 34EnCase Views 178enlinuxpc 37EnScript and Filters 269EnScript Options 159EnScript path 270EnScript Types 190EnScript Types tab 190EnScript View 215EnScripts 28, 149, 269EnScripts tab 189enstart.exe 34, 35, 36, 37Entering Keywords 244Enterprise Options 160Entire Physical File 222Entries subtab 17Error messages 169Evidence file format 381Evidence file name 218Evidence storage 379Examining flash media 122Export folder 25Exporting Keywords 248Exporting the Report 358Exporting/importing Bookmarks 348Exporting/importing Keywords 248EXT2/3 37, 375Extended DOS partition 371
FFastBloc 64, 91FastBloc Acquisitions 91FastBloc Field Edition (FE) 91FastBloc indicators 93FastBloc Lab Edition (LE) 91FAT and NTFS Info Record Finder 149FAT file systems 51

398 EnCase Forensic v5.05 User Manual
Copyright © 2006 Guidance Software, Inc. May not be copied or reproduced without the written permission of Guidance Software, Inc.
FAT12 37FAT16 37FAT32 37FDISK 319FFS (BSD) 37Field acquisitions 393File Allocation Table (FAT) 374File entries 373File Extents subtab 17, 19File Finder 149File Group Bookmark 330, 340File Hashing 141File Mounter EnScript module 261File offset 218File Segment Size 100File Signature 381File Signatures 136, 184File Signatures tab 184File slack 373File system concepts 372File systems 37, 374file systems 22File Types 183, 226File Types tab 183File Viewers 184, 225File Viewers tab 184File Viewing FAQs 226Filter Conditions 27Filters 273Find 219Finding web artifacts 235Firewall 78FireWire / USB acquisitions 56First steps 125Flag Lost Files 26, 157Flash Card reader/writers 122Flash media 122Floppy Disks 120Folder Information Bookmark 330, 337Font recommendations 302Fonts Options 158Fonts tab 296
Foreign language Bookmarking 311Foreign language Keyword searches 307Foreign language support 295Forensic Terminology 367
GGallery View 202, 210Global Options 155Globally Unique Identifiers (GUIDs) 24Go To Parent 22Gpart 390Granularity 23, 56, 88GREP 245, 383GREP examples 384GUEST.EXE 120
HHard drive anatomy 368Hard drive layout 370Hardware Disk Configuration 106Hash 141hash 48Hash Library 147Hash Sets 141Hash sets 141Hash Sets tab 190Hashing, DOS 48, 49Hashing, LinEn 56HashKeeper Hash Sets 143Head 368Help folder 26Help resources 10Hex 216HFS 37, 375HFS+ 37, 375Hiding and showing columns 201Highlighted Data Bookmark 330History 229, 235History subtab 18, 183Home Plate 178Home subtab 17, 178, 182Hyper Text Markup Language (HTML) 358
Index 399
Copyright © 2006 Guidance Software, Inc. May not be copied or reproduced without the written permission of Guidance Software, Inc.
IIE History time interpretation 236ifconfig 56Image verification 382Importing Keywords 250Include folder 270INFO2 285Initialize Case 149installation files and folders 25Installing EnCase 32Installing the Servlet 34Integers Bookmark 333Interface 176International Keywords 246Inter-partition space 371Invalid picture timeout 156IrfanView 389
JJFS 37JFS1 22JFS2 22JFS2 (AIX 37
KKeyword groups 243Keyword searches 243Keyword Tester 27, 247Keywords 243Keywords tab 185keywords.ini 21Known 141
LLab analysis 394lap-link (null-modem) cable 67Length 218License Agreement 1, 33LinEn 21, 55, 73, 75, 77LinEn setup 57LinEn, troubleshooting 77Link File Parser 150Live Device indicators 93Live Windows Registry 287
Local Keywords 21Lock 217Lock Box 217Locking / Unlocking 47Log Record Bookmark 330Logging Into a SAFE Server 126Logical Evidence File 27Logical Evidence Files 176Logical File Only 222Logical file size 373Logical restore 320Logical sector number 218logon 125Lost Files 136Lost Files in UFS and EXT2/3 136LVM8 22
MMailbag Assistant 390Master Boot Record (MBR) 370Master File Table 136Match 141Maximum File Segment Size 24MBXtract 390MD5 Hash 379Message Boards 11MFT 136Mirrored 103Mode, DOS 52Move or Copy Bookmarks 348MS Outlook E-Mail 266
NNavigating EnCase 151Navigation data 218net stop 35netstat 36Network Interfaces and Users 292Network Support 76Node to Client 162Non-FastBloc write-blockers 101Notable 141Notable File Bookmark 330, 338
400 EnCase Forensic v5.05 User Manual
Copyright © 2006 Guidance Software, Inc. May not be copied or reproduced without the written permission of Guidance Software, Inc.
Notes Bookmark 330, 335NSRL Hash Sets 145NTFS 37, 374NTFS compressed files 267
OOLE files 262Open Files 287, 292Open Ports 287, 288Open Ports table columns 288Options Dialog 154Organizing columns 200OST2PST 390Outlook Express E-mail 264Overwrite diskette with a boot floppy base image 40
PPalm 37PalmOS 375Palms supported 109pane locations 16Panes 219parallel port 67Partition Entry Bookmark 333Partition table 371PC hardware 367PCI cards supported 74PCMCIA cards supported 74PDA in Console mode 109PDF manual 28Permissions subtab 17, 19Physical file size 373Physical restore 316Physical sector number 218Physical vs. Logical restore 315Picture 216Platter 369Presenting multiple images 356Presenting Search Results 362Presenting the findings 351Preview, laptop computers 65Preview, Linux and Unix 64Previewing 63
Previewing advantages 64Previewing lmitations 63Private Key Caching 163Processes table columns 290Professional Services Division 13PST Cracker 390
QQueries 275Queries tab 27Quick Reacquisition 23, 124Quick View Plus 389Quit, DOS 53
RRAID 103RAID 0
Striping 376RAID 1
Mirroring 376RAID 5 377RAID, Software 104RAID-10 103, 108RAID-5 103, 108RAID-5, validating parity 108RAM 367RAM and Disk Slack 222RAM slack 374RAM Slack Only 222Raw Image 171Read Ahead 23ReadMe 33Rearranging columns 200Rebuilding the Hash Library 147Recompute hash values 96, 113Reconstructed HTML 332Recover Folders 133Recover Folders on FAT volumes 133Recover NTFS Folders 134Recovered information 284Recovering Folders from a formatted drive 282Recovering partitions 277Recycle Bin 284
Index 401
Copyright © 2006 Guidance Software, Inc. May not be copied or reproduced without the written permission of Guidance Software, Inc.
Red Hat 57Refresh 258Regional settings 310Registry Bookmark 330Registry Files 261Registry files 261Reiser 37, 375Remote acquisition 129Reordering Bookmarks for Reports 354Replace Non-ASCII Characters with DOT 222Replace source device 69, 95, 112Replace source drive 95Report 217, 351Report View 214Requirements 9Restart Acquisition 23, 70, 71, 99Restoration FAQs 322Restoring evidence 315Rich Edit Control in Bookmarks 313Rich Text Format (RTF) 358Right-to-Left (RTL) languages 306ROM 367Root Folder 372ROT 13 Encoding 332RTL Reading 245Running EnScripts 271
SSAFE Administration 125SafeBack 87, 173SafeBack, DOS 87Scan for LVM 22Script Security 158, 159SCSI 108SCSI controller cards 74Search each file for keywords 96, 113Search file slack 97, 114Search Hits subtab 181Search only slack area of the files in the Hash Library97, 114Search Options 252Search Summary 330Search, Hash and Signature Analysis 70
Search, Hash, and Signature Analysis 96, 113Sector 368Sector offset 218Secure Storage subtab 17, 181Security IDs tab 185Security key
Drivers 31Security Key Drivers 32Security key IDs 10Selected keywords only 97, 114Server mode 50Server mode, DOS 50, 51Sessions Option 167SETUP.EXE 31setup.exe 35, 37Show Errors 223Show True Show False 155Signature Analysis 136Single Files 27, 175Snapshot 287, 343Snapshot Bookmark 330Sorting 201Sources subtab 20Sources table column 20Spanned 103Split files above (MB) 223Starting a search 251Starting a Signature Analysis 139Starting and stopping Filters 274Storage computer/media 367Storage folder 26Storage Paths Options 159Styles Bookmark 334Subject computer/media 367Subjects subtab 21Subtab, Attachments 233Superdisks 121SuSE 9.1 57Symbolic Link table column 22System Snapshot 286
TTable Columns, Email 233
402 EnCase Forensic v5.05 User Manual
Copyright © 2006 Guidance Software, Inc. May not be copied or reproduced without the written permission of Guidance Software, Inc.
Table columns, History 237Table columns, WebCache 240Table Pane 191Table View 191Table View columns 192Technical Support 10Temp folder 26Temporary Folder 152Text 216, 331Text Styles tab 188The Forensic Lab 393Third-party utilities 389Thumbs.db 268Time Format 157Time Zone settings 130Timeline View 213TiVo 22TiVo Series 1 and 2 37to Drive 81Track 369Training 12
UUFS 376UFS (Unix) 37Undelete files before searching 97, 114Unicode 245, 295Unicode characters 300Unicode fonts 299Unique EMail Address List 150Unknown 141Update existing boot floppy 40Updates 36USB Acquisition 76USB Destination 76user interface 15Users Forum 11UTF-7 246UTF-8 246
Vverify 170Verify evidence files 65
Verify files signatures 96, 113Verifying 170Verifying evidence 170Verifying evidence files 324View File Structure 261View Pane 215Viewing Compound Files 261Viewing Files 221Viewing non-Unicode files 303Viewing Search Hits 253Viewing Unicode files 297VMware 173Volatile data components 287Volatile data defined 286Volume Boot Sector 371Volume slack 374
WWaiting to connect 77Web browsing history 282Web Cache 229, 238WebCache subtab 18, 183Win2000 Info File Record Bookmark 334Win95 Info File Record Bookmark 334Windows acquisition issues 39Windows XP SP2 78WinHelp 28Wipe Drive 325Write blocking 39Write-protecting floppy disks 121
ZZip and Jaz disks 119Zip Disks 119
Related Documents


