40873/06.11

Welcome message from author
This document is posted to help you gain knowledge. Please leave a comment to let me know what you think about it! Share it to your friends and learn new things together.
Transcript

40873/06.11
AUTOMATIC BREAD MAKERMACHINE A PAIN AUTOMATIQUEPANIFICADORA AUTOMÁTICA
DBM450
Register this product on-line and receive a free trial issue of Cook's Illustrated. Visit www.delonghiregistration.com.Visit www.delonghi.com for a list of service centers near you.
Enregistrez ce produit en ligne et recevez un numéro gratuit de Cook's Illustrated. Visitezwww.delonghiregistration.com.Visitez www.delonghi.com pour y voir une liste des centres de réparation proches dechez vous.
Registre este producto en línea y reciba un ejemplar gratis de Cook's Illustrated. Visite www.delonghiregistration.com.Visite www.delonghi.com para ver la lista de centros de servicios cercanos a usted.
Instructions for use Keep these instructions Mode d'emploi Conservez cette noticeInstrucciones para el usoRepase y guarde estas instruccionesLea cuidadosamente este instructivo antes de usar su aparato.
ELECTRICAL SPECIFICATIONS: CARACTÉRISTIQUES ÉLECTRIQUES: CARACTERISTICAS ELECTRICAS: 120V~60Hz 780W

a
b
c
i
j
k
d
e
f
g
h
l
m
n
q
s
21
op
r
t
22
23
27
26
25
24
1 2 3
7 8 9
13 14 15
19 20
4 5 6
10 11 12
16 17 18
1 141lb 1.5lb 2lb
6
IMPORTANT SAFEGUARDS• Read these instructions carefully and retain for fu-
ture reference.• Remove all packaging and any labels.• Do not touch hot surfaces. Accessible surfaces are li-
able to get hot during use. Always use oven glovesto remove the hot bread pan.
• To prevent spillages inside the oven chamber, alwaysremove the bread pan from the machine beforeadding the ingredients. Ingredients that splash ontothe heating element can burn and cause smoke.
• Do not use this appliance if there is any visible sign ofdamage to the supply cord or if it has been acciden-tally dropped.
• The use of accessory attachments not recommendedby the appliance manufacturer may cause injuries.
• Do not immerse this appliance, the supply cord orthe plug in water or any other liquid.
• Always unplug this appliance after use, before fittingor removing parts or before cleaning. Allow to coolbefore putting on or taking off parts.
• Do not let the electrical supply cord hang over theedge of a work surface or allow it to touch hot sur-faces such as a gas or electric stove.
• Do not place on or near a hot gas or electric burner,or in a heated oven.
• Extreme caution must be used when moving an ap-pliance containing hot oil or other hot liquids.
• Always attach plug to appliance first, then plug cordinto the wall outlet. To disconnect, turn any control to‘off’, then remove plug from wall outlet.
• This appliance should only be used on a flat heat re-sistant surface.
• Do not place your hand inside the oven chamber afterthe bread pan has been removed as it will be veryhot.
• Do not touch moving parts within the Bread Maker.• Do not exceed the maximum flour and raising agent
quantities specified in the recipes supplied.
• Do not place the Bread Maker in direct sun light, nearhot appliances or in a draft. All these things can af-fect the internal temperature of the oven, whichcould spoil the results.
• Do not use this appliance outdoors.• Do not operate the Bread Maker when it is empty as
this could cause it serious damage. • Do not use the oven chamber for any type of storage. • Do not cover the vents on the side of the machine
and ensure there is adequate ventilation around thebread maker during operation.
• This appliance is not intended to be operated bymeans of an external timer or separate remote-con-trol system.
• This appliance is not intended for use by persons (in-cluding children) with reduced physical, sensory ormental capabilities, or lack of experience and knowl-edge, unless they have been given supervision or in-struction concerning use of the appliance by a personresponsible for their safety.
• Children should be supervised to ensure that they donot play with the appliance.
• Only use the appliance for its intended domestic use.De’Longhi will not accept any liability if the appli-ance is subject to improper use, or failure to complywith these instructions.
Before plugging in• Make sure your electricity supply is the same as the
one shown on the underside of your Bread Maker.
Before using your bread maker for the first time• Wash all parts (see care and cleaning).• Fit the lid (see care & cleaning).• Fit the automatic dispenser to the underside of the lid
(see automatic dispenser).
This product is designed exclusively for household use
SAVE THESE INSTRUCTIONS
7
Electrical corda) A short power-supply cord (or detachable power-
supply cord) should be used to reduce the risk re-sulting from becoming entangled in or tripping overa longer cord.
b) Longer detachable power-supply cords or extensioncords are available and may be used if care is exer-cised in their use.
c) If a longer detachable power-supply cord or exten-sion cord is used:1 The marked electrical rating of the cord set or ex-
tension cord should be at least as great as the elec-trical rating of the appliance, and
2 The cord should be arranged so that it will notdrape over the countertop or tabletop where it canbe pulled on by children or tripped over uninten-tionally.
Note: If the appliance is of the grounded type, the ex-tension cord should be a grounding-type 3-wire cord.
Polarized plug (120V models only)This appliance has a polarized plug (one blade is widerthan the other). To reduce the risk of electric shock, thisplug is intended to fit into a polarized outlet only oneway. If the plug does not fit fully into the outlet, reversethe plug. If it still does not fit, contact a qualified elec-trician. Do not attempt to modify the plug in any way.
8
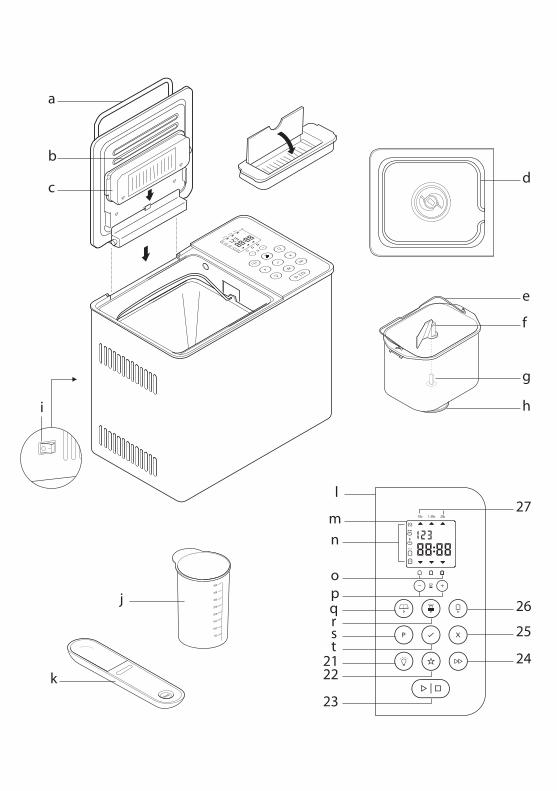
KEYa lid handleb viewing windowc automatic dispenserd heating elemente bread pan handlef kneaderg drive shafth drive couplingi on/off switchj measuring cupk dual measuring spoon (1/2 tsp, 1 tsp, 1/2 tbsp or 1 tbsp.)l control panelm display windown program status indicatoro crust color indicators (light, medium, dark)p delay timer buttonsq menu buttonr loaf size buttons program buttont confirm button21 viewing light22 favorite button23 start/stop button24 rapid bake button25 cancel button26 crust color button27 loaf size indicators
HOW TO MEASURE INGREDIENTS(refer to illustrations 3 to 7)
It is extremely important to use the exact measure of ingredientsfor best results.
• Always measure liquid ingredients in the see-through measur-ing cup with graduated markings provided. Liquid should justreach marking on cup at eye level, not above or below (see 3).
• Always use liquids at room temperature, 20ºC/68ºF, unless mak-ing bread using the rapid 1 hour cycle. Follow the instructionsgiven in the recipe section.
• Always use the measuring spoon provided to measure smallerquantities of dry and liquid ingredients. Use the slider to selectbetween the following measure - 1/2 tsp, 1 tsp, 1/2 tbsp or 1 tbsp.Fill to the top and level off the spoon (see 6).
(I) ON/OFF SWITCHYour De'Longhi breadmaker is fitted with an ON/OFF switch andwill not operate until the “on” switch is pressed.
• Plug in and press the ON/OFF switch (i) situated at the back ofthe breadmaker - the unit will beep and setting 1 (3:15) will ap-
pear in the display window.• Always switch off and unplug your breadmaker after use.
(N) PROGRAM STATUS INDICATORThe program status indicator is situated in the display windowand the indicator arrow will point to the stage of the cycle thebreadmaker has reached as follows: Pre-heat – The pre-heat feature only operates at the startof the wholewheat (30 minutes), wholewheat rapid (5 minutes)and gluten free (8 minutes) settings to warm the ingredientsbefore the first kneading stage begins. There is no kneader ac-tion during this period.
Knead – The dough is either in the first or 2nd kneadingstage or being knocked back between the rising cycles. Duringthe last 20 minutes of the 2nd Kneading cycle on setting (1),(2), (3). (4). (5). (6). (9), (10), (11) and (13) the automatic dis-penser will operate and an alert will sound to tell you to add anyadditional ingredients manually.
Rise – the dough is in either the 1st, 2nd or 3rd rising cycle.
Bake – The loaf is in the final baking cycle.Keep Warm – The bread maker automatically goes into theKeep warm mode at the end of the baking cycle. It will stay onthe keep warm mode for up to 1 hour or until the machine isturned off, which ever is soonest. Please note: the heating ele-ment will switch on and off and will glow intermittently duringthe keep warm cycle.
9
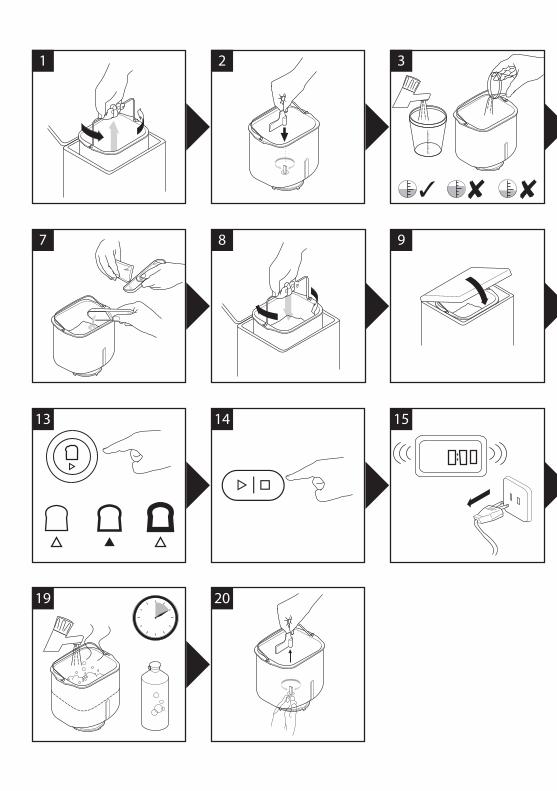
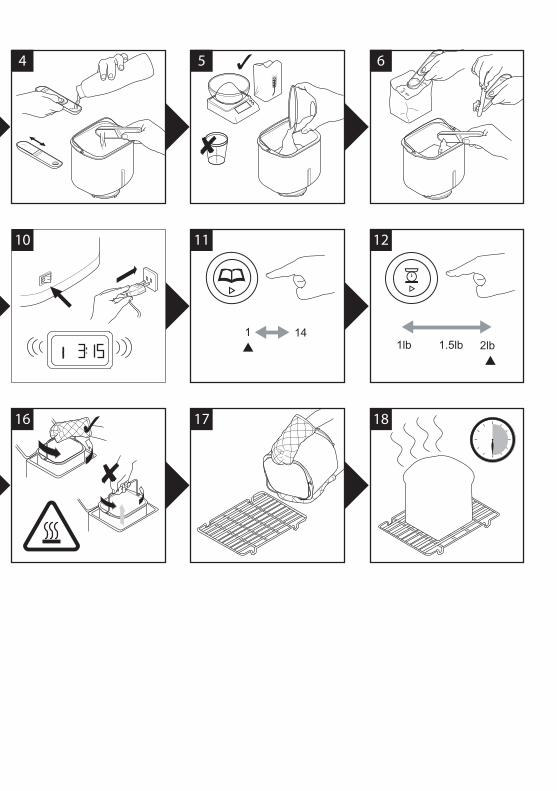
USING YOUR BREAD MAKER(refer to illustration panel)1 Remove the bread pan by holding the handle and turning
the pan to the back of the baking chamber.2 Fit the kneader.3 Pour the water into the bread pan.4 Add the rest of the ingredients to the pan in the order listed
in the recipes.5-6-7 Ensure that all the ingredients are weighed accurately
as incorrect measures will produce poor results.8 Insert the bread pan into the oven chamber by positioning
the bread pan at an angle towards the back of the unit. Thenlock the pan by turning it towards the front.
9 Lower the handle and close the lid.10 Plug in and switch on - the unit will beep and default to set-
ting 1 (3:15).11 Press the MENU button (q) until the required program is se-
lected. The breadmaker will default to 2lb & medium crustcolor. Note: If using the “RAPID BAKE” , just press thebutton and the program will start automatically.
12 Select the loaf size by pressing the LOAF SIZE button (r) until the indicator moves to the required loaf size.
13 Select the crust color by pressing the CRUST button untilthe indicator moves to the required crust color (light,medium or dark).
14 Press the START/STOP button . To stop or cancel the pro-gram press the START/STOP button for 2 -3 seconds.
15 At the end of the baking cycle unplug the breadmaker.16 Remove the bread pan by holding the handle and turning
the pan to the back of the baking chamber. Always use ovengloves as the pan handle will be hot and take care not totouch the automatic dispenser on the underside of the lid asthis will also be hot.
17 Then turn out onto a wire rack to cool.18 Leave the bread to cool for at least 30 minutes before slicing,
to allow the steam to escape. The bread will be difficult toslice if hot.
19 Clean the bread pan and kneader immediately after use (seecare and cleaning).
(21) VIEWING LIGHT• The LIGHT button can be pressed at any time to view the pro-
gram status in the display window or to check the progress ofthe dough inside the baking chamber.
• The baking chamber viewing light will automatically switch offafter 60 seconds.
• If the light bulb stops working it must be replaced by De’Longhior an authorized De’Longhi repairer (see service and customercare).
(C) AUTOMATIC DISPENSERYour DBM450 breadmaker is fitted with an automatic dis-penser for releasing additional ingredients directly into thedough during the kneading cycle. This ensures that the ingre-dients are not overprocessed or crushed and are evenly distrib-uted.
To fit and use the automatic dispenser1 Fit the dispenser (c) to the lid using the alignment arrows .• The dispenser will not locate and lock into position unless fitted
the correct way round. • The breadmaker can be used without the dispenser fitted if re-
quired but the manual alert will still sound.2 Fill the dispenser with the required ingredients.3 The automatic dispenser operates after approx. 15-20 minutes
of kneading and an audible alert sounds as well in case youneed to add ingredients manually.
Hints & tipsNot all ingredients are suitable for use with the automatic dis-penser and for best results follow the guidelines below:
• Do not overfill the dispenser – follow the recommended quan-tities specified in the recipes supplied.
• Keep the dispenser clean and dry to prevent ingredients fromsticking.
• Cut ingredients roughly or lightly dust with flour to reduce stick-iness, which may prevent the ingredients from being released.
10
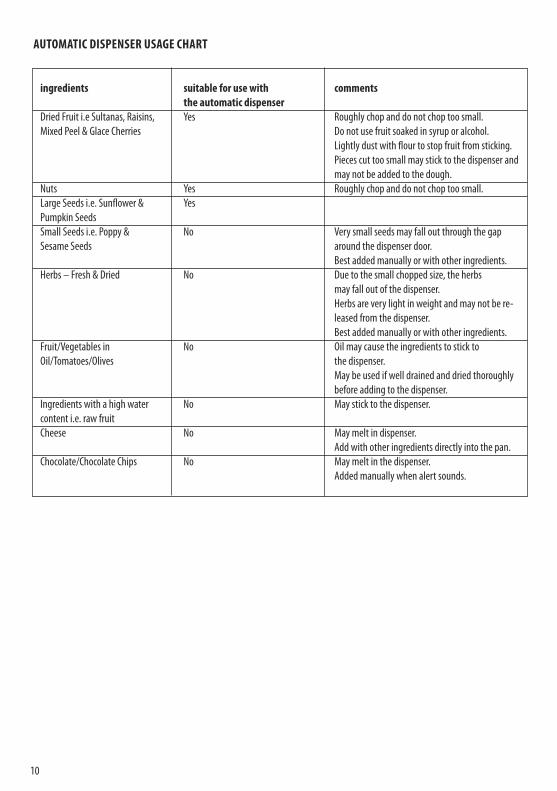
ingredients suitable for use with commentsthe automatic dispenser
Dried Fruit i.e Sultanas, Raisins, Yes Roughly chop and do not chop too small.Mixed Peel & Glace Cherries Do not use fruit soaked in syrup or alcohol.
Lightly dust with flour to stop fruit from sticking.Pieces cut too small may stick to the dispenser andmay not be added to the dough.
Nuts Yes Roughly chop and do not chop too small.Large Seeds i.e. Sunflower & YesPumpkin SeedsSmall Seeds i.e. Poppy & No Very small seeds may fall out through the gapSesame Seeds around the dispenser door.
Best added manually or with other ingredients.Herbs – Fresh & Dried No Due to the small chopped size, the herbs
may fall out of the dispenser.Herbs are very light in weight and may not be re-leased from the dispenser.Best added manually or with other ingredients.
Fruit/Vegetables in No Oil may cause the ingredients to stick to Oil/Tomatoes/Olives the dispenser.
May be used if well drained and dried thoroughlybefore adding to the dispenser.
Ingredients with a high water No May stick to the dispenser.content i.e. raw fruitCheese No May melt in dispenser.
Add with other ingredients directly into the pan.Chocolate/Chocolate Chips No May melt in the dispenser.
Added manually when alert sounds.
AUTOMATIC DISPENSER USAGE CHART
11
LAn
aler
t will
soun
d befo
re th
e end
of th
e 2nd
knea
ding c
ycle
to ad
d ing
redie
nts i
f the
recip
e rec
omm
ends
doing
so.
LL
The B
read
mak
er w
ill au
tom
atica
lly go
in to
the k
eep w
arm
mod
e at t
he en
d of t
he ba
king c
ycle.
It w
ill sta
y in t
he ke
ep w
arm
mod
e for
up to
1 ho
ur or
until
the m
achin
e is t
urne
d off,
whic
h eve
r is so
on-
est.
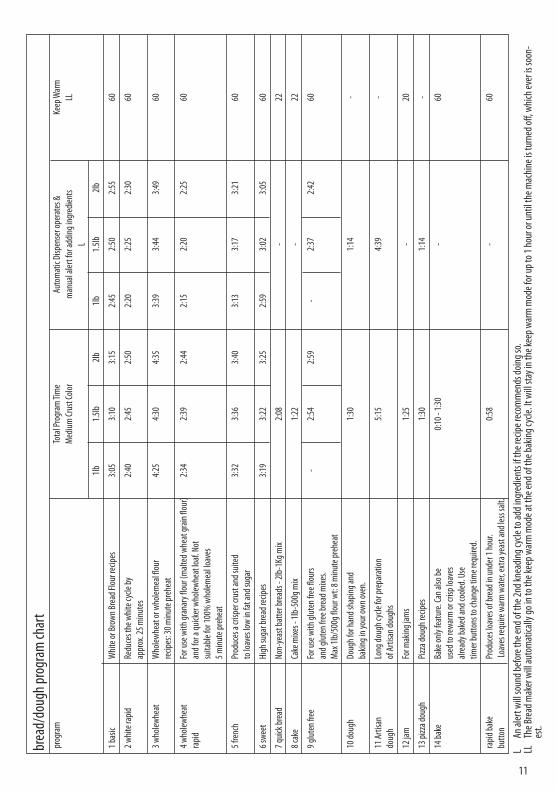
brea
d/do
ugh p
rogr
am ch
art
prog
ram
Tota
l Pro
gram
Tim
eAu
tom
atic
Disp
ense
r ope
rate
s &Ke
ep W
arm
Med
ium Cr
ust C
olor
man
ual a
lert f
or ad
ding i
ngre
dient
sLL
L1lb
1.5lb
2lb1lb
1.5lb
2lb
1 bas
icW
hite o
r Bro
wn Br
ead F
lour r
ecipe
s3:0
53:1
03:1
52:4
52:5
02:5
560
2 whit
e rap
idRe
duce
s the
whit
e cyc
le by
2:40
2:45
2:50
2:20
2:25
2:30
60ap
prox
. 25 m
inute
s
3 who
lewhe
atW
holew
heat
or w
holem
eal fl
our
4:25
4:30
4:35
3:39
3:44
3:49
60re
cipes
: 30 m
inute
preh
eat
4 who
lewhe
atFo
r use
with
gran
ary f
lour (
malt
ed w
heat
grain
flour
) 2:3
42:3
92:4
42:1
52:2
02:2
560
rapid
and f
or a
quick
er w
holew
heat
loaf.
Not
suita
ble fo
r 100
% w
holem
eal lo
aves
5 minu
te pr
ehea
t
5 fre
nch
Prod
uces
a cri
sper
crus
t and
suite
d3:3
23:3
63:4
03:1
33:1
73:2
160
to lo
aves
low
in fat
and s
ugar
6 swe
etHi
gh su
gar b
read
recip
es3:1
93:2
23:2
52:5
93:0
23:0
560
7 quic
k bre
adNo
n-ye
ast b
atte
r bre
ads -
2lb-
1Kg m
ix2:0
8-
22
8 cak
eCa
ke m
ixes -
1lb-
500g
mix
1:22
-22
9 glut
en fr
eeFo
r use
with
glut
en fr
ee flo
urs
-2:5
42:5
9-
2:37
2:42
60an
d glut
en fr
ee br
ead m
ixes.
Max
1lb/
500g
flour
wt:
8 minu
te pr
ehea
t
10 do
ugh
Doug
h for
hand
shap
ing an
d 1:3
01:1
4-
bakin
g in y
our o
wn ov
en.
11 Ar
tisan
Long
doug
h cyc
le fo
r pre
para
tion
5:15
4:39
-do
ugh
of Ar
tisan
doug
hs
12 ja
mFo
r mak
ing ja
ms
1:25
-20
13 pi
zza d
ough
Pizza
doug
h rec
ipes
1:30
1:14
-
14 ba
keBa
ke on
ly fea
ture.
Can a
lso be
0:10 -
1:30
-60
used
to re
warm
or cr
isp lo
aves
alrea
dy ba
ked a
nd co
oled.
Use
timer
butto
ns to
chan
ge ti
me r
equir
ed.
rapid
bake
Prod
uces
loav
es of
brea
d in u
nder
1 ho
ur.0:5
8-
60bu
tton
Loav
es re
quire
war
m w
ater,
extra
yeas
t and
less
salt.

12
(P) DELAY TIMER The Delay timer allows you to delay the bread making processup to 15 hours. The delayed start cannot be used with the“RAPID BAKE” program or programs (7) to (13).IMPORTANT: When using this delayed start function you mustnot use perishable ingredients – things that ‘go off’ easily atroom temperature or above, such as milk, egg, cheese and yo-gurt etc.To use the DELAY TIMER simply place the ingredients in thebread pan and lock the pan into the bread maker. Then:
• Press the MENU button to choose the required program –the program cycle time is displayed.
• Select the crust color and size required.• Then set the delay timer.• Press the (+) TIMER button and keep pressing until the total
time required is displayed. If you go past the required time pressthe (-) TIMER button to go back. The timer button when pressed,moves in 10 minute increments. You do not need to work outthe difference between the program time selected and the totalhours required as the bread maker will automatically includethe setting cycle time.Example: Finished loaf required at 7am. If the breadmaker isset up with the required recipe ingredients at 10pm theevening before, total time to be set on the delayed timer is 9hours.
• Press the MENU button to chooseyour program e.g. 1 and use the(+) TIMER button to scroll the timein 10 minute increments to display‘9:00’. If you go past ‘9:00’, simplypress the (-) TIMER button untilyou return to ‘9:00’.
• Press the START/STOP button andthe display colon (:) will flash. Thetimer will start to count down.
• If you make a mistake or wish tochange the time set, press theSTART/STOP button until thescreen clears. You can then resetthe time.
13
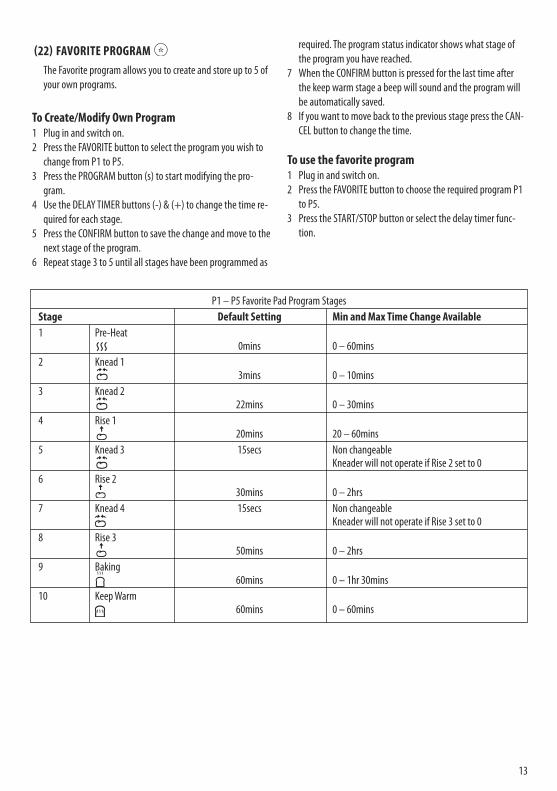
(22) FAVORITE PROGRAM The Favorite program allows you to create and store up to 5 ofyour own programs.
To Create/Modify Own Program1 Plug in and switch on.2 Press the FAVORITE button to select the program you wish to
change from P1 to P5.3 Press the PROGRAM button (s) to start modifying the pro-
gram.4 Use the DELAY TIMER buttons (-) & (+) to change the time re-
quired for each stage.5 Press the CONFIRM button to save the change and move to the
next stage of the program.6 Repeat stage 3 to 5 until all stages have been programmed as
required. The program status indicator shows what stage ofthe program you have reached.
7 When the CONFIRM button is pressed for the last time afterthe keep warm stage a beep will sound and the program willbe automatically saved.
8 If you want to move back to the previous stage press the CAN-CEL button to change the time.
To use the favorite program1 Plug in and switch on.2 Press the FAVORITE button to choose the required program P1
to P5. 3 Press the START/STOP button or select the delay timer func-
tion.
P1 – P5 Favorite Pad Program StagesStage Default Setting Min and Max Time Change Available1 Pre-Heat
0mins 0 – 60mins2 Knead 1
3mins 0 – 10mins3 Knead 2
22mins 0 – 30mins4 Rise 1
20mins 20 – 60mins5 Knead 3 15secs Non changeable
Kneader will not operate if Rise 2 set to 06 Rise 2
30mins 0 – 2hrs7 Knead 4 15secs Non changeable
Kneader will not operate if Rise 3 set to 08 Rise 3
50mins 0 – 2hrs9 Baking
60mins 0 – 1hr 30mins10 Keep Warm
60mins 0 – 60mins
14
POWER INTERRUPTION PROTECTIONYour Bread Maker has an 8 minute power interruption protection incase the unit is accidentally unplugged during operation. The unitwill continue the program if plugged back in straight away.
CARE AND CLEANING• Unplug the bread maker and allow to cool completely before
cleaning.• Do not immerse either the bread maker body or the outside base
of the bread pan in water.• Do not use abrasive scouring pads or metal implements.•l Use a soft damp cloth to clean the outside and inside surfaces of
the bread maker if necessary.
Bread pan• Do not dishwash the bread pan.• Clean the bread pan and the kneader immediately after each
use by partially filling the pan with warm soapy water. Leave tosoak for 5 to 10 minutes. To remove the kneader, turn clockwiseand add after lift off (see 20). Finish cleaning with a soft cloth,rinse and dry.If the kneader cannot be removed after 10 minutes, hold theshaft from underneath the pan and twist back and forth untilthe kneader is released.
Glass lid• Lift off the glass lid and clean with warm soapy water.• Do not dishwash the lid.• Ensure the lid is completely dry before refitting to the bread
maker.
Automatic dispenser• Remove the automatic dispenser from the lid and wash in warm
soapy water and if required use a soft brush to clean. Ensure thedispenser is completely dry before refitting to the lid.
15
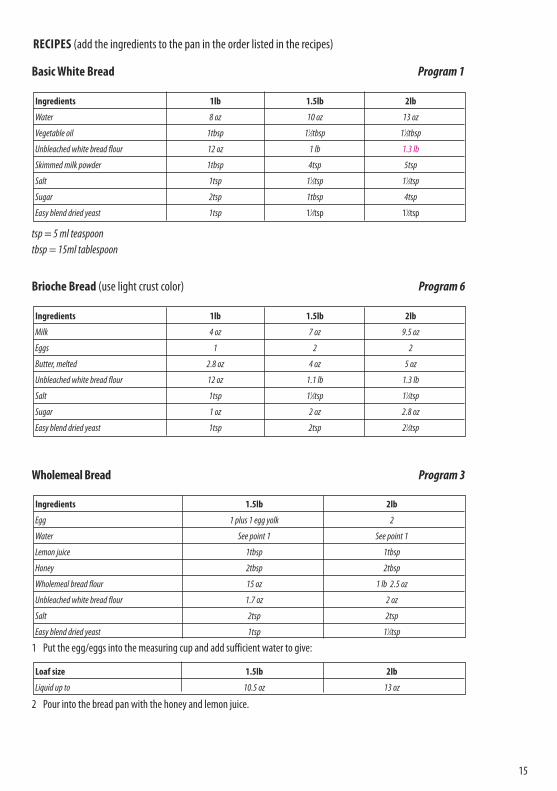
Basic White Bread Program 1
tsp = 5 ml teaspoontbsp = 15ml tablespoon
Brioche Bread (use light crust color) Program 6
Wholemeal Bread Program 3
1 Put the egg/eggs into the measuring cup and add sufficient water to give:
2 Pour into the bread pan with the honey and lemon juice.
Loaf size 1.5lb 2lb
Liquid up to 10.5 oz 13 oz
Ingredients 1.5lb 2lb
Egg 1 plus 1 egg yolk 2
Water See point 1 See point 1
Lemon juice 1tbsp 1tbsp
Honey 2tbsp 2tbsp
Wholemeal bread flour 15 oz 1 lb 2.5 oz
Unbleached white bread flour 1.7 oz 2 oz
Salt 2tsp 2tsp
Easy blend dried yeast 1tsp 11⁄2tsp
Ingredients 1lb 1.5lb 2lb
Milk 4 oz 7 oz 9.5 oz
Eggs 1 2 2
Butter, melted 2.8 oz 4 oz 5 oz
Unbleached white bread flour 12 oz 1.1 lb 1.3 lb
Salt 1tsp 11⁄2tsp 11⁄2tsp
Sugar 1 oz 2 oz 2.8 oz
Easy blend dried yeast 1tsp 2tsp 21⁄2tsp
Ingredients 1lb 1.5lb 2lb
Water 8 oz 10 oz 13 oz
Vegetable oil 1tbsp 11⁄2tbsp 11⁄2tbsp
Unbleached white bread flour 12 oz 1 lb 1.3 lb
Skimmed milk powder 1tbsp 4tsp 5tsp
Salt 1tsp 11⁄2tsp 11⁄2tsp
Sugar 2tsp 1tbsp 4tsp
Easy blend dried yeast 1tsp 11⁄2tsp 11⁄2tsp
RECIPES (add the ingredients to the pan in the order listed in the recipes)
16
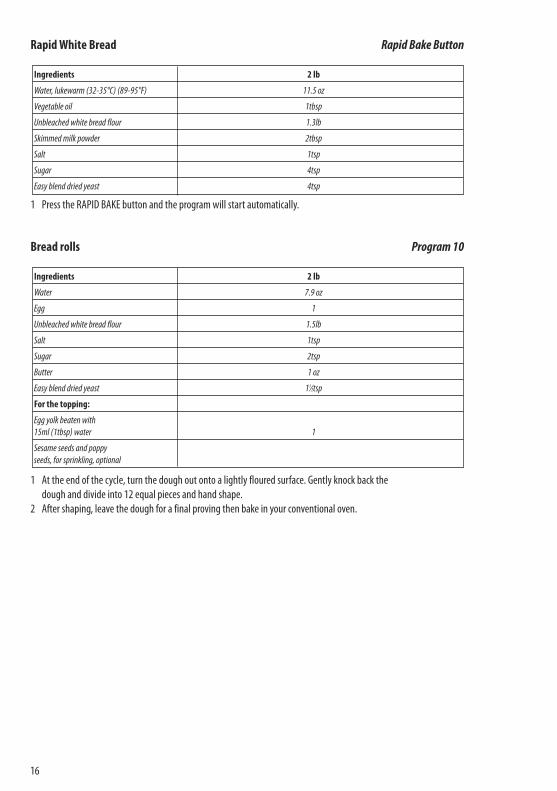
Rapid White Bread Rapid Bake Button
1 Press the RAPID BAKE button and the program will start automatically.
Bread rolls Program 10
1 At the end of the cycle, turn the dough out onto a lightly floured surface. Gently knock back the dough and divide into 12 equal pieces and hand shape.
2 After shaping, leave the dough for a final proving then bake in your conventional oven.
Ingredients 2 lb
Water 7.9 oz
Egg 1
Unbleached white bread flour 1.5lb
Salt 1tsp
Sugar 2tsp
Butter 1 oz
Easy blend dried yeast 11⁄2tsp
For the topping:
Egg yolk beaten with15ml (1tbsp) water 1
Sesame seeds and poppyseeds, for sprinkling, optional
Ingredients 2 lb
Water, lukewarm (32-35°C) (89-95°F) 11.5 oz
Vegetable oil 1tbsp
Unbleached white bread flour 1.3lb
Skimmed milk powder 2tbsp
Salt 1tsp
Sugar 4tsp
Easy blend dried yeast 4tsp
17
INGREDIENTSThe major ingredient in bread making is flour, so selecting the rightone is the key to a successful loaf.
Wheat floursWheat flours make the best loaves. Wheat consists of an outer husk,often referred to as bran, and an inner kernel, which contains thewheat germ and endosperm. It is the protein within the endospermwhich, when mixed with water, forms gluten. Gluten stretches likeelastic and the gases given off by the yeast during fermentation aretrapped, making the dough rise.
White floursThese flours have the outer bran and wheat germ removed, leavingthe endosperm which is milled into a white flour. It is essential touse strong white flour or white bread flour, because this has ahigher protein level, necessary for gluten development. Do not useplain white flour or self-raising flour for making yeast risen breadsin your bread maker, as inferior loaves will be produced. There areseveral brands of white bread flour available, use a good qualityone, preferably unbleached, for the best results.
Wholemeal floursWholemeal flours include the bran and wheat germ, which givesthe flour a nutty flavor and produces a coarser textured bread.Again, strong wholemeal or wholemeal bread flour must be used.Loaves made with 100% wholemeal flour will be more dense thanwhite loaves. The bran present in the flour inhibits the release ofgluten, so wholemeal doughs rise more slowly. Use the specialwholewheat programs to allow time for the bread to rise. For alighter loaf, replace part of the wholemeal flour with white breadflour. You can make a quick wholemeal loaf using the rapid wholewheat setting.
Strong brown flourThis can be used in combination with white flour, or on its own. Itcontains about 80-90% of the wheat kernel and so it produces alighter loaf, which is still full of flavor. Try using this flour on thebasic white cycle, replacing 50% of the strong white flour withstrong brown flour. You may need to add a little extra liquid.
Granary bread flourA combination of white, wholemeal and rye flours mixed withmalted whole wheat grains, which adds both texture and flavor.Use on its own or in combination with strong white flour.
Non-wheat floursOther flours such as rye can be used with white and wholemealbread flours to make traditional breads like pumpernickel or rye
bread. Adding even a small amount adds a distinctive tang. Do notuse on its own, as it will produce a sticky dough, which will pro-duce a dense heavy loaf. Other grains such as millet, barley, buck-wheat, cornmeal and oatmeal are low in protein and, therefore, donot develop sufficient gluten to produce a traditional loaf.These flours can be used successfully in small quantities. Try re-placing 10-20% of white bread flour with any of these alternatives.
SaltA small quantity of salt is essential in bread making for dough de-velopment and flavor. Use fine table salt or sea salt, not coarselyground salt which is best kept for sprinkling on top of hand-shapedrolls, to give a crunchy texture. Low-salt substitutes are best avoidedas most do not contain sodium. • Salt strengthens the gluten structure and makes the dough more
elastic.• Salt inhibits yeast growth to prevent over-rising and stops the
dough collapsing.• Too much salt will prevent the dough rising sufficiently.
SweetenersUse white or brown sugars, honey, malt extract, golden syrup,maple syrup, molasses or treacle.• Sugar and liquid sweeteners contribute to the color of bread,
helping to add a golden finish to the crust.• Sugar attracts moisture, so improving the keeping qualities.• Sugar provides food for the yeast, although not essential, as
modern types of dried yeast are able to feed on the natural sug-ars and starches found in the flour, it will make the dough moreactive.
• Sweet breads have a moderate level of sugar with the fruit, glazeor icing adding extra sweetness. Use the sweet bread cycle forthese breads.
• If substituting a liquid sweetener for sugar then the total liquidcontent of the recipe will need to be reduced slightly.
Fats and oilsA small amount of fat or oil is often added to bread to give a softercrumb. It also helps to extend the freshness of the loaf. Use butter,margarine or even lard in small quantities up to 25 g (1 oz) or 22ml(11⁄2 tbsp.) vegetable oil. Where a recipe uses larger amounts so theflavor is more noticeable, butter will provide the best result.• Olive oil or sunflower oil can be used instead of butter, adjust
the liquid content for amounts over 15ml (3 tsp) accordingly.Sunflower oil is a good alternative if you are concerned aboutthe cholesterol level.
• Do not use low fat spreads as they contain up to 40% water sodo not have the same properties as butter.
18
LiquidSome form of liquid is essential; usually water or milk is used. Waterproduces a crisper crust than milk. Water is often combined withskimmed milk powder. This is essential if using the time delay asfresh milk will deteriorate. For most programs water straight fromthe tap is fine, however, on the rapid one-hour cycle it needs to belukewarm.• On very cold days measure the water and leave to stand at room
temperature for 30 minutes before use. If using milk straightfrom the fridge do likewise.
• Buttermilk, yogurt, sour cream and soft cheeses such as ricotta,cottage and fromage frais can all be used as part of the liquidcontent to produce a more moist, tender crumb. Buttermilk addsa pleasant, slightly sour note, not unlike that found in countrystyle breads and sour doughs.
• Eggs may be added to enrich the dough, improve the color of thebread and help to add structure and stability to the gluten dur-ing rising. If using eggs reduce the liquid content accordingly.Place the egg in a measuring cup and top up with liquid to thecorrect level for the recipe.
YeastYeast is available both fresh and dried. All the recipes in this bookhave been tested using easy blend, fast action dried yeast whichdoes not require dissolving in water first. It is placed in a well in theflour where it is kept dry and separate from the liquid until mixingcommences.• For best results use dried yeast. The use of fresh yeast is not rec-
ommended as tends to give more variable results than driedyeast. Do not use fresh yeast with the delay timer.If you wish to use fresh yeast note the following:6g fresh yeast = 1tsp dried yeastMix the fresh yeast with 1tsp sugar and 2tbsp of the water(warm). Leave for 5 minutes until frothy.Then add to the rest of the ingredients in the pan. To get the best results the yeast quantity may need to be ad-justed.
• Use the amounts stated in the recipes; too much could cause thebread to over-rise and spill over the top of the bread pan.
• Once a sachet of yeast is opened, it should be used within 48hours, unless stated otherwise by the manufacturer. Re-seal afteruse. Resealed opened sachets can be stored in the freezer untilrequired.
• Use dried yeast before its use by date, as the potency graduallydeteriorates with time.
• You may find dried yeast, which has been manufactured espe-cially for use in bread machines. This will also produce good re-sults, though you may need to adjust the quantities
recommended.
19
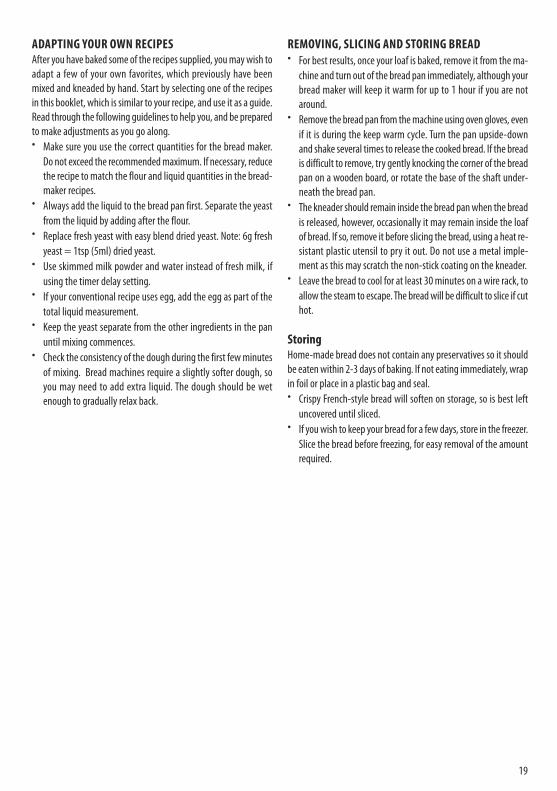
ADAPTING YOUR OWN RECIPESAfter you have baked some of the recipes supplied, you may wish toadapt a few of your own favorites, which previously have beenmixed and kneaded by hand. Start by selecting one of the recipesin this booklet, which is similar to your recipe, and use it as a guide.Read through the following guidelines to help you, and be preparedto make adjustments as you go along.• Make sure you use the correct quantities for the bread maker.
Do not exceed the recommended maximum. If necessary, reducethe recipe to match the flour and liquid quantities in the bread-maker recipes.
• Always add the liquid to the bread pan first. Separate the yeastfrom the liquid by adding after the flour.
• Replace fresh yeast with easy blend dried yeast. Note: 6g freshyeast = 1tsp (5ml) dried yeast.
• Use skimmed milk powder and water instead of fresh milk, ifusing the timer delay setting.
• If your conventional recipe uses egg, add the egg as part of thetotal liquid measurement.
• Keep the yeast separate from the other ingredients in the panuntil mixing commences.
• Check the consistency of the dough during the first few minutesof mixing. Bread machines require a slightly softer dough, soyou may need to add extra liquid. The dough should be wetenough to gradually relax back.
REMOVING, SLICING AND STORING BREAD• For best results, once your loaf is baked, remove it from the ma-
chine and turn out of the bread pan immediately, although yourbread maker will keep it warm for up to 1 hour if you are notaround.
• Remove the bread pan from the machine using oven gloves, evenif it is during the keep warm cycle. Turn the pan upside-downand shake several times to release the cooked bread. If the breadis difficult to remove, try gently knocking the corner of the breadpan on a wooden board, or rotate the base of the shaft under-neath the bread pan.
• The kneader should remain inside the bread pan when the breadis released, however, occasionally it may remain inside the loafof bread. If so, remove it before slicing the bread, using a heat re-sistant plastic utensil to pry it out. Do not use a metal imple-ment as this may scratch the non-stick coating on the kneader.
• Leave the bread to cool for at least 30 minutes on a wire rack, toallow the steam to escape. The bread will be difficult to slice if cuthot.
StoringHome-made bread does not contain any preservatives so it shouldbe eaten within 2-3 days of baking. If not eating immediately, wrapin foil or place in a plastic bag and seal.• Crispy French-style bread will soften on storage, so is best left
uncovered until sliced.• If you wish to keep your bread for a few days, store in the freezer.
Slice the bread before freezing, for easy removal of the amountrequired.
20
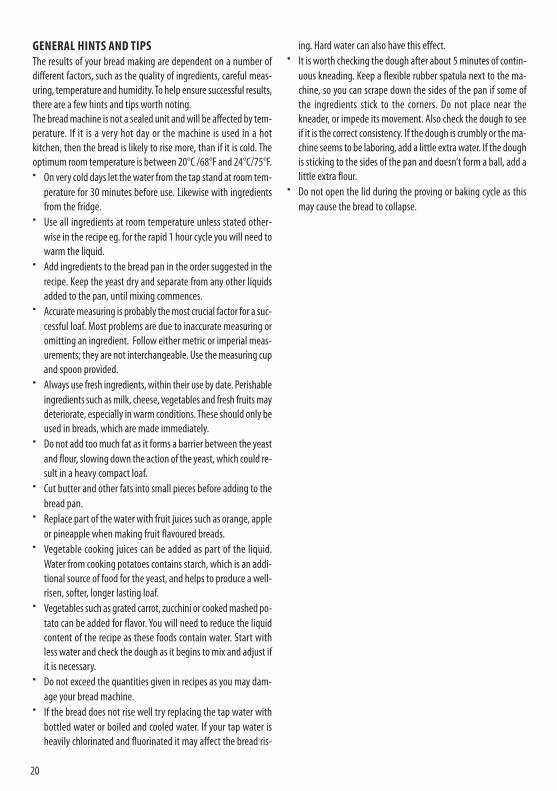
GENERAL HINTS AND TIPSThe results of your bread making are dependent on a number ofdifferent factors, such as the quality of ingredients, careful meas-uring, temperature and humidity. To help ensure successful results,there are a few hints and tips worth noting.The bread machine is not a sealed unit and will be affected by tem-perature. If it is a very hot day or the machine is used in a hotkitchen, then the bread is likely to rise more, than if it is cold. Theoptimum room temperature is between 20°C /68°F and 24°C/75°F.• On very cold days let the water from the tap stand at room tem-
perature for 30 minutes before use. Likewise with ingredientsfrom the fridge.
• Use all ingredients at room temperature unless stated other-wise in the recipe eg. for the rapid 1 hour cycle you will need towarm the liquid.
• Add ingredients to the bread pan in the order suggested in therecipe. Keep the yeast dry and separate from any other liquidsadded to the pan, until mixing commences.
• Accurate measuring is probably the most crucial factor for a suc-cessful loaf. Most problems are due to inaccurate measuring oromitting an ingredient. Follow either metric or imperial meas-urements; they are not interchangeable. Use the measuring cupand spoon provided.
• Always use fresh ingredients, within their use by date. Perishableingredients such as milk, cheese, vegetables and fresh fruits maydeteriorate, especially in warm conditions. These should only beused in breads, which are made immediately.
• Do not add too much fat as it forms a barrier between the yeastand flour, slowing down the action of the yeast, which could re-sult in a heavy compact loaf.
• Cut butter and other fats into small pieces before adding to thebread pan.
• Replace part of the water with fruit juices such as orange, appleor pineapple when making fruit flavoured breads.
• Vegetable cooking juices can be added as part of the liquid.Water from cooking potatoes contains starch, which is an addi-tional source of food for the yeast, and helps to produce a well-risen, softer, longer lasting loaf.
• Vegetables such as grated carrot, zucchini or cooked mashed po-tato can be added for flavor. You will need to reduce the liquidcontent of the recipe as these foods contain water. Start withless water and check the dough as it begins to mix and adjust ifit is necessary.
• Do not exceed the quantities given in recipes as you may dam-age your bread machine.
• If the bread does not rise well try replacing the tap water withbottled water or boiled and cooled water. If your tap water isheavily chlorinated and fluorinated it may affect the bread ris-
ing. Hard water can also have this effect.• It is worth checking the dough after about 5 minutes of contin-
uous kneading. Keep a flexible rubber spatula next to the ma-chine, so you can scrape down the sides of the pan if some ofthe ingredients stick to the corners. Do not place near thekneader, or impede its movement. Also check the dough to seeif it is the correct consistency. If the dough is crumbly or the ma-chine seems to be laboring, add a little extra water. If the doughis sticking to the sides of the pan and doesn’t form a ball, add alittle extra flour.
• Do not open the lid during the proving or baking cycle as thismay cause the bread to collapse.
21
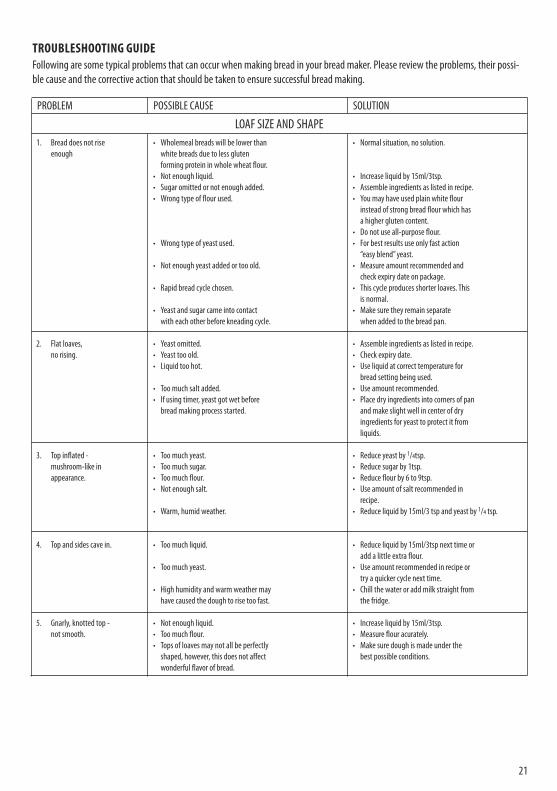
PROBLEM POSSIBLE CAUSE SOLUTION
1. Bread does not rise enough
2. Flat loaves,no rising.
3. Top inflated -mushroom-like in appearance.
4. Top and sides cave in.
5. Gnarly, knotted top -not smooth.
• Wholemeal breads will be lower than white breads due to less glutenforming protein in whole wheat flour.
• Not enough liquid.• Sugar omitted or not enough added.• Wrong type of flour used.
• Wrong type of yeast used.
• Not enough yeast added or too old.
• Rapid bread cycle chosen.
• Yeast and sugar came into contact with each other before kneading cycle.
• Yeast omitted.• Yeast too old.• Liquid too hot.
• Too much salt added.• If using timer, yeast got wet before
bread making process started.
• Too much yeast.• Too much sugar.• Too much flour.• Not enough salt.
• Warm, humid weather.
• Too much liquid.
• Too much yeast.
• High humidity and warm weather may have caused the dough to rise too fast.
• Not enough liquid.• Too much flour.• Tops of loaves may not all be perfectly
shaped, however, this does not affect wonderful flavor of bread.
• Normal situation, no solution.
• Increase liquid by 15ml/3tsp.• Assemble ingredients as listed in recipe.• You may have used plain white flour
instead of strong bread flour which has a higher gluten content.
• Do not use all-purpose flour.• For best results use only fast action
“easy blend” yeast.• Measure amount recommended and
check expiry date on package.• This cycle produces shorter loaves. This
is normal.• Make sure they remain separate
when added to the bread pan.
• Assemble ingredients as listed in recipe.• Check expiry date.• Use liquid at correct temperature for
bread setting being used.• Use amount recommended.• Place dry ingredients into corners of pan
and make slight well in center of dry ingredients for yeast to protect it from liquids.
• Reduce yeast by 1/4tsp.• Reduce sugar by 1tsp.• Reduce flour by 6 to 9tsp.• Use amount of salt recommended in
recipe.• Reduce liquid by 15ml/3 tsp and yeast by 1/4 tsp.
• Reduce liquid by 15ml/3tsp next time or add a little extra flour.
• Use amount recommended in recipe or try a quicker cycle next time.
• Chill the water or add milk straight from the fridge.
• Increase liquid by 15ml/3tsp.• Measure flour acurately.• Make sure dough is made under the
best possible conditions.
LOAF SIZE AND SHAPE
TROUBLESHOOTING GUIDEFollowing are some typical problems that can occur when making bread in your bread maker. Please review the problems, their possi-ble cause and the corrective action that should be taken to ensure successful bread making.

22
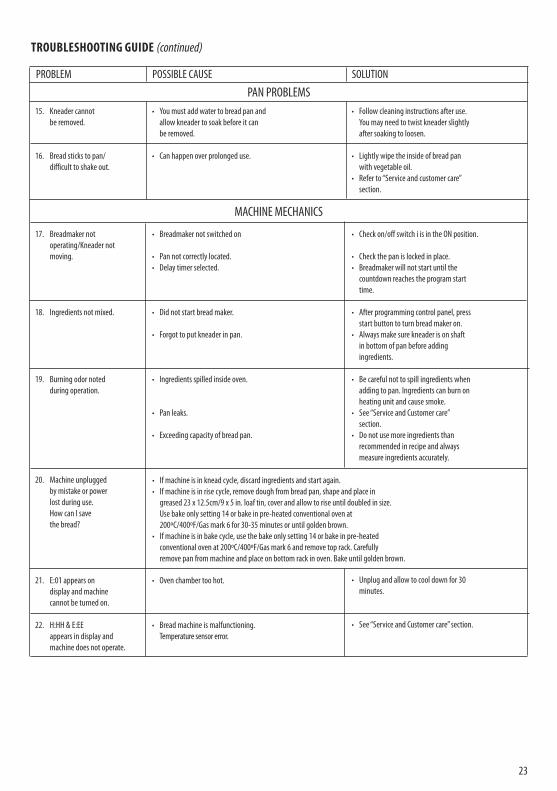
TROUBLESHOOTING GUIDE (continued)
PROBLEM POSSIBLE CAUSE SOLUTION
6. Collapsedwhile baking.
7. Loaves unevenshorter on one end.
8. Heavy dense texture.
9. Open, course, holeytexture.
10. Center of loaf is raw,not baked enough.
11. Bread doesn’t slicewell, very sticky.
12. Dark crust color/too thick.
13. Loaf of bread is burnt.
14. Crust too light.
• Machine was placed in a draft or may have been knocked or jolted during rising.
• Exceeding capacity of bread pan.
• Not enough salt used or omitted. (salt helps prevent the dough over proving)
• Too much yeast.• Warm, humid weather.
• Dough too dry and not allowed to riseevenly in pan.
• Too much flour.• Not enough yeast.
• Not enough sugar.
• Salt omitted.• Too much yeast.
• Too much liquid.
• Too much liquid.• Power cut during operation.
• Quantities were too large and machine could not cope.
• Sliced while too hot.
• Not using proper knife.
• DARK crust setting used.
• Bread maker malfunctioning.
• Bread not baked long enough.• No milk powder or fresh milk in recipe.
• Reposition bread maker.
• Do not use more ingredients than recommended for large loaf (max. 2lb/1Kg).
• Use amount of salt recommended inrecipe.
• Measure yeast acurately.• Reduce liquid by 15ml/3tsp and
reduce yeast by 1/4tsp.
• Increase liquid by 15ml/3 tsp.
• Measure accurately.• Measure right amount of
recommended yeast.• Measure accurately.
• Assemble ingredients as listed in recipe.• Measure right amount of recommended
yeast.• Reduce liquid by 15ml/3tsp.
• Reduce liquid by 15ml/3tsp.• If power is cut during operation for more
than 8 minutes you will need to remove theunbaked loaf from the pan and start againwith fresh ingredients.
• Reduce amounts to maximumquantities allowed.
• Allow bread to cool on rack at least30 minutes to release steam, before slicing.
• Use a good bread knife.
• Use medium or light setting the next time.
• Refer to “Service and customer care” section.
• Extend baking time.• Add 15ml/3tsp skimmed milk powder
or replace 50% of water with milk to encourage browning.
LOAF SIZE AND SHAPE
BREAD TEXTURE
CRUST COLOR AND THICKNESS
23
TROUBLESHOOTING GUIDE (continued)
PROBLEM POSSIBLE CAUSE SOLUTION
15. Kneader cannotbe removed.
16. Bread sticks to pan/difficult to shake out.
17. Breadmaker notoperating/Kneader notmoving.
18. Ingredients not mixed.
19. Burning odor notedduring operation.
20. Machine unpluggedby mistake or powerlost during use.How can I savethe bread?
21. E:01 appears on display and machine cannot be turned on.
22. H:HH & E:EE appears in display andmachine does not operate.
• You must add water to bread pan and allow kneader to soak before it can be removed.
• Can happen over prolonged use.
• Breadmaker not switched on
• Pan not correctly located.• Delay timer selected.
• Did not start bread maker.
• Forgot to put kneader in pan.
• Ingredients spilled inside oven.
• Pan leaks.
• Exceeding capacity of bread pan.
• Oven chamber too hot.
• Bread machine is malfunctioning.Temperature sensor error.
• Follow cleaning instructions after use.You may need to twist kneader slightly after soaking to loosen.
• Lightly wipe the inside of bread panwith vegetable oil.
• Refer to “Service and customer care” section.
• Check on/off switch i is in the ON position.
• Check the pan is locked in place.• Breadmaker will not start until the
countdown reaches the program starttime.
• After programming control panel, pressstart button to turn bread maker on.
• Always make sure kneader is on shaft in bottom of pan before adding ingredients.
• Be careful not to spill ingredients whenadding to pan. Ingredients can burn onheating unit and cause smoke.
• See “Service and Customer care” section.
• Do not use more ingredients than recommended in recipe and always measure ingredients accurately.
• Unplug and allow to cool down for 30 minutes.
• See “Service and Customer care” section.
PAN PROBLEMS
MACHINE MECHANICS
• If machine is in knead cycle, discard ingredients and start again.• If machine is in rise cycle, remove dough from bread pan, shape and place in
greased 23 x 12.5cm/9 x 5 in. loaf tin, cover and allow to rise until doubled in size. Use bake only setting 14 or bake in pre-heated conventional oven at 200ºC/400ºF/Gas mark 6 for 30-35 minutes or until golden brown.
• If machine is in bake cycle, use the bake only setting 14 or bake in pre-heated conventional oven at 200ºC/400ºF/Gas mark 6 and remove top rack. Carefully remove pan from machine and place on bottom rack in oven. Bake until golden brown.
LIMITED WARRANTY
This warranty applies to all products with De’Longhi or Kenwood brand names.
What does the warranty cover?We warrant each appliance to be free from defects in material and workmanship. Our obligation under this warranty is limited to repairat our factory or authorized service center of any defective parts or part thereof, other than parts damaged in transit. In the event of a pro-ducts replacement or return, the unit must be returned transportation prepaid. The repaired or new model will be returned at the com-pany expense.This warranty shall apply only if the appliance is used in accordance with the factory directions, which accompany it, and on an Alterna-ting current ( AC ) circuit.
How long does the coverage last?This warranty runs for one year ( 1 ) from the purchase date found on your receipt and applies only to the original purchaser for use.
What is not covered by the warranty?The warranty does not cover defects or damage of the appliance, which result from repairs or alterations to the appliance outside our fac-tory or authorized service centers, nor shall it apply to any appliance, which has been subject to abuse, misuse, negligence or accidents.Also, consequential and incidental damage resulting from the use of this product or arising out of any breach of contract or breach of thiswarranty are not recoverable under this warranty. Some states do not allow the exclusion or limitation of incidental or consequential da-mage, so the above limitation may not apply to you.
How do you get service?If repairs become necessary, see contact information below:
U.S. Residents: Please contact our toll free hotline at 01-800-322-3848 or log onto our website at www.delonghi.com.
Residents of Canada: Please contact our toll free hotline at 01-888-335-6644 or log onto our website at www.delonghi.com.
Residents of Mexico: Please contact our toll free hotline at 01-800-711-8805 or log onto our website at www.delonghi.com.
The above warranty is in lieu of all other express warranties and representations. All implied warranties are limited to the applicable war-ranty period set forth above. This limitation does not apply if you enter into an extended warranty with De’Longhi. Some states/countriesdo not allow limitations on how long an implied warranty lasts, so the above exclusions may not apply to you. De’Longhi does not authorizeany other person or company to assume for it any liability in connection with the sale or use of its appliance.
How does state law apply?This warranty gives you specific legal rights, and you may also have other rights, which vary from state to state/country to country.
24
Related Documents